

Page 1
Extended User Guide
KODAK VERITÉ 64 series
WIRELESS ALL-IN-ONE INKJET PRINTER
We’re glad you chose this KODAK VERITÉ Wireless All-In-One Inkjet
Printer.
Need help fast?
Read your Quick Start Guide and/or Extended User Guide first for quick tips that make using your KODAK
VERITÉ Wireless All-In-One Inkjet Printer more enjoyable. If you have read your instructions and still need
assistance, you may access our online help at
www.kodakverite.com/support
or call 1-844-995-6325 (1-844-99KODAK)
Details, explanations, and expressions displayed on your smartphone/tablet/PC display may differ from those
shown in this Extended User Guide. The displayed items and specifications are subject to change without
notice.
Page 2
Contents
Introduction ................................................... 3
Notice and Safety .................................................................................... 3
Dear Customer ..........................................................................................
About this Extended User Guide ........................................................ 3
General safety information ........................... 4
Overview ........................................................ 7
Control panel ............................................................................................. 8
Meaning of LED behavior and lights ..................................................
Initial operation ............................................ 11
Packing contents ..................................................................................... 11
Unpack ........................................................................................................
Install ink cartridges ............................................................................... 12
Load paper ............................................................................................... 13
Turn On the unit ...................................................................................... 13
11
Initial setup .................................................. 14
Before you download the printer driver to your PC .................... 14
Install the printer driver to your PC ...................................................
Wi-Fi Setup ............................................................................................... 18
Changing connection from USB to Wi-Fi ....................................... 19
Changing connection from Wi-Fi to USB ...................................... 20
ECO mode ................................................................................................ 21
15
Print using your smartphone/tablet ............ 22
Use the mobile App ............................................................................... 22
Mobile connection by (Wireless) .............................................. 23
Settings ....................................................... 40
Wi-Fi Setup .............................................................................................. 40
3
Google Cloud Print™ .............................................................................
AirPrint ....................................................................................................... 43
Software update .................................................................................... 43
Printer Utility ............................................................................................ 43
Web interface .............................................. 46
Confirming the IP Address ................................................................. 46
9
Calling the Web interface ...................................................................
Device Status .......................................................................................... 47
Device Configuration ........................................................................... 47
Network ..................................................................................................... 47
Mobile ........................................................................................................ 48
Order Supplies ....................................................................................... 49
Software Update ................................................................................... 49
Login Password ...................................................................................... 49
Service ......................................................... 50
Checking ink levels ............................................................................... 50
Changing the ink cartridge ................................................................
Ordering supplies .................................................................................. 52
Fixing a paper jam ................................................................................. 52
Restoring the factory settings ........................................................... 52
Hard Reset ................................................................................................ 52
Cleaning the ink cartridge nozzles and contacts ........................ 53
Preserving the ink cartridges ............................................................. 53
Cleaning the scanner glass ................................................................ 53
Cleaning the exterior of the unit ...................................................... 54
Periodic maintenance is required .................................................... 54
Important Notice Regarding Printheads ........................................ 54
42
46
50
Print from a Mobile Device ..........................
Google Cloud Print™ ............................................................................. 24
Information about Google Cloud Print™ ........................................
AirPrint ....................................................................................................... 25
Information about AirPrint .................................................................. 25
24
24
Check print status from your PC ................. 26
Status Messenger for Windows® ......................................................
26
Print media ................................................... 27
Specifications for print media ........................................................... 27
Insert paper into the paper support ................................................ 27
Print settings ............................................... 29
Confirming Printing Preferences for Windows® ..........................
Confirming Print Settings for Mac .................................................... 31
29
Making Copies ............................................. 34
Copy Setting ........................................................................................... 34
Scanner ........................................................
Scan in [Scanning] application by Windows® ..............................
Scan in Mac ............................................................................................. 38
37
37
Troubleshooting .......................................... 55
Setup troubleshooting ......................................................................... 55
Status messages and LED behaviors ..............................................
Improving the print quality ................................................................. 65
59
Appendix ..................................................... 66
Specifications ......................................................................................... 66
Note about recycling ............................................................................
Safety Data Sheet (SDS) ...................................................................... 67
67
Limited Warranty ......................................... 68
English
2
Page 3
Introduction
CAUTION
Note(s)
Notice and Safety
Please read the following instructions carefully before operating the
device and refer to them as needed to ensure the continued safe
operation of your device.
Your Kodak Product and supplies have been designed and tested to
meet strict safety requirements, including safety agency evaluation
and certification, compliance with electromagnetic regulations and
established environmental standards.
The safety, environmental testing and performance of this device
have been verified using approved materials only.
Unauthorized alterations, which may include the
WARNING
Dear Customer
You've purchased a very different kind of printer and we are glad
you did. Now we want to help you get started saving on ink and using
all of it's features. This KODAK VERITÉ printer provides quality
printing for personal and office / small business use and it always
helps you save on the cost of printing. For printing, copying and
scanning, this all-in-one printer utilizes the most up-to-date
technology. Easy to install ink cartridges are always provided with
our printers; however, you must remove all packaging used for
transportation first.
You can find the latest Software drivers and manuals for the printer
on the website:
www.kodakverite.com/support
We hope you enjoy your KODAK VERITÉ Wireless All-In-One Inkjet
Printer and its many functions!
:
addition of new functions or connection of external
devices, may impact the product certification.
Please contact your Customer Support representative
for more information at
www.kodakverite.com/support
Copying and scanning
●
The device also supports copying and scanning of Color or Black
& White documents. You can scan the document and save it to
your Network PC.
»
Refer to “Making Copies” on page 34.
» Refer to “Scanner” on page 37.
About this Extended User Guide
Read the entire Extended User Guide carefully.
Follow all safety instructions in order to ensure proper operation of
your device. The manufacturer accepts no liability if these
instructions are not followed.
Symbols used in this Extended User Guide
Symbols Description
DANGER
Danger to Persons
This symbol gives warning of danger to persons.
Physical injury or damage can result from
improper handling.
DO NOT TOUCH
This symbol gives warning of danger to persons.
Physical injury or damage can result from
improper handling.
Damage to the Device or Loss of Data
This symbol gives warning of damage to the
device and possible loss of data. These damages
can result from improper handling.
This symbol designates tips that will help you to
use your device more effectively and easily
Features
ECO mode
●
You can easily save ink consumption.
»
Refer to “ECO mode” on page 21.
Paper requirement
●
You can load up to 60 sheets (20lb. or 75g/m2) onto the Paper
support.
» Refer to “Specifications for print media” on page 27.
ID Card Copy function
●
Using the ID Card Copy function, you can copy both sides of a
small document (e.g. business card) onto one page.
» Refer to “ID Card Copy” on page 36.
Web interface
●
The web interface is available to you on all operating systems.
You can access the web interface with an Internet browser on your
PC and conduct many different settings to your device.
» Refer to “Web interface” on page 46.
Status Messenger (for Windows® only)
●
The Status Messenger is available on the operating system.
It is installed together with the printer driver and informs you of
the newest driver, Software or application to download and
install.
Also, it shows the present status of the device. You receive
detailed error messages among other things.
» Refer to “Check print status from your PC” on page 26.
English
3
Page 4
General safety information
Funai reserves the right to change products at any time without
being obliged to adjust earlier supplies accordingly.
The material in this Extended User Guide is believed adequate for
the intended use of the system. If the product or its individual
modules or procedures are used for purposes other than those
specified herein, confirmation of their validity and suitability must
be obtained. Funai warrants that the material itself does not infringe
any United States patents. No further warranty is expressed or
implied.
Funai cannot be held responsible neither for any errors in the
content of this document nor for any problems as a result of the
content in this document. Errors reported to Funai will be adapted
and published on the Funai support website as soon as possible.
Warranty (Limited Warranty on page 68.)
●
DO NOT attempt to take the device apart. There is danger of an
electrical shock. No components are user serviceable. Opening
the device voids the warranty. DO NOT disassemble or remove
covers on the device. Repairs may only be done by an Authorized
Service Center. Failure to do so shall void any warranty, stated or
implied.
●
Any operation expressly prohibited in this Extended User Guide,
any adjustments or assembly procedures not recommended or
authorized in this Extended User Guide shall void the warranty.
●
DO NOT make any changes or settings that are not described in
this Extended User Guide. Physical injury or damage to the device
or loss of data can result from improper handling. Take note of all
warning and safety notes indicated.
●
DO NOT remove the product label located on the bottom side on
your device; this would void the warranty.
Setting up the device
Please read the following instructions when you set up the device.
●
Select a stable location.
Select a level, stable place with adequate space for air circulation.
Make sure to allow extra space to open covers and trays.
The setup area should be well-ventilated and away from direct
sunlight or sources of heat, cold, and humidity. DO NOT set the
device near the edge of your desk or table.
●
Place the device on a flat and stable surface.
●
The device should be placed securely. If the device should fall, it
can be damaged or can cause injury to people, especially small
children. If the device is dropped it should be inspected by an
Authorized Service Center.
●
Position all cables in such a way that no one will stumble on them,
thus avoiding possible injuries to persons or damage to the device
itself.
●
Protect the device against direct sunlight, heat, large temperature
fluctuations and moisture. DO NOT place the device in the vicinity
of heaters or air conditioners. Observe the information on
temperature and humidity in the technical data.
●
The device must have sufficient ventilation and may not be
covered. DO NOT put your device in closed cabinets or boxes. DO
NOT place the device on soft surfaces such as tablecloths or
carpets and do not cover the ventilation slits. Otherwise the
device could overheat or degrade.
●
The area in which you operate the device must be adequately
ventilated, especially if the device is used frequently. Set up your
device in such a way that the Heat or A/C vent's air flow must be
directed away from the work station.
●
Never use a gas duster on this device. This gas trapped inside of
this device may cause ignition and explosion.
●
In the event that the device becomes too hot, or if you see smoke
coming from the device, you must immediately disconnect the
AC plug from the AC outlet. Have your device examined by trained
professionals at an Authorized Service Center. To prevent the
spread of fire, open flames should be kept away from the device.
●
DO NOT allow liquids to enter into the device. Disconnect the
device from the AC plug if liquids or foreign objects have entered
the device and have your device examined by trained
professionals at an Authorized Service Center.
●
DO NOT allow children to handle the device without supervision.
The packing materials should be kept out of the hands of children.
●
DO NOT press forcefully on the scanner lid when you scan thicker
documents or three-dimensional items, this could damage the
scanner lid and/or the scanner glass.
●
Make sure to place the device on a desk or table with adequate
strength. DO NOT shake the device as this may cause printing
failure or trouble. DO NOT place the device in a location or
environment of high temperature or high humidity.
Power supply
●
Check whether the voltage rating of your device (indicated on the
product label located on the bottom side) is adequate for the
power source available at the setup location.
●
DO NOT plug in the device in moist rooms. Never touch the AC
Power cord or the AC plug connection with wet hands.
●
Set up your device so that the AC Power cord is easily accessible.
In an emergency, disconnect your device from the power supply
by pulling the AC plug.
●
Never touch the AC Power cord if the insulation is damaged. Turn
Off the circuit breaker for that AC outlet.
●
Damaged wire could cause fire or electrical shock. Keep the AC
Power cord straight without being twisted, bent or scraped.
Please contact an Authorized Service Center.
●
Before cleaning the surface of your device, disconnect it from the
power supply only by pulling the AC plug. Use a soft, lint-free cloth.
Never use liquid, gaseous or easily flammable cleansers (sprays,
abrasives, polishes or alcohol). DO NOT allow any moisture to
reach the interior of the device.
●
In rare cases, the saved settings can be partly or completely reset
to the Factory Default(s) when the AC plug is disconnected or in
the event of a Power outage. DO NOT disconnect the AC plug
right after a print job or after entering Settings.
●
Press
To completely turn Off the device, you must disconnect the AC
plug.
Disconnect the AC plug to shut the device Off when trouble is
found or not in use. The AC Power cord shall remain readily
available.
(Power/Standby) to turn the device On or Off (Standby).
CAUTION
●
Turn the device Off (Standby) using
(Power/
Standby) buttons located on the Control panel of the
device or the Remote Control before you disconnect
the AC plug from the AC outlet to turn the Unit
completely Off.
English
4
Continued on next page.
Page 5
Federal communications commission notice
This device complies with part 15 of the FCC Rules. Operation is
subject to the following two conditions:
(1) This device may not cause harmful interference, and (2) this
device must accept any interference received, including
interference that may cause undesired operation.
This equipment may generate or use radio frequency energy.
Changes or modifications not expressly approved by the party
responsible for compliance could void the user’s authority to
operate the equipment.
This transmitter must not be co-located or operated in conjunction
with any other antenna or transmitter.
Note: This equipment has been tested and found to comply with the
limits for a Class B digital device, pursuant to part 15 of the FCC Rules.
These limits are designed to provide reasonable protection against
harmful interference in a residential installation. This equipment
generates, uses and can radiate radio frequency energy and, if not
installed and used in accordance with the instructions, may cause
harmful interference to radio communications. However, there is no
guarantee that interference will not occur in a particular installation.
If this equipment does cause harmful interference to radio or
television reception, which can be determined by turning the
equipment off and on, the user is encouraged to try to correct the
interference by one or more of the following measures:
–
Reorient or relocate the receiving antenna.
–
Increase the separation between the equipment and receiver.
–
Connect the equipment into an AC outlet on a circuit different
from that to which the receiver is connected.
–
Consult the dealer or an experienced radio/TV technician for
help.
Declaration of conformity
Trade Name
Responsible party :
Product Name :
Regulatory Model
Address
Telephone Number :
*
Phone rings once, then no sound until agent answers.
For regulatory purpose, this product is assigned a regulatory
model name. The regulatory model name should not be confused
with the product name or product model.
KODAK
:
FUNAI CORPORATION, Inc.
VERITE 64/37 (US / Canada)
JM602-50UC (VERITE 64/37)
:
19900 Van Ness Avenue, Torrance, CA 90501
:
U.S.A.
1-844-995-6325 (1-844-99KODAK)*
Canadian notice
This device complies with Industry Canada license-exempt RSS
standard(s). Operation is subject to the following two conditions: (1)
This device may not cause interference, and (2) this device must
accept any interference, including interference that may cause
undesired operation of the device.
CAN ICES-3(B)/NMB-3(B)
Trademark information
All other registered and unregistered trademarks are the property
of their respective owners.
ENERGY STAR® is a joint program of the U.S.
Environmental Protection Agency and the U.S.
Department of Energy helping us all save money and
protect the environment through energy efficient
products and practices.
The Wi-Fi CERTIFIED Logo is a certification mark of
the Wi-Fi Alliance.
The Wi-Fi Protected Setup Identifier Mark is a mark
of Wi-Fi Alliance.
Google Cloud Print™ is a trademark of Google Inc.
AirPrint™ and the AirPrint logo™ are trademarks of
Apple Inc.
●
Windows®, Windows® Server, Windows® Vista, Microsoft Edge,
Internet Explorer® and the Windows logo are trademarks of the
Microsoft group of companies in the United States and/or other
countries.
●
Google™, Google Chrome™, Chrome OS™, Google Drive™,
Gmail™ and Android™ are trademarks of Google Inc.
●
Mac OS®, OS X®, iPhone®, iPod touch®, iPad®, Safari®, macOS™ and
Mac logo® are trademarks of Apple Inc., registered in the U.S. and
other countries.
●
iOS is a trademark or registered trademark of Cisco® in the U.S.
and other countries and is used under license by Apple Inc.
●
Intel®
Core™ and Celeron™ are trademarks of Intel Corporation in
the U.S. and/or other countries.
Copyright
All other trademarks referenced herein are the property of their
respective owners.
Cables
Connections to this device must be made with shielded cables with
metallic RFI / EMI connector hoods to maintain compliance with
FCC Rules and Regulations.
PC connection
Use only a custom high speed certified USB cable to connect the
device to your PC. The recommendable cable length is no longer
than 5 feet (1.5 m).
English
Wireless Network
The functioning of security systems, medical equipment or sensitive
devices can be disrupted by the transmission power of the device.
Observe any usage regulations (or restrictions) in the vicinity of such
equipment.
The use of this device can affect the operation of insufficiently
shielded medical devices, hearing aids and pacemakers through the
release of high frequency radiation. Also consult a doctor or the
manufacturer of a medical device to establish whether these are
sufficiently shielded from external high frequency radiation.
5
Continued on next page.
Page 6

Caution when handling ink cartridges
Never open an ink cartridge. Store both new and used cartridges in
a place where they will not come into the hands of children.
Ink cartridge safety
If ink gets on your skin, wash with soap and water. If ink gets into
your eyes, flush immediately with water. If any discomfort or change
in vision persists after washing, seek immediate medical attention.
About the Software
When carrying out a Software update only use the Printer Software
Upgrade file for your device from the website:
www.kodakverite.com/support
Using other Software files can lead to your device not functioning
properly. Funai accepts no liability for device malfunctions which
can be traced back to the use of third party Software.
When paper jam has occurred
In case of a paper jam, use two hands to carefully remove the paper
from the unit. Throw the paper away carefully.
DO NOT make any repairs to the unit yourself. Improper
maintenance can result in injuries or damage to the unit.
Copying and Scanning precautions
Be aware that scanning, photocopying or editing any of the
following may be punishable by law.
Copyrighted work
Unauthorized reproduction of copyrighted work is prohibited
except for personal/domestic use or use in a limited extent based
on that purpose.
Reproducing a photographic portrait may also be subject to
punishment.
Currency, securities, etc.
Forging any of the following to use as genuine articles or producing
misleading articles is subject to punishment by law.
●
Banknotes, paper currency, coins (including foreign
currency)
●
Government bonds, territorial bonds
●
Postal money order certificates
●
Postal stamps, documentary stamps
●
Capital stock certificates, debenture stock certificates
●
Bills, checks
●
Commuter passes, coupon tickets
●
Other valuable paper
Official documents
Forging any of the following to use as genuine articles is subject to
punishment by law.
●
Licenses, copies of corporate registration, and other
certifications/documents issued by public officials or
government offices.
●
Agreements/contracts, documents of “rights and
obligations”, etc. for proof of facts created by private
individuals.
●
Seals, signatures, or symbol marks put on by public officials.
●
Private seals and signatures
Relative laws
Criminal code, Copyright law, Act on Control of Imitation of
Currency and Securities, Alteration and Imitation of Coins, Money
Bills, Banknotes and Securities Circulating in Foreign States, Postal
Act, Act on Control of Imitation of Postal stamps, Act on
Punishment of Crimes Related to Stamps, Act on Control of
Imitation of Stamps.
English
© 2017 Funai Electric Co., Ltd. All rights reserved.
The Kodak trademark, logo and trade dress are used under license
from Kodak.
Funai is a registered trademark of Funai Electric Co., Ltd. and may
not be used in any way without the express written consent of Funai.
No part of this manual may be reproduced, transmitted,
disseminated or transcribed, in any form or for any purpose without
the express prior written consent of Funai. Furthermore, any
unauthorized commercial distribution of this manual or any revision
hereto is strictly prohibited.
Information in this document is subject to change without notice.
Funai reserves the right to change the content herein without the
obligation to notify any person or organization of such changes.
6
Page 7
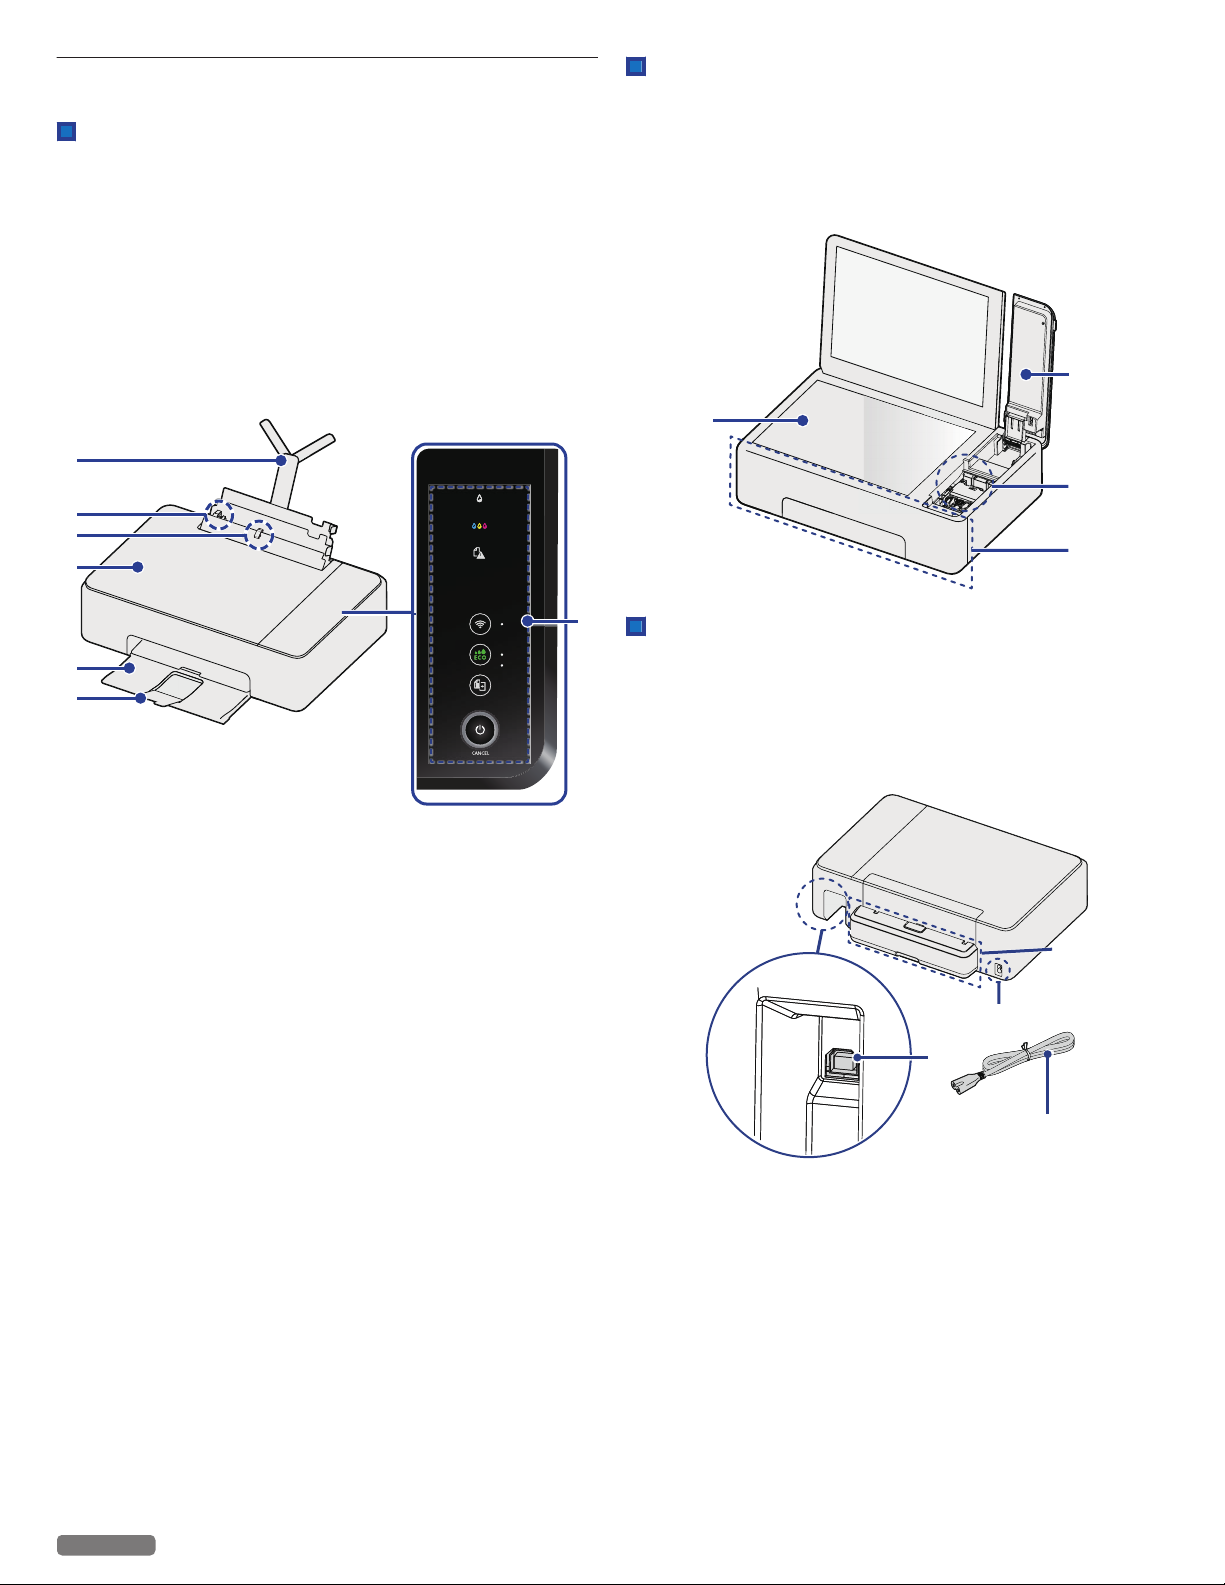
Overview
1
2
4
3
5
6
7
8
10
11
9
13
12
15
14
When opening the lid/door
8 Scanner glass
Front view
1 Paper support
2 Paper guide
3 Photo Tray
4 Scanner lid
5 Paper exit tray
6 Exit tray extender
7 Control panel and LED indicators
9 Ink door
10 Ink cartridge holder
11 Front cover
Rear view
12 Rear Cover (Duplex Unit)
13 Printer USB port — USB connection for your PC
14 AC inlet
15 AC Power cord and AC plug
English
7
Continued on next page.
Page 8
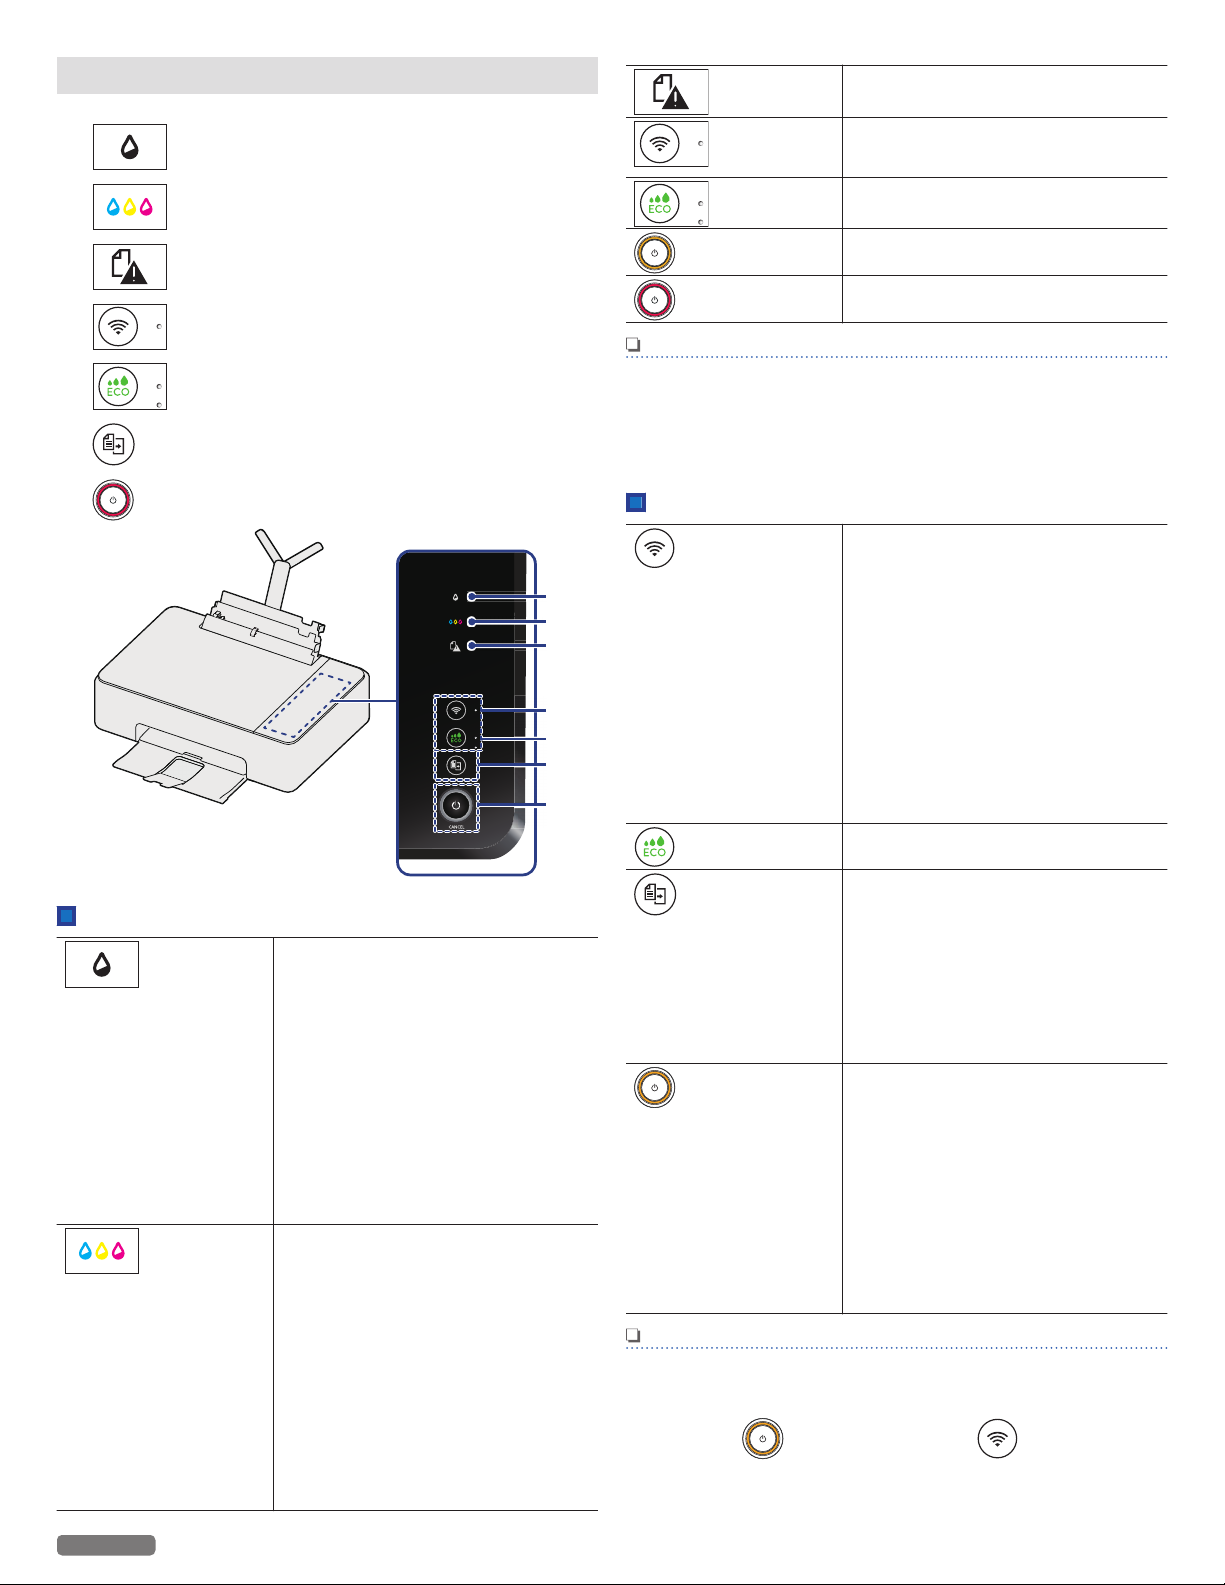
Control panel
1
4
5
6
7
2
3
1 (Black ink) LED
2 (Color ink) LED
3
4 (Wireless) LED and button
5 (ECO) LED and button
6 (Copy) button
(Paper Jam) LED
—
(Paper Jam)
(Wireless)
Indicates a paper jam has occurred.
—
Indicates the connection status of
the Wireless Network and Easy
Simple Print.
—
(ECO)
(Power Yellow)
(Power Red)
Indicates ECO mode
—
Indicates the present unit's status.
e.g.) power is supplied, working
—
Indicates an error status
Note(s)
●
You can find the meaning of status and error lights in
“Meaning of LED behavior and error lights” on the next
page. Please note the messages displayed in the Web
Interface, or in the Status Messenger (for Windows® only)
on your PC.
7
LEDs
English
(Power) LED and Power/Standby button
—
(Black ink)
Indicates the black ink level or if
empty.
●
Lights up: when ink cartridge is
not inserted or empty.
●
Blinking4: If not enough ink
remains.
●
Blinking6: Notifies if an error
occurs.(Ink cartridge is not
inserted or empty when the unit
starts the initial setup.)
»
Refer to “Meaning of LED
behavior and lights - LED
lighting patterns” on page 9
for lighting patterns.
—
(Color ink)
Indicates the color ink level or if
empty.
●
Lights up: when ink cartridge is
not inserted or empty.
●
Blinking4: If not enough ink
remains.
●
Blinking6: Notifies if an error
occurs.(Ink cartridge is not
inserted or empty when the unit
starts to initial setup.)
»
Refer to “Meaning of LED
behavior and lights - LED
lighting patterns” on page 9
for lighting patterns.
8
Buttons
—
(Wireless)
(ECO)
(Copy)
(Power/Standby)
Note(s)
●
The function carried out will vary, depending on the unit’s
status when you press a button.
●
Factory Default Restore can be performed by pressing and
holding (Power/Standby) and (Wireless)
together for more than 15 seconds.
Use to connect to the Wireless
Network.
Wireless feature: On
●
By using ‘Easy Simple Print’ with
the mobile device, press it less
than 3 seconds to establish the
Wireless Connection.
●
By using Wireless router if your
router has a ‘WPS’ button, press
and hold it until the LED beside the
button changes to blinking to
establish the Wireless
Connection. Follow “WPS Search”
in “Wi-Fi Setup” “WPS Search” on
page 18.
—
Use to shift to ECO mode.
—
Use to
●
Start a copy job with the current
settings.
Unit status: ready
●
Press and hold less than 3
seconds: starts copying.
●
Press and hold longer than 3
seconds: starts printing the
configuration report.
—
Press to change the power state.
Press and hold less than 3 seconds:
enters Sleep mode or wake up On.
Press and hold longer than 3
seconds:
(Make sure to wake the unit in
advance if the unit is in Sleep mode.)
●
The unit goes into Standby mode.
●
The unit cancels the current
printing jobs (including test print
and print reports), scanning or
copying.
Continued on next page.
Page 9
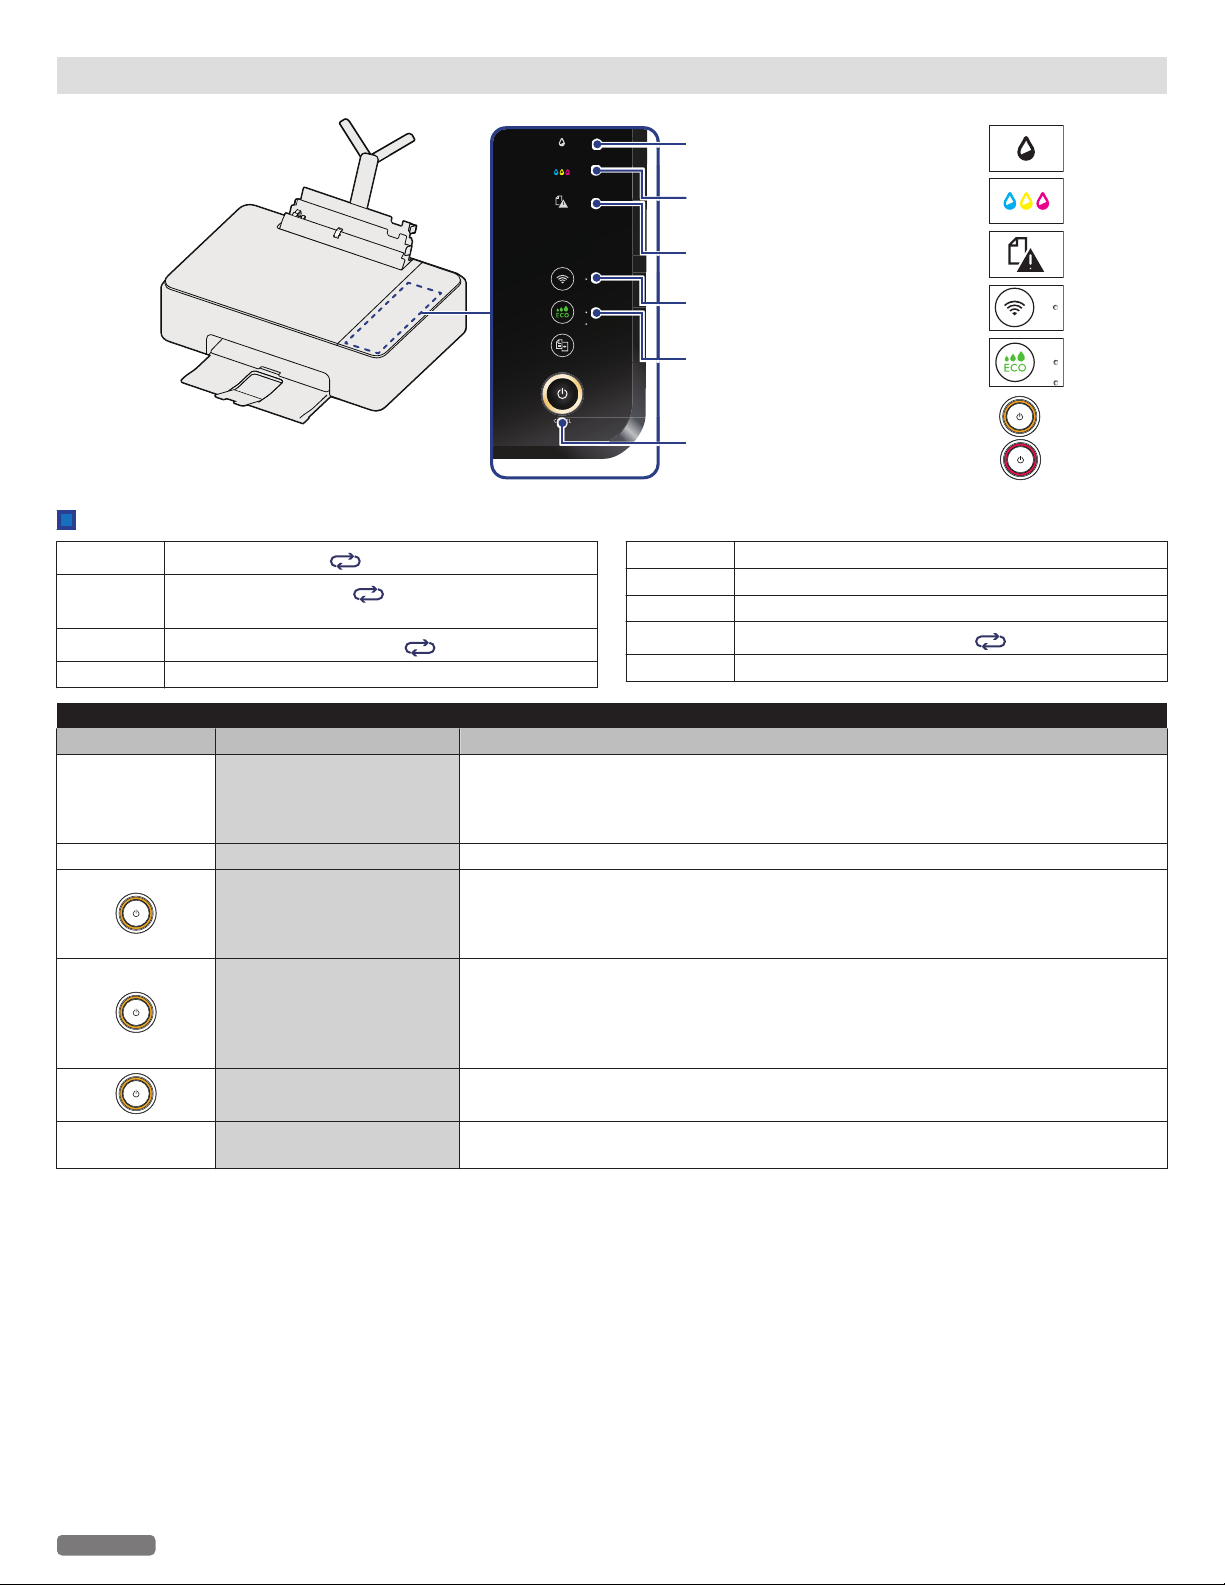
Meaning of LED behavior and lights
Black ink LED
——
Color ink LED
Paper jam LED
Wireless LED
ECO LED
Power LED
indicated by
——
indicated by
——
indicated by
——
——
indicated by
——
——
indicated by
—
——
indicated by
——
LED lighting patterns
Blinking 1
Blinking 2
Blinking 3
Blinking 4 Blinking very slowly
Lights up for 1 sec. No light for 1 sec.
Lights up very rapidly
sec.
Blinking very rapidly 2 times No light for 1 sec.
No light for more than 1
Blinking 5 Blinking slowly
Blinking 6 Blinking rapidly
Blinking 7 Blinking very rapidly
Blinking 8
Blinking 9 Blinking slowly (in Power-On mode)
Blinking very rapidly 4 times No light for 2 sec.
Unit status
LED(s) Behavior Meaning / Possible cause(s)
Unit is turned Off (Standby), or in Sleep mode, a mode which is effective in saving
All LEDs No light
All LEDs Lights up and Blinking 9 Unit is Starting.
Lights up
Blinking 5
Blinking 1
All LEDs Blinking 1
power.
Even in Sleep mode, the unit is able to receive a print job from USB / Network
equipment.
Indicates that the unit is Ready.
The unit is able to receive a print job.
This Yellow LED behavior is also used when copying, scanning or cancelling copy or
scan.
Indicates that the unit is Running.
This Yellow LED behavior is used when printing, cancelling a print job and after the print
jobs are received, running the alignment process (While running the alignment process,
any new print job received will start printing after the alignment process is done. (The
print job is not effected while the unit is scanning the alignment pattern.)).
This Yellow LED behavior is used when updating Software, restoring factory default
and performing weekly maintenance.
System error occurred.
Refer to “Status messages and LED behaviors” on page 59.
English
9
Continued on next page.
Page 10
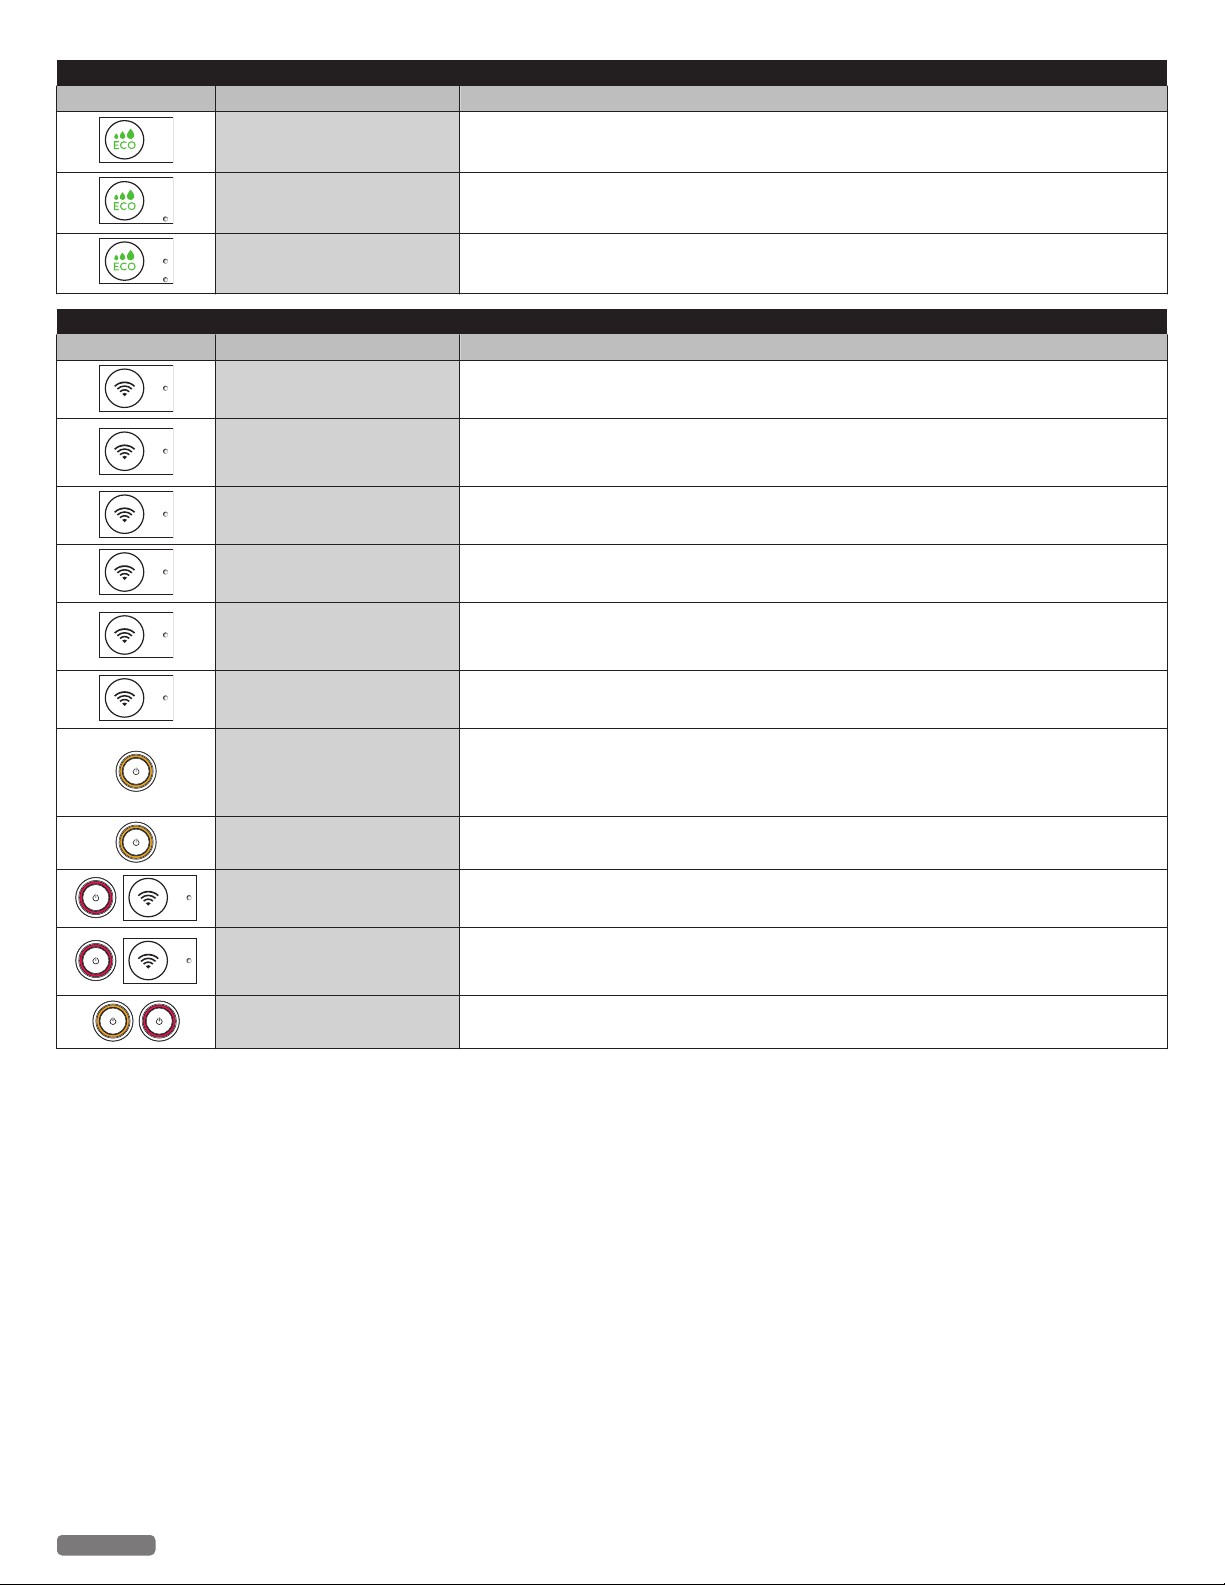
ECO mode status
LED(s) Behavior Meaning / Possible cause(s)
No light Indicates that ECO mode0 (ECO Off).
Lights up Indicates that ECO mode1 is ON (Save 20% ink).
Lights up Indicates that ECO mode2 is ON (Save 20% ink, page reduced 12%).
Network status
LED(s) Behavior Meaning / Possible cause(s)
Lights up The unit is connected to the Network using a Wireless connection.
Indicates that the unit started to connect to the Network using a Wireless connection
Blinking 2
Blinking 3
or WPS (Wi-Fi Protected Setup) connection.
The unit is not connected to the Network yet.
Indicates that the unit is in Easy Simple Print and there is no connection point.
Connection with Network equipment is not established yet.
No light
Blinking 1
Blinking 7
Blinking 5
Blinking 1 Indicates that the unit needs confirmation to start the Google Cloud Print™ registration.
Blinking 7
Blinking 8
Blinking 1
(alternate Yellow and Red)
Indicates that Wireless connection is Off.
The unit is not connected to the Network.
Indicates that the unit is directly connected to your smartphone/tablet using Easy
Simple Print connection.
The unit is connected to the Network using Easy Simple Print.
Indicates that the Network connection has become unavailable and the unit is not
currently connected to the Network.
Indicates that the unit is in the process of the Google Cloud Print™ registration.
Proceed to Google account registration and register this unit to your Google account
by following the instructions for the Google Cloud Print™ service.
Refer to “Google Cloud Print™” on page 42.
Indicates that the WPS connection failed.
The unit detected the Router, but failed to establish a connection.
Indicates a session overlap error.
The session overlap error occurred because two Routers started the Wi-Fi Protection
Setup simultaneously.
Indicates that the unit received an identification request from AirPrint.
English
10
Page 11
Initial operation
1
ColorBlack
BLACK COLOR
3
2
4
Ink Cartridges
BLACK
COLOR
Color Black
1 2
AC Power cord
2
1
2
1
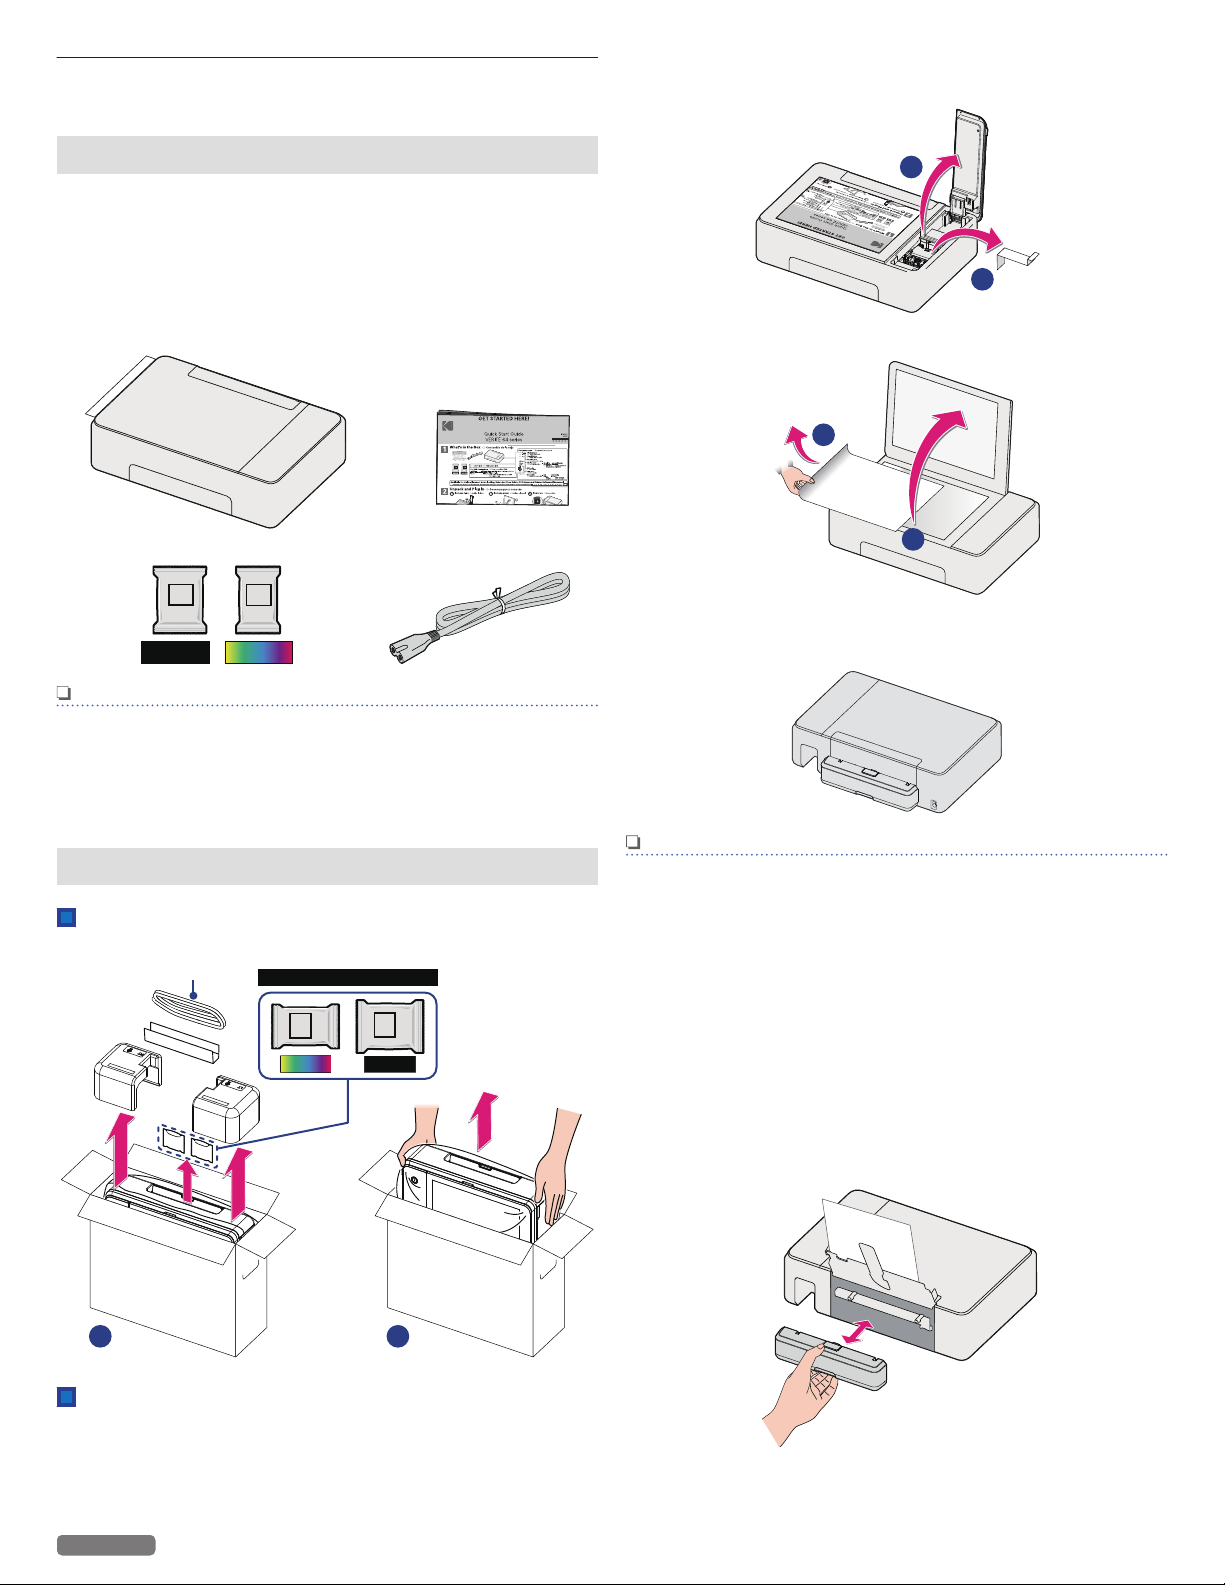
Packing contents
1 Unit
2 Quick Start Guide (Including Safety Sheet and Limited
Warranty)
3 Black/Color ink cartridges
2 Take the Quick Start Guide and Limited Warranty from the
unit, lift up the Ink door, then remove the protective paper.
4 AC Power cord
Note(s)
Missing package contents
●
If any of the parts are missing or damaged, please contact
an Authorized Service Center or Kodak Support.
Unpack
Remove the unit, ink cartridges and the AC Power
cord from the box.
3 Open the Scanner lid, then remove the protective paper.
4 Confirm that the Rear Cover (Duplex Unit) is correctly
installed before operating the unit.
Note(s)
How to Remove / Re-Install the Rear Cover (Duplex Unit)
1 Place your fingers in the bottom concave area, then
place your thumb on the top gray button and lightly
grasp the Rear Cover (Duplex Unit).
2 Press the top gray button with your thumb. The Rear
Cover (Duplex Unit) will be released from the unit by
itself.
3 Pull the Rear Cover (Duplex Unit) toward you.
Removing packaging material from the unit
1 Remove tape and the plastic bag from the unit and then
remove the twisted wire from the AC Power cord.
English
4 Confirm that there are no obstacles in the installation
between the Rear Cover (Duplex Unit) and the unit. Then
push the Rear Cover (Duplex Unit) back into the unit until
the gray button clicks.
11
Continued on next page.
Page 12
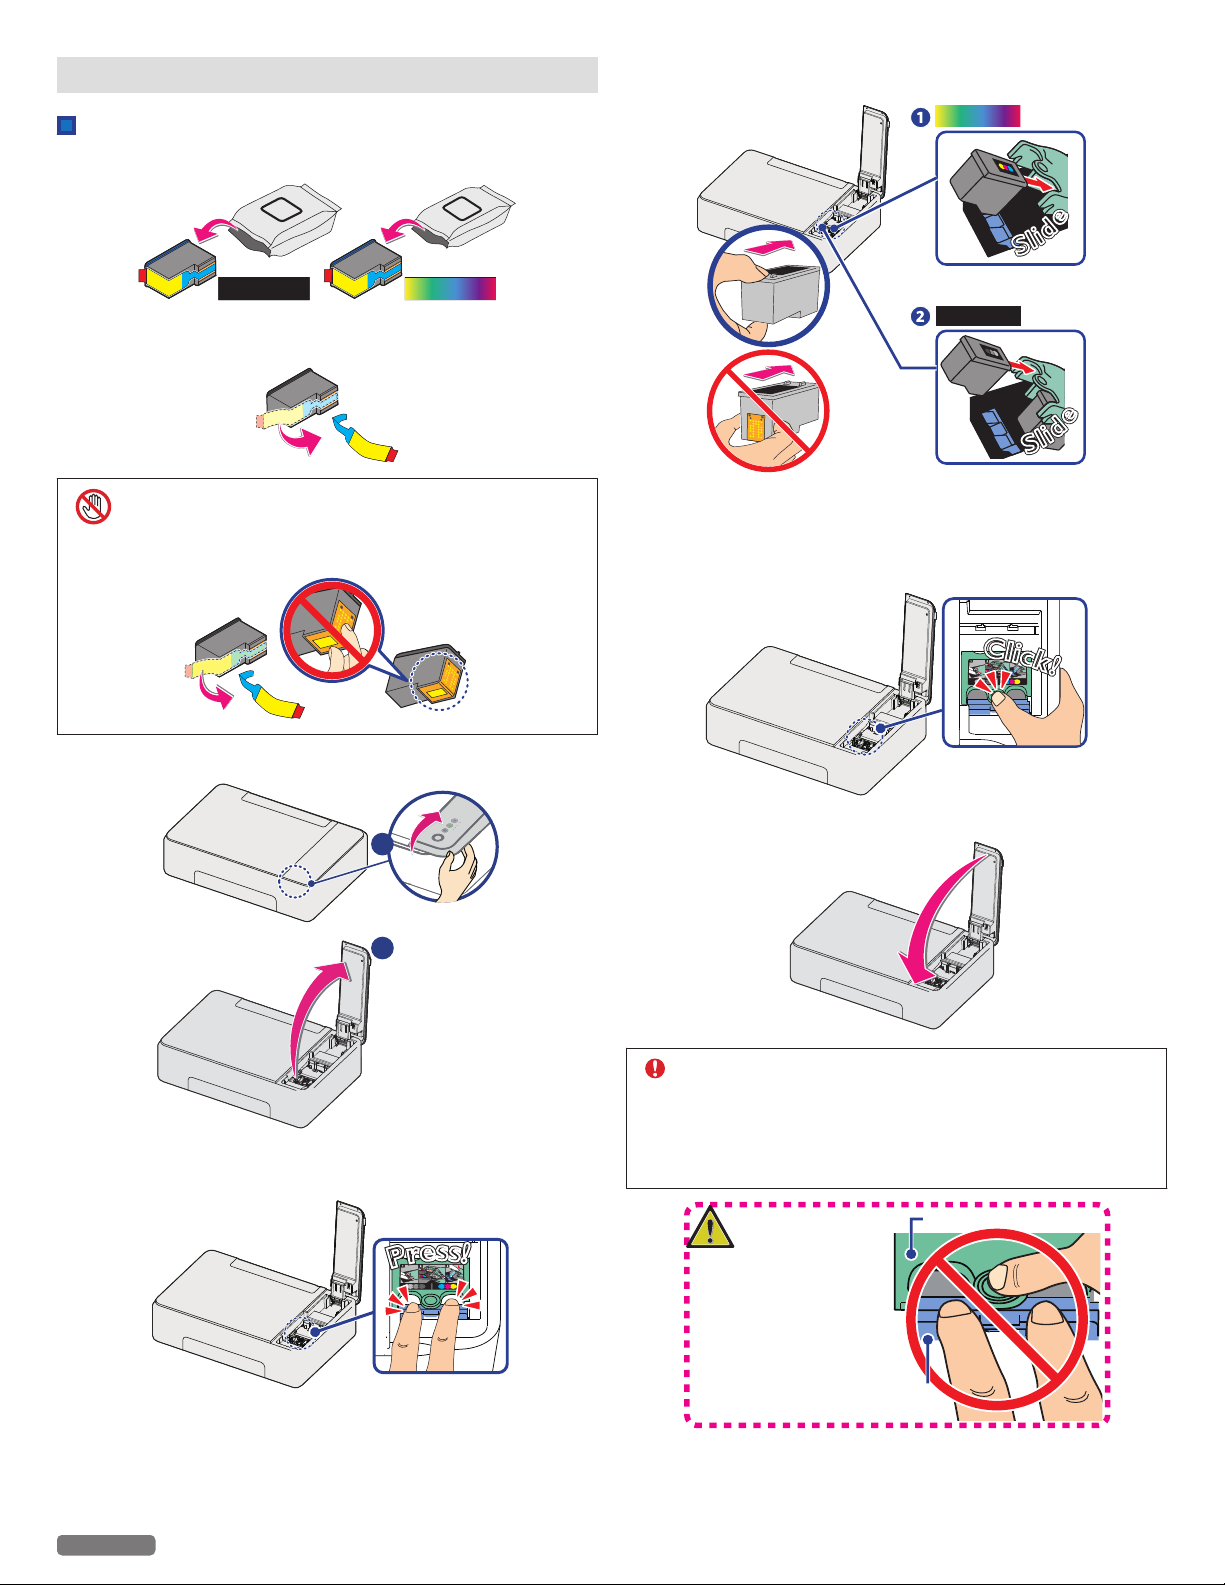
Install ink cartridges
BLACK
COLOR
Black Color
1
2
P
r
e
s
s
!
P
r
e
s
s
!
S
l
i
d
e
S
l
i
d
e
S
l
i
d
e
S
l
i
d
e
S
l
i
d
e
S
l
i
d
e
Color(Right)
Black(Left)
C
l
i
c
k
!
C
l
i
c
k
!
CLOSE: use only GREEN part.
OPEN: use only BLUE part.
Green
Blue
DO NOT PUSH the green/blue
parts at the same time.
Install ink cartridges to ink cartridge holder
1 Remove the black and color ink cartridges from packaging.
2 Remove the plastic tape on the black and color ink
cartridges using the red pull tab.
5 Slide the color ink cartridge all the way into the right slot
using the green rail.
DO NOT TOUCH
●
DO NOT TOUCH the gold contact area on the back or
the metal nozzles on the bottom of the cartridge.
3 Lift the Ink door to access the cartridge slot.
6 Slide the black ink cartridge all the way into the left slot using
the green rail.
7 Push and click the center green Cartridge tab to close the
cartridge slot until the cover snaps securely into position.
8 Close the Ink door.
CAUTION
4 Press front side blue Cartridge tab with 2 fingers to open the
cartridge slot.
English
Ink Cartridge Not Inserted Correctly!
●
If the Ink door does not close properly, the ink
cartridges are not inserted correctly. Remove the ink
cartridges and then correctly insert them again.
12
Continued on next page.
Page 13
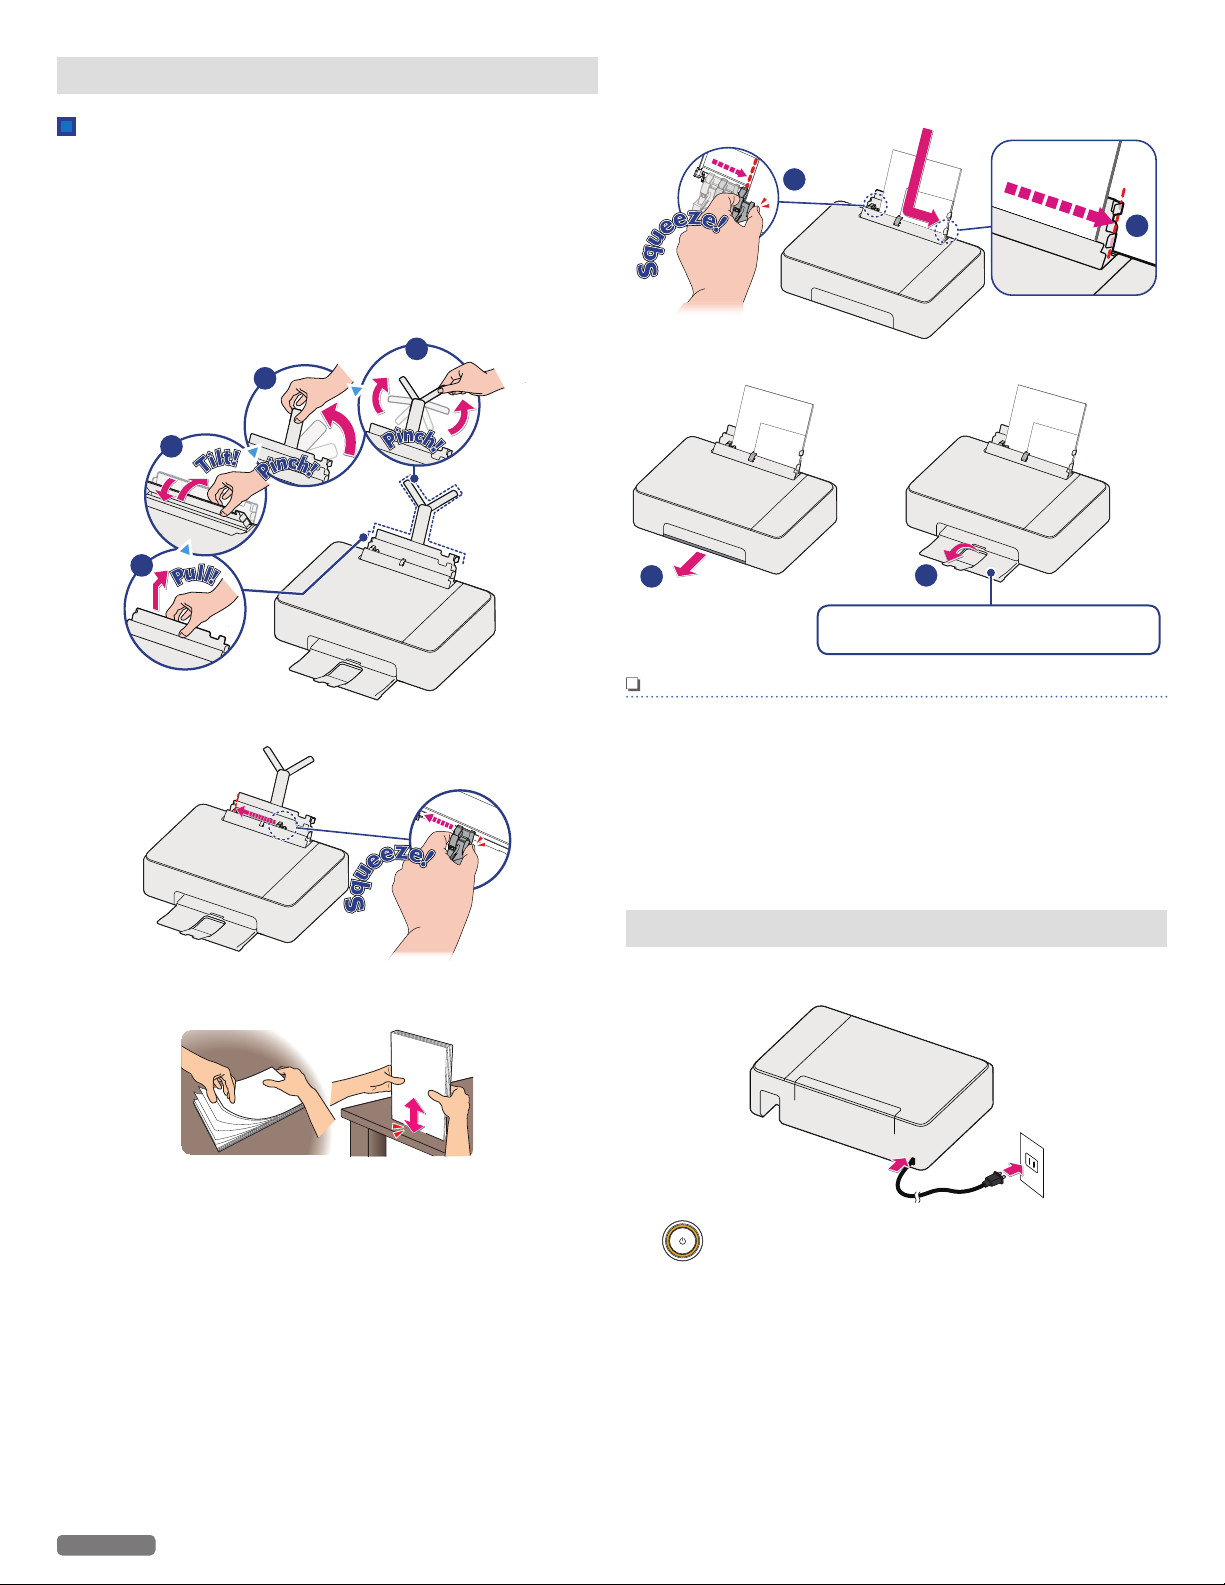
Load paper
1
2
3
4
1
2
1
2
Pull out the Paper exit tray all the way
before opening the Exit tray extender.
Set paper onto the paper support
1 Reach your hand to the back of the unit, just above the Rear
Cover (Duplex Unit), and lift up the center of the Paper
Support.
2 Tilt the Paper Support forward, then tilt it backward so that
the Paper Support is fixed in the right position.
3 Pinch the Paper Support Bar at the rectangular cutout on the
right of the Paper Support, and rotate it upward.
6 Set the plain paper (Letter or A4 size 20 lb. or 75 g/m2) onto
the paper support. You can load up to 60 plain paper sheets.
Slide the paper guide firmly against the edge of the paper.
7 Open the paper exit tray and the exit tray extender.
4 Slide the paper guide to the left.
5 Fan the plain paper to be printed and then tap the paper
sheets so the ends are all the same.
Note(s)
Loading Paper
●
You can load up to 15 index cards or postcards, 10 glossy
paper sheets or 5 envelopes on the paper support.
●
You can load up to 10 sheets of photo paper (4 x 6 inches)
when printing photo(s) on the Photo tray.
»
Refer to “Print media” on page 27.
Turn On the unit
1 Connect the AC plug to the AC outlet.
2 (Power) LED will light up, when the unit is turned On.
English
13
Page 14
Initial setup
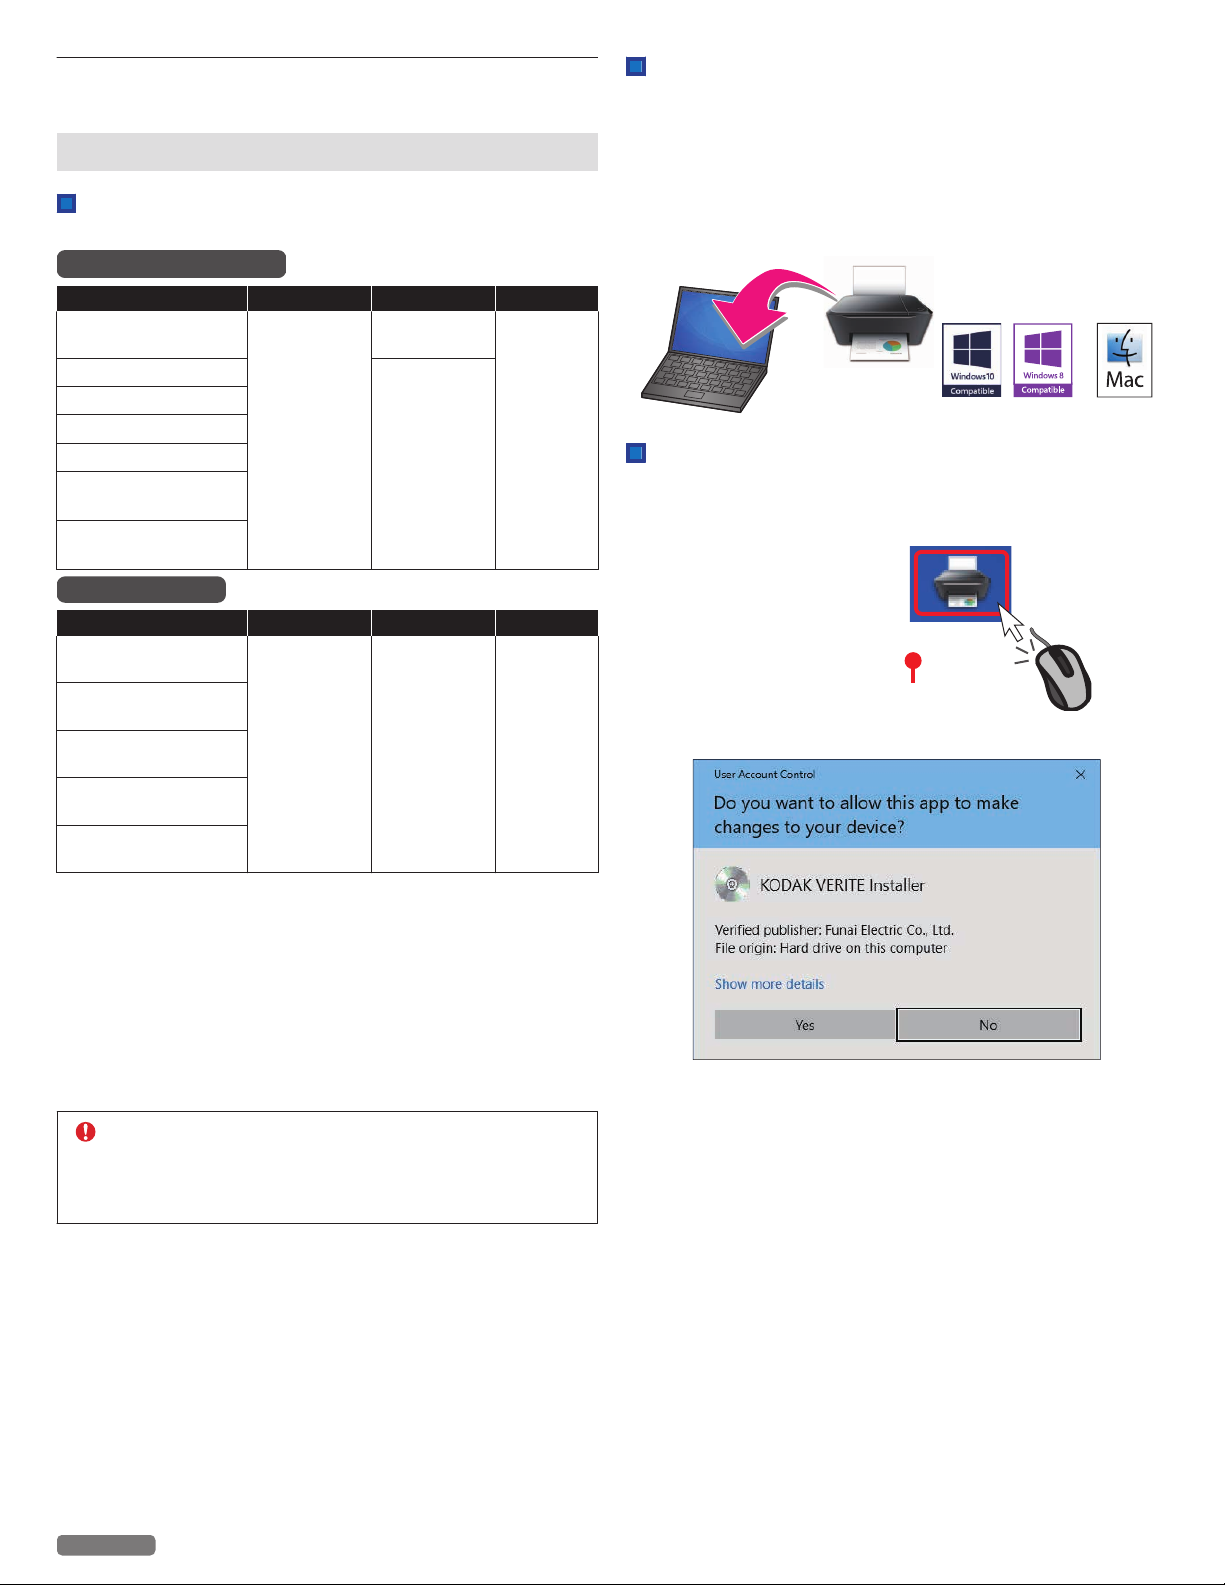
KODAKVERITE64xxxx-vxxxxx.exe
Driver's version
Before you download the printer driver to your PC
Requirements
Your PC must have one of the following operating systems.
Microsoft® Windows
OS Version Processor Browser USB port
Windows® 10
Windows® 8.1
Windows® 8
Windows® 7
Windows® Vista
Windows® Server
2012
Windows® Server
2008
Apple Mac OS
OS Version Processor Browser USB port
macOS 10.12
(Sierra)
OS X v10.11
(El Capitan)
OS X v10.10
(Yosemite)
OS X v10.9
(Mavericks)
OS X v10.8
(Mountain Lion)
●
Make sure that your PC is turned On and you are logged on with
administrator rights.
●
In this Extended User Guide, the file extensions of the programs,
files are omitted. If you set your PC to show the file extensions, the
program and file names appear to be different from those
described in this User Guide.
●
In this Extended User Guide, the appearance of the screen images
are based on Windows® 10; however, other operating systems
(e.g. Windows® 8, etc.) provide basically the same operations.
(There may be programs and functions named differently.)
®
32-bit (x86)
or 64-bit
(x64)
Intel® Core™
Processor
Microsoft
Edge
Internet
Explorer
Safari
®
USB 2.0
High
Speed or
Full Speed
USB 2.0
High
Speed or
Full Speed
How to download the printer driver
1 From your PC go to www.kodakverite.com/support and
confirm that the “DOWNLOADS” is selected.
2 Select the model number of your unit from [SELECT
PRINTER].
3 Select “PC drivers and software” from [HOW CAN WE
HELP:], then follow the Instructions on your PC.
Extraction of printer driver installer
For Windows® users
1 Double-click on the downloaded installer file to extract it.
2 If “User Account Control” window appears, click “Yes”.
CAUTION
●
If there are any programs running, close them first.
●
The screens may differ depending on your operating
system.
English
14
Continued on next page.
Page 15
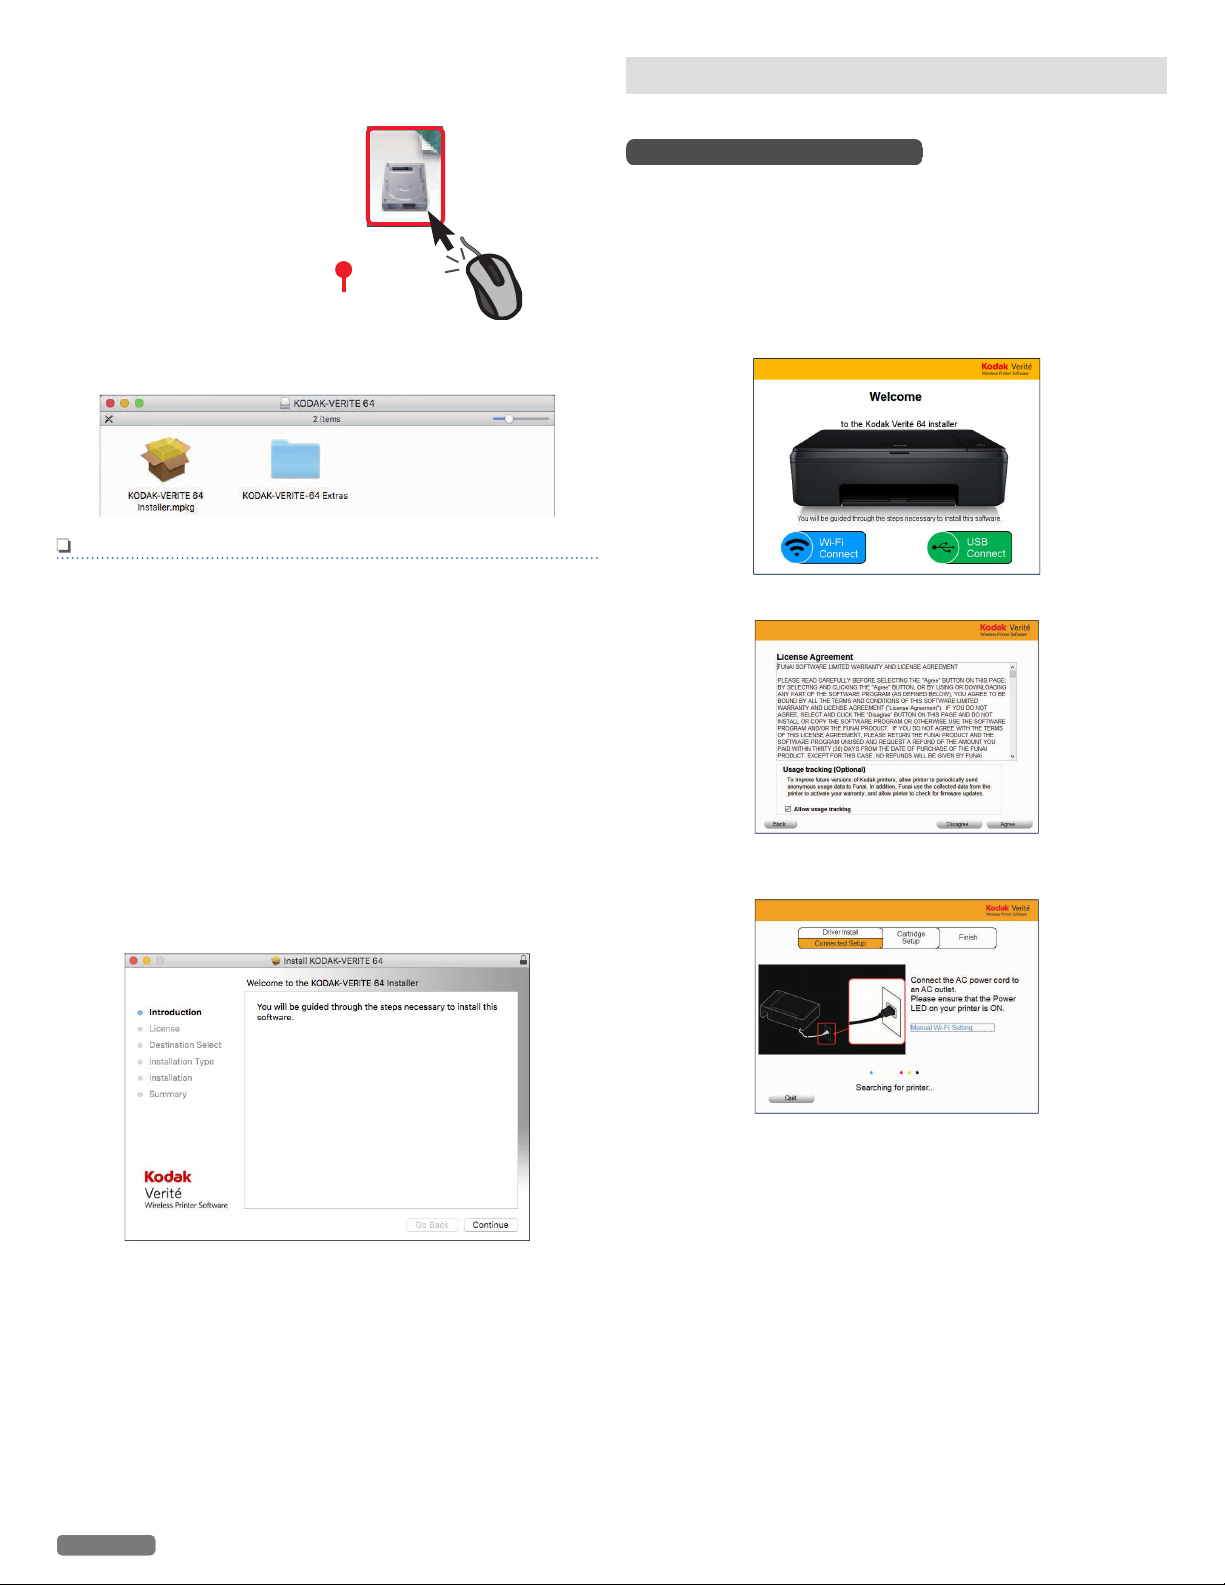
For Mac users
KODAKVERITE64xxxx-vxxxxx.dmg
Driver's version
1 Double-click the downloaded installer file to mount it.
2 The following window will appear.
Double-click on [KODAK-VERITE 64 Installer.mpkg].
Note(s)
●
If the installer does not start when you double-click
[KODAK-VERITE 64 Installer.mpkg], please try the
following steps:
1 Select [System Preferences] in the Apple Menu. The Apple
Menu is located on the top left of the screen. Click the Apple
Icon to display the pull-down menu.
2 Click [Security & Privacy].
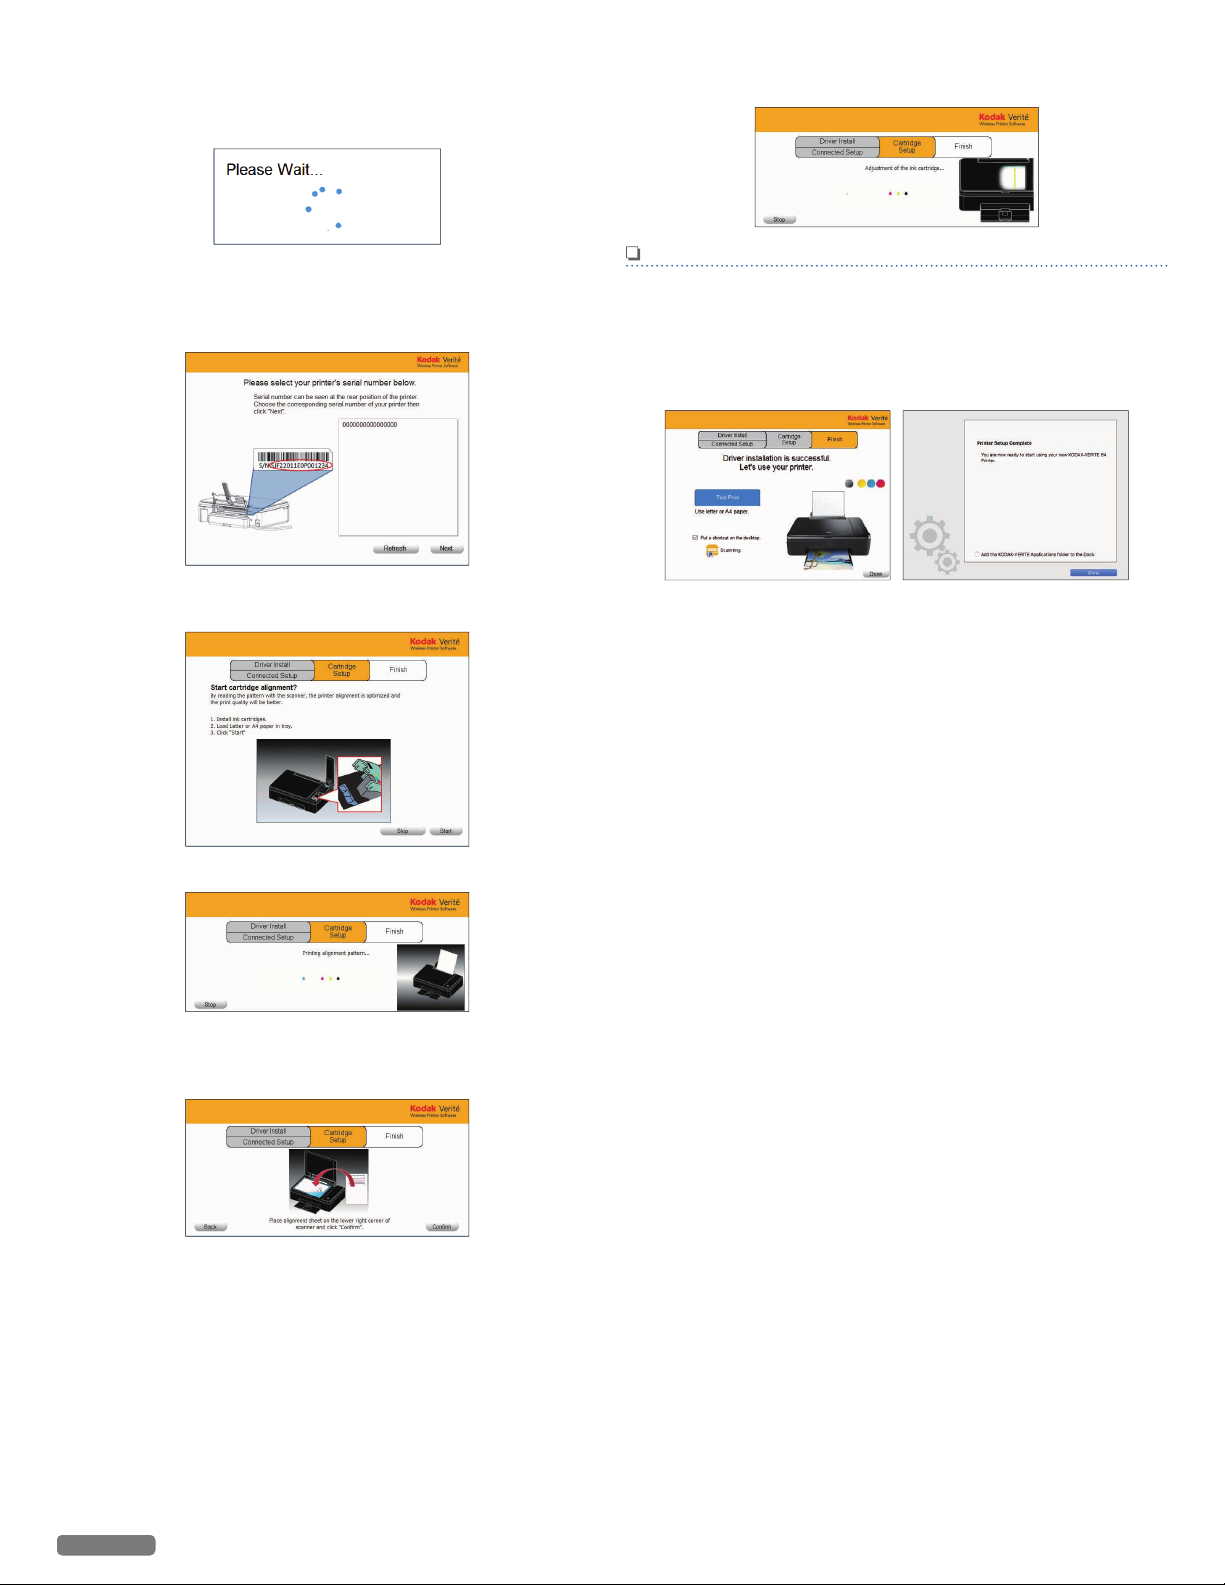
Install the printer driver to your PC
There are two ways to connect to the unit.
Using Wi-Fi (Recommended)
When your PC finds the unit in your network, this unit's serial number
will appear on the Menu display.
●
Double-click the printer driver installer and select “Wi-Fi
Connect”. If you accept the License Agreement, the installation
of the driver will begin.
Select this unit's serial number to complete the printer driver
installation.
1 Click [Wi-Fi Connect].
2 Click [Agree].
3 Click the [General] tab and you will see the [Allow
application downloaded from:] option. If the setting is
locked, please unlock it. The Lock Icon is displayed on the
bottom left of the [Security & Privacy] window. Click the
lock Icon to unlock. You may be required to enter the login
password to proceed.
4 Select [Anywhere] from options listed. For more
information, visit our FAQ on the website at -
www.kodakverite.com/support
3 The following guidance will appear while the PC is searching
the Network.
English
15
Continued on next page.
Page 16
4 If your PC cannot find the unit, the pop-up menu will appear
for 5 seconds. Click the instruction for the connection
method you have chosen, then read the help text for more
details.
9 The unit will start scanning the alignment pattern to set an
appropriate alignment on this unit.
5 The unit's serial number will appear when the PC finds the
unit. Select the serial number, then click “Next”. The unit's
serial number is located on the sticker on the back side of
the unit.
6 Make sure plain Letter or A4 size paper is loaded in the paper
support, click [Start].
Note(s)
●
Make sure to use only blank white paper (sold separately).
Never use colored or patterned paper when you set the
alignment.
10 The following guidance will appear when the printer driver
is installed to your PC successfully.
●
Click “Test Print” to make sure the printer driver is installed
properly (for Windows®).
7 The unit will start printing the alignment pattern.
8 Open the scanner lid and place the alignment pattern paper
facing down on the scanner glass, then click [Confirm] after
closing the scanner lid.
English
16
Continued on next page.
Page 17
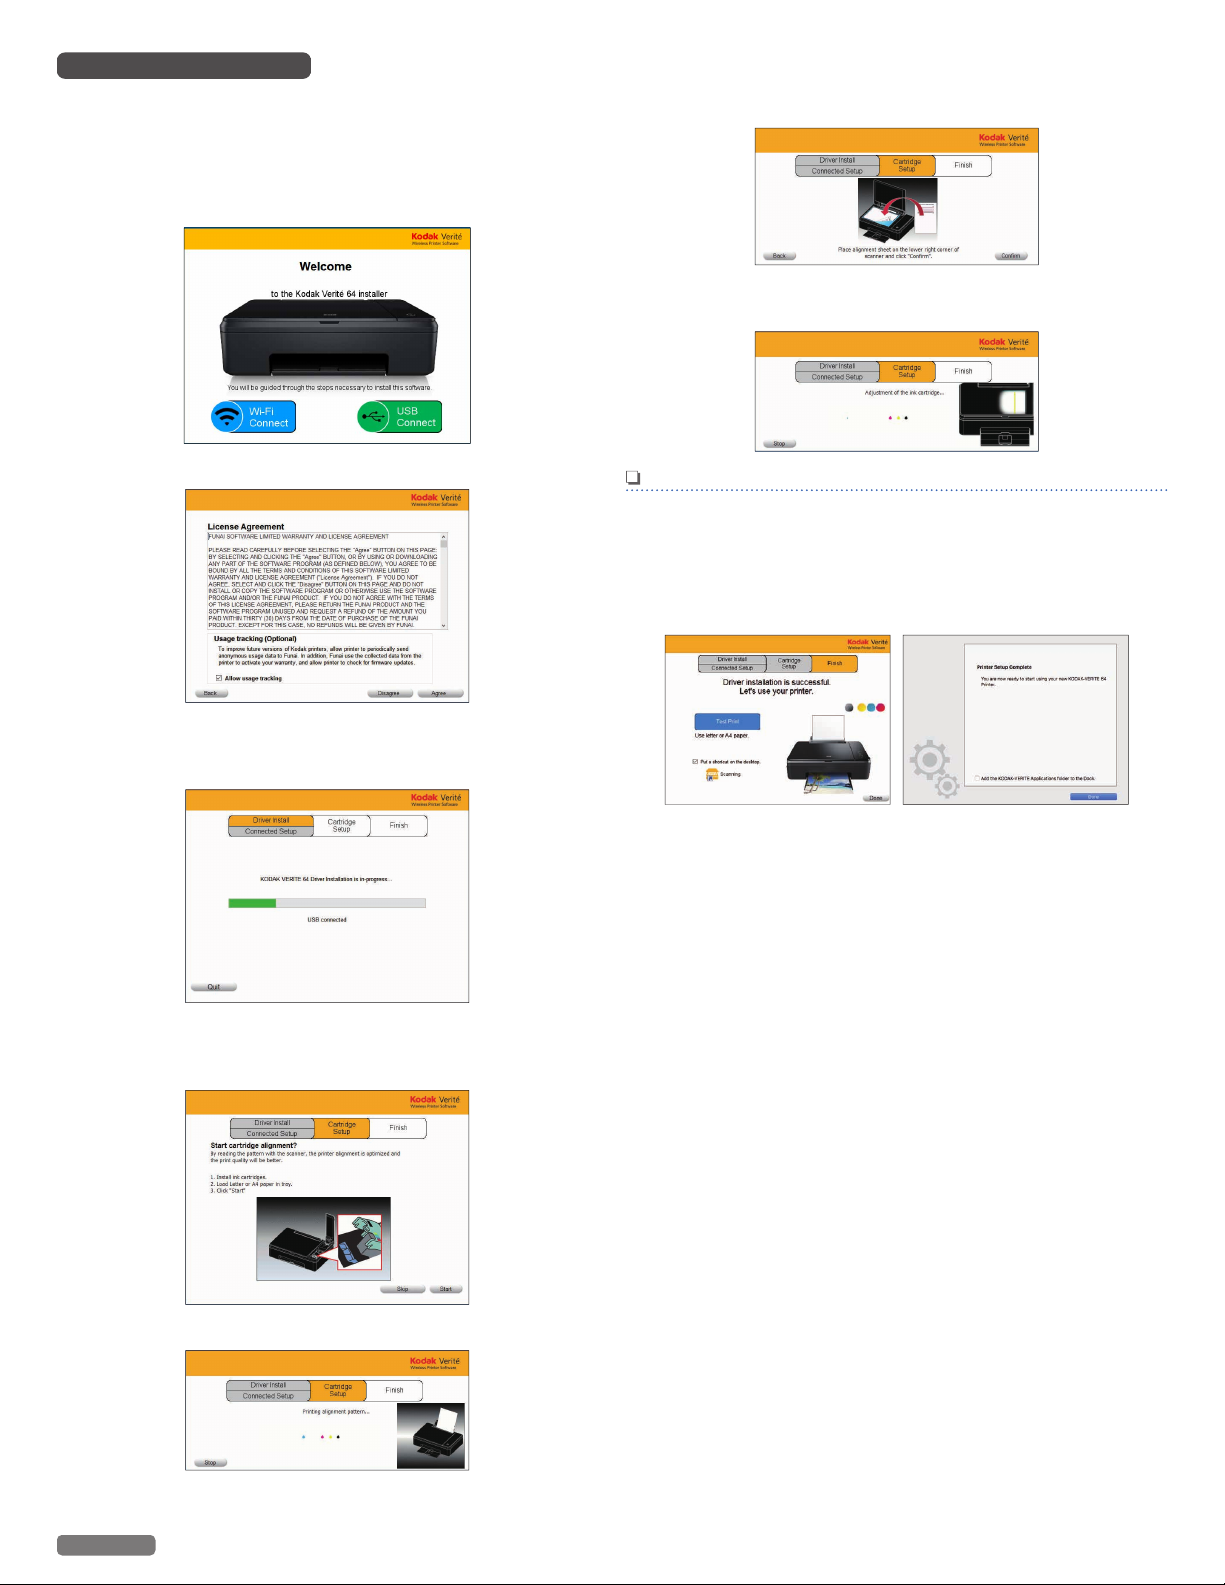
Using USB Printer cable
●
Double-click the printer driver installer and select “USB
Connect”. If you accept the License Agreement, the installation
of the driver will begin.
Select this unit's serial number to complete the printer driver
installation.
1 Click [USB Connect].
6 Open the scanner lid and place the alignment pattern paper
facing down on the scanner glass, then click [Confirm] after
closing the scanner lid.
7 The unit will start scanning the alignment pattern to set an
appropriate alignment on this unit.
2 Click [Agree].
3 When the following window appears, connect printer AC
Power Cord to AC Outlet and then connect the USB cable
between the unit and your PC.
4 [Cartridge Setup] screen will be displayed on the Menu
display. Make sure plain Letter or A4 size paper is loaded in
the paper support, click [Start].
Note(s)
●
Make sure to use only blank paper (sold separately).
Never use colored or patterned paper when you set the
alignment.
8 The following guidance will appear when the printer driver
is installed to your PC successfully.
●
Click “Test Print” to make sure the printer driver is installed
properly. (for Windows®)
5 The unit will start printing the alignment pattern.
English
17
Continued on next page.
Page 18

Wi-Fi Setup
Select Wi-Fi Setup type and follow the Menu display instructions.
WPS Search
1 Click [WPS Search].
- Click Manual Wi-Fi Settings.
Manual Connect Setting
1 Fill in the blank, Network Name(SSID), Security type,
Security key, then click [Next].
2 Connect up the Unit to your PC.
2 Press and hold the WPS button on your Router for a few
seconds.
3 Press and hold (Wireless) until the blinking pattern of
(Wireless) LED changes.
4 Click [Continue].
English
18
Continued on next page.
Page 19
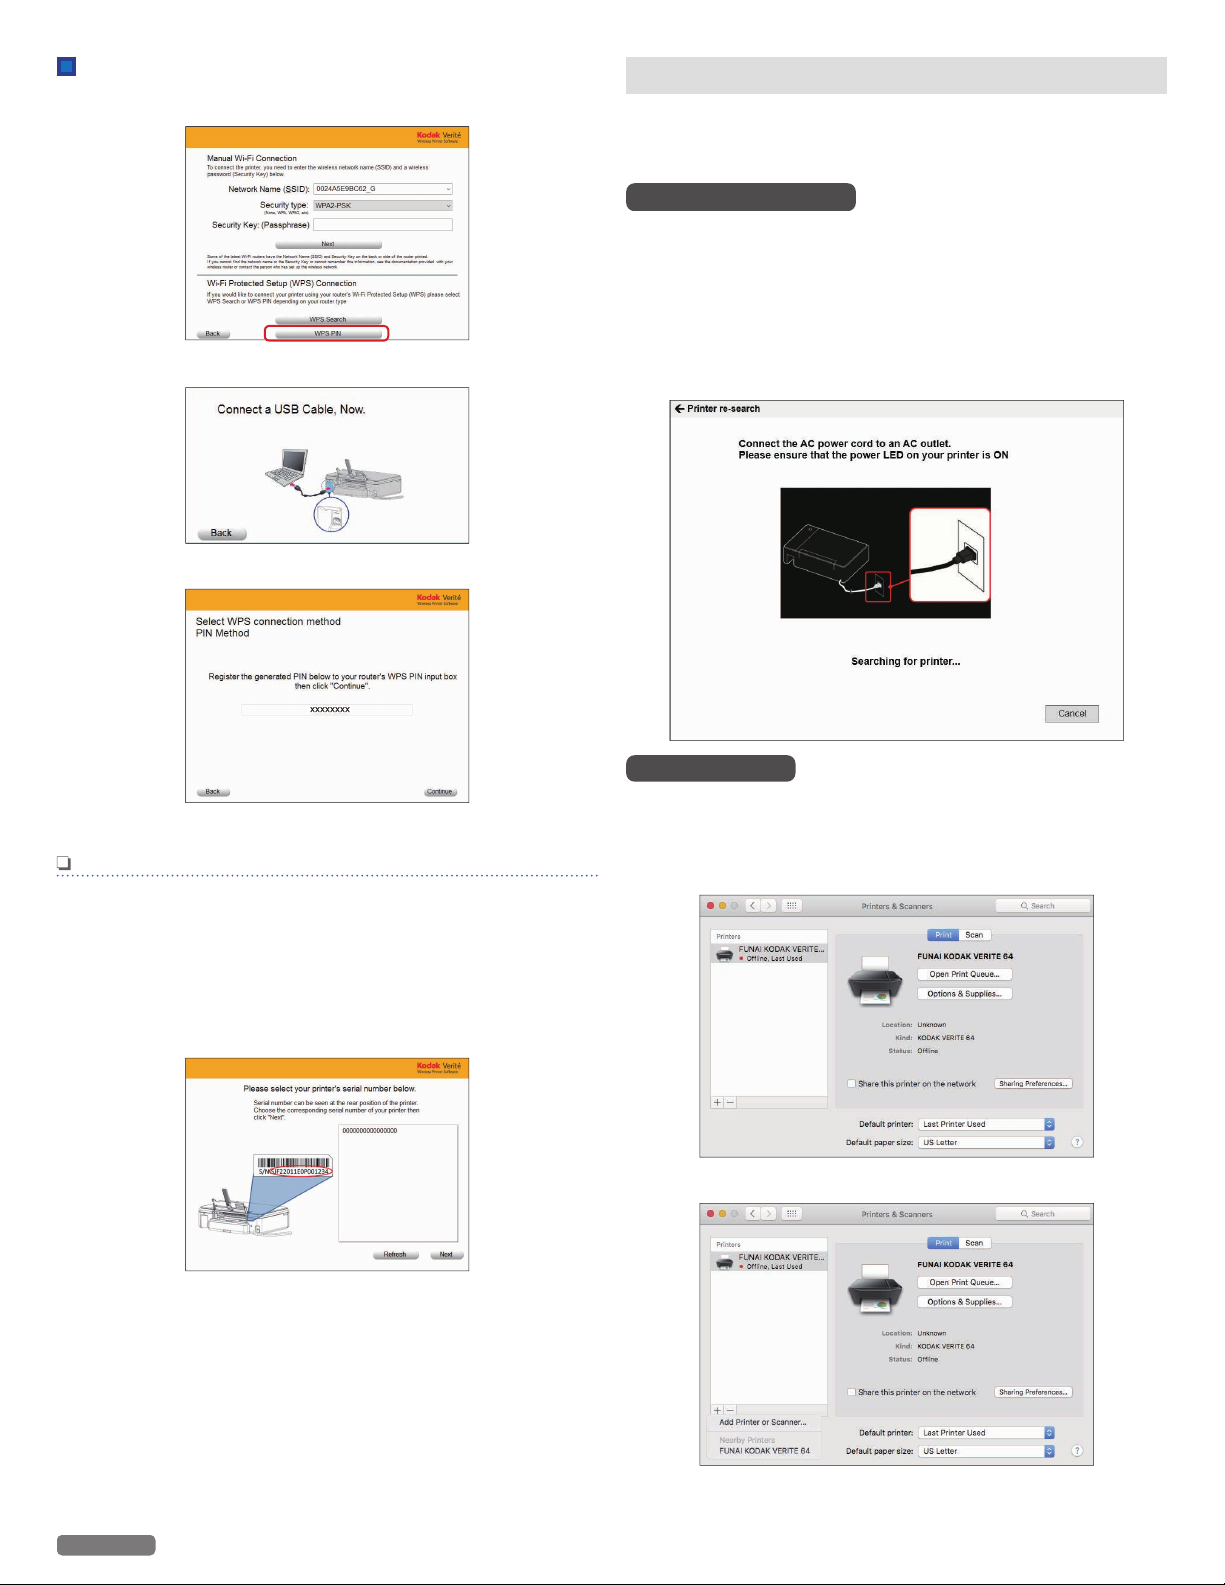
WPS PIN
1 Click [WPS PIN].
2 Connect up the Unit to your PC.
3 Enter Wireless PIN code password.
Changing connection from USB to Wi-Fi
USB always has priority.
If you would like to change connection from USB to Wi-Fi, refer to
the following instructions.
Microsoft® Windows
1 Disconnect the USB cable between this unit and your PC
first.
2 From the Windows® start menu, select [All apps]
VERITE 64] > [Device setting].
3 Click [Printer re-search] in the [Device setting] window.
4 Change the connection type automatically.
®
> [KODAK
4 Click [Continue].
Note(s)
●
When performing Network connection, make sure the unit
is not placed too far away from the access point/router and
the access point/router is powered On and its settings are
correct.
If you need additional help on Network problems, visit our
website at www.kodakverite.com/support
●
If there are multiple printers on the Network, the window
below will appear.
–
Select your printer's serial number and click [Next].
Apple Mac OS
1 Disconnect the USB cable between this unit and your PC.
2 Activate [System Preferences].
3 Click [Printers & Scanners].
4 Click [+] > [Add printer or Scanner...].
English
19
Continued on next page.
Page 20
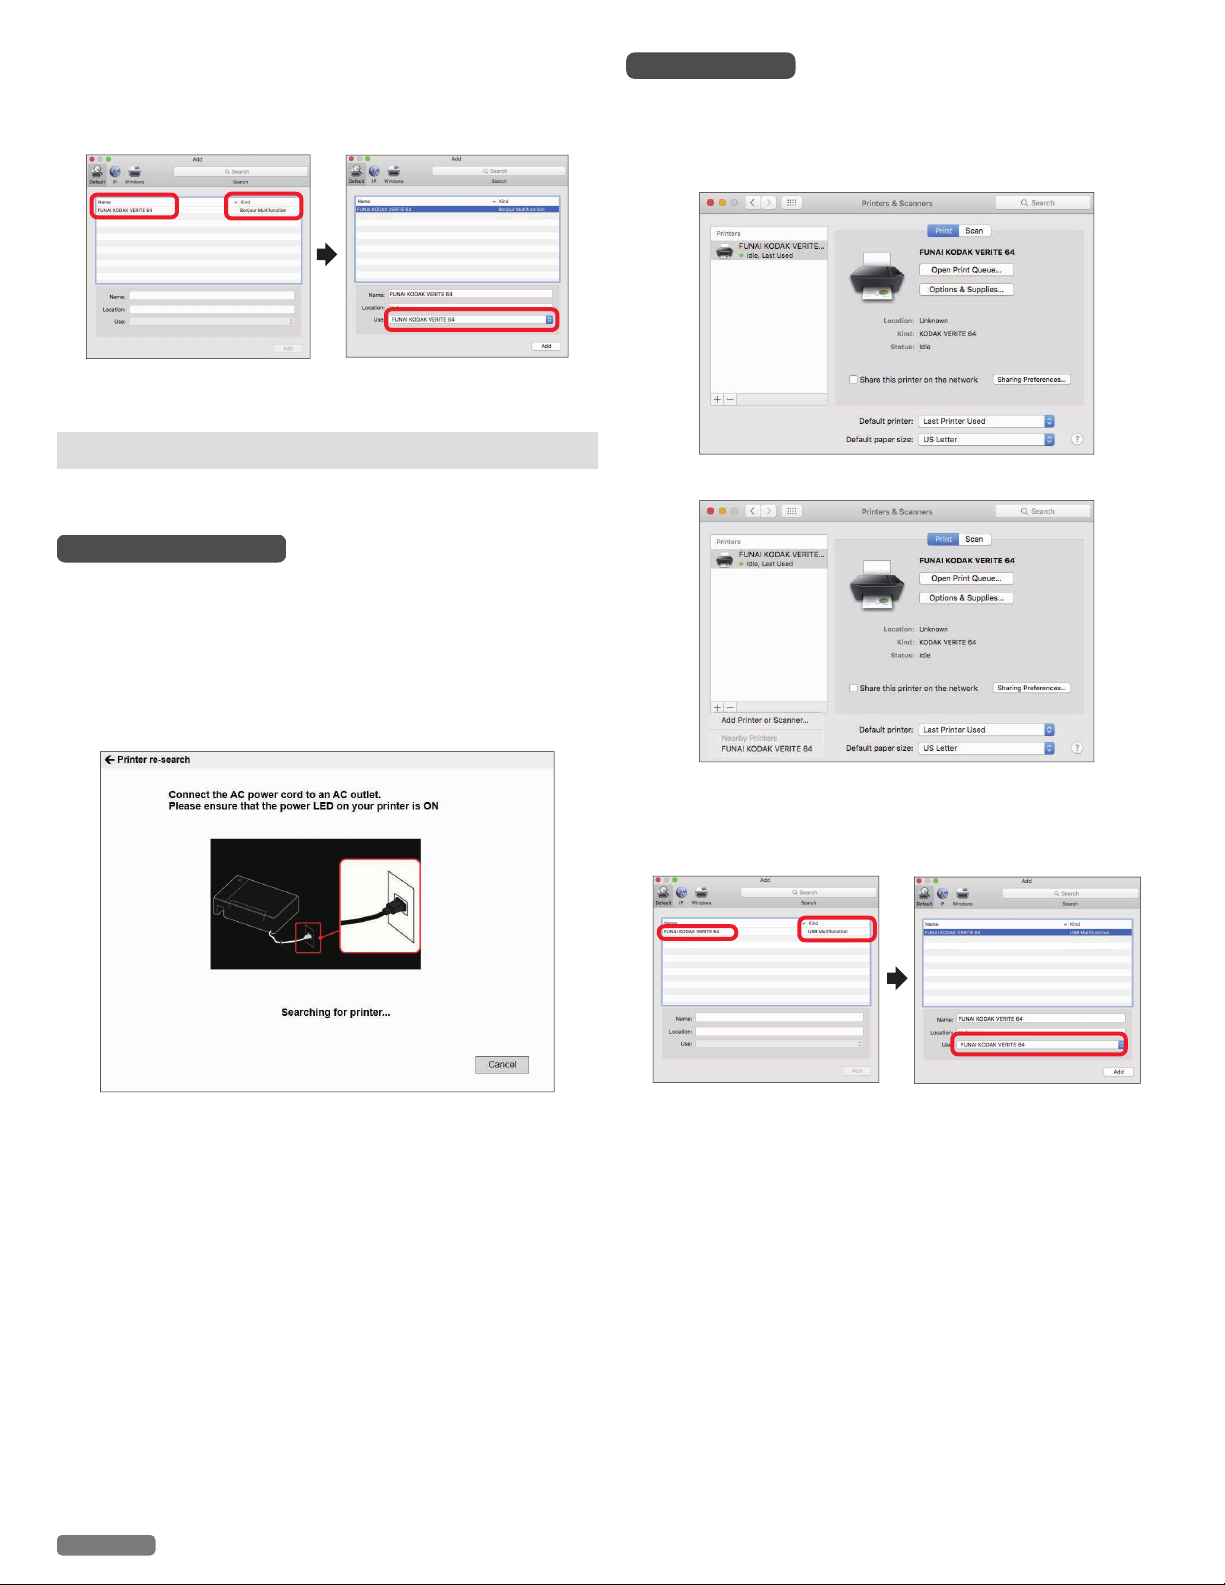
5 Click the printer, select the driver from pull-down menu
[Use], then click [Add].
●
Make sure to choose FUNAI KODAK VERITE 64 with [Bonjour
Multifunction] in [Kind].
6 Select [FUNAI KODAK VERITE 64] added.
Changing connection from Wi-Fi to USB
If you would like to change connection from Wi-Fi to USB, refer to
the following instructions.
Microsoft® Windows
1 Connect the USB cable between this unit and your PC first.
®
Apple Mac OS
1 Connect the USB cable between this unit and your PC.
2 Activate [System Preferences].
3 Click [Printers & Scanners].
4 Click [+] > [Add printer or Scanner...].
2 From the Windows® start menu, select [All apps]
VERITE 64] > [Device setting].
> [KODAK
3 Click [Printer re-search] in the [Device setting] window.
4 Change the connection type automatically after checking
one of the connections.
5 Click the printer, select the driver from pull-down menu
[Use], then click [Add].
●
Make sure to choose FUNAI KODAK VERITE 64 with [USB
Multifunction] in [Kind].
6 Select [FUNAI KODAK VERITE 64] added.
English
20
Continued on next page.
Page 21
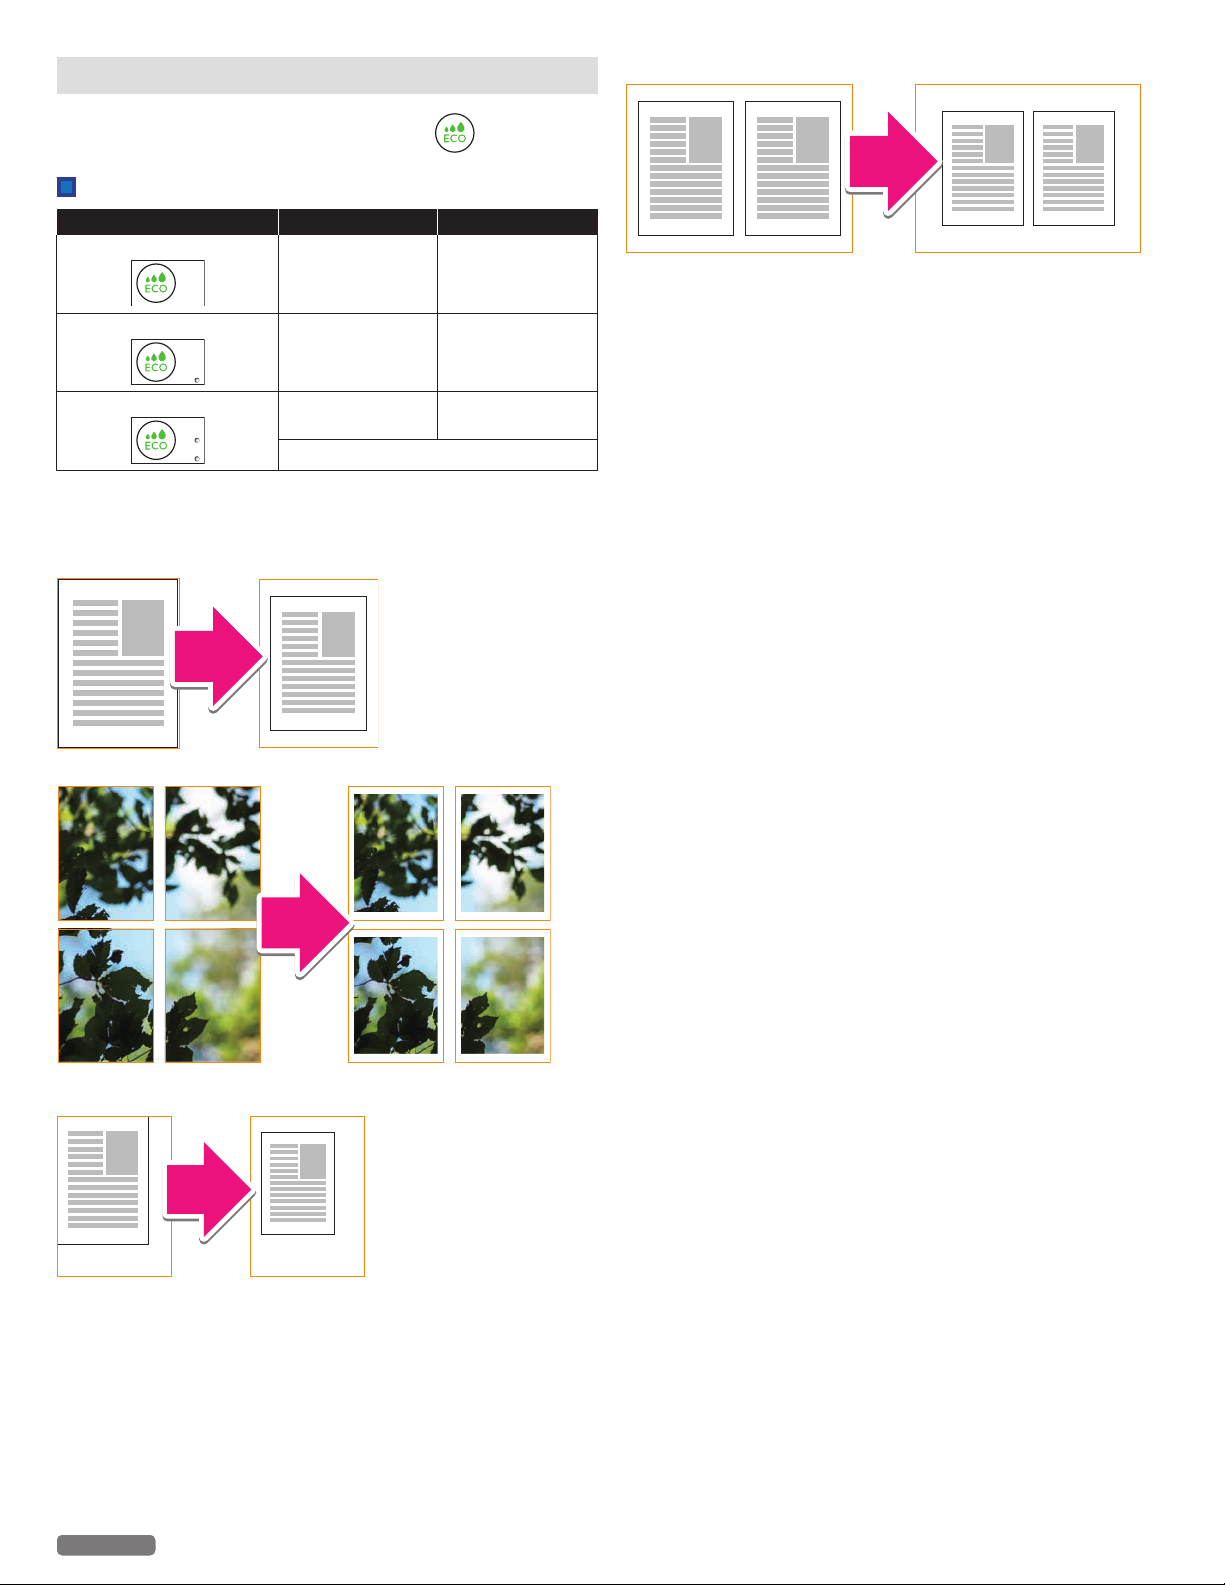
ECO mode
e. g. 1) Paper size : Letter
e. g. 2) Poster
e. g. 3) Resizing
(Paper : Letter changes to a smaller print size on Letter paper.)
e. g. 4) Layout : 2-up
You can easily save on ink consumption using (ECO).
ECO mode status
Mode Ink Density Print Size
ECO mode 0 (ECO Off)
100% 100%
ECO mode 1
ECO mode 2
●
In ECO mode 2, the length and width of the print area will be
reduced approx. 94%, resulting in a centered image that is approx.
88% of the original image size.
80%
SAVE 20%!
80%
SAVE 20%!
SAVE 30% in total!!
100%
88%
(Reduced 12%)
●
Selecting ECO mode, you can automatically save ink and reduce
the size of your print.
●
You can also select ECO mode under Printer Preferences on your
PC.
●
If you set photo print borderless, the print size is not reduced.
●
If the printer goes into Sleep mode or is turned Off (Standby), ECO
mode will return to its default setting OFF.
English
21
Page 22

Print using your smartphone/tablet
'Easy Simple Print' can print the data in your smartphone/tablet
directly to the unit.
Printing is also available by using the mobile App for Android™ or
iOS. For more information, read the following requirements and
usage for your smartphone/tablet.
Requirements
Your smartphone/tablet must have one of the following operating
systems.
Android™
OS Version
Android™ 4.0.3
or later
Memory
required
10 MB or
more free
space
Required
product
specification
Wi-Fi Built-in camera
Recommended
product
specification
Use the mobile App
Printing using the print application is available.
How to download the mobile App
1 From your mobile device go to
www.kodakverite.com/support
2 Confirm that the “DOWNLOADS” is selected, then select the
model number of your unit from [SELECT PRINTER].
3 Select “Connect your Mobile Device”, then follow the
Instructions.
4 Install Printer App on your smartphone/tablet using process
defined by App Site.
iOS
OS Version
iOS 8.0 or
later(iPhone,
iPod touch,
iPad)
●
In order to download the mobile App, you will need a Google
Account or an Apple ID.
Note(s)
●
Connect your mobile to the same Wireless Network that
your unit is using.
Memory
required
30 MB or
more free
space
Required
product
specification
Wi-Fi Built-in camera
Recommended
product
specification
5 When the install Icon appears on your smartphone/tablet
display, then tap the install Icon.
●
Please visit our website for more information about the
mobile App - www.kodakverite.com/support
Note(s)
●
The mobile App's name and screen images display the
current version. They may be changed due to updates.
English
22
Continued on next page.
Page 23

Mobile connection by (Wireless)
Note(s)
●
Check whether your smartphone/tablet supports the code
reading first.
1 Scan the code below (or on the Quick Start Guide) with your
smartphone/tablet and visit the address obtained.
2 Your smartphone/tablet will be connected to the website
(store) where you can download the mobile App.
3 Install the mobile App.
4 After installation is completed, run the mobile App and
follow its directions and press
connect your smartphone/tablet with the unit.
●
(Wireless) LED will change from blinking to steady
lighting when connection is completed.
●
If your smartphone/tablet and the unit have already
connected to the same router (Network), you do not need to
press
●
From the next time on, you do not need to scan the code.
(Wireless).
Simply run the mobile App, then follow its directions and
press (Wireless) to connect your smartphone/tablet
with the unit.
Note(s)
●
The code is a type of two-dimensional barcodes that can be
read using smartphones/tablets.
(Wireless) in order to
English
23
Page 24

Print from a Mobile Device
Google Cloud Print™
This unit supports Google Cloud Print™ and iOS / OS X / macOS
AirPrint.
Google Cloud Print™
Google Cloud Print™ is a service provided by Google that allows you
to print to the unit registered to your Google account using a
Network-compatible device (such as a smartphone/tablet or PC),
without installing the printer driver on the unit.
»
Refer to “Google Cloud Print™” on page 42.
Note(s)
●
In order to use Google Cloud Print™, you must have a
Google account and sign in to your account.
●
Make sure the unit and your smartphone/tablet or PC are
connected to the Internet.
Information about Google Cloud Print™
For information about Google Cloud Print™, visit website at -
www.kodakverite.com/support
●
The contents of the website are subject to change without notice.
1 Click [TROUBLESHOOTING].
2 Select the model number of your unit from [SELECT
PRINTER].
3 Select [Software - How to] from [HOW CAN WE HELP:].
Supported operating systems and applications
Google Cloud Print™ is compatible with the following operating
systems and applications:
Supported operating systems
–
Chrome OS™
–
Android™ 2.1 or later
–
iOS 3.0 or later
Applications that can be used for printing
–
Applications for Chrome OS™
–
Google Chrome™ browser
–
Google Drive™ for mobile
–
Gmail™ webmail service for mobile
●
For more information about Google Cloud Print™, visit website at
- www.kodakverite.com/support
4 Select [Google Cloud Print] from [NEXT:].
5 Select necessary item from [LAST].
English
24
Continued on next page.
Page 25

AirPrint
Information about AirPrint
With iOS / OS X / macOS AirPrint, you can print photos, emails, web
pages, and documents wirelessly from your Apple devices (iPhone,
iPod touch, iPad).
iOS / OS X / macOS AirPrint does not require a driver to be installed.
Refer to “AirPrint” on page 43.
»
Note(s)
●
Your Apple devices need to be connected to the same
Wireless Network that your unit is using.
Supported operating systems
Following Apple devices running the latest version:
–
iPhone (3GS or later)
–
iPod touch (3rd generation or later)
–
iPad (all models)
–
OS X (v10.7 or later)
–
macOS (v10.12)
●
For more information about AirPrint, visit website at -
www.kodakverite.com/support
For information about AirPrint, visit website at -
www.kodakverite.com/support
●
The contents of the website are subject to change without notice.
1 Click [TROUBLESHOOTING].
2 Select the model number of your unit from [SELECT
PRINTER].
3 Select [Mobile] from [HOW CAN WE HELP:].
4 Select [Printing] from [NEXT:].
English
5 Select necessary item from [LAST].
25
Page 26

Check print status from your PC
Error Message
A
Right click
Status Messenger Settings
To configure the Status Messenger, right click on the Icon in the
system tray and select [Settings].
Status Messenger for Windows
®
The Status Messenger application automatically displays an error
when a unit error has occurred. It is installed together with the printer
driver and is added to the Start-up program by default, so it will
automatically launch at startup. It can also be activated from the
Windows Start Menu. When the Status Messenger is activated, an
Icon appears in the Windows® system tray.
Normal state
Error or Warning
:
Color: Green
:
Color: Red
For example, if there is no paper in the paper support, an error occurs
when you try to print...
A pop-up appears from the system tray Icon to provide immediate
error notification. If you click on the pop-up, an error recovery guide
appears so that you can confirm a detailed explanation on how to
fix the problem.
You can change the following items in the Status Messenger
Settings.
●
Alert me when a problem prevents printing
When checked: A message will pop up when an error occurs.
●
Alert me when my supplies are low
When checked: A message will pop up when information is
available.
●
Show me detailed status about my supplies
When checked: Status Monitor Center will be launched by
clicking on the pop-up or the Icon in the Windows® system tray.
Settings for pop-up message and detailed information display can
be configured in Status Messenger Settings.
For how to configure the settings, refer to the following instructions.
English
26
Page 27

Print media
0.08 inches (2 mm)
or more
1
2
3
4
1
2
Insert paper into the paper support
Specifications for print media
You can set up normal printer paper, envelopes or printed
documents (forms) onto the paper support.
Paper support
Paper
Sizes
Weight Plain paper: 17 - 24 lb. (64 - 90 g/m2)
Capacity Plain paper (20 lb. or 75 g/m2): Up to 60
●
Borderless printing is supported with paper sizes Letter, A4, A5,
A6, 3x5 in., 4x6 in., 5x7 in., and Hagaki, when printing from your
PC.
●
Automatic Duplex Printing supports Paper Sizes Letter and A4.
Paper Type must be Plain and 20 lb. (80 g/m2).
Note(s)
●
A4, A5, A6, DL Envelope and C5 Envelope are International
Paper Sizes.
CAUTION
Letter · Legal · JIS B5 · A4 · Executive · A5 · Statement
· A6 · 3x5 in. · 4x6 in. · 5x7 in. · Hagaki · 3.5x5 in.(L) ·
10 Envelope · DL Envelope · C5 Envelope
Cards: 90 - 110 lb. (163 - 200 g/m2)
Envelopes: 20 - 24 lb. (75 - 90 g/m2)
Photo paper: 50 - 65 lb. (180 - 240 g/m2)
Cards (110 lb. or 200 g/m2): Up to 15
Envelopes (24 lb. or 90 g/m2): Up to 5
Photo paper (65 lb. or 240 g/m2): Up to 10
Set paper onto the paper support
1 Reach your hand to the back of the unit, just above the Rear
Cover (Duplex Unit), and lift up the center of the Paper
Support.
2 Tilt the Paper Support forward, then tilt it backward so that
the Paper Support is fixed in the right position.
3 Pinch the Paper Support Bar at the rectangular cutout on the
right of the Paper Support, and rotate it upward.
Unsuitable Paper!
Forms from a Laser Printer!
Note(s)
Curled Paper
Storing Paper
●
DO NOT insert any sheets of paper into the paper
support...
–
that are wet, have been edited with correction fluid, are
soiled or have a coated surface.
–
that are held together with office or notebook staples
or with tape or glue.
–
that are pasted with note paper.
–
that are creased, crumpled or torn
–
that are curled.
●
Forms that have been printed out by a laser printer are
not suitable for further printing.
●
If paper is curled, use it after flattening paper. 0.08 inches
(2 mm) or more curl may cause paper jam.
●
To avoid curling, when you do not use the unit, unused
paper is put into package, please keep it in a flat state. And
also, store it avoiding heat, humidity and direct sunlight.
4 Slide the paper guide to the left.
5 Fan the plain paper to be printed and then tap the paper
sheets so the ends are all the same.
6 Insert the paper into the paper support. You can load up to
60 plain paper sheets (20 lb. or 75 g/m2). Slide the paper
guide firmly against the edge of the paper.
English
27
Continued on next page.
Page 28

7 Open the paper exit tray and exit tray extender.
1
2
Pull out the Paper exit tray all the way
before opening the Exit tray extender.
Note(s)
Loading Photo paper
●
Insert the photo paper into the Photo tray. You can load up to
10 sheets of photo paper (4 x 6 inches). Place the photo paper
with the nonprinted side facing forward in the Photo tray.
Loading Pre-printed Material
●
If you would like to print on an input sheet (for example,
forms or stationery), place the input sheet with the Preprinted side facing front in the paper support.
CAUTION
Forms from a Laser Printer!
●
Forms that have been printed out by a laser printer
are not suitable for further printing.
Loading Envelopes
●
Insert the envelopes into the paper support. You can load
up to 5 envelopes. Place the envelopes with the nonprinted side facing forward in the paper support.
CAUTION
●
DO NOT reverse the direction when loading
envelopes.
Child Safety
●
DO NOT pull out the paper support swiftly, otherwise
the tray may fall resulting in injury.
8 Make sure the inserted paper format and paper type
matches the printer settings.
» Refer to “Print settings” on page 29.
English
28
Page 29

Print settings
Confirming Printing Preferences for
Windows
Note(s)
Microsoft® Windows® Screenshots
●
The screen shots in this guide were made with Windows
10. If you use Windows® OS other than Windows® 10, the
screen interfaces look slightly different. The functions,
however, are the same.
Edit print settings
When you print a document, the [Print] dialog box appears.
Select [VERITE 64] (this unit) and click on [Properties] or
[Preferences] and such. The changes to the settings only apply to
a print job of the respective application and only until this application
is closed.
®
®
Edit detailed print setting on the Advanced Settings
menu
Click [Advanced Settings] on the top right corner if you want to
change specific detailed settings.
Select default print setting on the Quick Settings
menu
You can adjust the default print settings using the [Quick
settings] menu. Click on [Start] > [Settings] > [Devices] >
[Devices and printers]. Right click on the name of the unit and
select [Printer properties]. Click on [Preferences...] in the
[General] tab.
Note(s)
[Devices and printers] on Windows® OS other than
Windows® 10
●
Right-click on the Windows® start menu, click [Control
Panel], [Hardware and Sound] and [Devices and
printers] (Windows® 8.1).
●
Right-click at the bottom left corner on your desktop, click
[Control Panel], [Hardware and Sound]
printers] (Windows® 8).
●
From the Windows® start menu, click [Devices and
printers] (Windows® 7).
●
From the Windows® start menu, click [Control Panel] >
[Hardware and Sound] > [Printers] (Windows® Vista).
After you have selected one of the default settings you want to
change the selection will be saved when you click [X] to close the
[Quick settings] menu window.
and [Devices and
Change to ECO Mode:
You can easily use less Ink.
[ ]
]
[
[ ]
●
For more details, refer to “ECO mode” on page 21.
ECO mode is not effective.
ECO mode is effective for saving 20% ink.
ECO mode is effective for saving 20% ink and
reducing 12% printed area.
Copies:
Enter the number of copies you would like to print. Activate
[Collate], if you would like to print the copies sorted and not have
all the copies of one page behind each other in succession. Activate
[Reverse page order], if you would like to change the print order
to print the last page of your document first.
Paper size:
Select the format of the document.
●
Letter (8.5 x 11 in.)
●
Letter Borderless
●
Legal (8.5 x 14 in.)
●
Executive (7.25 x 10.5 in.)
●
Statement (5.5 x 8.5 in.)
●
4x6 in. (Postcard)
●
4x6 in. (Postcard) Borderless
●
3x5 in. (Index card)
●
5x7 in. (2L)
●
5x7 in. (2L) Borderless
●
3.5x5 in. (L)
●
3.5x5 in. (L) Borderless
●
A4 (210 x 297 mm)
●
A4 (210 x 297 mm) Borderless
●
JIS B5 (182 x 257 mm)
●
A5 (148 x 210 mm)
●
A5 (148 x 210 mm) Borderless
●
A6 (105 x 148 mm)
●
A6 (105 x 148 mm) Borderless
●
Hagaki (100 x 148 mm)
●
Hagaki (100 x 148 mm) Borderless
●
Envelope 10 (4.125 x 9.5 in.)
●
Envelope DL (110 x 220 mm)
●
Envelope C5 (162 x 229 mm)
Note(s)
●
A4, JIS B5, A5, A6, Hagaki, Envelope DL and Envelope C5
are International Paper Sizes.
Adjusting this setting in the print settings of each application is the
best option as many programs overwrite the settings of the printer
driver.
You can also create, edit or delete to manage custom paper size by
selecting [Manage Custom Sizes...].
Select the print settings automatically according to the
paper size. can be selected depend on the paper size.
English
29
Continued on next page.
Page 30

Color Output:
Select print output for [Color] or [Black and White].
[Color]
[Black and White]
Color print
Black-and-white print
Paper type:
Select the desired paper type. Ensure that the selected paper size
is used.
Note(s)
●
Automatic Duplex Printing only supports Paper Size Letter
and A4 with Paper Type 20 lb Plain. With other settings,
Automatic Duplex Printing is not available.
Print Quality:
Select the Quality settings to match the document type to be
printed. You can select the type of Print Quality [Auto/Draft/
Normal/Best].
[Auto (default)]
Printing with a quality suitable for the paper
type that is selected.
[Draft]
[Normal]
[Best]
High-speed printing, but low image quality.
Standard speed printing and image quality.
Highest quality image, but printing speed is
low.
Sharpen:
Adds sharpness to the image.
[On]
[Off]
Activates Sharpen.
Deactivates Sharpen.
Collate:
The Collate feature controls the order of printed pages when
printing multiple copies of a document. For example, if you are
printing two copies of a five-page document, then the page order
of the collated output would be 1, 2, 3, 4, 5, 1, 2, 3, 4, 5. The page
order of the non-collated output would be 1, 1, 2, 2, 3, 3, 4, 4, 5, 5.
[On]
[Off]
Activates Collate
Deactivates Collate
Reverse page order:
[On]
[Off]
Print from the last page.
Print from the first page.
Page Orientation:
This function allows you to select the direction of printing on a page.
You can set whether to print in Portrait or Landscape format.
Adjusting this setting in the print settings of the application is the
best option as many programs overwrite the settings of the printer
driver.
[Portrait]
Portrait indicates vertical orientation, where
the page is taller than it is wide.
[Landscape]
Landscape indicates horizontal orientation,
where the page is wider than it is tall.
Resizing Options:
If you would like to resize the printing document, click on [On].
[On]
Resizes the printing document to the
selected paper size.
[Off]
Does not resize. Keep the document size.
2-sided printing:
You can select whether to print on one side only or print on both
sides. For both sides printing, you can also select whether the
binding position is along the long edge or the short edge of the
paper.
[1-sided
document]
[2-sided long
edge]
[2-sided short
edge]
[Manual 2-sided
long edge]
[Manual 2-sided
short edge]
Prints on one side.
Prints on both sides with a margin on long
edge.
Prints on both sides with a margin on short
edge.
Prints manually on both sides with a margin
on long edge.
Prints manually on both sides with a margin
on short edge.
Note(s)
When [Manual 2-sided long edge] or [Manual 2-sided short
edge] is selected.
●
You must manually turn the stack of printed pages over and
place them in the paper support. Before placing the pages
with the front printed sides in the paper support, make sure
of the following items to avoid a paper jam or double-feed:
–
All other paper (unused paper) has been removed from the
paper support.
–
The ink is completely dry.
–
The paper is not curled or creased. If it is, flatten the paper.
–
Align the corners of the paper.
–
A paper jam or double-feed may occur if the paper is in a
bad condition or the printed page is placed incorrectly.
–
Maximum number of sheets by Paper type:
Plain paper (20 lb.): 30 sheets (60 pages)
Postcard: 15 sheets
Page Layouts:
[Normal]
[Multiple pages
per side(N-UP)]
Prints the Normal printing.
Prints Multiple pages on one side of a paper
for the page layout e.g. like 2 pages printed
on 1 sheet of paper like a book.
[Poster]
Prints a document in a larger format. The
Poster option lets you enlarge a print job to
several times the standard size.
[Mirror]
Prints a horizontally flipped document
Note(s)
When [Poster] is selected.
●
Depending on the poster size that you select, your
document is divided into an equal number of sections, each
of which prints on a full sheet of paper. When all sections
have printed, you can trim the extra white space around
each page and join the individual sheets to create a poster.
Supported size of poster - 2 x 2 (4 pages), 3 x 3 (9 pages),
or 4 x 4 (16 pages).
English
30
Continued on next page.
Page 31

Watermark:
You can choose a watermark from two modes. (Same watermark on
all pages or a different watermark on first page.) Select a watermark
that you would like to add to your print job.
[Use the same watermark on all pages]
●
(None)
●
Confidential
●
Date and Time
●
Draft
●
Username
[First page]
You can choose the same selection above ([(None)] to
[Username]) on the first page.
[Other pages]
You can choose the same selection above ([(None)] to
[Username]) on the other pages.
To add or remove watermark, click on [Edit Watermarks].
Confirming Print Settings for Mac
Note(s)
Macintosh Screenshots
●
The screen shots in this guide were made with the Preview
(Applications) of OS X 10.11. If you use another version of
OS X or another application, the screen interfaces look
slightly different. The functions, however, are the same.
Save Detail changes
Click on [Add user's settings] on the [Advanced Settings]
bottom left corner to save the changes to the respective register.
The saved configuration information will be managed by names.
You can type the substitute name for [Custom 1] when [Add user's
settings] windows appears.
Click on [Quick settings] or [X] to close the [Advanced
Settings] window without saving.
in the
Remove Custom settings
You can delete custom settings by Quick Settings menu. Select the
one of the registered settings, then click [Remove].
Paper Size:
Select the format of the document. Adjusting this setting in
the print settings of each application is the best option as
many programs overwrite the settings of the printer driver.
You can also create and manage custom paper size by
selecting [Manage Custom Sizes...].
Note(s)
●
Automatic Duplex Printing only supports Paper Size Letter
and A4 with Paper Type 20 lb Plain. With other settings,
Automatic Duplex Printing is not available.
Orientation:
Choose Portrait or Landscape output.
Edit Print Settings for a print job
When you print a document, follow the Steps below.
1 Open the file you want to print.
2 Select [File] on the menu bar.
3 Select [Print...], then the Printer Setting menu will be
displayed.
4 If details are not displayed, select [Show Details] on the
bottom of the Print Menu. You can edit Print Settings when
details are displayed.
English
31
Continued on next page.
Page 32

Save changes
1 Click on [Presets] list box, and select [Save Current
Settings as Preset...]. The saved configuration information
will be managed by names.
2 Input name in [Preset Name:] textbox, then select [Preset
Available For:] radio button.
3 Click on [OK] to save and close the window.
4 Select [Cancel] to close window without saving.
Load settings
●
You can access the saved settings quickly by selecting a name
from [Show Presets...] in [Presets] list box.
Change Print options
●
In the Print Setting menu, select the Print options you want to
change in the red frame below.
Layout
Pages per Sheet:
Print multiple pages on one sheet.
Layout Direction:
If you print multiple pages on a sheet, select the layout direction.
Border:
Print the border on the sheet.
Reverse page orientation: If you would like to reverse page
orientation, select the checkbox.
Flip horizontally:
If you would like to flip horizontally, select the checkbox.
Preview
Auto Rotate:
Automatically selects portrait or landscape.
Scale:
Enter the scaling ratio.
Scale to Fit:
Input the scaling ratio of [Print Entire Image] or [Fill Entire
Paper] automatically.
Copies per page(s):
Print multiple copies of the page(s).
Paper Handling
Pages to Print:
If you would like to print odd/even pages only, select [Odd only] or
[Even only].
Page Order:
If you would like to print in reverse order, select [Reverse].
Scale to fit paper size:
If you would like to scale to fit your printer paper, select the checkbox
and select [Destination Paper Size].
Destination Paper Size:
Select the paper size to scale.
Scale down only:
If you don’t want to scale up, select the checkbox.
English
32
Continued on next page.
Page 33

Cover Page
If necessary, you can print the cover page.
Print Cover Page:
If you would like to print the cover page, select [Before
document] or [After document].
Cover Page Type:
If you would like to print the Cover Page, select the type of Cover
Page.
Quality & Media
Print Quality:
Select the Quality settings to match the type of document to be
printed. You can select the type of Print Quality [Auto/Draft/
Normal/Best].
[Auto]
[Draft]
[Normal]
[Best]
Paper Type:
Select the desired Paper Type. Ensure that the selected paper size
is used.
Note(s)
●
Automatic Duplex Printing only supports Paper Size Letter
and A4 with Paper Type 20 lb Plain. With other settings,
Automatic Duplex Printing is not available.
Sharpen:
Activate Sharpen, if you would like to add sharpness to the image.
Printing with a Quality suitable for the type of
Paper that is selected.
High-speed printing, but low image quality.
Standard speed printing and image quality.
Highest quality image, but printing speed is low.
Advanced Options
Color Output:
Select the Print output using [Color] or [Black & White].
English
33
Page 34

Making Copies
Copy Setting
The Copy function is available using (Copy) on the unit.
1 Lift the scanner lid on the unit.
2 Load the original print side down on the scanner glass.
3 Close the scanner lid.
4 Specify the Settings as necessary.
5 Press (Copy).
Printing using the available print application.
From the Windows® start menu, select [All apps] > [KODAK
VERITE 64] > [Copying].
Copies
Set the number of Copies.
6 The unit will start copying.
●
To cancel Copy mode, press and hold (Power).
1 Select the number of copies [1] to [99].
Enter the number [1] to [99] directly in the box, or click [+] to
increase the number of copies or [-] to decrease the number
of Copies.
2 Click [Copy] or press
(Copy).
English
34
Continued on next page.
Page 35

Color
21
12
4
3
2
43
1
1
2
2 in 1 Portrait
2 in 1 Landscape
4 in 1 Portrait
4 in 1 Landscape
Set the copy Color setting from pull-down menu.
●
Color
●
Black and White
Quality
Set the copy Quality from pull-down menu.
●
Text
●
Text/Photo
●
Photo
●
Draft
Paper Size
Set the Paper Size for the document copy from pull-down menu.
●
Letter (8.5 x 11 in.)
●
Legal (8.5 x 14 in.)
●
Executive (7.25 x 10.5 in.)
●
Statement (5.5 x 8.5 in.)
●
A4 (210 x 297 mm)
●
JIS B5 (182 x 257 mm)
●
A5 (148 x 210 mm)
●
A6 (105 x 148 mm)
Note(s)
●
A4, JIS B5, A5, A6, Hagaki, Envelope DL and Envelope C5
are International Paper Sizes.
●
4 x 6 in. (Postcard)
●
3 x 5 in. (Index Card)
●
5 x 7 in. (2L)
●
3.5 x 5 in. (L)
●
Hagaki (100 x 148 mm)
●
Envelope 10 (4.125 x 9.5 in.)
●
Envelope DL (110 x 220 mm)
●
Envelope C5 (162 x 229 mm)
Pages per Side
You can copy multiple pages on one sheet by printing smaller
images on each page.
1 Lift the scanner lid on the unit.
2 Load the original print side down on the scanner glass.
3 Close the scanner lid.
4 Click either printing option
●
One
●
2 in 1 Portrait
●
2 in 1 Landscape
●
4 in 1 Portrait
●
4 in 1 Landscape
5 Click [Copy] or press (Copy).
Paper Type
Set the Paper Type from pull-down menu.
●
Plain
●
Label
●
Envelope
●
Glossy Photo
●
Matte Photo
Brightness
Set the level of Brightness. Adjust the slider to the right to get lighter
and to the left to get darker.
Copy Resize
Set the Resize for enlarging or compressing the document copy
from pull-down menu.
●
100% Default
●
130% Letter->Legal
●
104% Executive->Letter
●
97% Letter->A4
●
93% A4->Letter
●
85% Letter->Executive
●
Custom*
*
You can select custom Resize range from 25% to 400%.
Enter the number [1] to [99] directly in the box, click [+] or [-]
to select the Resize value. The default value is 100%.
6 Remove the first page from the scanner glass and place the
next page.
7 Click [Copy] or press (Copy) to continue scanning the
next page. Repeat this until you have scanned all the pages.
CAUTION
●
[Copy Resize] and [Pages per side] can never be set
at the same time. If either setting is set, another one
will be reset to the [Copy Resize]: [100%] or [Pages
per side]: [One].
CAUTION
●
English
[Copy Resize] and [Pages per side] can never be set
at the same time. If either setting is set, another one
will be reset to the [Copy Resize]: [100%] or [Pages
per side]: [One].
35
Continued on next page.
Page 36

ID Card Copy
You can copy both sides of a small document (e.g. ID card, business
card) onto one page.
Note(s)
●
This function is valid only with Letter or A4 size paper.
1 Select [ID Card Copy] from [Quick settings] menu, then
click [Advanced Settings] on the top right corner.
2 Load plain Letter or A4 size paper on the paper support.
3 Lift the scanner lid on the unit.
4 Load the front side of the ID card facedown on the scanner
glass in the right front placement corner with arrows and
then Click [Copy] or press
process will start.
(Copy), then Copying
5 Lift the scanner lid on the unit, flip ID card over and click
[Copy] or press
Note(s)
●
If you have changed the Paper Settings in the Setup Menu,
the default value of Paper Settings in the Copy Menu will
also be changed.
English
(Copy).
36
Page 37
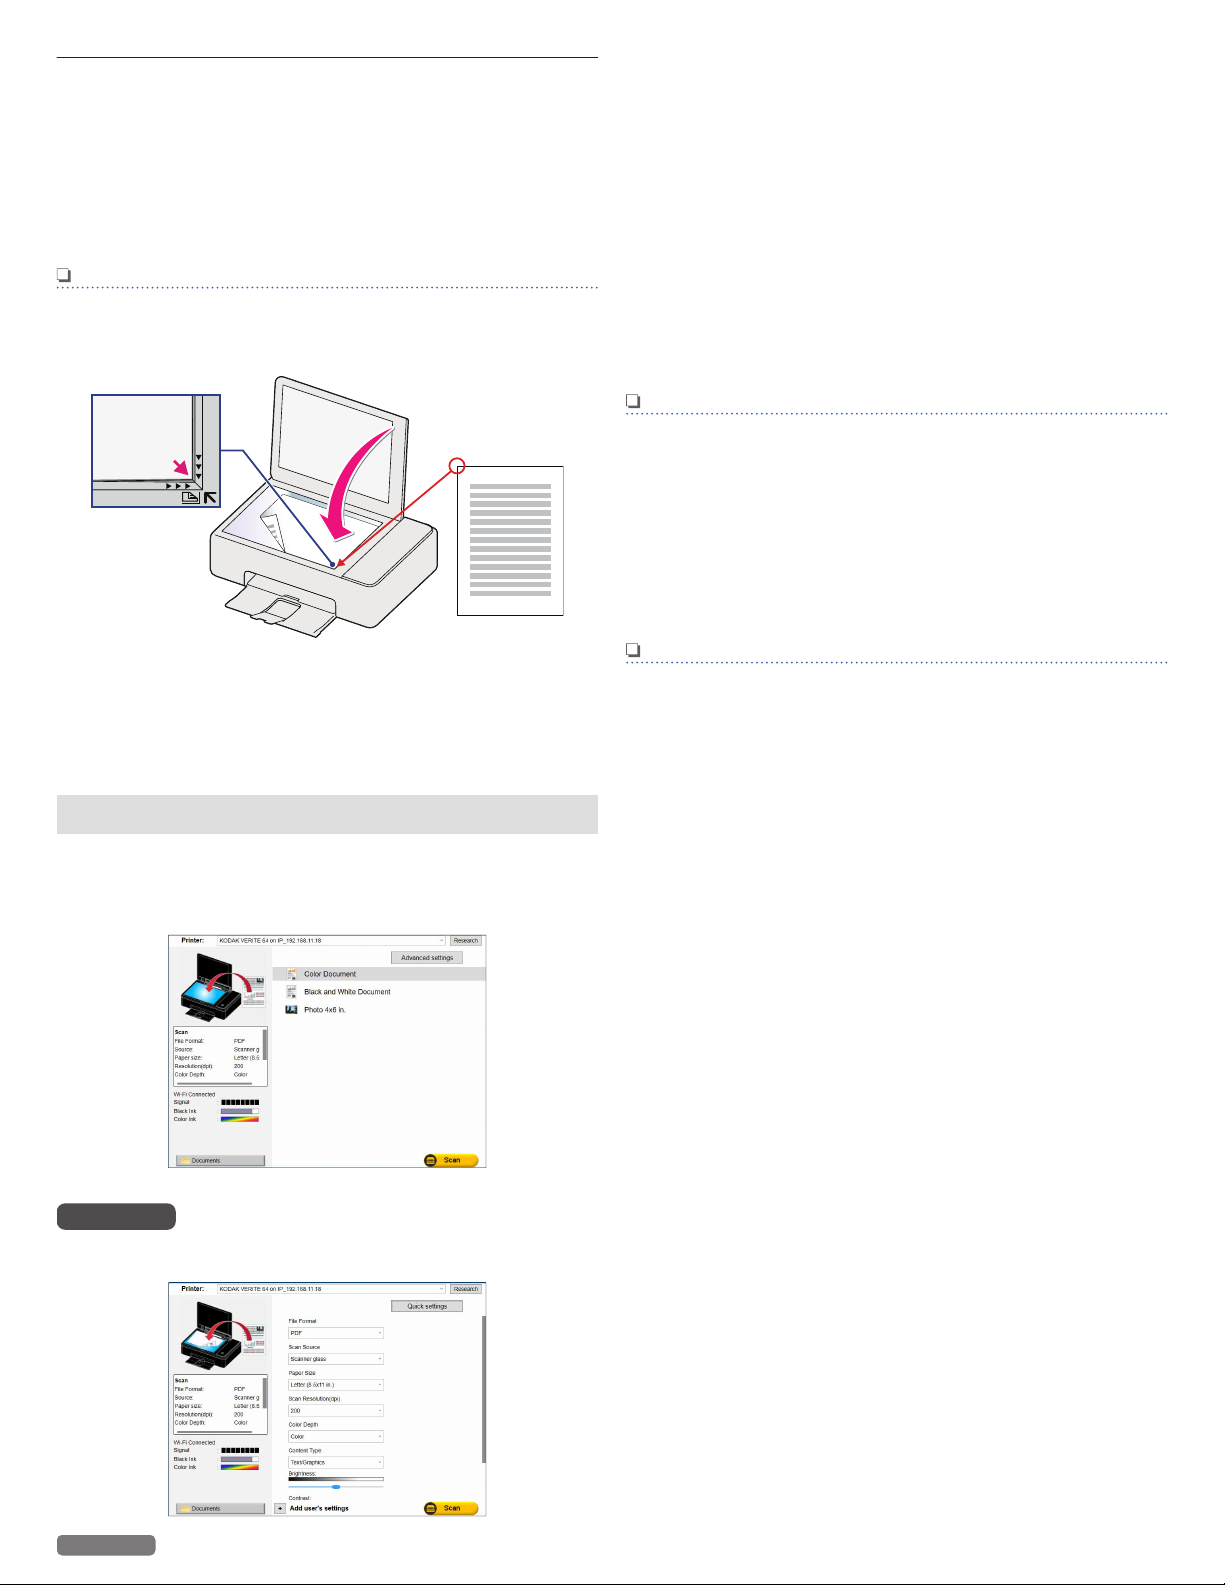
Scanner
You can use a variety of scanner functions from your smartphone/
tablet or PC. The “Scanning” application is available if your PC has a
Windows® platform.
The scanner function is also available by using an application called
“Image Capture” bundled as a default for OS X.
Or the mobile App for Android™ and iOS. For information on the
mobile App, refer to “Print using your smartphone/tablet” on
page 22.
Note(s)
●
You cannot use the scan function directly with this unit.
●
Load the original print side down on the scanner glass.
Make sure to align the original print to the right front corner
of the scanner glass with arrow marks.
●
The readable area of the scanner is not equal to the area of
the scanner glass. Therefore, when placing the document
in the right front corner of the scanner the edges of the
document may not be scanned.
●
0.079 inch (2 mm) is missing on the short side, and 0.024
inch (0.6 mm) is missing on the long side of the scan area.
Scan in [Scanning] application by Windows
Run [Scanning] from the [Start] menu as it appears in the window
below.
From the Windows® start menu, select [All apps] > [KODAK
VERITE 64] > [Scanning].
Click [Scan] to start the scanning.
Settings
If you would like to change the settings, click [Advanced
Settings].
English
®
File Format:
Select the File Format from below:
●
JPEG
●
PDF
Paper Size:
Select the Paper Size from below:
●
A4 (210 x 297 mm)
●
A5 (148 x 210 mm)
●
A6 (105 x 148 mm)
●
4x6 in. (Postcard)
●
Letter (8.5 x 11 in.)
●
Executive (7.25 x 10.5 in.)
●
Statement (5.5 x 8.5 in.)
●
3x5 in. (Index Card)
●
5x7 in.(2L)
●
3.5x5 in.(L)
●
JIS B5 (182 x 257 mm)
●
Hagaki (100 x 148 mm)
●
Envelope 10 (4.125 x 9.5 in.)
●
Envelope DL (110 x 220 mm)
●
Envelope C5 (162 x 229 mm)
●
Entire Flatbed (216 x 297 mm)
Note(s)
●
A4, JIS B5, A5, A6, Hagaki, Envelope DL and Envelope C5
are International Paper Sizes.
●
Entire Flatbed (216x297mm) is the setting that scans the
entire scanner glass.
Scan Resolution (dpi):
Select the scan Resolution from below:
●
75 dpi
●
100 dpi
●
150 dpi
●
200 dpi
●
300 dpi
●
600 dpi
●
1200 dpi
Note(s)
●
Scanning at 2400 dpi or more is available on the “High
Resolution Scanning” application included with the
Software.
Color Depth:
Select the scan Color Depth from below:
●
Color
●
Gray
●
Black & white
Content Type:
Specify the Content Type of the scan document from below:
●
Text
●
Text/Graphics
●
Photo
Brightness:
Select the Brightness level. Adjust the bar toward the left end to set
the reproduction darker. Adjust the bar toward the right end to set
the reproduction lighter. The Brightness level will be reflected in the
scanned data.
Contrast:
Select the Contrast level. Adjust the bar toward the left end to
reduce the Contrast. Adjust the bar toward the right end to increase
the Contrast. The Contrast level will be reflected in the scanned data.
Background Removal:
Select Background Removal to remove the background on the scan
data. The Background Removal feature adjusts the amount of
background that is visible in the scanned data.
Documents:
If you would like to change the Folder to Save the scanned file to,
click [Documents].
1 Click on [Documents], then [Browse For Folder] will
appear.
2 Select the Folder you want to save the scanned file to, then
click [OK].
3 The scanned file will be Saved to the selected Folder.
●
The Folder you have chosen is automatically selected for the
next time. Perform Step 1 and 2 if you want to save the
scanned file to another Folder.
37
Continued on next page.
Page 38

Scan in Mac
Run the Image Capture application. (Scanning with other
applications such as “Preview” is a very similar process.)
Simplified scan mode
In the “Simplified” scanner interface, follow these Steps:
1 Place the document you would like to scan on the scanner
glass.
2 Open Image Capture located in the Applications folder.
3 Select this unit from the list of devices.
4 Select the desired destination where the scanned document
is to be saved from the [Scan To] pop-up menu.
5 Click [Scan] to start scanning.
6 A preview will appear on your monitor when scanning is
completed.
Resolution:
Select the scan Resolution from below:
●
75 dpi
●
100 dpi
–
Select the [Use Custom Size] checkbox to enable the [Size]
●
150 dpi
●
200 dpi
●
300 dpi
●
600 dpi
●
1200 dpi
fields to specify the width and height you want to scan. Select
pixels, inches or cm (centimeters).
Advanced scanning options
In the “Simplified” scanner interface, click [Show Details] if you
want to enter a detailed scan mode with more advanced options.
Kind:
Select the scan type from below:
●
Color
–
Choose “Color” to scan an object in Color.
–
Choose “Black & White” to scan an object in Grayscale (256 or
Thousands of grays).
–
Choose “Text” to scan text documents.
●
Black & White
●
Text
Rotation Angle:
Set the number of degrees for the clockwise rotation of your
scanned image.
Auto Selection:
Choose one of the following from the [Auto selection] pop-up
menu.
[Off]
[Detect
Separate Items]
[Detect
Enclosing Box]
to normally select the object.
to automatically select and straighten the
objects you are scanning.
to include all the items on the scanner bed in
one image.
Scan To:
Select the desired destination where the scanned document is to
be saved.
Name:
Enter the name of scanned images. For multiple scans, the name
entered will be a part of incrementally named scans. For example,
enter “doc”, and the names of the scanned images will be
“doc1.jpeg”, “doc2.jpeg”, and so forth.
English
38
Continued on next page.
Page 39

Format:
Select the image format of the scan from below:
●
JPEG
●
TIFF
●
PNG
–
[Combine into single document] is only available when the
●
●
BMP
PDF
format PDF or TIFF is selected. In order to save multiple pages
as a single file, select the checkbox.
Image Correction:
When [Manual] is selected, the adjustment of the following
parameters are possible.
Document Type:
Select the type of document to be scanned from below:
●
Text Only
●
Photo
●
Mixed Graphics
When choosing [Color] in [Kind:]
[Brightness]
[Tint]
to adjust the balance between light and dark.
to adjust the Color balance between red and
green.
[Temperature]
[Saturation]
to adjust the Color balance of warm and cool.
to adjust the vividness of Colors.
When choosing [Black & White] in [Kind:]
[Brightness]
[Contrast]
to adjust the balance between light and dark.
to adjust the balance of sharpness and
softness.
When choosing [Text] in [Kind:]
- [Threshold] to adjust the transition point between dark and light.
Note(s)
●
Those images are created based on the screen of OS X
10.11.
If the version of the OS is different or the OS is updated, it
is possible that the display on the screen has changed.
●
When Dither is checked the printer will only use Black and
White or Color Dots and no Grayscale or Multicolor dots are
used (e.g. Newspaper photographs are Dithered).
English
39
Page 40

Settings
You can set up the unit as you like depending on your needs.
–
From the Start Menu, activate [Device setting].
Wi-Fi Setup
You can set the following Wi-Fi settings.
–
Click [Wi-Fi setup].
Network and Password
If you would like to connect to a router manually, follow the Steps
below.
1 Click the SSID you would like to connect.
2 Enter Password and click [Connect].
IP Address
1 Click [IP Address].
2 Select [Auto] or [IP address].
[Auto] DHCP (Dynamic Host Configuration Protocol) mode
It's easy to Automatically get the IP address of this unit from the
Network.
[IP address] Static mode
Set the Network address manually.
3 If you select [Manual], set the items below.
●
IP Address
●
Subnet Mask
●
Default gateway
●
DNS address
4 Click [Save].
English
40
Continued on next page.
Page 41

Proxy
Direct Connect Time
1 Click [Proxy].
2 Select [OFF] or [Proxy].
3 If you select [Proxy], set the items below.
●
Address
●
Port
1 Click [Direct Connect Time].
2 Select Direct Connect Time from pull-down menu.
●
5 min
●
10 min
●
60 min
●
Unlimited
Friendly name
1 Click [Friendly name].
4 Click [Save].
Host Name
1 Click [Host Name].
- Current Host Name is displayed.
2 If you would like to change it, enter Host Name.
3 After entering the Host Name, click [Save].
2 Enter the name you would like.
3 After entering the Friendly Name, click [Save].
English
41
Continued on next page.
Page 42

Google Cloud Print™
Register printer with Google.
Click [Register], then the registration will start
The following are required for Google Cloud Print registration.
࣭Google account (Gmail address)
࣭Internet environment
You can set the Google Cloud Print™ settings.
–
Click [Google Cloud Print].
Status
1 The Google Cloud Print™ connection (or registration) status,
unit name, and unit description will be displayed.
Register to Google Cloud Print™
1 Click [Register/Unregister].
2 Click [Register], then registration will start. The unit will
print a registration URL for the Google Cloud Print™
registration.
Note(s)
●
Load plain Letter or A4 -size paper.
The following table shows the Google Cloud Print™ service
registration and connection status of this unit.
Status Unit state
Not configured Unit is not registered to the Google Cloud
Print™ service.
The Google Cloud Print™ feature is not
available.
Disabled The Google Cloud Print™ service has been
disabled.
The Google Cloud Print™ feature is not
available. (Unit is registered in the Google
Cloud Print™ service.)
Not connected Unit is not connected from the Google Cloud
Print™ service.
The Google Cloud Print™ feature is not
available. (Unit is registered in the Google
Cloud Print™ service.)
Connected Unit is connected to use the Google Cloud
Print™ service.
The Google Cloud Print™ feature is available.
(Unit is registered in the Google Cloud Print™
service.)
Disconnected Unit has been disconnected from the Google
Cloud Print™ service.
The Google Cloud Print™ feature is not
available. (Unit is registered in the Google
Cloud Print™ service.)
Registration in
progress
Registration is in process to use the Google
Cloud Print™ service.
The Google Cloud Print™ feature is not
available.
Registration should complete, please wait.
3 Access that registration URL within 14 minutes and follow its
instructions.
Enable/Disable
1 Click [Enable/Disable].
2 Select [Enable] or [Disable].
Select Action Action
Register Register to Google Cloud Print™
Unregister Unregister from Google Cloud Print™
Enable Enable Google Cloud Print™
Disable Disable Google Cloud Print™
English
42
Continued on next page.
Page 43

AirPrint
Once you check , the server will receive your printer's data.
Printer Utility
Enable or disable the AirPrint function.
1 Select [Enable] or [Disable].
Software update
You can update your printer's Software.
1 Click [Update Now], then automatically starts updating.
You can perform maintenance operations.
–
Click [Printer Utility].
Device Sleep Time
You can set the time to go into Sleep mode.
1 Enter the number [1] to [120] directly or click [-] or [+] by
minute.
Clean Printhead
1 Load plain blank white Letter or A4 -size paper.
2 Click [Clean Print Head].
3 A page prints, forcing ink through the ink cartridge nozzles
to clean them.
4 Print the document again to verify that the print quality has
improved.
English
43
Continued on next page.
Page 44

Cartridge Setup
By reading the pattern with the scanner, the printer alignment is optimized and
the print quality will be better.
Please set the letter or A4 paper in the printer, press ”Start” button.
Please this paper on the scann
Please this paper on the scanner
Finished Cartridge setup.
Print the alignment pattern for alignment adjustment. By reading the
pattern with the scanner, the printer alignment is optimized and the
print quality will be better.
1 Load plain blank white Letter or A4 -size paper.
2 Click [Cartridge Setup].
3 Click [Start].
5 Open the scanner lid on the unit. Load the front side of the
alignment pattern result facedown at the placement corner
of the scanner glass (see below), then click [Next] to start
the alignment adjustment after closing the scanner lid.
6 The unit will start scanning the alignment pattern to set an
appropriate alignment on this unit.
7 When alignment is completed, [Finished Cartridge setup.]
message will be displayed on the PC screen.
4 The unit will start printing the alignment pattern.
●
The (Power) LED will light up then blink rapidly. LED
lighting pattern is “Blinking 6” .
Refer to “Meaning of LED behavior and lights” on page 9.
»
English
44
Continued on next page.
Page 45

Print Reports
Configuration
Report
Erases all contents and settings, then restores Factory Default.
Print out the configuration information.
1 Click [Print Reports].
2 Click [Start] to start printing the configuration report.
Restore Factory Default
All of the unit settings will be reset to the Factory Default.
1 Click [Restore Factory Default].
Paper Setup
Sets the paper type and paper size.
Note(s)
●
If you change the following Paper Settings, the default
paper setting values in the Copy Menu will also be changed.
●
This setting will also affect the AirPrint paper size setting.
- Click [Paper Setup].
Paper Size
Set the Paper Size for the document copy.
1 Select the Paper Size from pull-down menu.
●
Letter (8.5 x 11 in.)
●
Legal (8.5 x 14 in.)
●
Executive
(7.25 x 10.5 in.)
●
Statement (5.5 x 8.5 in.)
●
A4 (210 x 297 mm)
●
JIS B5 (182 x 257 mm)
●
A5 (148 x 210 mm)
●
A6 (105 x 148 mm)
●
4 x 6 in. (Postcard)
●
3 x 5 in. (Index Card)
●
5 x 7 in. (2L)
●
3.5 x 5 in. (L)
●
Hagaki (100 x 148 mm)
●
Envelope 10
(4.125 x 9.5 in.)
●
Envelope DL
(110 x 220 mm)
●
Envelope C5
(162 x 229 mm)
2 Click [Restore].
●
If you choose [Restore], all settings will be restored to
factory defaults and the unit will restart. The connection
between PC and printer will be disconnected.
3 Click [Restore Factory Default].
Note(s)
●
A4, A5, A6, Envelope DL and Envelope C5 are International
Paper Sizes.
Paper Type
1 Select the Paper Type from pull-down menu.
●
Plain
●
Label
●
Envelope
●
Glossy Photo
●
Matte Photo
English
45
Page 46

Web interface
Configuration Report
[2017-07-04 07:42:39(UTC)]
Model Name KODAK VERITE 62 PLUS
Serial Number XXXXXXXXXXXXXXXX
Software Version X.XX.XXX (XXXXXXXX)
Printed Page 44
Scanned Page 65
Cartridge Status Installed
Cartridge Type XXL
Ink Level 43%
Cartridge Status Installed
Cartridge Type XXL
Ink Level 75 %
Language English
Default Paper Size Letter
Default Paper Type Plain
Sleep Time-out 10 min
EWS Access path http://xxx.xxx.xxx.xxx
Color Cartridge
Black Cartridge
Device Information
Device Statistics Information
Supply Information
Device Configuration
Network Information
Configuration Report
[2017-07-04 07:42:39(UTC)]
Model Name KODAK VERITE 64
Serial Number XXXXXXXXXXXXXXXX
Software Version X.XX.XXX (XXXXXXXX)
Printed Page 44
Scanned Page 65
Cartridge Status Installed
Cartridge Type XXL
Ink Level 43%
Cartridge Status Installed
Cartridge Type XXL
Ink Level 75 %
Language English
Default Paper Size Letter
Default Paper Type Plain
Sleep Time-out 10 min
EWS Access Path http://xxx.xxx.xxx.xxx
㸸
㸸
Color Cartridge
Black Cartridge
Device Information
Device Statistics Information
Supply Information
Device Configuration
Network Information
EWS Access Path
Unit’s IP address
http://xxx.xxx.xxx.xxx
http://xxx.xxx.xxx.xxx
Unit’s IP address
»
»
Refer to “Login Password” on page 49.
Click on the item to check the information or change
its settings.
The printer’s status is displayed here.
[Ready / Busy / Status message]
More details on Status messages and how to correct
problems can be found under “Status messages and
LED behaviors”.
Changes the display language.
After selecting the language, click on [Accept].
Input “admin” into the “Password” field, then click on [Login]
then, create the Password as you like.
Refer to “Status messages and LED behaviors” on
page 59.
The Web interface is available to you on all operating systems.
You can access the web interface with an Internet browser on your
PC and conduct many different settings to your unit.
You can access the Web interface if the unit is connected to a
Network via Wireless Connection.
Note(s)
●
Before you start, make sure your PC and the unit are
connected to the SAME NETWORK.
●
When the unit is connected to the Network,
(Wireless) LED lights up.
Confirming the IP Address
You will need the current IP address of the unit in order to access
the Web interface. You can verify the IP address by printing out the
Configuration Report.
Refer to “Print Reports” on page 45.
»
Calling the Web interface
For the first time use, you will need to set the Password to get the
entire features on the Web interface. After you have set the
Password, you do not need to set the Password anymore.
1 Start an Internet browser on a PC, which is connected to the
Network.
Note(s)
Suitable Internet browser
●
We recommend the following Internet browser.
–
Windows®: Internet Explorer® (version 8.0 or above)
–
Mac: Safari (version 1.3 or above)
2 Enter the IP address of the unit into the address bar of the
browser.
3 The following screen will be displayed.
English
46
Continued on next page.
Page 47

Device Status
The network connection will be disconnected.
You can check the status of the unit, such as remaining ink level.
Device Configuration
General Settings
You can change the following items.
●
Default paper size/type
If you change this setting, the default paper size/type in Copy
Menu setting are also changed.
●
Sleep mode time
You can change the time required before unit enters Sleep mode
from [1 min / 10 min / 20 min / 30 min / 40 min / 50 min / 60 min /
70 min / 80 min / 90 min / 100 min / 110 min / 120 min].
Network
If necessary, you can confirm or set the state of the Network. If you
are not familiar with Network management, use the default settings.
Note(s)
●
Be careful if you want to assign the IP address manually. If
the IP address you entered is not correct, you will not be
able to connect to the unit. When you cannot connect to
the unit after a configuration change, please reset the unit
to the factory default.
Refer to “Restore Factory Default” on page 45.
»
●
When the connection of the unit is changed, the Web
interface will be disconnected. If necessary, reconnect the
Web interface.
Enable Wi-Fi
Print Reports
You can print out the configuration report.
Factory Reset
You can restore the default settings to the unit.
Note(s)
●
The unit will automatically restart after reset to factory
settings. (The Web Interface will be disconnected.)
You can turn On / Off the Wireless function.
Note(s)
●
Even if the Wireless function is set to Off, when you connect
by Easy Simple Print, the Wireless function will be valid.
●
When you have connected the unit to the access point/
router, if you disable Wi-Fi, you will not be able to operate
from the Web Interface. If you connect to Wi-Fi again, press
(Wireless).
English
47
Continued on next page.
Page 48

TCP/IP (IPv4) Settings
You can change the IP source / IP address or the like.
Note(s)
●
The initial value of the IP Source of Wireless is DHCP
(Dynamic Host Configuration Protocol).
IPv6 Settings
This unit supports IPv6 in order to support AirPrint.
You can check the information on IPv6.
Wireless LAN Settings
Mobile
AirPrint
You can AirPrint Settings.
Refer to “AirPrint” on page 25 for more information.
»
Note(s)
●
When you select [Certificate Installation] or [Generate
Certificate Request], you can set the encrypted
communication.
AirPrint Configuration
You can turn On/Off the AirPrint function. If set to On, you can print
using the AirPrint.
●
You can change connection settings by setting the SSID /
Security / Password for Wireless Connection.
Proxy Settings
●
The printer name (Friendly Name) and its information are
displayed when you are using AirPrint.
Google Cloud Print™
You can set the Google Cloud Print™ settings.
●
Registration and connection status of Google Cloud Print™ will be
shown. More information can be found under “Google Cloud
Print™”.
» Refer to “Google Cloud Print™” on page 42 for more information.
●
The printer name and its information are displayed when you are
using Google Cloud Print™.
●
You can connect to Internet through a proxy server.
English
48
Continued on next page.
Page 49

Select Action
You can set the following for the Google Cloud Print™ setting.
After you select the Action, click on [Accept].
Select Action Action
Register to Google
Register to Google Cloud Print™
Cloud Print
Disable Cloud Print Disable Google Cloud Print™
Suspend Cloud Print Suspend Google Cloud Print™
Enable Cloud Print Enable Google Cloud Print™
Resume Cloud Print Resume Google Cloud Print™
Unregister from Google Unregister from the Google Cloud
Print™
Register Cancel Cancel the Google Cloud Print™
registration
Set XMPP Ping Interval Set the interval time to communicate
with the Google Cloud Print™ service.
*
Usually, set the XMPP Ping Interval to 5 minutes (default).
To change this setting, select [Set XMPP Ping Interval]
in [Select
Action] and choose the communication interval from 1 minute to
10 minutes.
Note(s)
●
When you select [Register to Google Cloud Print], then
ensure plain Letter or A4-size paper is loaded.
Software Update
●
If the Software Update for this unit is available, the Update button
is displayed. Click it and start to update the Software.
●
When the Software is the latest version, the Update button is not
displayed.
Login Password
Order Supplies
If you would like to purchase consumable material, visit the following
website at www.kodakverite.com/support
●
Once you have logged in to the Web interface using “admin”, it is
recommended that you change the Password.
Note(s)
●
Record the Password in case you forget it.
●
If you have forgotten the Password, you can perform
[Restore Factory Default] to reset all settings, including
the Password, to their factory default. After resetting the
unit, you can login with the default Password “admin”.
●
Passwords may only contain alphanumeric characters, and
are from 1 to 32 characters in length.
●
The default Password “admin” provides you with full
access to all setup functions, but can allow access by an
unauthorized third party. It is recommended that you
change the Password.
English
49
Page 50

Service
1
2
P
r
e
s
s
!
P
r
e
s
s
!
S
l
i
d
e
S
l
i
d
e
S
l
i
d
e
S
l
i
d
e
S
l
i
d
e
S
l
i
d
e
ColorBlack
BLACK
COLOR
Black Color
Note(s)
●
If any problems occur, please see the notifications on the
Status Messenger (Windows®).
»
Refer to “Status Messenger for Windows®” on page 26.
Checking ink levels
2 Press front side blue Cartridge tab with 2 fingers to open the
Cartridge slot.
Using PC
»
Refer to “Status Messenger for Windows®” on page 26.
Changing the ink cartridge
CAUTION
Use Original Consumable Materials!
●
Use only original consumable materials. These are
available from a specialized retailer or through our
order service. Other consumable materials can cause
damage to the unit.
Observe Packaging Instructions
●
Follow the instructions on the packaging of the
consumable materials.
1 Open the unit by lifting the Ink door.
DO NOT Open During a Print Job!
●
Never open the Ink door while printing.
3 Remove the cartridges.
4 Remove the Black and Color Ink cartridges from the
packaging.
5 Remove the plastic tape on the Black and Color Ink
cartridges using the red pull tab.
English
DO NOT TOUCH
●
DO NOT TOUCH the gold contact area on the back or
the metal nozzles on the bottom of the Cartridge.
50
Continued on next page.
Page 51

6 Slide the Color Ink cartridge all the way into the right slot
S
l
i
d
e
S
l
i
d
e
S
l
i
d
e
S
l
i
d
e
S
l
i
d
e
S
l
i
d
e
Color(Right)
Black(Left)
C
l
i
c
k
!
C
l
i
c
k
!
CLOSE: use only GREEN part.
OPEN: use only BLUE part.
Green
Blue
DO NOT PUSH the green/blue
parts at the same time.
using the green rail.
7 Slide the Black Ink cartridge all the way into the left slot using
the green rail.
8 Push and click the center green Cartridge tab to close the
slot until the cover snaps securely into position.
CAUTION
Ink Cartridge Not Inserted Correctly!
●
If the Ink door does not close properly, the Ink
cartridges are not inserted correctly. Remove the Ink
cartridges and then correctly insert them again.
9 Close the Ink door.
English
51
Continued on next page.
Page 52

Ordering supplies
Fixing a paper jam
If you would like to purchase consumable material, visit the following
website at www.kodakverite.com
Ordering ink cartridges
Product Name Ink Page Yield
KODAK VERITÉ 5 Standard Black Ink
Cartridge
KODAK VERITÉ 5 Standard Color Ink
Cartridge
KODAK VERITÉ 5 XL Black Ink
Cartridge
KODAK VERITÉ 5 XL Color Ink
Cartridge
KODAK VERITÉ 5 XXL Black Ink
Cartridge
KODAK VERITÉ 5 XXL Color Ink
Cartridge
KODAK VERITÉ 5 3XL Black Ink
Cartridge
KODAK VERITÉ 5 3XL Color Ink
Cartridge
KODAK VERITÉ 5 XL Combo Ink
Cartridge
KODAK VERITÉ 5 3XL Combo Ink
Cartridge
Ink page yield values for color graphics and text document obtained
by continuous printing in accordance with ISO/IEC 24711.
Actual results may vary.
Note(s)
●
For page yield information, visit
www.kodakverite.com/support
●
The cartridges used for printing documents can also be
used for printing photos.
●
For best results, use only genuine KODAK VERITÉ Ink
Cartridges.
~200 pages
~180 pages
~400 pages
~360 pages
~600 pages
~500 pages
~1200 pages
~1080 pages
Black: ~400 pages/
Color: ~360 pages
Black: ~1200 pages/
Color: ~1080 pages
Clearing paper jam in the unit
Note(s)
●
The Parts inside the unit are Sensitive. Avoid unnecessarily
touching Parts while Clearing Jams.
1 Check the paper support, the other side of the removed Rear
Cover (Duplex Unit) or the fully-opened front cover for
jammed paper.
2 Firmly grasp both sides of the paper, then gently pull it out.
Note(s)
●
Be careful not to tear the paper while removing it.
3 Press and hold (Power/Standby) to cancel the rest of the
print job.
Restoring the factory settings
You can restore the default settings on the unit using the web
interface.
»
Refer to “Device Configuration” on page 47.
» Refer to “Restore Factory Default” on page 45.
Using genuine KODAK VERITÉ Ink Cartridges
KODAK VERITÉ Ink Cartridges are designed to perform for superior
print quality, and our inks are formulated to work with the unit and
help extend the life of your product.
We recommend that you use only genuine KODAK VERITÉ Ink
Cartridges sold by Funai Corporation, Inc.
Funai’s warranty does not cover damage caused by non-KODAK
VERITÉ Ink or Ink Cartridges.
English
Hard Reset
Refer to “Troubleshooting” on page 55.
»
If a problem occurs that cannot be corrected with the instructions
in “Troubleshooting”, follow the Steps given here.
1 Press and hold
to turn the unit Off (Standby).
2 Unplug the AC plug from the AC outlet.
3 Wait at least 30 seconds, then reconnect the AC plug back
into the AC outlet.
4 Follow the instructions on the display and in the error report.
If the problem repeats, visit the following website at
www.kodakverite.com/support
52
(Power/Standby) longer than 3 seconds
Continued on next page.
Page 53

Cleaning the ink cartridge nozzles and contacts
1 Remove the ink cartridge(s).
2 Dampen a clean, lint-free soft cloth with water and then
place the cloth on a flat surface.
3 Gently hold the nozzles against the cloth for about 3 seconds
and then wipe in the direction shown below.
e.g.) KODAK VERITÉ 5 XL Color Ink Cartridge
4 Using another clean section of the cloth, gently hold the
cloth against the contacts for about 3 seconds and then wipe
in the direction shown below.
Preserving the ink cartridges
●
Keep new ink cartridges in their packaging until you are ready to
install them.
●
DO NOT remove an ink cartridge from the unit except to replace,
clean or store it in an airtight container. The cartridges do not print
correctly if left exposed for an extended period of time.
CAUTION
Refilling ink cartridges
●
The warranty does not cover repair of failures or
damage caused by a refilled ink cartridge.
●
Kodak does not recommend use of a refilled ink
cartridge.
●
Refilling an ink cartridge can affect print quality and
may cause damage to the unit.
●
For the best results, use Kodak Supplies.
Warning - Drying out of the Printheads:
●
DO NOT move the Ink Cartridge Holder by hand.
If you move the Cartridge Holder to the left of the
printhead Cover Caps will not protect the Printheads
from Drying out.
Cleaning the scanner glass
e.g.) KODAK VERITÉ 5 XL Color Ink Cartridge
5 With another clean section of the cloth, repeat Step 3 and
Step 4, and then let the nozzles and contacts dry completely.
6 Reinsert the ink cartridge(s) and then print the document
again.
7 If the print quality does not improve, clean the print nozzles
and then try printing the document again.
8 Repeat Step 7 up to two more times.
9 If print quality is still not satisfactory then replace the ink
cartridge(s).
1 Dampen a clean, lint-free soft cloth with water.
2 Gently wipe the scanner glass clean.
3 Use a dry lint-free soft cloth to wipe the moisture left over.
Note(s)
●
Make sure all ink or corrective fluid on a document is dry
before placing the document on the scanner glass.
English
53
Continued on next page.
Page 54

Cleaning the exterior of the unit
1 Make sure that the unit is turned Off (Standby) and
unplugged from the AC outlet.
SHOCK HAZARD
●
To avoid the risk of electric shock, disconnect the AC
Power cord from the AC outlet and disconnect all
cables to the unit before proceeding.
2 Remove paper from the paper support and paper exit tray.
3 Dampen a clean, lint-free soft cloth with water.
CAUTION
Warning-Potential Damage:
●
DO NOT use household cleaners or detergents, as
they may damage the finish on the unit.
4 Wipe only the outside of the unit, making sure to remove any
ink residue that has accumulated on the paper exit tray.
CAUTION
Warning-Potential Damage:
●
Using a damp cloth to clean the interior may cause
damage to your unit.
5 Make sure the paper support and paper exit tray are dry
before beginning a new print job.
Periodic maintenance is required
The unit will automatically clean the nozzle itself regularly to keep
an appropriate print quality. This maintenance begins automatically
even when the unit is in Sleep mode.
Important Notice Regarding Printheads
This unit automatically protects the printhead (caps) on each ink
cartridge in order to prevent the printheads from drying. This
function is only performed when pressing (Power/Standby)
button to select the Power-Off (Standby) mode. DO NOT Unplug the
AC Power cord from the AC outlet to shut down the unit or move
the ink cartridge access holder after the unit was shut down. Failure
to do so may result in Clogging of the Printhead Nozzles.
English
54
Page 55

Troubleshooting
Microsoft® Windows
®
Windows® 10
Windows® Server 2012
Windows® 8.1
Windows® Server 2008
Windows® 8 Windows® Vista
Windows® 7
Apple Mac OS
Safari
Linux
Debian 8.0
Ubuntu 14.04 LTS
Firefox
Windows® Server 2016
OS Version Processor Browser USB port
OS Version Processor Browser USB port
OS Version Processor Browser USB port
32-bit (x86) or
64-bit (x64)
Microsoft
Edge (Only
Windows® 10),
Internet
Explorer
®
USB 2.0
High Speed or
Full Speed
USB 2.0
High Speed or
Full Speed
USB 2.0
High Speed or
Full Speed
Intel® Core™
Processor
700MHz (about
Intel® Celeron™
or better)
macOS v10.12
(Sierra)
OS X v10.11
(El Capitan)
OS X v10.10
(Yosemite)
OS X v10.9
(Mavericks)
You can correct most problems by yourself. If you need additional help, the Kodak Solutions Center offers the most up-to-date driver,
manuals, the latest FAQs and troubleshooting tips. Visit our website at www.kodakverite.com/support
Setup troubleshooting
●
(Power) LED is not lit
Press
Make sure the unit is on by pressing (Power/Standby).
●
Disconnect and reconnect the AC plug
(Power/Standby)
Software did not install
1 Press and hold
(Power/Standby) longer than 3 seconds to turn the
unit Off (Standby).
2 Disconnect the AC plug from the AC outlet for 30 sec.
3 Reconnect the AC plug to an AC outlet that other electrical devices
have been using or check this outlet with another device.
4 If the (Power) LED is not lit, press (Power/Standby).
If you encountered problems while installing, or if the unit does not appear in the list in the printers
folder or as the unit option when sending a print job, you can try uninstalling and reinstalling the
Software.
Make sure your operating system is supported
The following operating systems are supported:
English
Check that your computer meets the minimum system requirements listed on the printer box.
●
Check the USB connection
1 Check the USB cable for any obvious damage. If the cable is damaged, use a new one.
2 Firmly plug the square end of the USB cable into the back of the unit.
3 Firmly plug the rectangular end of the USB cable into the USB port of your PC.
●
Disconnect and Reconnect the Power Supply
1 Press and hold
2 Disconnect the AC plug from the AC outlet for 30sec.
3 Reconnect the AC plug to the AC outlet.
4 If the
●
Temporarily disable security programs in Windows
1 Close all open programs.
2 Disable any security programs.
3 Double-click the downloaded installer file to extract it.
4 Follow the instructions on the computer screen to install the Software.
5 When the installation is completed, enable the security Software again.
The USB port is marked with the USB symbol.
(Power/Standby) to turn the unit Off (Standby).
(Power) LED is not lit, press (Power/Standby) to turn the unit On.
55
®
Continued on next page.
Page 56

Page does not print
●
Check messages
If an error message appears, then resolve the error before trying to print again.
●
Check power
If the (Power/Standby) LED is not lit, then make sure that the AC Power cord is properly
connected to the unit and the AC plug is connected to a known working AC outlet that other
electrical devices have been using or check this outlet with another device.
●
Remove and then reload paper
●
Check ink
Check the ink levels and then install new ink cartridges if necessary.
●
Check cartridges
1 Remove the ink cartridges.
2 Make sure the sticker and tape have been removed.
3 Reinsert the cartridges.
●
Check printer default and pause settings
Using Windows® 10 / 8.1 / 8 / 7 / Vista
1 Proceed to Default print setting screen.
a. Right-click the Windows® start menu, click [Control Panel], [Hardware and Sound]
and [Devices and printers] (Windows® 10 / 8.1).
b.
Right-click at the bottom left corner on your desktop, click [Control Panel],
[Hardware and Sound] and [Devices and printers] (Windows® 8).
c. From the Windows® start menu, click [Devices and printers] (Windows® 7).
d. From the Windows® start menu, click [Control Panel], [Hardware and Sound] and
[Printers] (Windows® Vista).
2 Either double-click the Icon for your unit or right-click the Icon for your unit and select,
see what’s printing to open the print queue.
3 On the menu, make sure there are no check marks next to Pause Printing or Use Printer
Offline.
4 If you made any changes, try to print again.
If a check mark does not appear next to Set As Default Printer, then you must select the unit for
each file that you want to print.
●
Disconnect and Reconnect Power Supply
Print unexpectedly or it prints
garbage data.
1 Press and hold
(Power/Standby) to turn the unit Off (Standby).
2 Disconnect the AC plug from the AC outlet for 30 sec.
3 Reconnect the AC plug to the AC outlet.
4 If the
●
Remove and reinstall the Software
If you encountered problems while installing, or if the unit does not appear in the printers folder
or as a printer option when sending a print job, then try uninstalling and reinstalling the Software.
●
Make sure that the USB cable is not too long.
●
Make sure that the USB cable is not damaged or broken.
●
If you are using a USB interface-switching device, remove it. Connect your computer
directly to your unit and then try again.
●
Make sure that you have chosen the correct printer driver to [Set as Default Printer].
●
Make sure that this unit is not connected to the same port that is also connected to a storage
device or scanner device. Remove all other devices and connect only this unit (printer) to
this port.
(Power) LED is not lit, press (Power/Standby) to turn the unit On.
English
56
Continued on next page.
Page 57

Solving the power problems
●
The unit and the PC do not communicate.
●
Make sure the power supply is attached correctly to the unit
1 Press and hold (Power/Standby) longer than 3 seconds to turn the unit Off (Standby).
2 Disconnect the AC plug from the AC outlet.
3 Wait 30 seconds and then reconnect the AC plug to the AC outlet.
Removing and Reinstalling the
Printer Software
Enabling the USB port in
Windows
®
4 If the
If the unit is not working properly, or if a communication error message appears when you try to
use the unit, then you may need to remove and reinstall the Software.
Using Windows® 10 / 8.1 / 8 / 7 / Vista
(Power) LED is not lit, press (Power/Standby) to turn the unit On.
1 Open All Programs or All apps.
a. Click [Start] button, Click [All apps], and then select the printer Software folder
“KODAK VERITE 64” from the list (Windows® 10 / 8.1).
Display [Start] screen, right-click for [All apps] Icon to fade into the bottom right,
b.
click [All apps], select the printer Software folder “KODAK VERITE 64” from the list
(Windows® 8).
c. Click [Start] button, Click [All Programs], and then select the printer Software folder
“KODAK VERITE 64” from the list (Windows® 7 / Vista).
2 Select Uninstall.
3 Follow the instructions on your PC screen to remove the printer Software.
4 Restart the PC before Reinstalling the printer Software.
5 Click Cancel on all New Hardware Found screens.
6 From your computer go to www.kodakverite.com/support and confirm that the
“DOWNLOADS” is selected.
7 Select the model number of your unit from [SELECT PRINTER].
8 Click “PC drivers and software”.
9 Click OS you use.
10 Click [download] from [LAST].
» Refer to “Before you download the printer driver to your PC” on page 14.
●
To confirm that the USB port is enabled on your PC:
Using Windows® 10 / 8.1 / 8 / 7 / Vista
1 Proceed to Control panel.
a. Right-click [Start] (Windows® 10 / 8.1).
b.
Right-click at the bottom left corner on your desktop (Windows® 8).
c. Click [Start] button (Windows® 7 / Vista).
2 Click [Control Panel] > [Hardware and Sound].
3 Under [Devices and printers], click [Device Manager].
4 Double-click [Universal Serial Bus Controller].
If USB Host Controller and USB Root Hub are listed, then the USB port is enabled. For more
information, see your PC documentation.
English
57
Continued on next page.
Page 58

Status Messenger Error Message appears
»
Refer to “Check print status from your PC” on page 26.
» Refer to “Status messages and LED behaviors” on page 59.
Paper handling
»
Refer to “Print media” on page 27.
» Refer to “Status messages and LED behaviors” on page 62
(status message: Paper Jam).
Pages are printed, but there are problems with:
- Print quality
Refer to “Improving the print quality” on page 65.
»
Network problems
If you need additional help, the Funai Solutions Center offers the
most-up-to-date driver, manuals, the latest FAQs and
troubleshooting tips.
Visit our website at www.kodakverite.com/support
Alignment problems
A failure notification will only be displayed on the App being used to
print. Status Messenger will not notify if an alignment failure occurs.
English
58
Continued on next page.
Page 59

Status messages and LED behaviors
Black ink LED
——
Color ink LED
Paper jam LED
Wireless LED
ECO LED
Power LED
indicated by
——
indicated by
——
indicated by
——
——
indicated by
——
——
indicated by
—
——
indicated by
——
The Status information will report problems with the unit. Take the proper action by referring to the following table.
Refer to “Check print status from your PC” on page 26.
»
LED lighting patterns
Blinking 1
Blinking 2
Blinking 3
Lights up for 1 sec.
Lights up very rapidly
than 1 sec.
Blinking very rapidly 2 times
sec.
Blinking 4 Blinking very slowly
No light for 1 sec.
No light for more
No light for 1
Blinking 5 Blinking slowly
Blinking 6 Blinking rapidly
Blinking 7 Blinking very rapidly
Blinking 8
Blinking very rapidly 4 times
sec.
Blinking 9 Blinking slowly (in Power-On mode)
No light for 2
LED behaviors Status messages Unit status or possible causes Refer to
Unplug the AC plug.
and
blink as pattern 1
Scanner Error:
Unplug and replug
the power cable.
–
Wait at least 30 seconds, then reconnect the AC plug back
into the AC socket.
●
If this error occurs occasionally, visit our website at
www.kodakverite.com/support for the latest
troubleshooting.
●
If you cannot solve the problem, disconnect the AC
plug and contact an Authorized Service Center.
“Hard Reset” on
page 52.
Unplug the AC plug.
and
blink as pattern 1
Memory Error:
Unplug and replug
the power cable.
–
Wait at least 30 seconds, then reconnect the AC plug back
into the AC socket.
●
If this error occurs occasionally, visit our website at
www.kodakverite.com/support for the latest
troubleshooting.
●
If you cannot solve the problem, disconnect the AC
plug and contact an Authorized Service Center.
“Hard Reset” on
page 52.
Unplug the AC plug.
and
blink as pattern 1
Wi-Fi Module
Error:
Unplug and replug
the power cable.
–
Wait at least 30 seconds, then reconnect the AC plug back
into the AC socket.
●
If this error occurs occasionally, visit our website at
www.kodakverite.com/support for the latest
troubleshooting.
●
If you cannot solve the problem, disconnect the AC
plug and contact an Authorized Service Center.
“Hard Reset” on
page 52.
English
59
Continued on next page.
Page 60

LED behaviors Status messages Unit status or possible causes Refer to
Software Update failed.
and
This error is
displayed when
printer is
unrecoverable.
–
If this error has occurred, visit our website at
www.kodakverite.com/ support for the latest
troubleshooting.
“Software update” on
page 43
blink as pattern 1
A paper jam has occurred inside of the unit.
–
Firmly grasp both sides of the paper, then gently pull it out.
and
blinks as pattern 1
Paper Jam:
Unplug and replug
the power cable.
Press and hold
to turn the unit Off (Standby). Unplug the AC plug.
Wait at least 30 seconds, then reconnect the AC plug back
into the AC socket.
●
If this error occurs occasionally, visit our website at
www.kodakverite.com/support for the latest
(Power/Standby) longer than 3 seconds
“Clearing paper jam in
the unit” on page 52.
“Hard Reset” on
page 52.
troubleshooting.
●
If you cannot solve the problem, disconnect the AC
plug and contact an Authorized Service Center.
and/or
blink as pattern 6
blinks as pattern 1
and
blink as pattern 6
blinks as pattern 1
and
blink as pattern 6
blinks as pattern 1
Check cartridge
lock
Remove and reinsert both black
and color ink
cartridges.
Both inks are
empty.
An ink cartridge is not installed correctly.
–
If the packaging paper is stuck in the Ink door, remove it.
–
Reinstall the cartridge, then close the lid completely.
●
Confirm the ink cartridge is correctly installed, then
press
(Power/Standby).
Soiled or unsupported ink cartridge(s) has been inserted.
–
Clean the surface of the nozzles and contacts on the Ink
cartridge(s) with a dampened soft cloth then let them dry
before reinserting cartridge(s).
–
Replace the current Ink cartridge(s) with an authorized Ink
cartridge(s).
The ink is empty in the ink cartridge(s).
–
Replace with a new Ink cartridge(s).
●
Order new Ink cartridge(s) from our website at
www.kodakverite.com
“Unpack” on page 11.
“Install ink cartridges” on
page 12.
“Changing the ink
cartridge” on page 50.
“Cleaning the ink
cartridge nozzles and
contacts” on page 53.
“Changing the ink
cartridge” on page 50.
“Changing the ink
cartridge” on page 50.
and/or
blink as pattern 6
blinks as pattern 1
and
blink as pattern 6
blinks as pattern 1
and
blink as pattern 4 and
blink as pattern 4
No Ink detected
Both Inks Error
Both ink levels are
low.
No ink detected.
–
Remove and reinstall the Ink cartridges.
–
Make sure the Ink cartridges are inserted correctly.
–
Clean the surface of the nozzles and contacts on the Ink
cartridges with a dampened soft cloth then let them dry
before reinserting cartridges.
Ink cartridges error.
–
Clean the surface of the nozzles and contacts on the Ink
cartridges with a dampened soft cloth then let them dry
before reinserting cartridges.
–
Replace the current Ink cartridges with authorized Ink
cartridges.
●
If this error occurs occasionally, try to replace the
current Ink cartridges with new Ink cartridges.
Both inks are low in the ink cartridges.
–
You should purchase a new Ink cartridges.
●
Order new Ink cartridges from our website at
www.kodakverite.com
“Changing the ink
cartridge” on page 50.
“Cleaning the ink
cartridge nozzles and
contacts” on page 53.
“Cleaning the ink
cartridge nozzles and
contacts” on page 53.
“Changing the ink
cartridge” on page 50.
-
English
60
Continued on next page.
Page 61

LED behaviors Status messages Unit status or possible causes Refer to
An ink cartridge is not installed correctly.
–
Press and hold
(Power/Standby) longer than 3 seconds to
turn the unit Off (Standby).
Unplug the AC Plug.
Check that the Ink Cartridges have no obstacles and clear
pathways.
and
blink as pattern 1
Cartridge/Paper
Jam:
Unplug and replug
the power cable.
Connect the AC plug to the AC outlet.
A paper jam has occurred inside of the unit.
–
Firmly grasp both sides of the paper, then gently pull it out.
Press and hold
(Power/Standby) longer than 3 seconds
to turn the unit Off (Standby). Unplug the AC Plug. Wait at
least 30 seconds, then connect the AC plug back into the AC
“Clearing paper jam in
the unit” on page 52.
“Fixing a paper jam” on
page 52.
“Hard Reset” on
page 52.
socket.
●
If this error occurs occasionally, visit our website at
www.kodakverite.com/support for the latest
troubleshooting.
●
If you cannot solve the problem, disconnect the AC
plug and contact an Authorized Service Center.
Soiled or unsupported ink cartridge has been inserted.
–
blink as pattern 6
blinks as pattern 1
Remove and reinsert black ink
cartridge.
Clean the surface of the nozzles and contacts on the Ink
cartridge with a dampened soft cloth then let them dry before
reinserting cartridge.
–
Replace the current Ink cartridge with an authorized Ink
cartridge.
●
If this error occurs occasionally, try to replace the
“Cleaning the ink
cartridge nozzles and
contacts” on page 53.
“Changing the ink
cartridge” on page 50.
current Ink cartridge with a new Ink cartridge.
blink as pattern 6
Black ink is empty.
blinks as pattern1
Black ink is empty in the ink cartridge.
–
Replace with a new Ink cartridge.
●
Order a new Ink cartridge from our website at
www.kodakverite.com
“Changing the ink
cartridge” on page 50.
Black ink cartridge error.
–
blink as pattern 6
blinks as pattern 1
Black Ink Error
Clean the surface of the nozzles and contacts on the Ink
cartridge with a dampened soft cloth then let them dry before
reinserting cartridge.
–
Replace the current Ink cartridge with an authorized Ink
cartridge.
●
If this error occurs occasionally, try to replace the
“Cleaning the ink
cartridge nozzles and
contacts” on page 53.
“Changing the ink
cartridge” on page 50.
current Ink cartridge with a new Ink cartridge.
blink as pattern 6
blinks as pattern 1
blink as pattern 6
blinks as pattern 1
Remove and reinsert color ink
cartridge.
Color ink is empty.
Soiled or unsupported ink cartridge has been inserted.
–
Clean the surface of the nozzles and contacts on the Ink
cartridge with a dampened soft cloth then let them dry before
reinserting cartridge.
–
Replace the current Ink cartridge with an authorized Ink
cartridge.
Color ink is empty in the ink cartridge.
–
Replace with a new Ink cartridge.
●
Order a new Ink cartridge from our website at
www.kodakverite.com
“Cleaning the ink
cartridge nozzles and
contacts” on page 53.
“Changing the ink
cartridge” on page 50.
“Changing the ink
cartridge” on page 50.
Color ink cartridge error.
–
blink as pattern 6
blinks as pattern 1
Color Ink Error
Clean the surface of the nozzles and contacts on the Ink
cartridge with a dampened soft cloth then let them dry before
reinserting cartridge.
–
Replace the current Ink cartridge with an authorized Ink
cartridge.
●
If this error occurs occasionally, try to replace the
“Cleaning the ink
cartridge nozzles and
contacts” on page 53.
“Changing the ink
cartridge” on page 50.
current Ink cartridge with a new Ink cartridge.
English
61
Continued on next page.
Page 62

LED behaviors Status messages Unit status or possible causes Refer to
Black ink is empty in the ink cartridge.
–
blink as pattern 4 and
Black ink is empty.
lighting
You get good printed results with Color mode in this
condition.
●
If you want to use both Ink cartridges, please cancel
the print job then press and hold
(Power/Standby)
“Changing the ink
cartridge” on page 50.
and replace with a new Black Ink cartridge.
Black ink is not inserted.
–
blink as pattern 4 and
lighting
Black ink cartridge
is not detected.
You get good printed results with Color mode in this
condition.
●
If you want to use both Ink cartridges, please cancel
the print job then press and hold
(Power/Standby)
-
and replace with a new Black Ink cartridge.
blink as pattern 4 and
blink as pattern 4
Black ink level is
Low.
Black ink level is low.
–
You should purchase a new Ink cartridge.
●
Order a new Ink cartridge from our website at
www.kodakverite.com
-
Color ink is empty in the ink cartridge.
–
blink as pattern 4 and
Color ink is empty.
lighting
You get good printed results with Mono mode in this
condition.
●
If you want to use both Ink cartridges, please cancel
the print job then press and hold
(Power/Standby)
“Changing the ink
cartridge” on page 50.
and replace with a new Color Ink cartridge.
Color ink is not inserted.
–
blink as pattern 4 and
lighting
Color ink cartridge
is not detected.
You get good printed results with Mono mode in this
condition.
●
If you want to use both Ink cartridges, please cancel
the print job then press and hold
(Power/Standby)
-
and replace with a new Color Ink cartridge.
blink as pattern 4 and
blink as pattern 4
and
blinks as pattern 1
and
blinks as pattern 1
Color Ink level is
Low.
Insert Paper
Paper Jam
Color ink level is low.
–
You should purchase a new Ink cartridge.
●
Order a new Ink cartridge from our website at
www.kodakverite.com
Insert Paper.
–
Check the paper support.
A paper jam has occurred inside of the unit.
–
Firmly grasp both sides of the paper, then gently pull it out.
-
“Insert paper into the
paper support” on
page 27.
“Clearing paper jam in
the unit” on page 52.
A paper jam has occurred during duplex printing, or the
Rear Cover (Duplex Unit) is detached.
and
blinks as pattern 1
Paper Jam.
Open rear cover.
Open the Rear Cover (Duplex Unit), then firmly grasp both
sides of the jammed paper and slowly pull it out.
–
This error occurs when there is an automatic duplex printing
“Clearing paper jam in
the unit” on page 52
–
function.
and
blinks as pattern 1
Paper Size Error
An unsupported size of paper for two-sided printing is
inserted.
–
Insert supported size of paper (Letter or A4).
“Specifications for
print media” on
page 27
blinks as pattern 1
English
and
Paper Size is short.
Attempted to print on paper which is shorter in length
than set in the Paper Settings.
62
-
Continued on next page.
Page 63

LED behaviors Status messages Unit status or possible causes Refer to
Black ink is empty in the ink cartridge.
–
You get good printed results with Color mode in this
lighting
Black ink is empty.
condition.
●
If you want to use both Ink cartridges, please cancel
the print job then press and hold
(Power/Standby)
-
and replace with a new Black Ink cartridge.
Black ink is not inserted.
–
You get good printed results with Color mode in this
lighting
Black ink cartridge
is not detected.
condition.
●
If you want to use both Ink cartridges, please cancel
the print job then press and hold
(Power/Standby)
-
and replace with a new Black Ink cartridge.
Color ink is empty in the ink cartridge.
–
You get good printed results with Mono mode in this
lighting
Color ink is empty.
condition.
●
If you want to use both Ink cartridges, please cancel
the print job then press and hold
(Power/Standby)
-
and replace with a new Color Ink cartridge.
Color ink is not inserted.
–
You get good printed results with Mono mode in this
lighting
Color ink cartridge
is not detected.
condition.
●
If you want to use both Ink cartridges, please cancel
the print job then press and hold
(Power/Standby)
-
and replace with a new Color Ink cartridge.
Ink cartridge(s) error.
–
blinks as pattern 1
Defective
Cartridge
Clean the surface of the nozzles and contacts on the Ink
cartridges with a dampened soft cloth then let them dry
before reinserting cartridge(s).
–
Replace the current Ink cartridges with authorized Ink
cartridge(s).
●
If this error occurs occasionally, try to replace the
“Cleaning the ink
cartridge nozzles and
contacts” on page 53.
“Changing the ink
cartridge” on page 50.
current Ink cartridges with new Ink cartridges.
Alignment in progress.
–
Print jobs cannot start while running alignment.
Run the alignment or run cancel operation on the device.
Ink Door Open.
–
Close Ink Door.
Memory of the unit is full.
–
You cannot print with this print setting.
–
Please change the print setting and try again.(Resolution, size
or number of copies)
Memory of the unit is full.
–
You cannot print the multiple copies with this print setting.
–
Please change the print setting and try again.(Resolution, Size
or Number of copies)
-
-
“ Confirming Printing
Preferences for
Windows® -Page
Layouts” on page 30
or “Confirming Print
Settings for Mac Layout” on page 32.
“ Confirming Printing
Preferences for
Windows® -Print
Quality” on page 30 or
blinks as pattern 5
blinks as pattern 1
blinks as pattern 1
blinks as pattern 1
Alignment in
progress...
Printer's ink door is
open.
Printer Memory
Full
Printer Memory
Full (Recoverable)
“Confirming Print
Settings for Mac Quality & Media” on
page 33.
English
63
Continued on next page.
Page 64

LED behaviors Status messages Unit status or possible causes Refer to
This printer is in the process of Weekly Maintenance.
–
If this printer receives a print job during Weekly Maintenance,
the print job will be processed after maintenance completes.
–
This printer will automatically exit Weekly Maintenance mode
upon completion of maintenance.
●
Cartridge setup is not done yet. You need to set up for
ink cartridges before use.
-
“Cartridge Setup” on
page 44.
blinks as pattern 1
-
This represents
that Weekly
Maintenance is in
progress.
Please proceed
with cartridges
setup.
Communication failed on the unit.
–
Check the AC plug is connected to the AC outlet properly,
the unit is turned On, or the connection environment (USB,
Wireless) to the unit.
Then follow the procedures by showing the help text on your
connected unit.
●
If this error occurs occasionally, visit our website at
-
-
Communication
failure
www.kodakverite.com/support for the latest
troubleshooting.
●
If you cannot solve the problem, disconnect the AC
plug and contact an Authorized Service Center.
English
64
Continued on next page.
Page 65

Improving the print quality
Faint
Faded colors / Incorrect color
White lines across on the page
If printout is like below, please try the suggestions in order.
Examples of poor image quality Suggestions
1 Using genuine ink cartridges
»
Refer to “Ordering ink cartridges” on page 52.
2 Checking ink levels
» Refer to “Checking ink levels” on page 50.
3 Cleaning the ink cartridge nozzles
» Refer to “Clean Printhead” on page 43.
4 Aligning ink cartridges
» Refer to “Cartridge Setup” on page 44.
5 Cleaning the ink cartridge nozzles and contacts
» Refer to “Cleaning the ink cartridge nozzles and contacts” on page 53.
6 Cleaning the scanner glass (Copy function)
» Refer to “Cleaning the scanner glass” on page 53.
7 Cleaning the exterior of the unit
» Refer to “Cleaning the exterior of the unit” on page 54.
8 Please change to the higher quality mode. (Faint or White lines)
» Refer to “Confirming Printing Preferences for Windows® -Print Quality” on
page 30.
» Refer to “Confirming Print Settings for Mac -Quality & Media” on page 33.
No printing results on the page
English
65
Page 66

Appendix
Specifications
For more product specifications, see the Product Data Sheet at www.kodakverite.com/support
Technical Data
Dimensions (width x depth x height)
Maximum dimensions (width x depth x height)
Weight 9.3 lb. (4.22 kg)
Power requirements 100 - 240 VAC (-10%/+5%), 50/60 Hz (+/- 3 Hz)
Operating temperature 41 °F (5 °C) to 95 °F (35 °C)
Operating humidity 10 – 60 % (no condensation)
Print technology Thermal inkjet
Standard printer language(s) GDI
Print resolution (best) Up to 4800 x 1200(black)
Copy resolution
(Black & Color/Text and Photo)
Scanner type Flatbed scanner
Scan resolution (optical)
(Software enhanced)
Maximum scan area 8.5 x 11.7 inches (216 x 297 mm)
Supported file types JPEG, PDF
17.7 x 13.2 x 5.3 inches (450 x 335 x 134 mm)
17.7 x 20.5 x 15.8 inches (450 x 521 x 402 mm)
Printer
Up to 4800 x 1200(color)
Copier
Scan up to 600 x 600 dpi
Print up to 4800 x 1200 dpi(black)
Print up to 4800 x 1200 dpi(color)
Scanner
Up to 1200 x 1200 dpi
Up to 19,200 x 19,200 dpi
Paper
Input capacity Plain paper (20 lb. or 75 g/m2): Up to 60
Photo Paper (4x6 in.): Up to 10 (Photo tray)
Output capacity Plain paper (20 lb. or 75 g/m2): Up to 25
Size Letter, Legal, JIS B5, A4, Executive, A5, Statement, A6, 3x5 in., 4x6 in., 5x7 in.,
Hagaki, 3.5x5 in.(L), 10 Envelope, DL Envelope, C5 Envelope
Weight Plain paper: 17 -24 lb. (64 - 90 g/m2)
PC-Network Connection
Connection type USB 2.0 (High Speed)
Wi-Fi IEEE 802.11 b/g/n
Supported operating systems Visit our website at www.kodakverite.com/support
Direct print support capability Wireless Direct Printing
●
Technical specifications subject to change without notice.
Note(s)
●
A4, A5, A6, DL Envelope and C5 Envelope are International Paper Sizes.
English
66
Continued on next page.
Page 67

Note about recycling
●
This unit’s packaging materials are recyclable and can
be reused. Please dispose of any materials in
accordance with your local recycling regulations.
Safety Data Sheet (SDS)
To obtain Safety Data Sheets (SDS) for supplies containing chemical
substances (e.g. ink), visit our website at
www.kodakverite.com/support
Notes on statutory limitations, data protection and
legal validity
The reproduction of certain documents (e.g. by scanning, printing,
copying) is prohibited in many countries. The list of such documents
below is not intended to be complete, it only offers a general
overview. In case of doubt, consult your legal adviser.
–
Passports (personal identification)
–
Entrance and exit visa papers (immigration papers)
–
Military service documents
–
Paper Currency, Bank notes, travel checks, payment orders
–
Postage stamps, tax stamps (stamped or unstamped)
–
Loan papers, certificates of deposit, bonds
–
Documents protected by copyright
Neither Funai nor its affiliates shall be liable to the purchaser of this product or
third parties for damages, losses, costs, or expenses incurred by the purchaser or
third parties as a result of accident, misuse, or abuse of this product or
unauthorized modifications, repairs, or alterations to this product, or failure to
strictly comply with Funai operating and maintenance instructions. Funai shall not
be liable for any damages or problems arising from the use of any options or any
consumable materials other than those designated as original products or
approved products. Funai shall not be held liable for any damage resulting from
electromagnetic interference that occurs from the use of any interface cables
other than those designated as products.
JF253UC ★★★★★
English
67
Page 68

Limited Warranty
Wireless All-In-One Inkjet Printer
FUNAI warrants this Product to be free from malfunctions and defects in both materials and workmanship for one year from the date of
purchase unless the product is sold as refurbished in which case it then comes with a (90) day Limited Warranty.
LIMITS AND EXCLUSIONS:
Warranty service is only available from within the country where the Product was originally purchased. You may be required to ship Product,
at your expense, to the authorized service facility for the country where the Product was purchased.
Funai will repair or replace this Product if it fails to function properly during the warranty period, subject to any conditions and/or limitations
stated herein. Warranty service will include all labor as well as any necessary adjustments and/or replacement parts. If Funai is unable to
repair or replace a Product, Funai will, at its option, refund the purchase price paid for the Product provided the Product has been returned
to Funai along with proof of the purchase price paid. Repair, replacement, or refund of the purchase price are the sole remedies under this
warranty.
If replacement parts are used in making repairs, those parts may be remanufactured or may contain remanufactured materials. If it is
necessary to replace the entire Product, it may be replaced with a remanufactured Product. Remanufactured Products, parts and materials
are warranted for the remaining warranty term of the original Product, or 90 days after the date of the repair or replacement, whichever is
longer.
THIS WARRANTY IS EXTENDED ONLY TO THE ORIGINAL RETAIL PURCHASER. A PURCHASE RECEIPT OR OTHER PROOF OF
ORIGINAL RETAIL PURCHASE WILL BE REQUIRED TOGETHER WITH THE PRODUCT TO OBTAIN SERVICE UNDER THIS
WARRANTY.
This warranty shall not be extended to any other person or transferee.
This warranty is void and of no effect if any serial numbers on the product are altered, replaced, defaced, missing or if service was attempted
by an unauthorized service center.
This warranty only covers failures due to defects in material or workmanship which occur during normal use. It does not cover damage
which occurs in shipment, or failures which are caused by repairs, alterations or products not supplied by FUNAI, or damage, which results
from accident, misuse, abuse, mishandling, misapplication, alteration, faulty installation, improper maintenance, commercial use such as
hotel, rental or office use of this product, or damage which results from fire, flood, lightning or other acts of God.
THIS WARRANTY DOES NOT COVER PACKING MATERIALS, ANY ACCESSORIES, ANY COSMETIC PARTS, COMPLETE ASSEMBLY
PARTS, DEMO OR FLOOR MODELS. FUNAI AND ITS REPRESENTATIVES OR AGENTS SHALL IN NO EVENT BE LIABLE FOR ANY
GENERAL, INDIRECT OR CONSEQUENTIAL DAMAGES ARISING OUT OF OR OCCASIONED BY THE USE OF OR THE INABILITY TO
USE THIS PRODUCT. THIS WARRANTY IS MADE IN LIEU OF ALL OTHER WARRANTIES, EXPRESS OR IMPLIED, AND OF ALL OTHER
LIABILITIES ON THE PART OF FUNAI, ALL OTHER WARRANTIES INCLUDING THE WARRANTY OF MERCHANTABILITY AND
FITNESS FOR A PARTICULAR PURPOSE, ARE HEREBY DISCLAIMED BY FUNAI AND ITS REPRESENTATIVES.
ALL WARRANTY INSPECTIONS AND REPAIRS MUST BE PERFORMED BY AN AUTHORIZED SERVICE CENTER.
Some states or jurisdictions do not allow exclusion or limitation of incidental or consequential damages, so the above
IMPORTANT
Outside the United States and Canada
In countries other than the United States and Canada, the terms and conditions of this warranty may be different. Unless a specific Funai
warranty is communicated to the purchaser in writing by a Funai company, no warranty or liability exists beyond any minimum requirements
imposed by law, even though defect, damage, or loss may be by negligence or other act.
ATTENTION
WARRANTY STATEMENT REGARDING NON AUTHORIZED REPAIRS:
To obtain warranty service, you must take the product, or deliver the product freight prepaid, in either its original packaging or packaging
affording an equal degree of protection, to any AUTHORIZED SERVICE CENTER. FUNAI will not reimburse you for any service done by
unauthorized service providers without prior written approval.
To locate your nearest AUTHORIZED SERVICE CENTER or for general service inquiries, please contact us at:
:
limitation or exclusion may not apply to you. Some states or jurisdictions do not allow limitations on how long an implied
warranty lasts, so the above limitation may not apply to you.
This warranty gives you specific rights, and you may have other rights which vary from state to state or by jurisdiction.
FUNAI RESERVES THE RIGHT TO MODIFY ANY DESIGN OF THIS PRODUCT WITHOUT PRIOR NOTICE.
:
English
FUNAI SERVICE CORPORATION
www.kodakverite.com/support
2425 Spiegel Drive, Groveport, OH 43125
68
Page 69

The Kodak trademark, logo and trade dress are used under license from Kodak.
www.kodakverite.com
© 2017 Funai Electric Co., Ltd. All rights reserved.
 Loading...