

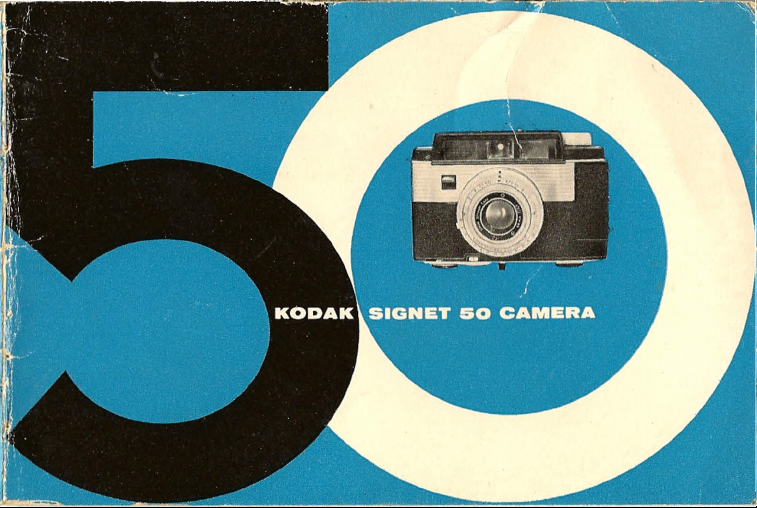
Page 1
Page 2
ffiera_
"iO'1 oifsURf
AlA
~
VAL UE
1
Page 3
contents
Loading 6
Kodak Film 10
Setting Film Index 12
Exposure Value Number 13
Exposure Settings 18
Distance Settings 22
Taking the Picture 26
Flash Pictures 28
Photo Aids 32
Page 4
Page 5
Page 6
Page 7
Page 8
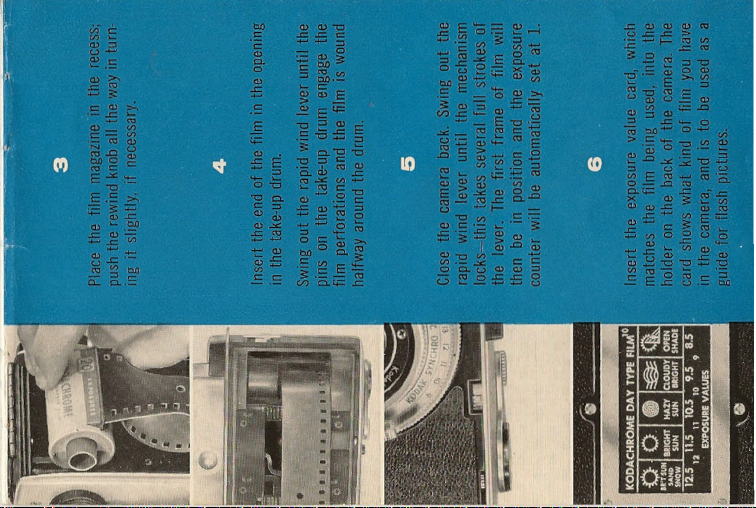
Open the back by pushing the LATCH upward with the
fleshy part of your finger. Push out the REWIND KNOB
with your thumb. Put the film magazine in the recess
next to the knob. Push the rewind knob all the way in,
turning it slightly, if necessary.
Swing out the RAPID WIND LEVER until the opening
in the take-up drum is up.
Drop the end of the film into the opening in the
take-up drum. Swing out the rapid wind lever until
the pins on the take-up drum engage the film perfora-
tions and the film is wound halfway around the drum.
Close the back. Make sure the latch snaps in place.
Swing out the rapid wind lever until the mechanism
6
Page 9
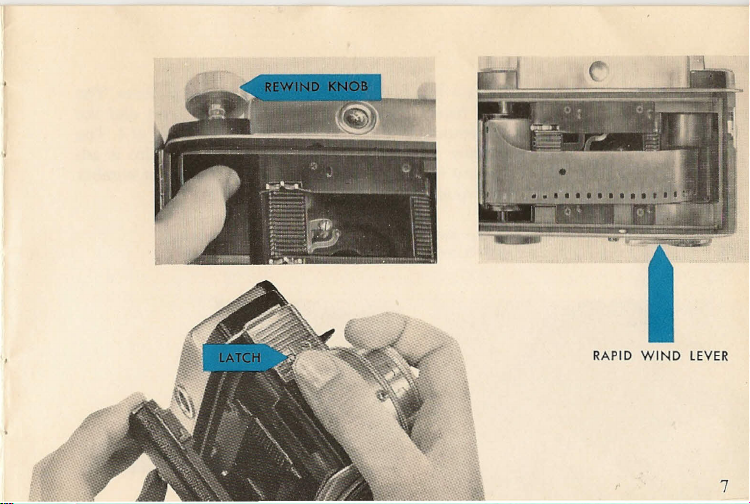
RAPID WIND LEVER
7
Page 10
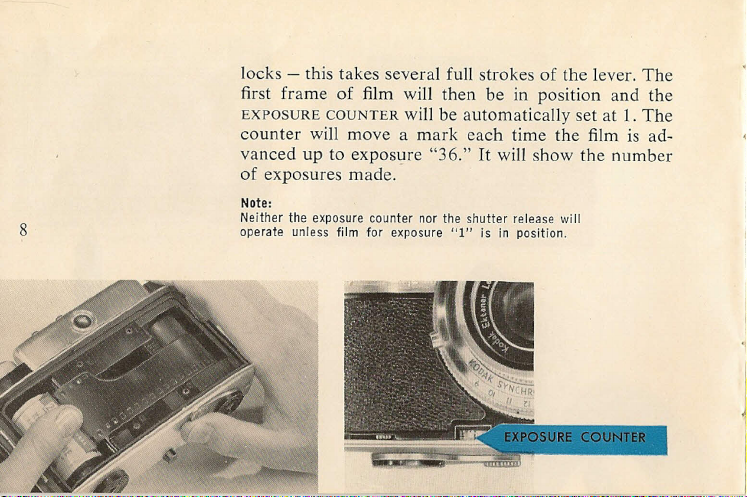
locks - this takes several full strokes of the lever. The
first frame of film will then be in position and the
EXPOSURE COUNTER will be automatically set at 1. The
counter will move a mark each time the film is ad-
vanced up to exposure "36." It will show the number
of exposures made.-
Note:
8
Neither the exposure counter nor the shutter release will
operate unless film for exposure "1" is in position.
Page 11
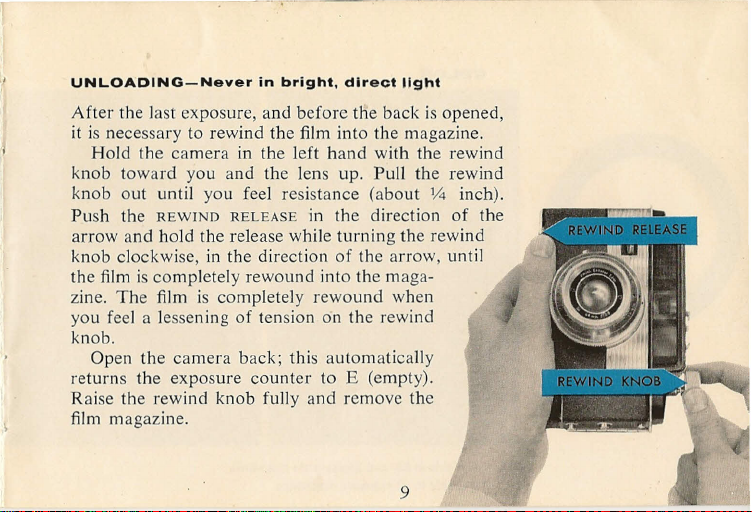
UNLOADING-Never in bright. direct light
After the last exposure, and before the back is opened,
it is necessary to rewind the film into the magazine.
Hold the camera in the left hand with the rewind
knob toward you and the lens up. Pull the rewind
knob out until you feel resistance (about
1;4
inch).
Push the REWIND RELEASE in the direction of the
arrow and hold the release while turning the rewind
knob clockwise, in the direction of the arrow, until
the film is completely rewound into the maga-
zine. The film is completely rewound when
you feel a lessening of tension on the rewind
knob.
Open the camera back; this automatical1y
returns the exposure counter to E (empty).
Raise the rewind knob fully and remove the
film magazine.
9
Page 12

COLOR
10
*available in 20· and as-exposure magazines
tavailable in 20·exposure magazines
Page 13

Kodak Plus·X Film"
This is a moderately fast, fine-grain film for
all-around picture taking.
Kodak
rnx
Film'
You'll like this ultra-speed film having medi-
um contrast, moderate graininess and wide
exposure latitude. It's ideal for sports pic-
tures and other snapshots where adverse
lighting conditions are encountered.
Kodak Panatemlc-X Film'
!,
Here's a new, modern film with micro-fine
grain and high resolution, for those who
I
want super-size enlargements with crisp,
I
brilliant tone rendering.
r
11
Page 14

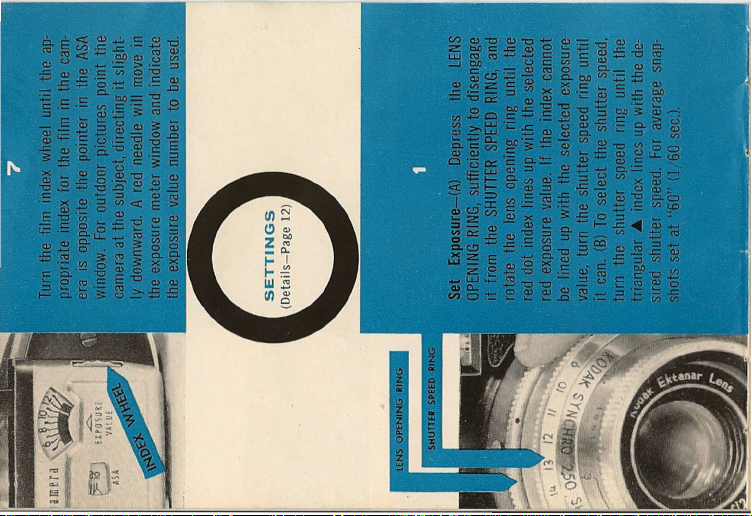
12
The film index for the film loaded in the camera can
be found in the instructions packed with the film and
on page 11. Turn the
appropriate index for the film in the camera is oppo-
site the pointer. For example: The daylight index of
Kodachrome Film Daylight Type is 10; set 10 in the
opening for daylight exposure of this film.
Make sure that the film index setting always cor-
responds to the index of the film used.
,..50
G~,~~.~.<z\\~!l~~
' ~.,
I -
., eJ
, ASA VALUE
tx~u
FILM INDEX WHEEL
The film indexes shown in
the opening marked ASA
are, 10, 12, 16, 20, 25. 32,
40, 50, 64, 80, 100, 125.
160, 200, 250, 320, 400
until the
I
Page 15

Page 16

-qo SI
'suompuoo U!BPCl;) l<>puil
paunn
o.msodxa
uosrsd
B
10j
aql -
puno.rf
UB
ut
llnsCl.l
uiaiqo
oJ..
o.msodxa
UB ClAljJ 111M.'ssaulqjJ!.Iq
Janaq B
r
'-~
. .:...... .-:',' ~.IL· I":
...
'~~\
~~I •.., ,
-~.
.'
*
.'
~I."i.~.... ~~ ••
'Z
raq
uaaA-qaq 01
u~
jJU!pBaJ al{l :3U!AJ!POW Aq
panun] A[aA!lB[aJ Jlaql 01 anp SW[y
Clql jJu!U!Wlalap uaqM. 'aldwBxa JOd
'lapw
ornsodxa
arruoid posodxaraxo
arruoid
aql 01 osojo dalS'
aq1 aSBaDul
'(6
pUB
8
ssaurqsuq
amsodxo ronaq
aql
uro.ij paunnqo
10[0;)
aql t.p1M os A[1B[n;)!lJBd S! SlqJ.. 'Japw
amsodxa
lad old
:parqns Cll{lJO
uosrad
o.msodxa
'apnlllBI
arnsodxo
-de
jJu!Adn;);)o 'jJU!l{lO[;) PCl.lO[O;)-lq:3![ U!
-xoaq )j.lBp B lSU!BjJB 'Play aql JO j[Bq AlalBLU!xo.ld
IIB-JaAo al{l jJU!pBaJ
111M.q;)!l{M. anlBA
'UOS1Cld Clql JO
B a)[Bl ~
-qns aql Aq pClpa]Ja1lq:3![ aql JO :3ll!PBClJ
.10 (~[ a:3Bd UopB11snill aClS) AIUO par
-wnu anlBA
8
WO.l] 'aldwBxa .I0j) J[Bl{-auo Aq
a;)Ualawp aq1 JI
-qns IBd!;)U!ld aq1 uaaA-qaq
-:~.'..
"".
'
.
/'.
,':
.
.'1('" .•• ,
171
Page 17

Page 18

16
reading provided by the meter and, if necessary, adjust
the film index.
With color film it may be worthwhile to take a few
pictures of a typical sunlit outdoor subject, with the
sun in back of you, for test purposes. One picture
should be taken at the setting indicated by the expo-
sure meter and the others, one-half exposure value
number more and one-half exposure value number
less. From the picture-taking results, when projected,
you can tell readily whether you should use the film
index setting suggested by the film manufacturer or a
higher or lower one.
Another approach to getting the kind of pictures
you want is to use the exposure meter as recom-
mended, and note whether the slides are correctly ex-
posed, too light, or too dark.Ifthey tend to be light,
try a higher film index; for example, if" I 0" is the sug-
gested film index, try a setting at12or
16.
~\
Page 19

ExpOSure
Supplied with your camera, are 7 exposure value cards
(one for each of the7Kodak color and black-and-
white 35mm
posures for flash shots; the other side shows exposures
for the five most common outdoor lighting conditions.
Slip the proper exposure card, for the film you are
using, into the holding frame on the back of the cam-
era. The recess is deep enough to hold two cards. The
cards also show what kind of film you have in the
camera.
Select the proper exposure from the card.
The exposures in the daylight exposure table for
Kodachrome and Kodak Ektachrome Films are for
average subjects in daylight from two hours after sun-
rise to two hours before sunset. For side- or back-
lighted close-ups in bright sunlight, with important
shadow detail, deduct 0.5 to 1.0 from the exposure
value. With light-colored subjects, add 0.5.
Value
films.)
eards
One side of the card gives the ex-
"
17
Page 20

00
Page 21

sapnpui
xapui
WI!I 142!I'(ep a41
',I
jO
raquinu
SWI!I a1!4M·pue·~JeLq 10j
raquinu
anle, arnsodxa 1a42!4 ixau a41 asn 'SUO!l!PUOJ
'91 jO an Ie, e 1e Jalln4s lno,( ras
,,10pej ,(jaleS" e
ieuuou
rapun 'SUOIlIPUOJ aSla'pe lapun uaM 'amsodxa IInl amsse OJ
lno,( ,(q pa1eJ!pu!
anle, arnsodxa ue sa1eJ!pu! la1aw a41 j! aldwexa 101 - la1aw amsodxa
6T
Page 22

o
N
c.
'"
E
o
"'"
g
o
Page 23

opening to
shutter speed time.
On the other hand, if you intend to take a picture
which requires good depth of field (see page 23), need-
ing a lens opening such asf/16, rotate the shutter
speed ring until the black dot index on the lens open-
ing ring is at 16. This changes the shutter speed to
1/15
be made from a firm support, such as a table or tripod,
because there is a risk of camera movement at slow
shutter speeds.
If you want to set the exposure without reference
to the exposure value numbers, be sure to set the shut-
ter speed first and the lens opening afterwards. If you
reverse the procedure, changes in the shutter speed
will also change the lens open ing, due to the linkage
between the lens opening ring and the shutter speed
ring .
1/4
and thus compensates for the faster
second. Such an exposure should, however, only
2J
Page 24

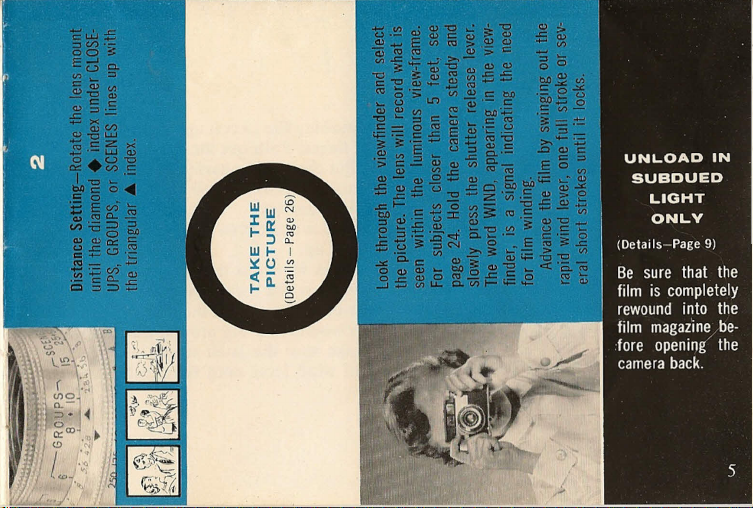
For quick distance settings line up the diamond-
shaped. index under the appropriate subject zone,
CLOSE-UPS, GROUPS, and SCENES, with the triangular .•.
index. Zone focusing can be used only at lens openings
between
ings larger than
-for flash pictures, estimate carefully or measure the
film-to-subject distance and line up the appropriate
footage number with the triangular index.
t/5.6
and
fl8
and smaller (larger numbers).
For careful distance settings-when using lens open-
f/5.6 -
for pictures of nearby objects
SCENES
!,
I
I
22
r
Page 25

Nearest
Distance
About
6 Feet
Focusing
Distance
10 Feet
Farthest
Distance
About
50 Feet
Depth of Field
L
Distances. are measured from the film plane to the subject.
The film plane coincides approximately with the back edge
of the Accessory Clip on the top of the camera.
-I
Page 26

24
When taking pictures, hold the camera close to your
eye so that you can see the complete luminous view-
frame. What is seen within the frame will be in the
picture.
Note the two paral1ax pointers, one on each side
near the top of the view-frame. The 5 ~ near the
upper left corner of the view-frame, when the camera
is held horizontally, indicates the upper edge of the
picture when the subject is 5 feet from the camera.
The ...•••3, on the right side, indicates the upper edge
of the picture when the subject is 3 feet from the cam-
era. The part thus eliminated at the top of the frame
is added to the bottom of the frame.
The illustrations at the right show two ways of hold-
ing the camera. Use any method you prefer as long as
the camera is held steady.
Page 27

Page 28

1.
Set the red index dot to the exposure value number
obtained from the exposure meter or the exposure
value card.
2.
Turn the shutter speed ring to the desired speed
setting or lens opening. For average snapshots set the
shutter speed at "60" (1/60
3.
Set the distance.
4.
Select the view in the viewfinder.
5.
Hold the camera steady; then press the shutter re-
sec.).
lease lever all the way down with a slow, squeezing
action.Ifthe film has not been advanced to the next
frame and the word WIND appears in the viewfinder,
or if the film leader has not been wound off fully, you
cannot press the release lever.
To advance the film, with the right thumb swing out
the rapid wind lever one full stroke or several short
26
Page 29

ones until it locks; then let the lever return to its
original position. Now you can press the shutter re-
lease lever.
After you have taken the last picture, the rapid
wind lever locks. The film must be rewound into the
magazine before opening the camera. To do this, push
the rewind release in the direction of the arrow
and hold the release while turning the rewind
knob clockwise, in the direction of the
arrow, until the film is completely
rewound into the magazine.
Page 30

Flash pictures, in black-and-white or color, are easy to
make with your camera. The built-in synchronization
of your Kodak Synchro 250 Shutter permits the use
of flash, including electronic flash. Flash lamps are
fired when the camera shutter is released. Flash ex-
posure data is on one side of the exposure value cards.
The Kodak Synchro 250 Shutter synchronizes No.5,
No. 25, and M-2 lamps at speed 30 (1/30 second).
Electronic flash (zero-time delay) synchronizes at all
shutter speeds.
The Signet 50 was designed to use flasholders with
Kodalite fittings such as the Kodalite Super-M 4
Flasholder and Kodak Rotary Flasholder, Model
These flasholders do not require the use of a bracket
to attach the flasholder to the camera. Instructions for
using the flasholders are packed with them.
28
l.
Page 31

MaKing
1:
FI••~h
Pictures
Kodal ite Super-M 4 Flasholder
Insert the No. 5 or 25 or M-2 flash lamps into the
lamp socket.
Koda!< Rotary FLasholcler, MQdei 1
Insert the M-2 flash lamps into the plastic lamp disc.
2.
Set the index on the shutter speed ring to 30,(1/30
second). A No.5 or 25 lamp has a flash duration of
Note:
Do not insert a lamp in
the lamp socket until
the flasholder has been
connected to the cam-
era,
29
Page 32

approximately. 1/50 second; an M-2 lamp has a flash
duration of approximately 1/100 second, thus pro-
viding effective stopping of subject movement if most
of the exposure light is provided by the flash.
3. Estimate carefully the distance in feet you are from
the subject and set the lens accordingly.
4. Obtaining Exposure From Exposure Value Card
a. Slip the proper exposure card into the holding
frame, with the Flash Setting side out.
b. Determine the exposure value from the distance
in feet to the subject and the type flash lamps used.
c. Transfer the exposure value to the shutter speed
ring being sure that the shutter speed is 1/30 sec.
5.
Hold the camera steady; then press the release lever
all the way down with a slow squeezing action.
30
Page 33

Inf.
25 181/2
10
6
4
3
21f2
Inf.
25 I
10
6
5
4 I 101f.
3 I 9%
21f2
'Subject·to·lens distance is measured to front of the Portra Lens
191/2
16Y.
1
15
14'/4
13'/4 6
12'/.
111/2
I
13
12'1'.
I
1]3/4
I
II
I
I
5
10
8Y.
/4
I
I
I
I
/.
I
I
I
I
1
10
/.
x
15
5
9
/. X
14'/4
87/8 X
131f8
7'/4 Xllln
1
7
/2 X II
7
/. X
10
1
6
/.
x
5
5
/8 X
8
6'/4Xl0
6'1'8
X 91/2
6 X
8
50/.X8%
5'Al X 8
51/8 X 70/8
4
5
/a x6%
4% X 6
1
/4
9
1
/4
7
1a
1
h
Page 34

You'll have a lot more
fun with your Signet 50
Camera, when you use
some of the products
pictured in this section.
32
Kodak Signet 50 Field Case
This de luxe, velvet-lined, top-
grain leather case combines
practical protection with drop-
away front convenience. Open-
ings on the side of the case
permit attaching the flasholder
with the camera in the case.
Strap inside top holds 7 expo-
sure value cards.
Kodak 300 Projector
Choice of two models. Here's
the newest in projectors. The
projector comes complete in a
self-carrying case, has finger-
tip knob controls for focus and
elevation, and weighs only 9
Ibs. The changer accepts up to
36 cardboard mounts. A short,
high efficiency, 300·watt pro-
jection lamp gives brilliant
pictures.
Page 35

Kodak Filter Kit, No.1 044A
The Kodak Signet 50 Camera
accepts Series 5 Kodak Filters
and Combination Lens Attach-
ments directly. The Kit con-
tains a Kodak Skylight Filter
(No.1Mto add warmth to pic-
tures taken in the open shade
or on overcast days; a Kodak
Daylight Filter (No. 85C) for
converting indoor type F color
films for outdoor use, and a
Pictorial Yellow Filter for ac-
centing clouds.
Kodak Ektachrome
Outfit,
35mm
This outfit includes the Kodak
Day-Load Tank and all neces-
sary equipment and supplies
for processing your own 35mm
Ektachrome Film. No darkroom
required, either.
The outfit also contains stor-
age containers of 16-ounce ca-
pacity for the various chemi-
cals and 100 Kodak Ready-
Mounts for mounting your
transparencies.
Processing
Kodaslide 400 File Box
It's styled like a book for con-
venient bookcase storage. This
file box holds up to 400 card-
board or 176 glass slides which
are stored in 16 Kodaslide
boxes for handy slide group
filing.
Page 36

 Loading...