

Page 1
KODAK ESP 9200 Series
All-in-One Printer
Extended User Guide
Page 2

Eastman Kodak Company
Rochester, NY 14650
© Eastman Kodak Company, 2010
Kodak, EasyShare, ESP, and Perfect Touch are trademarks of Eastman Kodak Company.
Specifications subject to change without notice.
P/N 1K7344
June 2010
Page 3

Table of contents
1 Printer Overview
Components.......................................................................................................................................................................1
Control panel.....................................................................................................................................................................2
Home Center Software ..................................................................................................................................................3
Configuring printer settings ..........................................................................................................................................4
2 Networking Your Printer
Connecting to a wireless network ...............................................................................................................................5
Before you connect ...................................................................................................................................................5
Connecting to a wireless network using the WiFi Setup Wizard..................................................................5
Using the LCD keyboard..........................................................................................................................................8
Setting up an IP address...........................................................................................................................................8
Viewing the network configuration.......................................................................................................................9
Printing the network configuration .....................................................................................................................10
Installing your printer on additional computers on the network.................................................................10
Connecting to another KODAK All-in-One Printer ........................................................................................10
Connecting to an Ethernet network ...........................................................................................................................11
Adding a network connection to a USB-connected computer .......................................................................... 12
Changing from USB to a wireless connection .................................................................................................. 12
Changing from USB to an Ethernet connection ............................................................................................... 13
3 Handling Paper
Paper types...................................................................................................................................................................... 15
Paper sizes....................................................................................................................................................................... 15
Envelope sizes................................................................................................................................................................. 16
Loading paper ................................................................................................................................................................. 17
Loading plain paper in the main paper tray ...................................................................................................... 17
Loading legal-size paper in the main paper tray............................................................................................. 20
Loading the photo paper tray ...............................................................................................................................23
Loading envelopes.................................................................................................................................................. 25
Loading originals ........................................................................................................................................................... 27
Using the scanner glass ........................................................................................................................................ 27
Using the Automatic Document Feeder (ADF).............................................................................................. 28
4 Printing
Changing paper trays................................................................................................................................................... 29
Printing documents ...................................................................................................................................................... 30
Printing two-sided documents............................................................................................................................ 30
Printing forms ...........................................................................................................................................................32
Printing pictures .............................................................................................................................................................33
Printing from a memory card or USB-connected device...............................................................................33
Printing pictures from a BLUETOOTH Technology enabled device.......................................................... 39
www.kodak.com/go/aiosupport i
Page 4

Table of contents
Printing pictures or documents from a wireless device ......................................................................................39
Transferring pictures to a computer........................................................................................................................40
Transferring pictures to a computer with WINDOWS OS..........................................................................40
Transferring pictures to a computer with MAC OS ......................................................................................40
5 Copying
Loading originals for copying...................................................................................................................................... 41
Copying a document..................................................................................................................................................... 41
Using the default settings to copy a document............................................................................................... 41
Adjusting the settings and copying a document............................................................................................. 41
Changing the number of copies of a document ............................................................................................. 43
Enlarging or reducing a document ..................................................................................................................... 43
Darkening or lightening a copy ........................................................................................................................... 43
Copying a photograph................................................................................................................................................. 44
Using the default settings to copy a photograph ........................................................................................... 44
Adjusting the settings and copying a photograph ......................................................................................... 44
Changing the number of copies of a photograph........................................................................................... 46
Enlarging or reducing a photograph .................................................................................................................. 46
Darkening or lightening a copy of a photograph............................................................................................ 46
6 Scanning
Before you begin scanning ......................................................................................................................................... 47
Changing the scan settings for scanning from the control panel .............................................................. 47
Loading originals for scanning................................................................................................................................... 49
Scanning from the computer ..................................................................................................................................... 49
Scanning multiple pictures simultaneously..................................................................................................... 50
Scanning from the control panel.................................................................................................................................51
7 Faxing
Before you begin faxing................................................................................................................................................53
Connecting the printer for faxing ........................................................................................................................53
Setting fax options ..................................................................................................................................................55
Working with the phonebook...............................................................................................................................59
Preparing a fax for transmission................................................................................................................................ 61
Printing a fax cover page ....................................................................................................................................... 61
Loading originals...................................................................................................................................................... 61
Changing resolution and brightness...................................................................................................................62
Sending a fax...................................................................................................................................................................62
Using the phonebook to send a fax ....................................................................................................................62
Using Quick Dial to send a fax .............................................................................................................................63
Using the numeric keypad to send a fax ...........................................................................................................63
Using the Redial button to send a fax ................................................................................................................63
Receiving a fax................................................................................................................................................................63
Receiving a fax automatically...............................................................................................................................63
Receiving a fax manually ...................................................................................................................................... 64
ii www.kodak.com/go/aiosupport
Page 5

Table of contents
8 Maintaining Your Printer
General care and cleaning .......................................................................................................................................... 65
Cleaning the scanner glass and document backing....................................................................................... 66
Replacing ink cartridges .............................................................................................................................................. 68
Replacing the printhead ............................................................................................................................................... 71
Updating the software and printer firmware......................................................................................................... 75
Updating if your printer is connected to a computer with WINDOWS OS ............................................ 75
Updating if your printer is connected to a computer with MAC OS......................................................... 76
Monitoring and adjusting printer performance .................................................................................................... 76
Checking ink levels................................................................................................................................................. 76
Resetting factory defaults .................................................................................................................................... 76
9 Troubleshooting
Basic troubleshooting .................................................................................................................................................. 77
Getting help on the Web............................................................................................................................................. 79
Status lights....................................................................................................................................................................80
Power status light...................................................................................................................................................80
Wi-Fi status light ....................................................................................................................................................80
10 Product and Safety Specifications
Features and Specifications ....................................................................................................................................... 82
Print performance................................................................................................................................................... 82
Photo printing features.......................................................................................................................................... 82
Copy document features ...................................................................................................................................... 83
Copy photo features .............................................................................................................................................. 83
Scanning features ................................................................................................................................................... 83
Bottom (main) input paper tray .........................................................................................................................84
Top (photo) input paper tray ..............................................................................................................................84
Output paper tray................................................................................................................................................... 84
Ink cartridges ...........................................................................................................................................................84
Connectivity.............................................................................................................................................................84
Software support .................................................................................................................................................... 85
Physical specifications .......................................................................................................................................... 85
Warranty................................................................................................................................................................... 85
System requirements............................................................................................................................................. 86
Safety information ........................................................................................................................................................89
Regulatory compliance................................................................................................................................................90
FCC statement ........................................................................................................................................................90
Canadian statements..............................................................................................................................................91
European compliance statement.........................................................................................................................91
German compliance statement ...........................................................................................................................91
REACH Article 33 declarations........................................................................................................................... 92
Power supply information .................................................................................................................................... 92
Waste electrical and electronic equipment labeling..................................................................................... 92
www.kodak.com/go/aiosupport iii
Page 6

Table of contents
ENERGY STAR® Qualified...........................................................................................................................................92
Warranty Information ..................................................................................................................................................93
Declaration of Conformity.......................................................................................................................................... 94
iv www.kodak.com/go/aiosupport
Page 7
1
19
17
18
20
25
22
21
4 65
141513
9
10
16
3
1
2
12
11
23
24
7 8
Printer Overview
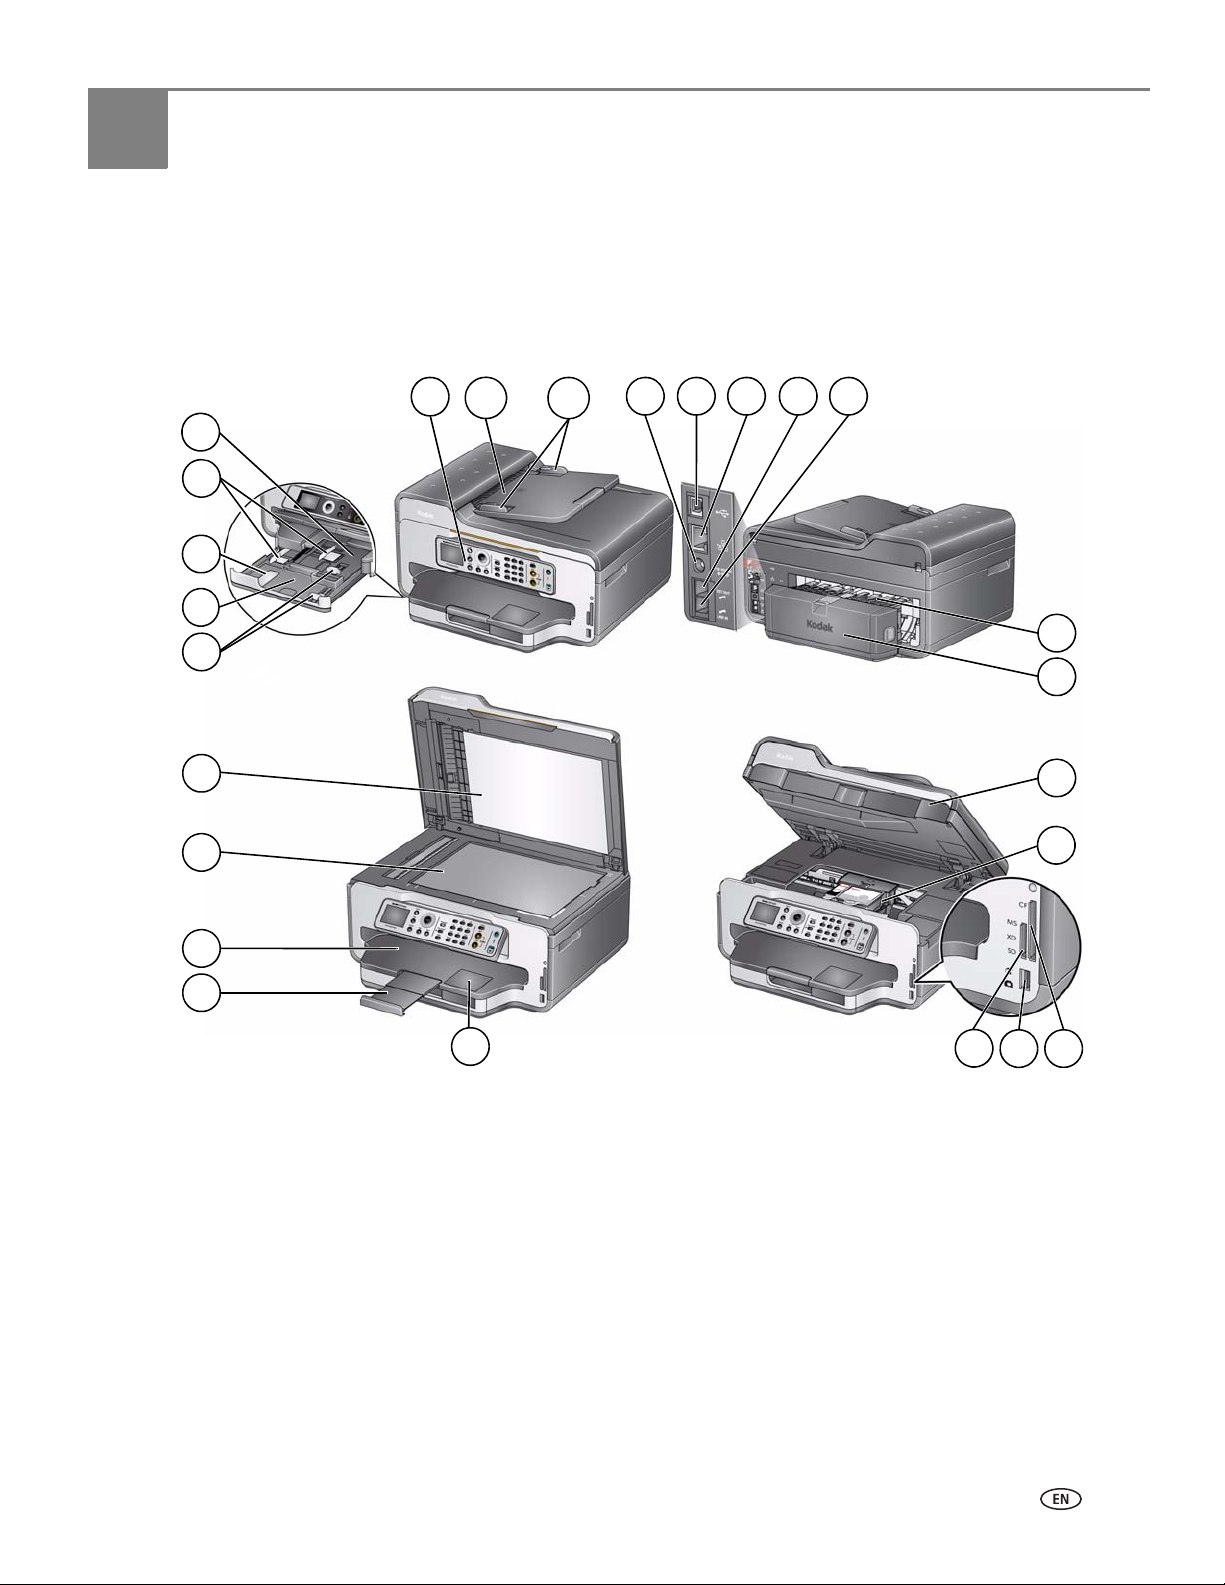
Components
This printer lets you print, copy, scan, and fax pictures and documents. In addition,
this printer supports networking, letting you access the printer over a wireless
(Wi-Fi) or Ethernet network.
1 Control panel 14 Front USB port
2 Automatic document feeder (ADF) 15 MS/XD/SD Card slot
3 ADF paper-edge guides 16 Window for photo paper
4 Power cord port 17 Output tray extender with paper stop
5 USB port 18 Output tray
6 Ethernet port 19 Scanner glass
7 Ext out phone port 20 Scanner lid
8 Line in phone port 21 Front paper-edge guides
9 Cleanout area 22 Main (bottom) paper tray
10 Duplexer (pulled out) 23 Paper tray extender for legal paper
11 Printer access door 24 Left paper-edge guides
12 Printhead with ink cartridges installed 25 Photo (top) paper tray
13 CF card slot
www.kodak.com/go/aiosupport 1
Page 8
Printer Overview
1 32 4 5126 117 8 10 14 15 16 17 18139
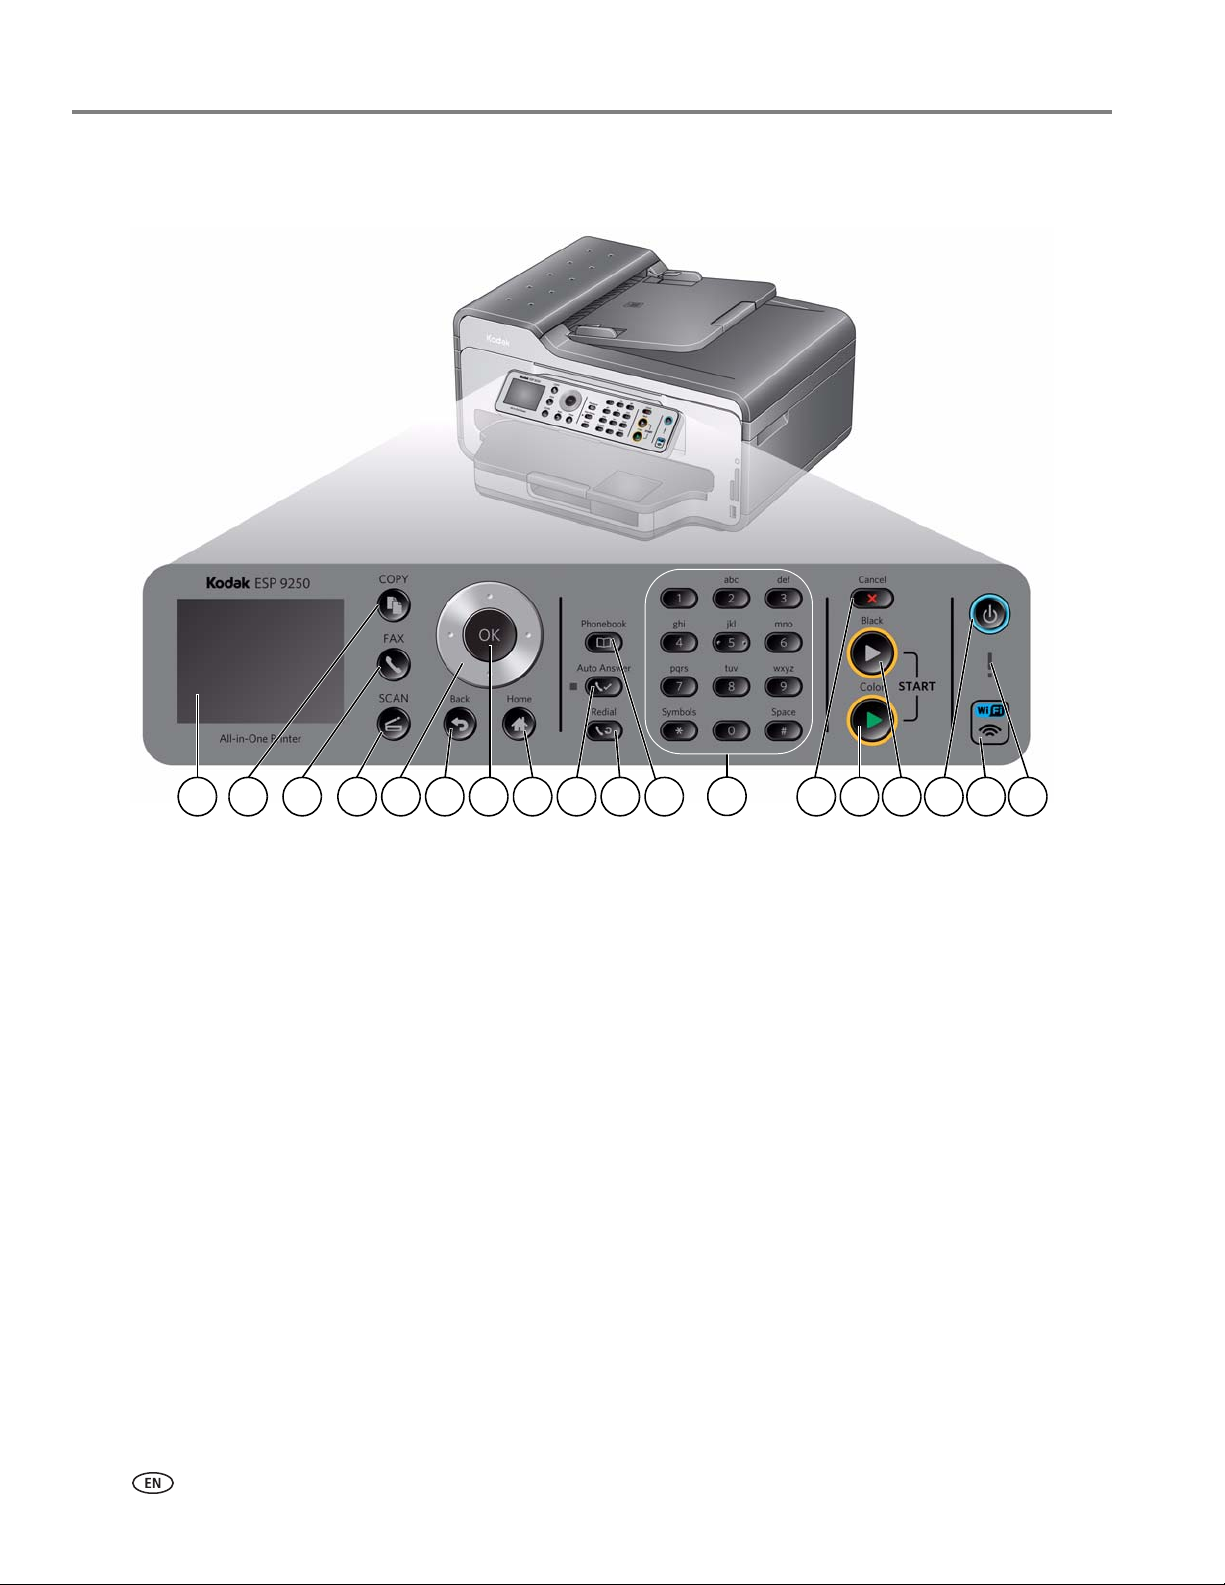
Control panel
Feature Description
1 LCD Displays pictures, messages, and menus
2 Copy button Displays the Copy Options menu
3 Fax button Lets you enter a phone number for sending a fax or choose the Fax Options menu
4 Scan button Displays the Scan Options menu
5 Navigation buttons Used to navigate menus and scroll through pictures
6 Back button Displays the next higher screen in the menu structure
7 OK button Selects a menu item, accepts a setting, or continues with the current operation
8 Home button Displays the Main Menu
9 Auto Answer button Turns the fax auto answer feature on or off; when on, the fax answers all incoming
calls
10 Redial button Dials the last dialed phone number
11 Phonebook button Displays the phonebook of fax numbers entered on this printer; lets you enter or
edit phone numbers
2 www.kodak.com/go/aiosupport
Page 9

KODAK ESP 9200 Series All-in-One Printer
Feature Description
12 Numeric keypad Used to dial a phone number or a Quick Dial number for faxing; to enter
information and Quick Dial settings into the fax phonebook; to specify a quantity
for making copies; or to enter an encryption string or passphrase for access to a
wireless network
13 Cancel button Stops the current operation and goes to the Main Menu, highlighting the function
that you used last
14 Start Color button Starts the selected operation in color
15 Start Black button Starts the selected operation in black and white
16 On/Off button Turns the printer on or off
17 Wi-Fi connectivity LED When lit steadily, signals that the printer is connected to a wireless (Wi-Fi)
network; blinks quickly when searching for networks; blinks slowly when
attempting to join an already configured network
18 Attention light Blinks when an error occurs
Home Center Software
KODAK Home Center Software is installed as part of the software installation on
your computer. The Home Center icon is added to your desktop and, depending on
your configuration, to the Start menu. Use this icon to start Home Center Software.
On a computer with WINDOWS Operating System (OS), you can use Home Center
Software to:
• browse, crop, enhance, and edit pictures
• print, scan, and fax
• upgrade your printer with the latest software and firmware
•configure your printer
• order supplies
• access the KODAK Tips and Projects Center
• access this Extended User Guide
On a computer with MAC OS, you can use Home Center Software to order supplies,
configure your printer, set printer scan settings, or check for printer software
updates.
www.kodak.com/go/aiosupport 3
Page 10

Printer Overview
Configuring printer settings
NOTE: When you first power on the printer, the LCD prompts you to select the
Language and Country/Region.
To set or change basic printer settings:
1. Press Home.
2. Press to select Printer Settings, then press OK.
3. Press to select one of the following settings:
• Date and Time
–Press OK, then press to select Ye a r , Month, Day, Hour, or Minute.
Press or to change the values; press OK when you are done.
NOTE: You can also synchronize the printer date and time to your computer using
the Home Center Software.
• Button Sounds
–Press to select Loud, Off, or Soft.
• Time t o Low Powe r
To conserve energy, your printer will enter a low power (sleep) mode after
being idle for a default delay time of 1 hour. You can increase the delay time to
low power (in 0.5 hour increments) up to 4 hours. Increasing the delay time
may result in reduced energy savings.
–Press to change the time to energy-saving sleep mode (select from 1 to
4 hours in 0.5 hour increments).
• Tagged Image Printin g (see Printing tagged pictures, page 37)
–Press to select Off or On.
• Language
–Press OK, press to select a language, then press OK.
• Country/Region
–Press OK, press to select a country or region, then press OK.
• Reset All Settings (see Resetting factory defaults, page 76)
NOTE: Resetting factory defaults does not change the date and time, language,
country/region, or network settings.
4. Press Back to return to the Main Menu.
4 www.kodak.com/go/aiosupport
Page 11

2
Networking Your Printer
This section explains how to configure or change your network settings.
Connecting to a wireless network
To connect your printer to an 802.11b/g/n wireless (Wi-Fi) network, refer to the
following information.
Before you connect
You need to:
• Have a wireless router.
• Determine whether your wireless router supports Wi-Fi Protected Setup (WPS).
• Temporarily disable your firewall until the printer is successfully installed and
communicating.
– If you are unsure of how your network is configured, contact your Internet
service provider or your network administrator.
– If you have specific questions about your router, see your router
manufacturer’s documentation for more information.
For information, go to www.kodak.com/go/inkjetnetworking.
Connecting to a wireless network using the WiFi Setup Wizard
You can use the WiFi Setup Wizard on the printer to connect to your wireless
network. Read the following procedures and use the one that is appropriate for your
network setup.
Connecting to a non-WPS wireless router
To connect your printer to your wireless network, you need to know the network
name, also called the Service Set Identifier (SSID). You can obtain your network
name from the wireless router.
If your network has security enabled, you also need to know the password
(passphrase or security string).
Record your network information in the spaces below, using the correct uppercase
and lowercase letters.
Network Name (SSID):_____________________________________________________
Security String: ___________________________________________________________
1. Press Home.
2. Press to select Network Settings, then press OK.
3. With WiFi Setup Wizard selected, press OK.
NOTE: The Wi-Fi radio turns on automatically when you select Wi-Fi Setup
Wizard.
www.kodak.com/go/aiosupport 5
Page 12
Networking Your Printer
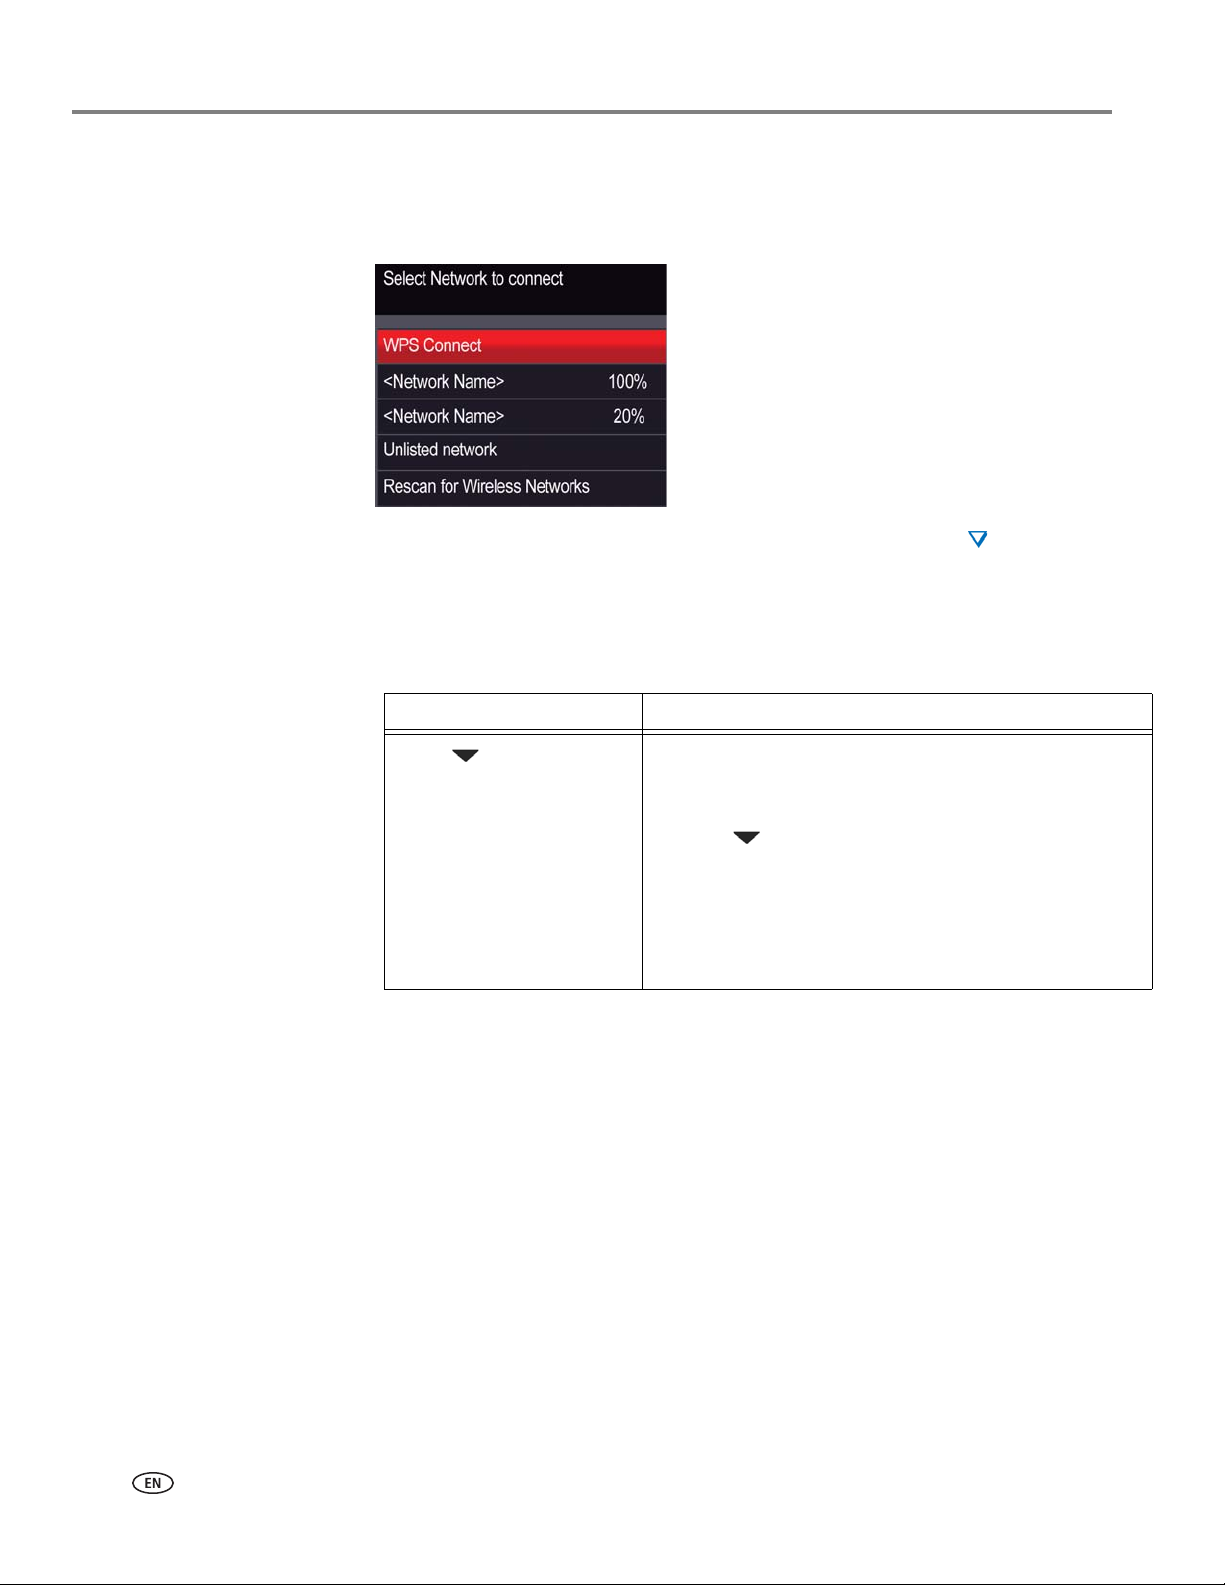
The Wi-Fi connectivity LED blinks as the printer searches for available wireless
networks within range, then displays the list in order of signal strength. For
example:
If there are more networks than can be shown on the LCD, a (page down)
symbol appears in the bottom right of the display. If you don’t see your network
in the list, or if you want to change your network, select
Networks
, then press OK.
Rescan for Wireless
4. If the name of your network is:
Listed Not listed
Press to select your
network, then press OK.
Make sure your wireless router is turned on and
within range. If your wireless router does not
broadcast its SSID (network name):
1. Press to select Unlisted Network, then press
OK.
2. Use the LCD keyboard (see Using the LCD
keyboard, page 8) to enter your network name.
3. Select WEP or WPA/WPA2 as required for your
network's security setup, then press OK.
5. If your network has security enabled, use the LCD keyboard (see Using the LCD
keyboard, page 8.) to enter your security string.
6. When the confirmation message appears, press OK.
If the printer is successfully connected, the Wi-Fi connectivity LED will stop
blinking and stay on steadily.
If you are unable to connect your printer, go to
www.kodak.com/go/inkjetnetworking for more information.
7. If you haven’t yet installed the KODAK All-in-One Printer Software, go to
www.kodak.com/go/aiodownloads and follow the on-screen instructions to
install the software.
The printer with a wireless connection is listed as the name of the printer plus a
number (for example, KodakESP9200+0069).
8. Enable the firewall that you disabled earlier.
6 www.kodak.com/go/aiosupport
Page 13
Connecting to a WPS wireless router
If your router supports Wi-Fi Protected Setup (WPS), you can use WPS Connect.
WPS lets you configure your printer for a wireless network by pressing buttons or
entering a PIN.
To connect to a network using WPS:
1. Press Home.
2. Press to select Network Settings, then press OK.
3. With WiFi Setup Wizard selected, press OK.
NOTE: The Wi-Fi radio turns on automatically when you select Wi-Fi Setup
Wizard.
4. With WPS Connect selected, press OK.
5. Select one of two methods of connecting:
IMPORTANT: Before you press OK on the printer, make sure you know where the
KODAK ESP 9200 Series All-in-One Printer
router's push button is, or where to enter the generated PIN. If
necessary, consult your Internet service provider or router device
manufacturer’s documentation for more information.
Pressing a button Entering a PIN
NOTE: You will have two minutes to
press or select the WPS
button. It may be a button on
the device or a virtual button
in the device’s software.
a. With Push Button Configuration
a. Press to select Generate
WPS PIN, then press OK.
b. In your wireless router’s
software, locate the PIN screen.
c. Enter the PIN you received on
the LCD into the PIN screen.
selected, press OK.
b. Press or select the WPS button for
your wireless router.
6. When the confirmation message appears, press OK.
If the printer is successfully connected, the Wi-Fi LED will stop blinking and stay
on steadily.
If you are unable to connect your printer, go to
www.kodak.com/go/inkjetnetworking for more information.
7. If you haven’t yet installed the KODAK All-in-One Printer Software, go to
www.kodak.com/go/aiodownloads and follow the on-screen instructions to
install the software.
The printer with a wireless connection is listed as the name of the printer plus a
number (for example, KodakESP9200+0069).
8. Enable the firewall that you disabled earlier.
www.kodak.com/go/aiosupport 7
Page 14
Networking Your Printer
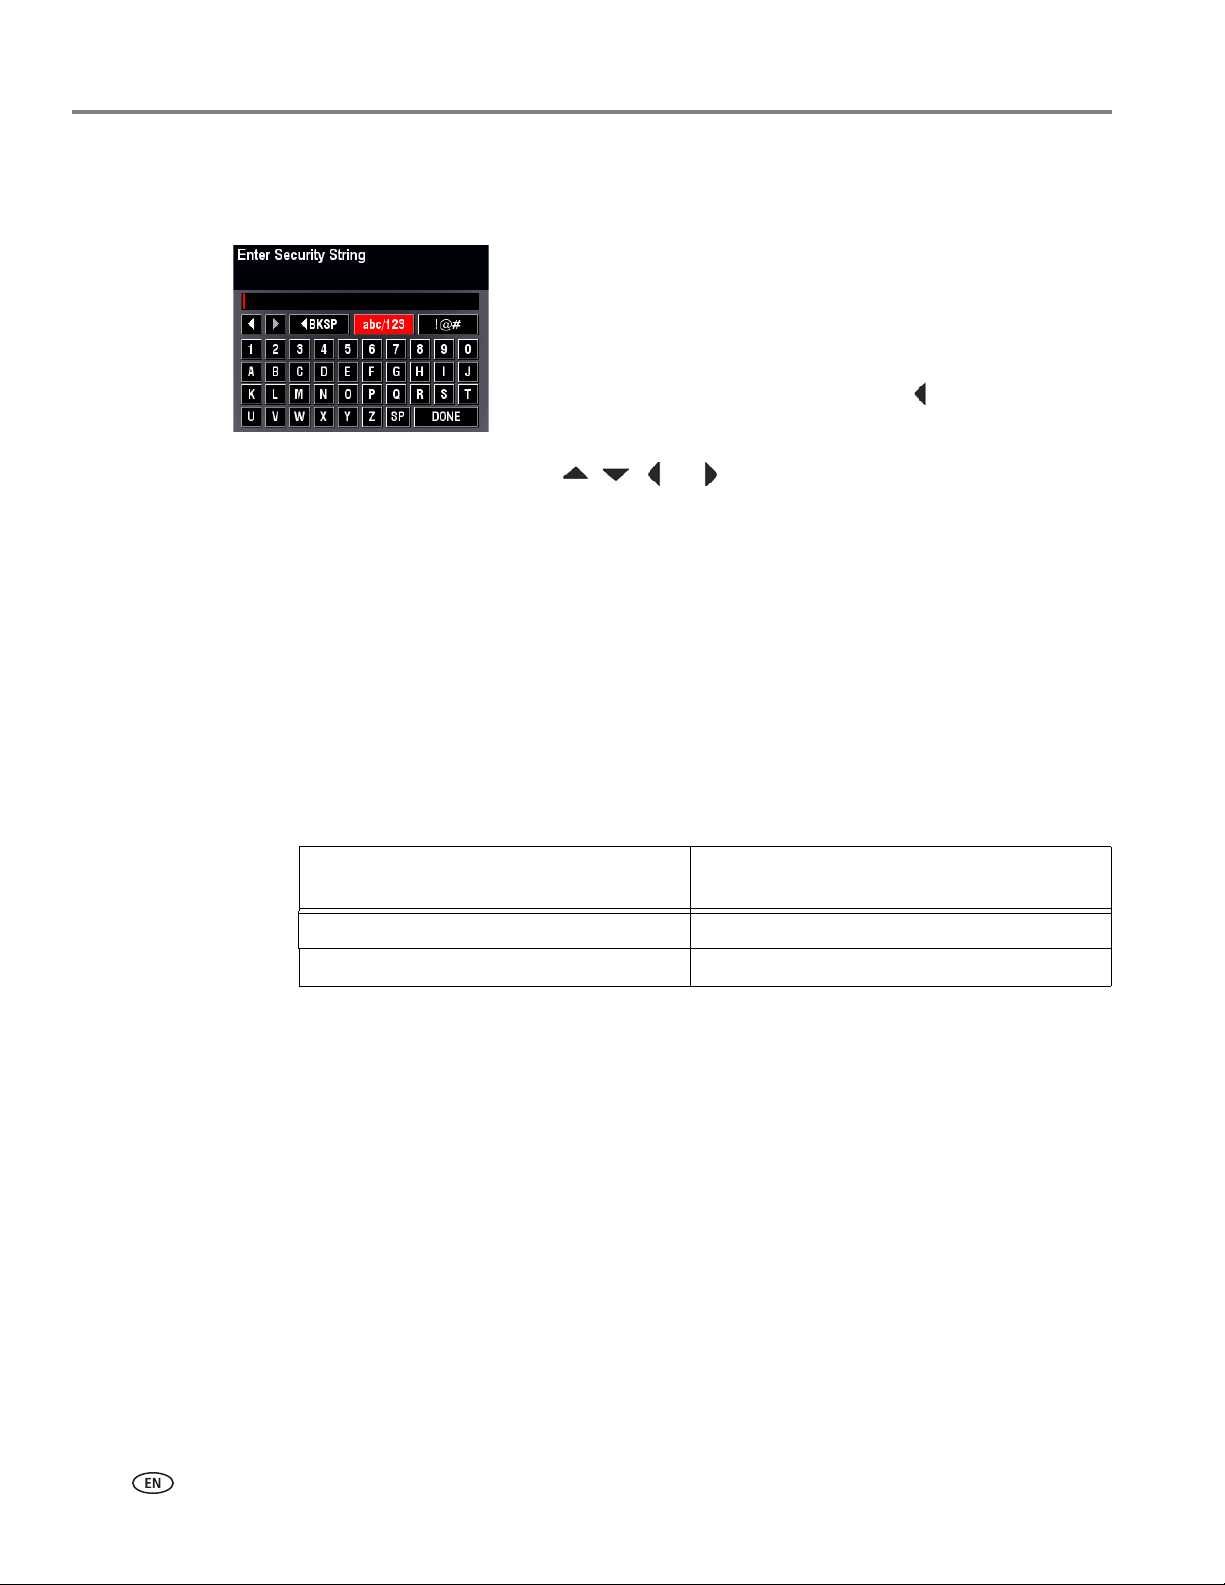
Using the LCD keyboard
When you need to enter letters or numbers, a keyboard appears on the LCD.
On the control panel, press , , or to select the letters and numbers, using
the correct uppercase and lowercase letters. Press OK after each character. When
you are done, select
Setting up an IP address
IMPORTANT: You should only need to set up an IP address for your printer if you are
• To change from uppercase to lowercase, select abc/123, then
OK.
press
• To change from lowercase to uppercase, select
then press OK.
• To enter punctuation or symbols, select
• To erase a character you entered, select
OK.
DONE, then press OK.
!@#, then press OK.
ABC/123,
BKSP, then press
having a problem with connecting. Typically, it is not necessary to set up an
IP address. This procedure is for advanced users who know how to obtain
the IP address for the printer.
All IP address entries have the following format: 000.000.000.000. Within each
three-digit grouping, the number must be right-justified. If an address or subnet
mask has only one or two characters between the periods, include one or two
leading zeros in front of that number. For example:
The address as it may appear
in your documentation
149.89.138.149 149.089.138.149
149.2.40.149 149.002.040.149
How to enter the address
in the printer menu
For information about obtaining the printer IP address, go to
www.kodak.com/go/inkjetnetworking.
8 www.kodak.com/go/aiosupport
Page 15

To set up your IP address on the printer:
1. Press Home.
2. Press to select Network Settings, then press OK.
3. Press to select Advanced IP Address Setup, then press OK.
4. Press OK again to continue.
5. Select one of the following, then press OK:
• Dynamic (DHCP)
• Automatic (Private)
• Manual (Static)
6. If you selected Manual (Static), you are prompted to enter an IP address, a
Subnet Mask, a Gateway Address, and a DNS Server address. Press
each entry. Use the navigation buttons to enter each digit of the numbers.
Consult your Internet service provider or network administrator for more
information.
Viewing the network configuration
KODAK ESP 9200 Series All-in-One Printer
OK after
To view the network configuration and verify that you are connected to your wireless
network:
1. Press Home.
2. Press to select Network Settings, then press OK.
3. Press to select View Network Configuration, then press OK.
The wireless or Ethernet network settings appear on the LCD, including:
•Printer Hostname
• Connection
• Speed
• IP Address
• IP Address Type
• Network Subnet
• Connected Network SSID
•Security
• Authentication
• Channel
•Region
• Radio (on/off)
• MAC Address
If the printer is connected to your network, you will see the network name and
the word CONNECTED.
4. To scroll through the information, press .
5. When you are done, press OK.
www.kodak.com/go/aiosupport 9
Page 16

Networking Your Printer
Printing the network configuration
To print the current network configuration:
1. Load plain paper into the printer. (See Loading plain paper in the main paper
tray, page 17.)
2. Press Home.
3. Press to select Network Settings, then press OK.
4. Press to select Print Network Configuration, then press OK.
Installing your printer on additional computers on the network
To add your printer to another computer(s) on your network, install the KODAK
All-in-One Printer Software on each computer. Go to
www.kodak.com/go/aiodownloads and follow the on-screen instructions.
Connecting to another KODAK All-in-One Printer
If you are connecting to a newer model printer (for example, you have an ESP 7
printer and now you are adding an ESP
for the newer model.
9250 printer), you must install the software
If you are connecting to another ESP 9250 printer or to a previous model:
On a computer with WINDOWS OS:
1. Select Start > All Programs > Kodak > Kodak Printer Network Setup Utility.
• If your wireless all-in-one printer (example: KodakESP9200+0069) is not
listed:
a. Select No, my printer is not listed, then click Next.
b.From the drop-down list, select your printer.
c. Select Network - Wireless / WiFi, then click Next.
When your printer is detected, driver installation begins.
• If your wireless all-in-one printer (example: KodakESP9200+0069) is listed:
a. Highlight the all-in-one printer that is connected to your network.
b. Select Yes, my printer is listed, then click Next.
When your printer is detected, driver installation begins.
2. When driver installation is complete, click Done.
On a computer with MAC OS:
1. Select Apple > System Preferences.
2. Under Hardware, select Print & Fax.
3. In the Print & Fax dialog box, click +.
4. Select your printer from the list, then click Add.
10 www.kodak.com/go/aiosupport
Page 17

Connecting to an Ethernet network
NOTE: The printer cannot be connected to a wireless network and to an Ethernet
network at the same time. (The printer can, however, be connected to an
Ethernet network and to the computer via USB cable at the same time.) If
you connect an Ethernet cable to the back of the printer, the wireless
connection will automatically disconnect and the Wi-Fi connectivity LED will
turn off. When you disconnect the Ethernet cable, the Wi-Fi radio will
automatically connect to the last connection.
Before you connect to an Ethernet network, you need:
• An Ethernet network that includes a router, switch, or hub with an Ethernet port.
• A Category 5 (or higher) Ethernet cable.
• To temporarily disable your firewall until the printer is successfully installed and
communicating. For information, go to www.kodak.com/go/inkjetnetworking.
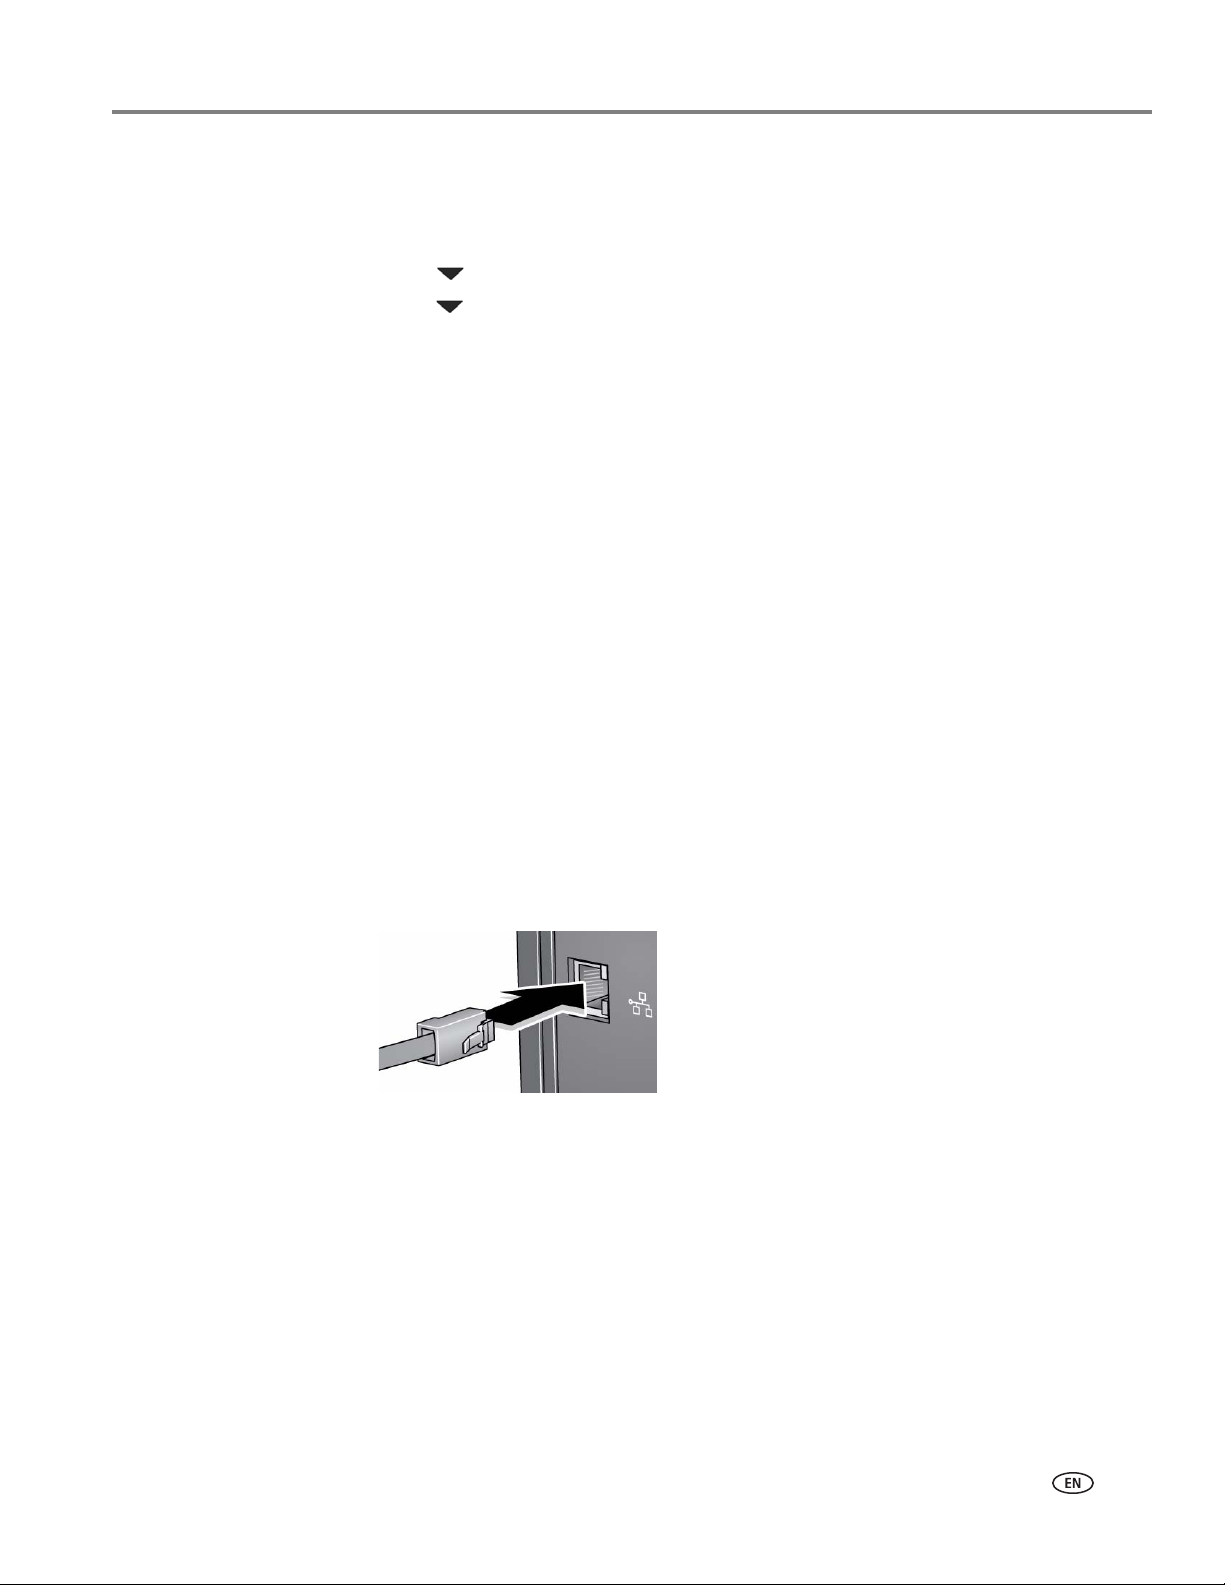
To connect to an Ethernet network:
1. Connect the Ethernet cable to the Ethernet port on the back of the printer.
KODAK ESP 9200 Series All-in-One Printer
2. Connect the other end of the Ethernet cable to an available Ethernet port on
your router, switch, or hub.
3. If you haven’t yet installed the KODAK All-in-One Printer Software, go to
www.kodak.com/go/aiodownloads and follow the on-screen instructions to
install the software and complete your setup.
www.kodak.com/go/aiosupport 11
Page 18

Networking Your Printer
Adding a network connection to a USB-connected computer
You can change the way you connect to your printer at any time.
Changing from USB to a wireless connection
To change the printer connection type from USB to a wireless (Wi-Fi) network:
If your printer is connected to a computer with WINDOWS OS:
1. Unplug the USB cable from your printer and computer.
2. On the printer control panel, press Home.
3. Press to select Network Settings, then press OK.
4. Press to select Vi ew Networ k Configurat ion, press OK, then confirm you have
a non-zero IP address.
5. If you have not already done so, connect your printer to your wireless network.
Connecting to a wireless network, page 5.
See
6. On your computer, disable any firewall you have installed until you have
successfully completed the installation. For more information on firewalls, go to
www.kodak.com/go/inkjetnetworking.
7. S el ect Start > All Programs > Kodak > Kodak Printer Network Setup Utility.
• If your wireless all-in-one printer (example: KodakESP9200+0069) is not
listed:
a. Select No, my printer is not listed, then click Next.
b.Select your printer from the list.
c. Select Network - Wireless/WiFi, then click Next.
When your printer is detected, driver installation begins.
• If your wireless all-in-one printer (example: KodakESP9200+0069) is listed:
a. Highlight the all-in-one printer that is connected to your network.
b. Select Yes, my printer is listed, then click Next.
When your printer is detected, driver installation begins.
8. When driver installation is complete, click Done.
The printer with a wireless connection is listed as the name of the printer plus a
number (for example, KodakESP9200+0069).
12 www.kodak.com/go/aiosupport
Page 19
If your printer is connected to a computer with MAC OS:
1. Unplug the USB cable from your printer and computer.
2. On the printer control panel, press Home.
3. Press to select Network Settings, then press OK.
4. Press to select View Network Configuration, press OK, then confirm you have
an IP address.
5. Select Apple > System Preferences.
6. Under Hardware, select Print & Fax.
7. In the Print & Fax dialog box, click +.
8. Select your printer from the list, then click Add.
The printer with a wireless connection is listed as the name of the printer plus a
number (for example, KodakESP9200+0069).
Changing from USB to an Ethernet connection
Before you connect, you need:
• An Ethernet network that includes a router, switch, or hub with an Ethernet port.
• A Category 5 (or higher) Ethernet cable.
• To temporarily disable your firewall until the printer is successfully installed and
communicating. For information, go to www.kodak.com/go/inkjetnetworking.
KODAK ESP 9200 Series All-in-One Printer
To change from a USB connection to an Ethernet network connection:
1. Unplug the USB cable from your printer and computer.
2. Connect the Ethernet cable to the Ethernet port on the back of the printer.
3. Connect the other end of the Ethernet cable to an available Ethernet port on
your router, switch, or hub.
www.kodak.com/go/aiosupport 13
Page 20

Networking Your Printer
If your printer is connected to a computer with WINDOWS OS:
1. Select Start > All Programs > Kodak > Kodak Printer Network Setup Utility.
2. Select No, my printer is not listed, then click Next.
3. Select ESP 9200 Series from the printer drop-down list.
4. Select Network - Ethernet cable, then click Next.
The Printer Setup Utility searches for your printer and connects automatically.
5. Click Done.
If your printer is connected to a computer with MAC OS:
1. Select Apple > System Preferences.
2. Under Hardware, select Print & Fax.
3. In the Print & Fax dialog box, click +.
4. Select your printer from the list, then click Add.
14 www.kodak.com/go/aiosupport
Page 21
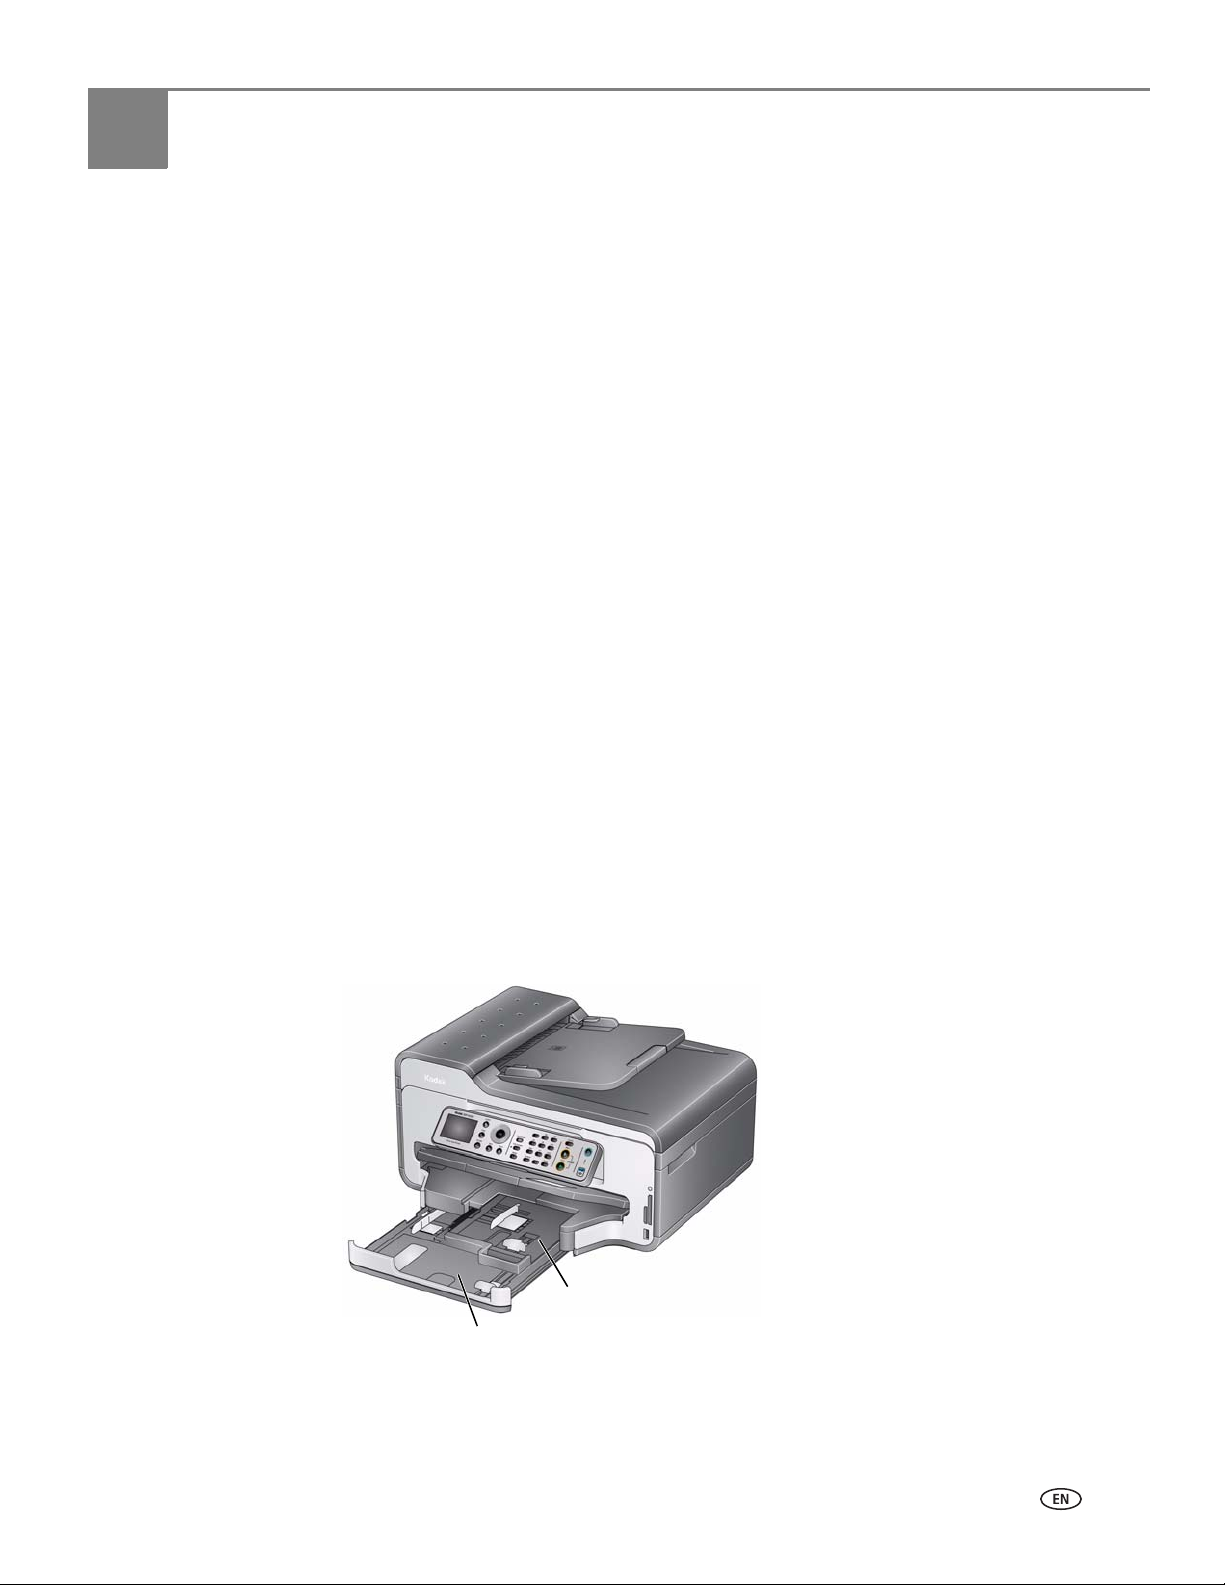
3
Main (bottom) paper tray
Photo (top) paper tray
Handling Paper
Paper types
For the best printing results, use KODAK Photo Papers, which are optimized to work
with KODAK All-in-One Printers.
For the best document printing results, use KODAK Document Papers or a paper
with the COLORLOK Technology logo on the package. Use only paper that is
designed for inkjet printers.
When handling paper:
• Hold the paper by the edges; avoid placing your fingerprints on it.
• Do not touch the glossy side of photo paper.
• Store paper flat, away from direct sunlight and heat.
You can use:
• Plain paper — 20 to 24 lb / 75 to 90 gsm
• Photo paper — 6.5 to 12 mils (up to 290 gsm)
• Card stock — 110 lb / 200 gsm, max
• Envelopes — 20 to 24 lb / 75 to 90 gsm
• Transparencies — inkjet variety with white stripe
• Labels — all commercially available inkjet varieties on 8.5 x 11-in. or A4 sheets
• Iron-on transfers — all commercially available inkjet varieties on 8.5 x 11-in. or
A4 sheets
Paper sizes
This printer has two paper trays, which accept different sizes of paper.
www.kodak.com/go/aiosupport 15
Page 22

Handling Paper
The main paper tray accepts the following paper sizes:
• 4 x 6 in. / 10 x 15 cm
• 4 x 7 in. / 10 x 18 cm
• 4 x 12 in. / 10 x 31 cm
• 5 x 7 in. / 13 x 18 cm
• 7.3 x 8.5 in / 18 x 22 cm
• 8 x 10 in. / 20 x 25 cm
• 8.5 x 11 in. / 22 x 28 cm
• 8.5 x 14 in. / 22 x 36 cm
• A4 (8.3 x 11.7 in. / 21 x 30 cm)
• A5 (5.8 x 8.3 in. / 15 x 21 cm)
•A6 (4.1 x 5.8 in. / 11 x 15 cm)
• B5 (6.9 x 9.8 in. / 18 x 25 cm)
The photo paper tray accepts the following paper sizes:
• 4 x 6 in. / 10 x 15 cm
• 4 x 7 in. / 10 x 18 cm
• 5 x 7 in. / 13 x 18 cm
•A6 (4.1 x 5.8 in. / 11 x 15 cm)
NOTE: Do not load paper smaller than 4 x 6 in. / 10 x 15 cm in either paper tray.
Envelope sizes
The printer accepts the following envelope sizes (in the main paper tray):
• C5 (6.7 x 9 in. / 16 x 23 cm)
• C6 (4.5 x 6.4 in. / 11 x 16 cm)
• DL (4.3 x 8.7 in. / 11 x 22 cm)
• US #7¾ (3.9 x 7.5 in. / 10 x 19 cm)
• US #9 (3.9 x 8.9 in. / 10 x 23 cm)
• US #10 (4.1 x 9.5 in. / 11 x 24 cm)
IMPORTANT: Do not load envelopes with cutout or clear windows.
16 www.kodak.com/go/aiosupport
Page 23

Loading paper
Main paper tray
Output tray
Left paperedge guide
Front paper-edge guide
Paper tray
extender
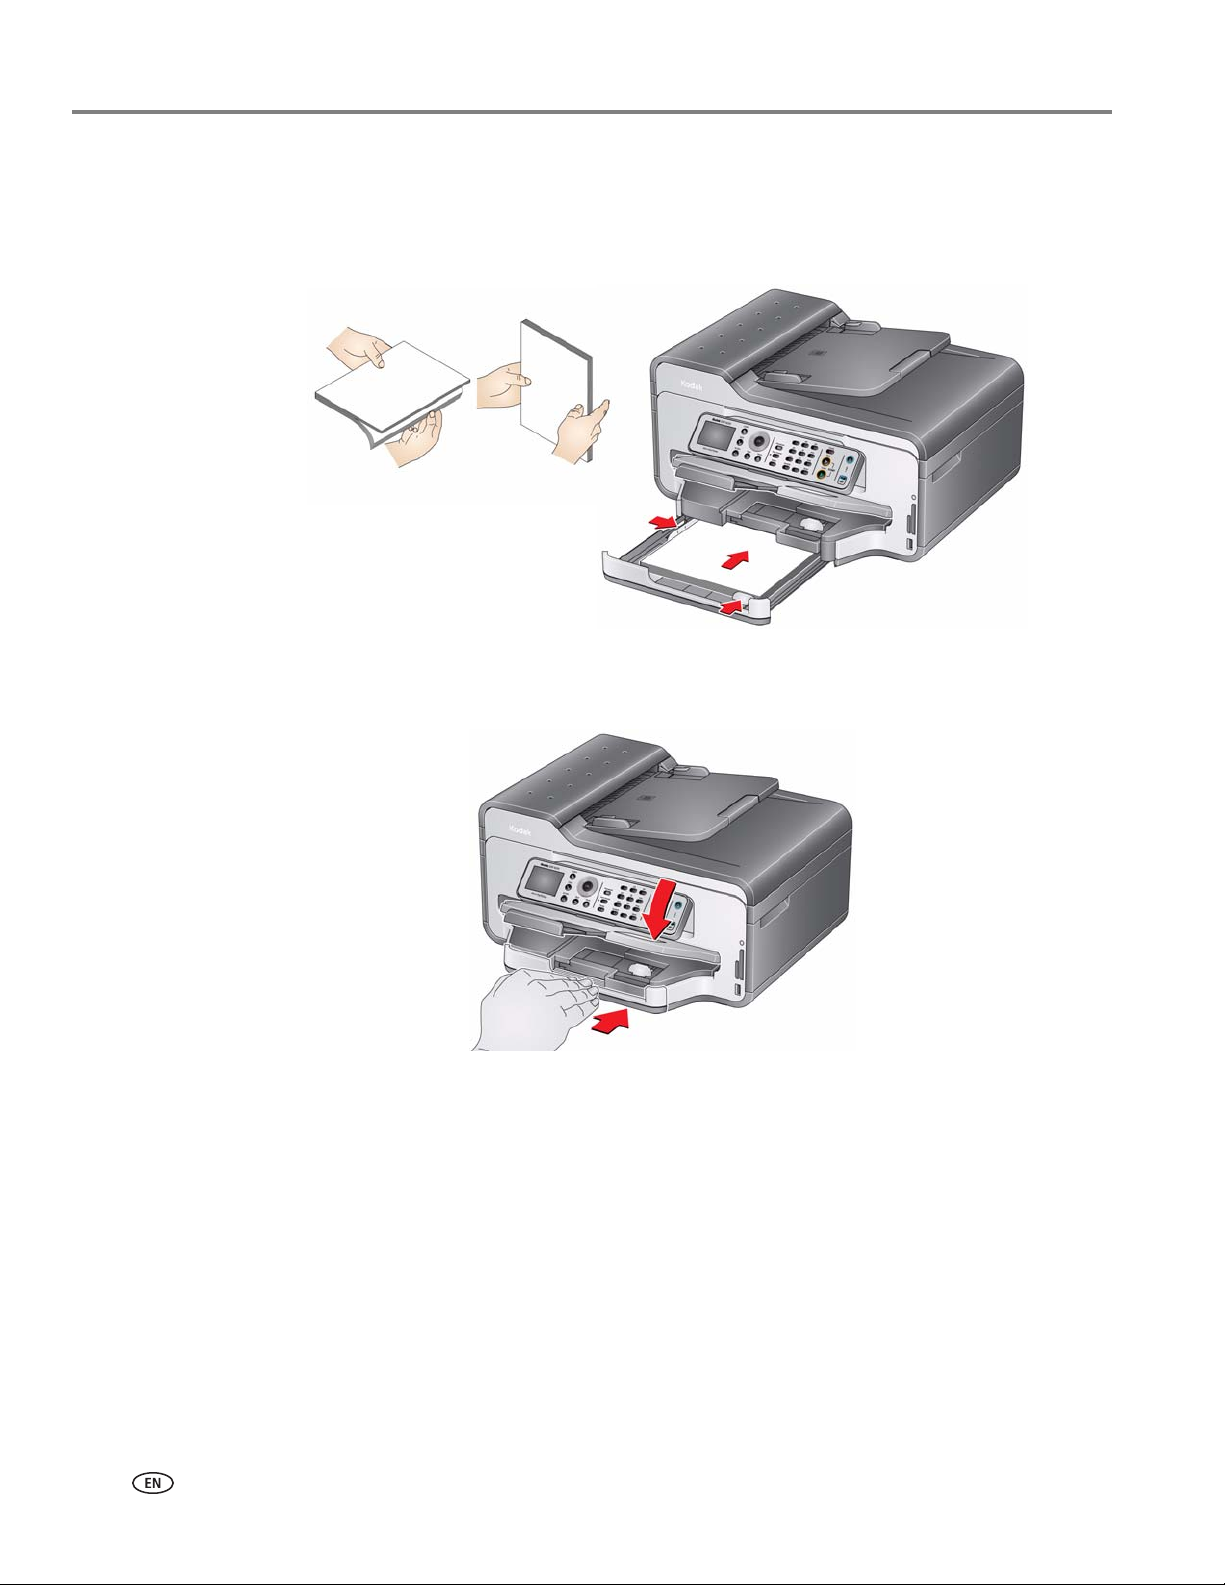
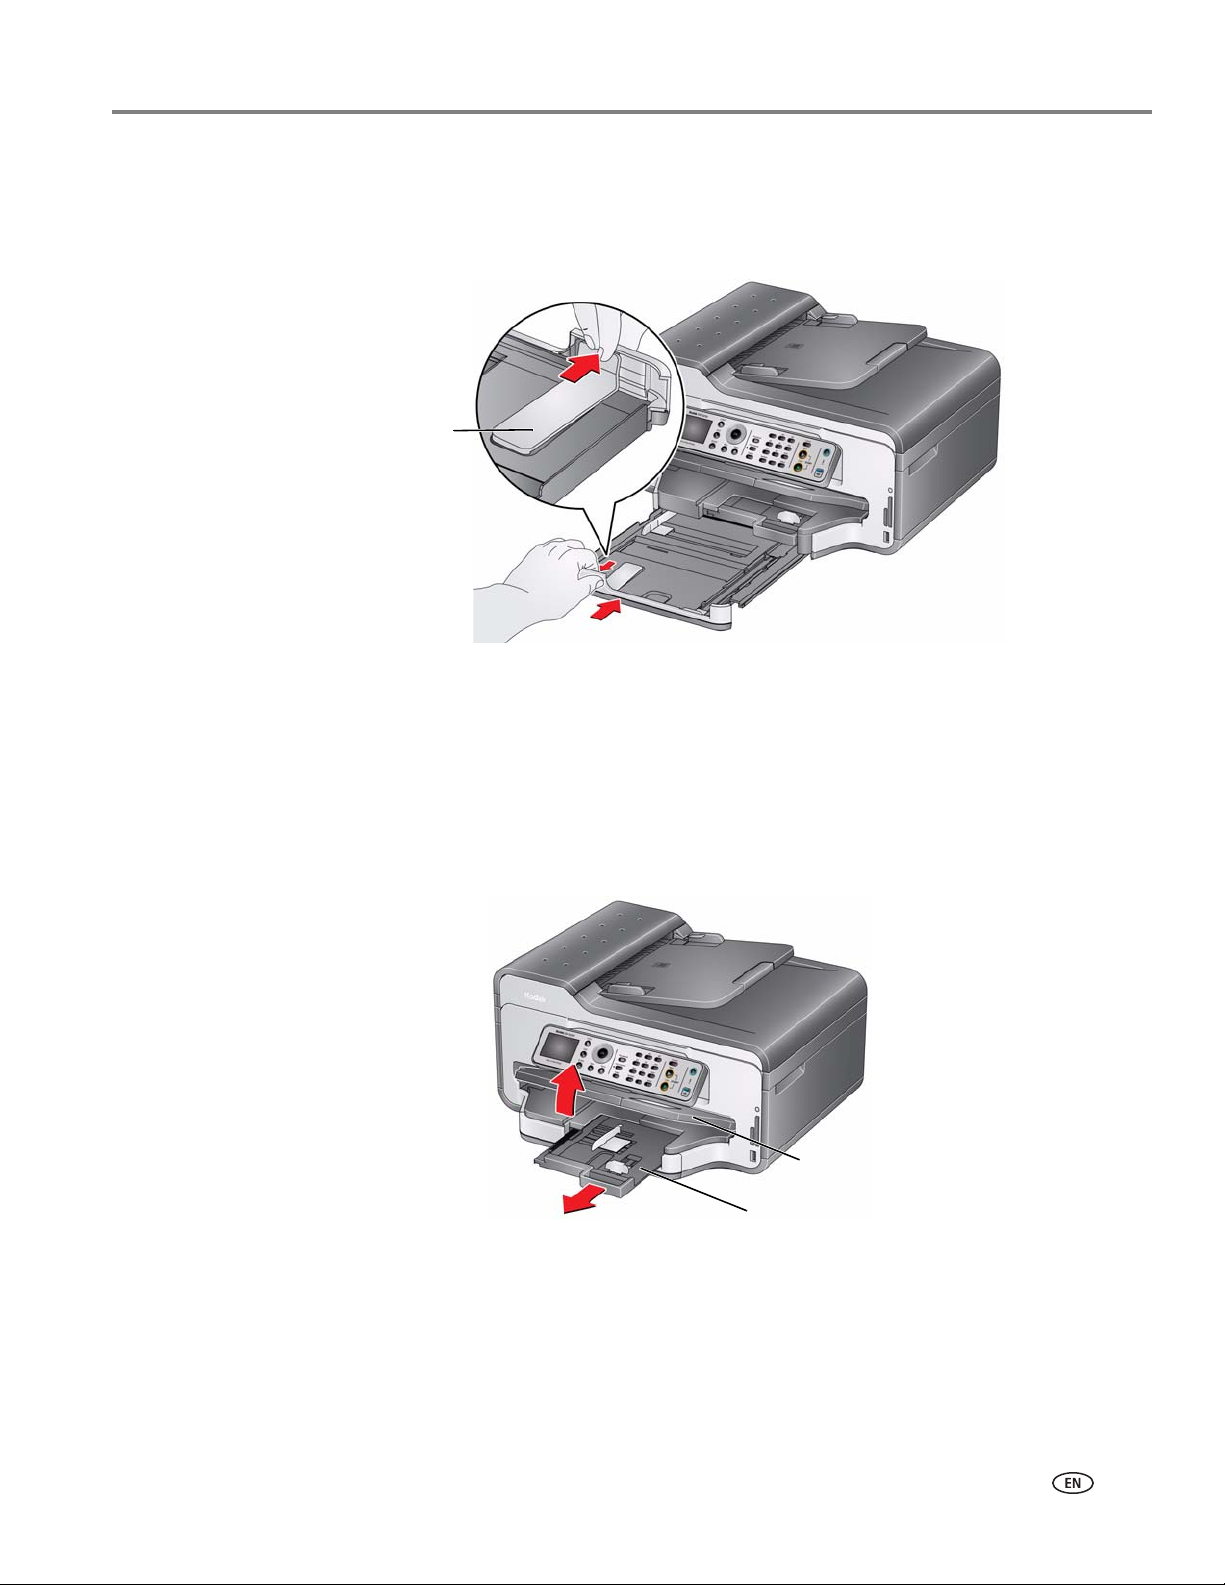
Loading plain paper in the main paper tray
The main paper tray capacity is 100 sheets of plain paper.
To load plain paper:
1. Raise the output tray, and pull out the paper tray.
KODAK ESP 9200 Series All-in-One Printer
2. Move the left paper-edge guide to the far left.
3. Move the front paper-edge guide forward.
www.kodak.com/go/aiosupport 17
Page 24
Handling Paper
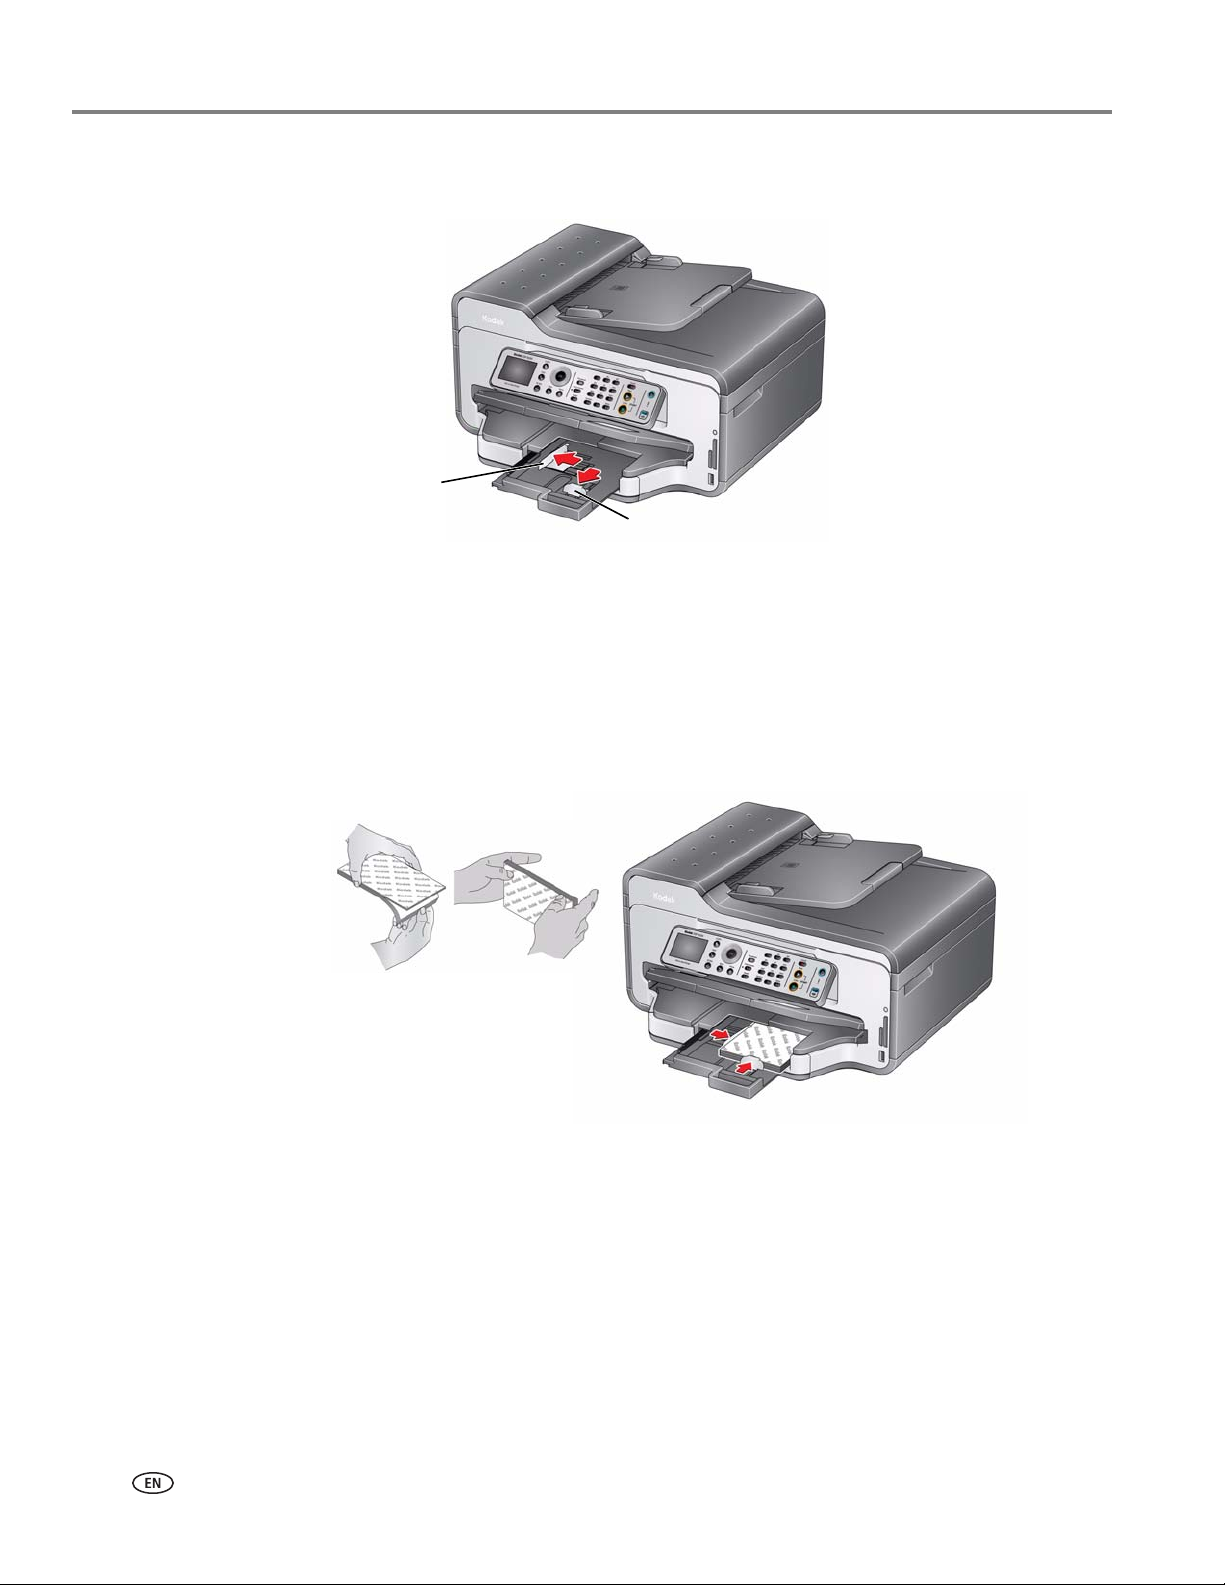
4. Fan and stack the paper, then insert it into the tray.
5. Move the paper forward until it stops.
6. Move both the left and front paper-edge guides until they touch the paper.
7. Push in the paper tray until it clicks into place, and lower the output tray.
18 www.kodak.com/go/aiosupport
Page 25
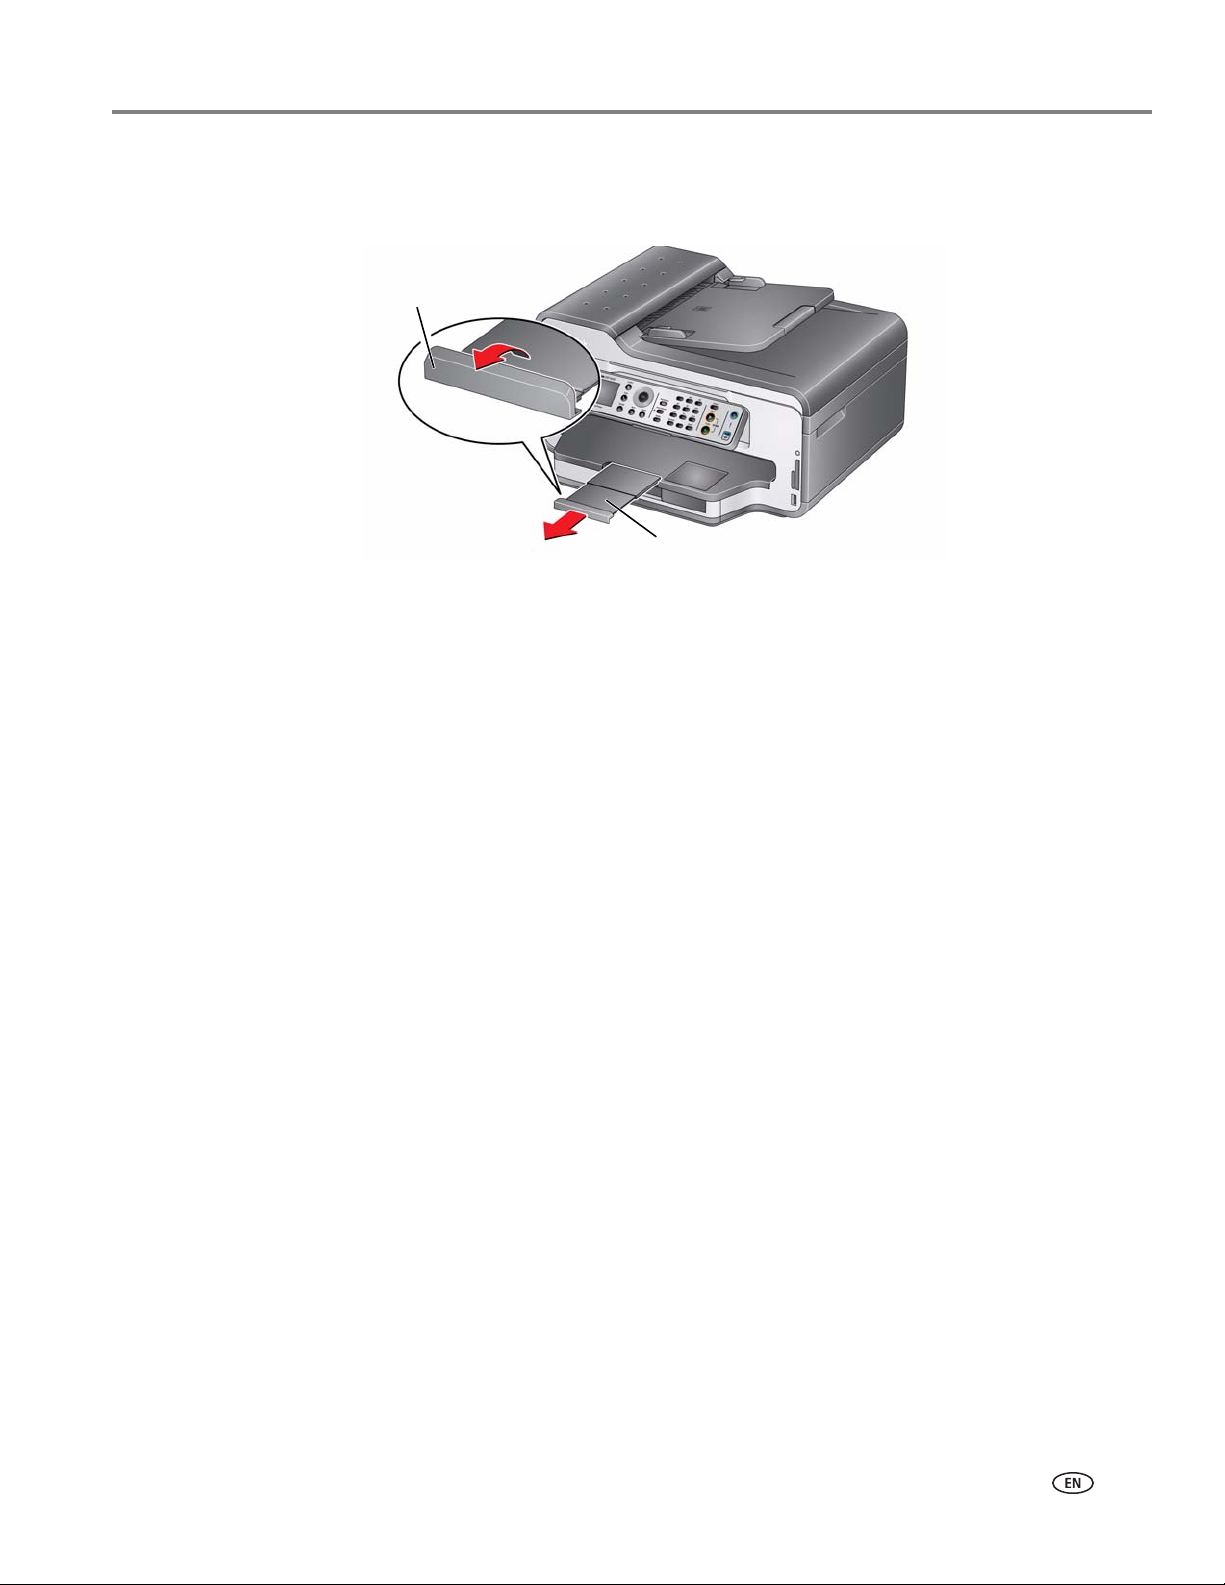
KODAK ESP 9200 Series All-in-One Printer
Output tray extender
Paper stop
8. Pull out the output tray extender until it is fully extended.
9. Lift the paper stop.
NOTE: You may also load photo paper as small as 4 x 6 in. / 10 x 15 cm in the main
paper tray with the
logo side facing up and the glossy side down.
www.kodak.com/go/aiosupport 19
Page 26
Handling Paper
Main paper tray
Output tray
Left paperedge guide
Front paper-edge guide
Paper tray
extender
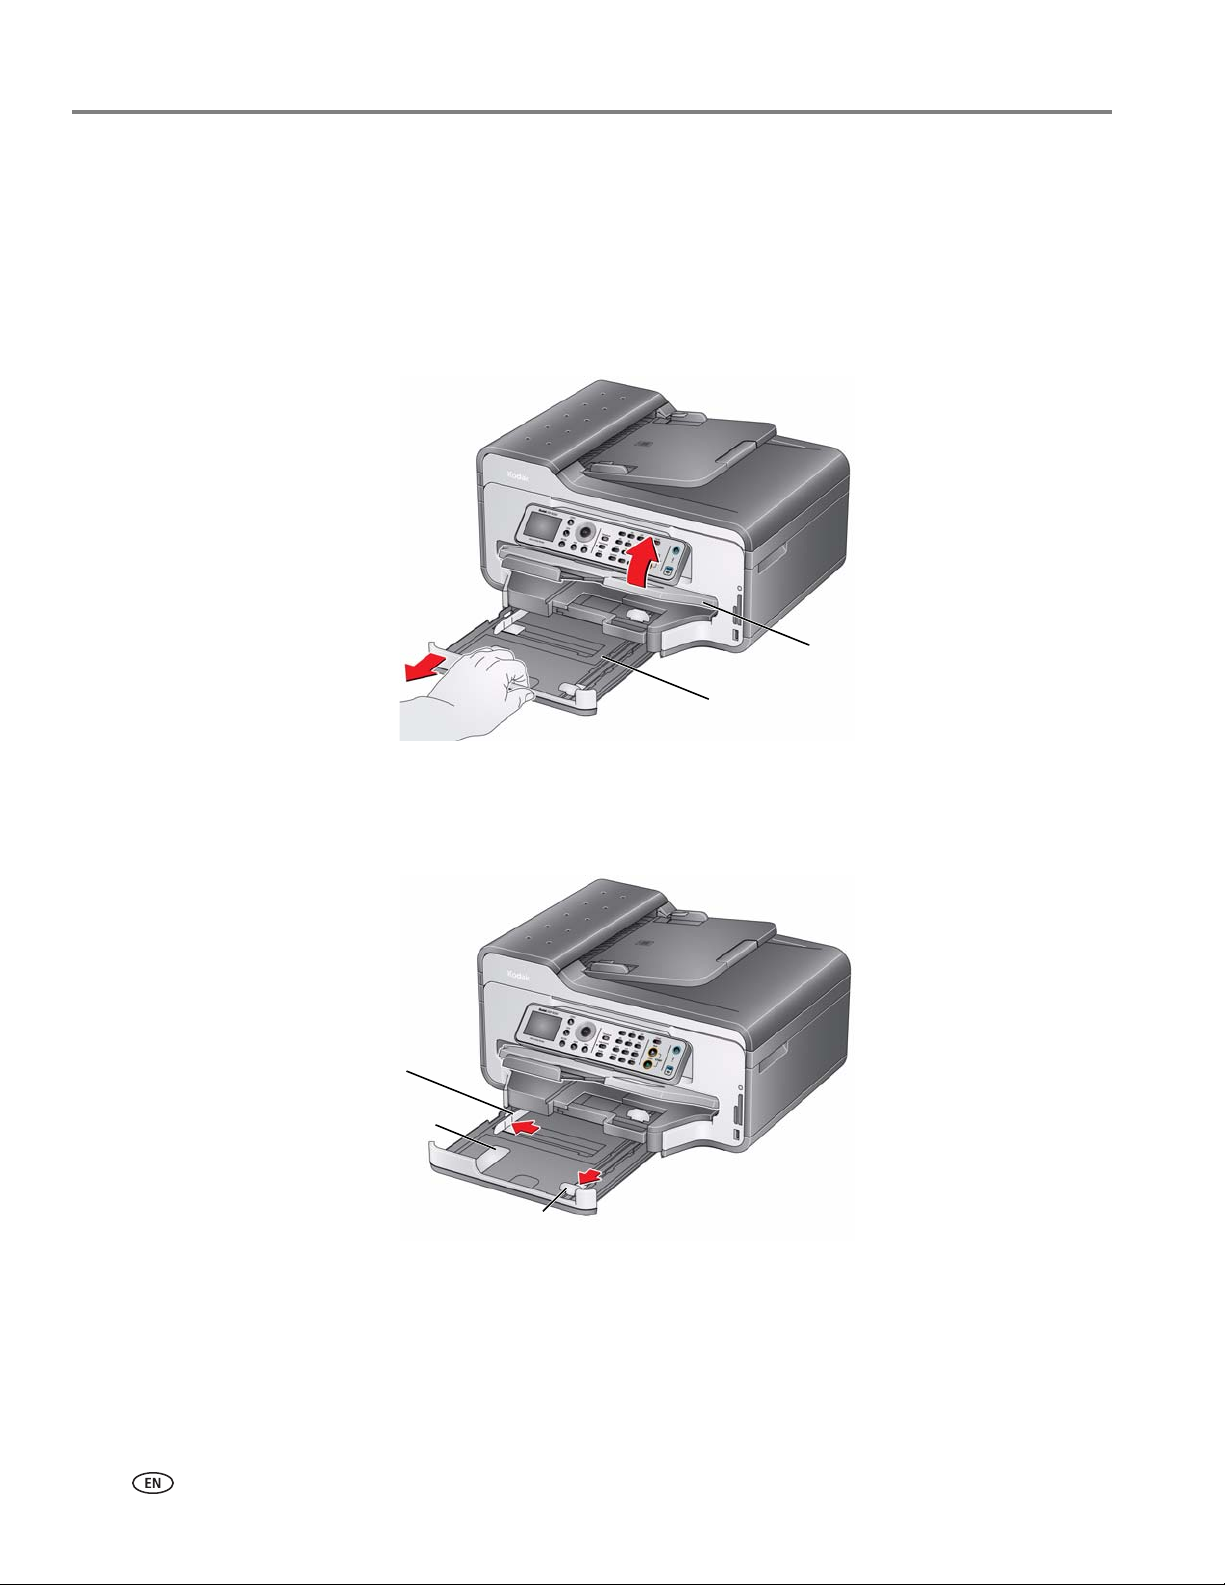
Loading legal-size paper in the main paper tray
The main (bottom) paper tray capacity is 100 sheets of legal-size (8.5 x 14 in. /
22 x 36 cm) paper.
To load legal-size paper:
1. Raise the output tray, and pull out the main paper tray.
2. Move the left paper-edge guide to the far left.
3. Move the front paper-edge guide forward.
20 www.kodak.com/go/aiosupport
Page 27
KODAK ESP 9200 Series All-in-One Printer
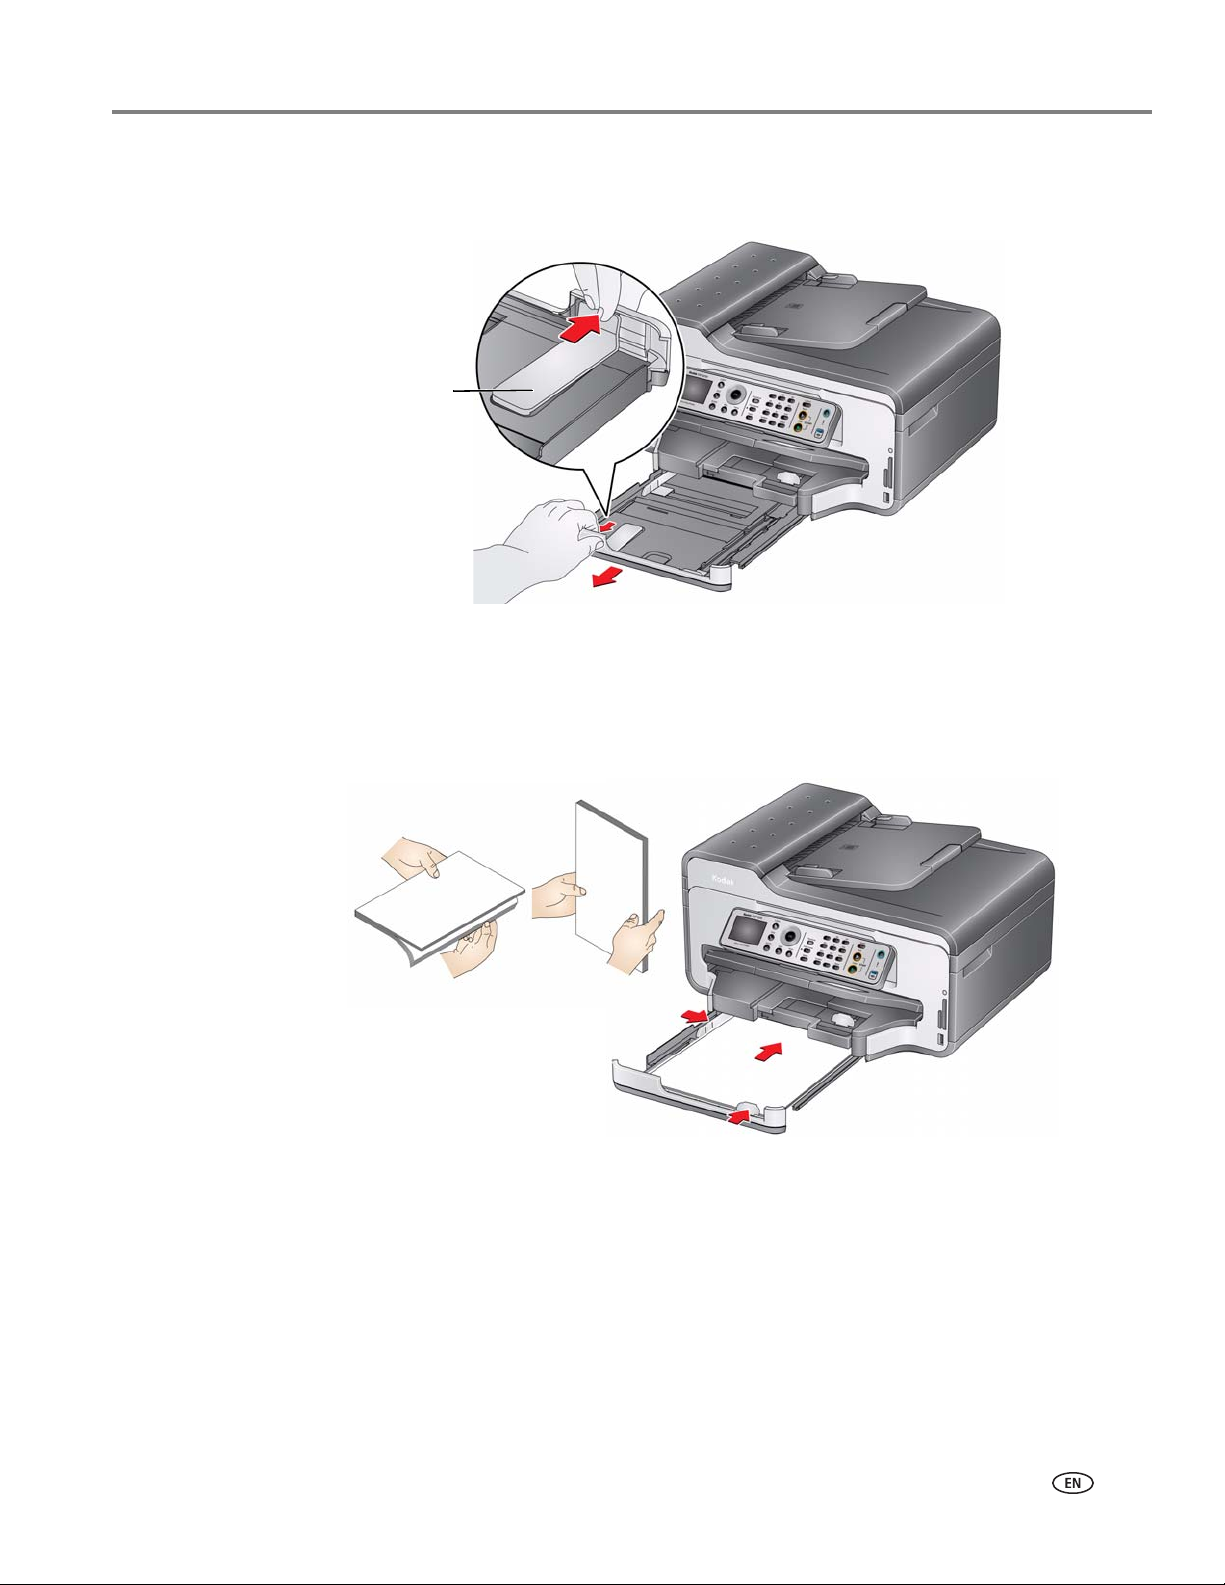
Paper tray
extender
4. Press the paper tray extender, and pull the paper tray forward until it is fully
extended.
5. Fan and stack the paper, then insert it into the tray.
6. Move the paper forward until it stops.
7. Move both the left and front paper-edge guides until they touch the paper.
www.kodak.com/go/aiosupport 21
Page 28

Handling Paper
Output tray
Paper stop
extender
8. Push in the main paper tray until it clicks into place, and lower the output tray.
9. Pull out the output tray extender until it is fully extended, but do not lift the
paper stop.
22 www.kodak.com/go/aiosupport
Page 29
KODAK ESP 9200 Series All-in-One Printer
Paper tray
extender
Photo paper tray
Output tray
NOTE: To close the paper tray extender, pull out the main paper tray and take out
the legal-size paper. Press the paper tray extender and push the tray forward
until you hear a click.
Loading the photo paper tray
The photo (top) paper tray capacity is 40 sheets of photo paper.
To load photo paper:
1. Raise the output tray, and pull out the photo paper tray.
2. Move the left paper-edge guide to the far left.
www.kodak.com/go/aiosupport 23
Page 30
Handling Paper
Front paper-edge guide
Left paperedge guide
3. Move the front paper-edge guide forward.
4. Fan and stack the photo paper, then insert it (short side first) into the tray with
logo side facing up and the glossy side down.
the
IMPORTANT: If the photo paper is loaded the wrong way, the ink on your pictures will be
wet and the image quality will be affected.
5. Move the paper forward until it stops.
6. Move both the left and front paper-edge guides until they touch the paper.
24 www.kodak.com/go/aiosupport
Page 31

Loading envelopes
Main paper tray
Output tray
KODAK ESP 9200 Series All-in-One Printer
7. Push in the photo paper tray until it clicks into place, and lower the output tray.
The main paper tray capacity is 20 envelopes.
IMPORTANT: Do not load envelopes with cutout or clear windows.
To l o a d e nve l o pes :
1. Raise the output tray, and pull out the main paper tray.
2. Remove any paper from the tray.
3. Make sure the left paper-edge guide is to the far left.
www.kodak.com/go/aiosupport 25
Page 32

Handling Paper
Left paperedge guide
Front paper-edge guide
Paper tray
extender
4. Move the front paper-edge guide forward.
5. Insert the envelopes into the tray with the flap up and against the right side of
the tray.
6. Move the envelopes forward until they stop.
7. Move both the left and front paper-edge guides until they touch the envelopes.
26 www.kodak.com/go/aiosupport
Page 33

8. Push in the main paper tray until it clicks into place, and lower the output tray.
Loading originals
You can place originals for copying, scanning, or faxing on the scanner glass or in the
ADF (automatic document feeder). The ADF automatically feeds the originals into
the printer when you begin copying, scanning, or faxing.
KODAK ESP 9200 Series All-in-One Printer
NOTE: Keep the scanner glass clean. Any dirt or smudges on the glass will appear
Using the scanner glass
To place an original on the scanner glass:
1. Remove any originals from the automatic document feeder (ADF).
2. Lift the scanner lid, and place the document or picture face down in the
right-front corner.
as marks on the copy. See
backing, page 66.
Cleaning the scanner glass and document
3. Close the scanner lid.
www.kodak.com/go/aiosupport 27
Page 34

Handling Paper
ADF paper-edge guides
Using the Automatic Document Feeder (ADF)
The ADF capacity is 30 originals (20 to 24 lb / 75 to 90 gsm plain paper).
The ADF accepts originals from 6.9 x 9.8 in. / 18 x 25 cm to 8.5 x 14 in. / 22 x 36 cm.
IMPORTANT: Do not load photographs in the ADF.
1. Move the ADF paper-edge guides outward.
2. Fan and stack the originals, then insert them face up in the ADF.
IMPORTANT: Remove all paper clips and staples from the originals.
3. Move the ADF paper-edge guides until they touch the paper.
The ADF automatically feeds the originals into the printer when you begin copying,
scanning, or faxing.
28 www.kodak.com/go/aiosupport
Page 35

4
Printing
Print documents and lab-quality pictures on your printer.
Changing paper trays
The printer has two paper trays. When you print documents, the printer
automatically selects paper from the main (bottom) paper tray. When you print
photos, the printer automatically selects paper from the photo (top) paper tray. You
may, however, choose the top or bottom tray at any time.
To change paper trays when printing from a computer with WINDOWS OS:
1. Open the document you want to print, then select File > Print.
2. In the Print dialog box, make sure that KODAK ESP 9200 Series AiO is selected,
then click
3. In the General tab under Paper tray, click then select Bottom Tray or To p Tray.
4. Click OK to close the Properties dialog box.
5. Click OK to begin printing.
To change paper trays when printing from a computer with MAC OS:
Properties.
1. Open the document you want to print, then select File > Print.
2. In the Print dialog box, make sure that Eastman Kodak Company ESP 9200 Series
is selected.
AiO
3. From the Copies & Pages drop-down list, select Printer Options.
4. From the Paper Tray drop-down list, select Top tray or Bottom tray.
5. Click Print.
To change paper trays when printing from the printer control panel:
1. Press Home.
2. Press to select Copy Photo or View and Print P hotos .
3. Press to select Tray Selection, then press to select Bottom Tray.
NOTE: Top Tray is the default when printing pictures. You cannot change to the
bottom tray from the control panel.
www.kodak.com/go/aiosupport 29
Page 36

Printing
Printing documents
To print a document from your computer:
1. Open the document.
2. Select File > Print.
3. In the Print dialog box, select your KODAK Printer.
4. Choose the pages to print, number of copies, etc, then click OK (on a computer
with WINDOWS OS) or
Printing two-sided documents
Print two-sided documents either automatically with the built-in duplexer or by
manually rotating and reloading the paper.
Automatic two-sided printing
The duplexer can print two-sided documents automatically on:
• plain paper
• standard paper sizes
– letter (8.5 x 11 in. / 22 x 28 cm)
– A4 (8.3 x 11.7 in. / 21 x 30 cm)
– executive (7.3 x 10.5 in. / 18 x 27 cm)
– B5 (6.9 x 9.8 in. / 18 x 25 cm)
NOTE: The paper width must be 3.9 to 8.5 in. / 10 to 22 cm. The paper length must
be 7 to 11.7 in. / 18 to 30 cm.
Print (on a computer with MAC OS).
The duplexer cannot print:
• borderless prints
• poster layout
Automatic two-sided printing from a computer with WINDOWS OS
To print two-sided documents from a computer with WINDOWS OS using the
duplexer:
1. Load plain paper into the paper tray.
2. Open the document you want to print, then select File > Print.
3. In the Print dialog box, make sure that KODAK ESP 9200 Series AiO is selected,
then click
4. Select the Layout tab.
5. Select Automatically with Duplexer.
6. Under Flip on, select Long edge or Short edge, then click OK.
7. Clic k OK.
30 www.kodak.com/go/aiosupport
Properties.
Page 37

Automatic two-sided printing from a computer with MAC OS
To print two-sided documents from a computer with MAC OS using the duplexer:
1. Load plain paper into the paper tray.
2. Open the document you want to print, then select File > Print.
3. In the Print dialog box, make sure that Eastman Kodak Company ESP 9200 Series
4. In the Copies & Pages drop-down list, select Layout.
5. In the Tw o- S id e d drop-down list, select either Long-Edge binding or Short-Edge
6. Click Print.
Manual two-sided printing
You can print two-sided documents on any size paper that the printer accepts (see
Paper sizes, page 15) when you rotate the paper manually.
IMPORTANT: Manual two-sided printing will not work on bar-coded photo paper (the bar
is selected.
AiO
binding
KODAK ESP 9200 Series All-in-One Printer
.
code is on the back side). Manual two-sided printing can only be done on
media that can absorb ink on both sides, such as plain paper or two-sided
photo paper.
Manual two-sided printing from a computer with WINDOWS OS
To print two-sided documents from a computer with WINDOWS OS:
1. Load paper into the paper tray.
2. Open the document you want to print, then select File > Print.
3. In the Print dialog box, make sure that KODAK ESP 9200 Series AiO is selected,
then click
Properties.
4. Select the Layout tab.
5. Select Manual (Instructions provided), then click OK.
6. Click OK.
7. When a message appears on your computer and printer LCD, remove the
printed pages from the output tray.
8. Rotate the printed pages 180 degrees, and place them into the paper tray
(printed side up).
9. Press Start Black or Start Color on the printer.
NOTE: It does not matter which Start button you press; the print job will continue
printing in either color or black, depending on the document.
www.kodak.com/go/aiosupport 31
Page 38

Printing
Manual two-sided printing from a computer with MAC OS
To print two-sided documents from a computer with MAC OS:
1. Load paper into the paper tray.
2. Open the document you want to print, then select File > Print.
3. In the Print dialog box, make sure that Eastman Kodak Company ESP 9200 Series
is selected.
AiO
4. In the Copies & Pages drop-down list, select Paper Handling.
5. In the Pages to Print drop-down list, select Odd Only.
6. In the Page Order drop-down list, select Reverse.
7. Clic k Print.
8. When the odd pages have finished printing, remove the printed pages from the
output tray.
9. Rotate the printed pages 180 degrees and place them into the paper tray
(printed side up).
10. Select File > Print.
11. In the Copies & Pages drop-down list, select Paper Handling.
12. In the Pages to Print drop-down list, select Even Only.
13. In the Page Order drop-down list, select Normal.
14. Click Print.
Printing forms
You can print the following preprogrammed forms:
• Graph paper
•Wide ruled
•Narrow ruled
•Grocery list
•Reminder list
• Tic-tac-toe
• Sheet music (portrait)
• Sheet music (landscape)
To print a preprogrammed form:
1. Press Home.
2. Press to select Printable Forms, then press OK.
3. Press to select a form.
4. Press or to select a quantity (up to 99), then press OK.
5. Press Start Black or Start Color on the printer.
NOTE: It does not matter which Start button you press; the form will printing in
either color or black, depending on the form.
32 www.kodak.com/go/aiosupport
Page 39

Printing pictures
You can print pictures with your all-in-one printer from:
• A memory card inserted into a memory card slot
• A storage device (such as a flash drive) or camera connected to the front USB
• A BLUETOOTH Technology enabled device (with the optional KODAK Wireless
• An iPhone / iPod Touch or BLACKBERRY Device (may not be available with all
You can also print pictures using Home Center Software from your computer with
WINDOWS OS. Home Center Software lets you edit and enhance your pictures
quickly. Open Home Center Software, select
on-screen instructions.
On a computer with either MAC OS or WINDOWS OS, you can print pictures from
KODAK EASYSHARE Software or any picture-editing or photo-management
software.
KODAK ESP 9200 Series All-in-One Printer
port with a USB cable
2.0 USB BLUETOOTH Adapter plugged into the front USB port)
models). For information, go to www.kodak.com/go/picflick.
Print Pictures, then follow the
Printing from a memory card or USB-connected device
You can print pictures from the following cards or USB-connected devices:
MS/XD/SD Card slot CF Card slot Front USB port
• MULTIMEDIA Card
(MMC)
•XD Picture Card
•SECURE DIGITAL (SD)
Card
•SECURE DIGITAL High
Capacity (SDHC) Card
• Variations of the
memory cards above
that require an adapter
(for example,
STICK Duo, miniSD
microSD, and T-Flash)
IMPORTANT: If you use a memory card with an adapter, make sure you insert and remove
MEMORY
,
the adapter and the memory card as a unit; do not remove the memory card
while leaving the adapter in the printer.
• COMPACTFLASH
Card (Types I and II)
• MICRODRIVE
•PICTBRIDGE
Technology enabled
camera
•Flash drive
• KODAK Wireless 2.0
USB BLUETOOTH
Adapter
®
www.kodak.com/go/aiosupport 33
Page 40

Printing
Front USB port
Using default settings to print a picture
To print a picture from a memory card or USB-connected device using the default
settings:
1. Insert the memory card into the appropriate slot, or connect the digital camera
or portable drive to the front USB port.
IMPORTANT: Use only one slot or port at a time.
2. Press or to select the picture you want to print.
3. Press Start Black to print a black-and-white picture, or Start Color to print a color
picture.
The printer prints a single 4 x 6 in. / 10 x 15 cm picture.
IMPORTANT: To prevent loss of data from your memory card, do not remove it from the
printer while printing.
34 www.kodak.com/go/aiosupport
Page 41

Changing the settings and printing a picture
Front USB port
You can change the print photos options for an individual picture or group of
pictures, or you can change the settings and save them as the default.
To print a picture or pictures using settings other than the default settings:
1. Insert the memory card into the appropriate slot, or connect the digital camera
or portable drive to the front USB port.
IMPORTANT: Use only one slot or port at a time.
KODAK ESP 9200 Series All-in-One Printer
2. Press or to select the picture you want to print, then press OK.
3. Repeat step 2 for each picture you want to print.
4. Press Home.
5. Press to select View and Pr int Photos, then press OK.
6. Press to select an option, then press or to change the setting.
Print Photos Option Settings Description
View Photos -- Scroll through the pictures on the
memory card.
Transfer All to PC --
Rotate This Photo Press OK to rotate the selected photo.
Quantity 1 (default) to 99 The number of copies that print.
To transfer all the pictures on the
memory card to your computer, press
OK then press Start Black or Start
Color. (It does not matter which Start
button you press, but your printer and
computer must be connected with a
USB cable.)
www.kodak.com/go/aiosupport 35
Page 42

Printing
Print Photos Option Settings Description
Tray Se l e c t i o n Top Tray ( d e f a ult) Picture prints on the paper in the top
tray.
Bottom Tray Picture prints on the paper in the bottom
tray.
Print Size 2 x 3
3.5 x 5
4 x 6 (default)
4 x 7
5 x 7
If bottom tray is
selected, the following
choices also appear:
4 x 12
8 x 10
8.5 x 11 or A4
Plain Paper Quality
(only available if
bottom tray is
selected)
Normal (default) Good quality output; prints faster than
Best The highest quality, but the slowest print
Draft The fastest print speed, but the lowest
If the selected print size is smaller than
the paper in the paper tray, the printer
automatically arranges the pictures to
best fit the paper size.
Best.
speed; eliminates the banding effect that
sometimes occurs when printing Draft or
Normal.
quality.
Photo Paper Quality Automatic
(default)
Scene Balance On (default)
Off
Color Color (default) Prints full color.
Black & White Prints black and white (gray scale).
Add Date to Prints No (default)
Ye s
Save as Defaults No / Yes To save the settings as the new default,
36 www.kodak.com/go/aiosupport
The printer detects when you load photo
paper and sets Best quality
automatically.
Adjusts the image brightness to correct
for underexposure and reduces the
variation in contrast in different areas of
the picture.
Prints the date of the picture(s) (the date
the picture was taken or last edited) in a
corner of the print.
press
OK. With Ye s selected, press OK.
Page 43

IMPORTANT: To prevent loss of data from your memory card, camera, or portable drive,
Printing tagged pictures
Some digital cameras let you tag (or “mark”) pictures on the memory card for
printing. This creates a tag that is recognized by the printer. If you choose to print
tagged pictures, they will print according to the default settings on your printer
(unless otherwise specified by the tag from the camera).
NOTE: Refer to your camera user guide to determine whether your camera supports
To print tagged pictures:
KODAK ESP 9200 Series All-in-One Printer
7. When you have finished changing settings, press Start Black to print a
black-and-white picture, or
Start Color to print a color picture.
do not remove it from the printer while printing.
tagged (also “marked” or “DPOF”) functionality.
1. Insert the memory card into the appropriate card slot.
2. When the “Print tagged images?” message appears, press Start Black to print a
black-and-white picture, or
www.kodak.com/go/aiosupport 37
Start Color to print a color picture.
Page 44

Printing
Front USB port
Printing panoramic pictures
To print a panoramic picture, load 4 x 12 in. / 10 x 31 cm paper, or US letter or A4
paper in the main paper tray.
1. Insert the memory card into the appropriate slot, or connect the digital camera
or portable drive to the front USB port.
IMPORTANT: Use only one slot or port at a time.
2. Press or to select the picture you want to print, then press OK.
3. Press Home.
4. Press to select View and Print Photos, then press OK.
5. Press to select Tray Selection, then press to select Bottom Tray.
6. Press to select Print Size, then press to select 4 x 12.
7. Pre ss Start Black to print a black-and-white picture, or Start Color to print a color
picture.
IMPORTANT: To prevent loss of data from your memory card, camera, or portable drive,
do not remove it from the printer while printing.
38 www.kodak.com/go/aiosupport
Page 45

KODAK ESP 9200 Series All-in-One Printer
Printing pictures from a BLUETOOTH Technology enabled device
You can print pictures from wireless devices, such as mobile phones, digital
cameras, and Personal Digital Assistants (PDAs) using the optional KODAK
Wireless 2.0 USB BLUETOOTH Adapter.
NOTE: You can only print JPEG pictures.
To print a JPEG picture from a BLUETOOTH Technology enabled device:
1. Insert the KODAK Wireless 2.0 USB BLUETOOTH Adapter into the front USB
port.
2. “Pair” the printer and the device so they can communicate.
NOTE: You must “pair” from your device’s interface. If your device prompts you for
the printer’s personal identification number (PIN), enter
3. Select the picture you want to print, then select Send to begin printing.
The printer prints one 4 x 6 in. / 10 x 15 cm picture.
NOTE: For additional instructions, see the user manual for your device.
1111.
Printing pictures or documents from a wireless device
Wirelessly print pictures from an iPhone or iPod Touch Device* at the touch of a
button. Download the KODAK Pic Flick App from the App Store, or go to
www.kodak.com/go/picflick for more information.
You can also print MICROSOFT Word, PowerPoint, and Excel documents with your
DOCUMENTS TO GO Software included with your Wi-Fi enabled BLACKBERRY
Device. For more information, go to
* Compatible with iPhone (with MAC OS 2.2 or later) and iPod Touch Devices (2nd
generation).
www.kodak.com/go/blackberry.
www.kodak.com/go/aiosupport 39
Page 46

Printing
Transferring pictures to a computer
You can transfer .jpg, .mov, and .wav files from a memory card in the printer to your
computer. To transfer these files, the printer
with a USB cable and Home Center Software must be installed on your computer.
NOTE: If you have large video files or a large number of pictures (400 or more), we
recommend that you transfer them using a memory card reader attached
directly to your computer.
Transferring pictures to a computer with WINDOWS OS
1. Insert the memory card into the appropriate card slot.
2. Press Back.
3. Press to select Transfer All to PC, then press OK.
4. Press Start Black or Start Color.
NOTE: It does not matter which Start button you press.
5. If your computer is connected to a wireless network and with a USB cable, select
the USB-connected printer (no number after the printer name).
6. Follow the on-screen instructions on your computer.
must be connected to your computer
Transferring pictures to a computer with MAC OS
1. Insert the memory card into the appropriate card slot.
2. Press Back.
3. Press to select Transfer All to PC, then press OK.
4. Press Start Black or Start Color.
NOTE: It does not matter which Start button you press.
5. If your computer is connected to a wireless network and with a USB cable, select
the USB-connected printer (no number after the printer name).
6. Use iPhoto or Image Capture on your computer to complete the transfer.
40 www.kodak.com/go/aiosupport
Page 47

5
Copying
You can copy documents and photographs with your all-in-one printer. The printer
produces high-quality color or black-and-white copies on a variety of paper types
Paper types, page 15).
(see
Loading originals for copying
To copy documents (up to 30 pages) on plain paper, load the original(s) in the
automatic document feeder (ADF).
To copy a photograph, documents on thick paper, or a document that is too small or
too large to fit in the ADF, place the original on the scanner glass. (The ADF accepts
originals from 6.9 x 9.8 in. / 18 x 25 cm to 8.5 x 14 in. / 22 x 36 cm.)
For more information on loading originals, see Loading originals, page 27.
Copying a document
You can copy a document using the default settings, or you can adjust the quantity,
size, quality, and brightness of your copies.
Using the default settings to copy a document
The default settings are either the factory default settings (see Resetting factory
defaults, page 76), or defaults that you have set on the printer (see Save as Defaults,
page 42).
To copy a document using the current default settings:
1. Place the original document in the ADF or on the scanner glass.
2. Press Copy.
3. Press Start Black to make a black-and-white copy, or press Start Color to make a
color copy.
NOTE: If you load the original document in the ADF, the ADF automatically feeds
the document into the printer when you begin copying.
Adjusting the settings and copying a document
To copy a document using settings other than the default settings:
1. Place the original document in the ADF or on the scanner glass.
2. Press Copy.
The Copy Document Options menu appears on the LCD.
www.kodak.com/go/aiosupport 41
Page 48

Copying
3. Press to select an option, then press or to change the setting.
Copy Document
Option
Quantity 1 (default) to 99 The number of copies that print.
Copy Size Same Size
Plain Paper Quality Normal
Settings Description
The copy is the same size as the
(default)
Fit to Page The printer detects the size of the
20% to 500% Reduces up to 20% or enlarges up to
(default)
Best The highest quality, but the slowest
original.
original on the scanner glass and the
size of the paper in the paper tray, and
automatically reduces
original so that the copy fits on the
paper.
500% of the original size.
Good quality output; prints faster than
Best.
print speed; eliminates the banding
effect that sometimes occurs when
printing Draft or Normal.
or enlarges the
Draft The fastest print speed, but the lowest
quality.
Photo Paper Quality Automatic
(default)
Brightness Normal, -3 to +3
(Normal is default)
Save as Defaults No / Yes To save the settings as the new
The printer detects photo paper in the
paper tray and sets Best quality
automatically.
Lightens or darkens the copy.
Normal is no change from the original;
-3 is the darkest; +3 is the lightest.
default, press
press
OK.
OK. With Ye s selected,
4. Press Start Black to make a black-and-white copy, or press Start Color to make a
color copy.
42 www.kodak.com/go/aiosupport
Page 49

Changing the number of copies of a document
To change the number of copies:
1. Place the original document in the automatic document feeder (ADF) or on the
scanner glass.
2. Press Copy.
The Copy Document Options menu appears on the LCD.
3. Make sure Quantity is selected.
4. Press or to select a number, or use the numeric keypad to enter the
number of copies.
5. Press Start Black to make black-and-white copies, or press Start Color to make
color copies.
Enlarging or reducing a document
To enlarge or reduce the size of the copy:
1. Place the original document in the automatic document feeder (ADF) or on the
scanner glass.
2. Press Copy.
The Copy Document Options menu appears on the LCD.
3. Press to select Copy Size.
4. Press or to select an enlargement or reduction.
5. Press Start Black to make a black-and-white copy, or press Start Color to make a
color copy.
KODAK ESP 9200 Series All-in-One Printer
Darkening or lightening a copy
To darken or lighten the copy:
1. Place the original document in the automatic document feeder (ADF) or on the
scanner glass.
2. Press Copy.
The Copy Document Options menu appears on the LCD.
3. Press to select Brightness.
4. Press to select a number below zero for a darker copy, or press to select a
number above zero for a lighter copy.
5. Press Start Black to make a black-and-white copy, or press Start Color to make a
color copy.
www.kodak.com/go/aiosupport 43
Page 50

Copying
Copying a photograph
You can copy a photograph using the default settings, or you can make adjustments
to the quantity, size, quality, and brightness of your copies.
Using the default settings to copy a photograph
The default settings are either the factory default settings (see Resetting factory
defaults, page 76), or defaults that you have set on the printer (see Save as Defaults,
page 45).
To copy a photograph using the current default settings:
1. Place the original photograph face down on the scanner glass.
2. Press Home.
3. Press to select Copy Photo.
4. Press Start Black to make a black-and-white copy, or press Start Color to make a
color copy.
Adjusting the settings and copying a photograph
To copy a photograph using settings other than the default settings:
1. Place the original photograph face down on the scanner glass.
2. Press Home.
3. Press to select Copy Photo, then press OK.
4. Press to select an option, then press or to change the setting.
Copy Photo Option Settings Description
Quantity 1 (default) to 99 The number of copies that print.
Tray S e l ectio n Top Tray ( d e fa ult ) Copy is made on the paper in the top
tray.
Bottom Tray Copy is made on the paper in the
bottom tray.
44 www.kodak.com/go/aiosupport
Page 51

KODAK ESP 9200 Series All-in-One Printer
Copy Photo Option Settings Description
Copy Size 2 x 3
3.5 x 5
4 x 6 (default)
4 x 7
5 x 7
If bottom tray is
selected for Tray
Selection, the
following choices
also appear:
4 x 12
8 x 10
8.5 x 11 or A4
Plain Paper Quality
(available only if
bottom tray is
selected)
Normal
(default)
Best The highest quality, but the slowest
Draft The fastest print speed, but the lowest
The printer enlarges or reduces the
original to make it the copy size you
select.
If the selected copy size is smaller
than the paper in the paper tray, the
printer automatically arranges the
pictures to best fit the paper size.
Good quality output; prints faster than
Best.
print speed; eliminates the banding
effect that sometimes occurs when
printing Draft or Normal.
quality.
Photo Paper Quality Automatic
(default)
Brightness Normal, -3 to +3
(Normal is default)
Preview No (default) / Yes To see a preview of the photograph on
Save as Defaults No / Yes To save settings as the new default,
The printer detects photo paper in the
paper tray and sets Best quality
automatically.
Lightens or darkens the copy.
Normal is no change from the original;
-3 is the darkest; +3 is the lightest.
the LCD, select
OK, select Ye s , then press OK.
press
Ye s .
5. Press Start Black to make a black-and-white copy, or press Start Color to make a
color copy.
www.kodak.com/go/aiosupport 45
Page 52

Copying
Changing the number of copies of a photograph
To change the number of copies:
1. Place the original photograph face down on the scanner glass.
2. Press Home.
3. Press to select Copy Photo, then press OK.
4. Make sure Quantity is selected.
5. Press or to select a number, or use the numeric keypad to enter the
number of copies.
6. Press Start Black to make black-and-white copies, or press Start Color to make
color copies.
Enlarging or reducing a photograph
To enlarge or reduce the size of the copy:
1. Place the original photograph face down on the scanner glass.
2. Press Home.
3. Press to select Copy Photo, then press OK.
4. Press to select Copy Size.
5. Press or to select the copy size.
NOTE: If you select a copy size larger than 5 x 7 in. / 13 x 18 cm, press to select
Tray Se le ct ion , then press to select Bottom Tray. Make sure that the paper
in the bottom tray is the size and type (plain paper, photo paper, etc.) that
you want.
6. Press Start Black to make a black-and-white copy, or press Start Color to make a
color copy.
Darkening or lightening a copy of a photograph
To darken or lighten the copy of the photograph:
1. Place the original photograph face down on the scanner glass.
2. Press Home.
3. Press to select Copy Photo, then press OK.
4. Press to select Brightness.
5. Press to select a number below zero for a darker copy, or press to select a
number above zero for a lighter copy.
6. Press Start Black to make a black-and-white copy, or press Start Color to make a
color copy.
46 www.kodak.com/go/aiosupport
Page 53

6
Scanning
Scanning digitizes documents and pictures, and sends the digital files to your
computer.
When you scan, the digital file can:
• Open in Home Center Software (when connected to a computer with
WINDOWS OS)
• Open in a third-party scanner software
• Be saved in a format and location that you determine (see Changing the scan
settings for scanning from the control panel, page 47)
Scanning from a software program on the computer (such as Home Center
Software) gives you more options, but you can also scan from the printer control
panel.
Before you begin scanning
Make sure that the printer is connected to a computer using a USB cable, Ethernet
cable, or wireless network (
Changing the scan settings for scanning from the control panel
see Networking Your Printer, page 5).
Make sure that Home Center Software is installed on the computer. (If not, go to
www.kodak.com/go/aiodownloads, and follow the on-screen instructions to install
the KODAK All-in-One Printer Software.) Then change the scan settings in the
Home Center Software. The printer uses these settings when you scan from the
printer control panel.
1. Open Home Center Software.
2. Select Tools and Documentation (when connected to a computer with
WINDOWS OS) or
3. Select Printer Scan Settings.
4. Adjust settings for scanning documents and pictures as described below.
To adjust settings for scanning documents, select the Document tab, then select
an option for each setting:
Setting Options
Scan As Black and white
File format .pdf
To o l s (when connected to a computer with MAC OS).
Color
Grayscale
.rtf (available only when connected to a computer with
WINDOWS OS)
.tif
.jpg
.bmp (available only when connected to a computer with
MAC OS)
www.kodak.com/go/aiosupport 47
Page 54

Scanning
Setting Options
Resolution (dpi) 75
150
200
300
File Save Prompt for File Name and Location
Automatically Save - specify:
• Base name; by default, scanned files are names “scan1”,
“scan2”, and so on.
• Location (folder) where the scanned files will be saved
To adjust settings for scanning pictures, select the Picture tab, then select an
option for each setting:
Setting Options
Scan As Black and white
Color
Grayscale
File format .jpg
.bmp
.tif
Resolution (dpi) 75
150
300
600
Quality
When connected to a computer with WINDOWS OS:
•Best for E-mail
•Normal
•High
•Maximum
When connected to a computer with MAC OS, a slider bar
with:
•Least
•Medium
•Best
48 www.kodak.com/go/aiosupport
Page 55

Setting Options
KODAK ESP 9200 Series All-in-One Printer
Automatically
Detect Pictures
(when connected to
a computer with
WINDOWS OS) or
Auto Crop (when
connected to a
computer with
MAC OS)
File Save Prompt for File Name and Location
When selected, multiple pictures placed on the scanner glass
are saved as separate files.
Automatically Save - specify:
• Base name; by default, scanned files are names “scan1”,
“scan2”, and so on.
• Location (folder) where the scanned files will be saved
Before saving a scanned file, you can preview it in Home Center Software
version 6.0, crop and sharpen the image, and adjust color, if desired. On
a computer with WINDOWS OS, see the Home Center Software Help (? icon) for
instructions.
Loading originals for scanning
To scan documents (up to 30 pages) on plain paper, load the original(s) in the
automatic document feeder (ADF). The ADF accepts originals from 6.9 x 9.8 in. /
18 x 25 cm to 8.5 x 14 in. / 22 x 36 cm.
IMPORTANT: Load only originals on plain paper into the ADF.
To scan a photograph, originals on thick paper, or a document that is too small or too
large to fit in the ADF, place the original on the scanner glass.
For more information on loading originals, see Loading originals, page 27.
Scanning from the computer
To scan a document or a picture:
1. Load the original.
2. Open Home Center Software, then:
• On a computer with WINDOWS OS, select Scan Documents and Pictures,
then follow the on-screen instructions.
• On a computer with MAC OS and Home Center Software version 6.0, select
Tools tab, click Scan Application, then follow the on-screen instructions.
the
www.kodak.com/go/aiosupport 49
Page 56

Scanning
Scanning multiple pictures simultaneously
Using Home Center Software, you can scan multiple pictures simultaneously and
save them as separate files.
When scanning multiple pictures, leave space between the pictures so that the
printer can detect the separate pictures. Any pictures that overlap are interpreted as
a single picture.
Scanning multiple pictures when connected to a computer with WINDOWS OS
To scan multiple pictures simultaneously, and save them as separate files:
1. Lift the scanner lid, and place the pictures face down on the glass, leaving space
between the pictures.
2. Close the lid.
3. Open Home Center Software, then select Tools and Documentation.
4. Click Printer Scan Settings, then select the Picture tab.
5. Select Automatically Detect Pictures, if it is not selected, then click OK.
6. Click the Home icon in the top right corner, then select Scan Documents and
Pictures
7. Make sure that Picture is selected and Collage - Combine all pictures is cleared,
then follow the on-screen instructions.
NOTE: Click the Help icon for additional instructions.
.
Scanning multiple pictures when connected to a computer with MAC OS
To scan multiple pictures simultaneously, and save them as separate files:
1. Lift the scanner lid, and place the pictures face down on the glass, leaving space
between the pictures.
2. Close the lid.
3. Open Home Center Software version 6.0, then select your printer.
4. Select the To o l s tab.
5. Click Scan Application.
6. Select Color Picture or Black and White Picture.
7. S el ect Automatically detect multiple pictures, if it is not selected.
8. Click Preview or Scan All, then follow the on-screen instructions.
NOTE: Click the Help icon for additional instructions.
50 www.kodak.com/go/aiosupport
Page 57

Scanning from the control panel
To scan a document or picture(s) from the control panel:
1. Load the original.
2. Press Scan.
The Scan Options menu appears on the LCD.
3. Press to select an option, then press or to change the setting.
Scan Option Settings Description
KODAK ESP 9200 Series All-in-One Printer
Scan To USB-connected
computer
(default)
Name of computer
(only if a computer is
connected by
wireless or Ethernet
network)
Memory Card The scanned file is sent to the
USB Flash Drive The scanned file is sent to the flash
Scan What Document
(default)
Photo
The scanned file is sent to the
USB-connected computer.
The scanned file is sent to the
computer on the wireless or Ethernet
network.
memory card in one of the memory
card slots.
drive attached to the front USB port.
Sets the scan settings for scanning a
document (
settings for scanning from the
control panel, page 47).
Sets the scan settings for scanning a
photograph (
settings for scanning from the
control panel, page 47).
see Changing the scan
see Changing the scan
Destination File
(default)
Application Sends the scanned file to Home
Save as Defaults No / Yes To save the settings as the new
www.kodak.com/go/aiosupport 51
Sends the scanned file in the format
and to the location on your computer
that you designate (
scan settings for scanning from the
control panel, page 47).
Center Software.
default, press
OK.
press
see Changing the
OK. With Ye s selected,
Page 58

Scanning
4. Press Start Black to make a black-and-white scan, or press Start Color to make a
color scan.
The scanned file appears at the destination you specified.
52 www.kodak.com/go/aiosupport
Page 59

7
Faxing
Your printer can send and receive faxes in either black-and-white or color.
Before you begin faxing
Before you can send or receive faxes, you must connect your printer and set up the
fax options on the printer.
Connecting the printer for faxing
1. Make sure that the selected Country/Region matches your location.
This setting determines how your faxes are sent and received.
a. Press Home.
b. Press to select Printer Settings, then press OK.
c. Press to select Country/Region, then press OK
d. Press to select your country or region, then press OK.
2. Determine the type of telephone service you have, and connect your printer
accordingly.
IMPORTANT: Use the phone cord that was provided with the printer. If you use any other
phone cord, you may not be able to send or receive faxes successfully.
• Standard telephone service — telephone service that uses dedicated
telephone wiring to transmit only phone signals
• Cable telephone service — telephone service that is delivered by a cable
television service
• Internet telephone service (Voice-Over-Internet-Protocol or VOIP) —
telephone service delivered by an Internet provider
If you have Standard, Cable, or Internet telephone service, connect one end of
the phone cord into the LINE IN port on the back of the printer and the other
end into the wall phone jack.
www.kodak.com/go/aiosupport 53
Page 60

Faxing
DSL filter
• Digital subscriber line (DSL) — telephone service that uses the wires of a local
telephone network to transmit digital data over cables
Connect one end of the phone cord into the LINE IN port on the back of the
printer and the other end into the DSL filter (available from your DSL provider),
which is connected to the wall phone jack.
NOTE: You must use a DSL filter to transmit fax signals properly to your printer.
3. Determine whether your phone line is shared or dedicated.
•A dedicated phone line is one that has only this printer and no other devices
connected to it. If you have a dedicated line, connect your printer as shown for
step 2 above.
•A shared phone line is one that has several devices connected to it, such as a
phone and/or answering machine as well as the printer. If you have a shared
line, connect your printer in one of the following ways, based on the devices
you have connected to the same phone line.
If you share the line with an answering machine or telephone:
a. Connect one end of the phone cord that came with the printer into the LINE
IN port on the back of the printer.
b. Connect the other end of the phone cord into either a wall phone jack or a
DSL filter, depending on the type of telephone service you use (see step 2
above).
c. Connect one end of the phone cord for your answering machine into the
LINE EX port on the back of the printer.
d. Connect the other end of the phone cord into the answering machine or
telephone.
54 www.kodak.com/go/aiosupport
Page 61

KODAK ESP 9200 Series All-in-One Printer
Phone with answering machine
Configuration for connecting an answering
machine with a standard telephone service
NOTE: If you have an answering machine, set the number of rings to answer on the
printer to a higher number than the rings to answer for the answering
machine (
see Rings to Answer, page 56).
Setting fax options
If you have an answering service:
If you have an answering service that uses a computerized system for
recording messages remotely for the same phone line that you use for your
all-in-one printer, then you can set up a distinctive ring to receive faxes
automatically (
see Distinctive Ring, page 57).
If you do not set up a distinctive ring, you can still receive faxes manually (see
Receiving a fax manually, page 64).
Before sending or receiving faxes, set up the fax options.
To set up fax options:
1. Press Home.
2. Press to select Fax Settings, then press OK.
3. Press or to select an option, then press or to change the setting.
Fax Option Settings Description
Fax Sender
Information
-- This information appears on the faxes
you send.
Press OK, then enter the fax sender
name (your name), your fax number, and
your phone number (
numeric keypad on the control panel to
enter text, page 60); press OK to save.
see Using the
www.kodak.com/go/aiosupport 55
Page 62

Faxing
Fax Option Settings Description
Rings to Answer 1 to 6 (default is 4) The number of times that your phone
will ring before the printer picks up the
call.
If you use a dedicated phone line for your
printer, set the Rings to Answer to any
setting. If the printer shares the phone
line with an answering machine, set the
Rings to Answer to a higher number (5
or 6) than the rings to answer for the
answering machine (typically 4 rings).
This allows the answering machine to
pick up phone calls. The printer will
monitor the line after the answering
machine picks up, and, if set to Auto
Answer, will detect an incoming fax and
receive it.
Redial if No Answer Yes (de fa u l t ) / N o If the number you call is busy, the printer
will redial the number once
automatically.
Busy Redial
Attempts
Disable Call Waiting No (default) / Yes If you have call-waiting service on your
Call Waiting Disable
Code
0 to 12
(default is 5)
*70 (default) The printer automatically dials the call
The number of times that the fax will
attempt to redial a busy number.
phone line, you can disable it so that an
incoming call does not interrupt your fax
transmission.
Select Ye s to disable call waiting, then
enter the call waiting disable code
(below).
waiting disable code before dialing the
number to which you are sending a fax.
This code disables call waiting for the
duration of the fax, preventing incoming
calls from interrupting your fax
transmission.
The usual code to disable call waiting is
the default *70. If the call waiting disable
code is different in your area, press
then press
Use the keypad to enter the correct
code, then press
NOTE: You must enable call waiting
to erase the current code.
OK.
manually after your fax
transmission.
OK,
56 www.kodak.com/go/aiosupport
Page 63

KODAK ESP 9200 Series All-in-One Printer
Fax Option Settings Description
Distinctive Ring Any ring (default) /
Single Ring / Double
Ring / Triple Ring
Fax Speaker On (default) / Off The fax speaker allows you to hear the
Print Fax
Confirmation Page
Print Fax Settings -- To print the current fax settings, press
Never (default) /
Always / After Failure
Only
This service, available from most phone
companies, adds multiple phone
numbers to one phone line. Each phone
number has a distinctive ring pattern
(single, double, or triple ring) to let you
know which number is ringing.
Select the ring pattern assigned to the
phone number for the printer so the
printer can receive faxes automatically.
dial tone and initial fax tones when
sending faxes.
The Fax Confirmation Page contains the
time and date, the number you called,
the number you called from, and
whether the transmission was
successful.
OK. Load letter or A4 paper, then press
Start Black or Start Color.
Print Fax Cover Page -- The Fax Cover Page shows the date and
headings for To and From information for
your fax. Use this cover page, if needed,
when sending your fax.
To print a Fax Cover Page, press OK.
Load letter or A4 paper, then press
or Start Color. (The Fax Cover
Black
Page is black and white.)
Start
Print Fax Activity Log -- The Fax Activity Log contains
information (date, time, duration,
to/from, number of pages, and more)
about the last 30 faxes sent and/or
received.
To print a Fax Activity Log, press OK.
Load letter or A4 paper, then press
or Start Color.
Black
www.kodak.com/go/aiosupport 57
Start
Page 64

Faxing
Fax Option Settings Description
Dialing Mode Tone (d e f a u lt) / P u l s e Determines how the printer dials a fax
number.
Tone dialing (the more common
method) uses tones to dial a phone
number. It is faster and more reliable
than pulse dialing, which uses a series of
pulses to dial a phone number.
Traditionally, pulse dialing was used by
rotary phones; tone dialing is used by
touch-tone phones.
Error Correction On (default) / Off Error correction is applied only when
sending black-and-white faxes. It
reduces the loss of data, which can occur
on poor phone lines.
Error correction increases the send time
on poor phone lines, but the
transmission is much more reliable.
(Error correction does not apply to faxes
being received.)
Setting the answer mode (auto answer or manual)
The default setting is for Auto Answer to be on. When Auto Answer is on, the
printer picks up all incoming faxes automatically. The green Auto Answer LED is lit
when Auto Answer is on.
To answer calls manually, turn off Auto Answer by pressing the Auto Answer button
so that the green LED is off. (See
Receiving a fax manually, page 64.)
58 www.kodak.com/go/aiosupport
Page 65

Working with the phonebook
You can enter up to 60 fax numbers in the phonebook.
You can create and manage the phonebook from the printer LCD, or if connected to a
computer with WINDOWS OS, you can use Home Center Software.
Using symbols in phonebook entries
The following symbols are used in phonebook entries:
Symbol Description Response by fax
0 - 9 numbers Dials number
* star Used for special features (for example, *70 is used to
, comma Causes a 2-second delay before dialing the remaining
# pound Used for special features (for example, # at the end of a
KODAK ESP 9200 Series All-in-One Printer
deactivate call waiting)
numbers
number signifies the completion of the number sequence)
Adding a new phonebook entry
To add a new phonebook entry:
1. Press Phonebook.
2. Make sure Edit Phonebook is selected, then press OK.
3. Make sure Add New Entry is selected, then press OK.
4. Make sure Number is selected, then press OK.
5. Use the numeric keypad on the control panel to enter a fax number, then press
OK.
6. With Name selected, press OK.
The alphanumeric keyboard appears on the LCD.
7. Enter a name using either the alphanumeric keyboard (see Using the
alphanumeric keyboard on the LCD, page 61) or the numeric keypad (see Using
the numeric keypad on the control panel to enter text, page 60).
8. When you are finished entering a name, press and to select DONE on the
LCD, then press OK.
9. Optional: Assign a Quick Dial number.
Set up your ten most frequently used fax numbers as Quick Dial numbers. You
will be able to dial them quickly, and they will be displayed at the top of your
phonebook.
a. Press to select Quick Dial, then press OK.
b. Using the numeric keypad on the control panel, enter a number from 0 to 9,
then press
10. Press to select DONE, then press OK.
OK.
www.kodak.com/go/aiosupport 59
Page 66

Faxing
Editing a phonebook entry
To edit a phonebook entry:
1. Press Phonebook.
2. Make sure Edit Phonebook is selected, then press OK.
3. Press to select Edit Entry, then press OK.
4. Press to select the entry you want to edit, then press OK.
5. Press to select the field you want to edit, then press OK.
6. Use the alphanumeric keyboard (see Using the alphanumeric keyboard on the
LCD, page 61) or the numeric keypad (see Using the numeric keypad on the
control panel to enter text, page 60) to make your change(s).
7. Pre ss to select DONE, then press OK.
Deleting a phonebook entry
To delete a phonebook entry:
1. Press Phonebook.
2. Make sure Edit Phonebook is selected, then press OK.
3. Press to select Delete Entry, then press OK.
4. Press to select the entry you want to delete, then press OK.
5. To delete the entry, press OK.
The entry is deleted from the phonebook.
6. Repeat steps 4 – 5 to delete more entries; when you are finished, press Back or
Cancel.
Using the numeric keypad on the control panel to enter text
The number keys on the numeric keypad represent a number and several characters.
For example, the number
must press the
2 key multiple times to enter a corresponding letter. For example, to
enter the letter “B”, press the
2 key six times.
the
2 key also represents the letters A, B, C and a, b, and c. You
2 key three times; to enter the small letter “b”, press
If you need to use the same key for more than one letter in a row (for example, to
type “Cab”), you need to pause between letters. To type “Cab”, press the
times to enter “C”, then pause 10 seconds; press the
then pause 10 seconds; and press the
2 key six times to enter “b”.
Note that the Symbols (*) key and the Space (#) key also cycle through several
different symbols when you press the key multiple times.
To make a correction to your entry, use the BKSP (backspace) key on the
alphanumeric keyboard on the LCD (
see Using the alphanumeric keyboard on the
LCD).
60 www.kodak.com/go/aiosupport
2 key four
2 key five times to enter “a”,
Page 67

Using the alphanumeric keyboard on the LCD
When you need to enter letters, a keyboard appears on the LCD. You may use this
keyboard to enter numbers and symbols as well as text.
To use the alphanumeric keyboard:
• To change from uppercase to lowercase, select abc/123, then press OK.
• To change from lowercase to uppercase, select ABC/123, then press OK.
• To enter punctuation or symbols, select !@#, then press OK
• To erase a character you entered, select BKSP, then press OK.
On the control panel, press , , or to select the letters and numbers, using
the correct uppercase and lowercase letters. Press OK after each character. When
you are done, select
DONE, then press OK.
Preparing a fax for transmission
Before you send a fax, prepare a cover page (if needed), load the original(s), and
change the resolution and brightness (if needed).
KODAK ESP 9200 Series All-in-One Printer
Printing a fax cover page
If you need a fax cover page, you can print one with your printer, then manually
complete the information (person to whom you are sending, fax number, your name,
etc).
To print a fax cover page:
1. Press Home.
2. Press to select Fax Settings, then press OK.
3. Press to select Print Fax Cover page, then press OK.
4. Load letter or A4 paper, then press Start Black or Start Color to begin printing.
NOTE: It does not matter which Start button you press; the fax cover prints in black
Loading originals
To fax documents (up to 30 pages) that are on plain paper, load the original(s) in the
automatic document feeder (ADF).
To fax a photograph, originals on thick paper, or a document that is too small or too
large to fit in the ADF, place the original on the scanner glass. (The ADF accepts
originals from 6.9 x 9.8 in. / 18 x 25 cm to 8.5 x 14 in. / 22 x 36 cm.)
only.
NOTE: You can fax only one page at a time from the scanner glass.
For more information on loading originals, see Loading originals, page 27.
www.kodak.com/go/aiosupport 61
Page 68

Faxing
Changing resolution and brightness
Before sending your fax, change the resolution and brightness settings, as needed,
based on your original.
To modify settings before sending your fax:
1. Press Fax.
2. With Fax Options selected, press OK.
3. Press to select Resolution.
The resolution setting determines the amount of detail that is transmitted.
Select:
• Standard (default) for most documents
• Fine for documents with fine print
• Photo for photographs
4. Press to select Brightness.
Adjust the brightness setting according to how light or dark your original is.
Select:
• Normal (default) for most documents
• +1 to +3 to lighten dark originals
• -1 to -3 to darken light originals
NOTE: If you do not want to save these settings, send your fax. The settings will
apply only to the current transmission. If you want to save these settings as
defaults:
a. Press to select Save as Defaults, then press OK.
b. Select Ye s , then press OK.
Sending a fax
You can send your fax in several ways. You can use:
• the phonebook
• Quick Dial
•the numeric keypad
• the Redial button
Using the phonebook to send a fax
To send a fax to a number in the phonebook:
1. Press Phonebook.
2. Press to select the desired number.
3. Press Start Black to send a black-and-white fax or Start Color to send a color fax.
62 www.kodak.com/go/aiosupport
Page 69

Using Quick Dial to send a fax
To send a fax using Quick Dial:
1. Press Phonebook.
2. Press the number on the keypad that corresponds to the desired Quick Dial
entry.
3. Press Start Black to send a black-and-white fax or Start Color to send a color fax.
Using the numeric keypad to send a fax
To send a fax from the numeric keypad:
1. Press Fax.
2. Enter a fax number using the numeric keypad.
3. Press Start Black to send a black-and-white fax or Start Color to send a color fax.
Using the Redial button to send a fax
To send a fax to one of the last numbers dialed:
KODAK ESP 9200 Series All-in-One Printer
1. Press Redial.
2. Press to select an entry.
3. Press Start Black to send a black-and-white fax or Start Color to send a color fax.
If there is no number to redial, the phonebook opens.
Receiving a fax
You can set up your printer to receive faxes automatically or manually. Even if your
printer is set up to receive faxes automatically, you can still receive them manually at
any time.
Receiving a fax automatically
To receive faxes automatically:
1. Load letter (8.5 x 11 in. / 22 x 28 cm) or A4 (8.3 x 11.7 in. / 21 x 30 cm) plain
paper into the paper tray (
page 17).
2. Make sure the Auto Answer LED is on. (If not, press Auto Answer to turn it on.)
The printer will receive all incoming faxes automatically.
see Loading plain paper in the main paper tray,
www.kodak.com/go/aiosupport 63
Page 70

Faxing
Receiving a fax manually
If Auto Answer is turned off for your printer, you can receive incoming faxes
manually.
NOTE: You can receive any incoming fax manually, even if Auto Answer is
To receive a fax manually:
• When you hear the phone ring, press Start Black or Start Color.
NOTE: Pressing either Start button triggers the printer to receive the fax. It does
If your printer is connected to the same phone line as another telephone and you are
using tone dialing (see
manually from another phone. When you hear the distinctive ring of your fax line or
know that the incoming call is a fax:
• Pick up any phone and dial 234 (the remote access code).
turned on.
not matter which Start button you press; whether a fax is color or black
and white is determined by the sender.
Dialing Mode, page 58), you may receive an incoming fax
64 www.kodak.com/go/aiosupport
Page 71

8
CAUTION:
Maintaining Your Printer
Your printer requires little maintenance. However, Kodak recommends cleaning the
scanner glass and lid regularly to remove dust and fingerprints, which affect the
quality and accuracy of scanning.
Except while cleaning the printer, keep the printer plugged into an AC power outlet.
If you use a power strip, don't turn off the power strip. (The printer does not
necessarily have to be turned on, but should be plugged in.)
Keep the printhead and ink cartridges in the printer at all times to help prevent
damage to the printhead.
For recycling and/or disposal information, contact your local authorities. In the US,
go to the Electronics Industry Alliance at
www.kodak.com/go/recycle.
General care and cleaning
Always disconnect the power to the printer before cleaning it. Do not use
harsh or abrasive cleaners on any part of the printer.
• Place the printer on a solid surface with no papers or loose items as anything
under the printer can jam the paper tray or block the paper path.
• Keep the surrounding area vacuumed and litter-free.
• To clean the printer, wipe the outside with a clean, dry cloth.
• Protect the printer from tobacco smoke, dust, and liquid spills.
• Do not place objects on the printer.
• Keep the printer supplies away from direct sunlight and out of high-temperature
environments.
• Do not allow chemicals to come into contact with the printer.
www.eia.org or go to
www.kodak.com/go/aiosupport 65
Page 72

Maintaining Your Printer
CAUTION:
Cleaning the scanner glass and document backing
The scanner glass can get smudged and minor debris can accumulate on the white
document backing under the scanner lid. Periodically clean the scanner glass and
document backing.
Do not use harsh or abrasive cleaners on any part of the printer.
Do not spray liquid directly on the glass.
Do not use paper-based wipes on the document backing as they can
scratch it.
To clean the scanner glass and document backing under the scanner lid:
1. Unplug the printer and lift the scanner lid.
2. Wipe the glass with a soft cloth or sponge, slightly moistened with a
nonabrasive glass cleaner.
66 www.kodak.com/go/aiosupport
Page 73

KODAK ESP 9200 Series All-in-One Printer
3. Dry the glass with a lint-free cloth.
4. Gently clean the document backing with a soft cloth or sponge, slightly
moistened with mild soap and warm water.
5. Dry the document backing with a chamois or lint-free cloth.
NOTE: If the document backing needs further cleaning, use isopropyl (rubbing)
alcohol on a soft cloth, then wipe thoroughly with a cloth moistened with
water to remove any residual alcohol.
6. When you finish cleaning, plug in the printer.
www.kodak.com/go/aiosupport 67
Page 74

Maintaining Your Printer
Color ink cartridge
Printhead
Black
ink cartridge
Replacing ink cartridges
Your printer uses both black and color ink cartridges. You can check the approximate
ink levels on the LCD (see
When an ink cartridge is out of ink, the printer LCD displays a message stating that
the black or color ink cartridge needs replacing.
IMPORTANT: Do not use non-Kodak brand or refilled ink cartridges.
To replace an ink cartridge:
1. Make sure your printer is on.
2. Lift the printer access door, and wait for the carriage to move to the access
position.
Checking ink levels, page 76) or in Home Center Software.
The ink cartridges are located in the printhead.
68 www.kodak.com/go/aiosupport
Page 75

KODAK ESP 9200 Series All-in-One Printer
3. Pinch the tab on the ink cartridge and lift it out of the printhead.
4. Remove the new ink cartridge from its bag.
IMPORTANT: To prevent the printhead from drying out, insert the ink cartridge into the
printhead immediately.
5. Remove the protective cap from the cartridge.
www.kodak.com/go/aiosupport 69
Page 76

Maintaining Your Printer
6. Insert the ink cartridge into the printhead.
7. Press down on the ink cartridge tab until you hear a click.
8. Close the printer access door.
70 www.kodak.com/go/aiosupport
Page 77

Replacing the printhead
IMPORTANT: Replacing the printhead is not a regular maintenance procedure. Replace
To replace the printhead:
1. Make sure your printer is on.
2. Lift the printer access door, and wait for the carriage to move to the access
position.
KODAK ESP 9200 Series All-in-One Printer
the printhead only if you receive a new printhead from Kodak.
3. Remove both ink cartridges and set them aside.
www.kodak.com/go/aiosupport 71
Page 78

Maintaining Your Printer
CAUTION:
4. Unlatch the used printhead by lifting the button in the center of the carriage.
5. Lift the used printhead out of the carriage.
6. Remove the new printhead from its bag.
Do not touch the gold contacts on the printhead, as doing so may damage it.
72 www.kodak.com/go/aiosupport
Page 79

7. Remove the two plastic protective caps.
8. Place the new printhead into the carriage.
KODAK ESP 9200 Series All-in-One Printer
9. Push firmly against the target label of the printhead until you hear a loud snap.
www.kodak.com/go/aiosupport 73
Page 80

Maintaining Your Printer
10. Insert the black ink cartridge into the printhead.
11. Press down on the ink cartridge tab until you hear a click.
12. Repeat steps 10 - 11 for the color ink cartridge.
13. Close the printer access door.
The printer detects the new printhead. Follow the instructions on the LCD to
calibrate your printer.
74 www.kodak.com/go/aiosupport
Page 81

KODAK ESP 9200 Series All-in-One Printer
Updating the software and printer firmware
Using the latest software and firmware helps ensure optimal performance of your
printer.
NOTE: Firmware is the software that runs on your printer.
When you open Home Center Software on a computer with WINDOWS OS, the
software automatically checks for software and firmware updates. On a computer
with MAC OS, you must check manually for updates.
Use the following procedure to update manually.
Updating if your printer is connected to a computer with WINDOWS OS
To update the software:
1. Make sure that your computer is connected to the Internet.
2. Open Home Center Software.
3. Click Tools and Documentation.
4. Under Web Links, click Check for Software Updates to check whether software
updates are available.
5. If there are updates, click Next and follow the on-screen instructions.
To update the printer firmware:
1. Make sure that your computer is connected to the Internet.
2. Connect the printer to the computer with a USB cable, Ethernet cable, or
wirelessly (if not currently connected).
3. Open Home Center Software.
4. Make sure that the all-in-one printer name and “connected” appear in the
bottom left corner of the Home Center Software window.
5. Click Tools and Documentation.
6. Under Web Links, click Check for Printer (Firmware) Updates.
7. If there are updates, click Next and follow the on-screen instructions.
IMPORTANT: Do not turn off or unplug your printer or your computer during the update.
www.kodak.com/go/aiosupport 75
Page 82

Maintaining Your Printer
Updating if your printer is connected to a computer with MAC OS
To update the software:
1. Make sure that your computer is connected to the Internet.
2. Open Home Center Software.
3. On the File menu, select Check for Updates.
4. If there are software updates, follow the on-screen instructions for updating
your software.
To update the firmware:
1. Go to www.kodak.com/go/esp9250downloads.
2. Connect the printer to the computer with a USB cable, Ethernet cable, or
wirelessly (if not currently connected).
3. Select your operating system from the drop-down list.
4. Click Select in the Firmware box.
5. Read the instructions, click Download, then follow the on-screen instructions.
IMPORTANT: Do not turn off or unplug your printer or your computer during the update.
Monitoring and adjusting printer performance
From the control panel, you can perform tasks to help keep the printer functioning
well.
Checking ink levels
To check the ink levels:
1. Press Home.
2. Press to select Maintenance, then press OK.
3. With Check Ink Levels selected, press OK.
The LCD shows approximate levels of ink in the cartridges so you know when it’s
time to order replacement cartridges.
Resetting factory defaults
To reset defaults to the factory default settings:
1. Press Home.
2. Press to select Printer Settings.
3. Press to select Reset All Settings, then press OK.
4. When you see the message, “This will reset printer settings to factory defaults,”
OK.
press
NOTE: Resetting factory defaults does not change the date and time, language,
country/region, or network settings.
76 www.kodak.com/go/aiosupport
Page 83

9
Troubleshooting
Basic troubleshooting
Some problems can be resolved quickly by power cycling the printer: Turn off your
printer. Wait five seconds. Turn on the printer.
Use the following information to help troubleshoot problems with your printer.
Problem Possible Solutions
Printer does not
power on
Printer not detected
• Make sure you are using the power cord that came with
your printer.
• Make sure that the power cord is connected to the AC
adapter and is plugged into an outlet or power strip, and
that the LED on the AC adapter is lit.
• Make sure that the power cord is securely connected to
the power cord port in the back of the printer.
• Make sure your printer is plugged in and turned on.
• If you are using a USB cable, make sure:
– it is a USB 2.0 High-Speed cable.
– it is connected both to your computer and to the USB
port on the
– you restart the computer if the USB cable was
disconnected from the printer then reconnected, or if
power to the printer was interrupted
• If you are using a wireless connection, make sure:
– the Wi-Fi connectivity LED is glowing steadily.
– the printer is connected to your wireless network.
To c h eck:
a. On the printer, press Home.
b. Press to select Network Settings, then press
OK.
c. Press to select View Network Configuration,
then press OK.
Make sure that the Active Connection Type is WiFi,
and that the IP Address is not zeros.
– your router is transmitting data.
– the firewall (excluding WINDOWS Firewall) is
allowing the services needed for your printer.
back of your printer.
.
Wireless connectivity
www.kodak.com/go/aiosupport 77
For additional information, go to
www.kodak.com/go/inkjetnetworking.
For wireless connectivity issues, go to
www.kodak.com/go/inkjetnetworking.
Page 84

Troubleshooting
Problem Possible Solutions
Carriage jam
Print quality • For best results, use KODAK Paper or a paper with the
Ink cartridge • Check that KODAK Ink Cartridge(s) are installed. Do not
Paper jam • Press down on the center latch on the duplexer on the back
• Open the printer access door and clear any obstructions.
• Check that the printhead and ink cartridges are installed
correctly. (The printhead and ink cartridges are installed
correctly when you hear them click into place.)
COLORLOK Technology logo on the package.
• Make sure the paper is loaded correctly (see page 17).
For more information, go to www.kodak.com/go/stepbystep,
select All-in-one printer, then Print Quality (missing colors,
blank prints, etc).
use non-Kodak brand or refilled ink cartridges.
• Remove, then install the cartridges again. Make sure the
cartridges click into place.
of the printer, open the duplexer cover, and gently remove
any paper from inside the duplexer; close the duplexer
cover.
• Press the side detents on the duplexer, and remove the
duplexer to access the cleanout area; remove any paper or
debris, then replace the duplexer.
• Make sure the paper in the tray is free of tears or creases.
• Make sure you do not overload the paper tray.
• Make sure that your is on a flat, hard surface free of debris.
When adding paper to the paper tray, objects that are
under the printer can enter the bottom opening and create
obstructions.
For more information, go to www.kodak.com/go/stepbystep.
Select All-in-one printer, then Paper jam.
78 www.kodak.com/go/aiosupport
Page 85

KODAK ESP 9200 Series All-in-One Printer
Problem Possible Solutions
Cannot send or
receive a fax
Error codes/message
Getting help on the Web
• Make sure that the wall phone line is plugged into the Line
in port.
• Verify that the wall jack works by plugging in a phone and
checking for a dial tone.
• Verify that Region is set to the correct country.
– Press Home.
–Press or to select Printer Settings, then press
OK.
–Press to select Country/Region, then press OK.
– Press or to select your country, then press OK.
• If you are connected to a DSL phone line, make sure you
have a DSL filter connected to the phone jack.
For more information, go to www.kodak.com/go/stepbystep.
Select All-in-one printer, then Cannot use a feature on my
printer, then Fax.
s Go to www.kodak.com/go/esp9250support, then type your
error code or message.
For more troubleshooting information:
Get help with wireless networking. www.kodak.com/go/inkjetnetworking
Use our Step-by-Step Solutions and
Repair tool to troubleshoot common
problems.
Search our knowledge base of FAQs
(Frequently Asked Questions).
Download the latest firmware and
software for optimal printer
performance.
Check the Extended User Guide for
detailed instructions and the
recommended system requirements.
www.kodak.com/go/stepbystep
www.kodak.com/go/esp9250support
www.kodak.com/go/esp9250downloads
www.kodak.com/go/manuals
www.kodak.com/go/aiosupport 79
Page 86

Troubleshooting
Status lights
Power status light
Get help with problems you cannot
resolve.
Contact Kodak at www.kodak.com/go/contact
and have the following information available:
– Kodak Service Number (located inside the
printer when you open the printer access
door)
– Printer model number (located on the
control panel)
– Computer model, operating system, and
version of Home Center Software
There are three status lights on the printer: the power status light (on the on/off
button) indicates power, the Wi-Fi status light indicates Wi-Fi status, and the
attention light blinks when an error occurs.
Power light What it means
Off The printer is turned off.
• Press the on/off button to turn on power.
Wi-Fi status light
The printer does not have power.
• Make sure that the power cord is plugged into the back of the
printer and into an electrical outlet, and that the electrical
outlet has power.
Blinking The printer is busy.
• Wait for the printer to finish the task.
On The printer is ready.
Wi-Fi status light What it means
Off The Wi-Fi radio is either turned off or is turned on but not
connected to a wireless network.
Blinks continuously The Wi-Fi radio is turned on and the printer is searching for
available wireless networks within range.
80 www.kodak.com/go/aiosupport
Page 87

KODAK ESP 9200 Series All-in-One Printer
Wi-Fi status light What it means
Blinks intermittently
On The Wi-Fi radio is turned on and there is a working connection
The Wi-Fi radio is turned on and the printer cannot find any
available wireless networks within range, or the Wi-Fi radio
connection has been interrupted or is too weak to send signals.
To find and connect to an available wireless network within
range, press OK, turn the Wi-Fi radio off, and run the WiFi Setup
Wizard (see
Setup Wizard, page 5).
between the printer and a wireless network.
Connecting to a wireless network using the WiFi
www.kodak.com/go/aiosupport 81
Page 88

10
Product and Safety Specifications
The following specifications are subject to change without notice.
Features and Specifications
Print performance
Black print speed Up to 32 pages per minute on plain paper
Color print speed Up to 30 pages per minute on plain paper
Print technology Continuous-tone, thermal inkjet
Print quality modes Draft, Normal, and Best on plain paper
Photo quality mode on photo paper
Photo printing features
Quantity 1 to 99
(may vary for different models of the 9200 series printers)
Print sizes 2 x 3 in. (5 x 8 cm)
3.5 x 5 in. (9 x 13 cm)
4 x 6 in. (10 x 15 cm)
4 x 7 in. (10 x 18 cm)
4 x 12 in. (10 x 30 cm) (Panoramic)
5 x 7 in. (13 x 18 cm)
8 x 10 in. (20 x 25 cm)
US Letter - 8.5 x 11 in. (22 x 28 cm)
A4 (21 x 30 cm)
Quality Best, Normal, Draft, Automatic
Auto-detect media Auto-detect plain paper, photo paper, and transparency
Optimize image quality for KODAK Photo Papers with barcode
Image enhancement KODAK PERFECT TOUCH Technology with
Home Center Software (from the computer only)
Color Black-and-white or color
Scene balance On (default), Off
82 www.kodak.com/go/aiosupport
Page 89

Copy document features
Quantity 1 to 99 copies
Copy sizes Same Size, Fit to Page, 20% to 500%
Plain paper quality Best, Normal, Draft
Brightness – 3 to + 3
Copy photo features
Quantity 1 to 99
Copy sizes 2 x 3 in. (5 x 7.6 cm)
KODAK ESP 9200 Series All-in-One Printer
Color Black-and-white or color
(may vary for different models of the 9200 series printers)
(may vary for different models of the 9200 series printers)
Color Black-and-white or color
(may vary for different models of the 9200 series printers)
3.5 x 5 in. (9 x 12.7 cm)
4 x 6 in. (10 x 15 cm)
4 x 7 in. (10 x 18 cm)
4 x 12 in. (10 x 30 cm) (Panoramic)
5 x 7 in. (13 x 18 cm)
8 x 10 in. (20 x 25 cm)
US Letter - 8.5 x 11 in. (22 x 28 cm)
A4 (21 x 30 cm)
Scanning features
Maximum scan size 8.5 x 11.7 in. (21.6 x 29.7 cm)
Quality Automatic
Brightness – 3 to + 3
Scanner type Contact Image Sensor (CIS)
Functions Segmentation scanning
Auto-destination
Optical Character Recognition (OCR)
www.kodak.com/go/aiosupport 83
Page 90

Product and Safety Specifications
Bottom (main) input paper tray
Paper capacity 100 sheets of 20 lb plain paper
Paper size 4 x 6 in. to 8.5 x 14 in. (10 x 15 cm to 21.6 x 36 cm)
Top (photo) input paper tray
Paper capacity 40 sheets of photo paper, up to 12 mil (290 gsm)
Paper size 4 x 6 in. (10 x 15 cm), 4 x 7 in. (10 x 18 cm), and 5 x 7 in.
Output paper tray
Paper capacity 50 sheets of 20 lb plain paper
20 envelopes
(13 x 18 cm)
Ink cartridges
Connectivity
Image formats supported Image printing supports JPEG (EXIF v2.21 non-progressive);
Ink handling 2-cartridge, 6-ink system
Ink life 1-year warranty from date of purchase
Protocols supported USB 2.0 High Speed, BLUETOOTH 2.0, DPOF (Tagged image
printing), Ethernet 10/100 BaseT
Devices supported Computers with WINDOWS OS (XP 32-bit, VISTA 32-bit and
64-bit, WINDOWS 7) and computers with MAC OS X 10.4.8
and later; mobile phones with custom print applications;
memory cards (MMC, XD, SD, SDHC, COMPACTFLASH Types
I and II, MICRODRIVE); PICTBRIDGE Technology enabled
cameras, BLUETOOTH Technology enabled devices, flash
drives
does not support progressive JPEG format
Number of USB ports Two USB 2.0 high-speed ports: one device port on the back of
the printer, one host port in the front
84 www.kodak.com/go/aiosupport
Page 91

KODAK ESP 9200 Series All-in-One Printer
Wi-Fi technology
supported
Software support
Application support Third-party image-management software; optical character
Media support Plain paper, photo paper, envelopes, greeting cards, card stock,
Scanner support TWAIN and WIA, WIA2 (VISTA OS and WINDOWS 7), ICA
Update support Software and firmware updates available through Web support
Physical specifications
802.11b/g/n, WPA2
reader (OCR) support for documents
transparencies with white stripe, labels
(MAC OS), including segmentation scanning
Power WW: 110-240 V AC, 50-60 Hz at 1.3 A
Output: 36 V DC at 1.6 A
Warranty
Dimensions W x D x H = 17.5. x 16.8. x 9.3 in. (44.5 x 42.7 x 23.5 cm)
Wei ght 20 lb (9.1 kg) without power supply, printhead, or ink
cartridges
Operating range 41°- 95°F (5° - 35°C), 15 to 85% RH
Full image quality
environmental range
Energy efficiency ENERGY STAR® Qualified
Product One year from purchase (with proof of purchase)
Printhead One year from purchase (with proof of purchase)
59° - 86°F (15° - 30°C) and 20 to 80% RH.
www.kodak.com/go/aiosupport 85
Page 92

Product and Safety Specifications
System requirements
Computer with WINDOWS OS
Computer Minimum
Operating System WINDOWS 7, VISTA,or XP Home (SP2 or later)
CPU Intel Celeron
Clock speed 1.2 GHz
Memory 512 MB RAM
Available hard disk space 500 MB available
Interface USB
Removable drive CD-ROM
Computer with MAC OS
Computer Minimum
Operating System MACINTOSH OS X 10.4.8 or later
CPU PowerPC G4, G5, or Intel Based Mac
Clock speed 1.2 GHz
Memory 512 MB RAM
Available hard disk space 200 MB available
Interface USB
Removable drive CD-ROM
86 www.kodak.com/go/aiosupport
Page 93

Paper types supported
Transparencies All commercially available inkjet varieties (with a white stripe)
Iron-on transfers All commercially available inkjet varieties on 8.5 x 11 in. and A4
Paper sizes supported
KODAK ESP 9200 Series All-in-One Printer
Plain paper 20 to 24 lb (75 to 90 gsm)
Photo paper 6.5 to 12 mil
Card stock 110 lb index max (200 gsm)
Envelopes 20 to 24 lb (75 to 90 gsm)
Labels All commercially available inkjet varieties on 8.5 x 11 in. and A4
size sheets
size sheets
Plain paper A4 (8.3 x 11.7 in. / 21 x 30 cm)
A5 (5.8 x 8.3 in. / 15 x 21 cm)
A6 (4.1 x 5.8 in. / 11 x 15 cm)
B5 (6.9 x 9.8 in. / 18 x 25 cm)
US Executive (7.3 x 10.5 in. / 18 x 27 cm)
US Letter (8.5 x 11 in. / 22 x 28 cm)
US Legal (8.5 x 14 in. / 22 x 36 cm)
Custom sizes from 4–8.5 in. / 10–22 cm wide and 6–14 in. /
15–36 cm long
Labels A4 (8.3 x 11.7 in. / 21 x 30 cm)
US Letter (8.5 x 11 in. / 22 x 28 cm)
Index card stock 4 x 6 in. index cards (10 x 15 cm)
5 x 7 in. index cards (13 x 18 cm)
Transparencies and
iron-on transfers
A4 (8.3 x 11.7 in. / 21 x 30 cm)
US Letter (8.5 x 11 in.) (22 x 28 cm)
www.kodak.com/go/aiosupport 87
Page 94

Product and Safety Specifications
Envelopes
Photos
C5 (6.4 x 9 in. / 16 x 23 cm)
C6 (4.5 x 6.4 in. / 11 x 16 cm)
DL (designated long) (4.3 x 8.7 in. / 11 x 22 cm)
US #10 (4.1 x 9.5 in / 11 x 24 cm)
US #7¾ (3.9 x 7.5 in. / 10 x 19 cm)
US #9 (3.9 x 8.9 in. / 10 x 23 cm)
4 x 6 in. (10 x 15 cm)
4 x 7 in. (10 x 18 cm)
4 x 12 in. (10 x 31 cm)
5 x 7 in. (13 x 18 cm)
8 x 10 in. (20 x 25 cm)
US Letter (8.5 x 11 in. / 22 x 28 cm)
A4 (8.3 x 11.7 in. / 21 x 30 cm)
88 www.kodak.com/go/aiosupport
Page 95

Safety information
CAUTION:
KODAK ESP 9200 Series All-in-One Printers are Class 1 LED Products.
• Always follow all warnings and instructions marked on the product.
• Use only the power source indicated on the product regulatory label.
• Use only the power cord that comes with the product (or an approved power
cord greater or equal to H05W-F, 2G, 0.75mm
cause fire and/or shock. Do not use the included power cord with any other
equipment.
• Always turn this product off by using the On/Off button. Wait until the On/Off
button stops flashing before removing the power plug from the outlet.
• Do not allow the power cord to become damaged or frayed.
• If you need to use an extension cord with this product, make sure that the
ampere rating of the product does not exceed the ampere rating of the extension
cord.
• Place the product on a flat, stable surface that extends beyond the product’s
base in all directions. This product will not operate properly if tilted or at an
angle.
• When storing or transporting this product, do not tilt or stand it on its side.
Never turn this product upside down (ink can leak out of the product).
• Avoid placing this product in an environment that is subject to rapid changes in
temperature or humidity, mechanical shocks, vibration, or dust. Do not place
near radiators, heating vents, or in direct sunlight.
• Leave enough room around this product for sufficient ventilation.
• Do not block this product’s covers or openings, or insert any objects through
slots.
• Do not use aerosol products inside or around this product.
• Do not spill any liquid on this product.
• Do not attempt to repair or service this product.
• If the power cord or plug is damaged, if any liquid has been spilled onto the
product, if the product has been dropped or the case damaged, if the product
does not operate normally or exhibits a major change in performance level,
unplug this product and contact Kodak at
KODAK ESP 9200 Series All-in-One Printer
2
). Using another power cord may
www.kodak.com/go/contact.
For Service Personnel:
Risk of explosion if battery is replaced by an incorrect type. Dispose of used
batteries according to local instructions.
www.kodak.com/go/aiosupport 89
Page 96

Product and Safety Specifications
CAUTION:
LCD screen safety
• Use only a dry, soft cloth to clean the LCD screen. Do not use any liquid or
chemical cleaners.
• If the LCD screen is damaged, contact Kodak immediately. If any of the solution
from the display gets on your hands, wash them thoroughly with soap and water.
Ink cartridge safety
• Keep all ink cartridges out of the reach of children.
• If ink gets on your skin, wash with soap and water. If ink gets into your eyes, flush
immediately with water. If any discomfort or change in vision persists after
washing, seek medical attention immediately.
• For MSDS information on inks, go to www.kodak.com/go/MSDS.
Regulatory compliance
FCC statement
The United States Federal Communications Commission (in CFR 47 Part 15.105) has
specified that the following notice be brought to the attention of the users of this
product:
NOTE: This equipment has been tested and found to comply with the limits for a
Class B digital device, pursuant to part 15 of the FCC Rules. These limits are
designed to provide reasonable protection against harmful interference in a
residential installation. This equipment generates, uses, and can radiate
radio frequency energy and, if not installed and used in accordance with the
instructions, may cause harmful interference to radio communications.
However, there is no guarantee that interference will not occur in a particular
installation. If this equipment does cause harmful interference to radio or
television reception, which can be determined by turning the equipment off
and on, the user is encouraged to try to correct the interference by one or
more of the following measures:
• Reorient or relocate the receiving antenna.
• Increase the separation between the equipment and receiver
• Connect the product into an outlet on a circuit different from that to which
the receiver is connected.
• Consult the dealer or an experienced radio/TV technician for help.
Pursuant to Part 15.21 of the FCC Rules, any changes or modifications to this
product not expressly approved by Eastman Kodak Company might cause
harmful interference and void the FCC authorization to operate this product.
The radiated energy from this product is well below the FCC radio frequency
exposure limits. Nevertheless, the product shall be used in such a manner
90 www.kodak.com/go/aiosupport
Page 97

Canadian statements
CAUTION:
CAUTION:
This product meets the applicable Industry Canada technical specifications.
Operation is subject to the following two conditions: (1) this device may not cause
interference, and (2) this device must accept any interference, including interference
that may cause undesired operation of the device.
This Class B digital apparatus complies with Canadian ICES-003.
Industry Canada (IC) Radiation Exposure Statement
This equipment complies with IC radiation exposure limits set forth for an
uncontrolled environment. This equipment should be installed and operated with a
minimum distance of 20 cm between the radiator and your person.
KODAK ESP 9200 Series All-in-One Printer
that the potential for human contact during normal operation is minimized.
This product and any attached external antenna, if supported, shall be placed
in such a manner to minimize the potential for human contact during normal
operation. In order to avoid the possibility of exceeding the FCC exposure
limits, human proximity shall not be less than 20 cm (8 inches) during normal
operation.
European compliance statement
Hereby, Eastman Kodak Company declares that this KODAK all-in-one wireless
printer is in compliance with the essential requirements and other relevant
provisions of Directive 1999/5/EC.
German compliance statement
This device is not intended for use in the direct field of view at visual display
workplaces. To avoid incommoding reflections at visual display workplaces
this device must not be placed in the direct field of view.
Das Gerät ist nicht für die Benutzung im unmittelbaren Gesichtsfeld am
Bildschirmarbeitsplatz vorgesehen. Um störende Reflexionen am
Bildschirmarbeitsplatz zu vermeiden, darf dieses Produkt nicht im unmittelbaren
Gesichtsfeld platziert verden.
Noise emissions for this equipment do not exceed 70 dB(A).
This equipment is not intended for use in the work place in accordance with
BildscharbV regulations.
www.kodak.com/go/aiosupport 91
Page 98

Product and Safety Specifications
“Das Gerät ist nicht für die Benutzung am Bildschirmarbeitsplatz gemäß
BildscharbV vorgesehen.”
REACH Article 33 declarations
Go to www.kodak.com/go/REACH for information about the presence of
substances included on the candidate list according to article 59(1) of Regulation
(EC) No. 1907/2006 (REACH).
Power supply information
Certified External Power Supply that can be used with this product: Hipro
HP-A0601R3, or Flextronics VP-09500084-000.
Waste electrical and electronic equipment labeling
In the European Union, do not discard this product as unsorted municipal waste.
Contact your local authorities or go to www.kodak.com/go/recycle for recycling
program information.
ENERGY STAR® Qualified
To conserve energy, this printer will enter a low power (sleep) mode after being idle
for a default delay time of 1 hour. You can increase the delay time to low power (in
0.5 hour increments) up to 4 hours. Increasing the delay time may result in reduced
energy savings.
ENERGY STAR and the ENERGY STAR mark are registered U.S. service marks. As an
ENERGY STAR partner, Kodak has determined that this product meets ENERGY
STAR Guidelines for energy efficiency. For more information on the ENERGY STAR
program, see
www.energystar.gov.
92 www.kodak.com/go/aiosupport
Page 99

Warranty Information
Limited Warranty
Kodak warrants Kodak consumer electronic products and accessories (“Products”),
excluding batteries, to be free from malfunctions and defects in both materials and
workmanship for one year from the date of purchase. Retain the original dated sales
receipt. Proof of the date of purchase will be required with any request for warranty
repair.
Limited Warranty Coverage
Warranty service is only available from within the country where the Products were
originally purchased. You may be required to send Products, at your expense, to the
authorized service facility for the country where the Products were purchased.
Kodak will repair or replace Products if they fail to function properly during the
warranty period, subject to any conditions and/or limitations stated herein.
Warranty service will include all labor as well as any necessary adjustments and/or
replacement parts. If Kodak is unable to repair or replace a Product, Kodak will, at its
option, refund the purchase price paid for the Product provided the Product has been
returned to Kodak together with proof of the purchase price paid. Repair,
replacement, or refund of the purchase price are the sole remedies under this
warranty. If replacement parts are used in making repairs, those parts may be
remanufactured or may contain remanufactured materials. If it is necessary to
replace the entire Product, it may be replaced with a remanufactured Product.
Remanufactured Products, parts and materials are warranted for the remaining
warranty term of the original Product, or 90 days after the date of repair or
replacement, whichever is longer.
KODAK ESP 9200 Series All-in-One Printer
Limitations
This warranty does not cover circumstances beyond Kodak’s control. This warranty
does not apply when failure is due to shipping damage, accident, alteration,
modification, unauthorized service, misuse, abuse, use with incompatible
accessories or attachments (such as third party ink or ink tanks), failure to follow
Kodak’s operation, maintenance or repacking instructions, failure to use items
supplied by Kodak (such as adapters and cables), or claims made after the duration
of this warranty. KODAK MAKES NO OTHER EXPRESS OR IMPLIED WARRANTY
FOR THIS PRODUCT, AND DISCLAIMS THE IMPLIED WARRANTIES AND
CONDITIONS OF MERCHANTABILITY AND FITNESS FOR A PARTICULAR
PURPOSE. In the event that the exclusion of any implied warranty is ineffective
under the law, the duration of the implied warranty will be one year from the
purchase date or such longer period as required by law. The option of repair,
replacement, or refund is Kodak’s only obligation. Kodak will not be responsible for
any special, consequential or incidental damages resulting from the sale, purchase,
or use of this product regardless of the cause. Liability for any special consequential
or incidental damages (including but not limited to loss of revenue or profit,
downtime costs, loss of the use of the equipment, cost of substitute equipment,
facilities or services or claims of your customers for such damages resulting from
www.kodak.com/go/aiosupport 93
Page 100

Product and Safety Specifications
the purchase, use or failure of the Product), regardless of cause, or for breach of any
written or implied warranty is expressly disclaimed.
You r R i g ht s
Some states or jurisdictions do not allow exclusion or limitation of incidental or
consequential damages, so the above limitation or exclusion may not apply to you.
Some states or jurisdictions do not allow limitations on how long an implied
warranty lasts, so the above limitation may not apply to you. This warranty gives you
specific rights, and you may have other rights which vary from state to state or by
jurisdiction. Your statutory rights are not affected.
Outside the United States and Canada
In countries other than the United States and Canada, the terms and conditions of
this warranty may be different. Unless a specific Kodak warranty is communicated to
the purchaser in writing by a Kodak company, no warranty or liability exists beyond
any minimum requirements imposed by law, even though defect, damage, or loss
may be by negligence or other act.
Declaration of Conformity
See www.kodak.com/go/declarationofconformity.
94 www.kodak.com/go/aiosupport
 Loading...