

Page 1

2
. . . . . . . . . . . . . . . . . . . . . . . . . . . . .
. . . . . . . . . . . . . . . . . . . . . . . . . . . . .
. . . . . . . . . . . . . . . . . . . . . . . . . . . . .
User’s Manual
EOS•DCS 1
EOS
EOS
•
DCS 3
•
DCS 5
Digital Cameras
© Eastman Kodak Company, 1997
This manual and the accompanying software are protected by United States and international copyright laws. You may
make one backup copy of the enclosed software and one copy of this manual. Do not make additional copies of the
software or copies of the manual or electronically transmit them in any form whatsoever, in whole or in part, without
the prior written permission of Eastman Kodak Company.
Page 2

. . . . . . . . . . . . . . . . . . . . . . . . . . . . .
ii
Page 3

. . . . . . . . . . . . . . . . . . . . . . . . . . . . .
WARRANTY
KODAK Professional DCS Digital Camera
THIS WARRANTY APPLIES TO EQUIPMENT PURCHASED IN THE
UNITED STATES.
Warranty Time Period
Kodak warrants your camera to be free from malfunctions and defects in
both materials and workmanship for six months from the date of purchase.
Warranty Repair Coverage
If this equipment does not function properly during the warranty period,
due to defects in either materials or workmanship, Kodak will, at its
option, either repair or replace the equipment, without charge, subject to
the conditions and limitations stated herein. Such repair service will
include all labor as well as any necessary adjustments and/or replacement
parts.
If replacement parts are used in making repairs, these parts may be
remanufactured, or may contain remanufactured materials. If it is necessary to replace the entire system, it may be replaced with a
remanufactured system. If it should become necessary to repair or replace
a malfunctioning or defective system, the provisions of this warranty shall
apply to the repaired or replaced system until the expiration of 30 days
from the date of return, or until the end of the original warranty period,
whichever is later.
Kodak will also provide telephone assistance during the warranty period.
iii
Page 4

. . . . . . . . . . . . . . . . . . . . . . . . . . . . .
Limitations
Warranty service will not be provided without return of the Warranty
Registration card or dated proof of purchase. Please return the Warranty
Registration card within 30 days of purchase.
As a condition of warranty service, before sending in your unit to the
nearest service center for repair, you must first contact a Kodak representative for return authorization and instructions.
This warranty becomes null and void if, during shipment, you fail to pack
your camera in a manner consistent with the enclosed repacking instructions in an appendix.
This warranty does not cover the following: circumstances beyond
Kodak’s control; service or parts to correct problems resulting from the
use of attachments, accessories or alterations not marketed by Kodak;
unauthorized modifications or service; misuse; abuse; failure to follow
Kodak’s operating, maintenance, or repacking instructions; or failure to
use Kodak supplied items (such as cables).
KODAK MAKES NO OTHER WARRANTIES, EXPRESS OR IMPLIED,
INCLUDING THE IMPLIED WARRANTIES OF MERCHANTABILITY
AND FITNESS FOR A PARTICULAR PURPOSE. Repair or replacement
without charge is Kodak’s only obligation under this warranty. Kodak will
not be responsible for any consequential or incidental damages resulting
from the purchase, use, or improper functioning of this equipment even if
the loss or damage is caused by the negligence or other fault of Kodak.
Such damages for which Kodak will not be responsible include, but are
not limited to, loss of revenue or profit, downtime costs, loss of use of the
equipment, cost of any substitute equipment, facilities, or services, or
claims of your customers for such damages.
iv
Page 5

. . . . . . . . . . . . . . . . . . . . . . . . . . . . .
Outside the United States
In countries other than the United States, the terms of this warranty may
be different. Unless a specific Kodak warranty is communicated to the
purchaser in writing by a Kodak company, no other warranty or liability
exists beyond the information contained above, even though defect,
damage or loss may be by negligence or other act.
How to obtain service
In the United States, call 1-800-23-KODAK (1-800-235-6325), and in
Canada call 1-800-GO-KODAK (1-800-465-6325).
In other countries, call your nearest Kodak representative.
If service is required, your Kodak representative will instruct you to return
the unit to the nearest service center for repair and will issue a return
authorization number.
When returning a camera for repair, the unit shall be packed in its original
packing materials according to the enclosed repacking instructions in an
appendix. The enclosed problem report form (see appendices) should also
be completed and enclosed with the equipment. If the original packaging
has been discarded or is not available, packing will be at the owner’s
expense. (NOTE: The camera body that is supplied as part of the camera
should be included in the return.)
Return of the repaired or replaced unit to the customer can be expected in
five to seven days from the date the camera arrives at the service center.
v
Page 6

. . . . . . . . . . . . . . . . . . . . . . . . . . . . .
EASTMAN KODAK COMPANY
Software License Agreement
YOU SHOULD CAREFULLY READ THE FOLLOWING TERMS AND CONDITIONS
BEFORE OPENING THE DISKETTE PACKAGE(S). OPENING THE DISKETTE
PACKAGE(S) INDICATES YOUR ACCEPTANCE OF THESE TERMS AND CONDITIONS. IF YOU DO NOT AGREE WITH THEM, YOU SHOULD PROMPTLY RETURN THE DISKETTE PACKAGE(S) UNOPENED, ALONG WITH THE ACCOMPANYING MATERIALS.
Eastman Kodak Company (Kodak) provides this software and licenses its
use worldwide.
You assume responsibility for selection of the software to achieve your
intended results, and for installation, use, and results obtained from the
software.
LICENSE
vi
You may:
a. use the software;
b. copy the software onto one or more computers only for the purpose of
operating the equipment with which this software was provided (the
“Related Equipment”) or into any machine-readable form for backup
purposes in support of your use of the software;
c. transfer the software and license to another party to whom you also
transfer the Related Equipment, if the other party agrees to accept the
terms and conditions of this Agreement. If you transfer the software,
you must at the same time either transfer all copies to the same party
or destroy any copies not transferred.
Page 7

. . . . . . . . . . . . . . . . . . . . . . . . . . . . .
You must reproduce and include the copyright notice on any copy of the
software.
YOU MAY NOT USE, COPY OR TRANSFER THE SOFTWARE, OR ANY
COPY, IN WHOLE OR IN PART, EXCEPT AS EXPRESSLY PROVIDED
FOR IN THIS LICENSE.
IF YOU TRANSFER POSSESSION OF THE RELATED EQUIPMENT OR
ANY COPY OF THE SOFTWARE TO ANOTHER PARTY, YOUR LICENSE
IS AUTOMATICALLY TERMINATED.
TERM
The license is effective until terminated. You may terminate it at any time
by destroying the software together with all copies in any form. It will also
terminate upon conditions set forth elsewhere in the Agreement or if you
fail to comply with any term or condition of this Agreement. You agree
upon such termination to destroy the software together with all copies in
any form.
LIMITED WARRANTY
Kodak warrants the diskettes on which the software is furnished to be free
from defects in materials and workmanship under normal use for a period
of ninety (90) days from the date of delivery to you as evidenced by a
copy of your receipt.
Kodak does not warrant that the functions contained in the software will
meet your requirements or that the operation of the software will be
uninterrupted or error free.
THE SOFTWARE IS PROVIDED ‘AS IS’ WITHOUT WARRANTY OF ANY
KIND, EITHER EXPRESSED OR IMPLIED, INCLUDING, BUT NOT
LIMITED TO, THE IMPLIED WARRANTIES OF MERCHANTABILITY
vii
Page 8

. . . . . . . . . . . . . . . . . . . . . . . . . . . . .
AND FITNESS FOR A PARTICULAR PURPOSE. THE ENTIRE RISK AS TO
QUALITY AND PERFORMANCE OF THE SOFTWARE IS WITH YOU. IF
THE SOFTWARE PROVES DEFECTIVE, YOU (AND NOT KODAK OR
YOUR DEALER) ASSUME THE ENTIRE COST OF ALL NECESSARY
SERVICING, REPAIR, OR CORRECTION.
Some states do not allow the exclusion of implied warranties, so the
above exclusion may not apply to you. This warranty gives you specific
legal rights and you may also have other rights that vary from state to
state.
LIMITATIONS OF REMEDIES
Kodak’s entire liability and your exclusive remedy shall be:
1. the replacement of any diskette not meeting Kodak’s “Limited Warranty” that is returned to Kodak or your dealer with a copy of your
receipt, or
2. if Kodak or the dealer is unable to deliver a replacement diskette that
is free of defects in materials or workmanship, you may terminate this
Agreement by returning the software.
viii
IN NO EVENT WILL KODAK BE LIABLE TO YOU FOR ANY DAMAGES,
INCLUDING ANY LOST PROFITS, LOST SAVINGS, OR OTHER INCIDENTAL OR CONSEQUENTIAL DAMAGES ARISING OUT OF THE USE
OR INABILITY TO USE THE SOFTWARE EVEN IF KODAK OR YOUR
DEALER HAS BEEN ADVISED OF THE POSSIBILITY OF SUCH DAMAGES, OR FOR ANY CLAIM BY ANY OTHER PARTY.
Some states do not allow the limitation or exclusion of liability for incidental or consequential damages, so the above limitation or exclusion
may not apply to you.
Page 9

. . . . . . . . . . . . . . . . . . . . . . . . . . . . .
GENERAL
You may not sublicense, assign, or transfer the license or the software,
except as expressly provided in this Agreement. Any attempt otherwise to
sublicense, assign, or transfer any of the rights, duties, or obligations
hereunder is prohibited.
This Agreement will be governed by the laws of the State of New York.
Should you have any questions concerning this Agreement, you may
contact Kodak in the United States at 1-800-23-KODAK (1-800-235-
6325), in Canada at 1-800-GO-KODAK (1-800-465-6325), and in other
countries through your nearest Kodak representative.
YOU ACKNOWLEDGE THAT YOU HAVE READ THIS AGREEMENT,
UNDERSTAND IT, AND AGREE TO BE BOUND BY ITS TERMS AND
CONDITIONS. YOU FURTHER AGREE THAT IT IS THE COMPLETE
AND EXCLUSIVE STATEMENT OF THE AGREEMENT BETWEEN US,
WHICH SUPERSEDES ANY PROPOSAL OR PRIOR AGREEMENT, ORAL
OR WRITTEN, AND ANY OTHER COMMUNICATIONS BETWEEN US
RELATING TO THE SUBJECT MATTER OF THIS AGREEMENT.
ix
Page 10
. . . . . . . . . . . . . . . . . . . . . . . . . . . . .
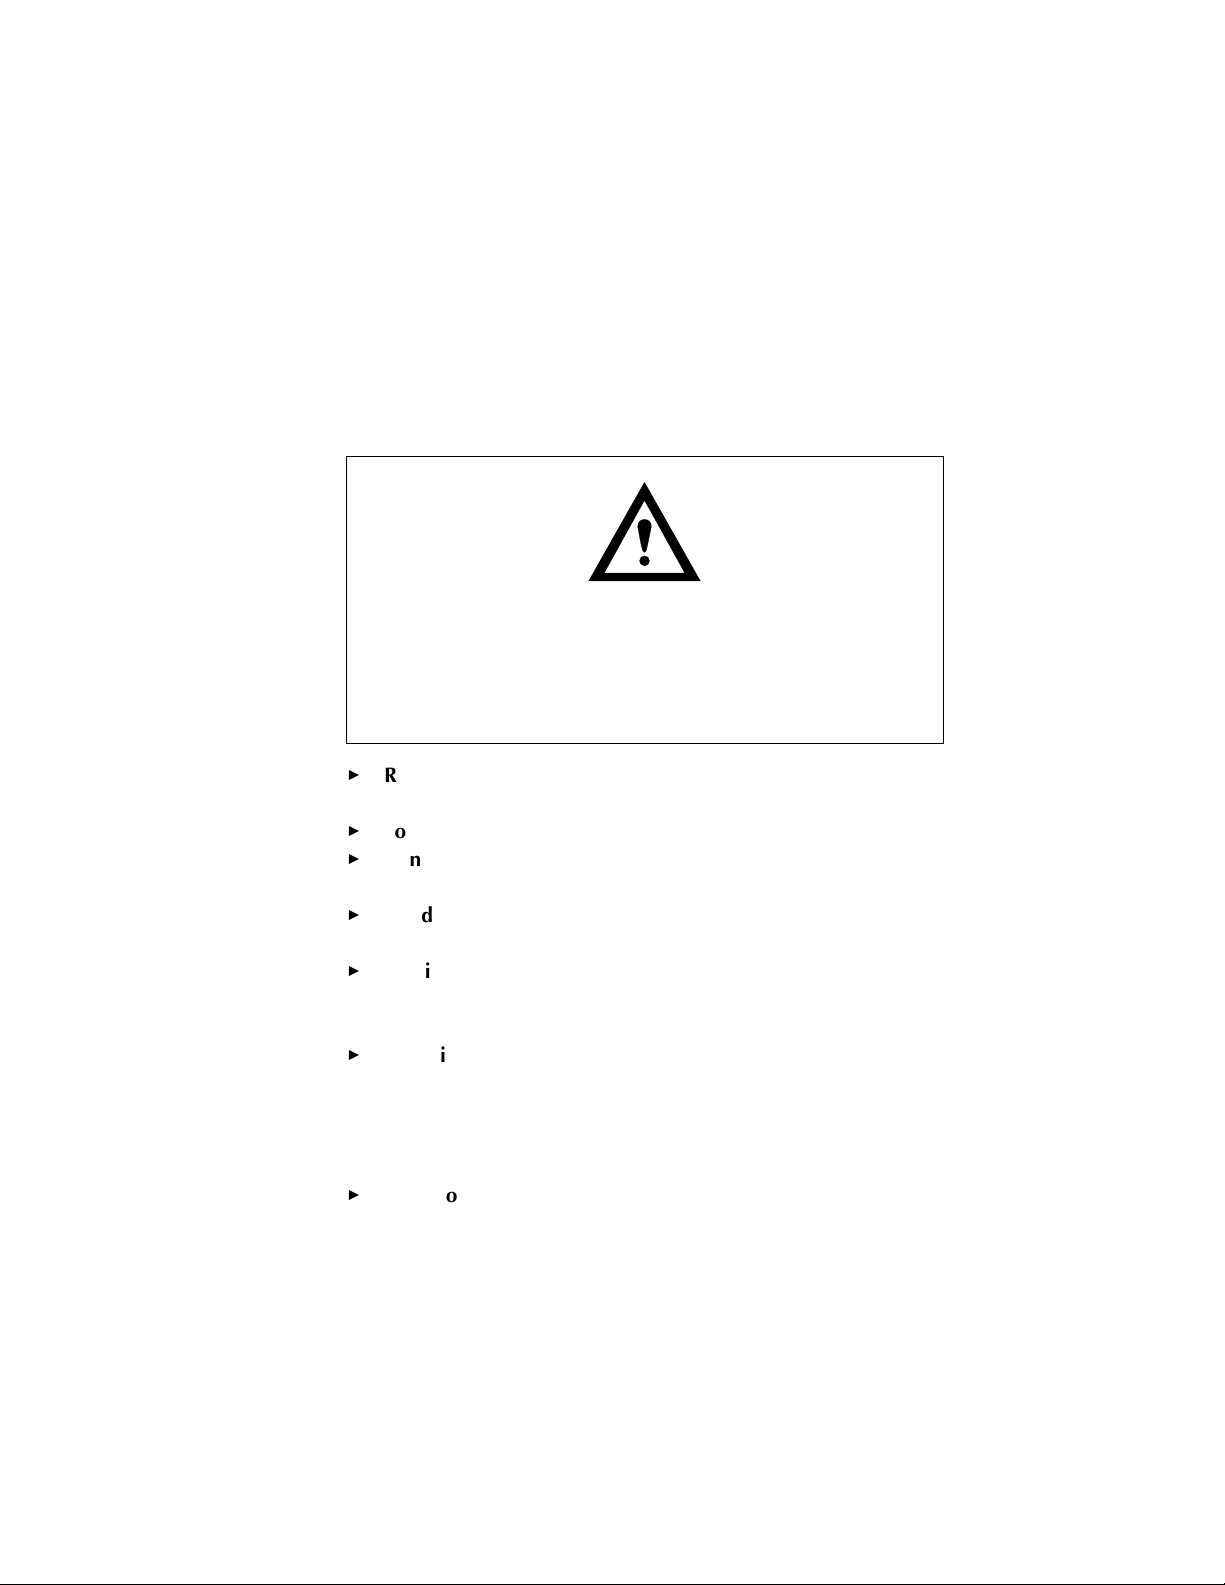
Important Safeguards and
Precautions
The exclamation point in an equilateral triangle is intended to alert the user to the presence of important
operating and maintenance (servicing) instructions in
the literature accompanying the equipment.
Read Instructions — Read all the safety and operating instructions
before operating the equipment.
Follow Instructions — Follow all operating and use instructions.
Controls — Adjust only those controls that are covered by the operating instructions.
Heed Warnings — Heed all warnings on the equipment and in the
operating instructions.
Retain Instructions and Packaging — Retain the safety and operating
instructions for future reference. Retain the packing case for use if the
equipment needs to be shipped.
Handling — Handle the equipment as you would any valuable
camera. Handle the equipment with care, especially when the hard
disk is running. Treat the imager as you would your best lens. Do not
drop the equipment. Mishandling can damage the imager resulting in
an expensive repair.
Accessories — Do not place the equipment on an unstable cart,
stand, bracket, or table. It can fall, causing serious injury to persons
x
Page 11

. . . . . . . . . . . . . . . . . . . . . . . . . . . . .
and serious damage to the equipment. Use only with a stable cart,
stand, bracket, or table.
Cleaning — Unplug the camera from its AC battery charger/adapter
and from a computer. Be certain the camera off. Using a damp cloth,
clean only the outside cabinet and the liquid crystal display (LCD) on
the KODAK camera back. Do not use liquid cleaners or aerosol
cleaners on the outside of the equipment. (Refer to Chapter 7 for
directions on cleaning the imager in the camera back.)
Dust — If you operate the camera in environments with excessive
dust levels, dust may accumulate on the imager in the camera back.
(Refer to Chapter 7 for directions on cleaning the imager in the camera back.)
CAUTION: Water and Moisture — Do not use the AC battery
charger/adapter near water — for example, near a sink, or in a wet
room or basement. Do not use the equipment in heavy rain and do
not immerse the equipment in water or other liquids.
Object or Liquid Entry — Never push foreign objects of any kind into
the equipment openings. The objects could touch dangerous voltage
points or short out parts and cause a fire or electric shock. Never spill
liquid of any kind on the equipment.
Attachments — Do not use attachments that are not recommended.
The use of such attachments may cause hazards and serious damage
to the equipment.
Power Sources — You should operate the equipment only from the
type of power source indicated on the name plate of the AC battery
charger/adapter. If you are not sure of the type of AC power that will
be used, consult a dealer or local power company.
Overloading — Do not overload power outlets and extension cords;
this can result in a risk of fire or electric shock.
Cables — Do not use cables other than those supplied with the
camera, except that an additional cable is required if you will use the
xi
Page 12

. . . . . . . . . . . . . . . . . . . . . . . . . . . . .
camera as the only external device attached to a PowerBook computer (refer to Chapter 4). Use only the SCSI cables supplied with the
camera to attach the camera or other peripherals to the computer. If
you use other cables, you may violate FCC emission requirements
and could corrupt data on the hard disk.
Power-Cord Protection — Route power-supply, and other cords, so
that you are not likely to walk on them or pinch them with items
placed on or against them; pay particular attention to cords at plugs,
receptacles, and the point where they leave the equipment.
Grounding — The AC battery charger/adapter is equipped with a
three-wire grounding-type plug with a third (grounding) pin. The
three-wire plug will fit into a grounding-type power outlet. This is a
safety feature. If you are unable to insert the plug into the outlet,
contact an electrician to replace the obsolete outlet. Do not defeat the
safety purpose of the grounding-type plug.
Lightning — For added protection for the equipment during a lightning storm, or any time when you will leave the equipment unattended and unused for long periods of time, unplug the AC battery
charger/adapter from the power outlet and disconnect the camera
from the computer. This will protect the equipment from damage
caused by lightning or power-line surges.
Temperature, Humidity, Condensation — We do not recommend
operating the equipment outside the operating temperature or humidity ranges as indicated in the Specifications appendix. If condensation
occurs, added time may be required to read from or write to a
PCMCIA card. Condensation may be present if the camera system
and/or PCMCIA card(s) are moved from a relatively cold environment
(like an air conditioned hotel room), into a warm, humid environment. We recommend that you allow sufficient time for the camera
system and/or PCMCIA cards to normalize within the specified
environmental ranges before operation. (Third-party, optional
xii
Page 13

. . . . . . . . . . . . . . . . . . . . . . . . . . . . .
PCMCIA cards may have more restrictive operating temperature and
humidity ranges. Refer to the specifications for the cards you use.)
PCMCIA cards — PCMCIA cards (not supplied with the camera
system) are fragile devices that can be damaged if not treated with
care. Refer to the documentation accompanying any card(s) you
obtain to ensure that you are handling the card as specified in that
documentation, and that you are using the card within its operating
ranges for temperature, humidity, condensation, and so on.
Servicing — Do not attempt to service the equipment yourself.
Opening or removing covers may expose you to dangerous voltage or
other hazards. Never open the KODAK camera back. (Refer to Chapter 7 for directions on separating the KODAK camera back from the
Canon EOS-1 N camera to clean a dirty imager.)
Damage Requiring Service — Unplug the equipment from the wall
outlet and computer, and refer all servicing to the manufacturer under
the following conditions:
- When any cord or plug is damaged (send cord only).
- If liquid has been spilled or if objects have fallen in the equipment.
- If the equipment has been exposed to rain or water.
- If the equipment does not operate normally according to the
operating instructions.
- If the equipment has been dropped or the housing has been
damaged.
- When the equipment exhibits a distinct change in performance.
Disconnecting Parts — Do not separate the KODAK camera back
from the Canon EOS-1 N camera. The system is shipped as a single
unit; do not disconnect the parts (except as described in Chapter 7 for
cleaning a dirty imager). Do not open or attempt to open the camera
back; doing so will void the warranty.
xiii
Page 14

. . . . . . . . . . . . . . . . . . . . . . . . . . . . .
You can connect the camera to a computer with or without a PCMCIA
card in the camera. Once the camera is connected to a computer, you
can insert/remove a PCMCIA card while the camera and computer are
turned on or turned off; however, do not remove a PCMCIA card from
the camera while the red “Card Busy” light on the camera back is
blinking. The blinking indicates that data are being read from or
written to the PCMCIA hard disk. If you do, you may lose the current
image, and may lose all of your images as well.
CAUTION: To prevent fire or shock hazard, use only the recommended
accessories or attachments.
Battery — Important Warnings
Do not attempt to remove the battery; it is not a customer serviceable
part.
If you will be operating the camera while it is connected to the AC
battery charger/adapter, the camera will be ready for operation almost
immediately. (However, if you are beginning with a dead battery, and
notice unusual behavior such as random characters flashing on the
camera back LCD, you may need to wait for approximately three
minutes while the adapter charges the battery.) If you will be operating the camera without the AC battery charger/adapter, you should
charge the battery for at least two hours before using as described in
Chapter 4.
If the unusual behavior continues for more than five minutes, the
battery may need to be replaced; contact Kodak.
xiv
Page 15

. . . . . . . . . . . . . . . . . . . . . . . . . . . . .
AC Battery Charger/Adapter — Important
Warnings
You should operate the equipment only from the type of power source
indicated on the name plate of the AC battery charger/adapter.
voltage outside of this range can destroy the AC battery charger/
adapter and/or the camera.
Use only the supplied AC battery charger/adapter; do not plug other
chargers or adapters into the camera.
The AC battery charger/adapter is for indoor use only.
Do not use the supplied AC battery charger/adapter for any purpose
other than for the camera.
Do not plug the AC battery charger/adapter into any equipment other
than the camera.
The rechargeable battery in the KODAK camera back becomes warm
during charging; this is normal operation.
Under normal conditions, charging the battery for at least two hours
provides optimal capacity. However, under very cold or very hot
conditions, charge for at least 30 minutes after the LCD battery
indicator indicates a full charge. Charge the battery as close to the
time the camera will be used as possible. (Waiting in excess of two
days before shooting will result in reduced battery capacity.)
Use the AC battery charger/adapter when connected to a computer if
possible; use without the adapter in this configuration for an extended
time period will drain the battery. Leaving the camera connected to
the AC battery charger/adapter will not maintain a full charge; therefore disconnect before use, then reconnect and charge for two hours
to ensure a full charge. Extended camera metering or focusing reduces
the number of images available from a charge.
A line
xv
Page 16

. . . . . . . . . . . . . . . . . . . . . . . . . . . . .
Electromagnetic Emissions
This equipment has been tested and found to comply with the limits for a
Class B digital device, pursuant to Part 15 of the FCC Rules. These limits
are designed to provide reasonable protection against harmful interference in a residential installation. This equipment generates, uses and can
radiate radio energy and, if not installed and used in accordance with the
instructions, may cause harmful interference to radio communications.
However, there is no guarantee that interference will not occur in a
particular installation. If this equipment does cause harmful interference
to radio or television reception, which can be determined by turning the
equipment off and on, the user is encouraged to try to correct the interference by one or more of the following measures: reorient or relocate the
receiving antenna; increase the separation between the equipment and
receiver; connect the equipment into an outlet on a circuit different from
that to which the receiver is connected; consult the dealer or an experienced radio/TV technician for help.
This equipment conforms with the requirements of European Standard
EN55022 with respect to radio interference for a Class B device.
xvi
Le présent appareil numérique n’émet pas de bruits radioélectriques
dépassant les limites applicables aux appareils numériques de la classe B
prescrites dans le réglement sur le broullage radioélectrique édicté par le
Ministère des Communications du Canada.
This digital apparatus does not exceed the class B limits for radio noise
emissions from digital apparatus set out in the radio interference regulations of the Canadian Department of Communications.
This equipment is in the Class 2 category (information equipment to be
used in a residential area or an adjacent area thereto) and conforms to the
standards set by the voluntary Control Council For Interference by Data
Processing Equipment and Electronic Office Machines aimed at preventing radio interference in such residential areas. When used near a radio or
TV receiver, it may become the cause of radio interference. Read the
instructions for correct handling.
Page 17

. . . . . . . . . . . . . . . . . . . . . . . . . . . . .
Contents
11
1 Before You Begin 1-1
11
Macintosh Computer — Hardware and Software 1-2
Required Computer, Memory, Hard Disk 1-2
Computer 1-2
Memory 1-2
Hard disk 1-2
Required Monitor and Display Card 1-2
Required Systems Software 1-3
Required SCSI Cables and Terminators 1-3
Required Applications Software 1-3
IBM PC or Compatible Computer —Hardware and Software 1-4
Required Computer, Memory, Hard Disk 1-4
Computer 1-4
Memory 1-4
Hard disk 1-4
Required Monitor and Display Card 1-4
Required SCSI Interface 1-5
Required Systems Software 1-5
Required Applications Software 1-5
Optional Hardware/Software for Playing Recorded Sound 1-5
Other Optional Equipment 1-6
Optional Camera Equipment 1-6
Optional PCMCIA Hard Disk Card 1-6
xvii
Page 18

. . . . . . . . . . . . . . . . . . . . . . . . . . . . .
22
2 Introduction 2-1
22
KODAK Camera Back 2-3
Features 2-4
33
3 Quick Start 3-1
33
44
4 Preparing the Camera and the Computer 4-1
44
Using the AC Battery Charger/Adapter 4-3
Charging the Battery 4-4
Setting the SCSI ID on the Camera 4-7
Installing a SCSI Host Adapter (TWAIN PC Only) 4-12
Making the SCSI Connection 4-13
Camera as the Sole SCSI Device 4-13
Camera Used with Other SCSI Devices 4-17
Camera Used with a Macintosh PowerBook or a PC Laptop 4-23
Macintosh PowerBook with No External SCSI Devices 4-23
PC (for TWAIN driver) 4-25
Inserting and Removing a PCMCIA Card 4-26
Inserting a PCMCIA Card 4-26
Removing a PCMCIA Card 4-30
Installing the KODAK Driver 4-32
Accessing the Camera from the Driver 4-35
Special Instructions for TWAIN-compliant Software 4-35
Final Steps to the Driver Window 4-37
Updating Camera Firmware 4-38
Formatting a PCMCIA Card 4-40
Quitting — Disconnecting the Camera from the Computer 4-42
55
5 Using the EOS•DCS Camera 5-1
55
Readying the EOS•DCS Camera 5-2
Accommodate for the Absent Quick Control Dial 5-5
xviii
Page 19

. . . . . . . . . . . . . . . . . . . . . . . . . . . . .
Choose Other Canon Camera Settings 5-6
Turning Off the Camera 5-8
Taking Pictures 5-8
Reading the Frames Remaining Indicator and the Frame Counter 5-10
Frames Remaining 5-10
Frame Counter/Image Reference Number 5-11
Deleting Pictures (Optional) 5-11
Recording Sound (Optional) 5-14
Turning off the Camera 5-15
Operating Differences with Your Camera 5-16
66
6 Tutorial — Accessing Camera Images 6-1
66
Working with Images Already on a PCMCIA Card 6-3
Accessing the Camera from the Driver 6-3
Viewing/Selecting an Image from the Camera with the Driver 6-5
Acquiring One Image from the Camera 6-8
Acquiring Multiple Images or a Contact Sheet 6-9
Rotate, Rename, and Annotate Images 6-11
Navigating Through Images 6-14
Navigating through a Contact Sheet 6-14
One or No Images Selected 6-14
More than One Image Selected 6-15
Preview 6-15
Applying Color Balance to Images 6-16
Applying Color Balance to a Single Image 6-17
Lighting Menu 6-18
Click-Balance Tool 6-18
Applying Color Balance to Multiple Selected Images 6-20
Saving Color Balance Changes 6-21
xix
Page 20

. . . . . . . . . . . . . . . . . . . . . . . . . . . . .
66
6 Tutorial — Accessing Camera Images (continued)
66
Working with Images Already on a PCMCIA Card
Crop Images 6-21
Close the Driver Image Window Saving Changes) 6-25
Working with Images in the Studio 6-26
Playing Recorded Sound Files 6-29
Archive and Delete Images 6-30
(Optional) Create Archive Files 6-30
Delete Files 6-32
Revise Preferences 6-32
Quitting 6-32
77
7 Reference — Camera 7-1
77
KODAK Camera Back and Imager 7-2
Timing Considerations 7-3
KODAK Camera Back Controls 7-4
Liquid Crystal Display (LCD) 7-4
Battery Indicator 7-6
Frames Remaining Indicator — KODAK Camera Back 7-7
Frame Counter — Canon EOS-1 N Camera 7-7
Disk Indicator 7-9
Disk Error Indicator 7-9
Control Buttons 7-10
DELETE Button and Delete Indicator 7-11
SCSI ID Button and SCSI Indicator 7-14
SCSI Connector (KODAK Camera Back) 7-16
Multipurpose Connector (KODAK Camera Back) 7-17
PCMCIA Cards 7-18
Supported PCMCIA Cards 7-18
Card Busy Light 7-19
DOS Formatting and Card Access 7-19
(continued)
xx
Page 21

. . . . . . . . . . . . . . . . . . . . . . . . . . . . .
Troubleshooting, Disk Recovery, and Fragmentation 7-19
Camera Operating Configurations 7-21
Supported Configurations 7-21
Taking Pictures While Connected to the Computer 7-22
Using the Camera with a PCMCIA Card 7-23
Using the Camera Without a PCMCIA Card While Connected to a
Computer 7-23
Battery and AC Battery Charger/Adapter 7-24
Battery Charging for Optimal Capacity 7-24
AC Battery Charger/Adapter 7-25
External Battery Adapter 7-26
Recorded Sound 7-27
How to Record Sound 7-28
Recording “Lengthy” Audio Segments 7-29
Playing Sound Files 7-30
On/Off State of the Camera 7-31
Troubleshooting the Camera 7-32
Cleaning the Imager 7-39
Determining If the Imager Is Dirty 7-39
Technique 1: Examine a Test Image 7-39
Technique 2: Visually Inspect the Imager 7-39
Cleaning a Dirty Imager 7-41
Separating the Camera from the KODAK Camera Back 7-41
Wiping the Imager 7-45
Reassembling the Camera 7-46
Using a Flash 7-48
Calibration (CAL) Files — EOS•DCS 1 Only 7-49
88
8 Reference — Kodak Driver Software 8-1
88
General Features 8-2
Defaults — Driver Image Window 8-5
xxi
Page 22

. . . . . . . . . . . . . . . . . . . . . . . . . . . . .
88
8 Reference — Kodak Driver Software (continued)
88
Commands 8-6
Source Menu 8-6
Camera 8-7
Folder 8-7
Choose Folder 8-7
View Menu 8-7
Contact Sheet 8-8
Preview 8-8
Test Shot 8-10
Photoshop Menus 8-12
Photoshop Edit Menu 8-12
Photoshop Select menu 8-12
All 8-12
None 8-12
Acquire As Menu 8-13
Photo 8-13
Contact Sheet 8-13
Acquire Contact Sheet Dialog 8-15
Document Name 8-15
Output Resolution 8-16
Size (Thumbnails) 8-16
Show Crop Rectangle (Thumbnails) 8-16
Printable Area Width and Height 8-16
Cancel 8-16
OK 8-16
Take Picture Icon 8-17
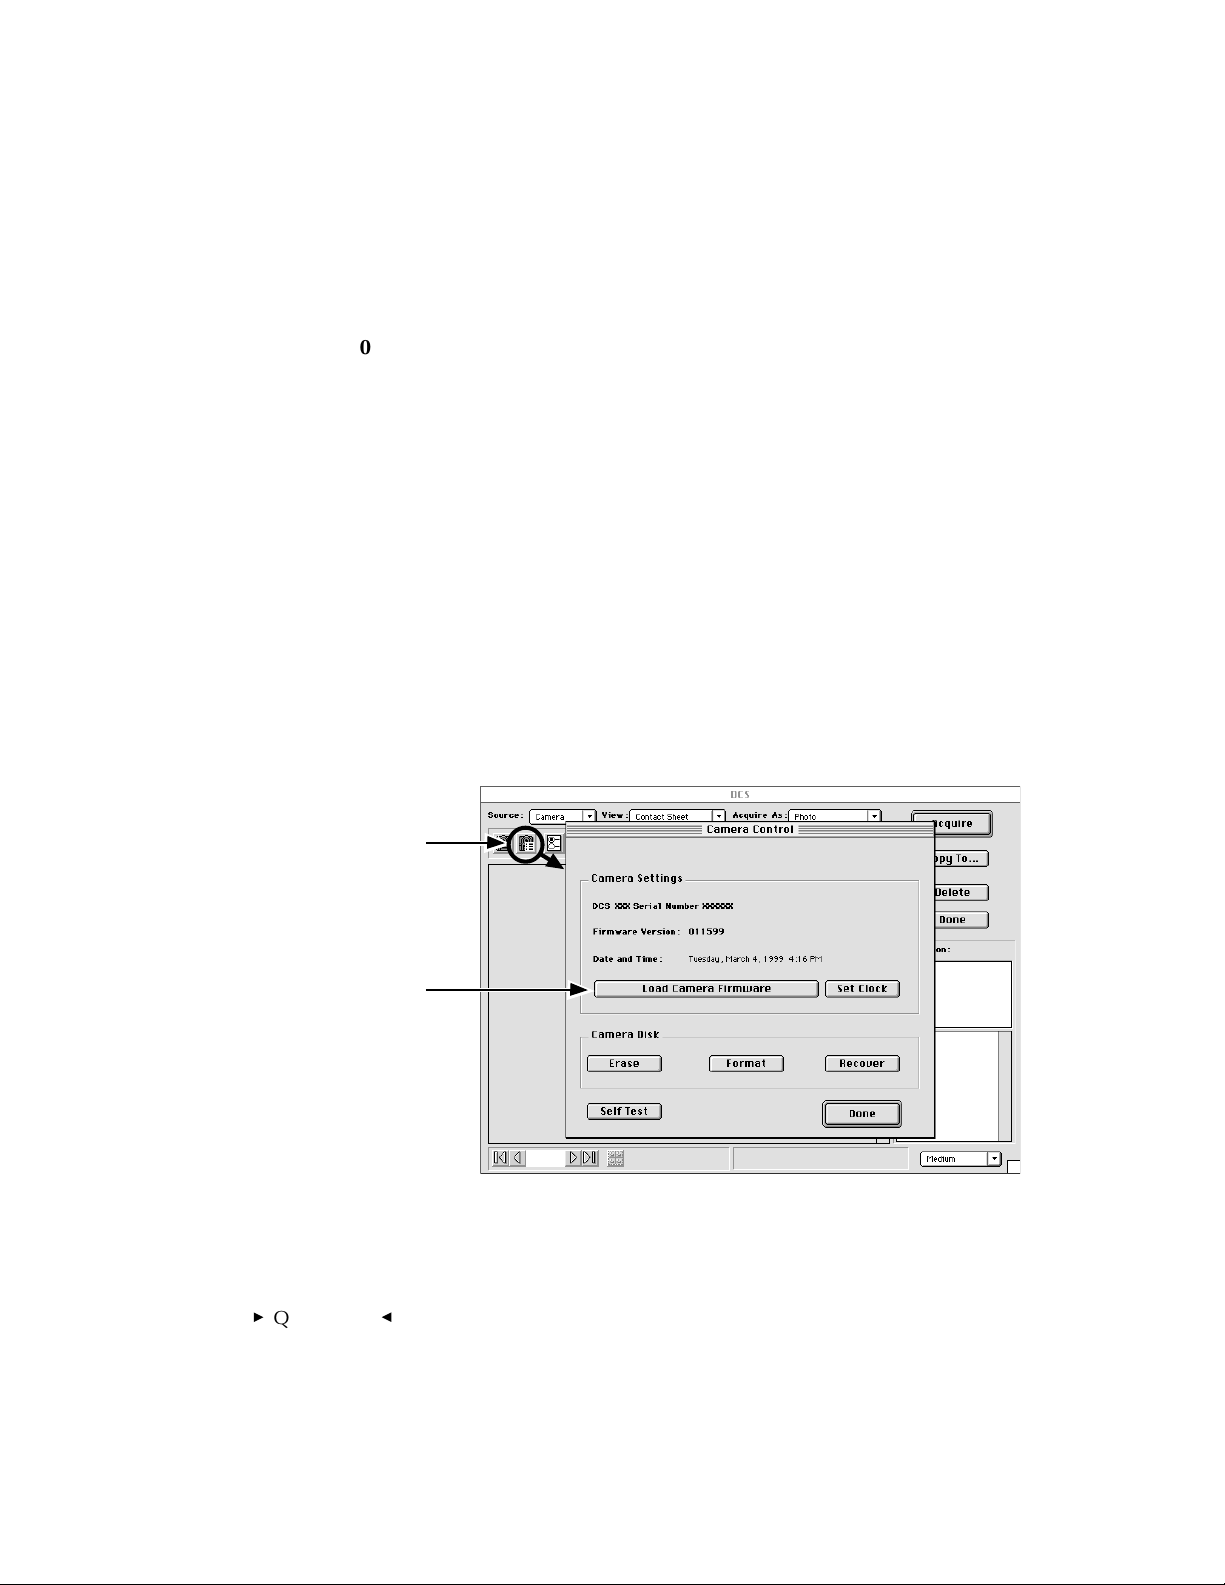
Camera Control Icon 8-17
Load Camera Firmware 8-19
Set Clock 8-20
xxii
Page 23

. . . . . . . . . . . . . . . . . . . . . . . . . . . . .
Erase 8-20
Format 8-20
Recover 8-21
Self Test 8-22
Done 8-22
Preferences Icon 8-23
Default Acquire Resolution 8-23
12-Bit Acquire 8-24
Show Tool Tips 8-24
Units: Inches/Centimeters 8-24
Acquired Contact Sheet Layout 8-25
Factory Settings 8-25
Cancel 8-25
OK 8-25
Rename Images Icon 8-25
Name 8-26
Sequence Number: Digits and Starting From 8-26
Example 8-27
Rename 8-27
Cancel 8-27
Rotate Clockwise/Counterclockwise Icons 8-28
Crop Icon 8-28
Introduction 8-28
The Crop Dialog Box 8-30
Method: Freeform and Fixed Size 8-31
Size 8-31
Left, Top, Width, and Height 8-32
Fix Aspect Ratio 8-32
Final Output 8-33
Remove 8-33
xxiii
Page 24

. . . . . . . . . . . . . . . . . . . . . . . . . . . . .
88
8 Reference — Kodak Driver Software (continued)
88
Commands
Using Photoshop “Actions” (Macintosh Only) 8-47
Troubleshooting — KODAK Driver Software 8-51
Messages — KODAK Driver Software 8-54
(continued)
Cancel 8-33
OK 8-33
Crop New Images after Shutter Release 8-33
Navigation Buttons 8-33
Lighting Menu 8-34
Click-Balance Tool 8-35
Sound Menu 8-38
Acquire Button 8-39
Copy To Button 8-40
Archive Image File Format 8-40
Delete Button 8-41
Done Button 8-42
Annotation Area and Image Information Window 8-42
Navigation Bar 8-44
Contact Sheet View 8-44
Preview View or Crop Dialog 8-44
Select All Icon 8-45
Number of Images Selected 8-45
The X-Y Cursor Location 8-45
RGB Values at the Cursor Location 8-46
Thumbnail/Preview Size Menu 8-46
Supported Commands 8-49
Driver Commands Not Supported 8-50
xxiv
Page 25

. . . . . . . . . . . . . . . . . . . . . . . . . . . . .
99
9 Appendices 9-1
99
Appendix A — Specifications for EOS•DCS 1, EOS•DCS 3, EOS•DCS 5 A-1
Appendix B — Glossary B-1
Appendix C — Updating Your KODAK Software Driver C-1
Appendix D — Repacking Instructions D-1
Appendix E — Problem Report Form E-1
Appendix F — Using an Infrared Camera F-1
Appendix G — Technical and Telephone Assistance G-1
Appendix H — Optional Equipment & Spare Parts List H-1
1010
10 Index 10-1
1010
xxv
Page 26

Page 27

. . . . . . . . . . . . . . . . . . . . . . . . . . . . .
. . . . . . . . . . . . . . . . . . . . . . . . . . . . . .
. . . . . . . . . . . . . . . . . . . . . . . . . . . . . . .
. . . . . . . . . . . . . . . . . . . . . . . . . . . . . . . .
1
Before You Begin
NOTE: Before you continue, complete and submit the enclosed Warranty Registration card. You should also read the Warranty and the Software License Agreement for the product.
Check the following lists to ensure that you have the required and optional
computer hardware and software, and camera accessories, to use the
available models of the camera. (Model numbers are included in the
Specifications appendix.)
The camera can be used with a Macintosh computer and/or with an IBM
PC or compatible computer. Separate specifications for both are included
on the following pages. (You may be able to use the camera on other
computer platforms, or with additional operating systems, using drivers
prepared by companies other than Kodak, or by developing your own
driver. Contact Kodak for information.)
Before You BeginG1-1
Page 28

. . . . . . . . . . . . . . . . . . . . . . . . . . . . .
Macintosh Computer — Hardware
and Software
The following sections list the required and optional computer hardware
and software needed to run the Kodak Driver for use with Adobe Photoshop Software on an Apple Macintosh computer.
IMPORTANT: Refer to the read-me files on the supplied software driver diskette
for additional details or revisions to these requirements.
Required Computer, Memory, Hard Disk
Computer
An Apple Macintosh computer with a 68020 processor or above, or
Power Macintosh product line is required.
Memory
Memory in megabytes (MB) of random access memory (RAM) required:
32 MB RAM required for EOS•DCS 3, EOS•DCS 5.
64 MB RAM required for EOS•DCS 1.
Hard disk
At least 100 megabytes of free disk space are needed.
Required Monitor and Display Card
A color monitor is required for color work. Your monitor should be at
least 12 inches or larger; the monitor on a PowerBook is also acceptable.
You need the appropriate display card for the monitor in use; we recommend a 16-bit or a 24-bit video display card (which can display more
1-2Before You Begin
G
Page 29

. . . . . . . . . . . . . . . . . . . . . . . . . . . . .
than 16.7 million colors). Neither the amount of data stored for each
image, nor the quality of any printed output, is affected by the monitor or
card in use. If you do not have a 24-bit display card, the software automatically dithers the display data to achieve the best looking image.
Required Systems Software
Apple System software version 7.5 or above.
Required SCSI Cables and Terminators
Use only the supplied cables; do not use substitute cables, except that an
additional cable is required if you will use the camera as the only external
device attached to a PowerBook computer. (If you are using a PowerBook
computer, refer to Chapter 4.)
Appropriate SCSI terminator(s), as required for your computer system.
Required Applications Software
Adobe Photoshop 3.0.4 or above.
Before You BeginG1-3
Page 30

. . . . . . . . . . . . . . . . . . . . . . . . . . . . .
IBM PC or Compatible Computer —
Hardware and Software
These sections list required and optional hardware and software needed
to run the Kodak drivers for TWAIN-compliant PC applications.
IMPORTANT: Refer to the read-me files on the supplied software driver diskette
for additional details or revisions to these requirement.
Required Computer, Memory, Hard Disk
NOTE: Your TWAIN application, or systems software, may have additional
hardware requirements.
Computer
An 80486 processor or above is required; a 100 MHz Pentium processor
or above is recommended.
Memory
A minimum of 64 megabytes (MB) of random access memory (RAM) are
required.
Hard disk
At least 100 megabytes of free hard disk space is necessary.
Required Monitor and Display Card
A color monitor is required for color work. VGA or compatible display
with a minimum 640 x 480 pixel resolution is required, with 1024 x 768
pixel resolution preferred. You need the appropriate 16-bit display card
1-4Before You Begin
G
Page 31

. . . . . . . . . . . . . . . . . . . . . . . . . . . . .
for the monitor in use; we recommend a 24-bit display card. A 16-bit card
can display up to 32,768 colors, while a 24-bit card can display more
than 16.7 million colors. (Neither the amount of data stored for each
image, nor the quality of any printed output, is affected by the monitor or
card in use.) If you do not have a 24-bit display card, the software automatically dithers the display data to achieve the best looking image.
Required SCSI Interface
ASPI (Advanced SCSI Programming Interface) Windows host adapter such
as those from Adaptec, Inc. running EZ-SCSI 4.0 or later.
If other external SCSI devices are connected to your computer, you may
need to obtain a SCSI terminator depending on the termination of devices
in the SCSI chain.
Required Systems Software
Microsoft Windows 95 or Windows NT 4.0.
Required Applications Software
A TWAIN-compliant software application. The Kodak driver for use with
TWAIN-compliant PC applications can be used with software such as
Adobe Photoshop and may work with other software applications that
support TWAIN specifications.
Optional Hardware/Software for Playing
Recorded Sound
A hardware sound board is required if you want to play the “.WAV” files
you can record with the microphone in the camera.
Before You BeginG1-5
Page 32

. . . . . . . . . . . . . . . . . . . . . . . . . . . . .
Other Optional Equipment
Optional Camera Equipment
Refer to the supplied “EOS-1 N Accessory Guide” for specific details of
available accessories and spare parts.
Electronic flash and accessories.
Extra lenses for the camera.
Close-up accessories.
Other camera accessories.
Optional PCMCIA Hard Disk Card
The camera is designed to accept PCMCIA hard disk cards that support
the PCMCIA “ATA” interface and operate in 8-bit mode. Refer to the readme file on the supplied software driver diskette for information on specific
cards known to work with the camera.
1-6Before You Begin
G
Page 33

. . . . . . . . . . . . . . . . . . . . . . . . . . . . .
. . . . . . . . . . . . . . . . . . . . . . . . . . . . . .
. . . . . . . . . . . . . . . . . . . . . . . . . . . . . . .
. . . . . . . . . . . . . . . . . . . . . . . . . . . . . . . .
2
Introduction
This chapter includes:
A brief introduction to the design of the camera.
An overview of the product features.
NOTE: This manual assumes that you are familiar with the operation of the Canon
EOS-1 N camera; if you are not, refer to the Canon instruction manual for the
Canon EOS-1 N supplied with the EOS•DCS camera.
Introduction
G
2-1
Page 34

. . . . . . . . . . . . . . . . . . . . . . . . . . . . .
The EOS•DCS camera is a portable camera system that takes and stores
high-resolution digital images. You can attach the camera to one of
several computers and move your images from the camera to the computer using one of the special software drivers provided by Kodak. You
can then use the image in other applications or edit it with your image
editing software. You can also record sound with the built-in microphone
in the camera and play the sound files through your computer system.
EOS•DCS CAMERA
2-2Introduction
G
Page 35

. . . . . . . . . . . . . . . . . . . . . . . . . . . . .
KODAK Camera Back
The KODAK camera back is a sealed, one-piece unit. A single mounting
screw attaches it to a specially modified Canon EOS-1 N camera body
that has had its film back removed.
Canon EOS-1 N
(with film back removed)
KODAK camera back
Mounting screw
Introduction
G
2-3
Page 36

. . . . . . . . . . . . . . . . . . . . . . . . . . . . .
Features
The KODAK camera back incorporates the following features:
FRONT VIEW
Imager
2-4Introduction
Tripod socket
Mounting screw
A KODAK charge coupled device (CCD) imager, with image data
recorded as listed in the Specifications appendix.
Exposure indexes equivalent to film speeds as listed in the Specifications appendix.
Dynamic random access memory (DRAM) that supports shooting as
listed in the Specifications appendix.
A mounting screw rigidly mates the camera back to the camera.
A tripod socket.
G
Page 37

. . . . . . . . . . . . . . . . . . . . . . . . . . . . .
BACK VIEW
Microphone
Power switch
Record button
SCSI port
DELETE button
Card Busy light
Remove/insert
PCMCIA card
here.
LCD
DELETE SCSI
CARD BUSY
MIC
ID
MIC BUTTON
Multipurpose connector
A PCMCIA-ATA Type III slot designed to accept PCMCIA cards that
SCSI ID button
support the “ATA” protocol and operate in 8-bit mode.
A liquid crystal display (LCD) that shows status and control information.
A SCSI port to connect the camera to your computer for transferring
images from the camera to your computer. You can take pictures
while the camera is connected to a computer. The images are then
immediately available on the computer. The camera back is a nonterminated SCSI device.
A single, rechargeable nickel hydride battery that powers both the
camera back and the camera; the Specifications appendix lists the
number of frames you can expect from a fully-charged battery in
typical shooting situations.
Two controls — one sets the camera back SCSI ID; the other deletes
the most recent image from the PCMCIA card.
Introduction
G
2-5
Page 38

. . . . . . . . . . . . . . . . . . . . . . . . . . . . .
A built-in microphone records sound as “.WAV” files at “telephone
quality”— 8-bits, 11 kilohertz, monaural.
Software drivers to move images from the camera back to your
computer. You can also use the drivers to perform self-tests on the
camera from your computer, and to load new firmware (camera
control programming) into the camera. This last function allows you
to keep the firmware in the camera up-to-date without sending the
camera to a service center.
2-6Introduction
G
Page 39

. . . . . . . . . . . . . . . . . . . . . . . . . . . . .
. . . . . . . . . . . . . . . . . . . . . . . . . . . . . .
. . . . . . . . . . . . . . . . . . . . . . . . . . . . . . .
. . . . . . . . . . . . . . . . . . . . . . . . . . . . . . . .
3
Quick Start
This chapter provides a brief summary of the steps you follow to use the
camera. Most steps refer you to more detailed explanations elsewhere in
this manual; you can also refer to the quick reference and tips card.
If you are experienced with previous Kodak digital cameras, with
personal computers, and with the Canon EOS-1 N, you may be able to
follow these steps without referring to other material.
If you are inexperienced with previous Kodak digital cameras, with
personal computers, and with the Canon EOS-1 N, read through the
steps below (without following them), as an overview. Then proceed
through the manual for a thorough explanation of each step.
Quick Start
G
3-1
Page 40

. . . . . . . . . . . . . . . . . . . . . . . . . . . . .
1. Obtain and mount a lens on the camera.
Canon EF lenses are not supplied with the camera system, but are
available from authorized Canon camera dealers. If necessary, refer to
the EOS-1 N Instructions for details on lens attachment. Also refer to
the Specifications appendix regarding differences in lens behavior
with the EOS
2. Obtain one or more supported PCMCIA cards.
PCMCIA cards are not supplied with the camera system, but are
available elsewhere. The camera accepts cards that support the
PCMCIA “ATA interface and operate in 8-bit mode. Refer to the readme file on the supplied driver diskette for supported cards.
3. PC customers only: obtain and install — if not already present — a
supported SCSI host adapter card.
Supported adapters are listed in Chapter 1; brief installation information is in Chapter 4.
4. (Optional) PC customers only: Obtain and install a sound board — if
not already present — required to play sounds recorded with the
camera system.
•
DCS.
5. Install the supplied software driver.
3-2Quick Start
A. Macintosh: Load the first diskette for the Macintosh driver. Review
its read-me file. Double-click the installer and follow the instructions it presents to install the software. Refer to Chapter 4.
B. PC: Load the first diskette for the TWAIN (PC) driver. Review its
read-me file. Run the SETUP program to install the TWAIN driver
supplied by Kodak. Refer to Chapter 4.
G
Page 41

. . . . . . . . . . . . . . . . . . . . . . . . . . . . .
6. EOS•DCS 1 Only: Install the Calibration File.
A. Macintosh: Load the diskette with the calibration (CAL) file for
your camera. Copy the calibration file (its name ends with the
characters “.CAL”) into the folder containing your Photoshop
plug-ins (it is probably named PLUG-INS). Refer to Chapter 4.
B. TWAIN (PC): Load the diskette with the calibration (CAL) file for
your camera. Run the SETUP program to install the calibration
file.
7. Attach the supplied AC battery charger/adapter.
Connect the adapter to a source supplying power within the range on
its label, and to the connector on the lower left corner of the camera
back. The first time it is used, allow the battery to charge for at least
two hours shortly before it is used. Refer to Chapter 4. The section
“Battery Charging for Optimal Capacity” in Chapter 7 includes
important battery information.
8. Set the Camera SCSI ID.
Turn on the camera system by setting the power switch to on (I), push
the camera back SCSI button once to enter SCSI mode, and then
repeatedly to rotate through SCSI IDs. Stop at the desired ID. Do not
select an ID that conflicts with any in use on your computer system.
Refer to Chapter 4.
9. Connect the camera system to your Computer.
For this step we encourage all customers to refer to the detailed
instructions in Chapter 4 to ensure that this connection is made
properly before continuing. There you will turn off your computer,
and connect the camera, a non-terminated SCSI device, to the computer.
Quick Start
G
3-3
Page 42
. . . . . . . . . . . . . . . . . . . . . . . . . . . . .
10. Place a supported PCMCIA card into the camera.
Open the door on the side of the camera, push the PCMCIA card
firmly into place, and close the door. (Do not be startled by the red
Card Busy light that blinks briefly, or by the slight noise.) Refer to
Chapter 4.
11. Update the camera firmware.
This onetime action ensures that the most current control commands
(firmware) are loaded in the camera. Refer to Chapter 4.
A. Run Adobe Photoshop and choose KODAK DCS 400/EOS•DCS
from the I
The driver image window appears.
MPORT submenu of the Adobe Photoshop 4.0 FILE menu.
B. Click the camera control icon, shown below. Click the L
CAMERA FIRMWARE icon.
A.
B.
OAD
3-4Quick Start
G
Page 43

. . . . . . . . . . . . . . . . . . . . . . . . . . . . .
NOTES: For earlier supported versions of Photoshop, choose the driver from
the A
CQUIRE submenu of the FILE menu.
For other supported TWAIN applications on the PC, access the TWAIN driver
through the select-then-acquire process used by your application to access
the driver image window.
12. Format a PCMCIA card.
Your PCMCIA card must be (DOS) formatted by the camera. Formatting destroys any files that may be on the card. Click the camera
control icon as described in the previous step. Click F
time process for each card you use. Refer to Chapter 4.
13. Take pictures with the camera.
The camera is now ready to take pictures. Use it while connected to a
computer and/or the AC battery charger/adapter. Or you can use the
camera without the computer or adapter. When you are finished with
the camera, you can leave it connected to the computer or you can
turn off the computer, then disconnect the adapter and the camera.
Refer to Chapter 5 for specific details on how the EOS
sates for the absence of the quick control dial on the Canon EOS-1 N,
and how the use of the Canon EOS-1 N differs when it is part of the
EOS•DCS camera.
ORMAT, a one-
•
DCS compen-
14. Record sound.
With the camera system on and awake (lightly tap the shutter release
if the camera back LCD shows no activity), hold the back of the
camera about six inches (15 cm) from your mouth (the microphone is
behind four small holes centered at the top of the camera back). Press
and hold the record button (to the right and below the microphone),
and speak into the microphone. Refer to Chapter 5. Recorded sound
files can be played by the computer; they cannot be played by the
camera. Refer to Chapters 6 and 8.
Quick Start
G
3-5
Page 44

. . . . . . . . . . . . . . . . . . . . . . . . . . . . .
15. Move images from the camera system to the computer.
With equipment off, reconnect the camera system to the computer (if
needed), run your application, access the driver image window as
described above. Thumbnails of pictures you have taken appear in the
window. Scroll through images, select one or more, adjust color using
the balance controls, crop, and acquire the image into your application by clicking the A
folder on your computer by selecting the image(s) and using the C
TO
button. Refer to Chapters 6 and 8.
16. Quit
Click the D
ONE button to leave the driver. Quit your application
software. Shut down your computer system. Disconnect the AC
battery charger/adapter from the camera back. Turn off the camera by
moving the power switch to off (O).
CQUIRE button. And/or move images to an archive
OPY
3-6Quick Start
G
Page 45

. . . . . . . . . . . . . . . . . . . . . . . . . . . . .
. . . . . . . . . . . . . . . . . . . . . . . . . . . . . .
. . . . . . . . . . . . . . . . . . . . . . . . . . . . . . .
. . . . . . . . . . . . . . . . . . . . . . . . . . . . . . . .
4
Preparing the Camera
and the Computer
This chapter describes the series of steps you follow to prepare the camera
for use in a Macintosh or PC computer environment. This includes how to:
Charge the battery and use the AC battery charger/adapter.
Set the SCSI ID on the camera.
Make the SCSI connection between the camera and your computer.
Install the driver for Adobe Photoshop Software on your Macintosh
computer or the TWAIN driver on your PC.
Insert and remove your PCMCIA card.
Access the driver for Adobe Photoshop Software.
Preparing the Camera and the ComputerG4-1
Page 46

. . . . . . . . . . . . . . . . . . . . . . . . . . . . .
Load and/or update camera firmware.
Format a PCMCIA card for use with the camera.
IMPORTANT: We assume that you are familiar with the operation of your
computer. If you are not, refer to the manuals that accompany that computer
before continuing.
Before you continue, if you have not completed and returned the enclosed
Warranty Registration card, please do so now.
CAUTION: In this chapter you will connect the camera to your computer.
Once connected, do not disconnect the camera from the computer while
using the supplied software, or even while the computer is on. Doing so
may result in the loss of data from the PCMCIA card in the camera or from
the hard disk in your computer. Instead, turn off all equipment in the order
described at the end of this chapter before disconnecting the camera.
4-2Preparing the Camera and the Computer
G
Page 47

. . . . . . . . . . . . . . . . . . . . . . . . . . . . .
Using the AC Battery Charger/
Adapter
Keep the following battery considerations in mind as you use the camera.
IMPORTANT: Do not attempt to remove the battery; it is not a customer serviceable part.
IMPORTANT: The section “Battery Charging for Optimal Capacity” in
Chapter 7 includes important battery information.
The camera incorporates a single, rechargeable nickel hydride battery
that powers both the camera back and the camera; no batteries are
installed in the camera.
The Specifications appendix lists the number of frames you can expect
from a full-charged battery in typical shooting situations.
When the camera will be used in the field, charge the battery as close
to the time it will be used as possible.
You can operate the camera while connected to the supplied AC
battery charger/adapter, or you can recharge the battery with the
adapter and then use the camera in the field without the adapter.
The adapter will run the camera continuously while charging the
battery.
You can leave the camera continually connected to the AC battery
charger/adapter, however, this will not maintain a full charge. Disconnect and then reconnect the charger before use, and charge for two
hours to ensure a full charge.
If you are using the camera in an environment in which a power
outlet is available, we recommend that you operate the camera while
connected to the AC battery charger/adapter as described below.
Refer to Chapter 7 for information on the effect of temperature extremes on battery operation.
Preparing the Camera and the ComputerG4-3
Page 48

. . . . . . . . . . . . . . . . . . . . . . . . . . . . .
Charging the Battery
You should charge the battery for two hours before using the camera for
the first time, and thereafter on a regular basis as needed. Charging the
battery in this way will ensure that you begin shooting with a fully
charged battery, and that you obtain the most images per charge.
Follow these steps to charge the battery.
1. Locate the AC battery charger/adapter and power cord supplied with
the camera.
AC BATTERY CHARGER/ADAPTER
To camera
To AC battery charger/adapter
2. Plug the appropriate end of the power cord into the AC battery
charger/adapter.
4-4Preparing the Camera and the Computer
POWER CORD
To wall outlet
G
Page 49

. . . . . . . . . . . . . . . . . . . . . . . . . . . . .
3. Plug the other end of the power cord into a wall outlet.
4. Plug the AC battery charger/adapter into the camera; the unit plugs
into the round connector at the lower left corner of the back of the
camera.
Preparing the Camera and the ComputerG4-5
Page 50

. . . . . . . . . . . . . . . . . . . . . . . . . . . . .
5. The first time the camera is used, allow the battery to charge for two
hours.
IMPORTANT: An LCD at the top left corner of the camera back displays a
battery icon.
LCD GRAPHICS
Battery indicator
KODAK camera back LCD
MIC
DELETE SCSI
ID
MIC BUTTON
CARD BUSY
While the battery is charging, the three segments of this icon light repeatedly in turn from bottom to top; when the battery is fully charged all three
remain lit.
When the camera is used without the adapter, the number of lit segments
indicates the charge state of the battery. When the bottom segment is blinking, the battery needs recharging.
4-6Preparing the Camera and the Computer
Filling battery
G
Page 51

. . . . . . . . . . . . . . . . . . . . . . . . . . . . .
Setting the SCSI ID on the Camera
In this section you will set the SCSI identification (ID) number for the
camera. Each SCSI device connected to the same computer must have a
different ID number.
CAUTION: This section assumes that the camera and the computer are not
currently connected. You should never change the SCSI ID on the camera
when it is connected to a computer.
1. Shut down your computer.
2. If SCSI devices other than the camera are connected to your
computer, for example a hard disk, determine their SCSI identification
numbers so that you can select a different number for the camera. If
necessary, refer to the instructions for those devices to determine how
to find their numbers.
NOTE: Since you may connect the camera to different computers, or since
you may change the external devices connected to the computer you
regularly use with the camera, you should ensure that the camera has a
unique SCSI ID each time you connect it to the computer.
Preparing the Camera and the ComputerG4-7
Page 52

. . . . . . . . . . . . . . . . . . . . . . . . . . . . .
3. Turn on the camera as shown below.
Shutter release button
Power switch set to (I)
4. Wake the camera by lightly pressing the shutter release button.
NOTES: The camera turns off after several seconds of inactivity; therefore, as
you complete these steps you may need to reawaken the camera by lightly
pressing the shutter release button again.
4-8Preparing the Camera and the Computer
G
Page 53
. . . . . . . . . . . . . . . . . . . . . . . . . . . . .
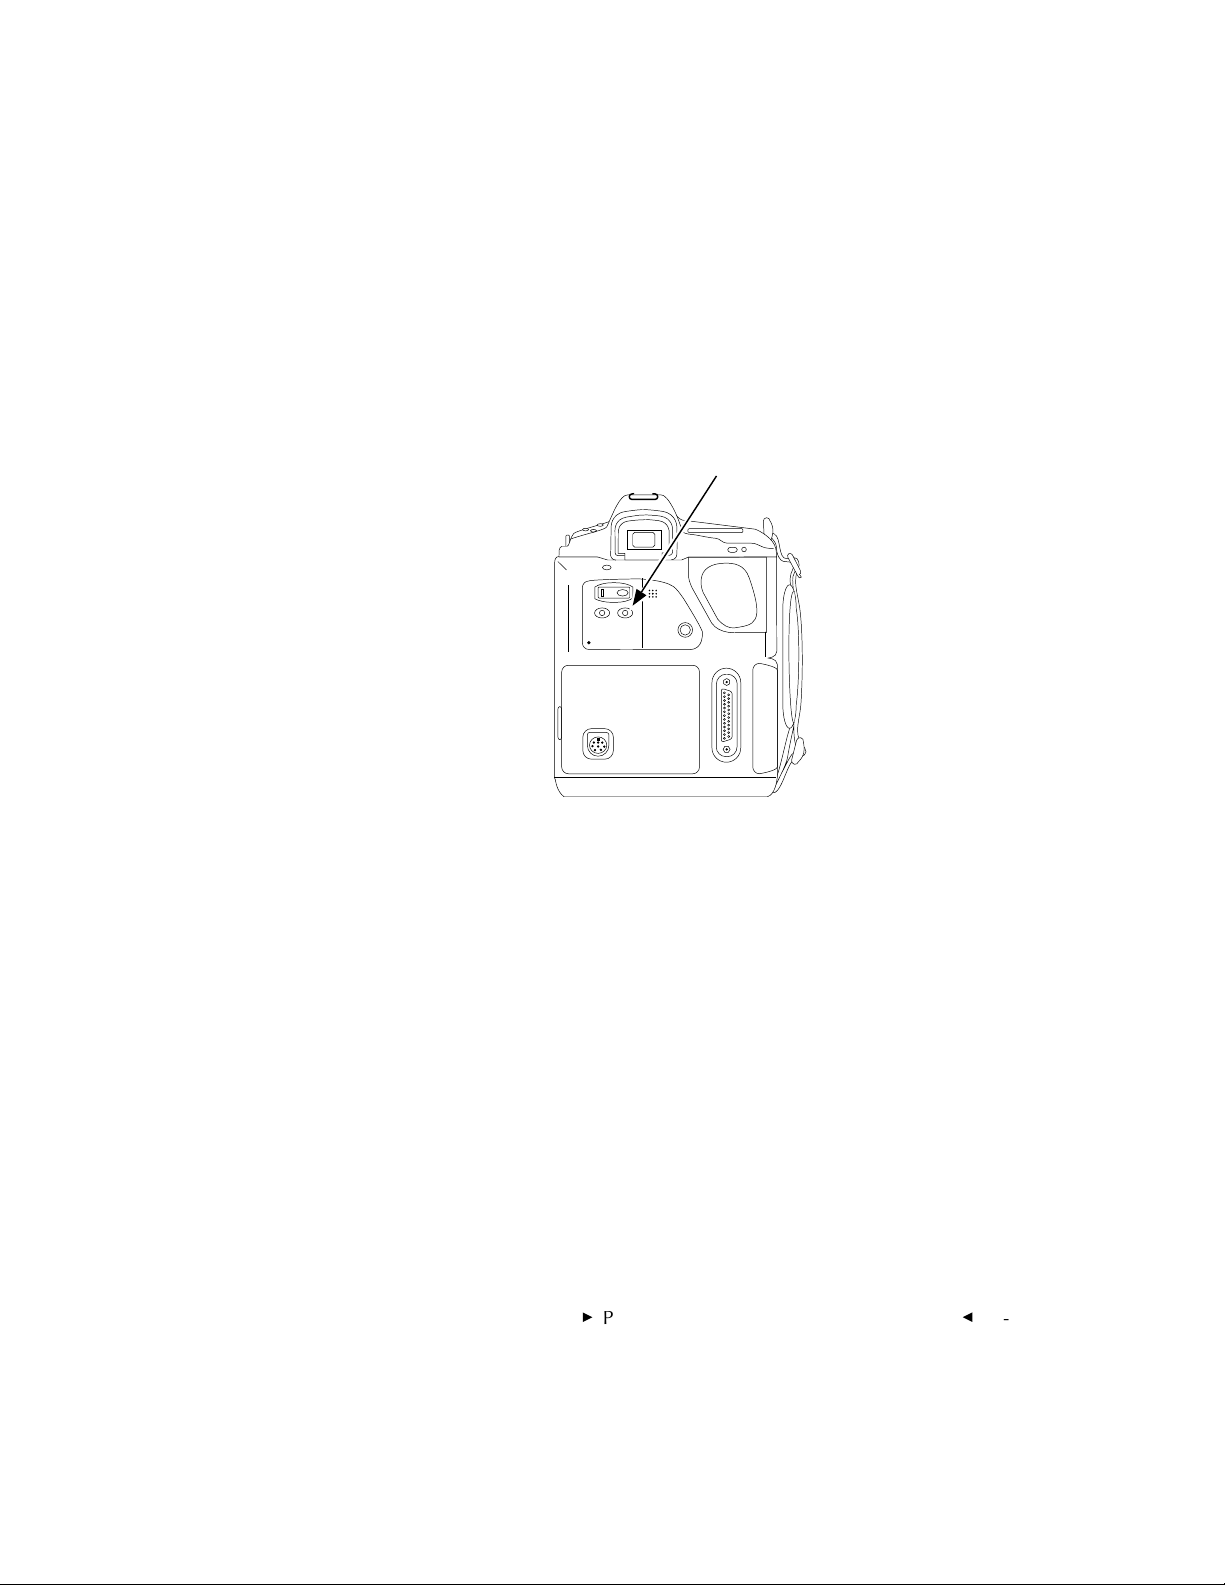
5. Locate the indented button on the back of the camera labeled “SCSI
ID.”
SCSI ID button
MIC
DELETE SCSI ID
MIC BUTTON
CARD BUSY
Preparing the Camera and the ComputerG4-9
Page 54

. . . . . . . . . . . . . . . . . . . . . . . . . . . . .
6. Press the SCSI ID button once with your fingertip or a blunt object;
this action wakes SCSI mode. The characters “SCSI” (called the SCSI
indicator), as well as a single value from 0 to 7, “PC,” and “PP”
appear on the camera back LCD. That value is the current SCSI ID of
the camera.
SCSI ID
4
SCSI
SCSI indicator
DELETE SCSI ID
SCSI ID button
CARD BUSY
4-10Preparing the Camera and the Computer
MIC
DELETE SCSI
ID
MIC BUTTON
CARD BUSY
G
Page 55

. . . . . . . . . . . . . . . . . . . . . . . . . . . . .
7. While “SCSI” still appears on the LCD, you change the current SCSI
ID by pressing the SCSI ID button repeatedly. The ID rotates through
the values 0 to 7, “PC,” and “PP.” Stop when you have the SCSI ID
you want, using the separate information below for Macintosh and
TWAIN (PC).
A camera set to a SCSI ID currently in use by another connected SCSI
device may not respond to the computer; instead, the camera will
flash the SCSI indicator on the camera back LCD. If this occurs, shut
down the computer, disconnect the camera, reset the SCSI ID on the
camera as described in this section, and try again.
Macintosh: Do not use the SCSI values 0 (usually your internal hard disk) or 7
(usually your computer), do not select “PC” or “PP,” and do not use a number
currently assigned to any other connected SCSI device such as a CD-ROM
drive which is usually number 3 if it is an internal drive supplied by Apple
Computer, Inc.
TWAIN (PC): Do not use a number currently assigned to any other connected
SCSI device. Do not assign the number used by your SCSI host adapter.
Consult your SCSI host adapter manual to see if other SCSI IDs should not be
used.
“PC” SETTING FOR IBM LAPTOP CUSTOMERS (not for use with the
Macintosh):
camera to an IBM or compatible laptop computer using a PCMCIA-to-SCSI II
adapter (such as the Adaptec SlimSCSI used with EZ-SCSI 4.0 or the New
Media Bus Toaster), to connect the PCMCIA slot on your laptop (not the
camera) to the SCSI connector on the camera. “PC” sets the SCSI ID of the
camera to 1 and turns on active termination in the camera.
When you finish, take the camera out of “PC” mode, turn off the computer
and camera. If left in “PC” mode, a fully charged battery will be exhausted in
approximately eight hours since the camera can not change to low power
mode when this SCSI setting is active.
“PP” SETTING:
ported and should not be selected for use with the Kodak driver.
Use the “PC” SCSI ID setting only if you will be connecting the
The “PP” setting, although it appears, is not currently sup-
Preparing the Camera and the Computer
G
4-11
Page 56

. . . . . . . . . . . . . . . . . . . . . . . . . . . . .
Installing a SCSI Host Adapter
(TWAIN PC Only)
The camera connects to your PC at a SCSI port provided by installing one
of the supported SCSI host adapter cards. If your PC already has a supported card installed, continue at the next section.
CAUTION: Only trained and qualified technical personnel should perform the
following procedure. You should contact a computer service professional to
configure and install an ASPI host adapter card such as those available from
Adaptec, Inc. running EZ-SCSI 4.0 or later. The installer should read all manufacturers’ instructions for both the computer and the host adapter before installing
the adapter in your computer.
1. Turn off the power to the computer, then to all peripherals.
2. If the termination power setting on your SCSI host adapter is disabled,
change its setting to enable it.
3. Install the SCSI Host Adapter card for your PC according to the
manufacturer’s installation instructions. When installation is complete,
a SCSI2 connector should be available on the back of your PC. The
figures in this chapter are intended to illustrate a typical computer
(Macintosh or PC).
BACK OF PC AFTER INSTALLING SCSI HOST ADAPTER
SCSI2 Port
4-12Preparing the Camera and the Computer
G
Page 57

. . . . . . . . . . . . . . . . . . . . . . . . . . . . .
Making the SCSI Connection
The camera is a non-terminated SCSI device that connects to your
Macintosh computer or PC with one of the included SCSI cables. In
normal usage you may connect and disconnect the camera from the
computer on a regular basis; for this reason you may want to position
your computer so that its SCSI connector is readily accessible.
Three sets of instructions follow.
I. The camera is the sole SCSI device.
II The camera is used with other SCSI devices.
NOTE: You may need to obtain a SCSI terminator to complete these steps if
other external SCSI devices are connected to your computer. A single 25-pin
SCSI terminator is supplied with the camera.
III. The camera is used with a Macintosh PowerBook or a PC laptop.
Read the section that matches the environment in which you will use the
camera
I. Camera as the Sole SCSI Device
Follow these steps if you will connect the camera as the sole external SCSI
device attached to your computer
1. Turn off the camera and the computer.
IMPORTANT: Later when you connect and disconnect the computer and the
camera on a regular basis, make sure that the computer is off.
2. Place the camera in a convenient position next to your computer.
Preparing the Camera and the Computer
G
4-13
Page 58

. . . . . . . . . . . . . . . . . . . . . . . . . . . . .
25-pin Connector25-pin Connector
3. Connect the AC battery charger/adapter to the camera as described
earlier in this chapter. Although this step is optional, we recommend it
whenever the camera is connected to a computer.
4. Select the appropriate SCSI cable for your Macintosh (with 25-pin
connectors at both ends), or PC (with a 50-pin SCSI2 HD connector at
one end and a 25-pin SCSI connector at the other end.).
IMPORTANT: Use only the cable supplied with the camera; do not use a
substitute cable.
MACINTOSH:
PC — for TWAIN driver:
25-pin SCSI Connector50-pin SCSI2 HD Connector
4-14Preparing the Camera and the Computer
G
Page 59

. . . . . . . . . . . . . . . . . . . . . . . . . . . . .
5. Follow the appropriate part of this step for either a Macintosh or a PC.
MACINTOSH: Attach one 25-pin connector to the SCSI port on the
back of the Macintosh computer. Make sure the connector is well
seated by pressing it into place firmly, and then tighten both knobs on
the cable connector.
Knobs
PC: Attach the 50-pin SCSI2 connector to the SCSI2 port on the back
of the PC. Make sure the cable connector is well seated by pressing it
into place firmly, so that the spring-clips on the connector snap onto
the SCSI port.
Preparing the Camera and the Computer
G
4-15
Page 60
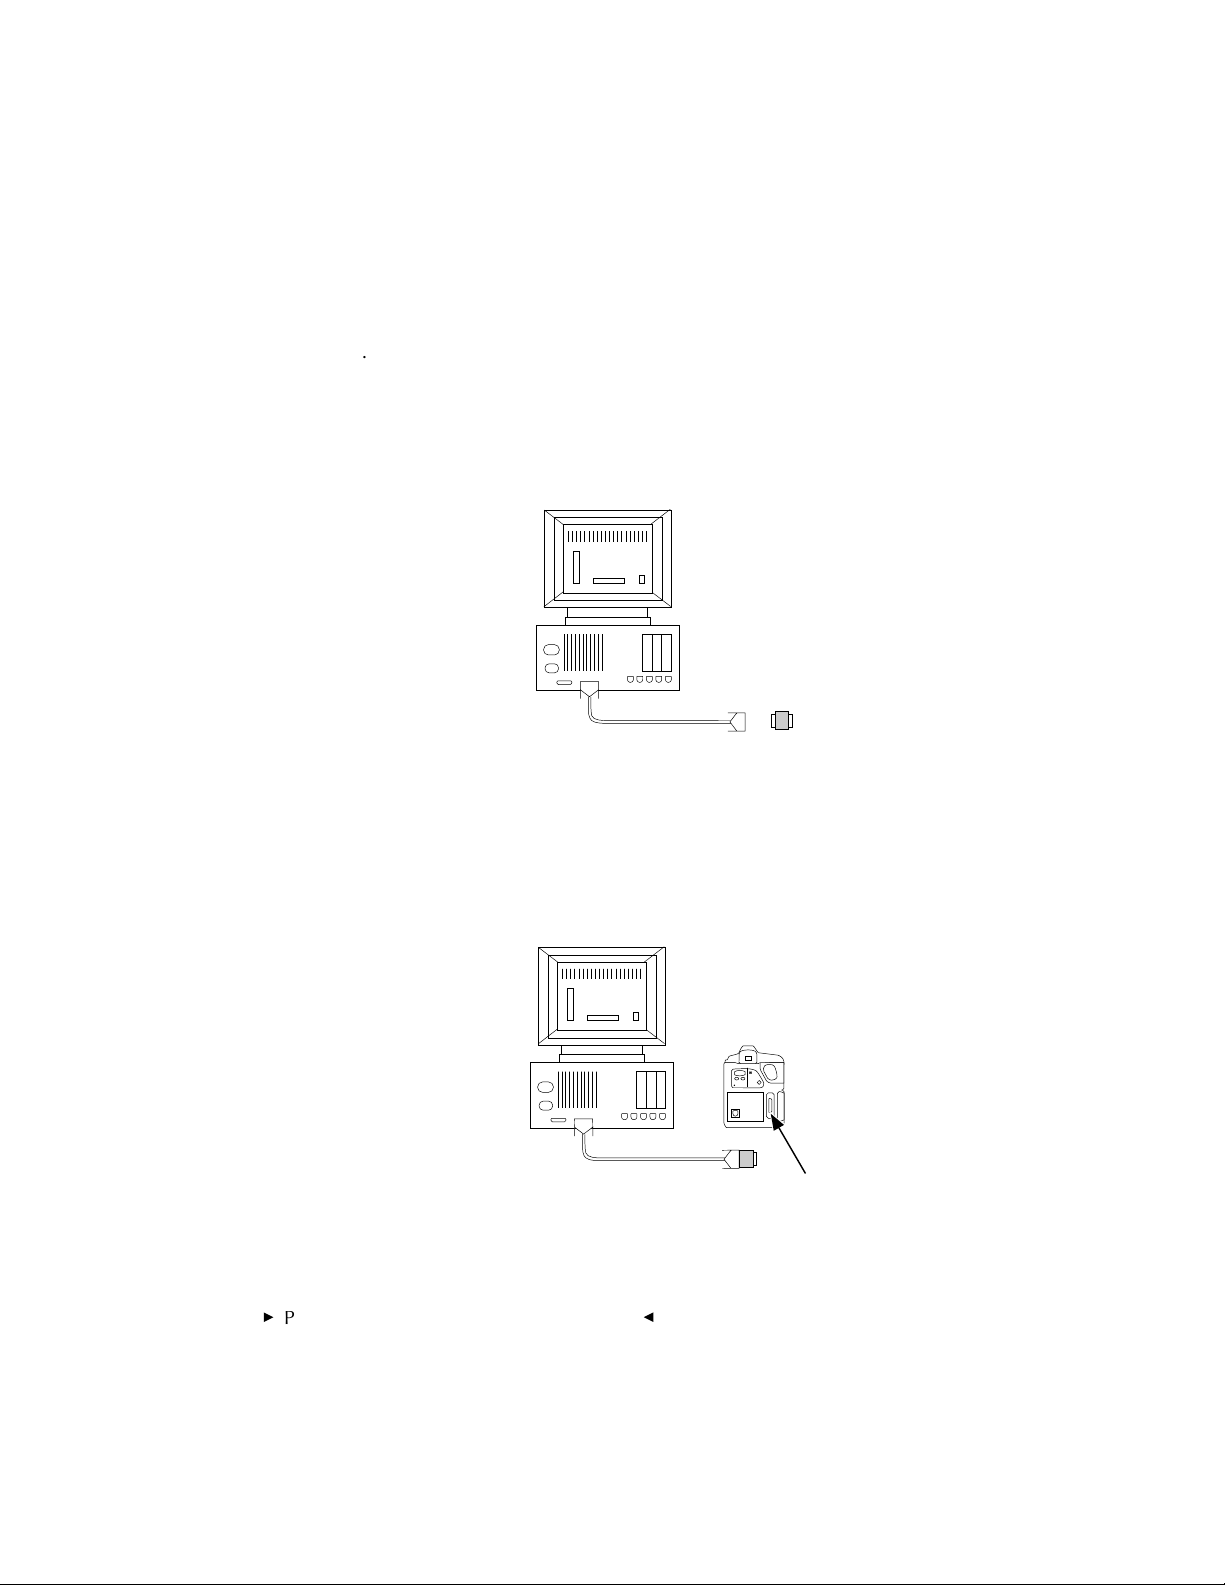
. . . . . . . . . . . . . . . . . . . . . . . . . . . . .
6. Attach the appropriate end of the supplied 25-pin SCSI terminator to
the other end of the SCSI cable you just attached to your computer.
BACK OF
COMPUTER
25-pin Terminator
7. Attach the open end of the 25-pin terminator to the SCSI connector
on the back of the camera.
BACK OF
MACINTOSH
COMPUTER
4-16Preparing the Camera and the Computer
EOS•DCS Camera
SCSI Port
G
Page 61

. . . . . . . . . . . . . . . . . . . . . . . . . . . . .
8. (Optional) Later, to disconnect the camera from the computer, shut
down the computer and then power off the camera. Then disconnect
the terminator from the camera and the SCSI cable from the computer.
Do not leave a SCSI cable with an empty connector/terminator
dangling from your computer.
Continue at “Inserting and Removing a PCMCIA Card” later in this
chapter.
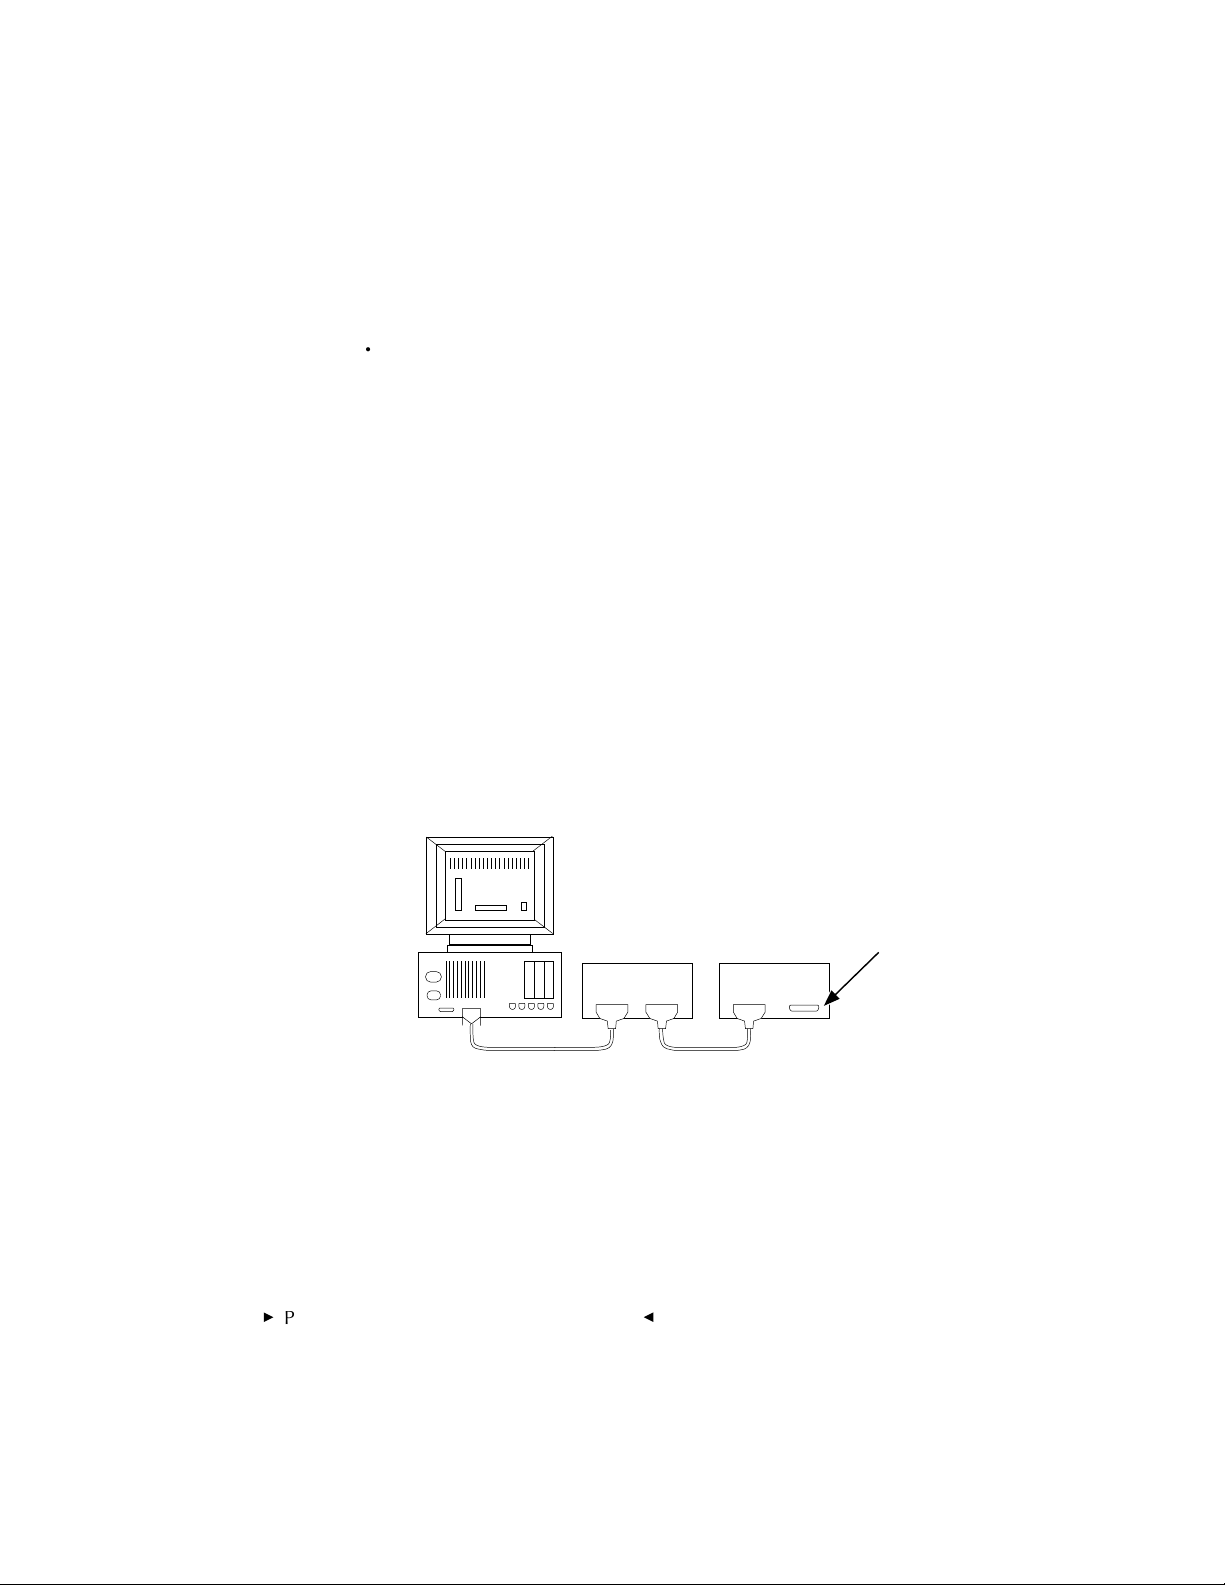
II. Camera Used with Other SCSI Devices
NOTE: If other external SCSI devices are connected to your computer, you may
need to obtain a SCSI terminator to complete these steps.
Follow these steps if one or more external SCSI devices are already
connected to your computer.
Multiple SCSI devices are connected to the computer in a chain. If the
camera is one of multiple SCSI devices connected to your computer, it
must be connected as the last device in the chain of SCSI devices since it
only includes one SCSI connector.
The total cable length connecting all devices must not exceed 15 feet (4.6
meters).
You will need to determine if the connected SCSI devices are terminated
or not. To do so, first look for an external SCSI terminator on the devices.
Because some devices contain internal terminators, also check the instructions for your devices to determine if they are terminated internally,
and if they are whether that termination is currently active.
We provide two sets of instructions. Follow the first set (A) if none of the
connected devices are terminated or if one of the devices is terminated
externally. Follow the second set (B) if one of the devices — it should be
the last device in the chain — is terminated internally.
Preparing the Camera and the Computer
G
4-17
Page 62
. . . . . . . . . . . . . . . . . . . . . . . . . . . . .
A. Follow these steps if none of the connected
devices are terminated or if one of the devices
is terminated externally.
1. Turn off the computer, and all connected SCSI devices.
IMPORTANT: Later, when you connect and disconnect the computer and the
camera on a regular basis, make sure that all devices are off.
2. Place the camera in a convenient position next to the last device in
the SCSI chain of devices connected to your computer.
3. Connect the AC battery charger/adapter to the camera as described
earlier in this chapter. Although this step is optional, we recommend it
whenever the camera is connected to a computer.
4. When you have completed part A or part B of this step, the last device
in the chain should have a cable (with no terminator) connected to
one of its SCSI connector, and the other connector should be empty.
BACK OF
COMPUTER
NON-INTERNALLY TERMINATED
A. If there is an external SCSI terminator on an otherwise empty SCSI
connector on the last device, remove it.
4-18Preparing the Camera and the Computer
BACK OF ONE OR MORE
SCSI DEVICES
Empty SCSI Connector
G
Page 63
. . . . . . . . . . . . . . . . . . . . . . . . . . . . .
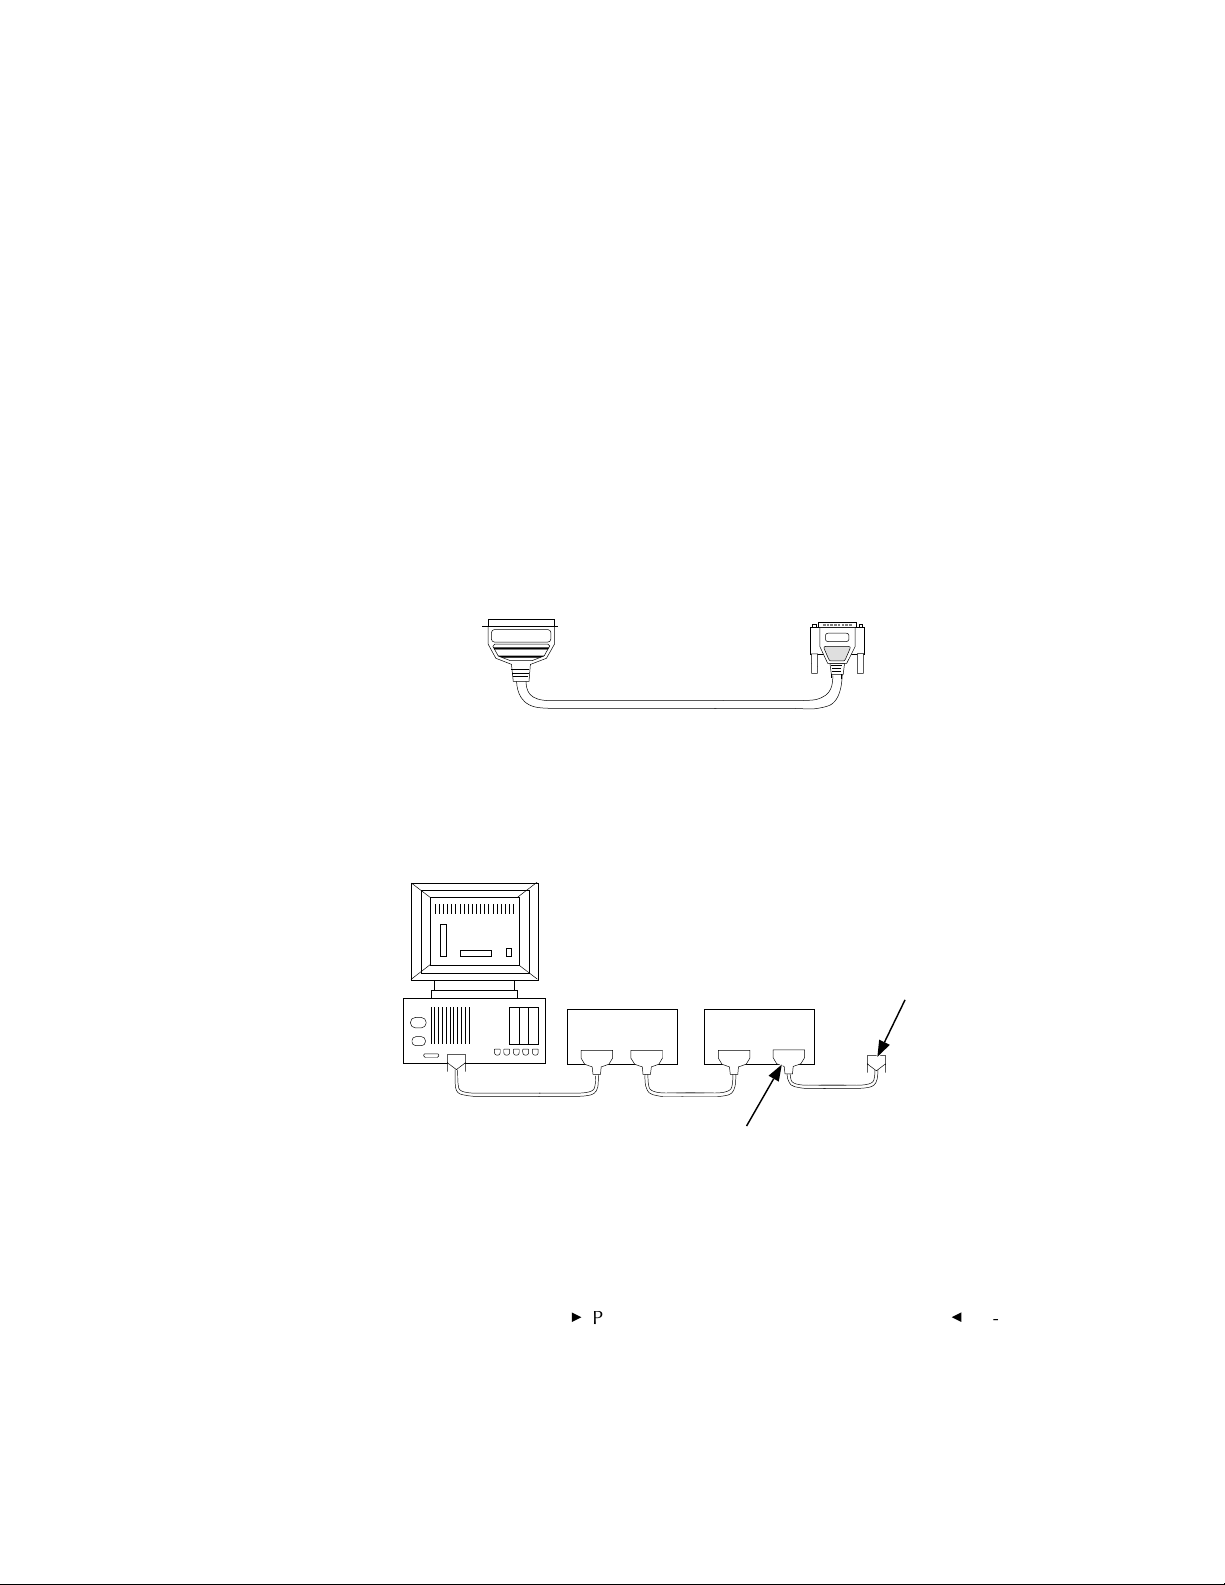
B. If there is an external SCSI terminator between the end of a cable
and a SCSI connector on a device, remove the terminator, and
then reconnect the cable. (Later, if you remove the camera cable
from your computer, remember to replace this terminator.)
5. Select the SCSI cable with the 50-pin connector at one end and the
25-pin connector at the other end.
IMPORTANT: Use only the cable supplied with the camera; do not use a
substitute cable.
25-pin Connector50-pin Connector
6. Connect the 50-pin connector to the empty connector on the last SCSI
device in the chain. Make sure the connector is well seated by pressing it into place firmly, and then pinch the thin wire clamps over its
base.
25-pin Connector
50-pin Connector
Preparing the Camera and the Computer
G
4-19
Page 64

. . . . . . . . . . . . . . . . . . . . . . . . . . . . .
7. Attach the supplied 25-pin terminator to the other end of the SCSI
cable and then to the camera.
EOS•DCS Camera
SCSI Connector
25-pin Connector
25-pin Terminator
8. (Optional) Later, to disconnect the camera from the computer, turn off
the computer and all external SCSI devices, and then power off the
camera. Then restore the SCSI cables and terminator to the state they
were in before the camera was connected. Do not leave a SCSI cable
with an empty connector dangling from a SCSI chain.
Continue at “Inserting and Removing a PCMCIA Card” later in this
chapter.
B. Follow these steps if the last connected
device is terminated internally.
1. Turn off the computer, and all connected SCSI devices.
IMPORTANT: Later when you connect and disconnect the computer and the
camera on a regular basis, make sure that all devices are off.
4-20Preparing the Camera and the Computer
G
Page 65

. . . . . . . . . . . . . . . . . . . . . . . . . . . . .
25-pin Connector50-pin Connector
25-pin Connector
50-pin Connector
BACK OF
COMPUTER
Not
Terminated
Terminated
Internally
BACK OF ONE OR MORE
SCSI DEVICES
2. Place the camera in a convenient position next to the last device in
the SCSI chain of devices connected to your computer.
3. Connect the AC battery charger/adapter to the camera as described
earlier in this chapter. Although this step is optional, we recommend it
whenever the camera is connected to a computer.
4. Select the SCSI cable with the 50-pin connector at one end and the
25-pin connector at the other end.
IMPORTANT: Use only the cable supplied with the camera; do not use a
substitute cable.
5. Connect the 50-pin connector to the empty SCSI connector of the
device that is terminated internally. Make sure the connector is well
seated by pressing it into place firmly, and then pinch the thin wire
clamps over its base.
Preparing the Camera and the Computer
G
4-21
Page 66

. . . . . . . . . . . . . . . . . . . . . . . . . . . . .
6. Attach the other end of the SCSI cable to the SCSI connector on the
camera.
SCSI Connector
25-pin Connector
7. (Optional) Later, to disconnect the camera from the computer, shut
down the computer and all external SCSI devices, and then power off
the camera. Then restore the SCSI cables and terminator to the state
they were in before the camera was connected. Do not leave a SCSI
cable with an empty connector dangling from a SCSI chain.
Continue at “Inserting and Removing a PCMCIA Card” later in this
chapter.
4-22Preparing the Camera and the Computer
G
Page 67

. . . . . . . . . . . . . . . . . . . . . . . . . . . . .
III. Camera Used with a Macintosh PowerBook
or a PC Laptop
Follow the steps below to match your computer system, either a
Macintosh PowerBook (part A) or a PC Laptop (part B).
A. Macintosh PowerBook with No External
SCSI Devices
You can use the camera with a variety of PowerBook models (except do
not use the camera with the model 100). However, the information in this
section may not apply to all PowerBook models.
For this installation you will need to supply an HDI-30-pin to 25-pin
Macintosh PowerBook SCSI adapter cable. Do not use a terminator.
NOTE: This cable is available in two versions; be certain that your cable is no
longer than three feet long, and that you obtain a cable for connecting a
PowerBook computer to a SCSI device, not for connecting a PowerBook computer to a desktop Macintosh computer.
PowerBook SCSI Adapter Cable
HDI-30-pin Connector
Preparing the Camera and the Computer
25-pin Connector
G
4-23
Page 68

. . . . . . . . . . . . . . . . . . . . . . . . . . . . .
1. Turn off the Macintosh PowerBook computer.
IMPORTANT: Later when you connect and disconnect the Macintosh
PowerBook computer and the camera on a regular basis, make sure the
computer is off.
2. Connect the AC battery charger/adapter to the camera as described
earlier in this chapter. Although this step is optional, we recommend it
whenever the camera is connected to a computer.
3. Attach the HDI-30-pin connector of your HDI-30-pin to 25-pin SCSI
cable to the HDI-30 port on the back of the Macintosh PowerBook.
Make sure the connector is well seated by pressing it into place firmly.
IMPORTANT: Do not use a terminator.
BACK OF
POWERBOOK
COMPUTER
EOS•DCS Camera
SCSI Connector
4. Attach the other end of your HDI-30-pin to 25-pin SCSI cable to the
SCSI connector on the back of the camera.
5. (Optional) Later, to disconnect the camera from the Macintosh computer, shut down the computer and then power off the camera. Then
disconnect the SCSI cable from the camera and from the Macintosh
computer. Do not leave a SCSI cable with an empty connector/
terminator dangling from your Macintosh computer.
Continue at “Inserting and Removing a PCMCIA Card” later in this
chapter.
4-24Preparing the Camera and the Computer
G
Page 69

. . . . . . . . . . . . . . . . . . . . . . . . . . . . .
B. PC (for TWAIN driver)
The camera can be used with an IBM or compatible laptop computer if
you use a PCMCIA-to-SCSI II adapter (such as the Adaptec SlimSCSI used
with EZ-SCSI 4.0 or the New Media Bus Toaster). These adapters include
a PCMCIA card that plugs into the PCMCIA slot in your laptop (not in the
camera). A cable connects this card to the SCSI connector on the camera,
using an adapter if needed at the camera end of the cable. None of this
equipment is provided with the camera.
In this configuration set the SCSI ID on the camera to “PC;” this sets the
camera SCSI ID to 1 and turns on active termination in the camera.
CAUTION: When you finish with the camera in “PC” mode, turn off the computer and camera. If left in “PC” mode, a fully charged battery will be exhausted
in approximately eight hours since the camera can not change to low power
mode when this SCSI setting is active.
Preparing the Camera and the Computer
G
4-25
Page 70

. . . . . . . . . . . . . . . . . . . . . . . . . . . . .
Inserting and Removing a PCMCIA
Card
This section describes how to insert and remove a PCMCIA card. PCMCIA
cards are not supplied with the camera, but are available as optional
equipment. Refer to Chapter 1 and to the read-me files supplied with the
software for additional information on supported cards.
A PCMCIA card can be inserted or removed at any time, except when the
red “Card Busy” light on the camera back is blinking. You can insert or
remove a card while in the field, while connected to the AC battery
charger adapter, while connected to a computer, and/or while the camera
is on or off.
IMPORTANT: When the red Card Busy light is blinking, data is being read from
or written to the PCMCIA card, for example just after you take a picture, or later
when you move data from the camera to a computer. If the card is removed while
the light is blinking, you may lose the current image, and may lose other images
as well.
Inserting a PCMCIA Card
Follow these steps to insert a PCMCIA card. (If a card is currently installed, there is no need to follow these steps now, although if you are
unfamiliar with the use of this type of card you may wish first to remove
the card as described in the next section, and then to return here to
reinstall the card.)
4-26Preparing the Camera and the Computer
G
Page 71

. . . . . . . . . . . . . . . . . . . . . . . . . . . . .
1. Be certain that the red “Card Busy” light is not blinking before you
continue.
0
DELETE SCSI ID
CARD BUSY
MIC
DELETE SCSI
ID
MIC BUTTON
CARD BUSY light
CARD BUSY
Preparing the Camera and the Computer
G
4-27
Page 72

. . . . . . . . . . . . . . . . . . . . . . . . . . . . .
Insert/remove
PCMCIA card
here.
CARD BUSY
MIC
DELETE SCSI ID
MIC BUTTON
2. While looking at the back of the camera, open the door on the left
edge of the camera back by inserting a thumb or finger into the
opening and swinging the door away from you.
3. NOTE: As you complete this step, do not be startled when the red
Card Busy light blinks and you hear noise from the camera; this is
normal operation when a PCMCIA card is inserted.
4-28Preparing the Camera and the Computer
G
Page 73

. . . . . . . . . . . . . . . . . . . . . . . . . . . . .
CARD BUSY
MIC
DELETE SCSI
ID
MIC BUTTON
LCD
Insert your PCMCIA card (not supplied with the camera), by sliding it
— thin edge first — into the empty slot, and pushing it firmly into
place.
When properly installed, the end of the PCMCIA release button
should be flush with the edge of the card.
Release button
PCMCIA card
Preparing the Camera and the Computer
G
4-29
Page 74
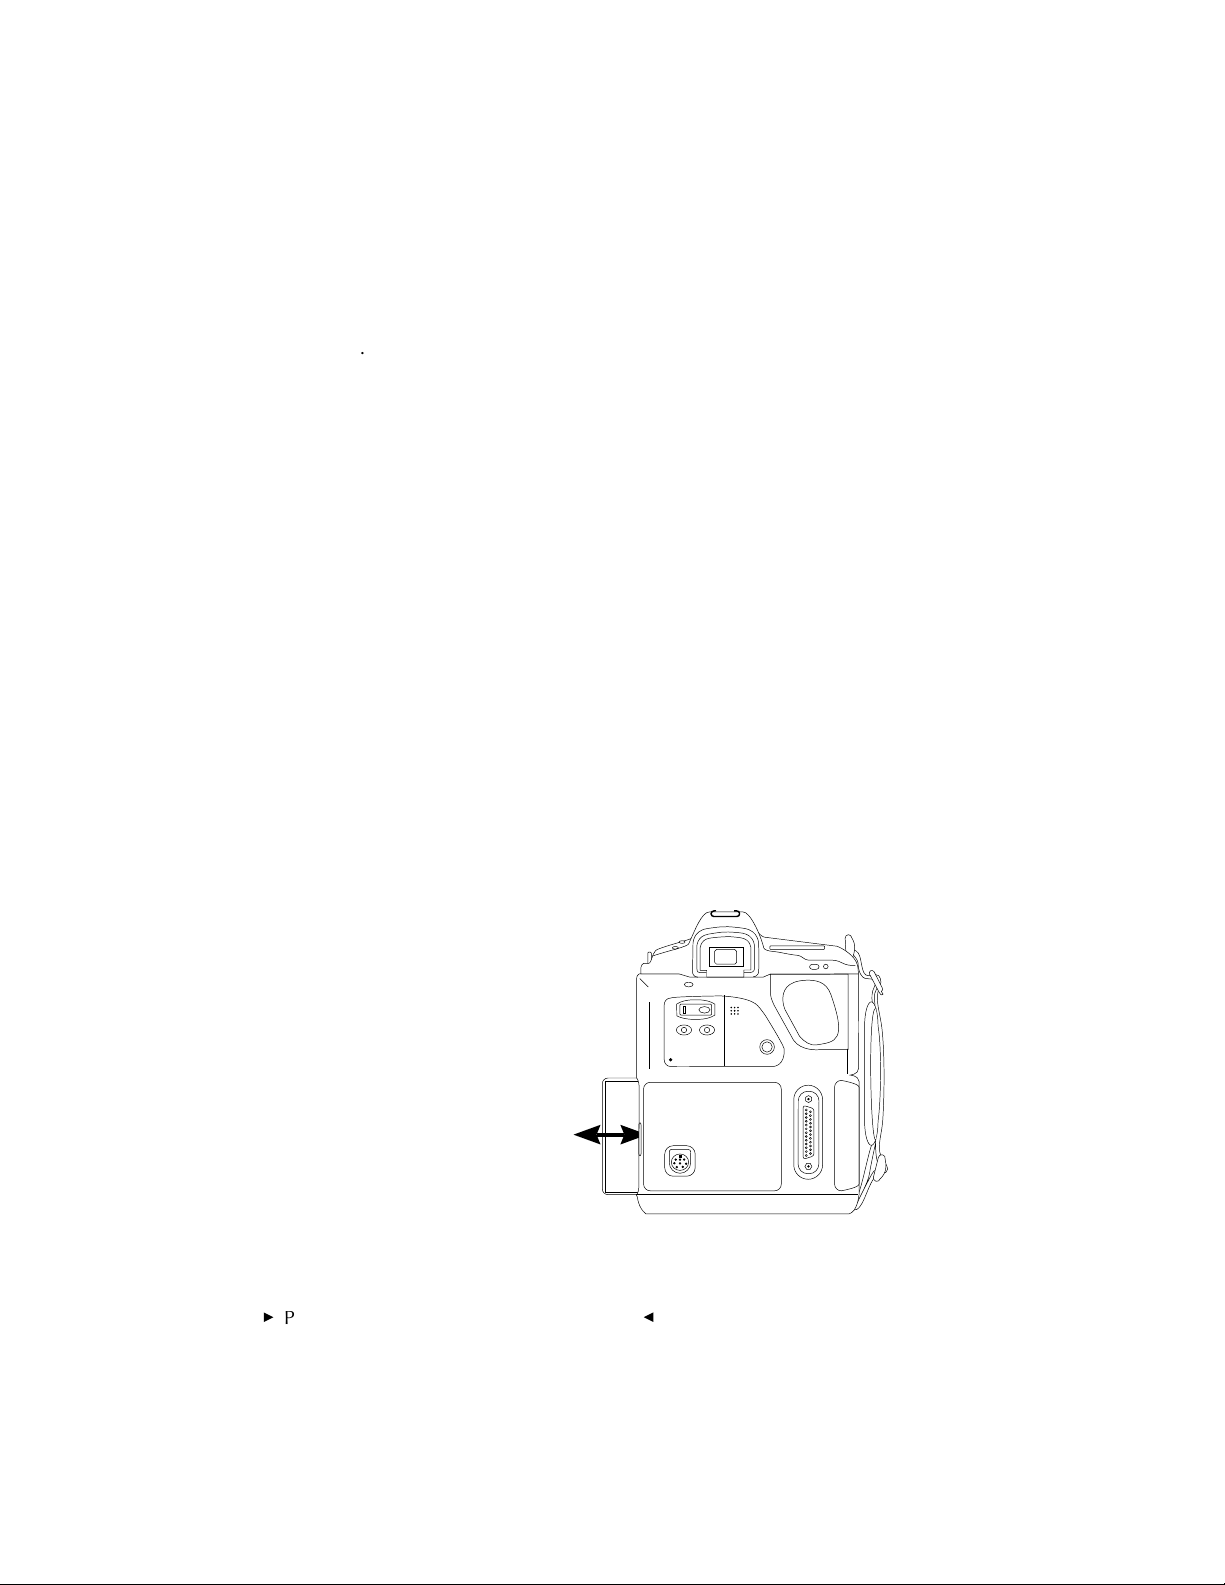
. . . . . . . . . . . . . . . . . . . . . . . . . . . . .
4. Swing the door closed over the PCMCIA card.
NOTE: The camera back LCD (see figure above at the start of step 3) may
show “E6,” a code indicating that the PCMCIA card is not formatted. That is a
normal condition at this point in the preparation of the camera. In a later
section of this chapter you will format the PCMCIA card.
Removing a PCMCIA Card
Follow these steps to remove a PCMCIA card.
1. Be certain that the red “Card Busy” light is not blinking before you
continue.
IMPORTANT: When the red Card Busy light is blinking, data is being read
from or written to the PCMCIA card, for example just after you take a picture,
or later when you move data from the camera to a computer. If the card is
removed while the light is blinking, you may lose the current image, and may
lose other images as well.
2. While looking at the back of the camera, open the door on the left
edge of the camera back by inserting your left thumb or other finger
into the opening and swinging the door away from you.
Remove/insert
PCMCIA card
here.
4-30Preparing the Camera and the Computer
MIC
DELETE SCSI ID
MIC BUTTON
CARD BUSY
G
Page 75

. . . . . . . . . . . . . . . . . . . . . . . . . . . . .
3. CAUTION: As you complete this step, the PCMCIA card is ejected
from the camera; for that reason, keep your hand in front of the door
opening to prevent the fragile card from falling out of the camera. If a
PCMCIA card is dropped, you may destroy it, resulting in the loss of
all of your data on the card.
Firmly press the rectangular button at the top of the opening inside the
door; this action releases the PCMCIA card from its connector and
ejects the card from the camera back.
Press firmly.
4. Remove the card from the camera by grasping it at the top and bottom
with your thumb and forefinger and pulling it completely from the
camera.
5. Swing the door closed over the empty card compartment.
Preparing the Camera and the Computer
G
4-31
Page 76

. . . . . . . . . . . . . . . . . . . . . . . . . . . . .
Installing the KODAK Driver
In this section you will install the special software driver provided with
the camera. Then you can use the driver to ensure that the camera has the
latest firmware (camera control programming), and to format a PCMCIA
card(s). Once the software is installed, you can use it regularly to move
images and sound files from the camera to your computer by acquiring
them while running your copy of Adobe Photoshop (or other supported
software on a PC), as described in Chapters 6 and 8.
Installing the software is a onetime action; you complete these steps once,
and do not repeat them each time you want to acquire images. The
camera can remain connected to the AC battery charger/adapter and the
computer while you complete these steps.
1. If your computer is not on, turn it on now
2. Locate the Kodak-supplied driver diskettes for the computer system
you will use — either Macintosh or PC.
3. Place the first diskette into the internal drive of your computer.
4. Read the contents of the read-me file — it contains the latest information on the camera and software driver.
5. Follow the instructions below to install the driver for either a
Macintosh computer or PC.
Macintosh: Double-click on the installer icon and follow the directions you find there for installing the camera software.
PC:
A. Choose R
B. Type A:\S
command line.
4-32Preparing the Camera and the Computer
UN from START (or the FILE menu if appropriate).
ETUP (type B:\SETUP if the diskette is in drive B) in the
G
Page 77

. . . . . . . . . . . . . . . . . . . . . . . . . . . . .
C. Install the software by following all instructions as they appear.
NOTES ON TWAIN FOR THE PC: TWAIN is a set of written specifications
developed by a consortium of vendors, that when implemented in software
allows you to acquire data from a peripheral (such as a digital camera or film
scanner) directly into your software application (such as image-editing
software) without leaving the application. Software that incorporates the
specifications is called “TWAIN-compliant.” TWAIN-compliant software
applications should be able to obtain image data from a TWAIN-compliant
source of data, such as the KODAK Driver described in this chapter.
You can install and use the TWAIN-compliant driver for use with ASPI
(Advanced SCSI Programming Interface) host adapter card such as those
available from Adaptec, Inc. running EZ-SCSI 4.0 or later.
This KODAK Driver is intended for use with applications that are ASPI
compliant for Windows, and not for use with applications that are ASPI
compliant for other operating platforms.
With an ASPI compliant SCSI host adapter card, you must install the Windows ASPI files that accompany it. The KODAK Driver for use with ASPI
compliant host adapter cards will not work properly unless these files have
been installed.
The process described in this section automatically:
Creates a subdirectory named “TWAIN” in the Windows directory. (If
you have other TWAIN-compliant devices this subdirectory may already
exist; if so, a new one is not created.)
Creates (if one does not already exist), a “DCSxxx” subdirectory within
the “TWAIN” directory to hold files for the camera.
Places a set of files within the “DCSxxx” subdirectory.
Overwrites any existing DCS drivers already in the directory. This version
of the driver processes images for other Kodak professional cameras
(except for the DCS 100 and 200).
6. EOS•DCS 1 Only
A. Locate the diskette for your computer system (Macintosh or
TWAIN-PC) with the Calibration (CAL) file for your camera.
Preparing the Camera and the Computer
G
4-33
Page 78

. . . . . . . . . . . . . . . . . . . . . . . . . . . . .
B. Make a backup of the calibration diskette; you cannot obtain
images from the camera without the CAL file.
C. Follow the appropriate part of this step for your computer system.
Macintosh: Copy the calibration file (its name ends with the
characters “.CAL”) into the folder containing your Photoshop
plug-ins (it is probably named P
TWAIN (PC): Run the SETUP program to install the calibration
file.
LUG-INS).
4-34Preparing the Camera and the Computer
G
Page 79

. . . . . . . . . . . . . . . . . . . . . . . . . . . . .
Accessing the Camera from the
Driver
Repeat the steps below each time you want to access the KODAK Driver
for Adobe Photoshop software or for supported TWAIN-compliant PC
applications.
1. If the camera and your computer are not connected, turn both off and
connect them now by following the directions in “Making the SCSI
Connection” earlier in this chapter.
2. Connect the AC battery charger/adapter to the camera as described
earlier in this chapter. Although this step is optional, we recommend it
whenever the camera is connected to a computer.
3. If your computer is on, turn it off.
4. Turn on the computer.
NOTES: The camera is always on when it is connected to a computer that is
on or when the adapter is connected to the camera, even if the power switch
is set to off (O).
Windows 95 users: The first time you use the camera with your PC, choose
“don’t install” when presented with choices from the installation wizard.
5. Run Adobe Photoshop. (The examples throughout this manual use
Photoshop — available for both the Macintosh and PC platforms.)
NOTE: You should ensure that the gamma for your monitor is calibrated properly
per instructions accompanying Adobe Photoshop; if you do not, images may be
consistently too light or too dark.
Special Instructions for TWAIN-compliant
Software
All TWAIN-compliant software does not provide access to TWAIN drivers
in the same way. As a result, for demonstration purposes this section
Preparing the Camera and the Computer
G
4-35
Page 80

. . . . . . . . . . . . . . . . . . . . . . . . . . . . .
provides one example using the KODAK Driver with Adobe Photoshop.
If you use other supported software, refer to its documentation to deter-
mine if it is TWAIN-compliant, and if it is, how it provides access to
TWAIN drivers.
As you use a variety of TWAIN-compliant software, it may be helpful to
know how the TWAIN specifications expect applications to perform. The
specifications provide for a consistent software interface by encouraging
software developers to include two specific commands — S
and ACQUIRE — on the FILE menu. The specification intends that users
should first choose S
ELECT SOURCE which should display a list of TWAIN-
compliant device drivers installed on the system. After the user selects a
driver from the list, he/she should be returned to the application. The user
should then choose ACQUIRE which should open access to the device and
allow the user to obtain image data.
IMPORTANT: Some image editing software takes all available RAM by default at
start-up. The TWAIN driver will not work if this occurs. To avoid the problem, set
the memory preference for your application (often found on the F
there is at least one megabyte of free RAM.
ELECT SOURCE
ILE menu) so that
Once you have installed the TWAIN driver as described earlier in this
chapter, and are running Photoshop, you access the driver by following
these steps.
1. Choose SELECT TWAIN SOURCE on the IMPORT submenu on the Adobe
Photoshop F
ILE menu; the SELECT SOURCE dialog box appears. (For
earlier supported versions of Photoshop choose S
on the ACQUIRE submenu on the Adobe Photoshop FILE menu.)
2. Click the name of the camera driver.
3. Click S
NOTE: The choice is maintained in a preference file for the TWAIN-compliant driver; you do not need to repeat steps 1 through 3 each time you use the
driver.
4-36Preparing the Camera and the Computer
ELECT; you are returned to Photoshop.
ELECT TWAIN SOURCE
G
Page 81

. . . . . . . . . . . . . . . . . . . . . . . . . . . . .
Final Steps to the Driver Window
1. Follow the appropriate step below.
MACINTOSH: Pull down the Adobe Photoshop 4.0 File menu and
choose K
earlier supported versions of Photoshop, choose the driver from the
CQUIRE submenu of the FILE menu.)
A
ODAK DCS 400/EOS•DCS from the IMPORT submenu. (For
TWAIN (PC): Choose TWAIN on the F
ILE menu (TWAIN ACQUIRE in
earlier supported versions of Photoshop).
2. Wait as the driver image window appears.
NOTES: Instead of the driver image window above you may see a message
that the camera was not found. If you do, follow the troubleshooting suggestions in the message. Additional information regarding this and other messages appears in the “Messages” section of the Chapter 8.
Preparing the Camera and the Computer
G
4-37
Page 82

. . . . . . . . . . . . . . . . . . . . . . . . . . . . .
Updating Camera Firmware
The camera incorporates nonvolatile memory that contains controls —
called firmware — for most features of the camera. You can update that
firmware yourself, which means you can keep the camera up-to-date as
changes are made to the firmware. (Refer to the appendix “Updating Your
KODAK Software Driver,” for additional information.) You can also
perform some troubleshooting without sending the camera to a service
center, as described in the camera troubleshooting section of this manual.
By following the steps below to update camera firmware the first time you
use the driver, you will ensure that the camera contains the most current
version of the firmware. You do not need to update camera firmware each
time you use the driver.
To complete these steps, the camera must be connected to your computer
as described earlier in this chapter. We also assume that Adobe
Photoshop (or other supported TWAIN-compliant application on a PC) is
currently running on your computer, and that you have accessed the
driver image window by choosing the driver as described earlier in this
chapter.
4-38Preparing the Camera and the Computer
G
Page 83

. . . . . . . . . . . . . . . . . . . . . . . . . . . . .
1. Click the camera control icon of the driver image window. You see
the dialog box below.
1.
2.
2. Click the LOAD CAMERA FIRMWARE button.
NOTE: If you see a message indicating that the firmware update failed and
specifying the name of a missing “BIN” file, be certain that you have installed
the software as described earlier in this chapter.
3. Wait while firmware is copied to the camera.
NOTE: You may see a message asking you to use the AC battery charger/
adapter and to wait for several minutes; if you do see this message, follow the
instructions in the message and wait (to allow the battery to charge) before
clicking the L
OAD CAMERA FIRMWARE button again.
4. Click DONE to close the CAMERA CONTROL dialog box.
Preparing the Camera and the Computer
G
4-39
Page 84

. . . . . . . . . . . . . . . . . . . . . . . . . . . . .
Formatting a PCMCIA Card
This section describes how to format a PCMCIA card, an action you may
need to take now as you start to use the camera, and may need to repeat
later on an occasional basis when you want to format another card, or to
reformat a card you have been using with the camera.
To complete these steps, the camera must be connected to your computer
as described earlier in this chapter. We also assume that a supported
application is currently running on your computer, and that you have
accessed the driver image window by choosing the driver as described
earlier in this chapter.
A PCMCIA card used for image storage must be (DOS) formatted using the
camera with the supplied driver as described in this section.
1. Click the camera control icon of the driver image window. You see
AMERA CONTROL dialog box.
the C
1.
2.
4-40Preparing the Camera and the Computer
G
Page 85

. . . . . . . . . . . . . . . . . . . . . . . . . . . . .
2. IMPORTANT: As you complete this step, keep in mind that this
operation will erase all existing data on the PCMCIA card.
Click the F
ORMAT button, and click the response you want on the
confirmation box that appears.
3. Wait as the software formats the card. (If the operation fails, try
formatting one more time.)
4. If you have more than one card to format, you can remove the current
card as described earlier in this chapter, insert another, and click the
FORMAT button again to format the new card. You can also use this
operation to reformat a card that you have been using with the
camera.
5. Click D
6. Click D
ONE to close the dialog box.
ONE to leave the driver image window.
7. Quit the application.
Preparing the Camera and the Computer
G
4-41
Page 86

. . . . . . . . . . . . . . . . . . . . . . . . . . . . .
Quitting — Disconnecting the Camera
from the Computer
Complete these steps when you have completed your work with the
camera and the computer.
1. If Photoshop or other supported application is running, quit that
application now.
2. If the power switch on the camera is set to on (I), turn off the camera
by sliding the power switch to off (O).
3. Turn off your computer.
4. Turn off other SCSI devices if present.
5. (Optional) Disconnect the camera from the computer.
CAUTION: Do not disconnect the camera from the computer while the
driver image window is open, or even while the computer is on. Doing
so may result in the loss of data from the PCMCIA card in the camera or
from the hard disk in your computer. Instead, turn off all equipment in
the order described above before disconnecting the camera.
Your camera is now ready to take pictures as described in Chapter 5.
4-42Preparing the Camera and the Computer
G
Page 87

. . . . . . . . . . . . . . . . . . . . . . . . . . . . .
. . . . . . . . . . . . . . . . . . . . . . . . . . . . . .
. . . . . . . . . . . . . . . . . . . . . . . . . . . . . . .
. . . . . . . . . . . . . . . . . . . . . . . . . . . . . . . .
5
Using the EOS•DCS Camera
Follow the steps in this chapter to take pictures with the camera. As you
do, you can use the camera in a variety of settings, including:
Indoors while connected to the AC battery charger/adapter. (If you are
working indoors, we recommend that you keep the camera connected
to the adapter, even though you can use the camera without it.)
Indoors while connected to a computer (with or without the adapter).
In the field with the camera operating from its battery without being
connected to a computer or to the adapter.
Using the Camera
G
5-1
Page 88

. . . . . . . . . . . . . . . . . . . . . . . . . . . . .
Readying the EOS•DCS Camera
1. If a formatted PCMCIA card is not in the camera, insert one now.
NOTE: Refer to Chapter 4 for information on formatting, inserting, and
removing PCMCIA cards. If the camera back LCD shows “E6” the card has not
been formatted; you must format it before you can continue.
Camera back LCD
MIC
ID
DELETE SCSI
MIC BUTTON
CARD BUSY
Insert/remove
PCMCIA card
here.
2. If one is not connected, attach your lens to the camera. (A lens is not
supplied with the camera.)
3. Select either step A or B below depending on the environment in
which you will use the camera.
A.
5-2Using the Camera
Indoors.
Connect the camera to the AC battery charger/adapter as
described in Chapter 4; leave it connected while you operate the
camera. The camera will be ready for operation almost immediately. However, if you are beginning with a dead battery, and
notice unusual behavior, you may need to wait for approximately
three minutes before using the camera.
G
Page 89

. . . . . . . . . . . . . . . . . . . . . . . . . . . . .
NOTE: The AC adapter supplies enough power to support operation of
the camera as well as to continue charging the camera battery. Once
the battery is fully charged, the AC adapter automatically switches to a
slow trickle charge.
B.
In the field without the AC battery charger/adapter.
into the field, you should charge the battery fully as described in
Chapter 4; charging the battery for at least two hours will ensure
the most images per charge.
4. If the camera is connected to the AC battery charger/adapter it is
automatically on. However without the adapter, turn on the camera
by sliding the power switch to on (I); this switch turns on both the
KODAK camera back and the Canon camera body.
NOTE: The main switch on the Canon EOS-1 N is not available. Instead, the
•
on (I) setting of the EOS
setting, and the off (O) setting sets it into the “L” setting.
)
)
g
The
function 3 to 1. (For the EOS
has been reprogrammed. It no longer is used to set film speed — a function of
no use with the digital camera.)
setting is also available on the EOS•DCS; to set it, set custom
)
DCS power switch sets the EOS-1 N into the “A”
•
DCS camera the purpose of custom function 3
Before you go
5. Notice that the camera back LCD displays several graphics. (To
conserve battery power, if the AC adapter is not connected, the
camera back automatically turns off after approximately five seconds;
to wake it and see these data, lightly press the shutter release button.)
The graphics display:
The amount of charge in the battery.
The number of frames remaining on the PCMCIA card. For
example the following illustration indicates that there is still room
for 64 additional images on the card.
Using the Camera
G
5-3
Page 90
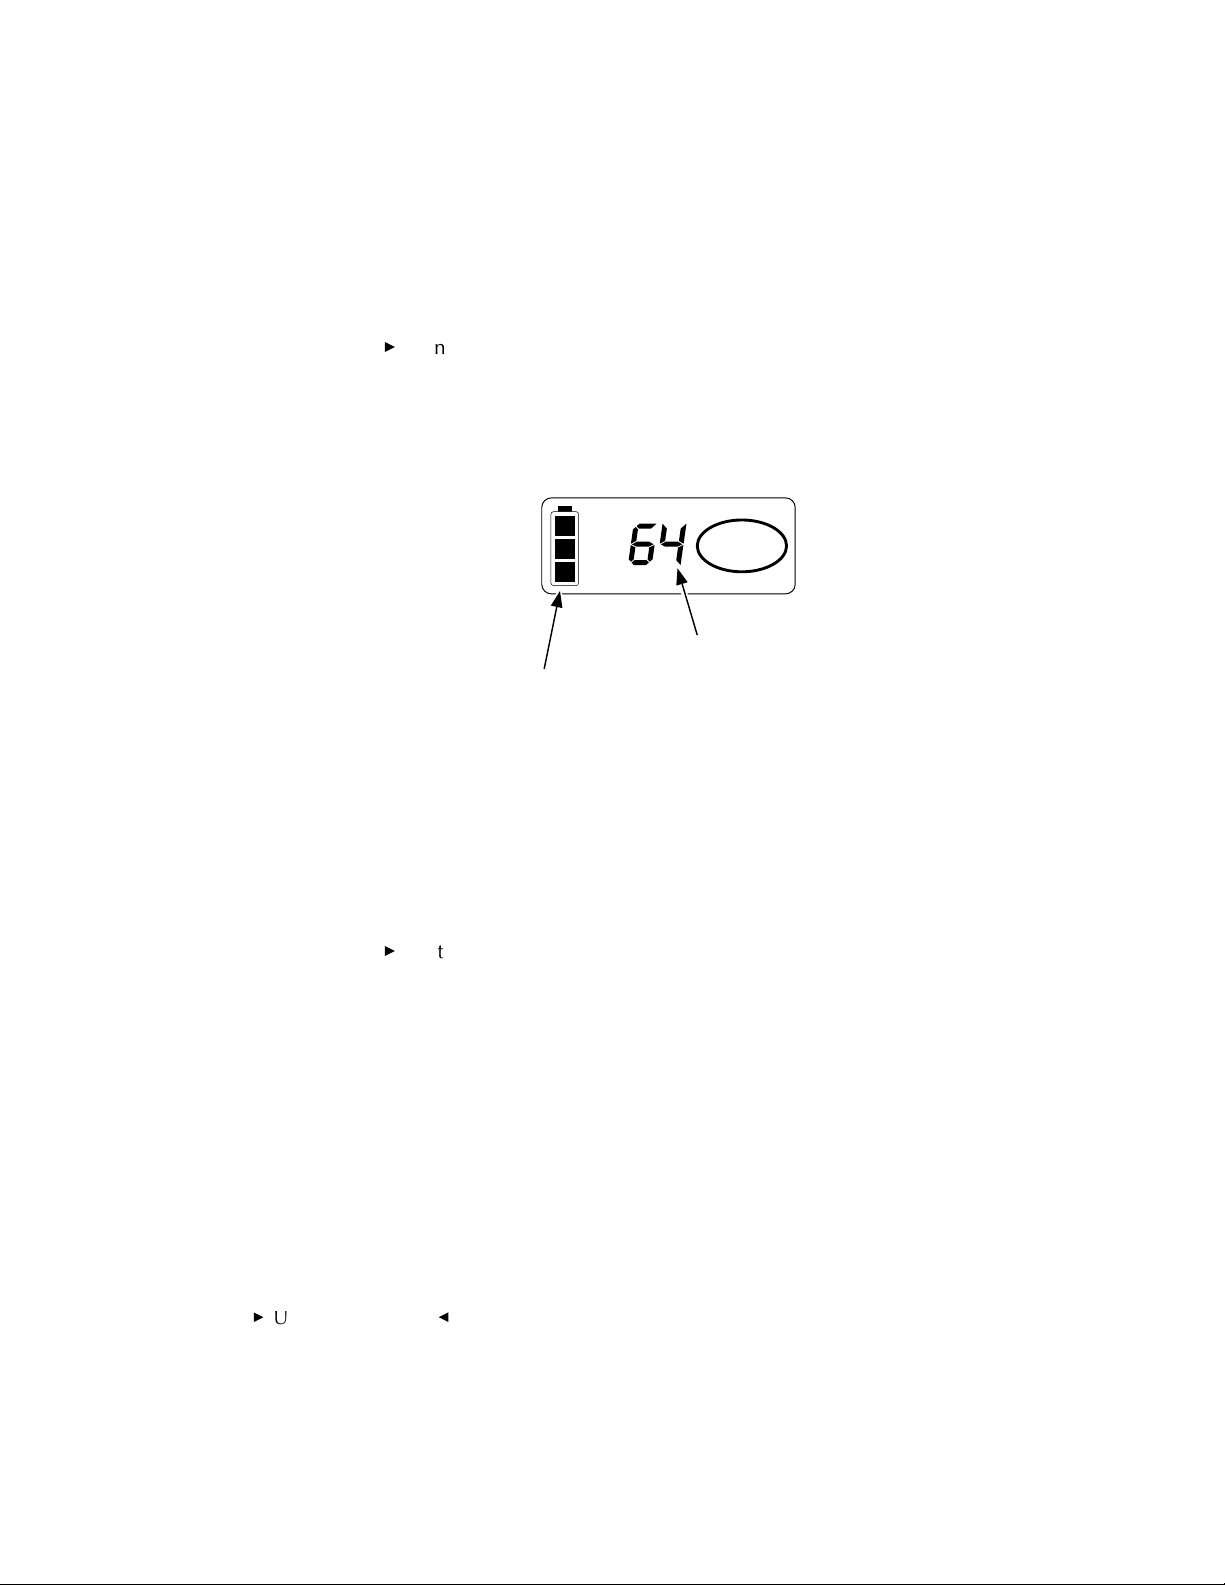
. . . . . . . . . . . . . . . . . . . . . . . . . . . . .
An oval that serves several purposes, including indicating the
amount of the card filled with images. (An empty oval indicates
that the PCMCIA card is empty.)
LCD GRAPHICS
Frames remaining
Battery indicator
6. With the camera back awake, check the battery indicator on the LCD
on the camera back. The EOS•DCS includes a single battery that
powers both the KODAK camera back and the Canon EOS-1 N
camera.
NOTE: The information displayed by the Canon battery check on the Canon
LCD should be ignored; instead use the battery indicator on the camera back
as described in this step to determine the state of the battery.
5-4Using the Camera
If the segments are lighting in turn from bottom to top, the battery
is being charged by the attached AC battery charger/adapter; you
can operate the camera system normally in this state.
G
Page 91

. . . . . . . . . . . . . . . . . . . . . . . . . . . . .
Without the AC battery charger/adapter, if the indicator shows
that the battery is low, recharge it or operate the camera from the
AC battery charger/adapter.
2
Full battery
Accommodate for the Absent Quick Control
Dial
The main functions of the quick control dial located on the back of the
standard EOS-1 N include exposure compensation settings, flash exposure
compensation settings, and manual exposure adjustments. The following
steps describe how to make settings that accommodate for the absence of
the quick control dial on the EOS•DCS camera.
1. If it is not on, turn on the camera by moving the power switch to
on (I).
⁄
3 full
Low battery
Blinks when battery exhausted
2. Exposure compensation. Press and release the exposure compensa-
+
⁄-) button, then turn the main dial.
tion (
3. Flash exposure compensation. Hold down the flash exposure com-
pensation button (metering mode selector) while turning the main
dial.
Using the Camera
G
5-5
Page 92

. . . . . . . . . . . . . . . . . . . . . . . . . . . . .
4. Aperture adjustment in manual exposure mode. Press and release the
exposure compensation (
NOTES: Custom Function 5 can be used to reverse the shutter speed and aperture
value setting methods in manual exposure mode. Refer to information in the
supplied EOS-1 N Instructions.
Custom Function 6 can be used to set exposure control increments (full, 1/2, or
1/3 stops). Refer to information in the supplied EOS-1 N Instructions.
Custom Function 11-1 or 11-2 can be used to interchange the functions of the
) focusing point selector and the exposure compensation (+⁄-) button. Refer to
(
information in the supplied EOS-1 N Instructions. When Custom Function 11-1 or
11-2 is engaged:
Press and release the exposure compensation (+⁄-) button, then turn
+
⁄-) button, then turn the main dial.
the main dial to select a focusing point.
Turn the main dial while pressing the ( ) focusing point selector
button to set AE exposure compensation or adjust manual exposure.
Choose Other Canon Camera Settings
This section describes how to set camera settings other than exposure
compensation and flash exposure compensation. Please refer to the
supplied EOS-1 N Instructions for detailed information on each of these
settings.
1. Select an autofocus mode (One Shot AF or AI Servo AF) by turning the
main dial while pressing the AF button.
2. Select a metering mode by turning the main dial while pressing the
metering mode selector button.
3. Select an exposure mode by turning the main dial while pressing the
MODE button.
5-6Using the Camera
G
Page 93
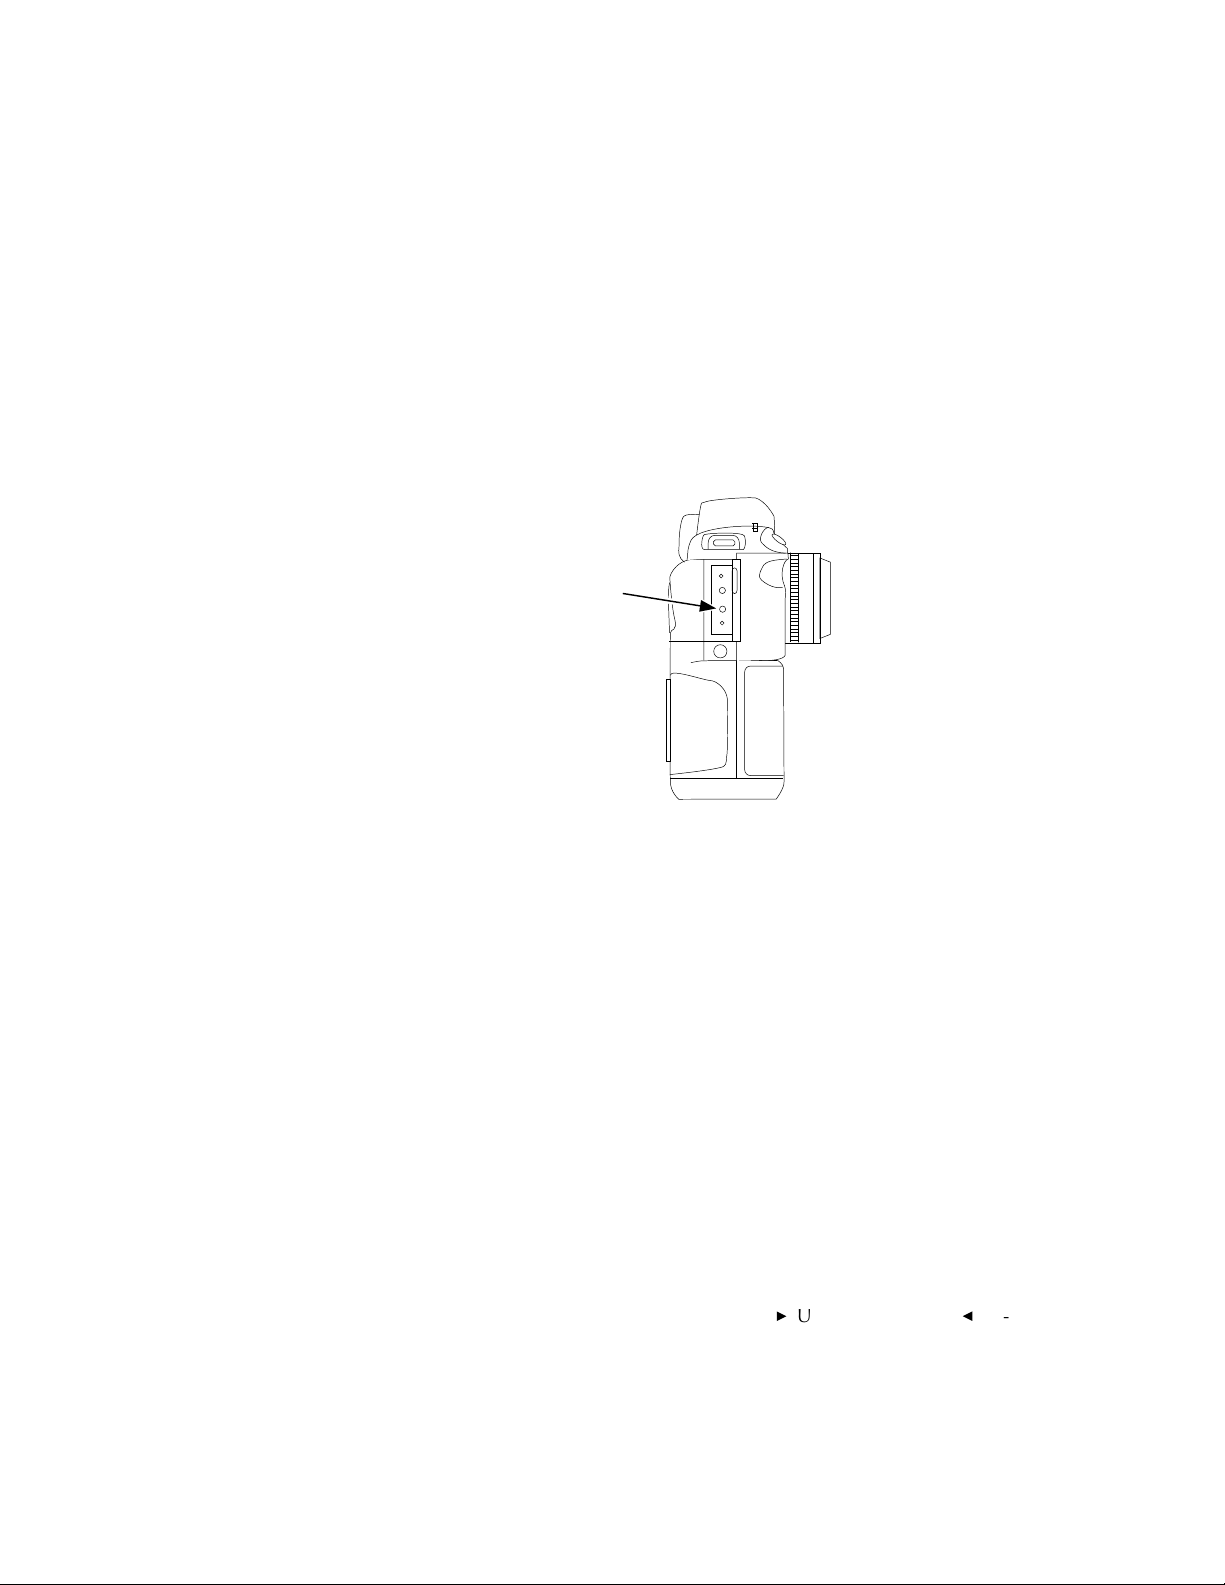
. . . . . . . . . . . . . . . . . . . . . . . . . . . . .
4. Select a film winding mode (Single or Continuous) or a Self-timer
mode (2-second delay or 10-second delay) by turning the main dial
after pressing the DRIVE button located inside the hinged door on the
right side of the camera.
DRIVE button
5. Set the ISO value by turning the main dial while simultaneously
pressing the AF and metering mode selector buttons; the specifications
appendix lists supported ISO values.
NOTES: ISO values outside these values cannot be set. Exposure compensation values up to +/- 3 steps in 1/3- or 1/2-step increments may be selected at
the supported ISO value.
As with film, you may want to use flash to achieve maximum image quality
in low light situations.
Using the Camera
G
5-7
Page 94

. . . . . . . . . . . . . . . . . . . . . . . . . . . . .
Turning Off the Camera
You turn off the camera by sliding the power switch to off (O).
When the camera is on but not awake (the LCD on the camera back is
off), the drain on the battery is very minimal as the camera system waits in
a sleep state for your next action. Therefore, in normal usage of the
camera during a shooting session with or without the AC battery charger/
adapter, it is not necessary to continually turn the camera off then on
again. In either case, when you are finished with a shooting session, you
should turn off the camera by sliding the power switch to off (O).
Taking Pictures
1. Turn on the camera system, and wake it by lightly pressing the shutter
release button.
2. Frame the scene within the inner rectangle of the focusing screen. The
focusing screen in the camera has been modified and indicates a
reduced view of the scene to match the size of the picture that will be
recorded on the imager. (An illustration of the focusing screen appears
in the Specifications appendix.)
3. Focus.
You can use manual focus, or select any of the focusing points, or let
the camera select the focusing point. (Please refer to information in
the supplied EOS-1 N Instructions for a detailed explanation of
focusing point selection and choice of AF mode.)
Placing the camera into F-11-1 custom function mode as described
earlier in this chapter, alters the process you use for selecting a
focusing point. The new procedure is different from the process you
would follow if the Canon EOS-1 N were being used without the
5-8Using the Camera
G
Page 95
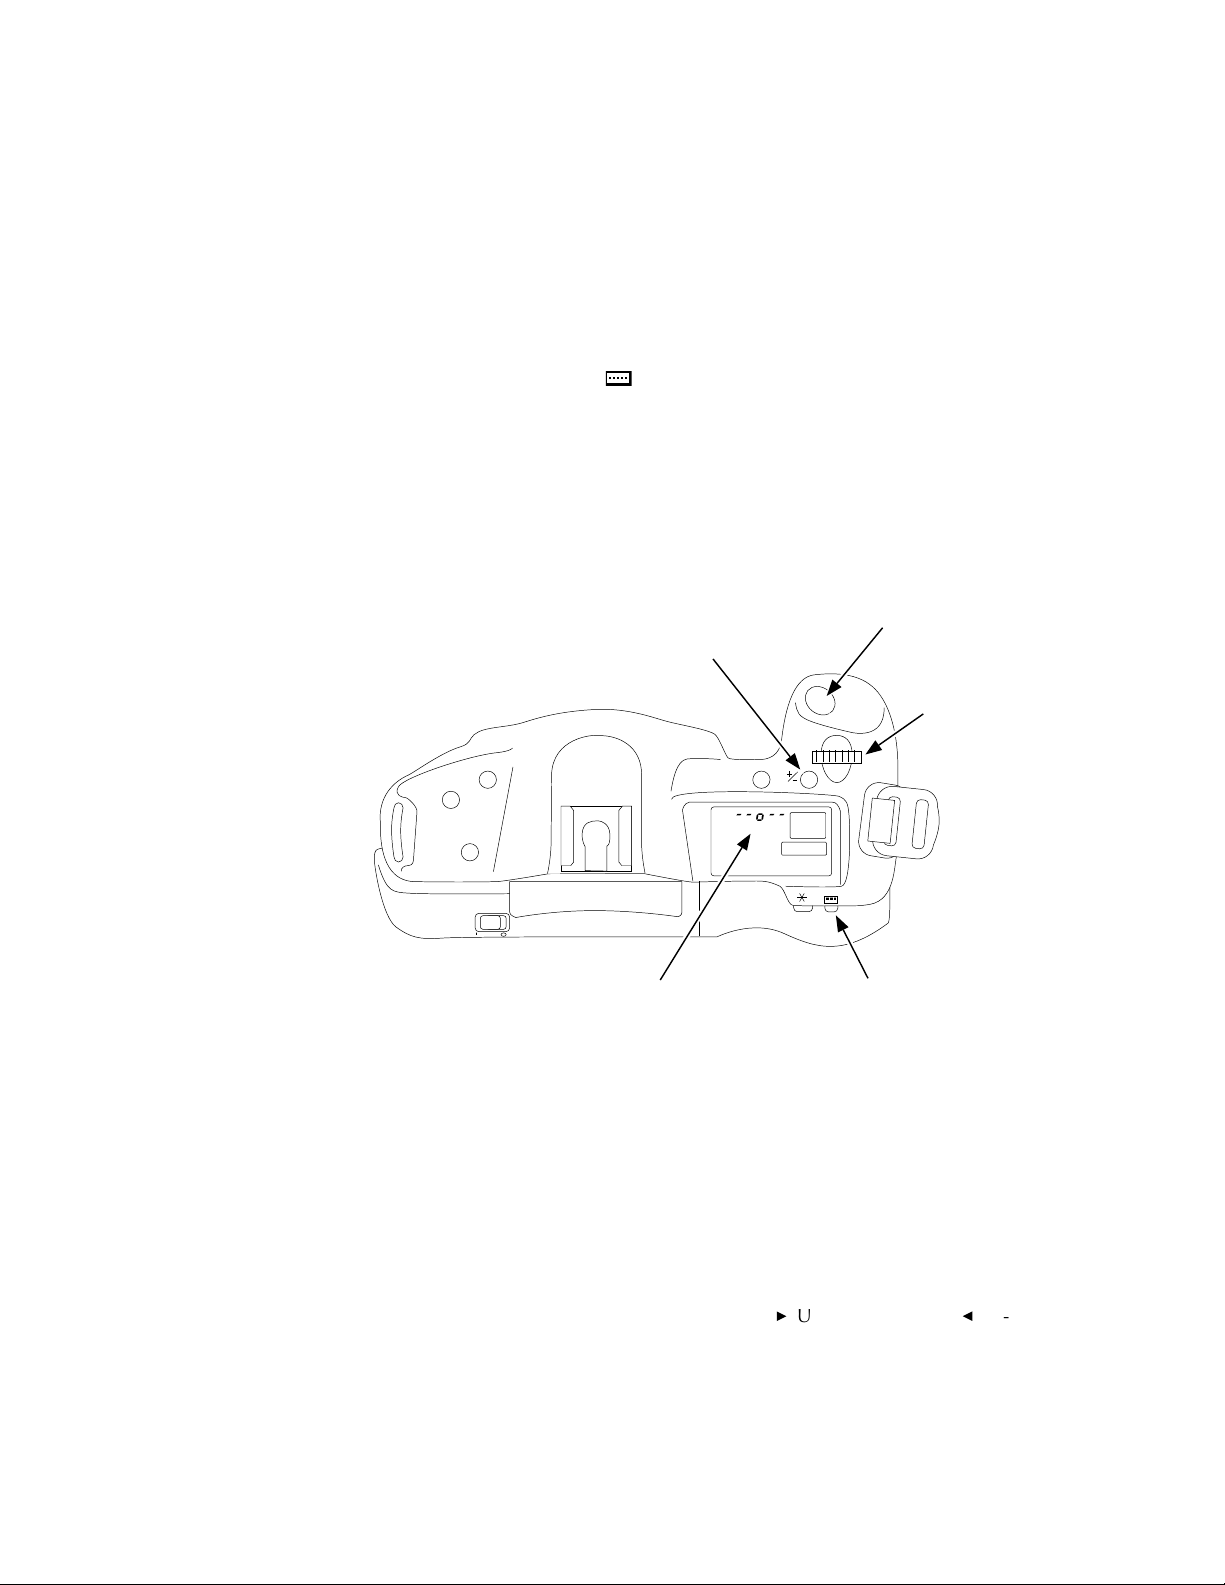
. . . . . . . . . . . . . . . . . . . . . . . . . . . . .
KODAK camera back. You do not select a focusing point with the
focusing point selector (
A. Tap the exposure compensation button (
appear on the camera-top LCD.
B. Turn the main dial to select the desired focusing point.
C. Tap the shutter release button; this action returns the camera-top
LCD to its regular display.
). Instead, follow these steps:
+
⁄-). The focusing points
Shutter release button
Exposure compensation button
Main dial
Focusing points Focusing point selector
4. Press the shutter release to take a picture.
5. (Optional) If you have not been using continuous exposure, set the
film winding mode to continuous exposure, and take a burst of
pictures by keeping the shutter release button depressed.
NOTE: The camera burst rate and timing data appear in the Specifications
appendix.
Using the Camera
G
5-9
Page 96

. . . . . . . . . . . . . . . . . . . . . . . . . . . . .
Frames remaining
Reading the Frames Remaining Indicator and
the Frame Counter
Two numbering systems provide different information about your pictures.
Frames Remaining
Each time you take a picture, the number on the camera back LCD goes
down by one indicating the number of additional pictures that can be
stored on the PCMCIA card currently in the camera system.
5-10Using the Camera
The oval at the right of the LCD indicates the amount of the PCMCIA card
filled with images. As more pictures are taken, subsequent sectors of this
graphic appear.
Card
empty
Card up to
1/6 filled
G
Card filled
(indicator flashes)
Page 97

. . . . . . . . . . . . . . . . . . . . . . . . . . . . .
Frame Counter/Image Reference Number
A separate numbering system is provided by the Canon EOS-1 N camera.
Its frame counter appears on the camera-top LCD. These numbers go up
by one as each picture is taken. After reaching number 39, the image
reference numbers cycle back to 1, 2, etc.
Since the PCMCIA card can store more than 39 images, you probably will
have multiple images on the same PCMCIA card with the same numbers.
To avoid confusion when you — or others — look for specific images on
the PCMCIA card, you can use the record button as described later in this
chapter to annotate images, or when you access images with the driver,
you can look in the image information window to determine the time the
image was taken.
This frame counter displays the number of the picture you have just taken
rather than the number of the next picture you will take.
The frame counter is displayed with each image in the software driver
image window.
Deleting Pictures (Optional)
This section describes how you can delete one or more of the most recent
pictures from the PCMCIA card. This feature is useful if your card is full
and you need to make room for more pictures or if you know that you
have just taken an unsatisfactory picture and want to delete it. (As explained in later chapters, you can also delete pictures with the supplied
software driver.)
1. If it is not on, turn on the camera by sliding the power switch to on (I).
2. Wake the system by lightly pressing the shutter release button.
NOTE: After several seconds of inactivity, the camera system automatically
turns off. As you complete these steps you may need to begin again at this
step.
Using the CameraG5-11
Page 98

. . . . . . . . . . . . . . . . . . . . . . . . . . . . .
3. Locate the indented button on the back of the camera labeled
“DELETE.”
Indicates
delete mode
DELETE SCSI ID
CARD BUSY
Frames remaining
Disk indicator
DELETE SCSI ID
CARD BUSY
DELETE button
MIC
MIC BUTTON
5-12Using the Camera
G
Page 99

. . . . . . . . . . . . . . . . . . . . . . . . . . . . .
4. Press this DELETE button once with your fingertip or a blunt object;
this action wakes delete mode. The characters “DEL” appear on the
camera back LCD.
5. While “DEL” still appears on the LCD, press the DELETE button again.
The most current image — based on image date and time — is
deleted. The red Card Busy light will flicker, indicating that the image
is being deleted from the PCMCIA card.
6. (Optional) Press the DELETE button again — repeatedly if you wish —
to delete another picture(s).
NOTES: As each image is deleted the frames remaining indicator on the camera
back increases by one, indicating that there is now room for one additional image
on the PCMCIA card. The frame counter in the camera-top LCD does not change
as a result of deleting an image.
Only image files are deleted. Sound files (described just below), or other files that
may be on the disk are not deleted.
Use this feature with care since it is possible that you may unknowingly delete the
“wrong” image. This can occur since the camera deletes the image with the most
current date and time. Perhaps you have used the PCMCIA card to take pictures,
and then the camera or PCMCIA card has been used by another photographer. If
you now delete an image, you will delete images from the other photographer
since they have the most current date and time stamp.
If you inadvertently delete images, an emergency procedure provides an opportunity for you to recover images if you do so before taking any additional pictures.
Refer to the explanation of the R
Additionally, since the PCMCIA card is DOS formatted, if you have an IBM PC or
compatible computer with a PCMCIA card reader and disk utility software with
file recovery features, you may be able to recover image and sound files while
working with that utility software.
ECOVER button in Chapter 8.
Using the CameraG5-13
Page 100

. . . . . . . . . . . . . . . . . . . . . . . . . . . . .
Recording Sound (Optional)
You can record sound on the PCMCIA card via a microphone built into
the camera by following these steps.
1. Turn on and wake the camera system.
2. Hold the camera back approximately six inches (15 cm) from your
mouth.
3. Press and hold the record button.
Microphone
Record button
MIC
ID
DELETE SCSI
MIC BUTTON
CARD BUSY
4. Speak into the microphone.
5. Release the record button; the red Card Busy light blinks as the data
are recorded on the PCMCIA card.
The center dot of the recording level meter (also called the disk indicator)
on the camera back LCD comes on when the recording button is pressed
5-14Using the Camera
G
 Loading...