

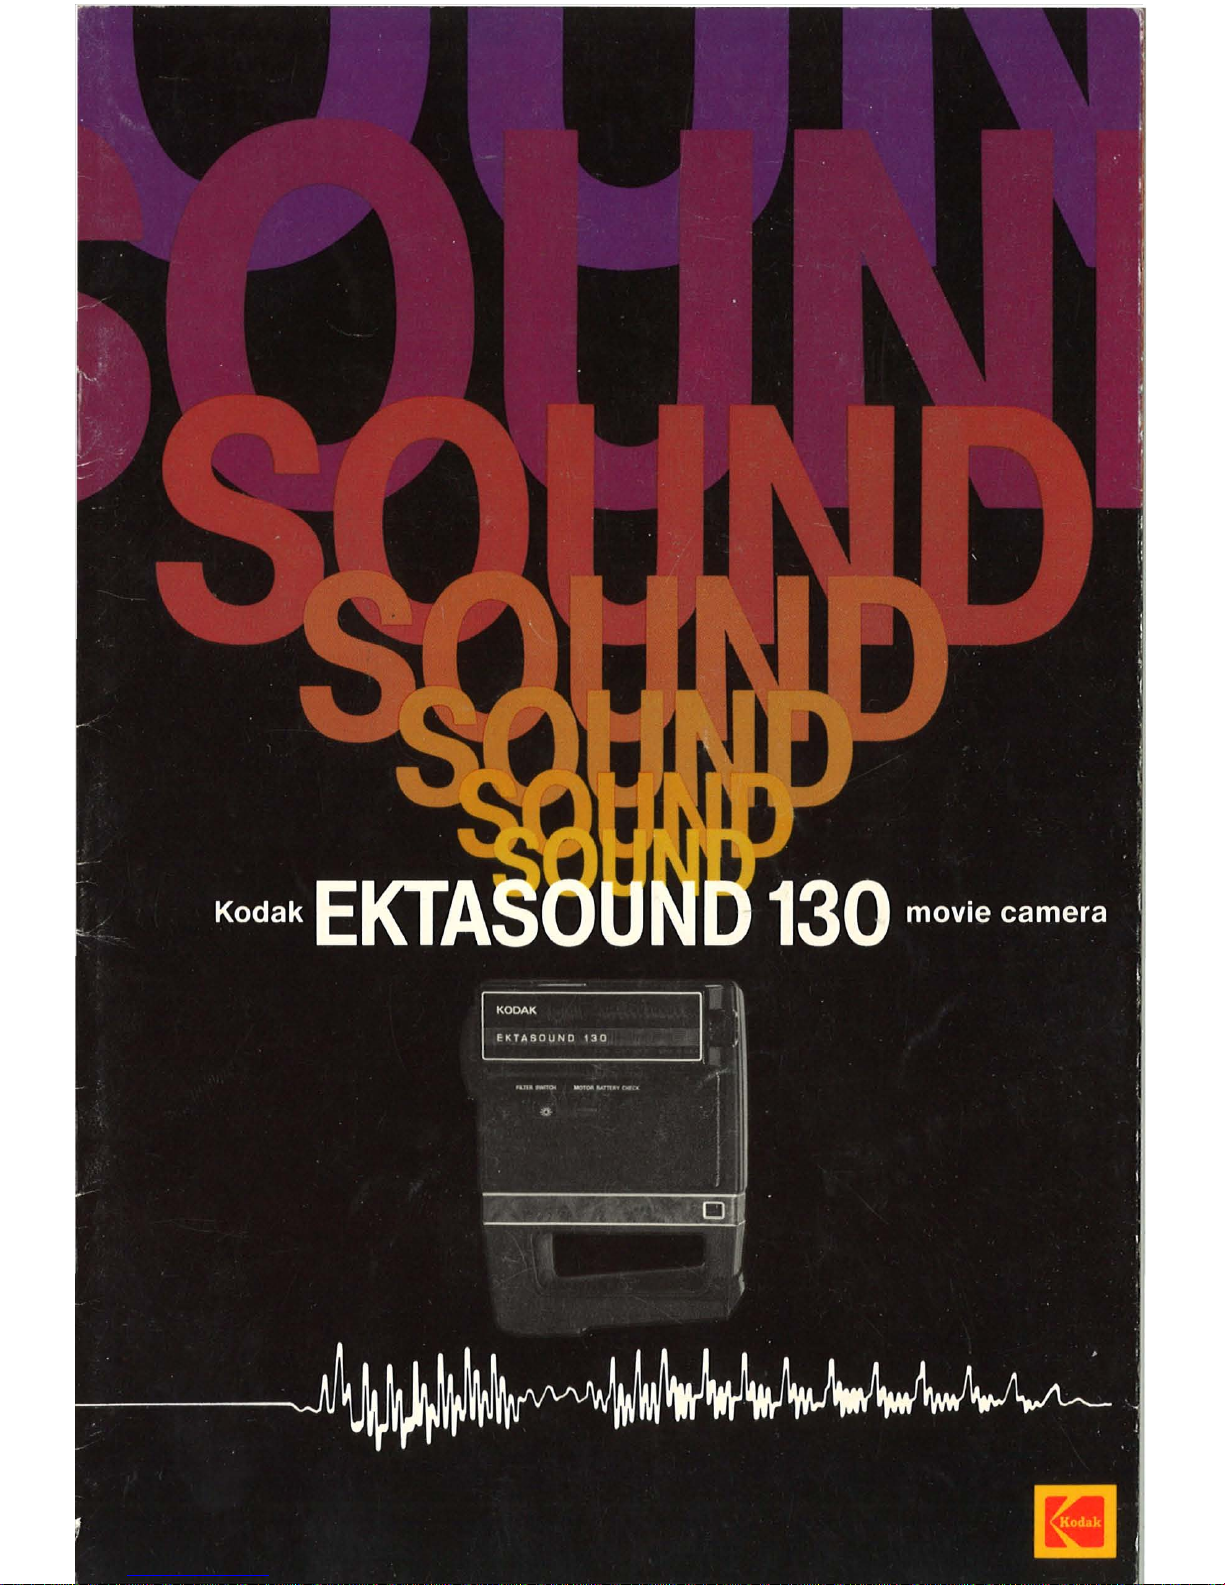
Page 1
Page 2

Page 3
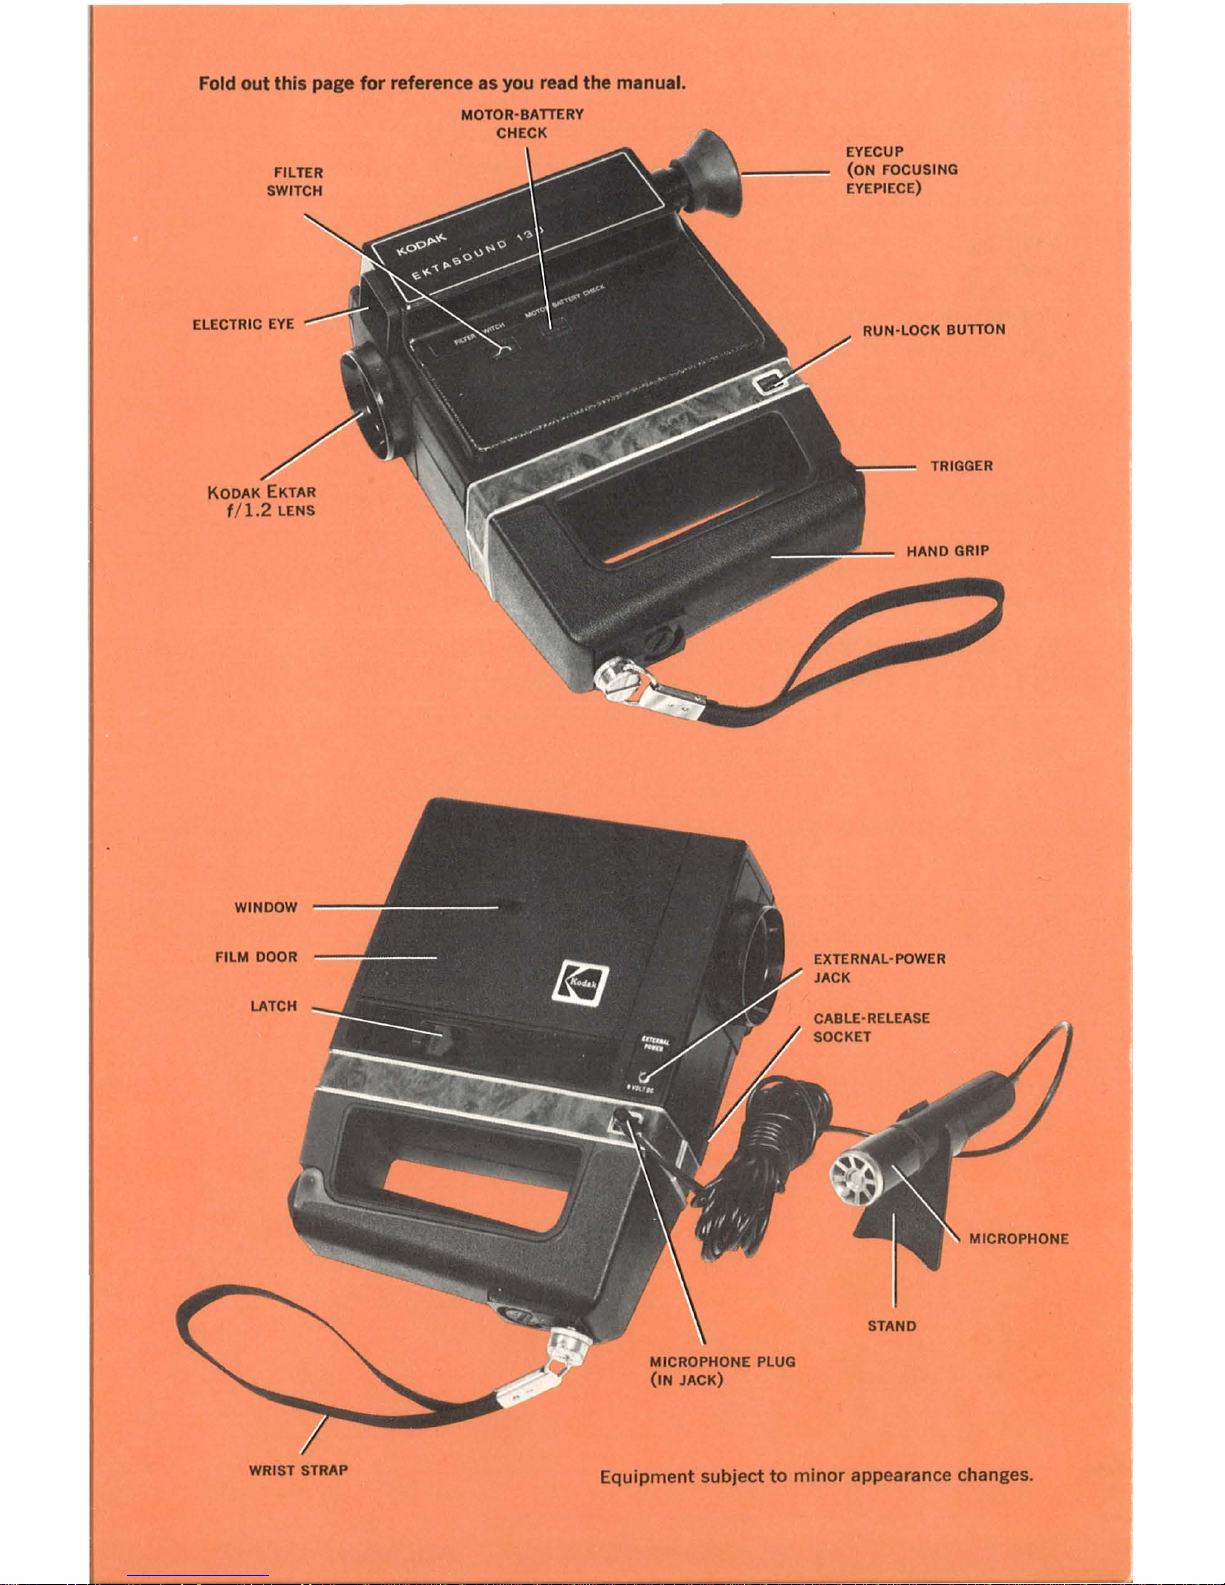
Fold
out
this
page
for
reference as you read the manual.
MOTOR· BATTERY
FILTER
EYECUP
(ON
FOCUSING
EYEPIECE)
RUN·LOCK
BUTTON
TRIGGER
WRIST STRAP
Equipment subject
to
minor
appearance changes.
Page 4
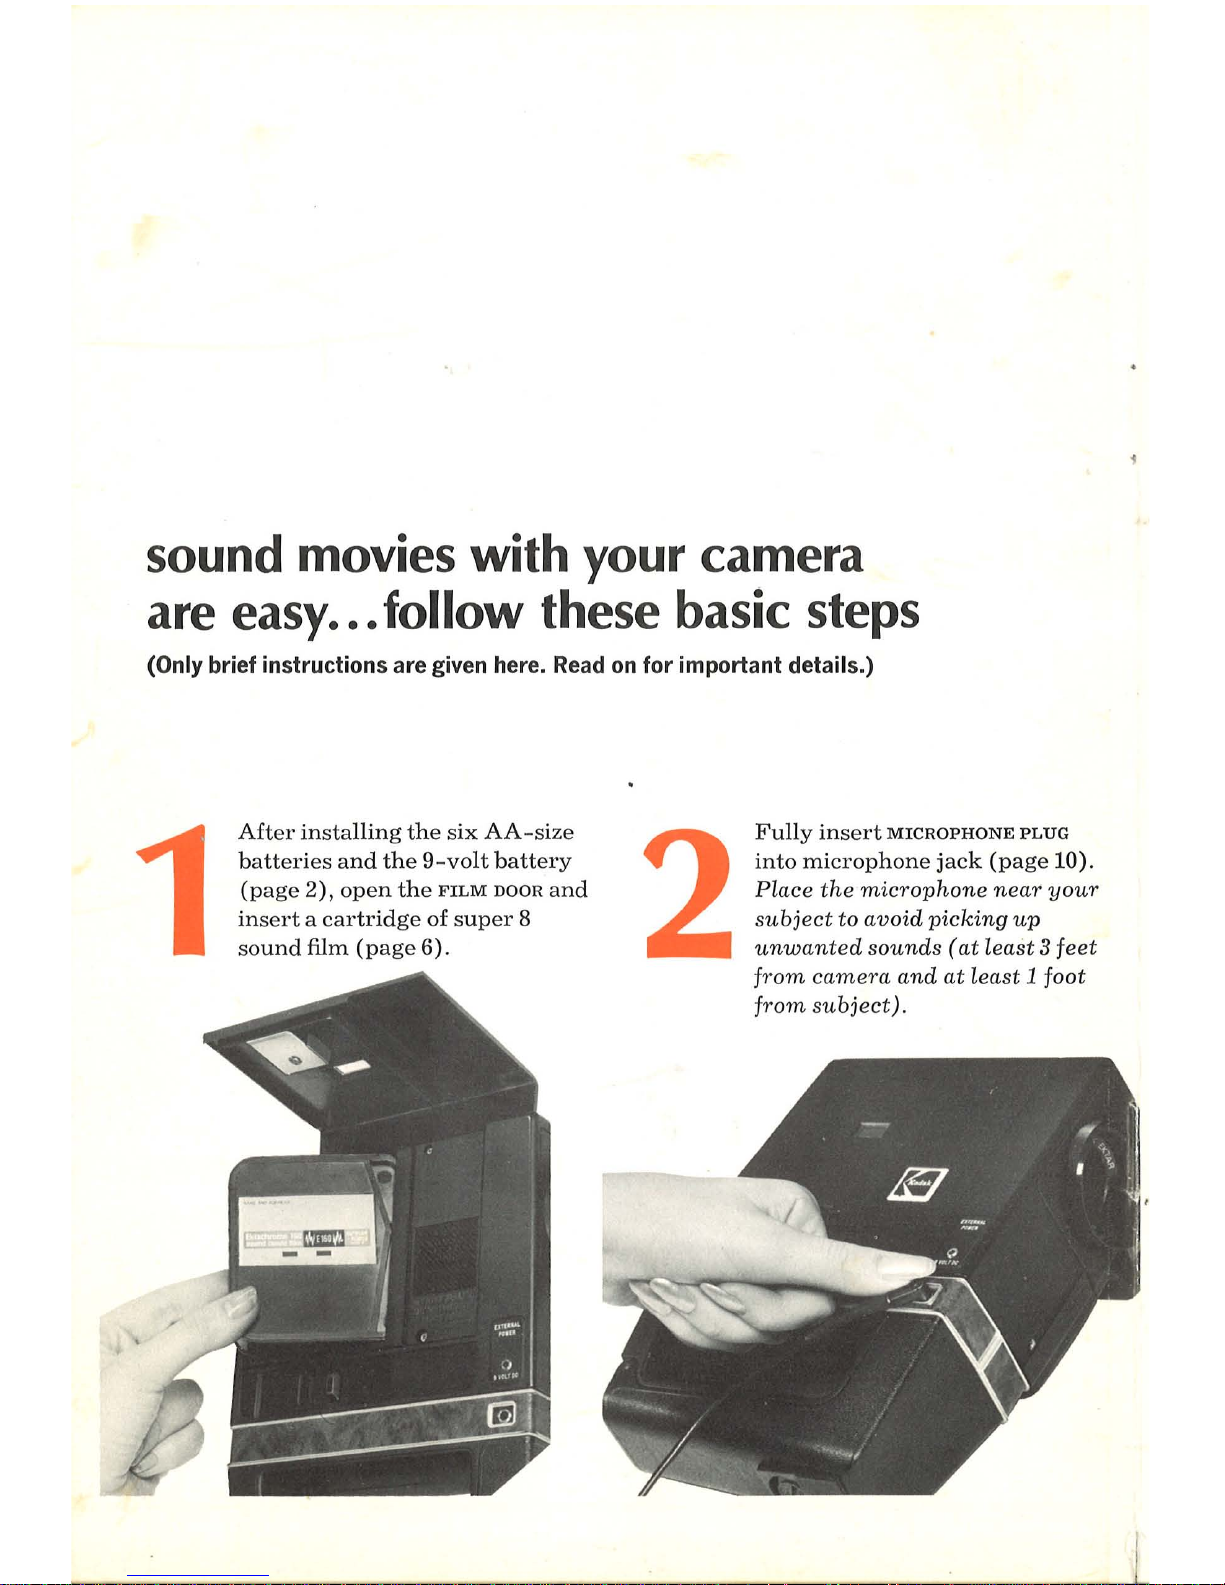
sound movies with your camera
are
easy
...
follow these basic steps
(Only
brief instructions
are
given
here.
Read
on
for important details.)
1
After
installing
the
six
AA
-size
batteries
and
the
9-volt
battery
(page
2),
open
the
FILM
DOOR
and
insert a cartridge
of
super
8
sound
film
(page
6).
2
Fully
insert
MICROPHONE
PLUG
into
microphone
jack
(page
10).
PLace
the
microphone
near
your
subject
to
avoid
picking
up
unwanted
sounds
(at
Least 3 feet
from
cam
era
and
at
Least 1 foot
from
subject).
Page 5
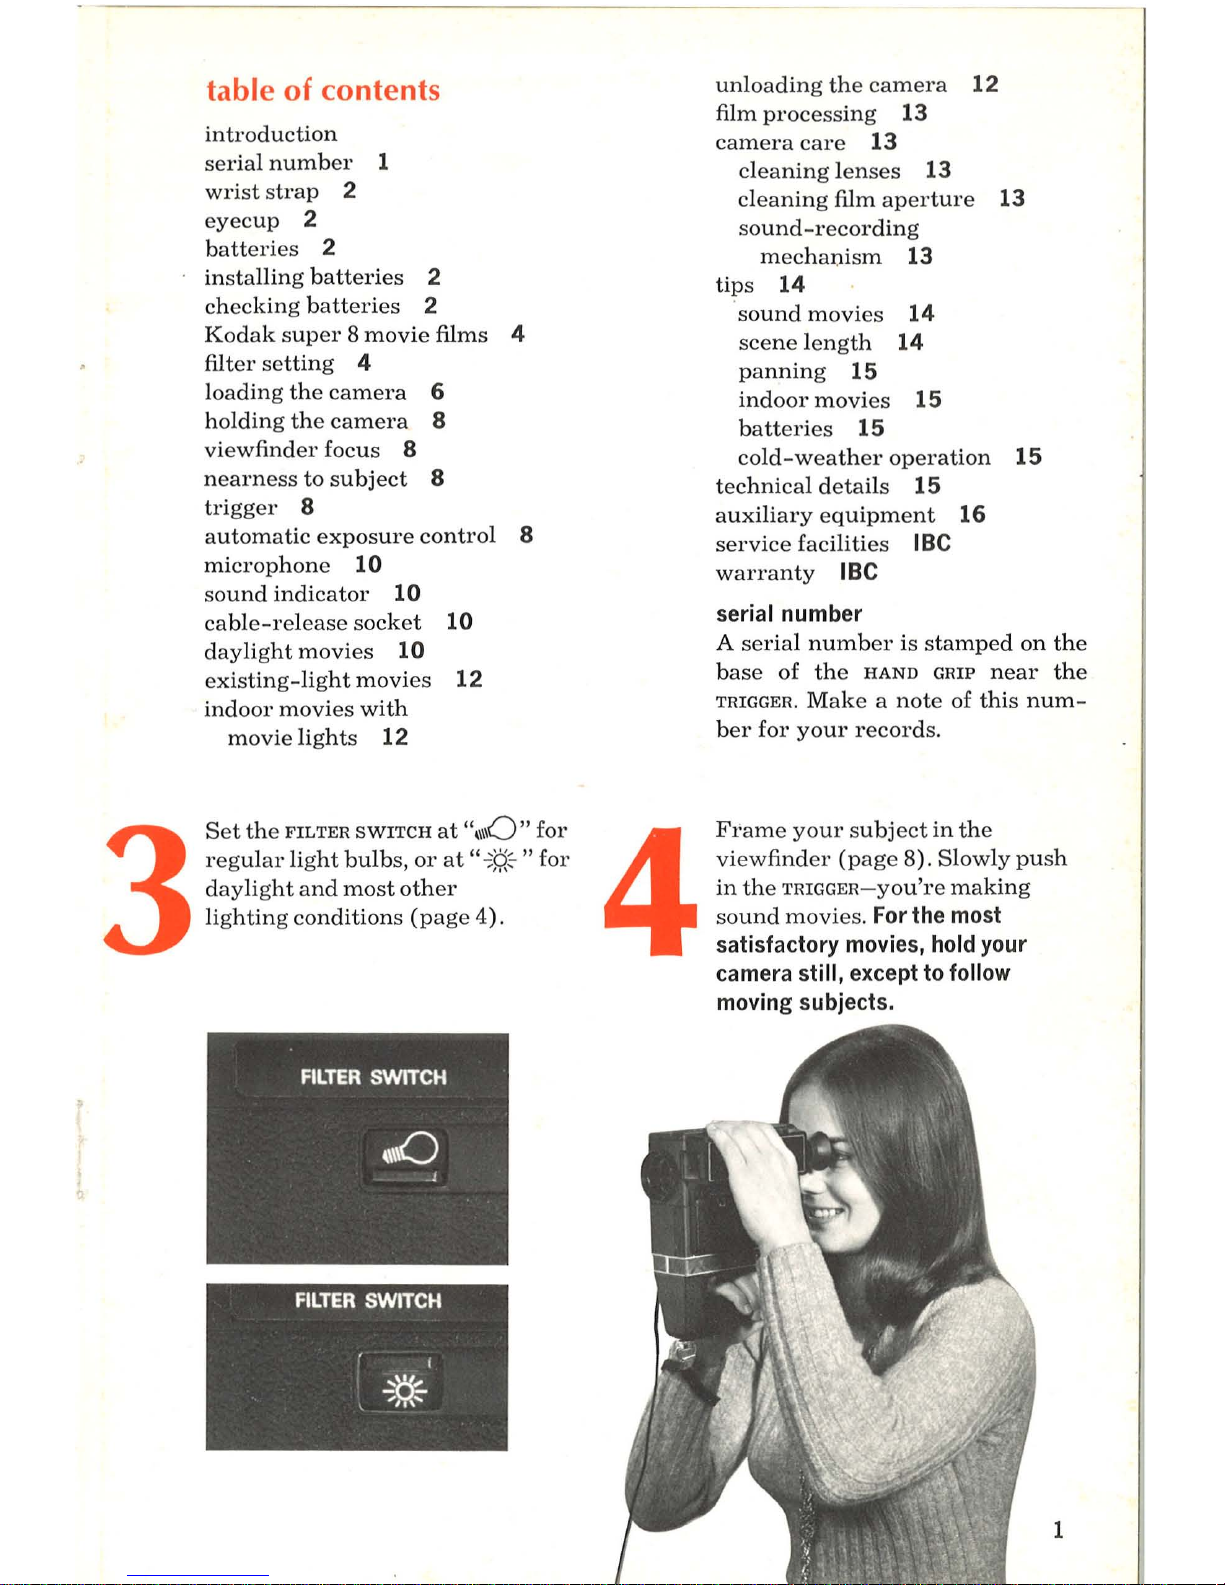
3
table
of
contents
introduction
serial
number
1
wrist
strap
2
eyecup
2
batteries
2
installing
batteries
2
checking
batteries
2
Kodak
super 8 movie
films 4
filter
setting
4
loading
the
camera
6
holding
the
camera
8
viewfinder
focus
8
nearness
to
subject
8
trigger
8
automatic
exposure
control
8
microphone
10
sound
indicator
10
cable-release
socket
10
daylight
movies
10
existing-light
movies
12
indoor
movies
with
movie
lights
12
Set
the
FILTER
SWITCH
at
"\\\10"
for
regular
light
bulbs,
or
at
"
-;$?<-"
for
daylight
and
most
other
lighting
conditions
(page
4).
4
unloading
the
camera
12
film
proc
ess
ing
13
camera
care
13
cleaning
lenses
13
cleaning
film
aperture
13
sound-recording
mechanism
13
tips
14
'
sound
movies
14
scene
length
14
panning
15
indoor
movies
15
batteries
15
cold-weather
operation
15
technical
details
15
auxiliary
equipment
16
service
facilities
IBC
warranty
IBC
serial
number
A
serial
number
is
stamped
on
the
base
of
the
HAND
GRIP
near
the
TRIGGER.
Make a note
of
this
num-
ber
for
your
records.
Fl'ame
your
subject
in
the
viewfinder
(page 8).
Slowly
push
in
the
TRIGGER-you're
making
sound
movies.
For
the
most
satisfactory
movies,
hold
your
camera
still,
except
to
follow
moving
subjects.
1
Page 6
wrist strap
A
WRIST
STRAP,
provided
for
your
conve-
nience
in
carrying
the
camera,
is
sup-
plied
with
your
camera.
Attach
the
strap
to
the
tripod
socket
on
the
HAND
GRIP
after
you
install
the
batteries.
eyecup
A
rubber
EYECUP,
which
reduces
extra-
neous
light
and
helps
position
your
eye
at
the
center
of
the
viewfinder,
is
sup-
plied
with
your
camera.
If
you
wish
to
use
the
eyecup,
snap
it
onto
the
view-
finder.
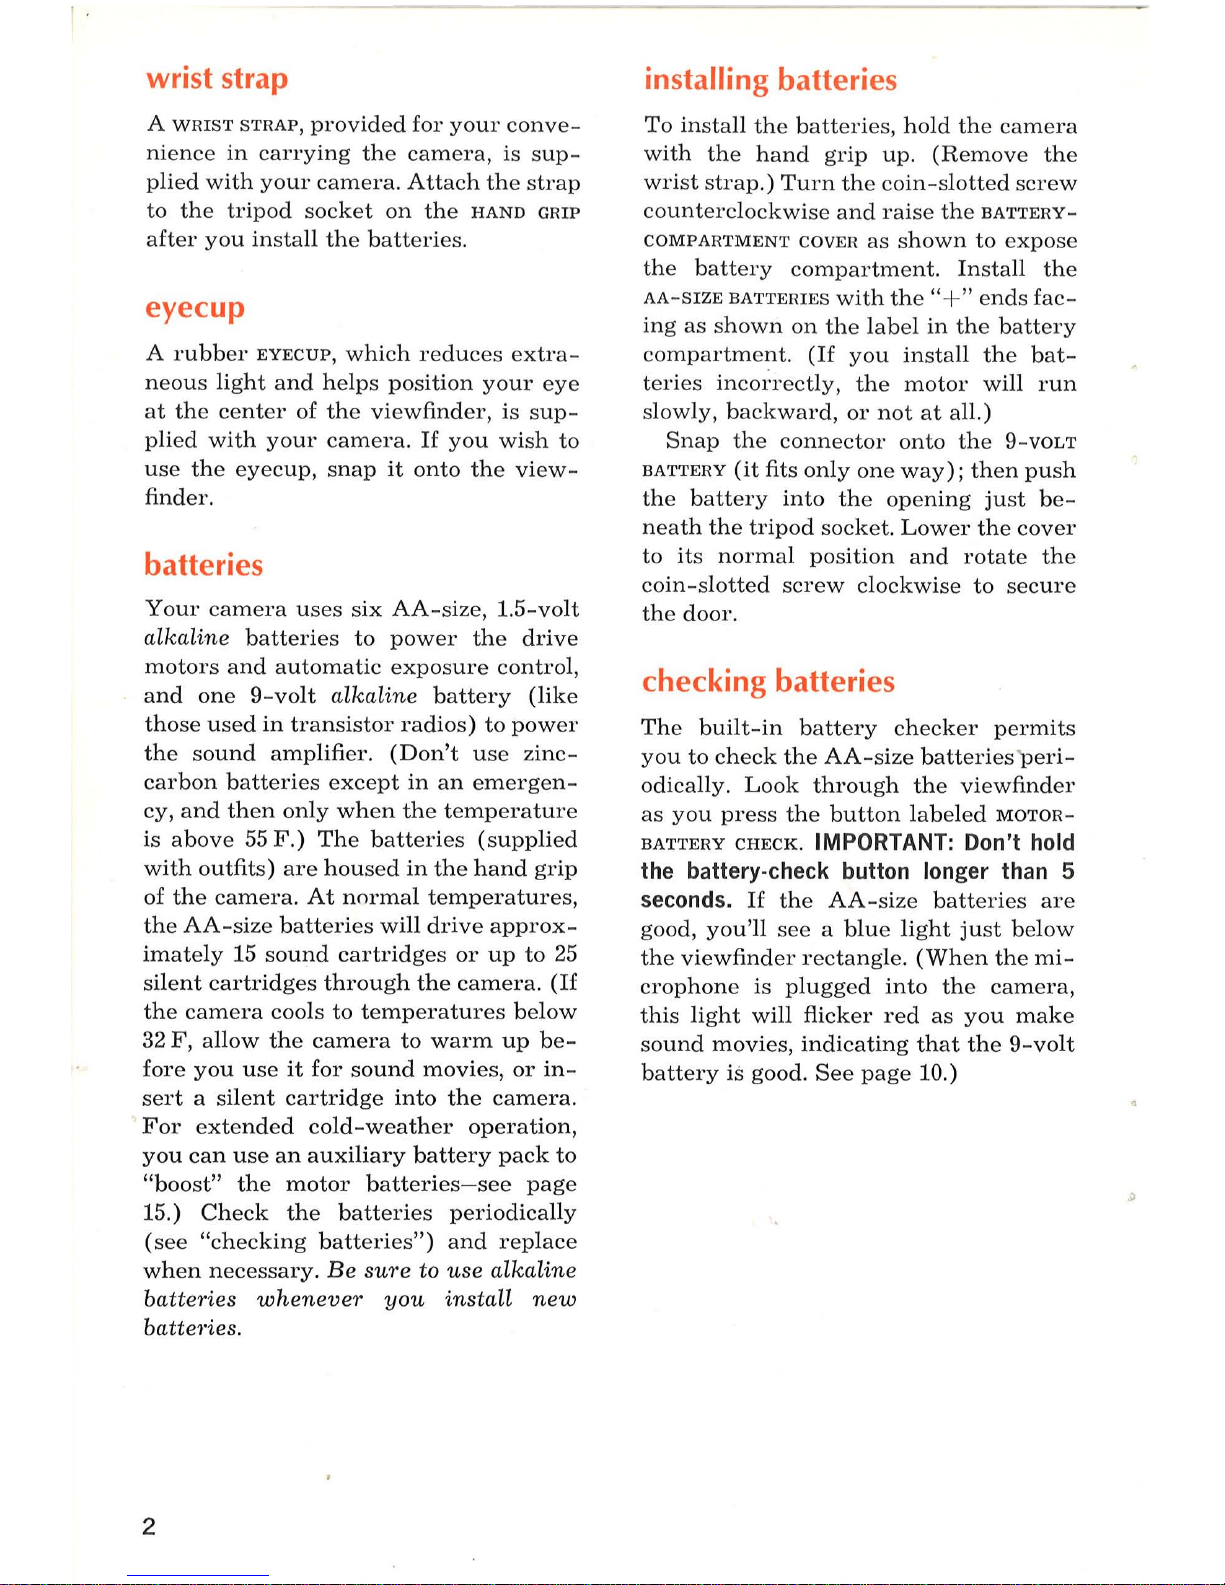
batteries
Your
camera
uses
six
AA-size,
lo5-volt
alkaline
batteries
to
power
the
drive
motors
and
automatic
exposure
control,
and
one
9-volt
alkaline
battery
(like
those
used
in
transistor
radios)
to
power
the
sound
amplifier.
(Don't
use
zinc-
carbon
batteries
except
in
an
emergen-
cy,
and
then
only
when
the
temperature
is
above
55
F.)
The
batteries
(supplied
with
outfits)
are
housed
in
the
hand
grip
of
the
camera. At
normal
temperatures,
the
AA-size
batteries
will
drive
approx-
imately
15
sound
cartridges
or
up
to
25
silent
cartridges
through
the
camera.
(If
the
camera
cools
to
temperatures
below
32
F,
allow
the
camera
to
warm
up
be-
fore
you
use
it
for
sound
movies,
or
in-
sert a silent
cartridge
into
the
camera.
For
extended
cold-weather
operation,
you
can
use
an
auxiliary
battery
pack
to
"boost"
the
motor
batteries-see
page
15.)
Check
the
batteries
periodically
(see
"checking
batteries")
and
replace
when
necessary.
Be
sure
to
use
alkaline
batteries
whenever
you
install
new
batteries.
2
installing batteries
To
install
the
batteries,
hold
the
camera
with
the
hand
grip
up.
(Remove
the
wrist
strap.)
Turn
the
coin-slotted
screw
counterclockwise
and
raise
the
BATTERY-
COMPARTMENT
COVER
as
shown
to
expose
the
battery
compartment.
Install
the
AA-SIZE
BATTERIES
with
the
"+"
ends
fac-
ing
as
shown
on
the
label
in
the
battery
compartment.
(If
you
install
the
bat-
teries
incol:rectly,
the
motor
will
run
slowly,
backward,
or
not
at
all.)
Snap
the
connector
onto
the
9-VOLT
BATTERY
(it
fits
only
one
way);
then
push
the
battery
into
the
opening
just
be-
neath
the
tripod
socket.
Lower
the
cover
to
its
normal
position
and
rotate
the
coin-slotted
screw
clockwise
to
secure
the
door.
checking batteries
The
built-in
battery
checker
permits
you
to
check
the
AA-size
batteries
peri-
odically.
Look
through
the
viewfinder
as
you
press
the
button
labeled
MOTOR-
BATTERY
CHECK.
IMPORTANT: Don't hold
the battery-check button longer than 5
seconds.
If
the
AA-size
batteries
are
good,
you'll
see a blue
light
just
below
the
viewfinder
rectangle. (When
the
mi-
crophone
is
plugged
into
the
camera,
this
light
will
flicker
red
as
you
make
sound
movies,
indicating
that
the
9-volt
battery
is
good.
See
page
10.)
Page 7

WRIST STRAP
EYECUP
BATIERY-
COMPARTMENT
DOOR
3
Page 8

Kodak super 8 movie films
Your
camera
uses
sound
or
silent
car-
tridges
of
movie
film
with
speeds
of
ASA
40
or
ASA
160.
(A
notch
in
the
cartridge
automatically
adjusts
the
cam-
era
for
the
appropriate
speed.)
For
day-
light
illumination,
these
speeds
are
re-
duced
to
ASA
25
or
ASA
100
by
a filter
built
into
your
camera. For
regular
light
bulbs
(tungsten
illumination)
the
built-
in
filter
can
be
moved
out
of
position
manually,
or
automatically
by
inserting
a
movie
light
into
the
slot
on
top
of
the
camera.
Select
a film
from
the
table
for
the
conditions
under
which
you
will
be
making
movies. (The
table
gives
exam-
ples
of
different
light
sources.)
If
you
have a sound
cartridge
in
the
camera
and
wish
to
add
sound
later
(with a projector
capable
of
recording
sound),
simply
unplug
the
microphone
from the
camera.
If
you
use a cartridge
of
silent
movie
film,
the
recording
mech-
anism
in
your
camera
will
not
be
acti-
vated.
If
you
decide
later
to
add a sound
background, a sound
stripe
such
as
the
KODAK
SONOTRACK
Coating
can
be
added
to
your
silent
film.
~fowever,
it
will
cost
more
than
if
you
use a sound
cartridge
initially.
Don't
carry
unwrapped,
unexposed
film
cartridges
in
your
pocket
or
purse,
because
dust
may
accumulate
on
the
film
and
appear
as
black
specks
on
your
movies
.
Be
fore
making
any
especially
impor-
tant
movies-on a trip
or
at
some
special
event-expose a cartridge
of film
and
check
the
results.
This
will
give
you
practice
in
camera
operation
and
will
provide a check
on
your
equipment.
If
you
have
any
questions,
your
photo
dealer
will
be
glad
to
help.
4
filter setting
Regula1'light
bulbs, jiames,
jioodlights,
movie
lights,
other
tungsten-light
SOU1'ces
Daylight, jiuo1'escent
light,
carbon-
a1'C
spotlights
If
you're
not
sure
of
the
type
of
light,
set
the
switch
to
" o
Qc."
If
more
than
one
kind
of
light
exists
in a scene,
set
the
filter
switch
for
the
predominant
light
source.
In
some
situations
the
use
of
the camera
filter is a
matter
of
personal
taste.
Mov-
ies
made
with
the
filt
er
switch
at
"
oQc
"
will
appear
"warm
er,"
or
more
red-yel-
low,
than
those
made
without
the
filter.
If
in
doubt,
set
the
filter switch
to "
oi:ic.
"
IMPORTANT:
Store
your
camera
and
film
away
from
heat
and
direct
sunlight-never
in
the
glove
com-
partment,
on
the
rear-window
shelf,
or
in
any
other
"hot
spot"
in
a
car.
,
Page 9

I
KODAK
Films
Film
Speed
Filter
Light
Sources
I
Switch
EKTACHROME
160
ASA
100
(with
Day
light, fluorescent,
carbon-
Sound
Movie
Film
bUilt -
in
filter)
-;l?~
arc
spotlight,
01'
other
(Type
A)
EKTACHROME
160
Existing
tungsten
light,
fire-
Movie
Film
ASA
160
(no
filter)
\\\\0
works,
flames, floodlight,
(Type
A)
bounce
movie
light
(3400
K)
I/)
Q)
KODACHROME
II
.:;
0
Sound
Movie
Film
ASA
25
(with
E
bUilt-in
filter)
-;
l?~
Daylight
"-
(Type
A)
0
'0
KODACHROME
II
(.)
Movie
Film
ASA
40
(no
filter)
\\\\0
Movie
light
(3400
K)
(Type
A)
EKTACHROME
40
ASA
25 (with
-;l?~
Daylight
Movie
Film
built-in
filter)
(Type A)
'*
ASA
40
(no
filter)
\\\\0
Movie
light
(3400
K)
.li::
TRI-X
Reversal
ASA
200
-;l?~
(.)
I/)
Daylight
~
Q)
Film
7278
~
(no
filted )
.Q .:;
Q)
0
Existing
tungsten
light,
I/)
E
ASA
160
(no
filter)
\\\\0
8.Q)
bounce
movie
light
(3400
K)
"-
-
::::I
.-
c,,c
ASA
25
(with
,
~
PLUS-X
Reversal
-;l?~
Daylight
~-o
built-in
filter)
(.)
c
Film
7276 "
Q)
ra
\\\\0
c,
ASA
40
(no
filter)
Movie
light
(3400
K)
I/)
"
Only
silent
cartridges
available
.
'i'Cartridge
automatically
moves
filter
out
of light
path;
exposure
is
at
ASA
160.
5
Page 10

loading the camera
1
Slide
the
film-door
LATCH
as
far
as
it
will
go
toward
the
front
of
the
cam-
LATCH
era.
The latch
has
two
functions-the
first
movement
releases
the
film
door
and
the
second
movement
lifts the
car-
tridge
slightly
for
easy
removal.
Open
the
door
to
the
position
shown;
don't
force it beyond this position.
2
Slip
a
super
8
cartridge
of film
(sound
or
silent) into
the
camera,
tilting
the
cartridge
as
shown.
Push
on
the
rear
of
the
cartridge
until
it
snaps
into
place.
With
sound
cartridges, .the
sound-recording
mechanism
is
auto-
matically
activated.
IMPORTANT: Don't move the film
in
either the picture aperture or sound·
recording opening or
you
may cause the
car.tridge to jam, making it unusable.
Don't operate the camera
when
the door
is
open
and a cartridge
is
in
place.
. .
3.
Close
the
film
door
and
press
on
its
l
ower
rear
corner
to
secure
the
door
.
(The camera
will
not
operate
properly
if
the
door
is
not
closed.) The
film-type
designation
will
appear in
the
WINnow
in
the
film door.
4
Th
e
FILM-SUPPLY
INDICATOR
is
marked
lik
e a
gas
gauge
("1-%
-%-%-0"
).
As
you
make
movies,
the
indicator
moves
to
show
you
how
much
unexposed
film
remains.
For
example,
when
the
in-
dicator
is
at
%,
you
have
exposed
ap-
proximately
12%
feet
of
film
and
have
approximately 37%
feet
of unexposed
film
remaining.
NOTE:
We
don't
recommend
removing
a
cartridge
of
film
before
it
is
completely
exposed
because
you
will
fog
approxi-
mately 6 inches
of
film
and
the
film-sup-
ply
indi
cator
will
return
to
"I"
(see
"un-
loading the
camera,"
page
12).
6
SO
UND
CARTRIDGE
Page 11

WINDOW
FI
LM-SUPPLY
INDICATOR
7
Page 12

holding the camera
Place
either
hand
on
the
HAND
GRIP so
that
your
thumb
falls
on
the
TRIGGER.
Cup
your
other
hand
over
the
top
of
the
camera,
being
careful
not
to
cover the
le
ns
or
the
electric
eye.
Bring
the
cam-
era
up
to
your
eye
and
hold
the
camera
in a comfortable
position
where you
can
see
throu
gh
the
viewfinder
clearly. The
scene
you
see
in
the
finder
is
about
the
same
as
that
which
will
be
projected
on
the
screen
after
the
film is
proc
esse
d.
At
close
distances,
the
viewfinder
and
taking
lenses
don't
"see"
quite
the
same
view beca
use
they
are
separated. This
effect,
called
"parallax,"
is especially
noticeable
in
close-ups.
To
correct
this
when
you
are
making
movies 8 feet
or
closer,
position
your
subject
slightly
below
and
to
the
right
of ce
nter
in
the
finder
to
avoid
cutting
off
part
of
your
subject
in
the
film .
viewfinder focus
By
rotating
the
viewfinder
focus
eye-
piece,
you
can
focus
the
finder
for
your
individual
eye
characteristics.
Look
through
the
viewfillder
and
rotate
the
eyepiece
until
the
image
is
sharp.
(This
will focus
only
the
viewfinder
image
.)
nearness to subject
The
9mm, f/
1.2
KODAK
EKTAR
Lens
in
your
camera
is
factory-set
for
sharp
movies
at
normal
distances.
However,
the
subject
must
be
no
closer
to
the
camera
than
the
recommended
distance.
In
bright
sunlight,
move
in
as
close
to
your
subject
as
3%
feet
when
using
film
with a daylight
speed
of
ASA
25,
such
as
KODACHROME
II
Movie
Film
(Type
A);
and
as
close
as 2 feet
when
using
film
with a daylight
speed
of
ASA
100,
such
as
KODAK
EKTACHROME
160
Movie
Film
(Type A).
When
the
sun
isn't
shining
b7-ightly, 01"
indo01"S
with
existing
light,
stay
about
8 feet from
yOU1"
subject.
8
trigger
The trigger
is lo
cated
at the rear of the
hand
grip.
Holding
the
camera
as
de-
scribed
earlier,
your
thumb
will fall
na-
turally
on the
trigger.
While
making
movies,
be sure to
push the
trigger
in
completely. You
can
lock
the
trigger
to
avoid
accidental
running
of
the
camera,
wasting
film
and batt
ery
power.
Push
the
RUN-LOCK
BUTTON
to
LOCK.
To
run
the
camera
continuously,
press
the
trigger
in
as
far
as
possible;
then
s
lide
the
run-lock
button
to
"lock."
To
stop the
camera,
slide
the
button
to
the
"run"
position.
If
you
want
to
be
in
the
movie,
place the camera
on a tripod
and
set
the
camera
to
run
continuously.
automatic exposure control
To
help
you
get
well-exposed
movies,
the
lens
opening
is
automatically
con-
trolled
by
the
amount
of
light
reflected
by
the
scene
to
the
ELECTRIC EYE.
There-
fore,
don't
obstruct
the
electric
eye
dur-
ing
movie-making
by
covering
it
with
your
fingers
or
any
oth
er
object,
and
don't
point
the
camera
directly
toward
the
sun
or
oth
er
bright
light
source.
As
you
look
through
the
viewfinder,
you
will
see a small
round
spot
located
below
the
viewfinder
rectangle;
this
is
the
low-light
signal.
When
you
start
to
make
movies,
partially
depress
the
trig-
ger,
pausing
for a
moment
to
allow
the
automatic
exposure
control
to
adjust
for
the
lighting
conditions. (The
first
movement
of the
trigger
energizes
the
exposure
control,
and
further
depres-
sion
starts
the
camera
motor.)
If
there
is a
low-light
condition,
the
spot
will
turn
blue
.
(It
may
also
flicker
red-see
"sound
indicator,"
page
10.)
NOTE:
The
blue
light
may
come
on
mo-
mentarily
as
the
exposure
control ad-
justs
for
the
lighting
conditions.
The
light
will also
come
on
when
the
motor-
battery
check
button
is
pres
sed
and
the
AA-size
batteries are
good.
y
Page 13

ELECTRIC
EYE
J I I
RUN-LOCK
BUTTON
o
•
LOW-LIGHT
SIGNAL
9
Page 14

microphone
For
good
sound
movies,
microphone
placement
is
extremely
important!
If
you
stop
and
listen
carefully,
you
will
hear
sounds
that
your
senses
normally
ignore.
For
example,
when
you
are
reading,
you
may
not
hear
the
television
set
in
the
next
room
or
the
airplane
passing
overhead.
But
YOU1'
came1'a wiU "heal'''
and
l'ecol'd
these
sounds. So,
place
the
microphone
near
your
subject
for
the
best
sound
pickup,
but
at
least 3 feet
from
the
camera
to
minimize
pickup
of
cam-
era
sounds.
Remembe1',
the
Loudest
sound
(whethe1'
backgl'ound
noise
01'
someone
speaking
LOt~dLy
nea1'
the
micl'ophone)
will
contl'oL
the
1'ec01'ding LeveL
Plug
the
microphone
into
the
MICRO-
PHONE
JACK
.
With a sound
cartridge
in
the
camera
and
the
microphone
plugged
in,
you
are
ready
to
make
sound
movies.
The
automatic
gain
control
(AGC) will
adjust
the
recording level
automaticaL-
Ly
.
(To
use a microphone
other
than
the
one
supplied,
select
one
with
an
imped-
ance
from
200
to
600
ohms.
)
The
supplied
microphone
is
sensitive
from
all
directions
(omnidirectional)
and
to
handling
nOIses. So,
locate
the
microphone
neal'
your
subject
and
Leave
it
thel'e
while
fiLming
the
scene.
(Per-
haps
you
can
conceal
the
microphone
neal'
your
subject.) Don't
rub
or
handle
the
microphone
roughly
during
record-
ing,
and
don't
place
it
on
the
camera
support.
The
STAND
supplied
with
the
microphone
permits
you
to
place
it
on
a
table
or
other
flat
surface.
If
you wish
to
narrate a scene
while
filming,
hold
the
camera
up
to
your
eye
with
one
hand
as
you
firmly
hold
the
microphone
off
to
the
opposite
side
(as
far
as
possible)
with
your
other
hand.
The
recording
level
will
be
adjusted
by
your
voice,
thus
minimizing
the
sounds
of
the
camera
on
the
sound
track.
N
OTE
:
If
the
camera
stops
running
while
the
trigger
is
pressed,
check
the
bat-
teries.
10
sound indicator
A
SOUND
INDICATOR
is
built
into
your
camera.
This
indicator
flickers
1'ed
while
making
mov-
ies
if
these
four
condi-
D
•
tions
occur:
(1)
a
SOUND
IND ICATOR
sound
cartridge
is
in
( l OW· LIGHT SIGNAL)
the
camera,
(2)
the
mi-
crophone
is
plugged
C01'1'ectly
into
the
camera,
(3)
the
9-volt
alkaline
battery
is
good,
and
(4)
there
are
sounds
in
the
scene
you
are
filming.
If
the
indicator
does
not
appear
while
making
sound
movies,
check
these
items.
(This
light
may
also
appear
red,
blue,
or
purple
if
you
are
making
movies
in
low-light
levels.)
NOTE:
The
indicator
may
flicker
momen-
tarily
even
if
the
microphone
is
not
plugged
into
the
camera.
cable-release socket
A
cable-release
socket,
in
the
front
of
the
camera,
enables
you
to
run
the
cam-
era
remotely.
To
use
this
feature,
mount
the
camera
on a tripod
and
screw
a
cable
release
into
the
socket.
daylight movies
For
bright
color
movies,
your
subject
should
be
either
entirely
in
bright
01'
hazy
sunlight
with
the
sun
approximate-
ly
behind
you,
or
entirely
in
the
shade
(not
partially
in
each).
Set
the
filter
switch
to
"
oi;ii-
."
1
For
sharp
movies,
keep
at
least
as
far
away
from
your
subject
as
suggested
in
"nearness
to
subject,"
(page
8).
2
Compose
your
picture
in
the
view-
finder.
Be
sure
that
nothing
obstructs
the
lens
or
the
electric
eye.
3
Hold
the
camera
steady
and
make
movies
by
firmly
pushing
in
the
trigger.
To
stop
making
movies,
release
pressure
quickly.
Page 15

The
optional
KODAK
EKTASOUND Movie·
Making Case provides an easy way
for
you
to
handle
the
came
ra
and microphone
while
making
sound movies. The micro·
phone,
secured in the case, is
far
enoug h
from
the
camera
to
minimize sounds
of
the camera in
your
movie .
See
"auxiliary
equipment,"
pag e 16.
11
Page 16

existing-light movies
Low-level
existing
light
is
the
light
found
in
homes,
schools,
churches,
and
stage
shows;
outdoors
at
night,
and
in
lighted
street
scenes
or
scenes
including
illuminated
buildings
after
dark.
This
includes
daylight
indoors
and
artificial
light
which
exists
in
a scene.
Your
camera,
loaded
with
KODAK
EKTACHROME
160
Movie
Film
(Type
A),
is
designed
for
making
movies
with
existing
light.
You
can
make
movies
in-
doors
with
the
light
existing
in a typical
living
room,
at
stage
or
ice
shows,
or
in
any
similarly
lighted
surroundings.
The
automatic
exposure
control
automati-
cally
adjusts
the
lens
opening
for
the
amount
of
light.
For
movies
of
subjects
illuminated
by
regular
light
bulbs
(tungsten
light),
set
the
filter
switch
to
the
".0" position.
(For
other
types
of
lighting,
such
as
fluorescent,
carbon-arc
spotlights,
or
daylight
indoors,
the
switch
should
be
set
to
the"
o!?:-
" position.
When
there
is
more
than
one
type
of
light
and
you
aren't
sure
which
type
is
strongest,
set
the
switch
for
daylight,
"
o!?:-
.")
When
the
low-liciht
signal
appears,
the
lens
opening
is
at
its
maximum.
You
can
continue
to
make
movies
with
the
signal
on
and
your
movies
will
be
some-
what
darker
than
normal,
but
accept-
able
in
most
instances
.
(If
your
subject
is
spotlighted
against
a
dark
back-
ground,
the
camera's
automatic
expo-
sure
control
will
adjust
for
the
dark
background
and
your
subject
may
ap-
pear
light
in
your
movie.)
When
making
movies
with
existing
light,
avoid
any
unusually
bright
light
sources
facing
toward
the
camera.
Other-
wise,
the
camera's
automatic
exposure
control
will
adjust
for
the
bright
light
and
your
subject
may
appear
dark
in
your
movie.
Be
certain
to
set
the
filter
switch
to
" o!?c"
before
making
daylight
movies.
12
indoor movies with
movie lights
You
can
also
use a movie
light
with
your
camera
if
you
desire. See
your
photo
dealer
for a
suitable
movie
light.
CAUTION:
For
the
safety
and
comfort
of
your
subjects,
read
the
manufac-
turer's
instructions
carefully
before
using
any
movie
light.
unloading the camera
When
the
film-supply
indi-
cator
approaches
the
"0"
position,
you
are
nearing
the
end
of
the
film. A
pointer
will
appear
at
the
top
right
of
the
viewfinder
rectangle
when
there
is
approximately
three
feet
of film
remaining
to
be
exposed.
Listen
very
careful-
ly
as
you
continue
to
operate
the
camera
until
you
hear
the
sudden
"free-running"
sound
of
the
camera
mech-
anism.
The
pointer
should
be
at
the
right
center
of
the
viewfinder
and
the
film-
supply
indicator
will
be
at
"0,"
indicating
the
cartridge
is
fully
exposed.
Open
the
film
door
and
remove
the
cartridge.
(Slide
the
latch
all
the
way
forward
to
raise
the
cartridge
for
easy
re-
moval.)
The
word
"EX-
POSED"
appears
on
the
film
in
the
picture
aperture
of a
fully
exposed
cartridge.
Never open the cartridge or manually ad-
vance film into the cartridge, or
you
may
cause the cartridge
to
jam.
NOTE:
We
feel
that
it
is
better
if
you
don't
remove
partially
exposed
car-
tridges
because
some
"light-fogging"
of
the
film
will
result
in
the
picture
aper-
Page 17

ture
and
sound
opening
of
the
cartridge.
In
addition,
when
a
partially
exposed
cartridge
is
placed
in
the
camera,
the
film-supply
indicator
will
be
at
"1,"
in-
dicating a "full"
cartridge.
However,
if
you
choose
to
remove
the
film
cartridge
before
it
is
fully
ex-
posed,
be
sure
to
run
the
camera
for
1
or 2 seconds
to
advance
your
scenes be-
yond
the
sound
opening
in
the
cartridge
to
avoid
spoiling
any
scenes.
Note
the
setting
of
the
film-supply
indicator
be-
fore
you
remove
the
cartridge.
Mark
this
setting
on
the
cartridge
so
that
it
will
appear
in
the
window.
When
you
re-insert
this
cartridge
into
the
camera,
subtract
the
marked
setting
from
"1"
to
determine
the
setting
at
which
the
car-
tridge
will
be
fully
exposed.
For
exam-
ple,
if
the
marked
setting
is
"3M,"
make
movies
until
the
indicator
is
at
"%."
(Listen
very
carefully
for
the
sudden
"free-running"
sound
of
the
camera
mechanism
when
the
indicator
ap-
proaches
"%.")
This
gives
you a fully
exposed
film
cartridge,
but
the
end-of-
film
pointer
will
not
appear
in
the
finder.
film processing
You
can
have
your
film
processed
as
fol-
lows:
(1)
Take
the
exposed
super
8 film
cartridge
to
your
dealer,
who
will
ar-
range
for
processing
(specify
the
pro
-
cessor,
if
you
desire);
or
(2)
You
can
mail
your
exposed
cartridge
of
Kodak
color
movie
film
to a Kodak
laboratory
(Kodak
doesn't
process
black-and-white
film)
if
you
purchase
the
appropriate
KODAK
Prepaid
Processing
Mailer
from
your
photo
dealer
and
then
send
the
ex-
posed
film
cartridge
directly
to a Kodak
laboratory
according
to
the
instructions
on
the
mailer.
The
Kodak
laboratory
will
mail
your
processed
film
directly
to
any
address
you
specify.
camera care
cleaning
lenses-The
picture-taking
lens
and
the
viewfinder
lenses
are
built
into
the
camera
and
cannot
be
removed
for
cleaning.
Clean
the
protective
glass
in
front
of
the
front
viewfinder
lens
and
the
pict1,lre-taking
lens
by
first
blowing
away
any
dust
or
grit
from
the
surfaces;
then
gently
wipe
the
surfaces
with
a
clean,
soft,
lintless
cloth.
If
necessary,
use
KODAK
Lens
Cleaner
on
the
cloth.
Clean
the
rear
viewfinder
lens
by
first
blowing
away
any
dust
from
the
sur-
face;
then
gently
wipe
the
surface
with
a
clean,
soft,
lintless
cloth.
cleaning
film
aperture-Clean
the
FILM
APERTURE
in
the
camera
frequently
to
prevent
buildup
of
dust
at
the
aperture.
Open
the
film-compartment
door;
then,
while
holding
the
camera
up
so
that
dust
will
not
fall
onto
the
rear
of
the
lens,
use
a
small,
soft
brush
to
clean
the
aperture.
Remove
any
dust
in
the
film
compart-
ment.
sound-recording
mechanism-As
the
film
passes
the
sound-recording
mechanism,
it
"wipes"
away
any
dust
or
dirt.
There-
fore,
you
don't
need
to
clean
the
sound-
recording
head
in
your
camera
.
13
Page 18

tips
1.
sound
movies-
With
the
added
dimen-
sion
of
sound,
there
are
many
new
tech-
niques for
you
to
use.
If
you
already
own
01'
have
used a tape
recorder,
you
prob-
ably
are
familial'
with
techniques
for
good
sound
recordings. Many
of
these
same
techniques
can
help
you
make
good
sound
movies
.
If
you
notice
that
the
sound
indicator
light
is
on
constantly
(not
flickering)
while
you
are
making
sound
movies,
the
background
noise
level
may
be
too
high.
Turn
off
any
radio
or
television
set
(01'
other
appliance)
operating
in
the
back-
ground. Then
position
the
microphone
equidistant
from
your
subjects
so
that
one
subject
doesn't
predominate
over
the
others
(especially
important
with
muscial
instruments).
This
enables
the
automatic
gain
control
(AGe)
to
adjust
the
recording
level
for
your
subjects.
For
the
best
continuity
in
your
mov-
ies,
keep
the
camera
centered
on
your
main
subject,
even
though
another
per-
son
may
be
speaking.
This
will
avoid
quick,
confusing,
and
distracting
scene
changes.
The
area
where
you
record
can
influ-
ence
the
sound
quality
of
your
movies
.
Rooms
with
carpeting
and
heavy
drap-
eries
help
deaden
echoes,
thereby
im-
proving
the
quality
of
recorded
sound.
Outdoors,
be
sure
that
you
place
the
mi-
crophone
near
your
prime
subject
so
that
wind,
traffic,
01'
other
background
noises
will
be
reduced.
Handling
of
the
microphone
during
recording
will
produce
excessive,
dis-
tracting
noises
on the so
und
track.
Onc
e
you
det
erm
ine a position
for
the
micro-
phone
in
a specific
scene, leave
it
there
until
you
change
scenes.
Use
an
exten-
sion
cord
(available from
your
photo
dealer)
for
the
microphone
if
the
cam-
era
position
will
be
limited
by
the
length
of
the
microphone
cord.
The
sound
recording
is
placedonto
the
film 18
frames
ahead
of the
picture. To
avoid
sounds
from
one
scene
being
played
with
an
adjacent
unrelated
scene,
run
the
camera
about 2 seconds
befoTe
and
afte7·
your
subjects'
actions.
This
compensates
for
the 1-to
2-second
de-
lay
of
sound
at
the
beginning
of
each
scene
and
makes
editing
your
sound
movies
much
easier.
2.
scene
length-With
sound
movies,
the
scene
length
will
probably
be
controlled
by
your
subject's
dialogue
or
other
sig-
nificant
sounds.
With
silent
mQvies,
about 5 to
10
seconds
of
filming
time
(approximately
1%
to
2%
feet
of
film)
is
appropriate
for
movie
scenes
of
aver-
age
action. Give
your
movies
an
inter-
esting
change
of
pace
and
make
them
more
fun
to
see
by
making
some
scenes
longer
than
others.
So
decide
how
long
you
want
the
scene
to
be
on
the
screen,
and
expose
the
film
for
that
length
of
time.
Some
scenes
need
to
be
long,
some
medium
in
length,
and
some
short.
For
example,
an
overall
shot
of a beach
to
establish
location
may
last
only a few
seconds,
but
the
more
interesting
close-
ups
may
deserve a much
longer
time.
Fo
llow a moving subject by keeping it centered in the viewfinder.
The
subject will
be
sharp, the background
bl
urred.
(See
"pan-
ni
ng,"
page 15.)
Page 19

3.
panning-"Panning"
is a term
that
means
moving
the
camera
while you
're
filming
to
cover
an ext
ended
view. Your
movies
will
be
more
enjoyable
if
you
keep
panning
to a minimum.
When
pan-
ning
is
excessive
or
too
fast,
subjects
and backgrounds
are
blu
rred
and
seem
to r'ace
by
on
the
screen.
By
holding your
camera
still
for
most
of
the tim
e, you
can
make
movies with
the
"professional"
touch-ones
that
are
easy
on
the
eyes,
and
more
fun
to see.
"Pan" only
in
rare
instances.
Whenever
possible, try
to
photograph a wide
view
by
making a series
of
shots,
moving the
camera betw
een takes
and
overlapping
each
scene
slig
htly. However,
in some
instances, a panning
sho
t m
ay
be
desir-
ab
le. The
secret
of a good
pan
is
to
move
the camera slowly and
smoothly.
Stand
st
ill,
hold the cam
era
steady
on the
first
part
of
the
scene
for a moment,
pivot
from
the
waist,
and
pan
slowly.
N
ever
pan
on near
by
objects.
4.
indoor movies -
Wh
en
you
make
mov-
i
es
indoors,
seat
your subj
ects
midway
b
etween and
slightly beh
ind
two
lamp
s
of
approximate
ly
the
same
wattag
e,
and
the
res
ults will
be
quite
pleasing.
Scenes
filmed
in
dining
rooms
with
overhead
lighting and includin
g a
white
or
li ght-
colored
tablecloth
will also
make
attrac-
tive indoor
movies.
It's
also a
good
idea
to
turn
on
all the lights
in a room whil
e
making
movies.
5. batteries- If
the camera stop
s r
unnin
g,
clean the
AA-size
battery
and
camera
contacts
with a ro
ugh c
loth. Have the
batteries
checked
for
their
power
out-
put;
replace them
if
necessary.
To
pre
-
vent
interruption
during
movie-making,
u
se
liv
e batteri
es
and
keep
battery
and
camera
contacts
clean.
If
the film-supply
indicator
does
not
advance
when
you have
a film
cartridge
in the cam
era and
the
camera
motor
is
runnin
g, ch
eck
to
see
if
the
batteri
es
are
cor
rec
tly
install
ed,
with
the
"+"
and
en
ds
of
the battel·ies
matching
the
"+"
and
"- "
on
the
battery
compart-
ment.
In
correct
insertion
of
batteries
will
cause
the
motor
to
run
slowly,
back-
ward,
or
not
at
all.
If
YOU1
· pl'ocessed film
is
"black"
(un
exposed
),
check
to see
if
the
battel'ies al'e
inserted
cOlTectly.
When
you
go
on
a trip, always take
a
lon
g a
spare
set
of
fresh batter
ies. Re-
place batteries
after
abo
ut a year
of use.
Batteries will
run
fewer
cartridges
through
the
camera
under
cold
tem
-
peratures.
6. cold-weather operation- For
sound
movies
outdoors (temperatures
below
32 F),
an
optional
9-volt
external power
s
uppl
y,
which
plugs
into
the
camera's
externa
l-po
wer jack,
can
be
ordered
from
your
photo
dealer.
This
power
supply
"boosts" the
motor
batteries
for
extended cold-w
eather
operation. (For
correct
exposure,
batteries
must
be
in
the
camera.) To
protect the
camera
from
cooling
to temperatures
below
32
F,
place
the
camera inside
your coat
when
you
stop
for
scene
changes.
technical details
film-Uses
super 8 sound
or
sil ent cartridges.
batteries-S
ix AA·si
ze
alka
lin
e
batt
eri
es
to
power
drive
motors
and
automatic
exposure
contro
l;
one
9·volt
alkaline
batt
ery (transistor-radio
typ
e)
to
power sound
amp
lier.
lens-KoDAK
EKTAR
gmm
, f/ 1.2, 6 element, fixed ,
focus; built-in Type A filter; aperture range
f/1.2
to
effective f
/36.
shutter-230o opening
with
exposure
of
1128
second
at
18
frames
per second with sound car-
trid
ges
(approximat
ely
20
fram
es
per second
with
silent cartridges); cable·re lease socket.
exposure
control-Automatic;
CdS cell; 10w,Ilght
signal in vie
wfind
er,
viewfinder- Optical
with
large aperture; blue
light
for
low·light
levels and
motor-battery
check;
flick
-
ering red li
ght
for
sound indicator; pointer
for
e
nd·of·film indicator.
sound
system-Built-in
amp
lifi
er;
18
frames
separation
(picture
to
sound);
automat
ic gain
control (AGC)
for rec
ordin
g;
input
imp
edance-
200
to
600
ohms;
maximum
input
voltage (other
than
microphone)
-3
mv
from
300
ohm impedance sourc e.
construction- Me
tal
and plastic
with
built-in
hand grip;
tripod
socket; cable -release socket;
microphone jack;
external-power jack
(for
drive
motors) ;
drum·type
film-supply
indicator
.
15
Page 20

auxiliary
equipment
...
...
see
your
dealer
Kodak Ektasound movie-making
case
-
Provides
an
easy
way
to
carry
the
cam-
era
and
microphone
while
making
sound
movies.
With
the
microphone
in
the
case,
sounds
of
the
camera
are
minimized
on
the
sound
track.
(A
removable
tube
holds
the
microphone
securely
in
the
case,
but
you
can
remove
the
tube
and
place
it
near
the
scene
being
photo-
graphed.)
When
you
use ,the
case,
you
can
hold
the
camera
with
both
hands
for
steady
movies.
The
case
holds
the
camera,
micro-
phone,
and
two
rolls
of
movie
film .
The
film is
held
securely
by
two
special
clips.
It's a convenient
way
to
use
or
store
your
camera.
(Items
shown
not
supplied
with
the
case.)
Kodak Ektasound
camera
battery
pack
-
Allows
the
addition
of
six
AA-size
bat-
teries
to
"boost"
the
motor
batteries
for
extended
cold-weather
operation
(in
temperatures
down
to
approximately
20 F).
Simply
plug
it
into
the
camera's
external-power
jack.
Kodak Ektasound
microphone
extension
cord,
I5-foot-This
cord
extends
the
range
of
the
microphone
up
to
27
feet
from
the
camera.
This
allows
you
to
im-
prove
your
recordings
by
positioning
the
microphone
in a scene
at a distance
from
the
camera,
thus
reducing
the
chance
of
recording
unwanted
back-
ground
noises.
16
Kodak
Presstape
universal
splicer-Easy-
to-use
dry
splicer
for
super
8,
8mm,
and
16mm
films
uses
pressure-sensitive
tape
(KODAK
PRESSTAPES)
to
make
splices.
Kodak Ektasound
245
movie projector-
New,
modern
design
for
easy
projection
of
your
super 8 sound
movies.
Attrac-
tively
styled
wood
cabinet,
with
a
smoke-colored
dust
cover.
Projects
up
to
400-foot
reels
of
super 8 movie
film
in
either
of
two
directions
(from
the
front
or
rear
of
the
projector). A single
pro-
jection
control
sets
the
projector
for
threading,
forward,
fast
forward,
still,
or
rewind.
You
can
record
your
own
sound-
tracks,
add
sound-on-sound,
or
erase
portions
of
your
recorded
material.
An
auxiliary
speaker
jack
is
provided,
as
well
as
jacks
for
microphone
and
phono-
graph
inputs.
Projection
speeds
of 18
fps
(for
movies
made
with
KODAK
EKTASOUND
Movie
Cameras)
and
24
fps
(for
commercial
sound
movies).
Kodak Ektasound
235
movie
projector
-
Similar
in
design
to
the
EKTASOUND
245
Movie
Projector,
except
it
has
playback
only
rather
than
playback/record
capa-
bilities.
As
with
the
245
Projector,
a
unique
projection
mirror
system
permits
you
to
project
movies
with
the
projector
sitting
on a bookshelf
or a table.
Kodak projection
screen
(40 x 40
inches)
-
Designed
for
use
at
home
with
your
projector.
The
KODAK
Projection
Screen
is
made
of
mildew-resistant
fabric
with
a
highly
reflective,
glass-beaded
surface
for
bright
screen
images.
The
screen
has
easy-opening
legs
and
can
be
adjusted
for
overall
height
from
the
floor.
Page 21

service facilities
If
your
movie
camera
should
require
service,
complete
facilities
are
provided
in
Rochester,
as
well
as
in
Kodak
Regional
Marketing
and
Distribution
Centers,
at
the
addresses
listed
below.
in
Rochester:
Eastman Kodak Company
Central
Equipment
Service
Center
800
Lee
Road
Rochester,
New
York
14650
regional centers: Eastman Kodak Company
Regional
Equipment
Service
Center
9100
Alcosta
Boulevard
12100
Rivera
Road
San
Ramon,
California
94583
Whittier,
California
90606
1122
Mapunapuna
Street
1901
West
22nd
Street
Honolulu,
Hawaii
96819
Oak
Brook,
Illinois 60521
2800
Forest
Lane
Dallas,
Texas
75234
5315
Peachtree
Industrial
Boulevard
Chamblee,
Georgia
30341
1334
York A venue
New
York,
New
York
10021
Canadian
Service
Facilities
KODAK
CANADA
LTD.
3500 Eglinton Avenue West, Taronto, Onfarlo M6M 1V3
warranty 12
25
East Keith Road,
Nortlt
Vancouver
3, B.C.
2,
Place du Commerce,lie des Soeurs, Montreal 201, Quebec .
Kodak
has
given
extensive
care
ana
at-
Well
'I'
cIlILY,
)<1>":;"
;'
v
••
,j'jJ'
:
~~'
~pplies
to
tention
in
producing
your
new
this
camera.
EKTAsouND
Movie
Camera.
Carefully
For
movie-making
help,. write
to
follow
all
the
instructions
in
this
manual
Eastman
Kodak
Company,
Photo
Infor
-
to
get
best
results
and
to
prevent
dam-
mation,
343
State
Street,
Rochester,
New
age
to
your
equipment.
If
you
should
York
14650.
For
service
on
your
want
help
or
service,
we're
at
your
call. EKTAsouND
Movie
Camera
during
or
We
will
repair
youi· camera
at
no
after
the
warranty
period,
contact
your
charge
within
one
year
after
purchase,
dealer
in
Kodak
products
or
one
of
the
except
for
damage
caused
by
misuse
or
Kodak
Consumer
Centers
for
assistance,
circumstances
beyond
Kodak's
control.
or
send
your
camera
to
one
of
the
Kodak
This
warranty
applies
only
to
the
cam
-
Equipment
Service
Centers
(listed
era,
and
Kodak
cannot
be
responsible
above)
. A
note
enclosed
with
the
equip-
for
other
losses
or
damages
of
any
kind
ment
giving
details
and
date
of
pur-
resulting
from
equipment
failure.
chase
will
help
us
get
it
back
to
you
Except
as
mentioned
above,
no
other
promptly.
Page 22

KODAK
Films See Things
Your Way
Ml
L---
__
Consumer Markets
Ca
nadianServiceFaclllties
KODAK
CANAl
~
LTD.
3500
Egl~ton
Avenue West, Toronto, Ontario
M6M 1 V3
"'
1225
'li
ast Keith Road, North Vancouv er
3,
B.C. J
2,
Place
du
Commerce, lie des
S~eufS
'Ii1
0p..trea'
201,
Qu
ebec
KODAK,
EKTASOUND,
So
~,.
•.
. " . .
-..;. _____
.......
EKTAR,
and
PRESSTAPE
are
trademarks
.
pt.
No.
635141
3·73·CX
Printed in
the
United States
of
America
 Loading...