

Page 1
KODAK
EKTAPRO
320
Slide Projector
Bedienungsanleitung
Instruction Manual
Mode d’emploi
Manual de Instrucciones
Istruzioni per l’uso
Gebruiksaanwijzing
Bruksanvisning
Käyttöohje
Page 2
Page 3

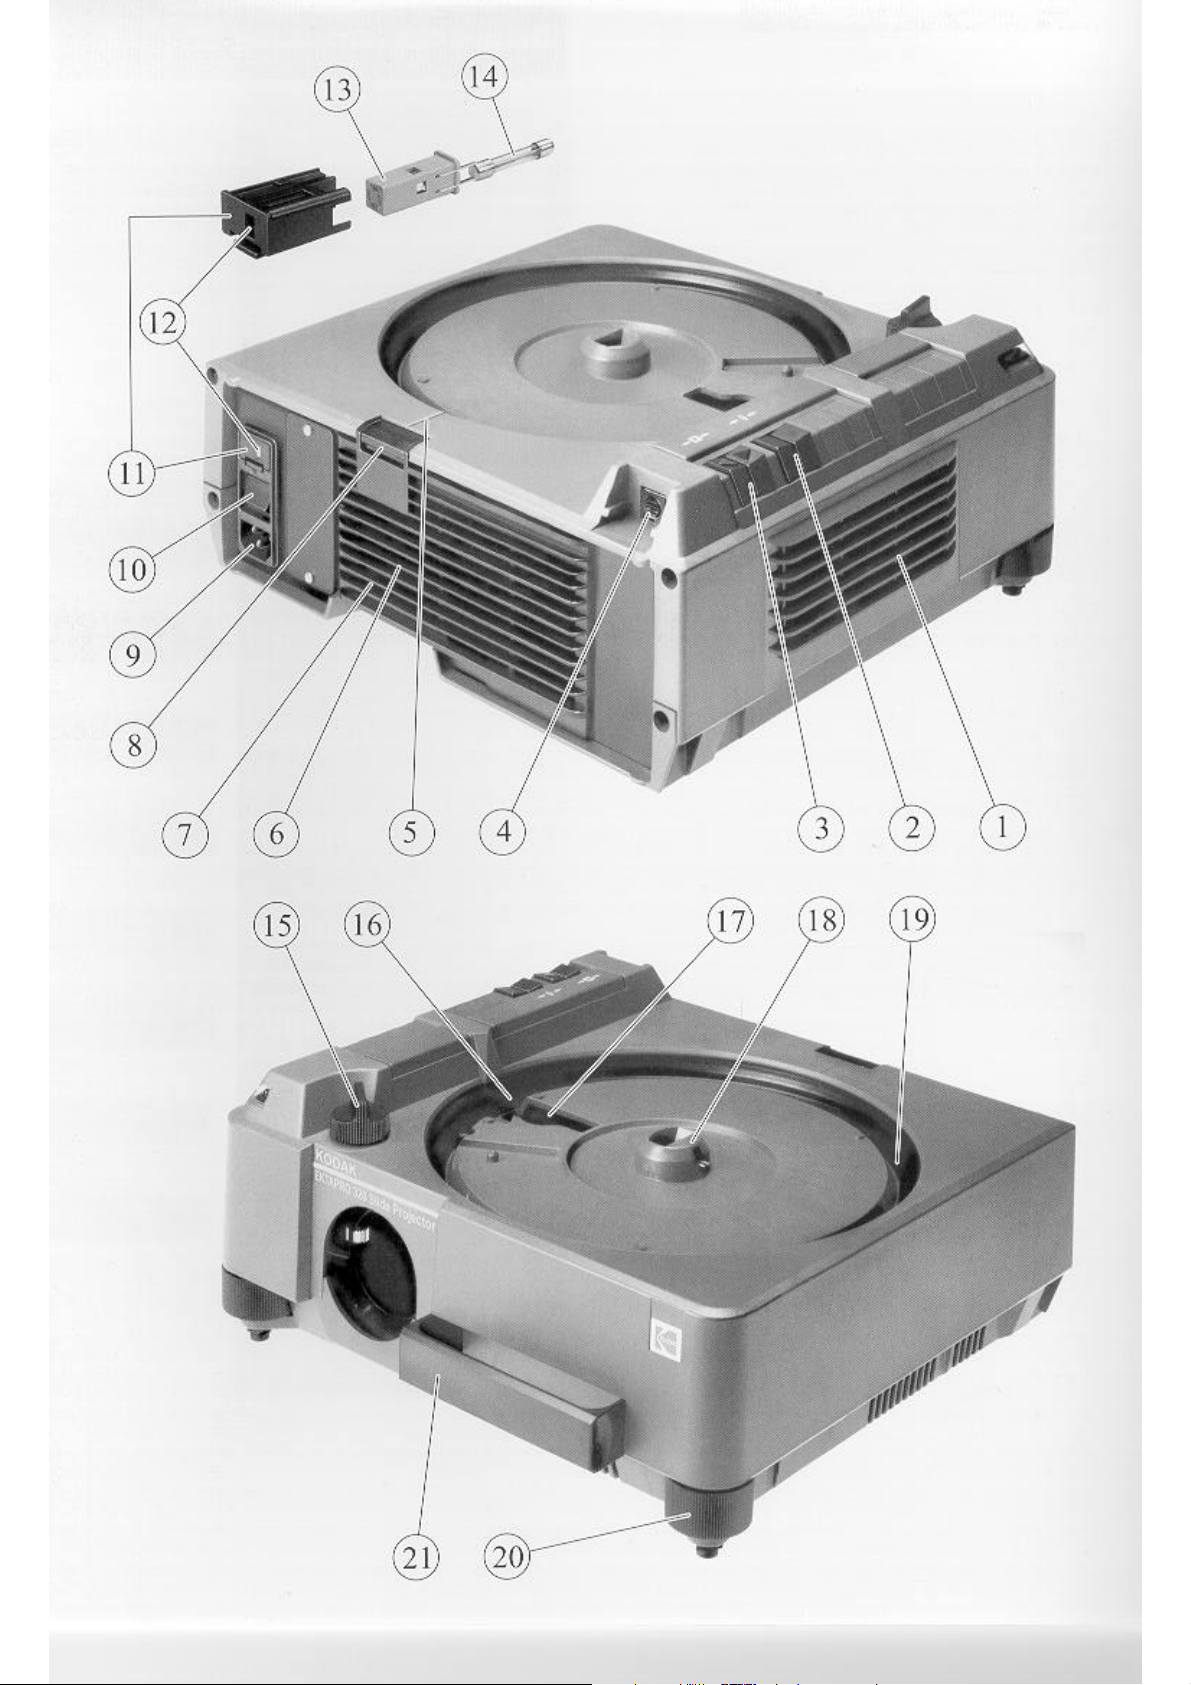
Projector-Features
Electrical Approvals and
Conformity Mark
1 Fan (air inlet)
2 Focusing buttons
3 Slide change buttons (forwards; backwards)
4 Remote Socket
5 Tray positioning index mark
6 Lamp module
7 Air exhaust
8 Lamp module release
9 AC mains socket
10 Mains switch (electrical)
11 Fuse link compartment (primary circuit)
12 Voltage indicator
13 Fuse link
14 Fuse (primary circuit)
15 Focusing knob for gear rack lenses
16 Lever for slide tray positioning
17 Slide gate
18 Slide tray lock
19 Slide tray transport ring
20 Height adjustment foot
21 Retractable handle
Electrical Approvals
The KODAK EKTAPRO 320 Slide Projector complies with International Safety requirements and bears the following safety
marks:
UL (Underwriter Laboratories Inc.)
CSA (Canadian Standards Association)
VDE (Verband Deutscher Elektrotechniker)
CE Conformity Mark
To show compliance with EMV-Directive 89/336/EEC and product
safety requirements, the slide projector bears the CE mark.
Please note
In case of extreme mains disturbances problems with lamp
flashing and/or jamming may occur. In this case please switch the
projector off and on again! In case of a jam, please refer also to
Possible problems during operation as written in the manual on
page 22. (Please keep the tray position in mind before switching
on the projector. With the random access function of the IR remote
control or the rapid search via the reverse transport button you will
easily come back to this position.)
In case of an electrostatic discharge, the projector will
execute a reset and the tray will be moved to the zero position.
Radio interference:
EEC directive 89/336
Australia standards AS 1044
RFS49 ISSUES July 1989
VCCI Regulations Nov. 1987 Class 2
Part 15 of FCC Rules Subpart J Class B
Using the instruction manual
Open the cover flap. Here you will find illustrations of the projector.
The figures have also been incorporated into the operating instructions to enable quick and exact identification of the individual
projector features.
Action arrow:
Reference arrow:
Important texts are highlighted
in grey.
WARNINGS are framed.
14
Page 4
Important Safety Precautions
When using your equipment, basic safety precautions should
always be followed, including the following:
1. Read and understand all instructions before using.
2. Always use the correct voltage, as described on page 16.
Incorrect voltage can lead to malfunctions in the projector.
3. Close supervision is necessary when any appliance is used by
or near children, or others who may not understand the need for
the following precautions. Do not leave the projector unattended while in use.
4. Care must be taken as burns can occur from touching hot
parts. For lamp replacement let the module cool down before
touching the lamp and the surrounding area. Do not place the
lampmodule on heat sensitive surfaces (s. p. 21).
5. Do not operate projector with a damaged cord or if the
projector has been dropped or damaged - until it has been
examined by a qualified service technician.
6. Position the cord so that it will not be tripped over, pulled, or
placed in contact with hot surfaces.
7. If an extension cord is necessary, a cord with a current rating
at least equal to that of the projector should be used. Cords rated
for less amperage than the projector may overheat.
8. Always unplug the projector from the mains before cleaning
and servicing (e.g. lamp replacement) and when not in use. Never
pull cord to plug from outlet. Grasp plug and pull to disconnect.
9. Let the projector cool completely before putting away.
10. The element of a hot projector lamp is impact-sensitive!
Avoid any impacts to the projector whilst it is running and
cooling down!
11. To reduce the risk of electric shock, do not immerse this
projector in water or other liquids.
12. To reduce the risk of electric shock, do not disassemble this
projector, but take it to a qualified service technican if service
or repair work is required. Incorrect reassembly can cause an
electric shock when the projector is used subsequently.
english
13. The use of an accessory attachment not recommended by the
manufacturer may cause a risk of fire, electric shock, or injury
to persons. Only devices with safety-low voltage (SELV) are
allowed to be connected.
14. Connect this projector to a grounded outlet.
15. Keep air inlet (1) and air outlet (7) free from obstruction.
SAV E THESE INSTRUCTIONS!
15
Page 5
Switching-on the projector
Check voltage setting
Switching- on the
projector
EKTAPRO Slide Projectors will be exported throughout the world to countries with
differing mains voltages. The projectors are already set during manufacture to a fixed
mains voltage.
Shipments to countries with 220, 230 or 240 V mains will be equipped with a T 2A L/
250 V fuse. A spare fuse for replacement is also supplied.
Before you switch on your projector ensure that the voltage is correctly adjusted! An
incorrectly adjusted mains voltage can damage the projector! The voltage indicator
(12) must show your country´s actual mains voltage!
2.
1.
. Connect your EKTAPRO Slide Projector
to the mains with the mains lead .
(UK users note: A suitable fused 13A plug
must be fitted. See instructions on cable!)
. Turn on the mains switch (10).
The projector is switched on and ready for
use. Lamp and fan are switched on.
3.
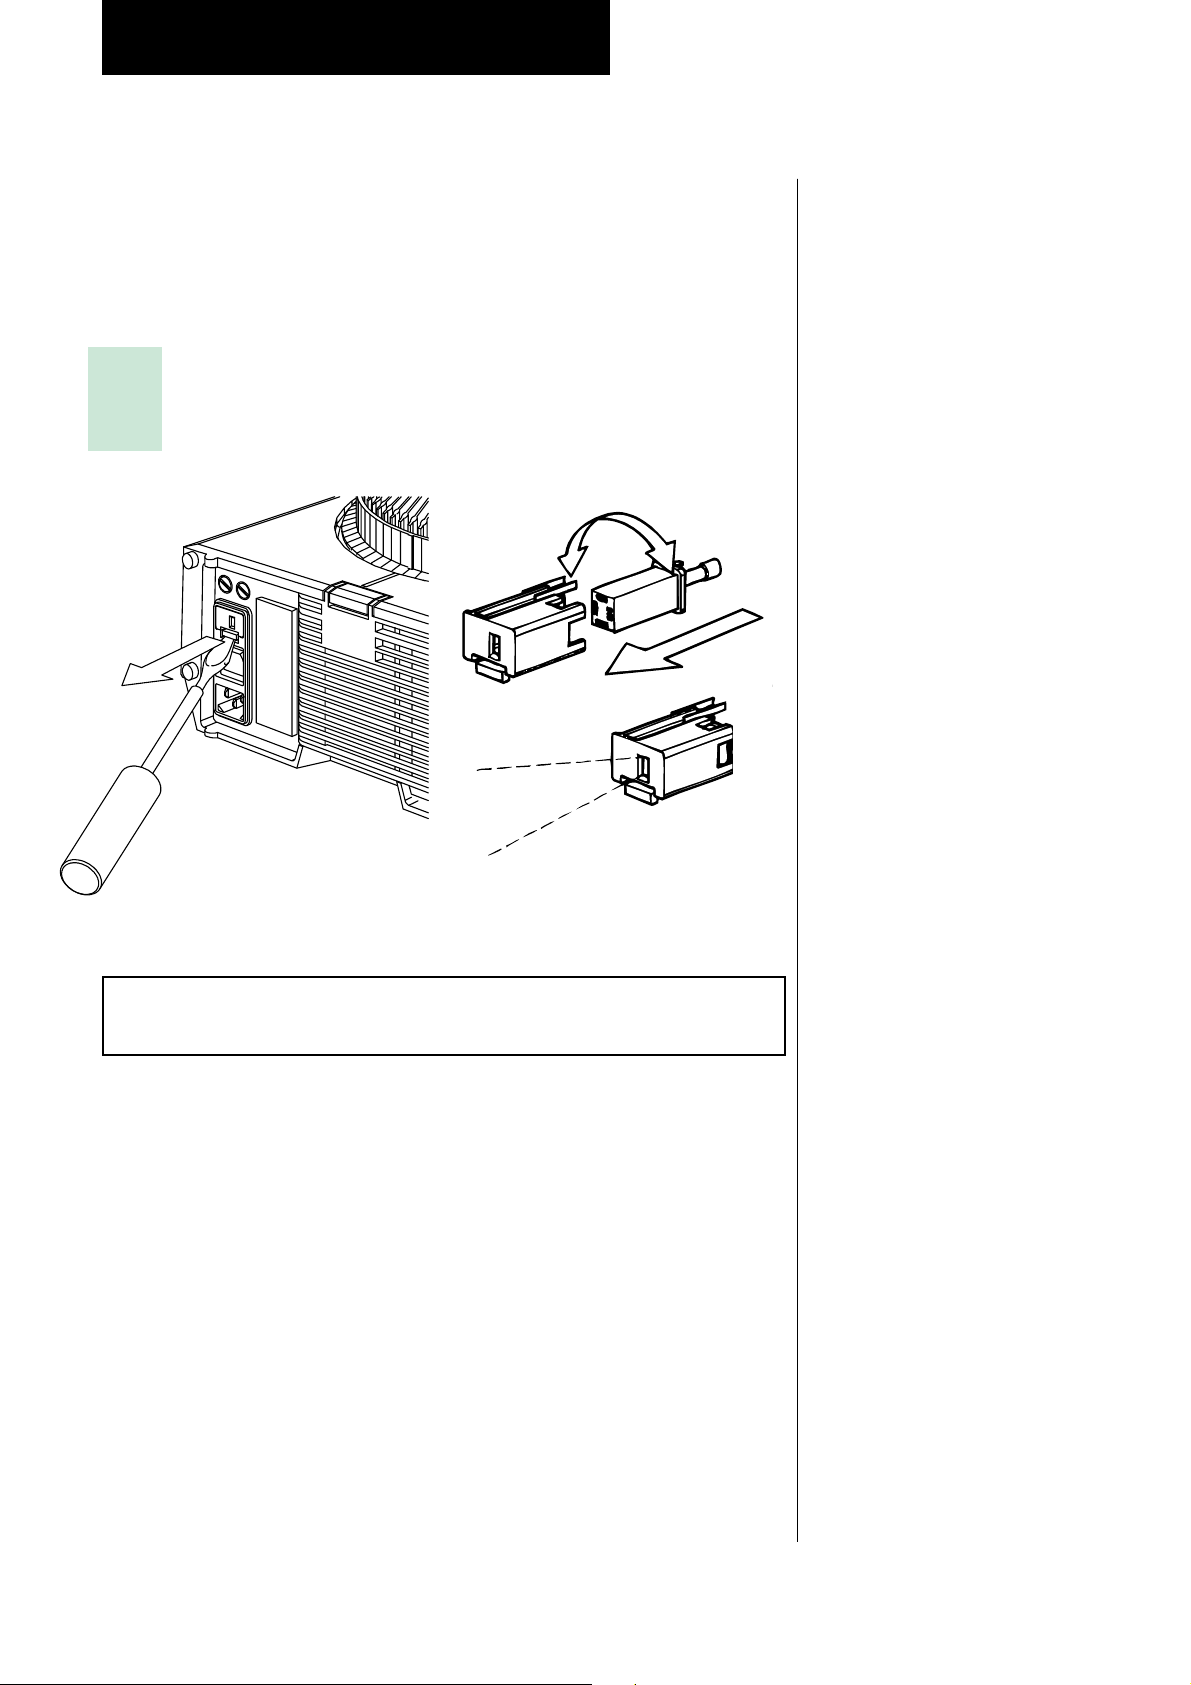
Setting of a different operation voltage
WARNING
For safety, the mains lead must be unplugged!
1. Unlock the fuse link compartment (11) by using a screwdriver and pull
compartment out.
2. Push the fuse link (13) into the compartment so -
3. - that the applied voltage can be seen in the window (12) of the compartment.
. Push the loaded compartment (with mounting underneath) firmly into the
16
projector opening provided.
Page 6

Loading and installing the slide tray
1. Check that the baseplate of the slide tray is locked
into zero-position and cannot be rotated.
2. Load the slides up-
side down for normal front
projection.
. Replace and lock the
cover to prevent damage
and splitting in case the tray
is dropped or turned over.
3.
2.
Extra Bright Lamp
Module - Important Hints
With the higher light ouput of the Extra
Bright Lamp Module the temperature in the
slide gate rises. To enable a smooth operation following hints should be considered:
1. Use only light respectively light gray
slide mounts (e.g. Wess slide mounts).
Slide mounts with only one dark side or
black side have to be sorted in respectively,
mounted with the side facing the lamp.
Please pay special attention when sorting
your slide mounts in rear projections:
3. Place the loaded tray into its zero
position on the projectors transport ring
(18). The cleft in the slide tray (zero position) fits on to the notch of the transport
ring.
Tray positioning index mark
Note:
To avoid annoying automatic refocus-
ing during presentation, damaged,
distorted or warped slides should not be
used as they may jam the projector`s
transport mechanism.
A slide tray index (80 slides) for
copying can be found on page 84. This
is ideal for archiving and an index copy
can be made for each slide tray.
2. Do not use a lamp type EXW/15 h for the
projector (higher temperature - lamp not
available from Kodak).
If these hints are not considered,
mounts may deform!
3. Glass mounted slides can produce sweat
spots due to the high temperature in long
term projections. As soon as the slide has
warmed up these sweat spots disappear.
To reduce slide temperature (and light
output):
a) Install a heat-absorbing filter (see Ac-
cessories p. 22) or
b) install a 200 h lamp (see Accessories p.
22)
Projectors are often installed on racks where
tray installation may be difficult and only
possible from the rear of the projector. In
this case the tray positioning index mark (5)
on the back of the projector is very helpful:
The tray is properly set when the index mark
aligns with the mark placed on the tray (at
slide no. 20 of the 80 slide tray).
17
Page 7

Fitting the lens
Setting up the projector
Focusing the image
(manually)
Gear rack lenses:
Gear rack lenses (such as KODAK Slide
Projection FF Lenses, page 85-87) are pushed
into the lens mount housing.
Spiral lenses:
Spiral grooved lenses are screwed clockwise (from front of the projector) into the
lens mount housing.
Leveling the projector
Push the slide-forward button (3) to
project a slide.
.Turn the projector feet (20) to adjust the
height.
Place the projector on a firm, vibration free
base for stable and smooth operation.
For professional use we recommend the
special projection racks available from dealers. The projector may be elevated plus or
minus 30o from the horizontal along the
projection axis.
Note: Operating the projector at its
maximum angle setting may reduce the
average lamp life time!
max. 30º
max. 30º
Important! Proper ventilation is
required!
Check that the projector can draw-in
sufficient cool air and that warm air can
be freely expelled.
Keep air inlet (1) and air outlet (7) free
from obstruction!
The picture focus can be altered at any time
during the projection by using the focus
buttons (2) on the projector or the corresponding buttons on the remote control.
The first slide, at the beginning of every
projection, must be focused by turning the
knob for gear rack lenses (15) or by turning
the spiral lens:
1.
2.
4.
3.
4.
1. Slide positioning
Press lightly the slide forward button (3).
The first slide will move into the slide gate
and will be projected.
2. Move the lens mount to the middle
position
Repeatedly press the focus buttons (2) The
lens and the focusing knob (15) will move.
Press the focus button (2) until ...
3. - ... the focusing knob reaches or gets
close to the middle position.
18
Fastening or mounting the projector
To reduce vibration or for security you will find fixing holes
suitable for inserts (M5) in the
baseplate of the projector (see
figure).
4. Focusing
a) with KODAK EKTAPRO Lenses or any
other gear rack lens:
- by turning the focusing knob (15)
b) with spiral lenses:
- by turning the lens by hand.
Page 8

Operation
Slide changing
Using the buttons on the projector or remote control
Single Movement:
Press button (1)
forwards
backwards
Quick search and zero positioning:
To transport the tray quickly in either direction, press and hold
down the slide change button-backwards (3) [ ] until the
position wanted is reached. The tray will, however, automatically
stop at 0 and will remain in this position. If you want to repeat the
search run, press the slide change button-backwards again.
Changing the slide tray (in zero position)
Always lift off the slide tray in the zero position!
Move tray to zero position:
a) Using the slide change button on your projector or remote
control units
Hold the slide transport-backwards button down. The slide tray
goes into rapid search and stops automatically in the zero position.
b) Using the IR Remote Control
Select "0" on the keypad and confirm with "*". The slide tray
moves to the zero position.
c) Using the mains switch
Turn the projector off by the mains switch (10). When the projector is turned on again, it will complete a system check and bring
the slide tray back to the zero position!
Removing the slide tray (in any position)
In an emergency, e.g. transport failure,
the tray can be removed from the projector in any position:
1.
3.
First switch off your projector!
2.
1. Push aside and hold the slide tray
lock (18) while -
2. - lifting off the slide tray.
3. Having removed the slide tray turn
it over and rotate the base plate until it
locks into the zero-position, otherwise
the slide tray cannot be replaced on the
projector in the zero position.
.Turn the projector on again. The
slide remaining in the slide gate will be
ejected by the slide lift and can be replaced in the slide tray.
19
Page 9

Service
Random access operation
Any slide can be selected using the
KODAK EKTAPRO IR Remote System
(available as accessory, see page 22). Access is fast, within approx. 5 sec: Input the
required slide number to your IR remote
control and confirm using <*>.
The RA operation is ideal for lectures, interactive learning programmes and computer
control. For further details, please see the
instructions manual for the IR EKTAPRO
Remote System RA and EKTAPRO IR Remote System RA/LP.
Operation via timer
It is not allowed to operate the KODAK
EKTAPRO 320 Slide Projector with an
external timer!
Simultaneous Projection
1. With the KODAK EKTAPRO Twin
Socket Adapter (accessory)
You can connect two projectors in parallel
using the Twin Socket Adapter and an
EKTAPRO Twin Socket Connecting cable
(accessory). The adapter is inserted into
the remote control socket (4). The cable
connects the Twin Socket Adapter with the
remote control socket of the second projector (see illustration).
You control the projectors with the cable
remote control as shown in the drawing.
The connection of the IR receiver is also
possible. However, this can only be connected to the receiver with the 8 m extension
cable (accessory).
2. Using the KODAK EKTAPRO IR Remote Systems
Several EKTAPRO Projectors can be op-
erated simultaneously when each projector
is equipped with an EKTAPRO IR Receiver
(available as accessory, see page 22).
Replacement of fuses
WARNING:
Always switch off the projector and
unplug the mains lead before
replacing a fuse!
Avoid the risk of fire, replace only
with a fuse of same type and rating!
Replacement of primary circuit fuse
1. Pull out the fuse link compartment
(11). Do not change the position of the fuse
holder when reinserting into the projector
(see also page 16).
. Replace the defective fuse (14) (tech-
nical data, page 23).
. Push the fuse link compartment back
into the projector.
This mode should only be used for slide
change purposes! The focus operation
will occur on all projectors in parallel!
Ensure that all receivers and the
transmitter are set to the same channel!
Note:
Simultaneous Projection with other
EKTAPRO models
If transport buttons are held down longer
than a second the trays may stop at different positions due to different slide change
times
1.
20
Page 10

Replacement of a defective lamp
WARNING:
Before pulling out the lamp module, switch off the projector and unplug the mains
lead first!
For lamp replacement let the module cool down before touching the lamp and the
surrounding area. Do not place the hot lampmodule on heat sensitive surfaces.
Glass may shatter. Wear gloves. Keep glass covered.
Guarantee
Kodak gives you a one year guarantee on
the original projector (without accessories
and lamp) provided the projectors have
been serviced regularly.
Cleaning the projector
Do not touch the small bulb or the mirror surface! If you accidentally get finger
prints on them, remove marks with a soft cloth moistened with rubbing alcohol.
Replacement of a defective lamp is very easy with your EKTAPRO Slide Projector:
1.
4.
3.
2.
1. Press down and hold down the
lamp module release (8) and...
WARNING:
For safety, always turn the machine
off, unplug the mains lead and allow
the projector to cool down before
cleaning.
Housing:
Wipe the housing with a soft, cotton cloth
and use a cleaner designed for plastic materials. Do not use solvents or spirit based
cleaners.
Optics:
Do not touch optical surfaces!
Clean the lens with a soft lintfree cloth or
with special lens tissues.
Never wipe over a dry surface!
Use a special lens cleaner (available from
photographic dealers) or add moisture by
breathing over the parts to be cleaned.
2. ... pull out the lamp module (6).
. Push the lamp ejector lever down
so that it clears the retaining clip.
Note:
For your projection requirements you
have a choice of 3 lamps with different
brightness and lamp life (see Accessories page 22).
3. Push the ejector lever completely to
the side.
The defective lamp will come free of its
holder.
4.Remove the defective lamp and in-
sert the new lamp.
. Push the ejector lever back to the right
and press down until it locks into its holding.
. Push the lamp module back into the
projector until it locks.
21
Page 11

Possible problems during operation
3UREOHP 3RVVLEOHUHDVRQV +HOS
After switching on, the projector is not
operable.
Projector drive system failure (tray
transportation, slide lift)
Image can’t be focused by focus buttons. 1. Lens mount was not set to its default
The tray cannot be fit on the tray transport
ring
The tray cannot be moved. Tray has not been placed correctly on the
Slides are one-sided illuminated. Condensor out of position. Switch off the projector; pull out the lamp module and let it cool down;
Fuse blown. Check fuse and possibly replace it.
1. Jammed slide in the slide gate.
2. Slide tray base plate not in the zero
position.
3. Slide tray base plate bent.
4. Partition wall of slide tray compartment
bent or damaged. (Turn tray and check via
baseplate opening)
position.
2. Slide is distorted
3. Slide mount is defective.
Tray transport ring not in zero position. - Hold slide change button-backwards depressed till tray stops in zero-
transport ring.
For UK users: Check 13 A plug fuse also.
1. Switch off projector; lift off slide tray; remove slide from the slide
gate; rotate the base plate until it locks in position; replace the tray and
switch on the projector.
2. Switch off projector; lift off slide tray, rotate the base plate until it
locks in position; replace tray and switch on the projector.
3. Use a new slide tray.
4. Use a new slide tray.
1. Press focus buttons to move lens mount to its default setting. Focus the
image as indicated in the manual.
2. Use glass mounted slides.
3. Replace slide mount.
position or
- switch projector off and then on again.
Lift off the tray; switch projector on and then off again and then replace
tray.
check that the condensor is correctly seated and push back into position if
necessary.
Fan runs but lamp is switched off. 1. Lamp failure
2. Lamp module is not properly fixed.
1. Refer to page 21
2. Refer to page 21
Note: If none of the faults listed above caused the problem, please contact your KODAK audiovisual products dealer.
Accessories
KODAK Slide Projection FF Lenses (lens summary, page 85)
KODAK EKTAPRO Lens Support European CAT No. 715 1335
KODAK EKTAPRO 80 Slide Tray European CAT No. 712 8580
KODAK EKTAPRO Cable Remote (4 m) European CAT No. 712 1080
KODAK EKTAPRO Remote Extension Cable / 8 m
European CAT No. 712 5925
Up to three of these cables can be joined together.
KODAK EKTAPRO IR Remote System RA
European CAT No. 712 1072
KODAK EKTAPRO IR Remote System RA/LP
European CAT No. 712 1064
KODAK EKTAPRO IR Remote Receiver RA
European CAT No. 712 8606
This receiver is necessary for operating another projector in parallel via the
EKTAPRO IR Remote Controls.
KODAK EKTAPRO Extra Bright Single Lamp Module
(with EXR 35 h lamp and stray light protection)
European CAT No. 718 4351
KODAK EKTAPRO Standard Heatfilter for Extra Bright Lamp
Modules for the reduction of slide temperature and brightness (conforms with
the 3000, 3010, 4010, 7000, 9000 and 9010 models).
European CAT No. 717 7140
KODAK EKTAPRO Heatfilter +10 for Extra Bright Lamp Modules for
the reduction of slide temperature and brightness (conforms with all previous
models already equipped with such filters). European CAT No. 717 7157
Projection Lamps
EXR 82V/35h 300W European CAT No. 145 2259
FHS 82V/70h 300W European CAT No. 147 7678
EXY 82V/200h 250W European CAT No. 145 2143
KODAK EKTAPRO Carrying Case European CAT No. 718 1993
Hard case for projector, lens, tray and remote control transportation.
KODAK EKTAPRO Twin Socket Adapter
European CAT No. 712 5909
This adapter allows linkage of an additional projector in parallel and an
EKTAPRO Cable Remote. The adapter will fit into the remote control
socket.
KODAK EKTAPRO Twin Socket Connecting Cable / 2 m
European CAT No. 712 5917
To connect an additional EKTAPRO Slide Projector to the Twin Socket
Adapter for a projection in parallel.
KODAK EKTAPRO 4 x 4 Condenser Kit Europ. Cat. No. 714 4967
For projecting 4 x 4 slides (superslides) for the KODAK 36, 85, 93, 100, 150
and 180 mm Projection FF Lenses!
22
Page 12

Technical Data
3
Projector Measurements (see page 88):
Length: 340 mm
Width: 336 mm
Height: 140 mm
Height with tray: 175 mm
Weight without tray: approx. 9000 g
Weight of tray without slides: 540 g
Slide Formats:
24 x 36 mm
4 x 4 (superslide) with special condenser
Slide Trays:
KODAK EKTAPRO 80 Slide Tray for holding 80 slides with a maximum slide mount
thickness of 3.2 mm.
Slide Gate:
Gravity-feed slide change with registergate pressure levers in two planes.
Lens Mount:
Universal lens mount for both spiral- and
rack-mounted lenses (such as KODAK
Projection FF Lenses).
Height Setting:
Height setting to a maximum of 10o via two
turnable feet.
Levelling:
The projector may be operated at an angle
of plus or minus 30o from the horizontal
along the projector axis.
Note: Tilting the projector side ways will
adversely affect the lamp lifetime!
Projection Lamps
(available as accessories):
EXR 82V/35h/300W
Brightness 100%
FHS 82V/70h 300W
Brightness 80%
EXY 82V/200h 250W
Brightness 60%
Temperature range for safe operation
The operating temperature range of the
projector depends on the ambient temperature and the voltage.
Minimum 0o C and maximum +30o C
Should the projector overheat, e.g., due to
lack of cooling air, the built-in thermal cutout automatically switches the lamp off and
then switches it on again once it has cooled
down.
Power Voltage: AC ONLY!
Different power voltages are adjustable via
the removable fuse link.
(120, 220, 230, 240 V)
Frequency:
50/60 Hz
Performance:
approximately 380 W
Fuses:
Primary circuit:
1 x T 2A L/250V for 220, 230 and 240V or 1
x 4 A slow blow/250V for 120V
8-pin Standard Projector Socket:
(For connecting the KODAK EKTAPRO
Remote Systems or KODAK EKTAPRO
Twin Socket Adapter).
Pin 1: 12 VDC
Pin 2: Gnd
Pin 3: Signal 1 (LSB)
Pin 4: Signal 2
Pin 5: Signal 3
Pin 6: Signal 4
Pin 7: Signal 5 (MSB)
Pin 8: Interrupt
8
5
4
7
2
1
Control via contacts is also possible:
Please note:
Pin 8 must always be connected with pin
2!
Slide transport forwards:
connect pin 7 with pin 2
Slide transport reverse:
connect pin 6 with pin 2
Focus forwards:
connect pin 5 with pin 2
Focus backwards:
connect pin 4 with pin 2
6
Housing:
Sturdy, fibre-glass reinforced housing (LEXAN).
All parts are marked and therefore fully
recyclable.
All important structural elements for the
optical equipment such as slide gate, lamp
module and base for the lens mount housing are in die-cast zinc assemblies.
Noise Development:
approx. 57 dB (A)
Illumination
Extra Bright Lamp Module with 82V/70h/
300W halogen lamp with integrated cold
light reflecting mirror.
Supply Voltage for External Units:
Provision of 12V/50 mA (DC) direct voltage
on the 8-pin remote control socket.
Slide Change Time:
1 sec (independent of mains voltage and
frequency).
Slide Access Times :
<5 sec for the longest search run.
KODAK and EKTAPRO are registered
trademarks.
23
Page 13

Diamagazin Register-80 Tray Index Card-80 Identification magasin 80 Indice para
Bandeja-80 Sequenza diapositive nel caricatore da 80 Diamagazijn register-80 Index för
Magasin-80 Kasetin sisällysluettelo-80
Kodak
1 21 41 61
2 22 42 62
3 23 43 63
4 24 44 64
5 25 45 65
6 26 46 66
7 27 47 67
8 28 48 68
9 29 49 69
10 30 50 70
11 31 51 71
12 32 52 72
13 33 53 73
14 34 54 74
15 35 55 75
16 36 56 76
17 37 57 77
18 38 58 78
19 39 59 79
20 40 60 80
"
84
Page 14

Projektor-Übersicht
KODAK Projektionsobjektive KODAK Projection Lenses Objectifs Kodak
KODAK Objetivos Obiettivi Kodak KODAK EKTAPRO objectieven
KODAK EKTAPRO objektiv KODAK EKTAPRO objektiivit
.2'$.6OLGH3URMHFWLRQ
))/HQVHV
Vergütung
Coating
Länge
Length
Front-Ø
Front tube-Ø
Gewicht
Weight
Lichtstärke
Aperture
Anzahl Linsen
Elements
Bildwinkel
Field angle
Couche
Revestimiento
Rivestimento
Longueur
Longitud
Lunghezza
Tube Ø devant
Tubo delantero Ø
Frontale
Poids
Peso
Aperture
Abertura
Apertura
Elements
Número de lenses
Numero di lenti
Champ
Angulo de projección
Campo die proiezione
.2'$.(.7$352
6(/(&73URMHFWLRQ))
/HQVHV
Vergütung
Coating
Länge
Length
Front-Ø
Front tube-Ø
Couche
Revestimiento
Rivestimento
Longueur
Longitud
Lunghezza
Tube Ø devant
Tubo delantero Ø
Frontale
PP PP PP PP PP PP
=RRP =RRP =RRP
C C C C C C
117 mm 153 mm 185 mm 125mm 125 mm 190 mm
69 mm 65 mm 73 mm 73 mm 73 mm 63 mm
210 g 310 g 450 g 108 g 108 g 205 g
f/3.5 f/3.5 f/3.5 f/2.8 f/2.8 f/3.5
7 7 9 3 3 3
32° - 20° 24° - 16° 24°-12° 27° 23° 13°
PP PP PP PP PP PP
=RRP =RRP =RRP
MC MC MC MC MC MC
150 mm 177 mm 226 mm 125 mm 125 mm 146 mm
61mm 70 mm 87.5 mm 78 mm 78 mm 73 mm
Gewicht
Weight
Lichtstärke
Aperture
Anzahl Linsen
Elements
Bildwinkel
Field angle
* 4 x 4 Projektion möglich (Spezialkondensor nötig, Zubehör)
* 4 x 4 Projection possible (special condenser necessary, see accessory!)
* Possibilité de projection de diapositives 4 x 4 (condenseur spécial requis !)
* Es posible la proyección 4x4 (se necesita un condensador especial).
* Possibilità di proiettare diapositive 4 x 4 (è necessario un condensatore speciale, vedere accessori).
* 4 x 4 projectie mogelijk (speciale condensor noodzakelijk, zie toebehoren).
* 4 x 4 Diabilder kan projiceras (Specialkondensorlins erfordras).
* Mahdollisuus heijastaa 4 x4 dioja (tarvitaan erikois-kondensori, kts. lisätärvikkeet).
Poids
Peso
Aperture
Abertura
Apertura
Elements
Número de lenses
Numero di lenti
Champ
Angulo de projección
Campo die proiezione
580 g 700 g 910 g 457 g 320 g 605 g
f/2.8 f/3.5 f/3.0 f/2.8 f/2.5 f/2.8
8 9 9 7 5 5
32°-20° 28° - 12° 12°-8° 62° 25° 15°
85
Page 15

175
88
Page 16

Germany:
Kodak Aktiengesellschaft
D-70323 Stuttgart
KODAK, CAROUSEL, EKTAGRAPHIC and
EKTAPRO are registered trademarks.
620 4361-0597, G&S 0192/97
Printed in Germany.
For more information on this or any other
KODAK PRESENTATION TECHNOLOGIES Product, check the Internet at
www.kodak.com/go/projectors/
or call
• in Austria/Österreich - 01-795-67000
• in Belgium/Belgique - 02-713-1398
• in Denmark/Danmark - 3848-7088
• in Finland/Soumi - 0800-11-8043
• in France - 0141-918578
• in Germany/Deutschland - 069-9509-6055
• in Ireland/Eire - 01-402-6815
• in Italy/Italia - 02-696-33205
• in Netherlands/Nederlands - 020-346-9128
• in Norway/Norge - 2316-2088
• in Spain/Espana - 91-406-9130
• in Sweden/Sverige - 08-587-70305
• in Switzerland/Schweiz/Suisse - 01-838-5358
• in UK (National Line ) - 0870-606-1031
Calls will be charged at a National Rate
• other countries - call the UK on
0044-870-606-1031
 Loading...