


DVD Player
DV-300-K
Register Your Product at
http://www.pioneerelectronics.com (US)
http://www.pioneerelectronics.ca (Canada)
Operating Instructions
T
Thank you for buying this Pioneer product.
Please read through these operating instructions so you will know how to operate your model properly.
After you have finished reading the instructions, put them away in a safe place for future reference.
IMPORTANT
The lightning flash with arrowhead, within
an equilateral triangle, is intended to alert
the user to the presence of uninsulated
"dangerous voltage" within the product's
enclosure that may be of sufficient
magnitude to constitute a risk of electric
shock to persons.
CAUTION:
TO PREVENT THE RISK OF ELECTRIC
SHOCK, DO NOT REMOVE COVER (OR
BACK). NO USER-SERVICEABLE PARTS
INSIDE. REFER SERVICING TO QUALIFIED
SERVICE PERSONNEL.
CAUTION
RISK OF ELECTRIC SHOCK
DO NOT OPEN
The exclamation point within an equilateral
triangle is intended to alert the user to the
presence of important operating and
maintenance (servicing) instructions in the
literature accompanying the appliance.
D1-4-2-3_En
IMPORTANT NOTICE – THE SERIAL NUMBER FOR THIS EQUIPMENT IS LOCATED IN THE REAR.
PLEASE WRITE THIS SERIAL NUMBER ON YOUR ENCLOSED WARRANTY CARD AND
KEEP IN A SECURE AREA. THIS IS FOR YOUR SECURITY.
D1-4-2-6-1_En
NOTE: This equipment has been tested and found to comply with the limits for a Class B digital device, pursuant to
Part 15 of the FCC Rules. These limits are designed to provide reasonable protection against harmful interference in
a residential installation. This equipment generates, uses, and can radiate radio frequency energy and, if not
installed and used in accordance with the instructions, may cause harmful interference to radio communications.
However, there is no guarantee that interference will not occur in a particular installation. If this equipment does
cause harmful interference to radio or television reception, which can be determined by turning the equipment off
and on, the user is encouraged to try to correct the interference by one or more of the following measures:
– Reorient or relocate the receiving antenna.
– Increase the separation between the equipment and receiver.
– Connect the equipment into an outlet on a circuit different from that to which the receiver is connected.
– Consult the dealer or an experienced radio/TV technician for help.
D8-10-1-2_En
CAUTION : USE OF CONTROLS OR ADJUSTMENTS OR PERFORMANCE OF PROCEDURES OTHER THAN THOSE
SPECIFIED HEREIN MAY RESULT IN HAZARDOUS RADIATION EXPOSURE.
CAUTION : THE USE OF OPTICAL INSTRUMENTS WITH THIS PRODUCT WILL INCREASE EYE HAZARD.
D6-8-2-1_En
Information to User
Alteration or modifications carried out without appropriate authorization may invalidate the user’s right to operate
the equipment.
D8-10-2_En
WARNING – TO PREVENT FIRE OR SHOCK
HAZARD, DO NOT EXPOSE THIS
APPLIANCE TO RAIN OR MOISTURE.
D1-4-2-1_En
WARNING: Handling the cord on this product or
cords associated with accessories sold with the
product will expose you to lead, a chemical known to
the State of California and other governmental
entities to cause cancer and birth defects or other
reproductive harm.
Wash hands after handling
D36-P4_En
his product contains mercury. Disposal of this
material may be regulated due to environmental
considerations. For disposal or recycling information,
please contact your local authorities or the Electronics
Industries Alliance : www.eiae.org.
K057_En
READ INSTRUCTIONS — All the safety and
operating instructions should be read before the
product is operated.
RETAIN INSTRUCTIONS — The safety and
operating instructions should be retained for
future reference.
HEED WARNINGS — All warnings on the product
and in the operating instructions should be
adhered to.
FOLLOW INSTRUCTIONS — All operating and use
instructions should be followed.
CLEANING — The product should be cleaned only
with a polishing cloth or a soft dry cloth. Never
clean with furniture wax, benzine, insecticides
or other volatile liquids since they may corrode
the cabinet.
ATTA CHMENTS — Do not use attachments not
recommended by the product manufacturer as
they may cause hazards.
WATER AND MOISTURE — Do not use this
product near water — for example, near a
bathtub, wash bowl, kitchen sink, or laundry
tub; in a wet basement; or near a swimming
pool; and the like.
ACCESSORIES — Do not place this product on an
unstable cart, stand, tripod, bracket, or table.
The product may fall, causing serious injury to a
child or adult, and serious damage to the
product. Use only with a cart, stand, tripod,
bracket, or table recommended by the
manufacturer, or sold with the product. Any
mounting of the product should follow the
manufacturer’s instructions, and should use a
mounting accessory recommended by the
manufacturer.
CART — A product and cart combination should be
moved with care. Quick stops, excessive force,
and uneven surfaces may cause the product
and cart combination to overturn.
VENTILATION — Slots and openings in the cabinet
are provided for ventilation and to ensure
reliable operation of the product and to protect
it from overheating, and these openings must
not be blocked or covered. The openings should
never be blocked by placing the product on a
bed, sofa, rug, or other similar surface. This
product should not be placed in a built-in
installation such as a bookcase or rack unless
proper ventilation is provided or the
manufacturer’s instructions have been adhered
to.
POWER SOURCES — This product should be
operated only from the type of power source
indicated on the marking label. If you are not
sure of the type of power supply to your home,
consult your product dealer or local power
company.
LOCATION – The appliance should be installed in a
stable location.
NONUSE PERIODS – The power cord of the
appliance should be unplugged from the outlet
when left un-used for a long period of time.
GROUNDING OR POLARIZATION
• If this product is equipped with a polarized
alternating current line plug (a plug having one
blade wider than the other), it will fit into the
outlet only one way. This is a safety feature. If
you are unable to insert the plug fully into the
outlet, try reversing the plug. If the plug should
still fail to fit, contact your electrician to replace
your obsolete outlet. Do not defeat the safety
purpose of the polarized plug.
• If this product is equipped with a three-wire
grounding type plug, a plug having a third
(grounding) pin, it will only fit into a grounding
type power outlet. This is a safety feature. If you
are unable to insert the plug into the outlet,
contact your electrician to replace your obsolete
outlet. Do not defeat the safety purpose of the
grounding type plug.
POWER-CORD PROTECTION — Power-supply
cords should be routed so that they are not likely
to be walked on or pinched by items placed
upon or against them, paying particular
attention to cords at plugs, convenience
receptacles, and the point where they exit from
the product.
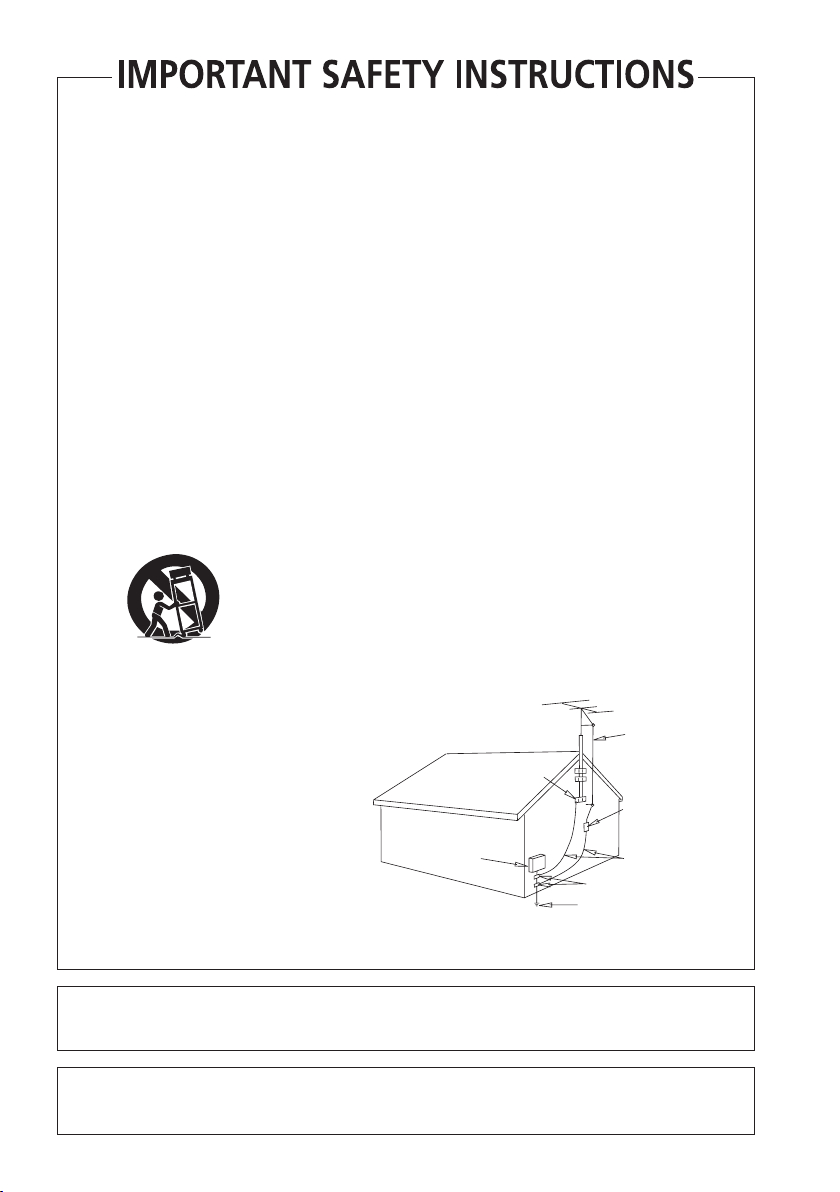
OUTDOOR ANTENNA GROUNDING — If an
outside antenna or cable system is connected to
the product, be sure the antenna or cable
system is grounded so as to provide some
protection against voltage surges and built-up
static charges. Article 810 of the National
Electrical Code, ANSI/NFPA 70, provides
information with regard to proper grounding of
the mast and supporting structure, grounding of
the lead-in wire to an antenna discharge unit,
size of grounding conductors, location of
antenna-discharge unit, connection to
grounding electrodes, and requirements for the
grounding electrode. See Figure A.
LIGHTNING — For added protection for this
product during a lightning storm, or when it is
left unattended and unused for long periods of
time, unplug it from the wall outlet and
disconnect the antenna or cable system. This
will prevent damage to the product due to
lightning and power-line surges.
POWER LINES — An outside antenna system
should not be located in the vicinity of overhead
power lines or other electric light or power
circuits, or where it can fall into such power
lines or circuits. When installing an outside
antenna system, extreme care should be taken
to keep from touching such power lines or
circuits as contact with them might be fatal.
OVERLOADING — Do not overload wall outlets,
extension cords, or integral convenience
receptacles as this can result in a risk of fire or
electric shock.
ELECTRIC
SERVICE
EQUIPMENT
Fig. A
OBJECT AND LIQUID ENTRY — Never push
objects of any kind into this product through
openings as they may touch dangerous voltage
points or short-out parts that could result in a
fire or electric shock. Never spill liquid of any
kind on the product.
SERVICING — Do not attempt to service this
product yourself as opening or removing covers
may expose you to dangerous voltage or other
hazards. Refer all servicing to qualified service
personnel.
DAMAGE REQUIRING SERVICE — Unplug this
product from the wall outlet and refer servicing
to qualified service personnel under the
following conditions:
• When the power-supply cord or plug is
damaged.
• If liquid has been spilled, or objects have fallen
into the product.
• If the product has been exposed to rain or water.
• If the product does not operate normally by
following the operating instructions. Adjust only
those controls that are covered by the operating
instructions as an improper adjustment of other
controls may result in damage and will often
require extensive work by a qualified technician
to restore the product to its normal operation.
• If the product has been dropped or damaged in
any way.
• When the product exhibits a distinct change in
performance — this indicates a need for service.
REPLACEMENT PARTS — When replacement parts
are required, be sure the service technician has
used replacement parts specified by the
manufacturer or have the same characteristics
as the original part. Unauthorized substitutions
may result in fire, electric shock, or other
hazards.
SAFETY CHECK — Upon completion of any service
or repairs to this product, ask the service
technician to perform safety checks to
determine that the product is in proper
operating condition.
WALL OR CEILING MOUNTING — The product
should not be mounted to a wall or ceiling.
HEAT — The product should be situated away from
heat sources such as radiators, heat registers,
stoves, or other products (including amplifiers)
that produce heat.
ANTENNA
LEAD IN
GROUND
CLAMP
WIRE
ANTENNA
DISCHARGE UNIT
(NEC SECTION 810-20)
GROUNDING CONDUCTORS
(NEC SECTION 810-21)
GROUND CLAMPS
POWER SERVICE GROUNDING
ELECTRODE SYSTEM
(NEC ART 250, PART H)
NEC — NATIONAL ELECTRICAL CODE
D1-4-2-2_En
This Class B digital apparatus complies with Canadian ICES-003.
Cet appareil numérique de la Classe B est conforme à la norme NMB-003 du Canada.
D8-10-1-3_EF
CAUTION: This product satisfies FCC regulations when shielded cables and connectors are used to connect the
unit to other equipment. To prevent electromagnetic interference with electric appliances such as radios and
televisions, use shielded cables and connectors for connections.
D8-10-3a_En

C67-7-3_En
This product is for general household purposes. Any
failure due to use for other than household purposes
(such as long-term use for business purposes in a
restaurant or use in a car or ship) and which
requires repair will be charged for even during the
warranty period.
K041_En
POWER-CORD CAUTION
Handle the power cord by the plug. Do not pull out the
plug by tugging the cord and never touch the power
cord when your hands are wet as this could cause a
short circuit or electric shock. Do not place the unit, a
piece of furniture, etc., on the power cord, or pinch the
cord. Never make a knot in the cord or tie it with other
cords. The power cords should be routed such that they
are not likely to be stepped on. A damaged power cord
can cause a fire or give you an electrical shock. Check
the power cord once in a while. When you find it
damaged, ask your nearest PIONEER authorized
service center or your dealer for a replacement.
Selecting fine audio equipment such as the unit
you’ve just purchased is only the start of your
musical enjoyment. Now it’s time to consider how
you can maximize the fun and excitement your
equipment offers. This manufacturer and the
Electronic Industries Association’s Consumer
Electronics Group want you to get the most out of
your equipment by playing it at a safe level. One that
lets the sound come through loud and clear without
annoying blaring or distortion-and, most importantly,
without affecting your sensitive hearing.
Sound can be deceiving. Over time your hearing
“comfort level” adapts to higher volumes of sound.
So what sounds “normal” can actually be loud and
harmful to your hearing. Guard against this by
setting your equipment at a safe level BEFORE your
hearing adapts.
To establish a safe level:
• Start your volume control at a low setting.
• Slowly increase the sound until you can hear it
comfortably and clearly, and without distortion.
Once you have established a comfortable sound
level:
• Set the dial and leave it there.
Taking a minute to do this now will help to prevent
hearing damage or loss in the future. After all, we
want you listening for a lifetime.
S002_En
This product incorporates copyright protection
technology that is protected by method claims of
certain U.S. patents and other intellectual property
rights owned by Macrovision Corporation and other
rights owners. Use of this copyright protection
technology must be authorized by Macrovision
Corporation, and is intended for home and other
limited viewing uses only unless otherwise authorized
by Macrovision Corporation. Reverse engineering or
disassembly is prohibited.
This product includes FontAvenue®dmlrqjgaclacb
`wLCAampnmp_rgml,Dmlr?tclscgq_pcegqrcpcb
rp_bck_pimdLCAAmpnmp_rgml,
We Want You Listening For A Lifetime
Used wisely, your new sound equipment will
provide a lifetime of fun and enjoyment. Since
hearing damage from loud noise is often
undetectable until it is too late, this manufacturer
and the Electronic Industries Association’s
Consumer Electronics Group recommend you avoid
prolonged exposure to excessive noise. This list of
sound levels is included for your protection.
Decibel
Level Example
30 Quiet library, soft whispers
40
Living room, refrigerator, bedroom away from traffic
50 Light traffic, normal conversation, quiet office
60 Air conditioner at 20 feet, sewing machine
70 Vacuum cleaner, hair dryer, noisy restaurant
80
Average city traffic, garbage disposals, alarm clock
at two feet.
THE FOLLOWING NOISES CAN BE DANGEROUS
UNDER CONSTANT EXPOSURE
Subway, motorcycle, truck traffic, lawn mower
90
100 Garbage truck, chain saw, pneumatic drill
120 Rock band concert in front of speakers,
thunderclap
140 Gunshot blast, jet plane
180 Rocket launching pad
Information courtesy of the Deafness Research Foundation.
S001_En

Contents
01 Before you start
Features
What’s in the box
Hints on installation
Disc/content format playback
compatibility
. . . . . . . . . . . . . . . . . . . . . . . . . . . .6
. . . . . . . . . . . . . . . . . . . . .6
. . . . . . . . . . . . . . . . . . .7
. . . . . . . . . . . . . . . . . . . . . . . .8
02 Connections
Easy connections
Connecting using the S-video output
Connecting using the component video
. . . . . . . . . . . . . . . . . . . . . . . . . . . .12
output
Connecting to an AV receiver
. . . . . . . . . . . . . . . . . . . .11
. . . . .12
. . . . . . . . . . .13
03 Controls and displays
Front panel
Remote control
. . . . . . . . . . . . . . . . . . . . . . . .14
. . . . . . . . . . . . . . . . . . . . .15
04 Getting started
Switching on
Using the on-screen displays
Setting up the player for your TV
Setting the language of this player’s on-screen
displays
Playing discs
. . . . . . . . . . . . . . . . . . . . . . .16
. . . . . . . . . . .16
. . . . . . . .17
. . . . . . . . . . . . . . . . . . . . . . . . . . .17
. . . . . . . . . . . . . . . . . . . . . . .18
05 Playing discs
Scanning discs
Playing in slow motion
Frame advance/frame reverse
Viewing a JPEG slideshow
Browsing DVD or Video CD disc with the Disc
Navigator
Browsing WMA, MP3, DivX video and JPEG
files with the Disc Navigator
Looping a section of a disc
Using repeat play
Using random play
Creating a program list
Searching a disc
. . . . . . . . . . . . . . . . . . . . .22
. . . . . . . . . . . . . . . .22
. . . . . . . . . .22
. . . . . . . . . . . . .23
. . . . . . . . . . . . . . . . . . . . . . . . . .23
. . . . . . . . . . .24
. . . . . . . . . . . .25
. . . . . . . . . . . . . . . . . . . .25
. . . . . . . . . . . . . . . . . .26
. . . . . . . . . . . . . . .26
. . . . . . . . . . . . . . . . . . . .28
Switching subtitles
Switching audio language/channels
Zooming the screen
Switching camera angles
Displaying disc information
. . . . . . . . . . . . . . . . . . 28
. . . . . 28
. . . . . . . . . . . . . . . . . 29
. . . . . . . . . . . . . 29
. . . . . . . . . . . 29
06 Audio Settings and Video Adjust
menus
Audio Settings menu
Video Adjust menu
. . . . . . . . . . . . . . . . 30
. . . . . . . . . . . . . . . . . . 31
07 Initial Settings menu
Using the Initial Settings menu
Digital Audio Out settings
Video Output settings
Language settings
Display settings
Options settings
Parental Lock
. . . . . . . . . . . . . . . . 33
. . . . . . . . . . . . . . . . . . . 33
. . . . . . . . . . . . . . . . . . . . . 34
. . . . . . . . . . . . . . . . . . . . 34
. . . . . . . . . . . . . . . . . . . . . . 35
. . . . . . . . . 32
. . . . . . . . . . . . . 32
08 Additional information
Taking care of your player and discs . . . . . 37
Screen sizes and disc formats. . . . . . . . . . 38
Resetting the player . . . . . . . . . . . . . . . . . 39
DVD-Video regions . . . . . . . . . . . . . . . . . . 39
Selecting languages using the language code
list. . . . . . . . . . . . . . . . . . . . . . . . . . . . . . . 39
Troubleshooting . . . . . . . . . . . . . . . . . . . . 39
Glossary . . . . . . . . . . . . . . . . . . . . . . . . . . 40
Language code list . . . . . . . . . . . . . . . . . . 41
Country/Area code list. . . . . . . . . . . . . . . . 41
Specifications . . . . . . . . . . . . . . . . . . . . . . 42
En
5

01
Before you start
Chapter 1
Before you start
Features
• 24-bit/96 kHz compatible DAC
The integrated 24-bit/96 kHz DAC means that
this player is compatible with high samplingrate discs, capable of delivering exceptional
sound quality in terms of dynamic range, lowlevel resolution and high-frequency detail.
• Excellent audio performance surround
sound entertainment with Dolby Digital
and DTS
When connected to a suitable AV amplifier or
receiver, this player gives great surround
sound with Dolby Digital and DTS discs.
• PureCinema Progressive Scan video
When connected to a progressive scancompatible TV or monitor using the
component video outputs, you can enjoy
extremely stable, flicker free images, with the
same frame refresh rate as the original movie.
• New Disc Navigator with moving
pictures
The new Disc Navigator enables you play the
first few seconds of each title or chapter in a
thumbnail image on screen.
• DSP effects for enhanced playback
See
page 30.
2
software
Audio Settings and Video Adjust menus
1
on
• Picture zoom
See
Zooming the screen
• MP3 and WMA compatibility
See
Compressed audio compatibility
• JPEG compatibility
See
JPEG file compatibility
®
• DivX
See
• Energy saving design
An auto power-off function switches the player
into standby if not used for about 30 minutes.
3
video compatibility
DivX video compatibility
on page 29.
on page 10.
on page 10.
What’s in the box
Please confirm that the following accessories
are in the box when you open it.
• Remote control
• AA/R6P dry cell batteries x 2
• Audio/video cable (red/white/yellow plugs)
• Warranty card
• Operating instructions
on page 9.
1 Manufactured under license from Dolby Laboratories. “Dolby” and the double-D symbol are trademarks of Dolby
Laboratories.
2 “DTS” and “DTS Digital Out” are registered trademarks of DTS, Inc.
6
3 DivX, DivX Certified, and associated logos are trademarks of DivX, Inc. and are used under license.
En
Before you start 01
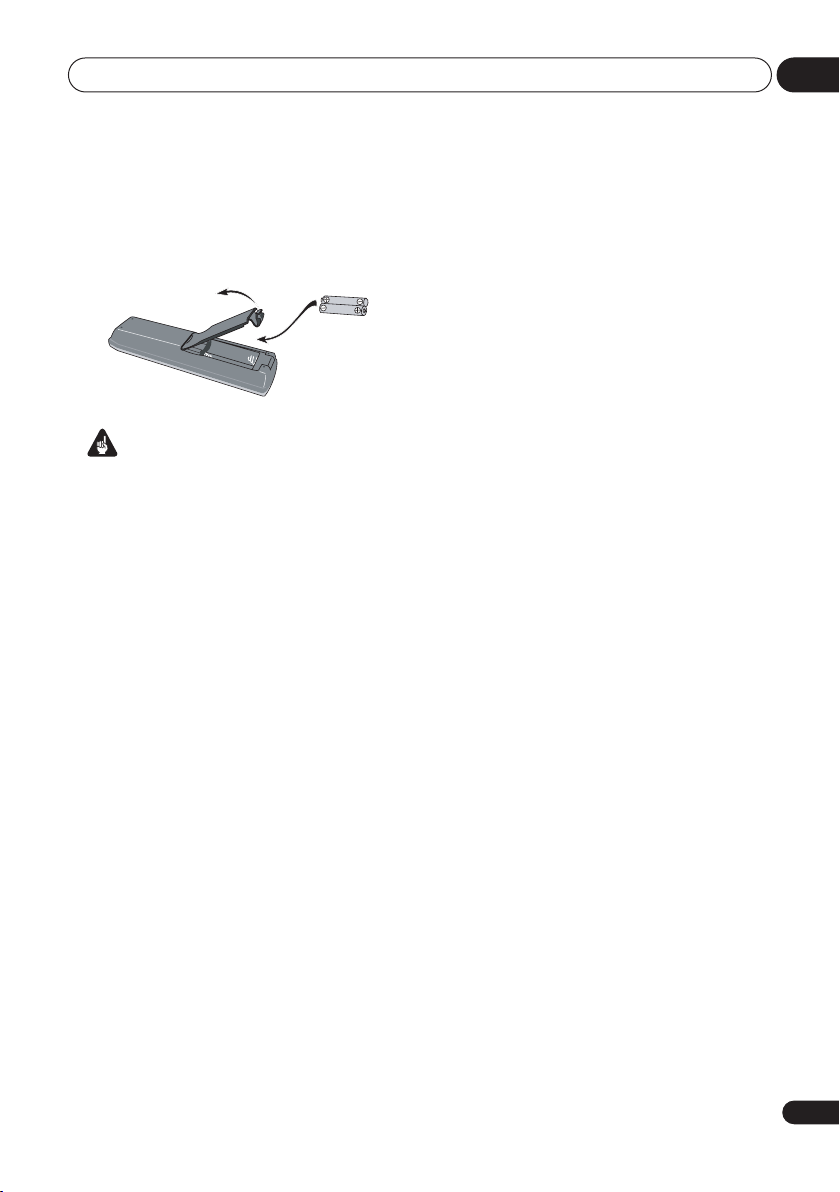
Putting the batteries in the remote
• Open the battery compartment cover
and insert the batteries as shown.
Use two AA/R6P batteries and follow the
indications (
Close the cover when you’re finished.
Incorrect use of batteries can result in hazards
such as leakage and bursting. Please observe
the following:
• Don’t mix new and old batteries together.
• Don’t use different kinds of battery
together—although they may look similar,
different batteries may have different
voltages.
• Make sure that the plus and minus ends of
each battery match the indications in the
battery compartment.
• Remove batteries from equipment that
isn’t going to be used for a month or more.
• When disposing of used batteries, please
comply with governmental regulations or
environmental public instruction’s rules
that apply in your country/area.
• Do not use or store batteries in direct
sunlight or other excessively hot place,
such as inside a car or near a heater. This
can cause batteries to leak, overheat,
explode or catch fire. It can also reduce the
life or performance of batteries.
,
Important
) inside the compartment.
Hints on installation
We want you to enjoy using this product for
years to come, so please use the following
guidelines when choosing a suitable location:
Do...
• Use in a well-ventilated room.
• Place on a solid, flat, level surface, such as
a table, shelf or stereo rack.
Don’t...
• Use in a place exposed to high
temperatures or humidity, including near
radiators and other heat-generating
appliances.
• Place on a window sill or a place where the
player will be exposed to direct sunlight.
• Use in an excessively dusty or damp
environment.
• Place directly on top of an amplifier, or
other component in your stereo system
that becomes hot in use.
• Use near a television or monitor as you
may experience interference—especially if
the television uses an indoor antenna.
• Use in a kitchen or other room where the
player may be exposed to smoke or steam.
• Use on a thick rug or carpet, or cover with
cloth—this may prevent proper cooling of
the unit.
• Place on an unstable surface, or one that
is not large enough to support all four of
the unit’s feet.
En
7

01
Before you start
Disc/content format playback
compatibility
This player is compatible with a wide range of
disc types (media) and formats. Playable discs
will generally feature one of the following logos
on the disc and/or disc packaging. Note
however that some disc types, such as
recordable CD and DVD, may be in an
unplayable format—see below for further
compatibility information.
Please also note that recordable discs cannot be
recorded using this player.
DVD-Video DVD-R DVD-RW
Audio CD CD-R
• This unit will play DVD+R/+RW discs.
•
Licensing Corporation.
• is a trademark of Fuji Photo Film Co. Ltd.
• Also compatible with KODAK Picture CD
Video CD
Fujicolor CD
is a trademark of DVD Format/Logo
CD-RW
About DualDisc playback
A DualDisc is a new two -sided disc, one side
of which contains DVD content video, audio,
etc. while the other side contains non-DVD
content such as digital audio material.
The non-DVD, audio side of the disc is not
compliant with the CD Audio specification and
therefore may not play.
The DVD side of a DualDisc plays in this
product.
For more detailed information on the DualDisc
specification, please refer to the disc
manufacturer or disc retailer.
CD-R/-RW compatibility
• Compatible formats: CD-Audio, Video CD,
ISO 9660 CD-ROM* containing MP3,
WMA, JPEG or DivX video files
*
ISO 9660 Level 1 or 2 compliant. CD
physical format: Mode1, Mode2 XA Form1.
Romeo and Joliet file systems are both
compatible with this player.
• Multi-session playback: No
• Unfinalized disc playback: No
• File structure (may differ): Up to 299
folders on a disc; up to 648 folders and files
(combined) within each folder
DVD+R/DVD+RW compatibility
Only DVD+R/DVD+RW discs recorded in
‘Video Mode (DVD Video Mode)’ which have
been finalized, can be played back. However,
some editing made during the recording may
not be played back accurately.
8
En
DVD-R/-RW compatibility
• Compatible formats: DVD-Video, Video
Recording (VR)*
*
Edit points may not play exactly as edited;
screen may go momentarily blank at edited
points.
• Unfinalized playback: No
• WMA/MP3/JPEG/DivX video file playback
on DVD-R/-RW: No

Before you start 01
Compressed audio compatibility
• Compatible formats: MPEG-1 Audio Layer
3 (MP3), Windows Media Audio (WMA)
• Sampling rates: 32 kHz, 44.1 kHz or 48 kHz
• Bit-rates: Any (128 kbps or higher
recommended)
• VBR (variable bit rate) MP3 playback: No
• VBR WMA playback: No
• WMA lossless encoding compatible: No
• DRM (Digital Rights Management)
compatible: No (DRM-protected audio
files will not play in this player—see also
DRM in the Glossary on page 40)
• File extensions: .mp3, .wma (these must
be used for the player to recognize MP3
and WMA files – do not use for other file
types)
WMA (Windows Media™ Audio)
compatibility
This player can playback Windows Media
Audio content.
WMA is an acronym for Windows Media Audio
and refers to an audio compression
technology developed by Microsoft
Corporation. WMA content can be encoded by
using Windows Media Player for Windows XP,
Windows Media Player 9 or Windows Media
Player 10 series.
Windows Media is a trademark of Microsoft
Corporation.
This product includes technology owned by
Microsoft Corporation and cannot be used or
distributed without a license from Microsoft
Licensing, Inc.
About DivX video
DivX is a digital video format created by DivX,
Inc. This player can play DivX videos burned on
CD-R/-RW/-ROM discs. Keeping the same
terminology as DVD-Video, individual DivX
video files are called “Titles”. When naming
files/titles on a CD-R/-RW disc prior to
burning, keep in mind that by default they will
be played in alphabetical order.
Displaying external subtitle files
The font sets listed below are available for
external subtitle files. You can see the proper
font set on-screen by setting the Subtitle
Language (in Language settings on page 33)
to match the subtitle file.
This player supports the following language
groups:
Group 1 Albanian (sq), Basque (eu), Catalan (ca),
Danish (da), Dutch (nl), English (en),
Faroese (fo), Finnish (fi), French (fr),
German (de), Icelandic (is), Irish (ga), Italian
(it), Norwegian (no), Portuguese (pt),
Rhaeto-Romanic (rm), Scottish (gd),
Spanish (es), Swedish (sv)
Group 2 Albanian (sq), Croatian (hr), Czech (cs),
Hungarian (hu), Polish (pl), Romanian (ro),
Slovak (sk), Slovenian (sl)
Group 3 Bulgarian (bg), Byelorussian (be),
Macedonian (mk), Russian (ru), Serbian
(sr), Ukrainian (uk)
Group 4 Hebrew (iw), Yiddish (ji)
Group 5 Turkish (tr)
• Some external subtitle files may be
displayed incorrectly or not at all.
• For external subtitle files the following
subtitle format filename extensions are
supported (please note that these files are
not shown within the disc navigation
menu): .srt, .sub, .ssa, .smi
• The filename of the movie file has to be
repeated at the beginning of the filename
for the external subtitle file.
• The number of external subtitle files which
can be switched for the same movie file is
limited to a maximum of 10.
En
9

01
Before you start
DivX video compatibility
• Official DivX® Certified product.
• Plays all versions of DivX
®
6) with standard playback of DivX®
DivX
media files.
• File extensions: .avi and .divx (these must
be used for the player to recognize DivX
video files).
extension are recognized as MPEG4, but not
all of these are necessarily DivX video files
and therefore may not be playable on this
player.
Note that all files with the .avi
®
video (including
JPEG file compatibility
• Compatible formats: Baseline JPEG and
EXIF 2.2* still image files up to a resolution
of 3072 x 2048.
*
File format used by digital still cameras.
• Progressive JPEG compatible: No
• File extensions: .jpg (must be used for the
player to recognize JPEG files – do not use
for other file types)
PC-created disc compatibility
Discs recorded using a personal computer
may not be playable in this unit due to the
setting of the application software used to
create the disc. In these particular instances,
check with the software publisher for more
detailed information.
Discs recorded in packet write mode (UDF
format) are not compatible with this player.
Check the DVD-R/-RW or CD-R/-RW software
disc boxes for additional compatibility
information.
10
En
Connections 02
Chapter 2
Connections
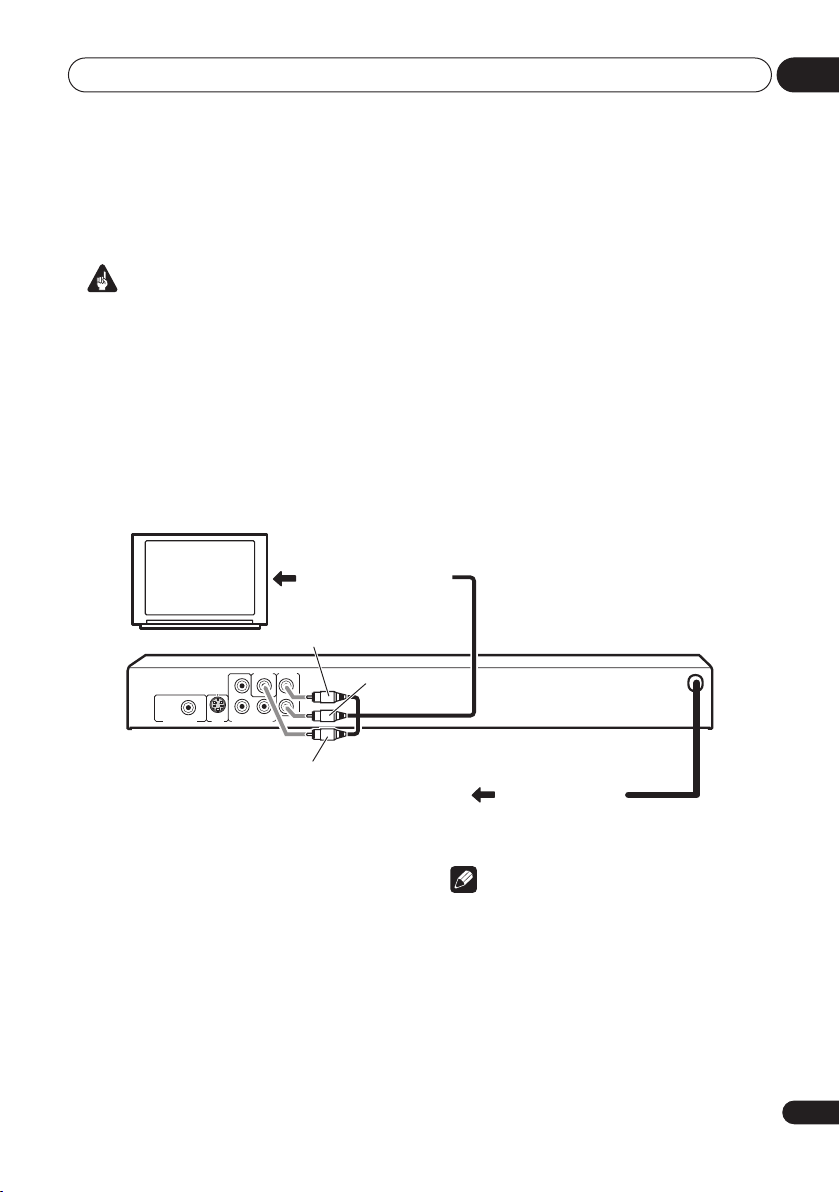
Easy connections
Important
• Before making or changing any connections, switch off the power and disconnect the power
cable from the AC outlet.
• The setup described here is a basic setup that allows you to play discs using just the cables
supplied with the player. In this setup, stereo audio is played through the speakers in your TV.
• This player is equipped with copy protection technology. Do not connect this player to your
TV via a VCR using audio/video or S-video cables, as the picture from this player will not
appear properly on your TV. (This player may also not be compatible with some combination
TV/VCRs for the same reason; refer to the manufacturer for more information.)
• When connecting to your TV as shown above, do not set the
Video Output settings
on page 33) to
To audio/video inputs
Progressive
.
Component Out
setting (See
VIDEO OUT
White
AUDIO OUT
L
R
Y
Yellow
Red
TV
PB
COAXIAL
DIGITAL AUDIO OUT
S-VIDEO
OUT
R
P
COMPONENT VIDEO OUT
1 Connect the VIDEO OUT and AUDIO
OUT L/R jacks to a set of audio/video
inputs on your TV.
Use the supplied audio/video cable,
connecting the red and white plugs to the
audio outputs and the yellow plug to the video
output. Make sure you match up the left and
right audio outputs with their corresponding
inputs for correct stereo sound.
See below if you want to use a component or
S-video cable for the video connection.
To power outlet
2 Plug into a power outlet.
Note
• Before unplugging the player from the
power outlet, make sure you first switch it
into standby using either the front panel
STANDBY/ON
control, and wait of the
button, or the remote
-OFF-
message to
disappear from the player’s display.
• For the above reasons, do not plug this
player into a switched power supply found
on some amplifiers and AV receivers.
11
En
02
DIGITAL AUDIO OUT
L
R
P
R
PB
Y
COAXIAL
COMPONENT VIDEO OUT
AUDIO OUT
VIDEO OUT
S-VIDEO
OUT
DIGITAL AUDIO OUT
L
R
P
R
PB
Y
COAXIAL
COMPONENT VIDEO OUT
AUDIO OUT
VIDEO OUT
S-VIDEO
OUT
Connections
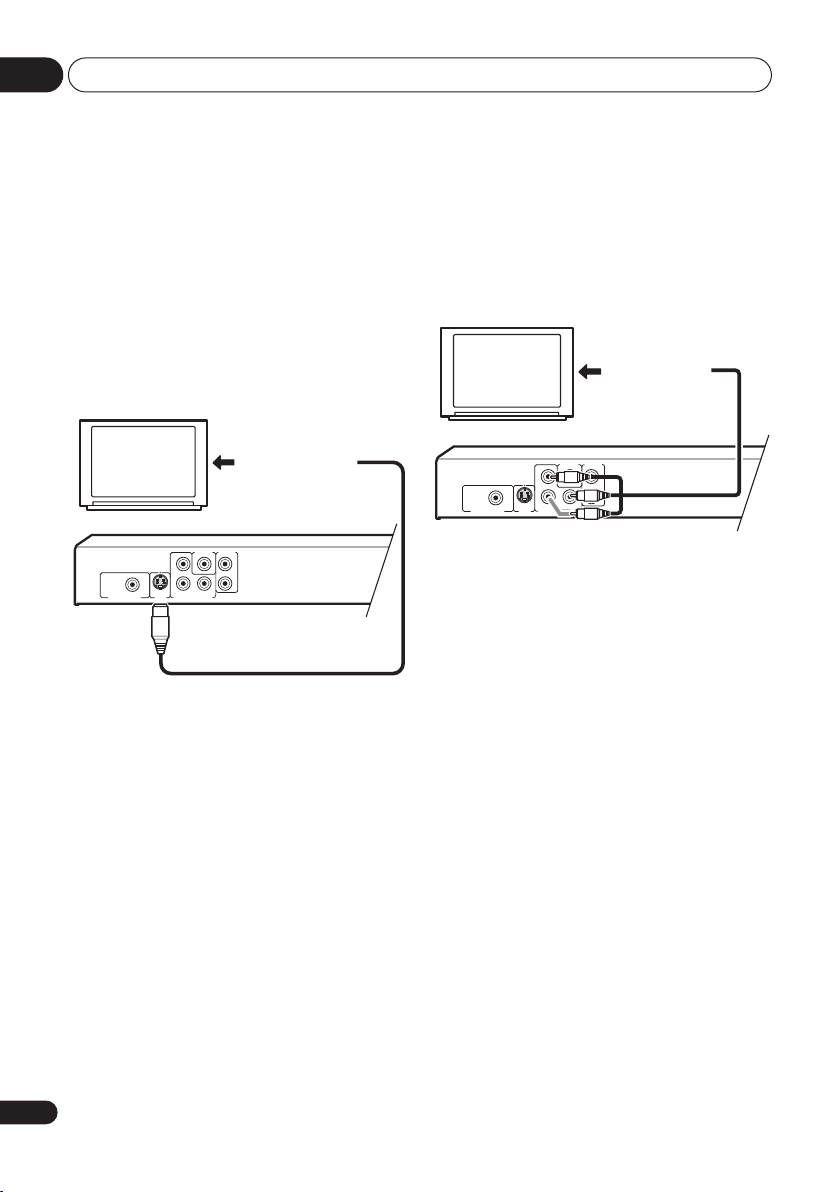
Connecting using the S-video
output
If your TV (or other equipment) has an S-video
(S1) input, you can use the S-video output on
this player instead of the standard (composite)
output for a better quality picture.
• Use an S-video cable (not supplied) to
connect the S-VIDEO OUT to an S-video
input on your TV (or monitor or AV
receiver).
Line up the small triangle above the jack with
the same mark on the plug before plugging in.
To S-video input
TV
Connecting using the
component video output
You can use the component video output
instead of the standard video out jack to
connect this player to your TV (or other
equipment). This should give you the best
quality picture from the three types of video
output available.
To component
video input
TV
• Use a component video cable (not
supplied) to connect the COMPONENT
VIDEO OUT jacks to a component video
input on your TV, monitor or AV receiver.
12
En
Connections 02
STANDBY/
ON
DIGITAL AUDIO OUT
L
R
P
R
PB
Y
COAXIAL
COMPONENT VIDEO OUT
AUDIO OUT
VIDEO OUT
S-VIDEO
OUT
DIGITAL AUDIO OUT
L
R
P
R
PB
Y
COAXIAL
COMPONENT VIDEO OUT
AUDIO OUT
VIDEO OUT
S-VIDEO
OUT
Watching progressive scan video
from the component video outputs
This player can output progressive scan video
from the component video output. Compared
to interlace video, progressive scan video
effectively doubles the scanning rate of the
picture, resulting in a very stable, flicker-free
image.
To set up the player for use with a progressive
scan TV, see
When the player is set to output progressive
scan video, the
front panel display.
• When
Progressive
the
OUT
• If you want to display video on more than
one monitor simultaneously, make sure
the player is set to
• If you connect a TV that is not compatible
with a progressive scan signal and switch
the player to progressive, you will not be
able to see any picture at all. In this case,
switch everything off and reconnect using
the supplied video cable (see
connections
to
Switching the video output to interlace
using the front panel controls
Switch the player to standby then, using the
front panel controls, press
while pressing
to
Interlace
STANDBY/ON
Video Output settings
PRGSVE
Important
Component Out
, there is no video output from
VIDEO OUT
(S-video) jacks.
on page 11), then switch back
Interlace
(see below).
.
on page 33.
indicator lights in the
(page 33) is set to
(composite) and
Interlace
S-VIDEO
.
Easy
STANDBY/ON
to switch the player back
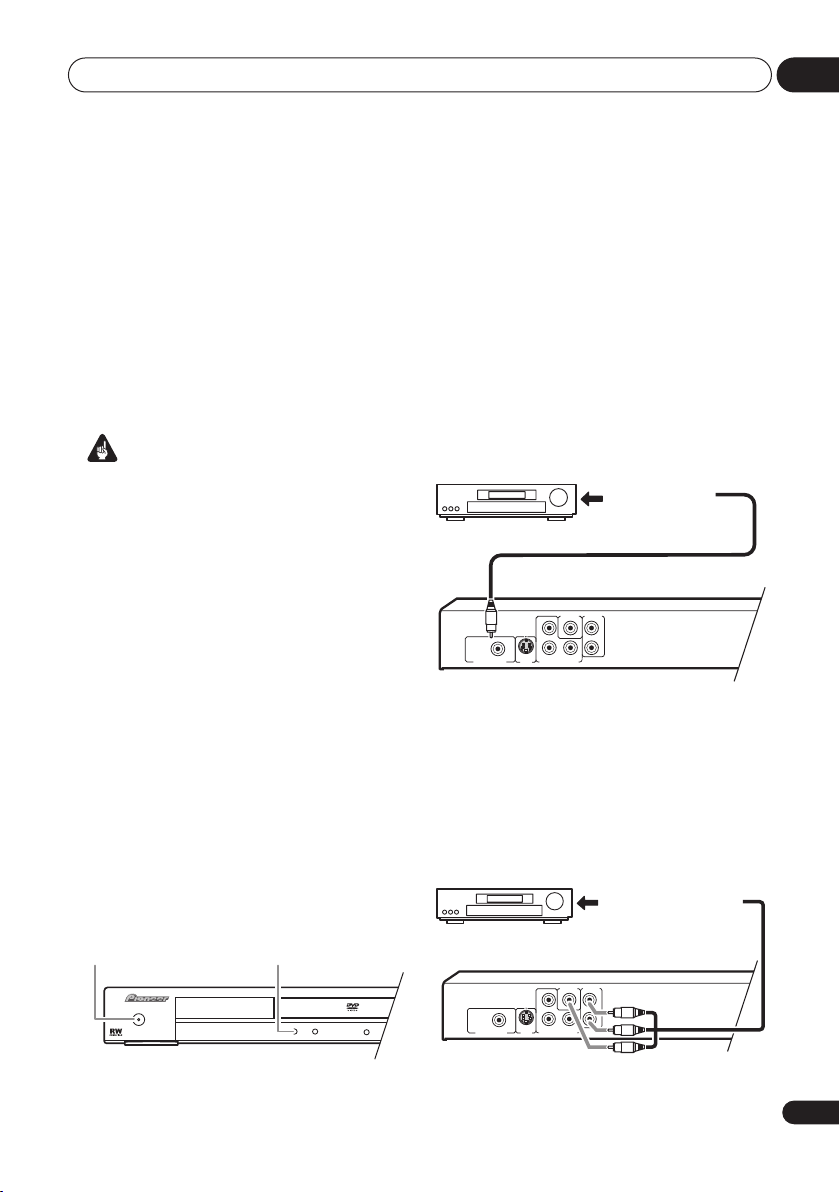
Connecting to an AV receiver
To enjoy multichannel surround sound you
need to connect this player to an AV receiver
using the digital audio output.
In addition to a digital connection, we
recommend also connecting using the stereo
analog connection.
You’ll probably also want to connect a video
output to your AV receiver. You can use any of
the video outputs available on this player (the
illustration shows a standard (composite)
connection).
1 Connect the COAXIAL DIGITAL AUDIO
OUT jack on this player to a coaxial digital
input on your AV receiver.
To coaxial digital
input
AV receiver
Use a coaxial cable (similar to the supplied
video cable) to connect the
AUDIO OUT
jack to a coaxial input on your AV
receiver.
2 Connect the analog AUDIO OUT L/R
and VIDEO OUT jacks on this player to a set
of analog audio/video inputs on your AV
receiver.
AV receiver
COAXIAL DIGITAL
To audio/video inputs
You can use the S-video or component video
jacks to connect to the AV receiver if you
prefer.
13
En
 Loading...