

Kenwood KSC-43 Instruction Manual
RAPID CHARGER
KSC-43
INSTRUCTION MANUAL
Thank you for purchasing this charger. This product will offer years of
reliable service when used to charge the specifi ed battery packs.
SUPPLIED EQUIPMENT
Charger .............................................. W08-1331-XX .............................1
Holder ................................................ J19-5586-XX ............................... 1
AC adapter .............................................................................................1
K type .............................................W08-1326-XX
E type .............................................W08-1327-XX
T type .............................................. W08-1328-XX
X type .............................................W08-1329-XX
Instruction manual ............................
B62-2495-XX
..............................1
APPLICABLE BATTERY PACK
Charge only the battery pack listed below. Other types of batteries may
burst, causing personal injury.
KNB-29N (Ni-MH) KNB-45L (Li-ion) KNB-53N (Ni-MH)
KNB-63L (Li-ion) KNB-65L (Li-ion) KNB-69L (Li-ion)
CHARGING TIPS
• Using the transceiver while charging its battery pack will interfere with
correct charging.
• If the operating time of a battery pack decreases although the battery
pack is fully and correctly charged, the battery pack life is over.
Replace the battery pack.
• The ambient temperature should be from 41°F (5°C) to 104°F (40°C) while
charging is in progress.
• The charging times provided are obtained when a battery pack
discharged to 3 V/cell x 2 (Li-ion) or 1 V/cell x 6 (Ni-MH) charged at
normal temperatures. This charging time varies depending on the
degree of discharge and the ambient charging temperature.
• This charger may be suitable to charge battery packs not listed herein,
due to further technology development.
• If the battery pack contacts are not properly mated with the charger
terminals, the indicator may fl ashing red or may remain unlit. To resolve
this problem, reinsert the battery pack after cleaning the battery pack
contacts and the charger terminals.
• When using this equipment near a radio or television, you may
experience interference with reception.
CHARGING PROCEDURE
WARNING: Do not use in explosive atmospheres (gases, dust,
fumes, etc.).
ATTENTION: Always switch OFF a transceiver equipped with a battery
pack before inserting the transceiver into the charger.
1 Plug the AC adapter cable into the jack located on the rear of the
charger.
2 Plug the AC adapter into an AC outlet.
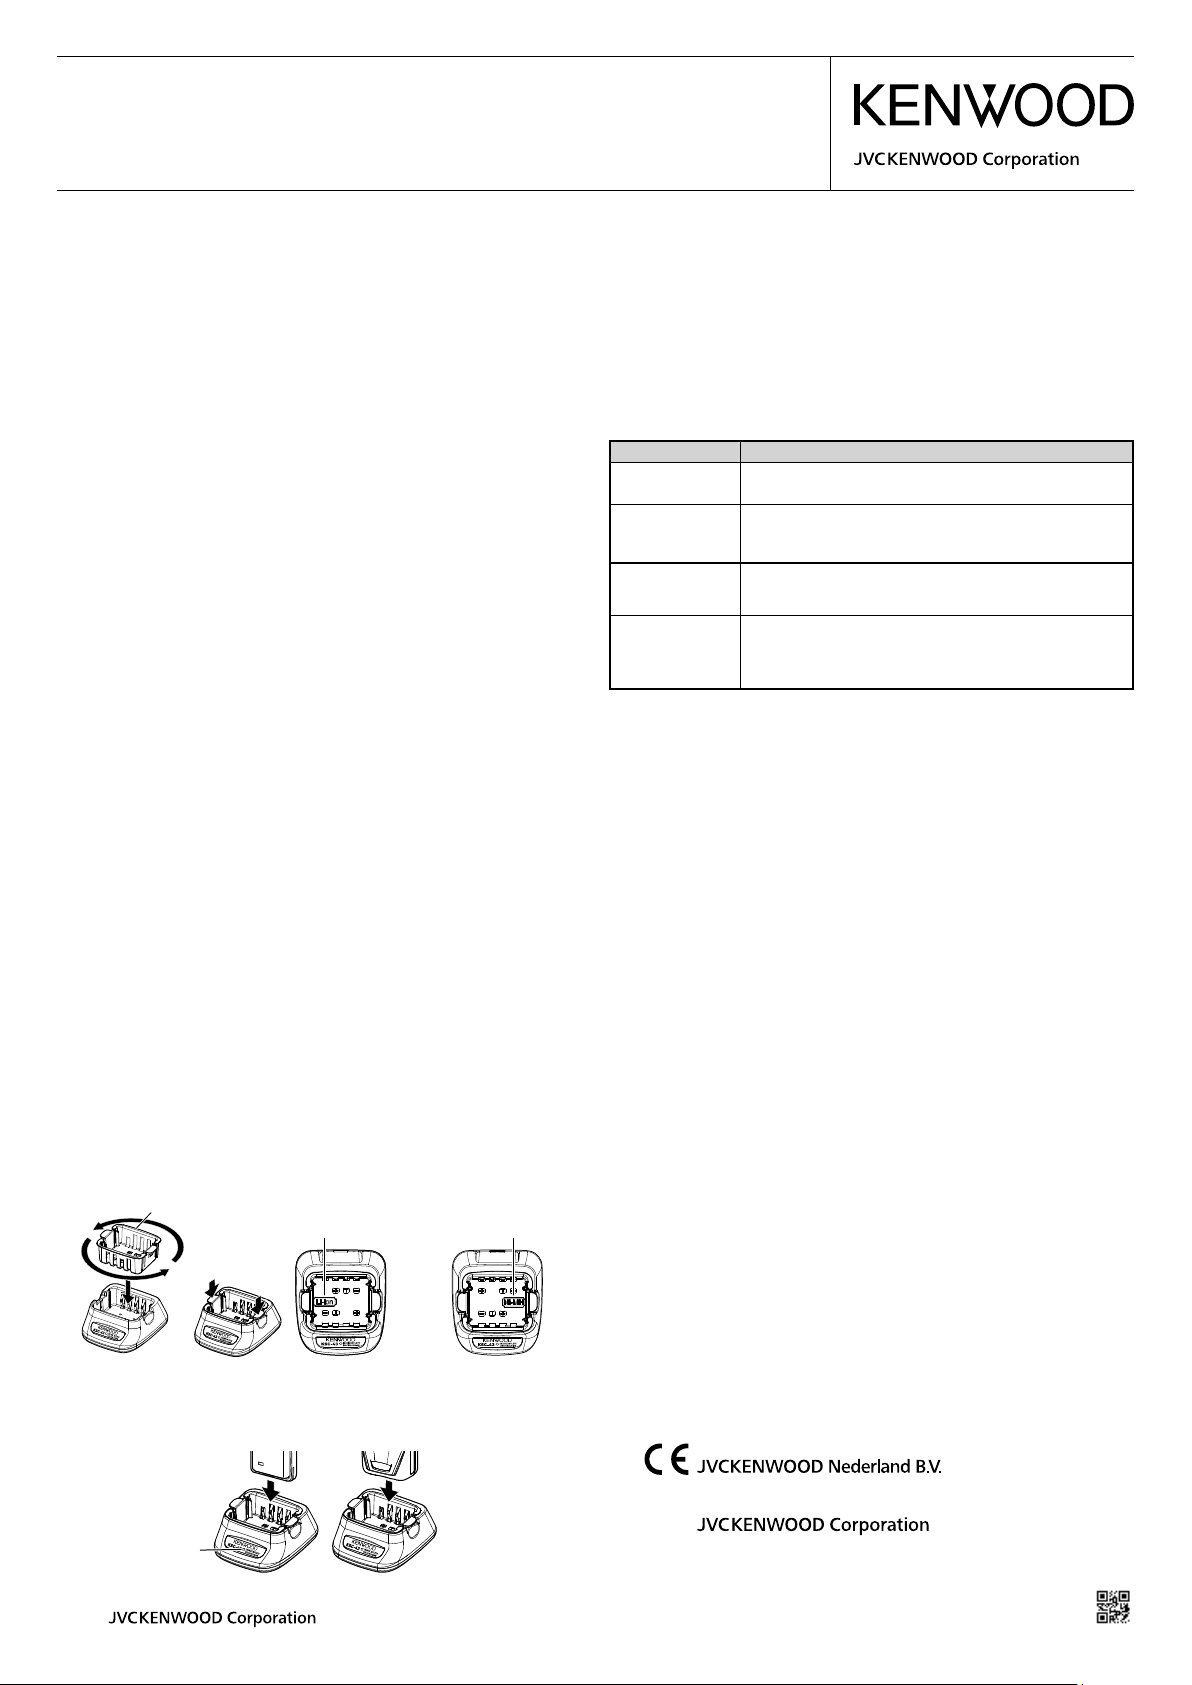
3 Match the Holder to the type of battery pack to be charged so that
when inserting the Holder, the battery type name can be seen on
the bottom of the charger. After inserting the Holder into the charger,
press the locking tabs to secure it in place.
Holder
Li-ion battery
charger
Ni-MH battery
charger
• Make sure the metal contacts of the battery pack mate securely
with the charger terminals.
• The indicator lights red and charging starts.
5 When charging is completed, the indicator lights fl ashing green.
Remove the battery pack or the transceiver from the charging slot.
• When the charger will not be used for a long time, unplug the AC
adapter from the AC outlet.
Approximate Charging Times
3 hours
Charger Status Table
Indicator color Meaning
Red
Flashing Red
Flashing Green
Alternates
fl ashing green
and orange
A battery pack is in the charging slot and charging has
started.
The battery pack is defective or the battery pack
contacts are not properly mated with those of the
charger.
Charging is completed; remove the battery pack or the
transceiver from the charging slot.
The temperature of the battery pack has not satisfi ed
the charging start temperature. Remove the battery
pack from the charger and wait until it reaches a
normal temperature before charging it again.
SAFETY PRECAUTIONS
Please read all safety instructions before using this charger. For best results,
be aware of all warnings on the charger, the battery pack, and the product
using the battery pack.
• Do not disassemble the charger. Incorrect reassembly can cause fi re
or electric shock.
• Use of an attachment not recommended by nor sold by KENWOOD
can cause fi re, electric shock, or injury.
• Do not expose the charger to rain or moisture, to avoid the risk of fi re
or electric shock.
• Always remove the AC adapter from a wall outlet before attempting
to inspect or clean the charger. Removing the battery packs or
changing the controls does not remove the AC voltage from the
charger.
• Position the AC adapter cable so it will not be stepped on, tripped
over, nor subjected to damage.
• Always remove the AC adapter from an AC wall outlet by pulling on
the adapter rather than the cable.
• Do not use the charger if it has a damaged AC adapter or adapter
cable, or if the charger has been damaged in any way. Contact your
KENWOOD dealer to replace or repair the damaged part.
• Prevent strong impacts, such as caused by dropping, since the
charger can be damaged.
• Do not use the charger in hot or humid environments, in direct
sunlight, nor near heaters.
• Do not use solvents such as benzene or paint thinner to clean the
charger.
• Use only the supplied AC adapter.
• To remove the Holder, squeeze the locking tabs together then pull
the Holder out of the charger.
4 Slide a battery pack or a transceiver equipped with a battery pack
into the charging slot.
Indicator
© 2016
SPECIFICATIONS
AC Voltages: 100 - 240 V AC only
Dimensions (W x H x D)/ Weight (charger only):
85.7 x 41.4 x 100.2 mm / 112 g <3.37 x 1.63 x 3.94 in./ 4.0 oz>
Note: The charger specifi cations are indicated on the bottom plate of the
charger.
Authorized Representative in Europe:
Amsterdamseweg 37, 1422 AC Uithoorn, The Netherlands
Manufacturer:
3-12 Moriyacho, Kanagawa-ku, Yokohama-shi, Kanagawa,
221-0022, Japan
B62-2495-10 (K, E, T, X)
<1/6>
CHARGEUR RAPIDE
KSC-43
MODE D’EMPLOI
Nous vous remercions d’avoir acheté ce chargeur. Ce produit vous donnera
des années de service fi able si vous l’utilisez pour charger les blocs-piles
prévus à cet effet.
MATÉRIEL FOURNI
Chargeur ............................................ W08-1331-XX .............................1
Support .............................................. J19-5586-XX ............................... 1
Adaptateur CA ........................................................................................ 1
Type K ............................................. W08-1326-XX
Type E ............................................. W08-1327-XX
Type T ............................................. W08-1328-XX
Type X ............................................. W08-1329-XX
Mode d'emploi ..................................
B62-2495-XX
..............................1
BLOC-PILES APPROPRIÉ
Ne chargez que le bloc-piles énumérés ci-dessous. Les autres types de
batterie pourraient éclater et causer des blessures corporelles.
KNB-29N (Ni-MH)
KNB-63L (Lithium-ion) KNB-65L (Lithium-ion) KNB-69L (Lithium-ion)
KNB-45L (Lithium-ion) KNB-53N (Ni-MH)
CONSEILS CONCERNANT LA CHARGE
• L’utilisation de l’émetteur-récepteur pendant la charge du bloc-piles
entrave le processus.
• Lorsque l’autonomie d’un bloc-piles diminue malgré qu’il soit chargé
correctement et à fond, cela indique que sa durée de service est
écoulée. Remplacez-le.
• La charge du bloc-piles doit être effectuée à une température
ambiante se situant entre 5°C et 40°C.
• Les durées de charge fournies ont été obtenues lorsqu’un bloc-piles
déchargé jusqu’à 3 V/pile x 2 est chargé à une température normale.
Cette durée de charge dépend du niveau de décharge et de la
température de charge ambiante.
• En raison des nouveaux développements technologiques, ce
chargeur pourrait être approprié pour charger des blocs-piles non
énumérés ici.
• Si les contacts du bloc-piles ne sont pas en contact direct les bornes
du chargeur, le témoin peut clignote en rouge ou même demeurer
éteint. Pour contrer ce problème, nettoyez les contacts du bloc-piles
et les bornes du chargeur avant de réinsérer le bloc-piles.
• Lorsque cet appareil est utilisé à proximité d’une radio ou d’un
téléviseur, des interférences risquent d’altérer la réception.
PROCÉDURE DE CHARGEE
AVERTISSEMENT: Ne pas utiliser dans des atmosphères explosives
(gaz, poussière, fumées, etc.)
ATTENTION: Un emetteur-recepteur muni d’un bloc-piles doit toujours etre
mis hors tension avant d’etre insere dans le chargeur.
1 Branchez le câble adaptateur CA à la prise pour adaptateur située à
l’arrière du chargeur.
2 Branchez l’adaptateur CA dans une prise secteur.
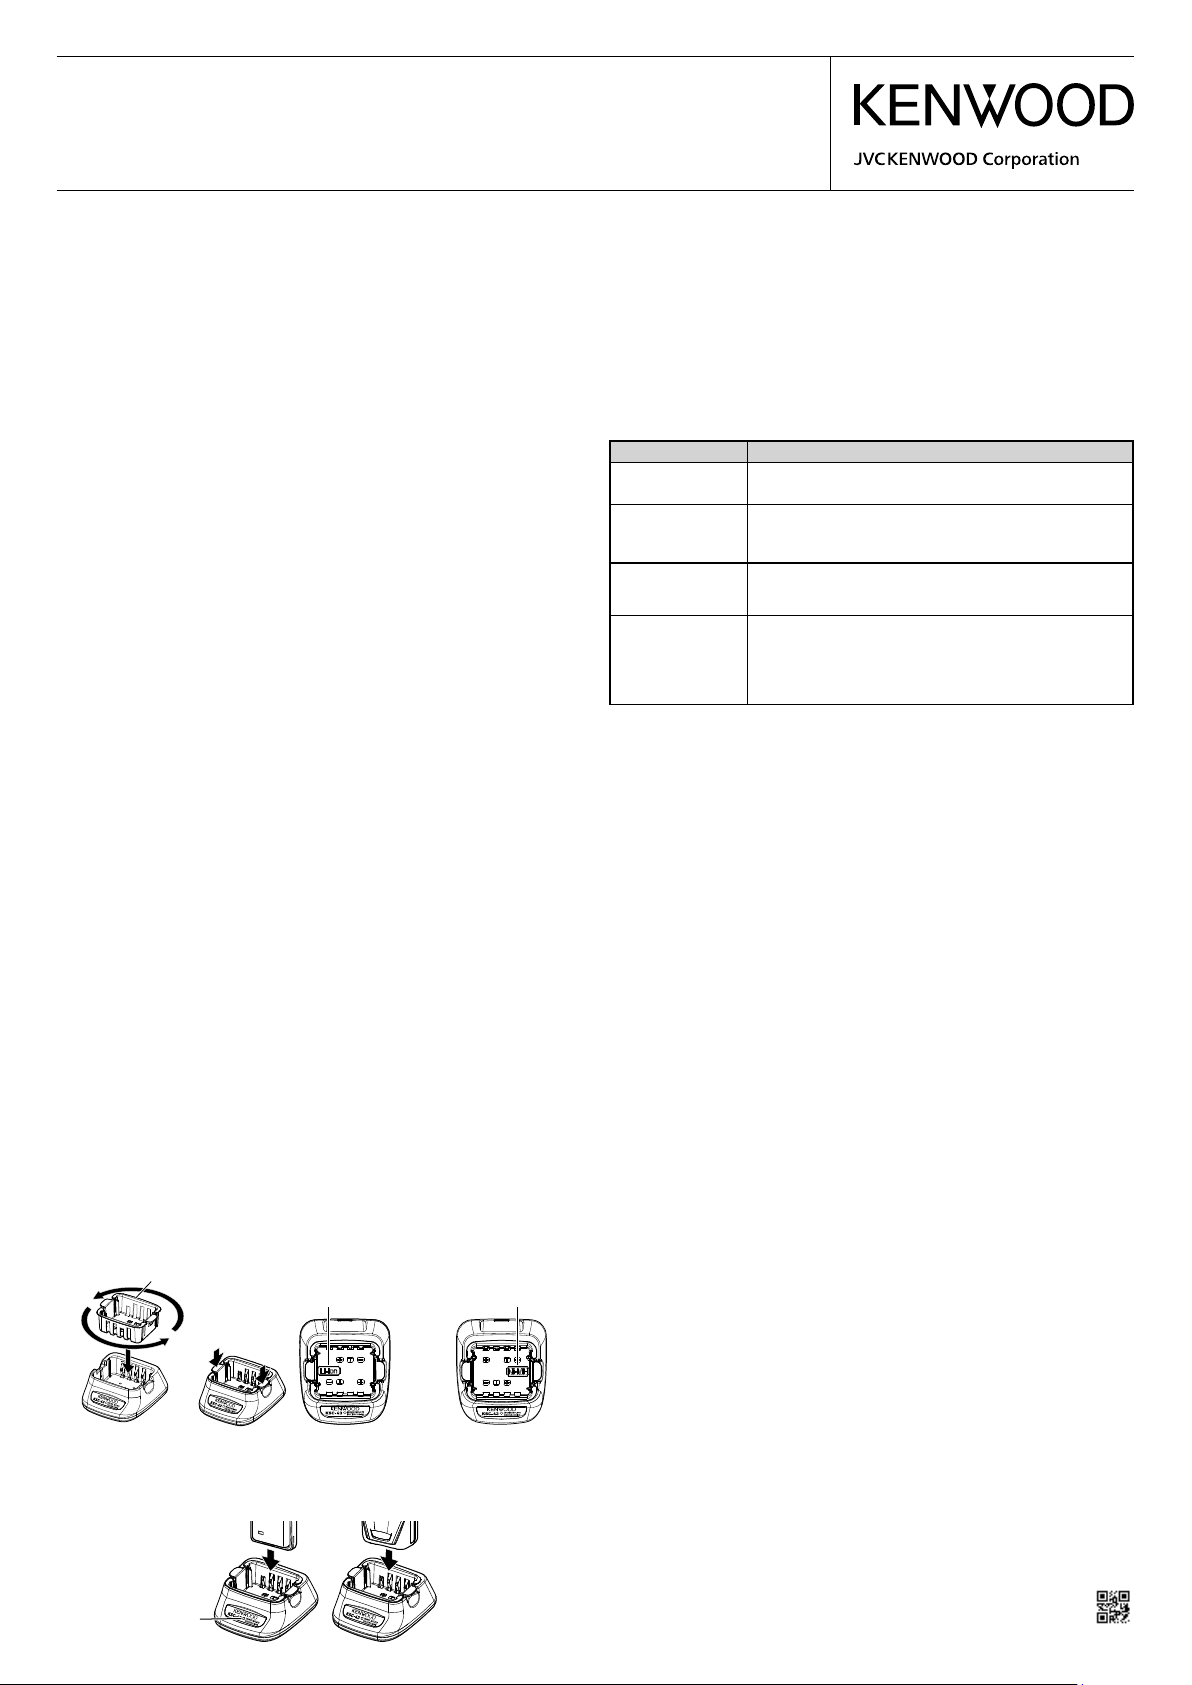
3 Faites correspondre le support avec le type de batterie à charger de
sorte que lors de l’insertion du support, le nom du type de batterie
soit visible à la base du chargeur. Après avoir inséré le support
dans le chargeur, appuyez sur les languettes de verrouillage pour le
maintenir en place.
Support
• Pour enlever le support, comprimez les deux languettes de
verrouillage, ensuite enlevez le support du chargeur.
4 Insérez un bloc-piles ou un émetteur-récepteur muni d’un bloc-piles
dans la fente du chargeur.
Chargeur de batterie
au lithium-ion
Chargeur de
batterie Ni-MH
• Assurez-vous que les contacts métalliques du blocpiles sont bien
en contact avec les bornes du chargeur.
• Le témoin devient rouge et le chargement commence.
5 Lorsque la charge est terminée, le témoin clignote en vert. Retirez le
bloc-piles ou l’émetteur-récepteur de la fente du chargeur.
• Si vous ne prévoyez pas utiliser le chargeur pendant une longue
période, débranchez l’adaptateur CA de la prise secteur.
Durées de charge approximatives
3 heures
Tableau des états du chargeur
Couleur de témoin Signifi cation
Rouge
Clignote en rouge
Clignote en vert
Alterne vert et
orange clignotant
Un bloc-piles se trouve dans la fente du chargeur et la
charge a commencé.
Le bloc-piles est défectueux ou les contacts du blocpiles ne sont pas en contact direct avec ceux du
chargeur.
La charge est terminée; Retirez le bloc-piles ou
l´émetteur-récepteur de la fente du chargeur.
La température du bloc-piles, batterie n’a pas
respecté la température de départ de chargement.
Enlevez le bloc-piles du chargeur et attendez jusqu’à
ce qu’il atteigne une température normale avant de le
recharger.
MESURES DE SÉCURITÉ
Veuillez lire toutes les instructions de sécurité avant d’utiliser ce chargeur.
Pour de meilleurs résultats, veuillez tenir compte de toutes les mises en
garde se trouvant sur le chargeur, sur le bloc-piles et sur
l’appareil qui utilise ce dernier.
• Ne démontez pas le chargeur. Un remontage incorrect pourrait être la
cause d’un incendie ou d’une électrocution.
• N’utilisez aucun accessoire qui ne soit ni recommandé ni vendu par
KENWOOD, car cela pourrait causer un incendie, une électrocution
ou une blessure corporelle.
• Pour éviter les risques d’incendie ou d’électrocution, n’exposez pas le
chargeur à la pluie ni à l’humidité.
• Débranchez toujours l’adaptateur CA de la prise secteur avant
d’examiner ou de nettoyer le chargeur. Le fait d’enlever le bloc-piles
ou de changer les commandes ne coupe pas la tension CA appliquée
chargeur.
• Placez le câble adaptateur CA de manière à éviter qu’il ne soit
écrasé, qu’une personne ne trébuche ou qu’il soit endommagé de
quelconque façon.
• Pour débrancher l’adaptateur CA de la prise secteur, tirez sur
l’adaptateur et non sur le câble.
• N’utilisez pas le chargeur s’il est muni d’un adaptateur ou d’un câble
d’adaptateur CA endommagé, ou si le chargeur a été endommagé
d’une quelconque façon. Contactez votre fournisseur KENWOOD,
pour remplacer ou réparer la pièce endommagée.
• Évitez les impacts violents tels que ceux causés par une chute, car le
chargeur pourrait être endommagé.
• N’utilisez pas le chargeur dans un environnement chaud ou humide ni
sous les rayons directs du soleil ni près des appareils de chauffage.
• N’utilisez pas de solvants tels que le benzène ou un diluant à peinture
pour nettoyer le chargeur.
• N’utilisez que l’adaptateur CA fourni.
FICHE TECHNIQUE
Tensions CA: 100 - 240 V CA seulement
Dimensions (L x H x P)/ Poids (chargeur seulement):
85,7 x 41,4 x 100,2 mm / 112 g
Remarque: Les caractéristiques du chargeur sont indiquées sur la plaque
de dessous du chargeur.
Tém oi n
B62-2495-10 (K, E, T, X)
<2/6>
 Loading...