

Page 1

KSC-310CCS
CENTER CHANNEL SPEAKER
INSTRUCTION MANUAL
ENCEINTE DE CANAL CENTRAL
MODE D’EMPLOI
MITTELKANAL-LAUTSPRECHER
BEDIENUNGSANLEITUNG
MIDDENKANAAL-LUIDSPREKER
GEBRUIKSAANWIJZING
DIFFUSORE CANALE CENTRALE
ISTRUZIONI PER L’USO
ALTAVOZ DE CANAL CENTRAL
MANUAL DE INSTRUCCIONES
This Product is not installed by the manufacturer of a vehicle on the production line, nor
by the professional importer of a vehicle into an EU Member State.
Dieses Produkt wird weder vom Hersteller eines Fahrzeugs während der Produktion
noch von einem professionellen Importeur eines Fahrzeugs in einen EU-Mitgliedsstaat
eingebaut.
Ce produit n’est pas installé par le constructeur d’un véhicule sur le site de production,
ni par l’importateur professionnel d’un véhicule dans un Etat membre de l’UE.
Questo prodotto non è installato dal produttore di un veicolo della linea di produzione,
nemmeno dall’importatore professionale di un veicolo negli stati membro della UE.
Dit product wordt niet geïnstalleerd door de fabrikant van een voertuig op de productielijn,
noch door de professionele invoerder van een voertuig in EU-lidstaten.
Este producto no ha sido instalado en la línea de producción por el fabricante de un
vehículo, ni tampoco por el importador profesional de un vehículo dentro del estado
miembro de la UE.
ENGLISH
FRANÇAIS
DEUTSCH
NEDERLANDS
ITALIANO
ESPAÑOL
KENWOOD CORPORATION
© PRINTED IN CHINA B61-1235-00 (FPI)
Page 2
IMPORTANT SAFEGUARDS /
Caution:Read this page carefully to keep your
safety.
WARNING
● To prevent a short circuit, never put or leave any metallic objects
(such as coins or metal tools) inside the speaker.
● Abnormal smell – In the event the unit generates smoke or ab-
normal smell, immediately switch the power OFF. After this, please
contact your dealer or nearest service station as soon as possible.
POWER OFF!
● Modification – Do not attempt to open or modify the unit, for this
could cause fire hazard or malfunction.
● Suffocation – After taking the unit out of the polyethylene bag, be
sure to dispose of the polyethylene bag out of the reach of children. Otherwise, they may play with the bag, which could cause
ENGLISH
FRANÇAIS
DEUTSCH
NEDERLANDS
ITALIANO
ESPAÑOL
hazard of suffocation.
CAUTION
● Do not install the speaker in a spot exposed to direct sunlight or
excessive heat or humidity.
● Water and moisture – Do not install the speakers in locations
which may be subject to water or moisture.
● Dust and unstable locations – Do not install the speakers in
unstable locations or locations subject to dust.
● If the fuse blows, after checking to see if the wiring cord has shorted,
be sure to replace with the stipulated size (amperage) fuse as
displayed on the fuse box.
(Using fuses other than the stipulated size can cause fires.)
Check the display!
To replace the fuse, refer to the vehicle instruction manual.
● To prevent a short circuit when replacing a fuse, disconnect the
wiring harness at first.
● Do not use gasoline, naphtha, or any type of solvent to clean the
speaker. Clean by wiping with a soft, dry cloth.
● Connect the speaker wires to appropriate speaker connectors
separately. Sharing the negative wire of the speaker or grounding
speaker wires to the metal body of the car can cause this unit to
fail.
● For ground wire mounting, do not fasten the wire to an airbag,
steering or brake line system or other critical safety unit bolts or
nut.
(Can cause accidents.)
● When mounting, be sure to mount in a place that will not interfere
with driving or be dangerous to passengers during sudden braking
etc.
(Cause of injury or accidents.)
● After installing the unit, check to make sure that electrical equipment such as the brake lamps, turn signal lamps and windshield
wipers operate normally.
Before installing the speaker or making any connections, please
read all of this instruction manual carefully, to make sure that
you perform these operations correctly.
■ For your records
Record the serial number, located on the back of the amplifier in the
spaces designated on the warranty card, and in the space provided
below. Refer to this model’s name and serial number whenever you
call upon your KENWOOD dealer for information or service on this
amplifier.
Model KSC-310CCS Serial number ________
■ Safety Precautions
In a situation where the car has been left in direct sunlight with its
windows closed and the temperature inside the car has risen to a
very high level, switch on the air conditioner or drive the car for awhile
with the windows open before operating the car stereo. Do not operate the car stereo until the temperature inside the car has dropped to
a normal level.
AVERTISSEMENTS IMPORTANTS
Attention: Lire attentivement cette page pour
ATTENTION DANGER
● Pour éviter tout court-circuit, n’introduisez jamais un objet
métalliaque (pièces de monnaie, outils) dans un haut-parleur.
● Odeur anormale – Dans le cas oû l’appareil produit de la fumée
ou une odeur anormale, couper immédiatement l’alimentation.
Contacter ensulte votre concessionnaire ou centre de service plus
proche le plus rapidement possible.
COUPER L’ALIMENTATION!
● Modiffication – Ne pas essayer de démonter ni de modifier
l’apparell car ceci risque de provoquar un risque d’incendie ou un
fonctionnement incorrect.
● Etouffement – Après avoir retré l’appareil du sac de polyéthylàne,
bien placer ce dernier hors de la portée des enfants. S’ils jouent
avec ce sac, un risque d’étouffement est possible.
ATTENTION
● N’installez pas le haut-parleur dans un endroit directement exposé
au soleil ou à une humidité ouchaleur excessives.
● Esu et humidité – Ne pas installer les haut-parieurs dans des
endroits où ils peuvent être exposés à de l’eau ou à l’humidité.
● Poussière et endroits instables – Ne pas installer les haut-
parleurs dans de endroits instables ou exposés à de la poussière.
● Si le fusible grille, assurez-vous de le remplacer, après avoir vérifié
que le câblage n’est pas en court-circuit, par un fusible du calibre
spécifié (ampérage) sur le boîtier.
(L’utilisation de fusible de calibre supérieur peut causer un incendie)
Vérifiez l’affichage !
Pour le remplacement de fusible, consultez le manuel d’utilisation
du véhicule.
● Avant de remplacer le fusible et pour éviter tout court-circuit,
débranchez le faisceau.
● N’utilisez ni essence, ni pétrole ni aucun solvant pour nettoyer le
haut-parleur. Utilisez un chiffon doux et sec.
● Reliez séparément les cordons de liaison des haut-parleurs aux
bornes convenables. Une liaison commune du cordon relié à la
borne négative, ou la mise à la masse de la carrosserie de ces
cordons peuvent entraîner une anomalie de fonctionnement.
● Pour le raccordement à la masse, ne pas fixer le fil à un airbag, au
système de direction, à une ligne du système de freinage ou à
tout autre boulon ou écrou critique en terme de sécurité.
(Risque d’accident).
● Pour l’installation, choisissez un emplacement qui ne présente
aucune gêne pour la conduite du véhicule ou un danger pour les
passagers lors de freinages soudains, etc.
(Risque de blessure ou d’accident)
● Apès installation assurez-vous que les équipements électriques
tels que les feux stop, les feux clignotants et les essuieglace
fonctionnent toujours normalement.
Avant déffectuer l’installation ou tout raccordement de hautparleur, lire ces instructions de montage avec soin et en entier
de manière à procéder correctement.
■ Pour votre propre référence
Noter le numéro de série, situé sur le dessous du amplificateur, dans
les espaces réservés sur la carte de garantie et dans l’espace cidessous. Se référer à ce nom de modè et à celui de série dans le
cas où vous consultez votre concessionnaire KENWOOD pour des
informations ou des réparations de cet amplificateur.
Modèle KSC-310CCS Numéro de série ________
■ Précautions pour la sécurité
Dans les cas où la voiture est laissée directement au soleil avec les
vitres fermées et que la température à l’intérieur de la voiture s’est
élevée à un très haut niveau, mettre le climatiseur en circuit ou
conduire pendant un moment avec les vitres ouvertes avant de faire
fonctionner l’autostéréo. Ne pas faire fonctionner l’autostéréo avant
que la température dans la voiture ne soit retournée à un niveau
normal.
votre sécurité.
2 KSC-310CCS
Page 3
Parts check / Vérification des pièces
Part Name Outside Shape
No.
Désignation des pièces Forme extérieure
1 Speaker
Haut-parleur
2 Bracket
(Double faced tape
attached)
Support 1
(fixé avec du ruban
adhésif double face)
Quantity
Quantité
1
Part Name Outside Shape
No.
Désignation des pièces Forme extérieure
3 Tap screw
(φ 4 × 16)
Vis auto taraudeuse
(φ 4 × 16) 2
4 Speed nut
Ecrou rapides
Quantity
Quantité
2
ENGLISH
FRANÇAIS
DEUTSCH
NEDERLANDS
KSC-310CCS 3
ITALIANO
ESPAÑOL
Page 4
Mounting the speaker / Montage du haut-parleur
[Step 1]
[Etape 1]
● Cut off the template from the carton box. Set the template so that the arrow points towards the passenger, and mark the holes with a pen.
CAUTION
Mount in a place where it will not interfere with the
air bag.
Be careful not to cover the air-conditioning vent
when mounting.
ENGLISH
[Step 2]
[Etape 2]
● Découpez le modèle dans la boîte en carton. Posez
le modèle de sorte que la flèche soit orientée vers le
passager et marquez les orifices avec un crayon.
ATTENTION
Montez le haut-parleur de sorte qu’il ne gêne pas
le coussin d’air.
Attention de ne pas recouvrir la sortie d’air du
climatiseur lors du montage.
3 Tap screw × 2
3 Vis auto taraudeuse × 2
Double face tape
Ruban adhésif double face
FRANÇAIS
DEUTSCH
NEDERLANDS
4 Speed nut × 2
4 Ecrou rapides × 2
● Remove the cover paper from bracket 2 and attach
ITALIANO
ESPAÑOL
it to the dashboard so that arrow points towards the
passenger.
● Mount bracket 2 on the dashboard with the tap
screws (φ 4 × 16) 3 and speed nut 4.
Make Sure To:
• Mount in a place near the center of the vehicle
where it will not interfere with driving and as level
as possible.
• Attach after thoroughly cleaning and drying the
mounting place with the cleaner (sold separately).
Remove the cover paper
Retirez le papier de protection
Front glass side
Côté vitre avant
2 Bracket
2 Support
Arrow
Flèche
Dashboard
Tableau de bord
● Retirez le papier de protection du support 2 et fixez-
le au tableau de bord de sorte que la flèche soit
orientée vers le passager.
● Montez le support 2 sur le tableau de bord à l’aide
des vis auto taraudeuses (φ 4 × 16) 3 et les écrous
rapides 4.
Assurez-vous de bien:
• Installer l’appareil dans un endroit proche du centre
du véhicule où il ne gênera pas la conduite et sera
le plus possible de niveau.
• Fixer l’appareil après avoir nettoyé et séché
l’emplacement de montage avec le produit de
nettoyage (vendu séparément).
4 KSC-310CCS
Page 5
[Step 3]
[Etape 3]
The front holes of the speaker
Orifices avant du haut-parleur
Speaker Cord
Câble de haut-parleur
Slot
Fente
Notch
Entaille
A
The back holes of the speaker
Orifices arrière du haut-parleur
1. When bringing out the speaker cord from the back,
slide the cord along the slot on the bottom of the
speaker 1, and fix by hooking the cord between
the notches.
1 Speaker
1 Haut-parleur
2 Bracket
2 Support
2.Insert the two back side lugs of the bracket 2 into
the back two holes of the speaker.
3.Insert the two front side lugs of the bracket 2 into
the front two holes of the speaker, by pulling the
speaker 1 towards the front.
4.Fix completely by pushing down the front of the
speaker 1.
CAUTION
Do not apply strong pressure onto the surface of
saran net, including manual push or thrust; otherwise the speaker system installed inside may be
damaged.
Notch
Entaille
1. Lorsque vous faites ressortir le cordon de haut-
2 Bracket
2 Support
2. Insérez les deux barrettes côté arrière du support
3. Insérez les deux barrettes côté avant du support 2
4. Fixez complètement en appuyant l’avant du haut-
Bottom View (Detail A)
Vue du bas (Détail A)
parleur de l’arrière, faites glisser le cordon le long de
la fente au bas du haut-parleur 1, et fixez-le en
accrochant le cordon dans les entailles.
The back side lug
Barrette côté arrière
The front side lug
Barrette côté avant
2 dans les deux orifices arrière du haut-parleur.
dans les deux orifices avant du haut-parleur en tirant
le haut-parleur 1 vers l’avant.
parleur 1 vers le bas.
ATTENTION
Ne pas appliquer de pression sur la surface de la
grille en saran, y compris avec la main ou dans un
élan, car cela pourrait endommager le système de
haut-parleur installé à l'intérieur.
ENGLISH
FRANÇAIS
DEUTSCH
NEDERLANDS
ITALIANO
ESPAÑOL
KSC-310CCS 5
Page 6
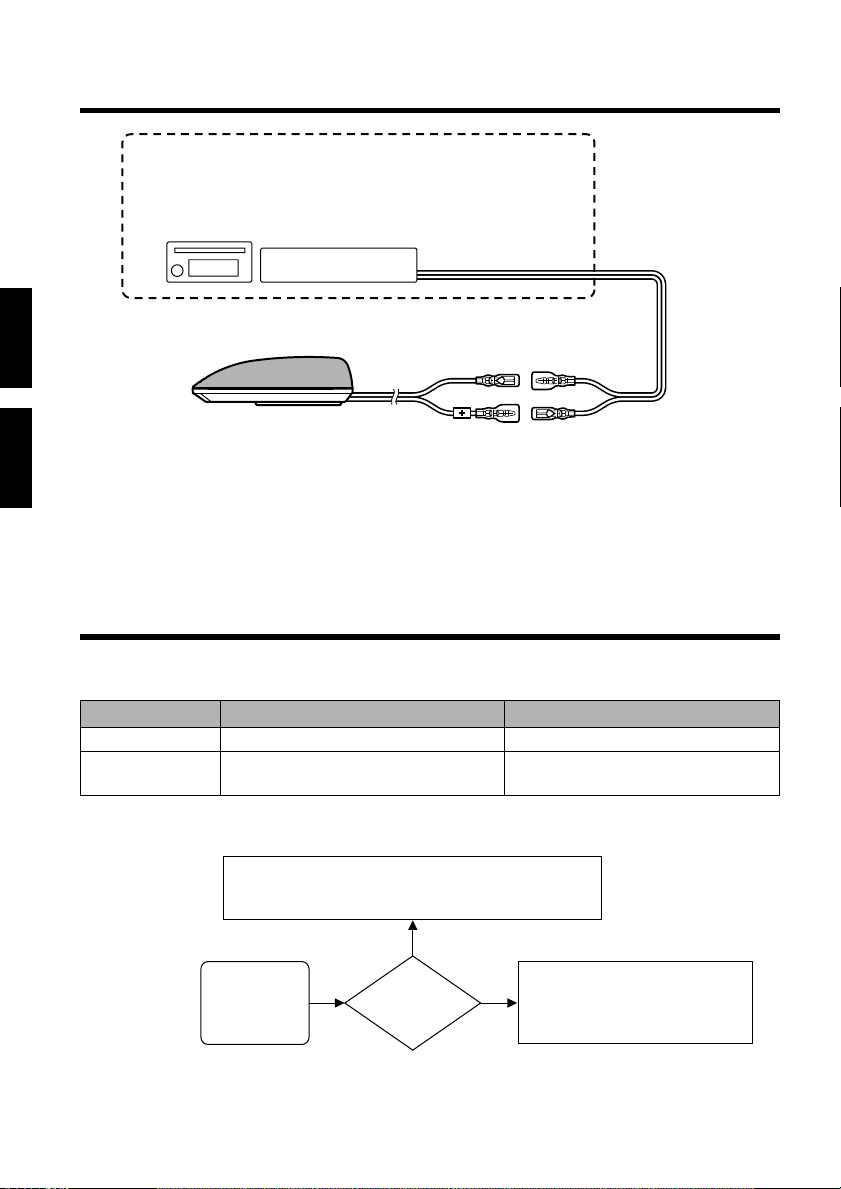
Connection / Connexions
DVD center unit
(sold separately)
Unité centrale DVD
(vendue séparément)
ENGLISH
5.1ch surround processor
(sold separately)
Processeur surround à 5.1canaux
(vendu séparément)
Center
Centre
Speaker cord (black) –
Câble d’enceinte (noir) –
Speaker cord (black / white color) +
Câble d’enceinte (noir / blanc) +
FRANÇAIS
You think it’s out of order but... (Troubleshooting) /
DEUTSCH
Même si vous estimez qu’il ne marche plus….(Résolution des problèmes)
It’s not operating right and you think it’s faulty, but before requesting service, check one more time according to the
problem.
NEDERLANDS
Problem Cause Remedy
No sound
Sound quality is bad
(sound is distorted).
Refer to chart 1
The speaker cord is pinched in a vehicle
screw.
Refer to chart 1
Check the speaker cord
ITALIANO
ESPAÑOL
[Chart 1]
6 KSC-310CCS
• The vehicle ignition switch (ACC ON)
• Vehicle fuse
• Check the DVD center unit or 5.1ch surround processor connection.
NO
No sound
Is there
sound coming from
other speakers?
• Check setting of DVD center unit
• Recheck the input terminal connection
YES
Page 7

Avant de faire appel au SAV, lorsque l’appareil ne semble pas fonctionner correctement, vérifiez encore une fois
qu’il ne s’agit pas d’un des problèmes suivants:
Problème Cause Remède
Pas de son
La qualité sonore
est insuffisante
Veuillez consulter le tableau 1
Le câble d’enceinte est pincé par une vis du
véhicule.
Veuillez consulter le tableau 1
Vérifiez le câble d’enceinte
(le son est déformé).
[Tableau 1]
• Commutateur à clef sur ON ou ACC
• Fusible du véhicule
• Vérifiez la connexion de l’unité centrale DVD ou du processeur
surround à 5.1canaux.
NO
ENGLISH
ENGLISH
Pas de son
les autres enceintes
Rating / Caractéristiques
CAUTION
The following ratings and design are subject to
change without notice.
Format Center Speaker
Type Enclosed type
Peak input power 60 W
Rated input power 15 W
Rated Impedance 4 Ω
Frequency response 300 – 25,000 Hz
Material ABS plastic
Speakers used
External size Width 95 mm
Weight 290 g
Full range 50 mm (1-15/16")
(3-3/4")
Height 39 mm
Depth 130 mm
(1-9/16")
(5-1/8")
(0.6 lb)
Est-ce que
produisent du
son ?
• Vérifiez le réglage de l’unité centrale DVD
• Vérifiez la connexion de la borne d’entrée
YES
ATTENTION
La conception et les caractéristiques suivantes
peuvent être modifiées sans préavis.
Format Enceinte centrale
Type Type fermée
Entrée de crête momentanée
60 W
Entrée nominale 15 W
Impédance nominale 4 Ω
Réponse en fréquence 300 à 25.000Hz
Matériau Plastique ABS
Enceintes utilisées Pleine gamme 50 mm
Dimensions hors tout
L : 95 mm
H : 39 mm
P : 130 mm
Poids 290g
FRANÇAIS
FRANÇAIS
DEUTSCH
NEDERLANDS
ITALIANO
ESPAÑOL
KSC-310CCS 7
Page 8

WICHTIGE SICHERHEITSHINWEISE / BELANGRIJKE VOORZORGSMAATREGELEN
Achtung: Diese Seite sorgfältig durchlesen.
WARNUNG
● Um einen Kurzschluß zu vermeiden, niemals Metallgegenstände
(wie zum Beispiel Münzen oder Werkzeuge aus Metall) im Innern
des Lautsprechers liegenlassen.
● Branderuch – Dei Brandgeruch oder Rauch muß die
Spannungsversorgung sofort ausgeschaltet werden, Wenden Sie
sich dann so bald wie möglich an Ihren Fachhändler oder eine
Kundendienststelle.
AUSSCHALTEN!
● Veränderungen – Niemals versuchen, die Lautsprecher zu öhnen
oder zu verändern, weil dadurch Fauergefahr und Fehlfunktionen
hervorgerufen werden können.
● Erstickungsgefahr – Nach der Entnahme der Lautsprecher aus
dem Polyäthylenbeutei muß dieser für Kinder unerrelchbar endzorgt
ENGLISH
werden. Wenn Kinder mit dem Bautel spielen, besteht
Erstickungsgefahr
.
VORSICHT
● Der Lautsprecher darf nicht an Stellen montiert werden, die einer
direkten Sonnenbestrahlung, übermäßiger Wärme oder starker
Luftfeuchtigkeit ausgesetzt sind.
● Wasser und Feuchtigkeit – Die Lautsprecher nicht an stellen
einbauen, wo sie Wasser oder Feuchtigkeit ausgesetzt werden.
● Staub und unstabile Stellen – Die Lautsprecher nicht an unstabilen
FRANÇAIS
DEUTSCH
NEDERLANDS
ITALIANO
ESPAÑOL
Stellen oder Stellen, wo sie Staub ausgesetzt sind, einbauen.
● Wenn die Sicherung herausgesprungen ist, überprüfen Sie
zunächst, ob ein Kurzschluss vorliegt. Tauschen Sie die Sicherung
dann gegen eine Sicherung mit der auf dem Sicherungskasten
aufgeführten vorgeschriebenen Kapazität (Amperezahl) aus.
(Die Benutzung anderer als der vorgeschriebenen Sicherungen
kann einen Brand verursachen.)
Überprüfen Sie das Display!
Beziehen Sie sich bezüglich des Sicherungsaustausches auf die
Betriebsanleitung Ihres Fahrzeuges.
Um einen Kurzschluß beim Auswechseln der Sicherung zu vermeiden,
●
ist vor Beginn der Arbeiten das Zuleitungskabel abzuziechen.
● Zur Reining des Lautsprecers niemals Benzin, Kerosin oder ein
anderes Lösungsmittel verwenden. Zum Sauberwischen stets
einen weichen, trockenen Lappen benutzen.
Die Lautsprecherkabel nacheinander mit dem entsprechenden
●
Lautsprecherstecker verbinden. Wenn das Minuskabel des
Lautsprechers mit einem anderen Kabel in Kontakt kommt, oder das
Lautsprecherkabel an einem Metallteil der Fahrzeugkarosserie geerdet
wird, hat dies eine Funktionsströrung des Lautsprechers zur Folge.
● Der Erdungsdraht darf weder am Airbag, an der Lenkung, am
Bremsleitungssystem noch an einem anderen für die Sicherheit
wichtigen Ort befestigt werden.
(Dies könnte Unfälle verursachen.)
● Wählen Sie einen Installationsort, der weder das Fahren des
Fahrzeuges beeinträchtigt noch bei plötzlichem Bremsen etc. eine
Gefahr für die Mitfahrer darstellt.
(Dies könnte sowohl Verletzungen als auch Unfälle verursachen.)
● Nach dem Einbau der Einheit sich vergewissern, daß alle
Komporenten der elektrischen Anlage, wie zum Beispiel
Bremsleuchten, Blinkeuchten und die Scheibenwischer,
einwandfrei funktionieren.
Bitte lesen Sie diese Einbau-Anleitung sorgfältig durch, bevor
Sie die Installation und die Anschlüsse des Lautsprechers
durchführen, um einwandfreie Ergebnisse zu erhalten.
■ Für Ihre Unterlagen
Tragen Sie die Seriennummer, die an der Rückseite des Verstär kers angegeben
ist, in die Garantiekarte und in den folgenden Freiraum ein. Geben Sie immer
die Bezeichnung dieses Modells und die Seriennummer an, wenn Sie sich für
Informationen oder Reparaturen an Ihren KENWOOD-Fachhändler wenden.
Modell KSC-310CCS Seriennummer _______________
■ Sicherheitsmaßregeln
Wenn das Fahrzeug mit geschlossenen Fenstern in der Sonne geparkt
war und die Temperatur im Fahrzeuginnen gestiegen ist, die Klimaanlage
einschalten oder das Fahrzeug eine Weile mit geöffneten Fenstern fahren,
bevor das Auto-stereogerät eingeschaltet wird. Das Auto-Stereogerät erst
einschalten, wenn die Temperatur im Fahrzeuginnern sich normalisier t hat.
KSC-310CCS
8
Let op: Lees voor uw veiligheid deze bladzijde
zorgvuldig door.
WAARSCHUWING
● Om kortsluiting te voorkomen mag un nooit metalen voorwerpen
(zoals muntjes of gereedschapen) in de luidspreker brengen of
achterlaten.
● Vreemde geur – Wanneeer er rook of een vreemde geur uit de
luldsprekers komt, moet u direkt de spanning uit (OFF) schakelen.
Raadpleeg vervolgens spoedig uw handelaar of een erkent
onderhoudscentrum.
SPANNING UIT!
● Knutselen – Voorkom brand of beschadiging en open derhahe de
luidsprekers niet en breng er geen ver anderingen in aan.
● Verstikking – Nadat u de luldspréers uit de polyethyleen zak heeft
verwijderd, meet u deze zak weggooien. Zorg dat de zak uit de
buurt van kinderen blljft. Kinderen zouden met de zak kunnen gaan
spelen en de zak bljvoorbeeld over hun hoofd trekken met
verstikking tot gevotg.
OPGELET
● Installeer de luidspreker niet op een plek die bloot staat aan direct
zonlicht of grote hitte of vochtigheid.
● Water en vocht – Installeer de luidsprekers niet op plaatsen waar
ze mogeiijk aan water of vocht bloot worden gesteld.
● Stoffige en instabele plaatsen – Installeer de luidsprekers niet
op stoffige plaatsen of instabiele plaatsen ondemevig aan trillingen.
● Als de zekering doorbrandt, moet u eerst controleren of de
aansluitdraad niet is kortgesloten en vervolgens de zekering
vervangen door een zekering met de op de zekeringkast
aangeduide stroomsterkte.
(Het gebruik van zekeringen met een andere stroomsterkte dan
voorgeschreven kan brand veroorzaken.)
Lees de aanduiding!
Raadpleeg het instructieboekje van het voertuig voor het vervangen
van de zekering.
● Om kortsluiting bij het vervangen van zekeringen te voorkomen,
dient u eerst de bedradingsbundel los te koppelen.
● Gebruik geen benzine, nafta, of andere oplosmiddelen om de
luidspreker schoon te maken. Maak de luidspreker schoon met
een zachte, droge doek.
● Bevestig de draden van de luidspreker apart aan de correcte
luidspreker-aansluitingen. Delen van de negatieve luidsprekerdraad of van de aarding naar metalen onderdelon van de auto
kan ertoe leiden dat dit toestel defect raakt.
● De massadraad mag niet worden vastgemaakt aan een airbag,
de stuurinrichting of de remleidingen, noch aan bouten of moeren
van andere cruciale veiligheidsonderdelen.
(Dit kan ongevallen veroorzaken.)
● Monteer het toestel op een plaats waar het de bestuurder niet
hindert tijdens het rijden en waar het geen gevaar kan veroorzaken
voor de passagiers bij plotse remmanoeuvres, enz.
(Dit kan letsels of ongevallen veroorzaken.)
● Nadat u het toestel gemonteerd hebt, dient u te controleren of de
eledtrische uitrusting van de auto zoals de remlichten, de
richtingaanwijzers en de rultenwissers normaal functioneren.
Alvorens de luidspreker te installeren of verbindingen te maken,
moet u deze geb ruiksaanwijzing geheel doorlezen zodat u de
diverse bedieningen juist kunt uitvoeren.
■ Voor uw administratie
schrijf het serienummer dat op de achterkant van de versterker is
aangegeven op in de hiervoor bestemde ruimte op het garantiebewijs
en tevens hieronder. Geef het model- en serienurnmer aan de
KENWOOD handelaar door wanneer u informatie of onderhoud voor
deze versterker nodig heeft.
Model KSC-310CCS Serienummer ______________
■ Veiligheidsvoorzorgen
Wanneer u de auto met gesloten ramen en portieren in het direkte
zonlicht heeft geparkeerd en de temperatuur in de auto derhalve
hoog is, moet u voordat u het auto-stereosysteem inschakelt eerst
de airconditioning in werking stellen of even met de auto met
geopende ramen rijden zodat de temperatuur in de auto wordt
verlaagd. Gebruik het auto-stereosysteem niet voordat de
temperatuur in de auto normaal is.
Page 9

Überprüfung der Teile / Controle van de onderdelen
Bezeichnung der Teile Außenform Menge
No.
Naam van onderdeel Buitenprofiel Aantal
1 Lautsprecher
Luidspreker
2 Rahmen
(mit doppelseitigem
Klebeband)
Beugel 1
(met dubbelzijdige
kleefband)
Bezeichnung der Teile Außenform Menge
No.
Naam van onderdeel Buitenprofiel Aantal
3 Blechschraube
(φ 4 × 16)
Tapschroef
(φ 4 × 16) 2
1
4 Schnellshraubmuttern
Clipmoer
ENGLISH
2
FRANÇAIS
DEUTSCH
NEDERLANDS
KSC-310CCS 9
ITALIANO
ESPAÑOL
Page 10

Lautsprecher-Installation / Montage van de luidspreker
[Schritt 1]
[Stap 1]
● Die Schablone im Karton abschneiden. Die
Schablone so ansetzen, dass der Pfeil zum Insassen
hin weist, und die Löcher mit einem Stift markieren.
VORSICHT
Nur an einer Stelle anbringen, wo der Airbag nicht
behindert wird.
Darauf achten, nicht die Klimaanlagenöffnung bei
der Montage zu verdecken.
ENGLISH
[Schritt 2]
[Stap 2]
● Knip of snijd het sjabloon uit de kartonnen doos.
Plaats het sjabloon zo dat de pijl naar de passagier
wijst en markeer de gaten met een pen.
OPGELET
Monteer uitsluitend op een plek waar de werking
van de airbag niet gehinderd wordt.
Let op dat u geen uitlaat van de ventilatie of
airconditioning afdekt bij de montage.
3 Blechschraube × 2
3 Tapschroef × 2
FRANÇAIS
DEUTSCH
NEDERLANDS
● Das Deckpapier vom
ITALIANO
ESPAÑOL
am Armaturenbrett anbringen, dass die
Pfeilmarkierungen zum Insassen hin weisen.
Befestigen Sie Rahmen 2 mit den Blechschrauben
●
4 × 16) 3
Armaturenbrett.
Stellen Sie folgendes sicher:
• Installieren Sie das Gerät nahe der Mitte im
Fahrzeug. Achten Sie darauf, dass der Fahrbetrieb
nicht behindert wird und dass sich das Gerät in
einer möglichst geraden Position befindet.
Säubern Sie die Montagefläche vor der Installation des
•
Gerätes gründlich mit dem Reiniger (als Zubehör erhältlich)
und wischen Sie die Fläche anschließend trocken.
Doppelseitiges Klebeband
Dubbelzijdige kleefband
4 Schnellshraubmuttern × 2
4 Clipmoer × 2
Rahmen
2 entfernen und so
und Schnellschraubmuttern 4 am
Entfernen Sie das Abdeckpapier
Verwijder het afdekpapier
Frontglasseite
Lado de cristal frontal
2 Rahmen
2 Beugel
Pfeil
Pijl
Armaturenbrett
Dashboard
● Verwijder het beschermpapier van beugel 2 en
bevestig deze aan het dashboard zodat de pijl naar
( φ
de passagier wijst.
● Monteer beugel 2 op het dashboard met de
tapschroeven (φ 4 × 16) 3 en de clipmoer 4.
Neem het volgende in acht:
• Monteer het toestel ongeveer in het midden van het
voertuig op een plaats waar het niet hindert tijdens
het rijden en plaats het zo horizontaal mogelijk.
• Maak het montagevlak eerst grondig schoon met
het (los verkochte) reinigingsmiddel en laat het
drogen alvorens het toestel te monteren.
KSC-310CCS
10
Page 11

[Schritt 3]
[Stap 3]
Frontlöcher am Lautsprecher
Voorste gaten van de luidspreker
Lautsprecherkabel
Luidsprekerkabel
Schlitz
Sleuf
Kerbe
Nok
A
Rückseitenlöcher am Lautsprecher
Achterste gaten van de luidspreker
1. Beim Herausführen des Lautsprecherkabels aus der
Rückseite das Kabel am Schlitz an der Unterseite
des Lautsprechers 1 entlang schieben und durch
Anhaken des Kabels zwischen den Kerben
befestigen.
1 Lautsprecher
1 Luidspreker
2 Rahmen
2 Beugel
Rahmen
2. Die beiden Rückseitenvorsprünge des
die beiden Rückseitenlöcher des Lautsprechers
einsetzen.
3. Die beiden Vorderseitenvorsprünge des
durch Ziehen des Lautsprechers 1 nach vorne in
die beiden Vorderseitenlöcher des Lautsprechers
einsetzen.
4.Vollständig durch Eindrücken der Vorderseite des
Lautsprechers 1 befestigen.
VORSICHT
Üben Sie keinen starken Druck auf die Oberfläche
des Sarannetzes aus, auch nicht durch Drücken
oder Stoßen mit der Hand, da sonst das auf der
Innenseite installierte Lautsprechersystem
beschädigt werden kann.
2 in
Rahmen
2
Kerbe
Nok
1.Pas het luidsprekersnoer in de sleuf aan de
2 Rahmen
2 Beugel
2.Steek eerst de twee lippen aan de achterkant van
3.Steek vervolgens de twee lippen aan de voorkant
4.Zet de luidspreker 1 vast door de voorkant naar
Sicht von unten (Detail A)
Onderaanzicht (Detail A)
onderkant van de luidspreker 1 wanneer u het snoer
van de achterkant van het luidspreker vandaan leidt,
en zet het snoer vast door het achter de nokken te
haken.
Rückseitenvorsprung
Achterste lippen
Vorderseitenvorsprung
Voorste lippen
de beugel 2 in de achterste twee gaten in de
luidspreker.
van beugel 2 in de voorste twee gaten van de
luidspreker door de luidspreker 1 voorzichtig naar
voren te trekken.
beneden te drukken.
OPGELET
Oefen geen sterke druk uit op het oppervlak van
de saran bespanning, ook niet door alleen maar
met uw hand ertegen te duwen; doet u dit toch dan
kan het luidspreker-systeem binnenin beschadigd
raken.
ENGLISH
FRANÇAIS
DEUTSCH
NEDERLANDS
ITALIANO
ESPAÑOL
KSC-310CCS 11
Page 12

Anschluss / Aansluiting
DVD - Hauptgerät
(als Zubehör erhältlich)
Centraal DVD-toestel
(los verkocht)
ENGLISH
5.1-Kanal-Surround-Prozessor (als Zubehör
erhältlich)
5.1-kanaals surroundprocessor (los
verkocht)
Mittle
Midden
Lautsprecherkabel (schwarz) –
Luidsprekerkabel (zwart) –
Lautsprecherkabel (schwarz / weiß) +
Luidsprekerkabel (zwart / wit) +
FRANÇAIS
Sie denken Ihr Gerät ist defekt, aber... (Fehlersuche) /
DEUTSCH
Alvorens aan te nemen dat het toestel defect is… (Verhelpen van problemen)
Ihr Gerät funktioniert nicht ordnungsgemäß und Sie gehen von einem Defekt aus. Bevor Sie jedoch einen
Kundendienst kontaktieren, sollten Sie noch einmal die mit der Störung in Zusammenhang stehenden Punkte
überprüfen.
NEDERLANDS
Störung Ursache Abhilfemaßnahme
Kein Ton
Schlechte Klangqualität
(verzerrt).
Lesen Sie die Tabelle 1
Das Lautsprecherkabel ist in eine
Fahrzeugschraube eingeklemmt.
Lesen Sie die Tabelle 1
Überprüfen Sie das Lautsprecherkabel
ITALIANO
ESPAÑOL
[Tabelle 1]
KSC-310CCS
12
• Fahrzeug-Zündschalter (ACC ON)
• Fahrzeug-Sicherung
• Überprüfen Sie den Anschluss des DVD-Hauptgerätes oder des 5.1Kanal-Surround-Prozessors.
NO
• Die Einstellung der DVD-Centereinheit
prüfen
• Überprüfen Sie noch einmal die
YES
Eingangsbuchse
Kein Ton
Wird von
anderen Lautsprechern
Ton ausgegeben?
Page 13

Als het toestel niet werkt zoals het hoort en u vermoedt dat het defect is, overloop dan nog even de aangegeven
controlepunten alvorens technische hulp in te roepen.
Probleem Oorzaak Oplossing
Geen geluid
De geluidskwaliteit
is slecht (geluid is
Zie schema 1
De luidsprekerkabel zit geklemd onder een
schroef van het voertuig.
Zie schema 1
Controleer de luidsprekerkabel
vervormd).
[Schema 1]
•
De contactschakelaar van het voertuig (ACC ON)
• Voertuigzekering
•
Controleer de aansluiting van de centrale DVD-eenheid of de 5.1-kanaals
surroundprocessor.
NO
Komt er
Geen geluid
geluid uit andere
luidsprekers?
YES
Betriebsdaten / Technische gegevens
VORSICHT
Änderung der nachfolgend aufgeführten Betriebsdaten
sowie des Designs ohne Ankündigung vorbehalten.
Format Mittellautsprecher
Ausführung Integrierter Typ
Spitzenbelastung 60 W
Nenn-Belastbarkeit 15 W
Nenn-Impedanz 4 Ω
Frequenzgang 300 – 25.000 Hz
Material ABS-Kunststoff
Verwendete Lautsprecher
Vollbereich 50 mm
Außenmaße Breite 95 mm
Höhe 39 mm
Tiefe 130 mm
Gewicht 290g
OPGELET
De hieronder vermelde technische gegevens en het
ontwerp zijn vatbaar voor wijzigingen zonder
kennisgeving met het oog op verbetering.
Formaat Middenluidspreker
Type Gesloten behuizing
Piekingangsvermogen 60 W
Nominaal ingangsvermogen
Nominale impedantie 4 Ω
Frekwentierespons 300 – 25.000 Hz
Materiaal ABS-kunststof
Gebruikte luidsprekers Volledig bereik 50 mm
Buitenafmetingen Breedte 95 mm
Gewicht 290 g
• Controleer de instelling van het DVD
hoofdtoestel.
• Controleer de ingangsaansluiting
opnieuw
15 W
Hoogte 39 mm
Diepte 130 mm
ENGLISH
FRANÇAIS
DEUTSCH
NEDERLANDS
ITALIANO
ESPAÑOL
KSC-310CCS 13
Page 14

PRECAUZIONI IMPORTANI / AVISOS IMPORTANTES
Attenzione: Per vostra sicurezza, leggete
attentamente questa pagina.
AVVERTIMENTO
● Per evitare corto circuiti, non lasciare mai degli oggetti metallici,
ad esempio monete ed utensili, all’interno dell'altoparlante.
● Odori anormallÅ|Se l’unità generasse odori anormali, spegnetela
subito. Entrate quindi immediatamente in contatto con il vostro
rivenditore di fiducia.
SPEGNIMENTO!
● Modifiche – Non tentate di aprire o modificare l’unità, dato che
ciò potrebbe causare incendi o errori di funzionamento.
● Pericolo di soffocamento – Estratta l’unità dal sacchetto in
polletilene, gettatelo in modo che non possa cadere in mano a
bambini. Essi potrebbero altrimenti rimanere soffocati.
ENGLISH
FRANÇAIS
DEUTSCH
NEDERLANDS
ITALIANO
ESPAÑOL
ATTENZIONE
● Non installare l'altoparlante inluoghi esposti a luce solare diretta o
calore eccessivo.
● Acqua ed umidità – Non installate gli altoparlanti in posizioni
cesposte ad acqua ed umidità.
● Urti e polvere – Non Installate gli altoparlanti in posizioni pericolose
o instablli o esposte a polvere e sporco.
● Se dovesse saltare il fusibile, controllate innanzitutto se è in corto
il cavo, poi sostituite il fusibile con uno del tipo indicato (con
l’amperaggio giusto) sulla scatola del fusibile.
(L’utilizzo di fusibili diversi da quello indicato può causare un incendio.)
Controllate il display!
Per sostituire il fusibile, fate riferimento al manuale delle istruzioni
dei veicolo.
● Per prevenire corto circuiti durante la sostituzione di un fusibile,
scollegare per prima cosa il fascio fili.
● Non usare benzina, nafta o solventi per pulire dell'altoparlante.
Usare solo un panno morbido e pulito.
● Collegare i cavi dell'altoparlante ai connettori appropriati
separatamente. Condividendo il filo negativo o la messa a terra
dei due altoparlanti in un punto metallico del telaio della vettura il
sistema può non funzionare.
● Per un cablaggio con messa a terra, non dovete fissare il cavo
all’airbag, al sistema dello sterzo o a quello frenante né a dei bulloni
o dati delle unità di sicurezza.
(Altrimenti si possono verificare degli incidenti.)
● Quando effettuate il montaggio, assicuratevi che il luogo di
installazione dell’unità non causerà dei fastidi durante la guida né
pericoli ai passeggeri per via di una frenata improvvisa, ecc.
(Causa di lesioni personali o incidenti.)
● Installata l’unità, controllare che le varie spie, le frecce, I
tergicristallo e le altre parti elettriche funzionino in modo normale.
Prima di installare e collegare l'altoparlante, leggete con
attenzione le intere istruzioni per l’installazione, in modo da
potervi servire correttamente di ciascuna funzione.
■ Per maggiore sicurezza
Trascrivete il numero di serie, scritto sul fondo dell’amplificatore, nello
spazio apposito del documento di garanzia e nello spazio qui sotto.
Ogni volta che consultate il vostro rivenditore KENWOOD, riferitegli
il numero di modello e di serie dell’amplificatore.
Modello KSC-310CCS Numero di serie ___________
■ Precauzioni per la sicurezza
Quando la vettura è stata lasciata al sole con I finestrini chiusi e la
temperatura all’interno si è alzata consistentemente attivare il
condizionatore d’aria o guidare per un po’con I finestrini aperti prima
di utilizzare lo stereo dell’auto. Non usare lo stereo dell’auto fino a
che la temperatura all’interno della vettura non è scesa ad un livello
normale.
KSC-310CCS
14
Precaución:Para su seguridad, lea con atención
ADVERTENCIA
● Para impedir cortocircuitos, nunca ponga o deje objetos metálicos
(tales como monedas o herramientas metálicas) en el interior de
un altavoz.
● Olcr anormal – En el caso de que la unidad genere humo o un
ruldo anormal, desconecte inmediatamenta la slimentación.
Después, consulte con su conceslonario o centro de reparaciones
más cercano tan pronto como sea posible.
DESCONECTE LA ALIMENTACION!
● Modificación – No trate de abrir ni modificar la unidad porque
podría producirse un peligro de incendio o una avería.
● Asflxia – Después de sacer la unidad de la bolsa de polletileno,
asegúrese de poner la bolsa de polletileno donde no puedan
alcanzarla los niños. De otra forma, éstos podrfan jugar con la
bolsa y se podría producir un pellgro de asflxia.
PRECAUCIÓN
● No instale el altavoz en un lugar expuesto a la luz solar directa o
a un calor o humedad excesivo.
● Agua y humedad – No instale los altavoces en lugares someticios
al agua o a la humedad.
● Polvo y ubicaciones inestabies – No instale los altavoces en
lugares inestabies ni en lugares donde haya polvo.
● Si saltara el fusible, después de comprobar si el cable ha sufrido
un cortocircuito, asegúrese de reemplazarlo por un fusible de la
capacidad (amperaje) estipulada, tal como se indica en la caja de
fusibles.
(El uso de fusibles de una capacidad que no sea la estipulada,
puede ser motivo de incendios).
¡Compruebe las indicaciones!
Para cambiar el fusible, remítase al manual de instrucciones del
vehículo.
● Para impedir un cortocircuito cuando sustituya un fusible,
desconecte primero el conjunto de los cables.
● No utilice gasolina, naftalina u otro tipo de disolvente para limpiar
el altavoz. Limpielo pasando un panño blando y seco.
● Conecte sparadamente los cables de los altavoces a los
conectores de altavoces apropiados. Compartir el cable negaivo
del altavoz o poner a masa los cables del altavoz en la carrocería
del automóvil puede ser la causa de que esta unidad no funcione
bien.
● Para el montaje de tierra no sujete el cable a un airbag, la dirección
o el sistema de frenado ni a ningún tornillo o tuerca críticos de la
unidad de seguridad.
(Puede producir accidentes.)
● Durante el montaje, asegúrese de realizar el mismo en un sitio
que no interfiera con la conducción o que resulte peligroso para
los pasajeros al frenar bruscamente, etc.
(Causa de lesiones o accidentes).
● Después de instalar la unidad, asegúrese de que el equipo eléctrico
tal como luces de frenos, luces de intermitentes y limpiaparabrisas
funcionen normalmente.
Antes de instalar el altavoz o hacer cualquier conexión, lea
cuidadosamente todo este manual de instrucciones para
asegurarse de realizar correctamente las operaciones necesarias.
■ Para su conocimiento
Anote el número de serie, situado en la parte posterior del
amplificador, en los espacios designados de la tarjeta de garantía y
en el espacio suministrado a continuación. Mencione el nombre y ei
número de serie de este modelo cuando quiera que acuda a su
concesionario KENWOOD para pedirle información o solicitarle
réparaciones de este amplifier.
Modeio KSC-310CCS Número de serie ____________
■ Precauciones de seguridad
Cuando el automóbil haya sido dejado bajo la luz solar directa con
sus ventanas cerradas y la temperatura interior haya alcanzado un
nivel muy alto, encienda el acondicionador de aire o conduzca el
automóvil durante un rato con las ventanas abiertas antes de utilizar
el equipo estéreo del automóvil. No utilice el equipo estéreo del
automóvil hasta que la temperatura en el interior haya disminuido
hasta un nivel normal.
esta página.
Page 15

Controllo delle parti / Comprobación de pieza
Nome della parte Forma esterna
No.
Nombre de pieza Forma externa
1 Altoparlante
Altavoz
2 Staffa
(Nastro biadesivo
fissato)
Abrazadera 1
(Cinta de doble cara
adjunta)
Quantità
Cantidad
1
Nome della parte Forma esterna
No.
Nombre de pieza Forma externa
3 Vite filettante
(φ 4 × 16)
Tornillo de cubierta
(φ 4 × 16) 2
4 Dadi
Tuerca de velocidad
Quantità
Cantidad
2
ENGLISH
FRANÇAIS
DEUTSCH
NEDERLANDS
KSC-310CCS 15
ITALIANO
ESPAÑOL
Page 16

Installazione dell’altoparlante / Montaje del altavoz
[Fase 1]
[Paso 1]
● Tagliare la maschera dalla scatola in cartone. Metterla
in posizione in modo che la freccia punti verso il
passeggero e segnale i punti da forare con una
penna.
ATTENZIONE
Installare in una posizione dove non interferisca con
l'airbag.
Fare anche attenzione a non bloccare l'uscita del
ENGLISH
climatizzatore.
[Fase 2]
[Paso 2]
● Corte la plantilla de la caja de cartón. Coloque la
plantilla de modo que la flecha señale hacia el
pasajero, y parque los orificios con un bolígrafo.
PRECAUCIÓN
Móntelo en un lugar en el que no cause
interferencias con el airbag.
Tenga cuidado para no cubrir las rejillas de
ventilación del aire acondicionado cuando efectúe
el montaje.
3 Vite filettante × 2
3 Tornillo de cubierta × 2
Nastro biadesivo
FRANÇAIS
Cinta de doble cara
DEUTSCH
NEDERLANDS
4 Dadi × 2
4 Tuerca de velocidad × 2
● Rimuovere la copertura in carta dalla staffa 2 ed
ITALIANO
ESPAÑOL
applicarla al cruscotto in modo che la freccia punti
verso il passeggero.
● Montate la staffa 2 sul cruscotto usando le viti
filettanti (φ 4 × 16) 3 e dadi 4.
Assicuratevi di:
• Effettuare il montaggio in un luogo vicino al centro
del veicolo, dove l’unità non impedirà la guida, e
in maniera più piana possibile.
• Fissate l’unità dopo aver pulito accuratamente ed
asciugato il luogo di installazione con il pulente
(venduto separatamente).
Rimuovete la carta protettiva
Extraiga el papel de cubierta
Lato anteriore del vetro
Lado de cristal frontal
2 Staffa
2 Abrazadera
Freccia
Flecha
Cruscotto
Salpicadero
● Extraiga el panel de cubierta de abrazadera 2 y
colóquela en el tablero de instrumentos de modo que
la flecha señale hacia el pasajero.
● Monte la abrazadera 2 en el salpicadero con los
tornillos de cubierta (ø 4 x 16) 3 y la tuerca de
velocidad 4.
Asegúrese de:
• Realizar el montaje cerca del centro del vehículo,
dónde no interfiera con la conducción y lo más
nivelado que sea posible.
• Realizar la fijación después de limpiar y secar
totalmente el sitio de montaje con un limpiador (de
venta aparte).
KSC-310CCS
16
Page 17

[Fase 3]
[Paso 3]
Fori anteriori dell'altoparlante
Los orificios frontales del altavoz
Cavo dell’altoparlante
Cable de altavoz
Fessura
Ranura
Tacca
Muesca
A
Fori posteriori dell'altoparlante
Los orificios traseros del altavoz
1. Nel portare in fuori il cavo dei diffusori dal retro, farlo
scivolare lungo la fessura sul fondo dell'altoparlante
1 e fissarlo facendolo passare per le tacche.
1 Altoparlante
1 Altavoz
2 Staffa
2 Abrazadera
2 Staffa
2 Abrazadera
2. Inserire le due linguette del lato posteriore della staffa
2 nei due fori posteriori dell'altoparlante.
3. Inserire le due linguette del lato anteriore nella staffa
2 nei due fori anteriori dell'altoparlante torando il
diffusore 1 in avanti.
4.Fissare bene il tutto spingendo verso il basso il
davanti dell'altoparlante 1 .
ATTENZIONE
Non applicare una forte pressione sulla superficie
della rete in saran, né premere o spingere; altrimenti
il sistema di altoparlanti installato all’interno
potrebbe danneggiarsi.
Tacca
Muesca
Visione dal basso (dettaglio A)
Vista inferior (Detalle A)
1. Cuando saque el cable de altavoz por la parte posterior, deslice el cable a lo largo de la ranura de la
parte inferior del altavoz 1, y fíjelo enganchando el
cable entre las muescas.
Linguetta lato posteriore
El apéndice del lado trasero
Linguetta lato anteriore
El apéndice del lado frontal
2.Inserte los dos apéndices del lado trasero de
abrazadera 2 en los dos orificios de la parte posterior del altavoz.
3.Inserte los dos apéndices del lado frontal de
abrazadera 2 en los dos orificios de la parte frontal
del altavoz, tirando del altavoz 1 hacia delante.
4.Fíjelo completamente empujando hacia abajo la
parte frontal del altavoz 1 .
PRECAUCIÓN
No aplique una presión fuerte sobre la superficie de
la rejilla de saran y evite asimismo empujarla o
apretarla con la mano; de lo contrario, se podría dañar
el sistema de altavoces instalado en el interior.
ENGLISH
FRANÇAIS
DEUTSCH
NEDERLANDS
ITALIANO
ESPAÑOL
KSC-310CCS 17
Page 18

Collegamento / Conexión
Unità centrale DVD
(venduto separatamente)
Unidad central de DVD
(de venta aparte)
Processore surround 5.1canali (venduto
separatamente)
Procesador de sonido envolvente (surround)
de 5,1 canales (de venta aparte)
Centro
Centro
Cavo dell’altoparlante (nero) –
ENGLISH
Cable de altavoz (negro) –
Cavo dell’altoparlante (nero / bianco) +
Cable de altavoz (negro / blanco) +
FRANÇAIS
Se credete che l’unità sia guasta … (Localizzazione dei guasti) /
DEUTSCH
Usted cree que no funciona... (Solución de problemas)
L’unità non funziona correttamente e voi credete che sia guasta, ma prima di richiedere dei lavori di assistenza
tecnica, controllate la seguente lista a seconda del problema in questione.
Problema Causa Rimedio
NEDERLANDS
Nessun suono
La qualità sonora è
cattiva
Fate riferimento alla scheda 1
Il cavo dell’altoparlante è premuto da una
vite nei veicolo.
Fate riferimento alla scheda 1
Controllate il cavo dell’altoparlante
(il suono è distorto).
ITALIANO
ESPAÑOL
[Scheda 1]
KSC-310CCS
18
•
L’interruttore di accensione del veicolo (ACC ON)
• Il fusibile del veicolo
•
Controllate l’unità centrale DVD o il collegamento del processore surround 5.1
canali.
NO
Nessun suono
Il suono
viene riprodotto
attraverso gli altri
altoparlanti?
• Controllare le impostazioni dell'unità
centrale DVD.
• Ricontrollate il collegamento del
YES
terminale di ingresso
Page 19

La unidad no funciona correctamente y usted cree que tiene un fallo, pero antes de solicitar el servicio técnico,
realice la comprobación una vez más según sea el problema.
Problema Causa Solución
No hay sonido
La calidad del sonido
es baja (el sonido
Remítase a la tabla 1
El cable de altavoz está acogido por un tor-
nillo del vehículo.
Remítase a la tabla 1
Compruebe el cable de altavoz
es distorsionado).
[Tabla 1]
•
La llave de contacto del vehículo (ACC activado (ON))
• Fusible del vehículo
•
Compruebe la unidad central de DVD o la conexión del procesador de sonido
envolvente de 5,1 canales.
NO
¿Se oye sonido
No hay sonido
proveniente de los otros
altavoces?
Valori nominali / Valor nominal
ATTENZIONE
I seguenti valori nominali ed il design sono soggetti
a modifiche senza preavviso.
Formato Altoparlante centrale
Tipo Tipo integrato
Picco istantaneo di ingresso
Ingresso nominale 15 W
Impedenza nominale 4 Ω
Risposta in frequenza 300 – 25.000Hz
Materiale Plastica ABS
Altoparlanti usati Tutta gamma 50 mm
Dimensioni esterne Larghezza 95 mm
Peso 290 g
60 W
Altezza 39 mm
Profondità 130 mm
• Compruebe el ajuste de la unidad central
de DVD
• Vuelva a comprobar la conexión de
YES
terminal de entrada
PRECAUCIÓN
Los valores nominales y el diseño siguientes están
sujetos a cambios sin previo aviso.
Formato Altavoz central
Tipo Tipo cerrado
Potencia máxima de entrada
Potencia de entrada nominal
60 W
15 W
Impedancia nominal 4 Ω
Respuesta de frecuencia
300 – 25.000 Hz
Material ABS plástico
Altavoces utilizados Gama completa 50 mm
Dimensiones externas Ancho 95 mm
Altura 39 mm
Profundidad 130 mm
Peso 290 g
ENGLISH
FRANÇAIS
DEUTSCH
NEDERLANDS
ITALIANO
ESPAÑOL
KSC-310CCS 19
Page 20

 Loading...