

Page 1

KMM-100
KMM-100U
DIGITAL MEDIA RECEIVER
INSTRUCTION MANUAL
RÉCEPTEUR MULTIMÉDIA NUMÉRIQUE
MODE D’EMPLOI
RECEPTOR DE MEDIOS DIGITALES
MANUAL DE INSTRUCCIONES
Take the time to read through this instruction manual.
Familiarity with installation and operation procedures will help you obtain the best performance from
your new Digital Media Receiver.
For your records
Record the serial number, found on the back of the unit, in the spaces designated on the warranty card, and in the
space provided below. Refer to the model and serial numbers whenever you call upon your Kenwood dealer for
information or service on the product.
Model
KMM-100/ KMM-100U
US Residents Only
Serial number
Register Online
Register your Kenwood product at www.Kenwoodusa.com
GET0867-001A (KN)© 2013 JVC KENWOOD Corporation
Page 2
CONTENTS
BEFORE USE 2
BASICS 3
GETTING STARTED 4
RADIO 5
USB / iPod 7
Pandora®
KMM-100U
(for
) 9
AUX 10
DISPLAY SETTINGS 10
AUDIO SETTINGS 11
MORE INFORMATION 12
TROUBLESHOOTING 13
INSTALLATION / CONNECTION 14
SPECIFICATIONS 17
How to read this manual
• Operations explained mainly using
buttons on the faceplate.
•
[XX]
indicates the selected items.
•
(« XX)
on the stated page number.
indicates references are available
BEFORE USE
Warning
Do not operate any function that takes your
attention away from safe driving.
Caution
Volume setting:
• Adjust the volume so that you can hear
sounds outside the car to prevent accident.
• Lower the volume before playing digital
sources to avoid damaging the speakers by
the sudden increase of the output level.
General:
• Avoid using the USB device or iPod/iPhone if
it might hinder driving safety.
• Make sure all important data has been backed
up. We shall bear no responsibility for any loss
of recorded data.
• Never put or leave any metallic objects (such
as coins or metal tools) inside the unit, to
prevent a short circuit.
Remote control (RC-406):
• Do not leave the remote control in hot places
such as on the dashboard.
• The Lithium battery is in danger of explosion
if replaced incorrectly. Replace it only with the
same or equivalent type.
• The battery pack or batteries shall not be
exposed to excessive heat such as sunshine,
fire or the like.
• Keep battery out of reach of children and in
original package until ready to use. Dispose of
used batteries promptly. If swallowed, contact
a physician immediately.
CALIFORNIA, USA ONLY
This perchlorate WARNING applies only to the
product sold or distributed in California USA
“Perchlorate Material–special handling may
apply, See www.dtsc.ca.gov/hazardouswaste/
perchlorate.”
2
Page 3

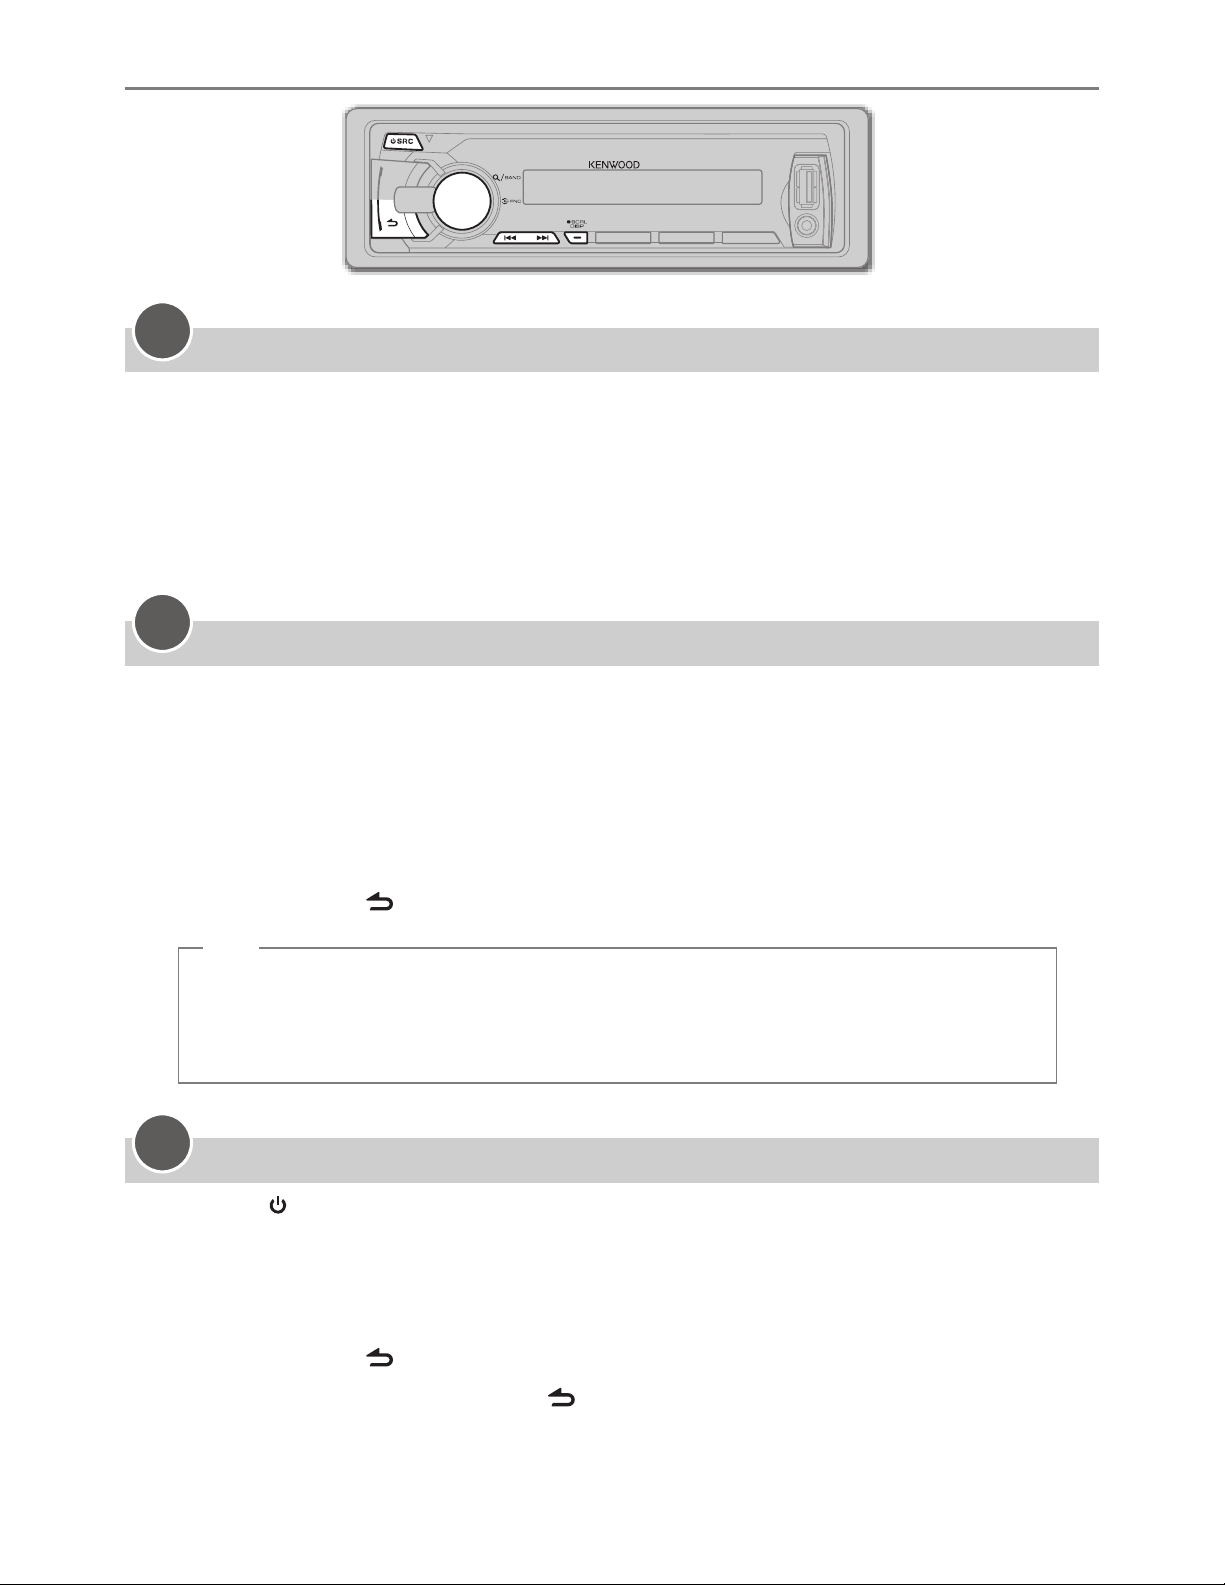
BASICS
Remote sensor (Do not
expose to bright sunlight.)
Display window
KMM-100U
Detach button
Volume knob
(turn/press)
* Not used.
How to replace the battery
Pull out the insulation sheet
when using for the first time.
How to resetAttach Detach
Your preset adjustments
will also be erased.
To Do this (on the faceplate) Do this (on the remote control)
Turn on the power Press L SRC.
• Press and hold to turn off the
power.
Press and hold SRC to turn off the
power.
( Pressing SRC does not turn on
the power. )
Adjust the volume Turn the volume knob. Press VOL
Press ATT during playback to
attenuate the sound.
• Press again to cancel.
Select a source Press L SRC repeatedly. Press SRC repeatedly.
Change the display
information*
*
KMM-100
repeatedly.
: You can also select to turn off the display information by pressing SCRL DISP
Press SCRL DISP repeatedly.
• Press and hold to scroll the
current display information.
( not available )
or VOL .
ENGLISH |
3
Page 4
GETTING STARTED
1
Cancel the demonstration
When you turn on the power (or after you reset the unit), the display shows:
“CANCEL DEMO” \ “PRESS” \ “VOLUME KNOB”
1 Press the volume knob.
[YES]
is selected for the initial setup.
2 Press the volume knob again.
“DEMO OFF” appears.
2
Set the clock
1 Press the volume knob to enter
2 Turn the volume knob to select
3 Turn the volume knob to select
4 Turn the volume knob to select
[FUNCTION]
[SETTINGS]
[CLOCK]
[CLOCK ADJ]
, then press the knob.
.
, then press the knob.
, then press the knob.
5 Turn the volume knob to adjust the hour, then press the knob.
6 Turn the volume knob to adjust the minute, then press the knob.
Press 4
/
¢ to move between the hour and minute adjustment.
7 Press and hold to exit.
(or)
Press and hold SCRL DISP to enter clock adjustment mode directly while in clock
display screen.
Then, perform steps 5 and 6 above to set the clock.
3
Set the initial settings
1 Press SRC to enter
2 Press the volume knob to enter
3 Turn the volume knob to select
[STANDBY]
.
[FUNCTION]
[INITIAL SET]
.
, then press the knob.
4 Turn the volume knob to make a selection (see the following table), then press the
knob.
5 Press and hold to exit.
• To return to the previous hierarchy, press
4
.
Page 5

GETTING STARTED
PRESET TYPE NORM: Memorizes one station for each preset button in each band (FM1/ FM2/ FM3/ AM). ;
MIX: Memorizes one station for each preset button regardless of the selected band.
KEY BEEP
PANDORA SRC
BUILTIN AUX
SWITCH PRE
SP SELECT
F/W UPDATE
F/W UP xx.xx
ON: Activates the keypress tone. ; OFF: Deactivates.
KMM-100U
ON: Enables PANDORA in source selection. ; OFF: Disables. (
ON: Enables AUX in source selection. ; OFF: Disables. (« 10)
REAR/ SUB-W: Selects whether rear speakers or a subwoofer are connected to the line out
terminals on the rear (through an external amplifier).
OFF/ 5/4/ 6 × 9/6/ OEM: Selects according to the speaker size (5 inches or 4 inches, 6×9 inches
or 6 inches) or OEM speakers for optimum performance.
YES: Starts upgrading the firmware. ; NO: Cancels (upgrading is not activated).
For details on how to update the firmware, see: www.kenwood.com/cs/ce/
:
«
9)
Default:
XX
RADIO
Search for a station
1 Press L SRC to select TUNER.
2 Press repeatedly (or press
3 Press 4 / ¢ (or press 4 / ¢ (+) on RC-406) to search for a station.
• To store a station: Press and hold one of the number buttons (1 to 6).
• To select a stored station: Press one of the number buttons (1 to 6) (or press one of the
number buttons (1 to 6) on RC-406).
Direct Access Tuning (using RC-406)
1 Press
AM– / #FM+ to select a band.
*
2 Press DIRECT to enter Direct Access Tuning.
“– – – • –” (for FM) or “– – – –” (for AM) appears on the display.
3 Press the number buttons to enter a frequency.
4 Press ENT 38 to search for a frequency.
AM– / #FM+ on RC-406) to select FM1/ FM2/ FM3/ AM.
*
• To cancel, press
• If no operation is done for 10 seconds after step 3, Direct Access Tuning is automatically canceled.
.
ENGLISH |
5
Page 6

RADIO
Other settings
1 Press the volume knob to enter
2 Turn the volume knob to select
[FUNCTION]
[SETTINGS]
.
, then press the knob.
3 Turn the volume knob to make a selection (see the following table), then press the knob.
4 Press and hold to exit.
Default:
SEEK MODE Selects the tuning method for the
AUTO1: Automatically searches for a station. ; AUTO2: Searches for a preset station. ;
MANUAL: Manually search for a station.
AUTO MEMORY
MONO SET ON: Improves the FM reception, but the stereo effect may be lost. ; OFF: Cancels.
KMM-100
PTY SEARCH Selects the available Program Type (see below), then, press
TI
CLOCK
:
YES: Automatically starts memorizing 6 stations with good reception. ; NO: Cancels. (Selectable only
if [NORM] is selected for [PRESET TYPE].) (
ON: Allows the unit to temporarily switch to Traffic Information. ; OFF: Cancels.
4
/
¢
buttons.
«
5)
4 / ¢
to start.
XX
TIME SYNC
TUNER SET: Selectable only when the source is not TUNER.
TI
•
[MONO SET]/ [PTY SEARCH]/ [TI]
• Available Program Type:
SPEECH: NEWS, INFORM
(personality),
WEATHER
:
MUSIC
The unit will search for the Program Type categorized under
KMM-100
•
volume is memorized automatically. It will be applied the next time traffic information or alarm
function is turned on.
ROCK, CLS ROCK
OLDIES
SOFT R&B
: If the volume is adjusted during reception of traffic information or alarm, the adjusted
ON: Synchronizes the unit’s time to the Radio Broadcast Data System station time. ; OFF: Cancels.
ON: Allows the unit to temporarily switch to Traffic Information. ; OFF: Cancels.
is selectable only when the source is FM.
(information),
PUBLIC, COLLEGE, HABL ESP
(classic rock),
,
SOFT, NOSTALGA
(soft rhythm and blues),
SPORTS, TALK, LANGUAGE, REL TALK
(spanish talk),
ADLT HIT
(nostalgia),
(adult hits),
JAZZ, CLASSICL
REL MUSC
(religious music)
SOFT RCK
(classical),
MUSC ESP
(softrock),
[SPEECH]
(religious talk),
(spanish music),
TOP 40, COUNTRY,
R & B
(rhythm and blues),
or
[MUSIC]
PERSNLTY
HIP HOP,
if selected.
6
Page 7

USB / iPod
Start playback
USB
iPod/iPhone
USB input terminal USB input terminal
CA-U1EX (max.: 500 mA)
(optional accessory)
The source changes to USB and
playback starts.
KCA-iP102 (optional accessory)
The source changes to iPod and playback starts
(depending on the status of the connected device).
Press 5 iPod to select the control mode while in iPod
source.
MODE ON:
1
You can still control play/pause, file selection, fast-
*
From the iPod
forward or reverse files from the unit.
KMM-100U
1
*
. ;
MODE OFF:
From the unit.
To Do this
Pause or resume
Press 6 38 (or ENT 38 on RC-406).
playback
Select a file Press 4 / ¢ (or 4 / ¢ (+) on RC-406).
Select a folder
Press 1 – / 2 + (or
AM– / #FM+ on RC-406).
*
(USB source only)
Reverse/Fast-forward Press and hold 4 / ¢ (or 4 / ¢ (+) on RC-406).
Select a file from a
3
*
list
1 Press .
2 Turn the volume knob to make a selection, then press the knob.
• MP3/WMA file: Select the desired folder, then a file.
• iPod or KENWOOD Music Editor Light (KME Light)/ KENWOOD Music
2
Control (KMC) file
ARTISTS, ALBUMS, SONGS, PODCASTS
*
: Select the desired file from the list (PLAYLISTS,
3
*
, GENRES, COMPOSERS
• To return to the root folder (or first file), press number button 5 iPod.
• To return to the previous hierarchy, press
• To cancel, press and hold
2*3
*
• To skip songs
2
*
Only for files registered in the database created with KME Light/ KMC. («
3
*
Only for iPod: Applicable only when
[MODE OFF]
at a specific ratio, press 4 / ¢. («
is selected.
.
.
12)
8)
3
*
).
ENGLISH |
7
Page 8

USB / iPod
Repeat play
(iPod source: Applicable only when
is selected.)
Press 4
• MP3/WMA file:
FILE REPEAT, FOLD REPEAT, REPEAT OFF
• iPod or KME Light/ KMC file:
FILE REPEAT, REPEAT OFF
Random play
(iPod source: Applicable only when
is selected.)
• Press
“FOLD RANDOM” or “RANDOM OFF.”
• Press and hold
Direct Music Search (using RC-406)
repeatedly.
repeatedly to select
to select “ALL RANDOM.”
[MODE OFF]
[MODE OFF]
1 Press DIRECT.
2 Press the number buttons to enter a file
number.
3 Press 4 / ¢ (+) to search for music.
• To cancel, press
• Not available if Random Play is selected.
• Not applicable for iPod, KME Light/ KMC file.
(« 12)
.
• To search for a character other than A to Z
and 0 to 9, enter only “
• To return to the previous hierarchy, press
• To return to the top menu, press number
button 5 iPod.
• To cancel, press and hold
Set the skip ratio
While listening to iPod or KME Light/ KMC file...
*
”.
.
1 Press the volume knob to enter
[FUNCTION]
2 Turn the volume knob to select
then press the knob.
.
[SETTINGS]
3 Turn the volume knob to select
[SKIP SEARCH]
, then press the knob.
4 Turn the volume knob to make a selection,
then press the knob.
0.5%
(default)/ 1%/ 5%/
ratio when searching for a song.
10%
: Sets the skip
(Holding 4 / ¢ skips songs at 10%
regardless of the setting made.)
5 Press and hold to exit.
Muting upon the reception of a phone
call
Connect the MUTE wire to your telephone
using a commercial telephone accessory.
(« 16)
.
,
Select a song by name
While listening to iPod...
1 Press .
2 Turn the volume knob to select a category,
then press the knob.
3 Press again.
4 Turn the volume knob to select the
character to be searched for.
5 Press 4 / ¢ to move to the entry
position.
You can enter up to three characters.
6 Press the volume knob to start searching.
7 Turn the volume knob to make a selection,
then press the knob.
Repeat step 7 until the desired item is
selected.
8
When a call comes in, “CALL” appears.
• The audio system pauses.
• To continue listening to the audio
system during a call, press
disappears and the audio system resumes.
When the call ends, “CALL” disappears.
• The audio system resumes.
SRC. “CALL”
Page 9

Pandora®
Preparation:
Install the latest version of the Pandora application into your device (iPhone/ iPod touch), then log
in and create an account with Pandora.
• Select
Start listening
[ON]
for
[PANDORA SRC]
(for
KMM-100U
)
. (« 5)
1 Open the Pandora application on your
device.
2 Connect your device to the USB input
terminal.
USB input terminal
KCA-iP102
(optional accessory)
The source changes to PANDORA and
broadcast starts.
To Do this
Pause or resume
playback
Press 6 38 (or ENT 38 on RC-406).
About Pandora
• Pandora is only available in the US.
• Because Pandora is a third-party service, the
specifications are subject to change without
prior notice. Accordingly, compatibility may
be impaired or some or all of the services may
become unavailable.
• Some functions of Pandora cannot be
operated from this unit.
• For issues using the application, please
contact Pandora at
pandora-support@pandora.com.
• If the version of the OS of the connected
iPhone is earlier than 4.0, start the Pandora
application before selecting the PANDORA
source.
Thumbs up or
thumbs down
Skip a track Press ¢ (or ¢ on RC-406).
Create a new station
Press 1
/ 2 .
• If thumbs down is selected, the current track is skipped.
1 Press and hold the volume knob.
2 Turn the volume knob to select
then press the knob.
[FROM TRACK]
or
A new station is created based on the current song or artist.
Save a station Press and hold number button 3, 4 or 5 to store.
• To select a stored station, press the same button (3, 4 or 5).
Search for a
registered station
1 Press .
2 Turn the volume knob to make a selection, then press the knob
(or press 5/∞ on RC-406).
[BY DATE]:
[A-Z]:
According to the registered date.
Alphabetical order.
3 Turn the volume knob to the desired station, then press the knob.
[FROM ARTIST]
,
ENGLISH |
9
Page 10

AUX
Preparation:
Select
[ON]
for
[BUILTIN AUX]
Start listening
. (« 5)
1 Connect a portable audio player
(commercially available).
Auxiliary input jack
3.5 mm (1/8") stereo mini plug
with “L” shaped connector
(commercially available)
Portable audio
player
2 Press SRC to select AUX.
3 Turn on the portable audio player and
start playback.
Set the AUX name
While listening to AUX...
1 Press the volume knob to enter
[FUNCTION]
2 Turn the volume knob to select
then press the knob.
.
[SETTINGS]
3 Turn the volume knob to select
[AUX NAME]
, then press the knob.
4 Turn the volume knob to make a selection,
then press the knob.
AUX
(default)/
TV
DVD/ PORTABLE/ GAME/ VIDEO
/
5 Press and hold to exit.
,
DISPLAY SETTINGS
1 Press the volume knob to enter
2 Turn the volume knob to select
3 Turn the volume knob to make a selection (see the following table), then press the knob.
Repeat step 3 until the desired item is selected or activated.
4 Press and hold to exit.
• To return to the previous hierarchy, press
DISPLAY
DISP DIMMER ON: Dims the display illumination. ; OFF: Cancels.
TEXT SCROLL
AUTO/ ONCE: Selects whether to scroll the display information automatically, or scroll only once. ;
OFF: Cancels.
[FUNCTION]
[SETTINGS]
.
, then press the knob.
.
Default:
XX
10
Page 11

AUDIO SETTINGS
While listening to any source...
1 Press the volume knob to enter
2 Turn the volume knob to select
3 Turn the volume knob to make a selection (see the following table), then press the knob.
Repeat step 3 until the desired item is selected or activated.
4 Press and hold to exit.
(or using RC-406)
[FUNCTION]
[AUDIO CTRL]
.
, then press the knob.
1 Press AUD to enter
[AUDIO CTRL]
.
2 Press 5/∞ to make a selection, then press ENT 38.
• To return to the previous hierarchy, press
SUB-W LEVEL –15 to +15 (0): Adjusts the subwoofer output level.
BASS LEVEL –8 to +8 (0):
MID LEVEL
TRE LEVEL
PRESET EQ
BASS BOOST
LOUDNESS
BALANCE
–8 to +8 (0):
–8 to +8 (0):
NATURAL/ USER/ ROCK/ POPS/ EASY/ TOP40/ JAZZ/ POWERFUL: Selects a preset equalizer
suitable to the music genre. (Select [USER] to use the customized bass, middle, and treble settings.)
B.BOOST LV1/ B.BOOST LV2/ B.BOOST LV3: Selects your preferred bass boost level. ;
OFF: Cancels.
LOUD LV1/ LOUD LV2: Selects your preferred low and high frequencies boost to produce a wellbalanced sound at a low volume level. ; OFF: Cancels.
L15 to R15 (0): Adjusts the left and right speaker output balance.
Adjusts the level to memorize for each source. (Before making an adjustment,
select the source you want to adjust.)
.
Default:
XX
FADER R15 to F15 (0): Adjusts the rear and front speaker output balance.
SUB-W SET ON: Turns on the subwoofer output. ; OFF: Cancels.
DETAIL SET
LPF SUB-W
SUB-W
PHASE
SUPREME
SET
VOL OFFSET
(Default: 0)
•
[SUB-W LEVEL]/ [SUB-W SET]/ [LPF SUB-W]/ [SUB-W PHASE]
[SUB-W]
•
[SUB-W LEVEL]/ [LPF SUB-W]/ [SUB-W PHASE]
. (« 5)
THROUGH: All signals are sent to the subwoofer. ; 85HZ/ 120HZ/ 160HZ: Audio signals with
frequencies lower than 85 Hz/ 120 Hz/ 160 Hz are sent to the subwoofer.
REV (180°)/ NORM (0°): Selects the phase of the subwoofer output to be in line with the speaker
output for optimum performance. (Selectable only if a setting other than [THROUGH] is selected for
[LPF SUB-W].)
ON: Creates realistic sound by interpolating the high-frequency components that are lost in audio
compression. ; OFF: Cancels. (Selectable only when playing back a USB device.)
–8 to +8 (for AUX) ; –8 to 0 (for other sources): Presets the volume adjustment level of each source.
(Before adjustment, select the source you want to adjust.)
is selectable only if
is selectable only if
[SUB-W SET]
[SWITCH PRE]
is set to
[ON]
is set to
.
ENGLISH |
11
Page 12

MORE INFORMATION
General
Detailed information and notes about the
playable audio files are stated in an online
manual on the following site:
www.kenwood.com/cs/ce/audiofile/
Playable files
• Playable Audio file: MP3 (.mp3), WMA (.wma),
FLAC (.flac), WAV (.wav)
• Playable USB device file system: FAT12, FAT16,
FAT32
Although the audio files are complied with
the standards listed above, playback maybe
impossible depending on the types or
conditions of media or device.
About USB devices
• This unit can play MP3/WMA/FLAC/WAV files
stored on a USB mass storage class device.
• You cannot connect a USB device via a USB
hub and Multi Card Reader.
• Connecting a cable whose total length is
longer than 5 m may result in abnormal
playback.
• This unit cannot recognize a USB device
whose rating is other than 5 V and exceeds
1 A.
About KENWOOD Music Editor Light and
KENWOOD Music Control
• This unit supports the PC application
KENWOOD Music Editor Light and Android™
application KENWOOD Music Control.
• When you play audio files with song data
added using the KENWOOD Music Editor
Light or KENWOOD Music Control, you can
search for audio files by Genres, Artists,
Albums, Playlists, and Songs.
• KENWOOD Music Editor Light and KENWOOD
Music Control are available from the following
web site: www.kenwood.com/cs/ce/
Maintenance
Cleaning the unit: Wipe off dirt on the
faceplate with a dry silicon or soft cloth.
Cleaning the connector: Detach the
faceplate and clean the connector with a
cotton swab gently, being careful not to
damage the connector.
About iPod/iPhone
Made for
- iPod touch (1st, 2nd, 3rd, and 4th generation)
- iPod classic
- iPod with video
- iPod nano (1st, 2nd, 3rd, 4th, 5th, and 6th
generation)
- iPhone, iPhone 3G, 3GS, 4, 4S
• For the latest compatible list and software
versions of iPhone/iPod, see:
www.kenwood.com/cs/ce/ipod
• If you start playback after connecting the
iPod, the music that has been played by the
iPod is played first.
In this case, “RESUMING” is displayed without
displaying a folder name, etc. Changing the
browse item will display the correct title, etc.
• You cannot operate iPod if “KENWOOD” or
“
” is displayed on iPod.
Connector (on the reverse
side of the faceplate)
12
Page 13

TROUBLESHOOTING
Symptom Remedy
Sound cannot be heard. • Adjust the volume to the optimum level.
• Check the cords and connections.
“PROTECT” appears and no
operations can be done.
• Sound cannot be heard.
• The unit does not turn on.
• Information shown on the
display is incorrect.
The unit does not work at all.
• Radio reception is poor.
• Static noise while listening to
the radio.
“NA FILE” appears. Make sure the media contains supported audio files.
“READ ERROR” appears. Copy the files and folders onto the USB device again. If this does not solve the
“NO DEVICE” appears. Connect a USB device, and change the source to USB again.
“COPY PRO” appears. A copy-protected file is played.
“NO MUSIC” appears. Connect a USB device that contains playable audio files.
“NA DEVICE” appears. Connect a supported USB device, and check the connections.
Check to be sure the terminals of the speaker wires are insulated properly, then
reset the unit. If this does not solve the problem, consult your nearest service
center.
Clean the connectors. (
Reset the unit. (
• Connect the antenna firmly.
• Pull the antenna out all the way.
problem, reset the USB device or use another USB device.
«
3)
«
12)
“USB ERROR” appears. • Remove the USB device, turn the unit off, then turn it on again.
• Try to connect another USB device.
“iPod ERROR” appears. • Reconnect the iPod.
• Reset the iPod.
“READING” keeps flashing. Do not use too many hierarchical levels or folders.
The number of songs
contained in the “SONGS”
category of this unit is different
from the iPod/iPhone.
Correct characters are not
displayed (e.g. album name).
“ADD ERR” or
“CHK DEVICE”
“NO SKIPS” The skip limit has been reached.
“NO STATIONS” No station is found.
Pandora
“STATION LIM” The number of registered stations has reached it’s limit. Retry after deleting an
“SEARCH ERR”
Podcast files are not counted on this unit as this unit does not support the
playback of podcast files.
This unit can only display uppercase letters, numbers, and a limited number of
symbols.
New station creation is unsuccessful.
Check the Pandora application on your device.
unnecessary station on your device.
“UPGRADE APP” Make sure you have installed the latest version of the Pandora application on
your device.
ENGLISH |
13
Page 14

INSTALLATION / CONNECTION
Warning
• The unit can only be used with a 12 V DC power supply, negative ground.
• Disconnect the battery’s negative terminal before wiring and mounting.
• Do not connect Battery wire (yellow) and Ignition wire (red) to the car chassis or Ground wire
(black) to prevent a short circuit.
• Insulate unconnected wires with vinyl tape to prevent a short circuit.
• Be sure to ground this unit to the car’s chassis again after installation.
Caution
• For safety’s sake, leave wiring and mounting to professionals. Consult the car audio dealer.
• Install this unit in the console of your vehicle. Do not touch the metal parts of this unit during
and shortly after use of the unit. Metal parts such as the heat sink and enclosure become hot.
• Do not connect the · wires of speaker to the car chassis, Ground wire (black), or in parallel.
•
Mount the unit with the angle of 30º or less.
• If your vehicle wiring harness does not have the ignition terminal, connect Ignition wire (red) to
the terminal on the vehicle’s fuse box which provides 12 V DC power supply and is turned on
and off by the ignition key.
• After the unit is installed, check whether the brake lamps, blinkers, wipers, etc. on the car are
working properly.
• If the fuse blows, first make sure the wires are not touching car’s chassis, then replace the old
fuse with one that has the same rating.
Part list for installation
A
Faceplate
B
Mounting sleeve
C
Trim plate
D
Wiring harness
( ×1 )
( ×1 )
( ×1 )
E
Extraction key
F
Flat head screw
G
Round head screw
( ×2 )
( ×4 )
( ×4 )
14
( ×1 )
Page 15

INSTALLATION / CONNECTION
Basic procedure
1
Remove the key from the ignition switch, then disconnect the · terminal of the car battery.
2 Connect the wires properly. (See Wiring connection.
3 Install the unit to your car. (See Installing the unit (in-dash mounting).)
4 Connect the · terminal of the car battery.
5 Reset the unit.
(« 3)
Installating the unit (in-dash mounting)
Hook on the top side
Orientate the trim plate as
illustrated before fitting.
(« 16)
Bend the appropriate tabs
to hold the mounting sleeve
firmly in place.
)
Do the required
wiring. (
«
Dashboard of
your car
16)
When installing without the mounting sleeve
1
Remove the mounting sleeve and trim plate from
the unit.
2 Align the holes in the unit (on both sides) with the
vehicle mounting bracket and secure the unit with
the supplied screws.
How to remove the unit
ENGLISH |
15
Page 16

INSTALLATION / CONNECTION
Wiring connection
Fuse (10 A) Rear/subwoofer output
To front speaker (left)
To front speaker (right)
To rear speaker (left)
To rear speaker (right)
White
White/Black
Gray
Gray/Black
Green
Green/Black
Purple
Purple/Black
RL
REAR/SW
Antenna terminal
If no connections are made, do not let the wire
come out from the tab.
Blue/White
(Power control
P. CONT
wire)
Rear ground terminal
To the power control
terminal when using the
optional power amplifier,
or to the antenna control
terminal in the vehicle.
Ignition switch
Car fuse box
Battery
Car fuse box
Black (Ground wire)
To the metallic body or
chassis of the car
Red
(Ignition wire)
Yellow
(Battery wire)
Brown
(Mute control
wire)
Blue
MUTE
ANT CONT
To the terminal that is
grounded when either the
telephone rings or during
conversation. (To connect
the Kenwood navigation
system, refer your
navigation manual.)
(Not used)
16
Page 17

SPECIFICATIONS
FM Frequency Range
Usable Sensitivity (S/N = 26 dB) 11.2 dBf (1.0 μV/75 Ω)
Quieting Sensitivity (DIN S/N = 46 dB) 19.2 dBf (2.5 μV/75 Ω)
Frequency Response (±3 dB) 30 Hz to 15 kHz
Tuner
AM Frequency Range 530 kHz to 1 700 kHz (10 kHz space)
USB Standard USB 1.1, USB 2.0 (Full speed)
File System FAT 12/16/ 32
Maximum Supply Current DC 5 V
D/A Converter 24 Bit
Frequency Response (±1 dB) 20 Hz to 20 kHz
Signal-to-Noise Ratio (1 kHz) 105 dB
USB
Dynamic Range 90 dB
Signal-to-Noise Ratio (MONO) 63 dB
Stereo Separation (1 kHz) 40 dB
Usable Sensitivity (S/N = 20 dB) 31 dBμ (36 μV)
KMM-100
KMM-100U
87.5 MHz to 108.0 MHz (50 kHz space)
1 A
87.9 MHz to 107.9 MHz (200 kHz space)
Channel Separation 85 dB
MP3 Decode Compliant with MPEG-1/2 Audio Layer-3
WMA Decode Compliant with Windows Media Audio
WAV Decode RIFF Waveform Audio Format (Linear PCM only)
FLAC Decode FLAC files
Maximum Output Power 50 W × 4
Full Bandwidth Power 22 W × 4 (at less than 1 % THD)
Speaker Impedance 4 Ω to 8 Ω
Tone Action Bass 100 Hz ±8 dB
Audio
Preout Level 2 500 mV/10 kΩ
Preout Impedance ≤ 600 Ω
Frequency Response (±3 dB) 20 Hz to 20 kHz
Input Maximum Voltage 1 200 mV
Auxiliary
Input Impedance 10 kΩ
Middle 1 kHz ±8 dB
Treble 12.5 kHz ±8 dB
Operating Voltage 14.4 V (11 V to 16 V allowable)
Maximum Current Consumption 10 A
Installation Size (W × H × D) 182 mm × 53 mm × 107 mm
General
Weight 0.7 kg (1.54 lbs)
Subject to change without notice.
(7-3/16" × 2-1/8" × 4-3/16")
ENGLISH |
17
Page 18

FCC WARNING
This equipment may generate or use radio frequency
energy. Changes or modifications to this equipment may
cause harmful interference unless the modifications are
expressly approved in the instruction manual. The user
could lose the authority to operate this equipment if an
unauthorized change or modification is made.
FCC NOTE
This equipment has been tested and found to
comply with the limits for a Class B digital device,
pursuant to Part 15 of the FCC Rules. These limits are
designed to provide reasonable protection against
harmful interference in a residential installation. This
equipment may cause harmful interference to radio
communications, if it is not installed and used in
accordance with the instructions. However, there is no
guarantee that interference will not occur in a particular
installation. If this equipment does cause harmful
interference to radio or television reception, which can
be determined by turning the equipment off and on, the
user is encouraged to try to correct the interference by
one or more of the following measures:
• Reorient or relocate the receiving antenna.
• Increase the separation between the equipment and
receiver.
• Connect the equipment into an outlet on a circuit
different from that to which the receiver is connected.
• Consult the dealer or an experienced radio/TV
technician for help.
• “Made for iPod,” and “Made for iPhone” mean that
an electronic accessory has been designed to connect
specifically to iPod, or iPhone, respectively, and
has been certified by the developer to meet Apple
performance standards. Apple is not responsible for
the operation of this device or its compliance with
safety and regulatory standards. Please note that the
use of this accessory with iPod or iPhone may affect
wireless performance.
• iPhone, iPod, iPod classic, iPod nano, and iPod touch
are trademarks of Apple Inc., registered in the U.S. and
other countries.
• Pandora, the Pandora logo, and the Pandora trade
dress are trademarks or registered trademarks of
Pandora Media, Inc., used with permission.
• Android is trademark of Google Inc.
Información acerca de la eliminación
de equipos eléctricos y electrónicos
al final de la vida útil (aplicable a los
países que hayan adoptado sistemas
independientes de recogida de residuos)
Los productos con el símbolo de un contenedor
con ruedas tachado no podrán ser desechados
como residuos domésticos. Los equipos eléctricos y
electrónicos al final de la vida útil, deberán ser reciclados
en instalaciones que puedan dar el tratamiento
adecuado a estos productos y a sus subproductos
residuales correspondientes. Póngase en contacto con
su administración local para obtener información sobre
el punto de recogida más cercano. Un tratamiento
correcto del reciclaje y la eliminación de residuos ayuda
a conservar los recursos y evita al mismo tiempo efectos
perjudiciales en la salud y el medio ambiente.
libFLAC
Copyright (C) 2000,2001,2002,2003,2004,2005,2006,
2007,2008,2009 Josh Coalson
Redistribution and use in source and binary forms, with
or without modification, are permitted provided that the
following conditions are met:
- Redistributions of source code must retain the above
copyright notice, this list of conditions and the
following disclaimer.
- Redistributions in binary form must reproduce the
above copyright notice, this list of conditions and the
following disclaimer in the documentation and/or
other materials provided with the distribution.
- Neither the name of the Xiph.org Foundation nor the
names of its contributors may be used to endorse or
promote products derived from this software without
specific prior written permission.
THIS SOFTWARE IS PROVIDED BY THE COPYRIGHT
HOLDERS AND ONTRIBUTORS “AS IS” AND ANY EXPRESS
OR IMPLIED WARRANTIES, INCLUDING, BUT NOT LIMITED
TO, THE IMPLIED WARRANTIES OF MERCHANTABILITY
AND FITNESS FOR A PARTICULAR PURPOSE ARE
DISCLAIMED. IN NO EVENT SHALL THE FOUNDATION OR
CONTRIBUTORS BE LIABLE FOR ANY DIRECT, INDIRECT,
INCIDENTAL, SPECIAL, EXEMPLARY, OR CONSEQUENTIAL
DAMAGES (INCLUDING, BUT NOT LIMITED TO,
PROCUREMENT OF SUBSTITUTE GOODS OR SERVICES; LOSS
OF USE, DATA, OR PROFITS; OR BUSINESS INTERRUPTION)
HOWEVER CAUSED AND ON ANY THEORY OF LIABILITY,
WHETHER IN CONTRACT, STRICT LIABILITY, OR TORT
(INCLUDING NEGLIGENCE OR OTHERWISE) ARISING IN
ANY WAY OUT OF THE USE OF THIS SOFTWARE, EVEN IF
ADVISED OF THE POSSIBILITY OF SUCH DAMAGE.
Page 19

Uni
ts
purchas
ed t
hmugh
the
U.S.
A.
military
exchang
e
servi
overseas may
be
serviced
under
warranty
in
the
U.S.A
., subj
ect
to
the foll
owing
1)
The original
warranty
2)
Proof ol
purchase
WARRANTY FOR MILITARY
Kenwood
corporation
of
its audio equ
ipment.
tested and inspected
install
ed
and operat
it
should g
ive you
WARRANTY PERIOD
This
prod
uct is wana
of
the origin
al purch
SCOPE OF WARRANTY
Exce
pt
as
s
pec
ified belo
materials and workmanship
Duri
ng t
he
warranty
Ce
nter
in the
military market lis
card
will proVI
de
required
to
correc
The
following
are
1.
Voltage conv
ersi
2.
Periodic ch
eck-ups
by
the
warranty
3. Cab
ine
ts.
grilles. other
and other non
4.
Unitsonwhi
chtheseri
or remo
ved
.
5. I
nstall
ati
on
and/or remov
6.
Damag
ed magn
7.
House
call
cha
8.
Shipping
or deli
Kenwood
Ser
vice Cen
9.
This
warranty
will not
following conditio
of
the
autho
riz
•
Improper maintenance
par
ts or ac
cess
specifications
• Misuse, abuse, neglect, unauthorized produc
or fail
ure
to l
ollo
ManuaL
~Accidental
or i
•
Repai
rs or
attempted repairs
(All repairs must
Servi
ce Cen
ter.)
•
Damages
or deteriorati
must be presented
• Da
mag
es
or deterio
or
replacement.
PURCHASER'S RESPONSIBILITIES
As the p
urchased
quested to do the fo
re
warranty serv
ice.
1.
Retainyoursalesslip or
your el
igi
bili
ty
2.
Make your
unit ava
nter
in the m
Ce
war
ranty service, or ship yo
or equivalen
t,
to the authoriz
Dear
Customer,
Thank
you
valid in
the
procedure,
conditions
is
in
effect.
is
provided
to
rs
proud
of
the
This
unit
has been
betore
it was s
ed
in a
ccordanc
e w
an optrmum
reliable
nted
lor a per1od
ase
w,
this
warranty cove
of
the
perrod,
any
authorized
ted
you free-of-charge
t any d
efect
in
materials
not c
overed
by
this
ons
which
do
not
.
exterior
-durable part
s a
nd
al
num
ber has
al char
etic tape
s.
rges
for
any
repairs
very
charges
ter
cover
anyfai
ns
in
accordance
ed
Kenwood
Service
or
repair,
ori
es
that
do
not
of the original p
ntentional
arts
w instructions containe
damages.
by
be
performed
ons
caused
to the
camer)
ration
s resulting fr
of
a n
ew Kenw
ood bra
llowing
in orde
other
evidence
for requesting
Kenwood warr
ilab
le
to
an
authorized Kenwood Service
ilitary
market
for
ur
unit
fully insured
and s
ed
Kenwo
od Servi
for
purchasing this kenwood product. As mentioned in the
countries listed. If
or
write to;
c:on
the
servicer.
MARKET
quality
and
workmanship
properly
hipp
Kenwood bra
in the ba
disclose
finishes,
accessori
ges
to
lure
including the
confor
at
ce
designed
ed to
you
.
II
ilh
i ns
truclions
furnished,
performance.
of
(1)
year
from
rs
all
defects in
nd
products.
Kenwood Servrce
ck
of this
both
parts
and
or workma
warranty.
any defectc
bells, tape
es.
been effaced
. modified
.
or
from
an
auth
that
isdu
etoany
with
the
visual inspec
Center
installati
m to lhe
quali
.
t modifi
d in t
he Owner's
an unauthorized agency.
an aut
horized
duri
ng
shi
pment (Clai
om rem
ova
nd pro
duct, yo
r to obtain K
of purchase
lor proving
anty service.
inspe
ction and approved
in its original carton
hipping
char
ges prepa
Cente
r.
your
ce
tinent
al
,
p
roper
ty
the date
warran
ty
lab
or
nship.
overe
d
hea<J
s.
orized
of the
tion
on of
ty and
catio
n
Kenwood
ms
l and/
u are
enwood
box
id,
country is not listed please contact
LIMITATION OF IMPLIED
Any
and
all
imp
merchantability
limited
EXCLUSION OF CERTAIN
KENWOOD
the repa
sha
consequentral
by
in
ir
ll
not inclu
applicab
durati
's liabili
or repl
le l
and fi
on to
aceme
de
or
aw
KENWOOD AUTHORIZED SERVICE
CENTERS
IN
JAPAN:
Yokota
Kenwood
Rep
BX
, JAAX
Yokota
APO
San
Franc
Zama
Kenwood Rep.; c/o
Zama
PX,
JAAX AA
APO
San
Fra
Misawa
Kenwood Rep, c/o
Misaw a B
X.
APO San Francisco 96519
Yokosuka
Kenwood
Rep
A-33. Yokosuka
FPO
Seattle 98760
Atsugi
Kenwood Rep .. c/o
Atsugi NEX No. 260-020 FPO Seattle
98767
lwakuni
Kenwood
Rep
Marine
Cor
ps Exchange, Marine Corps
Air Station,
FPO
Seattle 98764
Sasebo
Sasebo NEX:
Navy Exchange 260-040
FA
Box 115 FPO Seattle 98766
Okinawa
Kenwood
Rep
OWAX,
AAFES-P
96230
JVC KENWOOD Customer Information Center
3-12, Moriyacho,
Kanagawa-ku, Yokohama-shi, Kanagawa
WARRANTIES
lied warr
anties,
including
tness to
r a p
articular
the len
gth
of
this
warranty
ty
lor
any defective product
nt of said pro
damages
otherwis
duct, at
of
any
kind,
e.
expect to the exte
whether incident
MILITARY MARKET
, c/o
AA
FES-PAC.
isco
96328
FES-PAC,
ncisco 96343
JAAX AAF
ES-PA
C,
, c/o
NEX
No. 260-010
,; c/o
, c/o
AC.
APO
San
221-0022,
warranties of
purpose, shall
.
DAMAGES
rs limit
ed
our
poti
on, and
nt pro
hibit
Francisco
pages
your
KOREA:
Ke
nwood
Rep,
KOAX Repair Shop, AA
be
DO-Camp Market, APO San Francisco
96488
GUAM:
to
Kenwo
al.
Guam
ed
F
PO San
Kenwo
GU
AX,
96334
c/o
od Re
p,
c/o
NE
X No. 230-010,
Francisco 96630
od
Rep, c/o
AAFES-PAC, AP
FES-PAC
O San Francisco
U.S.A.:
Hawaii
Kenwood Factory Service
99-994 lwaena
Alaska
Vrsta Radio TV,
861 East Loop
99501
Anchorage
1450
99501
In
The
For Ne
Te
l: 1-800-536-9663
Kenwood
Kenwo
P.
O.
Street,
Long Beach, California 90801-5745
Te
l: 1
EUROPE:
Please inquire at the military resale
outlets where you bought your Kenwood
products,
KE
NWOOD ELECTRONICS
DEUTSCHLAND GMBH:
Rembrucker-Str. 15, 63150 Heusenstamm,
Ger
ma
Te
l.
: 4
of
this booklet,
retailer
for
St.
Area, Hawa1i 96701
Road,
Anchorage, Al
Comme
East
Continental
are
od Factory Service;
Box
31
OJ
rcial Electronics, Inc.,
9th Ave., Anchorage, Alaska
st Authorized Service Center;
22745,
U.S.A.
Service
U.S.A.
2201 East Domingu
639-5300
or
ny
9-0
6104·69010
our
warranty is only
information
on
warranty
Japan
aska
ez
Warranty Card
Id
Attention:
ca
This
or
damage
rd and recei
pt
(or invoic
.
Attention:
Vous aurez besoin de c
eau en cas
pann
Aten~ao:
Em
caso de
de
dano
compra serao requisitados para a
© 846-0824-00/
ette
de vol ou d'endommagemen
ou pe rda
01
!KI (12/07)
e)
are n
ecessa
ry to purchase a
carte
et
du
re~
u
(
ou
do
painel frontal, este Cert
aquisi~a
o
entification
Modele do aparelho e numero
Model number
Re
vendeur & cachet
Nome da loja e carimbo
Dealer
Date d'achtat
Data da compra
Pu
rchase date
No
m & adres
Nome e
Na
me & add
de Ia facture) pour acheter
t.
de
um novo
& stamp
en
dere9o do cliente
new panel in case
ificado
de Garanti
paine
du
produit
& serial number
se
du
client
ress
of customer
a e a Nota Fiscal
I.
un nouvea
de serie
of
the
ft
u
Page 20

This
warranly
will
be
hono
red
only
in the
U.S.A
.
KENWOOD
FOR CAR STEREO COMPONENTS
HOW
Kenwo
od U.
product
purchase
WHAT
Excep
t as
material and workm
The
followin
1.
Any
Kenwood
authorized Kenwood
dealer
li
tary
Mi
Any
2.
modified
3.
Damag
a.
Any shipmen
to
b
lnsla
c. Acc
nauthori
u
in
stru
d.
Repair
by
e.
Any
defec
0
fabricante garante o produto
qualquer
e
val ida
pela
JVC
Este
prod
a
part
ir da
de
venda
Eventuais
dilata~ao
(a)
Produlos
(b)
Deleitos
de instrucOes
de
lnst
(c) Danos
(d)
Defellos
(e) Def
eito
da
JVC
(I)
Danos
parafu
gravadoras
(g)
Oeleit
tr
ansporta
(h)
Oua
(i)
Danos causados
Iii
Danos ca
(k)
Dan
(I)
Danos
expos~
LONG
S.A.
Cor
tor a
period
of o
IS
COVERED
NOT
specified
bel
anship in
g are n
ot
producl which is
or
wh
ich
, unl
ess the
product
Exchange
ServiCe
prod
uct
on
which
or
remov
ed
e,
deleriorati
t of the
the
carrier).
lla
lion
or remo
ident
. ac
ls
zed
product
ctions
suppli
or
attempted
Kenwood.
other
cause which
t.
deleito
de
ta
no
territ6rio
brasileiro
KENWOOD
ulo e
garantido
data
de aqui
ao consumi
dor
reparos
reatizados
do
seu
prazo.
como
nUme
resu
llantes de ac1d
,
rna
ru~
oes
.
modil
causados
par
ou
danos em
sou
danos
resultantes
KENWOOD
ou
de!Briorayoes
sos
de lix.l,ao.
,
COs
ou
os
ou
danos devido
dora):
lquer oulracausa
par
usados
por
os
cle<:orrentes
causados
par
o
a umi
dade
LIMITED
WARRANTY
IS
THE
WARRANTY
poralion
("Kenwood") wa
ne
(1)
year
from the date
AND
COVERED
ow.
this
warranty
Kenwood
covered
is
on
of
bri
do
utili
car stereo components.
by
the
warranty
not
distributed
not
purchased
car
stereo
dealer
IS
purchased
lhe
serial
number
or
malfunction
prorilct
{claims must
val
of
the
product
nature.
misuse
modification
ed
with
the
product
repair
by
anyone not
does
not
identificado
""o
ou
de
materia-pri
desde
que
Bras11
Comerc
io
PERiODO DE
pelo
prazo
de
sicao,
comprovada
final
no
produto
EXCLUSAO
ro
de
ser
ie
ou
certiiicado
entes
(quedas. batidas e et
zacao
,
li
ga~aa
1ca
voes
nao
autor
agentes
da
natureza (Ex: chu
decorrencia
de
do
uso
;
do
de
aos
acabamentos externos, partes
luvas, al(:3s.
danos
causados por
ao
transporte
que
nao
este
ja relaci
tentat1va
de
roubo
uso
de
CDs
de
desgaste
natural
mau
usa.
(derramamentodeliquidos e/ou
ou
situaQ5es
climaticas
rranls !his
WHAT
cover
s a
ll defects
:
in
the
in
the
U.
S.A
or an aulo
through the U.S
has
been defaced
resu
lting
from
be presented
. a
buse
or
failure
relate
to
na
N
ma durante o
o
produto lenha
de
Eletrbnicos
GARANTIA
01
(
urn)
ano. inclu
media
nte a apresentat;ao
duran
te o perfo
DA
degarant
a
fon
te
de tensao dilerente
izada
s:
conse
rtos realizados
pe(:3s
ou disposit
balsas. eslojos.
pilhas
(reclama
ona
daa
ou
fmt
o;
ma
qualidade;
do
produ
extremas. riscos
of original
IS
in
U.S
.A.
by
. from an
mobile
.A
.
. negl
ect
,
to follow
authorize
d
a prod
uct
ota
Fiscal de
periodo de
sido
adquirido
Uda.
ind
o o
do
de
GARANTIA
ia
rasurados.
c).
usa
vas
. raios.
maresia,
por
ivos nao
ada
ptado~es.
deleituo
sas
ou com
~oes
devem ser
deleitos
de
lo;
WHO
This
warranty
is
enlm
ceab
WHAT
We
will
items.
section
II
your
1.
Take
in
problem.
is
authoriZed, pleasecaii1-800-K
ServiCe Center.
2.
Although
to
ship
shipping
within
3.
Whenever your u
you
as
WE
pay
for
all
lab
Payme
nt
ot
ship
of
thiswarran
ly
HOW
TO
OBTAIN
KENWOOD prod
or ship
ittoany
the
U.S.A. along
{if you are u
1-800
you must pay
the
product lor warranty service,
char
ges
ill
the United Sl
nits are
must
10c1ude a copy
proof
of
warranty coverage
LIMITATION OF IMPLIED
ALL
OF
PURPOSE.
THIS
venda
perfodo
da
garantia
em desac
da espec
pessoas
conlormes
cosm!ticas.
materia~prima
alimentos,
ou
quedas)
WARRANTIES
IMPLIED
WARRANTIES. INCLUDING
MERCHANTABILI
ao
garant1a. Esta garantia
no Bras
respectiva
adulterados
antenas. litas,
vazamento
lelt
TY
ARE
LIMITED
WARRANT
Y.
consumido
r contr
il
e dis
tribu
estabelecido por lei,
Nola
Fi
nao
im
plicam na
ou ilegive
ordo
como manu
iti
cada
no
Manual
enchenles e et
c);
nao autorizadas;
as especiti
caC(ies
cabos.
chi
cote
cabe(:3s
;
as
;unto
a em
pres
e
de tabrica.;ao
corrosao, oxida
IS
PROTECTED
le only
by
the
original
WILL
PAY
mater
ial
expenses
IS
discussed
FOR
or and
ping charoes
WARRANTY
SERVICE
uct
ever nee
ds
ser
KEN
with & com
ncertain as
-536-9663
any shipp
he repairs are
ates
AND
IN DU
a
ido
sca
is;
al
viCe
WOOD
Authorized
plete
description
to
whether a Service Cenler
ENWOOD
)
ing
charges
we
will
covered
tak
en
or
sent
for
of
l
warranty
the original dated
FITNESS
FOR A PARTICULAR
RAT
ION
TO
THE
E
indispen
ac
ompanhado
r
asuras
ou
0
consumidor
no
balcao
de
l
nstalafilo e remofilo do produto. despe
do
proprietario.
Es
te
produto e deslinado exclus
Pa
ra
qualqu
Se
rvico
Autorizado mais
de
Atend1mento
JVC
KENWOOD
s.
Nome
E
nderev
Ci
dade:
Data
do
da
o
compra:
a
;
cJo
,
purchaser
for covered
in
the
ne
xt
Servi
ce
Cenler
of the
lor
the
nearest
if
it
is
necessary
pay
the
return
by
the
warran
ty
service,
sales receipt
WARRANTIES
LENG
TH
OF
CONSERTO
savel
a
apresen~o
da
respecti
va
modifi
ca<;Oes
.
somen
te !era dir
um
Servi,o Autori
0
QUE
NAO
er
IOiormafilo sabre seu equ
pr6xim
JVC
KE
NWOOD
DO
www.kenwood.com.br
consumidor:
__________
__ / __ /__
EXCLUSION
KENWOOD'S
LI
MITEDTO
THEREPAIRORREPLACEM
AT
OUR OPTION.
1. INSTALLATION
TO
OTH
ER
ENWO
OD
K
BASED UPON
PRODUC
T:
2.
ANY
OTHER
CONSEQ
UENTIAL
SOME STATES
LO
NG
AN
IMPLIED
ALL
OW THE
EXCLUSI
CON
SEQUENTIAL
AND
EXCL
USIONS
This
warranty
h
aveother
rightswhichva
Ita
problem
develops
or
1f you have
product. you s
or
Au
thorized
n
ot handled
to
Re
lations Department
KENWOOD
P.O
Box 22745, 2201 East Dominguez
LIABILITY
FOR
KENWOOD SHAL
OR
REMOVAL CHA
PROPERTY
CAR STEREO
INCONVENIEN
OR
DAMA
GES. WHETHER INCI
OR
OTHER
DO NOT
WARRANTY LASTS
ON
OR
DAMAGE
MAY
NOT APPL
g1ves you
specif
ryfromst
dur
ing oraller 1
any
questions regarding
hould cont
act your KENW
Se
rvi
ce
Center.ll
your
satis
faclion. ple
at
the
USA
OF
DAMAGES
ANY
DEFECTI
VE
ENTO
L N
OT
BE
RGES. DAMAGE
CAUSED
BY ANY DE
COMPONENTS. DAMA
CE. LOSS
OF
WISE
ALLOW
LIMITA
TIO
AND
LIMI
TATION
OF
S,
SO THE
ABO
VE liM
Y TO
YOU
ic legal rights
. a
atetost
ale
00 Limi
ted Warra
the
OOD Authofl
lhepr
obte
m o
ryourque
ase con
tac
address listed below
CORPORATION
Street, Long Beach, CA 90801-57 45
Tel:
(3101
639-5300
EM
GARANTIA
de
ste Certificado
Nola
Fiscal de
eito a
estes beneffci
zado
da
E COBERTO PELA
sas
iva
men
te
IMPORT ANTE:
o,
acess
- Tel.: t
BRASIL
Tel: (11) 3777-6771
compra
os,
JVC
KENWOOD
de
Ireta.
seguro eembalagem
ao uso
domestico
ipament
o J
VC
e o site
www.kenw
55
(1
1)
3777-6771 com
COMERCIO
de
Garanlia devidam
do produto.
quan
do o produfo
GARANTIA
.
KENWOOD
ood.com.br
DE
ELETRONICOS
CEP: ______
Estado: _____
Nota
Fiscal:
ente preenchido,
desde que nao apr
for ent
reg
sao
de
responsab
. ou
para
obt
. ou ligue para a
os
dados abaiXO preench1dos.
__
___
____
PRODU
CT
FTH
EPRODUC
LIABLE
FOR:
FEC
TS
USE
OF
DENTA
NS
ON H
/OR
DO
INCIDEN
TAL
ITA
TIONS
nd
you may
nty
Per1od.
operat1on
of
zed
Dealer
stion
l our C
ustome
esente
ue diretamente
ilidade
er o
endere~o
Centra
LTDA
_
_
_
_
IS
IN
GES
THE
L.
OW
NOT
OR
also
the
is
do
(
e) Defec
ts
resulting
from disaster,
acci
den
KENWOOD
KENWOOD ELECTRO
-K
T
r
l
ENWOoo··). gi
or
iginal
customer
Ca
nada
by
K
ENWOOD and purcha
by
KENWOO
D.
KE
NWOOD warrant
normal use
. is
co
ndit
ions set for
wa
rranty period. re
a
nd
labo
ur when suc
or its
' aut
horized
ma
teri
als
or w
conta
ct KENWOO
au
lhorize
d by KENWOOD
WARRANTY PERIOD
Th
is K
enw
ood
per1od
of o
ne (1) year from
or renlal.
excep
or
commerci
al
of nin
ety
(90) days lor
terms and
conditions
WARRANTY EXCLUSIONS
Th
is warranty exclude
(a)
Products
purcha
Ca
nada and taken
(b)
Products
pur
KENW
OOD.
(c
) Pro
ducts
with the
m
issing
.
(d) Peflodic
check-u
cover
ed
by this
GARANTIE KENWOOD
KENWOOD ELECTRO
~KENWOOD"
),
original de cha
Canada pa
r K
ENWOOD et achet
par
KENWO
OD
KENWOOD garan
enonce
s
ci~dessous
dans
des conditions
d
81
aut
s. Si l'un
KENWOODs'engageil.assu
et
de
Ia main-d'oeuv
pourvu que de t
dBiectueus
es
employees
Kenwood ouil.
Ia
par l'un
de
ses
centres
pour verifi
er
si un
auiOfi
S! par
KENWO
PERIODE DE GARANTIE
les
pieces
et
Ia
des pro
duit
s K
enwood son!
an a camp
ier de
sauf dans l
es
cas
ofession
un but pr
etde
Ia
m
ain~d'oeuvr
de quat
re-vi
ngt
conditions
de
Ia
EXCLUSIONS DE GARANTIE
Cette
ga
rantie ne couvr
(
a) les produits
transportes
b) les
pro
duits
(
pa
r K
ENWOOD
(c
) l
es pro
duits d
ou m
odiM
:
d) les services d'entret
(
d!laut co
uvert par cette
WARRANTY
NICS
CANADA
ves
of
eac
s t
free from any
th b€1ow. II
pai1s will
h defect
servi
orKmanship
D to
product
t f
or prod
app
J~atio
of
s:
sed
to a foreign
chase
ps
war
donn
e
que nouvea
tit
, s
ous reservedestermes
,
Que
d'emploi norma
d€1aut
se
re
n&:essairespour
els
defauts
main~d'oeuvretelqu't'!tab
deserviceautorises. Appelez
concessionnaireou
OD
main~d'oeuvre
Ia date
ou
les produits
nel ou
e
de
-dix (
90)
garantie.
achetes
a I'
E!Iranger
ach
etes a un concess
;
oni
le nume
INC.
the foll
owing
wrillen warran
h n
ew Kenwood product dis
sed
i
rom
a deale
hai
each
new
Kenw
ood produ
defects,
subject
a detecl
should
be made f
ree
ot c
s are delermt
ce
centres
confi
.
is
warranted fo
ucts
n.
parts an
the
in
d f
rom a dea
ser
whic
rant
NICS CAN
par
etrit
chaque nouve
prod
Iars
garanliespendantla p8riode d'un
d'a
chal.
commercial,
meu
jours
epas
a l'
;
ien
ned
lo
be att
at
ti
me
of manufa
rm
if a
dea
ler
or
r parts
the date of ori
gmal purchase.l
which
are
used
which are warr
d l
abour an
d are subje
warranty.
a l
oreign
coun
try
cou
ntry
ler not a
ial
num
b€r def
h
do
no
t dis
y.
ADA INC
la
garanl
ie s
uivante a l'acheteur
u produil
Kenwoo
ea
un c
oncessio
au
les, est
uit
pend
ant
Ia periode
merl
ecoOtdesp
effec
so
n!
attribuables a des pieces
de
Ia f
abrication
l i
un
cen
necessaires
de
bail ou
de
Kenwood son
oU Ia
ga
reenvigueur pendant
sous reserve
t'!tranger
ou
achetes
ionnaire non a
ro
de
sfi
rie
manque
p{lriodiq
ues
qui
garanti
e;
(hereina~er
ty
tri
but
r aut
horize
ct, unde
to the terms and
occ
ur Within the
ha1ge
lor par
by
KENWOOD
ributable
to
cture
. Pl
serv1ce
centre
an
d
labour for a
in
a pr
ofessiona
anted for a
ct
or
pur
cha
uthoriZed
aced
. a
llere
clos
e any
defects
(ci-apr
es
appe
d di
str
ibue au
nnai
reautorise
etdes co
ndi
produ
it Kenw
exem
pt
de
de garan
iece
sdefectueu
tuer
les
reparatio
du prod
par
KENWOOD
KENW
tre de
service
pour
Ia reparation
lo
cati
on originat
t emplo
yes dans
rantie
des piec
une
pe
des
term
es
au
Canada
, a
et
e
n'in
diquent a
called
to the
ed
faulty
ease
ease
period
to the
sed
d or
tio
ood,
tous
OOD
ri ode
et des
utor
effa
ucu
tie.
ses
est
in
d
r
ts
is
l
in
by
l!e
ns
ns
uit
ou
(I)
e,
es
et
ise
ce
n
l
ightning, power
maintenance, unauthorized modifical
instructi
(f) Def
person or par
(g) Def
ot
n
(h
) D
amag
c
osmet
l
ape
l
eak
ef
(i) D
b€
(j) P
roduct volt
{k
) Pmduct installati
TO
ShO
uld
it to any a
the original
as
proo
reigh
t pre
f
centre. To avoid poss
product
of
bill
th your name
wi
a
comple
ault
(s)
l
f
reigh
t pr
is responsi
product
(e
) l
es
abus, lesemplois incorrects
courant.les manqu
esm
l
durnod
es
(I) l
eH
par KENWOOD;
(g) lesdelauts
ne
es finitions
(h) l
de
les
d
8fa
ou
(i) l
es
l'
exp!d
t
elle
es
(j) l
produit:
(k) l
es
COMMENT
Au
cas
avtr
e n
s'
entre
c
contra
de gara
pon paye au
pr
oche
le transport,
co pie du contra!
une
en
tant
meros
nu
vo
tre
produits sous garantie repar
estinati
d
r
esponsable
apport
r
l'exte
rieu
surges. neglect
ons in the owner's manual.
ec
ts
or damage
as
a r
ty
nol
ecls
ects or
presented
sale a
. P
delauts
ectuees
se conforment
qui fui
lrais d·inslallat
authonze
result
ing
from the
conf
orm
to
KENWOOD spec
e or
deterioration
ic part
s.
lape
s. di
ing batterie
OBTAIN
your Kenw
f of warranty.
is
te return address
epa
(s)
d8fa
odi
bandes
bandes, les disqu
uts
dBfauts
s reclamatio
conversions
heads, adap
scs
or faults
or damage caused
s
damage occurnng during
to t
he
shippmg
age and
/or line
on
or
rem
WARRANTY
ood prod ucl require warranty service, deliver
uthorized KENWOOD ser
copy
of
you
r bill ot sale and this
or
send
pai
d
to
the neareSI
ible
shippi
properl
y p
acked
. Include a c
nd
this
warranty card
, ho
me and
roducts repaired
ble
to
uts cau
e d·
ou dommages
rlio
and a det
id
to desti
nation
for all freight and rela
destinations outside Canada
ses
par
es
de soin
lica
lions
non autoriseesou les
emploi
:
ou l
es dommages cau
par
une person
causes par l'emp
pas
aux
e.xl~rieures,
, l
es
adap
taleu
es endommages
causes
ent
ou dommag
n d
es
produits Kenwood (On
ns aupr!s
de
tens
ion
ou d'enl!veme
OBTENIR
GARANTIE
SOUS
oU un
service
so us
ven
veuill
tel
ire,
ce
KENWO
te
e
veu111
centre
ler tout
reuve
epho
el une
de
tous frais
ur tai
Canada.
tce
ez bien
garant
veuillez
OD
~e
carte
ez laire parve
de
service KENWO
es
possibilit
emball
de
vente
de garantie aussi
ne au pos
descript
eur
du
de
re
expBdier les produits
ecessa
de servi
! de
nli
e ou
. Pour evi
que p
de
adr
esse
ons a l'inUiri
ent po
r du
t. abuse, misuse.
or lack of
ion
or
esult
of repai
rs
d by KENWOOD
use
ol p
arts
or de
ifications.
occurri
ng
to
any
ext
lor
s.
anl
ship
ping (clai
compan
y).
frequency con
oval charges
SERVICE
vice
centre and pr
your prod
uct full
authorized
KENWOOD
ng damage, mak
opy
as
pro
al of warranty
/or
work telepho
ailed
descri
within warranty will
s within Ca
nada. The customer
led costs
les
d9saslres
. l
es
, l
esOC
iairs. l
es surtensions
s
ou
d'entretie
manques
ses
lors de r
ne
ou par
une
par1
loi
de
pi
eceso
udedispo
exigences
de
KENWOOD:
l
es
pieces
cosmE!tiques, les tete
rs,
les antenoes
ou
par
des
pil
es
qui
se
produisent pendant
devra
des compagnies
ion
evo
u
de
nt
du proou11
DU
SERVICE
ie
devolre pr
liv
rer
le produi
t a n'imp
et pre
sent
er Ia copie originale du
de
garantieen tan
nir votre pr
OD autori
es
de
dom
er
le
pro
dui
t. Veuill
original
el
cetle carte
bien
le
de
tr
ava
il eVou
ion
df!tailh
~e
Can
tran
nt reloume
ada. Le co
sporl
et d'autres Ira
des defauts
nsomma
es sero
per
iodic
fai
lure
to loll ow
performed
by
v1ces
that
erior finishes
ennas, cables.
by
delec
live
ms shou
ver.s
inn
s
ese
war1anty
card
y insured an
serVIce
e sure the
of
your
original
alo
ne number(s),
pti
on
of
be returned
tor the r
etu
rn
accidents, l
ns
periodiques,
de r
espect
eparations
ie non a
utorisee
sitils qui
, l
es cables,
d€p€-ris, ni l
es
d8feclueuses
it dep
ose
de tra
nsport)
t
r!q
uence
oduit Kenwoo
ort
e quel
l q
ue
preuve
odUit
ass
ure
sl le pl
mages pendant
ez
inclure
de
garant
que votre nom.
au dom
icile,
. L
s port
paye aux
leur sera
is
qui s'y
a des
tinations
ENTIRE WARRANTY
This
warranty constitutes the enti
by KENW
OOD
. No person,
or their
age
nts
or
em
a
enl
arge
or verba
do
any
extended war
by
the dealer
.
by K
ENWO
or
KE
NWOO
ld
otthepro
da
mage
c
ommercial l
Th
e provis
to
limi
t, modify
nt
or righ
ls you m
provinci
d
This warranty card
a valid
ng
lhe
of
proof of purchase
you mu
warra
nty
kep
t in a
KENWOOD
6070 Kestrel Road, Mississauga,
ployees
this warranty
on beha
l sla
tem
ent
or
adverti
rant
y pr
or
service
OD
DISCLAIMER
D disclai
ms any responsi
ductor a
ny other indirect, incidenta
to o
the
r p
roducts
oss
.
NOTICE TO CONSUMER
ion
scon
tain
ed
in
, t
ake
away
ay
have whi
al
or f
ede
ral l
aws
IMPORTANT
by 1tsell
st
prese
nt t
he original copy
card as proof of warranty, so
saf
e p
lac
e,
sho
uld th
ELECTRONICS
On
tario, Canada L5T
Tel.: (905) 670-7211
Fax: (905) 670-7248
r de
es
de
s
es
;
du
d
et
us
ie
es
L'ENTIERE GARANTIE
Ce
ne
gar
ant
ie
represente l'enlie
KENWO
OD K
ENWOO
es
exte
nsi
ons
s ou entrepri
es
ou
au oom
lies, d'
es
ou
pla
ns
nair
es
n'y ail
con
RENONCIATION
OD
renon
cea tout
a d'autr
es
produ its
pertes comme
IS
AUX
ns contenu
de
limiter, de
autre
s ga
lois ou l€gislat
OD
ne
conside
preuve
d'
achat
i bi
en
que cette
On re
commande
ou
ell
es s·avA
ELECTRONICS
annonces
ran
IMPORTANT
rer
D ne
ni de
centres
de
de
ou
senti par Scr
to
us dom
rciales
CONSOMMATEURS
es dans
ties
ion
re
val id
p16senter
aie
de toul
garantie faite
concessionnair
ou employes
verbal
esou OCr
programm
l
es concession
K
ENW
OOD
K
ENWO
emploidu produit, de
d'
ca
uses
toutes
de
AV
L
es
stipulatio
pas
pour but
xc
lure d'
d'e
quell
es
KE
NWO
Btant une
so
us
garanlie, i llaudra
venteauss
de gar
anlie.
au
cas
KENWOOD
6070 Kestrel Road, Mississauga,
On
tario,
Telephone: (905) 670-72 11
Telecopieur: (905)
a
re
wri
tten
war
or
service centre
zed
KENWO
OD
by
nt
or promotio
bili
ty
lor
loss
l or conseQue
goods, inconv
en
warran
ty
are not in
or e
xclude
any warranties
in a
ny
n.
red
by
KENWOOD
ing for warranty repa
of your
bill
of
we
recommend
in the futu
ran
to ex
any
n. incl
of ti
enie
2pplica
sal
!hal they
party, dealer
are authmi
lf
of
seme
ogram
or plan thai may
cen
tre, unless appmved
or
thi
s w
ritt
, discla
im
ch
are set forth
or legislatio
is not
conside
. W
hen apply
ey
be required
CANADA I
158
re garan
tie don
se tient
toute
ses par tout
de
KENWOOD
garant
les
centres
es responsabilites
ou bien
modi
ni droits enonces dans n'importe
s provin
pas
cette garan
e.
carte de garanlie
de
nt n
nee par
auc
unement
responsab
s aug
mentations
es per
sonn
ou par leurs
au
moye
promotions, y i
de
serv
it d'
ava
nce
taus
te
cial
es
ou
tie
pie
originate
ver dans
a r
es, part
n d
'aflirmations
que pui
ssen
ice
, a mains
.
de
perle
inconve
garantie ecrite n'ont
r.
de
fi!
derales
lou
ie seule com
ernandedu serv
du conlrat
en tant q
un li
aven
ir.
service
ou
de
ie etendue
mages indireclsouaocessoires
s. de
Ia pr!sen
fier, de diminue
Lorsqu'on d
Ia
co
les conser
ecesaires
CANADA I
Canada L5T
158
670-7248
ty given
tend
written
uding
be
off
in w
me
or
nce
tended
e and th
re
Bc
de cette
agents
nc!
us to us
t otfrir
de
temps
nien
rejeler ni
.
ue
preu
eu sUr
ered
rit
ing
use
nti
irs,
NC.
rit par
ies
que
ts
NC.
ble
me
or
al
or
as
is
be
le
.
,
ou
ice
de
ve
 Loading...