

Page 1
Table Top Dishwasher
KDWTTB10
installation / instructions manual
KDWTTB10_IB_final110317.indd 1 21/03/2011 10:04 AM
Page 2

contents
unpacking ............................................................................................................................ 4
installation ........................................................................................................................... 5
location ............................................................................................................................ 5
product overview ................................................................................................................ 9
front view ......................................................................................................................... 9
rear view .......................................................................................................................... 9
dishwasher and cutlery basket ...................................................................................... 10
internal view .................................................................................................................. 10
control panel ...................................................................................................................11
display screen ................................................................................................................11
wash cycle table ............................................................................................................... 12
before operating ............................................................................................................... 13
to open the door ............................................................................................................ 13
to close the door ............................................................................................................ 13
items not suitable for use in the dishwasher ................................................................. 13
adding detergent or detergent tablet .............................................................................. 14
adding rinse aid ................................................................................................................ 15
adjusting the rinse aid reservoir .................................................................................... 15
adding salt ..................................................................................................................... 16
loading the dishwasher .................................................................................................... 17
before loading the dishwasher ...................................................................................... 17
dishwasher basket ......................................................................................................... 18
- hinged cup rack ....................................................................................................... 18
- hinged spikes .......................................................................................................... 18
cutlery basket ................................................................................................................ 19
- loading the cutlery basket ....................................................................................... 19
- loading the dishwasher basket for 6 place settings ................................................. 19
starting a wash cycle ....................................................................................................... 20
changing a programme .................................................................................................... 20
at the end of a programme .............................................................................................. 20
switching off the unit ....................................................................................................... 21
unloading the dishwasher ............................................................................................... 21
delay start.......................................................................................................................... 21
key lock ............................................................................................................................. 21
cleaning after use ............................................................................................................. 22
KDWTTB10_IB_final110317.indd 2 21/03/2011 10:04 AM
Page 3

external care .................................................................................................................. 22
- the door and the door seal ...................................................................................... 22
- the control panel ...................................................................................................... 22
internal care ................................................................................................................... 22
- ltering system ........................................................................................................ 22
spray arms ..................................................................................................................... 23
frost precaution ................................................................................................................ 23
moving the dishwasher.................................................................................................... 23
maintenance after a prolonged period of non-operation .............................................. 23
hints and tips .................................................................................................................... 24
fault code ....................................................................................................................... 24
technical problems ........................................................................................................ 24
disposal of the dishwasher ............................................................................................. 26
disposal of packing material ........................................................................................... 26
specications.................................................................................................................... 27
safety warnings ................................................................................................................ 28
KDWTTB10_IB_final110317.indd 3 21/03/2011 10:04 AM
Page 4
Thank you for purchasing your new Kenwood Table Top Dishwasher.
These operating instructions will help you use it properly and safely.
We recommend that you spend some time reading this installation/instruction
manual in order that you fully understand all the operational features it offers.
Read all the safety instructions carefully before use and keep this installation/
instruction manual for future reference.
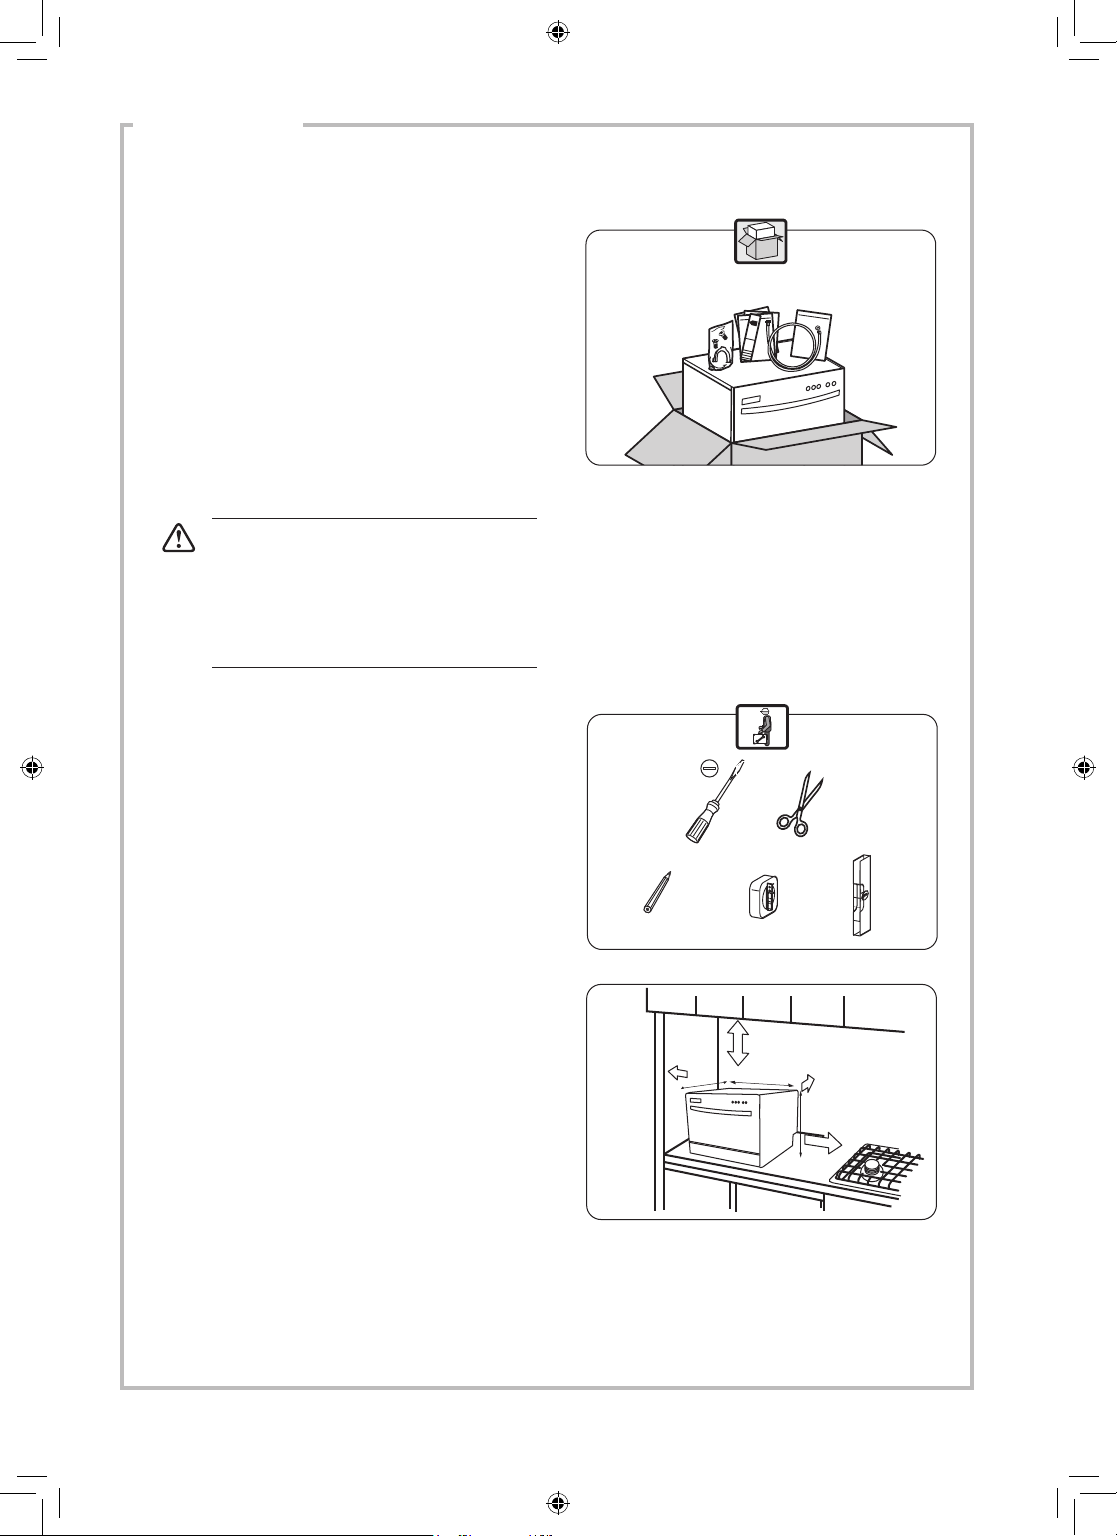
unpacking
Remove all packaging from the unit. Retain the packaging. If you dispose of it please do so
according to local regulations.
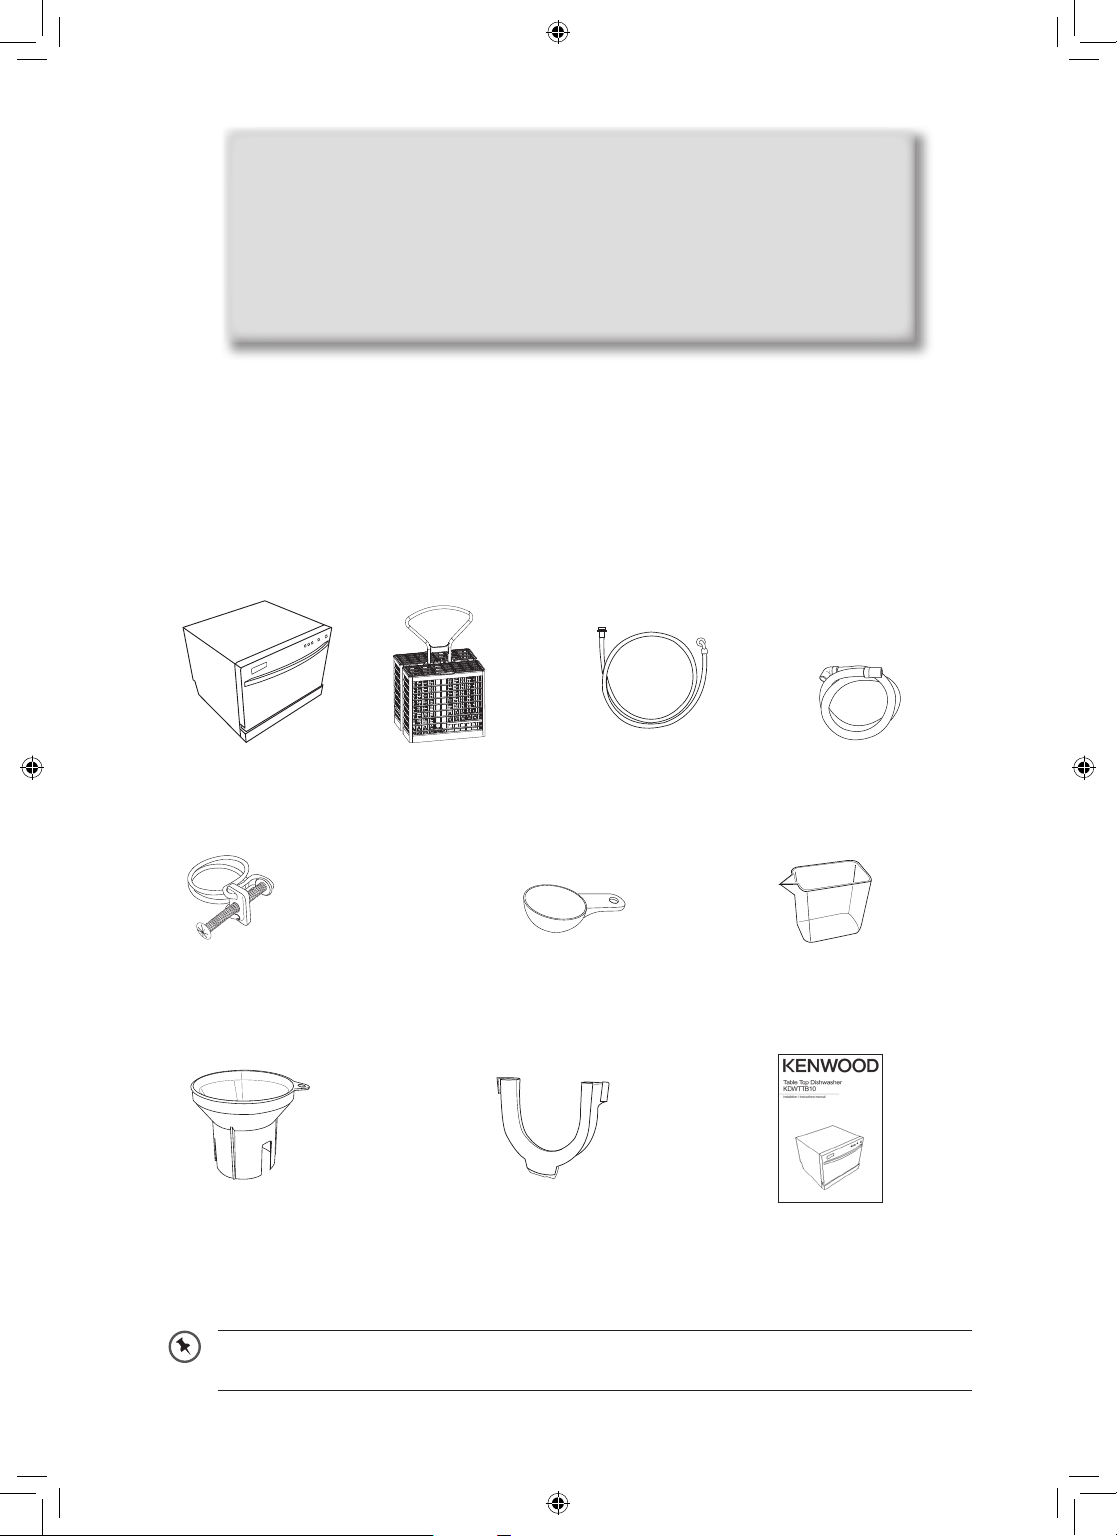
The following items are included:
the main unit
drain hose mounting clamp x 1
p.n.: 672005400002
salt funnel x 1
p.n.: 673002200001
cutlery basket
p.n.: 673006200014
detergent measuring spoon x 1
1 full spoon = 20g (approx.)
p.n.: 673002200079
u-shape hose holder x 1
p.n.: 673006200003
water supply hose x 1
p.n.: 673000900060
drain hose x 1
p.n.: 673005400041
measuring cup x 1
60ml (approx)
p.n.: 673006200004
instruction manual x 1
p.n.: KDWTTB10-002
If items are missing, or damaged please contact Partmaster (UK only).
Tel: 0844 800 3456 for assistance.
4
KDWTTB10_IB_final110317.indd 4 21/03/2011 10:04 AM
Page 5
installation
installation
location
When selecting a position for your
freestanding dishwasher you should make
sure the installation surface is flat and
firm, and the room is well ventilated. Avoid
locating your dishwasher near a heat source,
eg. cooker, boiler or radiator. Extreme cold
ambient temperatures may also cause the
appliance not to perform properly. This
dishwasher is not designed for use in a garage
or outdoor installation.
Do not drape the dishwasher with any
covering. When installing, ensure that free
space is left at the sides.
All parts removed must be saved to
do the reinstallation in the future.
Ensure the dishwasher is unplugged
and empty. We recommend that 2
people handle the dishwasher during
installation.
1. Please ensure the dishwasher is installed
by a qualified technician. Refer to the tools
required.
2. Ensure there is clearance each side of the
unit to allow slight sideways movement for
servicing when required. Good levelling is
essential for correct closure and sealing
of the door. When the unit is correctly
levelled, the door should not catch the
inner liner on either side of the cabinet.
The adjustable feet may be loosened or
tightened in order to obtain the optimum
levelling of the unit.
The dimension of the dishwasher is 550(W)
x 500(D) X 438(H) in mm. The figure
outlines the minimum dimensions required
to accommodate the table top dishwasher.
Protect plastic parts and cables from high
temperatures.
unit in mm
50mm
or
more
500mm
150mm or more
550mm
438mm
50mm or more
150mm or more
5
KDWTTB10_IB_final110317.indd 5 21/03/2011 10:04 AM
Page 6
installation
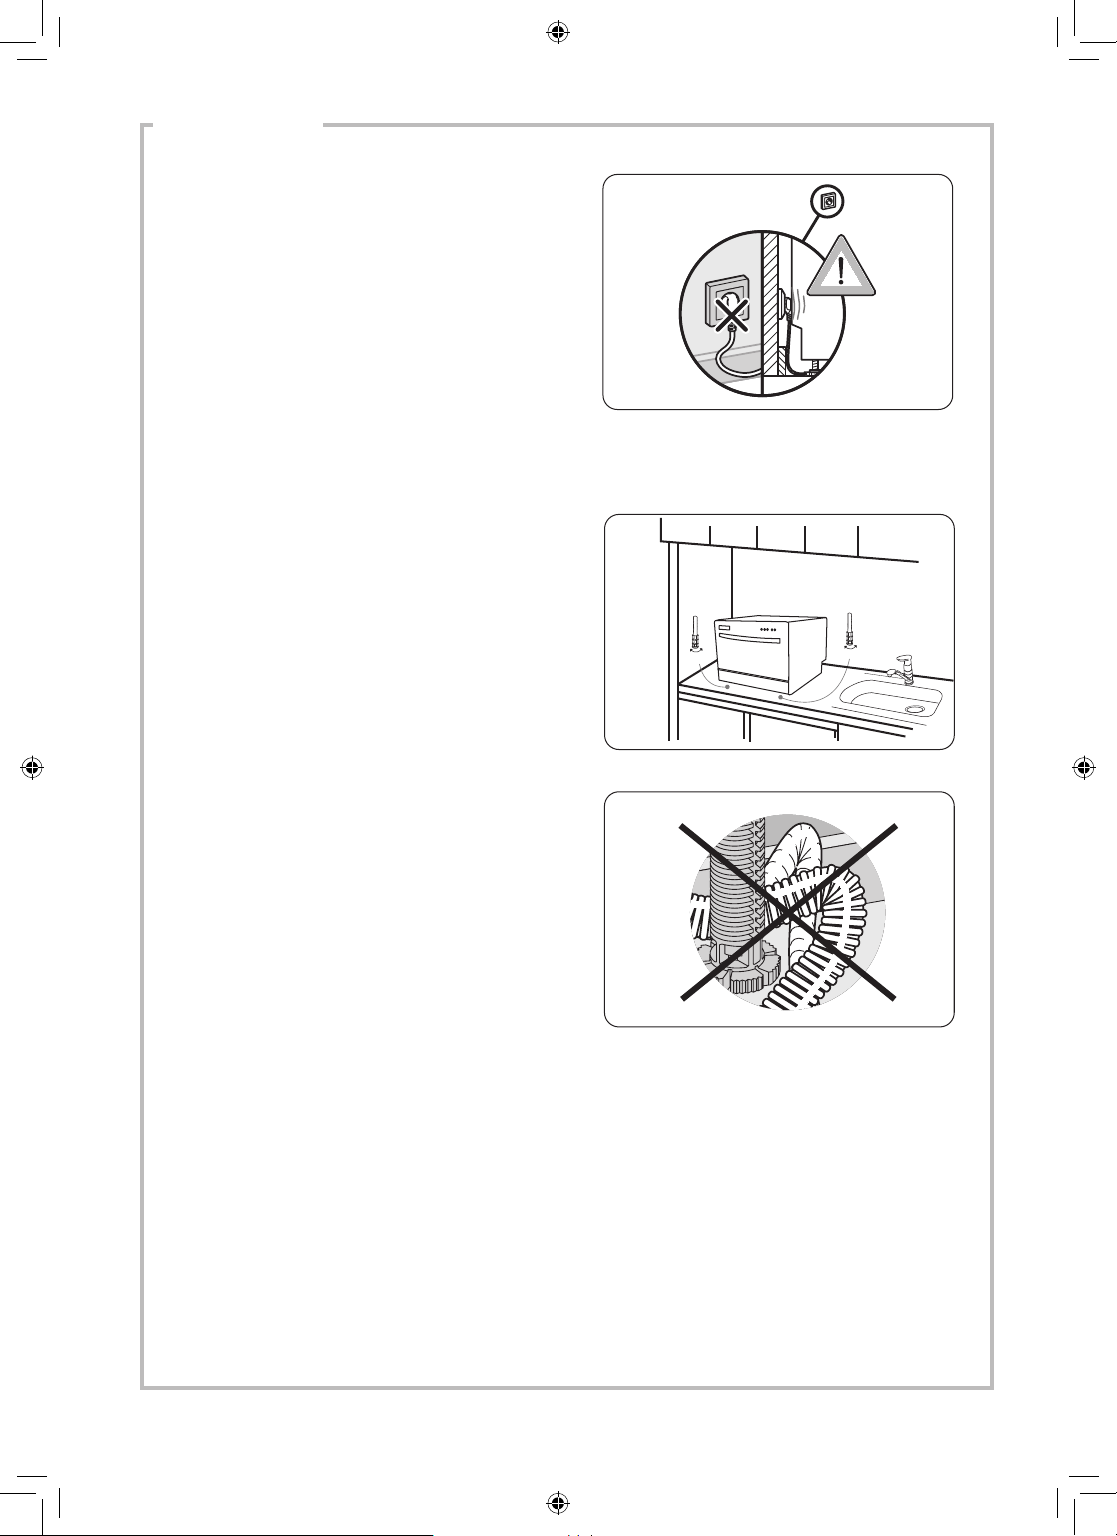
3. Do not connect the unit to the mains socket
before installation. Ensure you are not
installing the unit right in front of the mains
socket. This is to avoid potential damage to
the back of the unit.
After installing the appliance, ensure that
the mains plug is easily accessible.
4. The electrical connection conditions must
correspond with the specifications on the
rating plate of the dishwasher. Do not use
extension cables.
5. Position the unit next to a water tap and a
drain. Level the unit if needed.
6. Ensure the water inlet and drain hoses are
not kinked or squashed. The unit must not
stand on the electrical supply cable.
level
level
6
KDWTTB10_IB_final110317.indd 6 21/03/2011 10:04 AM
Page 7
installation
7. Make sure your plumbing is suitable for
use with the dishwasher. If in doubt contact
a qualified plumber. This unit MUST BE
connected to COLD WATER MAINS using
the new water inlet hose. OLD HOSE
SETS MUST NOT BE RE-USED. The
water pressure from the water mains
needs to be at a minimum of 0.04 MPa and
a maximum of 1.00MPa.
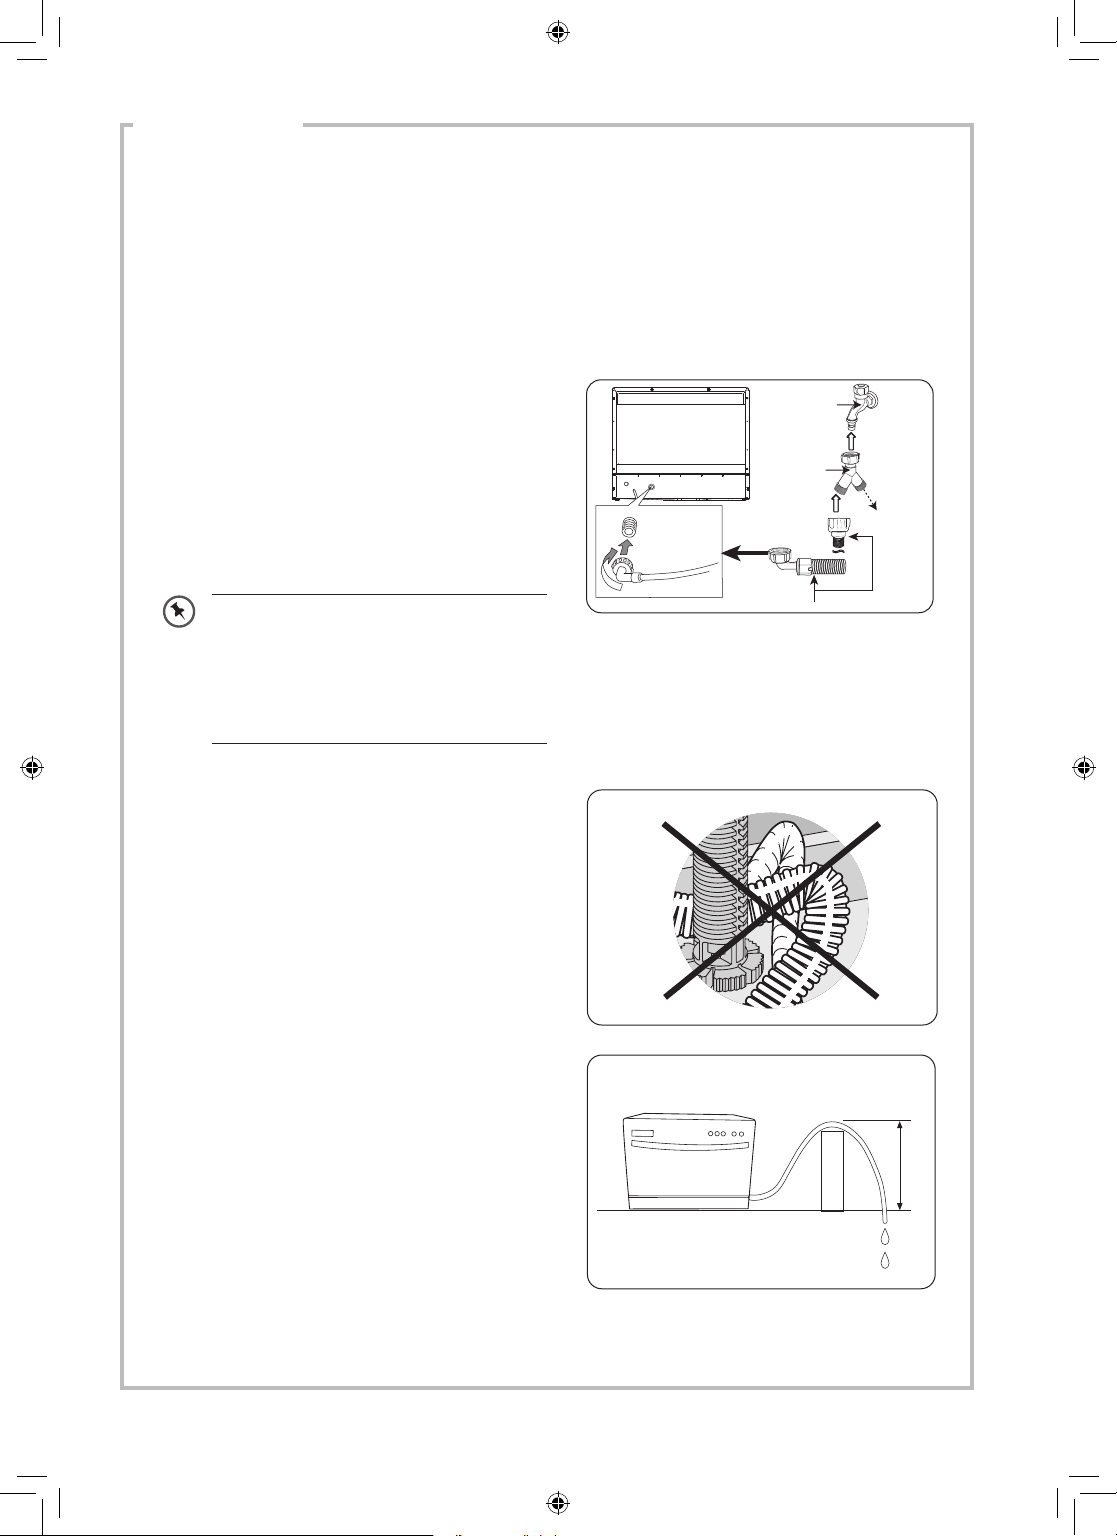
• Connect one end of the safety water
supply hose to your dishwasher, and
then connect the other end of the hose
to your water mains. Please ensure the
black rubber seal is in place.
• After connecting the hose, turn on your
water mains and check for leaks.
• Connect the dishwasher to the mains
socket.
You may use a Y-adaptor (not included)
for an additional water feed for another
appliance, for example a washing
machine. This is only applicable for
cold water mains. A Y-adaptor is
available from most DIY stores.
water mains
Y-Adaptor
(not included)
water supply hose
Connect to
another
appliance
if required.
• Do not bend your drain hose.
• Do not lift the drain hose higher than
10 cm from the table top, otherwise the
unit may not be able to expel the waste
water properly.
max.
10cm
7
KDWTTB10_IB_final110317.indd 7 21/03/2011 10:04 AM
Page 8
installation
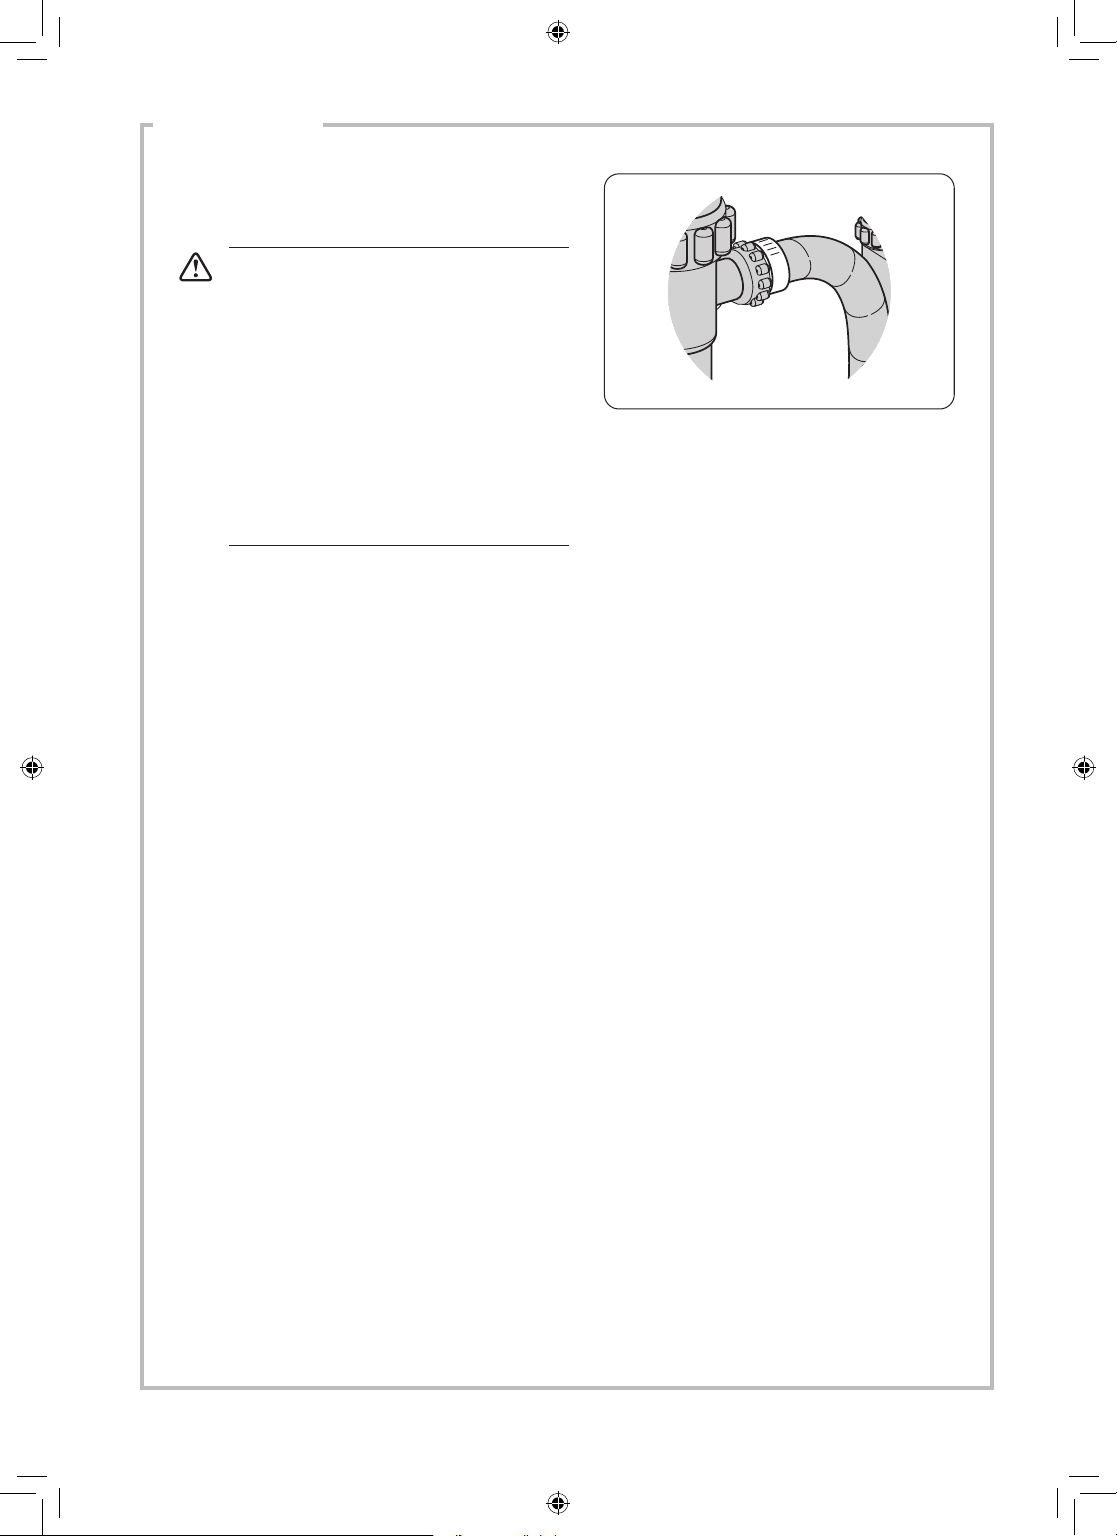
• Secure the water drain hose to the
waste pipe to avoid it coming off during
the washing process.
• The waste pipe must only be
connected to the foul drains and not
the surface water drainage system.
• The water drain hose should be
placed between 40 cm and 100 cm
from the floor level and must not be
extended, otherwise the unit may
not be able to expel the waste water
properly.
• You may use the u-shaped drain hose
holder to secure your drain hose and
to avoid bending it.
8
KDWTTB10_IB_final110317.indd 8 21/03/2011 10:04 AM
Page 9
product overview
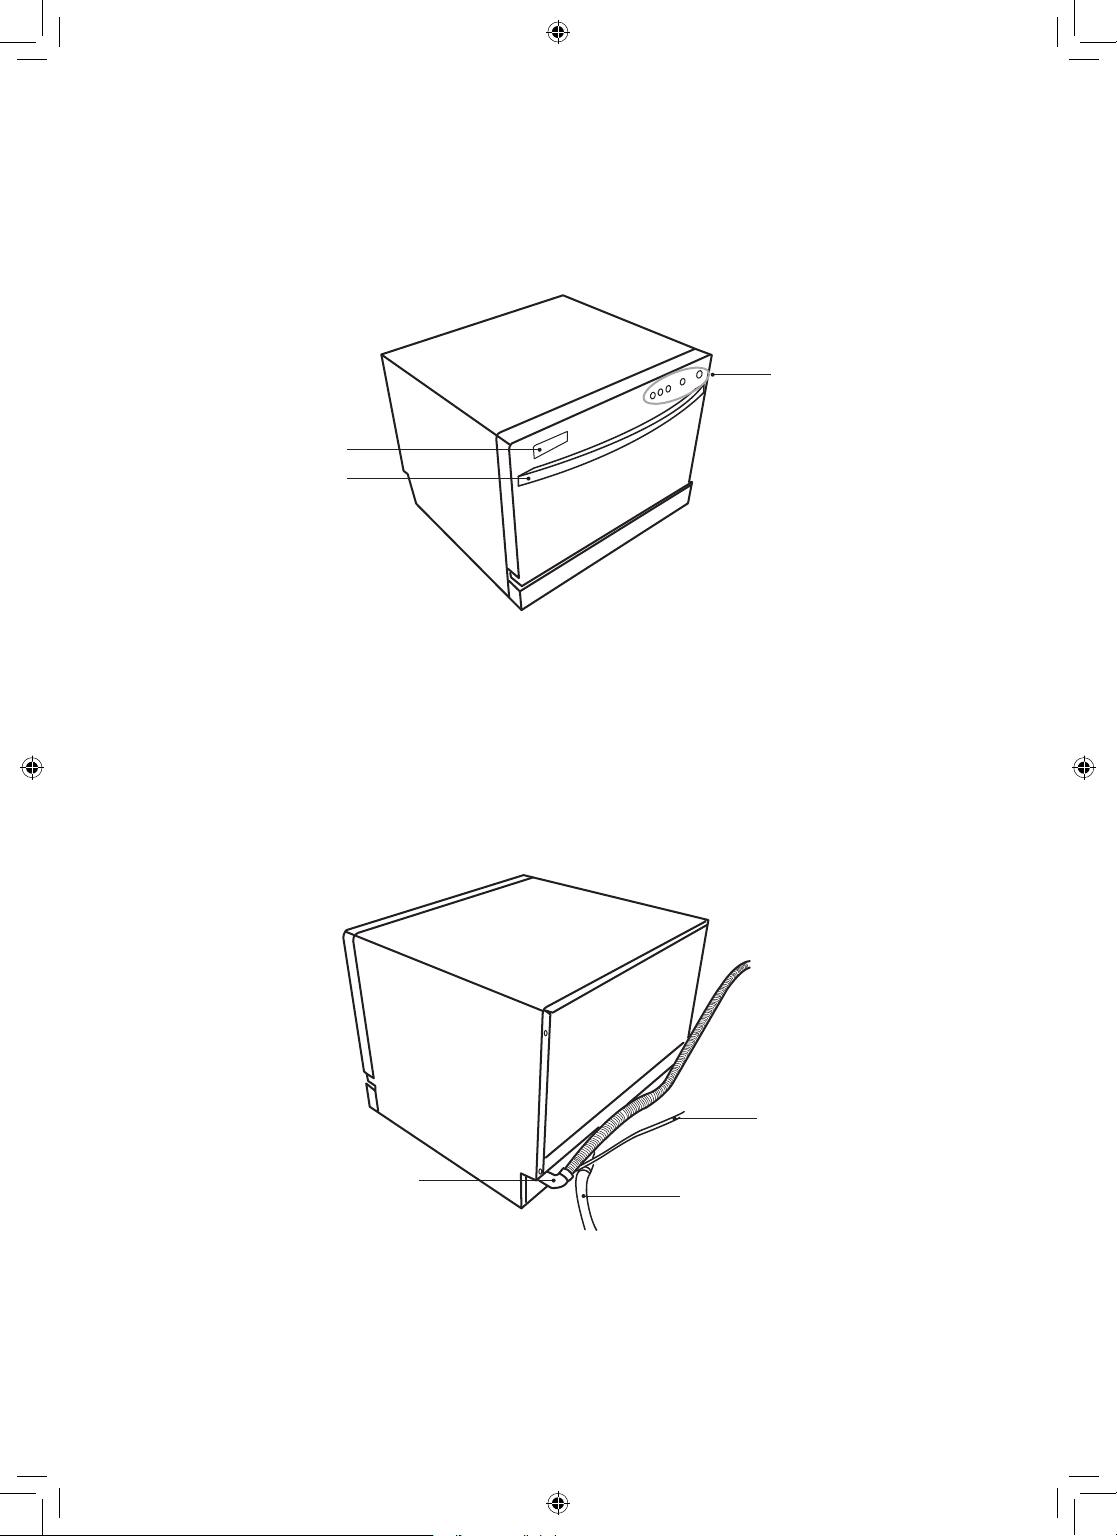
front view
2
3
1
rear view
1. control panel
2. display screen
4
3. door handle
5
6
4. drain hose
5. mains cable
(connect to electrical mains
outlet)
KDWTTB10_IB_final110317.indd 9 21/03/2011 10:04 AM
6. water inlet
(connect to supply hose)
9
Page 10
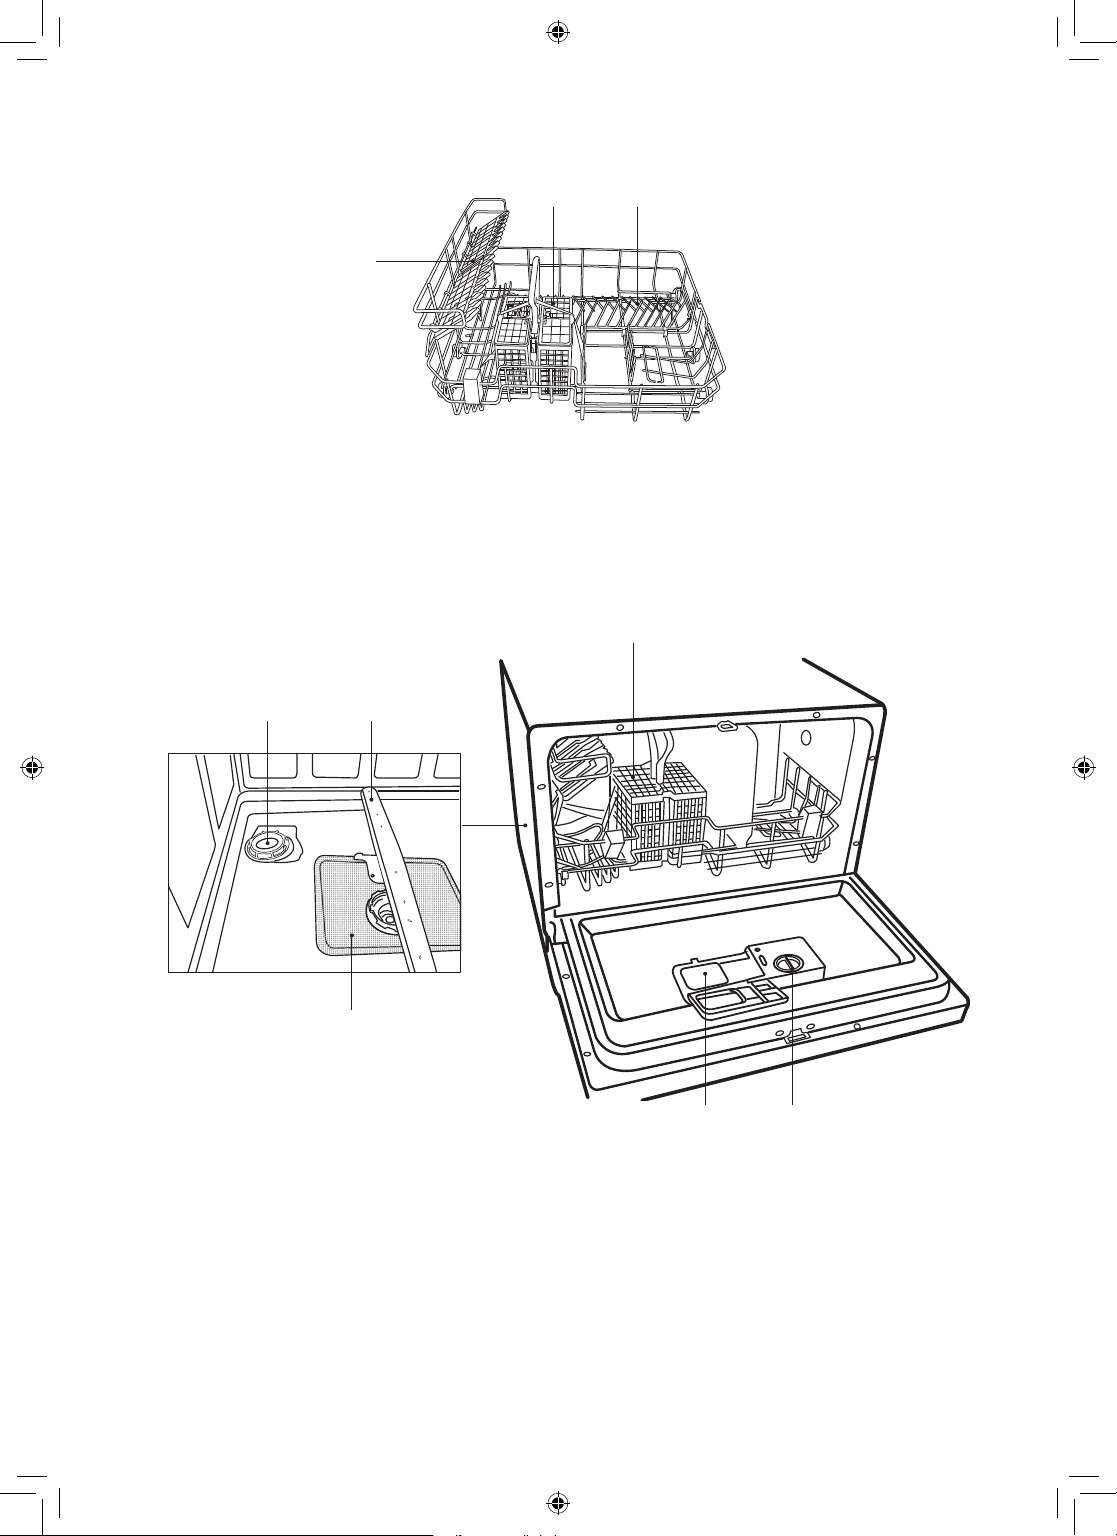
dishwasher and cutlery basket
9
7. cutlery basket
8. spikes
9. cup racks
87
internal view
10 11
10. salt reservoir
11. spray arms
12. filtering system
13
12
14 15
13. cutlery basket
14. detergent dispenser (dual compartment)
15. rinse aid dispenser
10
KDWTTB10_IB_final110317.indd 10 21/03/2011 10:04 AM
Page 11

control panel
p
lock delay
2 3 41 5 6
start/
reset
prog.
on/off
1. display window
• displays selected program time, delay
start time and fault codes etc.
2. key lock
• press for 3 seconds to turn on/off child
lock function.
3. delay start button
• to preset the wash timer and delay the
starting time by up to 24 hours.
• each press of this button
increases the delay start time by 1 hour
intervals.
display screen
2
3in1
1
4. start / reset button
• press this button to start or pause the
dishwasher, and the selected program
light will flash.
5. programme button
• press this button to select the washing
programme.
6. on/off button
• to turn the dishwasher on and off.
3
8:88
5
4
1. exterior display window
• displays programme selected, programme
time, delay start time and fault codes etc.
2. salt refill warning light
• illuminates when the salt reservoir needs
refilling.
3. 3 in 1 function light
• illuminates when the intensive, normal or
economy washing cycle is selected.
KDWTTB10_IB_final110317.indd 11 21/03/2011 10:04 AM
4. rinse aid refill warning light
• illuminates when the rinse aid dispenser
needs refilling.
5. lock light
• illuminates when the key lock function is
selected.
11
Page 12

wash cycle table
Cycle
Programme Cycle
Selection
Information
intensive • Pots, pans,
casserole
dishes.
Dishes that
have been
sitting with
dried food on
them for a
while.
normal • Pots, plates,
glasses and
lightly soiled
pans.
• Normally
soiled.
economy#
(EN50242)
• Plates,
glasses,
bowls.Lightly
soiled.
glass • For dishes
that need to
be rinsed and
dried only.
rapid • A shorter
wash for
lightly soiled
loads that
do not need
drying.
soak • To rinse
dishes that
you plan to
wash later
that day.
Process
• pre-wash
(50°C)
• wash (70°C)
• rinse
• (70°C)
• drying
Detergent
Amount
(Pre-wash/ Main
wash)
• pre-wash
(3g)
• main wash
(15g)
OR
• detergent
Running
Time
(min.)
Energy
Consumption
(Kwh)
Consumption
145 0.94 11
Water
(I)
tablet*
• pre-wash
• wash (60°C)
• rinse (70°C)
• drying
• pre-wash
(3g)
• main wash
(15g)
120 0.7 8.4
OR
• detergent
tablet*
• pre-wash
• wash (55°C)
• rinse (70°C)
• drying
• pre-wash
(3g)
• main wash
(15g)
170 0.63 8.4
OR
• detergent
tablet*
• wash (45°C)
• rinse (60°C)
• main wash
(15g)
75 0.48 6.8
• drying
• wash (40°C)
• rinse
• main wash
(15g)
30 0.3 6
• pre-wash • n/a 14 0.01 2.1
Rinse
Aid
* If you choose to use detergent tablet in these washing cycles, please do not add rinse aid.
3 in 1 function light will illuminate when you choose intensive, normal, or economy
washing cycle.
# To comply with Standards of Performance, i.e. EN50242, please ensure to use economy washing
cycle for the test.
Condensing dry technology
• Energy is saved by drying the dishes using the remaining heat after the last rinse cycle.
• Wash cycle times are extended due to this drying method.
• Some wash programmes do not have a drying function, please refer to the Wash Cycle
Table for more details.
12
KDWTTB10_IB_final110317.indd 12 21/03/2011 10:04 AM
Page 13

before operating
to open the door
• Pull the door handle.
• If the door is opened during operation all functions are automatically interrupted.
to close the door
• After loading the dishes, push the baskets fully into the dishwasher.
• Lift the door upwards and push until it clicks into position.
• Do not slam the dishwasher door.
items not suitable for use in the dishwasher
the following items are not suitable
crystal glasses
valuable vases
towels and sponges
cracked / chipped china
copper pots and pans
small plastic items
(milk bottle nipple)
plastic items that
are not dishwasher safe
silverware
cast iron pans
scratched non-stick cookware
When purchasing new crockery and cutlery, please make sure they are dishwasher-proof. Some
items are not suitable for dishwashers.
• Wooden cutlery and crockery or items with wooden parts may discolour and fade. The glue used
in these items is not dishwasher-proof and wooden handles may come loose after being washed
in a dishwasher.
• Craft items, antiques, valuable vases and decorative glassware are also not suitable for
dishwashers.
• Plastic items (e.g. tupperware) which are not heat resistant may melt or loose shape due to the
high temperature in the dishwasher.
• Copper, brass, tin and aluminium items may discolour or become matt.
• Clouding may occur on glasses and delicate glassware after frequent washing. Do not wash
delicate glassware, or glassware containing lead crystal in a dishwasher. Wash delicate
glassware by hand instead.
• Silver and aluminium parts have a tendency to discolour during washing. Residues like egg
white, egg yolk and mustard often cause discolouring and staining on silver. Therefore, please
clean the residues from silver immediately after use.
13
KDWTTB10_IB_final110317.indd 13 21/03/2011 10:04 AM
Page 14

adding detergent or detergent tablet
Only use detergents specifically designed for use in dishwashers. To be more environmentally
friendly, please use no more than the correct amount of detergent.
Bleach and
Countertop detergent
Keep out of the reach of children
• Irritating to eyes.
• Avoid contact with eyes. In case of contact with eyes, rinse
immediately with plenty of water and seek medical advice.
• If swallowed, seek medical advice immediately.
Please follow the steps below to fill the detergent dispenser.
1. Push the button on the lid of the detergent
dispenser in the direction of the arrow until the
flap springs open.
Irritant
push up from the right side
2. Fill the detergent dispenser with detergent
powder or insert the detergent tablet. The
marking indicates the filling level.
You can choose to add a detergent
tablet alone or to add detergent powder
to both the main wash detergent
chamber and the pre-wash detergent
chamber for your selected wash cycle.
All programmes with pre-wash need an
additional detergent dosage that must
be placed in the pre-wash detergent
chamber (please refer to the wash cycle
table). This detergent will take effect
during the pre-wash phase.
3. Close the lid firmly so that it clicks into place.
main wash detergent chamber
or
pre-wash detergent chamber
14
KDWTTB10_IB_final110317.indd 14 21/03/2011 10:04 AM
Page 15

adding rinse aid
Rinse aid helps to ensure water does not cling and leave marks on crockery during the drying phase
and helps crockery dry faster after it has been washed. Only pour rinse aid that is for domestic
dishwashers into the reservoir. This model is designed to use liquid rinse aids only.
Please follow the steps below to pour the rinse aid into the storage reservoir, and the amount will
dispense automatically.
1. Turn the cap and open as indicated.
2. When the cap open marking is aligned, you
may lift the cap up.
3. Pour the rinse aid in until the level indicator
turns completely black in colour and close
the cap.
rinse aid indicator
open
4. Be careful not to overfill the reservoir. Wipe
up any spills. The approximate volume of
the rinse aid reservoir is 110ml.
If the water hardness in your area is soft, you
may not need rinse aid as it may cause white
film to develop on your dishes.
Rinse aid warning light will illuminate when the reservoir
is running out of rinse aid and requires refilling.
rinse aid
warning light
Alternatively, you can judge the amount of rinse aid by checking the rinse aid indicator right next
to the reservoir’s cap. When the indicator is black, it means it is full. When it is clear, it means it is
almost empty.
adjusting the rinse aid reservoir
The rinse aid reservoir has six settings. Both the recommended
setting and the factory setting is “4”. If the dishes are not drying
properly or are spotted, adjust the dial to the next higher number
until your dishes are spot-free.
15
KDWTTB10_IB_final110317.indd 15 21/03/2011 10:05 AM
Page 16

adding salt
If the water in your area is hard, deposits will form on your dishes
and utensils. This appliance contains a salt reservoir for you to
reduce the hardness of the water.
Please follow the steps below to pour the salt into the salt reservoir
and it must be set to correspond to the water hardness level in your
area.
1. Remove the lower basket and unscrew the reservoir cap.
2. Fill the reservoir with approximately 500ml of water (first use
only).
3. Place the funnel provided over the salt reservoir.
Open
Open
OPEN
Open
4. Pour in approximately 1.2kg of dishwasher salt depending on the
brand used.
5. Clean any excess salt from around the reservoir opening and
then screw the cap on again firmly.
6. Run the “rapid” wash programme immediately (without any
crockery in the dishwasher) to remove any traces of salt from the
compartment.
The salt warning light will illuminate when the reservoir is
running out of salt and requires re-filling.
The salt warning light will cease to illuminate within a few
salt warning
light
days depending on how quickly the salt dissolves.
16
KDWTTB10_IB_final110317.indd 16 21/03/2011 10:05 AM
Page 17

loading the dishwasher
before loading the dishwasher
Please observe the following notes before loading your cutlery and crockery into the basket.
• Remove lipstick stains and any food residues from crockery and dishes. Rinse if necessary.
• Dishes and cutlery must not lay inside one another, or cover each other.
• Load your cutlery and crockery so that water can access all surfaces.
• Ensure all items are securely positioned.
• Hollow items such as cups, glasses, pans, etc. must be placed upside down in the basket.
• Wide based items should be placed at an angle so that water can run off them freely.
• The spray arms must not be blocked by items which are too tall or hang through the baskets. If
in doubt, test for free movement by manually rotating the spray arms.
• Ensure that small items cannot fall through the holders in the baskets.
Do not wash items soiled with ash, sand, wax, lubricating grease or paint in the dishwasher.
Ash does not dissolve and can distribute in the dishwasher. Wax, sand, lubricating grease
and paint can cause damage to the dishwasher.
17
KDWTTB10_IB_final110317.indd 17 21/03/2011 10:05 AM
Page 18

For safety reasons, do not operate the dishwasher without the upper and lower baskets in
place.
dishwasher basket
Please use the dishwasher basket for small and
lightweight items such as cups, saucers, glasses, dessert
bowls, etc. Shallow pans or casserole dishes can also be
placed in the upper basket.
Long items such as soup ladles, mixing spoons and long
knives should be placed lying down across the front of
the upper basket.
hinged cup rack
To make room for taller items in the dishwasher basket,
raise the cup rack upwards. You can then lean the tall
glasses against it. You can also remove it when it is not
required for use.
Raise upwards
Raise upwards
To prevent water dripping from the upper
basket onto the dishes in the lower basket, we
recommend that you empty the lower basket
first and then the upper basket.
hinged spikes
The spikes are used for holding plates and a platter. They can be lowered to make more room for
large items. Please refer below for the steps to open up the spikes.
Fold backwards
18
Push and snap
KDWTTB10_IB_final110317.indd 18 21/03/2011 10:05 AM
Page 19

3
7
3
loading the dishwasher basket for 6 place settings
For loading the upper basket, please refer to the table below.
Number Item
1 Cups
2 Large serving bowl
3 Glasses
4 Saucers
5 Dish
6 Oval platter
7 Dinner plates
8 Soup plates
9 Dessert dishes
10 Cultery basket
IN
cutlery basket
loading the cutlery basket
To make unloading much easier, cutlery should be
grouped in zones and placed in the cutlery basket.
Please refer to the table below for placement method.
Number Item
1 Forks
2 Soup spoons
3 Dessert spoons
4 Teaspoons
5 Knives
6 Serving spoons
7 Gravy ladle
8 Serving fork
IN
6
9
1
1
3
5
6 1 6
5
1
5
2
1
3
4
3
4
4 8
2
3
5
10
8
4
3
3
3
5
1
1
1
2 2
2
7
2
4
4
4
55
2
• Do not let any items extend through the
bottom of baskets.
• To avoid the risk of injury, please load your
knives and forks with handles upwards. Do
not hold them by their sharp edges.
• The cutlery basket comes with covers, and
they are designed for you to load the cutlery
into the appropriate slots. If you use the
basket without the cover, it may reduce the
washing results of your cutlery.
• Please ensure the cover is securely locked to
the basket before operation.
KDWTTB10_IB_final110317.indd 19 21/03/2011 10:05 AM
• To comply with Standards of Performance,
i.e. EN50242, all cutlery must be loaded
according to the instructions in this manual.
19
Page 20

starting a wash cycle
Please follow the steps below to start a wash cycle.
1. Ensure the unit is connected to the mains power and the water supply is on (water pressure
between 0.04MPa and 1.00MPa).
2. Open the door. Pull out the dishwasher baskets, load the dishes and push the baskets back.
3. Pour in the detergent or place the detergent tablet in the detergent compartment and close firmly
afterwards.
4. Close the dishwasher door. A click sound should be heard when the door is closed correctly. Do
not slam the door.
5. Press the on/off button.
6. Select the wash cycle programme based on the loading and soil requirements. Please refer to
the “Wash Cycle Table” (page 12).
7. The indicator light of the selected programme will illuminate.
8. Press start/reset button, the washing cycle will begin shortly.
If you open the dishwasher door during the washing cycle and then close it, the dishwasher
will continue the current washing programme after 10 seconds. However, if the door is not
closed correctly after 1 minute, the dishwasher will make an audible sound at 1 minute
intervals.
changing a programme
To change the programme if the washing cycle has already started, follow the steps below.
1. Press start/reset button to pause the unit, open the door slightly to check if the unit has
dispensed the detergent or detergent tablet. This will depend on how long the washing cycle was
running for.
2. If the detergent dispenser lid is opened, we suggest that you allow the wash cycle to finish.
3. If the detergent dispenser lid is still closed, press and hold down the programme button for 3
seconds to cancel the programme. You can then press the required new programme button and
close the dishwasher door. The unit will start the new washing cycle shortly.
4. The display window shows the state of the dishwasher.
a. “-:--” means the unit is on stand by mode.
b. “H:MM” and not flashing means the unit is on pause.
c. “H:MM” and flashing means the unit is running.
at the end of a programme
At the end of a programme, the dishwasher will make an audible sound.
20
KDWTTB10_IB_final110317.indd 20 21/03/2011 10:05 AM
Page 21

switching off the unit
To save energy, remember to switch the dishwasher off using the ON/OFF button. The dishwasher
will continue to use electricity until it is switched off with the ON/OFF button.
If the dishwasher is not going to be used for a long period of time, e.g. whilst on holiday, disconnect
the unit from the mains supply.
unloading the dishwasher
Allowing dishes to cool down before unloading is important as dishes tend to break and chip more
easily when they are hot. Therefore, if you open the dishwasher door fully after switching off, it will
allow the dishes to cool down much faster.
delay start
The starting time of a washing programme can be delayed and adjusted. Please follow the steps
below.
1. Open the dishwasher door and load your soiled dishes and crockery. Close the door.
2. Press the ON/OFF button to turn on the dishwasher.
3. Select your preferred programme.
4. Press the “delay start” button.
5. Set the required delay start time using the “delay start” button.
Each press of this button increases the delay start time by 1 hour increments.
6. Close the door and the unit will start the programme at the assigned time automatically.
key lock
The key lock prevents children stopping the programme accidentally. It locks the control buttons.
Press the key lock button for 3 seconds to activate by lock function. Press it again for 3 seconds to
release the key lock function.
21
KDWTTB10_IB_final110317.indd 21 21/03/2011 10:05 AM
Page 22

cleaning after use
external care
the door and the door seal
• Clean the door seals regularly with a soft damp cloth to remove food deposits.
• When the dishwasher is being loaded, food and drink residues may drip onto the sides of the
dishwasher door. These surfaces are outside the wash cabinet and are not accessed by water
from the spray arms. Any deposits should be wiped off before the door is closed.
the control panel
If cleaning is required, the control panel should be wiped with a soft damp cloth ONLY.
• To avoid penetration of water into the door lock and electrical components, do not use a
spray cleaner of any kind.
• Never use abrasive cleaners or scouring pads on the outer surfaces because they may
scratch the finish. Some paper towels may also scratch or leave marks on the surface.
internal care
filtering system
The filtering system in the base of the wash cabinet captures large particles of suds solution. Build
up of these particles may cause the filters to block. Check the condition of the filters regularly and
clean them if necessary under running water.
Follow the steps below to clean the filters in the wash cabinet.
1. Ensure the dishwasher is switched off.
2. Unscrew the coarse and fine filter.
3. Gently lift the coarse and fine filter out.
4. Gently lift the main filter with care.
5. Rinse all the filters under running water, including the filter cylinder, and then refit all filters in the
following order.
6. Gently refit the main filter back with care.
7. Gently rescrew the course and fine filter in clockwise direction.
Open
Close
• Do not over tighten the filters. Put the filters back in the filter cylinder in sequence
securely, otherwise the residue could get into the system and cause a blockage.
• NEVER use the dishwasher without the filters in place. Improper replacement of the filters
may reduce the performance level of the appliance and damage dishes and utensils.
22
KDWTTB10_IB_final110317.indd 22 21/03/2011 10:05 AM
Coarse and
Fine Filter
Main Filter
Filter cylinder without
the lters
Slide in
Push
down
Page 23

spray arms
Particles of food can get stuck in the spray arm jets and
bearings. The spray arms should therefore be checked
and cleaned regularly.
• Use a pointed object, eg. a cocktail stick, to loosen
food particles in the spray arms’ jets.
Do not attempt to remove the spray arms.
frost precaution
Avoid placing the dishwasher in a location where the temperature is below 0°C. If your appliance is
left in an unheated place over the winter, you are advised to:
1. Disconnect the unit from the water inlet.
2. Turn on the unit. Select any washing cycle and let it run for 1 minute only. This will allow all the
excessive water that remains in the unit to drain out.
3. Disconnect from the mains.
4. Empty the dishwasher.
5. Close the dishwasher’s door.
6. Disconnect the unit from the water drain. Use a suitable receptacle to catch the water.
Should you encounter any difficulties with the above steps, please ask a service technician for
assistance.
moving the dishwasher
If you have to move the unit, for instance due to moving house, you are advised to:
1. Disconnect the dishwasher from the mains.
2. Disconnect the unit from the water inlet and drain. Use a suitable receptacle to catch the water.
3. Remove the unit from the current location with the hoses discharged.
4. Pull the unit out together with the hoses.
• Avoid over tilting the unit during transportation.
• We recommend that 2 people handle the dishwasher during installation.
maintenance after a prolonged period of
non-operation
If you are not going to use the unit for a prolonged period of time, you are advised to:
1. Disconnect the dishwasher from the mains.
2. Disconnect the unit from the water inlet and drain. Use a suitable receptacle to catch the water.
3. Open the door slightly to prevent unpleasant smells building up in the compartment.
4. Ensure the washing compartment of the dishwasher is clean.
23
KDWTTB10_IB_final110317.indd 23 21/03/2011 10:05 AM
Page 24

hints and tips
Repairs should only be carried out by a qualified technician in strict accordance with
current local and national safety regulations. Unauthorised or incorrect repairs could cause
personal injury or damage to the unit.
fault code
Codes Possible Causes Remedy
Water tap is not turned on. Turn on the water tap.
Low water pressure (<0.04MPa) Turn on the water tap and ensure it is in full
E1
E4
Flow meter is broken.
The wire terminals which connect the
flow meter are loose.
The tank is leaking.
The hose is leaking.
The float switch is broken or PCB is
faulty.
position.
• Disconnect from the mains.
• Disconnect the water inlet.
• Call a qualified technician.
technical problems
Problem Possible Causes Remedy
The dishwasher does not start.
The drain pump is not working
properly.
Technical problems
The door is not properly
closed.
The unit is not connected to
the mains.
The unit is not switched on. Press the “on” button and select a
Fault code E4 - The antiflooding system has operated.
Close the door firmly.
Connect the plug to the mains.
programme.
• Disconnect from the mains.
• Disconnect the water inlet.
• Call a qualified technician.
24
KDWTTB10_IB_final110317.indd 24 21/03/2011 10:05 AM
Page 25

General problems
Problem Possible Causes Remedy
Detergent residue is left in the
dispenser at the end of the
programme.
The detergent dispenser lid
cannot be closed properly.
Knocking noise in the wash
cabinet.
Smearing appears on
glassware and cutlery.
Dishes, cutlery and glasses
are not dry.
White residue is visible on
cutlery and crockery, clouding
occurs on glassware; film can
be wiped off.
The detergent dispenser was
still damp when detergent was
added.
Clogged detergent residue is
blocking the catch.
A spray arm is knocking
against an item in a basket.
The rinse aid dosage is set
too high.
The amount of rinse aid may
be insufficient, or the rinse aid
reservoir is almost empty.
Crockery was taken out of the
dishwasher too soon.
Not enough rinse aid was
used.
There is not enough salt in the
salt reservoir.
The salt reservoir cap has not
been screwed on correctly.
Unsuitable detergent has been
used.
Make sure the dispenser is dry
before adding detergent.
Clean the catch.
Interrupt the programme, and
rearrange the items which are
obstructing the spray arm. See the
section “loading the dishwasher”.
Adjust the dial of the rinse aid
dispenser to a lower setting.
Replenish the reservoir, adjust the
rinse aid dispenser dial to a higher
setting or change the brand of rinse
aid.
Leave the crockery in the dishwasher
until you hear an audible sound.
Replenish the reservoir, adjust the
rinse aid dispenser dial to a higher
setting or change the brand of rinse
aid.
Fill the salt reservoir.
Ensure that it is screwed back on
correctly.
Change your detergent. Use a
dishwasher standard powder
detergent.
Glassware is dull and
discoloured; film cannot be
wiped off.
The salt consumption setting
is too low.
The glassware is not
dishwasher proof. The
surfaces are affected.
The wash temperature of the
selected programme was too
Select a higher salt consumption
setting.
Wash the non-dishwasher proof
glassware by hand.
Select a programme with a higher
wash temperature.
low.
Tea or lipstick stains have not
been completely removed.
The bleaching effect of the
detergent used is too low.
Forgot to pre-rinse or remove
the stains with a napkin prior
Change your detergent.
Pre-rinse or remove the stains with a
napkin prior to washing.
to washing.
25
KDWTTB10_IB_final110317.indd 25 21/03/2011 10:05 AM
Page 26

disposal of the dishwasher
• When disposing your old dishwasher, first make it unusable. Disconnect the hoses and unplug
the mains cable. Cut off the mains cable from the dishwasher. Make the door lock inoperative,
so that children cannot accidentally shut themselves in. Make appropriate arrangements for the
disposal of the dishwasher.
• At the end of its working life, the product must not be disposed of as urban waste. It must
be taken to a special local authority differentiated waste collection centre or to a dealer
providing this service. Disposing of a household appliance separately avoids possible negative
consequences for the environment and health deriving from inappropriate disposal and enables
the constituent materials to be recovered to obtain significant savings in energy and resources.
As a reminder of the need to dispose of household appliances separately the product is marked
with a crossed out wheeled dustbin.
• Please ensure that it presents no danger to children while being stored for disposal.
disposal of packing material
Please dispose of the plastic wrappings and bags safely and keep out of the reach of babies and
young children.
26
KDWTTB10_IB_final110317.indd 26 21/03/2011 10:05 AM
Page 27

specifications
Model
Dimensions
Capacity
Water Pressure Required
Power Consumption
Rated Voltage
Features and specifications are subject to change without prior notice.
550 mm (W) x 500 mm (D) x 438 mm (H)
KDWTTB10
6 Place Settings
0.04 - 1.00MPa
230V/50Hz
1280W
27
KDWTTB10_IB_final110317.indd 27 21/03/2011 10:05 AM
Page 28

safety warnings
general use
• Switch off and unplug before fitting or removing tools/attachments, after use and before cleaning.
• Keep your fingers away from moving parts and fitted attachments.
• Never use a damaged machine.
• Keep the mains cable out of reach from children.
• Keep power unit, mains cable and plug away from water.
• Never exceed the maximum capacities.
• When using an attachment, read the safety instructions.
• Take care when lifting this appliance.
• This appliance is not intended for use by persons (including children) with reduced physical,
sensory or mental capabilities, or lack of experience and knowledge, unless they have been
given supervision or instruction concerning the use of the appliance by a person responsible for
their safety.
• Children should be supervised to ensure that they do not play with the appliance.
• Only use the appliance for its intended domestic use. The company responsible for this product,
DSG Retail Limited, will not accept any liability if the appliance is subject to improper use, or
failure to comply with these instructions.
WARNING!
• Improper connection of the equipment-earthing conductor could result in a risk of electric shock.
• The wires in the cord are coloured as follows:
• Green and Yellow = Earth,
• Blue = Neutral,
• Brown = Live.
• Check with a qualified electrician or service representative if you are in doubt whether the
appliance is properly earthed or the plug does not fit correctly.
• Never modify the plug provided with the appliance.
proper use
• Do not sit or stand on the door or dish rack.
• Do not touch the heating element during or immediately after use.
• Do not operate your dishwasher unless all enclosure panels are properly in place. Open the door
very carefully when there is a programme running as there is a risk of hot water spraying out of
the appliance.
• Do not place any heavy objects on the open door. The appliance could tip over.
• When loading items to be washed:
1. Locate sharp items so that they will not damage the door seal;
2. Warning: Knives and other utensils with sharp points must be loaded in the basket with the
points downwards or placed horizontally.
• Do not allow plastic items to come into contact with the heating element.
• Check that the detergent receptacle is empty after completion of the wash cycle.
• Do not wash plastic items unless they are marked dishwasher safe or equivalent.
• Use only detergent and rinse aids designed for an automatic dishwasher.
• Other means for disconnection from the mains power supply must be incorporated in the fixed
wiring with at least 3mm contact separation in all poles.
• Keep children away from detergents and rinse aids. These may cause chemical burns in the
mouth, throat and eyes or asphyxiation.
• Keep children away from the dishwasher when the door is open.
• The door should not be left in the open position since this could present a tripping hazard.
• For energy saving, always remember to switch the dishwasher off when you have finished using
it. The dishwasher should not be left unattended when in use.
28
KDWTTB10_IB_final110317.indd 28 21/03/2011 10:05 AM
Page 29

• If the mains cable is damaged, it must be replaced by the manufacturer or its service agent in
order to avoid a hazard.
• Remove the door to the washing compartment when removing an old dishwasher from service
or discarding it.
• During installation, the mains cable must not be excessively or dangerously bent or flattened.
• Do not tamper with controls.
• The appliance is to be connected to the water mains using new hose sets.
• The maximum number of place settings to be washed is 6.
• The maximum permissible inlet water pressure is 1Mpa, and the minimum permissible inlet
water pressure is 0.04Mpa.
earthing instructions
WARNING: THIS APPLIANCE MUST BE EARTHED.
• This appliance is equipped with a mains cable having an equipment-earthing conductor
and an earthing plug.
• The plug must be plugged into an appropriate mains socket that is installed and earthed
in accordance with local standards and requirements.
29
KDWTTB10_IB_final110317.indd 29 21/03/2011 10:05 AM
Page 30

KDWTTB10_IB_final110317.indd 30 21/03/2011 10:05 AM
Page 31

KDWTTB10_IB_final110317.indd 31 21/03/2011 10:05 AM
Page 32

NOTE: If you require a replacement for any of the items listed below, please quote their
corresponding part numbers:
Replacement Part Part Number
cutlery basket 673006200014
water supply hose 673000900060
drain hose 673005400041
drain hose mounting clamp 672005400002
detergent measuring spoon (approx. 20g) 673002200079
measuring cup (approx. 60ml) 673006200004
U-shape hose holder 673006200003
salt funnel 673002200001
Visit Partmaster.co.uk today for the easiest way to
buy electrical spares and accessories. With over
1 million spares and accessories available we can
deliver direct to your door the very next day. Visit www.partmaster.co.uk or call
0844 800 3456 (UK customers only) Calls charged at National Rate.
This symbol on the product or in the instructions means that your
electrical and electronic equipment should be disposed at the
end of its life separately from your household waste. There are
separate collection systems for recycling in the EU.
For more information, please contact the local authority or your
retailer where you purchased the product.
DSG Retail Limited is responsible for after sales service.
If you have a query about the product please contact our product support
line 0844 561 6263 (Currys).
DSG Retail Ltd • Maylands Avenue • Hemel Hempstead • Herts • HP2 7TG • England
(P.N.: KDWTTB10-002)
KDWTTB10_IB_final110317.indd 32 21/03/2011 10:05 AM
 Loading...