

Kenwood KDW45X13 Installation Instructions Manual
Slimline Dishwasher
KDW45X13
installation / instructions manual


Contents
safety warnings .................................................................................................................. 5
unpacking ............................................................................................................................ 8
installation ........................................................................................................................... 9
location ............................................................................................................................ 9
product overview .............................................................................................................. 13
front view ....................................................................................................................... 13
rear view ........................................................................................................................ 13
internal view .................................................................................................................. 14
control panel .................................................................................................................. 15
display screen ............................................................................................................... 15
before operating ............................................................................................................... 16
to open the door ............................................................................................................ 16
to close the door ............................................................................................................ 16
items not suitable for use in the dishwasher ................................................................. 16
adding detergent or detergent tablet .............................................................................. 17
adding rinse aid ................................................................................................................ 18
adjusting the rinse aid reservoir .................................................................................... 18
adding salt ......................................................................................................................... 19
adjusting salt consumption ............................................................................................ 20
loading the dishwasher .................................................................................................... 21
before loading the dishwasher ...................................................................................... 21
upper basket .................................................................................................................. 22
- adjusting the upper basket ...................................................................................... 22
- loading the upper basket for 10 place settings ........................................................ 22
- hinged cup rack ....................................................................................................... 23
lower basket .................................................................................................................. 23
- hinged spikes .......................................................................................................... 23
- loading the lower basket for 10 place settings ........................................................ 24
cutlery basket ................................................................................................................ 24
operation ........................................................................................................................... 25
starting a wash cycle ..................................................................................................... 25
changing a programme ................................................................................................. 25
at the end of a programme ............................................................................................ 25
switching off the unit ...................................................................................................... 26
unloading the dishwasher .............................................................................................. 26
delay start ...................................................................................................................... 26
half load ......................................................................................................................... 26
wash cycle table ............................................................................................................... 27

cleaning after use ............................................................................................................. 28
external care .................................................................................................................. 28
- the door and the door seal ...................................................................................... 28
- the control panel ...................................................................................................... 28
internal care ................................................................................................................... 28
- ltering system ........................................................................................................ 28
- spray arms............................................................................................................... 29
frost precaution ................................................................................................................ 29
moving the dishwasher.................................................................................................... 29
maintenance after a prolonged period of non-operation .............................................. 30
hints and tips .................................................................................................................... 30
technical problems ........................................................................................................ 30
general problems ........................................................................................................... 31
disposal of the dishwasher ............................................................................................. 32
disposal of packing material ........................................................................................... 32
specications.................................................................................................................... 33

5
Safety Warnings
For your continued safety and to reduce the risk of injury or electric shock,
please follow all the safety precautions listed below.
• Read all instructions carefully before using the dishwasher and keep them
for future reference.
• Retain the manual. If you pass the dishwasher onto a third party, make sure
to include this manual.
• Keep ventilation openings in the dishwasher enclosure clear of obstructions.
• Choose a location for your dishwasher away from heat sources such as
radiators or fires.
• Young children should be supervised to ensure that they do not play with
the dishwasher.
• Keep mains cable out of reach of children.
• This appliance can be used by children aged from 8 years and above
and persons with reduced physical, sensory or mental capabilities or
lack of experience and knowledge if they have been given supervision or
instruction concerning use of the appliance in a safe way and understand
the hazards involved. Children shall not play with the appliance. Cleaning
and user maintenance shall not be made by children without supervision.
• Keep the appliance and its cord out of reach of children less than 8 years
old.
• Keep children away from detergents and rinse aids. These may cause
chemical burns in the mouth, throat and eyes or asphyxiation.
• Keep children away from the dishwasher when the door is open.
• Switch off water and power and unplug before fitting or removing tools/
attachments, after use and before cleaning.
• Keep your fingers away from moving parts and fitted attachments.
• Never use a damaged machine.
• If the mains cable is damaged, it must be replaced by the manufacturer, its
service agent or a qualified technician in order to avoid a hazard.
• Keep the power unit, mains cable and plug away from water.
• Never exceed the maximum capacities.
• 2 people are required to lift this dishwasher.
• Only use the dishwasher for its intended domestic use.

6
• This appliance is intended for indoor household use and similar applications
such as:
- farm houses and by clients in hotels, motels and other residential type
environment;
- bed and breakfast type environment;
- catering and similar non-retail applications.
WARNING
IT IS HAZARDOUS FOR ANYONE OTHER THAN AUTHORISED
SERVICE PERSONNEL TO CARRY OUT SERVICING OF REPAIRS
WHICH INVOLVE THE REMOVAL OF COVERS.
TO AVOID THE RISK OF AN ELECTRICAL SHOCK DO NOT
ATTEMPT REPAIRS YOURSELF.
• Do not sit or stand on the door or dish rack.
• Do not move your dishwasher by holding the door or its edges. Hold the
dishwasher around its sides or base when moving it.
• Do not touch the heating element during or immediately after use.
• Do not operate your dishwasher unless all enclosure panels are properly in
place. Open the door very carefully when there is a programme running, as
there is a risk of hot water spraying out of the appliance.
• Do not place any heavy objects on the open door. The appliance could tip.
• When loading items to be washed:
• Locate sharp items so that they will not damage the door seal;
• Warning: Knives and other utensils with sharp points must be loaded in the
basket with the points downwards or placed horizontally.
• Do not allow plastic items to come into contact with heating element.
• Check that the detergent receptacle is empty after completion of the wash
cycle.
• Do not wash plastic items unless they are marked dishwasher safe or
equivalent.
• Use only detergent and rinse aids designed for an automatic dishwasher.
• Other means for disconnection from the supply must be incorporated in the
fixed wiring with at least 3mm contact separation in all poles.
• The door should not be left in the open position since this could present a
tripping hazard.

7
• For energy saving, always remember to switch the dishwasher off when you
have finished using it. The dishwasher should not be left unattended when
in use.
• Remove the door to the washing compartment when removing an old
dishwasher from service or discarding it.
• During installation, the power supply cord must not be excessively or
dangerously bent or flattened.
• Do not tamper with controls.
• The appliance is to be connected to the water mains using new hose sets.
• The maximum number of place settings to be washed is 10.
• The maximum permissible inlet water pressure is 1Mpa, and the minimum
permissible inlet water pressure is 0.04Mpa.
earthing instructions
WARNING: THIS APPLIANCE MUST BE EARTHED.
• This appliance is equipped with a mains cable having an equipmentearthing conductor and an earthing plug.
• The plug must be plugged into an appropriate mains socket that
is installed and earthed in accordance with local standards and
requirements.
Improper connection of the equipment-earthing conductor could result in
a risk of electric shock.
• The wires in the cord are coloured as follows:
Green and Yellow = Earth,
Blue = Neutral,
Brown = Live.
• Check with a qualified electrician or service representative if you are in
doubt whether the appliance is properly earthed or the plug does not
fit correctly.
• Never modify the plug provided with the appliance.
8
unpacking
Remove all items from the packaging. Retain the packaging. If you dispose of it please do so
according to local regulations.
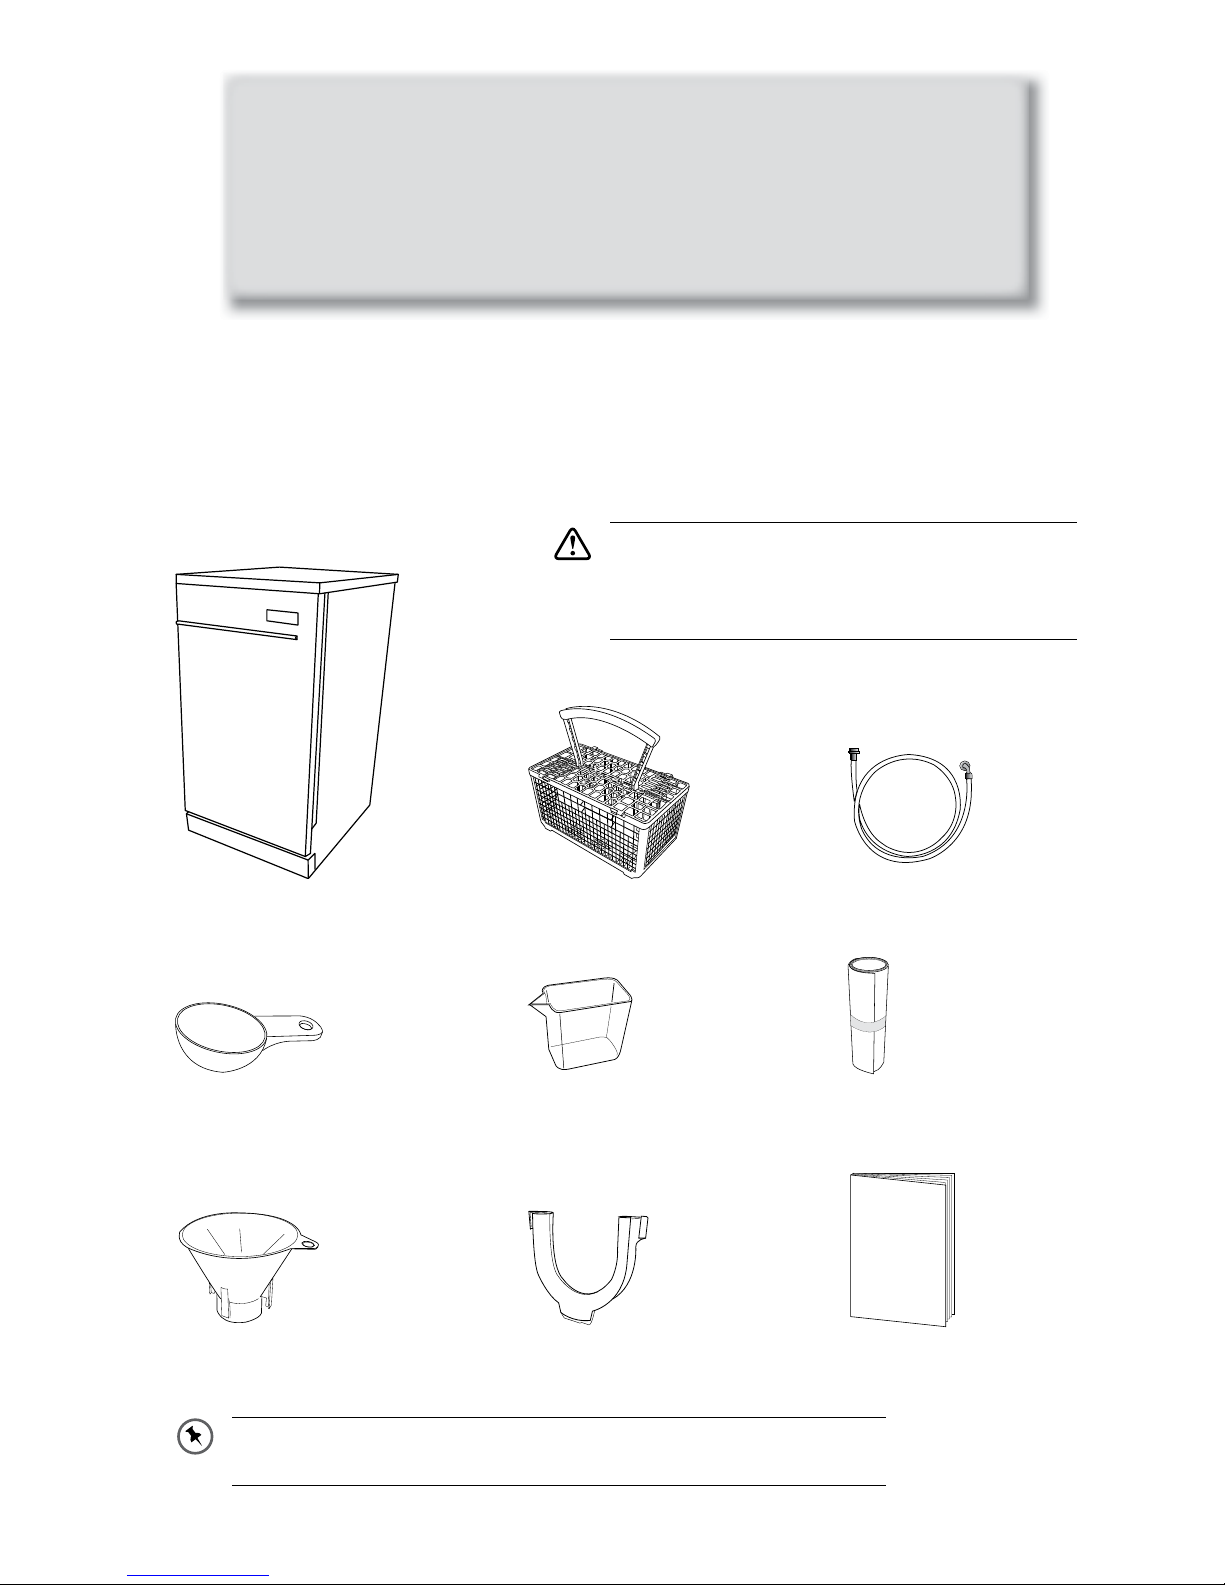
The following items are included:
The Main Unit
Detergent Measuring Spoon
(1 full spoon = 20g (approx.))
Instruction ManualU-shape Hose HolderSalt Funnel
Measuring Cup
(approx 60ml)
Water Supply Hose
Cutlery Basket
Condensation Strip
Thank you for purchasing your new Kenwood Dishwasher.
These operating instructions will help you use it properly and safely.
We recommend that you spend some time reading this installation/instruction
manual in order that you fully understand all the operational features it offers.
Read all the safety instructions carefully before use and keep this installation/
instruction manual for future reference.
This product has been wet tested to ensure correct
operation. As a result some water may remain
inside the unit. This is normal and safe. Remove
any water droplets from the exterior if necessary.
If items are missing or damaged please contact Partmaster (UK only).
Tel: 0844 800 3456 for assistance.
Instruction
Manual
9
installation
All parts removed must be saved to do
the reinstallation in the future. Ensure
the dishwasher is unplugged and empty.
We recommend that 2 people handle the
dishwasher during installation.
1. Please ensure the dishwasher is installed
by a qualified technician. Refer to the tools
required.
location
When selecting a position for your dishwasher
you should make sure the installation surface
is flat and firm, and the room is well ventilated.
Avoid locating your dishwasher near a heat
source, eg. cooker, boiler or radiator. Extreme
cold ambient temperatures may also cause
the appliance not to perform properly. This
dishwasher is not designed for use in a garage
or outdoors.
Do not cover the dishwasher. When installing,
ensure that free space is left at the sides.
2. Ensure there is clearance each side of the
unit to allow slight sideways movement for
servicing when required. Good levelling is
essential for correct closure and sealing of
the door. When the unit is correctly levelled,
the door should not catch the inner liner on
either side of the cabinet. The adjustable
feet may be loosened or tightened in order to
obtain the optimum levelling of the unit.
If required, the worktop of the dishwasher can
be removed. The height without the worktop
is 820 mm, the minimum dimensions required
to accommodate the dishwasher within fitted
kitchen furniture units.
level
level
level
level
850
450
620
450
600
850
30
min.100
80
units in mm
installation
10
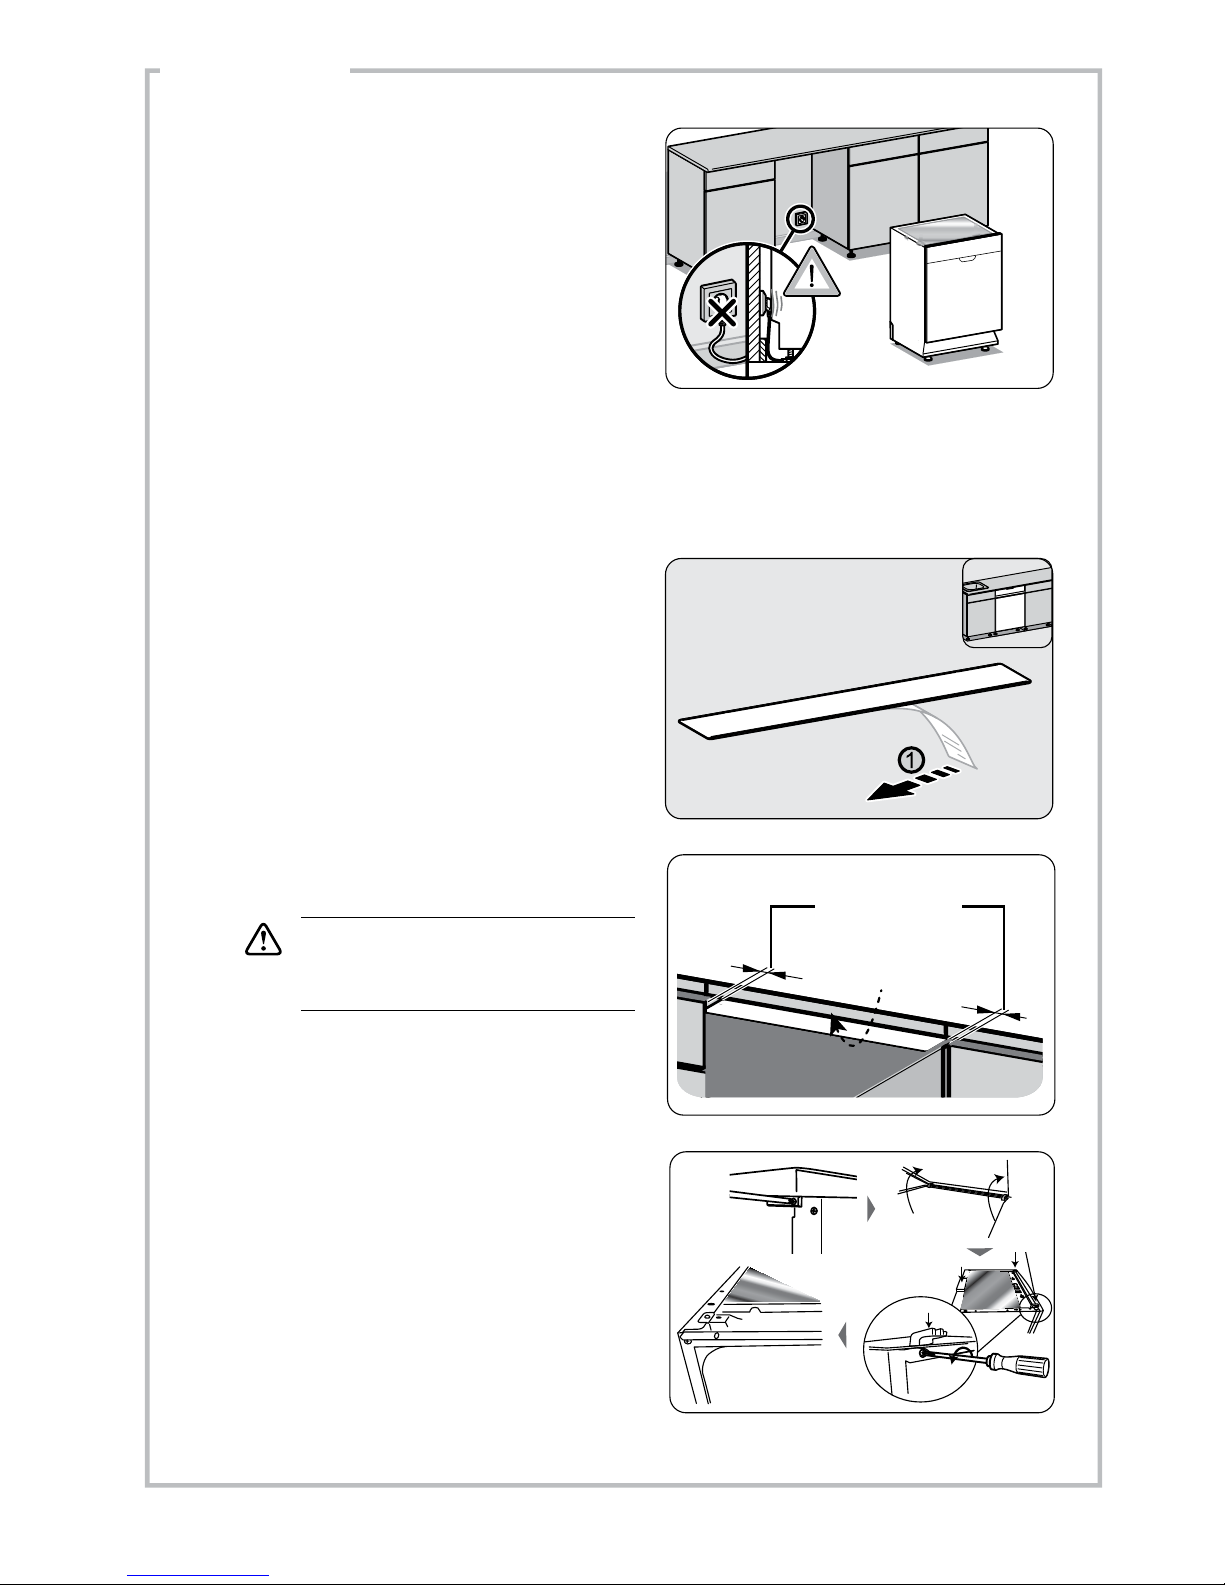
installation
Failure to attach the condensation
strip could result in damage to the
underside of your worktop!
4. The condensation strip must be fitted to
the underside of the worktop above your
dishwasher to protect it against any moisture.
Its purpose is to protect your worktop’s
underside from steam rising from the
dishwasher.
• Ensure the surface is clean prior to
sticking the condensation strip to the
underside of the worktop.
• Remove the backing paper from the
condensation strip.
3. Do not connect the unit to the mains socket
before installation. Ensure you are not
installing the unit right in front of the mains
socket. This is to avoid potential damage to
the back of the unit.
• Stick the condensation strip to the
underside of the worktop.
5. The worktop can be removed by removing
the fixing screws located at the rear of the
dishwasher. After removing the screws, lift
and push the worktop forward to release the
lugs from the front section of the dishwasher.
The polystyrene block and the lugs should be
saved for future use.
Leave some space
Stick the Condensation Strip
under the worktop, where you
want to install the dishwasher.
Remove
Remove
Remove
Unscrew
11
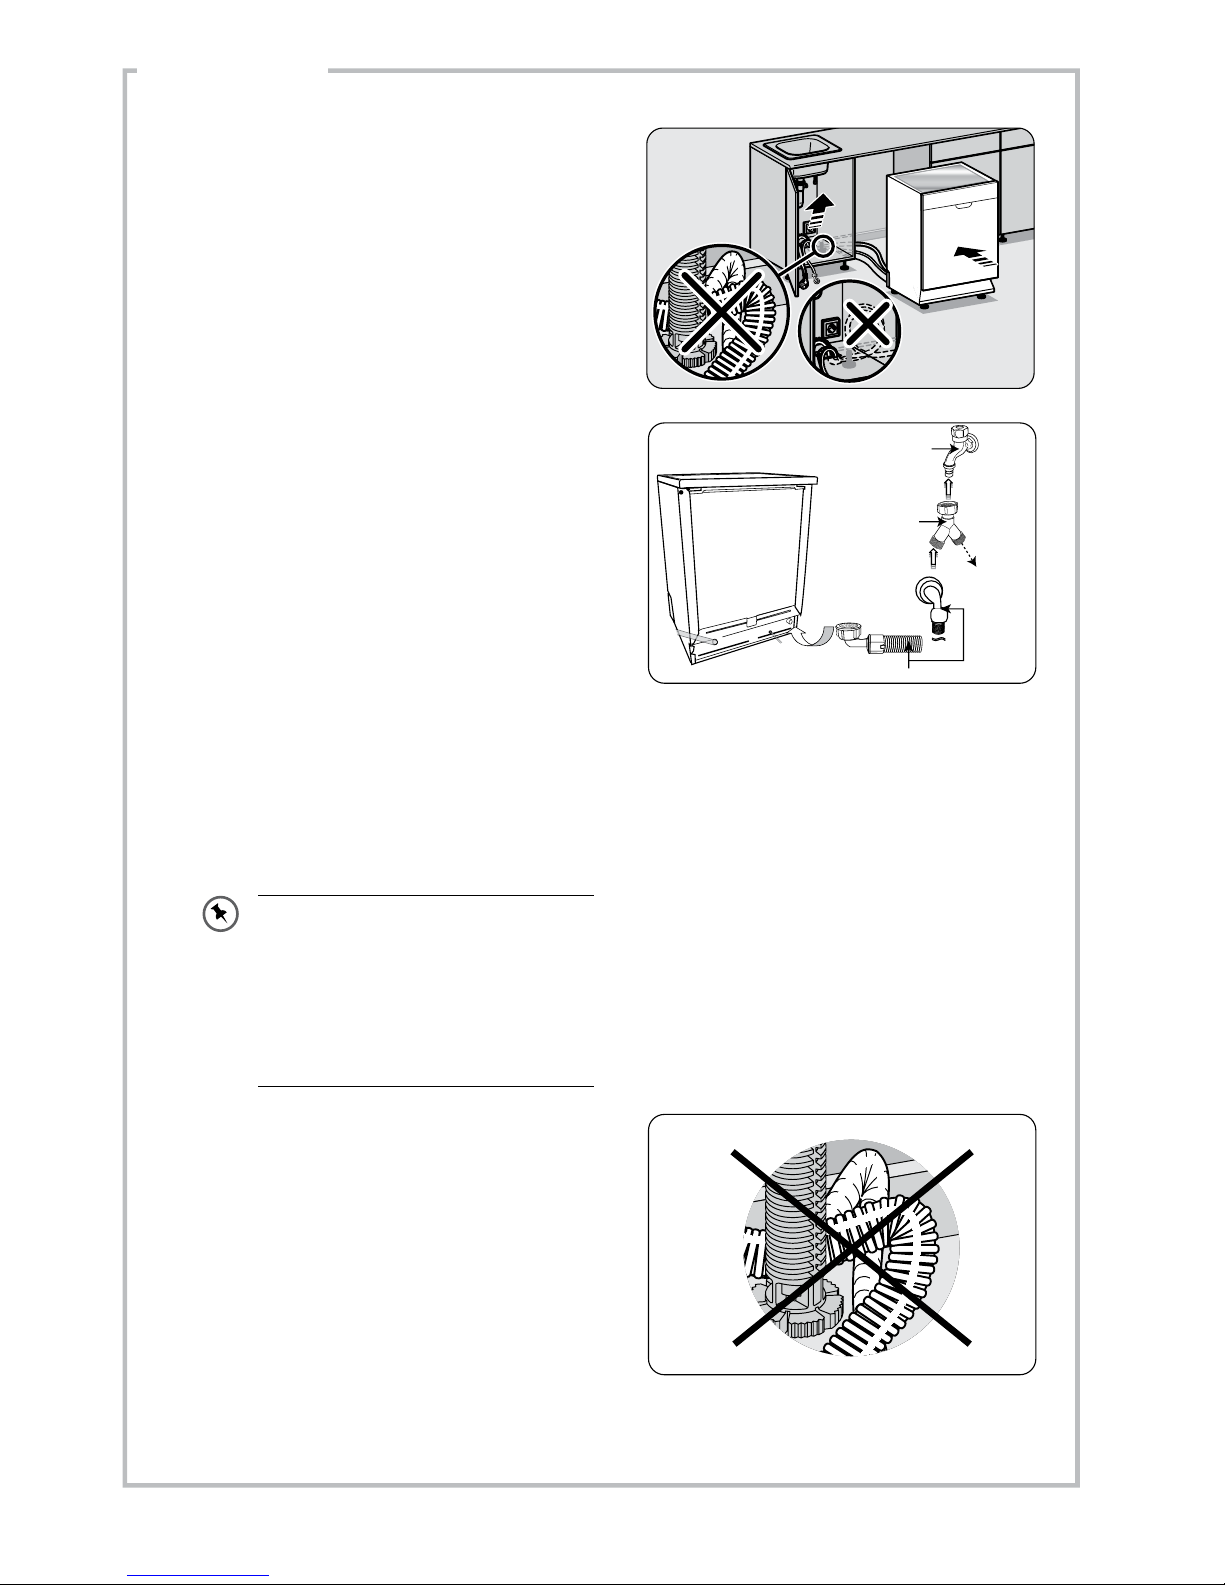
installation
• Do not bend your drain hose.
6. Position the dishwasher next to a water tap
and a drain. Ensure the water inlet and drain
hoses are not kinked or squashed. The unit
must not stand on the mains cable.
7. Make sure your plumbing is suitable for
use with the dishwasher. If in doubt contact
a qualified plumber. This unit MUST BE
connected to COLD WATER MAINS using
the new water inlet hose. OLD HOSE SETS
MUST NOT BE RE-USED. The water
pressure from the water mains needs to be at
a minimum of 0.04 MPa and a maximum of
1.00MPa.
• Connect one end of the safety water
supply hose to your dishwasher, and then
connect the other end of the hose to your
water mains. Please ensure the black
rubber seal is in place.
• After connecting the hose, turn on your
water mains and check for leaks.
• Connect the dishwasher to the mains
socket.
water mains
Y-Adaptor
(not included)
safety water supply hose
Connect
to another
appliance
if required.
You may use a Y-adaptor (not
included) for an additional water
feed for another appliance, for
example a washing machine. This
is only applicable for cold water
mains. A Y-adaptor is available
from most DIY stores.
 Loading...