


Thank you for purchasing your Kenwood dishwasher.
Please refer to this guide for the installation process.
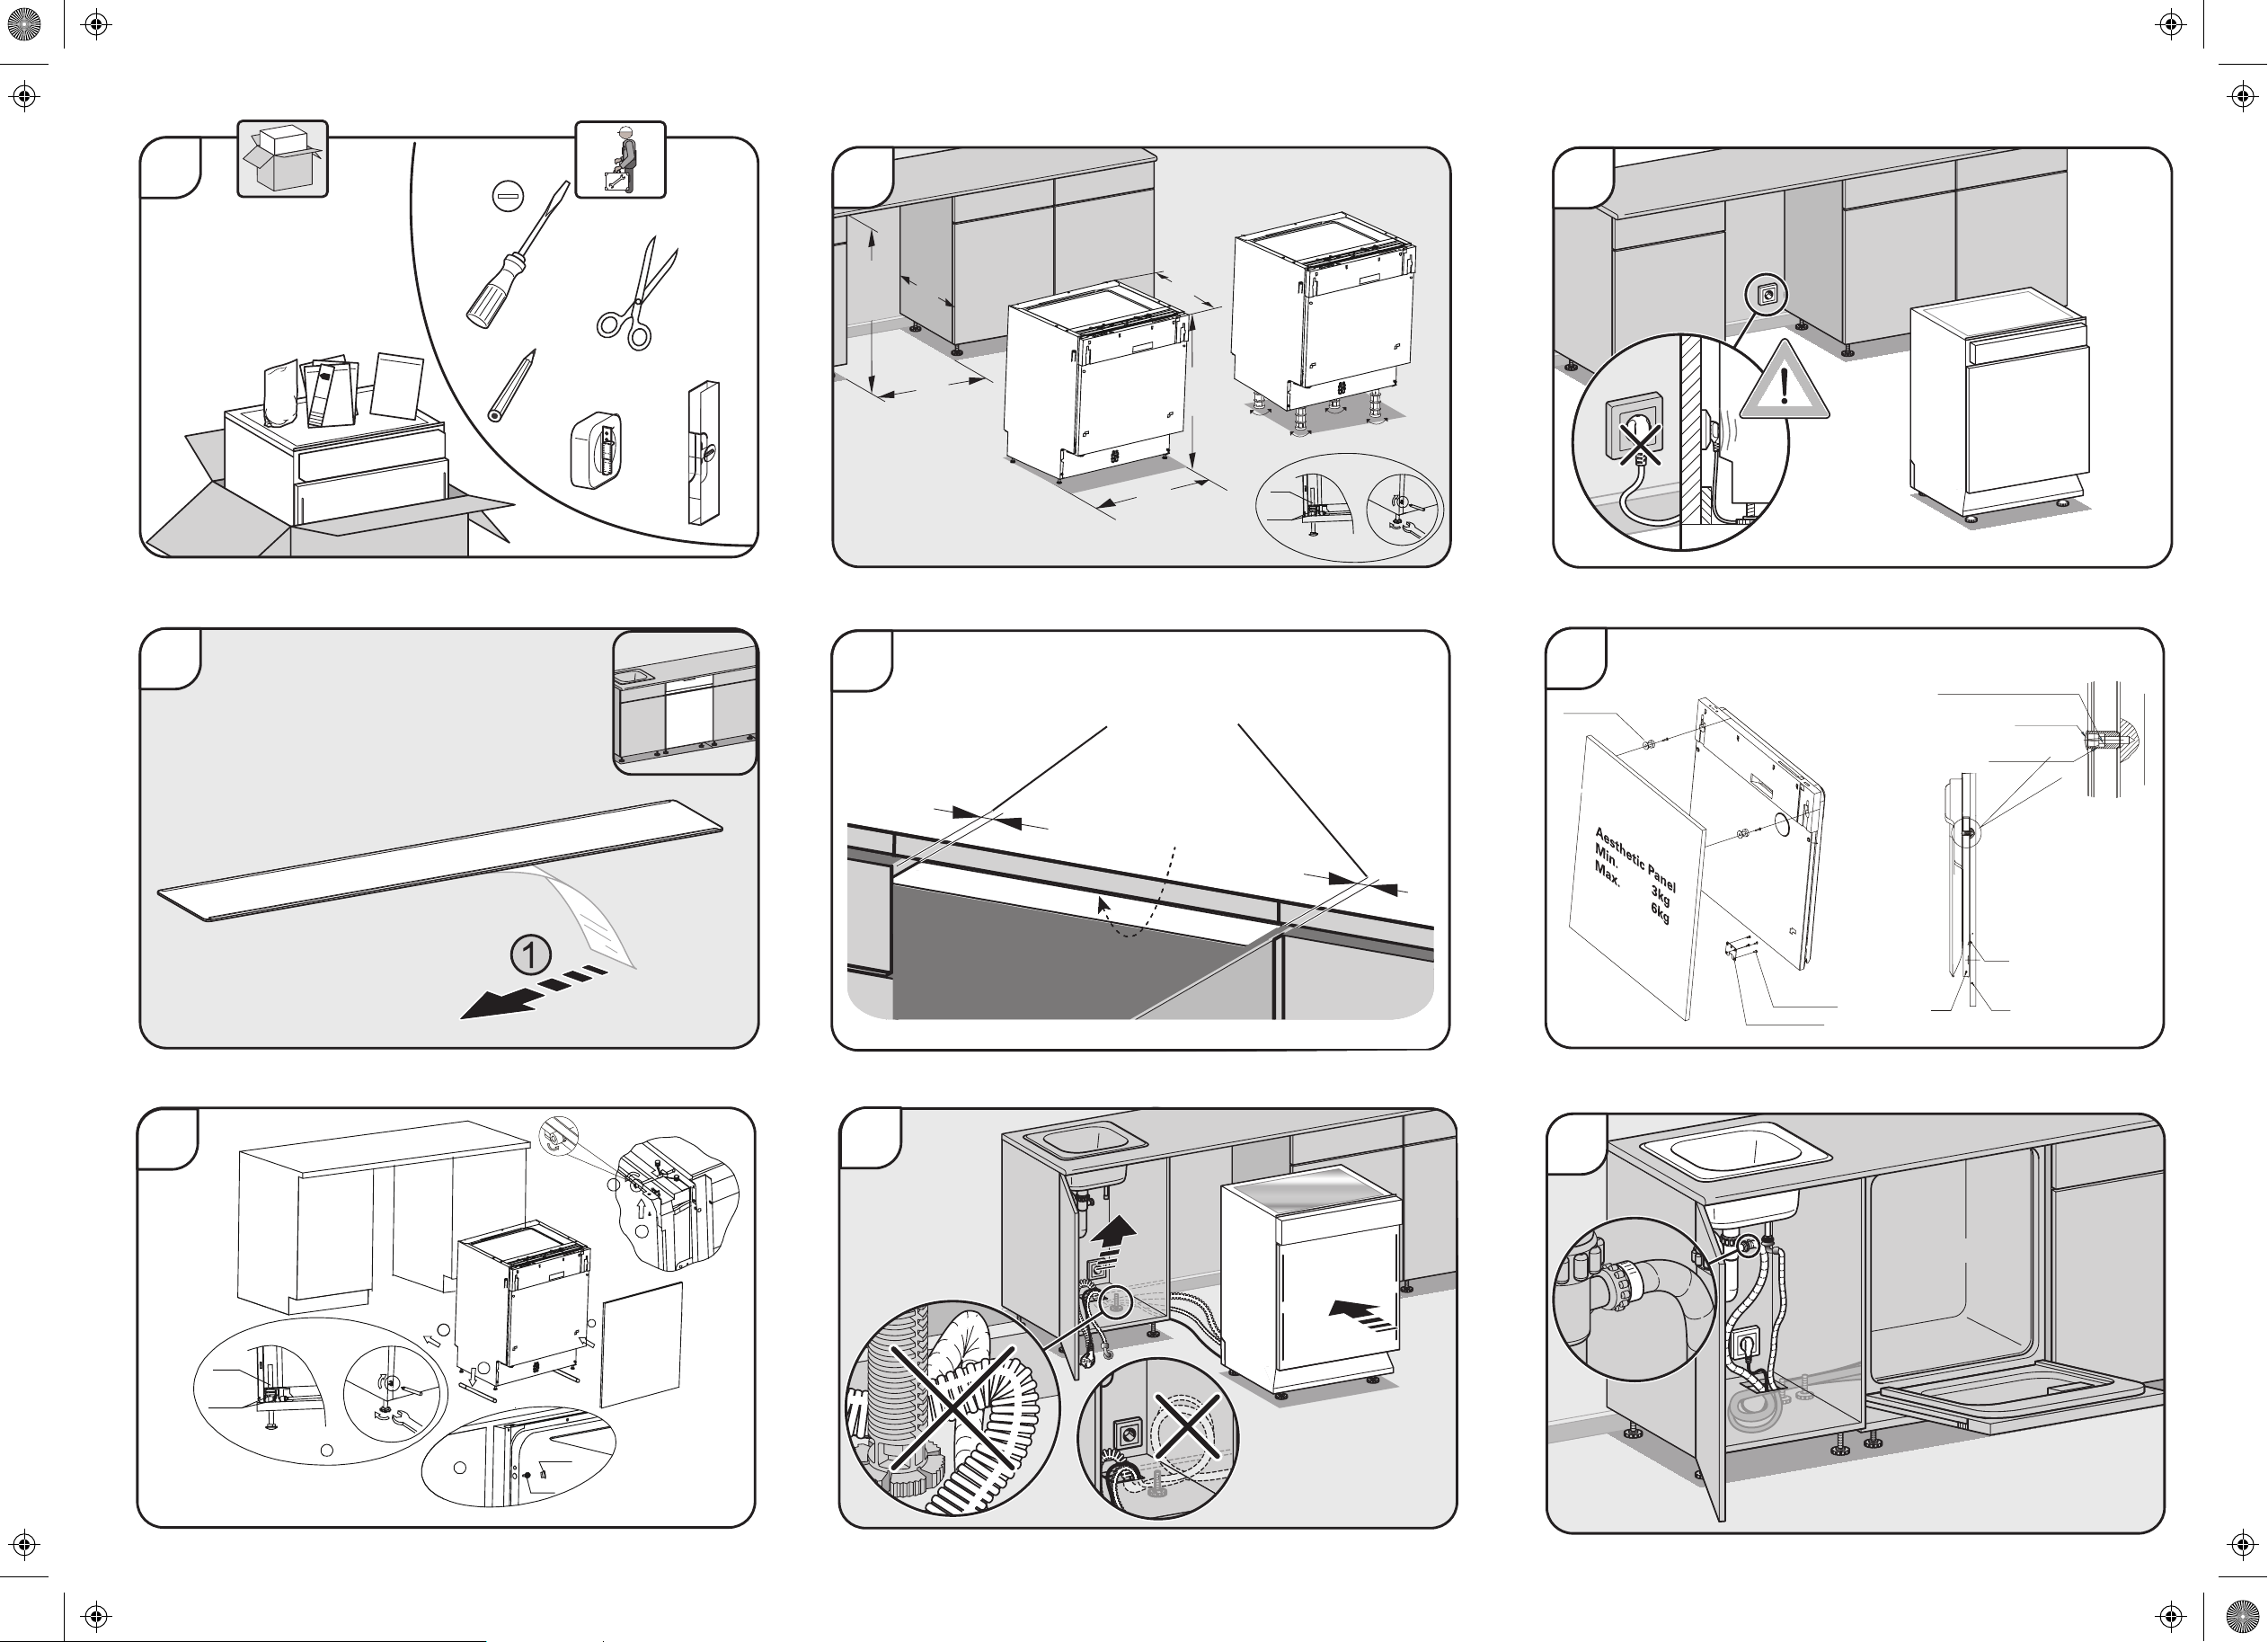
1. Remove all packaging before positioning the machine. (Fig 1)
2. Please ensure the dishwasher is installed by a qualied technician. Refer to the tools
required in Fig 1.
3. Ensure there is enough clearance each side of the unit to allow for slight sideways movement for
servicing when required. Good levelling is essential for the correct closure and sealing of the door.
When the unit is correctly levelled, the door should not catch the inner liner on either side of the
cabinet. The adjustable feet may be loosened or tightened in order to obtain the optimum
levelling of the unit (Fig 2)
4. If required the worktop of the dishwasher is removable and the height is 820 mm without the work
top. Figure 3 outlines the minimum dimensions required to accommodate the dishwasher within
tted kitchen furniture units. Do not connect the unit to the mains before the installation. Ensure
you are not installing the unit right in front of the mains, to avoid potential damage to the back of
the unit. (Fig 3)
5. The condensation strip must be tted to the underside of the worktop above your dishwasher to
protect it against moisture. Its purpose is to deect steam rising from your appliance to protect
your worktop’s underside. (Fig 4 and 5)
• Ensure the surface is clean prior to sticking to underside of the worktop.
• Remove the backing paper from the strip. (Fig 4)
• Stick the condensation strip to the underside of the worktop. (Fig 5)
NOTE: FAILURE TO ATTACH THE CONDENSATION STRIP COULD RESULT IN DAMAGE TO
THE UNDERSIDE OF YOUR WORKTOP!
6. Install the aesthetic panel to the dishwasher door as indicated in Fig 6. Ensure the aesthetic
panel weight is a minimum of 3kg and a maximum of 6kg. After the aesthetic panel is
installed, the tension of the dishwasher door spring can be adjusted by rotating the adjusting
screw (Fig 7). If the tension is right, the door will remain horizontal in the fully open position.
7. Position the unit next to a water tap and a drain. Ensure the water inlet and drain hoses are not
kinked or squashed. The unit must not stand on the electrical supply cable. (Fig 8)
8. Make sure your plumbing is suitable for use with the dishwasher. If in doubt contact a qualied
plumber. This unit MUST BE connected to COLD WATER MAINS using the new water inlet hose.
OLD HOSE SETS MUST NOT BE RE-USED. The water pressure from the water mains needs to be
at a minimum of 0.04 MPa and a maximum of 1.00MPa.
dishwasher installation guide
8. (continued)
• Connect one end of the water supply hose
to your dishwasher, and then connect the other
end of the hose to your water mains as Fig A.
Please ensure the black rubber seal is in place.
• Turn on your water mains and check for leakages
after connecting the hose.
• Connect the dishwasher to the electrical mains
outlet.
YOU MAY USE THE Y-ADAPTOR (NOT INCLUDED)
FOR ADDITIONAL WATER FEED FOR ANOTHER
APPLIANCE, FOR INSTANCE A WASHING
MACHINE. THIS IS ONLY APPLICABLE FOR COLD
WATER MAINS. A Y-ADAPTOR IS AVAILABLE
FROM MOST DIY STORES. (Fig A)
• Do not bend your drain hose. (Fig B)
• You may use the U-shaped drain hose holder to
secure your drain hose and to avoid bending it.
(Fig C)
• Secure the water drain hose to the waste pipe to
avoid it coming off during washing process.
(Fig 9 and D)
NOTE: THE WASTE PIPE MUST ONLY BE CONNECTED TO
THE FOUL DRAINS AND NOT THE SURFACE
WATER DRAINAGE SYSTEM.
THE WATER DRAIN HOSE SHOULD BE PLACED
BETWEEN 40 CM AND 100 CM FROM THE FLOOR
LEVEL AND MUST NOT BE EXTENDED,
OTHERWISE THE UNIT MAY NOT BE ABLE TO
EXPEL THE WASTE WATER PROPERLY.
A
water
mains
water supply hose
C
water drain hose
U-shaped drain hose
holder
B
D
Y-Adaptor
(not included)
Connect
to
another
appliance
if
required.
1
6
4 X 18 screw
Cover
Spacer for aesthetic panel
Hook for aesthetic panel
Aesthetic panel
Outer door of
dishwasher
Lower hook
Hop hook
St4 countersunk
head screw
2
3
4
5
7 8
9
600
580
unit in mm
820
820
600
600
level
level
level
level
f
d
a
e
Aesthetic door
g
b
RUBBER COVER
SCREW
relax
h
SCREW
CONE GEAR
f2
f1
level
SCREW
CONE
GEAR
level
Stick the Condensation Strip
under the worktop, where you
want to install the dishwasher.
Leave some space
 Loading...