

Page 1

KDV-C810
DIGITAL VIDEO
COMPACTCOMPACT
KDV-C820
DVD/CD-MP3 AUTO CHANGER
INSTRUCTION MANUAL
KDV-C830
KDV-C840
KDV-C860
This player has been designed to play back the DVD
software which has been encoded for specific region areas.
It cannot play back the DVD software encoded for other
region areas than the region areas for which it has been
designed.
Take the time to read through this instruction manual.
Familiarity with installation and operation procedures will help you obtain the
best performance from your new DVD/CD-MP3 auto changer.
For your records
Record the serial number, found on the back of the unit, in the spaces designated on
the warranty card, and in the space provided below. Refer to the model and serial
numbers whenever you call upon your KENWOOD dealer for information or service
on the product.
Model KDV-C810 Serial number
© B64-2291-00/03 (K/E/M/X/C)
2RR6P10A12900A
Page 2

Contents
Warning .......................................3
Safety precautions......................4
English
About Discs.................................6
Notes on playing MP3 ................7
Glossary.......................................8
Loading discs ..............................9
Setting the disc
Installing the magazine
Magazine ejection
Operations of remote control ..10
Loading and Replacing the battery
Power / Playing Disc
Pausing and Restarting Disc Play (DVD,
VCD, CD-DA)
Stopping playback (DVD, VCD, CD-DA)
Disc Search
Track/Chapter Search
Folder Select Mode (MP3)
Forward / Reverse Search (DVD, VCD,
CD-DA)
Slow playback (DVD, VCD)
Frame-by-frame playback (DVD, VCD)
Track Scan (VCD, CD-DA)
Repeat Play
Random Play (VCD, CD-DA, MP3)
Direct Disc Search
Direct Track/Chapter Search
GOTO - Direct Search (DVD, VCD, CD-
DA)
Using DVD Menu (DVD)
Using the PBC (VCD)
PBC function On/Off (VCD)
Switching the Viewing Angle (DVD)
Selecting the Sub Title Language (DVD)
Selecting the Audio Language (DVD)
Switching the Vocal sound (DVD, VCD,
CD-DA)
Viewing Zoom (DVD, VCD)
Title Information (DVD)
Switching the Time display
List mode
Track List Screen (CD-DA)
File List Screen (MP3)
Preferences ...............................19
Setup mode
Setting the Priority Language
List of language codes
Setting the Audio
Setting the Screen Mode
Setting the Rating Level (parental lock)
Operations of center unit .........25
Playing Disc
Pausing and Restarting Disc Play (DVD,
VCD, CD-DA)
Fast Forwarding and Reversing (DVD,
VCD, CD-DA)
Disc Search
Track/Chapter Search
Folder Select Mode (MP3)
Direct Disc Search (Function of remote)
Direct Track/Chapter Search (Function of
remote)
Track Scan (VCD, CD-DA)
Repeat Play
Random Play (VCD, CD-DA, MP3)
Magazine Random Play
Disc Naming (DNPS)
Accessories ...............................29
Installation Procedure ..............29
Connecting Wires to Terminals 30
Installation ................................33
Troubleshooting Guide .............36
Region codes in the world .......39
Specifications ...........................40
— 2 —
Page 3
2Warning
2CAUTION
Use of controls or adjustments or performance
of procedures other than those specified
herein may result in hazardous radiation
exposure.
In compliance with Federal Regulations,
following are reproductions of labels on, or
inside the product relating to laser product
safety.
KENWOOD CORPORATION
2967-3, ISHIKAWA-CHO,
HACHIOJI-SHI
TOKYO, JAPAN
KENWOOD CORP. CERTIFIES THIS EQUIPMENT
CONFORMS TO DHHS REGULATIONS N0.21 CFR
1040. 10, CHAPTER 1, SUBCHAPTER J.
Location : Bottom Panel
FCC WARNING
This equipment may generate or use radio
frequency energy. Changes or modifications to
this equipment may cause harmful
interference unless the modifications are
expressly approved in the instruction manual.
The user could lose the authority to operate
this equipment if an unauthorized change or
modification is made.
NOTE
This equipment has been tested and found to
comply with the limits for a Class B digital
device, pursuant to Part 15 of the FCC Rules.
These limits are designed to provide
reasonable protection against harmful
interference in a residential installation. This
equipment may cause harmful interference to
radio communications, if it is not installed and
used in accordance with the instructions.
However, there is no guarantee that
interference will not occur in a particular
installation. If this equipment does cause
harmful interference to radio or television
reception, which can be determined by turning
the equipment off and on, the user is
encouraged to try to correct the interference
by one or more of the following measures:
• Reorient or relocate the receiving antenna.
• Increase the separation between the
equipment and receiver.
• Connect the equipment into an outlet on a
circuit different from that to which the
receiver is connected.
• Consult the dealer or an experienced
radio/TV technician for help.
NOTE
This Class B digital apparatus complies with
Canadian ICES-003.
— 3 —
Page 4
Safety precautions
2WARNING
To prevent injury or fire, take the
English
following precautions:
• When extending the ignition, battery, or
ground wires, make sure to use automotivegrade wires or other wires with a 0.75mm
(AWG18) or more to prevent wire
deterioration and damage to the wire
coating.
•To prevent a short circuit, never put or leave
any metallic objects (such as coins or metal
tools) inside the unit.
• If the unit starts to emit smoke or strange
smells, turn off the power immediately and
consult your Kenwood dealer.
2CAUTION
To prevent damage to the unit, take
the following precautions:
• Make sure to ground the unit to a negative
12V DC power supply.
• Do not open the top or bottom covers of the
unit.
• Do not install the unit in a spot exposed to
direct sunlight or excessive heat or humidity.
Also avoid places with too much dust or the
possibility of water splashing.
• When replacing a fuse, only use a new one
with the prescribed rating. Using a fuse with
the wrong rating may cause your unit to
malfunction.
•To prevent a short circuit when replacing a
fuse, first disconnect the wiring harness.
• Do not use your own screws. Use only the
screws provided. If you use the wrong
screws, you could damage the unit.
NOTE
2
• If you experience problems during
installation, consult your Kenwood dealer.
• The illustrations of the display and the panel
appearing in this manual are examples used
to explain more clearly how the controls are
used. Therefore, what appears on the display
in the illustrations may differ from what
appears on the display on the actual
equipment, and some of the illustrations on
the display may represent something
impossible in actual operation.
The marking of products using lasers
(Except for some areas)
CLASS 1
LASER PRODUCT
The label is attached to the chassis/case and
says that the component uses laser beams
that have been classified as Class 1. It
means that the unit is utilizing laser beams
that are of a weaker class. There is no
danger of hazardous radiation outside the
unit.
IMPORTANT INFORMATION
You can enjoy a DVD with this unit alone when
connecting it to an external monitor or audio
equipment.
Also, you can operate this unit connected to a
center unit made by Kenwood to output
sound.
A Kenwood-made center unit that can be
connected to this unit is called “Center Unit”.
About a center unit that can be
connected to this unit:
If a center unit (such as CD receivers) has
capability for “N” of <“O-N” switch>, this unit
can be connected to this unit.
According to the operating instructions of a
center unit, the setting of <“O-N” switch> is
“N”. This unit is, however, exclusive to “N”.
Therefore, <“O-N” switch> is unnecessary.
If using a separate CD/MD changer switching
unit "KCA-S210A", AUX audio input is enabled
also on a disc changer control equipped center
unit not compatible with "N". In this case, this
unit cannot be operated on the center unit.
For connections to this unit, refer to "When
your car audio has RCA input" (page 32).
For details of connection, refer to the
operating instructions attached to KCA-S210A.
The functions available and/or information
displayable may depend on types of units to
which you connect.
— 4 —
Page 5
Do Not Load 3-in.(8cm) Discs
If you try to load a 3 in.(8cm) Disc with its
adapter into the unit, the adapter might
separate from the Disc and damage the unit.
Cleaning the Unit
If the front panel is dirty, wipe it clean with a
silicon cloth or soft dry cloth with the power
off.
Applying spray cleaner directly to the unit may
affect its mechanical parts. Wiping the
faceplate with a hard cloth or using a volatile
liquid such as thinner or alcohol may scratch
the surface or erases characters.
Lens Fogging
Right after you turn on the car heater in cold
weather, dew or condensation may form on
the lens in the Disc player of the unit. Called
lens fogging, Discs may be impossible to play.
In such a situation, remove the disc and wait
for the condensation to evaporate. If the unit
still does not operate normally after a while,
consult your Kenwood dealer.
This player has been designed to play
back the DVD software which has
been encoded for specific region
areas. It cannot play back the DVD
software encoded for other region
areas than the region areas for which
it has been designed. (page 39)
The KDV-C810 will playback any disc
whose region number is (or ).
1
ALL
The KDV-C820 will playback any disc
whose region number is (or ).
2
ALL
The KDV-C830 will playback any disc
whose region number is (or ).
3
ALL
The KDV-C840 will playback any disc
whose region number is (or ).
4
ALL
The KDV-C860 will playback any disc
whose region number is (or ).
6
ALL
Restrictions due to difference between
discs
Some DVD and VCD discs can be played only
in certain playback modes according to the
intentions of the software producers. As this
player plays discs according to their
intentions, some functions may not work as
intended by you. Please be sure to read the
instructions provided with each disc. When
an inhibition icon is displayed on the monitor,
it indicates that the disc being played is under
the restriction as described above.
Inhibition icon
Unplayable discs
This player cannot play back any of the
following discs.
• DVD-ROM discs
• DVD-R/DVD-RW/DVD-RAM discs
• SVCD/HQVCD discs
• VSD discs
• CDV discs (Only the audio part can be
reproduced.)
• CD-G/CD-EG/CD-EXTRA discs (Only the
audio can be reproduced.)
• Photo CD discs (Never attempt to play
them.)
This product incorporates copyright
protection technology that is protected by
method claims of certain U.S. patents and
other intellectual property rights owned by
Macrovision Corporation and other rights
owners. Use of this copyright protection
technology must be authorized by
Macrovision Corporation, and is intended for
home and other limited viewing uses only
unless otherwise authorized by Macrovision
Corporation. Reverse engineering or
disassembly is prohibited.
Manufactured under license from Dolby
Laboratories.
“ Dolby ” and the double-D symbol are
trademarks of Dolby Laboratories.
Confidential Unpublished Works. ©19921997 Dolby Laboratories, Inc. All rights
reserved.
— 5 —
“DTS” and “DTS Digital Out” are
trademarks of Digital Theater Systems, inc.
Page 6
About Discs
16:9 LB
9
32
8
ALL
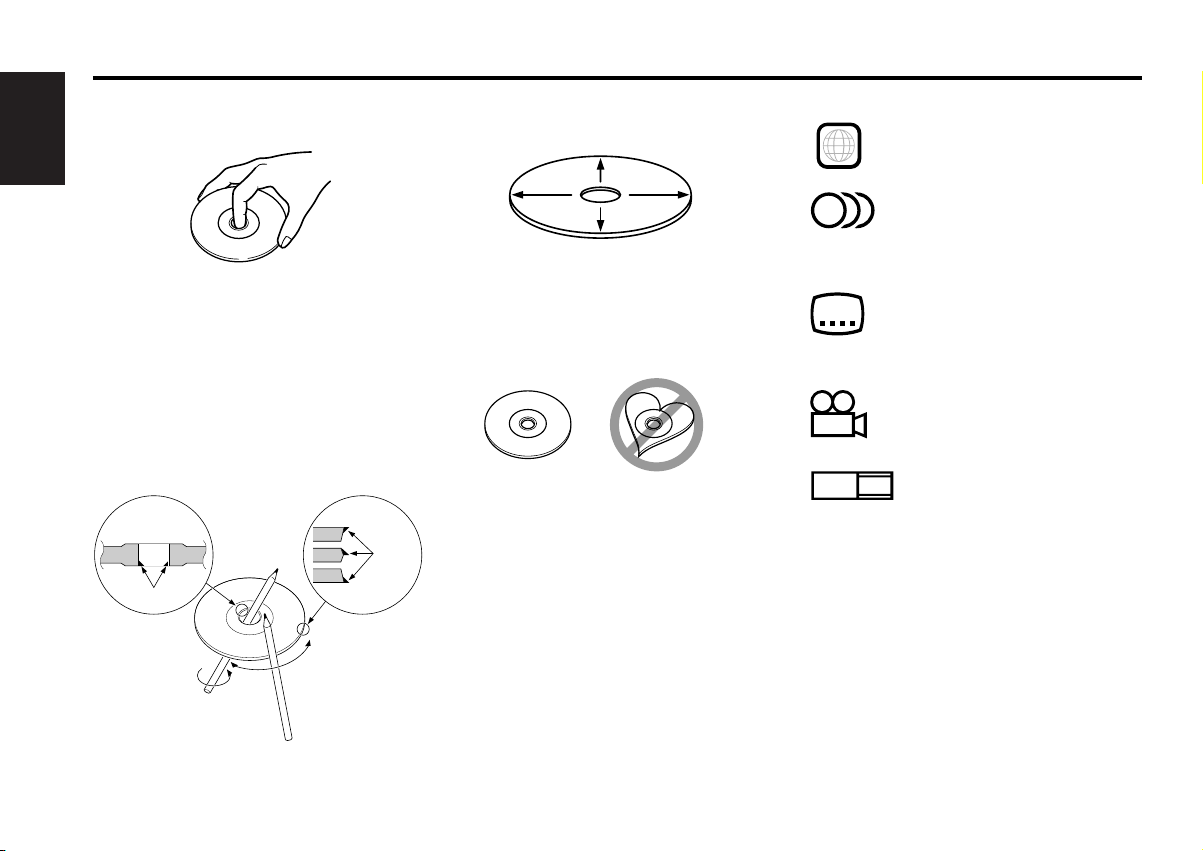
Handling Discs
• Don’t touch the recording surface of the
Disc.
English
• CD-R and CD-RW are easier to damage than
a normal music CD. Use a CD-R or a CD-RW
after reading the caution items on the
package etc.
• Don’t stick tape etc. on the Disc.
Also, don’t use a Disc with tape stuck on it.
When using a new Disc
If the Disc center hole or outside rim has
burrs, use it after removing them with a ball
pen etc.
Burrs
Burrs
Disc cleaning
Clean from the center of the disc and move
outward.
Removing Discs
When removing Discs from this unit pull them
out horizontally.
Discs that can’t be used
• Discs that aren’t round can’t be used.
• Discs with coloring on the recording surface
or that are dirty can’t be used.
•A CD-R or CD-RW that hasn’t been finalized
can’t be played. (For the finalization process
refer to your CD-R/CD-RW writing software,
and your CD-R/CD-RW recorder instruction
manual.)
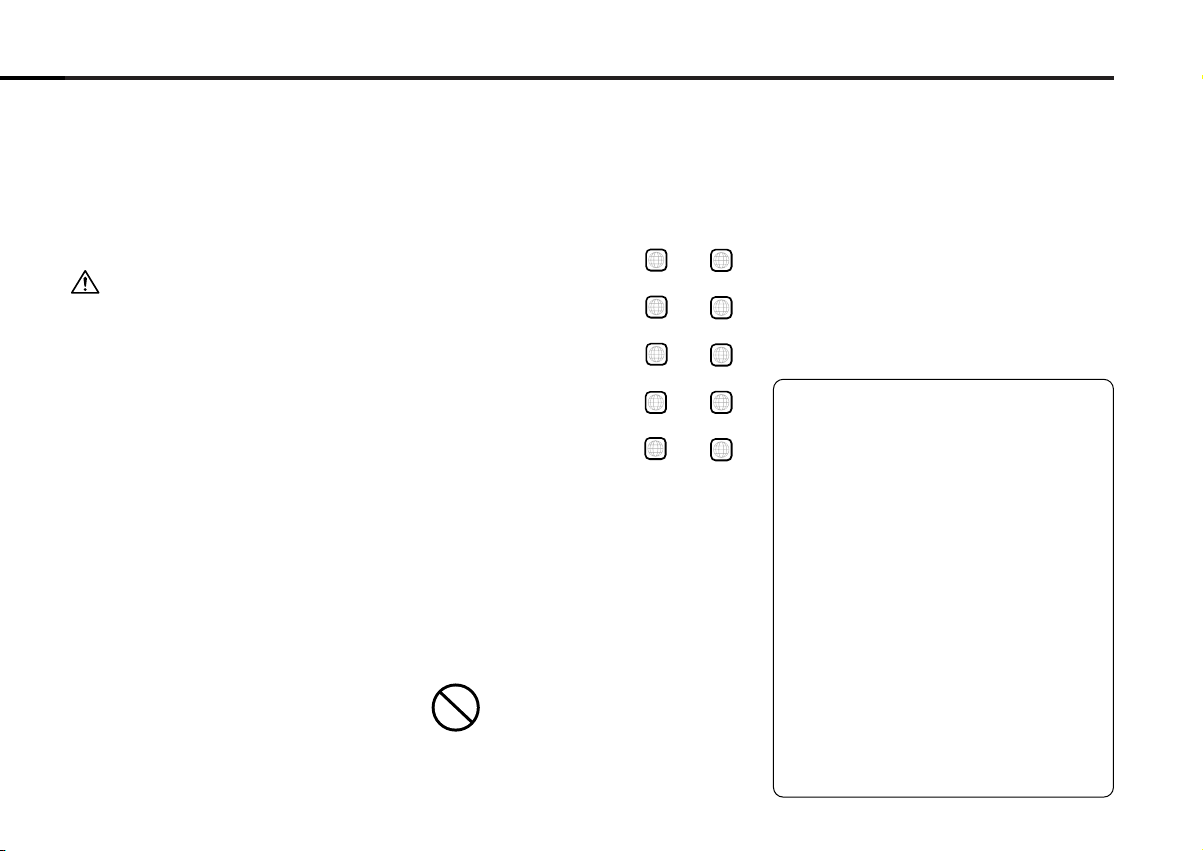
Icons on the DVD discs
Indicates the region code where
the disc can be played.
Number of voice languages
recorded with the audio
function. The number in the icon
indicates the number of voice
languages. (Max. 8 languages)
Number of subtitle languages
recorded with the subtitle
function. The number in the icon
indicates the number of subtitle
languages. (Max. 32 languages)
Number of angles provided by
the angle function. The number
in the icon indicates the number
of angles. (Max. 9 angles)
Aspect ratios that can be
selected. “LB” stands for Letter
Box and “PS” for Pan/Scan. In
the example on the left, the 16:9
video can be converted into
letter box video.
Disc storage
• Don’t place them in direct sunlight (On the
seat or dashboard etc.) and where the
temperature is high.
• Store Discs in their cases.
DVD/CD accessories
Don’t use disc type accessories.
— 6 —
Page 7
Notes on playing MP3
This unit can play MP3(MPEG1, 2 Audio Layer 3). Note, however,
that the MP3 recording media and formats acceptable are limited.
When writing MP3, pay attention to the following restrictions.
Acceptable media
The MP3 recording media acceptable to this unit are CD-ROM, CD-R,
and CD-RW.
When using CD-RW, do full format not quick format to prevent
malfunction.
Acceptable medium formats
The following formats are available for the media used in this unit. The
maximum number of characters used for file name including the
delimiter (".") and three-character extension are indicated in
parentheses.
• ISO 9660 Level 1 (12 characters)
• ISO 9660 Level 2 (31 characters)
• Joliet (64 characters; up to 19 characters are displayed on this unit)
The media reproducible on this unit has the following limitations:
• Maximum number of directory levels: 8
• Maximum number of files per folder: 255
• Maximum number of characters for folder name: 64 (up to 19
characters are displayed on this unit)
• Maximum number of folders: 50
MP3 written in the formats other than the above may not be
successfully played and their file names or folder names are not
properly displayed.
Settings for your MP3 encoder and CD writer
When you use your CD writer to record MP3 up to the maximum disc
capacity, disable additional writing. For recording on an empty disc up
to the maximum capacity at once, check Disc at Once.
Entering file and folder names
When entering file and folder names, use the alphanumeric characters
described above only. (ASCII code: 0x20 – 0x7f)
If you use any other character for entry, the file and folder names are
not displayed correctly. They may neither be displayed correctly
depending on the CD writer used.
The unit recognizes and plays only those MP3 which have the MP3
extension (.MP3).
A file with a name entered with characters not on the code list
may not play correctly.
Writing files into a medium
When a medium containing MP3 data is loaded, the unit checks all the
data on the medium. If the medium contains a lot of folders or nonMP3 files, therefore, it takes a long time until the unit starts playing
MP3.
In addition, it may take time for the unit to move to the next MP3 file
or a Track Search or Disc Search may not be performed smoothly.
Loading such a medium may produce loud noise to damage the speakers.
• Do no attempt to play a medium containing a non-MP3
MP3 extension.
The unit mistakes non-MP3
the MP3 extension.
• Do not attempt to play a medium containing non MP3.
files for MP3 data as long as they have
file with the
MP3 playing order
When selected for play, Track Search, or for Folder Select, files and
folders are accessed in the order in which they were written by the CD
writer.
Because of this, the order in which they are expected to be played
may not match the order in which they are actually played. You may be
able to set the order in which MP3 are to be played by writing them
onto a medium such as a CD-R with their file names beginning with
play sequence numbers such as "01" to "99", depending on your CD
writer.
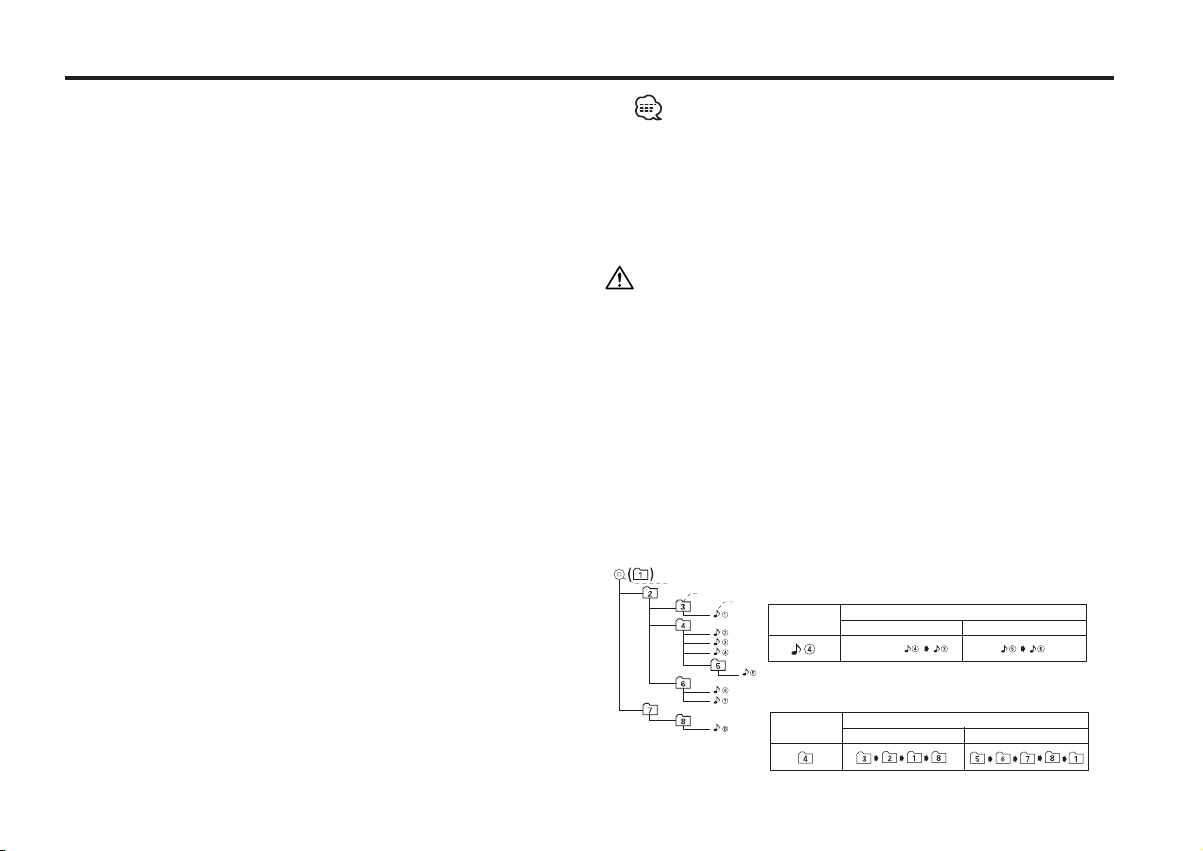
When a Track Search is executed with file
¡$ being played ...
File
Current
file number
Beginning of file
Operation of the button
4 Button
¢ Button
When an Folder select is executed with file ¡$
being played ...
Current
folder number
Operation of the button
DISC– Button DISC+ Button
— 7 —— 7 —
Root
Level 1 Level 3
Level 2 Level 4
Folder
Page 8

Glossary
DVD: Digital Versatile Disc
A type of disc which contains recording of audio/video packaged
media with high video and audio quality, such as a movie,
featuring large recording capacity and digital signal processing
English
capability.
VIDEO CD (VCD)
A type of CD which contains the recording of moving images. It
compresses image information by about 1/120 and audio
information by about 1/6 and accommodates up to 74 minutes of
recording in a disc with the same diameter as ordinary music CD
of 12 cm.
Some VCDs do not have the P.B.C. compatibility and are capable
of playback only, while some are P.B.C.-compatible and are
capable of various special playback control operations. This player
can play both of these VCDs.
MPEG: Moving Picture Expert Group (DVD, VCD)
This is an international standard for digital video and audio
compression and decompression in media.
Dolby Digital
This is a digital audio compression technology developed by Dolby
Laboratories. It is compatible with 5.1-channel surround audio as
well as normal stereo (2-channel) audio and can accommodate a
large amount of audio data efficiently in a disc.
DTS
Name of a digital surround system developed by Digital Theater
Systems, Inc.
MENU/TOP MENU (DVD)
Some DVDs display more than one title in a screen. This screen is
referred to as the title menu.
The DVD menu is the item display (menu screen) for use in
setting operations. The DVD menu can be recalled any time during
playback to perform settings according to the current software,
including the audio switching between Dolby Digital and PCM,
switching of language used in the subtitles and spoken voice.
Subtitles (DVD)
Some DVD discs contains the recording of more than one subtitle
language. This player allow you to select one of the recorded
subtitle languages during playback.
Title number (DVD)
The title is the largest unit of video and audio recorded in a DVD.
It usually corresponds to a single movie of video software or an
album (sometimes a piece of music) of music software. The
numbers assigned to individual titles are referred to as the title
numbers.
Chapter number (DVD)
The chapter is a section of video and audio recorded in a DVD. A
title is composed of several chapters. The numbers assigned to
individual chapters are referred to as the chapter numbers.
Track number (CD, VCD)
A track is also a section of video and audio recorded in a disc. The
numbers assigned to individual tracks are referred to as the track
numbers.
With most of music Discs, a track is assigned to a piece of music.
However, with a VCD, the sections of the contents do not always
correspond to the assigned tracks.
As (special) playback functions such as skipping and programming
of ordinary Discs are based on track number data, such playback
functions are sometimes impossible with some VCDs.
P.B.C.: Play-Back Control (VCD)
When a VIDEO CD carries “Play Back Control capable” or similar
message on the disc or jacket, desired scenes and information
can be played back in an interactive manner using a hierarchical
structure while viewing the menu screens displayed on the TV
screen.
— 8 —
Page 9
Loading discs
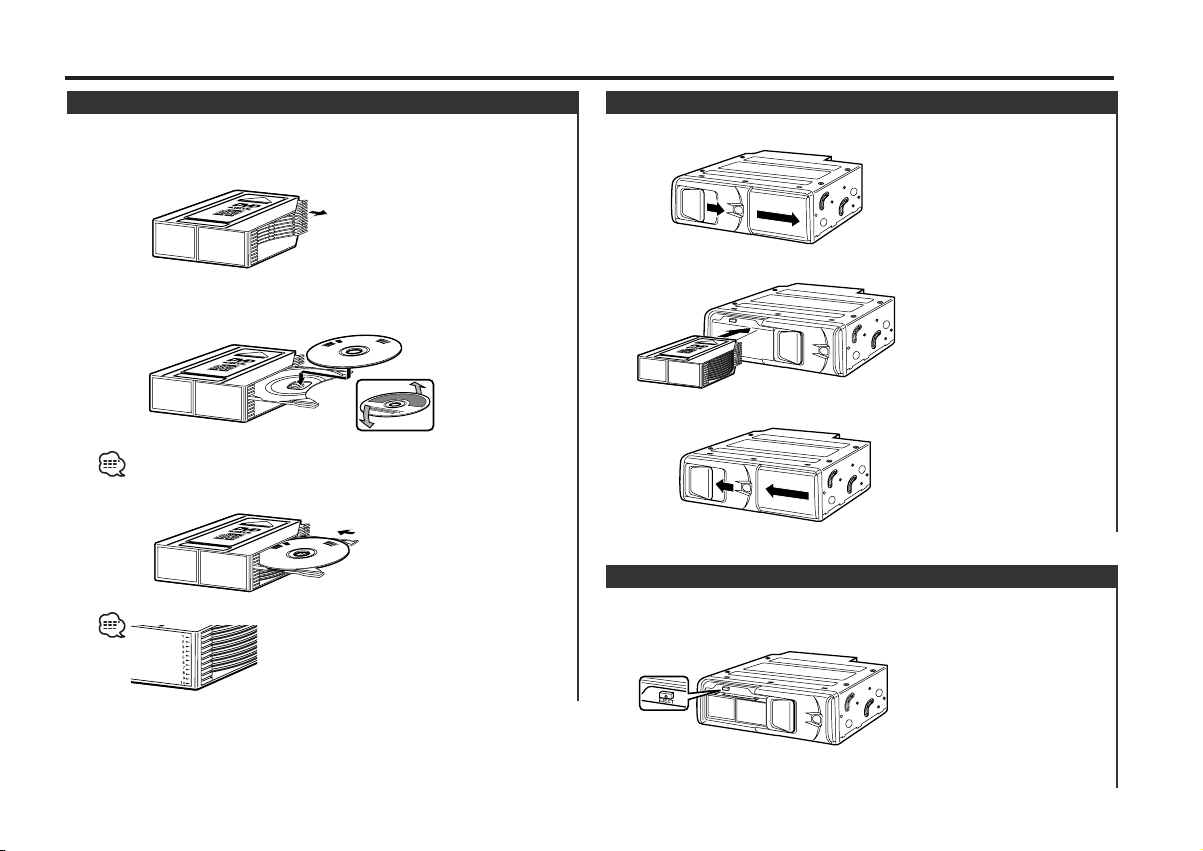
Setting the disc
1 Make sure the disc magazine is the right way up with the
"DVD"/"disc" logo on the top. Pull the tray out by the
projection.
2 Set a disc on the tray with the recording face upward. (The
label face is downward.)
8-cm discs cannot be used. If an 8-cm disc adapter is used, the disc
cannot be ejected.
3 Insert the tray into the disc magazine until it locks.
The discs are numbered from the top from 1 to 10.
Installing the magazine
1 Open the DVD/CD changer door.
2 Insert the magazine into the DVD/CD changer until it clicks.
3 Close the DVD/CD changer door.
Magazine ejection
1 Open the DVD/CD changer door.
2 Press the [EJECT] button.
3 Close the DVD/CD changer door.
— 9 —
Page 10
+-
-+
English
POWER
DISC–/DISC+
REW/FF
SCN
REP
RDM
CLEAR
GOTO
[#0]–[#9],[+10]
MENU
TOP MENU
ENTER/
RESUME
RETURN
PBC
ANGLE
SUB TITLE
AUDIO
VOCAL
ZOOM
TIME
LIST
38
4/¢
7
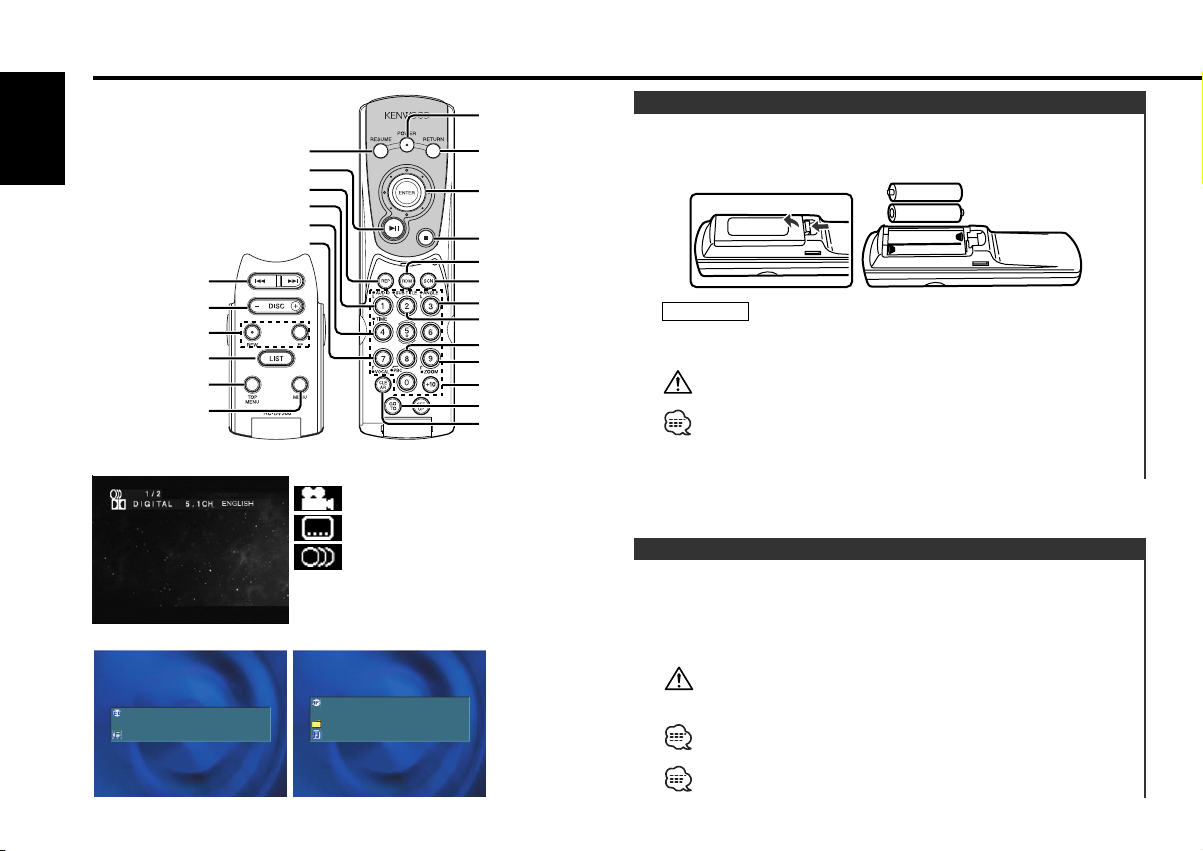
Operations of remote control
<OSD of DVD/VCD>
: Angle indicator
: Language for subtitle indicator
<OSD of CD-DA> <OSD of MP3>
DISC10 TRACK 99
A–TIME 01:02:15
NAME:AUDIO–CD
3
: Language for voice indicator
: On Screen Display
OSD
DISC10 TRACK199
A–TIME 01:02:15
NAME:ABCDEFGHIJKLMNOPQ
NAME:ABCDEFGHIJKLMNOPQ
3
Loading and Replacing the battery
Use two "AAA"-size batteries.
Insert the batteries with the + and – poles aligned properly,
following the illustration inside the case.
Joystick
2WARNING
Store unused batteries out of the reach of children. Contact a doctor
immediately if the battery is accidentally swallowed.
Do not set the remote on hot places such as above the dashboard.
• When the remote controllable distance becomes short, replace
both of the batteries with new ones.
•A portion of the operations may not be possible, depending on the
unit that is connected.
Power / Playing Disc
Turning ON the Power
Press the [POWER] button.
Turning OFF the Power
Press the [POWER] button.
You cannot view video pictures whilst the vehicle is moving. To
enjoy video pictures, find a safe place to park and engage the
parking brake. (Video output for front seats)
It takes time for the unit to check each medium to see if it contains
any MP3 file before it starts playing the medium.
Select the source mode of this unit on the center unit to operate
this unit linked with the center unit.
— 10 —
Page 11
• Before selecting a source of this unit on the center unit
– Turn on/off the power on the remote controller.
• After selecting a source of this unit on the center unit
– Select the source mode of this unit to turn it on.
– Select the other modes to turn off this unit.
– Cannot turn off this unit on the remote controller.
Operation after the end of a disc is reached
Playback does not automatically switch to the next disc once the
current disc is played to the end. Switch the disc manually.
Disc Operation
DVD, VCD[PBC ON] The operation differs according to the type
VCD[PBC OFF],
CD-DA, MP3
of disc. (Generally the menu reappears.)
Playback starts from the beginning of the
disc.
Disc Search
Selecting the disc you want to hear.
Press the [DISC–] or [DISC+] button.
Track/Chapter Search
Press the [4] or [¢] button.
Disc Search
DVD Searching for a chapter
VCD[PBC ON] Searching for a select
VCD[PBC OFF], CD-DA Searching for a track
MP3 Searching for a file
Pausing and Restarting Disc Play
Press the [38] button to make the disc pause.
Press the [38] button again to start play again.
• The following operation may not be available with certain discs.
• For MP3, Refer to <Folder Select Mode>. (page 11)
Stopping playback
Press the [7] button.
Press the button once during playback stops it and the position
where it is stopped is stored in memory.
•Press [38] under this condition to resume the play.
• No operation is possible depending on disks.
• For MP3, Refer to <Folder Select Mode>. (page 11)
Press the [7] button.
Press the button twice to cancel playback.
(DVD, VCD, CD-DA)
(DVD, VCD, CD-DA)
Folder Select Mode
Selecting the folder you want to hear.
1 Stopping play and Folder Select mode
Press the [38] or [7] button.
2 Selecting the desired folder
Press the [DISC–] or [DISC+] button.
3 Decide the folder to play
Press the [38] button.
The Folder Select mode releases, and the MP3 in the folder
being displayed is played.
— 11 —
(MP3)
Page 12
Operations of remote control
Forward / Reverse Search
Forward search
English
Press the [FF] button.
Reverse search
Press the [REW] button.
• Each time the button is pressed the Search speed switches as
shown below.
Setting Display
2 times "– – – 22" / "33 – – –"
4 times "– – 22 –" / "– 33 – –"
6 times "– 22 – –" / "– – 33 –"
8 times "22 – – –" / "– – – 33"
• Audio output of DVDs and video CDs is disabled during fastforward and fast-rewind. Audio output of audio CDs is disabled at
the 8x-speed operation.
Canceling Fast Forwarding / Reversing
Press the [38] button.
(DVD, VCD, CD-DA)
• While a VCD is played with the PBC function disabled, a track
change releases the slow playback.
Canceling the slow playback
Press the [38] button.
Frame-by-frame playback
(DVD, VCD)
1 Pausing
Press the [38] button.
2 Frame-by-frame playback
Press the [4] or [¢] button.
Canceling the frame-by-frame playback
Press the [38] button.
Slow playback
(DVD, VCD)
1 Pausing
Press the [38] button.
2 Forward slow playback
Press the [FF] button.
Reverse slow playback
Press the [REW] button.
• Each time the button is pressed the Search speed switches as
shown below.
Setting Display
1/6 times "– – 28" / "83 – –"
1/4 times "– 28 –" / "– 83 –"
1/2 times "28 – –" / "– – 83"
• Slow rewinding play is disabled for VCD.
Track Scan
Playing the first part of each song on the disc you are listening
to and searching for the song you want to listen to.
(VCD: When the PBC function is set to [OFF]. page 14)
(VCD, CD-DA)
1 Start Track Scan
Press the [SCN] button.
"SCAN" is displayed. Scan starts from the first track.
2 Release it when the song you want to listen to is played
Press the [SCN] or [38] button.
Repeat Play
(VCD: When the PBC function is set to [OFF]. page 14)
— 12 —
Page 13

Press the [REP] button.
Each time the button is pressed the Repeat Play switches as
shown below.
DVD:
Repeat play Display/Indicator
Chapter Repeat "CHAPTER REPEAT"/"CREP"
Title Repeat "TITLE REPEAT"/"TREP"
OFF "REPEAT OFF"/ –
VCD[PBC OFF], CD-DA:
Repeat play Display/Indicator
Track Repeat "REPEAT"/"REP"
OFF "REPEAT OFF"/ –
MP3:
Repeat play Display/Indicator
File Repeat "FILE REPEAT"/"REP"
Folder Repeat "FOLDER REPEAT"/"FREP"
OFF "REPEAT OFF"/ –
Random Play
Play all the songs on the disc or MP3 folder in random order.
(VCD: When the PBC function is set to [OFF]. page 14)
Press the [RDM] button.
Each time the button is pressed Random Play turns ON or OFF.
When it's ON, "RANDOM"/"RDM" is displayed.
• When the [¢] button is pressed, the next song select starts.
• When the [4] button is pressed, the beginning of the current
song.
(VCD, CD-DA, MP3)
Direct Disc Search
Doing Disc Search by entering the disc number.
1 Enter List Screen
Press the [LIST] button.
2 Enter the disc number
Press the number buttons.
3 Do Disc Search
Press the [DISC+] or [DISC–] button.
Clear the Disc number
Press the [CLEAR] button.
Direct Track/Chapter Search
Doing Track/Chapter Search by entering the track/chapter
number.
1 Enter List Screen
Press the [LIST] button.
2 Enter the track/Chapter number
Press the number buttons.
Press [+10] button to input two digits or more.
3 Do Track/Chapter Search
Press the [4] or [¢] button.
Clear the Track/Chapter number
Press the [CLEAR] button.
— 13 —
Page 14

Operations of remote control
GOTO - Direct Search
1 Enter GOTO mode
English
Press the [GOTO] button.
For DVDs, specify the title/chapter number or the elapsed time of
the title.
For VCD[PBC OFF] and CD-DA, specify the elapsed time of the
disc.
2 Select Search mode (DVD only)
Press the [GOTO] button.
Each time the button is pressed the Search mode switches as
shown below.
Search mode Display
Title/Chapter Search "T. **/ ** C. **/**"
Time Search "TIME __ : __ : __"
You can switch the title input from/to the chapter input by operating
the joystick from left side to right side in the title/chapter input
mode.
3 Enter the number
Press the number buttons.
Example: In case of Chapter 13 of a DVD
"T02/05 CØØ∞/030" :
Example: In case of 1 hour 23 min. 45 sec. of a CD-DA
"GOTO __ : __ : __" :
4 Do Search
Press the [ENTER] button.
(DVD, VCD, CD-DA)
,
,, ,,,
"DVD MENU" is displayed.
Enter Top Menu (root menu) mode
Press the [TOP MENU] button.
"TITLE MENU" is displayed.
2 Selecting the menu item
Move the Joystick or press the number buttons.
3 Setting the menu item
Press the [ENTER] button.
See your disc’s operating instructions for information on the menu
operation.
Canceling the Menu mode
Press the [RESUME] button.
Using the PBC
Available for video CDs with playback control record. (VCD:
When the PBC function is set to [ON]. page 14)
(VCD)
1 Selecting the menu item
Move the Joystick or press the number buttons.
2 Setting the menu item
Press the [ENTER] button.
See your disc’s operating instructions for information on the PBC
operation.
Using DVD Menu
Available in DVDs with title menus/root menus.
(DVD)
1 Enter Title Menu mode
Press the [MENU] button.
PBC function On/Off
You can determine whether to use the PBC function for video
CDs with playback control record.
Press the [PBC] button for at least 1 second.
— 14 —
(VCD)
Page 15

Each time the button is pressed PBC function turns ON or OFF.
This function cannot be used during the List Mode. (page 17)
"BOTH VOCAL" Both vocal
"MIX VOCAL" Mix vocal
"NO VOCAL" Vocal sound off
This function cannot be used during the List Mode. (page 17)
Switching the Viewing Angle
Press the [ANGLE] button for at least 1 second.
Each time you press the button to switch viewing angle.
Selecting the Sub Title Language
Press the [SUB TITLE] button for at least 1 second.
Each time you press the button to change the sub title language.
This function cannot be used during the List Mode. (page 17)
Selecting the Audio Language
Press the [AUDIO] button for at least 1 second.
Each time you press the button to change the voice language.
Switching the Vocal sound
Press the [VOCAL] button for at least 1 second.
Each time the button is pressed the vocal sound switches.
KARAOKE DVD
Display Setting
"LEFT VOCAL" Left vocal
"RIGHT VOCAL" Right vocal
(DVD)
(DVD)
(DVD)
(DVD, VCD, CD-DA)
VCD/CD-DA
Display/Indicator Setting
"MONO LEFT"/"LchONLY" Monaural Left (L / L)
"MONO RIGHT"/"RchONLY" Monaural Right (R / R)
"STEREO"/"LR BOTH" Stereo (L / R)
Viewing Zoom
Zooming the image
Press the [ZOOM] button for at least 1 second.
Each time the button is pressed the image switches between
zoom ("X1.5", "X2", "X4") and normal ("OFF").
Scrolling the image
Move the Joystick.
The zoom point is scrolled as the joystick moves.
— 15 —
(DVD, VCD)
This function cannot be used during the List Mode. (page 17)
Page 16

Operations of remote control
Title Information
This shows the information on your disc/title.
English
1 Enter Title Information
Press the [PBC] button for at least 1 second.
This function cannot be used during the List Mode. (page 17)
DISC TTL1
TOTAL TITLES: 10
PLAY ENTRIES: 10
PLAY TIME: 01:10:10
AUDIO STREAMS: 10
SUSPIC STREAMS:
NTSC
2 Select Title
Move the Joystick to left or right side.
Press the [FF] or [REW] button to switch a title quickly.
Canceling the title information
Press the [PBC] button for at least 1 second.
Switching the Time display
Press the [TIME] button for at least 1 second.
Each time the button is pressed the display switches as shown
below.
The chapter time is not displayed depending on software.
(DVD)
TTL2 TTL3
10
In OSD screen
DVD
Information Display
Title time
"TITLE##/## CHAPTER###/###"
Remaining time of title "TITLE REMAIN"
Chapter time "CHAPTER ELAPSED"
OFF –
VCD[PBC ON]
Information Display
Track Time "SINGLE ELAPSED"
OFF "OFF"
VCD[PBC OFF]
Information Display
Track Time "SINGLE ELAPSED"
Disc time "TOTAL ELAPSED"
Remaining time of entire disc "TOTAL REMAIN"
OFF "OFF"
CD-DA
Information Display/Indicator
Track Time "SINGLE ELAPSED"/"P-TIME"
Disc time "TOTAL ELAPSED"/"A-TIME"
Remaining time of entire disc "TOTAL REMAIN"/"R-TIME"
MP3
Information Display/Indicator
File Time
Remaining time of file
"FILE ELAPSED"/"P-TIME"
"FILE REMAIN"/"R-TIME"
— 16 —
Page 17

In List screen
DVD
Information Indicator
Title time "A-TIME"
Remaining time of title "R-TIME"
Chapter time "P-TIME"
VCD[PBC ON]
Information Indicator
Track Time "P-TIME"
VCD[PBC OFF], CD-DA
Information Indicator
Track Time "P-TIME"
Disc time "A-TIME"
Remaining time of entire disc "R-TIME"
MP3
Information Display
File Time "P-TIME"
Remaining time of file "R-TIME"
List mode
1 Enter List Screen
Press the [LIST] button.
DISC LIST INFORMATION
AUDIO–CD DISC
DVD–VIDEO TRACK
DVD–VIDEO
ISO9660 P–TIME
VCD_V20
VIDEO_CD
NO ACCESS
NO DISC
E–04 MODE
E–15
STATUS
1
1
00:01:10
3
LR BOTH
2 Select the Disc
Move the Joystick to front or back side.
Press the [ENTER] button.
Disc Select items
DVD The DVD will start playing.
VCD The VCD will start playing.
CD-DA The CD-DA will start playing. Refer to the
MP3 The MP3 will start playing. Refer to the
Canceling the List mode
Press the [LIST] button.
Track List Screen.
File List Screen.
— 17 —
Page 18

Operations of remote control
Track List Screen
1 Starting CD-DA
English
Refer to the List mode.
2 Switching to the track list screen
Press the [ENTER] button.
AUDIO–CD INFORMATION
TRACK–01
TRACK–02 TRACK
TRACK–03
TRACK–04 P–TIME
TRACK–05
TRACK–06 STATUS
TRACK–07
TRACK–08
TRACK–09 MODE
DISC
3 Select the track list
Move the Joystick to left or right side.
4 Select the track
Move the Joystick to front or back side.
Press the [ENTER] button.
Scrolling the track list
1 Stopping playback
Press the [7] button.
2 Press the [4] or [¢] button.
Returning to the List mode
1 Select the disc title
Move the Joystick to left or right side.
2 Returning to the list screen
Press the [ENTER] button.
(CD-DA)
1
2
00:01:10
3
LR BOTH
File List Screen
(MP3)
1 Starting MP3
Refer to the List mode.
2 Switching to the file/folder list screen
Press the [ENTER] button.
ISO9660 INFORMATION
.. DISC
FOLDER–1 FOLDER
FOLDER–2 FILE
FILE0–01.MP3 P–TIME
FILE0–02.MP3
FILE0–03.MP3 STATUS
FILE0–04.MP3
FILE0–05.MP3
FILE0–06.MP3 MODE
INFORMATION
00:02:15
NAME
FILE0–01.MP3
3 Select the file/folder list
Move the Joystick to left or right side.
4 Select the file/folder
Move the Joystick to front or back side.
Press the [ENTER] button.
Display Select items
File The MP3 file will start playing.
Folder Move to a folder.
" .." Move to an upper-level folder.
Scrolling the file/folder list
1 Stopping playback
Press the [7] button.
2 Press the [4] or [¢] button.
Returning to the List mode
1 Select the disc/folder title
Move the Joystick to left or right side.
— 18 —
4
1
1
3 3
FOLDER–2
.. DISC
FOLDER–2–1 FOLDER
FILE2–01.MP3 FILE
FILE2–02.MP3 P–TIME
FILE2–03.MP3
FILE2–04.MP3 STATUS
FILE2–05.MP3
FILE2–06.MP3
FILE2–07.MP3 MODE
00:02:15
NAME
FILE2–01.MP3
4
3
1
Page 19

2 Returning to the list screen
CLEAR
[#0]–[#9]
ENTER/
RESUME
RETURN
7
SETUP
Press the [ENTER] button.
Display Select items
Disc Returning to the list screen.
Folder Move to an upper-level folder.
Preferences
<SETUP screen>
– –
SETUP –
LANGUAGE
AUDIO
DISPLAY
PARENTAL
EXIT SETUP
GO TO LANGUAGE SETTING
GO TO LANGUAGE SETTING
Joystick
–
— 19 —
Page 20

GO TO LANGUAGE SETTING
Preferences
Setup mode
1 Stopping playback
English
Press the [7] button.
2 Enter Setup mode
Press the [SETUP] button.
3 Select the setup item
Move the Joystick.
Press the [ENTER] button.
Display
"LANGUAGE" page 20
"AUDIO" page 23
"DISPLAY" page 24
"PARENTAL" page 24
4 Exit Setup mode
Select "EXIT SETUP" and press the [ENTER] button.
Canceling the Setup mode
Press the [SETUP] or [RESUME] button.
Setting the Priority Language
1 Select "LANGUAGE" mode
See <Setup mode> to select "LANGUAGE".
– –
LANGUAGE SETTING –
AUDIO LANG
SUB–T LANG ORIGINAL
MENU LANG
SETUP LANG
MAIN PAGE
CHANGE AUDIO LANGUAGE
CHANGE AUDIO LANGUAGE
–
en
INPUT LANGUAGE CODE
LANGUAGE NUMBER:
LANGUAGE NUMBER:
PLEASE INPUT LANGUAGE CODE
PLEASE INPUT LANGUAGE CODE
1e144
2 Select the language item
Move the joystick to select an item.
Press the [ENTER] button.
"AUDIO LANG"
Set the audio language produced from the speakers.
Display Setting
Example "en" The display switches to the language
"ORIGINAL" The original language of a disc.
"SUB–T LANG"
Set the language of the subtitles displayed on the screen.
Display Setting
Example "en" The display switches to the language
"ORIGINAL" The original language of a disc.
"OFF" No subtitle is displayed
"MENU LANG"
Set the language used for the menus (title menu, etc.).
Display Setting
Example "en" The display switches to the language
"ORIGINAL" The original language of a disc.
number input screen.
number input screen.
number input screen.
n
— 20 —
Page 21

"SETUP LANG"
Set the setup, message or other display languages.
Display Setting
"ENGLISH" Set the English
日本語
"" Set the Japanese
3 Select the language (Language number input screen)
Press the number buttons.
See "List of language codes" to input a 4-digit code.
Press the [ENTER] button.
Returning to the Previous screen
Press the [RETURN] button.
— 21 —
Page 22

Preferences
List of language codes
Code Language Code Language
English
1027 aa Afar 1028 ab Abkhazian
1032 af Afrikaans 1039 am Amharic
1044 ar Arabic 1045 as Assamese
1051 ay Aymara 1052 az Azerbaijani
1053 ba Bashkir 1057 be Byelorussian
1059 bg Bulgarian 1060 bh Bihari
1061 bi Bislama 1066 bn Bengali, Bangla
1067 bo Tibetan 1070 br Breton
1079 ca Catalan 1093 co Corsican
1097 cs Czech 1103 cy Welsh
1105 da Danish 1109 de German
1130 dz Bhutani 1142 el Greek
1144 en English 1145 eo Esperanto
1149 es Spanish 1150 et Estonian
1151 eu Basque 1157 fa Persian
1165 fi Finnish 1166 fj Fiji
1171 fo Faeroese 1174 fr French
1181 fy Frisian 1183 ga Irish
1186 gd Scots Gaelic 1194 gl Galician
1196 gn Guarani 1203 gu Gujarati
1209 ha Hausa 1217 hi Hindi
1226 hr Croatian 1229 hu Hungarian
1233 hy Armenian 1235 ia Interlingua
1239 ie Interlingue 1245 ik Inupiak
1248 in Indonesian 1253 is Icelandic
1254 it Italian 1257 iw Hebrew
1261 ja Japanese 1269 ji Yiddish
1283 jw Javanese 1287 ka Georgian
1297 kk Kazakh 1298 kl Greenlandic
1299 km Cambodian 1300 kn Kannada
1301 ko Korean 1305 ks Kashmiri
1307 ku Kurdish 1311 ky Kirghiz
1313 la Latin 1326 ln Lingala
1327 lo Laothian 1332 lt Lithuanian
1334 lv Latvian, Lettish 1345 mg Malagasy
1347 mi Maori 1349 mk Macedonian
1350 ml Malayalam 1352 mn Mongolian
1353 mo Moldavian 1356 mr Marathi
1357 ms Malay 1358 mt Maltese
1363 my Burmese 1365 na Nauru
1369 ne Nepali 1376 nl Dutch
1379 no Norwegian 1393 oc Occitan
1403 om (Afan) Oromo 1408 or Oriya
1417 pa Punjabi 1428 pl Polish
1435 ps Pashto, Pushto 1436 pt Portuguese
1463 qu Quechua 1481 rm Rhaeto-Romance
1482 rn Kirundi 1483 ro Romanian
1489 ru Russian 1491 rw Kinyarwanda
1495 sa Sanskrit 1498 sd Sindhi
1501 sg Sangro 1502 sh Serbo-Croatian
1503 si Singhalese 1505 sk Slovak
1506 sl Slovenian 1507 sm Samoan
1508 sn Shona 1509 so Somali
1511 sq Albanian 1512 sr Serbian
1513 ss Siswati 1514 st Sesotho
1515 su Sundanese 1516 sv Swedish
1517 sw Swahili 1521 ta Tamil
1525 te Tegulu 1527 tg Tajik
1528 th Thai 1529 ti Tigrinya
1531 tk Turkmen 1532 tl Tagalog
1534 tn Setswana 1535 to Tonga
1538 tr Turkish 1539 ts Tsonga
1540 tt Tatar 1543 tw Twi
1557 uk Ukrainian 1564 ur Urdu
1572 uz Uzbek 1581 vi Vietnamese
— 22 —
Page 23

CHANGE AUDIO LANGUAGE
LANGUAGE NUMBER:
PLEASE INPUT LANGUAGE CODE
GO TO LANGUAGE SETTING
1587 vo Volapuk 1613 wo Wolof
1632 xh Xhosa 1665 yo Yoruba
1684 zh Chinese 1697 zu Zulu
Setting the Audio
1 Select "AUDIO" mode
See <Setup mode> to select "AUDIO".
– –
AUDIO SETTING –
D-RANGE
AUDIO-OUT ON
MAIN PAGE
DYNAMIC RANGE COMPRESSION
DYNAMIC RANGE COMPRESSION
2 Select the audio
Move the joystick to select an item.
Press the [ENTER] button.
"D-RANGE"
Display Setting
"OFF" For the regular sound
"ON" For more powerful sound at regular volumes
"AUDIO-OUT"
Setting digital output type.
Display Setting
"ANALOG" If connecting through a center unit or RCA
"OPT-RAW" If connecting through a Dolby Digital or DTS
–
OFF
cable,
decoder
"OPT-PCM" If connecting through digital audio equipment
without any Dolby Digital or DTS decoder,
If connecting with digital audio equipment without any Dolby Digital
or DTS decoder, select “OPT-PCM” for the setting. If the setting is
"OPT-RAW", it may cause a large sound or noise, which can result in
failure.
• "ANALOG": To output analog signal but no digital signal.
• "OPT-RAW": To output bit-stream signal if playing with Dolby Digital
or DTS. If playing with MPEG or linear PCM, you obtain the output
with PCM. No analog signal is output.
• "OPT-PCM": To output with PCM if playing with Dolby Digital,
MPEG or linear PCM. If playing with DTS, you obtain no output.
No analog signal is output.
— 23 —
Page 24

CHANGE AUDIO LANGUAGE
DYNAMIC RANGE COMPRESSION
SET TV ASPECT
LANGUAGE NUMBER:
PLEASE INPUT LANGUAGE CODE
GO TO LANGUAGE SETTING
CHANGE AUDIO LANGUAGE
DYNAMIC RANGE COMPRESSION
LANGUAGE NUMBER:
PLEASE INPUT LANGUAGE CODE
GO TO LANGUAGE SETTING
Preferences
Setting the Screen Mode
Use the procedure described below to set the output screen.
English
1 Select "DISPLAY" mode
See <Setup mode> to select "DISPLAY".
– –
DISPLAY SETTING –
TV ASPECT
MAIN PAGE
SET TV ASPECT
SET TV ASPECT
2 Select the "TV ASPECT"
Move the joystick to select an item.
Press the [ENTER] button.
Display Setting
"16:9 WIDE" Set the picture mode of the wide-screen monitor
"4:3 P&S" Wide-screen software with pan & scan
"4:3 LB" Wide-screen software with pan & scan
Setting the Rating Level (parental lock)
Use this function to restrict the viewing of movies to children of
appropriate age levels only.
1 Select "PARENTAL" mode
–
16:9 WIDE
4:3 P&S
4:3 LB
to “FULL”
specification is played in a panned & scanned
screen (with the left and right sides cut off).
specification is played in a letter box screen (with
black stripes on the top and bottom).
See <Setup mode> to select "PARENTAL".
– –
PARENTAL SETTING –
LEVEL
PASSWORD
MAIN PAGE
SET PARENTAL LEVEL
SET PARENTAL LEVEL
OFF
2 Setting the "LEVEL"(Parental Level)
Move the joystick to select an item.
Press the [ENTER] button.
Display Setting
"OFF" Canceling the parental lock.
"8" Plays any software (including adult-, general- and
children-oriented).
"7" – "2" Plays general- and children-oriented DVD software.
Restricts playback of adult-oriented DVD software.
"1" Plays children-oriented software.
Restricts playback of adult and general-oriented DVD
software.
Parental level varies with the discs.
3 Enter the password
Press the number buttons.
Enter your password ( 4-digit ). Input numbers are displayed “X”.
Press the [ENTER] button.
• If you enter the wrong number, press the [CLEAR] button. The
entered number is cleared.
• The password’s initial value is 0000.
•Pressing the Reset button erases the password.
To change the password
Select "PASSWORD" and press the [ENTER] button.
— 24 —
–
8
7
6
5
4
3
2
1
– –
VERIFY PASSWORD –
PASSWORD
PASSWORD
INPUT PASSWORD
INPUT PASSWORD
:
–
XXXX
Page 25

Display Setting
"CURRENT PWD" To enter your current password correctly
"NEW PWD" To enter a new password
"REENTER PWD" To enter the new password again for
confirmation
• Some discs may request that you change the rating level set in
the default settings during playback. In this case, the rating level
setup screen is displayed, if you do not input the correct password
either playback does not continue or a picture for a different rating
level is played.
•Write down the password on a piece of paper and store the piece
of paper somewhere in case you forget it.
• On undated DVDs, playback will not be restricted even if the rating
level is set.
• Once set, this rating level remains in memory until changed. To
enable the play of discs of higher rating levels or to cancel the
parental lock, the setting must be changed.
• Not all DVDs provide a Parental Lock feature. If you are unsure
about a DVD, play it first to confirm. Do not leave DVDs accessible
to young children for whom you deem them inappropriate.
Operations of center unit
Button Name and Functions of Center unit
[SRC]: Selecting the Source
[38]: Pause and Play
[DISC–]: Making a Reverse Disc Search (Album Search)
[DISC+]: Making a Forward Disc Search (Album Search)
[4]: Making a Reverse Track Search
[¢]: Making a Forward Track Search
[SCN]/[SCAN]: Track Scan
[REP]: Track Repeat (Track/Disc(Album) Repeat)
[D-REP]: Disc Repeat (Album Repeat)
[RDM]: Random Play
Some functions may be disabled depending on center units. Also
see operation manual of your center unit.
DVD: Title time
Disc number
VCD, CD-DA: Track time
MP3: File time
— 25 —
DVD: Title number
VCD, CD-DA: Track number
MP3: File number
Page 26

Operations of center unit
Playing Disc
Press the [SRC] button.
English
Select the "CD-CH"/"DISC"/"AUX" display.
You cannot view video pictures whilst the vehicle is moving. To
enjoy video pictures, find a safe place to park and engage the
parking brake. (Video output for front seats)
• It takes time for the unit to check each medium to see if it
contains any MP3 file before it starts playing the medium.
• File No. may not be shown depending on center units to be
connected if the number is 100 or 200.
Select the source mode of this unit on the center unit to operate
this unit linked with the center unit.
• Before selecting a source of this unit on the center unit
– Turn on/off the power on the remote controller.
• After selecting a source of this unit on the center unit
– Select the source mode of this unit to turn it on.
– Select the other modes to turn off this unit.
– Cannot turn off this unit on the remote controller.
Pausing and Restarting Disc Play
Press the [38] button to make the disc pause.
Press the [38] button again to start play again.
• The following operation may not be available with certain discs.
• For MP3, Refer to <Folder Select Mode>. (page 26)
(DVD, VCD, CD-DA)
Hold down on the [4] button.
Release your finger to play the disc at that point.
Search is carried out at the 6x speed.
Disc Search
Selecting the disc you want to hear.
Press the [DISC–] or [DISC+] button.
Track/Chapter Search
Press the [4] or [¢] button.
Disc Search
DVD Searching for a chapter
VCD[PBC ON] Searching for a select
VCD[PBC OFF], CD-DA Searching for a track
MP3 Searching for a file
Folder Select Mode
Selecting the folder you want to hear.
(MP3)
Fast Forwarding and Reversing
Fast Forwarding
Hold down on the [¢] button.
Release your finger to play the disc at that point.
Reversing
(DVD, VCD, CD-DA)
1 Stopping play and Folder Select mode
Press the [38] button.
File No. display changes to Folder No. display during the Folder
select mode.
2 Selecting the folder
Press the [DISC–] or [DISC+] button.
3 Decide the folder to play
— 26 —
Page 27

Press the [38] button.
The Folder Select mode releases, and the MP3 in the folder
being displayed is played.
Track Scan
Playing the first part of each song on the disc you are listening
to and searching for the song you want to listen to.
(VCD: When the PBC function is set to [OFF]. page 14)
(VCD, CD-DA)
Direct Disc Search (Function of remote)
Doing Disc Search by entering the disc number.
1 Enter the disc number
Press the number buttons on the remote.
Input "0" to select disc 10.
2 Do Disc Search
Press the [DISC+] or [DISC–] button.
Canceling Direct Disc Search
Press the [38] button.
Direct Track/Chapter Search (Function of remote)
Doing Track/Chapter Search by entering the track/chapter
number.
1 Enter the track/Chapter number
Press the number buttons on the remote.
Direct Track/Chapter Search is enabled for up to 99.
2 Do Track/Chapter Search
Press the [4] or [¢] button.
Canceling Direct Track/Chapter Search
Press the [38] button.
1 Start Track Scan
Press the [SCN] button.
Scan starts from the first track.
2 Release it when the song you want to listen to is played
Press the [SCN] or [38] button.
— 27 —
Page 28

Operations of center unit
Repeat Play
(VCD: When the PBC function is set to [OFF]. page 14)
English
Press the [REP] or [D-REP] button.
Each time the button is pressed the Repeat Play switches as
shown below.
Track Repeat ON:
Disc Repeat play
DVD Chapter Repeat
VCD[PBC OFF] Track Repeat
CD-DA Track Repeat
MP3 File Repeat
Disc Repeat ON:
Disc Repeat play
DVD Title Repeat
MP3 Folder Repeat
Repeat OFF:
Disc Repeat play
DVD Repeat Off
VCD[PBC OFF] Repeat Off
CD-DA Repeat Off
MP3 Repeat Off
song.
Magazine Random Play
Magazine Random Play is disabled in this unit.
Disc Naming (DNPS)
The disc name preset function can register names of up to 29
discs using up to 12 characters for each disc name.
The availability of this function as well as the number of discs
which can be registered using this function and the number of
usable characters may be variable depending on the control unit
in use.
DVD and MP3 recorded media allows you to register a single media
name only.
Random Play
Play all the songs on the disc or MP3 folder in random order.
(VCD: When the PBC function is set to [OFF]. page 14)
Press the [RDM] button.
Each time the button is pressed Random Play turns ON or OFF.
• When the [¢] button is pressed, the next song select starts.
• When the [4] button is pressed, the beginning of the current
(VCD, CD-DA, MP3)
— 28 —
Page 29

Accessories Installation Procedure
1
6
N
O
.
2
7
3
8
4
9
5
1
0
N
O
.
External view
......... Number of items
1
2
3
4
5
6
7
.........1
.........1
.........4
.........6
.........1
.........1
.........1
External view
......... Number of items
8
.........1
9
.........4
0
.........1
!
.........1
@
.........1
#
.........1
$
.........1
%
.........1
1. To prevent short circuits, remove the key from the ignition and
disconnect the - terminal of the battery.
2. Make the proper input and output wire connections for each unit.
3. Connect the wire on the wiring harness.
4. Install the unit in your car.
5. Reconnect the - terminal of the battery.
2WARNING
If you connect the ignition wire (red) and the battery wire (yellow)
to the car chassis (ground), you may cause a short circuit, that in
turn may start a fire. Always connect those wires to the power
source running through the fuse box.
2CAUTION
• If your car is not prepared for this special connection-system,
consult your Kenwood dealer.
• Make sure that all wire connections are securely made by
inserting jacks until they lock completely.
• If your vehicle's ignition does not have an ACC position, or if the
ignition wire is connected to a power source with constant
voltage such as a battery wire, the power will not be linked with
the ignition (i.e., it will not turn on and off along with the
ignition). If you want to link the unit's power with the ignition,
connect the ignition wire to a power source that can be turned
on and off with the ignition key.
• If the fuse blows, first make sure that the wires have not caused
a short circuit, then replace the old fuse with one with the same
rating.
• Insulate unconnected wires with vinyl tape or other similar
material. To prevent short circuits, also do not remove the caps
on the ends of the unconnected wires or the terminals.
• After the unit is installed, check whether the brake lamps,
indicators, wipers, etc. on the car are working properly.
The use of any accessories except for those provided might result in
damage to the unit. Make sure only to use the accessories shipped with
the unit, as shown above.
— 29 —
Page 30

Connecting Wires to Terminals
■ Power wire connection
English
2 CAUTION
• Be sure that the ground wire is connected to the chassis of a vehicle.
• Connect to another component after having connected the power/ground wire.
• If connecting to a center unit, you must connect the power/ground wire of this unit.
Caution on power wire connection
Ignition wire (Red) 7
Fuse (2A) 13
ACC
ACC 44
Ignition key
switch 41
Battery wire (Yellow) 6
Fuse (5A) 13
Ground wire (Black) - (To car chassis) 48
H
45°
V
H
45°
V
Picture format selector
switch
Select the NTSC/PAL
position for your monitor.
NTSCPA L
Please follow the procedure below to switch the NTSC/PAL switch.
1. Remove the magazine.
2. Turn OFF the power.
3. Set the switch to "NTSC" or "PAL".
4. Turn ON the power.
5. Insert the magazine.
If the magazine is inserted before the power is turned ON, the picture may not
be displayed correctly until the disc is played.
— 30 —
PARKING
BATT
Car fuse box 45
Connection wire (Green)
(Accessory5)
To parking brake detection switch
harness of car
2 CAUTION
For the sake of safety, be sure to
connect the parking sensor.
Light detector of remote
controller (Accessory8)
–
Battery
43
Car fuse
box
(Main fuse)
42
+
Page 31

■ To connect this unit to a monitor unit for use solely
Video output for rear seats.
(Yellow)
VIDEO
OUTPUT
REAR
VIDEO
OUTPUT
H
45°
V
H
45°
V
FRONT
Video output for front
seats. (Yellow)
Audio output
(Left: White,
Right: Red)
■ When your car audio is Kenwood center unit
Video output for rear seats.
(Yellow)
VIDEO
OUTPUT
REAR
VIDEO
OUTPUT
H
45°
V
H
45°
V
FRONT
Video output for front
seats. (Yellow)
Audio output
(Left: White,
Right: Red)
(Accessory6)
To monitor unit
for rear seats.
Monitor unit
for front seats.
(Accessory6)
Monitor unit
When the source mode of this
unit is not selected in the
center unit, you can use this
unit solely.
Center unit
TO
DVD CH
Changer control cable
(Accessory7)
— 31 —
Page 32

Connecting Wires to Terminals
■ When your car audio has RCA input
Video output for rear seats.
English
H
45°
V
■ This is used to connect to a digital audio device
H
45°
V
H
45°
V
H
45°
V
(Yellow)
Video output for front seats.
(Yellow)
Video output for rear seats.
(Yellow)
Video output for front seats.
(Yellow)
VIDEO
OUTPUT
REAR
VIDEO
OUTPUT
FRONT
Audio output
(Left: White,
Right: Red)
VIDEO
OUTPUT
REAR
VIDEO
OUTPUT
FRONT
No connect.
To monitor unit
for rear seats.
(Accessory6)
To monitor unit
for rear seats.
(Accessory6)
Monitor unit
for front seats.
Car audio with
RCA input.
Monitor unit
for front seats.
Optical digital output
Optical cable
(commercially available)
Set “AUDIO OUT” depending on digital equipment to be connected. (See page 23)
— 32 —
Digital amplifier/
DTS decoder etc.
Page 33

Installation
■ Removing the transportation screws
Remove all 3 transportation
screws for protecting the
internal mechanism before
you start to install the unit.
3
3
3
Transportation screws
■ Angle adjustment switches
Horizontal installation
H
45°
V
H
45°
V
Vertical installation
V
45°
H
V
45°
H
H
45°
V
H
45°
V
V
45°
H
V
45°
H
After removing the transport
screw, retain it carefully and
attach it again before
transporting the unit again.
Cover the holes indicated by
"3" with the dustproof seals
!.
The angle adjustment
switches on the both side
of the unit are to be set
according to the angle of
installation of the DVD/CD
auto changer. Set both of
the 4 switches to the same
position. If the switches
are not set properly, sound
skip or other malfunction
may occur.
■ Horizontal installation
H
45°
3
3
H
45°
V
Accessory 1 (L)
V
H
45°
V
“H”
H
3
45°
V
3
Ø3.6
Set "H" for all the four angle
adjustment parts on both sides.
Cover the holes indicated by
"3"/" " with the dustproof
seals !, @.
Use the holes marked "●" to
install the unit.
Accessory 3
(Ø5 x 12)
Accessory 4
(M5 x 8)
Accessory 1 (R)
At a 45° angle
H
V
45°
H
V
45°
45°
H
V
45°
H
V
— 33 —— 33 —
Page 34

Installation
■ Vertical installation
English
V
45°
H
3
V
45°
H
“V”
■ At a 45° angle installation
Set "V" for all the four
V
45°
H
3
V
45°
H
angle adjustment parts on
both sides.
Cover the holes indicated
by "3"/" " with the
dustproof seals !, @.
Use the holes marked "●"
H
33
“45°”
45°
H
H
V
45°
V
45°
V
45°
H
V
to install the unit.
Accessory 3
(Ø5 x 12)
Accessory 4
(M5 x 8)
Set "45°" for all the four
angle adjustment parts on
both sides.
Cover the holes indicated
by "3"/" " with the
dustproof seals !, @.
Use the holes marked "●"
to install the unit.
Accessory 3
(Ø5 x 12)
Accessory 4
(M5 x 8)
Accessory 2 (L)
<When your car audio is
Kenwood center unit>
Ø3.6
Changer control cable
(Accessory7)
Accessory 2 (R)
Accessory 2 (L)
— 34 —— 34 —
Ø3.6
Accessory 2 (R)
Page 35

■ In case of hanging in the trunk
H
45°
3
3
H
45°
V
V
H
45°
V
“H”
3
H
45°
V
3
Set "H" for all the four angle
adjustment parts on both sides.
Cover the holes indicated by
"3"/" " with the dustproof
seals !, @.
Use the holes marked "●" to
install the unit.
■ Mounting the remote controller
Light detector of remote
controller (Accessory8)
Clear the surface to be
affixed with
accessories0.
Accessory 9
Accessory 1 (L)
Accessory 4
(M5 x 8)
Ø3.6
Accessory 3
(Ø5 x 12)
Accessory 1 (R)
— 35 —
Accessory #
Accessory $
(M3 x 8 mm)
Accessory $
Page 36

Troubleshooting Guide
What might seem to be a malfunction in your unit may
just be the result of slight misoperation or miswiring.
Before calling service, first check the following table
for possible problems.
English
? The power does not turn ON.01
✔ The fuse has blown.
☞ After checking for short circuits in the wires, replace the fuse with
one with the same rating.
✔ No ACC position on vehicle ignition.02
☞ Connect the same wire to the ignition as the battery wire.
✔ The remote controller does not work.
☞ See <Connecting Wires to Terminals> (page 30) to connect the
light detector of the remote controller correctly.
? The power cannot be turned off
✔ You select the source mode of this machine, which is connected to a
center unit.
☞ The power cannot be turned off because the center unit is under
operation. If changing a mode other than the source mode of this
machine on the center unit, you can turn off the power.
? The power is automatically turned off.
✔ You switched the source mode while connecting to a center unit.
☞ If selecting the source mode of this machine on the center unit
and then switching to a mode other than this machine, you can
turn off the power.
? No video image appears.
✔ The unit is not connected to the parking brake detection switch.
☞ Make proper connections according to <Connecting Wires to
Terminals>.
✔ The parking brake is not engaged.
☞ For safety reasons no video images are displayed while the
vehicle is moving. Engaging the parking brake will cause images
to be displayed.
✔ The setting of the NTSC/PAL switch is incorrect.
☞ Set the NTSC/PAL switch correctly.
? Nothing happens when the buttons are pressed.04
✔ The " " symbol appears in the screen.
☞ You cannot carry out any operation disabled by disc.
✔ The batteries of the remote controller are weak.
☞ Replace both two batteries of the remote controller with new
ones.
✔ The remote controller does not work.
☞ See <Connecting Wires to Terminals> to connect the light
detector of the remote controller correctly.
✔ A center unit not applicable is connected.
☞ See <IMPORTANT INFORMATION> (page 4).
? The memory is erased when the ignition is turned OFF.10
✔ The battery wire has not been connected to the proper terminal.
☞ Connect the wire correctly, referring to the section on
<Connecting Wires to Terminals>.
✔ The ignition and battery wire are incorrectly connected.11
☞ Connect the wire correctly, referring to the section on
<Connecting Wires to Terminals>.
? No sound can be heard, or the volume is low.
✔ The audio setting of audio output is not “ANALOG”.
☞ If connecting through a center unit or RCA cable, select
“ANALOG” for this setting.
✔ The input/output wires or wiring harness are connected incorrectly.22
☞ Reconnect the input/output wires or the wiring harness correctly.
See the section on <Connecting Wires to Terminals>.
? The specified disc does not play, but another one plays instead.52
✔ The specified DVD/CD is quite dirty.
☞ Clean the Disc.
✔ The disc is upside down.
☞ Set the disc with the label face downward.
✔ The disc is severely scratched.55
☞ Tr y another disc instead.
? The specified track will not play.58-a
✔ Random play has been selected.
☞ Tu rn off random play.
? Cannot play CD-R or CD-RW.60
✔ Finalization processing is not being conducted for CD-R/CD-RW.
☞ Conduct finalization processing with CD recorder.
? A VCD cannot be played using menus.
✔ The VCD disc being played is not compatible with P.B.C.
☞ Menu playback is available only with VCD discs recorded with
— 36 —
P.B.C.
Page 37

? The subtitle is not displayed.
✔ The DVD disc being played does not contain the recording of
subtitles.
☞ The subtitle cannot be displayed when the DVD disc being played
does not contain the recording of subtitles.
? The voice (or subtitle) language cannot be changed.
✔ The DVD disc being played does not contain the recording of more
than one audio (or subtitle) language.
☞ The voice (or subtitle) language cannot be changed when the DVD
disc being played does not contain the recording of more than one
voice (or subtitle) language.
? The viewing angle cannot be changed.
✔ The DVD disc being played does not contain the recording of more
than one angle.
☞ The viewing angle cannot be changed when the DVD disc being
played does not contain the recording of more than one angle.
✔ You are attempting to switch the angle in a DVD section where more
than one angle is not recorded.
☞ More than one viewing angle may be recorded only in limited
sections in a disc.
? Playback will not start even after a title is selected.
✔ A viewing restriction (RATING) has been set for the disc.
☞ Check the viewing restriction level (RATING) setting.
? The voice or subtitle language selected in the initial setting is not
played.
✔ The DVD disc being played does not contain the recording of the
selected voice or subtitle language.
☞ Use a DVD disc containing the recording of the selected voice or
subtitle language.
MP3 source
? Cannot play an MP3.67
✔ Not conforming to ISO 9660 Level 1/2, and Joliet.
☞ Use a medium conforming to ISO 9660 Level 1/2, and Joliet.
✔ The MP3 has no or invalid track name extension.68
☞ Add the ".MP3" extension to the MP3 track name.
✔ The media is scratched or dirty.69
☞ Clean the media, referring to the section on <Disc cleaning>
(page 6).
? Noise or no sound generated when an MP3 is played.70
✔ The track has the MP3 track name extension while it is not an MP3.
☞ Do not use the ".MP3" extension in non-MP3.
? Takes time before the unit starts playing MP3.71
✔ The medium contains many albums, tracks, and hierarchical levels.
☞ The unit checks all tracks on the loaded medium first. If the
medium has many tracks recorded, it may take a long time for the
unit before it starts playing MP3.
? Fails to play MP3 in the intended order.72
✔ The MP3 tracks were not written by the CD writer in the order in
which you wanted them to be played.
☞ Depending on the CD writer, you may be able to set the order in
which MP3 tracks are to be played by writing them onto a
medium with their track names beginning with play sequence
numbers such as "01" to "99".
? The sound skips when an MP3 is being played.73-1
✔ The media is scratched or dirty.
☞ Clean the media, referring to the section on <Disc cleaning>
(page 6).
✔ The recording condition is bad.73-2
☞ Record the media again or use another media.
? Can’t enter Folder Select mode.76
✔ There’s no folder recorded in the MP3 media.
☞ Use a media with levels.
? The songs in the selected folder aren’t played in Folder Select
mode.77
✔ There are no MP3 in the selected folder.
☞ Make sure there’s recorded content in the MP3 media.
? The MP3 track/disc search takes time.78
✔ Many tracks are recorded on the media.
☞ When the media directory is complex, the track/disc search can
take time.
— 37 —
Page 38

Troubleshooting Guide
The messages shown below display your systems
condition.
E-01:EJECT: No disc magazine has been loaded. The disc
English
NO DISC: No disc has been loaded in the disc magazine.
magazine is not completely loaded.E01
➪
Load the disc magazine properly.
➪
Load a disc into the disc magazine.
E02
E-04: The Disc is quite dirty. The Disc is upside-down. The
Disc is scratched a lot.
➪ Clean the Disc and load it correctly.
E-15: • The disc cannot be played because of its
unacceptable format.
• A disc that cannot be read is set.
➪ Use another disc.
A file with unacceptable format is included.
E-99: Something is wrong with the disc magazine. Or the
unit is malfunctioning for some reason.
➪
Check the disc magazine. And then press the reset
E99
button on the unit. If the "E-99" code does not
disappear, consult your nearest service center.
NO NAME: Attempted to display DNPS during the CD play having
no disc names preset.
E51
NO ACCESS: No playback has been performed after the disc
was set into the disc changer.
WRONG REGION!!: The DVD software encoded for other region
code.
— 38 —
Page 39

1
2
4
1
5
4
5
2
1
2
6
3
Region codes in the world
The DVD players are given a region code according to the country or area it is marketed, as shown in the following map.
— 39 —
Page 40

Specifications
Specifications subject to change without notice.
Player section
D/A conversion ............................................................8 Level ∆∑
English
Wow and flutter ......................................Below measurable limit
Frequency response (Sampling frequency; 96 kHz)
....................................................................20 Hz - 44 kHz
Total harmonic distortion ......................................0.01 % (1 kHz)
Signal to noise ratio ..........................................................110 dB
Dynamic range ....................................................................90 dB
Channel separation..............................................................90 dB
Disc format ............DVD-VIDEO / VIDEO CD / CD-DA / CD-ROM
MP3 decoder...........Compliant with MPEG-1.0/2.0 Audio Layer-3
General
Audio output level / Load ...........................................1.2 V/10 kΩ
Video output level ......................................................1 Vp-p/75 Ω
Operating voltage (11 – 16V allowable) ..............................14.4 V
Current consumption...............................................................3 A
Dimensions (W x H x D) ................................250 × 80 × 200 mm
Weight...................................................................6.2 lbs (2.8 kg)
9-13/16 × 3-1/8 × 7-7/8 in.
— 40 —
 Loading...