

Page 1

KDC-MP8017
COMPACT
DIGITAL AUDIO
Take the time to read through this instruction
manual.
Familiarity with installation and operation procedures will help you obtain the best performance from your new CD-receiver.
For your records
Record the serial number, found on the back of
the unit, in the spaces designated on the warranty
card, and in the space provided below. Refer to
the model and serial numbers whenever you call
upon your KENWOOD dealer for information or
service on the product.
Model KDC-MP8017
Serial number
CD-RECEIVER
INSTRUCTION MANUAL
AMPLI-TUNER-LECTEUR DE CD
MODE D’EMPLOI
REPRODUCTOR DE DISCOS COMPACTOS RECEPTOR DE FM/AM
MANUAL DE INSTRUCCIONES
© B64-1879-00 (KW)
Page 2

Contents
Safety precautions
Warning.........................................................................................3
English
Safety precautions ........................................................................4
Handling Compact discs ...............................................................6
Notes on playing MP3 files...........................................................8
General features
Power..........................................................................................10
Switching Modes ........................................................................10
Volume........................................................................................11
Attenuator ...................................................................................11
Loudness ....................................................................................11
System Q ....................................................................................12
Audio Control Setting..................................................................12
Speaker Setting...........................................................................13
Clock display ...............................................................................13
Theft Deterrent Faceplate...........................................................14
Tuner features
Tuning..........................................................................................16
Station Preset Memory...............................................................16
Auto Memory Entry ....................................................................16
Station Name Preset (SNPS) ......................................................17
Switching Display for Tuner ........................................................17
CD/External disc control features
Playing CDs.................................................................................18
Playing Other Disc mode ............................................................19
Switching Display for Discs ........................................................19
Fast Forwarding and Reversing Disc Play ..................................20
Track Search................................................................................20
Disc Search .................................................................................20
Track / Disc Repeat .....................................................................20
Track Scan ...................................................................................21
Random Play ...............................................................................21
Magazine Random Play...............................................................21
Text / Title Scroll..........................................................................22
Presetting Disc Names (DNPS) ..................................................22
MP3 player features
Playing MP3 Files........................................................................24
File Search ..................................................................................24
Folder Search ..............................................................................25
Fast Forwarding and Reversing MP3 Play..................................25
Folder Select ...............................................................................26
File / Folder Repeat.....................................................................26
Random Play ...............................................................................27
Switching Display for MP3 .........................................................27
Name Scroll for MP3 ..................................................................27
Menu settings
Menu System .............................................................................28
Security Code..............................................................................28
Touch Sensor Tone......................................................................29
Manual Time Adjustment............................................................30
Selectable Illumination ................................................................30
Switching Graphic Display ..........................................................30
Contrast Adjustment...................................................................30
Dimmer .......................................................................................30
Clean Reception System Circuit (CRSC) ....................................31
Reading the MP3 ID3 tag ...........................................................31
Switching the MP3 title information display...............................31
Text Scroll ..................................................................................31
Installation
Accessories.................................................................................32
Installation Procedure .................................................................32
Connecting Wires to Terminals...................................................33
Installation...................................................................................34
Troubleshooting Guide........................................37
Specifications .....................................................41
— 2 —
Page 3
2Warning
2CAUTION
Use of controls or adjustments or
performance of procedures other than those
specified herein may result in hazardous
radiation exposure.
In compliance with Federal Regulations,
following are reproductions of labels on, or
inside the product relating to laser product
safety.
KENWOOD CORPORATION
2967-3, ISHIKAWA-CHO,
HACHIOJI-SHI
TOKYO, JAPAN
KENWOOD CORP. CERTIFIES THIS EQUIPMENT
CONFORMS TO DHHS REGULATIONS N0.21 CFR
1040. 10, CHAPTER 1, SUBCHAPTER J.
Location : Bottom Panel
FCC WARNING
This equipment may generate or use radio
frequency energy. Changes or modifications
to this equipment may cause harmful
interference unless the modifications are
expressly approved in the instruction manual.
The user could lose the authority to operate
this equipment if an unauthorized change or
modification is made.
NOTE
This equipment has been tested and found
to comply with the limits for a Class B digital
device, pursuant to Part 15 of the FCC Rules.
These limits are designed to provide
reasonable protection against harmful
interference in a residential installation. This
equipment may cause harmful interference
to radio communications, if it is not installed
and used in accordance with the instructions.
However, there is no guarantee that
interference will not occur in a particular
installation. If this equipment does cause
harmful interference to radio or television
reception, which can be determined by
turning the equipment off and on, the user is
encouraged to try to correct the interference
by one or more of the following measures:
• Reorient or relocate the receiving antenna.
• Increase the separation between the
equipment and receiver.
• Connect the equipment into an outlet on a
circuit different from that to which the
receiver is connected.
• Consult the dealer or an experienced
radio/TV technician for help.
NOTE
This Class B digital apparatus complies with
Canadian ICES-003.
— 3 —
Page 4

Safety precautions
2WARNING
To prevent injury or fire, take the
English
following precautions:
• Insert the unit all the way in until it is fully
locked in place. Otherwise it may fall out of
place when jolted.
• When extending the ignition, battery, or
ground wires, make sure to use
automotive-grade wires or other wires with
a 0.75mm2 (AWG18) or more to prevent
wire deterioration and damage to the wire
coating.
• To prevent a short circuit, never put or
leave any metallic objects (such as coins or
metal tools) inside the unit.
• If the unit starts to emit smoke or strange
smells, turn off the power immediately and
consult your Kenwood dealer.
• Make sure not to get your fingers caught
between the faceplate and the unit.
• Be careful not to drop the unit or subject it
to strong shock.
The unit may break or crack because it
contains glass parts.
• Do not touch the liquid crystal fluid if the
LCD is damaged or broken due to shock.
The liquid crystal fluid may be dangerous to
your health or even fatal.
If the liquid crystal fluid from the LCD
contacts your body or clothing, wash it off
with soap immediately.
2CAUTION
To prevent damage to the machine,
take the following precautions:
• Make sure to ground the unit to a negative
12V DC power supply.
• Do not open the top or bottom covers of
the unit.
• Do not install the unit in a spot exposed to
direct sunlight or excessive heat or
humidity. Also avoid places with too much
dust or the possibility of water splashing.
• Do not subject the faceplate to excessive
shock, as it is a piece of precision
equipment.
• When replacing a fuse, only use a new one
with the prescribed rating. Using a fuse
with the wrong rating may cause your unit
to malfunction.
• To prevent a short circuit when replacing a
fuse, first disconnect the wiring harness.
• Do not place any object between the
faceplate and the unit.
• Do not use your own screws. Use only the
screws provided. If you use the wrong
screws, you could damage the unit.
• Do not apply excessive force to the moving
faceplate. Doing so will cause damage or
malfunction.
• Do not apply excessive force to the open
faceplate or place objects on it. Doing so
will cause damage or breakdown.
IMPORTANT INFORMATION
About the disc changer to be
connected:
To connect a disc changer having the "O-N"
switch to this unit, set the "O-N" switch to
"N".
When you connect a model with no "O-N"
switch, the converter cord CA-DS100
available as an option may be required. For
details, consult your Kenwood dealer.
If a model with no "O-N" switch is
connected, some unavailable functions and
information that cannot be displayed are
generated, such as the DNPS, DNPP,
Magazine random play, and CD Text display.
Note that none of the KDC-C100, KDC-C302,
C205, C705, and non-Kenwood CD changers
can be connected.
2CAUTION
You can damage both your unit and
the CD changer if you connect them
incorrectly.
Do Not Load 3-in. CDs in the CD slot
If you try to load a 3 in. CD with its adapter
into the unit, the adapter might separate
from the CD and damage the unit.
— 4 —
Page 5
NOTE
• If you experience problems during
installation, consult your Kenwood dealer.
• Press the reset button if the disc auto
changer is first controlled and operates
incorrectly. The original operating condition
will return.
Reset button
• We recommend the use of the Security
Code function (see p. 28) to prevent theft.
• Characters in the LCD may become difficult
to read in temperatures below 41 ˚F (5 ˚C).
• The illustrations of the display and the
panel appearing in this manual are
examples used to explain more clearly how
the controls are used. Therefore, what
appears on the display in the illustrations
may differ from what appears on the
display on the actual equipment, and some
of the illustrations on the display may
represent something impossible in actual
operation.
• The functions that can be used and the
information that can be displayed will differ
depending on the external disc players
being connected.
Cleaning the Faceplate Terminals
If the terminals on the unit or faceplate get
dirty, wipe them with a dry, soft cloth.
Cleaning the Unit
If the faceplate of this unit is stained, wipe it
with a dry soft cloth such as a silicon cloth.
If the faceplate is stained badly, wipe the
stain off with a cloth moistened with neutral
cleaner, then wipe neutral detergent off.
2CAUTION
Applying spray cleaner directly to the unit
may affect its mechanical parts. Wiping the
faceplate with a hard cloth or using a volatile
liquid such as thinner or alcohol may scratch
the surface or erases characters.
Cleaning the CD Slot
As dust tends to accumulate in the CD slot,
clean it every once in a while. Your CDs can
get scratched if you put them in a dusty CD
slot.
Lens Fogging
Right after you turn on the car heater in cold
weather, dew or condensation may form on
the lens in the CD player of the unit. Called
lens fogging, CDs may be impossible to play.
In such a situation, remove the disc and wait
for the condensation to evaporate. If the unit
still does not operate normally after a while,
consult your Kenwood dealer.
— 5 —
Page 6
Handling Compact discs
Playing a CD that is dirty, scratched
or warped can cause the sound to
skip and the unit to operate
English
incorrectly, resulting in worsened
sound quality. Take the following
precautions to prevent your CDs from
getting scratched or damaged.
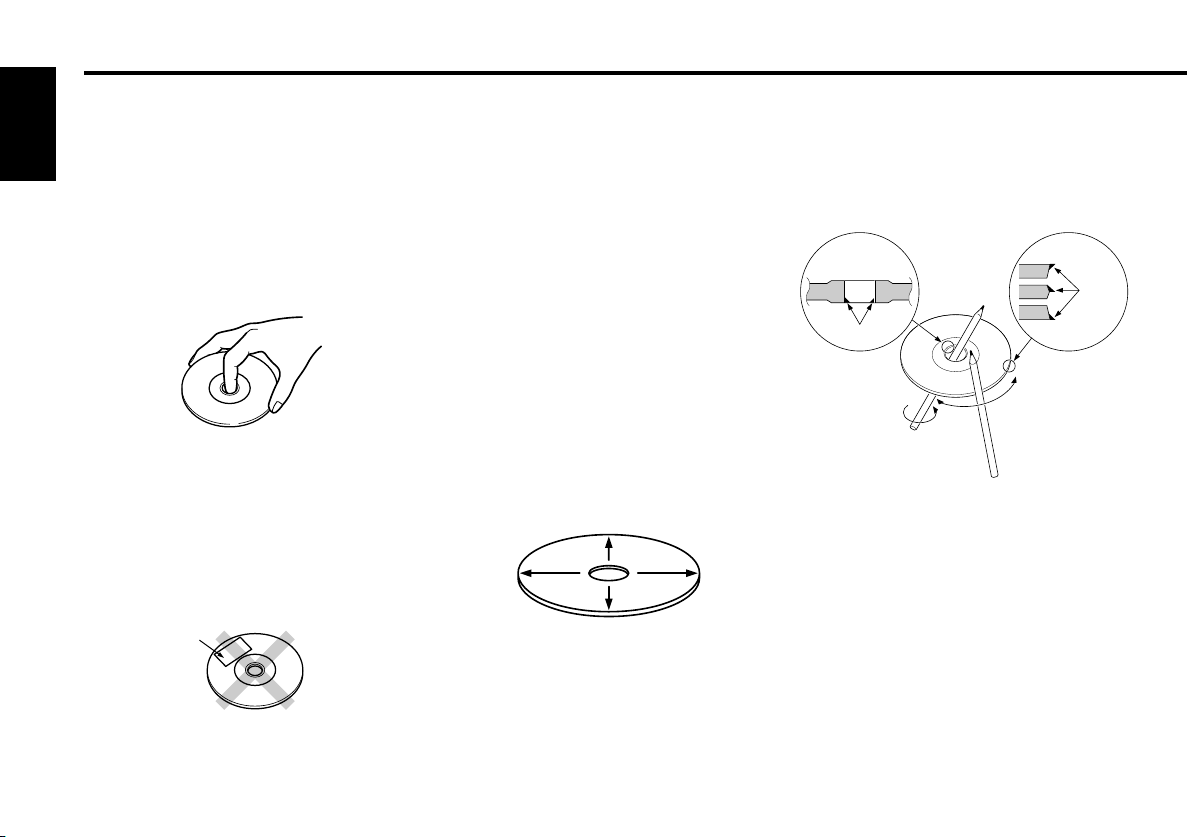
Handling CDs
• Do not touch the recorded side of the CD
(the side opposite the label) when holding
it.
• The reflective film on a CD-R or a CD-RW is
more fragile than that on an ordinary music
CD, and may peel off if scratched. Fingerprints
on a CD-R or CD-RW are also more likely to
cause skipping when the disc is played. For
these reasons, handle the disc very carefully.
Detailed handling instructions will appear on
the CD-R or CD-RW package: read this
information carefully before using the disc.
• Do not stick tape on either side of the CD.
Tape
Storing CDs
• Do not store CDs in areas exposed to
direct sunlight (such as a car seat or the
dashboard) or other hot places. A CD-R or
CD-RW is more susceptible than a music
CD to damage from high temperatures and
humidity, and in some cases, may become
unusable if left in the car for long periods
of time.
• Remove CDs from the unit when not
listening to them for a while, and put them
back in their cases. Do not pile up CDs
that are removed from their cases or prop
them against something.
Cleaning CDs
If a CD has gotten dirty, wipe it off gently
using a commercially available cleaning cloth
or a soft cotton cloth, starting from the
center of the disc and moving outward. Do
not clean CDs with conventional record
cleaners, anti-static formulas, or chemicals
such as paint thinner or benzene.
Checking New CDs for Burrs
When playing a new CD for the first time,
check that there are not any burrs stuck to
the perimeter of the disc or in the central
hole. CDs with burrs stuck on them may not
load properly or may skip while playing.
Remove burrs using a ballpoint pen or a
similar utensil.
Burrs
Burrs
— 6 —
Page 7
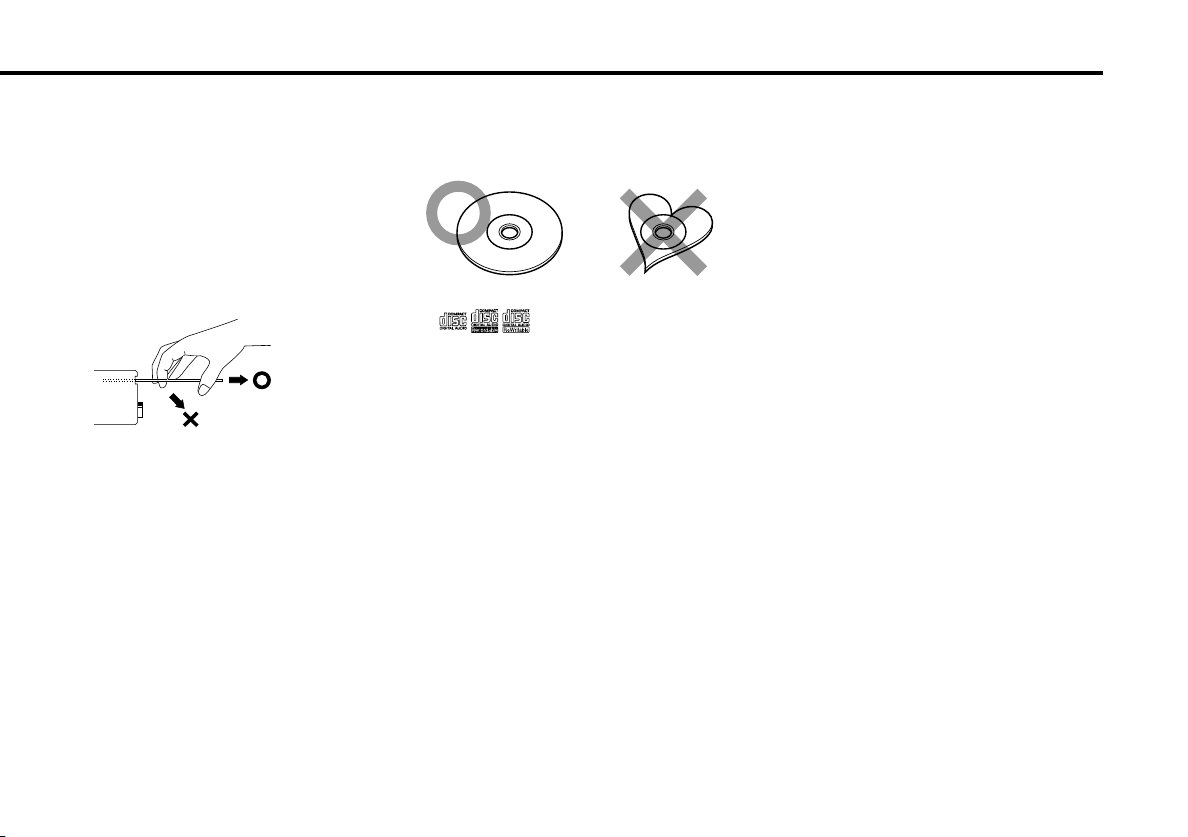
Do Not Load CD Accessories
Do not use commercially available CD
accessories that can be loaded into the CD
slot, such as stabilizers, protective sheets,
or CD cleaning discs, since they can cause
the unit to malfunction.
Removing the CD
Only remove the CD from the machine in a
horizontal direction, holding it flat. You may
damage the surface of the CD if you try
pulling it down as it ejects.
Do Not Use Special Shape CDs
• Be sure to use round shape CDs only for
this unit and do not use any special shape
CDs. Use of special shape CDs may cause
the unit to malfunction.
• Be sure to use CDs with disc mark
only for this unit.
•CD-Rs and CD-RWs which have not
undergone finalization processing cannot
be played. (For more information on
finalization processing, refer to the manual
for your CD-R/CD-RW writing software or
CD-R/CD-RW recorder.) Additionally,
depending on the recording status, it may
prove impossible to play certain CDs
recorded on CD-R or CD-RW.
Do Not Use CDs with Sticker on the
Labeled Side
Do not use the CD with the label sticker
stuck on it.
Using such a CD may cause the CD to be
deformed and the sticker to peel off,
resulting in malfunction of the unit.
— 7 —
Page 8
Notes on playing MP3 files
This unit can play MP3 files.
Note, however, that the MP3 file recording media and formats
acceptable are limited.
When writing MP3 files, pay attention to the following
English
restrictions.
Acceptable media
The MP3 file recording media acceptable to this unit are CD-ROM,
CD-R, and CD-RW.
Acceptable medium formats
The medium formats acceptable to this unit are ISO 9660 Level 1
and Level 2 excluding the extended formats. When reading an MP3
file written in a format other than ISO 9660 Level 1 or Level 2, the
unit may fail to play the file normally or display the file or folder name
correctly.
The major specifications of ISO 9660 Level 1 and Level 2 are as
follows:
• Maximum number of directory levels: 8
• Maximum number of files and folders per directory level:
• Characters available to file and folder names:
• Maximum number of characters in file names :
Level 1: 12 (including a separator "." and a 3-character extension)
Level 2: 31 (including a separator "." and a 3-character extension)
Settings for your MP3 encoder and CD writer
When you use your MP3 encoder to
compress audio data to an MP3 file, set
the transfer bit rate of the encoder to
fixed 128 kbps.
When you use your CD writer to record
MP3 files up to the maximum disc
capacity, disable additional writing. For
recording on an empty disk up to the
maximum capacity at once, check Disc
at Once.
Entering ID3 tag
Displayable ID3 tag is ID3 version 1 and
253 (files and folders in total)
A - Z, 0 - 9, _(underscore)
1.1; the character code is ASCII (see A List of Codes).
Entering file and folder names
When entering file and folder names, use the alphanumeric
characters described above only. If you use any other character for
entry, the file and folder names are not displayed correctly. They may
neither be displayed correctly depending on the CD writer used.
The unit recognizes and plays only those MP3 files which have the
MP3 filename extension (.MP3). MP3 files should therefore be saved
with the MP3 extension.
Writing files into a medium
When a medium containing MP3 data is loaded, the unit checks all
the files on the medium. If the medium contains a lot of folders or
non-MP3 files, therefore, it takes a long time until the unit starts
playing MP3 files.
In addition, it may take time for the unit to move to the next MP3 file
or a file search or folder search may not be performed smoothly.
You should not write non-MP3 files or unneeded folders along with
MP3 files on the medium.
2CAUTION
When playing MP3 files on a medium which also contains non-MP3
files or folders, observe the following precautions. Loading such a
medium may produce loud noise to break the speakers.
• Do no attempt to play a medium containing a non-MP3 file with the
MP3 extension.
The unit mistakes non-MP3 files for MP3 files as long as they have
the MP3 extension.
• Do not attempt to play a medium containing non MP3 file.
MP3 file playing order
When selected for play, folder search, file search, or for folder select,
files and folders are accessed in the order in which they were written
by the CD writer.
Because of this, the order in which they are to be recorded does not
match the order in which they are played. You may be able to set the
order in which MP3 files are to be played by writing them onto a
medium such as a CD-R with their file names beginning with play
sequence numbers such as "01" to "99", depending on your CD writer.
— 8 —
Page 9
For example, a medium with the following folder/file hierarchy is
subject to folder search, file search, or folder select as shown below.
Level 2
Root
Level 4
Level 5
Folder
Example of a medium's folder/file hierarchy
(For a file search or folder search
Level 2
Level 3
Level 1
Level 4
File
Level 5
Virtual folder
)
Level 1 Level 3
Medium's virtual folder/file hierarchy
for a folder select
When a file search is executed with file being played ...
Current
file number
Beginning of
file
4 Button
Operation of the button
...
¢ Button
...
When a folder search is executed with file being played ...
When a folder search is executed with file currently being
played, the unit selects folders as shown below, starting with
folder .
Current
folder number
Operation of the button
...
AM ButtonFM Button
...
When folder select is selected with file being played
to move from folder to folder ...
During folder select, a virtual folder is created one hierarchical level
below each folder. The hierarchy is displayed as if the MP3 file
recorded in each folder were placed in that virtual folder.
When the unit enters the folder select mode with file being
played, it selects folders as shown below, starting with folder
(virtual folder ).
Current
folder number
NOTE
4 Button ¢ Button AM Button FM Button
• Each virtual folder is displayed with the original folder name bounded
by parentheses " ( ) ". For example, the virtual folder below the folder
named " 4 " is displayed with a name of " (4) ". The file name of each
virtual folder is displayed with up to 29 characters (in the ISO 9660
Level 2 format) or 10 characters (in the ISO 9660 Level 1 format),
excluding the binding parentheses.
• The FM button is disabled in a folder because it has no subordinate
hierarchical level below. Immediately after entering the folder select
mode as in the above example, therefore, the FM button cannot be
used as there is no hierarchical level below folder .
Once you have moved to folder using the
folder select function, for example, you can use the FM button to
select folder one level below.
Operation of the button
...
6
...
— 9 —
Page 10
▼
Tuner mode
▼
CD/MP3 mode
▼
External disc control mode 1
▼
▼
External disc control mode 2 / AUX mode
Standby mode
General features
ATT/LOUD AM
4¢
Q / AUD
SRC / PWR OFF CLK5 / ∞
FMDISP
English
Clock indicator
Release
button
Power
Turning on the power:
Press the SRC (source) button.
NOTE
Turn the power on before carrying out the following procedures.
Turning off the power:
Press the PWR OFF button for at least one second.
NOTE
The status of the Security Code function (page 28) is displayed
whenever the power is switched on.
"CODE ON" : Security Code has been registered
"CODE OFF" : Security Code has not been registered
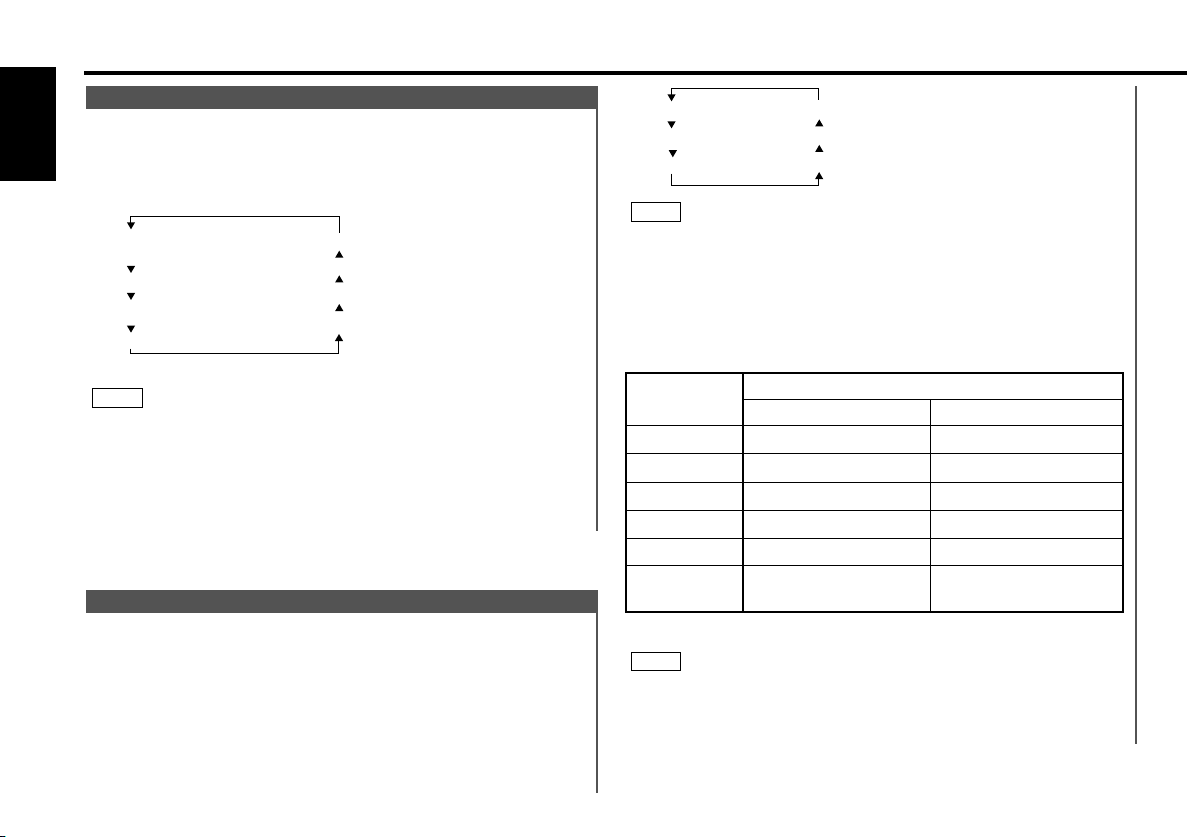
Switching Modes
Switching Modes:
Each time you press the SRC (source) button, the mode
switches as follows:
ATT indicator
LOUD indicator
System Q indicator
Speaker Setting indicator
Selecting standby mode:
Press the SRC button repeatedly and switch to "ALL OFF" .
When "ALL OFF" is displayed, the standby mode is activated.
The standby mode turns all functions off while leaving the
power to the unit on. Use this mode when you want to have
the display illuminated but don't want to listen to anything.
— 10 —
Page 11
NOTE
• The mode switches to the next mode from any mode which
cannot be used.
• The external disc control mode will differ depending on the unit
that is connected.
• To enable the selection of External disc control mode 2/AUX
mode, you should connect optional switching adapter KCAS210A (which allows you to select both External disc control
mode 2 and AUX mode) or CD changer (KDC-CPS87, KDCCX87, KDC-CPS85, KDC-CX85, KDC-CPS82 or KDC-CX82) or
switching adapter CA-C1AX (which allows you to select AUX
mode only).
During the AUX mode, "AUX" (or AUX-name display) will show
in the display. When the CA-C1AX is being used, the AUX Mode
will replace the External Disc Control Mode.
NOTE
Selecting AUX-name display
Pressing the DISP button for at least two seconds during the
AUX mode, AUX-name display is blinked for AUX-name selection
mode.
Pressing 4 or ¢ button during this mode allows you to select
"AUX" , "TV" , "VCP" , "GAME" or "PORTABLE" in the AUX mode.
The AUX-name selection mode can be exited by pressing the
DISP button or doing nothing for 10 seconds.
Volume
Increasing Volume:
Press the 5 button to turn up the volume.
Decreasing Volume:
Press the ∞ button to turn down the volume.
Attenuator
This function allows you to turn down the volume quickly.
Turning Attenuator On/Off:
Press the ATT button to switch the attenuator on and off.
When the attenuator is on, the ATT indicator blinks.
When the attenuator is off, the volume returns to the original
level.
NOTE
Turning the volume up, or turning it all the way down deactivates
the attenuator function.
Loudness
This function amplifies low and high tones when the volume is
turned down.
The LOUD indicator lights up when the loudness function is
on.
Turning Loudness On/Off:
Press the LOUD button for at least one second to switch the
loudness on and off.
— 11 —
Page 12
Adjustment
mode
(Display)
Bass ("Bass")
Treble("Treble")
Balance("Balance")
Fader ("Fader")
Bass decreased.
Treble decreased.
Bass increased.
Treble increased.
Middle("Middle")
Middle decreased.
Middle increased.
4 button ¢ button
Operation of Audio control button
Front channel increased.
Rear channel increased.
Volume Offset
("V Offset")
The sound level of
each source increased.
The sound level of
each source decreased.
Right channel emphasized.
Left channel emphasized.
General features
System Q
You can recall the best audio setting preset for different types
of the music.
English
Switching the Preset Sound Setting:
Each time you press the Q button, the preset sound setting
switches as follows:
Scan of Flat – Easy
(Default setting)
User memory*
Flat
Rock
As you proceed, each indicator would go on.
NOTE
The System Q function changes the values of the following
sound quality parameters:
Bass center frequency, bass level, bass quality factor, bass
extend, middle center frequency, middle level, middle quality
factor, treble center frequency, and treble level.
Their setting values are different depending on the setting of the
speaker setting mode.
Audio Control Setting
Adjust various parameters of sound quality.
Press the AUD button for at least one second to enter the
1
control mode.
Selecting mode
2
Press either the FM or AM button.
Each time the button is pressed, the adjustment mode will
change as follows:
Pressing the FM button advances the display, and pressing the
AM button reverses it.
Easy
Jazz
Pops
Top 40
*User memory:
The unit returns to the state
adjusted the last time with
the audio control setting feature.
— 12 —
Bass
Middle
Treble
NOTE
Source tone memory
Each source (CD, FM, AM and disc changer) has its own memory
in which to store the bass, middle, and treble tone settings.
The settings made for a particular source are recalled
automatically whenever you use that source (for example, FM
mode uses the tone settings made for FM, AM for AM, etc.).
Adjust each mode
3
Press the 4/¢ button.
Look at the table to adjust the mode being displayed.
Press the AUD button to end the control mode.
4
NOTE
Determining the parameters in the audio control setting would
clear all the adjustments made in the System Q and they are
replaced with the values in the audio control setting.
Volume Offset
Fader
Balance
Page 13

Speaker Setting
This function allows you to adjust the setting that is recalled
with the System Q, according to types of speakers.
Press the SRC button repeatedly to select the standby mode.
1
"ALL OFF" is displayed when the standby mode is selected.
Press the Q button to enter the speaker setting mode.
2
Press either the 4 or ¢ button to select the type of
3
speaker. The setting switches as follows.
Off ("SP OFF") / For 6/6x9 in. speaker ("SP 6*9/6inch") /
For 5/4 in. speaker ("SP 5/4inch") /
For the OEM speaker ("SP O.E.M.")
4
Press the Q button to end the speaker setting mode.
NOTE
Speaker setting function allows for tuning of bass, middle and
treble
Clock display
Changing the Clock Display:
Each time you press the CLK button, the display switches
between the clock and each mode display.
NOTE
The clock indicator lights while the clock is displayed.
— 13 —
Page 14

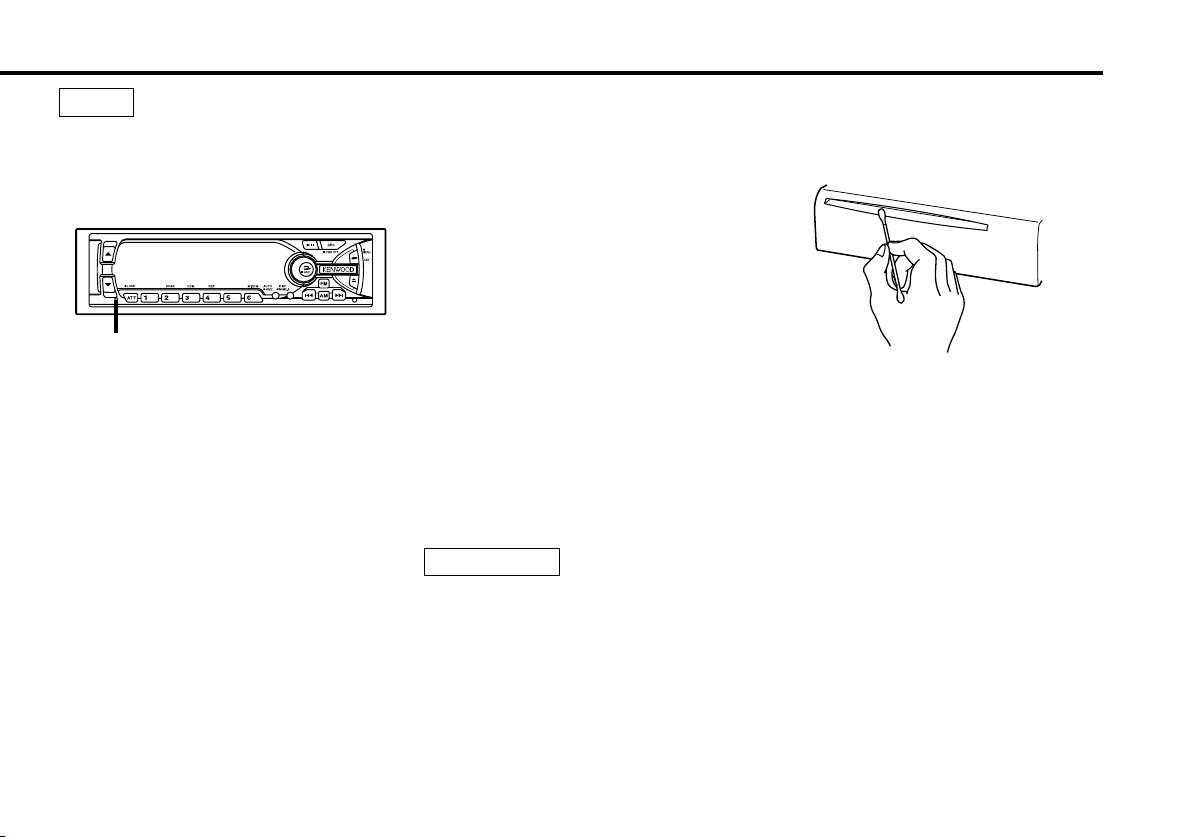
General features
Theft Deterrent Faceplate
The faceplate can be reversed to hide the control panel or
detached form the unit, helping to deter theft.
English
Removing the Faceplate:
• When the control panel is visible:
1
Press the release button.
• When the control panel has been hidden:
Press the upper side of the faceplate.
Holding the center part of the faceplate, pull it out.
2
Push back the bottom of the faceplate bracket until it locks.
3
2CAUTION
• Do not apply excessive force to the faceplate bracket without
attaching the faceplate. Doing so will cause the faceplate
bracket to be deformed.
• Do not touch the connector on the faceplate bracket after
removing the faceplate. Touching the connector may cause
damage to the unit.
NOTE
• The faceplate is a precision piece of equipment and can be
damaged by shocks or jolts. For that reason, keep the faceplate
in its special storage case while detached.
• Do not expose the faceplate or its storage case to direct
sunlight or excessive heat or humidity. Also avoid places with
too much dust or the possibility of water splashing.
Reattaching the Faceplate:
1
Hold the faceplate so that the control panel faces the front
toward you and set the left side of the faceplate in the
faceplate bracket.
2CAUTION
Do not set the right side of the faceplate in the faceplate bracket
first, when reattaching the faceplate. Doing so may cause the
connector on the faceplate bracket to malfunction.
2
Press the right side of the faceplate until it locks.
Hiding the control panel:
1
Press the release button and slide open the faceplate.
Push upward the back of the control panel and reverse the
2
panel.
NOTE
The panel cannot be reversed when the faceplate is not attached.
Opening the control panel:
Press the upper side of the faceplate.
1
The faceplate will open.
2
Push the bottom of the control panel and close the faceplate.
— 14 —
Page 15

NOTE
AMAUTO/
AME
FM
4¢
DISP/NAME.S
SRC
#1-6
38
While the control panel is sliding, only available buttons are 0,
ATT, ▲, ▼ and SRC.
Tuner features
Preset station numberFrequencyBand display
AUTO indicator
ST indicator
— 15 —
Page 16

▼
Auto 1 (Auto Seek Tuning)
▼
Auto 2 (Preset Station Seek Tuning)
▼
Manual (Manual Tuning)
Tuner features
Tuning
You can choose from three tuning modes: auto seek, preset
station seek, and manual. The AUTO 1 indicator lights up
English
when auto seek tuning is selected, and the AUTO 2 indicator
lights when preset station seek tuning is selected.
Selecting Tuning Mode:
Press the AUTO button.
Each time you press the AUTO button, the mode switches as
follows.
Tuning:
Press the SRC (source) button repeatedly to select the tuner
1
mode. "TUNER" is displayed when the tuner mode has been
selected.
Press either the FM or AM button to select the band.
2
Each time you press the FM button, the band switches
between the FM1, FM2 and FM3 (which are used for groups
of preset stations).
Press the AM button to select the AM band.
3
• Auto Seek Tuning
Press the ¢ button to seek higher frequencies.
Press the 4 button to seek lower frequencies.
• Preset station seek tuning
Press the ¢ button to move to the next preset station (i.e.,
the one with the next highest number), and the 4 button to
move to the last preset station (i.e., the one with the next
lowest number).
• Manual Tuning
Press the ¢ button to increase the frequency by one step.
Press the 4 button to decrease the frequency by one step.
NOTE
The ST indicator lights up when stereo broadcasts are being
received.
Station Preset Memory
Store the frequency of a station. You can then recall that
station with a single touch of a button.
Select the band/station that you want to have stored.
1
Press the button (#1-6) that you want to use for the station, for
2
at least two seconds.
The button number blinks once in the display to indicate that
the data has been stored.
Recalling a Preset Station:
Press the preset station button (#1-6) for the desired station.
The number of the recalled station is displayed.
NOTE
You can store six stations in each of the FM1, FM2, FM3, and
AM bands.
Auto Memory Entry
You can automatically store all the receivable frequencies in
the band currently being listened to, and then recall them with
the touch of a button later. This function is especially useful
when you are travelling and do not know what stations are
available. Up to six frequencies can be stored this way.
1
Select the band for auto memory entry.
2
Press the AME button for at least two seconds to start auto
memory entry.
The numbers of the preset station buttons are shown in order.
When all the stations in a certain band are stored in the preset
memory, the auto memory entry stops. The tuner then plays
the last station received.
— 16 —
Page 17

Station frequency
SNPS name (only when being preset)
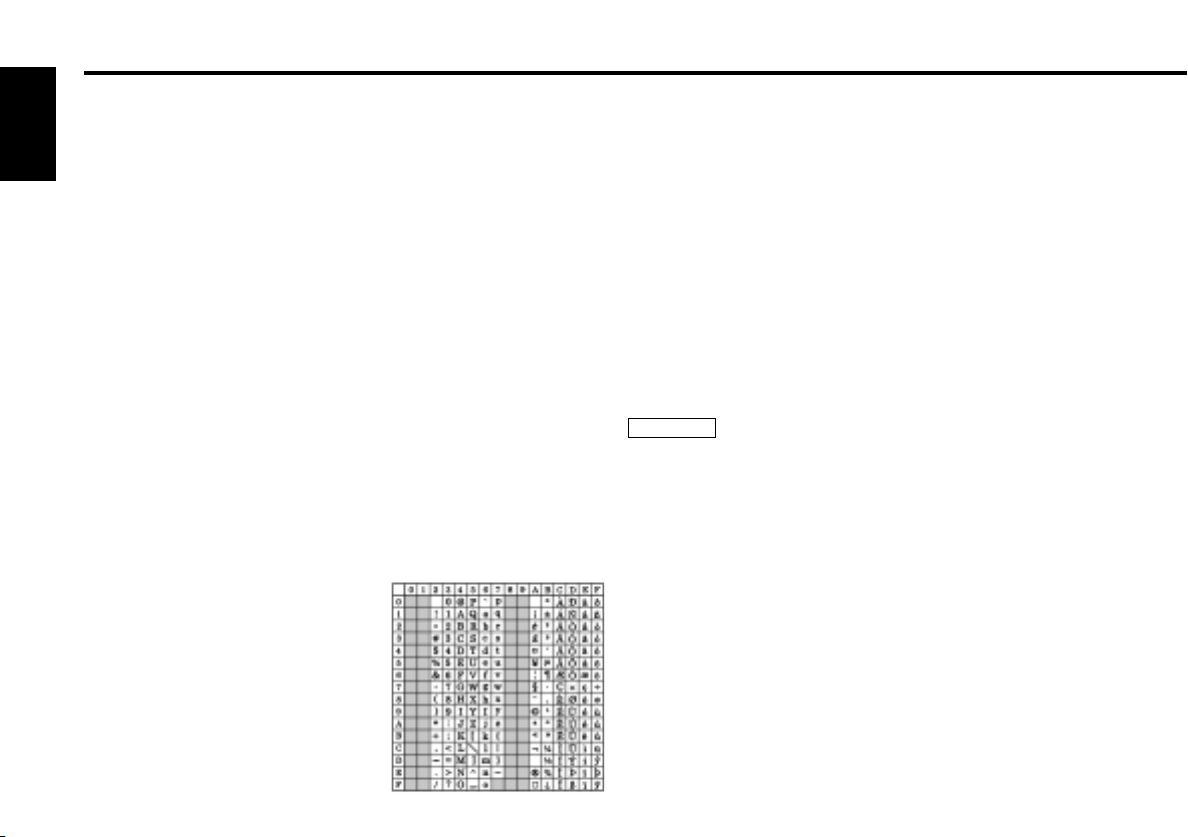
Alphabet (upper case): A ~ Z
Alphabet (lower case): a ~ z
Numerals and symbols: 0~9 @ ” ‘ ` % & * + - = , . / \ < > [ ]
Special characters: байинмутъщСЗ®Я‹fl
âäêë
опфцыьсз©Ж›fi
Recalling a Preset Station:
Press the preset station button (#1-6) for the desired station.
The number of the recalled station is displayed.
Station Name Preset (SNPS)
You can assign names to radio stations with the Station Preset
Memory. Up to 32 FM stations and 16 AM stations can be
assigned names.
Adjust the frequency to the station whose name you want to
1
enter.
2
Press the NAME.S button for at least two seconds.
"NAME SET" is displayed once the station name preset mode
is entered.
The cursor will blink in the position where letters are entered.
3
Press either the 4 or ¢ button to move the cursor to the
desired position.
The 4 button moves the cursor to the left, and the ¢
button to the right.
4
Each time the 38 button is pressed, the characters to be
entered change as listed below.
Press the FM or AM button to display the desired character.
Characters that can be displayed are as follows.
NOTE
You can enter up to eight characters for each name.
6
Assigning Names
Press the NAME.S button.
The name of the station is stored in memory, and the Station
Name Preset mode ends.
Also, if you make no input for 10 seconds, the name will be
stored up to the point that you have entered, and the mode
ends.
NOTE
• You can assign names to up to 32 FM stations and 16 AM
stations.
• All the station names will be erased if you press the Reset
button.
• If you want to change the name of a station, first display the
name of the station (following steps 1 and 2 above), then
change the letter(s) that you want by following steps 3 and 4.
Switching Display for Tuner
You can change the display used when listening to the radio.
Changing the Display:
Each time you press the DISP button, the display changes as
follows:
5
Continue steps 3 and 4 until all the characters are chosen for
the name.
— 17 —
Page 18

CD/External disc control features
SCAN
RDM
REP DISP/
NAME.S
M.RDM
AM
0
FM
4¢
38 SRC
English
Track number
IN indicator
Playing CDs
Playing CDs:
Release
button
Disc numberTrack time
Press the release button to slide open the faceplate, showing
the CD insertion slot.
Holding the CD with the labeled side facing up, insert it in the
slot. The CD will start playing. Push back the bottom of the
faceplate with your hand until it locks.
The IN indicator will light when a CD has been inserted.
2CAUTION
When inserting a CD, make sure the CD has been completely
drawn in before pushing back the faceplate. Failing to do so
might scratch the CD.
Playing CDs Already Inserted:
Press the SRC (source) button repeatedly to select the CD
mode.
"CD" is displayed when the CD mode has been selected.
The CD will start playing.
Pausing and Restarting CD Play:
Press the 38 button to make the disc pause.
Press the same button again to start play again.
Eject:
Press the release button and slide open the faceplate.
Press the 0 button.
The CD stops playing and ejects from the slot.
Push back the bottom of the faceplate with your hand until it
locks.
2CAUTION
• Do not attempt to insert a CD into the slot if another one is
already there.
• The unit can only play 5 in. CDs. If you insert a 3 in. CD, it will
get stuck inside and can cause the unit to malfunction.
• When the faceplate has been slid open, it might interfere with
the shift lever or something else. If this happens, pay attention
to safety and move the shift lever or take an appropriate action,
then operate the unit.
• Do not use the unit with the faceplate in the open condition.
Doing so will cause breakdown.
— 18 —
Page 19

NOTE
• When you load a CD and eject it right away, the next time you
try to insert the CD may not load. In such a situation, take the
CD out for a moment and then reinsert it.
• While the control panel is sliding, only available buttons are 0,
ATT, ▲, ▼ and SRC.
Playing Other Disc mode
This function permits the connection of optional players and
the playing of discs other than the loaded CD (in the current
unit).
Playing Discs:
Press the SRC button repeatedly to select the external disc
control mode.
The disc will start playing.
NOTE
The external disc control mode will differ, depending on the unit
that is connected.
Mode Display Examples
• "CD2" ...when a CD player is connected
• "DISC" ...when a disc changer is connected
• "DISC-1" , "DISC-2" ...when two disc changers are connected
Pausing and Restarting Disc Play:
Press the 38 button to make the disc pause.
Press the same button again to start play again.
NOTE
• When one disc has finished playing its last track, the next disc
in the changer will start playing. When the last disc in the
changer has finished, the player will return to the first disc and
start playing it.
• Disc #10 is displayed as "0".
Switching Display for Discs
Switch the display that appears while discs are playing.
Switching Display for Discs:
Each time you press the DISP button, the display during disc
play switches as follows:
Track time
Disc name (DNPS) (only when being preset)
Disc title (Units featuring CD text/MD only)
Track title (Units featuring CD text/MD only)
NOTE
• You can give names to discs through the presetting disc name
function (page 22). Note that depending on the unit, display
may not be possible.
• If you try to display the name of a disc that does not have one,
"NO NAME" is displayed instead.
• When there is an attempt to display the title of a disc for which
the disc title/track title has not been recorded, "NO TEXT" is
displayed for CD and "NO TITLE/NO NAME" is displayed for
MD.
• If you attempt to display disc title/track title when connecting
the CD changer not supported for CD text feature, caution
messages such as "NO TEXT" or "Reading" may be displayed.
• Depending on the type of characters of the CD Text, some
characters may not be displayable.
— 19 —
Page 20

CD/External disc control features
Fast Forwarding and Reversing Disc Play
Fast Forwarding Disc Play:
English
Hold down on the ¢ button.
Release your finger to play the disc at that point.
Reversing Disc Play:
Hold down on the 4 button.
Release your finger to play the disc at the point.
NOTE
You cannot use reverse play between tracks depending on the
model being connected. Instead, the reverse play function is
canceled when it reaches the beginning of a track, at which point
normal play will automatically resume.
Track Search
Search forward or backward through the tracks on the disc
until you reach the one that you want to listen to.
Making a Reverse Track Search:
Press the 4 button to display the desired track number.
Press once to search back to the beginning of the current
track, twice to search back to the beginning of the previous
track, and so forth.
Play starts at the beginning of the displayed track number.
NOTE
(For disc changers)
Pressing the 4 button while listening to track 1 will only search
back to the beginning of that track. The reverse search is not
"recycled" to the last track on the disc.
Making a Forward Track Search:
Press the ¢ button to display the desired track number.
Press once to fast forward to the next track, twice to fast
forward to the track after that, and so forth.
Play starts at the beginning of the displayed track number.
NOTE
(For disc changers)
You cannot make a forward track search when listening to the
last track on a disc.
Disc Search (Function of disc changers)
Search forward or backward through the discs in a disc
changer.
Making a Reverse Disc Search:
Press the AM button to display the desired disc number.
Each time the button is pressed, the displayed disc number
decreases by one.
Play starts at the beginning of the displayed disc.
Making a Forward Disc Search:
Press the FM button to display the desired disc number.
Each time the button is pressed, the displayed disc number
increases by one.
Play starts at the beginning of the displayed disc.
NOTE
"Load" is displayed when discs are being exchanged on the disc
changer.
Track / Disc Repeat
Repeat playing the track or the disc currently being listened to.
Turning Repeat Play On/Off:
Press the REP button to switch repeat track/disc play on and
off as follows:
▼
Track Repeat ON
▼
Disc Repeat ON (Function of disc changers)
▼
Repeat OFF
"Repeat ON"/"T-Repeat ON" is displayed and the track number
blinks in the display when track repeat is on.
"D-Repeat ON" is displayed and the disc number blinks in the
display when disc repeat is on.
NOTE
— 20 —
Page 21

Repeat play is canceled when you eject the disc.
Track Scan
Successively play the beginning of each track on a disc until
you find the track that you want to listen to.
Starting the Track Scan:
Press the SCAN button. "Scan ON" is displayed and the first 10
seconds of each track will be played, in order.
The track number currently being heard blinks in the display.
Stopping to Listen to the Track Being Scanned:
Press the 38 or SCAN button again to stop the scan and keep
on listening to a track normally.
NOTE
• The track scan function is canceled when you eject the disc.
• The track scan function only scans each track on a disc once.
Random Play
Play all the tracks on the current disc in random order.
Press the RDM button to switch random play on and off.
1
"Random ON" is displayed when random play is turned on.
The track number will change over and over in the display as
the next track is being selected.
When the track has been selected, play will begin.
The selected track number blinks in the display as it is being
played.
NOTE
(For disc changers)
When all the tracks on a certain disc have been played using
random play, the next disc on the changer will start playing using
the same function.
To change the track being heard, press the ¢ button.
2
Another track will be selected and played.
NOTE
Random play is canceled when you eject the disc.
Magazine Random Play (Function of disc changers)
Play the tracks on all the discs in the disc changer in random
order.
1
Press the M.RDM button to switch magazine random play on
and off.
"M.Random ON" is displayed when magazine random play is
turned on.
The disc and track numbers will change over and over in the
display as the next track is being selected.
When the disc/track has been selected, play will begin.
The selected disc/track number blinks in the display as it is
being played.
2
To change the track being heard, press the ¢ button.
Another disc/track will be selected and played.
NOTE
• Magazine random play is canceled when you eject the disc.
• The time needed for random selection depends on the number
of discs loaded in the disc magazine.
— 21 —
Page 22

Alphabet (upper case): A ~ Z
Alphabet (lower case): a ~ z
Numerals and symbols: 0~9 @ ” ‘ ` % & ∗ + - = , . / \ < > [ ]
Special characters: á
айинмутъщСЗ®Я‹flвдк
ë
î
пфцыьсз©Ж›fi
CD/External disc control features
Text / Title Scroll
This function permits the text to be scrolled and the entire text
to be displayed. The scrolling method differs depending on the
English
setting of scrolling in the menu.
To scroll automatically:
Press the DISP button to display the disc title or the track title.
The display of the text will be scrolled repeatedly.
To scroll manually:
1
Press the DISP button to display the disc title or the track title.
2
Pressing the DISP button for at least one second results in one
scrolling display of the titles.
NOTE
• Please see the menu settings (page 31) about switching
between manual scrolling and automatic scrolling.
• Only units with a CD text feature permit title display.
• You cannot use the text scroll function during magazine random
play.
Presetting Disc Names (DNPS)
Store the names of discs to be displayed when played.
Play the disc whose name you want to preset.
1
NOTE
• This function is not available for disc changers that do not
feature the Disc Name Preset function.
• The Disc Name Preset function cannot be used during the
Magazine random play as well as while a disc title or track title
is displayed.
2
Press the NAME.S button for at least two seconds.
"NAME SET" is displayed and the disc name preset mode is
entered.
The cursor blinks in the position where character input can be
made.
— 22 —
Press either the 4 or ¢ button to move the cursor to the
3
desired position.
The 4 button moves the cursor to the left, and the ¢
button to the right.
Each time the 38 button is pressed, the characters to be
4
entered change as listed below.
Press the FM or AM button to display the desired character.
Characters that can be displayed are as follows.
5
Continue steps 3 and 4 until all the characters are chosen for
the name.
NOTE
You can enter up to 12 characters for each name.
6
Press the NAME.S button.
The disc name is stored and the disc name preset mode is
canceled.
If you make no entry in a 10-second period, the name will be
stored with the characters input so far.
NOTE
• The number of discs whose names can be stored will differ
depending on the disc changer that is connected. Please see
your disc changer manual for details.
Up to 30 CDs can be registered with this unit.
• Discs are identified by their total length and number of tracks. If
another disc happens to have the same specifications as one
that you have already stored a name for, the name will be
displayed for it, too.
• If you want to change the name of a disc, repeat steps 1 and 2
to display the name, and then repeat steps 3 and 4 to input the
changes.
Page 23

• Pressing the reset button erases the disc names stored in this
#2
#3/RDM
REP DISP AM
0
FM
4¢
38 SRC
unit, but does not erase the names stored in a disc changer.
• MP3 recorded media allows you to register a single media
name only. Registration for each CD as it is available with the
CD cannot be achieved.
MP3 player features
Release
button
— 23 —
Track number
IN indicator
Track time
Page 24

MP3 player features
Playing MP3 Files
Play:
English
Press the Release button to slide open the faceplate, showing
the CD (insertion) slot.
Holding the media with the labeled side facing up, insert it in
the slot. The media will start playing. Push back the bottom of
the faceplate with your hand until it locks.
The IN indicator will light when a media has been inserted.
2CAUTION
When inserting a media, make sure the media has been
completely drawn in before pushing back the faceplate. Failing to
do so might scratch the media.
Playing Media Already Inserted:
Press the SRC button repeatedly to select the CD mode.
"CD" is displayed when the CD mode has been selected.
The media will start playing.
Pausing and Restarting Media Play:
Press the 38 button to make the media pause.
Press the same button again to start play again.
NOTE
MP3-related operations (such as a file search and folder search)
cannot be performed during a pause. Cancel the pause before
you can perform such operations.
Eject:
Press the release button and slide open the faceplate.
Press the 0 button.
The media stops playing and ejects from the slot.
Push back the bottom of the faceplate with your hand until it
locks.
2CAUTION
• Do not attempt to insert a media into the slot if another one is
already there.
• When the faceplate has been slid open, it might interfere with
the shift lever or something else. If this happens, pay attention
to safety and move the shift lever or take an appropriate action,
then operate the unit.
• Do not use the unit with the faceplate in the slid condition.
Doing so will cause breakdown.
NOTE
• When you load a media and eject it right away, the next time
you try to insert the media may not load. In such a situation,
take the media out for a moment and then reinsert it.
• The MP3 media that this unit can play are CD-ROM, CD-R, and
CD-RW.
The medium formats must be ISO 9660 Level 1 or Level 2. The
methods and precautions to be followed for writing MP3 files
are covered in "Notes on playing MP3 files" (page 8). Check that
section before creating your MP3 media.
• It takes time for the unit to check each medium to see if it
contains any MP3 file before it starts playing the medium.
• While the control panel is sliding, only available buttons are 0,
ATT, ▲, ▼ and SRC.
File Search
Search forward or backward through the files on the media
until you reach the one that you want to listen to.
Making a Backward File Search:
Press the 4 button to display the desired file number.
Press once to search back to the beginning of the current file,
twice to search back to the beginning of the previous file, and
so forth.
Play starts at the beginning of the displayed file number.
Making a Forward File Search:
Press the ¢ button to display the desired file number.
Press once to fast forward to the next file, twice to fast
forward to the file after that, and so forth.
Play starts at the beginning of the displayed file number.
NOTE
It may take time for the file search depending on the number of
files and the state of the folder hierarchy.
— 24 —
Page 25

Folder Search
Search forward or backward through the folders on the media.
Making a Backward Folder Search:
Press the AM button.
Pressing the button moves back to the previous folder. The
unit plays the medium starts at the beginning of the selected
folder.
If the selected folder contains no MP3 file, the unit
automatically plays the file nearest to that folder in the MP3
file playing order.
Making a Forward Folder Search:
Press the FM button.
Pressing the button moves to the next folder. The unit plays
the medium starts at the beginning of the selected folder.
If the selected folder contains no MP3 file, the unit
automatically plays the file nearest to that folder in the MP3
file playing order.
NOTE
It may take time for the folder search depending on the number
of files and the state of the folder hierarchy.
Fast Forwarding and Reversing MP3 Play
Fast Forwarding MP3 Play:
Hold down on the ¢ button.
Release your finger to play the MP3 at that point.
Reversing MP3 Play:
Hold down on the 4 button.
Release your finger to play the MP3 at the point.
NOTE
• If you reach the beginning of the file with the fast reverse, the
player enters the pause state. If you release the button, the
music begins to play.
•During the fast forwarding and reversing process, audible tone
and time code display are disabled.
•Time code may be different between the states before and after
the fast forwarding and reversing operations.
•The time code for the first few seconds on pressing the button
may be unchaged.
•The time code variation may be large if a file is encoded in
variable bit rate (VBR).
— 25 —
Page 26

MP3 player features
Folder Select
You can use this function to select the folder containing the
sound file you want be played.
English
Enter the Folder Select Mode
1
Pressing the #2 button enters the folder select mode.
The display reads as shown below.
<Folder name display>
Displays the current folder name.
(KENWOOD)
<Hierarchical level display>
Displays the hierarchical level of the current folder.
NOTE
The unit cannot enter the folder select mode if the loaded
medium contains no folder recorded.
Selecting the desired folder
2
• You can move from folder to folder at the same hierarchical
level:
Press the ¢ button to move to the next folder at the same
hierarchical level.
Press the 4 button to move to the previous folder at the
same hierarchical level.
• You can select the hierarchical level of the folder:
Press the FM button to move down one level in the folder
hierarchy.
Press the AM button to move up one level in the folder
hierarchy.
• You can return to the first hierarchical level (Root Jump):
Press the #3 button to return to the folder at the top
hierarchical level on the medium currently being played.
NOTE
The methods for moving to other folders in the folder select
mode are different from those in the folder search mode.
See "Notes on playing MP3 files" (page 8) for details.
3
When you have found a desired folder
Press either the #2 or 38 button.
This ends the folder select mode and starts playing the first
MP3 file in the selected folder.
NOTE
• If the folder selected after leaving the folder select mode
contains no MP3 file, the unit plays the MP3 file nearest to that
folder in the MP3 file playing order.
• If the folder select mode is interrupted by another session such
as traffic information, you will be brought back to the first folder
in the media.
• During the folder select mode, no audible sound is produced.
File / Folder Repeat
Repeat playing the file or the folder currently being listened to.
Turning Repeat Play On/Off:
Press the REP button to switch repeat file/folder play on and
off as follows:
▼
File Repeat ON
▼
Folder Repeat ON
▼
File/Folder Repeat OFF
"F REP ON" is displayed when file repeat is on.
"FOL REP ON" is displayed when folder repeat is on.
NOTE
Repeat play is canceled when you eject the media.
— 26 —
Page 27

Random Play
Play all the files on the current folder in random order.
1
Press the RDM button to switch random play on and off.
"Random ON" is displayed when random play is turned on.
When the file has been selected, play will begin.
To change the file being heard, press the ¢ button.
2
Another file will be selected and played.
NOTE
Random play is canceled when you eject the media.
Switching Display for MP3
Switch the display that appears while MP3 files are playing.
Switching Display for MP3:
Each time you press the DISP button, the display during files
play switches as follows.
Track time
Disc name (DNPS) (Only when being preset)
Folder name
File name / ID3 tag
NOTE
• You can give names to media through the presetting disc name
function (page 22).
• If you try to display the name of a media that does not have
one, "NO NAME" is displayed instead.
• Folder names and file names are not displayed correctly if the
loaded medium does not conform to ISO 9660 Level 1/2 or if
they contain any character unacceptable to your CD writer.
• The track time display may not match the actual track time
depending on the MP3 file recording states.
• For display items for File name/ID3 tag, see "Switching the MP3
title information display" for menu settings (page 31).
Name Scroll for MP3
This function permits the folder/file name and ID3 tag(Song
title, Artist, Album) to be scrolled and the entire name to be
displayed. The scrolling method differs depending on the
setting of scrolling in the menu.
To scroll automatically:
Press the DISP button to display the folder name or the file
name.
The display of the name will be scrolled repeatedly.
To scroll manually:
1
Press the DISP button to display the folder name or the file
name.
2
Pressing the DISP button for at least one second results in one
scrolling display of the names.
NOTE
Please see the menu settings (page 31) about switching between
manual scrolling and automatic scrolling.
— 27 —
Page 28

Menu settings
AM
4¢
SRC MENU
#1-4
FMDISP
English
Menu display
Menu System
You can set the defaults for additional functions in the menu
mode. Make a setting for each function, referring to the
following operations.
1
Enter the menu mode
Press the MENU button for at least one second.
"MENU" is displayed when the menu mode is entered.
The function that you can adjust is indicated with the current
settings displayed.
Selecting function to set
2
Press the FM button to search through the functions until you
see the one you want to adjust in the display.
Press the AM button to search through the functions
backward.
Function items change in the order of features that follow in
the menu system.
Example: If you want to switch the setting of the touch sensor
Changing setting for currently displayed function
3
Press either the 4 or ¢ button.
The setting will change for each function.
Example: The setting of the touch sensor tone will switch from
4
Ending the menu mode
Press the MENU button.
NOTE
Make sure to end the menu mode when finished.
tone function from on to off, first search through the
functions until you see "Beep ON" in the display.
on to off, and "Beep OFF" is displayed.
Security Code
When the battery is removed from the unit's power switch,
you cannot turn on the unit again unless the preset security
code is input. This function helps prevent theft.
NOTE
— 28 —
Page 29

You must follow steps 1 to 8 to be able to use the Security Code
Step Button to press
# Times
pressed
Display
1
#1 4
3
6#2
2
#3 2
4
#4 1
“3”
“5”
“1”
“0”
function. Turning off the power during the procedure will
deactivate the security code setting.
Once the security code function has been activated, "Security"
disappears from the MENU system. Note that it will no longer be
possible to cancel this function afterwards.
1
Press the SRC button repeatedly to select the standby mode.
"ALL OFF" is displayed when the standby mode is selected.
2
Select the four digits to use in your security code.
NOTE
The four-digit security code is very important, as you will need it
to turn the unit on again when the code security function is on.
Choose the number carefully and do not forget it (write it down
and keep it separately in a safe place).
3
Press the MENU button for at least one second.
"MENU" is displayed first and then "Security" is displayed.
4
Press either the 4 or ¢ button for at least one second.
"ENTER" will appear in the display for one second, indicating
the code setting mode has been entered. When "CODE"
appears in the display, you can start inputting the code.
5
Press the preset button and enter the security code that you
have selected in step 2.
Example: Use "3510" as the security code.
6
Press the DISP button for at least three seconds.
The security code will be set.
"RE-ENTER" will appear in the display for one second, asking
you to enter the code once again for confirmation. When
"CODE" appears in the display, you can start inputting the code.
7
Press the Preset button and input the security code again.
Press the DISP button again for at least three seconds.
8
"APPROVED" will appear in the display, with the security code
function turning on. From this point on, if the unit is
disconnected from the battery, the security code must be
entered the first time that the unit's power is turned on.
"ENTER" and "CODE" will appear in the display, asking you to
input the code.
NOTE
If you input an incorrect security code, the code setting mode
will be canceled automatically. Follow the steps from 4 to 8
above again.
If you press the RESET button or remove the battery:
The first time you turn the unit on again, "CODE" will appear in
the display, asking you to input the security code.
Repeat steps 7 and 8 above, and input the security code.
You can start operating the unit again when "APPROVED"
appears in the display.
If you enter the incorrect code, the power will turn off. Enter
the correct code to turn the unit on.
Touch Sensor Tone
This function produces a beep sound that accompanies button
operation. It can be switched on or off.
Display and setting:
"Beep ON" : Beep setting is on. (Default setting)
"Beep OFF" : Beep setting is off.
NOTE
The beep sound is not output from the preout jacks.
— 29 —
Page 30

Menu settings
Manual Time Adjustment
Adjust the time manually.
Display and setting:
English
1
Select the display "Clock Adjust" during the selecting function
in the menu system.
2
Press either the 4 or ¢ button for at least one second to
enter the Manual time adjustment mode.
The time display will blink.
3
• Adjusting the hours
Press the FM button to advance the hours, or press the AM
button to make the hours go back.
• Adjusting the minutes
Press the ¢ button to advance the minutes, or press the
4 button to make the minutes go back.
4
Press the MENU button to end the Manual Time Adjustment
mode.
Exiting the Manual Time Adjustment mode would start the
clock counting.
Selectable Illumination
You can switch the color of the button illumination between
green and red.
Display and setting:
"Button Green" : The color of the illumination is green.
"Button Red" : The color of the illumination is red.
Switching Graphic Display
This function allows you to turn off the lower part of the
display if there is too much information in the display.
Display and setting:
"Graphic ON" : The display will turn on by using the whole part
of the display. (Default setting)
"Graphic OFF" : The display will turn on by using only the upper
part of the display and the IN indicator.
Contrast Adjustment
This adjustment permits easy viewing of the display.
Display and setting:
"Contrast 0" – "Contrast 10"
NOTE
The initial setting value is "5".
Dimmer
You can dim the display.
NOTE
The dimmer function is not available for units if the dimmer wire
is not connected.
Display and setting:
"Dimmer ON" : The dimmer setting is on. (Default setting)
"Dimmer OFF" : The dimmer setting is off.
— 30 —
Page 31

Clean Reception System Circuit (CRSC)
<In FM reception of Tuner mode>
Temporarily have reception switched from stereo to mono to
reduce multi-path noise when listening to the FM station.
Display and setting:
"CRSC ON" : The CRSC is on. (Default setting)
"CRSC OFF" : The CRSC is off.
NOTE
Strong electrical fields (such as from power lines) may cause
unstable sound quality when CRSC is turned on. In such a
situation, turn it off.
Reading the MP3 ID3 tag <in MP3 mode>
ID3 tag information in the MP3 file is configured for use.
Display and setting:
"ID3 Read ON" : ID3 tag is read.
"ID3 Read OFF" : ID3 tag is not read. (Default setting)
NOTE
• If you switch this setting during the play of MP3, the track is
replayed from the beginning.
• If you turn the ID3 tag read ON, beginning of the play is
delayed for reading process of each tag for the tune.
Switching the MP3 title information display
You can switch what you want to display for an ongoing tune.
Display and setting:
"ID3 DISP A" : Filename
"ID3 DISP B" : ID3 tag song title and its artist name (Default
setting)
"ID3 DISP C" : ID3 tag album name and its artist name
NOTE
If you don't turn the MP3 ID Read ON, the setup items will not
be displayed.
Text Scroll
This function permits the CD text, MD title and ID3 tag(Song
title, Artist, Album) to be scrolled and the entire text to be
displayed. Switching between manual scrolling and automatic
scrolling is permitted.
Display and setting:
"Scroll Auto" : Automatic scrolling (Default setting)
"Scroll MANU" : Manual scrolling
— 31 —
Page 32

External view Number of items
1
..........................................1
English
2
3
4
5
6
7
8
2CAUTION
The use of any accessories except for those provided might
result in damage to the unit. Make sure only to use the
accessories shipped with the unit, as shown above.
..........................................1
..........................................2
..........................................4
..........................................4
..........................................1
..........................................1
..........................................1
Installation ProcedureAccessories
1. To prevent a short circuit, remove the key from the ignition and
disconnect the - battery.
2. Make the proper input and output wire connections for each unit.
3. Connect the speaker wires of the wiring harness.
4. Connect the wiring harness wires in the following order: ground,
battery, ignition.
5. Connect the wiring harness connector to the unit.
6. Install the unit in your car.
7. Reconnect the - battery.
8. Press the reset button.
2CAUTION
• If your car's ignition does not have an ACC position, connect
the ignition wires to a power source that can be turned on and
off with the ignition key. If you connect the ignition wire to a
power source with a constant voltage supply, as with battery
wires, the battery may die.
• If the console has a lid, make sure to install the unit so that the
faceplate will not hit the lid when closing and opening.
• If the fuse blows, first make sure the wires aren’t touching to
cause a short circuit, then replace the old fuse with one with
the same rating.
• Do not let unconnected wires or terminals touch metal on the
car or anything else conducting electricity. To prevent a short
circuit, do not remove the caps on the ends of the
unconnected wires or the terminals.
• Connect the speaker wires correctly to the terminals to which
they correspond. The unit may be damaged or fail to work if
you share the - wires or ground them to any metal part in the
car.
• After the unit is installed, check whether the brake lamps,
blinkers, wipers, etc. on the car are working properly.
• Insulate unconnected wires with vinyl tape or other similar
material.
• Some disc changers need conversion cords for connection. See
the section on "Safety Precautions" for details.
• Mount the unit so that the mounting angle is 30° or less.
— 32 —
Page 33

Connecting Wires to Terminals
ANT.
CONT.
ILLUMI
P.CONT.
+
+
+
+
FRONT • L
FRONT • R
REAR • L
REAR • R
–
+
FRONT
REAR
2WARNING
If you connect the ignition wire (red) and the battery
wire (yellow) to the car chassis (ground), you may
cause a short circuit, that in turn may start a fire.
Always connect those wires to the power source
running through the fuse box.
2CAUTION
When only two speakers are being connected to the
system, connect the connectors either to both the
front output terminals or to both the rear output
terminals (do not mix front and rear). For example, if
you connect the + connector of the left speaker to a
front output terminal, do not connect the - connector
to a rear output terminal.
If no connections are made, do not let the wire come out from the tab.
When using the optional power amplifier, connect
to its power control terminal.
Rear right output (Red)
Rear left output (White)
Front right output (Red)
Front left output (White)
FM/AM antenna input
Power control wire (Blue/White)
Wiring harness
(Accessory1)
To KENWOOD disc changer/
DAB control input/
KPA-SD100/KPA-HD100/KPASS100
NOTE
To connect these leads, refer to the
relevant instruction manuals.
Fuse (10A)
Depending on what antenna you are using, connect
either to the control terminal of the motor antenna, or
to the power terminal for the booster amplifier of the
film-type antenna.
To car light control switch
Ignition key
switch
Car fuse
box
(Main fuse)
Battery
Motor antenna control wire (Blue)
Dimmer control wire (Orange / White)
ACC
Car fuse box
Ignition wire (Red)
Battery wire (Yellow)
Ground wire (Black) - (To car chassis)
— 33 —
White/Black
White
Gray/Black
Gray
Green/Black
Green
Purple/Black
Purple
To front left
speaker
To front right
speaker
To rear left
speaker
To rear right
speaker
Page 34

Installation
6 mm
MAX.
M5mm
M5mm
6 mm
MAX.
■
Installation
Firewall or metal support
English
Accessory6
Self-tapping
screw
(commercially
available)
NOTE
Make sure that the unit is installed securely in place. If the unit
is unstable, it may malfunction (for example, the sound may
skip).
Accessory2
Metal mounting
strap
Bend the tabs of the
mounting sleeve with
a screwdriver or
similar utensil and
attach it in place.
■
Installing in Japanese-Made Cars
1
Refer to the section “Removing the hard rubber frame (P. 35)”
and then remove the hard rubber frame.
2
Mount the J-Car trim plate with the thick part at the
bottom.
3
Align the holes in the unit (two locations on each side) with
the vehicle mounting bracket and secure the unit with the
accessory screws.
T
N
Accessory8
J-Car Trim Plate
(place thick part on
bottom)
2CAUTION
N
T/N
T
T: Toyota cars
N: Nissan cars
4
Accessory4...for Nissan car
Accessory5 ...for Toyota car
5
• During installation, do not use any screws except for those
provided. The use of different screws might result in damage
to the main unit.
• Damage may occur if a screwdriver or similar tool is used with
excessive force during the installations.
— 34 —
Page 35

Installation
■
Removing the hard rubber frame
1
Refer to the section “Theft deterrent faceplate (P. 14)” and
then remove the faceplate.
2
Engage the catch pins on the removal tool and remove the
two locks on the upper level.
Push upward the frame and pull it forward as shown in the
figure.
Lock
Catch
Accessory3
Removal tool
3
When the upper level is removed, remove the lower two
locations.
NOTE
The frame can be removed from the bottom side in the same
manner.
■
Removing the Unit
1
Refer to the section “Removing the hard rubber frame” and
then remove the hard rubber frame.
2
Remove the Hex-head screw with integral washer (M4×8) on
the back panel.
3
Insert the two removal tools deeply into the slots on each
side, as shown.
Accessory6
Accessory3
Removal tool
4
Push upward the removal
tool toward the top, and
pull out the unit halfway
whilst pressing towards the
inside.
2CAUTION
Be careful to avoid injury from the catch pins on the removal
tool.
5
Pull the unit all the way out
with your hands, being
careful not to drop it.
Catch facing up
— 35 —
Page 36

Installation
■
Locking the faceplate to the unit
If you want to lock the faceplate to the unit so that it does not
fall off, follow the directions below.
English
1
Refer to the function "Theft Deterrent Faceplate" (page 14) and
remove the faceplate.
2
Insert the provided screw into the hole at the center of the
bottom side of the faceplate which you have removed from
the unit.
Accessory7
3
Push back the bottom of the faceplate bracket unit it locks.
4
Refer to the section "Theft Deterrent Faceplate (page 14)" and
then reattaching the faceplate.
2CAUTION
Never insert the taptite screws (ø2 × 4 mm) in any other screw
holes than the one specified. If you insert it in another hole, it
will contract and may cause damage to the mechanical parts
inside the unit.
— 36 —
Page 37

Troubleshooting Guide
What might seem to be a malfunction in your unit may just be the result of slight misoperation or miswiring.
Before calling service, first check the following table for possible problems.
SOLUTIONPOSSIBLE CAUSEPROBLEM
The power does not turn on. The fuse has blown. After checking for short circuits in the wires, replace the
No sound can be heard, or the
volume is low.
Attenuator is turned on. Turn off Attenuator.
The fader or balance settings are set all the way to one
side.
The input/output wires or wiring harness are connected
incorrectly.
The values of Volume offset are low. Increase the values of Volume offset. (see p. 12)
fuse with one with the same rating.
Reset the fader or balance settings.
Reconnect the input/output wires or the wiring harness
correctly. See the section on "Connecting Wires to
Terminals".
Nothing happens when the
buttons are pressed.
The sound quality is poor or
distorted.
Radio reception is poor. The car antenna is not extended. Pull the antenna out all the way.
The memory is erased when
the ignition is turned off.
A CD ejects as soon as it is
loaded.
The sound skips on a CD. The CD is scratched or dirty. Clean the CD, referring to the section on "Cleaning CDs"
A track will not play. Random play has been selected. Turn off random play.
The computer chip in the unit is not functioning normally. Press the reset button on the unit (see p. 5).
One of the speaker wires is being pinched by a screw in
the car.
The speakers are not wired correctly. Reconnect the speaker wires so that each output
The antenna control wire is not connected. Connect the wire correctly, referring to the section on
The battery wire has not been connected to the proper
terminal.
The ignition and battery wire are incorrectly connected.
The CD is upside-down. Load the CD with the labeled side up.
The CD is quite dirty. Clean the CD, referring to the section on "Cleaning CDs"
Check the speaker wiring.
terminal is connected to a different speaker.
"Connecting Wires to Terminals".
Connect the wire correctly, referring to the section on
"Connecting Wires to Terminals".
Connect the wire correctly, referring to the section on
"Connecting Wires to Terminals".
(see p. 6).
(see p. 6).
— 37 —
Page 38

Troubleshooting Guide
POSSIBLE CAUSEPROBLEM
Can’t remove disc. The cause is that more than 10 minutes has elapsed
since the vehicle ACC switch was turned OFF.
English
SOLUTION
The disc can only be removed within 10 minutes of the
ACC switch being turned OFF. If more than 10 minutes
has elapsed, turn the ACC switch ON again and press
the Eject button.
Free switching of the sound
quality.
Audio control setting cannot be
achieved.
Cannot play an MP3 file. Not conforming to ISO 9660 Level 1/2. Use a medium conforming to ISO 9660 Level 1/2.
Noise or no sound generated
when an MP3 file is played.
Takes time before the unit
starts playing MP3 files.
Fails to play MP3 files in the
intended order.
The sound skips when an MP3
file is being played.
The system Q function is set on Scan mode. Refer to the “System Q” page and switch it to a
The system Q function is set on Scan mode. Refer to the “System Q” page and switch it to a
The MP3 file has no or invalid filename extension. Add the ".MP3" extension to the MP3 file name.
The media is scratched or dirty. Clean the media, referring to the section on "Cleaning
The file has the MP3 filename extension while it is not an
MP3 file.
The medium contains many folders, files, and hierarchical
levels.
The MP3 files were not written by the CD writer in the
order in which you wanted them to be played.
The media is scratched or dirty. Clean the media, referring to the section on "Cleaning
function other than Scan mode. (see p. 12).
function other than Scan mode.(see p. 12).
CDs" (see p.6).
Do not use the ".MP3" extension in non-MP3 files.
The unit checks all files on the loaded medium first. If
the medium has many files recorded, it may take a long
time for the unit before it starts playing MP3 files.
Depending on the CD writer, you may be able to set the
order in which MP3 files are to be played by writing
them onto a medium with their file names beginning
with play sequence numbers such as "01" to "99".
CDs" (see p.6).
— 38 —
Page 39

Troubleshooting Guide
CD/MP3/External disc control mode
SOLUTIONPOSSIBLE CAUSEPROBLEM
The disc control mode cannot
be selected.
The specified disc does not
play, but another one plays
instead.
The sound skips. Something is touching the disc changer. Remove whatever is touching it.
The display shows that the
changer is being played, but no
sound can be heard.
The specified track will not
play.
Track repeat, disc repeat, track
scan, random play, and
magazine random play start by
themselves.
Cannot play CD-R or CD-RW Finalization processing is not being conducted for CD-
No wire has been connected to the disc changer input
terminal on the unit.
The specified CD is quite dirty. Clean the CD.
The CD is upside-down. Load the CD with the labeled side up.
The disc is loaded in a different slot from that specified. Eject the disc magazine and check the number for the
The disc is severely scratched. Try another disc instead.
The CD is scratched or dirty. If skipping happens at the same place when the car is
The computer chip in the unit is not functioning normally. Press the reset button on the unit (see p. 5).
Random play or magazine random play has been
selected.
The setting is not cancelled. The settings for these functions remain on until the
R/CD-RW.
A non-compatible CD changer is being used to play the
CD-R/CD-RW.
Connect the wire to the disc changer input terminal on
the unit.
specified disc.
stopped, something with the CD is wrong. Clean the CD.
Turn off random play or magazine random play.
setting to off or the disc ejected, even if the power is
turned off or the source changed.
Conduct finalization processing with CD recorder.
Use a CD changer compatible with CD-R/CD-RW to play.
If the following situations, consult your nearest service center:
• Even though the disc changer is connected, the Disc Changer Mode is not on, with "AUX" showing in the display during the Changer Mode.
• Even though no device (KCA-S210A, CA-C1AX, KDC-CPS87, KDC-CX87, KDC-CPS85, KDC-CX85, KDC-CPS82 or KDC-CX82) is connected, the AUX Mode is
entered when switching modes.
— 39 —
Page 40

Troubleshooting Guide
The following messages are displayed when certain problems are occurring in your system. Take the
recommended actions.
Eject
English
No Disc
TOC Error
Blank DISC
No Tr DISC
NO PANEL
E-77
Mecha Error
Hold Error
IN
No disc magazine has been loaded in the changer. The disc magazine is not completely loaded.
] Load the disc magazine properly.
No CD in the unit.
] Insert the CD.
No disc has been loaded in the disc magazine.
] Load a disc into the disc magazine.
No disc has been loaded in the disc magazine.
] Load a disc into the disc magazine.
The CD is quite dirty. The CD is upside-down. The CD is scratched a lot.
] Clean the CD and load it correctly.
Nothing has been recorded on the MD.
No tracks are recorded on the MD, although it has a title.
The faceplate of the slave unit being connected to this unit has been removed.
] Replace it.
The unit is malfunctioning for some reason.
] Press the reset button on the unit. If the "E- 77" code does not disappear, consult your nearest service center.
Something is wrong with the disc magazine. Or the unit is malfunctioning for some reason.
] Check the disc magazine. And then press the reset button on the unit. If the "Mecha Error" code does not disappear,
consult your nearest service center.
The protective circuit in the unit activates when the temperature inside the automatic disc changer exceeds 60°C (140°F),
stopping all operation.
] Cool down the unit by opening the windows or turning on the air conditioner. As the temperature falls below 60°C (140°F),
the disc will start playing again.
If this indicator blinks, the CD player is malfunctioning.
] Eject the CD and try inseting it again.
If the CD cannot be ejected, press the eject button and hold it in until the CD is ejected.
— 40 —
Page 41

Specifications
Specifications subject to change without notice.
FM tuner section
Frequency range (200 kHz space) ............87.9 MHz – 107.9 MHz
Usable sensitivity (S/N = 30dB) ....................9.3dBf (0.8 µV/75 Ω)
Quieting Sensitivity (S/N = 50dB) ...............15.2dBf (1.6 µV/75 Ω)
Frequency response (±3 dB) .................................30 Hz – 15 kHz
Signal to Noise ratio (MONO)..............................................70 dB
Selectivity (±400 kHz).......................................................≥ 80 dB
Stereo separation (1 kHz) ....................................................40 dB
AM tuner section
Frequency range (10 kHz space) ...................530 kHz – 1700 kHz
Usable sensitivity (S/N = 20dB) .............................28 dBµ (25 µV)
CD player section
Laser diode ....................................................GaAlAs (λ=780 nm)
Digital filter (D/A)......................................8 Times Over Sampling
D/A Converter .......................................................................1 Bit
Spindle speed...............................................500 – 200 rpm (CLV)
Wow & Flutter........................................Below Measurable Limit
Frequency response (±1 dB) .................................10 Hz – 20 kHz
Total harmonic distortion (1 kHz) ......................................0.01 %
Signal to Noise ratio (1 kHz) ................................................93 dB
Dynamic range ....................................................................93 dB
Channel separation..............................................................85 dB
Audio section
Maximum output power................................................47 W × 4
Full Bandwidth Power (at less than 1% THD) ...............22 W × 4
Tone action
Bass : ..........................................................100 Hz ±10 dB
Middle : .........................................................1 kHz ±10 dB
Treble :.........................................................10 kHz ±10 dB
Preout level / Load (during disc play) ...................1800 mV/10 kΩ
Preout impedance............................................................≤ 600 Ω
General
Operating voltage (11 – 16V allowable) ..............................14.4 V
Current consumption.............................................................10 A
Installation Size (W x H x D) .........................182 × 53 × 162 mm
7-3/16 × 2-1/16 × 6-5/16 in..
Weight...................................................................4.0 lbs (1.7 kg)
— 41 —
 Loading...