

Kenwood KDC-MP632U - USB/AAC/WMA/MP3/CD Receiver With External Media Control, KDC-MP632U, KDC-MP532U Instruction Manual
KDC-X590
KDC-MP632U
KDC-MP532U
CD-RECEIVER
INSTRUCTION MANUAL
AMPLI-TUNER LECTEUR DE CD
MODE D'EMPLOI
REPRODUCTOR
DE
DISCOS
COMPACTOS
RECEPTOR
DE
FM/AM
MANUAL DE INSTRUCCIONES
Kenwood Corporation
SIRIUS~
REA
0 Y
H3'Radio®
'!JREADY
~
AAC
~
PHATNOISE
Take
the
timetoread through this instruction manual.
Familiarity with installation and operation procedures will help you obtain
the
best
performance from your new CD-receiver.
For
your
records
Record the serial number, found on the backofthe unit, in the
spaces
designated on the
warranty card, and in the space provided below.
Refertothe model and serial numbers
whenever you call upon your Kenwood dealer for information or service on the product.
Model KDC-X590/MP632U/MP532U
Serial
number
_
US
Residence
Only
© 864-3343-00/01
(KW)
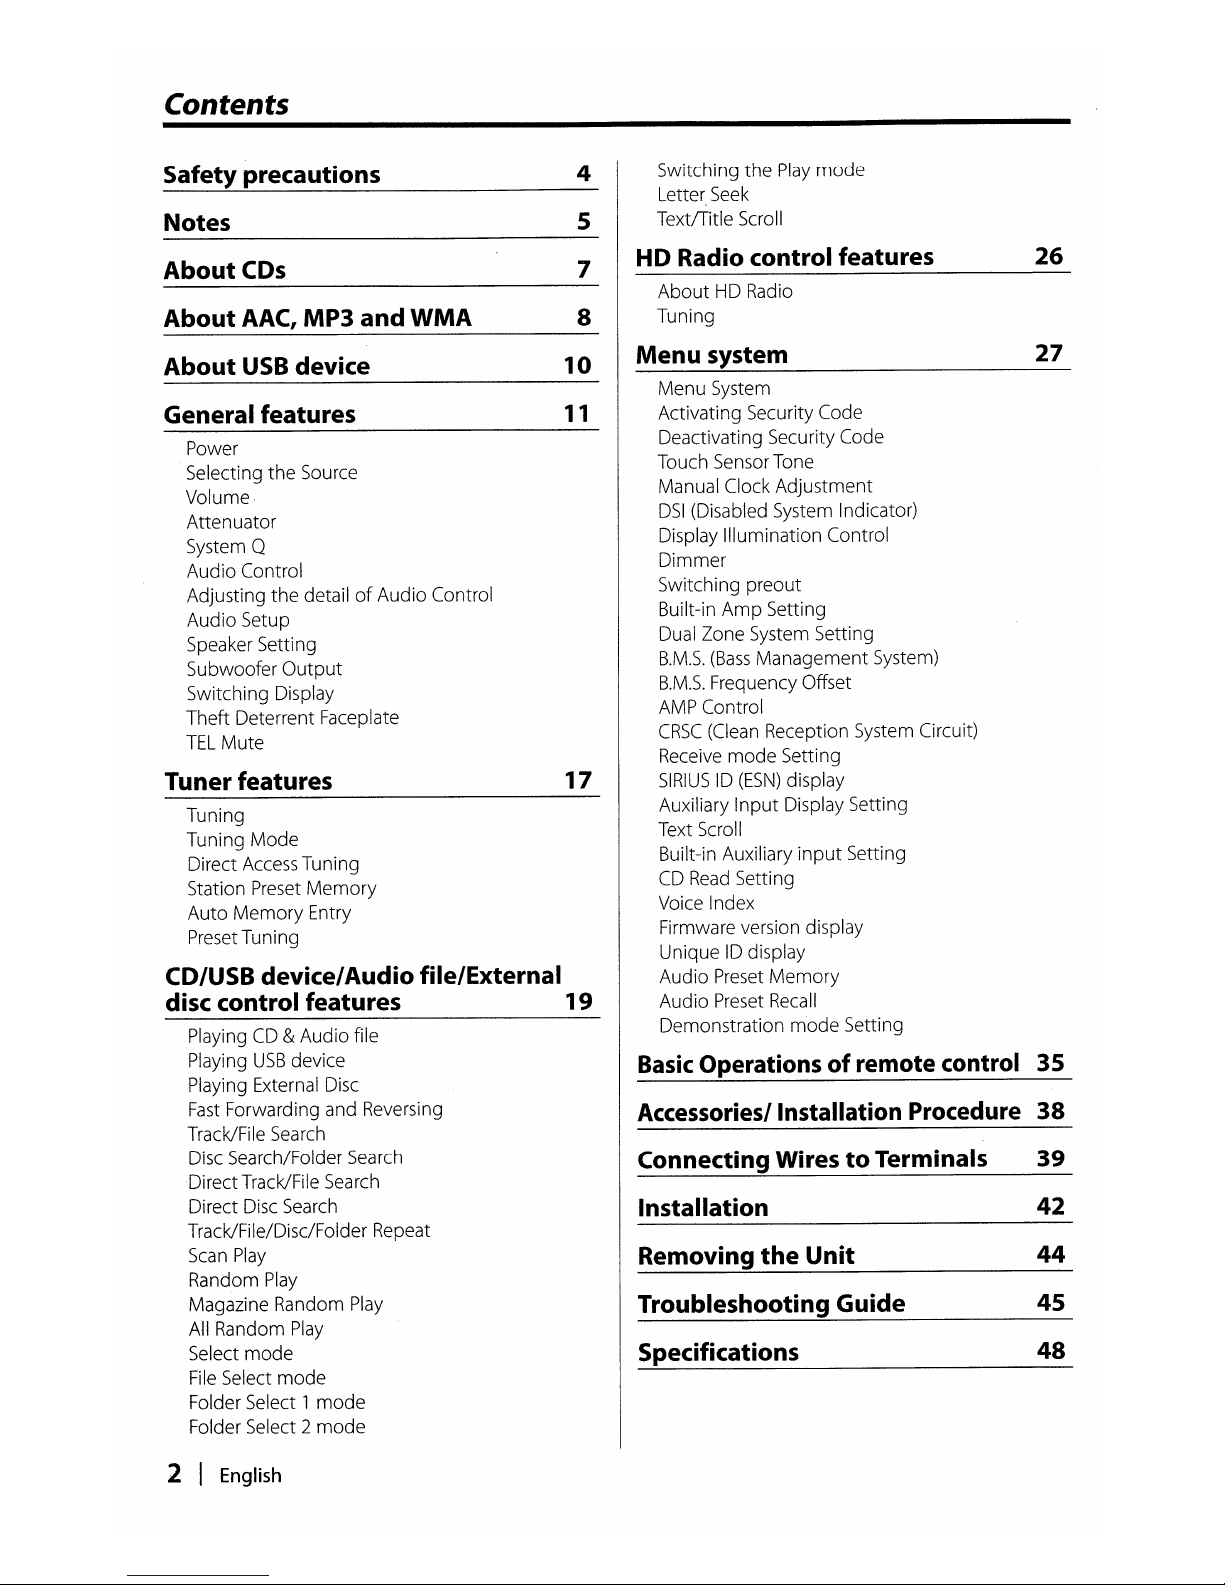
Contents
Safety precautions
4
Switching
the
Play
mode
Letter. Seek
Notes
5
TextlTitle Scroll
About
CDs
7
HD Radio control features
26
About
HD Radio
About
AAC,
MP3 and
WMA
8
Tuning
About
USB
device
10
Menu
system
27
Menu
System
General features
11
Activating Security Code
Power
Deactivating Security Code
Selecting
the
Source
Touch Sensor Tone
Volume
Manual Clock
Adjustment
Attenuator
DSI
(Disabled System Indicator)
System
Q
Display
Illumination
Control
Audio
Control
Dimmer
Adjusting
the
detailofAudio
Control
Switching
preout
Audio
Setup
Built-in
Amp
Setting
Speaker Setting
Dual Zone System Setting
Subwoofer
Output
B.M.S.
(Bass
Management
System)
Switching Display
B.M.5.
Frequency Offset
Theft
Deterrent Faceplate
AMP Control
TEL
Mute
CRSC
(Clean Reception System Circuit)
Receive
mode
Setting
Tuner features
17
SIRIUS10(ESN)
display
Tuning
Auxiliary
Input
Display Setting
Tuning
Mode
Text Scroll
Direct Access Tuning
Built-in Auxiliary
input
Setting
Station Preset
Memory
CD
Read
Setting
Auto
Memory
Entry
Voice Index
Preset Tuning
Firmware version display
Unique
10
display
CD/USB device/Audio file/External
Audio
Preset
Memory
disc control features
19
Audio
Preset Recall
Playing
CD&Audio
file
Demonstration
mode
Setting
Playing
USB
device
Basic
Operationsofremote control
35
Playing External Disc
Fast
Forwarding and Reversing
Accessories/Installation Procedure
38
Track/File Search
Disc Search/Folder Search
Connecting WirestoTerminals
39
DirectTrack/File Search
Direct Disc Search
Installation
42
Track/File/Disc/Folder Repeat
Scan
Play
Removing
the
Unit
44
Random
Play
Magazine Random Play
Troubleshooting Guide
45
All Random
Play
Select
mode
Specifications
48
File Select
mode
Folder Select 1
mode
Folder Select 2
mode
2
I
English
ACAUTION
Useofcontrols or adjustments or performance
of
procedures other than those specified herein may
result in hazardous radiation exposure.
In
compliance
with
Federal Regulations, following
are
reproductionsoflabels on, or inside
the
product
relatingtolaser
product
safety.
Kenwood Corporation
2967-3, ISHIKAWA-MACHI,
HACHIOJI-SHI
TOKYO,
JAPAN
KENWOOD
CORP.
CERTIFIES
THIS
EQUIPMENT
CONFORMSTODHHS
REGULATIONS
NO.21
CFR
1040.10,
CHAPTER1,SUBCHAPTER
J.
Location: Bottom
Panel
FCC
WARNING
This
equipment
may generate or
use
radio
frequency energy. Changes or modifications
to
this
equipment
may cause harmful interference
unless the modifications
are
expressly approved
in
the
instruction manual. The user could lose
the
authoritytooperate this
equipmentifan
unauthorized changeormodificationismade.
NOTE
This
equipment
has
been tested and found
to
comply
with
the
limits for a
Class
Bdigital device,
pursuant
to
Part15of
the
FCC
Rules.
These limits
are
designedtoprovide reasonable orotection
against harmful interference in a residential
installation. This
equipment
may cause harmful
interference
to
radio communications,ifit
is
not
installed and used in accordance
with
the
instructions. However, there
is
no guarantee
that
interference will
not
occur in a particular
installation. Ifthis
equipment
does cause harmful
interference
to
radioortelevision reception, which
can be determined
by
turning
the
equipment
off
and on,
the
userisencouragedtotrytocorrect
the interference by one
or
moreofthe following
measures:
• Reorient or relocate the receiving antenna.
• Increase the separation between
the
equipment
and receiver.
• Connect the
equipment
intoanoutlet
on a
circuit different from
thattowhich
the
receiver
is
connected.
• Consult the dealer or
an
experienced radiolTV
technician for help.
English
I 3
Safe,ty'precautions
AWARNING
To
p.revent
injury
or
fire,
take
the
following precautions:
•Topreventa
short circuit, never
putorleave any
metallic objects (such
as
coinsormetal tools)
inside
the
unit.
•
Mounting
andwiri·rig
this
product
requires
skills
and
experienc:e. For safety's
sake,
leave
the'
mou
ntingand.wiri
ng'
worktoprofessiona
Is.
Attach
thepanel·while.youare
on
the
.
vehicle
The panel lock arm appears
when
the
panel
is
removed. Therefore,
the
panel
must
be attached
while
the
electrical systemofthe
carisoperating.
ACAUTION
To
prevent
damage
to·
the
machine,
take
the
following precautions:
• Make suretoground
the
unittoa negative
12V
DC
power
supply.
•
Do
not
install
the
unit
in a
spot
exposedtodirect
sunlightorexcessive
heatorhumidity. Also avoid
places
with
too
much
dustorthe
possibility
of
water
splashing.
•
Do
not
place
the
faceplate (and
the
faceplate
case) in areas exposed
to
direct
sunlight, excessive
heat
or
humidity. Also avoid places
with
too
much
dustorthe
possibilityofwater
splashing.
•
To
prevent deterioration,donot
touch
the
terminalsofthe
unitorfaceplate
with
your
fingers.
•
Do
not
subject
the
faceplatetoexcessive shock,
as·itis
a pieceofprecision
equipment.
•
When
replacing a fuse,
only
use a
new
fuse
with
the
prescribed rating. Using a fuse
with
the
wrong
rating may cause
your
unittomalfunction.
•
Do
not
apply
excessive forcetothe
open
faceplateorplace objectsonit. Doingsowi(1
cause
damageorbreakdown.
•
Do
not
use
your
own
screws.
Use
only
the
screws
provided.
If
you use
the
wrong
screws, you
could
damage
the
ulllit.
Do
Not
LO'ad
3-in..
CDs
i'n
the
CD slot
If
you
trytoload a 3 in. CD
with
its adapter
into
the
unit,
the
adapter
might
separate
from
theCDand
damage
the
unit.
About CD players/disc changer:s
connectedtothis
unit
Kenwood disc:changers! CD players released in
1998
or
later
canbeconnectedtothis unit.
Refer
to
the
catalogorconsult
your
Kenwood
dealer
for
connectable
modelsofdisc
changers!
CD
players.
Note
that
any Kenwood disc
changers/COplayers
released in 1997orearlier and disc changers
made
by
other
makers
cannotbeconnected
tothis
unit.
Connecting
unsupported
disc changers!CD players
to
this
unit
may
result in damage.
Set
the
"O-N" Switchtothe
"N" position
for
the
applicable Kenwood disc
changers/
CD players.
The
functions
you can use and
the
information
that
can be displayed
may
differ
dependingonthe
models
being
connected.
~
•
You
can
damage both your unit and theCDchanger
if
you
connectthem
incorrectly.
LX-bus connection
TheLXAMP
and
the
sensor
unit
mustbeconnected
oneata time.
Lens Fogging
When you
turnonthe
car heaterincold
weather,
deworcondensation
may
form
onthe
lens in
the
CD
playerofthe
unit. Called lens fogging, this
condensation
on
the
lens
may
not
allow
CDs
to
play. In such a situation, remove
the
disc and
wait
for
the
condensationtoevaporate.Ifthe
unit
still
does
not
operate
normally
after a while,
consult
your
Kenwood dealer.
The "AAC·
logoistrademarkofDolby
Laboratories.
NOTE
This
Class
Bdigital apparatus complies
with
Canadian
ICES-003.
Notes
-NoUSB
device comes
with
this unit.
You
need
to
purchase a commercially available
USB
device.
For
the typesofavailable
USB
devices, referto<About
USB
device> (page
10).
- Ifyou experience problems during installation,
consult your Kenwood dealer.
- When you purchase optional accessories, check
with
your Kenwood dealertomake
sure
that
they
work
with
your model and in your
area.
-
We
recommend
the
useof<Activating Security
Code> (page
28)toprevent theft.
- The characters which can be displayed by this
unit
are
A-Z 0-9 @
III
' %&* +- = , .
1\
< >[]()
:;
1\ -
{}
I
~.
- The illustrationsofthe
display and the panel
appearing in
this
manual
are
examples used
to
explain more clearly
how
the
controls
are
used.
Therefore,
what
appears on the display in the
illustrations may differ from what appears on the
display on the actual equipment, and some
of
the
illustrations on
the
display may be inapplicable.
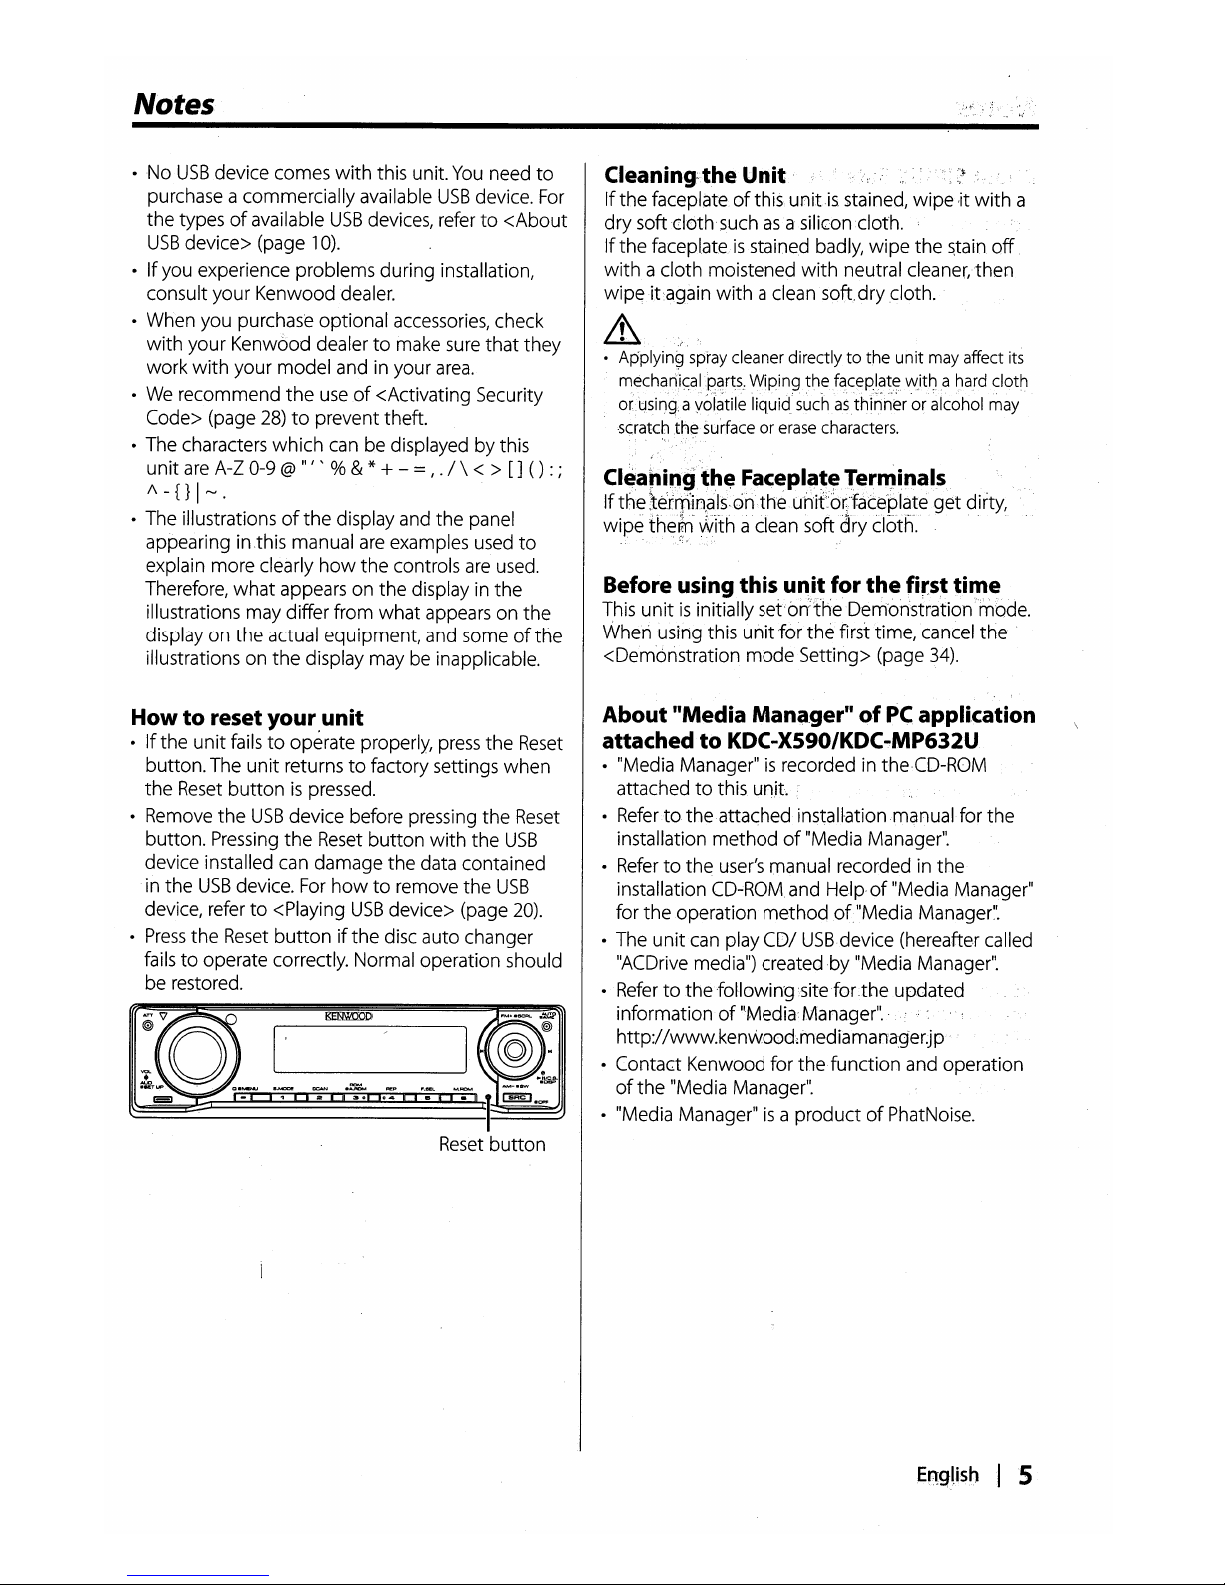
Howtoreset your
unit
- Ifthe unit failstooperate properly,
press
the
Reset
button.The unit returnstofactory settings when
the
Reset
buttonispressed.
- Remove
the
USB
device before pressing the
Reset
button.
Pressing
the
Reset
button
with the
USB
device installed can damage the data contained
in the
USB
device.
For
howtoremove the
USB
device, referto<Playing
USB
device> (page
20).
-
Press
the
Reset
buttonifthe
disc auto changer
fails
to
operate correctly. Normal operation should
be restored.
Cleaning~the
Unit·
Ifthe faceplateofthis
unit
is.
stained, wipe
,it
with
a
dry soft
doth
such
asasiliconcloth.
If the faceplateisstained badly, wipe the
~tain
off
with
a cloth moistened
with
neutral cleaner,
then
wipeitagain
with
a clean soft.drycloth.
& .1
• Applying
spray
cleaner
directly to the unit
may
affect
its
mecharii~alJ?Clrts.,
WIping.thefaceplat~
wIttJa
hard
dotll
ortlsing; ayolatile liquid
suchasthihn~r
'or
alcohol
may
-scratch
the
surfaceorerase
characters.
C1eaoin9
th~
Fac~pla~~Termil1als
If
the
lerrTfin,als~onthe.
unit"or;"facepl(3~e
get dirty,
wipe
the~
vVlth
a clean soft dry cloth.
Before using this ul1itfor
the
first ti't,lf!
This
unitisinitially sei'bn::theDem'onstration 'mode.
When using this
unit
for
the
first time, cancel
the
<Demonstration
mode
Setting> (page
34).
About "Media Mana.ger"ofPC
application
attached
to
KDC-X590/KDC
...
MP632U
- "Media Manager"isrecorded in the,CD-ROM
attached
to
this unit.
-
Refertothe attached install·ationmanualfor the
installation
methodof"Media
Manage(
-
Refertothe
user's
manual recorded in the
installation
CD~ROM
and Help,of"Media Manager"
for
the
operation
method
ofllMedia
Manager~'.
- The unit can play COl
USB
device (hereafter called
"ACDrive media") created
by
"Media Manager".
-Refertothefollowingositefor.theupdated
informationof"Media:Manager"
..
http://www.kenwood;rnediamanag·er.jp
• Contact Kenwood for the function and operation
of
the
"Media Manager".
- "Media Manager"
is
a productofPhatNoise.
En:gl.ishlS
Notes
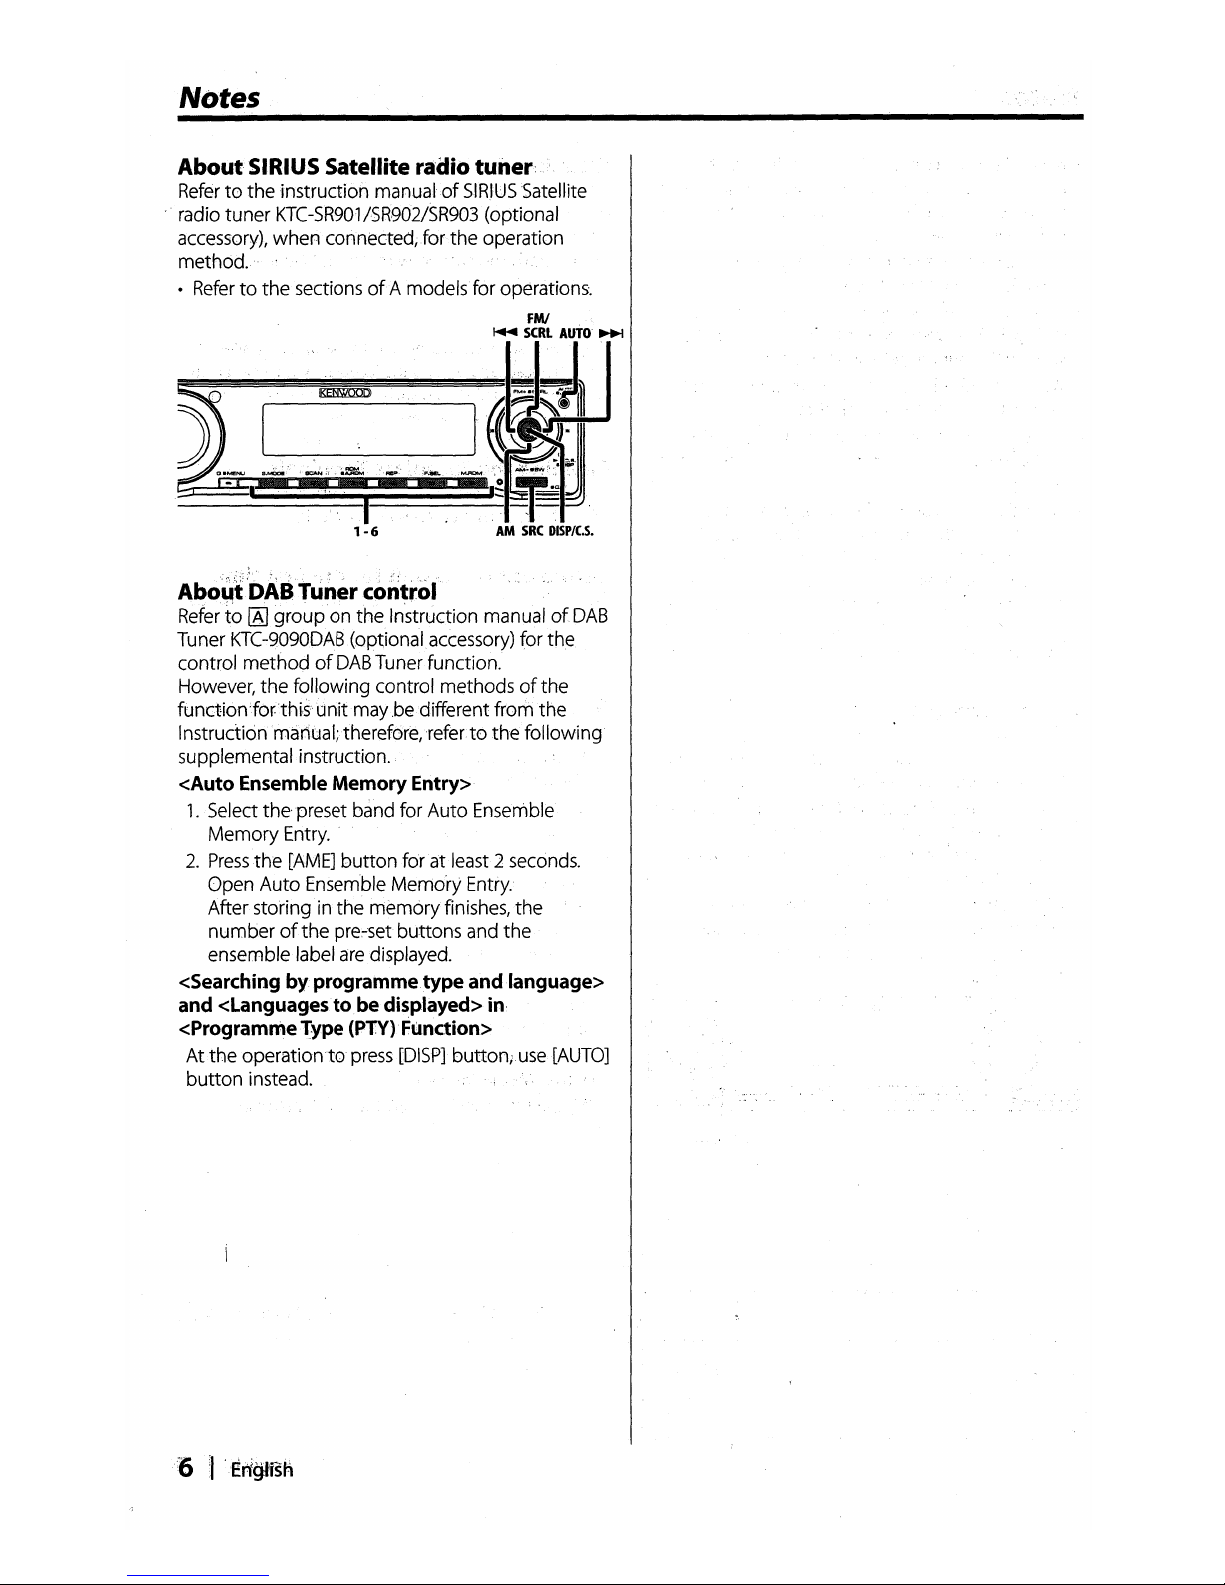
About
SIRIUS
Satellite radio tuner:
Refertothe
instruction
manualof
SIRIUS
Satellite
radio tuner
KTC
-SR901
/SR902/SR903 (optional
accessory),
when
connected;
for
the operation
method.
•
Refertothe
sectionsofA models for operations.
FMI
"'7,_
...
iii
.....
5,~i~1
----I
.
~
1 - 6
AM
SRC
DISPIC.S.
A~o~t'DABTunercontrol
Refer
to~grouponthe
Instruction manualofDAB
Tuner KTC-9090DAB(optionalaccessory) for
the
control
methodofDAB
Tuner function.
However,
the following control methodsofthe
function;for-thi,s'
llnitmay
.bedifferentfrom
the
Instructionmanual;therefore,referto
the
following
supplemental·instruction.
<Auto Ensemble Memory Entry>
1
..
Select
the
preset band for Auto Ensenible
Memory
Entry.
2.
Press
the
[AME]
button
forat·Ieast2 seconds.
Open Auto Ensemble Memdry Entry.
Afterstoring
in
the
memory
finishes, the
numberofthe
pre~set
buttons and
the
ensemble label
are
displayed.
<Searching by
programmetype
and language>
and <Languagestobedisplayed> in,
<ProgrammeType
(PTY)'
Function>
Atthe
operationto
press
[DISPl buttonjuse[AUTO]
button
instead.
About
CDs
Removing CDs
When
removing
CDs
from this unit,
pullthem
out
horizontally.
•
CDs
with
coloring on
the
recording surface or
CDs
that
are
dirty cannot be used.
• This
unit
can
only
play
the
CDs
with
lillm
lillm
DlOITALAUIIIQ
~
This
unit
may
not
correctly play discs which
do
not
have the mark.
•
You
cannot playa
CD-RorCD-RW
that
has
not
been finalized.
(For
the finalization process refer
to
your CD-RlCD-RW writing software, and your
CD-
RlCD-RW recorder 'instruction manual.)
CD storage
• Do
not
place
CDs
in direct sunlight
(On
the
seat
or dashboard etc.) or where the temperature
is
high.
• Store
CDs
in their
cases.
CDs
that
cannotbeused
•
CDs
that
are
not
round cannot be used.
When
using a
new
CD
If
theCDcenter hole or outside rim
has
burrs,
use
theCD
only
after removing
the
burrs
with
a
ballpoint pen, etc.
Handling
CDs
• Do
not
touch
the
recording surfaceofthe
CD.
•
CD-R
and CD-RW are easiertodamagethan
a
normalmusictb.
LJse'aCD-R or a'ED-RW'
after"
reading
the
caution items
oh:the
pat.kage
et<::
• Do
not
stick tape etc. on the
CD,oruseaCD
with
tape stuckonit
CD accessories
0.0
not
use,
disc,type
accessori~s.
CD
cleaning
Clean from
the
centerofthe
disc and move
outward.
The
-playable
'AAC/MP3IWMA
file (hereafter
called
Audio
file)
and
the
media format
has
the following
limitation.
The
Audio
file,
whichisnot conforming
to the specification,
may
not
play
normally,orthe
file
and
folder
names
r0~y'.Qot.9i?el.a.Y;
((~rr,~~t.I¥-
Playable
AudiC),
file
•
AAC,
MP3,
WMA
&
• Attach the
corre~textension
for the Audio
file.·
(AAC:
".M4N,
MP3:
".MP3",WMA:".WMN)
•Donot
attach the exterisions to
files
otherthan''the
Audio
file.
Ifthe extensionisattached,
the
file,
which
is
.not the Audio
file,
will
play
and
outputs aloudhoise,
causing
damage to
th~speaker.
"
•
The
files
with copy protection cannotbeplayed.
• Audio
files
cannotbeplayed
dependingonthe
encQding
software setting,
USB
device
type,
and/orrecording
conditions.
•
The
unit
may
notbecompatible with upgrade
of
c0ri1pression
format
standard
and
aqditional
specifications.
•
For
detailsontheformats
used
for
USB
devices
and
restrictions,:
refer
,to
http://www.kenwood.com/usb/.
Playable
AAC
file
•
l.
m
4a"
file encoded by
AAC
-LC
format.
Refer
to http://www.kenwood.mediamanager.jp
for the
details.
Playable
MP3
file
•
MPEG
1/2 Audio
Layer
3file
•
Transfer
bit
rate:
8-320
kbps
• Sampling frequency:
16,
22.05,
24,
32,44.1,48kHz
Playable
WMA
file '
•
The
fileinaccordance with Windows
Media
Audio
(Except
for the file for Windows Media
Player
9 or
after which applies
the
new functions)
•
Transfer
bit
rate:
48-192
kbps
• Sampling frequency: 32,44.1,48
kHz
Playable Storage media
•
CD-ROM,
CD-R,
CD-RW
•
USB
device
~
~
•
CD-RW
discs
which
are
qUick
formattedbythe writing
software cannot
be
used.
•
When
r~cording
to the maximum
CD-RlRW
media
capacityatonce,
the writing
softwareissetto"Disc
at
once".
•
For
detailsonthe
available
USB
devices,
refer
to <About
USB
device>
(page
10).
'8,'
11,
English
Playable CD-R/RW format
•
ISO
9660
Level
1/2
• Joliet
•
Romeo
•
Lo.ng
file
name.
Playable file forrr-at
of
USB
device ,
•
For
the formats supported by
USB
devices,
refer
to
http://www.kenwood.com/usbl.
The maximum
numberpf
characters
for
display
(CD-R/RWl
F,ile/FQI,der
name:
128
characters
MP3
103
Tag/
WMA
Contents property:
30
characters
AAC
song
information:
60characte~s
.
~
'.
~
•
File/Folder
nameIsthe number ofthe
characters
including the
extensions.
•
This
unit
can
display
the following
versionsofMP3
ID3
tag:.version
1.0/ 1.1/
2.2/
2.3
•
AAC
ID3
Tag
cannotbedisplayed.
Limitationofstructure for
the
file and
the
folder (CD-R/RW)
• Maximum numberofdirectory
levels:
8
• Maximum numberoffolders:
100
• Maximum numberoffiles
per folder:
4096
About partitionofthe
USB
device
• While using the
USB
device,
virtual folders
are
created
to control the partitioninthe
USB
device.
These
folders appearinthe first
level
(root)
directory
as
"#:".
"#"
isanalphabet to identify
each
partition.
•
Even
when the
USB
device
does
n'ot
have
partition,
"A:"
folderiscreated,and audio
files
are
controlled inside this folder.
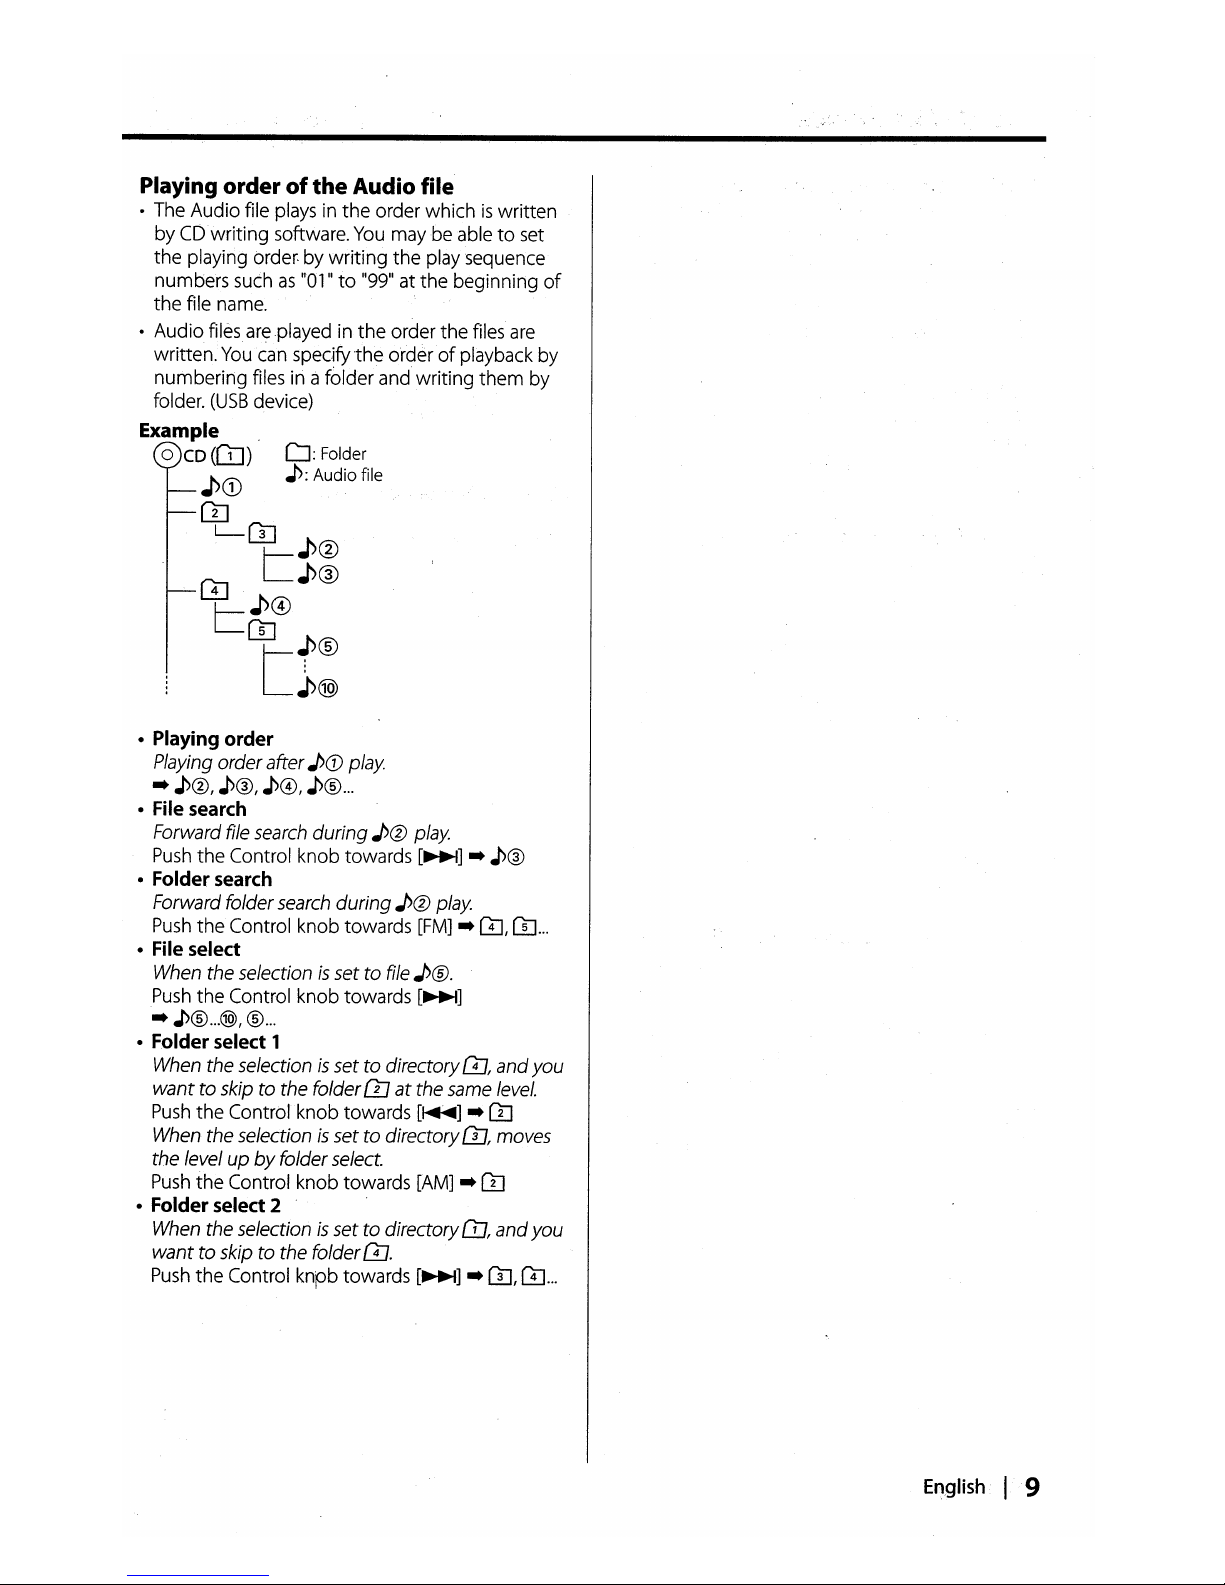
Playing orderofthe
Audio file
• The Audio file plays in
the
order whichiswritten
by
CD
writing software.
You
maybeabletoset
the playing order: by
writing
the
play sequence
numbers such
as
"01"to"99" at the beginning
of
the
file name.
• Audio files
are
played in
the
order the files
are
written.
You
can specify
the
orderofplayback by
numbering files in a folder and writing
them
by
folder.
(USB
device)
Example
.
o
CD
(OJ)
CJ:
Folder
J>CD
J>:
Audio file
OJ
L-f31
~
J>@
GJ
L~®
t=J>@
WtJ>®
~@)
• Playing order
Playing orderafter
J>(f)
play
-
J>®,
J>®,
J>@,J>®
...
• File search
Forward file search
during
J>@
play
Push
the Control knob towards
[~]
-
J>®
• Folder search
Forward folder search
during
J>@
play
Push
the
Control knob towards
[FM]
-
GJ,GJ...
• File select
When the selection
is
set to file
J>®.
Push
the Control knob towards
[~]
-J>®
...
@),®
...
• Folder select 1
When the selection
is
settodirectoryW,and
you
wanttoskiptothe folder
ill
at
the same level.
Push
the Control knob towards
[~]
-
OJ
When the selectionissetto directory {l], moves
the level
upbyfolder select.
Push
the
Control knob towards [AM] -
OJ
• Folder select 2
When the selection
is
settodirectory
OJ,
and
you
wanttoskip to the folder
0.
Push
the
Control knpb towards
[~]
-
m,
GJ
...
English.
I·
·9
About
USB
device
Notes on Useofthe
USB
device
This
unit
can
play
audio
files
storedinthe
flash
memory
and
digital audio
player
that
haveaUSB
port
(these
devices
are
referred
to·as
USB
devices
in
this document).
The
following restrictions
are
placedonthe types
and
usageofavailable
USB
devices:
Available
USB
devices
• .
USB
devices
belonging to the
USB
mass
storage
class.
•
USB
devices
whose maximum current
c·onsumptionis500mAor
less.
For
the supported formats
and
USB
device
types,
refer
to http://wwwokenwoodocom/usbl.
~
~
o
USB
Mass
Storage
Class:
USB
devices
that
thePCcan recognizeasan
external
storage
without
using any special driver or application
software.
• Contact the
sales
agentasto whether your
USB
device conforms to the
USB
mass
storage
class
specs.
•
Usinganunsupported
USB
device
can
result
in
abnormal playbackordisplay ofthe audio
file.
Evenifyou
use
the
USB
device conforming to
the
above
specs,
audio
files
cannotbeplayed
normally dependingonthe typeorcondition
of
the
USB
device.
About
the
Connectionofthe
USB
device
•
When
connecting the
USB
device,
usageofthe
CA-U1EX
(option)isrecommended.
Normal playbackisnot guaranteed when a
cable
other than the
USB
compatible
cableisused.
Connecting acable whose total lengthislonger
than 5 m
can
resultinabnormal
playback.
~
~
o
You
cannot connect a
USB
device
viaaUSB
hub.
10· I
English
&
o Install
the
USB
device in the place whereitwill
not
prevent you from driving your
vehi~le
properly.
o Do
not
leave the
USB
device
.in
the vehicle for a long
time. It can deform or damage due
to
direct sunlight,
high temperature, etc.
o
Take
backupsofthe
audio files used
with
this unit.
The files can be
eras~d
depending
on the operating
conditions
of
the
USB
device.
We
shall have no compensation for any damage arising
outoferasureofthe
stored data.
About
USB
device Operation
•
USB
device operationisthe
sameasaudio
file operation
unless
otherwise
some
notice
is
indicated.
•
USB
sourceisrecognizedasCD
sourceonthe
connected unit.
General features
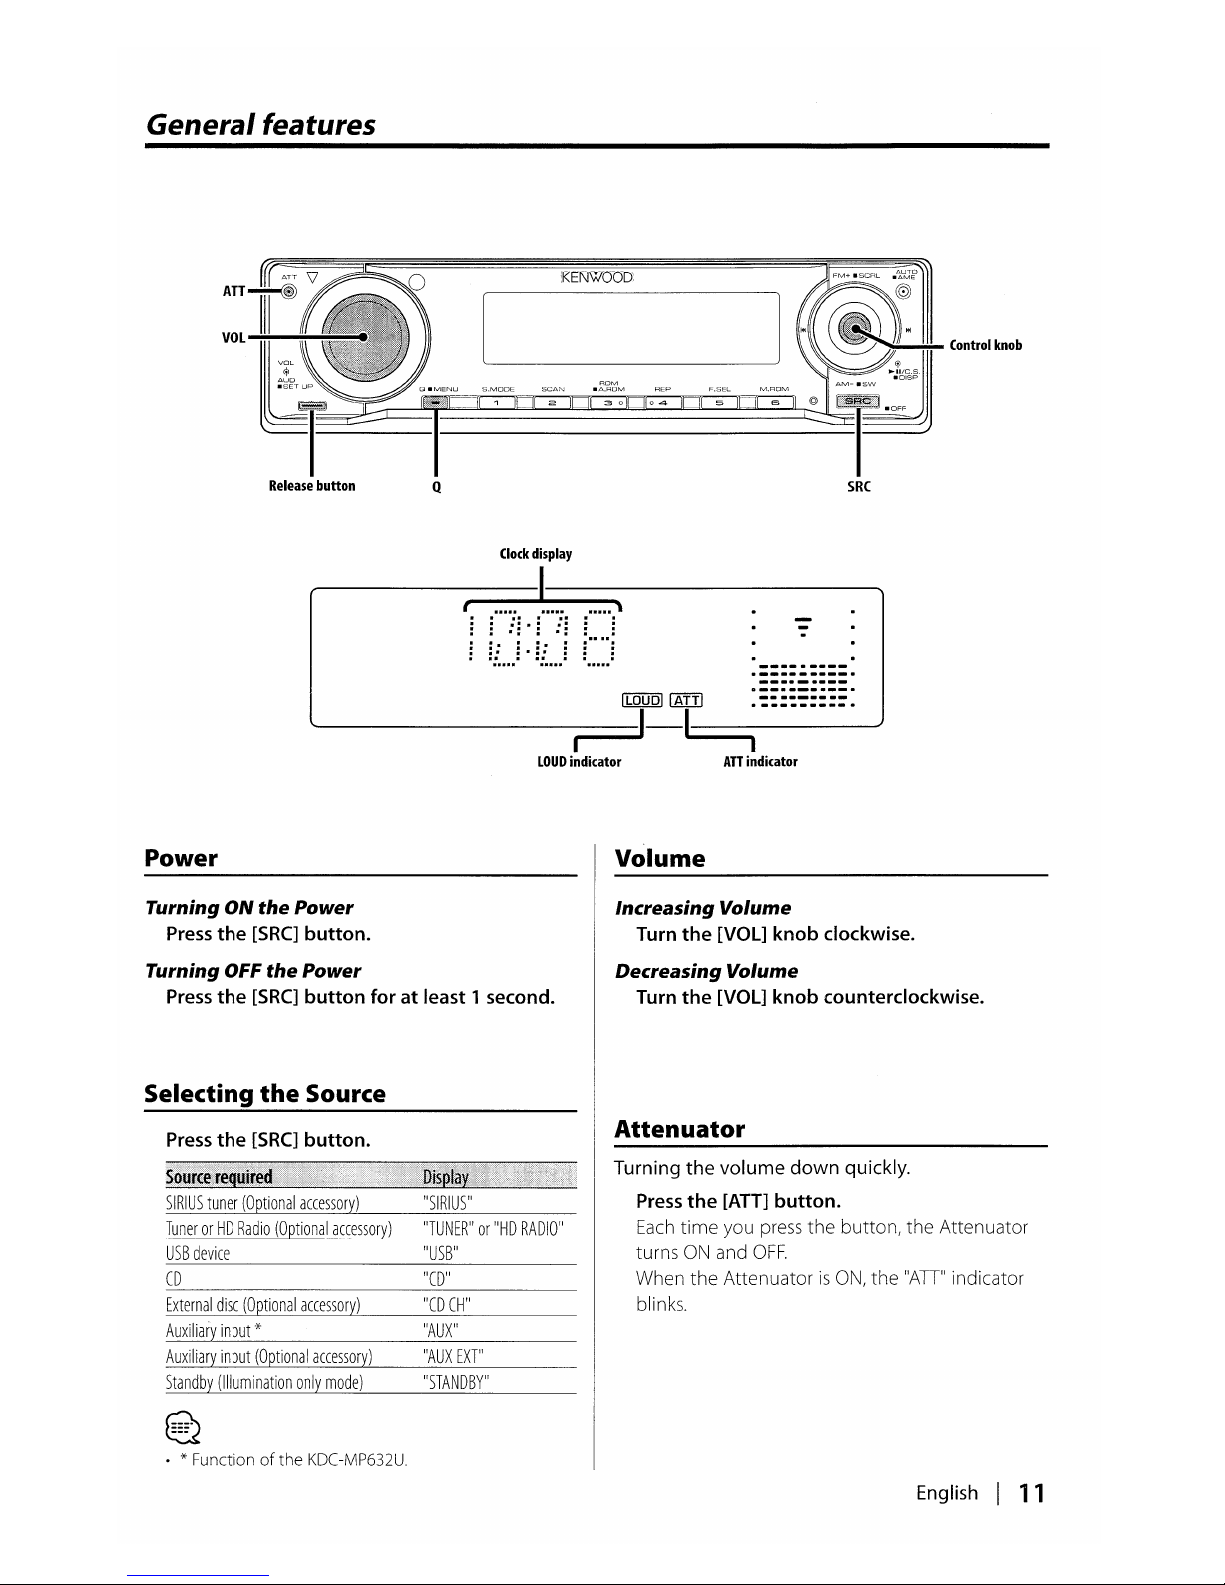
KENWOOD
Control
knob
Clock
display
t:
,no::.
:t.::,:'
: :
.::.:
: :
=.:
...
=.
~f..)
=
.:
--_
..
----
.
--_.
-
---_.
-_
..
_----
._---------
Power
ILOUDI~
.::::~:::=.
-----~-~----
LOUD
indicator
ATT
indicator
Volume
Turning ON
the
Power
Press
the
[SRC]
button.
Turning OFF
the
Power
Press
the
[SRC]
button
foratleast 1 second.
Selecting
the
Source
Press
the
[SRC]
button.
Increasing Volume
Turn
the
[VOL] knob clockwise.
Decreasing Volume
Turn
the
[VOL]
knob
counterclockwise.
Attenuator
SIRIUS
tuner
(Optional
accessory)
TunerorHD
Radio
(Optional
accessory)
USB
device
CD
External
disc
(Optional
accessory)
Auxiliary
input
oX-
Auxiliary
input
(Optional
accessory)
Standby
(Illumination
only
mode)
~
~
. * Function
of
the
KDC-MP632U.
"SIRIUS"
"TUNER"or"HD
RADIO"
"USB"
"CD"
"CD
CH"
"AUX"
"AUX
EXT'
"STANDBY"
Turning
the
volume
down
quickly.
Press
the
[ATT]
button.
Each
time
you
press
the
button, the Attenuator
turns
ON
and
OFF.
When the AttenuatorisON,
the "AD" indicator
blinks.
English I
11
General features
System Q
Audio Control
Selecting
the
best
sound
setting
preset
for
different
typesofmusic.
1 Select
the
sourcetoset
Press
the
[SRC]
button.
2 Select
the
Sound
type
Press
the
[Q]
button.
When you
press
the
button
once, the current
sound settingisdisplayed.
Each
time you
press
the button, the sound
setting alternates.
• * User memory:The values set on the
<Audio
Control> (page
12).
KDC
-MP532U does
not
have
the
User
memory
functionsothe valuesofBass,
Middle, and Treble set
in audio control are replacedtothe System Qvalues
and
"USER"isnot
displayed
when
the
System Q
settingischanged.
• Change each setting value
with
the <Speaker
Setting> (page
14).
First,
select the speaker
type
with
the
Speaker setting.
User
memory*
Rock
Pops
Easy
Top
40
Jazz
Natural
~
~
"USER"
"ROCK
'1
"EASY"
"TOP
40"
"JAZZ"
"NATURAL
"
1 Select
the
sourcetoadjust
Press
the
[SRC]
button.
2 Enter Audio Control
mode
Press
the
[VOL]
knob.
3 Select
the
Basic
Audio itemtoadjust
Press
the
[VOL]
knob.
Each
time you
press
the knob, the itemtobe
adjusted alternates between
the
items shown
in
the table below.
4 Adjust
the
Basic
Audio item
Turn
the
[VOL]
knob.
RearVolume
*1,2
"R-VOL"
0-
35
Subwoofer
level*1,3,4,S
"SW
L"
-15
- +
15
Bass
level*6
"BAS
L"
-8-+8
Middle
level*6
"MID
L"
-8-+8
Treble
level*6
"TRE
L"
-8-+8
Balance
"BAL"
Left
15
-
Right
15
Fader*s
"FAD"
Rear
15
-
Front
15
Exit
Audio
Contra!
mode
(Vo!ume
contro!
mode)
~
~
•
*1
FunctionofKDC-X590/MP632U.
•
*2
You
can control this item
when
"2Z0N"of<Audio
Setup> (page
14)issetto"ON".
•
*3
You
can control this item
when
<Switching preout>
(page
30)issetto"SWPRE
SW".
(KDC
-MP632U only)
•
*4
You
can control this item
when
<Subwoofer
Output>
(page
15)issetto"SW
ON".
•
*5
You
can control this item
when
"2Z0N"of<Audio
Setup> (page
14)issetto"OFF".
•
*6
You
can adjust these items in detail.
Refer
to
<Adjusting
the
detailofAudio Control>(Page13).
(KDC-X590 only)
•
*6
Source tone memory: Puts the setupvalueinthe
memory
per source. (Detail Audio itemisincluded:
KDC
-X590 only)
5 Exit Audio Control mode
Press
any button.
Pressabutton
other than the
[VOL]
knob and
[AD]
button.
12 I
English
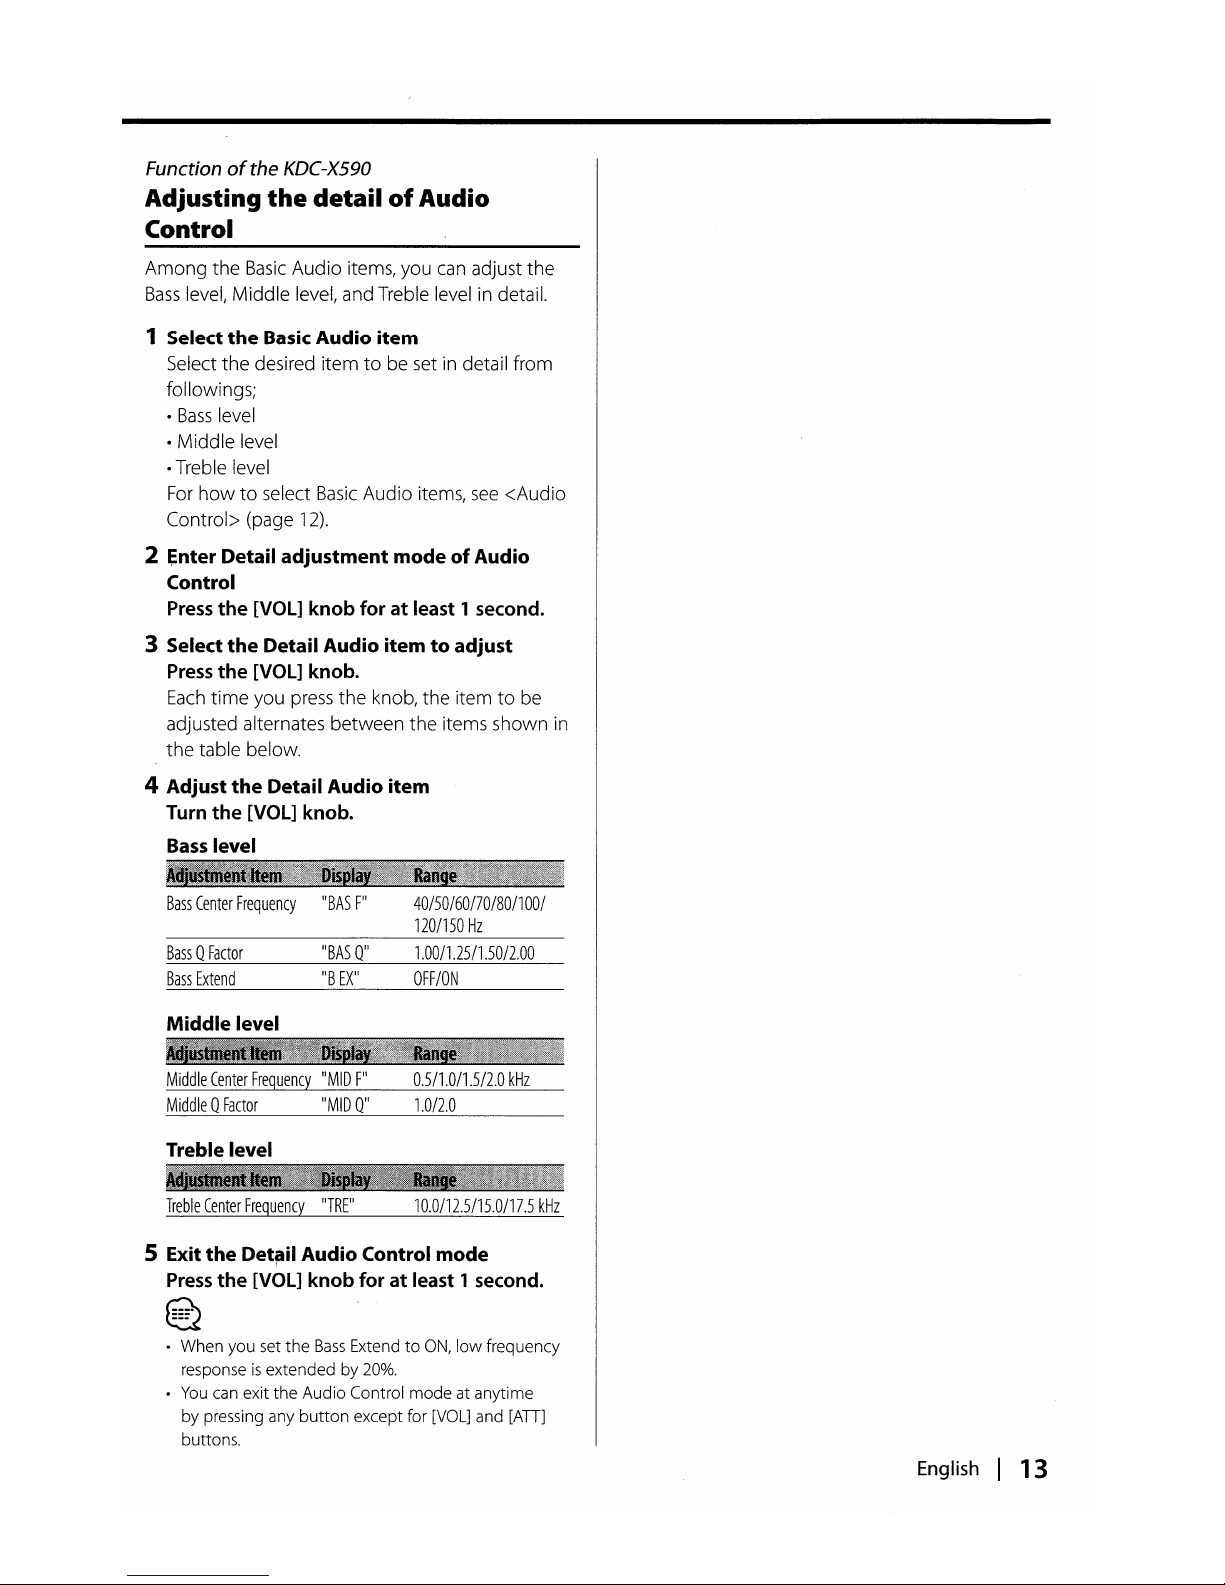
Function
of
the
KDC-X590
Adjusting
the
detailofAudio
Control
Among the
Basic
Audio items, you
can
adjust the
Bass
level, Middle level, and Treble level in detail.
1 Select the Basic
Audio
item
Select the desired itemtobe setindetail from
followings;
•
Bass
level
• Middle level
•Treble level
For
howtoselect
Basic
Audio items,
see
<Audio
Control> (page
12).
2
~nter
Detail adjustment modeofAudio
Control
Press
the
[VOL]
knob
foratleast 1 second.
3 Select
the
Detail Audio itemtoadjust
Press
the
[VOL] knob.
Each
time
you
press
the knob, the itemtobe
adjusted alternates between the items shown in
the table below.
4 Adjust
the
Detail Audio item
Turn
the
[VOL] knob.
Bass
level
Bass
Center
Frequency
Bass0Factor
Bass
Extend
Middle level
IIBAS
F
II
IIBAS
011
liB
EX
II
40/50/60170/80/100/
120/150
Hz
1.00/1.25/1.5012.00
OFF/ON
Middle
Center
Frequency
IIMID
F
I1
Middle0Factor
IIMID
011
Treble level
Treble
Center
Frequency
11
TR
Ell
0.5/1.0/1.512.0
kHz
1.0/2.0
10.0/12.5/15.0/17.5
kHz
5 Exit the Detflil Audio Control mode
Press
the
[VOL]
knob
foratleast 1 second.
~
~
• When you set the
Bass
ExtendtoON,
low frequency
response
is
extended by
20%.
•
You
can
exit the Audio Control mode at anytime
by pressing any
button
except for
[VOL]
and
[AD]
buttons.
English I 13
General features
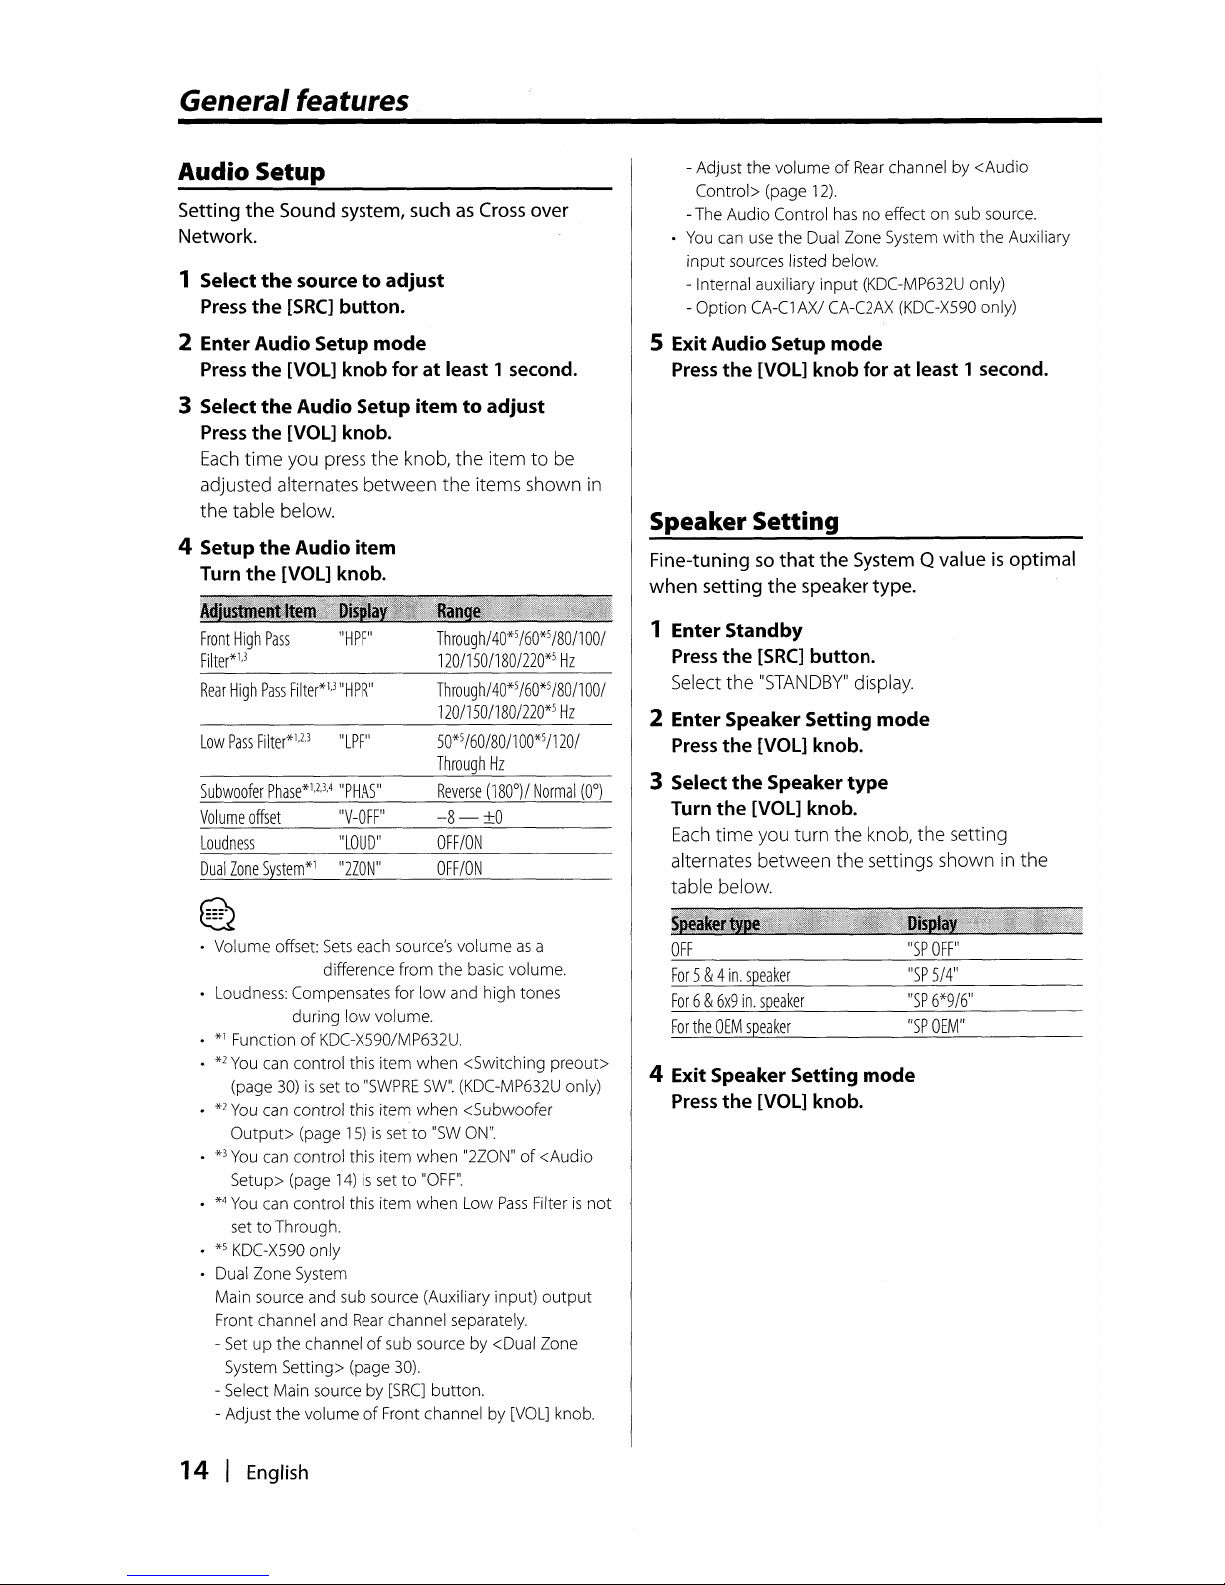
Audio Setup
Setting the
Sound
system,
suchasCross
over
Network.
1 Select
the
sourcetoadjust
Press
the
[SRC]
button.
2 Enter Audio Setup mode
Press
the
[VOL]
knob for at least 1
second.
3 Select
the
Audio Setup item to adjust
Press
the
[VOL]
knob.
Each
time
you
press
the knob, the itemtobe
adjusted alternates between
the
items shown
in
the table below.
4 Setup
the
Audio item
Turn
the
[VOL]
knob.
- Adjust
the
volumeofRear
channelby<Audio
Control> (page
12).
-The Audio Control
has
no effect on sub source.
•
You
can
use
the
Dual Zone System
with
the Auxiliary
input
sources listed below.
- Internal auxiliary
input
(KDC-MP632U only)
- Option
CA-C1
AXI
CA-C2AX
(KDC
-X590 only)
5 Exit Audio Setup mode
Press
the
[VOL]
knob for at least 1 second.
Speaker Setting
Fine-tuningsothat the
System
Q valueisoptimal
when
setting
the
speaker
type.
Front
High
Pass
IIHPF
II
Filter*1,3
Rear
High
Pass
Filter*1,3IIHPR
II
Low
Pass
Filter*l,2,311LPFII
Subwoofer
Phase*l,2,3,4
IIPHAS
II
Volume
offset
IIV-OFF
II
Loudness
IILOUD
'
!
Dual
Zone
System*l
112Z0N"
~
~
Through/40*5
/60*5
/80/1
00/
120/150/180/220*5
Hz
Through/
40*5
/60*5
/80/100/
120/150/180/220*5
Hz
50*5/60/80/100*5/120/
Through
Hz
-8-±0
OFF/ON
OFF/ON
1 Enter Standby
Press
the
[SRC]
button.
Select the
IISTANDBYIIdisplay.
2 Enter Speaker Setting mode
Press
the
[VOL]
knob.
3 Select
the
Speaker
type
Turn
the
[VOL]
knob.
Each
time
you turn the knob, the setting
alternates between the settings shown in the
table below.
4 Exit Speaker Setting mode
Press
the
[VOL]
knob.
• Volume offset:
Sets
each source's volumeasa
difference from
the
basic volume.
• Loudness: Compensates for
low
and high tones
during
low
volume.
• *1 Function
of
KDC-X590/MP632U.
•
*2
You
can control this item
when
<Switching preout>
(page
30)issetto"SWPRE
SW".
(KDC-MP632U only)
•
*2
You
can control this item
when
<Subwoofer
Output>
(page
15)issetto"SW
ON".
•
*3
You
can control this item
when
"2Z0N"of<Audio
Setup> (page
14)issetto"OFF".
•
*4
You
can control this item
when
Low
Pass
Filterisnot
settoThrough.
•
*5
KDC-X590 only
• Dual Zone System
Main source and sub source (Auxiliary input)
output
Front channel and
Rear
channel separately.
- Setupthe channelofsub source by <Dual Zone
System Setting> (page
30).
- Select Main source by
[SRC]
button.
- Adjust
the
volumeofFront channel by [VOL] knob.
14 I
English
OFF
For
5&4
in.
speaker
For6&6x9
in.
speaker
For
the
OEM
speaker
liSP
OFF
'
!
liSP
5/4
11
liSP
6*9/6
11
"SP
OEM"
In
Standby/
Auxiliary
input
source
~
~
3 Exit Switching Display
mode
Press
the
Control knob.
Functionofthe KDC-X590/KDC-MP632U
Subwoofer Output
Turning
the
Subwooferoutput
ON or
OFF.
Push
the
Control knob toward [AM] for at
least 2 seconds.
Each
time you push the knob, Subwoofer output
switches
ON
and
OFF.
When itisON,
IISW
ONIIis
displayed.
~
•
You
can control this function
when
<Switching
preout>
(page
30)issetto"SWPRE
SW".
(KDC
-MP632U
only)
•
You
can control this function
when"2ZONE"
of
<Audio
Setup> (page
14)issetto"OFF".
Switching Display
Changing
the
information displayed.
1 Enter Switching Display
mode
Press
the
Control knob for at least 1 second.
IIDISP
SELlisdisplayed.
2 Select
the
Display
item
Push
the
Control knob towards
[I
.....
] or
[~].
In Tunersource
In
HD
Radio source
Station
name
Song
title/
Artist
name/
Album
name/
Genre
Frequency
Clock
In SIRIUS
tuner
source
Channel
name
Song
title
Artist
name
Composer
name
Category
name
Label
name
Comment
Band&Channel
number
Clock
Source
name
Clock
liST
NAME
II
*
IIFREQII
IICLOCK
11
IICH
NAME
II
IIS0NG
II
IIARTlsr
IICOMPOSER
II
IICATEGORY
'I
'ILABEL
II
IICOMMENT
II
IICH
NUM
II
IICLOCK
II
"SRC
NAME"
InCD& Externaldisc source
Frequency
Clock
Disc
title
Track
title
Track
number&Play
time
Clock
In
Audio
file source
Song
title&Artist
name
Album
name&Artist
name
Folder
name
File
name
Track
number&Play
time
Clock
IIFREQII
IICLOCK
II
IID-TITLE
II
*
IIP-TIME
II
IICLOCK
II
IITITLE
II
*
IIFOLDER
II
IIFILE
II
IIP-TIME
II
IICLOCK
II
• When
LX-AMPisconnected,
the
item setup by the
Display
modeofLX-AMPisdisplayed. (KDC-X590 only)
• * If
the
contentsofthe
information cannot be
displayed,
Play
timeorFrequencyisdisplayed.
•Ifthe
contentsofthe
information for the
SIRIUS
tuner
source cannot be displayed, channel
number
is
displayed.
• Track
number
at Audio file displays the last 3 digits
when
it exceeds 1000 songs.
• When you select the clock display,
the
display setting
of
each source will be changedtothe clock display.
English I 15
General features
Theft Deterrent Faceplate
The
faceplate of the unit
canbedetached
and
taken with
you,
helping to deter theft.
Removing the Faceplate
1
Press
the
Release button.
Drop
open
the
faceplate.
2 Drawing
the
faceplatetoleft
side pull it to
forward and remove it.
Lh
• The faceplateisa precision pieceofequipment
and
can be damaged by shocksorjolts.
• Keep
the
faceplate in its faceplate
case
while
detached.
• Do
not
expose
the
faceplate (and
the
faceplate
case)
to
direct sunlightorexcessive heat or humidity. Also
avoid places
with
too
much
dust or
the
possibility
of
water splashing.
Reattaching the Faceplate
1 Align
the
shaft on
the
unit with
the
depression on
the
faceplate.
2
Push
the
faceplate in untilitclicks.
The faceplateislocked in place, allowing you
to
use
the
unit.
16 I
English
TEL
Mute
The
audio
system
automatically
mutes
when a
call
comes
in.
When a call comes in
"CALL'isdisplayed.
The audio system pauses.
Listeningtothe audio during a call
Press
the
[SRC]
button.
The "CALL' display disappears and
the
audio
system comes back
ON.
When the call
ends
Hang up
the
phone.
The "CALL' display disappears and
the
audio
system comes back
ON.
E2
•Touse
the
TEL
Mute
feature, you needtohook
up
the
,\t1UTE
wiretoyour telephone using a commercial
telephone accessory.
Referto<Connecting Wires
to
Terminals> (page 39,40,41).
Tuner features
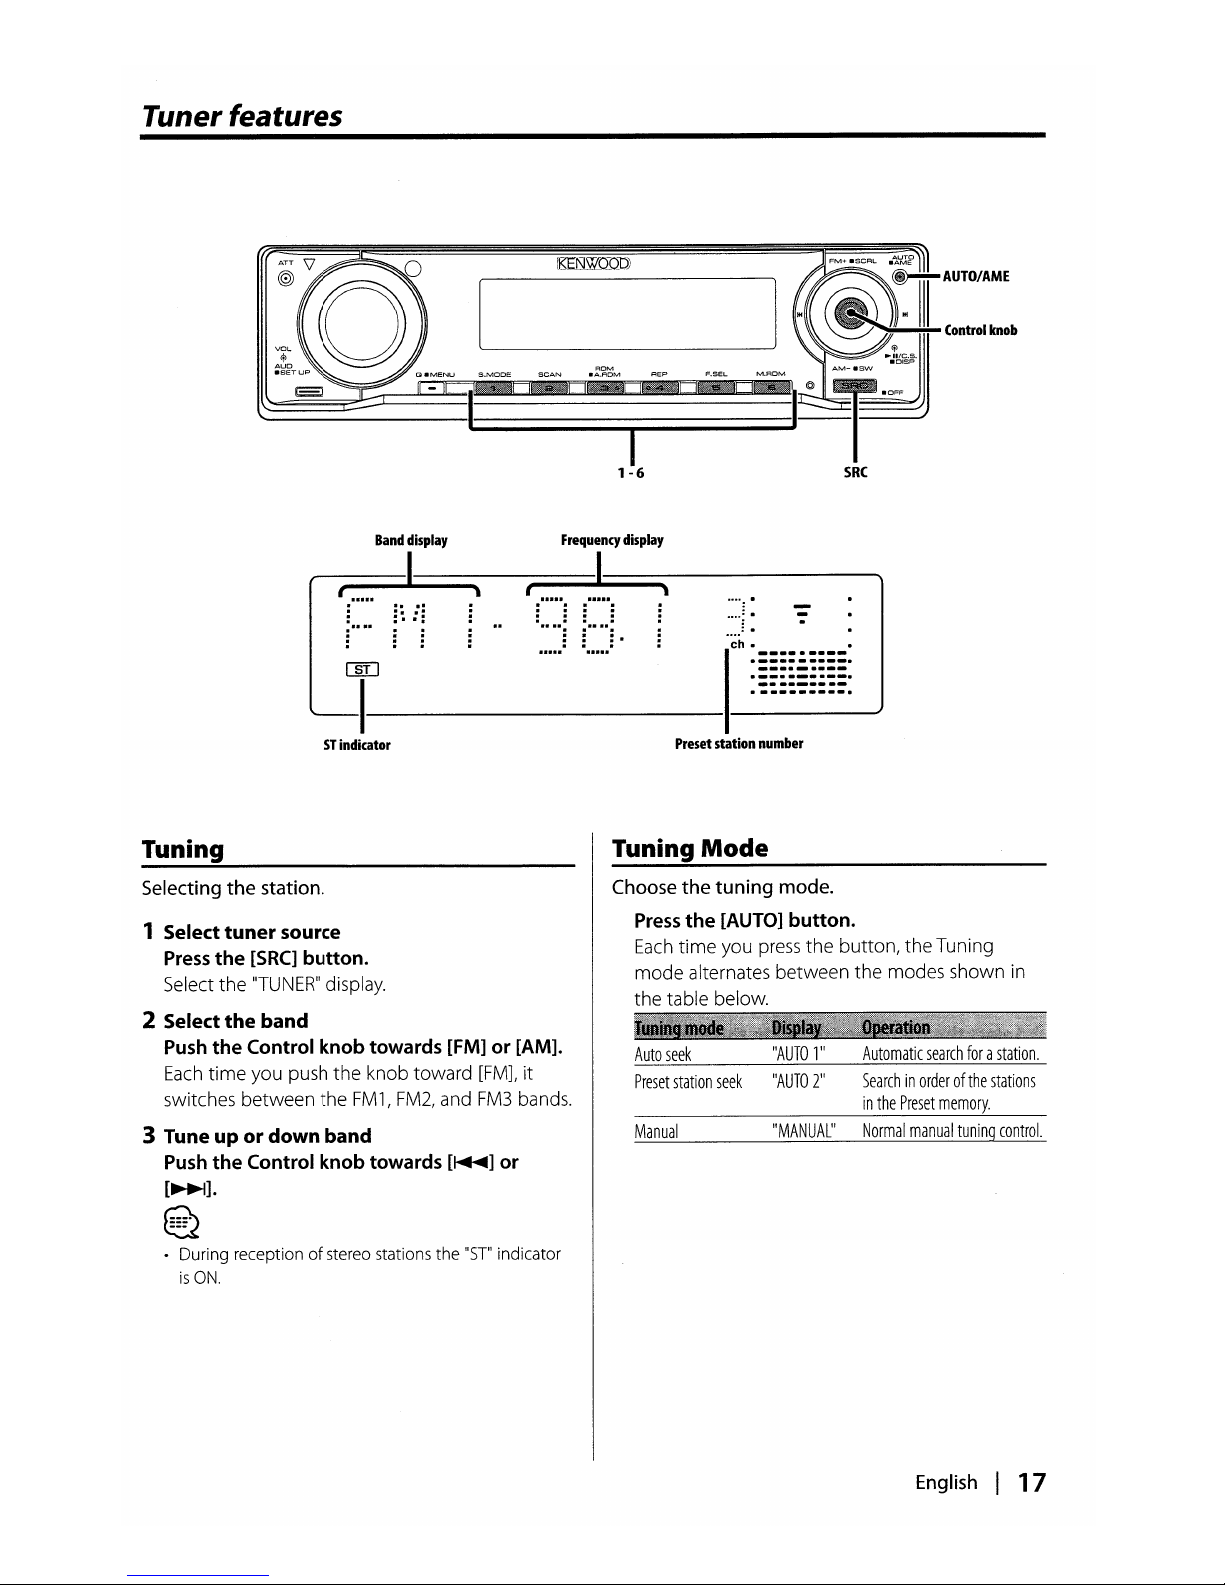
Frequency
display
~
...........
.....
: :
.....
:.
ST
indicator
Tuning
Tuning
Mode
Choose
the
tuning mode.
Press
the
[AUTO]
button.
Each
time
you press
the
button, the Tuning
mode
alternates between the modes shown in
the table below.
Selecting
the
station.
1 Select
tuner
source
Press
the
[SRC]
button.
Select the
"TUNER"
display.
2 Select
the
band
Push
the
Control
knob
towards [FM]or[AM].
Each
time
you push
the
knob toward
[FMJ,
it
switches between the
FM1,FM2,
and
FM3
bands.
3 Tune
upordown band
Push
the
Control
knob
towards
[~]
or
[~].
E2
• During receptionofstereo stations the
"ST"
indicator
isON.
Auto
seek
Preset
station
seek
Manual
"AUTO
1"
"AUTO
2"
"MANUAL"
Automatic
search
forastation.
Searchinorderofthe
stations
in
the
Preset
memory.
Normal
manual
tuning
control.
English I 17
Tuner features
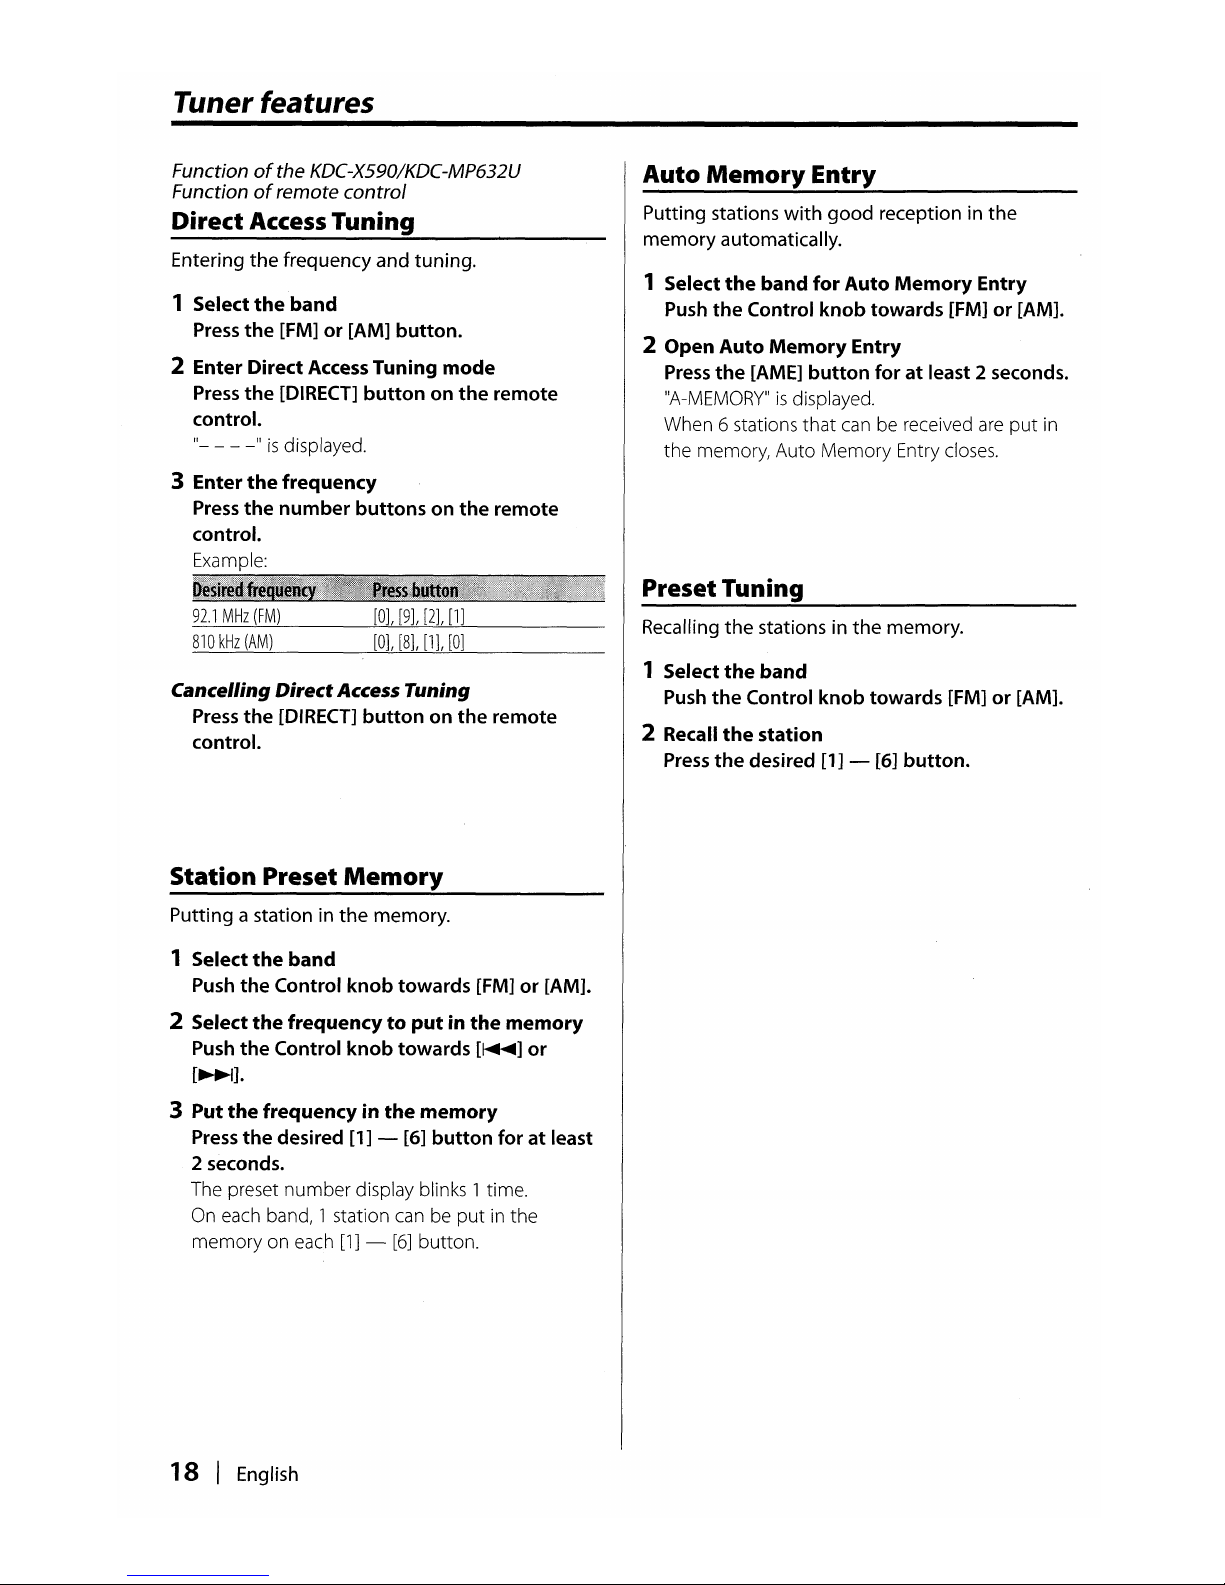
Functionofthe KDC-X590/KDC-MP632U
Function
of
remote
control
Direct
Access
Tuning
Entering the frequency and tuning.
1 Select
the
band
Press
the [FM] or [AM] button.
2 Enter Direct
Access
Tuning
mode
Press
the
[DIRECT] button on
the
remote
control.
"-
- --"is
displayed.
3 Enter
the
frequency
Press
the number buttons on the remote
control.
Example:
IF
Auto
Memory
Entry
Putting stations
with
good reception in the
memory automatically.
1 Select
the
band
for
Auto
Memory
Entry
Push
the Control knob towards [FM] or [AM].
2 Open Auto
Memory
Entry
Press
the
[AME] button foratleast 2 seconds.
"A-MEMORY"isdisplayed.
When 6 stations
that
can be received
are
put
in
the memory, Auto
Memory
Entry closes.
Preset Tuning
92.1
MHz
(FM)
810
kHz
(AM)
[OJ,
[9J,
[2],
[lJ
[OJ,
[8], [1],
[OJ
Recalling the stations in the memory.
Cancelling DirectAccess Tuning
Press
the [DIRECT] button on the remote
control.
Station Preset
Memory
Putting a station in
the
memory.
1 Select
the
band
Push
the Control knob towards [FM] or [AM].
2 Select
the
frequencytoputinthe
memory
Push
the Control knob towards
[~]
or
[~].
3
Put
the
frequency in
the
memory
Press
the
desired [1] - [6] button for at least
2 seconds.
The preset
number
display blinks 1 time.
On
each band, 1 station can be
put
in the
memory
on each
[1]
-
[6]
button.
18 I English
1 Select
the
band
Push
the
Control knob towards [FM] or [AM].
2 Recall
the
station
Press
the
desired [1] - [6] button.
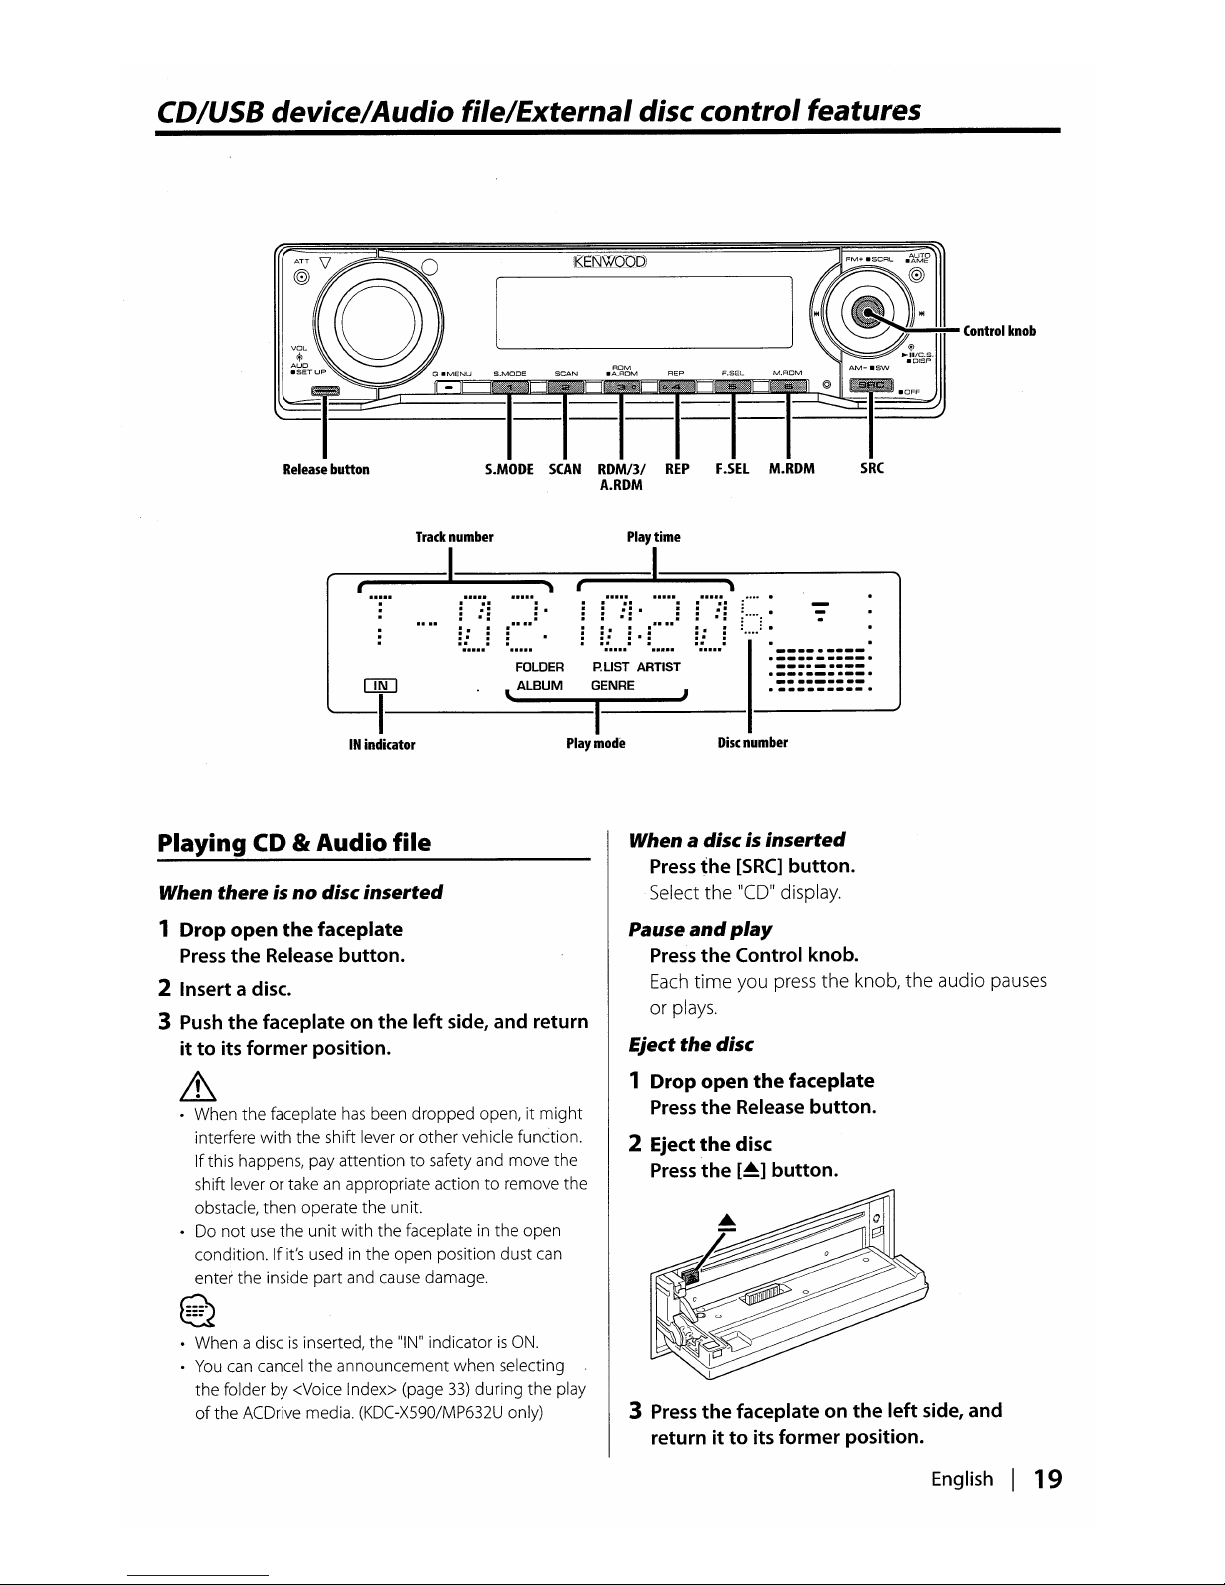
CD/USB device/Audio file/External disc control features
Release
button
S.MOOE
SCAN
ROM!3!
REPF.SEL
M.ROM
A.ROM
Control
knob
Disc
number
FOLDERP.LIST
ARTIST
[mJ
l, ALBUM
GENRE
I---I--I--~
Play
mode
IN
indicator
Track
number
Play
time
~~I!==::
==
..
:
:~.
~!::::i:
·
if..)
i
if..)·
C.::
if..)
_
.-
-..---
----_
...
-
.-
..
-_
..
__
.
--
..
__
._-
..
_._.--_
..
Playing
CD
It Audio file
When there isnodisc
inserted
1
Drop
open
the
faceplate
Press
the
Release button.
2 Insert a disc.
3
Push
the
faceplate on
the
left side, and return
it
to
its
former
position.
~
• When the faceplate
has
been dropped open, it
might
interfere
with
the shift lever or other vehicle function.
If
this happens, pay attentiontosafety and move the
shift lever or take
an
appropriate actiontoremove the
obstacle, then operate the unit.
• Do
not
use
the unit
with
the faceplate in the open
condition. If it's used in the open position dust
can
enter the inside part and cause damage.
~
~
• When a discisinserted, the
"IN"
indicatorisON.
•
You
can cancel the announcement when selecting
the folder by <Voice Index> (page
33)
during the play
of
the ACDrive media. (KDC-X590/MP632U only)
When a discis
inserted
Press
the
[SRC]
button.
Select
the
11(0
11
display.
Pause
and
play
Press
the
Control knob.
Each
time
you press
the
knoblthe
audio pauses
or plays.
Eject
the
disc
1
Drop
open
the
faceplate
Press
the
Release button.
2 Eject
the
disc
Press
the
[~]
button.
3
Press
the
faceplate on
the
left side, and
return
ittoits former position.
English
I 19

CD/USB device/Audio file/External disc control features
Playing
USB
device
Playing External Disc
Fast Forwarding and Reversing
• Thereisno sound while the Audio fileisbeing
searched.
•
You
cannot
fast Forwarding and Reversing depending
on
AAC
file format.
• Disc
lOis
displayedas"0".
• The functions
that
can be used and
the
information
that
can be displayed will differ
depending
on the
external disc players being connected.
Playing
discs
setinthe optional
accessory
disc
player connected to
this
unit.
Press
the
[SRC]
button.
Select
the
display for
the
disc player you want.
Display examples:
CD
changer
MD
changer
"MDCW
"CD
CH"
Pause
and
play
Press
the
Control knob.
Each
time
you press
the
knob,
the
audio pauses
or plays.
~
~
Fast Forwarding
Hold
down
toward
[~]
with
the
Control
knob.
Releasetoresume
the
playback.
Reversing
Hold
down
toward
[~]
with
the
Control
knob.
Releasetoresume
the
playback.
€2
Playing
USB
device
1 Select a source
other
than
the
USB device
Press
the
[SRC]
button.
2 Connect
the
USB
device.
3 Select USB source
Press
the
[SRC]
button.
Select
the
"USB"
display.
€2
&
• Removing
the
USB
device
with
it selectedasa source
can damage
the
data stored in
the
USB
device.
~
~
•
For
the
typesofavailable
USB
devices and
how
to
connect
USB
devices, referto<About
USB
device>
(page
10).
• After you stopped playing a file contained in
the
USB
device, you can restart playing
the
file from
the
point
where you stopped its playback.
Even
after removing
the
USB
device, you can restart
playing
the
file from the
point
where you stopped
its playbackaslongasthe files contained in
the
USB
device are all
the
same.
•Besuretoinsert the
USB
device connectorasfarasit
will go.
•
You
can play the disc (ACDrive media) made by Media
Managerbythe
same operation. (KDC-X590/MP632U
only)
•
You
can cancel
the
announcement
when
selecting
the
folderby<Voice Index> (page
33)
during
the
play
of
the
ACDrive media.
(KDC
-X590/MP632U only)
Pause
and
play
Press
the
Control knob.
Each
time
you press
the
knob,
the
audio pauses
or plays.
Removing
the
USB
device
1 Select a source
other
than
the
USB device
Press
the
[SRC]
button.
2 Remove
the
USB
device.
•
You
can remove the
USB
device safely
with
the
unit
power
turned
off.
20
I
English

Track/File
Search
Searching
for
a songonthe
discorin
the
Audio
file folder.
Push
the
Control
knob
towards
[~]
or
[~].
Functionofdisc changer/ Audio file
Disc
Search/Folder Search .
Selecting
the
disc set in
the
Disc changerorthe
folder
recordedonthe
Audio
file media.
Push
the
Control
knob
towards [FM]or[AM].
Function
of
remote control
DirectTrack/File
Search
Doing Track/File Searchbyentering
the
track/file
number.
1 Enter
the
track/file
number
Press
the
number
buttonsonthe
remote
control.
Function
of
disc changers
with
remote control
Direct Disc
Search
Doing Disc Searchbyentering
the
disc number.
1 Enter
the
disc
number
Press
the
number
buttonsonthe
remote
control.
2
Do
Disc Search
Press
the
[+]
or
[-]
button.
Cancelling
Direct
Disc
Search
Press
the
[~II]
button.
§
•
Input
"0"toselect disc
10.
Track/File/Disc/Folder
Repeat
Replaying
the
song, disc in
the
Disc changer
or
Audio
file
folder
you
are listening to.
Press
the
[REP]
button.
Each
time you
press
the button, the Repeat
Play
alternates between the modes shown in the
tables below.
In
CD &
External
disc
source
~
~
•
You
can select Direct
File
Searchupto
999.
2
Do
Track/File Search
Press
the
[~]or[~]
button.
Cancelling
Direct
Track/File Search
Press
the
[~II]
button.
Track
Repeat
Disc
Repeat
(In
Disc
Changer)
OFF
In
Audio
file
source
File
Repeat
Folder
Repeat
OFF
"TRAC
REpll
IIDISC
REpll
IIREP
OFF'
IIFILE
REP"
IlFOLD
REpll
IIREP
OFF
II
English I
21

CD/USB device/Audio file/External disc control features
Scan Play
Playing
the
first
part of
each
songonthe
disc
or
Audio
file
folder
you
are
listening
to"and
searching
for
the
song
you
want to
hear.
1
Start
Scan Play
Press
the
[SCAN]
button.
"TRAC
SCN"j"FILE SCN"j"SCAN ON"isdisplayed.
2 Release
it
when
the
song you
wanttolisten
toisplayed
Press
the
[SCAN]
button.
Random Play
Play
all
the
songsonthe
discorAudio
file folder
in
random
order.
Press
the
[ROM]
button.
Each
time
you press
the
button,
Random Play
turns
ONorOFF.
When
the
Random
modeisON,
"DISC
RDM"j
"FOLD RDM"j"RDM ON"
is
displayed.
~
• When you push the Control knob toward
[~],
the
next random song starts.
22
I
English
Functionofdisc
changer
Magazine Random Play
Play
the
songsonall
the
discsinthe
disc
changer
in
random
order.
Press
the
[M.ROM]
button.
Each
time
you press
the
button,
the
Magazine
Random Play turns ON
or
OFF.
When
the
Magazine Random
modeisON,
"MGZN RDM"isdisplayed.
~
• When you push the Control knob toward
[~],
the
next random song starts.
FunctionofAudio
file
All Random Play
Playing
randomly
from
all
ofthe Audio
files
recordedinthe media.
Press
the
[A.ROM] button foratleast 1
second.
When
the
random
modeisON,
"ALL
RDM"
is
displayed.
Cancelling
the
All
Random
Play
Press
the
[A.ROM]
button.
~
• When you push the Control knob toward
[~],
the
next random song starts.

FunctionofAudio
file
Select
mode
Quickly
selecting the fileorfolder
you
want to
hear.
1 Select
the
Select mode
Press
the
[F.SEL]
button.
lIFILE
SELlI*l
Referto<File
Select
mode>
(page
23).
lIFLD
SEL
111j"FLD
SELIIReferto<Folder
Select1mode>
(page
24).
lIFLD
SELr*2
Referto<Folder
Select2mode>
(page
24).
Exit
the
Select
mode
~.-_.
~
• The Select
mode
does
not
function
when
<All
Random Play> (page
22)isON.
• *1
You
cannot operate this function
when
<Random
Play> (page
22)issetto"ON".
•
*2
You
cannot operate this function
when
<Switching
the
Play
mode>
(page
25)issettoother
than
"FOLDER"
while
playing ACDrive media.
2 Select
the
filel
folder
Refertothe explanationofthe procedure
performed in each select mode.
Scrolling the
file/
foldername display
Push
the
Control knob toward [FM] for at
least 2 seconds.
~
~
•
You
can cancel the announcement
when
selecting
the
folder by <Voice Index> (page
33)
during the play
of
the ACDrive media.
(KDC
-X590/MP632U only)
•Inthe
File
Select mode,
the
<Voice Index> (page
33)
announcementisnot
made. (KDC-X590/MP632U only)
FunctionofAudio
file
File Select mode
You
can
selectanaudio fileinthe folder currently
being
playedbyfile
name.
1 Enter File Select mode
Press
the
[F.SEL]
button.
Select
the
"FILE
SELl
display.
Referto<Select
mode>
(page
23).
File
name
display
Displays the current file name.
I
2 Select
the
file
Push
the
Control knob towards [~] or
[~].
Switching between files in unitsof10
songs
Push
the
Control knob towards [FM] or [AM].
With the
[FM]
button, you move10songsupand
with
the [AM] button,10songs down.
~
~
•
You
can select
File
Select
modeupto
999.
3 Decide
the
filetoplay
Press
the
Control knob.
The
File
Select
mode
releases,
and
the
Audio file
being displayed
plays.
English
I 23

CD/USB device/Audio file/External disc control features
FunctionofAudio
file
Folder
S,lect
1 mode
'Select the target folder
by
tracing
the
hierarchical
levelsoffolders.
Thisisconvenient
when
managing
audio
filesbyfolder.
1 Enter Folder Select 1
mode
Press
the
[ESEL]
button.
Select
the
"FLD
SEL
l"j"FLD
SELl
display.
Refer
to
<Select
mode>
(page
23).
Folder
name
display
Displays
the
current folder name.
r====1~==~1-"
-:-1/------.
Ifni
:~.<.'.'
:~.:.:.".".'
~~
~
~
~
:::
(:::::::.
';'
L
~
i
\i
ii
\i
~/l
~i~~§~~~t
2 Select
the
folder
level*
Push
the
Control
knob
towards [FM] or [AM].
With
the
[FM]
button,
you move 1 level
down
and
with
the
[AM]
button,
1 level up.
Selecting a
folderinthe
same level
Push
the
Control
knob
towards
[~]
or
[~].
With
the
[~]
of
the
Control knob, you move
to
the
previous folder, and
with
the
[~]
of
the
Control knob,tothe
next folder.
Returningtothe
top
level*
Press
the
[3] button.
~
• *
You
cannot operate this
function
when
<Switching
the
Play
mode>
(page
25)issettoother than
"FOLDER"
while playing ACDrive media.
3 Decide
the
foldertoplay
Press
the
Control knob.
The Folder Select
mode
releases, and
the
Audio
file in
the
folder being displayed plays.
24 I
English
FunctionofAudio
file
Folder Select 2 mode
Select
the target folder within the
folders
containing
audio
files.
The
folder
which
contains
playable
audio
filesisonly
displayed.
1 Enter Folder Select 2
mode
Press
the
[F.SEL]
button.
Select
the
"FLD
SEL2"
display.
Referto<Select
mode>
(page
23).
Folder
name
display
Displays
the
current folder name.
I
~,r=.~=="7:=='
=~:
..
==:
==:~.:.:.'.=
....
'
==:~~
:~.:!
1
.:-
':!<:::::
';"
~
if....l
i ;
~/l
:~~~§~1~~:
2 Select
the
folder
Push
the
Control knob towards
[~]
or
[~].
Each
time
you push
the
knob,
the
folders
containing audio files
are
displayed
one
after
another.
Check the
name
of
upperlevel folder
Push
the
Control knob towards [FM] or [AM].
With
the
[FM]
button,
the
folder name in
the
upper
levelisdisplayed.
With
the
[AM]
button,
the
folder name in
the
lower levelisdisplayed.
IIHII
is
displayed
while
the
upper
level folder
is
displayed.
3 Decide
the
foldertoplay
Press
the
Control knob.
The Folder Select
mode
releases, and
the
Audio
file in
the
folder being displayed plays.

Functionofthe
KDC-X590/KDC-MP632U
Function
of
ACDrive media
Switching
the
Play mode
Arrange
the
playing
orders
ofthe
songs
by
categories.
Press
the
[S.MODE] button.
Each
time you
press
the button, the
Play
mode
alternates between the modes shown in the
table below.
The
Play
mode indicatorisON.
Functionofthe KDC-X590/KDC-MP632U
FunctionofACDrive media
Letter Seek
You
can
search
for
the
song,
you
want to
play,
by
selecting
the
initialofGenre
name,
Artist
name,
or
Album
name.
1 Enter the Letter Seek mode
Press
the
[S~MODE]
button
foratleast 1
second.
~
~
• The category informationofeach songisthe data
registered in Media Manager when ACDrive media
is
being generated.
•
You
can
cancel the announcement made when the
mode
is
changed by <Voice Index> (page
33).
•
You
can select the advancementofthe
Play
mode
information by [AM] and
[FM]
knob.
11P.L1ST'1
"GENRE"
"ARTIST"
"ALBUM"
"FOLDER"
b)...
~
Play
list
order.
By
genre.
By
artist.
Byalbum.
By
the
folder
recordedinmedia
• This operation does
not
function when <All Random
Play>
(page
22)isON.
• This functionisavailable only when
the
Play
mode
is
set Genre, Artist, or Album.
Cancelling
the
Letter
Seek
Press
the
[S.MODE]
button.
2 Start
the
Letter Seek
Push
the
Control knob towards
[~]
or
[~].
The initialofGenre name, Artist name, or Album
nameisdisplayed and announced in order.
b)...
~
• The announcementofthe initial
can
be canceled by
<Voice Index> (page
33).
• When you push the Control knobtothe reverse
[~]
or
[~]
during Letter
Seek,
the
initialisdisplayed and
announced
in
the reversed order.
• Once Letter
Seek
starts, it cannot be cancelled.
3 Select
the
songtoplay
Press
the
Control knob
when
the
initial
of
the
song you are searchingisdisplayed and
announced.
The selected initial group
plays.
Text/Title Scroll
Scrolling
the
displayedCDtextorMD title.
Push
the
Control knob toward [FM] for
at
least 2 seconds.
b)...
~
• When the <Display Illumination Control> (page
29)
is
settoOFF,
the display may black
out
while scrolling.
English
I 25

HD Radio
control
features
.......
:.
Frequency
display
~
.....
: : :
.....= =
=.
Band
display
~:.c·::
("i
ch
~
~~~~~§~~§:
1------------11-----
Sf
indicator
Preset station
number
About
HD
Radio
Tuning
• When you connectanHD
Radio,
Tuner features
of
the
unit
are
disabled and changedtoHD
Radio tuner features. A portionofthe setting
methods including the Tuning Mode will
change.
• With the
HD
Radio tuner, you
can
use
the
similar functions
to
<Station Preset Memory>,
<Auto Memory Entry>, and <Preset Tuning>
of
Tuner features. RefertoTuner features for
how
to
use
the functions.
Selecting the station.
1 Select HD Radio source
Press
the
[SRC]
button.
Select
the
"HD
RADIO"
display_
2 Select
the
HD FM
band
Push
the
Control
knob
toward
[FM].
Each
time you push the knob to
[FM],
the band
alternates between the
HF1, HF2,
and
HF3
bands_
Select
theHDAM
band
Push
the
Control
knob
toward
[AM].
3 Tune
upordown-band
Push
the
Control
knob
towards
[~]
or
[~].
26 I English

Menu
system
@~oo
I
~,Q~.MENU
S'----.MOOE~.A.R~DM~
~-
~
MENU
.....
.....
.....
.....
..
....
....
....
:.
~i
.....
.....
.....
.....
,
Menu
display
......,...
i .....
~.......:.:.:.-Control
knob
Menu
System
Setting beep sound during operation, etc.
functions.
The
Menu
system basic operation method
is
explained here. The reference for
the
Menu
items
and their setting content
is
after this operation
explanation.
1 Enter
Menu
mode
Press
the
[MENU] button for at least 1 second.
"MENU"isdisplayed.
2 Select
the
menu
item
Push
the
Control knob towards [FM] or [AM].
Example:
When you want to
set
the beep sound,
select the
"BEEP"
display.
3 Set
the
menu
item
Push
the
Co~trol
knob towards
[~]
or
[~].
Example:
When you select
"BEEP",
each
time
you
push the knob it alternates between
"BEEP
ON"or"BEEP
OFF".
Select1of
themasthe setting.
You
can
continue by returning to step 2
and
setting other items.
4 Exit
Menu
mode
Press
the
[MENU] button.
~
• When other items those applicable to the basic
operation method above
are
displayed, their setting
content chart
is
entered. (Normally the setting listed at
the
topofthe chartisthe original setting.)
Also,
the explanation for items that
are
not
applicable
«Manual
Clock Adjustment>
etc.)
are
entered step
by step.
English I
27

Menu
system
In
Standby mode
Activating Security Code
Activating the
Security
Code
disables
the
usage
of audio unitbysomeone
else.
Once
the
Security
Codeisactivated, the entry of authorized
Security
Codeisrequired
to turnonthe
audio
unit when
itisremoved
from
the
vehicle.
Indication of
this
Security
Code
activation
prevents
your
precious
audio unit
from
stealing.
~
~
•
Set
the
Security Code
when
the
<Demonstration
mode
Setting> (page
34)issettoOFF.
•
You
can set
the
Security Code
witha4digit
number
of
your choice.
• The Security Code cannot be displayed or referenced.
Make a noteofthe Security Code and treasure it up.
1 Enter Standby
Press
the
[SRC]
button.
Select
the
"STANDBY"
display.
2 Enter
Menu
mode
Press
the [MENU] button for at least 1
second.
When
"MENU"isdisplayed,
"CODE
SET"isalso
displayed.
3 Enter Security Code
mode
Press
the Control knob for at least 1
second.
When
"ENTER"isdisplayed,
"CODE"isalso
displayed.
4 Select
the
digitstoenter
Push
the Control knob towards
[~]
or
[~].
5 Select
the
Security Code numbers
Push
the Control knob towards
[FM]or[AM].
6 Repeat
steps
4 and5,and complete the
Security
Code.
7 Confirm
the
Security Code
Press
the Control knob for at least 3
seconds.
When
liRE-ENTER"isdisplayed,
"CODE"isalso
displayed.
8 Do the step 4 through 7 operation, and
reenter the Security
Code.
"APPROVEDIIis
displayed.
The
Security
Code
function
activates.
~
• Ifyou enter
the
wrong
code in steps 4
through
6,
repeat from step
4.
28
I
English
Resetting the Security Code function when
theaudio
unit
is first used
after
removed
from
the
battery
power
sourceorthe Reset
button
is
pressed
1
Turn
the power ON.
2
Do
the step 4 through 7 operation, and enter
the Security
Code.
"APPROVED"isdisplayed.
Now,
you
can
use
the unit.
~
~
• When
the
Security Code
functionisactivated,
"CODE
SET"
changesto"CODE
CLR".
•Todeactivate
the
Security Code function,
see
the
next
section <Deactivating Security Code>.
In
Standby
mode
Deactivating Security Code
To
deactivate the
Security
Code
function.
1 Select Security Code
mode
Push
the Control knob towards
[FM]
or [AM].
Select
the
"CODE
CLR"
display.
2 Enter Security Code
mode
Press
the Control knob for at least 1
second.
When
"ENTER"isdisplayed,
"CODE"isalso
displayed.
3 Select
the
digitstoenter
Push
the Control knob towards
[~]
or
[~].
4 Select
the
Security Code numbers
Push
the Control knob towards
[FM]
or [AM].
5 Repeat
steps
3 and4,and complete the
Security
Code.
6
Press
the Control knob for at least 3
seconds.
IICLEAR"isdisplayed.
The
Security
Code
function deactivates.
~
• Ifa
wrong
security codeisentered,
"ERROR"
is
displayed. Enter a correct security code.

In Standby
mode
Touch Sensor Tone
Setting
the
operation check sound (beep sound)
ON/OFF.
Display Illumination Control
This function turns
off
the
display
when
you
perform no operation for 5 seconds. This function
is
effective
when
you are drivingatnight.
IIBEEP
ON
II
IIBEEP
OFF
II
Beepisheard.
Beep
canceled.
1I0lSP
ON
II
1I0lSP
OFF'I
~
~
Keeps
the
display
on.
Turns
off
the
display
when
you
perform
no
operation
for5seconds.
In
Standby
mode
Manual Clock Adjustment
1 Select Clock
Adjustment
mode
Push
the
Control knob towards [FM] or [AM].
Select
the
IICLK
ADJIIdisplay.
2 EnterClock Adjust
mode
Press
the
Control knob for at least 1 second.
The
clock display
blinks.
3 Adjust
the
hours
Push
the
Control knob towards [FM] or [AM].
Adjust
the
minutes
Push
the
Control knob towards
[~]
or
[~].
4 Exit Clock
adjustment
mode
Press
the
[MENU] button.
•
Set
the Display Illumination Control when the
<Demonstration
mode
Setting> (page
34)isset
to
OFF.
• When the displayisoff, pressing any key will turn on
the display.
• When the display
is
off, you cannot perform any
operation except for the following:
• Volume
• Attenuator
• Selecting the source
• Ejecting the disc
• Turning
off
the power
• During function control, such
as
the Menu System, the
display
stays
on.
In
Standby
mode
Dimmer
Dimming this unit's display automatically when
the
vehicle light switchisturned ON.
In
Standby
mode
DSI (Disabled System Indicator)
A
red
indicator will blink on
the
unit after
the
faceplateisremoved, warning potential thieves.
1I01MON"
1I0lMOFF
li
The
display
dims.
The
display
doesn't
dim.
1I0SION
II
11051
OFF'
LED
fiashes.
LED
OFF.
English I
29

Menu
system
Functionofthe KDC-MP632U
In
Standby
mode
Switching preout
Alternating
the
preout between
the
rear and
subwoofer. (With
the
subwoofer
the
sound
outputs
without
being effected by fader control.)
Functionofthe KDC-X590
Other than Standby
mode
B.M.S.
(Bass
Management
System)
Adjust
the
bass
boost levelofthe
external
amplifier using
the
main unit.
"SWPRE
R"
"SWPRE
SW"
Rear
preout.
Subwoofer
preout.
'IBMS
FLT"
"BMS
+6"
"BMS+12"
"BMS+18"
~
~
Bass
boost
levelisfiat.
Bass
boost
levelislow
(+6dB).
Bass
boost
levelismid(+12dB).
Bass
boost
levelishigh
(+18dB).
Functionofthe KDC-X590IKDC-MP632U
In Standby
mode
Built-in Amp Setting
Controlling
the
built-in amplifier.
Turning
OFF
this control enhances
the
preout
quality.
•
Refertothe catalog or instruction manual for power
amplifiers
that
can be controlled from this unit.
•
For
amplifiers, there
are
the models you
can
set from
Flat
to+18
dB,
and the models you can set from
Flat
to
+
12
dB.
Whenanamplifier
that
can
only be set
to
+
12
is
connectedtothe unit,
"BMS+18"
will
not
work
correctly even
ifitis
selected.
"AMPOW
"AMP
OFF"
The
built-in
amplifier
activates.
The
built-in
amplifier
deactivates.
Functionofthe KDC-X590
Other than Standby
mode
B.M.S. Frequency Offset
Setting
the
central frequency, boosted by 8.M.S.
Functionofthe KDC-X590IKDC-MP632U
Other
than Standby
model
When the Dual
Zone
SystemisON
Dual Zone System Setting
Setting
the
Front channel and Rear channel
sound
in
the
Dual Zone System.
"BMSF
NML"
"BMSF
LOW"
Boost
with
the
normal
central
frequency.
Drop
the
normal
central
frequency
20%.
"Z0NE2
R"
"Z0NE2
F"
30
I English
Sub
source
(Auxiliary
input
source)istoberear
channel.
Sub
source
(Auxiliary
input
source)istobefront
channel.

Functionofthe
KDC-X590
WhenLXAMP unit connecting
AMP
Control
You
can control
theLXAMP connectedtothe
unit.
1 Select
AMP
Control
mode
Push
the Control knob towards [FM] or [AM].
Select
the
"AMS
CTRL"
display.
2 Enter AMP Control
mode
Press
the
Control knob foratleast 1 second.
3 Select
the
AMP
Control
item
for
adjustment
Push
the
Control knob towards [FM] or [AM].
~
~
InHDRadio
mode
Receive
mode
Setting
Sets
the
receive mode.
1 Select
the
Receive
mode
Push
the
Control knob towards [FM] or [AM].
Select
the
"HDR
MODE" display.
2 Enter Receive
mode
Press
the
Control knob foratleast 1 second.
3 Set
the
Receive
mode
Push
the
Control knob towards [FM] or [AM].
Each
time
you push
the
knob,
the
Receive
mode
alternates
between
the
modes
showninthe
table below.
4 Exit Receive
mode
Press
the
[MENU] button.
~
~
•
Evenifthe Receive
modeissetto"AUTO",
when
the
Ball
game
mode
program (non-delayed broadcast
program)isreceived,
the
Receive
mode
will
automatically switchtoAnalog broadcast only.
•
For
the
details on
the
AMP Control item,
see
the
Instruction manual attachedtotheLXAMP.
4 Adjust
the
AMP Control
item
Push
the
Control knob towards
[I
....
] or
[~].
5 Exit AMP Control
mode
Press
the
[MENU] button.
~
•
You
cannot
use
theLXAMP
operation during standby
mode.
InFMreception
CRSC
(Clean Reception System
Circuit)
Auto
mode
Digital
Analog
"AUTO"
"DIGITAL"
"ANALOG"
Analog
broadcasts
and
digital
broadcasts
willbeswitched
automatically.
When
both
are
being
transmitted,
the
digital
broadcast
will
have
priority.
Digital
broadcasts
only.
Analog
broadcasts
only.
Temporarily have reception alternate from
stereo
to
monotoreduce multi-path noise
when
listeningtotheFMstation.
In
SIRIUS
tuner
source
SIRIUS
ID
(ESN) display
"CRSC
ON"
"CRSC
OFF"
The
CRSCisON.
The
CRSCisOFF.
Displaying
the
SIRIUS
ID (Electronic Serial
Number).
"ESN
= ************"
• Strong electrical fields (suchasfrom
power
lines) may
cause unstable sound quality
when
CRSCisturned
ON.Insuch a situation,
turnitOFF.
~
~
•
Serial&SIRIUS
10
(ESN)
Itisimportanttoretain
the
unit
serial
number
and
the
electronic
SIRIUS
Identification
number
for service
activation and potential service changes.
English I
31

Menu
system
Auxiliary
Input
Display Setting
Selecting
the
display
when alternating
to
Auxiliary
input
source.
Text Scroll
Setting
the
displayed
text
scroll.
Set
the
Built-in
Auxiliary
Input function.
Functionofthe KDC-MP632U
In Standby
mode
Built-in Auxiliary input Setting
• The text scrolledislisted below.
-CD
text
- Folder
name/
File
name/
Song
title/
Artist
name/
Album name
-MDtitle
-Text for
the
SIRIUS
tuner
source,HDRadio source,
including Channel name, etc.
When
thereisa problem with
playingaCD
with
special
format,
this
setting
plays
theCDby
force.
In Standby
mode
CD
Read Setting
1 Select
Auxiliary
input
source
Press
the
[SRC]
button.
Selectthe
"AUX"j"AUX
EXT"
display.
2 Enter
Menu
mode
-
Press
the
[MENU]
button
foratleast 1 second.
"MENU"isdisplayed.
3 Select
Auxiliary
input
display setting
mode
Push
the
Control
knob
towards [FM] or [AM].
Select
the
"NAME
SET"
display.
4 Enter
Auxiliary
input
display setting
mode
Press
the
Control
knob
foratleast 1 second.
The
selected Auxiliary input displayisdisplayed.
5 Select
the
Auxiliary
input
display
Push
the
Control knob towards
[I
....
] or
[~].
Each
time
you
push
the knob, the display
alternates
as
listed below.
•
IIAUX"/"AUX
EXT'
•
"DVD"
•
"PORTABLE"
•
"GAME"
•
'VIDEO"
•
"TV"
6 Exit
Auxiliary
input
display setting
mode
Press
the
[MENU]
button.
~
~
• When operation stops for10seconds,
the
name at
that
timeisregistered, and
the
Auxiliary
input
display
setting
mode
closes.
•
You
can only set
the
Auxiliary
input
display
when
the
auxiliary
inputofoptional
KCA-S21OAis
used.
(KDC-
X590/MP532U)
"SCL
AUTO"
"SCL
MANU"
~
~
"AUX
OFF"
IIAUX
OW
"CD
READ1"
"CD
READ2"
~
~
Repeats
scroll.
Scrolls
when
the
display
changes.
When
selecting
the
source
there'snoAuxiliary
Input.
When
selecting
the
source
there's
Auxiliary
Input.
PlayCDand
Audio
file.
Play
CDbyforce.
32 I
English
'
• Setting
"CD
READ2"
cannot
play Audio file.
Some music
CDs
may
not
play even in the
"CD
READ2"
mode.

Functionofthe
KDC-X590IKDC-MP632U
Function
of
ACDrive media
Voice Index
Functionofthe
KDC-X590/KDC-MP632U
Other
than
Standby
mode
Audio Preset
Memory
Setting the announcement during the play
of
ACDrive media.
Registering
the
value setup by Sound Control. The
memory cannot be erased by
the
Reset
button.
Displaying the serial numberfor each product.
Displaying the firmware version
with
the unit.
In
COl
USB
mode
Firmware version display
Functionofthe
KDC-X590IKDC-MP632U
In
COl
USB
mode
Unique ID display
• Register 1 pairofAudio Preset Memory.
You
cannot
register by
the
source.
• When you press
the
Reset,
all
the
sources will be
the
setting value
whichisregistered.
• The
following
items cannot be registered.
Volume, Balance,
Fader,
Loudness, Volume offset, Dual
Zone System,
Rear
Volume
1
Setup
Sound
Control
Refer
to the following operations to setup the
Sound
Control.
-
<Audio
Control> (page
12)
-
<Audio
Setup> (page
14)
2 Enter
Menu
mode
Press
the
[MENU]
button
foratleast 1 second.
"MENU"isdisplayed.
3 Select
Audio
Preset
mode
Push
the
Control
knob
towards
[FM]or[AM].
Select
the
"A-PRESET'
display.
4 Enter
Audio
Preset
mode
Press
the
Control
knob
foratleast 1 second.
S Select
the
Audio
Preset
Memory
Push
the
Control
knob
towards
[FM]or[AM].
Select
the
"MEMORY"
display.
6
Put
the
Audio
Presetinthe
memory
Press
the
Control
knob
foratleast 2 seconds.
The
"MEMORyndisplay blinks 1time.
7
Exit
Audio
Preset
mode
Press
the
[MENU]
button.
~
Notbeannounced.
Guideisannounced.
"V-ID
OFF"
"V-ID
ON"
1 Select
the
firmware
version
display
mode
Push
the
Control
knob
towards [FM]or[AM].
Select
the
"ACD
VER"/"F/W
VEW
display.
2
Display
the
firmware
version
Push
the
Control
knob
towards
[~]
or
[~].
1 Select
the
unique10display
mode
Push
the
Control
knob
towards [FM]or[AM].
Select
the
"ACD
10"
display.
2
Display
the
unique
10
Push
the
Control
knob
towards
[~]
or
[~].
English I
33

Sets
the demonstration mode.
In
Standby
mode
Demonstration
mode
Setting
1 Select
the
Demonstration
mode
Push
the
Control knob towards [FM] or [AM].
Select
the
"DEMO"
display.
2 Set
the
Demonstration
mode
Press
the
Control knob foratleast 2 seconds.
Each
time you
press
the knobatleast2seconds,
the Demonstration mode alternates between the
settings shown
in
the table below.
Menu
system
Functionofthe KDC-X590/KDC-MP632U
Other
than Standby
mode
Audio Preset Recall
Recalling the sound setup registered by <Audio
Preset Memory> (page 33).
1 Select
the
source
Press
the
[SRC]
button.
2 Enter
Menu
mode
Press
the
[MENU]
button
foratleast 1 second.
"MENU"isdisplayed.
3 Select
Audio
Preset
mode
Push
the
Control
knob
towards [FM] or [AM].
Select the
"A-PRESET'
display.
4 Enter
Audio
Preset
mode
Press
the
Control
knob
foratleast 1 second.
S Select
the
Audio
Preset Recall
Push
the
Control knob towards [FM] or [AM].
Select the
"RECALL'
display.
6 Recall
the
Audio
Preset
Press
the
Control
knob
foratleast 2 seconds.
The
"RECALL'
display blinks 1time.
7 Exit Audio Preset
mode
Press
the
[MENU]
button.
E2
• The
User
memoryof<System Q> (page
12)
is
changedtothe value which was recalled.
• The source tone
memory
itemof<Audio Control>
(page
12)ischangedtothe value which was recalled
by the selected source.
34 I English
"DEMO
ON"
"DEMO
OFF'
The
Demonstration
mode
functionisON.
Exit
Demonstration
mode
(Normal
mode).

Basic Operations
of
remote control
SRC
~~~--
DIRECT
rnu-~--~II
mtWJo
......
~--
ATT
VOL--~-
AUD-~--em
[O]-[9]-~~
It
4
__
Loading and Replacing
the
battery
Basic
operations
[VOL] buttons
Adjusts the volume.
[SRC]
button
Each
time you
press
the button, the source
alternates.
For
the source alternating order refer
to
<Selecting
the
Source> (page
11).
[ATT] button
Turns the volume
down
quickly.
When the
buttonispressed again, the volume
returnstothe previous level.
I AWARNING I
• Store unused batteries
outofthe
reachofchildren.
Contact a doctor immediately
if
the battery
is
accidentally swallowed.
~
•Donot
set
the remote controlinhot places
such
as
on the dashboard.
English
I 35

Basic Operations
of
remote control
Audio Control
[AUD] button
Selects
the
Audio itemtobe adjusted.
[VOL] buttons
Adjusts
the
Audio item.
~
•
Referto<Audio Control> (page
12)
for the operation
method, such
as
the procedures for Audio control and
others operations.
• The remote control can only select and adjust the
Basic
Audio item. Selecting and adjustingofthe Detail
Audio item cannot be done.
Functionofthe KDC-X590/KDC-MP632U
Dual Zone System
[2-Z0NE] button
Each
time
you press
the
button, 12Z0N"
of
<Audio Setup> (page
14)isturnedONor
OFF.
[A]I
[T]
buttons
Adjusts the volumeofthe
rear channel.
The rear channel activates while the Dual Zone
System
is
ON.
In Tuner source
[FM]/ [AM] buttons
Selects
the
band.
Each
time
you press the
[FM]
button, the band
alternates between
theFM1,
FM2,
and
FM3
bands.
[~]I
[..,]
buttons
Tuneupor
down
band.
[0] - [9] buttons
Press
buttons
[1]
- [6]torecall preset stations.
[DIRECT] button
Enters and cancels
the
<Direct
Access
Tuning>
(page
18)
mode.
36
I
English
In Disc/USB source
[~]/
[~]
buttons
Going forwards and backwards between track!
files.
[+]1
[-]
buttons
Going forwards and backwards between
disci
folders.
[~II]
button
Each
time
you press
the
button, the song pauses
or
plays.
[0] - [9] buttons
When in <DirectTrack!File Search> (page
21)
and
<Direct Disc Search> (page
21),
enters
the
track!
file/disc number.
In SIRIUS
tuner
source
[FM] button
Selects
the
preset band.
[~]/
[~]
buttons
Searchesupor
down
channels.
[0] - [9] buttons
Press
buttons
[1]-[6]torecall preset channels.
[DIRECT] button
Enters and cancels
the
<Direct Access Tuning>
mode.

In
HD
Radio source
[FM] button
Selects
theHDFM
band.
Each
time
you
press
the
[FM]
button, the band
alternates between
the
HF1, HF2,
and
HF3
bands.
[AM] button
Selects
theHDAM
band.
[~]I
[~]
buttons
Tunesupor
down
bands.
[0] - [9] buttons
Press
buttons
[1]
-
[6]torecall preset stations.
English
I 37

Accessories/Installation Procedure
..........
2
..........
4
5.
Connect the wiring harness connectortothe
unit.
6.
Install the unit in your
car.
7.
Reconnect the 8 battery.
8.
Press
the reset button .
AWARNING
Ifyou connect the ignition wire (red) and the battery wire
(yellow) to the
car
chassis
(ground), you may cause a short
circuit, that
in
turn may start a fire. Always connect those
wires to the power source running through the fuse box.
~
Ifthe powerisnot turnedON(or itisON,
but
will be
OFF
immediately), the speaker wire may have a short-circuit
or touched the
chasisofthe vehicle and the protection
function may have been activated. Therefore, the speaker
wire should be checked.
Ifyour
car's
ignition does
not
haveanACC
position,
connect the ignition wires
to
a power source that
can
be
turned on and
off
with the ignition
key.
Ifyou connect
the ignition wire
to
a power source with a constant
voltage supply,
as
with battery wires, the battery may die.
Ifthe console
has
a lid, make suretoinstall the unit
so
that the faceplate will not hit the lid when closing and
opening.
Ifthe fuse blows, first make
sure
the wires aren't touching
to
cause
a short circuit, then replace the old fuse with
one with the same rating.
Insulate unconnected wires with vinyl tape or other
similar material.
To
prevent a short circuit, do not remove
the
caps
on the endsofthe unconnected wires or the
terminals.
Connect the speaker wires correctly
to
the terminals
to
which they correspond. The unit may be damaged or fail
to work
if
you
share
the 8 wires or ground them
to
any
metal part
in
the
car.
When only
two
speakers
are
being connectedtothe
system, connect the connectors either to both the front
output
terminals or to both the
rear
output
terminals
(do
not
mix front and
rear).
For
example,ifyou connect
the
ffi connector
of
the left speakertoafront
output
terminal, do
not
connect the 8 connector
toarear
output
terminal.
After the unit
is
installed, check whether the brake lamps,
blinkers, wipers, etc. on the
car
are
working properly.
Mount
the unitsothat the mounting angleis30°orless.
..........
2
..........
1
..........
1
..........
1
®
Accessories
..........
4
®
®
Installation Procedure
1.Toprevent a
short
circuit, remove the
key
from
the ignition and disconnect the
8 battery.
2.
Make the proper
input
and
output
wire
connections for each unit.
3.
Connect the speaker wiresofthe wiring harness.
4. Connect the wiring harness wires in the
following order: ground, battery, ignition.
38
I
English

Connecting Wires
to
Terminals (KDC-X590)
Ifnoconnections
are
made,donot
let the wire come
out
from
the
tab.
Sub Woofer right
output
(Red)
Sub Woofer left
output
(White)
Power control wire (Blue/White)
Motor
antenna control wire (Blue)
Dimmer control wire (Orange / White)
TEL
mute
wire (Brown)
~
• Do
not
remove
the
cap
when
youdonot
use
the
~
USB
cable. The connector will cause
the
unit
to
malfunctionifit gets in
touch
with
any metallic part
of
the
vehicle.
•
Fasten
the
connector
with
the
tapesothat
the
cable
will
not
come off.
FM/AMantenna
input
~
To
connect these leads, refer
to
~
the
relevant instruction manuals.
To
Kenwood disc changer/ External optional accessory
[0
To
USB
device
Front left
output
(White)
Front right
output
(Red)
USB
connector
To
use
the
steering
wheel remote
&===m'
control feature,
you needtoan
exclusive remote
adapter (not
supplied) matches
your carisrequired.
When using
the
optional
power
amplifier,
connecttoits
power
control terminal.
Depending on
what
antenna you
are
using,
connect eithertothe
control terminalofthe
motor
antenna, ortothe
power
terminal for
the
booster amplifierofthe
film-type antenna.
Connecttothe terminal
thatisgrounded
when
either the
telephone
rings or during
conversation.
~
To
connect
the
Kenwood navigation
~
system, consult your navigation manual.
To
car light control switch
Steering remote
control (Light Blue/
Yellow)
8 White/Black
To
front left speaker White
(f)-----------'
8 Gray/Black
To
front right speaker G
(f)_ra...;.,y
___
8 Green/Black
To
rear left speaker Green
(f)--------..J
8 Purple/Black
To
rear right speaker Purple
<±)
...J
Ignition key switch
~
@ Carfuse box
.-
I_g_n
i_ti_o_n_w_i_re_(_R_ed_)
--'
I I
English
I
39
Battery wire (Yellow)
Ground wire
(Black)8(To
car chassis)
ACC
Car
fuse box
~
(Main fuse)
Battery

Connecting Wires
to
Terminals (KDC-MP632U)
Ifnoconnections are made,donot
let
the
wire
come
out
from
the
tab.
FM/AM antenna
input
Motor
antenna control wire (Blue)
Power control wire (BluelWhite)
Dimmer
control wire (Oran e / White)
TEL
mute
wire (Brown)
~
• Do
not
remove
the
cap
when
youdonot
use
the
~
USB
cable. The
connector
will cause
the
unit
to
malfunctionifit
gets in
touch
with
any metallic part
of
the
vehicle.
• Fasten
the
connector
with
the
tapesothat
the
cable
will
not
come
off.
AUX
right
input
(Red)
AUX left
input
(White)
~
To
connect
these leads, refer
to
~
the
relevant instruction manuals.
To
Kenwood disc
changer/
External optional accessory
[0
To
USB
device
Front
left
output
(White)
Front rig
ht
output
(Red)
Rear
left
output
(White)/Sub
Woofer left
output
(Wh ite)
Rear
right
output
(Red)/Sub
Woofer
right
output
(Red)
USB
connector
When using
the
optional
power
amplifier,
connecttoits
power
control terminal.
Dependingonwhat
antenna you are using,
connect
eithertothe
control terminalofthe
motor
antenna, ortothe
power
terminal for
the
booster amplifierofthe
film-type
antenna.
Connecttothe
terminal
thatisgrounded
when
either
the
telephone
ringsorduring
conversation.
~
To
connect
the
Kenwood navigation
~
system, consult
your
navigation manual.
To
car
light
control switch
8 White/Black
To
front
left speaker
(±)
...;..W;..;..h.;.;,.;it=e
__
8
Gra
/Black
To
front
right
speaker
Gra
(±)--'----------'
8 Green/Black
To
rear left speaker
(±)
....;G;.;..re..;...e;;.;.n
~
8 Purple/Black
To
rear
right
speaker
®_p_u...;.rp_le
~
Ignition key switch
@=:>
@ Carfuse box
Car fuse
box
(Main fuse)
Battery
ACC
...
1
'-n_it_io_n_w_ire.......;...(R_e_d)'---
..........
1I
Batter wire (Yellow)
Ground wire
40
I
English

Connecting Wires
to
Terminals (KDC-MP532Uj
If
no connections
are
made,donot
let the wire come
out
from the tab.
Power control wire (Blue/White)
Motor
antenna control wire
(Blue)
TEL
mute wire (Brown)
Dimmer control wire (Orange / White)
~
• Do
not
remove the cap when youdonot
use
the
~
USB
cable. The connector will cause the unit
to
malfunctionifit
gets in touch
with
any metallic part
of
the vehicle.
•
Fasten
the
connector
with
the tapesothat the cable
will
not
come off.
Front right
output
(Red)
Front left
output
(White)
ANT.
CONT
[0
To
USB
device
Rear
left
output
(White)
Rear
right
output
(Red)
USB
connector
When using the optional
power
amplifier,
connect
to
its power control terminal.
Depending on
what
antenna you
are
using,
connect either
to
the control terminalofthe
motor
antenna, ortothe
power
terminal for the
booster amplifier
of
the film-type antenna.
Connect
to
the terminal
thatisgrounded
when either the telephone rings or during
conversation.
~
To
connect
the
Kenwood navigation
~
system, consult your navigation manual.
To
car light control switch
8
White/Black
To
front left speaker
White
®
8
Gray/Black
To
front right speaker
Gray
®
8
Green/Black
To
rear left speaker
Green
®
8
Purple/Black
To
rear right speaker
Purple
®
Ignition key switch ([)= @
Car
fuse box
Car
fuse box
(Main fuse)
ACC
Ignition wire
(Red)
...
-----------------
.....
11
Battery wire (Yellow)
Ground wire
(Black)8(To
car
chassis)
English
I
41

Installation
non-Japanese cars
Japanese cars
1
Refertothe section <Removing the hard rubber
frame> (page
44)
and then remove the hard
rubber frame.
2 Align the holes in the unit (two locations on each
side) with the vehicle
mounting
bracket and
secure the unit
with
the accessory screws.
T:
Toyotacars
N:
Nissan
cars
@T/N
W~~:x.
\-10
05mm
e~~~~
I~@
05mm
Accessory@
...
for Nissan car
Accessory0...forToyota car
~
• During installation,donot
use any screws except for
those provided. The useofdifferent screws
might
result
in damagetothe
main unit.
• Damage may occurifa screwdriverorsimilar toolisused
with
excessive force
during
the
installations.
\
Bend the tabsofthe
mounting
sleeve
with
a
screwdriverorsimilar utensil
and attach it in place.
Self-tapping screw
(commercially available)
Screw (M4X8)
(commercially available)
Metal
mounting
strap
(commerciallyavailable)
Firewall or metal support
~
~
• Make sure
that
the
unitisinstalled securely in place. If
the
unitisunstable, it may malfunction (for example, the
sound may skip).
42 I
English

Accessory(J)
4 Tighten the screw (02 x 5 mm) (Accessory@)
and bracket (Accessory0) in the hole shown on
the diagram.
~
~
~
~
I L
~
Accessory@
~~
~
• Never insert the screws in any other screw hole than the
one specified. Ifyou screw them in another hole,
it
will
contact and may cause damage
to
the
mechanical parts
inside the unit.
Accessory@
~
"'-I~
Accessory@
~
~
3 Tighten the screw (02 x 5 mm) (Accessory@)
and bracket (Accessory @) in the hole shown on
the diagram.
Screwing
the
Faceplate on
the
Unit
Ifyou
wanttofasten
the
faceplatetothe
main
unit
so
that
it does
not
fall off.
1
Refertothe section <Removing the hard rubber
frame> (page
44)
and then remove the hard
rubber frame.
2 Drop open the faceplate by pressing the
Release
button.
English I 43

Removing the Unit
Removing
the
hard rubber frame
1 Engage the catch pins on the removal tool and
remove the
two
locks on the upper level.
Upper the frame and pull it forward
as
shown in
the figure.
Accessory@
Removal tool
2 When the upper level
is
removed, remove the
lower
two
locations.
~
~
• The frame can be removed from the
bottom
side in the
same manner.
44
I
English
Removing the Unit
1
Refertothe section <Removing the hard rubber
frame> (page
44)
and then remove the hard
rubber frame.
2 Remove the screw (M4 x
8)
on the back panel.
3 Insert the
two
removal tools deeply into the slots
on each
side,asshown.
Screw
(M4X8)
(commercially available)
\
~.
~.
4 Lower the removal tool toward the bottom, and
pullout
the unit halfway while pressing towards
the inside.
&
•Becarefultoavoid injury from the catch pins on
the
removal tool.
5
Pull
the unit
all
the way
out
with your hands,
being careful
nottodrop it.

Troubleshooting Guide
What might
seemtobe
a malfunctioninyour
unit
may
justbethe
resultofslight
misoperation
or
miswiring.
Before
calling
service,
first
check
the
following table
for
possible
problems.
General
? The power does not turn ON.
1/
The fuse
has
blown.
(@"
After checking for short circuits in
the
wires,
replace
the
fuse
with
one
with
the
same
rating.
? There's a source you can't switch.
1/
There's no media inserted.
(@"
Set
the
media you
wanttolisten to.Ifthere's
no media in this unit, you can't switch
to
each
source.
1/
The Disc changer isn't connected.
(@"
Connect
the
Disc changer. If the Disc changer
isn't connected
to
it's
input
terminal, you can't
switch
toanexternal disc source.
? The memory
is
erased when the ignition
is
turned
OFF.
1/
The ignition and battery wire
are
incorrectly
connected.
(@"
Connect
the
wire correctly, referringtothe
section on <Connecting Wires
to
Terminals>
(page 39,40,41).
? The
TEL
mute function does not work.
1/
The
TEL
mute
wireisnot
connected properly.
(@"
Connect
the
wire correctly, referringtothe
section on <Connecting Wires
to
Terminals>
(page 39,40,41).
? The
TEL
mute function turnsONeven though the
TEL
mute wireisnot
connected.
1/
The
TEL
mute
wireistouching a metal partofthe
car.
(@"
Pull
the
TEL
mute
wire away from
the
metal
part
of
the
car.
?
EvenifLoudnessisturned ON, high-pitched tone
isn't compensated for.
1/
Tuner sourceisselected.
(@"
High-pitched
tone
isn't compensated for when
in Tuner source.
? No sound
can
be heard, or
the
volumeislow.
1/
The fader or balance settings are set all the way
to
one side.
(@"
Center
the
fader and balance settings.
1/
The
input/output
wires or wiring harness
are
connected incorrectly.
(@"
Reconnect
the
input/output
wires or the
wiring harness correctly.
See
the
section on
<Connecting Wires
to
Terminals> (page 39,40,
41).
1/
The valuesofVolume offset
are
low.
(@"
Turnupthe
Volume offset, referringtothe
section on <Audio Setup> (page
14).
1/
The <Built-in
Amp
Setting> (page
30)isOFF.
(@"
TurnitON.
? The sound quality
is
poor or distorted.
1/
Oneofthe
speaker wiresisbeing pinched by a
screw
in
the
car.
(@"
Check
the
speaker wiring.
1/
The speakers are
not
wired correctly.
(@"
Reconnect the speaker wiressothat
each
output
terminalisconnectedtoa different
speaker.
? The Touch Sensor Tone doesn't sound.
1/
The preoutjackisbeing used.
(@"
The Touch Sensor Tone can't be
output
from
the preout jack.
? The Dimmer function doesn't work.
1/
The Dimmer wire isn't connected correctly.
(@"
Check
the
Dimmer wire connection.
1/
The
<Dimmer>
(page
29)isOFF.
(@"
Turn it
ON.
? The display blacks out while scrolling.
1/
<Display Illumination Control>issettoOFF.
(@"
Referto<Display Illumination Control> (page
29).
? The sound
is
not
output
from Subwoofer or
it
outputs the different sound.
1/
When"2ZONE"of<Audio Setup>issettoON.
(@"
Set"2ZONE"of<Audio Setup>toOFF
(page14).
? Cannot set Dual Zone System
of
<Audio Setup>
(page 14).
1/
CA-C1
AX/ CA-C2AXisconnectedtoKCA-S21OAor
other units.
(@"
Connect
the
CA-C1
AX/ CA-C2AX directly
to
this unit.
English
I 45

Troubleshooting Guide
Tuner source
? Radio reception
is
poor.
V'
The car antennaisnot
extended.
1&
Pull
the
antenna
out
all
the
way.
V' The antenna control wire
is
not
connected.
1&
Connect
the
wire correctly, referringtothe
section on <Connecting WirestoTerminals>
(page 39,40,41).
? The desired frequency can't be entered with the
Direct
Access
Tuning.
V'
A station
that
can't be receivedisbeing entered.
1&
Enter a station
that
can be received.
V' You're trying
to
enter a frequency
witha0.01
MHz
unit.
1&
What can be designatedintheFMbandisto
0.1
MHz.
Disc source
?
"AUX
EXT"isdisplayed without achieving
External disc control mode.
V'
Unsupported disc changerisconnected.
1&
Use
the
disc changer mentioned in the
<AboutCDplayers/disc changers connected
to
this
unit>
(page4)of
the section on <Safety
precautions>.
? The specified disc does
not
play,
but
another one
plays instead.
V'
The specifiedCDis
quite
dirty.
1&
Clean
the
CD.
V' The disc
is
loaded in a different slot from that
specified.
1&
Eject
the
disc magazine and check
the
number
for
the
specified disc.
V' The disc
is
severely scratched.
1&
Try another disc instead.
? Can't remove disc.
V'
The causeisthat
more than10minutes
has
elapsed since the vehicle
ACC
switch
was
turned
OFF.
1&
The disc can only be removed
within
10
minutesofthe
ACC
switch being turned
OFF.
If more than10minutes
has
elapsed, turn
the
ACC
switchONagain and
press
the
Eject
button.
? The disc won't insert.
V'
There's already another disc inserted.
1&
Press
the
[~]
button
and remove
the
disc.
? Direct Search can't be done.
V'
Another functionisON.
1&
Turn Random
Play
or other functions
OFF.
? Track Search can't be done.
V'
For
the
discs/folders first or last song.
1&
For
each disc/folder, Track
Search
can't be
done in
the
backward direction for
the
first
song or in
the
forward direction for
the
last
song.
46
I
English
Audio file source
? Cannot play an Audio file.
V'
The mediaisscratched or dirty.
1&
Clean
the
media, referringtotheCDcleaning
of
the section on
<About
CDs> (page
7).
? The sound skips when an Audio file
is
being
played.
V'
The mediaisscratched or dirty.
1&
Clean the media, referringtotheCDcleaning
of
the section on
<About
CDs> (page
7).
V' The recording
conditionisbad.
1&
Record the media again or
use
another media.
? The Audio file track
time
isn't displayed correctly.
V'
1&
There
are
times when it isn't displayed
correctly according
to
the Audio file recording
conditions.
HD
Radio source
? No sound
can
be heard, or
the
volumeislow.
V'
The preset broadcast stationisnot
transmitting
in
the
mode
that
was set
with
<Receive
mode
Setting>.
1&
Please
set <Receive
mode
Setting> (page
31)
to
"AUTO".
V'
In
digitalAMbroadcasting, receive
mode
switches
between stereo and monaural
too
often.
1&
Receiving
conditionisbad or unstable.
Stereo
is
chosen when receiving condition
is
good, anditswitchestomonaural when
the
condition becomes bad.
V'
HD
Radio
tunerisconnectedtoKCA-S21OAor
other units.
1&
Connect
theHDRadio
tuner
directlytothe
control unit.
USB
device source
? The
USB
deviceisnot detected.
V'
The
USB
connectorisdisconnected.
1&
Connect
the
connectorofthe
USB
device
properly.
? The
USB
device does not play its audio files.
V'
The
USB
connectorisdisconnected.
1&
Connect
the
connectorofthe
USB
device
properly.

The messages shown below display your
systems condition.
EJECT:
No disc magazine
has
been loaded
in
the
changer. The disc magazineisnot
completely loaded.
¢ Load
the
disc magazine properly.
NoCDin the unit.
¢ Insert
the
CD.
DEMO
MODE:
The Demonstration
mode
has
been
selected.
¢ The <Demonstration
mode
Setting>
(page
34)isON.
Turn it
OFF.
The protective circuit in
the
unit activates
when
the
temperature inside
the
automatic disc changer exceeds
60°C
(140°F),
stopping
all
operation.
¢ Cool
down
the
unit
by opening
the
windowsorturningonthe
air
conditioner.Asthe
temperature falls
below
60°C
(140°F),
the
disc will start
playing again.
TheCDplayer sectionisnot
operating
properly.
¢ Reinsert the
CD.IftheCDcannot be
ejectedorthe
display continuestoflash
even
when
theCDhas
been properly
reinserted, please switch
off
the
power
and consult your nearest service center.
The speaker wire
has
a short-circuit
or
touches
the
chassisofthe
vehicle, and
then
the
protection
functionisactivated.
¢ Wire
or
insulate
the
speaker cable
properly and press
the
reset button.
An Audio fileisplayed
with
a format
that
this
unit
can't support.
¢----
A copy-protected fileisplayed.
¢----
The
USB
deviceisselectedasa source
although no
USB
deviceisconnected.
¢ Change
the
sourcetoany source other
than
USB.
ConnectanUSB
device, and
change
the
sourcetoUSB
again.
An unsupported
USB
deviceisconnected.
¢
For
the
supported
USB
devices, refer
to
<About
USB
device> (page
10).
HOLD:
IN
(Blink):
PROTECT:
NA
FILE:
NO
DVICE:
COPY
PRO:
NA
DVICE:
NO
MUSIC/
E-15:
• Media was played
that
doesn't have data
recorded
that
the
unit
can play.
•The connected
USB
device contains no
playable audio file.
¢
Use
media
that
has
data recorded
that
the
unit
can play.
The connected
USB
deviceisrated a
current capacity higher than
the
allowable
limit.
¢ Check
the
USB
device
with
reference
to
<About
USB
device> (page
10).
Some
trouble
may have occurredtothe
connected
USB
device.
¢ Remove
the
USB
device and then
reconnect it. When
the
same message
displays again,
use
another
USB
device.
USB
ERR:
No disc
has
been loaded in
the
disc
magazine.
¢ Load a disc into
the
disc magazine.
No disc
has
been loaded in
the
disc
magazine.
¢ Load a disc into
the
disc magazine.
TheCDis
quite
dirty.TheCDis
upside-
down.
TheCDis
scratched a lot.
¢ Clean
theCDand load it correctly.
•The
numberoffilesorfolders
which
are
stored in
the
connected
USB
device
is
above
the
limitation.
•The file systemofthe connected
USB
deviceisbroken.
¢ Copy
the
files and folders for
the
USB
device again referringtowww.
kenwood.com/usb!.Ifthe
error
messageisstill displayed, initialize the
USB
device or
use
other
USB
devices.
The
unitismalfunctioning for some reason.
¢
Press
the
reset
buttononthe
unit.Ifthe
"E-77" code does
not
disappear, consult
your nearest service center.
TheCDis
upside-down.
¢ Load
theCDcorrectly.
Nothing
has
been recorded on
the
MD.
No tracks
are
recorded on the MD,
although it
has
a title.
The faceplateofthe
slave
unit
being
connectedtothis
unit
has
been removed.
¢ Replace it.
Somethingiswrong
with
the disc
magazine. Or
the
unitismalfunctioning for
some reason.
¢ Check
the
disc magazine. And
then
press
the
reset
buttononthe
unit. If
the
"E-99" code does
not
disappear, consult
your nearest service center.
Discs
are being exchanged in
the
Disc
changer.
The
unitisreading
the
data on
the
disc.
NO
DISC:
READ
ERR:
TOC
ERR:
BLANK:
NO
TRACK:
NO
PANEL:
E-05:
E-77:
LOAD:
E-99:
READING:
English
I 47

Specifications
Specifications
subject to change without
notice.
FM
tuner
section
Frequency range (200 kHz space)
: 87.9
MHz
- 107.9
MHz
Usable sensitivity (SIN = 30dB)
: 9.3dBf (0.8
\lV
175
0)
Quieting
Sensitivity (SIN = 50dB)
: 15.2dBf (1.6
\lV
175
0)
Frequency response (±3.0 dB)
: 30 Hz -
15
kHz
Signal
to
Noise ratio (MONO)
: 70 dB
Selectivity
(±400
kHz)
:~80 dB
Stereo separation
(1
kHz)
: 40 dB
AM tuner section
Frequency
range
(10kHz
space)
: 530 kHz - 1700 kHz
Usable
sensitivity
(SIN =20dB)
: 28
dB\l
(25
\lV)
CD
player section
Laser
diode
: GaAIAs
Digital
filter
(DI
A)
: 8 Times
Over
Sampling
DI
A
Converter
: 1 Bit
Spindle speed
: 1000 -
400
rpm
(CLV
2times)
Wow&Flutter
:
Below
Measurable
Limit
Frequency response (±1 dB)
:
10Hz
- 20 kHz
Total
harmonic
distortion(1kHz)
: 0.008 % (KDC-X590)
:
0.01
% (KDC-MP632U/MP532U)
Signal
to
Noise ratio(1kHz)
: 110 dB (KDC-X590)
: 105 dB (KDC-MP632U/MP532U)
Dynamic
range
: 93 dB
MP3
decode
:
Compliant
with
MPEG-l/2
Audio
Layer-3
WMA
decode
:
Compliant
with
Windows
Media
Audio
AAC
decode
: AAC
-LC
lI.
m
4a
ll
files
48
I
English
Audio section
Maximum
output
power
: 50 W x 4
Full
Bandwidth
Power (at less
than
1%THO)
: 22 W x 4
Speaker
impedance
: 4 - 8 0
Tone
action
Bass: 100 Hz±8dB
Middle:
1 kHz±8dB
Treble:
10kHz±8dB
Preout level
I Load
(during
disc play)
: 4000
mV/l0
kO
(KDC-X590)
: 2500
mV/l 0
kO
(KDC-MP632U)
: 2000
mV/l 0
kO
(KDC-MP532U)
Preout
impedance
:~6000
USB
Interface
USB
Standard
: USB1.l1 2.0
File System
:
FAT161
32
Maximum
Supply
current
: 500
mA
MP3
decode
:
Compliant
with
MPEG-1/2
Audio
Layer-3
WMA
decode
:
Compliant
with
Windows
Media
Audio
AAC
decode
: AAC-LC
lI.
m
4a" files
Auxiliary
input
(KDC-MP632U)
Frequency responce(±1 dB)
: 20 Hz - 20 kHz
Input
Maximum
Voltage
: 1200
mV
Input
impedance
: 100
kO
General
Operating
voltage
(11
- 16V
allowable)
: 14.4 V
Current
consumption
: 10 A
Installation Size
(W
x H x
D)
: 182 x 53 x 155
mm
7-3/16 x 2-1/16 x 6-118
inch
Weight
:
3.1
Ibs (1.40 kg)


CORRECTION/CORRECCION
Incorrect/lncorrecto
English Page 39
KDC-X590
Fran~ais
Page 87
Espanol Pagina 135
I
__
~.
__
:0::0:
~_:.QJ:---,9J
['~
~
• • I
• • I
• I IllUMI I
• • I
I • I
: : I
Lj-T~~i~J-------------------------------------)
I
I,!
Correct/Correcto
•To"EXT.AMP.CONT"
the
external
•
VersIeterminal
ayantlafonctiondecontraledeI'amp. exterieure.
•AIterminal "EXTAMP.CONT" del amplificador con
funci6ndecontrol del amplificador externo.
terminalofthe
amp
control function.
"EXTAMP.CONT."deI'amplificateur
amplifier having
f-~
~
: .
: :
: :
: :
I
••
~
la
IllUMI
EXT.
CONT
• External amplifier control wire (Pink/Black)
•Cable de
(Rose/Noir)
•Cabledecontrol del amplificador externo (Rosado/
negro)
commande
de I'amplificateur externe
B59-1858-00/00

Media Manager
INSTALLATION
MANUEL
D1INSTALLATION
MANUAL
INSTALLATIONSHANDBUCH
INSTALLATIEHANDLEIDING
MANUALE DI INSTALLAZIONE
MANUAL
Kenwood Corporation
DE INSTALACION
© 859-1850-00/00 (KETM)

Preface
PhatNoise Media Manager (hereafter called "Media Manager") allows youtoencode
your audio
CDs
and create a digital music library on your
PC.
It also lets you create ACDrive media
The created ACDrive media can be played
with
audio system
following logo mark.
(CDorUSB
ACDrive
Playing
songs
playlist set
index featu
the
ACDrive media
by
using
the
music information (suchasthe
with
Media Manager.Inthis
reo
NOTE
• Screen images in this manual are shownasthe
from
may vary
• Available ACDrive media and features vary
system.
system.
those actually displayed.
For
more
details, refertothe
with
the Kenwood car audio system allows youtoselect
case,
Operating Instructions supplied
device) containing
with
the
ACDrive-compliant Kenwood car
your
rt
album title, artist, and genre)orthe
the
informationisread
reference for operating procedure, and
dependingonthe
modelofthe
outbythe
car audio
with
your car audio
favorite music.
voice
About
2 I
CD
attached
The CD contents
• ACDrive demonstration
• Installation programofPhatNoise Media Manager (for Windows
To
install PhatNoise Media
See<1Required Operating Environment> (page3)and <2 Software Installation> (page
4)toinstall PhatNoise Media Manager.
To
enjoy sample tracks
1.
Insert
the
CD
into
2.
Select
album, artist, genre,orplaylisttoselect
the
button
CD
Manager
Kenwood car audio
on Kenwood car audio
that
activates Voice Indextosearch
the
desired track.
PC)
English
by

o Required Operating Environment
To
use
Media
+Software
Manager,
the following software
and
hardware
are
required:
Microsoft®
Windows®
98SE,
+Hardware
•
Personal
MHz
run
•
128MB
•
Hard
•
CD-R/CD-RW
USB
•
computer (main unit,
or better
normally
RAM
disk
mass
Pentium®IIprocessor
or more
with sufficient
drive
storage device
free
+Others
Internet connection environment
NOTE
• Windows
• Administrator
XP.
etc).
Free
•
ME,
2000, orXPis
authorityisrequired
Be
suretolog-inasusers
space on
the
hard diskisrequiredasfollows:
ME,
2000,orXP
display,
space
(suchasUSB
requiredtocreateanACDrive on
with
administrator
and
peripheral units) incorporating a
(or
the equivalent)onwhich the aboveOScan
memory,
when
installing Media Manager in Windows 2000 or
USB
authority
hard
disk,
USB
card
reader)
USB
device.
(for example, IIAdministrator
500
ll
US
Europe
200
MB
400MB
English
I 3

H Software Installation
Install Media Manager following the procedure below.
NOTE
• ThePCneedstobe rebooted during installation.
starting the installation procedure.
End
all
application programs before
Installing
1
2
3
the
Program
Set
the
Media
disc in
The installation program will start
automatically.
Click
Perform operations following
messages appearing on
the
~!1U::J
Manager
CD-R/CD-RW drive.
installation
the
display.
the
4
4 I
English
Click
•••
Installation will start.

5
NOTE
•
Adobe
Click_._
Installation processingiscontinued.
Click_~E
ThePCwill be rebooted.
Readerisneededtoread User Manual.
English
I 5

At
the
first starting up
1
2
Double-click PhatNoise
Manager icon on
Media Manager
Register!]
Enter to all fields, and click I
[Load
appears.
dialog
Media
the
startsupand
appears.
From
Folder]
Media
desktop.
dialog
[Please
OK
,.
3
Click
Cancel
6 I
English

Language Selection
You
can
change the display language for Media Manager.
1
3
Select [Options...] from
menu.
The
[Preference]
Select a desired language in
"Select Language" combo box.
Clickmm.
The
display language
language for Media Manager will
dialog
will
and
the
[Tools]
appear.
manual
the
be
changed to the selected
CI
ick I
4
5
NOTE
• Media Managerissetupin same languageasWindowsofyour Pc.
• The Display language will be switched after restarting
CI
L:::::::::::~~::::::::::::::JI.
ick
1t::::::=:::::YK::::=:::::::::il.
of
Media Manager.
one.
English
I 7

Microsoft and Windows
the United States
and/or
are
other countries.
either registered trademarksortrademarksofMicrosoft Corporation in

KENWOOD

ATTENTION
Beforeusing
Demonstration functionissettoONasthe
Itisrecommended
or
before initial useofthe
If
the
Demonstration
arbitrarilyand
Setting
1. Enter
Select "STANDBY"I"Standby" display
2. Enter
Press
displayed.
3. Select
Push
Mode:ON" display.
4. Turn
Press
"DEMO Mode:OFF"
this
product
that
modeisleftintheONposition
the
security code feature can
the
Demonstration
Standby
mode.
Menu
mode.
[MENU]
button
Demonstration
th~
Control knobto[FM]or[AM]toselect "DEMO ON"/"DEMO
the
Demonstration
the
Control knob
is
for
the
this featureisturned
product.
functiontobe
by
foratleast 1 second
mode
setting
item.
mode
OFF.
([~II])
foratleast 2 seconds untit"DEMO OFF"/
displayed.
first
time
original setting
OFFatthe
the
not
be accessed. .
OFF
pressing
[SRC]
untit"MENU"/"Menu"
ATTENTION
Avant
d'utiliserceproduit
La
fonction de demonstration est activee en sortie d'usine.IIest
recommande
cet appareil ou avantsapremiere utilisation.
En
effet,siIe
changer de
de
configurationducodedesecurite.
de
desactiver cette
modededemonstration reste active, I'affichage risquera
fa~on
arbitraireetitnesera
Desactivationdela
1. Entrez en
Selectionnez I'affichage "STANDBY"/"Standby" en
touche
2. Entrez en
Appuyez sur
que
3. Selectionnez I'element
Placez
"DEMO ON"/"DEMO Mode:ON".
modedeveille.
[SRC].
mode
menu.
la
la
molette
touche [MENU]
de commande sur [FM] ou [AM]
"MENU"/"Menu" s'affiche. .
pourlapremiere
fonctionaumomentdeI'installation
pas possible d'acceder alafonction
fonctiondedemonstration
appuyant
pendant
au moins 1 seconde jusqu'a
du
modededemonstration
pour
for
this product.
timeofinstallation
displaywill change
button.
is
fois
de
de
sur
la
ce
it configurer.
afficher
DesactivezIe
Appuyez surlatouchedecommande
secondesjusqu'a
s'affiche.
modededemonstration.
ce
que
Ie message "DEMO OFF"/ "DEMO Mode:OFF"
([~II])
pendantaumoins 2
ATENelaN
Antesdeutilizar
La
funci6ndedemostraci6n esta activada
para este producto.
delainstalaci6n 0 antes del uso
Sielmododedemostraci6nsedeja activado,lapantalla cambiarademodo
arbitrario ynose
Efectuarel
1. Introduzca el
Selecione
2. Introduzcaelmododemenu. .
Pulse
el
bot6n
visualice "MENU"/"Menu".
3. Seleccione el
Mueva el
"DEMO ON"/"DEMO Mode:ON".
4. Desactive el
Presione el
hasta
quesevisualice "DEMO OFF"/"DEMO Mode:OFF".
esta
unidad
Se
recomienda desactivar esta funci6n en el
podra acceder alafunci6ndec6digodeseguridad.
ajustedefunciondedemostracion
mododeespera.
la
pantalla "STANDBY"/"Standby" pulsando el
[MENU]durantealmenos 1 segundo hasta
itemdeconfiguraciondemododedemostracion.
mandodecontrol a [FM] 0 [AM] para seleccionarlapantalla
mododedemostracion.
mandodecontrol
por
primera
como
configuraci6ndeorigen
in~cial
del producto.
([~II])
durantealmenos 2 segundos
vez
desactivada
bot6n
momento
que
[SRC].
se
01-'-
Molettedecommande
Control
Mandodecontrol
knob
858-1426-04

Attention:
This
cardisnecessarytopurchase
or
damage.
anew
panelincaseoftheft
Attention:
Cettecarte
panneau
celui
Achtung:
Diese
Diebstahl
Attentie:
Deze
in
-Attenzione:
Questa
frontale dopo
Atencion:
Esta
que lehaya
dansIecasdeperte·oud1endommagement
que
vous
Karte
ist
oder Beschadigung erneut
kaartisnodig
geval
van
schedaenecessaria
tarjetaesnecesaria
side
est
necessaire
possedez.
erforderlich,
alsueen
diefstalofbeschadiging.
un
furto 0 danni.
robado 0sehaya
pourseprocurer
urn
die FrontblendeimFall
nieuw
peracquistareunnuovo pannello
para
comprarelpanelenel
estropeado.
un
kaufenzuk6nnen.
paneel
with
aanschaffen
nouveau
de
von
caso
de
KENWOOD
Car
Audio
Passport
Kenwood Corporation

Nameofset1NomdeI'appareil 1Modell 1
Modello dell'apparecchio 1Modelo
Sales
Data
dete 1
Date
d'acquisto 1
d'schat1Verkaufsdatum
Fechadeventa
1
K W
KDC-XS90
1111I111111111111111111I111111
019048
Serial
No.1
No.deserie1Serien-Nr.1No.diserie
User
name1NomdeI'utilisateur1
Nome
del
proprietario1
User
address1Adresse
Adresse
1Indirizzo1Direcci6n
Phone1Phono1Telefon
167286
EigentOmer-Name
Usuario
de I'utilisateur1
ITelefono ITelefono
Dealer
stamp 1
Handlerstempel 1
SignatureofDealer
Unterschrift
Cachetduvendeur1
Sello
del
vendedor
1Signature du vendeur1
des
Handlers1Firma
del
vendedor
1
This
equipment
completely
Cette carte
~etement
Dieser
Gerat-Pass
ausfOllen
Esta
tarjetaesimportante.
futura referenda.
passisan
and
keepitinasafe
estundocument important.Laremplir com-
etlagarder
ist
und sorgfaltig aufbewahren.
important document.
place.
aansunendroit
ein
wichtiges Dokument.
Rellenela
Please
sur.
Bitte
por favor y guardela
B46-0681-04/00
fill it out
vollstandig
para

This
warranty
will
be honored
only
in the U.S.A.
KENWOOD LIMITED WARRANTY FOR CAR STEREO COMPONENTS
HOW
Kenwood U.S.A. Corporation
purchase.
WHAT IS COVERED
Exceptasspecified below,this
The
1.
2.
3.
WHO
This
WHAT WE WILL
We
section
HOW
If
1.
2.
3.
LONG IS THE WARRANTY
("Kenwood")
AND
WHAT IS
warranty
following
Any
Kenwood carstereodealer
Service.
Any
Damage, deteriorationormalfunction resulting
a.
b.
c.
d.
e.
are
not
coveredbythe
productwhich is
product on which the serial
Any
shipmentofthe product (claims
Installationorremovalofthe product.
Accident, actsofnature, misuse, abuse, neglect, unauthorized product modificationorfailuretofollow
supplied
Repairorattempted repairbyanyone
Any
other cause which does
with
the product.
not
distributed inthe U.S.A.byKenwood
or
covers all defects in material and workmanship in Kenwood car stereo components.
warranty:
an automobile dealer, unlesstheproductis purchased
number
not
IS PROTECTED
warranty
will
is enforceable
pay
for
all labor and material expenses
of
this warranty.
onlybythe original purchaser.
PAY
FOR
TO OBTAIN WARRANTY SERVICE
your
KENWOOD product ever needs service:
Takeorshipitto
problem. (if you are uncertain
Service Center. 1-800-536-9663).
Although
return shipping charges
Whenever
as
you
proofofwarranty
any KENWOOD Authorized Service Center in the U.S.A. along
astowhether
must
pay any shipping chargesifit
if
the repairs are coveredbythe
your
units are takenorsent
coverage.
warrants this product
NOT
COVERED
has been defaced, modifiedorremoved.
from:
must
be presentedtothe carrier).
not
authorizedbyKenwood.
relatetoa product defect.
for
covered items. Paymentofshipping charges is discussed in the next
a Service Center is authorized, please call1-800-KENWOOD
is necessarytoship the product
for
warranty
service, you
for
orwhichisnot
warranty
must
a periodofone
purchased in the U.S.A.
within
the United States.
include a copyofthe original dated sales receipt
(1)
through
with
for
warranty
year
from
the dateoforiginal
fromanauthorized
the U.S.A
& complete descriptionofthe
Military
instructions
for
the nearest
service,wewill
Exchange
pay the
LIMITATION OF IMPLIED WARRANTIES
ALLIMPLIEDWARRANTIES, INCLUDINGWARRANTIESOFMERCHANTABILITYANDFITNESS
ARE
LIMITEDINDURATION TO
THE
EXCLUSION OF DAMAGES
KENWOOD'S LIABILITY
AT
OUR
OPTION. KENWOOD SHALL NOTBELIABLE
1.
INSTALLATIONORREMOVAL CHARGES, DAMAGE TO
CAR
STEREO
2.
ANY
OTHER
SOME
STATESDONOT ALLOW LIMITATIONSONHOW LONG AN IMPLIED WARRANTY LASTS AND/ORDONOT ALLOW
THE
EXCLUSIONORLIMITATIONOFINCIDENTALORCONSEQUENTIAL DAMAGES,SOTHE
EXCLUSIONS MAY NOT
warranty
This
Ifa problem develops
product,you should contact
is
not
handledtoyour
gives you specific legal rights, and you
FOR
ANY
DEFECTIVE
COMPONENTS, DAMAGES BASED UPON INCONVENIENCE, LOSSOFUSEOFTHE
DAMAGES, WHETHER INCIDENTAL, CONSEQUENTIALOROTHERWISE.
APPLY
TO YOU.
duringorafterthe Limited WarrantyPeriod,orif
your
KENWOOD Authorized DealerorAuthorized Service Center.
satisfaction, please contact
P.O
Box
22745, 2201 East
LENGTHOFTHIS WARRANTY.
PRODUCTISLIMITED TO
FOR:
OTHER
may
also have
our
Customer Relations Department at the address listed below:
KENWOOD
USA
Dominguez
Tel: (310) 639-5300
CORPORATION
Street,
FOR
A PARTICULAR
THE
REPAIRORREPLACEMENTOFTHE
PROPERTY
other
you have any questions regarding
Long
CAUSEDBYANY
rights which vary
Ifthe
Beach, CA 90801-5745
DEFECTSINKENWOOD
ABOVE LIMITATIONS AND
from
statetostate.
problemoryour
PRODUCT;
the
operation
PURPOSE,
PRODUCT
OR
ofthe
question
 Loading...