

Page 1
KDC-HD548U
CD-RECEIVER
INSTRUCTION MANUAL
AMPLI-TUNER LECTEUR DE CD
MODE D’EMPLOI
REPRODUCTOR DE DISCOS COMPACTOS RECEPTOR DE FM/AM
MANUAL DE INSTRUCCIONES
Take the time to read through this instruction manual.
Familiarity with installation and operation procedures will help you obtain the best performance from
your new CD-receiver.
For your records
Record the serial number, found on the back of the unit, in the spaces designated on the warranty card, and in the
space provided below. Refer to the model and serial numbers whenever you call upon your Kenwood dealer for
information or service on the product.
Model KDC-HD548U Serial number
US Residents Only
Register Online
Register your Kenwood product at www.Kenwoodusa.com
GET0696-001A (KW/KN)© 2010 Kenwood Corporation All Rights Reserved.
Page 2
CONTENTS
Safety
Safety 2
Preparation 3
How to attach/detach the faceplate
How to reset your unit
How to prepare the remote controller
(RC-405)
Basic operations 4
Getting started 6
Canceling the display demonstration
Setting the demonstration mode
Adjusting the clock
Initial settings before operations
Listening to HD Radio™
Broadcasts 7
Direct Access Tuning using the remote
controller (RC-405)
iTunes Tagging
Adjust [SETTINGS] mode settings
Listening to a disc/
USB device/ iPod 9
Start playing a disc
Connecting a USB device
Connecting an iPod
Selecting Repeat Play
Selecting Random Play
Selecting Scan Play
Selecting a folder/track/file
Direct Music Search using the remote
controller (RC-405)
Alphabet Search and My Playlist for iPod
iPod control by Hand Mode
Adjust [SETTINGS] mode settings
Listening to the other
external components 12
Function settings 12
Troubleshooting 14
Specifications 17
WARNING
Stop the car before operating the unit.
Important to know...
To prevent a short circuit, never put or
leave any metallic objects (such as coins or
metal tools) inside the unit.
Caution: Adjust the volume so that you
can hear sounds outside the car. Driving
with the volume too high may cause an
accident.
Condensation: When the car is air-
conditioned, moisture may collect on the
laser lens. This may cause disc read errors.
In this case, remove the disc and wait for
the moisture to evaporate.
This unit can only play the CDs with:
The illustrations in this manual are
examples used to explain more clearly
how the controls are used. Therefore, what
appears on the illustrations may differ from
what appears on the actual equipment.
A USB connection cable, CA-U1EX (optional
accessory) is required for connecting a USB
device.
You can connect an Apple iPod/iPhone
with this unit.
The word “iPod” appearing in this manual
indicates the iPod or iPhone connected
to this unit with a connection cable,
KCA-iP102 (optional accessory).
If you experience problems during
installation, consult your Kenwood dealer.
When you purchase external components,
check with your Kenwood dealer to make
sure that they work with your model and in
your area.
Detailed information and notes about the
playable audio files are stated in an online
manual on the following site:
www.kenwood.com/cs/ce/audiofile/
2
Page 3
G
S
Preparation
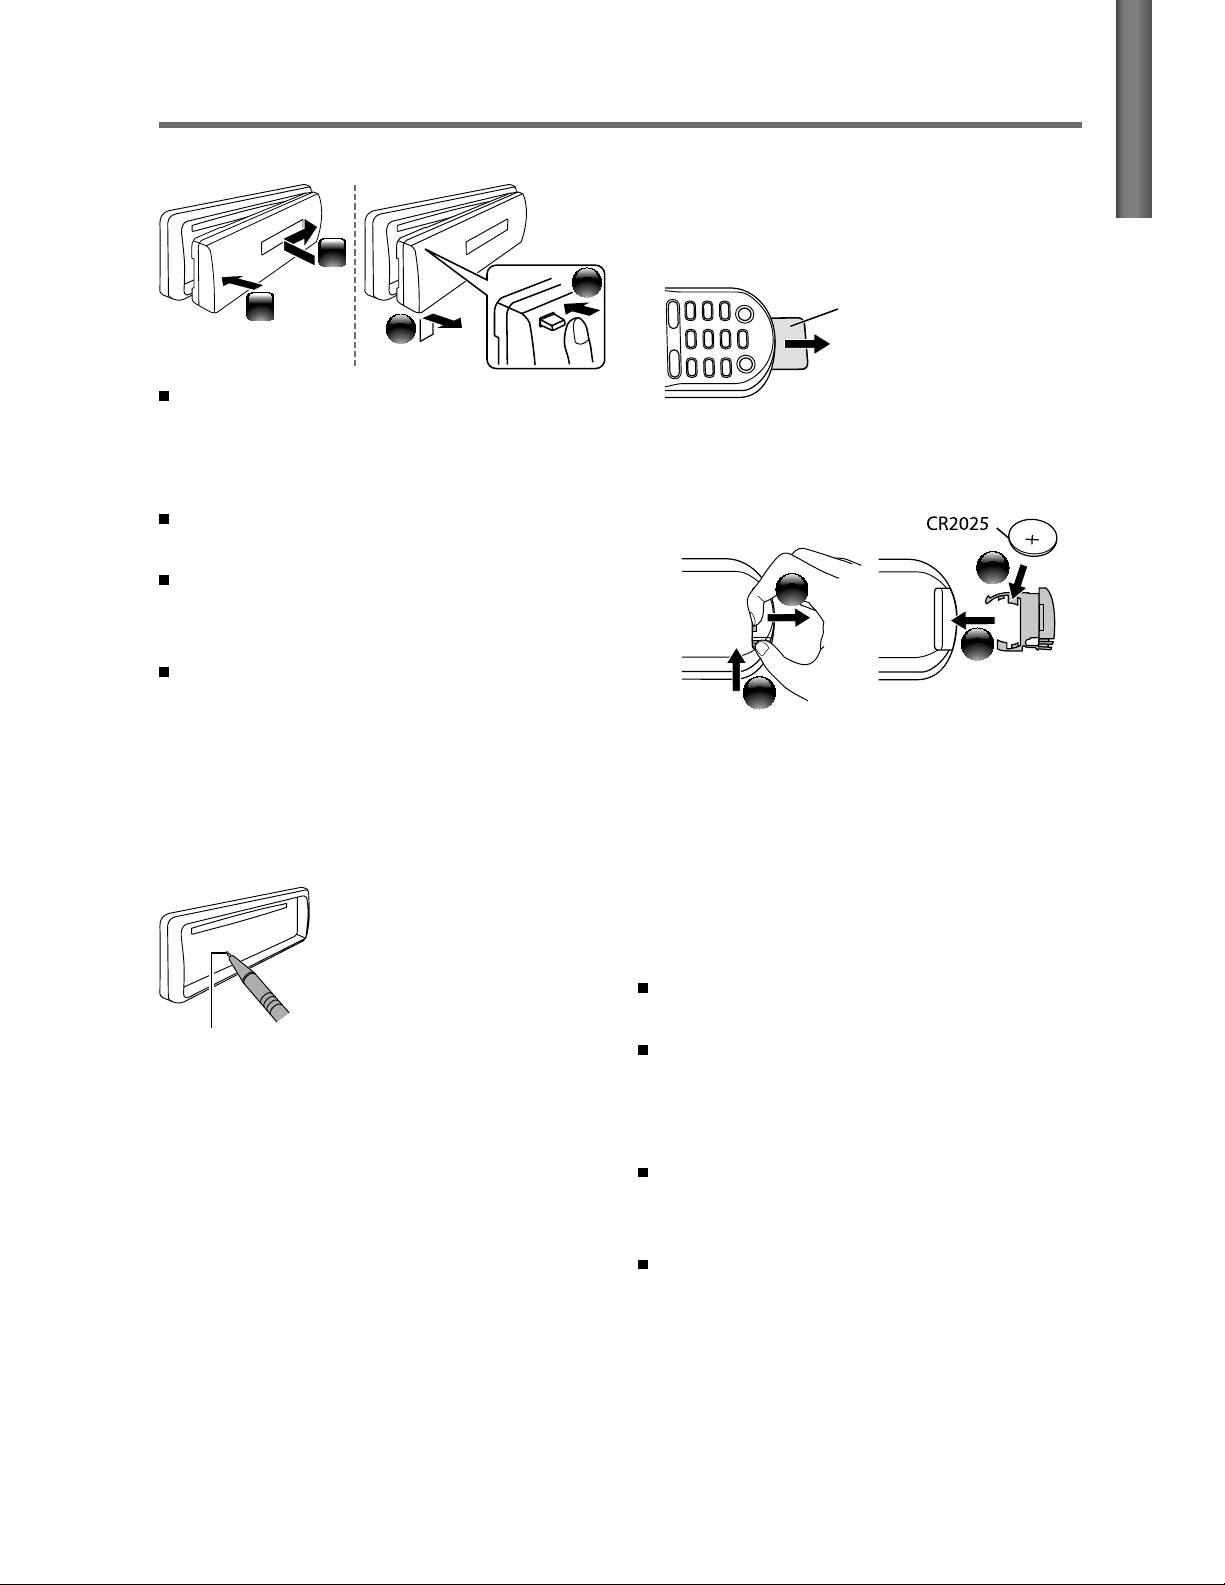
How to attach/detach the faceplate
1
1
2
2
How to prepare the remote
controller (RC-405)
When you use the remote controller for the
first time, pull out the insulation sheet.
Insulation sheet
H
LI
EN
Do not expose the faceplate to direct
sunlight, excessive heat, or humidity. Also
avoid places with too much dust or the
possibility of water splashing.
Keep the faceplate in its casing while
detached.
The faceplate is a precision piece of
equipment and can be damaged by shocks
or jolts.
To prevent deterioration, do not touch the
terminals of the unit and faceplate with
your fingers.
How to reset your unit
If this unit fails to operate properly, press the
reset button.
The unit returns to factory
settings when the reset
button is pressed.
Reset button
If the effectiveness of the remote
controller decreases, replace the battery.
3
2
4
1
CALIFORNIA, USA ONLY
This perchlorate WARNING applies only
to the product sold or distributed in
California USA “Perchlorate Material–special
handling may apply, See www.dtsc.ca.gov/
hazardouswaste/perchlorate.”
Caution:
Do not set the remote control in hot places
such as on the dashboard.
Lithium battery.
Danger of explosion if the battery is
incorrectly replaced. Replace only with the
same or equivalent type.
The battery pack or batteries shall not be
exposed to excessive heat such sunshine,
fire or the like.
Keep battery out of reach of children and in
original package until ready to use. Dispose
of used batteries promptly. If swallowed
contact physician immediately.
3
Page 4
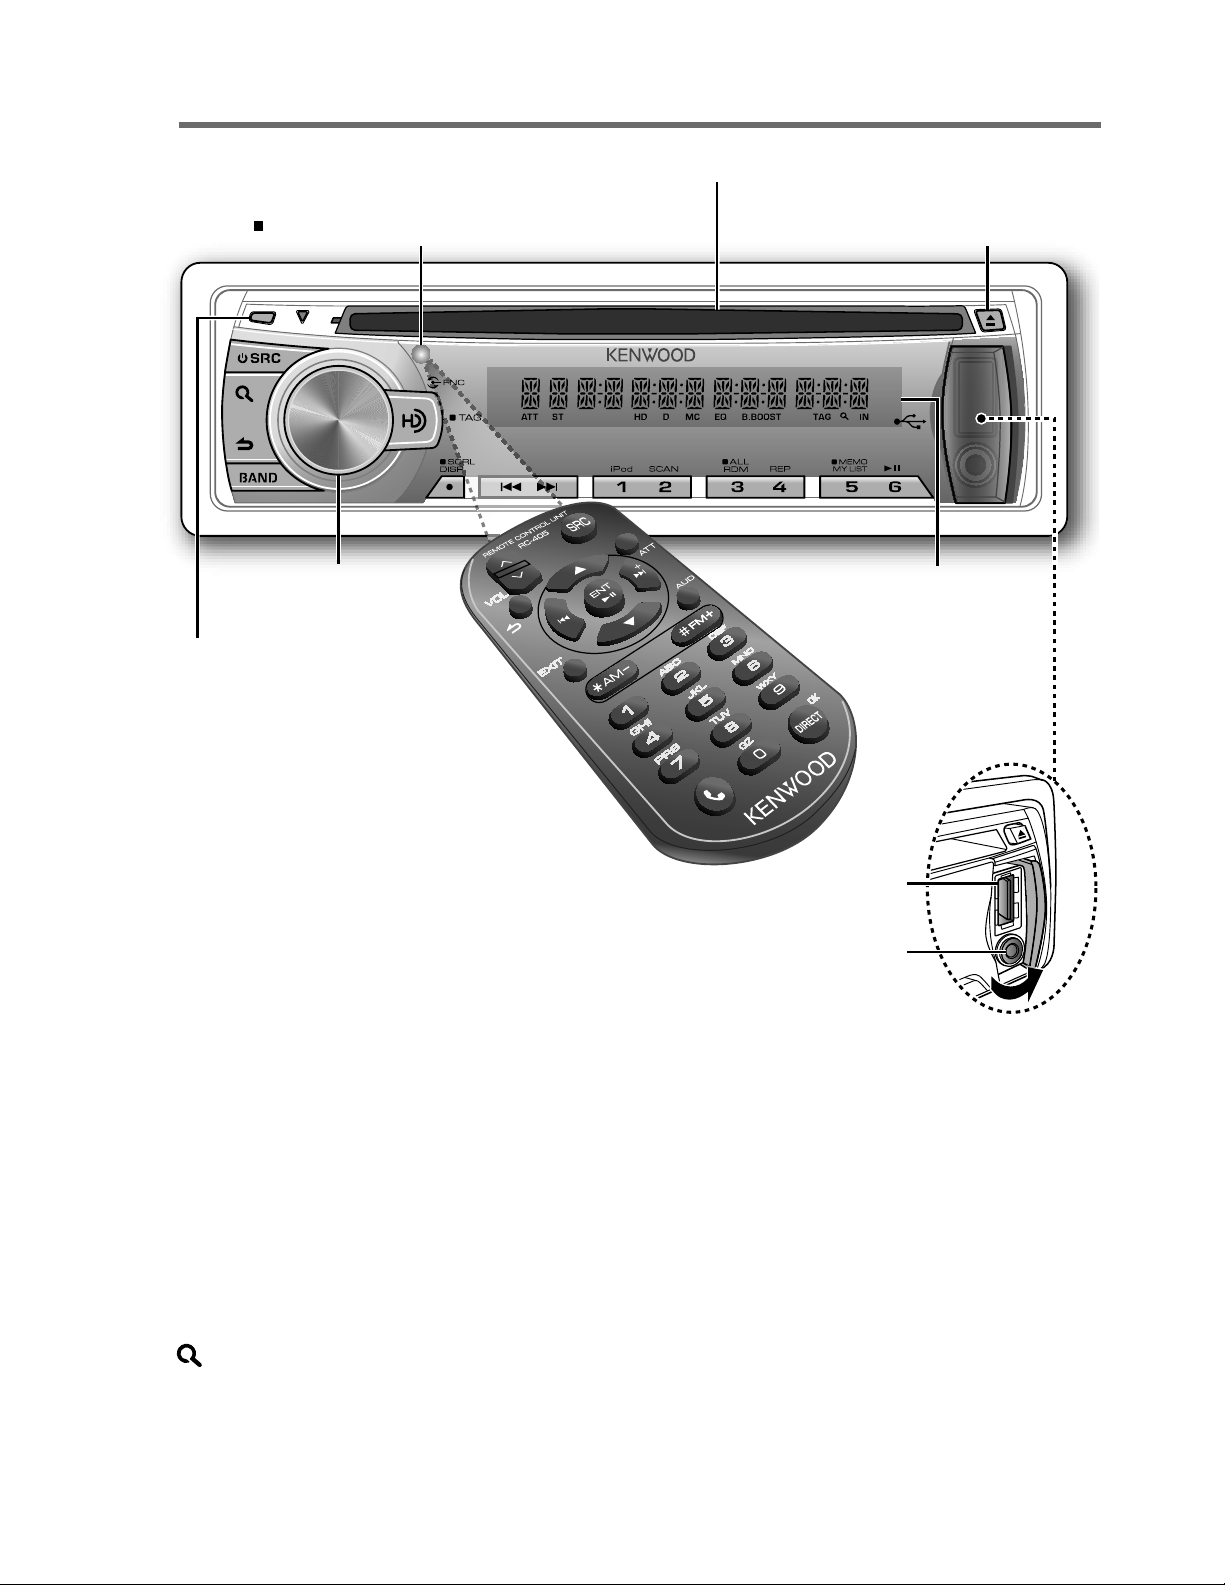
Basic operations
Remote sensor
Do not expose to bright sunlight.
Loading slot
Ejects the disc
Volume knob
Detaches the faceplate
USB terminal
Auxiliary input jack
The following indicator lights up when...
(blink)
ATT
ST : A stereo broadcast is received.
HD : HD Radio™ broadcast is tuned in.
D : HD Radio digital broadcast is tuned in.
MC : HD Radio multicast broadcast is tuned in.
EQ : [SYSTEM Q] is set to an EQ mode other than [NATURAL]. (page 12)
B.BOOST : [BASS BOOST] is set to [B.BOOST LV1] or [B.BOOST LV2]. (page 12)
TAG : The song information can be registered.
: In Search Mode or when a Playlist is displayed.
IN : A disc is in the unit.
: The sound attenuates. (Applicable only when using the remote controller,
RC-405).
Display window
4
Page 5

G
S
When you press or hold the following button(s)...
Main unit
SRC
Volume knob
(turn)
Volume knob
(press)
BAND
6 (
) ENT Pauses/resumes playback of a disc/ USB device/ iPod.
Remote
controller
—
SRC
VOL
5
/
∞ Selects items.
ENT Confirms selection.
— Enters [FUNCTION] settings.
AM– /
*
#FM+
Turns on.
Turns off if pressed and held.
Selects the available sources (HD RADIO, USB or iPod, CD, AUX,
STANDBY), if the power is turned on.
• If the source is ready, playback also starts. “iPod” or “CD” is
selectable only when an iPod is connected or a disc is loaded.
Adjusts the volume level.
Selects the FM bands (FM1/ FM2/ FM3) or AM.
Selects the next/previous folder. (Pressing BAND on the main
unit can only select the next folders.)
General operation
H
LI
EN
Searches for radio station.
/
¢4
4
SCRL DISP —
— AUD Enters [AUDIO CTRL] settings directly.
— ATT
/
—
EXIT
¢
+
Selects track/file.
Fast-forwards/reverses tracks if pressed and held.
Changes the display information.
Scrolls the display information if pressed and held.
Enters clock adjustment mode directly (page 6) if pressed and
held while in clock display screen.
Selects “HD RADIO” source.
Enters HD Radio tagging mode if pressed and held. (page 8)
Attenuates the sound.
• To return to the previous level, press the button again.
Returns to the previous item.
Exit from setting mode.
• Press and hold
mode.
on the main unit will also exit from the setting
5
Page 6

Getting started
Canceling the display
demonstration
The display demonstration is always turned
on unless you cancel it.
When you turn on the power (or after you
reset the unit), the display shows:
[CANCEL
[VOLUME KNOB]
1
Press the volume knob.
[YES] is selected as the initial setup.
2
Press the volume knob again to confirm.
[DEMO
If no operation is done for about
15 seconds or if you turn the volume knob
to select [NO] in step
appears and the display demonstration
starts.
DEMO] \ [PRESS] \
OFF] appears.
2
, [DEMO MODE]
Setting the demonstration mode
1
Press the volume knob to enter
[FUNCTION].
2
Turn the volume knob to select
[DEMO MODE], then press to enter.
3
Turn the volume knob to select [ON] or
[OFF].
If [ON] is selected, display demonstration
starts if no operation is done for about
20 seconds.
4
Hold to finish the procedure.
Adjusting the clock
1
Press the volume knob to enter
[FUNCTION] mode.
2
Turn the volume knob to select
[SETTINGS], then press to enter.
3
Turn the volume knob to select [CLOCK],
then press to enter.
4
Turn the volume knob to select
[CLOCK ADJUST], then press to enter.
Clock hour flashes on the display.
5
Turn the volume knob to adjust the
hour, then press to enter minute
adjustment.
Clock minutes flashes on the display.
6
Turn the volume knob to adjust the
minute, then press to confirm.
/
Press 4
hour and minute adjustment.
7
Hold to finish the procedure.
¢ to move between the
Initial settings before operations
1
Press SRC to enter [STANDBY] mode.
2
Press the volume knob to enter
[FUNCTION] mode.
3
Turn the volume knob to select
[INITIAL SET], then press to enter.
4
Turn the volume knob to make a
selection, then press to confirm.
See table below for selection.
5
Hold to finish the procedure.
Item Selectable setting (Preset: *)
PRESET TYPE NORMAL *: Memorizes one station for each preset button in each band (FM1/ FM2/ FM3/ AM). ;
MIX: Memorizes one station for each preset button regardless of the selected band (FM1/ FM2/ FM3/ AM).
KEY
BEEP ON */ OFF: Activates/deactivates the keypress tone.
BUILT-IN
AUX ON1 *: Outputs sound of the connected external component through the car speakers when “AUX” is selected
as the source.
source. When you turn on the power, the sound attenuates (to prevent noise when no external component is
connected). Turn the volume knob clockwise to return to the previous volume level.
source selection.
; ON2: Outputs sound from the connected external component when “AUX” is selected as the
; OFF: Disables “AUX” in
6
Page 7

G
S
Item Selectable setting (Preset: *)
CD READ 1 *: Automatically distinguishes between audio file disc and music CD. ; 2: Forces to play as a music CD. No
sound can be heard if an audio file disc is played.
SP
SELECT OFF */ 5/4/ 6 × 9/6/ OEM: Selects the speaker size for optimum performance.
F/W
UP
xx.xx YES: Starts upgrading the firmware. ; NO *: Cancels (upgrading is not activated).
For details on how to update the firmware, see: www.kenwood.com/cs/ce/
Listening to HD Radio™ Broadcasts
H
LI
EN
Hold for about 2 seconds to memorize the current station.
Press briefly to recall memorized station or channel.
1
Press SRC to select “HD RADIO.”
Press
2
Press BAND repeatedly to select a band (FM1/ FM2/ FM3/ AM).
3
Press 4
“LINKING” appears while linking to a multicast channel.
to select “HD RADIO” source directly.
/
¢ to search for a station or channel.
Direct Access Tuning using the remote controller (RC-405)
1
Press DIRECT to enter Direct Access Tuning Mode.
“– – – –” appears.
2
Press DIRECT repeatedly to select the tuning item.
Tuning item: Frequency “– – – –”, Channel “HD –”, or Cancelling Direct Access Tuning
3
Press the number buttons to enter the frequency or channel.
You can enter the FM band frequency in steps of a minimum of 0.1 MHz.
4
Press 4 / ¢ to tune in to the entered frequency or channel.
Using the remote controller (RC-405)
FM+ / AM– : Selects band.
4 / ¢ ( + ) : Selects station.
1 – 6 : Selects preset station.
Continued...
7
Page 8

iTunes Tagging
When you hear a song you enjoy on your local HD Radio station, you can tag the song and
save the song’s information on this unit. Up to 50 TAGs (song’s information) can be registered
to this unit.
By using this tagging function, you can easily purchase the songs from Apple iTunes Store.
Hold to enter HD Radio tagging mode and tag the song.
“TAG” will be indicated on the display when the song information can be registered.
To transfer the tagged songs to your iPod and purchase the songs from iTunes Store
1
Connect an iPod to this unit. (page 9)
The tagged information registered to this unit is automatically transferred to the connected
iPod.
2
Connect the iPod to your computer.
3
Synchronize the iPod to the iTunes.
The saved songs will be shown in a playlist called “Tagged.” You can now purchase and
download the songs easily from the iTunes Store.
Adjust [SETTINGS] mode settings
While listening to the radio...
1
Press the volume knob to enter [FUNCTION] mode.
2
Turn the volume knob to select [SETTINGS], then press to enter.
3
Turn the volume knob to make a selection, then press to confirm.
See table below for selection.
4
Hold to finish the procedure.
Item Selectable setting (Preset: *)
SEEK MODE Selects the tuning mode for
AUTO1 *: Automatically search for a station. ; AUTO2: Search in the order of the stations in the preset
memory. ; MANUAL: Manually search for a station.
AUTO
MEMORY YES: Automatically starts memorizing 6 stations with good reception. ; NO *: Cancels (automatic
memorizing is not activated). (Selectable only if [NORMAL] is selected for [PRESET
RECEIVE
TAG
MODE Sets the receive mode of the HD Radio receiver.
AUTO *: Automatically tunes to analog broadcast when there is no digital broadcast.
digital broadcast only.
MEMORY Displays the tag memory usage of the HD Radio receiver.
— 50
00
(Preset: 00): Up to 50 tags can be registered to this unit.
4
/
¢
buttons.
; ANALOG: Tunes in to analog broadcast only.
TYPE].) (page 6)
; DIGITAL: Tunes in to
8
Page 9

G
S
Listening to a disc/ USB device/ iPod
Ejects the disc.
(“NO DISC” appears and “IN” indicator goes off.)
Press to select track/file.
Hold to fast-forwards/reverses.
Press to select next folder.
USB terminal
Slide open the cover.
H
LI
EN
Start playing a disc
1
Press SRC to turn on the power.
2
Insert a disc into the loading slot.
Playback starts automatically.
3
Press number button 6 ( ) to
resume/pause playback (if necessary).
Discs that cannot be used
Discs that are not round.
Discs with coloring on the recording
surface or discs that are dirty.
You cannot play a Recordable/
ReWritable disc that has not been
finalized. (For the finalization process
refer to your disc writing software, and
your disc recorder instruction manual.)
3-inch CD cannot be used. Attempt
to insert using an adapter can cause
malfunction.
Connecting a USB
device
CA-U1EX
(optional accessory)
USB device (commercially available)
Connecting an iPod
Apple iPod
(commercially available)
KCA-iP102
(optional accessory)
The source automatically switches, and
playback starts.
Continued...
9
Page 10

Selecting Repeat Play
Press number button 4 (REP) repeatedly
to make a selection.
Audio CD : TRACK REPEAT, REPEAT OFF
AAC/MP3/WMA : FILE REPEAT,
FOLDER REPEAT, REPEAT OFF
iPod : FILE REPEAT, REPEAT OFF
Selecting Random Play
Press number button 3 (ALL RDM)
repeatedly to make a selection.
< or > on the display indicates that
preceded/next item is available.
For USB device * and iPod: To skip search,
press 4 / ¢.
* This operation is effective only for the files
registered in the database created with
Kenwood Music Editor. (page 16)
To return to the top menu while in the
search mode of an iPod, press BAND.
Direct Music Search using the
remote controller (RC-405)
Audio CD : DISC RANDOM, RANDOM OFF
AAC/MP3/WMA/iPod : FOLDER RANDOM,
RANDOM OFF
Press and hold number button
3 (ALL RDM) to select “ALL RANDOM.”
– Applicable only if “RANDOM OFF” is
selected initially.
– Changes the iPod browsing item to
“songs.”
Selecting Scan Play
Press number button 2 (SCAN)
repeatedly to make a selection.
Audio CD : TRACK SCAN, SCAN OFF
AAC/MP3/WMA : FILE SCAN, SCAN OFF
If scan play is selected, the unit starts
playing the first 10-second intro of the
music in the disc/current folder.
If “SCAN OFF” is selected, the unit resumes
normal play of the current song.
Selecting a folder/track/file
• Cannot be performed during playing of iPod,
“KENWOOD Music Editor” media, Random
Play, or Scan Play.
1
Press DIRECT to enter Direct Music
Search Mode.
“– – –” appears.
2
Press the number buttons to enter the
track number.
3
Press 4 / ¢ to search for the music.
To cancel the Direct Music Search Mode,
press
Using the remote controller (RC-405)
In playback mode:
FM+ / AM– : Selects folder.
4 / ¢ ( + ) : Selects track/file.
ENT
In Music Search Mode:
ENT : Confirms selection.
5 / ∞ : Selects folders/files.
: Returns to the previous folder.
or EXIT.
: Pauses/resumes playback.
1
Press to enter Music Search mode.
“SEARCH” appears, then the current file
name appears on the display.
2
Turn the volume knob to select a folder/
track/file, then press to confirm.
To return to the root folder (or first track for
audio CD), press BAND.
To return to the previous folder, press .
To cancel the Music Search mode, press
and hold
.
10
Alphabet Search and My Playlist
for iPod
Selecting a song by alphabet
1
Press to enter Music Search mode.
“SEARCH” appears.
2
Turn the volume knob to select a
category, then press to confirm.
3
Press again to enter alphabet search
mode.
“SEARCH <
– – –
>” appears.
Page 11

G
S
4
Turn the volume knob to select the
character to be searched for.
5
Press 4 / ¢ to move to the entry
position.
You can enter up to three characters.
6
Press the volume knob to start
searching.
To cancel the Alphabet Search mode, press
and hold
A longer searching time is required if there
are many songs or playlists in the iPod.
To search for a character other than A to Z
and 0 to 9, enter only “
The article (a, an, the) of songs name will
be skipped during search.
.
”.
*
Registering songs in the playlist
1
Select and play the song you want to
register. (page 10)
2
Press and hold number button
5 (MEMO MY LIST) to register.
“## STORED” (registration number)
appears.
You can register up to 10 songs.
“MEMORY FULL” appears, if you try to
register the eleventh song.
If you attempt to register a song from
a different iPod, “NO INFO” followed by
“MPLIST DELETE” appears.
To delete the playlist, turn the volume knob
to select “YES,” then press to confirm.
You can also register the song displayed in
the Music Search mode by following the
same procedure.
Do not register Podcasts.
Deleting a song on the playlist
1
Press number button 5 (MEMO MY LIST)
to display the playlist.
“MY PLAYLIST” appears.
2
Turn the volume knob to select the song
you want to delete, then press and hold
the volume knob.
3
Turn the volume knob to select
“DELETE ONE” or “DELETE ALL,” then
press to confirm.
Select “DELETE ALL” to delete all the songs
in the playlist.
4
Turn the volume knob to select “YES,”
then press to confirm.
“COMPLETE” appears.
iPod control by Hand Mode
Press 1 (iPod) to enter iPod mode.
HANDS ON :
Control iPod from the iPod. “iPod MODE”
appears on the display.
HANDS OFF: Control iPod from the unit.
Adjust [SETTINGS] mode settings
While listening to an iPod...
1
Press the volume knob to enter
[FUNCTION] mode.
2
Turn the volume knob to select
[SETTINGS], then press to enter.
3
Turn the volume knob to make a
selection, then press to confirm.
See the following table for selection.
4
Hold to finish the procedure.
H
LI
EN
Playing a song on the playlist
1
Press number button 5 (MEMO MY LIST)
to display the playlist.
“MY PLAYLIST” appears.
2
Turn the volume knob to select the song
you want, then press to confirm.
Random play cannot be performed during
playback of a song in the playlist.
Item Selectable setting (Preset: *)
SKIP SEARCH 0.5% */ 1%/ 5%/ 10%: Sets the ratio of
skip when searching for a song in Music
Search mode.
MPLIST
DELETE
(Keep pushing the
for 3 seconds or longer skips songs at 10%
regardless of the setting.)
YES: Deletes the saved My Playlist.
NO *:
Cancels.
4 / ¢
button
;
11
Page 12

Listening to the other external
components
Preparation : Make sure [ON1] or [ON2] is selected for [BUILT-IN AUX]. (page 6)
1
Press SRC to select “AUX.”
2
Turn on the external component and
start playing.
3
Turn the volume knob to adjust the
volume.
Auxiliary input jack
3.5 mm (3/16") stereo mini plug
(commercially available)
Portable audio device
(commercially available)
Function settings
1
Press the volume knob to enter [FUNCTION] mode.
2
Turn the volume knob to select [AUDIO CONTROL] or [SETTINGS], then press to enter.
3
Turn the volume knob to make a selection, then press to confirm.
See table below for selection.
Repeat step 3 until the desired item is selected/activated.
Press to return to the previous item.
4
Hold to finish the procedure.
[AUDIO CONTROL] : While listening to any source except in STANDBY state...
Item Selectable setting (Preset: *)
SUB-W LEVEL –15 — +15 (Preset: 0): Adjusts the subwoofer output level.
BASS BOOST B.BOOST LV1 */ B.BOOST LV2: Selects your preferred bass boost level.
SYSTEM Q NATURAL */ USER/ ROCK/ POPS/ EASY/ TOP40/ JAZZ/ GAME: Selects a preset sound mode suitable to
the music genre. (Selects [USER] to use the customized bass, middle, and treble settings.)
; OFF: Cancels.
12
Page 13

G
S
Item Selectable setting (Preset: *)
BASS LEVEL –8 — +8 (Preset: 0): Source tone memory: Adjusts the level to memorize in each source. (Before making
MID LEVEL
TRE LEVEL
BALANCE L15 — R15 (Preset: 0): Adjusts the left and right speaker output balance.
FADER R15 — F15 (Preset: 0): Adjusts the rear and front speaker output balance.
an adjustment, select the source you want to adjust.)
H
LI
EN
SUBWOOFER SET ON *: Turns on the subwoofer output.
DETAILED SET LPF
[SUB-W LEVEL/ LPF SUBWOOFER/ SUB-W PHASE] is selectable only if [SUBWOOFER SET] is set to [ON].
[SETTINGS]
Item Selectable setting (Preset: *)
SUBWOOFER: THROUGH *: All signals are sent to the subwoofer. ; 85HZ/ 120HZ/ 160HZ:
Frequencies higher than 85 Hz/ 120 Hz/ 160 Hz are cut off.
SUB-W
PHASE: REVERSE (180°)/ NORMAL (0°) *: Selects the phase angle of the subwoofer output
to be in line with the speaker output for optimum performance. (Selectable only if a
setting other than [THROUGH] is selected for [LPF SUBWOOFER].)
SUPREME SET: ON *: Creates realistic sound by interpolating the high-frequency components that
are lost in AAC/MP3/WMA audio compression.
playback an AAC/MP3/WMA disc or a USB device, except iPod.)
VOLUME OFFSET:
(Preset: 0)
–8 — +8
level of each source. The volume level will automatically increase or decrease when
you change the source. (Before making an adjustment, select the source you want to
adjust.)
; OFF: Cancels.
; OFF: Cancels. (Selectable only when
(for AUX) ; –8 — 0 (for other sources): Presets the volume adjustment
AUX NAME SET AUX */ DVD/ PORTABLE/ GAME/ VIDEO/ TV: Selects the desired name for the connected component.
(Selectable only if “AUX” is selected as the source.)
CLOCK CLOCK ADJUST: (For details, see page 6.)
DISPLAY DIMMER SET: ON: Dims the display illumination.
TEXT SCROLL: AUTO */ ONCE: Selects to scroll the display information automatically, or scroll only
once. ; OFF: Cancels.
; OFF *: Cancels.
Muting upon the reception of a phone call
To use this feature, connect the MUTE lead to your telephone using a commercial telephone
accessory. (See “Installation Manual” on a separate volume.)
When a call comes in, “CALL” appears.
The audio system pauses.
To continue listen to the audio system during a call, press SRC. “CALL” disappear and the
audio system resumes.
When a call ends, “CALL” disappear.
The audio system resumes.
13
Page 14

Troubleshooting
Symptom Remedy/Cause
Sound cannot be heard. Adjust the volume to the optimum level. / Check the cords and connections.
“PROTECT” appears and no operations can
be done.
The unit does not work at all. Reset the unit.
Radio reception is poor. / Static noise while
listening to the radio.
“MEMORY
“NO
“TAG
“IN” flashes. The CD player is not operating properly. Reinsert the disc properly. If the condition
CD-R/CD-RW cannot be played back and
tracks cannot be skipped.
Disc sound is sometimes interrupted. Stop playback while driving on rough roads.
“NA
“NO
FULL” appears. The tag memory of HD Radio receiver is full. / My Playlist in the iPod is full.
TAG FNC” appears. The connected iPod does not support iTunes tagging function.
ERROR” appears. The unit is unable to complete transferring the tagged information to the iPod.
FILE” appears. The unit is playing an unsupported audio file.
DISC” appears. Insert a playable disc into the loading slot.
Check to be sure the terminals of the speaker leads are covered with insulating
tape properly, then reset the unit. If “PROTECT” does not disappear, consult your
nearest service center.
Connect the antenna firmly.
did not improve, turn off the unit and consult your nearest service center.
Insert a finalized CD-R/CD-RW (finalize with the component which you used for
recording).
and connections.
/ Pull the antenna out all the way.
/ Change the disc. / Check the cords
“TOC
ERROR” appears. The CD is quite dirty. / The CD is upside-down. / The CD is scratched a lot. Try
another disc instead.
“ERROR
99” appears. The unit is malfunctioning for some reason. Press the reset button on the unit. If
the “ERROR
“COPY
PRO” appears. A copy-protected file is played.
“READ
ERROR” appears. Copy the files and folders for the USB device again. If the error message is still
displayed, initialize the USB device or use other USB devices.
“NO
DEVICE” appears. No USB device is connected. Connect an USB device, and change the source to
USB again.
“NO
MUSIC” appears. The connected USB device contains no playable audio file.
“NA
DEVICE” appears. Connect a supported USB device, and check the connections.
ERROR” appears. Remove the USB device, turn the unit off, then turn it on again. If the unit is still
“USB
showing the same display, try to connect another USB device.
“iPod
FULL” appears. The iPod memory is full.
“iPod
ERROR” appears. Reconnect the iPod. / Confirm that the software for the iPod is the latest version.
Noise is generated. Skip to another track or change the disc.
Tracks cannot play back as you have
intended them to play.
Playback order is determined when files are recorded.
99” code does not disappear, consult your nearest service center.
14
Page 15

G
S
Symptom Remedy/Cause
“READING” keeps flashing. Longer readout time is required. Do not use too many hierarchies and folders.
Elapsed playing time is not correct. This is caused by how the tracks are recorded.
The number of songs contained in “SONGS”
category of this unit is different from that
Podcast files are not counted in this unit as this unit does not support the
playback of podcast files.
contained in “SONGS” category of iPod.
H
LI
EN
Correct characters are not displayed (e.g.
album name).
This unit can only display letters (upper case), numbers, and a limited number
of symbols.
Maintenance
Cleaning the unit: Wipe off the dirt on the panel with a dry silicon or soft cloth. Failure to
observe this precaution may result in damage to the monitor or unit.
Cleaning the connector: Wipe off dirt on the connector of the unit and faceplate. Use a
cotton swab or cloth.
Handling discs
Do not touch the recording surface of the disc.
Do not stick tape etc. on the disc, or use a disc with tape stuck on it.
Do not use any accessories for the disc.
Clean from the center of the disc and move outward.
Clean the disc with a dry silicon or soft cloth. Do not use any solvents.
When removing discs from this unit, pull them out horizontally.
Remove the rims from the center hole and disc edge before inserting a disc.
HD Radio Technology manufactured under license from iBiquity
Digital Corporation. U.S. and Foreign Patents. HD Radio™ and the
HD, HD Radio, and “Arc” logos are proprietary trademarks of iBiquity
Digital Corp.
Program Service Data: Contributes to the superior user
experience of HD Radio Technology. Presents song name,
artist, station IDs, HD2/HD3 Channel Guide, and other
relevant data streams.
Adjacent to traditional main stations are extra local FM
channels. These HD2/HD3 Channels provide new, original
music as well as deep cuts into traditional genre.
Digital, CD-quality sound. HD Radio Technology enables local
radio stations to broadcast a clean digital signal. AM sounds
like today’s FM and FM sounds like a CD.
iTunes® Tagging provides you the opportunity to discover a
wide range of content and the means to “tag” that content
for later review and purchase from the iTunes® Store.
15
Page 16

About Audio file
Playable Audio file: AAC-LC (.m4a), MP3 (.mp3), WMA (.wma)
Playable disc media: CD-R/RW/ROM
Playable disc file format: ISO 9660 Level 1/2, Joliet, Romeo, Long file name.
Playable USB device file system: FAT16, FAT32
Although the audio files are complied with the standards listed above, the play maybe
impossible depending on the types or conditions of media or device.
About USB device
This unit can play AAC/MP3/WMA files stored on a USB mass storage class device.
Install the USB device in the place where it will not prevent you from driving your vehicle
properly.
You cannot connect a USB device via a USB hub and Multi Card Reader.
Make sure all important data has been backed up to avoid losing the data.
Connecting a cable whose total length is longer than 5 m can result in abnormal playback.
About compatible iPod/iPhone
Made for
– iPod touch (4th generation)
– iPod touch (3rd generation)
– iPod touch (2nd generation)
– iPod touch (1st generation)
– iPod classic
– iPod with video
– iPod nano (6th generation)
– iPod nano (5th generation)
– iPod nano (4th generation)
– iPod nano (3rd generation)
– iPod nano (2nd generation)
– iPod nano (1st generation)
– iPhone 4
– iPhone 3GS
– iPhone 3G
– iPhone
For the latest compatible list and software
version of iPod/iPhone, see:
www.kenwood.com/cs/ce/ipod
If you start playback after connecting the
iPod, the music that has been played by
the iPod is played first.
In this case, “RESUMING” is displayed
without displaying a folder name, etc.
Changing the browse item will display a
correct title, etc.
You cannot operate iPod if “KENWOOD” or
“” displayed on iPod.
About “KENWOOD Music Editor”
This unit supports the PC application “KENWOOD Music Editor Light ver1.1” or later.
When you use the audio file with database information added by the “KENWOOD Music
Editor Light ver1.1,” you can search a file by title, album or artist name using Music Search.
In the Instruction manual, the term “USB device” is used to mean the device that contains
audio files with database information added with KENWOOD Music Editor.
“KENWOOD Music Editor Light ver1.1” is available from the following web site:
www.kenwood.com/cs/ce/
For further information on “KENWOOD Music Editor Light ver1.1,” refer to the site above or
the application help.
16
Page 17

G
S
Specifications
FM tuner section
Frequency range (200 kHz space):
87.9 MHz — 107.9 MHz
Usable sensitivity (S/N = 26 dB):
11.2 dBf (1.0 μV/75 Ω)
Quieting sensitivity (DIN S/N = 46 dB):
19.2 dBf (2.5 μV/75 Ω)
Frequency response (±3 dB):
Signal-to-Noise ratio (MONO):
Stereo separation (1 kHz):
Digital FM tuner section
Frequency range (200 kHz space):
87.9 MHz — 107.9 MHz
Frequency response (±3 dB):
Signal-to-Noise ratio (STEREO):
AM tuner section
Frequency range (10 kHz space):
530 kHz — 1 700 kHz
Usable sensitivity (S/N= 20 dB):
30 Hz — 15 kHz
63 dB
40 dB
20 Hz — 20 kHz
70 dB
31 dBμ (36 μV)
USB interface
USB standard:
Maximum supply current:
File system:
AAC decode:
MP3 decode:
Layer-3
WMA decode:
Media Audio
USB1.1/ 2.0 (Full speed)
500 mA
FAT16/ 32
AAC-LC “.m4a” files
Compliant with MPEG-1/2 Audio
Compliant with Windows
Audio section
Maximum output power:
Full bandwidth power (at less than 1 % THD):
22 W × 4
Speaker impedance:
Tone action: Bass:
Preout level / load (CD):
Preout impedance:
Middle:
Treble:
50 W × 4
4 Ω — 8 Ω
100 Hz ±8 dB
1 kHz ±8 dB
10 kHz ±8 dB
2 000 mV/10 kΩ
≤ 600 Ω
Auxiliary input section
H
LI
EN
Digital AM tuner section
Frequency range (10 kHz space):
530 kHz — 1 700 kHz
Frequency response (±3 dB):
Signal-to-Noise ratio (STEREO):
40 Hz — 15 kHz
70 dB
CD player section
Laser diode:
Digital filter (D/A):
D/A converter:
Spindle speed:
Wow & Flutter:
Frequency response (±1 dB):
Total harmonic distortion (1 kHz):
Signal-to-Noise ratio (1 kHz):
Dynamic range:
AAC decode:
MP3 decode:
Layer-3
WMA decode:
Media Audio
GaAIAs
8 Times Over Sampling
24 Bit
500 rpm — 200 rpm (CLV)
Below Measurable Limit
20 Hz — 20 kHz
0.01 %
105 dB
90 dB
AAC-LC “.m4a” files
Compliant with MPEG-1/2 Audio
Compliant with Windows
Frequency response (±3 dB):
Input maximum voltage:
Input impedance:
10 kΩ
20 Hz — 20 kHz
1 200 mV
General
Operating voltage (11 V — 16 V allowable):
Maximum current consumption:
Installation size (W × H × D):
182 mm × 53 mm × 158 mm
(7-3/16" × 2-1/8" × 6-1/4")
Weight:
Subject to change without notice.
1.3 kg (2.9 lbs)
10 A
14.4 V
17
Page 18

CAUTION
Use of controls or adjustments or performance of procedures other than those specified herein may result in
hazardous radiation exposure.
In compliance with Federal Regulations, following are reproductions of labels on, or inside the product relating
to laser product safety.
Kenwood Corporation
2967-3, ISHIKAWA-MACHI,
HACHIOJI-SHI
TOKYO, JAPAN
KENWOOD CORP. CERTIFIES THIS EQUIPMENT
CONFORMS TO DHHS REGULATIONS N0.21 CFR.
1040. 10, CHAPTER 1, SUBCHAPTER J.
Location : Top Panel
FCC WARNING
This equipment may generate or use radio frequency energy. Changes or modifications to this equipment may
cause harmful interference unless the modifications are expressly approved in the instruction manual. The user
could lose the authority to operate this equipment if an unauthorized change or modification is made.
FCC NOTE
This equipment has been tested and found to comply with the limits for a Class B digital device, pursuant to Part
15 of the FCC Rules. These limits are designed to provide reasonable protection against harmful interference in
a residential installation. This equipment may cause harmful interference to radio communications, if it is not
installed and used in accordance with the instructions. However, there is no guarantee that interference will
not occur in a particular installation. If this equipment does cause harmful interference to radio or television
reception, which can be determined by turning the equipment off and on, the user is encouraged to try to
correct the interference by one or more of the following measures:
Reorient or relocate the receiving antenna.
Increase the separation between the equipment and receiver.
Connect the equipment into an outlet on a circuit different from that to which the receiver is connected.
Consult the dealer or an experienced radio/TV technician for help.
HD Radio Technology manufactured under license from iBiquity Digital Corporation. U.S. and Foreign Patents.
HD Radio™ and the HD, HD Radio, and “Arc” logos are proprietary trademarks of iBiquity Digital Corp.
The “AAC” logo is a trademark of Dolby Laboratories.
“Made for iPod,” and “Made for iPhone” mean that an electronic accessory has been designed to connect
specifically to iPod, or iPhone, respectively, and has been certified by the developer to meet Apple
performance standards. Apple is not responsible for the operation of this device or its compliance with safety
and regulatory standards. Please note that the use of this accessory with iPod or iPhone may affect wireless
performance.
iPhone, iPod, iPod classic, iPod nano, iPod touch and iTunes are trademarks of Apple Inc., registered in the U.S.
and other countries.
This symbol mark indicates that Kenwood manufactured this product so as to decrease
harmful influence on the environment.
Page 19

ENGLISH/ FRANÇAIS/ ESPAÑOL
KDC-HD548U
Installation Manual
Manuel d’installation
Manual de instalación
© 2010 Kenwood Corporation All Rights Reserved.
GET0696-002A (KW/KN)
Part list:
A Faceplate ........................................................................................................... (×1)
B Escutcheon ....................................................................................................... (×1)
C Mounting sleeve ........................................................................................... (×1)
D Casing for faceplate .................................................................................... (×1)
E Wiring harness ................................................................................................ (×1)
F Removal tool ................................................................................................... (×2)
G Flat head screw (for Nissan cars) ......................................................... (×4)
H Round head screw (for Toyota cars) ................................................. (×4)
Warning / Avertissement / Advertencia
The unit can only be installed in a car with a 12 V DC power
supply, negative ground.
If you connect the ignition wire (red) and the battery wire (yellow)
to the car chassis (ground), you may cause a short circuit, that in
turn may start a fire. Always connect those wires to the power
source running through the fuse box.
Disconnect the battery's negative terminal and make all electrical
connections before installing the unit.
Insulate unconnected wires with vinyl tape or other similar
material. If no connections are made, do not let the wire come
out from the tab to prevent short circuit.
Be sure to ground this unit to the car's chassis again after
installation.
Caution / Précautions / Precaución
If your car's ignition does not have an ACC position, connect the
ignition wires to a power source that can be turned on and off
with the ignition key. If you connect the ignition wire to a power
source with a constant voltage supply, as with battery wires, the
battery may die.
Do not use your own screws. Use only the screws provided.
Install this unit in the console of your vehicle. Make sure the
faceplate will not hit the lid of the console (if any) when closing
and opening.
After the unit is installed, check whether the brake lamps, blinkers,
wipers, etc. on the car are working properly.
Mount the unit so that the mounting angle is 30° or less.
If the fuse blows, first make sure the wires are not touching to
cause a short circuit, then replace the old fuse with one that has
the same rating.
Connect the speaker wires correctly to the terminals to which
they correspond. The unit may be damaged or fail to work if you
share the · wires or ground them to any metal part in the car.
When only two speakers are being connected to the system,
connect the connectors either to both the front output terminals
or to both the rear output terminals (do not mix front and rear).
Do not touch the metal part of this unit during and shortly after
the use of the unit. Metal part such as the heat sink and enclosure
become hot.
Mounting and wiring this product requires skills and experience.
For safety's sake, leave this work to professionals.
If you experience problems during installation, consult your
Kenwood dealer.
Liste de pièces:
A Façade ...................................................................................... (×1)
B Écusson .................................................................................... (×1)
C Manchon de montage ............................................................ (×1)
D Boîtier pour la façade ............................................................. (×1)
E Câblage électrique .................................................................. (×1)
F Outil de démontage ............................................................... (×2)
G Vis à tête plate (pour les voitures Nissan) .......................... (×4)
H Vis à tête ronde (pour les voitures Toyota)... ..................... (×4)
L’appareil peut uniquement être installé dans une voiture avec
une alimentation de 12 V CC, à masse négative.
Si vous connectez le câble d’allumage (rouge) et le câble de
batterie (jaune) au châssis de la voiture (masse), vous risquez
de causer un court-circuit qui peut provoquer un incendie.
Connectez toujours ces câbles à la source d’alimentation passant
par le boîtier de fusibles.
Déconnectez la borne négative de la batterie et réaliser toutes les
connexions avant d’installer l’appareil.
Isolez les câbles non-connectés avec un ruban de vinyle ou d'un
autre matériel similaire. Si aucune connexion n’est faite, ne
laissez pas le fil sortir de la languette pour éviter tout courtcircuit.
Assurez-vous de raccorder de nouveau la mise à la masse de cet
appareil au châssis de la voiture après l’installation.
Si l’allumage de votre voiture n’a pas de position ACC,
connectez le câble d’allumage à une source d’alimentation qui
peut être mise sous et hors tension avec la clef de contact. Si
vous connectez le câble d’allumage à une source d’alimentation
constante, comme un câble de batterie, la batterie risque de se
décharger.
N’utilisez pas vos propres vis. N’utilisez que les vis fournies.
Installez cet appareil dans la console de votre véhicule. Assurez-
vous que la façade ne heurtera pas le couvercle de la console (s’il
y en a) lors de sa fermeture ou de son ouverture.
Après avoir installé l’appareil, vérifiez si les lampes de frein,
les indicateurs, les clignotants, etc. de la voiture fonctionnent
correctement.
Monter l’unité de façon à ce que l’angle de montage soit de 30˚
ou moins.
Si un fusible saute, assurez-vous d’abord que les câbles n’ont
pas causé de court-circuit puis remplacez le vieux fusible par un
nouveau de même valeur.
Connectez séparément chaque câble d’enceinte à la borne
correspondante. L’appareil peut être endommagé si le câble
négatif · pour une des enceintes ou le câble de masse entre en
contact avec une partie métallique du véhicule.
Quand deux haut-parleurs seulement sont connectés au système,
connectez les câbles soit aux prises de sortie avant, soit aux prises
de sortie arrière (c.a.d. ne mélangez pas l’avant et l’arrière).
Ne touchez pas la partie métallique de cet appareil pendant ou
juste après son utilisation. Les parties métalliques, comme le
dissipateur de chaleur et le boîtier, deviennent chaudes.
Le montage et le câblage de ce produit nécessite des compétences
et de l’expérience. Pour des raison de sécurité, laissez ce travail à
des professionnels.
Si vous rencontrez des problèmes pendant l’installation,
consultez votre revendeur Kenwood.
Lista de componentes:
A Placa frontal .................................................................................................. (×1)
B Escudete .......................................................................................................... (×1)
C Manguito de montaje ............................................................................... (×1)
D Estuche de la placa frontal ...................................................................... (×1)
E Mazo de cond uctores ............................................................................... (×1)
F Herramieta de extracción ........................................................................ (×2)
G Tornillo de cabeza plana (para los automóviles Nissan) ........... (×4)
H Tornillo de cabeza redonda (para los automóviles Toyota) ..... (×4)
La unidad solo puede instalarse en un automóvil con fuente de
alimentación de 12 V CC con masa negativa.
Si conecta el cable de encendido (rojo) y el cable de la batería
(amarillo) al chasis del automóvil (tierra), podría producir un
cortocircuito y esto a su vez, un incendio. Conecte siempre esos cables
a la fuente de alimentación que pasa por la caja de fusibles.
Desconecte el terminal negativo de la batería y realice todas las
conexiones eléctricas antes de instalar la unidad.
Enrolle los cables no conectados con una cinta de vinilo u otro
material similar para que queden aislados. Si no se efectúan las
conexiones, no deje que el cable sobresalga de la lengüeta para evitar
cortocircuitos.
Asegúrese de volver a conectar a masa esta unidad al chasis del
automóvil después de la instalación.
Si el encendido de su automóvil no está provisto de la posición ACC,
conecte los cables de encendido a una fuente de alimentación que
pueda conectarse y desconectarse con la llave de encendido. Si
conecta el cable de encendido a una fuente de alimentación que
recibe un suministro constante de alimentación tales como los cables
de la batería, la batería podría descargarse.
No utilice sus propios tornillos. Útilice sólo los tornillos incluidos.
Instale esta unidad en la consola de su vehículo. Asegúrese de que la
placa frontal no golpee la tapa de la consola (si la hubiera) cuando la
abre y la cierra.
Después de instalar la unidad, compruebe que las lámparas de
freno, las luces intermitentes, el limpiaparabrisas, etc. funcionen
satisfactoriamente.
Instale la unidad en un ángulo de 30˚ o menos.
Si se funde el fusible, en primer lugar asegúrese de que los cables no
hayan causado un cortocircuito, y luego reemplace el fusible usado
por otro del mismo régimen.
Conecte los cables de los altavoces a cada uno de los terminales
correspondientes. La conexión compartida de los cables · o
la conexión a tierra de los mismos a cualquier parte metálica
del automóvil podrá dañar la unidad o impedir su correcto
funcionamiento.
Cuando se han conectado solamente dos altavoces al sistema,
conecte los conectores ya sea a ambos terminales de salida
delanteros, o a ambos terminales de salida traseros (o sea, no mezcle
terminales delanteros y traseros).
No toque las partes metálicas de la unidad durante o justo después
de utilizar la unidad. Las partes metálicas, tales como el radiador o la
carcasa, pueden estar muy calientes.
La instalación y cableado de este producto requiere de habilidad
y experiencia. Por seguridad, deje que un profesional realice este
trabajo.
Si tiene problemas durante la instalación, consulte con su distribuidor
Kenwood.
1
Page 20

Basic procedure / Procédure de base / Procedimiento básico
1
Remove the key from the ignition switch, then disconnect the
· terminal of the car battery.
2
Make proper input and output wire connections.
\ “Wiring connection”
3
Install the unit to your car.
\ “Installing the unit”
4
Reconnect the · terminal of the car battery.
5
Reset the unit.
1
2
3
4
5
Wiring connection / Connexions / Conexión del cableado
Subwoofer output terminals / Prises de sortie du caisson de grave / Terminales de salida del subwoofer
Front speaker output terminals / Prises de sortie de l’enceinte avant / Terminales de salida del altavoz delantero
Rear speaker output terminals / Prises de sortie des enceintes arrière / Terminales de salida del altavoz trasero
Retirez la clé de contact, puis déconnectez la borne · de la
batterie de la voiture.
Réalisez une connexion correcte des fils d’entrée et sortie.
\ “Connexions”
Installez l’appareil dans votre voiture.
\ “Installation de l’appareil”
Reconnectez la borne · de la batterie de la voiture.
Réinitialisez l’appareil.
Fuse (10 A) / Fusible (10 A) / Fusible (10 A)
1
Quite la llave del interruptor de encendido; después, desconecte
el terminal · de la batería del automóvil.
2
Realice las conexiones de los cables de entrada y salida
correspondientes.
\ “Conexión del cableado”
3
Instale la unidad en su automóvil.
\ “Instalación de la unidad”
4
Vuelva a conectar el terminal · de la batería del automóvil.
5
Reinicialice la unidad.
Antenna terminal / Borne de l’antenne /
To front speaker (left) / À
l’enceinte avant (gauche) /
Al altavoz delantero
(izquierdo)
To front speaker (right) / À
l’enceinte avant (droite) / Al
altavoz delantero (derecho)
To rear speaker (left) / Vers
l’enceinte arrière (gauche) /
Al altavoz trasero (izquierdo)
To rear speaker (right) / Vers
l’enceinte arrière (droite) /
Al altavoz trasero (derecho)
Terminal de la antena
White / Blanc / Blanco
White/Black /
Blanc/Noir /
Blanco/Negro
Gris / Gris
Gray /
Gray/Black /
Gris/Noir /
Gris/Negro
Green / Vert / Verde
Green/Black /
Vert/Noir /
Verde/Negro
Purple / Violet / Púrpura
Purple/Black /
Violet/Noir /
Púrpura/Negro
Light blue/yellow / Bleu clair/Jaune /
Luz azul/amarilla
(Steering remote control wire) /
(Fil de télécommande de volant) /
(Cable del mando a distancia para la dirección)
Blue / Bleu / Azul
(Antenna control wire) /
(Câble de commande de l’antenne) /
(Cable de control de la antena)
Blue/White / Bleu/Blanc / Azul/Blanco
(Power control wire) /
(Fil de commande d’alimentation) /
(Cable de control de potencia)
Brown / Marron / Marrón
(Mute control wire) /
(Câble de contrôle de la sourdine) /
(Silenciar cable del control)
Red (Ignition wire) / Rouge (Câble d’allumage) / Rojo (Cable de encendido)
Yellow (Battery wire) / Jaune (Câble de batterie) / Amarillo (Cable de la batería)
Black (Ground wire) / Noir (Fil de terre) / Negro (Cable a tierra)
To the metallic body or chassis of the car / Vers corps métallique ou châssis de la voiture /
Installing the unit / Installation de l’appareil / Instalación de la unidad
1
2
Before attaching, make sure the direction of the
escutcheon is correct. (Wider hooks on the top
side.) / Avant la fixation, assurez-vous que la
direction de l’écusson est correcte. (Crochets
plus larges sur le côté supérieur.) / Antes de fijarlo,
compruebe si la dirección del escudete es
correcta. (Ganchos más anchos en el lado
superior.)
Connect the wiring harness to the unit. Other wiring connection have been
completed earlier. /
Connectez le faisceau de câbles à l’appareil. Les autres connexions ont déjà
été réalisées précédemment. /
Conecte el mazo de conductores a la unidad. El resto de la conexión de
conductores fue finalizada anteriormente.
Bend the appropriate tabs to hold the mounting
sleeve firmly in place. / Tordez les languettes
appropriées pour maintenir le manchon de montage
en place. / Doble las pestañas correspondientes para
sostener el manguito de montaje firmemente en
posición.
To the steering wheel remote control adapter (optional accessory) /
À l’adaptateur de télécommande volant (accessoire en option) /
Al adaptador del mando a distancia del volante de la dirección (accesorio opcional)
(Not used) / (Non utilisé) / (Sin utilizar)
To the power control terminal when using the optional power amplifier, or
to the antenna control terminal in the vehicle. / À la borne de commande
d’alimentation lorsque vous utilisez l’amplificateur de puissance en option,
soit à la borne de commande d’antenne du véhicule. / Al terminal de control
de potencia, cuando utiliza el amplificador de potencia opcional, o al terminal de
control de la antena en el vehículo.
To the terminal that is grounded when either the telephone rings or during
conversation. (To connect the Kenwood navigation system, consult your
navigation manual.) / À la borne qui est mise à la masse lorsque le téléphone
sonne ou pendant les conversations. (Pour connecter au système de navigation
Kenwood, consultez votre manuel de navigation.) / Al terminal de tierra cuando
suena el teléfono o durante la conversación.
Kenwood, consulte el manual del sistema de navegación.)
Car fuse box / Boîte de fusible de la
voiture / Caja de fusibles del vehículo
A un cuerpo metálico o chasis del automóvil
Dashboard of your car / Tableau de bord de
votre voiture / Salpicadero del automóvil
(Para conectar el sistema de navegación
Ignition key switch /
Commutateur de clé de
contact / Interruptor de la llave
de encendido
Car fuse box / Boîte de
fusible de la voiture /
Caja de fusibles del
vehículo
Battery / Batterie / Batería
Installing without using the mounting sleeve
(Japanese car) / Installation sans utiliser le manchon
de montage (voiture japonaise) / Instalación sin el
manguito de montaje (automóviles japoneses)
1
Remove the mounting sleeve and escutcheon from the unit. /
Retirez le manchon de montage et l’écusson de l’appareil. /
Desmonte el manguito de montaje y el escudete de la unidad.
2
Align the holes in the unit (on both sides) with the vehicle
mounting bracket and secure the unit with the supplied
screws. /
Alignez les entailles de l’appareil (des deux côtés) avec le
support de montage du véhicule et fixez l’appareil avec les
vis fournis. /
Alinee los orificios de la unidad (en ambos lados) con la ménsula
de montaje del vehículo y fije la unidad con los tornillos
suministrados.
T:
Toyota cars /
Voitures Toyota /
Automóviles Toyota
N:
Nissan cars /
Voitures Nissan /
Automóviles Nissan
Removing the unit / Retrait de l’appareil / Extracción de la unidad
1
Detach the faceplate. / Retirez la façade. / Desmonte la placa frontal.
2
Engage the catch pin on the removal tools into the holes on both sides of the escutcheon, then pull it out. /
Engagez le loquet sur des outils de retrait dans les trous de chaque côté de l’écusson, puis tirez vers l’extérieur. /
Enganche la uña de agarre de las herramientas de extracción en los orificios a ambos lados del escudete y tire de él para
quitarlo.
3
Insert the removal tools deeply into the slots on each side, then follow the arrows instructions as shown on the right. /
Insérez les outils de retrait profondément dans les fentes de chaque côté, puis suivez les instructions des flèches
indiquées ci-à droite. /
Inserte profundamente las herramientas de extracción en las ranuras a ambos lados; después, siga la dirección de las flechas,
como se muestra a la derecha.
2
Page 21

Units
purchased
lhrough
the
U,S.A.
military
exchange
overseas
maybeserviced
U.S.A"
subjecltothe
1)
The
original
2)
Proofofpurchaseisprovidedtolhe
WARRANTY
Kenwood
corporationisproud
of
ils
audio
equipment.
lesled
and
inspected
inslalled
and
it
should
give
This
producliswarranted
of
the
original
SCOPEOFWARRANTY
Exceptasspecified
mater~ls
and
During
lhe
warranty
CenterinIhe
card
will
provide
requiredtocorrect
The
following
1.
Voltage
conversions.
2.
Periodic
check-ups
by
Ihe
warranty.
3.
Cabinets,
and
other
4.
Unitsonwhich
or
removed.
5.
Installation
6.
Damaged
7.
House
call
8.
Shippingordelivery
Kenwood
9.
This
warranty
following
of
the
authorized
•
Improper
maintenanceorrepair,
partsoraccessories
specilicationsofthe
•
Misuse.
abuse.
or
failure
Manual.
•
Accidentalorintentional
•
Repairsorallempted
(All
repairs
Service
Center.)
•
Damagesordeteriorations
mustbepresented10lhe
•
Damagesordeteriorations
or
replacement
PURCHASER'S RESPONSIBILITIES
As
Ihe
purchased01a
requestedtodo
warlantyservice,
1.
Relainyour
your
eligibility
2.
Make
your
Centerinthe
warranty
or
equivalent,
to
the
authorized
Dear
Customer,
Thank
validinthe
procedure.orwrite
under
warrantyinthe
following
warrantyisin
operatedinaccordance
youanoptimum
WARRANTY
purchase.
workmanshipatthe
mililarymarkellisledinthe
are
grilles.
non·durable
and/or
magnetic
charges
Service
conditionsinaccordance
to'
follow
mustbeperlormedatan
sales
unit
service,orship
you
conditions.
effect.
FOR
MILITARY MARKET
otthe
This
unit
has
beloreilwas
shippedtoyou.IIproperly
with
reliable
PERIOD
loraperiodat(1)
below,
this
warlanty
Kenwaoo
period,
any
authorized
you
free-of-charge
any
defectinmaterialsDrworkmanship.
nol
coveredbythis
whichdonot
discloseanydefecl
other
exterior
finishes.
parts
and
the
will
neglecl,
the
stipor
for
availabletoan
military
lully
accessories.
serial
number
has
removal
charges.
tapes.
for
any
repairs.
chargestoor
Center.
nOlCover
anytailure
Kenwood
Service
including
thatdonot
conformtothe
original
parts.
unauthorized
instructions
containedinIhe
damages.
repairsbyan
caused
carrier),
resulting
new
Kenwood
followinginorder10obtain
other
evidenceofpurchase
requesting
Kenwood
authorized
market
Jor
your
unitinits
insured
and
shipping
Kenwood
Service
for
purchasing
countries
to:
continental
servieer.
Quality
and
workmanship
been
properly
instructions
performance.
year
lrom
covers
all
brand
Kenwood
back
ollhis
bolh
parts
warranty.
bells,lape
been
effaced,
fromanauthorized
thaiisdueto
with
the
visual
Center:
the
installation
Quality
product
moditication
unaulhorized
aUlhorized
during
shipment
from
removal
brand
producf,
tor
warranty
Kenwood
inspection
and
original
carlon
charges
Center.
this
listed.Ifyour
service
designed.
furnished.
the
date
delects
in
producls.
Service
warranty
and
labor
covered
heads,
modified
any01the
inspection
of
and
Owner's
agency.
Kenwood
(Claims
and/
you
are
Kenwood
proving
service.
Service
approved
box
prepaid,
kenwood
countryisnot
LIMITATIONOFIMPLIED
Any
merchantability
limitedinduraliontothe
EXCLUSION OF CERTAIN DAMAGES
KENWOOD's
the
shall
consequentialorotherwise,
by
applicable
WARRANTIES
and
all
implied
warranties,
and
fitness
loraparticular
lengthatthis
liability
lor
include
law.
any
damages01any
expecltothe
repairorreplacemenlofsaid
not
KENWOOD AUTHORIZED
CENTERS IN MILITARY MARKET
JAPAN:
Yokota
Kenwood
Yokota
APO
Zama
Kenwood
2ama
APO
Misawa
Kenwood
Misawa
APO
Yokosuka
Kenwood
A-33,
FPO
Atsugi
Kenwood
Atsugi
98767
Iwakuni
Kenwood
Marine
Air Station,
FPO
Sasebo
Sasebo
Navy
FA
Okinawa
Kenwood
OWAX,
96230
Rep,; c/o
BX,
JAAX AAFES-PAC,
San
Francisco 96328
Rep,;
c/o
PX,
JAAX
AAFES-PAC,
San
Francisco 96343
Rep,;
clo
BX,
JAAX
San
Francisco 96519
Rep,;
clo
Yokosuka
NEX
Seattle 98760
Rep,;
clo
NEX
No.
260-020
Rep,;
clo
Corps
Exchange, Marine
Seattte 98764
NEX;
Exchange 260-040
Box
115
FPO
Rep,;
clo
AAFES-PAC,
AAFES-PAC,
Seattle 98766
product.Asmentionedinthe
listed
please
KENWOOD Corporation Customer Information Center
1-16-2,
Hakusan,
Midori-ku,
Yokohama-shi,
Kanagawa,
including
delective
product.atour
kind,
No.
260-010
FPO
APO
San
contact
226-8525
warranlies
purpose,
shall
warranty.
productislimited
potion,
whether
incidental,
extent
prohibited
SERVICE
Seattle
Corps
Francisco
pagesofthis
your
Japan
KOREA:
Kenwood
Rep,;
Repair
Shop,
Rep,;
NEX
No.
San
Francisco 96630
Rep,;
AAFES-PAC,
clo
clo
230-010,
clo
and
01
be
to
KOAX
DD-Camp Market.
96488
GUAM:
Kenwood
Guam
FPO
Kenwood
GUAX,
96334
U.S,A,:
Hawaii
Kenwood Factory Service
99-994 Iwaena
Alaska
Vista
861
99501
Anchorage Commercial Electronics,
1450
99501
In
The
For
Nearest Authorized Service Center;
Tet:
1-800-536-9663
Kenwood
Kenwood Factory Service;
P.O.
Street.
Long
Tel:
131Dl639-5300
EUROPE:
Please inquire at the military resale
outlets where
products, or
KENWOOD
DEUTSCHLAND GMBH:
Rembrucker-Str.
Germany
Tel..
booklet,
retailer
for
St.,
Radio
TV,;
East
Loop
Road,
East
9th
Ave.,
Continental
Service U,S,A,
Box
22745,2201
Beach,
California 90801-5745
you
ELECTRONICS
15,
49-06104-6901 0
our
warrantyisonly
informationonwarranty
AAFES-PAC
APO
San
Francisco
APO
San
Francisco
Aiea,
Hawaii
96701
Anchorage,
Anchorage,
Alaska
Alaska
Inc.;
U,S,A,
East
Dominguez
bought your Kenwood
63150 Heusenstamm,
Warranty Card
Identification du produit
Modelo
do
aparelho e numerodeserie
number
& serial
cachet
compra
do
of
customer
panel
facture)
pour
acheterunnouveau
paine!.
number
cliente
in caseoftheft
Attention:
This card
and
receipt
(or
invoice)
or
damage.
are necessarytopurchaseanew
Attention:
Vous aurez
panneauencasdevolaud'endommagement.
Aten~io:
Em casodedanoauperdadopainel
de
© B46-0812-00/01 (K) (10/021
compra
besoindecette
serao
requisitados
carteetdu
para a
re~u
frontal, este
aquisi~ao
Model
Revendeur &
Nome da loja e carimbo
Dealer & stamp
Date d'achtat
Data da
Purchase date
Nom & adresse du client
Nome e endere90
Name & address
(oudela
CertificadodeGarantia e a
deumnovo
Nota
Fiscal
Page 22

This
warranty
willbehonored
onlyinIhe
U.sA
KENWOOD LIMITED WARRANTY
FOR CAR STEREo COMPONENTS
"'OW
LONG IS THE WARRANTY
Kenwood
U.SA
Corporalion
('Kenwood")
produci
foraperiodofone
purchase.
WHAT
Exceplasspecil"d
material
and
The
lollowing
1
Any
producl
Kenwoodorwhichisnol
auttlOrized
dealer,
unless
Military
Exchange
2
Any
productonwhich
modifiedorremoved.
3.
Damage,
a.
Any
shipmenlofIhe
to
the
carrier)
b.lnslallalionorremovalofthe
c.
Accident,
unauthorized
instructions
d.
Repairorallempled
by
Kenwood
e.
Any
other
defect
o
labricanle
qualquer
defeito
e
validanolerrit6rio
de
instrugoes
ESle
produloegaranlido
a
partirdadatadeaquisicao,
de
vendaaoconsumidor
Eventuais
reparos
dilala,aodoseu
(a)
Produtos
ileglveis;
(b)
Oeleilos
de
instrucoes,mautilizacao,
de
Instrucoes,
(c)
Danos
causados
(d)
Deteilosoudanosemdecorr@nciadeconsertos
(e)
Defe
itosoudanos
da
Kenwood:
(I)
Danos
ou
antenas,
comvazamento:
Ig)
Oeleilosaudanos
transportadora):
(h)
Qualquer
fabrica,ao:
(i)
Danos
causados
(i)
Danos
causados
(1)
IS COVERED
NOT
COVERED
below,
Ihis
workmanshipinKenwood
are
nol
coveredbyIhe
whichisnol
dislribuledinIhe
purchasedinIhe
Kenwood
car
slereo
the
produclispurchased
Service
Ihe
serial
deteriorationormalfunction
product
acts01nature,
product
modificationorfailuretofollow
supplied
wilh
Ihe
repairbyanyone
cause
which
does
garanleaprodulo
de
fabrica~o
oudemateria-prima
brasileiro,
PERioDODEGARANTIA
pelo
prazode01
comprovada
final
realizadasnoproduto
prazo.
EXCLUSAODAGARANTIA
comanumerodeserieoucerlificadodegarantia
resullanlesdeacidenles
modificacoes
por
agentesdanatureza
resu
Itantesdousodepe9asoud
deleriora~oes
aos
filas,
cabecas
gra
.....
devidoaotransporle
Gutra
causa
que
por
lentalivaderoubooufurto;
por
usadeCOsdem'
warranls
year
from
Ihe
daleoforiginal
AND
WHAT
warranly
covers
all
car
slereo
components
warranly:
U.S.A.
dealeroran
Ihroughlhe
number
has
been
resulting
Iclaims
muslbepresenled
product.
misuse,
abuse,
product
nol
not
,elatetoa
idenlillcadonaNota
condicionadoaousa
(um)
medianteaapresentacaodarespectiva
duranteaperfododegarantia
(quedas,
batidaseelc),
ligacaoafonledetensao
nao
autorizadas;
(Ex:
acabamenlos
externos,
adoras,
CDsaudanos
(reclama,Des
nao
esleja
relacionadaadefeilosdemateria-primaede
qualtdade.
KENWOOD
This
warrantyisenforceable
We
will
ilems.
sectionofthis
Ihis
HOWTOOBTAIN WARRANTY
IS
If
your
1.
Takeorship
in
in
by
an
Ihe
problem.
is
aUlhorized,
Service
2.
Althoughyoumust
to
ship
shipping
wilhin
3.
Whenever
you
asproolofwarrantyco
ALL
IMPLIED
OF
MERCHANTABILITY
PURPOSE.
THIS
WARRANTY.
delecls
U.SA
from
automobile
USA
defaced,
from:
neglecl,
aUlhorized
product
JVC
Fiscaldevendaaoconsumidor
durante0perfododegarantia.
corretodoaparelho
ana,
incluindoaperiodo
diferenledaespecilicadanoManual
Chuvas,
raios,
realizados
ispositivos
partes
causados
eslabelecido
rasurados,
usaemdesacordo
maresia,
enchenteseetc):
por
pessoas
nao
conformesasespecificacoes
cosmeticas,
par
pilhas
devem
ser
feilas
USA
CORPORATION
WHO
IS PROTECTED
onlybythe
WHATWEWILL
pay
for
all
labor
Paymento!shipping
warranty.
KENWOOD
product
ilia
any
USA
along
(il
you
are
please
Cenler.
1-S00-536-9663).
pay
the
product
lor
chargesifIhe
the
Uniled
States.
your
units
must
includeacopyoflhe
PAY
and
material
expenses
chargesisdiscussedinthe
SERVICE
ever
needs
service
KENWOOD
Aulhorized
wilh&compiele
uncertainasto
whetheraService
call1-S00-KENWOOO
any
shipping
chargesilitisnecessary
warranlyser
.....
ice,
repairs
are
coveredbyIhe
are
takenorsent
original
.....
erage.
LIMITATION OF IMPLIED
WARRANTIES
WARRANTIES,
ARE
LIMITEDINDURATIONTOTHE
INCLUDING
AND FITNESS
original
purchaser
FOR
lorco.....
ered
next
Service
Cenler
descriptionofIhe
Center
for
the
nearesl
wewill
pay
the
return
warranly
for
warranty
ser
.....
ice,
dated
sales
receipt
WARRANTIES
FORAPARTICULAR
LENGTH
OF
EXCLUSION OF
KENWOOD'S
LIABILITY
lIMITEDTOTHEREPAIRORREPLACEMENTOFTHEPROOUCT
AT
OUR
OPTION.
1.
2.
SOME
LONGANIMPLIED
ALLOW
CONSEOUENTIAL
AND
This
have
IlaprobiemdevelopsdurlngoranertheLlmitedWarrantyPeriod,
orilyou
product,
or
nol
Reialions
KENWOOD
INSTALLATIONORREMOVAL
TO
OTHER
PROPERTY
KENWOOD
CAR
BASED
UPON
INCONVENIENCE,
PRODUCT:
OR
ANY
OTHER
CONSEOUENTIALOROTHERWISE.
STATESDONOT
THE
EXCLUSIONORlIMITATIONOF
DAMAGES,SOTHE
EXCLUSIONS
warrantygi.....esyou
other
rights
which
have
any
queslions
you
should
Authorized
handledtoyour
conlaclyour
Ser
.....
ice
Oepartmenl
KENWOOD
P.O
Box 22745,
FOR
ANY
SHALL
CAUSEDBYANY
STEREO
DAMAGES,
ALLOW
WARRANTY
MAY
NOT
APPLYTOYOU.
specific
vary
from
regarding
Center.Ifthe
satisfaction,
allhe
address
USA
2201
DAMAGES
OEFECTIVE
PRODUCT
NOTBELIABLE
CHARGES,
DAMAGE
COMPONENTS,
legal
KENWOOD
DEFECTS
DAMAGES
LOSSOFUSEOFTHE
WHETHER
INCIDENTAL,
LIMITATIONSONHOW
LASTS
ANOIOR00NOT
INCIDENTAL
ABOVE
LIMITATIONS
rights,
and
you
statetostate.
the
operalion
Aulhorized
problemoryour
please
Iisled
contact
below:
question
our
Customer
CORPORATION
East Dominguez
Street, Long Beach, CA 90801-5745
Tel: (310) 639·5300
KENWOOD DO BRASIL COMERCIODEELECTRONICOS LTDA.
conlra
Esta
garantia
conformeamanual
por
Nota
Fiscal
nao
implicam
adulterados
comamanual
nao
autorizadas:
cabos,
adaptadores,
defeituosas
iunlo•empresa
E
indispensavel
acompanhadodarespecliva
Instala,30eremocaodoprodulo,
lei,
do
proprietario.
JVC
na
au
ou
KENWOODDOBRASIL
CONSERTOEMGARANTIA
a
apresenla~o
deste
Nota
Fiscaldecompradoproduto.
o QUE
NAO
E COBERTO PELA
despesasdefrete,
COMERCIODEELECTRONICOS
Tel: 0800-7717270
www.kenwood.com.br
CertificadodeGarantia
GARANTIA
seguro
eembalagem
devidamente
preenchido,
saoderesponsabilidade
FOR:
OR
mayalso
ollhe
Dealer
LTDA.
KENWOOD ELECTRONICS
(e)
Detects
resulting
from
KENWOOD
KENWOOD
IS
IN
is
ELECTRONICS
"KENWOOD"),
original
customerofeach
CanadabyKENWOOD
by
KENWOOO.
KENWOOD
warrants
normal
use,isfree
condilions
sel
warranty
period,
and
labour
when
or
its'
aulhorized
materialsorworkmanshipattimeofmanulacture.
conlacl
KENWOODtoconfirmifa
aUlhorizedbyKENWOOD.
WARRANTY PERIOD
This
Kenwood
periodofone
(1)
or
rental,
except
or
commercial
of
ninely
(90)
days
terms
and
conditionsofthe
WARRANTY EXCLUSIONS
This
warranty
excludes:
(a)
Products
purchased10a
Canada
and
Ib)
Producls
purchased
KENWOOD.
Ie)
Producls
wilh
missing.
Id)
Perrodic
check-ups
coveredbythis
GARANTIE KENWOOD
KENWOOD
ELECTRONICS
"KENWOOD"),
originaldechaque
Canada
par
KENWOOD
par
KENWOOD.
KENWOOD
garanti!,
enonces
cl-dessous,
dans
des
conditions
defauls.SiI'un
KENWOOD
s'engage3assumerIecoOl
etde
lamain-d'oeuvre
pourvu
quedeleis
deleclueuses
employees
Kenwoodau3
lamain-d'oeuvre
par
I'unde
ses
cenlresdeservice
pour
verifiersiun
autorise
par
KENWOOD.
PERIODEDEGARANTIE
Les
pieces
ella
des
produils
Kenwood
an.
campierdela
saul
dans
105
casaules
un
but
professionneloucommercial,oula
eldela
main-d'oeu
de
qualre-vingt-dix
conditionsdela
EXCLUSIONSDEGARANTIE
Cellegaranlienecouvre
la)
les
produils
Iransporles31'etranger:
(b)
les
produits
par
KENWOOD:
(c)
les
produils
oumodilie;
(dl
les
services
deiaul
couvert
WARRANTY
CANADA
INC.
gives
Ihe
lollowing
new
and
purchased
Ihat
each
Irom
any
forlh
below.Ifa
repairs
willbemade
such
delecls
ser
.....
ice
cenlrestobe
productiswarranted
year
from
the
for
products
application.
for
parts
takentoa
foreign
fromadealer
Ihe
serial
Whichdonot
warranty.
donne
par
ecritlagarantie
nouveau
elachete3unconcessionnaire
sous
reserve
que
chaque
d'emploi
delaulseproduil
necessaires
delauls
larsdela
concessionnaireouun
main-d'oeuvre
sonlgaranties
dale
d'achat,debailaude
produils
.....
redemeureen
(90)
jours
garantie.
pas
acheles;I'elrangerauachelesauCanada
achetesaun
doniIenumerodeserie
d'entretien
periodiques
par
celie
garantie;
(hereinaher
wrihen
warranly10Ihe
Kenwood
productdislributed
fromadeal"
new
Kenwood
defects,
which
which
and
warranty
foreign
CANADA
sont
produc!,
subjecttothe
detecl
should
occur
freeofcharge
are
determinedbyKENWOOD
attributabletofaulty
dealerorservice
for
parts
and
daleoforiginal
purchase,
are
usedina
are
warranted
labour
and
are
counlryorpurchased
country.
nol
authorized
number
delaced,
disclose
INC.
(ci-apres
suivanteaI'acheteur
produit
Kenwood
des
termeseldes
nouveau
produit
normales,
est
exemptdetous
pendanlla
periodedegaranlie,
des
piocesdefeclueuses
poureffectuer
les
allribuables•des
fabricalionduproduil
lei
qU'elablt
par
KENWOOD
aulorises.
Appelez
centredeservice
necessaires
pourlareparation
pendanlla
periode
location
Kenwood
sonl
employes
garantie
.....
igueur
pendant
sous
reserve
des
concessionnaire
manque,aele
qui
n'indiquentaucun
aUlhorized
terms
wilhin
for
centre
labour
professional
foraperiod
subjecl10Ihe
alfered
any
delecls
appetee
distribue
aula
condilions
Kenwood,
reparations
KENWOOD
d'un
originale,
des
une
periode
lermeseldes
non
autorise
called
under
Please
lease
pieces
pieces
ehace
lightning,
maintenance,
instructionsinthe
in
(I)
Oefeclsordamageasa
personorparly
(g)
Detecls
not
and
Ihe
parts
lor
rise
est
(1)
dans
is
in
by
or
au
au
el
conformtoKENWOOD
(h)
Damageordeterioration
cosmetic
lapes,
discsorfaultsordamage
leaking
(i)
Oeleclsordamageoccurringduringshipping(ciaimsshould
be
presenled10Ihe
(j)
Product
(k)
Producl
TO OBTAIN WARRANTY SERVICE
a
ShouIdyourKenwood
ilia
any
aUlhorized
the
original
as
proalofwarranty,orsend
lreighl
prepaid10Ihe
centre.Toavoid
produclisproperly
billofsaie
wilh
your
name,
a
complete
fault(s).
Products
freight
prepaidtodestinations
IS
responsible
produclls)10destinations
(e)
les
delauls
abus,
les
courant,
les
modifications
du
mode
(f)
les
delaulsaules
effectuees
par
KENWOOD:
(g)
iesdefautscauses
neseconformenl
(h)
les
finitions
de
bandes,
les
bandes,
defaulsaudommages
ou
qUi
fuient;
(i)
les
delaulsaudommages
l'expMilion
telles
reclamations
(i)
les
conversionsdelens
produi!,
(k)
les
lrais
COMMENT
Au
casOUun
s'avere
necessaire,
centredeservice
conlraldevenleelcelie
de
garantieou.....
port
payeaucenlredeservice
proche.
Pour
Ie
transport.
une
copieduconlraldevenle
en
tant
que
numerosdeleiephoneauposledelravail
volre
adresseelune
produits
sous
destinationsaI'interieurduCanada.Leconsommateur
responsabledelous
rapportenl
pour
I'exterieurduCanada.
disaster,
power
surges,
neglectorlackofperiodic
unauthorized
modificationorfailuretofollow
owner's
manual.
resullofrepairs
nol
authorizedbyKENWOOD
resulting
from
the
useofpartsordevices
specifications.
occurringtoany
parts,
tape
heads,
adaptors,
balleries
shipping
voltage
inslallationorremoval
copy01your
possible
and
Ihis
return
for
causes
emplois
les
manquesde
d'emploi:
par
une
exterieures,
les
les
des
d'inslallationaud'entevemenlduprodui!'
company)
and
lor
line
frequency
product
require
KENWOOD
bill01sale
your
nearesl
aulhonzed
shipping
packed.
Includeacopyofyour
warranly
cardasproofofwarranly
home
and
lor
work
address
andadetailed
repaired
within
within
all
heighl
and
relaled
oulside
par
les
desaslres,
incorrects,
leseclairs,
soinsoud'entre1iensperiodiques,
non
autoriseesoules
dommages
personneoupar
par
I'emploidepiecesoudedispositifsqui
pas
aux
exigencesdeKENWOOD:
les
pieces
adaplaleurs,
disques
endommagesaudeperis,niles
causes
quiseproduisenl
produils
Kenwood
aupres
des
ion
OBTENIRDUSERVICE
SOUS
GARANTIE
ser
.....
ice
sous
garantiede.....
veuillez
livrerIeproduitan'importe
KENWOODelpresenlerlacopie
cartedegaranlieenlanl
euillez
faire
parvenir
eviler
veuillez
preu
.....ede
garanlie
laire
KENWOOD
loules
possibilitesdedommages
bienembailerIeproduit.
originalelcelie
garantie
aussi
description
repares
seront
fraisdeIransporteld'aulres
expMier
les
CANADA
accident.
abuse,
misuse,
performedbya
thaI
eXlerior
finishes,
antennas. cables,
causedbydefective
conversions.
charges
warranty
ser
.....ice,
cenlre
and
Ihis
warranty
lully
insured
KENWOOD
make
sure
lelephone
numberls),
descriptionofthe
willbereturned
The
customer
cosls
for
Ihe
relurn
les
accidenls,
les
surtensionsde
manquesde
larsdereparalions
partie
non
autorisee
cosmetiques,
les
anlennes,
ies
piles
defeclueuses
pendanl
devrail
deposer
de
frequence
otre
produit
Kenwood
originale
que
produit
assure
auloriseIeplus
pendanl
Veuillez
cartedegaranlle
bien
que
votre
eVou
au
domicile,
des
delauls.
port
paye
frais
del
presenl
card
service
original
along
respect
tetes
cables,
quel
preuve
inclure
nom,
sera
qUi
service
and
product
damage.
warranty
Canada.
Canada.
causes
une
les
par
des
(On
compagniesdetransport):
eVou
volre
delaillee
retoumes
produils•deslinalions
INC.
ENTIRE WARRANTY
This
warranty
constitutes
by
KENWOOD.Noperson,
or
their
agentsoremployees
enlarge
Ihis
warrantyonbehallofKENWOODbyany
or
verbal
statemenlorad
any
extended
warranty
by
the
dealerOfservice
by
KENWOOD.
KENWOOD
of
the
productorany
damagetoother
commercial
The
pravis
to
limit,
or
righls
provincialorlederal
This
warranly
a
valid
proofofpurchase.
you
musl
warranty
kepiina
KENWOOD
programorplan
DISCLAIMER
disclaims
any
olher
productsorgoods,
loss,
NOTICETOCONSUMER
ions
containedinthis
modify,
take
away,
you
may
have
iawsor
IMPORTANT
cardbyilselfisnol
presenllhe
original
cardasproalofwarranty,
safe
place,
should
ELECTRONICS
6070 Kestrel Road, Mississauga,
Ontario, Canada L5T 1S8
Tel.: (9051670-7211
Fax: (905) 670-7248
l'ENTIERE GARANTIE
Celie
garantie
represente
KENWOOD.
KENWOODnese
de
toutes
extensionsnide
garantie
'ailesouentreprises
concessionnairesoucentresdeserviceaupar
au
employesaunomdeKENWOODaumoyen
verbalesouecrites,
programmesauplansdegarantie
les
KENWOOD
KENWOOD
d'emploidupraduit,
causesad'autres
de
Les
pas
d'exciure
quelles
KENWOODneconsidere
etant
sous
vente
de
garantie.Onrecommandedeles
au
casouelles
KENWOOD
d'annoncesaude
concessionnairesoules
n'y
ail
consenll
RENONCIATION
renonce'
loules
detous
praduitsoubiens,detous
toutes
pertes
commerciales.
AVIS
AUX
slipu
pour
CONSOMMATEURS
lat
ions
contenues
buldeIimiler,demoditier,dediminuer,derejeter
d'aulres
garantiesnidroits
loisaulegislations
IMPORTANT
une
preuve
d'achat
garantie,iIfaudra
aussi
val
presenterlacopieoriginaleducontrat
bien
que
ceUe
s'avereraien1
ELECTRONICS
6070 Kestrel Road, Mississauga,
Ontario, Canada
Telephone: 19051670-7211
Telecopieur: (905) 670-7248
iver
and
Les
aux
do
or
the
of
les
de
du
du
et
s'y
3
the
entire
wrillen
party,
.....
ertisementorpromotion,
centre.
responsibility
indirect.
disclaimorexclude
which
legislalion.
When
copyofyour
Iheyberequiredinthe
warranty
dealerorservice
are
authorizedtoextend
that
maybeoffered
unless
appro
.....edin
lor
lossoftimeoruse
incidentalorconsequential
inconvenience
wriUen
warranty
are
not
any
are
sel
consideredbyKENWOOD
applying
sowe
warranties
forlhinany
applicable
for
warranly
bill01sale
recommendlhatlheybe
fulure.
CANADA
I'entiere
garantie
donnee
lient
toutes
par
centresdeservice,amoins
par
ocril
responsabililesdeperledelemps,
dommages
danslapresente
provincialesaufederales
pas
celie
garanlie
ide.
Lorsqu'on
cartedegarantieentanl
necesairesaI'avenir.
par
aucunemenl
responsable
augmentationsdecette
toutes
personnes,
leurs
d'aHirmalions
promotions,yinclus
etendue
que
puissenl
d'avance.
indireclsou
accessoires
inconvenients
garantie
ecriten'ant
enonces
dans
louie
seule
demandeduservice
que
conserver
dansunlieu
CANADA
l5T
1S8
given
cenlre
wrrllen
including
writing
intended
repairs,
and
Ihis
INC.
ecrit
par
parties.
agents
tous
oHrir
que
ou
n'importe
comme
de
preuve
sOr
INC,
or
or
as
ni
 Loading...