

Page 1

KDC-2027SA
KDC-2027SG
CD-RECEIVER
INSTRUCTION MANUAL
AMPLI-TUNER LECTEUR DE CD
MODE D’EMPLOI
CD-RECEIVER
BEDIENUNGSANLEITUNG
CD RECEIVER
GEBRUIKSAANWIJZING
SI DICHIARA CHE:
I Sintolettori CD Kenwood per auto, modelli
KDC-2027SA, KDC-2027SG, KDC-F327A,
KDC-F327G, KDC-308A, KDC-308G, KDC-3027A,
KDC-3027G, KDC-4027, KDC-4027V
Rispondono alle prescrizioni dell'art. 2 comma 1
del D.M. 28 agosto 1995, n. 548.
Fatto ad Uithoorn il 15 luglio 2003
Kenwood Electronics Europe B.V.
Amsterdamseweg 37
1422 AC Uithoorn
The Netherlands
SINTOLETTORE STEREO COMPACT DISC
ISTRUZIONI PER L’USO
REPRODUCTOR DE DISCOS COMPACTOS RECEPTOR DE FM/AM
MANUAL DE INSTRUCCIONES
RECEPTOR DE CD
MANUAL DE INSTRUÇÕES
© B64-2722-00 / 00 (EW/EN)
Page 2

Contents
Safety precautions......................3
About CDs...................................5
English
General features .........................6
Power
Selecting the Source
Volume
Attenuator
Loudness
System Q
Audio Control
Speaker Setting
Clock Display
Adjusting Clock
DSI (Disabled System Indicator)
Theft Deterrent Faceplate
Tuner features .............................9
Tuning Mode
Tuning
Monaural Reception
Station Preset Memory
Auto Memory Entry
Preset Tuning
CD player features....................11
Playing CD
Fast Forwarding and Reversing
Track Search
Track Repeat
Track Scan
Random Play
Accessories...............................13
Installation Procedure ..............13
Connecting Wires
to Terminals ...........................14
Installation ................................15
Troubleshooting Guide .............17
Specifications ...........................19
— 2 —
Page 3

Safety precautions
2WARNING
To prevent injury and/or fire, take the
following precautions:
• Insert the unit all the way until it is fully
locked in place. Otherwise it may fly out of
place during collisions and other jolts.
• When extending the ignition, battery or
ground wires, make sure to use automotivegrade wires or other wires with an area of
2
0.75mm
deterioration and damage to the wire
coating.
•To prevent short circuits, never put or leave
any metallic objects (e.g., coins or metal
tools) inside the unit.
•If the unit starts to emit smoke or strange
smells, turn off the power immediately and
consult your Kenwood dealer.
• Make sure not to get your fingers caught
between the faceplate and the unit.
• Be careful not to drop the unit or subject it to
strong shock.
The unit may break or crack because it
contains glass parts.
• Do not touch the liquid crystal fluid if the
LCD is damaged or broken due to shock. The
liquid crystal fluid may be dangerous to your
health or even fatal.
If the liquid crystal fluid from the LCD
contacts your body or clothing, wash it off
with soap immediately.
(AWG18) or more to prevent wire
2CAUTION
To prevent damage to the machine,
take the following precautions:
• Make sure to ground the unit to a negative
12V DC power supply.
• Do not open the top or bottom covers of the
unit.
• Do not install the unit in a spot exposed to
direct sunlight or excessive heat or humidity.
Also avoid places with too much dust or the
possibility of water splashing.
• Do not set the removed faceplate or the
faceplate case in areas exposed to direct
sunlight, excessive heat or humidity. Also
avoid places with too much dust or the
possibility of water splashing.
•To prevent deterioration, do not touch the
terminals of the unit or faceplate with your
fingers.
• Do not subject the faceplate to excessive
shock, as it is a piece of precision equipment.
• When replacing a fuse, only use a new one
with the prescribed rating. Using a fuse with
the wrong rating may cause your unit to
malfunction.
•To prevent short circuits when replacing a
fuse, first disconnect the wiring harness.
• Do not place any object between the
faceplate and the unit.
• During installation, do not use any screws
except for the ones provided. The use of
improper screws might result in damage to
the main unit.
Do Not Load 8-cm (3-in.) CDs in the CD
slot
If you try to load an 8-cm CD with its adapter
into the unit, the adapter might separate from
the CD and damage the unit.
— 3 —
Page 4
Safety precautions
NOTE
• If you experience problems during
installation, consult your Kenwood dealer.
English
• If the unit does not seem to be working
right, try pressing the reset button first. If
that does not solve the problem, consult
your Kenwood dealer.
LOUD
AUD
OFF
AUTO
AME
Reset button
• Characters in the LCD may become difficult
to read in temperatures below 41 ˚F (5 ˚C).
• The illustrations of the display and the panel
appearing in this manual are examples used to
explain more clearly how the controls are used.
Therefore, what appears on the display in the
illustrations may differ from what appears on
the display on the actual equipment, and some
of the illustrations on the display may represent
something impossible in actual operation.
Lens Fogging
Right after you turn on the car heater in cold
weather, dew or condensation may form on
the lens in the CD player of the unit. Called
lens fogging, CDs may be impossible to play.
In such a situation, remove the disc and wait
for the condensation to evaporate. If the unit
still does not operate normally after a whilst,
consult your Kenwood dealer.
SCAN
RDM REP
Cleaning the Faceplate Terminals
If the terminals on the unit or faceplate get
dirty, wipe them with a dry, soft cloth.
Cleaning the Unit
If the faceplate of this unit is stained, wipe it
with a dry soft cloth such as a silicon cloth.
If the faceplate is stained badly, wipe the stain
off with a cloth moistened with neutral
MONO
cleaner, then wipe neutral detergent off.
CLK ADJ
Applying spray cleaner directly to the unit may
affect its mechanical parts. Wiping the
faceplate with a hard cloth or using a volatile
liquid such as thinner or alcohol may scratch
the surface or erases characters.
Cleaning the CD Slot
As dust can accumulate in the CD slot, clean it
occasionally. Your CDs can get scratched if
you put them in a dusty CD slot.
The marking of products using lasers
(Except for some areas)
CLASS 1
LASER PRODUCT
The label is attached to the chassis/case and
says that the component uses laser beams
that have been classified as Class 1. It means
that the unit is utilizing laser beams that are of
a weaker class. There is no danger of
hazardous radiation outside the unit.
This Product is not installed by the
manufacturer of a vehicle on the production
line, nor by the professional importer of a
vehicle into an EU Member State.
— 4 —
Page 5
About CDs
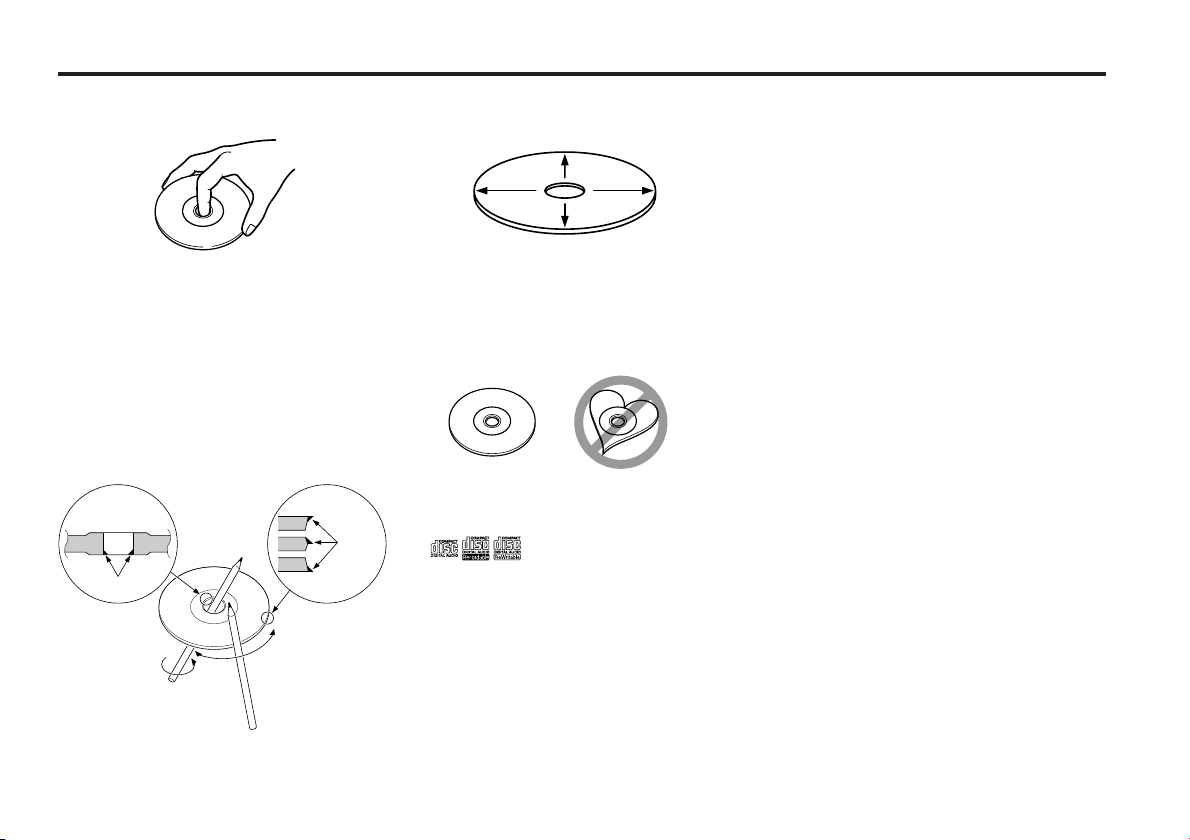
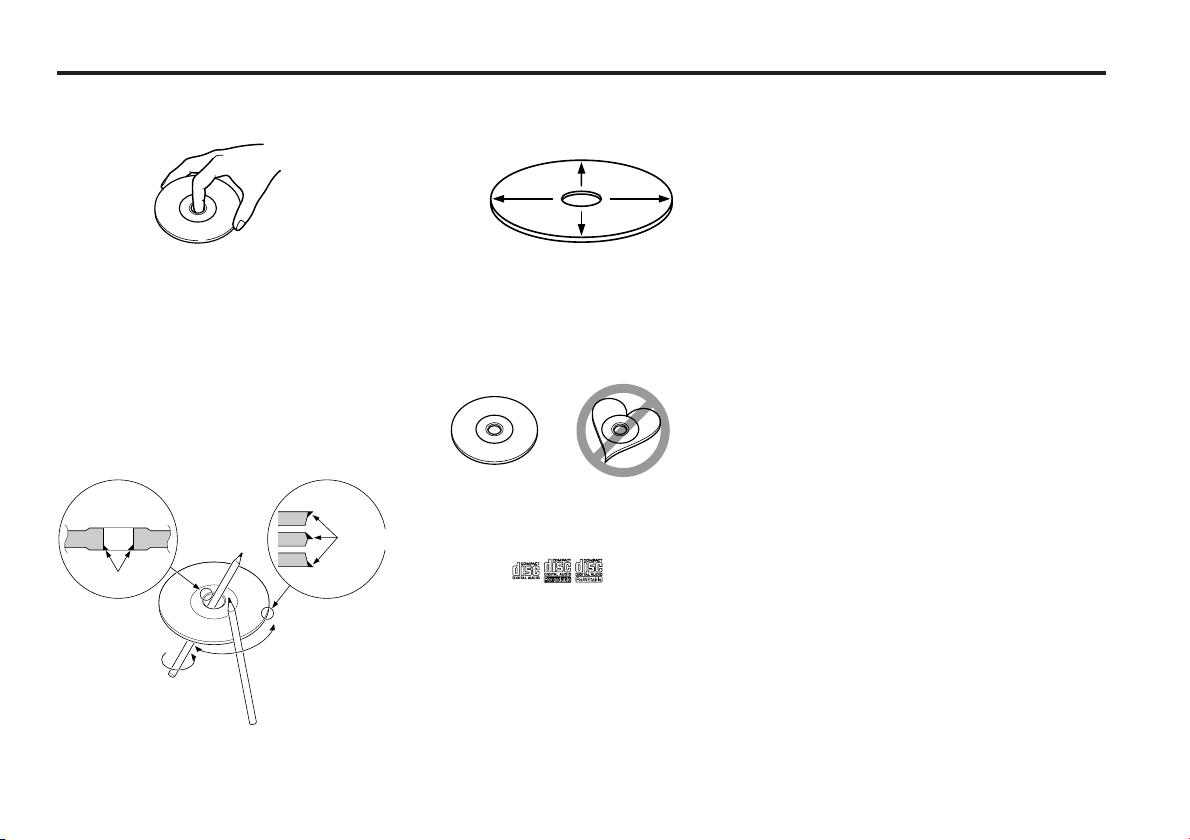
Handling CDs
• Don’t touch the recording surface of the CD.
• CD-R and CD-RW are easier to damage than
a normal music CD. Use a CD-R or a CD-RW
after reading the caution items on the
package etc.
• Don’t stick tape etc. on the CD.
Also, don’t use a CD with tape stuck on it.
When using a new CD
If the CD center hole or outside rim has burrs,
use it after removing them with a ball pen etc.
Burrs
Burrs
CD cleaning
Clean from the center of the disc and move
outward.
Removing CDs
When removing CDs from this unit pull them
out horizontally.
CDs that can’t be used
• CDs that aren’t round can’t be used.
• CDs with coloring on the recording surface
or that are dirty can’t be used.
• This unit can only play the CDs with
.
It may not correctly play discs which do not
have the mark.
•A CD-R or CD-RW that hasn’t been finalized
can’t be played. (For the finalization process
refer to your CD-R/CD-RW writing software,
and your CD-R/CD-RW recorder instruction
manual.)
CD storage
• Don’t place them in direct sunlight (On the
seat or dashboard etc.) and where the
temperature is high.
• Store CDs in their cases.
CD accessories
Don’t use disc type accessories.
— 5 —
Page 6
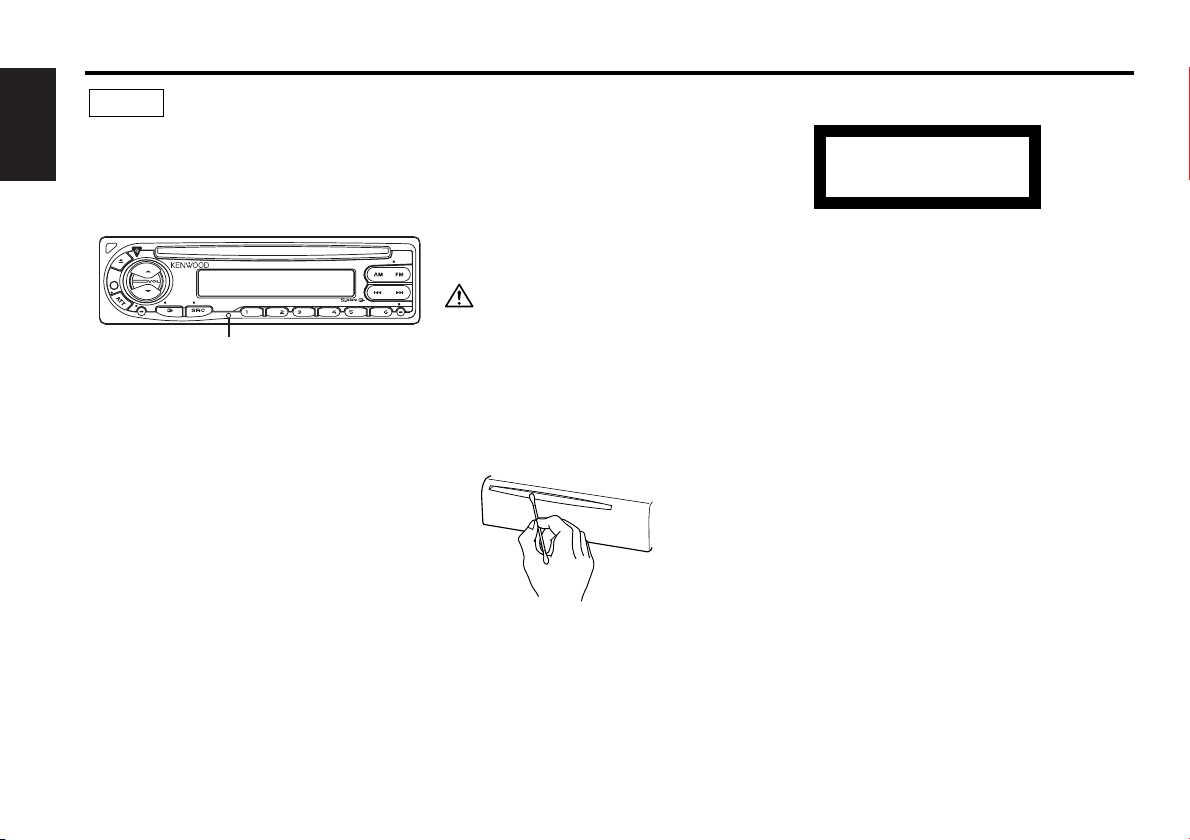
General features
Release button
English
u
d
AM FM
Power
¢4
MONO
Turning ON the Power
Press the [SRC] button.
Turning OFF the Power
Press the [SRC] button for at least 1 second.
LOUD
ATT/
LOUD
AUD
AUTO
AME
Q/
AUD
SYSTEM Q indicator
OFF
SRC
1
Clock display
SCAN
RDM REP
CLK ADJ
Selecting the Source
Press the [SRC] button.
3
CLK/
ADJ
Source required Display
Tuner "TUnE"
CD "CD"
Standby (Illumination only mode) "STBY"
Volume
Increasing Volume
Press the [u] button.
LOUD indicator
Decreasing Volume
Press the [d] button.
Attenuator
ATT indicator
Turning the volume down quickly.
Press the [ATT] button.
Each time the button is pressed the Attenuator turns ON or OFF.
When it’s ON, the "ATT" indicator blinks.
— 6 —
Page 7
Loudness
Compensating for low and high tones during low volume.
Press the [LOUD] button for at least 1 second.
Each time the button is pressed for at least 1 second the
Loudness turns ON or OFF.
When it’s ON, "LOUD" indicator is ON.
System Q
You can recall the best sound setting preset for different types of
the music.
1 Select the source to set
Press the [SRC] button.
2 Select the Sound type
Press the [Q] button.
Each time the button is pressed the sound setting switches.
Sound setting Display
Flat "FLAT"
Rock "ROCK"
Top 40 "TP40"
Pops "POPS"
Jazz "JAZZ"
Easy "EASY"
• Each setting value is changed with the <Speaker setting> (page
8).
First, select the speaker type with the Speaker setting.
• When the System Q setting is changed, the Bass, Middle, and
Treble set in audio control replace the System Q values.
Audio Control
1 Select the source for adjustment
Press the [SRC] button.
2 Enter Audio Control mode
Press the [AUD] button for at least 1 second.
3 Select the Audio item for adjustment
Press the [FM] or [AM] button.
Each time the button is pressed the items that can be adjusted
switch as shown below.
4 Adjust the Audio item
Press the [4] or [¢] button.
Adjustment Item Display Range
Bass level "BAS" –8 — +8
Middle level "MID" –8 — +8
Treble level "TRE" –8 — +8
Balance "BL" Left 15 — Right 15
Fader "FD" Rear 15 — Front 15
5 Exit Audio Control mode
Press the [AUD] button.
— 7 —
Page 8

General features
Speaker Setting
Fine-tuning so that the System Q value is optimal when setting
the speaker type.
English
1 Enter Standby
Press the [SRC] button.
Select the "STBY" display.
2 Enter Speaker Setting mode
Press the [Q] button.
3 Select the Speaker type
Press the [4] or [¢] button.
Each time the button is pressed the setting switches as shown
below.
Speaker type Display
OFF "SP-F"
For the OEM speaker "SP-O"
For 6 & 6x9 in. speaker "SP-6"
For 5 & 4 in. speaker "SP-5"
4 Exit Speaker Setting mode
Press the [Q] button.
Clock Display
Press the [CLK] button.
Each time the button is pressed the clock display turns ON or
OFF.
Adjusting Clock
1 Select the clock display
Press the [CLK] button.
2 Enter clock adjustment mode
Press the [ADJ] button for at least 2 seconds.
The clock display blinks.
3 Adjust the hours
Press the [FM] or [AM] button.
Adjust the minutes
Press the [4] or [¢] button.
4 Exit clock adjustment mode
Press the [CLK] button.
DSI (Disabled System Indicator)
A red indicator will blink on the unit after the faceplate is
removed, warning potential thieves.
1 Turn the power OFF
Press the [SRC] button for at least 1 second.
2 Set the DSI
While pressing the [1] and [3] button, press the [SRC] button.
Each time the step 1 and 2 operation is done the DSI turns ON or
OFF.
— 8 —
Page 9

Theft Deterrent Faceplate
MONO
CLK ADJ
AUTO
AME
SCAN
AUD
RDM REP
OFF
LOUD
AM
FM/
MONO
¢4
SRC
1 - 6
AUTO/
AME
The faceplate of the unit can be detached and taken with you,
helping to deter theft.
Removing the Faceplate
Press the Release button.
The faceplate is unlocked, allowing you to detach it.
• The faceplate is a precision piece of equipment and can be
damaged by shocks or jolts. For that reason, keep the faceplate in
its special storage case while detached.
• Do not expose the faceplate or its storage case to direct sunlight
or excessive heat or humidity. Also avoid places with too much
dust or the possibility of water splashing.
Reattaching the Faceplate
1 Align the projections on the unit with the grooves on the
faceplate.
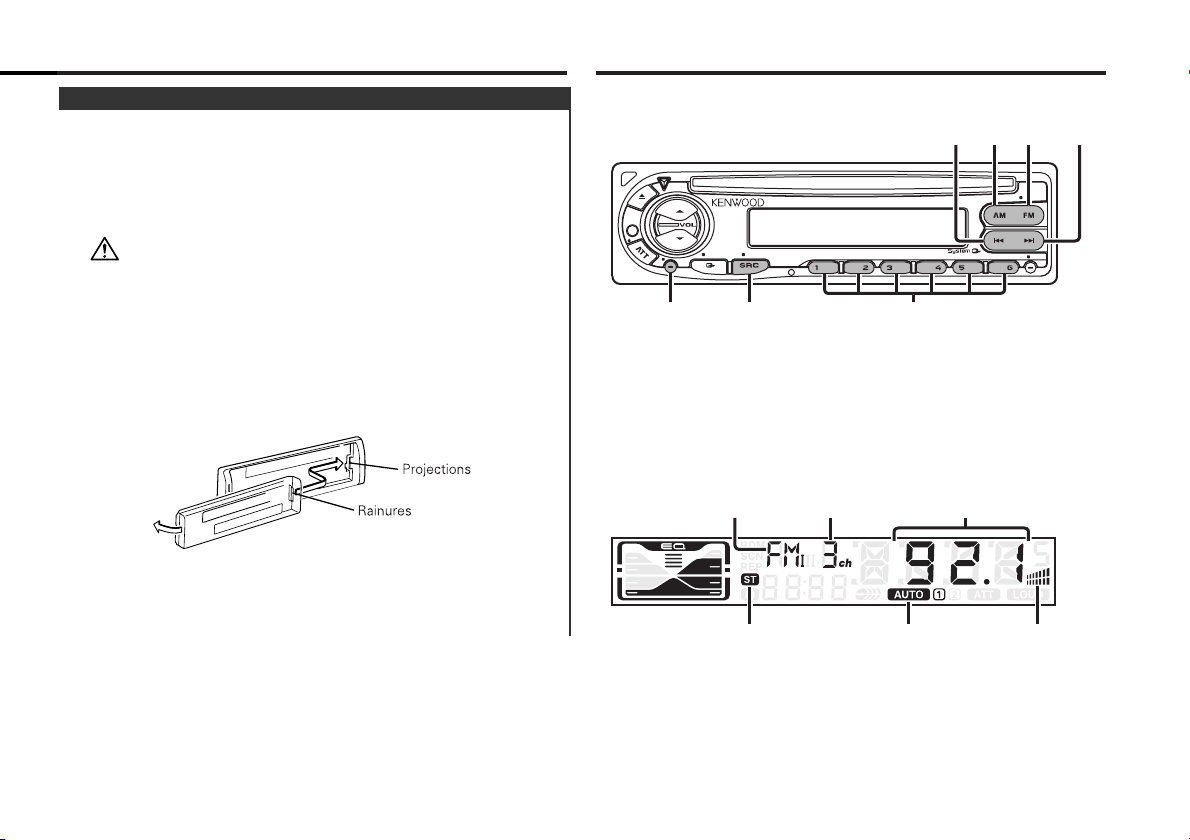
Tuner features
2 Push the faceplate in until it clicks.
The faceplate is locked in place, allowing you to use the unit.
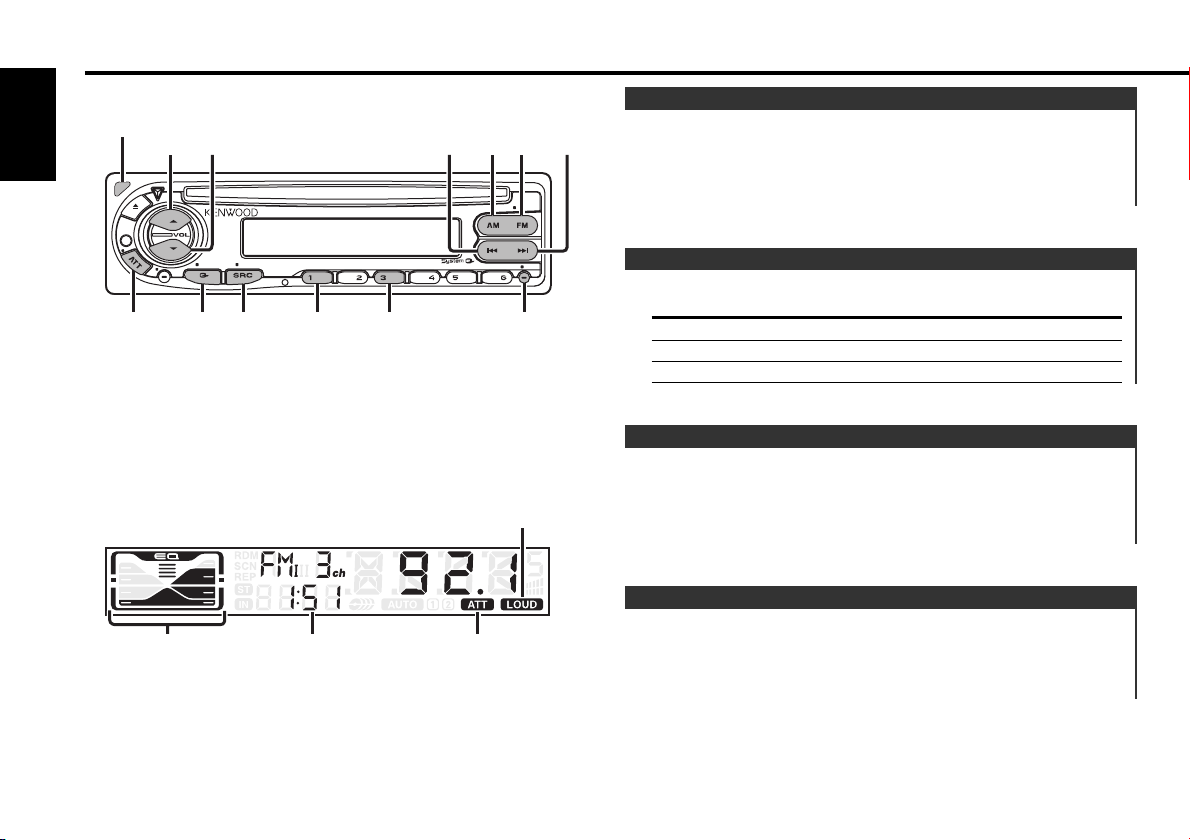
Band display Preset station number Frequency display
AUTO indicator
Monaural indicatorST indicator
— 9 —
Page 10

Tuner features
Tuning Mode
Choose the tuning mode.
English
Press the [AUTO] button.
Each time the button is pressed the Tuning mode switches as
shown below.
Tuning mode Display Operation
Auto seek "AUTO 1" Automatic search for a station.
Preset station "AUTO 2" Search in order of the stations
seek indicator in the Preset memory.
Manual — Normal manual tuning control.
Tuning
Selecting the station.
1 Select tuner source
Press the [SRC] button.
Select the "TUnE" display.
2 Select the band
Press the [FM] or [AM] button.
Each time the [FM] button is pressed it switches between the
FM1, FM2, and FM3 bands.
3 Tune up or down band
Press the [4] or [¢] button.
During reception of stereo stations the "ST" indicator is ON.
Monaural Reception
Noise can be reduced when stereo broadcasts are received as
monaural.
Press the [MONO] button for at least 1 second.
Each time the button is pressed for at least 1 second the
Monaural Reception turns ON or OFF.
When it's ON, the Monaural indicator is ON.
indicator
Station Preset Memory
Putting the station in the memory.
1 Select the band
Press the [FM] or [AM] button.
2 Select the frequency to put in the memory
Press the [4] or [¢] button.
3 Put the frequency in the memory
Press the [1] — [6] button for at least 2 seconds.
The preset number display blinks 1 time.
On each band, 1 station can be put in the memory on each [1] —
[6] button.
— 10 —
Page 11

Auto Memory Entry
MONO
CLK ADJ
AUTO
AME
SCAN
AUD
RDM REP
OFF
LOUD
¢4
SCAN
0
RDM REP
SRC
Putting stations with good reception in the memory
automatically.
1 Select the band for Auto Memory Entry
Press the [FM] or [AM] button.
2 Open Auto Memory Entry
Press the [AME] button for at least 2 seconds.
When 6 stations that can be received are put in the memory
Auto Memory Entry closes.
Preset Tuning
Calling up the stations in the memory.
1 Select the band
Press the [FM] or [AM] button.
2 Call up the station
Press the [1] — [6] button.
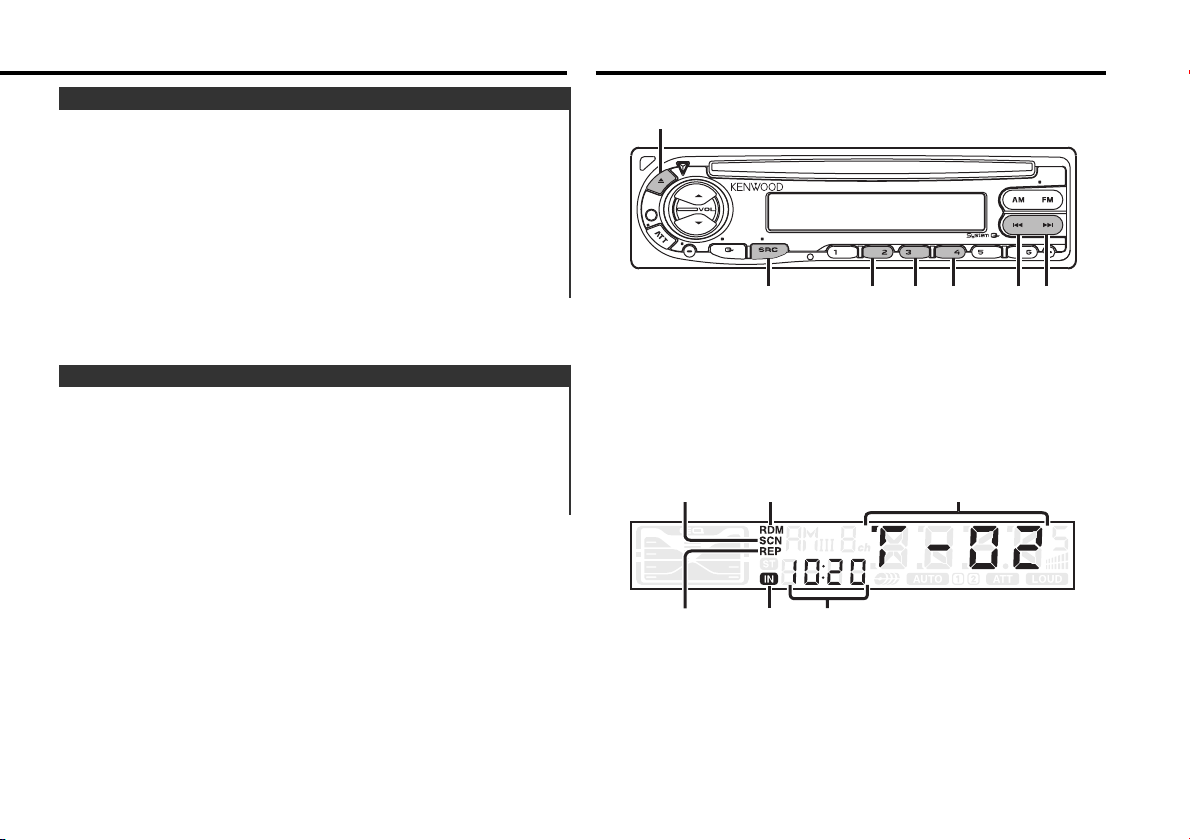
CD player features
SCN
indicator
RDM
indicator
Track number
— 11 —
REP indicator
IN indicator
Track time
Page 12
CD player features
Playing CD
When a CD is inserted
English
Press the [SRC] button.
Select the "CD" display.
When a CD is inserted, the "IN" indicator is ON.
Eject the CD
Press the [0] button.
3 in. (8cm) CD cannot be played. Using an adapter and inserting
them into this unit can cause damage.
Fast Forwarding and Reversing
Fast Forwarding
Hold down on the [¢] button.
Release your finger to play the disc at that point.
Reversing
Hold down on the [4] button.
Release your finger to play the disc at that point.
Track Search
Selecting the song you want to hear.
Press the [4] or [¢] button.
Track Repeat
Replaying the song you're listening to.
Press the [REP] button.
Each time the button is pressed the Track Repeat turns ON or
OFF.
When it's ON, the "REP" indicator is ON.
Track Scan
Playing the first part of each song on the disc you are listening
to and searching for the song you want to listen to.
1 Start Track Scan
Press the [SCAN] button.
"SCN" indicator is ON.
2 Release it when the song you want to listen to is played
Press the [SCAN] button.
Random Play
Playing all the songs on the disc in random order.
Press the [RDM] button.
Each time the button is pressed Random Play turns ON or OFF.
When it's ON, the "RDM" indicator is ON and the track number
blinks.
When the [¢] button is pressed, the next song select starts.
— 12 —
Page 13
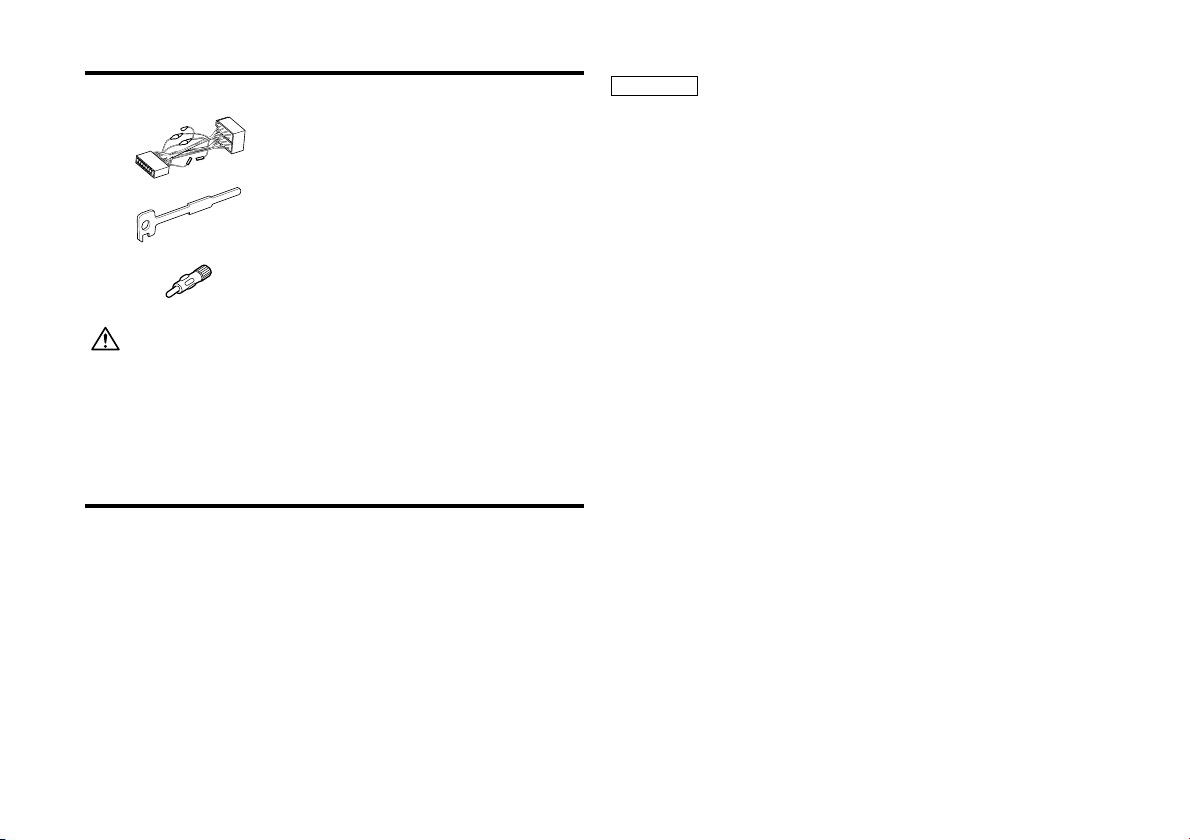
Accessories
External view
1
2
3
The use of any accessories except for those provided might result in
damage to the unit. Make sure only to use the accessories shipped with
the unit, as shown above.
..........................................1
..........................................2
..........................................1
Number of items
Installation Procedure
1. To prevent short circuits, remove the key from the ignition and
disconnect the - terminal of the battery.
2. Make the proper input and output wire connections for each unit.
3. Connect the wire on the wiring harness.
4. Take Connector B on the wiring harness and connect it to the
speaker connector in your vehicle.
5. Take Connector A on the wiring harness and connect it to the
external power connector on your vehicle.
6. Connect the wiring harness connector to the unit.
7. Install the unit in your car.
8. Reconnect the - terminal of the battery.
9. Press the reset button.
2CAUTION
• If your car is not prepared for this special connection-system,
consult your Kenwood dealer.
• Only use antenna conversion adapters (ISO-JASO) when the
antenna cord has an ISO plug.
• Make sure that all wire connections are securely made by
inserting jacks until they lock completely.
• If your vehicle's ignition does not have an ACC position, or if the
ignition wire is connected to a power source with constant
voltage such as a battery wire, the power will not be linked with
the ignition (i.e., it will not turn on and off along with the
ignition). If you want to link the unit's power with the ignition,
connect the ignition wire to a power source that can be turned
on and off with the ignition key.
• If the fuse blows, first make sure that the wires have not caused
a short circuit, then replace the old fuse with one with the same
rating.
• Insulate unconnected wires with vinyl tape or other similar
material. To prevent short circuits, also do not remove the caps
on the ends of the unconnected wires or the terminals.
• Connect the speaker wires correctly to the terminals to which
they correspond. The unit may receive damage or fail to work if
you share the - wires and/or ground them to any metal part in
the car.
• After the unit is installed, check whether the brake lamps,
indicators, wipers, etc. on the car are working properly.
• If the console has a lid, make sure to install the unit so that the
faceplate does not hit the lid when closing and opening.
•Mount the unit so that the mounting angle is 30° or less.
— 13 —
Page 14
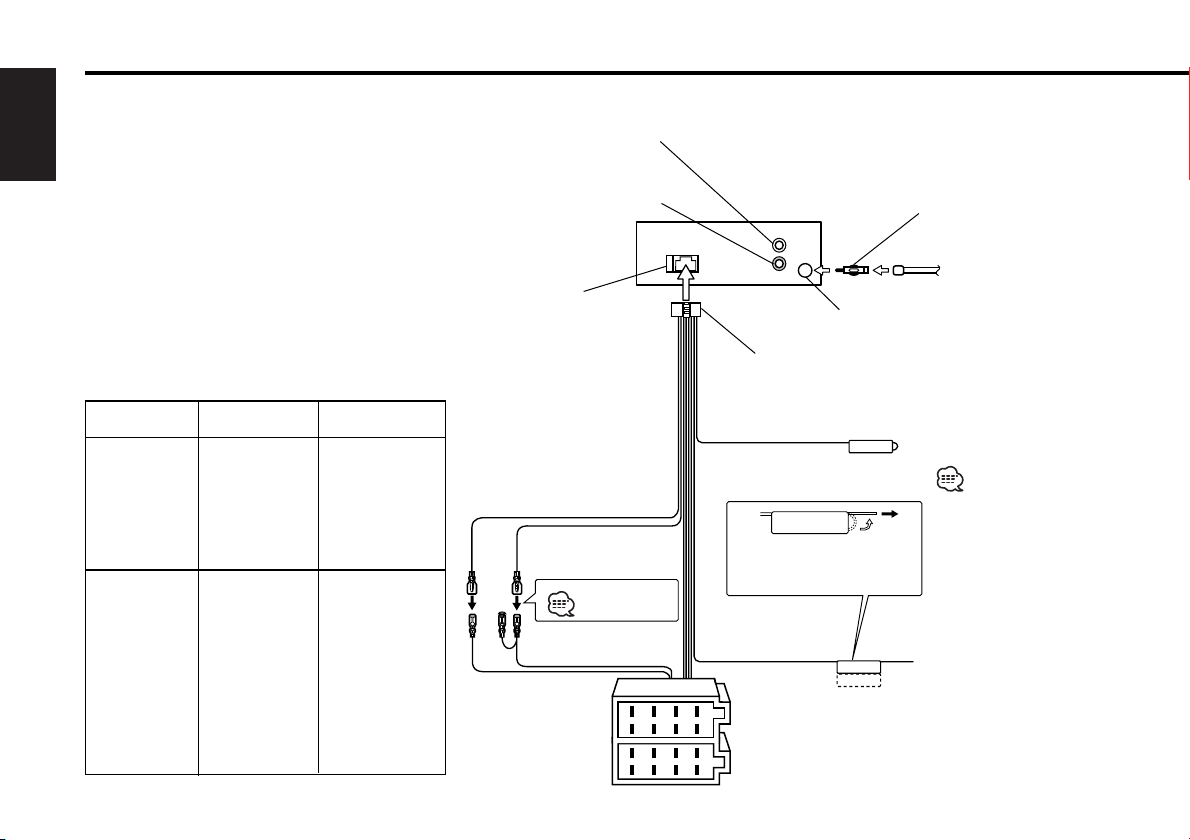
Connecting Wires to Terminals
English
10
Rear left output (White)
Connector Function Guide
Pin Numbers for
ISO Connectors
External Power
Connector
A–4
A–5
A–7
A–8
Speaker
Connector
B–1
B–2
B–3
B–4
B–5
B–6
B–7
B–8
Wire Color Functions
Yellow
Blue/White
Red
Black
Purple
Purple/Black
Gray
Gray/Black
White
White/Black
Green
Green/Black
Battery
Power Control
Ignition (ACC)
Earth (Ground)
Connection
Rear Right (+)
Rear Right (–)
Front Right (+)
Front Right (–)
Front Left (+)
Front Left (–)
Rear Left (+)
Rear Left (–)
Rear right output (Red)4
Fuse (10A) 13
Battery wire (Yellow) 6
Ignition wire (Red) 7
See page 15
A–7 Pin (Red) 8
A–4 Pin (Yellow) 9
Connector A
Connector B
— 14 —
Antenna Conversion Adaptor
(ISO–JASO) (Accessory3) 2
REAR
L
R
FM/AM antenna
input 3
Wiring harness
(Accessory1) 16
TEL MUTE
If no connections are
made, do not let the wire
come out from the tab. 18
Power control/ Motor
antenna control wire
(Blue/White) 20
8
1234567
8
1234567
P.CONT
ANT.CONT
Antenna Cord (ISO) 1
Not Used 19
Do not let the wire
come out from the
tab. 4b
Connect either to the power
control terminal when using
the optional power amplifier,
or to the antenna control
terminal in the vehicle. 23
Page 15
2WARNING
Connecting the ISO Connector (see p.14)
The pin arrangement for the ISO connectors depends on the type of
vehicle you drive. Make sure to make the proper connections to
prevent damage to the unit.
The default connection for the wiring harness is described in 1 below.
If the ISO connector pins are set as described in 2 or 3, make the
connection as illustrated.
Please be sure to reconnect the cable as shown 2 below to
install this unit to the Vol kswagen vehicles etc.
1 (Default setting) The A-7 pin (red) of the vehicle's ISO connector
is linked with the ignition, and the A-4 pin (yellow) is connected to
the constant power supply.
Ignition cable (Red)
Battery cable (Yellow)
Unit Vehicle
A–7 Pin (Red)
A–4 Pin (Yellow)
2 The A-7 pin (red) of the vehicle's ISO connector is connected to
the constant power supply, and the A-4 pin (yellow) is linked to
the ignition.
Ignition cable (Red)
Battery cable (Yellow)
Unit Vehicle
A–7 Pin (Red)
A–4 Pin (Yellow)
3 The A-4 pin (yellow) of the vehicle's ISO connector is not
connected to anything, while the A-7 pin (red) is connected to the
constant power supply (or both the A-7 (red) and A-4 (yellow) pins
are connected to the constant power supply).
Ignition cable (Red)
Unit Vehicle
A–7 Pin (Red)
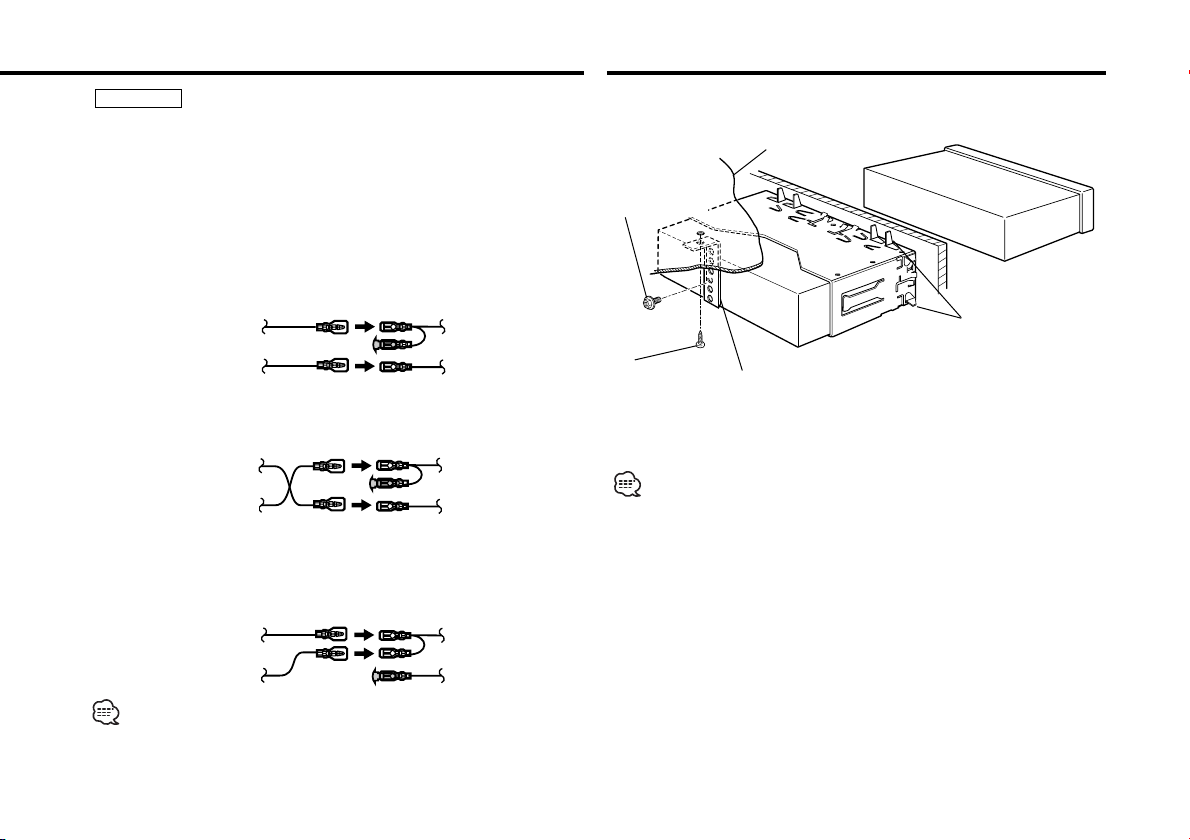
Installation
■ Installation
Firewall or metal support
Screw (M4X8)
(commercially
available)
Self-tapping
screw
(commercially
available)
Make sure that the unit is installed securely in place. If the unit is
unstable, it may malfunction (eg, the sound may skip).
Metal mounting
strap
(commercially
available)
Bend the tabs of the
mounting sleeve
with a screwdriver or
similar utensil and
attach it in place.
Battery cable (Yellow)
When the connection is made as in 3 above, the unit's power will not
be linked to the ignition key. For that reason, always make sure to turn
off the unit's power when the ignition is turned off.
To link the unit's power to the ignition, connect the ignition cable
(ACC...red) to a power source that can be turned on and off with the
ignition key.
A–4 Pin (Yellow)
— 15 —— 15 —
Page 16
Installation
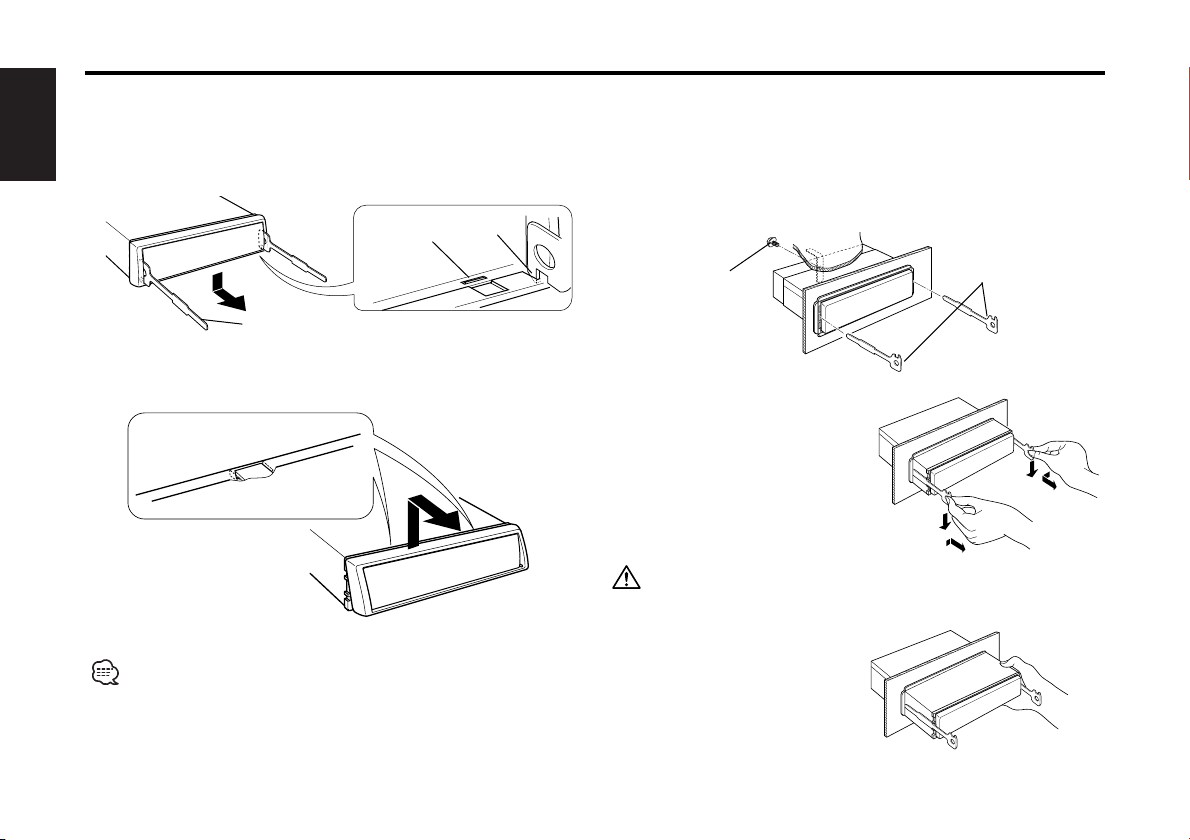
■ Removing the hard rubber frame
1 Engage the catch pins on the removal tool and remove the two
English
locks on the lower level.
Lower the frame and pull it forward as shown in the figure.
Lock
Catch
■ Removing the Unit
1 Refer to the section “Removing the hard rubber frame” and then
remove the hard rubber frame.
2 Remove the screw (M4×8) on the back panel.
3 Insert the two removal tools deeply into the slots on each side,
as shown.
Accessory2 Removal tool
2 When the lower level is removed, remove the upper two
locations.
The frame can be removed from the top side in the same manner.
Screw (M4X8)
(commercially
available)
4 Lower the removal tool
toward the bottom, and pull
out the unit halfway while
pressing towards the inside.
Be careful to avoid injury from the catch pins on the removal tool.
5 Pull the unit all the way out
with your hands, being
careful not to drop it.
— 16 —— 16 —
Accessory2 Removal tool
Page 17

Troubleshooting Guide
What might seem to be a malfunction in your unit may
just be the result of slight misoperation or miswiring.
Before calling service, first check the following table
for possible problems.
General
? The power does not turn ON.01
✔ The fuse has blown.
☞ After checking for short circuits in the wires, replace the fuse with
one with the same rating.
✔ No ACC position on vehicle ignition.02
☞ Connect the same wire to the ignition as the battery wire.
? Nothing happens when the buttons are pressed.04
✔ The computer chip in the unit is not functioning normally.
☞ Press the reset button on the unit (page 4).
? There’s a source you can’t switch.06
✔ There’s no CD inserted.
☞ Set the media you want to listen to. If there’s no media in this
unit, you can't swhich to each source.
? The memory is erased when the ignition is turned OFF.10
✔ The battery wire has not been connected to the proper terminal.
☞ Connect the wire correctly, referring to the section on
<Connecting Wires to Terminals> (page 14).
✔ The ignition and battery wire are incorrectly connected.11
☞ Connect the wire correctly, referring to the section on
<Connecting Wires to Terminals> (page 14).
? Even if Loudness is turned ON, high-pitched tone isn't compensated
for. 17
✔ Tuner source is selected.
☞ High-pitched tone isn't compensated for when in Tuner source.
? No sound can be heard, or the volume is low.
✔ The fader or balance settings are set all the way to one side.21
☞ Center the fader and balance settings.
✔ The input/output wires or wiring harness are connected incorrectly.22
☞ Reconnect the input/output wires or the wiring harness correctly.
See the section on <Connecting Wires to Terminals> (page 14).
? The sound quality is poor or distorted.25
✔ One of the speaker wires is being pinched by a screw in the car.
☞ Check the speaker wiring.
✔ The speakers are not wired correctly.27
☞ Reconnect the speaker wires so that each output terminal is
connected to a different speaker.
? The Touch Sensor Tone doesn’t sound.34
✔ The preout jack is being used.
☞ The Touch Sensor Tone can’t be output from the preout jack.
Tuner source
? Radio reception is poor.39
✔ The car antenna is not extended.
☞ Pull the antenna out all the way.
✔ The antenna control wire is not connected.40
☞ Connect the wire correctly, referring to the section on
<Connecting Wires to Terminals> (page 14).
— 17 —
Page 18

Troubleshooting Guide
Disc source
? The specified disc does not play, but another one plays instead.52
✔ The specified CD is quite dirty.
English
☞ Clean the CD.
✔ The CD is upside-down.53
☞ Load the CD with the labeled side up.
✔ The disc is severely scratched.55
☞ Try another disc instead.
? The specified track will not play.58-a
✔ Random play has been selected.
☞ Turn off random play.
? Track repeat, track scan, and random play start by themselves.59-a
✔ The setting is not canceled.
☞ The settings for these functions remain on until the setting to off
or the disc ejected, even if the power is turned off or the source
changed.
? Cannot play CD-R or CD-RW.60
✔ Finalization processing is not being conducted for CD-R/CD-RW.
☞ Conduct finalization processing with CD recorder.
? A CD ejects as soon as it is loaded.62
✔ The CD is upside-down.
☞ Load the CD with the labeled side up.
✔ The CD is quite dirty.63
☞ Clean the CD, referring to the section on <CD cleaning> (page 5).
? Can’t remove disc.64
✔ The cause is that more than 10 minutes has elapsed since the vehicle
ACC switch was turned OFF.
☞ The disc can only be removed within 10 minutes of the ACC
switch being turned OFF. If more than 10 minutes has elapsed,
turn the ACC switch ON again and press the Eject button.
? The disc won’t insert.65
✔ There’s already another disc inserted.
☞ Press the [0] button and remove the disc.
? Track Search can't be done.66-2
✔ For the albums first or last song.
☞ For each album, Track Search can't be done in the backward
direction for the first song or in the forward direction for the last
song.
The messages shown below display your systems
condition.
E-04: The CD is quite dirty. The CD is upside-down. The CD
IN (Blink): The CD player section is not operating properly.
is scratched a lot.
➪ Clean the CD and load it correctly.
➪
Reinsert the CD. If the CD cannot be ejected or the
display continues to flash even when the CD has
been properly reinserted, please switch off the
power and consult your nearest service center.
E59
— 18 —
Page 19

Specifications
Specifications subject to change without notice.
FM tuner section
Frequency range (50 kHz space) ..............87.5 MHz – 108.0 MHz
Usable sensitivity (S/N = 26dB) .................................0.7 µV/75 Ω
Quieting Sensitivity (S/N = 46dB) ..............................1.6 µV/75 Ω
Frequency response (±3 dB).................................30 Hz – 15 kHz
Signal to Noise ratio (MONO)..............................................65 dB
Selectivity (DIN) (±400 kHz)..............................................≥ 80 dB
Stereo separation (1 kHz) ....................................................35 dB
MW tuner section
Frequency range (9 kHz space) .....................531 kHz – 1611 kHz
Usable sensitivity (S/N = 20dB) ...........................................25 µV
LW tuner section
Frequency range .............................................153 kHz – 281 kHz
Usable sensitivity (S/N = 20dB) ...........................................45 µV
CD player section
Laser diode .......................................................................GaAlAs
Digital filter (D/A)......................................8 Times Over Sampling
D/A Converter .......................................................................1 Bit
Spindle speed...............................................500 – 200 rpm (CLV)
Wow & Flutter........................................Below Measurable Limit
Frequency response (±1 dB).................................10 Hz – 20 kHz
Total harmonic distortion (1 kHz) ......................................0.01 %
Signal to Noise ratio (1 kHz) ................................................93 dB
Dynamic range ....................................................................93 dB
Channel separation..............................................................85 dB
Audio section
Maximum output power.................................................45 W x 4
Output power (DIN 45324, +B=14.4V)...........................28 W x 4
Tone action
Bass : ...............................................................100 Hz ±10 dB
Middle : ..............................................................1 kHz ±10 dB
Treble : .............................................................10 kHz ±10 dB
Preout level / Load (during disc play)....................2000 mV/10 kΩ
Preout impedance............................................................≤ 600 Ω
General
Operating voltage (11 – 16V allowable) ..............................14.4 V
Current consumption.............................................................10 A
Installation Size (W x H x D) ..........................182 x 53 x 155 mm
7-3/16 x 2-1/16 x 6-1/10 inch
Weight...................................................................3.1 lbs (1.4 kg)
— 19 —
Page 20

Table des matiéres
Précautions de sécurité............21
Au sujet des CD .......................23
Caractéristiques générales.......24
Alimentation
Sélectionner la source
Volume
Atténuateur
Bruit
Français
System Q
Commande du son
Réglage des enceintes
Affichage de l'horloge
Régler l'horloge
DSI (Disabled System Indicator)
Façade antivol
Fonctions du tuner ...................27
Mode d'accord
Accord
Réception monaurale
Mémoire de station pré-réglée
Entrée en mémoire automatique
Accord pré-réglé
Caractéristiques du
lecteur CD ..............................29
Lire un CD
Avance rapide et retour
Recherche de plages
Répétition de plage
Balayage des plages
Lecture aléatoire
Accessoires...............................31
Procédure d’installation ...........31
Connexion des câbles sur les
prises......................................32
Installation ................................33
Guide de depannage .................35
Spécifications ...........................37
— 20 —
Page 21
Précautions de sécurité
2AVERTISSEMENT
Pour éviter toute blessure et/ou
incendie, veuillez prendre les
précautions suivantes:
• Insérez l’appareil à fond jusqu’à ce qu’il soit
complètement calé. Sinon, il risquerait d’être
projeté en cas de collisions ou de cahots.
• Si vous prolongez un câble d’alimentation, de
batterie ou de masse, assurez vous d’utiliser
un câble pour automobile ou un câble avec
une section de 0,75mm
d’éviter tous risques de détérioration ou
d’endommagement du revêtement des
câbles.
• Pour éviter les court-circuits, ne jamais
mettre ou laisser d’objets métalliques
(comme une pièce de monnaie ou un outil
en métal) à l’intérieur de l’appareil.
• Si l’appareil commence à émettre de la
fumée ou une odeur bizarre, mettez
immédiatement l’appareil hors tension et
consultez un revendeur Kenwood.
• Faites attention de ne pas vous prendre les
doigts entre la façade et l’appareil.
• Faites attention de ne pas laisser tomber
l’appareil ou lui faire subir de chocs
importants. L’appareil risque de se casser ou
de se fêler car il contient des parties en
verre.
• Ne touchez pas le cristal liquide si l’affichage
LCD était endommagé ou cassé à cause
d’un choc. Le cristal liquide peut être
dangereux pour votre santé et même mortel.
Si le cristal liquide de l’affichage LCD entrait
en contact avec votre corps ou un vêtement,
lavez-le immédiatement avec du savon.
2
(AWG18) afin
2ATTENTION
Pour éviter tout dommage à l'appareil,
veuillez prendre les précautions
suivantes:
• Assurez-vous de mettre l'appareil à la masse
sur une alimentation négative de 12V CC.
• N'ouvrez pas le couvercle supérieur ou
inférieur de l'appareil.
• N'installez pas l'appareil dans un endroit
exposé directement à la lumière du soleil, à
une chaleur excessive ou à l'humidité. Evitez
aussi les endroits trop poussiéreux et où
l'appareil risque d'être éclaboussé.
• Ne placez pas la façade amovible ou le
boîtier de la façade dans un endroit exposé
directement à la lumière du soleil, à une
chaleur excessive ou à l'humidité. Evitez
aussi les endroits trop poussiéreux et où la
façade risque d'être éclaboussée.
• Pour éviter toute détérioration, ne touchez
pas les contacts de l'appareil ou de la façade
avec les doigts.
• Ne faites pas subir de chocs excessifs à la
façade car elle fait partie d'un équipement de
précision.
• Lors du remplacement d'un fusible, utilisez
seulement un fusible neuf avec la valeur
indiquée. L'utilisation d'un fusible d'une
valeur différente peut être la cause d'un
mauvais fonctionnement de votre appareil.
• Pour éviter les courts-circuits lors du
remplacement d'un fusible, déconnectez
d'abord le faisceau de câbles.
• Ne placez aucun objet entre la façade et
l'appareil.
• Pendant l'installation, n'utilisez aucunes autres
vis que celles fournies. L'utilisation de vis
incorrectes pourrait endommager l'appareil.
— 21 —
Ne chargez pas de CD de 8 cm
(3 pouces) dans la fenêtre à CD
Si vous essayez de charger un CD de 8 cm
avec son adaptateur dans l’appareil,
l’adaptateur peut se séparer du CD et
endommager l’appareil.
Page 22

Précautions de sécurité
REMARQUE
• Si vous rencontrez des problèmes pendant
l’installation, consultez votre revendeur
Kenwood.
• Si l'appareil semble ne pas fonctionner
correctement, essayez d'abord d'appuyer sur
la touche de réinitialisation. Si cela ne résout
pas le problème, consultez votre revendeur
Kenwood.
Français
LOUD
AUD
OFF
AUTO
AME
SCAN
RDM REP
Touche de réinitialisation
• Les caractères de l’affichage LCD peuvent
devenir difficiles à lire quand la température
est inférieure à 5 °C (41 °F).
• Les illustrations de l’affichage et du panneau
apparaissant dans ce manuel sont des
exemples utilisés pour expliquer avec plus
de clarté comment les commandes sont
utilisées. Il est donc possible que les
illustrations d’affichage puissent être
différentes de ce qui réellement affiché sur
l’appareil et aussi que certaines illustrations
représentent des choses impossibles à
réaliser en cours de fonctionnement.
Condensation sur la lentille
Juste après avoir mis le chauffage de la
voiture par temps froid, de l’humidité risque
de se former sur la lentille à l’intérieur du
lecteur CD (voile). La reproduction de CD peut
être impossible. Dans ce cas, retirez le disque
et attendez que l’humidité s’évapore. Si
l’appareil ne fonctionne toujours pas
normalement après quelques temps, consultez
votre revendeur Kenwood.
Nettoyage des contacts de la façade
Si les contacts de l'appareil ou de la façade
deviennent sales, essuyez-les avec un tissu
sec et doux.
Nettoyage de l’appareil
Si le panneau avant de cet appareil est taché,
essuyez-le avec un chiffon sec et doux
comme ceux au silicone. Si le panneau avant
est très taché, essuyez-le avec un chiffon
imbibé d'un produit de nettoyage neutre et
MONO
ensuite essuyez toute trace de ce produit.
La pulvérisation directe de produit de
CLK ADJ
nettoyage sur l'appareil risque d'affecter les
pièces mécaniques. L'utilisation d'un chiffon
rugueux ou d'un liquide volatile tel que solvant
ou alcool pour essuyer le panneau avant peut
rayer la surface ou effacer des caractères.
Nettoyage de la fente à CD
De la poussière peut s’accumuler dans la
fenêtre à CD, nettoyez-la occasionnellement.
Vos CD peuvent être rayés si vous les
introduisez dans une fenêtre poussiéreuse.
— 22 —
Marquage des produits utilisant un
laser (Sauf pour certaines régions)
CLASS 1
LASER PRODUCT
L’étiquette est attachée au chassis/boîtier de
l’appareil et indique que l’appareil utiliser des
rayons laser de classe 1. Cela signifie que
l’appareil utilise des rayons laser d’une classe
faible. Il n’y a pas de danger de radiation
accidentelle hors de l’appareil.
Ce produit n’est pas installé par le
constructeur d’un véhicule sur le site de
production, ni par l’importateur professionnel
d’un véhicule dans un Etat membre de l’UE.
Page 23
Au sujet des CD
Manipulation des CD
• Ne pas toucher la surface d'enregistrement
d'un CD.
Nettoyage de CD
Nettoyez un CD en partant du centre vers
l'extérieur.
Rangement des CD
• Ne pas les placer à la lumière solaire directe
(sur le siège ou tableau de bord, etc.) et
dans les endroits où la température est
élevée.
• Rangez les CD dans leur boîtier.
• Les CD-R et CD-RW sont plus fragiles que
les CD de musique normaux. Utilisez un CDR ou un CD-RW après avoir lu les mises en
garde sur l'emballage, etc.
• Ne pas coller de ruban adhésif et autre sur
les CD. Ne pas non plus utiliser de CD avec
du ruban collé dessus.
Lors de l'utilisation d'un nouveau CD
Si le trou central ou le bord extérieur du CD
comporte des bavures, ne l'utiliser qu'après
les avoir retiré avec un stylo à bille ou autre.
Bavures
Bavures
Accessoires de CD
Ne pas utiliser d'accessoires de type disque
CD.
Retrait des CD
Pour retirer les CD de cet appareil, les extraire
à l'horizontale.
CD qui ne peuvent être utilisés
• Les CD non circulaire ne peuvent être
utilisés.
• Les CD comportant des colorations sur la
surface d'enregistrement ou sales ne
peuvent être utilisés.
• Cet appareil ne peut lire que les CD
comportant .
Il ne peut jouer les disques qui ne
comportent pas la marque.
• Un CD-R ou CD-RW qui n'a pas été finalisé
ne peut être lu. (pour le procédé de
finalisation, veuillez consulter votre
programme de gravure de CD-R/CD-RW et
les instructions du manuel d'utilisation de
votre graveur de CD-R/CD-RW).
— 23 —
Page 24
Caractéristiques générales
Touche de déverrouillage
u
d
D
U
LO
Français
ATT/
LOUD
Indicateur SYSTEM Q
AUD
AUTO
AME
OFF
SRC
Q/
AUD
Affichage de l'horloge
Alimentation
AM FM
SCAN
RDM REP
1
3
¢4
MONO
CLK ADJ
CLK/
ADJ
Allumer l'alimentation
Appuyez sur la touche [SRC].
Eteindre l'alimentation
Appuyez sur la touche [SRC] pendant au moins 1 seconde.
Sélectionner la source
Appuyez sur la touche [SRC].
Source requise Affichage
Tuner "TUnE"
CD "CD"
Veille (Mode éclairage seulement) "STBY"
Volume
Augmenter le volume
Indicateur LOUD
Appuyez sur la touche [u].
Baisser le volume
Appuyez sur la touche [d].
Atténuateur
Indicateur ATT
Baisser le volume rapidement.
Appuyez sur la touche [ATT].
Chaque fois que l'on appuie sur cette touche, l'Atténuateur est
activé ou désactivé.
Lorsqu'il est activé, l'indicateur "ATT" clignote.
— 24 —
Page 25

Bruit
Compenser les graves et les aigus lorsque le volume est bas.
Appuyez sur la touche [LOUD] pendant au moins 1 seconde.
Chaque fois que l'on appuie sur la touche pendant au moins 1
seconde, le système Bruit est activé ou désactivé.
Lorsqu'il est activé, l'indicateur "LOUD" est allumé.
System Q
Vous pouvez rappeler le meilleur réglage de son pré-réglé pour
différents types de musique.
1 Sélectionnez la source à régler
Appuyez sur la touche [SRC].
2 Sélectionnez le type de son
Appuyez sur la touche [Q].
Chaque fois que l'on appuie sur la touche, le réglage du son
change.
Réglage du son Affichage
Flat (Normal) "FLAT"
Rock "ROCK"
Top 40 "TP40"
Pops (Musique pop) "POPS"
Jazz "JAZZ"
Easy (Ambiance) "EASY"
• Chaque valeur de réglage est changée avec le <Réglage des
enceintes> (page 26).
D'abord, sélectionnez le type d'enceinte avec le Réglage des
enceintes.
• Lorsque le réglage du System Q est changé, les Graves,
Fréquences moyennes et Aigus configurés dans la commande du
son remplacent les valeurs du System Q.
Commande du son
1 Sélectionnez la source pour l'ajustement
Appuyez sur la touche [SRC].
2 Entrez en mode de commande du son
Appuyez sur la touche [AUD] pendant au moins 1 seconde.
3 Sélectionnez l'élément audio pour l'ajustement
Appuyez sur la touche [FM] ou [AM].
Chaque fois que l'on appuie sur la touche, les éléments qui
peuvent être ajustés défilent de la manière décrite ci-dessous.
4 Ajustez l'élément audio
Appuyez sur la touche [4] ou [¢].
Elément d'ajustement Affichage Gamme
Niveau des graves "BAS" –8 — +8
Niveau des fréquences "MID" –8 — +8
moyennes
Niveau des aigus "TRE" –8 — +8
Balance "BL" Gauche 15 — Droite 15
Balance avant/arrière "FD" Arrière 15 — Avant 15
Sortez du mode de commande du son
5
Appuyez sur la touche [AUD].
— 25 —
Page 26

Caractéristiques générales
Réglage des enceintes
Accord fin pour que la valeur du System Q soit optimale en
réglant le type d'enceinte.
1 Entrez en Veille
Appuyez sur la touche [SRC].
Sélectionnez l'affichage "STBY".
2 Entrez en mode de réglage des enceintes
Appuyez sur la touche [Q].
3 Sélectionnez le type d'enceinte
Français
Appuyez sur la touche [4] ou [¢].
Chaque fois que l'on appuie sur la touche, le réglage change de
la manière suivante.
Type d'enceinte Affichage
ETEINT "SP-F"
Pour enceinte OEM "SP-O"
Pour enceinte 6 & 6x9 pouces "SP-6"
Pour enceinte 5 & 4 pouces "SP-5"
4 Sortez du mode de réglage des enceintes
Appuyez sur la touche [Q].
Affichage de l'horloge
Appuyez sur la touche [CLK].
Chaque fois que l'on appuie sur cette touche, l'affichage de
l'horloge est activé ou désactivé.
Régler l'horloge
1 Sélectionnez l'affichage de l'horloge
Appuyez sur la touche [CLK].
2 Entrez en mode d'ajustement de l'horloge
Appuyez sur la touche [ADJ] pendant au moins 2 secondes.
L'affichage de l'horloge clignote.
3 Réglez les heures
Appuyez sur la touche [FM] ou [AM].
Réglez les minutes
Appuyez sur la touche [4] ou [¢].
4 Sortez du mode d'ajustement de l'horloge
Appuyez sur la touche [CLK].
DSI (Disabled System Indicator)
Un indicateur rouge clignotera sur l'appareil après que la façade
aura été enlevée, pour mettre en garde les éventuels voleurs.
Coupez l'alimentation
1
Appuyez sur la touche [SRC] pendant au moins 1 seconde.
2 Réglez le DSI
To ut en appuyant sur la touche [1] et [3], appuyez sur la
touche [SRC].
Chaque fois que l'on exécute les étapes 1 et 2, le DSI est activé
ou désactivé.
— 26 —
Page 27
Façade antivol
MONO
CLK ADJ
AUTO
AME
SCAN
AUD
RDM REP
OFF
LOUD
AM
FM/
MONO
¢4
SRC
1 - 6
AUTO/
AME
Vous pouvez détacher la façade de l'appareil et l'emmener avec
vous, ce qui aide à éviter les vols.
Retirer la façade
Appuyez sur la touche de détachement.
La façade est déverrouillée et vous pouvez la détacher.
• La façade est une pièce de précision de l'équipement et elle peut
être endommagée en cas de chocs ou de secousses. C'est
pourquoi, vous devez garder la façade dans sa boîte spéciale
lorsqu'elle est détachée.
• N'exposez pas la façade ou sa boîte aux rayons du soleil, à des
températures excessives ou à l'humidité. Evitez aussi les endroits
trop poussiéreux et où l'appareil risque d'être éclaboussé.
Remettre en place la façade
1 Alignez les parties saillantes situées sur l'appareil avec les
rainures situées sur la façade.
2 Poussez la façade jusqu'au clic.
La façade est vérouillée en position et vous pouvez alors utiliser
l'appareil.
Fonctions du tuner
Affichage de la
gamme d'onde
Indicateur ST
Numéro de
station préréglée
Indicateur AUTO
Affichage de
la fréquence
Indicateur monaural
— 27 —
Page 28

Fonctions du tuner
Mode d'accord
Choisissez le mode d'accord.
Appuyez sur la touche [AUTO].
Chaque fois que l'on appuie sur la touche, le mode d'accord
change de la manière suivante.
Mode d'accord Affichage Opération
Français
Recherche automatique Indicateur Recherche automatique
Recherche de station Indicateur Recherche dans l'ordre
pré-réglée "AUTO 2" des stations présentes
Manuel — Contrôle de l'accord
"AUTO 1" d'une station
Accord
Sélectionner la station.
Sélectionnez la source tuner
1
Appuyez sur la touche [SRC].
Sélectionnez l'affichage "TUnE".
2 Sélectionnez la bande
Appuyez sur la touche [FM] ou [AM].
Chaque fois que l'on appuie sur la touche [FM] la gamme d'onde
change parmi FM1, FM2 et FM3.
3 Réglez une bande supérieure ou inférieure
Appuyez sur la touche [4] ou [¢].
Pendant la réception de stations stéréo, l'indicateur "ST" est allumé.
dans la mémoire de
pré-réglage
manuel normal
Réception monaurale
On peut réduire les parasites lorsqu'une émission stéréo est
captée en mode monaural.
Appuyez sur la touche [MONO] pendant au moins 1 seconde.
Chaque fois que l'on appuie sur la touche pendant au moins 1
seconde, la réception monaurale est activée ou désactivée.
Lorsqu'elle est activée, l'indicateur Monaural est allumé.
Mémoire de station pré-réglée
Mettre la station en mémoire.
1 Sélectionnez la bande
Appuyez sur la touche [FM] ou [AM].
2 Sélectionnez la fréquence à mettre en mémoire
Appuyez sur la touche [4] ou [¢].
Mettez en mémoire la fréquence
3
Appuyez sur la touche [1] — [6] pendant au moins 2
secondes.
Le numéro pré-réglé affiché clignote 1 fois.
Sur chaque bande, 1 station peut être mise en mémoire sur
chaque touche [1] — [6].
— 28 —
Page 29
Entrée en mémoire automatique
MONO
CLK ADJ
AUTO
AME
SCAN
AUD
RDM REP
OFF
LO
U
D
¢4
SCAN
0
RDM REP
SRC
Mettre automatiquement en mémoire les stations dont la
réception est bonne.
1 Sélectionnez la bande pour l'entrée en mémoire automatique
Appuyez sur la touche [FM] ou [AM].
2 Ouvrez le mode entrée en mémoire automatique
Appuyez sur la touche [AME] pendant au moins 2 secondes.
Lorsque 6 stations qui peuvent être captées sont mises en
mémoire, le mode entrée en mémoire automatique est fermé.
Accord pré-réglé
Rappeler les stations mises en mémoire.
1 Sélectionnez la bande
Appuyez sur la touche [FM] ou [AM].
2 Rappelez la station
Appuyez sur la touche [1] — [6].
Caractéristiques du lecteur CD
Indicateur SCN
Indicateur RDM
Numéro de plage
— 29 —
Indicateur REP
Indicateur IN
Durée de la plage
Page 30
Caractéristiques du lecteur CD
Lire un CD
Lorsqu'il y a un CD
Appuyez sur la touche [SRC].
Sélectionnez l'affichage "CD".
Lorsqu'un CD est présent dans l'appareil, l'indicateur "IN" est allumé.
Ejectez le CD
Appuyez sur la touche [0].
Les CD de 3 pouces (8cm) ne peuvent pas être lus. Utiliser un
Français
adapteur et les insérer dans cet appareil pourrait causer des dégâts.
Avance rapide et retour
Avance rapide
Maintenez la touche [¢] enfoncée.
Relâchez la touche pour reproduire le disque à partir de ce point.
Retour
Maintenez la touche [4] enfoncée.
Relâchez la touche pour reproduire le disque à partir de ce point.
Recherche de plages
Sélectionner la chanson que vous souhaitez entendre.
Appuyez sur la touche [4] ou [¢].
Répétition de plage
Réécouter la chanson que vous êtes en train d'écouter.
Appuyez sur la touche [REP].
Chaque fois que l'on appuie sur la touche, la fonction de
répétition de plage est activée ou désactivée.
Lorsque la fonction est activée, l'indicateur "REP" est allumé.
Balayage des plages
Ecouter le début de chaque chanson du disque que vous écoutez
et rechercher la chanson que vous souhaitez écouter.
1 Commencez le balayage des plages
Appuyez sur la touche [SCAN].
Le voyant "SCN" est allumé.
Relâchez la touche lorsque vous entendez la chanson que
2
vous souhaitez écouter
Appuyez sur la touche [SCAN].
Lecture aléatoire
Ecouter toutes les chansons du disque dans un ordre aléatoire.
Appuyez sur la touche [RDM].
Chaque fois que l'on appuie sur la touche, la lecture aléatoire est
activée ou désactivée.
Lorsque la fonction est activée, l'indicateur "RDM" est allumé et
le numéro de la plage clignote.
Lorsque l'on appuie sur la touche [¢], la chanson suivante
sélectionnée commence.
— 30 —
Page 31

Accessoires
Vue externe
1
2
3
L’utilisation d’accessoires autres que les accessoires fournis pourrait
endommager l’appareil. Assurez-vous d’utiliser les accessoires fournis,
indiqués ci-dessus.
..........................................1
..........................................2
..........................................1
Nombre d’éléments
Procédure d’installation
1. Pour éviter les courts-circuits, retirez la clef de contact et
déconnectez la borne · de la batterie.
2. Effectuez les connexions d’entrée et sortie correctement pour
chaque appareil.
3. Connectez le câble au faisceau de fils.
4. Prenez le connecteur B sur le faisceau de fils et connectez-le au
connecteur haut-parleur de votre véhicule.
5. Prenez le connecteur A sur le faisceau de fils et connectez-le au
connecteur d'alimentation externe de votre véhicule.
6. Connectez le connecteur du faisceau à l’appareil.
7. Installez l’appareil dans votre voiture.
8. Reconnectez la borne · de la batterie.
9. Appuyez sur la touche de réinitialisation.
2ATTENTION
• Si votre véhicule n’est pas prévu pour ce type de connection,
consultez votre revendeur KENWOOD.
• Utilisez uniquement des adaptateurs de conversion d'antenne
(ISO-JASO) quand le cordon d'antenne a un fiche ISO.
• Assurez-vous que toutes les connexions de câble sont faites
correctement en insérant les fiches jusqu'à ce qu'elles soient
verrouillées.
• Si l'allumage de votre véhicule n'a pas de position ACC, ou si le
câble d'allumage est connecté à une source d'alimentation à
tension constante comme un câble de batterie, l'alimentation de
l'appareil ne sera pas relié à l'allumage (c. à d., il ne se mettra
pas sous et hors tension en même temps que l'allumage). Si
vous souhaitez connecter l'alimentation de l'appareil avec
l'allumage, connectez le câble d'allumage à une source
d'alimentation qui peut être mise sous et hors tension avec la
clef de contact.
• Si un fusible grille, assurez-vous d’abord que les câbles n’ont pas
causé de court-circuit puis remplacez le vieux fusible par un
nouveau de même valeur.
• Isolez les câbles non-connectés avec un ruban vinyle ou autre
matériel similaire. Pour éviter, les courts-circuits, ne retirez pas
non plus les capuchons à l’extrémité des câbles non-connectés
ou des prises.
• Connectez séparément chaque câble d'enceinte à la prise
correspondante. L'appareil peut être endommagé si le câble
négatif · pour une des enceintes ou le câble de masse entre en
contact avec une partie métallique du véhicule.
• Après avoir installé l’appareil, vérifiez si les lampes de frein, les
indicateurs, les clignotants, etc de la voiture fonctionnent
correctement.
• Si la console a un couvercle, assurez-vous d’installer l’appareil de
façon à ce que la façade ne frappe pas le couvercle lors de la
fermeture ou de l’ouverture.
• Monter l'unité de façon à ce que l'angle de montage soit de 30˚
ou moins.
— 31 —— 31 —
Page 32

Connexion des câbles sur les prises
Français
Guide des connecteurs
Numéros de broche
pour connecteurs ISO
Connecteur d’alimentation externe
A–4
A–5
A–7
A–8
Connecteur de
haut-parleurs
B–1
B–2
B–3
B–4
B–5
B–6
B–7
B–8
Couleur du
câble
Jaune
Bleu/Blanc
Rouge
Noir
Violet
Violet/Noir
Gris
Gris/Noir
Blanc
Blanc/Noir
Vert
Vert/Noir
Fonctions
Batterie
Commande d’alimentation
Allumage (ACC)
Connexion de la terre
(masse)
Arrière droit(+)
Arrière droit (–)
Avant droit (+)
Avant droit (–)
Avant gauche (+)
Avant gauche (–)
Arrière gauche (+)
Arrière gauche (–)
Fusible (10A) 13
Câble de batterie (Jaune) 6
Câble d’allumage
(Rouge) 7
Voir page 33
Broche A–7 (Rouge) 8
Broche A–4 (Jaune) 9
Connecteur A
Connecteur B
— 32 —
— 32 —
Sortie arrière
droite (Rouge) 4
Câble de commande de
l’alimentation/antenne
moteur (Bleu/Blanc) 20
8
8
1234567
1234567
Sortie arrière
gauche (Blanc) 10
REAR
L
R
Entrée de l’antenne
AM/FM 3
Faisceau de câbles
(Accessoire1) 16
Si aucune connexion n'est
faite, ne laissez pas le
câble sortir à l'extérieur. 18
ANT.CONT
Adaptateur de conversion d'antenne
(ISO-JASO) (Accessoire3) 2
Câble d'antenne (ISO) 1
TEL MUTE
P.CONT
Non utilisé
Ne pas laisser le
fil sortir par la
languette.
Connectez à la prise de
commande
d'alimentation lors de
l'utilisation d'un
amplificateur de
puissance optionnel, ou
à la prise de commande
d'antenne du véhicule.
23
Page 33

2AVERTISSEMENT
Connexion du connecteur ISO (page 32)
La disposition des broches pour les connecteurs ISO dépend du type de
votre véhicule. Assurez de réaliser les connexions correctes pour éviter
d'endommager l'appareil.
La connexion par défaut du harnais de câbles est décrite dans la section
1 ci-dessous. Si les broches du connecteur ISO sont réglées comme
décrit dans la section 2 ou 3, réalisez les connexions comme indiqué
dans l’illustration.
Veuillez vous assurer de reconnecter les câbles comme montré 2 cidessous pour installer cette unité aux véhicules Volkswagen etc.
1 (Réglage par défaut) La broche A-7 (rouge) du connecteur ISO du
véhicule est associée à l'allumage, et la broche A-4 (jaune) est
connectée à l'alimentation constante.
Câble d’allumage (Rouge)
Appareil Voiture
Câble de batterie (Jaune)
Broche A–7 (Rouge)
Broche A–4 (Jaune)
2 La broche A-7 (rouge) du connecteur ISO du véhicule est
connectée à l'alimentation constante et la broche A-4 (jaune) est
associée à l'allumage.
Câble d’allumage (Rouge)
Câble de batterie (Jaune)
Appareil Voiture
Broche A–7 (Rouge)
Broche A–4 (Jaune)
3 La broche A-4 (jaune) du connecteur ISO du véhicule n'est connectée
à rien, tandis que la broche A-7 (rouge) est connectée à l'alimentation
constante (ou bien, les deux broches A-7 (rouge) et A-4 (jaune) sont
connectées à l'alimentation constante).
Câble d’allumage (Rouge)
Appareil
Voiture
Broche A–7 (Rouge)
Installation
■ Installation
Tôle pare-feu ou support métallique
Vis (M4X8)
(disponibles dans
le commerce)
Tordre les pattes du
manchon de
montage
Vis à tôle
(disponibles
dans le
commerce)
Assurez-vous que l’appareil est solidement installé. Si l’appareil est
instable, il risque de mal fonctionner (ex. le son risque de sauter).
Armature de montage
métallique
(disponible dans le
commerce)
avec un tournevis ou
un outil similaire et
fixer.
Câble de batterie (Jaune)
Quand la connexion est faite comme dans 3 ci-dessus, l'alimentation
de l'appareil ne sera pas associée à la clef de contact de l'appareil. Pour
cette raison, assurez-vous toujours de mettre l'appareil hors tension
quand vous coupez le contact.
Pour associer l'alimentation de l'appareil à l'allumage, connectez le câble
d'allumage (ACC...rouge) à une source d'alimentation qui peut être
mise sous et hors tension avec la clef de contact.
Broche A–4 (Jaune)
— 33 —— 33 —
Page 34

Installation
■ Retrait du cadre en caoutchouc dur
1 Engagez les loquets sur l'outil de démontage et enlevez les
deux crochets inférieurs.
Baissez le cadre et tirez-le vers l'avant comme montré sur
l'illustration.
crochet
Français
Accessoire 2 Outil de démontage
2 Quand la partie inférieure est retirée, retirez les deux crochets
supérieurs.
loquet
■ Retrait de l’appareil
1 Référez vous à la section "Retrait du cadre en caoutchouc dur"
puis retirez le cadre en caoutchouc dur.
2 Retirez la vis (M4 × 8 mm) sur le panneau arrière.
3 Insérez les deux outils de démontage profondément dans les
fentes de chaque côté, comme montré.
Accessoire 2
Vis (M4X8)
(disponibles dans
le commerce)
Outil de démontage
4 Baissez les outils de
démontage vers le bas et
tirez l'appareil à moitié en
faisant pression vers
l'intérieur.
Faites attention de ne pas vous blesser avec le loquet de l'outil de
démontage.
Le cadre peut être retiré à partir de la partie supérieur de la même
façon.
5 Sortez l’appareil entièrement
avec les mains, en faisant
attention de ne pas le faire
tomber.
— 34 —
— 34 —
Page 35

Guide de depannage
Ce qui peut apparaître comme un mauvais
fonctionnement de votre appareil n’est peut être que le
résultat d’une mauvaise opération ou d’une mauvaise
connexion. Avant d’appeler un centre de service,
vérifiez d’abord dans le tableau suivant les problèmes
possibles.
Général
? L’appareil ne se met pas sous tension.01
✔ Le fusible a grillé.
☞ Après avoir vérifiez qu'il n'y a pas de court-circuits dans les
câbles, remplacez le fusible par un de la même valeur.
✔ Pas de position ACC sur l'allumage du véhicule.02
☞ Connectez le même câble à l'allumage comme câble de batterie.
? Rien ne se passe quand les touches sont pressées.04
✔ Le microprocesseur dans l’appareil ne fonctionne pas correctement.
☞ Appuyez sur la touche de réinitialisation sur l’appareil (page 22).
? Impossible de commuter sur une source. 06
✔ Il n'y a pas de CD dans le lecteur.
☞ Effectuez les réglage pour le média que vous souhaitez écouter.
S'il n'y a aucun média dans cet appareil, il est impossible de
commuter les sources.
? La mémoire est effacée quand le contact est mis. 10
✔ Le câble de batterie n’a pas été connecté correctement.
☞ Connectez le câble correctement en vous référant à la section
<Connexion des câbles sur les prises> (page 32).
✔ Les câble de batterie et d'allumage ne sont pas connectés
correctement. 11
☞ Connectez le câble correctement en vous référant à la section
<Connexion des câbles sur les prises> (page 32).
? Même si la force est activée, les sons de haute fréquence ne seront
pas compensés. 17
✔ La source de tuner est sélectionnée.
☞ Les sons de haute fréquence ne seront pas compensés lorsque la
source est le tuner.
? Aucun son ne peut être entendu, ou le volume est faible. 20
✔ Les réglages du fader ou de l'équilibre sont réglés complètement
d'un côté. 21
☞ Centrer les réglages du fader et de la balance.
✔ Les câbles d’entrée/sortie ou le faisceau de câbles sont connectés
incorrectement.22
☞ Reconnectez les câbles d’entrée/sortie et/ou le faisceau de câbles
correctement. Voir la section sur la <Connexion des câbles sur les
prises> (page 32).
? Le son est de mauvaise qualité ou déformé.25
✔ Un câble de haut-parleur a peut être été pincé par une vis dans la
voiture.
☞ Vérifiez la connexion des haut-parleurs.
✔ Les enceintes ne sont pas connectées correctement.27
☞ Reconnectez les câbles de haut-parleurs de manière que chaque
prise de sortie soit connectée à un haut-parleur différent.
? La tonalité de touche ne s'entend pas. 34
✔ La sortie de préampli sans fading est en cours d'utilisation.
☞ La tonalité de touche ne peut être émise par le jack de préampli.
Source tuner
? La réception radio est mauvaise.39
✔ L’ antenne de la voiture n’est pas sortie.
☞ Sortez l’antenne complètement.
✔ Le câble de commande de l’antenne n’est pas connecté.40
☞ Connectez le câble correctement en vous référant à la section
<Connexion des câbles sur les prises> (page 32).
— 35 —
Page 36

Guide de depannage
En source disque
? Le disque spécifié n’est pas reproduit mais un autre est reproduit à
sa place.52
✔ Le disque spécifié est très sale.
☞ Nettoyez le CD.
✔ Le CD est à l’envers.53
☞ Insérez un CD avec la face imprimée dirigée vers le haut.
✔ Le disque est très rayé.55
☞ Essayez un autre disque.
? La plage spécifiée n’est pas reproduite. 58-a
✔ La lecture aléatoire a été sélectionnée.
Français
☞ Désactivez la lecture aléatoire.
? La répétition de plage, le balayage de plage et la lecture aléatoire
commencent tous seuls. 59-a
✔ Le réglage n’est pas annulé.
☞ Les réglages pour ces fonctions restent activés tant qu’ils ne sont
pas désactivés ou que le disque n’est pas éjecté, même si
l’appareil est éteint ou que la source d’alimentation électrique est
changée.
? Ne peut lire de CD-R ou de CD-RW.60
✔ Le processus de finalisation du CD-R/CD-RW n'a pas été effectué.
☞ Effectuez le processus de finalisation avec le graveur de CD.
? Le CD est éjecté aussitôt après être introduit.62
✔ Le CD est à l’envers.
☞ Insérez le CD avec la partie imprimée dirigée vers le haut.
✔ Le CD est très sale.63
☞ Nettoyez le CD en vous référant à la section <Nettoyage de CD>
(page 23).
? Impossible de retirer le disque.64
✔ La cause en est que plus de 10 minutes se sont écoulées depuis que
le commutateur ACC du véhicule a été coupé.
☞ Le disque ne peut être retiré que dans les 10 minutes suivant la
mise hors tension du commutateur ACC.
Si plus de 10 minutes se sont écoulées, remettez le commutateur
ACC sous tension et appuyez sur la touche d’éjection.
? Le disque ne s'insère pas. 65
✔ Un disque est déjà chargé.
☞ Pressez la touche [0] et retirez le disque.
? La recherche par piste ne peut pas être effectuée.66-2
✔ Pour la première ou la dernière chanson du disque.
☞ La recherche par piste ne peut jamais être effecutée, sur aucun
disque, vers l'arrière pour la première chanson ou vers l'avant
pour la dernière chanson.
Les messages ci-dessous indiquent l’état de votre
système.
E-04: Aucun disque n’a été inséré dans le magasin à
IN (clignote): Le lecteur CD ne marche pas correctement.
disque.E04
➪
Nettoyez le CD et insérez-le correctement.
➪
Réinsérez le CD. si le CD ne peut pas être ejecté
E59
ou si l'affichage continue à clignoter même si le CD
a àtà correctement remis en place, veuillez couper
le courant et consulter votre centre de service
après-vente le plus proche.
— 36 —
Page 37

Spécifications
Les spécifications sont sujettes à changements sans notification.
Section tuner FM
Plage de fréquence (espacement de 50 kHz)
.......................................................87,5 MHz – 108,0 MHz
Sensibilité utilisable (S/N = 26dB)..............................0,7 µV/75 Ω
Sensibilité silencieuse (S/N = 46dB) ..........................1,6 µV/75 Ω
Réponse en fréquence (±3 dB).............................30 Hz – 15 kHz
Taux de Signal/Bruit (MONO) ..............................................65 dB
Sélectivité (DIN) (±400 kHz) .............................................≥ 80 dB
Séparation stéréo (1 kHz) ....................................................35 dB
Section tuner MW
Plage de fréquence (espacement de 9 kHz) .....531 kHz – 1611 kHz
Sensibilité utilisable (S/N = 20dB)........................................25 µV
Section tuner LW
Plage de fréquence .........................................153 kHz – 281 kHz
Sensibilité utilisable (S/N = 20dB)........................................45 µV
Section Disque Compact
Diodes laser ......................................................................GaAlAs
Filtre numérique (A/N) ............................8 fois suréchantillonnage
Convertisseur A/N .................................................................1 Bit
Vitesse de l’axe ............................................500 – 200 rpm (CLV)
Pleurage et scintillement ....................................Non mesurables
Réponse en fréquence (±1 dB).............................10 Hz – 20 kHz
Distorsion harmonique totale (1 kHz) ...............................0,01 %
Taux de Signal/Bruit (1 kHz).................................................93 dB
Gamme dynamique .............................................................93 dB
Séparation de canaux ..........................................................85 dB
Section audio
Puissance de sortie maximum .......................................45 W x 4
Puissance de sortie (DIN 45324, +B=14,4 V).................28 W x 4
Action en tonalité
Graves :............................................................100 Hz ±10 dB
Centrale : ...........................................................1 kHz ±10 dB
Aiguës :............................................................10 kHz ±10 dB
Niveau de préamplification/charge
(pendant le mode CD) .....................................2000 mV/10 kΩ
Impédance de sortie préamplificateur..............................≤ 600 Ω
Général
Tension de fonctionnement (11 – 16V admissible) ................14,4 V
Courant absorbé....................................................................10 A
Taille d’installation (L x H x P) ..........................182 x 53 x 155 mm
Masse ...................................................................3,1 lbs (1,4 kg)
7-3/16 x 2-1/16 x 6-1/10 pouce
— 37 —
Page 38

Inhalt
Sicherheitshinweise..................39
Über CDs ..................................41
Allgemeine Funktionen ............42
Ein- und Ausschalten
Auswählen der Quelle
Lautstärke
Stummschaltung
Loudness
System Q
Klangeinstellungen
Lautsprecher-Einstellung
Anzeige der Uhrzeit
Einstellung der Uhrzeit
DSI (Disabled System Indicator)
Abnehmbare Frontblende
Deutsch
Tuner-Funktionen ......................45
Abstimmungsmodus
Senderabstimmung
Mono-Empfang
Senderspeicher
Automatischer Senderspeicher
Voreinstellungs-Abstimmung
Funktionen des CD-Spielers .....47
CD-Wiedergabe
Schneller Vor- und Rücklauf
Suche nach einem bestimmten Titel
Titelwiederholung
Titelanspielautomatik
Zufallswiedergabe
Zubehör .....................................49
Hinweise zum Einbau ...............49
Anschlußdiagramm ..................50
Einbau........................................51
Fehlersuche...............................53
Technische Daten......................55
— 38 —
Page 39

Sicherheitshinweise
2WARNUNG
Zur Vermeidung von Bränden und
Verletzungen beachten Sie bitte die
folgenden Hinweise:
• Befestigen Sie das Gerät sicher im
Einbauschacht, damit es bei einem Unfall
nicht durch das Wageninnere geschleudert
wird.
•Verwenden Sie bei Verlegung des
Betriebsstrom-, Speicherschutz- und
Massekabels besonders strapazierfähige und
speziell für die Installation im Auto
angebotene Kabel mit einem
Leitungsquerschnitt von mindestens 0,75
2
(AWG 18).
mm
• Stellen Sie sicher, dass keine
Metallgegenstände (Münzen, Nadeln,
Werkzeuge etc.) ins Innere des Geräts
gelangen und Kurzschlüsse verursachen.
• Schalten Sie das Gerät bei Geruch- oder
Rauchentwicklung sofort aus und suchen Sie
einen KENWOOD-Fachhändler auf.
•Bitte berühren Sie nicht die Frontblende,
während sie sich dreht. Es besteht die
Gefahr, dass Ihre Finger zwischen
Frontblende und Gerätechassis geraten
könnten.
• Das Gerät verfügt über Glasbauteile, die
durch Sturz oder Schlag beschädigt werden
könnten.
•Wird das LCD-Display durch äußere
Einwirkungen wie Sturz oder Schlag
zerbrochen, meiden Sie den Kontakt mit der
evtl. austretenden Kristallflüssigkeit. Diese
Flüssigkeit kann Ihre Gesundheit
beeinträchtigen.
Sollten Sie mit der Flüssigkeit in Kontakt
kommen, bitte sofort mit Wasser und Seife
abwaschen.
2ACHTUNG
Bitte beachten Sie folgende
Vorsichtsmaßnahmen, damit Ihr Gerät
stets einwandfrei funktioniert:
• Betreiben Sie das Gerät ausschließlich mit
12-Volt-Gleichstrom und negativer
Masseverbindung.
• Entfernen Sie nicht die oberen oder unteren
Gehäuseabdeckungen.
• Schützen Sie das Gerät vor direkter
Sonneneinstrahlung, zu hohen Temperaturen,
Feuchtigkeit, Spritzwasser und Staub.
• Setzen Sie die abnehmbare Frontblende und
ihr Schutz-Etui keinem direkten Sonnenlicht
und zu hohen Temperaturen aus und
schützen Sie sie vor Feuchtigkeit,
Spritzwasser und Staub.
• Die abnehmbare Bedieneinheit ist ein
Präzisionsteil und enthält empfindliche
Elektronikbausteine. Behandeln Sie sie daher
äußerst sorgfältig.
• Berühren Sie nicht die Metallkontakte an der
abnehmbaren Frontblende und am
Radioeinschub.
• Achten Sie beim Austauschen einer Sicherung
darauf, dass der Wert der Sicherung mit den
Angaben am Gerät übereinstimmt.
Sicherungen mit einem falschen Wert können
Fehlfunktionen verursachen oder zur
Beschädigung des Geräts führen.
• Unterbrechen Sie vor dem Austauschen einer
Sicherung zunächst die Kabelverbindungen,
um Kurzschlüsse zu verhindern.
• Achten Sie bitte darauf, dass keine
Gegenstände zwischen Frontblende und
Gerätechassis fallen.
•Verwenden Sie für den Einbau ausschließlich
die mitgelieferten Schrauben. Zu lange oder
zu dicke Schrauben können das Gerät
beschädigen.
— 39 —
Geben Sie keine 8-cm-CD-Singles
wieder
Wenn Sie eine 8-Zentimeter-CD-Single mit
Adapter abspielen möchten, kann sich der
Adapter für CD-Singles von der CD lösen und
den CD-Spieler beschädigen.
Page 40

Sicherheitshinweise
ANMERKUNGEN
• Sollten Sie Probleme bei der Installation des
Geräts haben, lassen Sie sich von Ihrem
KENWOOD-Fachhändler beraten.
• Falls das Gerät nicht richtig zu funktionieren
scheint, drücken Sie zuerst die Reset-Taste.
Lässt sich die Fehlfunktion auf diese Weise
nicht beheben, wenden Sie sich bitte an
Ihren KENWOOD-Fachhändler.
LOUD
AUD
OFF
AUTO
AME
Reset -Taste
• Bei Temperaturen unter 5 °C (41 °F) sind die
Zeichen im LCD möglicherweise schwer
lesbar.
Deutsch
• Die in dieser Bedienungsanleitung gezeigten
Abbildungen des Autoradio-Displays und der
Frontblende dienen lediglich als
Erklärungshinweise für die vielseitigen
Einstellmöglichkeiten Ihres Geräts. Deshalb
können sich geringfügige Abweichungen
zwischen der Display-Darstellung Ihres
Geräts und den Illustrationen in der Anleitung
ergeben.
Beschlagen der Laser-Linse
Bei kaltem Wetter kann die Laserlinse des CDSpielers nach dem Einschalten der
Fahrzeugheizung beschlagen. In diesem Fall
lässt sich keine CD abspielen. Nehmen Sie
dann die CD aus dem Gerät und warten Sie
eine Zeitlang, bis der Beschlag abgetrocknet
ist. Arbeitet der CD-Spieler nach 1-2 Stunden
noch nicht richtig, wenden Sie sich an Ihren
KENWOOD-Fachhändler.
SCAN
RDM REP
Reinigen der Kontakte am Bedienteil
Reinigen Sie die Kontakte an der Rückseite
des Bedienteils und an der Front des
Einschubs mit einem trockenen, weichen
Tuch.
Reinigung
Sollte die Frontblende Ihres Gerätes
verschmutzt oder verstaubt sein, reinigen Sie
die Blende nur mit einem weichen Tuch (z. B.
Silikontuch). Bei stärkeren Verschmutzungen
MONO
verwenden Sie bitten ein feuchtes Tuch und
Neutralreiniger. Bitte nicht vergessen: Auch
die Rückstände des Neutralreinigers müssen
CLK ADJ
entfernt werden.
Bei der Verwendung von Reinigungssprays
kann eine Beschädigung der mechanischen
Teile des Gerätes nicht ausgeschlossen
werden. Rauhe Tücher und flüchtige
Lösungsmittel wie Verdünner, Spiritus oder
Alkohol zerstören die Blendenoberfläche oder
den Aufdruck.
Reinigen des CD-Schachts
Im CD-Schacht sammelt sich mit der Zeit
Staub an, der ab und an entfernt werden
muss. Ein verschmutzter Schacht kann die
CDs beschädigen.
— 40 —
Kennzeichnung von Geräten mit LaserAbtastern
CLASS 1
LASER PRODUCT
Dieser Aufkleber ist am Chassis oder Gehäuse
angebracht und weist darauf hin, dass das
Gerät mit einem als Class 1 eingestuften
Laserstrahl arbeitet. Das bedeutet, dass durch
den sehr schwachen Laserstrahl keine Gefahr
durch gefährliche Strahlungen außerhalb des
Geräts besteht.
Dieses Produkt wird weder vom Hersteller
eines Fahrzeugs während der Produktion noch
von einem professionellen Importeur eines
Fahrzeugs in einen EU-Mitgliedsstaat
eingebaut.
Hinweis zur Entsorgung der Batterien :
Verbrauchte Batterien dürfen
nach der Batterieverordnung
nicht mehr mit dem Hausmüll
entsorgt werden. Kenwood
beteiligt sich daher am
"Gemeinsamen
Rücknahmesystem Batterien" (GRS Batterien).
Werfen Sie verbrauchte Batterien unentgeltlich
in die beim Handel aufgestellten
Sammelbehälter. Auch bei Ihrem Fachhändler
finden Sie einen Sammelbehälter für
verbrauchte Batterien.
Auch Batterien, die in Geräten fest eingebaut
sind, unterliegen diesen gesetzlichen
Vorschriften.
Page 41

Über CDs
Anfassen der CD
• Berühren Sie nicht die Aufnahme-Oberfläche
der CD.
• CD-Rs und CD-RW sind wesentlich
empfindlicher als herkömmliche Musik-CDs.
Verwenden Sie CD-Rs oder CD-RWs erst,
nachdem Sie sich mit den
Vorsichtshinweisen auf der jeweiligen
Verpackung etc. vertraut gemacht haben.
• Kleben Sie keine Aufkleber oder ähnliches auf
eine CD. Verwenden Sie dem entsprechend
auch keine CDs, auf denen sich bereits ein
Aufkleber oder ähnliches befindet.
Wenn Sie eine neue CD verwenden
Wenn das mittlere Loch oder der äußere Rand
einer CD durch die Fertigung bedingte Grate
aufweist, verwenden Sie diese CD erst,
nachdem Sie diese Grate mit Hilfe eines
Kugelschreibers oder ähnlichem entfernt haben.
Grate
Grate
Zubehör
Verwenden Sie kein Zubehör für Ihre Discs.
Reinigung einer CD
Reinigen Sie CDs stets von der Mitte einer
Disc nach außen hin.
Entnehmen von CDs
Wenn Sie CDs aus diesem Gerät entnehmen
möchten, ziehen Sie sie stets in horizontaler
Richtung heraus.
CDs, die nicht verwendet werden
können
• CDs, die nicht rund sind, können nicht
verwendet werden.
• CDs, die auf der Aufnahme-Oberfläche
eingefärbt oder verschmutzt sind, können
nicht verwendet werden.
• Dieses Gerät kann nur CDs mit der Kennung
abspielen.
Discs ohne diese Kennung werden unter
Umständen nicht korrekt abgespielt.
• Eine CD-R oder CD-RW, die nicht
abgeschlossen (finalized) worden ist, kann
nicht abgespielt werden. (Einzelheiten
hinsichtlich der Finalisierung finden Sie bitte
in den Bebienungsanleitungen Ihrer
Brennsoftware sowie Ihres CD-R/CD-RWRecorders.)
Aufbewahrung von CDs
• Bewahren Sie CDs nicht in direktem
Sonnenlicht auf (beispielsweise auf dem
Armaturenbrett), wo hohe Temperaturen
herrschen.
• Bewahren Sie CDs immer in ihren Hüllen
auf.
— 41 —
Page 42

Allgemeine Funktionen
Freigabe-Taste
u
d
D
U
LO
ATT/
LOUD
AUD
AUTO
AME
OFF
SRC
Q/
AUD
Ein- und Ausschalten
AM FM
SCAN
RDM REP
1
3
¢4
MONO
CLK ADJ
CLK/
ADJ
Einschalten des Geräts
Drücken Sie die [SRC]-Taste.
Ausschalten der Stromversorgung
Drücken Sie mindestens 1 Sekunde lang die [SRC]-Taste.
Auswählen der Quelle
Drücken Sie die [SRC]-Taste.
Benötigte Quelle Display
Tuner "TUnE"
CD "CD"
Standby (Modus für "Nur Beleuchtung") "STBY"
Deutsch
SYSTEM Q -Anzeige
Uhranzeige
LOUD -Anzeige
ATT -Anzeige
Lautstärke
Erhöhen der Lautstärke:
Drücken Sie die [u]-Taste.
Senken der Lautstärke:
Drücken Sie die [d]-Taste.
Stummschaltung
Schnelles Senken der Lautstärke.
Drücken Sie die [ATT]-Taste.
Bei jeder Betätigung der Taste wird die Lautstärkeabsenkung einoder ausgeschaltet.
Wenn sie eingeschaltet ist, blinkt die "ATT"-Anzeige.
— 42 —
Page 43

Loudness
Anhebung der Bass- und Hochtonanteile bei niedriger
Wiedergabelautstärke.
Drücken Sie mindestens 1 Sekunde lang die [LOUD]-Taste.
Bei jeder Tastenbetätigung fur mindestens 1 Sekunde wird die
Loudness-Funktion ein- oder ausgeschaltet.
Wenn die Funktion eingeschaltet ist, leuchtet die "LOUD"Anzeige.
System Q
Im System Q sind verschiedene Klangeinstellungen gespeichert,
mit denen sich Ihre Audioquellen wiedergeben lassen.
Wählen Sie die Quelle aus, für die Sie den Klang einstellen
1
möchten
Drücken Sie dazu die [SRC]-Taste.
2 Wählen Sie die gewünschte Klangeinstellung aus
Drücken Sie dazu die [Q]-Taste.
Bei jeder Betätigung der Taste ändert sich die Klangeinstellung.
Klangeinstellung Display
Flat "FLAT"
Rock "ROCK"
Top 40 "TP40"
Pop "POPS"
Jazz "JAZZ"
Easy "EASY"
• Jeder Einstellwert wird mit <Lautsprecher-Einstellung> (Seite 44)
geändert. Wählen Sie zunächst im Menü Lautsprecher-Einstellung
den Lautsprechertyp aus.
• Bei Änderung der System Q-Einstellung ersetzen die in der
Klangregelung eingestellten Tiefen, Mitten und Höhen die Werte
des System Q.
Klangeinstellungen
1 Wählen Sie die Quelle aus, für die Sie den Klang einstellen
möchten
Drücken Sie dazu die [SRC]-Taste.
2 Aktivieren Sie die Klangeinstellungen
Drücken Sie mindestens 1 Sekunde lang die [AUD]-Taste.
3 Wählen Sie die gewünschte Einstellung aus
Drücken Sie die [FM]- oder [AM]-Taste.
Bei jeder Betätigung der Taste ändern sich die Punkte, die
eingestellt werden können, wie nachfolgend gezeigt.
4 Stellen Sie den gewünschten Wert ein
Drücken Sie die [4]- oder [¢]-Taste.
Einstellung Display Bereich
Basspegel "BAS" –8 — +8
Mittenpegel "MID" –8 — +8
Höhenpegel "TRE" –8 — +8
Balance "BL" Links 15 — Rechts 15
Fader "FD" Rear 15 — Front 15
Verlassen Sie die Klangeinstellungen
5
Drücken Sie die [AUD]-Taste.
— 43 —
Page 44

Allgemeine Funktionen
Lautsprecher-Einstellung
Damit der Q-Faktor für Ihre Lautsprecher optimal eingestellt ist,
sollte der richtige Lautsprechertyp eingestellt werden.
1 Aktivieren Sie den Standby-Modus
Drücken Sie die [SRC]-Taste.
Wählen Sie das "STBY"-Display aus.
2 Aktivieren Sie den Modus für die Lautsprecher-Einstellung
Drücken Sie die [Q]-Taste.
3 Wählen Sie den Lautsprechertyp aus
Drücken Sie die [4]- oder [¢]-Taste.
Bei jeder Betätigung der Taste ändert sich die Einstellung wie
nachfolgend gezeigt.
Lautsprechertyp Display
Aus "SP-F"
Deutsch
Für Original-Lautsprecher "SP-O"
Für 6x6- und 6x9-Zoll-Lautsprecher "SP-6"
Für 5- und 4 Zoll-Lautsprecher "SP-5"
4 Verlassen Sie den Lautsprecher-Einstellmodus
Drücken Sie die [Q]-Taste.
Anzeige der Uhrzeit
Drücken Sie die [CLK]-Taste.
Bei jeder Betätigung der Taste schaltet sich das Uhr-Display ein
oder aus.
Einstellung der Uhrzeit
1 Schalten Sie auf die Anzeige der Uhrzeit
Drücken Sie die [CLK]-Taste.
2 Aktivieren Sie den Uhr-Einstellmodus
Drücken Sie mindestens 2 Sekunden lang die [ADJ]-Taste.
Die Uhr-Anzeige blinkt.
3 Stellen Sie die Stunden ein
Drücken Sie die [FM]- oder [AM]-Taste.
Stellen Sie die Minuten ein
Drücken Sie die [4]- oder [¢]-Taste.
4 Verlassen Sie den Uhr-Einstellmodus
Drücken Sie die [CLK]-Taste.
DSI (Disabled System Indicator)
Nach dem Abnehmen der Frontblende blinkt eine rote
Warnanzeige am Gerät.
Schalten Sie das Radio aus
1
Drücken Sie mindestens 1 Sekunde lang die [SRC]-Taste.
Schalten Sie die "Gesperrt"-Anzeige ein
2
Halten Sie die [1]- und [3]-Tasten gedrückt und drücken Sie
gleichzeitig die [SRC]-Taste.
Jedesmal, wenn Sie die Schritte 1 und 2 ausführen, schaltet sich
die "Gesperrt"-Anzeige ein oder aus.
— 44 —
Page 45

Abnehmbare Frontblende
MONO
CLK ADJ
AUTO
AME
SCAN
AUD
RDM REP
OFF
LOUD
AM
FM/
MONO
¢4
SRC
1 - 6
AUTO/
AME
Die Frontblende des Gerätes kann abgenommen und
mitgenommen werden.
Abnehmen der Frontblende
Drücken Sie die Freigabe-Taste.
Die Frontblende ist entriegelt und kann abgenommen werden.
• Bei der Frontblende handelt es sich um ein Präzisionsbauteil, das
durch Erschütterungen oder Stöße beschädigt werden kann. Aus
diesem Grunde sollten Sie die Frontblende stets in dem dafür
vorgesehenen Etui aufbewahren, nachdem Sie sie abgenommen
haben.
• Setzen Sie weder die Frontblende noch deren Etui direktem
Sonnenlicht, extremer Wärme oder Luftfeuchtigkeit aus. Schützen
Sie beides darüber hinaus vor Spritzwasser und Staub.
Einsetzen der Frontblende
1 Setzen Sie die Frontblende so auf das Gerät, dass die
Vertiefungen an der Blende in die Vorsprünge am Gerät
passen.
Tuner-Funktionen
Wellenbereichsanzeige
Stationsnummer Frequenzanzeige
2 Drücken Sie die Frontblende hinein, bis sie einrastet.
Die Frontblende ist eingerastet und Sie können das Gerät in
Betrieb nehmen.
— 45 —
ST -Anzeige
AUTO -Anzeige Monoraulanzeige
Page 46

Tuner-Funktionen
Abstimmungsmodus
Wählen Sie einen Abstimmungsmodus aus.
Drücken Sie die [AUTO]-Taste.
Bei jeder Betätigung der Taste ändert sich der
Abstimmungsmodus wie nachfolgend gezeigt.
Abstimmungsmodus Display Funktion
Automatik-Suche "AUTO 1" Automatische Suche nach
Suche nach einem "AUTO 2" Suche nach den im
gespeicherten Sender -Anzeige Senderspeicher abgelegten
Manuell — Normale manuelle
Deutsch
Senderabstimmung
So wählen Sie einen Sender aus.
Schalten Sie auf Tuner-Betrieb
1
Drücken Sie die [SRC]-Taste.
Wählen Sie das "TUnE" -Display aus.
-Anzeige einem Sender
Sendern
Senderabstimmung
2 Wählen Sie den Wellenbereich aus
Drücken Sie die [FM]- oder [AM]-Taste.
Bei jeder Betätigung der [FM]-Taste wechseln die Wellenbereiche
zwischen FM1, FM2 und FM3.
3 Abstimmen einer höheren oder niedrigeren Frequenz
Drücken Sie die [4]- oder [¢]-Taste.
Während des Empfangs von Stereo-Sendern leuchtet das "ST"Symbol.
Mono-Empfang
Nebengeräusche können reduziert werden, wenn StereoRundfunksendungen monaural empfangen werden.
Drücken Sie mindestens 1 Sekunde lang die [MONO]-Taste.
Bei jeder Tastenbetätigung fur mindestens 1 Sekunde wird der
Mono-Empfang ein- oder ausgeschaltet.
Wenn der Mono-Empfang eingeschaltet ist, leuchtet die MonoAnzeige.
Senderspeicher
Häufiger gehörte Sender lassen sich im Senderspeicher ablegen.
1 Wählen Sie den Wellenbereich aus
Drücken Sie die [FM]- oder [AM]-Taste.
2 Wählen Sie die Frequenz aus, die im Speicher abgelegt
werden soll
Drücken Sie die [4]- oder [¢]-Taste.
3 Legen Sie die Frequenz im Speicher ab
Drücken Sie mindestens 2 Sekunden lang die [1] — [6]-Taste.
Die Speicherplatz-Anzeige blinkt einmal.
In jedem Wellenbereich kann jeweils 1 Sender im Speicher auf
jeder der Tasten [1] — [6] abgelegt werden.
— 46 —
Page 47

Automatischer Senderspeicher
MONO
CLK ADJ
AUTO
AME
SCAN
AUD
RDM REP
OFF
LO
U
D
¢4
SCAN
0
RDM REP
SRC
Im automatischen Senderspeicher werden sechs gut
empfangbare Sender abgelegt.
Die Reihenfolge wird durch die Empfangsfrequenz — beginnend
am unteren Ende des Frequenzbands — bestimmt.
1 Wählen Sie den Wellenbereich für den automatischen
Senderspeicher aus
Drücken Sie die [FM]- oder [AM]-Taste.
2 Starten Sie den automatischen Senderspeicher
Drücken Sie mindestens 2 Sekunden lang die [AME]-Taste.
Wenn 6 empfangbare Sender im Speicher abgelegt worden sind,
ist die automatische Speicherung der Sender beendet.
Voreinstellungs-Abstimmung
Abrufen der im Speicher abgelegten Sender
1 Wählen Sie den Wellenbereich aus
Drücken Sie die [FM]- oder [AM]-Taste.
2 Rufen Sie den Sender ab
Drücken Sie die [1] — [6]-Taste.
Funktionen des CD-Spielers
SCN -Anzeige
RDM -Anzeige
Titelnummer
— 47 —
REP -Anzeige
IN -Anzeige
Titel-Spielzeit
Page 48

Funktionen des CD-Spielers
CD-Wiedergabe
Wenn eine CD eingelegt ist
Drücken Sie die [SRC]-Taste.
Wählen Sie das "CD"-Display aus.
Wenn eine CD eingelegt ist, leuchtet die "IN"-Anzeige.
Auswerfen der CD
Drücken Sie die [0]-Taste.
3 in. (8cm)- CDs können nicht abgespielt werden. Die Benutzung
eines Adapters und das Einlegen des Adapters und der CD in dieses
Gerät kann Beschädigungen verursachen.
Schneller Vor- und Rücklauf
Schneller Vorlauf
Deutsch
Halten Sie die [¢]-Taste gedrückt.
Nach dem Loslassen der Taste wird die Wiedergabe fortgesetzt.
Schneller Rücklauf
Halten Sie die [4]-Taste gedrückt.
Nach dem Loslassen der Taste wird die Wiedergabe fortgesetzt.
Suche nach einem bestimmten Titel
Wählen Sie den Titel aus, den Sie sich anhören möchten.
Drücken Sie die [4]- oder [¢]-Taste.
Titelwiederholung
Wiederholung des Titels, den Sie sich gegenwärtig anhören.
Drücken Sie die [REP]-Taste.
Bei jeder Betätigung der Taste schaltet sich die TitelWiederholung ein oder aus.
Wenn die Funktion eingeschaltet ist, leuchtet die "REP"-Anzeige.
Titelanspielautomatik
Die ersten Sekunden jedes sich auf der gegenwärtig
wiedergegebenen Disc befindlichen Titels werden angespielt,
damit Sie bestimmte Musiktitel leichter finden können.
1 Starten Sie den Titel-Scan
Drücken Sie die [SCAN]-Taste.
Die "SCN"-Anzeige ist eingeschaltet (ON).
Deaktivieren Sie die Funktion, wenn der von Ihnen
2
gewünschte Titel wiedergegeben wird
Drücken Sie die [SCAN]-Taste.
Zufallswiedergabe
Alle Titel werden in zufälliger Reihenfolge wiedergegeben.
Drücken Sie die [RDM]-Taste.
Bei jeder Betätigung der Taste schaltet sich die
Zufallswiedergabe-Funktion ein oder aus.
Wenn die Funktion eingeschaltet ist, leuchtet die "RDM"-Anzeige
und die Titelnummer blinkt.
Wenn die [¢]-Taste gedrückt ist, wird der nächste Titel
ausgewählt.
— 48 —
Page 49

Zubehör
Ansicht
1
2
3
Verwenden Sie nur dieses Original-Zubehör, um Beschädigungen Ihres
Autoradios zu vermeiden.
Verwenden Sie nur das mit dem Gerät gelieferte, oben aufgeführte
Zubehör.
..........................................1
..........................................2
..........................................1
Anzahl der Teile
Hinweise zum Einbau
1. Ziehen Sie den Zündschlüssel ab und trennen Sie den Minuspol
von der Batterie, um Kurzschlüsse zu vermeiden.
2. Verbinden Sie die Ein und Ausgangskabel der einzelnen Geräte.
3. Schließen Sie alle Kabel an den Kabelbaum an.
4. Verbinden Sie den Steckverbinder B des Kabelbaums mit dem
Lautsprecheranschluß Ihres Fahrzeugs.
5. Verbinden Sie den Steckverbinder A mit dem Dauerplus Ihres
Fahrzeugs.
6. Stecken Sie die Kabelbaumanschluß ans Gerät.
7. Bauen Sie das Autoradio ein.
8. Schließen Sie den Minuspol der Batterie an.
9. Drücken Sie die Reset Taste.
2 ACHTUNG
• Sollte Ihr Fahrzeug über keinen ISO-Anschluß verfügen, wenden
Sie sich bitte an Ihren KENWOOD-Fachhändler.
•Verwenden Sie Antennen-Übergangsadapter (ISO-JASO) nur
dann, wenn das Antennenkabel einen ISO-Stecker besitzt.
•Vergewissern Sie sich, daß alle Kabelverbindungen einwandfrei
ausgeführt sind, indem Sie die Stecker bis zum vollkommenen
Einrasten in die Buchsen einführen.
• Falls das Zündschloß Ihres Fahrzeugs keine ACC-Stellung besitzt,
oder das Zündkabel an eine Konstantspannungs-Stromquelle,
wie z.B. ein Batteriekabel, angeschlossen ist, wird die
Stromversorgung des Gerätes nicht mit der Zündung verbunden
(d.h. es wird nicht zusammen mit der Zündung ein- und
ausgeschaltet). Wenn Sie die Stromversorgung des Gerätes mit
der Zündung verbinden wollen, schließen Sie das Zündkabel an
eine Stromquelle an, die mit dem Zündschlüssel ein- und
ausgeschaltet werden kann.
•Wenn die Sicherung anspricht, überprüfen Sie zunächst die
Kabel auf einen Kurzschluß. Ersetzen Sie dann die defekte
Sicherung durch eine intakte Sicherung gleichen Werts.
• Nicht angeschlossene Kabel mit Vinylband oder ähnlichem
Material isolieren. Um Kurzschlüsse zu verhindern, entfernen Sie
keine Schutzhüllen von den Kabelenden oder
Verbindungssteckern.
•Verbinden Sie beide Pole der Lautsprecher mit den
Lautsprecherausgängen am Gerät. Das Anschließen der
Lautsprecher Minuspole an die Karosserie kann zu
Betriebsstörungen führen oder die Elektronik beschädigen.
• Prüfen Sie nach dem Einbau, ob Bremslichter, Blinker und
Scheibenwischer einwandfrei funktionieren.
•Wenn das Armaturenbrett eine Klappe hat, vergewissern Sie
sich beim Einbau, daß die Frontplatte beim Öffnen und
Schließen nicht an die Klappe stößt.
• Das Gerät so anbringen, daß der Befestigungswinkel 30˚ oder
weniger beträgt.
— 49 —— 49 —
Page 50

Anschlußdiagramm
Steckerfunktionsanleitung
Stiftnummern für
Deutsch
ISO-Stecker
Externer
Stromanschluß
A–4
A–5
A–7
A–8
Lautsprecheranschluß
B–1
B–2
B–3
B–4
B–5
B–6
B–7
B–8
Kabelfarbe Funktionen
Gelb
Blau/Weiß
Rot
Schwarz
Batterie
Stromsteuerung
Zündung (ACC)
Erdanschluß
(Masse)
Lila
Lila/Schwarz
Grau
Grau/Schwarz
Weiß
Weiß/Schwarz
Grün
Grün/Schwarz
Hinten rechts (+)
Hinten rechts (–)
Vorne rechts (+)
Vorne rechts (–)
Vorne links (+)
Vorne links (–)
Hinten links (+)
Hinten links (–)
Ausgang für
hinten rechts (Rot)
4
Sicherung (10A) 13
Dauerpluskabel (gelb)
zur Batterie 6
Spannungsversorgungs
kabel (rot) 7
Siehe seite 51
Stift A-7 (rot) 8
Stift A-4 (gelb) 9
Steckvorrichtung A
Steckvorrichtung B
— 50 —
— 50 —
Ausgang für hinten
links (Weiß) 10
Anschluß-Kabelbaum
(Zubehör1) 16
20
Steuerleitung für
Stromversorgung und
Motorantenne (blau/weiß)
8
8
1234567
1234567
Antennen-Übergangsadapter
REAR
L
R
Wenn keine Anschlüsse
vorgenommen werden, das
Kabel nicht von der Öse
überstehen lassen. 18
(ISO-JASO) (Zubehör3) 2
UKW/MWAntenneneingang
3
TEL MUTE
P.CONT
ANT.CONT
Antennenkabel (ISO) 1
Nicht verwendet
Lassen Sie das
Kabel nicht
heraushängen.
Bei Verwendung des
gesonderten
Leistungsverstärkers an
die Stromsteuerklemme
anschließen,
anderenfalls an die
Antennensteuerklemme
im Fahrzeug
anschließen. 23
Page 51

2WARNUNG
Anschließen des ISO-Steckers (siehe S.50)
Die Stiftbelegung für die ISO-Stecker hängt von dem Typ Ihres Fahrzeugs
ab. Nehmen Sie unbedingt die richtigen Anschlüsse vor, um
Beschädigung des Gerätes zu vermeiden. Der Standard-Anschluß für den
Kabelbaum ist nachfolgend unter 1 beschrieben. Falls die ISOSteckerstifte gemäß 2 oder 3 belegt sind, nehmen Sie den Anschluß
vor, wie abgebildet.
Bitte stellen Sie sicher, dass das Kabel wie unten in 2 gezeigt wieder
angeschlossen wird, um dieses Gerät in Volkswagen-Fahrzeuge, usw. zu
installieren.
1 (Standard-Einstellung) Der Stift A-7 (rot) des ISO-Steckers am
Fahrzeug ist mit der Zündung verbunden, während der Stift A-4
(gelb) mit der Konstantspannungsquelle verbunden ist.
Spannungsversorgungs-
kabel (rot)
Dauerpluskabel (gelb)
zur Batterie
Gerät Fahrzeug
Stift A-7 (rot)
Stift A-4 (gelb)
2 Der Stift A-7 (rot) des ISO-Steckers am Fahrzeug ist mit der
Konstantspannungsquelle verbunden, während der Stift A-4 (gelb)
mit der Zündung verbunden ist.
Spannungsversorgungs-
kabel (rot)
Dauerpluskabel (gelb)
zur Batterie
Gerät Fahrzeug
Stift A-7 (rot)
Stift A-4 (gelb)
3 Der Stift A-4 (gelb) des ISO-Steckers am Fahrzeug ist mit nichts
verbunden, während der Stift A-7 (rot) mit der
Konstantspannungsquelle verbunden ist (oder Stift A-7 (rot) und Stift
A-4 (gelb) sind mit der Konstantspannungsquelle verbunden).
Spannungsversorgungs-
kabel (rot)
Dauerpluskabel (gelb)
zur Batterie
Wenn der Anschluß so vorgenommen wird, wie im obigen Fall 3
beschrieben, ist die Stromversorgung des Gerätes nicht mit dem
Zündschloß gekoppelt. Denken Sie daher stets daran, das Gerät nach
dem Ausschalten der Zündung auszuschalten. Um die Stromversorgung
des Gerätes mit der Zündung zu koppeln, schließen Sie das Zündkabel
(ACC...rot) an eine Stromquelle an, die mit dem Zündschlüssel ein- und
ausgeschaltet werden kann.
Gerät Fahrzeug
Stift A-7 (rot)
Stift A-4 (gelb)
Einbau
■ Einbau
Schraube (M4×8)
(Im Fachhandel
erhältliches Teil)
— 51 —— 51 —
Motortrennwand oder Metallstütze
Sichern Sie das
Einbaugehäuse,
Blechschraube
(Im Fachhandel
erhältliches Teil)
Bauen Sie das Gerät fest ein. Wenn das Gerät nicht fest sitzt, können
Fehlfunktionen und Klangbeeinträchtigungen auftreten.
Montagebügel
(Im Fachhandel
erhältliches Teil)
indem Sie die MetallLaschen mit einem
Schraubenzieher
umbiegen.
Page 52

Einbau
■ Ausbau des Hartgummirahmens
1 Die Anschlagstifte des Ausbauwerkzeugs einrasten und die
beiden Verriegelungen der unteren Hälfte ausbauen.
Wie in der Abbildung gezeigt, den Rahmen senken und nach
vorn ziehen.
Anschlag
Verriegelung
Zubehör2 Ausbauwerkzeug
2 Nach Ausbau der unteren Hälfte, Ausbau bei den beiden
oberen Stellen vornehmen.
■ Herausnehmen des Geräts
1 Nehmen Sie den Hartgummirahmen ab. (Siehe Kapitel "Ausbau
des Hartgummirahmens".)
2 Entfernen Sie die Schraube (M4×8) an der Rückseite des
Geräts.
3 Setzen Sie die beiden Ausbauwerkzeuge in die seitlichen
Schlitze an der Frontseite ein (siehe Skizze).
Zubehör2
Schraube (M4×8)
(Im Fachhandel
erhältliches Teil)
Ausbauwerkzeug
Deutsch
Der Rahmen kann von der Oberseite auf die gleiche Weise ausgebaut
werden.
4 Drücken Sie die
Ausbauwerkzeuge nach
unten und ziehen Sie das
Gerät etwa bis zur Hälfte
heraus.
Achten Sie darauf, daß Sie sich nicht an den Vorsprüngen der
Ausbauwerkzeuge verletzen.
5 Fassen Sie das Gerät mit
den Händen und ziehen Sie
es vorsichtig heraus.
— 52 —
— 52 —
Page 53

Fehlersuche
Manchmal funktioniert das Gerät nicht richtig, weil
möglicherweise ein Bedienungsfehler vorliegt. Schauen
Sie daher zunächst in die nachfolgende Übersicht,
bevor Sie Ihr Gerät zur Reparatur geben. Vielleicht
lässt sich der Fehler ganz leicht beheben.
Allgemein
? Das Gerät lässt sich nicht einschalten.01
✔ Die Sicherung ist durchgebrannt.
☞ Überprüfen Sie die Kabel auf Kurzschluß und ersetzen Sie die
Sicherung durch eine neue mit gleichen Werten.
✔ Das Zündschloss verfügt über keine ACC-Stellung.02
☞ Verbinden Sie die Leitung für "geschaltetes" Plus mit dem
Dauerplus-Kabel.
? Das Gerät reagiert auf keinen Tastendruck.04
✔ Der Mikrocomputer arbeitet nicht richtig.
☞ Drücken Sie die Reset-Taste (Seite 40).
? Das Radio lässt sich nicht auf CD-Betrieb umschalten.06
✔ Es wurde keine CD eingelegt.
☞ Legen Sie die gewünschte CD ein. Wenn sich keine CD im Gerät
befindet, können Sie nicht auf CD-Betrieb umschalten.
? Nach dem Abziehen des Zündschlüssels sind die Senderspeicher
gelöscht.10
✔ Das Dauerpluskabel ist nicht richtig angeschlossen.
☞ Schließen Sie das Kabel richtig an (siehe Kapitel
<Anschlußdiagramm>) (Seite 50).
✔ Dauerplus-Kabel und Leitung für "geschaltetes" Plus wurden nicht
richtig angeschlossen.11
☞ Schließen Sie das Kabel richtig an (siehe Kapitel
<Anschlußdiagramm>) (Seite 50).
? Trotz Loudness-Funktion werden die Höhen nicht angehoben. 17
✔ Das Radio befindet sich im Tuner-Betrieb.
☞ Im Tuner-Betrieb hebt die Loudness-Funktion die Höhen nicht an.
? Kein Ton oder zu geringe Lautstärke.20
✔ Fader und/oder Balanceregler sind zu einer Seite gedreht.21
☞ Mitteln Sie die Fader- und Abgleicheinstellung.
✔ Die Anschlusskabel oder der Kabelbaum sind nicht richtig
verbunden.22
☞ Überprüfen Sie die Kabelanschlüsse (siehe Kapitel
<Anschlußdiagramm>) (Seite 50).
? Schlechte Klangqualität (Verzerrungen, Störungen).25
✔ Ein Lautsprecherkabel wird durch eine Schraube kurzgeschlossen.
☞ Überprüfen Sie die Lautsprecherkabel.
✔ Die Lautsprecher sind nicht richtig angeschlossen.27
☞ Schießen Sie die Plus- und Minuspole aller Lautsprecher korrekt
an.
? Der Tastenton ist nicht zu hören.34
✔ Der Vorverstärkerausgang wird verwendet.
☞ Der Tastenton kann nicht über den Vorverstärkerausgang
ausgegeben werden.
Tuner-Betrieb
? Schlechter Radioempfang.39
✔ Die Fahrzeugantenne ist nicht herausgezogen.
☞ Ziehen Sie die Antenne vollständig heraus.
✔ Das Kabel für die Steuerung der Motorantenne ist nicht richtig
angeschlossen.40
☞ Schließen Sie das Kabel richtig an (siehe Kapitel
<Anschlußdiagramm>) (Seite 50).
— 53 —
Page 54

Fehlersuche
CD-Wechsler-Betrieb
? Statt der angewählten Disc wird eine andere abgespielt.52
✔ Die angewählte CD ist sehr verschmutzt oder beschädigt.
☞ Die CD überprüfen und ggf. reinigen (siehe Kapitel <Reinigung
einer CD>).
✔ Die CD ist verkehrt herum eingelegt.53
☞ Nehmen Sie das Magazin heraus und legen die CD richtig herum
ein.
✔ Die Disc ist beschädigt.55
☞ Tauschen Sie die Disc aus.
? Der angewählte Titel wird nicht wiedergegeben.58-a
✔ Die Zufallswiedergabe wurde eingestellt.
☞ Schalten Sie die Zufallswiedergabe aus.
? Titelwiederholung, Titel-Scan und Zufallswiedergabe starten
automatisch. 59-a
✔ Die jeweilige Funktion ist noch eingeschaltet.
☞ Die Einstellungen dieser Funktionen bleiben so lange aktiviert, bis
die Einstellung deaktiviert oder die Disc ausgeworfen wird, auch,
Deutsch
? CD-Rs oder CD-RWs können nicht wiedergegeben werden.60
? Eine CD wird sofort nach dem Einlegen wieder ausgeworfen.62
? Die Disc kann nicht entnommen werden.64
wenn die Stromversorgung ausgeschaltet oder die Quelle
geändert wird.
✔ Der Aufnahmeprozess der CD-R/CD-RW wurde nicht
ordnungssgemäß abgeschlossen (finalized).
☞ Aufnahmeprozess mit CD-Recorder ordnungsgemäß beenden.
✔ Die CD wurde falsch herum eingelegt.
☞ Legen Sie die CD so ein, dass die bedruckte Seite nach oben
weist.
✔ Die CD ist sehr verschmutzt.63
☞ Reinigen Sie die CD (siehe Kapitel <Reinigung einer CD>) (Seite
41).
✔ Die Zündung des Fahrzeuges wurde bereits vor mehr als 10 Minuten
ausgeschaltet.
☞ Die Disc kann nur innerhalb von 10 Minuten nach Ausschalten der
Fahrzeug-Zündung entnommen werden. Wenn mehr als 10
Minuten vergangen sind, müssen Sie zunächst die Zündung
einschalten und dann die Auswurftaste drücken.
? Die Disc lässt sich nicht einlegen.65
✔ Es wurde bereits eine Disc eingelegt.
☞ Drücken Sie die Taste [0] und entnehmen Sie die Disc.
? Die Spursuche kann nicht durchgeführt werden.66-2
✔ Für das erste oder letzte Musikstück eines Albums.
☞ Die Spursuche kann nicht bei jedem Album in Rückwärtsrichtung
für das erste Musikstück und in Vorwärtsrichtung für das letzte
Musikstück durchgeführt werden.
Die unten angeführten Meldungen zeigen den Zustand
Ihres Systems an.
E-04: Es befindet sich keine Disc im Magazin.E04
IN (Blinken): Der CD-Spieler funktioniert nicht ordnungsgemäß.
— 54 —
➪
Reinigen Sie die CD und legen Sie die CD richtig
ein.
➪
Legen Sie die CD erneut ein. Wenn sich die CD
nicht auswerfen lässt oder das Display weiterhin
blinkt, schalten Sie das Gerät bitte aus und wenden
sich an Ihren KENWOOD-Fachhändler.
E59
Page 55

Technische Daten
Die technischen Daten können sich ohne besonderen Hinweis ändern.
UKW-Tuner
Frequenzband (Abstimmschritte: 50 kHz)
.......................................................87,5 MHz – 108,0 MHz
Empfindlichkeit (Rauschabstand = 26dB)...................0,7 µV/75 Ω
Empfindlichkeitsschwelle
(Rauschabstand = 46dB) .......................................1,6 µV/75 Ω
Frequenzgang (±3 dB) ..........................................30 Hz – 15 kHz
Rauschabstand (MONO)......................................................65 dB
Selektivität (DIN) (±400 kHz) ............................................≥ 80 dB
Kanaltrennung (1 kHz) .........................................................35 dB
Verstärker
Max. Ausgangsleistung ..................................................45 W x 4
Ausgangsleistung (DIN 45324, +B=14,4V) .....................28 W x 4
Klangregler
Baß : ................................................................100 Hz ±10 dB
Mittel : ...............................................................1 kHz ±10 dB
Höhen : ............................................................10 kHz ±10 dB
Pegel und Impedanz des Vorstufenausgangs
(während eine CD wiedergegeben wird) .........2000 mV/10 kΩ
Vorverstärker-Impedanz....................................................≤ 600 Ω
MW-Tuner
Frequenzband (Abstimmschritte: 9 kHz)........531 kHz – 1611 kHz
Empfindlichkeit (Rauschabstand = 20dB) ............................25 µV
LW-Tuner
Frequenzband..................................................153 kHz – 281 kHz
Empfindlichkeit (Rauschabstand = 20dB) ............................45 µV
Disc-Abschnitt
Laserdiode ........................................................................GaAlAs
Digitalfilter (D/A)............................................8fach-Oversampling
D/A-Wandler..........................................................................1 Bit
Spindeldrehzahl .........................................500 – 200 U/min (CLV)
Tonhöhenschwankung..........................Unterhalb der Meßgrenze
Frequenzgang (±1 dB) ..........................................10 Hz – 20 kHz
Gesamtklirrgrad (1 kHz) ....................................................0,01 %
Rauschabstand (1 kHz) ........................................................93 dB
Dynamik ..............................................................................93 dB
Kanaltrennung .....................................................................85 dB
Allgemein
Betriebsspannung (11 – 16V möglich) ................................14,4 V
Stromverbrauch.....................................................................10 A
Einbaumaß.....................................................182 x 53 x 155 mm
7-3/16 x 2-1/16 x 6-1/10 Zoll
Gewicht.................................................................3,1 lbs (1,4 kg)
— 55 —
Page 56

Inhoud
Veiligheidsvoorschriften...........57
Informatie over CD's ................59
Algemene kenmerken...............60
Spanning
Kiezen van de geluidsbron
Volume
Demping
Toonversterking
System Q
Klankkleurregeling
Luidspreker instelling
Klokdisplay
Instellen van de klok
DSI (Disabled System Indicator)
Anti-diefstal voorpaneel
Functies van de tuner...............63
Afstemfunctie
Afstemmen
Mono ontvangst
Voorkeurzendergeheugen
Automatisch vastleggen van zenders in
het geheugen
Nederlands
Afstemmen op voorkeurzenders
Kenmerken van de CD-speler...65
Weergeven van CD's
Versnelde weergave in voor- of
achterwaartse richting
Fragmentzoeken
Herhalen van een fragment
Aftasten van fragment
Weergave in willekeurige volgorde
Toebehoren................................67
Handelingen voor het
installeren ..............................67
Verbinden van kabels met
aansluitingen..........................68
Installeren .................................69
Oplossen van problemen..........71
Technische gegevens................73
— 56 —
Page 57

Veiligheidsvoorschriften
2WAARSCHUWING
Voorkom persoonlijk letsel en/of
brand en let derhalve op de volgende
voorzorgen:
• Steek het toestel geheel in totdat het op zijn
plaats vergrendelt. Het toestel schiet anders
namelijk in geval van een botsing of
schokken mogelijk van zijn plaats.
• Bij het verlengen van de kabels voor het
kontakt, de accu of aarde moet u kabels
gebruiken die voor gebruik in auto’s zijn
ontworpen of andere kabels met een
doorsnede van tenminste 0,75 mm
(AWG18) zodat de kabels niet worden
aangetast of de isolatie van de kabels wordt
beschadigd.
•Voorkom kortsluiting en steek derhalve nooit
metalen voorwerpen (zoals munten en
gereedschap) in het toestel.
• Schakel de spanning direkt uit en raadpleeg
uw Kenwood handelaar indien er rook of een
vreemde geur uit het toestel komt.
• Let op dat uw vingers niet tussen de klep en
het toestel verstrikt raken.
• Laat het toestel niet vallen en stel het niet
aan zware schokken bloot.
Het toestel bevat namelijk glazen onderdelen
en zou anders kunnen breken of barsten.
• Raak de vloeibare kristallen niet aan indien
het LCD-display is beschadigd of gebroken
vanwege een schok. Deze vloeibare
kristallen zijn schadelijk voor uw gezondheid
en kunnen zeer ernstige problemen
veroorzaken.
Indien er vloeibare kristallen van het LCDdisplay op uw huid of kleding zijn gekomen,
moet u de vloeibare kristallen direkt met
water en zeep wegspoelen.
2
2LET OP
Voorkom beschadiging van het toestel
en let derhalve op de volgende
voorzorgen:
• Zorg dat het toestel op een negatief 12 Volt
gelijkstroomsysteem is geaard.
• Open nooit de boven- of onderpanelen van
het toestel.
• Installeer het toestel niet op plaatsen die aan
het direkte zonlicht, hitte of extreme
vochtigheid blootstaan. Vermijd tevens zeer
stoffige plaatsen of plaatsen waar het toestel
nat zou kunnen worden.
• Leg het verwijderde voorpaneel of de houder
voor het voorpaneel niet op plaatsen die aan
het direkte zonlicht, hitte of extreme
vochtigheid blootstaan. Vermijd tevens zeer
stoffige plaatsen of plaatsen waar het paneel
of de houder nat zou kunnen worden.
• Het voorpaneel bestaat uit precisieonderdelen. Stel het voorpaneel derhalve
niet aan zware schokken bloot.
•Voorkom een onjuist functioneren en raak de
aansluitingen op het toestel of van het
voorpaneel niet met uw vingers aan.
• Bij het vervangen van een zekering moet u
altijd een nieuwe zekering van hetzelfde
ampèrage gebruiken. Het gebruik van een
andere zekering veroorzaakt mogelijk een
onjuiste werking van het toestel.
•Voorkom kortsluiting bij het vervangen van
een zekering en ontkoppel derhalve eerst de
bedradingsbundel.
• Plaats geen voorwerpen tussen de klep en
het toestel.
• Gebruik bij het installeren uitsluitend de
bijgeleverde schroeven. Het toestel wordt
mogelijk beschadigd door gebruik van andere
schroeven.
— 57 —
Plaats geen 8-cm CD’s (“singles”) in de
CD-houder
Indien u probeert een 8-cm CD met adapter in
het toestel te steken, zal de adapter mogelijk
van de CD losschieten en het toestel
beschadigen.
Page 58

Veiligheidsvoorschriften
Batterij niet
weggooien, maar
inleveren als KCA.
OPMERKING
• Raadpleeg uw Kenwood handelaar indien u
problemen of vragen over het installeren
heeft.
•Druk op de resettoets indien het toestel niet
juist lijkt te functioneren. Raadpleeg uw
Kenwood handelaar indien het probleem
vervolgens nog niet is opgelost.
LOUD
AUD
OFF
AUTO
AME
Resettoets
• De lettertekens op de LCD kunnen bij
temperaturen onder 5 °C (41 °F) moeilijk
afleesbaar zijn.
• De afbeeldingen van de display en het
voorpaneel in deze gebruiksaanwijzing zijn
slechts voorbeelden en zijn bedoeld om het
gebruik van de bedieningsorganen te
verduidelijken. Derhalve kan het voorkomen
dat datgene wat op de afgebeelde display
afwijkt van wat in werkelijkheid op de display
kan verschijnen.
Nederlands
Kondens op de lens
Nadat u de autoverwarming aanzet bij lage
temperaturen wordt er mogelijk kondens op de
lens van de CD-speler gevormd. De lens
“beslaat” en CD’s kunnen niet worden
afgespeeld. Verwijder in zo’n geval de CD en
wacht totdat de kondens is verdampt. Raadpleeg
uw Kenwood handelaar indien het toestel na een
tijdje nog niet normaal functioneert.
SCAN
RDM REP
Reinigen van de aansluitpunten van
het voorpaneel
Veeg de aansluitpunten op het toestel zelf of
het voorpaneel indien nodig met een droge,
zachte doek schoon.
Reinigen van het toestel
Als het voorpaneel van dit toestel vuil is, moet
u het met een droge zachte doek, bijvoorbeeld
een siliconendoek, schoonvegen. Als het
MONO
voorpaneel erg vuil is, veegt u het vuil weg
met een doek die is bevochtigd met een
neutraal reinigingsmiddel en veegt u
CLK ADJ
vervolgens het reinigingsmiddel weg.
Spuit geen reinigingsmiddel rechtstreeks op
het toestel, want dit kan de mechanische
onderdelen beschadigen. Veeg het voorpaneel
niet schoon met een harde doek of met een
vluchtig middel als verdunner of alcohol, want
dit kan leiden tot krassen of het verdwijnen
van letters.
Reinigen van de CD-houder
De CD-houder wordt na verloop van tijd
stoffig. Reinig de houder indien nodig. Uw
CD’s worden namelijk beschadigd indien u
deze in een stoffige of vuile CD-houder steekt.
— 58 —
Markering op produkten die
laserstralen gebruiken (Uitgezonderd
voor bepaalde gebieden)
CLASS 1
LASER PRODUCT
Dit label is aangebracht op de
behuizing/houder en toont dat het komponent
een laserstraal gebruikt die als Klasse 1 is
geclassificeerd. Dit betekent dat de laserstraal
relatief zwak is en er geen gevaar van straling
buiten het toestel is.
Dit product wordt niet geïnstalleerd door de
fabrikant van een voertuig op de productielijn,
noch door de professionele invoerder van een
voertuig in EU-lidstaten.
Page 59

Informatie over CD's
Hanteren van CD's
• Raak het opgenomen oppervlak van de CD
niet aan.
Reinigen van CD's
Veeg vanuit het midden van de disk naar de
rand.
Bewaren van CD's
• Stel de CD's niet bloot aan direct zonlicht
(op de zitting of het dashboard, enz.) en
hoge temperaturen.
• Bewaar de CD's in de daarvoor bestemde
doosjes.
• Opneembare CD's (CD-R) en herschrijfbare
CD's (CD-RW) beschadigen sneller dan
gewone muziek-CD'sGebruik een CD-R of
een CD-RW niet voordat u de
waarschuwingen op de verpakking gelezen
heeft.
• Plak geen plakband e.d. op de CD.
Gebruik ook geen CD's waar plakband e.d.
op geplakt is.
Bij gebruik van een nieuwe CD
Verwijder voor gebruik eventuele bramen in
het middengat of de rand m.b.v. een balpen,
e.d.
Bramen
Bramen
CD-accessoires
Gebruik geen accessoires voor disktypes, e.d.
Verwijderen van CD's
Neem de CD's horizontaal uit het toestel.
CD's die niet gebruikt kunnen worden
• CD's die niet rond zijn kunnen niet worden
gebruikt.
• CD's met kleuren op het opgenomen
oppervlak kunnen niet worden gebruikt.
• Deze eenheid kan alleen cd’s met
weergeven.
Het is mogelijk dat disks zonder dit
kenteken niet foutloos worden
weergegeven.
• Een niet afgewerkte CD-R of CD-RW kan
niet worden weergegeven. (Raadpleeg de
instructies van de CD-brander software en
de gebruiksaanwijzing van uw CD-brander
voor details over het afwerkingsproces.)
— 59 —
Page 60

Algemene kenmerken
Ontgrendeltoets
u
d
D
U
LO
ATT/
LOUD
Nederlands
SYSTEM Q indicator
AUD
AUTO
AME
Q/
AUD
OFF
SRC
1
Klokdisplay
Spanning
AM FM
SCAN
RDM REP
3
¢4
MONO
CLK ADJ
CLK/
ADJ
Inschakelen van de spanning
Druk op de [SRC] toets.
Uitschakelen van de spanning
Houd de [SRC] toets tenminste 1 seconde ingedrukt.
Kiezen van de geluidsbron
Druk op de [SRC] toets.
Geluidsbron is vereist Display
Tuner "TUnE"
CD "CD"
Stand-by (alleen verlichting) "STBY"
Volume
Verhogen van het volume
LOUD indicator
ATT indicator
Druk op de [u] toets.
Verlagen van het volume
Druk op de [d] toets.
Demping
Dempen van het volume.
Druk op de [ATT] toets.
Elke keer dat de toets wordt ingedrukt, wordt de
dempingsfunctie aan- of uitgezet.
Wanneer ingeschakeld, knippert de "ATT" indicator.
— 60 —
Page 61

Toonversterking
Versterken van de lage en hoge tonen bij weergave met een laag
volume.
Houd de [LOUD] toets tenminste 1 seconde ingedrukt.
Elke keer dat de toets tenminste 1 seconde ingedrukt blijft,
wordt de toonversterkingsfunctie aan- of uitgezet.
Wanneer ingeschakeld, licht de "LOUD" indicator op.
System Q
U kunt voor verschillende soorten van muziek de optimale
geluidsinstellingen programmeren en weer oproepen.
Kies de in te stellen geluidsbron
1
Druk op de [SRC] toets.
2 Kies het soort van muziek
Druk op de [Q] toets.
Elke keer dat de toets wordt ingedrukt, verandert de
geluidsinstelling.
Geluidsinstelling Display
Neutraal "FLAT"
Rock "ROCK"
Top 40 "TP40"
Pop "POPS"
Jazz "JAZZ"
Easy-listening "EASY"
• Elke instelling wordt veranderd door de <Luidspreker instelling>
(blz. 62). Kies eerst het type luidspreker met luidspreker instelling.
•Wanneer de System Q instelling wordt veranderd, worden de
System Q waarden vervangen door de met klankkleurregeling
ingestelde lage, midden en hoge tonen.
Klankkleurregeling
1 Kies de in te stellen geluidsbron
Druk op de [SRC] toets.
2 Activeer de klankkleurregelingsfunctie
Houd de [AUD] toets tenminste 1 seconde ingedrukt.
3 Kies de in te stellen functie
Druk op de [FM] of [AM] toets.
Elke keer dat de toets wordt ingedrukt, veranderen de functies
die kunnen worden ingesteld in onderstaande volgorde.
4 Stel de functie in
Druk op de [4] of [¢] toets.
Functie Display Bereik
Niveau van de lage tonen "BAS" –8 — +8
Niveau van de middentonen "MID" –8 — +8
Niveau van de hoge tonen "TRE" –8 — +8
Balans "BL" linkerkant 15 -—
rechterkant 15
Fader "FD" achteraan15 —
vooraan15
5 Sluit de klankkleurregelingsfunctie af
Druk op de [AUD] toets.
— 61 —
Page 62

Algemene kenmerken
Luidspreker instelling
Fijnafstemmen zodat de System Q waarde bij instelling van het
luidsprekertype optimaal is.
1 Zet de eenheid stand-by
Druk op de [SRC] toets.
Kies de "STBY" display.
2 Activeer de luidspreker instellingsfunctie
Druk op de [Q] toets.
3 Kies het luidsprekertype
Druk op de [4] of [¢] toets.
Elke keer dat de toets wordt ingedrukt, verandert de instelling in
onderstaande volgorde.
Luidsprekertype Display
UIT "SP-F"
Voor de OEM luidspreker "SP-O"
Voor 6 & 6x9 in. luidspreker "SP-6"
Voor 5 & 4 in. luidspreker "SP-5"
4 Sluit de luidspreker instellingsfunctie af
Druk op de [Q] toets.
Klokdisplay
Nederlands
Druk op de [CLK] toets.
Elke keer dat de toets wordt ingedrukt, wordt de klokdisplay aanof uitgezet.
Instellen van de klok
1 Kies de klokdisplay
Druk op de [CLK] toets.
2 Activeer de functie voor het instellen de klok
Houd de [ADJ] toets tenminste 2 seconden ingedrukt.
De klokdisplay knippert.
3 Stel de uren in
Druk op de [FM] of [AM] toets.
Stel de minuten in
Druk op de [4] of [¢] toets.
4 Sluit de functie voor het instellen van de klok af
Druk op de [CLK] toets.
DSI (Disabled System Indicator)
Om potentiele dieven af te schrikken knippert er een rode
indicator op de eenheid nadat u het voorpaneel heeft verwijderd.
1 Schakel de spanning uit
Houd de [SRC] toets tenminste 1 seconde ingedrukt.
2 Stel de DSI-functie in
Houd de [1] en [3] toets ingedrukt en druk op de [SRC] toets.
Elke keer dat de stappen 1 en 2 worden uitgevoerd, wordt de
DSI-functie aan- of uitgezet.
— 62 —
Page 63

Anti-diefstal voorpaneel
MONO
CLK ADJ
AUTO
AME
SCAN
AUD
RDM REP
OFF
LOUD
AM
FM/
MONO
¢4
SRC
1 - 6
AUTO/
AME
U kunt het voorpaneel van de eenheid verwijderen en
meenemen om de eenheid minder aantrekkelijk voor dieven te
maken.
Verwijderen van het voorpaneel
Druk op de ontgrendeltoets.
Het voorpaneel wordt ontgrendeld, zodat u het kunt verwijderen.
• Het voorpaneel bestaat uit nauwkeurig luisterend onderdelen en
kan gemakkelijk beschadigd worden door schokken en stoten.
Bewaar het voorpaneel derhalve in de speciale houder wanneer
het van het toestel is verwijderd.
• Stel het voorpaneel en de houder niet bloot aan direct zonlicht,
hitte of extreme vochtigheid. Vermijd tevens zeer stoffige plaatsen
en plaatsen waar het voorpaneel of de houder nat kunnen worden.
Bevestigen van het voorpaneel
1 Breng de groeven van het voorpaneel op één lijn met de
uitstekende delen van de eenheid.
2 Klik het voorpaneel vast.
Het voorpaneel wordt vergrendeld, zodat u de eenheid kunt
bedienen.
Functies van de tuner
Golfbanddisplay
Voorkeurzendernum-mer Frequenctiedisplay
ST indicator
AUTO indicator
Mono-indicator
— 63 —
Page 64

Functies van de tuner
Afstemfunctie
Kies de afstemfunctie.
Druk op de [AUTO] toets.
Elke keer dat de toets wordt ingedrukt, verandert de
afstemfunctie in onderstaande volgorde.
Afstemfunctie Display Werking
Automatisch zoeken "AUTO 1" Automatisch zoeken naar
Voorkeurzender zoeken "AUTO 2" Op volgorde zoeken langs
Handmatig — Handmatig op een zender
indicator een zender.
indicator de voorkeurgeheugen
opgeslagen zenders.
afstemmen.
Afstemmen
Kiezen van de zender.
Kies de tuner als geluidsbron
1
Druk op de [SRC] toets.
Kies de "TUnE" display.
Kies de golfband
2
Nederlands
Druk op de [FM] of [AM] toets.
Elke keer dat de [FM] toets wordt ingedrukt, wordt
overgeschakeld tussen de golfbanden FM1, FM2 en FM3.
3 Stem op de golfband af op een hogere of lagere frequentie
Druk op de [4] of [¢] toets.
Tijdens ontvangst van een stereo uitzending licht de "ST" indicator
op.
Mono ontvangst
Door stereo-uitzendingen in mono te ontvangen kan ruis worden
verminderd.
Houd de [MONO] toets tenminste 1 seconde ingedrukt.
Elke keer dat de toets tenminste 1 seconde ingedrukt blijft,
wordt de mono ontvangst aan- of uitgezet.
Wanneer ingeschakeld, licht de mono indicator op.
Voorkeurzendergeheugen
Vastleggen van zenders in het geheugen.
1 Kies de golfband
Druk op de [FM] of [AM] toets.
2 Kies de in het geheugen vast te leggen frequentie
Druk op de [4] of [¢] toets.
3 Leg de frequentie vast in het geheugen
Houd de [1] — [6] toets tenminste 2 seconden ingedrukt.
Het voorkeurnummer knippert 1 keer op de display.
Er kan onder elk van de [1] — [6] toetsen 1 zender van elke
golfband in het geheugen worden vastgelegd.
— 64 —
Page 65

Automatisch vastleggen van zenders in het
MONO
CLK ADJ
AUTO
AME
SCAN
AUD
RDM REP
OFF
LO
U
D
¢4
SCAN
0
RDM REP
SRC
geheugen
Automatisch vastleggen van zenders die goed ontvangen
worden.
1 Kies de golfband waarvan de zenders automatisch moeten
worden vastgelegd
Druk op de [FM] of [AM] toets.
2 Activeer het automatisch vastleggen van zenders
Houd de [AME] toets tenminste 2 seconden ingedrukt.
Wanneer er 6 zenders die goed ontvangen worden in het
geheugen zijn opgeslagen, wordt de functie voor het automatisch
vastleggen afgesloten
Afstemmen op voorkeurzenders
Oproepen van in het geheugen opgeslagen zenders
1 Kies de golfband
Druk op de [FM] of [AM] toets.
2 Roep de zender op
Druk op de [1] — [6] toets.
Kenmerken van de CD-speler
SCN indicator
RDM indicator
Tracknummer
— 65 —
REP indicator
IN indicator Trackduur
Page 66

Kenmerken van de CD-speler
Weergeven van CD's
Wanneer er een CD geplaatst is
Druk op de [SRC] toets.
Kies de "CD" display.
Wanneer er een CD geplaatst is, licht de "IN" indicator op.
Werp de CD uit
Druk op de [0] toets.
CD's met een diameter van 8cm kunnen niet weergegeven worden.
De eenheid kan door het gebruik van een adapter worden
beschadigd.
Versnelde weergave in voor- of achterwaartse
richting
Versnelde weergave in voorwaartse richting
Houd de [¢] toets ingedrukt.
Laat de toets los op het punt waar u de normale weergave wilt
hervatten.
Versnelde weergave in achterwaartse richting
Houd de [4] toets ingedrukt.
Laat de toets los op het punt waar u de normale weergave wilt
hervatten.
Nederlands
Fragmentzoeken
Kiezen van het fragment waarnaar u wilt luisteren.
Druk op de [4] of [¢] toets.
Herhalen van een fragment
Herhalen van het huidige fragment.
Druk op de [REP] toets.
Elke keer dat de toets wordt ingedrukt, wordt de herhaalfunctie
aan- of uitgezet.
Wanneer ingeschakeld, licht de "REP" indicator op.
Aftasten van fragment
Weergeven van het eerste gedeelte van elk fragment op de
huidige disk om snel het gewenste fragment op te zoeken.
1 Starten van het aftasten van fragment
Druk op de [SCAN] toets.
De "SCN" indicator licht op.
Laat de toets los wanneer het gewenste fragment wordt
2
weergegeven
Druk op de [SCAN] toets.
Weergave in willekeurige volgorde
Weergeven van alle fragmenten op de disk in willekeurige
volgorde.
Druk op de [RDM] toets.
Elke keer dat de toets wordt ingedrukt, wordt de functie voor
weergave in willekeurige volgorde aan- of uitgezet.
Wanneer ingeschakeld, licht de "RDM" indicator op en knippert
het fragmentnummer.
Wanneer op de [¢] toets wordt gedrukt, wordt het volgende
fragment weergegeven.
— 66 —
Page 67

Toebehoren
Onderdeel Aantal stuks
1
2
3
Het gebruik van andere accessoires dan de bijgeleverde toebehoren kan
het toestel beschadigen. Gebruik uitsluitend de hierboven getoonde, bij
het toestel geleverde toebehoren.
..........................................1
..........................................2
..........................................1
Handelingen voor het installeren
1. Voorkom kortsluiting of ongelukken - Haal de sleutel uit het
kontakt en ontkoppel de min (negatieve) kabel.
2. Verbind de juiste in- en uitgangskabels van ieder toestel.
3. Verbind de kabel met de bedradingsbundel.
4. Neem stekker B van de bedradingsbundel en verbind met de
luidsprekeraansluiting van uw auto.
5. Neem stekker A van de bedradingsbundel en verbind met de
externe spanningsaansluiting van de auto.
6. Neem de kabelboom en verbind deze met het toestel.
7. Monteer het toestel in de auto.
8. Sluit de - pool van de accu weer aan.
9. Druk op de terugsteltoets.
2LET OP
• Als uw wagen niet voorbereid is op dit speciale
aansluitingssysteem, raadpleeg dan uw KENWOOD dealer.
• Gebruik uitsluitend antenneconversie-adapters (ISO-JASO)
wanneer de antennekabel een ISO stekker heeft.
• Kontroleer dat alle verbindingen juist zijn en de stekkers goed in
de aansluitingen zijn vergrendeld.
• Indien het kontakt van uw auto geen ACC stand heeft of de
ontstekingskabel (kontaktkabel) met een spanningsbron is
verbonden waar constant spanning op staat zoals bijvoorbeeld
een accukabel, zal de spanning van het toestel niet
overeenkomstig het kontakt worden in- en uitgeschakeld (met
andere woorden, de spanning van het toestel wordt niet gelijk
met het kontakt in- en uitgeschakeld). Indien u de spanning van
het toestel overeenkomstig het kontakt van de auto wilt in- en
uitschakelen, moet u de ontstekingskabel met een
spanningsbron verbinden die middels het kontakt van de auto
wordt in- en uitgeschakeld.
• Kontroleer wanneer een zekering doorbrandt eerst of de kabels
geen kortsluiting maken. Vervang vervolgens de doorgebrande
zekering door een van hetzelfde type.
• Isoleer niet-aangesloten kabels met isolatieband of ander
geschikt materiaal. Voorkom korstluiting en verwijder niet de
kappen of doppen van de uiteinden van kabels of aansluitingen
die niet worden verbonden.
•
Sluit de luidsprekerkabels juist met de overeenkomende aansluitingen
aan. Het toestel wordt mogelijk beschadigd of functioneert niet indien
de - kabels gezamelijk worden aangesloten en/of gezamelijk op een
metalen onderdeel van de auto worden geaard.
• Kontroleer na het installeren van het toestel dat de remlichten,
richtingaanwijzers, ruitewissers, etc. van de auto juist functioneren.
• Als de console voorzien is van een klep, dient u het toestel
zodanig te installeren dat het voorpaneel bij het openen en
sluiten de klep niet raakt.
• Installeer het toestel zodanig, dat een maximale hoek van 30˚
wordt bereikt.
— 67 —— 67 —
Page 68

Verbinden van kabels met aansluitingen
Aansluitfunctie gids
Pennummers voor
ISO aansluitingen
Externe
spanningsaansluiting
A–4
A–5
A–7
A–8
Luidsprekers-
Nederlands
B–1
B–2
B–3
B–4
B–5
B–6
B–7
B–8
aansluiting
Kleur van kabel Functies
Geel
Blauw/wit
Rood
Zwart
Paars
Paars/zwart
Grijs
Grijs/zwart
Wit
Wit/zwart
Groen
Groen/zwart
Accu
Spanningsregelaar
Kontakt (ACC)
Aardeverbinding
Rechtsachter (+)
Rechtsachter (–)
Rechtsvoor (+)
Rechtsvoor (–)
Linksvoor (+)
Linksvoor (–)
Linksachter (+)
Linksachter (–)
Zekering (10A)
Accukabel (geel) 6
Ontstekingskabel
(rood) 7
A–7 Pen (rood) 8
A–4 Pen (geel) 9
Aansluiting A
Aansluiting B
— 68 —
— 68 —
Linkerachteruitg
ang (wit) 10
Rechterachteruit
gang (rood) 4
zie blz. 69
8
8
REAR
L
R
Bedradingsbundel
(toebehoren 1) 16
18
Zorg dat de kabel niet uit het
lipje komt wanneer u geen
verbindingen heeft gemaakt.
Spanning-/
motorantennekabel
(blauw/wit) 20
1234567
1234567
Antenneconversie-adapter
(ISO–JASO) (toebehoren3) 2
Antennekabel (ISO) 1
FM/AM
antenne-ingang
3
TEL MUTE
Niet gebruikt
Zorg ervoor dat
de draad niet uit
het lipje steekt.
Verbind ofwel met de
P.CONT
ANT.CONT
spanningsaansluiting
wanneer u de los
verkrijgbare
eindversterker gebruikt,
ofwel met de antenneaansluiting van het
voertuig. 23
Page 69

2WAARSCHUWING
Verbinden van de ISO aansluiting (zie blz. 68)
De penopstelling van de ISO aansluitingen is afhankelijk van het type van
uw auto. Voorkom beschadiging en kontroleer dat de juiste verbindingen
worden gemaakt. De basisverbinding van de bedradingsbundel is in stap
1 hieronder beschreven. Maak de getoonde verbindingen indien de
penopstelling van de ISO aansluiting overeenkomt met de beschrijving in
2 of 3.
Sluit de kabel opnieuw aan zoals hieronder afgebeeld 2 wanneer u dit
toestel in een Volkswagen e.d. installeert.
1 (Basisverbinding) De A-7 pen (rood) van de ISO aansluiting van de
auto is verbonden met het kontakt en de A-4 pen (geel) is verbonden
met de spanningsbron waar constant spanning op staat.
Ontstekingskabel (rood)
Accukabel (geel)
Toestel Auto
A–7 Pen (rood)
A–4 Pen (geel)
2 De A-7 pen (rood) van de ISO aansluiting van de auto is verbonden
met de spanninsbron waar constant spanning op staat en de A-4 pen
(geel) is verbonden met het kontakt.
Ontstekingskabel (rood)
Accukabel (geel)
Toestel Auto
A–7 Pen (rood)
A–4 Pen (geel)
3 De A-4 pen (geel) van de ISO aansluiting van de auto is niet verbonden
en de A-7 pen (rood) is verbonden met de spanningsbron waar
constant spanning op staat (of zowel de A-7 (rood) en A-4 (geel) pennen
zijn verbonden met de spanningsbron waar constant spanning op staat.
Ontstekingskabel (rood)
Toestel Auto
A–7 Pen (rood)
Installeren
■ Installeren
Hitteschild of metalen steun
Schroef (M4X8)
(in de handel
verkrijgbaar)
Buig de lipjes van de
bevestigingshuls met
Zelf-tappende
schroef (in de
handel
verkrijgbaar)
Kontroleer dat het toestel goed op zijn plaats is geïnstalleerd. Het
toestel zal niet juist functioneren indien het niet goed is geplaatst (het
geluid zal bijvoorbeeld overslaan).
Metalen
bevestigingsriem
(in de handel
verkrijgbaar)
een schroevedraaier
of dergelijk en
bevestig op zijn
plaats.
Accukabel (geel)
Wanneer u een verbinding volgens 3 heeft gemaakt, wordt de
spanning van het toestel niet in overeenstemming met het kontakt inen uitgeschakeld. U moet in dit geval zelf de spanning uitschakelen
wanneer het kontakt van de auto is uitgeschakeld.
Voor het in- en uitschakelen in overeenstemming met het kontakt moet
u de ontstekingskabel (ACC ...rood) met een spanningsbron verbinden
die middels het kontakt wordt in- en uitgeschakeld.
A–4 Pen (geel)
— 69 —— 69 —
Page 70

Installeren
■ Verwijderen van het harde rubberframe
1 Gebruik de klempennen op het gereedschap voor het verwijderen
en verwijder de twee vergrendelingen onder.
Breng het frame omlaag en trek naar voren zoals u in de
afbeelding ziet.
Vergrendeling
Toebehoren2 Gereedschap voor het verwijderen
2 Nadat de onderkant is verwijderd moet u de twee plaatsen boven
verwijderen.
Nederlands
Klem
■ Verwijderen van het toestel
1 Zie het gedeelte "Verwijderen van het harde rubberframe" en
verwijder het harde rubberframe.
2 Verwijder de schroef (M4 x 8) van het achterpaneel.
3 Steek het gereedschap voor het verwijderen (2 stuks) in de
openingen aan beide kanten zoals afgebeeld.
Toebehoren2
Gereedschap voor het
Schroef (M4X8)
(in de handel
verkrijgbaar)
verwijderen
4 Breng het gereedschap voor
het verwijderen omlaag en
trek het toestel half naar
voren terwijl u het naar het
midden drukt.
Wees voorzichtig zodat u geen wonden van de klempennen op het
gereedschap voor het verwijderen krijgt.
Het frame kan op dezelfde manier vanaf de bovenkant worden
verwijderd.
5 Trek het toestel met uw
handen geheel naar voren en
let op het toestel niet te
laten vallen.
— 70 —
— 70 —
Page 71

Oplossen van problemen
Vele problemen worden slechts veroorzaakt door een
verkeerde bediening of verkeerde verbindingen.
Kontroleer voordat u uw handelaar raadpleegt eerst de
volgende lijst voor een mogelijke oplossing van uw
probleem.
Algemeen
? Spanning wordt niet ingeschakeld.01
✔ De zekering is doorgebrand.
☞ Nadat u de kabels op kortsluiting heeft gekontroleerd moet u de
zekering door een van hetzelfde type vervangen.
✔ Autokontakt heeft geen ACC stand.02
☞ Verbind dezelfde kabel met het kontakt als de accukabel.
? Er gebeurt niets na het drukken op toetsen.04
✔ De computerchip in het toestel functioneert niet normaal.
☞ Druk op de resettoets van het toestel (blz. 58).
? Er is een geluidsbron waarnaar u niet kunt overschakelen.06
✔ Er is geen CD geplaatst.
☞ Plaats de geluidsdrager waarnaar u wilt luisteren. Wanneer er in
dit toestel geen geluidsdrager is geplaatst, kunt u niet
overschakelen naar elke geluidsbron.
? Het geheugen wordt gewist wanneer het kontakt wordt
uitgeschakeld.10
✔ De accukabel is niet met de juiste aansluiting verbonden.
☞ Sluit de kabels juist aan de hand van het gedeelte <Verbinden van
kabels met aansluitingen> (blz. 68) aan.
✔ De kabel van het kontakt en de accu zijn niet juist verbonden.11
☞ Sluit de kabels juist aan de hand van het gedeelte <Verbinden van
kabels met aansluitingen> (blz. 68) aan.
? Zelfs als Toonversterking ingeschakeld is, kunnen schelle tonen niet
gecompenseerd worden. 17
✔ De Tuner is als geluidsbron geselecteerd.
☞ Schelle tonen kunnen niet gecompenseerd worden in de functie
met Tuner als geluidsbron.
? Geen geluidsweergave of zeer laag volume.20
✔ De instellingen van de Fader of Balans zijn altijd naar één kant
ingesteld.21
☞ Centreer de instellingen van de Fader en de Balans.
✔ De in- en uitgangskabels of bedradingsbundel is/zijn niet juist
verbonden.22
☞ Sluit de in- en uitgangskabels en/of bedradingsbundel opnieuw
juist aan. Zie het gedeelte <Verbinden van kabels met
aansluitingen> (blz. 68).
? Slechte geluidskwaliteit of vervormd geluid.25
✔ Een luidsprekerkabel wordt mogelijk afgekneld door een schroef in de
auto.
☞ Kontroleer de bedrading van de luidsprekers.
✔ De luidsprekers zijn niet juist aangesloten.27
☞ Sluit de luidsprekerkabels opnieuw juist aan zodat iedere
uitgangsaansluiting met een andere luidspreker is verbonden.
? De pieptoon van de aanraaksensor wordt niet weergegeven.34
✔ De voor-uitgangaansluiting wordt gebruikt.
☞ De pieptoon van de aanraaksensor kan niet via de voorversterker-
uitgang gaansluiting worden weergegeven.
Tuner als geluidsbron
? Ontvangst van radio-uitzendingen is slecht.39
✔ De auto-antenne is niet uitgetrokken.
☞ Trek de antenne geheel uit.
✔ De antennekabel is niet aangesloten.40
☞ Sluit de kabel juist aan de hand van het gedeelte <Verbinden van
kabels met aansluitingen> (blz. 68) aan.
— 71 —
Page 72

Oplossen van problemen
Disk als geluidsbron
? Niet de gekozen disk maar een andere wordt weergegeven.52
✔ De gekozen CD is vuil.
☞ Reinig de CD.
✔ De CD is verkeerd om geplaatst.53
☞ Plaats de CD met het label omhoog.
✔ De disk heeft krassen.55
☞ Probeer een andere disk.
? Het gekozen fragment wordt niet weergegeven.58-a
✔ Weergave in willekeurige volgorde is gekozen.
☞ Schakel de weergave in willekeurige volgorde uit.
? Herhalen van een fragment, aftasten van een fragtment en
weergeven in willekeurige volgorde, starten automatisch.59-a
✔ De instelling wordt niet geannuleerd.
☞ De instellingen voor deze functies blijven bewaard totdat de
instellingen worden uitgeschakeld of de disk wordt uitgeworpen,
zelfs wanneer het toestel wordt uitgeschakeld of naar een andere
geluidsbron wordt overgeschakeld.
CD-R of CD-RW kan niet worden weergegeven.60
?
✔ CD-R/CD-RW is niet gefinaliseerd.
☞ Finaliseer de disk op een CD-recorder.
? CD wordt direkt na het plaatsen uitgeworpen.62
✔ De CD is verkeerd om geplaatst.
☞ Plaats de CD met het label omhoog.
✔ De CD is vuil.63
☞ Reinig de CD aan de hand van het gedeelte <Reinigen van CD's>
Nederlands
? Kan de disc niet verwijderen.64
(blz 59).
✔ De reden is dat u het contactslot van de auto meer dan 10 minuten
geleden op OFF hebt gezet.
☞ U kunt de disc alleen verwijderen binnen de 10 minuten nadat u
het contactslot op OFF hebt gezet. Als u langer dan 10 minuten
hebt gewacht, moet u het contactslot opnieuw op ON zetten en
dan op de Uitwerptoets drukken.
? De disk kan niet geplaatst worden.65
✔ Er is al een andere disk geplaatst.
☞ Druk op de [0] toets en verwijder de disk.
? Fragment zoeken kan niet uitgevoerd worden.66-2
✔ Voor het eerste of laatste fragment van het album.
☞ Voor ieder album is van toepasssing dat het niet mogelijk is om de
functie Fragment zoeken naar het eerste fragment in
achterwaartse richting uit te voeren en evenmin is het mogelijk de
functie Fragment zoeken naar het laatste fragment in voorwaarste
richting uit te voeren.
De onderstaande berichten geven de toestand van uw
systeem weer.
E-04: Geen disk in het diskmagazijn geplaatst.E04
IN (Knipperend): Het gedeelte van de CD-weergave functioneert niet
➪
Reinig de CD en plaats juist.
E59
goed.
➪
Plaats de CD opnieuwAls de CD niet uitgevoerd
kan worden of de display blijft knipperen zelfs als
de CD op een juiste wijze opnieuw geplaatst is,
schakel dan de spanning uit en neem contact op
met het dichtstbijzijnde service center.
— 72 —
Page 73

Technische gegevens
Technische gegevens zijn zonder voorafgaande kennisgeving wijzigbaar.
FM tunergedeelte
Frekwentiebereik (50 kHz afstand)...........87,5 MHz – 108,0 MHz
Bruikbare gevoeligheid (S/R = 26dB) .........................0,7 µV/75 Ω
Onderdrukkinggevoeligheid (S/R = 46dB) ..................1,6 µV/75 Ω
Frequentieweergave (±3 dB) ................................30 Hz – 15 kHz
Signaal/ruisverhouding (MONO) ..........................................65 dB
Selektiviteit (DIN) (±400 kHz) ...........................................≥ 80 dB
Stereo-scheiding (1 kHz)......................................................35 dB
MW tunergedeelte
Frekwentiebereik (9kHz afstand) ...................531 kHz – 1611 kHz
Bruikbare gevoeligheid (S/R = 20dB) ...................................25 µV
LW tunergedeelte
Frekwentiebereik ............................................153 kHz – 281 kHz
Bruikbare gevoeligheid (S/R = 20dB) ...................................45 µV
CD-spelergedeelte
Laserdiode ........................................................................GaAlAs
Digitaal filter (D/A) ........................................8 keer oversampling
D/A Converter .......................................................................1 Bit
Rotatiesnelheid.............................................500 – 200 rpm (CLV)
Wow & Flutter ..........................................Onder meetbare limiet
Frequentieweergave (±1 dB) ................................10 Hz – 20 kHz
Totale harmonische vervorming (1 kHz) ............................0,01 %
Signaal/ruisverhouding (1 kHz).............................................93 dB
Dynamisch bereik................................................................93 dB
Kanaalscheiding...................................................................85 dB
Audiogedeelte
Maximaal uitgangsvermogen..........................................45 W x 4
Uitgangsvermogen (DIN 45324, +B=14,4V) ...................28 W x 4
Toonbereik
Lage tonen :.....................................................100 Hz ±10 dB
Middentonen :....................................................1 kHz ±10 dB
Hoge tonen : ....................................................10 kHz ±10 dB
Vooruitgangsniveau/belasting (Tijdens de CD-weergave)
...................................................................2000 mV/10 kΩ
Vooruitgangsimpedantie...................................................≤ 600 Ω
Algemeen
Bedrijfsvoltage (11 – 16V toelaatbaar) ................................14,4 V
Stroomverbruik......................................................................10 A
Installatie-afmetingen (B x H x D) ..................182 x 53 x 155 mm
Gewicht.................................................................3,1 lbs (1,4 kg)
7-3/16 x 2-1/16 x 6-1/10 inch
— 73 —
Page 74

Indice
Precauzioni di sicurezza ...........75
Sui CD .......................................77
Caratteristiche generali ............78
Alimentazione
Selezione della fonte
Volume
Attenuatore
Loudness
System Q
Controllo audio
Impostazione dell'altoparlante
Orologio
Regolazione dell'orologio
DSI (Disabled System Indicator)
Frontalino antifurto
Caratteristiche del
sintonizzatore ........................81
Selezione del modo di sintonia
Sintonia
Ricezione mono
Memoria di preselezione delle stazioni
Memorizzazione automatica
Sintonia con preselezione
Caratteristiche del lettore CD ..83
Riproduzione dei CD
Avanzamento rapido e riavvolgimento
Ricerca del brano
Ripetizione del brano
Scansione del brano
Riproduzione casuale
Accessorio.................................85
Procedimento per
l’installazione .........................85
Collegamento dei cavi ai
terminali.................................86
Installazione ..............................87
Guida alla soluzione di
problemi .................................89
Caratteristiche tecniche ...........91
Italiano
— 74 —
Page 75

Precauzioni di sicurezza
2AVVERTENZA
Per evitare lesioni e/o incendi,
osservare le seguenti precauzioni:
• Inserire l’apparecchio fino in fondo finché si
blocca saldamente in posizione, altrimenti
potrebbe fuoriuscire in caso di scontri o altre
scosse.
• Quando si prolungano i cavi dell’accensione,
della batteria o di massa, accertarsi di usare
cavi appositi per autoveicoli o cavi con
un’area di 0,75 mm
maggiore per evitare il deterioramento dei
cavi e danni al rivestimento dei cavi.
• Per evitare cortocircuiti, non inserire mai
oggetti di metallo (come monete o strumenti
di metallo) all’interno dell’apparecchio.
• Se l’apparecchio comincia ad emettere fumo
o odori strani, spegnerlo immediatamente e
rivolgersi ad un Centro di Assistenza
Autorizzato Kenwood.
• Fare attenzione a non schiacciarsi le dita tra il
frontalino e l’apparecchio.
• Fare attenzione a non far cadere
l'apparecchio e a non sottoporlo a forti urti.
L'apparecchio può rompersi o incrinarsi
perché contiene parti in vetro.
• Non toccare il fluido dei cristalli liquidi se il
display a cristalli liquidi è danneggiato o rotto
in seguito ad urti. Il fluido dei cristalli liquidi
può essere pericoloso per la salute e anche
causare la morte. Se il fluido dei cristalli
liquidi viene in contatto con il corpo o gli
abiti, lavare immediatamente con sapone.
2
(AWG18) o un un’area
2ATTENZIONE
Per evitare danni all'apparecchio,
osservare le seguenti precauzioni:
• Alimentare l'apparecchio esclusivamente con
una tensione nominale di 12 V CC, con polo
negativo a massa.
• Non aprire il coperchio superiore o il
coperchio inferiore dell'apparecchio.
• Non installare l'apparecchio in un luogo
esposto alla luce solare diretta, o al calore o
all'umidità eccessivi. Evitare anche luoghi
molto polverosi o soggetti a schizzi d'acqua.
• Non collocare il frontalino rimosso o la
custodia del frontalino in luoghi esposti alla
luce solare diretta, o al calore o all'umidità
eccessivi. Evitare anche luoghi molto
polverosi o soggetti a schizzi d'acqua.
• Non sottoporre il frontalino a forti urti, perché
è un componente di precisione.
• Per evitare deterioramenti, non toccare con
le dita i contatti elettrici dell'apparecchio o
del frontalino.
• Quando si sostituisce un fusibile, usarne solo
uno nuovo di valore prescritto. L'uso di un
fusibile di valore errato può causare problemi
di funzionamento dell'apparecchio.
• Per evitare cortocircuiti quando si sostituisce
un fusibile, scollegare innanzitutto il
connettore multipolare.
• Non collocare alcun oggetto tra il frontalino e
l'apparecchio.
• Durante l’installazione, non usare alcuna vite
all’infuori di quelle fornite. L’uso di viti
diverse potrebbe causare danni
all’apparecchio principale.
Non inserire compact disc da 8 cm
nella fessura di inserimento del disco.
Se si tenta di inserire un compact disc da 8 cm
con il suo adattatore nell’apparecchio,
l’adattatore può staccarsi dal compact disc e
danneggiare l’apparecchio.
— 75 —
Page 76

Precauzioni di sicurezza
NOTA
• Se si incontrano difficoltà durante
l'installazione, rivolgersi ad un rivenditore o ad
un installatore specializzato Kenwood.
• Se l'apparecchio sembra non funzionare
correttamente, provare a premere prima il
pulsante di ripristino (reset). Se questo non
risolve il problema, o se l’apparecchio non è
dotato di questo pulsante, rivolgersi ad un
Centro di Assistenza Autorizzato o ad un
rivenditore Kenwood.
LOUD
AUD
OFF
AUTO
AME
Pulsante di ripristino (reset)
•I caratteri nello schermo LCD possono essere
difficili da leggere con temperature al di sotto
dei 5 °C (41 °F).
• Le illustrazioni contenute in questo manuale
che raffigurano il display ed il pannello sono
degli esempi usati per spiegare come vengono
usati i controlli. Pertanto, l'indicazione sul
display dell'illustrazione può essere diversa da
quella effettivamente visualizzata sul display
dell'apparecchio ed alcune illustrazioni del
display possono rappresentare un evento
impossibile durante l’operazione in corso.
Appannamento della lente
Subito dopo aver acceso il riscaldamento
dell’automobile quando fa freddo, l’umidità può
condensarsi sulla lente all’interno del lettore CD
dell’apparecchio. A causa dell’appannamento della
lente, la riproduzione di compact disc potrebbe non
Italiano
iniziare. In questi casi, estrarre il disco e attendere
che l’umidità evapori. Se dopo un po’ l’apparecchio
continua a non funzionare normalmente, rivolgersi
ad un Centro di Assistenza Autorizzato o ad un
rivenditore Kenwood.
SCAN
RDM REP
Pulizia dei contatti elettrici del
frontalino
Se i contatti elettrici sull'apparecchio o sul
frontalino sono sporchi, pulirli con un panno
morbido asciutto.
Pulizia dell’apparecchio
Se il frontalino di quest'unità è macchiato,
strofinatelo con un panno asciutto e morbido,
ad esempio un panno al silicone. Se il frontalino
è molto sporco, strofinatelo con un panno
inumidito con un detergente neutro, poi
rimuovetelo.
MONO
CLK ADJ
Se spruzzate il prodotto di pulizia a spray
direttamente sull'unità, si possono danneggiare
le parti meccaniche. Se strofinate il frontalino
con un panno duro o usando un liquido volatile,
ad esempio acquaragia o alcool, si può
graffiare la superficie o possono venire
cancellati i caratteri.
Pulizia della fessura di inserimento del
disco
Poiché la polvere può accumularsi nella fessura
di inserimento del disco, pulire occasionalmente
la fessura. I compact disc possono graffiarsi se
vengono inseriti in una fessura polverosa.
— 76 —
Etichetta per i prodotti che impiegano
raggi laser (tranne per alcune aree)
CLASS 1
LASER PRODUCT
L’etichetta si trova sul rivestimento o sulla
scatola e serve ad avvertire che il componente
impiega raggi laser che sono stati classificati
come classe 1. Ciò significa che l’apparecchio
utilizza raggi laser di una classe inferiore. Non
c’è alcun pericolo di radiazioni pericolose
all’esterno dell’apparecchio.
Questo prodotto non è installato dal produttore
di un veicolo della linea di produzione,
nemmeno dall’importatore professionale di un
veicolo negli stati membro della UE.
LA DICHIARAZIONE DI CONFORMITA' "CE"
DI QUESTO PRODOTTO E' DEPOSITATA
KENWOOD ELECTRONICS EUROPE B.V.
PRESSO:
AMSTERDAMSEWEG 37
1422 AC UITHOORN
THE NETHERLANDS
Page 77

Sui CD
Modo d'impiego dei compact disc
• Non toccate la superficie registrata del CD.
• E' più facile danneggiare un CD-R o un CDRW rispetto ad un normale CD musicale.
Usate un CD-R o un CD-RW dopo aver letto
le precauzioni stampate sulla custodia.
• Non fissate del nastro adesivo sul CD.
Inoltre, non usate un CD in cui sono stati
fissati dei pezzi di nastro adesivo.
Quando usate un nuovo CD
Se il foro centrale del CD o il bordo esterno ha
delle sbavature, potete eliminarle usando una
penna a sfera, ecc.
Sbavature
Sbavature
Pulizia del CD
Pulite il CD dal centro del disco verso il bordo
esterno.
Rimozione dei CD
Per rimuovere i CD da quest'unità, estraeteli
orizzontalmente.
CD che non si possono usare
• Non è possibile usare dei CD non rotondi.
• Non è possibile usare dei CD colorati sulla
superficie di registrazione o dei CD sporchi.
• Questa unità è in grado di eseguire solo CD
con .
Potrebbe non eseguire correttamente i
dischi non contrassegnati.
• Non è possibile riprodurre un CD-R o CDRW non finalizzato. (Per ulteriori informazioni
sul processo di finalizzazione, fate
riferimento al software di scrittura del vostro
CD-R/CD-RW e al manuale di istruzioni del
vostro registratore CD-R/CD-RW.)
Cura dei CD
• Non tenete i vostri CD alla luce diretta del
sole (o sul sedile o sul cruscotto, ecc.) ed
evitate i luoghi in cui diventa molto elevata la
temperatura.
• Custodite i CD nelle apposite custodie.
Accessori CD
Non usate accessori per dischi.
— 77 —
Page 78

Caratteristiche generali
Tasto di rilascio
u
d
D
U
LO
ATT/
LOUD
Indicatore SYSTEM Q
Italiano
AUD
AUTO
AME
SRC
Q/
AUD
OFF
1
Indicazione di orologio
Alimentazione
AM FM
SCAN
RDM REP
3
¢4
MONO
CLK ADJ
CLK/
ADJ
Accensione della corrente (ON)
Premete il tasto [SRC].
Spegnimento della corrente (OFF)
Premete il tasto [SRC] per almeno 1 secondo.
Selezione della fonte
Premete il tasto [SRC].
Fonte Display
Sintonizzatore "TUnE"
CD "CD"
Attesa (solo modo di illuminazione) "STBY"
Volume
Aumento del volume
Premete il tasto [u].
Indicatore LOUD
Attenuazione del volume
Premete il tasto [d].
Attenuatore
Abbassamento rapido del volume
Indicatore ATT
Premete il tasto [ATT].
Ogni volta che premete il tasto, l'attenuatore si accende (ON) e si
spegne (OFF).
Quando è su ON, lampeggia l'indicatore "ATT".
— 78 —
Page 79

Loudness
Compensazione dei toni bassi ed alti quando il volume è basso.
Premete il tasto [LOUD] per almeno 1 secondo.
Ogni volta che il tasto viene premuto per almeno 1 secondo, il
loudness si accende o si spegne.
Quando è acceso, è illuminato l'indicatore "LOUD" sul display.
System Q
Potete richiamare le migliori impostazioni del suono per i vari
tipi di musica.
1 Selezionate la fonte da impostare
Premete il tasto [SRC].
2 Selezionate il tipo del suono
Premete il tasto [Q].
Ogni volta che premete il tasto, cambia l'impostazione del suono.
Impostazione sonora Display
Risposta piatta "FLAT"
Musica rock "ROCK"
Top 40 "TP40"
Musica pop "POPS"
Musica jazz "JAZZ"
Musica leggera "EASY"
• Ciascun valore di impostazione può essere cambiato con il modo
<Impostazione dell'altoparlante> (pagina 80).
Innanzitutto, selezionate il tipo di altoparlante con l'impostazione
Speaker.
• Quando cambiate l'impostazione System Q, i valori dei bassi, dei
medi e degli alti impostati nel modo di controllo audio
sostituiscono i valori System Q.
Controllo audio
1 Selezionate la fonte da regolare
Premete il tasto [SRC].
2 Selezionate il modo di controllo audio
Premete il tasto [AUD] per almeno 1 secondo.
3 Selezionate la voce audio da regolare
Premete il tasto [FM] o il tasto [AM].
Ogni volta che premete il tasto le voci che si possono regolare
appaiono come mostrato di seguito.
4 Regolazione dei livelli
Premete il tasto [4] o il tasto [¢].
Oggetto di regolazione Display Campo
Livello dei bassi "BAS" –8 — +8
Livello dei medi "MID" –8 — +8
Livello degli acuti "TRE" –8 — +8
Bilanciamento "BL" Sinistra 15 — Destra 15
Fader "FD" Posteriore 15 —
Anteriore 15
5 Conclusione delle operazioni
Premete il tasto [AUD].
— 79 —
Page 80

Caratteristiche generali
Impostazione dell'altoparlante
Sintonizzazione di precisione in modo tale che il valore System
Q sia ottimale con ogni tipo di altoparlante.
1 Attivate il modo Standby
Premete il tasto [SRC].
Selezionate "STBY".
2 Selezinate il modo di impostazione dell'altoparlante
Premete il tasto [Q].
3 Selezionate il tipo di altoparlante
Premete il tasto [4] o il tasto [¢].
Ogni volta che premete il tasto, l'impostazione cambia come di
seguito.
Tipo di altoparlante Display
OFF "SP-F"
Per l'altoparlante OEM
(Installato di fabbrica nel veicolo)
Per altoparlanti da 6 è 6x9 pollici "SP-6"
Per altoparlanti da 5/4 pollici "SP-5"
"SP-O"
4 Conclusione delle operazioni
Premete il tasto [Q].
Orologio
Premete il tasto [CLK].
Ogni volta che premete il tasto, si attiva o disattiva il display
dell'orologio.
Italiano
Regolazione dell'orologio
1 Selezionate il display dell'orologio
Premete il tasto [CLK].
2 Attivate il modo di regolazione dell'orologio
Premete il tasto [ADJ] per almeno 2 secondi.
Lampeggia il display dell'orologio.
3 Regolate le ore
Premete il tasto [FM] o il tasto [AM].
Regolate i minuti
Premete il tasto [4] o il tasto [¢].
4 Uscita dal modo di regolazione dell'orologio
Premete il tasto [CLK].
DSI (Disabled System Indicator)
Lampeggia un indicatore rosso sull'unità dopo la rimozione del
frontalino, avvertendo così potenziali ladri della sua mancanza.
1 Spegnete la corrente
Premete il tasto [SRC] per almeno 1 secondo.
2 Impostate il DSI
Mantenendo premuti i tasti [1] e [3], premete il tasto [SRC].
Ad ogni effettuazione dei passi 1 e 2, il DSI si attiva o si disattiva.
— 80 —
Page 81

Frontalino antifurto
MONO
CLK ADJ
AUTO
AME
SCAN
AUD
RDM REP
OFF
LOUD
AM
FM/
MONO
¢4
SRC
1 - 6
AUTO/
AME
Potete rimuovere il frontalino e portarlo con voi per prevenire
eventuali furti.
Rimozione del frontalino
Premete il tasto di sblocco.
Il frontalino è sbloccato affinché lo possiate rimuovere.
• Il frontalino è uno strumento ad alta precisione e può essere
danneggiato da urti o vibrazioni. Per questo motivo, tenete il
frontalino nell'apposita custodia mentre è rimosso.
• Non esponete il frontalino o la custodia alla luce diretta del sole o
ad un calore o livello di umidità eccessivamente alto. Evitare anche
luoghi molto polverosi o soggetti a schizzi d'acqua.
Reinstallazione del frontalino
1 Allineate le sporgenze dell'unità con le fessure del frontalino.
Caratteristiche del sintonizzatore
2 Premete il frontalino verso l'interno finché non sentirete uno
scatto.
Il frontalino viene bloccato, permettendovi così di usare l'unità.
— 81 —
Indicazione di banda
Indicatore ST
Numero stazione
preselezionata Display di frequenza
Indicatore AUTO
Indicatore
monoaurale
Page 82

Caratteristiche del sintonizzatore
Selezione del modo di sintonia
Scegliete il modo di sintonizzazione.
Premete il tasto [AUTO].
Ogni volta che premete il tasto, il modo Tuning cambia come
mostrato di seguito.
Modo Tuning Display Funzionamento
Ricerca automatica Indicatore Ricerca automatica di una
Ricerca delle stazioni Indicatore Ricerca nell'ordine delle
preselezionate "AUTO 2" stazioni memorizzate nella
Manuale — Sintonia manuale.
"AUTO 1" stazione.
memoria delle preselezioni.
Sintonia
Selezione della stazione.
1 Selezionate il sintonizzatore
Premete il tasto [SRC].
Selezionate "TUnE".
Selezionate la banda
2
Premete il tasto [FM] o il tasto [AM].
Ogni volta che premete il tasto [FM], l'unità cambia tra le bande
FM1, FM2 e FM3.
3 Sintonizzate le stazioni verso l'alto o verso il basso
Premete il tasto [4] o il tasto [¢].
Durante la ricezione delle stazioni stereo si accende l'indicatore "ST".
Italiano
Ricezione mono
Potete ridurre il rumore delle trasmissioni stereo commutandole
in mono.
Premete il tasto [MONO] per almeno 1 secondo.
Ogni volta che premete questo tasto per almeno 1 secondo, la
ricezione mono viene attivata o disattivata.
Quando è attivata la funzione, si illumina l'indicatore mono.
Memoria di preselezione delle stazioni
Memorizzazione della stazione.
1 Selezionate la banda
Premete il tasto [FM] o il tasto [AM].
2 Selezionate la frequenza da memorizzare
Premete il tasto [4] o il tasto [¢].
3 Memorizzate la frequenza
Premete il tasto [1] — [6] per almeno 2 secondi.
Il display del numero di preselezione lampeggia 1 volta.
In ciascuna banda, potete memorizzare 1 stazione in ciascun
tasto [1] — [6].
Memorizzazione automatica
Memorizzazione automatica di stazioni che offrono una buona
ricezione.
1 Selezionate la banda per la memorizzazione automatica
Premete il tasto [FM] o il tasto [AM].
2 Attivate il modo di memorizzazione automatica
Premete il tasto [AME] per almeno 2 secondi.
Quando le 6 stazioni, che si possono ricevere, sono state
memorizzate, si chiude il modo di memorizzazione automatica.
— 82 —
Page 83

Sintonia con preselezione
MONO
CLK ADJ
AUTO
AME
SCAN
AUD
RDM REP
OFF
LO
U
D
¢4
SCAN
0
RDM REP
SRC
Richiamo delle stazioni memorizzate.
1 Selezionate la banda
Premete il tasto [FM] o il tasto [AM].
2 Richiamo della stazione
Premete il tasto [1] — [6].
Caratteristiche del lettore CD
Indicatore SCN
Indicatore RDM
Numero di brano
Indicatore REP
Indicatore IN
Tempo del brano
— 83 —
Page 84

Caratteristiche del lettore CD
Riproduzione dei CD
Quando è stato inserito un CD
Premete il tasto [SRC].
Selezionate "CD".
Quando si inserisce un CD, si accende l'indicatore "IN" .
Espulsione del CD
Premete il tasto [0].
Non è possibile riprodurre dei CD da 8cm. L'utilizzo di un adattatore
e l'inserimento dello stesso nell'unità può provocare dei danni.
Avanzamento rapido e riavvolgimento
Avanzamento rapido
Mantenete il tasto [¢] premuto.
Rilasciate il tasto per riprodurre il disco da quel punto.
Riavvolgimento
Mantenete il tasto [4] premuto.
Rilasciate il tasto per riprodurre il disco da quel punto.
Ricerca del brano
Selezione del brano desiderato.
Premere il tasto [4] o il tasto [¢].
Italiano
Ripetizione del brano
Riproduzione ripetuta del brano in fase di riproduzione.
Premete il tasto [REP].
Ogni volta che premete il tasto, la funzione Ripetizione del brano
viene attivata o disattivata.
Quando è attivata, l'indicatore "REP" è acceso.
Scansione del brano
RIproduzione della prima parte di ciascun brano del disco in fase
di riproduzione e ricerca del brano desiderato.
1 Avvio della scansione del brano
Premete il tasto [SCAN].
L’indicatore "SCN" si accende.
2 Ascolto del brano desiderato
Premete il tasto [SCAN].
Riproduzione casuale
Riproduzione in ordine casuale di tutti i brani sul disco.
Premete il tasto [RDM].
Ogni volta che premete il tasto, la funzione Riproduzione casuale
si attiva o si disattiva.
Quando la funzione è attivata, l'indicatore "RDM" è acceso e
lampeggia il numero del brano.
Premendo il tasto [¢], viene selezionato un altro brano.
— 84 —
Page 85

Accessorio
Vista esterna
1
2
3
L’uso di accessori all’infuori di quelli forniti potrebbe causare danni
all’apparecchio. Accertarsi di usare soltanto gli accessori in dotazione
all’apparecchio, come indicato qui sopra.
..........................................1
..........................................2
..........................................1
Numero di articoli
Procedimento per l’installazione
1. Per evitare incidenti causati da corto circuiti, estrarre la chiavetta
dall’interruttore dell’accensione e scollegare il cavo negativo della batteria dall’autovettura.
2. Eseguire correttamente i collegamenti dei cavi di ingresso e di
uscita per ciascun apparecchio.
3. Collegare il cavo nel fascio dei fili.
4. Prendere il connettore B nel fascio dei fili e collegarlo al
connettore dei diffusori nel veicolo.
5. Prendere il connettore A nel fascio dei fili e collegarlo al
connettore di alimentazione esterna nel veicolo.
6. Collegare il connettore del cavo multipolare all'apparecchio.
7. Installare l'apparecchio nell'automobile.
8. Ricollegare il cavo negativo - della batteria.
9. Premere il pulsante di ripristino (reset).
2ATTENZIONE
• Se la vostra auto non è predisposta per questo sistema speciale
di connessione, rivolgetevi al vostro rivenditore KENWOOD.
• Usare gli adattatori di conversione antenna (ISO-JASO) soltanto
quando il cavo dell’antenna ha una spina ISO.
• Accertarsi che i collegamenti di tutti i cavi siano stati effettuati
saldamente mediante l’inserimento delle prese fino al punto in
cui esse si bloccano completamente.
• Se l’interruttore dell’accensione del proprio veicolo non è dotato di
posizione ACC, o se il cavo dell’accensione è collegato ad una
fonte di alimentazione con tensione costante come il cavo della
batteria, l’alimentazione dell’apparecchio non sarà in connessione
con l’interruttore dell’accensione (cioè l’apparecchio non si
accenderà e non si spegnerà in sincronizzazione con l’accensione
e lo spegnimento del motore). Se si desidera mettere in
connessione l’alimentazione dell’apparecchio con l’interruttore
dell’accensione del veicolo, collegare il cavo dell’accensione ad
una fonte di alimentazione che possa essere attivata e disattivata
con la chiavetta di accensione.
• Se il fusibile salta, accertarsi innanzitutto che i cavi non abbiano
causato un cortocircuito, quindi sostituire il fusibile con un altro
dello stesso valore.
• Isolare i cavi non collegati con del nastro isolante in vinile o un
altro materiale simile. Per evitare cortocircuiti, inoltre, non
rimuovere i cappucci di protezione applicati sulle estremità dei
cavi o dei terminali non collegati.
• Collegare i cavi dei diffusori correttamente ai terminali ai quali
corrispondono. L'apparecchio può subire danni o può non
funzionare affatto se si combinano i cavi · e/o li si collega a
massa ad una parte metallica dell'automobile.
• Dopo aver installato l'apparecchio, controllare che le luci dei
freni, gli indicatori, il tergicristallo, ecc. dell'automobile funzionino
correttamente.
• Se il pannello dei comandi ha un coperchio, assicurarsi di
installare l’apparecchio in modo tale che il frontalino non sbatta
contro il coperchio quando si apre e si chiude.
• Installare l'unità in modo tale che l'angolo di montaggio sia di 30˚
o meno.
— 85 —
— 85 —
Page 86

Collegamento dei cavi ai terminali
Guida alle funzioni dei connettori
Numeri dei terminali
per i connettori ISO
Connettore di
alimentazione
esterna
Connettore
diffusore
Italiano
A–4
A–5
A–7
A–8
B–1
B–2
B–3
B–4
B–5
B–6
B–7
B–8
Colore
del cavo
Giallo
Blu/bianco
Rosso
Nero
Porpora
Porpora/nero
Grigio
Grigio/nero
Bianco
Bianco/nero
Verde
Verde/nero
Batteria
Controllo alimentazione
Accensione (ACC)
Collegamento a terra
(massa)
Posteriore destro (
Posteriore destro (
Anteriore destro (
Anteriore destro (
Anteriore sinistro (
Anteriore sinistro (
Posteriore sinistro (
Posteriore sinistro (
Funzioni
+)
–)
+)
–)
9 Te rminale A-4 (giallo)
+)
–)
+)
–)
Uscita posteriore sinistra
(Bianco) 10
Uscita posteriore
destra (Rosso) 4
Fusibile (10A) 13
6 Cavo della batteria (giallo)
Cavo dell'accensione
(rosso) 7
Vedere
pagina 87
Terminale A-7
(rosso) 8
Connettore A
Connettore B
8
8
REAR
L
R
Connettore multipolare
(Accessorio1) 16
Se non sono eseguiti collegamenti,
non lasciare che il cavo fuoriesca
dalla linguetta. 18
20
Cavo di controllo
alimentazione/antenna
motorizzata (blu/bianco)
1234567
1234567
Adattatore di conversione antenna
(ISO–JASO) (Accessorio3) 2
Cavo antenna (ISO) 1
Ingresso
antenna FM/AM
3
TEL MUTE
Non utilizzato
Non lasciate
che il filo
fuoriesca
dall'aletta.
Collegare al terminale
P.CONT
ANT.CONT
di controllo
alimentazione quando
si usa l'amplificatore di
potenza opzionale o al
terminale di controllo
antenna nel veicolo. 23
— 86 —
— 86 —
Page 87

2AVVERTENZA
Collegamento del connettore ISO (vedere pagina 86)
La disposizione dei terminali per i connettori ISO dipende dal tipo di
veicolo di cui si è in possesso. Accertarsi di eseguire i collegamenti
corretti per evitare danni all’apparecchio.
Il collegamento default per il fascio dei fili è descritto in 1 qui sotto. Se
i terminali del connettore ISO sono impostati come descritto in 2 o in
3, eseguire il collegamento come illustrato.
Assicuratevi di ricollegare il cavo come è indicato in 2 qui sotto per
installare quest’unità nei veicoli della Volkswagen ecc.
1(Impostazione di base) Il terminale A-7 (rosso) del connettore ISO
del veicolo è in connessione con l’accensione, e il terminale A-4
(giallo) è collegato alla fonte di alimentazione costante.
Cable del encendido
(Rosso)
Cavo della batteria
(giallo)
Apparecchio
Veicolo
Terminale A–7
(Rosso)
Terminale A-4
(giallo)
2Il terminale A-7 (rosso) del connettore ISO del veicolo è collegato
alla fonte di alimentazione costante, e il terminale A-4 (giallo) è in
connessione con la chiave di accensione del veicolo.
Cable del encendido
Cavo della batteria
Apparecchio Veicolo
(Rosso)
(giallo)
Terminale A–7
(Rosso)
Terminale A-4
(giallo)
3Il terminale A-4 (giallo) del connettore ISO del veicolo non è
collegato a nulla, mentre il terminale A-7 (rosso) è collegato alla
fonte di alimentazione costante (o entrambi i terminali A-7 (rosso) e
A-4 (giallo) sono collegati alla fonte di alimentazione costante).
Cable del encendido
Cavo della batteria
Quando il collegamento viene effettuato come descritto in 3 sopra,
l’alimentazione dell’apparecchio non sarà in connessione con la
chiavetta di accensione. Per tale ragione, accertarsi sempre di spegnere
l’apparecchio quando si spegne il motore.
Per mettere in connessione l’alimentazione dell’apparecchio con
l’interruttore dell’accensione, collegare il cavo dell’accensione
(ACC...rosso) ad una fonte di alimentazione che possa essere attivata e
disattivata con la chiavetta di accensione.
Apparecchio
(Rosso)
(giallo)
Veicolo
Terminale A–7
(Rosso)
Terminale A-4
(giallo)
— 87 —— 87 —
Installazione
■ Installazione
Parete tagliafiamma o
supporto metallico
Vite (M4X8)
(disponibile in
commercio)
Piegare le linguette della
flangia di montaggio con un
Vite autofilettante
(disponibile in
commercio)
Accertarsi che l'apparecchio sia installato saldamente in posizione. Se
l'apparecchio è instabile, possono verificarsi problemi di funzionamento
(per esempio, possono verificarsi interruzioni di suono).
Fascetta di montaggio
metallica
(disponibile in
commercio)
cacciavite o un attrezzo
simile e applicarla in
posizione.
Page 88

Installazione
■ Rimozione della cornice di gomma dura
1 Agganciare le sporgenze sull'attrezzo di rimozione e sbloccare i
due fermi sul lato inferiore.
Abbassare il telaio e tirarlo in avanti come mostrato
nell’illustrazione.
Sporgenza
Fermo
Accessorio2 Attrezzo per la rimozione
2 Quando si sono sbloccati i due fermi inferiori, sbloccare i due
fermi superiori nello stesso modo.
È possibile rimuovere la cornice anche partendo dal lato superiore.
Italiano
■ Rimozione dell’apparecchio
1 Fare riferimento alla sezione "Rimozione della cornice di
gomma dura" e quindi rimuovere la cornice di gomma dura.
2 Rimuovere la vite (M4 × 8mm) sul pannello posteriore.
3 Inserire fino in fondo su ciascun lato i due attrezzi per la
rimozione, come mostrato nell'illustrazione.
Accessorio2
Vite (M4X8)
(disponibile in
commercio)
Attrezzo per la rimozione
4 Abbassare l'attrezzo di
rimozione verso il fondo e
tirare parzialmente in fuori
l'apparecchio premendo
verso l'interno.
Fare attenzione a non ferirsi con l'attrezzo di rimozione.
5 Estrarre completamente
l'apparecchio tirandolo con le
mani, facendo attenzione a
non farlo cadere.
— 88 —
— 88 —
Page 89

Guida alla soluzione di problemi
Ciò che può sembrare un problema di funzionamento
dell'apparecchio può essere in realtà soltanto il
risultato di operazioni o collegamenti errati. Prima di
rivolgersi ad un centro di assistenza, è consigliabile
eseguire i controlli indicati nella tabella sottostante.
Generale
? L'apparecchio non si accende.01
✔ Il fusibile è saltato.
☞ Dopo aver controllato che non esistano cortocircuiti tra i cavi,
sostituire il fusibile con un altro dello stesso valore.
✔ Posizione ACC mancante sulla chiave di accensione del veicolo.02
☞ Collegare lo stesso cavo all’interruttore dell’accensione come il
cavo della batteria.
? Quando si premono i tasti, non accade nulla.04
✔ I microprocessori nell'apparecchio non funzionano normalmente.
☞ Premere il pulsante di ripristino (reset) sull'apparecchio (pagina
76).
C'è una fonte che non è possibile commutare.06
?
✔ Non c'è nessun CD inserito.
☞ Inserite il disco da ascoltare. Se non c'è niente da ascoltare, non
sarà possibile commutare la fonte.
? Le memorie vengono perse quando si spegne il motore
dell'automobile.10
✔ Il cavo della batteria non è stato collegato al terminale appropriato.
☞ Collegare correttamente il cavo, facendo riferimento alla sezione
<Collegamento dei cavi ai terminali> (pagina 86).
✔ L’interruttore dell’accensione e il cavo della batteria non sono collegati
correttamente.11
☞ Collegare correttamente il cavo, facendo riferimento alla sezione
<Collegamento dei cavi ai terminali> (pagina 86).
? Anche se il loudness è attivato, i toni alti non vengono esaltati. 17
✔ La fonte del sintonizzatore è selezionata.
☞ I toni alti non vengono esaltati quando si ascolta il sintonizzatore.
? Nessun suono è udibile, o il volume è basso.20
✔ Il fader o le impostazioni di bilanciamento sono impostate tutte su un
lato.21
☞ Centrate il fader e le impostazioni del bilanciamento.
✔ I cavi di ingresso/uscita o i cavi del connettore multipolare sono
collegati in maniera errata.22
☞ Ricollegare correttamente i cavi di ingresso/uscita o i cavi del
connettore multipolare. Fare riferimento alla sezione
<Collegamento dei cavi ai terminali> (pagina 86).
? La qualità sonora è scadente o distorta.25
✔ Un cavo per i diffusori può essere stato stretto da una vite
dell'automobile.
☞ Controllare il collegamento dei cavi per i diffusori.
✔ I cavi non sono collegati correttamente.27
☞ Ricollegare i cavi per i diffusori in modo che ciascun terminale di
uscita sia collegato ad un diffusore diverso.
? Non si sente il tono di conferma dei tasti.34
✔ E' usata la presa di uscita preamplificata.
☞ Non è possibile emettere il tono di conferma dei tasti dalla presa
di uscita di preamplificata.
Sintonizzatore
? La ricezione radio è scadente.39
✔ L'antenna dell'automobile non è estesa.
☞ Estrarre completamente l’antenna.
✔ Il cavo di controllo dell'antenna non è collegato.40
☞ Collegare correttamente il cavo, facendo riferimento alla sezione
<Collegamento dei cavi ai terminali> (pagina 86).
— 89 —
Page 90

Guida alla soluzione di problemi
Disco esterno/Multilettore CD
? Il disco specificato non viene riprodotto, ma un altro disco viene
riprodotto al suo posto.52
✔ Il compact disc specificato è sporco.
☞ Pulire il compact disc.
✔ Il compact disc è stato inserito capovolto.53
☞ Inserire il compact disc con la facciata dell'etichetta rivolta verso
l'alto.
✔ Il disco è graffiato.55
☞ Provare ad usare un altro disco.
? Il brano specificato non viene riprodotto.58-a
✔ E' stata selezionata la riproduzione casuale.
☞ Disattivate la riproduzione casuale.
? Hanno inizio automaticamente la ripetizione del brano, la scansione
del brano e la riproduzione casuale. 59-a
✔ L’impostazione non viene cancellata.
☞ Le impostazioni di queste funzioni rimangono memorizzate finché
non vengono disattivate o espellete il disco, anche se spegnete la
corrente o cambiate la fonte di riproduzione.
? Non si riescono a riprodurre CD-R o CD-RW.60
✔ I dischi CD-R/CD-RW non sono stati finalizzati.
☞ Finalizzate i dischi CD-R/CD-RW tramite il registratore di CD.
? Il compact disc viene espulso subito dopo essere stato inserito.62
✔ Il compact disc è stato inserito capovolto.
☞ Inserire il compact disc in modo che la facciata dell’etichetta sia
rivolta verso l'alto.
✔ Il compact disc è sporco.63
☞ Pulire il compact disc, facendo riferimento alla sezione <Pulizia del
CD> (pagina 77).
? Non è possibile rimuovere il disco.64
✔ La causa dipende dal fatto che sono passati più di 10 minuti da
quando l'interruttore ACC del veicolo è stato spento.
☞ Il disco può essere rimosso solamente entro 10 minuti dallo
Italiano
spegnimento del tasto ACC. Se sono passati 10 minuti, riattivate il
tasto ACC ancora una volta e premete il tasto Eject.
? Non è possibile inserire il disco.65
✔ Avete già inserito un disco.
☞ Premete il tasto [0] e rimuovete il disco.
? La ricerca diretta del brano non può essere effettuata.66-2
✔ Per l'ultimo o il primo brano degli album.
☞ Per ogni album, la ricerca del brano non può essere effettuata
nella direzione inversa per il primo brano o nella direzione di
avanzamento per l'ultimo brano.
I seguenti messaggi vengono visualizzati quando si verifica
qualche problema. Adottare i rimedi indicati.
E-04: Nessun disco è stato inserito nel caricatore.E04
IN (Lampeggia): Il lettore CD non funziona correttamente.
➪
Pulire il compact disc e inserirlo correttamente.
➪
Reinserire il CD. Se questo non può essere
E59
espulso o il display continua a lampeggiare anche
quando il disco è stato reinserito correttamente,
spegnere l'apparecchio e consultare il Centro di
Assistenza Autorizzato Kenwood più vicino.
— 90 —
Page 91

Caratteristiche tecniche
Le caratteristiche tecniche sono soggette a cambiamenti senza preavviso.
Sezione del sintonizzatore FM
Gamma di frequenza (passi da 50 kHz) ....87,5 MHz – 108,0 MHz
Sensibilità utile (S/R = 26dB) .....................................0,7 µV/75 Ω
Sensibilità silenziamento (S/R = 46dB).......................1,6 µV/75 Ω
Risposta di frequenza (±3 dB)...............................30 Hz – 15 kHz
Rapporto segnale/rumore (MONO)......................................65 dB
Selettività (DIN) (±400 kHz)..............................................≥ 80 dB
Separazione stereo (1 kHz)..................................................35 dB
Sezione del sintonizzatore MW
Gamma di frequenza (passi da 9 kHz) ...........531 kHz – 1611 kHz
Sensibilità utile (S/R = 20dB) ...............................................25 µV
Sezione del sintonizzatore LW
Gamma di frequenza .......................................153 kHz – 281 kHz
Sensibilità utile (S/R = 20dB) ...............................................45 µV
Sezione del lettore CD
Diodo laser........................................................................GaAlAs
Filtro digitale (D/A) ........................Sovraccampionamento ottuplo
Convertitore D/A....................................................................1 bit
Velocità rotazione .........................................500 – 200 rpm (CLV)
Oscillazioni e fluttuazioni del suono
.............................................Al di sotto dei limiti misurabili
Risposta di frequenza (±1 dB)...............................10 Hz – 20 kHz
Distorsione armonica complessiva (1 kHz) .......................0,01 %
Rapporto segnale/rumore (1 kHz) ........................................93 dB
Gamma dinamica.................................................................93 dB
Separazione tra i canali........................................................85 dB
Sezione audio
Potenza di uscita massima.............................................45 W x 4
Potenza di uscita (DIN 45324, +B=14,4 V) .....................28 W x 4
Controlli di tono
Bassi : ..............................................................100 Hz ±10 dB
Toni medi : .........................................................1 kHz ±10 dB
Alti :..................................................................10 kHz ±10 dB
Livello /carico uscita preamplificata (nel modo CD)
...................................................................2000 mV/10 kΩ
Impedenza uscita preamplificata......................................≤ 600 Ω
Generale
Tensione di alimentazione (11 – 16V ammesso) .................14,4 V
Consumo di corrente.............................................................10 A
Ingombro effettivo di installazione (L x H x P)
.............................................................182 x 53 x 155 mm
Peso ....................................................................3,1 lbs (1,4 kg)
7-3/16 x 2-1/16 x 6-1/10 Pollici
— 91 —
Page 92

Índice
Precauciones de Seguridad......93
Acerca de los CDs ....................95
Español
Características generales .........96
Alimentación
Selección de la fuente
Volumen
Atenuador
Sonoridad
System Q
Control de audio
Ajuste de altavoz
Pantalla de visualización del reloj
Ajuste del reloj
DSI (Disabled System Indicator)
Placa frontal antirrobo
Características del
sintonizador ...........................99
Modo de Sintonización
Sintonización
Recepción Monaural
Memoria de presintonización de
emisoras
Entrada de Memoria Automática
Sintonización preajustada
Características del reproductor
de CD....................................101
Reproducción de CD
Avance rápido y rebobinado
Búsqueda de pista
Repetición de Pista
Exploración de Pista
Reproducción aleatoria
Accesorios ..............................103
Procedimiento de
instalación............................103
Conexión de cables a los
terminals ..............................104
Instalación ..............................105
Guia Sobre Localización De
Averias .................................107
Especificaciones .....................109
— 92 —
Page 93

Precauciones de Seguridad
2ADVERTENCIA
Para evitar el riesgo de lesiones y/o
fuego, observe las siguientes
precauciones:
• Inserte la unidad hasta el fondo, de manera
que quede firmemente bloqueada en su
sitio. De lo contrario, podría salir despedida
con fuerza durante un choque u otras
sacudidas.
• Cuando extienda los cables del encendido,
de la batería o de masa, asegúrese de utilizar
cables para automóviles u otros cables que
tengan un área de 0,75mm
para evitar el deterioro del cable y daños en
su revestimiento.
• Para evitar cortocircuitos, nunca coloque ni
deje objetos metálicos (por ejemplo,
monedas o herramientas metálicas) dentro
de la unidad.
• Si nota que la unidad emite humos u olores
extraños, desconecte inmediatamente la
alimentación y consulte con su distribuidor
Kenwood.
• Asegúrese de que sus dedos no queden
atrapados entre la placa frontal y la unidad.
•Preste atención para no dejar caer ni aplicar
un golpe fuerte a la unidad. Los
componentes de vidrio de la unidad podrían
romperse o agrietarse.
• Si se daña o rompe la LCD debido a un
golpe, no toque nunca el fluido de cristal
líquido contenido en su interior. El fluido de
cristal líquido podría ser perjudicial e incluso
fatal para su salud. Si el fluido de cristal
líquido entrara en contacto con su cuerpo o
vestimenta, lave inmediatamente con agua y
jabón.
2
(AWG18) o más,
2PRECAUCIÓN
Para evitar daños en la unidad, tome
las siguientes precauciones:
• Asegúrese de utilizar para la unidad una
fuente de alimentación de 12V CC con masa
negativa.
• No abra las cubiertas superior o inferior de la
unidad.
• No instale la unidad en un sitio expuesto a la
luz directa del sol, o excesivamente húmedo
o caluroso. Asimismo evite los lugares muy
polvorientos o sujetos a salpicaduras de
agua.
• No deje la placa frontal desmontada o el
estuche de la placa frontal en lugares
expuestos a la luz directa del sol, o
excesivamente húmedos o calurosos.
Asimismo evite los lugares muy polvorientos
o sujetos a salpicaduras de agua.
• Para evitar el deterioro, no toque con sus
dedos los terminales de la unidad o de la
placa frontal.
• Evite aplicar golpes fuertes a la placa frontal,
dado que se trata de un componente de
precisión.
• Cuando tenga que reemplazar un fusible,
utilice únicamente uno del régimen prescrito.
El uso de un fusible de régimen incorrecto
podría ocasionar un funcionamiento
defectuoso de la unidad.
• Para evitar cortocircuitos mientras sustituye
el fusible, desconecte previamente el mazo
de conductores.
• No coloque ningún objeto entre la placa
frontal y la unidad.
• Durante la instalación, no utilice otros
tornillos que no sean los suministrados. El
uso de tornillos diferentes podría causar
daños en la unidad principal.
— 93 —
No cargue discos compactos de
8 cm (3 pulg.) en la ranura del CD
Si intenta cargar en la unidad un CD de 8 cm
con su adaptador, éste podría separarse del
CD y dañar la unidad.
Page 94

Precauciones de Seguridad
NOTA
•Si tiene problemas durante la instalación,
consulte con su distribuidor KENWOOD.
Español
• Si le parece que su unidad no está
funcionando satisfactoriamente, primero
pruebe pulsando el botón de reposición. Si
con esto no consigue corregir el problema,
consulte con su concesionario Kenwood.
LOUD
AUD
OFF
AUTO
AME
Botón de reposición
• Los caracteres en la pantalla LCD pueden ser
difíciles de leer en temperaturas inferiores a
los 5 °C (41 °F).
• Las ilustraciones de la Pantalla y el panel que
aparecen en este manual son ejemplos
utilizados para explicar mejor cómo se
utilizan los mandos. Por lo tanto, las
ilustraciones de la pantalla que aparecen
pueden ser distintas a las que aparecen
realmente en la pantalla del equipo, y
algunas de las ilustraciones de la pantalla
puede que representen algo imposible
durante el funcionamiento actual.
Empañamiento de la lente
Inmediatamente después de encender el
calefactor del automóvil en épocas de frío, se
podría formar condensación o vaho sobre la
lente de la reproductora de CD. Este
empañamiento de la lente podría hacer
imposible la reproducción de los discos
compactos. En tal caso, retire el disco y
espere hasta que se evapore la condensación.
Si la unidad no opera de la manera normal
después de un tiempo, consulte con su
distribuidor Kenwood.
SCAN
RDM REP
Limpieza de los terminales de la placa
frontal
Si se ensucian los terminales de la unidad o de
la placa frontal, límpielos con un paño suave y
seco.
Limpieza de la unidad
Si la placa frontal de esta unidad está
manchada, límpiela con un paño seco tal como
un paño de silicona. Si la placa frontal está
MONO
muy sucia, límpiela con un paño humedecido
en jabón neutro, y luego aclárelo.
CLK ADJ
Si se aplica algún spray para limpiar
directamente a la unidad puede que afecte a
sus partes mecánicas. Si se limpia la placa
frontal con un paño duro o utilizando líquido
volátil tal como deluente o alcohol puede que
se raye la superficie o que se borren algunos
caracteres.
Limpieza de la ranura de CD
Como el polvo tiende a acumularse en la
ranura de CD, limpiela de vez en cuando.
Recuerde que sus discos compactos podrían
rayarse si los pone en una ranura de CD donde
haya polvo acumulado.
— 94 —
La marca del producto láser
CLASS 1
LASER PRODUCT
Esta etiqueta está colocada en el chasis e
indica que el componente funciona con rayos
láser de classe1.
Esto significa que el aparato utiliza rayos láser
considerados como de clase débil. No existe
el peligro de que este aparato emita al exterior
una radiación peligrosa.
Este producto no ha sido instalado en la línea
de producción por el fabricante de un vehículo,
ni tampoco por el importador profesional de un
vehículo dentro del estado miembro de la UE.
Page 95

Acerca de los CDs
Manipulación de CDs
• No toque la superficie de grabación del CD.
Limpieza de CD
Limpie desde el centro del disco hacia el
exterior.
Almacenamiento de CD
• No los coloque expuestos a la luz solar directa
(Sobre el asiento o el tablero de instrumentos
etc.) ni donde la temperatura sea alta.
• Guarde los CDs en sus cajas.
• CD-R y CD-RW son más fáciles de dañar que
un CD de música normal. Utilice un CD-R o un
CD-RW después de leer los ítems de
precaución en el paquete etc.
• No pegue cinta etc. sobre el CD.
Tampoco, no utilice un CD con cinta pegada
sobre el.
Cuando utilice un CD nuevo
Si el agujero central del CD o el margen
exterior tiene rebaba, utilícelo después de
haberla quitado con un bolígrafo.
Rebaba
Rebaba
Accesorios de CD
No utilice accesorios de tipo disco.
Extracción de CDs
Al extraer los CDs de esta unidad tire de ellos
hacia afuera en forma horizontal.
CDs que no se pueden utilizar
• No se pueden utilizar CDs que no sean
redondos
• No se pueden utilizar CDs coloreados en la
superficie de grabación o que estén sucios.
• Esta unidad sólo puede reproducir los CD con
.
Puede que no reproduzca correctamente los
discos que no tienen la marca.
• No se puede reproducir un CD-R o CD-RW que
no ha sido finalizado. (Para el proceso de
finalización remítase a su software escrito CDR/CD-RW, y a su manual de instrucciones de
grabador de CD-R/CD-RW.)
— 95 —
Page 96

Características generales
Botón de liberación
u
Español
Indicador SYSTEM Q
D
U
LO
ATT/
LOUD
d
AUD
AUTO
AME
OFF
SRC
Q/
AUD
SCAN
1
Visualización del reloj
RDM REP
3
AM FM
CLK ADJ
CLK/
ADJ
Indicador LOUD
Indicador ATT
Alimentación
¢4
MONO
Encendido de la alimentación
Pulse el botón [SRC].
Apagado de la alimentación
Pulse el botón [SRC] durante más de 1 segundo.
Selección de la fuente
Pulse el botón [SRC].
Fuente requerida Visualización
Sintonizador "TUnE"
CD "CD"
En espera (sólo modo de iluminación) "STBY"
Volumen
Para aumentar el nivel de volumen
Pulse el botón [u].
Para disminuir el nivel de volumen
Pulse el botón [d].
Atenuador
Para bajar el volumen rápidamente.
Pulse el botón [ATT].
Cada vez que se pulsa el botón, el Atenuador se activa o
desactiva.
Cuando está activado, el indicador "ATT" parpadea.
— 96 —
Page 97

Sonoridad
Compensación de los registros graves y agudos a bajo volumen.
Pulse el botón [LOUD] durante más de 1 segundo.
Cada vez que se pulsa el botón durante al menos 1 segundo el
Loudness se activa o se desactiva.
Cuando está activado, el indicador "LOUD" se ACTIVA.
System Q
Es posible recuperar el mejor ajuste de sonido predefinido para
los diferentes tipos de música.
1 Seleccione la fuente que desea ajustar
Pulse el botón [SRC].
2 Seleccione el tipo de Sonido
Pulse el botón [Q].
Cada vez que pulse el botón, el ajuste del sonido cambiará.
Ajuste de sonido Visualización
Plano "FLAT"
Rock "ROCK"
Top 40 "TP40"
Pops "POPS"
Jazz "JAZZ"
Ligera "EASY"
• Cada ajuste de valor se cambia con <Ajuste de altavoz> (página
98). Primero deberá seleccionar el tipo de altavoz con el ajuste de
Altavoz.
• Cuando se cambia el ajuste de System Q, los Graves, Medios y
Agudos ajustados en control de audio reemplazan a los valores de
System Q.
Control de audio
1 Seleccione la fuente para el ajuste
Pulse el botón [SRC].
2 Acceda al modo de Control de Audio
Pulse el botón [AUD] durante más de 1 segundo.
3 Seleccione el elemento de Audio para el ajuste
Pulse el botón [FM] o [AM].
Cada vez que se pulse el botón, los elemento que pueden
ajustarse cambian como se indica a continuación.
4 Ajuste el elemento de Audio
Pulse el botón [4] o [¢].
Ítem de ajuste Visualización Margen
Nivel de graves "BAS" –8 — +8
Nivel de medios "MID" –8 — +8
Nivel de agudos "TRE" –8 — +8
Balance "BL" Izquierda 15 — Derecha 15
Fader "FD" Posterior 15 — Frontal 15
5 Salga del modo de Control de Audio
Pulse el botón [AUD].
— 97 —
Page 98

Características generales
Ajuste de altavoz
Realice el ajuste exacto para que el valor de System Q sea
óptimo al ajustar el tipo de altavoz.
Español
1 Acceda a En Espera
Pulse el botón [SRC].
Seleccione la visualización "STBY".
2 Acceda al modo de Ajuste de Altavoz
Pulse el botón [Q].
3 Seleccione el tipo de Altavoz
Pulse el botón [4] o [¢].
Cada vez que se pulse el botón, el ajuste cambiará como se
indica a continuación.
Tipo de altavoz Visualización
DESACTIVAR "SP-F"
Para altavoz OEM "SP-O"
Para altavoz de 6 y 6x9 pulgadas "SP-6"
Para altavoz de 5 y 4 pulgadas "SP-5"
4 Salga del modo de Ajuste de Altavoz
Pulse el botón [Q].
Pantalla de visualización del reloj
Pulse el botón [CLK].
Cada vez que se pulsa el botón, la visualización del Reloj se
activa o desactiva.
Ajuste del reloj
1 Seleccione la visualización del reloj
Pulse el botón [CLK].
2 Acceda al modo de ajuste del reloj
Pulse el botón [ADJ] durante más de 2 segundos.
La indicación horaria parpadea.
3 Ajuste las horas
Pulse el botón [FM] o [AM].
Ajuste los minutos
Pulse el botón [4] o [¢].
4 Salga del modo de ajuste del reloj
Pulse el botón [CLK].
DSI (Disabled System Indicator)
Después de retirar la placa frontal de la unidad, parpadea un
indicador rojo como advertencia para potenciales ladrones.
1 Apague la unidad (OFF)
Pulse el botón [SRC] durante más de 1 segundo.
2 Ajuste el DSI
Mientras pulsa el botón [1] y [3], pulse el botón [SRC].
Cada vez que se realizan las operaciones 1 y 2, el DSI se activa o
desactiva.
— 98 —
Page 99

Placa frontal antirrobo
MONO
CLK ADJ
AUTO
AME
SCAN
AUD
RDM REP
OFF
LOUD
AM
FM/
MONO
¢4
SRC
1 - 6
AUTO/
AME
La placa frontal de la unidad puede extraerla y llevarla con usted
para impedir robos.
Extracción de la placa frontal
Pulse el botón de liberación.
La placa frontal queda desbloqueada permitiendo su extracción.
• La placa frontal es una pieza de precisión y puede resultar dañada
por gólpes o sacudidas. Por tal motivo, guarde la placa frontal en
su estuche especial cuando esté fuera del vehículo.
• No exponga la placa frontal o su estuche a la luz solar directa ni al
calor o humedad excesivos Además deberá evitar sitios con
mucho polvo o la posibilidad de que se derrame agua sobre ella.
Colocación de la placa frontal después de haberla
extraído
1 Alinee las proyecciones de la unidad con las ranuras en la
placa frontal.
2 Deslice la placa frontal hasta que sienta que hace clic.
La placa frontal queda bloqueada en su sitio, permitiendo utilizar
la unidad.
Características del sintonizador
Visualización de banda
Indicador ST
Número de la
emisora preajustada
Indicador AUTO Indicador monofónico
Pantalla de frecuencia
— 99 —
Page 100

Características del sintonizador
Modo de Sintonización
Elija el modo de sintonización.
Español
Pulse el botón [AUTO].
Cada vez que se pulse el botón, el modo de Sintonización
cambiará como se indica a continuación.
Modo de Sintonización Visualización Funcionamiento
Búsqueda automática Indicador Búsqueda automática
"AUTO 1" de una emisora.
Búsqueda de emisora Indicador Búsqueda de emisoras
predefinida "AUTO 2" por orden en la
Manual — Control de sintonización
Sintonización
Selección de la emisora.
Seleccione la fuente de sintonizador
1
Pulse el botón [SRC].
Seleccione la visualización "TUnE".
2 Seleccione la banda
Pulse el botón [FM] o [AM].
Cada vez que pulse el botón [FM] cambiará entre las bandas
FM1, FM2, y FM3.
3 Sintonice la banda hacia arriba o hacia abajo
Pulse el botón [4] o [¢].
Durante la recepción de emisoras en estéreo, el indicador "ST" se
activa.
memoria de preajuste.
manual normal.
Recepción Monaural
Es posible reducir el ruido recibiendo las emisiores estéreo en
monaural.
Pulse el botón [MONO] durante más de 1 segundo.
Cada vez que se pulsa el botón durante más de 1 segundo la
Recepción Monaural se activa o se desactiva (ON/OFF).
Cuando está activada, el indicador Monaural se activa.
Memoria de presintonización de emisoras
Almacenamiento de la emisora en la memoria.
1 Seleccione la banda
Pulse el botón [FM] o [AM].
2 Seleccione la frecuencia para guardarla en la memoria
Pulse el botón [4] o [¢].
3 Guarde la frecuencia en la memoria
Pulse el botón [1] — [6] durante más de 2 segundos.
La visualización del número predefinido parpadea 1 vez.
En cada banda, se puede guardar 1 emisora en la memoria de
cada botón [1] — [6].
Entrada de Memoria Automática
Almacenamiento automático de emisoras con buena recepción
en la memoria.
1 Seleccione la banda de la Entrada de Memoria Automática
Pulse el botón [FM] o [AM].
2 Abra la Entrada de Memoria Automática
Pulse el botón [AME] durante más de 2 segundos.
Cuando se guardan en memoria 6 emisoras que pueden
recibirse, la Entrada de Memoria Automática se cierra.
— 100 —
 Loading...