

Kenwood KDC-100UB, KDC-200UV, KDC-161URM, KDC-1010U, KDC-181UWM User Manual
...
KDC-1010U
KDC-100UG
KDC-181UWM
KDC-200UV
KDC-100UW
KDC-100UR
CD-RECEIVER
INSTRUCTION MANUAL
KDC-100UB
KDC-100UA
KDC-161URM
KDC-151UBM
B5A-0872-00 (MN/M2N/HN)© 2015 JVC KENWOOD Corporation

CONTENTS BEFORE USE
BEFORE USE 2
BASICS 3
GETTING STARTED 4
1 Select the display language
and cancel the demonstration
2 Set the clock and date
3 Set the initial settings
RADIO 6
AUX 7
CD / USB / iPod / ANDROID 8
Pandora®
(for )
10
AUDIO SETTINGS 11
DISPLAY SETTINGS 12
TROUBLESHOOTING 13
REFERENCES 15
Maintenance
More information
INSTALLATION /
CONNECTION 17
SPECIFICATIONS 21
2
IMPORTANT
• To ensure proper use, please read through this manual before using this product. It is especially important
that you read and observe Warning and Caution in this manual.
• Please keep the manual in a safe and accessible place for future reference.
Warning
Do not operate any function that takes your attention away from safe driving.
Caution
Volume setting:
• Adjust the volume so that you can hear sounds outside the car to prevent accidents.
• Lower the volume before playing digital sources to avoid damaging the speakers by the sudden increase of
the output level.
General:
• Avoid using the external device if it might hinder safe driving.
•
Make sure all important data has been backed up. We shall bear no responsibility for any loss of recorded data.
• Never put or leave any metallic objects (such as coins or metal tools) inside the unit, to prevent a short
circuit.
• If a disc error occurs due to condensation on the laser lens, eject the disc and wait for the moisture to
evaporate.
• Depending on the types of cars, the antenna will automatically extend when you turn on the unit with
the antenna control wire connected (
parking at a low ceiling area.
Remote control (RC-406):
• Do not leave the remote control in hot places such as on the dashboard.
• The Lithium battery is in danger of explosion if replaced incorrectly. Replace it only with the same or
equivalent type.
• The battery pack or batteries shall not be exposed to excessive heat such as sunshine, fire or the like.
• Keep the battery out of reach of children and in its original packaging when not in used. Dispose of used
batteries promptly. If swallowed, contact a physician immediately.
How to read this manual
• Operations are explained mainly using buttons on the faceplate of .
• English indications are used for the purpose of explanation. You can select the display language from the
[
FUNCTION
• [
• (
] menu. ( 5)
XX
] indicates the selected items.
XX) indicates references are available on the stated page.
19, 20
). Turn off the unit or change the source to STANDBY when

BASICS
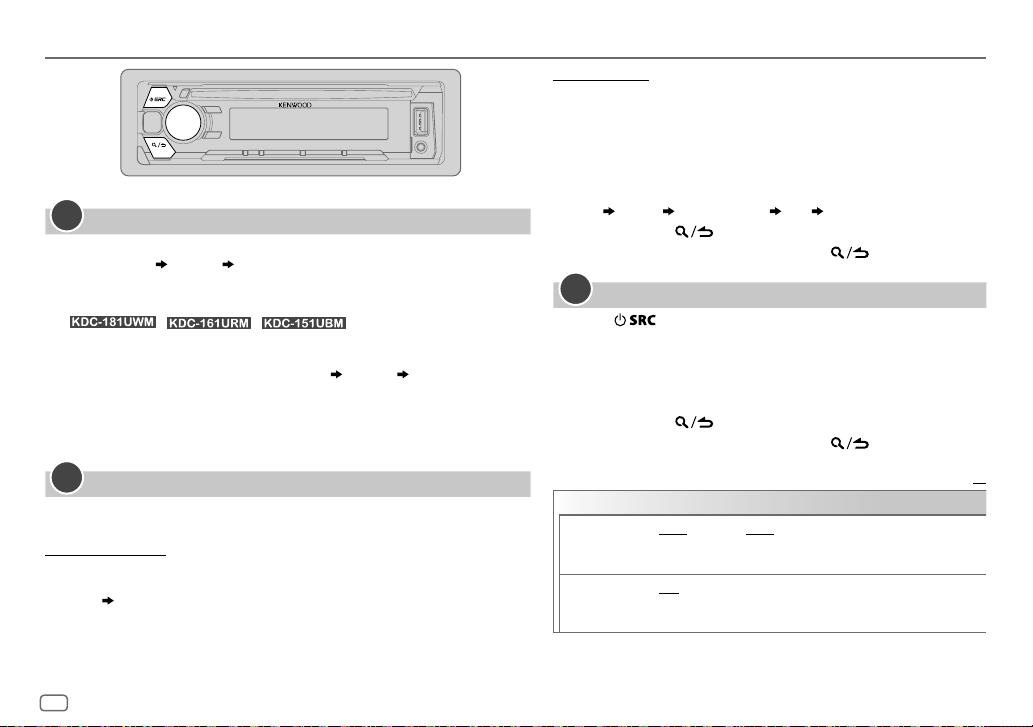
Faceplate
Display window
Remote control (RC-406)
(Sold separately for /
)
/
Volume knob
Detach button
To On the faceplate On the remote control
Turn on the power
Adjust the volume Turn the volume knob. Press
Select a source
Change the display information Press DISP repeatedly. (
Loading slot
enters searching status.
How to resetAttach Detach
Press
• Press and hold to turn off the power.
Press
: Flashes when the unit
Your preset adjustments
will be erased except
stored radio stations.
.
repeatedly.
16) ( Not available )
*
Not used
How to replace the battery
Press and hold SRC to turn off the power.
( Pressing SRC does not turn on the power. )
or .
Press ATT during playback to attenuate the sound.
• Press again to cancel.
Press SRC repeatedly.
Remote sensor (Do not expose
to bright sunlight.)
Pull out the
insulation sheet
when using for the
first time.
ENGLISH
3
GETTING STARTED
1
Select the display language and cancel the demonstration
When you turn on the power (or after you reset the unit), the display shows:
“SEL LANGUAGE”
1 Turn the volume knob to select the desired display language, [
(English) or [
/ / : Selectable display language:
[
EN
] (English)/ [RU] (Russian)/ [TU] (Turkish)/ [SP] (Spanish)
[
ENG
]/ [EN] is selected for the initial setup.
Then, the display shows: “CANCEL DEMO”
2 Press the volume knob.
[
YES
] is selected for the initial setup.
3 Press the volume knob again.
“DEMO OFF” appears.
2
Set the clock and date
Press the volume knob to enter [
1
2 Turn the volume knob to select [
To adjust the clock
3 Turn the volume knob to select [
4 Turn the volume knob to make the settings, then press the knob.
Hour
5 Turn the volume knob to select [
6 Turn the volume knob to select [
“PRESS” “VOLUME KNOB”
TUR
] (Turkish), then press the knob.
Minute
“PRESS” “VOLUME KNOB”.
FUNCTION
].
CLOCK
], then press the knob.
CLOCK ADJUST
CLOCK FORMAT
12H
], then press the knob.
], then press the knob.
] or [
24H
], then press the knob.
ENG
]
To set the date
7 Turn the volume knob to select [
knob.
8 Turn the volume knob to select [
press the knob.
9 Turn the volume knob to select [
DATE FORMAT
DD/MM/YY
DATE SET
], then press the
] or [
], then press the knob.
MM/DD/YY
], then
10 Turn the volume knob to make the settings, then press the
knob.
Day
Month Year or Month Day Year
11 Press and hold to exit.
To return to the previous setting item, press .
3
Set the initial settings
Press repeatedly to enter STANDBY.
1
2 Press the volume knob to enter [
• Pressing AUD enters [
AUDIO CONTROL
FUNCTION
] directly.
].
3 Turn the volume knob to select an item (see the following
table), then press the knob.
4 Repeat step 3 until the desired item is selected or activated.
5 Press and hold to exit.
To return to the previous setting item, press .
Default:
AUDIO CONTROL
SWITCH
PREOUT
SP SELECT OFF/ 5/4/ 6 × 9/6/ OEM
REAR/ SUB-W
speakers or a subwoofer are connected to the line out terminals on
the rear (through an external amplifier).
(5inches or 4inches, 6×9inches or 6inches) or OEM speakers for
optimum performance.
or
REAR/ SUBWOOFER
: Selects according to the speaker size
: Selects whether rear
XX
4

GETTING STARTED
DISPLAY
EASY MENU
TUNER SETTING
PRESET TYPE
SYSTEM
KEY BEEP
TDF ALARM
SOURCE SELECT
PANDORA SRC
BUILT-IN AUX ON
P-OFF WAIT
(For )
ON
:Both display and button illumination change to white color when
entering [
FUNCTION
].;
OFF
remain as [
COLORSELECT
NORMAL
:Memorizes one station for each preset button in each band
(
6, RADIO
regardless of the selected band.
ON
(Except for / / )
ON
is set to OFF.;
(For )
ON
(For / / )
Applicable only when the demonstration mode is turned off.
Sets the duration when the unit will automatically turn off (while in
standby mode) to save the battery.
20M
WAIT TIME – – –
).;
:Activates the keypress tone.;
: Activates the alarm if you forget to detach the faceplate when ACC
OFF
:Enables PANDORA in source selection.;
:Enables AUX in source selection.;
: 20minutes;
:Both display and button illumination
] color. ( 13)
MIX
:Memorizes one station for each preset button,
OFF
:Deactivates.
: Deactivates.
OFF
:Disables. ( 10)
OFF
:Disables. ( 7)
40M
or
OFF – – –
: 40minutes;
:Cancels
60M
: 60minutes;
CD READ 1
F/W UPDATE
UPDATE SYSTEM
F/W UP xx.xx
CLOCK
CLOCK DISPLAY
ENGLISH
РУССКИЙ
*
TURKCE
*
ESPANOL
:Automatically distinguishes between audio file disc and music
CD.;
2
:Forces to play as a music CD. No sound can be heard if an
audio file disc is played.
YES
:Starts upgrading the firmware.; NO:Cancels (upgrading is not
activated).
For details on how to update the firmware, see:
www.kenwood.com/cs/ce/
ON
:The clock time is shown on the display even when the unit is
turned off.;
OFF
:Cancels.
Select the display language for [
information if applicable.
By default, [
ENGLISH
*
Selectable only for /
] is selected.
.
FUNCTION
] menu and music
/
ENGLISH
5

RADIO
Supported band:
FM1/ FM2/ FM3/ AM/ SW1/ SW2
FM1/ FM2/ FM3/ MW/ LW
Search for a station
1
2 Press repeatedly (or press / on
3 Press S/T (or press S/ on RC-406) to search
• To change the searching method for S/T: Press
repeatedly.
AUTO1 : Automatically search for a station.
AUTO2 : Search for a preset station.
MANUAL : Manually search for a station.
• To store a station: Press and hold one of the number buttons
(1to6).
• To select a stored station: Press one of the number buttons
(1to6) (or press one of the number buttons (1to6) on RC-406).
/ / / /
/ / :
/ / :
Press repeatedly to select TUNER.
RC-406) to select the band.
for a station.
Direct Access Tuning (using RC-406)
Press DIRECT to enter Direct Access Tuning.
1
2 Press the number buttons to enter a frequency.
3 Press to search for a station.
• To cancel, press or DIRECT.
• If no operation is done for 10seconds after step
automatically canceled.
2, Direct Access Tuning is
Other settings
Press the volume knob to enter [
1
FUNCTION
].
2 Turn the volume knob to select an item (see the following table), then
press the knob.
3 Repeat step 2 until the desired item is selected or activated.
4 Press and hold to exit.
To return to the previous setting item, press .
TUNER SETTING
1
LOCAL SEEK
AUTO
MEMORY
MONO SET ON
NEWS SET ON
REGIONAL
AF SET
*
ON
: Searches only stations with good reception. ;
•
Settings made are applicable only to the selected source/station. Once you change
the source/station, you need to make the settings again.
YES
:Automatically starts memorizing 6 stations with good reception.; NO:Cancels.
•
Selectable only if [
:Improves the FM reception, but the stereo effect may be lost.;
: The unit will temporarily switch to News Programme if available. ;
2
*
ON
: Switches to another station only in the specific region using the “AF” control.;
OFF
:Cancels.
2
*
ON
: Automatically searches for another station broadcasting the same program
in the same Radio Data System network with better reception when the current
reception is poor.;
NORMAL
OFF
] is selected for [
:Cancels.
OFF
: Cancels.
PRESET TYPE
]. ( 5)
OFF
Default:
:Cancels.
OFF
: Cancels.
XX
6

RADIO
TI ON
PTY SEARCH1 Press the volume knob to enter PTY language selection.
CLOCK
TIME SYNC
1
*
2
*
Available Program Type
SPEECH : NEWS, AFFAIRS, INFO
MUSIC
:
The unit will search for the Program Type categorized under [
[
MUSIC
] if selected.
• [
MONO SET
when the band is FM1/ FM2/ FM3.
• If the volume is adjusted during reception of traffic information, alarm or news
bulletin, the adjusted volume is memorized automatically. It will be applied the
next time traffic information, alarm or news bulletin is turned on.
:Allows the unit to temporarily switch to Traffic Information if available (“TI”
lights up).;
OFF
:Cancels.
2
Turn the volume knob to select the PTY language (
GERMAN
3
4
ON
OFF
/ / / / /
/ : AM/ SW1/ SW2 stations only.
/ / / / /
/ : Default: [
SCIENCE, VARIED, WEATHER, FINANCE, CHILDREN, SOCIAL, RELIGION, PHONE IN
TRAVEL, LEISURE, DOCUMENT
POP M
(music),
OTHER M
]/ [
NEWS SET
), then press the knob.
Turn the volume knob to select the available Program Type (see the following).
Press
S / T
:Synchronizes the unit’s time to the Radio Data System station time.;
:Cancels.
/
/ : FM stations only.
/
/ : Default: [ON]
(music),
]/ [
to start searching.
OFF
]
(information),
ROCK M
(music),
]/ [
EASY M
AF SET
JAZZ, COUNTRY, NATION M
REGIONAL
SPORT, EDUCATE, DRAMA, CULTURE
(music),
]/ [TI]/ [
LIGHT M
(music),
PTY SEARCH
ENGLISH/ FRENCH
(music),
SPEECH
CLASSICS
(music)
] or
OLDIES, FOLK M
] is selectable only
/
,
,
AUX
Preparation:
Select [
ON
] for [
BUILT-IN AUX
Start listening
Connect a portable audio player (commercially available).
1
Auxiliary input jack
3.5mm stereo mini plug with “L” shaped
connector (commercially available)
2 Press repeatedly to select AUX.
3 Turn on the portable audio player and start playback.
Set the AUX name
While listening to a portable audio player connected to the unit...
1 Press the volume knob to enter [
2 Turn the volume knob to select [
knob.
3 Turn the volume knob to select [
,
knob.
4 Turn the volume knob to select an item, then press the
knob.
AUX
(default)/
5 Press and hold to exit.
To return to the previous setting item, press .
]. ( 5)
Portable audio player
FUNCTION
SYSTEM
], then press the
AUX NAME SET
DVD/ PORTABLE/ GAME/ VIDEO/ TV
].
], then press the
ENGLISH
7

CD / USB / iPod / ANDROID
Start playback
The source changes automatically and
playback starts.
M
Eject disc
USB input terminal
USB
CA-U1EX (max.: 500mA)
(optional accessory)
iPod/iPhone
ANDROID
Micro USB 2.0 cable
(commercially available)
Label side
(for )
KCA-iP102 / KCA-iP103
(optional accessory)
or accessory cable of the
iPod/iPhone
*
2
*
3
*
2
*
1
To On the faceplate On the remote control
Playback / pause Press .
4
Reverse / Fast-forward
Select a track/file
Select a folder
6
Repeat play
*
*
Press and hold S/T. Press and hold S/ .
Press S/T. Press S/
5
*
Press J/K.
Press repeatedly.
TRACK REPEAT/ ALL REPEAT
FILE REPEAT/ FOLDER REPEAT/ ALL REPEAT
FILE REPEAT/ FOLDER REPEAT/ REPEAT OFF
6
Random play
*
Press repeatedly.
DISC RANDOM/ RANDOM OFF
FOLDER RANDOM/ RANDOM OFF
: Audio CD
: Audio CD
Press
.
.
Press
/ .
: MP3/WMA/WAV/FLAC file
: iPod or ANDROID
: MP3/WMA/WAV/FLAC file, iPod or
ANDROID
7
Press and hold
1
*
KCA-iP102 : 30-pin type, KCA-iP103 : Lightning type
2
*
Do not leave the cable inside the car when not using.
3
*
When connecting an Android device, “Press [VIEW] to install KENWOOD MUSIC PLAY APP” is shown. Follow the instructions
to select
ALL RANDOM
*
.
to install the application. You can also install the latest version of KENWOOD MUSIC PLAY application on your Android device
before connecting. (
4
*
For ANDROID: Applicable only when [
5
*
For CD: Only for MP3/WMA files. This does not work for iPod/ ANDROID.
6
*
For iPod/ ANDROID: Applicable only when [
7
*
For CD: Only for MP3/WMA files.
15)
BROWSE MODE
MODE OFF
] is selected. (
]/ [
BROWSE MODE
9)
] is selected. (
9)
8

CD / USB / iPod / ANDROID
Select control mode
While in iPod source, press 5 repeatedly.
MODE ON
: Control iPod using the iPod itself
play/pause, file skip, fast-forward or reverse from this
MODE OFF
While in ANDROID source, press 5 repeatedly.
BROWSE MODE
HAND MODE
unit.
: Control iPod from this unit.
: Control Android device from this unit via KENWOOD
MUSIC PLAY application installed in the Android
device.
: Control Android device using the Android device
itself via other media player applications installed
in the Android device. However, you can still play/
pause and file skip from this unit.
. However,
you can still
Select music drive
Press 5 repeatedly.
Stored songs in the following drive will be played back.
• Selected internal or external memory of a smartphone (Mass
Storage Class).
• Selected drive of a multiple drives device.
Select a file from a folder/list
Press .
1
2 Turn the volume knob to select a folder/list, then press the knob.
3 Turn the volume knob to select a file, then press the knob.
Quick Search
If you have many files in the iPod, you can search through them quickly
according to the first character of the file name.
Turn the volume knob quickly to enter character search.
Turn the volume knob to select the character.
To search for a character other than A to Z and 0to9, enter only “ * ”.
Press S/T to move to the entry position.
• You can enter up to 3characters.
Press the volume knob to start searching.
• To return to the root folder/ first file/ top menu, press 5.
• To return to the previous setting item, press
• To cancel, press and hold
• For iPod, applicable only when [
• For ANDROID, applicable only when [
.
MODE OFF
BROWSE MODE
] is selected.
.
] is selected.
Direct Music Search (using RC-406)
Press DIRECT.
1
2 Press the number buttons to enter a track/file number.
3 Press to search for music.
• To cancel, press or DIRECT.
• Not available if Random Play is selected.
• Not applicable for iPod and ANDROID.
ENGLISH
9

CD / USB / iPod / ANDROID
Listen to TuneIn Radio/ TuneIn Radio Pro/
Aupeo
(for )
While listening to TuneIn Radio, TuneIn Radio Pro or
Aupeo, connect the iPod/iPhone to the USB input
terminal of the unit.
• The unit will output the sound from these
applications.
Pandora®
(for )
Preparation:
Install the latest version of the Pandora application on your device (iPhone/ iPod touch), then
create an account and log in to Pandora.
• Select [
ON
] for [
PANDORA SRC
]. ( 5)
Start listening
Open the Pandora application on your device.
1
2 Connect your device to the USB input terminal.
Other settings
Press the volume knob to enter [
1
FUNCTION
].
2 Turn the volume knob to select an item (see
the following table), then press the knob.
3 Repeat step 2 until the desired item is selected
or activated.
4 Press and hold to exit.
To return to the previous setting item, press .
Default:
USB
MUSIC DRIVE DRIVE CHANGE
to [
DRIVE 5
:The next drive ([
DRIVE 1
]) is selected automatically and
playback starts.
Repeat steps
1
to 3 to select the following
drives.
SKIP SEARCH 0.5%/ 1%/ 5%/ 10%
: While listening to
iPod or ANDROID, selects the skip search ratio
over the total files.
10
USB input terminal
1
*
or
2
*
KCA-iP102 / KCA-iP103 (optional accessory)
accessory cable of the iPod/iPhone
The source changes to PANDORA and broadcast starts.
To On the faceplate On the remote control
XX
Playback / pause
Skip a track
]
Thumbs up or thumbs down
1
*
KCA-iP102 : 30-pin type, KCA-iP103 : Lightning type
2
*
Do not leave the cable inside the car when not using.
3
*
If thumbs down is selected, the current track is skipped.
Press
Press T.
3
*
Press J/K.
. Press
Press
Press
Create and save a new station
Press .
1
2 Turn the volume knob to select [
3 Turn the volume knob to select [
NEW STATION
FROM TRACK
], then press the knob.
] or [
FROM ARTIST
], then press the knob.
A new station is created based on the current song or artist.
4 Press and hold one of the number buttons (1to5) to store.
To select a stored station, press one of the number buttons (1to5).
.
.
/ .

Pandora®
(for )
Search for a registered station
Press .
1
2 Turn the volume knob to select an item, then press the knob.
[
BY DATE
[
]:According to the registered date
A-Z
]:Alphabetical order
3 Turn the volume knob to select the desired station, then press
the knob.
To cancel, press and hold
.
(or using RC-406)
Press J / K to search for a station, then press .
Bookmark current song information
Press and hold the volume knob.
“BOOKMARKED” appears and the information is stored to your
device. The bookmark is available on your Pandora account but not
on this unit.
Delete a station
While listening to PANDORA...
1 Press the volume knob to enter [
2 Turn the volume knob to select [
3 Turn the volume knob to select [
knob.
4 Turn the volume knob to select [
the knob.
FUNCTION
].
SYSTEM
], then press the knob.
STATION DEL
A-Z
] or [
BY DATE
], then press the
], then press
5 Turn the volume knob to select the desired station to delete,
then press the knob.
6 Turn the volume knob to select [
YES
], then press the knob.
7 Press and hold to exit.
To return to the previous setting item, press .
AUDIO SETTINGS
While listening to any source...
1 Press AUD to enter [
2 Turn the volume knob to select an item (see the following table), then
press the knob.
3 Repeat step 2 until the desired item is selected or activated.
4 Press and hold to exit.
(or using RC-406)
1 Press AUD to enter [
2 Press J / K to select an item, then press .
To return to the previous setting item, press
SUB-W LEVEL –15
BASS LEVEL –8
MID LEVEL –8
TRE LEVEL –8
EQ PRO
(This setting is stored to [
BASS ADJUST BASS CTR FRQ 60/ 80/ 100/ 200
MID ADJUST MID CTR FRQ 0.5KHZ/ 1.0KHZ/ 1.5KHZ/ 2.5KHZ
AUDIO CONTROL
AUDIO CONTROL
to
+15 (0
) Adjusts the subwoofer output level.
to +8 (+2)
to +8 (+1)
to +8 (+1)
USER
BASS LEVEL –8
BASS Q FACTOR 1.00/ 1.25/ 1.50/ 2.00
BASS EXTEND ON
MID LEVEL –8
MID Q FACTOR 0.75/ 1.00/ 1.25
] directly.
].
Adjusts the level to memorize for each source. (Before making
an adjustment, select the source you want to adjust.)
].)
or
the center frequency.
to +8 (+2):Adjusts the level.
:Turns on the extended bass.;
frequency.
to +8 (+1):Adjusts the level.
:Adjusts the quality factor.
.
60HZ/ 80HZ/ 100HZ/ 200HZ
:Adjusts the quality factor.
OFF
:Cancels.
:Selects the center
Default:
: Selects
XX
ENGLISH
11

AUDIO SETTINGS DISPLAY SETTINGS
TRE ADJUST TRE CTR FRQ 10.0KHZ/ 12.5KHZ/ 15.0KHZ/ 17.5KHZ
TRE LEVEL –8
PRESET EQ DRIVE EQ/ TOP40/ POWERFUL/ ROCK/ POPS/ EASY/ JAZZ/ NATURAL/ USER
BASS BOOST LV1/ LV2/ LV3
LOUDNESS LV1/ LV2
SUBWOOFER SET ON
LPF SUBWOOFER THROUGH
SUB-W PHASE REVERSE
FADER R15
BALANCE L15
VOLUME OFFSET
SOUND RECNSTR
(Sound
reconstruction)
• [
SUB-W LEVEL
[
SWITCH PREOUT
• [
SUB-W LEVEL
set to [
a preset equalizer suitable to the music genre. (Select [
in [
EQ PRO
[
DRIVE EQ
the tyres.
OFF
:Cancels.
produce a well-balanced sound at a low volume level.;
:Turns on the subwoofer output.;
signals with frequencies lower than 85Hz/ 120Hz/ 160Hz are sent to the subwoofer.
with the speaker output for optimum performance. (Selectable only if a setting other
than [
to
to
For AUX:
each source. (Before adjustment, select the source you want to adjust.)
ON
:Creates realistic sound by compensating the high-frequency components and
restoring the rise-time of the waveform that are lost in audio data compression.;
OFF
:Cancels.
]/ [
SUBWOOFER SET
] is set to [
]/ [
LPF SUBWOOFER
ON
].
frequency.
to +8 (+1):Adjusts the level.
].)
] is a preset equalizer that reduces noise outside the car or running noise of
or
LEVEL1/ LEVEL2/ LEVEL3
or
LEVEL1/ LEVEL2
:All signals are sent to the subwoofer.;
(180°)/
THROUGH
] is selected for [
F15 (0
):Adjusts the rear and front speaker output balance.
R15 (0
):Adjusts the left and right speaker output balance.
–8
to +8(0) ; For other sources: –8 to 0:Preset the initial volume level of
]/ [
SUB-W
]/ [
:Selects your preferred low and high frequencies boost to
NORMAL
(0°):Selects the phase of the subwoofer output to be in line
LPF SUBWOOFER
] or [
SUBWOOFER
SUB-W PHASE
:Selects your preferred bass boost level.;
OFF
:Cancels.
LPF SUBWOOFER
]/ [
SUB-W PHASE
]. ( 4)
] is selectable only if [
:Selects the center
USER
] to use the settings made
OFF
:Cancels.
85HZ/ 120HZ/ 160HZ
].)
] is selectable only if
SUBWOOFER SET
:Audio
:Selects
] is
(For )
Set the dimmer
Press and hold DISP (DIMMER) to turn on or off the
dimmer.
• If you have set [
press and hold this button.
DIMMER TIME
], it will be canceled once you
Other settings
Press the volume knob to enter [
1
2 Turn the volume knob to select [
knob.
3 Turn the volume knob to select an item (
press the knob.
4 Repeat step 3 until the desired item is selected/
activated or follow the instructions stated on the
selected item.
5 Press and hold to exit.
To return to the previous setting item, press .
FUNCTION
DISPLAY
], then press the
].
13
), then
12

DISPLAY SETTINGS
COLOR SELECT
DIMMER
BRIGHTNESS 0
TEXT SCROLL AUTO/ ONCE
*
Preset colors:
BLUE2
GREEN2
ORANGERED
(For )
Select color for
1
Select a zone.
2
Select a color for the selected zone.
To make your own color, select [
made will be stored in [
1
Press the volume knob to enter the detailed color adjustment.
2
Press S/T to select the color (R/ G/ B) to adjust.
3 Turn the volume knob to adjust the level (0 — 9), then press the knob.
Dim the display illumination (and button illumination for ).
ON
DIMMER TIME
1
Turn the volume knob to adjust the [ON] time, then press the knob.
2
Turn the volume knob to adjust the [
(Default: [
— 31: Select your preferred brightness level for display illumination.
(For
1
Select a zone.
2
0 — 31: Select your preferred brightness level for display and button
automatically, or scroll only once.;
RED1/ RED2/ RED3/ PURPLE1/ PURPLE2/ PURPLE3/ PURPLE4/ BLUE1/
/
BLUE3/ SKYBLUE1/ SKYBLUE2/ LIGHTBLUE/ AQUA1/ AQUA2/ GREEN1/
/
GREEN3/ YELLOWGREEN1/ YELLOWGREEN2/ YELLOW/ ORANGE1/ ORANGE2/
ALL ZONE, ZONE 1
( 12)
VARIABLE SCAN/
:Dimmer is turned on.;
:Set the dimmer on and off time.
ON
]:
6:00 PM
)
( 12)
illumination.
:Select whether to scroll the display information
and
CUSTOM R/G/B/
CUSTOM R/G/B
CUSTOM R/G/B
OFF
:Cancels.
or
18:00
; [
OFF
OFF
ZONE 2
separately.
preset colors*
].
OFF
] time, then press the knob.
]:
6:00 AM
:Cancels.
Default:
]. The color you have
or
6:00
)
TROUBLESHOOTING
XX
Symptom Remedy
Sound cannot be heard.
“MISWIRING CHECK WIRING
THEN PWR ON” appears.
“PROTECTING SEND SERVICE”
appears.
General
•
Sound cannot be heard.
•
The unit does not turn on.
•
Information shown on the
display is incorrect.
The unit does not work at all. Reset the unit. (
•
Radio reception is poor.
•
Static noise while listening
adio
R
to the radio.
Disc cannot be ejected.
Noise is generated. Skip to another track or change the disc.
Tracks do not play back as
you intended them to play.
“READING” keeps flashing. Do not use too many hierarchical levels or folders.
CD / USB / iPod
Elapsed playing time is not
correct.
Correct characters are not
displayed (e.g. album name).
•
Adjust the volume to the optimum level.
•
Check the cords and connections.
Turn the power off, then check to be sure the terminals
of the speaker wires are insulated properly. Turn the
power on again.
Send the unit to the nearest service center.
Clean the connectors. (
Connect the antenna firmly.
Press and hold M to forcibly eject the disc. Be careful
not to drop the disc when it is ejected. If this does not
solve the problem, reset the unit. (
Playback order is determined when files are recorded.
This is caused by how the tracks are recorded.
This unit can only display uppercase letters, numbers,
and a limited number of symbols. (
15)
3)
3)
5)
ENGLISH
13

TROUBLESHOOTING
Symptom Remedy
“NA FILE” Make sure the disc contains supported audio files. ( 15)
“NO DISC” Insert a playable disc into the loading slot.
“TOC ERROR” Make sure the disc is clean and inserted properly.
“PLEASE EJECT” Reset the unit. If this does not solve the problem, consult
“READ ERROR” Copy the files and folders onto the USB device again. If this
“NO DEVICE” Connect a USB device, and change the source to USB again.
CD / USB / iPod
“COPY PRO” A copy-protected file is played.
“NA DEVICE”
“NO MUSIC” Connect a USB device that contains playable audio files.
“iPod ERROR”
•
Sound cannot
be heard during
playback.
•
Sound output only
from the Android
device.
ANDROID
Cannot playback at
[
BROWSE MODE
your nearest service center.
does not solve the problem, reset the USB device or use
another USB device.
Connect a supported USB device, and check the connections.
•
Reconnect the iPod.
•
Reset the iPod.
•
Reconnect the Android device.
•
If in [
HAND MODE
on the Android device and start playback.
•
If in [
HAND MODE
application or use another media player application.
•
Restart the Android device.
•
If this does not solve the problem, the connected Android
device is unable to route the audio signal to unit. (
•
Make sure KENWOOD MUSIC PLAY APP is installed on the
].
Android device. (
•
Reconnect the Android device and select the appropriate
control mode.
•
If this does not solve the problem, the connected Android
device does not support [
], launch any media player application
], relaunch the current media player
8)
BROWSE MODE
]. ( 16)
Symptom Remedy
“NO DEVICE” or
“READING” keeps
flashing.
ANDROID
Playback is intermittent
or sound skips.
“ANDROID ERROR” /
“NADEVICE”
“ADDERROR” New station creation is unsuccessful.
“CHECKDEVICE” Check the Pandora application on your device.
“NOSKIPS” The skip limit has been reached.
“NOSTATIONS” No stations are found.
“STATIONLIMIT”
“CONNECT ERROR” Communication is unstable.
Pandora
“RATING ERROR” Registration of thumbs up/thumbs down has failed due to
“THUMBS N/A” Registration of thumbs up/thumbs down is not allowed.
“LICENSE ERROR” You try to access from a country which Pandora is not
16)
Muting upon the reception of a phone call
Connect the MUTE wire to your telephone using a commercial telephone accessory.
(
19, 20
)
When a call comes in, “CALL” appears.
•
To continue listening to the audio system during a call, press . “CALL” disappears
and the audio system resumes.
When the call ends, “CALL” disappears.
•
Switch off the developer options on the Android device.
•
Reconnect the Android device.
•
If this does not solve the problem, the connected
Android device does not support [
(
16)
Turn off the power saving mode on the Android device.
•
Reconnect the Android device.
•
Restart the Android device.
The number of registered stations has reached its limit.
Retry after deleting unnecessary stations from your device.
insufficient network connectivity.
deliverable.
(The audio system pauses.)
(The audio system resumes.)
BROWSE MODE
].
14

REFERENCES
Maintenance
Cleaning the unit
Wipe off dirt on the faceplate with a dry silicone or soft cloth.
Cleaning the connector
Detach the faceplate and clean the connector gently
with a cotton swab, being careful not to damage
the connector.
Handling discs
•
Do not touch the recording surface of the disc.
•
Do not stick tape etc. on the disc, or use a disc with tape stuck on it.
•
Do not use any accessories for the disc.
•
Clean from the center of the disc and move outward.
•
Clean the disc with a dry silicone or soft cloth. Do not use any solvents.
•
When removing discs from this unit, pull them out horizontally.
•
Remove burrs from the center hole and disc edge before inserting a disc.
More information
Visit also the following website <www.kenwood.com/cs/ce/> for:
–
Latest firmware updates and latest compatible item list
–
Android™ application KENWOOD MUSIC PLAY
–
Any other latest information
General
•
This unit can only play the following CDs:
•
Detailed information and notes about the playable audio files are stated in an online manual
on the following website: www.kenwood.com/cs/ce/audiofile/
Connector (on the reverse
side of the faceplate)
Playable files
•
Playable audio file: MP3 (.mp3), WMA (.wma)
•
Playable disc media: CD-R/CD-RW/CD-ROM
•
Playable disc file format: ISO 9660 Level 1/2, Joliet, Long file name.
•
Playable USB device file system: FAT12, FAT16, FAT32
Even when audio files comply with the standards listed above, playback may be impossible
depending on the types or conditions of media or device.
Unplayable discs
•
Discs that are not round.
•
Discs with coloring on the recording surface or discs that are dirty.
•
Recordable/ReWritable discs that have not been finalized.
•
8cm CD. Attempting to insert using an adapter may cause malfunction.
About USB devices
•
This unit can play MP3/WMA/WAV/FLAC files stored on a USB mass storage class device.
•
You cannot connect a USB device via a USB hub.
•
Connecting a cable whose total length is longer than 5m may result in abnormal playback.
•
This unit cannot recognize a USB device whose rating is other than 5V and exceeds 1A.
About iPod/iPhone
Made for
-
iPod touch (2nd, 3rd, 4th, and 5th generation)
-
iPod classic
-
iPod nano (3rd, 4th, 5th, 6th, and 7th generation)
-
iPhone 3G, 3GS, 4, 4S, 5, 5S, 5C, 6, 6 Plus
•
You cannot operate iPod if “KENWOOD” or “ ” is displayed on iPod.
ENGLISH
15
 Loading...