

Page 1

GPS NAVIGATION SYSTEM
DNX7380BT
DNX5380
GPS NAVIGATION
INSTRUCTION MANUAL
© B64-4855-08
Page 2
Contents
Getting Started 4
Using the Navigation System 4
Help When You Need It 4
Where To? 7
Searching Near Another Location 7
Go! Page Options 7
Finding an Address 7
Finding a Place by Spelling the Name 8
Using the On-Screen Keyboard 8
Finding Places in a Different Area 8
Narrowing Your Search 8
Favorites 9
Saving Places You Find 9
Saving Your Current Location 9
Setting a Home Location 9
Viewing Saved Places 10
Editing Saved Places 10
Deleting a Favorite 10
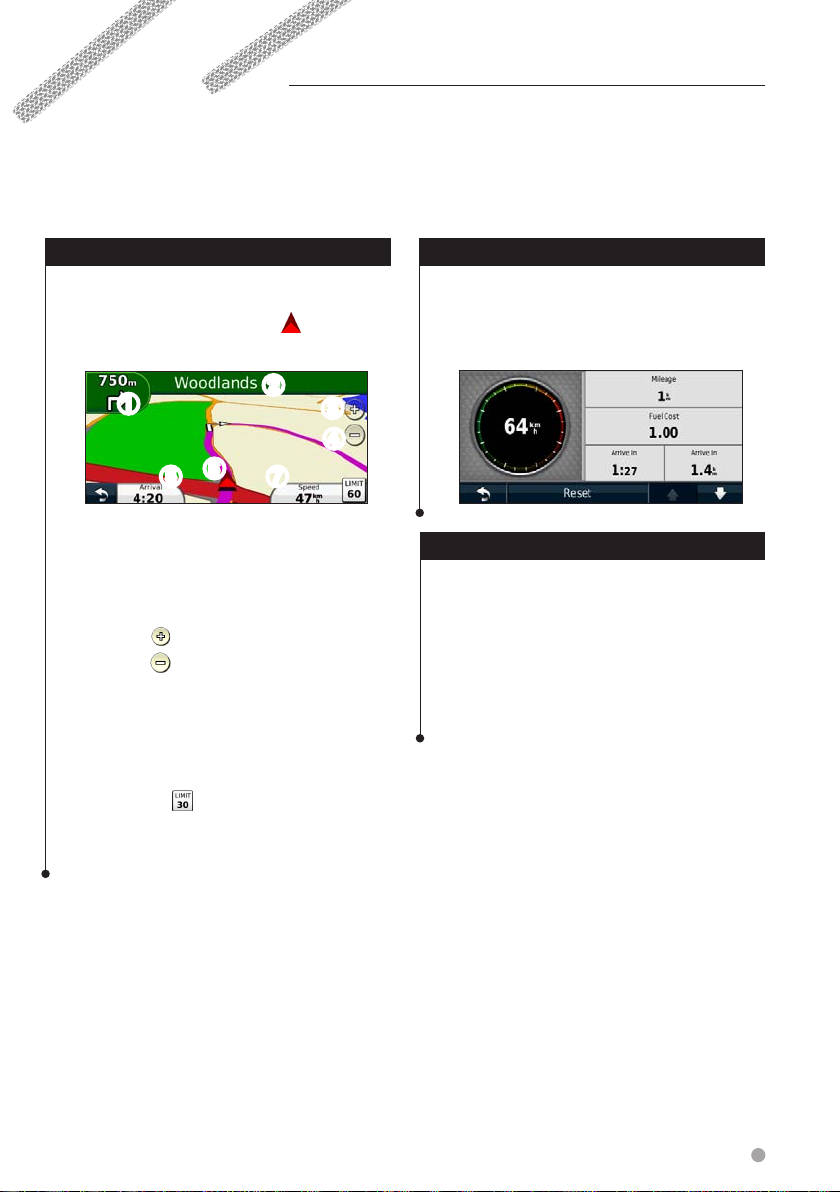
The Main Pages 11
Viewing the Map Page 11
Trip Computer 11
Resetting Trip Information 11
Turn List Page 12
Next Turn Page 12
About Junction View 12
GPS Info Page 12
Find It and Go! 5
Finding a Restaurant 5
Following Your Route 6
Adding a Via Point 6
Taking a Detour 6
Stopping the Route 6
Creating and Editing Routes 13
Creating a New Custom Route 13
Editing Custom Routes 13
Saving and Modifying the Active Route 13
Navigating a Saved Route 13
Deleting All Saved Routes 13
Stopping Your Route 13
Adding a Detour to a Route 14
Using Multiple Route Preview 14
Using ecoRoute™ 15
About ecoRoute 15
Creating a Vehicle Profile 15
Resetting Your Vehicle Profile 15
Calibrating Fuel Economy 15
Taking the ecoChallenge 15
About ecoChallenge Scores 15
Hiding Your ecoChallenge Score 16
Resetting Your Score 16
Viewing Your Fuel Economy 16
About the Mileage Report 16
Viewing a Mileage Report 16
Exporting a Mileage Report 17
Viewing Driving Tips 17
Setting Routes that Use Less Fuel 17
2 GPS Navigation Instruction Manual
Page 3
Customizing the Settings 18
Customizing the Navigation System 18
Changing the System Settings 18
Changing the Map Settings 18
Changing the Navigation Settings 18
Adjusting the Display Settings 18
Route Preferences 18
Updating the Time Settings 19
Setting the Languages 19
Adding Security 19
Appendix 20
Software License Agreement 20
Updating the Software 20
Updating the Map Data 20
Custom POIs (Points of Interest) 21
Finding Custom POIs 21
Deleting Custom POIs 21
Saving Trip Logs 21
Icons Used in This Manual
Important precautions are described to prevent injuries and potentially dangerous situations.
Special instructions, supplementary explanations, limitations, and reference pages are described.
Manual Conventions
When you are instructed to “touch” something, use your finger to touch an item on the screen.
The small arrows (>) used in the text indicate that you should touch a series of items. For
example, if you see “touch Where To? > Favorites” you should touch Where To?, and then touch
Favorites.
English 3
Page 4
Getting Started
The first time you use your Kenwood Navigation System, you need to set up your system. The Help menu
provides additional information.
WARNING
See "Safety Precautions and Important
Information" in the Quick Start Guide for
product warnings and other important
information.
⁄
• The screen shots shown in this manual may not exactly
match the screens on your navigation system. The
images used in this manual are intended for reference
only.
Using the Navigation System
For complete audio system information, see the
other Kenwood system manuals.
➊
➋
Touch to access the navigation system.
➊
➋
When navigating, this displays Kenwood
audio. When using audio, this displays
navigation information.
Help When You Need It
Touch Tools > Help to get more information
about using your navigation system. Touch a
category to view information about a topic.
1 Touch Tools > Help.
2 To search the Help topics for a keyword,
touch Search.
⁄
• The hands-free phone feature is only available if your
mobile phone has Bluetooth® wireless technology and
has been paired to the navigation system. See the other
Kenwood manuals and your phone manual for setup and
pairing instructions.
4 GPS Navigation Instruction Manual
Page 5
Find It and Go!
The Where To? page provides several different categories for you to use when searching for addresses,
cities, and other locations. The detailed map loaded in your navigation system contains millions of points of
interest, such as restaurants, hotels, and auto services.
Finding a Restaurant
1 Touch Where To?.
2 Select a category.
3 Select a subcategory.
5 Select a place.
6 Select Press for More to see the Review
page.
7 Touch Go!.
4 Select a type.
English 5
Page 6
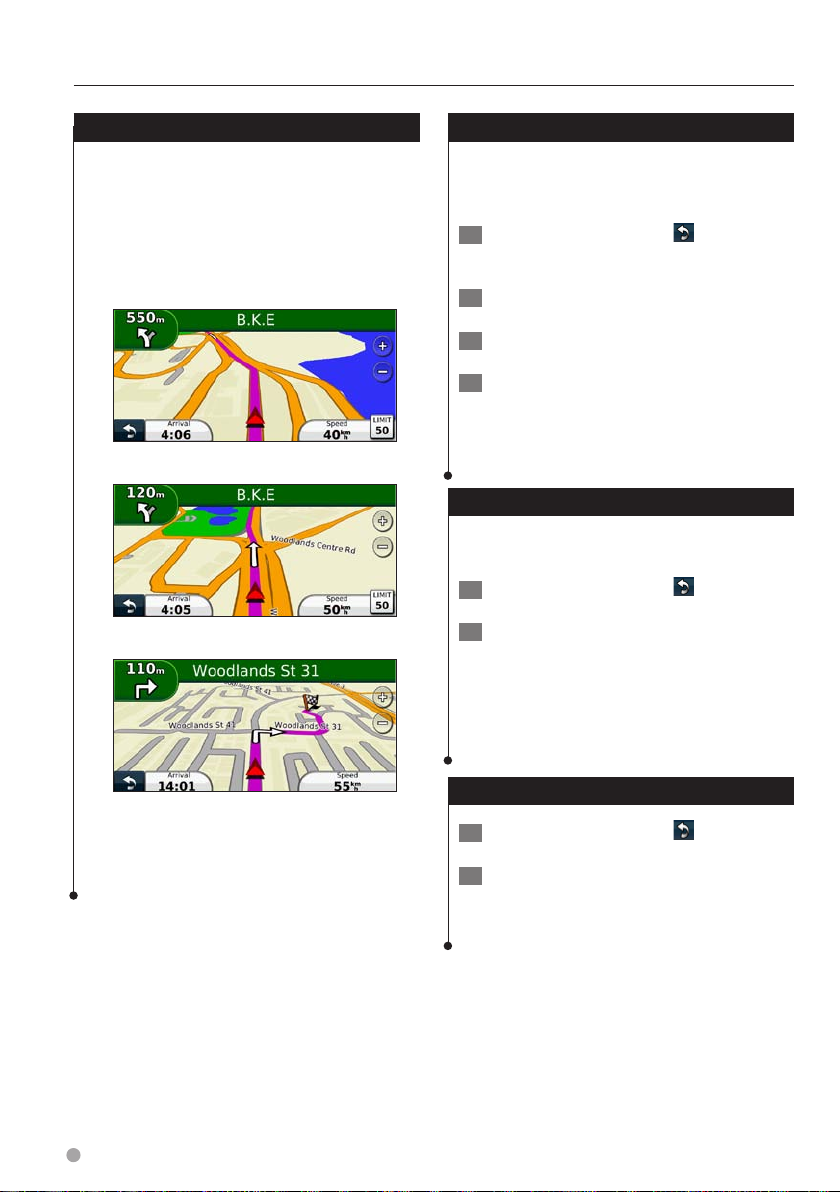
Find it and Go!
Following Your Route
As you travel, your navigation system guides you
to your destination with voice prompts, arrows
on the map, and directions at the top of the
map. The upper-left corner indicates the distance
to your next maneuver. If you depart from the
original route, your navigation system recalculates
the route and provides new directions.
Your route is marked with a highlighted line.
Follow the arrows.
Adding a Via Point
You can add a stop (Via Point) to your route. The
navigation system gives you directions to the
stop and to your final destination.
1 With a route active, touch
Where To?.
2 Search for the extra stop.
3 Touch Go!.
4 Touch Add As a Via Point to add this stop
before your destination.
If you want to add more than one stop to the
route, edit the current route. See page 13.
(back icon) >
Taking a Detour
If a road on your route is closed, you can take a
detour.
1 With a route active, touch .
2 Touch Detour.
The navigation system attempts to get you back
on your original route as quickly as possible. If
the route you are currently taking is the only
reasonable option, the navigation system might
not calculate a detour.
A checkered flag marks your destination.
6 GPS Navigation Instruction Manual
Stopping the Route
1 With a route active, touch .
2 Touch Stop.
Page 7
Where To?
The Where To? page provides several different categories you can use to search for locations.
➎
Searching Near Another Location
Your navigation system automatically searches for
places near your current location.
1 Touch Where To? > Near.
2 Select an option:
• Where I Am Now—search near your current location.
• A Different City—search near the city you enter.
• A Recent Destination—search near a recent
destination.
• A Favorite Destination—search near a favorite
destination.
• My Current Route—search along your route.
• My Destination—search near your current destination.
3 Touch OK.
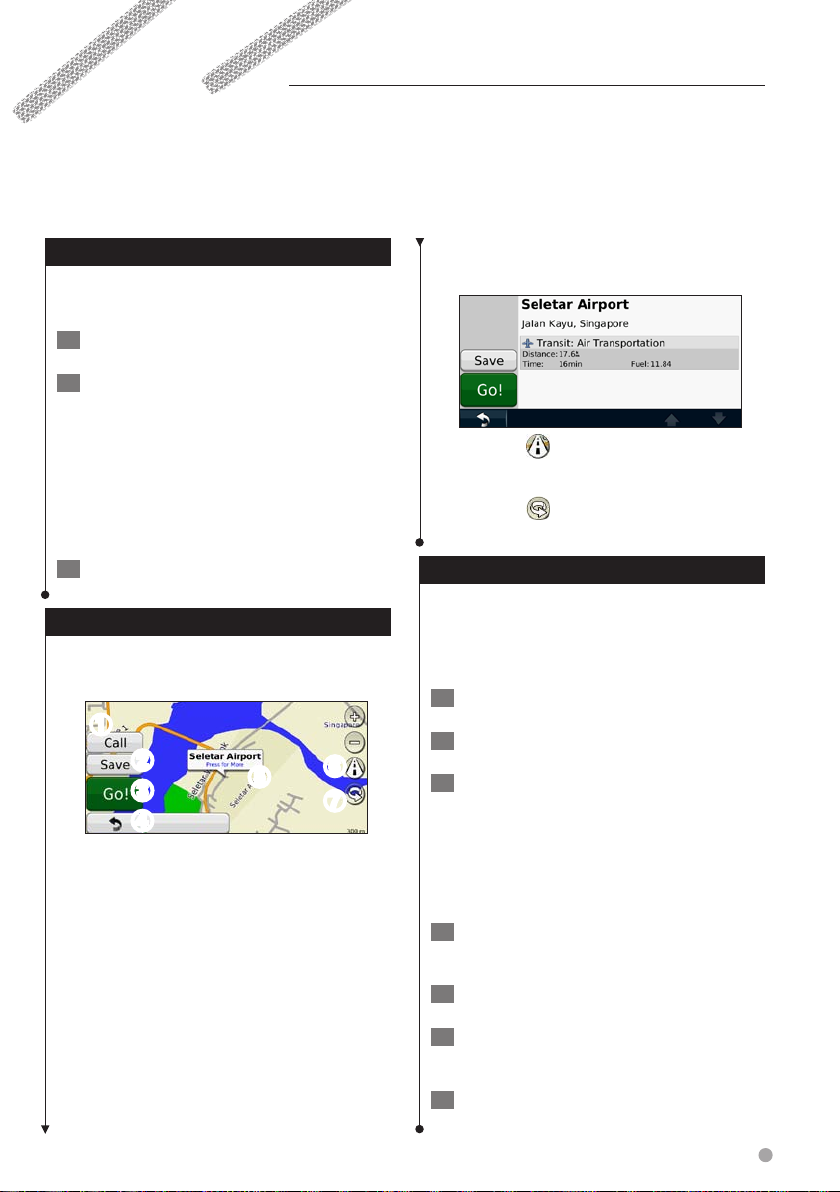
Go! Page Options
Touch an item in the search results list to view the
Go! page.
➊
➋
➌
➎
➏
➐
➍
Touch to call this location, if a mobile
➊
phone with Bluetooth wireless technology
is connected.
Touch to save this location to your Favorites.
➋
Touch to create a turn-by-turn route to this
➌
location.
Touch to return to the previous page.
➍
Touch to view more information about the
location.
Touch to switch between a 3D
➏
(three-dimensional) map and a 2D (twodimensional) map.
➐
Touch to rotate the viewing angle in
3D view.
Finding an Address
The steps to find an address can vary depending
on the maps that are loaded on your navigation
system. Not all map data provides postal-code
searching.
1 Touch Where To? > Address.
2 Touch Change State/Country, if necessary.
3 Touch Search All.
OR
Touch Spell City. Enter the city using the
keyboard, and touch Done. Select the city.
4 Enter the number of the address, and
touch Done.
5 Enter the street name, and touch Done.
6 Select the correct street in the list, if
necessary.
7 Touch the address, if necessary.
English 7
Page 8
Where To?
Finding a Place by Spelling the Name
If you know the name of the location you are
looking for, you can spell it using the on-screen
keyboard. You can also enter letters contained in
the name to narrow the search.
1 Touch Where To? > Points of Interest >
Spell Name.
2 Using the on-screen keyboard, enter
letters in the name.
3 Touch Done.
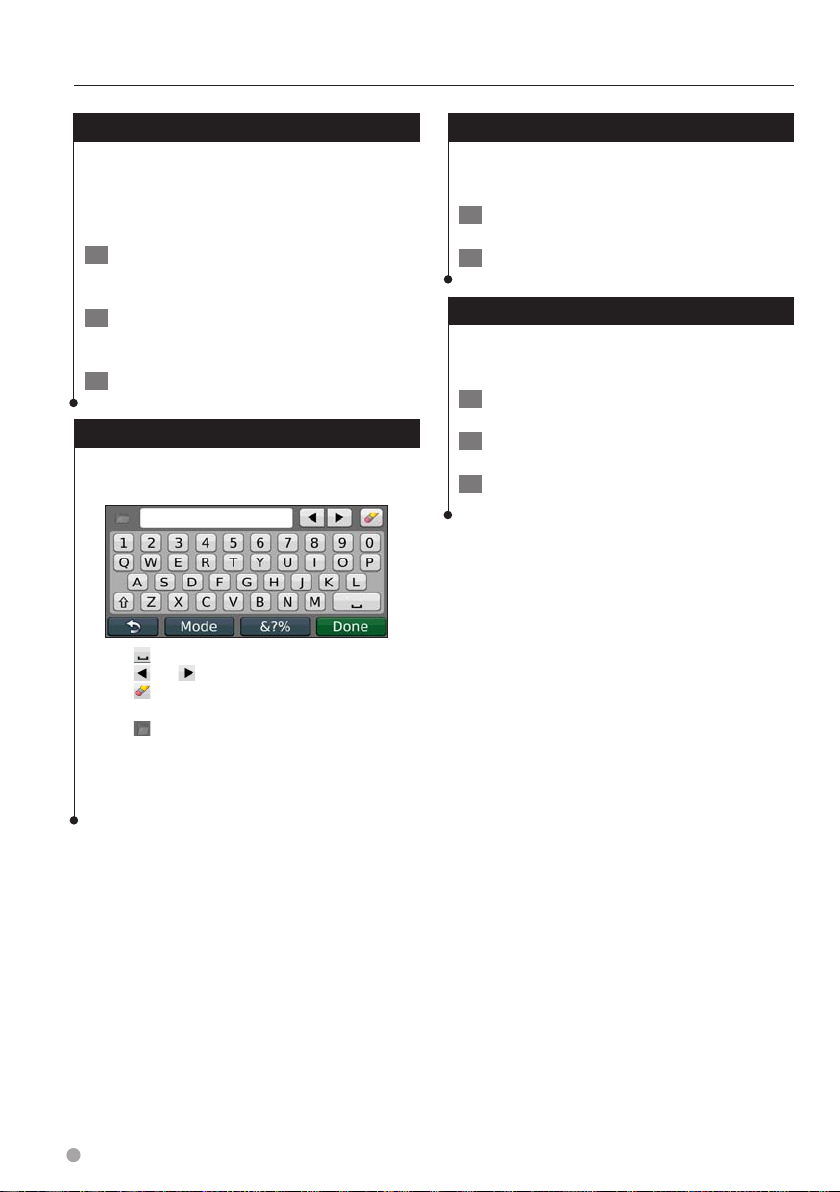
Using the On-Screen Keyboard
When an on-screen keyboard appears, touch a
letter or a number to enter it.
• Touch to add a space.
• Touch
• Touch
• Touch
• Touch Mode to change the keyboard language mode.
• Touch &?% to enter special characters.
and to move the cursor.
to delete the character, or touch and hold to
delete the entire entry.
to select words you have recently typed and
selected.
Finding Places in a Different Area
You can search for locations in a different area,
such as a different city or near your destination.
1 From the subcategories list, touch Near.
2 Select one of the search options.
Narrowing Your Search
To narrow your search, you can search near a
different city.
1 Touch Where To? > Near.
2 Touch A Different City.
3 Enter part of the name, and touch Done.
8 GPS Navigation Instruction Manual
Page 9
Favorites
You can save all of your favorite places in Favorites. You can also save your home location in Favorites.
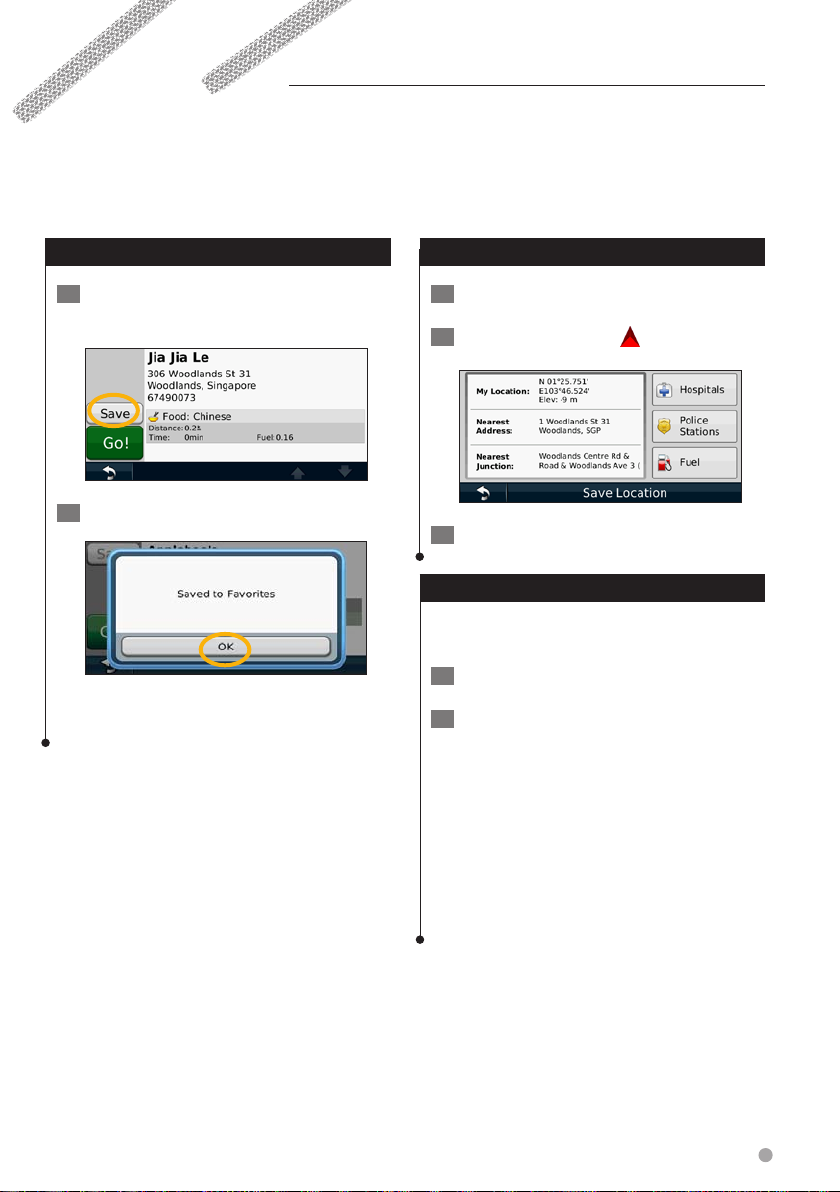
Saving Places You Find
1 After you have found a place you want to
save, touch Save on the Go! page.
2 Touch OK. The place is saved in Favorites.
Saving Your Current Location
1 Touch View Map.
2 Touch the vehicle icon
3 Touch Save Location.
.
Setting a Home Location
You can set a Home Location for the place you
return to most often.
1 Touch Where To? > Go Home.
2 Select an option.
• Enter My Address—enter an address for the location
using the on-screen keyboard.
• Use My current location—set your current location as
your Home Location.
• Choose from Recently Found—select a location from
your recently found locations.
After you set your Home Location, touch Where
To? > Go Home.
English 9
Page 10

Favorites
Viewing Saved Places
1 Touch Where To?.
2 Touch Favorites.
3 Touch a category.
Editing Saved Places
1 Touch Where To? > Favorites.
2 Touch the location you want to edit.
3 Touch Press for More.
4 Touch Edit.
5 Touch the item you want to edit.
• Change Name—enter a new name for the location
using the on-screen keyboard.
• Change Map Symbol—touch a new symbol.
• Change Phone Number—enter a phone number.
• Change Categories—create or change the category in
which this location is saved.
Deleting a Favorite
1 Touch Tools > My Data.
2 Touch Delete Favorite(s).
3 Select the Favorite to delete.
4 Touch Delete.
10 GPS Navigation Instruction Manual
Page 11
The Main Pages
This section provides details about the Map page, the Trip Computer, the Turn List, Lane assist, and the GPS
Info page.
Viewing the Map Page
Touch View Map to open the map. Touch an
area of the map to see additional information,
as shown below. The vehicle icon shows your
current location.
➋
➊
➌
➍
➏
➎ ➐
➊ Distance to the next turn. Touch to view
and hear next turn details. Lane assistance
also displays in this area.
➋ While navigating a route, touch the text bar
to open the Turn List. See page 12.
➌ Touch to zoom in.
➍ Touch to zoom out.
➎ Touch to change the data field.
➏ Touch to view the Where Am I? page.
➐ Touch the Speed data field to open the Trip
Computer.
⁄
• A speed limit icon may appear as you travel on major
roadways. This icon displays the current speed limit of the
roadway.
Trip Computer
The Trip Computer displays your current speed
and provides helpful statistics about your trip. To
view the Trip Computer, touch the Speed field on
the Map page.
Resetting Trip Information
If you want current and up-to-date trip
information, reset the trip information before
beginning a trip.
From the Trip Computer, touch Reset to
reset the information.
English 11
Page 12
The Main Pages
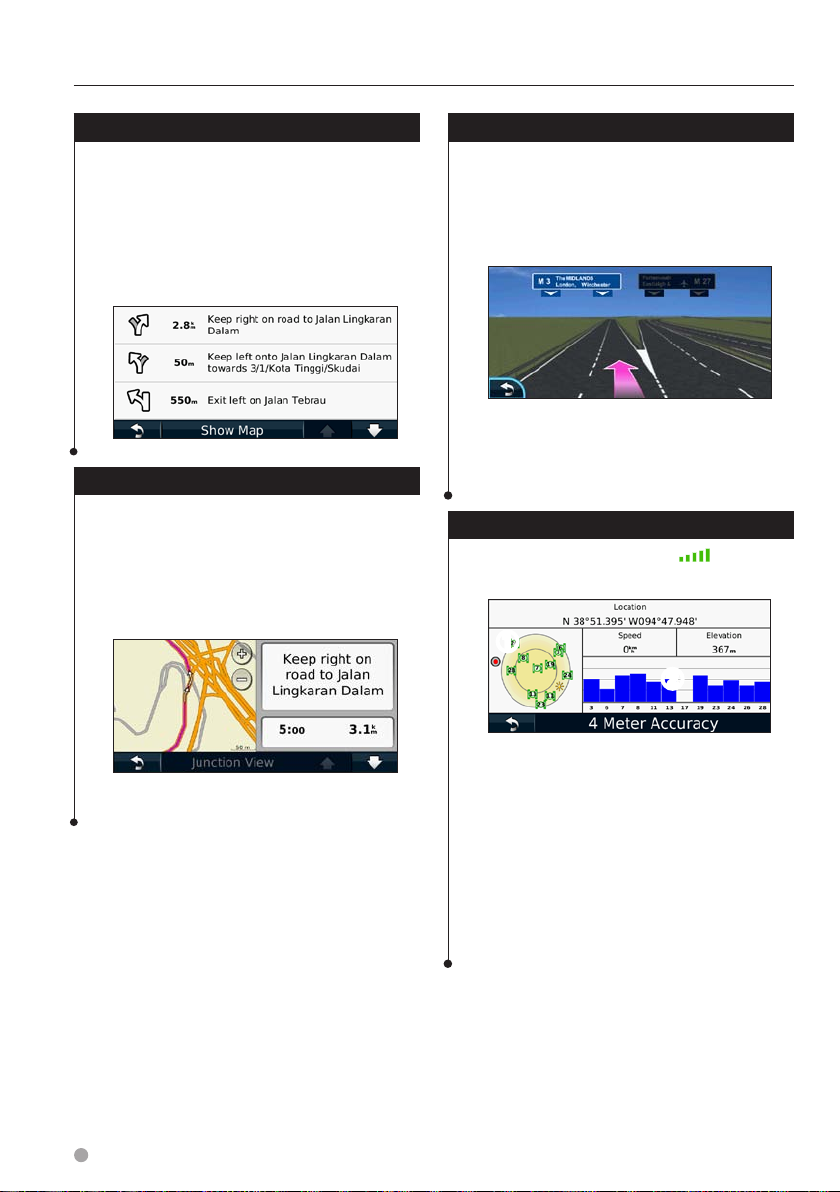
Turn List Page
When you are navigating a route, the Turn List
page displays turn-by-turn instructions for your
entire route and the distance between turns.
Touch the text bar on the top of the Map page to
view the Turn List page. Touch a turn on the list
to view the Next Turn page for that turn. Touch
Show Map to view the entire route on the map.
Next Turn Page
When you are navigating a route, the Next Turn
page shows the turn on the map and the distance
and time left before you reach the turn. To view
an upcoming turn on the map, touch the upperleft corner of the Map page, or touch any turn on
the Turn List page.
About Junction View
When available, the Lane Assist page may
display a view of the upcoming junction and
in which lane you should be driving. You must
be navigating a route before you can view the
junction.
⁄
• You can also view junctions from the Turn List page.
• The Lane Assist page is not available in all map areas.
GPS Info Page
From the Nav Menu page, touch in the
upper-left corner to view the GPS Info page.
➊
➋
12 GPS Navigation Instruction Manual
➊ Sky view
➋ Satellite signal-strength bars
The sky view shows the satellites you are
receiving. The satellite signal-strength bars
indicate the strength of each satellite you are
receiving. A solid bar indicates that the GPS
satellite is ready for use.
Page 13

Creating and Editing Routes
This section describes how to create and customize your routes.
Creating a New Custom Route
1 Touch Where To? (or Tools) > Routes > New.
2 Touch Add New Start Point.
3 Find a location for your starting point, and
touch Select.
4 Touch Add New End Point.
5 Find a location for your ending point, and
touch Select.
6 Touch + to add another location to your
route. Touch – to remove a location.
7 Touch Next to calculate your route and
view it on the map. Touch Save to save
your changes.
Editing Custom Routes
1 Touch Where To? (or Tools) > Routes.
2 Select the route you want to edit.
3 Touch Edit.
4 Touch the item to edit.
• Change Name—enter a new name.
• Add or Remove Points—add or remove points from
the route.
• Manually Reorder Points—change the order of points
along your route.
• Optimally Reorder Points—automatically order the
points.
• Recalculate—recalculate the route.
• Delete—remove this route.
Your changes are saved automatically when you
exit any of the route edit pages.
Saving and Modifying the Active Route
1 Touch Where To? (or Tools) > Routes.
2 Touch Active Route.
3 Touch Add or Remove Points.
4 Add, remove, or reorder the points.
5 Touch Next.
6 Touch Save.
Navigating a Saved Route
1 From the Main page, touch Where To? (or
Tools) > Routes.
2 Touch the route you want to navigate, and
touch Go!.
Deleting All Saved Routes
Touch Tools > My Data > Delete Selected
Route(s) > Select All > Delete.
Stopping Your Route
With a route active, touch > Stop.
English 13
Page 14

Creating and Editing Routes
Adding a Detour to a Route
If a road on your route is closed or congested
with traffic, you can take a detour.
1 With a route active on the Main Map,
touch
2 Touch Detour.
The navigation system attempts to get you back
on your original route as quickly as possible. If
the route you are currently taking is the only
reasonable option, the navigation system might
not calculate a detour.
.
Using Multiple Route Preview
⁄
• See page 18 to enable multiple route preview with Route
Preferences.
1 Select a point of interest (page 5).
A map appears with Faster Time, Shorter
Distance, and Less Fuel routes highlighted.
2 Select a route, and touch Go!.
14 GPS Navigation Instruction Manual
Page 15

Using ecoRoute™
The ecoRoute feature calculates your vehicle fuel economy, carbon footprint, and the fuel price of
navigating to a destination, and offers tools for improving fuel efficiency.
About ecoRoute
The data provided by the ecoRoute feature is
only an estimate. The data is not actually read
from your vehicle. To receive more-accurate
fuel reports for your specific vehicle and driving
habits, calibrate the fuel economy.
Creating a Vehicle Profile
The vehicle profile provides a basis for ecoRoute
to calculate your vehicle fuel economy.
1 Touch Tools > ecoRoute.
2 Enter the required information, and touch
Next.
3 Touch Done.
Resetting Your Vehicle Profile
1 Touch Tools > ecoRoute > Vehicle Profile.
2 Touch Reset.
Calibrating Fuel Economy
Use this feature when you refuel to maintain an
accurate fuel economy.
1 Touch Tools > ecoRoute > At the Pump.
2 Enter the current fuel price.
4 Enter the distance you have traveled since
the last fill up.
5 Touch Next.
Taking the ecoChallenge
The ecoChallenge helps you maximize your fuel
economy by scoring your driving habits. The
higher your ecoChallenge scores, the more fuel
you save. The ecoChallenge collects data and
calculates a score whenever you are moving.
The ecoChallenge
icon displays your current
score on the map.
Touch Tools > ecoRoute > ecoChallenge.
⁄
• To view detailed ecoChallenge scores, touch the icon.
The leaf color on the driving challenge icon changes
depending on your performance in the challenge.
About ecoChallenge Scores
• Overall—a combination of the speed, acceleration, and
braking score.
• Speed—gain points for driving at your vehicle optimal
speed for conserving fuel (72-97 km/h mph for most
vehicles).
• Acceleration—gain points for smooth acceleration; lose
points for rapid acceleration.
• Braking—gain points for smooth braking; lose points for
hard braking.
• Fuel Economy—ecoRoute compares your current fuel
economy with the highest fuel economy recorded for
your vehicle. Gain points for driving at the optimal fuel
economy for your vehicle.
3 Enter how much fuel your vehicle has used
since the last fill up.
English 15
Page 16

Using ecoRoute
Hiding Your ecoChallenge Score
1 Touch Tools > ecoRoute > ecoChallenge.
2 Touch Settings > Hide.
3 Touch OK.
Resetting Your Score
You can restart your current ecoChallenge.
While viewing the current ecoChallenge
details, touch Reset > Yes.
Viewing Your Fuel Economy
1 Touch Tools > ecoRoute > Fuel Economy.
The graph along the bottom shows your
average fuel economy for a period of
driving time.
2 Touch a section of the graph to zoom in.
3 Touch Reset to clear the fuel economy
data.
About the Mileage Report
A mileage report tracks the distance, the time,
the average fuel economy, and the fuel cost of
navigating to a destination.
A mileage report is created for every route that
you drive. If you stop a route on the device, a
mileage report is created for the distance you
traveled.
Mileage reports are created automatically when
you stop or complete routes.
Viewing a Mileage Report
You can view the 20 most-recent mileage reports.
1 Touch Tools > ecoRoute > Mileage Report.
2 Select a report.
• To reset all report data, touch Reset.
16 GPS Navigation Instruction Manual
Page 17

Exporting a Mileage Report
1 Insert a memory card in your Kenwood
unit.
2 Touch Tools > ecoRoute > Mileage Report.
3 Touch Export to export and save the
reports to the memory card.
Viewing Driving Tips
Touch Tools > ecoRoute > Tips.
Setting Routes that Use Less Fuel
1 Touch Tools > Settings > Navigation >
Route Preference.
2 Select Less Fuel.
English 17
Page 18

Customizing the Settings
You can customize the settings of your GPS navigation system.
Customizing the Navigation System
1 Touch Settings.
2 Touch the setting you want to change.
3 Touch the button below the setting name
to change it.
Changing the System Settings
Touch Settings > System.
• GPS Simulator—enable the simulator to turn off the
GPS mode and simulate navigation.
• Units—change the units of measure.
• Keyboard Layout—select keyboard layout.
• About—display the software version number, the unit
number, and the unit ID number.
• Restore—restore the original system settings.
Changing the Map Settings
Touch Settings > Map.
• Map Detail—adjust the amount of detail shown on the
map. More detail may cause the map to redraw slower.
• Map View—select a map perspective.
• Vehicle—touch Change to change the icon used to
display your position on the map. Touch the icon you
want to use, and touch OK.
• Trip Log—show or hide the log of your travels. To clear
your trip log, touch Tools > My Data > Clear Trip Log.
See page 21 to save trip logs.
• Map Data Layout—changes the layout of the main
map.
• Map Info—view the maps loaded on your navigation
system and their version. Touch a map to enable (check
mark) or disable (no check mark) that map.
• Restore—restore the original map settings.
Changing the Navigation Settings
Touch Settings > Navigation.
• Route Preference—select a preference for calculating
your route.
• Avoidances—select the road types you want to avoid or
you would prefer to use on your routes.
• Restore—restore the original navigation settings.
• Voice Prompts—turn voice prompts on or off.
Adjusting the Display Settings
Touch Settings > Display.
• Color Mode—select Day for a light background, Night
for a dark background, or Auto to automatically switch
between the two.
• Restore—restore the original display settings.
Route Preferences
Touch Settings > Navigation > Route
Preference.
The route calculation is based on road speeds and
vehicle acceleration data for a given route.
• Faster Time—calculates routes that are faster to drive
but can be longer in distance.
• Shorter Distance—calculates routes that are shorter in
distance but can take more time to drive.
• Less Fuel—calculates routes that could use less fuel
than other routes.
• Prompted—prompts you to select a route calculation
mode before navigating (multiple route preview, see
page 14).
• Off Road—calculates a direct line from your location to
your destination.
18 GPS Navigation Instruction Manual
Page 19

Updating the Time Settings
Touch Settings > Time.
• Time Format—select a 12-hour, 24-hour, or UTC time
format.
• Current Time—select Automatic to update the time
automatically. When Automatic is not selected, you can
adjust the time in 15-minute increments.
• Restore—restore the original time settings.
Setting the Languages
Touch Settings > Language.
• Voice Language—select a voice.
• Keyboard—select the keyboard for your language. You
can also change the keyboard language mode from any
keyboard by touching the Mode button.
• Recognition Prompt—turn speech recognition
prompts on or off.
• Restore—restore the original languages.
Adding Security
Touch Settings > Security.
• Safe Mode—turn safe mode on or off. When your
vehicle is moving, safe mode disables all functions that
require significant operator attention and could become
a distraction while driving.
• Restore—restore the original security settings.
English 19
Page 20

Appendix
This appendix provides additional information about your navigation system, such as how to update the
software and map data.
Software License Agreement
BY USING THE DNX7380BT / DNX5380, YOU
AGREE TO BE BOUND BY THE TERMS AND
CONDITIONS OF THE FOLLOWING SOFTWARE
LICENSE AGREEMENT. PLEASE READ THIS
AGREEMENT CAREFULLY.
Garmin grants you a limited license to use the
software embedded in this device (the “Software”)
in binary executable form in the normal operation
of the product. Title, ownership rights, and
intellectual property rights in and to the Software
remain in Garmin.
You acknowledge that the Software is the
property of Garmin and is protected under the
United States of America copyright laws and
international copyright treaties. You further
acknowledge that the structure, organization, and
code of the Software are valuable trade secrets
of Garmin and that the Software in source code
form remains a valuable trade secret of Garmin.
You agree not to decompile, disassemble, modify,
reverse assemble, reverse engineer, or reduce to
human readable form the Software or any part
thereof or create any derivative works based
on the Software. You agree not to export or
re-export the Software to any country in violation
of the export control laws of the United States of
America.
Updating the Software
To update the navigation system software, you
must have a memory card, a memory card reader,
and an Internet connection.
⁄
• The unit may restart when you insert a memory card.
1 Go to www.garmin.com/Kenwood.
2 Find your model and select Software
Updates > Download.
3 Read and accept the terms of the Software
License Agreement.
4 Follow the instructions on the Web site to
complete the installation of the software
update.
Updating the Map Data
You can purchase updated map data from Garmin
or ask your Kenwood dealer or Kenwood service
center for details.
1 Go to www.garmin.com/Kenwood.
20 GPS Navigation Instruction Manual
2 Select Order Map Updates for your
Kenwood unit.
3 Follow the Web site instructions to update
your map.
Page 21

Custom POIs (Points of Interest)
You can manually load custom points of interest
(POI) databases, available from various companies
on the Internet. Some custom POI databases
contain alert information for points such as safety
cameras and school zones. The navigation system
can notify you when you approach one of these
points.
NOTICE
Garmin is not responsible for the consequences of
using the safety camera database or other custom
POI databases, or for the accuracy of the safety
camera or other custom POI database.
After downloading your POI database, use the
Garmin POI Loader to install the POIs onto a
memory card. Use the memory card to load the
POIs. The POI Loader is available at www.garmin
.com/products/poiloader. Refer to the POI Loader
Help file for more information; click Help to open
the Help file.
⁄
• The unit may restart when you insert a memory card.
• Each time you load custom POIs to the navigation
system, any other custom POIs already saved in the
system will be overwritten.
Finding Custom POIs
To view a list of the custom POIs loaded in your
navigation system, touch Where To? > Extras >
Custom POIs.
Deleting Custom POIs
To delete all custom POIs from your navigation
system, touch Tools > My Data > Delete Custom
POI(s). Touch Yes to confirm.
Saving Trip Logs
Trip logs are recorded while you navigate a route.
⁄
• Trip log data is saved as a .gpx file.
1 Insert a memory card in the unit.
2 Touch Tools > My Data > Manage Trip Logs.
3 Select a trip log segment, or View All
Segments.
4 Select Share to export to the memory card.
English 21
Page 22

Page 23

Page 24

For the latest free software updates (excluding map data) throughout the
life of your Garmin products, visit the Garmin Web site at www.garmin.com/Kenwood.
© 2010 Garmin Ltd. or its subsidiaries
Garmin International, Inc.
1200 East 151st Street, Olathe, Kansas 66062, USA
Garmin (Europe) Ltd.
Liberty House, Hounsdown Business Park, Southampton, Hampshire, SO40 9LR, UK
Garmin Corporation
No. 68, Jangshu 2nd Road, Sijhih, Taipei County, Taiwan
www.garmin.com
Part Number 190-01309-90 Rev. A
Garmin® and the Garmin logo are trademarks of Garmin Ltd. or its subsidiaries, registered in
the USA and other countries. ecoRoute™ is a trademark of Garmin Ltd. or its subsidiaries. These
trademarks may not be used without the express permission of Garmin. The Bluetooth® word mark
and logos are owned by the Bluetooth SIG, Inc. and any use of such marks by Garmin is under
license. All other company names and trademarks mentioned or referenced in this documentation
are the properties of their respective owners. All rights reserved.
Page 25

GPS 导航系统
DNX7380BT
DNX5380
GPS 导航说明手册
© B64-4855-08
Page 26

目录
使用入门 4
使用导航系统 4
在需要时获得帮助 4
您要去哪里? 7
搜索另一个位置附近的位置 7
导航!页面选项 7
查找地址 7
通过输入名称查找位置 8
使用屏幕键盘 8
查找其它区域的位置 8
缩小搜索范围 8
我的最爱 9
保存找到的位置 9
保存当前位置 9
设定家的位置 9
查看保存的位置 10
编辑保存的位置 10
删除我的最爱 10
主页面 11
查看地图页面 11
行程数据表 11
重置行程信息 11
转弯列表页面 12
下一转弯页面 12
关于复杂路口导向图 12
GPS 信息页面 12
查找并导航! 5
查找饭店 5
按路线行驶 6
添加途经点 6
绕道行驶 6
停止路线 6
创建和编辑路线 13
新建的定制路线 13
编辑定制路线 13
保存和修改活动路线 13
导航已保存的路线 13
删除所有已保存的路线 13
停止路线 13
向路线添加绕路 14
使用多路线预览功能 14
使用 ecoRoute
关于 ecoRoute 15
创建车辆配置文件 15
重置车辆配置文件 15
校准油耗 15
使用 ecoChallenge 15
关于 ecoChallenge 得分 15
隐藏 ecoChallenge 得分 16
重置得分 16
查看油耗 16
关于里程报告 16
查看里程报告 16
导出里程报告 17
查看驾驶提示 17
设置油耗较少的路线 17
™
15
2 GPS
导航说明手册
Page 27

定制设置 18
定制导航系统 18
更改系统设置 18
更改地图设置 18
更改导航设置 18
调整显示设置 18
选路方式 18
更新时间设置 19
设置语言 19
增加安全 19
附录 20
软件许可协议 20
更新软件 20
更新地图数据 20
定制 POI(兴趣点) 21
查找定制 POI 21
删除定制 POI 21
保存航迹 21
本手册中使用的图标
重要的预防措施旨在避免人身伤害和潜在的危险情况。
特别说明、补充解释、限制事项和参考页面。
手册惯例
提示您“轻触”某物时,是指用手指轻触屏幕上的某个项目。
文本中使用的小箭头 (>) 表示您应轻触一系列项目。例如,如果看到“轻触您要去哪里? >
我的最爱”,表示您应轻触 您要去哪里?,然后轻触我的最爱。
中文
3
Page 28

使用入门
如果是首次使用 Kenwood 导航系统,您需要设置系统。“帮助”菜单提供了其它信息。
警告
有关产品警告和其它重要信息,请参阅《快
速入门指南》中的“安全预防措施和重要
信息”。
⁄
• 本手册中显示的屏幕截图可能与您导航系统中的屏幕
不完全一样。本手册中的图像仅供参考。
使用导航系统
有关完整的音频系统信息,请参阅其它
Kenwood 系统手册。
➊
➋
轻触可访问导航系统。
➊
导航时,这将显示 Kenwood 音频。使用
➋
音频时,这将显示导航信息。
⁄
• 仅在您的手机有蓝牙® 无线技术并且已与导航系统配
对后,才能使用免提电话功能。有关设置和配对说
明,请参阅其它 Kenwood 手册及手机手册。
在需要时获得帮助
轻触工具 > 帮助以获取有关使用导航系统的
更多信息。轻触某个类别以查看相关主题的
信息。
轻触“工具”>“帮助”。
1
2 要通过关键字搜索帮助主题,请轻触
“搜索”。
4 GPS
导航说明手册
Page 29

查找并导航!
“您要去哪里?”页面提供了多种不同的类别,便于您在搜索地址、城市及其它位置时使用。在导航系
统中加载的详细地图包含数百万个兴趣点,如饭店、酒店以及汽车服务等。
查找饭店
1 轻触“您要去哪里?”。
2 选择类别。
3 选择子类别。
5 选择位置。
6 选择“按下获取更多信息”以查看“查看”
页面。
7 轻触“导航!”。
4 选择类型。
中文
5
Page 30

查找并导航!
按路线行驶
在您旅行时,导航系统将通过语音提示、地图
上的箭头以及地图顶部的方向引导您找到目的
地。左上角列出了到下一机动车道的距离。如
果您偏离了原路线,导航系统会重新计算路线
并提供新的指引。
您的路线已经突出显示。
跟着箭头行驶。
添加途经点
您可以在路线中添加一个站点(途经点)。导
航系统将指导您行进至站点,然后到达最终目
的地。
在路线活动的情况下,轻触 (后退图
1
标)>“您要去哪里?”。
2
搜索额外的站点。
3
轻触“导航!”。
4
轻触“增设途经点”将此站点添加在目的地
之前。
如果希望向路线添加多个站点,请编辑当前路
线。请参阅第13 页。
绕道行驶
如果路线上某一道路被关闭,您可以选择绕道
行驶。
在路线活动的情况下,轻触 。
1
2
轻触“绕路”。
导航系统会尝试尽快返回原路线。如果您当前
使用的路线是唯一合理的路线,导航系统可能
不会计算绕行路线。
6 GPS
方格旗标志代表您的目的地。
导航说明手册
停止路线
1 在路线活动的情况下,轻触 。
2
轻触“停止”。
Page 31

您要去哪里?
“您要去哪里?”页面提供了多个不同的类别,您可用它们来搜索位置。
轻触可查看有关此位置的详细信息。
搜索另一个位置附近的位置
您的导航系统会自动搜索当前位置附近的
位置。
1 轻触“您要去哪里?”>“靠近”。
2
选择一个选项:
• 当前位置 — 搜索当前位置附近的位置。
其它城市 — 搜索您输入的城市附近的位置。
•
最近查找记录 — 搜索最近目的地附近的位置。
•
我的最爱 — 搜索最爱的目的地附近的位置。
•
当前路线 — 沿您的路线搜索。
•
目的地 — 搜索当前目的地附近的位置。
•
3 轻触“确定”。
导航!页面选项
轻触搜索结果列表中的某个项目以查看“导
航!”页面。
➊
➋
➌
➎
➏
➐
➍
轻触可呼叫此位置(如果连接了具
➊
有蓝牙无线技术的手机)。
轻触可将此位置保存在“我的最
➋
爱”中。
轻触可创建一条指向此位置的弯
➌
曲路线。
轻触可返回上一页。
➍
➎
轻触 可在 3D(三维)地图和
➏
2D(二维)地图之间切换。
轻触 可旋转 3D 视图中的视角。
➐
查找地址
查找地址的步骤将随导航系统加载的地图不同
而不同。并非所有地图数据都提供邮编搜索
功能。
轻触“您要去哪里?”>“地址”。
1
2
如有必要,轻触“更改州/国家”。
3
轻触“全省范围内搜索”。
或者
轻触“输入城市”。使用键盘输入城市,然
后轻触“完成”。选择城市。
4
输入地址编号,然后轻触“完成”。
5
输入街道名称,然后轻触“完成”。
6
如有必要,在列表中选择正确的街道。
7
如有必要,轻触地址。
中文
7
Page 32

您要去哪里?
通过输入名称查找位置
如果知道要查找的位置的名称,则可以使用屏
幕键盘输入。您还可以输入名称中的字母,以
缩小搜索范围。
轻触“您要去哪里?”>“兴趣点”>“输
1
入名称”。
2
使用屏幕键盘输入名称中的字母。
3
轻触“完成”。
使用屏幕键盘
显示屏幕键盘时,轻触某个字母或数字以将其
输入。
• 轻触 可添加一个空格。
和 可移动光标。
• 轻触
可删除字符,轻触并按住可删除整个条目。
• 轻触
可选择最近键入的字词并将其选定。
• 轻触
模式可更改键盘语言模式。
• 轻触
&?% 可输入特殊字符。
• 轻触
查找其它区域的位置
您可以搜索其它区域的位置,例如其它城市或
目的地附近地点。
在子类别列表中,轻触“靠近”。
1
2
选择其中一个搜索选项。
缩小搜索范围
要缩小搜索范围,您可以在其它城市附近
搜索。
轻触“您要去哪里?”>“靠近”。
1
2
轻触“其它城市”。
3
输入部分名称,然后轻触“完成”。
8 GPS
导航说明手册
Page 33

我的最爱
您可以将自己最喜爱的所有位置保存在“我的最爱”中。您也可以将自己家的位置保存在“我的
最爱”中。
保存找到的位置
1 找到要保存的位置后,轻触“导航!”页面
上的“保存”。
2 轻触“确定”。该位置会保存在“我的最
爱”中。
保存当前位置
1 轻触“查看地图”。
2
轻触车辆图标 。
3 轻触“保存位置”。
设定家的位置
您可以设定最常返回的家的位置。
1 轻触“您要去哪里?”>“回家”。
2
选择一个选项。
• 输入家的地址 — 使用屏幕键盘输入该位置的地址。
使用当前位置 — 将当前位置设为家的位置。
•
从最近查找记录中选择 — 从最近找到的位置中选择
•
一个位置。
设定家的位置后,轻触您要去哪里?> 回家。
中文
9
Page 34

我的最爱
查看保存的位置
1 轻触“您要去哪里?”。
2
轻触“我的最爱”。
3
轻触某个类别。
编辑保存的位置
1 轻触“您要去哪里?”>“我的最爱”。
2
轻触要编辑的位置。
3
轻触“按下获取更多信息”。
4
轻触“编辑”。
5
轻触要编辑的项目。
• 更改名称 — 使用屏幕键盘输入该位置的新名称。
更改地图符号 — 轻触新符号。
•
更改电话号码 — 输入电话号码。
•
更改类别 — 创建或更改保存此位置的类别。
•
删除我的最爱
1 轻触“工具”>“我的数据”。
2
轻触“删除我的最爱”。
3
选择要删除的“我的最爱”。
4
轻触“删除”。
10 GPS
导航说明手册
Page 35

主页面
本部分提供了有关“地图”页面、“行程数据表”、“转弯列表”、“车道辅助系统”和“GPS 信息”
页面的详细信息。
查看地图页面
轻触查看地图以打开地图。轻触地图的某区域
查看更多信息,如下所示。车辆图标 将显示
您当前所在的位置。
➋
➊
➌
➍
➏
➎ ➐
➊ 到下一转弯的距离。轻触可查看并收听
有关下一转弯的详细信息。车道辅助系
统也会显示在此区域。
➋ 导航路线时,轻触文本栏即可打开“转
弯列表”。请参阅第12 页。
➌ 轻触 可放大地图。
➍ 轻触 可缩小地图。
➎ 轻触可更改数据字段。
➏ 轻触可查看“我在哪里?”页面。
➐ 轻触速度数据字段可打开“行程数
据表”。
⁄
• 在主要道路上行驶时,可能出现限速图标 。此图
标显示当前公路的速度限制。
行程数据表
“行程数据表”能够显示当前速度,并提供有
关行程的统计信息。要查看“行程数据表”,
请在“地图”页面上轻触速度字段。
重置行程信息
如果想了解当前和最新的行程信息,请在出发
之前重置行程信息。
在“行程数据表”中,轻触“重置”以重置
信息。
中文
11
Page 36

主页面
转弯列表页面
当导航路线时,“转弯列表”页面可显示整个
路线的路口转弯说明,包括转弯之间的距离。
轻触“地图”页面顶部的文本栏可查看“转弯
列表”页面。轻触列表上的某个转弯,查看该
转弯的“下一转弯”页面。轻触显示地图在地
图上查看整个路线。
下一转弯页面
导航路线时,“下一转弯”页面将显示地图上
的转弯以及到达转弯的距离和时间。要查看地
图上的下一转弯,请轻触“地图”页面的左
上角,或者轻触“转弯列表”页面上的任何
转弯。
关于复杂路口导向图
如果适用,“车道辅助系统”页面将显示下一
个复杂路口的导向图以及您应在哪个车道驾
驶。您必须在看到路口前一直导航路线。
⁄
• 您还可以通过“转弯列表”页面查看路口。
• 并非所有地图区域均提供“车道辅助系统”页面。
GPS 信息页面
在“导航菜单”页面中轻触左上角的 ,以
查看“GPS 信息”页面。
➊
➋
12 GPS
➊ 天空视图
➋ 卫星信号强度栏
天空视图显示了当前接收的卫星。卫星信号强
度栏显示了当前各卫星的接收强度。实心栏表
示该 GPS 卫星可用。
导航说明手册
Page 37

创建和编辑路线
该部分将讲述创建和定制路线的方法。
新建的定制路线
1 轻触“您要去哪里?”(或“工具”)>
“路线” >“新建”。
2
轻触“添加新起点”。
3
查找起点位置,然后轻触“选择”。
4
轻触“添加新终点”。
5
查找终点位置,然后轻触“选择”。
6
轻触“+”以将其它位置添加到路线中。轻
触“–”以删除某位置。
7
轻触“下一步”以计算路线并在地图上查看
该路线。轻触“保存”以保存更改。
编辑定制路线
1 轻触“您要去哪里?”(或“工具”)>
“路线”。
2
选择要编辑的路线。
3
轻触“编辑”。
保存和修改活动路线
1 轻触“您要去哪里?”(或“工具”)>
“路线”。
2
轻触“活动路线”。
3
轻触“添加或移除点”。
4
添加、删除路线点或对其重新排序。
5
轻触“下一步”。
6
轻触“保存”。
导航已保存的路线
1 在主页面上轻触“您要去哪里?”(或“工
具”)>“路线”。
2
轻触要导航的路线,然后轻触“导航!”。
删除所有已保存的路线
轻触“工具”>“我的数据”>“删除选定
的路线”>“全选”>“删除”。
4
轻触要编辑的项目。
• 更改名称 — 输入新的名称。
添加或移除点 — 向路线添加点或从路线移除点。
•
对点手动重新排序 — 更改路线上各个点的顺序。
•
对点进行最优重新排序 — 对路线点自动排序。
•
重新计算 — 重新计算路线。
•
删除 — 删除此路线。
•
退出任何路线编辑页面时,系统均会自动保存
您所做的更改。
停止路线
在路线活动的情况下,轻触 >
“停止”。
中文
13
Page 38

创建和编辑路线
向路线添加绕路
如果路线上某一道路被关闭或发生拥堵,您可
以选择绕道行驶。
在主地图上的路线活动的情况下,
1
轻触 。
2
轻触“绕路”。
导航系统会尝试尽快返回原路线。如果您当前
使用的路线是唯一合理的路线,导航系统可能
不会计算绕行路线。
使用多路线预览功能
⁄
• 请参阅第18 页,通过“选路方式”启用多路线预览
功能。
1 选择兴趣点(第5 页)。
此时将出现一个地图,其中高亮显示“更快
的时间”、“更短的距离”和“较少燃油”
路线。
2
选择路线,然后轻触“导航!”。
14 GPS
导航说明手册
Page 39

使用 ecoRoute™
ecoRoute 功能可计算您的车辆油耗、碳排放量及导航到目的地所需的燃油成本,并可提供一些工具来
降低油耗。
关于 ecoRoute
ecoRoute 功能提供的数据仅为估计值。该数据
与您从车辆实际读取的不同。要针对您的特定
车辆及驾驶习惯获得更为准确的燃油报告,请
校准油耗。
创建车辆配置文件
车辆配置文件提供 ecoRoute 的基本信息,用以
计算车辆油耗。
轻触“工具”>“ecoRoute”。
1
2
输入所需信息,然后轻触“下一步”。
3
轻触“完成”。
重置车辆配置文件
1 轻触“工具”>“ecoRoute”>“车辆配置
文件”。
2
轻触“重置”。
校准油耗
加油后并保持准确的油耗时使用此功能。
4 输入自上次加满油后行驶的距离。
5
轻触“下一步”。
使用 ecoChallenge
ecoChallenge 可对您的驾驶习惯进行评分,从
而帮助您尽可能地省油。ecoChallenge 的得分
越高,您就越省油。ecoChallenge 可在您行驶
时收集数据并计算得分。
地图上的 ecoChallenge
得分。
轻触“工具”>“ecoRoute”>
“ecoChallenge”。
图标显示您当前的
⁄
• 要查看详细的 ecoChallenge 得分,请轻触该图标。
驾驶挑战图标上的叶子颜色将视挑战性能而定。
关于 ecoChallenge 得分
• 总分 — 速度、加速和制动的总得分。
速度 — 以最佳车速驾驶达到节油目的可得分(大多
•
数车辆的车速为 72-97 km/h)。
加速 — 平稳加速得分;快速加速失分。
•
刹车 — 平稳刹车得分;紧急刹车失分。
•
油耗 — ecoRoute 将当前油耗与车辆的最高油耗记录
•
进行比较。以最佳油耗驾驶车辆可得分。
轻触“工具”>“ecoRoute”>“加油”。
1
2
输入当前油价。
3
输入自上次加满油后车辆的耗油量。
中文
15
Page 40

使用 ecoRoute
隐藏 ecoChallenge 得分
1 轻触“工具”>“ecoRoute”>
“ecoChallenge”。
2
轻触“设置”>“隐藏”。
3
轻触“确定”。
重置得分
您可以重启当前的 ecoChallenge。
查看当前的 ecoChallenge 详情时,轻触
“重置”>“是”。
查看油耗
1 轻触“工具”>“ecoRoute”>“油耗”。
底部的图表显示了一段驾驶时间后的平均
油耗。
2
轻触图表的某个部分可放大图表。
3
轻触“重置”可清除油耗数据。
关于里程报告
里程报告记录导航到目的地所需的距离、时
间、平均油耗以及燃油成本。
将为您行驶的每条路线创建一个里程报告。
如果您在设备上停止路线,将为您行驶的距
离创建一个里程报告。
停止或完成路线时,设备会自动创建里程
报告。
查看里程报告
您可以查看最近的 20 个里程报告。
1 轻触“工具”>“ecoRoute”>“里程
报告”。
2
选择一个报告。
• 要重置所有报告数据,请轻触重置。
16 GPS
导航说明手册
Page 41

导出里程报告
1 将存储卡插入 Kenwood 设备。
2
轻触“工具”>“ecoRoute”>“里程
报告”。
3
轻触“导出”,以导出报告并将其保存到存
储卡中。
查看驾驶提示
轻触“工具”>“ecoRoute”>“节能
提示”。
设置油耗较少的路线
1 轻触“工具”>“设置”>“导航”>“选路
方式”。
2
选择“较少燃油”。
中文
17
Page 42

定制设置
您可以定制 GPS 导航系统的设置。
定制导航系统
1 轻触“设置”。
2
轻触要更改的设置。
3
轻触设置名称下面的按钮以进行更改。
更改系统设置
轻触“设置”>“系统”。
• GPS 模拟器 — 启用模拟器以关闭 GPS 模式并模拟
导航。
单位 — 更改测量单位。
•
键盘布局 — 选择键盘布局。
•
关于 — 显示软件版本号、设备编号以及设备 ID 号。
•
恢复 — 恢复原始系统设置。
•
更改地图设置
轻触“设置”>“地图”。
• 地图详细度 — 调整地图上显示的细节量。如果显示
更多细节,可能会导致地图绘制速度慢。
地图视角 — 选择地图视角。
•
交通工具 — 轻触更改可更改用于在地图上显示位置
•
的图标。轻触要使用的图标,然后轻触
里程日志 — 显示或隐藏旅行日志。要清除航迹,请
•
工具 > 我的数据 > 清除航迹。请参阅第21 页,
轻触
以保存航迹。
地图数据布局 — 更改主地图的布局。
•
地图信息 — 查看导航系统上加载的地图及其版本。
•
轻触某个地图即可启用(选中)或禁用(未选中)
该地图。
恢复 — 恢复原始地图设置。
•
确定。
更改导航设置
轻触“设置”>“导航”。
• 选路方式 — 选择计算路线所用的首选项。
回避 — 选择要在路线中避让或首选使用的道路
•
类型。
恢复 — 恢复原始导航设置。
•
语音提示 — 打开或关闭语音提示。
•
调整显示设置
轻触“设置”>“显示”。
• 颜色模式 — 如果背景较亮,则选择白天;如果背景
较暗,则选择
动切换。
恢复 — 恢复原始显示设置。
•
夜间;也可以选择自动在两者之间自
选路方式
轻触“设置”>“导航”>“选路方式”。
路线计算是基于给定路线的道路速度和车辆加
速数据。
• 更快的时间 — 计算驾驶速度较快但距离更长的
路线。
更短的距离 — 计算距离较短但驾驶时间更长的
•
路线。
较少燃油 — 计算比其它路线耗油较少的路线。
•
已提示 — 提示您在导航之前选择路线计算模式
•
(有关多路线预览,请参阅第14 页)。
直线导航 — 计算从当前位置到目的地之间的直线。
•
18 GPS
导航说明手册
Page 43

更新时间设置
轻触“设置”>“时间”。
• 时间格式 — 可选择 12 小时、24 小时或 UTC 时间
格式。
当前时间 — 选择自动可自动更新时间。如果未选
•
择“自动”,则可以 15 分钟为增量调整时间。
恢复 — 恢复原始时间设置。
•
设置语言
轻触“设置”>“语言”。
• 语音语言 — 选择一个语音。
键盘 — 选择适合您语言的键盘。您还可以通过轻触
•
模式按钮,更改任何键盘的键盘语言模式。
识别提示 — 打开或关闭语音识别提示功能。
•
恢复 — 恢复原始语言。
•
增加安全
轻触“设置”>“安全”。
• 安全模式 — 打开或关闭安全模式。车辆移动时,安
全模式会禁用所有要求操作人员高度集中和在驾驶时
会导致分心的功能。
恢复 — 恢复原始安全设置。
•
中文
19
Page 44

附录
本附录提供了有关导航系统的更多信息,例如如何更新软件和地图数据。
软件许可协议
使用该 DNX5380/ DNX7380BT,即表明您同意遵
循以下软件许可协议的条款和条件。请仔细阅
读该协议。
Garmin 授予您有限许可,在正常操作产品时,
可以使用内嵌在本设备中的、以二进制可执行
格式提供的软件(简称“软件”)。Garmin 保
留“软件”中及与“软件”相关的权利、所有
权和知识产权。
您承认该“软件”是 Garmin 的财产且受美国版
权法和国际版权条约的保护。您还承认该“软
件”的结构、组织和代码均为 Garmin 的重要
商业机密,并且源代码格式的“软件”始终是
Garmin 的重要商业机密。您同意不对“软件”
或任何相关部分进行反编译、反汇编、修改、
反向汇编、反向工程或降低其可读性,或以
该“软件”为基础创建任何衍生作品。您同意
不在违反美国出口控制法的情况下,将该“软
件”出口或再出口到任何国家/地区。
更新软件
要更新导航系统软件,必须使用存储卡、存储
卡读卡器和 Internet 连接。
⁄
• 插入存储卡后可能需要重新启动设备。
1 请访问 www.garmin.com/Kenwood。
2
查找您的型号,选择“软件更新”>
“下载”。
3
阅读并接受“软件许可协议”的条款。
4
按照网站上的说明完成更新软件的安装。
更新地图数据
您可以向 Garmin 购买更新的地图数据,或者
向 Kenwood 经销商或 Kenwood 服务中心咨询
详细信息。
1 请访问 www.garmin.com/Kenwood。
2
为您的 Kenwood 设备选择“订购地图
更新”。
3
按照网站上的说明更新您的地图。
20 GPS
导航说明手册
Page 45

定制 POI(兴趣点)
您可以手动加载各公司在互联网上提供的定制
兴趣点 (POI) 数据库。某些定制 POI 数据库中
的位置(例如测速摄像头和学校)包含报警信
息。导航系统将在接近这些位置时通知您。
注意
Garmin 对使用测速摄像头数据库或其它定制
POI 数据库的后果,以及对测速摄像头或其它
定制 POI 数据库的准确性不负任何责任。
下载 POI 数据库后,请使用 Garmin POI Loader
将 POI 安装到存储卡上。使用存储卡加载 POI。
可从 www.garmin.com/products/poiloader 下载
POI Loader。有关详细信息,请参阅 POI Loader
帮助文件;单击
帮助可打开帮助文件。
⁄
• 插入存储卡后可能需要重新启动设备。
• 每次将定制 POI 加载到导航系统时,系统中已保存的
其它定制 POI 将被覆盖。
查找定制 POI
要查看已加载到导航系统的定制 POI 列表,
请轻触您要去哪里?> 其它服务 > 定制兴趣点。
删除定制 POI
要从导航系统删除所有定制 POI,请轻触工具 >
我的数据 > 删除定制兴趣点。轻触是确认。
保存航迹
导航路线的同时会记录航迹。
⁄
• 航迹数据被另存为 .gpx 文件。
1 将存储卡插入设备。
2
轻触“工具”>“我的数据”>“管理
航迹”。
3
选择航迹段,或选择“查看所有段”。
4
选择“共享”导出存储卡。
中文
21
Page 46

Page 47

Page 48

有关 Garmin 产品整个使用周期中最新的免费软件更新(不包括地图数据),
请访问 Garmin 的网站 www.garmin.com/Kenwood。
© 2010 Garmin Ltd. 或其子公司
Garmin International, Inc.
1200 East 151st Street, Olathe, Kansas 66062, USA
Garmin (Europe) Ltd.
Liberty House, Hounsdown Business Park, Southampton, Hampshire, SO40 9LR, UK
Garmin Corporation
No. 68, Jangshu 2nd Road, Sijhih, Taipei County, Taiwan
www.garmin.com
部件号 190-01309-90 版本 A
Garmin® 和 Garmin 徽标是 Garmin Ltd. 或其子公司在美国和其它国家注册的商标。ecoRoute™
是 Garmin Ltd. 或其子公司的商标。没有经过 Garmin 明确许可,不得使用这些商标。蓝牙® 字
标和徽标归 Bluetooth SIG, Inc. 所有,Garmin 使用这些标志前已获得许可。本文档中提及或引
述的所有其他公司名称或商标是其各自所有人的财产。保留所有权利。
 Loading...