


GPS NAVIGATION SYSTEM
DNX7340BT
GPS NAVIGATION
INSTRUCTION MANUAL
© B64-4346-00

Contents
Safety Precautions and Important
Information 4
Find It and Go! 7
Finding a Restaurant 7
Following Your Route 8
Adding a Via Point 8
Taking a Detour 8
Stopping the Route 8
Where To? 9
Searching Near Another Location 9
Go! Page Options 9
Finding an Address 9
Finding a Place by Spelling the Name 9
Using the On-Screen Keyboard 10
Finding Places in a Different Area 10
Narrowing Your Search 10
Getting Started 6
Using the Navigation System 6
Help When You Need It 6
Favorites 11
Saving Places You Find 11
Saving Your Current Location 11
Setting a Home Location 12
Finding Saved Places 12
Editing Saved Places 12
Deleting a Favorite 12
The Main Pages 13
Viewing the Map Page 13
Trip Computer 13
Turn List Page 14
Next Turn Page 14
GPS Info Page 14
Creating and Editing Routes 15
Creating a New Custom Route 15
Editing Custom Routes 15
Saving and Modifying the Active Route 15
Navigating a Saved Route 15
Deleting All Saved Routes 15
Stopping Your Route 15
Adding a Detour to a Route 15
2 GPS Navigation System Instruction Manual
Customizing the Settings 16
Customizing the Navigation System 16
Changing the System Settings 16
Changing the Map Settings 16
Changing the Navigation Settings 16
Adjusting the Display Settings 16
Updating the Time Settings 16
Setting the Languages 16
Adding Security 16
Appendix 17
Updating the Software 17
Updating the Map Data 17
Custom POIs (Points of Interest) 18
Icons Used in This Manual
Important precautions are described to prevent injuries etc.
Special instructions, supplementary explanations, limitations, and reference pages are described.
Manual Conventions
When you are instructed to “touch” something, use your finger to touch an item on the screen.
The small arrows (>) used in the text indicate that you should touch a series of items. For
example, if you see “touch Where To? > Favorites” you should touch Where To?, and then touch
Favorites.
English 3

Safety Precautions and Important Information
Read this information carefully before starting to
operate the Kenwood Car Navigation System and
follow the instructions in this manual. Neither
Kenwood nor Garmin shall be liable for problems
or accidents resulting from failure to observe the
instructions in this manual.
2WARNINGS
To prevent injury or fire, take the following
precautions:
• To prevent a short circuit, never put or leave any
metallic objects (such as coins or metal tools) inside
the unit.
• Do not watch or fix your eyes on the unit screen
when you are driving for any extended period.
• Mounting and wiring this product requires skills
and experience. For safety, leave the mounting and
wiring work to professionals.
Failure to avoid the following potentially
hazardous situations could result in an
accident or collision resulting in death or
serious injury.
When navigating, carefully compare information
displayed on the navigation system to all available
navigation sources, including information from
street signs, visual sightings, and maps. For safety,
always resolve any discrepancies or questions
before continuing navigation.
Always operate the vehicle in a safe manner. Do
not become distracted by the navigation system
while driving, and always be fully aware of all
driving conditions. Minimize the amount of time
spent viewing the navigation system screen while
driving, and use voice prompts when possible.
Do not enter destinations, change settings, or
access any functions requiring prolonged use of
the navigation system controls while driving. Stop
your vehicle in a safe and legal manner before
attempting such operations.
Keep the system volume at a low enough level to
be able to hear outside noises while driving. If you
can no longer hear outside noises, you may be
unable to react adequately to the traffic situation.
This may cause accidents.
The navigation system will not display the correct
current position of the vehicle the first time it is
used after purchase, or if the vehicle battery is
disconnected. GPS satellite signals will soon be
received, however, and the correct position will be
displayed.
Be careful of the ambient temperature. Using the
navigation system at extreme temperatures can
lead to malfunction or damage. Also note that the
unit can be damaged by strong vibration, by metal
objects, or by water getting inside the unit.
2CAUTIONS
Failure to avoid the following potentially
hazardous situations may result in injury
or property damage.
The navigation system is designed to provide you
with route suggestions. It does not reflect road
closures or road conditions, traffic congestion,
weather conditions, or other factors that may affect
safety or timing while driving.
Use the navigation system only as a navigational
aid. Do not attempt to use the navigation system
for any purpose requiring precise measurement of
direction, distance, location, or topography.
The Global Positioning System (GPS) is operated
by the United States government, which is solely
responsible for its accuracy and maintenance. The
government system is subject to changes that
could affect the accuracy and performance of all
GPS equipment, including the navigation system.
Although the navigation system is a precision
navigation device, any navigation device can be
misused or misinterpreted and, therefore, become
unsafe.
IMPORTANT INFORMATION
Vehicle Battery Preservation
This navigation system can be used when the
ignition key is turned to ON or ACC. To preserve the
battery, however, it should be used with the engine
running whenever possible. Using the navigation
system for a long time with the engine switched off
can cause the battery to run down.
Map Data Information
One of the goals of Garmin is to provide customers
with the most complete and accurate cartography
that is available to us at a reasonable cost. We use
a combination of governmental and private data
sources, which we identify in product literature and
copyright messages displayed to the consumer.
Virtually all data sources contain some inaccurate
or incomplete data. In some countries, complete
and accurate map information is either not
available or is prohibitively expensive.
Software License Agreement
4 GPS Navigation System Instruction Manual

BY USING THE DNX7340BT, YOU AGREE TO BE
BOUND BY THE TERMS AND CONDITIONS OF THE
FOLLOWING SOFTWARE LICENSE AGREEMENT.
PLEASE READ THIS AGREEMENT CAREFULLY.
Garmin grants you a limited license to use the
software embedded in this device (the “Software”)
in binary executable form in the normal operation
of the product. Title, ownership rights, and
intellectual property rights in and to the Software
remain in Garmin.
You acknowledge that the Software is the property
of Garmin and is protected under the United
States of America copyright laws and international
copyright treaties. You further acknowledge
that the structure, organization, and code of the
Software are valuable trade secrets of Garmin and
that the Software in source code form remains a
valuable trade secret of Garmin. You agree not to
decompile, disassemble, modify, reverse assemble,
reverse engineer, or reduce to human readable
form the Software or any part thereof or create any
derivative works based on the Software. You agree
not to export or re-export the Software to any
country in violation of the export control laws of
the United States of America.
English 5
➊
➋
➌
Getting Started
➊
➋
➌
The first time you use your Kenwood Navigation System, you need to set up your system. The Help system
provides additional information.
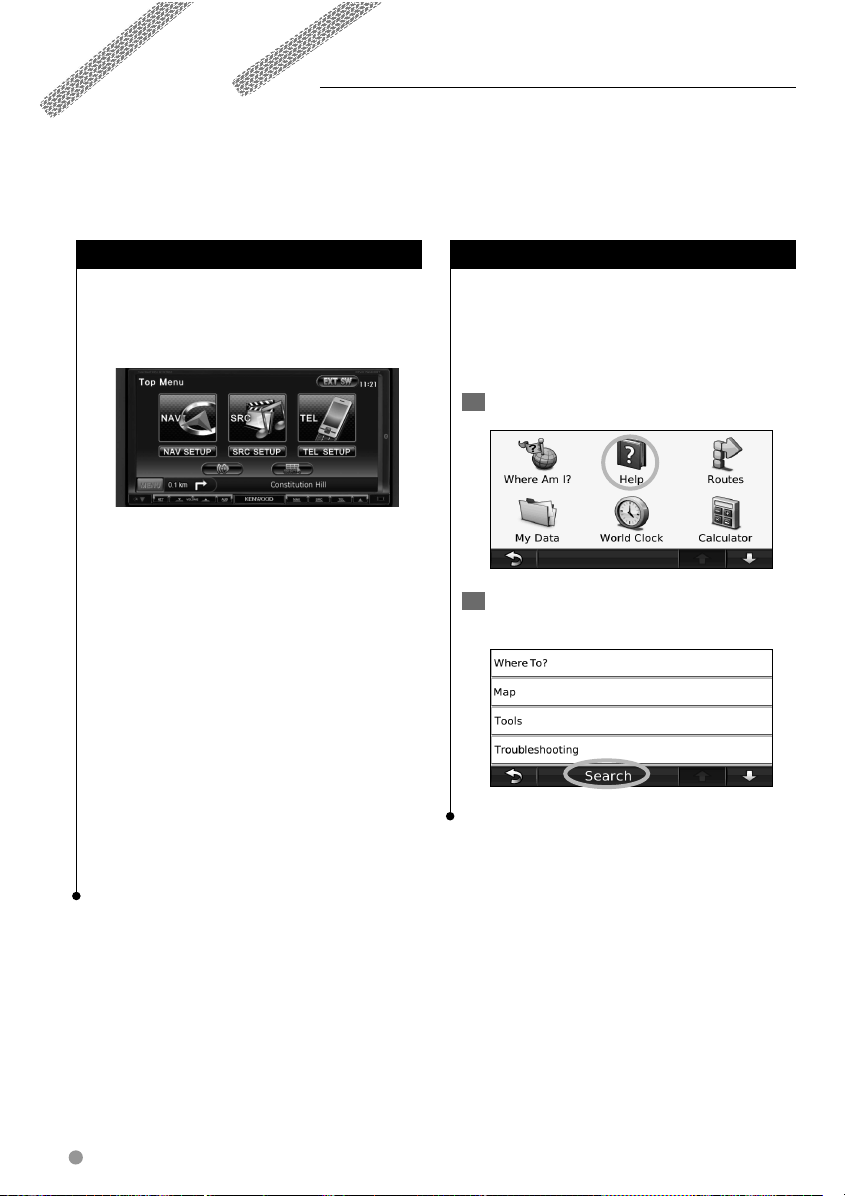
Using the Navigation System
Touch Nav to use the navigation system. To set
up the navigation system, touch Nav Setup. For
complete audio system information, see the other
Kenwood manuals.
➊
➋
➌
Touch to access the navigation system.
➊
Touch to set up the navigation system.
➋
➌
When navigating, this displays Kenwood
audio. When using audio, this displays
navigation information.
⁄
• The screen shots shown in this manual may not exactly
match the screens on your navigation system. The
images used in this manual are intended for reference
only.
⁄
• The Hands-free phone feature is only available if your
mobile phone has Bluetooth wireless technology and has
been paired to the head unit. See the other Kenwood
manuals and your phone manual for setup and pairing
instructions.
Help When You Need It
Touch Too ls > Help to get more information
about using your navigation system. Touch a
category to view information about a topic.
To search the Help topics for a keyword, touch
Search.
1 Touch Tools > Help.
2 To search the Help topics for a keyword,
touch Search.
6 GPS Navigation System Instruction Manual

Find It and Go!
The Where To? page provides several different categories for you to use when searching for addresses,
cities, and other locations. The detailed map loaded in your navigation system contains millions of points of
interest, such as restaurants, hotels, and auto services.
Finding a Restaurant
1 Touch Where To?.
2 Select a category.
3 Select a subcategory.
5 Touch a place.
6 Touch Go!, or touch Press for more to see
the Review page.
4 Select a destination.
English 7

Find It and Go!
Following Your Route
Your route is marked with a magenta line. As you
travel, your navigation system guides you to your
destination with voice prompts, arrows on the
map, and directions at the top of the map. The
upper left corner indicates the distance to your
next maneuver. If you depart from the original
route, your navigation system recalculates the
route and provides new directions.
Your route is marked with a highlighted line.
Follow the arrows.
Adding a Via Point
You can add a stop (Via Point) to your route. The
navigation system gives you directions to the
stop and then to your final destination.
1 With a route active, touch (back icon) >
Where To?.
2 Search for the extra stop.
3 Touch Go!.
4 Touch Add As a Via Point to add this stop
before your destination.
If you want to add more than one stop to the
route, edit the current route. See page 15.
Taking a Detour
If a road on your route is closed, you can take a
detour.
1 With a route active, touch .
2 Touch Detour.
The navigation system attempts to get you back
on your original route as quickly as possible. If
the route you are currently taking is the only
reasonable option, the navigation system might
not calculate a detour.
A checkered flag marks your destination.
8 GPS Navigation System Instruction Manual
Stopping the Route
1 With a route active, touch .
2 Touch Stop.

➍
➌
➋
➊
➎
➊
➋
➌
➍
➎
Where To?
The Where To? page provides several different categories you can use to search for locations.
Searching Near Another Location
Your navigation system automatically searches for
places near your current location.
1 Touch Where To? > Near.
2 Select an option:
• Where I Am Now—search near your current location.
•
A Different City—search near the city you enter.
•
My Current Route—search along your route.
•
My Destination—search near your current destination.
3 Touch OK.
Go! Page Options
Touch an item in the search results list to view the
Go! page.
➊
➋
➌
➍
Touch to call this location, if a mobile
➊
phone with Bluetooth wireless technology
is connected.
Touch to save this location to your Favorites.
➋
Touch to create a turn-by-turn route to this
➌
location.
Touch to return to the previous page.
➍
➎
Touch Press for more to view more
information about the location.
➎
Finding an Address
The steps to find an address can vary depending
on the maps that are loaded on your navigation
system. Not all map data provides postal-code
searching.
1 Touch Where To? > Address.
2 Touch Change State or Country, if
necessary.
3 Touch Search All.
OR
Touch
4 Enter the number of the address, and
5 Enter the street name, and touch Done.
6 Select the correct street in the list, if
7 Touch the address, if necessary.
Finding a Place by Spelling the Name
If you know the name of the location you are
looking for, you can spell it using the on-screen
keyboard. You can also enter letters contained in
the name to narrow the search.
Spell City. Enter the city using the
keyboard, and touch Done. Select the city.
touch Done.
necessary.
1 Touch Where To? > Points of Interest >
Spell Name.
2 Using the on-screen keyboard, enter
letters in the name.
3 Touch Done.
English 9

Where To?
Using the On-Screen Keyboard
When an on-screen keyboard appears, touch a
letter or number to enter it.
• Touch to add a space.
• Touch
• Touch
• Touch
• Touch
• Touch
and to move the cursor.
to delete the character, or touch and hold to
delete the entire entry.
to select words you have recently typed and
selected.
to change the keyboard language mode.
to enter special characters.
Finding Places in a Different Area
You can search for locations in a different area,
such as a different city or near your destination.
1 From the subcategories list, touch Near.
2 Select one of the search options.
Narrowing Your Search
To narrow your search, you can spell part of the
name of the location you are searching for.
1 Touch Where To? > Near.
2 Touch A Different City.
3 Enter part of the name, and touch Done.
10 GPS Navigation System Instruction Manual

Favorites
You can save all of your favorite places in Favorites. You can also save your home location in Favorites.
Saving Places You Find
1 After you have found a place you want to
save, touch Save on the Go! page.
2 Touch OK. The place is saved in Favorites.
Saving Your Current Location
1 Touch View Map.
2 Touch .
3 Touch Save Location to save your current
location.
English 11

Favorites
Setting a Home Location
You can set a Home Location for the place you
return to most often.
1 Touch Where To? > Go Home.
2 Select an option.
• Enter Address—enter an address for the location using
the on-screen keyboard.
•
Use my current location—sets your current location as
your Home Location.
•
Choose from Recently Found—select a location from
your recently found locations.
After you set your Home Location, touch Where
To? > Go Home.
Finding Saved Places
1 Touch Where To?.
2 Touch Favorites.
3 Touch a category. Your saved locations are
listed.
Editing Saved Places
Deleting a Favorite
1 Touch Tools > My Data.
2 Touch Delete Selected Favorites.
3 Select the Favorite to delete. Touch Select
All to delete all Favorites.
4 Touch Delete.
1 Touch Where To? > Favorites.
2 Touch the location you want to edit.
Touch Edit.
3
4 Touch the item you want to edit.
• Change Name—enter a new name for the location
using the on-screen keyboard.
•
Change Map Symbol—touch a new symbol.
•
Change Phone Number—enter a phone number, and
touch Done.
•
Change Categories—create or change the category in
which this location is saved.
• Delete—touch Ye s to remove this item from the
Favorites list.
12 GPS Navigation System Instruction Manual

The Main Pages
➍
➌
➋
➊
➐➐➏
➎
➊
➋
➌
➍
➎
➏
➐
This section provides details about the Map Page, the Trip Computer, the Turn List, and the GPS Info Page.
Viewing the Map Page
Touch View Map to open the map. Touch an
area of the map to see additional information,
as shown below. The vehicle icon shows your
current location.
➋
➏
➌
➍
➊
➎
➊ Distance to the next turn. Touch to view
and hear next turn details.
➋ While navigating a route, touch the text bar
to open the Turn List. See page 14.
➌ Touch to zoom in.
➍ Touch to zoom out.
➎ Touch to change the data field.
➏ Touch the Speed data field to open the Trip
Computer.
➐ Touch to view the Where Am I? page.
⁄
• A speed limit icon may appear as you travel on major
roadways. This icon displays the current speed limit of the
roadway.
Trip Computer
The Trip Computer displays your current speed
and provides helpful statistics about your trip. To
view the Trip Computer, touch the Speed field on
the Map page.
Resetting Trip Information
If you want accurate trip information, reset
the trip information before beginning a trip.
Touch
Reset to reset the information on the Trip
Computer page.
English 13

➋
➊
➊
➋
The Main Pages
Turn List Page
When you are navigating a route, the Turn List
page displays turn-by-turn instructions for your
entire route and the distance between turns.
Touch the text bar on the top of the Map page to
view the Turn List page. Touch a turn on the list
to view the Next Turn page for that turn. Touch
Show Map to view the entire route on the map.
Next Turn Page
When you are navigating a route, the Next Turn
page shows the turn on the map and the distance
and time left before you reach the turn. To view
an upcoming turn on the map, touch the upper
left corner of the Map page, or touch any turn on
the Turn List page.
GPS Info Page
From the Menu page, touch in the upper left
corner to view the GPS Info page.
➊
➋
➊ Sky view
➋ Satellite signal-strength bars
The sky view shows the satellites you are
receiving. The satellite signal-strength bars
indicate the strength of each satellite you are
receiving. A solid bar indicates that the GPS
satellite is ready for use.
14 GPS Navigation System Instruction Manual

Creating and Editing Routes
This section describes how to create and customize your routes.
Creating a New Custom Route
1 Touch Where To? (or Too l s) > Routes > New.
2 Touch Add New Start Point.
3 Find a location for your starting point, and
touch Select.
4 Touch Add New End Point.
5 Find a location for your ending point, and
touch Select.
6 Touch + to add another location to your
route. Touch – to remove a location.
7 Touch Next to calculate your route and
view it on the map. Touch Save to save
your changes.
Editing Custom Routes
Touch Where To? (or Tools) > Routes.
1 Select the route you want to edit.
2 Touch Edit.
Saving and Modifying the Active Route
1 Touch Where To? (or Tools) > Routes.
2
Touch Active Route.
3 Touch Add/Remove Points.
4 Add, remove, or reorder the points.
5 Touch Next.
6 Touch Save.
Navigating a Saved Route
From the Main page, touch Where To? (or Tools)
> Routes. Touch the route you want to navigate,
then touch Go!.
Deleting All Saved Routes
Touch Tools > My Data > Delete Selected
Route(s) > Select All > Delete.
Stopping Your Route
With a route active, touch Menu. Touch Stop.
3 Touch the item to edit.
• Change Name—enter a new name, and touch Done.
•
Add/Remove Points—add or remove points from the
route.
•
Manually Reorder Points—change the order of points
along your route.
•
Optimally Reorder Points—automatically order the
points.
•
Delete—remove this route.
Your changes are saved automatically when you
exit any of the route edit pages.
Adding a Detour to a Route
If a road on your route is closed, you can take a
detour.
1 With a route active, touch .
2 Touch Detour.
The navigation system attempts to get you back
on your original route as quickly as possible. If
the route you are currently taking is the only
reasonable option, the navigation system might
not calculate a detour.
English 15

Customizing the Settings
This section describes how to customize the settings of your GPS navigation system.
Customizing the Navigation System
1 Touch Settings.
2 Touch the setting you want to change.
3 Touch the button below the setting name
to change it.
Changing the System Settings
Touch Settings > System.
• GPS Simulator—enable the simulator to turn off the
GPS mode and simulate navigation.
• Units—change the units of measure.
• Keyboard Layout—select keyboard layout..
•
About—display the software version number, the unit
number, and the unit ID number.
Restore—restore the original system settings.
•
Changing the Map Settings
Touch Settings > Map.
• Map Detail—adjust the amount of detail shown on the
map. More detail may cause the map to redraw slower.
• Map View—select a map perspective.
• Vehicle—touch Change to change the icon used to
display your position on the map. Touch the icon you
want to use, and then touch OK. Download additional
vehicle icons at www.garmingarage.com.
• Trip Log—show or hide the log of your travels. To clear
your trip log, touch
• Map Data Layout—changes the layout of the main
map.
• Map Info—view the maps loaded on your navigation
system and their version. Touch a map to enable (check
mark) or disable (no check mark) that map.
• Restore—restore the original map settings.
Tools > My Data > Clear Trip Log.
Adjusting the Display Settings
Touch Settings > Display.
• Color Mode—select Daytime for a light background,
Nighttime for a dark background, or Auto to
automatically switch between the two.
•
Restore—restore the original display settings.
Updating the Time Settings
Touch Settings > Time.
• Time Format—select a 12-hour, 24-hour, or UTC time
format.
•
Current Time—select Automatic to update the time
automatically. When Automatic is not selected, you can
adjust the time in 15-minute increments.
•
Restore—restore the original time settings.
Setting the Languages
Touch Settings > Language.
• Voice Personality—select a voice.
•
Keyboard—select the keyboard for your language. You
can also change the keyboard language mode from any
keyboard by touching the
•
Restore—restore the original languages.
Mode button.
Adding Security
Touch Settings > Security.
• Safe Mode—turn safe mode on or off. When your
vehicle is moving, safe mode disables all functions that
require significant operator attention and could become
a distraction while driving.
•
Restore—restore the original security settings.
Changing the Navigation Settings
Touch Settings > Navigation.
• Route Preference—select a preference for calculating
your route.
•
Avoidances—select the road types you want to avoid or
you would prefer to use on your routes.
•
Restore—restore the original navigation settings.
16 GPS Navigation System Instruction Manual

Appendix
This appendix provides additional information about your navigation system, such as how to update the
software and map data.
Updating the Software
To update the navigation system software, you
must either have a Secure Digital (SD™) card, an
SD card reader, and an Internet connection.
⁄
• The unit may restart when you insert an SD card.
To update the navigation software:
1 Go to www.garmin.com/Kenwood. Select
Software Updates > Download.
2 Read and accept the terms of the Software
License Agreement.
3 Follow the instructions on the Web site to
complete the installation of the update
software.
Updating the Map Data
The navigation system will provide periodic
notification at startup when the preloaded maps
are considered out of date. You can purchase an
SD card updated map data from Garmin, or ask
your Kenwood dealer or Kenwood service center
for details.
Updating the Map Data with an SD Card
2 After you receive your new map data SD
card, insert the card into your unit to use
the maps. The navigation system will
automatically recognize and use the maps
on the SD card.
⁄
• The unit may restart when you insert an SD card.
1 Go to www.garmin.com/Kenwood. Select
Order Map Updates, and then follow the
Web site checkout procedure.
English 17

Appendix
Custom POIs (Points of Interest)
You can manually load custom points of interest
(POI) databases, available from various companies
on the Internet. Some custom POI databases
contain alert information for points such as safety
cameras and school zones. The navigation system
can notify you when you approach one of these
points.
CAUTION
Garmin is not responsible for the accuracy or
consequences of using the safety camera or other
custom POI database.
After downloading your POI database, use the
Garmin POI Loader to install the POIs onto an SD
card. Then, you can use the SD card to load the
POIs. The POI Loader is available at
www.garmin.
com/products/poiloader. Refer to the POI Loader
Help file for more information; click Help to open
the Help file.
⁄
• The unit may restart when you insert an SD card.
• Each time you load custom POIs to the navigation
system, any other custom POIs already saved in the
system will be overwritten.
Finding Custom POIs
To view a list of the custom POIs loaded in your
navigation system, touch
Where To? > Extras >
Custom POIs.
Deleting Custom POIs
To delete all custom POIs from your navigation
system, touch Tools > My Data > Custom POIs >
Delete All. Touch Yes to confirm.
18 GPS Navigation System Instruction Manual


For the latest free software updates (excluding map data) throughout the
life of your Garmin products, visit the Garmin Web site at www.garmin.com/Kenwood.
© 2009 Garmin Ltd. or its subsidiaries
Garmin International, Inc.
1200 East 151st Street, Olathe, Kansas 66062, USA
Garmin (Europe) Ltd.
Liberty House, Hounsdown Business Park, Southampton, Hampshire, SO40 9RB, UK
Garmin Corporation
No. 68, Jangshu 2nd Road, Shijr, Taipei County, Taiwan
www.garmin.com
Part Number 190-00969-03 Rev. B
Garmin® and the Garmin logo are registered trademarks of Garmin Ltd. or its subsidiaries and
may not be used without the express permission of Garmin. SD™ is a trademark of the SD
Card Association. All other company names and trademarks mentioned or referenced in this
documentation are the properties of their respective owners. All rights reserved.
 Loading...