

Page 1
DuraVac™ 152
OPERATOR MANUAL AND PARTS LISTOPERATOR MANUAL AND PARTS LIST
OPERATOR MANUAL AND PARTS LIST
OPERATOR MANUAL AND PARTS LISTOPERATOR MANUAL AND PARTS LIST
Kent MODEL 56010923
1/00 revised 11/02 Form Number 56041490
Page 2
A
B
C
D
1 - FORM NO. 56041490 / DuraVac™ 152
Important Safety Instructions ................................................................ 2
Grounding Instructions .......................................................................... 5
Introduction ........................................................................................... 7
Parts and Service.................................................................................. 7
Nameplate............................................................................................. 7
Unpacking the Machine ........................................................................ 7
Know Your Machine .............................................................................. 7
Set-Up and Assembly ........................................................................... 7
Operating the Machine.......................................................................... 8
Using the Wand .................................................................................... 8
After Using the Machine........................................................................ 8
Vacuum Motor Brushes ........................................................................ 8
Maintenance ......................................................................................... 8
Changing the Paper Dust Bag .............................................................. 8
Changing the Cloth Dust Bag ............................................................... 8
Cleaning the Vacuum Inlet Filter ........................................................... 9
Changing the Electrostat Exhaust Filter ................................................ 9
Changing the Brush .............................................................................. 9
Replacing the Belt ................................................................................. 9
Technical Specifications ....................................................................... 9
Bag Housing Parts List .................................................................. 11-12
Brush Housing Parts List ............................................................... 13-14
Wiring Diagram ................................................................................... 15
Page 3

IMPORTANT SAFETY INSTRUCTIONS
When using an electrical appliance, basic precautions should always be followed, including the following:
Read all instructions before using.
This machine is for commercial use, for example in hotels, schools, hospitals, factories, shops and offices other than normal residential
housekeeping purposes.
THIS APPLIANCE IS INTENDED FOR DRY USE ONLY!
DO NOT USE FOR WET FLOOR OR CARPET!
WARNING !
To reduce the risk of fire, electric shock, or injury:
* Do not leave the appliance when it is plugged in. Unplug the unit from the outlet when not in use and before servicing.
WARNING !
To reduce the risk of electric shock, do not use outdoors or on wet surfaces.
* Do not allow to be used as a toy. Close attention is necessary when used by or near children.
* Use only as described in this manual. Use only the manufacturer’s recommended attachments.
* If the appliance is not working as it should be, has been dropped, damaged, left outdoors or dropped into water, return it to a service
center. The machine must not be used if the electrical cord shows any sign of damage. Regularly inspect the cord for damage,
particularly if it has been crushed, shut in a door or run over.
* Do not pull or carry by the cord, use the cord as a handle, or pull the cord around sharp edges or corners. Keep the cord away
from heated surfaces.
* Do not unplug by pulling on the cord. To unplug, grasp the plug, not the cord.
* Do not handle the plug, cord or appliance with wet hands.
* Do not put any object into openings. Do not use with any opening blocked.
* Keep loose clothing, hair, fingers, and all parts of body away from openings and moving parts.
* Do not pick up anything that is burning or smoking, such as cigarettes or matches. Under no circumstances should the machine
be used for picking up hot material. In particular the machine must not be used for cleaning open and closed fireplaces, ovens
or similar that contain warm or glowing ashes.
* Do not use without dust bag and/or filters in place.
* Turn off all controls before unplugging. The plug must always be removed from the socket outlet before starting any service or
repair work of the vacuum cleaner or the cord.
* Avoid vacuuming hard or sharp objects.
* Use extra care when cleaning on stairs.
* The machine must not be used for picking up combustible materials which are health endangering or explosive materials such
as petrol (gasoline), nor should it be used in an explosive atmosphere. The machine must not be used for picking up water, other
liquids or for picking up hazardous - i.e. poisonous dust.
* No changes or modifications of the mechanical, electrical or thermal safety devices should be made.
* When repairing or replacing the cord, the same type of cord as originally supplied with the machine must be used. This cord can
be supplied by KENT.
SAVE THESE INSTRUCTIONS
FORM NO. 56041490 / DuraVac™ 152 - 2
Page 4

INSTRUCTIONS DE SÉCURITÉ IMPORTANTES
Toujours suivre certaines précautions élémentaires lors de l’utilisation d’un appareil électrique.
Lire toutes les instructions avant d’utiliser la machine.
Cette machine est adaptée à l’usage commercial, par exemple dans les hôtels, les écoles, les hôpitaux, les usines, les magasins et
les bureaux.
CET APPAREIL NE DOIT ETRE UTILISE QU’A SEC!
NE PAS UTILISER SUR UNE SURFACE HUMIDE!
AVERTISSEMENT !
Pour réduire les risques d’incendie, de décharge électrique ou de blessures:
* Ne pas abandonner l’appareil s’il est branché. Débrancher l’alimentation secteur quand l’appareil n’est pas utilisé ou avant
l’entretien.
AVERTISSEMENT !
Pour réduire les risques de décharges électriques, ne pas utiliser l’appareil en extérieur ou sur des surfaces humides.
* Cet appareil n’est pas un jouet. Rester attentif quand il est utilisé par ou près des enfants.
* Utiliser l’appareil conformément aux instructions de la notice. Utiliser seulement les accessoires préconisés par le fabricant.
* Ne pas utiliser l’appareil si le cable d’alimentation ou la prise est endommagé. Retourner l’appareil au centre de service après-
vente s’il ne fonctionne pas correctement, s’il est tombé, s’il a été endommagé, s’il a été laissé à l’extérieur ou s’il est tombé dans
l’eau.
* Ne pas tirer ou porter l’appareil par le cable d’alimentation, ou coincer le cable dans une porte ou tirer le cable sur des angles
vifs ou des coins. Ne pas faire passer l’appareil sur le cable. Eloigner le cable des surfaces chaudes.
* Ne pas débrancher l’appareil en tirant sur le cable d’alimentation, mais en saisissant la prise.
* Ne pas manipuler la prise, le cable d’alimentation ou l’appareil avec les mains humides.
* Ne rien introduire dans les ouvertures de l’appareil. Ne pas utiliser l’appareil si l’une des ouvertures est obstruée; éliminer la
poussière, les peluches, les cheveux et tout corps étranger pouvant gêner le flux d’air.
* Eloigner les vêtements amples, cheveux, doigts et toute autre partie du corps des pièces en mouvement et des ouvertures.
* Ne pas aspirer d’objets qui brûlent ou dégagent de la fumée, comme des cigarettes, des allumettes ou des cendres chaudes,
ni de poussières dangereuses pour la santé. Ne pas aspirer d’eau ou des liquides.
* Ne pas utiliser sans sac à poussière et/ou filtre en place.
* Placer toutes les commandes en position d’arrêt avant de débrancher l’appareil.
* Eviter d’aspirer des corps durs ou pointus.
* Etre particulièrement prudent en nettoyant les escaliers.
* Ne pas aspirer de liquides inflammables ou combustibles, telle l’essence, et ne pas utiliser à proximité.
* Eviter d’aspirer des objets durs ou pointus.
* Ne pas modifier les systèmes électriques, mécaniques ou thermiques.
* Remplacer le cable far un cable identique fourni far Kent.
CONSERVER CES INSTRUCTIONS
3 - FORM NO. 56041490 / DuraVac™ 152
Page 5

INSTRUCCIONES IMPORTANTES DE SEGURIDAD
Deben aplicarse ciertas precauciones básicas siempre que se utilice un aparato eléctrico, incluyendo las siguientes:
Lea todas las instrucciones antes de utilizar la máquina.
Esta máquina también es adecuada para el uso profesional, por ejemplo, en hóteles, colegios, hospitales, fábricas, tiendas y oficinas,
que no sean los usos domésticos normales.
¡ESTE APARATO HA SIDO DISEÑADO ÚNICAMENTE PARA SU USO EN SECO!
¡NO UTILICE LA MÁQUINA EN SUELOS O MOQUETAS HÚMEDOS!
¡AVISO !
Para reducir el riesgo de incendio, descarga eléctrica o lesión:
* No deje la máquina conectada a la red. Desenchufe la máquina cuando no se está utilizando y antes de efectuar una revisión.
¡AVISO !
Para reducir el riesgo de una descarga eléctrica, no utilice la máquina al aire libre, ni en superficies húmedas o mojadas.
* No deje que se utilice la máquina como juguete. Debe prestarse una atención especial cuando la maneja o se utiliza cerca de
los niños.
* Siga escrupulosamente las indicaciones de este manual. Utilice únicamente piezas recomendadas por el fabricante.
* No utilice la máquina con el cable o clavija en estado defectuoso. Si el aparato no funciona correctamente, si ha sufrido una caída
o daños, si se ha dejado a la intemperie, o si ha sufrido una inmersión en agua, devuélvalo a un Centro de Servicio. No utilice
la máquina si el cable eléctrico muestra cualquier signo de daño. Inspeccione regularmente el cable por si presente algún daño,
especialmente cuando haya sido aplastado, cogido por una puerta o pisado por un objeto pesado.
* No arrastre o transporte la máquina por el cable. No utilice el cable para dirigir la máquina. Mantenga el cable alejado de bordes
y esquinas que lo podrían dañar. Así mismo, mantenga el cable alejado de fuentes de calor.
* No desenchufe la máquina tirando del cable. Para desenchufar, tire de la clavija, no del cable.
* No toque la clavija, el cable o la máquina con las manos húmedas o mojadas.
* No inserte ningún objeto en las aberturas. No utilice la máquina con ninguna abertura obstruida.
* Mantenga alejado de las aberturas y piezas en movimiento las prendas sueltas, el pelo, los dedos y todas las demás partes del
cuerpo.
* No aspire ningún tipo de objeto que esté ardiendo o que desprenda humo, como cigarrillos o cerillas. Bajo ninguna circunstancia
la máquina podrá ser usada para aspirar materiales calientes. En particular no utilice la máquina para limpiar chimeneas, hornos
o similares con cenizas calientes o incandescentes.
* No utilice la máquina sin tener colocados los filtros y/o la bolsa del polvo.
* Apague todos los controles antes de desenchufar la máquina. La clavija siempre debe ser desenchufada de la red eléctrica antes
de revisar o reparar la máquina o el cable de conexión eléctrica.
* No aspire objetos duros o afilados.
* Tenga un cuidado especial cuando aspirar las escaleras.
* No utilice la máquina para recoger combustible, materiales nocivos para la salud o materiales explosivos como la gasolina,
tampoco debe utilizarse en atmósferas explosivas. No utilice la máquina para aspirar agua u otros líquidos o para aspirar polvo
peligroso, contaminante o tóxico.
* No realice ningún tipo de intervención o modificación en los dispositivos mecánicos, eléctricos o de seguridad térmica de la
máquina.
* Cuando repare o sustituya el cable de conexión eléctrica, utilice el mismo tipo de cable suministrado originalmente con la
máquina. Este cable le puede ser suministrado por KENT.
NO PIERDA ESTAS INSTRUCCIONES
FORM NO. 56041490 / DuraVac™ 152 - 4
Page 6
GROUNDING INSTRUCTIONS
This appliance must be grounded. If it should electrically malfunction, grounding provides a path of least resistance for electric current to reduce
the risk of electric shock. This appliance is equipped with a cord having an equipment-grounding conductor and grounding plug. The plug must be
plugged into an appropriate outlet that is properly installed and grounded in accordance with all local codes and ordinances.
DANGER!
Improper connection of the equipment-grounding conductor can result in a risk of electric shock. Check with a qualified electrician or
service person if you are in doubt as to whether the outlet is properly grounded. Do not modify the plug provided with the appliance.
If it will not fit the outlet, have a proper outlet installed by a qualified electrician.
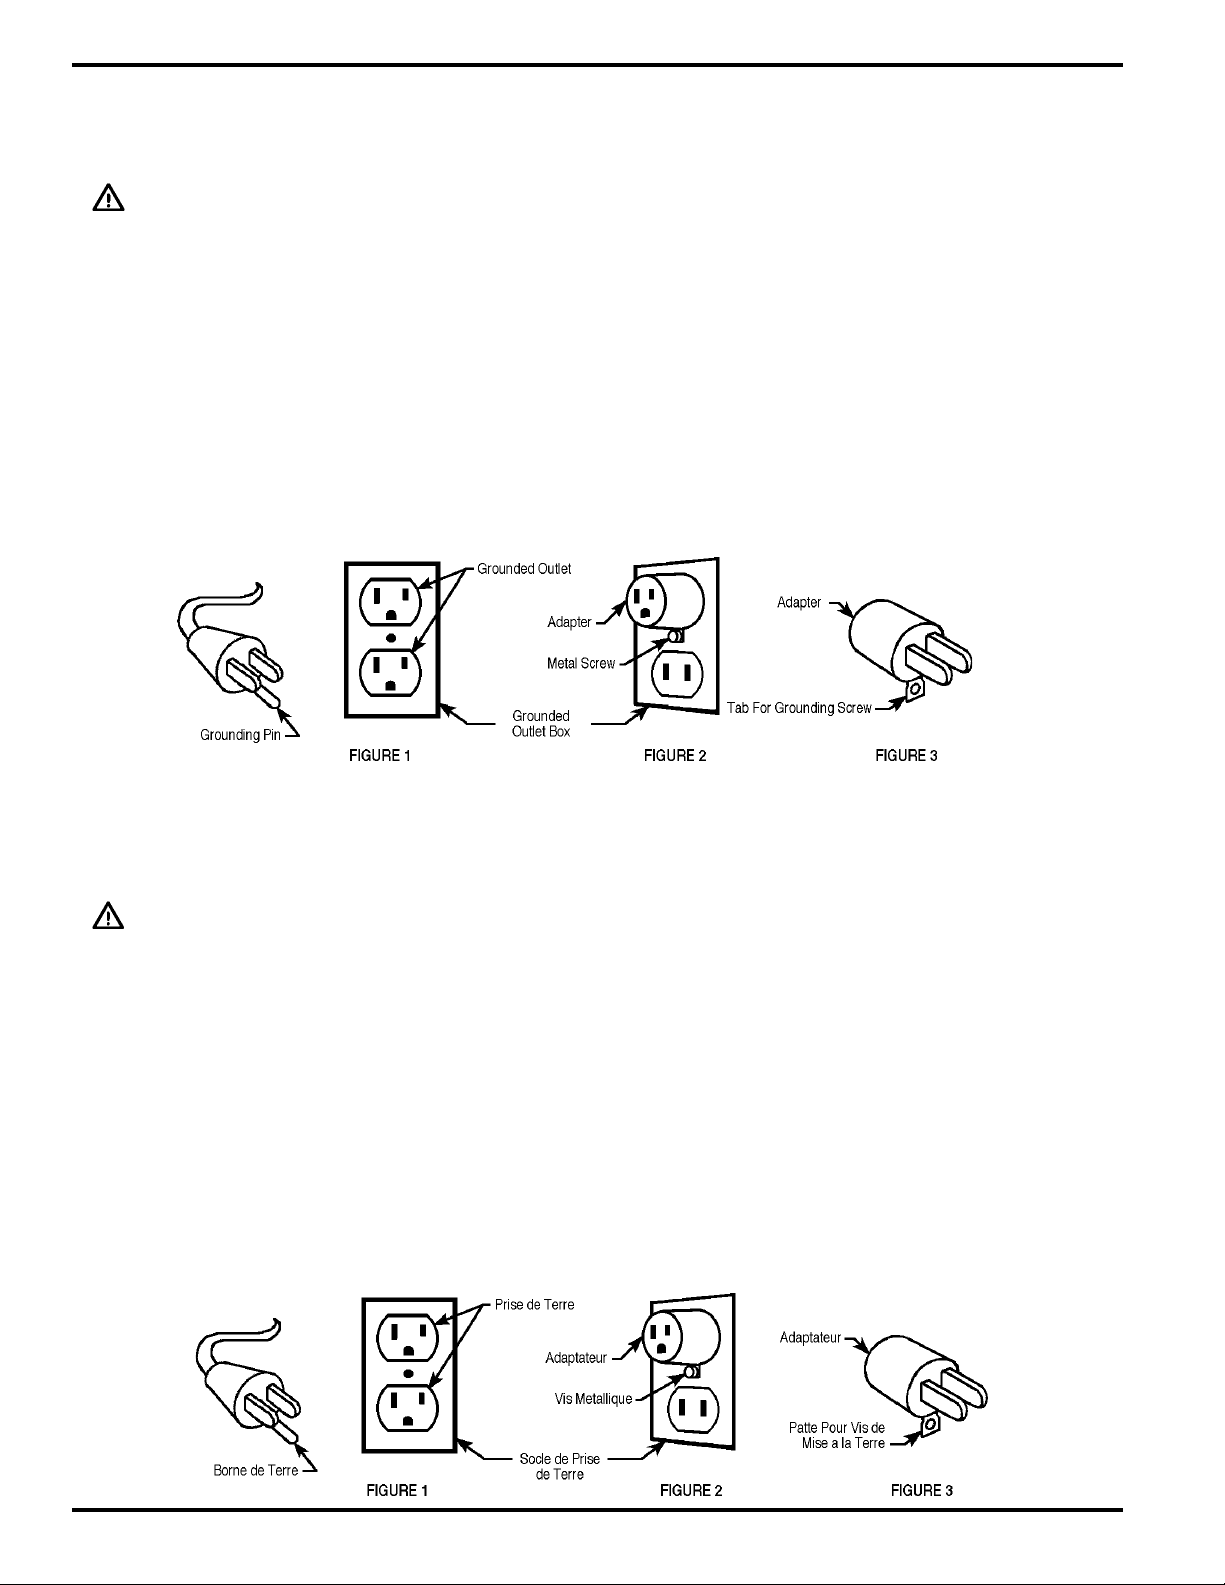
This appliance is for use on a nominal 120-volt circuit, and has a grounding plug that looks like the plug illustrated in Figure 1 below. A temporary
adapter illustrated in Figures 2 and 3 may be used to connect this plug to a 2-pole receptacle as shown in Figure 2 if a properly grounded outlet
is not available. The temporary adapter should be used only until a properly grounded outlet (Figure 1) can be installed by a qualified electrician.
The green-colored rigid ear, tab, or the like extending from the adapter must be connected to a permanent ground such as a properly grounded
outlet box cover. Whenever the adapter is used, it must be held in place by a metal screw. Grounding adapters are not approved for use in Canada.
Replace the plug if the grounding pin is damaged or broken.
The Green (or Green/Yellow) wire in the cord is the grounding wire. When replacing a plug, this wire must be attached to the grounding pin only.
Extension cords connected to this machine should be 12 gauge, three-wire cords with three-prong plugs and outlets. DO NOT use extension cords
more than 50 feet (15 m) long.
PLEASE NOTE: FOR NORTH AMERICA ONLY
INSTRUCTIONS VISANT LA MISE À LA TERRE
Cet appareil doit être mis à la terre. En cas de défaillance ou de panne éventuelles, la mise a la terre fournit au courant un chemin de moindre
résistance qui réduit le risque de choc électrique. Cet appareil est pourvu d’un cordon muni d’un conducteur de terre et d’une fiche avec broche
de terre. La fiche doit être branchée dans une prise appropriee correctement installée et mise à la terre conformément aux règlements et
ordonnances municipaux.
AVERTISSEMENT !
Un conducteur de terre mal raccordé peut entraîner un risque de choc électrique. Consulter un électricien ou un technicien d’entretien
qualifié si vous n’êtes pas certain que la prise est correctement mise à la terre. Ne pas modifier la fiche fournie avec l’appareil - si elle
ne peut être insérée dans la prise, faire installer une prise adéquate par un électricien qualifié.
Cet appareil est destiné à un circuit de 120 V et est muni d’une fiche de terre semblable à celle illustrée par le croquis 1. Un adaptateur temporaire
semblable à celui illustré par le croquis 2 et C peut être utilisé pour brancher cette fiche à une prise bipolaire comme l’illustre le croquis 2 si une
prise avec mise à la terre n’est pas disponible. L’adaptateur temporaire devrait etre utilisé seulement jusqu’à ce qu’une prise avec mise à la terre
soit installée par un électricien qualifié. L’oreille rigide ou le crochet ou autre dispositif semblable, de couleur verte, prolongeant l’adaptateur doit
Iêtre raccordé à un élément correctement mis à la terre comme le couvercle d’une boîte de sortie mise à la terre. L’adaptateur doit être fixé par
une vis métallique. Note: Au Canada, I’utilisation d’un adaptateur temporaire n’est pas autorisée par le Code canadien de l’électricité.
Remplacez la prise si la prise de terre est abîmée ou cassée.
Le fil Vert (ou Vert/Jaune) dans la ganse est le fil de terre. Lors du remplacement d´une prise, ce fil doit être raccordé à la prise de terre uniquement.
Les ralonges connectées à cette machine doivent avoir 12 mesures, trois ganses de fil ayant trois fiches masculines féminines tree-prong plugs
and outlets. N´UTILISEZ PAS de ralonge de plus de 15 m (50 pieds) de long.
VEUILLEZ NOTER: CES INSTRUCTIONS CONCERNENT UNIQUEMENT L’AMÉRIQUE DU NORD
5 - FORM NO. 56041490 / DuraVac™ 152
Page 7
INTRUCCIONES PARA HACER LA TOMA A TIERRA
Este aparato deberá ser conectado a tierra. En caso de malfuncionamiento o de desperfectos, la toma a tierra proporciona una vía de menor
resistencia de la corriente eléctrica para reducir el riesgo de choques eléctricos. Esta unidad viene equipada con un cordón con conductores para
toma a tierra y con un enchufe con toma a tierra. Ese enchufe deberá ser enchufado a un receptáculo en buen estado con instalación a tierra según
los códigos y ordenanzas de la zona.
¡PELIGRO !
Si el conductor a tierra no está instalado correctamente pueden producirse riegos de choques eléctricos. En caso de duda, consulte
con un electricista o personal de servicio autorizados. No modifique el cordón provisto con el aparato. Si no calza en el receptáculo,
llame a un electricista calificado para que coloque un receptáculo adecuado.
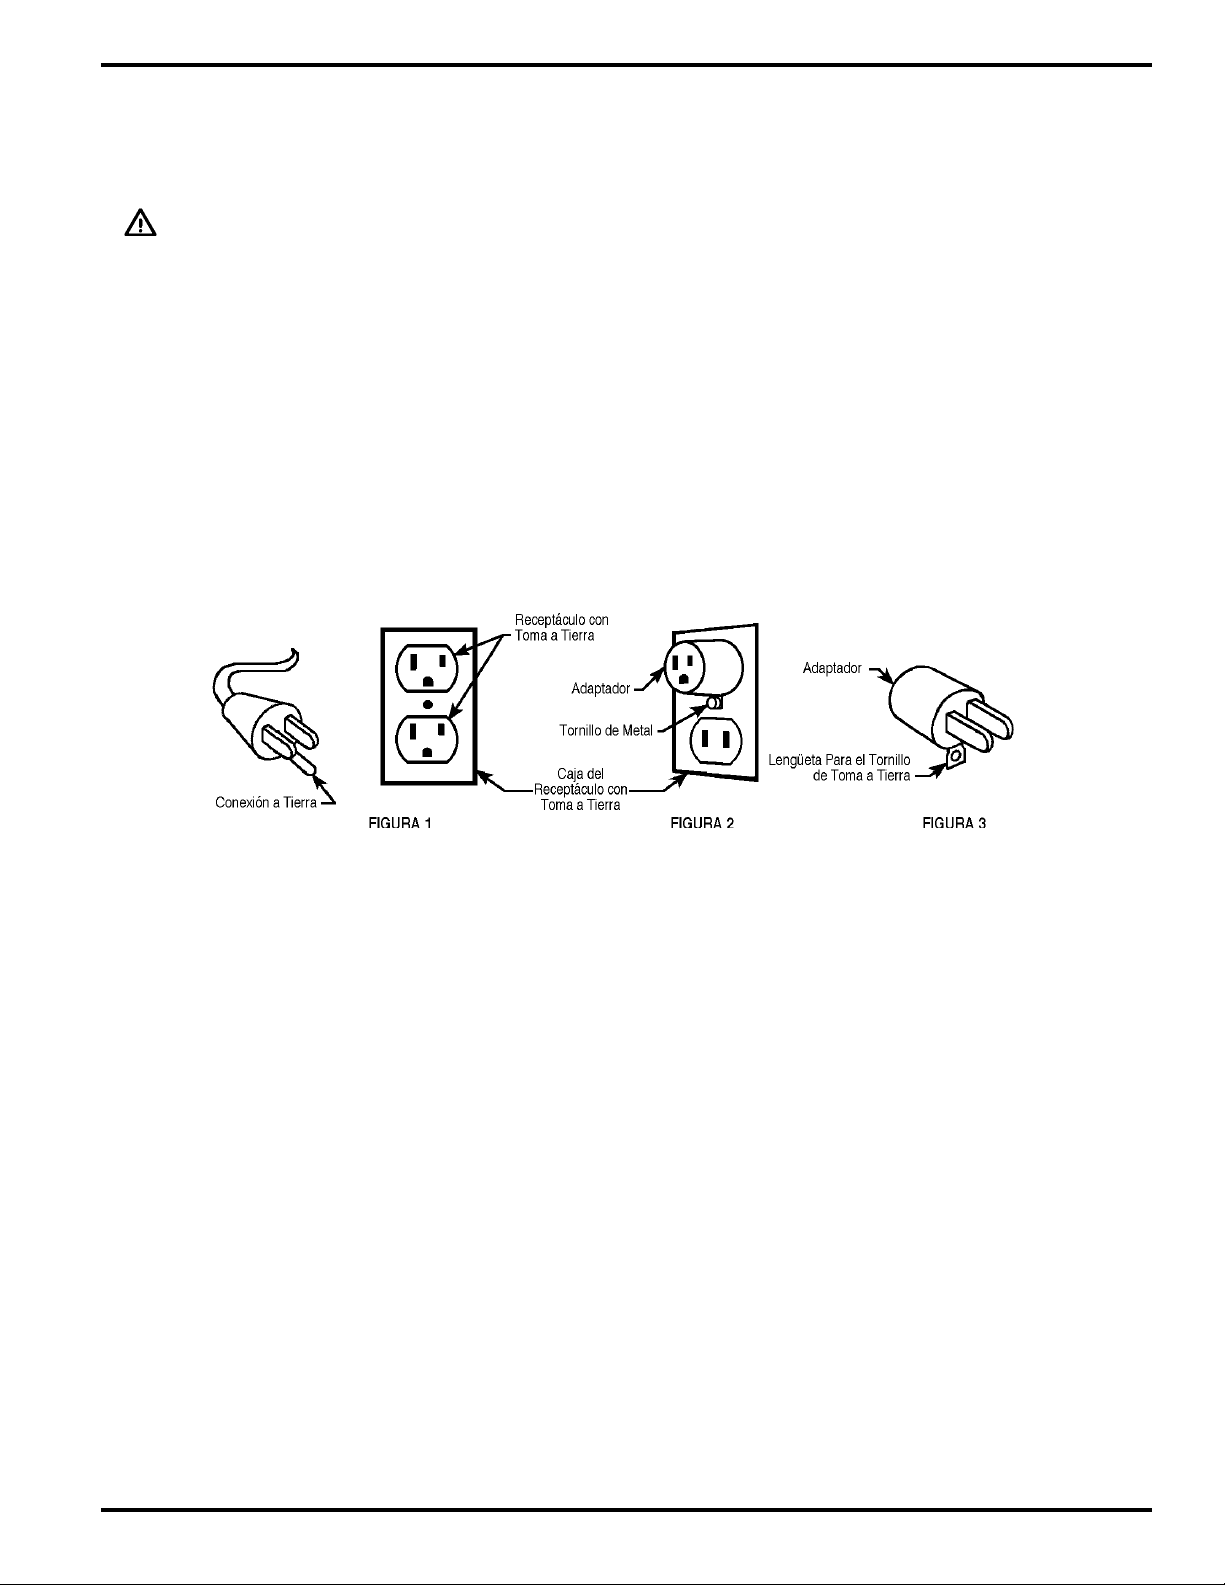
Este aparato se usa con un circuito de 120-voltios nominales, y tiene un enchufe con toma a tierra tal como se muestra en la figura 1, a continuación.
Se puede usar un adaptador provisorio tal como se ve en las figuras 2 y 3 en caso de disponerse de un receptáculo sin toma a tierra como en la
figura 2. Dicho adaptador provisorio se usará solamente hasta que un electricista calificado instale un receptáculo con la toma a tierra
correspondondiente (figura 1). La lengüeta de conexión de color verde que sale del adaptador deberá ser conectada a una toma a tierra permanente
como, por ejemplo, la caja del receptáculo con toma a tierra. Siempre que se use el adaptador, hay que sostenerlo en su lugar con un tornillo de
metal.
Sustituya el enchufe si la patilla de tierra está dañada o rota.
El hilo verde (o verde/amarillo) del cordón es el hilo de tierra. Cuando sustituya el enchufe, este hilo sólo debe ir conectado a la patilla de tierra.
Los cables alargadores conectados a esta máquina deben ser del calibre 12, trifilares, con tres patillas y tomas de pared adecuadas. NO UTILICE
cables alargadores de más de 15 m.
ATENCIÓN : PARA AMÉRICA DE NORTE SOLAMENTE.
FORM NO. 56041490 / DuraVac™ 152 - 6
Page 8

INTRODUCTION
This manual will help you get the most from your Kent DuraVac™. Read
it thoroughly before operating the machine.
Note: Bold numbers in parentheses indicate an item illustrated on
page 1.
This product is intended for commercial use only.
PARTS AND SERVICE
Repairs, when required, should be performed by your Authorized Kent
Service Center, who employs factory trained service personnel, and
maintains an inventory of Kent original replacement parts and accessories.
Call the KENT DEALER named below for repair parts or service. Please
specify the Model and Serial Number when discussing your machine.
(Dealer, affix service sticker here.)
NAME PLATE
The Model Number and Serial Number of your machine are shown on the
Nameplate on the machine. This information is needed when ordering
repair parts for the machine. Use the space below to note the Model
Number and Serial Number of your machine for future reference.
MODEL NUMBER
SERIAL NUMBER
UNCRATE THE MACHINE
When the machine is delivered, carefully inspect the shipping carton and
the machine for damage. If damage is evident, save the shipping carton
so that it can be inspected. Contact the Kent Customer Service
Department immediately to file a freight damage claim.
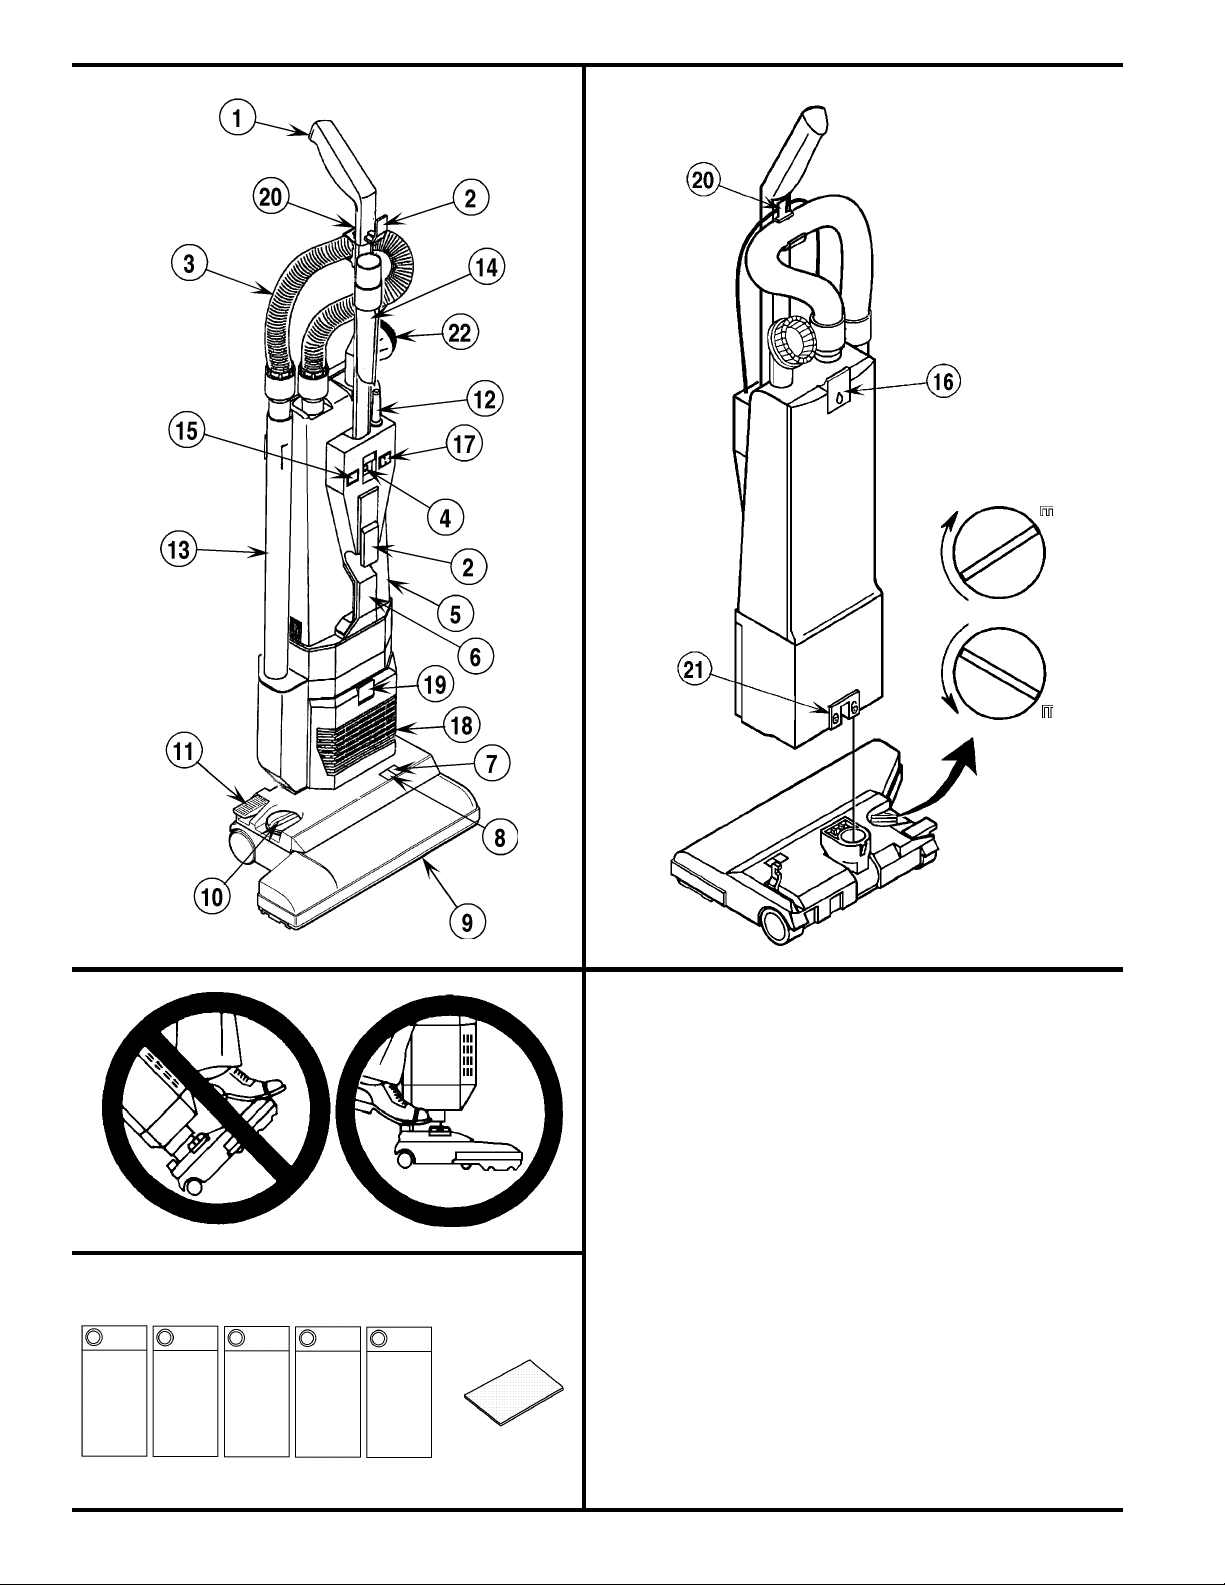
A-KNOW YOUR MACHINE
As you read this manual, you will occasionally run across a bold number
in parentheses - example: (2). These numbers refer to an item shown
on this page. Refer back to this page whenever necessary, to pinpoint
the location of an item mentioned in the text.
1 Handle
2 Cord Hook
3 Vacuum Hose
4 Handle Lock Button
5 Bag Housing
6 Carrying Handle
7 Red Light
8 Green Light
9 Brush Housing
10 Brush Height Adjustment Knob
11 Pedal
12 Power Cord
13 Wand
14 Crevice Tool
15 “Bag Full” Light
16 Bag Housing Latch
17 Main Power Switch
18 Exhaust Filter Cover
19 Filter Cover Latch
20 Power Cord Clamp (Figure B)
21 Locking Latch (Figure B)
22 Dusting Brush
B-SET UP AND ASSEMBLY
1 Carefully remove the machine from its carton.
2 Push the Handle (1) into the opening at the top of the Bag Housing
(5) until the button snaps into the hole between the Switch (17) and
the Bag Full Light (15).
3 Install the Bag Housing (5) on the Brush Housing (9). Slide the
Locking Latch (21) to the left.
4 Measure 15 inches of Power Cord (12) from where it comes out of
the machine. Insert the cord at this point into the Power Cord Clamp
(20).
5 Insert one end of the Vacuum Hose (3) into the top of the vacuum
body and the other end into the extension wand. Insert the wand
into the hole on the right side of the vacuum body and clip onto the
right side of the machine. Snap the Hose (3) into the clip below the
Handle (1).
6 To install a Paper Dust Bag, push the Bag Housing Latch (16) and
remove the back cover. Then follow the instructions printed on the
Paper Dust Bag. Never operate the machine without a Dust Bag
in place.
7 - FORM NO. 56041490 / DuraVac™ 152
Page 9

OPERATING THE MACHINE
1 To release the Power Cord (12) from the Cord Hooks (2), press the
Handle Lock Button (4) in while pushing down on the Handle (1) and
pull the power cord off the hooks. Plug the Power Cord into a
properly grounded electrical outlet.
2 Turn the Main Power Switch (17) ON. “l” is ON and “O” is OFF.
3 Step on the Pedal (11) and tilt the handle back. The Green Light (8)
on the base will come on to indicate that the brush motor is running.
C - IMPORTANT !
Foot pedal must be used to release base to operating position.
Failure to do so could result in damage to the handle release
mechanism.
4 Turn the Height Adjustment Knob (10) to adjust the height of the
brush. If the Red Light (7) comes on, slowly turn the Knob in the
opposite direction until the light goes off.
If the red light stays on continuously, there may be debris wrapped
around the brush. This can cause the overload protector for the
brush motor to trip. If this occurs, turn the Main Switch OFF and
unplug the power cord. Remove any debris from the brush and turn
the Main Switch back ON. This will automatically reset the overload
protector. The machine can also be reset by locking the handle in
the upright position. Remove any debris from the brush and repeat
Step 3. If the overload protector trips repeatedly, or if the red light
stays on continuously, contact Kent for service.
5 Change the bag whenever the “Bag Full” Light (15) comes on.
If the light comes on before the bag is full, the inside of the bag may
be coated with very fine dust (change the bag), or debris may be
built up somewhere between the brush and the bag.
USING THE WAND
To use the Wand (13), put the Handle in the upright locked position. The
brush motor will stop automatically. Slide the Wand out of its holder.
Install the Crevice Tool (14) or Dusting Brush (22) on the end of the
Wand, if desired.
AFTER USING THE MACHINE
1 Unplug the Power Cord from the electrical outlet and wrap it around
the Cord Hooks on the front of the machine.
2 Check to see if the bag is full, replace if necessary. Clean the bag
housing, if necessary.
3 Clean or replace the Vacuum Inlet Filter every third time the bag is
changed. Clean or replace the Electrostat Exhaust Filter every fifth
time the bag is changed.
4 Remove any built-up carpet fibers or debris from the brush housing.
5 Store the machine indoors in a clean, dry place.
VACUUM MOTOR BRUSHES
Have your Kent Dealer check the carbon motor brushes once a year or
after 500 operating hours.
IMPORTANT !
Motor damage resulting from failure to service the carbon brushes
is not covered under warranty. See the Limited Warranty Statement.
MAINTENANCE
CAUTION !
Always disconnect the Power Cord before performing any machine maintenance.
CHANGING THE PAPER DUST BAG
Change the Bag whenever the “Bag Full” Light comes on. To replace the
Paper Dust Bag :
1 Push the Bag Housing Latch (16) in and remove the back cover.
2 Remove the Paper Dust Bag following the instructions printed on
the bag.
3 Install a new Paper Dust Bag following the instructions printed on
the bag.
IMPORTANT !
Never operate the machine without a Dust Bag in place.
CHANGING THE CLOTH DUST BAG
Empty the Bag whenever the “Bag Full” Light comes on. To empty the
Cloth Dust Bag :
1 Push the Bag Housing Latch (16) in and remove the back cover.
2 Remove the Cloth Dust Bag following the instructions printed on the
bag.
3 Remove bag clip and shake out bag contents.
4 Put the bag clip back on the bag.
5 Install the Cloth Dust Bag following the instructions printed on the
bag.
6 Replace the Electrostat Exhaust Filter every fifth time the bag is
changed (more often in very dusty applications).
IMPORTANT !
Never operate the machine without a Dust Bag in place.
FORM NO. 56041490 / DuraVac™ 152 - 8
Page 10

CLEANING THE VACUUM INLET FILTER
The vacuum inlet filter catches any dirt spilled from the bag, before it can
enter the vacuum motor. The filter is located just below the bag. Clean
the filter every third time that the bag is changed (more often in very dusty
applications). To clean the Vacuum Inlet Filter...
1 Push the Bag Housing Latch (16) in and remove the back cover.
2 Slide the Filter Holder out of the bottom of the Bag Housing.
3 Remove the filter and wash it in warm water. Let the filter dry
completely before putting it back into the machine.
IMPORTANT !
Never operate the machine without the Vacuum Inlet Filter in
place.
D-CHANGING THE ELECTROSTAT EXHAUST FILTER
The electrostat exhaust filter catches any dirt that may escape from the
dust bag, vacuum inlet filter, or lower motor filter. The electrostat exhaust
filter is located just below the carrying handle. Replace the filter every
fifth time that the dust bag is changed (more often in very dusty
applications).
To replace the Electrostat Exhaust Filter...
1 Push the Filter Cover Latch (19) in and remove the Electrostat
Exhaust Filter Cover (18).
2 Remove the Filter from the filter holder and insert a new filter in its
place.
3 Snap the Filter Cover back into place.
CHANGING THE BRUSH
1 Remove the bottom cover from the brush housing.
2 Grasp the center of the brush and pull it out of the base.
3 Pull the metal brush support off the brush.
4 Hold the pulley and turn the brush 1/4 turn (clockwise). Pull the
brush off the shaft.
5 Follow the instructions in reverse order to install the new brush.
REPLACING THE BELT
WARNING !
To reduce the risk of electric shock, unplug before servicing.
1 Remove the bottom cover from the brush housing.
2 Grasp the center of the brush and pull it out of the base.
3 Remove the top cover from the brush housing.
4 Remove the old belt from the motor pulley.
5 Install the new belt on the motor pulley.
6 Install the brush with the new belt around the brush pulley.
7 Put the bottom and top covers back on the brush housing.
IMPORTANT !
Never operate the machine without the Electrostat Exhaust Filter
in place.
TECHNICAL SPECIFICATIONS (as installed and tested on the unit)
Model DuraVac™ 152
Voltage V/Hz 120/60
Rated Power W 870
Protection Class (electrical)
Sound Pressure Level dB(A)/20µPa 69
Total Weight lbs / kg 19 / 8.6
Vibrations at the Hand Controls m/s
2
<2.5m/s
2
9 - FORM NO. 56041490 / DuraVac™ 152
Page 11

NOTES
FORM NO. 56041490 / DuraVac™ 152 - 10
Page 12
11 - FORM NO. 56041490 / DuraVac™ 152
Page 13

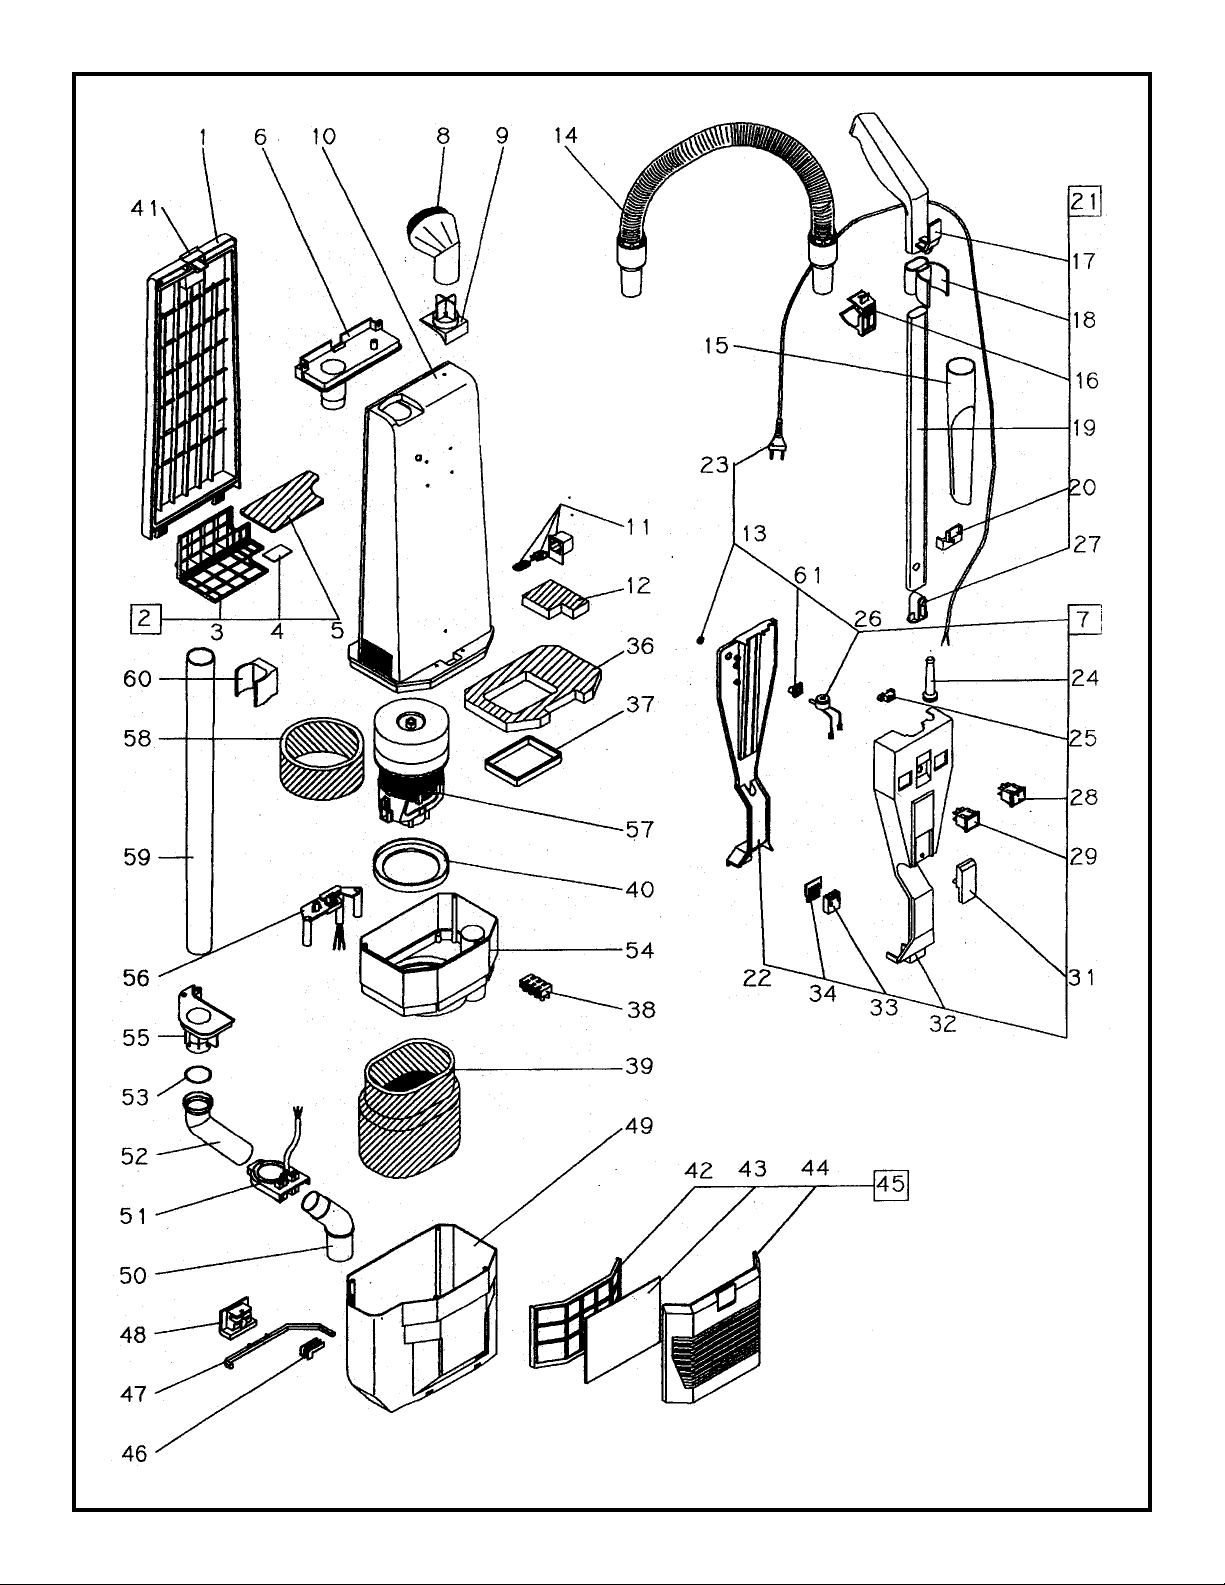
BAG HOUSING
Item Ref. No. Qty Description
1 1412922000 1 Bag Housing Cover
2 56646851 1 Grill, Complete
3 56703712 1 Grill Filter Holder
4 56703714 1 Scented Pad, Pkg. of 10
5 1412926000 1 Internal Filter, Pkg. of 5
6 56703720 1 Bag Entrance
7 1412928000 1 Elec. System Assy.
8 56703785 1 Round Dusting Brush
9 56646858 1 Round Dusting Brush Support
10 1412931000 1 Bag Housing, Complete
11 56703779 1 Valve Kit
12 56646861 1 Valve Filter
13 56703978 1 O-Ring
14 56704216 1 Semi Flexible Hose w/Sleeves
15 56703725 1 Crevice Tool
16 56704208 1 Upper Hook for Flexible Hose
17 56646865 1 Handle Grip (only)
18 56703724 1 Crevice Tool Clip
19 56704221 1 Chromate Tube only
20 1412941000 1 Crevice Tool Support
21 56646869 1 Handle Tube Asm.
22 1412943000 1 Frame Handle
23 56703795 1 Cord, 3 x 18 AWG US Plug
24 56703662 1 Strain Relief
25 56703977 1 Cord Clamp
26 56704159 1 Vacuum Sensor
27 56646875 1 Button+Support+Spring
28 56703708 1 Main Switch
29 56703709 1 Indicator Light
31 56646878 1 Cord Hook
32 56704091 1 Cover Handle
33 56646879 1 Contact Housing, 4 Pos.
34 56646880 1 Contact Cover, 4 Pos.
36 56703706 1 Filter, Exhaust
37 56703705 1 Gasket, Exhaust
38 56703972 1 Terminal Block, 3 Poles
39 56646884 1 Foam Motor Filter
40 56646885 1 Gasket
Item Ref. No. Qty Description
41 1412998000 1 Bag Door Latch+Spring
42 1412961000 1 Filter Holder
43 56646888 1 Exhaust Filter, Pkg. of 5
44 1412963000 1 Exhaust Filter Cover
45 1412964000 1 Complete Grill
46 56703966 1 Blocking Joint Pin
47 56703938 1 Joint Pin
48 56646893 1 Control Pin Slide
49 1412968000 1 Vacuum Motor Housing
50 56646895 1 Lower Curve
51 56646896 1 Curve Support, V.120/60
52 56646897 1 Upper Curve
53 56646898 1 O-Ring
54 1412973000 1 Inner Vacuum Motor Housing
55 56646900 1 Hose Inlet
56 56646901 1 Cord Clamp, V.120/60
57 56704237 1 Motor, V.120/60 (56704168 used prior to SN1501217)
* 56704238 2 Carbon Brush for 56704237 & 56704168 TSBUS2002-829
58 56703775 1 Foam
59 56703771 1 Extension Tube
60 56703726 1 Wand Clip
61 56704160 1 Adapter, Vacuum Sensor
* 56703768 A/R Bag, Paper (pkg of 10)
* 56703769 A/R Cloth Bag W/Clip
* 56320676 A/R Clip, Cloth Bag
* 56703774 A/R Upholstery Tool
* 56703771 A/R Extension Tube, 30mm x 30cm
* 56703772 A/R Tube Bend W/Suction Control
* = Not Shown
revised 11/02
FORM NO. 56041490 / DuraVac™ 152 - 12
Page 14
13 - FORM NO. 56041490 / DuraVac™ 152
Page 15

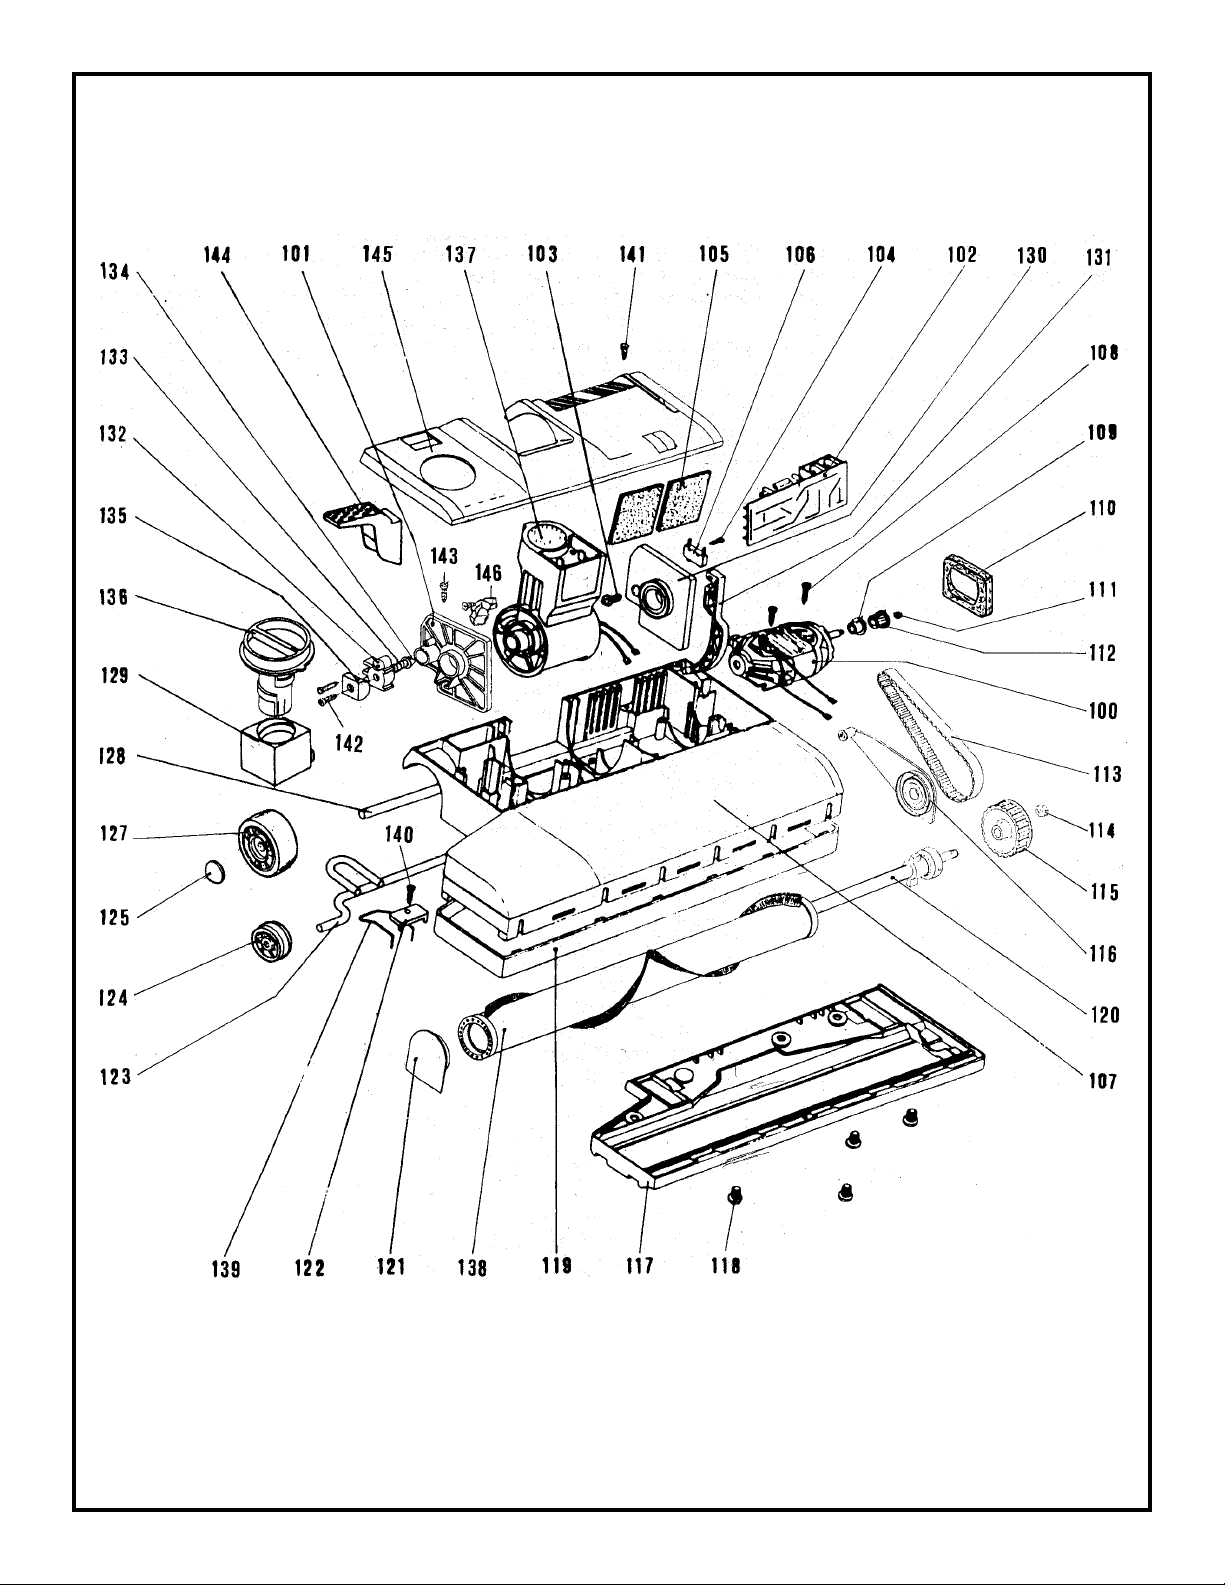
BRUSH HOUSING
Item Ref. No. Qty Description
100 56703743 1 Brush Motor
* 56704137 2 Carbon Brush for 56703743
101 56703734 1 Right Connector Support
102 56703739 1 Circuit Board
103 56704023 1 Switch Activator Pin
104 56704045 1 Screw, 2.2 x 16mm
105 1412890000 1 Brush Motor Filter (set of 2)
106 56703738 1 Brush Motor Switch
107 56703960 1 Base Housing
108 56704041 2 Screw, 3.9 x 16mm
109 56704130 1 Spacer
110 56704060 1 Brush Motor Filter
111 56703853 1 Brush Motor Nut
112 56704129 1 Pulley
113 56704039 1 Belt H7
114 56703746 1 Brush Pulley Nut
115 56703747 1 Brush Pulley
116 56703745 1 Left Brush Support, W/Bearing
117 56703750 1 Shoe Plate
118 56703751 4 Screw, Shoe M6
119 56703752 1 Bumper
120 56703749 1 Brush Shaft, W/Insert
121 56703754 1 Right Brush Support, W/Bearing
122 56703755 1 Spring Stop Plate
123 56703756 1 Front Axle
124 56703757 2 Front Wheel
125 56704033 2 Wheel Retainer
127 56703760 2 Rear Wheel
128 56703761 1 Rear Axle
129 56703762 1 Brush Adjuster
130 56703737 1 Left Connector Support
131 56703958 1 Slide Lever
132 56703765 1 Bushing
133 56703766 1 Spring, Handle Release Pedal
134 56100675 1 Plunger Kit
135 56703763 1 Slide
136 1412920000 1 Brush Adjuster Knob
137 56703089 1 Joint Complete
138 56703753 1 Brush
139 56703777 1 Spring, Brush Adjust
140 56704046 1 Screw, 3.9 x 13mm
141 1412983000 1 Screw, 3.9 x 13tsp
142 56704065 2 Screw, 2.9 x 16mm
143 56704046 2 Screw, 3.9 x 13mm
144 1412986000 1 Handle Release Pedal
145 1412987000 1 Base Housing Cover
146 1412988000 1 Joint Pin Slide
* = Not Shown
revised 11/02
FORM NO. 56041490 / DuraVac™ 152 - 14
Page 16

3
120Vac
Brush
2
3
12
3
12
Motor
7
5
Vac
6
Motor
1
4
WIRING DIAGRAM
Item Ref. No. Qty Description
1 56703708 1 Main Switch
2 56704159 1 Vacuum Sensor
3 56703709 1 Indicator Light
4 56704237 1 Motor, V.120/60 (56704168 used prior to SN1501217)
* 56704238 2 Carbon Brush for 56704237 & 56704168 TSBUS2002-829
5 56703738 1 Brush Motor Switch
6 56703739 1 Circuit Board
7 56703743 1 Brush Motor
* 56704137 2 Carbon Brush for 56703743
* = Not Shown
15 - FORM NO. 56041490 / DuraVac™ 152
revised 11/02
Page 17

DuraVac™ TWO YEAR LIMITED WARRANTY
FOR MODEL 56010923 ONLY
Nilfisk-Advance, Inc. warrants each new DuraVac™ carpet vacuum against defects in material and workmanship under normal use and service. The
obligation under this warranty is limited to repair or replace at our factory or authorized distributor service station any part or parts thereof which within
the warranty period are returned to our factory or authorized distributor service station, transportation prepaid, after examination discloses it to have
been thus defective.
The warranty period during which basic coverage applies is Two (2) years for parts replacement and one year for service labor. The start date of the
warranty coverage shall be the purchase date by the original end user, or six months from the date the machine was shipped from the factory, which
ever is earlier. The Warranty Registration Card is to be completed and returned immediately at the time of purchase.
This warranty shall not apply to: (1) accidents and misuse, (2) damage in transit, (3) overloading the capacity of the machine, (4) failure due to lack
of proper maintenance or care as described in the operating and maintenance instructions, (5) relatively minor adjustments such as tightening of
screws or bolts, etc., not connected with the replacement of parts, (6) repairs or alterations by an organization other than the factory or an authorized
Nilfisk-Advance Service Center.
STATED WARRANTIES ARE IN LIEU OF ALL OTHER WARRANTIES, EXPRESSED OR IMPLIED. Any statutory implied warranties, including any
warranty of merchantability or fitness for a particular purpose, are expressly limited to the durations of this written warranty. Nilfisk-Advance will not
be liable for any other damages arising out of or in connection with the furnishing, performance, use of or inability to use the machine. This remedy
shall be the exclusive remedy of the Buyer.
Authorized Nilfisk-Advance Service Centers can assist owners in the proper handling of any warranty question or claim. In the event that you want
to contact Nilfisk-Advance directly, please write to the Customer Service Department at Nilfisk-Advance, Inc., 14600 21st Avenue North, Plymouth,
Minnesota 55447-3408. Provide an explanation of the problem and include the serial number of the machine as well as the name of the selling
organization. The Customer Service Department will investigate and then contact you.
Cut out and mail to:
Nilfisk-Advance, Inc.
14600 21st Avenue North
Plymouth, Minnesota 55447-3408
✂
IMPORTANT: This card contains information necessary to expedite warranty protection.
Mail within 30 days of purchase to Nilfisk-Advance.
LIMITED WARRANTY
PLEASE PRINT
Purchaser________________________________________________
Address _________________________________________________
City _______________________ State ___________ Zip _________
Model ______________Serial Number ________________________
Purchased from___________________________________________
City _______________________ State __________ Zip __________
Date Purchased ___________________________________________
THIS IS TO CERTIFY THAT THE ABOVE EQUIPMENT
WAS CHECKED OUT IN WORKING CONDITION.
 Loading...