


Kenmore 25352624200, 25352622200, 25352614200, 25352612200, 25352324200 Owner’s Manual
...
®
Side by Side Refrigerator
Use & Care Guide
Lado a Lado Refrigerador
Gufa para su uso y cuidado
Compartiments C6te d C6te R_frig_rateur
Guide d'utilisation et d'entretien
Sears, Roebuck and Co., Hoffman Estates, IL 60179 U.S.A.
Sears Canada, Inc,, Toronto, Ontario, Canada M5B 2B8
i_ii_iiiiiiiiiiiiiiiiiiiiiiiiiiiiii
ii_i_,iiiii!i_ii!i_!iiii!ilili_i_i!ii_ii
www.sears.com
240461301 (0110)
Congratulations on your purchase of a new refrigerator! We
here at Sears are very proud of our product and we are
completely committed to providing you with the best
service possible. Your satisfaction is our #1 priority.
We know you'll enjoy your new refrigerator and Thank You
for choosing our product. We hope you consider us for
future purchases.
PLEASE READ AND SAVE THESE
INSTRUCTIONS
This Owner's Guide provides specific operating
instructions for your model. Use your refrigerator only as
instructed in this manual. These instructions are not meant
to cover every possible condition and situation that may
occur. Common sense and caution must be practiced
when installing, operating and maintaining any appliance.
Please record your model and serial numbers below
for future reference. This information is found on the
serial plate located inside the refrigerator
compartment.
Model Number: 253
FOR YOUR SAFETY
• Do not store or use gasoline, or other flammable liquids
in the vicinity of this or any other appliance. Read product
labels for warnings regarding flammability and other
hazards.
• Do not operate the refrigerator in the presence of
explosive fumes.
• Avoid contact with any moving parts of automatic ice
maker.
• Remove all staples from the carton. Staples can cause
severe cuts, and also destroy finishes if they come in
contact with other appliances or furniture.
CHILD SAFETY
Destroy or recycle the carton, plastic bags, and any
exterior wrapping material immediately after the refrigerator
_sunpacked. Children should NEVER use these items to
play. Cartons covered with rugs, bedspreads, plastic
sheets or stretch wrap may become airtight chambers,
and can quickly cause suffocation.
or: 970
Serial Number:
Purchase Date:
Record Serial/Model Numbers ............ 2
Safety .................................................. 2-3
Warranty .............................................. 3
Canada - Limited Warranty .................. 4
Installation ........................................... 5-6
Door Removal Instructions ................. 7
Features At A Glance ......................... 8
Temperature Controls .......................... 9
Looking Inside ..................................... 10-11
Automatic Ice & Water Dispenser ....... 12-13
Rear Ice and Water Filter ..................... 14
Food Storage & Energy Saving Tips ... 15
Normal Operating Sounds & Sights .... 16
Care & Cleaning .................................. 17-18
Before You Call .................................... 19-22
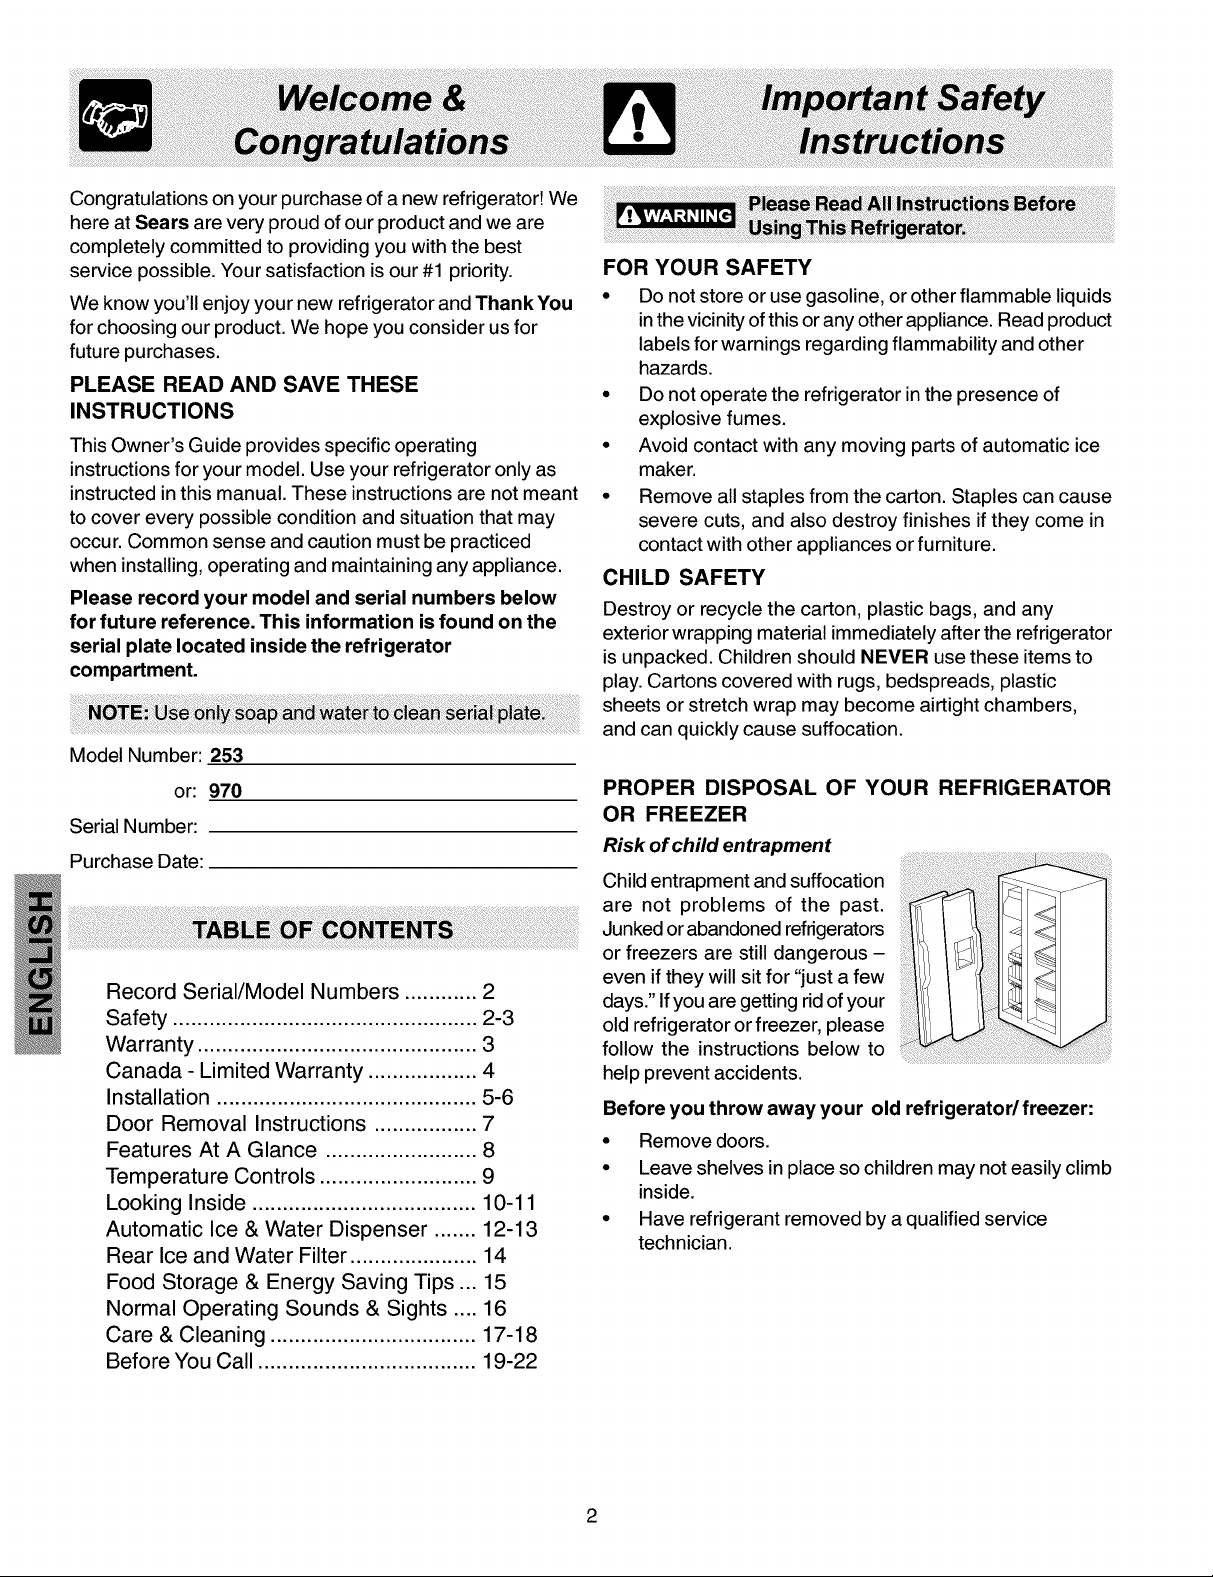
PROPER DISPOSAL OF YOUR REFRIGERATOR
OR FREEZER
Risk of child entrapment
Child entrapment and suffocation
are not problems of the past.
Junked orabandoned refrigerators
or freezers are still dangerous -
even if they will sit for "just a few
days." Ifyou are getting rid of your
old refrigerator or freezer, please
follow the instructions below to
help prevent accidents.
Before you throw away your old refrigerator/freezer:
• Remove doors.
• Leave shelves in place so children may not easily climb
inside.
• Have refrigerant removed by a qualified service
technician.
2
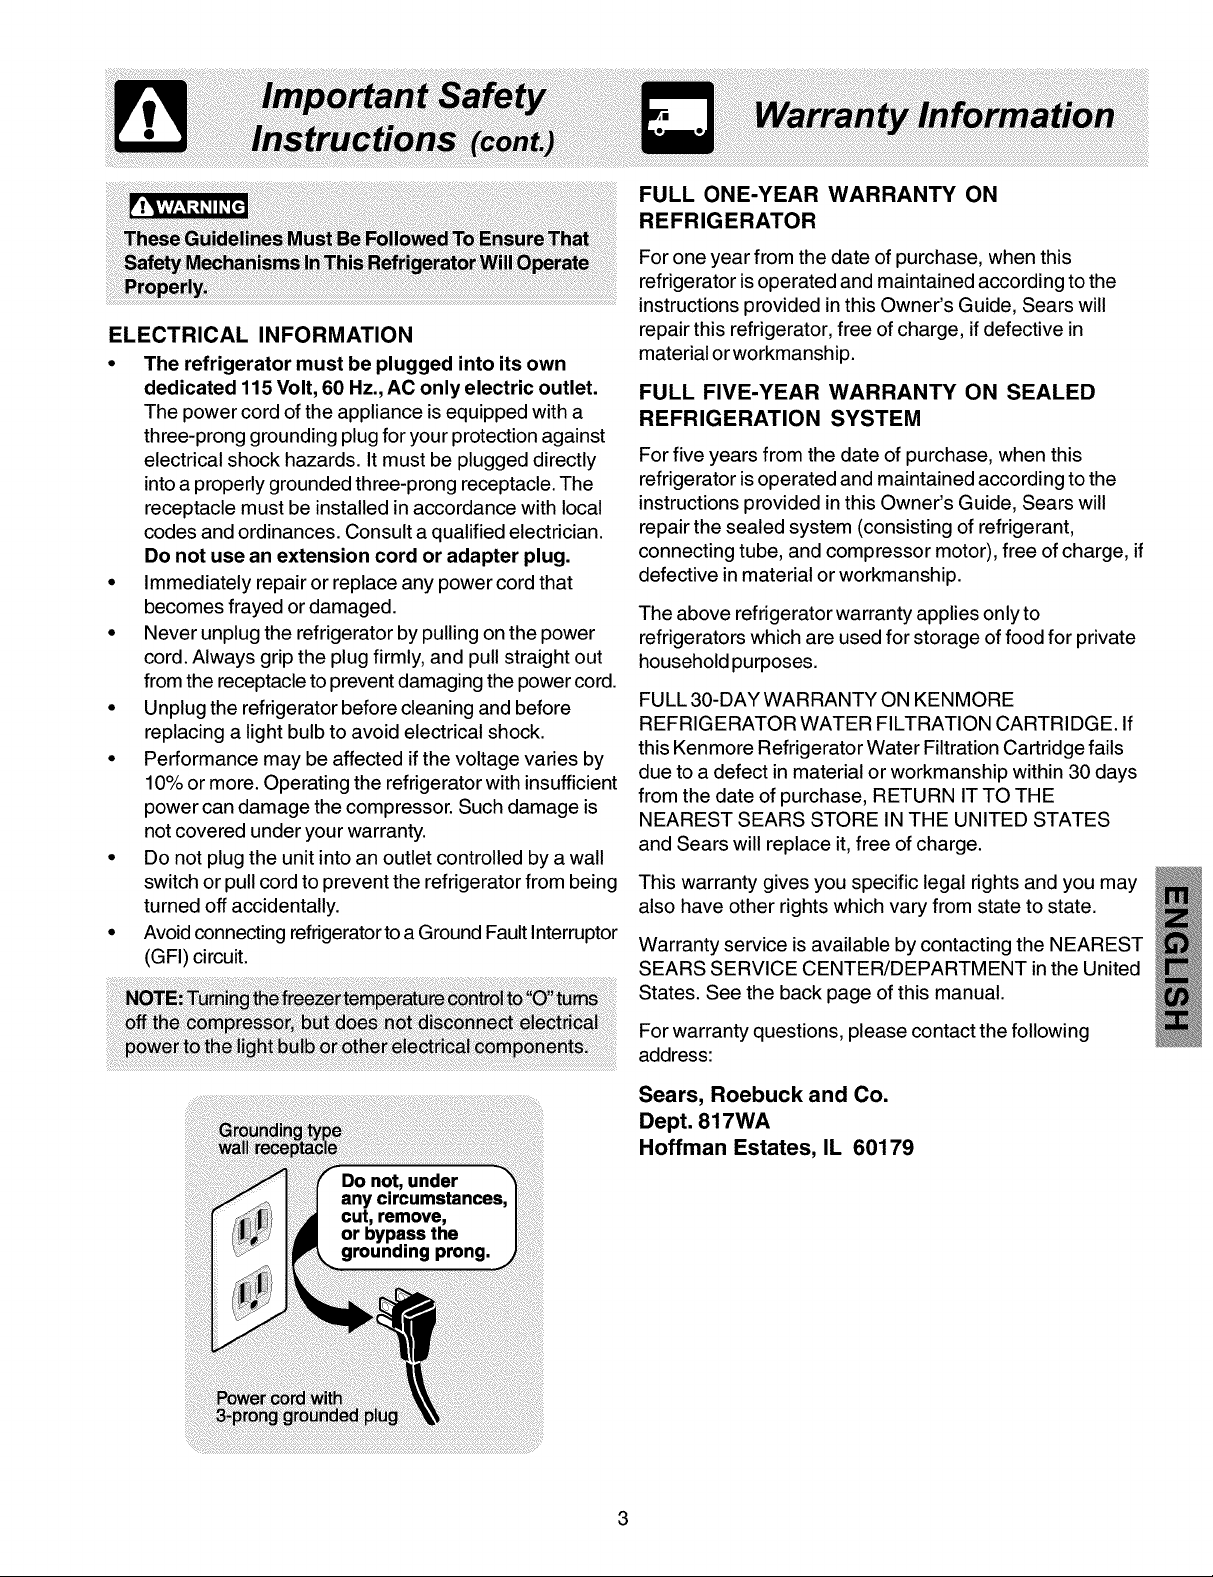
ELECTRICAL INFORMATION
• The refrigerator must be plugged into its own
dedicated 115 Volt, 60 Hz., AC only electric outlet.
The power cord ofthe appliance isequipped with a
three-prong groundingplugfor your protectionagainst
electrical shock hazards. It must be plugged directly
intoa properlygroundedthree-prong receptacle.The
receptacle must be installed inaccordance with local
codes and ordinances. Consult a qualifiedelectrician.
Do not use an extension cord or adapter plug.
• Immediately repair or replace any power cordthat
becomes frayed ordamaged.
• Never unplugthe refrigeratorby pullingon the power
cord. Always grip the plug firmly, and pullstraightout
from the receptacleto preventdamagingthe powercord.
• Unplug the refrigeratorbefore cleaning and before
replacing a light bulbto avoid electrical shock.
• Performance may be affected ifthe voltage varies by
10% ormore. Operating the refrigerator withinsufficient
power can damage the compressor. Such damage is
notcovered under your warranty.
• Do notplug the unit into an outlet controlled by a wall
switch or pull cordto prevent the refrigeratorfrom being
turned offaccidentally.
• Avoidconnectingrefrigeratortoa Ground FaultInterruptor
(GFI) circuit.
FULL ONE-YEAR WARRANTY ON
REFRIGERATOR
For one year from the date of purchase, when this
refrigerator is operated and maintained according to the
instructions provided in this Owner's Guide, Sears will
repair this refrigerator, free of charge, if defective in
material or workmanship.
FULL FIVE-YEAR WARRANTY ON SEALED
REFRIGERATION SYSTEM
For five years from the date of purchase, when this
refrigerator is operated and maintained according to the
instructions provided in this Owner's Guide, Sears will
repair the sealed system (consisting of refrigerant,
connecting tube, and compressor motor), free of charge, if
defective in material or workmanship.
The above refrigerator warranty applies only to
refrigerators which are used for storage of food for private
household purposes.
FULL 30-DAY WARRANTY ON KENMORE
REFRIGERATOR WATER FILTRATION CARTRIDGE. If
this Kenmore Refrigerator Water Filtration Cartridge fails
due to a defect in material or workmanship within 30 days
from the date of purchase, RETURN IT TO THE
NEAREST SEARS STORE IN THE UNITED STATES
and Sears will replace it, free of charge.
This warranty gives you specific legal rights and you may
also have other rights which vary from state to state.
Warranty service is available by contacting the NEAREST
SEARS SERVICE CENTER/DEPARTMENT in the United
States. See the back page of this manual.
For warranty questions, please contact the following
address:
Sears, Roebuck and Co.
Dept. 817WA
Hoffman Estates, IL 60179
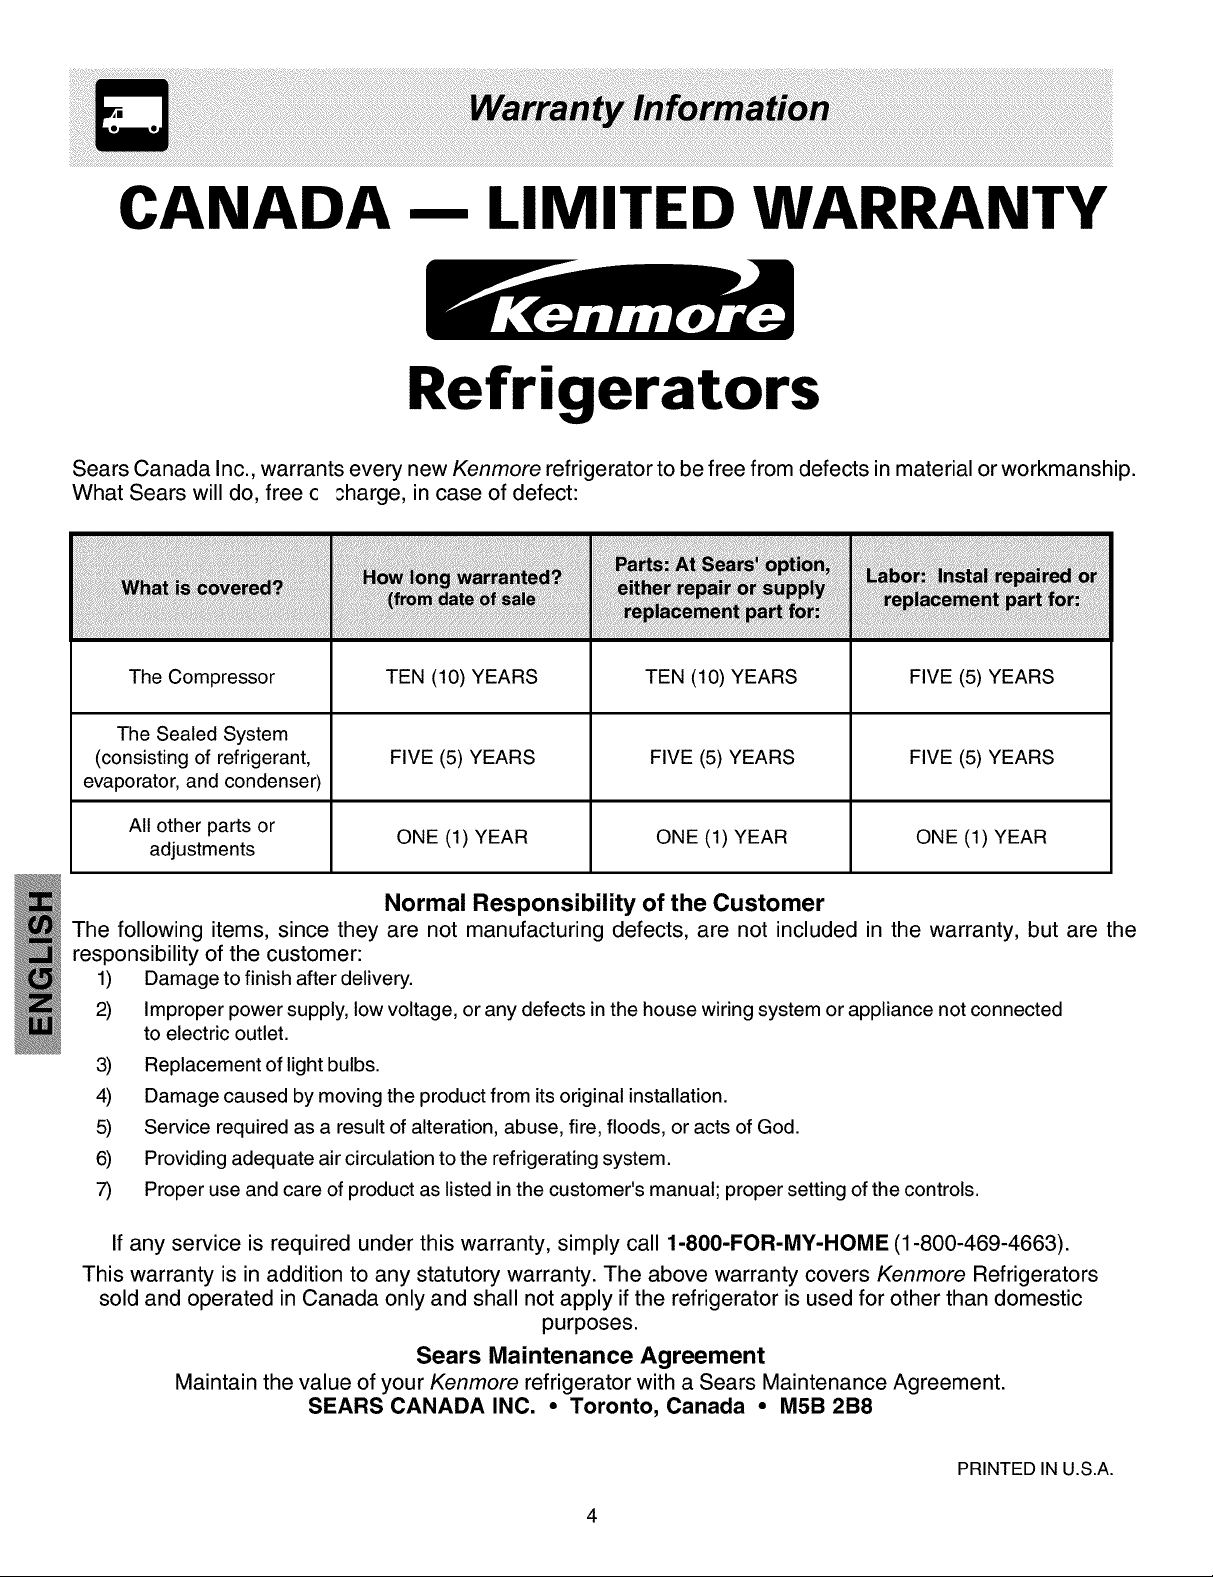
CANADA- LIMITED WARRANTY
Refrigerators
Sears Canada Inc., warrants every new Kenmore refrigerator to be free from defects in material or workmanship.
What Sears will do, free c sharge, in case of defect:
!!ii_ii_!iii_ili!i!_i!i_i!!i¸ii_!_!iili!iiiiiiiiii_iiii!_ii_i!_!i!!,i!iillii!ii!_!!_i_il!ii¸i'_ili!i!iiiiiii_,!_!!'iii!i!iiiii!i
!_i!!!'ii!i_i!!!'ii!i_i!!!'ii!i_i!!!'ii!i_i!!!'ii!i_i!!!'ii!i_i!!!'ii!i_i!!!'ii!i_i!!!'ii!i_i!!!'ii!i_i!!!'ii!i_i!!!'ii!i_i!!!'ii!i_i!!!'ii!i_i!!!'ii!i_i!!!'ii!i_i!!!'ii!i_i!!!'ii!i_i!!!'ii!i_i!!!'ii!i_i!!!'ii!i_i!!!'ii!i_i!!!'ii!i_i!!!'ii!i_i!!!'ii!i_i!!!'ii!i_i!!!'ii!i_i!!!'ii!i_i!!!'ii!i_i!!!'ii!i_i!!!'ii!i_i!!!'ii!i_i!!!'ii
The Compressor
The Sealed System
(consisting of refrigerant,
evaporator, and condenser)
All other parts or
adjustments
TEN (10) YEARS
FIVE (5) YEARS
ONE (1) YEAR
TEN (10) YEARS
FIVE (5) YEARS
ONE (1) YEAR
FIVE (5) YEARS
FIVE (5) YEARS
ONE (1) YEAR
Normal Responsibility of the Customer
The following items, since they are not manufacturing defects, are not included in the warranty, but are the
responsibility of the customer:
1) Damage to finish after delivery.
2) Improper power supply, low voltage, or any defects in the house wiring system or appliance not connected
to electric outlet.
3) Replacement of light bulbs.
4) Damage caused by moving the product from its original installation.
5) Service required as a result of alteration, abuse, fire, floods, or acts of God.
6) Providing adequate air circulation to the refrigerating system.
7) Proper use and care of product as listed in the customer's manual; proper setting of the controls.
If any service is required under this warranty, simply call 1-800-FOR-MY-HOME (1-800-469-4663).
This warranty is in addition to any statutory warranty. The above warranty covers Kenmore Refrigerators
sold and operated in Canada only and shall not apply if the refrigerator is used for other than domestic
purposes.
Sears Maintenance Agreement
Maintain the value of your Kenmore refrigerator with a Sears Maintenance Agreement.
SEARS CANADA INC. • Toronto, Canada • M5B 2B8
PRINTED IN U.S.A.
4
ThisOwner'sGuideprovidesspecificoperating
instructionsforyourmodel.Usetherefrigeratoronlyas
instructedinthisUse&CareManual.Beforestartingthe
refrigerator, follow these important first steps.
LOCATION
• Choose a place that is near a grounded electrical outlet.
Do Not use an extension cord or an adapter plug.
• If possible, place the refrigerator out of direct sunlight
and away from the range, dishwasher or other heat
sources.
• The refrigerator must be installed on a floor that is level
and strong enough to support a fully loaded refrigerator.
• Consider water supply availability for models equipped
with an automatic ice maker.
INSTALLATION
• Do Not installthe refrigerator wherethe temperature
will drop below 55°F (13°C) or rise above 110°F (43°C).
The compressor will not be able to maintain proper
temperatures inside the refrigerator.
Installation Clearances
• Allow the following clearances for ease of installation,
proper air circulation, and plumbing and electrical
connections:
Sides & Top 3/8"
Back ........................ 1"
DOOR OPENING
Your refrigerator should be positioned to allow easy access
to a counter when removing food. For best use of drawers
and freezer baskets, the refrigerator should be in a
position where both the refrigerator and freezer doors can
be fully opened.
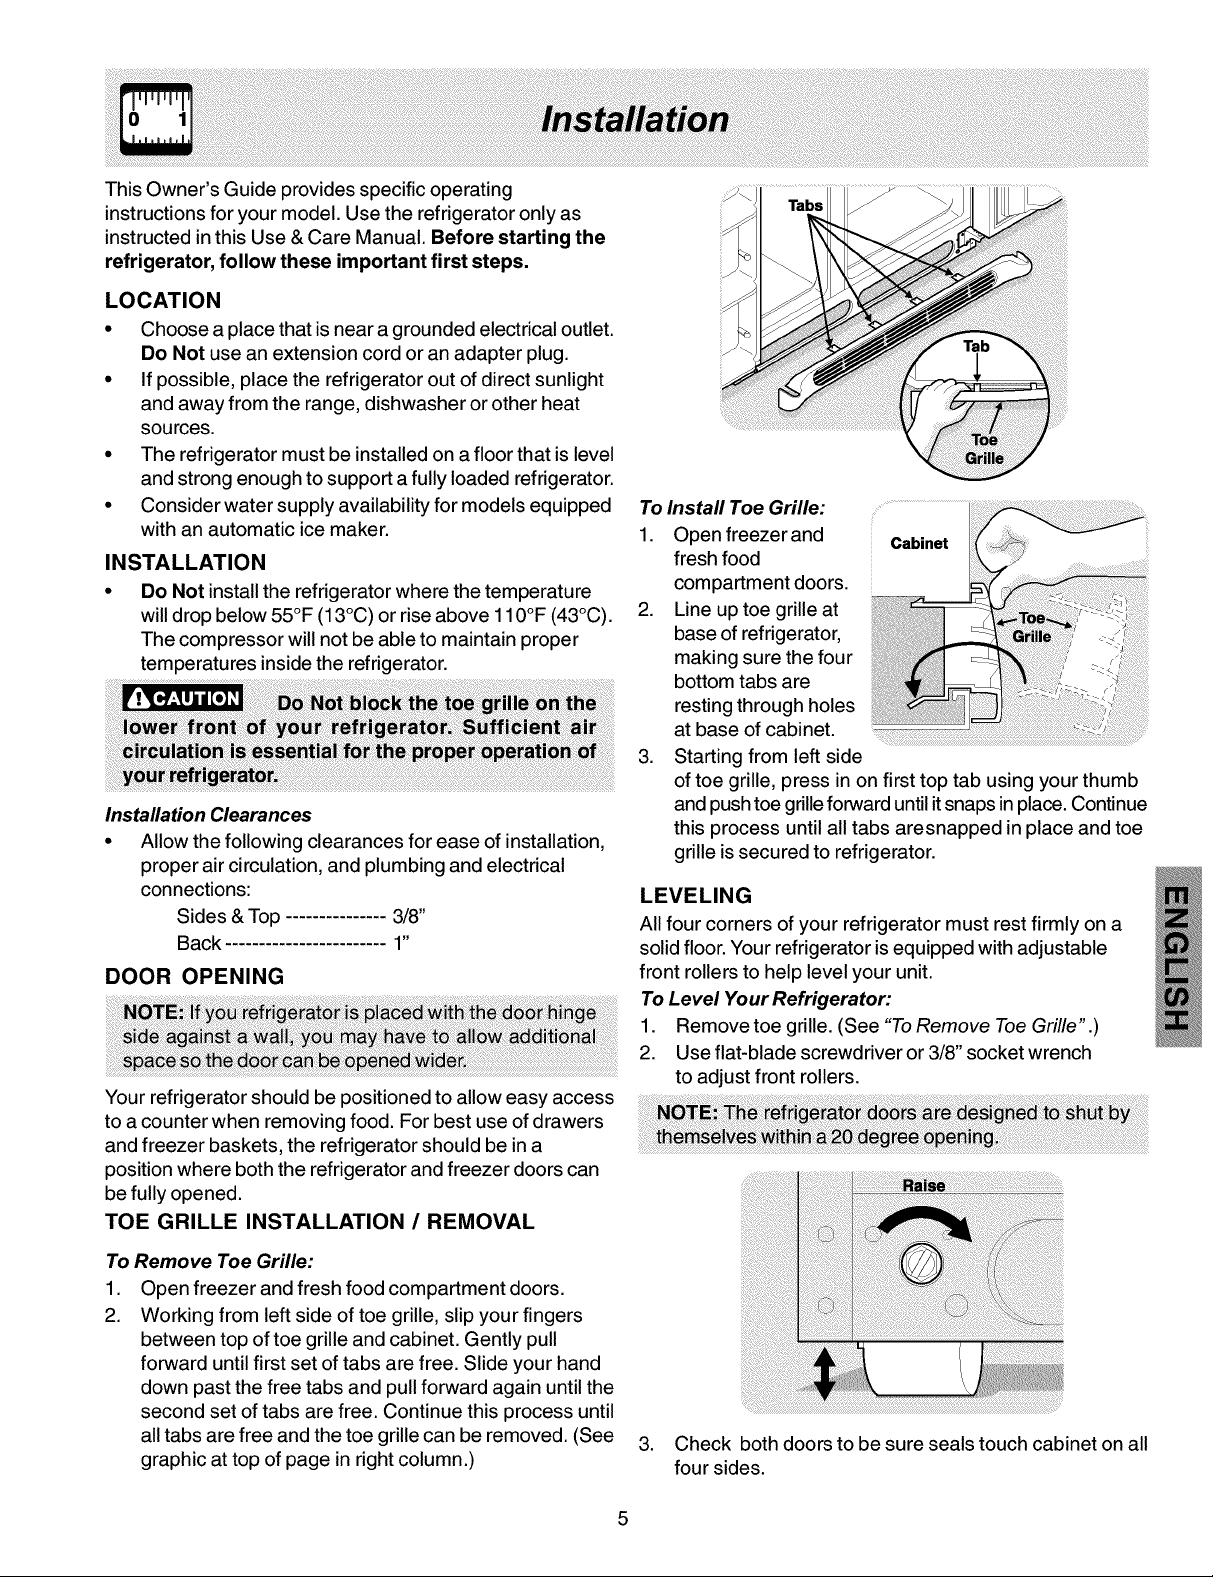
TOE GRILLE INSTALLATION / REMOVAL
To Remove Toe Grille:
1. Open freezer and fresh food compartment doors.
2. Working from left side of toe grille, slip your fingers
between top of toe grille and cabinet. Gently pull
forward until first set of tabs are free. Slide your hand
down past the free tabs and pull forward again until the
second set of tabs are free. Continue this process until
all tabs are free and the toe grille can be removed. (See
graphic at top of page in right column.)
To Install Toe Grille:
1. Open freezer and
fresh food
compartment doors.
2. Line up toe grille at
base of refrigerator,
making sure the four
bottom tabs are
resting through holes
at base of cabinet.
3. Starting from left side
of toe grille, press in on first top tab using your thumb
and push toe grille forward until itsnaps in place. Continue
this process until all tabs aresnapped in place and toe
grille is secured to refrigerator.
LEVELING
All four corners of your refrigerator must rest firmly on a
solid floor. Your refrigerator isequipped with adjustable
front rollers to help level your unit.
To Level Your Refrigerator:
1. Remove toe grille. (See "To Remove Toe Grille" .)
2. Use flat-blade screwdriver or 3/8" socket wrench
to adjust front rollers.
3. Check both doors to be sure seals touch cabinet on all
four sides.
Before Installing The Water Supply Line, You Will Need
• Basic Tools: adjustable wrench, flat-blade screwdriver, and PhillipsTM screwdriver
• Access to a household cold water line with water pressure between 20 and 100 psi.
• A water supply line made of 1/_inch (6.4 mm) OD, copper tubing. To determine the length of copper tubing needed,
you will need to measure the distance from the ice maker inlet valve at the back of the refrigerator to your cold water
pipe. Then add approximately 7 feet (2.1 meters), so the refrigerator can be moved out for cleaning (as shown).
• A shutoff valve to connect the water supply line to your household water system. DO NOT use a self-piercing type
shutoff valve.
• A compression nut and ferrule (sleeve) for connecting the water supply line to the ice maker inlet valve.
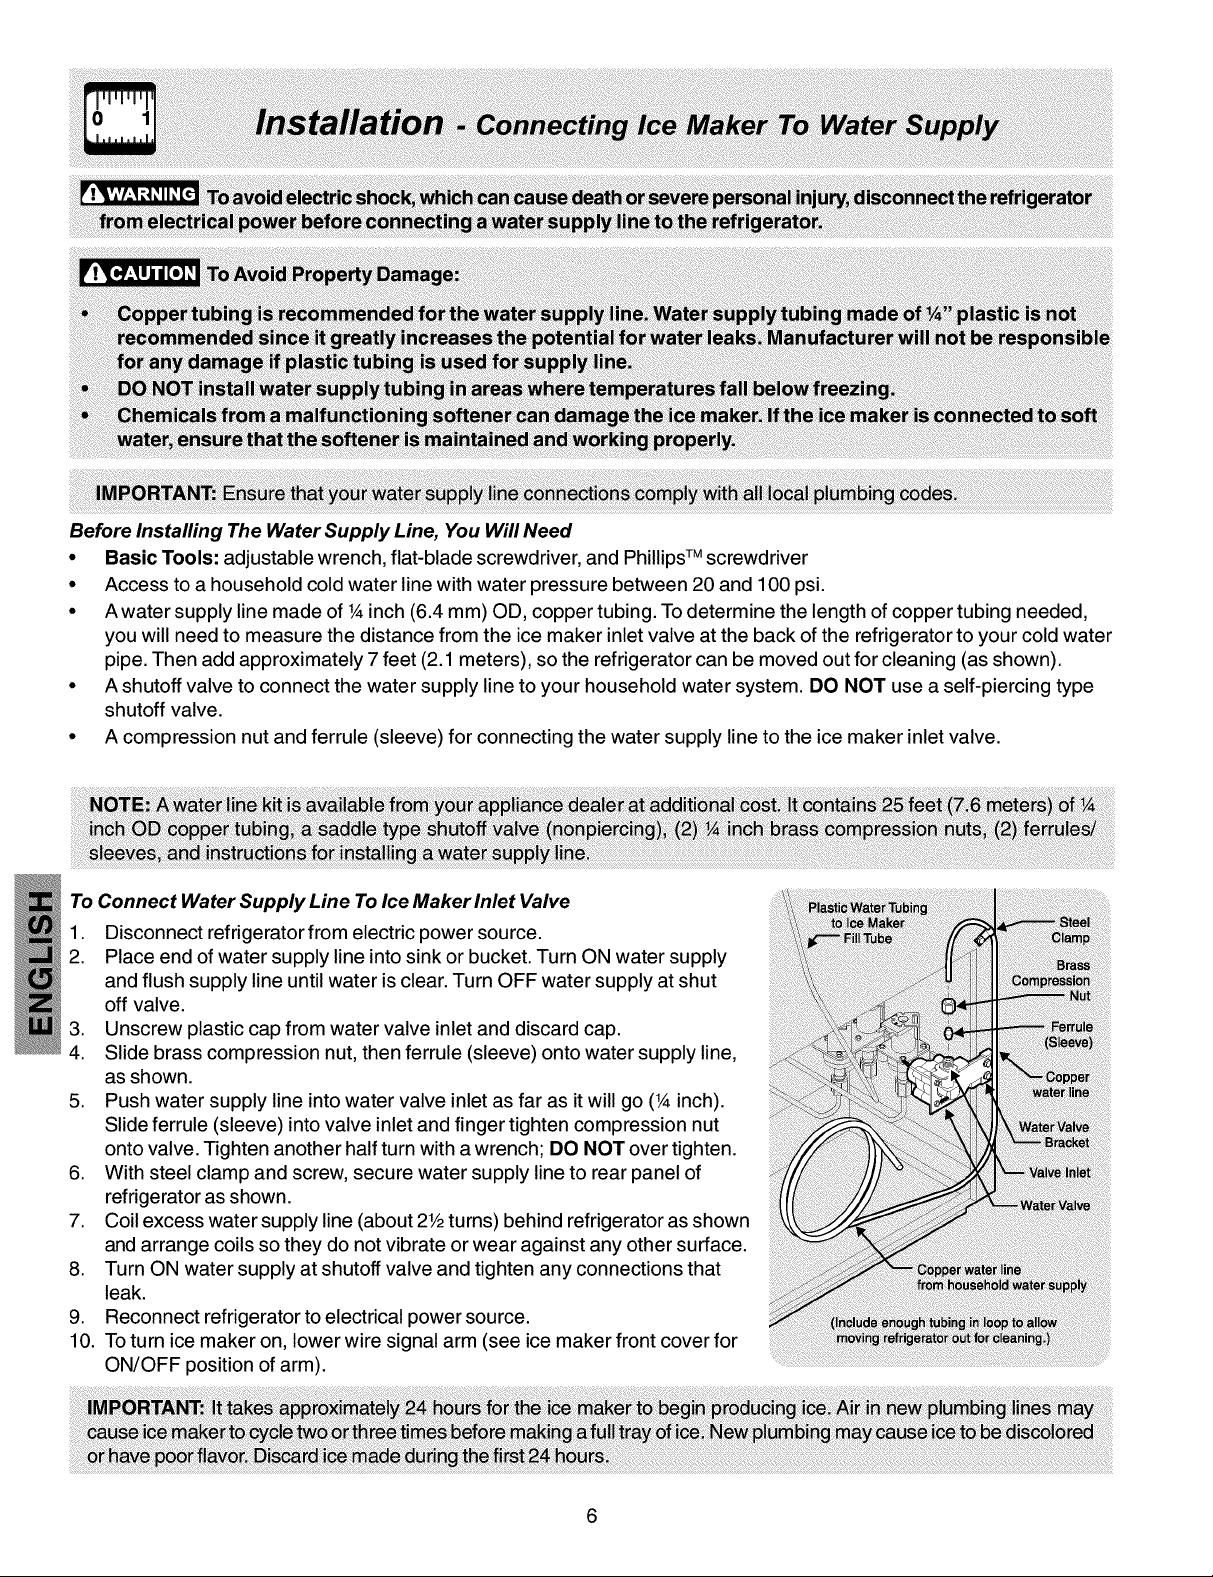
To Connect Water Supply Line To Ice Maker Inlet Valve
1. Disconnect refrigerator from electric power source.
2. Place end of water supply line into sink or bucket. Turn ON water supply
and flush supply line until water is clear. Turn OFF water supply at shut
off valve.
3. Unscrew plastic cap from water valve inlet and discard cap.
4. Slide brass compression nut, then ferrule (sleeve) onto water supply line,
as shown.
5. Push water supply line into water valve inlet as far as it will go (1/_inch).
Slide ferrule (sleeve) into valve inlet and finger tighten compression nut
onto valve. Tighten another half turn with a wrench; DO NOT over tighten.
6. With steel clamp and screw, secure water supply line to rear panel of
refrigerator as shown.
7. Coil excess water supply line (about 2V2turns) behind refrigerator as shown
and arrange coils so they do not vibrate or wear against any other surface.
8. Turn ON water supply at shutoff valve and tighten any connections that
leak.
9. Reconnect refrigerator to electrical power source.
10. To turn ice maker on, lower wire signal arm (see ice maker front cover for
ON/OFF position of arm).
6
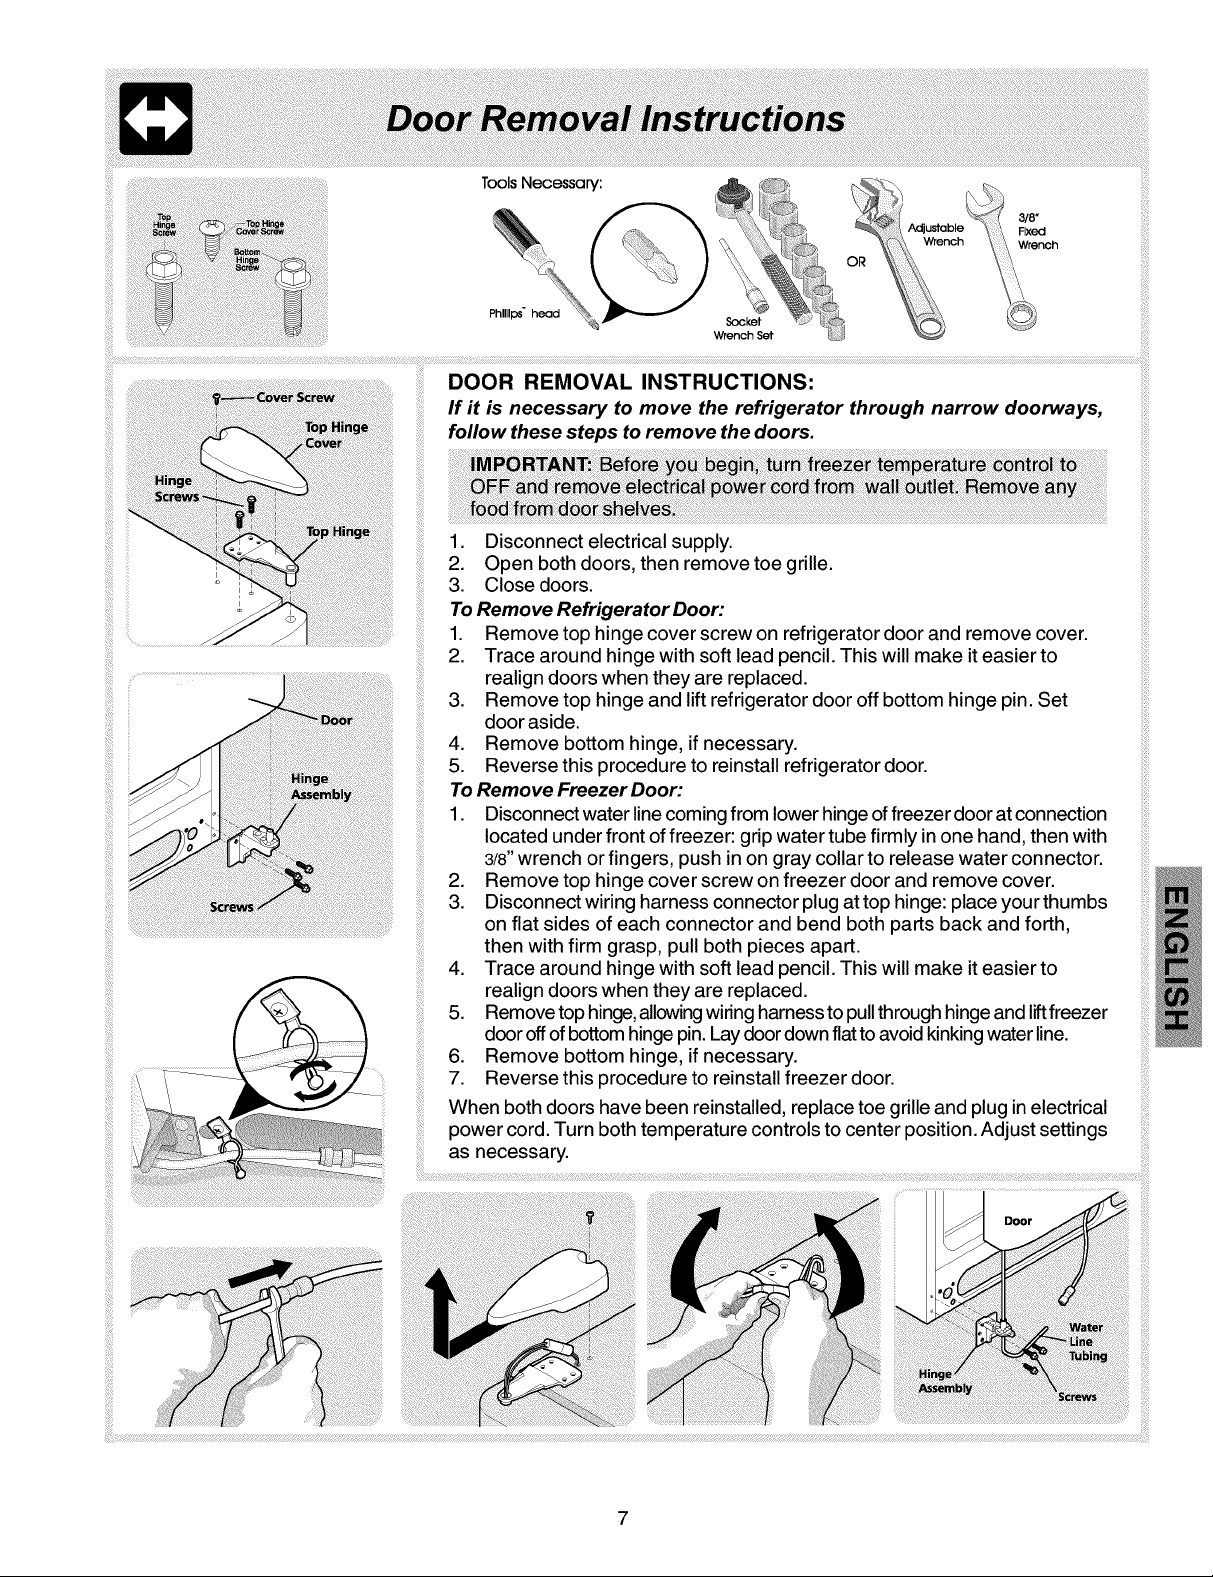
Tools Necessary:
Phillips" head
4. Trace around hinge with soft lead pencil. This will make it easier to
realign doors when they are replaced.
5. Remove top hinge,allowingwiring harnessto pullthrough hingeand liftfreezer
door offof bottom hinge pin. Lay door down flat toavoid kinkingwater line.
6. Remove bottom hinge, if necessary.
7. Reverse this procedure to reinstall freezer door.
When both doors have been reinstalled, replace toe grille and plug in electrical
power cord. Turn both temperature controls to center position. Adjust settings
as necessary.
 Loading...