


14819372
52850
TABLE OF CONTENTS
Section ! Knowing Your Sewing Machine
Identifying Parts ......................................... 2, 3
Installing and Connecting Machine .................... 4
Coverting to Free-arm Sewing .......................... 5
Removing Bobbin Case from Shuttle ................. 6
Winding the Bobbin ....................................... 7
Threading the Bobbin Case ............................. 8
Threading of Top Thread ................................ 9
Using the Controls ................................... 10 - 17
Adjusting Top Tensions, Adjusting Bobbin
Tensions, Checking Tensions, Stitch Length
Control, Stitch Width Control, Reverse Stitch
Control, Special Stitch Variegator, Special Stitch
Dial, Pressure Regulator, Feed Dog Control,
Sewing Light, Seam Guides, Presser Foot Lever
Accessories ............................................ 18 - 20
Presser Feet, Needles, Needle, Thread and
Fabric Chart
Section [[ Starting to Sew
Garment Construction Stitches ...................... 2 -'4
Straight Stitching, Zigzag Stitching
Stretch Stitching
Special Finishing Stitches ........................... 5- 18
Blind Hemming, Mending, Shell Stitching,
Buttonholing, Button Sewing, Bar Tacking,
Sating Stitching, Appliqueing, Writing and
Monogramming, Darning, Zipper Application,
Box Stitching, Decorative Stitches, Scallop
Stitch, Arrow Head Stitch, Diamond Stitch,
Domino Stitch, Free-arm Sewing
Section ]][
Guidance for sewing on Stretch Fabrics ............ 1, 2
Checking Performance Problems .................... 3, 4
Section _ Caring For the Machine
Cleaning Feed Dogs and Shuttle ....................... 1
Oiling Under Top Cover Plate ........................... 2
Oiling Underside ................ ;.......................... 3
Oiling in Face Cove Plate ................................. 4
Parts List ................................................... 5, 6
!ii iiiii!ii

ililjzili!i
/
i i¸
i¸ _ { ,
1, Needle Plate
2, Feed Dogs
3. Presser Foot Screw
4_ Seam Guide Lines
5, Thread Guide
6. Needle Clamp Screw
7. Face Cover Thread Guide
8. Top Thread Tension Control
9, Front Ttlread Guide
10. Thread Take-Up Lever
11. Top Thread Guide
12, RearThread Guide
13, Special Stitch Dial
14. Stitch Width Control
15, Special Stitch Variegator
(Models 19370, 1560, 1521 only)
16, Reverse Stitch Control
17, Stitch Length Control
18, Light and Power Switch
19, Feed Dog Control
20, Leg
21, Extension Table
22. Shuttle Access Hole Lid
(Models 19370, 19371, 1560 only)
23. Shuttle Cover
24, Free Arm
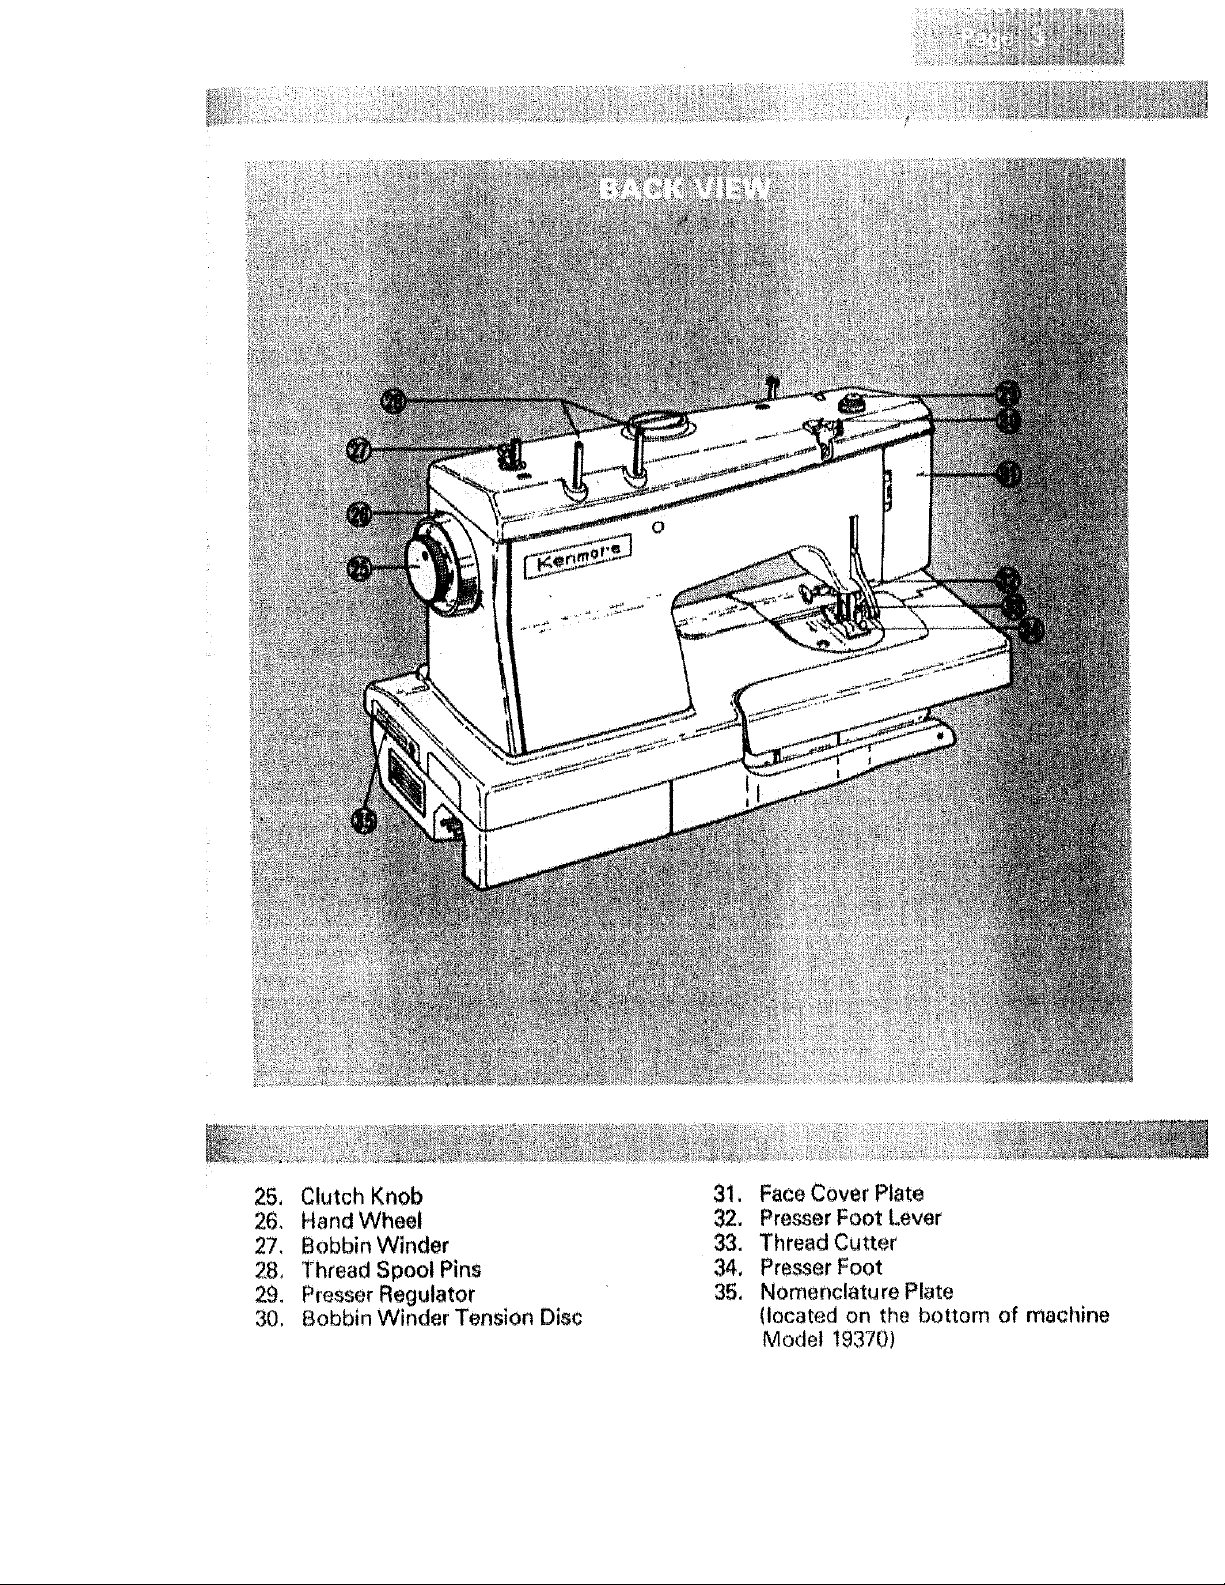
25, ClutchKnob
26, HandWheel
27, BobbinWinder
2,8, ThreadSpoolPins
29, PresserRegulator
30. BobbinWinderTensionDisc
31, FaceCoverPlate
32. PresserFootLever
33. ThreadCutter
34, PresserFoot
35, NomenclaturePlate
(locatedon the bottom of machine
Model19370)

1 To install the machine in cabinet,
position machine head on cabinet
platform so that holes on bottom of
machine match those on boards.
Insert washers and screws and tighten
into place. (Fig, 1)
2, To install machine in portable carrying
case. simply slip machine into base,
making certain the machine and the
words Front in the case face you,
(Fig_ 2)
Place cover on machine with words
,
,
"Sears" on handle facing you. The
case slopes in the same direction of the
machine. (Fig. 3)
Push the speed control plug onto
three-prong connector, Plug machine
cord into any 110-120 volt wall outlet.
Turn on power by pushing light and
power switch. (See Fig. 4)
Screw spool pins firmly into place with
a screwdriver. Place nylon discs on
spool pins, Discs and pins are packed
in the accessory box,
CICi_'___'_"_' _ _ _ _ _ _i
/
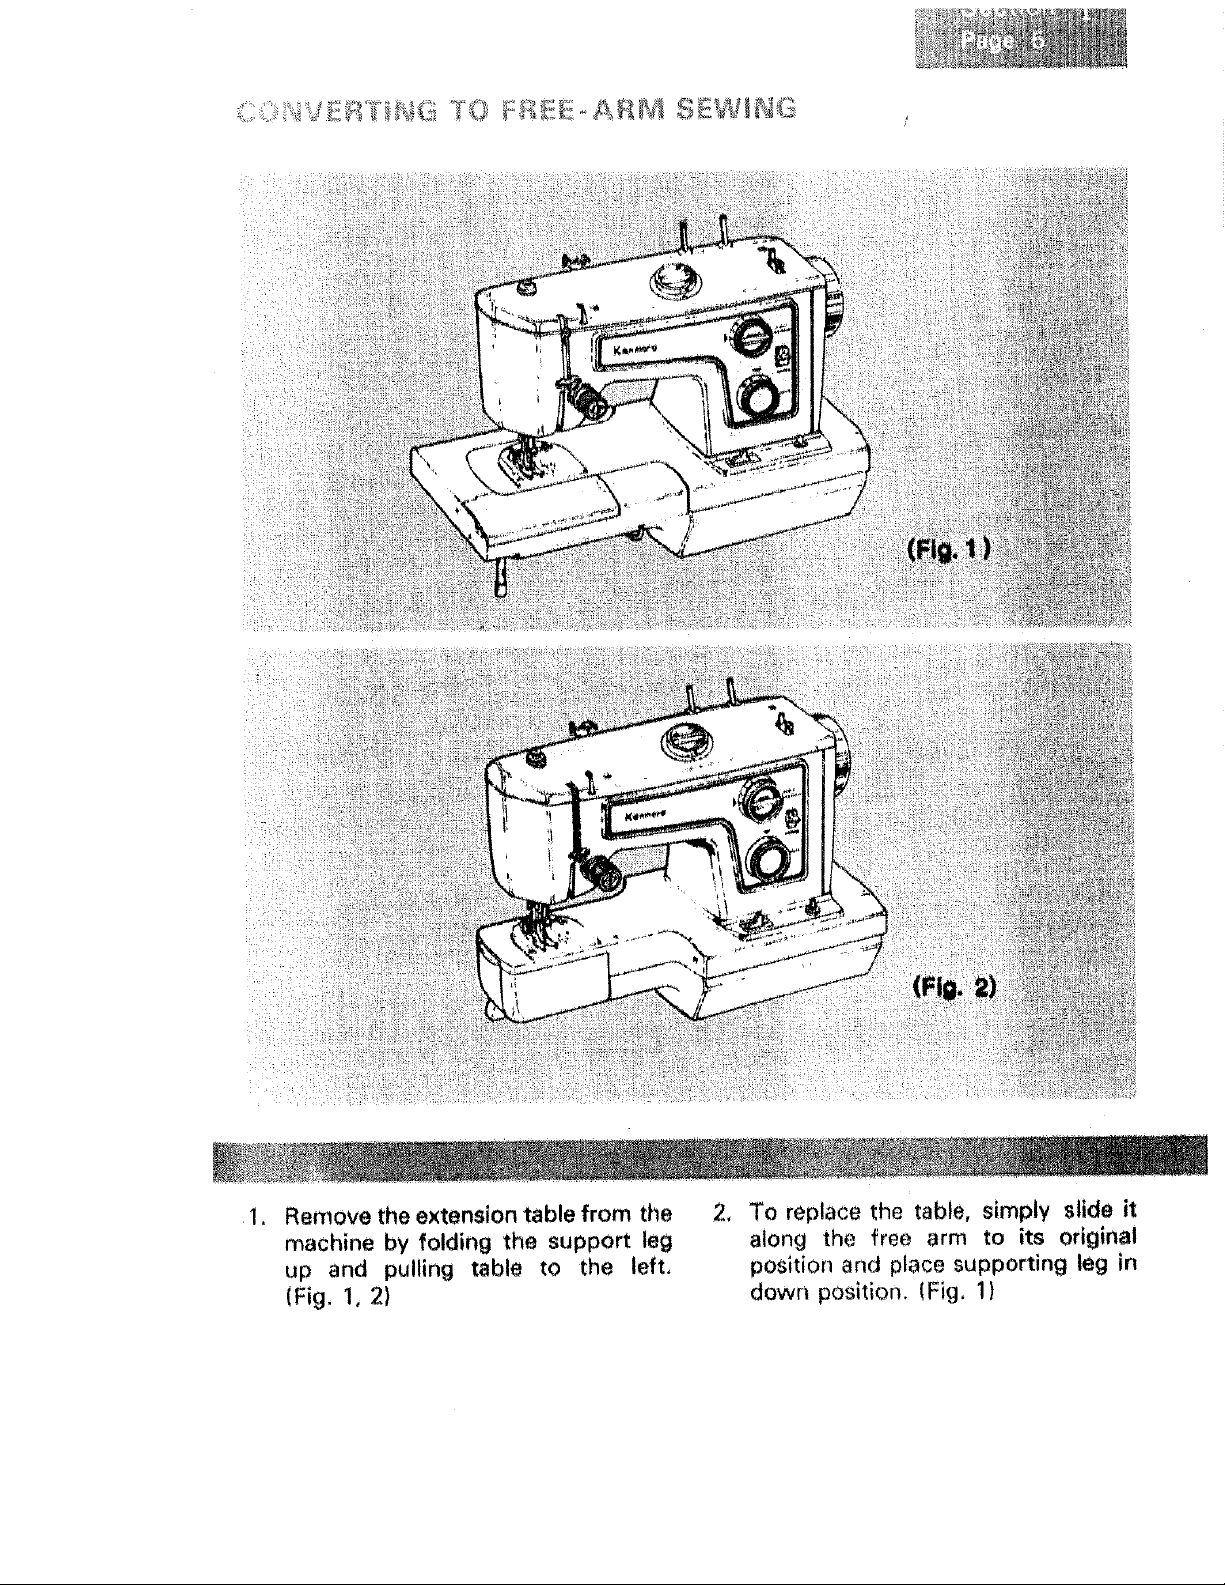
1.
Remove the extension table from the
machine by folding the support leg
up and pulling table to the left,
(Fig. 1, 2)
To replace the table, simply slide it
along the free arm to its original
position and place supporting leg in
down position. (Fig, 1)
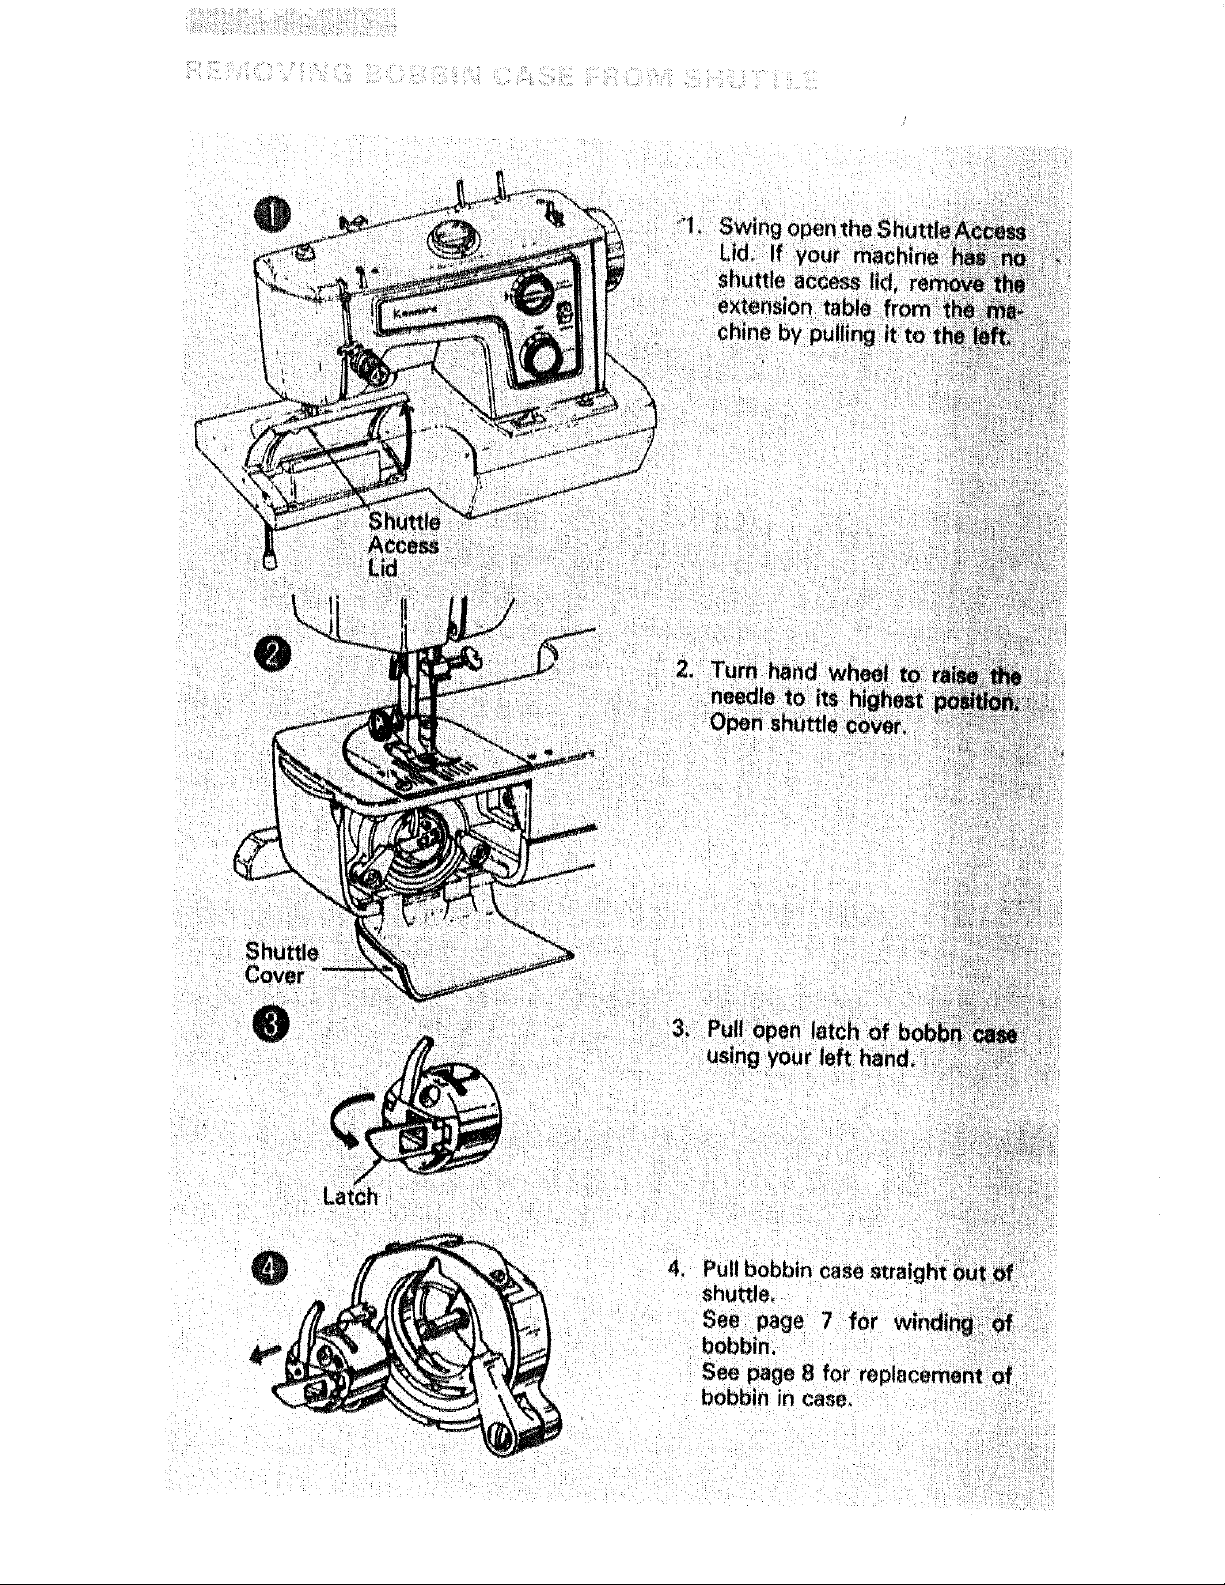
4. Pull bobbin case straigl_
shuttle_
See: page
bobbin:
See page 8 for re
bobbin in case.

I
1, Release clutch by turning clutch knob
toward you,
2, Draw thread from spool through
bobbin winder tension discs as shown,
3, Putt end of thread through hole in
bobbin as shown.
4. Place bobbin onto bobbin winder shaft
with end of thread coming from the top
of the bobbin, Push bobbin winder
latch against bobbin until it clicks_
Holding onto end of lhread, t_lar_
machine. When bobbin is siighttv fil_ed,
snip off end of thread.
5, Start machine. Wind thread until
bobbin winder latch releases,
6, Tighten clutch knob and remove
bobbin,
Two spool pins have been included with
"this machine to aid in bobbin winding. By
placing a spool of thread on the second
spool pin, you may wind your bobbin
witt_out unthreading the machine°
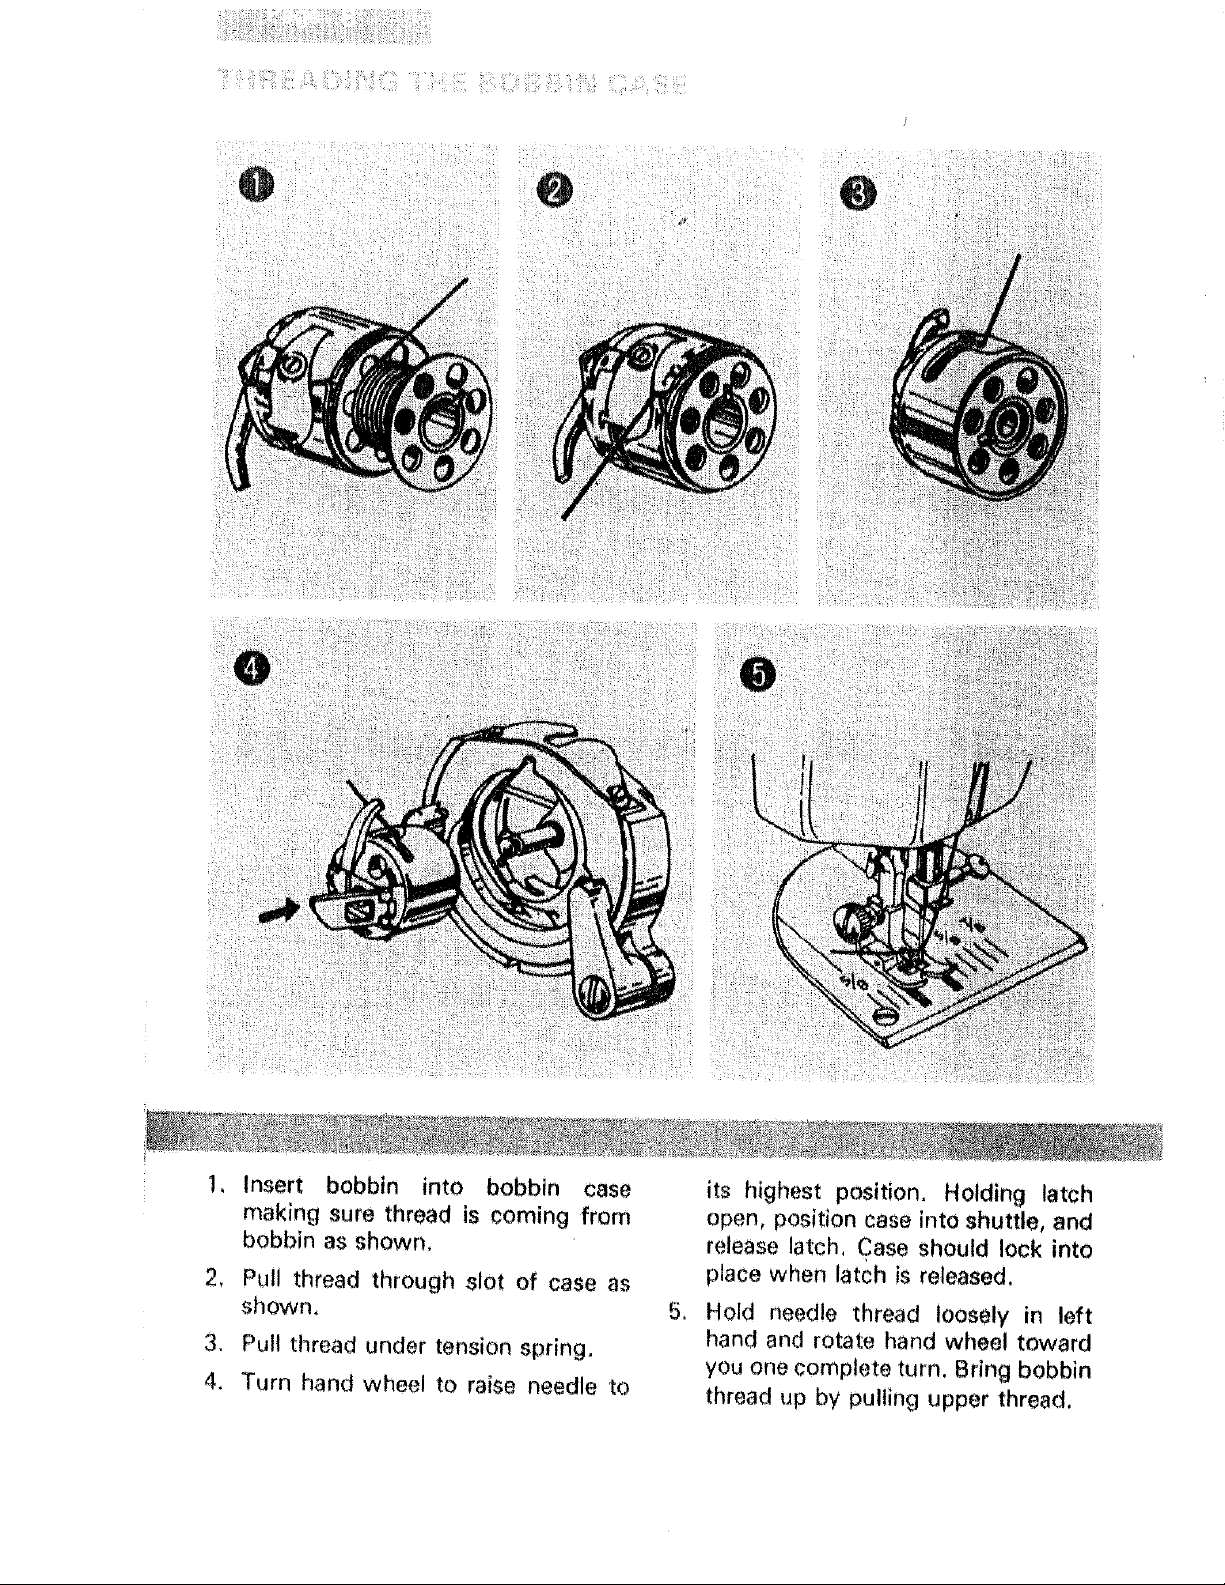
1, Insert bobbin into bobbin case
making sure thread is coming from
bobbin as shown,
2, Pull thread through slot of case as
shown,
3. Pull thread under tension spring.
4. Turn hand wheel to raise needle to
5_
its highest position, Holding latch
open, position case into shuttle, and
release latch, Case should lock into
place when latch is released,
Hold needle thread loosely in left
hand and rotate hand wheel toward
you one complete turn. Bring bobbin
thread up by pulling upper thread,
/
Fig. 4
Fig 5
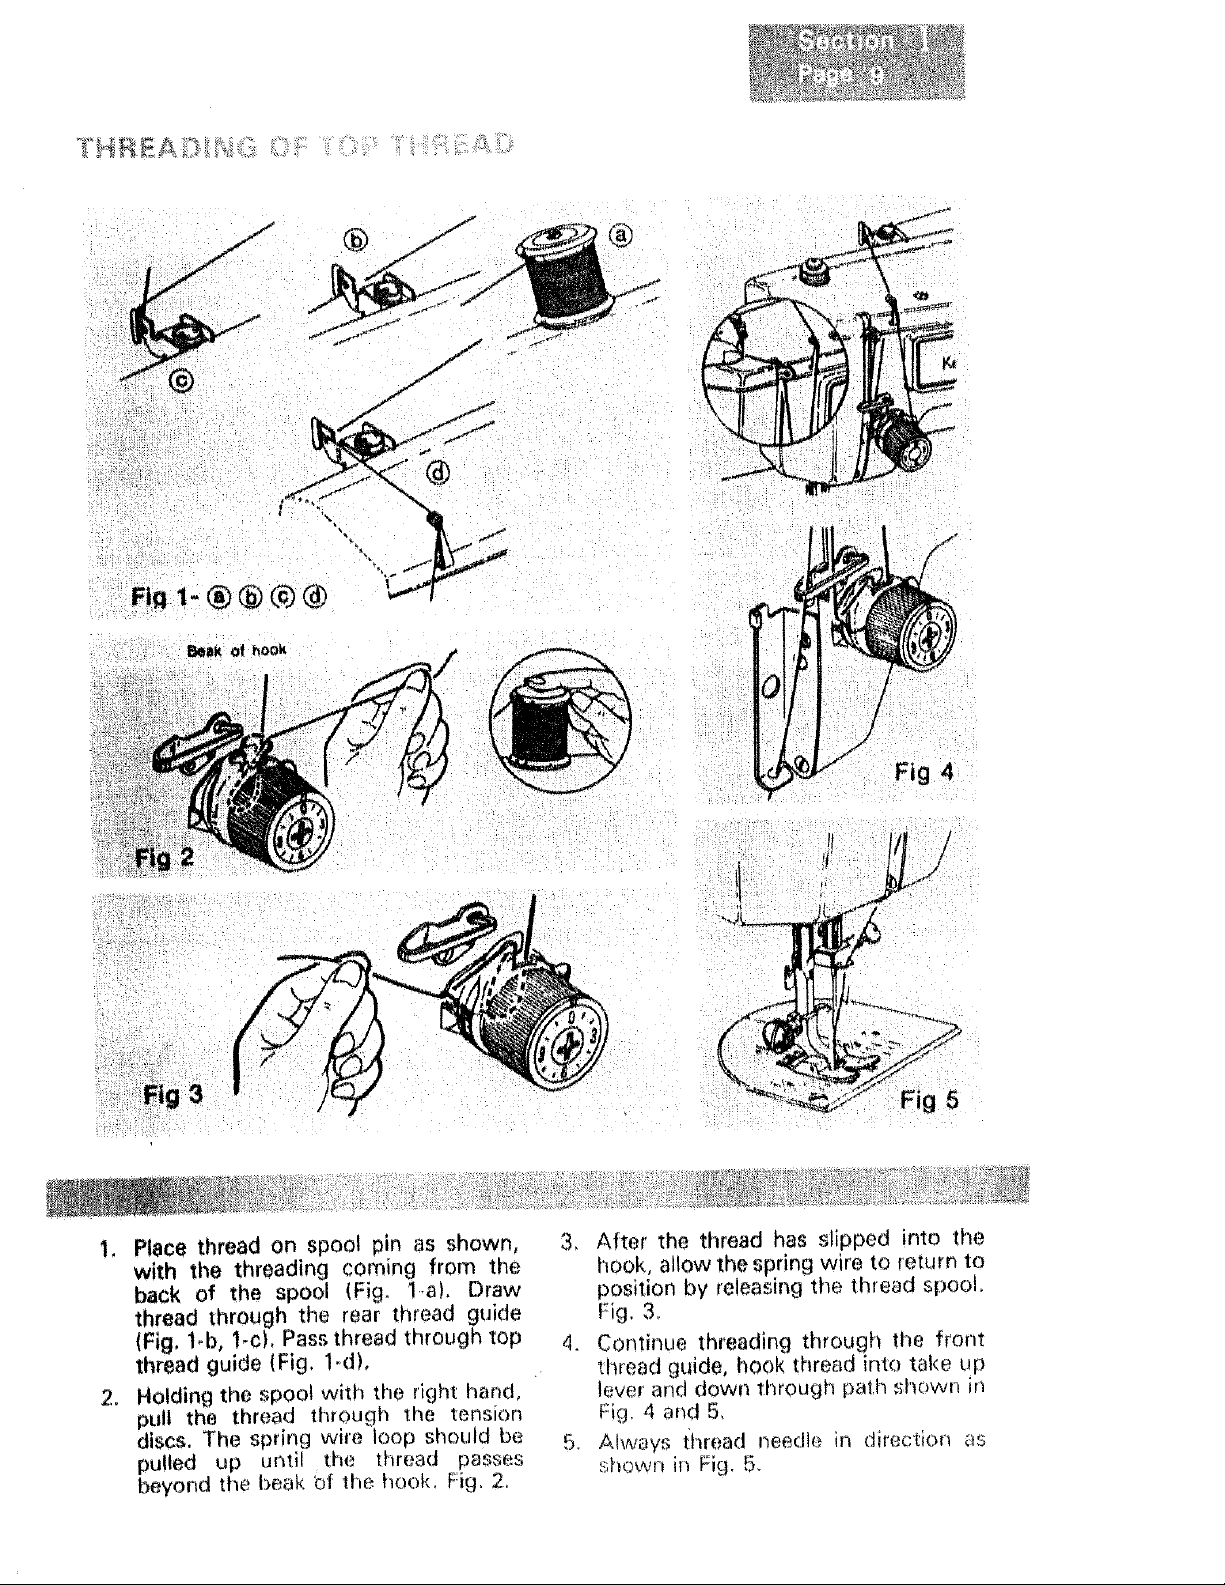
1, Place thread on spool pin as shown,
with the threading coming from the
back of the spool (Fig. 1.-a). Draw
thread through the rear thread guide
(Fig. 1.b, !-c)0 Pass thread through top
thread guide (Fig. led),
2. Holding the spool with the right hand.
pull the thread through tile tension
discs. The spring wire loop should be
pulled up until the thread passes
beyond the beak bf 1he hook. Fig. 2.
3. After the thread has slipped into the
hook. allow the spring wire to return to
position by releasing the thread spool.
Fig. 3.
4. Cor!tinue threading through the front
thread guide, hook thread into take up
lever and down through path _shown in
Fig, 4 and 5,
5. Always thread needle in direction as
shewn iT_Fig. 5,
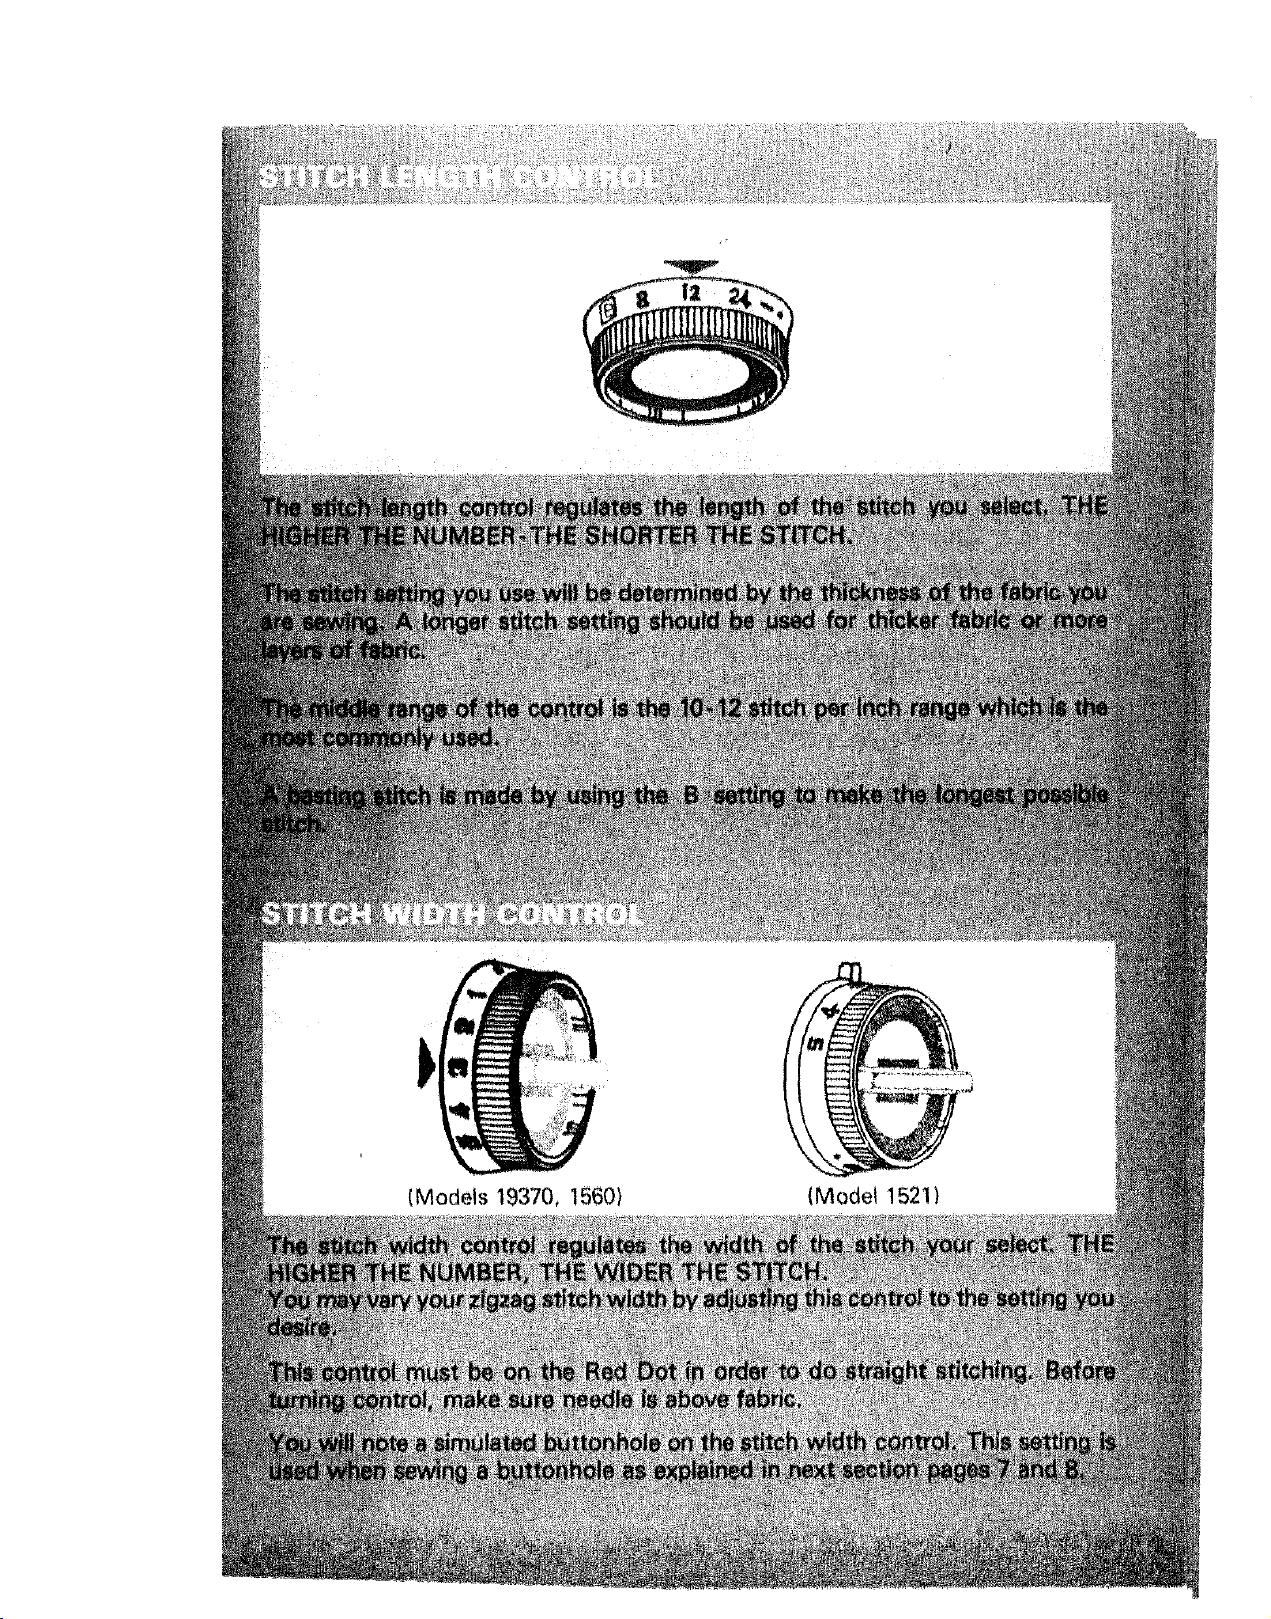
Probably the most important control on,your machine is this one that regulates your
top thread tension, It consists of discs between which the thread passes. The
pressure on these discs is regulated by _urning the dial. The higher the number, the
tighter the tension,
There are many reasOns for having to reset your tension. The best tension for one
fabric may not be correct for another. The required tension depends upon the
stiffness of the fabric, thickness of the fabric, numbers of layers of fabric being
sewn, as well as the type of stitch you are making.
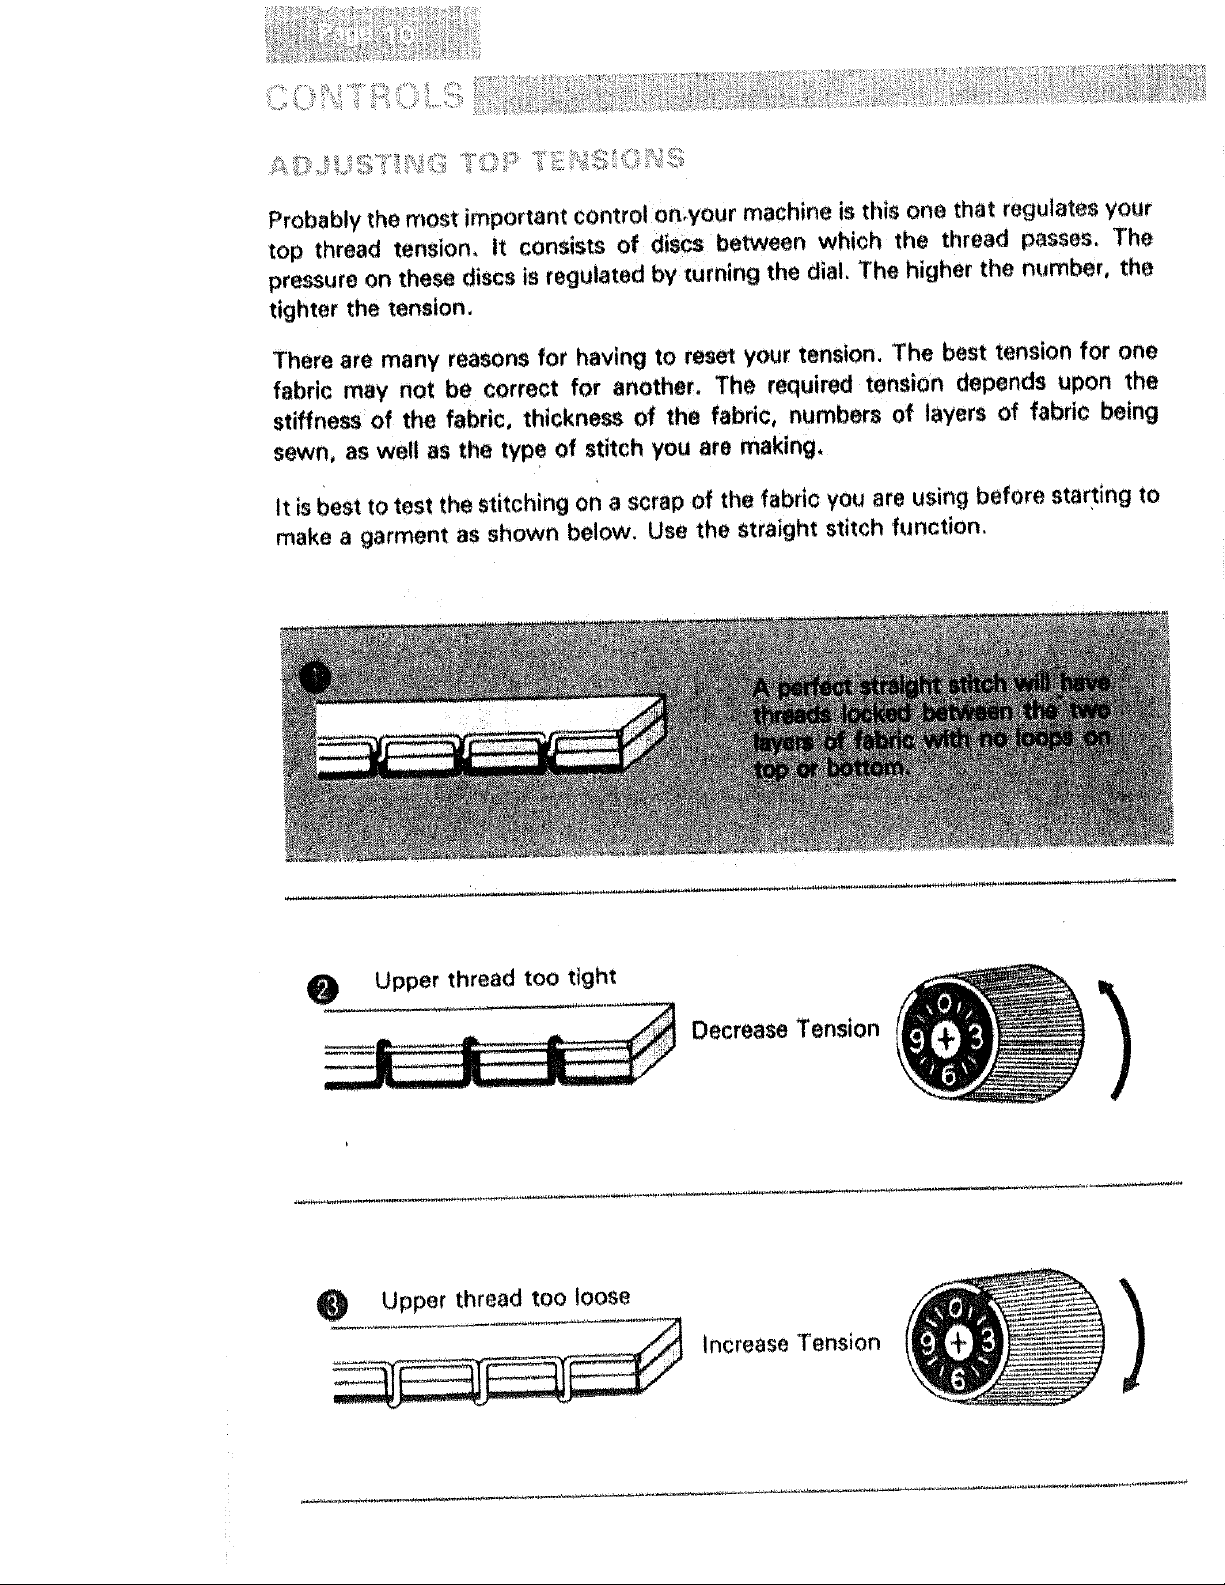
It is best to test the stitching on a scrap of the fabric you are using before starting to
make a garment as shown below. Use the straight stitch function.
Upper thread too tight
Decrease Tension
Upper thread too loose
increase Tension

!
Bobbin tension requires adjusting less frequently than the upper thread tension,
If the stitch is satisfactory but the seam is puckered, it may be necessary to loosen
Lhe tension on both the top and bottom threads. Be sure to balance them as
!ndicated on page 10,
When adjusting the tension on the bobbin case, make slight adjustments with a
_rewdriver+ Correct tensions will produce the stitch shown on page 10.
Turn Clockwise,
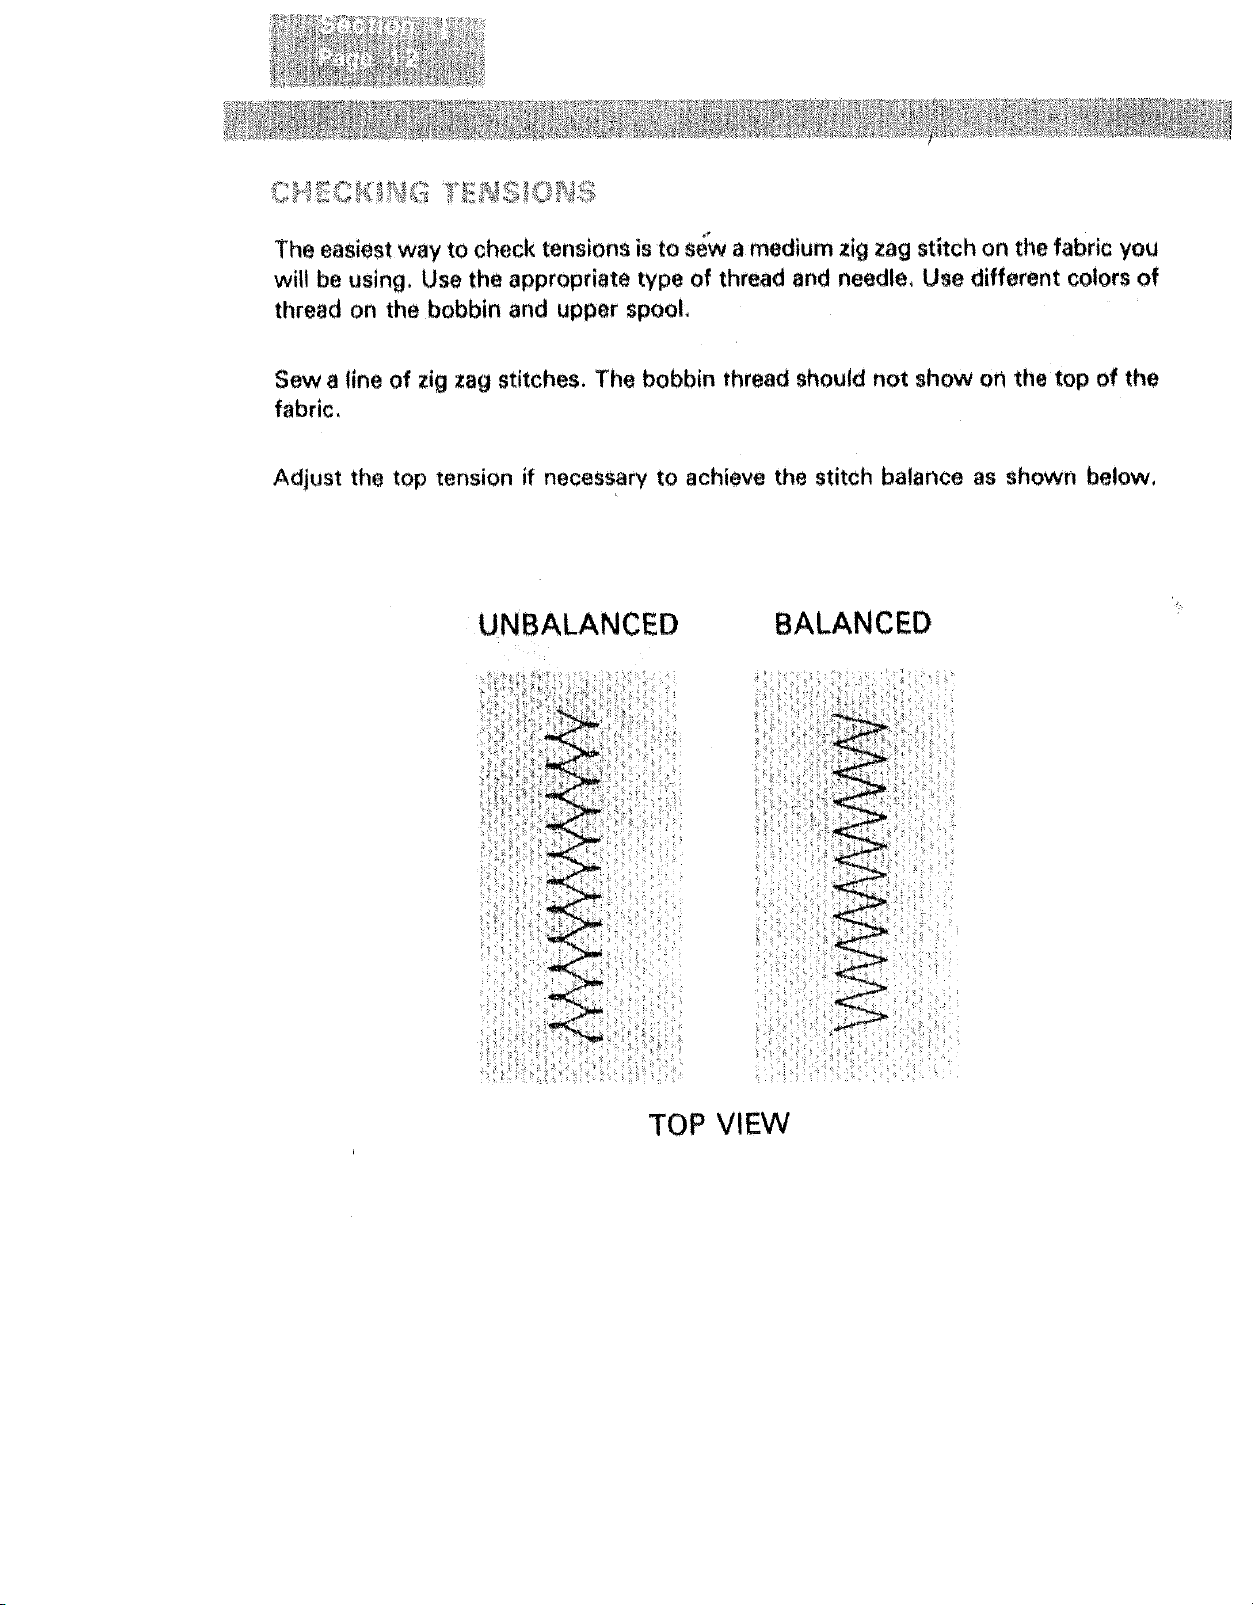
Theeasiestway to check tensions isto sew a medium zig zag stitch on the fabric you
will be using. Use the appropriate type of thread and needle, Use different colors of
thread on the bobbin and upper spool,
Sew a line of zig zag stitches. The bobbin thread should not show on the top of the
fabric,
Adjust the top tension if necessary to achieve the stitch balance as shown below,
UNBALANCED
BALANCED
TOP VIEW
i
(Models 19370, !560) (Model 1521)
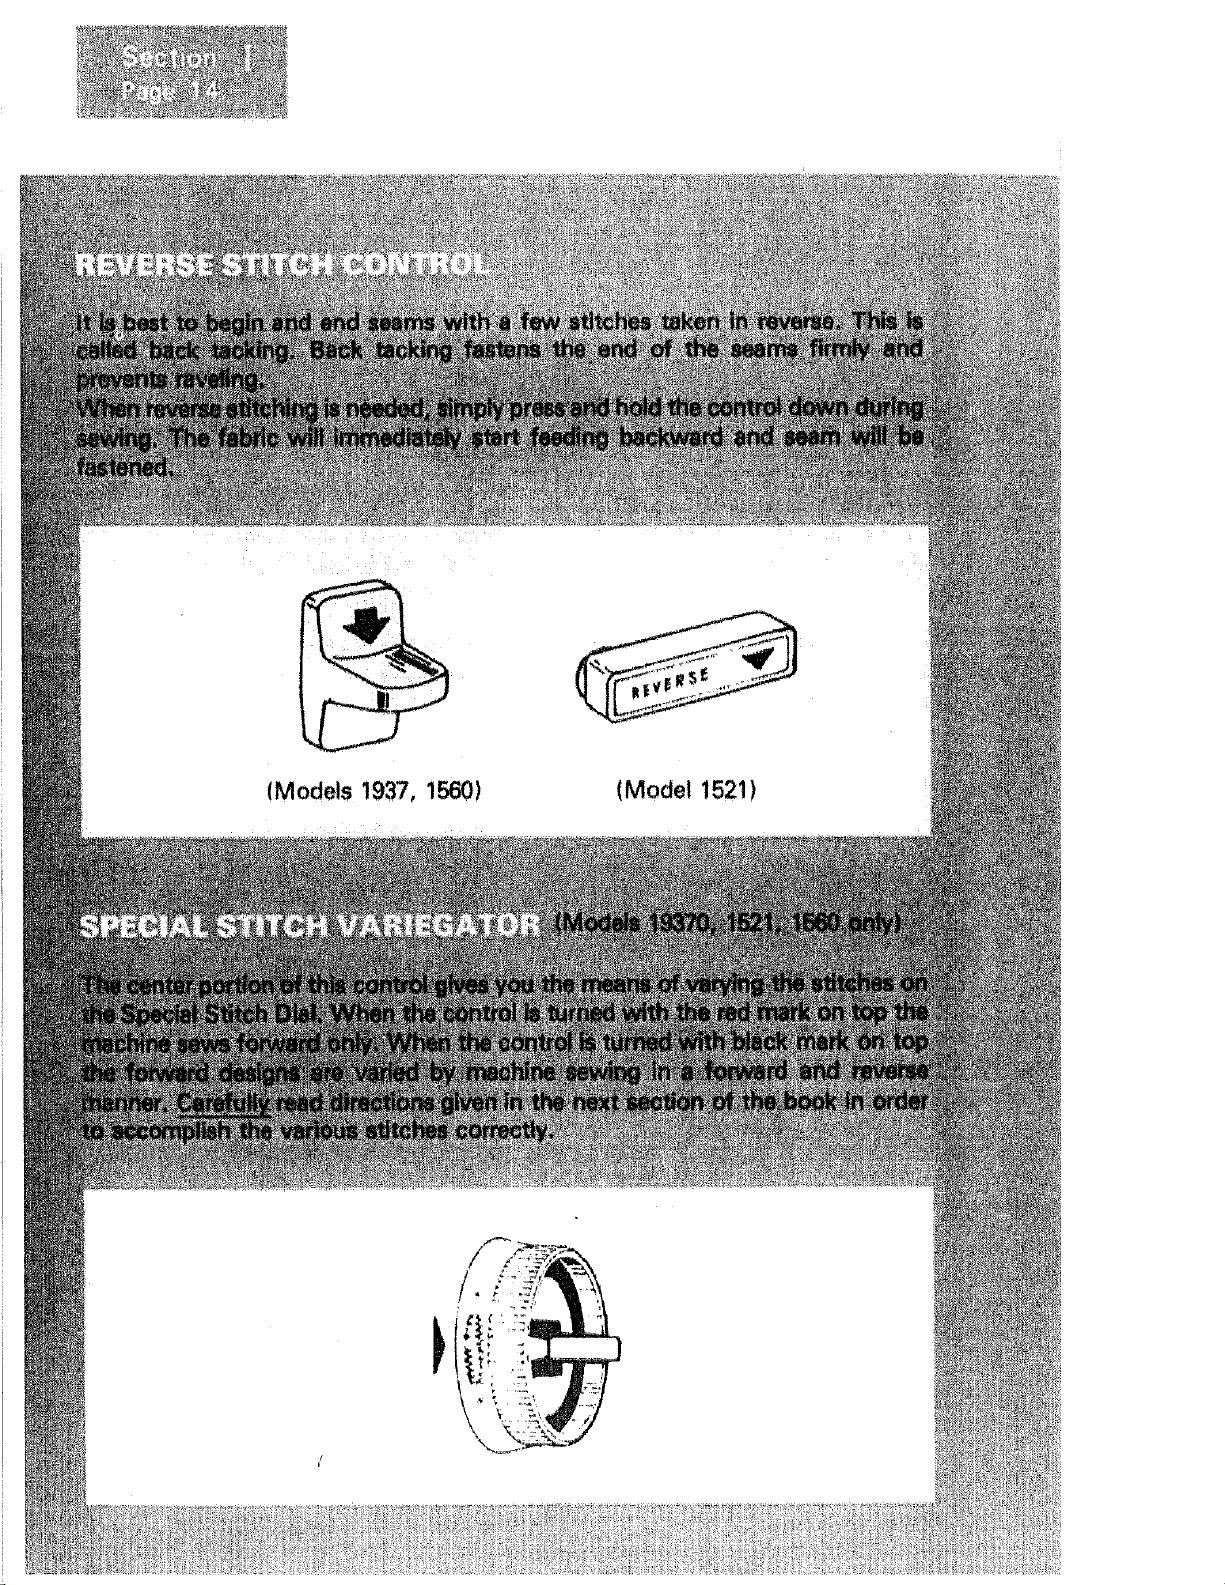
(Models 1937, 1560) (Model !52!)


Model 152I Model 1560
 Loading...