

Page 1

Instruction Manual
Model 179A
TRMS Multimeter
01982, Keithley Instruments, Inc.
Cleveland, Ohio, U.S.A.
Document Number 32430
Page 2
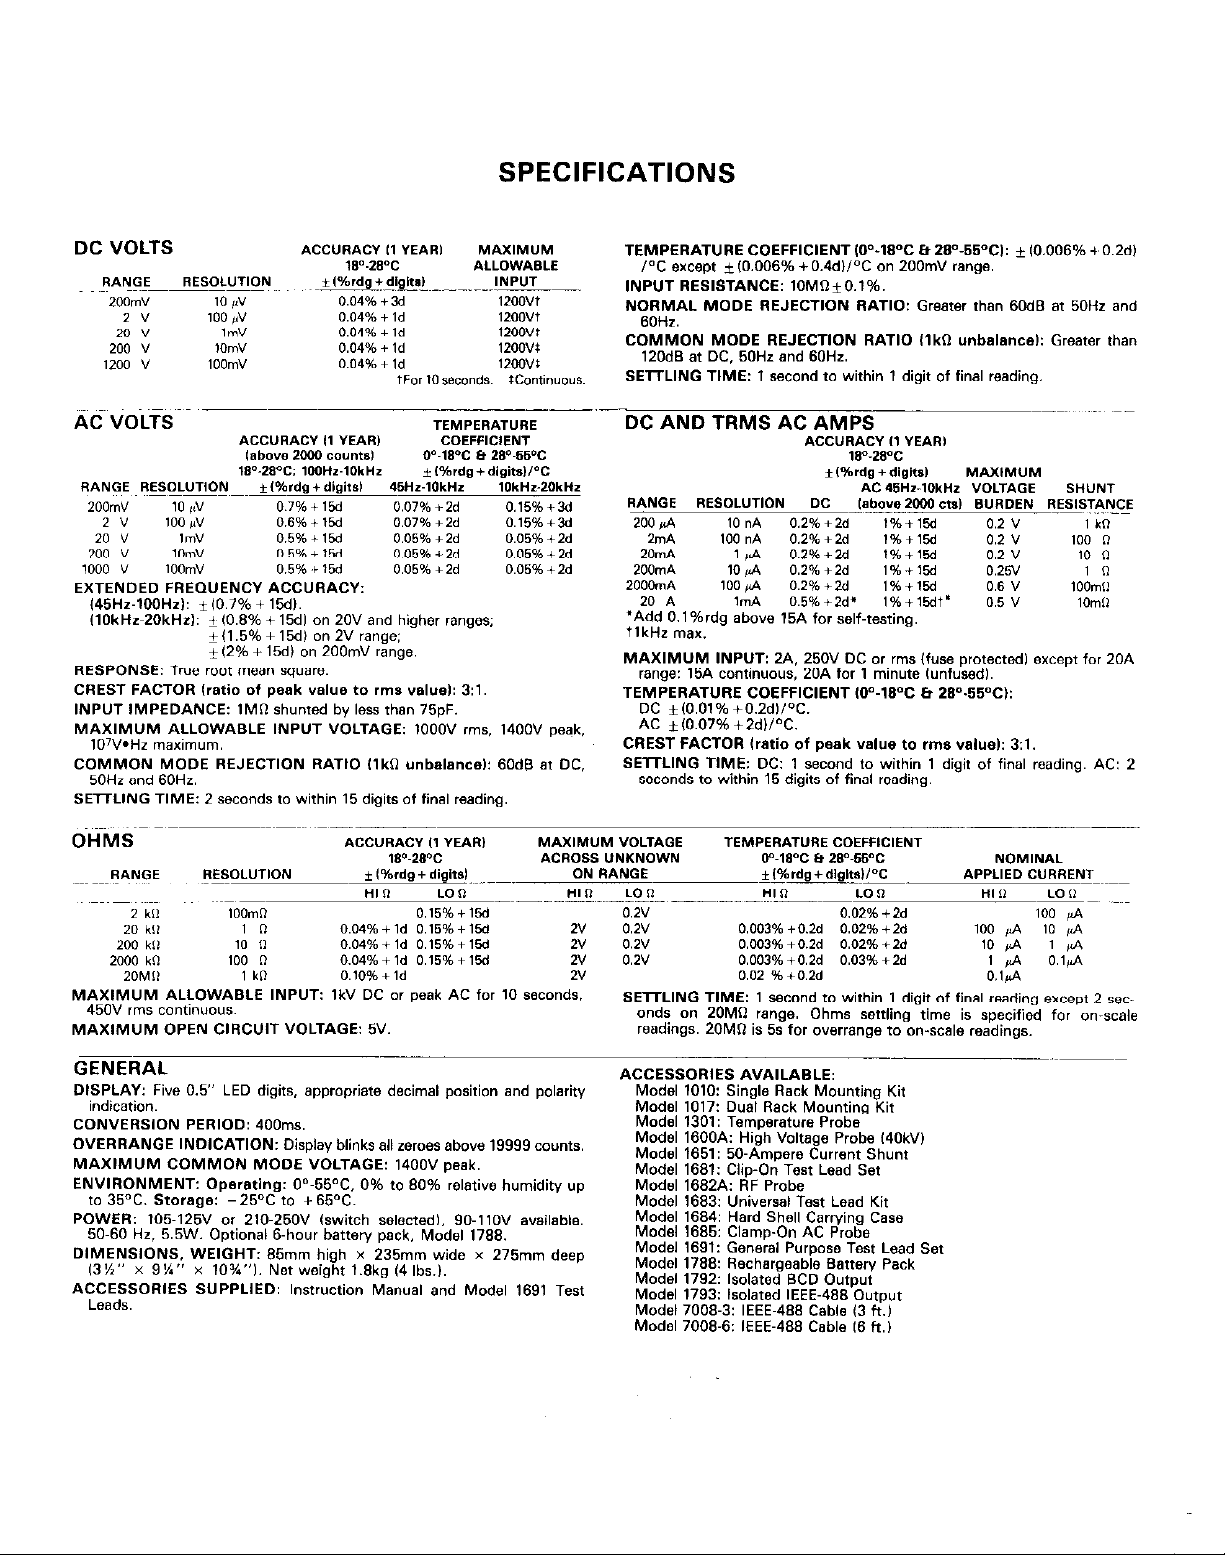
SPECIFICATIONS
DC AND TRMS AC AMPS
20 A A 0.5%+2d* l%+lEdt 0.5” ,Ornll
*Add 0.1 %rdg above 15A fo, self-testing.
tlktir max.
MAXIMUM INPUT: 24 250” DC o, rms (fuse protected, except ‘or 20A
range: l5A continuous. 20A for 1 minute lunfusedl.
TEMPERATTURE COEFFlClENT OF-18°C Et 28°-!XioC,:
DC f,O.Ol% +O.Zd,,T.
AC * lO.O7% +2dlPC.
CREST FACTOR Iratio of peak value to rms valuel: 31.
SETTLING TIME: DC: 1 second to within 1 digit of final reading. AC: 2
seconds to within 15 digits of final reading.
MAXIMUM OPEN CIRCUIT VOLTAGE: 5”
GENERAL
DISPLAY: Five 0.5” LED digits. appropriate decimal position and polarity
indication.
CONVERSION PERIOD: 4OOms.
OVERRANGE INDICATION: Display blinks all zmoes above 19999 counts.
MAXIMVM COMMON MODE VOLTAGE: ,400” oeak.
EWI,R,ONMENT: Operating: 0’
0
c. storage: -25T to +l35oc.
POWER
: 105-125” 0, 210-250” bvitch selectedl. go-,lO” available.
50~60 Hz, 5.5w. Optional B-hour batmy pack. Model 1788.
DIMENSIONS. \n
13%” x 9%” x WY,“,. Netweigirt l.Skg 14 Ix).
ACCESSORIES SUPPLIED: ,nst,wtio” Manual md Mode, ,691 Tesf
Leads.
IEIGHT: 85mm high x 235mm wide x 275mm deco
‘-55°C. 0% to 80% relative humidity up
ACCESSORIES AVAILASLE:
Model 1010: Single Rack Mounting Kit
Model 1017: Dual Rack Mounting Kit
Model 1301: Temperature Probe
Model 1600A: High Voltage Probe ,4Ok”,
Model 1651: 50.Ampere Current Shunt
Model 1581: Clip-On Test Lead Set
Model ISSZA: RF Probe
Model 1683: Universal Test Lead Kit
Model 1584: Herd She,, Carwing Case
Model ,885: Clamp-On AC Probe
Model 1591: General Purpass Test Lead Set
Model 1788: Rechargeable Smtery Pack
Model 1792: Isolated SCD Output
Model 1793: isolated IEEE-488 O”f,,uf
Model 7008-3: IEEE~488 Cable (3 ft.1
Model 7008-6: IEEE-488 Cable 18 tt.,
Page 3
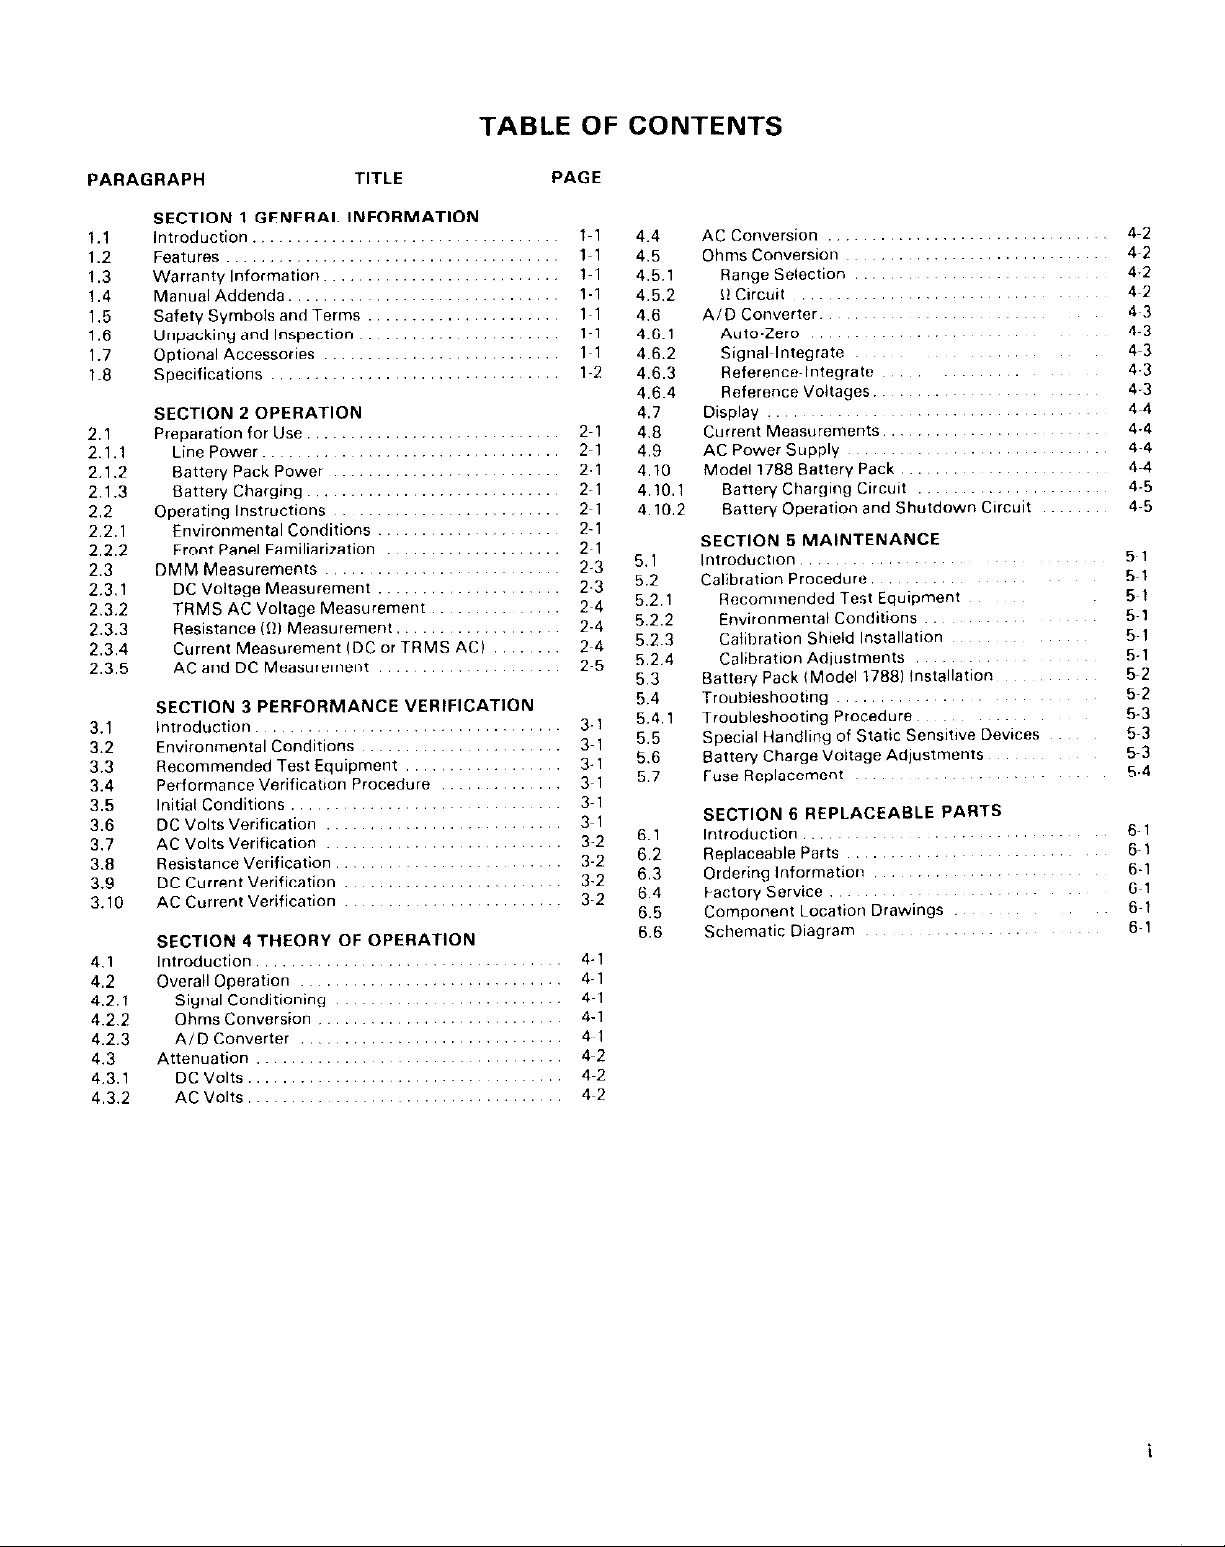
TABLE OF CONTENTS
PARAGRAPH
SECTION 1 GENERAL INFORMATION
1.1
1.2
1.3
1.4
1.5
1.6
1.7
1.8
2.1
2.1.1
2.1.2
2.1.3
2.2
2.2.1
2.2.2
2.3
2.3.1
2.3.2
2.3.3
2.3.4
2.3.5
3.1
3.2
3.3
3.4
3.5
3.6
3.7
3.8
3.9
3.10
4.1
4.2
4.2.1
4.2.2
4.2.3
4.3
4.3.1
4.3.2
Introduction.
Features .....................................
Warranty Information ... ...
ManualAddenda.........~
Safety Symbols and Terms
Unpacking and Inspection ..
Optional Accessories ..........................
Specifications ....... ~, .....
SECTION 2 OPERATION
Preparation for Use.,
LinePower........~.~...........~
Battery Pack Power
Battery Charging
Operating lnsfructi”ns
Environmental Conditions ...... ........
Front Panel Familiarization ..... ...... ....
DMMMeasurements ...........................
DC Voltage Measurement ...... .. ... ..
TRMS AC Voltage Measurement ..
Resistance (111 Measurement ...... ............
Current Measurement IDC or TRMS ACI .. ...
AC and DC Measurement ... .. ...... .. ..
SECTION 3 PERFORMANCE VERIFICATION
Introduction. ........ ...... ..... ... .....
Environmental Conditions ..... ......... .. ...
Recommended Test Equipment .... ..... ......
PerformanceVerification Procedure ....... .. ...
Initial Conditions .. ~,
DCVoltsVerification ...........................
AC Volts Verification
Resistance Verification.
DC Current Verification
AC Current Verification
SECTION 4 THEORY OF OPERATION
Introduction., .......... .... ~, ....... ......
Overall Operation ...
Attenuation ...................................
............
Signal Conditianing
Ohms Cowersian
A/D Converter ....
DC”o,ts........~~
AC”“,ts.............~...~
TITLE PAGE
....................
..................
....................
.....................
.. ~, ... .. .. ...
... ......... ..
..............
................
..
... ..... ...............
...............
..........
.....
...................
..
.. ... .. ... .........
.........
.....
.........
.. .. ... .. .......
......
.........................
.. .........
...........
.........
~, .... ...
..
.....
.. .. .. ...
..... .. ........
.. .. .........
~,
.............
.. ... ... .......
.. ... ...........
..................
~,
...
.....
4.4
4.5
4.5.1
4.5.2
4.6
4.6.1
4.6.2
4.6.3
4.6.4
4.7
2~1
4.8
2~1
4.9
2-l
4.10
2-1
2~1
2-1
2~1
5.1
2-3
5.2
2-3
5.2.1
2~4
..
2-4
2~4
2~5
3-1
3~1
3-1
3~1
3~1
3~1
3-2
3-2
3-2
3-2
4-1
4~1
4~1
4-1
4~ 1
4~2
4~2
4~2
5.2.2
5.2.3
5.2.4
5.3
5.4
5.4.1
5.5
5.6
5.7
6.1
6.2
6.3
6.4
6.5
6.6
SECTION 5 MAINTENANCE
Introduction., ~,
Calibration Procedure
Rccommendcd Tesr Equipment
Environmental Canditions
Calibration Shield Installation
Calibration Adjustments
Batten/ Pack iModel 17881 installation
Troubleshooting ~. ~.
Troubleshooting Procedure
Special Handling of Static Sen&e Devices
Batten/ Charge Voltage Adjustments
Fuse Replacement ~.
SECTION 6 REPLACEABLE PARTS
Introduction ~~~ ,.,, .~,.~ ~~,,,
Replaceable Parts ~. ~, ~.
Ordering Information ~.
Factory Service ~, ~, ~. ~,
Component Location Drawings
SchematicDiagram ~, ~, ~.
~, ~, ~,
~. 4~2
4~2
4-2
4~2
4~3
4-3
4~3
4-3
4-3
4~4
4-4
5~1
51
5~1
5~1
5-1
5-l
52
5-2
53
5-3
5~3
5-4
6-l
6- 1
6-l
6~1
6-l
6~1
Page 4
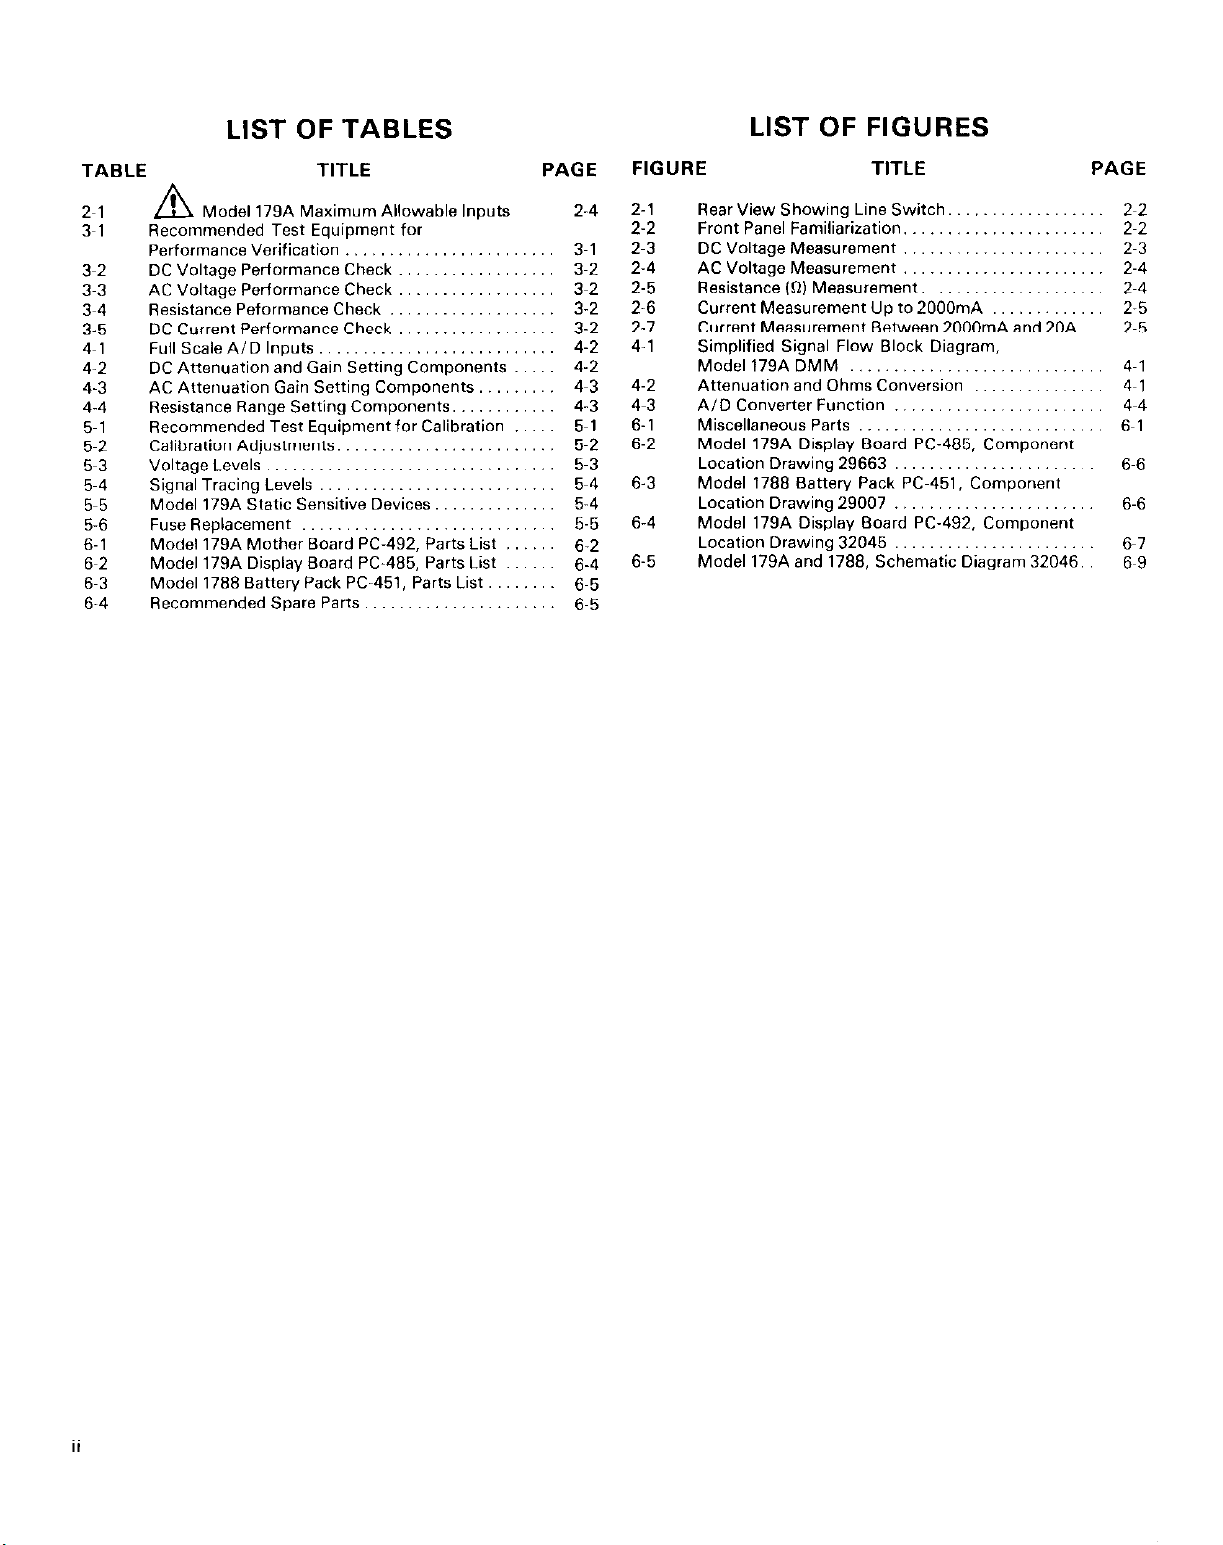
LIST OF TABLES
LIST OF FIGURES
TABLE
3-2
3~3
3~4
3-5
4~1
4-2
4-3
4-4
5~1
5~2
53
5~4
5-5
5-6
6-l
6~2
6~3
6-4
TITLE PAGE
Model 179A Maximum Allowable Inputs
Recommended Test Equipment for
Performanceverification ........................ 3-1
DC Voltage Performance Check .................. 3~2
AC Voltage Performance Check .................. 3-2
Resistance Peformance Check
DC Current Performance Check .................. 3-2
Full Scale A/D Inputs ........................... 4-2
DC Attenuation and Gain Setting Components ..... 4-2
AC Attenuation Gain Setting Components ......... 4-3
Resistance Range Setting Components ............ 4-3
Recommended Test Equipment
Calibration Adjustments ......................... 5-2
Voltage Levels ................................. 5-3
Signal Tracing Levels ...........................
Model l79A Static Sensitive Devices .............. 5-4
Fuse Replacement ............................. 5-5
Model l79A Mother Board PC-492, Parts List ...... 6.2
Model 179A Display Board PC-485, Parts List ...... 6.4
Model 1788 Battery Pack PC-451. Parts List ........ 6.5
Recommended spare parts ...................... 6~5
...................
for
Calibration ..... 5-l
2-4
3-2
5-4
FIGURE
2-1
2-2
2-3
2-4
2-5
2-6
2-7
4-1
4-2
4-3
6-l
6-2
6-3
6-4
6-5
TITLE PAGE
Rear View Showing Line Switch
Front Panel Familiarization
DC Voltage Measurement
AC Voltage Measurement
Resistance(R) Measurement.
Current Measurement Up to 2000mA
Current Measurement Between 2000mA and 20A.
Simplified Signal Flow Block Diagram,
Model 179A DMM
Attenuation and Ohms Conversion
AID Converter Function
Miscellaneous Parts
Model 179A Display Board PC-485, Component
Location Drawing 29663
Model 1788 Battery Pack PC-451. Component
Location Drawing i9007 :. .‘.
Model 179A Display Board PC-492, Component
Location Drawing 32045
Model 179A and 1788, Schematic Diagram 32046.
... ............
..... ... ......
.....................
.....................
.................
...........
2~2
2~2
2~3
2-4
2~4
2-5
2~5
4~1
4~1
4-4
6~1
6~6
6-6
Page 5
SECTION 1
GENERAL INFORMATION
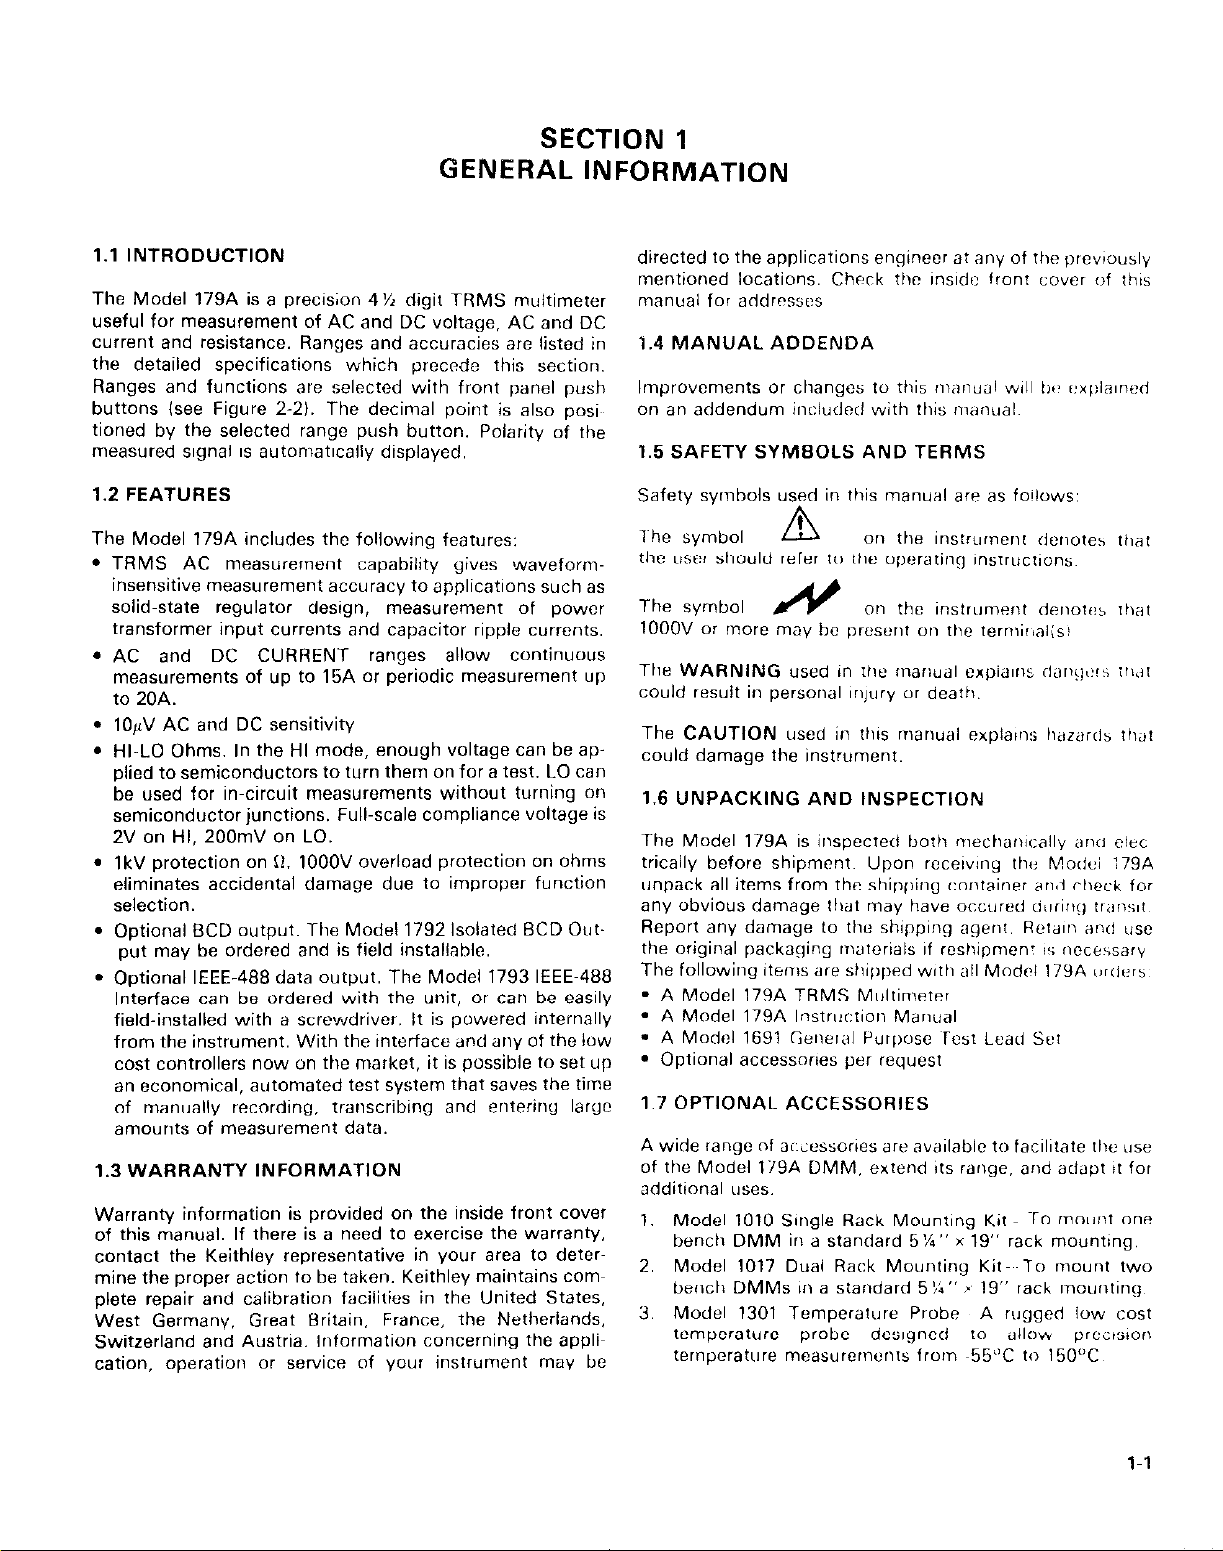
1.1 INTRODUCTION
The Model 179A is a precision 4% digit TRMS multimeter
useful for measurement of AC and DC voltage, AC and DC
Current and resistance. Ranges and accuracies are listed in
the detailed specifications which precede this section,
Ranges and functions are zselected with front panel push
buttons (see Figure Z-2). The decimal point is also po$
tioned by the selected range push button. Polarity of the
measured signal is automatically displayed.
1.2 FEATURES
The Model 179A includes the following features:
l
TAMS AC measurement capability gives waveforminsensitive measurement accuracy to applications such as
solid-state regulator design, measurement of powcr
transformer input currents and capacitor ripple currents.
. AC and DC CURRENT ranges allow continuous
measurements of up to 15A or periodic measurement up
to ZOA.
l
1OpV AC and DC sensitivity
l
HI-LO Ohms. In the HI mode, enough voltage can be applied to semiconductors to turn them on for a test. LO can
be used for in-circuit measurements without turning on
semiconductor junctions. Full-scale compliance voltage is
2V on Hf. 200mV on LO.
. 1kV protection on II. 1OOOV overload protection on ohms
eliminates accidental damage due to improper function
selection.
. Optional BCD output. The Model 1792 Isolated BCD Out-
put may be ordered and is field installable.
l
Optional IEEE-488 data output. The Model 1793 IEEE-488
Interface can be ordered with the unit, or can be easily
field-installed with a screwdriver. It is powered internally
from the instrument, With the interface and any of the low
c”?.t controllers now on the market. it is possible to set up
an economical, automated test system that saves the time
of manually recording, transcribing and entering large
amounts of measurement data.
1.3 WARRANTY INFORMATION
Warranty information is provided on the inside front cover
of this manual. If there is a need to exercise the warranty.
contact the Keithley representative in your area to determine the proper action lo be taken. Keithley maintains come
plete repair and calibration facilities in the United States.
West Germany. Great tlritain, France, the Netherlands.
Switzerland and Austria. Information concerning the appli~
cation, operation or sewice of your instrument mav be
directed to the applications engineer at any of the previously
mentioned locations. Check thr inside front cover of this
manual for addwsst!s
1.4 MANUAL ADDENDA
Improvements or changes to tilis manuill will t,l, r~x~:la~ned
on an addendum in<:/udcd with this manuals
1.5 SAFETY SYMBOLS AND TERMS
Safety symbols used in this manual are as follows:
The symbol
A
on the instrument denotes that
the user should refer to the operatin:, instructions~
The symbol
1OOOV or more may bc present
on the
instrument
on
the ternlir,al(si
derrotcs Ihilt
The WARNING used in the manual exl~ia~ns rls~q,:!~ :~u!
could result in personal injury or death
The CAUTION used in illis manual axpla~n:; hazards ~hrft
could damage the instrument.
1.6 UNPACKING AND INSPECTION
The Model 179A is inspecred both mecflai~~cally ano c1e.c
tricallv before shipments Upon receiving tfw Modui 179A
unpack all items from the shipping container and check for
any obvious damage Illat may have “CCIIIZ’~ dc,rir\!j i~i~ns~t
Report any damage to the shipping agent, Rela~n anti use
the original packqing tmatcriais 11 rcst,ipmen: 1s rnccessarv
The following items are sflipped with all Modal 179A urtitils
- A Model 179A TRMS Multimeter
l
A Model 179A Instn~ctior Manual
l
A Model 1691 tane~;rl Purpose To51 Lead Set
l
Optional accessories per request
1.7 OPTIONAL ACCESSORIES
A wide range of accessories are available to facilitate the use
of the Model 179A DMM. extend its range. and adapt it for
additional uses.
1. Model 1010 Single Rack Mounting Kit To mount one
bench DMM in a standard 5%” x 19” rack mounting.
2. Model 1017 Dual Rack Mounting Kit&To mount two
berlcfi DMMs in a standard 5%” I 19” rack amounting
3. Model 1301 Temperature Probe A rugged low cost
temperature probe deslgncd to allow precision
temperature rneasuremcn~s from ~55“C to 150°C
1-l
Page 6
Range: -55oc to 15ooc
Output: lmVI°C; compatible with any DMM with at
least 10MII input impedance
Accuracy: kZ°C from O” to 100°C; f3”C from -55’
to O°C and 100° to 150°C
Power: 9V alkaline or C-Zn (NEDA 16041 battery.
4. Model 1600A High Voltage Probe extends the DMM to
40kV.
Maximum Input: 40kV DC or peak AC to 300Hz
Input Resistance: IOOOMR
Division Ratio: 1OOO:l (into lOMa)
Ratio Accuracy (into lOM12 DMM): +2.5% from 1kV
to 40kV DC; -3dB at 300Hr AC
Operating Temperature: O” to 50°C
5. Model 1651 50.Ampere Current Shunt-The external
0.00112 + 1%.
measurements from O-50A DC and 20.50A AC.
6. Model 1681 Clip-On Test Lead Set contains two leads,
1.2m (48 inches) long terminated with banana plugs and
spring action clip-on probes.
7. Model 1682A RF Probe permits voltage measurements
from IOOkHz to 250MHr.
AC to DC transfer accuracy: +ldB from 1OOkHz
to 250MHz at IV, peak responding, calibrated
in rms of a sine wave. compatible with instruments
with lOML2 input resistance
Voltage Range: 0.25V to 15V rms
Maximum Allowable Input: 42V AC peak, ZOOV (DC
+ AC peak1
8. Model 1683 Universal Test Lead Kit consists of two test
leads. 1.2m (48 inches) long with 12 screw-in tips, 2
banana plugs, 2 spade lugs, 2 alligator clips with boots,
2 needle tips with chucks and 4 heavy duty tip plugs.
9. Model 1684 Hard Shell Carrying Case-Hard vinyl case,
1OOmm x 300mm x 350mm (4” x 13” x 14”) has a fitted
4.terminal shunt permits current
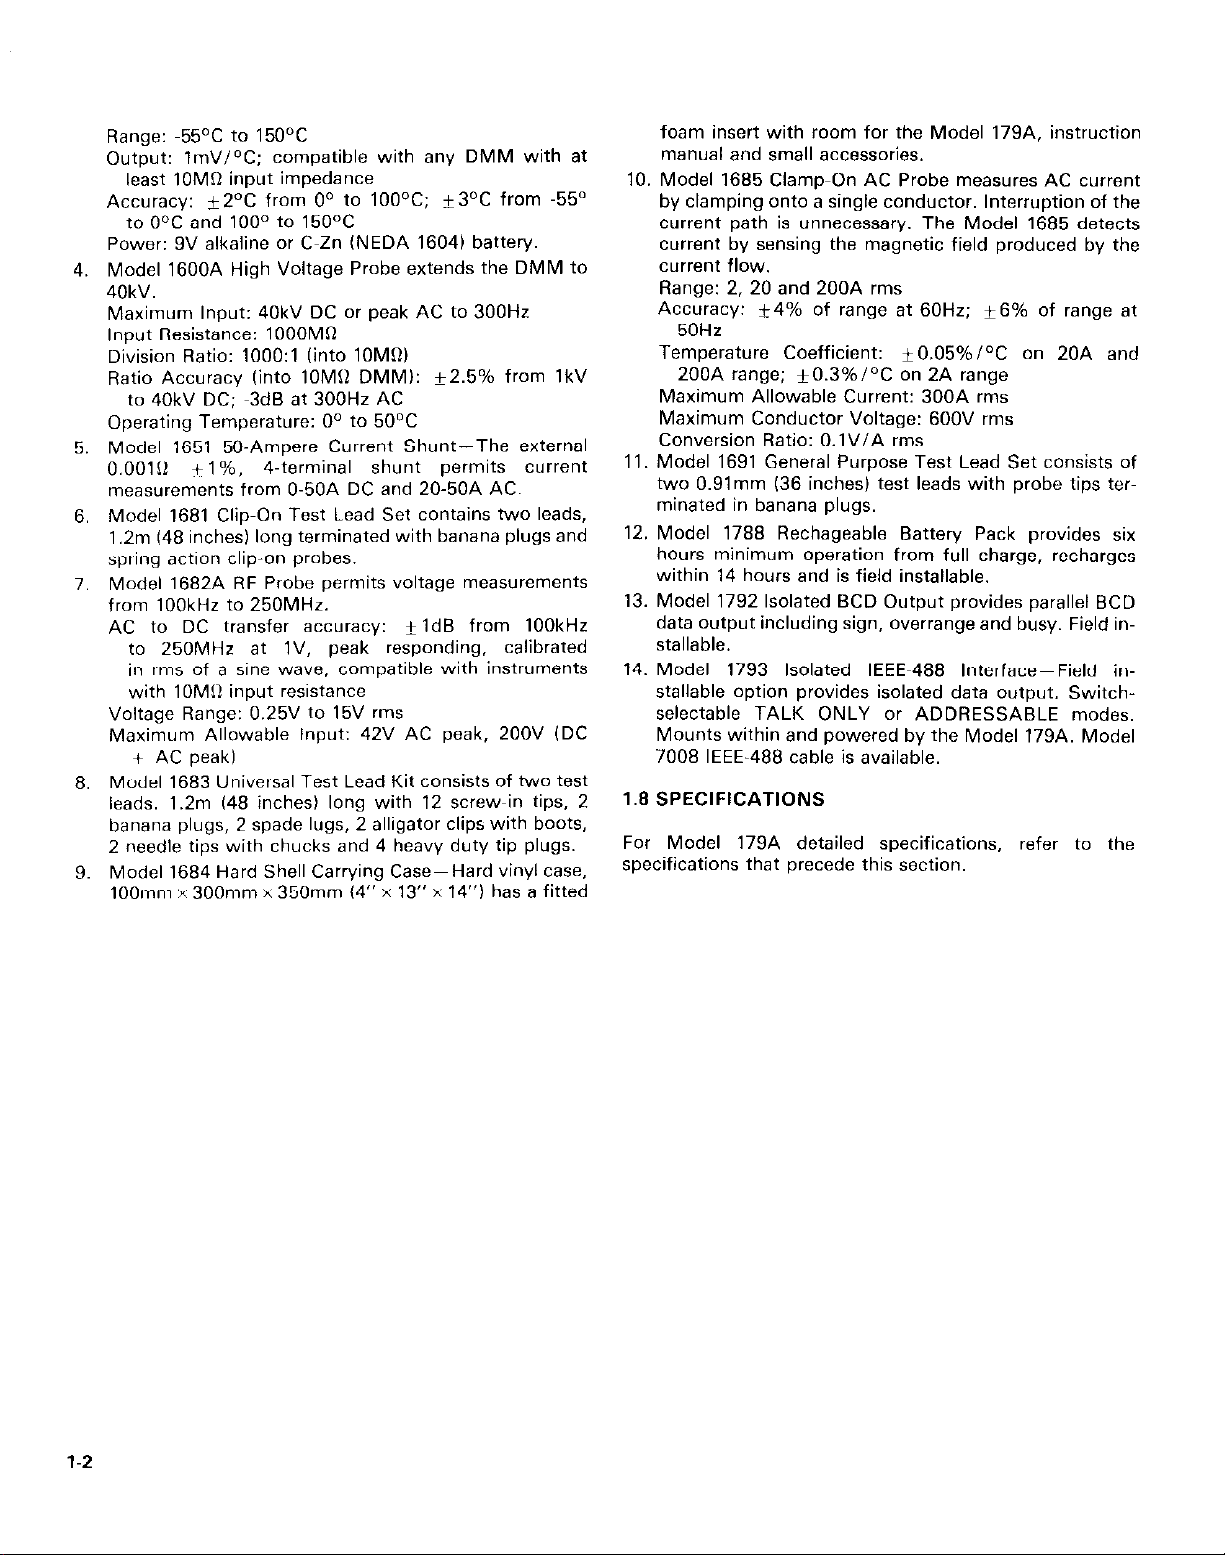
foam insert with room for the Model 179A, instruction
manual and small accessories.
10. Model 1685 Clamp-On AC Probe measures AC current
by clamping onto a single conductor. Interruption of the
current path is unnecessary. The Model 1685 detects
current by sensing the magnetic field produced by the
current flow.
Range: 2, 20 and 200A rms
Accuracy: i-4% of range at 60Hz; *6% of range at
5OHz
Temperature Coefficient: iO.O5%/‘C on 20A and
200A range; +0.3%/OC on 2A range
Maximum Allowable Current: 300A rms
Maximum Conductor Voltage: 600V rms
Conversion Ratio: O.lV/A rms
11. Model 1691 General Purpose Test Lead Set consists of
two 0.9lmm (36 inches) test leads with probe tips terminated in banana plugs.
12. Model 1788 Rechageable Battery Pack provides six
hours minimum operation from full charge, recharges
within 14 hours and is field installable.
13. Model 1792 Isolated BCD Output provides parallel BCD
data output including sign, overrange and busy. Field installable.
14. Model 1793 Isolated IEEE-488 Interface-Field in-
stallable option provides isolated data output. Switchselectable TALK ONLY or ADDRESSABLE modes.
Mounts within and powered by the Model 179A. Model
7008 IEEE-488 cable is available.
1.8 SPECIFICATIONS
For Model 179A detailed specifications, refer to the
specifications that precede this section.
1-2
Page 7
SECTION 2
OPERATION
2.1 PREPARATION FOR USE
The Model 179A is shipped ready to use. The instrument
may be powered from line voltage or from rechargeable bat-
teries (when the optional Model 1788 Rechargeable Battery
Pack is installedl.
21.1 Line Power
The Model 179A is provided with a three-wire line cord
which mates with third-wire grounded receptacles. Connect
the instrument to AC line power as follows:
1. Set the LINE VOLTAGE switch an the back of the instrument to correspond to line voltage available. Ranges are
105 to 125 volts and 210 to 250 volts AC as shown in
Figure 2-l.
CAUTION
Connect only to the line voltage
selected. Application of incorrect
voltage can damage the instrument.
2. Plug the power cord into a properly grounded outlet.
WARNING
Ground the instrument through a properly grounded receptacle before operation. Failure to ground the instrument
can result in severe injury or death in the
event of short circuit or malfunction.
2.1.2 Battery Pack Power
The Model 179A may also be operated from rechargeable
sealed lead-acid batteries contained in the optional Model
1788 Battery Pack. The battery pack will operate the 179A
for up to six hours. Circuits within the battery pack will
automatically shut down the instrument when the battery
charge is insufficient to maintain accurate readings. Refer to
Section 5, paragraph 5.3 for installation procedures.
2.1.3 Battery Charging
After the Model 1788 Battery Pack is installed in the Model
179A it can be charged and recharged as follows:
1. Connect the instrument to line power as described in
paragraph 2.1.1.
2. With the power switch off, the battery charge circuitry is
automatically engerized to charge the battery at the max-
imum rate. When the battery pack is first installed, or if it
is completely discharged, allow it to charge for at least 14
hours,
NOTE
For maximum battery life, do not allow the
battery pack to remain completely discharg-
ed. Constant charging will not harm either
the battery pack or the instrument. Allowing
the batten, pack to discharge below 7.2V
and remain discharged will ruin the battery
pack.
3. When the 179A is in use on line power, the bart~?ry
charger maintains a trickle charge on the battery pack.
2.2 OPERATING INSTRUCTIONS
2.2.1 Environmental Conditions
All measurements should be made at iii, ;Imlwnt
temperature within the range of O°C to 55°C. anti with a
relative humidity of 0% to 80% up to 35OC. For instliii w:~s
above 35OC derate humidity 3% per “C up to 55”C, If tilt sn
strument has been subjected to extremes of temperature,
allow sufficient time for internal temperatures to react1 cnw
ronmental conditions. Typically, it takes orx hwIr !o
stabilize a unit that is 10°C 118”Fl out of spei:lf!ixi
temperature range.
2.2.2 Front Panel Familiarization
The following text and Figure 2~2 provide a brief description
of the front panel controls, input terminals and display.
ON/OFF Depressing (in) this push button turns the ins
strument on for either battery power lif the Model 1788 is
installed) or line power. Releasing (out1 this push button
turns the instrument off.
NOTE
In the OFF position, the Model 1788 !if in
stalled) will be charging if the instrument 1s
connected to line power.
AC/DC This switch is used along with the volts IV1
and current (A) functions. Depressing linl this push butt
ton selects AC and releasing lout) this push button
selects DC.
LO/HI This feature is used along with the !! funcllon.
The front panel push button selects the LO or HI mode
for the 20kR. 200k12 and 2000kU ranges. Depressiw the
push button lin) selects LO and releasing the push button
selects HI. On the 2kI2 range the Model 179A is in rhc LO
mode, regardless of the push button position. On the
20MR range the Model 179A is in the HI mode,
regardless of the push button position.
2-l
Page 8
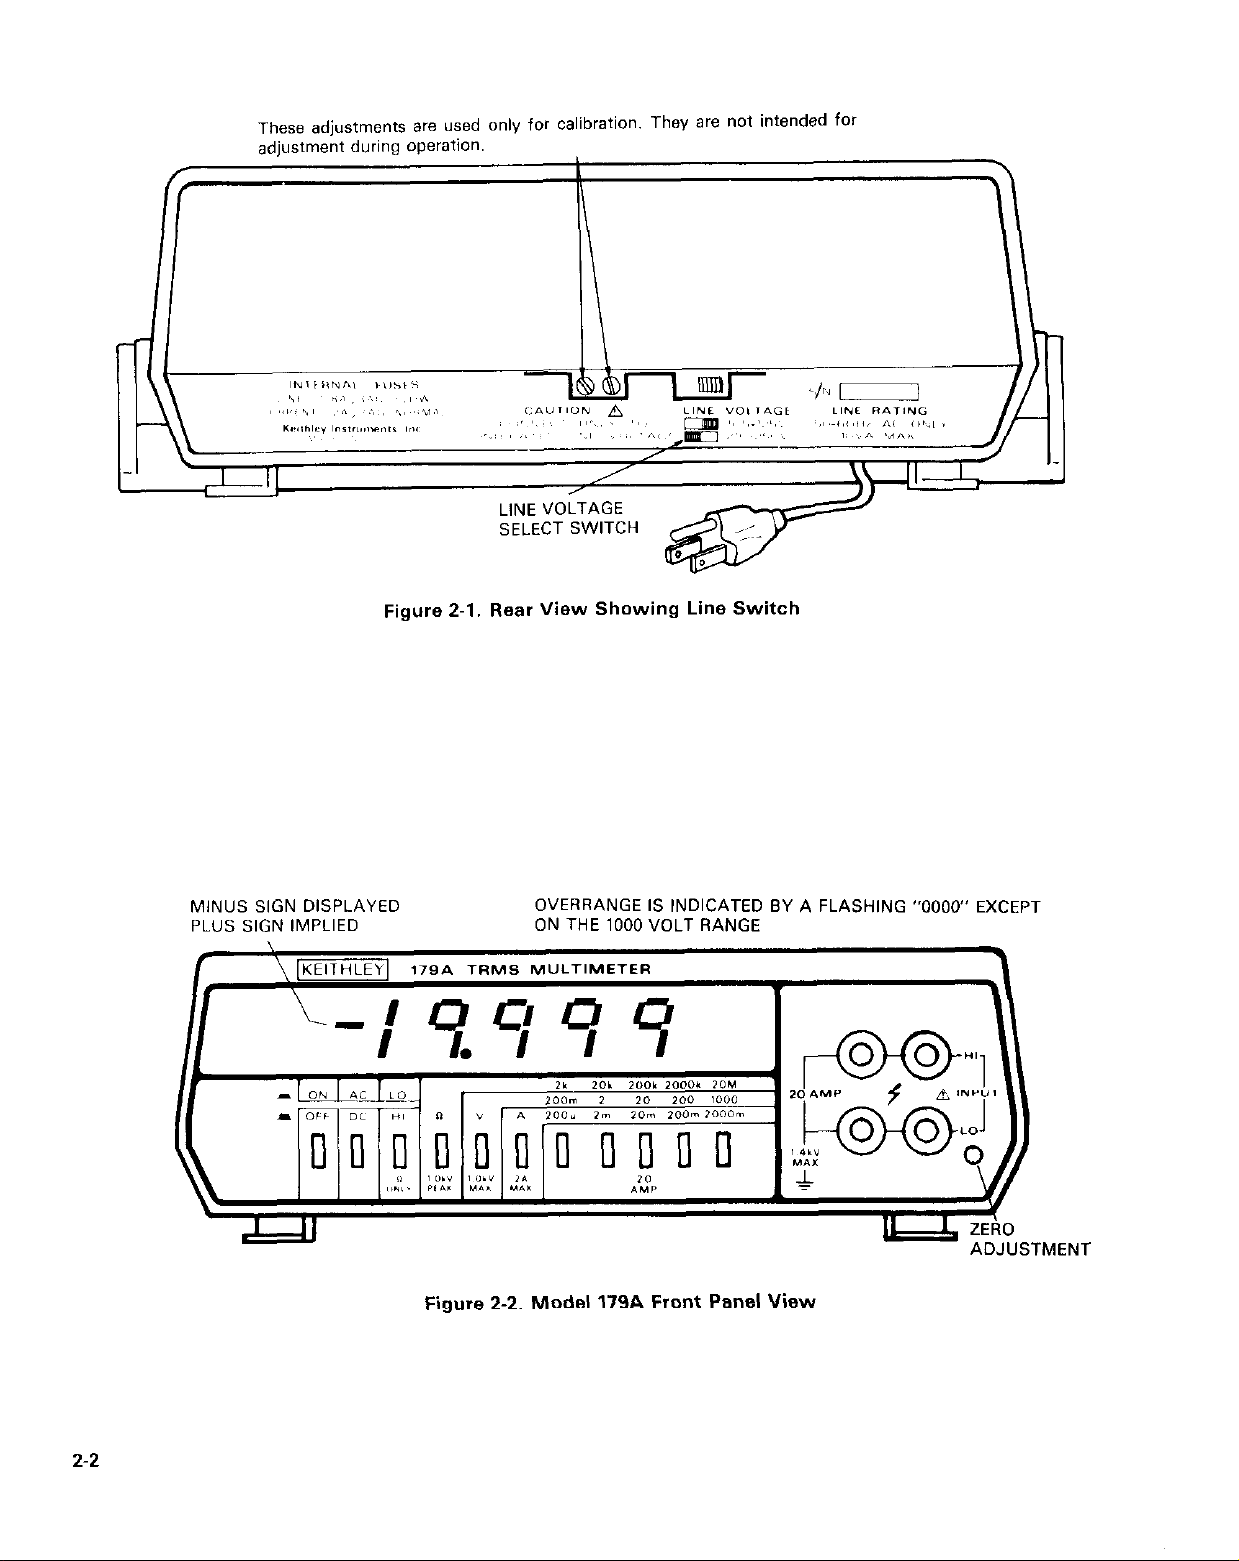
These adjustments are used only for calibration. They are not intended for
adjustment during operation.
Figure 2-l. Rear View Showing Line Switch
2-2
MlNUS SIGN DISPLAYED
PLVS SIGN IMPLIED
OVERRANGE IS INDICATED BY A FLASHING “0000” EXCEPT
ON THE 1000 VOLT RANGE
‘MENT
Figure 2-2. Model 179A Front Panel View
Page 9
A. Use the HI mode for measurements in the 20k. 200k.
2000k and 20M ranges. Full range voltage drop is 2
volts and is sufficient to cause forward conduction of
semiconductor junctions. The HI terminal is positive.
B. Use the LO mode for measurements in the 2k, 20k.
200k and 2000k ohm ranges. Full range voltage drop
is 2OOmV. Maximum open circuit voltage is 5V on all
ranges.
4. Function Selection
A. R Depressing this push button selects the ohms
function.
B. V Depressing this push button selects the volts
function.
C. A Depressing this push button selects the current
function.
5. Range Selection Select the desired range by depress-
ing the appropriate push button.
6. Input
A. 20 AMP jacks (grey and black) Use this pair exclu-
sively for measuring current up to 20A.
6. INPUT jacks (red and black1 Use this pair for current
measurements up to 2000mA and all other
measurements.
7. Zero Adjustment The from panel zero adjustment nulls
input offset on the 20, 200 and 1200 DC voltage ranges
and on all resistance ranges. Typically. this adjustment
need not be performed more often than once a week
unless the instrument is operated at ambient temperatures outside the range of 1WC to 28OC. Zero the instrument as follows:
A. Turn on the power and select LO II and the 200k
range.
E
Plug in test leads and short them. Adjust the zero adjustment pot on front panel to obtain a reading of
0000 +3 digits.
NOTE
The zero adjustment may also be used for
lead compensation on a particular R range.
2.3 DMM MEASUREMENTS
1. Turn on and zero the instrument as described in
paragraph 2.2.2 step 7. Zero the instrument before the
first use or whenever the instrument is used outside the
temperature range of 18OC to 28OC. and weekly during
normal use.
2. TRMS The Model 179A measures the true root mea”
square of a signal within the frequency range of 45 to
20kHz The maximum crest factor for rated accuracy to
3. Crest Factor (CF) is the ratio of the peak voltage to the
r”X
Vdtag‘3
CF = V
e-
Some typical crest factors:
Sine wave: CF =E
Square wave: CF = 1
Triangular wave: CF =w
Positive pulse train: CF- l/Vdufy cycle (duty cycle
forCF=3is0.11)
NOTE
There will be some additional measurement
error for signals with a crest factor greater
than 3lCF> 3).
CAUTION
Do not exceed the maximum allowable
inputs of the 179A or instrument
damage that is not covered by the warranty, may occur. See Table 2-l for max-
imum inputs.
WARNING
Exercise extreme caution when measuring voltage thaf present a shock hazard
hazard to the user. The American National Standard Institute (ANSI) etetes
that e shock hazard exists when voltage
levels greeter then 30 volts rms or 42.4V
peak are present. A good safety practice
is to expect that hazardous volfages ere
present in sny unknown circuit fo be
measured, until actual conditions are
verified.
2.3.1 DC Voltage Measurement
1. Select DC V function.
2. Select desired range.
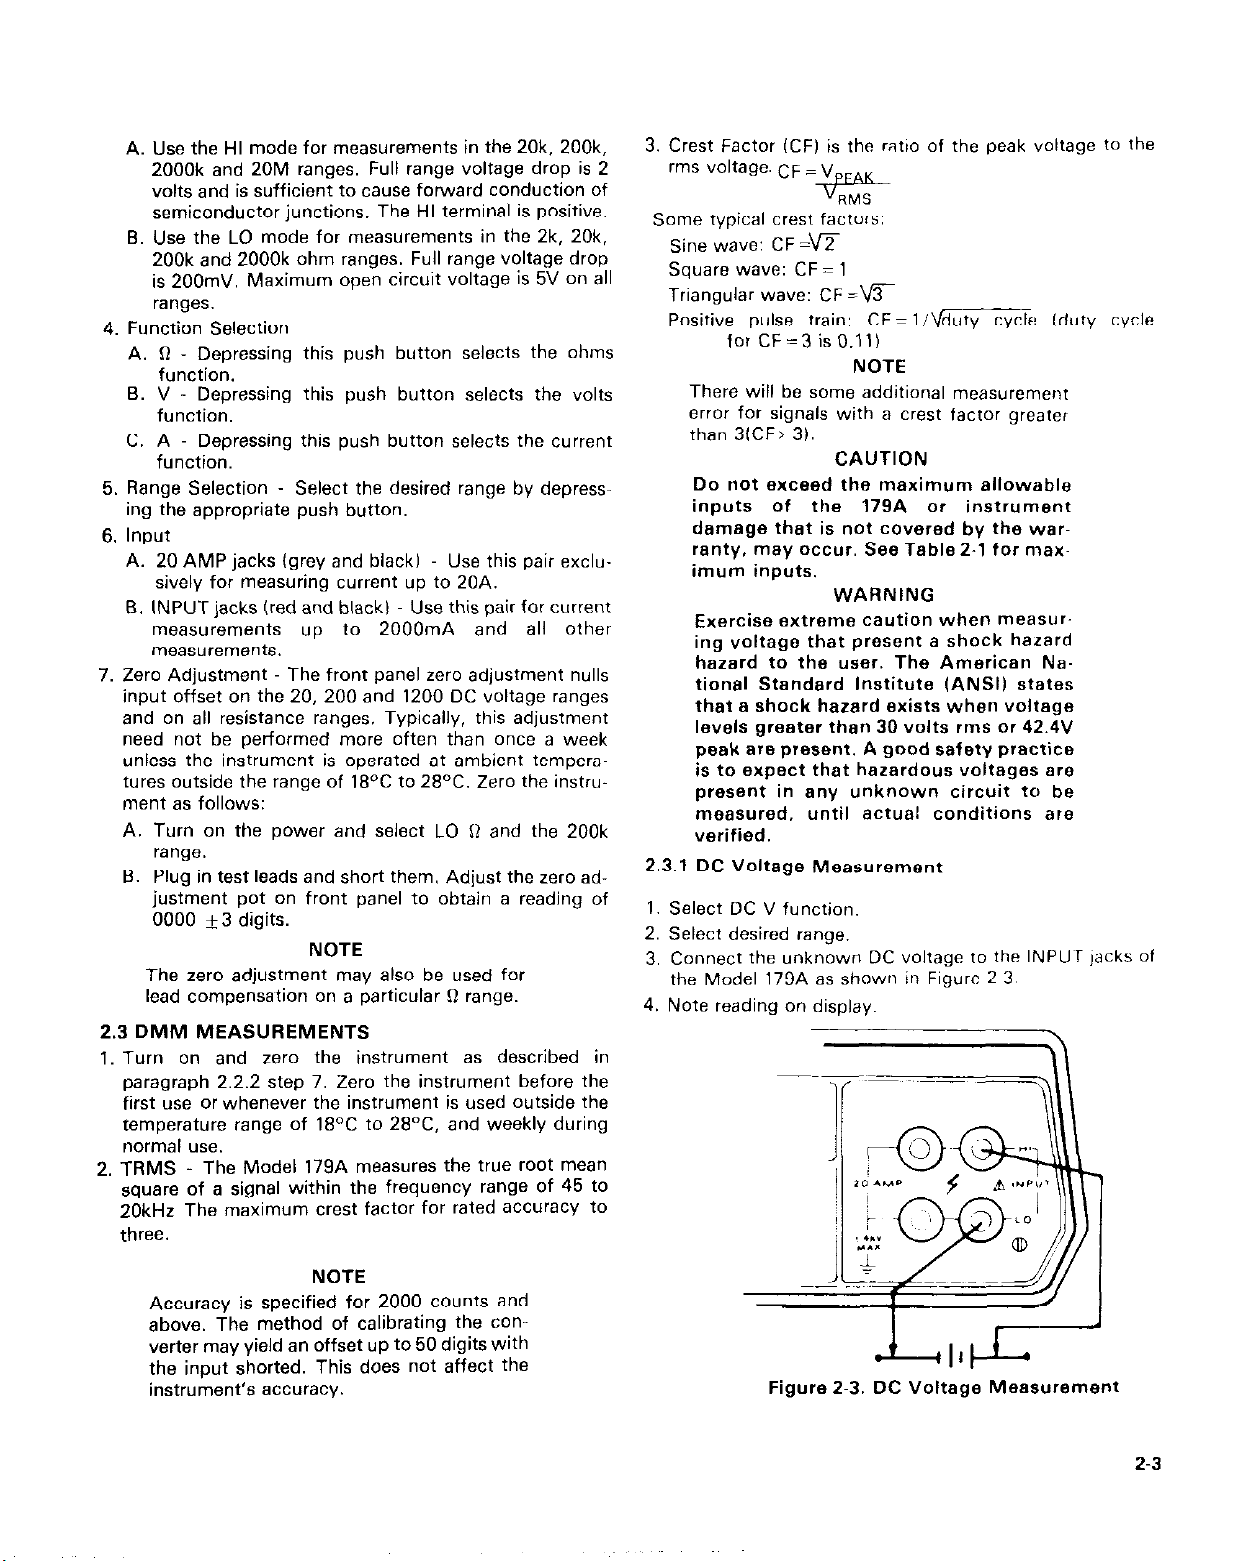
3. Connect the unknown DC voltage to fhe INPU~r jacks of
the Model 179A as shown in Figure 2~3.
4. Note reading on display.
NOTE
Accuracy is specified for 2000 counts and
above. The method of calibrating the converter may yield an offset up to 50 digits with
the input shorted, This does not affect the
instrument’s accuracy.
Figure 2.3. DC Voltage Measurement
2-3
Page 10
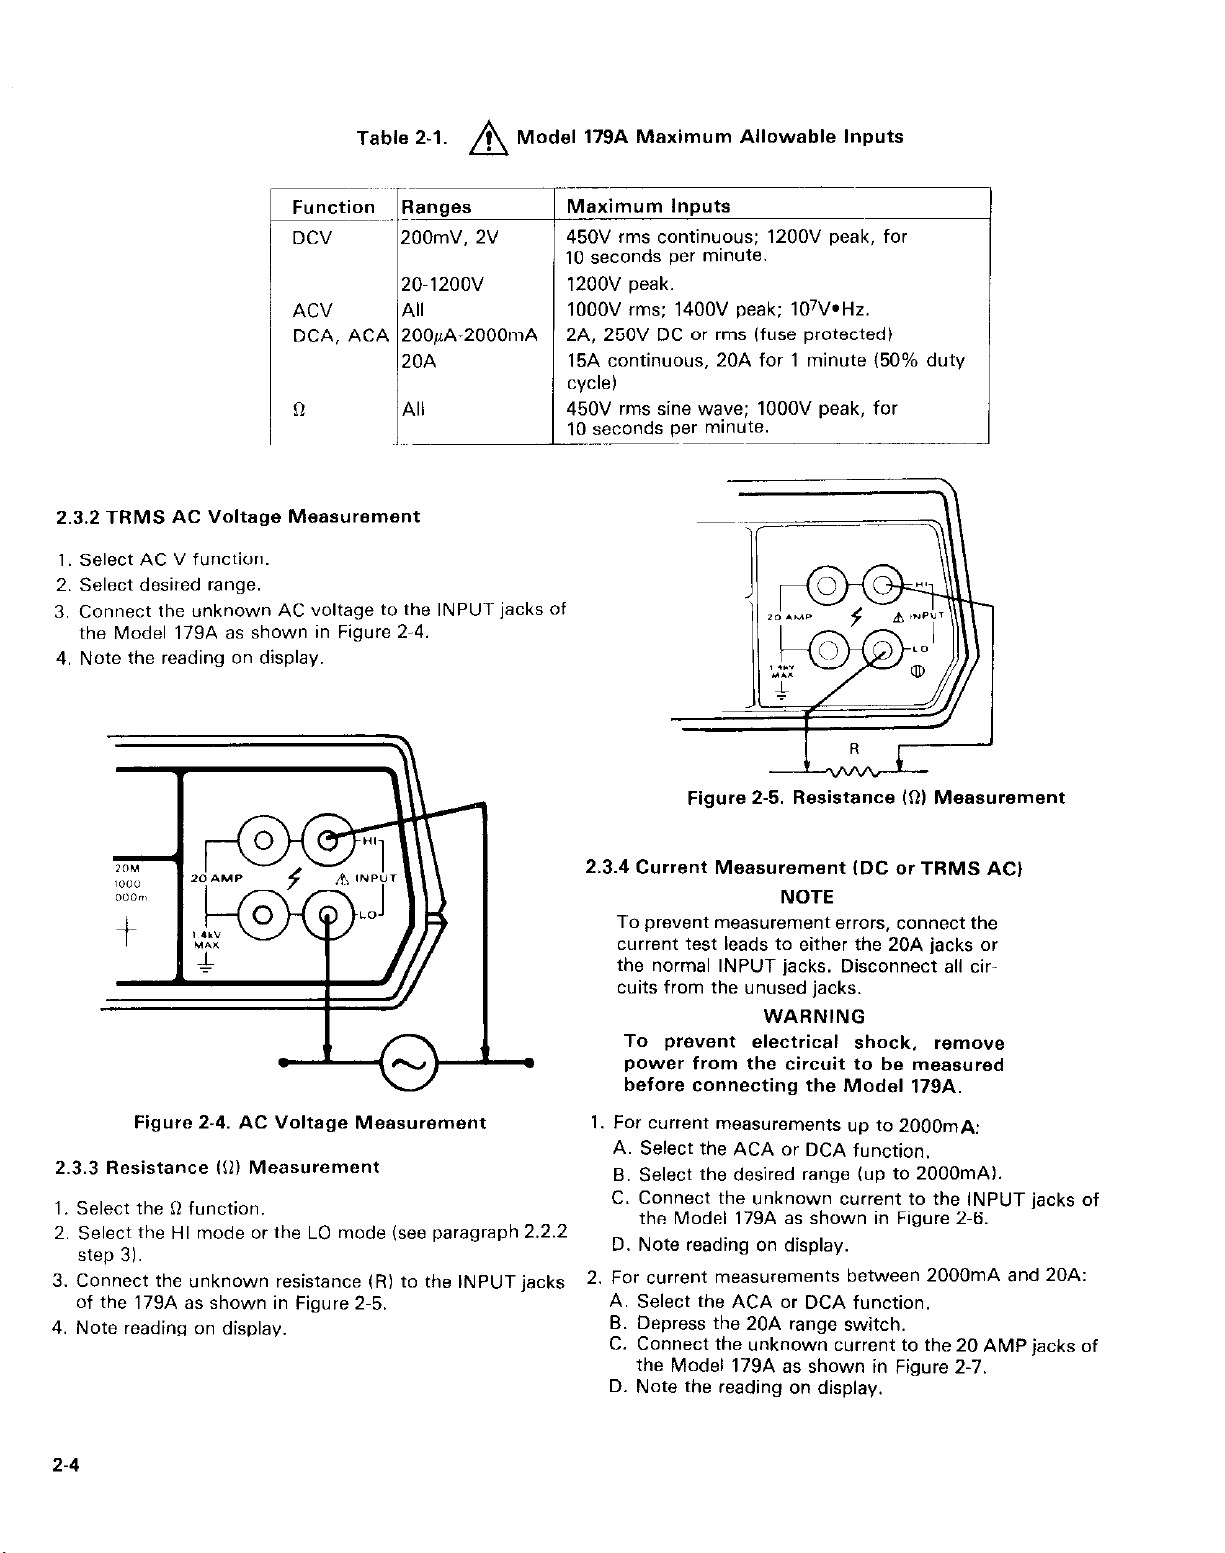
Table 2-1. A Model 179A Maximum Allowable Inputs
2.3.2 TRMS AC Voltage Measurement
1. Select AC V function
2. Select desired range.
3. Connect the unknown AC voltage to the INPUT jacks of
the Model 179A as shown in Figure 2-4.
4. Note the reading on display.
-Maximum Inputs
450V rms continuous; 1200V peak, for
lo seconds per minute.
1200V peak.
1OOOV rms; 1400V peak; 107WHz.
2A, 250V DC or rms (fuse protected)
15A continuous, 20A for 1 minute (50% duty
cycle1
450V rms sine wave; 1OOOV peak, for
lo seconds per minute.
Figure 2-4. AC Voltage Measurement
2.3.3 Resistance III) Measurement
1. Select the 12 function.
2. Select the HI mode or the LO mode (see paragraph 2.2.2
SteD 31.
3. Connect the unknown resistance (RI to the INPUT jacks
of the 179A as shown in Figure 2-5.
4. Note reading on display.
Figure 2-5. Resistance InI Measurement
2.3.4 Current Measurement IDC or TRMS AC)
NOTE
To prevent measurement errors, connect the
current test leads to either the 20A jacks or
the normal INPUT jacks. Disconnect all circuits from the unused jacks.
WARNING
To prevent electrical shock, remove
power from the circuit to be measured
before connecting the Model 179A.
1. For current measurements up to 20OOmA:
A. Select the ACA or DCA function,
B. Select the desired range (up to 2000mA).
C. Connect the unknown current to the INPUT jacks of
the Model 179A as shown in Figure 2-6.
D. Note reading on display.
2. FW current measurements between 2000mA and 20A:
A. Select the ACA or DCA function.
B. Depress the 20A range switch.
C. Connect the unknown current to the 20 AMP jacks of
the Model 179A as shown in Figure 2.7.
D. Note the reading on display.
2-4
Page 11

Figure 2-6. Current Measurements up to 2006mA
NOTE
Up to 15A may be applied continuously
without degradation of the measurement
due to self-heating effects. For currents between 15A and 20A. specified accuracy can
only be obtained when measurements are
limited to a 50% duty cycle (i.e., apply the
current for a maximum of one minute and
then allow et least one minute for cooling
before the next measurement).
NOTE
The test leads used must be capable of
handling 20A and it is recommended that
they be twisted (see Figure 2-71 to minimize
external fields which could affect the Model
179A or other equipment. Also, keep the
test leads as short es possible to mlnlmlze
voltage drop.
Figure 2-7. Current Measurements Between 2000mA
and 20A
2.3.5 AC + DC Measurement
Use the Model 179A to meawre TRMS on ;I sigrw WIWII
has both AC and DC components as lollows:
1. Measure and record the TRMS AC con~~onent as
described in paragraph 2.3.2.
2. Measure and record the DC component as descritxxl III
paragraph 2.3.1.
3. Compute the rms value from the followim] e(/uat~on
ERMs im
2-512-6
Page 12

Page 13

SECTION 3
PERFORMANCE VERIFICATION
3.1 INTRODUCTION
Performance verification may be done upon receipt of the
instrument to ensure that no damage or misadjustment has
occurred during transit. Verification may also be performed
whenever there is question of the instrument’s accuracy and
following calibration if desired.
NOTE
For instruments that are still under warranty
(less than 12 months since date of
shipment), whose performance falls outside
specifications at any point, contact your
Keithley representative or the factory imp
mediately.
3.2 ENVIRONMENTAL CONDITIONS
Measurements should be made at 18-28°C and at less than
80% relative humidity.
3.3 RECOMMENDED TEST EQUIPMENT
Table 3-l lists all the test equipment required for verifi-
cation. If alternate equipment is used, the alternate test
equipment’s specifications must be at least as good as the
equipment specifications listed in Table 3~1.
3.4 PERFORMANCE VERIFICATION PROCEDURE
Use this procedure to verify the Model 179A’s accuracy. If
the Model 179A is out of spec. proceed to maintenance
(calibration) Section 5, unless the Model 179A is under
warranty.
NOTE
Verification should be performed by
qualified personnel using accurate and
reliable test equipment.
WARNING
Some procedures require the use of
high voltage. Take care to prevent contact with live circuits which could cause
electrical shock resulting in injury or
death.
3.5 INITIAL CONDITIONS
Before
must meet the following conditions:
1. If the instrument has been subjected to extremes of
2. Turn on the 179A DMM and allow it to warm up for ten
3. Zero the instrument as described in paragraph 2.2.2
3.6 DC VOLTS VERIFICATION
1. Select the DC V function.
2. Connect the DC Calibrator iltem A, Table 3~11 ro the
3. Select the 200mV range. and apply positive 1OOmVDC to
4. Select each remaining range and apply ihe required
5. Repeat all checks with negative voltage.
beginning the verification procedure, the instrument
temperature, allow internal temperatures to stabilize for
one hour minimum at the environmental conditions
specified in paragraph 3.2.
minutes. The instrument may be operated from either
line power or battery pack power. as Ion51 as the battery
pack has been fully charged as described m paragraph
2.1.3.
stea 7.
instrument.
the DMM. The reading must be within the limits specified
in Table 3~2.
voltage as specified in Table 3~2. verify that the reading is
within specifications.
Table 3-l. Recommended Test Equipment for Performance Verification
MFR MODEL
Fluke
Fluke
Fluke
ESI
Valhalla 2500E
343A
5200A
5215A
RS725
DC Calibrator
AC Calibrator
Decade Resistor
Current Calibrator
SPECIFICATION
.~~
D.lV, 1v. 1ov. 1oov. 1ooov
f 0.002% or zouv
.lV, 1v. 1ov. 1oov
* .022%
1ooov @t .044%
1.9kR. 19k12. 190kI1
1.9MR. lOM12, ,O.Ol%
lOO,‘A, lmA, lOmA. lOOmA,
1A. 10A. +0.03%
3-l
Page 14

Table 3-Z. DC Voltage Performance Check
Table 3-4. Resistance Performance Check
Allowable Readings
v&age
200mV
2v
2ov
zoov
12oov
3.7 AC VOLTS VERIFICATION
1. Select the AC V function.
2. Connect the AC Calibrator (Item B, Table 3-l) to the
DMM. Set the calibrator frequency to 1kHz.
3. Set the DMM to the 200mV range and apply 1OOmV AC
to the DMM. The reading must be within the limits
specified in Table 3.3.
4. Select the 2. 20 and 200 volt ranges and apply the re-
quired voltages es specified in Table 3-3. Verify that the
readings are within specifications.
5. To check the 1OOOV range, connect the AC Calibrator
Amplifier (Item C, Table 3-l) to the output of the AC
Calibrator per the manufacturer’s instructions. Set it for
en output of 1OOOV AC rms and verify that the DMM
reading is within the specified limits.
Range
200mV
2v
2ov
2oov
1ooov
lOO.OOmV
1 .oooov
1o.ooov
1oo.oov
1ooo.ov
Table 3-3. AC Voltage Performance Check
at 180 to 28OC
99.93 to 100.07
0.9995 to 1.0005
9.995 to 10.005
99.95 to 100.05
999.5 to 1000.5
Allowable Readings
99.15 to 100.85
0.9925 to 1.0075
9.935 to 10.065
99.35 to 100.65
393.5 to 1006.5
Resistance
19.000kR
190.00kR
1.9000k12
19.000Mn
1.9000k0
19.000kI2
190.00k11
1900.0k$2
3.9 DC CURRENT VERIFICATION
1. Select the DC A function.
2. Connect the DC current source (Item E. Table 3-l!to the
DMM.
3. Select the 200/iA range and apply a current of lOO.OOfiA
to the DMM. The reading must be within the limits in
Table 3-5.
4. Select each range and apply the required current as
specified in Table 3-5. Verify that the reading is within
specifications.
Table 3-5. DC Current Performance Check
3.10 AC CURRENT VERIFICATION
Allowable Reading!
at 18” to 28°C
18.991 to 19.009k11
189.91 to 190.09kR
:899.1 to 1900.9kR
18.980 to 19.020MI2
1.8957 to 1.9043kR
18.957 to 19.043kR
189.57 to 190.43k12
1895.7 to 1904.3k12
I
Allowable Readings
to 28°C
99.78 to 100.22pA
0.9978 to 1.0022mA
9.978 to 10.022mA
99.78 to 100.22mA
997.8 to 1002.2mA
9.348 to 10.052A
3.8 RESISTANCE VERFICATION
1. Select the a function.
2. Set the HI/LO push button to HI and select the 20kQ
range.
3. Connect the decade resistor (Item D, Table 3-l) to the
DMM.
4. Set the decade resistor to zero and measure the
resistance of the test leads. Subtract this reading from
the displayed reading in all of the following steps.
5. Set the decade resistor to 19.000k12. Verify that the
reading is within the limits specified in Table 3.4.
6. Select the next range and measure the next resistance es
specified in Table 3-4. Verify that each reading is within
specifications. Test the remaining ranges in the table,
switching the HI/LO push button es indicated.
3-2
Since AC Current uses the same circuitry as AC Volts and
DC Current already checked in paragraphs 3.6 and 3.9, no
additional accuracy checks are necessary.
Page 15

SECTION 4
THEORY OF OPERATION
4.1 INTRODUCTION
This section contains circuit descriptions for the Model
179A DMM and Model 1788 Battery Pack. An overall signal
flow block diagram is provided in Figure 4-l. An overall
schematic diagram, drawing 32046, is contained at the end
of this manual.
2. In the ACV mode, AC inputs pass through the attenuator
on all ranges. The input is scaled to 2V rm:; full scale, ins
eluding X10 amplification for the 200mV ranges The
TRMS converter outputs a positive DC signal propor~
tional to the true root mean square AC signal. This DC
signal is the AID input. In the ACA mode, shunt voltage
is treated as a 200mV signal,
Figure 4-1. Simplified Signal Flow Block Diagram.
Model 179A DMM
4.2 OVERALL OPERATION
The Model 179A DMM uses a 2V or 200mV full scale analog
to digital (AID) converter with a 4% digit multiplexed
display. Signal conditioning permits the AID converter
handle full scale AC and DC voltage and current measurements over five decades, and to measure resistance over
five ranges.
4.2.1 Signal Conditioning
Signal conditioning includes DC attenuation (except on the
2V and 200mV ranges). AC attenuation, X10 amplification,
AC to DC conversion, ohms conversion and current shunts
as shown in Figure 4-2.
1. In the DCV mode, signal conditioning to the AID converter is an active attenuator, except on the two lowest
ranges. The A/D input is ~V,,~,o* Rf/FiI (Rf-feedback)
resistance, RI = input resistance), except on the lowest
ranges or under overload conditions. In the DCA mode,
the voltage across the shunt resistor is applied to the AID
converter with 200mV giving a full scale reading.
10
Figure 4-2. Attenuation and Ohms Conversion
4.2.2 Ohms Conversion
Resistance measurements are made by configuring the ate
tenuator as a resistance to voltage converter. Attenuator
stage voltage feedback resistors R, function as amplifier in
put resistance connected to either O.lV reference lLOt or
the l.OV reference (HI). The unknown resistance is con
netted as a feedback resistor around the atterwat~on
amplifier. The resulting voltage applied to the A/D cow
verter is proportional to the unknown resistance.
4.2.3 A/D Converter
The A/D converter is a large scale integration (LSII
ratiometric device. Converter output is a multiplexed five
digit binary coded decimal IBCD) number which is equal !(I
4-l
Page 16

the ratio of input voltage to reference voltage. A separate
clock circuit supplies a 1OOkHz timing input to the integrated
circuit, which also multiplexes the BCD output. Full scale
A/D inputs for various ranges and functions are listed in
Table 4-l.
Table 4-l. Full Scale A/D Inputs
DCV
DCV
200mV
2, 20, 200
Full Scale
A/D Input
200mV
2v
Reference
Voltage
O.lV
l.OV
1200v
ACV
DCA
ACA
11
All
All
All
HI
LO
2V
200mV
2v
2v
200mV
l.OV
O.lV
l.OV
l.OV
O.lV
4.3 ATTENUATION
When measuring AC and DC voltages, input signal condi-
tioning is provided by inverting amplifier UlOl and addi~
tional components as described below.
4.3.1 DC Volts
Input resistance is set by R102 and R103. During calibration,
R103 is adjusted to obtain a total input resistance of 10MIl.
Zero adjustments are provided for UlOl since an amplifier
output resolution of lO!V is required for LO resistance
measurements.
1. On the 2V and 200mV ranges. input HI is connected to
the A/D converter through protection resistors R106.
R135G and R136. Diode-connected FETs Q106 and Q107
clamp the AID input during overload.
2. On the 20, 200 and 1200 volt ranges, the amount of ate
tenuation is selected by switching feedback resistors into
the attenuator with relays KlOl, K102 and K103. Gain
setting components and attenuation values are listed in
Table 4-2.
Table 4-2. DC Attenuation and Gain Setting
Components
R&ly/
Attenuation
Switch
Signal Bypasses
attenuator
KlOl
K102
K103
0.1
0.01
0.001
4.3.2 AC Volts
Input resistance is 1MR IRlOl). Shunt capacitance is
typically less than 75pF. Additional conditioning is as
f0ll0ws:
1. For all ranges except the 200mV range. the amount of attenuation is selected by switching feedback resistors into
the attentator with relays KlOl through K104. For the
200mV range, non-inverting X10 amplifier U102 boosts
the signal to a 2V full scale. Gain setting components and
attenuation values are listed in Table 4-3.
2. On the 200mV and 2V ranges. high frequency compensation is adjusted with capacitor Cl1 1, as shown in Table
4.3. On the 20V range, adjustment is performed with
C112. On the 200 and 1000 volt ranges, adjustment is
performed with C106. Some low frequency rolloff is introduced by input blocking capacitor C105. and AC converter input capacitors Cl15 and C116.
4.4 AC CONVERSION
The AC converter is a monolithic TRMS module. Output
Avg (V 12 Potentiometer R143 provides gain adjust-
VDC =J---.
ment, and R142 establishes output zero. Settling time and
ripple are determined by Cl10 and C120. LOW frequency
rolloff is a function of C120.
4.5 OHMS CONVERSION
During calibration, the lOML2 input resistance CR102 and
R103) and all attenuator feedback resistors are adjusted for
both ratio and absolute value. Therefore. these resistors can
also serve as reference for resistance measurements. In the
11 mode, the attenuation (feedback) resistors are discam
netted from the output of the attenuation amplifier (UlOl)
and are connected instead to the A/D converw reference
voltage. Since two reference voltages and two AID cow
verter gains are available, the Model 179A DMM provides
the option of measuring resistance with the sense current
reduced by a factor of ten.
4.5.1 Range Selection
Operation of the range push buttons selects range resistors
to provide the reference current listed in Table 4-4. Opera-
tion of the HI/LO push button selects the 1V or O.lV
reference respectively on the 20k11, 200kn and 2OOOk(2
ranges. Relay K105 is always energized in the R mode.
4.5.2 R Circuit
For resistance measurements, relay K105 and terminals 4, 5
and 6 of the I2 push button connect the input HI terminal
directly to the amplifier summing node. Input LO is discon-
nected from ground and is connected to the A/D converter
input through the protection components described below.
The unknown resistance (Rx) then becomes the amplifier
feedback resistance.
1. Current flow in the unknown resistance is from input HI
to Input LO. At full scale, the voltage acr”ss R,is either
2V (HI) or 200mV (LO). Reference source loadmg does
not affect accuracy since the AID ““nverter is
ratiometric.
4-2
Page 17

Table 4.3. AC Attenuation Gain Setting Components
200mV
2V
2ov
2oov
1000v
“Signal applied to X10 AC amplifier U102
Alla. R126 KlOl
R119. R127 K102
R120: R128 / K103
R121. R122.
R129
Table 4-4. Resistance Range Setting Components
Attenuation Freq. Camp.
Capacitors
llX10’) ClO6, Cl11
1
0.1 C106, Cl12
0.01
0.001 C106, Cl14
C106. Cl11
C106. Cl13
Range Resistors
R121, R122. R129
R120, R128
R119, R127
R118, R126
R102. R103
2. The HI terminal is clamped to analog common by 0101
and Q102. The instrument protection network at the
amplifier output consists of a pulldown resistance iR104
and CR103, CR104and CR1051. R104sinksapproximaW
ly 150,tA. During in~range measurements. this current is
supplied by the reference voltage through CR105 and
voltage through the amplifier iU101) and CR104.
Overloads with input HI positive are sustained by CR105;
diodes CR103 and CR104 sustain negative overloads.
Open circuit voltage is set to less than 5V by R150 and
R151 through CR103 and CR105. AID protection in ff is
the same as in V except R105 is substituted for R106.
4.6 A/D CONVERTER
The A/D converter operates on the dual slope principle. The
timing is divided into three periods as described below.
Operation with high and low reference voltages is described
separately in paragraph 4.6.4.
4.6.1 Auto-Zero
The auto-zero period IA. Figure 4-31 is 1OOms in length,
which corresponds to 10,000 clock pulses. During this
period, reference voltage V,,, (see paragraph 4.6.4) is
stored on capacitor C124. Capacitor Cl17 stores
VREF + VOSl -vos2.
4.6.2 Signal-Integrate
The -i(rnal-integrate period (6, Figure 4-3) is 1OOms In
length, The A/D input is buffered by U104 lsee paragraph
4.6.4) and integrated by U103. Positive signals generate a
K104
K103 lOO,,A
K102
KlOl
1
1000 switch,
I Nom. lREF
1~~ in LO !!
’ lOO,<A
lO,,A
lO,<A i l,,A
negative-going ramp at the integrator output (pit, 14,. bvi,iie
negative signals produce a positive~going ramp The level of
the integrated signal at the end of the signal-integrate period
is proportional to the average of the applied signal during
this period. Since signal integration continues for 100ms.
the A/D converter exhibits high normal mode iejectlw for
AC signals in multiples of 10Hr. paticularly the 50 and 60Hr
line frequencies.
4.6.3 Reference-Integrate
The reference~integrate period IC or D, Figure 4 31 is 200ms
or 20,000 counts in length. During this period, the ins
tegrator is returned to baseline level by applying a reference
voltage of a polarity opposite to that of the siyxl. A
posltlve~golng ramp is obtained by grounding the Ibl.ffer ins
put, while negative going ramp is produced by the integral
tion of 2XV,,, ithal is, V,,, + the voltage stored on C1241.
The time, or number of clock pusles reqGred for d~scfiarge
is proportional to the signal input. Digital output is from
latches within U106 which store the number of clock pulses
required for the integrator to return to baseline level. The
maximum count during this period is 20,000 which cork
responds to a discharge period of 200ms or full scale input.
4.6.4 Reference Voltages
Reference voltage VREF rmay be either 1V or O.lV. The
voltages are provided by a divider across a temperature
compensated rener diode. An operational amplifier on U103
provides the zener with a self~regulating bias. Use of the
O.lV reference increases converter sensitivity to 200mV full
scale, permitting accurate LO ohms operation. 1OrV resolu~
tion on DC voltage measurements, and DC amperage
4-3
Page 18

Figure 4-3. A/D Converter Function
measurements with a full scale burden of 200mV. Increased
sensitivity is accomplished by switching input buffer U104
into a gain of 10 configuration by turning on Q105. Auto-
zero charging on Cl24 is to a 1OOmV reference instead of a
1V reference. Integrator and comparator voltage levels are
unaffected by buffer gain. Buffer offset voltage is zeroed.
4.7 DISPLAY
Five LED indicators are driven by U201, which is a CMOS
BCD to seven segment decoder/driver with bipolar current-
sourcing outputs. Segment currents are limited to approximately 20mA peak by resistor network R202. The LED
readout is a multiplexed, common-cathode configuration
with Darlington array U202 sequentially sinking current
from each digit. Blanking of the overrange digit is ac-
complished by gates U107A and U107B. Emitter-follower
Q108 ensures that CMOS-compatible levels are maintained
on U107A. pin 1, regardless of the loading of U202. The
minus polarity readout is blanked on AC voltage and
resistance ranges by contacts on the push button switch.
Proper decimal point position is determined by the combination of function and range selected.
4.8 CURRENT MEASUREMENTS
In the A mode, the signal is switched into one of six current
shunts ahead of the attenuator section. For DC current
measurements, the shunt voltage drop is applied directly to
the AID converter input at 200mV full scale. For AC current
measurements, the shunt voltage drop is treated as a
200mV AC signal and passes through the AC attenuator
and the X10 AC amplifier. Overload clamping occcurs at
three diode voltage drops which is a level high enough to
permit high crest factor current waveforms.
4.9 AC POWER SUPPLY
When the DMM is operated from AC line power, the power
supply furnishes f5, + 15 and -15 volts from regulators
VR104, VR102 and VRlOl, respectively. Full-wave rectified
AC from bridge rectifiers CR101 and CR102 is filtered by
reservoir capacitors C108, Cl04 and Cl03 and is applied to
the linear voltage regulators.
4.10 MODEL 1788 BAlTERY PACK
When the Model 1788 Battery Pack is installed in the DMM,
S102 must be set to the BAT position to provide additional
secondary voltage for battery charging. 5102 also switches
4-4
Page 19

the input to VR104 from bridge rectifier CR101 to batteries
87301. Four 2V, 2.5 ampere-hour lead-acid cells supply approximately 9.8V at full charge. After six hours of use on
battery power. the battery pack should be recharged to en-
sure long battery life.
4.10.1 Battery Charging Circuit
While the DMM is plugged into line power and the battery
pack is installed, battery charging proceeds as follows:
1. Full wave rectified voltage from CR101 is applied to the
anode of Q301. which is an SCR which regulates charging voltage. When 0301 is triggered on by a sufficient
gate-cathode voltage differential, the batteries receive
charge. Charging continues as long as the bridge output
voltage exceeds battery voltage by 1V or more. Resistor
R304 limits charging current when recharging a set of
completely discharged ceils. A filtered positive output
from CR102 lor T301l provides the necessary gate turn-
on bias through R306, and diode CR301. Resistor R303
ensures proper high temperature operation on 0301.
2. When the battery voltage reaches the preset float voltage
of 9.N. zener VR301 conducts sufficient current to turn
on 0302 and thus remove the gate trigger voltage from
Q301. Float voltage is adjusted with R301. This is a factory adjustment which normally does not need field readjustment.
4.10.2 Battery Operation and Shutdown Circuit
The DMM operates as follows on battery power:
1. When the power is turned on, the batteries are connected
to the input of VR104 to supply + 5V for the logic, display
and the clock circuit. The clock output is applied to the
AID converter as described in paragraph 4-6 and also to
U301, which is a divide-by~four binary counter. The outs
puts of U301 drive a DC to DC inverter which is synchro~
nired to the AID converter to filter out invr?rter noise. The
25kHz operating frequency is optimal for the small
transformer size, and results in low switchtng losses.
Blocking capacitors C301 and C302 protect Q307 and
Q308 from damage if the drive is lost. Two half~wave reck
tifiers (CR304 and CR3051 on the secondary of 7301 provide rectified AC to filter capacitors C304 and C305
which provide power to + 15V and ~15V regulators
VFi102 and VRlOl.
2. To prevent permanent loss of battery capacity caused by
deep discharge. a shutdown circuit stops operation on
battery power when the battery voltage drops below apt
proximately 7.2V. Shutdown is performed by micropower
voltage detector U302. The open-collector output U302.
pin4) saturates low and turns off pass transistor 0309
when the input voltage (at U302, pin 3) drops below
1.15V (typical). Resistor R314 provides sufficient
hysteresis to prevent discharge from resuming when the
battery voltages rises following disconnection of the load.
4.5/4-6
Page 20

Page 21

SECTION 5
MAINTENANCE
5.1 INTRODUCTION
This section contains calibration, installation and service in-
formation for the Models 179A DMM and 1788 Battery
Pack.
5.2 CALIBRATION PROCEDURE
Calibration should be performed yearly (every 12 months) or
whenever performance verification (see Section 3) indicates
that the Model 179A is out of specifications. If any step in
the calibration procedure cannot be performed properly,
refer to paragraph 5.4 for troubleshooting information or
contact your Keithley representative or the factory.
5.2.1 Recommended Test Equipment
Recommended test equipment for calibration is listed in
Table 5-l. Alternate test equipment may be used, However,
the accuracy of the alternate test equipment must be at
least 10 times better than the instrument specification, or
equal to Table 5-l specifications.
5.2.2 Environmental Conditions
Calibration should be performed under laboratory condi-
tions having an ambient temperature of 20’ to 26’C (68’ to
78OF). and a relative humidity of less than 80%.
5.2.3 Calibration Shield Installation
If the Model 1788 Battery Pack is installed in the instrument
it must be removed and the calibration shield reinstalled
before calibration.
WARNING
Disconnect the line cord before retn~v-
ing the case cover.
1, Turn off the power and disconnect the line cord. Remove
the four screws from the bottom of the case and separate
the top cover from the bottom cover.
2. Push back the ground clip (shown in Figure 6~1 j from the
upper side of the battery pack and remove the battery
pack from the spacers.
3. Calibration may be performed on battery power as long
as the battery pack is sufficiently charged. Leave the bats
tery pack plugged into the instrument, but set the hattery
pack behind the DMM on the bench or table.
4. Set the calibration shield in place on the spacers The
shield should read correctly when viewed from the front
of the instrument.
5. Slide the ground clip over the top of the calibration, shield
so that it contacts the upper surface of the shield
6. If battery power is not to be used, plug in the i~nt! cord
(make wre the BAT/LINE switch is in the line position 11
the battery pack is not instailedl.
5.2.4 Calibration Adjustments
WARNING
Some procedures require the use of
high voltage. Take care to prevent cow
tact with live circuits which could cause
electrical shock resulting in injury or
death.
1. Refer to Table 5-2 and perform the listed adjustments III
the sequence indicated. Note that the step sequence 1s
indicted on the calibration shield by boxed numerals, The
sequence must be followed exactly because the ad~usl~
ments are interrelated and dependent on the preceding
steps.
NOTE
Perform step 5 only if Fill2 is installed, It
not, proceed to step 6.
2. If the indicated adjust:nent cannot be mado to obtain the
specified reading,
troubleshooting information.
refer to paragraph 5.4 for
Table 5-l. Recommended Test Equipment for Calibration
Item Description
A DC Calibrator
B AC Calibrator
C Decade Resistor
Specification
O.lV, lV, 1ov. lOOV, 1ooov
*0.002% or 2opv
.lV, lV, 1ov. 1oov
* .022%
1.9kR. 190kR, i 0.01%
t
Model
343A
5200A
RS725 1
5-l
Page 22

5.3 BAlTERY PACK IMODEL 17881 INSTALLATION
WARNING
Disconnect the line cord before remov-
ing the case cover.
1. Turn off the power and disconnect the line cord. Remove
four screws from the bottom of the case and separate the
top cover from the bottom cover.
2. Lift off the calibration shield, and save it for later use. The
four plastic spacers must remain in place on the upright
studs projecting through the main circuit board.
NOTE
Do not discard the calibration shield. This
shield must be reinstalled during calibration,
as described in paragraph 5.2.3.
3. Set the BAT/LINE switch to the BAT position show” in
Figure 6-l Note that the battery pack will not operate
properly if this switch is not in the BAT position.
4. Remove fuse F301 on the battery pack.
5. Install the battery pack in the instrument so that it rests
on the plastic spacers. The ground clip must make contact with the upper side of the battery pack plate.
6. Carefully align the battery pack plug with connector
P1004 on the circuit board. Push the plug firmly onto the
connector until the lip on the plug engages the lip on the
connector to lock the plug in place.
CAUTION
Make sure the connector is aligned so
that all pins mate properly, otherwise
damage to the DMM will result.
7 Install fuse F301. Reinstall top cover and secure with four
screws.
8. Charge the battery pack as described in paragraph 2.1.3.
5.4 TROUBLESHOOTING
The troubleshooting information in this section is intended
for usa by qualified personnel who have a basic understand-
ing of analog and digital electronic principles and con-
ponents used in a precision electronic test instrument.
NOTE
For instruments that are still under warranty
(less than 12 months since date of
shipment), whose performance falls outside
specifications at any point, contact your
Keithlev representative or the factory
immediately.
The troubleshooting information provided includes checking the power supplies, clock, voltage references and signal
tracing 1 volt rms up to the processor lU106). It is strongly
recommended that the Theory of Operation (Section 4) be
utilized along with schematic diagram 32046.
Table 5-2. Calibration Adjustments
Adjustment
Point
R107
RI08
RI07
R149
R112
R149
R127
R129
A103
R126
R128
R142
RI43
R142
R143
Cl06
Cl12
Cl11
5” QLO
6 IlLO
7 RHI
8 IlLO
9 DCV
Range
2V
200mV
2v
200kI2
200kR
200kR
Input
+ 1.9v
+ 190mV
+1.9v
Short
Short
Short
200kII 190kR
2kR
1.9kfl
2oov + 19ov
2ov +19v
1ooov + 1ooov
2ov 1V at 1kHr
2ov 1OV at 1kHz
2ov 1V at 1kHz
2ov
2oov
1OV at lkHr
1OOV at 1OkHr
2ov 1OV at 1OkHz
2v 1V at 1OkHz
*Perform Step 5 only if R112 is installed. If it is not, proceed to Step 6.
Desired
Reading
1.9000
190.00
1.9000
Sat Front
Panel Zero to
Mechanical Center
OO.O+ 10 digits
00.00 +2 digits
190.00
1.9000
190.00
19.000
1000.0
1.000
10.000
1.000
10.000
100.00
10.000
1 .oooo
Test Equipment
(see Table 5-l)
DC Calibrator (A)
DC Calibrator
DC Calibrator
NO!lt?
None
None
Decade Resistor (C)
Decade Resistor
DC Calibrator
DC Calibrator
DC Calibrator
AC Calibrator (B)
AC Calibrator
AC Calibrator
AC Calibrator
AC Calibrator
AC Calibrator
AC Calibrator
5-2
Page 23

5.4.1 Troubleshooting Procedure
I. Remove the top cover per instructions in paragraph 5.23
step 1.
WARNING
High voltage is present with the top
cover removed. Take care to prevent
contact with line circuits which could
cause electrical shock resulting in injury
or death.
2. To gain access to the test points:
A. Remove the Calibration Shield, if installed.
8. If the Model 1788 Battery Pack is installed, leave it
plugged into the instrument but set it behind the
Model 179A on the bench or table.
3. Turn the Model 179A ON and check the power supplies,
clock and reference voltages per Table 5-3.
4. Select the ACV function and 2 volt range of the Model
179A. Input a 1 volt rms sine wave (lkHz1 into the Model
179A and check signals per Table 5-4.
NOTE
Test points 1 through 10 and the power supply and clock pads are called out on the
Model Board (PC-492). Test points 11
through 14 are not called out on the Model
1788 Battery Pack board (PC-541). Use the
schematic diagam and component layout
drawing to located these test points.
Table 5-3. Power Supplies, Clock and Reference Voltages
5.5 SPECIAL HANDLING OF STATIC SENSITIVE
DEVICES
CMOS devices are designed to function at high impedance
levels. Normal static charge can destroy these devices.
Table 5-5 lists all static sensitive devices for the Model 179A,
Steps 1 through 7 provide instructions on how to avoid
damaging these devices.
1. Devices should be handled and transported in protective
containers, antistatic tubes or conductive foam.
2. Use a properly grounded work bench and a grounding
WrIststrap.
3. Handle device by the body only.
4. PCBs must be grounded to bench while inserting] ~WICL’S.
5. Use antistatic solder suckers.
6. Use grounded tip soldering irons.
7. After devices are soldered or inserted into sockets they
are protected and normal handling can resume.
5.6 BATTERY CHARGE VOLTAGE ADJUSTMENT
Perform the following steps if it is determined that the
Model 1788 battery charge voltage needs adjusting.
1. Remove the top cove,.
2. Connect the Model 179A 10 line power and turn the
instrument OFF.
5-3
Page 24

3. Turn R301 (see Figure 6-l) fully counter-clockwise (“XIXimum charge rate) and monitor battery voltage (BT301)
for ) 9.8V. Fully charged cells require several minutes to
reach this level. Discharged cells require several hours.
CAUTION
Charging to greater than 10 volts for
longer than 30 minutes will reduce battery life.
4. When cells reach 9.8V. turn the Model 179A ON and ad-
just R301 to maintain 9.8V across BT301.
5~ Turn the Model 179A OFF, disconnect line power and
reinstall the top cover,
Table 5-4. Signal Tracing Levels
“hocks
Nttenuator (UlOl) Output TP-5
5.7 FUSE REPLACEMENT
The line fuse and current fuse are located internally in the
Model 179A. The battery fuse if located on the battery pack
PC-board. Turn off, unplug and remove the top cover of the
instrument. Referring to Figure 6-l for exact fuse location,
replace blown fuses with those indicated in Table 5-6.
CAUTION
Installing a higher rated fuse than the
one specified could result in damage to
the instrument.
Test
Point
Signal
IXMS Converter Input
AID Converter:
A/D Converter Input
U104 (buffer) u104
Input and Output
Integrator
Auto-Zero Cap
Table 5.5. Model 179A Static Sensitive Devices
Reference
Designation
UlOl
u103
u104
U106
u107
u201
u301
Keithley
Part Number
IC-165
LSI-12
IC-175
LSI-11
IC-102
IC-168
IC-103
TP-9
TP-10
pins 3 and 6
TP-7
TP-6
Table 5-6. Fuse Replacement
~~
5-4
Page 25

SECTION 6
REPLACEABLE PARTS
6.1 INTRODUCTION
This section contains replacement parts information, a
schematic diagram and component layouts for the Model
179A.
6.2 REPLACEABLE PARTS
Parts are listed alpha-numerically in order of their circuit
designation. Table 6-l contains parts list information for the
Model 179A Mother Board PC-492. Table 6-2 contains a
parts list for the Model 179A Display Board PC-485. Table
6-3 contains a parts list for the Model 1788 Battery Pack
PC-451, Miscellaneous replaceable parts not listed in a table
can be identified in Figure 6-l. Table 6-4 contains a complement of spare parts that can be ordered to maintain up to 10
Model 179A DMMS for approximately one year.
6.3 ORDERING INFORMATION
To place an order, or to obtain information concerning
replacement parts, contact your Keithley representative or
the factory. See the inside front cover for addresses. When
ordering include the following information:
1. Instrument Model Number
2. Instrument Serial Number
3. Part Description
4. Circuit Description (if applicable1
5. Keithley Part Number
6.4 FACTORY SERVICE
If the instrument is to be returned to the factory for service,
please complete the service form which follows this section
and return it with the instrument.
6.5 COMPONENT LAYOUTS
Figure 6-Z-Model 179A Display Board PC~485, Drawing
No. 29663.
Figure 6.3-Model 1788 Battery Pack PC-451. Drnwlng ~0~
29007.
Figure 6-4-Model 179A Mother Board PG492, Drawing
No. 32045.
6.6 SCHEMATIC DIAGRAM
Figure 6.5%Model 179A and 1788~-Drawing No. 32046~
Figure 6-l. Miscellaneous Parts
6-l
Page 26

Table 6-l. Model 179A Mother Board PD-492, Parts List
Circuit
Desig.
Cl01
Cl02
Cl03
Cl04
Cl05
Cl06
Cl07
Cl08
Cl09
Cl10
Cl11
Cl12
Cl13
Cl14
Cl15
Cl16
Cl17
Cl18
Cl19
Cl20
Cl21
Cl22
Cl23
Cl24
Cl25
CR101
CR102
CR103
CR104
CR105
CR106
CR107
CR108
CR109
CRllO
CR111
CR112
CR113
FlOl
F102
JlOOl
J1002
J1003
JlOO4’
J1005
J1006
J1007
J1008
J1009
JlOlO
KlOl
KlO2
K103
K104
K105
PlOOl”
P1002”
P1003
P1004
P1005
P1006
P1007
Description
4.7,tF. 25VDC, 20%. +~ 100%. Aluminum Electrolytic
4.7&F, 25VDC. -20%. ~4~ 100%. Aluminum Electrolytic
470h~F. 35V, Aluminum Electrolytic
470,rF. 35V. Aluminum Electrolytic
O.l,iF, 1OOOV. MPF
.25-l .5pF, ZOOOV. Teflon Trimmer
1000pF. 5OOV. 5%, Polystyrene
2200,tF. 15V, Aluminum Electrolytic
3.3pF. tO.SpF, SOVDC, Ceramic Disc
l,iF, 1OOV. 10%. MPF
.25~1.5pF, ZOOOV, Teflon Trimmer
1.9~15.8pF. 25OV. Trimmer
IlOpF, SOOVDC, 1%. Silver Mica
11OOpF. SOOVDC, 5%. Dipped Mica
33aF. 16VDC. 10%. Aluminum Electrolytic
33pF; 16VDC; 10%; Aluminum Elect&ic
l,iF, 1OOV. 10%. MPF
.22,iF, ZOOVDC, 10%. MPF
NOT USED
l,,F. 1OOV. 10%. MPF
4:71;F, ZSGDC, Rio%, 4~ 100%. Aluminum Electrolytic
4.7nF. 25VDC. -20%. + 100%. Aluminum Electrolytic
.l,,F, ZOOV, 20%. MPF
4,iF. 1OOV. 10%. MPF
100pF. 1OOOV. Ceramic Disc
Bridge Rectifier, 1OOV. 2A
Bridge Rectifier, IA. 400V
Silicon Rectifier, lA, 1OOOV
Silicon Rectifier, IA. IOOOV
Silicon Rectifier, lA, 1OOOV
Rectifier, 75mA. 75V
Rectifier. 75mA. 75V
Rectifier, 75mA. 75V
Rectifier, 75mA. 75V
Rectifier. 75mA. 75V
Bridge Rectifier, 5A. 50V
Rectifier, 3A. 50V
Rectifier. 75mA. 75V
Fuse. Slo-610, l/XA, 25OV. 3AG
Fuse. ZA, 25OV. 3AG
8 Pin Female Connector
10 Pin Female Connector
3Pin Connector HousIng
8 Pin Connector Housing
Banana Jack, Black
Banana Jack, Red
NOT USED
14 Pin Socket
Banana Jack. Black
Banana Jack, Gray
5V. Reed Type, Relay
5V, Reed Type, Relay
5V. Reed Type, Relay
5V. Reed Type, Relay
5V. Reed Type, Relay
8 Pin Male Connector
10 Pin Male Connector
3 Pin Male Connector
8 Pin Male Connector
NOT USED
NOT USED
Line Cord
Location
Sch.
n-7
D-7
C-8
C-8
C-3
D-2
D-3
C~7
E-2
G-2
D-2
D-2
D-2
D-1
F-2
F~2
J~3
J~2
F~3
D-8
D-8
G-4
H-2
F-5
C-6
c-7
E~3
E-3
E-3
D~8
J-2
J-2
K-3
J-3
A-3
A-4
H-l
B-7
A-3
H-7
H-6
B-8
D-8
A-4
A-3
K-5
A~5
A-5
B-8
B-8
A-8
A-8
A-8
H-7
H-6
B-8
D-5
Pcb.
D-4
E-4
E-5
E-5
F-5
F-4
F-4
D-3
E-3
E-3
E-3
E-3
F-3
F-3
E-3
E-3
D-2
D-2
F-l
D-2
D-2
E-2
E-l
F-2
D-5
D~5
F~5
F~5
G~5
D-4
D~2
D-2
F-2
F~2
G~3
G~2
c-2
D~4
F~3
H~5
H~2
D-5
G-2
-
E-4
F-4
F-4
F-4
F-4
G-5
G-2
D-5
D-3
Keithley
Part No.
c-314-4.7
c-314-4.7
C~289~470
C-289-470
C-285-.1
Cl84
c-306~.001
c-290-2200
c~291-3.3p
G294~1
C~l84
c-339
C~278~1 lop
C-236-1 100~
C~321~33
C-321~33
C~294-1
c-269~.22
C~294~1
c~314-4.7
c-314-4.7
C~306~. 1
C~294~4
c-64..loop
RF~36
RF-52
RF~50
RF-50
RF-50
RF~28
RF-28
RF-28
RF-28
RF-28
RF-36
RF-34
HF.28
FU-20
FU-13
CS~356~4
CS-356-5
CS-287-3
CS-287-8
!3J-11-O
BJ-11~2
so-70
BJ-11-O
BJ-Il..8
RL~56
RL~56
RL-59
RL-59
RL-59
cs-355.4
cs-355-5
CS-288-3
CS-288-8
co-9
6-2
Page 27

Table 6-1. Model 179A Mother Bord PC-492, Parts List (Cont.)
Circuit
Desig.
(1101
0102
a103
a104
a105
al06
at07
al08
RlOl
R102
A103
R104
R105
R106
R107
A108
R109
RllO
All1
R112’
R113
R114
R115
R116
R117
R118
R119
R120
R121
R122
R123
R124
R126
R126
A128
I3129
R130
R131
R132
R133
A134
R135
R136
R137
R138
R139
R140
R141
A142
A143
R144
R145
R147
R148
R149
R150
R151
R152
R153
Description
N-Chan. JFET
N~Chan: JFET
N-Ghan. JFET. 2N4392
N-Ghan. JFET. 2N4392
N-Chan, JFET. 2N4392
N-Chan, JFET
N-Chan, JFET
NPN, Switch, 2N3904
IMR. 0.5%. 2W. Metal Film
9.88M. 0.5%, .5W, 12OOV. Metal Film
200kR. 10%. Cermet Trimmer
100kR. 10%. 2W. Composition
47k11, 10%. 2W. Composition
47kR. 10%. 2W. Composition
lOOR, 10%. Cermet Trimmer
2OOIl. 10%. Cermet Trimmer
8.98kR. O.l%, O.lW. Metal Film
4.59kI1. 0.1%. O.lW, Metal Film
931lX 1%. li8W. Metal Film
50kII. 10%. Cermer Trimmer
NOT USED
750kn. 5%. 1/4W, Compositon
lOOR, 1%. 1/8W, Metal Film
4.99kR. .l%. l/low. Metal Film
44.Sk12. .l%, l/low. Metal Film
998kR. .l%, 1/4W, Metal Film
99.8kII. .l%, 114W. Metal Film
9.98kR. ,196, l/lOW. Metal Film
1.002kR. 10%. l/low, Metal Film
270kn. 5%. 114W. Composition
.898R. .l%, 5w. ww
.lR. .l%. 7.5W. Composition
12011, 5%. 1/4W. Composition
5kR. 10%. Cermet Trimmer
500R. lo%, Cermet Trimmer
5011. 10%. Cermet Trimmer
50k0. 10%. Cermet Trimmer
1430, .l%. l/low. Metal Film
8560, .l%, l/low. Metal Film
100kR. 1%. l/lOW. Metal Film
26.7kR. 1%. li8W. Metal Film
3.01kQ. 1%. li8W. Metal Film
Thick Film Network
47kll. 10%. WW. Composition
90, 0.5w. 0.1%. ww
SOOR, 0.1%. 112W. Metal Film
Son, 1/2W. .l%, Metal Film
llkll. 1%. li8W. Metal Film
19.6kII. 1%. l/EW. Metal Film
50k12. 10%. Cermet Trimmer
5000, lo%, Cermet Trimmer
NOT USED
NOT USED
47kn. 5%. 114W, Composition
22Mn. lo%, 1/4W, Composition
200kn. 10%. Cermet Trimmer
3.3kl2, 5%. 114W, Composition
12k0, 5%. 114W. Composition
R162, R153 and UR105 are part of a selected set
R152. R153 and UR105 are part of a selected set
LOCefiOfl
Sch. Pcb.
D~3
E-4
D-3 E~4
H~2
H-2
D-2
C~2
J~3 c-2
G-3
E~2
G-4 F-2
H-6 G~2
D-3
D~2
c-2
E~4
G~4
0~4
E-5
F~5
F-5
F-5
F-5
G-5
J~l D-3
J~l
J-l
J-l
D-3
D~3
D-3
J-l D-3
E-3 E~3
D-3 E-3
D-3 E~3
E~2
E-2
D-2
E-3
E~3
E~3
D-2 E~3
D-2
D-l
D~l
8-4
F~3
F~3
F-3
F~3
8-4 F-2
G-7 G-3
D-2
D-2
D-2
E-3
E-3
F-3
E-l F-3
J-2 D-2
J~2 D-2
J~2 D-2
J-2 D-2
J-3 E-2
Several E~2
F~4 F-2
8-4 F-3
c-4 F-3
E-4 F-3
J-l D-2
J-2 D-2
G-3
E-2
G-2 E-2
F-5 G-2
F-5 G-2
D-3 G-l
E-3
F-5
F-3 F-5
J-l
D-3
J~l D~3
.~~
Keithley
Part No.
TG-139
TG-139
TG-77
TG-77
TG~77
TG-139
TG~l39
TG~47
R~267-IM
R-265.9.68M
RP~89~200k
ROD-100k
R~3~47k
R-3~47k
RP-64~100
R-64~200
R-263.8.98k
R~263~4.59k
R-88-931
RP-97.50k
R~76~750k
R-68-,00
R-263~4.99k
R-263.44.9k
R~264~998k
A-26399.8k
R-263~9~981
A-263.1.002k
R-76~270k
R~310-,898
R-262~.1000
R~76~120
RP~S7~5k
RP-97-500
RP~S7~50
RP~S7~50k
R-263-143
R-263-856
R~HE~lOOk
R-88.26.7k
R-88~3 Olk
TF~~65
R-3-47k
R-252-S
R-168-900
R-169-90
R-88-l 1 k
R-ES-19.6k
RP-97.50k
RP~S7~500
R-76~47k
R-76~22M
RP-89.200k
R-76.3.3k
R~76~12k
R.88.SEL
.a 5
R-88.SEL $!
Page 28

Table 6-1. Model 179A Mother Board PC-492, Parts List (Cont.1
Circuit
Desig.
R154
R155
R156
SlOl
s102
~~~.~s103~~ ,~~~~
TlOl
TlOl
UlOl
u102
u103
u104
u105
U106
u107
VRlOl
VR102
VR103
VR104
VR105
Description
0.010. 0.25%. 7.5W. WW, 4-Terminal
Thick Film Network
10kO 5%. 114W. Composition
Line Voltage Selector
Line/Battery
~~~~7ISt~t~n~~Pushbutton
~~.~~~~~;fo;mei po;;ei(sf Jo
Transformer Power (Japanese Version lOOl2OOVI
Bl-FET Operational Amplifier 8 Pin TO-99
Operational
4% Digit Analog-Processor
Operational Amplifier, 8 Pin, T0~5
TRMS Converter
+ 15V. 3-Term, LO-Powel
NOT USED
+ 5V. 3.Term, TO-220
Reference Zener. (VR105. R152 and R153 are part
Amplifier, 8 Pin. Dip
of a selected set
YlOl
‘J1004 is located on PC-451 (1788 Battery Pack1
“PlOOl and P1002 are located on PC-485 (Display Board)
*R112 may or may not be installed
Ouartz, *O.l%. 10OkHr
Location
Sch.
K~1
A-8
G-4 E~2
B-7 D~4
C-6
A-5
C-6 D-5
C-6
D-3 E~4
E-2 E-3
K~2
H~2
F-2
J-4 E~2
Several
C~8
C-8
D-7
J-2
F~5 F-l
P&.
G-2
F-4
D-4
G-4
D-5
D~2
E-2
D-2
G-2
E-5
E-5
D-4
D-2
Keithley
Part No.
R-274-.01
TF-103~1
R~76-IOk
SW-318
SW-397
2?@6Sti fu2
TR~l68
TR-169
IC-165
IC~l67
LSl~l2
IC-‘176
IC.172~1
tst-H; ,y,,.&x
IC~lO2
lC~253
IC-170
IC-93
2 s7w
DZ~58
CR~8
--
Circuit
Desig.
c201
DS201
DS202
DS203
DS204
DS205
R201
R202
u201
u202
PlOOl
P1002
Table 6.2. Model 179A Display Board PC-485, Parts List
Description
4.7pF, 25VDC.
f 1 LED Digit
7 Segment LED Digit
7 Segment LED Digit
7 Segment LED Digit
7 Segment LED Digit
1200, 114W, 5%. Composition
47R. Thick Film Network
Segment Drive
Digit Driver
8 Pin Male Connector
10 Pin Male Connector
20%. + 100%. Aluminum Electrolytic
Location
Sch.
K-7
H~7
H~7
H-7
J-7
J-7
H-7
J-7 E-2
K-7
H-6
H-7 G-5
H-6
Pcb.
c-2
c-2
D-2
D-2
C~2
G-2
8~2
E-2
E~2
B-2
Keithley
Part No.
c-314-4.7
DD~31
DD-30
DD-30
DD-30
DD-30
R~76~120
TF-102-3
K-168
IC~l69
CS~355~4
cs-335-5
I
6-4
Page 29

Table 6-3. Model 1766 Batterv Pack PC-451, Parts List
Circuit
Desig.
ET301
c301
c302
c303
c304
c305
CR301
CR302
CR303
CR304
CR305
F301
J1004
a301
a302
a303
a304
a305
a306
a307
(1308
a309
a310
R301
R302
R303
ii304
R305
R306
R307
R309
R309
R310
R311
R312
R313
R314
R315
R316
T301
u301
U302
VR301
Description
Lead Acid “D” cell. ZV, 2.5AH ISet of four)
4.7pF, ZOVDC, 20%. Tantalum Electrolytic
4.7gF. ZOVDC. 20%. Tantalum Electrolytic
lpF, 250VDC. 10%. Metalized Polyester
lOOtiF, 35VDC. -10, + 100%. Aluminum Electrolytic
lOO*F, 35VDC. -10, + 100%. Aluminum Electrolytic
Rectifier, 75mA. 75V
Rectifier. 75mA. 75V
Rectifier, 75mA. 75V
Rectifier. 75mA. 75V
Rectifier, 75mA. 75V
2A. 25OV. 3AG.
6 Pin Connector Housing
Thyristor, SCR, 106Fl
NPN, Switch, 2N3904
PNP. Silicon, 2N3905
NPN, Switch, 2N3904
NPN, Switch, 2N3904
PNP. Silicon, TO-92 Case, 2N3905
NPN, Switch, 2N3725
NPN, Switch, 2N3725
PNP. Silicon. MPS-WA5
PNP. Silicon: TO-92 Case. 2N3905
ZOk!l. 0.5W. POT
330R. 5 %, 1/4W, Composition
lkn, 5 96, 114W. Composition
3.9R. 20%. 3w, ww
4.7kcl. 5 %, ll4W. Composition
33klI. 5%. 1/4W. Composition
82kR. 5%. 114W. Composition
82kR. 5%. 114W. Composition
10R. 5%. 114W. Composition
1On. 5%. 114W. Composition
100kil. 5%. 114W. Composition
100kn. 5%. ll4W. Composition
100kR. 5%. 1/4W. Composition
6.6MO. 10%. 1.4W. Composition
576kI2, 1%. 116W. Composition
lOOkfl, 1%. 1/6W, Composition
Transformer, Power
Dual D-Type Flip-Flop, 14-Pin, Dip
1.1V Micro-Power Detector
6.2 volt &“I?,
Location
Sch.
F-6
F~7
F~7
F~7
FOE
F~6
E-6
E~7
E~7
EWE
E-E
F-6
DUE
D-6
E-7
E~7
E~7
E~6
E~7
F~7
F~7
E~6
E-6
E~7
E~7
E~6
D-6
E~7
D-8
F~7
F~7
DUE
D-E
E-6
E-6
F~6
F-6
F~6
F-6
F-7
E-7
F~6
E~6
PCh
E~3
E3
E~3
F-4
F-3
D~4
E~3
E-3
F~4
F~4
C~3
D.5
C~4
C~3
D~4
E~4
E~4
E~4
E-3
E~3
D~3
D~3
C~3
c3
D-4
0~4
D3
C~3
E~3
E~3
F~4
F~4
E~3
E~3
E-3
E~3
E~3
E~3
F~3
D~3
E~3
c-3
Ksithlsy
Part No.
BA~33
C~l79 4.7
C~179~4.7
C,256~’
C~295~ 100
C~295~100
RF~28
RF~26
RF 28
FU 13
CS287 8
TG 132
TG~47
TG 53
TG 47
~TG~47
TG~53
RP 97 2”k
R 16~330
R~76~,k
R 268~3,s
R~76~4.7k
R 16 3.3k
“~76~1”
R 76~lOOk
R~76~lOOk
R ‘76~6 EM
R~68~576k
R 68~lOOk
ri? 17”
D2~61
Table 6.4. Recommended Spare Parts
av
Keithley
Sch. Designation
Part No.
1
2
1
5
2
1
1
2
1
1
1
1
1
1
1
2
2
C-294~4
DD~20
DD-21
FU~13
FU-20
K-93
IC-102
IC-165
IC-166
IC-169
IC-170
IC-253
LSl~ll
LSl~l2
RL-56
RL-59
TG-126
Cl24
DS202 through DS205
DS201
F102
FlOl
VR104
UlO7
UlOl
u201
u202
VR102
VU101
U106
u103
KlOl and 102
K103 through K105
a106and 107
6-5
Page 30

Y
*
.
_6
Figure 6-Z. Model 179A Display Board PC-485. Component Location Drawing, Dwg. No. 29663
6-6
Figure 6-3. Model 1788 Battery Pack PC-451, Component Location Drawing, Dwg. No. 29007
Page 31

Figure 64. Model 179A Mother Board PC492 Com-
ponent Location Drawing, Dwg. No. 32045
6.7/6-E
Page 32

3
4
i
\
DC
i
I
Figure 6 6 Model 179A and 1788. Schematic
Diagram. Dwg No 32046
6-916-10
Page 33

SERVICE FORM
Model No. ~ Serial No.
Name and Telephone No.
Company
List all control settings. descrihc problem and check hones lbat apply to problem
Date
 Loading...