

Kawai Concert Artis CA61 Owner's Manual
1
Part Names
and Functions
2
Listening to
the Piano
3
Playing the Piano
4
Recorder
5
Lesson Function
6
Concert Magic
7
Hymn Player
8
Virtual Technician
9
Menu Functions
10
Appendix
Owner’s Manual

THANK YOU FOR PURCHASING A KAWAI Concert Artist DIGITAL PIANO!
Your KAWAI digital piano is a revolutionary new keyboard instrument that combines the latest in technology
with traditional piano craftsmanship inherited from KAWAI’s many years of experience in building fi ne acoustic
pianos. Its 88 key wooden keyboard provides the touch response and full dynamic range required for a superb
performance on the piano, harpsichord, organ, and other instruments. The CA61’s piano sound has been
created through stereo-sampling of concert grand pianos, and is reproduced by KAWAI’s Harmonic Imaging
sound technology. The CA61 is also equipped with a revolutionary sound board speaker system, providing an
even more realistic piano experience.
Your CA61 piano is equipped with a Lesson function which, in addition to basic fi nger exercises, includes
songs from Alfred’s Basic and Premier Piano lesson books. The CA61 piano is also equipped with reverb
and a digital effect processor for an even fuller sound. Industry-Standard MIDI (Musical Instrument Digital
Interface) jacks and a USB interface are included which allow you to play other electronic instruments at
the same time or connect your CA61 piano to a personal computer—opening a whole new world of musical
possibilities.
There are many other features and functions inside your new piano. This Owner’s Manual contains valuable
information that will help you make full use of this instrument’s many capabilities. Please read all sections
carefully and keep this manual handy for further reference.
Page
3
Please read this Owner’s Manual before using the CA61 piano.
¡
Important Safety Instructions ..............4
1. Part Names and Functions .................8
Panel ............................................................................ 8
Using the pedals ..........................................................8
Headphone .................................................................. 9
2. Listening to the Piano .......................10
1) Basic Operation .............................................................. 10
2) Demo Songs ................................................................... 11
3) Piano Music .................................................................... 12
3. Playing the Piano ..............................13
1) Selecting a Sound .......................................................... 13
2) Dual Mode ...................................................................... 15
3) Split Mode....................................................................... 16
4) Four Hands Mode ........................................................... 18
5) Reverb / Effects ............................................................. 19
Using REVERB .......................................................... 19
Using EFFECTS ........................................................ 20
Editing the settings for the Chorus / Delay / Tremolo / Rotary effect
... 21
6) Transpose ....................................................................... 22
7) Using Metronome / Rhythm ............................................ 23
Starting the metronome and setting the tempo .......... 23
Changing the metronome time signature and rhythm
... 23
Setting the sound volume for the metronome / rhythm
... 24
Rhythm list .................................................................25
4. Recorder ...........................................26
1) Recording a Song (REC Button) .................................... 26
Selecting a song and part to be recorded .................. 26
2) Playing Back a Song (PLAY/STOP Button) ....................28
3) Deleting a Song or Part .................................................. 29
5. Lesson Function................................31
1) Using the Alfred Lesson Books ...................................... 31
Selecting an Alfred book and song ............................31
Listening to a song ..................................................... 32
Playing a song from a specifi c bar ............................. 33
Practicing the right / left-hand part while listening to the other part
... 34
Repeating and practicing specifi c sections of a song
... 35
Playing along with a song and recording your own performance
... 36
Exiting the lesson function .........................................36
2) Using the Finger Exercises ............................................. 37
Selecting an exercise ................................................. 37
Listening to an exercise .............................................38
Playing along with an exercise, recording your own
performance, and checking the evaluation result ....... 39
Exiting the lesson function .........................................40
6. Concert Magic ...................................41
1) Selecting a Song ............................................................ 41
2) Listening to the Song ...................................................... 42
3) Performing a Song .......................................................... 43
4) Part Volume Balance for Concert Magic ......................... 43
5) Concert Magic Song Arrangement Types ....................... 44
6) Steady Beat .................................................................... 45
7) Concert Magic Song Demo ............................................ 46
8)
Adjusting the Playback Speed for the Concert Magic Songs
... 46
7. Hymn Player .....................................47
1) Turning Hymn Player On / Off ......................................... 47
2) Selecting a Hymn ........................................................... 48
3) Listening to a Hymn ........................................................ 49
4) Performing a Hymn ......................................................... 50
Performing a Hymn using STEADY BEAT mode ........ 50
Performing a Hymn using NORMAL mode ................ 50
5) Part Volume Balance for Hymn Player ............................ 51
6) Using the Hymn Player Prelude Mode............................ 52
7) Adjusting the Playback Speed for the Hymns ................. 53
8. Virtual Technician ..............................54
1) Voicing ............................................................................ 54
2) Damper Resonance........................................................ 55
3) String Resonance ........................................................... 56
4) Key-off Effect .................................................................. 57
5) Touch Curve.................................................................... 58
Using the user touch curve function ........................... 59
6) Temperament Setting ...................................................... 60
Creating a user temperament ....................................61
7) Key of Temperament ....................................................... 62
8) Stretch Tuning ................................................................. 63
9. Menu Functions ................................64
1) Brilliance ......................................................................... 64
2) Lower Octave Shift ......................................................... 65
3) Lower Pedal On / Off ...................................................... 65
4) Layer Octave Shift .......................................................... 66
5) Layer Dynamics .............................................................. 67
6) Damper Hold On / Off ..................................................... 68
7) Tuning ............................................................................. 69
About MIDI ................................................................. 70
8) MIDI Transmit / Receive Channel ...................................72
9) Sending Program (Sound Type) Change Numbers ..............73
10) Local Control ................................................................ 74
11)
Transmit Program Change (Sound Type) Numbers On / Off
... 75
Transmitting a program change number using the SOUND
SELECT button
s .......................................................... 75
12) Multi-timbral Mode ........................................................ 77
13) Channel Mute ............................................................... 78
14) User Memory ................................................................ 78
15) Factory Reset ............................................................... 79
10. Appendix .........................................80
Connecting to other devices ....................................... 80
CA61 stand assembly instructions ............................. 82
Piano Music song list .................................................84
Lesson Function song list .......................................... 85
Concert Magic song list.............................................. 88
Hymn Player song list ................................................90
Prelude Mode song list .............................................. 92
Specifi cations ............................................................. 93
MIDI exclusive data format ......................................... 94
KAWAI [Model CA61] MIDI implementation chart ...... 95
Table of Contents
Page
4
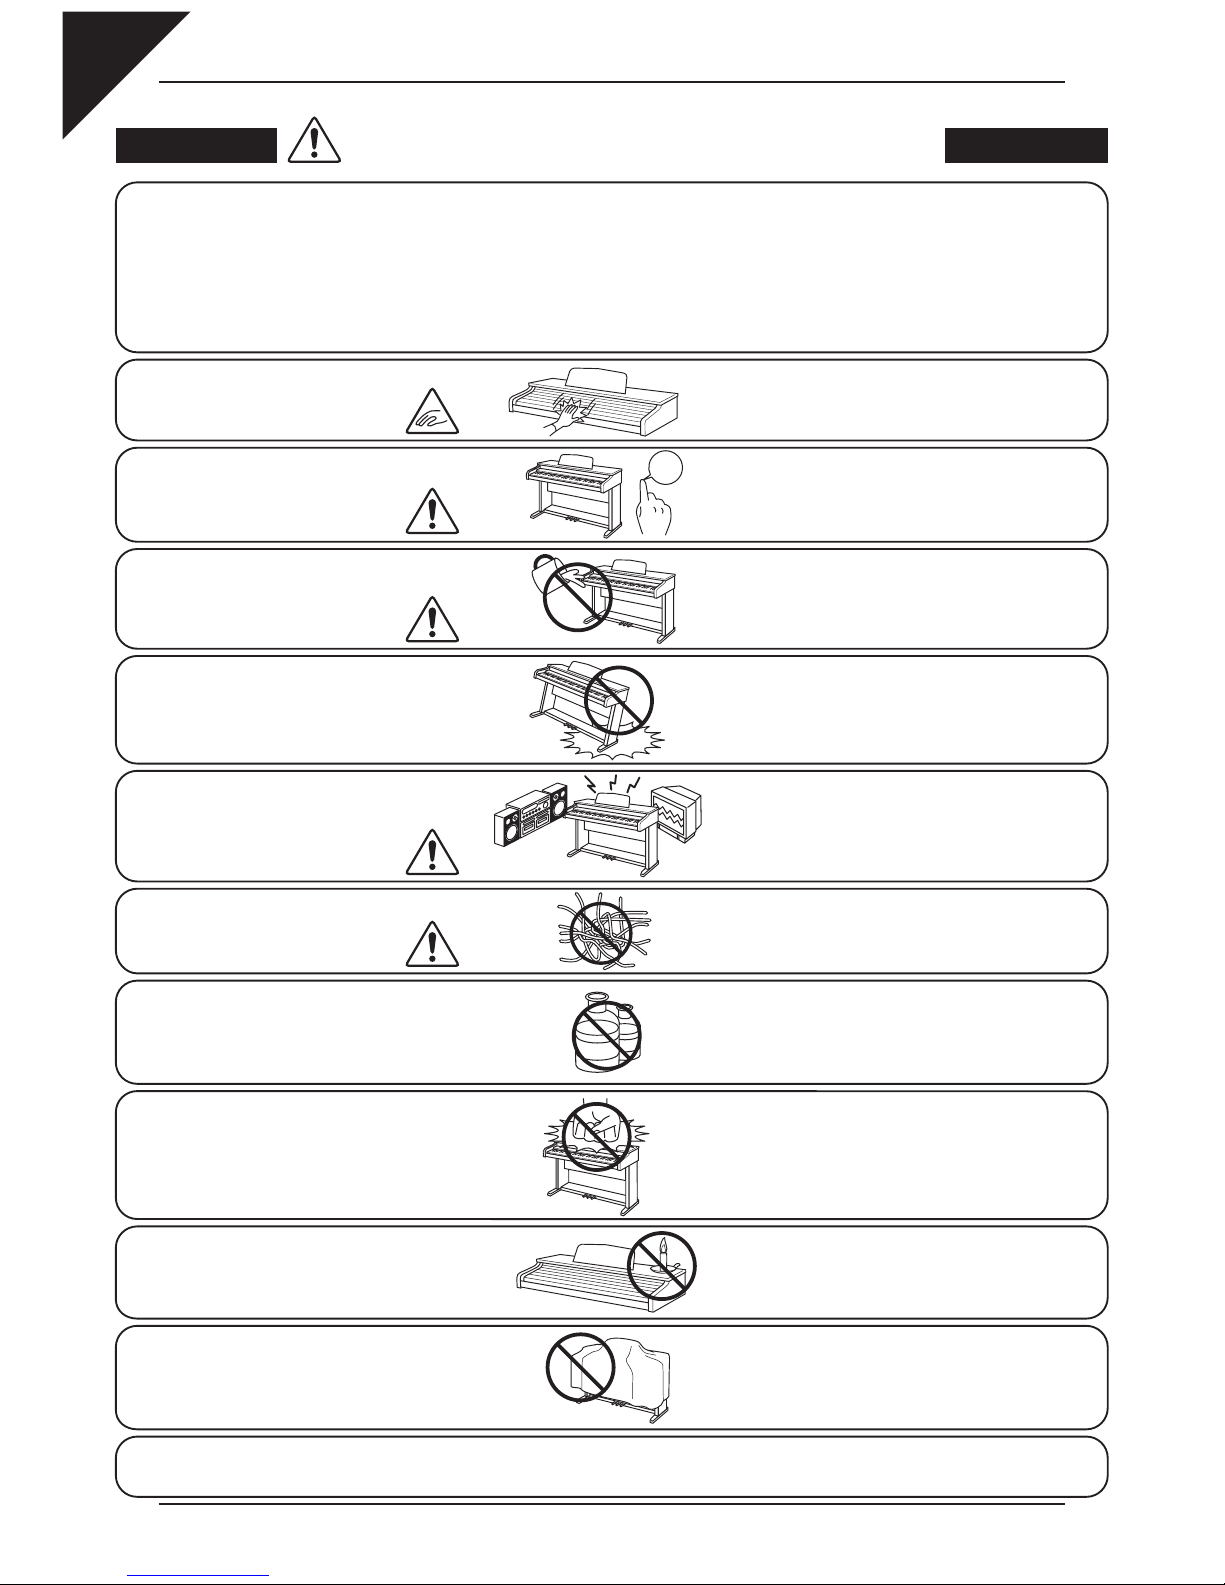
Important Safety Instructions
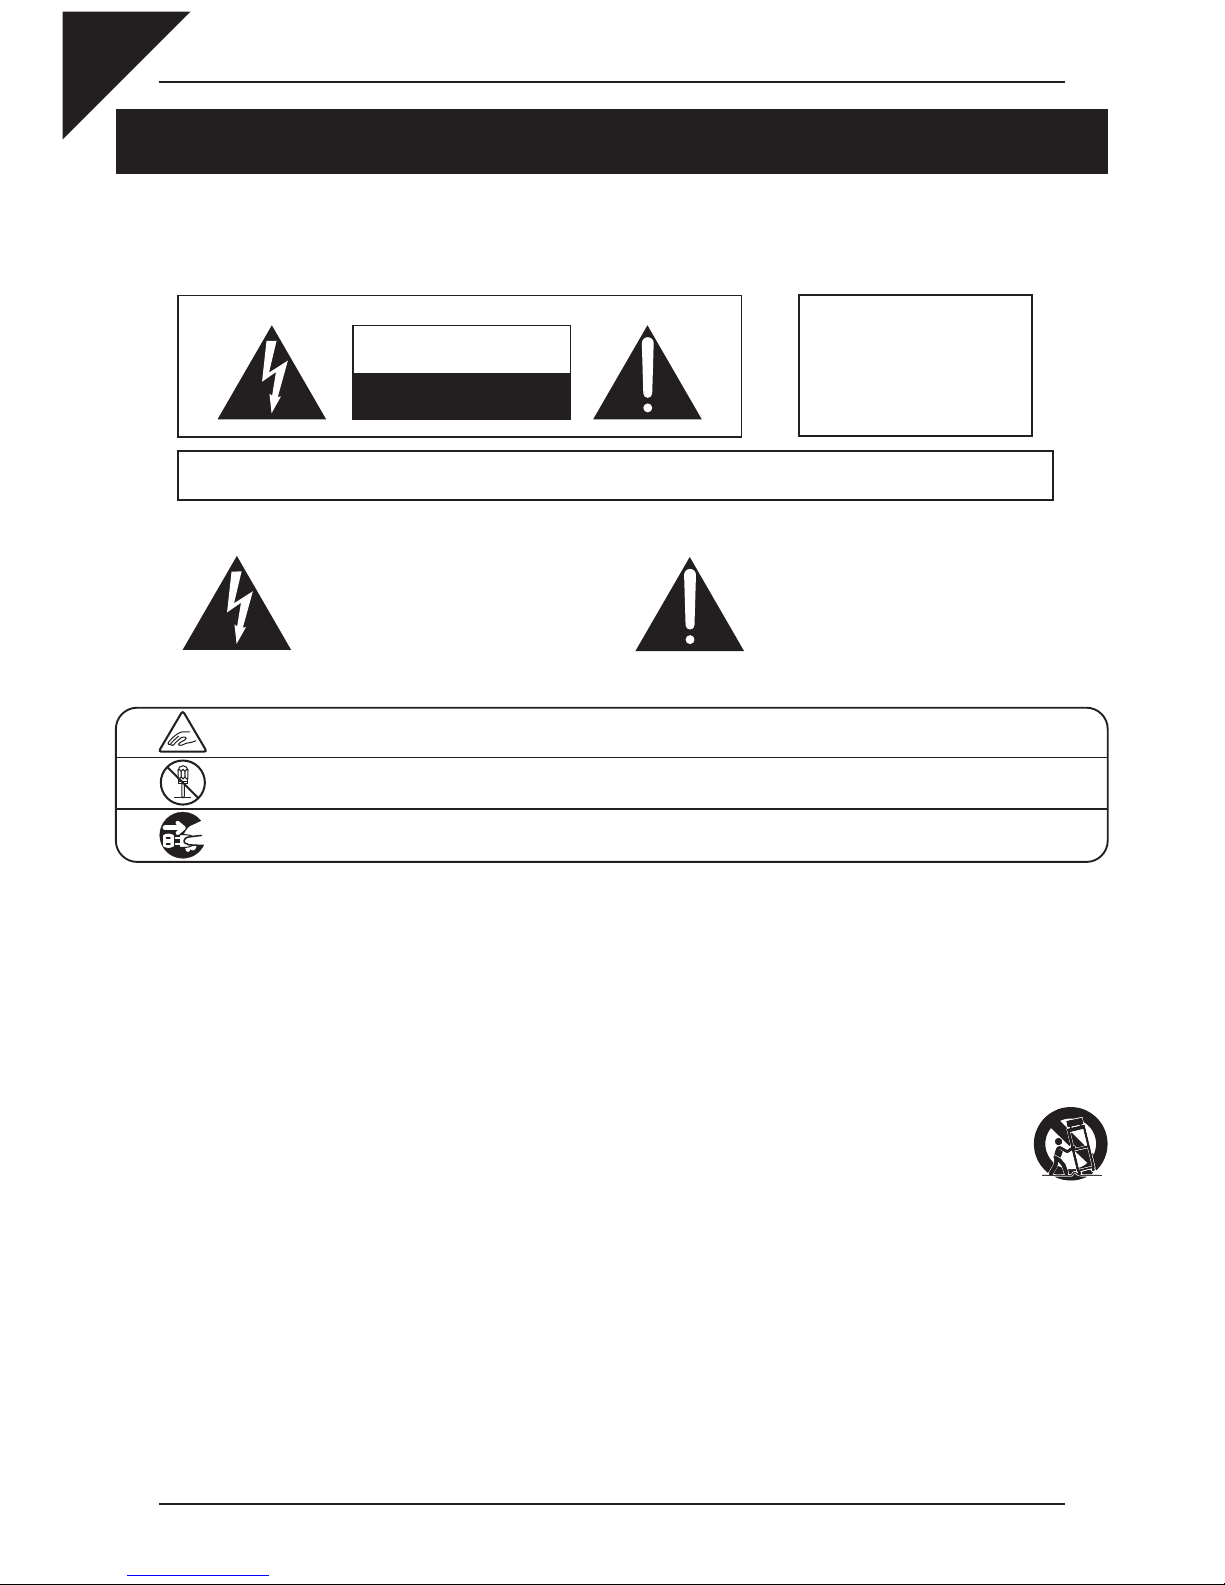
denotes that care should be taken.
The example instructs the user to take care not to allow fingers to be trapped.
denotes a prohibited operation.
The example instructs that disassembly of the product is prohibited.
denotes an operation that should be carried out.
The example instructs the user to remove the power cord plug from the AC outlet.
Examples of Picture Symbols
Read all the instructions before using the product.
CAUTION
RISK OF ELECTRIC SHOCK
DO NOT OPEN
AVIS : RISQUE DE CHOC ELECTRIQUE - NE PAS OUVRIR.
TO REDUCE THE RISK OF ELECTRIC SHOCK, DO NOT REMOVE COVER (OR BACK).
NO USER-SERVICEABLE PARTS INSIDE. REFER SERVICING TO QUALIFIED SERVICE PERSONNEL.
The lighting flash with arrowhead symbol, within
an equilateral triangle, is intended to alert the user
to the presence of uninsulated "dangerous voltage"
within the product's enclosure that may be of
sufficient magnitude to constitute a risk of electric
shock to persons.
The exclamation point within an equilateral triangle
is intended to alert the user to the presence of
important operating and maintenance (servicing)
instructions in the leterature accompanying the
product.
WARNING
TO REDUCE THE RISK OF
FIRE OR ELECTRIC
SHOCK, DO NOT EXPOSE
THIS PRODUCT TO RAIN
OR MOISTURE.
INSTRUCTIONS PERTAINING TO A RISK OF FIRE, ELECTRIC SHOCK, OR INJURY TO PERSONS
SAVE THESE INSTRUCTIONS
1) Read these instructions.
2) Keep these instructions.
3) Heed all warnings.
4) Follow all instructions.
5) Do not use this apparatus near water.
6) Clean only with dry cloth.
7) Do not block any ventilation openings. Install in
accordance with the manufacturer's
instructions.
8) Do not install near any heat sources such as
radiators, heat registers, stoves, or other
apparatus (including amplifiers) that produce
heat.
9) Do not defeat the safety purpose of the
polarized or grounding-type plug. A polarized
plug has two blades with one wider than the
other. A grounding type plug has two blades
and a third grounding prong. The wide blade
or the third prongs are provided for your safety.
If the provided plug does not fit into your outlet,
consult an electrician for replacement of the
obsolete outlet.
10) Protect the power cord from being walked on
or pinched particularly at plugs, convenience
receptacles, and the point where they exit from
the apparatus.
11) Only use attachments/accessories specified by
the manufacturer.
12) Use only with the cart, stand, tripod, bracket, or
table specified by the manufacturer, or
sold with the apparatus. When a cart is used,
use caution when moving the cart/apparatus
combination to avoid injury from tip-over.
13) Unplug this apparatus during lightning storms
or when unused for long periods of time.
14) Refer all servicing to qualified service
personnel. Servicing is required when the
apparatus has been damaged in any way,
such as power-supply cord or plug is
damaged, liquid has been spilled or object
have fallen into the apparatus, the apparatus
has been exposed to rain or moisture, does not
operate normally, or has been dropped.
Page
5
The product is not completely disconnected from the
power supply even when the power switch is turned
off. If the product will not be used for a long time,
unplug the AC power cord from the AC outlet.
● Failure to do so may cause fire in case of
lightning.
● Failure to do so may over-heat the product,
resulting in fire.
Do not disassemble, repair or modify
the product.
Doing so may result in product breakdown, electric
shock or short-circuit.
This product may be equipped with a polarized line plug (one blade
wider than the other). This is a safety feature.
If you are unable to insert the plug into the outlet, contact an
electrician to replace your obsolete outlet.
Do not defeat the safety purpose of the plug.
When disconnecting the AC power cord's
plug, always hold the plug
and pull it to remove it.
● Pulling the AC power cord itself may damage
the cord, causing a fire, electric shock or
short-circuit.
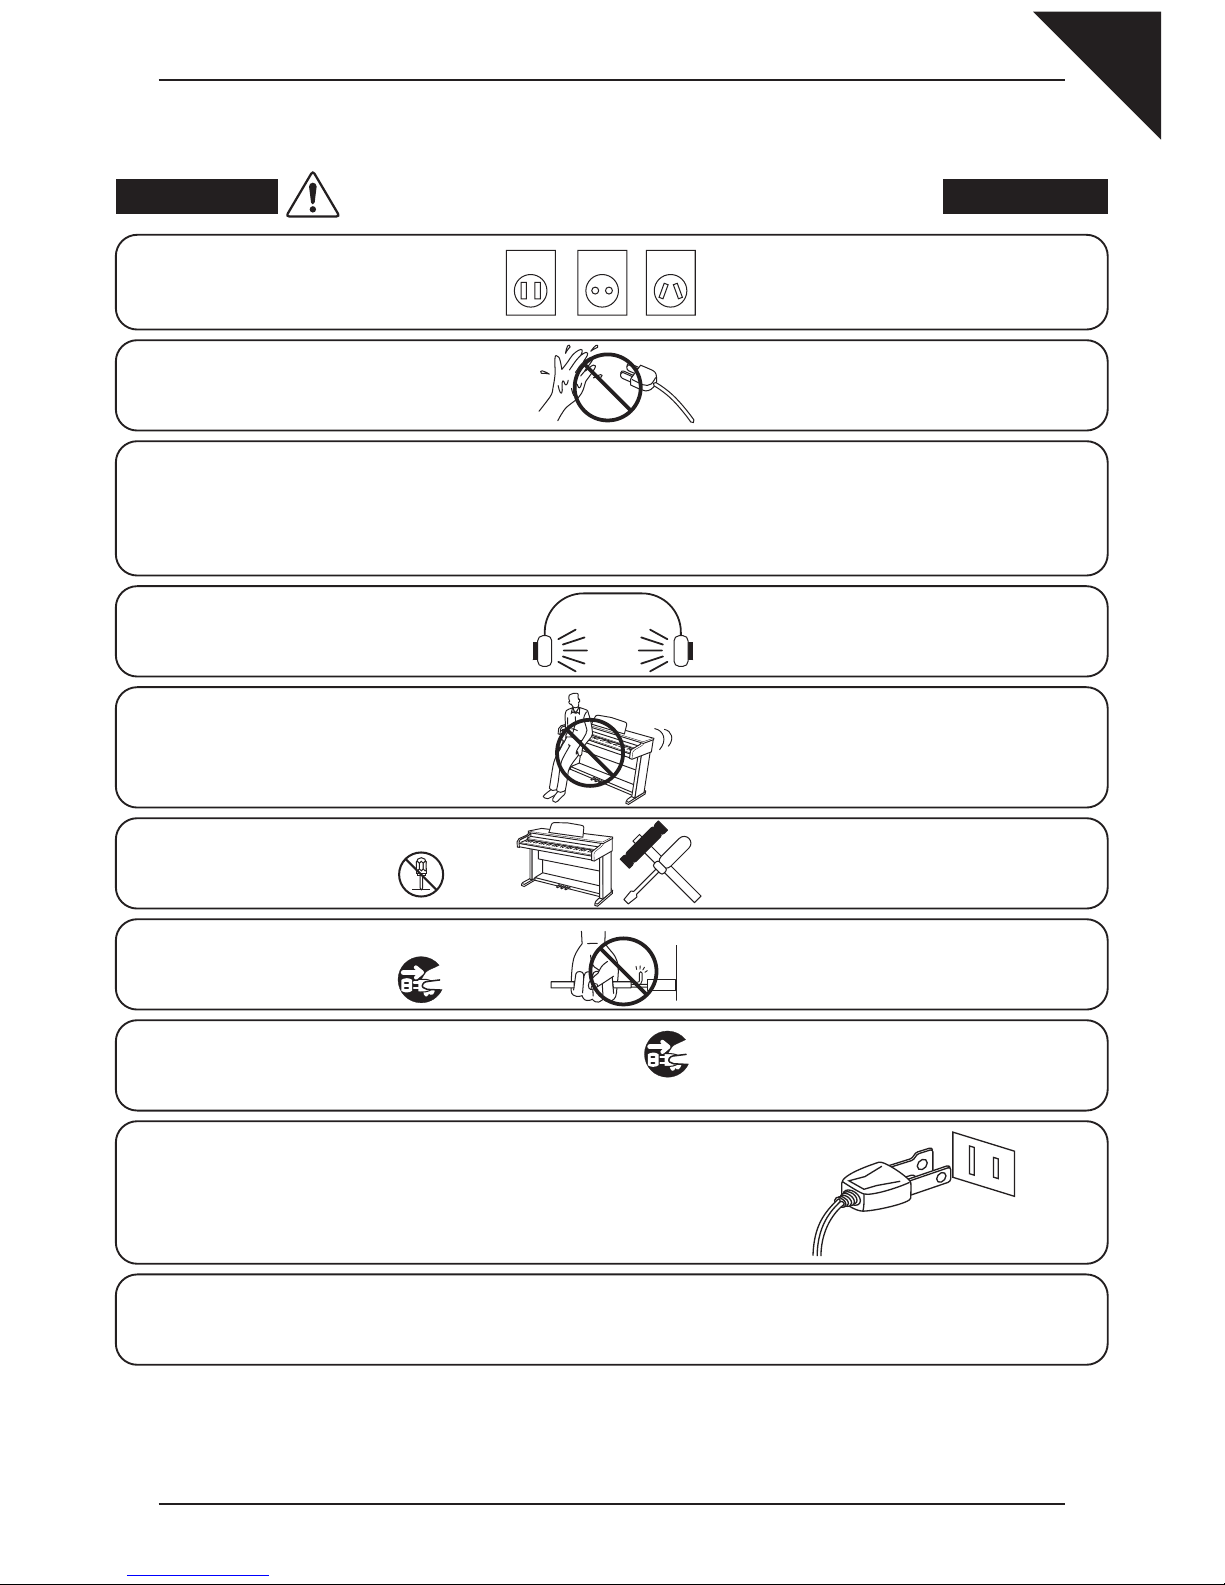
Doing so may cause the product to fall over,
resulting in injury.
Do not lean against the keyboard.
When using the headphones, do not
listen for long periods of
time at high volume levels.
Doing so may result in hearing problems.
It is a good practice to have the instrument near the AC outlet and the power cord plug in a position
so that it can readily be disconnected in an emergency because electricity is always charging
while the plug is in the AC outlet even in a power switch off condition.
The chair must be used properly (it must be
used only when playing the product).
● Do not play with it or stand on it.
● Only one person is allowed to sit on it.
● Do not sit on it when opening the lid.
● Re-tighten the bolts occasionally.
Doing so may cause the chair to fall over or your
fingers to be trapped, resulting in injury.
WARNING
The product should be connected to
an AC outlet of the specified voltage.
● If you are going to use an AC power cord,
make sure that its has the correct plug shape
and conforms to the specified power voltage.
● Failure to do so may result in fire.
120V 240V230V
Indicates a potential hazard that could result in death
or serious injury if the product is handled incorrectly.
Do not insert or disconnect the power
cord plug with wet hands.
Doing so may cause electric shock.
WARNING - When using electric products, basic precautions should always be followed,
including the following.
Page
6
● Doing so may cause the product to become
deformed or fall over, resulting in breakdown
or injury.
Do not stand on the product or exert
excessive force.
● Doing so may result in discoloration or deformation
of the product.
● When cleaning the product, put a soft cloth in
lukewarm water, squeeze it well, then wipe the
product.
Do not wipe the product with benzene
or thinner.
Failure to do so may damage them, resulting in
fire, electric shock or short-circuit.
When connecting the AC power cord
and other cords, take care
not to get them tangled.
● Doing so may cause the product to generate
noise.
● If the product generates noise, move the
product sufficiently away from the electrical
appliance or connect it to another AC outlet.
Do not place the product near electrical
appliances such as TVs and
radios.
Please lift up the product when moving it.
Please note that the product is heavy and must
be carried by more than two persons.
Dropping the product may result in breakdown.
Do not drag the product on the floor.
Take care not to drop the product.
Entry of water, needles or hair pins may result
in breakdown or short-circuit.
The product shall not be exposed to dripping or
splashing. No objects filled with liquids, such as
vases, shall be placed on the product.
Take care not to allow any foreign
matter to enter the product.
Doing so may cause the illumination to fall over,
resulting in fire.
Do not place naked flame, such as lighted
candles on the product.
CAUTION
Indicates a potential hazard that could result in injury
or damage to the product or other property if the
product is handled incorrectly.
Using the product in such areas may result in
product breakdown.
Use the product only in moderate climates (not
in tropical climates).
Do not use the product in the following areas.
● Areas, such as those near windows, where the product is
exposed to direct sunlight
● Extremely hot areas, such as near a heater
● Extremely cold areas, such as outside
● Extremely humid areas
● Areas where a large amount of sand or dust is present
● Areas where the product is exposed to excessive
vibrations
Closing it roughly may trap your fingers,
resulting in injury.
When you close the keyboard cover,
close it gently.
Failure to do so may cause breakdown of this
product and other devices.
Before connecting cords, make sure
that the power to this product
and other devices is turned
OFF.
OFF
The product should be located so that its location or position does not interfere with its proper ventilation. Ensure a
minimum distance of 5cm around the product for sufficient ventilation.
Failure to do so may over-heat the product,
resulting in fire.
Ensure that the ventilation is not
impeded by covering the ventilation
openings with items, such as newspaper,
table-cloths, curtains, etc.
Page
7
Notes on Repair
Should an abnormality occur in the product, immediately turn the power OFF, disconnect the
power cord plug, and then contact the shop from which the product was purchased.
CAUTION:
To prevent electric shock, match wide blade of plug to wide slot, fully insert.
ATTENTION:
Pour éviter les chocs électriques, introduire la lame la plus large de la fiche dans la borne
correspondante de la prise et pousser jusqu'au fond.
Instruction for AC power cord (U.K.)
Do not plug either terminal of the power cord to the ground of the AC outlet on the wall.
Canadian Radio Interference Regulations
This instrument complies with the limits for a class B digital apparatus, pursuant to the Radio
Interference Regulations, C.R.C., c. 1374.
FCC Information
This equipment has been tested and found to comply with the limits for a Class B digital device,
pursuant to Part 15 of the FCC Rules. These limits are designed to provide reasonable
protection against harmful interference in a residential installation. This equipment generates,
uses and can radiate radio frequency energy and, if not installed and used in accordance with
the instructions, may cause harmful interference to radio communications.
If this equipment does cause harmful interference to radio or television reception, which can be
determined by turning the equipment off and on, the user is encouraged to try to correct the
interference by one or more of the following measures:
Reorient or relocate the receiving antenna.
• Increase the separation between the equipment and receiver.
• Connect the equipment into an outlet on a different electrical circuit from the receiver.
• Consult the dealer or an experienced radio/TV technician for help.
FCC WARNING
Changes or modifications not expressly approved by the party responsible for compliance
could void the user’s authority to operate the equipment.
The product should be serviced by qualified service personnel when:
● The power supply cord or the plug has been damaged.
● Objects have fallen, or liquid has been spilled into the product.
● The product has been exposed to rain.
● The product does not appear to operate normally or exhibits a marked change in performance.
●The product has been dropped, or the enclosure damaged.
Declaration of Conformity
This device complies with Part 15 of the FCC Rules. Operation is subject to the
following two conditions: (1) this device may not cause harmful interference, and
(2) this device must accept any interferen ce received, including interference that
may cause undesired operation.
Model Name : CA61
Responsible Party Name : Kawai America Corporation
Address : 2055 East University Drive Rancho
Dominguez, CA 90220
Telephone : 310-631-1771
This applies only to products distributed by Kawai America Corporation.
Page
8
1
Part Names
and Functions
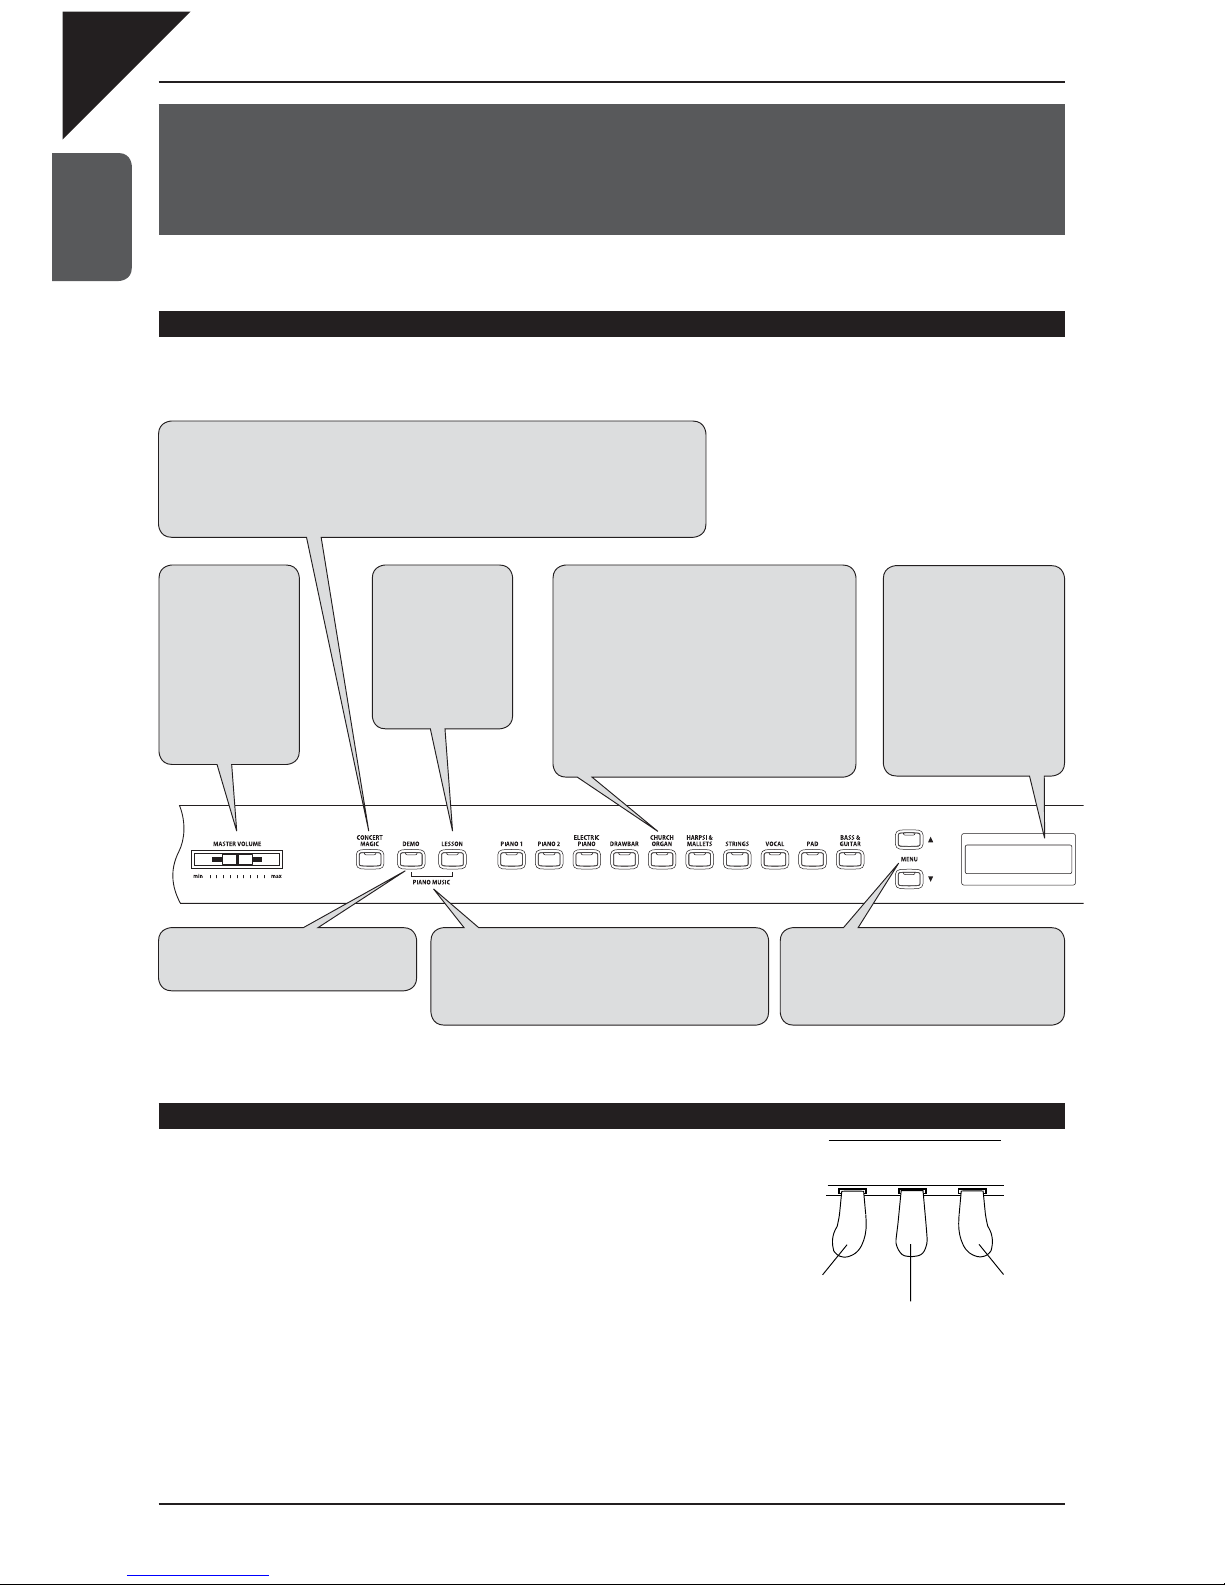
1. Part Names and Functions
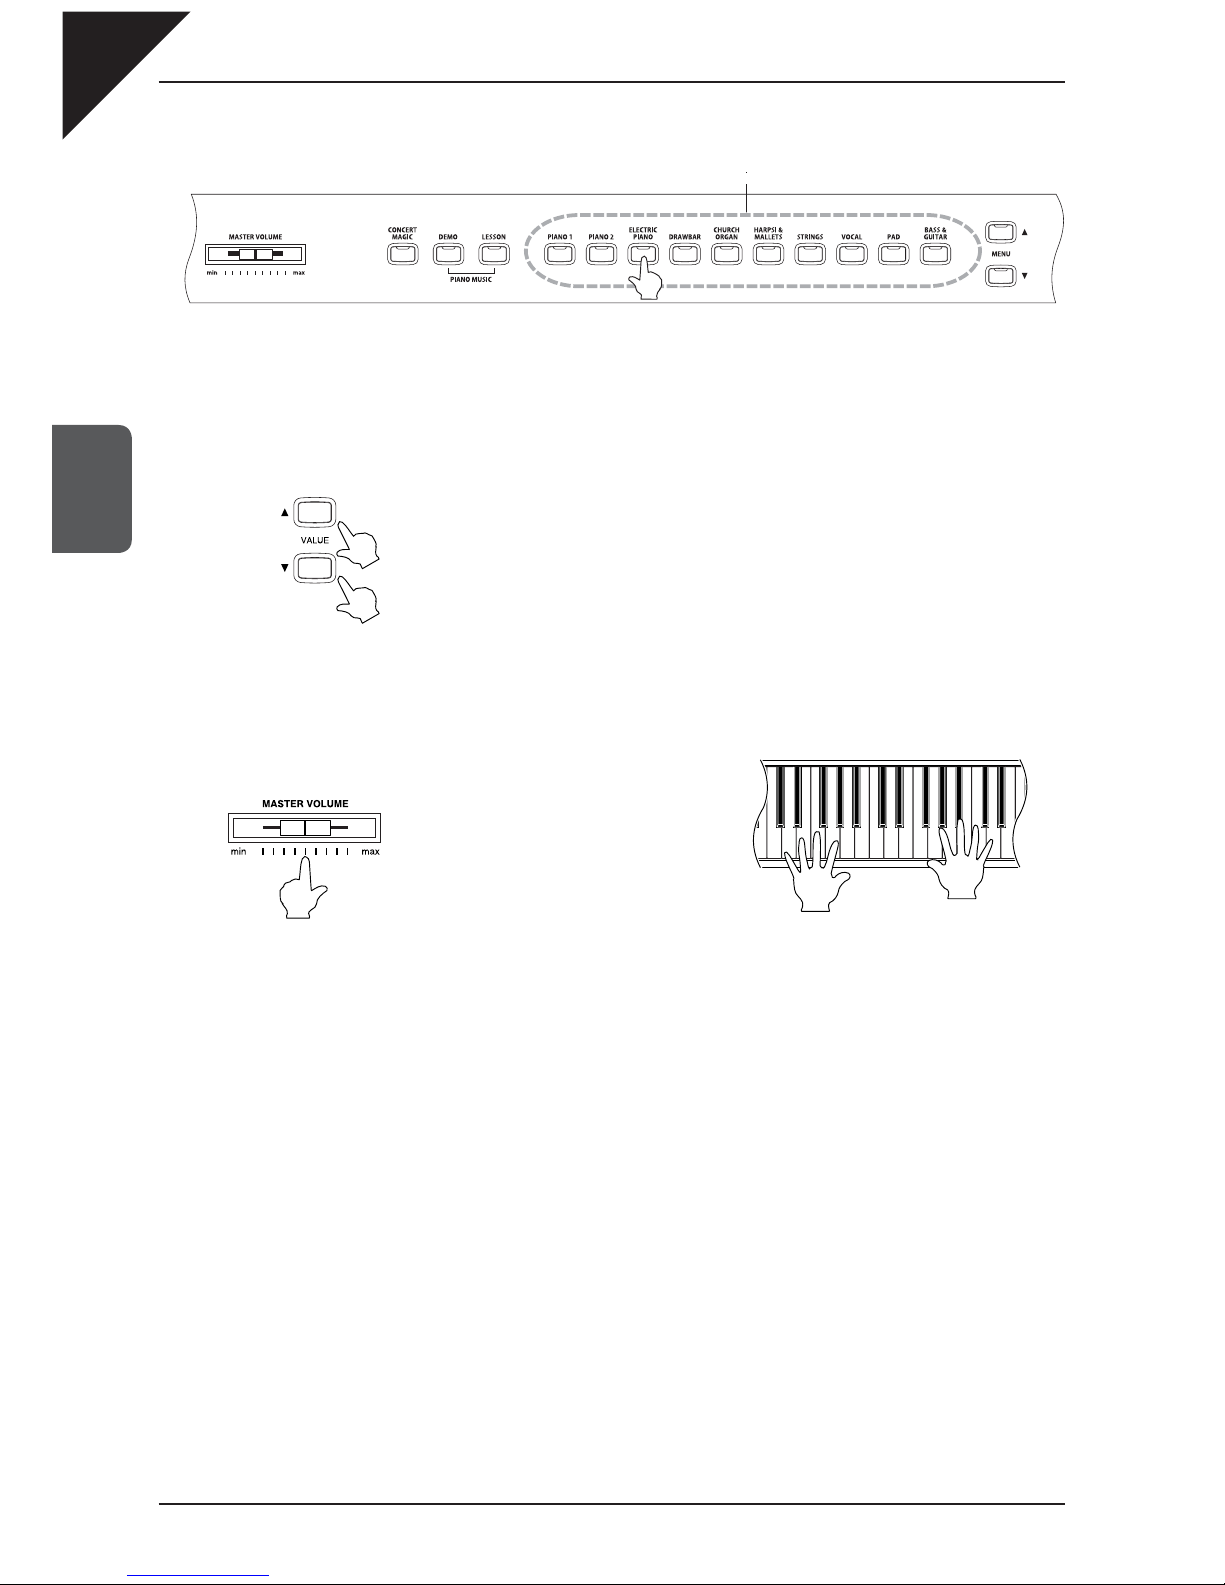
This section explains the locations and functions of the various panel sliders and buttons.
Panel
CA61
Using the pedals
The CA61 piano has three pedals—just like a grand piano. They are Sustain,
Soft and Sostenuto.
¡
Sustain pedal
Sustains the sound after lifting your hands from the keyboard. The sustain pedal
is capable of responding to half pedaling.
¡
Sostenuto pedal
Depressing this pedal after playing the keyboard and before releasing the keys sustains the sound of only the keys just
played.
¡
Soft pedal
Depressing this pedal softens the sound and reduces its volume. When the rotary effect is active the soft pedal is used
to change the speed of the rotor between slow and fast.
Soft pedal
Sostenuto pedal
Sustain pedal
z
CONCERT MAGIC
Press the CONCERT MAGIC button to enjoy listening or performing a collection of preprogrammed
piano songs. Concert Magic will provide the correct melody and accompaniment notes, regardless
of which keys you press. Anybody, young or old, can enjoy Concert Magic from the moment they sit
down at the CA61 piano regardless of their previous musical experience (page 41).
z
MASTER
VOLUME
The MASTER VOLUME
slider controls the
master volume level of
the built-in speakers
and headphones. Move
this slider to the right
to increase the volume
and move to the left to
decrease the volume.
z
Sound buttons
Use these buttons to select the different preset
sounds. Press the SOUND SELECT button
under the name of the instrument you would
like to listen to. When the button is pressed, the
LED indicator will be turned on to indicate that
this sound category is selected. Multiple sound
types are assigned to each button. Repeatedly
pressing a SOUND SELECT button selects the
different sounds assigned to that button. The
name of the selected sound will be displayed in
the LCD display (page 13).
z
PIANO MUSIC
Pressing the DEMO and LESSON buttons together
lets you enter the piano music mode. The CA61 piano
provides some hours of pre-recorded classical piano
music for your listening pleasure (page 12).
z
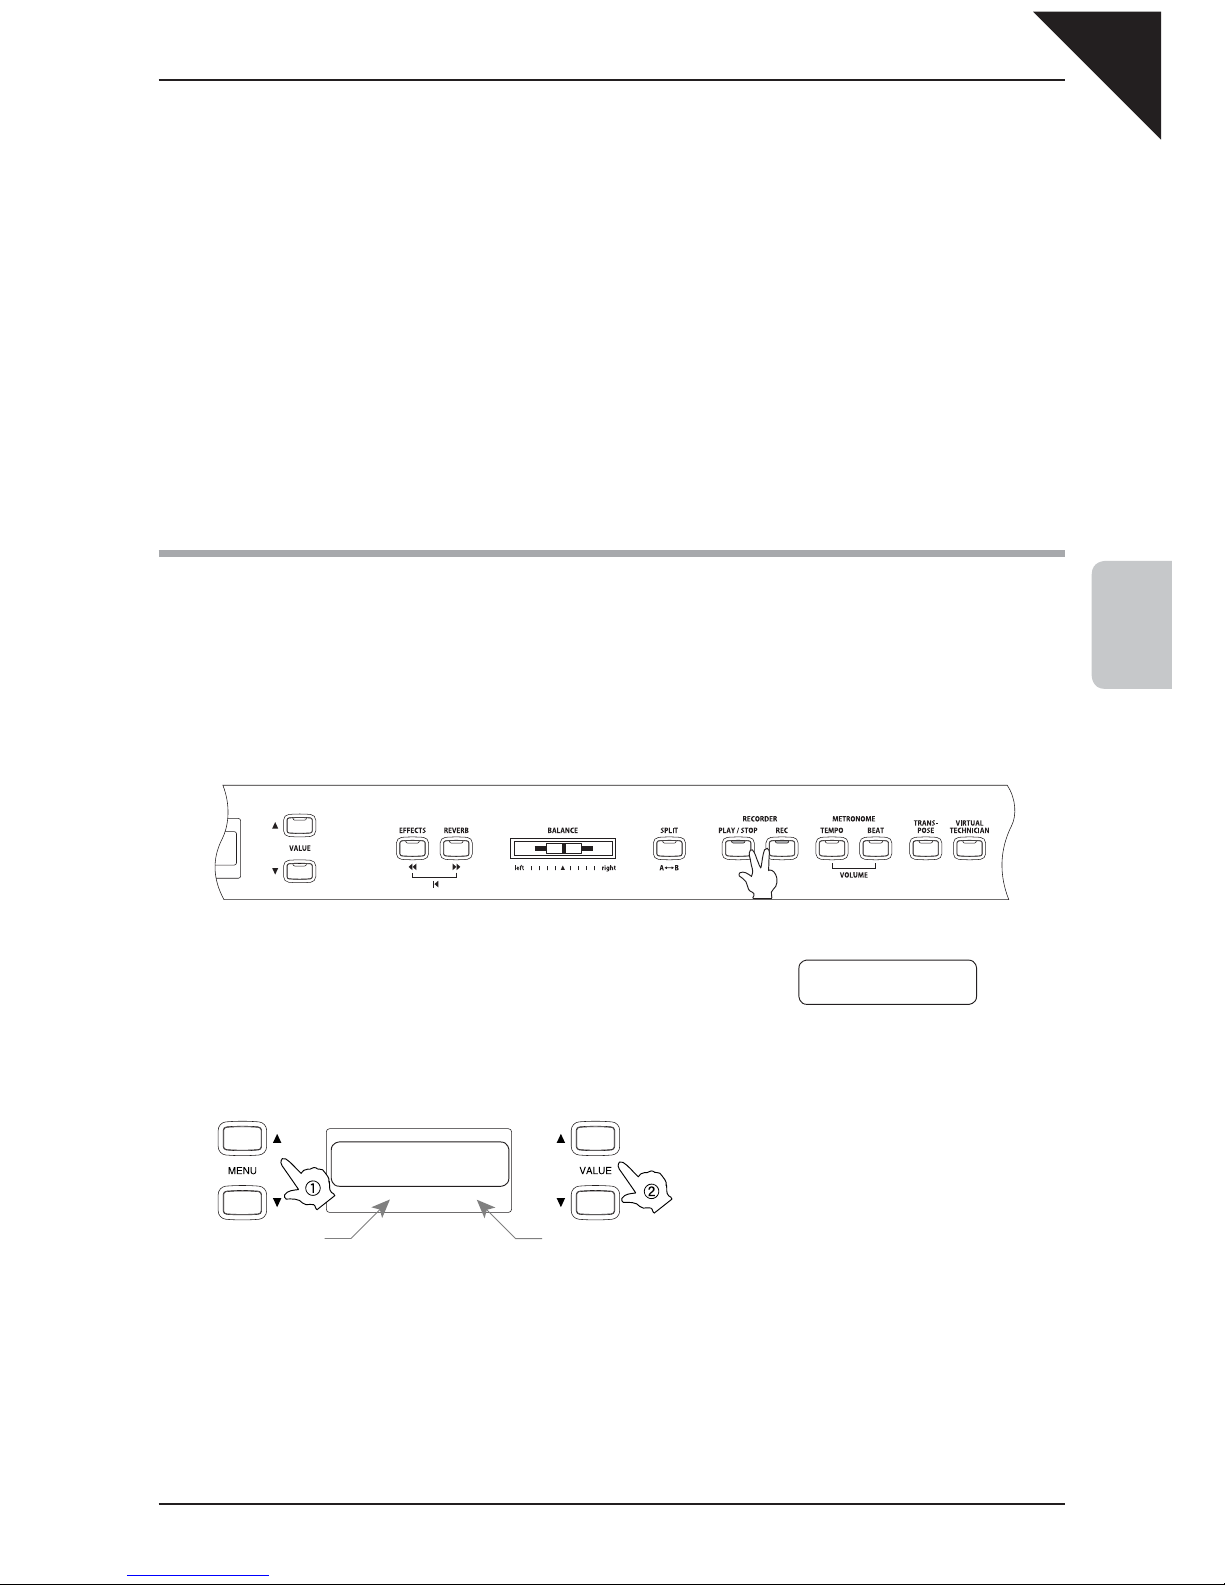
MENU
These buttons are used to access the various
virtual technician and menu functions that
control the CA61 piano’s tuning, system and
MIDI functions.
z
LCD display
The LCD display provides
useful information such
as the currently selected
sound type. It also shows
values or status when
other functions are
active.
*
A protective plastic fi lm is
provided on the display.
Remove it before use.
z
DEMO
Press the DEMO button to listen to the
various different demo songs (page 11).
z
LESSON
Press the LESSON
button to access fi nger
exercises and Alfred
lesson books.
Listen or practice along
with the various songs
and exercises (page
31).
Page
9
1
Part Names
and Functions
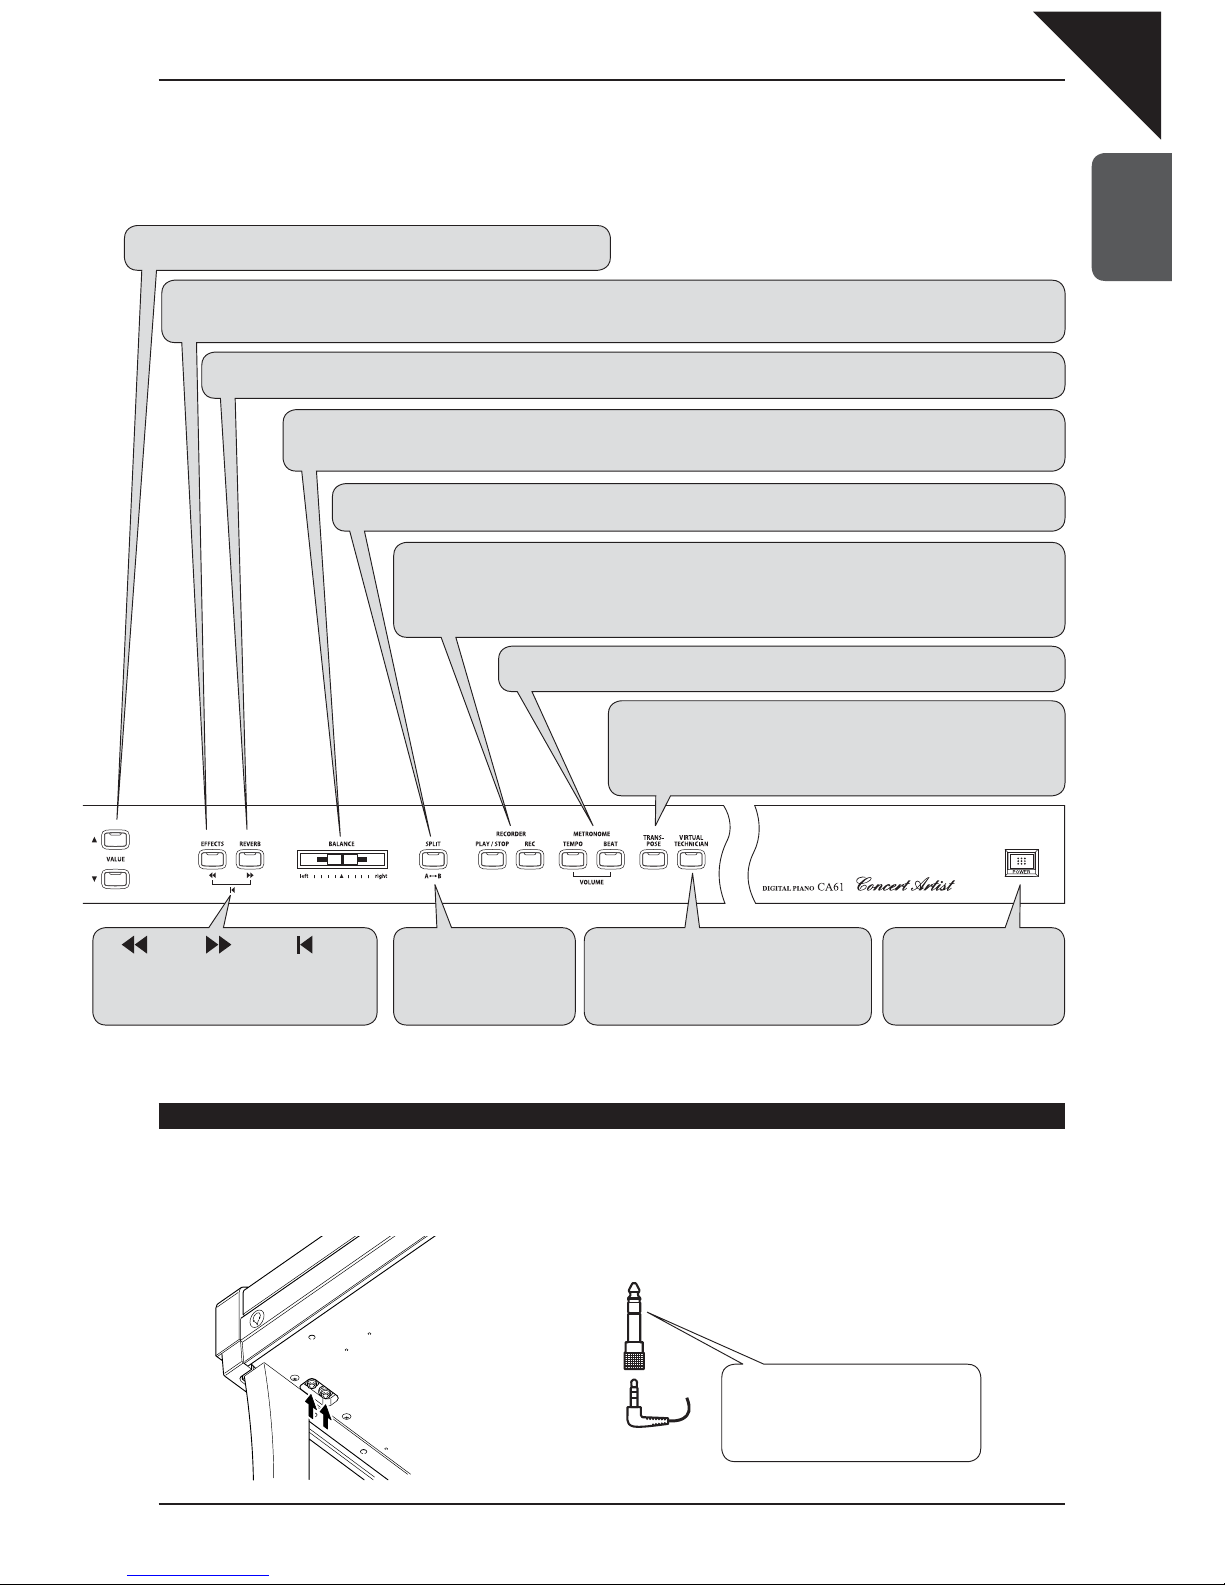
Headphone
¡
Headphone jack (x 2)
Use this Jack to connect a pair of headphones.
Up to two pairs of headphones can be connected.
z
VALUE
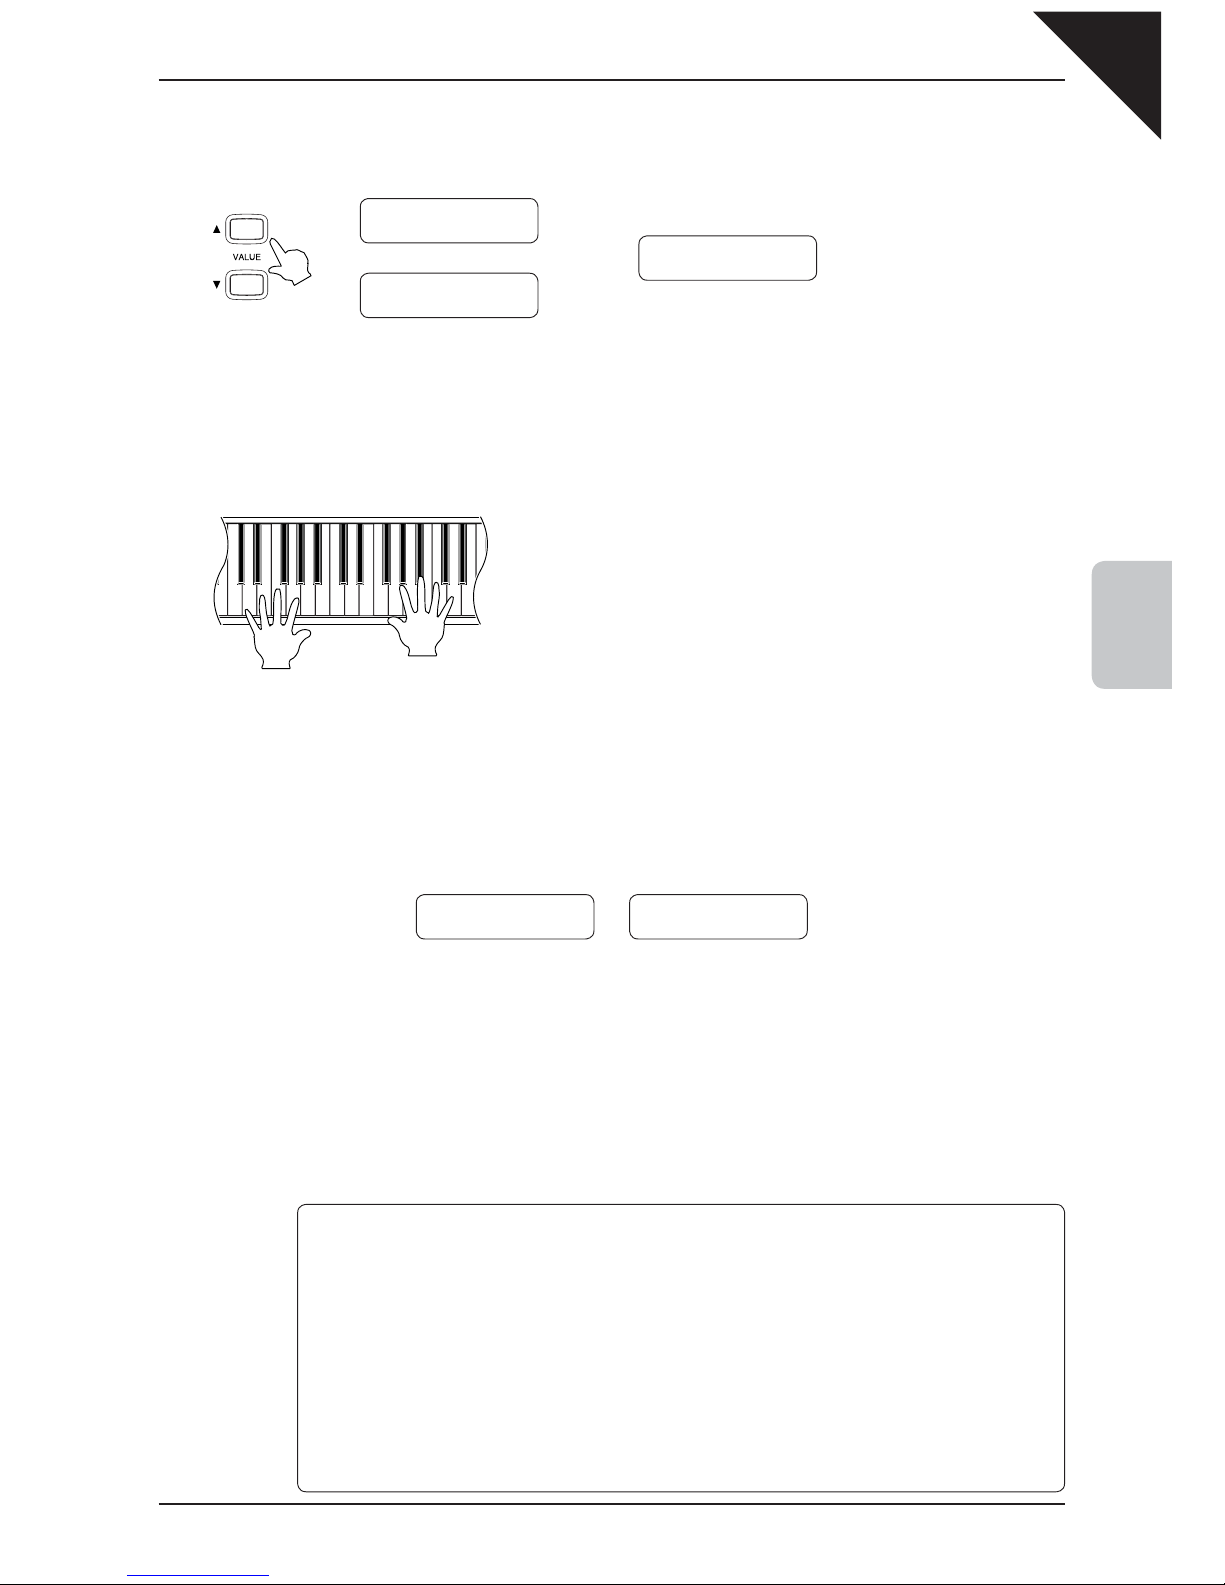
These two buttons are used to change the value settings for the various functions.
z
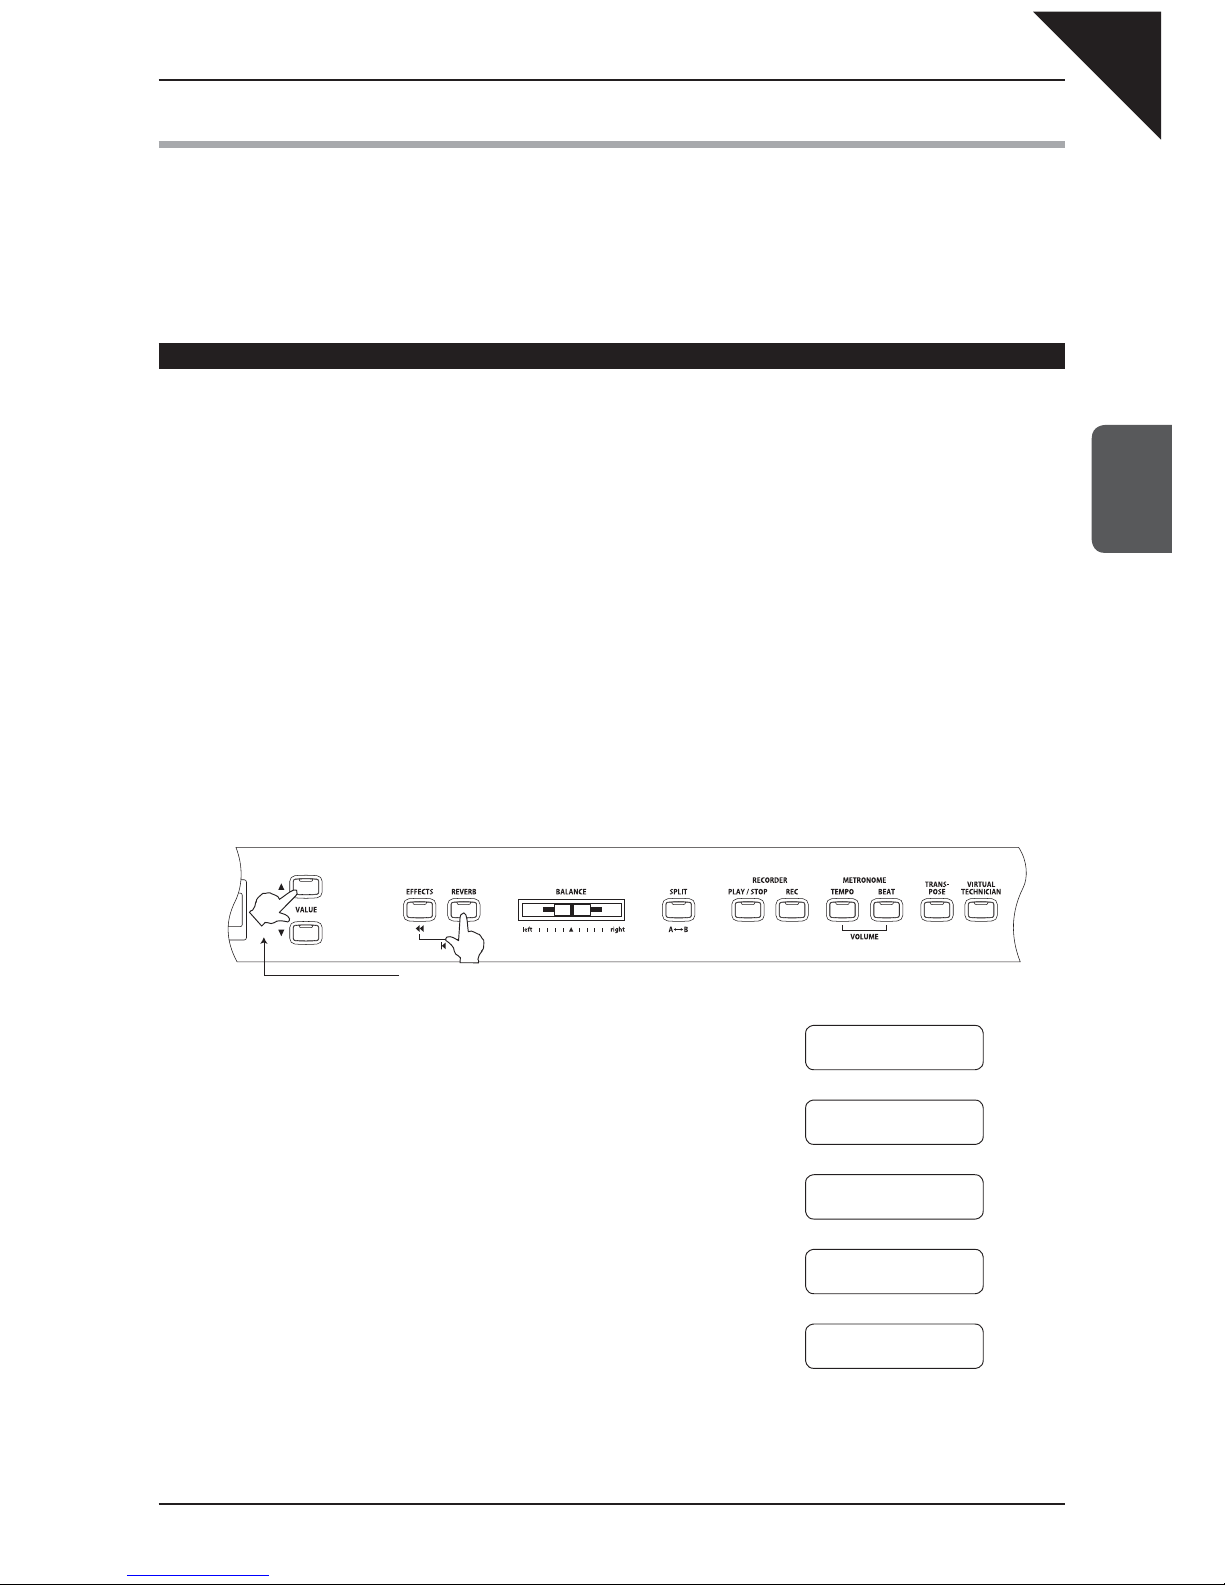
EFFECTS
Press the EFFECTS button to turn the effects ON/OFF for the selected sound. The EFFECTS button is used to select the different effect types and
adjust their settings (page 20).
z
REVERB
Press the REVERB button to turn the reverb ON/OFF for the selected sound. The REVERB button is used to select the different reverb types (page 19).
z
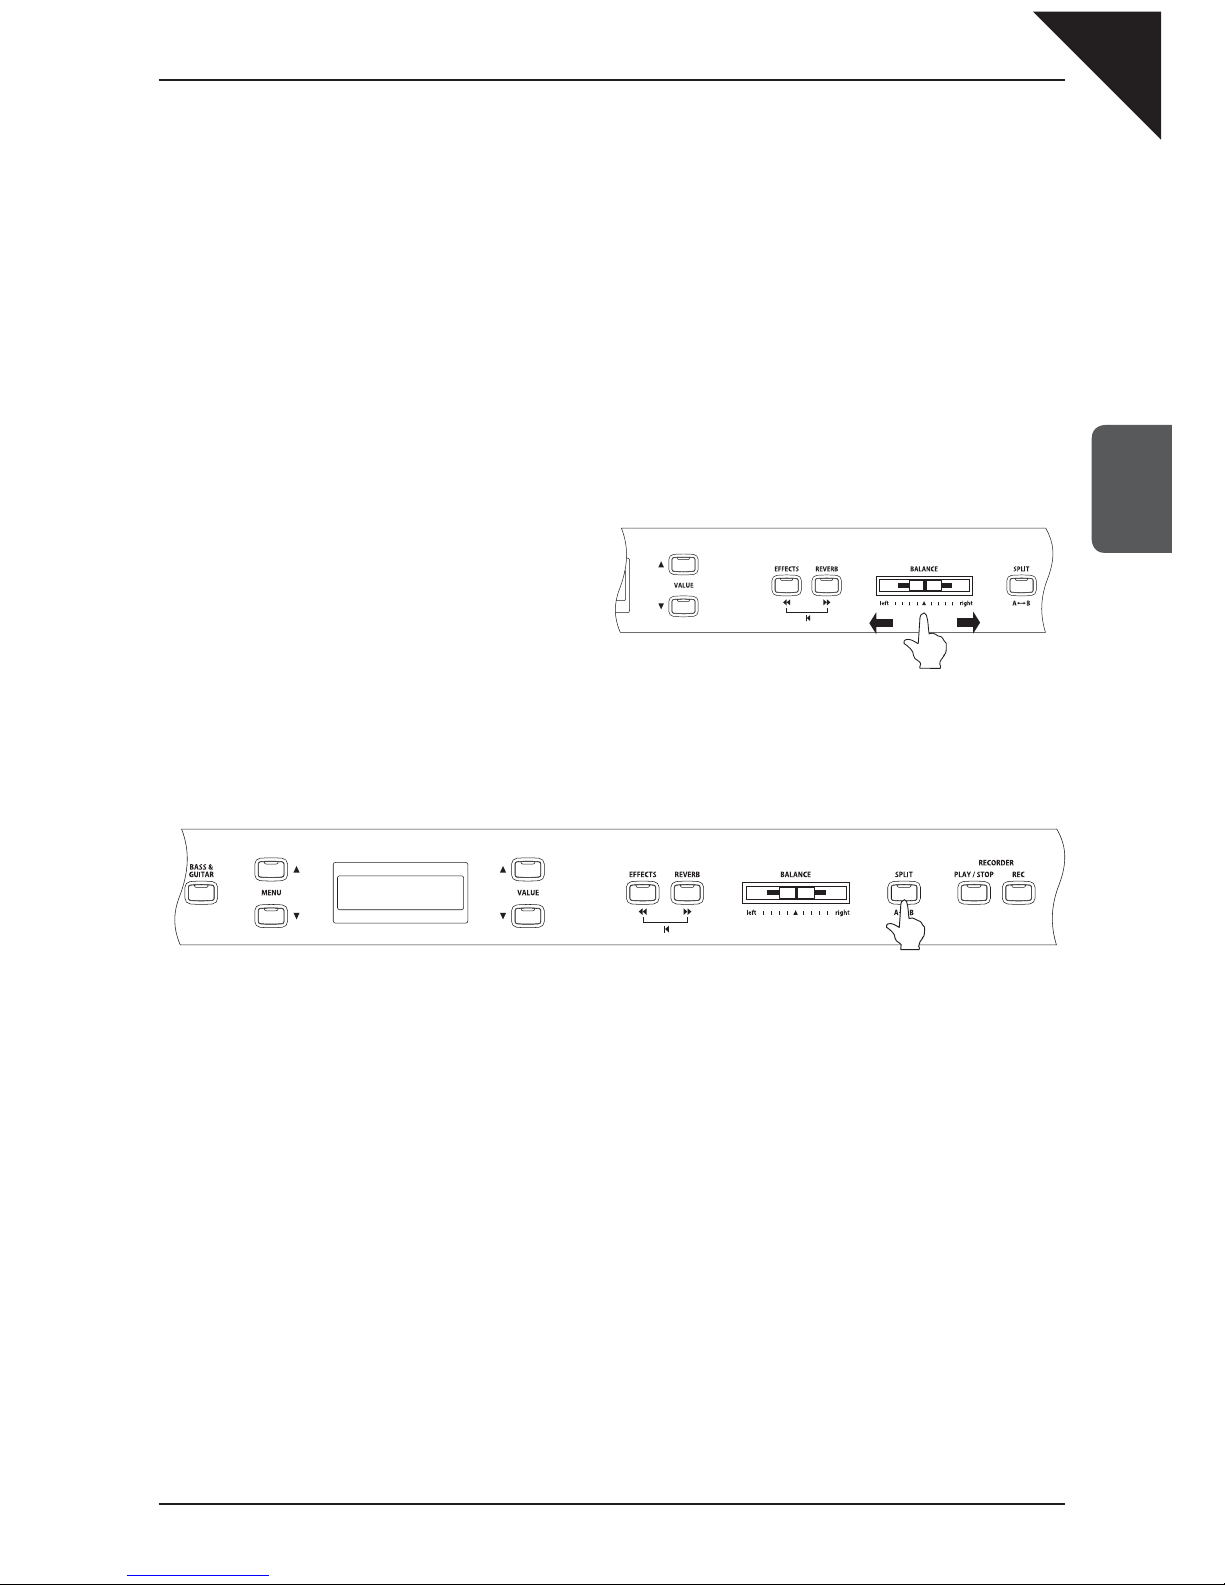
BALANCE
Use the BALANCE slider to adjust the volume balance between two sounds in dual or Split mode. The BALANCE slider is also
used to adjust the balance of the two parts in the Concert Magic and lesson modes (pages 15, 17, 34, and 43).
z
SPLIT
The split function divides the keyboard into two sections—upper and lower—and lets you play each par t with a different sound (page 16).
z
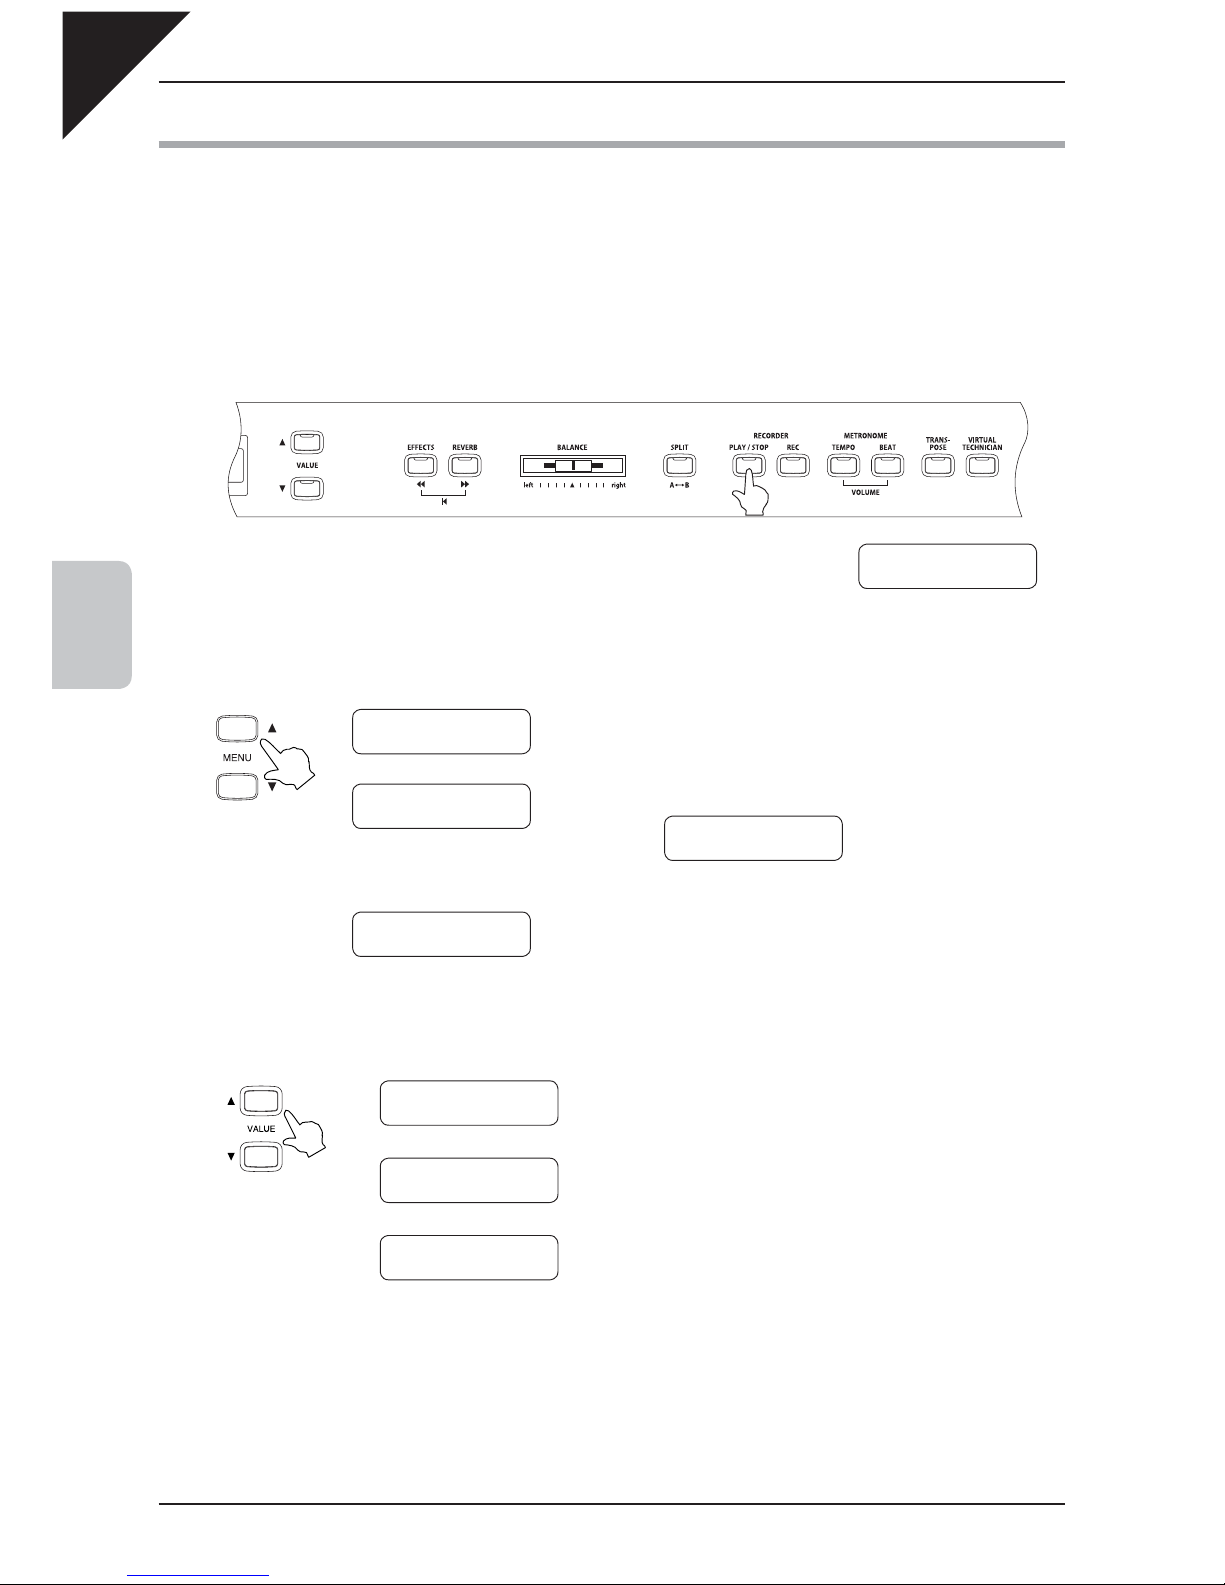
RECORDER
The REC button is used for recording your own songs and when using the lesson function, to record your playing
and compare with the built in songs and exercises.
The PLAY/STOP button is used to select a song and part to play, and to star t and stop play back of the recorded
songs. It is also used to start / stop playback when using the lesson function (page 26).
z
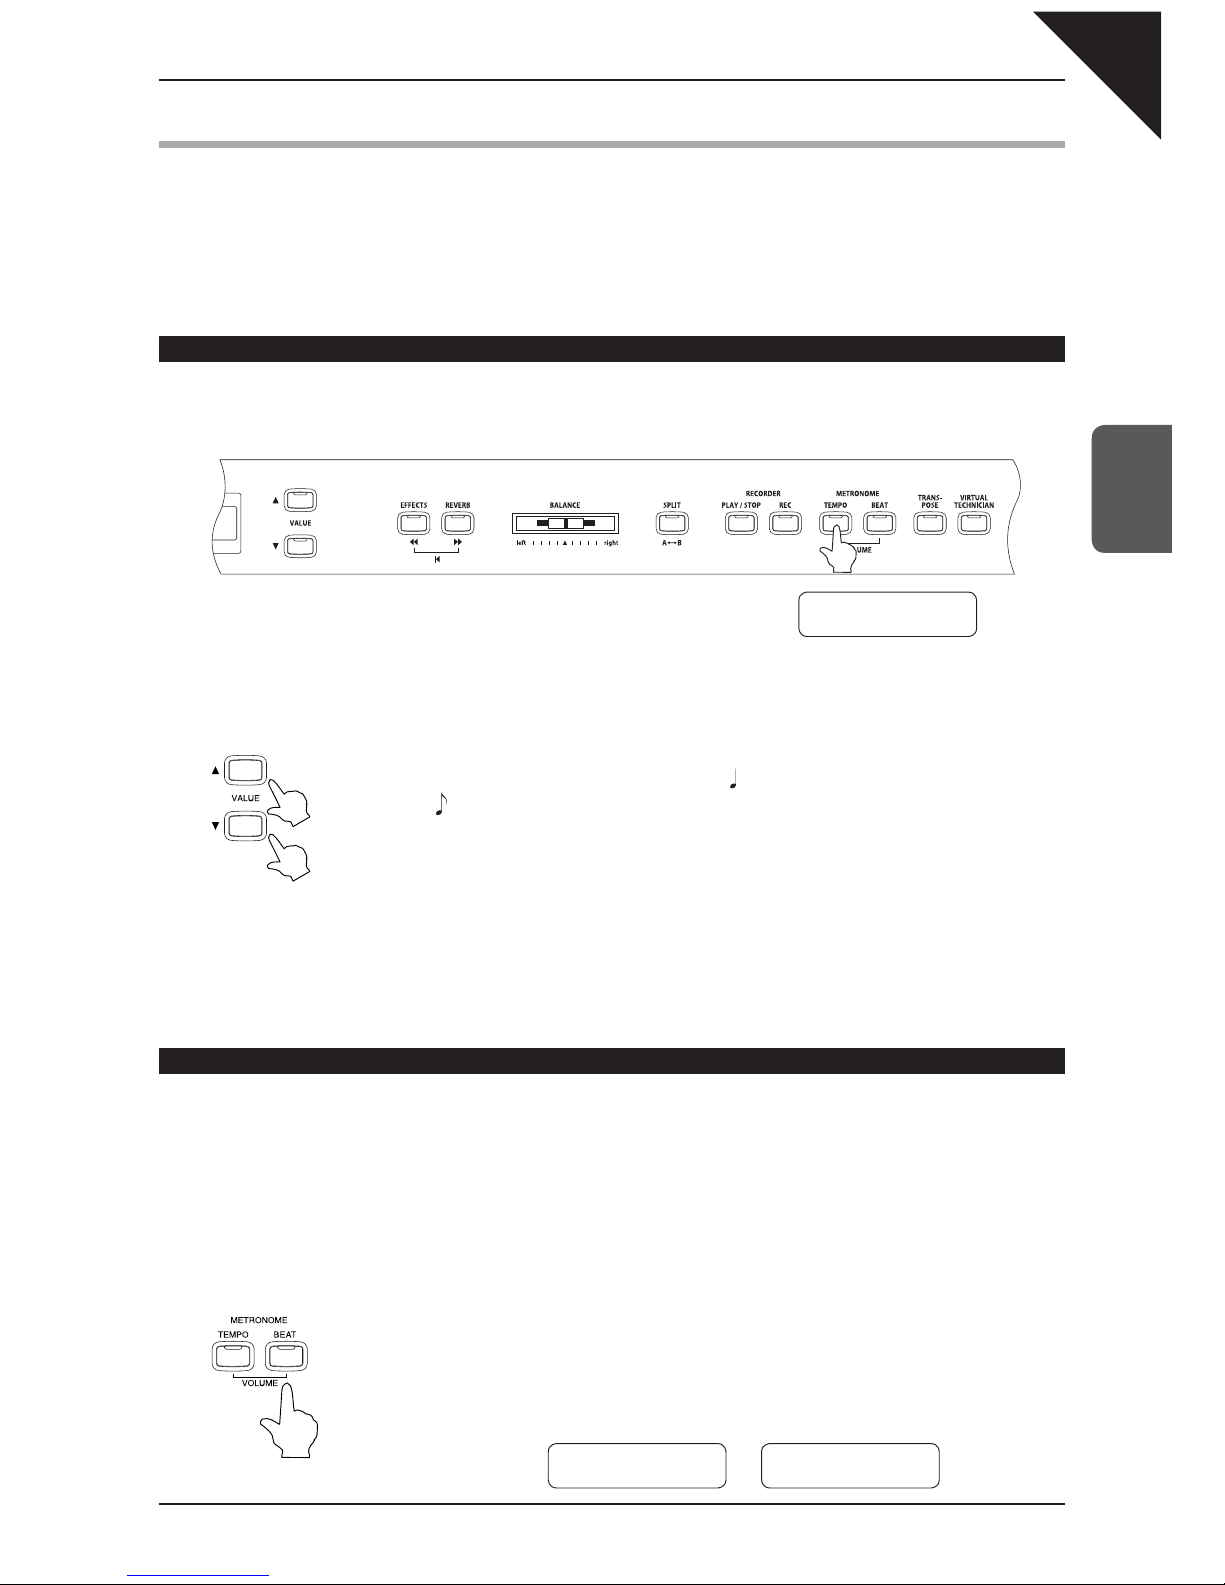
METRONOME
Use these buttons to turn on / off the metronome, and to set the tempo, beat, and volume (page 23).
z
rewind forward reset
Use these buttons to play a song from a
specifi c bar or to fi nd the beginning of a song
in the lesson function (pages 32 and 33).
z
AÅÆ B (AB repeat)
Press this button to play
back a specifi c section of
a song repeatedly in the
lesson function (page 35).
z
POWER
Press the POWER to turn
the power on / off. Turn
the power off after use
(page 10).
z
VIRTUAL TECHNICIAN
The virtual technician provides a set of
special functions that make it possible for you
to customize the CA61 piano to your personal
taste. (page 54).
z
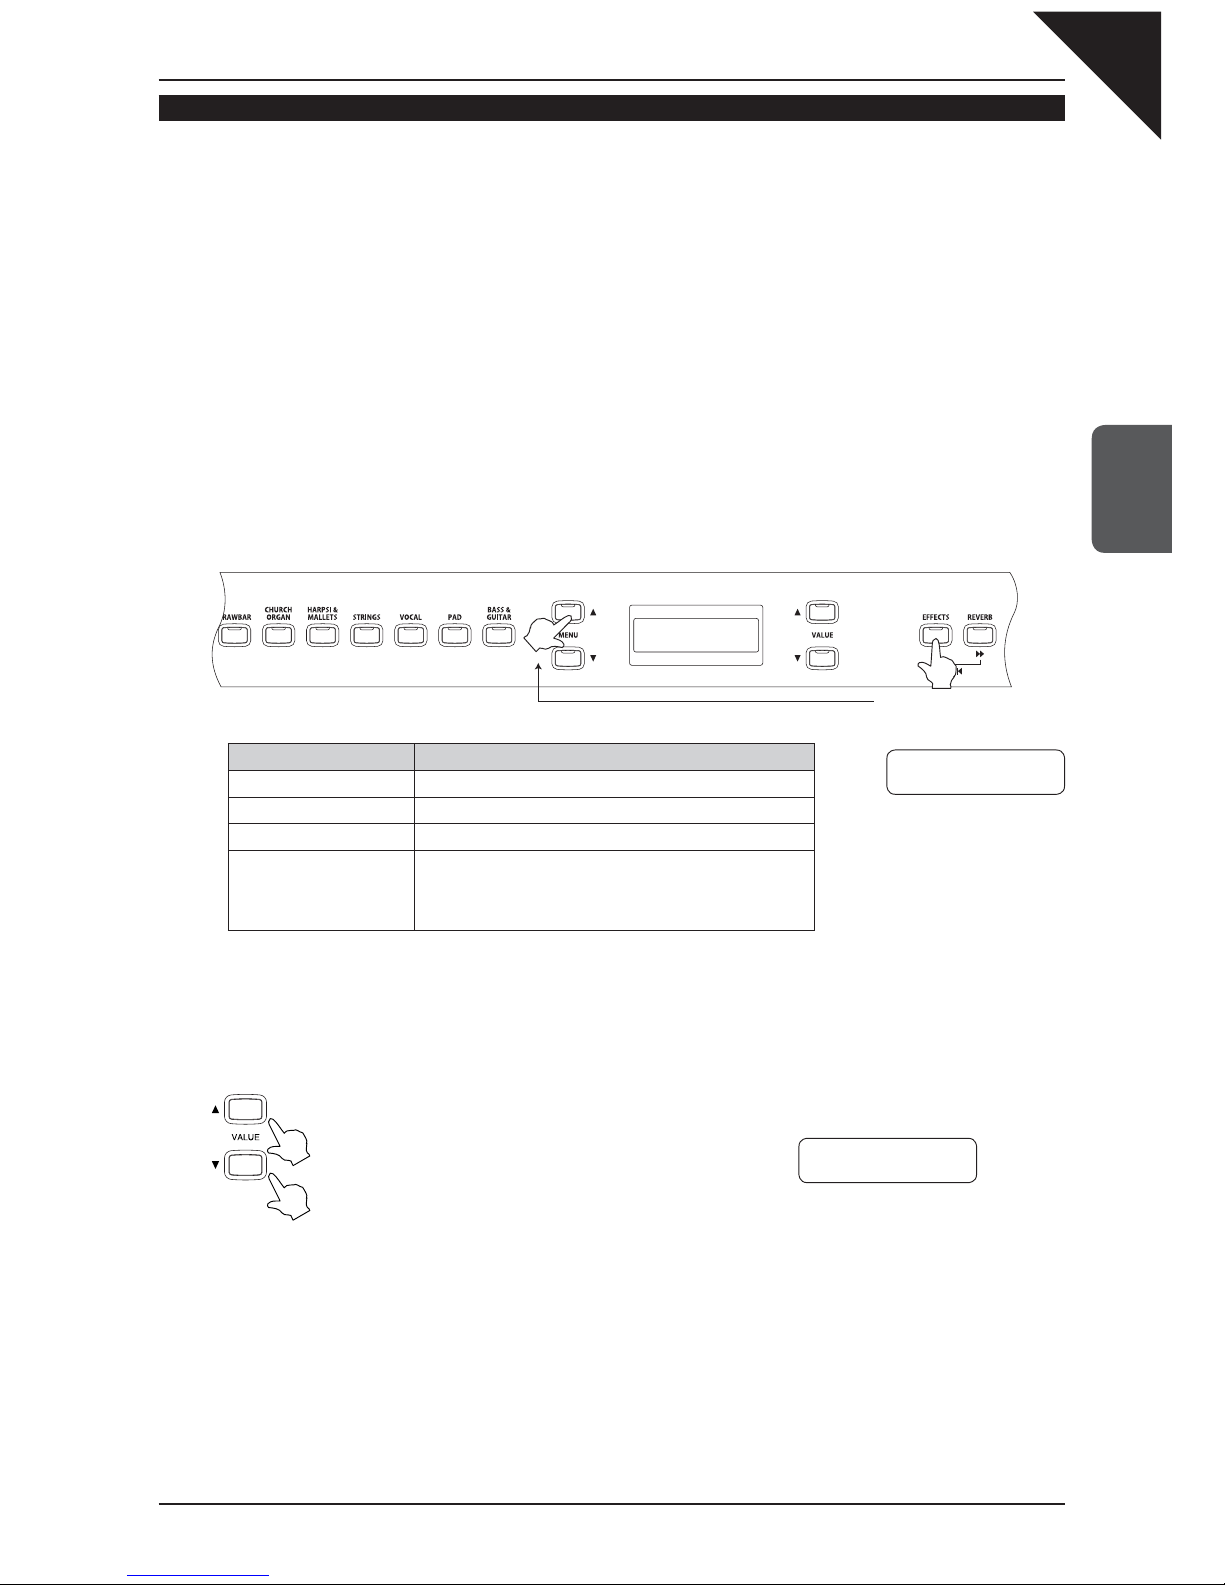
TRANSPOSE
The transpose function lets you raise or lower the piano’s key in half steps.
This is especially useful when you have learned a song in one key and
have to play it in another key. The transpose feature allows you to play the
song in the original key, but hear it in another key (page 22).
Some headphones are designed with a
removable adapter that is used to connect
to different sized jacks. Sound may not be
heard from the built-in speakers if this adapter
remains in the CA61 headphone jack when the
plug is removed.
Caution
Page
10
2
Listening to
the Piano
2. Listening to the Piano
1) Basic Operation
This section provides the basic procedures for turning the power on and playing the CA61 piano.
Step 1
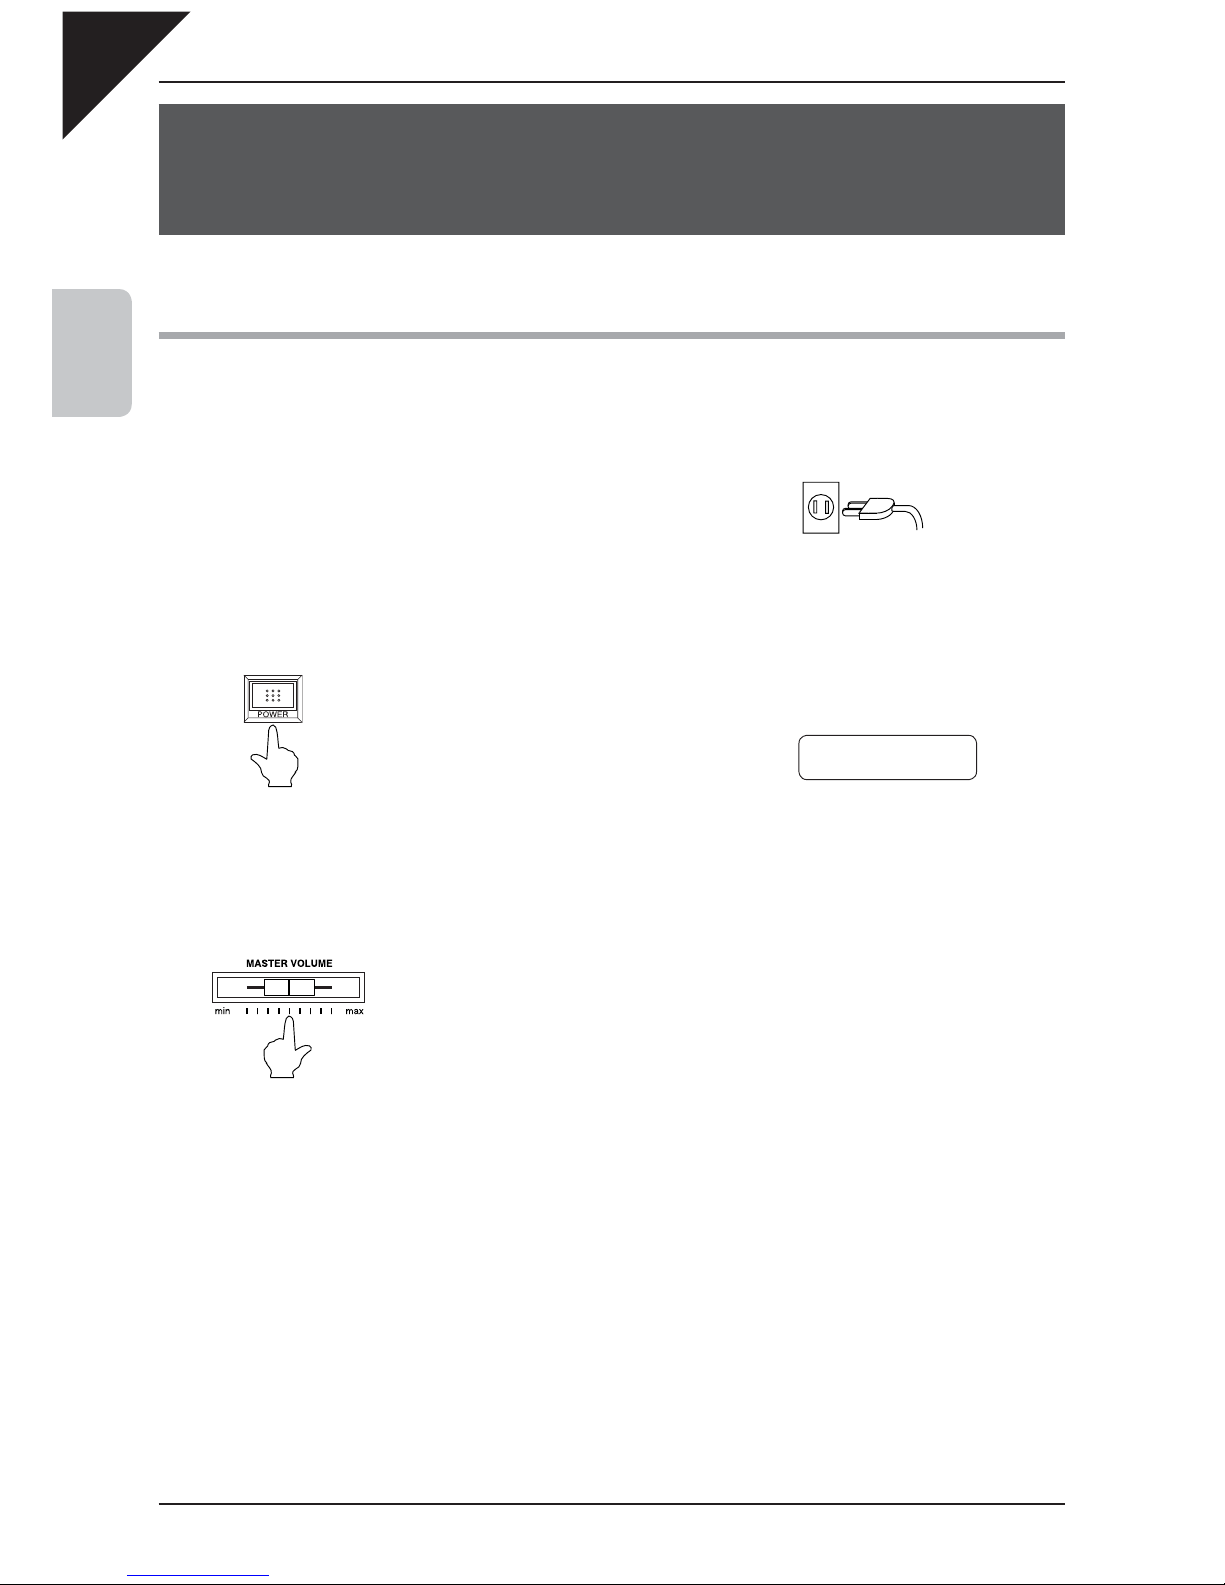
Connect the CA61 pianos’ power cable to an AC outlet.
Step 2
You will fi nd the POWER SWITCH at the right end of the front panel. Press this button to turn on the power.
Pressing it again will turn off the power.
When the power is fi rst turned ON you will hear the CA61’s main piano sound. The name of
the sound, “Concert Grand” is shown in the LCD Display.
The REVERB button will also be turned on.
Step 3
Use the MASTER VOLUME slider to set the volume to a comfortable listening level. The MASTER VOLUME
slider controls the volume level of the speakers and the headphones. Setting the volume slider to the middle
is a good starting point.
Concert Grand
Page
11
2
Listening to
the Piano
2) Demo Songs
The CA61 features 31 built in demo songs. Each of the demo songs presents a musical piece to introduce the
different sounds.
Press the DEMO button and then use the SOUND SELECT buttons to select and play the different demo songs.
Step 1
Press the DEMO button and the LED indicator for the DEMO button will be turned on.
The LED indicators for the SOUND SELECT buttons will fl ash and the demo song for the Piano 1 category will
start. After the Piano 1 demo songs are fi nished playing, the demo songs for another sound category will be
selected at random.
The LCD display shows the sound name for the demo that is currently being played.
Step 2
If you would like to listen to the demos for a particular category, just press the desired SOUND SELECT
button while the demo is playing. When you press the button, the demo songs for the newly selected category
will be played. Then the demo songs for another category will be selected at random.
Some SOUND SELECT buttons have more than one demo assigned to them. Press the same SOUND SELECT
button repeatedly to select the other demos assigned to that button.
Step 3
Press the DEMO button again to exit the demo mode.
You can also exit demo mode by pressing the PLAY / STOP button of the recorder.
Button lights
Demo
Concert Grand
PIANO 1
Concert Grand : Valse Romantique / Debussy
Studio Grand : KAWAI
Mellow Grand : La Fille aux Cheveux de Lin / Debussy
Rock Piano : KAWAI
PIANO 2
Modern Piano : KAWAI
New Age Piano 2 : KAWAI
ELECTRIC PIANO
Classic E.Piano : KAWAI
Modern E.P. : KAWAI
Modern E.P. 2 : KAWAI
DRAWBAR
Jazz Organ : KAWAI
Drawbar Organ : KAWAI
Drawbar Organ 2 : KAWAI
CHURCH ORGAN
Church Organ : Toccata / Eugene Gigout
Diapason : Wohl mir, daß ich Jesum habe / Bach
Full Ensemble : KAWAI
HARPSI & MALLETS
Harpsichord : French Suite No.6 / Bach
Vibraphone : KAWAI
Clavi : KAWAI
STRINGS
Slow Strings : KAWAI
String Pad : KAWAI
String Ensemble : Le quattro stagioni La primavera / Vivaldi
VOCALS
Choir : KAWAI
Choir 2 : KAWAI
Jazz Ensemble : KAWAI
PADS
New Age Pad : KAWAI
Atmosphere : KAWAI
BASS & GUITAR
Wood Bass : KAWAI
Fretless Bass : KAWAI
W. Bass & Ride : KAWAI
Ballad Guitar : KAWAI
Pick Nylon Gt. : KAWAI
KAWAI regret that sheet music for KAWAI original demo songs is not available.
Page
12
2
Listening to
the Piano
3) Piano Music
Pressing the DEMO button and the LESSON button simultaneously lets you enter the piano music mode. The CA61
piano provides over two hours of pre-recorded classical piano music for your listening pleasure.
All of the song titles are listed in the appendix of this owner’s manual.
Step 1
Press the DEMO and LESSON buttons simultaneously.
The LED indicators for these buttons will be turned on, and the piano music selection screen will be displayed.
Step 2
Use the VALUE buttonsS or T to select your desired song.
Songs can be changed while the selected song is being played.
Step 3
Start the song by pressing the PLAY / STOP button.
To stop the song, press the same button again.
Step 4
Press the DEMO and LESSON buttons simultaneously again to exit the piano music mode.
Press them at the same time.
Page
13
3
Playing the Piano
3. Playing the Piano
1) Selecting a Sound
The CA61 panel has 10 SOUND SELECT buttons, with multiple sounds assigned to each button for a total of 58
different sounds.
Sound Button CA61
Piano 1
Concert Grand
Studio Grand
Mellow Grand
Jazz Grand
Rock Piano
Piano 2
Modern Piano
Honky Tonk
New Age Piano 2
New Age Piano 3
New Age Piano 4
Electric Piano
Classic E.Piano
Modern E.P.
60’s E.P.
Modern E.P. 2
New Age E. P.
Crystal E. P.
Drawbar
Jazz Organ
Drawbar Organ
Drawbar Organ 2
Be 3
Jazzer
Odd Man
Church Organ
Church Organ
Diapason
Full Ensemble
Diapason Oct.
Chiffy Tibia
Stopped Pipe
Harpsi & Mallets
Harpsichord
Harpsichord 2
Vibraphone
Clavi
Marimba
Celesta
Strings
Slow Strings
String Pad
Warm Strings
String Ensemble
Soft Orchestra
Harp
Vocals
Choir
Pop Ooh
Pop Aah
Choir 2
Jazz Ensemble
Pop Ensemble
Pads
New Age Pad
Atmosphere
Itopia
Brightness
New Age Pad 2
Brass Pad
Bass & Guitar
Wood Bass
Finger Bass
Fretless Bass
W. Bass & Ride
Ballad Guitar
Pick Nylon Gt.
Page
14
3
Playing the Piano
Step 1
Selecting a sound.
Press the SOUND SELECT button under the name of the instrument you would like to listen to. When the button
is pressed, the LED indicator will be turned on to indicate that this sound is selected.
Multiple sounds are assigned to each button. Press the selected button repeatedly to select the different sounds
assigned to that button.
The VALUE buttons can also be used to select sounds.
Step 2
Try playing the keyboard.
You will hear your selected sound as you play.
Use the MASTER VOLUME slider to adjust the volume.
The CA61 piano is capable of playing up to 96 notes simultaneously (96-note polyphony). When playing in dual mode, or
when playing the stereo piano sound, the polyphony will be reduced by half since the piano has to produce two sounds
for each note.
SOUND SELECT buttons
Page
15
3
Playing the Piano
2) Dual Mode
Another feature of the CA61 piano is the ability to layer two preset sounds together to create a more complex
sound. For example, piano layered with strings, electric piano with choir sound, and so on.
Step 1
To layer two sounds, press the SOUND SELECT buttons for both sounds simultaneously.
The LED indicators for each button will be turned on to indicate the two sounds you have chosen. You will fi nd the
selected sound names are also shown in the LCD display. (the sound assigned to the button that is pressed fi rst
will be displayed in the top line).
For example, To layer a piano sound and a string sound, press the PIANO 1 and STRINGS buttons simultaneously
as shown in the diagram.
Pressing either of the SOUND buttons again will select the other sounds assigned to that button. For example if
you want to change the String Ensemble sound to Slow Strings, while holding down the PIANO 1 button press the
STRINGS button again until Slow Strings is displayed in the LCD.
If you want to layer two sounds assigned to the same SOUND SELECT button, while pressing the desired SOUND
SELECT button use the VALUE buttons to select your desired layered sound.
For example, if you wish to layer Concert Grand and Mellow Grand, fi rst press the PIANO 1 button to select Concert
Grand, and then use the VALUE buttons to select Mellow Grand while still holding down the PIANO 1 button.
Step 2
Try playing the keyboard.
Two different sounds are played at the same time.
Step 3
Use the BALANCE slider to adjust the
volume balance between the two sounds.
Step 4
To exit dual mode, simply press any individual SOUND SELECT button and dual mode will be cancelled.
Press them at the same time
Increases the volume of the
sound assigned to the leftmost
selected SOUND button.
Increases the volume of
the sound assigned to the
rightmost selected SOUND
button.
Concert Grand
String Ensemble
Page
16
3
Playing the Piano
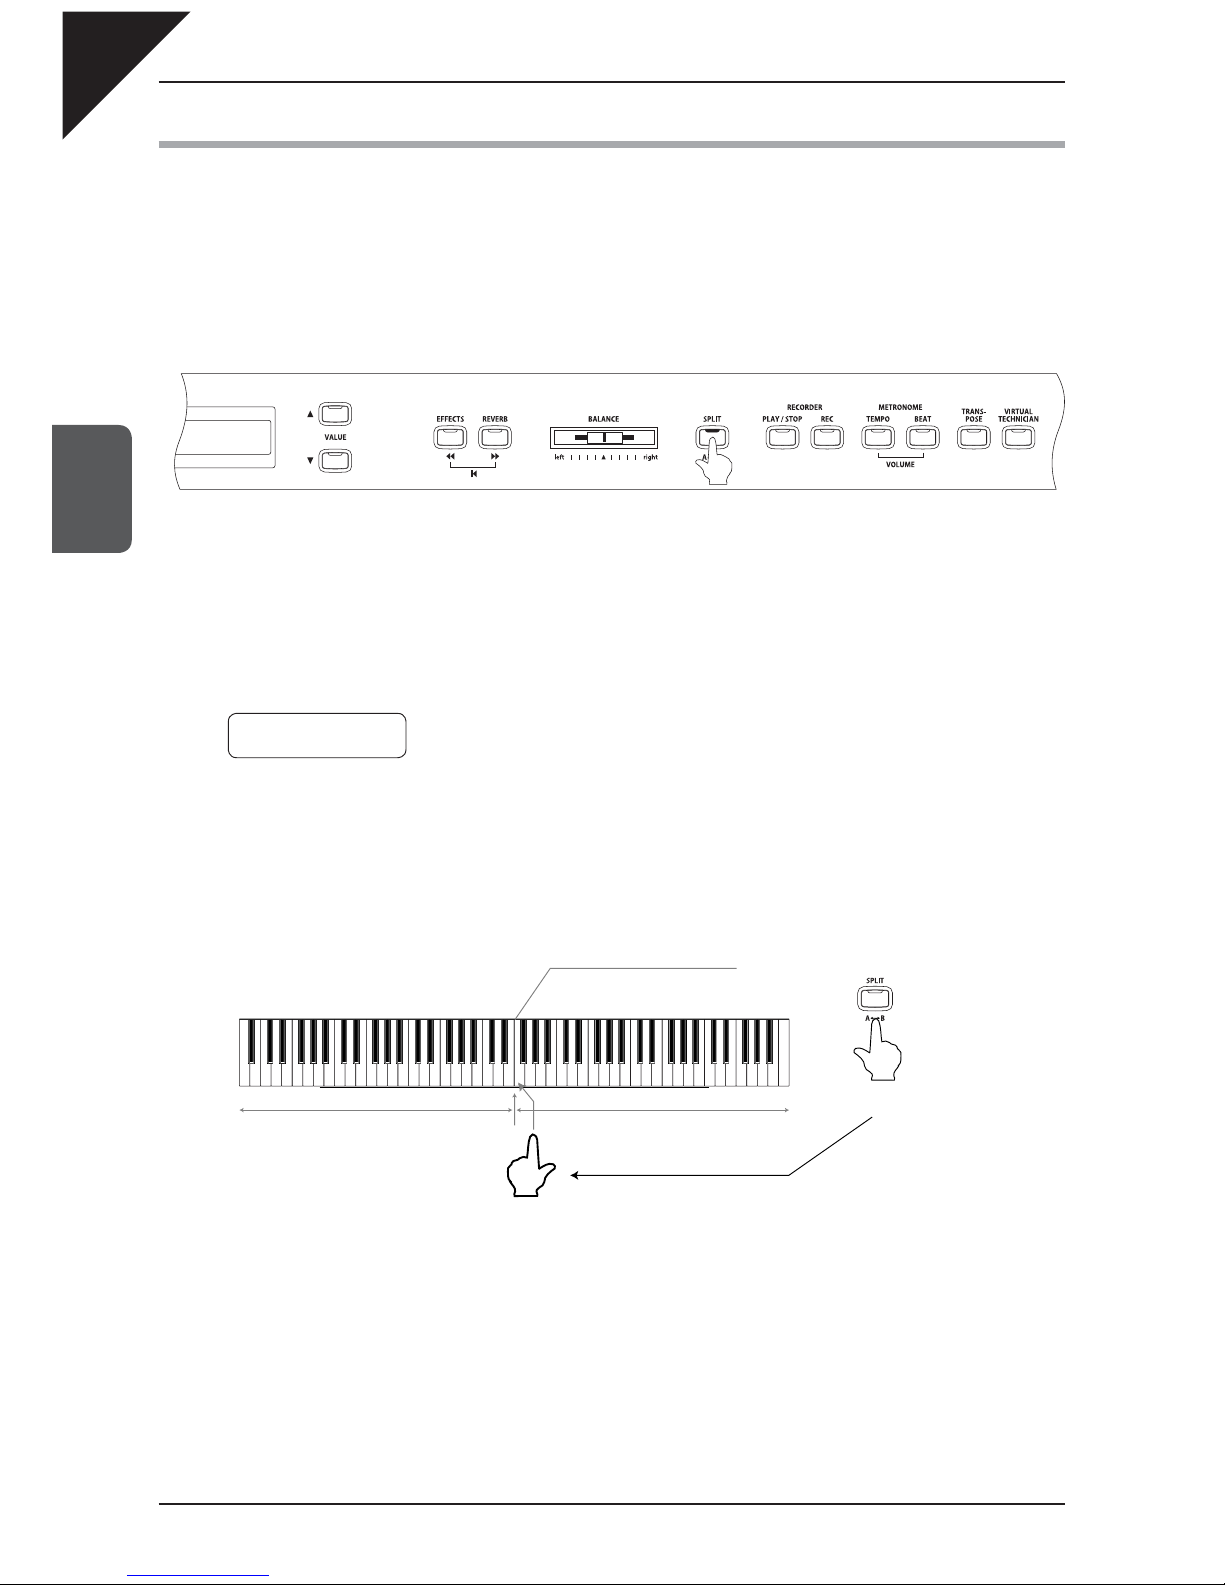
3) Split Mode
The split function divides the keyboard into two sections—upper and lower—and lets you play each section with
a different sound.
Step 1
First press the desired SOUND SELECT button to select the upper sound, then press the SPLIT button.
The LED indicator on the SPLIT button will be turned on.
The LED Indicator for the upper sound will be turned on and the LED for the lower sound will start fl ashing.
To change the lower sound, while holding down the SPLIT button, press the desired SOUND SELECT button to
select the lower sound.
The LCD display shows the selected sound for the upper and lower sections.
The “/” symbol will be displayed at the bottom left corner of the LCD display to
show that split mode has been activated.
The default split point is set between B2 and C3. The split point can be moved
to anywhere on the keyboard.
Step 2
Press a key while holding down the SPLIT button to change the split point.
The key you pressed becomes the lowest note of the upper section.
Step 3
Try playing the keyboard.
Different sounds are produced in the upper and lower sections.
Hold down the SPLIT button.
(Upper sound)(Lower sound)
Split point
Button lights
Concert Grand
/ Wood Bass
Page
17
3
Playing the Piano
Step 4
To change the upper sound while in split mode, press the desired SOUND SELECT button to select the
desired sound.
The LED indicator turns on for the selected SOUND SELECT button.
Press the same button repeatedly to select a different sound type assigned to that button.
Step 5
To change the Lower sound, Press the desired SOUND SELECT button while holding down the SPLIT
button to select the desired sound.
The LED indicator fl ashes for the selected SOUND SELECT button.
Press the same button repeatedly to select a different sound type assigned to that button.
Step 6
Use the BALANCE slider to adjust the
volume balance between the upper and
lower sections.
Step 7
Press the SPLIT button to exit the split mode.
The LED indicator on the SPLIT button will be turned off.
“Lower Octave shift” can be used to adjust the octave range for the lower section. (page 65).
The Sustain pedal can be turned ON / OFF for the lower section. (page 65).
Increases the
volume of the
sound assigned to
the upper section.
Increases the
volume of the
sound assigned to
the lower section.

Page
18
3
Playing the Piano
4) Four Hands Mode
It is possible to divide the keyboard into left and right sections at the default split point, and to play both sections
in the same key range using the four hands mode.
When four hands mode is active, the sustain pedal (right pedal) acts as the sustain pedal for the right section, and
the soft pedal (left pedal) acts as the sustain pedal for the left section. When four hands mode is active the CA61
functions as two pianos, so you can enjoy duet performances or use one CA61 piano for two students.
Step 1
To enter the four hands mode, depress the Sustain pedal (right pedal) and the Soft pedal (left pedal) while
holding down the SPLIT button.
The LED indicator on the SPLIT button will fl ash to indicate four hands mode is active.
On the LCD display, the top line indicates the sound for the right
section, and the lower line indicates the sound for the left section.
Concert Grand is the default sound for both sections.
As with SPLIT mode, left and right sounds, split point, and the volume balance can be set (pages 16 and 17).
Compared to the normal operation of the CA61 piano, the key range is lowered by two octaves for the right section,
and raised by two octaves for the left section. “Lower octave shift” can be used to adjust the octave range of the lower
section (page 65).
The settings made for four hands mode are independent of those made in split mode; therefore, making these settings
will not change the split mode settings.
Step 2
Press the SPLIT button to exit four hands mode.
The LED indicator for the SPLIT button will be turned off.
Hold down the button.
Depress the pedals
Sustain pedal Soft pedal
Concert Grand
/Concert
Grand
Page
19
3
Playing the Piano
5)
Reverb / Effects
You might have noticed that when you select some of the preset sounds, the LED indicator for the EFFECTS or
the REVERB button is turned on. The reason for this is some of the sounds are set up with reverb or an effect on
as their initial setting. Adding an effect to the sound enhances tonal quality and improves acoustical realism. The
CA61 piano is equipped with fi ve types of reverb and seven different effects.
Using REVERB
Reverb adds reverberation to the sound, simulating the acoustic environment of a recital room, stage, or concert
hall.
Five types of reverb are available as follows:
ROOM1, ROOM2 : Simulates the ambiance of a living room or small rehearsal room.
Room2 simulates a larger room than Room1.
STAGE : Simulates the ambiance of a small hall or live stage.
HALL1, HALL2 : Simulates the ambiance of a concert hall or theater.
Hall2 simulates a larger hall or theater than Hall1.
Step 1
Press the REVERB button to turn the reverb on / off. The LED indicator will be turned on to indicate that reverb is in use.
Press and hold the REVERB button and the currently selected reverb type will be shown in the LCD display.
To change the reverb type, while holding the REVERB button use the VALUE buttons to change the reverb type.
Release the REVERB button once the desired reverb type is displayed.
The currently selected reverb type is displayed while the REVERB
button is held down.
Reverb will be turned off when the REVERB button is pressed and its
LED indicator turns off.
To turn the selected reverb on, press the REVERB button once again
to turn its LED indicator on.
Hold down the button.
Ç
È
Ç
È
Ç
È
Ç
È
Reverb
= Room 1
Reverb
= Room 2
Reverb
= Stage
Reverb
= Hall 1
Reverb
= Hall 2
Page
20
3
Playing the Piano
Using EFFECTS
Seven different effect types are available as follows:
Chorus : Chorus is an effect that simulates the rich character of a vocal choir or string ensemble, by layering a
slightly detuned version of the sound over the original to enrich it.
Delay : Adds echoes to the sound. There are three types of delay available (delay 1 - 3), each of which has a
different length of delay between the echoes.
Tremolo : Adds vibrato to the sound.
Rotary : This effect simulates the sound of the Rotary Speaker cabinet commonly used with electronic organs.
Rotary 1 is a normal rotary effect and Rotary 2 adds distor tion to the rotary effect.
The soft pedal is used to change the speed of the rotor between SLOW and FAST (page 8).
Step 1
Press the EFFECTS button to turn the effects on / off. The LED indicator will be turned on to indicate that
the effects are in use.
Press and hold the EFFECTS button and the currently selected effect type will be shown in the LCD
display.
To change the effect type, while holding the EFFECT button use the
VALUE
buttons to change the effect
type.
Release the EFFECTS button once the desired effect type is displayed.
The currently selected effect type is displayed while the EFFECTS
button is held down.
Effects will be turned off when the EFFECTS button is pressed and its
LED indicator turns off.
To turn the selected effect on, press the EFFECTS button once again
to turn its LED indicator on.
Hold down the button.
Ç
È
Ç
È
Ç
È
Ç
È
Ç
È
Ç
È
Effect
Type
= Chorus
Effect Type
= Delay 1
Effect Type
= Delay 2
Effect Type
= Delay 3
Effect Type
= Tremolo
Effect Type
= Rotary 1
Effect Type
= Rotary 2
Page
21
3
Playing the Piano
Editing the settings for the Chorus / Delay / Tremolo / Rotary effect
The following parameters can be edited for each effect type:
Chorus : Modulation speed – Higher values produce a faster modulation, Depth- higher values produce a deeper
chorus.
Delay : Delay Time – Higher values add longer delays, Delay Depth – Higher values create louder echoes.
Tremolo : Rate – Higher values produce faster tremolo, Depth - Higher values produce a deeper tremolo.
Rotary : Acceleration speed – higher values produce a faster change from slow to fast, Rotary Speed- higher
values produce a faster rotor speed.
Step 1
While Holding the EFFECTS button and use the VALUE buttons to select the effect type you wish to edit.
Step 2
With the EFFECTS button still held down, use the MENU buttons to select the parameter to be edited.
Effect type Item
Chorus Depth, Speed
Delay 1, 2, 3 Depth, Time
Tremolo Depth, Rate
Rotary 1, 2
Acceleration speed (time required to change the rotor
speed from “SLOW” to “FAST” or from “FAST” to “SLOW”),
Rotary Speed (this setting only affects the “FAST”
speed)
Step 3
With the EFFECTS button still held down, use the VALUE buttons to adjust the value for the selected
parameter.
As the value is set higher:
Depth : The effect becomes deeper or louder.
Rate : The speed becomes faster.
Time : The time length becomes longer.
Speed : The speed becomes faster.
Step 4
Release the EFFECTS button when you are fi nished editing.
Hold down the button.
Delay 1 Depth
= 5
Delay 1 Depth
= 6
Page
22
3
Playing the Piano
6) Transpose
The transpose function lets you raise or lower the piano’s key in half steps. This is especially useful when you have
learned a song in one key and have to play it in another key. The transpose feature allows you to play the song in
the original key, but hear it in another key.
Step 1
While holding down the TRANSPOSE button, use the keys to specify a transpose value (between -12 and
+12 (two octaves)).
Notes will be transposed according to the set transpose value when the LED indicator for the TRANSPOSE button
is on. The current transpose value is displayed in the display while the TRANSPOSE button is held down.
The default setting is C major.
The “C” key at the middle of the keyboard corresponds to
the value 0.
The value is displayed in the second line on the display.
Step 2
Transpose can be turned on or off by pressing the TRANSPOSE button.
Transpose is active when the LED indicator is on, and the notes are transposed according to the set transpose
value.
The LED indicator will not turn on when the set value is 0.
Notes can also be transposed by pressing the VALUE buttons while holding down the TRANSPOSE button.
Hold down the button.
Hold down the button.
Transpose
= 0
Page
23
3
Playing the Piano
7) Using Metronome / Rhythm
Rhythm is one of the most important elements when learning music. It is important to practice playing the piano
at the correct tempo and with a steady rhythm. The CA61 piano’s metronome is a tool that helps you to achieve
this by providing a steady beat for you play along with. In addition to regular metronome beats, the CA61 piano
contains a wide variety of drum beats such as pop, rock, ballad, and jazz.
Starting the metronome and setting the tempo
Step 1
Press the TEMPO button.
You will see the LED indicator for the TEMPO button turn on and
hear the metronome begin counting with a steady beat.
The current tempo is displayed on the LCD display in beats per minute.
Step 2
Use the VALUE buttons to set the tempo.
The tempo can be set within a range of = 10 to 400.
(
= 20 to 800 for 3/8, 6/8, 7/8, 9/8, and 12/8 times)
Step 3
To stop the metronome, press the TEMPO button again. The LED indicator for the TEMPO button will be turned off.
The metronome function cannot be used when Concert Magic is active.
Changing the metronome time signature and rhythm
You probably noticed that there are two types of clicks and the louder one comes every fourth beat. The metronome
is capable of giving you a down beat to indicate the beginning of the measure. You are now hearing a 4-beat or
4/4 time signature. You can select a different time signature, if you want to. There are ten different time signatures
available on the CA61 piano—1/4, 2/4, 3/4, 4/4, 5/4, 3/8, 6/8, 7/8, 9/8 and 12/8. You can also select one of the 100
built-in rhythm styles instead of a simple metronome click.
Step 1
Press the BEAT button.
You will see the LED indicator turn on and hear the metronome begin counting. The LCD
display shows the time signature and a visual indicator of beats per measure.
The LED indicator for the BEAT button turns on, the set beat is displayed on the LCD
display, and then the metronome starts. When a rhythm is selected, the currently selected
rhythm is shown on the LCD display, and the rhythm starts.
Tempo Œ= 120
~|||
Beat = 4/4
~|||
8 Beat 1
~|||
Page
24
3
Playing the Piano
Step 2
Use the VALUE buttons to change the beat / rhythm.
The beat can be selected from 1/4, 2/4, 3/4, 4/4, 5/4, 3/8, 6/8, 7/8, 9/8, 12/8.
The rhythm can be selected from 100 patterns (please see page 25 for a list of available
rhythms).
Step 3
To stop the metronome or rhythm, press the BEAT button again. The LED indicator for the BEAT button
will be turned off.
Setting the sound volume for the metronome / rhythm
Step 1
Press the TEMPO and BEAT buttons at the simultaneously.
You will see the LED indicators for these buttons turn on and hear the
metronome begin counting.
The Metronome volume is displayed on the LCD display.
Step 2
Use the VALUE buttons to set the volume.
The volume can be set within a range of 1 to 10.
Step 3
To stop the metronome or rhythm, press the TEMPO and BEAT buttons simultaneously again. The LED
indicators for the TEMPO and BEAT button will be turned off.
Volume = 5
~|||
Page
25
3
Playing the Piano
Rhythm list
No. Rhythm
1 8 Beat 1
2 8 Beat 2
3 8 Beat 3
4 16 Beat 1
5 16 Beat 2
6 16 Beat 3
7 16 Beat 4
8 16 Beat 5
9 16 Beat 6
10 Rock Beat 1
11 Rock Beat 2
12 Rock Beat 3
13 Hard Rock
14 Heavy Beat
15 Surf Rock
16 2nd Line
17 50 Ways
18 Ballad 1
19 Ballad 2
20 Ballad 3
21 Ballad 4
22 Ballad 5
23 Light Ride 1
24 Light Ride 2
25 Smooth Beat
26 Rim Beat
27 Slow Jam
28 Pop 1
29 Pop 2
30 Electro Pop 1
31 Electro Pop 2
32 Ride Beat 1
33 Ride Beat 2
34 Ride Beat 3
35 Ride Beat 4
36 Slip Beat
37 Jazz Rock
38 Funky Beat 1
39 Funky Beat 2
40 Funky Beat 3
41 Funk 1
42 Funk 2
43 Funk 3
44 Funk Shuffl e 1
45 Funk Shuffl e 2
46 Buzz Beat
47 Disco 1
48 Disco 2
49 Hip Hop 1
50 Hip Hop 2
No. Rhythm
51 Hip Hop 3
52 Hip Hop 4
53 Techno 1
54 Techno 2
55 Techno 3
56 Heavy Techno
57 8 Shuffl e 1
58 8 Shuffl e 2
59 8 Shuffl e 3
60 Boogie
61 16 Shuffl e 1
62 16 Shuffl e 2
63 16 Shuffl e 3
64 T Shuffl e
65 Triplet 1
66 Triplet 2
67 Triplet 3
68 Triplet 4
69 Triplet Ballad 1
70 Triplet Ballad 2
71 Triplet Ballad 3
72 Motown 1
73 Motown 2
74 Ride Swing
75 H.H. Swing
76 Jazz Waltz 1
77 Jazz Waltz 2
78 5/4 Swing
79 Tom Swing
80 Fast 4 Beat
81 H.H. Bossa Nova
82 Ride Bossa Nova
83 Beguine
84 Mambo
85 Cha Cha
86 Samba
87 Light Samba
88 Surdo Samba
89 Latin Groove
90 Afro Cuban
91 Songo
92 Bembe
93 African Bembe
94 Merenge
95 Reggae
96 Tango
97 Habanera
98 Waltz
99 Ragtime
100 Country & Western
Page
26
4
Recorder
4. Recorder
1) Recording a Song (REC Button)
The CA61 piano’s recorder is a 5 songs, two track recorder. It records your playing much like a tape recorder, and
it is just as easy to use. The CA61 piano records a song as digital data instead of audio data and stores the song
inside the piano. Because the song is stored as digital information you can modify the song when you play it back.
You can, for example, record each of the two tracks separately, adjust the tempo without changing the pitch or
use a different effect setting from one you have recorded. Once you understand the recorder, you will fi nd it to be
a useful tool for both practicing and playing the piano.
Selecting a song and part to be recorded
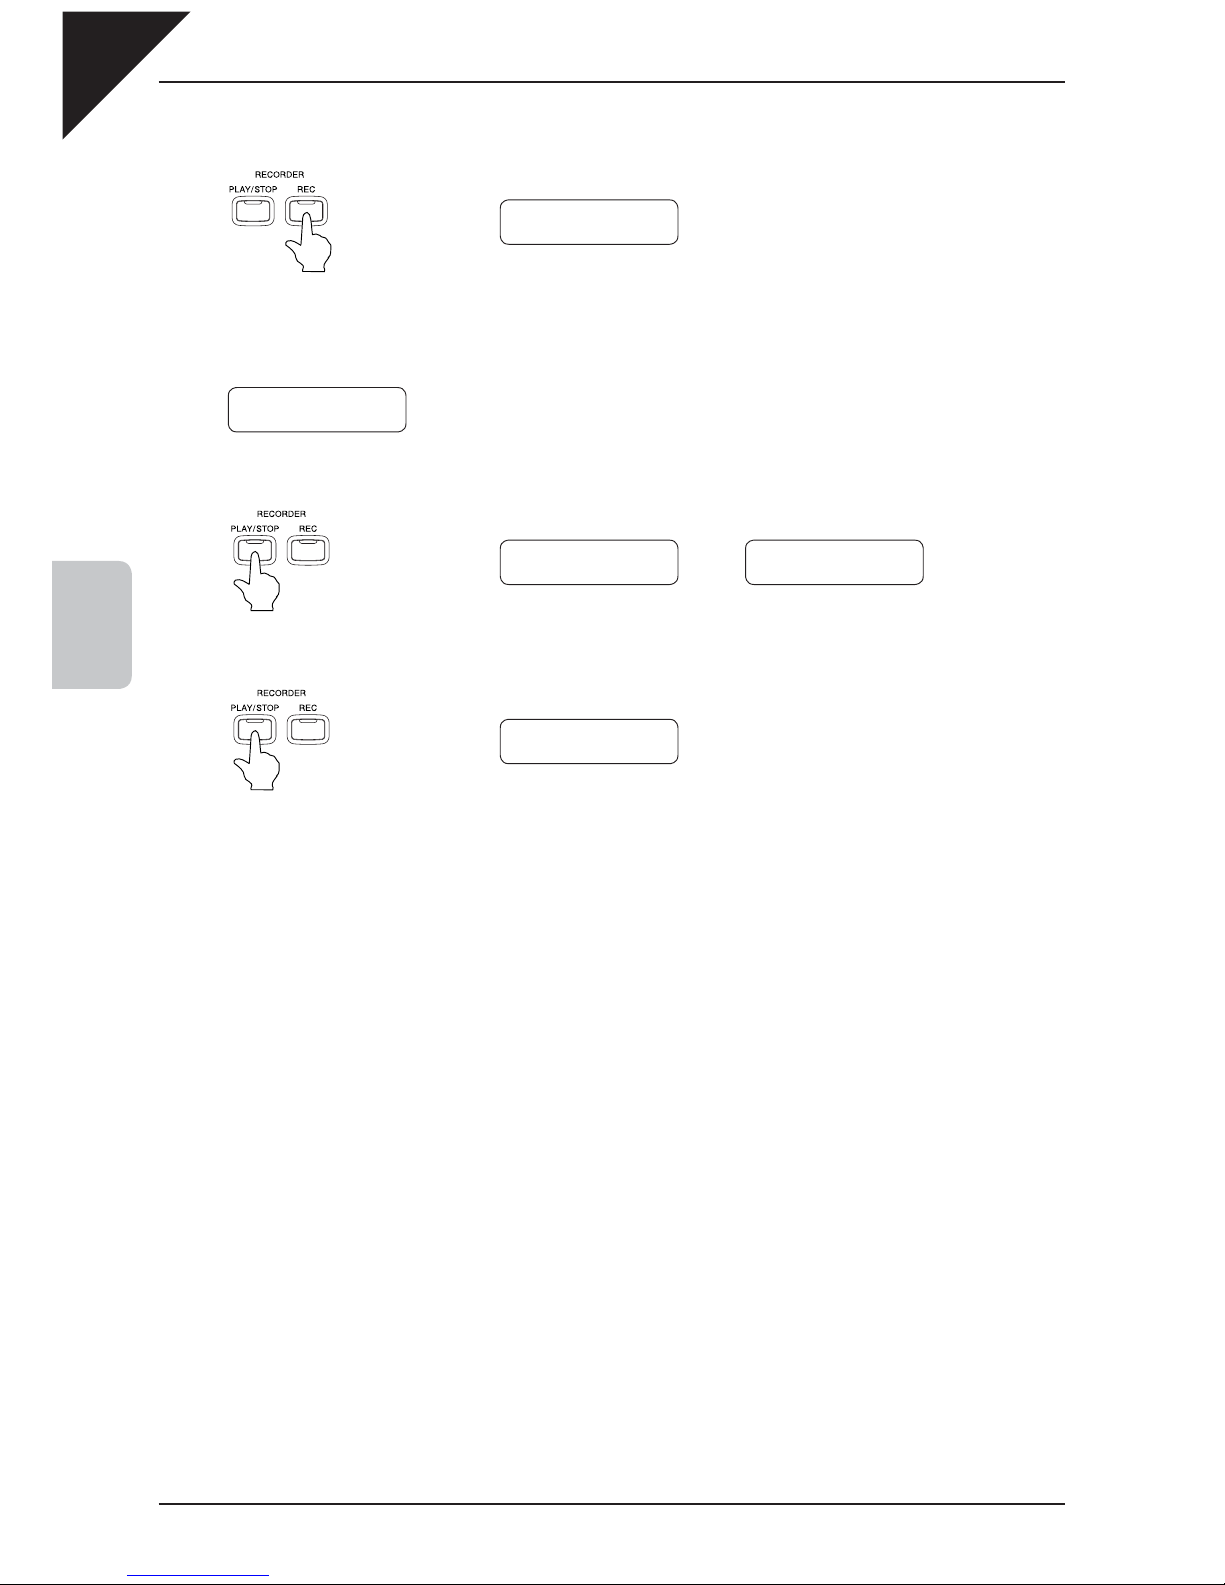
Step 1
Press the REC button.
The display shows the song and part numbers.
The LED indicator on the REC button fl ashes.
If you just want to record a song without making any changes you can proceed to step 4 at this time.
Step 2
Use the MENU buttons to select a song to be recorded.
Record
Song
1 Part=1
Ç
È
Ç
È
Ç
È
…
MENU buttons
Record
Song
1 Part=1
Record
Song
2 Part=1
Record
Song
5 Part=1
Page
27
4
Recorder
Step 3
Use the VALUE buttons to select a part to be recorded.
The¼ symbol appears on the second line on the display
if the selected part has already been recorded.
If you select a part with previously recorded data to record,
the previously recorded data will be overwritten by the new
performance data.
Step 4
Play the keys to start recording.
Recording starts automatically when you play the keys.
At the same time, the LED indicators of the REC and PLAY
/ STOP buttons will be turned on.
Recording can also be started by pressing the PLAY /
STOP button.
Any changes made to the sound while you are recording
will also be recorded.
Step 5
When you fi nish playing a song, press the PLAY / STOP buttons to stop recording.
The LED indicators of the PLAY / STOP and REC buttons turn off, and recording stops.
After showing that the recording has been stopped, the display shows that the CA61 piano is ready to play the
recorded performance.
The maximum recording capacity is approximately 15,000 notes. When the storage capacity becomes full during
recording, the LED indicators of the PLAY / STOP and REC buttons turn off, and recording stops. Performance up to
that point that will be recorded.
Performance data stored in the CA61 piano will be saved even after turning off the power.
You can record a second part in the second track (part) of the same song. After recording the fi rst part, use the VALUE
buttons to select the other track and record your second part. You will hear the fi rst part playing as you record the second
part. If you want to record a second part without hearing the fi rst part please read step 3 of the next section: “2) Playing
Back a Song (PLAY/STOP Button)” for more information on selecting the different parts for playback.
Panel operations during recording:
x Any changes made to the sound type will be stored in memory.
x Shifts between dual and split modes will be stored in memory.
x Changes made to the effect settings will not be stored in memory; the selected effect will be applied to the
selected sound type.
x Changes made to tempo will not be stored in memory.
x Changes made using the BALANCE slider in dual and split modes will not be stored in memory. The volume
balance set immediately before recording will be stored in memory.
x Turning the touch curve or transpose functions ON or OFF will not be stored in memory. Regardless of the
transpose settings, the performance will be replayed at the pitch that had been used for recording.
Ç
È
VALUE buttons
Record
Song
1 Part=1
Record
Song 1 Part=2
Record
Song
1 Part=1*
Æ
Record
Stopping
Song
1 Part=1
Play
Song
1 Part=1&2*
Page
28
4
Recorder
2)
Playing Back a Song (PLAY/STOP Button)
The PLAY/STOP button is used to select a song and part to play, and to start and stop play back of the recorded
songs.
To play back a recorded performance immediately after recording, proceed to Step 2.
Step 1
Press the PLAY / STOP button.
The currently selected song and parts are displayed, and the CA61
piano is ready to play back the song.
Step 2
Use the MENU buttons to select a song.
The½ symbol appears on the second line on
the display if the selected part has already been
recorded.
Step 3
Use the VALUE buttons to select a part.
Part 1 & 2 : Both parts will be played back.
Part 1 : Only the fi rst part will be played
back.
Part 2 : Only the second part will be played
back.
Ç
È
Ç
È
VALUE buttons
Select
Song/Part
Song
1 Part=1&2*
Select Song/Part
Song
1 Part=1*
Select Song/Part
Song
1 Part=2*
Select Song/Part
Song 1 Part=1&2*
Ç
È
Ç
È
Ç
È
…
MENU buttons
Select Song/Part
Song
1 Part=1&2*
Select Song/Part
Song
2 Part=1&2
Select Song/Part
Song
5 Part=1&2
Select Song/Part
Song
1 Part=1&2*
Å
Page
29
4
Recorder
Step 4
After you have made any desired settings, press the PLAY / STOP button to play back the song.
Step 5
To stop, press the PLAY / STOP button again.
The CA61 piano enters standby mode.
While the recorder is in standby mode, you may select a song and part to be played back next.
Step 6
To exit the recorder and return to the normal operation, press any SOUND SELECT button.
3) Deleting a Song or Part
You can delete songs or parts within a song that were not recorded as you wished or that you do not want to keep
any more.
Step 1
Press the PLAY / STOP and REC buttons at the simultaneously.
The LED indicators of the PLAY / STOP and REC buttons fl ash.
Step 2
Select a song by using the MENU buttons, and then select a part using the VALUE buttons.
Select a tune. Select a part.
To Del Press REC
Song
1 Part=1&2*
To Del Press REC
Song
1 Part=1&2*
Press them at the same time.
Button fl ashes Button fl ashes
Page
30
4
Recorder
Step 3
Press the REC button to delete. The LCD display will ask you if you’re sure.
Step 4
Press the REC button again to delete the selected song and part data.
* To cancel the delete operation in Step 3, press the PLAY / STOP button.
The display returns to the play back standby screen when the PLAY / STOP button is pressed again.
Repeat the same procedures to delete multiple songs / parts.
If you wish to delete all the recorded songs, turn on the power while pressing the PLAY / STOP and REC buttons at the
same time.
Sure? Press REC
Song
1 Part=1&2*
Delete Completed
Song
1 Part=1&2*
Select Song/Part
Song
1 Part=1&2*
Æ
To
Del Press REC
Song
1 Part=1&2*
Delete Canceled
Song
1 Part=1&2*
 Loading...