


Operating instructions – Part 2 UFS 913
Basic functions and operation English
Receivers Part no. Operating manual valid as of software version:
UFS 913si 20210184
UFS 913sw 20210185
2.00

Preface
Dear customer,
this operating manual are intended to help you make the fullest use of the extensive range of functions
offered by your new receiver.
We have tried to make the operating instructions as easy as possible to understand, and to keep them
as concise as possible. To help you understand particular specialist terms that cannot be translated,
we have added a short glossary at the end of the manual.
The power switch is an environmentally friendly feature. If you will not be using your receiver for an
extended period, you should use the on/off switch to disconnect it from the power supply and save energy.
For shorter breaks, you can use the remote control to switch the receiver to standby, which uses only
a minimal amount of energy.
We hope your reception will always be brilliant and you will enjoy using your new HDTV receiver.
Your
KATHREIN team
2

Legal information
Information on Audio MPEG Inc. and S.I.SV.EL, S.P.A:
This unit makes use of legally protected technologies, which are protected by patents in the USA and also
by other intellectual property rights in other countries.
KATHREIN-Werke KG has obtained licences from Audio MPEG Inc. and Societa‘ Italiana per lo sviluppo
dell‘elettronica, S.I.SV.EL, S.P.A to use these technologies. These licences carry certain restrictions, which
apply also to you as the customer. Accordingly this unit may only be used by the end customer for private
non-commercial purposes and for the licensed content. It may not be used for commercial purposes. The
use of products or processes that are sold or used with this unit is not included in this statement. The use of
reverse engineering is not permitted in respect of the licensed technologies, nor is disassembly.
Note on DiSEqC™:
The term DiSEqC™ used in this operating manual is a registered trade mark of the European
Telecommunication Satellite Organisation (EUTELSAT).
Manufactured under licence from Dolby Laboratories. “Dolby” and the double D
symbol are registered trademarks of Dolby Laboratories.
®
Included in the software for this receiver is software that is licensed under the GNU (General Public
Licence). The source code of the program is available at: http://www.kathrein.de/linux/receiver/ufs913
Software changes/use of applications
Any modifi cations to the receiver software, or the use of applications not provided by Kathrein will
invalidate the warranty! You will have to bear the costs yourself for shipping and repairing any receiver that
requires attention due to modifi cations to the software and use of applications other than those provided
by Kathrein!
Therefore exclusively use only software and applications provided by Kathrein for your receiver. These are
available by downloading from the satellite or from our Internet pages (www.kathrein.de).
Kathrein assumes no liability for the loss of recordings/data on external storage media.
The software installed on the device/product before dispatch from the factory is suitable for its function and
is of the quality usual for this type of software. It has not been technically possible to fully eliminate all bugs
during the software development process. However the software as delivered is defective only if it fails to
perform the functions usual for the device/product. A shortcoming that causes only an insignifi cant reduction
in quality does not rank as a defect. Functional shortcomings in the software or program that result from
hardware defects, ambient conditions, incorrect operation or the like do not rank as software defects.
The terms HDMI and HDMI High-Defi nition Multimedia Interface, and the HDMI
logo are trademarks or registered trademarks of HDMI Licensing LLC in the USA
and other countries.
YouTube and the YouTube logo are trademarks or registered trademarks of
YouTube, LLC.
SHOUTcast™Radio and the SHOUTcast™Radio logo are trademarks or
registered trademarks of Nullsoft Inc.
3

List of Contents
Preface............................................................... 2
Legal information ............................................. 3
List of Contents ................................................ 4
Safety instructions - Important notes ............. 6
Basic functions ............................................... 10
Remote control in live mode (TV/radio) .......... 11
I want to watch TV ... ...................................... 12
I want to listen to the radio ... ......................... 13
I want to access teletext ... ............................. 14
I want to watch time-shift TV ... ...................... 15
I want to record a programme immediately ... 16
I want to record a programme that is scheduled
for later (timer list) .......................................... 17
I want to play back a recording ... .................. 18
I want to delete a recording ... ........................ 19
Editing and selection options in the menus .... 20
Alphanumeric entries ..................................... 21
Switching between TV and radio operation .... 23
Setting the volume ......................................... 23
Channel selection ........................................... 23
... direct .................................................................. 23
... from channel list ................................................ 23
Channel banners (information) ....................... 26
Calling up the channel options ....................... 28
Audio selection ............................................... 29
Subtitle selection ............................................ 30
Teletext ........................................................... 31
Automatic Timeshift ........................................ 32
One Touch Recording (OTR) - recording direct
to hard disk ..................................................... 33
Picture-in-picture ............................................ 35
Explanation of symbols in receiver display .... 36
Electronic Programme Guide (EPG) ............. 37
General information on the programme guide 37
Calling up the EPG ......................................... 38
Navigation (remote control buttons in the EPG) 39
EPG views ...................................................... 40
“Current” view ........................................................ 40
"Current" view ........................................................ 40
“Preview” view (channel guide) ............................. 41
Categories view ..................................................... 42
Timer list view ........................................................ 43
Timer recording .............................................. 43
Programme present in the EPG ............................ 44
Specifying a target (recording location) ................. 44
Programme not present in the EPG ...................... 44
Specifying a recording mode ................................. 45
Reminder function ................................................. 49
Timer list view ........................................................ 50
Editing a recording ................................................ 51
Timer overlap ......................................................... 52
Search function .............................................. 53
More episodes ....................................................... 53
Presenter - Actor ................................................... 54
Key word search in detailed information ............... 54
Full text search ...................................................... 55
Extras menu ................................................... 56
My hints ................................................................. 56
Actors list ............................................................... 57
Recording archive (playing back/editing recor-
dings) ............................................................... 58
Calling up the recording archive (My recordings) 58
Navigation (remote control buttons in the recor-
ding archive) ................................................... 59
Recording archive views (sorting the recordings) 60
Playing back a recording ................................ 61
Editing recordings .......................................... 63
Delete .................................................................... 64
Lock ....................................................................... 64
Rename ................................................................. 64
Change category ................................................... 65
Create new folder .................................................. 66
Move to folder ........................................................ 66
Decrypt in standby ................................................. 66
Copy to external data carrier (such as NAS) ......... 67
Start Blockselection ............................................... 68
Folders in the recording archive ..................... 69
Create new folder ... .............................................. 69
Move to folder ... .................................................... 70
Editing folders (delete/rename) ............................. 71
Chapter view .................................................. 72
Creating chapters .................................................. 72
Opening a chapter ................................................. 72
Deleting chapters .................................................. 73
HbbTV .............................................................. 74
4

List of Contents
Kathrein portal (Media centre) ....................... 75
Main Menu ....................................................... 76
Calling up the main menu and introduction .... 76
Overview of the main menu submenus .......... 77
Main Menu – Edit Channel List ...................... 78
Calling up the menu ....................................... 78
Navigation (remote control buttons in “Edit TV-
Channellist” menu) ......................................... 80
Views (sort orders) ......................................... 81
Selection of the channel(s) to be edited ......... 82
Edit channels (channel lists) .......................... 82
Move ...................................................................... 83
Delete .................................................................... 83
Skip ....................................................................... 83
Lock ....................................................................... 84
Adding to favourites list ......................................... 84
tvtv on/off ............................................................... 85
Start Blockselection ............................................... 86
Editing favourites lists .................................... 87
Move ...................................................................... 87
Remove from favoritelist ........................................ 87
Lock ....................................................................... 87
Start Blockselection ............................................... 87
Rename favourites list ........................................... 88
Main menu - Search Channels ...................... 89
Calling up the menu ....................................... 89
Automatic Channel Search ............................ 90
Manual Channel Search ................................. 92
Search with service ID ................................... 94
ASTRA program list management (LCN) ....... 95
ASTRA program list ............................................... 95
ASTRA Program List Update ................................. 96
ASTRA program list refresh ................................... 97
Main menu - Service menu ............................ 98
Calling up the menu ....................................... 98
Automatic Software Update ........................... 99
Update (software) via satellite ...................... 100
Update via USB stick ................................... 102
Operational software ........................................... 102
Program list ......................................................... 103
Saving channel list to USB .................................. 103
Reset to factory defaults .............................. 103
Main Menu - Settings .................................... 104
Calling up the menu ..................................... 104
First installation ............................................ 105
Basic Settings .............................................. 105
Video Settings ..................................................... 106
Audio settings ...................................................... 108
Date and Time ..................................................... 109
Remote control code ........................................... 110
User-Defined ................................................ 112
Parental lock ........................................................ 112
Customize Screen Menu ..................................... 114
EPG Setup .......................................................... 116
PVR Setup ........................................................... 117
Media centre ........................................................ 118
Auto. channel name update ................................ 118
Antenna & Satellites ..................................... 119
Sat Finder ............................................................ 119
Tuner Configuration ............................................. 120
Edit satellites ....................................................... 121
Edit Transponder ................................................. 123
Main menu - Interfaces................................. 127
Calling up the menu ..................................... 127
Common Interface (CI) ................................. 128
Multi-decryption ................................................... 128
Automatic decryption in stand-by mode .............. 129
HDD Management ....................................... 129
Format a recording/media archive ....................... 129
Create archive hard disk ..................................... 130
Ethernet Settings .......................................... 132
Main menu - Applications ............................ 133
Calling up the menu ..................................... 133
Main menu - Language Selection ................ 134
Calling up the menu ..................................... 134
Operation from the front panel (without remo-
te control) ...................................................... 135
Backup operation ......................................... 135
Software update via the front USB port ........ 136
Brief technical glossary ............................... 137
Troubleshooting ........................................... 141
Service ........................................................... 142
Subject Index ................................................ 143
5

Safety instructions - Important notes
These two pages contain important information about the operation, installation location and connection of
the unit. Read these instructions carefully before setting up the unit.
Danger!
Warning!
Mains cable
Make sure that the mains cable
(power supply cable) is not damaged.
Units with a damaged mains cable
must be disconnected from the mains
(unplugged at the mains power
socket) and repaired by an electrical
specialist before being used. Only
use the power supply unit supplied
(if available)!
Risk of fatal injury due to electric
shock!
Cleaning
Disconnect the mains plug before
cleaning the unit. Only use a dry cloth
for cleaning and only clean the outer
surface. Never open the casing of the
unit.
Touching the parts inside the unit
carries a risk of death due to electric
shock!
Playing children
Make sure that children do not push
any objects into the ventilation slots.
Risk of fatal injury due to electric
shock!
Earthing
The antenna system must be
earthed as specifi ed or equipotentially
bonded.
EN 60728/11 and any national
regulations must be complied with.
Risk of voltage surges due to lightning
strikes!
Power supply voltage
Operate the unit only at the specifi ed
mains voltage (indicated on the rear
of the unit or on the external power
supply unit). The unit may only be
connected to the mains and turned
on once it has been connected to the
Warning!
Warning!
Do not
cover
antenna and to the TV set or the cable
network and PC.
If the mains voltage is too high, there
is a risk of fi re!
Moisture, direct sunlight, heat,
naked fl ames
Protect the unit against moisture,
dripping and splashed water (do
not place any fi lled objects such
as vases on top of the unit). Do not
place the unit close to a heater or
expose it to direct sunlight and do
not operate it in damp locations. Only
use the unit in a moderate climate,
not in tropical conditions! Do not
place naked fl ames such as candles
on top of the unit!
There is a risk of fi re!
Batteries
If your unit was supplied with
batteries (e.g. for the remote control),
take care that the batteries are
not exposed to excessively high
temperatures, direct sunshine or
fi re. Exchange the batteries only
with types that are identical or
equivalent. Otherwise the batteries
and also the remote control may be
damaged. Also comply with the safety
instructions stated on the batteries:
There is a risk of explosion!
Ventilation
The heat generated in this unit is
adequately dissipated. However,
the unit should never be installed
in a cupboard or on shelves with
inadequate ventilation. Never cover
the cooling slots on the unit (e.g.
with other equipment, magazines,
tablecloths, clothing or curtains)!
6

Safety Instructions - Important Notes
Caution!
Do not place any objects on top of
the unit. Unless stated to the contrary
in the “Connection and set-up” and
“Installation” sections in the manual
supplied, maintain a clearance of at
least 10 cm above the unit, 2 cm to
either side and 5 cm behind the unit,
to allow the unobstructed dissipation
of the heat generated.
There is a risk of fi re!
Repairs
Ensure that any repairs to your unit
are carried out by qualifi ed personnel.
Opening the unit and attempting to
repair it yourself will void all warranty
claims!
Improper work on the unit may
jeopardise the electrical safety of the
unit.
The manufacturer accepts no liability for accidents caused by the user
opening the casing of the unit!
Connections
Incorrect wiring of the connections
can lead to malfunctions or defects on
the unit!
Periods of extended absence,
thunderstorms, mains socket
accessibility
In order to disconnect the unit from
the mains completely, the mains
plug must be unplugged from the
wall socket! Therefore install the unit
close to a mains socket and make
sure this socket is accessible at all
times, so that you can disconnect the
unit from the mains if necessary.
If you are away for an extended
period, and during thunderstorms,
always switch the unit off at the
mains and unplug it from the socket.
This also applies to the other
equipment connected to the unit.
Isolation from the cable network is
also recommended. Note any timer
programming (receiver) and turn the
unit on again promptly before the
recording time.
Installation location
All electronic equipment generates
heat. The temperature rise of this
unit does however lie within the
permissible range. Sensitive furniture
surfaces and veneers may become
discoloured by the effects of constant
heat over time. The feet of the unit can
also cause colour changes to treated
furniture surfaces. If necessary, place
the unit on a suitable stable and fl at
base!
Electronic equipment is not domestic
waste - it must be disposed of
properly in accordance with directive
2002/96/EC OF THE EUROPEAN
PARLIAMENT AND THE COUNCIL
dated 27
used electrical and electronic
appliances.
At the end of its service life, take
this device to a designated public
collection point for disposal.
Spent batteries are special waste!
Do not throw spent batteries into
your domestic waste; take them to a
collection point for spent batteries!
th
January 2003 concerning
7

Safety Instructions - Important Notes
Product return/original packaging
Please keep the original packaging in case you need to return the product at any time! The receivers
are fragile due to their construction and are only adequately protected by the original packaging. If the
receiver is not shipped correctly the guarantee/warranty on it will be voided.
Ventilation slots on the unit
Make sure that the ventilation slots on the unit are not blocked or covered in any way.
otherwise the unit may overheat.
Warning!
There is a risk of fi re!
Switching the receiver off
Before you disconnect the receiver from the mains, you must switch it to the standby mode by pressing
the standby button (on/off) on the remote control. In standby mode, any changed or new data that
are broadcast will be saved by the receiver. As soon as the receiver is in the standby mode, it can be
disconnected from the mains at any time.
You must not disconnect the receiver from the mains while it is in operation!
This can lead to a loss of data and corruption of the software.
Channel assignment
The channels available on the satellites and transponders are subject to continual change. If changes
do occur, the new channels have to be set on the receiver because the factory pre-programming
corresponds to the status on the date of manufacture. The information for these settings can be found
on the Internet or in relevant magazines.
Updating the receiver software
Your receiver was equipped in the factory with the latest software version available at that time. We
are, however, constantly working on adapting the software to the wishes of our customers and to
developments in technology. Further information on this can be found in the sections “Main Menu - Service
Menu”, “Update Firmware”.
8

Safety Instructions - Important Notes
Network function
To connect the receiver to the network via the PC/laptop, you must have unrestricted rights (administrator
rights) for your PC/laptop and on your network. For this refer to the chapter “Main Menu”, “Interfaces”,
“Network Settings”.
Power consumption in standby mode < 0.5 W
The standby power consumption of < 0.5 W printed on the receiver packaging will only be achieved when
the receiver is in standby mode with the display switched off. You can defi ne this setting in the following
menu: “Main menu”, “Settings”, “User-Defi ned Settings”, “Customize Screen Menu”, “Front display
in standby” → Setting “Off”.
Miscellaneous
The information in this operating manual was correct at the time of going to print. We reserve the right
however to make changes at any time and without prior notice. If new software is released for your
receiver, and this affects the information in the operating instructions (e.g. changes to the menus and/or
functions), if we believe it necessary we will make available new operating instructions for download at
“www.kathrein.de”.
Make a note of the receiver's basic settings (these are set during the fi rst installation), so you can restore
them if necessary!
Please be aware of your responsibility towards your fellow human beings! Keep this manual
for any questions that arise later, and if the receiver passes to another owner, pass it on to the
new owner.
For compliance with the EMC Directives, the USB connection cable between the receiver and hard disk
must not be longer than 50 cm.
Please see the UFS 913 Operating manual – Part 1, “Connection and set-up” for details on how to
connect the receiver and carry out fi rst installation.
The following description of the menus and functions assumes that the UFS 913 has been correctly
connected and installed (as detailed in the operating instructions part 1 “Connection and set-up”).
9

Basic functions
Following an overview of the remote control, a simple explanation will be provided of the receiver’s
most important functions (with all the required buttons on the remote control). The explanations in the
sections “I would like to ...” merely demonstrate the most simple use of the relevant receiver functions
without going into any great detail.
For more detailed explanations of the functions, refer to the relevant sections.
10

Basic functions
Remote control in live mode (TV/radio)
Switch between TV/radio mode
Number pad
Call up main menu
Volume “-” (softer)
Mute
The coloured buttons are
reserved for certain contentdependent functions
(e.g. teletext ...)
Calling up tvtv EPG (Electronic
Programme Guide)
Select last channel called up,
exit on-screen displays/
menus step by step
= Fast rewind
Operation (on)/standby (off)
Call up teletext
Volume “+” (louder)
Channel selection
Calling up channel
information (info banner
and detailed information)
Calling up recording archive
= Navigation/channel
or change channel option
= Calling up selection box/
confi rmation or calling up of
selected menus, on-screen
displays ...
= Start playback
= Fast forward
If an external device is connected to the VCR Scart socket, the
TV signal present at the VCR Scart socket can be looped through
to the TV Scart socket. Pressing the
once toggles between the TV Scart mode and the VCR Scart
loop-through mode.
OTR = One Touch Recording
button more than
Calling up Media centre/
Kathrein portal
= Start timeshift
(freeze-frame)/pause
= Start recording (OTR)
= Stop playback/
timeshift/recording
11

Basic functions
I want to watch TV ...
- Press
- Press
- Press
- Press
- Press ... to enter the channel number directly
to increase or decrease the volume
to switch channels
to display and hide additional channel information
to mute sound
12
- Press to open the selection box, to select the channel list
and call up using
- Press to select a channel
- Press
channel and close the channel
list
twice to call up a

Basic functions
I want to listen to the radio ...
- Press
- Press
- Press
- Press
- Press
- Press ... to enter the channel number directly
to change to radio mode
to increase or decrease the volume
to switch channels
to display and hide additional channel information
to mute sound
- Press to open the selection box, to select the channel list
and call up using
- Press to select a channel
- Press
- Press
channel and close the channel
list
twice to call up a
to change back to TV mode
13
Basic functions
I want to access teletext ...
- Press
- Press ... to enter the required page directly
or
- Press
- Press
to call up teletext
browse forward/backward page-by-page
or to return to TV
14

Basic functions
I want to watch time-shift TV ...
To watch time-shift TV using the UFS 913 you must connect an external hard disk *)
to the USB port on the rear of the receiver and set it up as described in the
“Main menu - interfaces”, “Hard disk management” section.
- Press to start timeshift
Made a
mistake?
*)
- Press to cancel timeshift
- Press
- Press
- Press
- Press
- Press
Tested only with hard disks from the Kathrein product range (see also:
www.kathrein.de → Service → FAQs)
to start playback
during playback to fast forward and rewind
to return to normal playback speed
to pause playback
to cancel timeshift and return to normal (live) TV
15

Basic functions
I want to record a programme immediately ...
To make recordings using the UFS 913 you must connect an external hard disk *)
to the USB port on the rear of the receiver and set it up as described in the
“Main menu - interfaces”, “Hard disk management” section.
- Press the (red dot) button to open the “Recording” window
- Press to start recording the
programme
or
Made a
mistake?
- Press
duration before recording
- Press or to close the window without recording
- Press
to change the
and to stop a recording that is in progress
16
*)
Tested only with hard disks from the Kathrein product range (see also:
www.kathrein.de → Service → FAQs)

Basic functions
I want to record a programme that is scheduled for later (timer list)
To make recordings using the UFS 913 you must connect an external hard disk *)
to the USB port on the rear of the receiver and set it up as described in the
“Main menu - interfaces”, “Hard disk management” section.
- Press the button to open the
programme guide
- Press
- Press the (yellow) button to
call up the programme preview
- Press
- Press the button to open the
“Recording” window.
- Press to start recording the
programme
or
to select the desired channel
to select the desired programme
- Press
before recording
- Press or to return to TV
*)
Tested only with hard disks from the Kathrein product range (see also:
www.kathrein.de → Service → FAQs)
to change the recording mode, date, start, end and duration
17

Basic functions
I want to play back a recording ...
To record programmes using the UFS 913 and then be able to play them back, you
must connect an external hard disk *) to the USB port at the rear of the receiver and
set it up as described in the “Main menu - interfaces”, “Hard disk management”
section.
- Press (or ) to open the “My Recordings” recording archive
- Press to select a recording
- Press
exit the recording archive
- Press
- Press
- Press
- Press
- Press
to start playback and
during playback to fast forward and rewind
to return to normal playback speed
to pause playback
to cancel playback and return to the recording archive
to exit the recording archive and return to normal (live) TV
18
*)
Tested only with hard disks from the Kathrein product range (see also:
www.kathrein.de → Service → FAQs)

Basic functions
I want to delete a recording ...
- Press (or ) to open the “My Recordings” recording archive
- Press to select a recording
- Press the button to open the
“Edit” menu
- Press to select the “Delete” option, then to confi rm
- Press
- Press to exit the recording archive and return to normal (live) TV
to confi rm the security question
19

Basic functions
Editing and selection options in the menus
In some menus/on-screen displays
this box is shown with a particular
colour gradation. Each colour gradation
represents a specifi c view/selection. The
table below shows which colours are
assigned to which buttons. Where the
functions of these buttons are assigned
for the current menu/view, they are also
shown in the line at the bottom of the
on-screen display.
Tip!
Always check the bar at the bottom of
the on-screen display. This provides
information on what to do next.
In many menus all editing and selection options
for the respective menu will appear at the bottom
of the on-screen display. Where a specifi c remote
control button is required for executing them
or calling them up, this also will be shown (see
screenshot example above).
20
Colour Button on the remote control
Green
Yellow
Red
Blue

Basic functions
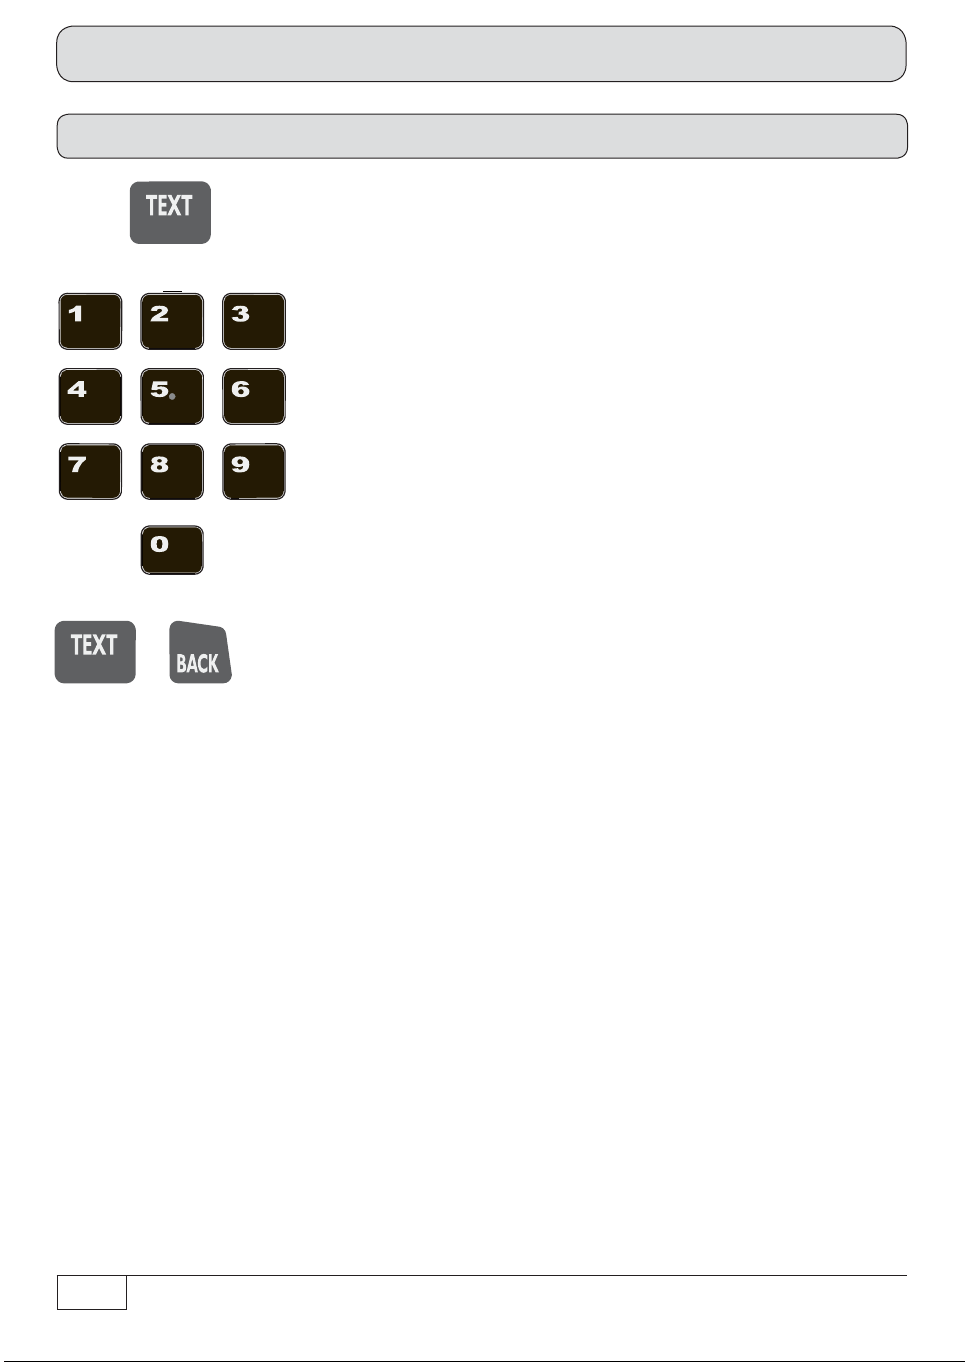
Alphanumeric entries
For entries such as names of favourites or search terms, use the keyboard displayed on the screen
(see screenshot example).
The letters assigned to the number pad
also apply to your remote control. They
are used in a similar way to those on a
mobile phone. The following buttons can
be used for entry or to select an action:
Button Assigned character/action
Press
1 x2 x3 x4 x5 x
.ß?!1
abc2ä
def3
ghi4
jkl5
mno6ö
pqrs7
tuv8ü
wxyz9
1 x space 2 x 0
Last character is deleted
21

Switch between letters and digits/
special characters
Switch to QWERTZ keyboard (control using the arrow buttons
and the OK button) - see screenshot at top right
Basic functions
After entering the desired term, press the button to transfer the name/search term, etc. or the
button to abort the entry.
or
Switch between upper case and lower case letters
Confi rm the term entered
Cancel entry without saving
Cancel entry without saving
22

Basic functions
Switching between TV and radio operation
Press the button to switch between TV and radio operation.
Setting the volume
Adjust the volume using the
buttons.
Channel selection
... direct
The button allows the channel to be selected from the sorted channel list/favourites list currently
selected. If the channel slot in the channel list is known, the desired channel can also be called up directly
by entering the channel slot, using the number pad on the remote control (e.g. ASTRA HD+ is at channel
slot 10 in the currently selected channel list - to call it up, successively press the
the remote control).
... from channel list
Press the button to open the selection menu. The following on-screen display appears:
buttons on
Use the
The following on-screen display appears:
buttons to select “Open channel list” and confi rm by pressing the button.
23

Live picture for the
Currently selected
channel
selected channel
Signal strength
and quality
Basic functions
Frequency
Channel data:
- Transmitting satellite
- Transponder
- Polarisation
- Symbol Rate
- Service ID
Call up the search
function
Change
between TV and
radio channel list
Edit channel list, see
section “Main menu -
Edit TV-channel list”
Currently selected
channel list
24
Channel list
Calling up the
favourites lists
Calling up alphabetical
sort order
Calling up the complete
list/satellites list

Basic functions
Now use the relevant coloured button to select the category from which you want to open a channel list:
(red) button: Calling up the
“Favoriteslist”
Contains the following channel lists:
- Favourites lists 1-8
(green) button: Calling up the
“Complete List”
Contains the following channel lists:
- Complete list
- Channel lists sorted by satellite
- Channels supported by tvtv programme
guide
(yellow) button: Calling up alphabetically
sorted lists
Contains the following channel lists:
- A-Z
- Z-A
- 0-9
- Sorted by individual letters
Use the
overview of the currently available channel lists, press the coloured button for the selected category
again; you will then obtain the following on-screen display (for example the favourites lists):
buttons to scroll through the currently available channel lists. If you want to see an
25

Basic functions
Use the cursor () buttons to select
the desired channel list and call it up
using the
After selecting the desired channel list,
the desired channel is selected using the
cursor (
the
To exit the channel list and return to the TV picture, press the button again, or press the button.
button.
) buttons and called up using
button.
Tip!
You can also call up favourites lists via the selection menu (using the button). Then
use the cursor (
button. The receiver automatically selects the fi rst channel saved in the favourites
list and returns to the TV screen. You can now select the sequence of channels saved in
the selected favourites list, using the
) buttons to select the desired favourites list and confi rm using the
buttons.
Channel banners (information)
Channel information is shown for a few seconds each time the channel is changed (this can be changed
under “Settings”, “User-Defi ned Settings”, “Customise Screen Menu”) or displayed continuously by
pressing the
26
button.

HDTV format
broadcast
Selected
audio track
Basic functions
Current
time
Teletext
available
Selected channel
Selected favourites list or
channel number from
selected channel list
Current programme (top) and
next programme (bottom),
each with the start time
If a channel is encrypted,
a key symbol is shown
before the channel name
27

Basic functions
The following icons (symbols) may appear in the channel information:
Broadcast transmitted in
HDTV standard 1080i
Broadcast transmitted in
HDTV standard 720p
Portal channel
(channel options available)
Dolby Digital audio
track selected
Audio selection is: mono
Audio selection is:
Mono left
Audio selection is:
Mono right
Audio selection is: Stereo
Teletext is available
Receiver registers
the programme as
a live broadcast
Receiver registers the
programme as a fi lm
Receiver registers the
programme as a series
FSK 6. Programme
unsuitable for children
under the age of 6 years
FSK 12. Programme
unsuitable for children
under the age of 12 years
FSK 16. Programme
unsuitable for children
under the age of 16 years
FSK 18. Programme
unsuitable for children
under the age of 18 years
Subtitles are available
Calling up the channel options
If the channel banner contains the following icon this indicates that it is a portal channel. Open the
selection box (with the
with the
to confi rm. The following on-screen display then appears (example):
28
button. Use the
button) and press to select “Change sound, picture, subtitles”. Confi rm
buttons to select “Channel options” and press the button

Basic functions
The desired channel list is selected using the cursor buttons (
button.
The following on-screen display appears:
Press the button if you want to be reminded of this function next time, or the button, if you
don't want to see this message again.
After selecting a channel option using the
your selected portal channel.
If the channel banner displays “1/3” in front of the symbol for the selected audio track, this tells you
that you have currently selected the fi rst of the three available audio tracks. Open the selection box
Audio selection
buttons, skip through the other channel options in
) and called up using the
(with the
button. Use the
button. The following on-screen display then appears (example):
Use the cursor (
button) and press to select “Change sound, picture, subtitles”. Confi rm with the
) buttons to select the desired audio track option and press the button to confi rm.
buttons to select “Select Audio track” and confi rm by pressing the
29

Basic functions
Subtitle selection
If the channel banner includes the following symbol for subtitles , you can call up the “Subtitle”
function as follows: Open the selection box (with the
picture, subtitles”. Confi rm with the
by pressing the
Use the
receiver will automatically return to the TV picture.
button. The following on-screen display then appears (example):
buttons to select the desired subtitles and confi rm by pressing the button. The
button. Use the
button) and press to select “Change sound,
buttons to select “Subtitle” and confi rm
Tip!
The “Subtitles” function can also be switched off completely (“Mainmenu - Settings”, “Basic Settings”, “Audio Settings”, “Preferred Subtitle Language” - setting “Disable”).
30
 Loading...