

Page 1

Page 2

GB
DEAR CUSTOMER,
We thank you and congratulate you on your choice.
This new carefully designed product, manufactured with
the highest quality materials, has been carefully tested to
satisfy all your cooking demands.
We would therefore request you to read and follow these
easy instructions which will allow you to obtain excellent results right from the start.
OLAN-Haushaltsgeräte
Berlin, Germany
IMPORTANT
The oven’s data plate is accessible even with the oven
fully installed. The plate is visible simply by opening the
door. Always quote the details from it to identify the
appliance when ordering spare parts.
2
Page 3

RUD
SEHR GEEHRTER KUNDE,
wir danken Ihnen und beglückwünschen Sie zu Ihrer
Wahl.
Dieses neue Produkt, sorgfältig entworfen und mit
erstklassigen Materialien hergestellt, wurde genau
geprüft um alle Ihre Forderungen an ein perfektes Kochen zu erfüllen.
Wir bitten Sie deshalb die einfachen Anweisungen zu
lesen und einzuhalten, damit von der ersten Anwendung
an ausgezeichnete Ergebnisse erreicht werden können.
OLAN-Haushaltsgeräte
Berlin, Germany
Edf;ftvsq gjregfntkm>Edf;ftvsq gjregfntkm>
Edf;ftvsq gjregfntkm>
Edf;ftvsq gjregfntkm>Edf;ftvsq gjregfntkm>
vs ,kfujlfhbv Dfc pf Dfi ds,jh b gjplhfdkztv c
elfxyjq gjregrjq. "njn yjdsq ghjlern> nofntkmyj
hfphf,jnfyysq b bpujnjdktyysq bp gthdjrkfccys[
vfnthbfkjd> ,sk jcyjdfntkmyj jghj,jdfy> xnj,s extcnm
dct Dfib nht,jdfybz r cjdthitycndjdfyb/ ghjwtccf
ghbujnjdktybz ,k/l. Gj'njve vs ghjcbv Dfc
dybvfntkmyj ghjxbnfnm 'nj herjdjlcndj gj 'rcgkefnf
wbb b cj,k/lfnm ghjcnst erfpfybz> xnj gjpdjkztn c
cfvjuj yfxfkf ghbvtytybz ecnhjqcndf ljcnbxm jnkbxys[
htpekmnfnjd. C 'nbv cjdhtvtyysv fggfhfnjv vs ;tkftv
Dfv dctuj cfvjuj yfbkexituj.
OLAN-Haushaltsgeräte
Berlin, Germany
WICHTIG
Das Typenschild mit den technischen Merkmalen des
Backofens ist auch bei installiertem Gerät zugänglich.
Auf diesem Typenschild, das bei Öffnen der Ofentür
sichtbar ist, sind auch alle Kenndaten des Geräts
aufgeführt, die bei eventuellen Ersatzteilbestellungen
angegeben werden müssen.
DF:YJ ^^^DF:YJ ^^^
DF:YJ ^^^
DF:YJ ^^^DF:YJ ^^^
Nf,kbxrf c nt[ybxtcrbvb lfyysvb le[jdrb kturj
ljcnegyf b yf ecnfyjdktyyjv> ujnjdjv r 'rcgkefnfwbb>
ghb,jht. "nf nf,kbxrf> rjnjhfz dblyf ghb jnrhsnbb
ldthws le[jdrb> cjlth;bn lfyyst> rjnjhst ytj,[jlbvj
erfpsdfnm ghb djpvj;yjv pfrfpt pfgfcys[ xfcntq.
3
Page 4

GB
CONTENTS
First use 6
Self-cleaning catalytic panels 8
Respect for the environment 8
Control panel 10
Cooking instructions:
- conventional cooking 14
- fan cooking 14
- defrosting 16
- grill cooking 16
Cooling fan 18
Cooking functions 20
Replacing the oven light 38
Removing the oven door 40
INSTALLATION INSTRUCTIONS
Flush fitting 42
Electrical connections 44
4
Page 5

RUD
INDEX
Erstmalige Benutzung 7
Selbstreinigende katalytische Platten 9
Umweltverträglichkeit 9
Bedienblende 11
Backempfehlungen:
- Konventionelles Backen 15
- Umluftbacken 15
- Auftauen 17
- Grillen 17
Kühlventilator 19
JUKFDKTYBTJUKFDKTYBT
JUKFDKTYBT
JUKFDKTYBTJUKFDKTYBT
Gthdjt bcgjkmpjdfybt 7
Cfvjjxbof/obtcz gkfcnbys 9
J[hfyf jrhe;f/otq chtls 9
Gthtrk/xfntkm aeyrwbq 11
Ghfrnbxtcrbt cjdtns%
- J,sxyjt ghbujnjdktybt 15
- Ghbujnjdktybt c j,ledjv 15
- Jnnfbdfybt 17
- Uhbkm 17
J[kf;lf/obq dtynbkznjh 19
Ofenfunktionen 21
Auswechslung der Ofenbeleuchtung 39
Ausbauen der Ofentür 41
FÜR DEN INSTALLATEUR
Einbau des Backofens 43
Stromanschluß 45
Ht;bvs ghbujnjdktybz 21
Pfvtyf kfvgjxrb 39
Ltvjynf; ldthws 41
ERFPFYBZ LKZ VJYN+HFERFPFYBZ LKZ VJYN+HF
ERFPFYBZ LKZ VJYN+HF
ERFPFYBZ LKZ VJYN+HFERFPFYBZ LKZ VJYN+HF
Ecnfyjdrf 43
Gjlrk/xtybt r 'k. ctnb 45
5
Page 6
GB
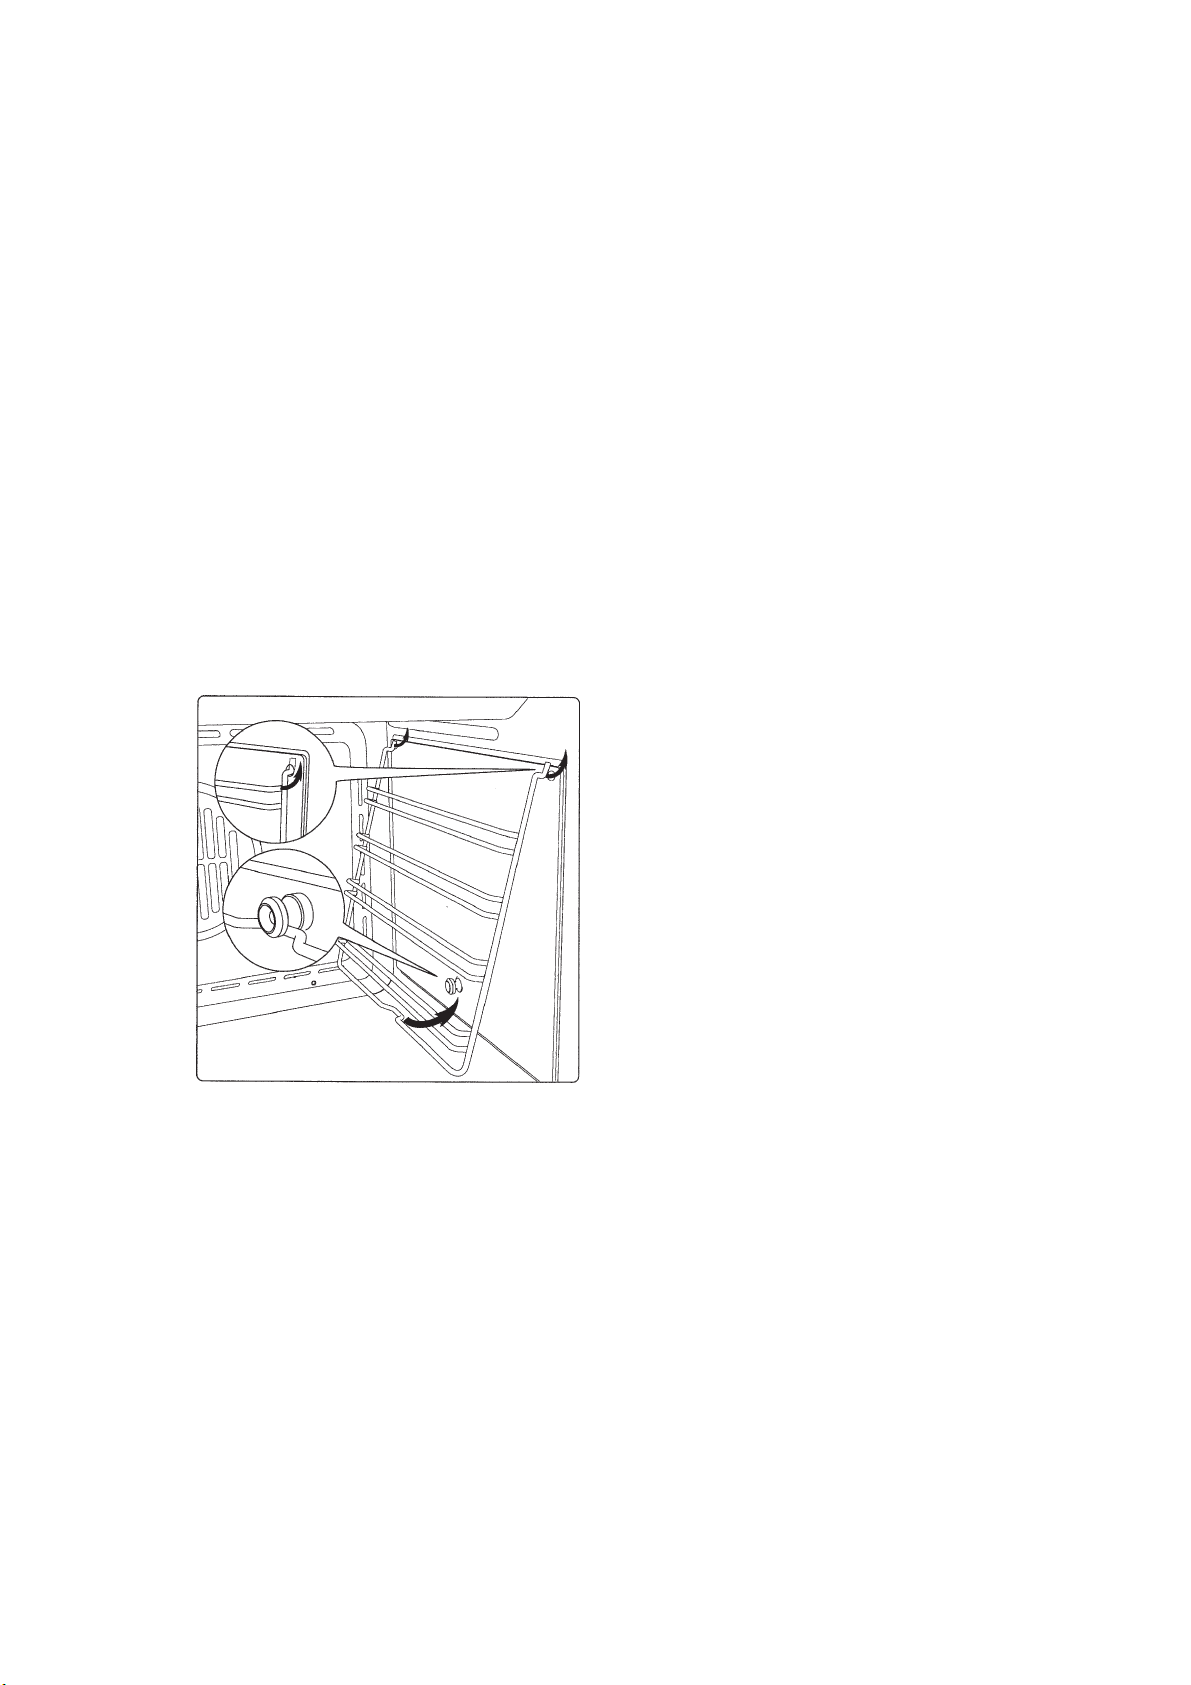
THE FIRST TIME YOU USE THE
OVEN
Clean the oven thoroughly with soapy water and rinse
well. To remove the lateral frames from smooth-walled
ovens, proceed as shown in the figure.
Operate the oven for about 30 minutes at maximum
temperature to burn off all traces of grease which might
otherwise create unpleasant smells when cooking.
Important:
As a safety precaution, before cleaning the oven, always
disconnect the plug from the power socket or the power
cable from the oven. Do not use acid or alkaline
substances to clean the oven (lemon juice, vinegar, salt,
tomatoes etc.). Do not use chlorine based products, acids
or abrasive products to clean the painted surfaces of the
oven.
6
Page 7

RUD
ERSTMALIGE BENUTZUNG
Der Backofen muss gründlich mit Seifenwasser gesäubert werden. Wie auf der Abbildung dargestellt vorgehen, um bei den Öfen mit glatten Wänden die seitlichen Backbleche herauszunehmen.
Den Backofen für etwa 30 Minuten auf Höchsttemperatur aufheizen; auf diese Weise werden alle fetthaltigen
Bearbeitungsrückstände eliminiert, die beim Backen
unangenehme Gerüche verursachen könnten.
GTHDJT BCGJKMPJDFYBTGTHDJT BCGJKMPJDFYBT
GTHDJT BCGJKMPJDFYBT
GTHDJT BCGJKMPJDFYBTGTHDJT BCGJKMPJDFYBT
Nofntkmyj jxbcnbnm le[jdre vskmysv hfcndjhjv b
[jhjij ghjvsnm ljcnfnjxysv rjkbxtcndjv djls.
Yfdtcbnm yf ,jrjdst cntyrb gjcnfdkztvst d rjvgktrnt
ktcnybxrb b ecnfyjdbnm yf yb[ htitnrb b ghjnbdyb.
D ntxtybt ghbvthyj 30 vbyen ghjuhtnm le[jdre lj
vfrcbvfkmyjq ntvgthfnehs> ghb 'njv ytqnhfkbpe/ncz
dct ;bhjcjlth;fobt dtotcndf> bcgjkmpetvst ghb
ghjbpdjlcndtyyjq j,hf,jnrt bpltkbz> rjnjhst vjuen
j,eckjdbnm gjzdktybt ytghbznys[ pfgf[jd ghb gthdjv
ghbujnjdktybb ,k/l.
Wichtig:
Als Sicherheitsvorkehrung muss vor jeder Reinigung des
Backofens immer das Stromnetz abgeschaltet werden.
Zum Reinigen dürfen keine sauren oder alkalischen
Substanzen verwendet werden (Zitronensaft, Essig, Salz,
usw.). Chlorhaltige Produkte, sowie Säuren oder
Scheuermittel sind ebenfalls zu vermeiden, dies gilt vor
allem für die Reinigung der lackierten Wände.
DF:YJ ^^^DF:YJ ^^^
DF:YJ ^^^
DF:YJ ^^^DF:YJ ^^^
D rfxtcndt vths ghtljcnjhj;yjcnb ytj,[jlbvj gthtl
rf;ljq xbcnrjq le[jdrb jnrk/xfnm tt jn ctnb.
Yt ghbvtyzqnt lkz xbcnrb rbckjnj - bkb
otkjxtcjlth;fob[ dtotcnd !ercec> cjr kbvjyf> cjkm
b n.l.@. Yb d rjtv ckexft yt ghbvtyzqnt nfr;t
[kjhjcjlth;fobt chtlcndf !jn,tkbdf/obt b n.l.@.
Jcj,tyyj 'nj ye;yj bvtnm d dble ghb xbcnrt 'vfkbhjdfyys[ gjdth[yjcntq le[jdjr.
7
Page 8
GB
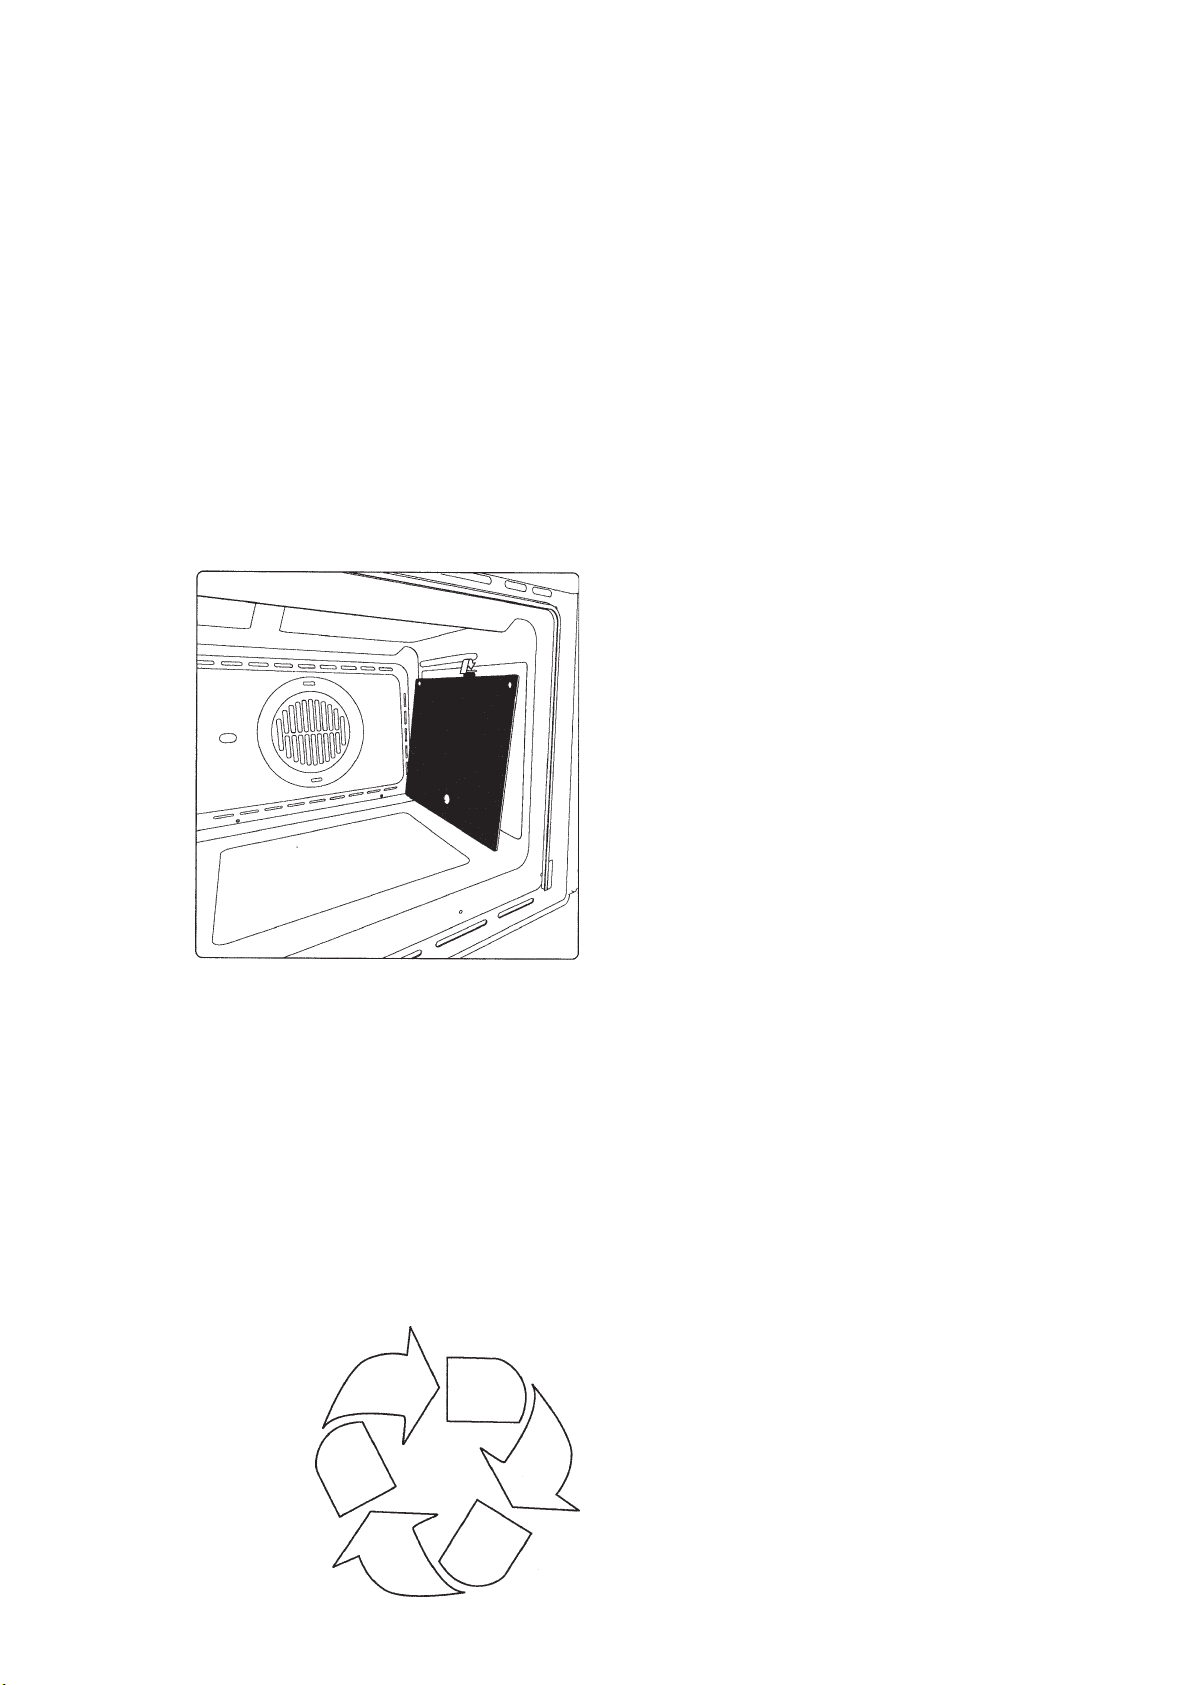
SELF-CLEANING CATALYTIC
PANELS
Our smooth walled ovens can be fitted with self-cleaning
panels to cover the inside walls.
These special panels are simply hooked on to the walls
before the side frames are fitted. They are coated in a
special, micro-porous catalytic enamel which oxidises
and gradually vaporises splashes of grease and oil at
cooking temperatures above 200° C.
If the oven is not clean after cooking fatty foods, operate
the empty oven for 60 minutes (max.) at maximum
temperature.
Never wash or clean self-cleaning panels with abrasive,
acid, or alkaline products.
RESPECT FOR THE
ENVIRONMENT
The documentation provided with this oven has been
printed on chlorine free bleached paper or recycled paper
to show respect for the environment.
The packaging has also been designed to avoid environmental impact. Packaging material is ecological and
can be re-used or recycled.
By recycling the packaging, you will help save raw materials as well as reducing the bulk of domestic and
industrial waste.
8
Page 9

RUD
SELBSTREINIGENDE
KATALYTISCHE PLATTEN
Unsere Backöfen mit glatten Wänden bieten die
Möglichkeit, in der Muffel selbstreinigende Platten zu
montieren, mit denen die Wände verkleidet werden.
Diese Spezialplatten, die vor den seitlichen Rahmen an
den Wänden eingehängt werden, sind mit einem
mikroporösen katalytischen Speziallack bedeckt, der
oxidiert, die Öl- und Fettspritzer nach und nach verdampfen lässt, und so bei den Backvorgängen über
200°C eliminiert.
Sollte der Ofen nach dem Backen sehr fetthaltiger
Speisen nicht sauber sein, lässt man ihn maximal 60
Minuten lang leer bei Höchsttemperatur eingeschaltet.
Die selbstreinigenden Platten dürfen weder gewaschen,
noch mit scheuernden oder säurehaltigen bzw.
alkalischen Produkten gereinigt werden.
CFVJJXBOF?OBTCZCFVJJXBOF?OBTCZ
CFVJJXBOF?OBTCZ
CFVJJXBOF?OBTCZCFVJJXBOF?OBTCZ
RFNFKBNBXTCRBT GKFCNBYRFNFKBNBXTCRBT GKFCNBY
RFNFKBNBXTCRBT GKFCNBY
RFNFKBNBXTCRBT GKFCNBYRFNFKBNBXTCRBT GKFCNBY
D yfib[ le[jdrf[ ghtlecvjnhtyf djpvj;yjcnm
gjrhsnbz dyenhtyyb[ cntyjr cfvjjxbof/obvbcz
rfnfkbnbxtcrbvb gkfcnbyfvb. "nb cgtwbfkmyst
gkfcnbys> jxtym kturj vjynbhe/obtcz yf ,jrjds[
cntyrf[ le[jdrb gthtl ecnfyjdrjq yf yb[ ,jrjds[
ktcnybxtr> gjrhsns cgtwbfkmysv vbrhjgjhbcnsv kfrjv>
rjnjhsq jrbckztn ,hspub vfckf b ;bhf b gjcntgtyyj
bcgfhzz ecnhfyztn b[ ghb ntvgthfnehf[ hf,jns cdsit
200
° C. Tckb ;t gjckt ghbujnjdktybz jxtym ;bhys[
,k/l yf cntyrf[ le[jdrb dct;t jcnf/ncz pfvtnysvb
cktls vfckf b ;bhf> jcnfdmnt gecne/ le[jdre drk/
xtyyjq ghb vfrcbvfkmyjq ntvgthfneht lj nt[ gjh>
gjrf jyf gjkyjcnm/ yt jxbcnbncz.
Cfvjjobxf/obtcz rfnfkbnbxtcrbt gkfcnbys ytkmpz
yb vsnm> yb ntv ,jktt xbcnbnm f,hfpbdysvb
vfnthbfkfvb b rbckjnj - b otkjxtcjlth;fobvb
chtlcndfvb.
SS
S
SS
UMWELTVERTRÄGLICHKEIT
Als Beitrag zum Umweltschutz wurde die Dokumentation dieses Geräts auf chlorfrei gebleichtes oder
Recycling-Papier gedruckt.
Bei der Verpackung wurde auf deren Umweltverträglichkeit Wert gelegt; sie kann gesammelt oder recycelt
werden, da es sich um umweltschonendes Material
handelt.
Durch Recycling der Verpackung wird zur Reduzierung
des Rohstoffverbrauchs und des Volumens von
Industrie- und Hausmüll beigetragen.
J{HFYF JRHE:F?OTQJ{HFYF JRHE:F?OTQ
J{HFYF JRHE:F?OTQ
J{HFYF JRHE:F?OTQJ{HFYF JRHE:F?OTQ
CHTLSCHTLS
CHTLS
CHTLSCHTLS
D rfxtcndt drkflf d j[hfye jrhe;f/otq chtls> dcz
ljrevtynfwbz r 'njve ecnhjqcnde ,skf yfgtxfnfyf
yf jn,tktyyjq> yt cjlth;fotq [kjhf bkb yf ghbujlyjq
rj dnjhbxyjq gththf,jnrt ,evfut.
B ghb bpujnjdktybb egfrjdrb ,sk cltkfy frwtyn yf
cj,k/ltybt yjhv gj j[hfyt jrhe;f/otq chtls. Jyf
nfr;t vj;tn ,snm dnjhbxyj gththf,jnfyf> gjcrjkmre
bpujnjdktyf bp ,tpdhtlys[ lkz jrhe;f/otq chtls
vfnthbfkjd.
Djpvj;yjcnm gththf,jnrb egfrjdjxyjuj vfnthbfkf
pyfxbntkmyj cyb;ftn rfr gjnht,ktybt ghbhjlyj cshmtds[ htcehcjd> nfr b j,hfpjdfybt ghjvsiktyyjuj
b ,snjdjuj vecjhf.
9
Page 10
GB
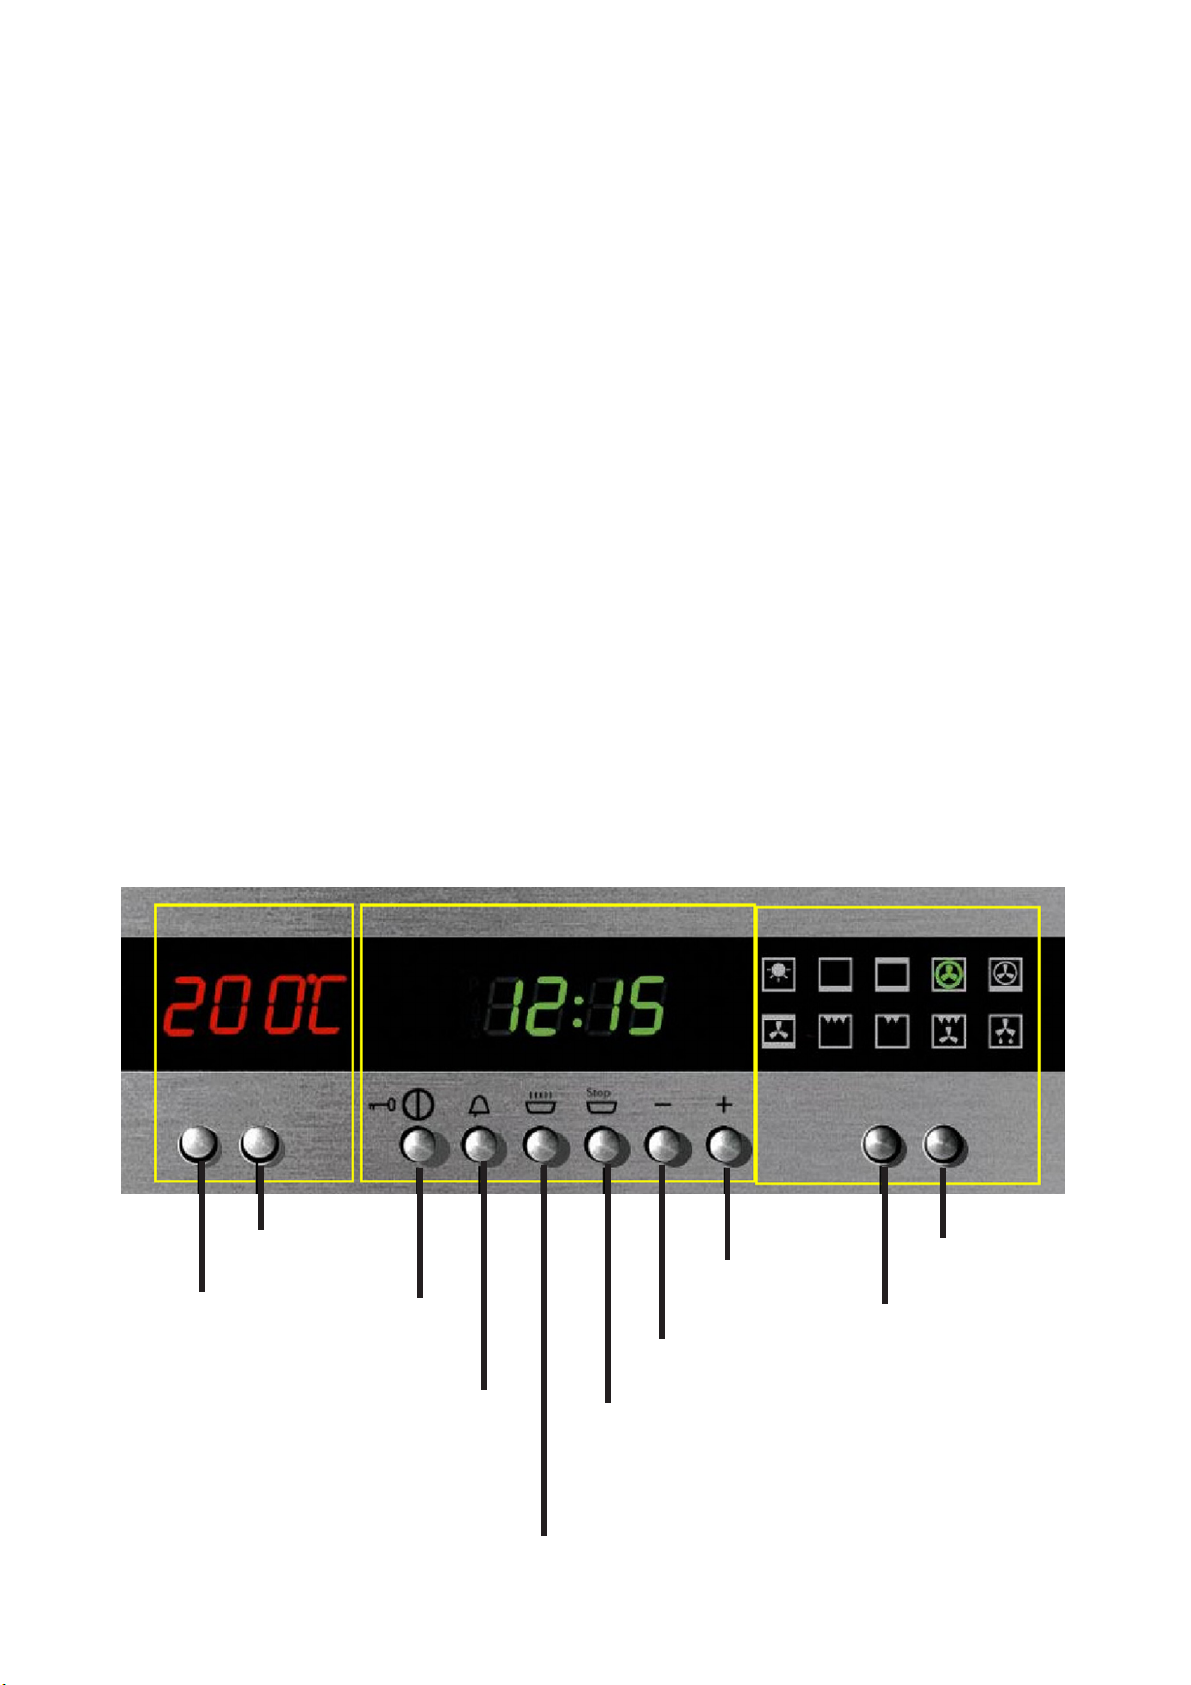
THE CONTROL PANEL
The panel shown here is purely indicative and may not
be identical to the panel on the oven you have purchased.
Depending on the model of oven you have purchased,
the cooking functions and temperature functions may be
controlled by knobs instead of keys. The functions
themselves are the same for keyboard and knob control
ovens.
Temperature display
Thermostatanzeige
Индикация температуры
Increase
Erhöhen
Decrease
Vermindern
Уменьшение
Увеличение
On-Off Child lock
On-Off Kindersicherung
Вкл./Выкл. Блокировка
Time display
Zeitanzeige/Timer
Индикация времени
Increase
Erhöhen
Увеличение
Decrease
Vermindern
Уменьшение
Cooking functions
Anzeige Ofenfunktionen
Режимы приготовления
Scroll right
Rechtslauf
Перемещение вправо
Scroll left
Linkslauf
Перемещение влево
10
Countdown timer
Minutenuhr
Таймер обратного счета
Cooking time
Programm Garzeit
Время приготовления
End of cooking time
Programm Garzeitende
Окончание приготовления
Page 11
RUD
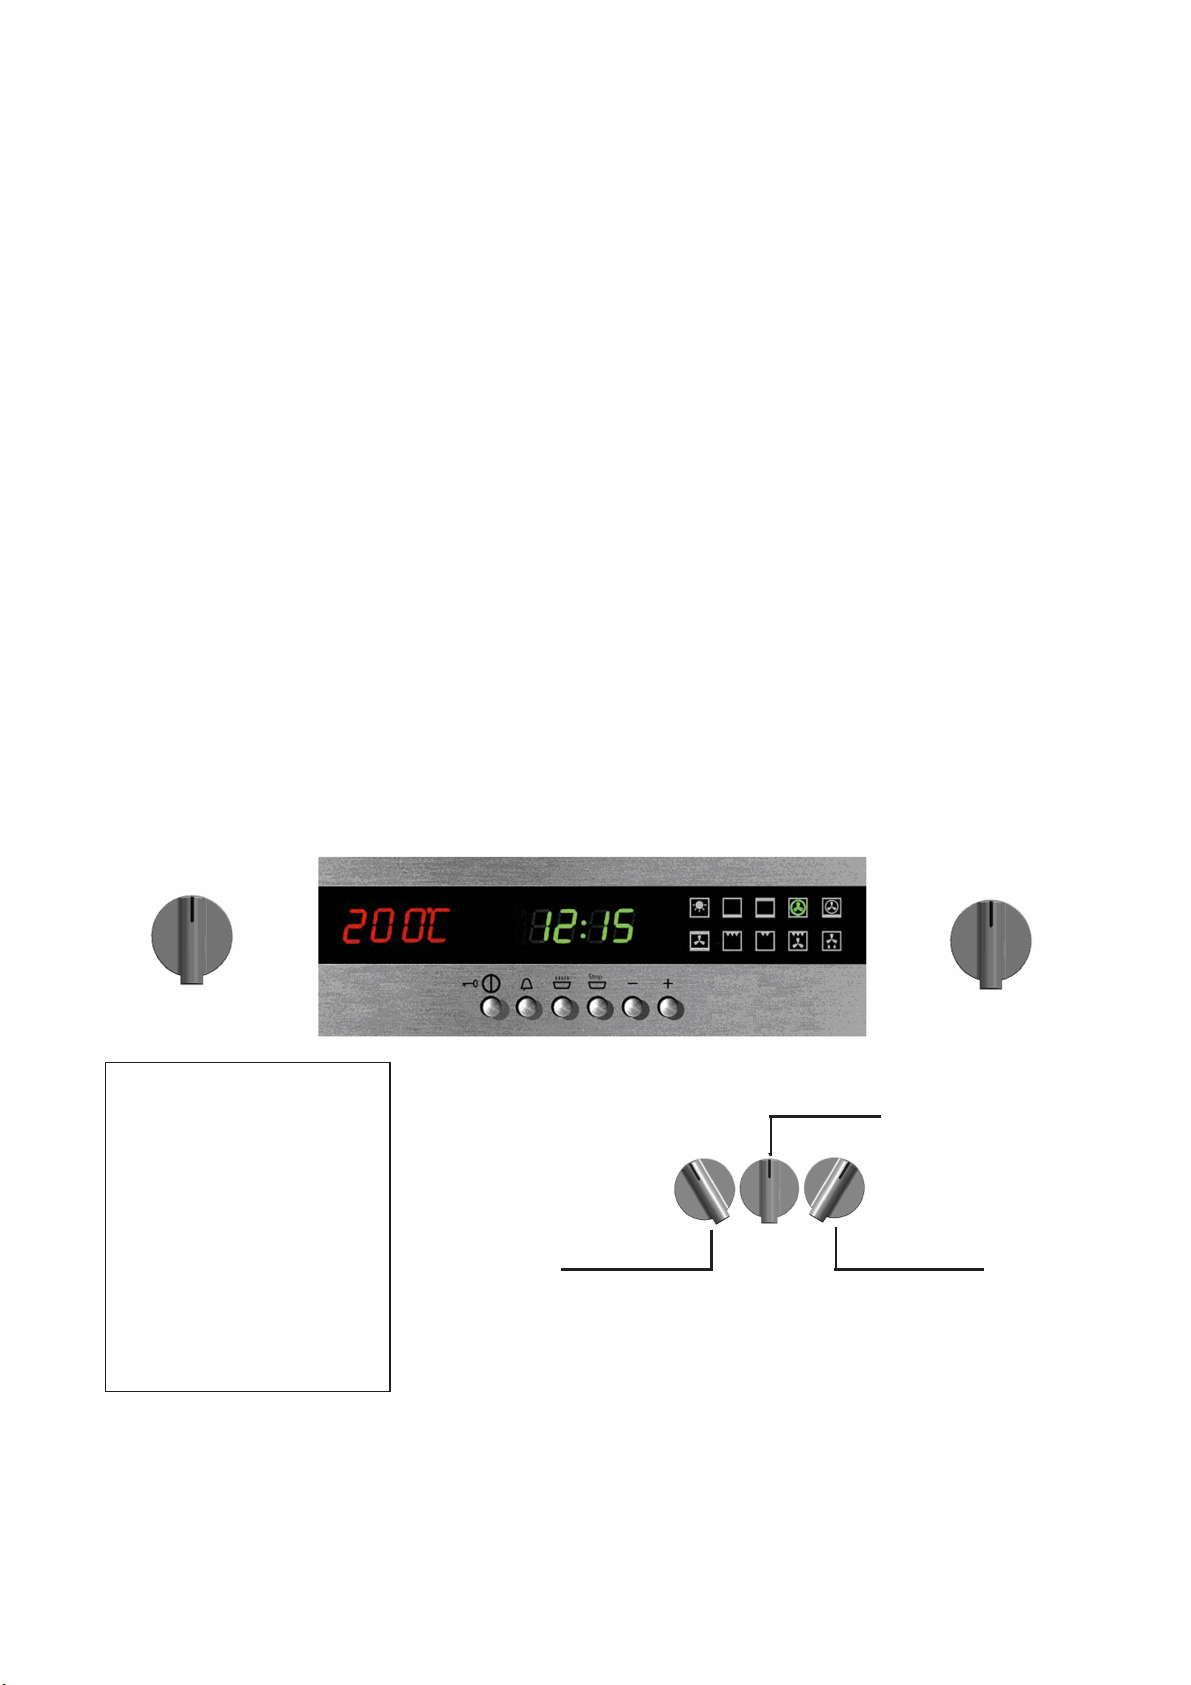
DIE BEDIENBLENDE
Die dargestellte Bedienblende dient nur als Beispiel und
entspricht nicht unbedingt der des von Ihnen gewählten
Modells.
Die Einstellung der Garfunktionen und der
Thermostatanzeige kann je nach Modell auch über
Bedienknöpfe erfolgen, die beschriebene Funktionsweise
bleibt jedoch die gleiche.
ПАНЕЛЬ УПРАВЛЕНИЯ
Показанная здесь панель внешне может
отличаться от панели на купленной Вами духовке.
В зависимости от модели купленной Вами духовки
режим приготовления и температурный режим
могут управляться кнопками вместо ручек. Сами
функции одинаковы для духовок с кнопками и
духовок с ручками.
Functions on knob
control versions
Funktionsweise
Ausführung mit
Bedienknöpfen
Функции ручки
управления
Decrease/Scroll left
Vermindern/Linkslauf
Уменьшение/
перемещение влево
Reset position
Ruhestellung
Нейтральное положение
Increase/Scroll right
Erhöhen/Rechtslauf
Увеличение/
перемещение вправо
11
Page 12
GB
THE FIRST TIME YOU USE THE
OVEN
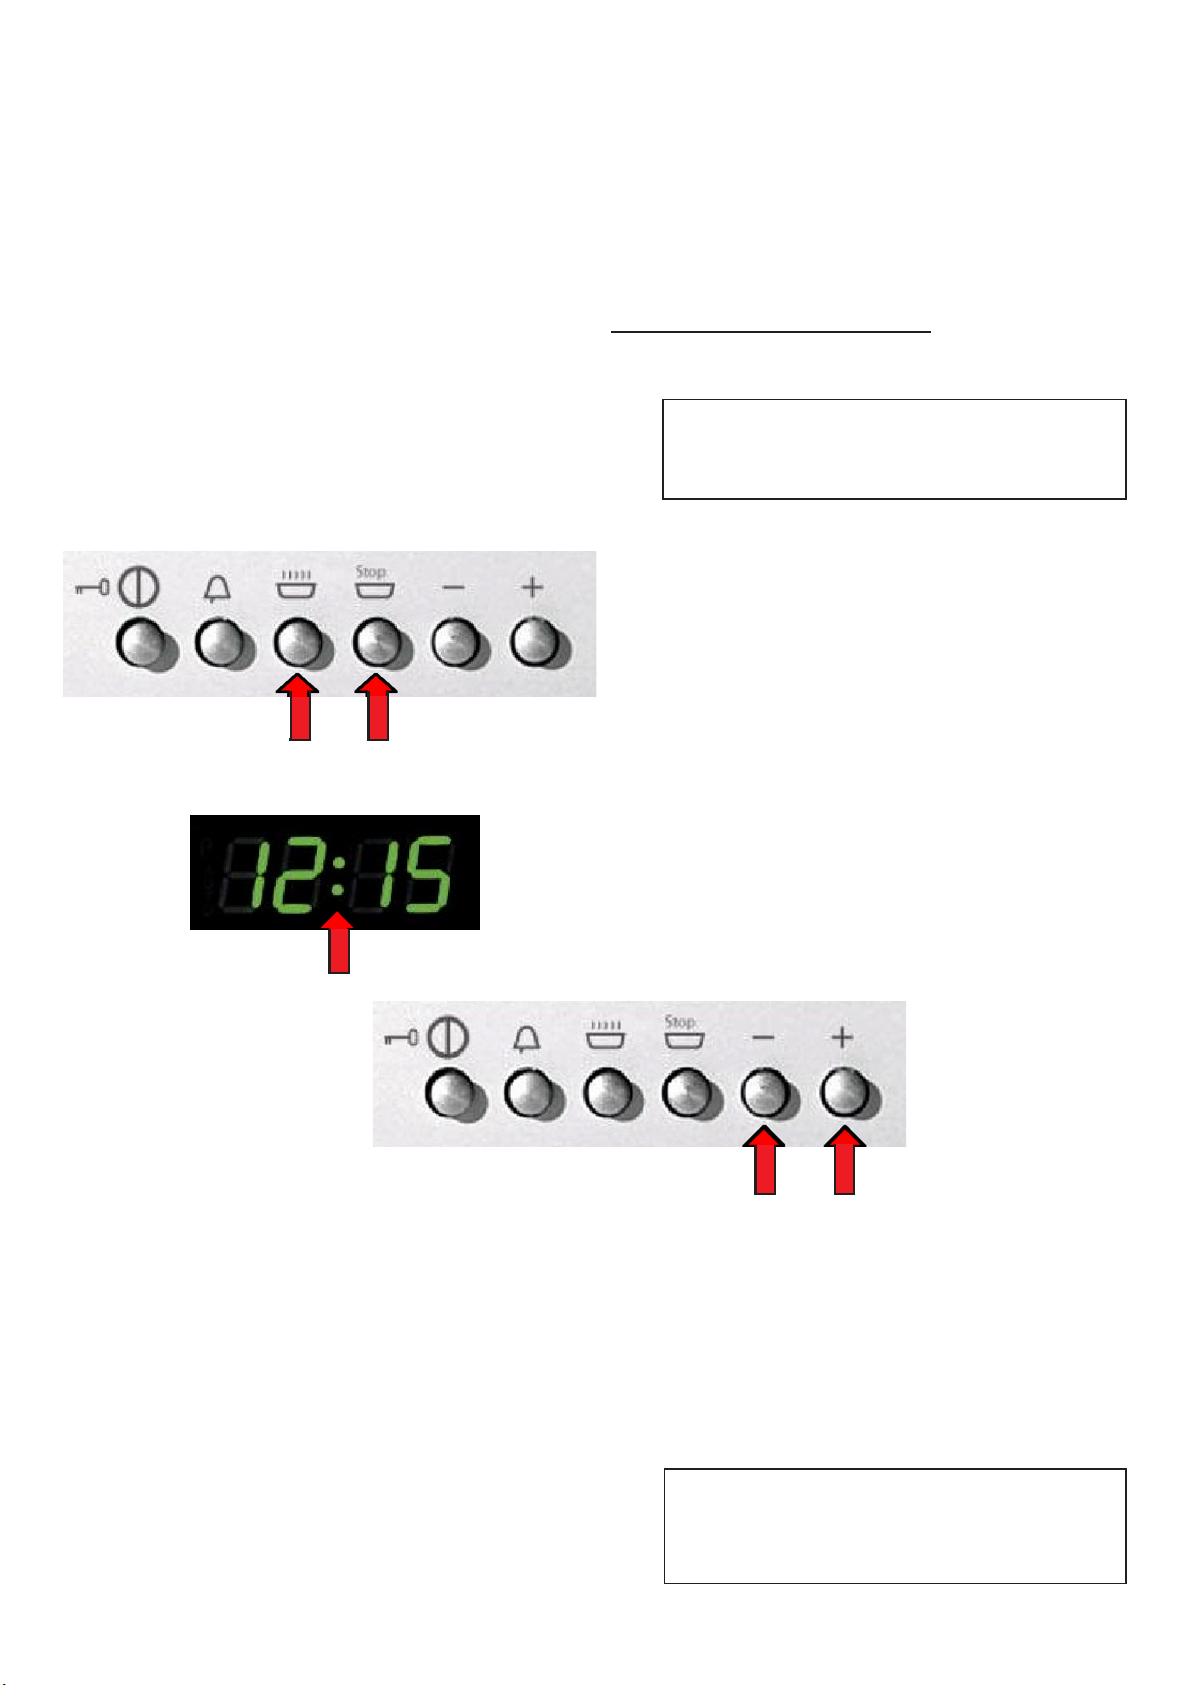
Three zeroes flash on the display the first time you connect
the oven to the mains electricity supply, and every time
power returns after a power failure. This warns you that
you must set the time on the clock before you can select
any cooking function.
You must set the time on the clock
before you can use the oven.
!
· Setting the clock
Press the two keys shown below simultaneously to enter
clock mode.
Press the + or - keys
mit den Tasten
Нажмите кнопки + и -
The two dots separating the hours and minutes flash to
show you are in clock mode.
to increase or
decrease the time.
die Uhrzeit einstellen.
чтобы выставить
текущее время
After a few seconds the controller sets the time currently
displayed and the two dots stop flashing.
Use one of the cooking functions to burn off any
manufacturing residues from the heating elements and
oven walls before actually using the oven to cook food.
12
!
Important! If you change the time
setting, you reset the timer and cancel
all cooking settings.
Page 13

RUD
ERSTE INBETRIEBNAHME
Nach dem elektrischen Anschluss des Ofens, wie auch
bei Rückkehr der Stromversorgung nach einem
Stromausfall, erscheinen auf der Anzeige der
Programmiervorrichtung drei blinkende Nullen und keine
Betätigung ist möglich :
die Uhr muss eingestellt werden.
Die Einschaltung des Ofens ohne
vorherige Uhreinstellung ist nicht
!
zulässig
· Uhrzeiteinstellung
Zur Einstellung der Uhrzeit gleichzeitig folgende Tasten
drücken
ПЕРВОЕ ПОЛЬЗОВАНИЕ
ДУХОВКОЙ
При подключении духовки к сети электропитания,
а также при возобновлении подачи питания после
отключения, на индикаторе высвечиваются три
нуля. Это предупреждает Вас о том, что прежде
чем можно будет выбрать режим приготовления,
Вы должны выставить время на часах.
Прежде чем Вы сможете
пользоваться духовкой, Вы
!
должны выставить время на часах.
· Установка часов
Чтобы установить часы, нажмите показанные
ниже две кнопки одновременно.
: während der Uhrzeiteinstellung blinkt der Doppelpunkt.
Nach einigen Sekunden wird die Uhrzeit automatisch
übernommen, der Doppelpunkt hört zu blinken auf und
leuchtet dauerhaft.
Es ist ratsam, eine der nachstehend beschriebenen
Garfunktionen zu wählen, um Bearbeitungsrückstände
von den Heizelementen und Ofenflächen, die mit den
Speisen in Kontakt kommen, zu beseitigen.
При этом замигают две точки, разделяющие часы
и минуты, показывая, что Вы в режиме часов.
Через несколько секунд будет показываться
текущее время и точки перестают мигать.
Прежде чем пользоваться духовкой для
приготовления пищи, прогрейте ее для
нейтрализации производственных
жиросодержащих веществ на стенках и на
нагревательных элементах.
!
Achtung: bei der Uhrzeiteinstellung wird das
Reset des elektronischen Timers ausgeführt und
alle eventuellen Garprogramme werden gelöscht
!
Важно! При изменении установленного
времени таймер будет установлен
заново, а все выбранные режимы
приготовления будут отменены.
13
Page 14
GB
COOKING INSTRUCTIONS
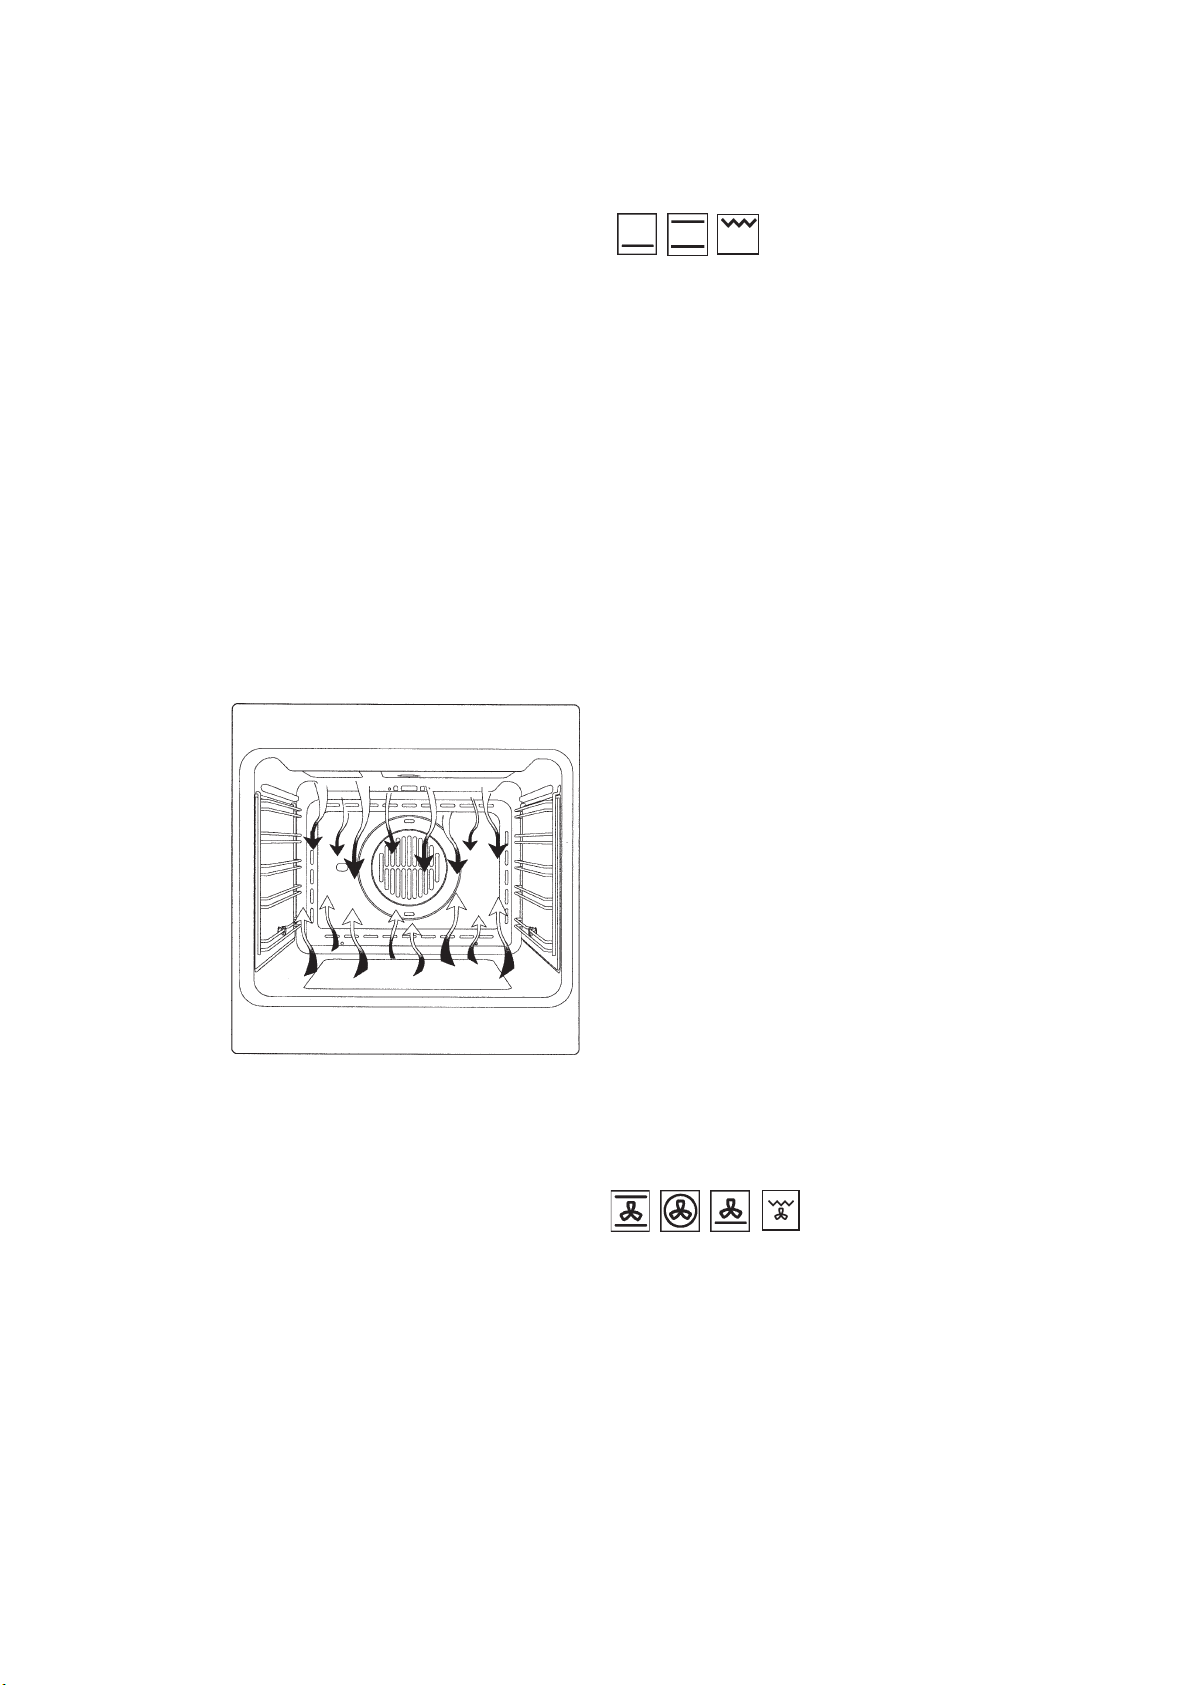
CONVENTIONAL COOKING
Conventional cooking uses top and bottom heat to cook a
single dish.
Place the food in the oven only once cooking temperature has been reached, i.e. when the heating indicator
goes out.
If you want to increase top or bottom temperature towards the end of the cooking cycle, set the temperature
control to the right position.It is advisable to open the
oven door as little as possible during cooking.
14
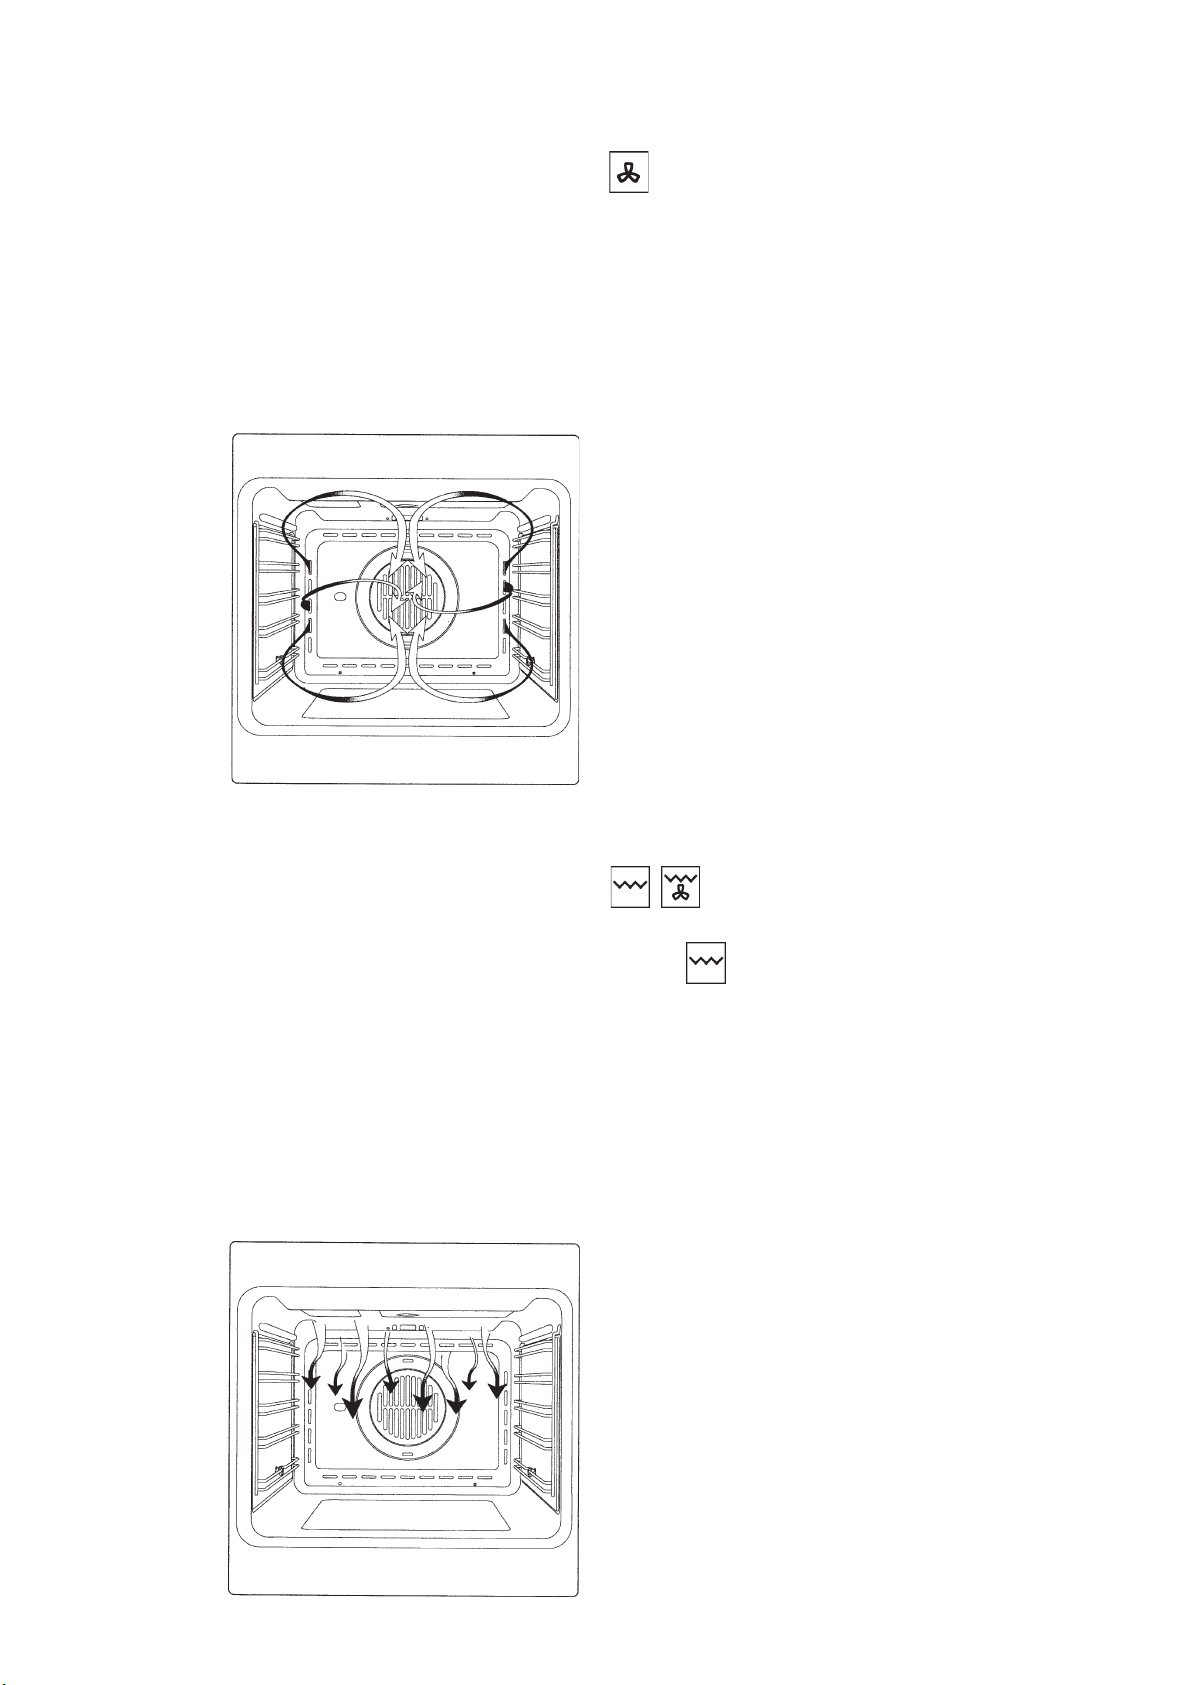
FAN COOKING
For this type of cooking a fan positioned at the back
allows the circulation of hot air inside the oven, creating
uniform heat. In this way cooking is more rapid than
conventional cooking. It is a suitable method for cooking
dishes on more than one shelf, especially when the food
is of different types (fish, meat etc.)
Page 15

RUD
BACKEMPFEHLUNGEN
KONVENTIONELLES BACKEN
Klassisches System, bei dem Unter- oder Oberhitze
verwendet wird, die für das Garen nur eines Gerichts
geeignet ist.
Die Speisen sollten möglichst eingeschoben werden,
wenn der Backofen bereits die vorgegebene Temperatur
erreicht hat, das heißt, nach Erlöschen der Kontrolllampe.
Wenn die Unter- oder Oberhitze gegen Ende des Backvorgangs erhöht werden muss, ist der Schalter in die
jeweilige gewünschte Position zu bringen. Während des
Backvorgangs sollte die Ofentür möglichst wenig
geöffnet werden.
GHFRNBXTCRBT CJDTNSGHFRNBXTCRBT CJDTNS
GHFRNBXTCRBT CJDTNS
GHFRNBXTCRBT CJDTNSGHFRNBXTCRBT CJDTNS
J<SXYJT GHBUJNJDKTYBTJ<SXYJT GHBUJNJDKTYBT
J<SXYJT GHBUJNJDKTYBT
J<SXYJT GHBUJNJDKTYBTJ<SXYJT GHBUJNJDKTYBT
Rkfccbxtcrfz cbcntvf> ghb rjnjhjq ghbvtyztncz
dth[ybq bkb yb;ybq yfuhtd> ghbujlyf lkz
ghbujnjdktybz njkmrj jlyjuj ,k/lf. <k/lf ljk;ys
gjvtofnmcz d le[jdre> gj djpvj;yjcnb> kbim gjckt
ljcnb;tybz pflfyyjq ntvgthfnehs> n.t. rjulf gjufcytn
rjynhjkmyfz kfvgjxrf.
Tckb r rjywe ghjwtccf ghbujnjdktybz ,k/lf Ds
;tkftnt gjdscbnm ntvgthfnehe dth[ytuj bkb yb;ytuj
yfuhtdfntkz> ecnfyjdbnt gthtrk/xfntkm yf cjjndtncnde/
oe/ ;tkftve/ aeyrwb/. D ntxtybt dsgtrfybz ldthwe
le[jdrb htrjvtyletncz jnrhsdfnm rfr vj;yj ht;t.
UMLUFTBACKEN
Bei dieser Garart bringt der Ventilator, der sich im
hinteren Ofenteil befindet, heiße Umluft in den Ofen und
verteilt diese gleichmäßig, wobei die Garzeit geringer als
beim konventionellen Backen ist.
Diese Methode eignet sich zum Garen auf mehreren
Einschubhöhen, auch von Speisen unterschiedlicher Art
(Fisch, Fleisch usw.).
GHBUJNJDKTYBT C J<LEDJVGHBUJNJDKTYBT C J<LEDJV
GHBUJNJDKTYBT C J<LEDJV
GHBUJNJDKTYBT C J<LEDJVGHBUJNJDKTYBT C J<LEDJV
Ghb 'njv ht;bvt ghbujnjdktybz yf[jlzobqcz d lfkmytq
xfcnb le[jdrb dtynbkznjh jceotcndkztn wbhrekzwb/
ujhzxtuj djple[f> hfdyjvthyj tuj hfcghtltkzz> ntv
cfvsv cjrhfofz dhtvz ghbujnjdktybz gj chfdytyb/ c
j,sxysv ghbujnjdktybtv.
"njn vtnjl gjl[jlbn lkz jlyjdhtvtyyjuj ghbujnjdktybz
hfpys[ dbljd ,k/l !hs,f b vzcj b n.l.@ ghb hfpys[
dscjnf[ gjkj;tybz ghjnbdyz.
15
Page 16
GB
DEFROSTING
By selecting one of the fan cooking functions and setting
the thermostat to zero, the fan allows cold air to circulate
inside the oven. In this way frozen food can be rapidly
defrosted.
It is not essential to pre-heat the oven, but you are
advised to do so when cooking pastries.
GRILL COOKING
Use the grill to grill or brown foods.
Symbol
Some ovens may be equipped with an electric motor, spit
and skewers for turning on the spit.
Place the shelf with the food to be cooked in the 1st or
2nd position from the top.
Pre-heat the oven for 5 minutes. Turn the thermostat to a
temperature between 50° and 200°.
16
Page 17

RUD
AUFTAUEN
Falls eine der Umluftfunktionen ausgewählt und der
Thermostat auf Null gestellt wird, führt der Ventilator
Kaltluft in den Ofen und fördert das schnelle Auftauen
der Tiefkühlkost.
Ein Vorheizen des Ofens ist eigentlich nicht notwendig,
aber für Patisserie dennoch empfehlenswert.
JNNFBDFYBTJNNFBDFYBT
JNNFBDFYBT
JNNFBDFYBTJNNFBDFYBT
Ghb drk/xtyyjv j,ledt b ecnfyjdktyyjv yf yjkm
nthvjcnfnt> dtynbkznjh jceotcndkztn wbhrekzwb/
[jkjlyjuj djple[f> j,tcgtxbdfz ntv cfvsv ,scnhjt
jnnfbdfybt pfvjhj;tyys[ ghjlernjd.
Ghtldfhbntkmysq ghjuhtd le[jdrb ytj,zpfntkty> jlyfrj
ghb dsgtxrt rjylbnthcrb[ bpltkbq htrjvtyljdfy.
GRILLEN
Zum Grillen oder Bräunen der Speisen.
Symbol
Einige Backöfen sind komplett mit Stabmotor und
Drehspieß für Spießbraten ausgestattet.
Der Rost mit dem Gargut wird in der 1. oder 2. Schiene
von oben eingeschoben.
Den Backofen 5 Minuten vorheizen. Den ThermostatDrehgriff auf Temperaturen von 50° bis 200° drehen.
UHBKMUHBKM
UHBKM
UHBKMUHBKM
Lkz ghbujnjdktybz uhbkz bkb gjlhevzybdfybz ,k/l
Cbvdjk
Ytrjnjhst le[jdrb j,jheljdfys dthntkjv> ghbdjlbvsv
dj dhfotybt 'k. vjnjhjv.
Htitnrf c ghbujnfdkbdftvsv ,k/ljv ecnfyfdkbdftncz
yf 1-q bkb 2-q ehjdtym cdth[e.
Ghjuhtnm le[jdre d ntxtybt 5 vbyen. Hexre gthtrk/
xtybz ht;bvf nthvjcnfnf ecnfyjdbnm yf ntvgthfnehe
jn 50° C lj 200° C.
17
Page 18

GB
COOLING FAN
The fan is positioned on the upper part of the oven and
create a circle of cooling air on the inside of the furniture
and through the door of the oven.
It is turned on when the temperature of the outer shell of
the oven reaches 60°C.
By switching on the oven with the thermostat at 200°C
the fan starts working after approx.10 min.
It is turned off when the temperature of the outer shell of
the oven descends under 60°C.
By switching off the oven with the thermostat at 200°C
the fan stops working after approx. 30 min.
18
Page 19

RUD
KÜHLVENTILATOR
Der Kühventilator befindet sich auf der oberen Seite des
Backofens und dient zur Kühlung sowohl des Einbaumöbels als auch der Backofentüre.
Der Ventilator schaltet sich selbstättig ein, wenn das
äußere Gehäuse des Backofens eine Temperatur von
60°C überschreitet.
Wird der Backofen z.B. auf 200°C eingestellt, schaltet
sich die Kühlung nach etwa 10 Min ein.
Der Ventilator schaltet sich selbstättig aus, wenn das
äußere Gehäuse des Backofens eine Temperatur von
60°C wieder überschreitet.
z.B. schaltet sich die Kühlung nach Betrieb auf 200°C
nach etwa 30 Min. aus.
J{KF:LF?OBQ DTYNBKZNJHJ{KF:LF?OBQ DTYNBKZNJH
J{KF:LF?OBQ DTYNBKZNJH
J{KF:LF?OBQ DTYNBKZNJHJ{KF:LF?OBQ DTYNBKZNJH
J[kf;lf/obq dtynbkznjh yf[jlbncz yf dth[ytq xfcnb
le[jdrb b cke;bn lkz j[kf;ltybz rfr dcnhjtyyjq
vt,tkb> nfr b cfvjq ldthws le[jdrb.
Dtynbkznjh drk/xftncz fdnjvfnbxtcrb ghb ljcnb;tybb
ntvgthfnehs dytiytq gjdth[yjcnb le[jdrb 60° C.
Yfghbvth> ghb ecnfyjdrt le[jdrb yf 200° C
dtynbkznjh drk/xbncz ghb,kbpbntkmyj xthtp 10 vby.
Ghb gjyb;tybb ntvgthfnehs dytiytq gjdth[yjcnb
le[jdrb yb;t 60° C dtynbkznjh fdnjvfnbxtcrb jnrk/
xftncz. Yfghbvth> gjckt dsrk/xtybz le[jdrb>
ecnfyjdktyyjq yf 200° C> dtynbkznjh dsrk/xbncz
ghb,kbpbntkmyj xthtp 30 vby.
19
Page 20

GB
· Cooking functions
For each cooking function, your new oven’s electronic
controller suggests a default cooking temperature. This is
based on our own experience in obtaining the best results.
You can nevertheless change the default value to suit your
own requirements.
Oven light Griddle 150°C Fixed 200°C Fan 180°C Pizza 230°C
Innen- Ober- und
beleuchtung Unterhitze 150°C Unterhitze 200°C Heißluft 180°C Pizza 230°C
Освещение духовки Жарение 150°С Выпечка 200°С Обдув 180°С Пицца 230°С
Fixed & fan 60°C Double grill 250°C Single grill 250°C Grill & fan 210°C Defrost 180°C
Ober- und Unterhitze
m. Heißluft 180°C Grill Doppelt 250°C Grill Einfach 250°C Grill m. Heißluft 210°C Defrost 60°C
Запекание Двойной гриль 250°С Гриль 250°С Гриль с обдувом 210°С Размораживание 60°С
с обдувом 180°С
The food types shown are purely indicative of the sort of
meal you can prepare with that function. To discover the
tremendous versatility of this oven, feel free to experiment
with all the functions on the basis of your own cooking
experience.
20
Page 21

RUD
· Ofenfunktionen
Die elektronische Steuerung Ihres neuen Ofens schlägt
für die verschiedenen Garfunktionen Temperaturen vor,
die Erfahrungswerte darstellen und hervorragende
Garergebnisse ermöglichen. Selbstverständlich können
Sie diese Temperaturwerte jederzeit nach Belieben ändern
und somit Ihren Anforderungen anpassen!
· Режимы приготовления
Для каждого режима приготовления электронное
оборудование Вашей новой духовки предлагает
рекомендуемую температуру. Это основано на
нашем собственном опыте в получении лучших
результатов. Однако, Вы можете изменить
температуру по своему усмотрению.
Die vorgeschlagenen Speisen stellen nur eine
Orientierungshilfe dar. Ihre Kocherfahrung wird Sie bei
der Erprobung aller Funktionen dieses vielseitigen Ofens
unterstützen!
Эти символы лишь образно показывают, какие
типы пищи могут быть приготовлены в том или
ином режиме. Чтобы познать огромную
многосторонность этой духовки, не бойтесь
экспериментировать со всеми функциями,
опираясь на собственный опыт на кухне.
21
Page 22

Switch on the oven.
Den Ofen einschalten...
Включите духовку
GB
· Cooking
You can start cooking in just a few simple moves.
Choose which cooking function you want to use.
die Garfunktion wählen und...
Выберите желаемый режим приготовления
The cooking time symbol
appears on the display to show
that the oven is working.
Change the default temperature if you wish, or just wait
4 seconds to accept the default temperature.
After 4 seconds the electronic controller automatically
switches on the oven. The degrees centigrade symbol
flashes to show that the oven is warming up.
The oven beeps and the degrees centigrade symbol stops
flashing when the oven reaches the set temperature. You
can now put in the food you want to cook.
22
!
Important! The oven switches itself off
automatically if you do not select a cooking
function within 8 seconds of switching the
oven on. If this occurs, the time display reads
“OFF” and the oven beeps to tell you that it
has switched off.
Page 23

RUD
· Der Garvorgang...
Zum Garen genügen wenige und einfache Handgriffe...
· Приготовление
В несколько простых движений Вы можете начать
процесс приготовления.
die voreingestellte Temperatur verändern, oder 4
Sekunden warten...
, nach deren Ablauf schaltet sich der Ofen automatisch
ein und das Celsius-Grad-Symbol zeigt durch Blinken das
Vorheizen des Ofens an.
Das Garsymbol auf der
Zeitanzeige bedeutet, dass der
Ofen in Betrieb ist
Sobald der Ofen die eingestellte Temperatur erreicht,
ertönt ein akustisches Signal und das Celsius-GradSymbol hört zu blinken auf: das Gargut kann eingeschoben
werden.
При желании Вы можете изменить
рекомендуемую температуру или же подождать
4 секунды, чтобы принять рекомендуемую
температуру.
Через 4 секунды электронное управление
автоматически включит духовку.
Замигает символ градуса, показывая, что духовка
разогревается.
Появится символ времени
приготовления,
показывая, что духовка
работает.
Когда духовка достигнет заданной температуры,
она подаст звуковой сигнал, а символ градуса
перестанет мигать. Теперь Вы можете ставить в
нее блюдо, которое хотите готовить.
!
Achtung! Wird innerhalb von 8 Sekunden
nach Einschaltung des Ofens keine
Garfunktion gewählt, schaltet er sich
automatisch ab : auf der Zeitanzeige erscheint
die Meldung “OFF” und ein akustisches
Signal zeigt die Ausschaltung des Ofens an.
!
Ваэно! Если в течение 8 секунд после
включения Вы не выберите режим
приготовления, духовка выключается
автоматически. В таком случае на дисплее
появится надпись “OFF” и раздастся
звуковой сигнал, сообщающий, что духовка
выключена.
23
Page 24

GB
· Using the oven light
The oven is equipped with an intelligent light control to
reduce electricity consumption. The light stays on while
the oven is warming up and for 3 minutes after set
temperature is reached, and then switches off.
Press any key to check on the food in the oven. The light
comes on for another 3 minutes.
· Child lock
Your new electronic oven has a child lock function to
prevent young children from tampering with it or
accidentally switching it on. You can activate the child
lock at any time, even when the oven is switched off.
Activating the child lock
Press and hold the “On/Off” key for at least 3 seconds.
The time display shows
followed by
und danach
— затем —
The electronic controller is now disabled. All you can do
with the controls is switch the oven off (if it is on) or use
the countdown timer.
24
Off
Ausschaltung
Выключить
Countdown timer
Minutenuhr
Таймер обратного счета
If you press any other key, a key symbol appears on the
time display or temperature display to inform you that
the child lock is active.
Page 25

RUD
· Kontrolle der Innenbeleuchtung
Aus Energiespargründen wird die Innenbeleuchtung des
Ofens gesteuert : während des Vorheizens bis zu 3 Minuten
nach dem Erreichen der Temperatur bleibt die
Beleuchtung eingeschaltet, danach schaltet sie sich aus.
Zur Kontrolle des Gargutes einfach eine beliebige Taste
drücken, und die Innenbeleuchtung schaltet sich für
weitere 3 Minuten ein.
· “Kindersicherung”
Ein wichtiger Planungsaspekt Ihres neuen Ofens besteht
darin, versehentliche Verstellungen oder ungewolltes
Einschalten zu verhindern. Es kann daher jederzeit, auch
bei ausgeschaltetem Ofen, die Kindersicherung
zugeschaltet werden!
Aktivierung der “Kindersicherung”
· Пользование освещением духовки
Духовка оснащена интеллигентной системой контроля
освещения, понижающей потребление энергии. Свет
остается включенным лишь на время разогрева и в
течение 2 мин. после достижения заданной
температуры, затем выключается.
Чтобы проверить блюдо в духовке, нажмите на любую
кнопку. Свет загорится на 3 минуты снова.
· Блокировка от детей
Ваша новая электронная духовка имеет функцию
блокировки от детей, которая предотвращает их
вмешательство и случайное включение духовки. Вы
можете активировать эту функцию в любое время,
даже если духовка выключена.
Активация функции блокировки от детей
Die “On/Off”-Taste mindestens 3 Sekunden gedrückt
halten...
...auf der Zeitanzeige erscheint
ab diesem Zeitpunkt kann der Ofen einzig und allein
ausgeschaltet werden, sofern er eingeschaltet ist, oder die
Minutenuhr eingestellt werden
Нажмите и держите кнопку “On/Off” в течение
приблизительно 3 секунд
Дисплей индикации времени показывает:
Электронное управление духовкой
заблокировано. Теперь Вы можете лишь
выключить ее (если она включена) или
использовать таймер обратного счета.
Beim Drücken einer beliebigen Taste zeigt ein Schlüssel
auf der Zeitanzeige oder Thermostatanzeige an, dass die
Funktion “Kindersicherung” eingeschaltet ist.
Если Вы нажмете любую другую кнопку, на
дисплее индикации времени или температуры
появится ее символ, информируя Вас о том, что
активирована функция блокировки от детей.
25
Page 26

GB
Important! You must deactivate the
!
child lock before you can use the oven
again.
Deactivating the child lock
Press and hold the “On/Off” key for at least 3 seconds.
The time display shows
followed by
und danach
— затем —
· Using the time display
1.Using the countdown timer
The countdown timer works independently of all other
timer functions, and can be used as a practical timer
with buzzer even when the oven is switched off.
26
Countdown timer key
Taste der Minutenuhr
Включение таймера обратного
счета
The time display appears and the dots separating
the hours and minutes flash. Use the “+” and “-”
keys to set the countdown period, then simply wait
a few seconds for the controller to start the
countdown.
Page 27

RUD
Achtung! Auch zur Einschaltung des
!
Ofens muss die Funktion ausgeschaltet
werden
Ausschaltung der “Kindersicherung”
Die “On/Off”-Taste mindestens 3 Sekunden gedrückt
halten...
...auf der Zeitanzeige erscheint
Важно! Теперь, прежде чем снова
пользоваться духовкой, вы должны
!
дезактивировать функцию
блокировки от детей.
Дезактивация функции блокировки
от детей
Нажмите и держите кнопку “On/Off” в течение
приблизительно 3 секунд
Дисплей индикации времени показывает:
· Gebrauch der Zeitanzeige/Timer
1. Minute Minder (oder Minutenuhr)
Der Gebrauch der Minutenuhr ist von den anderen
Garfunktionen unabhängig und kann auch bei
ausgeschaltetem Ofen als einfaches Tonsignal verwendet
werden.
Die Anzeige schaltet um und der Doppelpunkt
zwischen Stunden/Minuten blinkt : mit den Tasten
“+” und “-“ die Gesamtzeit einstellen und einige
Sekunden warten, bis die Eingabe erfasst wird...
· Пользование дисплеем индикации
времени
1. Пользование таймером обратного счета
Таймер обратного счета работает назависимо от
всех других временных функций. Им можно
пользоваться как обычным таймером с зуммером
даже если духовка выключена.
на дисплее появится индикация времени и
замигают точки, разделяющие часы и
минуты. Используя кнопки “+” и “-”
установите время отсчета и просто
подождите, через несколько секунд таймер
начнет обратный счет.
27
Page 28

The normal time display returns with the
countdown symbol to show that the countdown
is running.
At the end of the countdown time the oven beeps twice at
an interval of two seconds and the countdown symbol
flashes. Press any key to silence the buzzer. The oven
beeps three times and the countdown symbol disappears.
2. Setting cooking time
GB
Use the cooking time function to set the duration of
cooking starting from the present time. You must select a
cooking function before you can set cooking time (see
the “Cooking” section).
Oven active: a cooking function has been selected.
Press this key to set cooking time.
28
The time display appears and the dots
separating the hours and minutes flash. Use
the “+” and “-” keys to set cooking time, then
simply wait a few seconds for the controller
to start timing the cooking period.
Page 29

RUD
...danach erscheint auf der Zeitanzeige wieder
die Uhrzeit sowie das entsprechende Symbol,
das die erfolgte Einstellung anzeigt.
Der Ablauf der eingestellten Zeit wird durch einen
doppelten Signalton im 2-Sekunden-Abstand und das
blinkende Symbol gemeldet : eine beliebige Taste
drücken, um das Tonsignal abzustellen. Der Vorgang wird
durch ein dreifaches akustisches Signal und das
Ausblenden des Symbols bestätigt
2. Cooking Time (oder Garzeit)
Diese Funktion dient zur Einstellung einer Garzeit
ausgehend von der aktuellen Uhrzeit und kann nur nach
Wahl einer Garfunktion aktiviert werden (siehe Kapitel
“Der Garvorgang...”).
Вернется нормальная индикация
времени с символом таймера обратного
счета, указывая на то, что идет обратный
счет.
По окончании обратного счета духовка дважды
подает звуковой сигнал с интервалом в две
секунды и замигает символ таймера обратного
счета. Нажав любую кнопку, отключите зуммер.
Трижды раздается звуковой сигнал и символ
таймера погаснет.
2. Установка времени приготовления
Используйте функцию установки времени
приготовления, чтобы задавать
продолжительность приготовления от настоящего
момента времени. Прежде чем задать
продолжительность приготовления, Вы должны
выбрать режим приготовления (см. раздел
“Приготовление”).
Ofen in Betrieb : es wurde eine Garfunktion gewählt Духовка активна: режим приготовления
выбран
Mit dieser Taste wird die Option Cooking Time
aktiviert
Die Anzeige schaltet um und der
Doppelpunkt zwischen Stunden/Minuten
blinkt : mit den Tasten “+” und “-“ die
Garzeit einstellen und einige Sekunden
warten, bis die Eingabe erfasst wird...
Нажмите эту кнопку, чтобы задать время
приготовления
На дисплее появится индикация
времени и замигают точки,
разделяющие часы и минуты.
Используя кнопки “+” и “-”, задайте
время и просто подождите, через
несколько секунд начнется отсчет
времени приготовления.
29
Page 30

GB
The normal time display returns with the
auto-timer cooking symbol to show that the
oven is working.
At the end of the cooking time the oven beeps twice at an
interval of two seconds and the symbols flash. Then the
temperature display, the time display and the heating
elements switch off.
Press any key to silence the buzzer. The oven beeps three
times and the symbols disappear.
!
3. Setting end of cooking time
Use the end of cooking time function to set the time at
which you want cooking to finish. You must select a
cooking function before you can set end of cooking time
(see the “Cooking” section).
Oven active: a cooking function has been selected.
If you select no other functions within
8 seconds from silencing the buzzer,
the oven automatically switches off.
30
Press this key to set end of cooking time.
Page 31

RUD
...danach erscheint auf der Zeitanzeige
wieder die Uhrzeit sowie das entsprechende
Symbol, das die erfolgte Einstellung
anzeigt.
Der Ablauf der Garzeit wird durch einen doppelten
Signalton im 2-Sekunden-Abstand und blinkende
Symbole gemeldet : die Thermostatanzeige und die
Anzeige der Ofenfunktionen sowie die Heizelemente des
Ofens werden ausgeschaltet.
Eine beliebige Taste drücken, um das Tonsignal
abzustellen. Der Vorgang wird durch ein dreifaches
akustisches Signal und das Ausblenden der Symbole
bestätigt.
8 Sekunden nach Abstellen des
akustischen Signals schaltet sich der
!
Ofen automatisch aus, wenn keine
weiteren Garfunktionen gewählt
werden.
Вернется нормальная индикация
времени с символом автоматического
времени приготовления А,
показывая, что духовка работает.
По истечении времени приготовления духовка
дважды подает звуковой сигнал с интервалом в
две секунды и замигают символы. Затем дисплей
индикации температуры, дисплей индикации
времени и нагревательные элементы
отключаются.
Нажав любую кнопку, отключите зуммер.
Трижды раздастся звуковой сигнал и символы
погаснут.
Важно! Если в течение 8 секунд
после отключения зуммера Вы не
!
выберите режим приготовления,
духовка выключается
автоматически.
3. Cooking Stop (Garzeitende)
Mit der Option Cooking Stop kann die Uhrzeit des
Garzeitendes ausgehend von der aktuellen Uhrzeit
bestimmt werden. Sie kann nur nach Wahl einer
Garfunktion aktiviert werden (siehe Kapitel “Der
Garvorgang...”).
Ofen in Betrieb : es wurde eine Garfunktion gewählt Духовка активна: режим приготовления
Mit dieser Taste wird die Option Cooking Stop
aktiviert
3. Установка времени окончания приготовления
Используйте функцию установки времени
окончания приготовления, чтобы задать время,
когда Вы хотите, чтобы процесс приготовления
закончился и духовка отключилась. (см. раздел
“Приготовление”)
выбран.
Нажмите на эту кнопку, чтобы задать время
окончания приготовления
31
Page 32

GB
The time display appears and the dots separating the hours
and minutes flash. Note that you must set a time different
from the present time!
Use the “+” and “-” keys to set end of cooking time, then
simply wait a few seconds for the controller to register it.
The normal time display returns with the
auto-timer cooking symbol to show that the
oven is working.
At the end of cooking time the oven beeps twice at an
interval of two seconds and the symbols flash. Then the
temperature display, the time display and the heating
elements switch off.
Press any key to silence the buzzer. The oven beeps three
times and the symbols disappear.
If you select no other functions within
!
8 seconds from silencing the buzzer,
the oven automatically switches off.
32
Page 33

RUD
Der blinkende Doppelpunkt zwischen Stunden/
Minuten zeigt an, dass nun das gewünschte Garzeitende
eingestellt werden kann : die eingestellte Uhrzeit muss
nach der aktuellen Zeit liegen!
mit den Tasten “+” und “-“ das Garzeitende einstellen
und einige Sekunden warten, bis die Eingabe erfasst
wird...
На дисплее появится индикация времени и
замигают точки, разделяющие часы и минуты.
Учтите, Вы должны задать время,
отличающееся от текущего!
Используя кнопки “+” и “-” задайте время
окончания приготовления и просто подождите
несколько секунд, пока программа примет его.
...danach erscheint auf der Zeitanzeige
wieder die Uhrzeit sowie das entsprechende
Symbol, das die erfolgte Einstellung
anzeigt.
Das Erreichen der eingestellten Uhrzeit für das
Garzeitende wird durch einen doppelten Signalton im 2Sekunden-Abstand und blinkende Symbole gemeldet : die
Thermostatanzeige und die Anzeige der Ofenfunktionen
sowie die Heizelemente des Ofens werden ausgeschaltet.
Eine beliebige Taste drücken, um das Tonsignal
abzustellen. Der Vorgang wird durch ein dreifaches
akustisches Signal und das Ausblenden der Symbole
bestätigt.
8 Sekunden nach Abstellen des
!
akustischen Signals schaltet sich der
Ofen automatisch aus, wenn keine
weiteren Garfunktionen gewählt
werden.
Вернется нормальная индикация
времени с символом автоматического
времени приготовления А,
показывая, что духовка работает.
По истечении времени приготовления духовка
дважды подает звуковой сигнал с интервалом в
две секунды и замигают символы. Затем дисплей
индикации температуры, дисплей индикации
времени и нагревательные элементы
отключаются.
Нажав любую кнопку, отключите зуммер. Трижды
раздастся звуковой сигнал и символы погаснут.
Важно! Если в течение 8 секунд
!
после отключения зуммера Вы не
выберите режим приготовления,
духовка выключается
автоматически.
33
Page 34

4. Setting cooking start and end times
You can combine the cooking time and end of cooking
time functions to set the start and end times for cooking.
In this way you can program your electronic oven to cook
while you are out or to defrost foods ready for you to
cook when you get back. A great help in the kitchen!
The order in which you set the two
functions is not important.
GB
Example: We want to start cooking a dish 30 minutes
before we get home so that it will be ready for us when
we do.
Place the dish in the oven and select the cooking
function you want (Grill + fan shown by way of
example only). Adjust the default temperature as
required.
Set a cooking time of 30 minutes.
34
Set the cooking time (see section 2. Setting cooking time).
Page 35

RUD
4. Programm Garzeitbeginn und -ende
Durch Kombination der beiden Optionen “Cooking time”
und “Cooking Stop” können Sie Ihren elektronischen Ofen
programmieren. Dies ist besonders nützlich, wenn Sie
außer Haus sind. Der Ofen führt selbständig das
eingestellte Garprogramm oder das Auftauen von Speisen
aus, die Sie dann bei Ihrer Rückkehr bereits garfertig
vorfinden !
Die Programmierfolge ist nicht
entscheidend
4. Установка времени начала и окончания
приготовления
Вы можете комбинировать функции времени
приготовления и времени окончания
приготовления, задавая желаемое время
включения и выключения духовки. Таким
образом, Вы можете запрограммировать
процесс приготовления в Вашей духовке на то
время, когда Вас нет дома или же процесс
размораживания продуктов к Вашему приходу.
Неплохая помощь на кухне.
Не важно в каком порядке
Вы программируете эти две
функции.
Beispiel : Der Garvorgang soll 30 Minuten vor unserer
Heimkehr beginnen und beendet sein um...
Bereiten Sie die Speise vor und legen Sie sie in den
Ofen. Wählen Sie z. B. die Funktion Grill mit
Heißluft und verändern Sie ggf. die Temperatur...
...Geben Sie eine Garzeit von 30
min ein.
Например: Мы хотим начать готовить блюдо за
30 минут до нашего возвращения домой, чтобы
к нашему приходу оно было готово.
Поместите блюдо в духовку и выберите
желаемый режим приготовления (режим
“гриль + обдув” показан лишь для
примера). Установите нужную
температуру.
Задайте время
приготовления 30 минут.
Die Garzeit einstellen (siehe Punkt 2)
Установка времени приготовления (см. раздел 2
“Установка времени приготовления”).
35
Page 36

GB
Before you set end of cooking time, note the
present time.
When you set end of cooking time, the timer
display present time plus cooking time by
default.
Use the “+” key to set a time e.g. 10 minutes
later. The timer registers this time after a few
seconds. The display switches off and the oven
enters stand-by mode. The present time is
displayed.
At 12:25, the oven switches on in Grill + fan
mode for 30 minutes, and switches off at 12.55
according to our time settings.
36
!
Hint! This is a good time to
activate the child lock to prevent
young children from tampering
with or accidentally switching on
the oven.
Page 37

RUD
Vor dem Einstellen des gewünschten
Garzeitendes (Cooking Stop) merken Sie sich die
aktuell eingestellte Uhrzeit
Wird nun die Uhrzeit für das Garzeitende
eingestellt, erscheint auf der Anzeige die aktuelle
Uhrzeit summiert mit der zuvor eingestellten
Garzeit!
Mit der Taste “+” fügen wir 10min. zum
Garzeitende hinzu : die Eingabe wird nach
wenigen Sekunden erfasst, der Ofen schaltet
sämtliche Displays aus und stellt sich in den
Stand-by-Modus. Die aktuelle Uhrzeit wird
angezeigt...
Прежде чем установить время
окончания приготовления, запомните
текущее время.
Значение времени окончания
приготовления равно текущему
времени плюс значение времени
приготовления (30 мин.).
Используя кнопку “+”, Вы можете
изменить время, например, на 10
минут позже. Через несколько секунд
таймер зарегистрирует это значение.
Дисплей погаснет, духовка в режиме
ожидания. Высветиться текущее
время.
Um 12:25 führt der Ofen einen Garvorgang
“Grill mit Heißluft” der Dauer von 30 min.
aus und beendet ihn um 12.55, gemäß unserer
Programmierung!
Empfehlung : an dieser Stelle die
Funktion “Kindersicherung”
!
einschalten, um eine Verstellung der
Eingabewerte oder ein
versehentliches Einschalten des
Ofens zu verhindern.
Т.о. в 12:25 включится в режиме “гриль
+ обдув” на 30 минут и выключится в
12:55 соответственно заданному
времени.
Совет! Самое время
активировать функцию
!
блокировки от детей, чтобы
предотвратить их
вмешательство или случайное
включение духовки.
37
Page 38

GB
REPLACING THE OVEN LIGHT
IMPORTANT:
The oven light must have these precise features:
a) it must be able to resist high temperatures (up to
300°C)
b) power supply: see V/Hz indicated on data plate.
c) power 25W.
d) E 14 connection.
Before proceeding, disconnect the appliance from the
main electricity supply.
- to prevent damage, place a tea cloth in the oven
- unscrew the glass cover of the light
- unscrew the old light bulb and replace it with the new
one
- put back the glass cover and remove the tea cloth
- connect the appliance to the main electricity supply
38
Page 39

RUD
AUSWECHSLUNG DER OFENBELEUCHTUNG
WICHTIG:
Die Ofenbeleuchtung muss folgende Merkmale
aufweisen:
a) hochtemperaturbeständig (bis zu 300 Grad)
b) Stromversorgung: siehe Anschlusswerte V/Hz auf
dem Typenschild.
c) Leistung 25 W
d) Sockel E 14
Das Gerät zuallererst vom Stromnetz abtrennen.
- Zur Vermeidung von Schadensfällen, ist im Ofen ein
Geschirrtuch auszubreiten
- Lampenabdeckung aus Glas abschrauben
- Alte Lampe abschrauben und mit einer neuen Be-
leuchtung auswechseln
- Lampenabdeckung wieder anmontieren und
Geschirrtuch entfernen
- Das Gerät erneut an das Stromnetz anschließen
PFVTYF KFVGJXRBPFVTYF KFVGJXRB
PFVTYF KFVGJXRB
PFVTYF KFVGJXRBPFVTYF KFVGJXRB
DF:YJ%DF:YJ%
DF:YJ%
DF:YJ%DF:YJ%
Jcdtotybt le[jdrb ljk;yj bvtnm cktle/obtJcdtotybt le[jdrb ljk;yj bvtnm cktle/obt
Jcdtotybt le[jdrb ljk;yj bvtnm cktle/obt
Jcdtotybt le[jdrb ljk;yj bvtnm cktle/obtJcdtotybt le[jdrb ljk;yj bvtnm cktle/obt
gfhfvtnhs%gfhfvtnhs%
gfhfvtnhs%
gfhfvtnhs%gfhfvtnhs%
Nthvjcnjqrjcnm !lj 300 Nthvjcnjqrjcnm !lj 300
a)
Nthvjcnjqrjcnm !lj 300°
Nthvjcnjqrjcnm !lj 300 Nthvjcnjqrjcnm !lj 300
""
ktrnhjgbnfybt% gfhfvtnhs gjlrk/xtybz ktrnhjgbnfybt% gfhfvtnhs gjlrk/xtybz
b)
"
ktrnhjgbnfybt% gfhfvtnhs gjlrk/xtybz V/Hz
""
ktrnhjgbnfybt% gfhfvtnhs gjlrk/xtybz ktrnhjgbnfybt% gfhfvtnhs gjlrk/xtybz
erfpfys d pfdjlcrjq nf,kbxrt.erfpfys d pfdjlcrjq nf,kbxrt.
erfpfys d pfdjlcrjq nf,kbxrt.
erfpfys d pfdjlcrjq nf,kbxrt.erfpfys d pfdjlcrjq nf,kbxrt.
Gjnht,kztvfz vjoyjcnm 25 Gjnht,kztvfz vjoyjcnm 25
c)
Gjnht,kztvfz vjoyjcnm 25 W
Gjnht,kztvfz vjoyjcnm 25 Gjnht,kztvfz vjoyjcnm 25
Wjrjkm Wjrjkm
d)
Wjrjkm E 14
Wjrjkm Wjrjkm
Gthtl yfxfkjv jnrk/xbnm le[jdre jn ctnbGthtl yfxfkjv jnrk/xbnm le[jdre jn ctnb
Gthtl yfxfkjv jnrk/xbnm le[jdre jn ctnb
Gthtl yfxfkjv jnrk/xbnm le[jdre jn ctnbGthtl yfxfkjv jnrk/xbnm le[jdre jn ctnb
- Dj bp,t;fybt gjdht;ltybq hfpkj;bnt d le[jdrt
re[jyyjt gjkjntywt
- Dsrhenbnt cntrkzyysq gkfajy
- Dsrhenbnt cnfhe/ kfvgjxre b drhenbnt yjde/
- Drhenbnt yf vtcnj gkfajy b e,thbnt gjkjntywt
- Gjlrk/xbnt le[jdre r 'ktrnhjctnb
..
.
..
C@ C@
C@
C@ C@
..
.
..
..
.
..
39
Page 40

GB
REMOVING THE OVEN DOOR
The oven door can be removed quickly and easily. To do
so, proceed as follows:
- Open the door fully.
- Lift the two levers shown in fig.
- Close the door as far as the first stop (caused by the
raised levers).
- Lift the door upwards and outwards to remove it from
its mountings.
To replace fit the door, fit the hinges in their mountings
and lower the two levers.
40
Page 41

RUD
AUSBAUEN DER OFENTÜR
Die Backofentür kann mühelos ausgebaut werden. Dazu
folgendermaßen vorgehen:
- die Tür ganz öffnen;
- die zwei auf Abb. dargestellten Hebel anheben;
- die Tür wieder bis zur ersten, von den zwei zuvor
angehobenen Hebeln bestimmten Einrastung schließen;
- die Tür nach oben und nach außen anheben und herausnehmen;
Um die Tür wieder einzubauen, die Scharniere wieder
einsetzen und dann die zwei Hebel in Schließstellung
bringen..
LTVJYNF: LDTHWS LE{JDRBLTVJYNF: LDTHWS LE{JDRB
LTVJYNF: LDTHWS LE{JDRB
LTVJYNF: LDTHWS LE{JDRBLTVJYNF: LDTHWS LE{JDRB
Ldthwf le[jdrb vj;tn ,snm jxtym kturj ltvjynbhjdfyf.
Lkz 'njuj ytj,[jlbvj%
- gjkyjcnm/ jnrhsnm ldthwe&
- ghbgjlyznm ldf erfpfyys[ yf hbceyrt hsxf;rf&
- ghbrhsnm ldthwe lj gthdjuj rfcfybz gjlyzns[
hsxf;rjd&
- ghbgjlyzd ldthwe> gjnzyenm tt ddth[ yf ct,z.
Xnj,s dyjdm ecnfyjdbnm ldthwe> dcnfdbnm ifhybhs yf
ght;ytt vtcnj b pfotkryenm hsxf;rb.
41
Page 42

GB
INSTALLATION INSTRUCTIONS
Flush fitting
The oven can be installed under a work top or in a cooking column. Figure shows the installation dimensions.
Make sure that surrounding materials are heat resistant.
Align the oven centrally with respect to the side walls of
the units surrounding it and fix it in place with the screws
and Allen screws provided.
See the accompanying instructions for combining the
oven with multi-functional gas or gas-electric cookers.
42
Page 43

RUD
FÜR DEN INSTALLATEUR
Einbau des Backofens
Der Ofen kann unter einem Kochfeld oder in einen
Schrank eingebaut werden. Die Einbaumaße müssen
den auf der Abbildung dargestellten entsprechen. Das
Möbelmaterial muss hitzebeständig sein. Der Backofen
muss zu den Möbelwänden zentriert, und mit den
mitgelieferten Schrauben und Buchsen befestigt
werden.
Für die Kombination des Backofens mit den Gasoder Gas/Elektrokombikochfeldern siehe beiliegende Anleitungen.
ERFPFYBZ LKZ VJYNTHFERFPFYBZ LKZ VJYNTHF
ERFPFYBZ LKZ VJYNTHF
ERFPFYBZ LKZ VJYNTHFERFPFYBZ LKZ VJYNTHF
Ecnfyjdrf
Le[jdrf ghtlyfpyfxtyf lkz dcnhjqrb kb,j d hf,jxe/
gjdth[yjcnm cnjkf> kb,j d irfa. Hfpvths> rjnjhsvb
ytj,[jlbvj herjdjlcndjdfnmcz ghb dcnhjqrt> erfpfys
yf hbceyrt. Vt,tkm ljk;yf ,snm bpujnjdktyf bp
yfuhtdjcnjqrjuj vfnthbfkf. Le[jdrf ljk;yf ,snm
jnwtynhjdfyf gj jnyjityb/ r cntyrfv vt,tkb b
yflt;yj pfrhtgktyf ghb gjvjob gjcnfdkztvs[ d
rjvgktrnt rhtgt;ys[ vfnthbfkjd.
Lkz rjv,byfwbb le[jdrb c ufpjdjq bkb ufpj-Lkz rjv,byfwbb le[jdrb c ufpjdjq bkb ufpj-
Lkz rjv,byfwbb le[jdrb c ufpjdjq bkb ufpj-
Lkz rjv,byfwbb le[jdrb c ufpjdjq bkb ufpj-Lkz rjv,byfwbb le[jdrb c ufpjdjq bkb ufpj'ktrnhbxtcrjq gjdth[yjcnm/ bcgjkmpeqnt'ktrnhbxtcrjq gjdth[yjcnm/ bcgjkmpeqnt
'ktrnhbxtcrjq gjdth[yjcnm/ bcgjkmpeqnt
'ktrnhbxtcrjq gjdth[yjcnm/ bcgjkmpeqnt'ktrnhbxtcrjq gjdth[yjcnm/ bcgjkmpeqnt
ghbrkflsdftve/ ljrevtynfwb/.ghbrkflsdftve/ ljrevtynfwb/.
ghbrkflsdftve/ ljrevtynfwb/.
ghbrkflsdftve/ ljrevtynfwb/.ghbrkflsdftve/ ljrevtynfwb/.
43
Page 44

GB
ELECTRICAL CONNECTIONS
Before connecting the oven to the mains power supply,
make sure that:
- The supply voltage corresponds to the specifications on
the data plate on the front of the oven.
- The mains supply has an efficient earth (ground) con-
nection complying with all applicable laws and regulations. Correct earthing (grounding) is a legal requirement. If the appliance is not pre-fitted with a power
cable and/or plug, use only suitable cables and plugs
capable of handling the power specified on the
appliance’s data plate and capable of resisting heat. The
power cable should never reach a temperature 50° C
above ambient temperature at any point along its length.
If the appliance is to be connected directly to mains
terminals, fit a switch with minimum aperture of 3 mm
between the contacts. make sure that the switch is of
sufficient capacity for the power specified on the appliance’s data plate, and compliant with applicable
regulations. The switch must not break the yellow-green
earth wire. The socket or switch must be easily reachable
with the oven fully installed.
44
N.B. The manufacturer declines all responsibility for
damage or injury if the above instructions and normal
safety precautions are not respected.
Page 45

RUD
STROMANSCHLUSS
Vor der Durchführung des Stromanschluss muss sichergestellt werden, dass:
- die Eigenschaften der Stromnetzes mit den Werten auf
dem vorne am Ofen angebrachten Typenschild
übereinstimmen;
- das Stromnetz gemäß den geltenden Bestimmungen
und Rechtsvorschriften geerdet ist. Die Erdung ist gesetzlich vorgeschrieben. Falls das Gerät nicht mit Kabel
und/oder Netzstecker ausgestattet ist, muss geeignetes
Material verwendet werden, das der auf dem
Typenschild angegebene Stromaufnahme und der Betriebstemperatur entspricht. Das Kabel darf an keiner
Stelle eine Temperatur von über 50° C erreichen.
Wenn ein direkter Netzanschluss gewünscht wird, muss
ein allpoliger Schalter mit einem Öffnungsweg von
mindestens 3 mm zwischen den Kontakten
zwischengeschaltet werden, der entsprechend der Belastung lt. Typenschild bemessen sein, und den geltenden
Vorschriften entsprechen muss (das gelb-grüne
Erdungskabel darf nicht vom Schalter unterbrochen
werden. Die Steckdose bzw. der allpolige Schalter
müssen bei installiertem Gerät problemlos zugänglich
sein.
Gjlrk/xtybt r 'k. ctnbGjlrk/xtybt r 'k. ctnb
Gjlrk/xtybt r 'k. ctnb
Gjlrk/xtybt r 'k. ctnbGjlrk/xtybt r 'k. ctnb
Gthtl gjlrk/xtybtv le[jdrb r 'k. ctnb> ytj,[jlbvj
e,tlbnmcz> xnj
- gfhfvtnhs ctnb cjjndtncnde/n lfyysv d nf,kbxrt
yf pflytq cntyrt le[jdrb
- 'k. ctnm pfptvktyf d cjjndtncndbb c ltqcnde/obvb
ghtlgbcfybzvb. Pfptvktybt zdkztncz ytj,[jlbvsv
eckjdbtv ghfdbkmyjq 'rcgkefnfwbb. Tckb le[jdrf yt
j,jheljdfyf rf,tktv b#bkb intrthjv> ghbvtyzqnt
njkmrj vfnthbfks> cjjndtncnde/obt lfyysv>
erfpfyysv d nf,kbxrt yf pflytq cntyrt ghb,jhf>
rjnjhst vjuen aeyrwbjybhjdfnm d hf,jxtv ht;bvt
ntvgthfneh. Rf,tkm yb d rjtv ckexft yt ljk;ty
yfuhtdfnmcz dsit ntvgthfnehs ,jktt 50° C.
D ckexft gjlcjtlbytybz ytgjchtlcndtyyj r 'k. ctnb>
ytj,[jlbvj bcgjkmpjdfnm cgtwbfkmysq dctgjkzhysq
dsrk/xfntkm c pfpjhjv vt;le rjynfrnfvb yt vtytt 3
vv> cjjndtncndtyyj nt[ybxtcrbv lfyysv ltqcnde/ob[
ghtlgbcfybq !;tknj - ptktysq rf,tkm pfptvktybz
ljk;ty ,snm gjlrk/xty r dsrk/xfntk/@. Intrth bkb
dctgjkzhysq dsrk/xfntkm yf ghfdbkmyj ecnfyjdktyyjv
ghb,jht ljk;ty ,snm dctulf kturj ljczuftv.
N.B. Der Hersteller ist nicht haftbar, wenn die obigen
Anweisungen und die üblichen Unfallverhütungsvorschriften nicht befolgt werden.
Bpujnjdbntkm yt ytctn ybrfrjq jndtncndtyyjcnb tckb
ghb ecnfyjdrt ghb,jhf yt cj,k/lf/ncz dct
dsitghbdtltyyst ghtlgbcfybz.
45
Page 46

Page 47

УСЛОВИЯ ГАРАНТИИ
1. Гарантия на исправное действие прибора действительна на период 12 месяцев со дня покупки прибора
(подтверждена оттиском печати пункта розничной продажи и подписью продавца).
2. Фирма - изготовитель обеспечивает безвозмездный ремонт в случае обнаружения в гарантийный период заводских
дефектов (несоответствующая конструкция, монтаж, дефектные материалы и исполнение).
3. Данная гарантия распространяется только на изделия использующиеся в некоммерческих, личных, семейных
или домашних целях. В противном случае, гарантийный срок составляет 4 месяца с момента приобретения.
4. Гарантийный ремонт выполняется бесплатно ( включая стоимость работ, материалов и, при необходимости и с
учетом действующего законодательства, перевозки) уполномоченной сервисной компанией на дому у потребителя
или в мастерской, по усмотрению сервисной компании.
5. Любые претензии по качеству изделия рассматриваются только после проверки качества изделия уполномоченной
сервисной компанией и при необходимости выдачи последней соответствующего заключения.
6. Обмен прибора на свободный от дефектов в течение гарантийного срока осуществляется только в том случае,
если на основании заключения эксперта невозможно произвести ремонт или если после 3-х ремонтов прибор
остаётся неисправным.
7. Обмен прибора на исправный производит только организация, продавшая товар.
8. Ответственность по настоящей гарантии ограничивается, если иное неопределено законом, указанным в настоящем
документе, обязательствами.
ГАРАНТИЯ НЕ РАСПРОСТРАНЯЕТСЯ:
1. На изделия, отказы и неисправности которых вызваны транспортными повреждениями, неправильной установкой,
небрежным обращением или плохим уходом, подключением к неправильному напряжению питания, использования
не рекомендованных чистящих и моющих средств несоблюдением прилагаемой инструкции по эксплуатации или
если изделие подвергалось ремонту или конструктивным изменениям неуполномоченными лицами, или если
удален, не разборчив или изменен серийный номер изделия.
2. На изделия, эксплуатировавшиеся с неустраненными недостатками или проходившие техническое обслуживание
в компаниях, не являющихся нашими уполномоченными сервисными компаниями.
3. На неисправности, которые вызваны независящими от производителя причинами, такими как: перепады
напряжения питания, явления природы и стихийные бедствия, пожар, домашние и дикие животные, насекомые и
т. п.
4. На стеклянные. и керамические поверхностей, а также внешние элементы из пластмасс в случае, если дефект
наступил по вине пользователя, после подписания потребителем акта приёмки—сдачи.
5. На царапины, трещины и аналогичные механические внешние повреждения, возникшие в процессе эксплуатации.
6. На такие повреждения деталей, вероятность которых существенно выше обычной по характеру их эксплуатации
или которые произошли в результате естественного износа, ( включая расходные материалы) таких как: лампы,
фильтры и т. п., перемещаемые вручную пластмассовые детали.
7. На такие виды работ как регулировка, чистка и прочий уход за изделием, оговоренный в Инструкции по
эксплуатациию.
8. А также по другим причинам, возникшим по вине покупателя и не вызванными заводом-изготовителем - могут
устраняться исключительно за счёт покупателя.
Незаземленное оборудование является потенциально опасным.
Производитель не несет ответственность за ущерб здоровью и
собственности, если оно вызвано несоблюдением норм
установки, использованием неисправного оборудования
1
Page 48

ГАРАНТИЙНЫЙ ТАЛОН
(Nr. соответствует номеру аппарата, смотри на задней обложке настоящей инструкции)
Данные гарантийные обязательства не ограничивают определенные законом права потребителей
Поздравляем Вас с приобретением бытовой техники отличного качества!
Пожалуйста ознакомьтесь с настоящим гарантийным свидетельством и проследите чтобы оно было правильно
заполнено и имело штамп магазина. При отсутствии штампа и даты продажи гарантийный срок исчисляется с
момента изготовления изделия. Тщательно проверьте внешний вид изделия, все претензии по внешнему виду
предъявляйте продавцу при принятии товара. Сохраняйте гарантийный талон и чек на проданное изделие. По
Для установки, подключения и по всем вопросам, связанным с техническим обслуживанием, обращаться
только в авторизированные сервисные центры. Подробная информация об уполномоченных на
обслуживание и ремонт сервисных центрах прилагается отдельным списком
Мы сохраняем за собой право вносить изменения в конструкцию или технологию изготовления. Таковые
изменения не влекут обязательств по изменению или улучшению ранее выпущенных изделий
вопросам неполного комплекта изделия и его замены обращайтесь в торговую организацию.
ОТМЕТКА О ПРОДАЖЕ:
7Электрическая плита 7Холодильник
ИЗДЕЛИЕ: 7Газовая плита 7Стиральная машина
7Встраиваемая поверхность 7Посудомоечная машина
7Встраиваемая духовка 7Вытяжка
7Микроволновая печь
Модель:..............................................................................................................................................................................................
Заводской №:.......................................................................................................................................................................
Название магазина:.............................................................................................................................................................
Телефон:..........................................................................................................................................................................................
Дата продажи:”_____”_______________200___г.
СВЕДЕНИЯ ОБ УСТАНОВКЕ:
Установлено:”_____”_______________200___г.
Владелец (фамилия, имя, отчество)..........................................................................................................................................................
Адрес, телефон.............................................................................................................................................................................
Подпись владельца.....................................................................................................................................................................
Мастер
(фамилия, имя, отчество)...............................................................................................................................................................
Орг. установщик............................................................................................................................................................................
Подпись..........................................................................................................................................................................................
Изделие продано в заводской упаковке или проверено в моем присутствии, Инструкция по эксплуатации получена. С правилами эксплуатации
ознакомлен. Претензий по внешнему виду и комплектности не имею.
Подпись покупателя.......................................................................................................................................................................
2
Page 49

Представительство «Каisеr» в России по сервисному обслуживанию:
тел/ Наш адрес в Интернете: www.kaiser.ru.
Почтовый факс: (095) 488-75-10, 488-76-10; е-mail: service@kaiser.ru.
адрес: 127238, Москва, а/я 46.
Адреса и телефоны авторизированных сервисных центров, обеспечивающих гарантийное и послегарантийное
обслуживание техники «Kaiser»:
1. Москва
Подключение и ремонт электрических плит, газовых плит, встраиваемых духовок и поверхностей,
микроволновых печей, вытяжек, стиральных и посудомоечных машин:
ООО «Кайзер-сервис», тел.: 488-75-10, 488-76-10. Адрес: 127238, Москва, а/я 46
Ремонт холодильников и подключение газовых плит:
«Евросервис», тел.: 737-78-04, ул. Автозаводская, д.5
2. Санкт-Петербург
Подключение и ремонт электрических плит, встраиваемых духовок, поверхностей и вытяжек:
ООО «Олан Спб», тел.: (812) 227-60-46, 227-60-36, Ириновский пр-т, д.2
Подключение и ремонт газовых плит, стиральных и посудомоечных машин, холодильников:
ООО «Мойдодыр специалист», тел.: (812) 326-05-83, Ленинский проспект, дом 153, офис 227
3. Альметьевск: ООО «Триумф-Сервис», тел.: (8553) 32-74-92, 23-78-12, ул. М. Джалиля, д.47
4. Ангарск: ПБОЮЛ Бровкин, тел.: (3951) 55-05-36, 18 мкр, д.1, кв.262
5. Архангельск: Сервис-центр «Мир», тел.: (8182) 276066, ул Гагарина , дом 1
ООО «Сервис-Быт», тел.: (8182) 64-54-91, ул. Галушина, д.24, к.1
6. Астрахань: ЧП Кузнецов, тел.: (8512) 39-82-16, 36-83-37, ул. Яблочкова, 1-В
ЧП Савин, тел.: (8512) 38-28-67, 38-35-84, 25-12-32, ул. Сен-Симона, 42-46
7. Барнаул: ООО «Промэкс», тел.: (3852) 77-23-23, 75-44-97, пр-т Калинина, д.24а
8. Белгород: ООО «Выбор-Сервис», тел.: (0722) 32-65-92, пр-т Ленина, д.32
ООО «Универмаг Торггарант», тел.: (0722) 32-93-47, ул.Попова, 36
9. Бийск: ООО «Семь ключей», тел.: (3854) 33-52-16, 32-70-02, ул. Озерная, д.6-Б
10. Биробиджан: ООО «Реал Электроник», тел.: (42622) 22-0-24, 22-0-25, ул.Димитрова, 3
11. Благовещенск: ООО «Олакс», тел.: (4162) 522-000. 524-000, 520-500, ул. Ленина, д.27
СЦ «РадиоСвязьСервис», тел.: (4162) 533-671, ул.Горького, 182/1
12. Братск: СЦ «Смарт», тел.: (3953) 47-92-59, ул. Южная, д.103
13. Брянск: ООО «МТК-сервис», тел.: (0832) 75-69-00, 75-68-42, ул. Красноармейская, д.170
ООО «Рембытаппарат», тел.: (0832) 64-57-16, ул. Крапивницкого, д.27
14. Великий Новгород: ЧП Смирнов, тел.: (816-2) 11-20-03, 11-52-22, ул. Великая, д.22, д.81А
15. Владивосток: ЧП Занегин , тел.: (4232) 292-001, ул Невельского, 1-112
Сервисный центр «ЧП Корнейчук», тел.: (4232) 41-30-12, ул. Бестужева, д.40
16. Владикавказ: ООО «Альда-сервис», тел.: (8672) 54-82-02, ул. Кутузова, д.82
ОАО «Люкс», тел.: (8672) 53-23-03, 54-83-99, ул. Ватутина, д. 120
17. Владимир: «Рост-сервис», тел.: (0922) 30-50-55, ул. Юбилейная, д.60
ООО «Домовой сервис», тел.: (0922) 32-23-09, ул. Урицкого, д.26
18. Волгоград: ООО «Фирма Мир видео 1», тел.: (8442) 23-41-36, проспект Ленина, д.58а
ООО «Классика Сервис», тел.: (8442) 97-50-10, ул Елецкая, д.173
19. Вологда: ООО «Скерцо-СВ», тел.: (8172) 21-79-90, ул. Ленинградская, д.134
20. Воронеж: ООО «Технопрофсервис», тел.: (0732) 46-31-79, ул. Проспект Труда, д.91
21. Глазов: ООО «Служба сервиса «Ваш дом», тел.: (34141) 4-07-37, ул. Калинина, д.6
22. Екатеринбург: ООО «Норд-сервис», тел.: (343) 335-74-05, 334-08-28, 335-25-92, ул. Донская, д.31
ТТЦ «Kaiser», тел.: (343) 260-48-15, 260-48-16, ул. Машинная, д.38
23. Иваново: ООО «Луч», тел.: (0932) 47-29-84, ул. Заводская, 13
24. Ижевск: Сервисный центр «Ваш дом», тел.: (3412) 75-33-77, 75-34-64, Ключевой поселок, д.6За
ООО «Аргус-сервис», тел.: (3412) 78-76-85, 78-04-64, ул. М. Горького, д.76
ЗАО «ДС», тел.: (3412) 431-662, ул. К.Маркса, 393
25. Иркутск: ЧП Побежимов П.П., тел.: (3952) 25-82-02, ул. Советская, д.82А
«Комту-Сервис», тел.: (3952) 222-699, 222-732, ул. Сведлова, д.40
ООО «НПФ «ТИС», тел.: (3952) 51-36-93, 51-31-09, 33-38-59, ул.Партизанская, 149
26. Йошкар-Ола: СЦ «Мидас», тел.: (8362) 21-39-10, 45-73-68, ул.Советская, 173
27. Калиниград: ООО «Вестер Сервис», ул.Горького, 50 тел.: (0112) 27-34-32, 27-31-51, 27-20-54
ОАО «БАЛТ-АКТОР», тел.: (0112 44 81 65), ул. Новикова, 14
28. Казань: ООО «Александр и К
0
», тел.: (8432)915-900, ул. 10 лет Октября, 3
29. Калуга: ООО ТТЦ «Лана-сервис», тел.: (0842) 54-86-05,72-82-46, переулок Чечерина, 24
30. Кемерово: ООО «Сибирская Сервисная Компания», тел.: (3842) 36-12-22, ул. Н. Островского, 12А
31. Киров: ООО «Вятка Сервис», тел.: (8332) 27-34-66, ул. Производственная, 24
32. Кимры: СЦ «Престиж сервис», тел.: (08236) 3-21-38, ул. Урицкого, д.9
33. Комсомольск на Амуре: АСЦ «Айс-сервис», тел.: (42172) 6-62-09, пр. Копылова, д.48 кор.2
34. Кострома: ЗАО «Аксон-сервис», тел.: (0942) 22-36-28, ул. Сутырина, д.5,
35. Краснодар: ООО «ТОП ЧЭНП Лтд», тел.: (8612) 59-55-73, ул. Чапаева, д.94
36. Красноярск: Сервисный центр «Близнецов», тел.: (3912) 27-67-20, 65-34-41, ул. Дудинская, д.12а
37. Курск: ЧП Сунцов, тел.: (0712) 52-13-40, 53-35-97, ул. Льва Толстого, д.9
38. Липецк: ООО «Оптима ЛТД», тел.: (0742) 77-89-81, ул. Площадь Коммунальная, д.9а
3
Page 50

39. Магадан: ЧП «Шантиленко», тел.: (41322) 7-58-44, ул. Парковая, 21
40. Махачкала: АСЦ «Техник ISE», тел.: (8722) 64-71-33, 64-28-95, пр-т Шамиля, д.20
41. Майкоп: ЗАО з-д «Рембыттехника», тел.: (87722) 3-28-48, 3-91-74 ул. Курганная, д.328
42. Междуреченск: ООО «РТА Сервис», тел.: (38475) 2-11-25, 2-82-00, пр.Строителей, 67
43. Минеральные Воды: ООО «КЛЕН», тел.: (87922) 7-61-45, 7-65-18, ул. Московская, 29А
44. Мурманск: ООО «СиПиЭс-Мурманск Технический, центр», тел.: (8152) 45-50-31,45-09-49, ул. С. Перовской, д.37
ООО «БМ – мастер», тел.: (8152) 700-769, 443-519, ул. Книповича, д.47, офис 54
45. Набережные Челны: ООО «Бизнес Центр ВС», тел.: (8552) 52-92-54, пр-т Х. Туфана, д.26
46. Нальчик: ИП Мирзоева, тел.: (8662) 443-086, пр. Ленина, д.24
47. Нефтеюганск: ООО «Юганскрембыттехника», тел.: 3-23-00, 1 мкр, д. 2 Д/б «Силуэт»
48. Нижневартовск: ЗАО «Ланкорд», тел.: (3466) 61-23-71, ул Ленина, 10П
ЗАО «Техэлектробыт», тел.: (3466) 61-32-66, проспект Победы, 24
49. Нижний Новгород: ЧП Грешнихина И.Э.б АСЦ «Гарант-сервис », тел.: (6312) 12-36-01, 12-00-29,
16-31-41, ул. Заярская, д.18
50. Новосибирск: ООО «ДэСибсервис», тел.: (3832) 51-81-13, ул. Выставочная, д.40
ООО «Сибирский Сервис», тел.: (3832) 92-47-12, 43-16-38, ул. Плахотного, д.39
51. Новый Уренгой: ООО «Бризант», тел.: (34949) 4-61-45, ул. 26-го съезда КПСС, д.10Б
52. Норильск: Сервис центр «Тайсервис», тел.: (3919) 49-12-12, ул. Ленинградская, д.22, оф.43
ПБОЮЛ «Спирин», тел.: (3919) 48-10-43, ул. Комсомольская, д.48
53. Обнинск: ООО «Радиотехника», тел.: (08439) 6-44-14, пл. Треугольная, д.1
54. Омск: ООО «Бытовая техника», тел.: (3812) 57-95-40, 57-24-47, пр-т Космический, д.99/2
ЧП Масютенко, тел.: (3812) 24-02-09, ул. Семиреченская, 93
55. Орел: ООО «Металлоремонт», тел.: (0862) 41-17-97, ул. Игнатова, д.31
56. Оренбург: ООО «Ком Инком», тел.: (3532) 62-77-01, 62-68-88, ул. Брестская, д.7
ООО ТЦ «Ликос Сервис», тел.: (3532) 77 55 05, 77 65 54, ул. Невельского, 8А
57. Пенза: ЗАО «Техсервис», тел.: (8412) 49-16-10, ул. Коммунистическая, д.28
ООО «Техносервис», тел.: (8412) 544-301, ул. Пушкина, д.10
ПБОЮЛ Васильев, тел.: (8412) 59-72-09, ул. Антонова, д. 11, кв. 117
58. Петропавловск-Камчатский: ЗАО «Элита Сервис», тел.: (4152) 191-100, 191-111, пр-т 50 лет Октября, 23/1
59. Пермь: ООО «Мария-М», тел.: (3422) 630-222, 631-116, ул. Тургенева, д. 21 оф. 440
60. Петрозаводск: ЧП «Хоршунов», тел.: (8142) 70-23-42, ул. Мурманская, д.25Б
61. Ростов на Дону: ООО «Диана и К», тел.: (86350) 5-51-59, 5-51-58, (8632) 47-09-55,
Ростовская обл., г. Аксай, ул. Ленина, 49
62. Рязань: ООО «Фирма Фонограф», тел.: (0912) 72-17-12, пл. 50-летия Октября, д.1
63. Самара: ООО «Фирма Сервис-Центр», тел.: (8462) 34-94-63, 34-94-28, ул. Мичурина, д.15, офис 307
64. Саратов: ООО «Аэлита», тел.: (8452) 50-69-24, 52-37-74, ул. Московская, 134/146
65. Саяногорск: ООО «МБТ», тел.: (39042) 7-78-18, Енисейский мкр., д.36
66. Северодвинск: ЧП Березин, тел.: (8184) 52-97-30, ул. Карла Маркса, 48
67. Смоленск: СЦ «Гарант», тел.: (0812) 647-111, ул. Ленина, д.22/6
68. Ставрополь: ООО «Т-Сервис», тел.: (8652) 94-41-13, 94-42-13, ул. Ленина, 468
69. Старый Оскол: ООО «Техномаркет», тел.: (0725) 44-10-82, 24-45-84, микрорайон Рудничный, д.24
70. Сургут: Техцентр «Интер-Сервис», тел.: (3462) 25-25-63, 25-69-70, Комсомольский пр-т, д.44
71. Сыктывкар: ИП Антипов Н.Н., тел.: (8212) 21-15-32, Сысольское шоссе, д. 1/3
ООО «Атлант Сервис», тел.: (8212) 20-02-86, ул. Южная, 7
72. Тамбов: ООО ТТЦ «Атлант-Сервис», тел.: (0752) 72-63-46, 72-75-85, ул. Московская, д.23А
73. Тверь: ООО «Стеко-сервис», тел.: (0822) 32-00-23, пр-т Чайковского, д.100
74. Тольятти: ООО «Элро Сервис», тел.: (8482) 20-72-56, 70-44-06, Приморский б-р, 2, офис 5
75. Томск: ООО «Академия Сервис», тел.: (3822) 49-15-80, 25-98-08, Академический пр-т, д.1, блок А, оф.204
ООО «СБ-сервис», тел: (3822) 52-77-72, 52-77-87, ул. Никитина, д.37А
ООО «ГлавбытСервис», тел.: (3822) 26-64-62, 44-03-07, ул. Некрасова, д.12
76. Тула: Сервисный центр «Профит», тел.: (0872) 30-95-65, 30-94-64, ул. Вересаева, д.1
77. Тюмень: ООО «Аверс-Сервис», тел.: (3452) 39-12-18, 39-12-29, ул. Мельникайте, д.131 „А”
78. Улан-Удэ: ООО «Кондор-сервис», тел.: (3012) 44-23-44, ул. Гагарина, д.15
79. Ульяновск: ООО «Мастер-Сервис», тел.: (8422) 32-07-33, ул. Минаева, д.42
80. Уссурийск: Сервисный центр «ПОЛУКС», тел.: (4234) 32-10-35, 33-92-59, ул. Советская, д.29
81. Уфа: Сервисный центр «Техно», тел.: (3472) 22-99-18, 51-20-55, ул. Чернышевского, д.88
82. Ухта: ООО «АВВА», тел.: (82147) 6-36-13, ул. Семяшкина, д.8А
83. Хабаровск: ООО «Контур-сервис», тел.: (4212) 701-000, 752-137, ул. Ким-Ю-Чена, 43
84. Чебоксары: ЧП «Мельник», тел.: (8352) 42-09-46, 42-09-00, Московский пр-т, д.З
85. Челябинск: ООО ТТЦ «Рембыттехника», тел.: (3512)49-30-33, ул. Производственная 8-Б
86. Чита: СЦ «Славянский Электроник», тел.: (3022) 32-55-22, 35-26-26, ул. Ингодинская, 35
87. Ярославль: ЗАО «Фирма ТАУ», тел.: (0852) 79-66-77, 79-66-78, 79-66-79, ул. Свободы д.101
( 03.2005)
4
Page 51

The manufacturer declines all responsibility for possible inaccuracies contained in this pamphlet, due
to printing or copying errors. We reserve the right to make on our own products those changes to be
considered necessary or useful, without jeopardizing the essential characteristics.
Die Herstellerfirma übernimmt keinerlei Verantwortung für eventuell in dieser Broschüre enthaltene
Ungenauigkeiten, die auf Druckfehler zurückzuführen sind und behält sich das Recht vor an ihren
Produkten alle für notwendig erachteten Änderungen anzubringen, ohne die wesentlichen
Eigenschaften zu beeinflussen.
Abhvf bpujnjdbntkm yt ytctn ybrfrjq jndtncndtyyjcnb pf djpvj;yj cjlth;fobtcz d 'njq ,hji/ht
ytnjxyjcnb> rjnjhst vjuen ,snm cktlcndbtv jgtxfnjr nbgjuhfabb> b cj[hfyztn pf cj,jq ghfdj dyjcbnm d
lbpfqy b ecnhjqcndj cdjtq ghjlerwbb dct ytj,[jlbvst bpvtytybz> rjnjhst yt jrfpsdf/n ceotcndtyyjuj
dkbzybz yf gjnht,bntkmcrbt rfxtcndf b cdjqcndf ghjlernf.
Page 52

COD. 2.000.20.2
OLAN-Haushaltsgeräte, Berlin Germany
www.kaiser-olan.de
 Loading...