

Page 1

EH ..., EHK ...
BUILT IN OVEN
EINBAUBACKOFEN
ВСТРАИВАЕМЫЙ ДУХОВОЙ ШКАФ
EN
DE
RU
USER MANUAL
GEBRAUCHSANWEISUNG
ИНСТРУКЦИЯ ПО ОБСЛУЖИВАНИЮ И ЭКСПЛУАТАЦИИ
Page 2

EN
DEAR CUSTOMERS,
we thank to you for the acquisition of our technology.
We are convinced that you have made a right choice.
This product which satisfies the high quality demands
and corresponds to world comprehensive standards
realizes your cookeries, and his modern appearance
which has been developed by the best European
designers will decorate your kitchen splendidly.
We ask you to read the operating instructions before
usage thoroughly. The consideration of
recommendations protects you from possible
inconveniences which can appear as a result of the
wrong use of the oven, and allows you to reduce the
consumption of electric energy. If the use corresponds to
the present operating instructions, the oven will bring
you a lot of pleasure for a long time.
Our ovens correspond to the main demands of the
security, hygiene and environment protection, according
to the directives of the EU which is confirmed with
certificates DIN ISO 9001, ISO 1400, according to the
norms counting within the frames of the EU, they also
correspond to the Gosstandart of Russia, standards of
the CIS, which is confirmed with the corresponding
certificates.
With the thoughts of a constant improvement of the
quality of our ovens the changes in design and
equipment which lead only to positive changes of the
technical qualities are reserved by the manufacturer.
We wish you an effective use of our oven.
Yours faithfully
OLAN-Haushaltsgeräte
Berlin Germany
We Inform you that our devices which are the object of the present
operating instructions are precertain exclusively for the domestic
use.
2
Page 3

DE RU
LIEBE KUNDIN, LIEBER KUNDE,
wir danken Ihnen für den Erwerb unserer Technik.
Wir sind überzeug, dass Sie eine richtige Wahl getroffen
haben. Dieses Produkt, das die hohen Forderungen zur
Qualität befriedigt und weltumfassenden Standards
entspricht, verwirklicht Ihre Kochkünste, und sein
modernes Aussehen, das von besten europäischen
Designer entwickelt worden ist, wird Ihre Küche
prächtig schmücken.
Wir bitten Sie die Bedienungsanleitung vor der Nutzung
aufmerksam zu lesen. Die Beachtung von Empfehlungen
schützt Sie von eventuellen Unannehmlichkeiten, die als
Folge der falschen Nutzung des Backofens auftreten
können, und ermöglicht Ihnen den Verbrauch von
Elektroenergie zu reduzieren. Der Backofen bringt
Ihnen viel Vergnügen auf lange Zeit, wenn der
Gebrauch der vorliegenden Bedienungsanleitung
entsprechen wird.
ɍȼȺɀȺȿɆɕɃ ɉɈɄɍɉȺɌȿɅɖ,
ɛɥɚɝɨɞɚɪɢɦ ȼɚɫ ɡɚ ɩɪɢɨɛɪɟɬɟɧɢɟ ɧɚɲɟɣ ɬɟɯɧɢɤɢ.
Ɇɵ ɭɜɟɪɟɧɵ, ɱɬɨ ȼɵ ɫɞɟɥɚɥɢ ɩɪɚɜɢɥɶɧɵɣ ɜɵɛɨɪ.
Ⱦɚɧɧɵɣ ɩɪɨɞɭɤɬ, ɭɞɨɜɥɟɬɜɨɪɹɸɳɢɣ ɫɚɦɵɦ ɜɵɫɨɤɢɦ
ɬɪɟɛɨɜɚɧɢɹɦ ɢ ɨɬɜɟɱɚɸɳɢɣ ɦɢɪɨɜɵɦ ɫɬɚɧɞɚɪɬɚɦ,
ɩɨɡɜɨɥɢɬ ȼɚɦ ɥɟɝɤɨ ɜɨɩɥɨɬɢɬɶ ɜɫɟ ȼɚɲɢ
ɤɭɥɢɧɚɪɧɵɟ ɫɩɨɫɨɛɧɨɫɬɢ, ɚ ɟɝɨ ɫɨɜɪɟɦɟɧɧɵɣ ɜɢɞ,
ɪɚɡɪɚɛɨɬɚɧɧɵɣ ɥɭɱɲɢɦɢ ɟɜɪɨɩɟɣɫɤɢɦɢ ɞɢɡɚɧɟɪɚɦɢ,
ɜɟɥɢɤɨɥɟɩɧɨ ɭɤɪɚɫɢɬ ȼɚɲɭ ɤɭɯɧɸ.
ɉɪɨɫɢɦ ȼɚɫ ɜɧɢɦɚɬɟɥɶɧɨ ɩɪɨɱɢɬɚɬɶ ɢɧɫɬɪɭɤɰɢɸ
ɩɨ ɨɛɫɥɭɠɢɜɚɧɢɸ ɢ ɷɤɫɩɥɭɚɬɚɰɢɢ ɞɨ ɩɭɫɤɚ
ɭɫɬɪɨɣɫɬɜ
ɪɟɤɨɦɟɧɞɚɰɢɣ ɡɚɳɢɬɢɬ ȼɚɫ ɨɬ ɜɨɡɦɨɠɧɵɯ
ɧɟɩɪɢɹɬɧɨɫɬɟɣ ɩɪɢ ɧɟɩɪɚɜɢɥɶɧɨɣ ɷɤɫɩɥɭɚɬɚɰɢɢ
ɞɭɯɨɜɨɝɨ ɲɤɚɮɚ, ɚ ɬɚɤɠɟ ɩɨɡɜɨɥɢɬ ȼɚɦ ɭɦɟɧɶɲɢɬɶ
ɪɚɫɯɨɞ ɷɥɟɤɬɪɨɷɧɟɪɝɢɢ. ȿɫɥɢ ɷɤɫɩɥɭɚɬɚɰɢɹ ɞɭɯɨɜɨɝɨ
ɲɤɚɮɚ ɛɭɞɟɬ ɫɨɨɬɜɟɬɫɬɜɨɜɚɬɶ ɧɚɫɬɨɹɳɟɣ
ɢɧɫɬɪɭɤɰɢɢ, ɧɚɲ ɞɭɯɨɜɨɣ ɲɤɚɮ ɛɭɞɟɬ ɪɚɞɨɜɚɬɶ ȼɚɫ
ɞɨɥɝɨɟ ɜɪɟɦɹ.
ɚ. ɋɨɛɥɸɞɟɧɢɟ ɫɨɞɟɪɠɚɳɢɯɫɹ ɜ ɧɟɣ
Unsere Backöfen entsprechen den Hauptforderungen
der Sicherheit, der Hygiene und des Umweltschutzes,
laut den Direktiven der EU, was mit Zertifikaten DIN
ISO 9001, ISO 1400, entsprechend den im Rahmen der
EU geltenden Normen, bestätigt ist, und genauso auch
den Anforderungen von Gosstandart in Russland und
Standards anderer GUS Länder, was durch die
Identifikationszertifikate bestätigt ist.
Mit den Gedanken der ständigen Verbesserung der
Qualität unserer Backöfen sind Änderungen bei Design
und Einrichtung, die nur zu positiven Veränderungen
der technischen Eigenschaften führen, vom Hersteller
vorbehalten.
Wir wünschen Ihnen die effektive Nutzung unseres
Backofens.
Hochachtungsvoll
ɇɚɲɢ ɞɭɯɨɜɵɟ ɲɤɚɮɵ ɩɨɥɧɨɫɬɶɸ ɫɨɨɬɜɟɬɫɬɜɭɟɬ
ɨɫɧɨɜɧɵɦ ɬɪɟɛɨɜɚɧɢɹɦ ɛɟɡɨɩɚɫɧɨɫɬɢ, ɝɢɝɢɟ
ɧɵ ɢ
ɡɚɳɢɬɵ ɨɤɪɭɠɚɸɳɟɣ ɫɪɟɞɵ, ɫɨɝɥɚɫɧɨ ɞɢɪɟɤɬɢɜɚɦ
ȿɜɪɨɩɟɣɫɤɨɝɨ ɋɨɸɡɚ, ɱɬɨ ɩɨɞɬɜɟɪɠɞɟɧɨ
ɫɟɪɬɢɮɢɤɚɬɚɦɢ DIN ISO 9001, ISO 1400, ɜ
ɫɨɨɬɜɟɬɫɬɜɢɢ ɫ ɧɚɫɬɨɹɳɢɦɢ ɧɨɪɦɚɦɢ,
ɞɟɣɫɬɜɭɸɳɢɦɢ ɧɚ ɬɟɪɪɢɬɨɪɢɢ ȿɜɪɨɩɟɣɫɤɨɝɨ
ɫɨɨɛɳɟɫɬɜɚ, a ɬɚɤɠɟ ɩɨɥɧɨɫɬɶɸ ɨɬɜɟɱɚɸɬ ɜɫɟɦ
ɬɪɟɛɨɜɚɧɢɹɦ Ƚɨɫɫɬɚɧɞɚɪɬɚ Ɋɨɫɫɢɢ ɢ ɫɬɚɧɞɚɪɬɨɜ
ɞɪɭɝɢɯ ɫɬɪɚɧ ɋɇȽ, ɱɬɨ ɩɨɞɬɜɟɪɠɞɚɟɬɫɹ
ɫɟɪɬɢɮɢɤɚɬɚɦɢ ɫɨɨɬɜɟɬɫɬɜɢɹ.
ɋ ɦɵɫɥɶɸ ɨ ɞɚɥɶɧɟɣɲɟɦ ɩɨɜɵɲɟɧɢɢ ɬɟɯɧɢɱɟɫɤɢɯ ɢ
ɷɤɫɩɥɭɚɬɚɰɢɨɧɧɵɯ ɯɚɪɚɤɬɟɪɢɫɬɢɤ ɧɚɲɢɯ ɛɵɬɨɜɵɯ
ɩɪɢɛɨɪɨɜ ɦɵ ɨɫɬɚɜ
ɥɹɟɦ ɡɚ ɫɨɛɨɣ ɩɪɚɜɨ ɧɚ ɜɧɟɫɟɧɢɟ
ɢɡɦɟɧɟɧɢɣ ɜ ɞɢɡɚɣɧ ɢ ɭɫɬɪɨɣɫɬɜɨ, ɜɥɢɹɸɳɢɯ ɬɨɥɶɤɨ
ɩɨɥɨɠɢɬɟɥɶɧɨ ɧɚ ɩɨɬɪɟɛɢɬɟɥɶɫɤɢɟ ɤɚɱɟɫɬɜɚ ɢ
ɫɜɨɣɫɬɜɚ ɩɪɨɞɭɤɬɚ.
ɀɟɥɚɟɦ ȼɚɦ ɷɮɮɟɤɬɢɜɧɨɝɨ ɩɨɥɶɡɨɜɚɧɢɹ ɞɭɯɨɜɵɦ
ɲɤɚɮɨɦ ɧɚɲɟɣ ɮɢɪɦɵ.
ɍɜɚɠɚɸɳɢɣ ȼɚɫ
OLAN-Haushaltsgeräte
Berlin Germany
Wir Informieren Sie, dass unsere Geräte, die der Gegenstand der
vorliegenden Bedienungsanleitung sind, sind ausschließlich für den
häuslichen Gebrauch vorbestimmt.
OLAN-Haushaltsgeräte
Berlin Germany
ɂɧɮɨɪɦɢɪɭɟɦ, ɱɬɨ ɧɚɲɢ ɩɪɢɛɨɪɵ, ɹɜɥɹɸɳɢɟɫɹ ɩɪɟɞɦɟɬɨɦ
ɧɚɫɬɨɹɳɟɣ ɂɧɫɬɪɭɤɰɢɢ, ɩɪɟɞɧɚɡɧɚɱɟɧɵ ɢɫɤɥɸɱɢɬɟɥɶɧɨ ɞɥɹ
ɞɨɦɚɲɧɟɝɨ ɩɨɥɶɡɨɜɚɧɢɹ.
3
Page 4

EN
CONTENTS
INSTALLATION INSTRUCTIONS 6
Electrical connection 6
Installation of the oven 8
Preparation 8
BRIEF DESCRIPTION 10
Location drawing 10
Control panel 12
EQUIPMENT 16
Cooking zones control 16
Multifunction oven control 18
Operation functions of the oven 20
USAGE 24
Mechanical timer 26
Digital clock timer of the oven Prestige 30
Digital clock timer with sensor of
the oven Touch control 42
Specialities of the oven Logic control 56
Digital clock timer of the oven
Logic control 58
Digital clock timer of the oven Logic control
F12 BITURBO with full sensor control 74
Digital clock timer of the oven Logic control
F14 BITURBO with full sensor control 92
PRACTICAL ADVICES 116
CARE AND ATTENDANCE 124
ENVIROMENTAL COMPATIBILITY 136
4
Page 5

DE RU
INHALTSVERZEICHNIS
FÜR DEN INSTALLATEUR 7
Stromanschluss 7
Einbau des Backofen 9
Vorbereitung 9
KURZBESCHREIBUNG 11
Gesamtansicht 11
Bedienblende 13
AUSSTATUNG 17
Kochfeldersteuerung 17
Steuerung von Multifunktionsbackofen 19
ɈȽɅȺȼɅȿɇɂȿ
ɂɇɋɌɊɍɄɐɂə ɉɈ ɆɈɇɌȺɀɍ 7
ɉɨɞɤɥɸɱɟɧɢɟ ɤ ɷɥɟɤɬɪɨɫɟɬɢ 7
ɍɫɬɚɧɨɜɤɚ 9
ɉɨɞɝɨɬɨɜɤɚ 9
ɄɊȺɌɄɈȿ ɈɉɂɋȺɇɂȿ 11
ȼɧɟɲɧɢɣ ɜɢɞ 11
ɉɚɧɟɥɶ ɭɩɪɚɜɥɟɧɢɹ 13
ɈȻɈɊɍȾɈȼȺɇɂȿ 17
ɍɩɪɚɜɥɟɧɢɟ ɪɚɛɨɬɨɣ ɧɚɝɪɟɜɚɬɟɥɶɧɵɯ ɩɨɥɟɣ 17
ɍɩɪɚɜɥɟɧɢɟ ɪɚɛɨɬɨɣ ɦɧɨɝɨɮɭɧɤɰɢɨɧɚɥɶɧɨɝɨ
ɞɭɯɨɜɨɝɨ ɲɤɚɮɚ 19
Betriebsfunktion des Backofens 21
BENUTZUNG 25
Mechanische Zeitschaltuhr 27
Elektronische Zeitschaltuhr von
Backofen Prestige 31
Elektronische Zeitschaltuhr mit Sensor
von Backofen Touch control 43
Besonderheiten des Backofen Logic control 57
Elektronische Zeitschaltuhr von
Backofen Logic control 59
Elektronische Zeitschaltuhr von Backöfen
Logic control
Vullsensorbedienung 75
Elektronische Zeitschaltuhr von Backöfen
Logic control
Vullsensorbedienung 93
F12 BITURBO mit
F14 BITURBO mit
Ɋɚɛɨɱɢɟ ɮɭɧɤɰɢɢ ɞɭɯɨɜɨɝɨ ɲɤɚɮɚ 21
ɂɋɉɈɅɖɁɈȼȺɇɂȿ 25
Ɇɟɯɚɧɢɱɟɫɤɢɣ Ɍɚɣɦɟɪ 27
ɗɥɟɤɬɪɨɧɧɨɟ ɩɪɨɝɪɚɦɦɢɪɭɸɳɟɟ ɭɫɬɪɨɣɫɬɜɨ
ɞɭɯɨɜɨɤ Prestige 31
ɋɟɧɫɨɪɧɨɟ ɷɥɟɤɬɪɨɧɧɨɟ ɩɪɨɝɪɚɦɦɢɪɭɸɳɟɟ
ɭɫɬɪɨɣɫɬɜɨ ɞɭɯɨɜɨɤ Touch control 43
Ɉɫɨɛɟɧɧɨɫɬɢ ɞɭɯɨɜɨɤ Logic control 57
ɗɥɟɤɬɪɨɧɧɨɟ ɩɪɨɝɪɚɦɦɢɪɭɸɳɟɟ ɭ
ɞɭɯɨɜɨɤ Logic control 59
ɗɥɟɤɬɪɨɧɧɨɟ ɩɪɨɝɪɚɦɦɢɪɭɸɳɟɟ ɭɫɬɪɨɣɫɬɜɨ
ɞɭɯɨɜɨɤ Logic control
ɫ ɩɨɥɧɵɦ ɫɟɧɫɨɪɧɵɦ ɭɩɪɚɜɥɟɧɢɟɦ 75
ɗɥɟɤɬɪɨɧɧɨɟ ɩɪɨɝɪɚɦɦɢɪɭɸɳɟɟ ɭɫɬɪɨɣɫɬɜɨ
ɞɭɯɨɜɨɤ Logic control
ɫ ɩɨɥɧɵɦ ɫɟɧɫɨɪɧɵɦ ɭɩɪɚɜɥɟɧɢɟɦ 93
F12 BITURBO
F14 BITURBO
ɫɬɪɨɣɫɬɜɨ
PRAKTISCHE EMPFEHLUNGEN 117
PFLEGE UND WARTUNG 123
UMWELTVERTRÄGLICHKEIT 137
ɉɊȺɄɌɂɑȿɋɄɂȿ ɋɈȼȿɌɕ 117
ɈȻɋɅɍɀɂȼȺɇɂȿ ɂ ɍɏɈȾ 125
ɈɏɊȺɇȺ ɈɄɊɍɀȺɘɓȿɃ ɋɊȿȾɕ 137
5
Page 6
EN
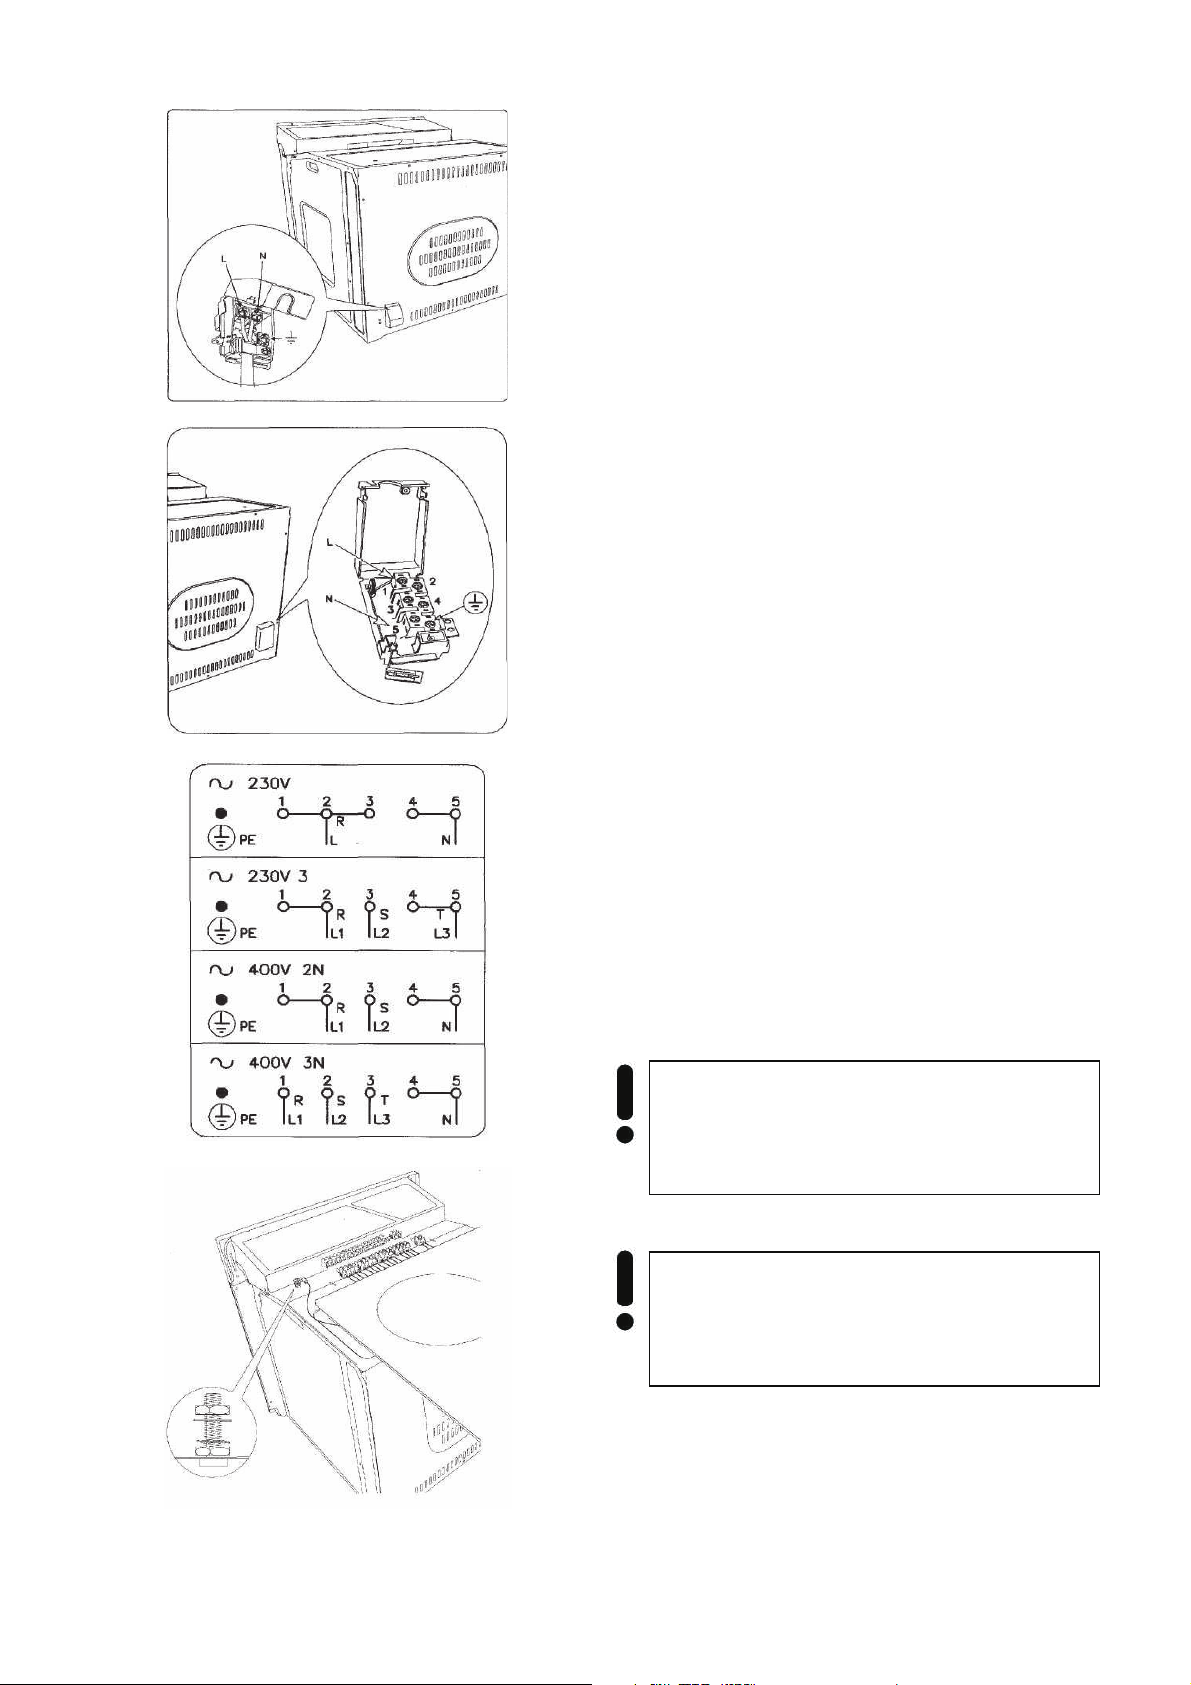
INSTALLATION INSTRUCTIONS
ELECTRICAL CONNECTION
Before connecting the oven to the mains power
supply, make sure that:
x The supply voltage corresponds to the
specifications on the data plate on the front
of the oven.
x The mains supply has an efficient ground
connection complying with all applicable
laws and regulations.
Correct grounding is a legal requirement. If the
appliance is not pre-fitted with a power cable
and/or plug, use only suitable cables and plugs
capable of handling the power specified on the
appliance's data plate and capable of resisting
heat. The power cable should never reach a
temperature 50 °C above ambient temperature at
any point along its length.
If the appliance is to be connected directly to
mains terminals, fit a switch with minimum
aperture of 3 mm between the contacts. Make sure
that the switch is of sufficient capacity for the
power specified on the appliance's data plate, and
compliant with applicable regulations. The switch
must not break the yellow-green earth wire. The
socket or switch must be easily reachable with the
oven fully installed.
Attention! Installation and electrical
connection must be made by a qualified
expert only.
Attention! The manufacturer declines all
responsibility for damage or injury if the
above instructions and normal safety
precautions are not respected.
6
Page 7
DE RU
FÜR DEN INSTALLATEUR
STROMANSCHLUSS
Vor der Durchführung des Stromanschlusses muss
sichergestellt werden, dass:
x die Eigenschaften des Stromnetzes mit den
Werten auf dem angebrachten Typenschild
auf der hinteren Wand des Backofens
übereinstimmen;
x das Stromnetz gemäß den geltenden
Bestimmungen und Rechtsvorschriften
geerdet ist.
Die Erdung ist eine notwendige Voraussetzung der
Nutzung des Gerätes. Falls der Backofen nicht mit
Kabel und\ oder Netzstecker ausgestattet ist, muss
geeignetes Material verwendet werden, das der auf
dem Typenschild auf der hinteren Wand des
Gerätes angegebene Stromaufnahme und der
Betriebstemperatur entspricht. Das Kabel darf an
keiner Stelle keinesfalls eine Temperatur von über
50 °C erreichen.
ɂɇɋɌɊɍɄɐɂə ɉɈ ɆɈɇɌȺɀɍ
ɉɈȾɄɅɘɑȿɇɂȿ Ʉ ɗɅȿɄɌɊɈɋȿɌɂ
ɉɟɪɟɞ ɩɨɞɤɥɸɱɟɧɢɟɦ ɞɭɯɨɜɤɢ ɤ ɷɥ. ɫɟɬɢ,
ɧɟɨɛɯɨɞɢɦɨ ɭɛɟɞɢɬɶɫɹ, ɱɬɨ
x ɩɚɪɚɦɟɬɪɵ ɫɟɬɢ ɫɨɨɬɜɟɬɫɬɜɭɸɬ ɞɚɧɧɵɦ ɜ
ɬɚɛɥɢɱɤɟ ɧɚ ɡɚɞɧɟɣ ɫɬɟɧɤɟ ɞɭɯɨɜɤɢ,
x ɷɥ. ɫɟɬɶ ɡɚɡɟɦɥɟɧɚ ɜ ɫɨɨɬɜɟɬɫɬɜɢɢ ɫ
ɞɟɣɫɬɜɭɸɳɢɦɢ ɩɪɟɞɩɢɫɚɧɢɹɦɢ.
Ɂɚɡɟɦɥɟɧɢɟ ɹɜɥɹɟɬɫɹ ɧɟɨɛɯɨɞɢɦɵɦ ɭɫɥɨɜɢɟɦ
ɩɪɚɜɢɥɶɧɨɣ ɷɤɫɩɥɭɚɬɚɰɢɢ. ȿɫɥɢ ɞɭɯɨɜɤɚ ɧɟ
ɨɛɨɪɭɞɨɜɚɧɚ ɤɚɛɟɥɟɦ ɢ/ɢɥɢ ɲɬɟɤɟɪɨɦ,
ɩɪɢɦɟɧɹɣɬɟ ɬɨɥɶɤɨ ɦɚɬɟɪɢɚɥɵ,
ɫɨɨɬɜɟɬɫɬɜɭɸɳɢɟ ɞɚɧɧɵɦ, ɭɤɚɡɚɧɧɵɦ ɜ
ɬɚɛɥɢɱɤɟ ɧɚ ɡɚɞɧɟɣ ɫɬɟɧɤɟ ɩɪɢɛ
ɦɨɝɭɬ ɮɭɧɤɰɢɨɧɢɪɨɜɚɬɶ ɜ ɪɚɛɨɱɟɦ ɪɟɠɢɦɟ
ɬɟɦɩɟɪɚɬɭɪ. Ʉɚɛɟɥɶ ɧɢ ɜ ɤɨɟɦ ɫɥɭɱɚɟ ɧɟ
ɞɨɥɠɟɧ ɧɚɝɪɟɜɚɬɶɫɹ ɜɵɲɟ ɬɟɦɩɟɪɚɬɭɪɵ ɛɨɥɟɟ
50 °ɋ.
ɨɪɚ, ɤɨɬɨɪɵɟ
Wenn ein direkter Netzanschluss gewünscht wird,
muss ein allpoliger Schalter mit Kontaktöffnung von
min. 3mm vorgesehen werden, der erlaubt das
Gerät vom Netz zu trennen, der den technischen
Daten der geltenden Vorschriften entsprechen
muss (das gelb-grüne Erdungskabel darf nicht vom
genannten Schalter unterbrochen werden). Der
Stecker bzw. der allpolige Schalter müssen bei
installiertem Gerät problemlos zugänglich sein.
Achtung! Die Montage und
Stromnetzanschluss soll nur von einem
qualifizierten Fachmann durchgeführt
werden.
Achtung! Der Hersteller ist nicht haftbar,
wenn bei der Installation des Gerätes alle
obenangeführten Anweisungen nicht
befolgt werden.
ȼ ɫɥɭɱɚɟ ɩɨɞɫɨɟɞɢɧɟɧɢɹ ɧɟɩɨɫɪɟɞɫɬɜɟɧɧɨ ɤ ɷɥ.
ɫɟɬɢ, ɧɟɨɛɯɨɞɢɦɨ ɢɫɩɨɥɶɡɨɜɚɬɶ ɫɩɟɰɢɚɥɶɧɵɣ
ɚɜɬɨɦɚɬɢɱɟɫɤɢɣ ɜɵɤɥɸɱɚɬɟɥɶ ɫ ɡɚɡɨɪɨɦ ɦɟɠɞɭ
ɤɨɧɬɚɤɬɚɦɢ ɧɟ ɦɟɧɟɟ 3 ɦɦ, ɩɨɡɜɨɥɹɸɳɢɣ
ɨɬɫɨɟɞɢɧɹɬɶ ɩɪɢɛɨɪ ɨɬ ɫɟɬɢ, ɫɨɨɬɜɟɬɫɬɜɟɧɧɨ
ɬɟɯɧɢɱɟɫɤɢɦ ɞɚɧɧɵɦ ɞɟɣɫɬɜɭɸɳɢ
ɩɪɟɞɩɢɫɚɧɢɣ (ɠɟɥɬɨ-ɡɟɥɟɧɵɣ ɤɚɛɟɥɶ
ɡɚɡɟɦɥɟɧɢɹ ɧɟ ɞɨɥɠɟɧ ɩɪɟɪɵɜɚɬɶɫɹ ɞɚɧɧɵɦ
ɜɵɤɥɸɱɚɬɟɥɟɦ). ɒɬɟɤɟɪ ɢɥɢ ɚɜɬɨɦɚɬɢɱɟɫɤɢɣ
ɜɵɤɥɸɱɚɬɟɥɶ ɧɚ ɩɪɚɜɢɥɶɧɨ ɭɫɬɚɧɨɜɥɟɧɧɨɦ
ɩɪɢɛɨɪɟ ɞɨɥɠɟɧ ɛɵɬɶ ɜɫɟɝɞɚ ɥɟɝɤɨ ɞɨɫɹɝɚɟɦ.
ȼɧɢɦɚɧɢɟ! Ɇɨɧɬɚɠ ɢ ɩɨɞɤɥɸɱɟɧɢɟ
ɞɭɯɨɜɨɝɨ ɲɤɚɮɚ ɞɨɥɠɧɵ ɩɪɨɜɨɞɢɬɶɫɹ
ɬɨɥɶɤɨ ɤɜɚɥɢɮɢɰɢɪɨɜɚɧɧɵɦ
ɫɩɟɰɢɚɥɢɫɬɨɦ.
ȼɧɢɦɚɧɢɟ! ɂɡɝɨɬɨɜɢɬɟɥɶ ɧɟ ɧɟɫɟɬ
ɧɢɤɚɤɨɣ ɨɬɜɟɬɫɬɜɟɧɧɨɫɬɢ, ɟɫɥɢ ɩɪɢ
ɭɫɬɚɧɨɜɤɟ ɩɪɢɛɨɪɚ ɧɟ ɫɨɛɥɸɞɚɸɬɫɹ ɜɫɟ
ɜɵɲɟɩɪɢɜɟɞɟɧɧɵɟ ɩɪɟɞɩɢɫɚɧɢɹ.
ɯ
7
Page 8
EN
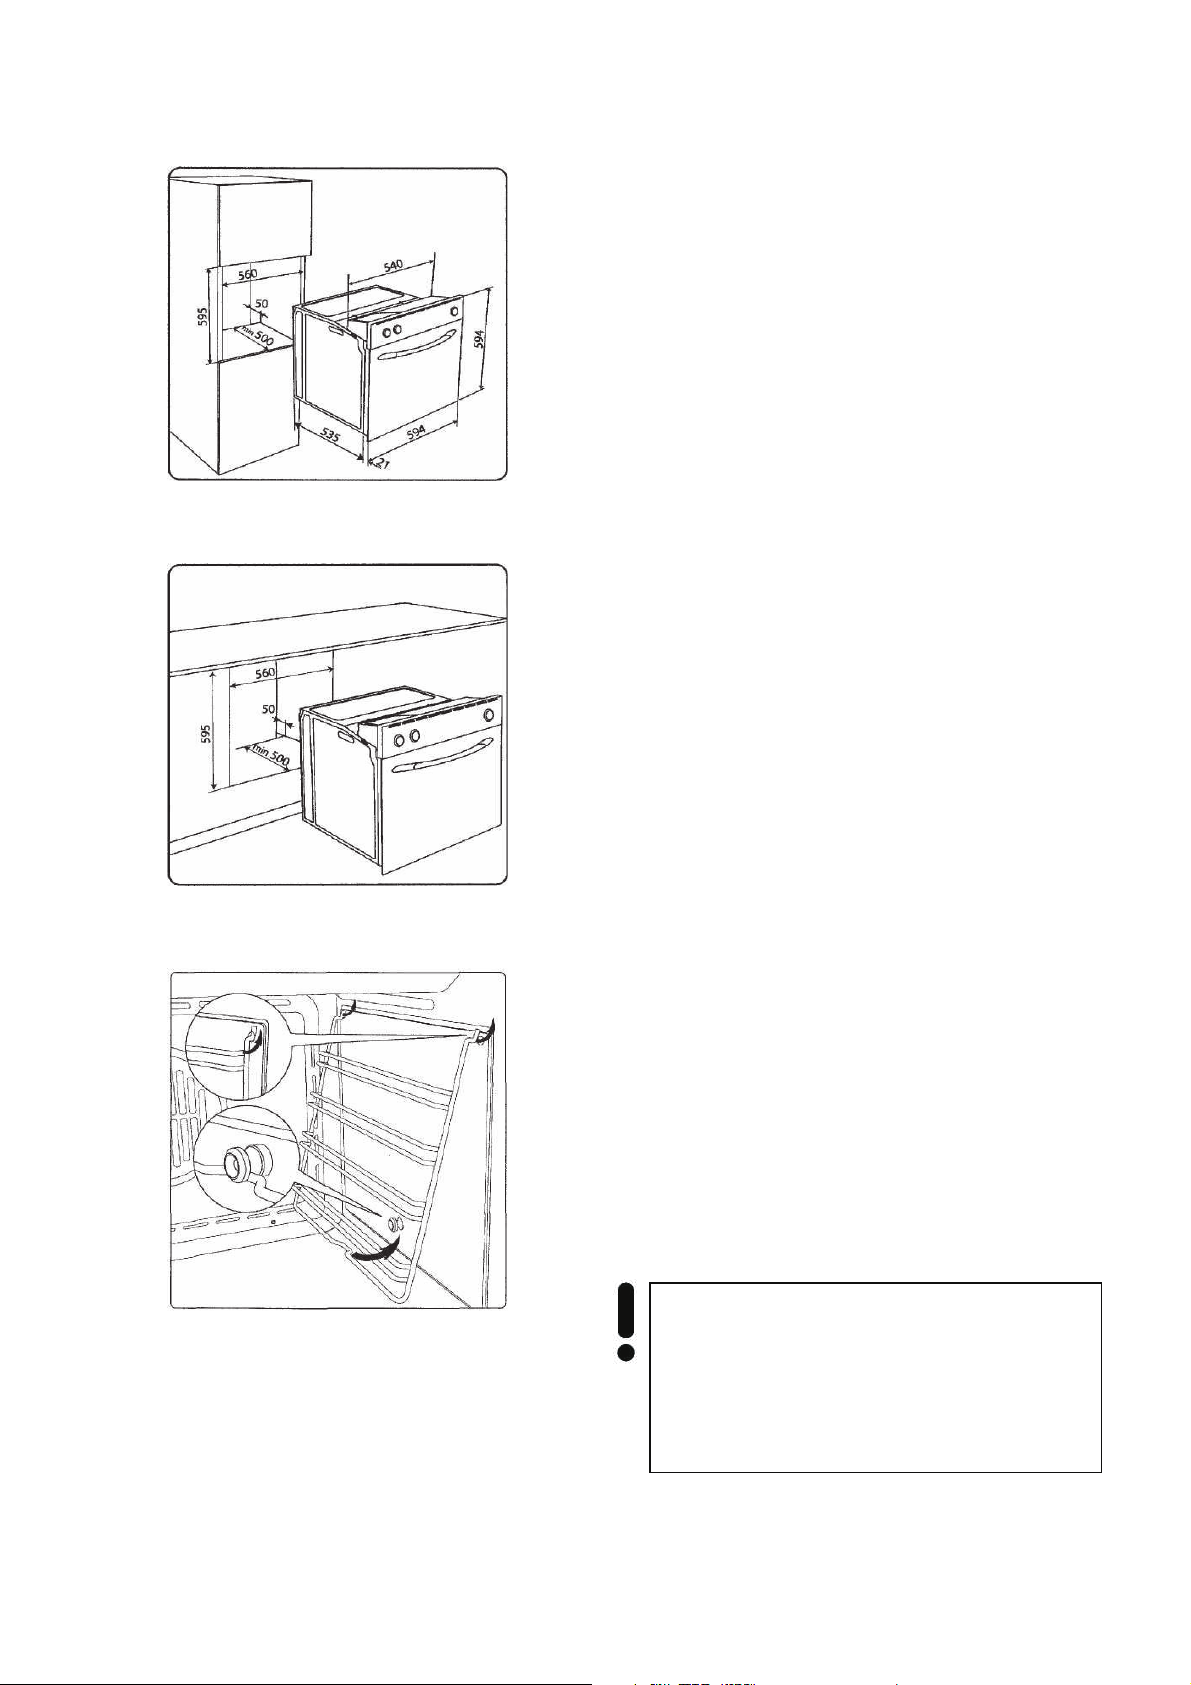
INSTALLATION OF THE OVEN
The oven can be installed under a work top or in a
cooking column. Figure shows the installation
dimensions. Make sure that surrounding materials
are heat resistant. Align the oven centrally with
respect to the side walls of the units surrounding it
and fix it in place with the screws and Allen screws
provided.
See the accompanying instructions for combining
the oven with multi-functional gas or gas-electric
cookers.
PREPARATION
Clean the oven thoroughly with soapy water and
rinse well. To remove the lateral frames from
smooth-walled ovens, proceed as shown in the
figure.
Operate the oven for about 30 minutes at
maximum temperature to burn off all traces of
grease which might otherwise create unpleasant
smells when cooking.
Important!!!
As a safety precaution, before cleaning the oven,
always disconnect the plug from the power socket
or the power cable from the oven. Do not use acid
or alkaline substances to clean the oven (lemon
juice, vinegar, salt, tomatoes etc.). Do not use
chlorine based products, acids or abrasive
products to clean the painted surfaces of the oven.
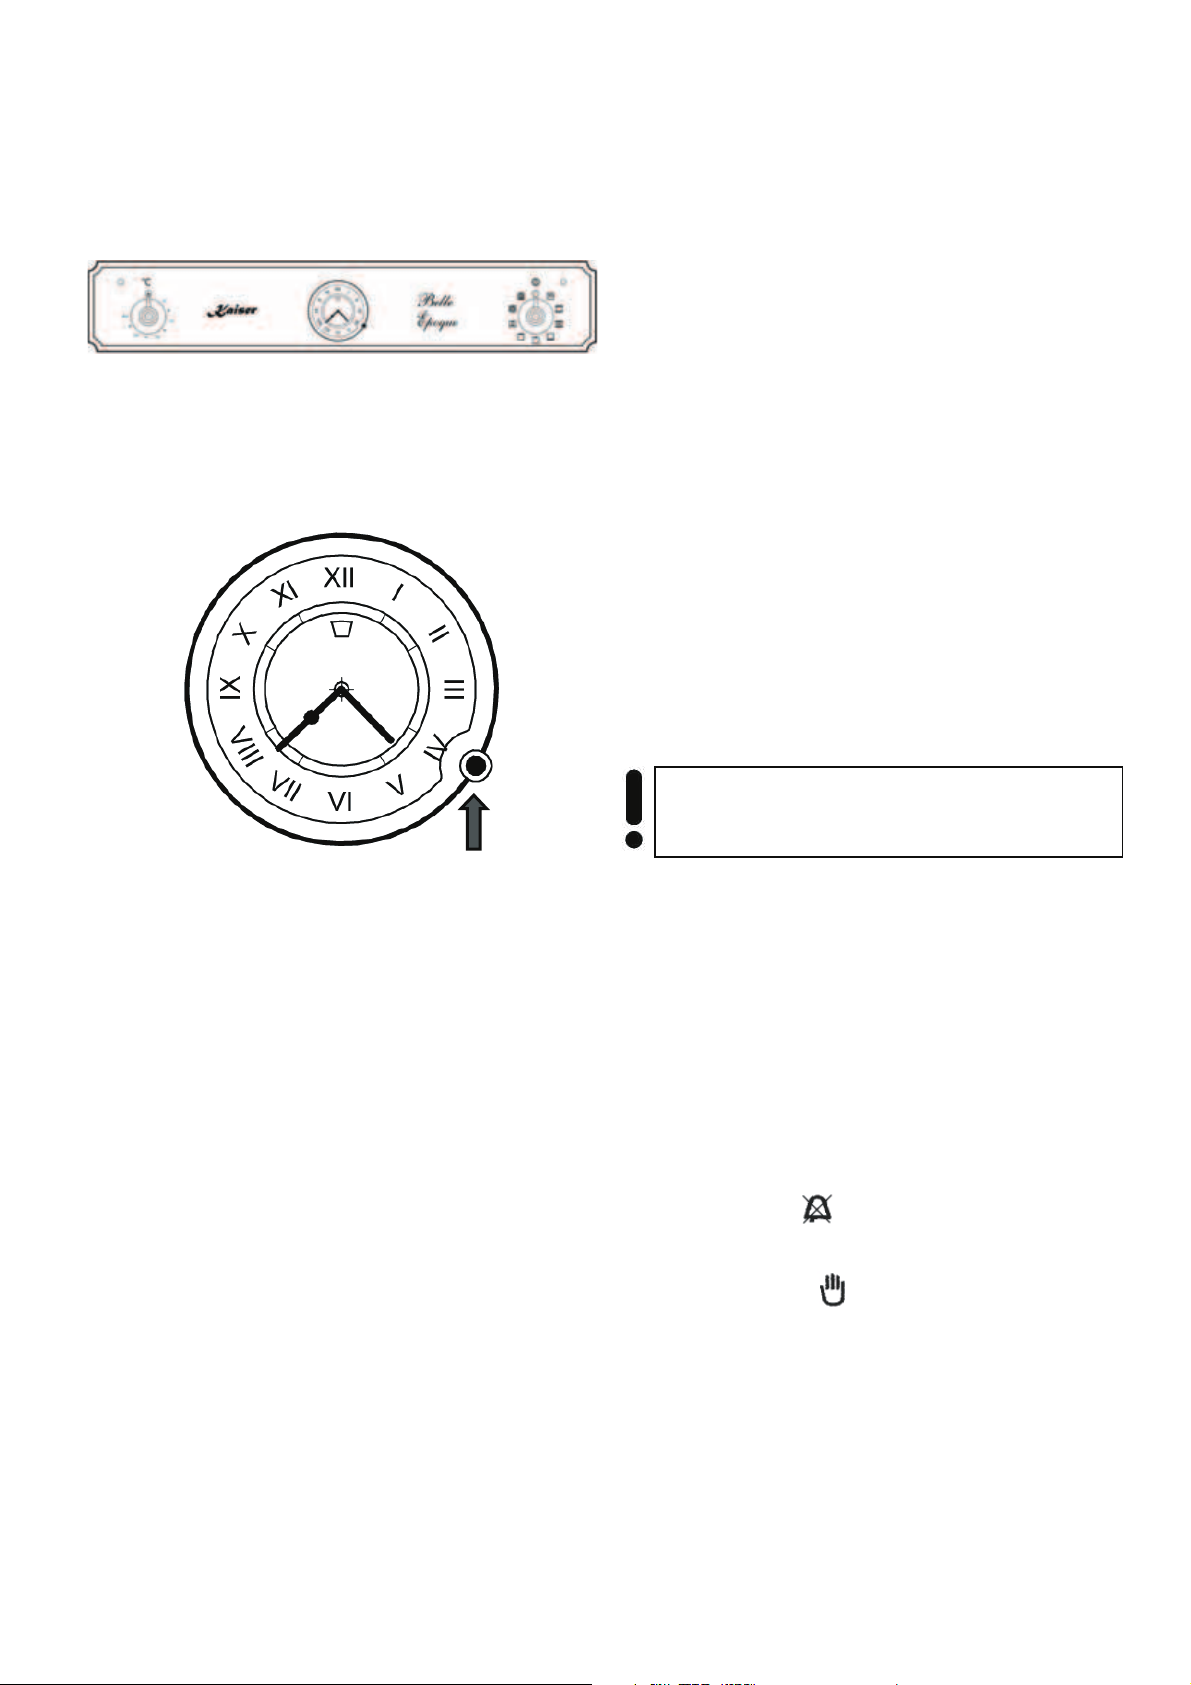
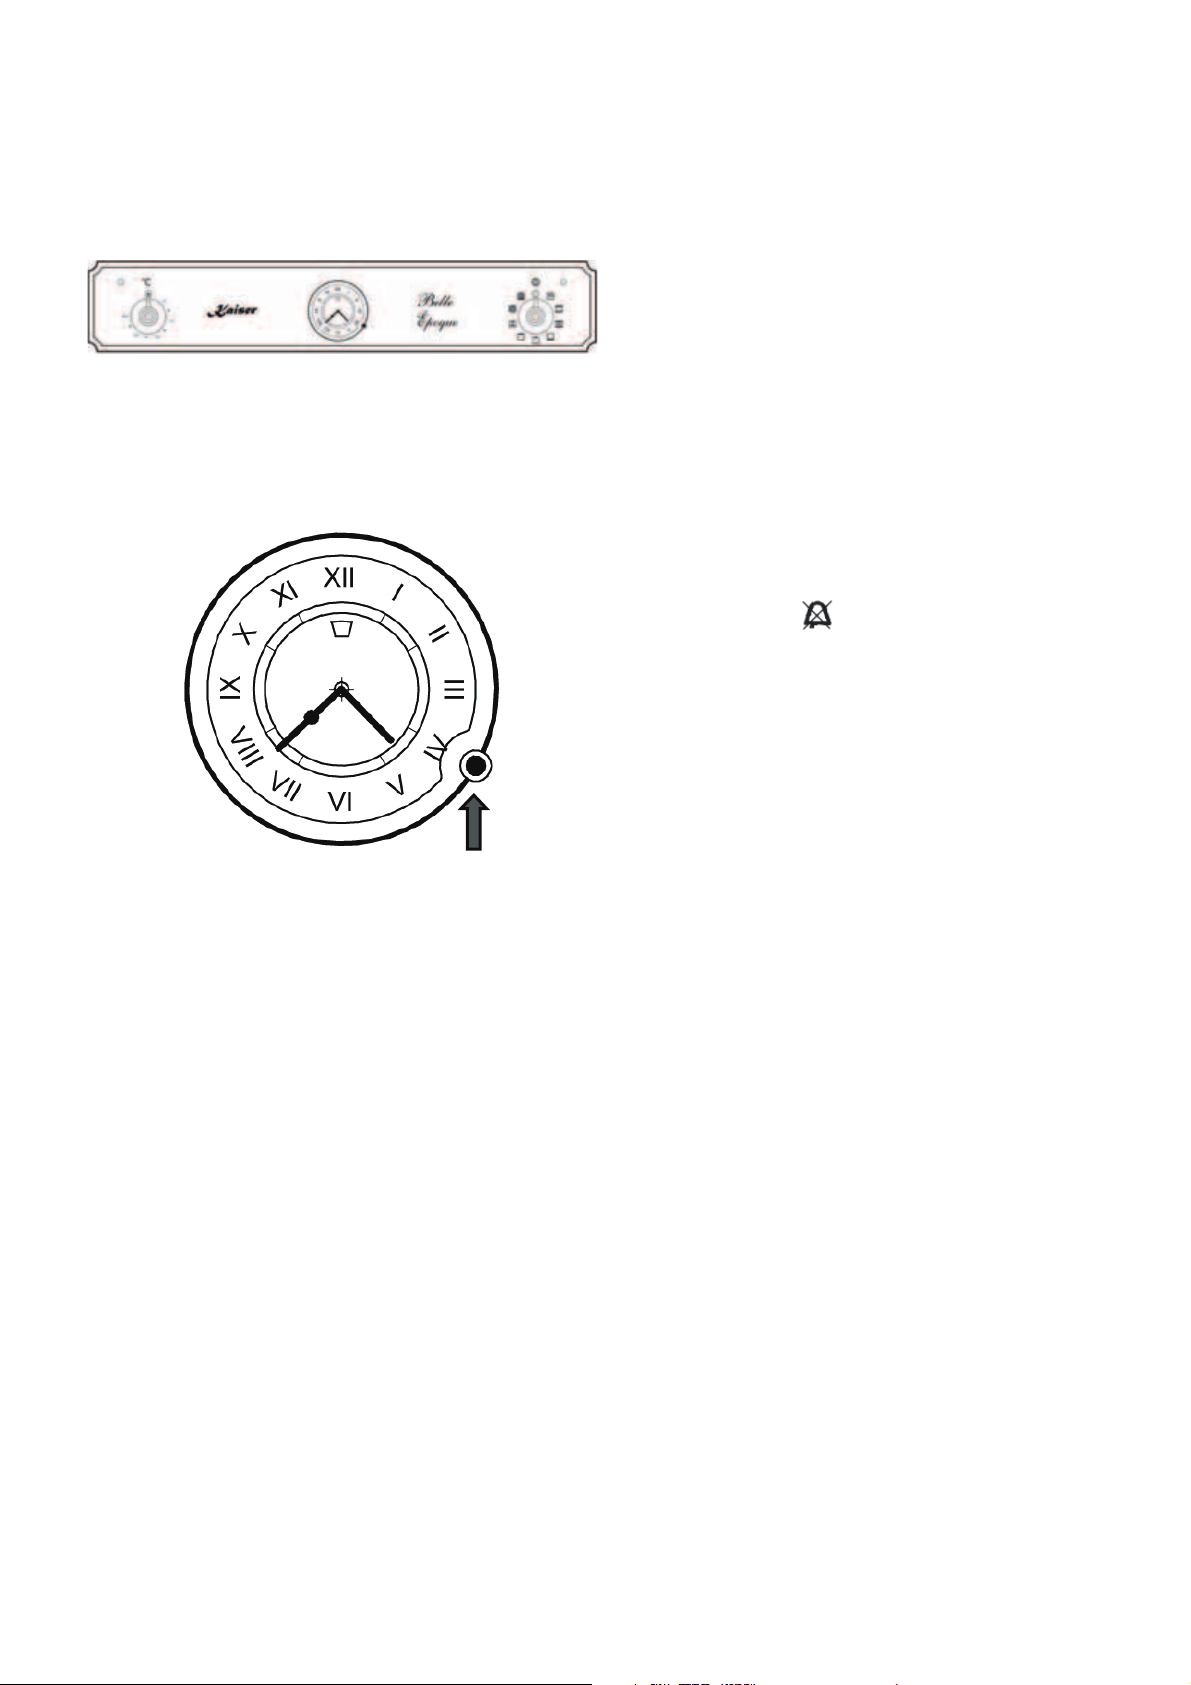
Attention! You must set the time on the
clock before you can use the oven.
(See chapter “Digital clock timer“).
If the time is not set, the oven will not work!
8
Page 9

DE RU
ɪ
EINBAU DES BACKOFENS
Der Backofen kann unter einer Arbeitsplatte oder in
einen Schrank eingebaut werden. Die Einbaumaße
müssen den auf der Abbildung dargestellten
Massen entsprechen. Das Möbelmaterial muss
hitzebeständig sein. Der Backofen muss zu den
Möbelwänden zentriert, und mit den mitgelieferten
Schrauben und Buchsen befestigt werden.
Für die Kombination des Backofens mit den Gasoder Gas-Elektrokombikochfeldern siehe
beiliegende Anleitungen.
VORBEREITUNG
Vor dem ersten Gebrauch muss der Backofen
gründlich mit Seifenwasser gesäubert und
anschließend mit klarem Wasser abgewaschen
werden. Die mitgelieferten Einhängegitter auf die
Seitenwände einbauen und die Gitter und Bleche
aufstellen. Den Backofen für etwa 30 Minuten auf
Höchsttemperatur aufheizen, auf diese Weise
werden alle fetthaltigen Bearbeitungsrückstände
eliminiert, die beim Backen unangenehme Gerüche
verursachen könnten.
ɍɋɌȺɇɈȼɄȺ
Ⱦɭɯɨɜɤɚ ɩɪɟɞɧɚɡɧɚɱɟɧɚ ɞɥɹ ɜɫɬɪɨɣɤɢ ɥɢɛɨ ɩɨɞ
ɪɚɛɨɱɭɸ ɩɨɜɟɪɯɧɨɫɬɶ ɫɬɨɥɚ, ɥɢɛɨ ɜ ɲɤɚɮ.
Ɋɚɡɦɟɪɵ, ɤɨɬɨɪɵɦɢ ɧɟɨɛɯɨɞɢɦɨ
ɪɭɤɨɜɨɞɫɬɜɨɜɚɬɶɫɹ ɩɪɢ ɜɫɬɪɨɣɤɟ, ɭɤɚɡɚɧɵ ɧɚ
ɪɢɫɭɧɤɟ. Ɇɟɛɟɥɶ ɞɨɥɠɧɚ ɛɵɬɶ ɢɡɝɨɬɨɜɥɟɧɚ ɢɡ
ɧɚɝɪɟɜɨɫɬɨɣɤɨɝɨ ɦɚɬɟɪɢɚɥɚ. Ⱦɭɯɨɜɤɚ ɞɨɥɠɧɚ
ɛɵɬɶ ɨɬɰɟɧɬɪɨɜɚɧɚ ɩɨ ɨɬɧɨɲɟɧɢɸ ɤ ɫɬɟɧɤɚɦ
ɦɟɛɟɥɢ ɢ ɧɚɞɟɠɧɨ ɡɚɤɪɟɩɥɟɧɚ ɩɪɢ ɩɨɦɨɳɢ
ɩɨɫɬɚɜɥɹɟɦɵɯ ɜ ɤɨɦɩɥɟɤɬɟ ɤɪɟɩɟɠɧɵɯ
ɦɚɬɟɪɢɚɥɨɜ.
Ⱦɥɹ ɤɨɦɛɢɧɚɰɢɢ ɞɭɯ
ɷɥɟɤɬɪɢɱɟɫɤɨɣ ɩɨɜɟɪɯɧɨɫɬɶɸ ɢɫɩɨɥɶɡɭɣɬɟ
ɩɪɢɤɥɚɞɵɜɚɟɦɭɸ ɞɨɤɭɦɟɧɬɚɰɢɸ.
ɉɈȾȽɈɌɈȼɄȺ
ɉɟɪɟɞ ɩɟɪɜɵɦ ɩɨɥɶɡɨɜɚɧɢɟɦ ɬɳɚɬɟɥɶɧɨ
ɨɱɢɫɬɢɬɶ ɞɭɯɨɜɤɭ ɦɵɥɶɧɵɦ ɪɚɫɬɜɨɪɨɦ ɢ ɯɨɪɨɲɨ
ɩɪɨɦɵɬɶ ɞɨɫɬɚɬɨɱɧɵɦ ɤɨɥɢɱɟɫɬɜɨɦ ɜɨɞɵ.
ɇɚɜɟɫɢɬɶ ɧɚ ɛɨɤɨɜɵɟ ɫɬɟɧɤɢ ɩɨɫɬɚɜɥɹɟɦɵɟ ɜ
ɤɨɦɩɥɟɤɬɟ ɥɟɫɬɧɢɱɤɢ ɢ ɭɫɬɚɧɨɜɢɬɶ ɧɚ ɧɢɯ
ɪɟɲɟɬɤɢ ɢ ɩɪɨɬɢɜɧɢ. ȼ ɬɟɱɟɧɢɟ ɩɪɢɦɟɪɧɨ 30
ɦɢɧɭɬ ɩɪɨɝɪɟɬɶ ɞɭɯɨɜɤɭ ɞɨ ɦɚɤɫɢɦɚɥɶɧɨɣ
ɬɟɦɩɟɪɚɬɭɪɵ, ɩɪɢ ɷɬɨɦ ɧɟɣɬɪɚɥɢɡɭɸɬɫɹ ɜɫɟ
ɠɢɪɨɫɨɞɟɪɠɚɳɢɟ ɜɟɳɟɫɬɜɚ, ɢɫɩɨɥɶɡɭɟɦɵɟ ɩɪɢ
ɩɪɨɢɡɜɨɞɫɬɜɟɧɧɨɣ ɨɛɪɚɛɨɬɤɟ ɢɡɞɟɥɢɹ, ɤɨɬɨɪɵɟ
ɦɨɝɭɬ ɨɛɭɫɥɨɜɢɬɶ ɩɨɹɜɥɟɧɢɟ ɧɟɩɪɢɹɬɧɵɯ
ɡɚɩɚɯɨɜ ɩɪɢ ɩɟɪɜɨɦ ɩɪɢɝɨɬɨɜɥɟɧɢɢ ɛɥɸɞ.
ɨɜɤɢ ɫ ɝɚɡɨɜɨɣ ɢɥɢ ɝɚɡɨ-
Wichtig!!!
Als Sicherheitsvorkehrung muss vor jeder
Reinigung des Backofens immer das Stromnetz
abgeschaltet werden. Zum Reinigen dürfen keine
sauren oder alkalischen Substanzen verwendet
werden (Zitronensaft, Essig, Salz, usw.).
Chlorhaltige Produkte (Bleichmittel u. s. w.) sind
ebenfalls zu vermeiden, dies gilt vor allem für die
Reinigung der emaillierten Oberflächen
Achtung! Vor dem ersten Gebrauch des
Backofens muss die aktuelle Tageszeit
eingestellt werden. (siehe Kapitel
„Elektronische Zeitschaltuhr.“).
Ohne eingestellte Uhr funktioniert der
Backofen nicht!
ȼɚɠɧɨ!!!
ȼ ɤɚɱɟɫɬɜɟ ɦɟɪɵ ɩɪɟɞɨɫɬɨɪɨɠɧɨɫɬɢ
ɧɟɨɛɯɨɞɢɦɨ ɩɟɪɟɞ ɤɚɠɞɨɣ ɱɢɫɬɤɨɣ ɞɭɯɨɜɤɢ
ɨɬɤɥɸɱɚɬɶ ɟɟ ɨɬ ɫɟɬɢ. ɇɟ ɩɪɢɦɟɧɹɣɬɟ ɞɥɹ
ɱɢɫɬɤɢ ɤɢɫɥɨɬɨ- ɢɥɢ ɳɟɥɨɱɟɫɨɞɟɪɠɚɳɢɯ
ɜɟɳɟɫɬɜ (ɭɤɫɭɫ, ɫɨɤ ɥɢɦɨɧɚ, ɫɨɥɶ ɢ ɬ.ɞ.). ɇɢ ɜ
ɤɨɟɦ ɫɥɭɱɚɟ ɧɟ ɩɪɢɦɟɧɹɣɬɟ ɬɚɤɠɟ
ɯɥɨɪɨɫɨɞɟɪɠɚɲɢɟ ɫɪɟɞɫɬɜɚ (ɨɬɛɟɥɢɜɚɸɳɢɟ ɢ
ɬ.ɞ.). Ɉɫɨɛɟɧɧɨ ɷɬɨ ɧɭɠɧɨ ɢɦɟɬɶ ɜ ɜɢɞɭ ɩɪɢ
ɱɢɫɬɤɟ ɷɦɚɥɢɪɨɜɚɧɧɵɯ ɩɨɜɟɪ
ȼɧɢɦɚɧɢɟ! ɉɟɪɟɞ ɩɟɪɜɵɦ
ɢɫɩɨɥɶɡɨɜɚɧɢɟɦ ɞɭɯɨɜɤɢ ɧɟɨɛɯɨɞɢɦɨ
ɜɵɫɬɚɜɢɬɶ ɬɟɤɭɳɟɟ ɜɪɟɦɹ ɧɚ
ɱɚɫɚɯ (ɫɦ. ɪɚɡɞɟɥ „ɗɥɟɤɬɪɨɧɧɨɟ
ɩɪɨɝɪɚɦɦɢɪɭɸɳɟɟ ɭɫɬɪɨɣɫɬɜɨ“).
ȼɩɪoɬɢɜɧɨɦ ɫɥɭɱɚɟ ɞɭɯɨɜɤɚ ɧɟ ɛɭɞɟɬ
ɚɛɨɬɚɬɶ!
ɯɧɨɫɬɟɣ ɞɭɯɨɜɨɤ.
9
Page 10
EN
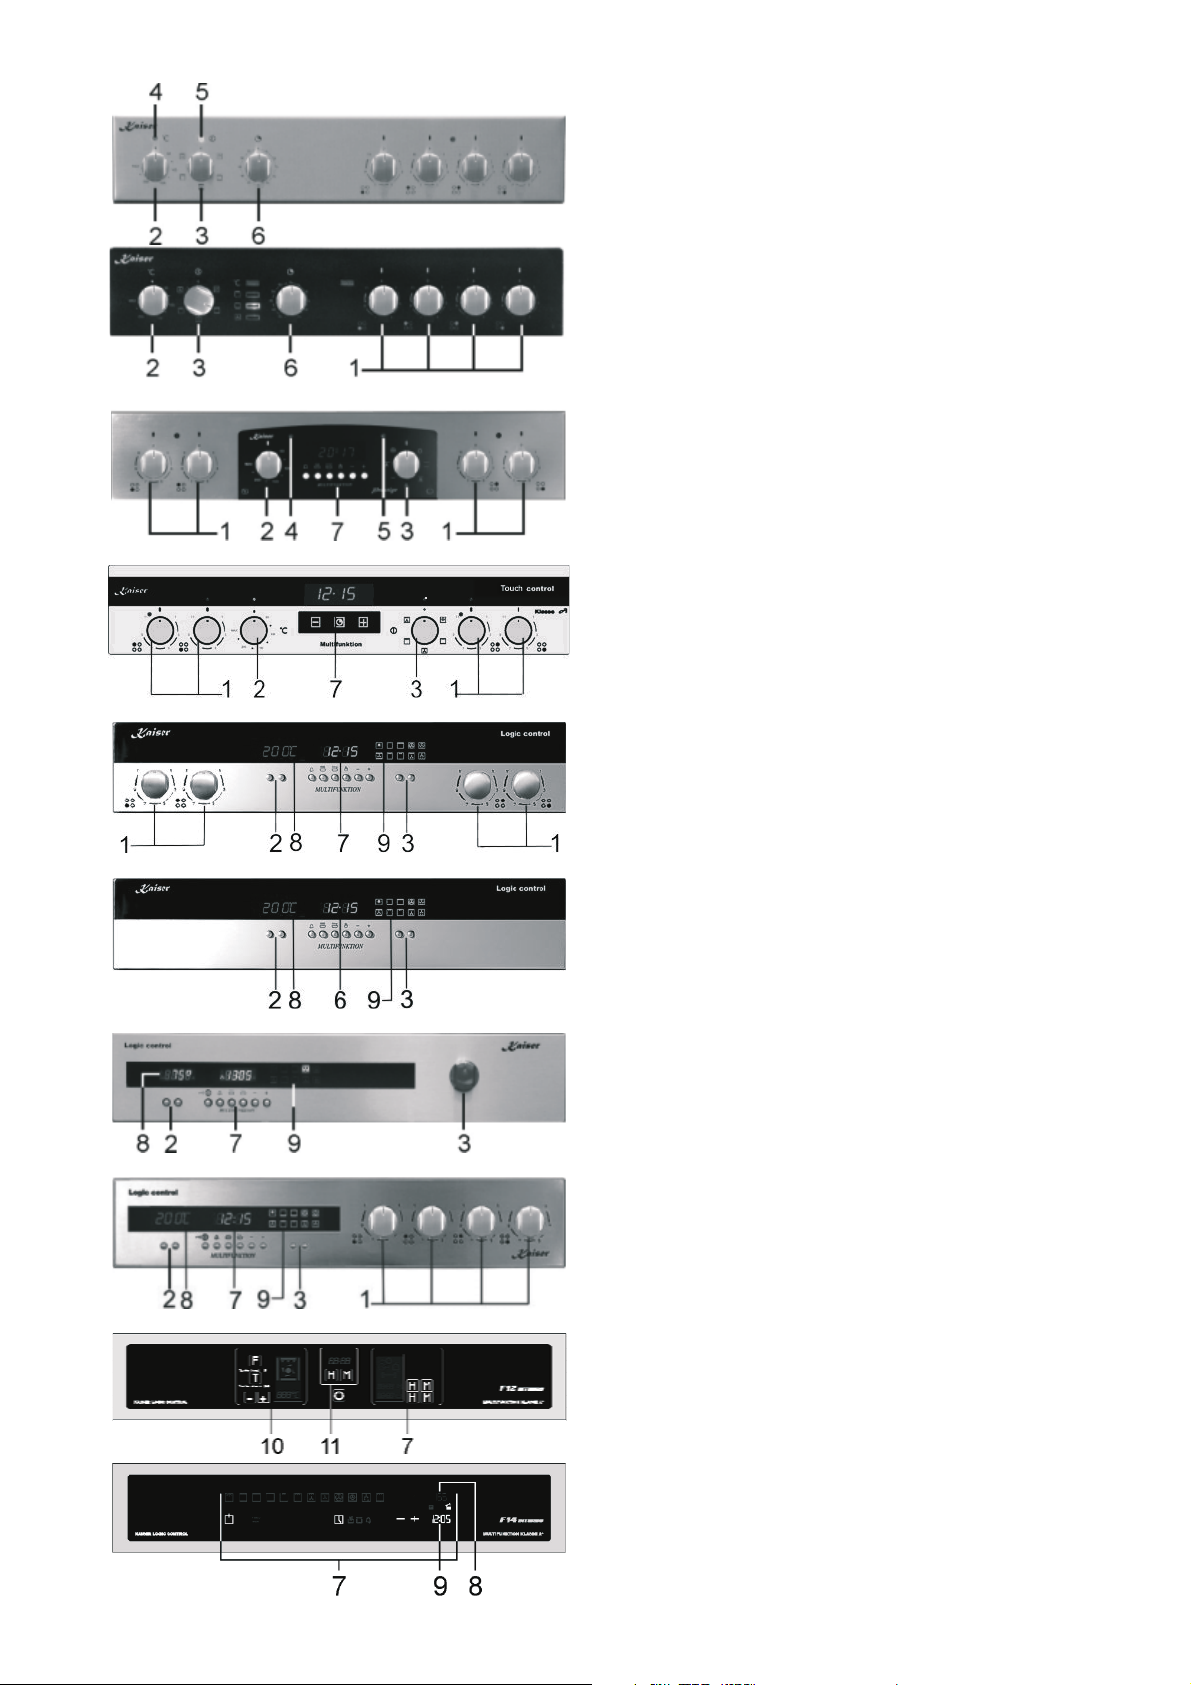
BRIEF DESCRIPTION
LOCATION DRAWING
Arrangement of functional assemblies
1. Vitroceramic cooking hob
5
2
3
6
5
3 4
2. Rotary handles of the cooking zones
2
4
regulator
3. Rotary handles / keys of the oven
temperature regulator
4. Rotary handles / keys of the oven operating
functions
5. Control panel
6. Oven door
7. Digital clock timer
8. Funɫtions set area
6
8
5
6
7
Different control panels are put on different models
according to their technical equipment on which
the operating elements are arranged sensibly.
10
Page 11

DE RU
KURZBESCHREIBUNG
GESAMTANSICHT
Anordnung von Funktionsbaugruppen
1. Glaskeramik-Kochfeld mit Kochzonen
2. Drehknebel der Kochzonenregler
3. Drehknebel / Tasten des
Backofentemperaturreglers
4. Drehknebel / Tasten der
Backofenbetriebsfunktionen
5. Bedienblende
6. Backofentür
7. Elektronische Zeitschaltuhr
ɄɊȺɌɄɈȿ ɈɉɂɋȺɇɂȿ
ȼɇȿɒɇɂɃ ȼɂȾ
ɉɪɢɦɟɪɧɨɟ ɪɚɡɦɟɳɟɧɢɟ ɮɭɧɤɰɢɨɧɚɥɶɧɵɯ
ɭɡɥɨɜ
1. Ʉɟɪɚɦɢɱɟɫɤɚɹ ɩɨɜɟɪɯɧɨɫɬɶ ɫ
ɧɚɝɪɟɜɚɬɟɥɶɧɵɦɢ ɩɨɥɹɦɢ
2. Ɋɭɱɤɢ / ɤɧɨɩɤɢ ɭɩɪɚɜɥɟɧɢɹ
ɧɚɝɪɟɜɚɬɟɥɶɧɵɯ ɩɨɥɟɣ
3. Ɋɭɱɤɢ / ɤɧɨɩɤɢ ɬɟɪɦɨɪɟɝɭɥɹɬɨɪɚ ɞɭɯɨɜɤɢ
4. Ɋɭɱɤɢ / ɤɧɨɩɤɢ ɪɟɠɢɦɚ ɪɚɛɨɬɵ ɞɭɯɨɜɤɢ
5. ɉaɧeɥɶ ɭɩɪɚɜɥɟɧɢɹ
6. Ⱦɜɟɪɶ ɞɭɯɨɜɨɝɨ ɲɤɚɮɚ
7. ɗɥɟɤɬɪɨɧɧɨɟ ɩɪɨɝɪɚɦɦɢɪɭɸɳɟɟ
ɭɫɬɪɨɣɫɬɜɨ
8. Bereich für Funktioneneinstellungen
8. Ɉɛɥɚɫɬɶ ɭɫɬɚɧɨɜɤɢ ɮɭɧɤɰɢɣ
Verschiedene Modelle, je nach ihrer technischen
Ausrüstung, sind mit verschiedenen Bedienblenden
versehen, an denen die Bedienelemente sinnvoll
angeordnet sind.
Ɉɬɞɟɥɶɧɵɟ ɦɨɞɟɥɢ, ɜ ɡɚɜɢɫɢɦɨɫɬɢ ɨɬ ɢɯ
ɬɟɯɧɢɱɟɫɤɨɝɨ ɨɛɨɪɭɞɨɜɚɧɢɹ, ɢɦɟɸ
ɩɚɧɟɥɢ ɭɩɪɚɜɥɟɧɢɹ ɫ ɫɨ
ɪɚɡɦɟɳɟɧɧɵɦɢ ɧɚ ɧɢɯ ɷɥɟɦɟɧɬɚɦɢ ɭɩɪɚɜɥɟɧɢɹ.
ɬ ɪɚɡɥɢɱɧɵɟ
ɨɬɜɟɬɫɬɜɟɧɧɨ
11
Page 12
EN
*
*
*
*
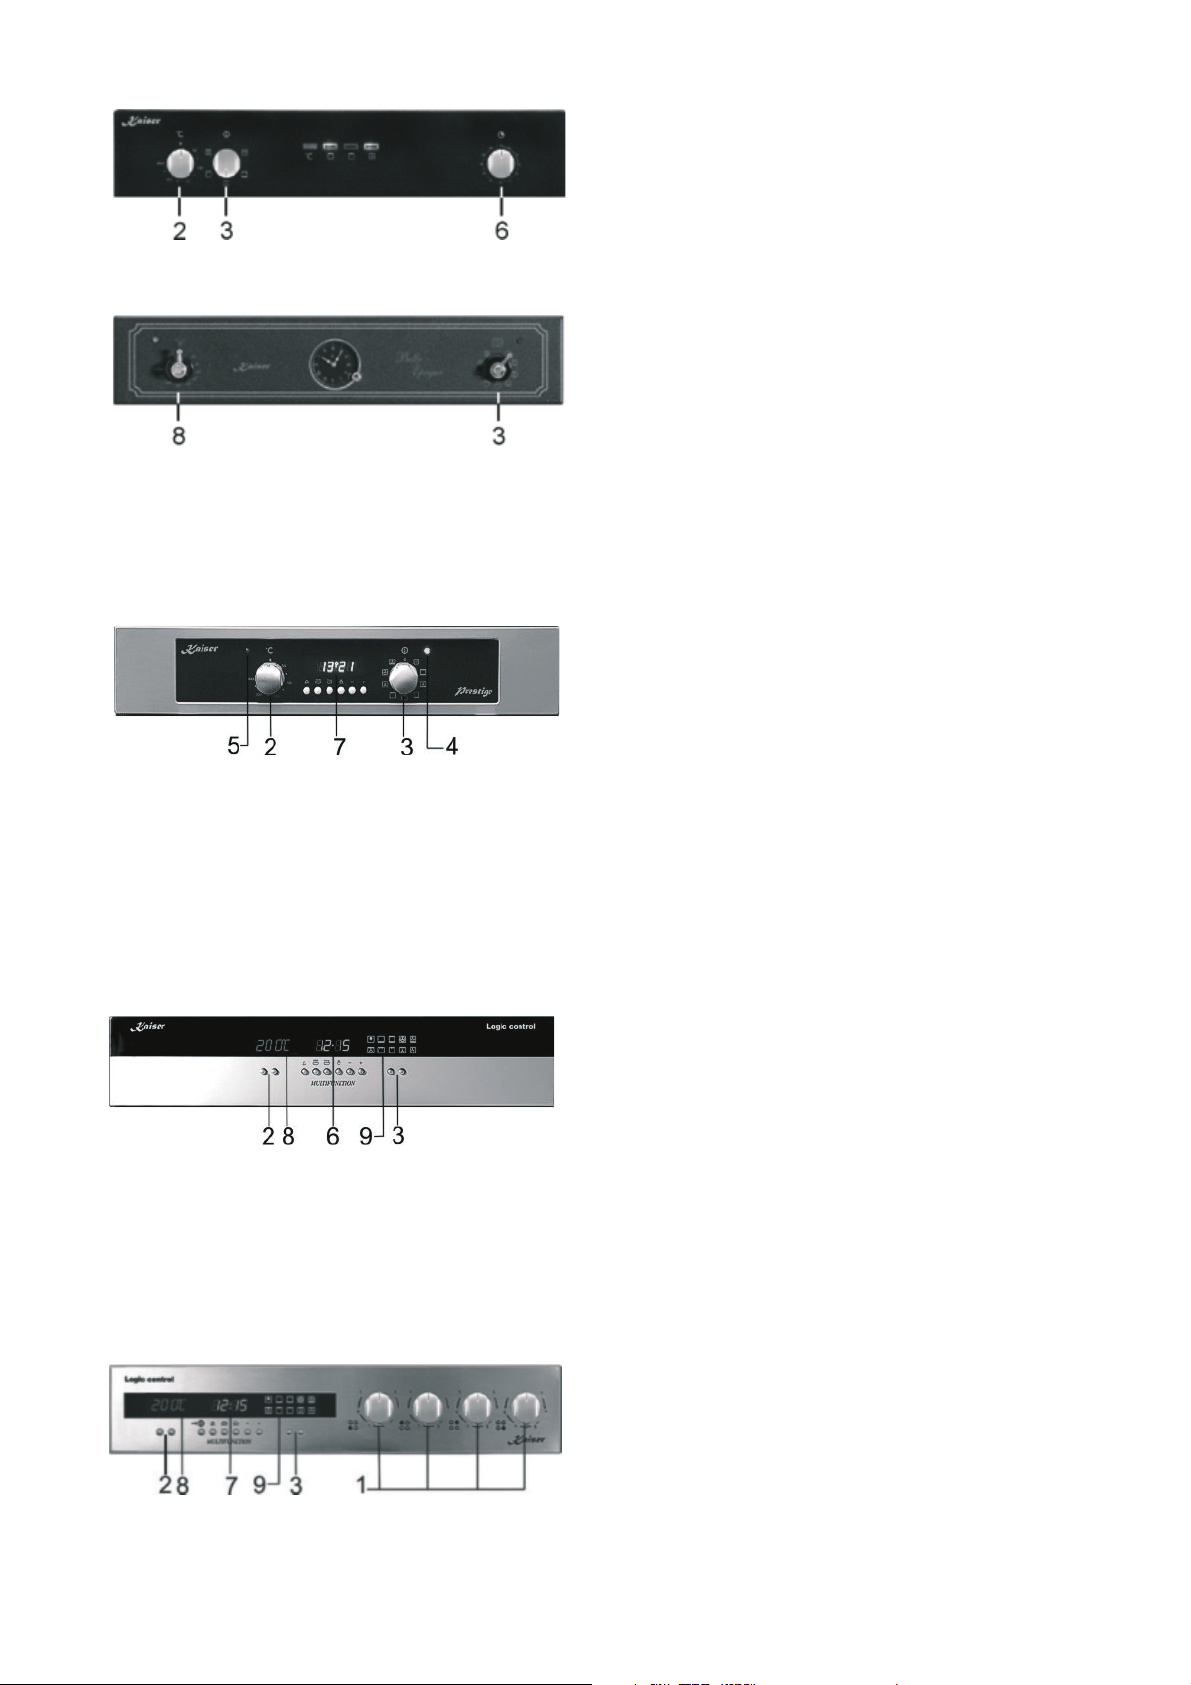
CONTROL PANEL
Control Panels of the models Prestige*
with Timer
Control panels of the models Prestige*
with clock timer
Control panels of the models Touch control*
with clock timer with sensor
Control panels of the models Logic control*
with Digital clock timer
1. Rotary handles of cooking zones
2. Rotary handles / keys of the oven
temperature regulator
3. Rotary handles / keys of the oven oven
operating functions
4. Controlling light ON/OFF (yellow)
5. Oven operation - Controlling light (red)
6. Rotary clutch of the timer
7. Digital time switch clock
8. Temperature indicator
9. Oven function indicator
10. Funktion/ temperature set area
11. Clock setting/ ON-OFF area
Control panels of the models
Logic control* with full sensor control
12
– electronic time switch clock can be executed differently
*
according to the model. See a precise description in the
suitable chapter.
Page 13

DE RU
*
*
*
*
*
BEDIENBLENDE
Bedienblende von Modellen Prestige*
mit Kurzzeitwecker
Bedienblende von Modellen Prestige*
mit elektronischer Zeitschaltuhr
Bedienblende von Modellen Touch control *
mit elektronischer Zeitschaltuhr mit
Sensorbedienung
ɉȺɇȿɅɖ ɍɉɊȺȼɅȿɇɂə
ɉɚɧɟɥɢ ɭɩɪɚɜɥɟɧɢɹ ɦɨɞɟɥɟɣ Prestige*
ɫ ɦɢɧɭɬɧɢɤɨɦ
ɉɚɧɟɥɢ ɭɩɪɚɜɥɟɧɢɹ ɦɨɞɟɥɟɣ Prestige*
ɫ ɷɥɟɤɬɪɨɧɧɵɦ ɩɪɨɝɪɚɦɦɢɪɭɸɳɢɦ
ɭɫɬɪɨɣɫɬɜɨɦ
ɉɚɧɟɥɢ ɭɩɪɚɜɥɟɧɢɹ ɦɨɞɟɥɟɣ
Touch control *
ɩɪɨɝɪɚɦɦɢɪɭɸɳɢɦ ɭɫɬɪɨɣɫɬɜɨɦ
ɫ ɫɟɧɫɨɪɧɵɦ ɷɥɟɤɬɪɨɧɧɵɦ
Bedienblende von Modellen Logic control*
mit elektronischer Zeitschaltuhr
1. Drehknebel der Kochzonenregler
2. Drehknebel / Tasten des
Backofentemperaturreglers
3. Drehknebel / Tasten der
Backofenbetriebsfunktionen
4. Kontrollleuchte ON/OFF (gelb)
5. Backofenbetrieb - Kontrollleuchte (rot)
6. Drehknebel des Kurzzeitweckers
7. Elektronische Zeitschaltuhr
8. Temperaturanzeige
9. Backofenfunktionsanzeige
10. Bereich für Temperutur-/
Funktioneneinstellungen
11. Bereich für Uhreinstellung, Ein-/ Auschalten
vom Backofen
Bedienblende von Modellen Logic control*
mit mit Vollsensorbedienung
ɉɚɧɟɥɢ ɭɩɪɚɜɥɟɧɢɹ ɦɨɞɟɥɟɣ Logic control*
ɫ ɷɥɟɤɬɪɨɧɧɵɦ ɩɪɨɝɪɚɦɦɢɪɭɸɳɢɦ
ɭɫɬɪɨɣɫɬɜɨɦ
1. Ɋɭɱɤɢ ɭɩɪɚɜɥɟɧɢɹ ɧɚɝɪɟɜɚɬɟɥɶɧɵɯ ɩɨɥɟɣ
2. Ɋɭɱɤɢ / ɤɧɨɩɤɢ ɬɟɪɦɨɪɟɝɭɥɹɬɨɪɚ ɞɭɯɨɜɤɢ
3. Ɋɭɱɤɢ / ɤɧɨɩɤɢ ɪɟɠɢɦɚ ɪɚɛɨɬɵ ɞɭɯɨɜɤɢ
4. Ʉɨɧɬɪɨɥɶɧɚ
ɹ ɥɚɦɩɚ ȼɤɥ/ȼɵɤɥ (ɠɟɥɬ.)
5. Ʉɨɧɬɪɨɥɶɧɚɹ ɥɚɦɩɚ ɪɚɛɨɬɵ
ɞɭɯɨɜɤɢ(ɤɪɚɫɧ.)
6. Ɋɭɱɤɚ ɦɢɧɭɬɧɢɤɚ
7. ɗɥɟɤɬɪɨɧɧɨɟ ɩɪɨɝɪɚɦɦɢɪɭɸɳɟɟ
ɭɫɬɪɨɣɫɬɜɨ
8. Ⱦɢɫɩɥɟɣ ɡɧɚɱɟɧɢɹ ɬɟɦɩɟɪɚɬɭɪɵ
9. Ⱦɢɫɩɥɟɣ ɮɭɧɤɰɢɣ ɞɭɯɨɜɤɢ
10. Ɉɛɥɚɫɬɶ ɭɫɬɚɧɨɜɤɢ ɬɟɦɩɟɪɚɬɭɪ/ ɮɭɧɤɰɢɣ
11. Ɉɛɥɚɫɬɶ ɭɫɬɚɧɨɜɤɢ ɱɚɫɨɜ, ȼɤɥɸɱɟɧɢɟ/
Ɉɬɤɥɸɱɟɧɢɟ ɞɭɯɨɜɨɝɨ ɲɤɚɮɚ
ɉɚɧɟɥɶ ɭɩɪɚɜɥɟɧɢɹ ɦɨɞɟɥɟɣ Logic control*
c ɩɨɥɧɵɦ ɫɟɧɫɨɪɧɵɦ ɭɩɪɚɜɥɟɧɢɟɦ
– elektronische Zeitschaltuhr kann je nach Modell
*
unterschiedlich ausgeführt werden. Genaue Beschreibung
siehe im entsprechenden Kapitel.
– ɷɥɟɤɬɪɨɧɧɨɟ ɩɪɨɝɪɚɦɦɢɪɭɸɳɟɟ ɭɫɬɪɨɣɫɬɜɨ, ɜ
*
ɡɚɜɢɫɢɦɨɫɬɢ ɨɬ ɦɨɞɟɥɢ, ɦɨɠɟɬ ɛɵɬɶ ɪɚɡɥɢɱɧɵɦ.
Ɍɨɱɧɨɟ ɨɩɢɫɚɧɢɟ ɫɦɨɬɪɢɬɟ ɜ ɫɨɨɬɜɟɬɫɬɜɭɸɳɟɦ ɪɚɡɞɟɥɟ.
13
Page 14
EN
*
*
*
Control Panels of the models Prestige*
with Timer
Control Panels of the models Belle Epoque
with mechanical timer
Control panels of the models Prestige*
with clock timer
Control panels of the models Logic control*
with Digital clock timer
1. Rotary handles of cooking zones
2. Rotary handles / keys of the oven
temperature regulator
3. Rotary handles / keys of the oven oven
operating functions
4. Controlling light ON/OFF (yellow)
5. Oven operation - Controlling light (red)
6. Rotary clutch of the timer
7. Digital time switch clock
8. Temperature indicator
9. Oven function indicator
– electronic time switch clock can be executed differently
*
according to the model. See a precise description in the
suitable chapter.
14
Page 15

DE RU
*
*
*
*
Bedienblende von Modellen Prestige*
mit Kurzzeitwecker
Bedienblende von Modellen Belle Epoque
mit mechaniche Zeitschaltuhr
Bedienblende von Modellen Prestige*
mit elektronischer Zeitschaltuhr
ɉɚɧɟɥɢ ɭɩɪɚɜɥɟɧɢɹ ɦɨɞɟɥɟɣ Prestige*
ɫ ɦɢɧɭɬɧɢɤɨɦ
ɉɚɧɟɥɢ ɭɩɪɚɜɥɟɧɢɹ ɦɨɞɟɥɟɣ Belle Epoque
ɫ ɦɟɯɚɧɢɱɟɫɤɢɦ ɬɚɣɦɟɪɨɦ
ɉɚɧɟɥɢ ɭɩɪɚɜɥɟɧɢɹ ɦɨɞɟɥɟɣ Prestige*
ɫ ɷɥɟɤɬɪɨɧɧɵɦ ɩɪɨɝɪɚɦɦɢɪɭɸɳɢɦ
ɭɫɬɪɨɣɫɬɜɨɦ
Bedienblende von Modellen Logic control*
mit elektronischer Zeitschaltuhr
1. Drehknebel der Kochzonenregler
2. Drehknebel / Tasten des
Backofentemperaturreglers
3. Drehknebel / Tasten der
Backofenbetriebsfunktionen
4. Kontrollleuchte ON/OFF (gelb)
5. Backofenbetrieb - Kontrollleuchte (rot)
6. Drehknebel des Kurzzeitweckers
7. Elektronische Zeitschaltuhr
8. Temperaturanzeige
9. Backofenfunktionsanzeige
– elektronische Zeitschaltuhr kann je nach Modell
*
unterschiedlich ausgeführt werden. Genaue Beschreibung
siehe im entsprechenden Kapitel.
ɉɚɧɟɥɢ ɭɩɪɚɜɥɟɧɢɹ ɦɨɞɟɥɟɣ Logic control*
ɫ ɷɥɟɤɬɪɨɧɧɵɦ ɩɪɨɝɪɚɦɦɢɪɭɸɳɢɦ
ɭɫɬɪɨɣɫɬɜɨɦ
1. Ɋɭɱɤɢ ɭɩɪɚɜɥɟɧɢɹ ɧɚɝɪɟɜɚɬɟɥɶɧɵɯ ɩɨɥɟɣ
2. Ɋɭɱɤɢ / ɤɧɨɩɤɢ ɬɟɪɦɨɪɟɝɭɥɹɬɨɪɚ ɞɭɯɨɜɤɢ
3. Ɋɭɱɤɢ / ɤɧɨ
ɩɤɢ ɪɟɠɢɦɚ ɪɚɛɨɬɵ ɞɭɯɨɜɤɢ
4. Ʉɨɧɬɪɨɥɶɧɚɹ ɥɚɦɩɚ ȼɤɥ/ȼɵɤɥ (ɠɟɥɬ.)
5. Ʉɨɧɬɪɨɥɶɧɚɹ ɥɚɦɩɚ ɪɚɛɨɬɵ
ɞɭɯɨɜɤɢ(ɤɪɚɫɧ.)
6. Ɋɭɱɤɚ ɦɢɧɭɬɧɢɤɚ
7. ɗɥɟɤɬɪɨɧɧɨɟ ɩɪɨɝɪɚɦɦɢɪɭɸɳɟɟ
ɭɫɬɪɨɣɫɬɜɨ
8. Ⱦɢɫɩɥɟɣ ɡɧɚɱɟɧɢɹ ɬɟɦɩɟɪɚɬɭɪɵ
9. Ⱦɢɫɩɥɟɣ ɮɭɧɤɰɢɣ ɞɭɯɨɜɤɢ
– ɷɥɟɤɬɪɨɧɧɨɟ ɩɪɨɝɪɚɦɦɢɪɭɸɳɟɟ ɭɫɬɪɨɣɫɬɜɨ, ɜ
*
ɡɚɜɢɫɢɦɨɫɬɢ ɨɬ ɦɨɞɟɥɢ, ɦɨɠɟɬ ɛɵɬɶ ɪɚɡɥɢɱɧɵɦ.
Ɍɨɱɧɨɟ ɨɩɢɫɚɧɢɟ ɫɦɨɬɪɢɬɟ ɜ ɫɨɨɬɜɟɬɫɬɜɭɸɳɟɦ ɪɚɡɞɟɥɟ.
15
Page 16
EN
EQUIPMENT
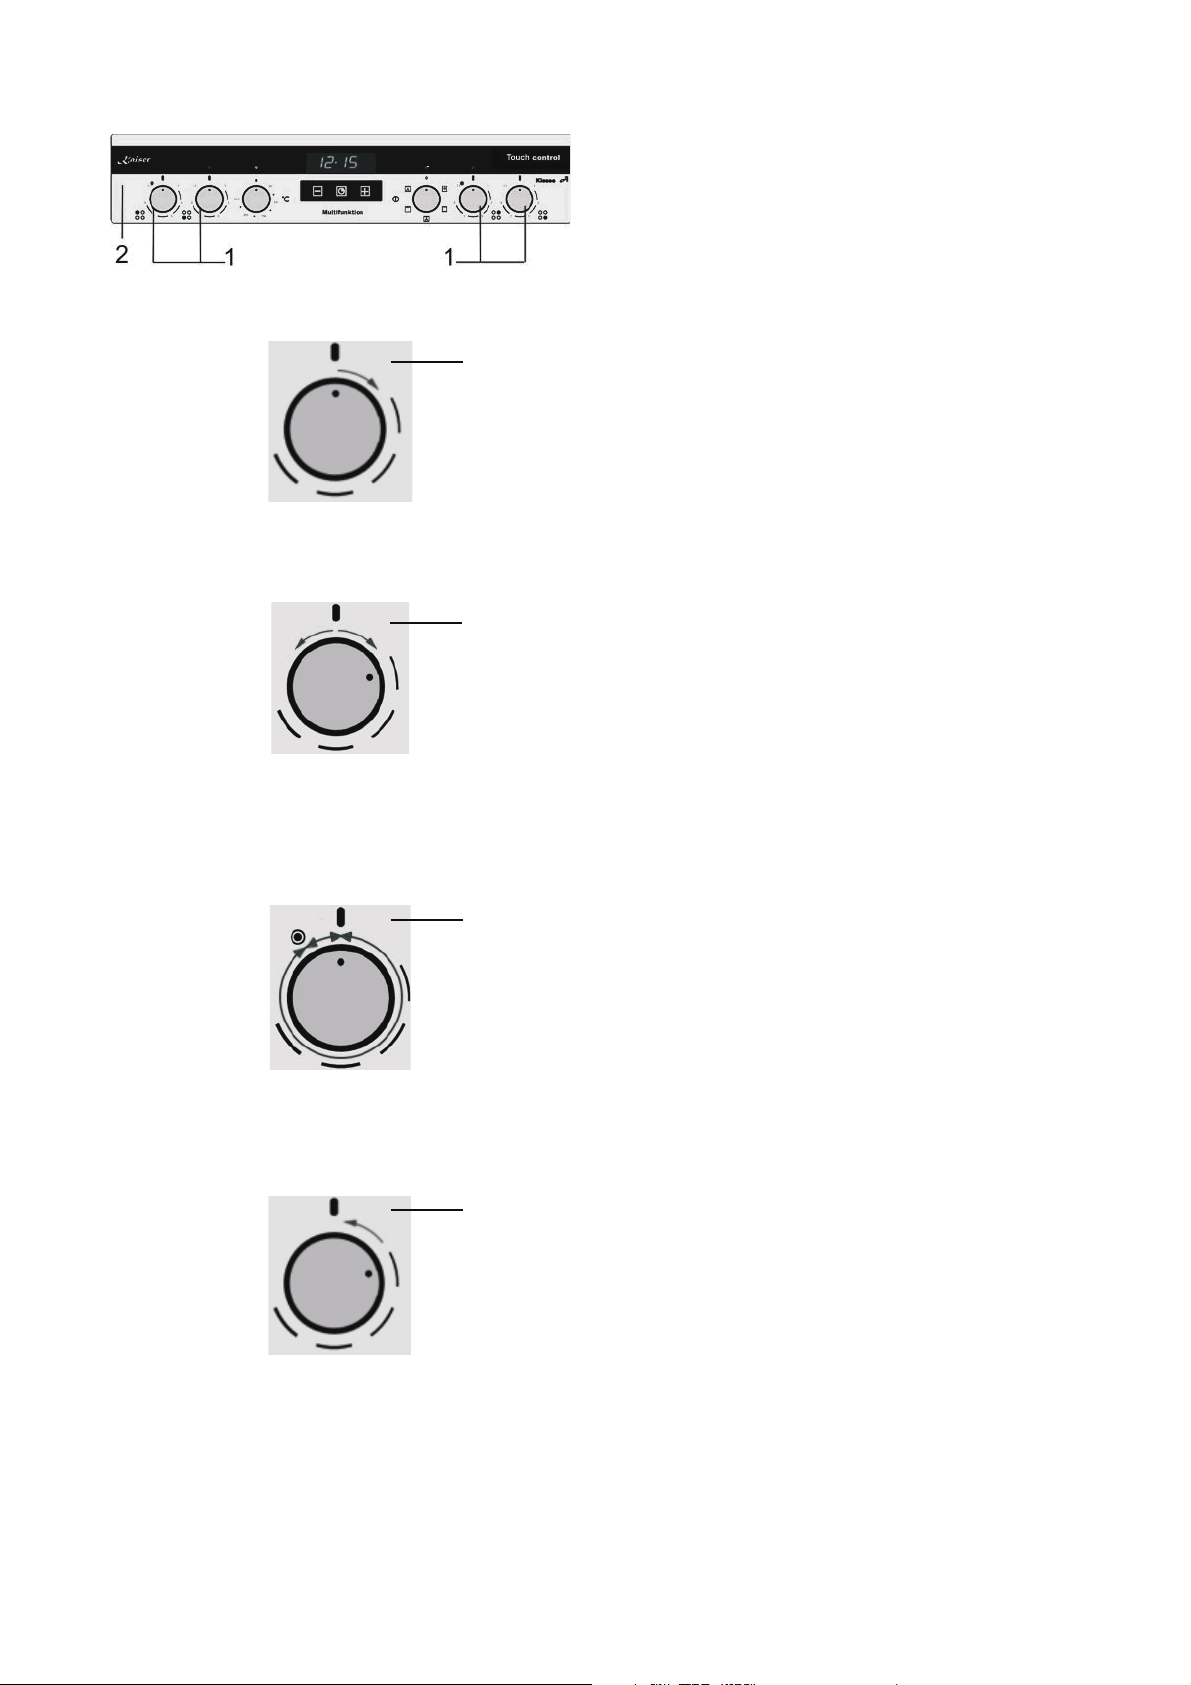
COOKNG ZONES CONTROL
The cooking zones regulation ensues with the
help of rotary handles 1 which are set up on the
control panel 2 of the oven.
3
4
5
The graphic symbols which are beside the rotary
handles of the cooking zones shows which
cooking zone the chosen rotary clutch manages.
To turn on or regulate a cooking zone do the
following:
x Turn the rotary handle clockwise 3
x Bring the rotary handle to the chosen
position 4.
You can regulate the amount of the heat supply to
the dishes fluently within the rotary area.
The double field heating elements are steered by
the energy regulators with the integrated switch of
the outer field.
You can regulate the amount of the heat supply to
the dishes fluently within the rotary area up to
symbol 5 only for the inner cooking zone. To turn
off the outer field:
x Turn rotary handle clockwise as far as it
will go and let go.
By this moment you can regulate the amount of
the heat supply to the dishes fluently for both
cooking zones (inner and outer).
To turn off the cooking zones 6 bring the rotary
handle to position «0»
6
If the control panel of your oven is equipped with
rotary handles Push (sunk rotary handles), for
the control with these rotary handles is necessary:
x Push the rotary handle carefully and let it
go
The rotary handle will come out of the control
panel
To countersink the rotary handle:
x Push the rotary handle as far as it will go
and let go
16
Page 17

DE RU
1
2
AUSSTATUNG
KOCHFELDERSTEUERUNG
Die Kochzonensteuerung erfolgt mit Hilfe von
Drehknebel 1, die auf der Bedienblende des
Backofens 2 eingerichtet sind.
Die graphischen Symbole, die sich neben den
Drehknebel der Kochzonen befinden, zeigen, über
welche Kochzone der gewählten Drehknebel
verwaltet.
Zum Einschalten oder zur Regulierung einer
Kochzone müssen sie wie folgt vorgehen:
x Drehknebel im Uhrzeigersinn drehen 3
x den Drehknebel in ausgewählte Position
bringen 4
In dem Drehbereich kann man fließend die Menge
der Wärmezufuhr zum Geschirr regulieren.
ɈȻɈɊɍȾɈȼȺɇɂȿ
ɍɉɊȺȼɅȿɇɂȿ ɊȺȻɈɌɈɃ
ɇȺȽɊȿȼȺɌȿɅɖɇɕɏ ɉɈɅȿɃ
ɍɩɪɚɜɥɟɧɢɟ ɪɟɠɢɦɨɦ ɪɚɛɨɬɵ ɧɚɝɪɟɜɚɬɟɥɶɧɵɯ
ɩɨɥɟɣ ɨɫɭɳɟɫɬɜɥɹɟɬɫɹ ɩɨɜɨɪɨɬɨɦ ɪɭɱɟɤ
ɭɫɬɚɧɨɜɥɟɧɧɵɯ ɧɚ ɩɚɧɟɥɢ ɭɩɪɚɜɥɟɧɢɹ ɞɭɯɨɜɨɝɨ
ɲɤɚɮɚ
Ƚɪɚɮɢɱɟɫɤɢɟ ɨɛɨɡɧɚɱɟɧɢɹ, ɭɫɬɚɧɨɜɥɟɧɧɵɟ
ɪɹɞɨɦ ɫ ɪɭɱɤɚɦɢ ɭɩɪɚɜɥɟɧɢɹ ɧɚɝɪɟɜɚɬɟɥɶɧɵɦɢ
ɩɨɥɹɦɢ ɩɨɤɚɡɵɜɚɸɬ, ɤɚɤɢɦ ɧɚɝɪɟɜɚɬɟɥɶɧɵɦ
ɩɨɥɟɦ ɭɩɪɚɜɥɹɟɬ ɜɵɛɪɚɧɧɚɹ ɪɭɱɤɚ.
Ⱦɥɹ ɜɤɥɸɱɟɧɢɹ ɧɚɝɪɟɜɚɬɟɥɶɧɨɝɨ ɩɨɥɹ ɢɥɢ
ɪɟɝɭɥɢɪɨɜɤɢ ɦɨɳɧɨɫɬɢ ɧɚɝɪɟɜɚɬɟɥɶɧɨɝɨ ɩɨɥɹ
ɫɥɟɞɭɟɬ:
.
x ɩɨɜɟɪɧɭɬɶ ɪɭɱɤɭ ɩɨ ɱɚɫɨɜɨɣ ɫɬɪɟɥɤɟ 3 .
x ɭɫɬɚɧɨɜɢɬɶ ɪɭɱɤɭ ɜ ɢɡɛɪɚɧɧɨɟ
ɩɨɥɨɠɟɧɢɟ 4
ȼ ɩɪɟɞɟɥɚɯ ɪɟɝɭɥɹɬɨɪɚ ɜɨɡɦɨɠɧɚ ɩɥɚɜɧɚɹ
ɪɟɝɭɥɢɪɨɜɤɚ ɤɨɥɢɱɟɫɬɜɚ ɬɟɩɥɚ ɧɚɝɪɟɜɚɬɟɥɶɧɨɝɨ
ɩɨɥɹ.
,
Die Heizelemente mit dem doppelten Feld werden
durch den Energieregler, mit dem eingebauten
Schalter des Außenfeldes gesteuert.
In dem Drehbereich bis zum Symbol 5 kann man
fließend die Menge der Wärmezufuhr zum Geschirr
nur von innerem Kochfeld regulieren. Zum
Einschalten des Außenfeldes:
x Drehknebel bis zum Anschlag im
Uhrzeigersinn umdrehen und loslassen.
Von diesem Moment kann man fließend die Menge
der Wärmezufuhr zum Geschirr von beiden
Kochfeldern (inneres und äußeres) regulieren
Zum Abschalten beider Kochfeldern 6 den
Drehknebel in die Position «0» bringen.
Wenn die Bedienblende Ihres Backofens mit
Drehknebeln Push (versenkbare Drehknebel)
ausgestattet ist, ist zur Steuerung mit diesen
Drehknebeln nötig:
x den Drehknebel vorsichtig drücken und
loslassen.
Drehknebel wird aus der Bedienblende
herauskommen.
ɇɚɝɪɟɜɚɬɟɥɶɧɵɟ ɷɥɟɦɟɧɬɵ ɫ ɞɜɨɣɧɵɦ ɩɨɥɟɦ
ɭɩɪɚɜɥɹɸɬɫɹ ɩɪɢ ɩɨɦɨɳɢ ɪɟɝɭɥɹɬɨɪɚ ɫɨ
ɜɫɬɪɨɟɧɧɵɦ ɜɵɤɥɸɱɚɬɟɥɟɦ ɜɧɟɲɧɟɝɨ ɩɨɥɹ.
ȼ ɩɪɟɞɟɥɚɯ ɪɟɝɭɥɹɬɨɪɚ ɞɨ ɡɧɚɤɚ 5, ɜɨɡɦɨɠɧɚ
ɩɥɚɜɧɚɹ ɪɟɝɭɥɢɪɨɜɤɚ ɤɨɥɢɱɟɫɬɜɚ ɬɟɩɥɚ ɬɨɥɶɤɨ
ɜɧɭɬɪɟɧɧɟɝɨ ɩɨɥɹ. Ⱦɥɹ ɜɤɥɸɱɟɧɢɹ ɜɧɟɲɧɟɝɨ
ɧɚɝɪɟɜɚɬɟɥɶɧɨɝɨ ɩɨɥɹ:
x ɪɭɱɤɭ ɩɨɜɟɪɧɭɬɶ ɞɨ ɭɩɨɪɚ ɩɨ ɱɚɫɨɜɨɣ
ɫɬɪɟɥɤɟ ɢ ɨɬɩɭɫɬɢɬɶ.
ɋ ɷɬɨɝɨ ɦɨɦɟɧɬɚ, ɜɨɡɦɨɠɧɚ ɩɥɚɜɧɚɹ
ɪɟɝɭɥɢɪɨɜɤɚ ɨɛɨɢɯ ɧɚɝɪɟɜɚɬɟɥɶɧɵɯ ɩɨɥɟɣ
(ɜɧɭɬɪɟɧɧɟɝɨ ɢ ɜɧɟɲɧɟɝɨ).
Ⱦɥɹ ɨɬɤɥɸɱɟɧɢɹ ɨɛɨɢɯ ɩɨɥɟɣ 6 ɭɫɬɚɧɨɜɢɬɶ
ɪɭɱɤɭ ɜ ɩɨɥɨɠɟɧɢɢ «0».
ȿɫɥɢ ȼɚɲɚ ɞɭɯɨ
(ɭɬɨɩɥɟɧɵɦɢ ɜ ɩɚɧɟɥɢ), ɬɨ ɞɥɹ ɭɩɪɚɜɥɟɧɢɹ
ɷɬɢɦɢ ɪɭɱɤɚɦɢ ɧɟɨɛɯɨɞɢɦɨ:
x ɨɫɬɨɪɨɠɧɨ ɧɚɠɚɬɶ ɧɚ ɪɭɱɤɭ ɢ ɨɬɩɭɫɬɢɬɶ
ɟɟ.
Ɋɭɱɤɚ ɜɵɣɞɟɬ ɢɡ ɩɚɧɟɥɢ.
ɜɤɚ ɨɛɨɪɭɞɨɜɚɧɚ ɪɭɱɤɚɦɢ Push
Um den Drehknebel wieder zu versenken,:
x den Drehknebel vorsichtig bis zum
Anschlag drücken und loslasse
Ⱦɥɹ ɬɨɝɨ ɱɬɨɛɵ ɜɧɨɜɶ ɭɬɨɩɢɬɶ ɪɭɱɤɭ:
x ɨɫɬɨɪɨɠɧɨ ɧɚɠɚɬɶ ɧɚ ɪɭɱɤɭ ɞɨ ɭɩɨɪɚ ɢ
ɨɬɩɭɫɬɢɬɶ.
17
Page 18
EN
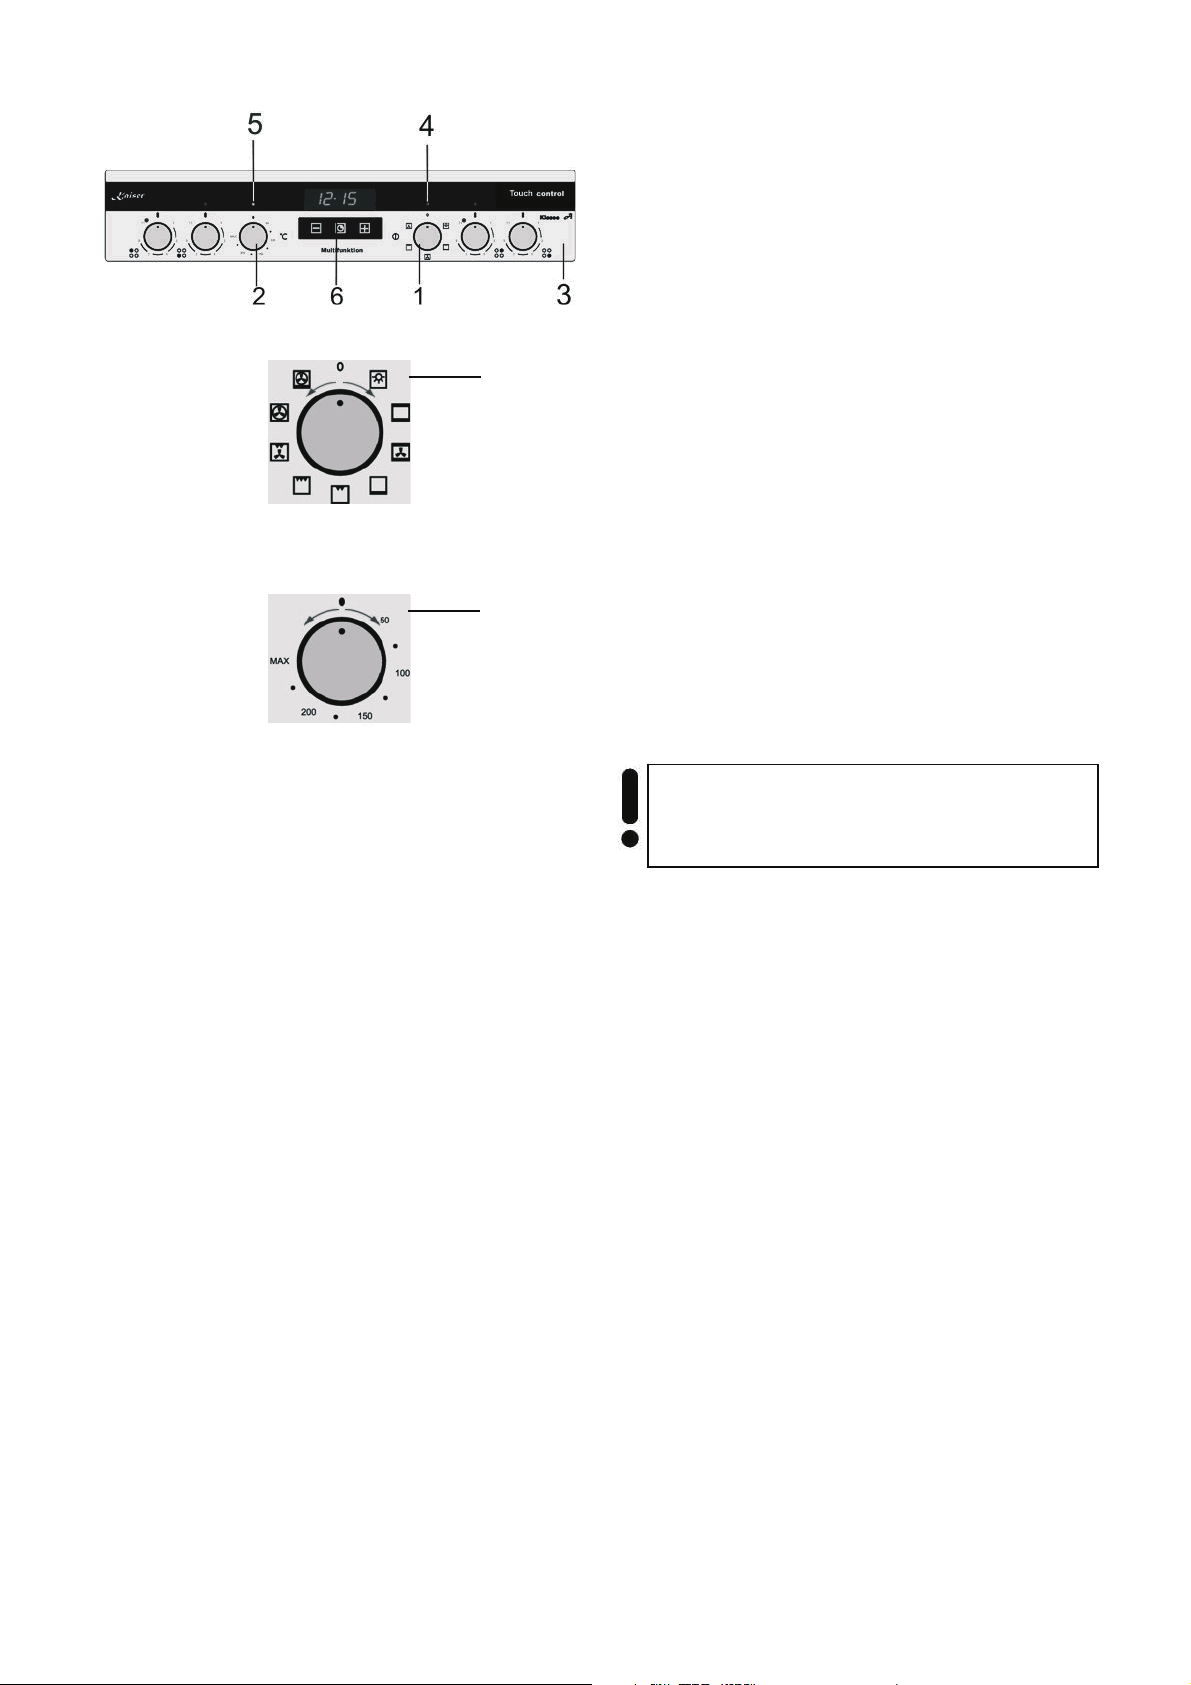
MULTIFUNCTION OVEN CONTROL
Oven operation functions are steered through
turning of the rotary handle mode of operation
1 and rotary handle temperature regulator 2
on the control panel 3.
1
2
The graphic symbols next to the rotary handles
show the chosen operation modes.
To turn off the oven bring the rotary handle
operating mode 1 and the rotary handle
temperature regulator 2 to position «0».
For more comfort you can use the digital clock
timer 6. It enables you to run the oven in an
automatical, half automatical or manuel cycle.
Important! The activation of the oven is
signalizes by the flashing up of controlling
lights in yellow 4 and red 5.
If the red controlling light lapses it signalizes that
the set oven temperature has been reached.
If a cooking recipe advices you to put the meal in
a preheated oven, o this after the lapse of the red
controlling light.
The red controlling light can also glow when the
rotary handle is in the oven inner allumination
position, but in this rotary handle position the
heating element is always off.
If the control panel of your oven is equipped with
rotary handles Push (sunk rotary handles), for
the control with these rotary handles is necessary:
x Push the rotary handle carefully and let it
go
The rotary handle will come out of the control
panel
To countersink the rotary handle:
x Push the rotary handle as far as it will go
and let go
*
for models with digital time switch clock
18
Page 19
DE RU
*
STEUERUNG VON MULTIFUNKTIONSBACKOFEN
ɍɉɊȺȼɅȿɇɂȿ ɊȺȻɈɌɈɃ
ɆɇɈȽɈɎɍɇɄɐɂɈɇȺɅɖɇɈȽɈ ȾɍɏɈȼɈȽɈ
ɒɄȺɎȺ
Backofenbetriebsfunktionen werden durch Drehen
von Drehknebel Betriebsart 1 und Drehknebel
Temperaturregler 2 auf der Bedienblende 3
gesteuert.
Die graphischen Symbole neben den Drehknebeln
zeigen die gewählten Backofenbetriebarten.
Zum Abschalten des Backofens Drehknebel
Betriebsart 1 und Drehknebel
Temperaturregler 2 in die Position «0»
bringen.
Für mehr Komfort können Sie die Elektronische
Zeitschaltuhr* 6 benutzen, die ermöglicht den
Backofen im automatischen, halbautomatischen
und manuellen Zyklus zu betreiben.
ɍɩɪɚɜɥɟɧɢɟ ɪɟɠɢɦɨɦ ɪɚɛɨɬɵ ɞɭɯɨɜɨɝɨ ɲɤɚɮɚ
ɨɫɭɳɟɫɬɜɥɹɟɬɫɹ ɩɨɜɨɪɨɬɨɦ ɪɭɱɟɤ ɜɵɛɨɪɚ
1 ɢ 2
ɞɭɯɨɜɤɢ, ɭɫɬɚɧɨɜɥɟɧɧɵɯ ɧɚ ɩɚɧɟɥɢ ɭɩɪɚɜɥɟɧɢɹ
ɞɭɯɨɜɨɝɨ ɲɤɚɮɚ 3.
Ƚɪɚɮɢɱɟɫɤɢɟ ɨɛɨɡɧɚɱɟɧɢɹ ɭɫɬɚɧɨɜɥɟɧɧɵɟ
ɪɹɞɨɦ ɫ ɪɭɱɤɚɦɢ ɭɩɪɚɜɥɟɧɢɹ ɩɨɤɚɡɵɜɚɸɬ
ɜɵɛɪɚɧɧɵɟ ɩɚɪɚɦɟɬɪɵ ɪɚɛɨɬɵ ɞɭɯɨɜɤɢ.
Ⱦɥɹ ɨɬɤɥɸɱɟɧɢɹ ɞɭɯɨɜɤɢ ɭɫɬɚɧɨɜɢɬɶ ɪɭɱɤɢ
1 ɢ
2 ɜ ɩɨɥɨɠɟɧɢɢ «0».
Ⱦɥɹ ɛɨɥɶɲɟɝɨ ɤɨɦɮɨɪɬɚ ȼɵ ɬɚɤɠɟ ɦɨɠɟɬɟ
ɢɫɩɨɥɶɡɨɜɚɬɶ
*
ɞɚɸɳɟɟ ɜɨɡɦɨɠɧɨɫɬɶ ɭɩɪɚɜɥɹɬɶ ɪɚɛɨɬɨɣ
ɞɭɯɨɜɤɢ ɜ ɚɜɬɨɦɚɬɢɱɟɫɤɨɦ, ɩɨɥɭɚɜɬɨɦɚɬɢɱɟɫɤɨɦ
ɢ ɪɭɱɧɨɦ ɪɟɠɢɦɚɯ.
6,
Wichtig! Die Einschaltung vom Backofen
wird durch Aufleuchten von Kontrolllampen
gelben 4 und roten 5 Farben signalisiert.
Wenn die rote Kontrollleuchte erlischt, signalisiert
es, dass die voreingestellte Backofentemperatur
erreicht worden ist.
Wenn ein Kochrezept empfiehlt, die Speise in den
vorgewärmten Backofen hineinzulegen, so ist es
nach dem Erlöschen der roten Kontrollleuchte zu
tun
Die rote Kontrollleuchte kann auch bei der
Einstellung des Drehknebels in der Position
Innenbeleuchtung des Backofens leuchten,
jedoch sind die Heizkörper bei dieser
Drehknebelposition immer ausgeschaltet.
Wenn die Bedienblende Ihres Backofens mit
Drehknebeln Push (versenkbare Drehknebel)
ausgestattet ist, ist zur Steuerung mit diesen
Drehknebeln nötig:
x den Drehknebel vorsichtig drücken und
loslassen.
Drehknebel wird aus der Bedienblende
herauskommen.
Um den Drehknebel wieder zu versenken,:
x den Drehknebel vorsichtig bis zum
Anschlag drücken und loslassen.
*
für Modelle mit elektronischer Zeitschaltuhr
ȼɚɠɧɨ! ȼɤɥɸɱɟɧɢɟ ɞɭɯɨɜɤɢ
ɫɢɝɧɚɥɢɡɢɪɭɟɬɫɹ ɜɤɥɸɱɟɧɢɟɦ ɤɨɧɬɪɨɥɶɧɵɯ
ɥɚɦɩ ɠɟɥɬɨɝɨ 4 ɢ ɤɪɚɫɧɨɝɨ 5 ɰɜɟɬɨɜ
ɉɨɫɥɟ ɬɨɝ
ɭɫɬɚɧɨɜɥɟɧɧɨɣ ɬɟɦɩɟɪɚɬɭɪɵ ɤɪɚɫɧɚɹ ɥɚɦɩɚ
ɩɨɝɚɫɧɟɬ.
ȿɫɥɢ ɤɭɥɢɧɚɪɧɵɟ ɪɟɰɟɩɬɵ ɪɟɤɨɦɟɧɞɭɸɬ ɫɬɚɜɢɬɶ
ɛɥɸɞɨ ɜ ɩɪɨɝɪɟɬɭɸ ɞɭɯɨɜɤɭ, ɞɟɥɚɣɬɟ ɷɬɨ ɩɨɫɥɟ
ɜɵɤɥɸɱɟɧɢɹ ɤɪɚɫɧɨɣ ɤɨɧɬɪɨɥɶɧɨɣ ɥɚɦɩɵ.
Ʉɨɧɬɪɨɥɶɧɚɹ ɥɚɦɩɚ ɦɨɠɟɬ ɬɚɤɠɟ ɫɜɟɬɢɬɶɫɹ ɜ
ɩɨɥɨɠɟɧɢɢ ɪɭɱɤɢ
, ɧɨ ɜ ɷɬɨɦ ɩɨɥɨɠɟɧɢɢ ɧɚɝɪɟɜɚɬɟɥɶɧɵɟ
ɷɥɟɦɟɧɬɵ ɜɫɟɝɞɚ ɜɵɤɥɸɱɟɧɵ.
ȿɫɥɢ ȼɚɲɚ ɞɭɯɨɜɤɚ ɨɛɨɪɭɞɨɜɚɧɚ ɪɭɱɤɚɦɢ Push
(ɭɬɨɩɥɟɧɵɦɢ ɜ ɩɚɧɟɥɢ), ɬɨ ɞɥɹ ɭɩɪɚɜɥɟɧɢɹ
ɷɬɢɦɢ ɪɭɱɤɚɦɢ ɧɟɨɛɯɨɞɢɦɨ:
x ɨɫɬɨɪɨɠɧɨ ɧɚɠɚɬɶ ɧɚ ɪɭɱɤɭ ɢ ɨɬɩɭɫɬɢɬɶ
Ɋɭɱɤɚ ɜɵɣɞɟɬ ɢɡ ɩɚɧɟɥɢ.
Ⱦɥɹ ɬɨɝɨ ɱɬɨɛɵ ɜɧɨɜɶ ɭɬɨɩɢɬɶ ɪɭɱɤɭ:
x ɨɫɬɨɪɨɠɧɨ ɧɚɠɚɬɶ ɧɚ ɪɭɱɤɭ ɞɨ ɭɩɨɪɚ ɢ
*
ɞɥɹ ɦɨɞɟɥɟɣ ɫ ɷɥɟɤɬɪɨɧɧɵɦ ɩɪɨɝɪɚɦɦɚɬɨɪɨɦ
ɨ ɤɚɤ ȼɚɲɚ ɞɭɯɨɜɤɚ ɞɨɫɬɢɝɧɟɬ
ɟɟ.
ɨɬɩɭɫɬɢɬɶ.
19
Page 20
EN
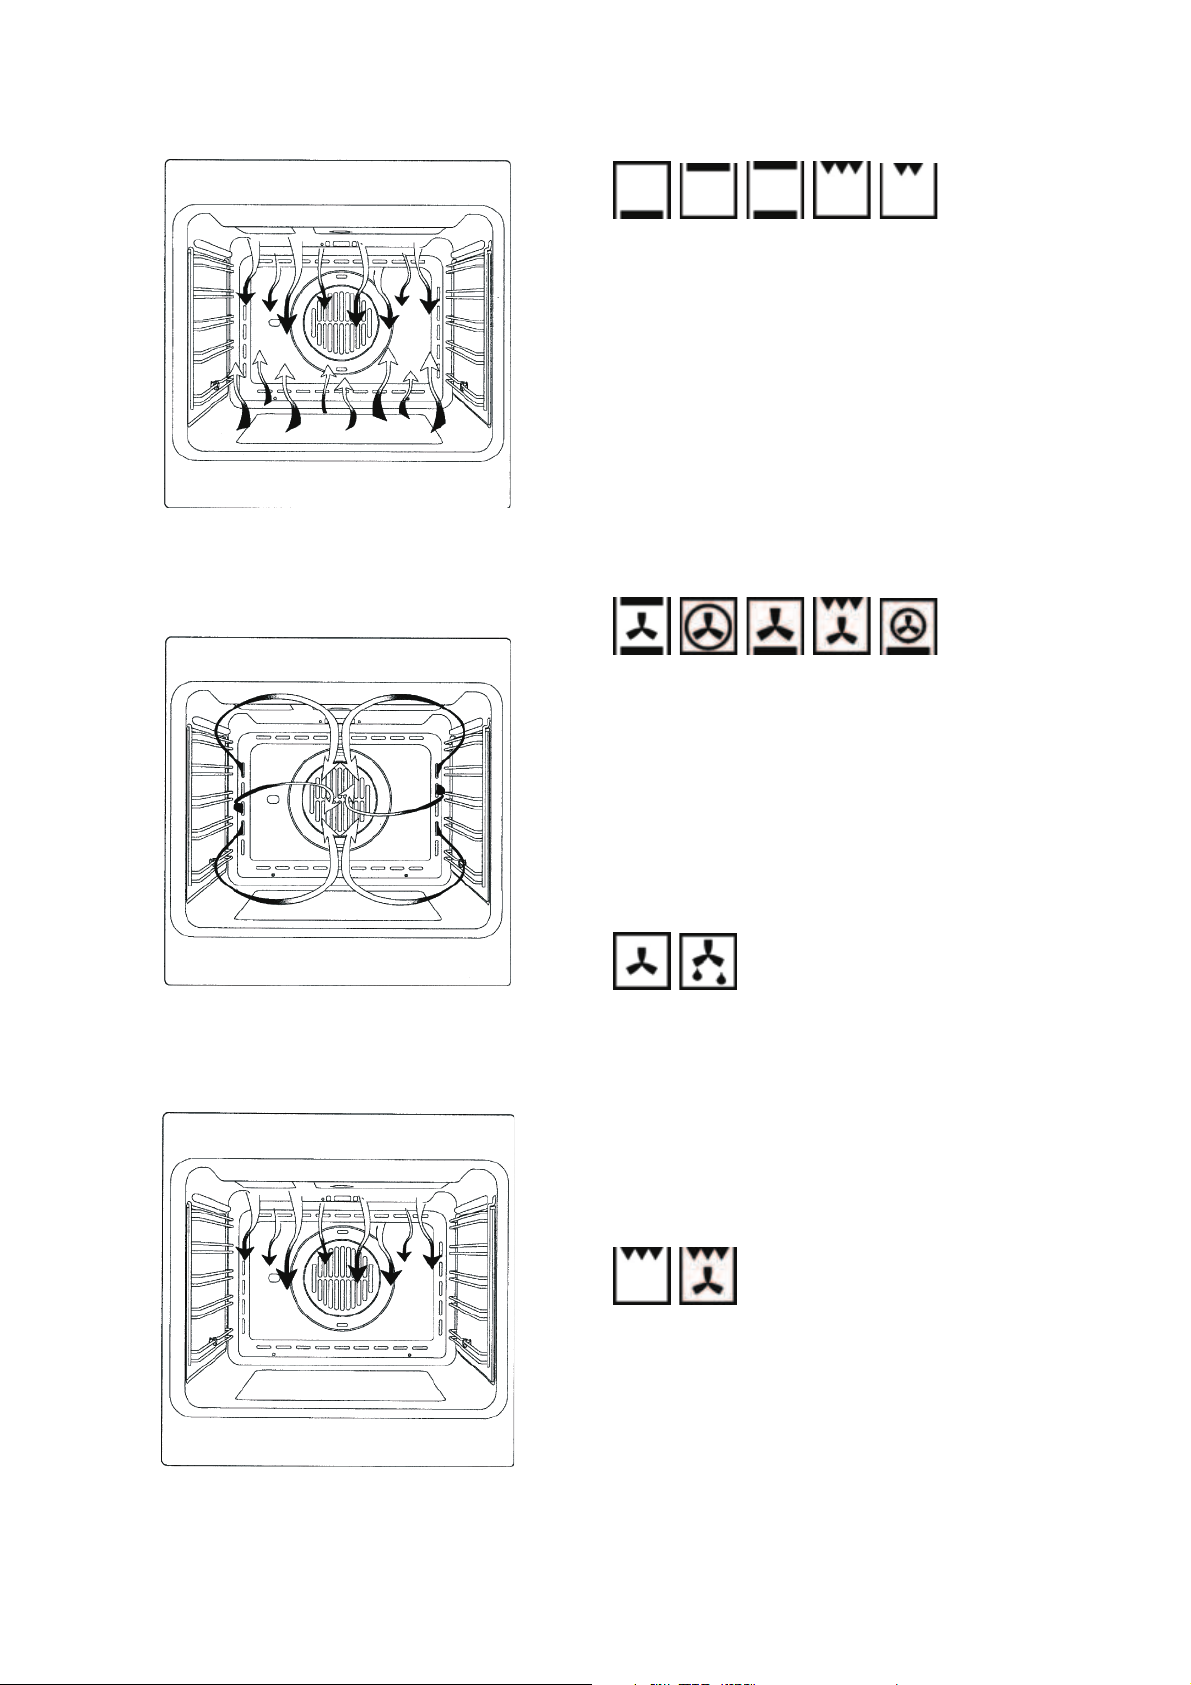
OPERATION FUNCTIONS OF THE OVEN
CONVENTIONAL COOKING
A classical system in which top and bottom heat
are used to cook a single dish.
Place the food in the oven only once cooking
temperature has been reached, i.e. when the
heating indicator goes out.
If you want to increase top or bottom temperature
towards the end of the cooking cycle, set the
temperature control to the right position. It is
advisable to open the oven door as little as
possible during cooking.
FAN COOKING
For this type of cooking a fan positioned at the
back allows the circulation of hot air inside the
oven, creating uniform heat. In this way cooking is
more rapid than conventional cooking. It is a
suitable method for cooking dishes on more than
one shelf, especially when the food is of different
types (fish, meat etc.)
DEFROSTING
By selecting one of the fan cooking functions and
setting the temperature regulator to zero, the
fan allows cold air to circulate inside the oven. In
this way frozen food can be rapidly defrosted.
It is not essential to pre-heat the oven, but you are
adviced to do so when cooking pastries.
GRILL COOKING
20
This function is used to grill or brown foods.
Place the shelf with the food to be cooked in the
1st or 2nd position from the top.
Pre-heat the oven for 5 minutes. Set the
temperature regulator to a temperature
between 50 °C and 200 °C.
Page 21

DE RU
BETRIEBSFUNKTIONEN DES BACKOFENS
KONVENTIONELLES BACKEN
Ein klassisches System, bei dem Unter- oder
Oberhitze verwendet werden, die für die
Zubereitung nur eines Gerichts geeignet ist.
Die Speisen sollten möglichst eingeschoben
werden, wenn der Backofen bereits die
vorgegebene Temperatur erreicht hat, das heißt,
nach Erlöschen der Kontrolllampe.
Wenn die Unter- oder Oberhitze gegen Ende des
Backvorgangs erhöht werden muss, ist der
Schalter in die jeweilige gewünschte Position zu
bringen. Während des Backvorgangs sollte die
Backofentür möglichst wenig geöffnet werden.
UMLUFTBACKEN
Bei dieser Backofenfunktion bringt der Ventilator,
der sich im hinteren Backofenteil befindet, heiße
Umluft in den Backofen und verteilt diese
gleichmäßig, wobei die Zubereitungszeit geringer
als beim konventionellen Backen ist. Diese
Methode eignet sich zum Garen auf mehreren
Einschubhöhen, auch von Speisen
unterschiedlicher Art (Fisch, Fleisch usw.).
ɊȺȻɈɑɂȿ ɎɍɇɄɐɂɂ ȾɍɏɈȼɈȽɈ ɒɄȺɎȺ
ɈȻɕɑɇɈȿ ɉɊɂȽɈɌɈȼɅȿɇɂȿ
Ʉɥɚɫɫɢɱɟɫɤɚɹ ɫɢɫɬɟɦɚ, ɩɪɢ ɤɨɬɨɪɨɣ
ɩɪɢɦɟɧɹɟɬɫɹ ɜɟɪɯɧɢɣ ɢɥɢ ɧɢɠɧɢɣ ɧɚɝɪɟɜ,
ɩɪɢɝɨɞɧɚ ɞɥɹ ɩɪɢɝɨɬɨɜɥɟɧɢɹ ɬɨɥɶɤɨ ɨɞɧɨɝɨ
ɛɥɸɞɚ. Ȼɥɸɞɚ ɞɨɥɠɧɵ ɩɨɦɟɳɚɬɶɫɹ ɜ ɞɭɯɨɜɤɭ,
ɩɨ ɜɨɡɦɨɠɧɨɫɬɢ, ɥɢɲɶ ɩɨɫɥɟ ɞɨɫɬɢɠɟɧɢɹ
ɡɚɞɚɧɧɨɣ ɬɟɦɩɟɪɚɬɭɪɵ, ɬ.ɟ. ɤɨɝɞɚ ɩɨɝɚɫɧɟɬ
ɤɨɧɬɪɨɥɶɧɚɹ ɥɚɦɩɨɱɤɚ.
ȿɫɥɢ ɤ ɤɨɧɰɭ ɩɪɨɰɟɫɫɚ ɩɪɢɝɨɬɨɜɥɟɧɢɹ ɛɥɸɞɚ
ȼɵ ɠɟɥɚɟɬɟ ɩɨɜɵɫɢɬɶ ɬɟɦɩɟɪɚɬɭɪɭ ɜɟɪɯɧɟɝɨ
ɢɥɢ ɧɢɠɧɟɝɨ ɧɚɝɪɟɜɚɬɟɥɹ, ɭɫɬɚɧɨɜɢɬɟ
ɩɟɪɟɤɥɸɱɚɬɟɥɶ ɧɚ ɫɨɨɬɜɟɬɫɬɜɭɸɳɭɸ ɠɟɥɚɟɦ
ɮɭɧɤɰɢɸ. ȼ ɬɟɱɟɧɢɟ ɜɵɩɟɤɚɧɢɹ ɞɜɟɪɰɭ ɞɭɯɨɜɤɢ
ɪɟɤɨɦɟɧɞɭɟɬɫɹ ɨɬɤɪɵɜɚɬɶ ɤɚɤ ɦɨɠɧɨ ɪɟɠɟ.
ɉɊɂȽɈɌɈȼɅȿɇɂȿ ɋ ɈȻȾɍȼɈɆ
ɉɪɢ ɷɬɨɦ ɪɟɠɢɦɟ ɩɪɢɝɨɬɨɜɥɟɧɢɹ, ɧɚɯɨɞɹɳɢɣɫɹ
ɜ ɞɚɥɶɧɟɣ ɱɚɫɬɢ ɞɭɯɨɜɤɢ ɜɟɧɬɢɥɹɬɨɪ,
ɨɫɭɳɟɫɬɜɥɹɟɬ ɰɢɪɤɭɥɹɰɢɸ ɝɨɪɹɱɟɝɨ ɜɨɡɞɭɯɚ,
ɪɚɜɧɨɦɟɪɧɨ ɟɝɨ ɪɚɫɩɪɟɞɟɥɹɹ, ɬɟɦ ɫɚɦɵɦ
ɫɨɤɪɚɳɚɹ ɜɪɟɦɹ ɩɪɢɝɨɬɨɜɥɟɧɢɹ ɩɨ ɫɪɚɜɧɟɧɢɸ ɫ
ɨɛɵɱɧɵɦ ɩɪɢɝɨɬɨɜɥɟɧɢɟɦ. ɗɬɨɬ ɦɟɬɨɞ
ɩɨɞɯɨɞɢɬ ɞɥɹ ɨɞɧɨɜɪɟɦɟɧɧɨɝɨ ɩɪɢɝɨɬɨɜɥɟɧɢɹ
ɪɚɡɧɵɯ ɜɢɞɨɜ ɛɥɸɞ (ɪɵɛɚ ɢ ɦɹɫɨ ɢ ɬ.ɞ.) ɩɪɢ
ɪɚɡɧɵɯ ɜɵɫɨɬɚɯ ɩɨɥɨɠɟɧɢɹ ɩɪɨɬɢɜɧɹ.
ɭɸ
AUFTAUEN
Falls eine der Umluftfunktionen ausgewählt und der
Temperaturregler auf Null gestellt wird, führt
der Ventilator Kaltluft in den Backofen und fördert
das schnelle Auftauen der Tiefkühlkost.
Ein Vorheizen des Backofens ist eigentlich nicht
notwendig, aber für Patisserie dennoch
empfehlenswert.
GRILLEN
Diese Funktionen werden zum Grillen oder
Bräunen von Speisen benutzt.
Der Rost mit der Speise wird in der 1. oder 2.
Schiene von oben eingeschoben.
Den Backofen 5 Minuten vorheizen. Den
Temperaturregler auf Temperaturen von 50 °ɋ
bis 200 °C einstellen.
ɈɌɌȺɂȼȺɇɂȿ
ɉɪɢ ɜɤɥɸɱɟɧɧɨɦ ɨɛɞɭɜɟ ɢ ɭɫɬɚɧɨɜɥɟɧɧɨɦ ɧɚ
ɧɨɥɶ , ɜɟɧɬɢɥɹɬɨɪ
ɨɫɭɳɟɫɬɜɥɹɟɬ ɰɢɪɤɭɥɹɰɢɸ ɯɨɥɨɞɧɨɝɨ ɜɨɡɞɭɯɚ,
ɨɛɟɫɩɟɱɢɜɚɹ ɬɟɦ ɫɚɦɵɦ ɛɵɫɬɪɨɟ ɨɬɬɚɢɜɚɧɢɟ
ɡɚɦɨɪɨɠɟɧɧɵɯ ɩɪɨɞɭɤɬɨɜ.
ɉɪɟɞɜɚɪɢɬɟɥɶɧɵɣ ɩɪɨɝɪɟɜ ɞɭɯɨɜɤɢ
ɧɟɨɛɹɡɚɬɟɥɟɧ, ɨɞɧɚɤɨ ɩɪɢ ɜɵɩɟɱɤɟ
ɤɨɧɞɢɬɟɪɫɤɢɯ ɢɡɞɟɥɢɣ ɪɟɤɨɦɟɧɞɨɜɚɧ.
ȽɊɂɅɖ
ɗɬɨɬ ɪɟɠɢɦ ɢɫɩɨɥɶɡɭɟɬɫɹ ɞɥɹ ɩɪɢɝɨɬɨɜɥɟɧɢɹ ɧɚ
ɝɪɢɥɟ ɢɥɢ ɩɨɞɪɭɦɹɧɢɜɚɧɢɹ ɛɥɸɞ.
Ɋɟɲɟɬɤɚ ɫ ɩɪɢɝɨɬɚɜɥɢɜɚɟɦɵɦ ɛɥɸɞɨɦ
ɭɫɬɚɧɚɜɥɢɜɚɟɬɫɹ ɧɚ 1-ɣ ɢɥɢ 2-ɣ ɭɪɨɜɟɧɶ ɫɜɟɪɯɭ.
ɉɪɨɝɪɟɬɶ ɞɭɯɨɜɤɭ ɜ ɬɟɱɟ
ɭɫɬɚɧɨɜɢɬɶ ɧɚ ɬɟɦɩɟɪɚɬɭɪɭ
ɨɬ 50 °C ɞɨ 200 °C.
ɧɢɟ 5 ɦɢɧɭɬ.
21
Page 22
EN
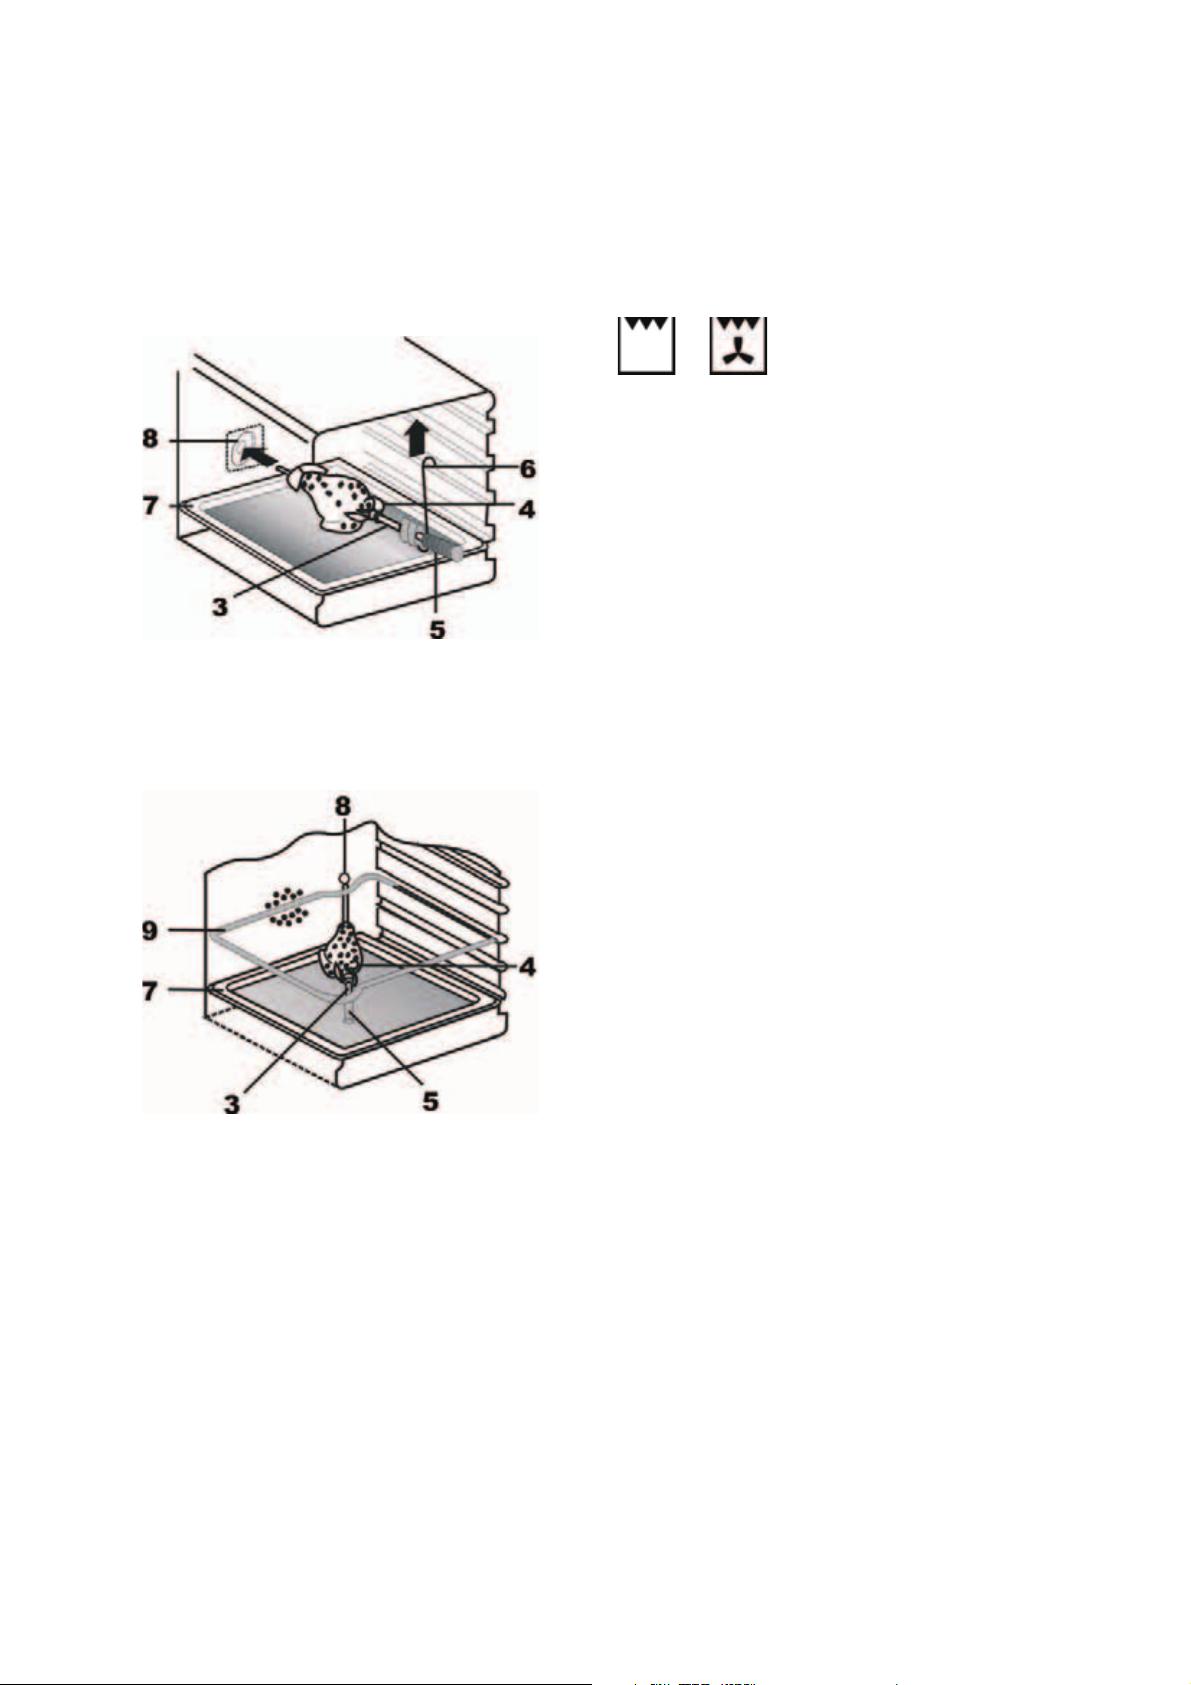
SPIT
Some ovens are completely equipped with stick
engine and rotary spit for spit roast. The spit*
allows to roast food in the oven rotary. It serves
primarily for the roasting of shashliks, fowl, small
sausages and similar dishes. The switch on and
off of the spit actuation occurs simultaneously with
the switch on and off of the Grill functions
or .
ATTENTION! No separate controlling rotary
handle is assigned to the spit on the control
panel.
PREPARING OF THE FOOD ON THE SPIT
To do this you have to proceed the following:
x Spear the food on the handle of the spit 3
and fix it on it with the help of forks 4,
x Screw on handle 5, when required,
x Arrange the spit frame 9 in height "II" in
the oven,
x Shift the end piece of the spit 3 into the
drive coupling 8; besides, is to be noted
that the spit frame hook intervenes in the
groove of the spit clutch metal part,
x Unscrew the handle 5,
x Shift the metal tray 7 in the oven space by
the lowest height and abut the oven door.
To take out food of the oven use the handle 5
implicitly to avoid burns.
COOLING FAN
The cooling fan* is positioned on the upper part of
the oven and creates a circle of cooling air on the
inside of the furniture and through the door of the
oven.It is turned on automatically when the
temperature of the outer shell of the oven exceeds
60°C.
By switching on the oven with the thermostat at
200°C the fan starts working after approx.10 min.
It is turned off when the temperature of the outer
shell of the oven descends under 60°C.
By switching off the oven with the thermostat
at 200°C the fan stops working after approx.
30 min.
22
Page 23

DE RU
DREHESPIESS
Einige Backöfen sind komplett mit Stabmotor und
Drehspieß für Spießbraten ausgestattet.
Der Spieß* erlaubt es, Speisen im Backofen
rotierend zu rösten. Er dient hauptsächlich zum
Rösten von Schaschliks, Geflügel, Würstchen u.ä.
Speisen. Die Ein- und Ausschaltung vom
Spießantrieb erfolgt gleichzeitig mit der Ein- und
Ausschaltung von Grillfunktionen oder .
ACHTUNG! Dem Spieß ist kein separater
Steuerdrehknebel an Bedienblende zugeordnet.
GRILLEN AM DREHESPIESS
Um dies zu tun ist wie folgt vorzugehen:
x die Speise auf den Stiel vom Spieß 3
aufspießen und sie darauf mit Hilfe von
Gabeln 4 fixieren,
x bei Bedarf den Handgriff 5 aufschrauben,
x den Spießrahmen 9 an der Höhe „II“ im
Backofen einordnen,
x Das Endstück vom Spieß 3 in die
Antriebskupplung 8 hineinschieben; dabei
ist zu beachten, dass der
Spießrahmenhaken in die Rille des
Spießgriffmetallteils eingreift,
x den Handgriff 5 herausschrauben,
x das Blechtablett 7 in den Backofenraum in
niedrigster Höhe hineinschieben und die
Backofentür anlehnen.
ȼȿɊɌȿɅ
ɇɟɤɨɬɨɪɵɟ ɞɭɯɨɜɤɢ ɨɛɨɪɭɞɨɜɚɧɵ ɜɟɪɬɟɥɨɦ,
ɩɪɢɜɨɞɢɦɵɦ ɜɨ ɜɪɚɳɟɧɢɟ ɷɥ. ɦɨɬɨɪɨɦ,
Ȼɥɚɝɨɞɚɪɹ ɜɟɪɬɟɥɭ* ɜɨɡɦɨɠɧɚ ɜɪɚɳɚɬɟɥɶɧɚɹ
ɨɛɠɚɪɤɚ ɛɥɸɞ ɜ ɞɭɯɨɜɤɟ. ɋɥɭɠɢɬ ɝɥɚɜɧɵɦ
ɨɛɪɚɡɨɦ ɞɥɹ ɨɛɠɚɪɤɢ ɞɨɦɚɲɧɟɣ ɩɬɢɰɵ,
ɲɚɲɥɵɤɨɜ, ɤɨɥɛɚɫɨɤ ɢ ɞɪɭɝɢɯ ɛɥɸɞ. ȼɤɥɸɱɟɧɢɟ
ɢ ɜɵɤɥɸɱɟɧɢɟ ɩɪɢɜɨɞɚ ɜɟɪɬɟɥɚ ɩɪɨɢɫɯɨɞɢɬ
ɨɞɧɨɜɪɟɦɟɧɧɨ ɫɨ ɜɤɥɸɱɟɧɢɟɦ ɢ ɜɵɤɥɸɱɟɧɢɟɦ
ɮɭɧɤɰɢɣ ɝɪɢɥɹ ɢɥɢ .
ȼɇɂɆȺɇɂȿ! ȼɟɪɬɟɥ ɧɟ ɢɦɟɟɬ ɨɬɞɟɥɶɧɨɣ
ɪɭɱɤɢ ɭɩɪɚɜɥɟɧɢɹ.
ɉɊɂȽɈɌɈȼɅȿɇɂȿ ɇȺ ȼȿɊɌȿɅȿ
Ⱦɥɹ ɷɬɨɝɨ ɧɟɨɛɯɨɞɢɦɨ ɫɥɟɞɭɸɳɟɟ:
x ɧɚɞɟɬɶ ɛɥɸɞɨ ɧɚ ɩɪɭɬɨɤ ɜɟɪɬɟɥɚ 3 ɢ
ɡɚɫɬɨɩɨɪɢɬɟ ɛɥɸɞɨ ɩɪɢ ɩɨɦɨɳɢ ɜɢɥɨɤ 4,
x ɩɪɢ ɧɟɨɛɯɨɞɢɦɨɫɬɢ ɧɚɞɟɬɶ ɪɭɱɤɭ 5 ɧɚ
ɜɟɪɬɟɥ,
x ɪɚɦɤɭ 9 ɩɨɫɬɚɜɢɬɶ ɜ ɞɭɯɨɜɤɭ ɧɚ ɭɪɨɜɟɧɶ
„II“,
x ɤɨɧɟɰ ɩɪɭɬɤɚ ɜɟɪɬɟɥɚ 3 ɜɫɬɚɜɶɬɟ ɜ
ɦɭɮɬɭ ɩɪɢɜɨɞɚ 8, ɨɛɪɚɳɚɹ ɜɧɢɦ
ɬɨ, ɱɬɨɛɵ ɜɵɟɦɤɚ ɪɚɦɤɢ ɩɨɩɚɥɚ
ɤɚɧɚɜɤɭ ɦɟɬɚɥɥɢɱɟɫɤɨɣ ɱɚɫɬɢ ɞɟɪɠɚɬɟɥɹ
ɜɟɪɬɟɥɚ,
x ɜɵɜɟɪɧɢɬɟ ɪɭɱɤɭ 5,
x ɜɫɬɚɜɶɬɟ ɩɪɨɬɢɜɟɧɶ 7 ɧɚ ɫɚɦɵɣ ɧɢɡɤɢɣ
ɭɪɨɜɟɧɶ ɞɭɯɨɜɨɝɨ ɲɤɚɮɚ ɢ ɩɪɢɤɪɨɣɬɟ
ɞɜɟɪɰɭ.
ɚɧɢɟ ɧɚ
ɜ
Beim Herausnehmen von Speisen benutzen Sie
unbedingt den Handgriff 5, um eine
Verbrennung zu vermeiden.
KÜHLVENTILATOR
Der Kühlventilator* befindet sich auf der oberen
Seite des Backofens und dient zur Kühlung
sowohl des Einbaumöbels als auch der
Backofentüre. Der Ventilator schaltet sich
selbsttätig ein, wenn das äußere Gehäuse des
Backofens eine Temperatur von 60°C
überschreitet.
Wird der Backofen z.B. auf 200°C eingestellt,
schaltet sich die Kühlung nach etwa 10 Min ein.
Der Ventilator schaltet sich selbsttätig aus,
wenn das äußere G ehäu se de s Bac kofe ns ei ne
Te m p er a t u r v o n 60°C unterschreitet.
z.B. Wenn der Backofen nach Betrieb bei 200°C
ausgeschaltet ist, schaltet sich die Kühlung
nach etwa 30 Min. aus.
ɉɪɢ ɜɵɧɢɦɚɧɢɢ ɛɥɸɞɚ ɜɨ ɢɡɛɟɠɚɧɢɟ ɨɠɟɝɚ
ɨɛɹɡɚɬɟɥɶɧɨ ɢɫɩɨɥɶɡɨɜɚɬɶ ɪɭɱɤɭ 5.
ɈɏɅȺɀȾȺɘɓɂɃ ȼȿɇɌɂɅəɌɈɊ
Ɉɯɥɚɠɞɚɸɳɢɣ ɜɟɧɬɢɥɹɬɨɪ* ɧɚɯɨɞɢɬɫɹ ɧɚ
ɜɟɪɯɧɟɣ ɱɚɫɬɢ ɞɭɯɨɜɤɢ ɢ ɫɥɭɠɢɬ ɞɥɹ
ɨɯɥɚɠɞɟɧɢɹ ɤɚɤ ɜɫɬɪɨɟɧɧɨɣ ɦɟɛɟɥɢ, ɬɚɤ ɢ
ɫɚɦɨɣ ɞɜɟɪɰɵ ɞɭɯɨɜɤɢ. ȼɟɧɬɢɥɹɬɨɪ ɜɤɥɸɱɚɟɬɫɹ
ɚɜɬɨɦɚɬɢɱɟɫɤɢ ɩɪɢ ɞɨɫɬɢɠɟɧɢɢ ɬɟɦɩɟɪɚɬɭɪɵ
ɜɧɟɲɧɟɣ ɩɨɜɟɪɯɧɨɫɬɢ ɞɭɯɨɜɤɢ
ɇɚɩɪɢɦɟɪ
ɜɟɧɬɢɥɹɬɨɪ ɜɤɥɸɱɢɬɫɹ ɩɪɢɛɥɢɡɢɬɟɥɶɧɨ ɱɟɪɟɡ 10
ɦɢɧ. ɉɪɢ ɩɨɧɢɠɟɧɢɢ ɬɟɦɩɟɪɚɬɭɪɵ ɜɧɟɲɧɟɣ
ɩɨɜɟɪɯɧɨɫɬɢ ɞɭɯɨɜɤɢ ɧɢɠɟ 60° ɋ ɜɟɧɬɢɥɹɬɨɪ
ɚɜɬɨɦɚɬɢɱɟɫɤɢ ɨɬɤɥɸɱɚɟɬɫɹ. ɇɚɩɪɢɦɟɪ, ɩɨɫɥɟ
ɜɵɤɥɸɱɟɧɢɹ ɞɭɯɨɜɤɢ, ɭɫɬɚɧɨɜɥɟɧɧɨɣ ɧɚ 200°
ɋ, ɜɟɧɬɢɥɹɬɨɪ ɜɵɤɥɸɱɢɬɫɹ ɩɪɢɛɥɢɡɢɬɟɥɶ
ɱɟɪɟɡ 30 ɦɢɧ.
, ɩɪɢ ɭɫɬɚɧɨɜɤɟ ɞɭɯɨɜɤɢ ɧɚ 200° ɋ
60° ɋ.
ɧɨ
23
Page 24
EN
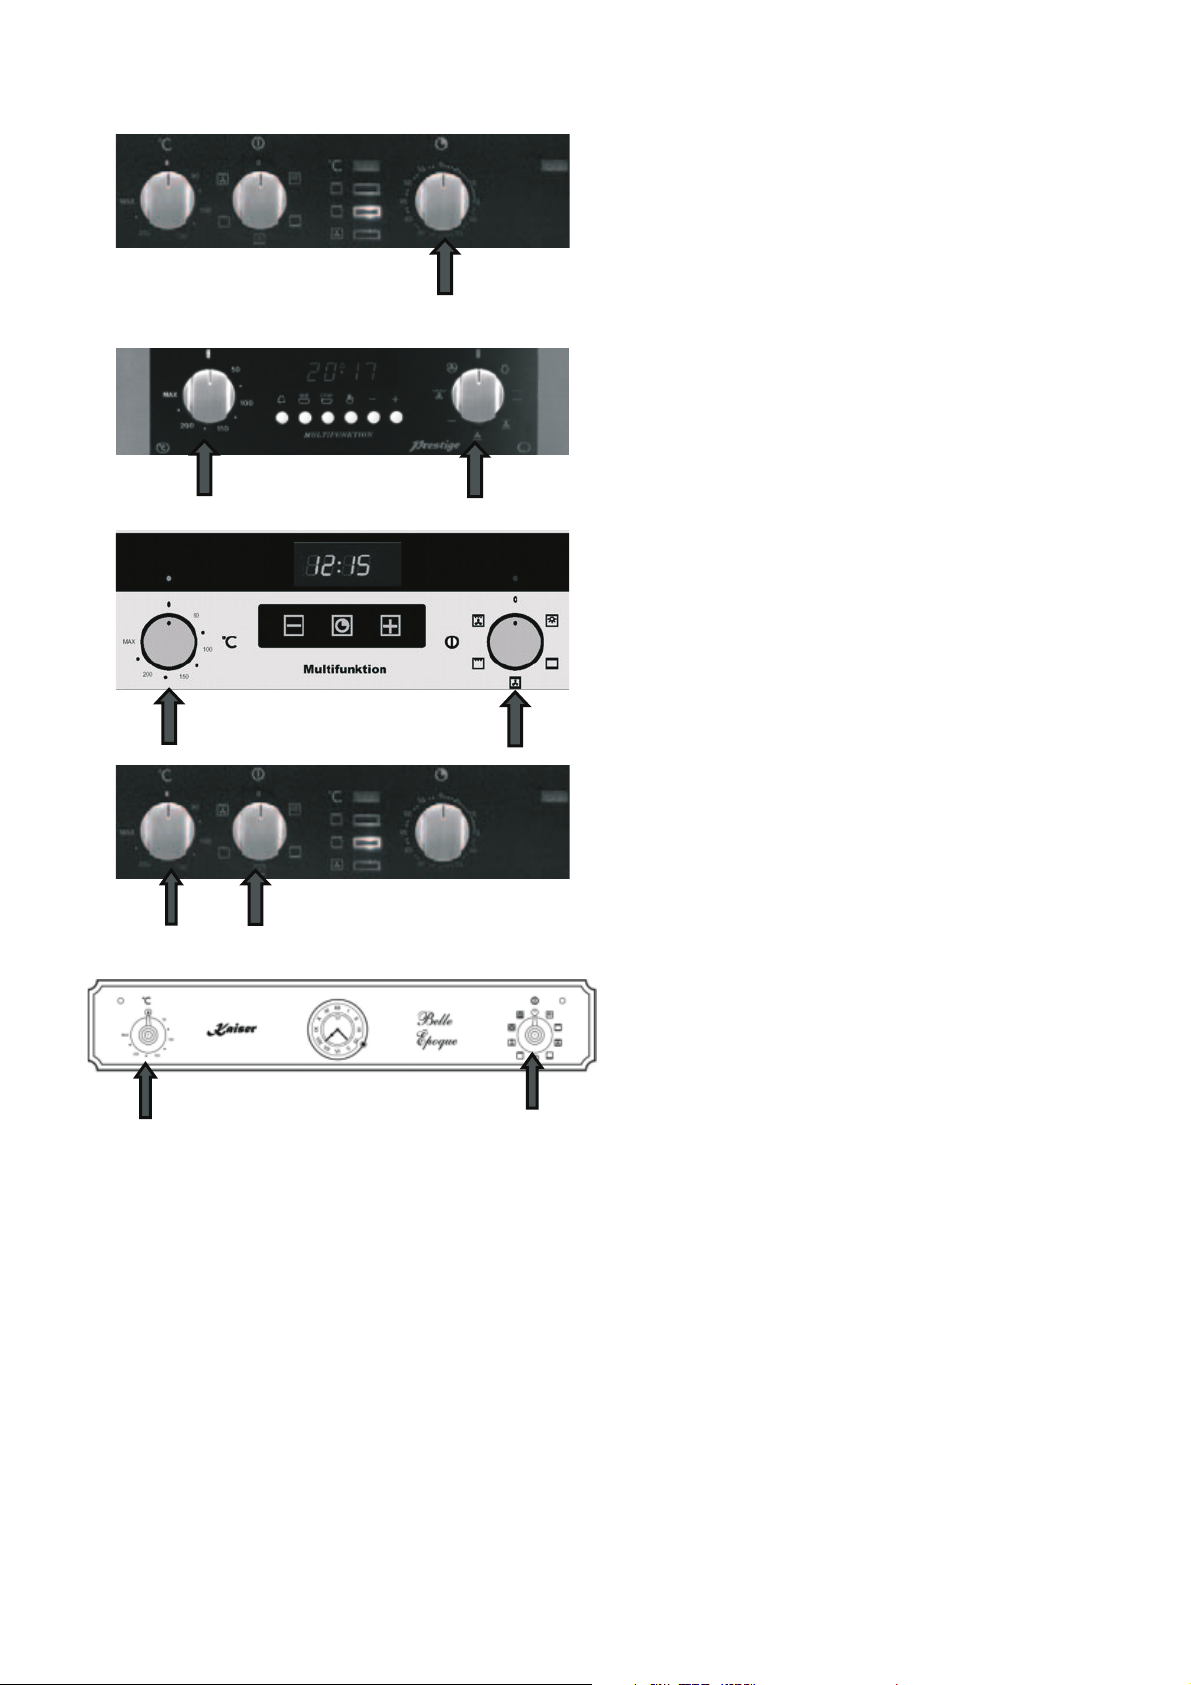
MECHANICAL TIMER *
To start using: turn the rotary handle 1 clockwise
as far as it will go and then set the wanted time
between 0 and 60 minutes.
The machanical Timer cannot steer the oven
1
operation and only serves as a signalling device
to remind of the execution.
OVEN LIGHT
2
2
2
2
1
1
1
The oven is equipped with an oven light. The
oven light stays active during oven operations. If
you want to control your food after preparing it,
bring the rotary handle oven operating mode in
the light position.
USAGE
You can start the process of baking with a few
easy handels.
x Choose the wanted baking function with
the rotary handle 1 oven operating
mode.
x Set the wanted temperature with rotary
handle 2 temperature regulator.
The activation of the oven is signalizes by the
flashing up of controlling lights in yellow and red.
1
24
If the red controlling light lapses it signalizes that
the set oven temperature has been reached. Now
you can insert the food.
– if available
*
Page 25

DE RU
MECHANISCHER KURZZEITWECKER *
Um in Betrieb zu nehmen: den Drehknebel 1 bis zum
Anschlag im Uhrzeigersinn drehen, und dann auf die
gewünschte Zeit zwischen 0-60 Minuten einstellen.
Der mechanische Kurzzeitwecker kann die den
Betrieb vom Backofen nicht steuern und dient nur als
eine Signaleinrichtung, die an die Ausführung
erinnert.
INNENBELEUCHTUNG
Der Backofen ist mit Innenbeleuchtung ausgestattet.
Die Innenbeleuchtung bleibt während des Betriebes
vom Backofen aktiv. Wenn Sie nach Zubereitung Ihr
Gericht kontrollieren möchten, stellen Sie den
Drehknebel Backofenbetriebsart in die Position
Licht.
ɆȿɏȺɇɂɑȿɋɄɂɃ ɆɂɇɍɌɇɂɄ
Ⱦɥɹ ɩɪɢɜɟɞɟɧɢɹ ɜ ɞɟɣɫɬɜɢɟ ɩɨɜɟɪɧɭɬɶ ɪɭɱɤɭ
ɩɟɪɟɤɥɸɱɚɬɟɥɹ 1 ɩɨ ɱɚɫɨɜɨɣ ɫɬɪɟɥɤɟ ɞɨ ɭɩɨɪɚ,
ɚ ɡɚɬɟɦ ɭɫɬɚɧɨɜɢɬɶ ɧɚ ɠɟɥɚɟɦɨɟ ɜɪɟɦɹ ɜ
ɩɪɟɞɟɥɚɯ ɨɬ 0 ɞɨ 60 ɦɢɧɭɬ.
Ɇɢɧɭɬɧɢɤ ɧɟ ɭɩɪɚɜɥɹɟɬ ɪɚɛɨɬɨɣ ɩɥɢɬɵ,ɚ
ɹɜɥɹɟɬɫɹ ɥɢɲɶ ɫɢɝɧɚɥɢɡɚɬɨɪɨɦ, ɧɚɩɨɦɢɧɚɸɳɢɦ
ɨ ɜɵɩɨɥɧɟɧɢɢ.
Ɉɋȼȿɓȿɇɂȿ ȾɍɏɈȼɄɂ
Ⱦɭɯɨɜɤɚ ɨɫɧɚɳɟɧɚ ɫɢɫɬɟɦɨɣ ɨɫɜɟɳɟɧɢɹ. ɋɜɟɬ
ɨɫɬɚɟɬɫɹ ɜɤɥɸɱɟɧɧɵɦ ɜɨ ɜɪɟɦɹ ɪɚɛɨɬɵ ɞɭɯɨɜɤɢ.
ȿɫɥɢ ɜɵ ɯɨɬɢɬɟ ɩɪɨɤɨɧɬɪɨɥɢɪɨɜɚɬɶ ɫɨɫɬɨɹɧɢɟ
ɛɥɸɞɚ ɩɨɫɥɟ ɟɝɨ ɩɪɢɝɨɬɨɜɥɟɧɢɹ ɭɫɬɚɧɨɜɢɬɟ
ɪɭɱɤɭ ɜɵɛɨɪɚ ɪɟɠɢɦɨɜ ɞɭɯɨɜɤɢ ɜ ɩɨɥɨɠɟɧɢɟ
ɋɜɟɬ.
*
BENUTZUNG
Zum Backen genügen wenige einfache Handgriffe.
x Gewünschte Backfunktion mit dem
Drehknebel 1 Backofenbetriebsart wählen.
x Gewünschte Temperatur mit dem Drehknebel
2 Temperaturregler wählen.
Die Einschaltung vom Backofen wird durch
Aufleuchten von gelben und roten Kontrolllampen auf
der Bedienblende signalisiert.
Wenn die rote Kontrollleuchte erlischt, signalisiert es,
dass die voreingestellte Backofentemperatur erreicht
worden ist, jetzt können Sie Ihre Speise einschieben.
ɂɋɉɈɅɖɁɈȼȺɇɂȿ
ȼ ɧɟɫɤɨɥɶɤɨ ɩɪɨɫɬɵɯ ɞɜɢɠɟɧɢɣ ȼɵ ɦɨɠɟɬɟ
ɧɚɱɚɬɶ ɩɪɨɰɟɫɫ ɩɪɢɝɨɬɨɜɥɟɧɢɹ.
x Ɋɭɱɤɨɣ 1 ɪɟɠɢɦɚ ɪɚɛɨɬɵ ɞɭɯɨɜɤɢ,
ɜɵɛɟɪɢɬɟ ɠɟɥɚɟɦɵɣ ɪɟɠɢɦ
ɩɪɢɝɨɬɨɜɥɟɧɢɹ.
x Ɋɭɱɤɨɣ 2 ɬɟɪɦɨɪɟɝɭɥɹɬɨɪɚ ,ɜɵɛɟɪɢɬɟ
ɠɟɥɚɟɦɭɸ ɬɟɦɩɟɪɚɬɭɪɭ ɩɪɢɝɨɬɨɜɥɟɧɢɹ.
ȼɤɥɸɱɟɧɢɟ ɞɭɯɨɜɤɢ ɫɢɝɧɚɥɢɡɢɪɭɟɬɫɹ
ɜɤɥɸɱɟɧɢɟɦ ɤɨɧɬɪɨɥɶɧɵɯ ɥɚɦɩ ɠɟɥɬɨɝɨ ɢ
ɤɪɚɫɧɨɝɨ ɰɜɟɬɨɜ ɧɚ ɩɚɧɟɥɢ ɭɩɪɚɜɥɟɧɢɹ.
ɉɨɫɥɟ ɬɨɝɨ ɤɚɤ ȼɚɲɚ ɞɭɯɨɜɤɚ ɞɨɫɬɢɝɧɟɬ
ɭɫɬɚɧɨɜɥɟɧɧɨɣ ɬɟɦɩɟɪɚɬɭɪɵ ɤɪɚɫɧɚɹ ɥɚɦɩɚ
ɩɨɝɚɫɧɟɬ ɢ ȼɵ ɦɨɠɟɬ
ɤɨɬɨɪɨɟ ɯɨɬɢɬɟ ɝɨɬɨɜɢɬɶ
ɟ ɫɬɚɜɢɬɶ ɜ ɧɟɟ ɛɥɸɞɨ,
*
– falls vorhanden
*
– ɟɫɥɢ ɢɦɟɟɬɫɹ
25
Page 26
EN
MECHANICAL TIMER
Setting the clock
To set the current day time:
x Push the rotary switch 1 and turn it
counter clockwise.
Setting the end of cooking time
The oven must switch off after the set end time.
Before setting the end of cooking time you have to
set the oven operating function and the
temperature (see chapter «Multifunction oven
control»).
1
x Pull the rotary switch 1 out, turn it counter
clockwise and set the end of preparation.
Important! You should set a time which
differs from the current day time.
After the set end time is reached, the alarm will
sound and the oven switches itself off.
x Set the oven operating function and
the temperature in the position 0.
To switch off the alarm tone:
x Turn the rotary switch 1 counter clockwise
to position .
26
For undefined time of cooking, leave the knob in
the manual position .
Page 27
DE RU
MECHANISCHE ZEITSCHALTUHR
Tageszeiteinstellung
Zur Einstellung der aktuellen Uhrzeit:
x Den Drehgriff 1 drücken und im gegen
Uhrzeigersinn drehen.
Einstellen der Endzeit
Der Backofen muss in eingegebener Endzeit
ausgeschaltet werden.
Bevor die Dauer der Gerichtszubereitung
eingegeben wird, müssen Sie die
Backofenfunktion und die Temperatur der
Zubereitung einstellen (siehe Kapitel »Steuerung
von Multifunktionsbackofen«).
x Den Drehgriff 1 herausziehen, gegen
Uhrzeigersinn drehen, und die Endzeit
einzugeben.
ɆȿɏȺɇɂɑȿɋɄɂɃ ɌȺɃɆȿɊ
ɍɫɬɚɧɨɜɤɚ ɬɟɤɭɳɟɝɨ ɜɪɟɦɟɧɢ
ɑɬɨɛɵ ɭɫɬɚɧɨɜɢɬɶ ɬɟɤɭɳɟɟ ɜɪɟɦɹ:
ɍɫɬɚɧɨɜɤɚ ɜɪɟɦɟɧɢ ɨɤɨɧɱɚɧɢɹ
ɩɪɢɝɨɬɨɜɥɟɧɢɹ
Ⱦɭɯɨɜɤɚ ɞɨɥɠɧɚ ɚɜɬɨɦɚɬɢɱɟɫɤɢ ɨɬɤɥɸɱɢɬɶɫɹ ɜ
ɡɚɪɚɧɟɟ ɡɚɞɚɧɧɨɟ ɜɪɟɦɹ.
ɉɪɟɠɞɟ ɱɟɦ ɡɚɞɚɬɶ ɜɪɟɦɹ ɨɤɨɧɱɚɧɢɹ ɪɚɛɨɬɵ,
ȼɵ ɞɨɥɠɧɵ ɭɫɬɚɧɨɜɢɬɶ
ɢ .
(ɫɦ. ɪɚɡɞɟɥ «ɍɩɪ
ɦɧɨɝɨɮɭɧɤɰɢɨɧɚɥɶɧɨɝɨ ɞɭɯɨɜɨɝɨ ɲɤɚɮɚ»).
x ɇɚɠɦɢɬɟ ɤɧɨɩɤɭ ɩɟɪɟɤɥɸɱɚɬɟɥɹ 1 ɢ
ɩɨɜɟɪɧɢɬɟ ɩɪɨɬɢɜ ɱɚɫɨɜɨɣ ɫɬɪɟɥɤɢ.
ɚɜɥɟɧɢɟ ɪɚɛɨɬɨɣ
x ȼɵɬɹɧɢɬɟ ɤɧɨɩɤɭ ɩɟɪɟɤɥɸɱɚɬɟɥɹ 1 ɢ
ɩɨɜɟɪɧɢɬɟ ɩɪɨɬɢɜ ɱɚɫɨɜɨɣ ɫɬɪɟɥɤɢ,
ɱɬɨɛɵ ɡɚɞɚɬɶ ɜɪɟɦɹ ɨɤɨɧɱɚɧɢɹ ɩɪɨɰɟɫɫɚ
ɩɪɢɝɨɬɨɜɥɟɧɢɹ.
Wichtig! Sie sollen die Zeit eingeben, die
sich von der aktuellen Uhrzeit unterscheidet!
Wenn die eingegebene Endzeit erreicht ist, ertönt
ein akustisches Signal und der Backofen wird
ausgeschaltet.
x Stellen Sie die Backofenfunktion und
die Temperatur in die Position 0 ein.
Zum abstellen des Signaltons:
x den Drehgriff 1 bis zu Stellung gegen
Uhrzeigersinn drehen.
Für unbestimmte Garzeiten muss der Drehgriff auf
der Stellung Manualbetrieb bleiben.
ȼɚɠɧɨ! ȼɵ ɞɨɥɠɧɵ ɡɚɞɚɬɶ ɜɪɟɦɹ,
ɨɬɥɢɱɚɸɳɟɟɫɹ ɨɬ ɬɟɤɭɳɟɝɨ!
ɉɨ ɞɨɫɬɢɠɟɧɢɸ ɡɚɩɪɨɝɪɚɦɦɢɪɨɜɚɧɧɨɝɨ ɜɪɟɦɟɧɢ
ɩɪɨɡɜɭɱɢɬ ɚɤɭɫɬɢɱɟɫɤɢɣ ɫɢɝɧɚɥ ɢ ɞɭɯɨɜɤɚ
ɨɬɤɥɸɱɢɬɫɹ ɚɜɬɨɦɚɬɢɱɟɫɤɢ.
x ɍɫɬɚɧɨɜɢɬɟ
ɢ ɜ
ɩɨɥɨɠɟɧɢɟ 0.
ɑɬɨɛɵ
ȼ ɫɥɭɱɚɟ ɧɟɧɚɞɨɛɧɨɫɬɢ ɨɝɪɚɧɢɱɟɧɢɹ ɜɪɟɦɟɧɢ
ɩɪɢɝɨɬɨɜɥɟɧɢɹ, ɤɧɨɩɤɚ ɨɫɬɚɟɬɫɹ ɜ ɪɭɱɧɨɦ
ɪɟɠɢɦɟ .
ɨɬɤɥɸɱɢɬ
x ɉɨɜɟɪɧɢɬɟ ɤɧɨɩɤɭ ɩɟɪɟɤɥɸɱɚɬɟɥɹ 1
ɩɪɨɬɢɜ ɱɚɫɨɜɨɣ ɫɬɪɟɥɤɢ ɞɨ ɩɨɥɨɠɟɧɢɹ
ɶ ɫɢɝɧɚɥ:
27
Page 28
EN
Mechanical countdown timer
The mechanical countdown timer does not control
the oven operation and only serves as a signal
device which indicates the end of the operating
function.
To switch on the countdown timer:
x Turn the rotary switch 1 counter clockwise
and set the required time between 0 and
180 minutes
When the set time has elapsed, the alarm will
sound.
To switch off the alarm tone:
x Turn the rotary switch 1 counter clockwise
to position .
1
28
Page 29

DE RU
Mechanischer Kurzzeitwecker
Der mechanische Kurzzeitwecker kann den Betrieb
des Backofens nicht steuern und dient nur als eine
Signaleinrichtung, die an den Ablauf der
eingerichteten Zeit erinnert.
Zum Einschalten des Kurzzeitweckers:
x Den Drehgriff 1 gegen Uhrzeigersinn
drehen, und die gewünschte Zeit zwischen
0-180 Minuten einstellen.
Nach Ablauf der vorgegebenen Zeit ertönt ein
akustisches Signal.
Zum abstellen des Signaltons:
x den Drehgriff 1 bis zu Stellung gegen
Uhrzeigersinn drehen.
Ɇɟɯɚɧɢɱɟɫɤɢɣ ɦɢɧɭɬɧɢɤ
Ɇɢɧɭɬɧɢɤ ɧɟ ɭɩɪɚɜɥɹɟɬ ɪɚɛɨɬɨɣ ɞɭɯɨɜɤɢ, ɚ
ɹɜɥɹɟɬɫɹ ɥɢɲɶ ɫɢɝɧɚɥɢɡɚɬɨɪɨɦ, ɧɚɩɨɦɢɧɚɸɳɢɦ
ɨɛ ɢɫɬɟɱɟɧɢɢ ɭɫɬɚɧɨɜɥɟɧɧɨɝɨ ɜɪɟɦɟɧɢ.
ɑɬɨɛɵ ɜɤɥɸɱɢɬɶ ɦɢɧɭɬɧɢɤ:
x Ʉɧɨɩɤɭ ɩɟɪɟɤɥɸɱɚɬɟɥɹ 1 ɩɨɜɟɪɧɭɬɶ
ɩɪɨɬɢɜ ɱɚɫɨɜɨɣ ɫɬɪɟɥɤɢ ɢ ɭɫɬɚɧɨɜɢɬɶ
ɠɟɥɚɟɦɨɟ ɜɪɟɦɹ ɜ ɩɪɟɞɟɥɚɯ ɨɬ 0 ɞɨ 180
ɦɢɧɭɬ.
ɉɨ ɢɫɬɟɱɟɧɢɢ ɡɚɞɚɧɧɨɝɨ ɜɪɟɦɟɧɢ ɩɪɨɡɜɭɱɢɬ
ɚɤɭɫɬɢɱɟɫɤɢɣ ɫɢɝɧɚɥ.
ɑɬɨɛɵ ɨɬɤɥɸɱɢɬɶ ɫɢɝɧɚɥ:
x ɉɨɜɟɪɧɢɬɟ ɤɧɨɩɤɭ ɩɟɪɟɤɥɸɱɚɬɟɥɹ 1
ɩɪɨɬɢɜ ɱɚɫ
ɨɜɨɣ
ɫɬɪɟɥɤɢ ɞɨ ɩɨɥɨɠɟɧɢɹ
29
Page 30
EN
DIGITAL CLOCK TIMER* OF THE OVEN
Prestige
Setting the clock
To set the current day time
1
2
3
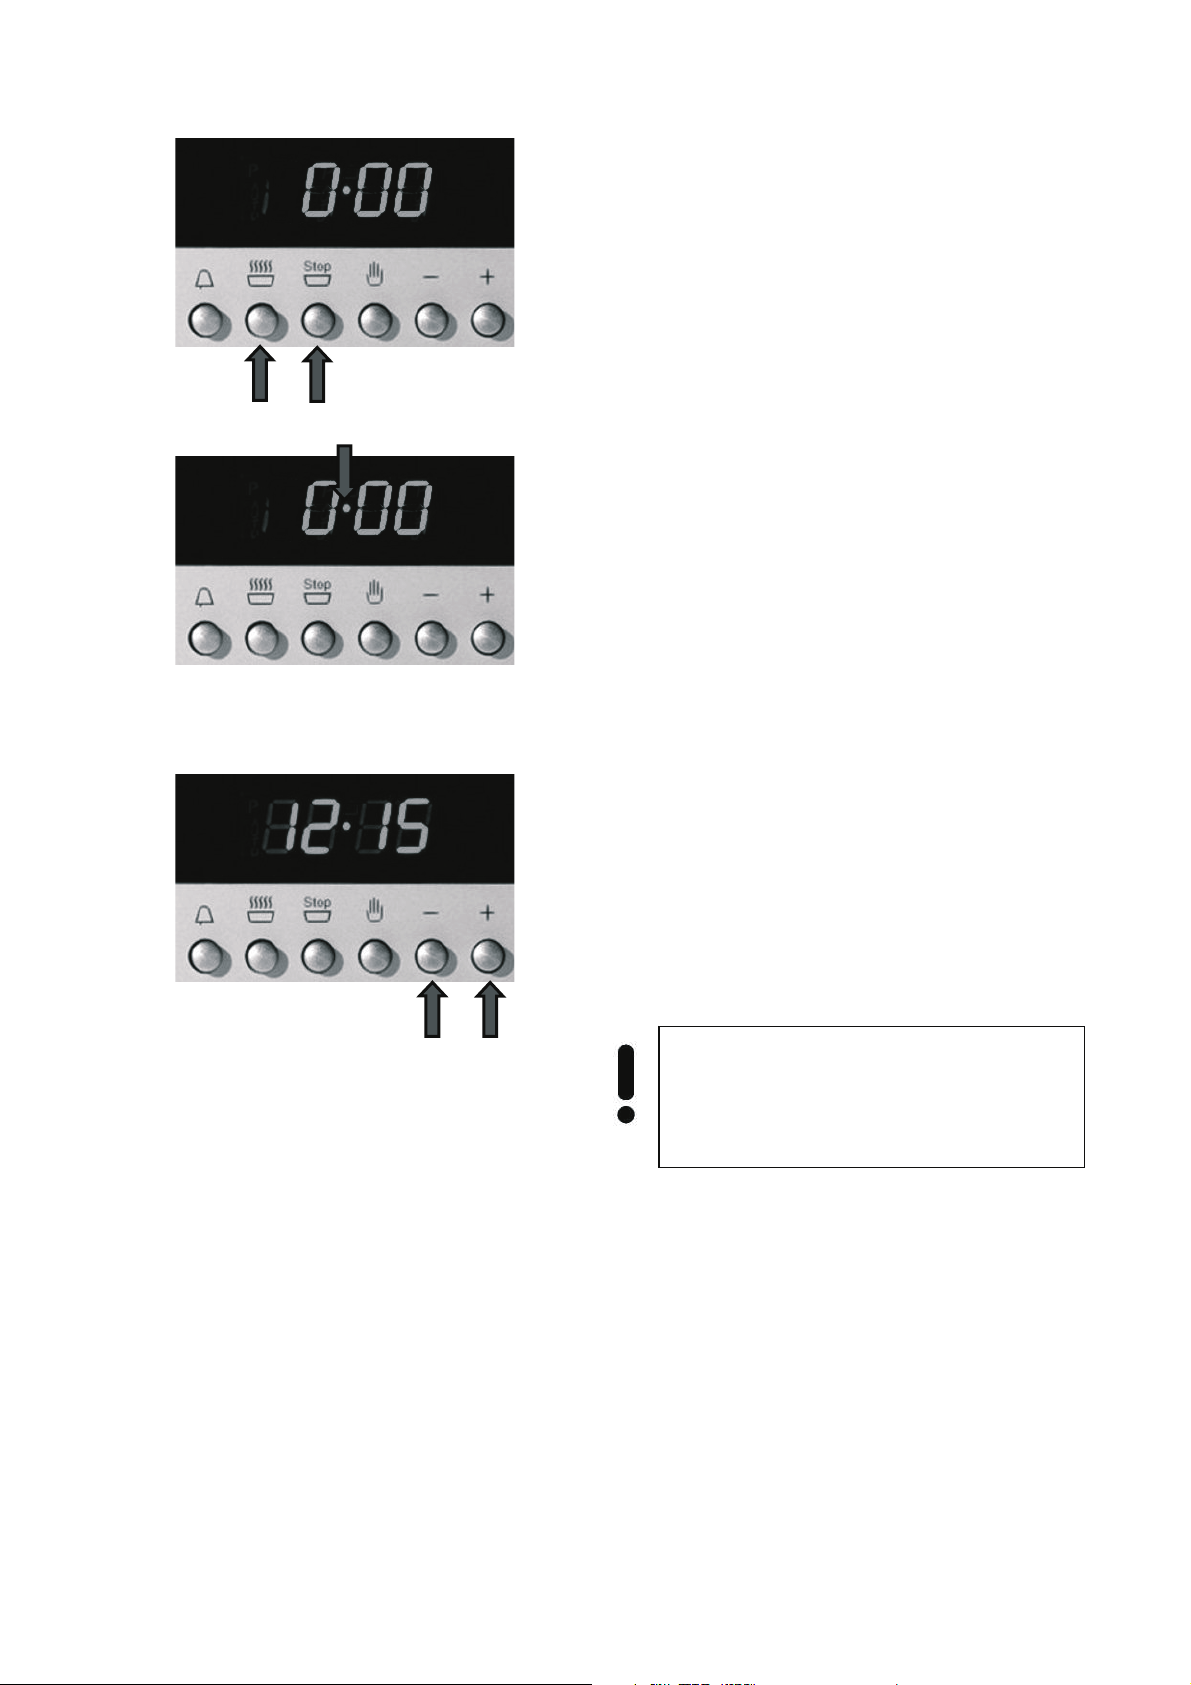
x Press key 1 and 2 at the same time.
With this setting a flashing dot 3 appears showing
you are in clock setting mode.
x By pressing the electoral keys 4 (
you can set the time.
After a few seconds the controller sets the time
currently displayed and the two dots stop flashing.
- or + )
4
Important! If you change the time
setting, you reset the timer and cancel
former set programs.
*
- if available
30
Page 31

DE RU
ELEKTRONISCHE ZEITSCHALTUHR* VON
BACKÖFEN Prestige
Tageszeiteinstellung
Zur Einstellung der aktuellen Uhrzeit:
x Tasten 1 und 2 gleichzeitig drücken
Bei dieser Einstellung erscheint ein blinkender
Punkt 3, er zeigt, dass Sie gerade bei der
Zeiteinstellung sind.
ɗɅȿɄɌɊɈɇɇɈȿ ɉɊɈȽɊȺɆɆɂɊɍɘɓȿȿ
ɍɋɌɊɈɃɋɌȼɈ* ȾɍɏɈȼɈɄ Prestige
ɍɫɬɚɧɨɜɤɚ ɬɟɤɭɳɟɝɨ ɜɪɟɦɟɧɢ
ɑɬɨɛɵ ɭɫɬɚɧɨɜɢɬɶ ɬɟɤɭɳɟɟ ɜɪɟɦɹ:
x ɧɚɠɦɢɬɟ ɨɞɧɨɜɪɟɦɟɧɧɨ ɤɧɨɩɤɢ 1 ɢ 2.
ɉɪɢ ɷɬɨɦ ɡɚɦɢɝɚɟɬ ɬɨɱɤɚ 3, ɪɚɡɞɟɥɹɸɳɚɹ ɱɚɫɵ
ɢ ɦɢɧɭɬɵ, ɩɨɤɚɡɵɜɚɹ, ɱɬɨ ȼɵ ɜ ɪɟɠɢɦɟ ɱɚɫɨɜ.
x Ɇit den Wahltasten 4 (
aktuelle Uhrzeit einstellen.
Nach einigen Sekunden wird die aktuelle Uhrzeit
automatisch übernommen und der Punkt hört zu
blinken auf.
Wichtig! Bei der Änderung der
eingestellten Uhrzeit werden alle vorher
gewählten Programme gelöscht.
- oder + ) die
x Ʉɧɨɩɤɚɦɢ 4 ɜɵɛɨɪɚ
ɜɵɫɬɚɜɢɬɶ ɬɟɤɭɳɟɟ ɜɪɟɦɹ.
ɑɟɪɟɡ ɧɟɫɤɨɥɶɤɨ ɫɟɤɭɧɞ ɧɚ ɞɢɫɩɥɟɟ ɩɨɹɜɢɬɫɹ
ɢɧɞɢɤɚɰɢɹ ɬɟɤɭɳɟɝɨ ɜɪɟɦɟɧɢ ɢ ɬɨɱɤɚ ɩɟɪɟɫɬɚɟɬ
ɦɢɝɚɬɶ.
ȼɚɠɧɨ! ɉɪɢ ɢɡɦɟɧɟɧɢɢ
ɭɫɬɚɧɨɜɥɟɧɧɨɝɨ ɜɪɟɦɟɧɢ ɬɚɣɦɟɪ ɛɭɞɟɬ
ɭɫɬɚɧɨɜɥɟɧ ɡɚɧɨɜɨ, ɚ ɜɫɟ ɜɵɛɪɚɧɧɵɟ
ɪɟɠɢɦɵ ɩɪɢɝɨɬɨɜɥɟɧɢɹ ɛɭɞɭɬ
ɨɬɦɟɧɟɧɵ.
- ɢɥɢ + )
(
* - falls vorhanden
* - ɟɫɥɢ ɢɦɟɟɬɫɹ
31
Page 32

EN
Electronical countdown timer
The countdown timer works independently of all
other timer functions, and can be used even when
the oven is switched off.
To switch on the countdown timer
1
2
3
4
x Press key 1
The symbol countdown timer
the display
x Press the choice keys 3 (
the duration and wait a few seconds.
After a few seconds the countdown timer starts the
countdown and the topical time of day and the
symbol countdown timer 4 appear.
After the end of the opposed duration a double
tone with the interval of 2 seconds sounds and the
symbol countdown timer 4 flashes.
2 appears on
- or + ) to set
x To switch off the timer press any key.
The symbol countdown timer 4 goes out.
32
Page 33

DE RU
Elektronischer Kurzzeitwecker
Der Gebrauch vom elektronischen Kurzzeitwecker
ist von anderen Funktionen unabhängig und kann
auch bei ausgeschaltetem Backofen verwendet
werden.
Zum Einschalten des Kurzzeitweckers:
x Taste 1 drücken
Auf dem Display erscheint das Symbol
Kurzzeitwecker 2.
x Mit den Wahltasten 3 (
Zeitdauer einstellen und einige Sekunden
warten.
Nach wenigen Sekunden wird der Kurzzeitwecker
die Rückzählung beginnen und es wird die aktuelle
Tageszeit und das entsprechende Symbol
Kurzzeitwecker 4 erscheinen.
- oder + ) die
ɗɥɟɤɬɪɨɧɧɵɣ ɦɢɧɭɬɧɢɤ
ɗɥɟɤɬɪɨɧɧɵɣ ɦɢɧɭɬɧɢɤ ɪɚɛɨɬɚɟɬ ɧɟɡɚɜɢɫɢɦɨ ɨɬ
ɞɪɭɝɢɯ ɮɭɧɤɰɢɣ. ɂɦ ɦɨɠɧɨ ɩɨɥɶɡɨɜɚɬɶɫɹ ɞɚɠɟ
ɟɫɥɢ ɞɭɯɨɜɤɚ ɜɵɤɥɸɱɟɧɚ.
ɑɬɨɛɵ ɜɤɥɸɱɢɬɶ ɦɢɧɭɬɧɢɤ:
x ɧɚɠɦɢɬɟ ɤɧɨɩɤɭ 1.
ɇɚ ɞɢɫɩɥɟɟ ɡɚɦɢɝɚɟɬ ɫɢɦɜɨɥ 2.
x ɂɫɩɨɥɶɡɭɹ ɤɧɨɩɤɢ 3 ɜɵɛɨɪɚ (
ɭɫɬɚɧɨɜɢɬɟ ɜɪɟɦɹ ɨɬɫɱɟɬɚ ɢ ɩɪɨɫɬɨ
ɩɨɞɨɠɞɢɬɟ.
ɑɟɪɟɡ ɧɟɫɤɨɥɶɤɨ ɫɟɤɭɧɞ ɬɚɣɦɟɪ ɧɚɱɧɟɬ ɨɛɪɚɬɧɵɣ
ɫɱɟɬ ɢ ɜɟɪɧɟɬɫɹ ɧɨɪɦɚɥɶɧɚɹ ɢɧɞɢɤɚɰɢɹ ɜɪɟɦɟɧɢ ɫ
ɫɢɦɜɨɥɨɦ 4, ɭɤɚɡɵɜɚɹ ɧɚ ɬɨ, ɱɬɨ ɢɞɟɬ
ɨɛɪɚɬɧɵɣ ɫɱɟɬ.
- ɢɥɢ + )
Nach Ablauf der eingestellten Zeitdauer ertönt ein
doppelter Signalton mit dem Intervall von 2
Sekunden und blinkt das Symbol
Kurzzeitwecker 4.
x Um den Kurzzeitwecker auszuschalten eine
beliebige Taste drücken.
Das Symbol Kurzzeitwecker 4 erlischt.
ɉɨ ɨɤɨɧɱɚɧɢɢ ɨɛɪɚɬɧɨɝɨ ɫɱɟɬɚ ɞɭɯɨɜɤɚ ɩɨɞɚɟɬ
ɞɜɨɣɧɨɣ ɡɜɭɤɨɜɨɣ ɫɢɝɧɚɥ ɫ ɢɧɬɟɪɜɚɥɨɦ ɜ 2 ɫɟɤɭɧɞɵ
ɢ ɦɢɝɚɟɬ ɫɢɦɜɨɥ 4.
ɋɢɦɜɨɥ 4 ɩɨɝɚɫɧɟɬ.
x ɇɚɠɚɜ ɥɸɛɭɸ ɤɧ
ɨɩɤɭ, ɨɬɤɥɸɱɢɬɟ ɦɢɧɭɬɧɢɤ.
33
Page 34

EN
Setting the cooking time
The process in the oven should switch off after a
wanted duration automatically.
Before setting the duration you have to set the
oven operating function and the
temperature (see chapter «Multifunction oven
control»)
x Press key 1 to set the duration of
preparation.
1
2
3
4
5
The meal preparation symbol 2 and symbol 3
( AUTO ) appear on the display.
x By using the choose keys 4 (
set the wanted duration of the preparation.
After a few seconds the countdown of the
duration starts.
Symbol 5 ( AUTO ) appears on the display to
confirm the successful setting. The topical time
appears again.
After the end of the opposed duration a double
tone with the interval of 2 seconds sounds and the
symbols flash to inform you that all processes in
the oven are switched off.
- or + ) you
34
6
x Press any key to silence the buzzer.
x Set the oven operating function and
the temperature in the position 0.
x Press key 6.
The symbol 5 ( AUTO ) disappear to confirm this
process.
Page 35

DE RU
r
Einstellen der Betriebsdaue
Der Vorgang im Backofen soll nach einer
gewünschten Dauer automatisch abgeschaltet
werden.
Bevor die Dauer der Gerichtszubereitung
eingegeben wird, müssen Sie die
Backofenfunktion und die Temperatur der
Zubereitung einstellen (siehe Kapitel »Steuerung
von Multifunktionsbackofen«).
ɍɫɬɚɧɨɜɤɚ ɩɪɨɞɨɥɠɢɬɟɥɶɧɨɫɬɢ
ɩɪɢɝɨɬɨɜɥɟɧɢɹ
Ⱦɭɯɨɜɤɚ ɞɨɥɠɧɚ ɚɜɬɨɦɚɬɢɱɟɫɤɢ ɨɬɤɥɸɱɢɬɶɫɹ ɩɨ
ɢɫɬɟɱɟɧɢɢ ɠɟɥɚɟɦɨɝɨ ɩɪɨɦɟɠɭɬɤɚ ɜɪɟɦɟɧɢ.
ɉɪɟɠɞɟ ɱɟɦ ɡɚɞɚɬɶ ɩɪɨɞɨɥɠɢɬɟɥɶɧɨɫɬɶ
ɩɪɢɝɨɬɨɜɥɟɧɢɹ, ȼɵ ɞɨɥɠɧɵ ɭɫɬɚɧɨɜɢɬɶ
ɢ
. (ɫɦ. ɪɚɡɞɟɥ «ɍɩɪɚɜɥɟɧɢɟ
ɪɚɛɨɬɨɣ ɦɧɨɝɨɮɭɧɤɰɢɨɧɚɥɶɧɨɝɨ ɞɭɯɨɜɨɝɨ
ɲɤɚɮɚ»).
x Drücken Sie die Taste 1, um die Dauer der
Gerichtzubereitung einzugeben.
Auf dem Display erscheinen
Gerichtzubereitung 2 und blinkt das Symbol
3 ( AUTO ).
x Mit den Wahltasten 4 (
Sie die gewünschte Dauer der
Gerichtzubereitung ein. Nach einigen
Sekunden beginnt die Rückzählung der
Zeitdauer.
das Symbol
ɇɚ ɞɢɫɩɥɟɟ ɩɨɹɜɢɬɫɹ ɫɢɦɜɨɥ
2 ɢ ɡɚɦɢɝɚɟɬ ɫɢɦɜɨɥ 3 ( AU
- oder + ) stellen
x ɇɚɠɦɢɬɟ ɤɧɨɩɤɭ 1, ɱɬɨɛɵ ɡɚɞɚɬɶ
ɩɪɨɞɨɥɠɢɬɟɥɶɧɨɫɬɶ ɩɪɢɝɨɬɨɜɥɟɧɢɹ.
TO ).
x ɂɫɩɨɥɶɡɭɹ ɤɧɨɩɤɢ ɜɵɛɨɪɚ 4 (
ɭɫɬɚɧɨɜɢɬɟ ɠɟɥɚɟɦɭɸ
ɩɪɨɞɨɥɠɢɬɟɥɶɧɨɫɬɶ ɩɪɢɝɨɬɨɜɥɟɧɢɹ.
ɑɟɪɟɡ ɧɟɫɤɨɥɶɤɨ ɫɟɤɭɧɞ ɧɚɱɧɟɬɫɹ ɨɬɫɱɟɬ
ɜɪɟɦɟɧɢ ɩɪɢɝɨɬɨɜɥɟɧɢɹ.
- ɢɥɢ + ),
Auf dem Display erscheint Symbol
was die erfolgreiche Einstellung bestätigt, und die
aktuelle Uhrzeit erscheint wieder.
Nach Ablauf der eingestellten Zeitdauer ertönt ein
doppelter Signalton mit dem Intervall von 2
Sekunden und die Symbole blinken, um Sie zu
informieren, dass alle Vorgänge im Backofen
abgeschaltet sind.
x Um den Signalton auszuschalten, eine
beliebige Taste drücken.
x Stellen Sie die Backofenfunktion und
die Temperatur in die Position 0 ein.
x Drücken Sie die Taste 6.
Der Vorgang wird durch Erlöschen des Symbols 5
( AUTO ) bestätigt.
5 ( AUTO ),
ɇɚ ɞɢɫɩɥɟɟ ɩɨɹɜɢɬɫɹ ɫɢɦɜɨɥ 5 ( AUTO ),
ɩɨɞɬɜɟɪɠɞɚɸɳɢɣ ɭɫɩɟɲɧɨɟ ɩɪɨɝɪɚɦɦɢɪɨɜɚɧɢɟ,
ɚ ɬɚɤɠɟ ɜɟɪɧɟɬɫɹ ɩɨɤɚɡɚɧɢɟ ɬɟɤɭɳɟɝɨ ɜɪɟɦɟɧɢ.
ɉɨ ɢɫɬɟɱɟɧɢɢ ɜɪɟɦɟɧɢ ɩɪɢɝɨɬɨɜɥɟɧɢɹ ɞɭɯɨɜɤɚ
ɩɨɞɚɟɬ ɞɜɨɣɧɨɣ ɡɜɭɤɨɜɨɣ ɫɢɝɧɚɥ ɫ ɢɧɬɟɪɜɚɥɨɦ ɜ
2 ɫɟɤɭɧɞɵ ɢ ɡɚɦɢɝɚɸɬ ɫɢɦɜɨɥɵ, ɢɧɮɨɪɦɢɪɭɹ,
ɱɬɨ ɜɫɟ ɮɭɧɤɰɢɢ ɪɚɛɨɬɵ ɞɭɯɨɜɤɢ ɨɬɤɥɸɱɟɧɵ.
x ɇɚɠɚɜ ɥɸ
x ɍɫɬɚɧɨɜɢɬɟ
ɢ ɜ
ɩɨɥɨɠɟɧɢɟ 0.
x ɇɚɠɦɢɬɟ ɤɧɨɩɤɭ 6.
ɋɢɦɜɨɥ 5 ( AUTO ) ɩɨɝɚɫɧɟɬ.
ɛɭɸ ɤɧɨɩɤɭ, ɨɬɤɥɸɱɢɬɟ ɡɭɦɦɟɪ.
35
Page 36

EN
Setting the end of cooking time
The oven must switch off after the set end time.
Before setting the end of cooking time you have to
set the oven operating function and the
temperature (see chapter “Cooking”).
x Press key 1 to set the end of preparation.
3
5
1
2
4
The meal preparation symbol 2 and symbol 3
( AUTO ) appear on the display.
x By using the choose keys 4 (
set the wanted end of the preparation.
After a few seconds the countdown of the duration
starts.
Important! You should set a time which
differs from the current day time.
Symbol 5 ( AUTO ) appears on the display to
confirm the successful setting. The topical time
appears again.
- or + ) you
36
6
After the set end time is reached a double tone with
the interval of 2 seconds sounds and the symbols
flash to inform you that all processes in the oven
are switched off.
x Press any key to silence the buzzer.
x Set the oven operating function and the
temperature in the position 0.
x Press key 6.
The symbol 5 ( AUTO ) disappear to confirm this
process.
Page 37

DE RU
Einstellen der Endzeit
Der Backofen muss in eingegebener Endzeit
ausgeschaltet werden.
Bevor die Endzeit eingegeben wird, müssen Sie
die Backofenfunktion und die Temperatur
der Zubereitung einstellen (siehe Kapitel
„Gebrauch vom Backofen“).
x Taste 1 drücken, um die Endzeit
einzugeben.
Auf dem Display erscheinen
Gerichtzubereitung 2 und blinkt das Symbol
3 ( AUTO ).
x Mit den Wahltasten 4 (
gewünschte Endzeit der
Gerichtszubereitung einstellen.
das Symbol
- oder + ) die
ɍɫɬɚɧɨɜɤɚ ɜɪɟɦɟɧɢ ɨɤɨɧɱɚɧɢɹ
ɩɪɢɝɨɬɨɜɥɟɧɢɹ
Ⱦɭɯɨɜɤɚ ɞɨɥɠɧɚ ɚɜɬɨɦɚɬɢɱɟɫɤɢ ɨɬɤɥɸɱɢɬɶɫɹ ɜ
ɡɚɪɚɧɟɟ ɡɚɞɚɧɧɨɟ ɜɪɟɦɹ.
ɉɪɟɠɞɟ ɱɟɦ ɡɚɞɚɬɶ ɜɪɟɦɹ ɨɤɨɧɱɚɧɢɹ ɪɚɛɨɬɵ,
ȼɵ ɞɨɥɠɧɵ ɭɫɬɚɧɨɜɢɬɶ
ɢ .
(ɫɦ. ɪɚɡɞɟɥ "ɉɨɥɶɡɨɜɚɧɢɟ ɞɭɯɨɜɵɦ
ɲɤɚɮ
ɇɚ ɞɢɫɩɥɟɟ ɩɨɹɜɢɬɫɹ ɫɢɦɜɨɥ
2 ɢ ɡɚɦɢɝɚɟɬ ɫɢɦɜɨɥ 3 ( AUTO ).
ɨɦ").
x ɇɚɠɦɢɬɟ ɤɧɨɩɤɭ 1, ɱɬɨɛɵ ɡɚɞɚɬɶ ɜɪɟɦɹ
ɨɤɨɧɱɚɧɢɹ ɩɪɨɰɟɫɫɚ ɩɪɢɝɨɬɨɜɥɟɧɢɹ.
x ɂɫɩɨɥɶɡɭɹ ɤɧɨɩɤɢ ɜɵɛɨɪɚ 4 (
ɭɫɬɚɧɨɜɢɬɟ ɠɟɥɚɟɦɨɟ ɜɪɟɦɹ ɨɤɨɧɱɚɧɢɹ
ɩɪɢɝɨɬɨɜɥɟɧɢɹ.
- ɢɥɢ + ),
Nach wenigen Sekunden wird das Programm
aktiviert.
Wichtig! Sie sollen die Zeit eingeben, die
sich von der aktuellen Uhrzeit unterscheidet!
Auf dem Display erscheint das Symbol 5
( AUTO ) als Bestätigung der erfolgreichen
Programmierung und die aktuelle Tageszeit wird
wieder angezeigt.
Wenn die eingegebene Endzeit erreicht ist, ertönt
ein doppelter Signalton mit dem Intervall von 2
Sekunden und die Symbole blinken, um Sie zu
informieren, dass alle Vorgänge im Backofen
abgeschaltet sind.
x Um den Signalton auszuschalten, eine
beliebige Taste drücken.
x Stellen Sie die Backofenfunktion und
die Temperatur in die Position 0 ein.
x Drücken Sie die Taste 6.
Der Vorgang wird durch Erlöschen des Symbols 5
( AUTO ) bestätigt.
ɑɟɪɟɡ ɧɟɫɤɨɥɶɤɨ ɫɟɤɭɧɞ ɩɪɨɝɪɚɦɦɚ ɛɭɞɟɬ
ɚɤɬɢɜɢɪɨɜɚɧɚ.
ȼɚɠɧɨ! ȼɵ ɞɨɥɠɧɵ ɡɚɞɚɬɶ ɜɪɟɦɹ,
ɨɬɥɢɱɚɸɳɟɟɫɹ ɨɬ ɬɟɤɭɳɟɝɨ!
ɇɚ ɞɢɫɩɥɟɟ ɩɨɹɜɢɬɫɹ ɫɢɦɜɨɥ 5 ( AUTO ),
ɩɨɞɬɜɟɪɠɞɚɸɳɢɣ ɭɫɩɟɲɧɨɟ ɩɪɨɝɪɚɦɦɢɪɨɜɚɧɢɟ,
ɚ ɬɚɤɠɟ ɜɟɪɧɟɬɫɹ ɩɨɤɚɡɚɧɢɟ ɬɟɤɭɳɟɝɨ ɜɪɟɦɟɧɢ.
ɉɨ ɞɨɫɬɢɠɟɧɢɸ ɡɚɩɪɨɝɪɚɦɦɢɪɨɜɚɧɧɨɝɨ ɜɪɟɦɟɧɢ
ɞɭɯɨɜɤɚ ɩɨɞɚɟɬ ɞɜɨɣɧɨɣ ɡɜɭɤɨɜɨɣ ɫɢɝɧɚɥ ɫ
ɢɧɬɟɪɜɚɥɨɦ ɜ ɞɜɟ ɫɟɤɭɧɞɵ ɢ ɡɚɦɢɝɚɸɬ ɫɢɦɜɨɥɵ,
ɢɧɮɨɪɦɢɪɭɹ, ɱɬɨ ɜɫɟ ɮɭɧɤɰɢɢ ɪɚɛɨɬɵ ɞɭɯɨɜɤɢ
ɨɬɤɥɸɱɟɧɵ.
x ɇɚɠɚɜ ɥɸɛɭɸ ɤɧɨɩɤɭ, ɨɬɤɥɸɱɢɬɟ ɡɭɦɦɟɪ.
x ɍɫɬɚɧɨɜɢɬɟ
ɢ ɜ
ɩɨɥɨɠɟɧɢɟ 0.
x ɇɚɠɦɢɬɟ ɤɧɨɩɤɭ 6.
ɋɢɦɜɨɥ 5 ( AUTO ) ɩɨɝɚɫɧɟɬ.
37
Page 38

EN
1
2
Setting cooking duration and end time
You can combine the cooking duration and end of
cooking time functions to set the start and end
times for cooking. In this way you can program
your electronic oven to cook while you are out or to
defrost foods ready for you to cook when you get
back. A great help in the kitchen!
The programming sequence of these two functions
is arbitrative. You can program first the duration 1
and then the end 2 of cooking time or the other
way round.
Example: You want to start cooking a dish 30
minutes before you get home so that it will be
ready for you arrival at 12:55.
3
4
Befor you set the the duration and the end of
cooking time, you have to set the oven function
3 ant the temperature (see chapter
«Multifunction oven control»).
Set the cooking duration 4 (in our example – 30
minutes).
Therefor you have to program the wanted end of
cooking time (see chapter «Setting cooking
duration»).
38
Page 39

DE RU
Einstellen der Betriebsdauer und Endzeit
Sie können die beiden Funktionen „Betriebsdauer“
und „Endzeit“ kombinieren, wobei Sie eine
gewünschte Zeit eingeben, um den Backofen einund auszuschalten. So können Sie Ihren Backofen
für die Zeit programmieren, wenn Sie nicht zu
Hause sind; oder das Auftauen von Speisen bevor
Sie nach Hause kommen. Das ist eine große Hilfe
in Ihrer Küche.
Die Programmierfolge von diesen beiden
Funktionen ist nicht entscheidend. Sie können
zuerst Betriebsdauer 1 und dann Endzeit 2
programmieren, oder umgekehrt.
Beispiel: Sie möchten die Gerichtszubereitung 30
Minuten vor Ihrer Rückkehr nach Hause beginnen,
so, dass zu Ihrer Ankunft um 12:55 die Speise
fertig ist.
ɍɫɬɚɧɨɜɤɚ ɩɪɨɞɨɥɠɢɬɟɥɶɧɨɫɬɢ ɢ ɜɪɟɦɟɧɢ
ɨɤɨɧɱɚɧɢɹ ɩɪɢɝɨɬɨɜɥɟɧɢɹ
ȼɵ ɦɨɠɟɬɟ ɤɨɦɛɢɧɢɪɨɜɚɬɶ ɮɭɧɤɰɢɢ ɜɪɟɦɟɧɢ
ɩɪɢɝɨɬɨɜɥɟɧɢɹ ɢ ɜɪɟɦɟɧɢ ɨɤɨɧɱɚɧɢɹ
ɩɪɢɝɨɬɨɜɥɟɧɢɹ, ɡɚɞɚɜɚɹ ɠɟɥɚɟɦɨɟ ɜɪɟɦɹ
ɜɤɥɸɱɟɧɢɹ ɢ ɜɵɤɥɸɱɟɧɢɹ ɞɭɯɨɜɤɢ. Ɍɚɤɢɦ
ɨɛɪɚɡɨɦ, ȼɵ ɦɨɠɟɬɟ ɡɚɩɪɨɝɪɚɦɦɢɪɨɜɚɬɶ
ɩɪɨɰɟɫɫ ɩɪɢɝɨɬɨɜɥɟɧɢɹ
ɜ ȼɚɲɟ
ɣ ɞɭɯɨɜɤɟ ɧɚ ɬɨ
ɜɪɟɦɹ, ɤɨɝɞɚ ȼɚɫ ɧɟɬ ɞɨɦɚ ɢɥɢ ɠɟ ɩɪɨɰɟɫɫ
ɪɚɡɦɨɪɚɠɢɜɚɧɢɹ ɩɪɨɞɭɤɬɨɜ ɤ ȼɚɲɟɦɭ ɩɪɢɯɨɞɭ.
ɇɟɩɥɨɯɚɹ ɩɨɦɨɳɶ ɧɚ ɤɭɯɧɟ.
ɇɟ ɜɚɠɧɨ ɜ ɤɚɤɨɦ ɩɨɪɹɞɤɟ ȼɵ ɩɪɨɝɪɚɦɦɢɪɭɟɬɟ
ɷɬɢ ɞɜɟ ɮɭɧɤɰɢɢ. ɋɧɚɱɚɥɚ ɜɪɟɦɹ ɩɪɢɝɨɬɨɜɥɟɧɢɹ
1 ɢ ɡɚɬɟɦ ɜɪɟɦɹ ɨɤɨɧɱɚɧɢɹ 2,
ɢɥɢ ɧɚɨɛɨɪɨɬ.
ɇɚɩɪɢɦɟɪ: ȼɵ ɯɨɬɢɬɟ ɧɚɱɚɬɶ ɝɨɬɨɜɢɬɶ ɛɥɸɞɨ ɡɚ
30 ɦɢɧɭɬ ɞɨ ɜɨɡɜɪɚɳɟɧɢɹ ɞɨɦɨɣ, ɱɬɨɛɵ ɤ
ȼɚɲɟɦɭ ɩɪɢɯɨɞɭ ɜ 12:55 ɨɧɨ ɛɵɥɨ ɝɨɬɨɜɨ.
Bevor die Dauer der Gerichtszubereitung und die
Endzeit eingegeben werden, müssen Sie die
Backofenfunktion 3 und die Temperatur der
Zubereitung einstellen (siehe Kapitel »Steuerung
von Multifunktionsbackofen«).
Geben Sie die Betriebsdauer der erichtzubereitung
4 ein (in unserem Beispiel - 30 Minuten).
Dafür muss die gewünschte Betriebsdauer
programmiert werden (siehe Kapitel »Einstellen
der Betriebsdauer«).
ɉɪɟɠɞɟ ɱɟɦ ɡɚɞɚɬɶ ɩɪɨɞɨɥɠɢɬɟɥɶɧɨɫɬɶ
ɩɪɢɝɨɬɨɜɥɟɧɢɹ ɢ ɜɪɟɦɹ ɨɤɨɧɱɚɧɢɹ ɪɚɛɨɬɵ, ȼɵ
ɞɨɥɠɧɵ ɭɫɬɚɧɨɜɢɬɶ
3 ɢ . (ɫɦ.
Ɋɚɡɞɟɥ «ɍɩɪɚɜɥɟɧɢɟ ɪɚɛɨɬɨɣ
ɦɧɨɝɨɮɭɧɤɰɢɨɧɚɥɶɧɨɝɨ ɞɭɯɨɜɨɝɨ ɲɤɚɮɚ»).
Ɂɚɞɚɣɬɟ ɩɪ
ɨɞɨɥɠɢɬɟɥɶɧɨɫɬɶ ɩɪɢɝɨɬɨɜɥɟɧɢɹ 4
(ɜ
ɧɚɲɟɦ ɩɪɢɦɟɪɟ - 30 ɦɢɧɭɬ).
Ⱦɥɹ ɷɬɨɝɨ ɡɚɩɪɨɝɪɚɦɦɢɪɭɣɬɟ ɠɟɥɚɟɦɭɸ
ɩɪɨɞɨɥɠɢɬɟɥɶɧɨɫɬɶ ɩɪɢɝɨɬɨɜɥɟɧɢɹ. (ɫɦ. ɪɚɡɞɟɥ
«ɍɫɬɚɧɨɜɤɚ ɩɪɨɞɨɥɠɢɬɟɥɶɧɨɫɬɢ
ɩɪɢɝɨɬɨɜɥɟɧɢɹ»).
39
Page 40

EN
1
The symbol 1 ( AUTO ) appears on the display,
that comfirms a successful programming of the
cooking duration and the current day time appears
again.
x Press key 2 to set the end time (see
chapter “Setting the end time”).
3
The end time (3) appears on the display, that
accords to the current day time plus duration (in
our example 12:45, that means plus 30 minutes).
2
4
5
6
x Set the wanted end time with the choice
key 4 (
A few seconds later this time will be registrated 5
(in our example – 12:55, that means we shifted
the end time 10 minutes).
The oven is in expectance state now.
The current day time is displayed 6 (in our
example 12:15).
+ ).
40
7
In our example the oven should be turned on at
12:25 (7) with the functions “Grill + Thermo
Circulation” and be turned off at 12:55 according
to your setting.
Page 41

DE RU
Auf dem Display erscheint das Symbol 1
( AUTO ), das bestätigt eine erfolgreiche
Programmierung der Betriebsdauer und die
aktuelle Tageszeit wird wieder angezeigt.
x Die Taste 2 drücken, um die Endzeit
einzugeben (siehe Kapitel „Einstellen der
Endzeit“).
Auf dem Display erscheint die Endzeit (3), die der
aktuellen Tageszeit plus Betriebsdauer entspricht
(in unserem Beispiel 12:45, das heißt plus 30
Minuten).
ɇɚ ɞɢɫɩɥɟɟ ɩɨɹɜɢɬɫɹ ɫɢɦɜɨɥ 1 ( AUTO ),
ɩɨɞɬɜɟɪɠɞɚɸɳɢɣ ɭɫɩɟɲɧɨɟ ɩɪɨɝɪɚɦɦɢɪɨɜɚɧɢɟ
ɩɪɨɞɨɥɠɢɬɟɥɶɧɨɫɬɢ ɩɪɢɝɨɬɨɜɥɟɧɢɹ, ɚ ɬɚɤɠɟ
ɜɟɪɧɟɬɫɹ ɩɨɤɚɡɚɧɢɟ ɬɟɤɭɳɟɝɨ ɜɪɟɦɟɧɢ.
x ɇɚɠɦɢɬɟ ɤɧɨɩɤɭ 2, ɱɬɨɛɵ ɡɚɞɚɬɶ ɜɪɟɦɹ
ɨɤɨɧɱɚɧɢɹ ɩɪɨɰɟɫɫɚ ɩɪɢɝɨɬɨɜɥɟɧɢɹ (ɫɦ.
ɪɚɡɞɟɥ "ɍɫɬɚɧɨɜɤɚ ɜɪɟɦɟɧɢ ɨɤɨɧɱɚɧɢɹ
ɩɪɢɝɨɬɨɜɥɟɧɢɹ").
ɇɚ ɞɢɫɩɥ
ɩɪɢɝɨɬɨɜɥɟɧɢɹ (3), ɪɚɜɧɨɟ ɬɟɤɭɳɟɦɭ ɜɪɟɦɟɧɢ,
ɩɥɸɫ ɜɪɟɦɹ ɩɪɨɞɨɥɠɢɬɟɥɶɧɨɫɬɢ ɩɪɢɝɨɬɨɜɥɟɧɢɹ
(ɜ ɧɚɲɟɦ ɩɪɢɦɟɪɟ 12:45, ɬ.ɟ. ɩɥɸɫ 30 ɦɢɧ.).
ɟɟ ɩɨɹɜɢɬɫɹ ɜɪɟɦɹ ɨɤɨɧɱɚɧɢɹ
x Mit der Wahltaste 4 (
Endzeit einstellen.
Nach wenigen Sekunden wird diese Zeit registriert
5 (in unserem Beispiel - 12:55, das heißt,
wir haben die Endzeit um 10 Minuten verschoben).
Der Backofen ist im Bereitschaftsmodus.
Die aktuelle Tageszeit wird angezeigt 6 (in
unserem Beispiel 12:15).
In unserem Beispiel soll der Backofen um 12:25
(7) bei den Funktionen „Grill + Thermozirkulation“
eingeschaltet und um 12:55 ausgeschaltet werden,
gemäß Ihrer Programmierung.
+ ) die gewünschte
x ɂɫɩɨɥɶɡɭɹ ɤɧɨɩɤɭ ɜɵɛɨɪɚ 4 (
ɭɫɬɚɧɨɜɢɬɟ ɠɟɥɚɟɦɨɟ ɜɪɟɦɹ ɨɤɨɧɱɚɧɢɹ
ɩɪɢɝɨɬɨɜɥɟɧɢɹ.
ɑɟɪɟɡ ɧɟɫɤɨɥɶɤɨ ɫɟɤɭɧɞ ɬɚɣɦɟɪ ɡɚɪɟɝɢɫɬɪɢɪɭɟɬ
ɷɬɨ ɡɧɚɱɟɧɢɟ 5 (ɜ ɧɚɲɟɦ ɩɪɢɦɟɪɟ - 12:55, ɬ.ɟ
ɦɵ ɫɞɜɢɧɭɥɢ ɜɪɟɦɹ ɨɤɨɧɱɚɧɢɹ ɩɪɢɝɨɬɨɜɥɟɧɢɹ
ɧɚ 10 ɦɢɧ.).
Ⱦɭɯɨɜɤɚ ɩɟɪɟɣɞɟɬ ɜ ɪɟɠɢɦ ɨɠɢɞɚɧɢɹ.
ȼɵɫɜɟɬɢɬɶɫɹ ɬɟɤɭɳɟɟ ɜɪɟɦɹ 6
ɩɪɢɦɟɪɟ – 12:15).
ȼ ɧɚɲɟɦ ɩɪɢɦɟɪɟ ɞɭɯɨɜɤɚ ɞɨɥɠɧɚ ɜɤɥɸɱɢɬɫɹ ɜ
12:25 (7) ɜ ɪɟɠɢɦɟ "ɝɪɢɥɶ + ɨɛɞɭɜ" ɧɚ 30 ɦɢɧɭɬ
ɢ ɜɵɤɥɸɱɢɬɫɹ ɜ 12:55, ɫɨɨɬɜɟɬɫɬɜɟɧɧɨ ɡɚɞɚɧɧɨɣ
ȼɚɦɢ ɩɪɨɝɪɚɦɦɟ.
+ ),
(ɜ ɧɚɲɟɦ
41
Page 42

1
EN
DIGITAL CLOCK TIMER WITH SENSOR* OF
THE OVEN Touch control
Symbols 1 ( AUTO ) and 0.00 will start flashing
when the unit is switched on for the first time.
Setting the clock
To set the current day time:
2
3
x Press the middle key 2 for at least 3
seconds.
The symbol meal preparation 3 appears on
the display
x By pressing choice keys 4 (
can set the time.
After a few seconds the set time is confirmed
through an akustical signal and the symbols stop
flashing.
The set time can be also set afterwards. Therefor
you have to:
x Press the choice keys 4 and 5 (
simultaneously for 3 seconds and the time
is regulated as described.
- or + ) you
- or + )
42
4
5
Important! If you change the time
setting, you reset the timer and cancel
former set programs.
*
- if available
Page 43

DE RU
ELEKTRONISCHE ZEITSCHALUHR MIT
SENSOR - BEDIENUNG* VON BACKÖFEN
Touch control
Wird die Uhr zum ersten Mal eingeschaltet, blinken
die Symbole 1 ( AUTO ) und 0.00
Uhrzeiteinstellung
Zur Einstellung der aktuellen Uhrzeit:
x Auf die mittlere Taste 2 mind. 3 Minuten
lang drücken.
Auf dem Display erscheint das Symbol
Gerichtzubereitung 3.
x Mit den Wahltasten 4 (
gewünschte
Uhrzeit einstellen.
.
- oder + ) die
ɋȿɇɋɈɊɇɈȿ ɗɅȿɄɌɊɈɇɇɈȿ
ɉɊɈȽɊȺɆɆɂɊɍɘɓȿȿ ɍɋɌɊɈɃɋɌȼɈ*
ȾɍɏɈȼɈɄ Touch control
ɉɪɢ ɩɟɪɜɨɦ ɜɤɥɸɱɟɧɢɢ ɱɚɫɨɜ ɧɚɱɢɧɚɸɬ ɦɢɝɚɬɶ
ɫɢɦɜɨɥɵ 1 ( AUTO ) ɢ 0.00.
ɍɫɬɚɧɨɜɤɚ ɬɟɤɭɳɟɝɨ ɜɪɟɦɟɧɢ
ɑɬɨɛɵ ɭɫɬɚɧɨɜɢɬɶ ɬɟɤɭɳɟɟ ɜɪɟɦɹ:
x ɇɚɠɦɢɬɟ ɧɚ ɫɪɟɞɧɸɸ ɤɧɨɩɤɭ 2 ɜ ɬɟɱɟɧɢɟ
3-ɯ ɫɟɤɭɧɞ.
ɇɚ ɞɢɫɩɥɟɟ ɩɨɹɜɢɬɫɹ ɫɢɦɜɨɥ
3.
x ɋ ɩɨɦɨɳɶɸ ɤɧɨɩɨɤ ɜɵɛɨɪɚ 4 ɢɥɢ 5 (
+ ) ɭɫɬɚɧɨɜɢɬɟ ɠɟɥɚɟɦɨɟ ɜɪɟɦɹ.
ɢɥɢ
-
Nach wenigen Sekunden wird die eingestellte Zeit
durch ein akustisches Signal bestätigt und die
Symbole hören auf zu blinken.
Die eingestellte
Uhrzeit kann auch anschließend
verändert werden. Dafür muss man:
x Die Wahltasten 4 und 5 (
gleichzeitig 3 Sekunden lang gedrückt
halten und die Uhrzeit dann wie oben
beschrieben reguliert.
Wichtig! Bei der Änderung der
eingestellten Uhrzeit werden alle vorher
gewählten Programme gelöscht.
- oder + )
ɑɟɪɟɡ ɧɟɫɤɨɥɶɤɨ ɫɟɤɭɧɞ ɚɤɭɫɬɢɱɟɫɤɢɣ ɫɢɝɧɚɥ
ɩɨɞɬɜɟɪɞɢɬ ɭɫɬɚɧɨɜɥɟɧɧɨɟ ɜɪɟɦɹ, ɫɢɦɜɨɥɵ
ɩɟɪɟɫɬɚɧɭɬ ɦɢɝɚɬɶ.
ɍɫɬɚɧɨɜɥɟɧɧɨɟ ɜɪɟɦɹ ɦɨɠɧɨ ɢɡɦɟɧɢɬɶ. Ⱦɥɹ
ɷɬɨɝɨ:
x Ʉɧɨɩɤɢ ɜɵɛɨɪɚ 4 ɢ 5 (
ɞɟɪɠɚɬɶ ɨɞɧɨɜɪɟɦɟɧɧɨ ɧɚɠɚɬɵɦɢ ɜ
ɬɟɱɟɧɢɟ 3-ɯ ɫɟɤɭɧɞ ɢ ɭɫɬɚɧɨɜɢɬɶ ɜɪɟɦɹ,
ɤɚɤ ɨɩɢɫɚɧɨ ɜɵɲɟ.
ȼɚɠɧɨ! ɉɪɢ ɢɡɦɟɧɟɧɢɢ
ɭɫɬɚɧɨɜɥɟɧɧɨɝɨ ɜɪɟɦɟɧɢ ɬɚɣɦɟɪ ɛɭɞɟɬ
ɭɫɬɚɧɨɜɥɟɧ ɡɚɧɨɜɨ, ɚ ɜɫɟ ɜɵɛɪɚɧɧɵɟ
ɪɟɠɢɦɵ ɩɪɢɝɨɬɨɜɥɟɧɢɹ ɛɭɞɭɬ
ɨɬɦɟɧɟɧɵ.
- ɢɥɢ + ) ɧɭɠɧɨ
*
- falls vorhanden
*
- ɟɫɥɢ ɢɦɟɟɬɫɹ
43
Page 44

EN
1
2
Electronical countdown timer
The countdown timer works independently of all
other timer functions, and can be used even when
the oven is switched off.
To switch on the countdown timer
x Press the middle key 1 for 3 seconds.
The symbol countdown timer
the display
2 appears on
3
4
5
x Press the choice keys 3 or 4 (
set the duration and wait a few seconds.
After a few seconds the countdown timer starts the
countdown and the current time of day and the
symbol countdown timer 5 appear.
After the end of the opposed duration a double
tone with the interval of 2 seconds sounds and the
symbol countdown timer 5 flashes.
x To switch off the timer press any key.
- or + ) to
44
The symbol countdown timer 5 goes out.
Page 45

DE RU
Elektronischer Kurzzeitwecker
Der Gebrauch vom elektronischen Kurzzeitwecker
ist von anderen Funktionen unabhängig und kann
auch bei ausgeschaltetem Backofen verwendet
werden.
Zum Einschalten des Kurzzeitweckers:
x Die mittlere Taste 1 3 Sekunden land
gedrückt halten.
Auf dem Display erscheint das Symbol
Kurzzeitwecker 2.
ɗɥɟɤɬɪɨɧɧɵɣ ɦɢɧɭɬɧɢɤ
ɗɥɟɤɬɪɨɧɧɵɣ ɦɢɧɭɬɧɢɤ ɪɚɛɨɬɚɟɬ ɧɚɡɚɜɢɫɢɦɨ ɨɬ
ɞɪɭɝɢɯ ɮɭɧɤɰɢɣ. ɂɦ ɦɨɠɧɨ ɩɨɥɶɡɨɜɚɬɶɫɹ ɞɚɠɟ
ɟɫɥɢ ɞɭɯɨɜɤɚ ɜɵɤɥɸɱɟɧɚ.
ɑɬɨɛɵ ɜɤɥɸɱɢɬɶ ɦɢɧɭɬɧɢɤ:
x ɇɚɠɦɢɬɟ ɧɚ ɫɪɟɞɧɸɸ ɤɧɨɩɤɭ 1 ɜ ɬɟɱɟɧɢɟ
3-ɯ ɫɟɤɭɧɞ.
ɇɚ ɞɢɫɩɥɟɟ ɩɨɹɜɢɬɫɹ ɫɢɦɜɨɥ 2.
x Mit den Wahltasten 3 oder 4 (
die gewünschte Zeit einstellen.
Nach wenigen Sekunden wird der Kurzzeitwecker
die Rückzählung beginnen und es wird die aktuelle
Tageszeit und das entsprechende Symbol
Kurzzeitwecker 5 erscheinen.
Nach Ablauf der eingestellten Zeitdauer ertönt ein
doppelter Signalton mit dem Intervall von 2
Sekunden und blinkt das Symbol
Kurzzeitwecker 5.
x Um den Kurzzeitwecker auszuschalten eine
beliebige Taste drücken.
- oder + )
ɑɟɪɟɡ ɧɟɫɤɨɥɶɤɨ ɫɟɤɭɧɞ ɬɚɣɦɟɪ ɧɚɱɧɟɬ
ɨɛɪɚɬɧɵɣ ɫɱɟɬ ɢ ɜɟɪɧɟɬɫɹ ɧɨɪɦɚɥɶɧɚɹ
ɢɧɞɢɤɚɰɢɹ ɜɪɟɦɟɧɢ ɫ ɫɢɦɜɨɥɨɦ 5,
ɭɤɚɡɵɜɚɹ ɧɚ ɬɨ, ɱɬɨ ɢɞɟɬ ɨɛɪɚɬɧɵɣ ɫɱɟɬ.
ɉɨ ɨɤɨɧɱɚɧɢɢ ɨɛɪɚɬɧɨɝɨ ɫɱɟɬɚ ɞɭɯɨɜɤɚ ɩɨɞɚɟɬ
ɞɜɨɣɧɨɣ ɡɜɭɤɨɜɨɣ ɫɢɝɧɚɥ ɫ ɢɧɬɟɪɜɚɥɨɦ ɜ 2
ɫɟɤɭɧɞɵ ɢ ɦɢɝɚɟɬ ɫɢɦɜɨɥ 5.
x ɋ ɩɨɦɨɳɶɸ ɤɧɨɩɨɤ ɜɵɛɨɪɚ 3 ɢɥɢ 4 (
+ ) ɭɫɬɚɧɨɜɢɬɟ ɠɟɥɚɟɦɨɟ ɜɪɟɦɹ.
ɢɥɢ
x ɇɚɠɚɜ ɥɸɛɭɸ ɤɧɨɩɤɭ, ɨɬɤɥɸɱɢɬɟ
ɦɢɧɭɬɧɢɤ.
-
Das Symbol Kurzzeitwecker 5 erlischt.
ɋɢɦɜɨɥ 5 ɩɨɝɚɫɧɟɬ.
45
Page 46

3
EN
Setting the cooking time
The process in the oven should switch off after a
wanted duration automatically.
Before setting the duration you have to set the
oven operating function and the
temperature (see chapter “Cooking”)
x Press the middle key 1 for 3 seconds.
2
x Press key 1 again.
1
4
5
The symbol 2 and 0.00 appear on the display
alternately and the symbol 3 (AUTO) flashes.
x By using the choose keys 4 or 5 (
you set the wanted duration of the
preparation. After a few seconds the
countdown of the duration starts.
Symbol 6 (AUTO) appears on the display to
confirm the successful setting. The current time
appears again.
After the end of the opposed duration a double tone
with the interval of 2 seconds sounds and the
symbols flash to inform you that all processes in the
oven are switched off.
- or + )
46
6
x Press any key to silence the buzzer. The
symbols disappear to confirm this process.
Page 47

DE RU
Einstellen der Betriebsdauer
Der Vorgang im Backofen soll nach einer
gewünschten Dauer automatisch abgeschaltet
werden.
Bevor die Dauer der Gerichtszubereitung
eingegeben wird, müssen Sie die
Backofenfunktion und die Temperatur der
Zubereitung einstellen (siehe Kapitel „Gebrauch
vom Backofen“).
x Die mittlere Taste 1 3 Sekunden lang
Drücken.
x Die mittlere 1 Taste erneut drücken.
Auf dem Display erscheinen abwechselnd die
Symbole 2 und 0.00 und das Symbol 3
(AUTO) blinkt.
ɍɫɬɚɧɨɜɤɚ ɩɪɨɞɨɥɠɢɬɟɥɶɧɨɫɬɢ
ɩɪɢɝɨɬɨɜɥɟɧɢɹ
Ⱦɭɯɨɜɤɚ ɞɨɥɠɧɚ ɚɜɬɨɦɚɬɢɱɟɫɤɢ ɨɬɤɥɸɱɢɬɶɫɹ ɩɨ
ɢɫɬɟɱɟɧɢɢ ɠɟɥɚɟɦɨɝɨ ɩɪɨɦɟɠɭɬɤɚ ɜɪɟɦɟɧɢ.
ɉɪɟɠɞɟ ɱɟɦ ɡɚɞɚɬɶ ɩɪɨɞɨɥɠɢɬɟɥɶɧɨɫɬɶ
ɩɪɢɝɨɬɨɜɥɟɧɢɹ, ȼɵ ɞɨɥɠɧɵ ɭɫɬɚɧɨɜɢɬɶ
ɢ
. (ɫɦ. ɪɚɡɞɟɥ "ɉɨɥɶɡɨɜɚɧɢɟ
ɞɭɯɨɜɵɦ ɲɤɚɮɨɦ").
ɇɚ ɞɢɫɩɥɟɟ ɩɨɹɜɹɬɫɹ ɩɨɩɟɪɟɦɟɧɧɨ ɫɢɦɜɨɥ 2 ɢ
0.00 ɢ ɡɚɦɢɝɚɟɬ ɫɢɦɜɨɥ 3 (AUTO).
x ɇɚɠɦɢɬɟ ɧɚ ɫɪɟɞɧɸɸ ɤɧɨɩɤɭ 1 ɜ ɬɟɱɟɧɢɟ
3-ɯ ɫɟɤɭɧɞ.
x ɇɚɠɦɢɬɟ ɫɧɨɜɚ ɧɚ ɫɪɟɞɧɸɸ ɤɧɨɩɤɭ 1.
x Mit den Wahltasten 4 oder 5 (
stellen Sie die gewünschte Dauer der
Gerichtzubereitung ein. Nach einigen
Sekunden beginnt die Rückzählung der
Zeitdauer.
Auf dem Display erscheint Symbol 6 (AUTO), was
die erfolgreiche Einstellung bestätigt, und die
aktuelle Uhrzeit erscheint wieder.
Nach Ablauf der eingestellten Zeitdauer ertönt ein
doppelter Signalton mit dem Intervall von 2
Sekunden und die Symbole blinken, um Sie zu
informieren, dass alle Vorgänge im Backofen
abgeschaltet sind.
x Um den Signalton auszuschalten, eine
beliebige Taste drücken. Der Vorgang wird
durch Erlöschen der Symbole bestätigt.
- oder + )
x ɋ ɩɨɦɨɳɶɸ ɤɧɨɩɨɤ ɜɵɛɨɪɚ 4 ɢɥɢ 5 (
ɢɥɢ
ɑɟɪɟɡ ɧɟɫɤɨɥɶɤɨ ɫɟɤɭɧɞ ɧɚɱɧɟɬɫɹ ɨɬɫɱɟɬ
ɜɪɟɦɟɧɢ ɩɪɢɝɨɬɨɜɥɟɧɢɹ.
ɇɚ ɞɢɫɩɥɟɟ ɩɨɹɜɢɬɫɹ ɫɢɦɜɨɥ 6 (AUTO),
ɩɨɞɬɜɟɪɠɞɚɸɳɢɣ ɭɫɩɟɲɧɨɟ ɩɪɨɝɪɚɦɦɢɪɨɜɚɧɢɟ,
ɚ ɬɚɤɠɟ ɜɟɪɧɟɬɫɹ ɩɨɤɚɡɚɧɢɟ ɬɟɤɭɳɟɝɨ ɜɪɟɦɟɧɢ.
ɉɨ ɢɫɬɟɱɟɧɢɢ ɜɪɟɦɟɧɢ ɩɪɢɝɨɬɨɜɥɟɧɢɹ ɞɭɯɨɜɤɚ
ɩɨɞɚɟɬ ɞɜɨɣɧɨɣ ɡɜɭɤɨɜɨɣ ɫɢɝɧɚɥ ɫ ɢɧɬɟɪɜɚɥɨɦ ɜ
2 ɫɟɤɭɧɞɵ ɢ ɡɚɦɢɝɚɸɬ ɫɢɦɜɨɥɵ, ɢɧɮɨɪɦɢɪɭɹ,
ɱɬɨ ɜɫɟ ɮɭɧɤɰɢɢ ɪɚɛɨɬɵ ɞɭɯɨɜɤɢ ɨɬɤɥɸɱɟɧɵ.
x ɇɚɠɚɜ ɥɸɛɭɸ ɤɧɨɩɤɭ, ɨɬɤɥɸɱɢɬɟ ɡɭɦɦɟɪ.
ɋɢɦɜɨɥɵ ɩɨɝɚɫɧɭɬ.
+ ) ɭɫɬɚɧɨɜɢɬɟ ɠɟɥɚɟɦɨɟ ɜɪɟɦɹ.
-
47
Page 48

EN
Setting the end of cooking time
The oven must switch off after the set end time.
Before setting the end of cooking time you have to
set the oven operating function and the
temperature (see chapter «Multifunction oven
control»).
x Press the middle key 1 for 3 seconds
3
1
4
5
2
x Press key 1 again twice consecutively
The symbol 2 and 0.00 appear on the display
alternately and the symbol 3 (AUTO) flashes..
x By using the choose keys 4 or 5 (
you set the wanted end of the preparation.
After a few seconds the program is
activated.
Important! You shoul set a time that
differs from the current day time.
Symbol 6 (AUTO) appears on the display to
confirm the successful setting. The current time
appears again.
- or + )
48
6
After the set end time is reached a double tone
with the interval of 2 seconds sounds and the
symbols flash to inform you that all processes in
the oven are switched off.
x Press any key to silence the buzzer.
The oven beeps three times and the symbols
disappear to confirm this process.
Page 49

DE RU
Einstellen der Endzeit
Der Backofen muss in eingegebener Endzeit
ausgeschaltet werden.
Bevor die Endzeit eingegeben wird, müssen Sie
die Backofenfunktion und die Temperatur
der Zubereitung einstellen (siehe Kapitel
»Steuerung von Multifunktionsbackofen«).
x Die mittlere Taste 1 3 Sekunden lang
drücken.
x Die mittlere Taste 1 erneut zwei Mal
hintereinander drücken.
Auf dem Display erscheinen abwechselnd die
Symbole 2 und 0.00 und blinkt das Symbol 3
(AUTO).
ɍɫɬɚɧɨɜɤɚ ɜɪɟɦɟɧɢ ɨɤɨɧɱɚɧɢɹ
ɩɪɢɝɨɬɨɜɥɟɧɢɹ
Ⱦɭɯɨɜɤɚ ɞɨɥɠɧɚ ɚɜɬɨɦɚɬɢɱɟɫɤɢ ɨɬɤɥɸɱɢɬɶɫɹ ɜ
ɡɚɪɚɧɟɟ ɡɚɞɚɧɧɨɟ ɜɪɟɦɹ.
ɉɪɟɠɞɟ ɱɟɦ ɡɚɞɚɬɶ ɜɪɟɦɹ ɨɤɨɧɱɚɧɢɹ ɪɚɛɨɬɵ,
ȼɵ ɞɨɥɠɧɵ ɭɫɬɚɧɨɜɢɬɶ
ɢ .
(ɫɦ. ɪɚɡɞɟɥ «ɍɩɪɚɜɥɟɧɢɟ ɪɚɛɨɬɨɣ
ɦɧɨɝɨɮɭɧɤɰɢɨɧɚɥɶɧɨɝɨ ɞɭɯɨɜɨɝɨ ɲɤɚɮɚ»).
x ɇɚɠɦɢɬɟ ɧɚ ɫɪɟɞɧɸɸ ɤɧɨɩɤɭ 1 ɜ ɬɟɱɟɧɢɟ
3-ɯ ɫɟɤɭɧɞ.
x ɇɚɠɦɢɬɟ ɫɧɨɜɚ ɞɜɚ ɪɚɡɚ
ɩɨɫɥɟɞɨɜɚɬɟɥɶɧɨ ɧɚ ɫɪɟɞɧɸɸ ɤɧɨɩɤɭ 1
ɇɚ ɞɢɫɩɥɟɟ ɩɨɹɜɹɬɫɹ ɩɨɩɟɪɟɦɟɧɧɨ ɫɢɦɜɨɥ 2 ɢ
0.00 ɢ ɡɚɦɢɝɚɟɬ ɫɢɦɜɨɥ 3 (AUTO).
.
x Mit den Wahltasten 4 oder 5 ( - oder + )
die gewünschte Endzeit der
Gerichtszubereitung einstellen. Nach
wenigen Sekunden wird das Programm
aktiviert.
Wichtig! Sie sollen die Zeit eingeben, die
sich von der aktuellen Uhrzeit
unterscheidet!
Auf dem Display erscheint das Symbol 6
(AUTO) als Bestätigung der erfolgreichen
Programmierung und die aktuelle Tageszeit wird
wieder angezeigt.
Wenn die eingegebene Endzeit erreicht ist, ertönt
ein doppelter Signalton mit dem Intervall von 2
Sekunden und die Symbole blinken, um Sie zu
informieren, dass alle Vorgänge im Backofen
abgeschaltet sind.
x ɋ
ɇɚ ɞɢɫɩɥɟɟ ɩɨɹɜɢɬɫɹ ɫɢɦɜɨɥ 6 (AUTO),
ɩɨɞɬɜɟɪɠɞɚɸɳɢɣ ɭɫɩɟɲɧɨɟ ɩɪɨɝɪɚɦɦɢɪɨɜɚɧɢɟ,
ɚ ɬɚɤɠɟ ɜɟɪɧɟɬɫɹ ɩɨɤɚɡɚɧɢɟ ɬɟɤɭɳɟɝɨ ɜɪɟɦɟɧɢ.
ɉɨ ɞɨɫɬɢɠɟɧɢɸ ɡɚɩɪɨɝɪɚɦɦɢɪɨɜɚɧɧɨɝɨ ɜɪɟɦɟɧɢ
ɞɭɯɨɜɤɚ ɩɨɞɚɟɬ ɞɜɨɣɧɨɣ ɡɜɭɤɨɜɨɣ ɫɢɝɧɚɥ ɫ
ɢɧɬɟɪɜɚɥɨɦ ɜ 2 ɫɟɤɭɧɞɵ ɢ ɡɚɦɢɝɚɸɬ ɫɢɦɜɨɥɵ,
ɢɧɮɨɪɦɢɪɭɹ, ɱɬɨ ɜɫɟ ɮɭɧɤɰɢɢ ɪɚɛɨɬɵ ɞɭɯɨɜɤɢ
ɨɬɤɥɸɱɟɧɵ.
ɩɨɦɨɳɶɸ
ɢɥɢ + ) ɭɫɬɚɧɨɜɢɬɟ ɠɟɥɚɟɦɨɟ ɜɪɟɦɹ
ɨɤɨɧɱɚɧɢɹ ɩɪɢɝɨɬɨɜɥɟɧɢɹ. ɑɟɪɟɡ
ɧɟɫɤɨɥɶɤɨ ɫɟɤɭɧɞ ɩɪɨɝɪɚɦɦɚ ɛɭɞɟɬ
ɚɤɬɢɜɢɪɨɜɚɧɚ.
ȼɚɠɧɨ! ȼɵ ɞɨɥɠɧɵ ɡɚɞɚɬɶ ɜɪɟɦɹ,
ɨɬɥɢɱɚɸɳɟɟɫɹ ɨɬ ɬɟɤɭɳɟɝɨ!
ɤɧɨɩɨɤ ɜɵɛɨɪɚ 4 ɢɥɢ 5 ( -
x Um den Signalton auszuschalten, eine
beliebige Taste drücken.
Der Vorgang wird durch Erlöschen der Symbole
bestätigt.
x ɇɚɠɚɜ ɥɸɛɭɸ ɤɧɨɩɤɭ, ɨɬɤɥɸɱɢɬɟ ɡɭɦɦɟɪ.
ɋɢɦɜɨɥɵ ɩɨɝɚɫɧɭɬ.
49
Page 50

EN
1
Setting cooking duration and end times
You can combine the cooking duration and end of
cooking time functions to set the start and end
times for cooking. In this way you can program
your electronic oven to cook while you are out or
to defrost foods ready for you to cook when you
get back. A great help in the kitchen!
The programming sequence of these two functions
is arbitrative. You can program first the duration 1
and then the end of cooking time 2 or the other
way round.
Example: You want to start cooking a dish 30
minutes before you get home so that it will be
ready for you arrival at 12:55.
2
Before you set the the duration and the end of
cooking time, you have to set the oven function
3 ant the temperature (see chapter
«Multifunction oven control»).
3
Set the cooking duration 4 (in our example – 30
minutes).
Therefor you have to program the wanted end of
cooking time. (see chapter «Setting cooking
duration»).
4
50
Page 51

DE RU
Einstellen der Betriebsdauer und Endzeit
Sie können die beiden Funktionen "Betriebsdauer"
und „Endzeit“ kombinieren, wobei Sie eine
gewünschte Zeit eingeben, um den Backofen einund auszuschalten. So können Sie Ihren Backofen
für die Zeit programmieren, wenn Sie nicht zu
Hause sind; oder das Auftauen von Speisen bevor
Sie nach Hause kommen. Das ist eine große Hilfe
in Ihrer Küche.
Die Programmierfolge von diesen beiden
Funktionen ist nicht entscheidend. Sie können
zuerst Betriebsdauer 1 und dann Endzeit 2
programmieren, oder umgekehrt.
Beispiel: Sie möchten die Gerichtszubereitung 30
Minuten vor Ihrer Rückkehr nach Hause beginnen,
so, dass zu Ihrer Ankunft um 12:55 die Speise
fertig ist.
ɍɫɬɚɧɨɜɤɚ ɩɪɨɞɨɥɠɢɬɟɥɶɧɨɫɬɢ ɢ ɜɪɟɦɟɧɢ
ɨɤɨɧɱɚɧɢɹ ɩɪɢɝɨɬɨɜɥɟɧɢɹ
ȼɵ ɦɨɠɟɬɟ ɤɨɦɛɢɧɢɪɨɜɚɬɶ ɮɭɧɤɰɢɢ ɜɪɟɦɟɧɢ
ɩɪɢɝɨɬɨɜɥɟɧɢɹ ɢ ɜɪɟɦɟɧɢ ɨɤɨɧɱɚɧɢɹ
ɩɪɢɝɨɬɨɜɥɟɧɢɹ, ɡɚɞɚɜɚɹ ɠɟɥɚɟɦɨɟ ɜɪɟɦɹ
ɜɤɥɸɱɟɧɢɹ ɢ ɜɵɤɥɸɱɟɧɢɹ ɞɭɯɨɜɤɢ. Ɍɚɤɢɦ
ɨɛɪɚɡɨɦ, ȼɵ ɦɨɠɟɬɟ ɡɚɩɪɨɝɪɚɦɦɢɪɨɜɚɬɶ
ɩɪɨɰɟɫɫ ɩɪɢɝɨɬɨɜɥɟɧɢɹ ɜ ȼɚɲɟɣ ɞɭɯɨɜɤɟ ɧɚ ɬɨ
ɜɪɟɦɹ, ɤɨɝ
ɪɚɡɦɨɪɚɠɢɜɚɧɢɹ ɩɪɨɞɭɤɬɨɜ ɤ ȼɚɲɟɦɭ ɩɪɢɯɨɞɭ.
ɇɟɩɥɨɯɚɹ ɩɨɦɨɳɶ ɧɚ ɤɭɯɧɟ.
ɇɟ ɜɚɠɧɨ ɜ ɤɚɤɨɦ ɩɨɪɹɞɤɟ ȼɵ ɩɪɨɝɪɚɦɦɢɪɭɟɬɟ
ɷɬɢ ɞɜɟ ɮɭɧɤɰɢɢ. ɋɧɚɱɚɥɚ ɜɪɟɦɹ ɩɪɢɝɨɬɨɜɥɟɧɢɹ
1 ɢ ɡɚɬɟɦ ɜɪɟɦɹ ɨɤɨɧɱɚɧɢɹ 2,
ɇɚɩɪɢɦɟɪ: ȼɵ ɯɨɬɢɬɟ ɧɚɱɚɬɶ ɝɨɬɨɜɢɬɶ ɛɥɸɞɨ ɡɚ
30 ɦɢɧɭɬ ɞɨ ɜɨɡɜɪɚɳɟɧɢɹ ɞɨɦɨɣ, ɱɬɨɛɵ ɤ
ȼɚɲɟɦɭ ɩɪɢɯɨɞɭ ɜ 12:55 ɨɧɨ ɛɵɥɨ ɝɨɬɨɜɨ.
ɞɚ ȼɚɫ ɧɟɬ ɞɨɦɚ ɢɥɢ ɠɟ ɩɪɨɰɟɫɫ
ɢɥɢ ɧɚɨɛɨɪɨɬ.
Bevor die Dauer der Gerichtszubereitung und die
Endzeit eingegeben werden, müssen Sie die
Backofenfunktion 3 und die Temperatur der
Zubereitung einstellen (siehe Kapitel »Steuerung
von Multifunktionsbackofen«).
Geben Sie die Betriebsdauer der erichtzubereitung
4 ein (in unserem Beispiel – 30 Minuten).
Dafür muss die gewünschte Betriebsdauer
programmiert werden (siehe Kapitel »Einstellen
der Betriebsdauer«)
ɉɪɟɠɞɟ ɱɟɦ ɡɚɞɚɬɶ ɩɪɨɞɨɥɠɢɬɟɥɶɧɨɫɬɶ
ɩɪɢɝɨɬɨɜɥɟɧɢɹ ɢ ɜɪɟɦɹ ɨɤɨɧɱɚɧɢɹ ɪɚɛɨɬɵ, ȼɵ
ɞɨɥɠɧɵ ɭɫɬɚɧɨɜɢɬɶ
3 ɢ . (ɫɦ.
ɪɚɡɞɟɥ «ɍɩɪɚɜɥɟɧɢɟ ɪɚɛɨɬɨɣ
ɦɧɨɝɨɮɭɧɤɰɢɨɧɚɥɶɧɨɝɨ ɞɭɯɨɜɨɝɨ ɲɤɚɮɚ»).
Ɂɚɞɚɣɬɟ ɩɪɨɞɨɥɠɢɬɟɥɶɧɨɫɬɶ ɩɪɢɝɨɬɨɜɥɟɧɢɹ 4 (ɜ
ɧɚɲɟɦ ɩɪɢɦɟɪɟ – 30 ɦɢɧɭɬ).
Ⱦɥɹ
ɩɪɨɞɨɥɠɢɬɟɥɶɧɨɫɬɶ ɩɪɢɝɨɬɨɜɥɟɧɢɹ. (ɫɦ. ɪɚɡɞɟɥ
«ɍɫɬɚɧɨɜɤɚ ɩɪɨɞɨɥɠɢɬɟɥɶɧɨɫɬɢ
ɩɪɢɝɨɬɨɜɥɟɧɢɹ»).
ɨ ɡɚɩɪɨɝɪɚɦɦɢɪɭɣɬɟ ɠɟɥɚɟɦɭɸ
ɷɬɨɝ
51
Page 52

EN
1
The symbol 1 (AUTO) appears on the display,
that confirms a successful programming of the
cooking duration and the current day time appears
again.
Now set the wanted end time (see chapter
«Setting the end time»).
The end time (2) appears on the display, that
accords to the current day time plus duration (in
our example 12:45, that means plus 30 minutes).
2
4
3
5
x Set the wanted end time with the choice
key 3 (
A few seconds later this time will be registrated 4
(in our example – 12:55, that means we shifted
the end time 10 minutes).
The oven is in expectance state now.
The current day time is displayed 5 (in our
example 12:15).
In our example the oven should be turned on at
12:25 (6) with the functions “Grill +
Thermocirculation” and be turned off at 12:55
according to your setting.
+ ).
52
6
Page 53

DE RU
A
uf dem Display erscheint das Symbol 1 (AUTO),
das bestätigt eine erfolgreiche Programmierung
der Betriebsdauer und die aktuelle Tageszeit wird
wieder angezeigt.
Programmieren Sie jetzt die gewünschte Endzeit
(siehe Kapitel »Einstellen der Endzeit«).
Auf dem Display erscheint die Endzeit (2), die der
aktuellen Tageszeit plus Betriebsdauer entspricht
(in unserem Beispiel 12:45, das heißt plus 30
Minuten).
ɇɚ ɞɢɫɩɥɟɟ ɩɨɹɜɢɬɫɹ ɫɢɦɜɨɥ 1 (AUTO),
ɩɨɞɬɜɟɪɠɞɚɸɳɢɣ ɭɫɩɟɲɧɨɟ ɩɪɨɝɪɚɦɦɢɪɨɜɚɧɢɟ
ɩɪɨɞɨɥɠɢɬɟɥɶɧɨɫɬɢ ɩɪɢɝɨɬɨɜɥɟɧɢɹ, ɚ ɬɚɤɠɟ
ɜɟɪɧɟɬɫɹ ɩɨɤɚɡɚɧɢɟ ɬɟɤɭɳɟɝɨ ɜɪɟɦɟɧɢ.
Ɍɟɩɟɪɶ ɡɚɩɪɨɝɪɚɦɦɢɪɭɣɬɟ ɠɟɥɚɟɦɨɟ ɜɪɟɦɹ
ɨɤɨɧɱɚɧɢɹ ɩɪɨɰɟɫɫɚ ɩɪɢɝɨɬɨɜɥɟɧɢɹ (ɫɦ. ɪɚɡɞɟɥ
«ɍɫɬɚɧɨɜɤɚ ɜɪɟɦɟɧɢ ɨɤɨɧɱɚɧɢɹ
ɩɪɢɝɨɬɨɜɥɟɧɢɹ»).
ɇɚ ɞɢɫɩɥɟɟ ɩɨɹɜɢɬɫɹ ɜɪɟɦɹ ɨɤɨɧɱɚɧɢɹ
ɩɪɢɝɨɬɨɜɥɟɧɢɹ (2), ɪɚɜɧɨɟ ɬɟɤɭɳɟɦɭ ɜɪɟɦɟɧɢ,
ɩɥɸɫ ɜɪɟɦ
ɜ ɧɚɲɟɦ ɩɪɢɦɟɪɟ 12:45, ɬ.ɟ. ɩɥɸɫ 30 ɦɢɧ.).
(
ɹ ɩɪɨɞɨɥɠɢɬɟɥɶɧɨɫɬɢ ɩɪɢɝɨɬɨɜɥɟɧɢɹ
x Mit der Wahltaste 3 (
Endzeit einstellen.
Nach wenigen Sekunden wird diese Zeit registriert
4 (in unserem Beispiel - 12:55, das heißt,
wir haben die Endzeit um 10 Minuten verschoben).
Der Backofen ist im Bereitschaftsmodus.
Die aktuelle Tageszeit wird angezeigt 5 (in
unserem Beispiel 12:15).
In unserem Beispiel soll der Backofen um 12:25
(6) bei den Funktionen „Grill + Thermozirkulation“
eingeschaltet und um 12:55 ausgeschaltet werden,
gemäß Ihrer Programmierung.
+ ) die gewünschte
x ɂɫɩɨɥɶɡɭɹ ɤɧɨɩɤɭ ɜɵɛɨɪɚ 3 (
ɭɫɬɚɧɨɜɢɬɟ ɠɟɥɚɟɦɨɟ ɜɪɟɦɹ ɨɤɨɧɱɚɧɢɹ
ɩɪɢɝɨɬɨɜɥɟɧɢɹ.
ɑɟɪɟɡ ɧɟɫɤɨɥɶɤɨ ɫɟɤɭɧɞ ɬɚɣɦɟɪ ɡɚɪɟɝɢɫɬɪɢɪɭɟɬ
ɷɬɨ ɡɧɚɱɟɧɢɟ 4 (ɜ ɧɚɲɟɦ ɩɪɢɦɟɪɟ - 12:55, ɬ.ɟ
ɦɵ ɫɞɜɢɧɭɥɢ ɜɪɟɦɹ ɨɤɨɧɱɚɧɢɹ ɩɪɢɝɨɬɨɜɥɟɧɢɹ
ɧɚ 10 ɦɢɧ.).
Ⱦɭɯɨɜɤɚ ɩɟɪɟɣɞɟɬ ɜ ɪɟɠɢɦ ɨɠɢɞɚɧɢɹ.
ȼɵɫɜɟɬɢɬɶɫɹ ɬɟɤɭɳɟɟ ɜɪɟɦɹ 5
ɩɪɢɦɟɪɟ - 12:15).
ȼ ɧɚɲɟɦ ɩɪɢɦɟɪɟ ɞɭɯɨɜɤɚ ɞɨɥɠɧɚ ɜɤɥɸɱɢɬɫɹ ɜ
12:25 (6)ɜɪɟɠɢɦɟ "ɝɪɢɥɶ + ɨɛɞɭɜ" ɧɚ 30 ɦɢɧɭɬ ɢ
ɜɵɤɥɸɱɢɬɫɹ ɜ 12:55, ɫɨɨɬɜɟɬɫɬɜɟɧɧɨ ɡɚɞɚɧɧɨɣ
ȼɚɦɢ ɩɪɨɝɪɚɦɦɟ.
(ɜ ɧɚɲɟɦ
+ )
53
Page 54

EN
Adjusting beep volume
To adjust beep volume:
x Press the choice keys 1 and 2 ( - or + )
simultaneously.
The dot separating the hours from the minutes
flashes.
4
1
2
x Then press the middle key 3.
A flashing heading 4 appears ( ton1 ) - (loud
sound).
3
If you want to choose ( ton2 ) - (middle sound) or
( ton3 ) - (low sound):
x Press choice key 5 (-) again.
5
To save the chosen volume
x press the middle key 6.
6
54
Page 55

DE RU
Toneinstellung des Warnsignals
Um die Lautstärke des Warnsignals einzustellen:
x Die Wahltasten 1 und 2 ( - oder + )
gleichzeitig drücken
Punkt zwischen Stunden- und Minutenanzeige
blinkt
x Dann die mittlere Taste 3 drücken.
Eine blinkende Überschrift 4 erscheint ( ton1 ) (lauter Ton).
ɍɫɬɚɧɨɜɤɚ ɝɪɨɦɤɨɫɬɢ ɩɪɟɞɭɩɪɟɞɢɬɟɥɶɧɨɝɨ
ɫɢɝɧɚɥɚ
ɑɬɨɛɵ ɭɫɬɚɧɨɜɢɬɶ ɝɪɨɦɤɨɫɬɶ
ɩɪɟɞɭɩɪɟɞɢɬɟɥɶɧɨɝɨ ɫɢɝɧɚɥɚ:
x ɇɚɠɦɢɬɟ ɨɞɧɨɜɪɟɦɟɧɧɨ ɧɚ ɤɧɨɩɤɢ
ɜɵɛɨɪɚ 1 ɢ 2 ( - ɢ + ).
Ɂɚɦɢɝɚɟɬ
ɦɢɧɭɬɵ
x Ɂɚɬɟɦ ɧɚɠɦɢɬɟ ɧɚ ɫɪɟɞɧɸɸ ɤɧɨɩ
ɉɨɹɜɢɬɫɹ ɦɢɝɚɸɳɚɹ ɧɚɞɩɢɫɶ 4 ( ton1 ) -
(ɝɪɨɦɤɢɣ ɬɨɧ).
ɫɪɟɞɧɹɹ ɬɨɱɤɚ, ɪɚɡɞɟɥɹɸɳɚɹ ɱɚɫ
ɤɭ 3.
ɵɢ
Wenn Sie ( ton2 ) -(mittlerer Ton) oder
( ton3 ) - (leiser Ton) wählen möchten:
x Die Wahltaste 5 ( - ) erneut drücken.
Um die gewählte Lautstärke zu speichern,
x Die mittlere Taste 6 drücken.
ȿɫɥɢ ȼɵ ɯɨɬɢɬɟ ɜɵɛɪɚɬɶ ( ton2 ) - (ɫɪɟɞɧɢɣ ɬɨɧ)
ɢɥɢ ( ton3 ) - (ɬɢɯɢɣ ɬɨɧ):
x ɧɚɠɦɢɬɟ ɫɧɨɜɚ ɧɚ ɤɧɨɩɤɭ ɜɵɛɨɪɚ 5
( - ).
ɑɬɨɛɵ ɡɚɩɨɦɧɢɬɶ ɜɵɛɪɚɧɧɭɸ ɝɪɨɦɤɨɫɬɶ,
x ɧɚɠɦɢɬɟ ɧɚ ɫɪɟɞɧɸɸ ɤɧɨɩɤɭ 6.
55
Page 56

EN
SPECIALITIES OF THE OVEN
Logic control
For each cooking function, your new oven's Logic
control electronic controller suggests a default
cooking temperature. This is based on our own
experience in obtaining the best results. You can
nevertheless change the default value to suit your
own requirements.
Oven light
Innenbeleuchtung
Ɉɫɜɟɳɟɧɢɟ ɞɭɯɨɜɤɢ
Griddle 150°C
Unterhitze 150°C
ɀɚɪɟɧɢɟ 150°ɋ
Fixed 200°C
Ober- und
Unterhitze 200°C
ȼɵɩɟɱɤɚ 200°ɋ
The food types shown are purely indicative of the
sort of meal you can prepare with that function. To
discover the tremendous versatility of this oven,
feel free to experiment with all the functions on the
basis of your own cooking experience.
Fan 180°C
Heißluft 180°C
Ɉɛɞɭɜ 180°ɋ
Pizza 230°C
Pizza 230°C
ɉɢɰɰɚ 230°ɋ
56
Page 57

DE
RU
BESONDERHEITEN DES
BACKOFENS Logic control
Die elektronische Steuerung Ihres Backofens
Logic control schlägt für alle Betriebsfunktionen
eine empfohlene Temperatur vor. Das basiert sich
auf unseren eigenen Erfahrungen, damit die
besten Backergebnisse erreicht werden.
Selbstverständlich können Sie diese
Temperaturwerte jederzeit nach Belieben ändern
ɈɋɈȻȿɇɇɈɋɌɂ ȾɍɏɈȼɈɄ
Logic control
Ⱦɥɹ ɤɚɠɞɨɝɨ ɪɟɠɢɦɚ ɩɪɢɝɨɬɨɜɥɟɧɢɹ
ɷɥɟɤɬɪɨɧɧɨɟ ɨɛɨɪɭɞɨɜɚɧɢɟ ȼɚɲɟɣ ɞɭɯɨɜɤɢ
Logic control ɩɪɟɞɥɚɝɚɟɬ ɪɟɤɨɦɟɧɞɭɟɦɭɸ
ɬɟɦɩɟɪɚɬɭɪɭ. ɗɬɨ ɨɫɧɨɜɚɧɨ ɧɚ ɧɚɲɟɦ
ɫɨɛɫɬɜɟɧɧɨɦ ɨɩɵɬɟ ɜ ɩɨɥɭɱɟɧɢɢ ɥɭɱɲɢɯ
ɪɟɡɭɥɶɬɚɬɨɜ. Ɉɞɧɚɤɨ, ȼɵ ɦɨɠɟɬɟ ɢɡɦɟɧɢɬɶ
ɬɟɦɩɟɪɚɬɭɪɭ ɩɨ ɫɜɨɟɦɭ ɭɫɦɨɬɪɟɧɢɸ.
und somit Ihren Anforderungen anpassen.
Fixed & fan 180°C
Ober- und Unterhitze m.
Heißluft 180°C
Ɂɚɩɟɤɚɧɢɟ ɫ ɨɛɞɭɜɨɦ 180°ɋ
Double grill 250°C
Grill Doppelt 250°C
Ⱦɜɨɣɧɨɣ ɝɪɢɥɶ 250°ɋ
Single grill 250°C
Grill Einfach 250°C
Ƚɪɢɥɶ 250°ɋ
Grill & fan 210°C
Grill m. Heißluft 210°C
Ƚɪɢɥɶ ɫ ɨɛɞɭɜɨɦ 210°ɋ
Defrost 60°C
Defrost 60°C
Ɋɚɡɦɨɪɚɠɢɜɚɧɢɟ 60°ɋ
Diese Symbole stellen nur eine Orientierungshilfe
dar, welche Typen von Produkten bei jenem oder
anderem Programm zubereitet werden können.
Um die Vielseitigkeit von diesem Backofen zu
erkennen, fürchten Sie nicht, mit allen Funktionen
zu experimentieren, nutzen Sie dabei Ihre eigene
Erfahrung in der Küche
ɗɬɢ ɫɢɦɜɨɥɵ ɥɢɲɶ ɨɛɪɚɡɧɨ ɩɨɤɚɡɵɜɚɸɬ, ɤɚɤɢɟ
ɬɢɩɵ ɩɢɳɢ ɦɨɝɭɬ ɛɵɬɶ ɩɪɢɝɨɬɨɜɥɟɧɵ ɜ ɬɨɦ ɢɥɢ
ɢɧɨɦ ɪɟɠɢɦɟ. ɑɬɨɛɵ ɩɨɡɧɚɬɶ ɦɧɨɝɨɝɪɚɧɧɨɫɬɶ
ɷɬɨɣ ɞɭɯɨɜɤɢ, ɧɟ ɛɨɣɬɟ
ɫɶ ɷɤɫɩɟɪɢɦɟɧɬɢɪɨɜɚɬɶ
ɫɨ ɜɫɟɦɢ ɮɭɧɤɰɢɹɦɢ, ɨɩɢɪɚɹɫɶ ɧɚ ɫɨɛɫɬɜɟɧɧɵɣ
ɨɩɵɬ ɧɚ ɤɭɯɧɟ.
57
Page 58

EN
DIGITAL TIME SWITCH CLOCK OF THE
OVEN Logic control
Setting the clock
1 2
3
4
To set the current time:
x Press key 1 and 2 at the same time.
With this setting a flashing colon 3 appears
showing you are in clock setting mode.
x By pressing the choice keys 4 (
you can set the time.
After a few seconds the controller sets the time
currently displayed and the two dots stop flashing.
Important! If you change the time setting,
you reset the timer and cancel all cooking
settings.
- or + )
58
Page 59

DE RU
ELEKTRONISCHE ZEITSCHALTUHR VON
BACKÖFEN Logic control
Tageszeiteinstellung
Zur Einstellung der aktuellen Uhrzeit:
x Tasten 1 und 2 gleichzeitig drücken
Bei dieser Einstellung erscheint ein blinkender
Doppelpunkt 3, er zeigt, dass Sie gerade bei der
Zeiteinstellung sind.
x Ɇit den Wahltasten 4 (
aktuelle Uhrzeit einstellen.
Nach einigen Sekunden wird die aktuelle Uhrzeit
automatisch übernommen und der Doppelpunkt
hört zu blinken auf.
- oder + ) die
ɗɅȿɄɌɊɈɇɇɈȿ ɉɊɈȽɊȺɆɆɂɊɍɘɓȿȿ
ɍɋɌɊɈɃɋɌȼɈ ȾɍɏɈȼɈɄ Logic control
ɍɫɬɚɧɨɜɤɚ ɬɟɤɭɳɟɝɨ ɜɪɟɦɟɧɢ
ɑɬɨɛɵ ɭɫɬɚɧɨɜɢɬɶ ɬɟɤɭɳɟɟ ɜɪɟɦɹ:
x ɧɚɠɦɢɬɟ ɨɞɧɨɜɪɟɦɟɧɧɨ ɤɧɨɩɤɢ 1 ɢ 2.
ɉɪɢ ɷɬɨɦ ɡɚɦɢɝɚɸɬ ɞɜɟ ɬɨɱɤɢ 3 , ɪɚɡɞɟɥɹɸɳɢɟ
ɱɚɫɵ ɢ ɦɢɧɭɬɵ, ɩɨɤɚɡɵɜɚɹ, ɱɬɨ ȼɵ ɜ ɪɟɠɢɦɟ
ɱɚɫɨɜ.
x Ʉɧɨɩɤɚɦɢ ɜɵɛɨɪɚ
ɜɵɫɬɚɜɢɬɶ ɬɟɤɭɳɟɟ ɜɪɟɦɹ.
ɑɟɪɟɡ ɧɟɫɤɨɥɶɤɨ ɫɟɤɭɧɞ ɧɚ ɞɢɫɩɥɟɟ ɩɨɹɜɢɬɫɹ
ɢɧɞɢɤɚɰɢɹ ɬɟɤɭɳɟɝɨ ɜɪɟɦɟɧɢ ɢ ɬɨɱɤɢ ɩɟɪɟɫɬɚɸɬ
ɦɢɝɚɬɶ.
4 (
- ɢɥɢ + )
Wichtig! Bei der Änderung der
eingestellten Uhrzeit werden alle vorher
gewählten Programme gelöscht.
ȼɚɠɧɨ! ɉɪɢ ɢɡɦɟɧɟɧɢɢ ɭɫɬɚɧɨɜɥɟɧɧɨɝɨ
ɬɟɤɭɳɟɝɨ ɜɪɟɦɟɧɢ ɜɫɟ ɩɪɟɞɵɞɭɳɢɟ
ɩɪɨɝɪɚɦɦɵ ɛɭɞɭɬ ɨɬɦɟɧɟɧɵ.
59
Page 60

EN
1
2
4
5
9
Usage of the oven
You can start the process of cooking with a few
easy handels.
2
1
3
7
4
x Switch on the oven by pressing key
x Pressing keys
operating function
or
x Using the rotary handle
operating function
you choose the wanted oven function.
According to the chosen program a recommended
temperature is set in the oven automatically.
x The preset temperature can be changed by
using the temperature regulating keys
and 6.
and 3 for the oven
for the oven
.
8
5
9
6
After 4 seconds the electronic controller
automatically switches on the oven. The degrees
centigrade symbol 7 flashes to show that the oven
is warming up.
8
The symbol meal preparation
display to show that the oven is working.
As soon as the oven reaches the set temperature
the oven beeps and the degrees centigrade
symbol stops flashing. Now you can put the food
you want to prepare into the oven.
Important! The oven switches itself off
automatically if you do not select a cooking
function within 8 seconds of switching the
oven on. If this occurs, the time display
reads
you that it has switched off.
(OFF) and the oven beeps to tell
appears on the
60
Page 61

DE RU
1
1
5
Gebrauch von Backofen
Mit wenigen einfachen Handgriffen können Sie den
Prozess der Zubereitung beginnen.
x Den Backofen mit Hilfe von Taste
ɉɨɥɶɡɨɜɚɧɢɟ ɞɭɯɨɜɵɦ ɲɤɚɮɨɦ
ȼ ɧɟɫɤɨɥɶɤɨ ɩɪɨɫɬɵɯ ɞɜɢɠɟɧɢɣ ȼɵ ɦɨɠɟɬɟ
ɧɚɱɚɬɶ ɩɪɨɰɟɫɫ ɩɪɢɝɨɬɨɜɥɟɧɢɹ.
einschalten.
x mit Hilfe von Tasten 2 und 3,
Backofenbetriebsfunktionen
oder
ɢɥɢ
x mit Hilfe des Drehknebeles 4,
Backofenbetriebsfunktionen
gewünschte Backofenfunktion wählen.
Entsprechend des gewählten Programms, wird im
Backofen automatisch eine empfohlene
Temperatur eingestellt.
ɜɵɛɟɪɢɬɟ ɠɟɥɚɟɦɵɣ ɪɟɠɢɦ ɩɪɢɝɨɬɨɜɥɟɧɢɹ.
ȼ ɫɨɨɬɜɟɬɫɬɜɢɢ ɫ ɜɵɛɪɚɧɧɵɦ ɪɟɠɢɦɨɦ, ɞɭɯɨɜɤɚ
ɚɜɬɨɦɚɬɢɱɟɫɤɢ ɭɫɬɚɧɨɜɢɬ ɪɟɤɨɦɟɧɞɭɟɦɭɸ
ɬɟɦɩɟɪɚɬɭɪɭ.
x ȼɤɥɸɱɢɬɟ ɞɭɯɨɜɤɭ ɧɚɠɚɬɢɟɦ ɤɧɨɩɤɢ
.
x Ʉɧɨɩɤɚɦɢ 2 ɢ 3,
x ɪɭɱɤɨɣ 4,
x Die voreingestellte Temperatur können Sie
mit Hilfe von Tasten 5 und 6
Temperaturreglers ändern,
Nach 4 Sekunden nach der Temperaturänderung
schaltet sich der Backofen automatisch ein.
Das Celsius-Grad-Symbol 7 zeigt durch Blinken,
dass der Backofen erwärmt wird.
Das Symbol Gerichtzubereitung 8 erscheint,
das bedeutet, dass der Backofen in Betrieb ist.
Sobald der Backofen die eingestellte Temperatur
erreicht, ertönt ein akustisches Signal und das
Celsius-Grad-Symbol hört zu blinken auf: Sie
können Ihr zu zubereitendes Gericht in Backofen
stellen.
Wichtig! Wird innerhalb von 8 Sekunden
nach Einschaltung des Backofens keine
Funktion ausgewählt, schaltet er sich
automatisch ab. Auf dem Display erscheint
die Meldung 9 (OFF) und ertönt ein
akustisches Signal, was bedeutet, dass der
Backofen ausgeschaltet ist.
x ɉɪɢ ɠɟɥɚɧɢɢ ȼɵ ɦɨɠɟɬɟ ɢɡɦɟɧɢɬɶ
ɪɟɤɨɦɟɧɞɭɟɦɭɸ ɬɟɦɩɟɪɚɬɭɪɭ ɤɧɨɩɤɚɦɢ
ɢ 6 ,
ɑɟɪɟɡ 4 ɫɟɤɭɧɞɵ ɩɨɫɥɟ ɢɡɦɟɧɟɧɢɹ ɬɟɦɩɟɪɚɬɭɪɵ
ɷɥɟɤɬɪɨɧɧɨɟ ɭɩɪɚɜɥɟɧɢɟ ɚɜɬɨɦɚɬɢɱɟɫɤɢ
ɜɤɥɸɱɢɬ ɞɭɯɨɜɤɭ.
Ɂɚɦɢɝɚɟɬ ɫɢɦɜɨɥ 7, ɩɨɤɚɡɵɜɚɹ, ɱɬɨ
ɞɭɯɨɜɤɚ ɪɚɡɨɝɪɟɜɚɟɬɫɹ.
ɉɨɹɜɢɬɫɹ ɫɢɦɜɨɥ 8,
ɩɨɤɚɡɵɜɚɹ, ɱɬɨ ɞɭɯɨɜɤɚ ɪɚɛɨɬɚɟɬ.
Ʉɨɝɞɚ ɞɭɯɨɜɤɚ ɞɨɫɬɢɝɧɟɬ ɡɚɞɚɧɧɨɣ
ɬɟɦɩɟɪɚɬɭɪɵ, ɨɧɚ ɩɨɞɚɫɬ ɡɜɭɤɨɜɨɣ ɫɢɝɧɚɥ, ɚ
ɫɢɦɜɨɥ ɝɪɚɞɭɫɚ ɩɟɪɟɫɬɚɧɟɬ ɦɢɝɚɬɶ. Ɍɟɩɟɪɶ ȼɵ
ɦɨɠɟɬɟ ɫɬɚɜɢɬɶ ɜ ɧɟɟ ɛɥɸɞɨ, ɤɨɬɨɪɨɟ ɯɨɬɢɬɟ
ɝɨɬɨɜɢɬɶ.
ȼɚɠɧɨ! ȿɫɥɢ ɜ ɬɟɱɟɧɢɟ 8 ɫɟɤɭɧɞ ɩɨɫɥɟ
ɜɤɥɸɱɟɧɢɹ ɞɭɯɨɜɤɢ ȼɵ ɧɟ ɜɵɛɟɪɢɬɟ
ɪɟɠɢɦ ɩɪɢɝɨɬɨɜɥɟɧɢɹ, ɞɭɯɨɜɤɚ
ɜɵɤɥɸɱɚɟɬɫɹ ɚɜɬɨɦɚɬɢɱɟɫɤɢ. ȼ ɬɚɤɨɦ
ɫɥɭɱɚɟ ɧɚ ɞɢɫɩɥɟɟ ɩɨɹɜɢɬɫɹ ɢɧɞɢɤɚɰɢɹ
9 (OFF) ɢ ɪɚɡɞɚɫɬɫɹ ɡɜɭɤɨɜɨɣ ɫɢɝɧɚɥ,
ɫɨɨɛɳɚɸɳɢɣ, ɱɬɨ ɞɭɯɨɜɤɚ ɜɵɤɥɸɱɟɧɚ.
61
Page 62

EN
1
Oven light
The oven is equipped with an intelligent light
control to reduce the electricity consumption. The
light stays on while the oven is warming up and for
2 minutes after the set temperature is reached,
then switches off.
Press any key to check on the food in the oven.
The light switches on for another 3 minutes.
Child lock
An important planning aspect is to prevent
inadvertent shift or unintentional turning on. You
can activate the child lock at any time, even when
the oven is turned off.
2
Activating the child lock
x Press and hold key 1 for at least 3
seconds.
Symbol 2 appears on the display
3
followed by
symbol 3
The electronic controller is now disabled.
All you can do with the controls is:
x switch off the oven 4 (if it is on)
or
x use the countdown timer 5 (see
chapter «Electronical ountdown timer»).
62
4
5
If you press any other key, the symbol key 2
appears on the display. Child lock is activated.
Important! You must deactivate the child
lock before you can use the oven again.
Page 63

DE RU
Innenbeleuchtung
Der Backofen ist mit einem intelligenten
Kontrollsystem der Beleuchtung ausgestattet, die
den Konsum der Elektroenergie vermindert. Das
Licht bleibt angeschaltet nur für die Zeit der
Erwärmung und wird nach 2 Minuten nach dem
Erreichen der angegebenen Temperatur
Ɉɫɜɟɳɟɧɢɟ ɞɭɯɨɜɤɢ
Ⱦɭɯɨɜɤɚ ɨɫɧɚɳɟɧɚ ɢɧɬɟɥɥɢɝɟɧɬɧɨɣ ɫɢɫɬɟɦɨɣ
ɤɨɧɬɪɨɥɹ ɨɫɜɟɳɟɧɢɹ, ɩɨɧɢɠɚɸɳɟɣ ɩɨɬɪɟɛɥɟɧɢɟ
ɷɧɟɪɝɢɢ. ɋɜɟɬ ɨɫɬɚɟɬɫɹ ɜɤɥɸɱɟɧɧɵɦ ɥɢɲɶ ɧɚ
ɜɪɟɦɹ ɪɚɡɨɝɪɟɜɚ ɢ ɜ ɬɟɱɟɧɢɟ 2 ɦɢɧ. ɩɨɫɥɟ
ɞɨɫɬɢɠɟɧɢɹ ɡɚɞɚɧɧɨɣ ɬɟɦɩɟɪɚɬɭɪɵ, ɡɚɬɟɦ
ɜɵɤɥɸɱɚɟɬɫɹ.
ausgeschaltet.
Zur Kontrolle des Gerichtes einfach eine beliebige
Taste drücken, und die Innenbeleuchtung schaltet
sich für 3 Minuten ein.
Kindersicherung
Ein wichtiger Planungsaspekt Ihres neuen
Backofens besteht darin, versehentliche
Verstellungen oder ungewolltes Einschalten zu
verhindern. Sie können die Kindersicherung
jederzeit aktivieren, auch bei ausgeschaltetem
Backofen.
ɑɬɨɛɵ ɩɪɨɜɟɪɢɬɶ ɛɥɸɞɨ ɜ ɞɭɯɨɜɤɟ, ɧɚɠɦɢɬɟ ɧɚ
ɥɸɛɭɸ ɤɧɨɩɤɭ. ɋɜɟɬ ɡɚɝɨɪɢɬɫɹ ɧɚ 3 ɦɢɧɭɬɵ
ɫɧɨɜɚ.
Ȼɥɨɤɢɪɨɜɤɚ ɨɬ ɞɟɬɟɣ
ȼɚɲɚ ɧɨɜɚɹ ɷɥɟɤɬɪɨɧɧɚɹ ɞɭɯɨɜɤɚ ɢɦɟɟɬ
ɮɭɧɤɰɢɸ ɛɥɨɤɢɪɨɜɤɢ ɨɬ ɞɟɬɟɣ, ɤɨɬɨɪɚɹ
ɩɪɟɞɨɬɜɪɚɳɚɟɬ ɢɯ ɜɦ
ɜɤɥɸɱɟɧɢɟ ɞɭɯɨɜɤɢ. ȼɵ ɦɨɠɟɬɟ ɚɤɬɢɜɢɪɨɜɚɬɶ
ɷɬɭ ɮɭɧɤɰɢɸ ɜ ɥɸɛɨɟ ɜɪɟɦɹ, ɞɚɠɟ ɟɫɥɢ ɞɭɯɨɜɤɚ
ɜɵɤɥɸɱɟɧɚ.
ɟɲɚɬɟɥɶɫɬɜɨ ɢ ɫɥɭɱɚɣɧɨɟ
Aktivierung der Kindersicherung
x Die Taste 1 mindestens 3 Sekunden
gedrückt halten.
Auf dem Display erscheint Symbol 2,
und danach
Symbol 3
Elektronische Steuerung des Backofens ist
gesperrt.
Ab diesem Zeitpunkt können Sie nur:
x den Backofen ausschalten 4, sofern er
eingeschaltet ist,
oder
x den elektronischen Kurzzeitwecker 5
einstellen (siehe Kapitel »Elektronischer
Kurzzeitwecker«).
Beim Drücken einer beliebigen Taste erscheint auf
dem Display das Symbol
Schlüssel 2. Die
Funktion Kindersicherung ist eingeschaltet.
Ⱥɤɬɢɜɚɰɢɹ ɮɭɧɤɰɢɢ ɛɥɨɤɢɪɨɜɤɢ ɨɬ ɞɟɬɟɣ
x ɇɚɠɦɢɬɟ ɢ ɞɟɪɠɢɬɟ ɤɧɨɩɤɭ 1 ɜ ɬɟɱɟɧɢɟ
ɩɪɢɛɥɢɡɢɬɟɥɶɧɨ 3 ɫɟɤɭɧɞ.
ɇɚ ɞɢɫɩɥɟɟ ɩɨɹɜɢɬɫɹ ɫɢɦɜɨɥ 2,
ɚ ɡɚɬɟɦ
ɫɢɦɜɨɥ 3
ɗɥɟɤɬɪɨɧɧɨɟ ɭɩɪɚɜɥɟɧɢɟ ɞɭɯɨɜɤɨɣ
ɡɚɛɥɨɤɢɪɨɜɚɧɨ.
Ɍɟɩɟɪɶ ȼɵ ɦɨɠɟɬɟ ɬɨ
ɥɶɤɨ:
x ɜɵɤɥɸɱɢɬɶ ɞɭɯɨɜɤɭ 4 (ɟɫɥɢ ɨɧɚ
ɜɤɥɸɱɟɧɚ).
ɢɥɢ
x ɢɫɩɨɥɶɡɨɜɚɬɶ
5
ɦɢɧɭɬɧɢɤ»
(ɫɦ. ɪɚɡɞɟɥ «ɗɥɟɤɬɪɨɧɧɵɣ
).
ȿɫɥɢ ȼɵ ɧɚɠɦɟɬɟ ɥɸɛɭɸ ɞɪɭɝɭɸ ɤɧɨɩɤɭ, ɧɚ
ɞɢɫɩɥɟɟ ɩɨɹɜɢɬɫɹ ɫɢɦɜɨɥ 2,
ɢɧɮɨɪɦɢɪɭɹ ȼɚɫ ɨ ɬɨɦ, ɱɬɨ ɚɤɬɢɜɢɪɨɜɚɧɚ
ɮɭɧɤɰɢɹ ɛɥɨɤɢɪɨɜɤɢ ɨɬ ɞɟɬɟɣ.
Wichtig! Wenn Sie den Backofen wieder
nutzen möchten, müssen, Sie
Kindersicherung deaktivieren.
ȼɚɠɧɨ! Ɍɟɩɟɪɶ, ɩɪɟɠɞɟ ɱɟɦ ɫɧɨɜɚ
ɩɨɥɶɡɨɜɚɬɶɫɹ ɞɭɯɨɜɤɨɣ, ȼɵ ɞɨɥɠɧɵ
ɞɟɡɚɤɬɢɜɢɪɨɜɚɬɶ ɮɭɧɤɰɢɸ ɛɥɨɤɢɪɨɜɤɢ
ɨɬ ɞɟɬɟɣ.
63
Page 64

EN
Deactivating the child lock
x Press and hold key 1 for at least 3
seconds.
1
Symbol 2 appears on the display
4
5
2
3
Followed by
symbol 3.
The electronic control of the oven is ready for use
again.
Electronical countdown timer
The countdown timer works independently of all
other timer functions, and can be used even when
the oven is switched off.
To switch on the countdown timer
x Press key 4.
The symbol 5 (0:00
x Press the choice keys 6 (
the duration and wait a few seconds.
) appears on the display
- or + ) to set
7
After a few seconds the countdown timer starts the
countdown and the topical time of day and the
symbol countdown timer 7 appear.
After the end of the opposed duration a double
tone with the interval of 2 seconds sounds and the
symbol countdown timer 7 flashes.
6
x To switch off the timer press any key.
A triple acoustic signal sounds and the symbol
countdown timer 7 goes out.
64
Page 65

DE RU
Ausschaltung der Kindersicherung
x Die Taste 1 mindestens 3 Sekunden
gedrückt halten.
Auf dem Display erscheint das Symbol 2
und danach
das Symbol 3
Elektronische Steuerung des Backofens ist wieder
Betriebsbereit.
Elektronischer Kurzzeitwecker
Der Gebrauch vom elektronischen Kurzzeitwecker
ist von anderen Funktionen unabhängig und kann
auch bei ausgeschaltetem Backofen verwendet
werden.
Ⱦɟɡɚɤɬɢɜɚɰɢɹ ɮɭɧɤɰɢɢ ɛɥɨɤɢɪɨɜɤɢ ɨɬ ɞɟɬɟɣ
x ɇɚɠɦɢɬɟ ɢ ɞɟɪɠɢɬɟ ɤɧɨɩɤɭ 1 ɜ ɬɟɱɟɧɢɟ
ɩɪɢɛɥɢɡɢɬɟɥɶɧɨ 3 ɫɟɤɭɧɞ.
Ⱦɢɫɩɥɟɣ ɢɧɞɢɤɚɰɢɢ ɜɪɟɦɟɧɢ ɩɨɤɚɡɵɜɚɟɬ
ɫɢɦɜɨɥ 2,
ɚ ɡɚɬɟɦ
ɫɢɦɜɨɥ 3
ɗɥɟɤɬɪɨɧɧɨɟ ɭɩɪɚɜɥɟɧɢɟ ɞɭɯɨɜɤɨɣ ɫɧɨɜɚ
ɞɨɫɬɭɩɧɨ ɤ ɢɫɩɨɥɶɡɨɜɚɧɢɸ.
ɗɥɟɤɬɪɨɧɧɵɣ ɦɢɧɭɬɧɢɤ
ɗɥɟɤɬɪɨɧɧɵɣ ɦɢɧɭɬɧɢɤ ɪɚɛɨɬɚɟɬ
ɞɪɭɝɢɯ ɮɭ
ɟɫɥɢ ɞɭɯɨɜɤɚ ɜɵɤɥɸɱɟɧɚ.
ɧɤɰɢɣ. ɂɦ ɦɨɠɧɨ ɩɨɥɶɡɨɜɚɬɶɫɹ ɞɚɠɟ
ɧɚɡɚɜɢɫɢɦɨ ɨɬ
Zum Einschalten des Kurzzeitweckers:
x Taste 4 drücken
Auf dem Display erscheint das Symbol 5 (0:00)
x Mit den Wahltasten 6 (
Zeitdauer einstellen und einige Sekunden
warten.
Nach wenigen Sekunden wird der Kurzzeitwecker
die Rückzählung beginnen und es wird die aktuelle
Tageszeit und das entsprechende Symbol
Kurzzeitwecker 7 erscheinen.
Nach Ablauf der eingestellten Zeitdauer ertönt ein
doppelter Signalton mit dem Intervall von 2
Sekunden und blinkt das Symbol
Kurzzeitwecker 7.
x Um den Kurzzeitwecker auszuschalten eine
beliebige Taste drücken.
- oder + ) die
ɑɬɨɛɵ ɜɤɥɸɱɢɬɶ :
ɇɚ ɞɢɫɩɥɟɟ ɩɨɹɜɢɬɫɹ ɫɢɦɜɨɥ 5 (0:00)
ɑɟɪɟɡ ɧɟɫɤɨɥɶɤɨ ɫɟɤɭɧɞ ɬɚɣɦɟɪ ɧɚɱɧɟɬ
ɨɛɪɚɬɧɵɣ ɫɱɟɬ ɢ ɜɟɪɧɟɬɫɹ ɧɨɪɦɚɥɶɧɚɹ
ɢɧɞɢɤɚɰɢɹ ɜɪɟɦɟɧɢ ɫ ɫɢɦɜɨɥɨɦ 7,
ɭɤɚɡɵɜɚɹ ɧɚ ɬɨ, ɱɬɨ ɢɞɟɬ ɨɛɪɚɬɧɵɣ ɫɱɟɬ.
ɉɨ ɨɤɨɧɱɚɧɢɢ ɨɛɪɚɬɧɨɝɨ ɫɱɟɬɚ ɞɭɯɨɜɤɚ ɩɨɞɚɟɬ
ɞɜɨɣɧɨɣ ɡɜɭɤɨɜɨɣ ɫɢɝɧɚɥ ɫ ɢɧɬɟɪɜɚɥɨɦ ɜ 2
ɫɟɤɭɧɞɵ ɢ ɦɢɝɚɟɬ ɫɢɦɜɨɥ 7.
x ɧɚɠɦɢɬɟ ɤɧɨɩɤɭ 4
x ɂɫɩɨɥɶɡɭɹ ɤɧɨɩɤɢ ɜɵɛɨɪɚ 6 (
ɭɫɬɚɧɨɜɢɬɟ ɜɪɟɦɹ ɨɬɫɱɟɬɚ ɢ ɩɪɨɫɬɨ
ɩɨɞɨɠɞɢɬɟ.
x ɇɚɠɚɜ ɥɸɛɭɸ ɤɧ
ɦɢɧɭɬɧɢɤ.
- ɢɥɢ + )
ɨɩɤɭ, ɨɬɤɥɸɱɢɬɟ
Es ertönt ein dreifaches akustisches Signal und
das Symbol Kurzzeitwecker 7 erlischt.
Ɍɪɢɠɞɵ ɪɚɡɞɚɟɬɫɹ ɡɜɭɤɨɜɨɣ ɫɢɝɧɚɥ ɢ ɫɢɦɜɨɥ
7
ɩɨɝɚɫɧɟɬ.
65
Page 66

EN
Setting the cooking time
The processes in the oven should switch off after
a wanted duration automatically.
Before setting the duration you have to set the
oven operating function and the
temperature (see chapter “Cooking”)
The meal preparation symbol 1 appears on
the display and shows that the oven is on.
1
x Press key 2 to set the duration of
preparation.
The time and the colon 3 appear on the display.
2
x By using the choise keys 4 ( - or + ) you
set the wanted duration of the preparation.
After a few seconds the countdown of the
duration starts.
3
Symbol 5 (letter A) appears on the display to
confirm the successful setting. The topical time
appears again.
After the end of the opposed duration a double
tone with the interval of 2 seconds sounds and the
symbols flash to inform you that all preocesses in
the oven are switched off.
66
4
5
Press any key to silence the buzzer. The oven
beeps three times and the symbols disappear to
confirm this process.
Important! If you select no other functions
within 8 seconds from silencing the buzzer,
the oven automatically switches off.
Page 67

DE RU
r
Einstellen der Betriebsdaue
Der Vorgang im Backofen soll nach einer
gewünschten Dauer automatisch abgeschaltet
werden.
Bevor die Dauer der Gerichtszubereitung
eingegeben wird, müssen Sie die
Backofenfunktion und die Temperatur der
Zubereitung einstellen (siehe Kapitel „Gebrauch
vom Backofen“).
Auf dem Display wird das Symbol
Gerichtzubereitung 1 erscheinen und
informiert, dass Backofen in Betrieb ist.
x Drücken Sie die Taste 2, um die Dauer der
Gerichtzubereitung einzugeben.
Auf dem Display erscheinen die Zeit und der
Doppelpunkt 3.
x Mit den Wahltasten 4 ( - oder + ) stellen
Sie die gewünschte Dauer der
Gerichtzubereitung ein. Nach einigen
Sekunden beginnt die Rückzählung der
Zeitdauer.
ɍɫɬɚɧɨɜɤɚ ɩɪɨɞɨɥɠɢɬɟɥɶɧɨɫɬɢ
ɩɪɢɝɨɬɨɜɥɟɧɢɹ
Ⱦɭɯɨɜɤɚ ɞɨɥɠɧɚ ɚɜɬɨɦɚɬɢɱɟɫɤɢ ɨɬɤɥɸɱɢɬɶɫɹ ɩɨ
ɢɫɬɟɱɟɧɢɢ ɠɟɥɚɟɦɨɝɨ ɩɪɨɦɟɠɭɬɤɚ ɜɪɟɦɟɧɢ.
ɉɪɟɠɞɟ ɱɟɦ ɡɚɞɚɬɶ ɩɪɨɞɨɥɠɢɬɟɥɶɧɨɫɬɶ
ɩɪɢɝɨɬɨɜɥɟɧɢɹ, ȼɵ ɞɨɥɠɧɵ ɭɫɬɚɧɨɜɢɬɶ
ɢ
. (ɫɦ. ɪɚɡɞɟɥ " ɉɨɥɶɡɨɜɚɧɢɟ
ɞɭɯɨɜɵɦ ɲɤɚɮɨɦ ").
ɇɚ ɞɢɫɩɥɟɟ ɩɨɹɜɢɬɫɹ ɫɢɦɜɨɥ
1, ɢɧɮɨɪɦɢɪɭɹ, ɱɬɨ ɞɭɯɨɜɤɚ
ɜ ɪɚɛɨɬɟ.
ɇɚ ɞɢɫɩɥɟɟ ɩɨɹɜɢɬɫɹ ɢɧɞɢɤɚɰɢ
ɡɚɦɢɝɚɸɬ ɬɨɱɤɢ 3, ɪɚɡɞɟɥɹɸɳɢɟ ɱɚɫɵ ɢ ɦɢɧɭɬɵ.
x ɇɚɠɦɢɬɟ ɤɧɨɩɤɭ 2, ɱɬɨɛɵ ɡɚɞɚɬɶ
ɩɪɨɞɨɥɠɢɬɟɥɶɧɨɫɬɶ ɩɪɢɝɨɬɨɜɥɟɧɢɹ.
ɹ ɜɪɟɦɟɧɢ ɢ
x ɂɫɩɨɥɶɡɭɹ ɤɧɨɩɤɢ ɜɵɛɨɪɚ 4 ( - ɢɥɢ + ),
ɭɫɬɚɧɨɜɢɬɟ ɠɟɥɚɟɦɭɸ
ɩɪɨɞɨɥɠɢɬɟɥɶɧɨɫɬɶ ɩɪɢɝɨɬɨɜɥɟɧɢɹ.
ɑɟɪɟɡ ɧɟɫɤɨɥɶɤɨ ɫɟɤɭɧɞ ɧɚɱɧɟɬɫɹ ɨɬɫɱɟɬ
ɜɪɟɦɟɧɢ ɩɪɢɝɨɬɨɜɥɟɧɢɹ.
Auf dem Display erscheint Symbol 5 (Buchstabe
!), was die erfolgreiche Einstellung bestätigt, und
die aktuelle Uhrzeit erscheint wieder.
Nach Ablauf der eingestellten Zeitdauer ertönt ein
doppelter Signalton mit dem Intervall von 2
Sekunden und die Symbole blinken, um Sie zu
informieren, dass alle Vorgänge im Backofen
abgeschaltet sind.
Um den Signalton auszuschalten, eine beliebige
Taste drücken. Der Vorgang wird durch ein
dreifaches akustisches Signal und Erlöschen der
Symbole bestätigt.
Wichtig! Wenn Sie innerhalb von 8
Sekunden nach der Abschaltung des
Signaltons keine Backofenfunktion wählen,
wird der Backofen automatisch
ausgeschaltet.
ɇɚ ɞɢɫɩɥɟɟ ɩɨɹɜɢɬɫɹ ɫɢɦɜɨɥ 5 (ɛɭɤɜɚ !),
ɩɨɞɬɜɟɪɠɞ
ɚ ɬɚɤɠɟ ɜɟɪɧɟɬɫɹ ɩɨɤɚɡɚɧɢɟ ɬɟɤɭɳɟɝɨ ɜɪɟɦɟɧɢ.
ɉɨ ɢɫɬɟɱɟɧɢɢ ɜɪɟɦɟɧɢ ɩɪɢɝɨɬɨɜɥɟɧɢɹ ɞɭɯɨ
ɩɨɞɚɟɬ ɞɜɨɣɧɨɣ ɡɜɭɤɨɜɨɣ ɫɢɝɧɚɥ ɫ ɢɧɬɟɪɜɚɥɨɦ ɜ
2 ɫɟɤɭɧɞɵ ɢ ɡɚɦɢɝɚɸɬ ɫɢɦɜɨɥɵ, ɢɧɮɨɪɦɢɪɭɹ,
ɱɬɨ ɜɫɟ ɮɭɧɤɰɢɢ ɪɚɛɨɬɵ ɞɭɯɨɜɤɢ ɨɬɤɥɸɱɟɧɵ.
ɇɚɠɚɜ ɥɸɛɭɸ ɤɧɨɩɤɭ, ɨɬɤɥɸɱɢɬɟ ɡɭɦɦɟɪ.
Ɍɪɢɠɞɵ ɪɚɡɞɚɫɬɫɹ ɡɜɭɤɨɜɨɣ ɫɢɝɧɚɥ ɢ ɫɢɦɜɨɥɵ
ɩɨɝɚɫɧɭɬ.
ɚɸɳɢɣ ɭɫɩɟɲɧɨɟ ɩɪɨɝɪɚɦɦɢɪɨɜɚɧɢɟ,
ɜɤɚ
ȼɚɠɧɨ! ȿɫɥɢ ɜ ɬɟɱɟɧɢɟ 8 ɫɟɤɭɧɞ ɩɨɫɥɟ
ɨɬɤɥɸɱɟɧɢɹ ɡɭɦɦɟɪɚ ȼɵ ɧɟ ɜɵɛɟɪɢɬɟ
ɪɟɠɢɦ ɩɪɢɝɨɬɨɜɥɟɧɢɹ, ɞɭɯɨɜɤɚ
ɜɵɤɥɸɱɚɟɬɫɹ ɚɜɬɨɦɚɬɢɱɟɫɤɢ.
67
Page 68

1
EN
Setting the end of cooking time
The oven must switch off after the set end time.
Before setting the end of cooking time you have to
set the oven operating function and the
temperature (see chapter «Multifunction oven
control»).
The meal preparation symbol 1 appears on
the display and shows that the oven is on.
2
3
4
x Press key 2 to set the end time
The time appears on the display and the colon 3
flashes.
x By using the choise keys 4 (
set the wanted end of cooking time. After a
few seconds the the program is activated.
Important! You shoul set a tme that
differs from the current day time
Symbol 5 (letter A) appears on the display to
confirm the successful programming. The topical
time appears again.
- or + ) you
5
After the set end time is reached a double tone
with the interval of 2 seconds sounds and the
symbols flash to inform you that all preocesses in
the oven are switched off
68
Press any key to silence the buzzer. The oven
beeps three times and the symbols disappear to
confirm this process.
Important! If you don’t choose an oven
funktion within 8 seconds after the buzzer
silenced, the oven is turned off
automatically.
Page 69

DE RU
Einstellen der Endzeit
Der Backofen soll in eingegebener Endzeit
ausgeschaltet werden.
Bevor die Endzeit eingegeben wird, müssen Sie
die Backofenfunktion und die Temperatur
der Zubereitung einstellen (siehe Kapitel
»Steuerung von Multifunktionsbackofen«).
Auf dem Display erscheint das Symbol
Gerichtzubereitung 1, das mitteilt, dass der
Backofen in Betrieb ist.
x Taste 2 drücken, um die Endzeit
einzugeben.
Auf dem Display erscheint die Zeit und der
Doppelpunkt 3 blinkt:
x Mit den Wahltasten 4 (
gewünschte Endzeit der
Gerichtszubereitung einstellen. Nach
wenigen Sekunden wird das Programm
aktiviert.
- oder + ) die
ɍɫɬɚɧɨɜɤɚ ɜɪɟɦɟɧɢ ɨɤɨɧɱɚɧɢɹ
ɩɪɢɝɨɬɨɜɥɟɧɢɹ
Ⱦɭɯɨɜɤɚ ɞɨɥɠɧɚ ɚɜɬɨɦɚɬɢɱɟɫɤɢ ɨɬɤɥɸɱɢɬɶɫɹ ɜ
ɡɚɪɚɧɟɟ ɡɚɞɚɧɧɨɟ ɜɪɟɦɹ.
ɉɪɟɠɞɟ ɱɟɦ ɡɚɞɚɬɶ ɜɪɟɦɹ ɨɤɨɧɱɚɧɢɹ ɪɚɛɨɬɵ,
ȼɵ ɞɨɥɠɧɵ ɭɫɬɚɧɨɜɢɬɶ
ɢ .
(ɫɦ. ɪɚɡɞɟɥ «ɍɩɪɚɜɥɟɧɢɟ ɪɚɛɨɬɨɣ
ɦɧɨɝɨɮɭɧɤɰɢɨɧɚɥɶɧɨɝɨ ɞɭɯɨɜɨɝɨ ɲɤɚɮɚ»).
ɇɚ ɞɢɫɩɥɟɟ ɩɨɹɜɢɬɫɹ ɫɢɦɜɨɥ
ɜ ɪɚɛɨɬɟ.
x ɇɚɠɦɢɬɟ ɤɧɨɩɤɭ 2, ɱɬɨɛɵ ɡɚɞɚɬɶ ɜɪɟɦɹ
ɨɤɨɧɱɚɧɢɹ ɩɪɨɰɟɫɫɚ ɩɪɢɝɨɬɨɜɥɟɧɢɹ.
ɇɚ ɞɢɫɩɥɟɟ ɩɨɹɜɢɬɫɹ ɢɧɞɢɤɚɰɢɹ ɜɪɟɦɟɧɢ ɢ
ɡɚɦɢɝɚɸɬ ɬɨɱɤɢ 3, ɪɚɡɞɟɥɹɸɳɢɟ ɱɚɫɵ ɢ ɦɢɧɭɬɵ.
x ɂɫɩɨɥɶɡɭɹ ɤɧɨɩɤɢ ɜɵɛɨɪɚ 4 (
ɭɫɬɚɧɨɜɢɬɟ ɠɟɥɚɟɦɨɟ ɜɪɟɦɹ ɨɤɨɧɱɚɧɢɹ
ɩɪɢɝɨɬɨɜɥɟɧɢɹ. ɑɟɪɟɡ ɧɟɫɤɨɥɶɤɨ ɫɟɤɭɧɞ
ɩɪɨɝɪɚɦɦɚ ɛɭɞɟɬ ɚɤɬɢɜɢɪɨɜɚɧɚ.
1, ɢɧɮɨɪɦɢɪɭɹ, ɱɬɨ ɞɭɯɨɜɤɚ
- ɢɥɢ + ),
Wichtig! Sie sollen die Zeit eingeben, die
sich von der aktuellen Uhrzeit
unterscheidet!
Auf dem Display erscheint das Symbol 5
(Buchstabe A) als Bestätigung der erfolgreichen
Programmierung und die aktuelle Tageszeit wird
wieder angezeigt.
Wenn die eingegebene Endzeit erreicht ist ertönt
ein doppelter Signalton mit dem Intervall von 2
Sekunden und die Symbole blinken, um Sie zu
informieren, dass alle Vorgänge im Backofen
abgeschaltet sind.
Um den Signalton auszuschalten, eine beliebige
Taste drücken. Der Vorgang wird durch ein
dreifaches akustisches Signal und Erlöschen der
Symbole bestätigt.
Wichtig! Wenn Sie innerhalb von 8
Sekunden nach der Abschaltung des
Signaltons keine Backofenfunktion wählen,
wird der Backofen automatisch
ausgeschaltet.
ȼɚɠɧɨ! ȼɵ ɞɨɥɠɧɵ ɡɚɞɚɬɶ ɜɪɟɦɹ,
ɨɬɥɢɱɚɸɳɟɟɫɹ ɨɬ ɬɟɤɭɳɟɝɨ!
ɇɚ ɞɢɫɩɥɟɟ ɩɨɹɜɢɬɫɹ ɫɢɦɜɨɥ 5 (ɛɭɤɜɚ !),
ɩɨɞɬɜɟɪɠɞɚɸɳɢɣ ɭɫɩɟɲɧɨɟ ɩɪɨɝɪɚɦɦɢɪɨɜɚɧɢɟ,
ɚ ɬɚɤɠɟ ɜɟɪɧɟɬɫɹ ɩɨɤɚɡɚɧɢɟ ɬɟɤɭɳɟɝɨ ɜɪɟɦɟɧɢ.
ɉɨ ɞɨɫɬɢɠɟɧɢɸ ɡɚɩɪɨɝɪɚɦɦɢɪɨɜɚɧɧɨɝɨ ɜɪɟɦɟɧɢ
ɞɭɯɨɜɤɚ ɩɨɞɚɟɬ ɞɜɨɣɧɨɣ ɡɜɭɤɨɜɨɣ ɫɢɝɧɚɥ ɫ
ɢɧɬɟɪɜɚɥɨɦ ɜ 2 ɫɟɤɭɧɞɵ ɢ ɡɚɦɢɝɚɸɬ ɫɢɦɜɨɥɵ,
ɢɧɮɨɪɦɢɪɭɹ, ɱɬɨ ɜɫɟ ɮɭɧɤɰɢɢ ɪɚɛɨɬɵ ɞɭɯɨɜɤɢ
ɨɬɤɥɸɱɟɧɵ.
ɇɚɠɚɜ ɥɸɛɭɸ ɤɧɨɩɤ
Ɍɪɢɠɞɵ ɪɚɡɞɚɫɬɫɹ ɡɜɭɤɨɜɨɣ ɫɢɝɧɚɥ ɢ ɫɢɦɜɨɥɵ
ɩɨɝɚɫɧɭɬ.
ȼɚɠɧɨ! ȿɫɥɢ ɜ ɬɟɱɟɧɢɟ 8 ɫɟɤɭɧɞ ɩɨɫɥɟ
ɨɬɤɥɸɱɟɧɢɹ ɡɭɦɦɟɪɚ ȼɵ ɧɟ ɜɵɛɟɪɢɬɟ
ɪɟɠɢɦ ɩɪɢɝɨɬɨɜɥɟɧɢɹ, ɞɭɯɨɜɤɚ
ɜɵɤɥɸɱɚɟɬɫɹ ɚɜɬɨɦɚɬɢɱɟɫɤɢ.
ɭ, ɨɬɤɥɸɱɢɬɟ ɡɭɦɦɟɪ.
69
Page 70

EN
Setting cooking duration and end times
You can combine the cooking duration and end of
cooking time functions to set the start and end
times for cooking. In this way you can program
your electronic oven to cook while you are out or
to defrost foods ready for you to cook when you
get back. A great help in the kitchen!
1
The programming sequence of these two functions
is arbitrative. You can program first the duration 1
and then the end of cooking time 2 or the other
way round.
Example: You want to start cooking a dish 30
minutes before you get home so that it will be
ready for you arrival at 12:55.
4
2
3
x Put the food into the oven and choose the
wanted oven operating function
(«Grill + Thermociculation» is shown only
as an example).
x Set the needed temperature if you want
to change the adviced temperature.
Set the cooking duration 4 (in our example – 30
minutes).
Therefore you have to program the wanted end of
cooking time. (see chapter «Setting the cooking
duration»).
70
Page 71

DE RU
Einstellen der Betriebsdauer und Endzeit
Sie können die beiden Funktionen "Betriebsdauer"
und „Endzeit“ kombinieren, wobei Sie eine
gewünschte Zeit eingeben, um den Backofen einund auszuschalten. So können Sie Ihren Backofen
für die Zeit programmieren, wenn Sie nicht zu
Hause sind; oder das Auftauen von Speisen bevor
Sie nach Hause kommen. Das ist eine große Hilfe
in Ihrer Küche.
Die Programmierfolge von diesen beiden
Funktionen ist nicht entscheidend. Sie können
zuerst Betriebsdauer 1 und dann Endzeit 2
programmieren, oder umgekehrt.
Beispiel: Sie möchten die Gerichtszubereitung 30
Minuten vor Ihrer Rückkehr nach Hause beginnen,
so, dass zu Ihrer Ankunft um 12:55 die Speise
fertig ist.
ɍɫɬɚɧɨɜɤɚ ɩɪɨɞɨɥɠɢɬɟɥɶɧɨɫɬɢ ɢ ɜɪɟɦɟɧɢ
ɨɤɨɧɱɚɧɢɹ ɩɪɢɝɨɬɨɜɥɟɧɢɹ
ȼɵ ɦɨɠɟɬɟ ɤɨɦɛɢɧɢɪɨɜɚɬɶ ɮɭɧɤɰɢɢ ɜɪɟɦɟɧɢ
ɩɪɢɝɨɬɨɜɥɟɧɢɹ ɢ ɜɪɟɦɟɧɢ ɨɤɨɧɱɚɧɢɹ
ɩɪɢɝɨɬɨɜɥɟɧɢɹ, ɡɚɞɚɜɚɹ ɠɟɥɚɟɦɨɟ ɜɪɟɦɹ
ɜɤɥɸɱɟɧɢɹ ɢ ɜɵɤɥɸɱɟɧɢɹ ɞɭɯɨɜɤɢ. Ɍɚɤɢɦ
ɨɛɪɚɡɨɦ, ȼɵ ɦɨɠɟɬɟ ɡɚɩɪɨɝɪɚɦɦɢɪɨɜɚɬɶ
ɩɪɨɰɟɫɫ ɩɪɢɝɨɬɨɜɥɟɧɢɹ ɜ ȼɚɲɟɣ ɞɭɯɨɜɤɟ ɧɚ ɬɨ
ɜɪɟɦɹ, ɤɨɝɞɚ ȼɚɫ ɧɟɬ ɞɨɦɚ ɢɥɢ ɠɟ ɩɪɨɰ
ɟɫɫ
ɪɚɡɦɨɪɚɠɢɜɚɧɢɹ ɩɪɨɞɭɤɬɨɜ ɤ ȼɚɲɟɦɭ ɩɪɢɯɨɞɭ.
ɇɟɩɥɨɯɚɹ ɩɨɦɨɳɶ ɧɚ ɤɭɯɧɟ.
ɇɟ ɜɚɠɧɨ ɜ ɤɚɤɨɦ ɩɨɪɹɞɤɟ ȼɵ ɩɪɨɝɪɚɦɦɢɪɭɟɬɟ
ɷɬɢ ɞɜɟ ɮɭɧɤɰɢɢ. ɋɧɚɱɚɥɚ ɜɪɟɦɹ ɩɪɢɝɨɬɨɜɥɟɧɢɹ
1 ɢ ɡɚɬɟɦ ɜɪɟɦɹ ɨɤɨɧɱɚɧɢɹ 2,
ɢɥɢ ɧɚɨɛɨɪɨɬ.
ɇɚɩɪɢɦɟɪ: ȼɵ ɯɨɬɢɬɟ ɧɚɱɚɬɶ ɝɨɬɨɜɢɬɶ ɛɥɸɞɨ ɡɚ
30 ɦɢɧɭɬ ɞɨ ɜɨɡɜɪɚɳɟɧɢɹ ɞɨɦɨɣ, ɱɬɨɛɵ ɤ
ȼɚɲɟɦɭ ɩɪɢɯɨɞɭ ɜ 12:55 ɨɧɨ ɛɵɥɨ ɝɨɬɨɜɨ.
x Stellen Sie Ihre Speise in Backofen und
wählen die gewünschte
Backofenfunktion 3 (»Grill +
Thermozirkulation«) wird nur als Beispiel
gezeigt).
x Stellen Sie die notwendige Temperatur
ein, wenn Sie die empfohlene Temperatur
ändern möchten.
Geben Sie die Betriebsdauer der
Gerichtzubereitung ein 4 (in unserem Beispiel –
Ɂɚɞɚɣɬɟ ɩɪɨɞɨɥɠɢɬɟɥɶɧɨɫɬɶ ɩɪɢɝɨɬɨɜɥɟɧɢɹ 4
ɧɚɲɟɦ ɩɪɢɦɟɪɟ – 30 ɦɢɧɭɬ).
30 Minuten).
Dafür muss die gewünschte Betriebsdauer
programmiert werden (siehe Kapitel »Einstellen
der Betriebsdauer«).
Ⱦɥɹ ɷɬɨɝɨ ɡɚɩɪɨɝɪɚɦɦɢɪɭɣɬɟ ɠɟɥɚɟɦɭɸ
ɩɪɨɞɨɥɠɢɬɟɥɶɧɨɫɬɶ ɩɪɢɝɨɬɨɜɥɟɧɢɹ. (ɫɦ. ɪɚɡɞɟɥ
«ɍɫɬɚɧɨɜɤɚ ɩɪɨɞɨɥɠɢɬɟɥɶɧɨɫɬɢ
ɩɪɢɝɨɬɨɜɥɟɧɢɹ»).
x ɉɨɦɟɫɬɢɬɟ ɛɥɸɞɨ ɜ ɞɭɯɨɜɤɭ ɢ ɜɵɛɟɪɢɬɟ
ɠɟɥɚɟɦɵɣ
3 (ɪɟɠɢɦ «ɝɪɢɥɶ + ɨɛɞɭɜ» - ɩɨɤɚɡɚɧ ɥɢɲɶ
ɞɥɹ ɩɪɢɦɟɪɚ).
x ɍɫɬɚɧɨɜɢɬɟ ɧɭɠɧɭɸ
, ɟɫɥɢ ȼɵ ɯɨɬɢɬɟ
ɩɨɦɟɧɹɬɶ ɪ
ɟɤɨɦɟɧɞɭɸɦɭɸ ɬɟɦɩɟɪɚɬɭɪɭ.
(ɜ
71
Page 72

EN
2
1
3
The symbol 1 (letter A) appears on the display,
that comfirms a successful programming of the
cooking duration and the current day time appears
again.
x Press key 2 to set the end time (see
chapter «Setting the end time»).
The end time (3) appears on the display, that
accords to the current day time plus duration (in
our example 12:45, that means plus 30 minutes).
x Set the wanted end time with the choice
keys 4 ( - or + ).
A few seconds later this time will be registrated 5
(in our example – 12:55, that means we shifted the
end time 10 minutes).
4
5
6
7
The oven is in expectance state now.
The current day time is displayed 6 (in our
example 12:15).
In our example the oven should be turned on at
12:25 (7) with the functions “Grill + Thermo
Circulation” and be turned off at 12:55 according
to your setting.
Advise! The right point to activate the child
lock 8, to prevent inadvertent shift or
unintentional turning on
72
8
Page 73

DE RU
A
uf dem Display erscheint das Symbol 1
(Buchstabe !), das bestätigt eine erfolgreiche
Programmierung der Betriebsdauer und die
aktuelle Tageszeit werden wieder angezeigt.
x Die Taste 2 drücken, um die Endzeit
einzugeben (siehe Kapitel »Einstellen der
Endzeit«).
Auf dem Display erscheint die Endzeit (3), die der
aktuellen Tageszeit plus Betriebsdauer entspricht
(in unserem Beispiel 12:45, das heißt plus 30
Minuten).
x Mit den Wahltasten 4 (
gewünschte Endzeit einstellen.
Nach wenigen Sekunden wird diese Zeit registriert
5 (in unserem Beispiel - 12:55, das heißt, wir
haben die Endzeit um 10 Minuten verschoben).
- oder + ) die
ɇɚ ɞɢɫɩɥɟɟ ɩɨɹɜɢɬɫɹ ɫɢɦɜɨɥ 1 (ɛɭɤɜɚ !),
ɩɨɞɬɜɟɪɠɞɚɸɳɢɣ ɭɫɩɟɲɧɨɟ ɩɪɨɝɪɚɦɦɢɪɨɜɚɧɢɟ
ɩɪɨɞɨɥɠɢɬɟɥɶɧɨɫɬɢ ɩɪɢɝɨɬɨɜɥɟɧɢɹ, ɚ ɬɚɤɠɟ
ɜɟɪɧɟɬɫɹ ɩɨɤɚɡɚɧɢɟ ɬɟɤɭɳɟɝɨ ɜɪɟɦɟɧɢ.
x ɇɚɠɦɢɬɟ ɤɧɨɩɤɭ 2, ɱɬɨɛɵ ɡɚɞɚɬɶ ɜɪɟɦɹ
ɨɤɨɧɱɚɧɢɹ ɩɪɨɰɟɫɫɚ ɩɪɢɝɨɬɨɜɥɟɧɢɹ (ɫɦ.
ɪɚɡɞɟɥ «ɍɫɬɚɧɨɜɤɚ ɜɪɟɦɟɧɢ ɨɤɨɧɱɚɧɢɹ
ɩɪɢɝɨɬɨɜɥɟɧɢɹ»).
ɇɚ ɞɢɫɩɥɟɟ ɩɨɹɜɢɬɫɹ ɜɪɟɦɹ ɨɤɨɧɱɚ
ɩɪɢɝɨɬɨɜɥɟɧɢɹ (3) ɪɚɜɧɨɟ ɬɟɤɭɳɟɦɭ ɜɪɟɦɟɧɢ,
ɩɥɸɫ ɜɪɟɦɟɧɢ ɩɪɨɞɨɥɠɢɬɟɥɶɧɨɫɬɢ
ɩɪɢɝɨɬɨɜɥɟɧɢɹ (ɜ ɧɚɲɟɦ ɩɪɢɦɟɪɟ 12:45, ɬ.ɟ.
ɩɥɸɫ 30 ɦɢɧ.).
x ɂɫɩɨɥɶɡɭɹ ɤɧɨɩɤɢ ɜɵɛɨɪɚ 4 (
ɭɫɬɚɧɨɜɢɬɟ ɠɟɥɚɟɦɨɟ ɜɪɟɦɹ ɨɤɨɧɱɚɧɢɹ
ɩɪɢɝɨɬɨɜɥɟɧɢɹ.
ɑɟɪɟɡ ɧɟɫɤɨɥɶɤɨ ɫɟɤɭɧɞ ɬɚɣɦɟɪ ɡɚɪɟɝɢɫɬɪɢɪɭɟɬ
ɷɬɨ ɡɧɚɱɟɧɢɟ 5 (ɜ ɧɚɲɟɦ ɩɪɢɦɟɪɟ – 12:55, ɬ.ɟ
ɦɵ ɫɞɜɢɧɭɥɢ ɜɪɟɦɹ ɨɤɨɧɱɚɧɢɹ ɩɪɢɝɨɬɨɜɥɟɧɢɹ
ɧɚ 10 ɦɢɧ.).
- ɢɥɢ + ),
ɧɢɹ
Der Backofen ist im Bereitschaftsmodus
Die aktuelle Tageszeit wird angezeigt 6 (in
unserem Beispiel 12:15).
In unserem Beispiel soll der Backofen um 12:25
(7) bei den Funktionen „Grill + Thermozirkulation“
eingeschaltet und um 12:55 ausgeschaltet werden,
gemäß Ihrer Programmierung.
Empfehlung! Der richtige Zeitpunkt die
Kindersicherung 8 zu aktivieren, damit eine
versehentliche Verstellungen oder ein
ungewolltes Einschalten verhindert werden.
Ⱦɭɯɨɜɤɚ ɩɟɪɟɣɞɟɬ ɜ ɪɟɠɢɦ ɨɠɢɞɚɧɢɹ.
ȼɵɫɜɟɬɢɬɶɫɹ ɬɟɤɭɳɟɟ ɜɪɟɦɹ 6
ɩɪɢɦɟɪɟ - 12:15).
ȼ ɧɚɲɟɦ ɩɪɢɦɟɪɟ ɞɭɯɨɜɤɚ ɞɨɥɠɧɚ ɜɤɥɸɱɢɬɫɹ ɜ
12:25 (7)ɜ ɪɟɠɢɦɟ "ɝɪɢɥɶ + ɨɛɞɭɜ" ɧɚ 30 ɦɢɧɭɬ ɢ
ɜɵɤɥɸɱɢɬɫɹ ɜ 12:55, ɫɨɨɬɜɟɬɫɬɜɟɧɧɨ ɡɚɞɚɧɧɨɣ
ȼɚɦɢ ɩɪɨɝɪɚɦɦɟ.
ɋɨɜɟɬ! ɋɚɦɨɟ ɜɪɟɦɹ ɚɤɬɢɜɢɪɨɜɚɬɶ
ɮɭɧɤɰɢɸ ɛɥɨɤɢɪɨɜɤɢ ɨɬ ɞɟɬɟɣ 8, ɱɬɨɛɵ
ɩɪɟɞɨɬɜɪɚɬɢɬɶ ɢɯ ɜɦɟɲɚɬɟɥɶɫɬɜɨ ɢɥɢ
ɫɥɭɱɚɣɧɨɟ ɜɤɥɸɱɟɧɢɟ ɞɭɯɨɜɤɢ.
(ɜ ɧɚɲɟɦ
73
Page 74

EN
DIGITAL TIME SWITCH CLOCK OF THE
3
OVEN Logic control F12
sensor control
Setting the clock
To set the current time:
BITURBO
with full
1
2
x Press key 1 and 2 at the same time.
With this setting a flashing colon 3 appears
showing you are in clock setting mode.
x By pressing the choice keys 1 or 2 you can
set the time.
After a few seconds the controller sets the time
currently displayed and the two dots stop flashing.
Important! If you change the time
setting, you reset the timer and cancel all
cooking settings.
74
Page 75

DE RU
ELEKTRONISCHE ZEITSCHALTUHR VON
BACKÖFEN Logic control F12
BITURBO
mit Vollsensorbedienung
Tageszeiteinstellung
Zur Einstellung der aktuellen Uhrzeit:
x Tasten 1 und 2 gleichzeitig drücken
Bei dieser Einstellung erscheint ein blinkender
Doppelpunkt 3, er zeigt, dass Sie gerade bei der
Zeiteinstellung sind.
x Ɇit den Wahltasten 1 oder 2
Uhrzeit einstellen.
die aktuelle
ɗɅȿɄɌɊɈɇɇɈȿ ɉɊɈȽɊȺɆɆɂɊɍɘɓȿȿ
ɍɋɌɊɈɃɋɌȼɈ ȾɍɏɈȼɈɄ Logic control
BITURBO c ɩɨɥɧɵɦ ɫɟɧɫɨɪɧɵɦ
F12
ɭɩɪɚɜɥɟɧɢɟɦ
ɍɫɬɚɧɨɜɤɚ ɬɟɤɭɳɟɝɨ ɜɪɟɦɟɧɢ
ɑɬɨɛɵ ɭɫɬɚɧɨɜɢɬɶ ɬɟɤɭɳɟɟ ɜɪɟɦɹ:
x ɇɚɠɦɢɬɟ ɨɞɧɨɜɪɟɦɟɧɧɨ ɤɧɨɩɤɢ 1 ɢ 2.
ɉɪɢ ɷɬɨɦ ɡɚɦɢɝɚɸɬ ɞɜɟ ɬɨɱɤɢ 3, ɪɚɡɞɟɥɹɸɳɢɟ
ɱɚɫɵ ɢ ɦɢɧɭɬɵ, ɩɨɤɚɡɵɜɚɹ, ɱɬɨ ȼɵ ɜ ɪɟɠɢɦɟ
ɱɚɫɨɜ.
x Ʉɧɨɩɤɚɦɢ ɜɵɛɨɪɚ
ɬɟɤɭɳɟɟ ɜɪɟɦɹ.
1 ɢɥɢ 2 ɜɵɫɬɚɜɢɬɶ
Nach einigen Sekunden wird die aktuelle Uhrzeit
automatisch übernommen und der Doppelpunkt
hört auf zu blinken.
Wichtig! Bei der Änderung der
eingestellten Uhrzeit werden alle vorher
gewählten Programme gelöscht.
ɑɟɪɟɡ ɧɟɫɤɨɥɶɤɨ ɫɟɤɭɧɞ ɧɚ ɞɢɫɩɥɟɟ ɩɨɹɜɢɬɫɹ
ɢɧɞɢɤɚɰɢɹ ɬɟɤɭɳɟɝɨ ɜɪɟɦɟɧɢ ɢ ɬɨɱɤɢ ɩɟɪɟɫɬɚɸɬ
ɦɢɝɚɬɶ.
ȼɚɠɧɨ! ɉɪɢ ɢɡɦɟɧɟɧɢɢ ɭɫɬɚɧɨɜɥɟɧɧɨɝɨ
ɬɟɤɭɳɟɝɨ ɜɪɟɦɟɧɢ ɜɫɟ ɩɪɟɞɵɞɭɳɢɟ
ɩɪɨɝɪɚɦɦɵ ɛɭɞɭɬ ɨɬɦɟɧɟɧɵ.
75
Page 76

EN
1
2
3
3
A
Usage of the oven
You can start the process of cooking with a few
easy handels.
Oven light
Innenbeleuchtung
Ɉɫɜɟɳɟɧɢɟ ɞɭɯɨɜɤɢ
2
3
Warm over 50°C
ufwärmen 50°C
Ɋɚɡɨɝɪɟɜ 50°ɋ
4
1
Fixed 190°C
Ober- und
Unterhitze 190°C
ȼɵɩɟɱɤɚ 190°ɋ
x Switch on the oven by pressing key
x Using the key
for the oven operating
.
function you choose the wanted oven
function.
According to the chosen program a recommended
temperature is set in the oven automatically.
Fan 165°C
Heißluft 165°C
Ƚɨɪɹɱɢɣ ɨɛɞɭɜ
165°ɋ
Grill & fan 165°C
Grill m. Heißluft 165°C
Ƚɪɢɥɶ ɫ ɨɛɞɭɜɨɦ 165°ɋ
Top & bottom + fan 165°C
Ober- und Unterhitze m.
Heißluft 165°C
ȼɟɪɯɧɢɣ ɢ ɧɢɠɧɢɣ ɧɚɝɪɟɜ
+ ɨɛɞɭɜ 165°ɋ
3
4
6
5
x The preset temperature can be changed by
using the temperature regulating
keys 3
and 4.
The symbol 5 (ºC) flashes to show that the oven is
warming up.
As soon as the oven reaches the set temperature
the oven beeps 2 times and the symbol 5 (ºC)
stops flashing. Now you can put the food you want
to prepare into the oven.
x To read the actual temperature of the oven
on the display 6 at any moment, press the
keys
and 4 simultaneously.
For a few seconds the display wil visualise the
temperature reached by the oven at that precise
moment 6 by flashing it on the display.
76
Page 77

DE RU
1
1
3
Gebrauch von Backofen
Mit wenigen einfachen Handgriffen können Sie den
Prozess der Zubereitung beginnen.
x Den Backofen mit Hilfe von Taste
ɉɨɥɶɡɨɜɚɧɢɟ ɞɭɯɨɜɵɦ ɲɤɚɮɨɦ
ȼ ɧɟɫɤɨɥɶɤɨ ɩɪɨɫɬɵɯ ɞɜɢɠɟɧɢɣ ȼɵ ɦɨɠɟɬɟ
ɧɚɱɚɬɶ ɩɪɨɰɟɫɫ ɩɪɢɝɨɬɨɜɥɟɧɢɹ.
einschalten.
x Mit Hilfe der Taste
Backofenbetriebsfunktionen 2,
gewünschte Backofenfunktion wählen.
Entsprechend des gewählten Programms, wird im
Backofen automatisch eine empfohlene
Temperatur eingestellt.
Pizza 230°C
Pizza 230°C
ɉɢɰɰɚ 230°ɋ
Double grill 250°C
Grill Doppelt 250°C
Ⱦɜɨɣɧɨɣ ɝɪɢɥɶ 250°ɋ
Single grill 250°C
Grill Einfach 250°C
Ƚɪɢɥɶ 250°ɋ
ȼ ɫɨɨɬɜɟɬɫɬɜɢɢ ɫ ɜɵɛɪɚɧɧɵɦ ɪɟɠɢɦɨɦ, ɞɭɯɨɜɤɚ
ɚɜɬɨɦɚɬɢɱɟɫɤɢ ɭɫɬɚɧɨɜɢɬ ɪɟɤɨɦɟɧɞɭɟɦɭɸ
ɬɟɦɩɟɪɚɬɭɪɭ.
Defrost 40°C
Defrost 40°C
Ɋɚɡɦɨɪɚɠɢɜɚɧɢɟ 40°ɋ
x ȼɤɥɸɱɢɬɟ ɞɭɯɨɜɤɭ ɧɚɠɚɬɢɟɦ ɤɧɨɩɤɢ
x Ʉɧɨɩɤɨɣ
2,
ɜɵɛɟɪɢɬɟ ɠɟɥɚɟɦɵɣ ɪɟɠɢɦ
ɩɪɢɝɨɬɨɜɥɟɧɢɹ.
Turbo heat Turbo clean
.
x Die voreingestellte Temperatur können Sie
mit Hilfe der Tasten des
Temperaturreglers 3 und 4 ändern.
Das Symbol 5 (ºC) zeigt durch Blinken, dass der
Backofen erwärmt wird.
Sobald der Backofen die eingestellte Temperatur
erreicht hat, ertönten 2 akustische Signale und das
Symbol 5 (ºC) hört auf zu blinken: jetzt können Sie
Ihr zu zubereitendes Gericht in den Backofen
stellen.
x Drücken Sie gleichzeitig die Tasten 3 und
4, um jederzeit die aktuelle Backofentempe-
ratur 6 auf dem Display zu lesen.
Für einige Sekunden blinkt das Display und das
zeigt die aktuelle Temperatur 6 an.
x ɉɪɢ ɠɟɥɚɧɢɢ ȼɵ ɦɨɠɟɬɟ ɢɡɦɟɧɢɬɶ
ɪɟɤɨɦɟɧɞɭɟɦɭɸ ɬɟɦɩɟɪɚɬɭɪɭ ɤɧɨɩɤɚɦɢ
ɢ 4.
Ɂɚɦɢɝɚɟɬ ɫɢɦɜɨɥ 5 (ºC), ɩɨɤɚɡɵɜɚɹ, ɱɬɨ ɞɭɯɨɜɤɚ
ɪɚɡɨɝɪɟɜɚɟɬɫɹ.
Ʉɨɝɞɚ ɞɭɯɨɜɤɚ ɞɨɫɬɢɝɧɟɬ ɡɚɞɚɧɧɨɣ
ɬɟɦɩɟɪɚɬɭɪɵ, ɨɧɚ ɩɨɞɚɫɬ 2 ɡɜɭɤɨ
ɜɵɯ ɫɢɝɧɚɥɚ
, ɚ
ɫɢɦɜɨɥ 5 (ºC) ɩɟɪɟɫɬɚɧɟɬ ɦɢɝɚɬɶ. Ɍɟɩɟɪɶ ȼɵ
ɦɨɠɟɬɟ ɫɬɚɜɢɬɶ ɜ ɧɟɟ ɛɥɸɞɨ, ɤɨɬɨɪɨɟ ɯɨɬɢɬɟ
ɝɨɬɨɜɢɬɶ.
x ɑɬɨɛɵ ɭɡɧɚɬɶ ɬɟɦɩɟɪɚɬɭɪɭ ɞɭɯɨɜɤɢ 6 ɜ
ɧɚɫɬɨɹɳɢɣ ɦɨɦɟɧɬ ɜɪɟɦɟɧɢ ɧɚ ɞɢɫɩɥɟɟ,
ɧɚɠɦɢɬɟ ɨɞɧɨɜɪɟɦɟɧɧɨ ɤɧɨɩɤɢ 3 ɢ 4.
Ɇɢɝɚɹ ɜ ɬɟɱɟɧɢɢ ɧɟɫɤɨɥɶɤɢɯ ɫɟɤɭɧɞ, ɞɢɫɩɥɟɣ
ɩɨɤɚɡɵɜɚɟɬ ɚɤɬɭɚɥɶɧɭɸ ɬɟɦɩɟɪɚɬɭɪɭ 6.
77
Page 78

EN
1
7
5
6
Residual heat
The term Residual heat is used to describe the
heat which the oven has accumulated inside it
while cooking foods. This heat is gradually
dispersed over time and may still be a culinary
resource if managed properly: your oven indicates
the internal temperature, after turning the oven off,
until it drops to 50°C. This way you can use it to
heat up food, unfreeze foods at a low temperature,
or to indicate the level of safety in the kitchen.
Turbo heat function
1
2
3
4
This function greatly reduces a time of heating of
the oven with all of selected functions.
x Choose a wanted oven function using the
key
.
x To activate Turbo heat function, press
the key 2 Display shows a stairs simbol 3.
On reaching the temperature set the display will
show the temperature value 4 and emit two beeps.
Turbo clean function
This function is applied to fast clearing the oven
end can only be activated when no other function
of the oven has been activated. Function Turbo
clean speeds up the cleaning the oven using the
self-cleaning catalytic panels.
x Push the key 5 on the control panel to turn
on the oven.
x Push key Turbo clean 6 to turn on this
function. Display shows the symbol 7 and
the oven reaches the temperature of 250°C
and stays at this temperature for 1 hour.
Important! Do not put dishes in the
oven; do not use this special function
for cooking!
78
Page 79

DE RU
Restwärme
Unter Restwärme versteht man jene Wärme, die
im Backofen nach der Zubereitung von Gerichten
gespeichert bleibt. Diese Wärme sinkt im Laufe der
Zeit und kann ggf. noch als Wärmestelle in der
Küche verwendet werden: Nach dem Abschalten
zeigt Ihr Backofen die Innentemperatur an, bis sie
50°C erreicht hat. Auf diese Weise ist der
Backofen zum Erwärmen von Speisen oder, bei
niedrigen Temperaturen, zum Abtauen
verwendbar. Ferner kann diese Anzeige als
Hinweis für die Sicherheit des Küchenbereichs
dienlich sein.
Funktion Turbo heat
Diese Funktion beschleunigt gewaltig das
Aufheizen des Backofens mit jeder ausgewählten
Funktion.
x Mit Hilfe der Taste 1 gewünschte
Backofenfunktion wählen.
Ɉɫɬɚɬɨɱɧɚɹ ɬɟɦɩɟɪɚɬɭɪɚ
Ɍɟɪɦɢɧ "
ɢɫɩɨɥɶɡɭɟɬɫɹ ɞɥɹ ɨɩɢɫɚɧɢɹ ɬɟɦɩɟɪɚɬɭɪɵ,
ɤɨɬɨɪɚɹ ɨɫɬɚɥɚɫɶ ɜ ɞɭɯɨɜɤɟ ɩɨɫɥɟ
ɩɪɢɝɨɬɨɜɥɟɧɢɹ. ɗɬɚ ɬɟɦɩɟɪɚɬɭɪɚ ɩɨɫɬɟɩɟɧɧɨ
ɩɨɧɢɠɚɟɬɫɹ ɢ ɦɨɠɟɬ ɛɵɬɶ ɟɳɟ ɢɫɩɨɥɶɡɨɜɚɧɚ
ɞɥɹ ɪɚɡɥɢɱɧɵɯ ɰɟɥɟɣ: ȼɚɲɚ ɞɭɯɨɜɤɚ
ɩɨɤɚɡɵɜɚɟɬ ɜɧɭɬɪɟɧɧɸɸ ɬɟɦɩɟɪɚɬɭɪɭ, ɩɨɫɥɟ ɟɟ
ɜɵɤɥɸɱɟɧɢɹ, ɩɨɤɚ ɬɚ ɧɟ ɫɩɚɞɚɟɬ ɞɨ 50°C.
Ȼɥɚɝɨɞɚɪɹ ɷɬɨɦɭ ȼɵ ɦɨɠɟɬɟ ɢɫɩɨɥɶɡɨ
ɞɭɯɨɜɤɭ, ɱɬɨɛɵ ɧɚɝɪɟɬɶ ɩɢɳɭ, ɪɚɡɦɨɪɨɡɢɬɶ
ɩɢɳɟɜɵɟ ɩɪɨɞɭɤɬɵ, ɚ ɬɚɤɠɟ ɢɦɟɬɶ ɢɧɮɨɪɦɚɰɢɸ
ɨɛ ɭɪɨɜɧɟ ɛɟɡɨɩɚɫɧɨɫɬɢ ɧɚ ɤɭɯɧɟ.
Ɏɭɧɤɰɢɹ Turbo heat
ɗɬɚ ɮɭɧɤɰɢɹ ɪɟɡɤɨ ɫɨɤɪɚɳɚɟɬ ɜɪɟɦɹ ɪɚɡɨɝɪɟɜɚ
ɞɭɯɨɜɤɢ ɞɨ ɡɚɞɚɧɧɨɣ ɬɟɦɩɟɪɚɬɭɪɵ ɩɪɢ ɥɸɛɨɣ
ɜɵɛɪɚɧɧɨɣ ɮɭɧɤɰɢɢ.
ɜɚɬɶ
x ɋ ɩɨɦɨɳɶɸ ɤɧɨɩɤɢ 1 ɜɵɛɟɪɢɬɟ
ɠɟɥɚɟɦɵɣ ɪɟɠɢɦ ɩɪɢɝɨɬɨɜɥɟɧɢɹ.
x Um die Turbo heat-Funktion zu
aktivieren, die Taste 2 drücken. Auf dem
Display erscheint das Symbol 3.
Nachdem im Backofen die eingestellte Temperatur
erreicht worden ist, erscheint sie auf dem Display
4 und es klingen zwei Signaltöne.
Funktion Turbo clean
Diese Funktion wird für die schnelle Reinigung des
Backofens verwendet und kann nur dann
angeschaltet werden, wenn keine andere Funktion
des Backofens aktiv ist. Die Nutzung der Funktion
Turbo clean ist dankbar der selbstreinigenden
katalytischen Seitenpanellen ermöglicht.
x Drücken Sie die Taste 5, um den Backofen
anzuschalten.
x ɑɬɨɛɵ
heat, ɧɚɠɦɢɬɟ ɤɧɨɩɤɭ 2 ɇɚ ɞɢɫɩɥɟɟ
ɩɨɹɜɥɹɟɬɫɹ ɫɢɦɜɨɥ 3.
ɉɨ ɞɨɫɬɢɠɟɧɢɢ ɞɭɯɨɜɤɨɣ ɜɵɛɪɚɧɧɨɣ
ɬɟɦɩɟɪɚɬɭɪɵ ɧɚ ɞɢɫɩɥɟɟ ɩɨɹɜɥɹɟɬɫɹ ɟɟ
ɡɧɚɱɟɧɢɟ 4 ɢ ɪɚɡɞɚɸɬɫɹ 2 ɡɜɭɤɨɜɵɯ ɫɢɝɧɚɥɚ.
Ɏɭɧɤɰɢɹ Turbo clean
ɗɬɚ ɮɭɧɤɰɢɹ ɩɪɢɦɟɧɹɟɬɫɹ ɞɥɹ ɛɵɫɬɪɨɣ ɨɱɢɫɬɤɢ
ɞɭɯɨɜɤɢ ɢ ɦɨɠɟɬ ɛɵɬɶ ɜɤɥɸɱɟɧɚ ɬɨɥɶɤɨ ɬɨɝɞɚ,
ɤɨɝɞɚ ɧɟɚɤɬɢɜɢɪɨɜɚɧɚ ɧɢɤɚɤɚɹ ɞɪɭɝɚɹ ɮɭɧɤɰɢɹ
ɞɭɯɨɜɤɢ. ɂɫɩɨɥɶɡɨɜɚɧɢɟ ɮɭɧɤɰɢɢ Turbo clean
ɜ ɞɭɯɨɜɤɟ ɭɫɤɨɪɹɟɬ ɩɪɨɰɟɫɫ ɨɱɢɫɬɤɢ ɛɥɚɝɨɞɚɪɹ
ɫɚɦɨɨɱɢɳɚɸɳɢɦɢɫɹ ɤɚɬɚɥɢɬɢɱɟɫ
x ɇɚɠɦɢɬɟ ɤɧɨɩɤɭ 5, ɱɬɨɛɵ ɜɤɥɸɱɢɬɶ
ɞɭɯɨɜɤɭ.
ɚɤɬɢɜɢɪɨ
ɜɚɬɶ ɮɭɧɤɰɢɸ Tur
ɤɢɦ ɩɚɧɟɥɹɦ.
bo
x Drücken Sie die Taste Turbo clean 6,
um diese Funktion zu aktivieren. Auf dem
Display erscheint das Symbol 7, der
Backofen erreicht die Temperatur von
250°C und behält sie für 1 Stunde.
Wichtig! Bei dieser Sonderfunktion
keine Gerichte in den Backofen
stelleln. Diese Funktion auf keinen Fall
für Zubereitung verwenden!
x ɇɚɠɦɢɬɟ ɤɧɨɩɤɭ Turbo clean 6, ɱɬɨɛɵ
ɚɤɬɢɜɢɪɨɜɚɬɶ ɷɬɭ ɮɭɧɤɰɢɸ. ɇɚ ɞɢɫɩɥɟɟ
ɩɨɹɜɢɬɫɹ ɫɢɦɜɨɥ 7, ɬɟɦɩɟɪɚɬɭɪɚ ɞɭɯɨɜɤɢ
ɩɨɞɧɢɦɟɬɫɹ ɞɨ 250°C ɢ ɛɭɞɟɬ
ɩɨɞɞɟɪɠɢɜɚɬɶɫɹ ɜ ɬɟɱɟɧɢɢ 1 ɱɚɫɚ.
ȼɚɠɧɨ! ɗɬɚ ɮɭɧɤɰɢɹ ɧɟ ɩɪɟɞɧɚɡɧɚɱɟɧɚ
ɞɥɹ ɩɪɢɝɨɬɨɜɥɟɧɢɹ ɩɢɳɢ! ɉɪɢ ɪɚɛɨɬɟ
ɞɭɯɨɜɤɢ ɜ ɷɬɨɦ ɪɟɠɢɦɟ ɧɟ ɫɥɟɞɭɟɬ ɜ
ɧɟɟ ɩɨɦɟɳɚɬɶ ɛɥɸɞɚ.
79
Page 80

EN
3
2
Oven light
The oven is equipped with an intelligent light
control to reduce the electricity consumption. The
light stays on while the oven is warming up and for
3 minutes after the set temperature is reached,
then switches off.
Press any key (except ON/ OFF) to check on the
food in the oven. The light switches on for another
3 minutes.
Child lock
An important planning possibility in your new oven
with electronocal programmable Logic control
is to prevent inadvertent shift or unintentional
turning on. You can activate the child lock at any
time, even when the oven is turned off.
1
Activating the child lock
x Press and hold keys 1 and 2 at the same
time for at least 3 seconds.
Symbol 3 appears on the display for 10 seconds.
The electronic controller is now disabled. The only
you can do with the controls is:
x Switch off the oven (if it is on).
If you press any other key, the key symbol 3
appears on the display. Child lock is activated.
Important! If the oven is turned off, the
child lock function remains active!
Deactivating the child lock
x Press and hold keys 1 and 2 at the same
time for at least 3 seconds.
The electronic control of the oven is ready for use
again.
80
Page 81

DE RU
Innenbeleuchtung
Der Backofen ist mit einem intelligenten
Kontrollsystem der Beleuchtung ausgestattet, die
den Konsum der Elektroenergie vermindert. Das
Licht bleibt nur für die Zeit der Vorheizung
angeschaltet und wird nach 3 Minuten nach dem
Erreichen der angegebenen Temperatur
ausgeschaltet.
Zur Kontrolle des Gerichtes einfach eine beliebige
Taste (ausschließlich EIN/ AUS) drücken, und die
Innenbeleuchtung schaltet sich für 3 Minuten ein.
Kindersicherung
Ein wichtiger Planungsaspekt Ihres neuen
Backofens mit elektronischer Programmierung
Logic control besteht darin, versehentliche
Verstellungen oder ungewolltes Einschalten zu
verhindern. Sie können die Kindersicherung
jederzeit aktivieren, auch bei ausgeschaltetem
Backofen.
Ɉɫɜɟɳɟɧɢɟ ɞɭɯɨɜɤɢ
Ⱦɭɯɨɜɤɚ ɨɫɧɚɳɟɧɚ ɢɧɬɟɥɥɢɝɟɧɬɧɨɣ ɫɢɫɬɟɦɨɣ
ɤɨɧɬɪɨɥɹ ɨɫɜɟɳɟɧɢɹ, ɩɨɧɢɠɚɸɳɟɣ ɩɨɬɪɟɛɥɟɧɢɟ
ɷɧɟɪɝɢɢ. ɋɜɟɬ ɨɫɬɚɟɬɫɹ ɜɤɥɸɱɟɧɧɵɦ ɥɢɲɶ ɧɚ
ɜɪɟɦɹ ɪɚɡɨɝɪɟɜɚ ɢ ɜ ɬɟɱɟɧɢɟ 3 ɦɢɧ. ɩɨɫɥɟ
ɞɨɫɬɢɠɟɧɢɹ ɡɚɞɚɧɧɨɣ ɬɟɦɩɟɪɚɬɭɪɵ, ɡɚɬɟɦ
ɜɵɤɥɸɱɚɟɬ
ɑɬɨɛɵ ɩɪɨɜɟɪɢɬɶ ɛɥɸɞɨ ɜ ɞɭɯɨɜɤɟ, ɧɚɠɦɢɬɟ ɧɚ
ɥɸɛɭɸ ɤɧɨɩɤɭ (ɤɪɨɦɟ ȼɄɅ/ ȼɕɄɅ). ɋɜɟɬ
ɡɚɝɨɪɢɬɫɹ ɧɚ 3 ɦɢɧɭɬɵ ɫɧɨɜɚ.
Ȼɥɨɤɢɪɨɜɤɚ ɨɬ ɞɟɬɟɣ
ȼɚɲɚ ɧɨɜɚɹ ɞɭɯɨɜɤɚ, ɫ ɷɥɟɤɬɪɨɧɧɵɦ
ɩɪɨɝɪɚɦɢɪɭɸɳɢɦ ɭɫɬɪɨɣɫɬɜɨɦ Logic control
ɢɦɟɟɬ ɮɭɧɤɰɢɸ ɛɥɨɤɢɪɨɜɤɢ ɨɬ ɞɟɬɟɣ, ɤɨɬɨɪɚɹ
ɩɪɟɞɨɬɜɪɚɳɚɟɬ ɢɯ ɜɦɟɲɚɬɟɥɶɫɬɜɨ ɢ ɫɥɭɱɚɣɧɨɟ
ɜɤɥɸɱɟɧɢɟ ɞɭɯɨɜɤɢ. ȼɵ ɦɨɠɟɬɟ ɚɤɬɢɜɢɪɨɜɚɬɶ
ɷɬɭ ɮɭɧɤɰɢɸ ɜ ɥɸɛɨɟ ɜɪɟɦɹ, ɞɚɠɟ ɟɫɥɢ ɞɭɯɨɜɤɚ
ɜɵɤɥɸɱɟ
ɫɹ.
ɧɚ.
Aktivierung der Kindersicherung
x Die Tasten 1 und 2 mindestens 3
Sekunden gleichzeitig gedrückt halten.
Auf dem Display erscheint Symbol 3.
Elektronische Steuerung des Backofens ist
gesperrt. Ab diesem Zeitpunkt können Sie nur:
x den Backofe n ausschalten, sofern er
eingeschaltet ist.
Beim Drücken einer beliebigen Taste erscheint auf
dem Display das Schlüsselsymbol 3. Die
Funktion Kindersicherung ist eingeschaltet.
Wichtig! Wenn der Backofen
ausgeschaltet wird, bleibt die Funktion
Kindersicherung aktiviert!
Ausschaltung der Kindersicherung
Ⱥɤɬɢɜɚɰɢɹ
x Ɉɞɧɨɜɪɟɦɟɧɧɨ ɧɚɠɦɢɬɟ ɢ ɭɞɟɪɠɢɜɚɣɬɟ
ɇɚ ɞɢɫɩɥɟɟ ɩɨɹɜɢɬɫɹ ɫɢɦɜɨɥ 3. ɗɥɟɤɬɪɨɧɧɨɟ
ɭɩɪɚɜɥɟɧɢɟ ɞɭɯɨɜɤɨɣ ɡɚɛɥɨɤɢɪɨɜɚɧɨ. Ɍɟɩɟɪɶ
ȼɵ ɦɨɠɟɬɟ ɬɨɥɶɤɨ:
x ɜɵɤɥɸɱɢɬɶ ɞɭɯɨɜɤɭ (ɟɫɥɢ ɨɧɚ ɜɤɥɸɱɟɧɚ).
ȿɫɥɢ ȼɵ ɧɚɠɦɟɬɟ ɥɸɛɭɸ ɞɪ
ɞɢɫɩɥɟɟ ɩɨɹɜɢɬɫɹ " 3. Ɏɭɧɤɰɢɹ
ɛɥɨɤɢɪɨɜɤɢ ɨɬ ɞɟɬɟɣ ɚɤɬɢɜɢɪɨɜɚɧɚ.
ȼɚɠɧɨ! ɉɪɢ ɜɵɤɥɸɱɟɧɧɨɣ ɞɭɯɨɜɤɟ
ɮɭɧɤɰɢɹ ɛɥɨɤɢɪɨɜɤɢ ɨɬ ɞɟɬɟɣ ɨɫɬɚɟɬɫɹ
ɚɤɬɢɜɢɪɨɜɚɧɧɨɣ!
Ⱦɟɚɤɬɢɜɚɰɢɹ ɮɭɧɤɰɢɢ ɛɥɨɤɢɪɨɜɤɢ ɨɬ ɞɟɬɟɣ
ɮɭɧɤɰɢɢ ɛɥɨɤɢɪɨɜɤɢ ɨɬ ɞɟɬɟɣ
ɤɧɨɩɤɢ 1 ɢ 2 ɜ ɬɟɱɟɧɢɟ ɩɪɢɛɥɢɡɢɬɟɥɶɧɨ 3
ɫɟɤɭɧɞɵ.
ɭɝɭɸ ɤɧɨɩɤɭ, ɧɚ
x Die Taste 1 und 2 mindestens 3 Sekunden
gleichzeitig gedrückt halten.
Elektronische Steuerung des Backofens ist wieder
Betriebsbereit.
x ɇɚɠɦɢɬɟ ɢ ɭɞɟɪɠɢɜɚɣɬɟ ɤɧɨɩɤɢ 1 ɢ 2 ɜ
ɬɟɱɟɧɢɟ ɩɪɢɛɥɢɡɢɬɟɥɶɧɨ 3 ɫɟɤɭɧɞ.
ɗɥɟɤɬɪɨɧɧɨɟ ɭɩɪɚɜɥɟɧɢɟ ɞɭɯɨɜɤɨɣ ɫɧɨɜɚ
ɞɨɫɬɭɩɧɨ ɤ ɢɫɩɨɥɶɡɨɜɚɧɢɸ.
81
Page 82

EN
Electronical countdown timer and alarm clock
The countdown timer and alarm clock work
independently of all other functions, and can be
used even when the oven is switched off.
Countdown timer emits the beeping sounds at
the end of choosed time interval.
1
3
4
To switch on the countdown timer
x Press key 1 to turn on the oven without a
setting the cooking functions.
x Press the choice key 2 to set the duration
in minutes. It will be shown on the display
3.
2
After a few seconds the countdown timer starts the
countdown and the beeping sound is emitted.
At the end of the preset duration beeps a tone and
the symbol 4 flashes.
x To switch off the timer press any key.
1
6
4
Electronical alarm clock emits the alarm
signals at preset time.
x To turn on the alarm clock, press key 1.
x Press the choice keys 5 to set the hours
and minutes. It will be shown on the display
6.
5
At preset time the oven emits the alarm signals.
At the end of the preset time beeps a tone and the
symbol 4 flashes.
x To switch off the signal of the alarm clock,
press any key.
82
Page 83

DE RU
Elektronischer Kurzzeitwecker und Wecker
Der Gebrauch vom elektronischen Kurzzeitwecker
und Wecker ist von anderen Funktionen
unabhängig und kann auch bei ausgeschaltetem
Backofen verwendet werden..
Elektronischer Kurzzeitwecker ertönt die
Signaltöne nach Ablauf der eingestellten Zeitdauer.
Zum Einschalten des Kurzzeitweckers:
x Taste 1 drücken, um den Backofen
einzuschalten ohne eine Funktion zu
wählen.
x
Mit der Wahltaste 2 die gewünschte
Zeitdauer einstellen. Sie erscheint auf dem
Display 3.
Nach wenigen Sekunden wird der Kurzzeitwecker
die Rückzählung beginnen und es klingt ein
Signalton, was über Beginn der Rückzählung
informiert.
ɗɥɟɤɬɪɨɧɧɵɣ ɦɢɧɭɬɧɢɤ ɢ ɛɭɞɢɥɶɧɢɤ
ɗɥɟɤɬɪɨɧɧɵɣ ɦɢɧɭɬɧɢɤ ɢ ɛɭɞɢɥɶɧɢɤ ɪɚɛɨɬɚɸɬ
ɧɚɡɚɜɢɫɢɦɨ ɨɬ ɞɪɭɝɢɯ ɮɭɧɤɰɢɣ. ɂɦɢ ɦɨɠɧɨ
ɩɨɥɶɡɨɜɚɬɶɫɹ ɞɚɠɟ ɟɫɥɢ ɞɭɯɨɜɤɚ ɜɵɤɥɸɱɟɧɚ.
# ɢɡɞɚɟɬ ɡɜɭɤɨɜɵɟ
ɫɢɝɧɚɥɵ ɩɨ
ɜɪɟɦɟɧɢ.
ɑɬɨɛɵ ɜɤɥɸ
x ɇɚɠɦɢɬɟ ɤɧɨɩɤɭ 1, ɱɬɨɛɵ ɜɤɥɸɱɢɬɶ
ɞɭɯɨɜɤɭ ɛɟɡ ɜɵɛɨɪɚ ɩɪɨɝɪɚɦɦ.
x ɂɫɩɨɥɶɡɭɹ ɤɧɨɩɤɭ ɜɵɛɨɪɚ 2 ɭɫɬɚɧɨɜɢɬɟ
ɠɟɥɚɟɦɵɣ ɩɪɨɦɟɠɭɬɨɤ ɜɪɟɦɟɧɢ. Ɉɧ
ɛɭɞɟɬ ɨɬɨɛɪɚɠɟɧ ɧɚ ɞɢɫɩɥɟɟ 3.
ɑɟɪɟɡ ɧɟɫɤɨɥɶɤɨ ɫɟɤɭɧɞ ɬɚɣɦɟɪ ɧɚɱɧɟɬ
ɨɛɪɚɬɧɵɣ ɨɬɫɱɟɬ ɢ ɩɪɨɡɜɭɱɢɬ ɡɜɭɤɨɜɨɣ ɫɢɝɧɚɥ
ɢɧɮɨɪɦɢɪɭɹ ɨ ɧɚɱɚɥɟ ɪɚɛɨɬɵ ɦɢɧɭɬɧɢɤɚ.
ɢɫɬɟɱɟɧɢɢ ɠɟɥɚɟɦɨɝɨ ɩɪɨɦɟɠɭɬɤɚ
ɱɢɬɶ ɦɢɧɭɬɧɢɤ:
Nach dem Ablauf der eingestellten Zeitdauer ertönt
ein Signalton und blinkt das Symbol 4.
x Um den Kurzzeitwecker auszuschalten,
eine beliebige Taste drücken.
Elektronischer Wecker ertönt die Signaltöne,
wenn die eingestellte Zeit erreicht ist.
x Um den elektronischen Wecker zu
aktivieren, die Taste 1 dücken.
x Die Tasten 5 drücken, um die Stunden und
Minuten einzustellen. Die Zeit erscheint auf
dem Display 6.
Nach wenigen Sekunden wird der Wecker die
Rückzählung beginnen und es klingt ein Signalton.
Wenn die eingestellte Zeit erreicht ist, werden vom
Backofen akustische Signale ertönt und das
Symbol 4 blinkt.
ɉɨ ɨɤɨɧɱɚɧɢɢ ɨɛɪɚɬɧɨɝɨ ɨɬɫɱɟɬɚ ɞɭɯɨ
ɡɜɭɤɨɜɨɣ ɫɢɝɧɚɥ ɢ ɦɢɝɚɟɬ ɫɢɦɜɨɥ 4.
x ɇɚɠɚɜ ɥɸɛɭɸ ɤɧɨɩɤɭ, ɨɬɤɥɸɱɢɬɟ
ɦɢɧɭɬɧɢɤ.
# $ ɢɡɞɚɟɬ ɡɜɭɤɨɜɵɟ
ɫɢɝɧɚɥɵ ɜ ɡɚɪɚɧɟɟ ɭɫɬɚɧɨɜɥɟɧɧɨɟ ɜɪɟɦɹ.
x ɑɬɨɛɵ ɜɤɥɸɱɢɬɶ ɷɥɟɤɬɪɨɧɧɵɣ ɛɭɞɢɥɶɧɢɤ,
ɧɚɠɦɢɬɟ ɤɧɨɩɤɭ 1.
x ȼɵɫɬɚɜɶɬɟ ɧɟɨɛɯɨɞɢɦ
5. Ɉɧɨ ɨɬɨɛɪɚɠɚɟɬɫɹ ɧɚ ɞɢɫɩɥɟɟ 6.
ɑɟɪɟɡ ɧɟɫɤɨɥɶɤɨ ɫɟɤɭɧɞ ɩɪɨɡɜɭɱɢɬ ɡɜɭɤɨɜɨɣ
ɫɢɝɧɚɥ, ɢɧɮɨɪɦɢɪɭɹ ɨ ɧɚɱɚɥɟ ɪɚɛɨɬɵ
ɛɭɞɢɥɶɧɢɤɚ.
ɉɨ ɞɨɫɬɢɠɟɧɢɢ ɭɫɬɚɧɨɜɥɟɧɧɨɝɨ ɜɪɟɦɟɧɢ
ɞɭɯɨɜɤɚ ɢɡɞɚɟɬ ɡɜɭɤɨɜɵɟ ɫɢɝɧɚɥɵ ɢ ɦɢɝɚɟɬ
ɫɢɦɜɨɥ 4.
ɨɟ ɜɪɟɦɹ ɤɧɨɩɤɚɦɢ
ɜɤɚ ɢɡɞɚɟɬ
x Um den Signalton auszuschalten, eine
beliebige Taste drücken.
x ɑɬɨɛɵ ɨɬɤɥɸɱɢɬɶ ɡɜɭɤɨɜɨɣ ɫɢɝɧɚɥ,
ɧɚɠɦɢɬɟ ɥɸɛɭɸ ɤɧɨɩɤɭ.
83
Page 84

1
EN
Setting the cooking time
The process should switch off the oven after a
wanted duration automatically.
Before setting the duration you have to set an
4
2
1 2
3
oven operating function and a
temperature (see chapter “Cooking”).
The symbol 1 appears on the display and shows
that the oven is on.
x Press the keys 2 to set the duration of
preparation.
5
5
On the display appear the duration of preparation
3 and the actual time 4.
After a few seconds the countdown of the duration
starts. Symbol 5 appears on the display to confirm
the successful setting. The topical time
desappears.
x By using the choise keys 2 you can set the
wanted duration during the preparation.
After the end of the opposed duration a beeping
sound and the symbol 5 flashes to inform you that
all preocesses in the oven are switched off.
Press any key to silence the buzzer.
Important! If you select no other functions
within 8 seconds from silencing the buzzer,
the oven automatically switches off.
84
2
x To zero all the settings press both keys 2
simultaneously.
2
Page 85

DE RU
Einstellen der Betriebsdauer
Der Vorgang im Backofen soll nach einer
gewünschten Dauer automatisch abgeschaltet
werden.
Bevor die Dauer der Gerichtszubereitung
eingegeben wird, müssen Sie eine Backofen-
funktion und eine Temperatur der Zubereitung
einstellen (siehe Kapitel „Gebrauch vom
Backofen“).
Auf dem Display erscheint das Symbol 1 und
informiert, dass Backofen in Betrieb ist.
x Mit den Wahltasten 2 stellen Sie die
gewünschte Dauer der Gerichtzubereitung
ein.
Auf dem Display erscheinen die Betriebsdauer
3 und aktuelle Uhreit 4.
ɍɫɬɚɧɨɜɤɚ ɩɪɨɞɨɥɠɢɬɟɥɶɧɨɫɬɢ
ɩɪɢɝɨɬɨɜɥɟɧɢɹ
Ⱦɭɯɨɜɤɚ ɞɨɥɠɧɚ ɚɜɬɨɦɚɬɢɱɟɫɤɢ ɨɬɤɥɸɱɢɬɶɫɹ ɩɨ
ɢɫɬɟɱɟɧɢɢ ɠɟɥɚɟɦɨɝɨ ɩɪɨɦɟɠɭɬɤɚ ɜɪɟɦɟɧɢ.
ɉɪɟɠɞɟ ɱɟɦ ɡɚɞɚɬɶ ɩɪɨɞɨɥɠɢɬɟɥɶɧɨɫɬɶ
ɩɪɢɝɨɬɨɜɥɟɧɢɹ, ȼɵ ɞɨɥɠɧɵ ɭɫɬɚɧɨɜɢɬɶ
ɪɚɛɨɬɵ ɞɭɯɨɜɤɢ ɢ
ɩɪɢɝɨɬɨɜɥɟɧɢɹ (ɫɦ. ɪɚɡɞɟɥ "ɉɨɥɶɡɨɜɚɧɢɟ
ɞɭɯɨɜɵɦ ɲɤɚɮɨɦ").
ɇɚ ɞɢɫɩɥɟɟ ɩɨɹɜɢɬɫɹ ɫɢɦɜɨɥ 1, ɢɧɮɨɪɦɢɪɭɹ,
ɱɬɨ ɞɭɯɨɜɤɚ ɜ ɪɚɛɨɬɟ.
x ɂɫɩɨɥɶɡɭɹ ɤɧɨɩɤɢ ɜɵɛɨɪɚ 2, ɭɫɬɚɧɨɜɢɬɟ
ɠɟɥɚɟɦɭɸ ɩɪɨɞɨɥɠɢɬɟɥɶɧɨɫɬɶ
ɩɪɢɝɨɬɨɜɥɟɧɢɹ.
Ⱦɢɫɩɥɟɣ ɩɨɤɚɡɵɜɚɟɬ ɩɪɨɞɨɥɠɢɬɟɥɶɧɨɫɬɶ
ɩɪɢɝɨɬɨɜɥɟɧɢɹ 3 ɢ ɬɟɤɭɳɟɟ ɜɪɟɦɹ 4.
Nach einigen Sekunden beginnt die Rückzählung
der Zeitdauer. Auf dem Display erscheint Symbol
5, was die erfolgreiche Einstellung bestätigt, und
die aktuelle Uhrzeit erlischt.
x Die Betriebsdauer des Backofens können
Sie während seiner Arbeit mittels der
Tasten 2 ändern.
Nach Ablauf der eingestellten Zeitdauer ertönt ein
Signalton das Symbol 5 blinkt, um Sie zu
informieren, dass alle Vorgänge im Backofen
abgeschaltet sind.
Um den Signalton auszuschalten, eine beliebige
Taste drücken.
Wichtig! Wenn Sie innerhalb von 8
Sekunden nach der Abschaltung des
Signaltons keine Backofenfunktion wählen,
wird der Backofen automatisch
ausgeschaltet.
ɑɟɪɟɡ ɧɟɫɤɨɥɶɤɨ ɫɟɤɭɧɞ ɧɚɱɧɟɬɫɹ ɨɬɫɱɟɬ
ɜɪɟɦɟɧɢ ɩɪɢɝɨɬɨɜɥɟɧɢɹ. ɇɚ ɞɢɫɩɥɟɟ ɡɚɦɢɝɚɟɬ
ɫɢɦɜɨɥ 5, ɩɨɞɬɜɟɪɠɞɚɸɳɢɣ ɭɫɩɟɲ
ɩɪɨɝɪɚɦɦɢɪɨɜɚɧɢɟ, ɩɨɤɚɡɚɧɢɟ ɬɟɤɭɳɟɝɨ
ɜɪɟɦɟɧɢ ɢɫɱɟɡɧɟɬ.
x ȼɪɟɦɹ ɪɚɛɨɬɵ ɞɭɯɨɜɤɢ ȼɵ ɦɨɠɟɬɟ
ɢɡɦɟɧɹɬɶ ɜ ɬɟɱɟɧɢɢ ɩɪɢɝɨɬɨɜɥɟɧɢɹ
ɤɧɨɩɤɚɦɢ 2.
ɉɨ ɢɫɬɟɱɟɧɢɢ ɜɪɟɦɟɧɢ ɩɪɢɝɨɬɨɜɥɟɧɢɹ ɞɭɯɨɜɤɚ
ɩɨɞɚɟɬ ɡɜɭɤɨɜɨɣ ɫɢɝɧɚɥ ɢ ɡɚɦɢɝɚɟɬ ɫɢɦɜɨɥ 5,
ɢɧɮɨɪɦɢɪɭɹ, ɱɬɨ ɜɫɟ ɮɭɧɤɰɢɢ ɪɚɛɨɬɵ ɞɭɯɨɜɤɢ
ɨɬɤɥɸɱɟɧɵ.
ɇɚɠɚɜ ɥɸɛɭɸ ɤɧɨɩɤɭ, ɨɬɤɥɸɱɢɬɟ ɡɭɦɦɟɪ.
ȼɚɠɧɨ! ȿɫɥɢ ɜ ɬɟɱɟɧɢɟ 8 ɫɟɤɭɧɞ ɩɨɫɥɟ
ɨɬɤɥɸɱɟɧɢɹ ɡɭɦɦɟɪɚ ȼɵ ɧɟ ɜɵɛɟɪɢɬɟ
ɪɟɠɢɦ ɩɪɢɝɨɬɨɜɥɟɧɢɹ, ɞɭɯɨɜɤɚ
ɜɵɤɥɸɱɚɟɬɫɹ ɚɜɬɨɦɚɬɢɱɟɫɤɢ.
ɧɨɟ
x Betätigen Sie gleizeitig die Tasten 2, um
die Einstelungen zur Nullstellung zu
bringen.
x ɑɬɨɛɵ ɨɛɧɭɥɢɬɶ ɜɫɟ ɩɪɟɞɭɫɬɚɧɨɜɤɢ,
ɧɚɠɦɢɬɟ ɤɧɨɩɤɢ 2 ɨɞɧɨɜɪɟɦɟɧɧɨ.
85
Page 86

EN
Setting the end of cooking time
The oven must switch off after the set end time.
Before setting the end of cooking time you have to
set the oven operating function and the
temperature (see chapter “«Multifunction oven
control»).
The symbol 1 appears on the display and shows
that the oven is on.
3
4
1
2 2
x By using the choise keys 2 you set the
wanted end of cooking time.
The time of end of cooking 3 appears on the
display.
Important! By setting a cooking end time
earlier than the current time the oven will
begin to cook from now until the time set
on the following day!
After a few seconds the the program is activated.
Symbol 4 appears on the display to confirm the
successful programming. The topical time
desappears.
After the setting of end time is reached a beep
tone and the symbol 4 flashes to inform you that
all preocesses in the oven are switched off.
86
2
Press any key to silence the buzzer.
Important! If you don’t choose an oven
funktion within 8 seconds after the buzzer
silenced, the oven is turned off
automatically.
x To zero all the settings press both keys 2
simultaneously.
2
Page 87

DE RU
Einstellen der Endzeit
Der Backofen soll in eingegebener Endzeit
ausgeschaltet werden.
Bevor die Endzeit eingegeben wird, müssen Sie
sowohl eine Backofenfunktion als auch die
Temperatur der Zubereitung einstellen (siehe
Kapitel »Steuerung von
Multifunktionsbackofen«).
Auf dem Display erscheint das Symbol 1, das
mitteilt, dass der Backofen in Betrieb ist.
x Mit den Wahltasten 2 die gewünschte
Endzeit der Gerichtszubereitung einstellen.
Auf dem Display erscheint die Endzeit 3.
ɍɫɬɚɧɨɜɤɚ ɜɪɟɦɟɧɢ ɨɤɨɧɱɚɧɢɹ
ɩɪɢɝɨɬɨɜɥɟɧɢɹ
Ⱦɭɯɨɜɤɚ ɞɨɥɠɧɚ ɚɜɬɨɦɚɬɢɱɟɫɤɢ ɨɬɤɥɸɱɢɬɶɫɹ ɜ
ɡɚɪɚɧɟɟ ɡɚɞɚɧɧɨɟ ɜɪɟɦɹ.
ɉɪɟɠɞɟ ɱɟɦ ɡɚɞɚɬɶ ɜɪɟɦɹ ɨɤɨɧɱɚɧɢɹ ɪɚɛɨɬɵ,
ȼɵ ɞɨɥɠɧɵ ɭɫɬɚɧɨɜɢɬɶ
ɢ .
(ɫɦ. ɪɚɡɞɟɥ «ɍɩɪɚɜɥɟɧɢɟ ɪɚɛɨɬɨɣ
ɦɧɨɝɨɮɭɧɤɰɢɨɧɚɥɶɧɨɝɨ ɞɭɯɨɜɨɝɨ ɲɤɚɮɚ»).
ɇɚ ɞɢɫɩɥɟɟ ɩɨɹɜɢɬɫɹ ɫɢɦɜɨɥ 1, ɢɧɮɨɪɦɢɪɭɹ,
ɱɬɨ ɞɭɯɨɜɤɚ ɜ ɪɚɛɨɬɟ.
x ɂɫɩɨɥɶɡɭɹ ɤɧɨɩɤɢ ɜɵɛɨɪɚ 2, ɭɫɬɚɧɨɜɢɬɟ
ɠɟɥɚɟɦɨɟ ɜɪɟɦɹ ɨɤɨɧɱɚɧɢɹ
ɩɪɢɝɨɬɨɜɥɟɧɢɹ.
ɇɚ ɞɢɫɩɥɟɟ ɩɨɹɜɢɬɫɹ ɢɧɞɢɤɚɰɢɹ ɜɪɟɦɟɧɢ
ɨɤɨɧɱɚɧɢɹ ɩɪɢɝɨɬɨɜɥɟɧɢɹ 3.
Wichtig! Wenn die Endzeit vor der
aktuellen Uhrzeit liegt, bäckt bzw. brät der
Backofen bis zur eingestellten Uhrzeit des
Folgetages weiter!
Nach wenigen Sekunden wird das Programm
aktiviert. Auf dem Display erscheint das Symbol 4
als Bestätigung der erfolgreichen Programmierung
und die Endzeit wird nicht mehr angezeigt.
Wenn die eingegebene Endzeit erreicht ist, ertönt
ein Signalton und das Symbol 4 blinkt, um Sie zu
informieren, dass alle Vorgänge im Backofen
abgeschaltet sind.
Um den Signalton auszuschalten, eine beliebige
Taste drücken.
Wichtig! Wenn Sie innerhalb von 8
Sekunden nach der Abschaltung des
Signaltons keine Backofenfunktion wählen,
wird der Backofen automatisch
ausgeschaltet.
ȼɚɠɧɨ! ȿɫɥɢ ȼɵ ɡɚɞɚɞɢɬɟ ɜɪɟɦɹ ɛɨɥɟɟ
ɪɚɧɧɟɟ, ɱɟɦ ɬɟɤɭɳɟɟ, ɬɨ ɩɪɨɰɟɫɫ
ɩɪɢɝɨɬɨɜɥɟɧɢɹ ɛɭɞɟɬ ɞɥɢɬɶɫɹ ɞɨ
ɭɫɬɚɧɨɜɥɟɧɧɨɝɨ ɜɪɟɦɟɧɢ ɫɥɟɞɭɸɳɟɝɨ
ɞɧɹ!
ɑɟɪɟɡ ɧɟɫɤɨɥɶɤɨ ɫɟɤɭɧɞ ɩɪɨɝɪɚɦɦɚ ɛɭɞɟɬ
ɚɤɬɢɜɢɪɨ
ɩɨɞɬɜɟɪɠɞɚɸɳɢɣ ɭɫɩɟɲɧɨɟ ɩɪɨɝɪɚɦɦɢɪɨɜɚɧɢɟ,
ɚ ɢɧɞɢɤɚɰɢɹ ɜɪɟɦɟɧɢ ɨɤɨɧɱɚɧɢɹ ɩɪɢɝɨɬɨɜɥɟɧɢɹ
ɢɫɱɟɡɧɟɬ.
ɉɨ ɞɨɫɬɢɠɟɧɢɸ ɡɚɩɪɨɝɪɚɦɦɢɪɨɜɚɧɧɨɝɨ ɜɪɟɦɟɧɢ
ɞɭɯɨɜɤɚ ɩɨɞɚɟɬ ɡɜɭɤɨɜɨɣ ɫɢɝɧɚɥ ɢ ɡɚɦɢɝɚɟɬ
ɫɢɦɜɨɥ 4, ɢɧɮɨɪɦɢɪɭɹ, ɱɬɨ
ɞɭɯɨɜɤɢ ɨɬɤɥɸɱɟɧɵ.
ɇɚɠɚɜ ɥɸɛɭɸ ɤɧɨɩɤɭ, ɨɬɤɥɸɱɢɬɟ ɡɭɦɦɟɪ.
ɜɚɧɚ. ɇɚ ɞɢɫɩɥɟɟ ɩɨɹɜɢɬɫɹ ɫɢɦɜɨɥ 4,
ɮɭɧɤɰɢɢ ɪɚɛɨɬɵ
ɜɫɟ
ȼɚɠɧɨ! ȿɫɥɢ ɜ ɬɟɱɟɧɢɟ 8 ɫɟɤɭɧɞ ɩɨɫɥɟ
ɨɬɤɥɸɱɟɧɢɹ ɡɭɦɦɟɪɚ ȼɵ ɧɟ ɜɵɛɟɪɢɬɟ
ɪɟɠɢɦ ɩɪɢɝɨɬɨɜɥɟɧɢɹ, ɞɭɯɨɜɤɚ
ɜɵɤɥɸɱɚɟɬɫɹ ɚɜɬɨɦɚɬɢɱɟɫɤɢ.
x Betätigen Sie gleizeitig die Tasten 2, um
die Einstelungen zur Nullstellung zu
bringen.
x ɑɬɨɛɵ ɨɛɧɭɥɢɬɶ ɜɫɟ ɩɪɟɞɭɫɬɚɧɨɜɤɢ,
ɧɚɠɦɢɬɟ ɤɧɨɩɤɢ 2 ɨɞɧɨ
ɜɪɟɦɟɧɧɨ.
87
Page 88

EN
Setting cooking duration and end times
You can combine the cooking duration and end of
cooking time functions to set the start and end
times for cooking. In this way you can program
your electronic oven to cook while you are out or
to defrost foods ready for you to cook when you
get back. A great help in the kitchen!
The programming sequence of these two functions
is arbitrative. You can program first the duration
and then the end of cooking time or the other way
1
round.
Example: You want so that a dish will be ready for
you arrival at 15:30.
6
6
3
2
5
4
4
x Put the food into the oven and choose the
wanted oven operating function 1
(“Thermociculation” is shown only as an
example)
x Set the needed temperature 2 if you
want to change the adviced temperature.
x Set the cooking duration 3 using the keys
4 (in our example – 70 minutes).
Therefor you have to program the wanted end of
cooking time (see chapter «Setting cooking
duration»).
The symbol 5 appears on the display, that
comfirms a successful programming of the cooking
duration and appears the current day time 6.
88
Page 89

DE RU
Einstellen der Betriebsdauer und Endzeit
Sie können die beiden Funktionen "Betriebsdauer"
und „Endzeit“ kombinieren, wobei Sie eine
gewünschte Zeit eingeben, um den Backofen einund auszuschalten. So können Sie Ihren Backofen
für die Zeit programmieren, wenn Sie nicht zu
Hause sind; oder das Auftauen von Speisen bevor
Sie nach Hause kommen. Das ist eine große Hilfe
in Ihrer Küche.
Die Programmierfolge von diesen beiden
Funktionen ist nicht entscheidend. Sie können
zuerst Betriebsdauer und dann Endzeit
programmieren oder umgekehrt.
Beispiel: Sie möchten so, dass zu Ihrer Ankunft
um 15:30 die Speise fertig wäre.
ɍɫɬɚɧɨɜɤɚ ɩɪɨɞɨɥɠɢɬɟɥɶɧɨɫɬɢ ɢ ɜɪɟɦɟɧɢ
ɨɤɨɧɱɚɧɢɹ ɩɪɢɝɨɬɨɜɥɟɧɢɹ
ȼɵ ɦɨɠɟɬɟ ɤɨɦɛɢɧɢɪɨɜɚɬɶ ɮɭɧɤɰɢɢ ɜɪɟɦɟɧɢ
ɩɪɢɝɨɬɨɜɥɟɧɢɹ ɢ ɜɪɟɦɟɧɢ ɨɤɨɧɱɚɧɢɹ
ɩɪɢɝɨɬɨɜɥɟɧɢɹ, ɡɚɞɚɜɚɹ ɠɟɥɚɟɦɨɟ ɜɪɟɦɹ
ɜɤɥɸɱɟɧɢɹ ɢ ɜɵɤɥɸɱɟɧɢɹ ɞɭɯɨɜɤɢ. Ɍɚɤɢɦ
ɨɛɪɚɡɨɦ, ȼɵ ɦɨɠɟɬɟ ɡɚɩɪɨɝɪɚɦɦɢɪɨɜɚɬɶ
ɩɪɨɰɟɫɫ ɩɪɢɝɨɬɨɜɥɟɧɢɹ ɜ ȼɚɲɟɣ ɞɭɯɨɜɤɟ ɧɚ
ɜɪɟɦɹ, ɤɨɝ
ɞɚ
ȼɚɫ ɧɟɬ ɞɨɦɚ ɢɥɢ ɠɟ ɩɪɨɰɟɫɫ
ɬɨ
ɪɚɡɦɨɪɚɠɢɜɚɧɢɹ ɩɪɨɞɭɤɬɨɜ ɤ ȼɚɲɟɦɭ ɩɪɢɯɨɞɭ.
ɇɟɩɥɨɯɚɹ ɩɨɦɨɳɶ ɧɚ ɤɭɯɧɟ.
ɇɟ ɜɚɠɧɨ ɜ ɤɚɤɨɦ ɩɨɪɹɞɤɟ ȼɵ ɩɪɨɝɪɚɦɦɢɪɭɟɬɟ
ɷɬɢ ɞɜɟ ɮɭɧɤɰɢɢ. ɋɧɚɱɚɥɚ ɜɪɟɦɹ ɩɪɢɝɨɬɨɜɥɟɧɢɹ
ɢ ɡɚɬɟɦ ɜɪɟɦɹ ɨɤɨɧɱɚɧɢɹ ɢɥɢ ɧɚɨɛɨɪɨɬ.
ɇɚɩɪɢɦɟɪ: ȼɵ ɯɨɬɢɬɟ, ɱɬɨɛɵ ɤ ȼɚɲɟɦɭ ɩɪɢɯɨɞɭ
ɜ 15:30 ɛɥɸɞɨ ɛɵɥɨ ɝɨɬɨɜɨ.
x Stellen Sie Ihre Speise in den Backofen
und wählen eine der gewünschten
Backofenfunktion 1
(„Thermozirkulation“ wird nur als Beispiel
gezeigt).
x Stellen Sie die notwendige Temperatur
2 ein, wenn Sie die empfohlene
Temperatur ändern möchten.
x Geben Sie die Betriebsdauer der
Gerichtzubereitung 3 mittels der Tasten 4
ein (in unserem Beispiel – 70 Minuten).
Dafür muss die gewünschte Betriebsdauer
programmiert werden (siehe Kapitel »Einstellen
der Betriebsdauer«).
Auf dem Display erscheint das Symbol 5, das
bestätigt eine erfolgreiche Programmierung der
Betriebsdauer und die aktuelle Tageszeit 6 wird
angezeigt.
x ɉɨɦɟɫɬɢɬɟ ɛɥɸɞɨ ɜ ɞɭɯɨɜɤɭ ɢ ɜɵ
ɛɟɪɢɬɟ
ɧɭɠɧɵɣ 1
(ɪɟɠɢɦ "ɨɛɞɭɜ" – ɩɨɤɚɡɚɧ ɥɢɲɶ ɞɥɹ
ɩɪɢɦɟɪɚ).
x ɍɫɬɚɧɨɜɢɬɟ ɧɭɠɧɭɸ
2, ɟɫɥɢ ȼɵ ɯɨɬɢɬɟ
ɩɨɦɟɧɹɬɶ ɪɟɤɨɦɟɧɞɭɸɦɭɸ ɬɟɦɩɟɪɚɬɭɪɭ.
x Ɂɚɞɚɣɬɟ ɩɪɨɞɨɥɠɢɬɟɥɶɧɨɫɬɶ
ɩɪɢɝɨɬɨɜɥɟɧɢɹ 3 ɤɧɨɩɤɚɦɢ 4
(ɜ ɧɚɲɟɦ
ɩɪɢɦɟɪɟ – 70 ɦɢɧɭɬ).
Ⱦɥɹ ɷɬɨɝɨ ɡɚɩɪɨɝɪɚɦɦɢɪɭɣɬɟ ɠɟɥɚɟɦɭɸ
ɩɪɨɞɨɥɠɢɬɟɥɶɧɨɫɬɶ ɩɪɢɝɨɬɨɜɥɟɧɢɹ. (ɫɦ. ɪɚɡɞɟɥ
«ɍɫɬɚɧɨɜɤɚ ɩɪɨɞɨɥɠɢɬɟɥɶɧɨɫɬɢ
ɩɪɢɝɨɬɨɜɥɟɧɢɹ»).
ɇɚ ɞɢɫɩɥɟɟ ɩɨɹɜɢɬɫɹ ɫɢɦɜɨɥ 5,
ɩɨɞɬɜɟɪɠɞɚɸɳɢɣ ɭɫɩɟɲɧɨɟ ɩɪɨɝɪɚɦɦɢɪɨɜɚɧɢɟ
ɩɪɨɞɨɥɠɢɬɟɥɶɧɨɫɬɢ ɩɪɢɝɨɬɨɜɥɟɧɢɹ, ɚ ɬɚɤɠɟ
ɩɨɤɚɡɚɧɢɟ ɬɟɤɭɳɟɝɨ ɜɪɟɦɟɧɢ 6.
89
Page 90

6
EN
x Set the wanted end time with the choice
keys 7.
The end time 8 appears on the display.
A few seconds later this time will be registrated.
7
8
7
The oven is in expectance state now. The current
day time 6 is displayed (in our example 13:45).
5
In our example the oven should be turned on at
14:20 with the functions “Grill + Thermo
Circulation” for 70 minutes and be turned off at
15:30 according to your setting.
Advice! The right point to activate the
child lock, to prevent inadvertent shift or
unintentional turning on
After the set end time (15:30) is reached the oven
emits a beeping tone and the symbols flash to
inform you that all preocesses in the oven are
switched off.
Press any key to silence the buzzer.
90
Important! If you don’t choose an oven
funktion within 8 seconds after the buzzer
silenced, the oven is turned off
automatically.
Page 91

DE RU
x Mit den Wahltasten 7 die gewünschte
Endzeit einstellen.
Auf dem Display erscheint die Endzeit 8 (in
unserem Beispiel 15:30).
Nach wenigen Sekunden wird diese Zeit vom
Timer registriert.
Der Backofen ist im Bereitschaftsmodus. Die
aktuelle Tageszeit wird angezeigt 6 (in unserem
Beispiel 13:45).
In unserem Beispiel soll der Backofen um 14:20
bei den Funktionen „Grill + Thermozirkulation“ für
70 Minuten eingeschaltet und um 15:30
ausgeschaltet werden, gemäß Ihrer
ɇɚ ɞɢɫɩɥɟɟ ɩɨɹɜɢɬɫɹ ɜɪɟɦɹ ɨɤɨɧɱɚɧɢɹ
ɩɪɢɝɨɬɨɜɥɟɧɢɹ 8 (ɜ ɧɚɲɟɦ ɩɪɢɦɟɪɟ 15:30).
ɑɟɪɟɡ ɧɟɫɤɨɥɶɤɨ ɫɟɤɭɧɞ ɬɚɣɦɟɪ ɡɚɪɟɝɢɫɬɪɢɪɭɟɬ
ɷɬɨ
Ⱦɭɯɨ
ȼɵɫɜɟɬɢɬɶɫɹ ɬɟɤɭɳɟɟ ɜɪɟɦɹ 6
ɩɪɢɦɟɪɟ – 13:45).
ȼ ɧɚɲɟɦ ɩɪɢɦɟɪɟ ɞɭɯɨɜɤɚ ɞɨɥɠɧɚ ɜɤɥɸɱɢɬɫɹ ɜ
14:20 ɜ ɪɟɠɢɦɟ "ɝɪɢɥɶ + ɨɛɞɭɜ" ɧɚ 70 ɦɢɧɭɬ ɢ
ɜɵɤɥɸɱɢɬɫɹ ɜ 15:30, ɫɨɨɬɜɟɬɫɬɜɟɧɧɨ ɡɚɞɚɧɧɨɣ
ȼɚɦɢ ɩɪɨɝɪɚɦɦɟ.
Programmierung.
x ɂɫɩɨɥɶɡɭɹ ɤɧɨɩɤɢ ɜɵɛɨɪɚ 7, ɭɫɬɚɧɨɜɢɬɟ
ɠɟɥɚɟɦɨɟ ɜɪɟɦɹ ɨɤɨɧɱɚɧɢɹ
ɩɪɢɝɨɬɨɜɥɟɧɢɹ.
ɡɧɚɱɟɧɢɟ.
ɜɤɚ ɩɟɪɟɣɞɟɬ ɜ ɪɟɠɢɦ ɨɠɢɞɚɧɢɹ.
(ɜ ɧɚɲɟɦ
Empfehlung! Der richtige Zeitpunkt die
Kindersicherung zu aktivieren, damit eine
versehentliche Verstellungen oder ein
ungewolltes Einschalten verhindert werden.
Wenn die eingegebene Endzeit (15:30) erreicht ist,
ertönt ein Signalton und blinkt das Symbol 5, um
Sie zu informieren, dass alle Vorgänge im
Backofen abgeschaltet sind.
Um den Signalton auszuschalten, eine beliebige
Taste drücken.
Wichtig! Wenn Sie innerhalb von 8
Sekunden nach der Abschaltung des
Signaltons keine Backofenfunktion wählen,
wird der Backofen automatisch
ausgeschaltet.
ɋɨɜɟɬ! ɋɚɦɨɟ ɜɪɟɦɹ ɚɤɬɢɜɢɪɨɜɚɬɶ
ɮɭɧɤɰɢɸ ɛɥɨɤɢɪɨɜɤɢ ɨɬ ɞɟɬɟɣ, ɱɬɨɛɵ
ɩɪɟɞɨɬɜɪɚɬɢɬɶ ɢɯ ɜɦɟɲɚɬɟɥɶɫɬɜɨ ɢɥɢ
ɫɥɭɱɚɣɧɨɟ ɜɤɥɸɱɟɧɢɟ ɞɭɯɨɜɤɢ.
ɉɨ ɞɨɫɬɢɠɟɧɢɸ ɡɚɩɪɨɝɪɚɦɦɢɪɨɜɚɧɧɨɝɨ ɜɪɟɦɟɧɢ
(15:30) ɞɭɯɨɜɤɚ ɩɨɞɚɟɬ ɡɜɭɤɨɜɨɣ ɫɢɝɧɚɥ ɢ
ɡɚɦɢɝɚɟɬ ɫɢɦɜɨɥ 5, ɢɧɮɨɪɦɢɪɭɹ, ɱɬɨ ɜɫɟ
ɮɭɧɤɰɢɢ ɪɚɛɨɬɵ ɞɭɯɨɜɤɢ ɨɬɤɥɸɱɟɧɵ.
ɇɚɠɚɜ ɥɸɛɭɸ ɤɧɨɩɤɭ, ɨɬɤɥɸɱɢɬɟ ɡɭɦɦɟɪ.
ȼɚɠɧɨ! ȿɫɥɢ ɜ ɬɟɱɟɧɢɟ 8 ɫɟɤɭɧɞ ɩɨɫɥɟ
ɨɬɤɥɸɱɟɧɢɹ ɡɭɦɦɟɪɚ ȼɵ ɧɟ ɜɵɛɟɪɢɬɟ
ɪɟɠɢɦ ɩɪɢɝɨɬɨɜɥɟɧɢɹ, ɞɭɯɨɜɤɚ
ɜɵɤɥɸɱɚɟɬɫɹ ɚɜɬɨɦɚɬɢɱɟɫɤɢ.
91
Page 92

EN
DIGITAL TIME SWITCH CLOCK OF THE
OVEN Logic control F14
BITURBO
with full
sensor control
1
2
Demo mode
This is the mode of operation after an electric
supply break and also after the first turning-on.
The purpose of this mode is to show all
performance capabilities of the electronic control
with the help of a registered sequence of orders.
In this mode of operation the oven is not really
operated, i.e. no heating element is switched on.
The control panel is not active and the oven
doesn’t respond from there at the orders.
To deactivate the demonstration mode, touch
during 5 seconds the lighting key 1 up to a
confirming sound signal. The electronic control
passes into the normal operation mode.
Delay of the keys activation
For the prevention of casual turning-on during the
oven’s cleaning and in other situations it has been
applied the delay of the keys activation. The key
ON/OFF 1 has a delay of 640 ms, other keys –
140 ms.
Thus, to activate any function or change
parameters it is necessary to keep a finger on the
key up to a confirming sound signal.
92
Page 93

DE RU
ELEKTRONISCHE ZEITSCHALTUHR VON
BACKÖFEN Logic control F14
BITURBO
mit Vollsensorbedienung
Vorführmodus
So heißt die Betriebsart, in der der Backofen sich
normalerweise befindet, wenn die Speisespannung
ausgefallen ist, von daher auch beim ersten
Einschalten. Der Zweck ist es, alle Möglichkeiten
der elektronischen Steuerung anhand einer
registrierten Folge von Befehlen zu zeigen.
In dieser Betriebsart wird der Backofen nicht
wirklich betätigt, d.h. es werden keine
Heizwiderstände eingeschaltet. Die Bedienblende
ist nicht aktiv und der Backofen reagiert von
daher nicht auf die Befehle.
Um die Vorführmodus zu deaktivieren, berühren
Sie 5 Sekunden lang die Beleuchtungstaste 1 bis
zum bestätigenden Signalton. Die elektronische
Steuerung geht in die normale Betriebsart über.
ɗɅȿɄɌɊɈɇɇɈȿ ɉɊɈȽɊȺɆɆɂɊɍɘɓȿȿ
ɍɋɌɊɈɃɋɌȼɈ ȾɍɏɈȼɈɄ Logic control
BITURBO c ɩɨɥɧɵɦ ɫɟɧɫɨɪɧɵɦ
F14
ɭɩɪɚɜɥɟɧɢɟɦ
Ⱦɟɦɨɧɫɬɪɚɰɢɨɧɧɵɣ ɪɟɠɢɦ
Ɍɚɤ ɧɚɡɵɜɚɟɬɫɹ ɪɟɠɢɦ ɪɚɛɨɬɵ ɞɭɯɨɜɨɝɨ ɲɤɚɮɚ
ɩɨɫɥɟ ɬɨɝɨ, ɤɚɤ ɛɵɥɚ ɩɪɟɪɜɚɧɚ ɩɨɞɚɱɚ
ɷɥɟɤɬɪɨɷɧɟɪɝɢɢ, ɚ ɬɚɤɠɟ ɩɪɢ ɩɟɪɜɨɦ ɜɤɥɸɱɟɧɢɢ.
ɐɟɥɶɸ ɹɜɥɹɟɬɫɹ ɩɨɤɚɡ ɜɫɟɯ ɜɨɡɦɨɠɧɨɫɬɟɣ
ɷɥɟɤɬɪɨɧɧɨɝɨ ɩɪɨɝɪɚɦɦɢɪɭɸɳɟɝɨ ɭɫɬɪɨɣɫɬɜɚ
ɩɨɫɪɟɞɫɬɜɨɦ ɡɚɪɚɧɟɟ ɭɫɬɚɧɨɜɥɟɧɧɨɣ
ɩɨɫɥɟɞɨɜɚɬɟɥɶɧɨɫɬɢ ɤɨɦɚɧɞ.
ȼ ɷɬɨɦ ɪɟɠɢɦɟ ɪɚɛɨɬɵ ɞɭɯɨɜɤɚ ɧɟ ɪɚɛɨɬɚɟɬ,
ɬ.ɟ. ɧɢ ɨɞɢɧ ɧɚɝɪɟɜɚɬɟɥɶɧɵɣ ɷɥɟɦɟɧɬ ɧɟ
ɜɤɥɸɱɚɟɬɫɹ. Ʉɨɧɬɪɨɥɶɧɚɹ ɩɚɧɟɥɶ ɧɟ ɚɤɬɢɜɧɚ
ɢ ɩɨɷɬɨɦɭ ɞ
ɑɬɨɛɵ ɞɟɚɤɬɢɜɢɪɨɜɚɬɶ ɞɟɦɨɧɫɬɪɚɰɢɨɧɧɵɣ
ɪɟɠɢɦ, ɞɨɬɪɨɧɶɬɟɫɶ ɢ ɭɞɟɪɠɢɜɚɣɬɟ 5 ɫɟɤɭɧɞ
ɤɧɨɩɤɭ ɨɫɜɟɳɟɧɢɹ 1 ɞɨ ɩɨɞɬɜɟɪɠɞɚɸɳɟɝɨ
ɡɜɭɤɨɜɨɝɨ ɫɢɝɧɚɥɚ. ɗɥɟɤɬɪɨɧɧɨɟ
ɩɪɨɝɪɚɦɦɢɪɭɸɳɟɟ ɭɫɬɪɨɣɫɬɜɨ ɩɟɪɟɯɨɞɢɬ ɜ
ɧɨɪɦɚɥɶɧɵɣ ɪɟɠɢɦ ɪɚɛɨɬɵ.
ɭɯɨɜɤɚ ɧɟ ɪɟɚɝɢɪɭɟɬ ɧɚ ɤɨɦɚɧɞɵ.
Verzögerung der Tastenaktivierung
Um die zufällige Einschaltung während der
Backofenreinigung und in den übrigen Situationen
zu vermeiden, ist der Verzögerung der
Tastenaktivierung eingeführt. Die Taste ON/OFF
2 verfügt über eine Verzögerung von 640 ms, alle
anderen – 140 ɦɫ.
Auf solche Weise, ist es nötig für die Aktivierung
jener oder anderen Funktion, für die
Veränderungen der Parameter, den Finger auf der
Taste bis zum bestätigenden Signalton
festzuhalten.
Ɂɚɞɟɪɠɤɚ ɚɤɬɢɜɚɰɢɢ ɤɧɨɩɨɤ
Ⱦɥɹ ɩɪɟɞɨɬɜɪɚɳɟɧɢɹ ɫɥɭɱɚɣɧɨɝɨ ɜɤɥɸɱɟɧɢɹ ɜɨ
ɜɪɟɦɹ ɱɢɫɬɤɢ ɞɭɯɨɜɨɝɨ ɲɤɚɮɚ ɢ ɜ ɩɪɨɱɢɯ
ɫɢɬɭɚɰɢɹɯ ɜɜɟɞɟɧɚ ɡɚɞɟɪɠɤɚ ɚɤɬɢɜɚɰɢɢ ɤɧɨɩɨɤ.
Ʉɧɨɩɤɚ ON/OFF 2 ɢɦɟɟɬ ɡɚɞɟɪɠɤɭ 640 ɦɫ, ɜɫɟ
ɨɫɬɚɥɶɧɵɟ – 140 ɦɫ.
Ɍɚɤɢɦ ɨɛɪɚɡɨɦ, ɞɥɹ ɚɤɬɢɜɚɰɢɢ ɬɨɣ ɢɥɢ ɢɧɨɣ
ɮɭɧɤɰɢɢ, ɢɡɦɟɧɟɧɢɹ ɩɚɪɚɦɟɬɪɨɜ ɫɥɟɞɭɟɬ
ɭɞɟɪɠɢɜɚɬɶ ɩɚɥɟɰ ɧɚ ɤɧɨɩɤɟ ɞɨ
ɩɨɞɬɜɟɪɠɞɚɸɳɟɝɨ ɡɜɭɤɨɜɨɝɨ ɫɢɝɧɚɥɚ.
93
Page 94

EN
Setting the clock
To set the current time:
x Press and hold the key 1 for 5 seconds.
As a confirmation that the clock setting is possible,
it appears a sound signal.
The keys 2 and 3 are highlighted, the dividing
colon 4 between indications of hours and minutes
blinks
1 2 3
4
x By pressing the choice keys 2 or 3 you
can set the current time.
After a few seconds the controller sets the time
currently displayed and the two dots stop flashing.
Important! If you change the time
setting, you reset the timer and cancel all
cooking settings.
94
Page 95

DE RU
Uhrzeiteinstellung
Zur Einstellung der aktuellen Uhrzeit:
x Die Taste 1 drücken und 5 Sekunden lang
gedrückt halten.
Jeder aktivierte Befehl wird mit einem Signalton
bestätigt.
Die Tasten 2 und 3 sind beleuchtet, der
Doppelpunkt 4 zwischen den Anzeigen für
Stunden und Minuten blinkt.
x Ɇit den Wahltasten 2 oder 3 die aktuelle
Uhrzeit einstellen.
x
Nach einigen Sekunden wird die aktuelle Uhrzeit
auf dem Display erscheinen und der Doppelpunkt
hört auf zu blinken.
ɍɫɬɚɧɨɜɤɚ ɬɟɤɭɳɟɝɨ ɜɪɟɦɟɧɢ
ɑɬɨɛɵ ɭɫɬɚɧɨɜɢɬɶ ɬɟɤɭɳɟɟ ɜɪɟɦɹ:
x ɇɚɠɦɢɬɟ ɢ ɭɞɟɪɠɢɜɚɣɬɟ ɜ ɬɟɱɟɧɢɢ 5
ɫɟɤɭɧɞ ɤɧɨɩɤɭ 1.
Ʉɚɠɞɚɹ ɚɤɬɢɜɢɪɨɜɚɧɧɚɹ ɤɨɦɚɧɞɚ
ɩɨɞɬɜɟɪɠɞɚɟɬɫɹ ɡɜɭɤɨɜɵɦ ɫɢɝɧɚɥɨɦ.
Ʉɧɨɩɤɢ 2 ɢ 3 ɩɨɞɫɜɟɱɢɜɚɸɬɫɹ, ɪɚɡɞɟɥɢɬɟɥɶɧɨɟ
ɞɜɨɟɬɨɱɢɟ 4 ɦɟɠɞɭ ɩɨɤɚɡɚɧɢɹɦɢ ɱɚɫɨɜ ɢ ɦɢɧɭɬ
ɦɢɝɚɟɬ.
x Ʉɧɨɩɤɚɦɢ ɜɵɛɨɪɚ 2 ɢɥɢ 3 ɜɵɫɬɚɜɢɬɟ
ɬɟɤɭɳɟɟ ɜɪɟɦɹ.
ɑɟɪɟɡ ɧɟɫɤɨɥɶɤɨ ɫɟɤɭɧɞ ɧɚ ɞɢɫɩɥɟɟ ɩɨɹɜɢɬɫɹ
ɢɧɞɢɤɚɰɢɹ ɬɟɤɭɳɟɝɨ ɜɪɟɦɟɧɢ ɢ ɞɜɨɟɬɨɱɢɟ
ɩɟɪɟɫɬɚɧɟɬ ɦɢɝɚɬɶ.
Wichtig! Bei der Änderung der
eingestellten Uhrzeit werden alle vorher
gewählten Programme gelöscht.
ȼɚɠɧɨ! ɉɪɢ ɢɡɦɟɧɟɧɢɢ ɭɫɬɚɧɨɜɥɟɧɧɨɝɨ
ɬɟɤɭɳɟɝɨ ɜɪɟɦɟɧɢ ɜɫɟ ɩɪɟɞɵɞɭɳɢɟ
ɩɪɨɝɪɚɦɦɵ ɛɭɞɭɬ ɨɬɦɟɧɟɧɵ.
95
Page 96

EN
1
2
3
1
Oven light
Innenbeleuchtung
Ɉɫɜɟɳɟɧɢɟ ɞɭɯɨɜɤɢ
2
Top and bottom heat
Ober- und Unterhitze
ȼɵɩɟɱɤɚ
Top heat
Obehitze
ȼɵɩɟɱɤɚ
Usage of the oven
You can start the process of cooking with a few
easy handels.
x Switch on the oven by pressing key
x Using one of the key
for the oven
operating functions you choose a
desired oven function.
According to the chosen program a recommended
temperature is set in the oven automatically.
Bottom heat
Unterhitze
ȼɵɩɟɱɤɚ
Grill
Grill
Ƚɪɢɥɶ
Double grill
Doppelgrill
Ⱦɜɨɣɧɨɣ ɝɪɢɥɶ
Grill & fan
Grill mit Heißluft
Ƚɪɢɥɶ ɫ ɨɛɞɭɜɨɦ
.
3
4
6
5
x The preset temperature can be changed by
using the temperature regulating
keys 3
and 4.
You should not confirm any changes; the
electronic control applies it automatically.
The symbol 5 (º) blinks to show that the oven is
warming up.
As soon as the oven reaches the set temperature
the oven beeps 3 times and the symbol 5 (º) stops
to blink. Now you can put the food you want to
prepare into the oven.
Residual heat
The term Residual heat is used to describe the
heat which the oven has accumulated inside it
while cooking foods. This heat is gradually
dispersed over time and may still be a culinary
resource if managed properly: your oven indicates
the internal temperature 6, after turning the oven
off, until it drops to 50°C. This way you can use it
to heat up food, unfreeze foods at a low
temperature, or to indicate the level of safety in the
kitchen.
96
Page 97

DE RU
1
1
3
A
Gebrauch von Backofen
Mit wenigen einfachen Handgriffen können Sie den
Prozess der Zubereitung beginnen.
x Den Backofen mit Hilfe von Taste
einschalten.
x Mit Hilfe einer Taste von den
Backofenbetriebsfunktionen 2, die
gewünschte Backofenfunktion wählen.
Entsprechend des gewählten Programms, wird im
Backofen automatisch eine empfohlene
Temperatur eingestellt.
Top and bottom + fan
165°C
Ober- und Unterhitze m.
Heißluft 165°C
ȼɟɪɯɧɢɣ +ɧɢɠɧɢɣ
ɧɚɝɪɟɜ ɫ ɨɛɞɭɜɨɦ165°C
Fan 165°C
Heißluft 165°C
Ƚɨɪɹɱɢɣ ɨɛɞɭɜ 165°ɋ
Pizza 230°C
Pizza 230°C
ɉɢɰɰɚ 230°ɋ
ɉɨɥɶɡɨɜɚɧɢɟ ɞɭɯɨɜɵɦ ɲɤɚɮɨɦ
ȼ ɧɟɫɤɨɥɶɤɨ ɩɪɨɫɬɵɯ ɞɜɢɠɟɧɢɣ ȼɵ ɦɨɠɟɬɟ
ɧɚɱɚɬɶ ɩɪɨɰɟɫɫ ɩɪɢɝɨɬɨɜɥɟɧɢɹ.
x ȼɤɥɸɱɢɬɟ ɞɭɯɨɜɤɭ ɧɚɠɚɬɢɟɦ ɤɧɨɩɤɢ
x Ɉɞɧɨɣ ɢɡ ɤɧɨɩɨɤ
ȼ ɫɨɨɬɜɟɬɫɬɜɢɢ ɫ ɜɵɛɪɚɧɧɵɦ ɪɟɠɢɦɨɦ, ɞɭɯɨɜɤɚ
ɚɜɬɨɦɚɬɢɱɟɫɤɢ ɭɫɬɚɧɨɜɢɬ ɪɟɤɨɦɟɧɞɭɟɦɭɸ
ɬɟɦɩɟɪɚɬɭɪɭ.
Defrost
uftauen
Ɋɚɡɦɨɪɚɠɢɜɚɧɢɟ
.
2, ɜɵɛɟɪɢɬɟ ɠɟɥɚɟɦɵɣ ɪɟɠɢɦ
ɩɪɢɝɨɬɨɜɥɟ
Double grill + Bottom heat
Doppelgrill + Unterhitze
Ⱦɜɨɣɧɨɣ ɝɪɢɥɶ + ɇɢɠɧɢɣ
ɧɚɝɪɟɜ
ɧɢɹ.
x Die voreingestellte Temperatur können Sie
mit Hilfe der Tasten des
Temperaturreglers 3 und 4 ändern.
Sie müssen die Änderungen nicht bestätigen, die
Steuerung aktiviert sich nach einigen Sekunden
von alleine.
Das Symbol 5 (º) zeigt durch Blinken, dass der
Backofen erwärmt wird.
Sobald der Backofen die eingestellte Temperatur
erreicht hat, ertönten 3 akustische Signale und das
Symbol 5 (º) hört auf zu blinken: jetzt können Sie
Ihr zu zubereitendes Gericht in den Backofen
stellen.
Restwärme
Unter Restwärme versteht man jene Wärme, die
im Backofen nach der Zubereitung von Gerichten
gespeichert bleibt. Diese Wärme sinkt im Laufe der
Zeit und kann ggf. noch als Wärmestelle in der
Küche verwendet werden: Nach dem Abschalten
zeigt Ihr Backofen die Innentemperatur 6 an, bis
sie 50°C erreicht hat. Auf diese Weise ist der
Backofen zum Erwärmen von Speisen oder, bei
niedrigen Temperaturen, zum Abtauen
verwendbar. Ferner kann diese Anzeige als
Hinweis für die Sicherheit des Küchenbereichs
dienlich sein.
ȼɵ ɧɟ ɞɨɥɠɧɵ ɩɨɞɬɜɟɪɠɞɚɬɶ ɢɡɦɟɧɟɧɢɹ,
ɷɥɟɤɬɪɨɧɧɨɟ ɭɩɪɚɜɥɟɧɢɟ ɩɪɢɦɟɧɢɬ ɢɯ ɱɟɪɟɡ
ɧɟɫɤɨɥɶɤɨ ɫɟɤɭɧɞ.
Ɂɚɦɢɝɚɟɬ ɫɢɦɜɨɥ 5 (º), ɩɨɤɚɡɵɜɚɹ, ɱɬɨ ɞɭɯɨɜɤɚ
ɪɚɡɨɝɪɟɜɚɟɬɫɹ.
Ʉɨɝɞɚ ɞɭɯɨɜɤɚ ɞɨɫɬɢɝɧɟɬ ɡɚɞɚɧɧɨɣ
ɬɟɦɩɟɪɚɬɭɪɵ, ɨɧɚ ɩɨɞɚɫɬ 3 ɡɜɭɤɨɜɵɯ ɫɢɝɧɚɥɚ, ɚ
ɫɢɦɜɨɥ 5 (º) ɩɟɪɟɫɬɚɧɟɬ ɦɢɝɚɬɶ. Ɍɟɩɟɪɶ ȼɵ
ɦɨɠɟɬɟ ɫɬɚɜɢɬɶ ɜ ɧɟɟ ɛɥɸɞɨ, ɤɨ
ɝɨɬɨɜɢɬɶ.
Ɉɫɬɚɬɨɱɧɚɹ ɬɟɦɩɟɪɚɬɭɪɚ
Ɍɟɪɦɢɧ "
ɢɫɩɨɥɶɡɭɟɬɫɹ ɞɥɹ ɨɩɢɫɚɧɢɹ ɬɟɦɩɟɪɚɬɭɪɵ,
ɤɨɬɨɪɚɹ ɨɫɬɚɥɚɫɶ ɜ ɞɭɯɨɜɤɟ ɩɨɫɥɟ
ɩɪɢɝɨɬɨɜɥɟɧɢɹ. ɗɬɚ ɬɟɦɩɟɪɚɬɭɪɚ ɩɨɫɬɟɩɟɧɧɨ
ɩɨɧɢɠɚɟɬɫɹ ɢ ɦɨɠɟɬ ɛɵɬɶ ɟɳɟ ɢɫɩɨɥɶɡɨɜɚɧɚ
ɞɥɹ ɪɚɡɥɢɱɧɵɯ ɰɟɥɟɣ: ȼɚɲɚ ɞɭɯɨɜɤɚ
ɩɨɤɚɡɵɜɚɟɬ ɜɧɭɬɪɟɧɧɸɸ ɬɟɦɩɟɪɚ
ɟɟ ɜɵɤɥɸɱɟɧɢɹ, ɩɨɤɚ ɬɚ ɧɟ ɫɩɚɞɚɟɬ ɞɨ 50°C.
Ȼɥɚɝɨɞɚɪɹ ɷɬɨɦɭ ȼɵ ɦɨɠɟɬɟ ɢɫɩɨɥɶɡɨɜɚɬɶ
ɞɭɯɨɜɤɭ, ɱɬɨɛɵ ɧɚɝɪɟɬɶ ɩɢɳɭ, ɪɚɡɦɨɪɨɡɢɬɶ
ɩɢɳɟɜɵɟ ɩɪɨɞɭɤɬɵ, ɚ ɬɚɤɠɟ ɢɦɟɬɶ ɢɧɮɨɪɦɚɰɢɸ
ɨɛ ɭɪɨɜɧɟ ɛɟɡɨɩɚɫɧɨɫɬɢ ɧɚ ɤɭɯɧɟ.
x ɉɪɢ ɠɟɥɚɧɢɢ ȼɵ ɦɨɠɟɬɟ ɢɡɦɟɧɢɬɶ
ɪɟɤɨɦɟɧɞɭɟɦɭɸ ɬɟɦɩɟɪɚɬɭɪɭ ɤɧɨɩɤɚɦɢ
ɢ 4.
ɬɨɪɨɟ ɯɨɬɢɬɟ
ɬɭɪɭ 6, ɩɨ
ɫɥɟ
97
Page 98

EN
1
2
Turbo heat function
This function greatly reduces a time of heating of
the oven with all of selected functions.
1
4
2
3
5
x Switch on the oven by pressing key
x Choose a wanted oven function using one
of the keys
x Set a temperature you need by using the
keys 3.
x To activate Turbo heat function, press
the key 4.
The key becomes red. The degree symbol (º) 5 is
blinking. On reaching the temperature set the oven
emits two beeps.
Turbo clean function
This function is applied to fast clearing the oven
end can only be activated when no other function
of the oven has been activated. The function
Turbo clean speeds up the cleaning the oven
using the self-cleaning catalytic panels.
.
.
1
6
x Push the key 1 on the control panel to turn
on the oven.
x Push key Turbo clean 6 to turn on this
function.
Symbol 6 blinks red. The oven reaches the
temperature of 250 °C and stays at this
temperature for 1 hour.
Important! Do not put dishes in the oven;
do not use this special function for
cooking!
98
Page 99

DE RU
1
1
Funktion Turbo heat
Diese Funktion beschleunigt gewaltig das
Aufheizen des Backofens bei jeder ausgewählten
Funktion.
x Den Backofen mit Hilfe von Taste
einschalten.
x Mit Hilfe einer der Tasten 2 gewünschte
Backofenfunktion wählen.
x Die gewünschte Temperatur mit den
Tasten 3 einstellen.
x Um die Turbo heat-Funktion zu
aktivieren, die Taste 4 drücken.
Diese Taste ändert ihre Farbe in rot. Das
Temperaturensymbol (º) 5 blinkt. Nachdem im
Backofen die eingestellte Temperatur erreicht
worden ist, ertönen zwei akustische Signale.
Ɏɭɧɤɰɢɹ Turbo heat
ɗɬɚ ɮɭɧɤɰɢɹ ɪɟɡɤɨ ɫɨɤɪɚɳɚɟɬ ɜɪɟɦɹ ɪɚɡɨɝɪɟɜɚ
ɞɭɯɨɜɤɢ ɞɨ ɡɚɞɚɧɧɨɣ ɬɟɦɩɟɪɚɬɭɪɵ ɩɪɢ ɥɸɛ
ɜɵɛɪɚɧɧɨɣ ɮɭɧɤɰɢɢ.
x ȼɤɥɸɱɢɬɟ ɞɭɯɨɜɤɭ ɧɚɠɚɬɢɟɦ ɤɧɨɩɤɢ
x ɋ ɩɨɦɨɳɶɸ ɨɞɧɨɣ ɢɡ ɤɧɨɩɨɤ 2 ɜɵɛɟɪɢɬɟ
ɠɟɥɚɟɦɭɸ ɮɭɧɤɰɢɸ.
x ɍɫɬɚɧɨɜɢɬɟ ɧɭɠɧɭɸ ɬɟɦɩɟɪɚɬɭɪɭ
ɤɧɨɩɤɚɦɢ 3.
x ɑɬɨɛɵ ɚɤɬɢɜɢɪɨɜɚɬɶ ɮɭɧɤɰɢɸ Turbo
heat, ɧɚɠɦɢɬɟ ɤɧɨɩɤɭ 4.
Ʉɧɨɩɤɚ ɦɟɧɹɟɬ ɰɜɟɬ ɧɚ ɤɪɚɫɧɵɣ. ɋɢɦɜɨɥ
ɝɪɚɞɭɫɚ (º) 5 ɦɢɝɚɟɬ. ɉɨ ɞɨɫɬɢɠɟɧɢɢ ɞɭɯɨɜɤɨɣ
ɜɵɛɪɚɧɧɨɣ ɬɟɦɩɟɪɚɬɭɪɵ ɪɚɡɞɚɸɬɫɹ 2 ɡɜɭɤɨɜɵɯ
ɫɢɝɧɚɥɚ.
ɨɣ
.
Funktion Turbo clean
Diese Funktion wird für die schnelle Reinigung des
Backofens verwendet und kann nur dann
angeschaltet werden, wenn keine andere Funktion
des Backofens aktiv ist. Bei der Nutzung der
Funktion Turbo clean wird der
Reinigungsprozess dank der selbstreinigenden
katalytischen Seitenpanellen beschleunigt.
x Drücken Sie die Taste 1, um den Backofen
anzuschalten.
x Drücken Sie und halten Sie ca. 3 Sekunden
lang die Taste Turbo clean 6 gedrückt,
um diese Funktion zu aktivieren.
Das Symbol 6 blinkt in rot. Der Backofen erreicht
die Temperatur von 250 °C und behält sie für 1
Stunde.
Wichtig! Bei dieser Sonderfunktion
keine Gerichte in den Backofen
stelleln. Diese Funktion auf keinen Fall
für Zubereitung verwenden!
Ɏɭɧɤɰɢɹ Turbo clean
ɗɬɚ ɮɭɧɤɰɢɹ ɩɪɢɦɟɧɹɟɬɫɹ ɞɥɹ ɛɵɫɬɪɨɣ ɨɱɢɫɬɤɢ
ɞɭɯɨɜɤɢ ɢ ɦɨɠɟɬ ɛɵɬɶ ɜɤɥɸɱɟɧɚ ɬɨɥɶɤɨ ɬɨɝɞɚ,
ɤɨɝɞɚ ɧɟɚɤɬɢɜɢɪɨɜɚɧɚ ɧɢɤɚɤɚɹ ɞɪɭɝɚɹ ɮɭɧɤɰɢɹ
ɞɭɯɨɜɤɢ. ɂɫɩɨɥɶɡɨɜɚɧɢɟ ɮɭɧɤɰɢɢ Turbo clean
ɜ ɞɭɯɨɜɤɟ ɭɫɤɨɪɹɟɬ ɩɪɨɰɟɫɫ ɨɱɢɫɬɤɢ ɛɥɚɝɨɞɚɪɹ
ɫɚɦɨɨɱɢɳɚɸɳɢɦɢɫɹ ɤɚɬɚɥɢɬɢɱɟɫɤɢɦ ɩɚɧɟɥɹɦ.
ɋɢɦɜɨɥ 6 ɦɢɝɚɟɬ ɤɪɚɫɧɵɦ. Tɟɦɩɟɪɚɬɭɪɚ
ɞɭɯɨɜɤɢ ɩɨɞɧɢɦɟɬɫɹ ɞɨ 250 °C ɢ ɛɭɞɟɬ
ɩɨɞɞɟɪɠɢɜɚɬɶɫɹ ɜ ɬɟɱɟɧɢɢ 1 ɱɚɫɚ.
x ɇɚɠɦɢɬɟ ɤɧɨɩɤɭ 1, ɱɬɨɛɵ ɜɤɥɸɱɢɬɶ
ɞɭɯɨɜɤɭ.
x ɇɚɠɦɢɬɟ ɢ ɭɞɟɪɠɢɜɚ
clean 6 ɩɨɪɹɞɤɚ 3 ɫɭɤɭɧɞ ɞɥɹ ɚɤɬɢɜɚɰɢɢ
ɷɬɨɣ ɮɭɧɤɰɢɢ.
ȼɚɠɧɨ! ɉɪɢ ɪɚɛɨɬɟ ɞɭɯɨɜɤɢ ɜ ɷɬɨɦ
ɪɟɠɢɦɟ ɧɟ ɫɥɟɞɭɟɬ ɜ ɧɟɟ ɩɨɦɟɳɚɬɶ
ɛɥɸɞɚ. ɗɬɚ ɮɭɧɤɰɢɹ ɧɟ ɩɪɟɞɧɚɡɧɚɱɟɧɚ
ɞɥɹ ɩɪɢɝɨɬɨɜɥɟɧɢɹ ɩɢɳɢ!
ɣɬɟ ɤɧɨɩɤɭ Turbo
99
Page 100

1
2
EN
Oven light
The oven is equipped with an intelligent light
control to reduce the electricity consumption. The
light stays on while the oven is warming up and for
3 minutes after the set temperature is reached,
then switches off.
x To check a meal in the oven, touch the
oven lighting key 1.
The oven light tutns on for 3 minutes.
x To turn off the oven light, touch the key 1.
By opening/ closing the oven’s door the oven’s
lighting turns-on/ off automatically.
4
3
Child lock
An important planning possibility in your new oven
with electronical programmable Logic control is
to prevent inadvertent shift or unintentional
turning-on. You can activate the child lock at any
time, even when the oven is turned off.
x Touch and hold the key ON/OFF 2 for at
least 3 seconds to activate the child lock.
The oven emits a sound signal. On the display the
symbol 4 changes the symbol 3 .The oven’s
electronic control is blocked. Now you can only
turn off the oven (if it’s on) or turn on/ off the
oven light.
If you press any key, the oven emits a sound
signal.
100
Important! If the oven is turned off, the
child lock function remains active!
x Touch and hold the key ON/OFF 2 for at
least 3 seconds to deactivate the child lock.
The electronic control of the oven is ready for use
again.
 Loading...