

Page 1
MICRO COMPONENT SYSTEM
SISTEMAS DE MICROCOMPONENTES
SISTEMA DE MICRO COMPONENTES
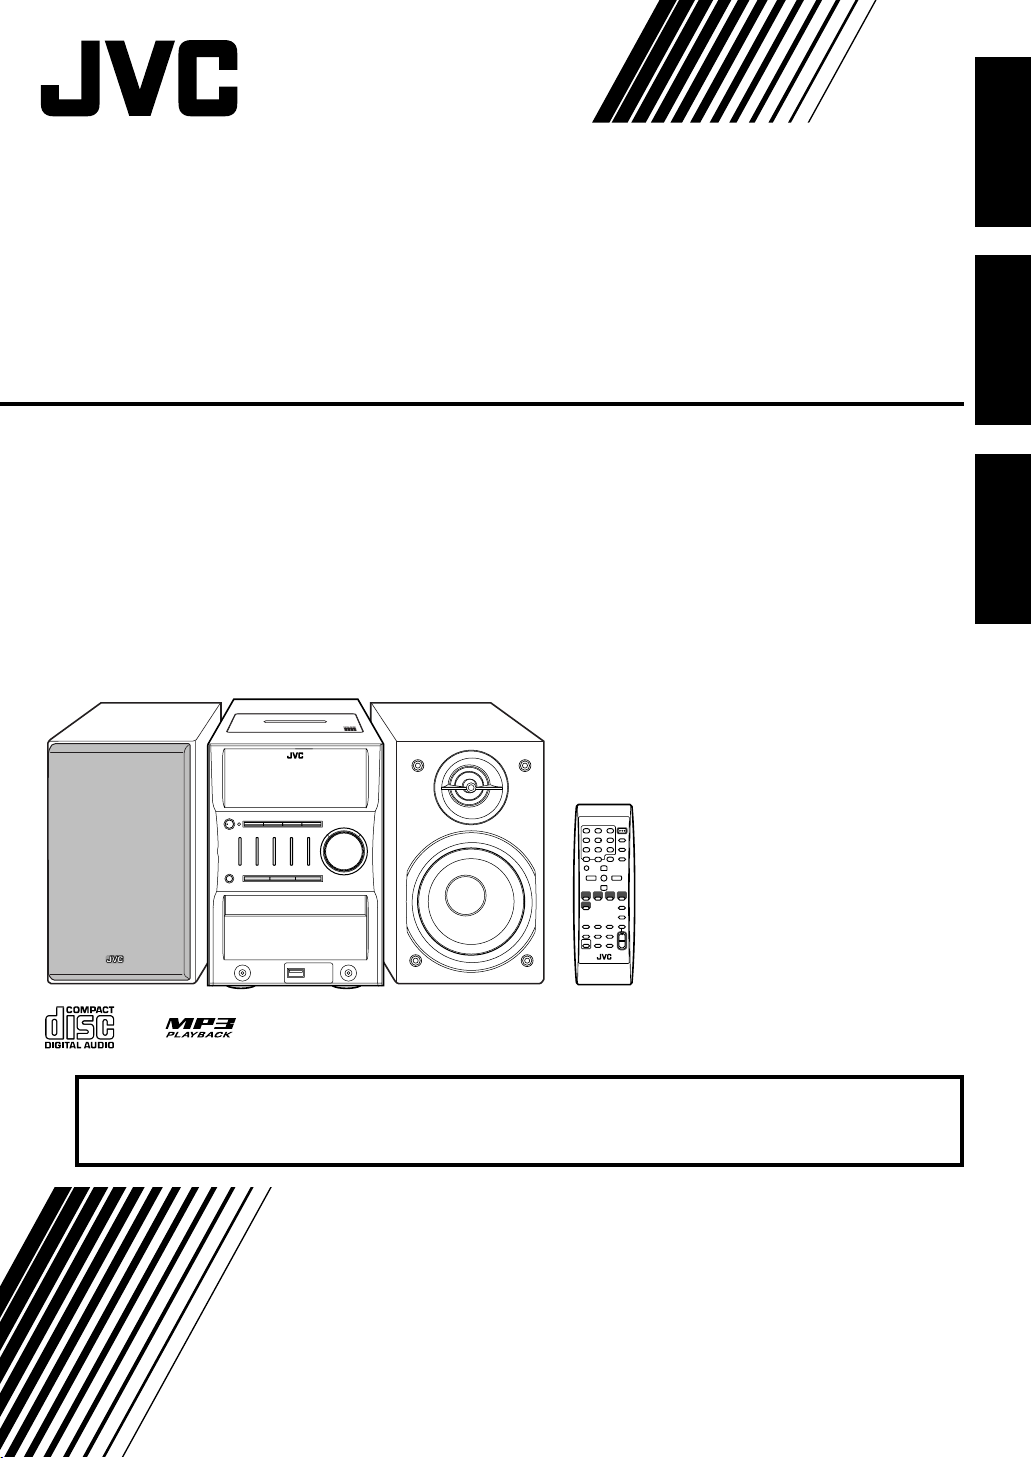
—Consists of CA-UXG45 and SP-UXG45
UX-G45
—Consta de CA-UXG45 y SP-UXG45
—Consiste em CA-UXG45 e SP-UXG45
English
Español
Português
¡ATENCION!
Antes de operar su equipo, lea cuidadosamente este instructivo.
INSTRUCTIONS
MANUAL DE INSTRUCCIONES
INSTRUCOES
LVT1520-010A
[UW]
Page 2

Warnings, Cautions and Others
Avisos, precauciones y otras notas
Advertências, precauções e outras notas
CAUTION— (standby/on) button!
Disconnect the mains plug to shut the power off completely
(all lamps and indications go off). When installing the product
ensure that the plug is easily accessible. The button in
any position does not disconnect the mains line.
• When the unit is on standby, the STANDBY/ON lamp lights in
red.
• When the unit is turned on, the STANDBY/ON lamp goes off.
The power can be remote controlled.
CAUTION
To reduce the risk of electrical shocks, fire, etc.:
1. Do not remove screws, covers or cabinet.
2. Do not expose this appliance to rain or moisture.
CAUTION
• Do not block the ventilation openings or holes.
(If the ventilation openings or holes are blocked by a
newspaper or cloth, etc., the heat may not be able to get
out.)
• Do not place any naked flame sources, such as lighted
candles, on the apparatus.
• When discarding batteries, environmental problems must
be considered and local rules or laws governing the
disposal of these batteries must be followed strictly.
• Do not expose this apparatus to rain, moisture, dripping or
splashing and that no objects filled with liquids, such as
vases, shall be placed on the apparatus.
PRECAUCIÓN––Botón (standby/on)!
Desconecte el enchufe tomacorriente para desconectar la
alimentación completamente (se apagan todas las lámparas
e indicaciones). Al instalar el aparato, asegúrese de poder
acceder fácilmente al enchufe. Ninguna posición del botón
conseguirá desconectar la red de alimentación eléctrica.
• Cuando la unidad está en espera, la lámpara STANDBY/ON
se enciende en rojo.
• Cuando la unidad está encendida, la lámpara STANDBY/ON
se apaga.
CUIDADO—botão (standby/on)!
Desligue a ficha da tomada da parede para desligar
completamente a alimentação (todas asluzes e indicadores
apagam-se). Quando instalar o aparelho, certifique-se de que
a ficha fique facilmente acessível. O botão , quer esteja
premido ou solto, não desliga a alimentacao principal.
• Quando a unidade estiver em standby, a luz STANDBY/ON
fica vermelha.
• Quando a unidade estiver ligada, a luz STANDBY/ON
.
se
O aparelho pode ser ligado através da unidade de controlo
remoto.
PRECAUÇÃO
Para reduzir riscos de choques elétricos, incêndio, etc.:
1. Não remova parafusos e tampas ou desmonte a caixa.
2. Não exponha este aparelho à chuva nem à umidade.
PRECAUÇÃO
• Não obstrua as aberturas e orifícios de ventilação.
(Se os orifícios ou aberturas de ventilação estiverem
obstruídos por qualquer papel ou tecido, não haverá
circulação do ar quente.)
• Não coloque nenhum objeto com chamas, como velas
acesas, sobre o aparelho.
• Ao descartar as baterias, leve em consideração os
problemas que possam ser causados ao meio ambiente e
os regulamentos e leis locais e governamentais sobre
recolhimento dessas baterias devem ser rigorosamente
seguidos.
• Não exponha este aparelho à chuva, umidade, pingos ou
esguichos de água, nem coloque em cima do mesmo
qualquer tipo de recipiente que contenha líquidos, como por
exemplo vasos.
apaga-
La alimentación puede controlarse mediante control remoto.
PRECAUCIÓN
Para reducir riesgos de choques eléctricos, incendio, etc.:
1. No extraiga los tornillos, los cubiertas ni la caja.
2. No exponga este aparato a la lluvia o a la humedad.
PRECAUCIÓN
• No obstruya las rendijas o los orificios de ventilación. (Si las
rendijas o los orificios de ventilación quedan tapados con
un periódico, un trozo de tela, etc., no se podrá disipar el
calor).
• No ponga sobre el aparato ninguna llama al descubierto,
como velas encendidas.
• Cuando tenga que descartar las pilas, tenga en cuenta los
problemas ambientales y observe estrictamente los
reglamentos o las leyes locales sobre disposición de las
pilas.
• No exponga este aparato a la lluvia, humedad, goteos o
salpicaduras. Tampoco ponga recipientes conteniendo
líquidos, como floreros, encima del aparato.
G-1
Page 3
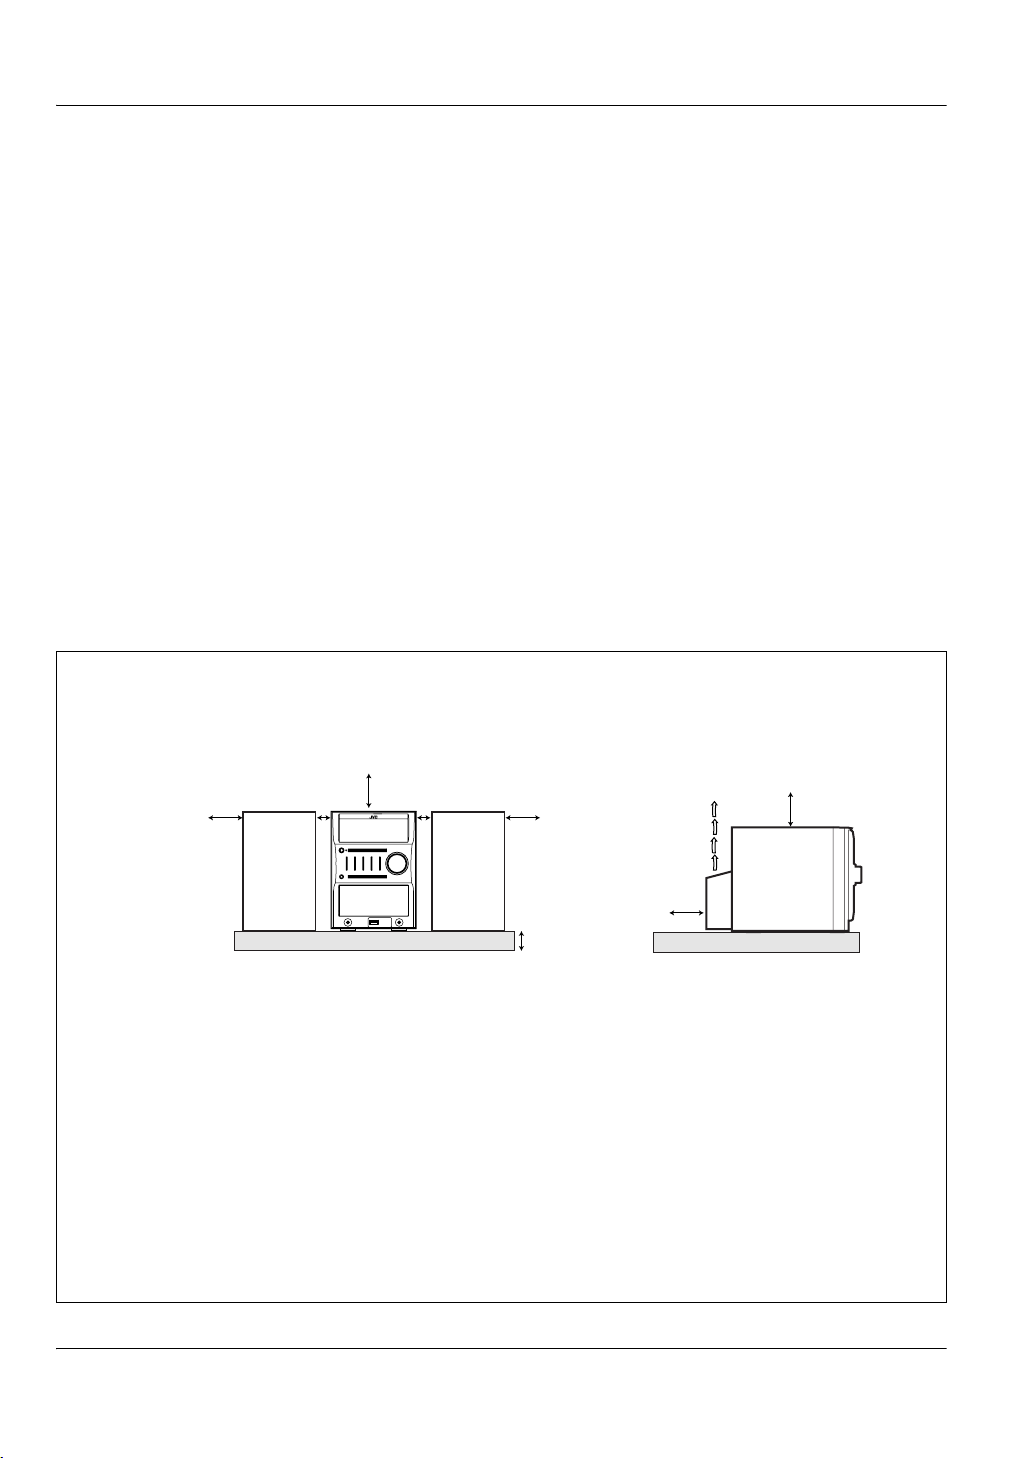
CAUTION: Proper Ventilation
To avoid risk of electric shock and fire, and to prevent damage, locate the apparatus as follows:
1. Front: No obstructions and open spacing.
2. Sides/ Top/ Back: No obstructions should be placed in the areas shown by the dimensions below.
3. Bottom: Place on a level surface. Maintain an adequate air path for ventilation by placing on a stand with a height of 10 cm or
more.
Precaución: Ventilación correcta
Para evitar el riesgo de descargas eléctricas e incendio y prevenir posibles daños, instale el equipo en un lugar que cumpla los
siguientes requisitos:
1. Parte frontal: Sin obstrucciones, espacio abierto.
2. Lados/parte superior/parte posterior: No debe haber ninguna obstrucción en las áreas mostradas por las dimensiones de la
siguiente figura.
3. Parte inferior: Sitúe el equipo sobre una superficie nivelada. Mantenga un espacio adecuado para permitir el paso del aire y una
correcta ventilación, situando el equipo sobre un soporte de 10 cm o más cm de allura.
PRECAUÇÃO: Ventilação adequada
Para evitar riscos de choques elétricos e incêndios, e prevenir avarias, instale o aparelho como segue:
1. Parte frontal: Sem obstruções e espaços abertos.
2. Partes laterais/ Tampa/ Posterior: Nenhuma obstrução deverá ser colocada entre as áreas cujas dimensões são indicadas
abaixo.
3. Parte inferior: Instale-o sobre uma superfície plana. Deverá ser mantido espaço suficiente para a ventilação se este for instalado
numa posição que tenha uma altura de 10 cm ou mais.
Front
Frontal
Fronta
15 cm
15 cm
*
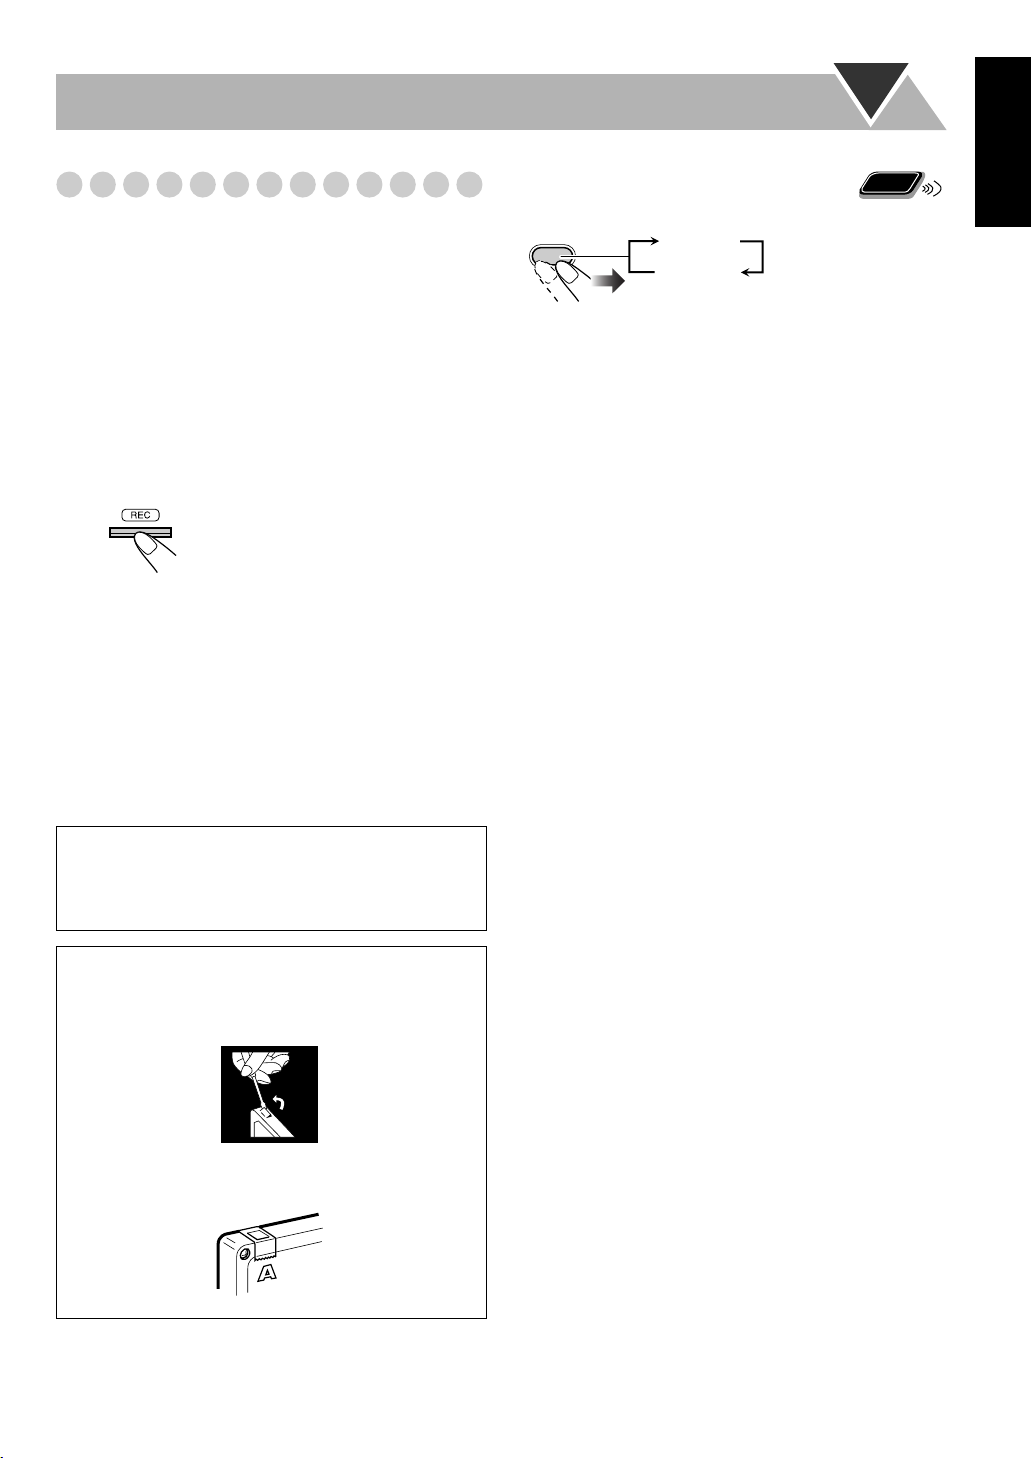
About the cooling fan
A cooling fan is mounted on the rear panel of the unit to prevent abnormal temperature inside the unit, thus assuring normal
operation of the unit. The cooling fan automatically starts rotating to intake external cool air when the volume is increased
up to more than a certain level.
*
Acerca del ventilador de enfriamiento
En el panel trasero de la unidad se provee un ventilador de enfriamiento para evitar un aumento anormal de la temperatura
interior de la unidad, asegurando así el normal funcionamiento de la misma. Cuando la temperatura aumenta por encima
de un determinado nivel, el ventilador de enfriamiento comienza a girar automáticamente para introducir aire frío exterior.
*
Sobre o ventilador de esfriamento
Um ventilador de refrigeração é montado no painel traseiro do aparelho para prevenir a temperatura anormal dentro do
aparelho, assegurando assim um funcionamento normal do aparelho. O ventilador de refrigeração começa a girar
automaticamente para admitir ar frio externo quando o volume é aumentado acima de um certo nível.
1 cm
1 cm
SP-UXG45CA-UXG45SP-UXG45 CA-UXG45
15 cm
10 cm
Side
Lateral
Lateral
15 cm
15 cm
G-2
Page 4
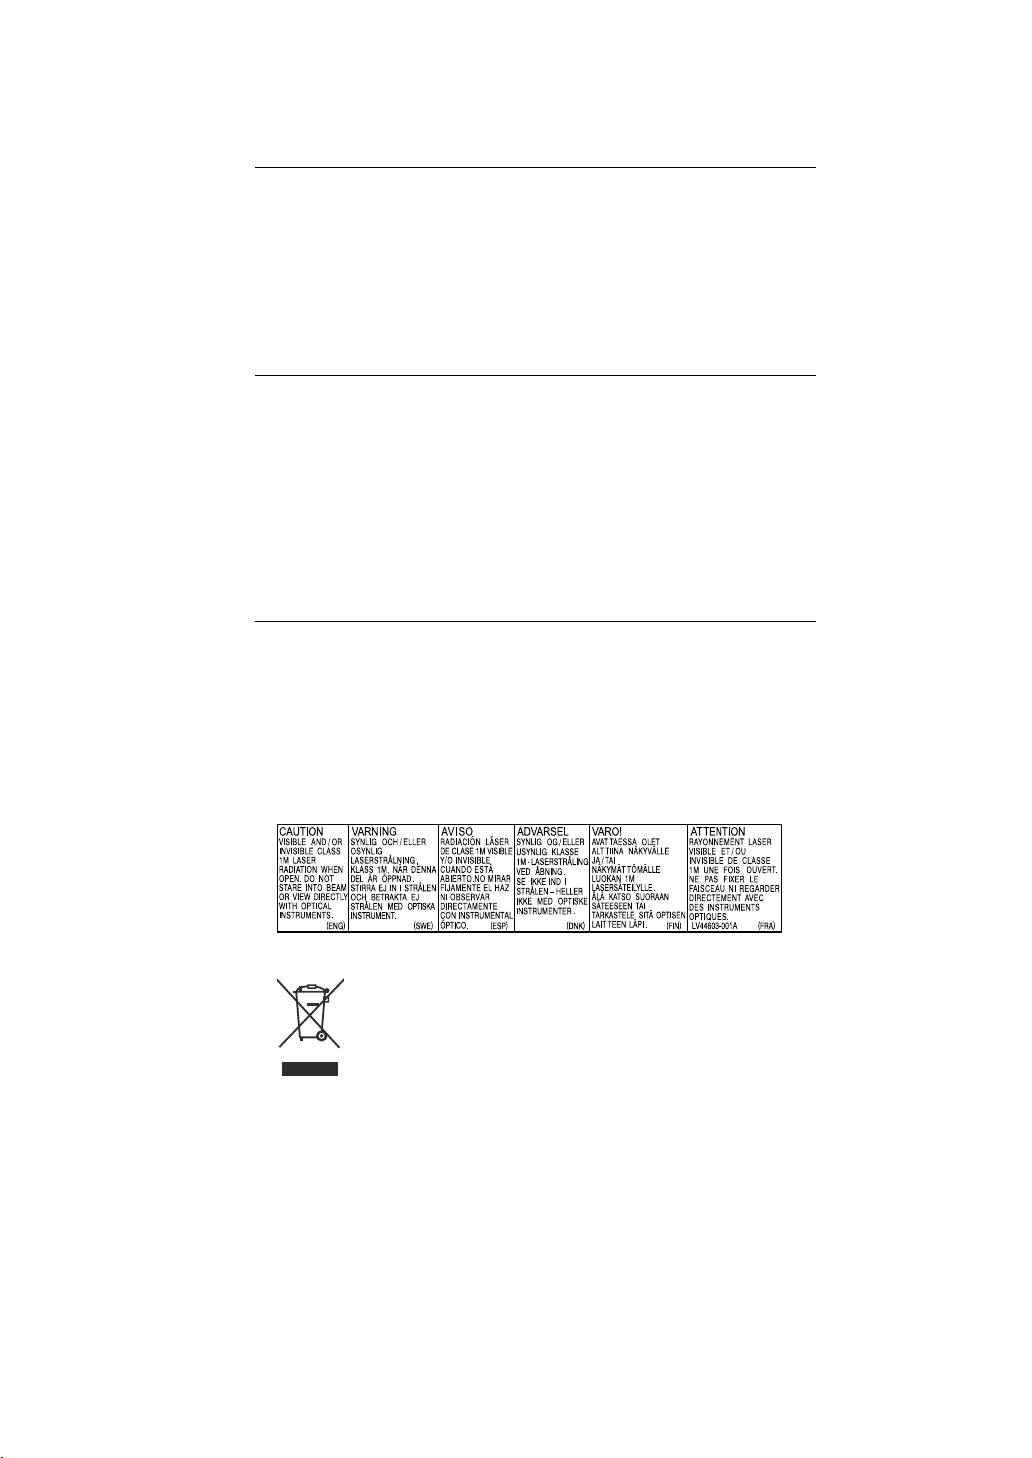
IMPORTANT FOR LASER PRODUCTS
1. CLASS 1 LASER PRODUCT
2.
CAUTION
: Do not open the top cover. There are no user serviceable parts
inside the unit; leave all servicing to qualified service personnel.
CAUTION
3.
: Visible and invisible laser radiation when open and interlock
failed or defeated. Avoid direct exposure to beam.
4. REPRODUCTION OF LABEL: CAUTION LABEL, PLACED INSIDE UNIT.
IMPORTANTE PARA PRODUCTOS LÁSER
1. PRODUCTO LÁSER CLASE 1
2.
PRECAUCIÓN:
No abra la tapa superior. En el interior de la unidad no hay
piezas que pueda reparar el usuario; encargue el servicio a personal técnico
cualificado.
PRECAUCIÓN:
3.
Radiación láser visible e invisible en caso de apertura o con
interbloqueo averiado o defectuoso. Evite la exposición directa a los haces.
4. REPRODUCCIÓLN DE LA ETIQUETA: ETIQUETA DE PRECAUCIÓN,
COLOCADA EN EL INTERIOR DE LA UNIDAD.
PARA PRODUTOS LASER, IMPORTANTE
1. PRODUTO LASER DE CLASSE 1
2.
PRECAUÇÃO:
não abrir a cobertura superior. Dentro da unidade não
existem partes cuja manutenção tenha de ser feita pelo usuário; deixe
qualquer manutenção a cargo do pessoal de serviço qualificado.
PRECAUCÃO:
3.
radiação laser visível e invisível quando se abre e com a
conexão interna em falha ou frustrada. Evite a exposição direta ao raio.
4. REPRODUÇÃO DE ETIQUETA: ETIQUETA DE AVISO SITUADA NO
INTERIOR DA UNIDADE.
G-3
[European Union only]
[La Unión europea solo]
[Apenas União Europeia]
Page 5

Contents
English
English
Introduction .................................................... 2
Precautions...................................................................... 2
How to Read This Manual .............................................. 3
Getting Started ............................................... 4
Step 1: Unpack................................................................ 4
Step 2: Prepare the Remote Control ............................... 4
Step 3: Hook Up ............................................................. 5
Before Operating the System ........................ 8
Daily Operations—Playback ......................... 9
Listening to the Radio................................................... 10
Playing Back a Disc...................................................... 11
Playing Back from the USB Memory or
Digital Audio Player ................................................. 11
Playing Back a Tape ..................................................... 13
Playing Back Other Equipment .................................... 13
Quick Portable Link (QP Link) .................................... 14
Daily Operations—Sound &
Other Adjustments ................................... 15
Adjusting the Volume................................................... 15
Adjusting the Sound ..................................................... 15
Changing the Display Brightness—DIMMER............. 16
Setting the Clock .......................................................... 16
Turning Off the Power Automatically.......................... 17
Advanced Disc/USB Memory/
DAP Operations ........................................ 18
Programming the Playing Order—Program Play......... 18
Playing at Random—Random Play .............................. 19
Playing Repeatedly—Repeat Play ................................ 20
Prohibiting Disc Ejection—Child Lock ....................... 20
Advanced Tape Operations ......................... 21
Recording on a Tape..................................................... 21
Synchronized Disc Recording ...................................... 22
Timer Operations ......................................... 23
Setting the Timer .......................................................... 23
Additional Information ............................... 26
Learning More about This System ............................... 26
Troubleshooting............................................................ 27
Maintenance.................................................................. 28
Specifications................................................................ 28
Parts Index .................................................................... 29
1
Page 6
Introduction
Thank you for purchasing the JVC Micro Component
System.
We hope it will be a valued addition to your home, giving
you years of enjoyment.
Be sure to read this instruction manual carefully before
operating your new stereo system.
In it you will find all the information you need to set up and
use the system.
If you have a query that is not answered by the manual,
please contact your dealer.
Precautions
Installation
• Install in a place which is level, dry and neither too hot nor
too cold—between 5°C and 35°C.
• Install the System in a location with adequate ventilation to
prevent internal heat buildup inside the System.
DO NOT install the System in a location near
heat sources, or in a place subject to direct
sunlight, excessive dust or vibration.
• Leave sufficient distance between the System and the TV.
• Keep the speakers away from the TV to avoid interference
with TV.
Internal heat
• A cooling fan is mounted on the rear panel to prevent heat
buildup inside the main unit (see page G-2).
For safety, observe the following carefully:
• Make sure there is good ventilation around
the main unit. Poor ventilation could
overheat and damage the System.
• DO NOT block the cooling fan and the
ventilation openings or holes. If they are
blocked by a newspaper or cloth, etc., the
heat may not be able to get out.
Others
• Should any metallic object or liquid fall into the System,
unplug the AC power cord and consult your dealer before
operating any further.
DO NOT disassemble the System since there
are no user serviceable parts inside.
• If you are not going to operate the System for an extended
period of time, unplug the AC power cord from the wall outlet.
If anything goes wrong, unplug the AC power cord and
consult your dealer.
English
Power sources
• When unplugging the System from the wall outlet, always
pull on the plug, not the AC power cord.
DO NOT handle the AC power cord with wet
hands.
Moisture condensation
Moisture may condense on the lenses inside the System in
the following cases:
• After starting to heat the room
• In a damp room
• If the System is brought directly from a cold to a warm
place
Should this occur, the System may malfunction. In this case,
leave the System turned on for a few hours until the moisture
evaporates, unplug the AC power cord, then plug it in again.
2
Page 7

English
How to Read This Manual
To make this manual as simple and easy-to-understand as
possible, we have adapted the following methods:
• Button and control operations are explained as listed in the
table below. In this manual, the operations using the
remote control is mainly explained; however, you can use
the buttons and controls on the main unit if they have the
same (or similar) name and marks.
•
Some related tips and notes are explained later in the
sections “Learning More about This System” and
“Troubleshooting,” but not in the same section
explaining the operations.
If you want to know more about
the functions, or if you have a doubt about the functions, go
to these sections and you will find the answers.
Indicates that you press the button
briefly
.
Indicates that you press the button
briefly and repeatedly
you want is selected.
Indicates that you press one of the
buttons.
until an option
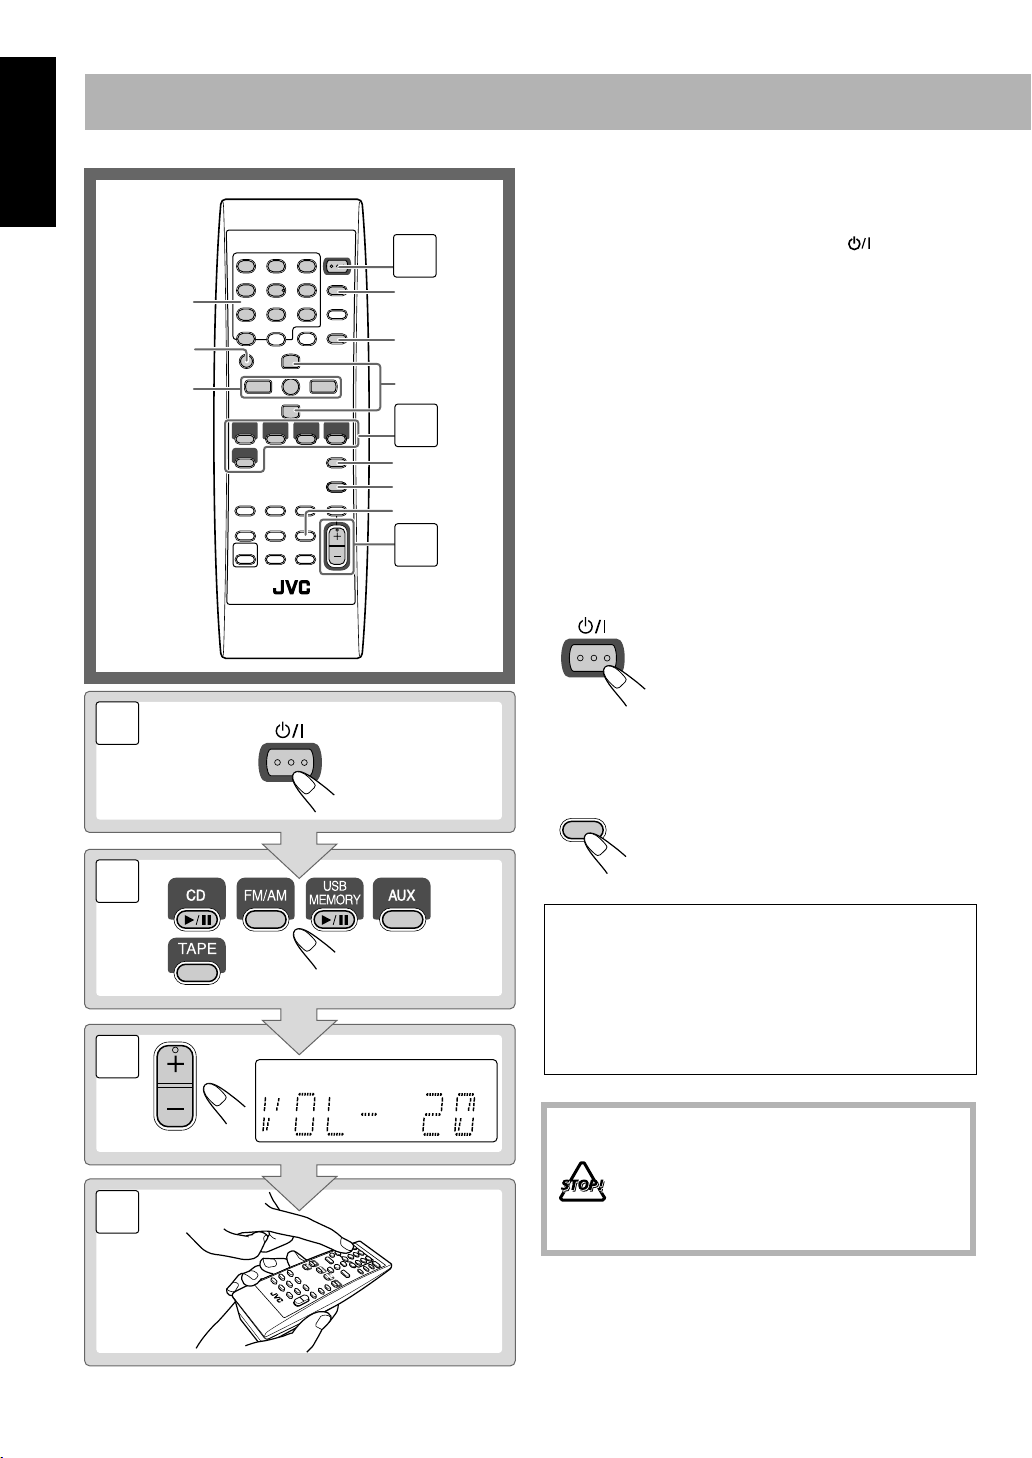
Remote
ONLY
Main Unit
ONLY
Indicates that you
press and hold
button for specified seconds.
2 sec.
• The number inside the arrow
indicates the period of press (in this
example, 2 seconds).
• If no number is inside the arrow,
press and hold until the entire
procedure is complete or until you
get a result you want.
Indicates that you turn the control
toward the specified direction(s).
Indicates that this operation is only possible
using the remote control.
Indicates that this operation is only possible
using the buttons and controls on the main
unit.
the
3
Page 8
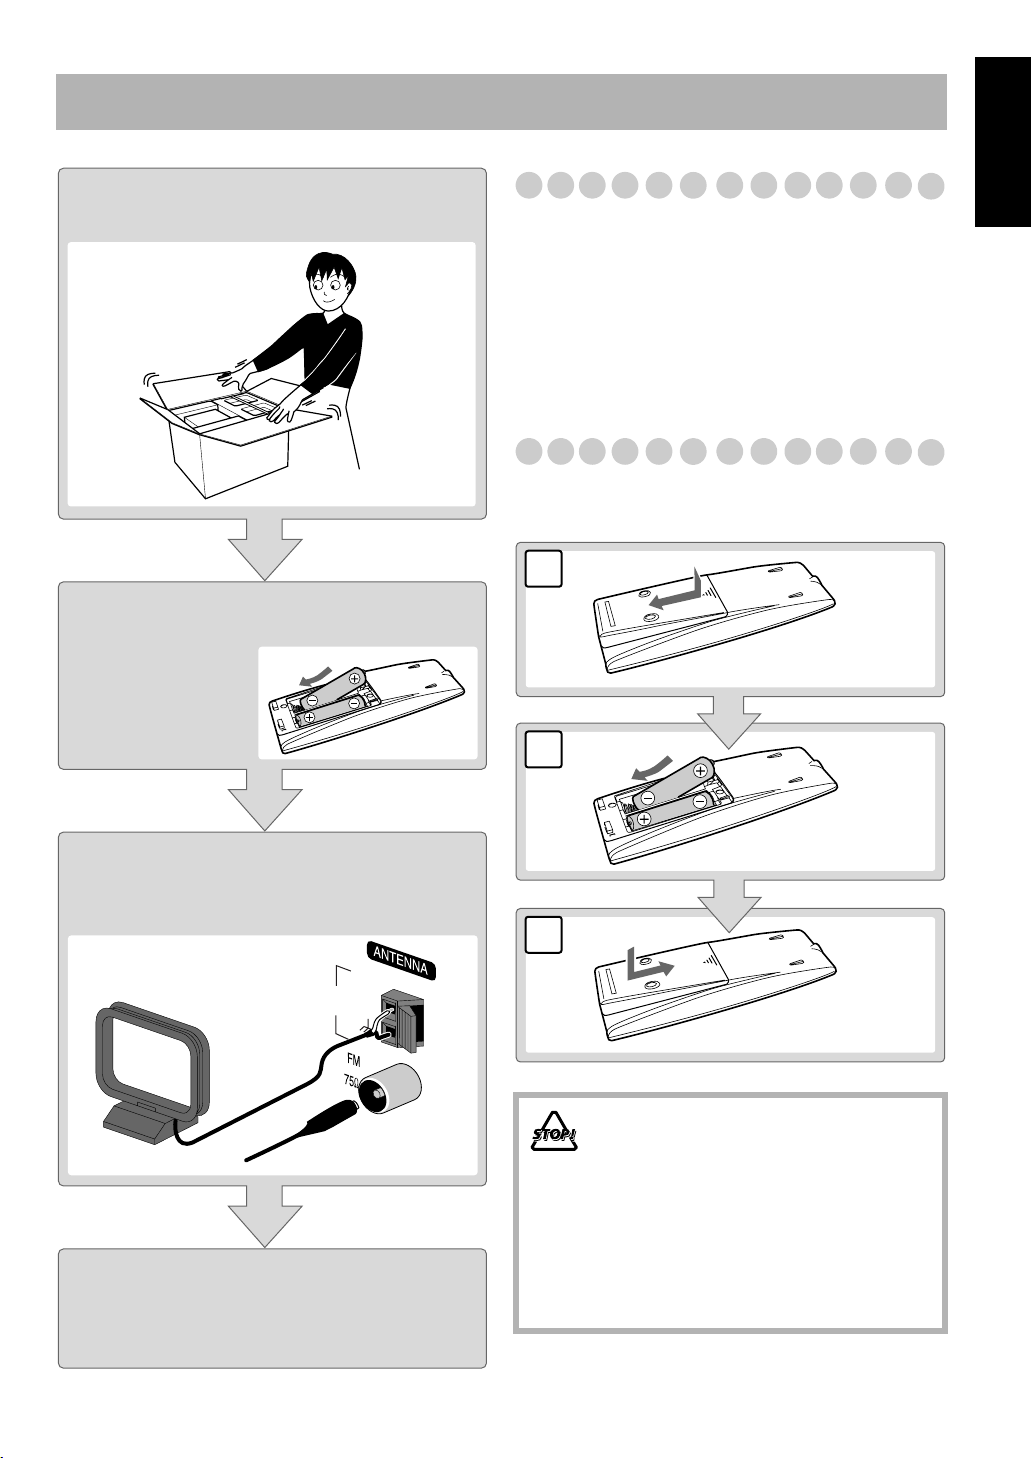
Getting Started
Step 1:Unpack the package and
check the accessories.
Step 2:Prepare the remote control.
Step 1: Unpack
After unpacking, check to be sure that you have all the
following items. The number in parentheses indicates the
quantity of each piece supplied.
• FM antenna (1)
• AM loop antenna (1)
• Remote control (1)
•Batteries (2)
• AC plug adapter (1)
If any item is missing, consult your dealer immediately.
Step 2: Prepare the Remote Control
Insert the batteries into the remote control by matching the
polarity (+ and –) correctly.
1
English
Step 3:Hook up the components such
as AM/FM antennas, speakers,
etc. (see pages 5 to 7).
AM
EXT
AM
LOOP
GND
Finally plug the AC power cord.
Now you can operate the System.
2
R6(SUM-3)/AA(15F)
3
• DO NOT use an old battery together with a
new one.
• DO NOT use different types of batteries
together.
• DO NOT expose batteries to heat or flame.
• DO NOT leave the batteries in the battery
compartment when you are not going to use
the remote control for an extended period of
time. Otherwise, the remote control will be
damaged from battery leakage.
4
Page 9
English
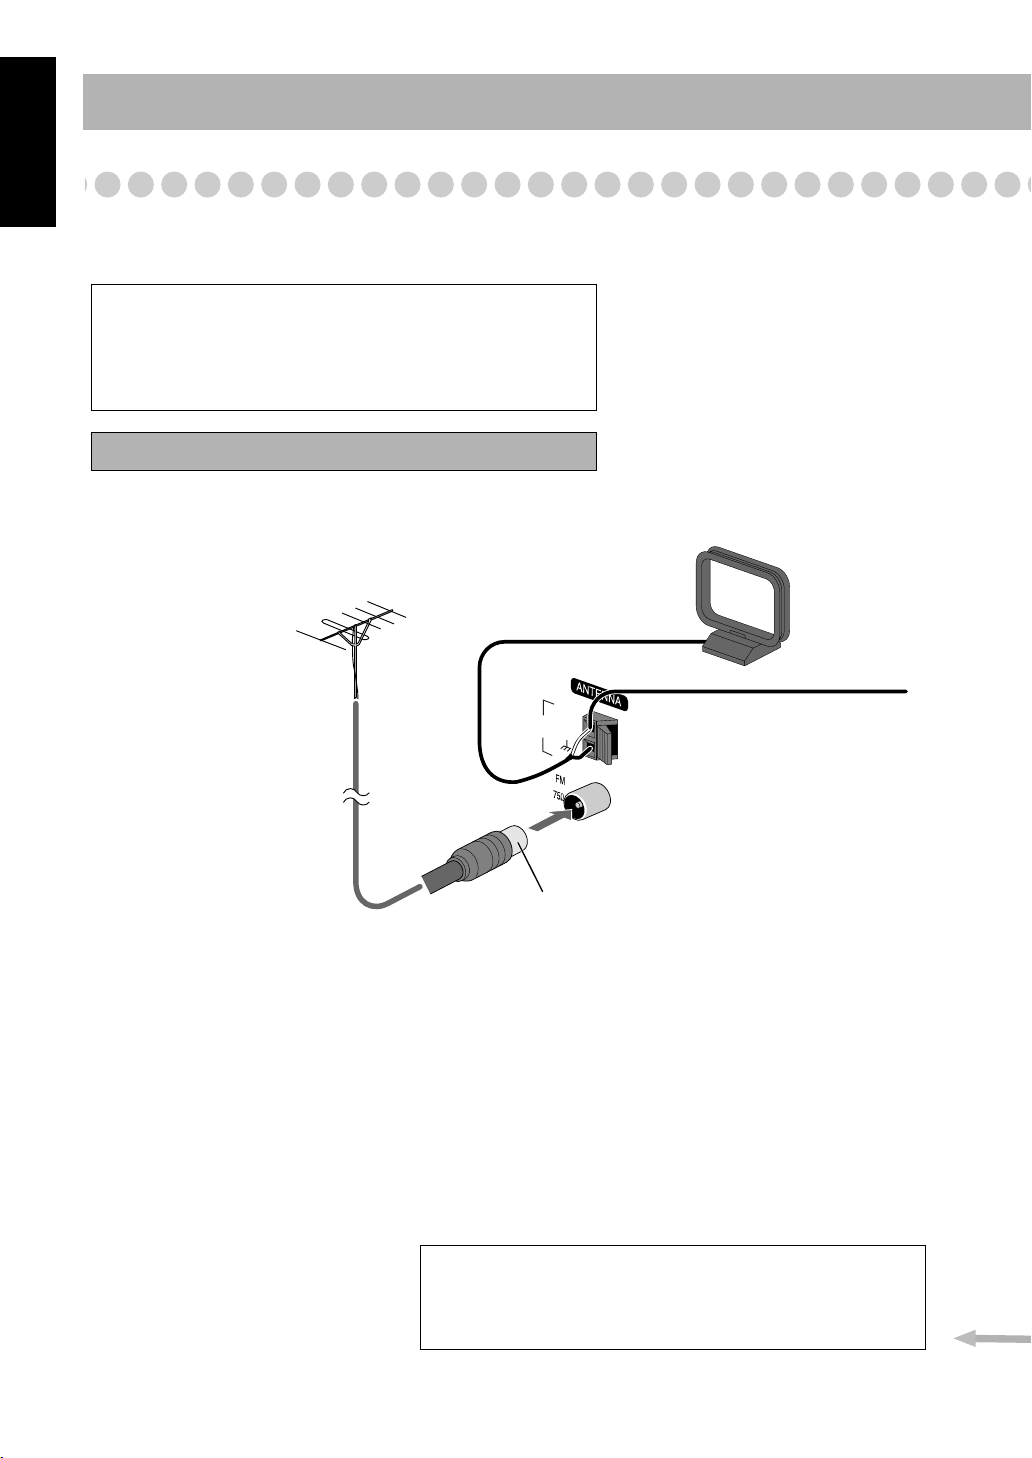
Step 3: Hook Up
If you need more detailed information, see page 7.
For more detailed information on connecting external equipment, see page 13.
Illustrations of the input/output terminals below are typical
examples.
When you connect other components, refer also to their
manuals since the terminal names actually printed on the rear
may vary.
Turn the power off to all components before connections.
For better FM/AM reception
Outdoor FM
antenna
(not supplied)
AM
LOOP
AM
EXT
GND
AM loop antenna
Keep it connected.
Vynile-covered wire (not supplied)
Extend it horizontally.
Disconnect the supplied FM antenna, and connect to an outdoor FM antenna
using a 75 Ω wire with coaxial type connector (IEC or DIN45325).
To a wall outlet
Plug the AC power cord only after all connections are complete.
• If the wall outlet does not match the AC plug, use the supplied AC
plug adapter.
5
Page 10
FM antenna (supplied)
Extend it so that
you can obtain the
best reception.
English
AM loop antenna (supplied)
Turn it until the best reception is
obtained.
LOOP
AM
EXT
AM
GND
110V–127V
220V–240V
AC VOLTAGE
SELECTOR
Black striped
Non-striped
6
Page 11
English
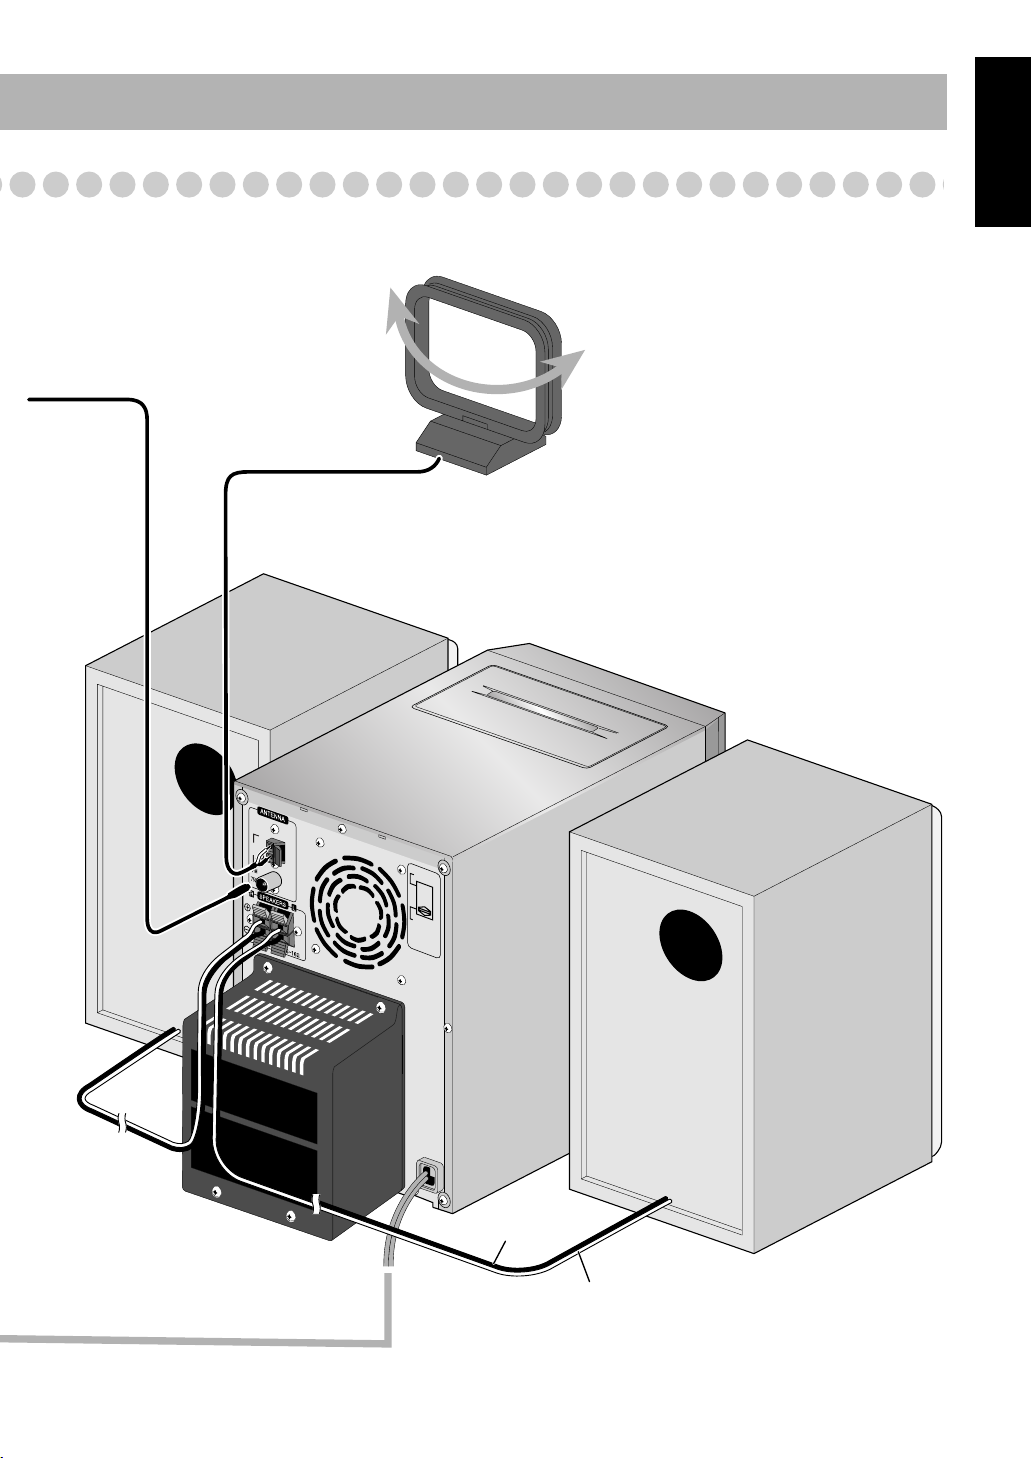
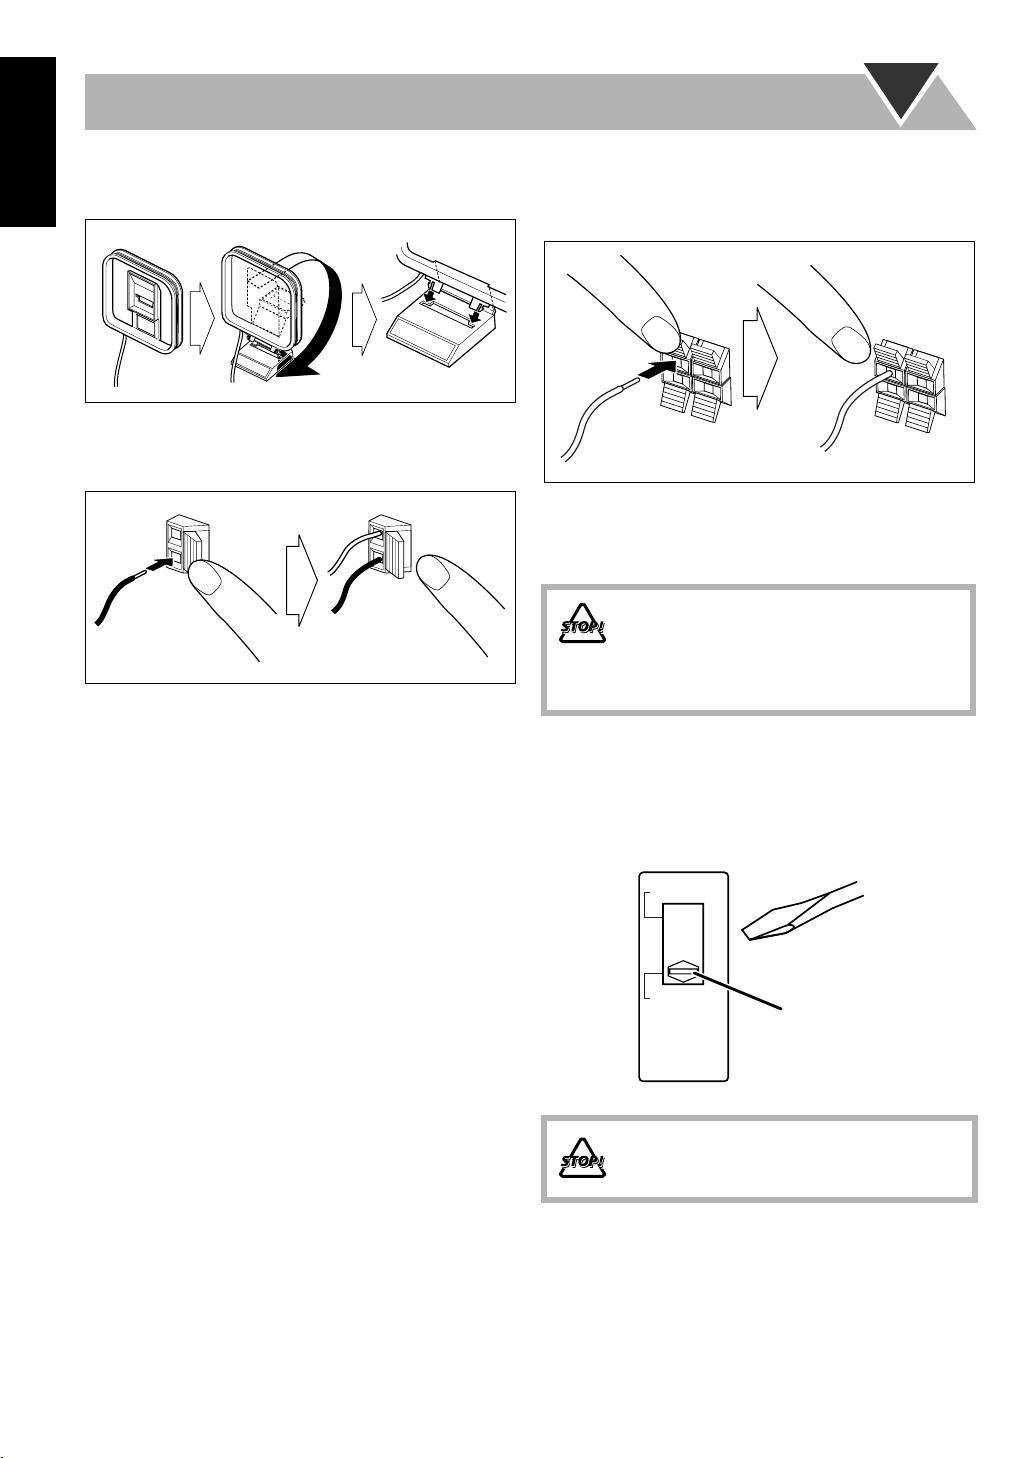
To assemble and connect the AM loop antenna
To assemble the AM loop antenna
To connect the speaker cords
Make sure the both speakers are connected correctly and
firmly.
3 Release
1 Hold
To connect the AM loop antenna
Make sure to connect the wire correctly: The white end to
AM EXT, the black end to GND.
1 Hold
2 Insert
3 Release
• If the AM loop antenna wire or speaker cords are covered
with vinyl, remove the vinyl to expose the tip of the
antenna by twisting the vinyl.
• Make sure the antenna conductors do not touch any other
terminals, connecting cords and power cord. Also, keep the
antennas away from metallic parts of the System,
connecting cords, and the AC power cord. This could cause
poor reception.
2 Insert
When connecting the speaker cords, match the polarity of
the speaker terminals: The cord with black stripe to (–), the
cord without stripe to (+).
• DO NOT connect more than one speaker to
each terminal.
• DO NOT allow the conductor of the speaker
cords to be in touch with the metallic parts of
the System.
Adjusting the voltage selector
Use a screwdriver to slide the voltage selector so that the
voltage marker is pointing at the same voltage as where you
are plugging in the unit. (See also the back cover page.)
110V-127V
220V-240V
Voltage marker
AC VOLTAGE
SELECTOR
DO NOT plug in before setting the voltage
selector on the rear of the unit and all
connection procedures are complete.
7
Page 12
Before Operating the System
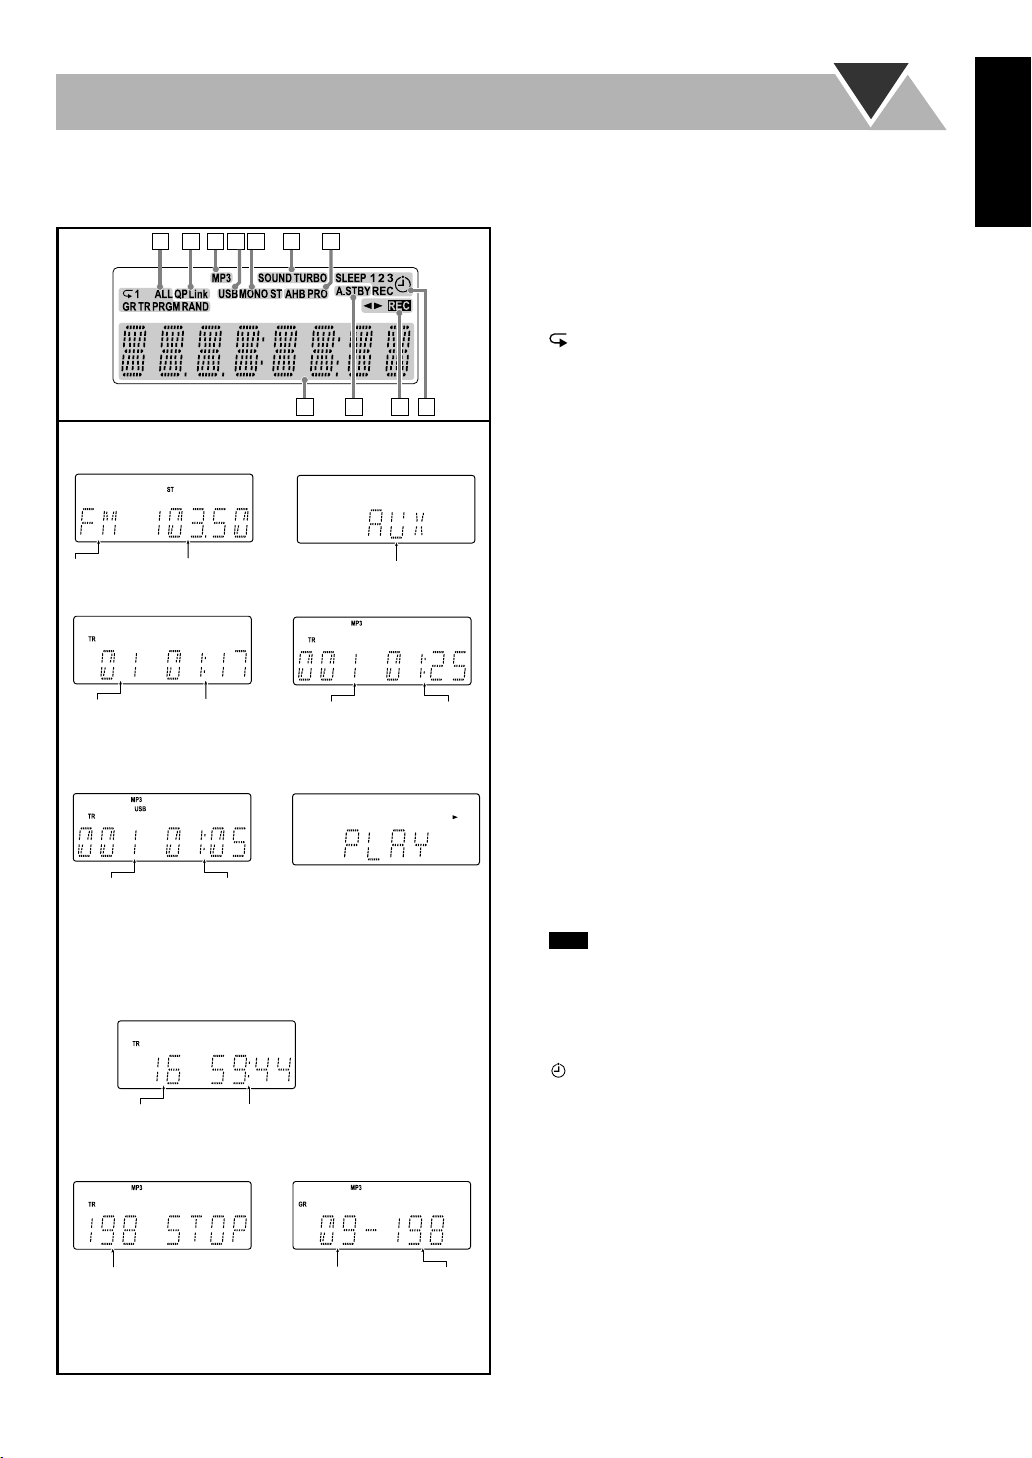
The indications on the display teach you a lot of things while you are operating the System.
Before operating the System, be familiar with when and how the indicator illuminates on the display.
12345 6 7
1 Play mode indicators
• RAND (random): Lights when Random Play mode is
activated.
• PRGM (program): Lights when Program Play mode is
activated.
• : Lights when Repeat mode is activated.
– 1: Repeats the track.
– ALL: Repeats all the tracks.
– GR: Repeats all the tracks in the selected group (MP3
only).
2 QP Link Indicator
Indications on the main display
• While listening to radio:
• While selecting AUX:
911
8
10
• Lights when QP Link is activated.
3 MP3 indicator
• Lights when an MP3 is detected.
4 USB indicator
Band
Frequency
• While playing a CD:
Source name
• While playing an MP3*:
• Lights when USB MEMORY is selected.
5 FM reception indicators
• MONO: Lights while the FM monaural mode is
activated.
• ST (stereo): Lights while an FM stereo station with
sufficient signal strength is tuned in.
Track number Elapsed
playing time
• While selecting USB
MEMORY:
Current track
number
Elapsed
playing time
• While playing a Tape:
6 SOUND TURBO indicator
• Lights when the SOUND TURBO is activated (see
page 15).
7 AHB PRO (Active Hyper Bass Pro) indicator
• Lights when the AHB PRO is activated.
8 Main display
9 A.STBY(Auto Standby) indicator
• Lights when Auto Standby is activated.
Current track
number
Elapsed
playing time
• While disc play is stopped:
When RESUME is ON, RESUME is shown on the
display. This also applies when the USB Memory or the
DAP is stopped.
CD:
• Flashes when disc playback stops with Auto Standby
activated.
p Tape operation indicators
REC
• indicator
–Lights while recording.
•
23
(tape direction):
– Flashes slowly during playback and recording.
– Flashes quickly while rewinding a tape.
q Timer indicators
• : Lights when Daily Timer or Recording Timer stands
by; flashes while working.
Total track number
MP3:
Total playing time
• While in “TRACK” mode:
• While in “GROUP” mode:
• 1/2/3: Lights when a Daily Timer (1, 2, or 3) stands by;
flashes while being preset or working.
• REC: Lights when the Recording Timer stands by:
flashes while setting or working.
• SLEEP: Lights when the Sleep Timer is activated.
English
Total track number
Total group
number
Total track
number
*When you start playing an MP3 disc, the track number,
track name, (and ID3 Tag) will be shown before the
elapsed playing time appears.
8
Page 13
English
Numeric
buttons
MP3 MODE
4/1,
7,¡/¢
Daily Operations—Playback
1 Turn on the power.
The STANDBY lamp on the main unit turns off.
• Without pressing STANDBY/ON , the System
1
SET/
RESUME
DISPLAY
PRESET UP,
PRESET DOWN
2
QP LINK
FM MODE
DIMMER
turns on by pressing one of the source selecting
buttons in the next step.
2 Select the source.
Playback automatically starts if the selected source is
ready to start.
• If you press AUX, start playback source on the
external component.
3 Adjust the volume.
4 Operate the target source as explained
later.
1
2
3
4
VOLUME
STANDBY/ON
3
To turn off (stand by) the System
STANDBY/ON
The STANDBY lamp on the main unit
lights up.
• A small amount of power is always
consumed even while on standby.
To turn off the clock indication to save the power
While the System is turned off...
DIMMER
For private listening
Connect a pair of headphones to the PHONES jack on the
main unit. The sound will no longer come out of the
speakers. Be sure to turn down the volume before
connecting or putting the headphones.
• Disconnecting the headphones will activate the
speakers again.
• Press the button again, to display the
clock indication.
DO NOT turn off (stand by) the System with
the volume set to an extremely high level;
otherwise, the sudden blast of sound can
damage your hearing, speakers and/or
headphones when you turn on the System or
start playback.
9
Page 14
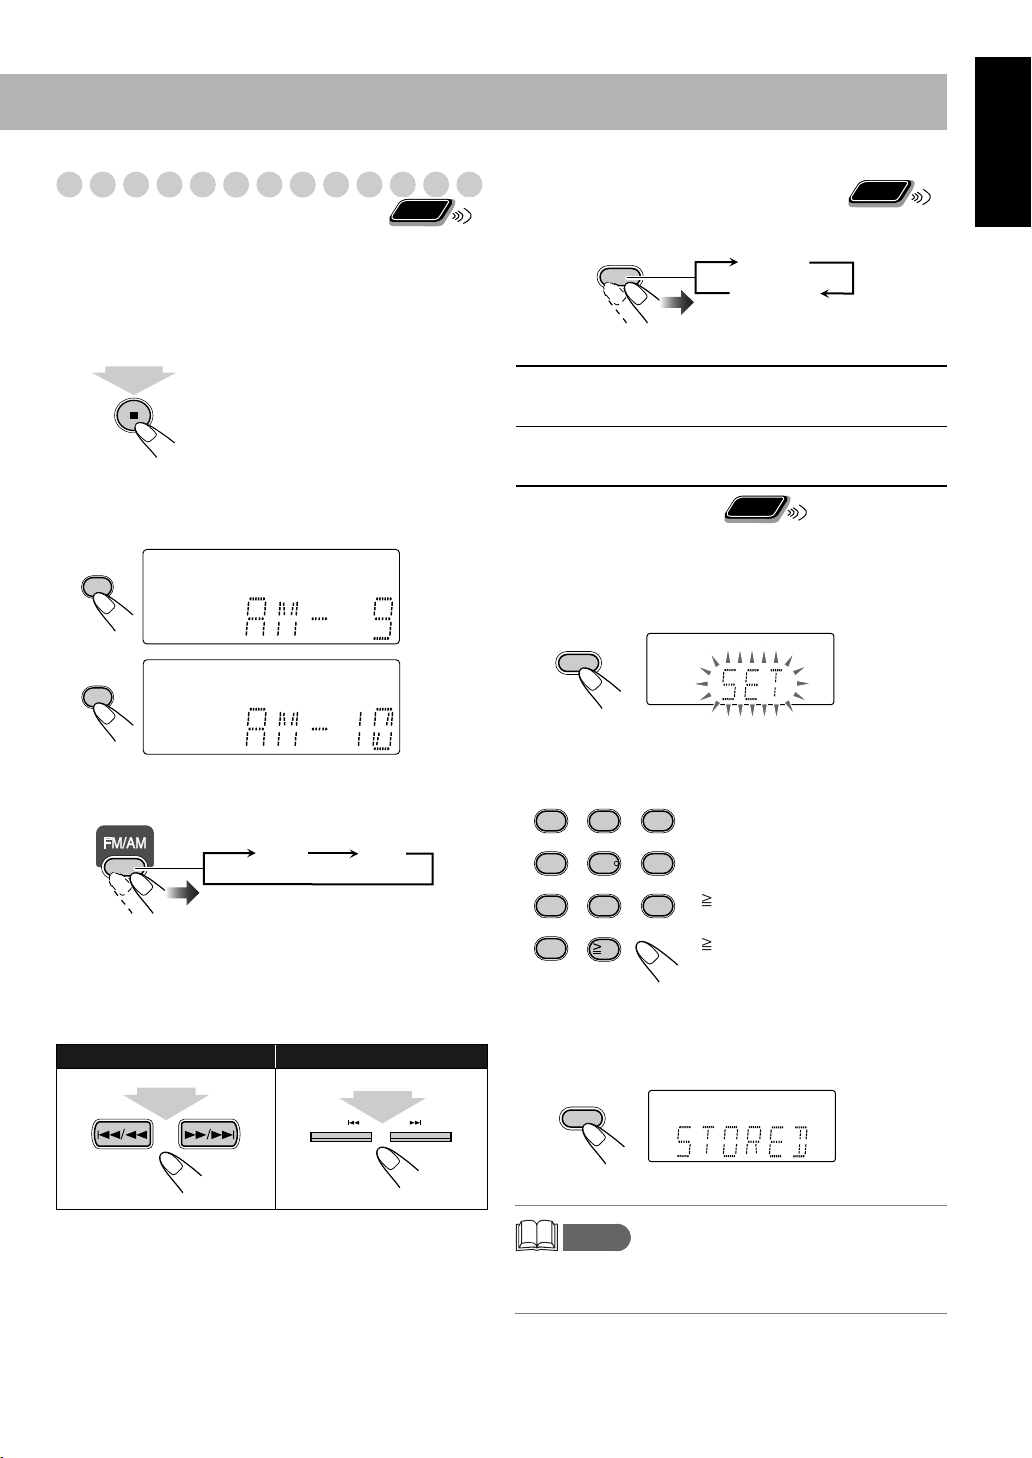
Listening to the Radio
Remote
To select the AM tuner interval spacing
Some countries space AM stations 9 kHz spacing, and other
countries use 10 kHz spacing.
You can change the AM tuner intervals while the System is
on stand by.
1
2
sec.
• Current interval setting appears on the display.
2 Select the interval spacing while current setting
appears on the display.
ONLY
Remote
If the received FM station is hard to listen
FM MODE
MONO
ONLY
STEREO
MONO: Reception will improve though stereo
effect is lost. MONO indicator lights up.
STEREO: Normally select this. Stereo effect will
be resumed.
Remote
To preset the stations
You can preset 30 FM and 15 AM stations.
ONLY
English
9
0
To select the band (FM or AM)
FM AM
You can also carry out the same operation using the FM/AM
button on the System.
To tune in to a station
While FM or AM is selected...
Remote control: Main unit:
1 sec.
1 sec.
DOWN UP
1 Tune in to a station you want to preset.
2 Activate the preset number entry mode.
SET/RESUME
• Finish the following process while the indication on the
display is flashing.
3 Select a preset number for the station you store.
1
2
5
4
8
7
0
10
• You can also use the PRESET UP/PRESET DOWN
buttons.
Examples:
3
To select preset number 5, press
5.
6
To select preset number 15, press
9
10 → 1 → 5.
To select preset number 30, press
10 → 3 → 0.
4 Store the station.
SET/RESUME
Frequency starts changing on the display.
When a station (frequency) with sufficient signal strength is
tuned in, the frequency stops changing.
• When you repeatedly press the button, the frequency
changes step by step.
To stop searching manually,
press either button.
memo
• If you preset a station set to MONO, the station is stored
with the MONO setting.
10
Page 15

English
To tune in to a preset station
1
Select a band (FM or AM).
Remote
ONLY
FM AM
To start: To pause: To stop:
To release, press again.
2 Select a preset number for the station you store.
1
2
5
4
8
7
0
10
• You can also use the
3
6
9
PRESET UP or
PRESET DOWN.
Playing Back a Disc
This System can play back the following discs—regular CD
and CD-R/CD-RW (recorded either in the audio CD or MP3
format).
Disc Type Mark (logo)
Audio CD
CD-R
CD-RW
• Caution for DualDisc playback
The Non-DVD side of a “DualDisc” does not comply with
the “Compact Disc Digital Audio” standard. Therefore, the
use of Non-DVD side of a DualDisc on this product may
not be recommended.
Main Unit
To insert a disc
You can insert discs while playing another source.
ONLY
To select a track/group*
Increases the track/group*
numbers.
Decreases the track/group*
numbers.
* For details about the group selection, see “For MP3
playback” on page 12.
To locate a particular portion
While playing a disc, press and hold until the portion you
want is reached.
Fast-forwards the track.
Fast-reverses the track.
No sound is played during this operation on MP3 sources.
To locate a track directly and
Remote
ONLY
start play
Examples:
1
4
7
0
2
5
8
10
3
To select track number 5, press 5.
To select track number 15, press
6
10 → 1 → 5.
To select track number 30, press
9
10 → 3 → 0.
(For MP3 sources with 100 or
more tracks)
To select track number 125, press
10 twice → 1 → 2 → 5.
* For up to 99 tracks, you can press
10 twice to turn to the
condition before 10 is pressed.
To close the disc tray,
press 0 again.
• When the disc tray is open, pressing CD 6 closes the tray
and the playback starts.
11
Playing Back from the USB Memory or
Digital Audio Player
This System is equipped with a USB MEMORY terminal on
the front panel. You can connect your USB Memory or
Digital Audio Player (DAP) to this terminal and enjoy the
sound out of your USB Memory or DAP.
• Remember you cannot send any signal or data to your USB
Memory or DAP from this System.
Page 16
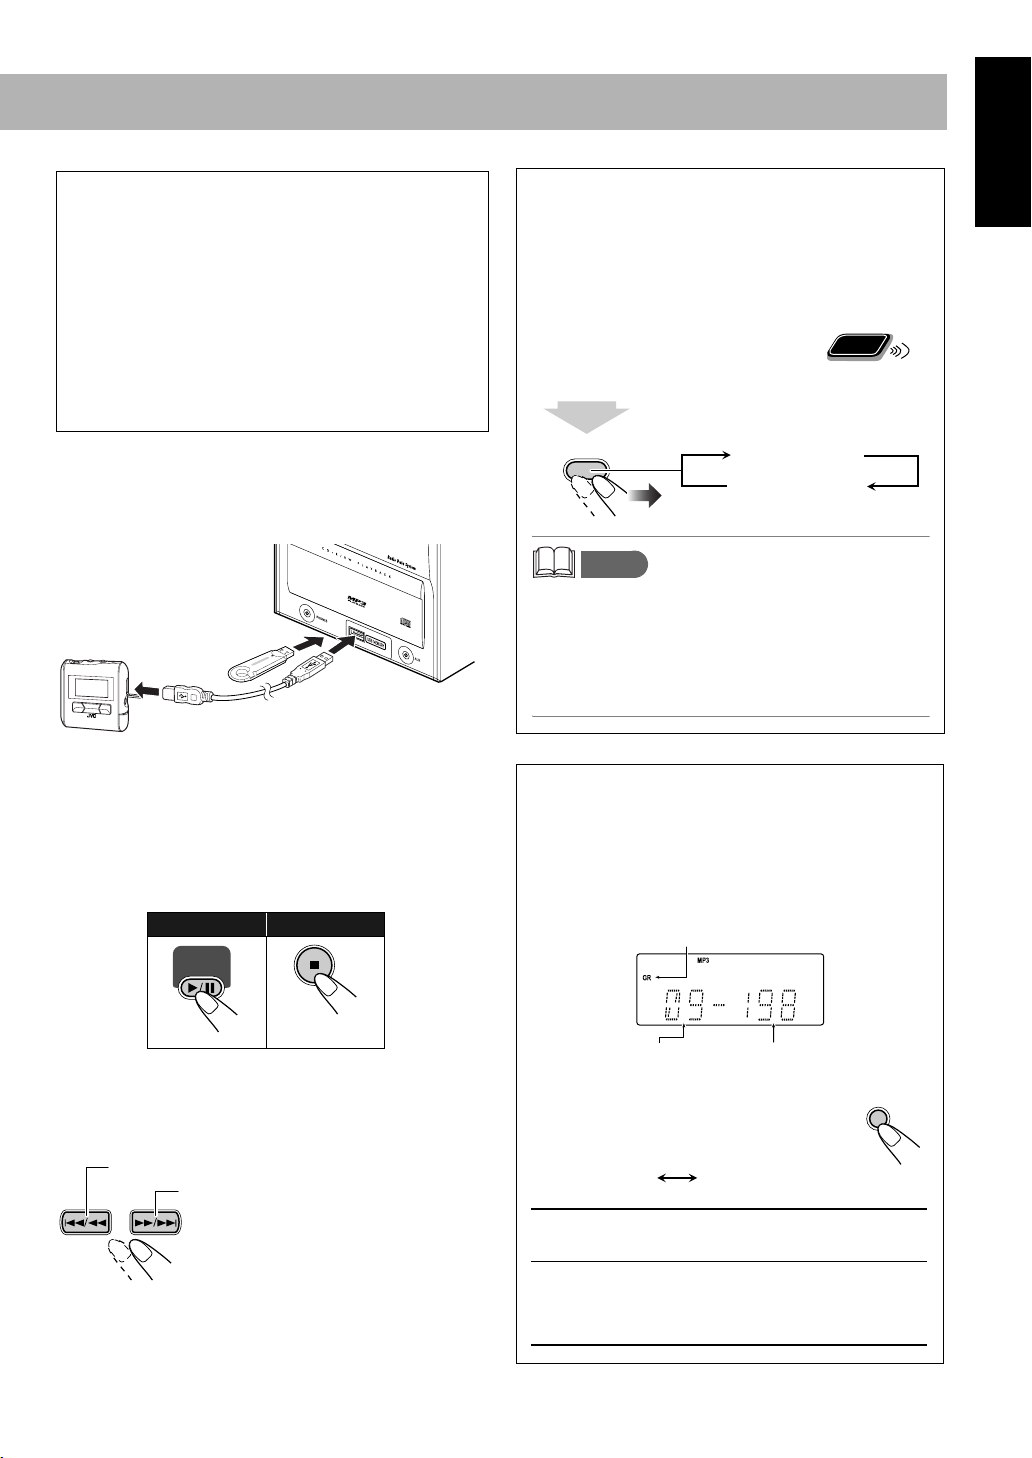
IMPORTANT
• Always set volume to “VOL MIN” when connecting or
disconnecting the other equipment.
• Connect the USB Memory or DAP directly to the front
panel of the unit. Connecting via a USB hub may result
in malfunction.
• USB Memory and DAPs compatible with the USB
mass storage class specifications are connectable.
• Some DAPs are not compatible with the unit.
• Coded or encrypted tracks in a special method cannot be
played on the unit. Only MP3 is supported.
Resume Play for Audio CD/MP3/USB
Memory/DAP
If you press 7 during playback, the position of the track
•
where you stopped playback will be memorized by the unit.
By pressing CD 6 or USB MEMORY 6, you can
start playback again from the point where you stopped
it.
To activate/cancel resume play
When the source is CD or USB MEMORY...
2 sec.
Remote
ONLY
English
To connect the USB Memory or DAP
Connect the DAP to the System using the USB cable
supplied with the DAP.
or
• Use a USB cable with a “series A” plug at the System end.
• When disconnecting the USB Memory or DAP, make sure
that playback is finished and that the System is in the stop
condition.
To play back sounds on the USB Memory or DAP
To start: To stop:
USB
MEMORY
SET/RESUME
RESUME ON
RESUME OFF
memo
• Pressing 0 or disconnecting the USB Memory/DAP
will erase the position of the track where you stopped
playback.
• To play back from the first track while resume play is
activated, press 7 twice during playback then press
CD 6 or USB MEMORY 6.
For MP3 playback
According to the MP3 playback mode, 4/1 /
¡/¢ or number buttons work for the group
selection or the track selection.
Examples:
When the MP3 play back mode is “GROUP.”
GR (Group) indicator
• The USB indicator on the display is lit while USB
MEMORY is selected.
To select a track/group*
Decreases the track/group* numbers.
Increases the track/group* numbers.
* For details about the group selection, see “For MP3
playback” below.
Total group number Total track number
You can change the MP3 playback mode
by pressing MP3 MODE.
• Each time you press the button, the MP3
playback mode changes as follows:
TRACK GROUP
TRACK:
GROUP:
• Only tracks are detected (groups are ignored).
• 4/1, ¡/¢, and number buttons
work for the track selection of the MP3.
• Both groups and tracks are detected.
• 4/1, ¡/¢, and number buttons
work for the group selection of the MP3.
• Number buttons work for selecting the track
number within the group.
MP3 MODE
12
Page 17
English
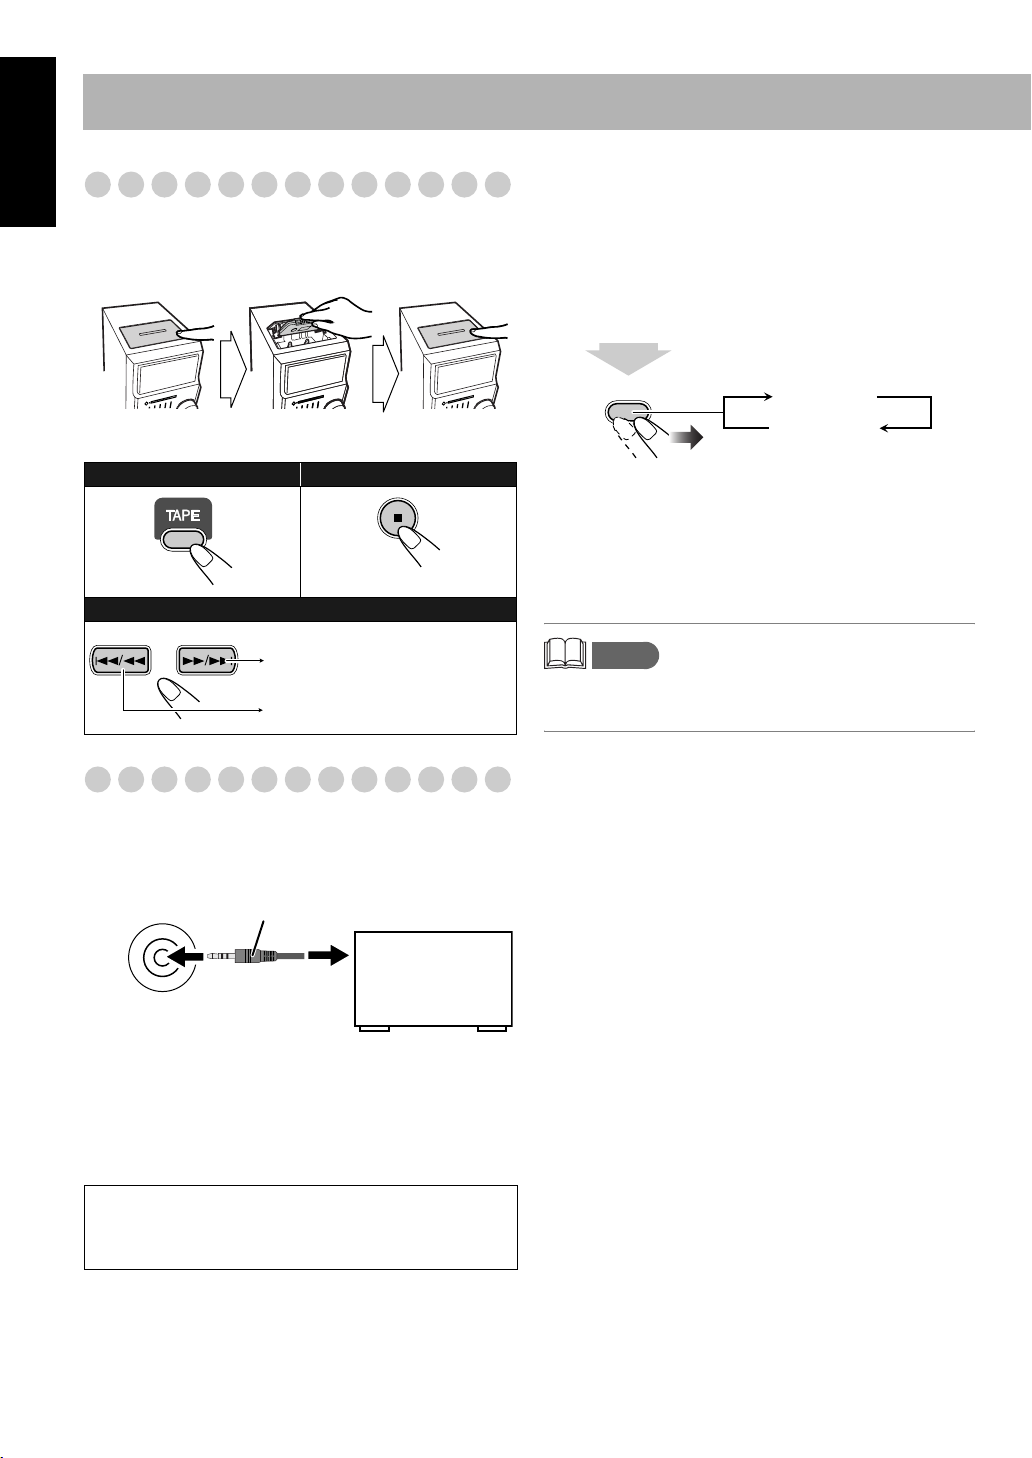
Playing Back a Tape
To insert a tape
You can play back type I tapes.
Push Insert Close
To adjust the sound input level from other
equipment
You can adjust the sound input level from the connected
equipment, if the incoming signal is too small or too large.
1 Select AUX for the source.
2 Adjust the input level.
2 sec.
With the tape side facing front
To start: To stop:
To rewind tape:
Wind forward the tape.
Rewind the tape.
Playing Back Other Equipment
To connect other equipment
By using an stereo mini plug cord (not supplied), you can
connect equipment with analog audio output jacks such as a
Digital Audio Player, or a TV, etc.
Stereo mini plug cord (not supplied)
AUX
(front panel)
Portable audio
device,
Game machine, etc.
SET/RESUME
AUX LVL 1
AUX LVL 2
AUX LVL 1: Ordinary input level (factory setting).
Suitable for equipment with low output level
(such as a portable audio device).
AUX LVL 2: Decreased input level.
Suitable for equipment with high output level
(such as a DVD player).
memo
• If you feel that the output level from the external
equipment is high, select AUX LVL2.
If the audio output on the other equipment is not stereo
mini plug type,
Use a plug adapter to convert the stereo mini plug to the
corresponding plug of the audio output.
Refer to the manuals supplied with the other equipment.
IMPORTANT
• Always set volume to “VOL-MIN” when connecting or
disconnecting the other equipment.
13
Page 18
Remote
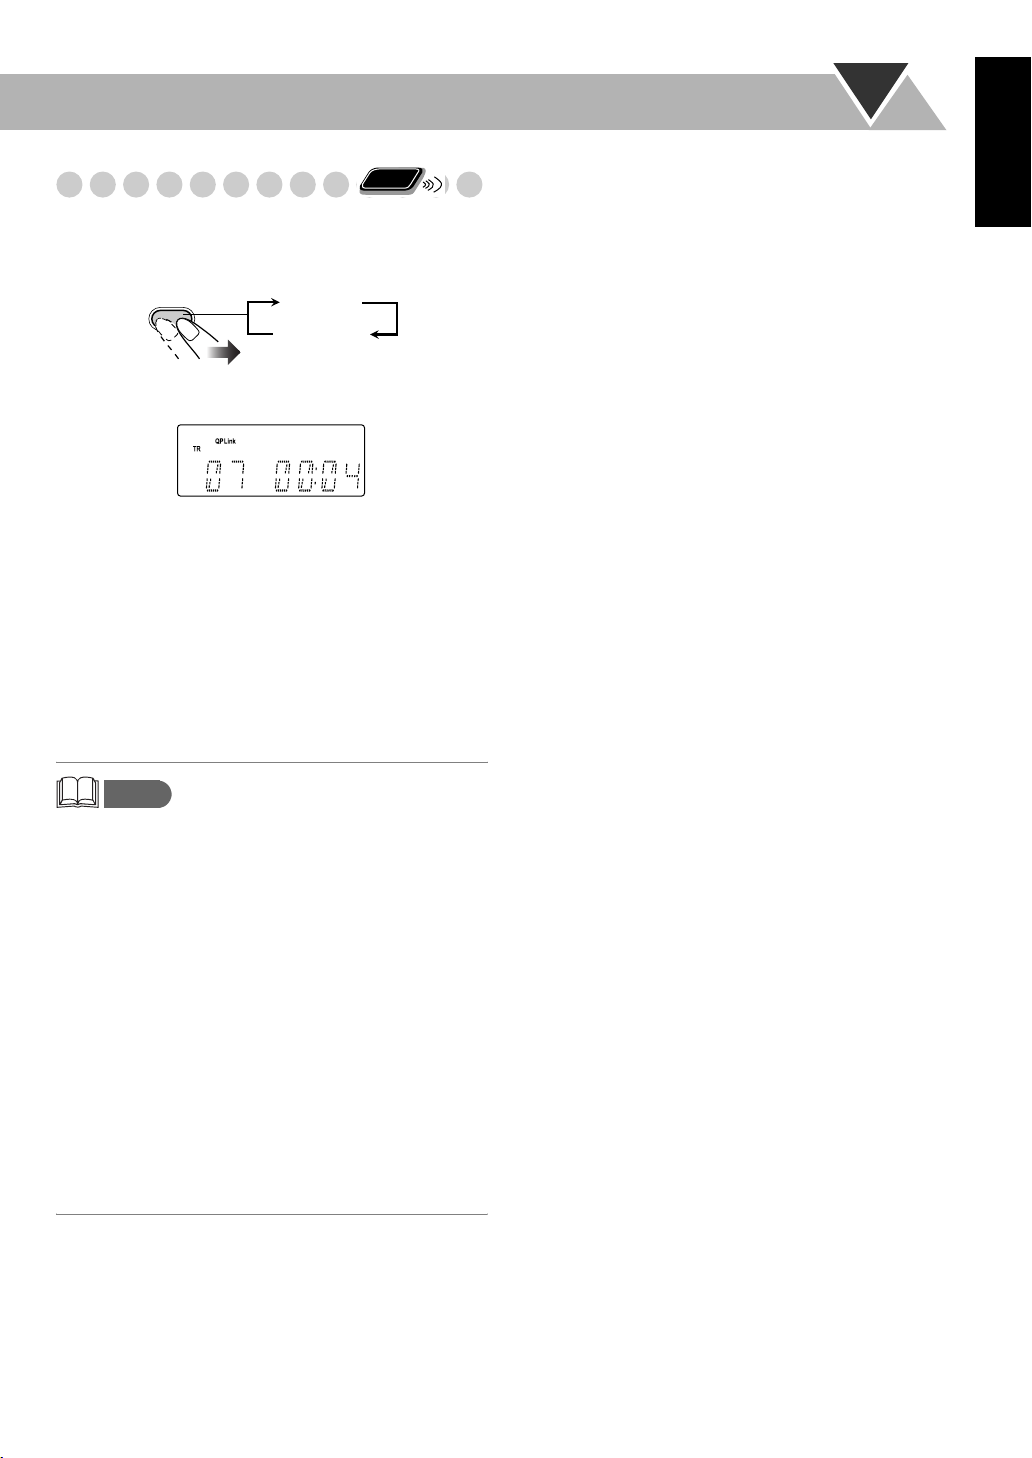
Quick Portable Link (QP Link)
ONLY
If you connect other equipment such as a digital audio player
to the AUX terminal and play it back, the source
automatically changes to AUX.
QP LINK
QP Link
Canceled
(No indication)
The QP Link indicator is lit while QP Link is activated.
When QP Link is activated...
• If an audio input is received at AUX when the System is
turned on, the source automatically switches to AUX.
• If an audio input is received at AUX when the System is in
standby mode, the system automatically turns on and plays
the audio.
• You cannot change the source while audio input is being
received at AUX.
If you press another source button, the QP Link indicator
blinks several times.
English
memo
• While playback is going on the portable audio device, QP
Link may turn the System on even if the Sleep Timer turn
the System to standby or if you turn the System to standby.
In this case, deactivate QP Link or stop playback on the
device connected to the AUX jack.
• If the audio input received at AUX is small, the source may
not switch to AUX.
• The source may not switch to AUX depending on the
content of the music.
• It takes a second or two for the source to switch to AUX
after another equipment such as a digital audio player is
started and sound is output. This is due to the System
detecting the signal from the equipment.
• The QP Link does not function:
– If the clock indication is turned off at standby
– During recording
– While Daily Timer is active
– While Recording Timer is active
14
Page 19
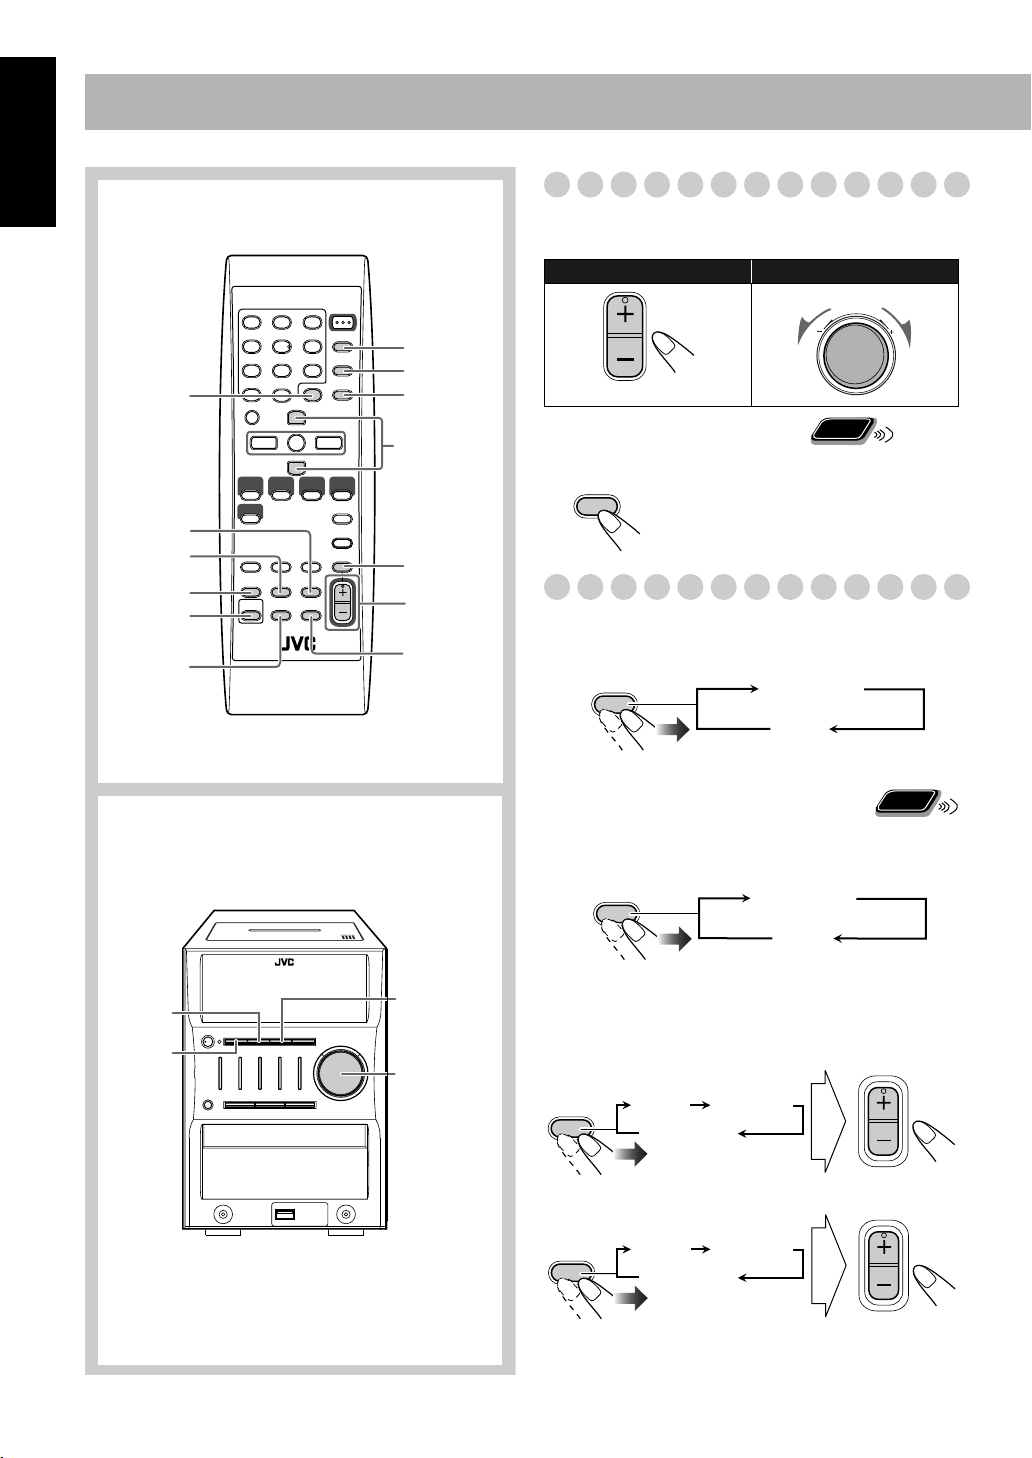
Daily Operations—Sound & Other Adjustments
English
Remote control
CLOCK/
TIMER
DIMMER
A.STANDBY
SLEEP
SOUND
TURBO
AHB PRO
SET/RESUME
CANCEL
DISPLAY
PRESET UP,
PRESET DOWN
FADE
MUTING
VOLUME
+/–
BASS/
TREBLE
Adjusting the Volume
You can adjust the volume level from level 0 (VOL-MIN) to
level 31 (VOL-MAX).
Remote control: Main unit:
VOLUME
VOLUME
Remote
To drop the volume in a moment
FADE
MUTING
To restore the volume,
adjust the volume level.
ONLY
press again, or
Adjusting the Sound
To emphasize the sound—SOUND TURBO
This function emphasizes the sound.
SOUND
TURBO
S-TURBO
OFF
(Canceled)
Main unit
BASS
SOUND
TURBO
TREBLE
VOLUME
+/–
To reinforce the bass sound
Remote
ONLY
—AHB PRO
You can reinforce the bass sound to maintain rich, full bass
at low volume.
AHB PRO
AHB PRO
OFF
(Canceled)
To adjust the tone—BASS/TREBLE
You can adjust the bass and treble level from 0 to +5.
To adjust the bass
BASS/
TREBLE
To adjust the treble
BASS/
TREBLE
You can also carry out the same operation on the System.
When SOUND TURBO is ON, BASS/TREBLE is disabled.
BASS TREBLE
Canceled
VOLUME
BASS TREBLE
Canceled
VOLUME
15
Page 20
Changing the Display Brightness—DIMMER
Remote
ONLY
3 Adjust the minute.
PRESET UP
English
SET/RESUME
You can dim the display window.
DIMMER
DIM ON
DIM OFF
(Canceled)
Remote
Setting the Clock
ONLY
Without setting the built-in clock, you cannot use the Daily
Timer and Recording Timer (see page 23).
• To exit from the clock setting, press CLOCK/TIMER as
required.
• To go back to the previous step, press CANCEL.
1 Activate the clock setting mode.
CLOCK
/TIMER
• If you have already adjusted the clock before, press the
button repeatedly until the clock setting mode (see
page 23) is selected.
2 Adjust the hour.
PRESET UP
SET/RESUME
PRESET DOWN
“CLOCK OK” appears and the built-in clock starts
working.
To check the current time during play
DISPLAY
Clock
Source information
If there is a power failure
The clock loses the setting and is reset to “0:00.” You need
to set the clock again.
PRESET DOWN
16
Page 21

English
Turning Off the Power
Remote
Automatically
ONLY
To turn off the System after playback is over—
Auto Standby
This function works only when the source is CD or tape.
A.STANDBY
When Auto Standby is in use, the A.STBY indicator lights
on the display.
When the disc and tape playback stops, the A.STBY
indicator starts flashing.
If no disc or tape operation is done for about 3 minutes while
the indicator is flashing, the System turns off (stands by)
automatically.
A.STBY
Canceled
(No indication)
To turn off the System after a certain period of
time—Sleep Timer
Specify the time (in minutes).
1
SLEEP
10 20 30 60 90 120
OFF
(Canceled)
2 Wait until the set time goes off.
To check the time remaining until the shut-off time
SLEEP
• If you press the button repeatedly, you can change the shutoff time.
17
Page 22
Advanced Disc/USB Memory/DAP Operations
Remote control
Numeric
buttons
4/1,
7,¡/¢
CD 6
REPEAT
PROGRAM
Main unit
CANCEL
USB MEMORY
6
RANDOM
Programming the Playing Order—
Remote
Program Play
ONLY
You can arrange the playing order of the tracks (up to 32)
before you start playback.
• Program play can be used only in MP3 TRACK mode.
• You can repeat all the programmed tracks by pressing
REPEAT.
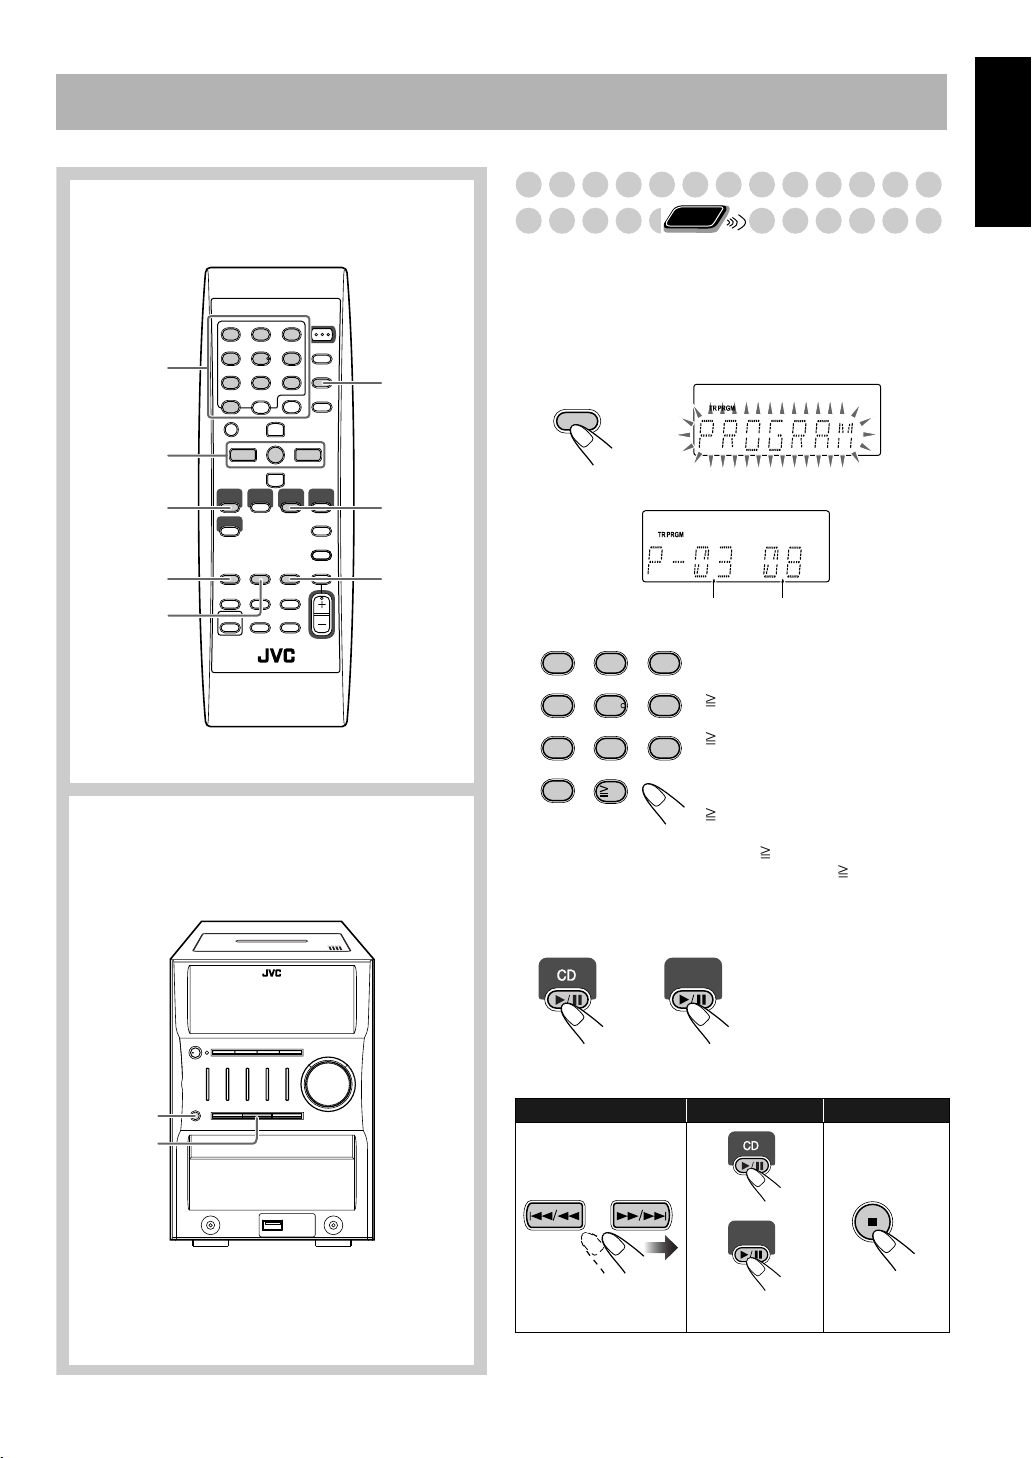
1 Before starting playback, press PROGRAM.
PROGRAM
2 Select tracks you want for Program Play.
Track numberProgram step
Examples:
1
4
7
0
3
2
To select track number 5, press 5.
To select track number 15, press
5
8
10
10 → 1 → 5.
6
To select track number 30, press
10 → 3 → 0.
9
(For MP3 sources with 100 or
more tracks)
To select track number 125, press
10 twice → 1 → 2 → 5.
* For up to 99 tracks, you can
press 10 twice to turn to the
condition before 10 is pressed.
English
3 Repeat step 2 to program the other tracks.
4 Start playback.
USB
MEMORY
or
The tracks you have selected are played back in the order
you have programmed.
0
7
To skip a track: To pause: To stop:
or
USB
MEMORY
To release, press
again.
• Tracks cannot be selected with the Numeric buttons during
Program Play.
18
Page 23
English
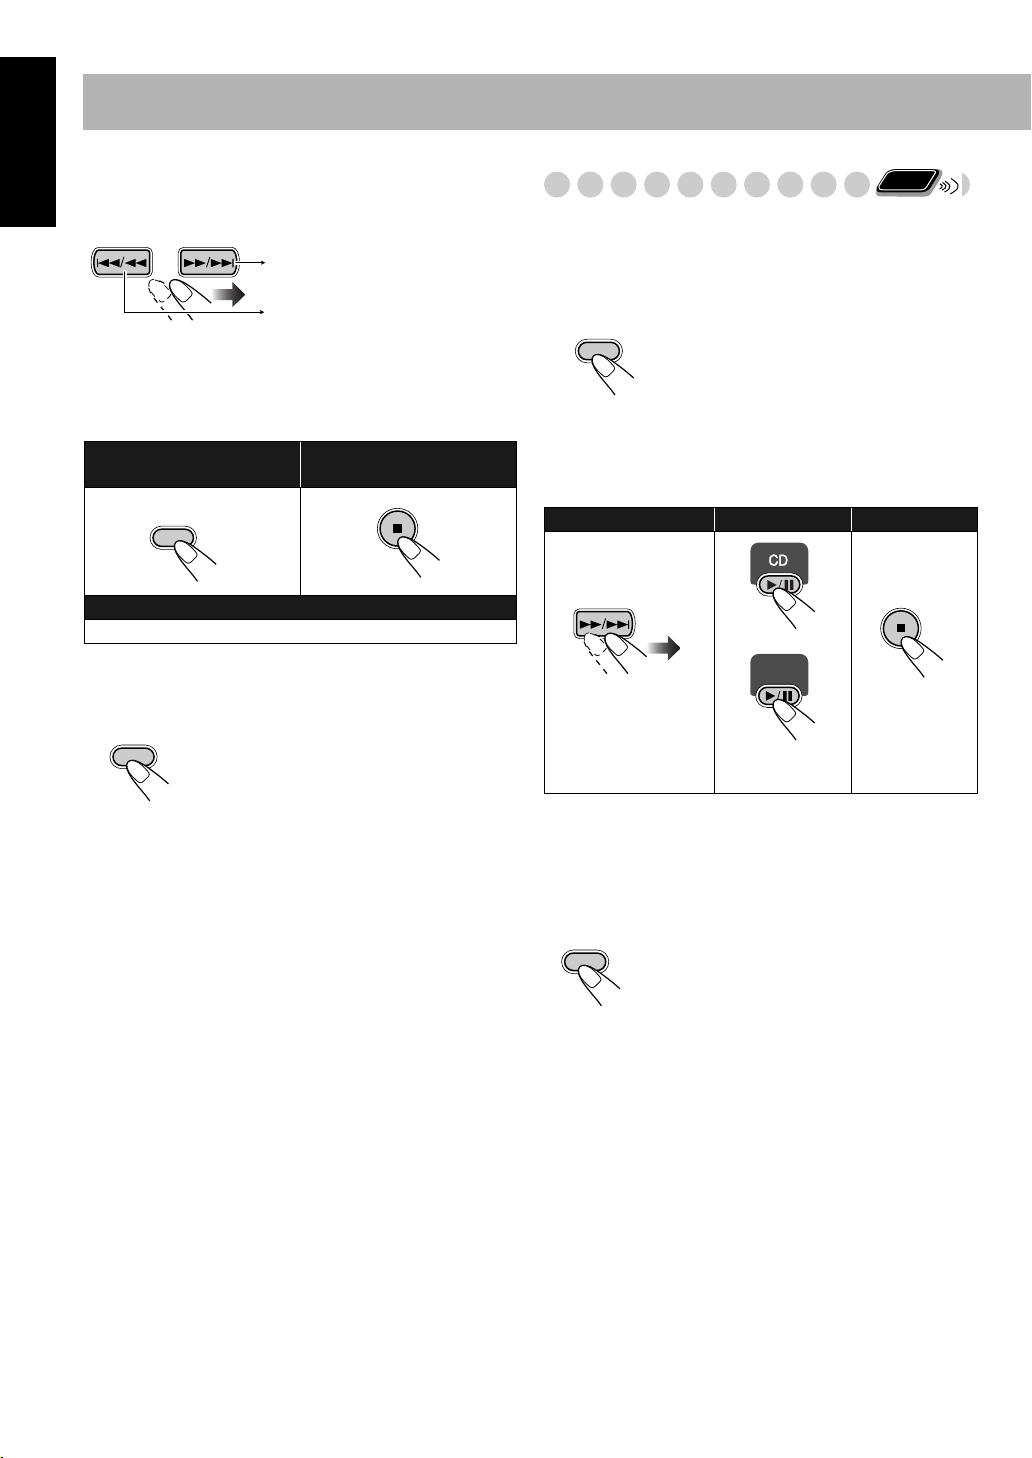
To check the programmed contents
While the PRGM indicator is shown on the display and
before playback...
In the programmed order.
In the reverse order.
To modify the program
While the PRGM indicator is shown on the display and
before playback...
To erase the last step: To erase the entire
program:
CANCEL
To add steps in the program:
Repeat step 2 on page 18.
To exit from Program Play
While the PRGM indicator is shown on the display...
Remote
Playing at Random—Random Play
ONLY
You can play back all the tracks on the selected disc, USB
Memory or DAP at random.
• You can repeat All tracks (PALL) by pressing REPEAT.
Press RANDOM.
RANDOM
Playback starts in random order.
• If “GROUP” mode is selected for the MP3. It will be
canceled.
Random Play ends when all tracks are played.
To skip a track: To pause: To stop:
or
USB
MEMORY
PROGRAM
Pressing 7 also cancels Program Play.
• While in Program Play (PRGM indicator is shown on the
display), you cannot open the disc trays. If no operation is
done, Program Play is canceled and you can open the disc
trays.
To release, press
again.
• Tracks cannot be selected with the Numeric buttons during
Random Play.
To exit from Random Play
While the RAND indicator is shown on the display...
RANDOM
19
Page 24
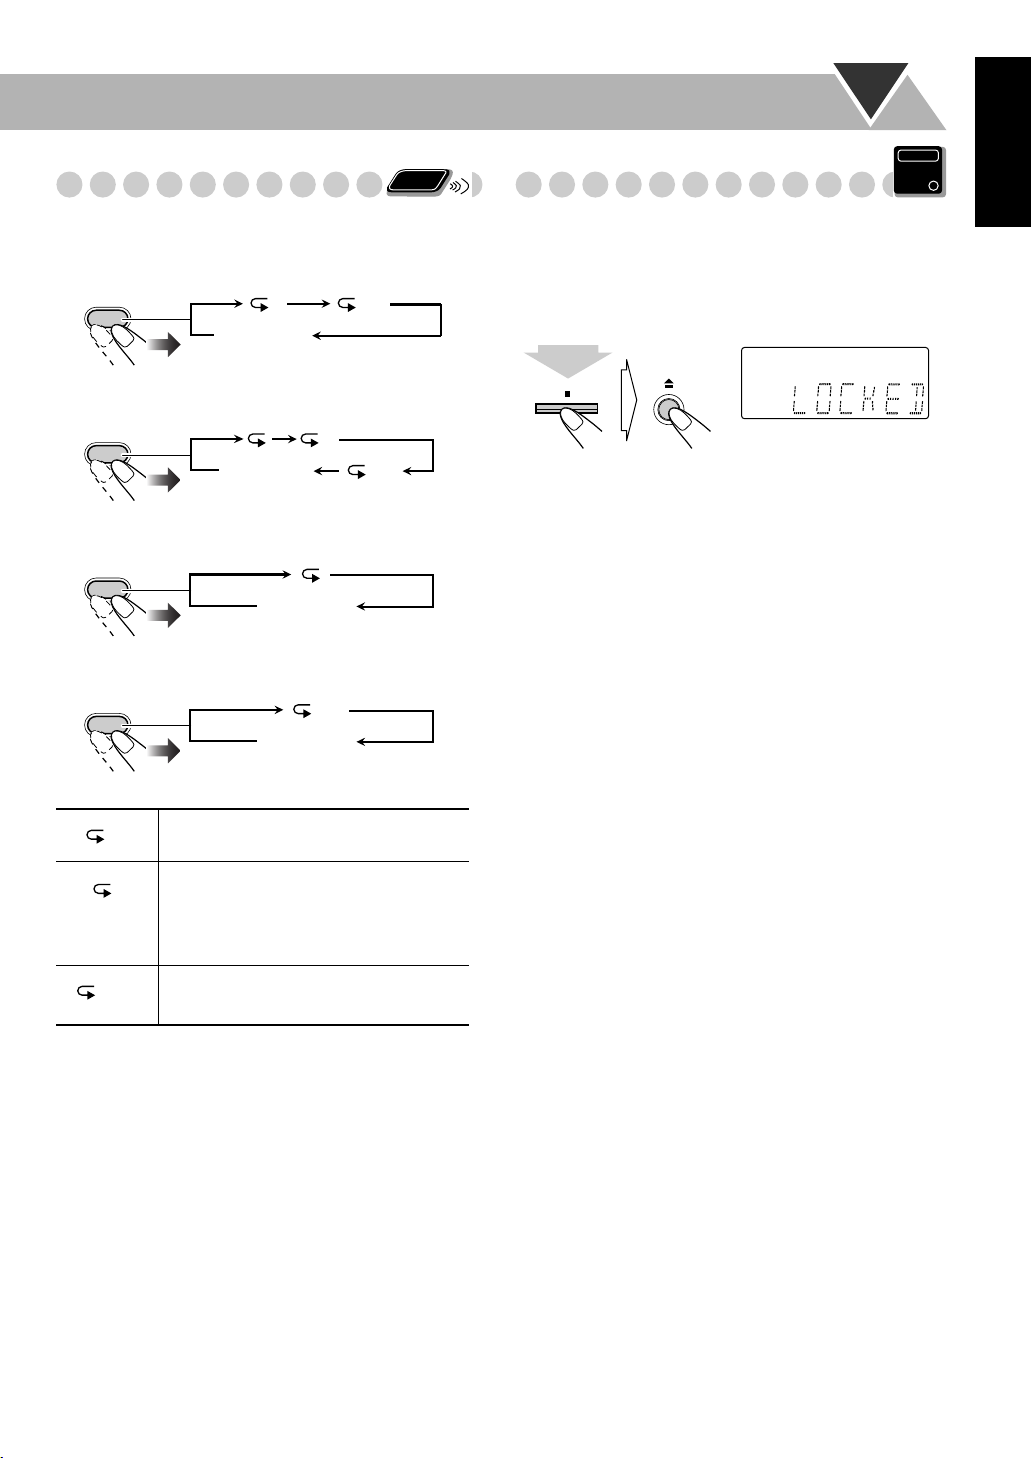
Playing Repeatedly—Repeat Play
You can repeat playback.
For CD/MP3(TRACK mode):
Remote
ONLY
Prohibiting Disc Ejection—Child Lock
You can lock the disc trays so that no one can eject the
loaded discs.
• This is possible while the System is on standby.
Main Unit
ONLY
English
REPEAT
Canceled
(No indication)
For MP3 (GROUP mode):
REPEAT
Canceled
(No indication)
During Program Play:
REPEAT
During Random Play:
RANDOM
1
Repeats the current track.
1
Canceled
(No indication)
ALL
Canceled
(No indication)
ALL1
ALL
While the disc trays are closed...
(at the same time)
To cancel the prohibition,
repeat the same procedure.
“UNLOCKED” appears on the display.
ALL
• Repeats the program
• Repeats all the tracks in the current
group (for MP3 playback mode in
“GROUP”)
Repeats all the tracks. (Selectable in
Normal play and Random play)
20
Page 25
Advanced Tape Operations
English
Remote control
FM/AM
CD 6
TAPE
7
USB MEMORY
6
AUX
IMPORTANT
It may be unlawful to record or play back copyrighted
material without the consent of the copyright owner.
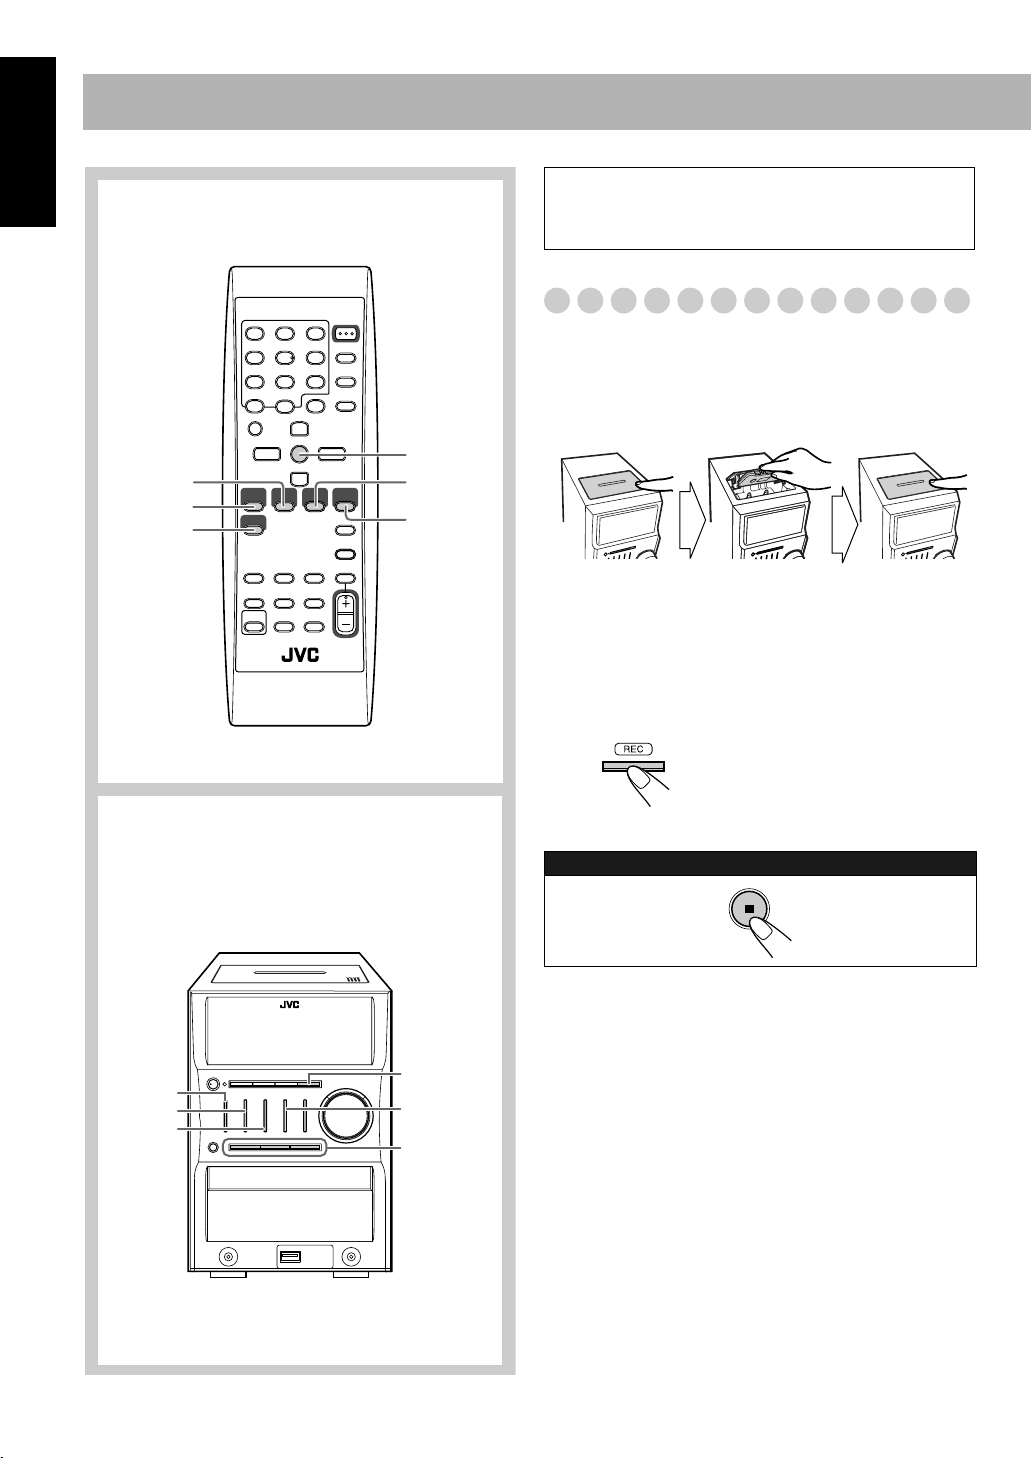
Recording on a Tape
You can use type I tapes for recording.
• To play a tape, see page 13.
1 Insert a recordable cassette.
Push Insert
With the tape side facing front
2 Select and start playing the source—“FM,” “AM,”
“CD,” “USB,” or “AUX.”
• When recording a disc, you can also use “Synchronized
Disc Recording” (see page 22).
3 Start recording.
Close
Main unit
CD #/8
TAPE
FM/AM
REC
USB MEMORY
#/8
4, 7, ¢
On the main unit
To stop recording:
21
Page 26
Synchronized Disc Recording
You can start and stop both disc, USB memory and DAP
playback and tape recording at the same time.
To record the entire disc
Set “RESUME” on (see page 12).
1 Load a disc and insert a recordable cassette.
• If the current playing source is not the CD player, press
CD 6, then 7.
• The display will show “RESUME”. Press 7 to stop the
system for the recording.
2 Start recording.
On the main unit
3 Flip the cassette tape manually to the opposite side.
• When the tape has reached the end, both the tape and the
disc will stop. The display will show “RESUME”. Press
REC after flipping the cassette tape to the opposite side
to resume recording from the beginning of the current
track.
• When the disk has finished playing back all the tracks,
both the tape and the disk will stop.
If the beat is heard while recoding an AM
broadcast
FM MODE
BEAT 1
BEAT 2
• Select “BEAT 1” or “BEAT 2” to reduce the beat.
Remote
ONLY
English
To record Program Play or Random Play
1 Select Program Play (and make a program) or Random
Play.
2 Press REC to start recording.
To protect your recording
Cassettes have two small tabs on the back to protect
from unexpected erasure or re-recording.
To protect your recording,
To re-record on a protected tape,
adhesive tape.
remove these tabs.
cover the holes with
22
Page 27

Timer Operations
English
Remote control
CLOCK/
TIMER
STANDBY/ON
SET/RESUME
CANCEL
PRESET UP,
PRESET DOWN
Remote
Setting the Timer
Using Daily Timer, you can wake up with music, etc. On the
other hand, with Recording Timer, you can make a tape of a
radio broadcast automatically.
• You can store three Daily Timer settings and one
Recording Timer setting; however, you can activate only
one of the four settings above at the same time.
• To exit from the timer setting, press CLOCK/TIMER as
required.
• To correct a misentry during the process, press CANCEL.
You can return to the previous step.
ONLY
How Daily Timer actually works
Once the Daily Timer has been set, the timer ( )
indicator and timer number indicator (1, 2, or 3) are lit on
the display. Daily Timer is activated at the same time
everyday until the timer is turned off manually or another
Daily Timer is activated.
When the on-time comes
The System turns on, tunes in to the selected station, or
starts playing the specified source.
• If “P – – –” is selected, the last tuned station will be
selected for Daily Timer.
• If “VOL – – –” is selected, the last specified value is
selected.
• While Daily Timer is working, the timer ( ) and
timer number indicators (1, 2, or 3) flash on the display.
• The timer setting remains in memory until you change
it.
• Without canceling the Daily Timer, you can change the
source or adjust the volume after Daily Timer starts
playback.
23
How Recording Timer actually works
When Recording Timer has been set, Timer ( )
indicator and the REC indicator are lit on the display.
Recording Timer works only once.
When the on-time comes
The System turns on, tunes in to the specified station, and
starts recording.
• If “VOL – – –” is selected, the last specified value is
selected.
When the off-time comes
The System stops recording, and turns off (stands by).
• The timer setting remains in memory until you change
it.
Page 28
1 Select one of the timer setting modes you want to set—
Daily 1 Timer, Daily 2 Timer, Daily 3 Timer, or
Recording Timer.
CLOCK
/TIMER
Ex.: When Daily Timer 1 setting mode is selected
Daily 1 Timer Daily 2 Timer Daily 3 Timer
Canceled
Clock setting
(see page 16)
Recording Timer
For Recording Timer:
1
Set the hour then the minute for on-time.
PRESET UP
SET/RESUME
PRESET DOWN
2
Set the hour then minute for off-time in the same
manner.
3
Select “TUNER FM” or “TUNER AM.”
PRESET UP
SET/RESUME
English
2 Make the timer setting as you want.
For Daily Timers:
Set the hour then the minute for on-time.
1
PRESET UP
SET/RESUME
PRESET DOWN
2
Set the hour then the minute for off-time in the
same manner.
3
Select the playback source—“TUNER FM,”
“TUNER AM,” “CD,” “AUX,” “USB” or “TAPE”.
PRESET UP
SET/RESUME
PRESET DOWN
4
For “TUNER FM” and “TUNER AM”:
Select a preset number or “P– – –” by pressing
PRESET UP or PRESET DOWN, then press SET/
RESUME.
Set the volume.
5
PRESET UP
SET/RESUME
PRESET DOWN
4 Select preset station number.
PRESET UP
SET/RESUME
PRESET DOWN
5
Set the volume.
PRESET UP
SET/RESUME
PRESET DOWN
If you select “VOL – – –,” the volume is set to the
level that was set before the power was turned off.
3 Turn off the System (on standby) if you have set the
timer with the System turned on.
STANDBY/ON
The Recording Timer can function both the System is
turned on and off.
PRESET DOWN
If you select “VOL – – –,” the volume is set to the
level that was set before the power was turned off.
24
Page 29
English
To turn off the Timer after its setting is done
Since Daily Timer is activated at the same time everyday,
you may need to cancel it on some particular days.
1 Select the Timer you want to cancel.
CLOCK
/TIMER
Daily 1 Timer Daily 2 Timer Daily 3 Timer
Canceled
Clock setting
(see page 16)
Recording Timer
2 Turn off the selected Timer.
CANCEL
The indicator corresponding to the Timer is turned off.
To turn on the Timer again,
press in step 2...
SET/RESUME
The indicator corresponding to the Timer lights.
repeat the above steps and
25
Page 30

Additional Information
Learning More about This System
Daily Operations—Playback (see pages 9 to 14)
Listening to the Radio:
• If you store a new station into an occupied preset number, the
previously stored station in that number will be erased.
• When you unplug the AC power cord or if a power failure
occurs, the preset stations will be erased in a few days. If this
happens, preset the stations again.
Playing Back a Disc/USB Memory/DAP:
• When using an 8 cm disc, place it on the inner circle of the disc
tray.
• This System cannot play “packet write” discs.
• For MP3 playback...
– MP3 discs are required a longer readout time than regular
CDs. (It depends on the complexity of the group/file
configuration.)
– Some MP3 files cannot be played back and will be skipped.
This result from their recording processes and conditions.
– When making MP3 discs, use ISO 9660 Level 1 or Level 2
for the disc format.
– This System can play back MP3 files with the extension
code <.mp3> (regardless of the letter case—upper/lower).
– Some characters or symbols will not be shown correctly on
the display.
The maximum character number shown on the display is 32
(without the extension code) for files, and 30 for ID3 tag.
– It is recommended that you make each MP3 file at a
sampling rate of 44.1 kHz and at bit rate of 128 kbps.
– This System can recognize a total of 500 tracks and 200
groups on an MP3 disc and 999 tracks and 250 groups on a
USB Memory. Those exceeding the maximum number
cannot be recognized.
– Playback order of MP3 tracks may be different from the one
you have intended while recording. If a folder does not
include MP3 tracks, they are ignored.
MP3 groups/tracks configuration
This System plays back MP3 tracks as follows.
The play order in the figure is for MP3 tracks on the disc.
MP3 tracks on USB Memory or DAP may be played
back differently.
Level 1 Level 2 Level 3 Level 4 Level 5
ROOT
01
1
MP3 track with its play order
Hierarchy
01
03 04
3
02
Group with its play order
4
5
1
2
05
6
9
10
7
8
11
12
Playing Back a Tape:
• It is not recommended to use the C-120 or longer tapes.
These tapes easily jams in the pinch roller and capstan, and
may cause characteristic deterioration.
Quick Portable Link (QP Link):
• The system holds the On/Off status of QP Link even when
the AC Power cord is connected or removed.
• The source remains at AUX when you stop the other
equipment such as a digital audio player.
Daily Operations—Sound & Other Adjustments
(see pages 15 to 17)
Adjusting the Volume:
• Be sure to turn down the volume before connecting or putting
the headphones.
Adjusting the Sound:
• This function also affects the sound through the headphones.
• SOUND TURBO and AHB PRO cannot be used at the same
time.
Setting the Clock:
• “0:00” will flash on the display until you set the clock.
• The clock may gain or lose 1 to 2 minutes per month. If this
happens, reset the clock.
Turning off the Power Automatically:
• Auto Standby cannot be canceled by the following operations.
– Changing the display brightness.
– Adjusting the volume.
– Adjusting the sound.
Advanced Disc/USB Memory/DAP Operations
(see pages 18 to 20)
Programming the Playing Order—Program Play:
• If you try to program a 33rd track, “FULL” appears on the
display.
• While programming steps...
Your entry will be ignored if you have tried to program an item
number that does not exist on the disc (for example, selecting
track 14 on a disc that only has 12 tracks).
Advanced Tape Operations (see pages 21 to 22)
Recording on a Tape:
• The recording level is automatically set correctly. Thus, you
can adjust the sound you are actually listening to without
affecting the recording level.
• There is leader tape which cannot be recorded onto at the start
and end of cassette tapes. Thus, when recording CDs or radio
broadcasts, wind the leader tape first to ensure that the
recording will be made without any music part lost.
• If you start recording with no cassette inserted, “NO TAPE”
appears on the display. If a protected tape has been inserted,
“NO REC” appears.
Synchronized Disc Recording:
• You cannot open the disc tray while recording.
English
26
Page 31

English
Timer Operations (see pages 23 to 25)
• When you unplug the AC power cord or if a power failure
occurs, the timer will be canceled. You need to set the clock
first, then the timer again.
• Without Stopping the recording, you cannot change the source
after Recording Timer starts recording.
• You cannot use the SLEEP timer while activating the
Recording timer.
• If you set the Sleep Timer after Daily Timer starts playing the
selected source, Daily Timer is canceled.
Other
The following settings are memorized by the system for two or
three days even if the AC power cord is removed. The settings
are reset to factory default values after few days in which case
you must set them again.
Preset stations, volume, BASS/TREBLE, AHB PRO,
SOUND TURBO, AUX LEVEL, QP Link, and timer.
To remove the speaker grilles
] The batteries are exhausted.
No sound is heard from the speakers.
] Speaker connections are incorrect or loose (see page 7).
] Headphones are connected (see page 9).
System does not turn off.
] QP Link is active (see page 14).
Radio Operations:
Hard to listen to broadcasts because of noise (see pages 4
to 6).
] Antennas connections are incorrect or loose.
] The AM loop antenna is too close to the System.
] The FM antenna is not properly extended and positioned.
Speaker
grille
Holes
Projections
Troubleshooting
If you are having a problem with your System, check this list
for a possible solution before calling for service.
General:
Adjustments or settings are suddenly canceled before
you finish.
] There is a time limit. Repeat the procedure again.
Operations are disabled.
] The built-in microprocessor may malfunction due to
external electrical interference. Unplug the AC power cord
and then plug it back in.
Unable to operate the System from the remote control.
] The path between the remote control and the remote sensor
on the System is blocked.
] Point it at the remote sensor on the front panel.
] Signals cannot reach the remote sensor.
Move closer to the System.
Disc Operations:
The disc does not play.
] The disc is placed upside down. Place the disc with the label
side up.
The disc sound is discontinuous.
] The disc is scratched or dirty.
The disc tray does not open or close.
] The AC power cord is not plugged in.
] Child Lock is in use (see page 20).
Tape Operations:
The cassette holder cannot be opened.
]
Power supply from the AC power cord has been cut off
while the tape was running. Turn on the System.
Impossible to record.
] Small tabs on the back of the cassette are removed.
Cover the holes with adhesive tape (see page 22).
Timer Operations:
Daily Timer does not work.
] The System has been turned on when the on-time comes.
Timer starts working only when the System is turned off.
27
Page 32

Maintenance
To get the best performance of the System, keep your discs,
and mechanism clean.
Handling discs
• When removing the disc from its case, hold it at the edge while
pressing the center hole lightly.
• Do not touch the shiny surface of the disc, or bend the disc.
• Put the disc back in its case after use to prevent warping.
• Be careful not to scratch the surface of the disc.
• Avoid exposure to direct sunlight, temperature extremes, and
moisture.
To clean the disc:
Wipe the disc with a soft cloth in a straight line from center to
edge.
Handling cassette tapes
• If the tape is loose in its cassette, take up the slack by inserting
a pencil in one of the reels and rotate it.
– If the tape is loose, it may get stretched, cut, or caught in the
cassette.
• Be careful not to touch the tape surface.
• Avoid the following places to store the tape—in dusty places,
in direct sunlight or heat, in moist areas, on a TV or speaker,
or near a magnet.
To keep the best recording and playback sound quality
• Use a cotton swab moistened with alcohol to clean the heads,
capstans, and pinch rollers.
• Use a head demagnetizer (available at electronics and audio
shops) to demagnetize the heads (when the System turned off).
Cleaning the System
• Stains should be wiped off with a soft cloth. If the System is
heavily stained, wipe it with a cloth soaked in water-diluted
neutral detergent and wrung well, then wipe clean with a dry
cloth.
• Since the System may deteriorate in quality, it become
damaged or get its paint peeled off, be careful about the
following:
– DO NOT wipe it with a hard cloth.
– DO NOT wipe it strongly.
– DO NOT wipe it with thinner or benzine.
– DO NOT apply any volatile substance such as insecticides
to it.
– DO NOT allow any rubber or plastic to remain in contact for
a long time.
Specifications
Amplifier section
Output Power: 80 W per channel, min. RMS,
driven into 6 Ω at 1 kHz with no
more than 10% total harmonic
distortion. (IEC268-3)
Speakers/Impedance: 6 Ω – 16 Ω
Audio Input AUX
Input sensitivity/Impedance:
LEVEL1: 150 mV/47 kΩ
LEVEL2: 500 mV/47 kΩ
USB: Ver.1.1
Tuner section
FM tuning range: 87.50 MHz – 108.00 MHz
AM (MW) tuning range: 530 kHz – 1 710 kHz (at 10 kHz)
531 kHz – 1 710 kHz (at 9 kHz)
CD player section
Dynamic range: 85 dB
Signal-to-noise ratio: 85 dB
Wow and flutter: Immeasurable
Cassette deck section
Frequency response
Normal (type I): 60 Hz – 14 000 Hz
Wow and flutter: 0.15% (WRMS)
General
Power requirement:
Power consumption: 150 W (at operation)
Dimensions (approx.): 175 mm × 246 mm × 415 mm
Mass (approx.): 6.2 kg
Speakers
Type: 2-way Bass reflex
Speaker units: Woofer: 12 cm cone × 1
Impedance: 6 Ω
Dimensions (approx.): 145 mm × 246 mm × 212 mm
Mass (approx.): 2.2 kg each
AC 110 V – 127 V / 220 V – 240 V
(adjustable with the voltage selector),
50Hz/60Hz
22 W (on standby)
(standby and on display off)
1.0 W
(W/H/D)
Tweeter: 4 cm cone × 1
(W/H/D)
English
Supplied Accessories
See page 4.
Design and specifications are subject to change without notice.
28
Page 33

English
Parts Index
Refer to the pages to see how to use the buttons and controls.
Remote control
STANDBY/ON
10, 11, 18
12
10–12,
18, 19
10, 16, 24
9–12,
18, 19
18, 19
20
17
17
15
15
1
4
7
0
MP3 MODE
SLEEP A.STANDBY
SOUND
TURBO
2
5
8
10
IIV
PRESET UP
PRESET DOWN
PROGRAMREPEAT
AHB PRO
REMOTE CONTROL
3
6
9
CLOCK
/TIMER
USB
MEMORY
RANDOM
DIMMER
BASS/
TREBLE
SET/RESUME
CANCEL
DISPLAY
QP LINK
FM MODE
FADE
MUTING
VOLUME
9, 24
10, 12, 13,
16, 24
,
25
19, 23
16
16, 23, 25
10, 16, 24
11, 12,
18, 19
10–12,
18, 19
14
10
15
19
9, 15
9, 16
15
29
Page 34

Main unit
English
27
9, 24
9–13, 18, 19
11, 20
10–12, 18,
19, 20
8
9, 15, 16
9, 15
11, 12
9
13
30
Page 35

Contenido
Introducción ................................................... 2
Precauciones ................................................................... 2
Cómo leer este manual.................................................... 3
Procedimientos iniciales ................................ 4
Paso 1: Desembalaje ....................................................... 4
Paso 2: Prepare el control remoto ................................... 4
Paso 3: Conexión ............................................................ 5
Español
Antes de operar el sistema ............................. 8
Operaciones diarias—Reproducción ........... 9
Para escuchar la radio ................................................... 10
Para reproducir un disco............................................... 11
Cómo reproducir desde la memoria USB Memory o
el reproductor de audio digital.................................. 11
Para reproducir una cinta.............................................. 13
Reproducción en otro equipo........................................ 13
Quick Portable Link (QP Link) .................................... 14
Operaciones diarias—
Ajustes del sonido y otros ajustes ............ 15
Ajuste del volumen ....................................................... 15
Ajuste del sonido .......................................................... 15
Cambio de la luminosidad de la pantalla—DIMMER . 16
Ajuste del reloj.............................................................. 16
Apagado automático del sistema .................................. 17
Operaciones avanzadas de disco/
memoria USB/DAP ................................... 18
Programando el orden de reproducción—
Reproducción programada........................................ 18
Reproduciendo en orden aleatorio—
Reproducción aleatoria ............................................. 19
Reproduciendo de forma repetida—
Reproducción repetida .............................................. 20
Prohibición de la expulsión del disco—
Bloqueo para niños ................................................... 20
Operaciones avanzadas de la cinta ............. 21
Grabando en una cinta .................................................. 21
Grabación sincronizada del disco ................................. 22
Operaciones de los temporizadores ............ 23
Programando el temporizador....................................... 23
Información adicional .................................. 26
Aprendiendo más acerca de este sistema...................... 26
Localización de averías................................................. 27
Mantenimiento.............................................................. 28
Especificaciones ........................................................... 28
Índice de las piezas ....................................................... 29
1
Page 36

Introducción
Gracias por adquirir el sistema de microcomponentes de
JVC.
Esperamos que aporte a su hogar un valor añadido y le
proporcione años de entretenimiento.
Asegúrese de leer atentamente este manual de instrucciones
antes de utilizar su nuevo sistema estéreo.
En él encontrará toda la información que necesita para
instalar y utilizar el sistema.
Si tiene alguna duda que no conteste este manual, póngase en
contacto con el distribuidor.
Precauciones
Instalación
• Efectúe la instalación en un lugar nivelado, seco, y que no
sea ni muy frío ni muy caluroso—entre 5°C y 35°C.
• Instale el sistema en un lugar adecuadamente ventilado
para evitar que se genere calor dentro del mismo.
NO instale el sistema cerca de fuentes de calor,
o expuesto a la luz directa del sol, al polvo o a
vibraciones excesivas.
• Deje una distancia suficiente entre el sistema y el televisor.
• Para evitar interferencias del televisor, mantenga los
altavoces alejados del televisor.
Fuentes de alimentación
• Cuando desenchufe el sistema de la toma de corriente,
siempre tire de la clavija, nunca del cable de alimentación
de CA.
Calor interior
• Hay un ventilador de enfriamiento montado en el panel
trasero para evitar que se genere calor dentro de la unidad
principal (consulte la página G-2).
Para fines de seguridad, observe
atentamente lo siguiente:
• Asegúrese de que haya una buena
ventilación alrededor de la unidad
principal. Una ventilación defectuosa
podría recalentar y dañar el sistema.
• NO tape el ventilador de enfriamiento ni las
rendijas u orificios de ventilación. Si
quedan tapados con un periódico, un trozo
de tela, etc., no se podrá disipar el calor.
Otros
• Si llegara a entrar líquido o algún objeto metálico dentro
del sistema, desenchufe el cable de alimentación de CA y
consulte con su distribuidor antes de seguir usando el
sistema.
NO desarme el sistema; en el interior no hay
piezas que pueda reparar el usuario.
• Cuando no se va a utilizar el sistema por un tiempo
prolongado, desenchufe el cable de alimentación de CA de la
toma de corriente de la pared.
Si algo no funciona, desconecte el cable de alimentación de
CA y consulte con su distribuidor.
Español
NO manipule el cable de alimentación de CA
con las manos mojadas.
Condensación de humedad
Podría condensarse humedad en los lentes del interior del
sistema, en los siguientes casos:
• Después de encender la calefacción de la sala
• En una habitación húmeda
• Si lleva la unidad directamente desde un lugar frío a otro
cálido
Si se produce condensación, el sistema podría no funcionar
correctamente. En este caso, deje el sistema encendido
durante algunas horas hasta que se evapore la humedad, a
continuación, desenchufe el cable de alimentación de CA y
vuélvalo a enchufar.
2
Page 37

Cómo leer este manual
Para que las explicaciones de este manual sean simples y
fáciles de entender, hemos adoptado los siguientes métodos:
• Las operaciones de los botones y de los controles se
explican tal como se indican en la tabla de abajo. En este
manual, las operaciones se explican utilizando
principalmente el control remoto; no obstante, podrá
utilizar los botones y controles de la unidad principal si
Español
disponen de nombres y marcas iguales (o similares).
•
Algunas notas y consejos relacionados se explican
posteriormente en las secciones “Aprendiendo más
acerca de este sistema” y “Localización de averías”, pero
no en la misma sección en que se describen las
operaciones.
Si desea saber más sobre las funciones, o si
tiene alguna duda sobre las funciones, vaya a la sección
pertinente y busque la respuesta.
Indica que debe pulsar el botón
brevemente
.
Remote
ONLY
Indica que debe pulsar el botón
manera breve y repetida
seleccione la opción deseada.
Indica que debe pulsar uno de los
botones.
Indica que debe
el botón durante los segundos
pulsado
especificados.
2 seg.
• El número que está dentro de la
flecha indica el tiempo de pulsación
(en este ejemplo, 2 segundos).
• Si no hay ningún número dentro de la
flecha, pulse y mantenga pulsado
hasta que finalice todo el
procedimiento o hasta que se
obtenga el resultado deseado.
Indica que debe girar el control en
la(s) dirección(es) especificada(s).
Indica que esta operación sólo se puede
realizar utilizando el control remoto.
de
hasta que se
pulsar y mantener
Indica que esta operación sólo se puede
Main Unit
ONLY
realizar utilizando los botones y controles
de la unidad principal.
3
Page 38

Procedimientos iniciales
Paso 1:Abra el paquete y verifique los
accesorios.
Paso 2:Prepare el control remoto.
Paso 1: Desembalaje
Después de efectuar el desembalaje, asegúrese de que
dispone de todos los elementos siguientes. El número entre
paréntesis indica la cantidad de piezas suministradas para
cada elemento.
• Antena FM (1)
• Antena de cuadro AM (1)
• Control remoto (1)
•Pilas (2)
• Adaptador para conector de CA (1)
Si hay algún elemento faltante, consulte inmediatamente con
su distribuidor.
Paso 2: Prepare el control remoto
Instale las pilas en el control remoto haciendo coincidir
correctamente las polaridades (+ y –).
1
Español
Paso 3
:Efectúe la conexión de los componentes,
como por ejemplo, antenas AM/FM,
altavoces, etc. (consulte las páginas 5 a 7).
AM
EXT
AM
LOOP
GND
Por último, conecte el cable de
alimentación de CA.
Ahora podrá operar el sistema.
2
R6(SUM-3)/AA(15F)
3
• NO utilice una pila nueva con otra usada.
• NO utilice conjuntamente pilas de diferentes
tipos.
• NO exponga las pilas al calor o a las llamas.
• NO deje las pilas en su compartimiento si
piensa no usar el control remoto durante un
tiempo prolongado. De lo contrario, el
control remoto se dañará debido a fugas de
electrólito.
4
Page 39

Paso 3: Conexión
Si necesita una información más detallada, consulte la página 7.
Para obtener información más detallada sobre la conexión de un equipo externo, consulte la página 13.
Las ilustraciones de abajo son ejemplos típicos de los terminales
de entrada/salida.
Cuando conecte otros componentes, consulte también sus
Español
respectivos manuales debido a que los nombres de los
terminales impresos al dorso pueden variar entre los mismos.
Antes de realizar las conexiones, desconecte la alimentación de
todos los componentes.
Para una mejor recepción de FM/AM
Antena FM
exterior
(no suministrada)
AM
LOOP
AM
EXT
GND
Cable cubierto de vinilo (no
suministrado)
Extiéndalo horizontalmente.
Antena de cuadro
AM
Manténgala
conectada.
Desconecte la antena FM suministrada, y conecte la antena FM exterior,
utilizando un cable de 75 Ω con conector tipo coaxial (IEC o DIN45325).
A un tomacorriente de pared
Conecte el cable de alimentación de CA sólo después de
finalizar todas las conexiones.
• Si la toma de corriente no coincide con el conector de CA, utilice
el adaptador para conector de CA suministrado.
5
Page 40

Antena FM (suministrada)
Extiéndala de
manera que se
obtenga la mejor
recepción.
LOOP
Español
Antena de cuadro AM
(suministrada)
Gírela hasta que se obtenga la
mejor recepción.
AM
EXT
AM
GND
110V–127V
220V–240V
AC VOLTAGE
SELECTOR
Con rayas negras
Sin rayas
6
Page 41

Cómo armar y conectar la antena de cuadro AM
Cómo armar la antena de cuadro AM
Español
Cómo conectar los cables de los altavoces
Asegúrese de que ambos altavoces se encuentren conectados
correcta y firmemente.
3 Suelte
1
Sostenga
Cómo conectar la antena de cuadro AM
Asegúrese de conectar correctamente el cable: El extremo
blanco a AM EXT, el extremo negro a GND.
1 Sostenga
2 Inserte
3 Suelte
• Si el cable de la antena de cuadro AM o los cables de
altavoz están cubiertos con vinilo, quite el vinilo
retorciéndolo de manera que quede expuesta la punta de la
antena.
• Asegúrese de que los conductores de la antena no estén en
contacto con otros terminales, cables de conexión y cable
de alimentación. Asimismo, mantenga las antenas alejadas
de las partes metálicas del sistema, de los cables de
conexión y del cable de alimentación de CA. Podría
producir una recepción defectuosa.
2 Inserte
Cuando conecte los cables de los altavoces, haga coincidir
las polaridades de los terminales de altavoces: El cable con
rayas negras a (–), el cable sin rayas a (+).
• NO conecte más de un altavoz a cada
terminal.
• NO permita que el conductor de los cables de
altavoz entren en contacto con las partes
metálicas del sistema.
Ajuste del selector de tensión
Utilice un destornillador para deslizar el selector de tensión
de manera tal que la marca de tensión apunte hacia la tensión
de la zona de conexión de la unidad. (Véase también la
página de la contracubierta).
110V-127V
220V-240V
Marca de tensión
AC VOLTAGE
SELECTOR
NO enchufe antes de ajustar el selector de
tensión de la parte trasera de la unidad y de
finalizar todos los procedimientos de
conexión.
7
Page 42

Antes de operar el sistema
Las indicaciones que aparecen en la pantalla le permitirán aprender muchas cosas mientras está operando el sistema.
Antes de operar el sistema, comprenda cuándo y cómo se iluminan los indicadores en la pantalla.
12345 6 7
10
911
8
Indicaciones en la pantalla principal
• Mientras escucha la radio:
Banda
Frecuencia
• Mientras se reproduce un CD:
Número de
pista
Tiempo de reproducción
transcurrido
• Al seleccionar USB MEMORY
(MEMORIA USB):
Número de pista
Tiempo de reproducción transcurrido
• Mientras se selecciona AUX:
Nombre de la fuente
• Mientras se reproduce un disco MP3*:
Número
de pista
Tiempo de reproducción
transcurrido
• Mientras se reproduce una
cinta:
• Mientras la reproducción del disco está detenida:
Cuando RESUME (REANUDAR) está activado,
RESUME se muestra en la pantalla. Esto también se
aplica cuando la memoria USB o el DAP se detienen.
CD:
Número total de pistas
MP3:
• Mientras está en el modo “TRACK”:
Número total de pistas
Tiempo de reproducción total
• Mientras está en el modo “GROUP”:
Número total de
grupos
Número total
de pistas
* Cuando se empieza a reproducir un disco MP3, se visualizarán el
número de pista, el nombre de la pista, (y etiqueta ID3) antes de
que aparezca el tiempo de reproducción transcurrido.
1 Indicadores del modo de reproducción
• RAND (aleatorio): se enciende cuando se activa el modo
de reproducción aleatoria.
• PRGM (programada): se enciende cuando se activa el
modo de reproducción programada.
• : se enciende cuando se activa el modo de repetición.
– 1: Se repite la pista.
– ALL: Se repiten todas los pistas.
– GR: Se repiten todas las pistas del grupo seleccionado
(sólo MP3).
2 Indicador QP Link
• Se enciende cuando se activa QP Link.
3 Indicador MP3
• Se enciende cuando se detecta un disco MP3.
4 Indicador USB
• Se enciende cuando se selecciona USB MEMORY.
5 Indicadores de recepción de FM
• MONO: Se enciende mientras el modo FM monoaural
está activado.
• ST (estéreo): Se enciende mientras se sintoniza una
emisora en FM estéreo con una señal suficientemente
fuerte.
6 Indicador SOUND TURBO
• Se enciende cuando se activa SOUND TURBO (consulte
la página 15).
7 Indicador AHB PRO (Active Hyper Bass Pro)
• Se enciende cuando el AHB PRO está activado.
8 Pantalla principal
9 Indicador A.STBY (espera automática)
• Se enciende cuando se activa Auto Standby.
• Parpadea cuando se para la reproducción del disco con
Auto Standby activado.
p Indicadores de operación de la cinta
• Indicador
– Se enciende mientras se está grabando.
•
2 3
– Parpadea lentamente durante la reproducción y la
grabación.
– Parpadea rápidamente mientras se está rebobinando una
cinta.
REC
(dirección de la cinta):
q Indicadores de los temporizadores
•:
Se enciende cuando el temporizador diario o el
temporizador de grabación está en espera, parpadea mientras
está funcionando.
• 1/2/3: Se enciende cuando el temporizador diario (1, 2, o
3) está en espera; parpadea durante la programación o el
funcionamiento.
• REC: Se enciende cuando el temporizador de grabación está
en espera; parpadea mientras se está ajustando o
funcionando.
• SLEEP: Se enciende cuando el temporizador dormir está
activado.
Español
8
Page 43

Español
Botones
numéricos
MP3 MODE
4/1,
7,¡/¢
Operaciones diarias—Reproducción
1 Encienda el sistema.
La lámpara STANDBY de la unidad principal se
apaga.
1
SET/
RESUME
DISPLAY
PRESET UP,
PRESET DOWN
2
QP LINK
FM MODE
DIMMER
3
• Sin pulsar STANDBY/ON , el sistema se
enciende cuando se pulsa uno de los botones de
selección de fuente en el siguiente paso.
2 Seleccione la fuente.
Si la fuente seleccionada está preparada, la
reproducción se iniciará automáticamente.
• Si pulsa AUX, inicie la reproducción de la fuente en
el componente externo.
3 Ajuste el volumen.
4 Opere la fuente objetivo tal como se
describe posteriormente.
Cómo apagar (poner en espera) el sistema
1
2
3
4
VOLUME
STANDBY/ON
STANDBY/ON
La lámpara STANDBY de la unidad
principal se enciende.
• Siempre se consumirá una pequeña
cantidad de energía aunque esté en
espera.
Cómo desactivar el indicador del reloj para
ahorrar energía
Mientras el sistema está apagado...
DIMMER
Para una audición privada
Conecte un par de auriculares al jack PHONES de la
unidad principal. El sonido dejará de emitirse a través de
los altavoces. Asegúrese de bajar el volumen antes de
conectar o de ponerse los auriculares.
• Al desconectar los auriculares se volverán a activar los
altavoces.
• Para visualizar la indicación del reloj,
pulse de nuevo el botón.
NO apague (en espera) el sistema con el
volumen ajustado a un nivel extremadamente
alto. De lo contrario, la explosión súbita de
sonido podrá dañar sus oídos, altavoces y/o
auriculares cuando vuelva a encender el
sistema o iniciar la reproducción.
9
Page 44

Para escuchar la radio
Para seleccionar el intervalo de
frecuencias del sintonizador de AM
En algunos países el intervalo de frecuencias de las emisoras
AM es de 9 kHz, y en otros es de 10 kHz.
Los intervalos del sintonizador de AM se pueden cambiar
mientras el sistema está en espera.
1
2 seg.
• Aparece en el visor el ajuste de intervalo actual.
2 Seleccione el intervalo de frecuencias con el ajuste
actual visualizado en el visor.
9
Remote
ONLY
Remote
Si la emisora FM recibida es muy ruidosa
FM MODE
MONO
ONLY
STEREO
MONO: La recepción mejorará, pero se perderá
el efecto estéreo. El indicador MONO se
enciende.
STEREO: Normalmente seleccione esto. El efecto
estereofónico se reanuda.
Remote
Cómo preajustar las emisoras
ONLY
Puede preajustar 30 emisoras FM y 15 emisoras AM.
1 Sintonice la emisora que desea preajustar.
2 Active el modo de entrada del número de preajuste.
SET/RESUME
Español
0
Para seleccionar la banda (FM o AM)
FM AM
Puede realizar también la misma operación con el botón FM/
AM del Sistema.
Para sintonizar una emisora
Mientras está seleccionado FM o AM...
Control remoto: Unidad principal:
1 seg.
La frecuencia comienza a cambiar en la pantalla.
La frecuencia deja de cambiar cuando se sintoniza una
emisora (frecuencia) con una señal lo suficientemente fuerte.
• Pulsando el botón repetidamente, la frecuencia cambia
paso a paso.
Para detener la búsqueda manualmente,
1 seg.
DOWN UP
pulse uno u otro botón.
• Finalice el siguiente proceso mientras parpadea la
indicación en pantalla.
3 Seleccione el número de preajuste para la emisora que
se va almacenar.
1
2
5
4
8
7
0
10
Ejemplos:
3
Para seleccionar el número de
preajuste 5, pulse 5.
6
Para seleccionar el número de
preajuste 15, pulse 10 → 1 → 5.
9
Para seleccionar el número de
preajuste 30, pulse 10 → 3 → 0.
>
=
>
=
• También podrá usar los botones PRESET UP/PRESET
DOWN.
4 Almacene la emisora.
SET/RESUME
memo
• Si preajusta una emisora en MONO, la emisora queda
almacenada con el ajuste MONO.
10
Page 45

Para sintonizar una emisora
presintonizada
Seleccione la banda (FM o AM).
1
Remote
ONLY
Para iniciar: Para poner en pausa: Para detener:
FM AM
Español
2 Seleccione el número de preajuste para la emisora que
se va almacenar.
1
2
5
4
8
7
0
10
• También puede usar el
3
6
9
control PRESET UP o
PRESET DOWN.
Para reproducir un disco
Este sistema puede reproducir los siguientes discos—CD
regulares y CD-R/CD-RW (grabados ya sea en formato
audio CD o MP3).
Tipo de disco Marca (logotipo)
CD de audio
CD-R
CD-RW
• Precaución sobre la reproducción de DualDisc
El lado no DVD de un “DualDisc” no es compatible con la norma
“Compact Disc Digital Audio”. Por consiguiente, no se
recomienda usar el lado no DVD de un DualDisc en este producto.
Main Unit
Cómo insertar un disco
Podrá insertar los discos mientras está reproduciendo otra fuente.
ONLY
Para cancelar, pulse otra
vez.
Para seleccionar una pista/grupo*
Los números de las pistas/grupos*
aumentan.
Los números de las pistas/grupos*
disminuyen.
* Para los detalles acerca de la selección del grupo, consulte
“Para la reproducción de MP3” en la página 12.
Cómo localizar un determinado pasaje
Mientras se está reproduciendo el disco, pulse y mantenga
pulsado hasta llegar al pasaje deseado.
Avance rápido de la pista.
Retroceso rápido de la pista.
No se reproduce ningún sonido en las fuentes de MP3
durante esta operación.
Cómo localizar directamente una pista e
Remote
ONLY
iniciar la reproducción
Ejemplos:
1
4
7
0
2
5
8
10
3
Para seleccionar el número de
pista 5, pulse 5.
Para seleccionar el número de
6
pista 15, pulse 10 → 1 → 5.
Para seleccionar el número de
9
pista 30, pulse 10 → 3 → 0.
(Para fuentes de MP3 con 100 o
>
=
>
=
más pistas)
Para seleccionar el número de
pista 125, pulse 10 dos veces →
1 → 2 → 5.
* Para hasta 99 pistas, puede pulsar
>
10 dos veces para cambiar el
=
estado antes de pulsar 10.
>
=
>
=
Para cerrar la bandeja del disco,
pulse de nuevo 0.
• Si pulsa CD 6 mientras está abierta la bandeja del disco,
esta se cierra y se inicia la reproducción.
11
Cómo reproducir desde la memoria USB Memory o
el reproductor de audio digital
Este sistema incorpora una terminal de USB MEMORY en
el panel frontal. Puede conectar una memoria USB o un
reproductor de audio digital (DAP) a este terminal y disfrutar
del sonido que ellos produzcan.
• Recuerde que no se puede enviar ninguna señal o dato a la
memoria USB o a un DAP desde este sistema.
Page 46

IMPORTANTE
• Siempre ajuste el volumen a “VOL MIN” cuando
conecte o desconecte el otro equipo.
• Conecte la memoria USB o DAP directamente al panel
frontal de la unidad. La conexión a través de un hub
USB puede provocar errores de funcionamiento.
• Pueden conectarse memorias USB y DAP compatibles
con las especificaciones del tipo de almacenamiento
masivo USB.
• Algunos DAP no son compatibles con la unidad.
• Las pistas codificadas mediante un método especial no
pueden reproducirse en la unidad. Sólo es compatible el
formato MP3.
Cómo conectar la memoria USB o el DAP
Conecte el DAP al sistema mediante el cable USB
suministrado con el DAP.
o
Reanude la reproducción de CD de audio/
MP3/Memoria USB/DAP
Si pulsa 7 durante la reproducción, la unidad memorizará la
•
posición de la pista
cuando detenga la reproducción.
Al pulsar CD 6 o USB MEMORY 6, puede iniciar la
reproducción de nuevo desde el punto en la que se haya
detenido.
Cómo activar/cancelar la
Remote
ONLY
reanudación de la reproducción
Cuando la fuente es CD o USB MEMORY...
2 seg.
SET/RESUME
memo
•Al pulsar 0 o desconectar la USB Memory/DAP, se borrará
la posición de la pista donde haya detenido la reproducción.
• Para reproducir desde la primera pista mientras está activada
la reanudación de la reproducción, pulse
durante la reproducción y después pulse CD
6
MEMORY
.
RESUME ON
RESUME OFF
7
dos veces
6
o USB
Español
• Utilice un cable USB con un enchufe de la “serie A” en la
toma del sistema.
• Cuando desconecte la memoria USB o el DAP, asegúrese
de que la reproducción ha terminado y de que el sistema
está parado.
Cómo reproducir sonidos de la memoria USB o DAP
Para iniciar: Para detener:
USB
MEMORY
• El indicador USB de la pantalla se ilumina mientras USB
MEMORY está seleccionado.
Cómo seleccionar una pista/grupo*
Los números de las pistas/grupos* disminuyen.
Los números de las pistas/grupos*
aumentan.
* Para los detalles acerca de la selección del grupo, consulte
“Para la reproducción de MP3” a continuación.
Para la reproducción de MP3
Según el modo de reproducción de MP3, 4/1 /
¡/¢ o los botones numéricos funcionan para
seleccionar el grupo o la pista.
Ejemplos:
Cuando el modo de reproducción de MP3 es “GROUP”.
Indicador GR (Grupo)
Número total de grupos Número total de pistas
Podrá cambiar el modo de reproducción
de MP3 pulsando MP3 MODE.
• Cada vez que pulsa el botón, el modo de
reproducción de MP3 cambia de la
siguiente manera:
TRACK GROUP
TRACK:
GROUP:
• Se detectan sólo las pistas (los grupos se ignoran).
• 4/1, ¡/¢, y los botones numéricos
funcionan para seleccionar las pistas de los discos MP3.
• Se detectan ambos, grupos y pistas.
• 4/1, ¡/¢, y los botones numéricos
funcionan para seleccionar los grupos de los discos MP3.
•
Los botones numéricos funcionan para seleccionar el
número de pista dentro del grupo.
MP3 MODE
12
Page 47

Para reproducir una cinta
Cómo insertar una cinta
Puede reproducir cintas tipo I.
Presione Inserte Cierre
Cómo ajustar el nivel de entrada de sonido
desde otro equipo
Puede ajustar el nivel de entrada de sonido desde el equipo
conectado, si la señal de entrada es demasiado pequeña o
demasiado grande.
1 Seleccione AUX como fuente.
2 Ajuste el nivel de entrada
Español
Con la cara de la cinta dirigida hacia delante
Para iniciar: Para detener:
Para rebobinar una cinta:
Enrolla la cinta hacia.
Rebobina la cinta.
Reproducción en otro equipo
Para conectar otro equipo
Utilizando un cable con miniclavija estéreo (no
suministrado), podrá conectar el equipo con los jacks de
salida de audio analógica como por ejemplo, un reproductor
de audio digital, un televisor, etc.
Cable con miniclavija estéreo (no suministrado)
2 seg.
SET/RESUME
AUX LVL 1
AUX LVL 2
AUX LVL 1: Nivel de entrada normal (ajuste de fábrica).
Adecuado para equipos con un nivel de
entrada bajo (como un dispositivo de audio
portátil).
AUX LVL 2: Nivel de entrada más bajo.
Adecuado para equipos con un nivel de
entrada alto (como un reproductor de DVD).
memo
• Si nota que el nivel de salida desde el equipo externo es
alto, seleccione AUX LVL2.
AUX
(panel frontal)
Si la salida de audio del otro equipo no es del tipo
miniclavija estéreo,
Utilice un adaptador de clavija para convertir la miniclavija
estéreo a la clavija correspondiente de la salida de audio.
Refiérase a los manuales que vienen con el otro equipo.
Dispositivo de audio
portá,
Videojuego, etc.
IMPORTANTE
• Siempre ajuste el volumen a “VOL-MIN” cuando
conecta o desconecta el otro equipo.
13
Page 48

Remote
Quick Portable Link (QP Link)
ONLY
Si conecta otro equipo como un reproductor de audio digital
al terminal AUX y lo reproduce, la fuente cambia
automáticamente a AUX.
QP LINK
QP Link
Cancelado
(Sin indicación)
El indicador de QP está encendido mientras QP Link esté
activado.
Cuando QP Link está activado...
• Si se recibe una entrada de audio en AUX cuando el
sistema está encendido, la fuente cambia automáticamente
a AUX.
• Si se recibe una entrada de audio en AUX cuando el
sistema está en el modo de espera, el sistema se enciende
automáticamente y reproduce el audio.
• No se puede cambiar la fuente mientras la entrada de audio
se reciba en AUX.
Si pulsa el botón de otra fuente, el indicador de QP Link
parpadea varias veces.
Español
memo
• Mientras la reproducción está en curso en el dispositivo de
audio portátil, QP Link puede encender el sistema incluso
aunque el temporizador o usted cambien el sistema al
modo de espera. En este caso, desactive QP Link o detenga
la reproducción en el dispositivo conectado a la clavija
AUX.
• Si la entrada de audio recibida en AUX es pequeña, la
fuente no podrá cambiarse a AUX.
• Puede que no pueda cambiarse la AUX dependiendo del
contenido de la música.
• La fuente tarda un segundo o dos en cambiar a AUX
después de que otro equipo como un reproductor de audio
digital se inicie y se produzca sonido. Esto se debe a que el
sistema detecta la señal del equipo.
• El Vínculo QP no funciona:
– Si la indicación de reloj se desactiva durante la
suspensión
– Durante la grabación
– Cuando el Temporizador Diario está activo
– Cuando el Temporizador de Grabación está activo
14
Page 49

Operaciones diarias—Ajustes del sonido y otros ajustes
Español
Control remoto
CLOCK/
TIMER
DIMMER
A.STANDBY
SLEEP
SOUND
TURBO
AHB PRO
SET/RESUME
CANCEL
DISPLAY
PRESET UP,
PRESET DOWN
FADE
MUTING
VOLUME
+/–
BASS/
TREBLE
Ajuste del volumen
Podrá ajustar el nivel de volumen entre nivel 0 (VOL-MIN)
y nivel 31 (VOL-MAX).
Control remoto: Unidad principal:
VOLUME
VOLUME
Remote
Para bajar el volumen instantáneamente
FADE
MUTING
Para restablecer el volumen,
nuevo o ajuste el nivel de volumen.
ONLY
pulse de
Ajuste del sonido
Para acentuar el sonido—SOUND TURBO
Esta función permite acentuar el sonido.
SOUND
TURBO
S-TURBO
OFF
(Cancelado)
Unidad principal
BASS
SOUND
TURBO
TREBLE
VOLUME
+/–
Cómo reforzar los sonidos graves
Remote
ONLY
—AHB PRO
Podrá reforzar los sonidos graves para mantener graves ricos
y profundos a un volumen bajo.
AHB PRO
AHB PRO
OFF
(Cancelado)
Para ajustar el tono—BASS/TREBLE
Podrá ajustar el nivel de graves y agudos entre 0 y +5.
Para ajustar los graves
BASS/
TREBLE
Para ajustar los agudos
BASS/
TREBLE
Puede realizar también la misma operación en el sistema.
Cuando SOUND TURBO está activado, BASS/TREBLE está desactivado.
BASS TREBLE
Cancelado
VOLUME
BASS TREBLE
Cancelado
VOLUME
15
Page 50

Cambio de la luminosidad de la pantalla—
Remote
DIMMER
ONLY
Remote
ONLY
DIM ON
DIM OFF
(Cancelado)
SET/RESUME
DIMMER
Podrá oscurecer la ventana de visualización.
Ajuste del reloj
Sin ajustar el reloj incorporado, no podrá utilizar el
temporizador diario y el temporizador de grabación
(consulte la página 23).
• Para salir del ajuste del reloj, pulse CLOCK/TIMER según
se requiera.
• Para volver al paso anterior, pulse CANCEL.
1 Active el modo de ajuste del reloj.
CLOCK
/TIMER
• Si ya ajustó el reloj anteriormente, pulse el botón
repetidamente hasta que se seleccione el modo
(consulte la página 23) de ajuste del reloj.
2 Ajuste la hora.
PRESET UP
3 Ajuste los minutos.
PRESET UP
SET/RESUME
PRESET DOWN
Aparece “CLOCK OK” y el reloj incorporado comienza
a funcionar.
Para verificar la hora actual durante la reproducción
DISPLAY
Si hay un fallo de alimentación
El reloj se desajusta y se reposiciona a “0:00.” Vuelva a
poner en hora el reloj.
Reloj
Información de fuente
Español
PRESET DOWN
16
Page 51

Apagado automático del sistema
Para que el sistema se apague después de
finalizar la reproducción—Auto Standby
Esta función funciona sólo cuando la fuente es el CD o cinta.
A.STANDBY
A.STBY
Cancelado
(Sin indicación)
Español
Cuando se está usando Auto Standby, el indicador A.STBY
se enciende en la pantalla.
Cuando se detiene la reproducción del disco y de la cinta, el
indicador A.STBY comienza a parpadear.
Si no se realiza ninguna operación de disco o de cinta
durante unos 3 minutos mientras el indicador está
parpadeando, el sistema se apaga (entra en espera)
automáticamente.
Para que el sistema se apague después de un
cierto lapso—Temporizador dormir
Remote
ONLY
Especifique el tiempo (en minutos).
1
SLEEP
10 20 30 60 90 120
OFF
(Cancelado)
2 Espere hasta que se apague la hora de ajuste.
Para verificar el tiempo que falta hasta la hora de
apagado
SLEEP
• Si pulsa el botón repetidamente, podrá cambiar la hora de
apagado.
17
Page 52

Operaciones avanzadas de disco/memoria USB/DAP
Control remoto
Botones
numéricos
4/1,
7,¡/¢
CD 6
REPEAT
PROGRAM
Unidad principal
CANCEL
USB MEMORY
6
RANDOM
Programando el orden de reproducción—
Remote
Reproducción programada
ONLY
Antes de iniciar la reproducción, podrá programar el orden
de reproducción de las pistas (hasta 32).
• La reproducción programada sólo puede utilizarse en el
modo MP3 TRACK.
• Pulse REPEAT si desea repetir todas las pistas programadas.
1 Antes de iniciar la reproducción, pulse PROGRAM.
PROGRAM
2 Seleccione las pistas que desea para la reproducción
programada.
Número de pistaPaso del programa
Ejemplos:
1
3
2
Para seleccionar el número de
pista 5, pulse 5.
5
4
8
7
0
10
Para seleccionar el número de
6
pista 15, pulse 10 → 1 → 5.
Para seleccionar el número de
9
pista 30, pulse 10 → 3 → 0.
(Para fuentes de MP3 con 100 o más pistas)
Para seleccionar el número de
pista 125, pulse 10 dos veces →
1 → 2 → 5.
* Para hasta 99 pistas, puede pulsar
>
10 dos veces para cambiar el
=
estado antes de pulsar 10.
>
=
>
=
>
=
>
=
3 Repita el paso 2 para programar otras pistas.
4 Inicie la reproducción.
USB
MEMORY
o
Español
Las pistas seleccionadas se reproducen en el orden
programado por usted.
0
7
Para omitir una pista:
Para poner en pausa:
Para detener:
o
USB
MEMORY
Para cancelar,
pulse otra vez.
• Las pistas no pueden seleccionarse con los botones
numéricos durante la reproducción programada.
18
Page 53

Para verificar una secuencia programada
Mientras el indicador PRGM se encuentra visualizado en la
pantalla, y antes de la reproducción...
En el orden programado.
En el orden inverso.
Español
Para modificar la programación
Mientras el indicador PRGM se encuentra visualizado en la
pantalla, y antes de la reproducción...
Para borrar el último
paso:
CANCEL
Para borrar toda la
programación:
Para añadir pasos a la programación:
Repita el paso 2 de la página 18.
Para salir de la reproducción programada
Mientras el indicador PRGM se encuentra visualizado en la
pantalla...
PROGRAM
Reproduciendo en orden aleatorio—
Remote
Reproducción aleatoria
Puede reproducir todas las pistas del disco, memoria USB o
DAP seleccionado de forma aleatoria.
• Puede repetir todas las pistas (PALL) si pulsa REPEAT.
Pulse RANDOM.
RANDOM
La reproducción se inicia en orden aleatorio.
• Si selecciona el modo “GROUP” para el disco MP3. Será
cancelada.
La reproducción aleatoria finaliza cuando se reproducen
todas las pistas.
Para omitir una
pista:
Para poner en
pausa:
ONLY
o
USB
MEMORY
Para detener:
La reproducción programada también se cancela pulsando 7.
• Durante la reproducción programada (indicador PRGM
visualizado en la pantalla), no podrá abrir las bandejas de
los discos. Si no se realiza ninguna operación, la
reproducción programada se cancela y se podrán abrir las
bandejas de los discos.
Para cancelar,
pulse otra vez.
• Las pistas no pueden seleccionarse con los botones
numéricos durante la reproducción aleatoria.
Para salir de la reproducción aleatoria
Mientras el indicador RAND se encuentra visualizado en la
pantalla...
RANDOM
19
Page 54

Reproduciendo de forma repetida—
Remote
Reproducción repetida
Podrá repetir la reproducción.
Para CD/MP3 (modo TRACK):
ONLY
Prohibición de la expulsión del disco
Main Unit
ONLY
—Bloqueo para niños
Podrá bloquear las bandejas de los discos para que nadie
pueda sacar los discos cargados.
• Esto es posible mientras el sistema está en espera.
REPEAT
Cancelado
(Sin indicación)
Para MP3 (Modo grupo):
REPEAT
1
Cancelado
(Sin indicación)
Durante la reproducción programada:
REPEAT
Cancelado
(Sin indicación)
Durante la reproducción aleatoria:
RANDOM
ALL
Cancelado
(Sin indicación)
1
Se repite la pista actual.
ALL1
ALL
Con las bandejas de los discos cerradas...
(simultáneamente)
Para cancelar la prohibición,
repita el mismo
procedimiento.
Aparece “UNLOCKED” en la pantalla.
Español
ALL
• Repite el programa.
• Se repiten todas las pistas del grupo
actual (sólo para el modo de
reproducción MP3 en “GROUP”).
Repite todas las pistas. (Puede
seleccionarse en Reproducción normal
y Reproducción aleatoria)
20
Page 55

Operaciones avanzadas de la cinta
Español
Control remoto
FM/AM
CD 6
TAPE
7
USB MEMORY
6
AUX
IMPORTANTE
Podría ser ilegal grabar o reproducir material protegido
por los derechos de autor sin el consentimiento del titular
de los derechos de autor.
Grabando en una cinta
Podrá usar cintas tipo I para la grabación.
• Para reproducir una cinta, consulte la página 13.
1 Inserte un cassette grabable.
Presione Inserte
Con la cara de la cinta dirigida hacia delante
Cierre
2 Seleccione la fuente y comience a reproducir—“FM”,
“AM”, “CD”, “USB”, o “AUX”.
• Al grabar un disco, también se podrá usar la “Grabación
sincronizada del disco” (see page 22).
3 Inicie la grabación.
Unidad principal
CD #/8
TAPE
FM/AM
REC
USB MEMORY
#/8
4,7,¢
En la unidad principal
Para detener la grabación:
21
Page 56

Grabación sincronizada del disco
Puede iniciar y detener el disco, la memoria USB y la
reproducción DAP y grabar en cinta al mismo tiempo.
Para grabar el disco entero
Active “RESUME” (consulte la página 12)
Si se escuchan batidos mientras se está
grabando una radiodifusión en AM
FM MODE
BEAT 1
Remote
ONLY
BEAT 2
• Seleccione “BEAT 1” o “BEAT 2” para reducir el batido.
1 Cargue un disco e inserte un cassette grabable.
• Si la fuente que se está reproduciendo no es el
reproductor de CD, pulse CD 6 y, a continuación, 7.
• Aparecerá “RESUME” en la pantalla. Pulse 7 para que
el sistema deje de grabar.
2 Inicie la grabación.
En la unidad
principal
3 Dé la vuelta manualmente a la cinta de casette.
• Cuando la cinta llegue al final, tanto esta como el disco
se detendrán. Aparecerá “RESUME” en la pantalla.
Pulse REC después de dar la vuelta a la cinta de casette
para continuar la grabación desde el principio de la pista
actual.
• Cuando el disco haya terminado de reproducir todas las
pistas, se detendrán tanto la cinta como el disco.
Para grabar con reproducción programada o
reproducción aleatoria
1 Seleccione reproducción programada (y haga un
programa) o reproducción aleatoria.
2 Pulse REC para iniciar la grabación.
Español
Para proteger su grabación
Los cassettes tienen dos lengüetas pequeñas en su parte
trasera para protección contra el borrado o la regrabación
accidental.
Para proteger sus grabaciones,
Para volver a grabar en una cinta protegida,
agujeros con cinta adhesiva.
quite estas lengüetas.
tape los
22
Page 57

Español
Control remoto
CLOCK/
TIMER
Operaciones de los temporizadores
Programando el temporizador
Usando el temporizador diario, podrá despertarse con
canción, etc. Por otra parte, con el temporizador de
grabación, podrá grabar automáticamente una cinta con un
programa de la radio.
STANDBY/ON
SET/RESUME
CANCEL
PRESET UP,
PRESET DOWN
• Podrá almacenar tres ajustes para el temporizador diario y
uno para el temporizador de grabación; sin embargo, se
podrá activar sólo uno de los cuatro ajustes anteriores a la
vez.
• Para salir del ajuste del temporizador, pulse CLOCK/
TIMER según se requiera.
• Para corregir un error de entrada durante el proceso, pulse
CANCEL. Podrá volver al paso anterior.
Cómo funciona el temporizador diario
Una vez que ajuste el temporizador diario, el indicador
( ) del temporizador y el indicador del número de
temporizador (1, 2, ó 3) se iluminan en la pantalla. El
temporizador diario se activa todos los días a la misma
hora hasta que sea desactivado manualmente (véase la
siguiente página) o se active otro temporizador diario.
Al llegar la hora de activación
El sistema se enciende, se sintoniza la emisora
seleccionada, o se empieza a reproducir la fuente
especificada.
• Si se escoge “P – – –”, se selecciona la última emisora
sintonizada.
• Si se escoge “VOL – – –”, se selecciona el último valor
especificado.
• Mientras el temporizador diario está funcionando, el
temporizador ( ) y los indicadores del número de
temporizador (1, 2 ó 3) parpadean en la pantalla.
• El ajuste del temporizador permanece en la memoria
hasta que usted lo cambie.
• Sin cancelar el temporizador diario, se podrá cambiar la
fuente o ajustar el volumen después que el
temporizador diario inicie la reproducción.
Remote
ONLY
23
Cómo funciona el temporizador de grabación
Una vez que ajuste del temporizador de grabación, el
indicador del temporizador ( ) y el indicador REC se
encienden en la pantalla.
El temporizador de grabación funciona una sola vez.
Al llegar la hora de activación
El sistema se encience, se sintoniza la emisora
especificada, y se inicia la grabación.
• Si se escoge “VOL – – –”, se selecciona el último valor
especificado.
Al llegar la hora de desactivación
El sistema detiene la grabación, y se apaga (en espera).
• El ajuste del temporizador permanece en la memoria
hasta que usted lo cambie.
Page 58

1 Seleccione uno de los modos de ajuste del
temporizador que desea definir—temporizador
diario 1, temporizador diario 2, temporizador diario 3
o temporizador de grabación.
CLOCK
/TIMER
Temporizador diario 1 Temporizador diario 2 Temporizador diario 3
Cancelado
Ej.: Cuando se selecciona el modo de ajuste de Daily
Timer 1 (temporizador diario 1)
Ajuste del reloj
(Consulte la página 16)
Temporizador de grabacion
2 Efectúe los ajustes del temporizador según se desee.
Para los temporizadores diarios:
Ajuste la hora y seguidamente, los minutos de la
1
hora de activación.
PRESET UP
SET/RESUME
PRESET DOWN
2
Ajuste la hora y seguidamente, los minutos de la
hora de desactivación del mismo modo.
3
Seleccione la fuente de reproducción—“TUNER
FM,” “TUNER AM,” “CD,” “AUX,” “USB”
“TAPE”.
PRESET UP
SET/RESUME
PRESET DOWN
o
Para el temporizador de grabación:
1
Ajuste la hora y seguidamente, los minutos de la
hora de activación.
PRESET UP
SET/RESUME
PRESET DOWN
2
Ajuste la hora y seguidamente, los minutos de la
hora de desactivación del mismo modo.
3
Seleccione “TUNER FM” o “TUNER AM”.
PRESET UP
SET/RESUME
PRESET DOWN
4
Seleccione un número de emisora preajustada.
PRESET UP
SET/RESUME
PRESET DOWN
5
Ajuste el volumen.
PRESET UP
SET/RESUME
PRESET DOWN
Si selecciona “VOL – – –,” el volumen se ajusta al
nivel que se haya ajustado antes de apagar el aparato.
3 Apague el sistema (en espera) si se ajustó el
temporizador con el sistema encendido.
STANDBY/ON
Español
Para “TUNER FM” y “TUNER AM”:
Seleccione un número de preajuste o “P – – –” con
PRESET UP o PRESET DOWN, y después pulse
SET/RESUME.
Ajuste el volumen.
4
PRESET UP
SET/RESUME
PRESET DOWN
Si selecciona “VOL – – –,” el volumen se ajusta al
nivel que se haya ajustado antes de apagar el aparato.
El Temporizador de Grabación funciona con el Sistema
encendido o apagado.
24
Page 59

Para desactivar el temporizador después de
programarlo
Como el temporizador diario se activa todos los días a la
misma hora, es posible que quiera cancelarlo para algunos
días específicos.
1 Seleccione el temporizador que desea cancelar.
Temporizador diario 1 Temporizador diario 2 Temporizador diario 3
Cancelado
Ajuste del reloj
(Consulte la página 16)
Temporizador de grabacion
Español
CLOCK
/TIMER
2 Desactive el temporizador seleccionado.
CANCEL
Se apaga el indicador de número correspondiente al
temporizador diario.
Para activar el temporizador otra vez,
arriba y pulse en el paso 2...
SET/RESUME
Se enciende el indicador de número correspondiente al
temporizador diario.
repita los pasos de
25
Page 60

Información adicional
Aprendiendo más acerca de este sistema
Operaciones diarias—Reproducción (consulte
las páginas 9 a 14)
Para escuchar la radio:
• Almacenando una emisora nueva en un número de preajuste usado se
borrará la emisora almacenada previamente en ese número.
• Cuando se desenchufa el cable de alimentación de CA o se produce
una falla de alimentación eléctrica, las emisoras preajustadas se
borrarán en unos días. En tal caso, preajuste las emisoras otra vez.
Cómo reproducir un disco/Memoria USB/DAP:
• Para introducir un disco de 8 cm, colóquelo en el círculo
interior de la bandeja del disco.
• Este sistema no puede reproducir discos “packet write”
(escritura por paquetes).
• Para reproducción de MP3...
– Los discos MP3 requieren un tiempo de lectura mayor que
los discos CD regulares. (Depende de la complejidad de la
configuración grupo/archivo).
– Algunos archivos MP3 no se pueden reproducir y serán
omitidos. Esto se debe a sus respectivos procesos y
condiciones de grabación.
– Cuando haga discos MP3, utilice ISO 9660 Nivel 1 o Nivel
2 para el formato del disco.
– Este sistema puede reproducir archivos MP3 con el código
de extensión <.mp3> (independientemente de la caja o
alta—mayúsculas/minúsculas).
– Algunos caracteres o símbolos no serán mostrados
correctamente en la pantalla.
El número máximo de caracteres mostrados en la pantalla es
32 (sin el código de extensión) para los archivos, y 30 para
la etiqueta ID3.
– Se recomienda hacer cada archivo MP3 a una frecuencia de
muestreo de 44,1 kHz, y a una velocidad de bit de 128 kbps.
– Este sistema puede reconocer un total de 500 pistas y 200
grupos de un disco MP3 y 999 pistas y 250 de una memoria
USB. Todos los que excedan el número máximo no serán
reconocidos.
– El orden de reproducción de las pistas MP3 puede ser
diferente del intentado durante la grabación. Si la carpeta no
incluye pistas MP3, las mismas serán ignoradas.
Configuración de los grupos/pistas MP3
El sistema reproduce las pistas MP3 de la siguiente
manera.
El orden de reproducción de la figura es para las pistas
MP3 del disco.
Las pistas MP3 de una memoria USB o DAP pueden
reproducirse de forma diferente.
01
02
Jerarquía
1
2
03 04
3
4
5
05
6
9
10
7
8
11
12
Nivel 1 Nivel 2 Nivel 3 Nivel 4 Nivel 5
ROOT
Grupo con su orden de
01
reproducción
Pista MP3 con su orden de
1
reproducción
Para reproducir una cinta:
• No se recomienda usar cintas de C-120 o más largas. Estas
cintas tienden a atascarse en el rodillo de presión y en el
cabestrante, y pueden ocasionar el deterioro de las
características.
Quick Portable Link (QP Link):
• El sistema mantiene el estado On/Off de QP Link incluso
cuando el cable de alimentación de CA está conectado o
desconectado.
• La fuente permanece en AUX cuando detiene otros
equipos como un reproductor de audio digital.
Operaciones diarias—Ajustes del sonido y otros
ajustes (consulte las páginas 15 a 17)
Ajuste del volumen:
• Asegúrese de bajar el volumen antes de conectar o de ponerse
los auriculares.
Ajuste del sonido:
• Esta función también afecta al sonido que sale de los
auriculares.
• SOUND TURBO y AHB PRO no se pueden utilizar
simultáneamente.
Ajuste del reloj:
• “0:00” parpadea en la pantalla hasta que usted ajuste el reloj.
• El reloj puede adelantarse o atrasarse 1 a 2 minutos por mes.
En tal caso, vuelva a poner el reloj en hora.
Apagado automática del sistema:
• La espera automática no se puede cancelar mediante las
siguientes operaciones.
– Cambio de la luminosidad de la pantalla
– Ajuste del volumen
– Ajuste del sonido.
Operaciones avanzadas de disco/memoria USB/
DAP
(consulte las páginas 18 a 20)
Programando el orden de reproducción—Reproducción programada:
• Si intenta programar la pista 33, aparece “FULL” en la pantalla.
• Durante la programación...
Su entrada será ignorada si intenta programar un número de
elemento que no existe en el disco (por ejemplo, selecciona la
pista 14 de un disco con sólo 12 pistas).
Operaciones avanzadas de la cinta (consulte las
páginas 21 y 22)
Grabando en una cinta:
• La grabación se ajusta automáticamente al nivel correcto. Así,
podrá ajustar el sonido que está escuchando sin afectar el nivel
de grabación.
• Al comienzo y al final de las cintas cassette, hay una cinta guía
en la cual no se puede grabar. Por consiguiente, cuando se
graban CDs o programas de radio, primero enrolle la cinta guía
para tener la seguridad de que se podrá realizar la grabación
sin perder ninguna parte de la música.
• Si empieza a grabar sin el cassette insertado, aparecerá “NO
TAPE” en la pantalla. Si se inserta una cinta protegida,
aparecerá “NO REC”.
Español
26
Page 61

Grabación sincronizada del disco:
• No es posible abrir la bandeja de discos mientras se graba.
Operaciones de los temporizadores (consulte las
páginas 23 a 25)
• Cuando se desenchufa el cable de alimentación de CA o se
produce una falla de alimentación eléctrica, el temporizador se
cancela. Primero deberá volver a ajustar el reloj, y luego el
temporizador.
• Sin detener la grabación, no podrá cambiar la fuente una vez
Español
que el temporizador de grabación inicie la grabación.
• No podrá usar el temporizador SLEEP mientras se está
activando el temporizador de grabación.
• Si ajusta el temporizador dormir después que el temporizador
diario comience a reproducir la fuente seleccionada, el
temporizador diario se cancela.
Otros
El sistema memoriza los ajustes siguientes durante dos o tres
días incluso aunque se desconecte el cable de alimentación de
CA. Los ajustes se restablecen a los valores de fábrica a los
pocos días, en cuyo caso deberá ajustarlos de nuevo.
Emisoras preajustadas, volumen, BASS/TREBLE, AHB
PRO, SOUND TURBO, AUX LEVEL, QP Link y
temporizador.
Para quitar las rejillas de los altavoces
No es posible operar el sistema con el control remoto.
] Hay un obstáculo en el espacio comprendido entre el
control remoto y el sensor remoto del sistema.
] Diríjalo hacia el sensor remoto del panel frontal.
] Las señales no llegan al sensor remoto.
Acérquese al sistema.
] Las pilas están gastadas.
No se puede escuchar el sonido a través de los altavoces.
] Conexiones de los altavoces flojas o incorrectas (consulte la
página 7).
] Están conectados los auriculares (consulte la página 9).
El sistema no se apaga.
] QP Link está activo (consulte la página 14).
Operaciones de la radio:
Recepción de radio deficiente debido a los ruidos
(consulte las páginas 4 a 6).
] Conexiones de las antenas flojas o incorrectas.
] La antena de cuadro AM está demasiado cerca del sistema.
La antena FM no está correctamente extendida ni posicionada.
]
Rejilla
de
altavoz
Orificios
Salientes
Localización de averías
Si surge algún problema con el sistema, busque la solución
en esta lista antes de llamar al servicio técnico.
General:
Los ajustes o las configuraciones se cancelan
súbitamente antes de finalizar.
] Hay un límite de tiempo. Repita el procedimiento.
Las operaciones están inhabilitadas.
]
El microprocesador incorporado ha experimentado una
anomalía debido a interferencias eléctricas externas.
Desenchufe el cable de alimentación de CA y vuélvalo a
enchufar.
27
Operaciones de los discos:
No se puede reproducir el disco.
] El disco está colocado boca abajo. Coloque el disco con el
lado de la etiqueta hacia arriba.
El sonido del disco se interrumpe.
] El disco está rayado o sucio.
La bandeja del disco no se abre o cierra.
] El cable de alimentación de CA no está conectado.
] Se está usando el bloqueo para niños (consulte la
página 20).
Operaciones de la cinta:
El portacassette no se puede abrir.
] Hubo una interrupción de energía eléctrica del cable de
alimentación CA mientras la cinta estaba funcionando.
Encienda el sistema.
Grabación imposible.
] Se han quitado las lengüetas pequeñas provistas en la parte
trasera del cassette. Tape los orificios con cinta adhesiva
(consulte la página 22).
Page 62

Operaciones de los temporizadores:
El temporizador diario no funciona.
] El sistema estaba encendido al llegar la hora de activación.
El temporizador comienza a funcionar sólo cuando el
sistema está apagado.
Mantenimiento
Para obtener el máximo rendimiento del sistema, mantenga
limpios sus discos y mecanismo.
Manejo de los discos
• Saque el disco de su estuche sujetándolo por los bordes,
mientras presiona ligeramente el orificio central.
• No toque la superficie brillante del disco, ni doble el disco.
• Vuelva a guardar el disco en su estuche después de usarlo, para
evitar su combamiento.
• Tenga cuidado de no rayar la superficie del disco.
• Evite la exposición directa a la luz del sol, a las temperaturas
extremas, y a la humedad.
Para limpiar el disco:
Limpie el disco con un paño suave en línea recta desde el centro
hacia el borde.
Manejo de las cintas cassette
• Si la cinta está floja en su cassette, elimine la flojedad
haciendo girar uno de los carretes con un lápiz.
– Si la cinta está floja podrá quedar estirada, cortada o
enredada en el cassette.
• Tenga cuidado de no tocar la superficie de la cinta.
• No almacene la cinta en los siguientes lugares—en lugares
polvorientos, a la luz directa del sol u otras fuentes de calor, en
lugares húmedos, sobre un televisor o altavoz, o cerca de un
imán.
Para mantener la mejor calidad de sonido de grabación
y de reproducción:
• Limpie las cabezas, los cabrestantes y los rodillos de presión
con un palillo de algodón humedecido con alcohol.
• Para desmagnetizar las cabezas (con el sistema apagado),
utilice un desmagnetizados de cabezas (disponible en los
establecimientos de productos electrónicos y de audio).
Limpieza del sistema
• Limpie las manchas con un paño suave. Si el sistema está muy
sucio, límpielo con un paño mojado en una solución de agua y
detergente neutro diluido y bien exprimido, y luego pásele un
trapo seco.
• Para evitar que se deteriore la calidad de la imagen, se dañe o
se despegue la pintura, tenga en cuenta lo siguiente:
– NO lo limpie con un trapo duro.
– NO frote con fuerza.
– NO lo limpie con diluyente ni bencina.
– NO aplique ninguna sustancia volátil, tales como
insecticidas.
– NO permita que ninguna pieza de goma o de plástico
permanezca en contacto por un tiempo prolongado.
Especificaciones
Sección del amplificador
Potencia de salida: 80 W por canal, min. RMS,
accionado en 6 Ω a 1 kHz con no
más de un 10% de la distorsión
armónica total. (IEC268-3)
Altavoces/Impedancia: 6 Ω – 16 Ω
Entrada de audio AUX
Sensibilidad/impedancia de entrada:
NIVEL 1: 150 mV/47 kΩ
NIVEL 2: 500 mV/47 kΩ
USB: Ver.1.1
Sección del sintonizador
Gama de sintonización de FM: 87,50 MHz – 108,00 MHz
Gama de sintonización de AM: 530 kHz – 1 710 kHz
(a 10 kHz)
531 kHz – 1 710 kHz
(a 9 kHz)
Sección del reproductor de CD
Gama dinámica: 85 dB
Relación señal a ruido: 85 dB
Lloro y fluctuación: No medible
Sección de la platina de cassette
Respuesta de frecuencia
Normal (tipo I): 60 Hz – 14 000 Hz
Lloro y fluctuación: 0,15% (WRMS)
General:
Demanda de energía:
Consumo de energía: 150 W (en funcionamiento)
Dimensiones (aprox.): 175 mm × 246 mm × 415 mm
Peso (aprox.): 6,2 kg
Altavoces
Tipo: Bass-reflex de 2 vías
Unidades de altavoces: Woofer: 12 cm Cono de × 1
Impedancia: 6 Ω
Dimensiones (aprox.): 145 mm × 246 mm × 212 mm
Peso (aprox.): 2,2 kg cada uno
Accesorios suministrados
Consulte la página 4.
CA 110 V – 127 V / 220 V – 240 V
(ajustable con el selector de tensión),
50 Hz/60 Hz
22 W (en espera)
1,0 W (en espera y con la pantalla
apagada)
(An/Al/Pr)
Tweeter: 4 cm Cono de × 1
(An/Al/Pr)
Español
El diseño y las especificaciones se encuentran sujetos a
cambios sin previo aviso.
28
Page 63

Índice de las piezas
Consulte las páginas indicadas para saber cómo usar los
botones y controles.
Control remoto
Español
STANDBY/ON
10, 11, 18
12
10–12,
18, 19
10, 16, 24
9–12,
18, 19
18, 19
20
17
17
15
15
1
4
7
0
MP3 MODE
SLEEP A.STANDBY
SOUND
TURBO
2
5
8
10
IIV
PRESET UP
PRESET DOWN
PROGRAMREPEAT
AHB PRO
REMOTE CONTROL
3
6
9
CLOCK
/TIMER
USB
MEMORY
RANDOM
DIMMER
BASS/
TREBLE
SET/RESUME
CANCEL
DISPLAY
QP LINK
FM MODE
FADE
MUTING
VOLUME
9, 24
10, 12, 13,
16, 24
,
25
19, 23
16
16, 23, 25
10, 16, 24
11, 12,
18, 19
10–12,
18, 19
14
10
15
19
9, 15
9, 16
15
29
Page 64

Unidad principal
Español
27
9, 24
9–13, 18, 19
11, 20
10–12, 18,
19, 20
8
9, 15, 16
9, 15
11, 12
9
13
30
Page 65

Português
Índice Geral
Introdução ...................................................... 2
Precauções ...................................................................... 2
Como Consultar este Manual ......................................... 3
Começar a Utilizar ......................................... 4
Ponto 1: Efectue a desembalagem .................................. 4
Ponto 2: Prepare o comando à distância......................... 4
Ponto 3: Efectue as ligações ........................................... 5
Antes de Utilizar o Sistema ........................... 8
Operações Frequentes—Reprodução ........... 9
Ouvir Rádio .................................................................. 10
Reproduzir um Disco.................................................... 11
Reproduzir a partir da Memória USB ou do
Leitor de Áudio Digital............................................. 11
Reprodução de uma fita................................................ 13
Reproduzir Outro Equipamento.................................... 13
Quick Portable Link (QP Link) .................................... 14
Operações Frequentes—
Som e Outros Ajustes ............................... 15
Ajustar o Volume.......................................................... 15
Ajustar o Som ............................................................... 15
Alterar a Luminosidade do Visor—DIMMER ............. 16
Acertar o Relógio.......................................................... 16
Desligar o Dispositivo Automaticamente..................... 17
Operações de Disco/Memória USB/
Leitor de Áudio Digital Avançadas ......... 18
Programar a Ordem de Reprodução—
Reprodução Programada........................................... 18
Reproduzir de Modo Aleatório—
Reprodução Aleatória ............................................... 19
Reproduzir de Modo Repetido—
Reprodução Repetida................................................ 20
Evitar a Ejecção do Disco—
Bloqueio para Crianças............................................. 20
Operações de fita avançadas ....................... 21
Gravação em uma fita................................................... 21
Gravação de disco sincronizada.................................... 22
Operações de Temporização ....................... 23
Definição do timer ........................................................ 23
Informações Adicionais ............................... 26
Obter Mais Informações sobre este Sistema................. 26
Resolução de Problemas ............................................... 27
Manutenção................................................................... 28
Especificações............................................................... 28
Índice Remissivo dos Componentes............................. 29
1
Page 66

Introdução
Obrigado por adquirir o Sistema Micro da JVC.
Esperamos que seja um valor acrescentado para a sua casa e
que lhe proporcione longos anos de entretenimento.
Leia atentamente este manual de instruções antes de utilizar
a sua nova aparelhagem.
No manual, encontrará todas as informações necessárias
para a instalar e utilizar.
Se tiver qualquer questão cuja resposta não se encontre no
manual, contacte o seu fornecedor.
Precauções
Instalação
• Efectue a instalação num local plano, seco e não demasiado
quente nem frio — entre 5°C e 35°C.
• Instale o sistema num local com ventilação adequada, para
evitar a acumulação de calor no interior do sistema.
NÃO instale o sistema num local próximo de
fontes de calor nem em locais expostos a luz
solar directa, pó ou vibrações em excesso.
• Deixe espaço suficiente entre o sistema e o televisor.
• Mantenha os altifalantes afastados do televisor para evitar
a ocorrência de interferências.
Fontes de alimentação
• Quando desligar o sistema da tomada de parede, puxe
sempre pela ficha e não pelo cabo de corrente alterna.
NÃO manuseie o cabo de corrente alterna com
as mãos húmidas.
Condensação da humidade
Poderá formar-se condensação nas lentes internas do sistema
nas seguintes situações:
• depois de começar a aquecer a sala;
• num local húmido;
• se deslocar directamente o sistema de um local frio para um
local quente.
Se isto acontecer, o sistema poderá não funcionar
correctamente. Nesse caso, deixe-o ligado durante algumas
horas até que a humidade evapore, desligue o cabo de
corrente alterna e, em seguida, volte a ligá-lo.
Calor interno
• Para evitar a acumulação de calor no interior da unidade
principal, está instalada um ventoinha de arrefecimento no
painel posterior (consulte a página G-2).
Por questões de segurança, tenha em
atenção as indicações que se seguem.
• Certifique-se de que existe uma ventilação
adequada em redor da unidade principal.
Caso contrário, o sistema pode
sobreaquecer e sofrer danos.
• NÃO tape as aberturas ou orifícios de
ventilação nem a ventoinha de
arrefecimento. Se estes estiverem
obstruídos por um jornal, tecido, etc., o
calor poderá não ser libertado
adequadamente.
Outros
• Se qualquer objecto metálico ou algum líquido se infiltrar
no interior do sistema, desligue o cabo de corrente alterna
e contacte o seu fornecedor antes de prosseguir com a
utilização.
NÃO desmonte o sistema, pois no seu interior
não existem componentes cuja manutenção
deva ser efectuada pelos utilizadores.
• Se não pretender utilizar o sistema durante um longo período
de tempo, desligue o cabo de corrente alterna da tomada de
parede.
Se ocorrer qualquer problema, desligue o cabo de corrente
alterna e contacte o seu fornecedor.
Português
2
Page 67

Como Consultar este Manual
Para simplificar e facilitar ao máximo a compreensão deste
manual, adaptámos os métodos que se seguem.
• Os botões e as operações de controlo encontram-se
descritos na tabela apresentada em seguida. Neste manual,
as operações explicadas são, regra geral, efectuadas com o
comando à distância; no entanto, pode utilizar os botões e
os controlos da unidade principal, se estes tiverem nomes e
símbolos iguais (ou semelhantes).
•
Algumas sugestões e notas relacionadas encontram-se
explicadas posteriormente, nas secções “Obter Mais
Informações sobre este Sistema” e “Resolução de
Problemas,” mas não na mesma secção que contém a
explicação das operações.
informações sobre as funções ou se tiver qualquer dúvida
acerca das mesmas, aceda a estas secções para encontrar as
respostas.
Português
Se pretender obter mais
Indica que deve pressionar o botão
durante breves instantes
Indica que deve pressionar o botão
várias vezes durante breves
instantes
até ficar seleccionada a
opção pretendida.
Indica que deve pressionar um dos
botões.
.
Indica que deve
manter pressionado
o botão durante os segundos
indicados.
2 seg.
• O número da seta indica o período de
tempo durante o qual deve pressionar
o botão (neste exemplo, 2 segundos).
• Se não houver um número na seta,
mantenha pressionado o botão até
que o procedimento esteja concluído
ou até obter o resultado pretendido.
Indica que deve rodar o controlo na
direcção especificada.
Remote
ONLY
Indica que só é possível efectuar a operação
com o comando à distância.
Indica que só é possível efectuar a operação
Main Unit
ONLY
com os botões e controlos da unidade
principal.
3
Page 68

Começar a Utilizar
Ponto
1
:Retire o sistema da embalagem
e verifique os acessórios.
Ponto 2:Prepare o comando à
distância.
Ponto 1: Efectue a desembalagem
Depois de efectuar a desembalagem, certifique-se de que
possui os itens indicados em seguida. O número que se
encontra entre parêntesis indica a quantidade fornecida.
• Antena de FM (1)
• Antena circular de AM (1)
• Comando à distância (1)
• Pilhas (2)
• Adaptador de plugue de CA (1)
Se qualquer um destes itens estiver em falta, contacte
imediatamente o seu fornecedor.
Ponto 2: Prepare o comando à distância
Introduza as pilhas no comando, fazendo a correspondência
correcta entre as polaridades (+ e –).
1
Português
Ponto 3
:Ligue os componentes, tais como as
antenas de AM/FM, os altifalantes,
etc. (consulte as páginas 5 a 7).
AM
EXT
AM
LOOP
GND
Por fim, ligue o cabo de corrente
alterna.
Agora, pode utilizar o sistema.
2
R6(SUM-3)/AA(15F)
3
• NÃO utilize pilhas antigas juntamente com
novas.
• NÃO junte tipos de pilhas diferentes.
• NÃO exponha as pilhas a calor ou chamas.
• NÃO deixe as pilhas no respectivo
compartimento quando não pretender
utilizar o comando à distância durante um
longo período de tempo. Caso contrário, o
comando à distância ficará danificado se as
pilhas derramarem ácido.
4
Page 69

Ponto 3: Efectue as ligações
Para mais informações, consulte a página 7.
Para mais informações sobre como ligar equipamento externo, consulte a página 13.
As imagens dos terminais de entrada/saída apresentadas em
seguida são os exemplos mais comuns.
Quando ligar outros componentes, consulte também os
respectivos manuais, pois os nomes dos terminais impressos na
parte posterior podem ser diferentes.
Antes de efectuar as ligações, desligue todos os componentes da
corrente.
Para uma melhor recepção de FM/AM
Português
Antena de FM
exterior
(não fornecida)
AM
LOOP
AM
EXT
GND
Antena circular de
AM
Mantenha-a ligada.
Fio revestido a vinil (não fornecido)
Estique-o na horizontal.
Desligue a antena de FM fornecida e efectue a ligação a uma antena de FM exterior
utilizando um fio de 75 Ω com um conector do tipo coaxial (IEC ou DIN45325).
A uma tomada de parede
Ligue o cabo de corrente alterna apenas quando concluir todas
as ligações.
• Se o plugue de CA não entrar na tomada elétrica de parede, utilize
o adaptador de plugue de CA fornecido.
5
Page 70

Antena de FM (fornecida)
Estique-a para
poder obter a
melhor recepção.
LOOP
Antena circular de AM (fornecida)
Rode-a até obter a melhor
recepção.
Português
AM
EXT
AM
GND
110V–127V
220V–240V
AC VOLTAGE
SELECTOR
Riscas pretas
Sem riscas
6
Page 71

Para montar e conectar a antena AM de quadro
Para montar a antena AM de quadro
Para conectar os cabos de alto-falante
Certifique-se de ambas as caixas acústicas estejam
conectadas correta e firmemente.
3 Solte
1 Segure
Para conectar a antena AM de quadro
Certifique-se de conectar o fio corretamente: A extremidade
branca a AM EXT, e a extremidade preta a GND.
1 Segure
Português
2 Coloque
• Se o fio da antena AM de quadro ou os cabos de altofalante estiverem revestidos com vinil, retire o vinil,
torcendo-o, para expor a ponta da antena.
• Certifique-se de que os condutores da antena não toquem
em outros terminais, cabos de conexão e cabo de
alimentação. Do mesmo modo, mantenha as antenas
afastadas de partes metálicas do sistema, cabos de conexão
e cabo de alimentação de CA. Isso poderia causar uma má
recepção.
3 Solte
2 Coloque
Quando conectar os cabos de alto-falante, iguale a
polaridade dos terminais de alto-falante: O cabo com a listra
preta a (–), e o cabo sem listra a (+).
• NÃO conecte mais de uma caixa acústica a
cada terminal.
• NÃO permita que os condutores dos cabos
de alto-falante entrem em contato com partes
metálicas do sistema.
Ajuste do seletor de voltagem
Utilize uma chave de fenda para deslizar o seletor de
voltagem de modo que o indicador de voltagem aponte para
a mesma voltagem da rede elétrica local. (Veja também a
capa traseira.)
110V-127V
220V-240V
Indicador da voltagem
AC VOLTAGE
SELECTOR
NÃO conecte antes de ajustar o seletor de
voltagem na parte posterior do aparelho e de
completar todos os procedimentos de
conexão.
7
Page 72

Antes de Utilizar o Sistema
Durante a utilização do sistema, as indicações do visor fornecem muitas informações.
Antes de utilizar o sistema, familiarize-se com as situações em que os indicadores acendem no visor.
12345 6 7
10
911
8
Indicações da área principal do visor
• Quando ouve rádio:
Banda
Frequência
• Quando reproduz um CD:
Número da
faixa
Tempo
de reprodução
decorrido
• Quando selecciona USB
MEMORY:
Número da faixa actual
• Quando selecciona AUX:
Nome da fonte
• Quando reproduz MP3*:
actual
Tempo de
reprodução
decorrido
Número da
faixa
• Durante a reprodução de
uma fita:
Tempo de reprodução decorrido
• Quando interrompe a reprodução do disco:
Quando a opção RESUME estiver activada, aparece a indicação
RESUME no visor. Isto também se aplica quando interromper a
reprodução da memória USB ou do leitor de áudio digital.
CD:
Número total de faixas
MP3:
• No modo “TRACK”:
Número total de faixas
Tempo de reprodução total
• No modo “GROUP”:
Número total
de grupos
Número total
de faixas
* Quando iniciar a reprodução de um disco MP3, o número
e o nome da faixa (e a etiqueta ID3) são apresentados
antes de aparecer o tempo de reprodução decorrido.
1 Indicadores de modo de reprodução
• RAND (aleatório): acende quando activar o modo de
reprodução aleatório.
• PRGM (programa): acende quando activar o modo de
reprodução de programa.
• : acende quando activar o modo de repetição.
– 1: repete a faixa.
– ALL: repete todas as faixas.
– GR: repete todas as faixas do grupo seleccionado
(apenas para MP3).
2 Indicador QP Link
• Acende quando activar QP Link.
3 Indicador MP3
• Acende quando for detectado um MP3.
4 Indicador USB
• Acende quando seleccionar USB MEMORY.
5 Indicadores de recepção FM
• MONO: acende quando activar o modo mono de FM.
• ST (estéreo): acende quando sintonizar uma estação de
FM estéreo e a intensidade do sinal for suficiente.
6 Indicador SOUND TURBO
• Acende quando activar SOUND TURBO (consulte a
página 15).
7 Indicador AHB PRO (Active Hyper Bass Pro)
• Acende quando activar AHB PRO.
8 Área principal do visor
9 Indicador A.STBY (modo de espera automático)
• Acende quando activar o modo de espera automático.
• Fica intermitente quando a reprodução do disco for
interrompida pela função de modo de espera automático.
p Indicadores de operação de fita
• Indicador
REC
– Ilumina-se durante uma gravação.
• 2 3
(direção da fita):
– Pisca lentamente durante a reprodução ou gravação.
– Pisca rapidamente durante a rebobinagem de uma fita.
q Indicadores de temporização
• : Ilumina-se quando o timer diário ou timer de
gravação está no modo de prontidão; pisca durante o
funcionamento do timer.
• 1/2/3: acende quando um temporizador diário (1, 2 ou 3)
estiver em modo de espera; fica intermitente quando
estiver predefinido ou activo.
• REC: Ilumina-se quando o timer de gravação está no
modo de prontidão; pisca durante um ajuste ou
funcionamento.
• SLEEP: acende quando activar o temporizador de
repouso.
Português
8
Page 73

Português
Botões
numéricos
MP3 MODE
4/1,
7,¡/¢
Operações Frequentes—Reprodução
1 Ligue o dispositivo.
O indicador luminoso STANDBY da unidade principal
apaga.
1
SET/
RESUME
DISPLAY
PRESET UP,
PRESET DOWN
2
QP LINK
FM MODE
DIMMER
3
• Se não pressionar STANDBY/ON , o sistema liga
se pressionar um dos botões de selecção de fonte no
ponto seguinte.
2 Seleccione a fonte.
A reprodução inicia automaticamente se a fonte
seleccionada estiver pronta.
• Se pressionar AUX, inicie a reprodução da fonte no
componente externo.
3 Ajuste o volume.
4 Utilize a fonte de destino conforme
descrito posteriormente.
Para desligar (modo de espera) o sistema
1
2
3
4
VOLUME
STANDBY/ON
STANDBY/ON
O indicador luminoso STANDBY da
unidade principal acende.
• Mesmo quando o sistema está em modo
de espera, é sempre consumida uma
pequena quantidade de energia.
Para desactivar o relógio e poupar energia
Quando o sistema estiver desligado...
DIMMER
Audição em privado
Ligue um par de auscultadores ao conector PHONES da
unidade principal. Não será emitido som pelos
altifalantes. Certifique-se de que diminui o volume antes
de ligar ou colocar os auscultadores.
• Se desligar os auscultadores, volta a activar os
altifalantes.
• Volte a pressionar o botão para visualizar
o relógio.
NÃO desligue (modo de espera) o sistema
com o volume excessivamente alto; caso
contrário, quando voltar a ligar o sistema ou
iniciar a reprodução, a emissão repentina do
som muito alto poderá afectar o aparelho
auditivo ou danificar os altifalantes e/ou os
auscultadores.
9
Page 74

Ouvir Rádio
Para selecionar o espaçamento do
intervalo do sintonizador AM
Em alguns países o espaçamento entre as emissoras AM é de 9
kHz, enquanto que em outros países o espaçamento é de 10 kHz.
Você pode alterar os intervalos do sintonizador AM
enquanto o sistema estiver no modo de prontidão.
1
2 seg.
• A definição do intervalo atual aparece no mostrador.
2 Selecione o espaçamento do intervalo enquanto a
definição atual estiver no mostrador.
9
Remote
ONLY
Se for difícil ouvir a estação de FM
sintonizada
FM MODE
MONO
Remote
ONLY
STEREO
MONO: A qualidade da recepção melhora,
embora deixe de ouvir o som em estéreo.
O indicador MONO acende.
STEREO: Normalmente, deve seleccionar esta
opção. É reposto o som estéreo.
Remote
Para predefinir as estações
ONLY
Pode predefinir 30 estações de FM e 15 de AM.
1 Sintonize uma estação que pretenda predefinir.
2 Active o modo de inserção do número de predefinição.
SET/RESUME
Português
0
Para seleccionar a banda (FM ou AM)
FM AM
Você também pode efetuar a mesma operação com o botão
FM/AM do Sistema.
Para sintonizar uma estação
Quando as opções FM ou AM estiverem seleccionadas...
Comando à distância: Unidade principal:
1 seg.
A frequência começa a mudar no visor.
Quando for sintonizada uma estação (frequência) com uma
intensidade de sinal suficiente, a frequência pára de mudar.
• Quando pressionar várias vezes o botão, a frequência muda
passo a passo.
Para parar a procura manual,
pressione um dos botões.
1 seg.
DOWN UP
• Conclua o procedimento seguinte enquanto a indicação
do visor estiver intermitente.
3 Seleccione um número de predefinição para a estação
que pretende gravar.
1
2
5
4
8
7
0
10
Exemplos:
3
Para seleccionar a predefinição
número 5, pressione 5.
6
Para seleccionar a predefinição
número 15, pressione 10
9
Para seleccionar a predefinição
número 30, pressione 10
>
→
1 → 5.
=
>
→
3 → 0.
=
• Pode também utilizar os botões PRESET UP/PRESET DOWN.
4 Grave a estação.
SET/RESUME
memo
• Se predefinir uma estação com o som definido para
MONO, a estação é gravada com a definição MONO.
10
Page 75

Para sintonizar uma estação
predefinida
Seleccione uma banda (FM ou AM).
1
FM AM
2 Seleccione um número de predefinição para a estação
que pretende gravar.
1
2
4
5
8
7
0
10
• Pode também utilizar
3
6
9
PRESET UP ou
PRESET DOWN.
Português
Reproduzir um Disco
Remote
ONLY
Para iniciar: Para efectuar uma
Para parar:
pausa:
Para libertar, pressione
novamente.
Para seleccionar uma faixa/um grupo*
Aumenta os números de faixa/grupo*.
Diminui os números de faixa/grupo*.
* Para mais informações sobre a selecção do grupo, consulte
“Para reprodução de MP3”, na página 12.
Para localizar uma determinada parte
Durante a reprodução de um disco, mantenha pressionado
um destes botões para chegar à parte pretendida.
Este sistema consegue reproduzir os seguintes discos—CDs normais
e CD-R/CD-RW (gravados no formato de CD áudio ou MP3).
Tipo de Disco Símbolo (logótipo)
CD áudio
CD-R
CD-RW
• Cuidados a ter na reprodução de um DualDisc
O lado do CD de um “DualDisc” não cumpre os requisitos
da norma “Compact Disc Digital Audio”, pelo que não é
aconselhável que reproduza o lado do CD de um DualDisc
neste produto.
Main Unit
Para inserir um disco
ONLY
Pode inserir discos enquanto está a ser reproduzida outra fonte.
Para fechar o suporte para discos,
volte a pressionar 0.
• Quando o suporte para discos estiver aberto e pressionar
CD 6, o suporte fecha e a reprodução é iniciada.
Faz avançar rapidamente a faixa.
Faz recuar rapidamente a faixa.
Nas fontes de MP3, não é emitido som durante esta operação.
Para localizar directamente uma faixa e
Remote
ONLY
iniciar a reprodução
Exemplos:
1
3
2
Para seleccionar a faixa número 5,
pressione 5.
5
4
8
7
0
10
Reproduzir a partir da Memória USB ou do
Para seleccionar a faixa número 15,
6
pressione 10
Para seleccionar a faixa número 30,
9
pressione 10
(Para fontes de MP3 com 100 ou mais
>
→
1 → 5.
=
>
→
3 → 0.
=
faixas)
Para seleccionar a faixa número 125,
pressione duas vezes 10 → 1 → 2 → 5.
* Quando houver um máximo de 99
faixas, pode pressionar duas vezes
>
10 para regressar ao estado
=
anterior a ter pressionado 10.
>
=
>
=
Leitor de Áudio Digital
Este sistema está equipado com um terminal USB
MEMORY no painel frontal. Pode ligar uma memória USB
ou um leitor de áudio digital a este terminal e desfrutar do
som proveniente destas fontes.
• Tenha em atenção que não pode enviar qualquer sinal ou
dados para a memória USB ou para o leitor de áudio digital
a partir deste sistema.
11
Page 76

IMPORTANTE
• Defina sempre o volume para “VOL MIN” quando ligar
ou desligar outros equipamentos.
• Ligue a memória USB ou o leitor de áudio digital
directamente ao painel frontal da unidade. Se efectuar a
ligação através de um concentrador (hub) USB, o
dispositivo poderá não funcionar correctamente.
• Pode ligar memórias USB e leitores de áudio digitais
compatíveis com as especificações da classe de
armazenamento em massa USB.
• Alguns leitores de áudio digitais não são compatíveis
com a unidade.
• Não é possível reproduzir faixas codificadas ou
encriptadas através de métodos especiais na unidade. Só
são suportados MP3.
Para ligar a memória USB ou o leitor de áudio digital
Ligue o leitor de áudio digital ao sistema utilizando o cabo
USB fornecido com o leitor.
Retomar a Reprodução de CDs de Áudio/
MP3/Memória USB/Leitor de Áudio Digital
Se pressionar 7 durante a reprodução, a posição da
•
faixa
que estava a ser reproduzida quando interrompeu o
funcionamento será memorizada pela unidade.
Se pressionar CD 6 ou USB MEMORY 6, pode
iniciar a reprodução a partir do ponto em que a interrompeu.
Para activar/cancelar o
Remote
ONLY
retomar da reprodução
Quando a fonte for CD ou USB MEMORY...
2 seg.
SET/RESUME
RESUME ON
RESUME OFF
ou
• Utilize um cabo USB com uma ficha da “série A” na
extremidade que liga ao sistema.
• Quando desligar a memória USB ou o leitor de áudio
digital, certifique-se de que a reprodução está concluída e
que o sistema está parado.
Para reproduzir sons da memória USB ou do
leitor de áudio digital
Para iniciar: Para parar:
USB
MEMORY
• O indicador USB do visor mantém-se aceso enquanto a
opção USB MEMORY estiver seleccionada.
memo
• Se pressionar 0 ou desligar a memória USB/o leitor
de áudio digital, apaga a informação de posição da
faixa quando interrompe a reprodução.
• Para retomar a reprodução a partir da primeira faixa,
pressione 7 duas vezes durante a reprodução e, em
seguida, pressione CD 6 ou USB MEMORY 6.
Para reprodução de MP3
Consoante o modo de reprodução de MP3, os botões
4/1 / ¡/¢ ou os botões numéricos podem ser
utilizados para seleccionar o grupo ou a faixa.
Exemplos:
Quando o modo de reprodução de MP3 for “GROUP.”
Indicador GR (Grupo)
Número total de grupos Número total de faixas
Pode alterar o modo de reprodução de
MP3 pressionando MP3 MODE.
• Sempre que pressiona o botão, o modo de
reprodução de MP3 muda da seguinte forma:
MP3 MODE
Português
Para seleccionar uma faixa/um grupo*
Diminui os números de faixa/grupo*.
Aumenta os números de faixa/grupo*.
* Para mais informações sobre a selecção do grupo, consulte
“Para reprodução de MP3” em seguida.
TRACK GROUP
TRACK:
GROUP:
• Só são detectadas as faixas (os grupos são
ignorados).
• 4/1, ¡/¢ ou os botões numéricos
podem ser utilizados para seleccionar a faixa de
MP3.
• São detectados os grupos e as faixas.
• 4/1, ¡/¢ e os botões numéricos podem
ser utilizados para seleccionar o grupo de MP3.
• Os botões numéricos podem ser utilizados para
seleccionar o número da faixa dentro do grupo.
12
Page 77

Reprodução de uma fita
Para colocar uma fita
Você pode reproduzir fitas do tipo I.
Empurre Coloque Feche
Para ajustar o nível de entrada do som do outro
equipamento
Pode ajustar o nível de entrada do som do equipamento
ligado se o sinal de entrada for demasiado fraco ou forte.
1 Seleccione AUX como fonte.
2 Ajuste o nível de entrada.
2 seg.
Com o lado da fita virado para a frente
Para iniciar: Para parar:
Português
Para rebobinar a fita:
Bobina a fita.
Rebobina a fita.
Reproduzir Outro Equipamento
Para ligar outro equipamento
Utilizando um cabo com minificha estéreo (não fornecido),
pode ligar equipamento com conectores de saída de áudio
analógico, tais como leitores de áudio digitais, televisores,
etc.
Cabo com minificha estéreo (não fornecido)
SET/RESUME
AUX LVL 1
AUX LVL 2
AUX LVL 1: Nível de entrada normal (predefinição).
Adequado para equipamento com um nível de
saída baixo (como, por exemplo, dispositivos
de áudio portáteis).
AUX LVL 2: Nível de entrada reduzido.
Adequado para equipamento com um nível de
saída elevado (como, por exemplo, leitores de
DVD).
memo
• Se achar que o nível de saída do equipamento externo é
elevado, seleccione AUX LVL2.
AUX
(painel frontal)
Se a saída de áudio do outro equipamento não for do tipo
minificha estéreo
Utilize um adaptador para converter a minificha estéreo para
a ficha da saída de áudio correspondente.
Consulte os manuais fornecidos com o outro equipamento.
Dispositivo de áudio
portátil,
consola de jogos,
IMPORTANTE
• Defina sempre o volume para “VOL-MIN” quando
ligar ou desligar outros equipamentos.
13
Page 78

Remote
Quick Portable Link (QP Link)
ONLY
Se ligar outro equipamento ao terminal AUX, como, por
exemplo, um leitor de áudio digital, e efectuar a reprodução,
a fonte muda automaticamente para AUX.
QP LINK
QP Link
Cancelado
(Sem indicação)
O indicador QP Link mantém-se aceso enquanto QP Link
estiver activado.
Quando QP Link estiver activado...
• Se for recebido um sinal de entrada de áudio através de
AUX quando ligar o sistema, a fonte muda
automaticamente para AUX.
• Se for recebido um sinal de entrada de áudio através de
AUX quando o sistema estiver em modo de espera, o
sistema liga automaticamente e reproduz o áudio.
• Não pode alterar a fonte enquanto estiver a ser recebido um
sinal de entrada de áudio através de AUX.
Se pressionar outro botão de fonte, o indicador QP Link
fica intermitente várias vezes.
Português
memo
• Enquanto decorre a reprodução no dispositivo de áudio
portátil, a função QP Link poderá ligar o sistema, mesmo
que o temporizador de repouso o tenha colocado em modo
de espera ou que o utilizador tenha activado o modo de
espera do sistema. Nesse case, desactive QP Link ou
interrompa a reprodução no dispositivo ligado ao conector
AUX.
• Se o sinal de entrada de áudio recebido através de AUX for
fraco, a fonte poderá não mudar para AUX.
• A fonte poderá não mudar para AUX, consoante a música.
• São necessários um ou dois segundos para que a fonte
mude para AUX depois de ligar outro equipamento - como,
por exemplo, um leitor de áudio externo - e até que seja
emitido som. Isto ocorre porque o sistema está a detectar o
sinal do equipamento.
• A Ligação QP não funciona:
– Se a indicação do relógio se desligar em espera
– Durante a gravação
– Enquanto o Daily Timer (Temporizador Diário) estiver
activo
– Enquanto o Recording Timer (Temporizador de
Gravação) estiver activo
14
Page 79

Operações Frequentes—Som e Outros Ajustes
Português
Comando à distância
CLOCK/
TIMER
DIMMER
A.STANDBY
SLEEP
SOUND
TURBO
AHB PRO
SET/RESUME
CANCEL
DISPLAY
PRESET UP,
PRESET DOWN
FADE
MUTING
VOLUME
+/–
BASS/
TREBLE
Ajustar o Volume
Pode ajustar o nível de volume de 0 (VOL-MIN) a 31 (VOL-MAX).
Comando à distância: Unidade principal:
VOLUME
VOLUME
Remote
Para baixar momentaneamente o volume
FADE
MUTING
Para repor o volume,
ou ajuste o nível do volume.
volte a pressionar
ONLY
Ajustar o Som
Para dar ênfase ao som—SOUND TURBO
Esta função dá ênfase ao som.
SOUND
TURBO
S-TURBO
OFF
(Cancelado)
Unidade principal
BASS
SOUND
TURBO
TREBLE
VOLUME
+/–
Para reforçar os tons graves
Remote
ONLY
—AHB PRO
Pode reforçar os tons graves para que sejam detalhados e
envolventes mesmo quando o volume for baixo.
AHB PRO
AHB PRO
OFF
(Cancelado)
Para ajustar o tom—BASS/TREBLE
Pode ajustar o nível de graves e agudos de 0 a +5.
Para ajustar os tons graves
BASS/
TREBLE
Para ajustar os tons agudos
BASS/
TREBLE
Pode efectuar a mesma operação no sistema.
Quando a opção SOUND TURBO estiver activada, BASS/
TREBLE não está disponível.
BASS TREBLE
Cancelado
VOLUME
BASS TREBLE
Cancelado
VOLUME
15
Page 80

Remote
Alterar a Luminosidade do Visor—DIMMER
ONLY
Pode escurecer a janela do visor.
DIMMER
DIM ON
DIM OFF
(Cancelado)
Remote
Acertar o Relógio
ONLY
Se não acertar o relógio integrado, não pode utilizar o
temporizador diário e o temporizador de gravação (consulte
a página 23).
• Para sair da definição do relógio, pressione CLOCK/
TIMER conforme necessário.
• Para voltar ao ponto anterior, pressione CANCEL.
1 Active o modo de definição do relógio.
CLOCK
/TIMER
• Se já tiver acertado o relógio previamente, pressione
várias vezes o botão até seleccionar o modo de
definição do relógio (consulte a página 23).
2 Acerte as horas.
PRESET UP
SET/RESUME
3 Acerte os minutos.
PRESET UP
SET/RESUME
PRESET DOWN
Aparece a indicação “CLOCK OK” e o relógio integrado
começa a funcionar.
Para ver as horas durante a reprodução
DISPLAY
Se ocorrer uma falha de energia
As definições do relógio são perdidas e este volta a
apresentar a indicação “0:00.” Tem de voltar a acertar o
relógio.
Relógio
Informação da fonte
Português
PRESET DOWN
16
Page 81

Desligar o Dispositivo
Remote
Automaticamente
Para desligar o sistema após o fim da
reprodução—Modo de espera automático
Esta função só é activada quando a fonte for CD ou fita.
A.STANDBY
Quando o modo de espera automático estiver activado, o
indicador A.STBY fica aceso no visor.
Português
Quando parar a reprodução do disco ou da fita, o indicador
A.STBY fica intermitente.
Se não for efectuada qualquer operação relacionada com o
disco e a fita durante cerca de 3 minutos enquanto o
indicador estiver intermitente, o sistema desliga (fica em
modo de espera) automaticamente.
Para desligar o sistema passado um
determinado período de tempo—Temporizador
de repouso
ONLY
A.STBY
Cancelado
(Sem indicação)
Especifique o tempo (em minutos).
1
SLEEP
10 20 30 60 90 120
OFF
(Cancelado)
2 Aguarde até que o período de tempo definido passe.
Para consultar o período de tempo que falta até que o
sistema desligue
SLEEP
• Se pressionar várias vezes o botão, pode alterar o período
de tempo .
17
Page 82

Operações de Disco/Memória USB/Leitor de Áudio Digital Avançadas
Comando à distância
Botões
numéricos
4/1,
7,¡/¢
CD 6
REPEAT
PROGRAM
Unidade principal
CANCEL
USB MEMORY
6
RANDOM
Programar a Ordem de Reprodução—
Remote
Reprodução Programada
ONLY
É possível organizar a ordem de reprodução das faixas (até
32) antes de iniciar a reprodução.
• A reprodução programada só pode ser efectuada no modo
MP3 TRACK.
• Pode repetir todas as faixas programadas pressionando REPEAT.
1 Antes de iniciar a reprodução, pressione PROGRAM.
PROGRAM
2 Seleccione as faixas pretendidas para a reprodução
programada.
Número da faixaPonto do programa
Exemplos:
1
4
7
0
3
2
Para seleccionar a faixa número
5, pressione 5.
5
8
10
Para seleccionar a faixa número
6
15, pressione 10 → 1 → 5.
Para seleccionar a faixa número
9
30, pressione 10 → 3 → 0.
(Para fontes de MP3 com 100 ou mais faixas)
Para seleccionar a faixa número 125,
pressione duas vezes 10
* Quando houver um máximo de 99
faixas, pode pressionar duas vezes
>
10 para regressar ao estado
=
anterior a ter pressionado 10.
>
=
>
=
>
=
→
1 → 2 → 5.
>
=
Português
3 Volte a executar a operação do ponto 2 para
programar as outras faixas.
4 Inicie a reprodução.
USB
MEMORY
ou
As faixas que seleccionou são reproduzidas pela ordem que programou.
Para avançar uma
0
7
faixa:
Para efectuar
uma pausa:
Para parar:
ou
USB
MEMORY
Para libertar,
pressione novamente.
• Não é possível seleccionar faixas com os botões numéricos
durante a reprodução programada.
18
Page 83

Para verificar o conteúdo programado
Quando o indicador PRGM aparece no visor e antes da
reprodução...
Pela ordem programada.
Pela ordem inversa.
Para alterar o programa
Quando o indicador PRGM aparece no visor e antes da
reprodução...
Para eliminar o último
ponto:
CANCEL
Para eliminar todo o
programa:
Português
Para adicionar pontos ao programa:
Volte a executar a operação do ponto 2 da página 18.
Para sair da reprodução programada
Quando o indicador PRGM aparece no visor...
PROGRAM
Se pressionar 7 também cancela a reprodução programada.
• Durante a reprodução programada (o indicador PRGM
aparece no visor), não é possível abrir os suportes para
discos. Se não for efectuada nenhuma operação, a
reprodução programada é cancelada e pode abrir os
suportes.
Reproduzir de Modo Aleatório—
Remote
Reprodução Aleatória
Pode reproduzir todas as faixas do disco seleccionado, da
memória USB ou do leitor de áudio digital de modo
aleatório.
• Pode repetir todas as faixas (PALL) pressionando
REPEAT.
Pressione RANDOM.
RANDOM
A reprodução é iniciada por ordem aleatória.
• Se tiver seleccionado o modo “GROUP” para o MP3, o
modo será cancelado.
A reprodução aleatória termina depois de reproduzidas todas
as faixas.
Para avançar uma
faixa:
• Não é possível seleccionar faixas com os botões numéricos
durante a reprodução aleatória.
ONLY
Para efectuar
uma pausa:
ou
USB
MEMORY
Para libertar,
pressione
novamente.
Para parar:
19
Para sair da reprodução aleatória
Quando o indicador RAND aparece no visor...
RANDOM
Page 84

Reproduzir de Modo Repetido—
Remote
Reprodução Repetida
Pode repetir a reprodução.
Para CD/MP3 (modo TRACK):
REPEAT
Cancelado
(Sem indicação)
Para MP3 (modo GROUP):
ONLY
Evitar a Ejecção do Disco—
Bloqueio para Crianças
Main Unit
ONLY
Pode bloquear os suportes para discos de forma a que
ninguém possa ejectar os discos inseridos.
• Pode efectuar esta operação quando o sistema está em
ALL1
modo de espera.
Quando os suportes para discos estiverem fechados...
REPEAT
Cancelado
(Sem indicação)
Durante a reprodução programada:
REPEAT
Cancelado
(Sem indicação)
Durante a reprodução aleatória:
RANDOM
ALL
Cancelado
(Sem indicação)
1
ALL
Repete a faixa actual.
• Repete o programa.
• Repete todas as faixas do grupo actual
(apenas para o modo de reprodução de
MP3 em “GROUP”).
Repete todas as faixas (pode seleccionar
no modo de reprodução normal ou
aleatória).
1
ALL
(em simultâneo)
Para cancelar o bloqueio,
A indicação “UNLOCKED” aparece no visor.
execute o mesmo procedimento.
Português
20
Page 85

Operações de fita avançadas
Português
Controle remoto
FM/AM
CD 6
TAPE
7
USB MEMORY
6
AUX
IMPORTANTE
Pode ser ilegal gravar ou reproduzir material protegido
por direitos autorais sem o consentimento do proprietário
dos direitos autorais.
Gravação em uma fita
Você pode utilizar fitas do tipo I para gravação.
• Para reproduzir uma fita, consulte a página 13.
1 Coloque uma fita que pode ser gravada.
Empurre Coloque
Com o lado da fita virado para a frente
2 Selecione e inicie a reprodução da fonte—“FM,”
“AM,” “CD,” “USB” ou “AUX”.
• Quando gravar um disco, você também pode utilizar a
“Gravação de disco sincronizada” (consulte a
página 22).
3 Inicie a gravação.
Feche
Unidade principal
CD #/8
TAPE
FM/AM
REC
USB MEMORY
#/8
4, 7, ¢
Na unidade principal
Para parar a gravação:
21
Page 86

Gravação de disco sincronizada
Pode iniciar e parar o disco, a memória USB e a reprodução
DAP e a gravação de cassetes simultaneamente.
Para gravar o disco inteiro
Ative “RESUME” (consulte a página 12).
1 Coloque um disco e uma fita que pode ser gravada.
• Se a fonte de reprodução atual não for o CD player,
pressione CD 6 e, em seguida, 7.
• O visor exibirá “RESUME”. Pressione 7 para parar o
sistema para a gravação.
2 Inicie a gravação.
Na unidade principal
3 Inverta manualmente o lado da fita cassete.
• Quando a fita chegar ao final, tanto a fita quanto o disco
serão interrompidos. O visor exibirá “RESUME”.
Pressione REC depois de inverter o lado da fita cassete
para continuar a gravação a partir do início da faixa
atual.
• Depois que o disco terminar de reproduzir todas as
faixas, tanto a fita quanto o disco serão interrompidos.
Se você ouvir ruídos de batimento durante
a gravação de uma emissora AM
FM MODE
BEAT 1
Remote
ONLY
BEAT 2
• Selecione “BEAT 1” ou “BEAT 2” para reduzir o ruído de
batimento.
Português
Para gravar com uma reprodução programada ou
reprodução aleatória
1 Selecione a reprodução programada (e crie um
programa) ou a reprodução aleatória.
2 Pressione REC para iniciar a gravação.
Para proteger a sua gravação
As fitas têm duas lingüetas pequenas na sua parte
posterior para proteção contra um apagamento ou
gravação acidental.
Para proteger a sua gravação,
Para re-gravar em uma fita protegida,
orifícios com fita adesiva.
retire as lingüetas.
cubra os
22
Page 87

Português
Comando à distância
CLOCK/
TIMER
Operações de Temporização
Remote
ONLY
STANDBY/ON
SET/RESUME
CANCEL
PRESET UP,
PRESET DOWN
Definição do timer
Com o timer diário, você pode acordar com música, etc. Por
outro lado, com o timer de gravação, você pode criar uma
fita de um programa de rádio automaticamente.
• Você pode armazenar três definições do timer diário e uma
definição do timer de gravação; no entanto, você só pode
ativar uma das quatro definições acima ao mesmo tempo.
• Para sair da definição do timer, pressione CLOCK/TIMER
conforme for necessário.
• Para corregir uma entrada errada durante o procedimento,
pressione CANCEL. Você pode voltar ao passo anterior.
Como o timer diário funciona realmente
Uma vez que o timer diário é definido, o indicador do
timer ( ) e o indicador do número do timer (1, 2 ou 3)
se acendem no mostrador. O timer diário é ativado na
mesma hora todos os dias, até que o timer seja desativado
manualmente (veja a página seguinte) ou até que um
outro timer diário seja ativado.
Quando chega na hora de ligar
O Sistema liga, sintoniza a estação selecionada ou
começa a reproduzir a fonte especificada.
• Se tiver seleccionado “P – – –”, é seleccionada a última
estação sintonizada.
• Se tiver seleccionado “VOL – – –”, é seleccionado o
último valor especificado.
• Enquanto o timer diário estiver funcionando, os
indicadores do timer ( ) e do do número do timer (1,
2 ou 3) piscam no mostrador.
• A definição do timer permanece na memória até que
você a altere.
• Sem cancelar o timer diário, você pode mudar a fonte
ou ajustar o volume depois que o timer diário iniciar a
reprodução.
23
Como o timer de gravação funciona realmente
Quando o timer de gravação é definido, o indicador do
timer ( ) e o indicador REC se acendem no mostrador.
O timer de gravação funciona apenas uma vez.
Quando chega na hora de ligar
Os sistema é ligado, sintoniza a emissora especificada, e
inicia a gravação.
• Se tiver seleccionado “VOL – – –”, é seleccionado o
último valor especificado.
Quando chega na hora de desligar
O sistema interrompe a gravação, e é desligado (modo de
prontidão).
• A definição do timer permanece na memória até que
você a altere.
Page 88

1 Selecione um dos modos de definição do timer que
deseja definir—timer diário 1, timer diário 2, timer
diário 3, ou timer de gravação.
CLOCK
/TIMER
Timer diario 1 Timer diario 2 Timer diario 3
Cancelado
Ex.: Quando o modo de definição do timer diário 1 é
selecionado
Ajuste do relógio
(consulte a pãgina 16)
Timer de gravação
2 Defina o temporizador conforme pretendido.
Para timers diários:
Defina as horas e, em seguida, os minutos para o
1
momento de activação.
PRESET UP
SET/RESUME
Para o timer de gravação:
Defina a hora e, em seguida, os minutos para a hora
1
de ligar.
PRESET UP
SET/RESUME
PRESET DOWN
2
Da mesma forma, defina as horas e, em seguida, os
minutos para o momento de desactivação.
3
Selecione “TUNER FM” ou “TUNER AM”.
PRESET UP
SET/RESUME
PRESET DOWN
4
Selecione um número de emissora predefinido.
PRESET UP
SET/RESUME
Português
PRESET DOWN
2
Da mesma forma, defina as horas e, em seguida, os
minutos para o momento de desactivação.
3
Seleccione a fonte de reprodução—“TUNER FM,”
“TUNER AM,” “CD,” “AUX,”
PRESET UP
PRESET DOWN
4
Para “TUNER FM” e “TUNER AM”:
“USB” ou “TAPE”.
SET/RESUME
Seleccione um número de predefinição ou “P – – –”
pressionando PRESET UP ou PRESET DOWN e, em
seguida, pressione SET/RESUME.
Defina o volume.
5
PRESET UP
SET/RESUME
PRESET DOWN
PRESET DOWN
5
Defina o volume.
PRESET UP
SET/RESUME
PRESET DOWN
Se seleccionar “VOL – – –,” o volume será definido
para o nível seleccionado antes de desligar o sistema.
3 Desligue o sistema (em modo de espera) se tiver
definido o temporizador com o sistema ligado.
STANDBY/ON
O Recording Timer (Temporizador de Gravação)
funciona com o Sistema ligado ou desligado.
Se seleccionar “VOL – – –,” o volume será definido
para o nível seleccionado antes de desligar o sistema.
24
Page 89

Desactivar o temporizador depois de definido
Uma vez que o temporizador diário é activado todos os dias
à mesma hora, poderá ter de o cancelar em dias específicos.
1 Seleccione o temporizador que pretende cancelar.
CLOCK
/TIMER
Timer diario 1
Cancelado
Timer diario 2 Timer diario 3
Ajuste do relógio
(consulte a página 16)
2 Desactive o temporizador seleccionado.
CANCEL
O indicador do número correspondente ao temporizador
diário apaga.
Para activar novamente o temporizador,
Português
as operações anteriores e pressione no ponto 2...
SET/RESUME
O indicador do número correspondente ao temporizador
diário acende.
volte a executar
25
Page 90

Informações Adicionais
Obter Mais Informações sobre este Sistema
Operações Frequentes—Reprodução (consulte
as páginas 9 a 14)
Ouvir Rádio:
• Se gravar uma nova estação num número de predefinição já utilizado,
a estação previamente gravada nesse número será eliminada.
• Quando desliga o cabo de corrente alterna ou quando ocorre uma
falha de energia, as estações predefinidas serão eliminadas após
alguns dias. Se isso acontecer, volte a predefinir as estações.
Reproduzir um Disco/Memória USB/Leitor de Áudio Digital:
• Quando utilizar um disco de 8 cm, coloque-o no círculo
interior do suporte para discos.
• Este sistema não consegue reproduzir discos de “escrita em
pacote” (packet write).
• Para reprodução de MP3...
– Os discos MP3 requerem mais tempo de leitura do que os
CDs normais (varia consoante a complexidade da
configuração do grupo/ficheiro).
– Alguns ficheiros MP3 não podem ser reproduzidos e, por
isso, serão avançados. Este facto deve-se aos processos e às
condições de gravação.
– Quando criar discos MP3, utilize o padrão ISO 9660 Nível
1 ou Nível 2 para o formato do disco.
– Este sistema consegue reproduzir ficheiros MP3 com a
extensão <.mp3> (independentemente de ser composta por
letras maiúsculas ou minúsculas).
– Alguns caracteres ou símbolos não serão apresentados
correctamente no visor.
O número máximo de caracteres apresentado no visor é de 32
(sem a extensão) para ficheiros e de 30 para a etiqueta ID3.
– Recomenda-se que crie cada ficheiro MP3 com uma taxa de
amostragem de 44,1 kHz e a uma velocidade de transmissão
de 128 kbps.
– Este sistema consegue reconhecer um total de 500 faixas e
200 grupos num disco MP3 e 999 faixas e 250 grupos numa
memória USB. As faixas ou grupos acima do número
máximo não podem ser reconhecidos.
– A ordem de reprodução das faixas MP3 poderá ser diferente
da pretendida durante a gravação. Se uma pasta não incluir
faixas MP3, será ignorada.
Configuração dos grupos/faixas MP3
Este sistema reproduz faixas MP3 da forma apresentada
em seguida.
A ordem de reprodução apresentada na imagem é
relativa às faixas MP3 do disco.
As faixas MP3 da memória USB ou do leitor de áudio
digital podem ser reproduzidas de forma diferente.
01
02
Hierarquia
1
2
03 04
3
4
5
05
6
9
10
7
8
11
12
Nível 1 Nível 2 Nível 3 Nível 4 Nível 5
ROOT
Grupo com a respectiva ordem
01
de reprodução
Faixa MP3 com a respectiva
1
ordem de reprodução
Reprodução de uma fita:
• Não recomendamos o uso de fitas C-120 ou mais longas.
Essas fitas se prendem facilmente nos rolos pressores e
eixos de tração, e podem causar deterioração das
características.
Quick Portable Link (QP Link):
• O sistema mantém o estado activado/desactivado da função QP
Link mesmo quando liga ou retira o cabo de corrente alterna.
• A fonte permanece AUX quando desliga o outro
equipamento, como um leitor de áudio digital.
Operações Frequentes—Som e Outros Ajustes
(consulte as páginas 15 a 17)
Ajustar o Volume:
• Certifique-se de que diminui o volume antes de ligar ou
colocar os auscultadores.
Ajustar o Som:
• Esta função afecta também o som emitido através dos
auscultadores.
• Não é possível utilizar SOUND TURBO e AHB PRO em simultâneo.
Acertar o Relógio:
• Enquanto não acertar o relógio, a indicação “0:00” aparece
intermitente no visor.
• O relógio pode atrasar ou ficar adiantado de 1 a 2 minutos por
mês. Se isso acontecer, volte a acertar o relógio.
Desligar Automaticamente:
• Não é possível cancelar o modo de espera automático através
das seguintes operações:
– alterar a luminosidade do visor;
– ajustar o volume;
– ajustar o som.
Operações de Disco/Memória USB/Leitor de Áudio
Digital Avançadas
Programar a Ordem de Reprodução—Reprodução Programada:
• Se tentar programar uma 33ª faixa, a indicação “FULL”
aparece no visor.
• Durante as operações de programação...
Os dados que inserir serão ignorados se tentar programar um
número que não exista no disco (por exemplo, se seleccionar a
faixa 14 num disco que tenha apenas 12 faixas).
(consulte as páginas 18 a 20)
Operações de fita avançadas (consulte as
páginas 21 e 22)
Gravação em uma fita:
• O nível de gravação é ajustado automaticamente de
maneira correta. Assim, você pode ajustar o som que está
ouvindo no momento sem afetar o nível de gravação.
• Há uma fita-guia que não pode ser gravada no início e fim
das fitas cassetes. Por isso, ao gravar CDs ou programas de
rádio, enrole a fita-guia primeiro para assegurar que a
gravação seja feita sem a perda de alguma parte da música.
• Se você iniciar a gravação sem uma fita colocada, “NO TAPE”
(sem fita) aparecerá no mostrador. Se uma fita protegida tiver
sido colocada, “NO REC” (não é possível gravar) aparecerá.
Gravação de disco sincronizada:
• Não é possível abrir a unidade do disco enquanto estiver a
decorrer uma gravação.
Português
26
Page 91

Operações de Temporização (consulte as
páginas 23 a 25)
• Quando desliga o cabo de corrente alterna ou quando ocorre
uma falha de energia, o temporizador será cancelado. Em
primeiro lugar, tem de voltar a acertar o relógio e, em seguida,
definir o temporizador.
• Sem parar a gravação, você não poderá mudar a fonte
depois que o timer de gravação começar a gravar.
• Não é possível utilizar o timer SLEEP enquanto o timer de
gravação está ativado.
• Se definir o temporizador de repouso depois de o
temporizador diário iniciar a reprodução da fonte
seleccionada, o temporizador diário é cancelado.
Outras
As definições seguintes são memorizadas pelo sistema durante
dois ou três dias, mesmo que retire o cabo de corrente alterna.
Após alguns dias, serão repostas as predefinições e, neste caso,
terá de voltar a efectuar as definições.
Estações predefinidas, volume, BASS/TREBLE, AHB PRO,
SOUND TURBO, AUX LEVEL, QP Link e temporizador.
Para retirar as grelhas dos altifalantes
Português
Orifícios
Saliências
Resolução de Problemas
Se ocorrer um problema com o sistema, procure uma
possível solução na lista apresentada em seguida antes de
contactar a assistência.
Gerais:
As definições ou os ajustes são subitamente cancelados
antes de os concluir.
] Existe um limite de tempo. Volte a executar o procedimento.
As operações são desactivadas.
]
O microprocessador integrado poderá não funcionar
correctamente devido a interferências eléctricas externas.
Desligue o cabo de corrente alterna e, em seguida, volte a ligá-lo.
Grelha do
altifalante
Não consegue utilizar o sistema a partir do comando à
distância.
] A trajectória entre o comando à distância e o sensor do
comando do sistema está bloqueada.
Direccione o comando para o sensor situado no painel frontal.
]
] Os sinais não alcançam o sensor do comando.
Aproxime mais o comando do sistema.
] As pilhas estão gastas.
Não é emitido som a partir dos altifalantes.
] As ligações dos altifalantes estão incorrectas ou soltas
(consulte a página 7).
] Estão ligados os auscultadores (consulte a página 9).
O sistema não desliga.
] QP Link activado (consulte a página 14).
Operações de Rádio:
Dificuldade de ouvir emissões devido a ruído (consulte as
páginas 4 a 6).
] As ligações das antenas estão incorrectas ou soltas.
A antena circular de AM está demasiado próxima do sistema.
]
] A antena de FM não está correctamente esticada ou
posicionada.
Operações de Disco:
O disco não toca.
] O disco está voltado ao contrário. Posicione o disco com a
etiqueta voltada para cima.
O som do disco não é contínuo.
] O disco está arranhado ou sujo.
O suporte para discos não abre nem fecha.
] O cabo de corrente alterna não está ligado.
] Está a ser utilizada a função de bloqueio para crianças
(consulte a página 20).
Operações de fita:
O porta-fita não pode ser aberto.
] O fornecimento de energia do cabo de alimentação de
CA foi cortado enquanto a fita estava em movimento.
Ligue o sistema.
Não é possível gravar.
] As lingüetas pequenas na parte posterior da fita foram
partidas. Cubra os orifícios com uma fita adesiva
(consulte a página 22).
27
Operações de Temporização:
O temporizador diário não funciona.
] Ligou o sistema no momento de activação. O temporizador
começa a funcionar apenas quando o sistema está desligado.
Page 92

Manutenção
Para obter o melhor desempenho do sistema, mantenha os
discos e o mecanismo limpos.
Manusear discos
• Quando retirar o disco da caixa, segure-o pelas extremidades
e exerça uma ligeira pressão no orifício central.
• Não toque na superfície brilhante do disco nem dobre o disco.
• Depois de utilizar o disco, guarde-o na respectiva caixa para
evitar deformações.
• Tenha cuidado para não riscar a superfície do disco.
• Evite a exposição a luz solar directa, temperaturas extremas e
humidade.
Para limpar o disco:
Limpe o disco com um pano suave e sempre em linha recta, do
centro para a extremidade.
Manipulação de fitas
• Se uma fita estiver frouxa em seu cassete, elimine a folga
inserindo um lápis em uma das bobinas e girando-o.
– Se a fita estiver frouxa, ela poderá esticar-se, cortar-se,
ou prender-se no cassete.
• Tome cuidado para não tocar na superfície da fita.
• Evite os seguintes lugares para guardar a fita—em lugares
poeirentos, em lugares expostos à luz direta do sol ou ao
calor, em áreas úmidas, em um televisor ou caixa acústica,
ou perto de um ímã.
Para manter a melhor qualidade sonora de gravação e
reprodução:
• Utilize um cotonete umedecido com álcool para limpar os
cabeçotes, eixos de tração e rolos pressores.
• Utilize um desmagnetizador de cabeçotes (disponível nas
lojas de produtos eletrônicos e de áudio) para
desmagnetizar os cabeçotes (com o sistema desligado).
Limpar o Sistema
• Deve limpar as manchas com um pano suave. Se o sistema
estiver demasiado manchado, limpe-o com um pano
humedecido em água com detergente neutro e bem torcido e,
em seguida, limpe-o com um pano seco.
• Uma vez que a qualidade do sistema pode diminuir e o
revestimento e o próprio sistema podem ficar danificados,
tenha em atenção o seguinte:
– NÃO o limpe com um pano áspero.
– NÃO o limpe com demasiada pressão.
– NÃO o limpe com diluente ou benzina.
– NÃO aplique uma substância volátil, como, por exemplo,
insecticidas.
– NÃO deixe nenhum produto de borracha ou plástico em
contacto prolongado com o sistema.
Especificações
Amplificador
Potência de saída: 80 W por canal, mín. RMS, com
uma distorção harmónica total
não superior a 10%, a 6 Ω a 1 kHz.
(IEC268-3)
Altifalantes/Impedância: 6 Ω – 16 Ω
Entrada Áudio AUX
Sensibilidade de entrada/Impedância:
NÍVEL1: 150 mV/47 kΩ
NÍVEL2: 500 mV/47 kΩ
USB: Ver.1.1
Sintonizador
Frequência de sintonização FM:87.50 MHz – 108.00 MHz
Frequência de sintonização AM (MW):
Leitor de CDs
Alcance dinâmico: 85 dB
Relação de sinal/ruído : 85 dB
Flutuação de velocidade: Imensurável
Seção do tape-deck
Resposta de freqüência
Normal (tipo I): 60 Hz – 14 000 Hz
Uáu (wow) e trêmolo (flutter): 0,15% (WRMS)
Gerais
Requisitos de voltagem:
Consumo energético: 150 W (em funcionamento)
Dimensões (aprox.): 175 mm × 246 mm × 415 mm
Peso (aprox.): 6,2 kg
Altifalantes
Tipo: 2 vias com reflexão de graves
Unidades: Woofer: cone de 12 cm × 1
Impedância: 6 Ω
Dimensões (aprox.): 145 mm × 246 mm × 212 mm
Peso (aprox.): 2,2 kg cada
530 kHz – 1 710 kHz (em intervalos
de 10 kHz)
531 kHz – 1 710 kHz (em intervalos
de 9 kHz)
CA 110 V – 127 V / 220 V – 240 V
(ajustável com seletor de
voltagem),
22 W (em modo de espera)
1,0 W (em modo de espera e visor
desligado)
(L/A/P)
Tweeter: cone de 4 cm × 1
(L/A/P)
50 Hz/60 Hz
Português
Acessórios Fornecidos
Consulte a página 4.
O design e especificações estão sujeitos a modificações sem
aviso prévio.
28
Page 93

Índice Remissivo dos Componentes
Consulte as páginas indicadas para obter informações sobre
como utilizar os botões e os controlos.
Comando à distância
STANDBY/ON
Português
10, 11, 18
12
10–12,
18, 19
10, 16, 24
9–12,
18, 19
18, 19
20
17
17
15
15
1
4
7
0
MP3 MODE
SLEEP A.STANDBY
SOUND
TURBO
2
5
8
10
IIV
PRESET UP
PRESET DOWN
PROGRAMREPEAT
AHB PRO
REMOTE CONTROL
3
6
9
CLOCK
/TIMER
USB
MEMORY
RANDOM
DIMMER
BASS/
TREBLE
SET/RESUME
CANCEL
DISPLAY
QP LINK
FM MODE
FADE
MUTING
VOLUME
9, 24
10, 12, 13,
16, 24
,
25
19, 23
16
16, 23, 25
10, 16, 24
11, 12,
18, 19
10–12,
18, 19
14
10
15
19
9, 15
9, 16
15
29
Page 94

Unidade principal
27
9, 24
9–13, 18, 19
11, 20
10–12, 18,
19, 20
8
9, 15, 16
9, 15
11, 12
9
13
Português
30
Page 95

Mains (AC) Line Instruction (not applicable for Europe, U.S.A., Canada,
Australia, and U.K.)
Instrucción sobre la línea de la red (CA) (no aplicable para Europa,
EE.UU., Canadá, Australia, ni el Grã-Bretanha)
Instrução sobre a tensão da rede eléctrica (CA) (não aplicável para a
Europa, os E.U.A., o Canadá, a Austrália e o Reino Unido)
AM
EXT
AM
LOOP
GND
110V–127V
220V–240V
AC VOLTAGE
SELECTOR
UX-G45 MICRO COMPONENT SYSTEM
CAUTION for mains (AC) line
BEFORE PLUGGING IN, do check that your mains (AC) line voltage
corresponds with the position of the voltage selector switch provided
on the outside of this equipment and, if different, reset the voltage
selector switch, to prevent from a damage or risk of fire/electric shock.
IMPORTANTE para la línea de la red (CA)
ANTES DE ENCHUFAR EL EQUIPO, compruebe si la tensión de la
línea de la red (CA) corresponde con la posición del selector de
tensión situado en la parte exterior del equipo, y si es diferente,
reajuste el selector de tensión para evitar el riesgo de incendios/
descargas eléctricas.
IMPORTANTE para a ligação à tensão da rede (CA)
ANTES DE LIGAR O APARELHO A UMA TOMADA DA REDE,
verifique se a tensão da rede CA corresponde à posição do seletor
de voltagem localizado na parte externa deste equipamento.
Caso não corresponda, reajuste o seletor de voltagem a fim de
evitar avarias ou riscos de incêndio e choque elétrico.
110V-127V
220V-240V
AC VOLTAGE
SELECTOR
Para el residente de Mexico
IMPORTADOR: JVC DE MEXICO, S.A. DE C.V.
AV. INSURGENTES SUR No. 670 8º PISO COL.
DEL VALLE, MEXICO, D.F. C.P.03100
Tel. 55 36 82 52 Fax. 56 69 09 43
EN, SP, PR
© 2006 Victor Company of Japan, Limited
0606NYMCREBET
 Loading...