

Page 1
KW-XR811
Installation/Connection Manual
Manuel d’installation/raccordement
Manual de instalación/conexión
GET0663-008A
[E]
ENGLISH / FRANÇAIS / ESPAÑOL
You need the installation kits which corresponds to your car. / Vous
avez besoin des kits d’installation correspondants à votre voiture. /
Necesitará los kits de instalación que corresponden con su vehículo.
WARNINGS / AVERTISSEMENTS / ADVERTENCIAS
• To prevent short circuits:
– Disconnect the battery’s negative terminal and make all electrical
connections before installing the unit.
– Cover the terminals of the UNUSED leads with insulating tape.
• Be sure to ground this unit to the car’s chassis again after installation.
• Replace the fuse with one of the specified rating.
• Connect speakers with a maximum power of more than 50 W
(impedance of 4 Ω to 8 Ω). Otherwise, change the <Amplifier Gain>
setting. (See page 30 of the INSTRUCTIONS.)
• The heat sink becomes very hot after use. Be
careful not to touch it when removing this
unit.
Heat sink / Dissipateur de chaleur / Sumidero térmico
Check the battery system in your car / Vérifiez le système de batterie
de votre voiture / Verifique el sistema de batería de su vehículo
12 V DC, NEGATIVE ground / 12 V CC, masse NÉGATIVE / 12 V CC, NEGATIVO a masa
• Pour éviter les courts-circuits:
– Déconnectez la borne négative de la batterie et réaliser toutes les
connexions avant d’installer l’appareil.
– Recouvrez les prises des fils NON UTILISÉS avec du ruban isolant.
• Assurez-vous de raccorder de nouveau la mise à la masse de cet appareil
au châssis de la voiture après l’installation.
• Remplacer le fusible par un de la valeur précisée.
• Connectez des enceintes avec une puissance maximum de 50 W
(impédance de 4 Ω à 8 Ω). Sinon, changez le réglage <Amplifier Gain>.
(Voir la page 30 du MANUEL D’INSTRUCTIONS.)
• Le dissipateur de chaleur devient très chaud après usage. Faire attention
de ne pas le toucher en retirant cet appareil.
0210DTSMDTJEIN
EN, FR, SP
© 2010 Victor Company of Japan, Limited
To the car system /
Au système autoradio /
Al sistema de automóvil
• Para evitar cortocircuitos:
– Desconecte el terminal negativo de la batería y realice todas las
conexiones eléctricas antes de instalar la unidad.
– Cubra los terminales de los conductores NO UTILIZADOS con
cinta aislante.
• Asegúrese de volver a conectar a masa esta unidad al chasis del
automóvil después de la instalación.
• Reemplace el fusible por uno con la corriente especificada.
• Conecte los altavoces con una potencia máxima de más de
50 W (impedancia de 4 Ω a 8 Ω). De lo contrario, cambie el
ajuste <Amplifier Gain>. (Véase la página 30 del MANUAL DE
INSTRUCCIONES).
• El sumidero térmico estará muy caliente después del uso. Asegúrese
de no tocarlo al desmontar esta unidad.
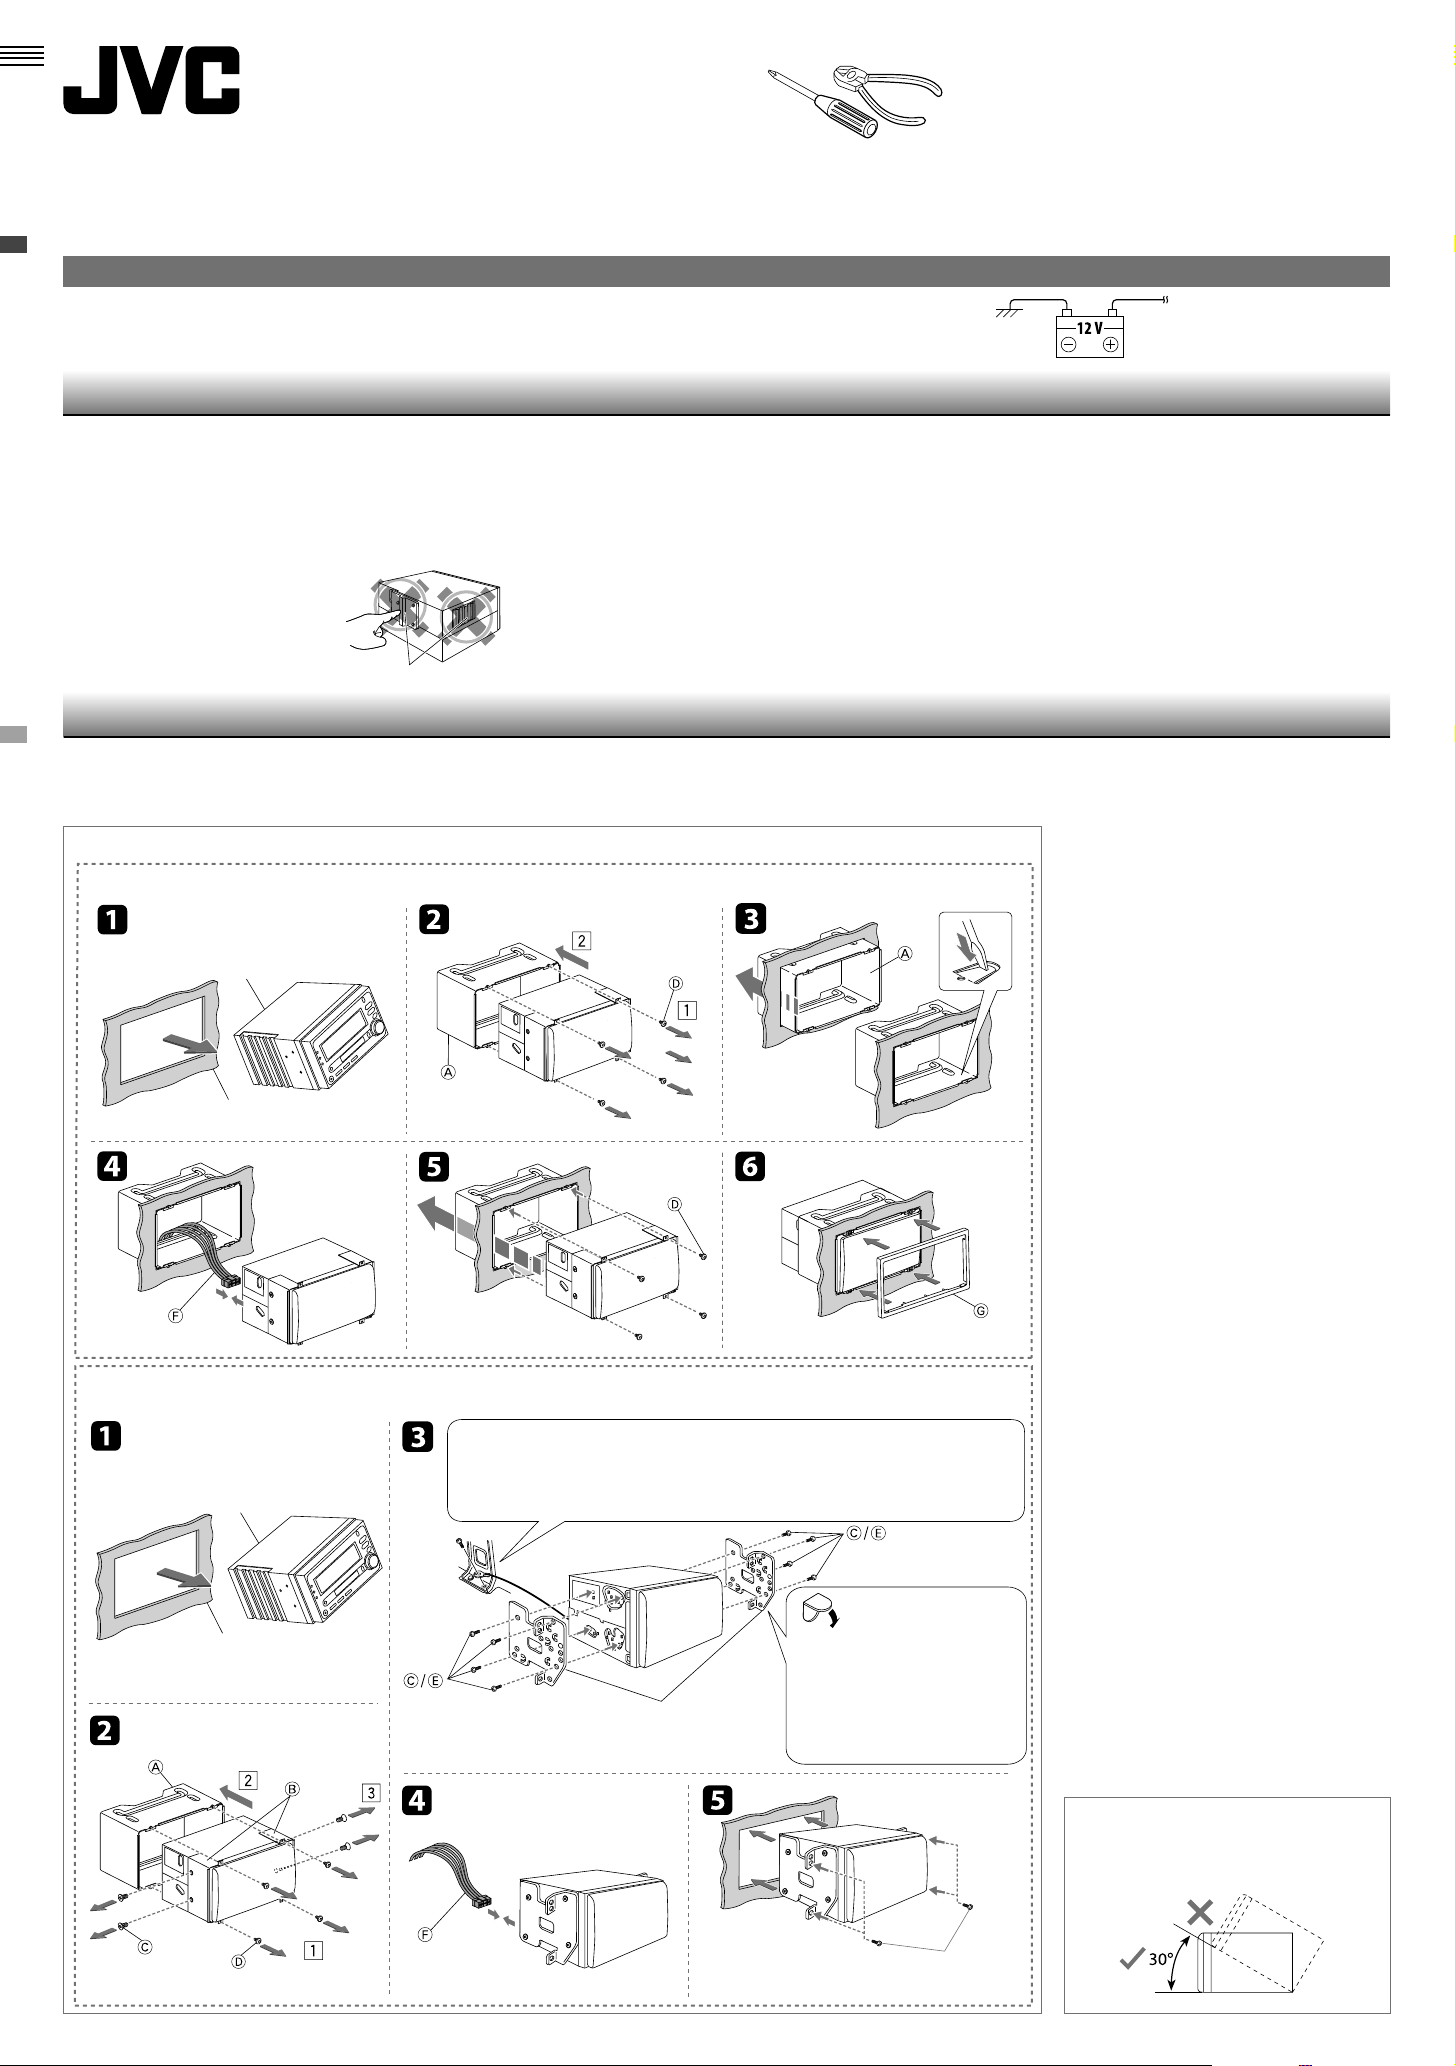
INSTALLATION / INSTALLATION / INSTALACIÓN
The following illustration shows a typical installation. If you have any
questions or require information regarding installation kits, consult
your JVC IN-CAR ENTERTAINMENT dealer or a company supplying kits.
In-dash mounting / Montage encastré / Montaje en el tablero
(A) Installing with the supplied sleeve / Installation avec le manchon fourni / Instalación con el manguito suministrado
Audio system originally installed in the
car / Système audio installé à l’origine dans
la voiture / Sistema de audio instalado
originalmente en el vehículo
Car dashboard / Tableau de bord de la voiture /
Cubretablero del automóvil
(B) Installing with the mounting brackets from the car / Installation avec les supports de montage de la voiture / Instalación
con los soportes de montaje desde el automóvil
Audio system originally installed in the
car / Système audio installé à l’origine dans
la voiture / Sistema de audio instalado
originalmente en el vehículo
Car dashboard / Tableau de bord de la voiture /
Cubretablero del automóvil
L’illustration suivante est un exemple d’installation typique. Si vous avez
des questions ou avez besoin d’information sur des kits d’installation,
consulter votre revendeur d’autoradios JVC.
Firmly attach the ground wire to the metallic body of the car using the screw originally fixed
to the metallic body of the car. / Fixez solidement le fil de mise à la masse au châssis métallique
de la voiture en utilisant une vis fixée à l’origine au châssis métallique de la voiture. / Conecte
firmemente el cable de tierra a la carrocería metálica del automóvil mediante el tornillo
instalado originalmente en la misma.
If there is an interfering tab on the
mounting bracket, bent it flat. / S’il y
a une languette gênante sur le support
de montage, aplatissez-la. / Si hay
Mounting bracket removed from the car /
Support de montage retiré de la voiture / Soporte
de montaje removido del automóvil
alguna lengüeta que interfiere con
el soporte de montaje, dóblela hasta
que quede plana.
La siguiente ilustración muestra una instalación típica. Si tiene alguna
pregunta o necesita información acerca de las herramientas para
instalación, consulte con su concesionario de JVC de equipos de audio
para automóviles o a una compañía que suministra tales herramientas.
Part list / Liste de pièces / Lista de componentes
A Sleeve (fitted to the main unit when shipped) /
Manchon (fixé à l’appareil lors de l’expédition) /
Manguito (fijado a la unidad principal cuando se
expide de fábrica) ..............................................................(×1)
B Brackets (fitted to the main unit when shipped) /
Supports (fixés à l’appareil lors de l’expédition) /
Soportes (fijados a la unidad principal cuando se
expide de fábrica) ..............................................................(×2)
1
C*
Flat countersunk screws—M5 × 8 mm /
Vis plat à tête fraisée—M5 × 8 mm /
Tornillos de cabeza avellanada plana—
M5 × 8 mm ............................................................................(×8)
1
D*
Round head screws—M2,6 × 3 mm /
Vis à tête ronde—M2,6 × 3 mm /
Tornillos de cabeza esférica—M2,6 × 3 mm
.........................................................................................................(×4)
E Round head screws—M5 × 8 mm /
Vis à tête ronde—M5 × 8 mm /
Tornillos de cabeza esférica—M5 × 8 mm
........................................................................................................(×8)
F Power cord / Cordon d’alimentation /
Cordón de alimentación.................................................(×1)
G Trim plate / Plaque d’assemblage /
Placa de guarnición............................................................(×1)
H Microphone / Microphone / Micrófono.................(×1)
I Microphone clips / Attache de microphone /
Presilla para micrófono...................................................(×2)
2
J*
KS-UBT1: USB Bluetooth adapter / Adaptateur
USB Bluetooth / Adaptador Bluetooth USB.........(×1)
*1
Four of these screws are fitted to the main unit when
shipped. Keep these screws for installation use if
necessary. / Quatre de ces vis sont fixées sur l’appareil
au moment de l’expédition. Conservez ces vis pour les
utiliser si nécessaire pour une installation. / Cuatro de
los tornillos vienen de fábrica fijados a la unidad
principal. Guarde estos tornillos para utilizar en la
instalación, si fuera necesario.
*2
For connecting the supplied USB Bluetooth adapter
(KS-UBT1), see page 15 of the INSTRUCTIONS. / Pour
connecter l’adaptateur USB Bluetooh fourni (KS-USBT1),
référez-vous à la page 15 du MANUEL D’INSTRUCTIONS. /
Para conectar el adaptador USB Bluetooth (KSUBT1), consulte la página 15 del MANUAL DE
INSTRUCCIONES.
Screw removed from the car / Vis retiré de la voiture /
Tornillo removido del automóvilr
1
Install the unit at an angle of less than 30˚.
Installez l’appareil avec un angle de moins de 30˚.
Instale la unidad a un ángulo de menos de 30˚.
Page 2
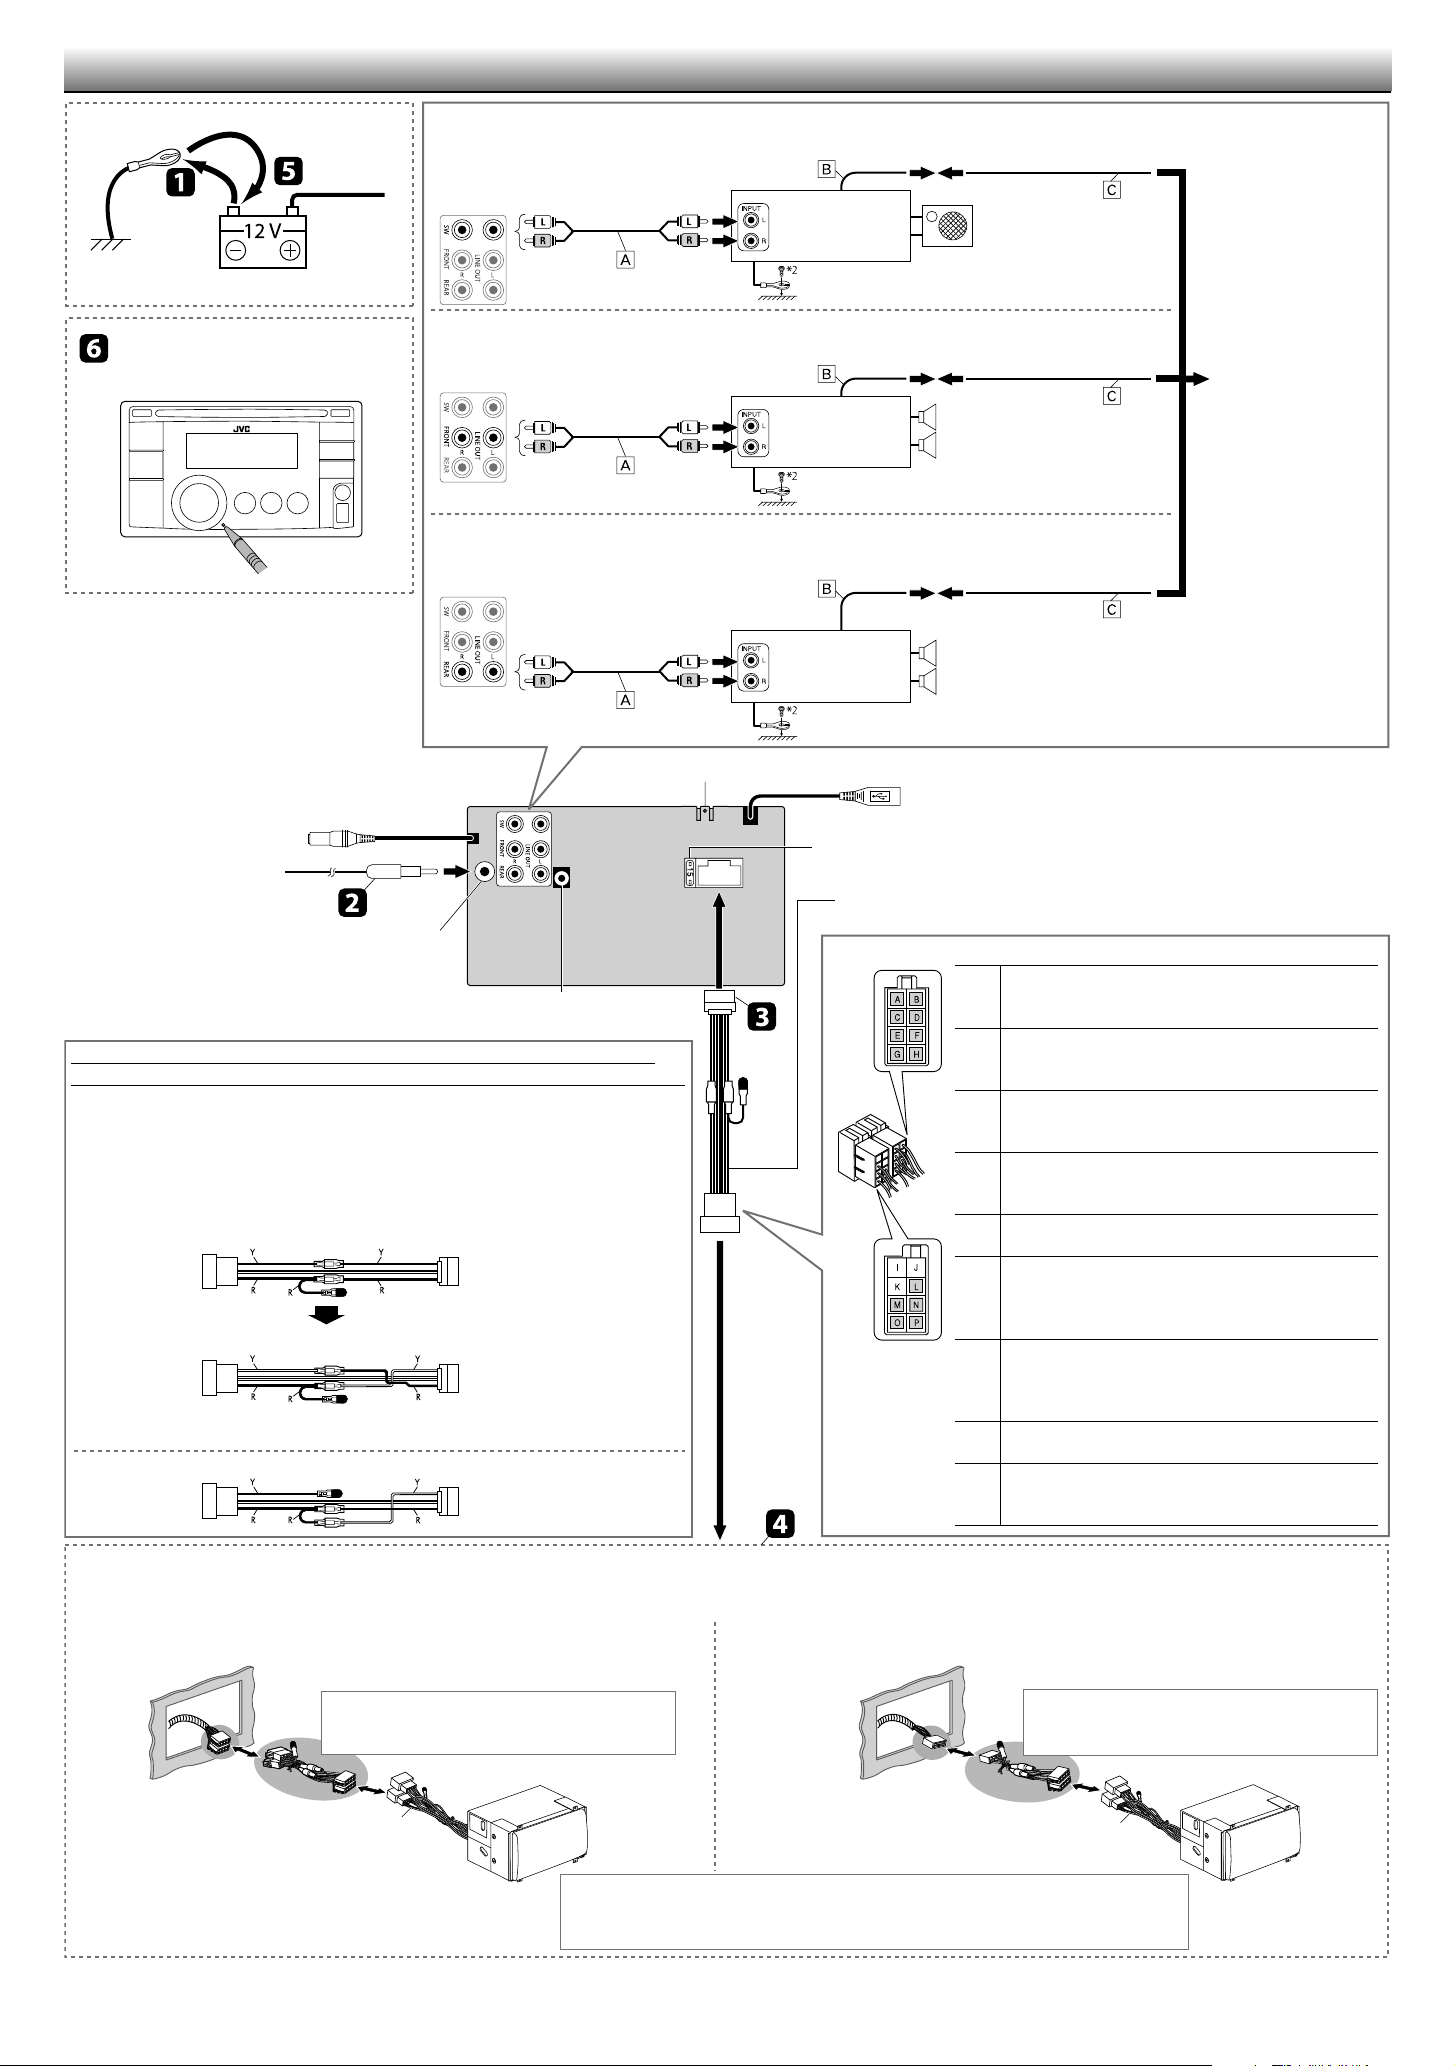
ELECTRICAL CONNECTIONS / RACCORDEMENTS ELECTRIQUES / CONEXIONES ELECTRICAS
Connecting a subwoofer (through a JVC amplifier) / Connexion d'un caisson de
grave (à travers un amplificateur JVC) / Conexión de un subwoofer (a través de un
amplificador JVC)
Reset the unit. / Réinitialisez
l’autoradio. / Reinicialice la unidad.
MIC (microphone input
terminal / prise d’entrée de
microphone / terminal de
entrada de micrófono)
JVC Amplifier /
JVC Amplificateur /
Amplificador de JVC
Subwoofer /
Caisson de grave /
Subwoofer
Connecting the front speakers (through a JVC amplifier) / Connexion des enceintes
avant (à travers un amplificateur JVC) / Conexión de los altavoces delanteros (a
través de un amplificador JVC)
JVC Amplifier /
JVC Amplificateur /
Amplificador de JVC
Front speakers /
Enceintes avant /
Altavoces delanteros
Connecting the rear speakers (through a JVC amplifier) / Connexion des enceintes
arrière (à travers un amplificateur JVC) / Conexión de los altavoces traseros (a través
de un amplificador JVC)
JVC Amplifier /
JVC Amplificateur /
Amplificador de JVC
Rear ground terminal / Borne arrière de masse / Terminal de tierra posterior
15 A fuse / Fusible 15 A / Fusible de 15 A
Rear speakers /
Enceintes arrière /
Altavoces traseros
USB cable (approx. 1.2 m) / Câble USB (environ 1,2 m) / Cable USB (aprox. 1,2 m)
Å Signal cord / Cordon de signal /
Cable de señal *
ı Remote lead / Fil d’alimentation
à distance / Cable remoto
Ç Y-connector / Connecteur Y /
Conector en Y *
To the blue (white stripe)
lead of the unit / Au fil
bleu (bande blanche) de
l’appareil / Al conductor
azul (rayas blancas) de la
unidad
1
1
Aerial input / Entrée d’antenne / Entrada de antena
Steering wheel remote input / Entrée de la télécommande de
volant / Entrada del control remoto del volante de dirección
For some VW/Audi or Opel (Vauxhall) automobiles / Pour certaines automobiles
VW/Audi ou Opel (Vauxhall) / Para algunos automóviles VW/Audi u Opel (Vauxhall)
You may need to modify the wiring of the supplied power cord as illustrated. / Vous aurrez peut-être
besoin de modifier le câblage du cordon d’alimentation fourni comme montré sur l’illustration. / Podría ser
necesario modificar el conexionado del cable de alimentación suministrado, tal como se indica en la
ilustración.
• Contact your authorized car dealer before installing this unit. / Contactez votre revendeur automobile
autorisé avant d’installer l’appareil. / Antes de instalar esta unidad, consulte a su concesionario de
automóviles autorizado.
Original wiring / Câblage original / Conexionado original
ISO connector /
Connecteur ISO /
Conector ISO
Y: Yellow / Jaune / Amarillo
R: Red / Rouge / Rojo
Modified wiring 1 / Câblage modifié 1 / Conexionado modificado 1
Use modified wiring 2 if the unit does not turn on. / Utilisez le câblage modifié 2 si l’appareil ne se met
pas sous tension. / Si la unidad no se enciende, utilice el conexionado modificado 2.
Modified wiring 2 / Câblage modifié 2 / Conexionado modificado 2
F Power cord / Cordon d’alimentation / Cordón de alimentación
ISO connector / Connecteur ISO / Conector ISO
Rear speaker, right (Purple/Purple, black stripe) (+/–) /
Å / ı
Enceintes arrière, droit (Violet/Violet, bande noire) (+/–) / Altavoz
trasero, derecho (Púrpura/Púrpura, rayas negras) (+/–)
Front speaker, right (Gray/Gray, black stripe) (+/–) /
Ç / Î
Enceintes avant, droit (Gris/Gris, bande noire) (+/–) / Altavoces
delanteros, derecho (Gris/Gris, rayas negras) (+/–)
Front speaker, left (White/White, black stripe) (+/–) / Enceintes
‰ / Ï
avant, gauche (Blanc/Blanc, bande noire) (+/–) / Altavoces
delanteros, izquierdo (Blanco/Blanco, rayas negras) (+/–)
Rear speaker, left (Green/Green, black stripe) (+/–) / Enceintes
Ì / Ó
arrière, gauche (Vert/ Vert, bande noire) (+/–) / Altavoz trasero,
izquierdo (Verde/Verde, rayas negras) (+/–)
Car battery 12 V (Yellow) / Batterie de la voiture 12 V (Jaune) /
Ò
Batería del automóvil de 12 V (Amarillo)
Remote lead/power aerial, 200 mA max. (Blue, white stripe) /
˜
Fil d’alimentation à distance/antenne automatique, 200 mA
max. (Bleu, bande blanche) / Conductor remoto/antena
motriz, máx. 200 mA (Azul, rayas blancas)
To car light control switch (Orange, white stripe) / À
ˆ
l’interrupteur d’éclairage de la voiture (Orange, bande blanche) /
Al interruptor de control de las luces del automóvil
(Naranja, rayas blancas)
Accessory terminal (Red) / Prise accessoire (Rouge) / Terminal
Ø
para accesorios (Rojo)
Metallic body/chassis of the car (Black) / Corps métallique/
∏
châssis de la voiture (Noir) / Carrocería metálica o chasis del
automóvil (Negro)
IMPORTANT/IMPORTANT/IMPORTANTE: A custom wiring harness (separately purchased) which is suitable for your car is recommended for connection between the unit and your car. / Un faisceau de câbles
personnalisé (vendu séparément) correspondant à votre voiture est recommandé pour raccorder l'appareil et votre voiture. / Para la conexión entre la unidad y su vehículo, se recomienda utilizar un mazo de cables
personalizado (vendido separadamente) que sea adecuado para su vehículo.
(A) If your car has an ISO terminal / Si votre voiture possède une prise ISO / Si su vehículo tiene
un terminal ISO
Custom wiring harness (separately purchased) /
Faisceau de fils personnalisé (vendu séparément) /
Mazo de cables personalizado (vendido separadamente)
F Power cord (supplied) / Cordon d’alimentation
(fourni) / Cordón de alimentación (suministrado)
Consult your JVC IN-CAR ENTERTAINMENT dealer or a company supplying kits for details about
connection. / Pour en savoir plus sur connexions, consultez votre revendeur d’autoradio JVC ou une
compagnie fournissant des kits. / Si desea información detallada sobre la conexión, consulte con su
concesionario de JVC de equipos de audio para automoviles o con una compañía proveedora de kits.
*1 Not supplied for this unit.
*2 Firmly attach the ground wire to the metallic body or to the chassis
of the car—to the place uncoated with paint.
*1 Non fourni avec cet appareil.
*2 Attachez solidement le fil de mise à la masse au châssis métallique de la
voiture—à un endroit qui n’est pas recouvert de peinture.
(B) If your car does NOT have an ISO terminal / Si votre voiture ne possède pas de prise ISO / Si su
vehículo NO tiene un terminal ISO
Custom wiring harness (separately purchased) /
Faisceau de fils personnalisé (vendu séparément) /
Mazo de cables personalizado (vendido separadamente)
F Power cord (supplied) / Cordon d’alimentation
(fourni) / Cordón de alimentación (suministrado)
*1 No suministrado con esta unidad.
*2 Fije firmemente el cable de tierra a la carrocería metálica o al
chasis—a un lugar no cubierto con pintura.
2
Page 3

PRECAUTIONS on power supply and speaker
or / ou / o
connections
• DO NOT connect the speaker leads of the power cord to the car
battery; otherwise, the unit will be seriously damaged.
• BEFORE connecting the speaker leads of the power cord to the
speakers, check the speaker wiring in your car.
PRECAUTIONS sur l’alimentation et la
connexion des enceintes
• NE CONNECTEZ PAS les fils d’enceintes du cordon d’alimentation à la
batterie; sinon, l’appareil serait sérieusement endommagé.
• AVANT de connecter les fils d’enceintes du cordon d’alimentation aux
enceintes, vérifiez le câblage des enceintes de votre voiture.
PRECAUCIONES sobre las conexiones de la
fuente de alimentación y de los altavoces
•
NO conecte los conductores de altavoz del cable de alimentación a
la batería de automóvil, pues podrían producirse graves daños en la
unidad.
•
ANTES de conectar a los altavoces los conductores de altavoz del
cable de alimentación, verifique el conexionado de altavoz de su
automóvil.
Connecting the microphone unit / Connexion du microphone / Conexión de la unidad de micrófono
H Microphone / Microphone / Micrófono
I Microphone clip / Attache de microphone /
Presilla para micrófono
Adjust the microphone angle /
Ajustez l’angle du microphone /
Ajuste el ángulo del micrófono
TROUBLESHOOTING / EN CAS DE DIFFICULTES / LOCALIZACIÓN DE AVERIAS
• The fuse blows. ] Are the red and black leads connected correctly?
• Power cannot be turned on. ] Is the yellow lead connected?
• No sound from the speakers. ] Is the speaker output lead short-
circuited?
• Sound is distorted. ] Is the speaker output lead grounded? ; Are
the “–” terminals of L and R speakers grounded in common?
• Noise interfere with sounds. ] Is the rear ground terminal
connected to the car’s chassis using shorter and thicker cords?
• This unit becomes hot. ] Is the speaker output lead grounded? ;
Are the “–” terminals of L and R speakers grounded in common?
• This unit does not work at all. ] Have you reset your unit?
Secure the microphone cord using cord cramps
necessary. / Fixez si nécessaire le cordon du microphone en utilisant
des serre-fils
micrófono por medio de abrazaderas
• Le fusible saute. ] Les fils rouge et noir sont-ils racordés correctement?
• L’appareil ne peut pas être mise sous tension. ] Le fil jaune est-
elle raccordée?
• Pas de son des enceintes. ] Le fil de sortie d’enceinte est-il court-
circuité?
• Le son est déformé. ] Le fil de sortie d’enceinte est-il à la masse? ; Les
bornes “–” des enceintes gauche et droit sont-elles mises ensemble à la
masse?
• Interférence avec les sons. ] La prise arrière de mise à la terre est-elle
connectée au châssis de la voiture avec un cordon court et épais?
• Cet appareil devient chaud. ] Le fil de sortie d’enceinte est-il à la
masse? ; Les bornes “–” des enceintes gauche et droit sont-elles mises
ensemble à la masse?
• Cet appareil ne fonctionne pas du tout. ] Avez-vous réinitialisé
votre appareil?
(non fournis)
. / Si es necesario, asegure el cable del
(no suministradas).
(not supplied)
if
I Microphone clip / Attache de microphone /
Presilla para micrófono
• El fusible se quema. ] ¿Están los conductores rojo y negro
correctamente conectados?
• No es posible conectar la alimentación. ] ¿Está el cable amarillo
conectado?
• No sale sonido de los altavoces. ] ¿Está el cable de salida del
altavoz cortocircuitado?
• El sonido presenta distorsión. ] ¿Está el cable de salida del altavoz
conectado a masa? ; ¿Están los terminales “–” de los altavoces L y R
conectados a una masa común?
• Perturbación de ruido. ] ¿El terminal de tierra trasero está
conectado al chasis del automóvil utilizando los cordones más corto
y más grueso?
• Esta unidad se calienta. ] ¿Está el cable de salida del altavoz
conectado a masa? ; ¿Están los terminales “–” de los altavoces L y R
conectados a una masa común?
• Esta unidad no funciona en absoluto. ] ¿Reinicializó la unidad?
3
Page 4

KW-XR811
Einbau/Anschlußanleitung
Handleiding voor installatie/aansluiting
Manuale d’installazione/collegamento
Manual de Instalação/Ligação
DEUTSCH / NEDERLANDS / ITALIANO / PORTUGUÊS
Sie benötigen Sie Einbau-Kits, die Ihrem Fahrzeug entsprechen. /
U heeft een voor uw auto vereiste installatiekit nodig / È necessario
disporre del kit d’installazione adatto al proprio veicolo. / Precisa
dos kits de instalação adequados ao seu carro.
WARNUNGEN / WAARSCHUWINGEN / AVVERTENZE / AVISOS
• Zum Verhindern von Kurzschlüssen:
– Trennen Sie den negativen Batterieanschluss abtrennen
und stellen alle elektrischen Anschlüsse her, bevor das
Gerät eingebaut wird.
– Die Klemmen der NICHT VERWENDETEN Leitungen mit
Isolierband abkleben.
• Sicherstellen, daß das Gerät nach dem Einbau a Chassis
des Fahrzeugs geerdet wird.
• Die Sicherung mit einer der entsprechenden
Nennleistung ersetzen.
• Schließen Sie Lautsprecher mit einer maximalen Leistung
von 50 W an (Impedanz von 4 Ω bis 8 Ω). Andernfalls
ändern Sie die Einstellung von <Amplifier Gain>. (Siehe
Seite 30 der BEDIENUNGSANLEITUNG.)
• Das Abstrahlblech wird nach dem Gebrauch sehr heiß.
Beim Ausbau des Geräts darauf achten, das Abstrahlblech
nicht zu berühren.
•
Voorkomen van kortsluiting:
– Ontkoppel de negatieve accupool en maak alle alle
elektrische verbindingen alvorens het toestel in te
bouwen.
– Bedek de aansluitingen van NIET-GEBRUIKTE draden
met isoleerband.
•
Aard dit toestel beslist weer op het chassis van de auto na
het installeren.
• Vervang de zekering door een nieuwe zekering van het
aangegeven vermogen.
•
Verbind luidsprekers met een maximaal vermogen hoger
dan 50 Watt (impedantie 4 Ω t/m 8 Ω). Verander anders
de <Amplifier Gain> instelling. (Zie bladzijde 30 van de
GEBRUIKSAANWIJZING).
•
De warmte-opnemer kan na gebruik erg heet worden.
Raak de warmte-opnemer niet aan wanneer u dit
apparaat van zijn plaats haalt.
Prüfen Sie die elektrische Anlage in Ihrem Fahrzeug / Controleer het accusysteem
van uw auto / Controllare la batteria del veicolo / Verifique o sistema da bateria do
seu carro
12 V DC, NEGATIVE Masse / 12 Volt, NEGATIEF geaard / 12 VCC, massa sul negativo /
CC 12 V, Terminal de ligação à terra NEGATIVO
• Per prevenire i cortocircuiti:
– Prima d’installare l’apparecchio si deve scollegare il
terminale negativo della batteria e completare tutti i
collegamenti elettrici.
– Si devono rivestire con del nastro isolante i terminali
dei fili INUTILIZZATI.
• Dopo l’installazione accertarsi di collegare l’unità a terra
sul telaio dell’automobile.
• Il fusibile deve essere sostituito con uno del valore
specificato.
• Si devono collegare diffusori di potenza massima
superiore a 50 W (e impedenza da 4 Ω a 8 Ω). Ciò
dipende tuttavia dall’impostazione <Amplifier Gain>.
(Cfr. pagina 30 delle ISTRUZIONI).
• Dopo l’uso, il dissipatore di calore si surriscalda. Evitare
di toccarlo quando si estrae l’apparecchio.
GE, NL, IT, PR
Zum Automobilsystem /
Naar het autosysteem /
Al sistema audio del veicolo /
Ao sistema do carro
• Para evitar curto-circuitos:
– Desligue o terminal negativo da bateria e faça todas as
conexões eléctricas antes de instalar a unidade.
– Cubra os terminais dos fios UNUSED com fita isolante.
• Certifique-se de que o aparelho tem uma ligação Terra ao
chassis do veículo.
• Substitua o fusível por um novo com o regime especificado.
• Ligue os altifalantes com uma potência máxima superior
a 50 W (impedância de 4 Ω a 8 Ω). Caso contrário,
altera a definição <Amplifier Gain>. (Ver pág. 30 de
INSTRUÇÕES.)
• Os dissipadores ficam muito
quentes depois de cada
utilização. Tenha cuidado
para não os tocar quando
remover o aparelho.
Abstrahlblech / Warmte-opnemer / Dissipatore di calore / Dissipador
EINBAU / INSTALLATIE / INSTALLAZIONE / INSTALAÇÃO
Die folgende Abbildung zeigt einen typischen Einbau.
Bei irgendwelchen Fragen oder wenn Sie Informationen
hinsichtlich des Einbausatzes brauchen, wenden Sie sich
an ihren JVC Autoradiohändler oder ein Unternehmen das
diese Einbausätze vertreibt.
Op de volgende afbeelding kunt u zien hoe de installatie,
normaal gesproken, in zijn werk gaat. Neem bij vragen of voor
meer bijzonderheden over inbouwpakketten contact op met
uw JVC auto-audiohandelaar of een dealer of een bedrijf dat
inbouwpakketten levert.
La figura che segue rappresenta un’installazione tipica.
Per eventuali chiarimenti in merito ai kit d’installazione,
rivolgersi al locale rivenditore car audio JVC o a negozi
analoghi.
Einbau im Armaturenbrett / Inbouwen in dashboard / Installazione nel cruscotto / Montagem no quadro de instrumentos
(A) Einbau mit der mitgelieferten Halterung / Installeren met de bijgeleverde huls / Installazione nel supporto fornito in dotazione /
Instalação com a manga fornecida
Ursprünglich im Fahrzeug eingebautes
Audiosystem / Oorspronkelijk audiosysteem van
de auto / Apparecchio audio originariamente
installato nel veicolo / Sistema de áudio
originalmente instalado no automóvel
Fahrzeugarmaturenbrett / Auto-dashboard /
Cruscotto
/
Tablier do carro
(B) Einbau mit den Befestigungskonsolen vom Fahrzeug / Installeren met de bevestigingsbeugels van de auto / Installazione sulle staffe di
montaggio del veicolo / Instalação com os suportes de montagem do carro
Ursprünglich im Fahrzeug eingebautes
Audiosystem / Oorspronkelijk audiosysteem van
de auto / Apparecchio audio originariamente
installato nel veicolo / Sistema de áudio
originalmente instalado no automóvel
Fahrzeugarmaturenbrett /
Auto-dashboard / Cruscotto /
Tablier do carro
Den Massedraht fest an der Metallkarosserie des Fahrzeugs mit der ursprünglich an der Metallkarosserie
des Fahrzeugs befestigten Schraube sichern. / Verbind het aardedraad goed met een metalen onderdeel
van de auto met gebruik van de schroef die oorspronkelijk aan het metalen chassis van de auto is bevestigd. /
Con l’ausilio della vite originariamente fissata al corpo metallico del veicolo collegarvi saldamente il
cavo di messa a terra. / Fixe firmemente o fio terra ao corpo metálico do carro utilizando o parafuso
originalmente instalado no corpo metálico do carro.
Wenn ein störender Zapfen an der
Befestigungskonsole ist, diesen flachbiegen.
/ Buig eventuele hinderende lipjes op de
bevestigingsbeugel vlak. / Se sulla staffa di
montaggio è presente una linguetta che
Aus dem Fahrzeug ausgebaute Befestigungskonsole /
Bevestigingsbeugel verwijderd uit de auto / Staffa di montaggio
rimossa dal veicolo / Suporte de montagem removido do carro
impedisce il montaggio la si deve ripiegare
completamente. / Se existir uma lingueta a
interferir no suporte de montagem, dobre-a.
A seguinte ilustração mostra uma instalação típica. Se tiver
quaisquer dúvidas ou necessitar de informações sobre kits
de instalação, consulte o seu revendedor de componentes de
áudio JVC para veículos (IN-CAR ENTERTAINMENT) ou
uma companhia fornecedora de kits.
Teileliste / Onderdelenlijst / Elenco delle parti /
Lista de peças
A Halterung (werkseitig am Hauptgerät angebracht) /
Huls (bij het verlaten van de fabriek aan het hoofdtoestel
bevestigd)
momento della spedizione)
unidade principal de fábrica) ............................................(×1)
B Konsole (werkseitig am Hauptgerät angebracht) /
Console (bij het verlaten van de fabriek aan
het hoofdtoestel bevestigd)
all’apparecchio al momento della spedizione)
/
Suporte (equipado na unidade principal de
fábrica).............................................................................................(×2)
1
C
*
Flache Senkschrauben—M5 × 8 mm /
Platte verzonken schroeven—M5 x 8 mm /
Viti svasate a testa piana—M5 x 8 mm /
Parafusos de cabeça chata escareada—M5 × 8 mm
..............................................................................................................(×8)
1
*
Rundkopfschrauben—M2,6 × 3 mm /
D
Ronde kopschroeven—M2,6 x 3 mm /
Viti a testa tonda—M2,6 x 3 mm /
Parafusos de cabeça redonda—M2,6 × 3 mm
..............................................................................................................(×4)
Rundkopfschrauben—M5 × 8 mm /
E
Ronde kopschroeven—M5 x 8 mm /
Viti a testa tonda (M5 x 8 mm) /
Parafusos de cabeça redonda—M5 × 8 mm.............(×8)
Stromkabel /
F
Cabo de alimentação...............................................................(×1)
G Frontrahmen /
Placa frontal..................................................................................(×1)
H Microfon / Microfoon / Microfono / Microfone
........ ...............................................................................................(×1)
I Mikrofonclips /
del microfono
J *2 KS-UBT1: USB-Bluetooth-Adapter / USB Bluetooth
adapter
USB de Bluetooth
1
*
Vier dieser Schrauben sind werkseitig am
Hauptgerät angebracht. Diese Schrauben bei
Bedarf für den Einbau aufbewahren. / Vier van deze
schroeven zijn bij het verlaten van de fabriek aan het
hoofdtoestel bevestigd. Bewaar deze schroeven voor
eventueel later gebruik. / Quattro di queste viti sono già
fissate all’apparecchio al momento della spedizione. Se
necessario le si può usare per installarlo. / Quatro desses
parafusos são instalados na unidade principal antes de
sair da fábrica. Guarde esses parafusos para utilização
na instalação, se necessário.
2
Zum Anschließen des mitgelieferten Bluetooth-
*
USB-Adapters (KS-UBT1) siehe Seite 15 der
BEDIENUNGSANLEITUNG. / Zie bladzijde 15 van de
GEBRUIKSAANWIJZING voor het verbinden van de
bijgeleverde USB Bluetooth adapter (KS-UBT1). / Per
istruzioni sul collegamento dell’adattatore Bluetooth
USB (KS-UBT1) fornito in dotazione si prega di
vedere a pagina 15 delle ISTRUZIONI. / Para ligar
o adaptador Bluetooth USB fornecido (KS-UBT1),
consulte a página 15 das INSTRUÇÕES.
Stellen Sie das Gerät mit einem Winkel von
weniger als 30˚ auf.
Installeer het toestel met een hoek kleiner dan 30˚.
Installare l’unità a un’inclinazione inferiore a 30˚.
Instale o aparelho num ângulo de, pelo menos, 30º.
/
Protezione (fissato all’apparecchio al
Stroomkabel / Cavo di alimentazione /
Sierplaat / Piastra di finitura /
Microfoon-clippen / Supporti a graffa
/
Manga (equipado na
/
Staffa (fissato
/ Clips de Microfone.............................. (×2)
/ Adattatore USB per Bluetooth / Adaptador
................................................................(×1)
Aus dem Fahrzeug ausgebaute Schraube / Van de
auto verwijderde schroef / Vite rimossa dal veicolo /
Parafuso retirado do carro
4
Page 5

ELEKTRISCHE ANSCHLÜSSE / ELEKTRISCHE VERBINDINGEN / COLLEGAMENTI ELETTRICI / LIGAÇÕES ELÉCTRICAS
Anschließen eines Subwoofers (über einen JVC-Verstärker) / Verbinden van een subwoofer (via een JVC
versterker) / Collegamento di un subwoofer (attraverso un amplificatore JVC) / Conexão dum subwoofer (através
dum amplificador JVC)
Setzen Sie das Gerät zurück. / Stel
het toestel terug. / Resettare l’unità. /
Reinicie o aparelho.
MIC (Mikrofoneingangsbuchse /
microfoon-ingangsaansluiting /
terminale di ingresso del microfono /
terminal de entrada de microfone)
JVC Verstärker /
JVC Versterker /
Amplificatore JVC /
Amplificador JVC
Anschließen der Frontlautsprecher (über einen JVC-Verstärker) / Verbinden van
de voorluidsprekers (via een JVC versterker) / Collegamento dei diffusori anteriori
(attraverso un amplificatore JVC) / Conexão dos altifalantes frontais (através dum
amplificador JVC)
JVC Verstärker /
JVC Versterker /
Amplificatore JVC /
Amplificador JVC
Anschließen der hinteren Lautsprecher (über einen JVC-Verstärker) / Verbinden van
de achterluidsprekers (via een JVC versterker) / Collegamento dei diffusori posteriori
(attraverso un amplificatore JVC) / Conexão dos altifalantes traseiros (através dum
amplificador JVC)
JVC Verstärker /
JVC Versterker /
Amplificatore JVC /
Amplificador JVC
Hintere Erdungsc-anschlußklemme / Massaklem aan de achterkant /
Terminale di terra posteriore / Terminal Terra posterior
15 A Sicherung / Zekering 15 A
USB-Kabel (ca. 1,2 m)
Cabo USB (apróx. 1,2 m)
Subwoofer /Subwoofer /
Subwoofer / Subwoofer
Vordere Lautsprecher /
Voorspeakers / Casse frontali /
Altifalantes da frente
Hintere Lautsprecher /
Achterluidsprekers /
Diffusori posteriori /
Altifalantes traseiros
/ USB-kabel (ongeveer 1,2 meter) / Cavo USB (circa 1,2 m) /
/ Fusibile 15 A / Fusível 15 A
Zur blauen Leitung des Geräts
(mit weißem Streifen) /
Naar blauwe (wit-gestreept)
draad van het toestel / Al filo
blu (con strisce bianche)
dell’apparecchio / Ao
condutor azul (listra branca)
da unidade
Å Einzelleitung / Signaalkabel / Cavo
dei segnali
/ Cabo de sinal*
1
ı Fernbedienungsleitung /
Afstandbedieningsdraad / Filo remoto
/ Conexão remota
Ç Y-Anschluß / Y-connector /
Connettore ad Y
/ Conexão em Y*
1
Antennen-Eingang / Antenne-ingang /
Ingresso antenna / Entrada da antena
Eingang für Lenkradfernbedienung / Ingang stuurwiel-afstandsbediening /
Ingresso telecomando volante / Controlo remoto a partir do volante
Bei bestimmten VW-/Audi- oder Opel- (Vauxhall-) Fahrzeugen
/ Voor bepaalde VW/Audi en
Opel (Vauxhall) auto’s / Per alcune automobili VW/Audi o Opel (Vauxhall) / Para alguns
automóveis VW/Audi ou Opel (Vauxhall)
Es kann erforderlich sein, die Verdrahtung des mitgelieferten Stromkabels zu modifizieren, wie in der
Abbildung gezeigt. / U moet mogelijk de bedrading van het bijgeleverde spanningssnoer als afgebeeld
veranderen. / Potrebbe essere necessario modificare il cablaggio del cavo di alimentazione fornito come
illustrato. / Pode ter de modificar a instalação do cabo fornecido, tal como mostrado na ilustração.
• Wenden Sie sich vor dem Einbau dieses Receivers an Ihre Auto-Fachwerkstatt. / Raadpleeg een erkend
autogarage alvorens deze receiver te installeren. / Contattare il proprio rivenditore di automobili prima di
installare questo ricevitore. / Contacte o revendedor autorizado do seu veículo antes de instalar este aparelho.
Original verdrahtung / Oorspronkelijke bedrading / Cablaggio originale / Instalação original
ISO-Steckverbinder /
ISO-aansluiting /
Connettore ISO /
Conector ISO
Y: Gelb / Geel / Amarillo
Giallo / Amarelo
R: Rot / Rood / Rosso /
Vermelho
Modifizierte verdrahtung 1 / Veranderde bedrading 1 / Cablaggio modificato 1 / Instalação
modificada 1
Verwenden Sie die modifizierte Verdrahtung 2 wenn der Receiver nicht einschaltet. / Gebruik methode 2 voor
het veranderen van de bedrading indien de receiver niet wordt ingeschakeld. / Utilizzare il cablaggio modificato
2 se il ricevitore non viene acceso. / Utilize uma instalação modificada 2 se a unidade não ligar.
Modifizierte verdrahtung 2 / Veranderde bedrading 2 / Cablaggio modificato 2 / Instalação
modificada 2
F Stromkabel / Stroomkabel / Cavo di alimentazione / Cabo de alimentação
ISO-Steckverbinder / ISO-aansluiting / Connettore ISO / Conector ISO
Hinterer Lautsprecher, rechts (Violett/Violett, schwarzer Streifen) (+/–) /
Å / ı
Achterluidspreker, rechts (paars/paars, zwarte streep) (+/–) / Diffusore posteriore
destro (porpora/porpora con striscia nera) (+/–) / Altifalante traseiro, direito
(Púrpura/Púrpura, listra preta) (+/–)
Vorderer Lautsprecher, rechts (Grau/Grau, schwarzer Streifen) (+/–) /
Ç / Î
Voorluidspreker, rechts (grijs/grijs, zwarte streep) (+/–) / Diffusore anteriore destro
(grigio/grigio con striscia nera) (+/–) / Altifalante frontal, direito (Cinzento/
Cinzento, listra preta) (+/–)
Vorderer Lautsprecher, links (Weiß/Weiß, schwarzer Streifen) (+/–) /
‰ / Ï
Voorluidspreker, links (wit/wit, zwarte streep) (+/–) / Diffusore anteriore sinistro
(bianco/bianco con striscia nera) (+/–) / Altifalante frontal, esquerdo (Branco/
Branco, listra preta) (+/–)
Hinterer Lautsprecher, links (Grün/Grün, schwarzer Streifen) (+/–) /
Ì / Ó
Achterluidspreker, links (groen/groen, zwarte streep) (+/–) / Diffusore posteriore
sinistro (verde/verde con striscia nera) (+/–) / Altifalante traseiro, esquerdo
(Verde/Verde, listra preta) (+/–)
Autobatterie 12 V (Gelb) / 12 Volt autoaccu (Geel) / Batteria del veicolo da 12 V
Ò
(Giallo) / Bateria de carro de 12 V (Amarelo)
Fernbedienungsleitung/Motorantenne, max. 200 mA (Blau, weißem Streifen) /
˜
Afstandsbedieningsdraad/antenne met vermogen, 200 mA max. (Blauw, witte
streep) / Cavo di telecomando/antenna elettrica, max 200 mA (Blu, strisce
bianche) / Fio condutor do controlo remoto/antena de potência, 200 mA máx.
(Azul, lista branca)
Zur Autobeleuchtungssteuerung (Orangefarben, weißer Streifen) / Naar
ˆ
lichtschakelaar van de auto (oranje, witte streep) / Al selettore delle luci del veicolo
(arancione con striscia bianca) / Ao interruptor de controlo da luz do veículo
(Laranja, listra branca)
Zubehöranschluss (Rot) / Accessoire-aansluiting (Rood) / Presa accessori (Rosso) /
Ø
Terminal para acessório (Vermelho)
Metallkarosserie/Chassis des Autos (Schwarz) / Metalen oppervlak of chassis van
∏
de auto (Zwart) / Telaio e/o carrozzeria metallica del veicolo (Nero) / Corpo
metálico/chassis do carro (Preto)
WICHTIG/BELANGRIJK/IMPORTANTE/IMPORTANTE: Ein spezieller Kabelbaum (getrennt erhältlich), der für Ihr Fahrzeug geeignet ist, wird zur Verbindung zwischen Gerät und Fahrzeug empfhohlen. / Gebruik een voor uw auto
aanbevolen draadbundel (los verkrijgbaar) voor het verbinden van het toestel in uw auto. / Per il collegamento dell’apparecchio al veicolo si raccomanda di usare (acquistandoli a parte) cavi adatti a quest’ultimo. / É recomendável
utilizar uma cablagem personalizada (comprada separadamente), adequada ao seu carro, para a conexão entre o aparelho e o seu carro.
(A) Wenn Ihr Fahrzeug einen ISO-Anschluss hat /
provvisto di connettore ISO / Se o seu carro tiver um terminal ISO
F Stromkabel (Mitgeliefert) / Stroomkabel
(Bijgeleverd) / Cavo di alimentazione (in
dotazione) / Cabo de alimentação (Fornecido)
1
*
Wird nicht mit Gerät mitgeliefert.
2
Verbinden Sie den Erdungsleiter mit der Karosserie
*
oder dem Rahmen des Fahrzeugs. Die Kontaktstelle
darf nicht lackiert sein.
Indien uw auto een ISO-aansluiting heeft / Veicolo
Spezieller Kabelbaum (getrennt erhältlich) / Geschikte draadbundel
(los verkrijgbaar) / Cavi procurati da sé (acquistandoli a parte) /
Cablagem personalizada (comprada separadamente)
1
*
Niet bij het apparaat inbegrepen.
2
Bevestig de aardedraad goed met een metalen
*
onderdeel of het chassis van de auto—bevestig op een
niet-gelakt gedeelte.
Für weitere Auskünfte zum Anschluss wenden Sie sich an Ihren JVC Autoradiohändler oder eine Firma, die Kits
herstellt. / Raadpleeg uw JVC auto-audiohandelaar of een verkooppunt voor accessoires voor details aangaande het
verbinden. / Per istruzioni sul collegamento si prega di rivolgersi al proprio rivenditore car audio JVC o a una
società che fornisce kit per autoveicoli / Consulte o seu revendedor de componentes de áudio JVC para veículos
(IN-CAR ENTERTAINMENT) ou uma companhia fornecedora de kits para os detalhes sobre a conexão.
(B) Wenn Ihr Fahrzeug KEINEN ISO-Anschluss hat / Indien uw auto GEEN ISO-aansluiting heeft / Veicolo
NON provvisto di connettore ISO / Se o seu carro NÃO tiver um terminal ISO
Spezieller Kabelbaum (getrennt erhältlich) / Geschikte
draadbundel (los verkrijgbaar) / Cavi procurati da sé
(acquistandoli a parte) / Cablagem personalizada
(comprada separadamente)
F Stromkabel (Mitgeliefert) / Stroomkabel
(Bijgeleverd) / Cavo di alimentazione (in
dotazione) / Cabo de alimentação (Fornecido)
1
Non fornite con l’apparecchio.
*
2
Fissare saldamente il filo di terra alla carrozzeria o al
*
telaio dell’ auto—in un punto non verniciato.
5
1
*
Não fornecido com este aparelho.
2
Estabeleça uma ligação segura do fio Terra à
*
carroçaria ou ao chassis do veículo—na área sem
revestimento de tinta.
Page 6

VORSICHTSMASSREGELN beim
oder / of / oppure / ou
Anschließen der Stromversorgung
und Lautsprecher
•
Die Lautsprecherleitungen des Netzkabels NICHT
an der Autobatterie anschließen, da sonst das Gerät
schwer beschädigt wird.
• VOR dem Anschließen der Lautsprecherleitungen
des Spannunsgversorgungskabels an die
Lautsprecher, die Lautsprecherverdrahtung in
Ihrem Auto überprüfen.
VOORZORGSMAATREGELEN
bij hetverbinden van de
stroomkabeldraad met de speakers
• Verbind de speakerdraden van de stroomkabel NIET met
de accu van de auto; als u dit wel doet, zal het apparaat
ernstige schade oplopen.
• VOORDAT u de speakerdraden van de stroomkabel
met de speakers verbindt, moet u de bedrading van de
speakers in uw auto controleren.
PRECAUZIONI! Collegamento del
cavo di alimentazione e delle casse
• NON collegare i fili del cavo di alimentazione per le
casse alla batteria dell’auto perché l’apparecchio ne
verrebbe seriamente danneggiato.
• PRIMA di collegare i fili del cavo si alimentazione per
le casse alle casse stesse, verificare il relativo cablaggio
sulla vettura.
PRECAUÇÕES com a alimentação
de corrente e ligações dos altifalantes
• NÃO ligue os conectores dos altifalantes do cabo
de alimentação à bateria do veículo, pois se o fizer
danificará seriamente o aparelho.
• ANTES de ligar os conectores dos altifalantes do
cabo de alimentação, verifique a instalação para
altifalantes do seu veículo.
Anschließen der Mikrofoneinheit / Verbinden van de microfoon
/
H Microfon / Microfoon / Microfono / Microfone
Sichern Sie das Mikrofonkabel mit Kabelklemmen (nicht
mitgeliefert), wenn erforderlich.
I Mikrofonclip / Microfoon-clip / Supporto a
graffa del microfono / Clipe do Microfone
met snoerklemmen (niet bijgeleverd) vast.
fissare il cavo del microfono usando un fermacavo (non in dotazione).
Fixe o fio do microfone com braçadeiras, se necessário (não fornecidas).
Stellen Sie den Mikrofonwinkel ein / Stel de hoek
van de microfoon in / Regolare l’inclinazione del
microfono / Ajuste o ângulo do microfone
Collegamento del microfono / Ligar o microfone
/
Zet het microfoonsnoer indien nodig
/ Qualora necessario, è possibile
/
I Mikrofonclip / Microfoon-clip / Supporto a
graffa del microfono
/
Clipe do Microfone
FEHLERSUCHE / PROBLEMEN OPLOSSEN / RICERCA GUASTI / RESOLUÇÃO DE PROBLEMAS
• Die Sicherung brennt durch. ] Sind die roten und
schwarzen Leitungen richtig angeschlossen?
• Stromversorgung kann nicht eingeschaltet
• Kein Ton aus den Lautsprechern.
• Ton verzerrt.
• Störgeräusche im Klang.
• Gerät wird heiß.
• Dieser Receiver funktioniert überhaupt nicht.
]
werden.
Lautsprecherausgangsleitung kurzgeschlossen?
geerdet? ; Sind die „–“ Anschlußklemmen der linken
und rechten Lautsprecher zusammen geerdet?
Erdungsklemme mit kürzeren und dickeren Kabeln an
das Fahrzeugchassis angeschlossen?
Lautsprecherausgangsleitung geerdet? ; Sind die
„–“ Anschlußklemmen der linken und rechten
Lautsprecher zusammen geerdet?
Haben Sie einen Reset am Receiver vorgenommen?
Ist die gelbe Leitung angeschlossen?
]
Ist die
]
Ist die Lautsprecherausgangsleitung
]
Ist die hintere
]
Ist die
]
]
• De zekering slaat door.
draden op de juiste manier aangesloten?
• De stroom kan niet worden ingeschakeld.
gele draad aangesloten?
• Er komt geen geluid uit de speakers.
uitgaande speakerdraad kortgesloten?
• Het geluid wordt vervormd.
speakerdraad geaard? ; Zijn de “–” polen van de linker- en
de rechterspeakers gemeenschappelijk geaard?
• Geluid wordt door ruis gestoord.
aansluiting achter met gebruik van kortere en dikkere
snoeren met het chassis van de auto verbonden?
• Het apparaat raakt verhit.
speakerdraad geaard? ; Zijn de “–” polen van de linker- en
de rechterspeakers gemeenschappelijk geaard?
• Receiver werkt helemaal niet.
teruggesteld?
Zijn de rode en de zwarte
]
]
Is de uitgaande
]
Is de aarde-
]
Is de uitgaande
]
Heeft u de receiver
Is de
• Il fusibile brucia.
collegati correttamente?
]
Is de
• Non si riesce ad accendere l’apparecchio.
giallo è stato collegato?
• Non esce alcun suono dalle casse.
delle casse è stato protetto contro i cortocircuiti?
• Suono distorto.
collegato a terra? ; I terminali “–” delle casse di sinistra
e destra sono stati collegati a terra in comune?
• Vi sono interferenze nell’audio.
terra posteriore è collegato al telaio dell’automobile
per mezzo di cavi più corti e più grossi?
• L’apparecchio si surriscalda.
casse è collegato a terra? ; I terminali “–” delle casse di
sinistra e destra sono stati collegati a terra in comune?
• L’unità non funziona.
]
I fili rossi e neri sono stati
]
Il filo di uscita
]
Il filo di uscita delle casse è
]
Il terminale a
]
Il filo di uscita delle
]
È stata inizializzata l’unità?
]
• O fusível queima-se.
preta estão correctamente ligadas?
Il filo
• A corrente não liga.
ligada?
• Os altifalantes não emitem som.
saída do altifalante estará em curto circuito?
• O som é distorcido.
altifalante tem uma ligação Terra? ; Os terminais “–”
dos altifalantes L (esq.) e R (dir.) têm uma ligação
Terra conjunta?
• Os sons sofrem interferências de ruídos.
ligação Terra no painel posterior estará ligada ao
chassis do carro com fios mais curtos e mais grossos?
• O aparelho aquece.
altifalante tem uma ligação Terra? ; Os terminais “–”
dos altifalantes L (esq.) e R (dir.) têm uma ligação
Terra conjunta?
• O aparelho não funciona de todo.
unidade?
]
As conexões vermelha e
]
A conexão amarela está
]
A conexão de
]
A conexão da saída do
]
A conexão da saída do
]
Reiniciou a
]
A
6
 Loading...