

JVC KW-XG506S Instructions Manual
CD RECEIVER KW-XG506S
ENGLISH
ALAT PENERIMA CD KW-XG506S
For canceling the display demonstration, see page 4.
Untuk membatalkan tampilan demonstrasi, lihat halaman 4.
INDONESIA
INSTRUCTIONS
BUKU PETUNJUK
GET0539-001A
[UN]
Please read all instructions carefully before operation, to ensure your complete understanding and to obtain the best
possible performance from the unit.
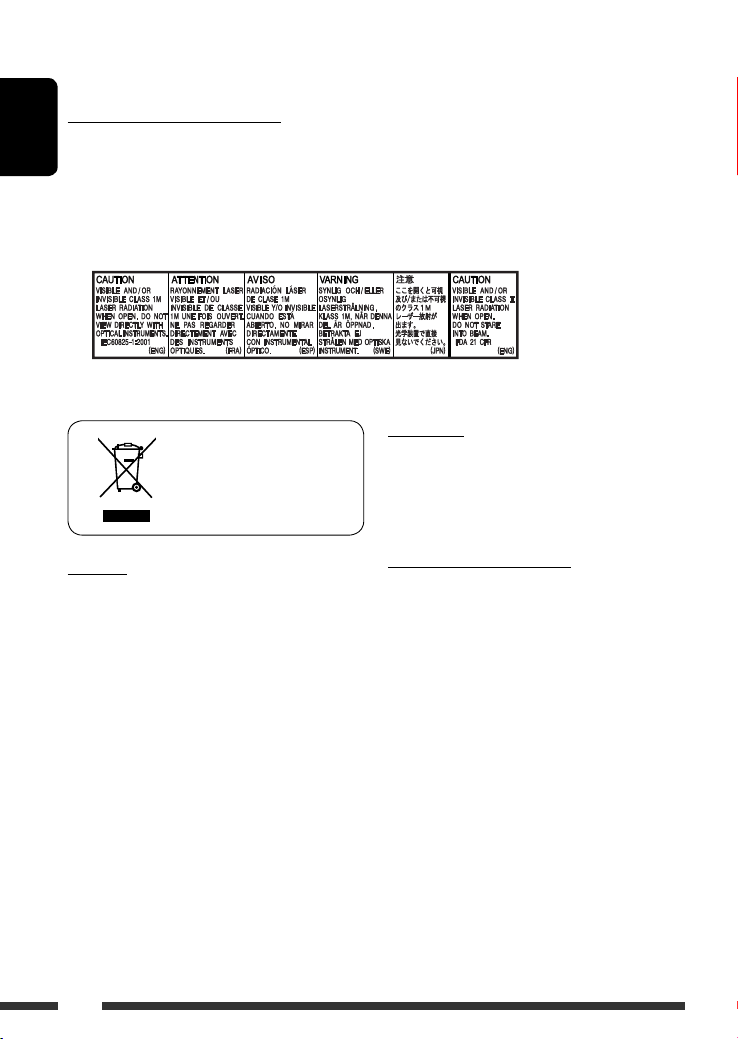
IMPORTANT FOR LASER PRODUCTS
1. CLASS 1 LASER PRODUCT
ENGLISH
2. CAUTION: Do not open the top cover. There are no user serviceable parts inside the unit; leave all servicing to
qualified service personnel.
3. CAUTION: Visible and/or invisible class 1M laser radiation when open. Do not view directly with optical
instruments.
4. REPRODUCTION OF LABEL: CAUTION LABEL, PLACED OUTSIDE THE UNIT.
For safety...
• Do not raise the volume level too much, as this will
[European Union only]
block outside sounds, making driving dangerous.
• Stop the car before performing any complicated
operations.
Warning:
If you need to operate the unit while driving, be sure to
look around carefully or you may be involved in a traffic
accident.
2
Temperature inside the car...
If you have parked the car for a long time in hot or cold
weather, wait until the temperature in the car becomes
normal before operating the unit.

How to reset your unit
• Your preset adjustments will also be erased.
How to forcibly eject a disc
• Be careful not to drop the disc when it ejects.
• If this does not work, reset your unit.
How to use the MODE button
If you press MODE, the unit goes into functions
mode, then the number buttons and 5/∞ buttons
work as different function buttons.
CONTENTS
INTRODUCTIONS
Preparation ...................................... 4
OPERATIONS
Basic operations ................................ 5
• Using the control panel ................ 5
Listening to the radio ......................... 7
Disc operations .................................. 8
EXTERNAL DEVICES
Listening to the CD changer ................ 10
Listening to the iPod .......................... 12
Listening to the other external
components ...................................... 13
SETTINGS
Selecting a preset sound mode ............ 15
General settings — PSM ..................... 16
Assigning titles .................................. 18
ENGLISH
[Within 5 seconds...]
REFERENCES
Maintenance ..................................... 19
More about this unit .......................... 20
Troubleshooting ................................ 22
Specifications .................................... 25
3
Preparation
Cancel the display demonstration and set the clock
• See also page 17.
ENGLISH
~ Turn on the power.
Ÿ Enter the PSM settings.
! ] ⁄ Cancel the display demonstrations
Select “DEMO,” then “DEMO OFF.”
Set the clock
Select “CLOCK H” (hour), then adjust the hour.
Select “CLOCK M” (minute), then adjust the minute.
@ Finish the procedure.
When the power is turned off: Check the current clock time
When the power is turned on: Change the display information
Caution on volume setting:
Discs produce very little noise compared with other sources. Lower the volume before playing a disc to avoid
damaging the speakers by the sudden increase of the output level.
4 INTRODUCTIONS
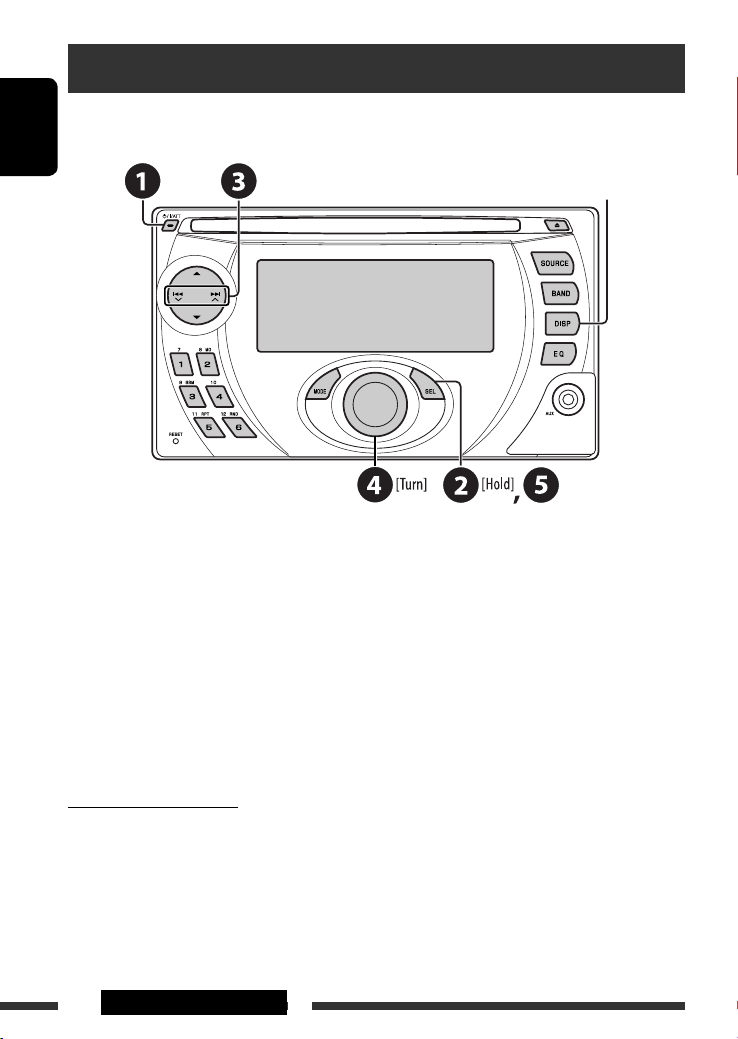
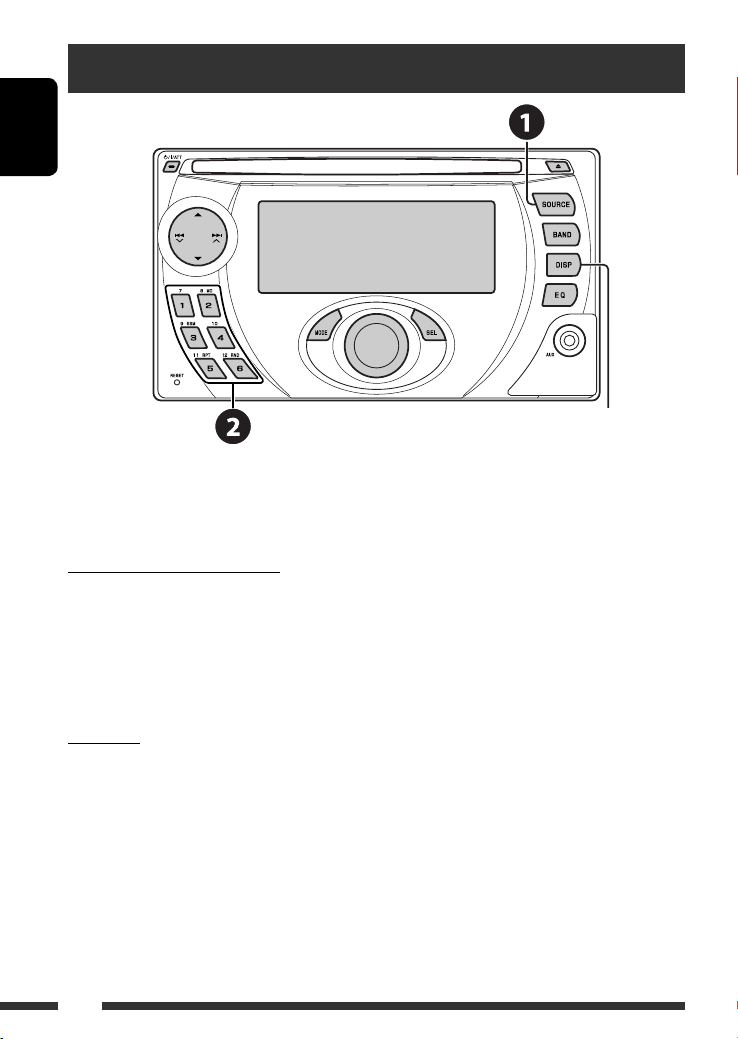
Basic operations
Using the control panel
ENGLISH
1 • FM/AM: Select preset station.
• CD/CD-CH: Select folder.
• IPOD: Enter the main menu/Pause playback/
Confirm selection.
2 • Turn on the power.
• Turn off the power [Hold].
• Attenuate the sound (if the power is on).
3 • FM/AM: Search for station.
• CD/CD-CH: Select track.
• IPOD: Select track.
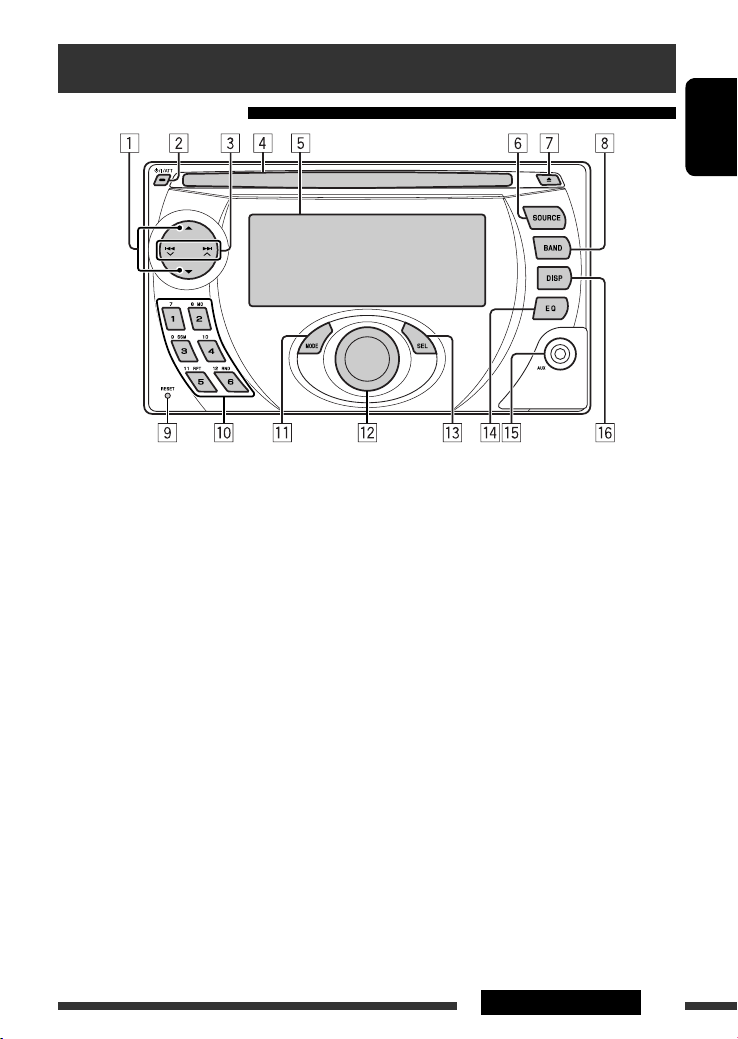
4 Loading slot
5 Display window
6 Select the source.
FM/AM = CD * = CD-CH */IPOD * (or EXT IN)
= AUX IN = (back to the beginning)
* You cannot select these sources if they are not
ready or not connected.
7 Eject disc.
8 Select the bands.
9 Reset button
p • FM/AM: Select preset station.
• CD/CD-CH: Select folder/track/disc (for CD
changer).
q Enter functions mode.
Press MODE, then one of the following buttons
(within 5 seconds)...
MO : Turn on/off monaural reception.
SSM : Automatic station presetting [Hold].
RPT : Select repeat play.
RND : Select random play.
5 / ∞ : Skip 10 tracks.
w Volume control [Turn].
e • Enter the PSM settings [Hold].
• Adjust the sound mode.
r Select the sound mode.
t AUX (auxiliary) input jack
y Change the display information.
5OPERATIONS
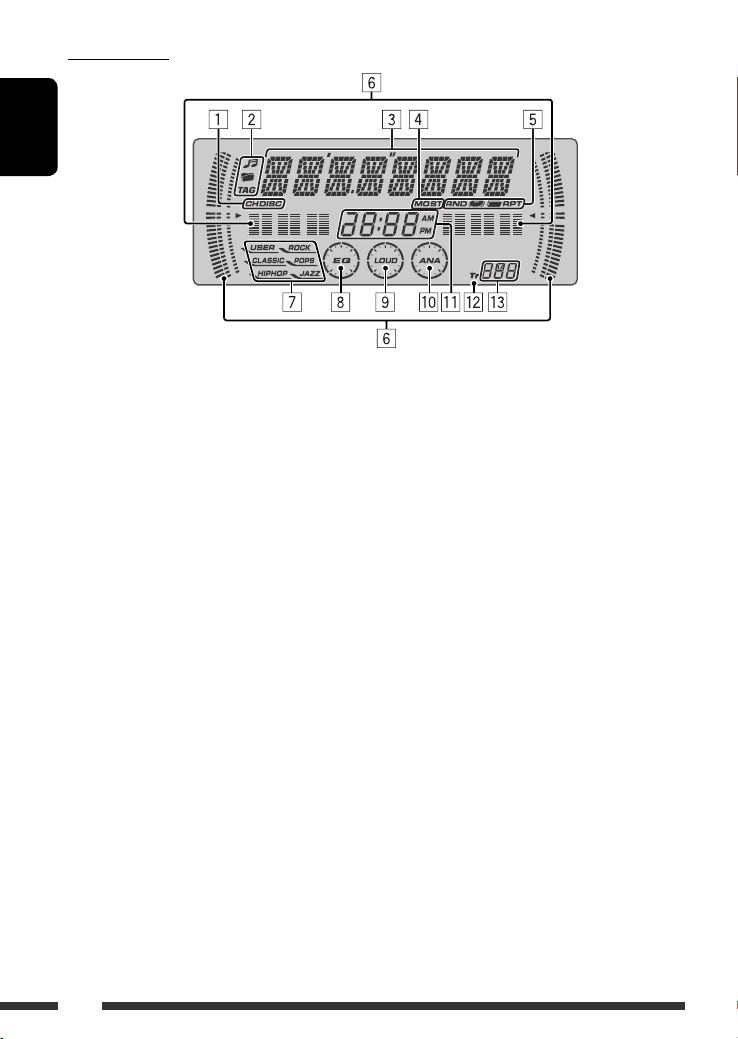
Display window
ENGLISH
1 Playback source indicators
2 Track information indicators
3 Main display
(Menu, playback information)
4 Tuner reception indicators
5 Playback mode/item indicators
(Random/Repeat)
6 • Spectrum analyzer meter
• Volume level indicator
7 Sound mode indicators
8 Equalizer indicator
9 Loudness indicator
p Analyzer indicator
q Clock indicator
w Track indicator
e Source display/Preset No./Track No./Folder No./
Disc No.
6
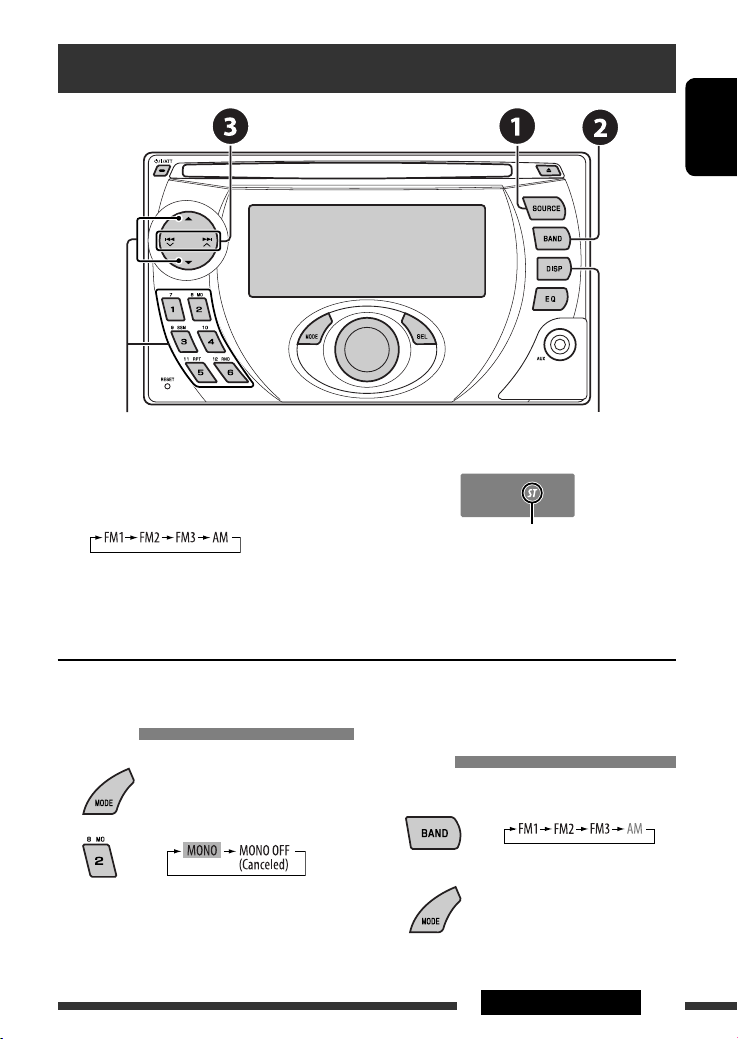
Listening to the radio
ENGLISH
Select preset station.
Change the display information
~ Select “FM/AM.”
Ÿ Select the bands.
Lights up when receiving an FM stereo
! Search for a station to listen—Auto Search.
Manual Search: Hold either one of the buttons until “M” flashes on the display, then press it repeatedly.
* If no title is assigned to a station, “NO NAME” appears. To assign a title to a station, see page 18.
When an FM stereo broadcast is hard
to receive
1
broadcast with sufficient signal strength.
FM station automatic presetting —
SSM (Strong-station Sequential
Memory)
You can preset up to six stations for each band.
1
2
Reception improves, but stereo effect will be lost.
• MO indicator lights up.
2
Continued on the next page
7OPERATIONS
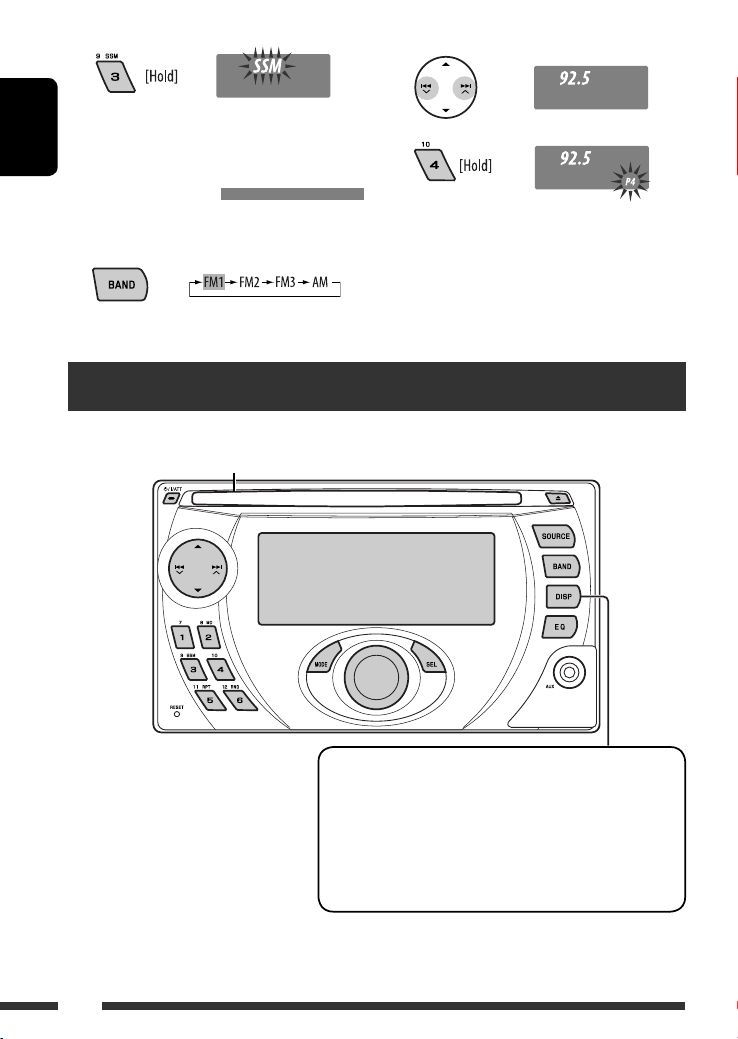
3
Local FM stations with the strongest signals are
searched and stored automatically in the FM band.
ENGLISH
Manual presetting
Ex.: Storing FM station of 92.5 MHz into preset number
4 of the FM1 band.
1
Disc operations
Insert the disc.
Playback starts automatically.
2
3
1
If the file does not have Tag information
*
or “TAG DISP” is set to “TAG OFF” (see
page 18), folder name and file name
appear. TAG indicator will not light up.
2
*
“NO NAME” appears for an audio CD.
8
Change the display information
• MP3/WMA: Album name/performer (folder name *1) = Track
title (file name *1) = Elapsed playing time and Current track
number = (back to the beginning)
• Audio CD/CD Text: Disc title/performer *2 = Track title *2 =
Elapsed playing time and Current track number = (back to the
beginning)
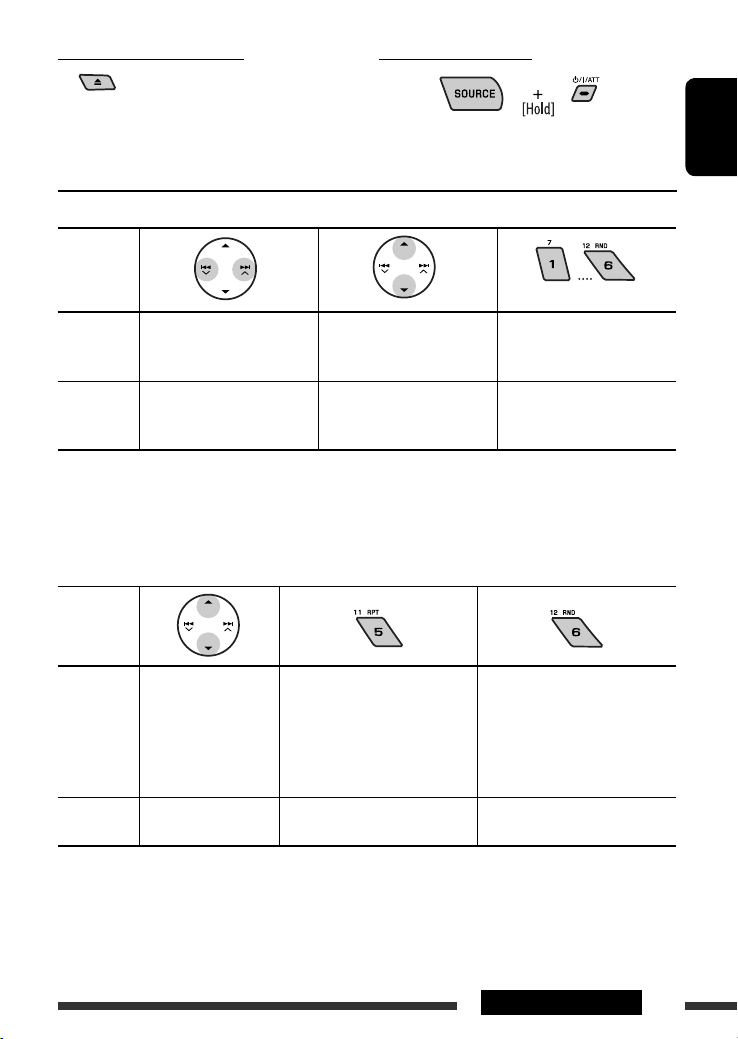
To stop play and eject the disc
• Press SOURCE to listen to another
playback source.
Prohibiting disc ejection
To cancel the prohibition, repeat the same
procedure.
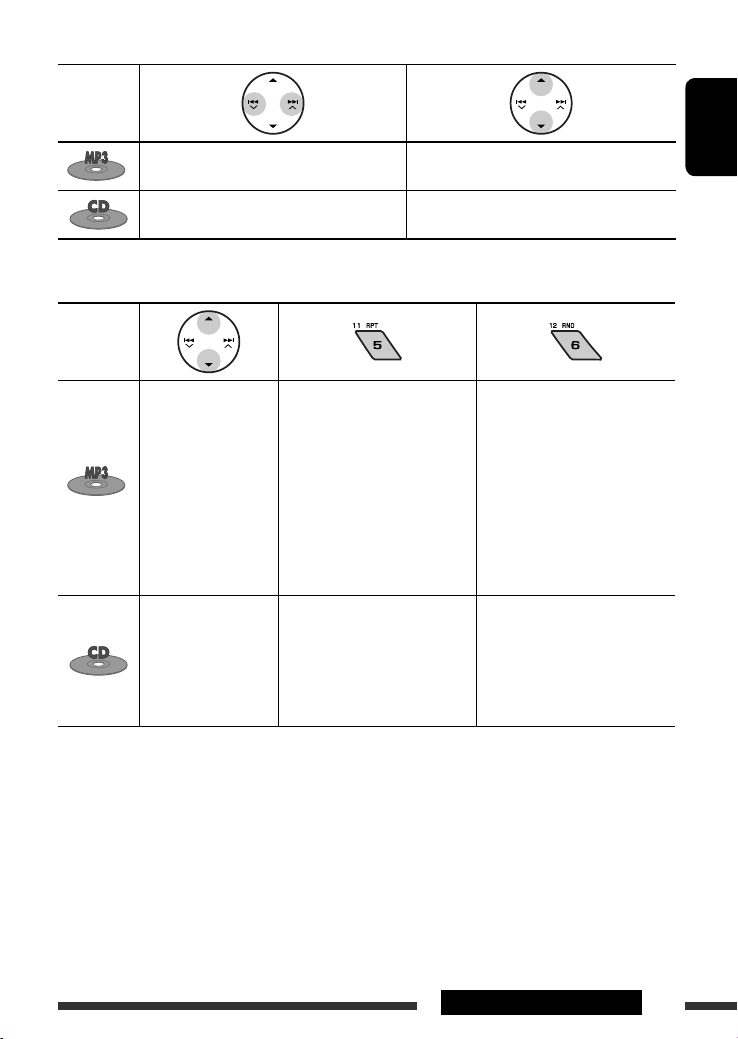
Pressing (or holding) the following buttons allows you to...
Disc type
1
MP3/WMA
Press: Select track
Hold: Reverse/fast-forward
(Number buttons) *
Select folder Locate particular folder
2
directly *
track
Audio CD/
CD Text
1
*
Press to select number 1 to 6; hold to select number 7 to 12.
Press: Select track
Hold: Reverse/fast-forward
track
—
Locate particular track directly
*2 It is required that folders be assigned with 2-digit numbers at the beginning of their folder names—01, 02, 03, and
so on.
After pressing MODE, press the following buttons to...
Disc type
Skip 10 tracks (within
the same folder)
MP3/WMA
TRK RPT:
Repeat current track
FLDR RPT:
Repeat current folder
FLDR RND:
Randomly play all tracks of
current folder, then tracks of
next folders
DISC RND:
Randomly play all tracks
Audio CD/
CD Text
Skip 10 tracks TRK RPT:
Repeat current track
DISC RND:
Randomly play all tracks
• To cancel repeat play or random play, select “RPT OFF” or “RND OFF.”
ENGLISH
9OPERATIONS
Listening to the CD changer
ENGLISH
Change the display information
(see page 8)
It is recommended to use a JVC MP3-compatible CD changer with your unit. You can connect a CD changer to the CD
changer jack on the rear of the unit. See also page 14.
• You can only play conventional CDs (including CD Text) and MP3 discs.
Before connecting the CD changer
• To prevent short circuits, it is recommended to disconnect the car battery’s negative terminal and make all
electrical connections before connecting the CD changer.
• When mounting this unit into your car, be sure to use the screws provided.
• When tightening screws or bolts, be careful not to pinch any connection cord.
• If you are not sure how to connect the CD changer correctly, consult your car dealer or have it installed by a
qualified technician.
Preparation
Make sure “CHANGER” is selected for the external input setting, see page 17.
~ Select “CD-CH.”
Ÿ Select a disc to start playing.
Press: For selecting disc number 1 – 6.
Hold: For selecting disc number 7 – 12.
10
Pressing (or holding) the following buttons allows you to...
Disc type
Press: Select track
Hold: Reverse/fast-forward track
Press: Select track
Hold: Reverse/fast-forward track
After pressing MODE, press the following buttons to...
Disc type
Skip 10 tracks (within
the same folder)
Skip 10 tracks TRK RPT:
• To cancel repeat play or random play, select “RPT OFF” or “RND OFF.”
TRK RPT:
Repeat current track
FLDR RPT:
Repeat all tracks of current folder
DISC RPT:
Repeat all tracks of the current
disc
Repeat current track
DISC RPT:
Repeat all tracks of the current
disc
Select folder
—
ENGLISH
FLDR RND:
Randomly play all tracks of
current folder, then tracks of
next folders
DISC RND:
Randomly play all tracks of
current disc
MAG RND:
Randomly play all tracks of the
inserted discs
DISC RND:
Randomly play all tracks of
current disc
MAG RND:
Randomly play all tracks of the
inserted discs
11EXTERNAL DEVICES

Listening to the iPod
ENGLISH
Change the display information
Before operating, connect a JVC interface adapter for iPod, KS-PD100 (separately purchased) to the CD changer
jack on the rear of this unit. See also page 14.
Preparations
Make sure “CHANGER” is selected for the external input setting, see page 17.
~ Select “IPOD.”
Ÿ Select a song to start playing.
Selecting a track from the menu
1 Enter the main menu.
• This mode will be canceled if no
operations are done for about
5 seconds.
12
2 Select the desired menu.
PLAYLIST Ô ARTISTS Ô ALBUMS Ô SONGS
Ô GENRES Ô COMPOSER Ô (back to the
beginning)
3 Confirm the selection.
• To move back to the previous menu, press 5.
• If a track is selected, playback starts
automatically.
• Holding
4 /¢ can skip 10 items at
a time.
Pause playback
• To resume playback, press the button
again.
Press: Select tracks
Hold: Reverse/fast-forward track
After pressing MODE, press the following buttons to...
ONE RPT:
Functions the same as “Repeat One.”
ALL RPT:
Functions the same as “Repeat All.”
ALBM RND *:
Functions the same as “Shuffle Albums.”
SONG RND:
Functions the same as “Shuffle Songs.”
• To cancel repeat play or random play, select
“RPT OFF” or “RND OFF.”
* Functions only if you select “ALL” in “ALBUMS” of the
main “MENU.”
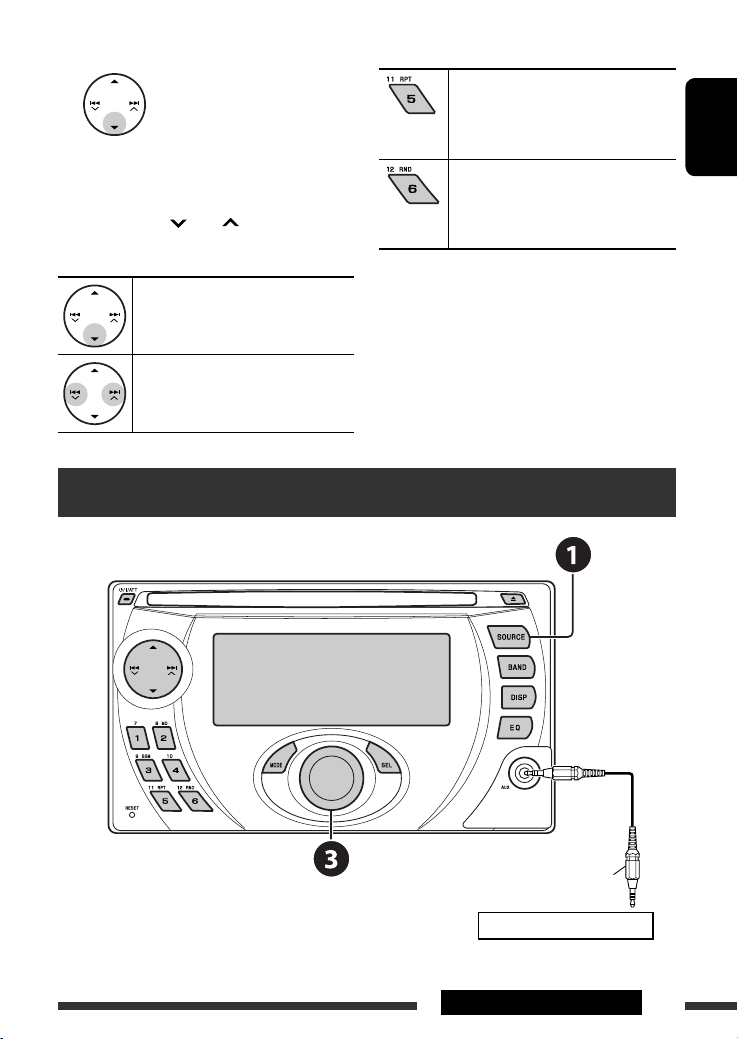
Listening to the other external components
ENGLISH
Stereo mini plug (not supplied)
Portable audio player, etc.
Continued on the next page
13EXTERNAL DEVICES
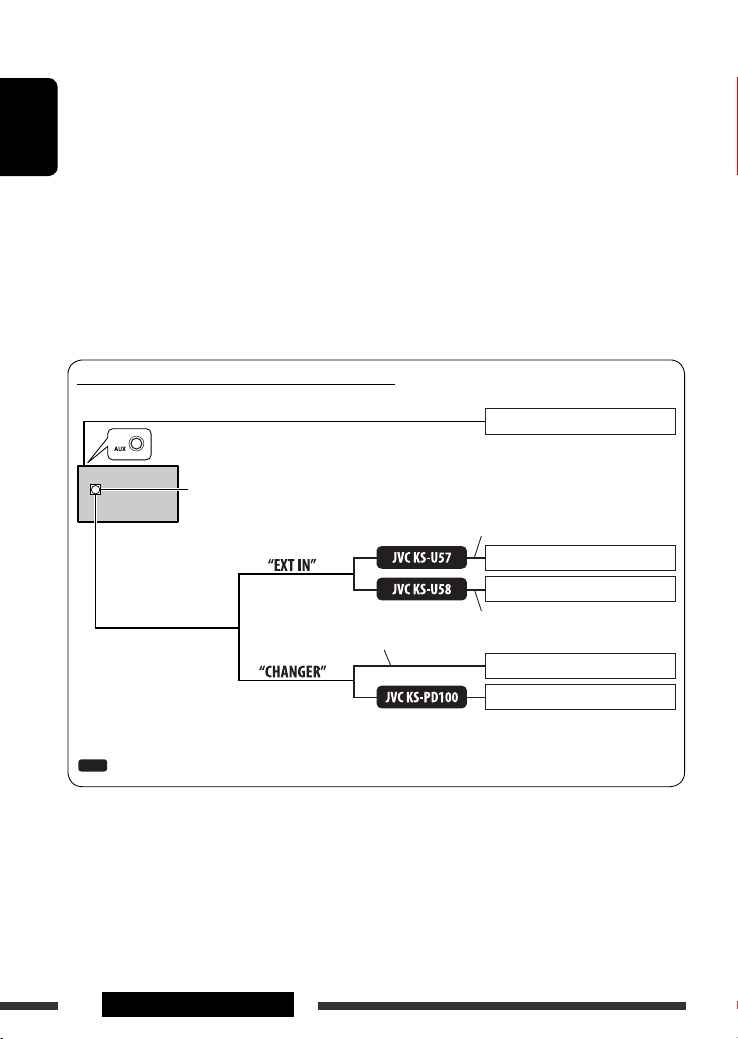
You can connect an external component to:
• CD changer jack on the rear using the following adapters:
– Line Input Adapter—JVC KS-U57
– AUX Input Adapter—JVC KS-U58
Make sure “EXT IN” is selected for the external input setting, see page 17.
• AUX (auxiliary) input jack on the control panel.
ENGLISH
~ Select “EXT IN” or “AUX IN.”
Ÿ Turn on the connected component and start playing the source.
! Adjust the volume.
⁄ Adjust the sound as you want (see pages 15 and 16).
Concept diagram of the external device connection
AUX input jack on the control panel
CD changer jack
Portable audio player, etc., [13]
Unit
: Adapter (separately purchased)
14
EXTERNAL DEVICES
(see page 17 of the
”EXT IN” setting)
Connection cord supplied for the CD changer
(see page 17 of the
”EXT IN” setting)
Signal cord
Portable audio player, etc., [13]
Portable audio player, etc., [13]
3.5 mm stereo mini plug
JVC CD changer, [10]
Apple iPod, [12]
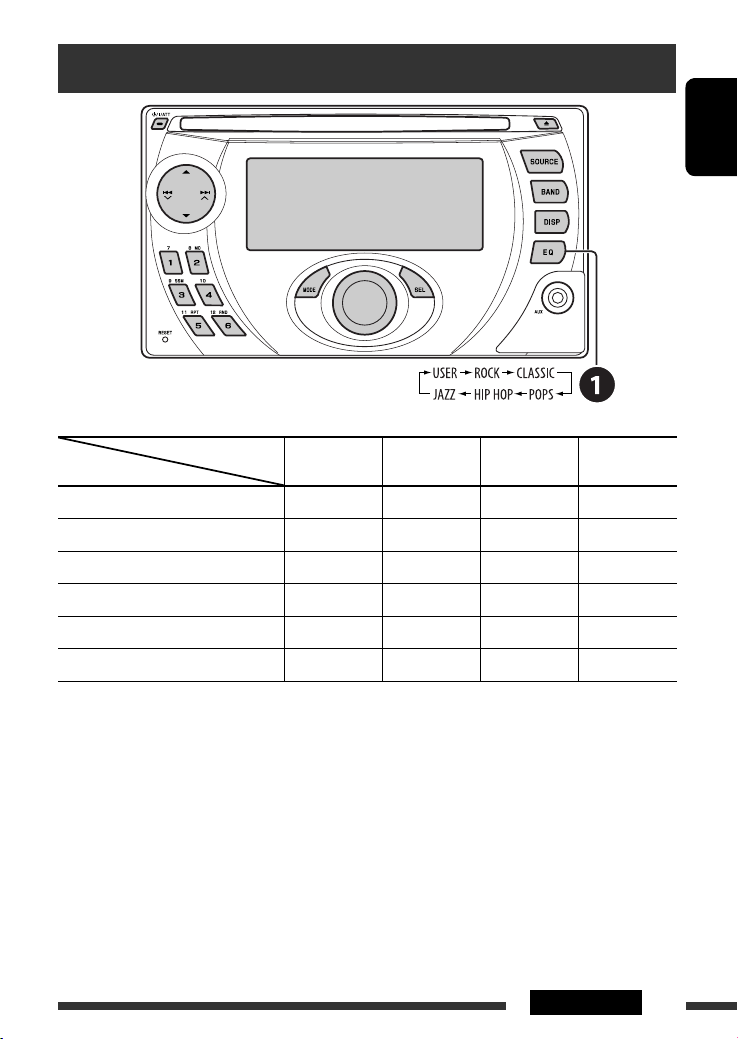
Selecting a preset sound mode
ENGLISH
Preset values
Indication (For)
USER (Flat sound) 00 00 00 OFF
ROCK (Rock or disco music) +03 00 +02 ON
CLASSIC (Classical music) +01 00 +03 OFF
POPS (Light music) +02 +01 +02 OFF
HIP HOP (Funk or rap music) +04 –02 +01 ON
JAZZ (Jazz music) +03 00 +03 OFF
BAS
(bass)
MID
(mid-range)
TRE
(treble)
LOUD
(loudness)
15SETTINGS
 Loading...