

Page 1
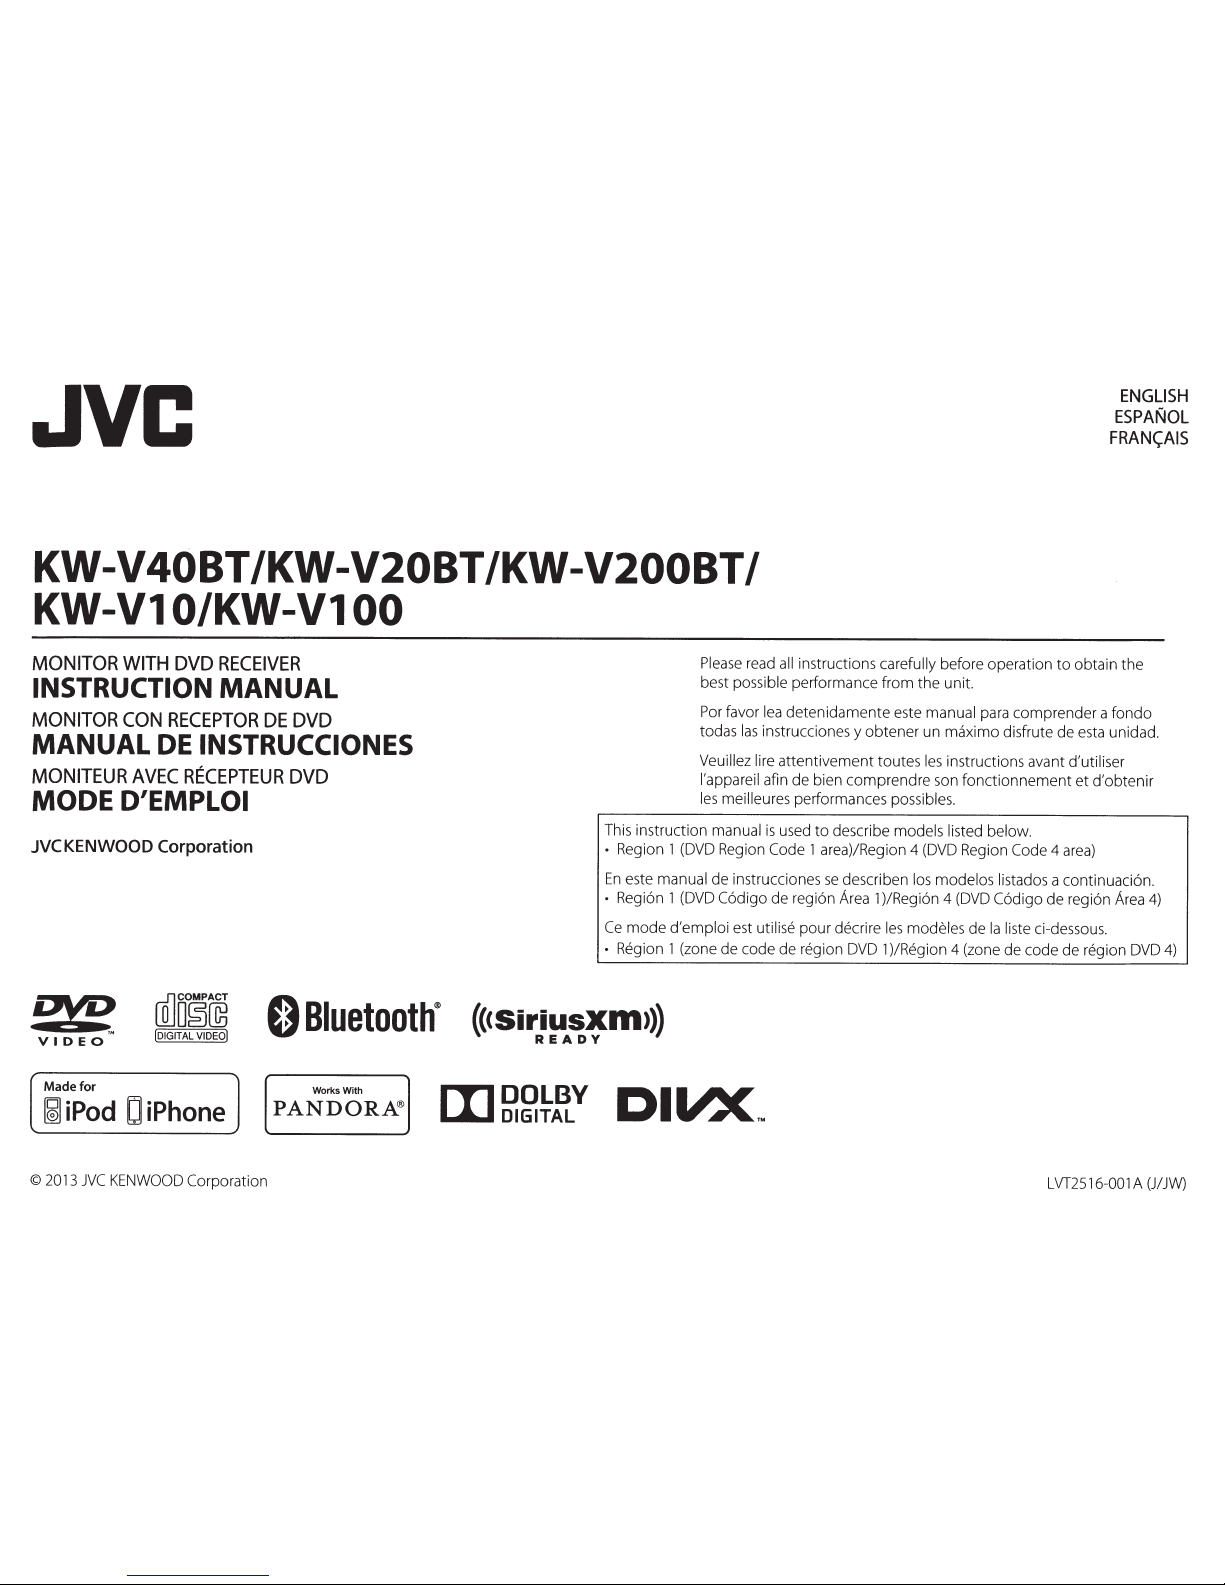
JVC
ENGLISH
ESPANOL
FRAN<;AIS
KW-V40BT /KW-V20BT /KW-V200BT
I
KW-V1
0/KW-Vl
00
MONITOR
WITH
DVD
RECEIVER
INSTRUCTION
MANUAL
MONITOR
CON
RECEPTOR
DE
DVD
MANUAL
DE
INSTRUCCIONES
MONITEUR
AVEC
RECEPTEUR
DVD
MODE
D'EMPLOI
JVC
KENWOOD
Corporation
ore
VIDEO
rnJO~~
!DIGITAL
VIDEO]
0
Bluetooth®
Made
for
Works With
~
iPod
D
iPhone
PANDORA®
©
2013
JVC
KENWOOD
Corporation
Please
read
all
instructions
carefully
before operation
to
obtain
the
best
possible
performance from
the
unit.
Por favor
lea
detenidamente este manual
para comprender a
fondo
todas
las
instrucciones y
obtener
un maximo disfrute de esta unidad.
Veuillez lire
attentivement toutes
les
instructions avant d'utiliser
l'appareil
afin de bien
com
prendre son
fonctionnement
et
d'obtenir
les
meilleures performances
possibles.
This instruction
manual
is
used
to
describe
models listed below.
•
Region 1 (DVD Region Code
1 area)/Region 4 (DVD Region Code
4 area)
En
este
manual
de instrucciones
se
describen
los modelos listados
a continuacion.
•
Region 1 (DVD
Codigo
de region Area 1 )/Region 4
(DVD
Codigo
de region
Area
4)
Ce
mode
d'emploi
est utilise
pour decrire
les
modeles de
Ia
liste
ci-dessous.
•
Region 1 (zone de code de region DVD 1 )/Region 4 (zone de code de region DVD
4)
(C<Siriusxm,>)
READY
L
VT2516-00 1
A
(J/
JW)
Page 2
5
BEFORE
USE
................................................... 2
How
to
reset
your
unit.
...................................................
3
How
to
forcibly eject a disc
...........................................
3
INITIAL
SETTINGS
......................................... 4
BASICS
........................................................... 5
Component
names and functions
.............................
5
Common operations
.......................................................
6
Common screen operations
.........................................
7
Selecting
the
playback source
.....................................
8
DISCS
............................................................. 9
USB
............................................................... 13
iPod/iPhone ................................................ 14
Pandora®
(Only for KW-V40BT Region
1/
KW-V20BT Region 1/KW-V200BT /KW-V1 0
Region 1/KW-V1 00) •.•••.•.•.••••.•••.•.•.••••.•.••.•.•..•.
18
Using external audio
players-Front
AUX (only
for
KW-V20BT /KW-V200BT /KW-V1
O/KW-V1
00)
..........
27
Using a rear
view
camera
............................................
28
Using an external
monitor-
Rear
Source
(only
for
KW-V40BT /KW-V20BT /KW-V200BT I
KW-V1
0 Region 1 /KW-V1 00)
.......................................
29
BLUETOOTH
(Only
for
KW-V40BT/KW-V20BT/
KW-V200BT) •.••••.••.••••••••.•••••••••.••.•••••.•.••.•••••••
30
SETTINGS
..................................................... 38
Sound
adjustment
.........................................................
38
Adjustment
for
video playback
.................................
39
Changing display design
.............................................
41
Customizing
the
system settings
.............................
42
Setting menu items
.......................................................
44
REMOTE
CONTROLLER
............................... 47
CONNECTION/INSTALLATION ................... 49
TUNER
.......................................................... 20
REFERENCES
................................................
S4
SiriusXM®
RADIO
(Only
for
KW-V40BT Region
1/KW-V20BT Region 1/KW-V200BT/KW-V10
Maintenance
....................................................................
54
More
information
...........................................................
54
Region 1/KW-V1 00) .•......••.••.•••.•...•.••.•.•.•••••.•.•
23
Error message list
...........................................................
58
Troubleshooting
.............................................................
59
OTHER
EXTERNAL
COMPONENTS ............. 27
Notice/Caution
on
using Bluetooth device
..........
61
Using external audio/video
players-AV-IN
........
27
Specifications
...................................................................
61
How
to
read this manual:
2
Illustrations
of
KW-V40BT Region 1 are mainly used
for
explanation. The displays and panels shown in
this manual are examples used
to
provide clear explanations
of
the
operations. For this reason,
they
may
be different from
the
actual displays
or
panels.
This manual mainly explains operations using the
buttons
on
the
monitor
panel and
touch
panel. For
operations using
the
remote controller (RM-RK256: supplied
only
for
KW-V40BT Region 4/KW-V20BT
Region 4/KW-V200/KW-V1 0 Region 4/KW-V1 00),
see
page 47.
< > indicates the various screens/menus/operations/settings
that
appear on
the
touch
panel.
[]
indicates
the
buttons
on
the
touch
panel.
Indication language: English indications are used for the purpose
of
explanation. You can select
the
indication language
from
the
<Settings> menu. (Page 46)
& WARNINGS: (To prevent accidents and
damage)
DO
NOT install any
unit
or
wire any cable in a
location where;
-
it
may obstruct
the
steering wheel and gearshift
lever operations.
-
it
may obstruct
the
operation
of
safety devices
such
as
air bags.
-
it
may obstruct visibility.
DO
NOT operate
the
unit
while driving.
If
you need
to
operate
the
unit
while driving, be
sure
to
look
around carefully.
The driver must
not
watch
the
monitor
while
driving.
For KW-V40BT Region 4/KW-V20BT Region
4/
KW-V10 Region 4:
The marking
of
products using lasers
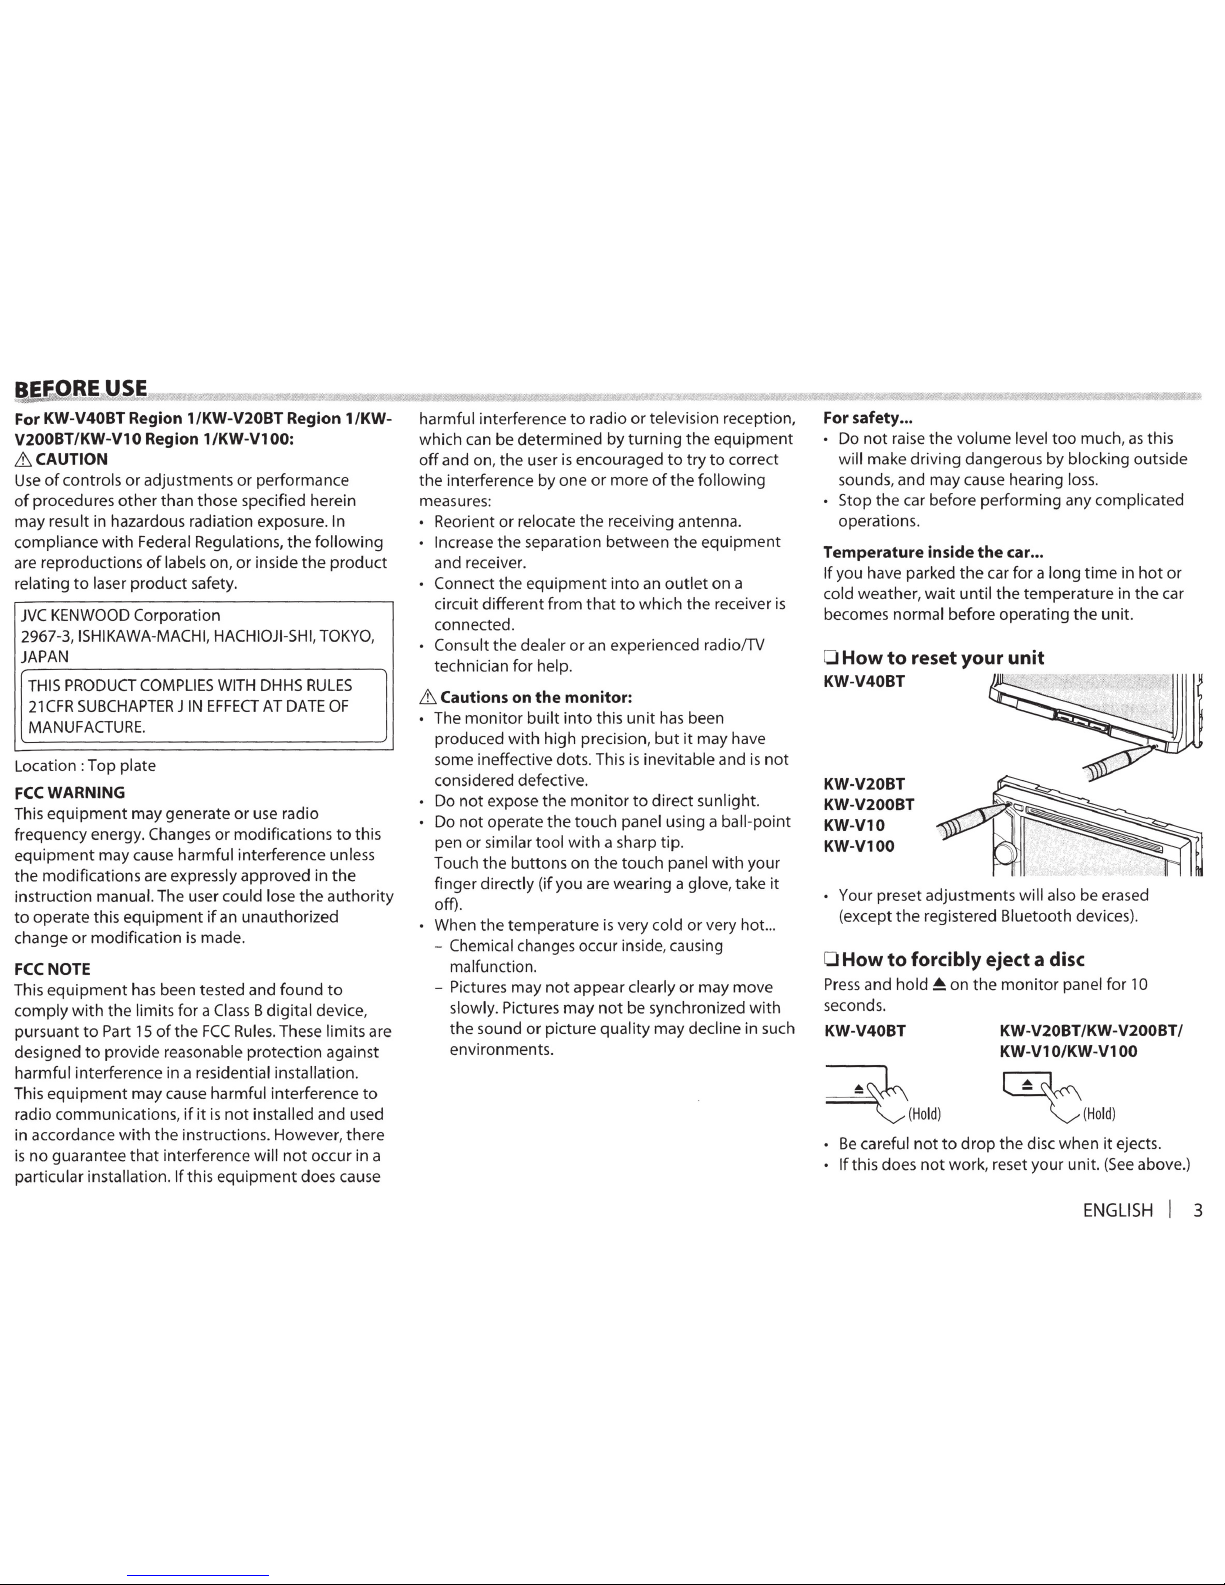
CLASS
1
LASER
PRODUCT
The label
is
attached
to
the
chassis/case and
says
that
the
component
uses
laser beams
that
have
been classified
as
Class
1.
It means
that
the
unit
is
utilizing laser beams
that
are
of
a weaker
class.
There
is
no
danger
of
hazardous radiation outside
the
unit.
Page 3
I!~E.(tRE
USE
For KW-V40BT Region 1/KW-V20BT Region 1/KWV200BT/KW-V10 Region 1/KW-VlOO:
&CAUTION
Use
of
controls
or
adjustments
or
performance
of
procedures
other
than
those
specified herein
may
result
in
hazardous
radiation
exposure. In
compliance
with
Federal Regulations,
the
following
are
reproductions
of
labels on,
or
inside
the
product
relating
to
laser
product
safety.
JVC
KENWOOD
Corporation
2967-3, ISHIKAWA-MACHI, HACHIOJI-
SHI,
TOKYO,
JAPAN
THIS PRODUCT
COMPLIES
WITH DHHS
RULES
21
CFR
SUBCHAPTER J IN
EFFECT
AT DATE
OF
MANUFACTURE.
Location:
Top
plate
FCC
WARNING
This
equipment
may
generate
or
use
radio
frequency energy. Changes
or
modifications
to
this
equipment
may
cause
harmful
interference
unless
the
modifications
are expressly
approved
in
the
instruction
manual. The user
could
lose
the
authority
to
operate
this
equipment
if
an
unauthorized
change
or
modification
is made.
FCC
NOTE
This
equipment
has been
tested
and
found
to
comply
with
the
limits
for
a Class B
digital
device,
pursuant
to
Part 15
of
the
FCC
Rules. These
limit
s are
designed
to
provide
reas
onable
protection
against
harmful
interference in a residential installation.
This
equipment
may
cause
harmful
interference
to
radio
communication
s,
if
it
is
not
installed
and used
in
accordance
with
the
ins
truction
s. However,
there
is
no
guarant
ee
that
interference
will
not
occur
in a
particular
inst
allation.
If
this equipment
doe
s cause
harmful
interference
to
radio
or
television
reception,
which
can
be
determined
by
turning
the
equipment
off
and
on,
the
user
is
encouraged
to
try
to
correct
the
interference
by
one
or
more
of
the
following
measures:
• Reorient
or
relocate
the
receiving antenna.
• Increase
the
separation
between
the
equipment
and receiver.
• Connect
the
equipment into
an
outlet
on
a
circuit
different
from
that
to
which
the
receiver
is
connected.
• Consult
the
dealer
or
an experienced radio/TV
technician
for
help.
& Cautions on
the
monitor:
• The
monitor
built
into
this
unit
has
been
produced
with
high
precision,
but
it
may
have
some
ineffective
dots. This is
inevitable
and
is
not
considered
defective
.
• Do
not
expose
the
monitor
to
direct
sunlight.
• Do
not
operate
the
touch
panel
using
a ball-
point
pen
or
similar
tool
with
a sharp
tip.
Touch
the
buttons
on
the
touch
panel
with
your
finger
directly
(if
you
are
wearing
a glove,
take
it
off).
• When
the
temperature
is
very
cold
or
very
hot ...
- Chemical changes occur inside, causing
malfunction.
- Pictures may
not
appear
clearly
or
may
move
slowly. Pictures
may
not
be
synchronized
with
the
sound
or
picture
quality
may
decline
in
such
environments.
For safety ...
•
Do
not
raise
the
volume
level
too
much,
as
this
will
make
driving
dangerous
by
blocking
outside
sounds, and
may
cause hearing loss.
•
Stop
the
car
before
performing
any
complicated
operations.
Temperature inside
the
car ...
If
you have parked
the
car
for a long
time
in
hot
or
cold weather,
wait
until
the
temperature
in
the
car
becomes
normal
before
operating
the
unit.
0
How
to
reset
your
unit
KW-V40BT
KW-V20BT
KW-V200BT
KW-V10
KW-V100
• Your
preset
adjustments
will
also
be
erased
(except
the
registered
Bluetooth
devices
).
0
How
to
forcibly eject a disc
Press
and
hold~
on
the
monitor
panel
for
10
seconds.
KW-V40BT
~
(
Hold)
KW-V20BT/KW-V200BT/
KW-V10/KW-V100
~
(
Hold
)
•
Be
careful
not
to
drop
the
disc
when
it
ejects.
•
If
this
does
not
work,
reset
your
unit.
(See
above.)
ENGLISH
I 3
Page 4
Initial setup
When you
power
on the
unit
for
the
first
time
or
reset
the
unit,
the
initial setting screen appears.
o You
can
also change
the
settings on
the
<Settings> screen. (Page 44)
1
4
lnrttrtl
Sethnq!;·~·-
·-
f.:ll\')ll.'ISJP
AV
lnp11l
Camera lnpul
n~·:pt,)·
Ot'st~1n
Uemoflstrattor.
<Language>
(Page 46)
<AVInput>
(Page
45)
<Camera
Input>
(Page 45)
<Display Design>
(Page 45)
<Demonstration>
(Page 45)
F-ngh-;.h
AV.It-J
,p(ld
On
Oft
•
Fnl+!~
On
Off
Select
the
text
language
used
for
on-screen
information.
o Set <GUI Language>
to
display
the
operation
buttons and menu items
in
the
selected language
([Local]: initially
selected)
or
English
([English]).
Select an external
component
connected
to
the
AV-IN1
terminal
to
play.
Select
[On]
when
connecting
the
rear
view
camera.
Select
the
background
and
the
colors
of
the
text,
touch
panel
buttons
and
the
monitor
panel buttons.
Activate
or
deactivate
the
display demonstration.
2 Finish
the
procedure.
Dcmonstr~lton
On
Oft
-----
~
Ftmsl•
•
The <HOME> screen
is
displayed.
o [AV Off]
is
selected initially. Select
the
playback source. (Page
8)
Clock settings
1 Display
the
<HOME> screen.
On
the
monitor
panel:
KW-V40BT KW-V20BT/KW-V200BT/
KW-V1 O/KW-V1
00
On
the
source control screen:
4 Set
the
clock time.
5
To synchronize
the
clock
time
with
FM
RBDS
To set
the
clock manually
CD
Select
the
time
display format.
@ Adjust
the
hour.
® Adjust
the
minute.
Page 5
5
·;·····
Co
:m
..
po
.nent
.·
·
nam
.
es
..
·
an~
•···•
ft~
•
nctiO
•
IlS
KW-V40BT
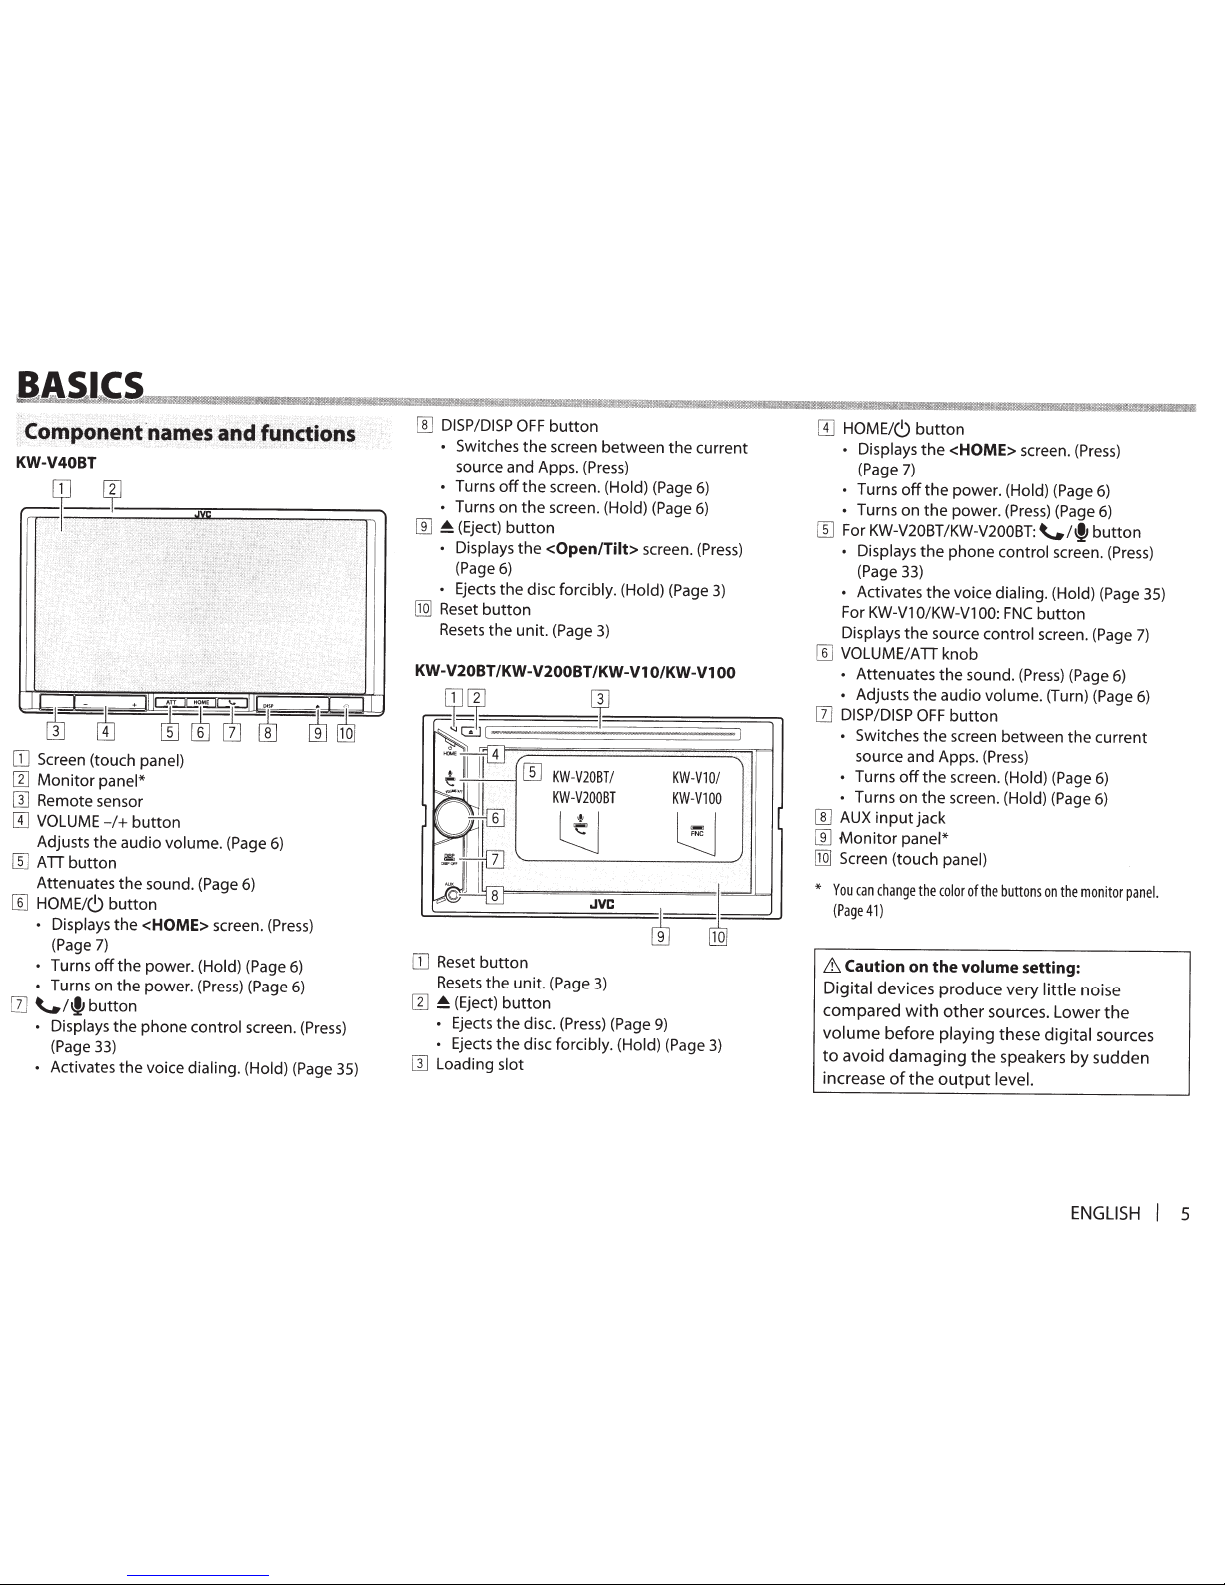
[]
Screen (touch
panel)
[I]
Monitor
panel*
W
Remote sensor
[I]
VOLUME-/+
button
Adjusts
the
audio
volume. (Page
6)
[[)
A
TI
button
Attenuates
the
sound. (Page
6)
[[]
HOME/C)
button
• Displays
the
<HOME>
screen.
(Press)
(Page
7)
•
Turns
off
the
power. (Hold) (Page
6)
•
Turns on
the
power.
(Press)
(Page
6)
[]]
\...!"'button
• Displays
the
phone
control
screen. (Press)
(Page 33)
•
Activates
the
voice dialing. (Hold) (Page 35)
[[]
DISP/DISP
OFF
button
•
Switches
the
screen
between
the
current
source and Apps. (Press)
•
Turns
off
the
screen. (Hold) (Page
6)
•
Turns on
the
screen. (Hold) (Page
6)
[]]
~
(Eject)
button
• Displays
the
<Open/Tilt>
screen.
(Press)
(Page
6)
•
Ejects
the
disc forcibly. (Hold) (Page
3)
[Q]
Reset
button
Resets
the
unit. (Page
3)
KW-V20BT /KW-V200BT
/KW-V1
O/KW-V1
00
[]
Reset
button
Resets
the
unit. (Page
3)
[1]
~
(Eject)
button
•
Ejects
the
disc. (Press) (Page
9)
•
Ejects
the
disc forcibly. (Hold) (Page
3)
[I]
Loading slot
[I]
HOME/C)
button
•
Displays
the
<HOME>
screen.
(Press)
(Page
7)
• Turns
off
the
power. (Hold) (Page
6)
• Turns
on
the
power.
(Press)
(Page
6)
[[]
For
KW-V20BT/KW-V200BT:
\...!"'button
•
Displays
the
phone
control screen.
(Press)
(Page 33)
•
Activates
the
voice dialing. (Hold) (Page 35)
For
KW-V1
0/KW-Vl 00:
FNC
button
Displays
the
source
control
screen. (Page
7)
[[]
VOLUME/ATI
knob
• Attenuates
the
sound.
(Press)
(Page
6)
•
Adjusts
the
audio
volume. (Turn) (Page
6)
[1]
DISP/DISP
OFF
button
•
Switches
the
screen
between
the
current
source and Apps.
(Press)
• Turns
off
the
screen. (Hold) (Page
6)
• Turns on
the
screen. (Hold) (Page
6)
[[]
AUX
input
jack
[]]
Monitor
panel*
[Q]
Screen
(touch
panel)
*
You
can
change
the
color
of
the
buttons
on
the
monitor
panel.
(Page41)
6
Caution
on the volume
setting:
Digital
devices produce very
little noise
compared
with
other sources. Lower the
volume
before
playing
these
digital
sources
to
avoid damaging the speakers by sudden
increase
of
the
output
level.
ENGLISH
I
5
Page 6
Common.
operation~
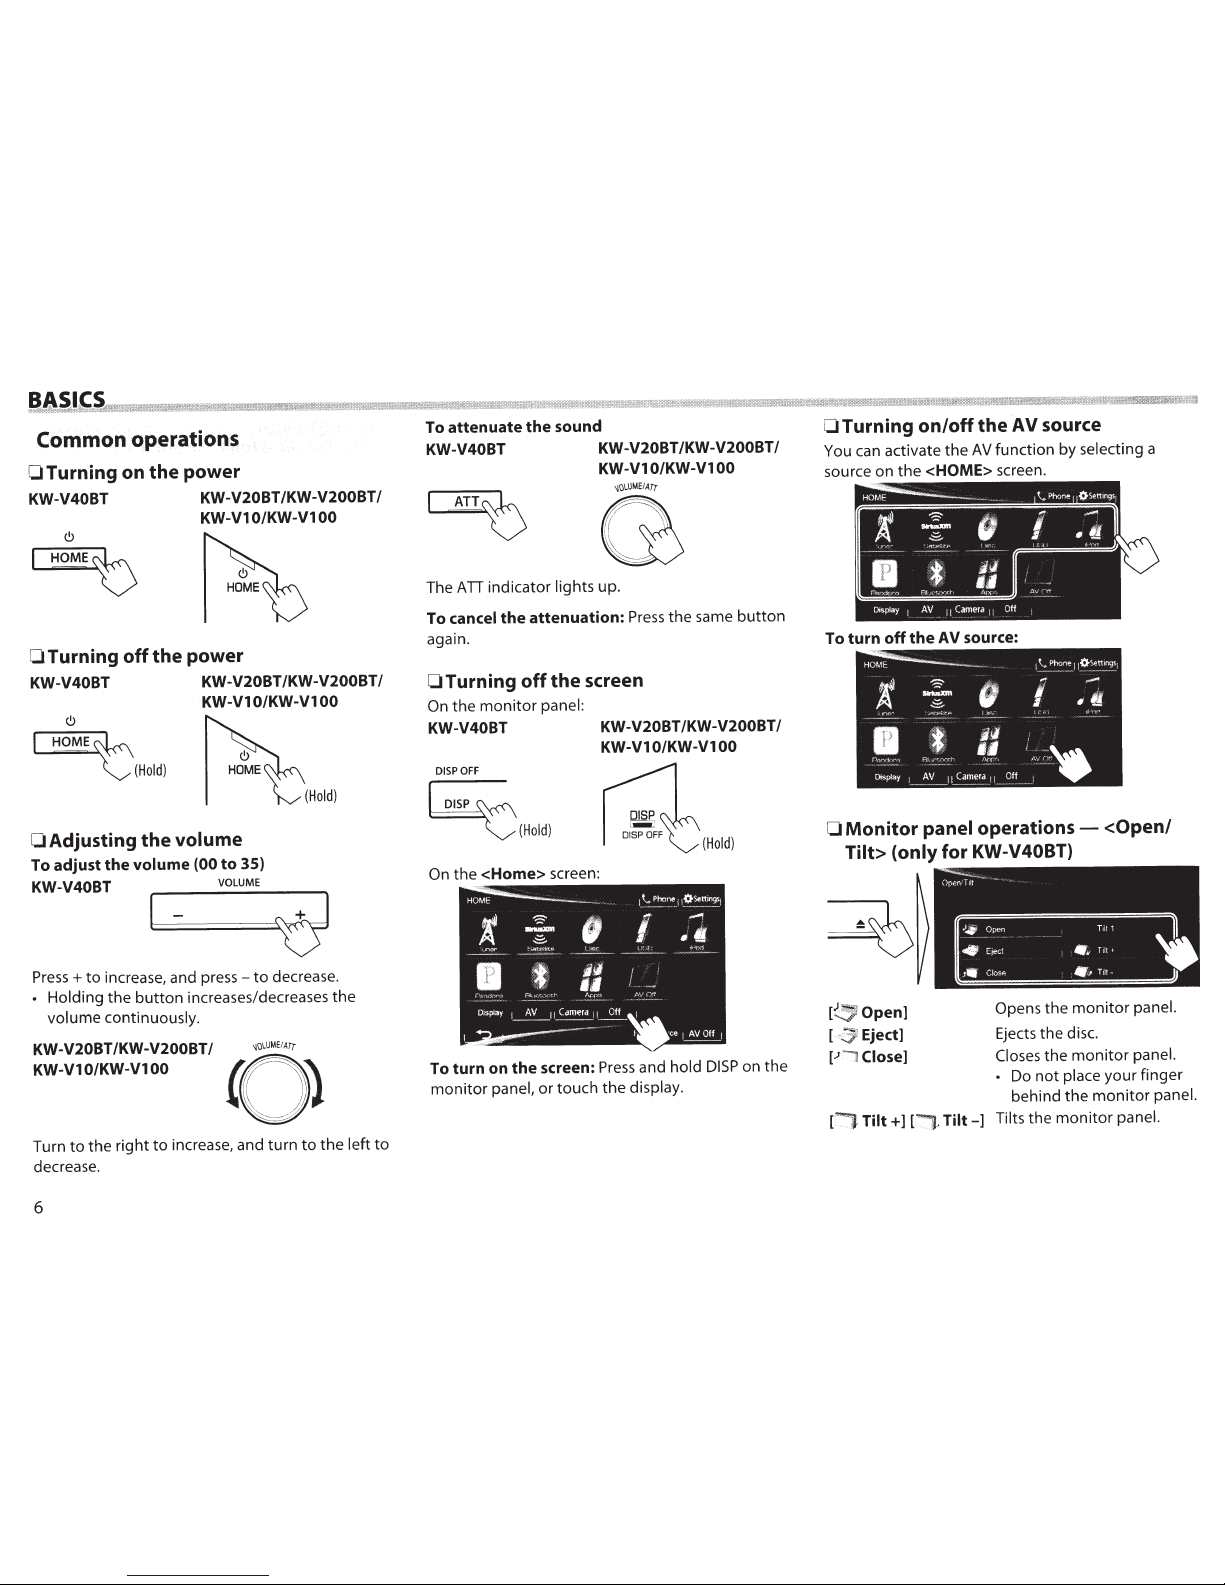
OTurning on the power
KW-V40BT KW-V20BT/KW-V200BT/
KW-V1
0/KW-Vl
00
OTurning
off
the power
KW-V40BT KW-V20BT/KW-V200BT/
KW-V1
0/KW-Vl
00
(!)
~
~·(Hold)
0
Adjusting the
volume
To adjust the volume
(00 to 35)
KW-V40BT
VOLUME
(Hold)
1-
~
Press+
to
increase, and
press-
to
decrease.
•
Holding the
button
increases/decreases the
volume continuously.
KW-V20BT /KW-V200BT
I
~oLUME
I
ATr
KW-V10/KW-V100
(Q)
Turn
to
the right
to
increase, and turn
to
the
left
to
decrease.
6
To attenuate the sound
KW-V40BT KW-V20BT/KW-V200BT/
KW-V1
0/KW-Vl
00
The
ATI
indicator lights up.
To cancel
the
attenuation:
Press
the
same
button
again.
0
Turning
off
the screen
On
the
monitor
panel:
KW-V40BT KW-V20BT/KW-V200BT/
KW-V1
0/KW-Vl
00
DISP
OFF
~
~(Hold)
(Hold)
On
the
<Home>
screen:
To turn on
the
screen:
Press
and hold
DISP
on the
monitor
panel,
or
touch the display.
0
Turning
on/off
the
AV
source
You
can
activate
the
AV
function by selecting a
source on
the
<HOME>
screen.
To turn
off
the
AV
source:
0
Monitor
panel
operations-
<Open/
Tilt> (only
for
KW-V40BT)
[
~
Open]
Eject]
[.J
~
Close]
[!"
':'1-
Tilt+]
[
J.
·
Tilt-]
Opens
the
monitor
panel.
Ejects the disc.
Closes
the
monitor
panel.
• Do not place your finger
behind the
monitor
panel.
Tilts the
monitor
panel.
Page 7
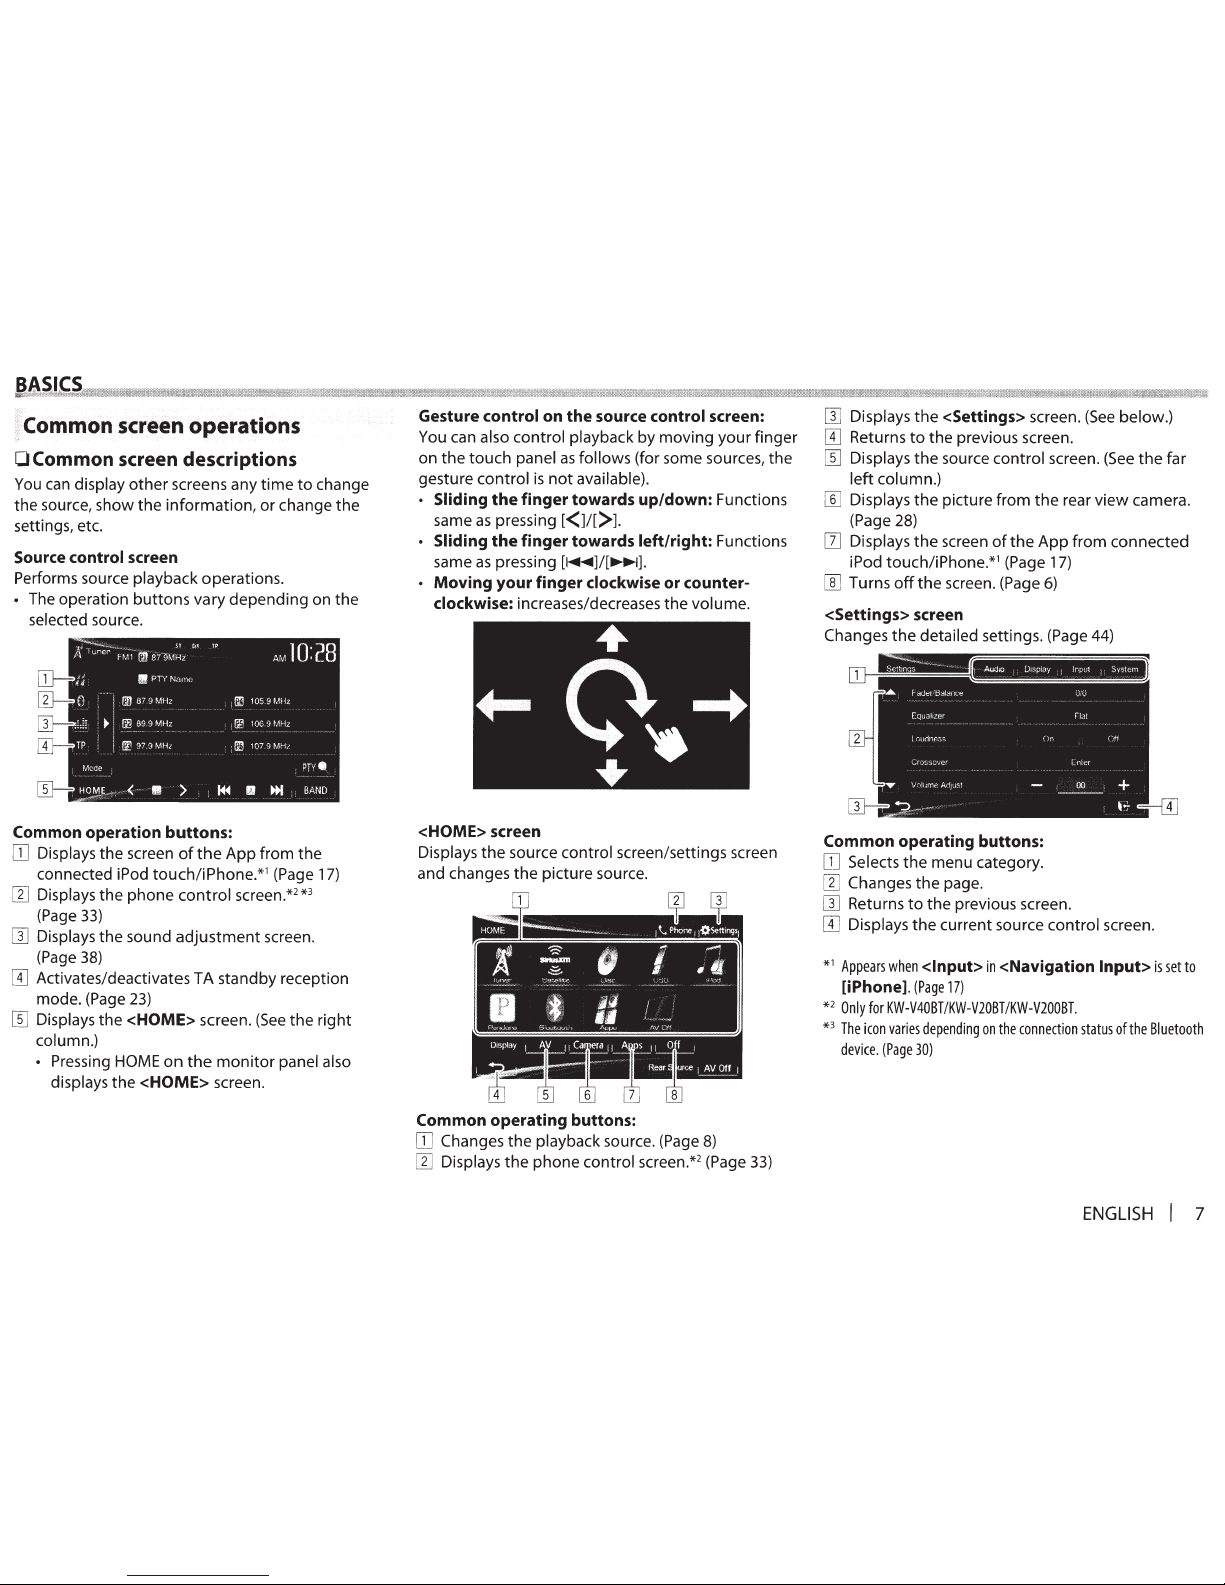
Common.
screen
operations
OCommon screen descriptions
You
can
display
other
screens any
time
to
change
the source, show
the
information,
or change
the
settings, etc.
Source control screen
Performs source playback operations.
• The operation
buttons
vary depending on the
selected source.
Common operation buttons:
OJ
Displays
the
screen
of
the
App
from the
connected iPod
touch/iPhone.*1 (Page
17)
[1]
Displays
the
phone
control
screen.*2 *
3
(Page
33)
[I]
Displays the sound
adjustment
screen.
(Page
38)
[i]
Activates/deactivates TA standby reception
mode. (Page
23)
[]]
Displays the <HOME> screen.
(See
the
right
column.)
• Pressing
HOME
on
the
monitor
panel also
displays
the
<HOME> screen.
Gesture control on the source control screen:
You can also control playback by moving
your
finger
on
the
touch
panel
as
follows (for some sources,
the
gesture control
is
not
available).
· Sliding
the
finger towards up/down: Functions
same
as
pressing
[<]I[>J.
• Sliding
the
finger towards left/right: Functions
same
as
pressing
[~]/[~].
• Moving your finger clockwise or counter-
clockwise:
increases/decreases
the
volume.
<HOME> screen
Displays
the
source control screen/settings screen
and changes
the
picture source.
Common operating buttons:
OJ
Changes
the
playback source. (Page
8)
[1]
Displays
the
phone control screen.*2 (Page
33)
[I]
Displays
the
<Settings> screen.
(See
below.)
[i]
Returns
to
the previous screen.
[[]
Displays
the
source control screen.
(See
the
far
left
column.)
[]]
Displays
the
picture from
the
rear
view
camera.
(Page 28)
[I]
Displays
the
screen
of
the
App
from connected
iPod touch/iPhone.*1 (Page 17)
[[]
Turns
off
the
screen. (Page
6)
<Settings> screen
Changes
the
detailed settings. (Page 44)
Common operating buttons:
OJ
Selects
the
menu category.
[1]
Changes
the
page.
[I]
Returns
to
the
previous screen.
[i]
Displays
the
current source control screen.
*
1
Appears
when
<Input>
in
<Navigation
Input>
is
set
to
[iPhone].
(Page
17)
*
2
Only
for
KW-V40BT/KW-V20BT/KW-V200BT.
*
3
The
icon
varies
depending
on
the
connection
status
of
the
Bluetooth
device.
(Page
30)
ENGLISH
I 7
Page 8
BA
CS
OTouch screen operations
ITJ
Displays the video control menu while playing a
video.
W Displays the source control screen while playing
a video.
• The operation buttons disappear when the
screen
is
touched or when no operation
is
done for about
10
seconds.
[I]
Goes
to
the previous chapter/track.*
[I]
Goes
to
the next chapter/track.*
*
Not
available
for
video
from
an
external
component.
Dragging
your
finger
to
the
left
or
right
functions
in
the
same
way
as
touching.
8
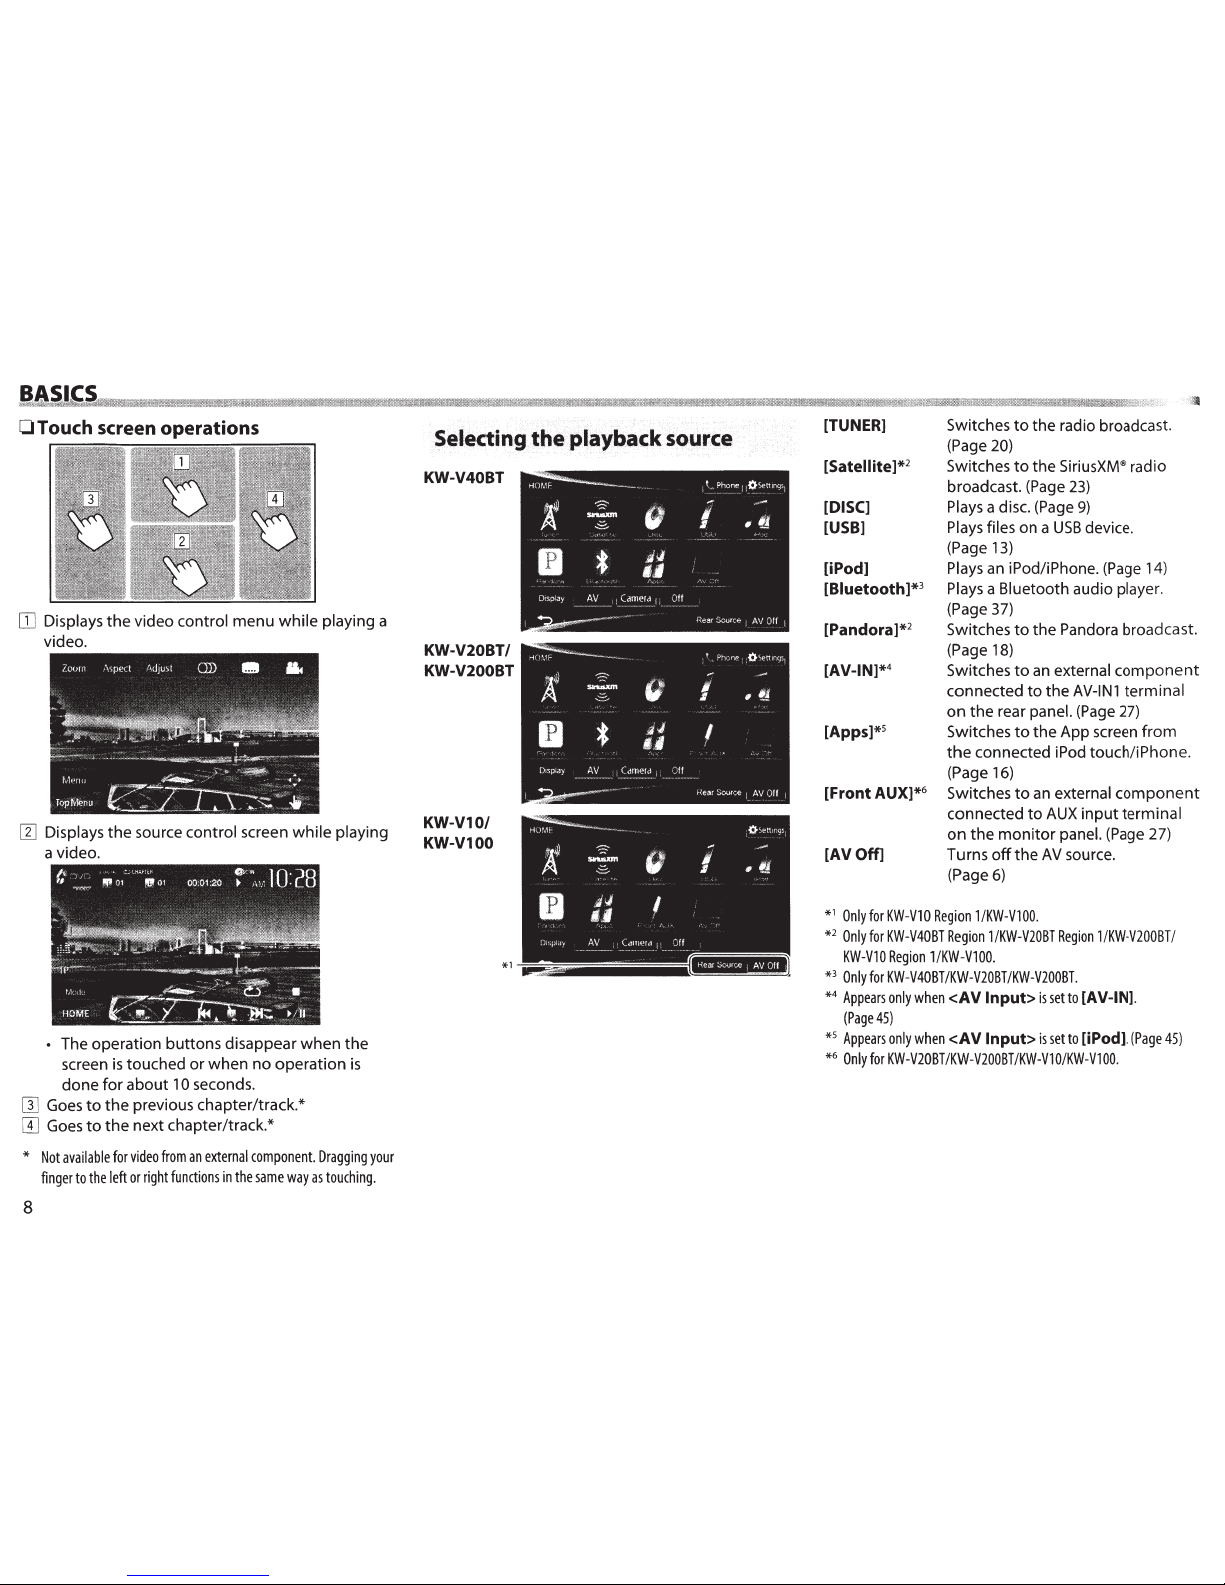
Selecting the playback
source
KW-V40BT
KW-V20BT/
KW-V200BT
KW-V10/
KW-V100
[TUNER]
[Satellite]*
2
[DISC]
[USB]
[iPod]
[Biuetooth]*
3
[Pandora]*
2
[AV-IN]*
4
[Apps)*
5
[Front AUX]*
6
[AV Off]
Switches
to
the radio broadcast.
(Page
20)
Switches
to
the
SiriusXM®
radio
broadcast.
(Page
23)
Plays
a disc.
(Page
9)
Plays
files
on a USB
device.
(Page
13)
Plays
an
iPod/iPhone.
(Page
14)
Plays
a Bluetooth audio player.
(Page
37)
Switches
to
the Pandora broadcast.
(Page
18)
Switches
to
an
external component
connected to the
AV-IN1
terminal
on the rear panel.
(Page
27)
Switches
to
the App
screen
from
the
connected iPod touch/iPhone.
(Page
16)
Switches
to
an
external component
connected to
AUX
input terminal
on the monitor panel.
(Page
27)
Turns
off
the
AV
source.
(Page
6)
*1 Only
for
KW-V10
Region
1/KW-V100.
*2 Only
for
KW-V40BT
Region
1/KW-V20BT
Region
1/KW-V200BT/
KW-VlO
Region
1/KW-VlOO.
*3 Only
for
KW-V40BT
/KW-V20BT
/KW-V200BT.
*4 Appears
only
when
<AV
Input>
is
set
to
[AV-IN].
(Page
45)
*5 Appears
only
when
<AV
Input>
is
set
to
[iPod].
(Page
45)
*6 Only
for
KW-V20BT
/KW-V200BT/KW-V10/KW-V100.
Page 9
;l
PI~¥ing
·
·
~
>
~i§~
·<
•
If
a disc does
not
have a disc menu,
all
tracks on
it
will
be played repeatedly until you change
the
source or eject
the
disc.
• For playable disc types/file types,
see
page
55.
0 Inserting
a disc
Insert
a disc
with
the
label side facing up.
•
For
KW-V40BT:
To open
the
monitor
panel,
see
page
6.
KW-V40BT KW-V20BT/KW-V200BT/
KW-V1
0/KW-Vl
00
The source changes
to
11
DISC"
and playback starts.
• The
DISC
IN
( .t
iifwtU)
indicator lights up while a
disc
is
inserted.
•
If
"{9"
appears on
the
screen,
the
unit
cannot
accept
the
operation
you have tried
to
do.
-
In
some
cases,
without
showing
"{9,"
operations will
not
be accepted.
•
When
playing
back a
multi-channel
encoded disc, the
multi-channel signals
are
downmixed
to
stereo.
0 Ejecting a disc
KW-V40BT
KW-V20BT/KW-V200BT/
KW-V1
0/KW-Vl
00
•
When removing a disc,
pull
it
horizontally.
•
You can eject a disc when playing another
AV
source.
•
If
the
ejected disc
is
not
removed
within
15 seconds,
the
disc
is
automatically
inserted
again
into
the
loading slot
to
protect
it
from
dust.
If
the
disc cannot be ejected,
see
page
3.
Playback operations
•
When
the
operation buttons
are
not
displayed on the screen,
touch
the
area shown on
the
illustration.
- For
KW-V1
0/KW-Vl
00:
You
can also display/hide
the
operation buttons by pressing
FNC
on
the
monitor
panel.
- To change settings for video
playback,
see
page
39.
0
Indications and
buttons
on
the
source
control screen
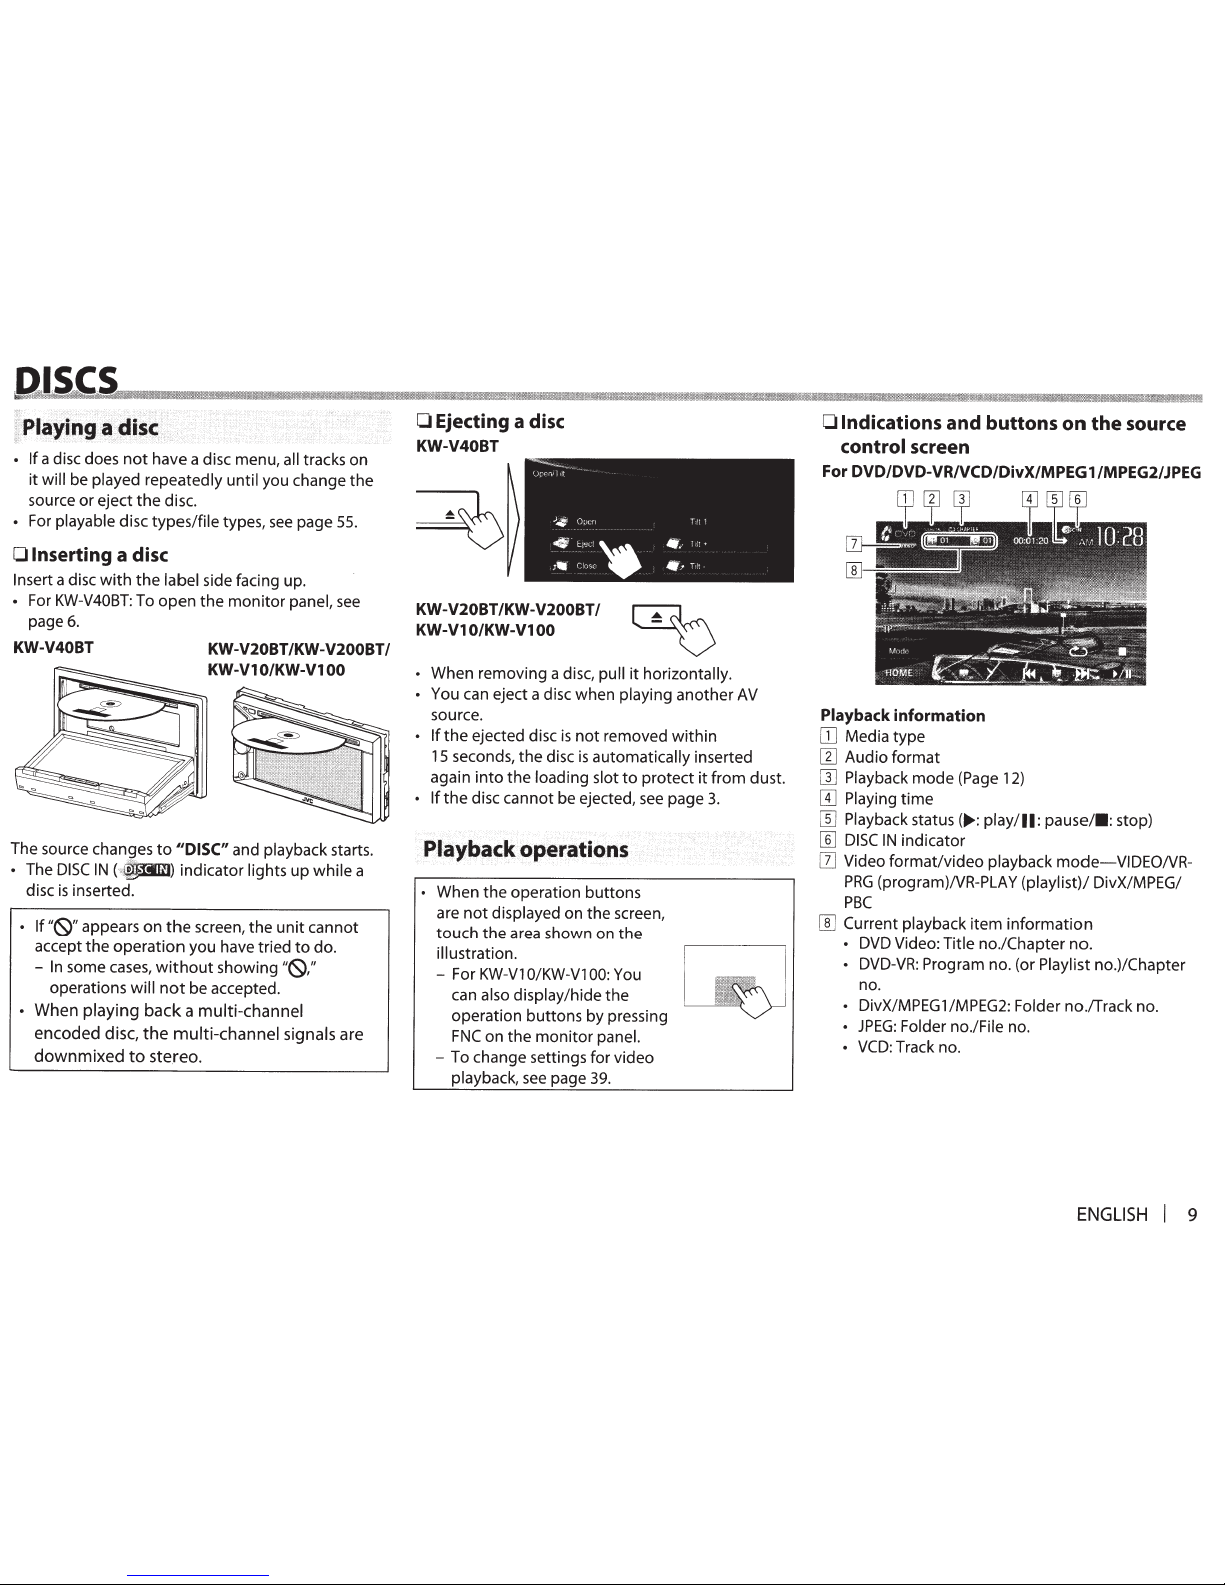
For
DVD/DVD-VR/VCD/DivX/MPEG1/MPEG2/JPEG
Playback
information
OJ
Media type
[1]
Audio
format
[]]
Playback
mode
(Page
12)
[I]
Playing
time
[[]
Playback
status(~:
play/11:
pause/•:
stop)
[]]
DISC
IN
indicator
[]]
Video
format/video
playback
mode-VIDEONR-
PRG
(program)NR-PLA
Y
(playlist)/ DivX/MPEG/
PBC
[]]
Current
playback item
information
DVD
Video: Title no./Chapter no.
•
DVD-VR:
Program no. (or Playlist no.)/Chapter
no.
•
DivX/MPEG1/MPEG2: Folder no./Track no .
•
JPEG:
Folder no./File no.
•
VCD:
Track no.
ENGLISH
I
9
Page 10

Operation buttons
[•]*
1
Stops playback.
[
~]*2
Displays
the
folder/track list.
(See
the
far
right
column.)
[c!:_)]
[-I.
t1*
3
[
....
/11
1
[Mode]*
6
[HOME]
Selects playback mode.
(Page 12)
Starts/pauses playback.
•
Selects a chapter/track. (Press)
•
Reverse/forward search.*
5
(Hold)
Selects
title
(DVD)/program
or
playlist (DVD-VR)/folder (DivX/
MPEG
1 /MPEG2/
JPEG).
Changes
the
settings
for
disc
playback on
the
<Mode>
screen.
(Page 12)
Displays
the
<HOME>
screen.
*
1
Appears
only
for
DVD/DVD-VR/VCD.
*
2
Does
not
appear
for
DVD/DVD-VR/VCD.
*
3
Does
not
appear
for
DVD/DVD-VR/JPEG.
*
4
The
icon
displayed
between
the
buttons
varies
depending
on
the
type
of
disc
or
file.
*
5
Search
speed
varies
depending
on
the
type
of
disc
or
file.
*
6
Does
not
appear
for
VCD.
10
For CD/MP3/WMA/WAV
Playback information
[JJ
Media
type
[I]
Audio
format
J
:;,
;
qN'ln•E
'!An,,
N,1tne
~-
-~~--~-
-
--
0
1\lbl"
N,,.
•.
[I]
Playback
mode
(Page 12)
[I]
Playing
time
[[]
Playback
status(..,.: play/11:
pause/•:
stop)
[§]
DISC
IN
indicator
[1]
Track/file information
•
Touching
the
information
bar
scrolls
the
text
if
not
all
of
the
text
is
shown.
[]]
Current
playback
item
information
•
MP3/WMA/WAV: Folder no./Track no.
•
CD:
Track no.
[]]
Jacket picture (Shown
while
playing
if
the
file
has
tag data
that
includes
the
jacket picture)
Operation buttons
[
~
]*1
Displays
the
folder/track
list.
(See
the
right
column.)
[c!:_)]
[,J.
t1
Selects playback
mode.
(Page
12)
[..,./II
1
Starts/pauses playback.
•
Selects a track.
(Press)
• Reverse/forward search.*
2
(Hold)
Selects a folder.
[Mode]*
1
Changes
the
settings for disc
playback on
the
<Mode>
screen.
(Page 12)
[HOME]
Displays
the
<HOME>
screen.
*
1
Does
not
appear
for
CD.
*
2
Search
speed
varies
depending
on
the
type
of
disc
or
file.
0 Selecting
a
folder/track
on
the
list
1
2
Select the
folder
(G)),
then the item in
the
selected folder
(W).
•
Repeat
the
procedure
until you select
the
desired track.
• If
you
want
to
play all tracks in
the
folder,
press
[..,.]
on
the
right
of
the
desired folder.
•
You can change
the
page
to
display
more
items by pressing
[•J/[T].
•
Press
[Root]
to
return
to
the
root
folder.
•
Press
[<1
to
return
to
the
upper
layer.
Page 11
Q;l,~e~CtammMiiiM&MiHI!tl!MWl!
Mit!M!!l'ltiiiil
MIW&IIlMll!!lli!Ht!
N!\f:!!ttMt@IHil'!MNfiMlMi'tH1MMNtWMltFM
t%!iil
Mll!!Mii!iit!lil!li'HIIMNifii
IMM
ii!MMMW
: iflMi!iiiiiH%:
!MlMIIIIMIM\JI!M'IMill
!I
Iii
I'IIIIlMltl!iiMih%!1%1il&lilM!Ill%Mi
IMIM
:MIMl!JI!i
OVideo menu operations
You can
display
the
video
menu
screen
during
video
playback.
• Available
items
on
the
screen
differ
depending
on
the
types
of
the
loaded disc and
playback
files.
• The
operation
buttons
disappear
when
the
screen
is
touched
or
when
no
operation
is
done
for
about
10 seconds.
*
[Zoom]
[Aspect]
[Adjust]
[OJ)]*
*
*
Displays
the
picture
size selecting
screen. (Page 40)
Selects
the
aspect ratio. (Page 40)
Displays
the
picture
adjustment
screen. (Page 39)
Selects
the
audio
type.
• For DVD-VR: Selects
the
audio
channel
(ST:
stereo,
L:
left,
R:
right).
Selects
the
subtitle
type.
Selects
the
view
angle.
[Menu]*
[Top
Menu]*
Displays
the
disc
menu
(DVD)/
playlist (DVD-VR).
Displays
the
disc
menu
(DVD)/
original
program
(DVD-VR) .
Displays
the
menu/playlist/original
program/scene
selecting screen.
•
[.A.]
[T] [
~]
[.,...]:Selects an
item.
- For DivX: [
~]
[.,...]
skips
back
or
forward
by
about 5 minutes.
• [Enter]:
Confirms
the
selection.
• [Return]: Returns
to
the
previous
screen.
•
[-+::>J:
Displays
the
menu
screen
of
the
top
layer
when
several
menu
screens exist
on
the
disc.
- For DivX: Exits
from
the
scene
selecting screen.
Switches
to
the
direct
disc
menu
mode.
Touch
the
target
item
to
select.
• To
exit
from
the
menu
selecting
screen, press
[-+::>J.
*
Does
not
appear
for
MPEG1/MPEG2.
Touching
any
position
other
than
operation
buttons
displays
the
source
control
screen.
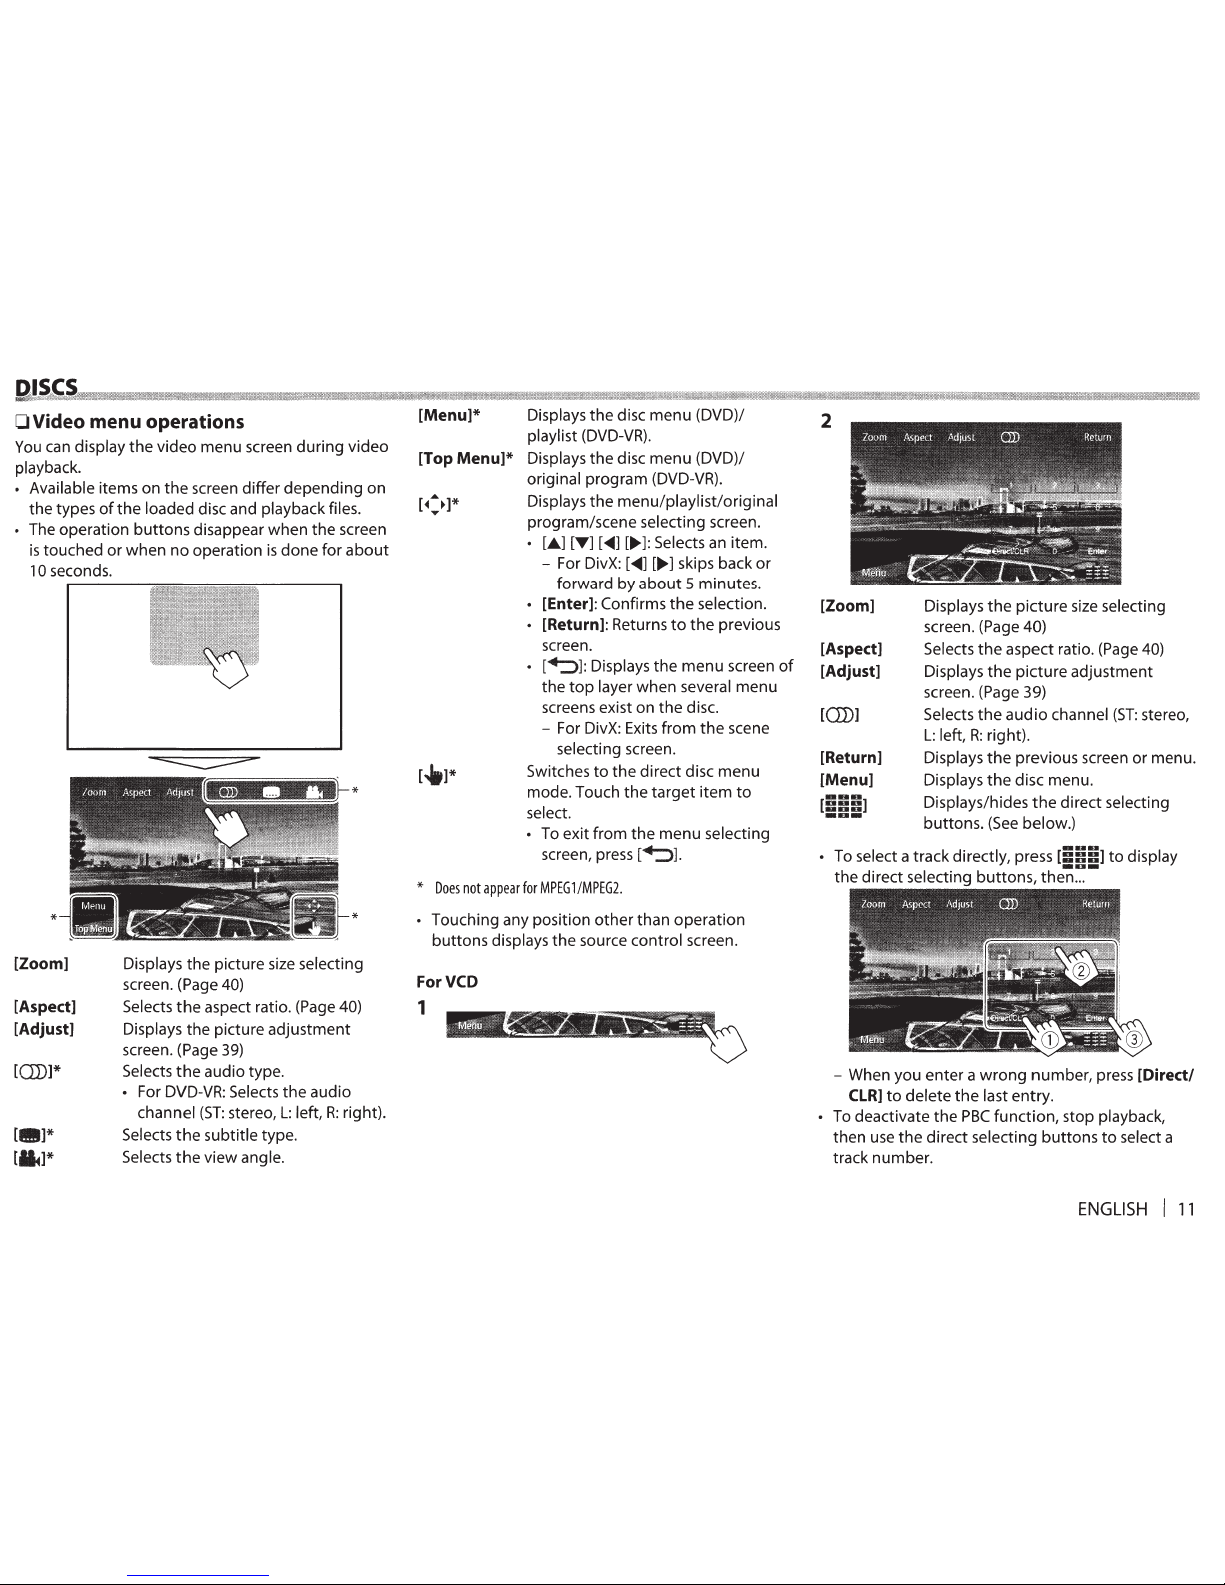
ForVCD
1
2
[Zoom]
[Aspect]
[Adjust]
[OJ)]
[Return]
[Menu]
Displays
the
picture
size selecting
screen. (Page 40)
Selects
the
aspect
ratio. (Page 40)
Displays
the
picture
adjustment
screen. (Page 39)
Selects
the
audio
channel
(ST:
stereo,
L:
left,
R:
right).
Displays
the
previous
screen
or
menu.
Displays
the
disc
menu.
Displays/hides
the
direct
selecting
buttons.
(See
below.)
• To select a
track
directly,
press
[5551
to
display
-lUI-
the
direct
selecting
buttons,
then
...
- When
you
enter a wrong
number,
press [Direct/
CLR]
to
delete
the
last
entry.
• To
deactivate
the
PBC
function,
stop
playback,
then
use
the
direct
selecting
buttons
to
select a
track
number.
ENGLISH I 11
Page 12

DISCS
0 Selecting playback mode
[c!:.,)] Selects Repeat playback mode.
[.J.
t1
Selects Random playback mode.
• For DVD/DVD-VR: Repeat play
is
available.
For
VCD
(without
PBC)/CD/DivX/MPEG 1 /MPEG2/
MP3/WMA/WAV: Repeat and Random play are
available.
- You
cannot
activate
the
repeat
mode
and
the
random
mode
at
the
same time.
•
Each
time
you press the
button,
the
playback
mode
changes. (The corresponding indicator
lights up.)
- Available items
differ
depending
on
the
types
of
loaded disc and playback file.
c!:.,)
PROGRAM Repeats current program (not
available
for
Playlist playback).
c!:.,)
CHAPTER
c!:.,)
TITLE
c!:.,)
SONGS
c!:.,) FOLDER
.I-t
FOLDER
.I-t
ALL
Repeats current chapter.
Repeats current title.
Repeats current track.
Repeats all tracks
of
the
current folder.
Randomly plays all tracks
of
the
current folder, then tracks
of
the
next folders.
Randomly plays all tracks.
To cancel Repeat/Random playback:
Press
the
button
repeatedly
until
the
indicator disappears.
12
Settings for disc playback
• The items shown on
the
<Mode>
screen are
different
depending
on
the
discs/files played back.
0 Setting items
<Menu
Language>
<Audio
Language>
<Subtitle>
<Down
Mix>
Select the initial disc menu language.
(Initial:
English) (Page
57)
Select the initial audio language.
(Initial:
English) (Page
57)
Select
the
initial subtitle language
or
turn
subtitles
off
(Off). (Page 57)
• Initial for KW-V40BT Region 1
I
KW-V20BT Region 1/KW-V200BT/
KW-V1
0 Region 1
/KW-V1
00: Off,
for
KW-V40BT
Region4/KW-V20BT
Region 4/KW-V1 0 Region
4:
English
When playing back a multi-channel
disc, this setting affects
the
signals
reproduced
through
the
front
and/
or rear speakers and AV-OUT/Audio
output*
1
•
• Dolby Surround: Select this
to
enjoy multi-channel surround
sound by connecting an
amplifier
compatible
with
Dolby Surround.
• Stereo (initial): Normally select
this.
<D.
Range
Com pres.>
<Monitor
Type>
<File
Type>*
2
You can change
the
dynamic range
while playing Dolby Digital software.
• Off: Select this
to
enjoy a
powerful
sound
at a low
volume level
with
its full dynamic range.
• On (initial): Select this
to
reduce
the
dynamic range a little.
• Dialog: Select this
to
reproduce
movie dialog more clearly.
Select
the
monitor
type
to
watch a
wide
screen picture on
the
external
monitor.
16:9
(Initial) 4:3
LB
4:3
PS
~~~
Select
the
playback file type
when
a
disc contains different types
of
files.
• Audio:
Plays
back audio files.
• Still Picture:
Plays
back
JPEG
files.
• Video:
Plays
back DivX/MPEG 1 I
MPEG2
files.
• Audio&Video (initial):
Plays
back
audio
files and DivX/MPEG 1 I
MPEG2
files.
*
1
Only
for
KW-V40BT
/KW-V20BT
/KW-V200BT
/KW-V1 0 Region
1 I
KW-V100.
*
2
For
playable
file
types,
see
page
55
.
If
the
disc
contains
no
files
of
the
selected
type,
the
existing
files
are
played
in
the
following
priority:
audio,
video,
then
still
picture.
Page 13
'
!ll
~
oiini~~'IIJ
~
;
~$11
~'~~c-
vou
can
connect a
USB
mass
storage class
device
such
as
a
USB
memory,
Digital
Audio
Player
etc.
to
the unit.
•
For
details
about
connecting
USB
devices,
see
page
52.
•
You cannot connect a
computer
or
portable
HDD
to
the
USB
input
terminal.
•
For
playable file
types and notes on using
USB
devices,
see
page
56.
When a
USB
device
is
connected ...
The source changes
to
"USB"
and
playback
starts.
• All tracks in
the
USB
device
will
be
played
repeatedly until
you change
the
source.
•
When
the
operation
buttons
are
not
displayed
on
the
screen,
touch
the
area shown on
the
illustration.
- For
KW-V1
O/KW-V1
00:
You
can
also
display/hide
the
operation buttons
by
pressing
FNC
on
the
monitor
panel.
- To change settings for video
playback,
see
page
39.
0
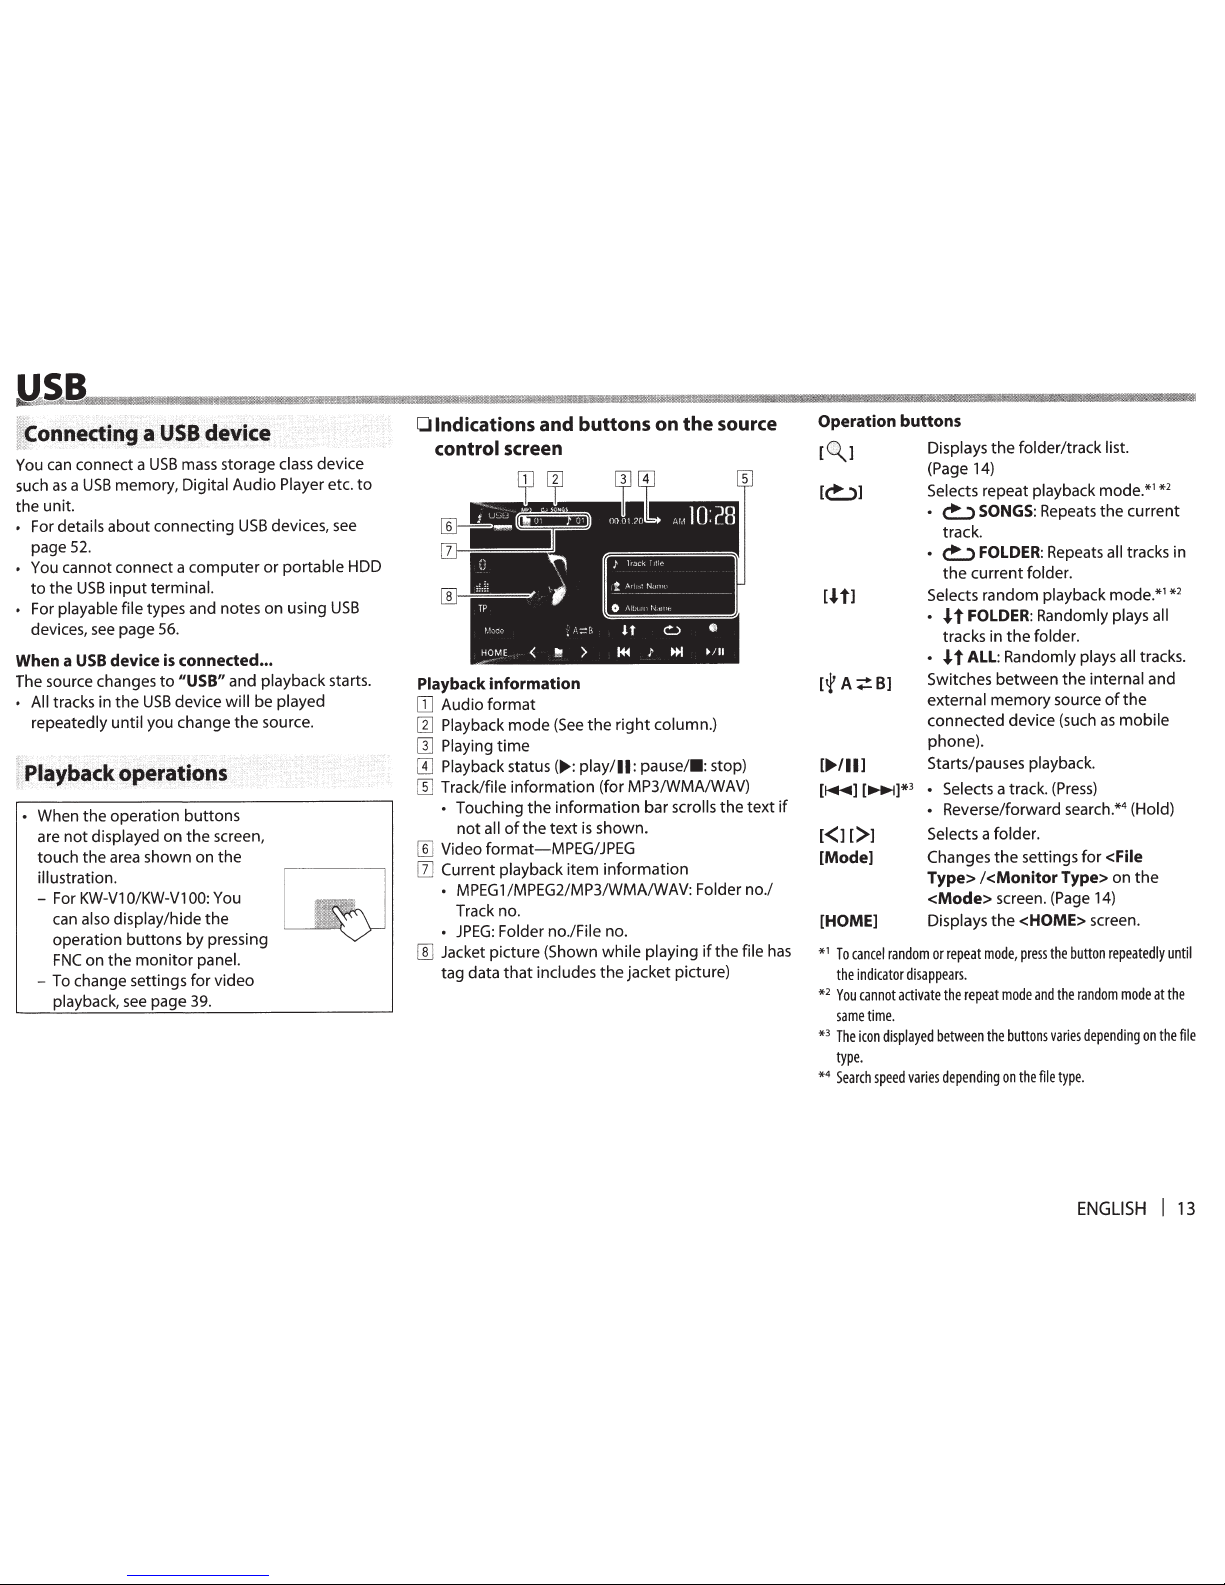
Indications and buttons on
the
source
control
screen
Playback
information
OJ
Audio
format
) loack
·,n,,
!_
Arl
.,•
Ndnh.
--
~~-
---~
0
Altnl!'
r"-tl''~
[1]
Playback
mode
(See
the
right
column.)
[]]
Playing
time
[!]
Playback
status(
....
:
play/11:
pause/•:
stop)
[]]
Track/file
information (for MP3/WMA/WAV)
•
Touching
the
information
bar
scrolls
the
text
if
not
all
of
the
text
is
shown.
[]]
Video format-MPEG/JPEG
[]]
Current playback
item
information
•
MPEG1/MPEG2/MP3/WMA/WAV: Folder
no./
Track no.
•
JPEG:
Folder no./File
no.
[]]
Jacket picture (Shown
while
playing
if
the
file
has
tag data
that
includes
the
jacket picture)
Operation buttons
[
~]
Displays
the
folder/track
list.
(Page
14)
[~]
[.Jt1
(
....
/11]
Selects
repeat
playback
mode.*
1
*
2
•
~SONGS:
Repeats
the
current
track.
•
~
FOLDER:
Repeats all
tracks in
the
current
folder.
Selects
random
playback
mode.*
1
*
2
•
.J
t
FOLDER:
Randomly plays all
tracks in
the
folder.
•
.J
tALL:
Randomly plays all
tracks.
Switches
between the
internal
and
external
memory
source
of
the
connected device (such
as
mobile
phone).
Starts/pauses playback.
(~]
(~]*
3
•
Selects
a track.
(Press)
•
Reverse/forward search.*
4
(Hold)
£<1
£>1
Selects
a
folder.
[Mode]
[HOME]
Changes
the
settings for
<File
Type>
I
<Monitor Type>
on
the
<Mode>
screen. (Page
14)
Displays
the
<HOME>
screen.
*
1
To
cancel
random
or
repeat
mode,
press
the
button
repeatedly
until
the
indicator
disappears.
*
2
You
cannot
activate
the
repeat
mode
and
the
random
mode
at
the
same
time.
*
3
The
icon
displayed
between
the
buttons
varies
depending
on
the
file
type.
*
4
Search
speed
varies
depending
on
the
file
type
.
ENGLISH
I
13
Page 14
SB
0
<Mode> settings
Setting <File
Type>
[Audio]
Plays
back audio
files.
[Still
Picture]
Plays
back
JPEG
files.
[Video]
Plays
back
MPEG
1 /MPEG2 files.
[Audio&Video]
(Initial)
Plays
back audio files
and
MPEG1/MPEG2
files.
• For
playable files,
see page
56.
If
the
USB
device
contains no
files
of
the
selected
type,
the
existing
files
are played
in
the
following
priority: audio,
video, then
still
picture.
Setting
<Monitor
Type>
Select
the
monitor
type
to
watch a wide screen
picture on the
external
monitor.
[16:9]
(Initial)
[4:3
LB]
[4:3
PS]
~
CiiJ
~·
14
0
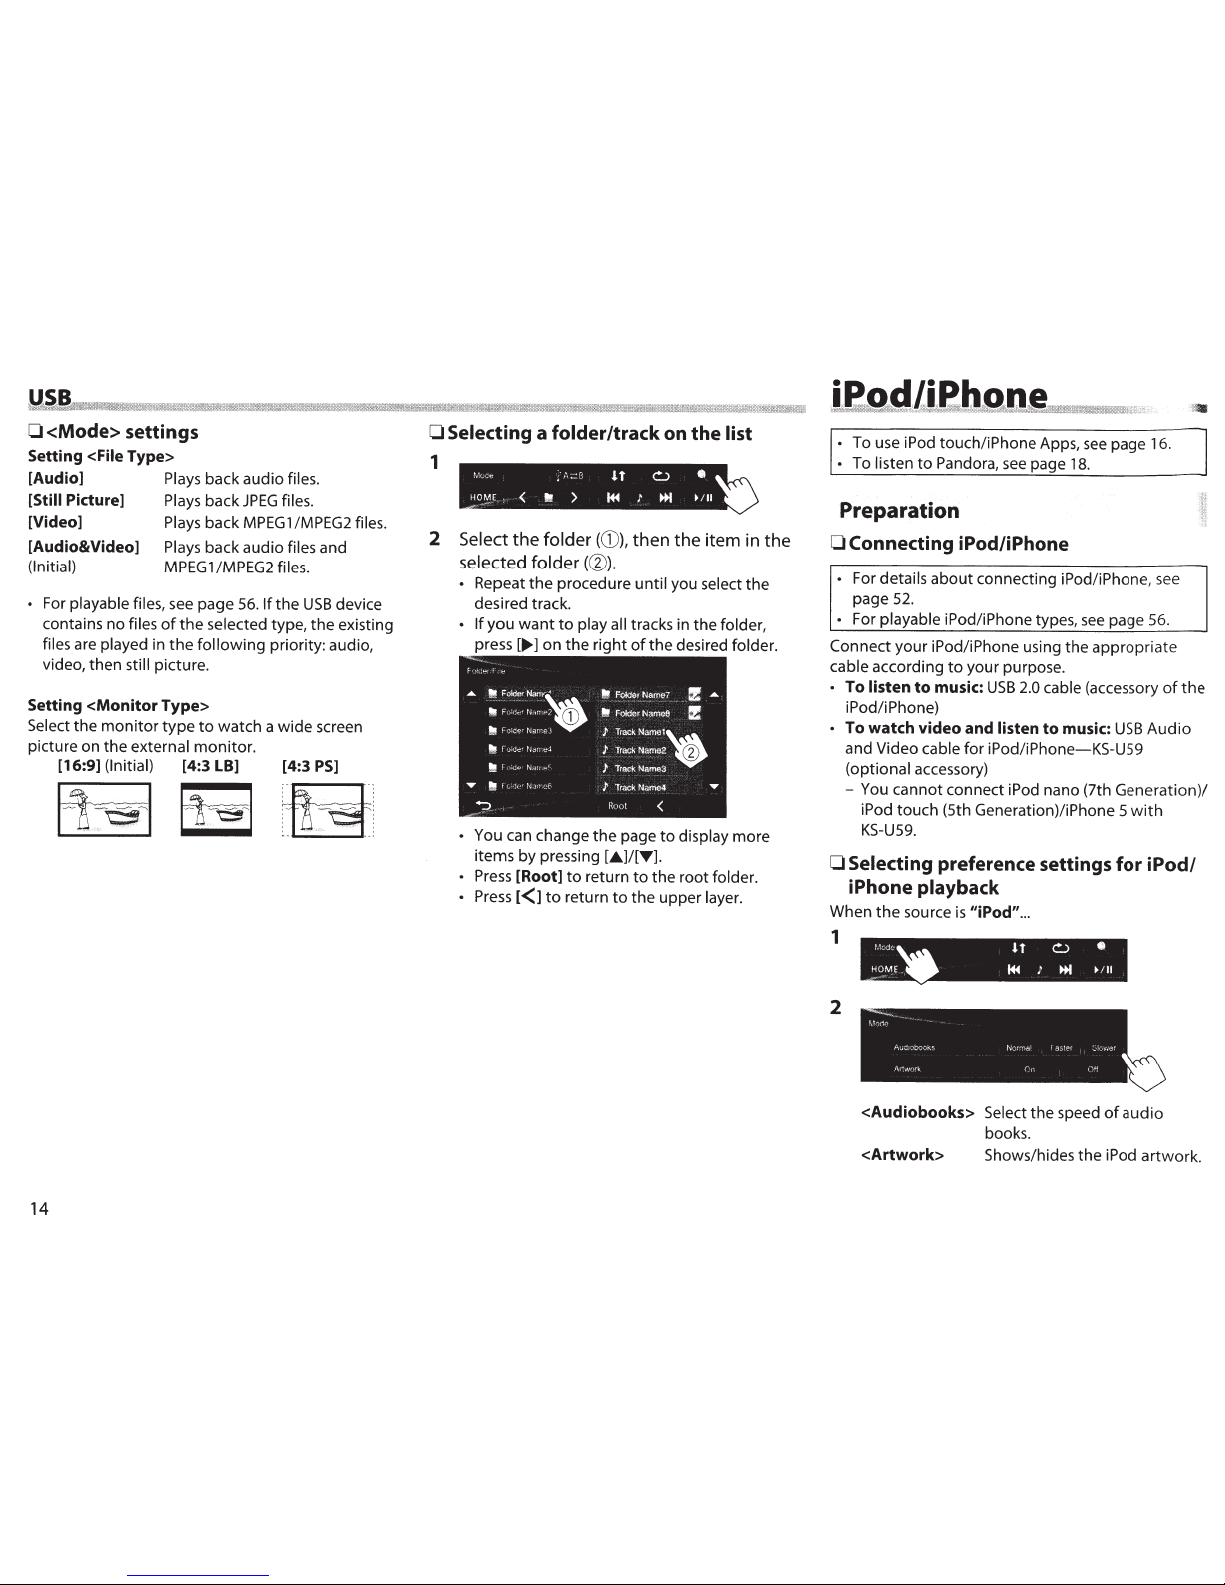
Selecting a folder/track on the
list
1
2
Select
the
folder ((})),then
the item in
the
selected
folder
(@).
Repeat
the
procedure
until
you select
the
desired track.
If
you
want
to
play all
tracks in
the
folder,
press
[llJll-]
on
the
right
of
the
desired
folder.
•
You can change
the
page
to
display
more
items by pressing
[A]/[T].
•
Press
[Root]
to
return
to
the
root
folder.
•
Press
£<1
to
return
to
the
upper
layer.
• To use iPod touch/iPhone Apps,
see
page 16.
•
To
listen
to
Pandora,
see
page
18.
Preparation
0 Connecting
iPod/iPhone
• For details
about
connecting iPod/iPhone,
see
page
52.
• For
playable
iPod/iPhone types,
see
page 56.
Connect
your iPod/iPhone using the appropriate
cable
according
to
your purpose.
• To listen
to
music:
USB
2.0
cable (accessory
of
the
iPod/iPhone)
•
To watch video and
listen
to music:
USB
Audio
and Video
cable
for
iPod/iPhone-KS-U59
(optional accessory)
- You cannot connect iPod nano (7th Generation}/
iPod touch (5th Generation)/iPhone 5
with
KS-U59.
0
Selecting preference settings for
iPod/
iPhone playback
When
the
source
is
"iPod"
...
1
2
f.1odc:
""'
l
f
0
till
HOME~
H4
t
...
~/II
<Audiobooks>
Select
the
speed
of
audio
books.
<Artwork>
Shows/hides
the
iPod artwork.
Page 15
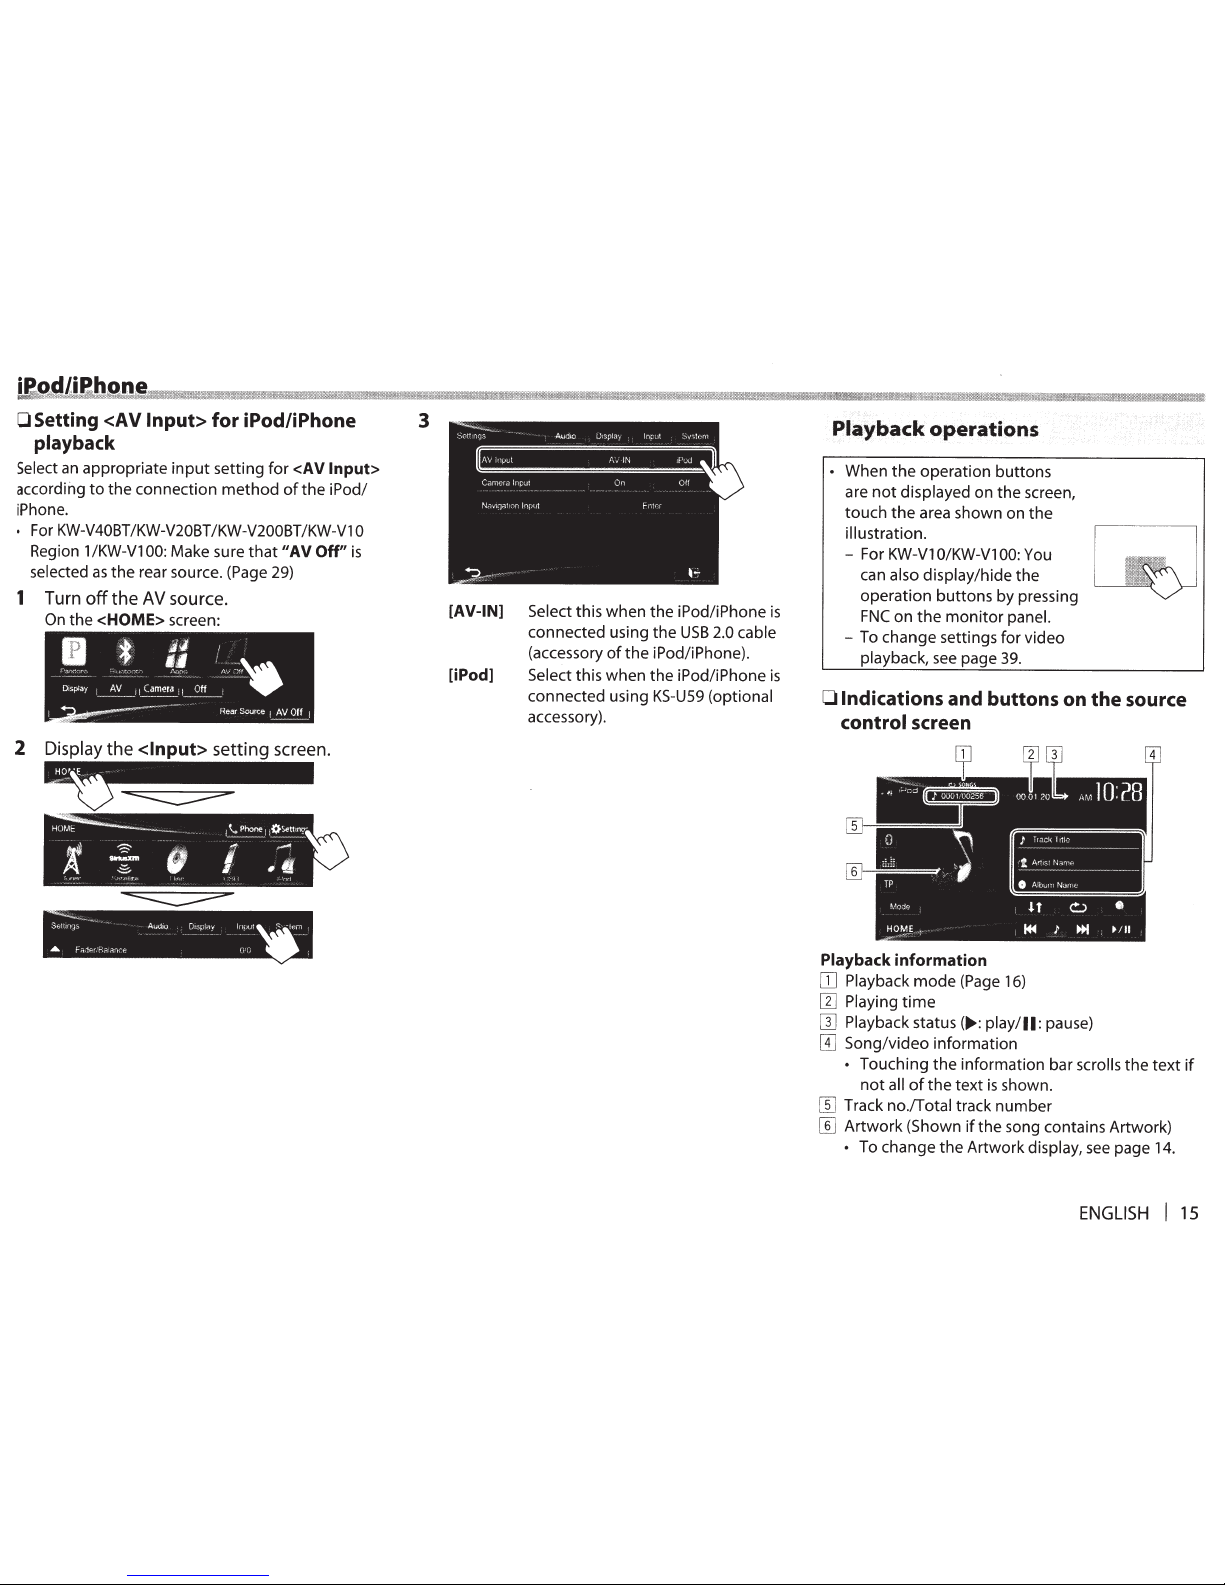
OSetting <AV
Input>
for iPod/iPhone
playback
Select
an
appropriate
input
setting
for
<AV Input>
according
to
the
connection
method
of
the
iPod/
iPhone.
•
For
KW-V40BT
/KW-V20BT /KW-V200BT
/KW-V1
0
Region 1 /KW-V1
00:
Make sure
that"
AV Off"
is
selected
as
the
rear source. (Page 29)
1
Turn
off
the
AV
source.
On
the
<HOME>
screen:
"
-.
!~
lt
!
.,
~\&
Dtsplay
1
_3!..._
11
Camera
1
~
•
1
••
"~
Rear
Source
!
AV
Off 1
2
Display
the
<Input>
setting screen.
3
[AV-IN]
Select
this
when
the
iPod/iPhone
is
connected using
the
USB
2.0 cable
(accessory
of
the
iPod/iPhone).
[iPod]
Select this
when
the
iPod/iPhone
is
connected using
KS-U59
(optional
accessory).
Playback
operations
•
When
the
operation
buttons
are
not
displayed
on
the
screen,
touch
the
area shown
on
the
illustration.
- For
KW-V1
O/KW-V1
00: You
can
also display/hide
the
operation
buttons
by
pressing
FNC
on
the
monitor
panel.
- To change settings
for
video
playback,
see
page 39.
0 Indications
and buttons on
the
source
control
screen
J
!tack
lttl·~
'l
Arl!SI
N~_r]1F
___
_
0
Albu•·t Nan.e
Playback
information
[]
Playback
mode
(Page 16)
W
Playing
time
[]]
Playback status(..,_: play/11: pause)
[I]
Song/video information
• Touching
the
information bar
scrolls
the
text
if
not
all
of
the
text
is
shown.
[[]
Track
no/Total
track
number
[[]
Artwork
(Shown
if
the
song contains Artwork)
•
To change
the
Artwork
display,
see
page
14.
ENGLISH
I
15
Page 16
Operation buttons
[~
1
Displays
the
audio/video
file list.
(See
below.)
[~]
Selects
repeat
playback
mode.
•
~SONGS:
Functions
the
same
as
//Repeat
One.~~
•
~ALL:
Functions
the
same
as
//Repeat
All."
[.I.
t1
Selects
random
playback
mode.*
1
[
....
,
..
]
·
.1.
t
SONGS:
Functions
the
same
as
//Shuffle
Songs."
.1.
t
ALBUMS:
Functions
the
same
as
//Shuffle Albums."
Starts/pauses
playback.
[~] [~]
• Selects
an
audio/video
file.*
2
(Press)
•
Reverse/forward search.
(Hold)
[Mode]
Changes
the
settings
for
iPod/iPhone
playback
on
the
<Mode>
screen.
(Page
14)
[HOME]
Displays
the
<HOME>
screen.
*
1
To
cancel
random
mode,
press
the
button
repeatedly
until
the
indicator
disappears.
*
2
Resume
playback
is
unavailable
for
video
files.
0 Selecting an audio/video
file from the
menu
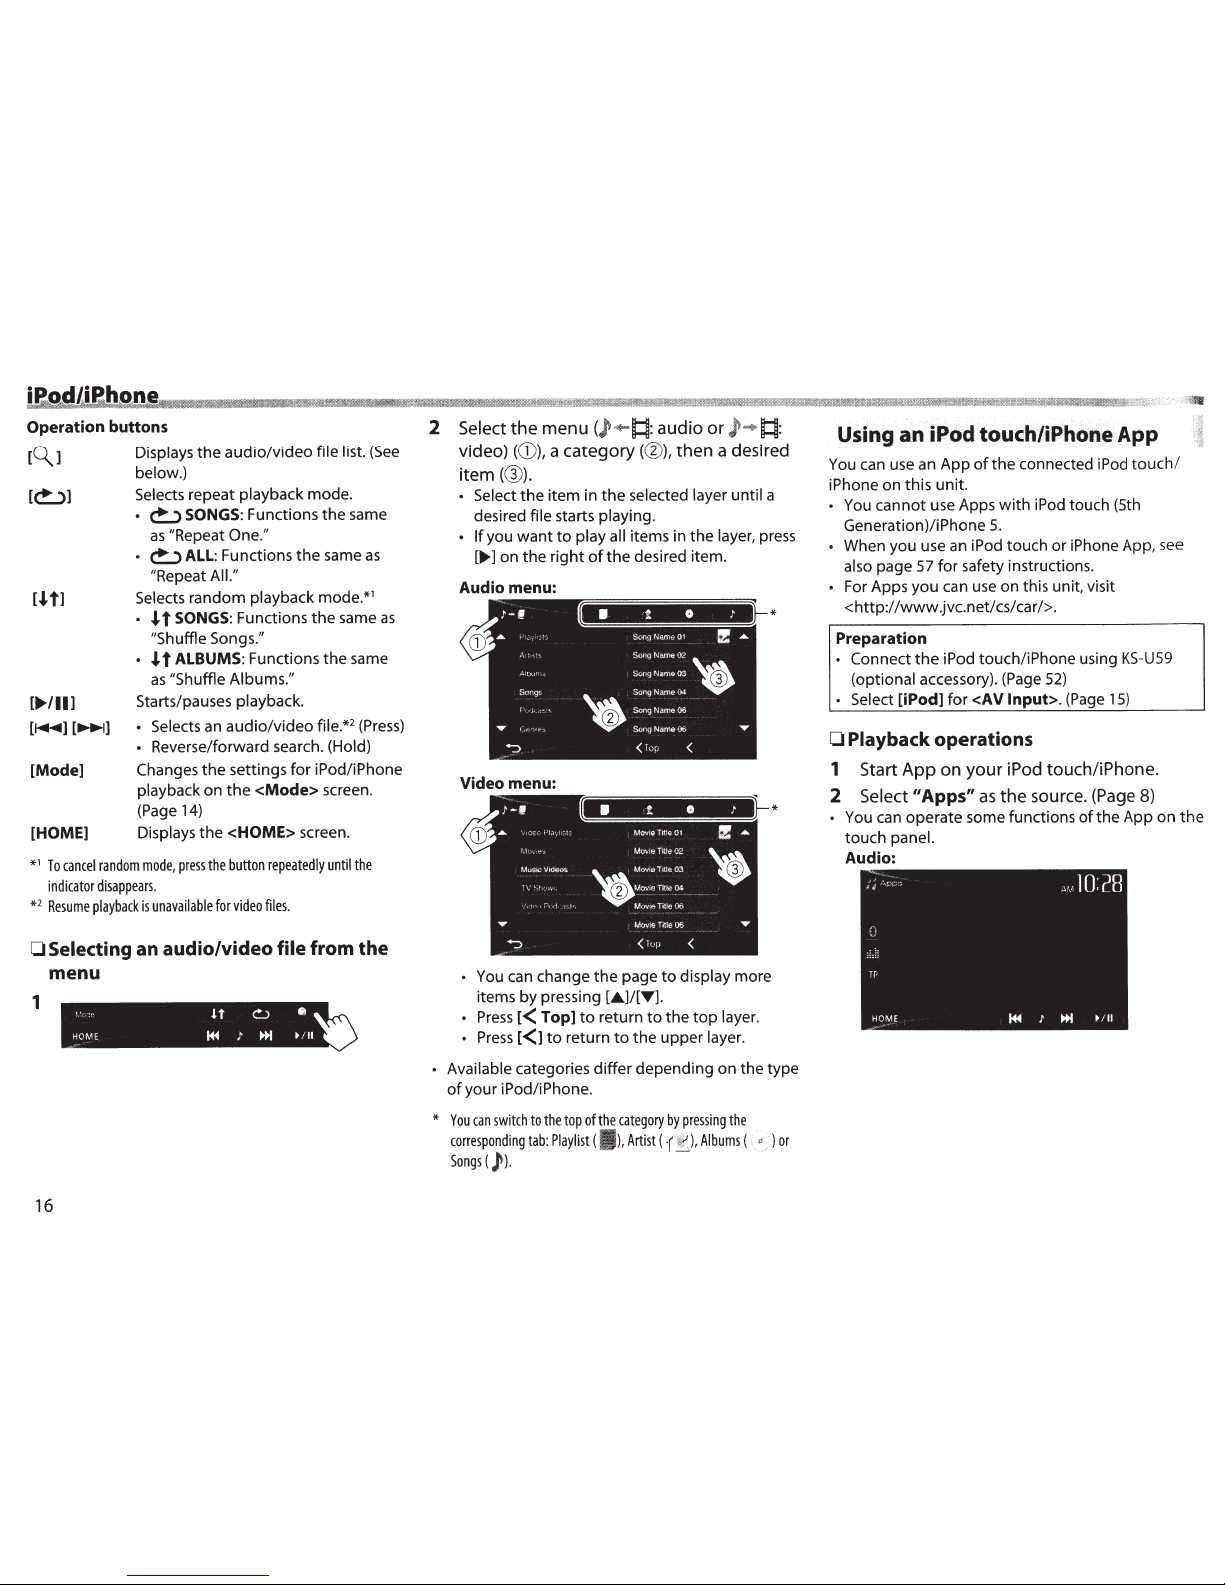
1
16
2
Select
the
menu
(
)•
!:~:
audio
or
!:~:
video)
((D),
a
category(@),
then
a desired
item(@).
• Select
the
item in
the
selected layer until
a
desired
file
starts
playing.
• If
you
want
to
play all
items in
the
layer,
press
[..,..]
on
the
right
of
the
desired item .
Audio menu:
Video menu:
•
You can change
the
page
to
display
more
items
by
pressing
[•]/[T].
•
Press
l<
Top]
to
return
to
the
top
layer.
•
Press
l<1
to
return
to
the
upper
layer
.
*
*
• Available
categories
differ
depending on the type
of
your iPod/iPhone.
*
You
can
switch
to
the top
of
the
category
by
pressing
the
corresponding
tab:
Playlist
(I
),
Artist
(
Albums
(
"~'
)
or
Songs
(
)'
).
Using
an
iPodtouchliPhorteApp
You can use an App
of
the
connected iPod
touch/
iPhone on this unit.
You cannot use Apps
with
iPod touch (5th
Generation)/iPhone
5.
When you use
an
iPod touch or iPhone App, see
also
page 57 for safety instructions.
•
For Apps
you
can use on this unit, visit
<http://www.jvc.net/cs/car/>.
Preparation
•
Connect
the
iPod touch/iPhone using
KS-U59
(optional
accessory). (Page
52)
• Select
[iPod]
for
<AV
Input>.
(Page
15)
0
Playback operations
1
Start
App
on
your
iPod
touch/iPhone.
2
Select
11
Apps"
as
the
source. (Page 8)
••
•
You can operate some functions
of
the
App on
the
touch
panel.
Audio:
Page 17
Video:
For some applications such
as
navigation
applications,
the
operating
buttons
and information
are
not
shown. You can perform
the
operations on
the
touch
panel,
such
as
scrolling
the
map.
You
can
also play
back
the
audio/video using iPod/
iPhone
itself
instead
of
the
unit.
0
Displaying
the
App
screen
while
listening
to
another
source
You
can
switch
to
the
App
screen from the
connected iPod
touch/i
Phone
while listening
to
another source.
Displaying the Apps switch button on the source
control screen
and
<HOME>
screen
•
For
KW-V40BT
/KW-V20BT
/KW-V200BT
/KW-Vl
0
Region
1
/KW-Vl 00:
Make sure
that
11
AV Off"
is
selected
as
the
rear source. (Page
29)
• Select
[AV]
for
<Display> on
the
<HOME> screen
beforehand. (Page
7)
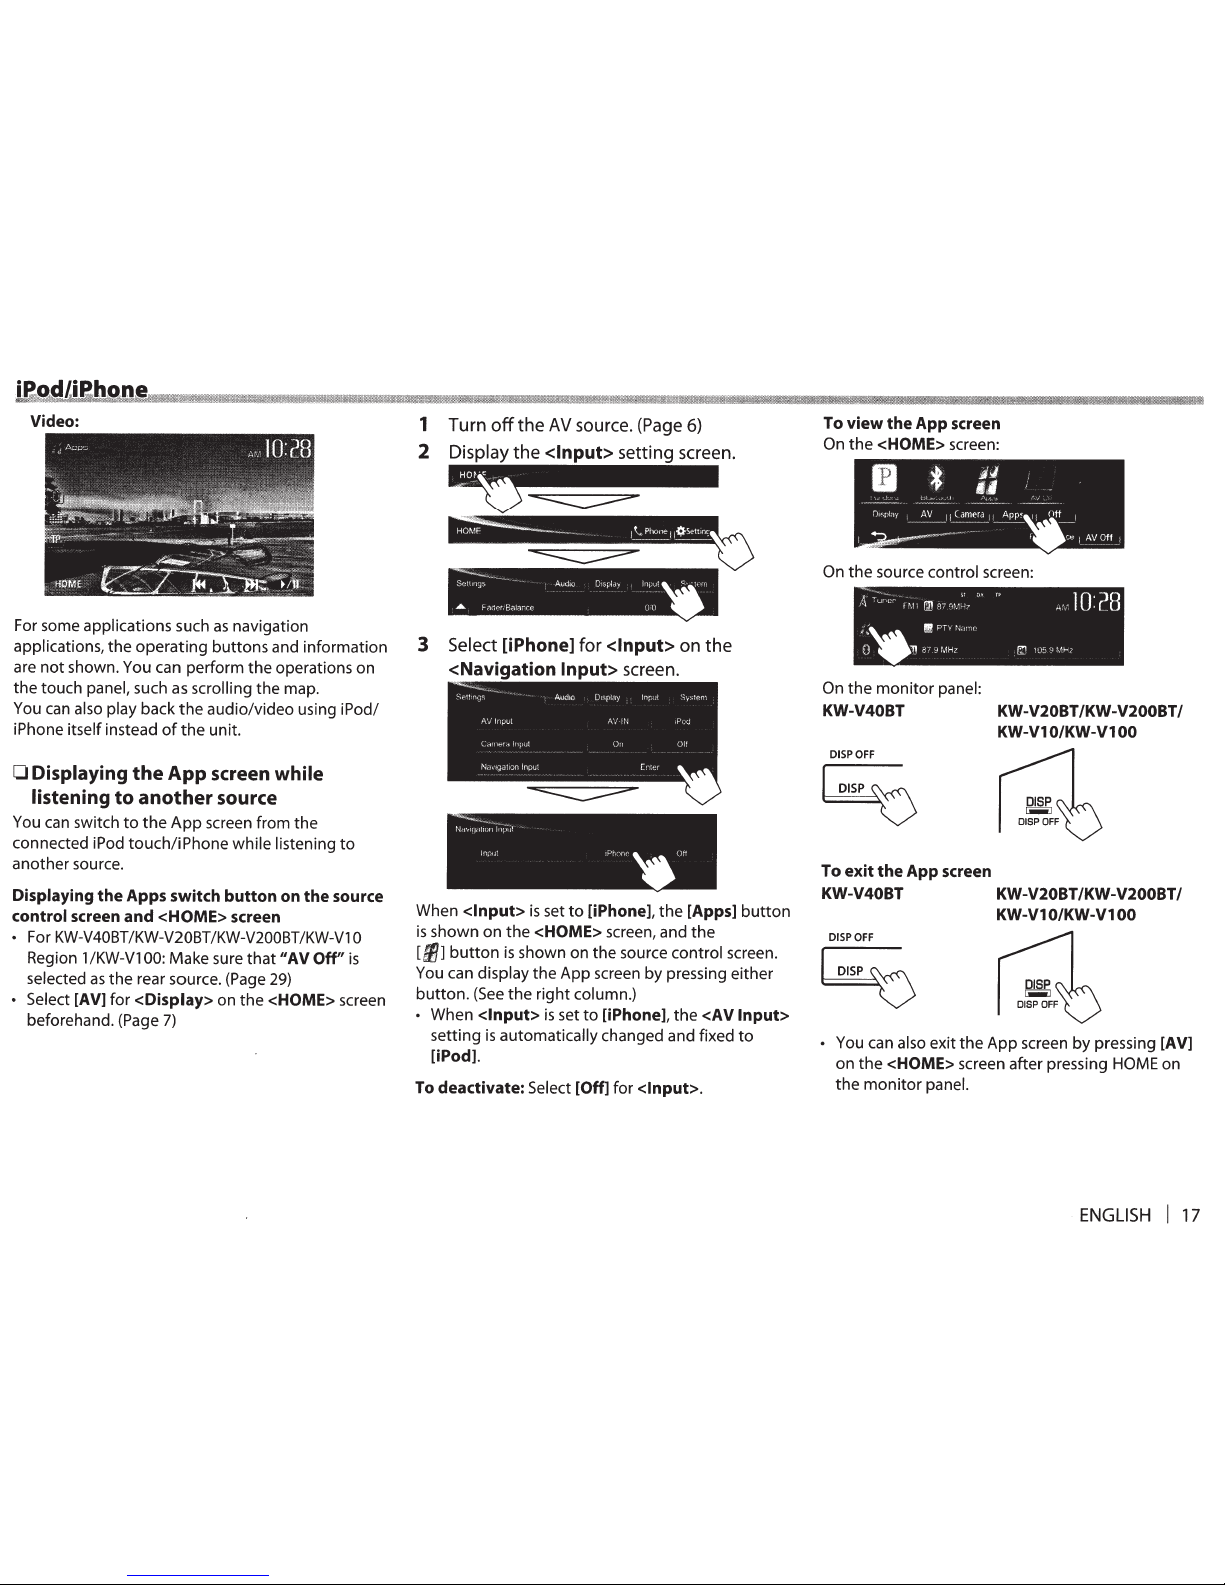
1
Turn
off
the
AV
source. (Page
6)
2
Display
the
<Input>
setting screen.
3
Select
[iPhone]
for
<Input>
on
the
<Navigation
Input>
screen.
Nc~v1qc
~;~~17~~)1
1l
'"'"' """"'
~
oe
When
<Input>
is
set
to
[iPhone],
the
[Apps]
button
is
shown
on
the
<HOME> screen, and
the
[fl1]
button
is
shown on the source
control
screen.
You can
display
the
App screen
by
pressing either
button.
(See
the
right
column.)
•
When
<Input>
is
set
to
[iPhone],
the
<AV
Input>
setting
is
automatically changed and fixed
to
[iPod].
To
deactivate:
Select [Off] for <Input>.
To
view
the App screen
On
the
<HOME> screen:
On
the
source
control screen:
On
the
monitor
panel:
KW-V40BT
DISPOFF
~
To exit the App screen
KW-V20BT/KW-V200BT/
KW-V1
O/KW-V1
00
KW-V40BT KW-V20BT/KW-V200BT/
KW-V1
O/KW-V1
00
DISPOFF
~
•
You can also
exit
the
App
screen
by
pressing [AV]
on
the
<HOME> screen after pressing
HOME
on
the
monitor
panel.
ENGLISH
I
17
Page 18
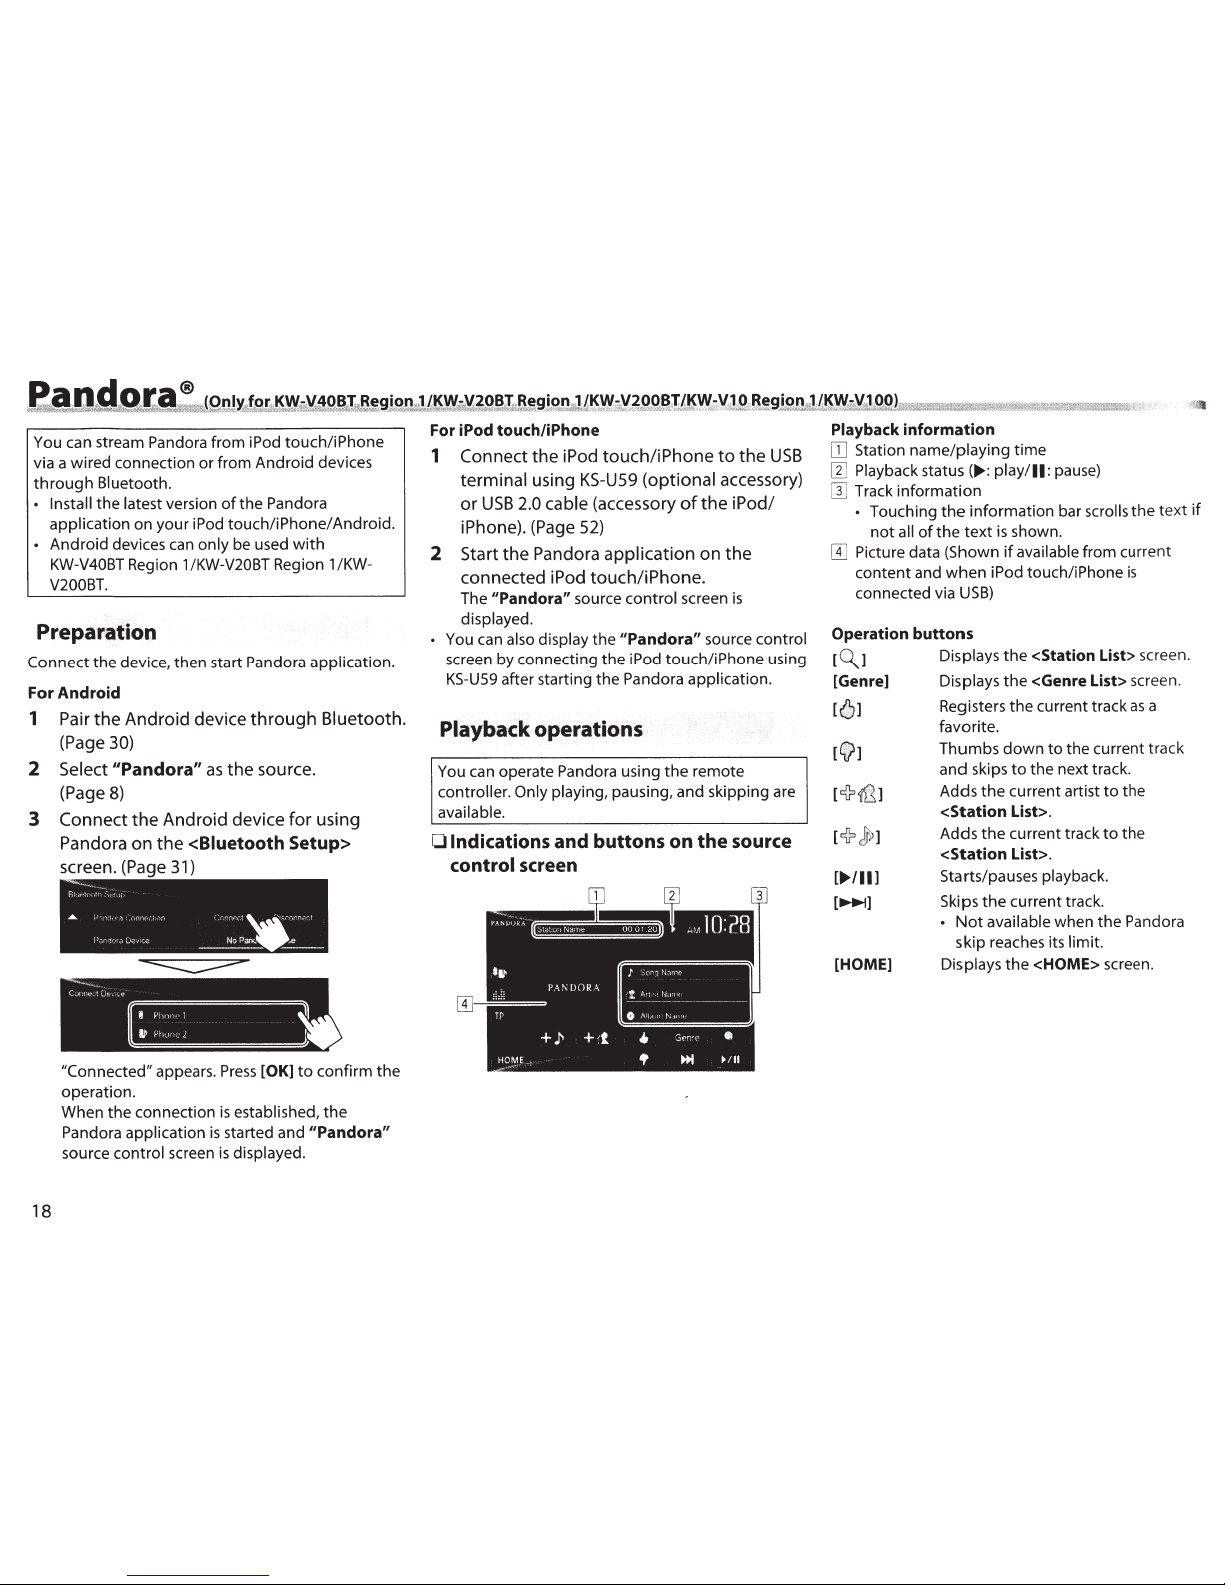
e.~~9~!3!9~~!l4W
""'
V~9
~
>
You can stream Pandora from iPod touch/iPhone
via a wired connection or from Android devices
through
Bluetooth.
• Install
the
latest
version
of
the Pandora
application
on your iPod
touch/iPhone/
Android.
•
Android devices
can
only
be used
with
KW-V40BT Region 1 /KW-V20BT Region 1 /KW-
V200BT.
Preparation
Connect the device, then start Pandora application.
For Android
1
Pair
the
Android
device
through
Bluetooth.
(Page 30)
2
3
18
Select
"Pandora"
as
the
source.
(Page
8)
Connect
the
Android
device
for
using
Pandora
on
the
<Biuetooth Setup>
s~reen.
(Page
31)
"''""··
R!1t->h•
tt--
-,\-'
11
,
A.
.,>
"••
1
"nnt "',;n
\
,"nn~.-t-;nyct
P;-,ryra
Dr;,,,:;e
No
Parn.:
:.e
-----
"Connected"
appears.
Press
[OK]
to
confirm
the
operation.
When the connection
is
established,
the
Pandora
application
is
started and "Pandora"
source
control screen
is
displayed.
For iPod touch/iPhone
1
Connect
the
iPod
touch/iPhone
to
the
USB
terminal
using KS-U59
(optional
accessory)
or
USB
2.0 cable (accessory
of
the
iPod/
iPhone). (Page
52)
2
Start
the
Pandora
application
on
the
connected
iPod
touch/iPhone.
The "Pandora"
source
control screen
is
displayed.
•
You can
also display
the
"Pandora"
source
control
screen by connecting the iPod touch/iPhone using
KS-U59
after starting the Pandora
application.
Playback operations
You can operate Pandora using
the
remote
controller. Only playing,
pausing, and skipping are
available.
0
Indications and buttons on
the
source
control
screen
J
:Oonq
~bmt
l
An·
I~.J!ll£
-------
-~
-
---
-~
0
/\ltJtP
t-,if't•
Playback information
[JJ
Station name/playing
time
[1]
Playback status
(.,.: play/11:
pause)
[}]
Track information
•
Touching
the
information bar
scrolls
the
text
if
not
all
of
the
text
is
shown.
W
Picture data (Shown
if
available
from current
content and
when
iPod touch/iPhone
is
connected via
USB)
Operation buttons
[~]
[Genre]
[']
[f]
r+
Jr;
1
[
...
,
..
]
[~]
[HOME]
Displays
the
<Station List> screen.
Displays
the
<Genre List> screen.
Registers
the
current track
as
a
favorite.
Thumbs
down
to
the current track
and skips
to
the next track.
Adds
the
current artist
to
the
<Station List>.
Adds
the
current track
to
the
<Station List>.
Starts/pauses playback.
Skips
the
current track.
•
Not
available
when
the
Pandora
skip reaches its
limit.
Displays the <HOME> screen.
Page 19
&!lt
.
d
.
Q
.
~~
/
~
a~
A
®
!!
!!
i
I:\
:
B!Wi\
!! ::
it
iil%\\Ml
~f!I
i
ii%
!MNf%l#M
iii
it
itKMmt1lt
W\
!
it
Lt:Jf'\W!\tM
'
it
Fi!MiliHW:l
!
!
1!
iMI.Wm!tL!
M
M!
i
i
!!IMtW!t!
Htii&
il
k!!
MW!l!:f@
!MHM!
!
M!iti@M!W
MMMI!i!M
rMWt!MHM
!MMW!if
WJJM.%\%
!%HMH
!i!!HIW:W
M1S11!MM
!Bf@ii@!!M
tM%!M!!
tiJtitt!M
t1iid!lkWWM
1lt:fiMM!M
tlBHi
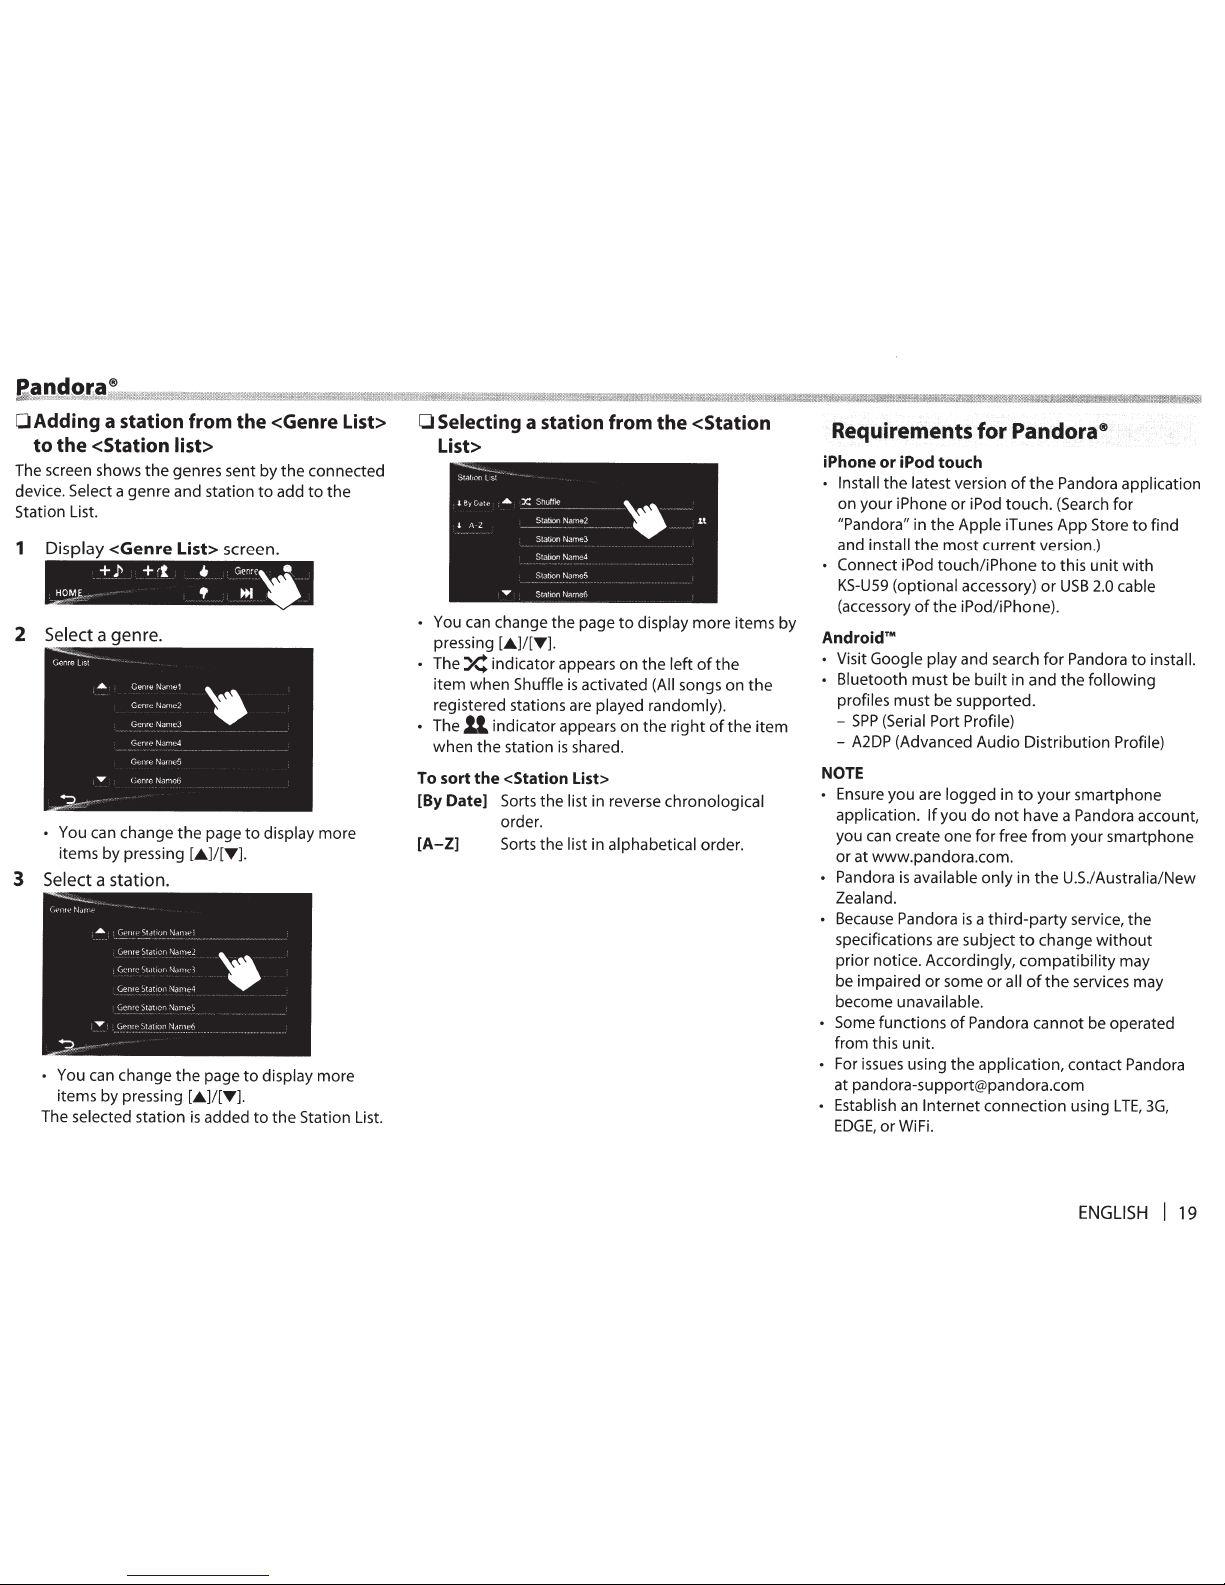
0
Adding a
station
from
the
<Genre List>
0
Selecting
a
station
from
the
<Station
List>
to
the
<Station list>
The screen shows
the
genres sent by
the
connected
device. Select
a genre and station
to
add
to
the
Station
List.
1
Display
<Genre
List> screen.
+
)"
+
'l
•
Genre"*
HOM~~
f ...
~
2 Select
a genre.
•
You can change
the
page
to
display more
items
by
pressing
[.&]/[T].
3
Select
a station.
•
You can change
the
page
to
display more
items by pressing
[.&]/[T].
The selected station
is
added
to
the
Station
List.
•
You can change
the
page
to
display
more
items
by
pressing
[.&]/[T].
•
The
X
indicator appears on
the
left
of
the
item
when
Shuffle
is
activated (All songs on
the
registered stations are played randomly).
•
The
1l
indicator appears on
the
right
of
the
item
when
the
station
is
shared.
To
sort
the
<Station
List>
[By
Date]
Sorts
the list in reverse chronological
order.
[A-Z]
Sorts
the list in alphabetical order.
.··
Requirements
for
Pand.
ora®
iPhone
or
iPod
touch
• Install
the
latest version
of
the
Pandora
application
on your iPhone
or
iPod
touch.
(Search
for
"Pandora"
in
the
Apple iTunes App
Store
to
find
and install
the
most current version.)
• Connect iPod touch/iPhone
to
this
unit
with
KS-U59
(optional accessory)
or
USB
2.0
cable
(accessory
of
the
iPod/iPhone).
AndroidTM
•
Visit Google play and search
for
Pandora
to
install.
•
Bluetooth must be
built
in and
the
following
profiles must be supported.
-
SPP
(Serial Port Profile)
-
A2DP
(Advanced Audio Distribution
Profile)
NOTE
•
Ensure you are logged in
to
your
smartphone
application.
If
you
do
not
have a Pandora
account,
you
can
create one for free
from
your smartphone
or at www.pandora.com.
• Pandora
is
available
only
in
the
U.S./
Australia/New
Zealand.
•
Because
Pandora
is
a
third-party
service, the
specifications are subject
to
change
without
prior notice. Accordingly,
compatibility
may
be impaired
or
some
or
all
of
the
services may
become unavailable.
• Some
functions
of
Pandora
cannot be operated
from this unit.
•
For
issues
using
the
application, contact Pandora
at pandora-support@pandora.com
•
Establish
an
Internet
connection using L
TE,
3G,
EDGE,
or WiFi.
ENGLISH
I
19
Page 20
Liste11i111J
to
the
·
radio
Preparation:
Select
the
appropriate
tuner
channel interval
for
<Area Setting>.
(Page
21)
0
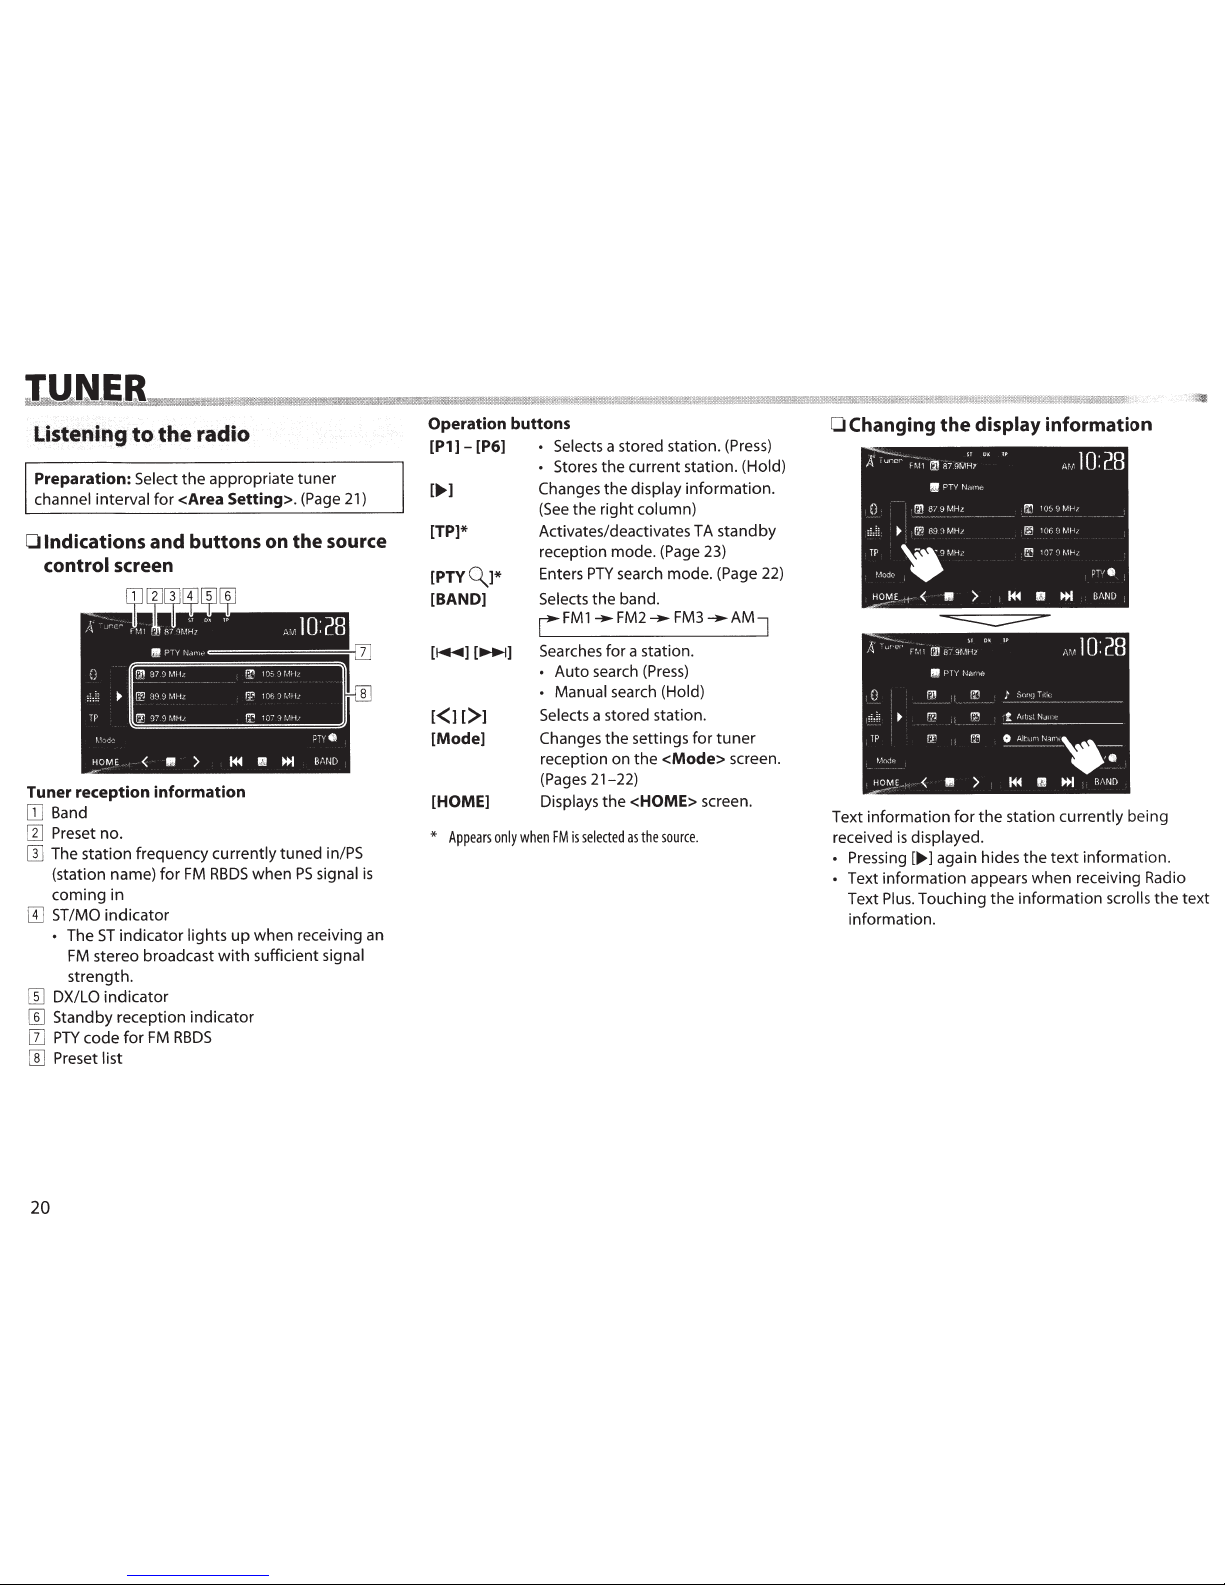
Indications and buttons on the source
control
screen
Tuner reception information
[]]
Band
W
Preset
no.
[]]
The station frequency
currently
tuned
in/PS
(station name)
for
FM
RBDS
when
PS
signal
is
coming
in
[I]
ST/MO
indicator
•
The
ST
indicator
lights
up
when receiving
an
FM
stereo broadcast
with
sufficient
signal
strength.
[[]
DX/LO
indicator
[]]
Standby reception indicator
[1]
PTY
code
for
FM
RBDS
[[]
Preset list
20
Operation buttons
[P1] - [P6]
•
Selects
a stored station.
(Press)
[
...
]
[TP]*
[PTYQ_]*
[BAND]
•
Stores the current station.
(Hold)
Changes
the
display
information.
(See
the right
column)
Activates/deactivates TA
standby
reception mode.
(Page 23)
Enters
PTY
search mode.
(Page
22)
Selects
the band.
LFMl-.
FM2
__..
FM3
-.AM]
[~]
[.....,] Searches for a station.
[Mode]
[HOME]
• Auto search
(Press)
• Manual search
(Hold)
Selects
a stored station.
Changes
the settings
for
tuner
reception on
the
<Mode>
screen.
(Pages
21-22)
Displays
the
<HOME>
screen.
*
Appears
only
when
FM
is
selected
as
the
source.
0 Changing
the
display
information
Text information
for
the
station
currently being
received
is
displayed.
• Pressing[..,.]
again hides
the
text
information.
• Text information appears when receiving Radio
Text
Plus.
Touching
the
information
scrolls
the
text
information.
Page 21

0
Improving the
FM
reception
Activate
monaural
mode
for
better reception.
1
2
Mode\&_
PTY.
HO~!!I!
II
>
~
II
...
BAND
[On]
Activate monaural
mode
to
improve
FM
reception,
but
the
stereo effect
will
be
lost.
The
MO indicator
lights
up.
[Off]
Restore
the
stereo effect.
D
Tuning in
FM
stations only
with strong
signals-LO/DX
(Local/Distance-
extreme)
1
2
[Local]
Select this
to
tune
in
only
to
stations
with
sufficient signal strength. The
LO
indicator lights up.
[OX] Deactivate
the
function. The
DX
indicator lights up.
0
Reducing interference during FM
reception
1
2
[Auto]
[Wide]
Increases
the
tuner
selectivity
to
reduce interference between
adjacent stations. (Stereo effect may
be
lost.)
Subject
to
the
interference from
adjacent stations,
but
sound quality
will
not
be degraded and
the
stereo
effect
will
remain.
0
Changing
the
tuner
channel interval
The
tuner
channel interval changes depending on
the
area you use this unit.
1
2
[US]
Select
this
when
using in
North/
Central/South America. FM/ AM
intervals are set
to
200 kHz/1
0
kHz.
[Europe]
Select
this
when
using in any
other
areas.
FM/
AM intervals are set
to
50
kHz/9kHz.
[SA]
Select this
when
using in South
American countries where
FM
interval
is
50
kHz.
AM interval
is
set
to
10kHz.
• The
initial setting
is
<US>
for KW-V40BT
Region 1 /KW-V20BT Region 1
/KW-V200BT
I
KW-V1
0
Region 1 /KW-V1
00,
and
<SA>
for
KW-V40BT Region 4/KW-V20BT Region
4/
KW-V1
0
Region
4.
ENGLISH
I
21
Page 22

Presetting stations
0
Storing stations in the memory
You can preset 6 stations
for
each band.
Automatic
presetting-SSM
(Strong-station
Sequential Memory) (For FM only)
1
2
Local stations
with
the
strongest
signals
are
found
and stored automatically.
22
Manual
presetting
1
Tune in
to
a station you
want
to
preset.
(Page 20)
2
Select a preset number.
(Hold)
The station
selected
in step
1
is
stored.
0 Selecting
a preset station
• You can
also select a preset station by pressing
[<11[>1.
FM
RBDS
features
OSearching for FM
RBDS
programs-PlY
Search
You can search for your favorite programs
being
broadcast by
selecting
the
PTY
code
for
your
favorite
programs.
1
2
Select
a
PTY
code.
(Hold)
• You can change
the
page
to
display
more
items by pressing
[.A.]/[T1.
PTY
Search starts.
If
there
is
a station broadcasting a
program
of
the
same
PTY
code
as
you have
selected,
that
station
is
tuned
in.
Page 23

CJ
Activating/deactivating TA Standby
Reception
The
unit
is
in standby
to
switch
to
Traffic
J\nnouncement
(TA)
if
available.
(The
TP
indicator
lights
up.)
• If
the
TP
indicator
flashes,
tune
into
another
station providing
RBDS
signals.
To
deactivate
TA
Standby Reception:
Press
[TP].
(The
TP
indicator goes off.)
• The
volume
adjustment
for
Traffic Announcement
is
automatically
memorized. The next
time
the
unit
switches
to
Traffic Announcement, the
volume
is
set
to
the
previous level.
SiriusXM®
RADIO
!9!J
,
!
,
~
t
fS
;
~
\\
~~;;~d2§'L
;;
!!!
,
S~i
"
9
,
!l
ii
a&
,
~~i·~~g§;){
:rk
e
~
!g
,
!ea
w
J~!S~
&
~~
,.
gQ
,
!!i!i~!S~m~
;
J
9
,
!!!9J
~
9
,
!\!
H;
l(;
,
!S~&~
;
J
;
99
:
~
i*1%t®wmwwramtftMiim
Everything
worth
listening
to
is
on SiriusXM,
getting
over
130 channels,
including
the
most
commercial-
free music, plus
the
best sports, news,
talk
and
entertainment. To start
listening
to
the
SiriusXM®
Satellite Radio, a SiriusXM Connect
Vehicle
Tuner
(commercially available)
and subscription are
required. For more information, visit www.siriusxm.
com.
Before operating, connect
the
SiriusXM Connect
Vehicle
Tuner (commercially available)
to
the
expansion
port
on
the
rear
of
the
unit.
(Page
52)
Activating subscription
1
Check
your
Radio
I
D.
Radio
ID
is
labeled
on
the
casing
of
the SiriusXM
Connect Vehicle
Tuner
or
the
bottom
of
the
SiriusXM Connect Vehicle Tuner unit.
• You can also display
the
Radio
ID
on
the
screen by
tuning
in
to
Channel
0.
2
Activate
the
SiriusXM Connect Vehicle
Tuner using
one
of
the
two
methods
below:
•
For users in
U.S.A:
-
Online:
Go
to
www.siriusxm.com/
activatenow
-
Phone: Call
1-866-635-2349
•
For users in Canada:
-
Online:
Go
to
www.xmradio.ca and click
on
II
ACTIVATE
RADIO" in
the
top
right
corner
-
Phone: Call1-877-438-9677
3
Select
11
Satellite"
as
the source.
(Page
8)
SiriusXM
Connect Vehicle
Tuner starts
updating
all
the
SiriusXM
channels.
Listening to the
SiriusXM®
Radio
0 Indications
and buttons on
the
source
control screen
SiriusXM® radio reception information
[I]
Band
[1]
Preset
number
[I]
Channel number/Channel
name
[I]
Signal
strength indicator
W
Category name
W
Preset list
ENGLISH
I
23
Page 24

~
;
i
,
!ii
t
Y
,
!
.
I
~
M
,:%t
BI~
.,,
t
D,
.\
1
i
"
:ln1l:t
wntrmmrmtittJMlltWwmw;tm
MiM!iNiMtJWiH!i
MWit&¥itiMmi!MMT!M
\rtt+b1iEW~t4r!lmmr
nn£&1IM&~tmtt!HMW~tm
Mww)W!fi.itrt£s\n::ar;
HsN;1MmmMmw&t
ttHWtttntnMmw;;'iliwJutimJM:
ww
::mwrrRwtnmM!mRi!ItiaM;;;g;;;;;;;
f;;imwrwm
rwat;n§&t~.iiWBi''Fh:liHMiil\W!KJmt
R:&mm;;mt¥
lmm;mm::;
Operation buttons
[P1
1 -
[P6]
• Selects
a stored
channel.
(Press)
• Stores
the
current channel. (Hold)
[...,.]
Changes
the
display
information.
(See
the
right
column)
[QJ
Displays
the
Category/Channel
List.
(See
the
far
right
column.)
[CH
Direct] Displays
the
<Direct
Channel
Number> screen.
(See
the
far
right
column.)
[BAND]
Selects
the
band.
L
SXM
1-.
SXM2-.
SXM3-.
SXM4
J
[~]
[~]
• Selects
a
channel.
(Press)
[Mode]
[HOME]
24
• Changes
the
channel
rapidly.
(Hold)
-
While searching, invalid, skipped
and unsubscribed channels are
skipped.
Selects
a stored
channel.
Changes
the
settings
for
restrictions
on the
<Mode>
screen. (Page
25)
Displays
the
<HOME> screen.
0 Changing
the
display information
Text
information
for
the
station currently being
received
is
displayed.
•
Pressing
[...,.]
again hides
the
text
information.
Selecting a channel
0
Selecting a
channel
on
the
list
1
Mode
CH
D1rect
e
HO~.E
H
<
I
>
~
II
1M
BAND::tl
2
Select
a category
(G)),
and
then
select
a
channel
(@).
•
You can change
the
page
to
display
more
items by pressing
[.A]/[T].
0
Selecting a channel directly
1
Mode
CH
D1r"*·
H0¥F
,
~<
I
>
>
144
•
~·D
'
2
Enter a
channel
no.
((D),
and
then
confirm
(@).
•
Press
[Clear]
to
delete the entry.
Page 25

~lli!!
,
§l
,
fti
~;
=
Jit
~~
,,
QI~
;
~Q~,
H
liiw
fflii!
ilti
;;;;;;
t'1lihi8HSd,@
!ii!M
tKMl%M!iW!!
i\M!t
1ii1f&tHlMW
li!iM
\@fillLMM\
i@!i!1
Mllmf8illiiwii!
Mttfii
E1tr0:W1&lH!M
MikMilli
lfWMMMM
8i\ill%M
JMillk'&JMH
MHlM%t&
&f#J[Jii1MM
I&idMM
MMH1ttlfiM
l1li*iM
!!kiHMiM!:H
'lWHMii
WliMt&100!!tJ
MM!!MM
MM!Mtt!:l!M
!t¥iMltilf
l:~;r;;;z_gtt@!
tif
~
pre
,
setting
,
channels
0
Storing channels in
the
memory
You
can preset 6 channels
for
each band.
1
Tune in
to
a
channel
you
want
to
preset.
(Page
24)
2
Select a preset number.
(Hold)
The channel selected in step
1
is
stored.
0 Selecting a
preset
station
•
You can also select a preset station
by pressing
[<];[>].
Setting the reception
restrictiQns
0
Setting
the
parental
lock
You can set
the
parental lock in order to,
for
example, restrict children from receiving
adult
channels.
Setting
the
parental code
• The initial setting
is
"0000."
• Changing
the
code does
not
change
the
<P.Lock
Channel Select>
and
<Skip
Channel Select>
settings.
1
Display
the
<Parental
Code>
screen.
Mode\6.
CH
Dr'Ect
•
I
HOME:!~!
II
> '
~
•
~
BAND
2
Enter
the
current code
in
<Current Code>,
a
new
code in
<New Code>,
and then the
new
code again
to
confirm the entry in
<Confirm Code>.
CD
Enter a code.
(1)
Confirm
the
entry.
•
Press
[Clear]
to
delete the entry.
To change the parental code:
Press
[Change]
in
step
1,
enter current code,
then
new
code in step
2
above.
Activating the parental
lock
1
Display the
<Parental Code>
screen.
2
Enter your
parental
code
number
((D),
then
confirm the
entry(@).
•
Press
[Clear]
to
delete
the
entry.
Continued
to
the
next
page
...
ENGLISH
I
25
Page 26

3
Select
a
category((})),
and
then
a
channel
you
want
to
activate the parental lock
for
(@).
•
The
At
indicator appears beside
the
channel
with
the
parental lock activated.
•
To
cancel
the
selection, select
the
locked channel
again in Step
3.
The
eJ
indicator disappears and
the
selection
is
canceled.
•
When you
try
to
receive a channel
with
the
parental lock activated, the
parental code
input
screen appears and you cannot receive
the
channel until
you enter the correct code.
Clearing
the
parental
lock
for all
locked channels
1
Display
the
<Parental
Code>
screen.
Mod"\&
(H
D1rect
0
HOM~
IJ
)
~
IJ
...
BAND
26
2
Enter your
parental code number((})),
then
confirm the
entry(@).
•
Press
[Clear]
to
delete
the
entry.
0
Skipping
unwanted channels
If
you
do
not
want
to
receive some channels, you
can skip them.
Activating channel skipping
1
Display
the
<Skip
Channel Select>
screen.
2
Select a category
((})),
and then
select a
channel
you
want
to
skip
(@)
•
You can change the page
to
display more
items by pressing
[A]/[T].
The
II
indicator appears beside the selected
channels.
•
Repeat this step
if
you
want
to
skip more channels.
Clearing
the
channel skipping for
all
skipped
channels
On
the
<Mode>
screen:
(Hold)
Page 27

Using
external audio/video
players-AV-IN
• When
the
operation
buttons
are
not
displayed
on
the
screen,
touch
the
area
shown
on
the
illustration.
- For KW-Vl
0/KW-Vl 00: You
can
also
display/hide
the
operations
buttons
by
pressing
FNC
on
the
monitor
panel.
- To change settings
for
video
playback,
see
page
39.
You
can
connect an
external
component
to
the
AV-IN1
terminal.
(Page 52)
Preparation:
Select
[AV-IN]
for
<AV
Input>.
(Page 45)
•
<AV Input>
can
be
changed
only
when
<Input>
in
<Navigation
Input>
is
set
to
[Off].
• For KW-V40BT/KW-V20BT/KW-V200BT/KW-V1 0
Region 1 /KW-Vl
00:
Make sure
that
11
AV Off"
is
selected
as
the
rear source. (Page
29)
0 Indications
and buttons on
the
source
control screen
Playback
information
[I]
AV-IN
name
Operation buttons
[Mode]
Changes
the
AV-IN
name.
[HOME]
•
Press
[
<01111]
or[~]
to
select an
AV-IN
name.
Displays
the
<HOME>
screen.
0
Starting
playback
1
Connect
an
external component
to
the
AV-IN
1
terminal.
• To connect
an
external
component,
see
page
52.
2
Select
11
AV-IN"
as
the source. (Page
8)
3
Turn on the connected component and
start playing the source.
U~~~~
e~~rnai
.
~IJ~io
~~y~rs;
,
'
Front
AUX(only
for
KW·V2.0BT/KW-V200BT/
KW-V10/KW-V100)
0
Indications
and buttons on the source
control
screen
[HOME]
Displays
the
<HOME>
screen.
0
Starting
playback
1
Connect
an
external
component
to
the
AUX
jack on the
monitor
panel.
•
Use
a
3.5
mm
stereo
mini
plug
(commercially
available).
2
Select
11
Front
AUX"
as
the
source.
(Page
8)
3
Turn on the connected
component
and
start
playing
the source.
ENGLISH
I
27
Page 28

Using a rear
view
camera
•
To use a rear
view
camera, a
REVERSE
GEAR
SIGNAL lead
connection
is
required. (Page
51)
0
Activating
the
rear
view
camera
1 Display the
<Input>
setting screen.
On
the
<HOME>
screen:
2
To
deactivate:
Select
[Off]
for
<Camera
Input>.
28
0
Displaying
the
picture
from
the
rear
view
camera
The rear
view
screen
is
displayed
when
you
shift
the
gear
to
the
reverse
(R)
position.
For
KW-V40BT Region 1
/KW-V20BT Region 1 /KW-
V200BT /KW-V1 0
Region 1 /KW-V1 00:
To erase
the
caution message,
touch
the
screen.
To
display
the
picture
from
the
rear
view
camera
manually
On
the
<HOME>
screen:
•
When
displaying
the
picture
from
the
rear
view
camera
manually,
you
can change
the
setting
of
the
picture using
[Zoom]/[Aspect]/[Adjust].
(Page
39)
To
exit
the
rear
view
screen
KW-V40BT
KW-V20BT
/KW-V200BT
I
KW-V1
0/KW-Vl
00
Page 29

9
r
Z
,
tl
i
~
,,
I
:L
~
,
I
;
J;
;
~~~J~J
,
I
;
L
a
s;Q
.,
M
~
RQ
,
fl'
,;
IJ:I
)
I~~
.:
....
·n
·
u;w:trltmmnxH!l't11hl'\\t1tWi~WJmtml&\Fi\1\Rir!Iil!!tmmwi1\awtt;mw:w&aM:w&;am;iMW!tmtt1triB1ThttJiMH&lli¥t~Mll&JMJJJJNtwnrun:mt:rntmnw;::Rn!lWwWI;llttmmwunmJnHmHMiSii'ilfif%\WMmrm;m'Iit1Jmmnttmm<lHt:!t1&NttrmtwmitM!MWt:WmJmtmlMmll'lftt~
Qsing
a
.
nexte
.
~ne~l
monitor__.
:
Rea
.r
Source
(only forKW-V40BTIKW-V20BTI
KW-V200BT/KW-V10 Region
1/KW-V100)
You can enjoy
the
rear source playback
on
an
external
monitor
connected
to
the
AV-OUT VIDEO
and
AV-OUT AUDIO
terminals,
while
listening
to
any
source.
0
Displaying rear source images on
the
external monitor
1
Display
the
<Rear
Source>
screen.
2
Select
the
rear source.
• If "DISC", "USB",
or
"iPod"
is
selected
as
the
front
source,
only
the
buttons
of
11
AV-IN",
11
AV
Off",
and
the
one selected
as
the
front
source
can be selected.
•
11
AV-IN"
can be selected
when
<AV
Input>
is
set
to
[AV-IN].
(Page 45)
•
You
cannot select
"DISC", "USB",
or
11
iPod"
as
the rear source
when
the
front
source
is:
- "Apps"
- "Pandora"
with
a Pandora device
connected via a
USB
cable*
*
Only
for
KW-V40BT
Region
1/KW-V20BT
Region
1/KW-V200BT/KW-
V10
Region
1/KW-V100.
While
activating rear source ...
•
To view a
front
source image
on
the
rear
monitor,
press [Same
as
Front].
- To select a source
other
than
the
front
source
as
the rear source, press [Select]
on
<HOME>
screen.
• When you press [Same
as
Front]
while
listening
to
music, the track
list
appears.
•
If
the
selected source
is
not
"DISC", "USB",
"iPod"
or
"AV-IN",
nothing
appears
on
the
rear
monitor.
0 Operations on
the
external monitor
(from
the
remote
controller only)*
Selecting a
folder
or
track
on
the
control screen
For DivX/M
PEG
1
/M
PEG2/
J
PEG/MP3/WMA/WAV
/CD/
iPod
• DivX/MPEG1/MPEG2/JPEG:
While playback
is
stopped.
• CD/iPod: Skip
step[]].
[]]
Press
~~~to
select
the
"Folder"
column
or
"Track"
column.
[I]
Press
Ji../T
to
select a Folder
or
Track.
*
For
KW-V40BT
Region
1/KW-V20BT
Region
1/KW-V10
Region
1:
Purchase
RM-RK252P
separately.
ENGLISH
I
29
Page 30

Information
for
usingBluetooth®
devices
0
Bluetooth®
Bluetooth
is
a short-range wireless radio
communication technology for mobile devices
such
as
mobile phones, portable
PCs,
and other devices.
Bluetooth devices
can
be connected
without
cables
and communicate
with
each other.
Notes
•
While driving,
do
not
perform complicated
operations such
as
dialing numbers, using
the phonebook, etc. When you perform these
operations, stop your car in a
safe
place.
•
Some Bluetooth devices may
not
connect
to
this
unit depending on
the
Bluetooth version
of
the
device.
•
This
unit
may
not
work
for some Bluetooth
devices.
•
Connecting conditions may vary depending on
your environment.
•
For
some Bluetooth devices, the device
is
disconnected when the unit
is
turned off.
Bluetooth Information:
If you wish
to
receive
more information
about
Bluetooth, visit the
following
JVC
web
site:
<http://www
.jvc.net/ cs/ car
I>
30
Bluetooth profile
This
unit
supports the following
Bluetooth profiles:
•
HFP
(Hands-Free Profile)
1.5
•
OPP
(Object
Push
Profile)
1.1
• A2DP
(Advanced Audio Distribution
Profile)
1.2
•
AVRCP
(AudioNideo
Remote
Control Profile)
1.3
•
PBAP
(Phone
Book
Access
Profile)
1.0
•
SPP
(Serial
Port Profile)
Icons
for
the
Bluetooth button
®
No device
is
connected.
O
;tll
A Bluetooth audio player
is
connected.
O
1
A Bluetooth mobile phone
is
connected.
0
Both a Bluetooth mobile phone and audio
player
are
connected.
Connecting Bluetooth
devices
0
Registering a new Bluetooth device
When you connect a Bluetooth device
to
the
unit
for
the first time, pair the
unit
and the device.
Pairing
allows
Bluetooth devices
to
communicate with each
other.
•
The pairing method differs depending on the
Bluetooth version
of
the device.
- For devices
with
Bluetooth
2.1:
You
can
pair the
device and the unit using
SSP
(Secure Simple
Pairing)
which only requires confirmation.
- For devices
with
Bluetooth
2.0:
You need
to
enter a
PIN
code both on the device and
unit
for
pairing.
• Once
the connection
is
established,
it
is
registered
in the unit even
if
you reset the unit. Up to 5
devices
can
be
registered in total.
• Only one device for Bluetooth phone and one
for
Bluetooth audio
can
be connected at a time.
•
To
use
the Bluetooth function, you need
to
turn
on
the Bluetooth function
of
the device.
•
To
use
the registered device, you need to connect
the device
to
the unit.
(Page
32)
Pairing a Bluetooth device using
SSP
(for
Bluetooth 2.1}
When the Bluetooth device
is
compatible with
Bluetooth
2.1,
a pairing request
is
sent from
an
available device.
1
Search
11
JVC
Unit"
from your
Bluetooth
device.
2
Confirm
the request both on the device
and the unit.
123456
•
Press
[Cancel]
to
reject the request.
Page 31

Pairing a Bluetooth device using a
PIN
code (for
Bluetooth
2.0)
1
Display the
<Biuetooth Setup>
screen.
On the
<HOME>
screen:
2
Change
the
PIN
code.
•
If
you skip changing
the
PIN
code,
go
to
step
3.
•
The
PIN
code
is
initially
set
to
"0000".
•
The maximum
number
of
digits in the
PIN
code
is
16.
•
Press
[tJ]
to
delete
the
last
entry.
•
Bluetooth connection
by
<Audio
Connection>
is
only
available when
"Pandora"*
or
"BT
Audio"
is
selected
as
the
source.
•
Bluetooth connection by <Pandora
Connection>
is
only
available when
"Pandora"
is
selected
as
the source.*
3
Search
11
JVC
Unit"
from
your
Bluetooth
device.
4
Select
the
11
JVC
Unit"
for
your
Bluetooth
device.
•
If
the
PIN
code
is
required, enter
"0000"
(initial).
PIN
code
0000
When pairing
is
complete, the device
is
listed on
<Connect
Device>.
•
To use
the
paired device, connect
the
device
on <Connect
Device>.
(Page
32)
*
Only
for
KW-V40BT
Region
1/KW-V20BT
Region
1/KW-V200BT.
ENGLISH
I
31
Page 32

0
Connecting/disconnecting
a registered
Bluetooth
device
1
Display the
<Biuetooth
Setup>
screen.
(Page
31)
2
To connect:
Select
[Connect]
next
to
the target device
to
display
the
<Connect Device>
screen
(G)),
and then select
the
device you want
to
connect
(@).
"Connected" appears.
Press
[OK]
to
confirm the
operation.
• All
registered devices
(mobile
phone and
audio
player)
are
listed
on
<Connect
Device>.
To
disconnect
Select
[Disconnect]
next
to
the target
device.
A confirmation message appears.
Press
[Yes].
0
Deleting
a registered
Bluetooth
device
1
Display
the
<Biuetooth
Setup>
screen.
(Page
31)
2 Select
[Connect]
next
to
the target device
to
display the
<Connect
Device>
screen
(G)),
then display the
<Delete
Device>
screen(@).
-
Selectable
items
depend
on the device you
3 Select
a device
to
delete.
are operating.
A confirmation message appears.
Press
[Yes].
32
Using
the
Bluetooth mobile
phone
0
Receiving a
call
When a
call
comes in
...
• Call
information
is
displayed
if
acquired.
•
The device status/battery capacity
is
displayed
when
the
information
is
acquired from the device.
• Phone operation
is
not
available while
the
picture from
the
rear view camera
is
displayed.
(Page
28)
To
reject
a call
TP
.)
tr-~~
1
"'''""!'
''
When
<Auto
Answer>
is set
to
[On]
(Page
37)
The
unit
answers
the
incoming
call automatically.
0
Ending a call
While talking
...
Page 33

0 Adjusting the volume
of
calls/earpiece/
microphone
While talking
...
• You
can
adjust the
volume
level between
-20
to
+8 (initial:
0).
• This adjustment does
not
affect
the
volume level
of
the other sources.
•
Use
the
monitor
panel
to
adjust the call/earpiece
volume. (Page
6)
0 Switching between handsfree mode
and phone mode
While talking
...
Each
time you press
the
button,
the
talking method
is
switched : handsfree
mode
I
~~:
phone
mode).
0 Notifying
SMS
reception
If the mobile
phone
is
compatible
with
SMS
(Short
Message Service),
the
unit
tells you a message
has
been received. (Page
37)
• To read a received message, operate
the
mobile
phone after stopping the car in a
safe
place.
- You cannot read, edit,
or
send a message
through
the
unit.
• For some
mobile
phones, the notification message
may
not
be shown even
if
the
SMS
function
is
supported.
0 Reducing noise/adjusting the echo
cancel level
While talking
...
· To reduce
the
noise: Select [On] for <NR/EC>.
• To adjust
the
echo volume (between 1
to
10,
initial: 4):
Press
[EC-
]I[EC +].
· To adjust
the
noise reduction volume (between
-5
to
-20,
initial:
-7)
:
Press
[NR-
]/[NR +
].
0 Making a call
1 Display
the
phone control screen.
On
the
source control screen:
On
the
<HOME> screen:
On
the
monitor
panel:
KW-V40BT KW-V20BT /KW-V200BT
2 Select a method
to
make a call.
[]]
From
the
preset list/phone book/call lists
[1]
Direct number entry
[]
Voice dialing
[I] Phone number list (Page
34)
ENGLISH I 33
Page 34

From
the
preset list/phone book/call lists
1
2
34
iH
12345678X
~·
-·- .
[Preset]
From
the
preset list
From
the
dialed call list
[
il*"']
From
the
received call list
[ ]
[~]
From
the
missed call list
From
the
phone
book
•
To
copy
the
phone
book,
see
page
35.
• You can change
the
page
to
display more
items by pressing [.A]/[T].
•
To
use
the A
to
Z search on phone book:
1
When the phone
book
list screen
is
displayed, you
can
search by initial.
2 Select the initial.
• If the initial
is
not
a letter
or
number, press
[Others].
3 Select a phone
number
from the list.
Preser~--1·•
I•·
~~
D
~
Phcn~;
...
Ndrnc1
1234~6l8X
>
sv~(t;Jn
Namr)
17)4')~',7XX
>
NurncJ
12J4:,(.X:'\/
A•o!
NcH1H.:4
12.34SXX,>\X
N,!tnP'i
l/">4XXXXX
>
....
NJmc6
123XXXXXX
>
• To display
the
details
of
an
entry:
When
the
phone
book
list screen
is
displayed,
you can display
the
details
of
an
entry and select
a phone
number
if
several phone numbers are
registered.
1 Display the details
of
the desired entry.
2 Select a phone number
to
call.
Direct
number
entry
You
can
enter
up
to
32
numbers.
•
Press
[
m]
to
delete the last entry.
•
Press
and hold [0+]
to
add
11+11
to the phone
number.
•
Press
[Save]
to
save
the entered phone
number
onto
the
preset list.
(See
the far left column.)
Page 35

Voice
dialing
•
Available
only
when
the
connected mobile phone
has
a voice recognition system.
1
Activate voice
dialing.
On
the phone control screen:
•
>)~'-
1
~34XXX~X
·~23XXXXXX
,~~
'
-~
On
the
monitor
panel:
KW-V40BT KW-V20BT/KW-V200BT
t
~(Hold)
I~~
~(Hold)
2
Say
the name
of
the
person you
want
to
call.
• If
the
unit
cannot find the target, the
following
screen appears.
Press
[Start],
then
say
the
name again.
To
cancel
voice
dialing:
Press
[Cancel].
0
Presetting phone numbers
You
can
preset
up
to
6
phone
numbers.
1
Display
the
phone
control
screen.
(Page
33)
2
Select
an
item from
the
phone book/call
lists.
3
Select
a phone number.
(Hold)
4
Select
a preset number
to
store into.
•
You can also preset a phone
number
entered on
the direct
number
entry screen by pressing
[Save].
(Page
34)
0 Copying
the phone book
You can copy
the
phone book memory
of
a
mobile
phone
into
the
unit
(up
to
400
entries).
1
Display
the phone
control screen.
(Page
33)
2
3
The
PIN
code (initial:
0000) necessary for
copying the
phonebook
from
the
mobile
phone
and the numbers
of
the
phone
book
entries
copied are displayed.
4
Operate
the
target
mobile
phone.
•
Refer
to
the
instruction manual supplied
with
your mobile phone.
•
To
cancel
the
transfer, press
[Finish].
5
Finish the procedure.
The phone
book
memory
is
copied from the
mobile phone.
ENGLISH
I
35
Page 36

BLU
About
mobile
phones compatible
with
Phone
Book
Access
Profile
(PBAP)
If
your
mobile
phone supports
PBAP,
you can
display
the
phone
book
and call lists on
the
touch
panel
screen
when
the
mobile
phone
is
connected.
•
Phone book:
up
to
5
000
entries
• Dialed calls,
received calls, and missed calls:
up
to
50
entries each
To
display
the
phone
book/call lists
of
the
mobile
phone or
the
unit
[Phone) Displays
the
phone
book/call lists on
the
connected mobile phone.
[System)
Displays
the
phone
book/call lists
copi.ed
to
the
unit.
36
0 Deleting
the phone number entries in
the unit
1
Display the preset
list/phone book/call list
you
want
to
delete.
(Page
34)
2
•
You cannot
delete
data
when
[Phone)
is
selected.
3
Select
the item you
want
to
delete.
Preset'
fl
•-+
fl•·
I
"
D
~
•
t~J!Ik'
1
1
23l~~6~g_'
,'
>
N.m1'.'..'
'2)4'_.•:.
<<;
~
'3,-ster-·
N:Hw•i
i:>?L•,:<xx
Ail
N.1f'P11
>
~'~d~ni.<)
1!
;4:<x:x>:."~
>
.....
Name(>
-,
23
x.X\:<X'\
>
? .
--~
•
Press
[All)
to
delete all
the
numbers/names in
the
selected list.
A confirmation message appears.
Press
[Yes).
~~ttil'l~~
fo~
,
8'"'''~9~b
:
rgglfi
.
l~
ph()nes
1
Display
the
phone
control
screen.
(Page
33)
2
Page 37

Q
Setting items
<:Auto
Answer>
<::SMS
Notify>
<:Ring
Mode>
<:Ring Tone
Change>
• On: The
unit
answers the incoming
calls automatically.
•
Off
(Initial):
The
unit
does
not
answer the
calls automatically.
Answer
the
calls manually.
•
On
(Initial):
The
unit
informs you
of
the
arrival
of
a message by ringing
and displaying
"Receiving Message".
• Off:
The unit does
not
inform you
of
the
arrival
of
a message.
•
System
(Initial):
The ring
tone
set on
the
unit
is
used.
•
Phone: The ring
tone
set on
the
mobile
phone
is
used. (This
function
may
not
work depending on
the
mobile
phone.)
When <Ring
Mode>
is
set
to
<System>,
press
[Enter], then
select
the
ring
tone
for received
calls
and
SMS
from <Tone1
>(Initial),
<Tone2>,
<Tone3>.
• Call
Tone:
Selects
the
ring
tone
for
phone
calls.
•
Message Tone:
Selects
the ring
tone
for
SMS.
•
To register a new device,
see
page
30.
• To connect/disconnect a device,
see
page
32.
0 Indications
and
buttons
on
the
source
control
screen
•
II'
. ;
..
'I
~
TP
HO
",
f,v~E
"
,o.:&--
f
':.onnq! l3
m€'
f
Ar
•,
!~.
W
if'
- -
- -
-
0
1\
lbt
,n
Nune
lt
b
II
~
J'
...
~
• The operation buttons, indications and
information
displayed
on
the
screen
differ
depending on the connected device.
Playback
information
[I]
The device status/battery capacity
(only
when
the information
is
acquired
from
the
device)
W
Playback
mode
(See
the
right
column.)
[]]
Track no.*
1
W
Playing
time*
1
[]]
Playback
status(~:
play/11:
pause)*
1
W
Tag
data (current track
title/artist name/album
title)*
1
• Touching the information bar scrolls
the
text
if
not
all
of
the
text
is
shown.
[I]
Type
of
the connected
Bluetooth
device
(Page
30)
Operation
buttons
[~]
l-l-t1
[111
[~]
[~]
[1111+1]
[HOME]
Selects
Repeat
playback mode.*
1
*
2
Selects
Random
playback mode.*
1
*
2
Pauses
playback.
Starts
playback.
• Selects
a track.
(Press)
•
Reverse/forward search.
(Hold)
Displays
the
<HOME> screen.
*
1
Available
only
for
devices
compatible
with
AVRCP
1.3.
*
2
To
cancel
random
and
repeat
mode,
press
the
button
repeatedly
until
the
indicator
disappears.
ENGLISH
I
37
Page 38

Sound adjustment
0
Using
the
sound
equalization
•
The adjustment
is
memorized
for
each source until
you adjust
the
sound again.
If
the
source
is
a disc,
the adjustment
is
stored for each
of
the following
categories.
- DVD/DVD-VRNCD
-CD
- DivX/MPEG1/MPEG2/MP3/WMA/WAV
•
You cannot adjust
the
sound when the
AV
source
is
turned off.
Selecting a preset sound mode
1
Display
the
<Equalizer>
screen.
On
the
<HOME>
screen:
On
the
source control screen:
38
2
Select a sound mode.
• You
can
change the page
to
display more
items by pressing
[•]/[~].
Storing your own adjustment-Customizing
preset sound mode
1
Select a sound mode.
(See
the
left column.)
2
Adjust
the
level
of
each band
(G)),
then
select the subwoofer level
(@).
The adjustments are stored and
<User>
is
activated.
•
To finish the procedure,
press[~].
Storing your own
adjustment-Adjusting
the
sound precisely
1
Select a sound mode
(see
the left column),
then
...
2
Select a band.
3
Adjust the sound.
<Reset>
<Freq>
<Q>
<Bass>
<SWLevel>
Changes level
of
Low/Mid/
High
to
0.
Selects frequency.
Adjusts the
width
of
the
frequency.*
1
Activates/deactivates bass.*
2
Adjusts subwoofer
level.
The adjustments are overwritten
if
the
<User>
setting
has
been created
(see
the
left
column),
and
<User>
is
activated.
•
To finish
the
procedure,
press
[G].
•
The adjustments are memorized until you adjust
sound again.
•
To make adjustment for other bands, repeat steps
2
and
3.
*
1
Fixed
for
"High"
band.
*
2
Only
for
"Low"
band.
Page 39

Q Adjusting
the
crossover frequency
1
Display the <Crossover> screen.
On
the
<HOME> screen:
1 1
tr
2 Select the item
to
adjust (G)), then make
adjustments
(@).
<HPF> Adjusts
the
crossover
for
the
front
([Front])
or
rear ([Rear])
speakers (high
pass
filter).
<LPF> Adjusts
the
crossover
for
the
subwoofer (low
pass
filter).
<SW Level> Adjusts
the
subwoofer level.
<Phase> Selects
the
phase
for
the
subwoofer.*
<Freq> Adjusts
the
crossover frequency.
*
Not
selectable
when
<Freq>
is
set
to
<Through>.
Adjustment for
v.ideo
playback
0 Adjusting
the
picture
You
can
adjust
the
picture quality.
1 Display the adjustment menu.
2 Select
[t]]
(dimmer on) or [£3] (dimmer
off).
3 Adjust
the
picture (-15
to+
15).
<Brightness>
<Contrast>
<Black>
<Color>
<Tint>*
<Detail>
Adjusts the brightness.
Adjusts the contrast.
Adjusts the blackness.
Adjusts
the
color.
Adjusts the tint.
Adjusts the detail.
*
Adjustable
only
when
the
incoming
signal
is
NTSC.
ENGLISH I 39
Page 40

~l~,J;J;IJ:,t~,i~~,.
·M
%1W!lii:IMnJ:i:MiJtt@iiti%dWttMfi!Mtl\ttli%i!i!iiiWt.t41\'M:M:l~li&:Wit.t.iiiiiWMlMMMWtWt:H:WtJMIWimt@t~IIlWIM:::f.ii::::mmMIW'%:M:%tiJl%fi@f!lli1i!im1MHiiiWii.i
X l
ill
0ilfi0:Miiii:MMll\l\MlMWtl
W:Mtft:MMMMWil@i\f.Mi1WMt1!itMii111Wid!llMMMIM!l1M1t.diiMiiWBM1iMtfft1@iltifiiWtllH!ii!WlM!M!:Wt&Mi'':'::,:,.:::::''•'••·:.::':••:·:'
.•
,,
.•.
\·.·.:.n
i@-
0 Changing the aspect ratio
You
can
change the aspect ratio for video playback.
1 Display the adjustment menu.
40
2 Select
the
aspect ratio.
<full>*
For 16:9 original pictures
4:3
signal
16:9
signal
~
I~O~I
<Panorama> For viewing
4:3
pictures
naturally on the wide screen
4:3
signal
16:9
signal
l~o~l I~O~I
<Regular>* For
4:3
original pictures
4:3
signal
16:9
signal
CQl
I~O~I
<Auto> For "DISC" r'USB" only: The
aspect ratio
is
automatically
selected
to
match the incoming
signals.
*
While
DivX
is
played
back
with
<Monitor Type>
set
to
[16:9]
(Page
12),
the
aspect
ratio
is
not
set
correctly.
OZooming the picture
You can zoom the picture (<full>, <Zoom1
>to
<Zoom3>).
• When <Aspect>
is
set
to
<Panorama>
or
<Auto>
(see
the
left column), the picture
is
zoomed
with
the
aspect ratio
of
the
<full>
setting.
1 Display the adjustment menu.
2 Change the magnification
(G)),
then move
the zooming frame
(W).
· [_.][T][
<IIIII][~]
are
not
displayed when
<full>
is
selected.
• The zoom
function
cannot be used for some
video
sources.
Page 41

You
can
change
the
background,
the
color
of
text,
touch panel buttons, and
monitor
panel buttons.
1 Display
the
<Display Design> screen.
On
the <HOME> screen:
2 Select an item
to
change ([Backgrnd],
[Text]
or
[Buttons]).
iiiiiiiiilllll
3
Select
the
design
or
color.
To select a background
Select a background design (G)), then select or
adjust color (@).
• When selecting color, select the Dimmer
setting
for
the
color
([I]J:
Dimmer On or
g:
Dimmer
Off), then select the color from
the color palette
or
adjust the color using the
color adjuster.
To select
text/button
color
Select
the
Dimmer
setting for
the
color
([I]J:
Dimmer
On
or
8:
Dimmer Off), then
select
the
color from the color palette or adjust
the color using
the
color adjuster.
• [Scan]
is
selectable when setting
button
color.
Selecting this changes the illumination color
gradually.
*
1
When
selecting
this,
you
cannot
change
the
background
color.
*
2
Store
your
own
scene
beforehand.
(See
the
right
column.)
0
Storing
your
own
scene
for
the
background
image
While playing a video or
JPEG,
you can capture an
image and use
the
captured image
as
a background.
You cannot capture copyrighted
content
and
images from iPod/iPhone.
When using a
JPEG
file
as
the
background, make
sure
that
the
resolution
is
800 x 600 pixels.
The color
of
the
captured image may look
different
from
that
of
the actual scene.
1 Play a
video
or
JPEG.
2 Display
the
<Display Design> screen.
(See
the
far
left
column.)
3
4
Adjust
the
image.
[ ... ]
Starts/pauses playback.
Advances scenes frame-by-
frame.
Magnifies the scene. (<Full>,
<Zoom1>-
<Zoom3>)
[A]['Y][
..._][...,
]*
2
Moves
the
zooming frame.
• To cancel the capture, press
l-+::::>1.
Continued
to
the
next
page
...
ENGLISH I 41
Page 42

5 Capture
the
image displayed on
the
screen.
A
confirmation
message appears.
Press
[Yes]
to
store
the
newly
captured image. (The existing
image
is
replaced
with
the
new
one.)
•
Press
[No]
to
return
to
the
previous screen.
*
1
Not
displayed
when
playing
an
external
component
connected
to
the
AV-IN1
terminal.
*
2
Not
displayed
when
<Full>
is
selected.
42
Customizing
the
system settings
0
Memorizing/recalling
the
settings
You can memorize
the
following
settings:
• Settings
on
the
<Settings>
screen: Fader/
Balance, Equalizer, Loudness, Crossover
(<HPF>/<LPF>/<SW Level>
settings),
Volume
Adjust,
Speaker Select,
Dimmer,
Display
Design, AV
Input,
Camera
Input,
Navigation
Input
• Settings
for
11
AV-IN": AV-IN Name
2
Save
\A.
Delete,.
I
~v~-~
E-
3 Select an item ([User1 ], [User2]
or
[User3])
to
memorize
the
settings.
A
confirmation
message appears.
Press
[Yes].
4 Finish
the
procedure.
Recalling
your
settings
• For KW-V40BT/KW-V20BT/KW-V200BT/KW-V1 0
Region 1
/KW-Vl
00: Make sure
that
11
AV
Off"
is
selected
as
the
rear source. (Page 29)
1 Display
the
<User
Profile>
screen.
(See
the
left
column.)
2 Select
the
item you
want
to
recall.
A
confirmation
message appears.
Press
[Yes].
3 Finish
the
procedure.
Page 43

Clearing
your settings
1
Display
the
<User
Profile>
screen.
(Page
42)
2
3
Select
the item you
want
to
clear.
• Select
[All]
to
clear all
settings memorized in
[User1
],
[User2]
and
[User3].
A confirmation message appears.
Press
[Yes].·
4
Finish the procedure.
3
0
Updating the system
You
can
update
the
system by connecting a
USB
device containing an update
file.
•
For updating
the
system, visit <http://www.jvc.
net/cs/car/>.
1
Create
an
update
file, copy
it
to
a
USB
device, and connect
it
to
the unit.
•
To
connect a
USB
device,
see
page
52.
2
Display the
<System Information>
screen.
On
the
<HOME>
screen:
I
Syst0m
!nfo;n1ll!16n·
,\PP
Vers,on
10.0
U;xla!"'
(
D\/D
1/ersi<.:n
0000
Upd-1t<·
SYS
i/ers1on
3.000
Upda!o
RT
Vm:-;.ion
0000
lJpdnl"
<APP Version>
Updates the system
application.
<DVD
Version>
Updates
the
DVD
system
application.
<SYS
Version>
Updates the system.
<BT Version>*
Updates the
Bluetooth
application.
It
may take a
while.
If
the
update
has
been
completed successfully,
"Update Completed" appears.
Reset
the
unit.
•
If
the
update
has
failed,
turn
the
power
off
and
then on, and retry
the
update.
•
Even
if
you have turned
off
the
power
during
the
update, you
can
restart the update after the power
is
turned on. The update
will
be performed from
the
beginning.
*
Only
for
KW-V40BT/KW-V20BT/KW-V200BT.
0
Adjusting the touch position
You
can adjust
the
touch position on
the
touch
panel
if
the position touched and
the
operation
performed
do
not
match.
1
Display
the
<Touch
Panel
Adjust>
screen.
On
the
<HOME>
screen:
2
Touch
the
center
of
the marks at
the
lower
left and at the
upper
right
as
instructed.
•
To reset
the
touch position, press
[Reset] .
•
To
cancel the current operation, press
[Cancel].
ENGLISH
I
43
Page 44

0
Displaying
the
<Settings> menu screen
•
When changing settings
for
<AV Input>,
and
<Input>
in
<Navigation
Input>,
turn
off
the
AV
source
while
[AV)
is
selected
for
<Display>
on
the
<HOME>
screen.
Other settings can be changed
when
the
AV
source
is
turned
on.
- For KW-V40BT /KW-V20BT
/KW-V200BT
/KW-Vl
0
Region1/KW-V100: Make sure
that
"AV Off"
is
selected
as
the
rear source. (Page 29)
44
0
<Audio> setting
screen
<Fader/Balance>
Fader:
Adjust
the
front
and rear speaker
output
balance.
•
F6
to
R6
(Initial:
0)
- When using a two-speaker system, set
the
fader
to
the
center
(0).
Balance:
Adjust
the
left
and
right
speaker
output
balance.
•
L6
to
R6
(Initial:
0)
Press
[.A.]/[T]/[
<IIIII]/[
...
]
or
drag
lffil
to
adjust.
- To
clear
the
adjustment, press
[Center).
<Equalizer>
Change
the
sound
mode
or
adjust and store
the
equalization
for
each source. (Page 38)
• Flat (lnitiai}/Naturai/DynamicNocal
Boost/Bass
BoostNibrant/User
<Loudness>
You can activate/deactivate
loudness.
• On
(Initial):
Boost
low
and high frequencies
to
produce a
well-balanced
sound at a
low
volume
level.
• Off:
Cancels.
<Crossover>
Adjust
the
crossover frequency. (Page 39)
,,«
"'"
'"'""'-"
''
0
-
<Volume
Adjust>
Adjust and store
the
auto-adjustment
volume
level
for each source. (For discs,
the
adjustment
is
stored
for
each
of
the
following
categories: DVD/DVD-VR/
VCD,
CD,
and DivX/MPEG 1 /MPEG2/MP3/WMA/WAV.)
The
volume
level
will
automatically increase
or
decrease
when
you
change
the
source.
-15
to
+6
(Initial:
00)
---------------
'"«<·
X
<~m.~
··
-
-
<Speaker
Select>
Select
the
size
of
the
connected speaker.
•
Standard (lnitiai}/Narrow/Middle/Wide
Page 45

s
CJ
<Display>
setting
screen
<Dimmer>
•
Auto
(Initial): Dims
the
screen and
button
illumination when you turn on
the
headlights.
- The ILLUMIIead connection
is
required.
(Page
51)
• On: Activates dimmer.
• Off: Cancels.
Dimmer
Time Set:
Sets
the Dimmer On
.)/Off
(IB)
times.
-
Press
[.&.]/[T]
to
set the time.
<Display Design>
Change
the
display design (background,
the
color
of
text, touch panel buttons, and
monitor
panel
buttons). (Page 41)
<OSDCiock>
• On:
Displays the clock while a video source
is
played back.
•
Off
(Initial): Cancels.
<Demonstration>
• On
(Initial): Activates
the
demonstration on the
screen.
• Off: Cancels.
<Scroll>
• Auto:
Repeats scrolling.
Once (Initial): Scrolls
the
displayed
information
once.
• Off: Cancels.
Touching the information bar scrolls
the
text
regardless
of
this setting.
<GUI Adjust>
Adjust
the
brightness and blackness
of
the
screen.
Press
[Enter]
to
display
the
setting screen, select
ll01 (dimmer on)I[!Jll] (dimmer off),
then
change
the
following settings:
• Brightness: Adjusts brightness.
-
-15
to
+15
(Initial:
00
for
Dimmer
On/+15
for
Dimmer Off)
• Black: Adjusts blackness.
-
-15
to
+15
(Initial: 00)
<NTSC/PAL>*
Select
the
color system
of
the
external monitor.
•
NTSC
(Initial),
PAL
*
"Please
Power
Off''
appears
when
the
setting
is
changed.
Turn
off
the
power,
then
turn
on
to
enable
the
change.
0
<Input>
setting
screen
<AV
Input>*
You
can
determine
the
use
of
the
AV-IN1
terminal.
• AV-IN (Initial
for
KW-V40BT Region 4/KW-V20BT
Region 4/KW-Vl 0 Region 4): Select
to
use
the
external
component
connected
to
AV-IN1
terminal
or the iPod/iPhone connected using
USB
2.0
cable.
(Page
52)
iPod (Initial
for
KW-V40BT Region 1 /KW-V20BT
Region 1 /KW-V200BT /KW-Vl 0 Region 1
/KW~Vl
00):
Select
to
use
the
iPod/iPhone connected
us1ng
JVC
KS-U59.
(Page
52)
<Camera
Input>
• On (Initial): Displays
the
picture from the rear view
camera when you shift
the
gear
to
the
reverse
(R)
position.
Off: Select this when
no
camera
is
connected.
<Navigation
Input>
Change
the
settings
for
displaying
the
screen
of
App
from
the
connected iPod touch/iPhone. (Page
17)
*
To
change
the
setting,
turn
off
the
AV
source
by
pressing
[AV Off]
on
the
<HOME>
screen
beforehand.
For
KW-V40BT/KW-V20BT/KW-V200BT/KW-V10
Region
1/KW-
VlOO:
Make
sure
that'' AV
Off"
is
selected
as
the
rear
source.
(Page
29)
<AV
Input>
can
be
changed
only
when
<Input>
in
<Navigation
Input>
is
set
to
[Off].
ENGLISH I 45
Page 46

s
GS
0 <System> setting screen
·~
<Language>
Select
the
text
language used for on-screen
information.
• English
(lnitiai)/Espanoi/Fran~ais/Deutsch/
ltaliano/Nederlands/Svenska/Dansk/PyccKMVt/
Portugues
- "Please Power Off" appears when the setting
is
changed. Turn
off
the power, then turn on
to
enable
the
change.
· GUI Language: Select a language used for
displaying operation
buttons
and menu items.
- English (lnitiai)/Local (the language selected
above)
<Time
Set>
Adjust
the
clock time. (Page
4)
.:«>»».Y--*>»>»"A"!.:O».Vh!o.'~
..
~!«o:o!>»»:-:.»~~-'<«-»»-~"
·-
...
-..,.,.,.,.,.,»>:_.~:«<-~-k-.»:.»V
<Beep>
• On
(Initial): Activates
the
key-touch tone.
• Off: Cancels.
<User Profile>
You can memorize, recall,
or
clear the settings you
have made. (Page 42)
<Touch Panel
Adjust-;-,·-=-·=-=----·"--,--,-=-··--~~-~--,---"-~-,
Adjust
the
touch
position
of
the
buttons on
the
screen. (Page 43)
<Initialize>
Initialize all settings you have made. Hold [Enter]
to
initialize
the
settings.
• After initializing
the
settings, adjust the settings
on the
<Initial
Settings> screen.
,.,.,....,.,..-.~.,.,.,.,.,..,.,.-,..,.,~
..
'«~-,.,..--·~»".-».'«~~~~
46
<iluetooth
seiUJ)>*1"'-====-~-=,W-~>-*'-=<'W.W->m=>•=>•=--»w=--»<=->
Configure settings
for
using a Bluetooth device, such
as
connection and other general operations.
• Phone Connection/ Audio Connection/Pandora
Connection*
2
:
Connects or disconnects a
Bluetooth mobile phone/Biuetooth audio device/
Pandora device*
2
•
(Page
32)
Phone Device/ Audio Device/Pandora
Device*
2
:
Shows
the
phone device name/audio device
name/Pandora device name*
2
•
· PIN Code: Changes the
PIN
code
of
the
unit.
(Page
31)
· Device Name: Shows the device name
to
be
shown on the Bluetooth
device-JVC
Unit.
• Device Address: Shows the
MAC
address
of
the
unit.
·
Auto
Connect:
- On
(Initial): The connection
is
automatically
established
with
the last connected Bluetooth
device when
the
unit
is
turned on.
- Off: Cancels.
•
HF/Audio
Output: Select the speakers used
for
Bluetooth (both phone and audio player).
- Front: From
front
speakers only.
-
All
(Initial): From all speakers.
• Initialize: Hold [Enter]
to
clear the registration
of
Bluetooth devices and memory
of
the
preset list
and call lists.
<DivX®VOD>
This
unit
has
its
own
Registration Code. Once you
have played back a file
with
the
Registration Code
recorded, this unit's Registration Code
is
overwritten
for copyright protection.
•
Press
[Enter]
to
display the information.
• To return
to
the previous screen, press [OK].
·<system-,lnicM-~atio-n>_,
___ , __
~,
_______
,_*
__
,. ···
Displays the version information
of
the
software.
You can update
the
software.
(Page
43)
'~>=«..»»>~«-".-Y-<.;«<-."»»X<-:««..._..,._._..,.,._»=«-:«·»:-»»».-..
...
~:·»:«·w.-...,.-..;.~:~»>=·»:.:«-»:~«-:-Y.-~.-»»:«-:·»>-'<·:««·>:-.':«·>9*m:«-i«>>:«~·:.:.>>.':·>:--..:-x~·••=~-=~.;,-.;·~:~.;-:-»:..:->
*
1
Only
for
KW-V40BT/KW-V20BT/KW-V200BT.
*
2
Only
for
KW-V40BT
Region
1/KW-V20BT
Region
1/KW-V200BT.
Page 47

For
KW-V40BT Region 1 /KW-V20BT Region 1
I
KW-V1
0
Region
1:
To use
the
remote
controller,
purchase
RM-RK252P
separately.
l,·
·
tr.
•
stal
·l·i
··
ns
•.•••
the
..•.
. b.
alteries
0 Installing
the batteries
Insert
the batteries
into
the
remote
controller
by
matching
the
polarity(+
and-)
correctly.
•
If
the
effectiveness
of
the
remote
controller
decreases,
replace
the batteries.
~Caution:
•
Danger
of
explosion
if
battery
is
incorrectly
replaced. Replace only
with
the
same or
equivalent
type.
•
Batteries
shall
not
be exposed
to
excessive heat
such
as
sunshine, fire,
or
the
like.
Before using the remote controller:
•
Aim the remote
controller directly at
the
remote
sensor on
the
unit.
• DO
NOT
expose the remote sensor
to
bright
light
(direct
sunlight
or
artificial lighting).
~f'era
.
~~f)
•
n
•
s
••••
••
·
~
·
si
·
l)9
•
·•
•
t11e
>•
relfl~~
·
~
c:ontroller(RM-RK2561RM~RK252P)
0
Basic
button functions
ATT
DISP
VOL+NOL-
Attenuates/restores
the
sound.
Does
not
function
for
this unit.
•
Tuner/SiriusXM radio *
1
:
Selects
the
preset stations.
Selects
a
title/item/folder.
• Tuner:
- Searches
for
stations
automatically.
-
Searches
for
stations
manually. (Hold)
• SiriusXM
radio*
1
:
-
Selects
a
channel.
-
Selects
a channel rapidly.
(Hold)
• Selects a track.
•
Reverse search/forward
search.
(Hold)
•
Reverse search/forward
search.
•
DVD-Video/DVD-VRNCD:
Slow
motion
playback
(during pause).
• DVD-VRNCD:
Reverse
slow
motion
does
not
work.
•
Adjusts
the
volume
level.
•
The
"2nd VOL"
function does
not
work
for
this unit.
SOURCE
Selects
the
source.
~/II
Starts/pauses*
2
playback.
PHONE/~
Answers incoming
calls.*
3
Selects
the
bands.
Stops playback.
BAND/./•-•
Ends
the
call.
Pauses
playback
of
Bluetooth
audio.*
3
•
Enters a
number
while
0-9
holding
SHIFT.
(Page 48)
• The
"SETUP"
function does
not
work
for this unit.
1-6
Enters preset station
number
while
holding
SHIFT.
Changes
the
aspect ratio.
ASPECT
To check
the
current aspect
ratio setting, operate
on
the
touch
panel.
(Page
40)
RETURN
Returns
to
the previous screen.
•
DVD-Video: Shows
the
disc
TOPM
menu.
(Page 48)
•
DVD-VR:
Shows
the
Original
Program screen.
•
VCD:
Resumes
PBC
playback.
•
DVD-Video:
Shows
the
disc
MENU
menu.
(Page 48)
•
DVD-VR:
Shows
the
Playlist
screen.
•
VCD:
Resumes
PBC
playback.
ENGLISH
I
47
Page 48

~tvi<Jit>
ENT
DUAL/#
SHIFT
DIRECT/CLR
•
DVD-Video: Makes selection/
settings.
•
DivX: Skips
back
or
forward
by
about
5 minutes.
Confirms
selection.
Does
not
function
for
this unit.
Does
not
function
for
this unit.
Functions
with
other
buttons.
•
Enters
direct
search
mode
when
pressed
with
SHIFT
button.
(See
the
right
column.)
•
Erases
the
misentry
when
pressed
with
SHIFT
button.
• "SURROUND"
function
does
not
work
for
this unit.
*
1
Only
for
KW-V40BT
Region
1/KW-V20BT
Region
1/KW-V200BT/
KW-V10
Region
1/KW-V100.
*
2
Does
not
work
while
listening
to
Bluetooth
audio.
*
3
Only
for
KW-V40BT/KW-V20BT/KW-V200BT.
48
0
Searching for an item directly
Tuner frequency
ITJ
Press
DIRECT
while
holding
SHIFT
to
enter
the
search
mode.
[I]
Press
number
buttons
while
holding
SHIFT
to
enter
a frequency.
•
To erase a misentry, press
CLR
(clear)
while
holding
SHIFT.
[1]
Press
ENT
to
confirm
the
entry.
DVD-Video/DVD-VR/DivX/MPEG 1/MPEG2/ JPEG/
MP3/WMA/W
AV
NCO/CD
ITJ
Press
DIRECT
while
holding
SHIFT
to
enter
the
search
mode.
•
Each
time
you
press
DIRECT,
the
item
to
search
for
changes.
[I]
Press
a
number
button
while
holding
SHIFT
to
select
a desired item.
• To erase a misentry, press
CLR
(clear)
while
holding
SHIFT.
[1]
Press
ENT
to
confirm
the
selection.
0
Various disc operations
Using
the
disc menu
•
DVD-Video/DVD-VR
[]]
For DVD Video, press
TOP
M
or
MENU.
For
DVD-VR,
press
...
•
TOP
M: To
display Original
Program
•
MENU: To
display Playlist
[I]
Press
~V
/<]/[>to
select
an item
you
want
to
play.
I]]
Press
ENT
to
confirm
the
selection.
• VCD
During
PBC
playback
...
[]]
Press
DIRECT
while
holding
SHIFT
to
enter
the
search mode.
[1]
Press
a
number
button
while
holding
SHIFT
to
select
the
item
you
want
to
play.
I]]
Press
ENT
to
confirm
the
selection.
•
To return
to
the
previous screen, press
RETURN.
To
cancel
PBC
playback
ITJ
Press
•
to
stop
PBC
playback.
[I]
Press
DIRECT
while
holding
SHIFT.
I]]
Press
a
number
button
while
holding
SHIFT
to
select
a desired track.
[I]
Press
ENT
to
confirm
the
selection.
•
To resume
PBC,
press
TOP
M
or
MENU.
Page 49

6WARNING
•
If
you connect the ignition wire (red) and the
battery wire (yellow)
to
the
car chassis (ground),
you may cause a short circuit,
that
in
turn
may
start a fire.
Always
connect those wires
to
the
power source running
through
the
fuse box.
•
Do
not
cut
out
the
fuse from
the
ignition
wire (red)
and the battery wire
(yellow).
The
power
supply
must
be
connected
to
the
wires via
the
fuse.
6
Precautions on
installation
and connection
•
Mounting and wiring this
product
requires
skills
and experience. For best safety,
leave
the
mounting and wiring
work
to
professionals.
•
Make sure
to
ground
the
unit
to
a negative
12
V
DC
power
supply.
•
Do
not
install
the
unit
in a spot exposed
to
direct
sunlight or excessive heat or humidity. Also
avoid
places with
too
much dust or
the
possibility
of
water splashing.
•
Do
not
use
your
own
screws.
Use
only
the
screws
provided.
If
you
use
the
wrong
screws, you
could
damage the unit.
•
If
the
power
is
not
turned on
("MISWIRING
Check
wiring connection then reset
unit",
"WARNING
Check wiring connection then reset
unit"
is
displayed), the speaker wire may have a short
circuit or have touched
the
chassis
of
the
vehicle
and the protection function may have been
activated. Therefore,
the
speaker wire
should
be
checked.
•
If
your car's
ignition
does
not
have
an
ACC
position, connect
the
ignition wires
to
a power
source
that
can be turned on and
off
with
the
ignition key.
If
you connect the ignition wire
to
a
power
source
with
a constant
voltage supply,
such
as
with
battery wires, the battery may be drained.
• Only
for
KW-V40BT:
If
the
console
has
a
lid,
make sure
to
install
the
unit
so
that
the
monitor
panel will
not
hit
the
lid
when
closing and opening.
•
If
the fuse blows,
first make sure the wires are
not
touching
to
cause a short circuit, then replace
the
old
fuse
with
one
with
the same rating.
• Insulate unconnected wires
with
vinyl tape
or
other
similar material.
To
prevent a short circuit,
do
not
remove
the
caps on the ends
of
the
unconnected wires or the terminals.
• Connect
the
speaker wires correctly
to
the
terminals
to
which
they
correspond. The
unit
may
be damaged or
fail
to
work
if
you share
the
8
wires or
ground
them
to
any metal
part in
the
car.
•
When
only
two
speakers are being connected
to
the
system, connect both connectors either
to
the
front
output
terminals or
to
the rear
output
terminals (do
not
mix front and rear). For example,
if
you connect
the
E8
connector
of
the
left
speaker
to
a
front
output
terminal,
do
not
connect
the
8
connector
to
a rear
output
terminal.
•
After
the
unit
is
installed,
check whether
the
brake
lamps,
blinkers, wipers, etc. on the car are working
properly.
•
Mount
the
unit
so
that
the
mounting
angle
is
30°
or
less.
•
Do
not
press hard on the
panel surface when
installing
the
unit
to
the
vehicle.
Otherwise
scars,
damage, or
failure
may result.
&CAUTION
Install
this
unit
in the console
of
your
vehicle.
Do
not
touch
the
metal part
of
this
unit
during and
shortly after
the
use
of
the unit. Metal parts such
as
the
heat sink and
enclosure become hot.
0 Supplied
accessories for
installation
CD
Wiring harness x
1
(%)
Trim plate x
1
*
1
®
Extension wire x
1
®
Extraction
keys
x 2
*
1
®
Flat
head screws
(MS
x
7
mm) x 6
®
Round head screws
(MS
x 6 mm) x 6
(])
Microphone x
1
*
2
*
1
Only
for
KW-V40BT
Region
4/KW-V20BT
Region
4/KW-V10
Region
4.
*
2
Only
for
KW-V40BT/KW-V20BT/KW-V200BT.
ENGLISH
I
49
Page 50

' i
Qf:I!J
,.
HJgLQJWJ~il!lbUIDQili-
------------------~
O~In
~
s
~
t
:
al~li:n:g
~
t
:
he:':tr:im
~
p:la:t:e:(o
:
n:l:y~fo:flr
~:
K;;w:-
•
0
Installation
procedure
Installing
the
unit
v
4
oBT Region 4/KW-V20BT
Region
4/
1
To
prevent a short circuit, remove the key
o
Installing
the
unit
(only
for
KW-V40BT KW-V1 0
Region 4)
from the ignition and disconnect the
8
Region
4/KW-V20BT Region
4/KW-V1 0
1
Attach the trim
plate
(@).
battery.
Region
4)
2
Make the proper
input
and
output
wire
connections for each unit.
3
Connect the speaker wires
of
the wiring
harness.
4
Connect the wiring harness wires in the
following
order: ground, battery, ignition.
5
Connect the wiring harness connector
to
the unit.
6
Install the unit in your
car.
7
Reconnect the
8
battery.
8
Press
the reset button.
9
Configure <Initial
Settings>. (page
4)
so
•
Bend the tabs
of
the
mounting
sleeve
with
a
screwdriver or
similar utensil
and attach
it
in
place.
0
When
installing
the
unit using the
mounting bracket removed from the
car
f~
• Select
the appropriate
type
of
screw for the
mounting bracket:
flat head
(@)
or
round head
(@).
Page 51

UConnecting
wires to terminals
USB
terminal:
See
l
f121
;
l
~~
page
52.
r---r-:R::-:E~v=E=-Rs-::-:E::--,.--Pu-rp-le-w-it-h
w-h-it-e-st-rip_e_
Connect
to
the
vehicle's
reverse lamp harness when
GEAR
using the optional rear view camera.
SIGNAL
(Reverse
sensor
wire)
L~·n---rr=---:-~--~
[
PARKING]
Light
green
Elil0-+
~
BRAKE
(Parking
sensor
wire)
~L
..
Connect
to
the
vehicle's
parking
brake detection switch harness.
r---------!.!.!..-
10
A
fuse
[f
Je
~~
•
For best safety, be sure
to
connect the parking sensor.
FUSE10A
EXTI
/F
Connect
SiriusXM
Connect
Vehicle
Tuner
(commercially
available).*
2
(Page
52)
*
1
Only
for
KW-V40BTIKW-V20BTIKW-V200BT.
White(£)
I
White
with
black
stripe
8:
To
front
speaker
(left)
Gray(£)
I
Gray
with
black
stripe
8:
To
front speaker (right)
*
2
Only
for
KW-V40BT
Region
1IKW-V20BT
Region
1IKW-V200BTI
KW-V10
Region
1IKW-V100.
*
3
If
no
connections
are
made,
do
not
let
the
cable
come
out
from
the
tab.
Green(£)
I
Green
with
black
stripe
8:
To
rear speaker (left)
Purple(£)
I
Purple
with
black
stripe
8:
To
rear speaker (right)
Blue
(Power
antenna
wire)
Blue
with
white
stripe
(Remote
output
wire)
Light
blue
with
yellow
stripe
(Steering
remote
control
wire)
Orange
with
white
stripe
(Dimmer
control
wire)
Red
(Ignition
wire)
Yellow
(Battery
wire)
Black
(Ground
wire)
(POWER
ANTENNA)
:
:
To
automatic antenna
if
any
(250
mA
max.)
I
I
(REMOTE
OUTPUT)
:
To
the remote lead
of
other equipment
(200
mA max.)
I
I
(STEERING
WHEEL
REMOTE)
:
To
the
OE
remote adapter matching your
car
I
I
(ILLUMI)
1
-
To
car light control switch
(ACC)
..
--------------l..d"
(BATT)
..
--------------L.d
U)-1-------J
(GND)
Fuse
box
ENGLISH
I
51
Page 52

0 Connecting
a
USB
device/iPod/iPhone
iPhone 5/iPod touch
(5th Generation)/iPod
nano (7th Generation)
(commercially
available)
USB
device
(commercially
available)
52
D
0
iPod/iPhone except for
iPhone 5/iPod touch
(5th Generation)/iPod
nano (7th Generation)
(commercially
available)
D
@)
~
~
[]
AV-OUTNideo
output
(Yellow)
[1]
Rear
view camera
input
(Yellow)
[}]
Audio Video input
(AV-IN
1)
• Connect
the
following
type
of
4-pole mini
plug:
CD
(3)
CD
Left audio
~
@
Right audio
(£(£
®
Ground
®
Composite video
III
Subwoofer
precut
(monaural
output)
• Subwoofer
left
output
(White)
•
Subwoofer right
output
(Red)
[[]
Rear
precut
•
Audio
left
output
(White)
•
Audio right
output
(Red)
[§]
Front precut
•
Audio
left
output
(White)
• Audio right
output
(Red)
IIl
AV-OUT/ Audio
output
(03.5
mini jack)*
1
Resistance-free stereo type mini
plug
[]]
Expansion
port
for connecting SiriusXM
Connect
Vehicle
Tuner
(commercially available)*
2
*
1
Only
for
KW-V40BT/KW-V20BT
/KW-V200BT/KW-V1
0
Region
1/
KW-VlOO.
*
2
Only
for
KW-V40BT
Region
1/KW-V20BT
Region
1/KW-V200BT/KW-
V10
Region
1/KW-V100.
Page 53

0
Connecting
microphone for Bluetooth
(only for
KW-V40BT/KW-V20BT/
KW-V200BT}
Connect the microphone
(
Cl)
)
to
the
MIC
terminal.
•
To install
the microphone, peel
off
the adhesive
tape, fix on the
installation
position, then adjust
the direction
of
the microphone
to
face the driver.
After installing, fix the microphone cable
to
the car
with
clamps (commercially available).
0
Removing the trim
plate
1
Engage the catch pins on the extraction
key
(@)
and remove the
two
locks
on
the
lower
part. Lower the frame and
pull
it
forward.
2
Remove the upper
two
locations.
•
The frame
can
be
removed from the
top
side in
the same manner.
0
Removing
the
unit
1
Remove
the
trim
plate.
(See
the
left
column.)
2
Insert
the
two
extraction keys(@), then
pull them
as
illustrated
so
tat
the
unit
can
be removed.
..,
•
Be
careful
to
avoid injury from the catch pins on
the extraction
key.
ENGLISH
I
53
Page 54

.R
Maintenance
0 Caution
on cleaning the unit
Do
not
use any solvent (for example, thinner,
benzine, etc.), detergent,
or
insecticide. This may
damage
the
monitor
or
the
unit.
Recommended
cleaning
method:
Gently
wipe
the
panel
with
a soft, dry
cloth.
0
Moisture condensation
Moisture may condense on
the
lens inside
the
unit
in
the
following
cases:
•
After starting
the
heater in
the
car.
•
If
it
becomes very
humid
inside
the
car.
Should this occur,
the
unit
may malfunction.
In this
case,
eject
the
disc and leave
the
unit
turned on for a
few hours
until
the
moisture evaporates.
0
How
to
handle
discs
•
When
removing
a disc
from
its
case,
press
down
the
center
holder
of
the
case
and lift
the
disc out,
holding
it
by
the
edges.
- Always hold
the
disc
by
the
edges. Do
not
touch
its recording surface.
•
When storing a disc in its
case,
gently
insert
the
disc around
the
center holder (with the printed
surface facing up).
- Make sure
to
store discs in their
cases
after
use.
54
OTo
keep
discs
clean
A
dirty
disc may
not
play correctly.
If
a disc does become dirty,
wipe
it
with
a soft
cloth
in a straight line from center
to
edge.
~
•
Do
not
use any solvents (for example,
conventional record
cleaner,
spray, thinner,
benzine, etc.)
to
clean
discs.
OTo
play
new
discs
New discs may have some rough spots around
the
inner and
outer
edges.
If
such a disc
is
used, this
unit
may reject
the
disc.
•
To remove these rough spots, rub
the
edges
with
a pencil or ball-point
pen, etc.
More information
0 File
playback
Playing
DivX
files
(for discs only)
This
unit
can
play back DivX files
with
the
extension code <.divx>, <.div>,
or
<.avi>
(regardless
of
the
letter
case-upper/lower).
Audio stream should conform
to
MP3
or
Dolby
Digital.
The file encoded in
the
interlaced scanning
mode
may
not
be played back correctly.
The maximum
bit
rate for video signals (average)
is
4 Mbps.
Playing
MPEG 1/MPEG2
files
This
unit
can
play back
MPEG
1 /MPEG2 files
with
the
extension code <.mpg>, <.mpeg>, or <.mod>.
The stream
format
should conform
to
MPEG
system/program stream.
The file format should be
MP@ML
(Main Profile at
Main
Levei)/SP@ML (Simple
Profile at Main Level)/
MP@LL
(Main Profile at Low Level).
Audio streams should conform
to
MPEG
1
Audio
Layer-2 or Dolby Digital.
The maximum
bit
rate for video signals (average)
is
4 Mbps.
Playing
JPEG
files
•
This
unit
can play back
JPEG
files
with
the
extension code <.jpg> or <.jpeg>.
This
unit
can
play back
JPEG
files
that
are at
32
x
32
to
8 192 x 7 680 resolution.
It
may take
time
to
display
the
file
depending
on
its resolution.
•
This
unit
can
play back baseline
JPEG
files.
Progressive
JPEG
files
or
lossless
JPEG
files cannot
be played.
Page 55

Playing
MP3/WMA/WAV
files
• This unit
can
play back files with the extension
code <.mp3>, <.wma>, or <.wav> (regardless
of
the letter
case-upper/lower).
• This unit
can
play back the files meeting the
conditions below:
- Bit rate:
MP3/WMA:
32
kbps-
320 kbps
- Sampling frequency:
48
kHz,
44.1
kHz,
32
kHz
(for
MPEG
1)
24
kHz,
22.05
kHz,
16
kHz
(for
MPEG2)
48
kHz,
44.1
kHz,
32
kHz,
22.05
kHz
(for WMA)
44.1
kHz
(for
WAV)
• This unit
can
show
103
Tag
Version
1.0/1.1/2.2/2.3/2.4 (for
MP3).
• This unit
can
also show WAV/WMA
Tag.
• This unit
can
play back files recorded in
VBR
(variable
bit
rate).
•
Files
recorded in
VBR
have a discrepancy in
elapsed time indication.
• This unit cannot play back the following files:
-
MP3
files encoded
with
MP3i and
MP3
PRO
format.
-
MP3
files encoded with Layer 1/2.
- WMA files encoded
with
lossless,
professional,
and voice format.
- WMA files which
are
not
based upon Windows
Media®
Audio.
- WMA files copy-protected with
DRM.
• This unit
can
display the jacket picture meeting
the conditions below:
- Picture
size:
32 x 32
to 1 232 x 672
resolution
- Data
size:
less
than 650
KB.
-
File
type:
JPEG
0 Disc playback
Playable disc types
DVD
•
DTS
sound cannot be
reproduced or emitted
from this unit.
DVD Recordable/Rewritable
(DVD-R/-RW*
2
,
+R/+RW*
3
}
•
DVD
Video:
UDF
bridge
•
DVD-VR
• DivX/MPEG1/MPEG2/JPEG/
MP3/WMA/WAV:
ISO
9660
level
1,
level
2,
Romeo,
Joliet
Dual
Disc
CDNCD
CD
Recordable/Rewritable
(CD-R/-RW)
•
ISO
9660 level
1,
level
2,
Romeo, Joliet
DVDVideo*
1
• DVDVideo
•
DVD-VR*
4
• DivX/MPEG1/
MPEG2
•
JPEG
• MP3/WMA/WAV
DVD
side
•
VCD
(Video
CD)
• Audio CD/
CD
Text
(CO-DA)
•
VCD
(Video
CD)
•
CO-DA
•
MPEG 1 /MPEG2
•
JPEG
• MP3/WMA/WAV
*
1
DVD
Region
code:
For
KW-V40BT/KW-V20BT/KW-V10:
1/4
(depending
on
the
country
and
sales
area)
For
KW-V200BT/KW-V100:
1
If
you
insert a DVD
Video
disc
of
an
incorrect
Region
Code,
"Region
Code
Error"
appears
on
the
screen.
*2 DVD-R
recorded
in
multi-border
format
is
also
playable
(except
for
dual
layer
discs).
DVD-RW
dual
layer
discs
are
not
playable.
*3 It
is
possible
to
play
back
finalized
+R/+RW
(Video
format
only)
discs.
"DVD"
is
selected
as
the
disc
type
when a +R/+RW
disc
is
loaded.
+RW
double
layer
discs
are
not
playable.
*4 This
unit
cannot
play
back
contents
protected
with
CPRM
(Content
Protection
for
Recordable
Media).
Unplayable discs
Unplayable disc types and formats
are
as
follows:
- DVD-Audio/DVD-ROM discs
- MPEG4/ AAC/DVD+VR/DVD-RAM recorded in the
DVD-R/RW
or
+R/+RW
-
DTS-CD,
SVCD
(Super Video
CD),
CD-ROM,
CD-I
(CD-I
Ready)
-
MPEG4/
AAC
recorded in the
CD-R/RW
•
Discs
that
are
not
round.
•
Discs
with coloring on the recording surface or
discs that are dirty.
• Recordable/Rewritable discs that have not been
finalized.
• 3 inch disc.
Attempting
to
insert using
an
adapter
may
cause
malfunction.
DuaiDisc playback
The Non-DVD side
of
a "Dual Disc" does not comply
with the "Compact Disc Digital Audio" standard.
Therefore, the use
of
Non-DVD side
of
a Dual
Disc
on
this product cannot be recommended.
ENGLISH I 55
Page 56

CES
Playing Recordable/Rewritable discs
This
unit
can recognize a total
of
5 000 files and
250 folders
(a
maximum
of
999 files per folder).
Use
only "finalized" discs.
This
unit
can play back multi-session discs;
however, unclosed sessions will be skipped while
playing.
Some discs
or
files may
not
be played back due
to
their characteristics or recording conditions.
OAbout
data stored in the connected
USB
device/iPod/iPhone
•
We
bear
no
responsibility
for
any loss
of
data in
an
iPod/iPhone and
USB
mass storage
class
device
while using this unit.
0
USB
playback
Playable files on a USB device
• This
unit
can play JPEG/MPEG1/MPEG2*/MP3/
WMA/WAV files stored in a
USB
mass
storage
class
device.
This
unit
can recognize a total
of
5 000 files and
250 folders
(a
maximum
of
999 files per folder).
• Make sure all
important
data
has
been backed
up
to
avoid losing
the
data.
*
Except
for
MPEG2
files
recorded
by
JVC
Everio
camcorder
(extension
code
<.mod>).
Notes on using a USB device:
This
unit
may
not
play back files in a
USB
device
properly when using a
USB
extension cable.
•
USB
devices
equipped
with
special functions such
as
data security functions cannot be used
with
the
unit.
• Do
not
use a
USB
device
with 2 or
more partitions.
56
• Depending on
the
shape
of
the
USB
devices and
connection ports, some
USB
devices may
not
be
attached properly
or
the
connection
might
be
loose.
• This
unit
cannot recognize a
USB
device whose
rating
is
other
than 5 V and exceeds 1
A.
• This
unit
may
not
recognize a memory card
inserted
into
the
USB
card reader.
• Connect
only
one
USB
device
to
the
unit
at a time.
Do
not
use a
USB
hub.
• When connecting
with a USB
cable, use
the
USB
2.0
cable.
• The
maximum
number
of
characters (when
the
characters are 1 byte):
- Folder names: 50 characters
- File names: 50 characters
• Avoid using
the
USB
device
if
it
might
affect
driving safety.
• Do
not
pull
out
and connect the
USB
device
repeatedly while
"Now
Reading
... " is
shown on
the
screen.
• Electrostatic shock at connecting a
USB
device
may cause abnormal playback
of
the
device.
In
this
case,
disconnect
the
USB
device then reset this
unit
and
the
USB
device.
• Operation and
power
supply may
not
work
as
intended
for
some
USB
devices.
• Do
not
leave a
USB
device in the
car,
or expose
to
direct
sunlight
or
high temperature
to
avoid
deformation
or
damage
to
the device.
0 Notes on playing iPod/iPhone
• iPod/iPhone
that
can be connected
to
this unit:
Made for
- iPod
with
video
- iPod classic
- iPod nano (7th Generation)*
- iPod nano (6th Generation)
- iPod nano (5th Generation)
- iPod nano (4th Generation)
- iPod nano (3rd Generation)
- iPod touch (5th Generation)*
- iPod touch (4th Generation)
- iPod touch (3rd Generation)
- iPod touch (2nd Generation)
- iPod touch (1st Generation)
- iPhone 5*
- iPhone
4S
- iPhone 4
- iPhone
3GS
- iPhone
3G
- iPhone
*
You
cannot
watch
video
when
connecting
iPod
nano
(7th
Generation)/iPod
touch
(5th
Generation)/iPhone
5.
• When operating
an
iPod/iPhone, some operations
may
not
be performed correctly
or
as
intended.
In
this
case,
visit
the
following
JVC
web
site:
<http://
www.jvc.net/cs/car/>
• For some iPod/iPhone models,
the
performance
may be abnormal or unstable
during
operation.
In
this
case,
disconnect
the
iPod/iPhone device, then
check its condition.
If
the
performance
is
not
improved
or
slow, reset
your
iPod/iPhone.
• When you
turn
on this unit, the iPod/iPhone
is
charged
through
the
unit.
• The
text
information may
not
be displayed
correctly.
Page 57

ES
0 Using Apps
of
iPod touch/iPhone
SAFETY
INSTRUCTIONS
Use
of
the iPhone Navigation
App
is
only
permitted
if
the
traffic conditions are suitable and you are
absolutely sure
that
no
risk, obstruction or injury
will be incurred
to
you, your passengers or other
road
users.
The requirements
of
the
Road
Traffic
Regulations must always be
followed
and may vary
by state. The destination must
not
be entered while
the vehicle
is
in motion.
iPhone Navigation guidance may
not
be applicable
to
the
current situation because
of
changes in traffic
conditions
(e.g.
changes in toll roads, principal roads,
one-way traffic, or
other
traffic regulations).
In
this
case,
observe the current traffic signs
or
regulations.
• Traffic signs should be observed carefully while
driving using the iPhone Navigation App. iPhone
Navigation App
is
only
an
aid. The driver must
always decide
whether
or
not
to
heed the
information provided.
We
do
not
accept liability
for
erroneous
data
provided
by
the
iPhone
Navigation App.
• Do not operate
the
unit
while driving.
0 Sound signals
emitted
through
the
rear
terminals
Through the analog terminals (Speaker out/REAR
OUT/FRONT OUT/AV-OUT Audio*)
2-channel signal
is
emitted. When playing multichannel encoded disc, multi-channel signals are
down
mixed.
*
Only
for
KW-V40BT/KW-V20BT/KW-V200BT/KW-V10
Region
1/
KW-V100.
0 Language codes (for DVD/DVD-VR language selection)
ENGLISH I 57
Page 58

Error
messagf;!
li~t
If
an error occurs while using
the
unit, a message
appears. Take appropriate action according
to
the
following
message/remedy/cause list.
11
NO
Signal":
• Start
the
playback on
the
external
component
connected
to
the
AV-IN1
terminal.
• Check
the
cords and connections.
• Signal
input
is
too
weak.
''MISWIRING Check
wiring connection then reset
unit" /
11
WARNING Check
wiring connection then
reset unit":
•
A speaker cord
has
shorted
or
it
has come in
to
contact
with
the
car chassis. Wire
or
insulate
the
speaker cord
as
appropriate,
then
reset
the
unit.
(Pages 3 and
51)
''Parking
Brake":
•
No playback picture
is
shown
when
the
parking
brake
is
not
engaged.
11
Eject Error"
/
11
Loading
Error":
• Eject
the
disc forcibly. (Page
3)
11
Restricted
Device":
• Check
whether
the
connected iPod/iPhone
is
compatible
with
this unit. (Page 56)
58
11
USB
Device Error":
•
The
USB
power
voltage
is
abnormal.
• Turn
off
and
turn
on
the
unit.
• Connect
another
USB
device.
~~connection
Error":
• The device
is
registered
but
the
connection
has
failed.
Connect
the
registered device. (Page
32)
11
Piease
Wait
... ":
•
The
unit
is
preparing
to
use
the
Bluetooth
function.
If
the
message does
not
disappear, turn
off
and
turn
on
the
unit, then connect the device
again (or reset
the
unit).
11
NO
Voice Device":
•
The connected
mobile
phone does
not
have a
voice recognition system.
11
NO
Data":
•
No phone
book
data
is
contained in
the
connected
Bluetooth phone.
11
lnitialize Error":
• The
unit
has
failed
to
initialize
the
Bluetooth
module. Try
the
operation again.
11
Dial Error":
•
Dialing
has
failed. Try
the
operation again.
11
Hung
Up Error":
• The
call
has
not
ended yet. Park
your
car, and use
the
connected
mobile
phone
to
end
the
call.
11
Pick
Up Error":
•
The
unit
has
failed
to
receive a
call.
11
Pandora upgrade required":
•
The Pandora application on your iPod
touch/
iPhone/Android
is
not
the latest version. Update
the
application.
11
Check
App":
•
The Pandora application on your iPod
touch/
iPhone/ Android
is
not
started up.
•
The Pandora application
is
not
installed
in
the
connected device.
•
Error occurs on
the
Pandora application.
•
You have
not
been signed in the Pandora.
11
SXM
No
Signal":
•
Make sure
the
SiriusXM radio antenna
is
mounted
outside
the
vehicle. Move vehicle
to
an area
with
a
clear
view
of
the
sky.
11
SXM Check
Antenna":
• Check
the
SiriusXM radio antenna connection, and
make sure
the
antenna
is
firmly attached
to
the
tuner.
• Check
whether
the
SiriusXM
radio antenna cable
is
bent
or
broken.
If
it
is
damaged, replace
the
whole
antenna unit.
Page 59

"SXM Check
Tuner":
•
Make sure
the
SiriusXM
Connect Vehicle
Tuner
is
connected
to
the
unit.
"SXM Chan Unavailable"
(appears on
the
screen
for about 2 seconds,
then
returns
to
the
previous
channel):
• Selected channel
is
no
longer available. Select
another
channel
or
continue
listening
to
the
previous
channel.
"SXM
Ch
Unsubscribed":
• Selected channel
is
not
part
of
your current
subscription
plan. Call
1-866-635-2349
to
subscribe.
''SXM
Subscription
Updated
-
Press
Enter
to
Continue":
• Your subscription
is
updated.
Press
the
appropriate
button
to
continue.
"SXM Channel Locked"
•
The
selected channel
has
been locked
by
the
parental controls.
Enter
unlock
code
after you are
asked. (Page 25)
"SXM
Incorrect Lock
Code"
•
The
selected channel
is
a mature or
parental lock
channel, and
locked
by
parental lock
or user
lock
code. Enter
the
correct
lock
code.
"tro
•
u
•
l)
·
l
.·
~
.
~
.
l'tppt~
•
·
ng
What appears
to
be
trouble
is
not
always
serious.
Check
the
following
points before
calling
a service
center.
•
For operations
with
the external components,
refer
also
to
the
instructions
supplied
with
the
adapters used for
the
connections
(as
well
as
the
instructions supplied
with
the
external
components).
OGeneral
No sound comes
out
of
the speakers.
•
Adjust
the
volume
to
the
optimum
level.
• Check
the
cords and connections.
No picture
is
displayed
on
the
screen.
• Turn on
the
screen. (Page
6)
The
unit
does
not
work
at
all.
•
Reset
the
unit. (Page
3)
The
remote
controller*
does not work.
• Replace
the
battery.
The desired source button
([AV-IN] or [Apps])
is
not
displayed
on
the
<HOME> screen.
• Select
an appropriate setting
for
<AV
Input>.
(Page 45)
The Apps switch button
UI?D
on
the
source
control
screen
or
[Apps] button on
the
<HOME>
screen
is
not
displayed.
• Select
an appropriate setting
for
<Navigation
Input>.
(Page 45)
*
For
KW-V40BT
Region
1/KW-V20BT
Region
1/KW-VlO
Regionl:
Purchase
RM-RK252P
separately.
0
Discs
in general
Disc can be neither recognized nor
played
back.
•
Eject
the
disc
forcibly.
(Page
3)
Recordable/Rewritable
discs cannot be
played
back.
• Insert
a finalized
disc.
• Finalize
the
discs
with
the
component
which
you
used
for
recording.
Tracks on the
Recordable/Rewritable
discs
cannot be skipped.
• Insert
a
finalized
disc.
• Finalize
the
discs
with
the
component
which
you
used for recording.
Playback
does not start.
•
The
format
of
files
is
not
supported
by
the
unit.
No
picture appears on
the
external monitor.
• Connect
the
video cord
correctly.
• Select
the
correct
input
on
the
external
monitor.
0
DivX/MPEG1/MPEG2/JPEG/MP3/WMA/
WAV
Disc cannot be
played
back.
•
Record
the
tracks using a
compliant
application
on
the
appropriate discs. (Page
55)
• Add appropriate extension codes
to
the
file
names.
Tracks are not
played
back
as
you have intended
them
to
play.
Playback
order may differ from
the
one
played
back using
other
players.
ENGLISH
I
59
Page 60

DUSB
"Now
Reading
•••
" does
not
disappear
from
the
screen.
•
Turn
the
power
off
and on again.
While
playing
a track, sound is
sometimes
interrupted.
• The tracks are
not
properly copied
into
the
USB
device. Copy tracks again, and
try
again.
D iPod/iPhone
No
sound
comes
out
of
the
speakers.
• Disconnect the
iPod/iPhone,
then connect
it
again.
• Select
another source, then reselect
"iPod".
The
iPod/iPhone
does
not
turn
on
or
does
not
work.
•
Check the connecting
cable
and its connection.
• Update
the
firmware version.
•
Charge the battery.
•
Reset
the
iPod/iPhone.
Sound is
distorted.
• Deactivate
the
equalizer either on this
unit
or
the
iPod/iPhone.
A
lot
of
noise is generated.
•
Turn
off
(uncheck) "VoiceOver"
of
the
iPod/iPhone.
For details, visit <http://www.apple.com>.
No
operations
are
available
when
playing
back
a
track
containing
Artwork.
• Operate the
unit
after the Artwork
is
loaded.
Sound does
not
synchronize
with
the
video.
• Select
[iPod]
for
<AV
Input>.
(Page
45)
60
Videos
cannot
be
played.
• Connect
with
USB
Audio and Video
cable
JVC
KS-U59.
Other cables
cannot be used.
• Select
[iPod]
for
<AV
Input>.
(Page
45)
No
sound
of
videos comes
out.
•
Connect
with
USB
Audio and Video cable
JVC
KS-U59.
Other cables
cannot be used.
• Select
[iPod]
for
<AV
Input>.
(Page
45)
OTuner
SSM
automatic
presetting
does
not
work.
•
Store stations
manually. (Page
22)
Static noise
while
listening
to
the
radio.
•
Connect the antenna firmly.
DAV-IN
No
picture
appears
on
the
screen.
•
Turn on the video
component
if
it
is
not
on.
•
Connect the video
component
correctly.
0
Pandora
(Only
for
KW-V40BT
Region
1/
KW-V20BT Region 1/KW-V1
0
Region 1)
The Pandora
application
does
not
work.
•
The
Pandora application on
your
iPod
touch/
iPhone/Android
is
not
the
latest
version. Update
the application.
0
Bluetooth
(Only
for
KW-V40BT/
KW-V20BT /KW-V200BT)
Phone
sound
quality
is
poor.
•
Reduce the distance between the
unit
and
the
Bluetooth
mobile
phone.
•
Move
the
car
to
a
place
where you can get a better
signal
reception.
The sound is
interrupted
or
skipped
while
using a
Bluetooth
audio
player.
Reduce the distance between the
unit
and
the
Bluetooth audio
player.
Disconnect
the
device connected
for
Bluetooth
phone.
Turn off, then
turn
on the unit.
(When the sound
is
not
yet restored) connect the
player again.
The connected
audio
player
cannot be
controlled.
• Check
whether
the
connected audio
player
supports
AVRCP
(Audio Video Remote
Control
Profile).
Bluetooth
device does
not
detect
the
unit.
•
Search
from the Bluetooth device again.
Page 61

The
unit
does not
make
pairing with
the
Bluetooth device.
•
For devices
compatible
with
Bluetooth
2.1:
Register
the
device using a
PIN
code. (Page 31)
•
For devices
compatible
with
Bluetooth
2.0:
Enter
the
same
PIN
code
for
both
the
unit
and
target
device.
If
the
PIN
code
of
the
device
is
not
indicated
on
its instructions,
try
"0000"
or
"1234."
Echo
or
noise occurs.
•
Adjust
the
microphone
unit
position.
•
Make sure
that
the
NR/EC
(Noise
reduction/Echo
cancel)
function
is
activated.
Adjust
the
echo
volume
or
noise
reduction
volume
if
necessary.
(Page 33)
The
unit
does not respond when you
try
to
copy
the
phone book
to
the
unit.
• You
may
have
tried
to
copy
the
same entries
(as
stored)
to
the
unit.
NoticeLCaution
··
on
using
Bluetooth
device
IC
(Industry Canada) Notice
This device
complies
with
Industry
Canada licence-
exempt
RSS
standard(s).
Operation
is
subject
to
the
following
two
conditions:
(1)
This device
may
not
cause interference, and
(2)
this device
must
accept
any interference,
including
interference
that
may
cause undesired
operation
of
the
device.
The
term
"IC: "
before
the
certification/
registration
number
only
signifies
that
the
Industry Canada
technical specification
were
met.
CAUTION
This
equipment
complies
with
FCC/IC
radiation
exposure limits set
forth
for
an
uncontrolled
environment
and meets
the
FCC
radio
frequency
(RF)
Exposure Guidelines in
Supplement
C
to
OET65
and
RSS-1
02
of
the
IC
radio
frequency
(RF)
Exposure
rules. This
equipment
has very
low
levels
of
RF
energy
that
it
deemed
to
comply
without
maximum
permissive exposure evaluation
(MPE).
But
it
is
desirable
that
it
should be
installed
and
operated
keeping
the
radiator at least
20
em
or
more
away
from
person's
body
(excluding
extremities: hands,
wrists,
feet
and ankles).
Under
Industry
Canada
regulations, this radio
transmitter
may
only
operate
using an
antenna
of
a
type
and
maximum
(or lesser) gain
approved
for
the
transmitter
by
Industry
Canada .
To reduce
potential
radio interference
to
other
users,
the
antenna
type
and
its
gain
should be
so
chosen
that
the
equivalent
isotropically
radiated
power
(e.i.r.p.)
is
not
more
than
that
necessary
for
successful
communication.
• Contains Transmitter
Module
FCC
ID
:
XQN-BTR60X
Contains
Transmitter
Module
IC:
9688A-BTR60 1
Specifications
0 Monitor section
Picture
Size
(W x
H)
KW-V40BT:
6.95 inches (diagonal)
wide
156.6
mm
x 81.6
mm
(6-3/16" x
3-3/16")
KW-V20BT /KW-V200BT /KW-V1
O/KW-V1
00:
6.1
inches (diagonal)
wide
136.2
mm
x 72
mm
(5-6/16" x
2-13/16")
Display System Transparent
TN
LCD
panel
Drive System
TFT
active
matrix
system
-"'~:~::o;,;
,;w8:•:·:•.·.
•,w_,;,.o:,;w
:w.o,v.
,.._.,,v;;Ov.'o
<SW;,><<•
:..•M
·k"<:,;;;,;;;,;so;,;;~·
:~
·.·.•.·>
.
.;-;-;:A<Y.•,,•;o;-,•;,;:;,;;·:'8iS'i<•;:;o,,•..:·.::
w.•:<<''"·;,.,;,,
•;;,.;o;,
•.••
,-;·:<:.:>·
""~'I'S
S«<.,."
';,;o;sw;w..:
ss<<'-':,;.;;
....,..;...;.:
,...y.-;,·.<·:·.·
,.,>
·
~"''
"'""""''"·«
~~'i·
MS""'-'"'·"'"'"•
:I':·~'"'~~
MW-"'"'·'
W
Number
of
Pixels 1 152
000 (800H
x
480V
x
RGB)
Effective Pixels
99.99o/o
Arrangement
RGB
striped
arrangement
-:.·-~:·»:.;.;.;.;..-.;o:<•>:•:-:.~;.;.;.;-:•:·l'.">;·>
:•>:•X•:
~-.;·:-.•:-:,-..-.;.
:•>:..;•>:<<
<.:«>:·:..;.;.;.:.
;.;.;.;.;.;.:.
»:•>X•:•:•:•:~·:
·:<~·:·:·:
•:.».
...
.._-.;.;.:.;.;.;..;.,.;-:..•:•>:>:-:..•;(.;-:-.-.;•:•:•:•»:<•:·Yh!·!•:-»!•>!•W~:,:.:.:.:
•:-:<
•:O.'»-'!•»!·!·:·:O:.:
.;.:.
:.:-:.»>!~·:·»:·:·:·
Y..:•W.
•
•"•"•"•:«•!·
W.•»!·:«
•>:·:~·:·Y~:~:.
»;o»:•;..'>;
•>:•!•!•:•>>!
«•!•»:·:~·:-:
•:•:<•:..'!•:0:.
'"•
Back
Lighting
LED
0
DVD
player
section
D/A
Converter
24
Audio
Decoder
Linear
PCM/Dolby
Digitai/MP3/
WMA/WAV
MPEG
1 /MPEG2/DivX/
JPEG
Wow
&
Flutter
Below
Limit
Frequency Response
96kHz
Sampling:
20Hz-
22
000
Hz
48 kHz Sampling:
20
Hz-
22
000 Hz
44.1
kHz Sampling:
20
Hz-
20 000
Hz
Harmonic
Distortion
0.01
0°/o
(1
kHz)
ENGLISH
I
61
Page 62

CES
Signal
to
Noise Ratio
99
dB
(DVD-Video 96kHz)
Dynamic Range 99 dB (DVD-Video 96 kHz)
Disc
Format
DVD-Video/DVD-VRNIDEO-CD/
CD-DA
Sampling
Frequency
44.1
kHz/ 48 kHz/96 kHz
·----
-----"-·
--
Quantifying
Bit
Number
16/20/24
bit
0
USB
interface section
·---~--$-·~
..
..
·-
.·
---·
.
··-
·
.
..
·
-·
·-··
··
--
·
.
~
..
--
-
--
·
-·
·-·
.
-~·
USB
Standard
USB
2.0 Full Speed
Compatible
Devices
Mass
storage
class
File System
FAT
12/16/32
Maximum
Power
Supply Current
DCSV~1
A
D/
A Converter 24
~---
-·
.
~
·
-·
;
~-.
---
-,
~-~~-·
--
·-
Video Decoder
MPEG
1 /MPEG2/
JPEG
Audio
Decoder
MP3/WMA/WAV
OBiuetooth
section (KW-V40BT/
KW-V20BT/KW-V200BT)
·
-
-··-
·
-
~
-----
Technology
Frequency
Output
Power
Bluetooth
2.1
+
EDR
'
~~~
2.402
GHz-
2.480
GHz
+4
dBm (MAX),
0 dBm
(AVE),
Power
Class
2
·~----
Maximum
Communication
Range
62
Line
of
sight
approx.
10m
(32.8
ft)
Profile
HFP
(Hands Free Profile)
OPP
(Object Push Profile)
PBAP
(Phonebook Access Profile)
A2DP (Advanced
Audio
Distribution Profile)
AVRCP
(AudioNideo
Remote
Control
Profile)
GAP
(Generic Access Profile)
SDP
(Service Discovery Profile)
SPP
(Serial Port Profile)
0
FM tuner section
Frequency Range
With
channel interval set
to
200kHz:
87.9 MHz
to
107.9
MHz
With
channel interval set
to
50
kHz:
87.5 MHz
to
108.0
MHz
-
----,~-------·
;.)Oolo..
-.
----
~
-
Usable Sensitivity
(S/N: 30
dB
Dev 22.5 kHz)
9.3
dBf
(0.8
tJV
/75
0)
Quieting
Sensitivity
(S/N:
46 dB Dev 22.5 kHz)
1s.2
dBf
(1.6
~v
/75
O)
Frequency Response (±
3.0
30Hz-15kHz
Signal
to
Noise Ratio
75
dB
(MONO)
--,----~~:«.-»:--~----'1
----v-.
~
·=---
'-
-~
'*
Y-
lo.'-'
'01.'1-
"":>:
Selectivity
(±
400
kHz)
~80dB
,_-~~--
IW<
-
·
~-
,_,.,._,
__
~~~--
....
...,;.v..,~''M.'-.,.;o:."~,
...
~.,..~-
Stereo Separation
45
dB
(1
kHz)
DAM
tuner section
Frequency Range
(1
0
kHz)
530
kHz
to
1
700
kHz
__
...__
___
~·
·-"-~~-:.;.»>,>-·
-· -·
--
O>I>.'«'»!Y»'h-~..,.,...,.,
_______
'«>._,.,.,
__
,.__.., ....
..,.,..._'«,
._,.,_..,.,.,.,-"»:·».-
Usable Sensitivity 28
dB~
0
Video
section
Color System
of
External Video
Input
NTSC/PAL
External Video
Input
Level (RCA/mini
jack)
1 Vp-p/75
n
External Audio Max
Input
Level
(mini jack)
2 V/25
kO
Video
Output
Level
(RCA
jack)
1 Vp-p/75
0
Audio
Output
Level
(mini jack)*
1.2
V/10 kO
*
Only
for
KW-V40BT/KW-V20BT/KW-V200BT/KW-V10
Region
1/
KW-V100.
0
Audio section
Maximum
Power (Front
&
Rear)
50Wx4
Full
Bandwidth Power (Front &
Rear)
(4
n,
14.4
V,
1
°/o
THD)
22Wx4
--~--o!«-.-:.<..:«¥>o.-~·
---·
....
:
,'+'J,."!«««.:""-'t-.'t-.'*~»:««
«-:«~<
->N-~:<-!>
-<Y
)I-''
'«-..
-.-.w"
.«,
:•:,.·.;.
;.:.:.:.:.:.:.;..:..:
-:>:,'«,'
:<«-.''Y
~
»:--
Preout
Level
4
V/1
0 kO
Precut
Impedance$
600
0
~
'"'''
*X-'».'-
'X>.
~'X>,.-·»;~m:«>;«
.-;.;.;o;
.;.,';.Xo>J«Y.'(-;,:
«-;o;
.;,~X.>»
»;
-~,
i':
·:<
·
>:•
:
·:•>:
-;.;;-;·;
·:
·:•>:«•:
....:·~>
N:v:·:VM""*-
Speaker
Impedance 4
0-
8
0
Equalizer
Control
Range
Low:
60Hz,
80Hz,
100Hz, 150Hz,
±1
0 dB
Mid:
500Hz,
1 kHz,
1.5
kHz,
2kHz,
±1
0
dB
High:
10kHz,
12.5 kHz, 15kHz, 17.5
kHz,
±1
0
dB
OGeneral
Operating Voltage
14.4 V
(1
0.5
V-
16 V allowable)
Maximum
Current
Consumption
10 A
Page 63

Installation Dimensions (W
x
H
x
D)
KW-V40BT Region 1 /KW-V20BT Region 1
I
KW-V200BT /KW-V1
0 Region 1 /KW-V1
00:
178
mm
x
100
mm
x
159
mm
(7-1
/16
11
X
3-15/16
11
X
6-5/16
11
)
KW-V40BT Region 4/KW-V20BT Region 4/KW-V1 0
Region
4:
182
mm
x
111
mm
x
162
mm
(7-3/16
11
X
4-3/8
11
X
6-7/16
11
)
Operational Temperature Range
-1
ooc
-
+60°C
Weight
KW-V40BT Region
1:
2.5
kg (5.5 lbs)
KW-V40BT Region
4:
2.8 kg (6.2 lbs)
KW-V20BT Region 1
/KW-V200BT
/KW-V1
0
Region 1 /KW-V1
00:
1.9 kg (4.2 lbs)
KW-V20BT Region 4/KW-V1
0
Region 4:
2.2
kg (4.9 lbs)
Design and specifications are subject
to
change
without
notice.
If
a kit
is
necessary
for
your
car,
consult
your
telephone
directory
for
the
nearest car
audio
speciality shop.
OTrademarks and licenses
•
Manufactured
under
license
from
Dolby
Laboratories.
Dolby
and
the
double-D
symbol
are
trademarks
of
Dolby
Laboratories.
• "DVD
Logo"
is
a
trademark
of
DVD
Format/Logo
Licensing Corporation registered in
the
US,
Japan
and
other
countries.
•
Microsoft
and
Windows
Media are
either
registered trademarks
or
trademarks
of
Microsoft
Corporation
in
the
United
States
and/or
other
countries.
• "Made
for
iPod," and
"Made
for
iPhone" mean
that
an
electronic accessory has been designed
to
connect
specifically
to
iPod,
or
iPhone,
respectively, and has been
certified
by
the
developer
to
meet
Apple
performance
standards.
Apple
is
not
responsible
for
the
operation
of
this device
or
its
compliance
with
safety and
regulatory standards. Please
note
that
the
use
of
this accessory
with
iPod,
or
iPhone
may
affect
wireless performance. iPhone, iPod, iPod classic,
iPod nano, and iPod
touch
are trademarks
of
Apple
Inc.,
registered in
the
U.S.
and
other
countries.
•
Lightning
is
a
trademark
of
Apple
Inc.
•
This
item
incorporates
copy
protection
technology
that
is
protected
by
U.S.
patents
and
other
intellectual
property
rights
of
Rovi Corporation.
Reverse
engineering
and disassembly are
prohibited.
•
Font
for
this
product
is
designed
by
Rico h.
•
DivX®,
DivX Certified® and associated logos are
trademarks
of
Rovi
Corporation
or
its subsidiaries
and are used
under
license.
• ABOUT DIVX VIDEO:
DivX®
is
a
digital
video
format
created
by
DivX,
LLC,
a subsidiary
of
Rovi
Corporation. This
is
an official DivX Certified®
device
that
plays DivX video. Visit divx.com
for
more
information
and
software
tools
to
convert
your
files
into
DivX videos.
• ABOUT DIVX VIDEO-ON-DEMAND: This DivX
Certified® device
must
be registered in
order
to
play purchased DivX
Video-on-Demand
(VOD)
movies. To
obtain
your
registration code, locate
the
DivX
VOD
section in
your
device setup menu.
Go
to
vod.divx.com
for
more
information
on
how
to
complete
your
registration.
•
THIS
PRODUCT
IS
LICENSED
UNDER
THE
MPEG-
4
VISUAL
PATENT
PORTFOLIO
LICENSE
FOR
THE
PERSONAL
AND
NON-COMMERCIAL
USE
OF
A
CONSUMER
FOR
(i)
ENCODING VIDEO
IN
COMPLIANCE WITH
THE
MPEG-4
VISUAL
STANDARD
("MPEG-4 VIDEO") AND/OR
(ii)
DECODING
MPEG-4
VIDEO
THAT
WAS
ENCODED
BY
A
CONSUMER
ENGAGED
IN
A
PERSONAL
AND
NON-COMMERCIAL ACTIVITY AND/OR
WAS
OBTAINED FROM
A VIDEO
PROVIDER
LICENSED
BY
MPEG
LA
TO
PROVIDE
MPEG-4
VIDEO. NO
LICENSE
IS
GRANTED
OR
SHALL
BE
IMPLIED
FOR
ANY
OTHER
USE.
ADDITIONAL INFORMATION
INCLUDING
THAT
RELATING
TO
PROMOTIONAL,
INTERNAL
AND
COMMERCIAL
USES
AND
LICENSING
MAY
BE
OBTAINED
FROM
MPEG
LA,
LLC.
SEE
HTIP:/
/WWW.MPEGLA.COM.
• Pandora,
the
Pandora logo, and
the
Pandora
trade
dress are
trademarks
or
registered trademarks
of
Pandora Media,
Inc.,
used
with
permission.
•
Sirius, XM
and
all related marks and logos are
trademarks
of
Sirius XM Radio Inc.
All rights
reserved.
•
Android
is
a
trademark
of
Google
Inc.
•
The Bluetooth®
word
mark
and logos are
registered
trademarks
owned
by
Bluetooth
SIG,
Inc.
and
any
use
of
such marks
by
JVC
KENWOOD
Corporation
is
under
license.
Other
trademarks
and
trade
names are those
of
their
respective
owners.
ENGLISH
I
63
Page 64

USA
ONLY
Having
TROUBLE
with
operation?
Please
reset
your
unit
Refer
to
page
of
How
to
reset
your
unit
Still
having
trouble??
Call1-800-252-5722
http://www
.jvc.com
We
can
help
you!
JVC
1113EHHMDWJEIN
Page 65

U.S.A.
JVC
AMERICAS
CORP.
TO OUR
VALUED
CUSTOMER
THANK
YOU
FOR PURCHASING THIS
JVC PRODUCT.
WE WANT
TO HELP YOU ACHIEVE
A PERFECT
EXPERIENCE.
NEED HELP
ON HOW
TO
HOOK
UP?
NEED
ASSISTANCE ON HOW TO
OPERATE?
NEED
TO LOCATE A
JVC SERVICE CENTER?
LIKE
TO PURCHASE ACCESSORIES?
JVC
IS
HERE
TO HELP!
TOLL FREE: 1
(800)252-5722
http
://www.jvc.com
Remember to retain your Bill
of
Sale
for Warranty Service.
Do
not
attempt
to
service
the
product
yourself
Caution
To
prevent electrical
shock, do not open the cabinet.
There are no user
serviceable parts inside.
Please
refer to
qualified service
personnel
for repairs.
PRODUCT
REGISTRATION
We suggest that you register your product since it
will enable
us to contact you
directly
if it is ever necessary to correct a safety related
condition in your product.
You can register at www.register.jvc.com
Please
note that
failure
to register does not diminish any of your rights during the
warranty period.
BT-50004
-1
(0313)
JVC
LIMITED
WARRANTY
ON
LY
FO
R
PR
ODUCT
PUR
CH
ASED
IN U.S.A.
JV
C
Ame
ric
as
C
orp
. (J
VC
) wa
rr
an
ts
this
pr
o
du
ct
and
a
ll
p
ar
ts t
here
of,
excep
t as
se
t forth below
O
NLY
TO
T
HE
ORIGINAL
RETA
IL PU
RCH
ASER
to
be
F
RE
E
FRO
M DE
FECT
IV
E
MA
T
ER
I
AL
S
A
ND
WORKMANSH
IP
fr
om
th
e
da
te
of o
ri
gin
al
p
urchase
for
the
pe
r
io
d s
ho
wn
be
lo
w.
("T
he
W
ar
r
anty
P
er
i
od
")
.---------------------------------
,
PA
RT
S 2
YR
S
I
LABO
R
2
YR
S :
Ca
r audio A
RS
EN
AL
seri
es
PARTS
1
YR
I
LABOR
1 YR :
All other
ca
r audio products
THIS
LIMITED
WARRANTY
IS
VALlO
ONLY
IN
THE
FIFTY
(50)
UNITED
STATES,
THE
DISTRIC
T
OF
COLUMBIA
AND
IN
THE
COMMONWEALTH
OF
PUERTO
RICO.
WHAT
WE
WI
LL
DO:
If
t
his
pr
odu
ct
is lo
und
to
be
defec
t
iv
e w
ithin
the
wa
rr
a
nty
per
i
od
,
JVC
wi
ll
re
pa
ir
or
replace
de
fe
cti
ve
par
ts
wi
th
ne
w
or
rebui
ll
equ
i
va
l
ents
at
no
charge
to t
he
origi
nal
o
wner
Such
repai
r a
nd
r
eplac
e
me
nt
services
sha
ll
be
ren
dered
by
J
VC
during
norm
al
bu
si
n
ess
hours
at J
VC
a
utho
ri
zed
serv
ic
e
centers
.
Part
s
u
se
d
fo
r
replacem
en
t are
wa
rra
nt
ed
only
f
or
the
rema
in
de
r
of
the
War
ranty
Pe
ri
od
. A
ll
p
ro
ducts
may
be
bro
ug
ht
to
a JVC
a
ut
ho
ri
zed
se
rvice
ce
nt
er
on
a
ca
rr
y
-in
bas
is. C
ol
or
tele
visi
ons
w
ith
a
sc
r
een
si
ze
of
37"c
l
ass
or gr
ea
t
er
qua
l
if
y
for
i
n-home
serv
ic
e.
In
such
ca
ses
, a t
ech
nici
an
wi
ll
com
e to
you
r
ho
me and e
it
her
r
ep
ai
r
th
e
TV
th
ere
or
re
mo
ve
an
d
re
tu
rn
it if it can
not
be
re
pa
ire
d
in
your
ho
me.
WHAT
YOU
MUST
OD
FOR
WARRANTY
SERVICE:
P
leasedo
n
ot
r
et
urn
y
our
product
to t
he
re
tail
er
I
ns
t
ead
. r
etu
rn
y
our
pr
oduc
t to
th
e
JVC
au
tho
ri
zed
serv
i
ce
ce
nt
er
near
est
you
If
sh
ipp
in
g the
prod
uct
to
the
ser
vice
center,
pl
ease
be
su
re to pa
ckage
it
car
eful
ly, p
referab
ly in
the
or
igi
na
l
pack
agi
ng
, and inclu
de
a
br
i
ef
de
s
cr
ipti
on
of
the p
ro
blem(s)
an
d a
co
py
of
the
p
ro
of
of
p
urch
ase
to
v
er
i
fy
pu
r
ch
as
e
date
.
Pleas
e
call1
-8
00
-
252
-
5722
to
l
ocat
e
the
ne
ar
es
t
JVC
au
th
or
i
zed
se
rv
i
ce
cen
t
er
Ser
vi
ce
loc
ations
can al
so
be
ob
tai
ned f
rom
ou
r w
ebs
ite hltp:ll
ww
w.j
vc
.com.
If
your
product
qual
if
i
es
fo
r i
n-home
se
rvi
ce
,
the
se
rv
i
ce
repres
en
t
at
iv
e
will
req
ui
re
cl
ea
r
ac
ces
s to
the
p
roduc
t
If
yo
u
have
any
q
uest
io
ns c
oncern
in
g
yo
ur
JV
C P
rodu
c
t.
p
lease
co
nt
ac
t
ou
r Cust
om
er
Care
Cente
r at
800
-
252-
57
22
WHAT
IS
NOT
COVER
EO:
T
his
lim
ited
war
ra
n
ty
pr
ov
i
ded
by J
VC
do
es
not co
ver
:
1.
Prod
u
cts
whi
ch
have
b
een
subj
ect
to
ab
us
e,
a
cc
i
den
t,
alteration
.
modi
f
ic
ation,
tam
pe
ri
ng
,
ne
g
ligence
. misu
se
,
fa
u
lty
inst
alla
ti
on
, la
ck
of
re
aso
nable c
are
, or if
re
pa
ir
ed
or
serv
i
ced
by
an
yo
ne
ot
her
th
an a
serv
ic
e f
ac
il
ity
authorized
by
JVC
to
rend
er
suc
h
service
.
or
if
aff
i
xed
to
a
ny
all
ac
h
me
nt
no
t p
rov
ided wi
th
the
produ
ct
s.
or
if
the m
ode
l or
se
ri
al
num
b
er
has
been
alt
ered
,
tampe
r
ed
w
ith
,
de
fa
ced
or
removed
;
2.
In
i
tial
i
nstalla
tion,
ins
ta
ll
a
tion
and
r
emova
l fr
om
c
ab
in
ets
or
moun
ting
syste
m
s.
3.
Operat
i
ona
l
a
djustme
n
ts
co
vere
d in t
he
Ow
n
er's
Man
ual, n
orma
l maint
en
an
ce, vid
eo
and
aud
io head cl
ea
ning;
4.
Damage
th
at
occurs
in s
hi
p
ment
,
due
to
ac
t
of
God,
an
d
cosme
tic
da
mage;
5.
Si
gna
l
rece
ption pr
ob
l
em
s
and
fa
i
lu
res
d
ue
to
lin
e p
ower
sur
ge
:
6.
User
R
emova
l Mem
ory
De
v
ices/V
ideo
Pic
k-
up
Tube
s
iC
CD
Image
Sens
ors
ar
e c
ove
r
ed
fo
r
90
d
ays
I
rom
th
e
da
te
of
purchase
;
7.
Ac
ce
sso
r
ies
;
8. Batt
er
i
es
(
ex
cept th
at
Recharg
ea
bl
e
Ball
er
ie
s
a
re
covered
f
or
90
days
from t
he
dale of
pu
r
chase)
;
9
Products
u
se
d for
commercia
l
purposes
. in
clud
i
ng
,
bu
t n
ot
lim
it
ed
to
r
ent
a
l.
1
0.
Loss
of
da
ta
re
sult
an
t f
rom
malf
u
nction
of
hard dri
ve
or
other
d
ata
s
tor
a
ge
dev
ic
e;
There
are
no
ex
press
wa
rr
an
ti
es
ex
c
ep
t
as
list
ed
above.
T
HE
DU
R
AT
I
ON
OF
ANY
IMPLIED
WA
R
RANT
IES.
I
NCLUD
I
NG
T
HE
I
MPL
IED
WA
RR
A
NT
Y
OF
ME
RCHAN
T
AB
I
LI
T
Y.
IS
LIMIT
ED
TO
T
HE
DURA
TI
ON
OF
T
HE
E
XPR
E
SS
WA
R
RANTY
HE
RE
IN.
JVC
SHA
LL
NOT
BE
LIAB
LE
FOR
ANY
L
OSS
OF U
SE
OF
THE
PRO
DUCT,
I
NCONVE
NIE
NCE,
OR
ANY
OTHER
DAMAGES
.
WH
ET
H
ER
DIRECT.
IN
CIDENTA
L
OR
CONSEQUENT
IAL (I
NC
LU
DI
NG,
WIT
HOUT
LIM
I
TATIO
N.
DA
MAGE
TO T
APES.
RE
CORDS
OR
DI
SC
S)
RE
SUL
TI
NG
FROM
T
HE
U
SE
OF
TH
IS
PR
ODU
CT
, OR
ARISING
OUT
OF ANY
BREAC
H OF THIS
WA
R
RA
NTY
.
ALL
EX
PRES
S
A
ND
IMPL
IED
WARRAN
TI
ES.
INCL
UDING
THE
WA
RRANT
I
ES
OF
M
ERC
H
AN
TABILI
TY
AND
FITN
E
SS
F
OR
PA
R
TIC
ULAR
PURPOS
E,
A
RE
LI
M
ITED
TO
THE
WARRANTY
P
ERIOD
S
ET
FORTH
ABOVE.
Some
states
do
not
a
ll
ow
t
he
exclus
ion
of
i
nc
ide
nt
al
or
consequent
i
al
damages
or
l
im
it
ations
on
how
l
ong
an im
plied
warranty
l
asts
.
so
these
li
mit
at
ions
or e
xc
l
us
i
ons
may
not
apply
to
you
.
Th
is w
arr
an
ty
gives
you
sp
ec
if
ic
leg
al r
igh
ts a
nd
you
may
also
h
ave
oth
er ri
gh
ts
whi
ch
va
ry
from
state
to
st
ate
.
JVC
AMERICAS
CORP.
17
00
Va
ll
ey
Ro
ad
. Wayne.
Ne
w J
ersey
07470
hll
p/l
www
.j
vc
.co
m
REFURB
I
SHED
P
RO
DU
CTS
C
ARR
Y
A
SEPARA
TE
WARR
AN
TY,
THIS
WARRAN
TY DO
ES
NOT
A
PPLY
.
FO
R
DETA
IL
OF RE
FURB
I
SHED
PRODUC
T
W
ARRAN
T
Y,
PLE
ASE
REF
ER
TO
THE
R
EFU
RB
ISHED
PR
ODUCT
WARRAN
TY
INFO
RM
ATION
PACKAGED
WI
TH
E
AC
H
RE
FU
RB
ISH
ED
PRO
DUCT
For
customer
use:
Ente
r
be
l
ow
t
he
Mo
de
l No. and
Ser
ial No.
wh
i
ch
is
loca
t
ed
e
ithe
r
on
the
r
ear
.
boll
om
or s
ide
of
t
he
cab
ine
t.
Reta
in
th
is
in
fo
r
matio
n for f
utu
re
refe
ren
ce.
Mo
del
No
..
Se
rial
No
Pur
chas
e
dal
e:
Name
of d
ea
ler:
Prin
ted
in
Indon
esi
a
Page 66

CANADA
JVC
CANADA
INC.
JVC
WARRANTY
Warrant
y ap
plies
only
to
PRODUCT distributed
in
Canada
by
JVC Canada
Inc.
JVC
CANADA
INC.
(hereafter
called "JVC")
grves
the
following express
warranty fo
r e
ach
new
JVC
produ
ct distribut
ed
in
Canada
by
JVC
and
sold
by
an
authorized
JVC
dealer.
JVC
warrants
that
this
JVC prod
uct
is f
ree,
under
norm
al u
se
and
maintenance. from
any
defects
in
material
and
workmans
hip subject
to
the
follow
ing
ter
ms
and
conditions·
1.
To
Obtain
Warranty
Service:
3.
Standards:
(a)
JVC product
requiring
service must
be presented together
If
any defec
ts s
hou
ld
be
fou
nd
in
a J
VC prod
uct with
in
the
with proof of
purchase.
appl
icable t
erms. necess
ary
repair
s shall
be made
at
no
cos
t to
(b)
The
JVC
product
must be brought in
for
service
to
an
the
purchaser
for par
ts
or labour
whe
n J
VC
ack
now
led
ges
that
authorized
JVC
Service
Cent
re.
such defects a
re due
to faulty material
or
workmanship
2.
Limitation:
This War
ran
ty
shall
not
app
ly to:
(
a)
Repa
ir
or
replaceme
nt of a
ny cabinets.
battenes
. plate
s.
conne
ction cords,
ant
ennas.
dust
covers, knobs, spe
aker
grills,
speaker cones, pr
ojection screen
s. pro
jection screen
s
ave
rs, and a
ll
accesso
rie
s
(b) Any
defects
caused
or
repai
rs required
as a resu
lt
of
misuse.
abusive
operation,
negligence.
improper use and/or
insu
fficient
care.
(c) Any
defect
caused
or
repai
rs required
as a result of not
f
ollo
wing
the
instructions
in the operation
manual.
(d) A
ny JVC
product
tampered with. a
djusted
or
repaired
by
any pa
rty other
than
JVC
or a
uthorrzed
JVC
Service
Cent
re
personne
l.
(
e) Any JVC
products on whi
ch the serr
al number h
as been
defaced, modified
or removed.
(
f)
Maintenance,
cleaning
or
period
ic
check-up
(g) C
onversion
to
foreign or
domestic voltage
or
frequency
.
(h) A
ny JVC
product
without
the Can
adian
Electrical Safety
Re
gulations
ID.
(i) A
ny
JVC
products
used
for commerc
ial
or
institutiona
l,
r
ental, or
displ
ay
purpose
s.
Parts
...... 1 year (except v
ideo he
ad-
90
day
s)
La
bour ...
90
days
(j)
Any
JVC product
whi
ch h
as bee
n res
old
and
no long
er own
ed
by
the
original
purchase
r
(k)
Product
purchased
from ·outside
Canada".
"bankruptcy"
or
"liquidator"
(
I) Any
detects
caused
by tire,
flood,
lightning,
power surge. or
o
ther
events
beyond
the control at
JVC.
(
m)FOR
AUTO
PRODUCTS
Warranty
doe
s not cov
er elimination
of car stati
c or
electrical
in
terteren
ces, clea
ning
cf head, adjustment
s,
or
labo
ur cost
for
the
remov
al or reinstall
ation
of t
he
unit
tor repa
ir.
4.
Exclusion
ot
All
Other Express
Warranties:
This war
ran
ty constit
utes the
entire expr
ess warranty giv
en
by
JVC
for
JVC produc
ts a
nd
no
dealer
or
service
centre personnel
or
his.
its
or thei
r agent
or employee
is.
or
are
autho
riz
ed
to
extend
or
enla
rge this warra
nty
on behal
f of JVC.
5.
Disclaimer
of
Conseque
ntial
Damag
e:
To
the
exte
nt the law permits
JVC disclaims any responsibi
lit
y
for
loss
of time
or
use
of i
ts
product.
transportati
on costs.
or
any
other indirec
t. inciden
tal
or
conse
quen
tial
dama
ge
or
inconvenien
ce.
WARRANTY
TERM
(VALID
FROM
THE
DATE
OF
PURCHASE)
Produ
ct
Parts
Lab
ou
r
(
Years) (Years)
Projection TV
In-Home
Serv
ice
Colour
TV
In-Home (25"
and
above
)
1
1
D-ILA
Rear
Projection In
-Ho
me
Service
LCD
TV
In-Home Se
rvi
ce (25"
and
above
)
*In-Home
service
to
be prov
ided
where ava
ilable.
Where
it
is
not avai
lab
le.
the
purchaser must
assume
the
respon
sibility a
nd
expense for the
prop
er p
acking
, shipme
nt
and all cos
ts assoc
iated with
the
deliv
ery
of the equi
pmen
t to
and
from the closest
JVC Aut
horiz
ed Servi
ce
Cent
re.
Receivers
and Home Speakers
purcha
sed
separately.
Front
Proj
ect
ion
and
Car
2
2
Audio
"ARSENAL" Series
AC
Adapters. Remo
te c
ontro
ls,
Headphones
. Micr
ophones
and
Project
or 90
days
90
days
lamp
s
W
oo
d Cone Speakers 5 5
All
Other
Categori
es
1 1
JVC
CANADA
INC.
6070
kestrel
Road, Missisauga, Ontario, L5T 1 58
Cana
da
TEL: (9
05)
670-3381
FAX:
(905)670-7244
Service toll
fre
e# 1-800-96
4-2650
http://www
.JVC ca
E-m
ail
service
@jvc
ca
Product
Registration
We
suggest that
you regis
ter your pro
duct
sin
ce it
will enable us
to
conta
ct
you
directly
it it
is
ever necessary
to
correct a sa
fety relat
ed
co
ndition
in
your produc
t.
You can regist
er
at
http://www.jv
c.ca/www/Suppori/Warranty
.as
px
For
customer
use:
Enter
below
the
Model
No.
and
Serial No.
which
is
located eith
er
on
the rear.
bottom
or
side
of
the
cabinet.
Reta
in this informati
on for future
reterence.
Model
No.
Serial
No
..
Purchase
date:
Name
of
dealer
:
GARANTIE
La garantls'
applrque
seul
ement a
ux
PRO
DUI
TS distrlbu
es
au Can
ada par J
VC
Canada In
c.
J
VC
CANA
DA
INC. ( ci-a
pres app
ele "JVC") enon
ce
Ia g
aran
tie exp
resse
sui
vante
pour
tout n
ouvea
u produit JVC distri
bue
au Canada par
JVC
et
vendu par un detai
lla
nt
JVC auto rise. J
VC
vous garantit que
ce
pro
duit est
degage, so
us utili
sat
ion et
en
tretien
normal,
de
tout defa
ut materiel
et
de fabr
ication
so
us
reserve
des modalites
et
cond
itions suivantes:
1.
Pour
obtenir
un service
de gara
ntie:
(a)
Les produits JVC
nec
ess
itant un ser
vic
e doit etre p
resentee
avec
Ia prevue d'ach
at.
(b)
Le p
rod
urt J
VC
doit eire apporte pour ser
vice
chez
un
cen
tre
de ser
vice J
VC
auto rise.
2.
Res
tric
tions:
Cette
garantre ne s'appliq
ue
pas
aux·
(a
) Repa
rati
on ou r
emplace
ment
de tout cabine
t, batteries
.
panneau a
van
t,
cordons
de
rac
cord, ant
ennes
. housse
s
de
protection.
boutons, couverts
de hautparl
eur. cones
de
ha
ut
parleu
r. ecr
ans
de projection
. protecteurs d'ec
ran
de
projec
tion
et
taus t
es acce
ssoires
.
(b) To
us defauts
occasionnes ou
reparat
rons requises suit
e a une
utili
sation abusive
, ma
uvaise. negligen
te et/ou une utiliz
atio
n
lllC
Drrecl
e.
(
c)
To
us defa
uts occasionnes
ou repa
rati
ons requises su
ite
a
!'omission de
suivre les recomm
andations
du manue
l
d
'instru
ction.
(d) Tout produit J
VC alt
ere
. ajus
te
ou repare par tout
aut
re
ent
rep
rise que J
VC
ou
un
cent
re
de serv
ice d'e
ntretien
ou
de
service auto rise JVC.
(e) Tout
prod
uit J
VC
don
t le nu
mero
de serie a ete altere, modi
fie
ou enl
eve
.
(f) L'
en
tre
tien, l
es
ver
ifi
cat
ions periodiques
et nettoyage
(
g)
La co
nver
sion
a une freq
uence
ou
une tens
ion etrange
re
ou
d
omestique
(h) To
ut
prod
uit
JVC
n'ayant
pas
le
signe d'i
den
tification qui
conforme aux norms el
ect
riq
ues Canadienn
es
(GSA).
(i)
Pour tout produ
il utili
se a des fins
commerciales
.
in
stitutio
nnelle
s.
de loc
ation ou
utili
se a de
s fins d
'elalage
.
Pi
eces
... ........ 1 An (Ex
cep
te les t
etes video-
90 to
urs
)
Ma
rn
d·oeu
vre ...
90
Jou
rs
(
J)
Tout
produ
it JVC ayant ete r
evendu
et qui n·est pl
us
Ia
propriete
de l'achete
ur origina
l.
(k) Produit achet
e a "l'exteri
eur du
Canad
a", proven
ant
d'une
"fai
llrte"
ou d'un "liquidateur"
.
(I)
To
ut dommage
cause par le feu,
une inondation.
un
ecl
air.
u
ne surtension ou tout autr
e ev
enement hors du
con
trole
de
JV
C.
(m)POUR L
ES
PRODU
ITS D'AUTOMO
BILE
La ga
rant
ie
ne
couv
re p
as !'elimi
nat
ion d'
interfere
nces
statiques
ou elec
tri
ques
de
Ia voiture
. le n
ettoyage
de
Wte,
t
es atus
teme
nts
etles coOts de main d'
muv
re
assoc
ies a
l'enlev
emen
t ou a
Ia rei
nstallation de !'unite pour
repar
ation.
3.
Criteres
:
Si un p
ro
duit
JVC
s'averait defectu
eux. se
ton les condi
tio
ns
applicables
. l
es reparat
ions necessaires seront effect
uris
sans coOts ad
dit
ion n
els a l'
acheteu
r pour l
es piece
s et Ia main
d'm
uv
re lorsque
JVC reconnait
que
de tells defectuosit
ris
son
t
caus
ees
par une defectuos
ite
de mater
iel ou
de
fabri
cati
on.
4. Exclusion
de fout
es
autres garanti
es
expresses
:
Cette garantie
constitu
e l'entiere
garant
ie
express donnee
par
JVC
pour
les pro
duits JVC
. Nul r
epresentant ou emplo
ye d'un
detai
llan
l ou d'
un servi
ce
d'e
ntr
etien n'
est
autorise a pr
o longer
ce
tt
e garantre
au nom
de JVC.
Deneg
ation
des dommages
indirects:
Dans
Ia
mesure permi
se par Ia lo
i, JVC
nie toute r
esponsab
ilite
p
ou
r per
le
de tem
ps
ou
d'u
sage
de ses
produits,
des coo
ts
de
tran
sport
ou tout autre domma
ge ou incon
venient
indirect.
acci
dente
l et c
onseque
nt.
CONDITIONS
DE
GARANTIE
(VALAB
LE
il
PARTIR
DE
LA
DATE
D'ACHAT)
Prod
uit
Pie
ce
s
Main-
Oo
euver
(
Annees\
· (Ann
ees
\
~cran
s
de
projectr
on Serv
ice a Domicile
E
crans
de
TV Coule
ur Service a Domicile (25" el plus
)
1 1
TV
projection
arriere D-ILA Service a
Dom
ici
le
E
crans
de L
CD Service a Domicile (25
'.
et pl
us)
'Servi
ce a domic
ile
fourni pa
r un detaill
ant dis
ponible
S'
il
n'y a pas
de
ser
vice J
VC
disponible
a pr
oxi
mit
e, l'achet
eur do it
assumer
Ia r
esponsab
ilite et les
coO
ls pour un emballage adequat.
!'ex
peditio
n, ainsi
que taus l
es
coOts ass
ocie
s a Ia livraison
de
l'equipement chez
et
depu
is le
diHaillant
JVC autori
se
le plus p
res
pou
r un
service d'entretien
.
Re
cepteurs
et
Hauts-Parleu
rs ach
etes
separ
ement, Projecteur Avant et Audio d'Auto
2 2
de
Serie "ARSENAL"
Adaptateurs AC, Telecommande, Casque
90
Jour
s
90 Jo
ur
s
D'e
co
ute, M
icrophones
et Lam
pe
de Proiecteur
Enceinte a
Cone
en Bois 5 5
Toute
s les autr
es
categori
es
1
1
JVC
CANADA
INC.
6070
kestrel
Roa
d, Missi
sauga, On
tario, LST 1
S8 Cana
da
TEL (905) 670-3381 FAX
(905)670
-7244 Service toll fre
e# 1-800-964-265
0
htt
p://www.jvc.ca E-mail: service@j
vc
ca
Enregistrement
du
prodult
No
us
vous
conse
illons d'
enregist
rer votre produil, car if no us p
ermettra de vous
conta
cter
directemen
t si jamais
elle est
nec
essaire
pour
corri
ger
un
prob
leme lie a Ia securile
de votre p
roduit.
Vous pou
vez
vou
s inscrire a
http//www.
jvc ca/
www
/Su
ppo
rt/Warrantyaspx
Pour
l'ulifisalion
des
clients:
Entrez ci-dessous
le nume
ro
de modele et le numero
de ser
ie qui
se trouve
soil a
l'a
rri
ere, en bas ou s
ur
le
cot
e de !'armoire. Cons
ervez
ces
informations pour rete
ren
ce
futu
re.
No. de model
e:
No
. de s
erie:
Da
te d'ac
hat:
Nom du revendeur:
 Loading...