

Page 1

ENGLISH
FRANÇAIS
ESPAÑOL
B5A-0831-00 [K]
KW-R925BTS / KW-R920BTS
CD RECEIVER
INSTRUCTION MANUAL
RÉCEPTEUR CD
MANUEL D’INSTRUCTIONS
RECEPTOR CON CD
MANUAL DE INSTRUCCIONES
For customer Use:
Enter below the Model No. and Serial No. which are
located on the top or bottom of the cabinet. Retain this
information for future reference.
Model No.
Serial No.
Page 2
i
CAUTION
Use of controls or adjustments or performance of procedures other than those specified
herein may result in hazardous radiation exposure.
In compliance with Federal Regulations, following are reproductions of labels on, or inside
the product relating to laser product safety.
JVC KENWOOD Corporation
2967-3, ISHIKAWA-MACHI,
HACHIOJI-SHI, TOKYO, JAPAN
THIS PRODUCT COMPLIES WITH DHHS RULES 21CFR
SUBCHAPTER J IN EFFECT AT DATE OF MANUFACTURE.
Location : Top Plate
FCC WARNING
This equipment may generate or use radio frequency energy. Changes or modifications
to this equipment may cause harmful interference unless the modifications are expressly
approved in the instruction manual. The user could lose the authority to operate this
equipment if an unauthorized change or modification is made.
FCC NOTE
This equipment has been tested and found to comply with the limits for a Class B digital
device, pursuant to Part 15 of the FCC Rules. These limits are designed to provide reasonable
protection against harmful interference in a residential installation. This equipment may
cause harmful interference to radio communications, if it is not installed and used in
accordance with the instructions. However, there is no guarantee that interference will
not occur in a particular installation. If this equipment does cause harmful interference to
radio or television reception, which can be determined by turning the equipment off and
on, the user is encouraged to try to correct the interference by one or more of the following
measures:
• Reorient or relocate the receiving antenna.
• Increase the separation between the equipment and receiver.
• Connect the equipment into an outlet on a circuit different from that to which the receiver
is connected.
• Consult the dealer or an experienced radio/TV technician for help.
CALIFORNIA, USA ONLY
This product contains a CR Coin Cell Lithium Battery which contains Perchlorate Material—
special handling may apply. See www.dtsc.ca.gov/hazardouswaste/perchlorate
Información acerca de la eliminación de equipos eléctricos y electrónicos al final
de la vida útil (aplicable a los países que hayan adoptado sistemas independientes
de recogida de residuos)
Los productos con el símbolo de un contenedor con ruedas tachado no
podrán ser desechados como residuos domésticos. Los equipos eléctricos y
electrónicos al final de la vida útil, deberán ser reciclados en instalaciones
que puedan dar el tratamiento adecuado a estos productos y a sus
subproductos residuales correspondientes. Póngase en contacto con su
administración local para obtener información sobre el punto de recogida
más cercano. Un tratamiento correcto del reciclaje y la eliminación de
residuos ayuda a conservar los recursos y evita al mismo tiempo efectos
perjudiciales en la salud y el medio ambiente.
Informação sobre a eliminação de pilhas
Este produto não deve ser eliminado como lixo doméstico geral. Devolva a pilha usada
ao revendedor ou entidade autorizada para que a mesma seja devolvida ao fabricante ou
importador.
A reciclagem e a eliminação de lixo de maneira apropriada ajudarão a conservar os recursos
naturais ao mesmo tempo que prevenirão os efeitos prejudicais à nossa saúde e ao meio
ambiente.
Page 3

ii
CAUTION
This equipment complies with FCC/IC radiation exposure limits set forth for an uncontrolled
environment and meets the FCC radio frequency (RF) Exposure Guidelines in Supplement C
to OET65 and RSS-102 of the IC radio frequency (RF) Exposure rules. This equipment has very
low levels of RF energy that it deemed to comply without maximum permissive exposure
evaluation (MPE). But it is desirable that it should be installed and operated keeping the
radiator at least 20cm or more away from person’s body (excluding extremities: hands,
wrists, feet and ankles).
Under Industry Canada regulations, this radio transmitter may only operate using an
antenna of a type and maximum (or lesser) gain approved for the transmitter by Industry
Canada. To reduce potential radio interference to other users, the antenna type and its gain
should be so chosen that the equivalent isotropically radiated power (e.i.r.p.) is not more
than that necessary for successful communication.
ATTENTION
Cet équipement est conforme aux limites d’exposition aux rayonnements énoncées
pour un environnement non contrôlé et respecte les règles d’exposition aux fréquences
radioélectriques (RF) CNR-102 de l’IC. Cet équipement émet une énergie RF très faible qui
est considérée conforme sans évaluation de l’exposition maximale autorisée. Cependant,
cet équipement doit être installé et utilisé en gardant une distance de 20 cm ou plus entre
le dispositif rayonnant et le corps (à l’exception des extrémités : mains, poignets, pieds et
chevilles).
Conformément à la réglementation d’Industrie Canada, le présent émetteur radio peut
fonctionner avec une antenne d’un type et d’un gain maximal (ou inférieur) approuvé
pour l’émetteur par Industrie Canada. Dans le but de réduire les risques de brouillage
radioélectrique à l’intention des autres utilisateurs, il faut choisir le type d’antenne et son
gain de sorte que la puissance isotrope rayonnée équivalente (p.i.r.e.) ne dépasse pas
l’intensité nécessaire à l’établissement d’une communication satisfaisante.
IC (Industry Canada) Notice
This device complies with Industry Canada licence-exempt RSS standard(s).
Operation is subject to the following two conditions:
(1) This device may not cause interference, and
(2) this device must accept any interference, including interference that may cause
undesired operation of the device.
The term “IC: ” before the certification/ registration number only signifies that the Industry
Canada technical specification were met.
Note de IC (Industrie Canada)
Le présent appareil est conforme aux CNR d’Industrie Canada applicables aux appareils
radio exempts de licence.
L’exploitation est autorisée aux deux conditions suivantes:
(1) l’appareil ne doit pas produire de brouillage, et
(2) l’utilisateur de l’appareil doit accepter tout brouillage radioélectrique subi, même si le
brouillage est susceptible d’en compromettre le fonctionnement.
L’expression “IC:” avant le numéro d’homologation/ enregistrement signifie seulement
que les specifications techniques d’Industrie Canada ont été respectées.
Para cumplimiento de la COFETEL:
“La operación de este equipo está sujeta a las siguientes dos condiciones:
(1) es posible que este equipo o dispositivo no cause interferencia perjudicial y
(2) este equipo o dispositivo debe aceptar cualquier interferencia, incluyendo la que pueda
causar su operación no deseada”
Contains Bluetooth Module FCC ID: ZWY8811X
IC ID: 12033A-8811X
Page 4

iii
SOFTWARE LICENSE AGREEMENT
The software embedded in the Product (hereinafter the "Licensed Software") provided by Licensor
is copyrighted to or sublicensable by the Licensor, and this Agreement provides for the terms and
conditions which Users shall follow in order to use the Licensed Software.
The User shall use the Licensed Software by agreeing with the terms of this Software License
Agreement. This Agreement shall be deemed completed at the time the User (hereinafter the "User")
initially used the Product in which the "Licensed Software" is embedded.
The Licensed Software may include the software which has been licensed to the Licensor directly
or indirectly from any third party. In such case, some third parties require the Users to follow their
conditions for use separately from this Software License Agreement. Such software shall not be
subject to this Agreement, and the Users are urged to read the "Important Notice concerning the
Software" to be provided separately below.
Article 1 General Provision
The Licensor shall grant to the User a non-exclusive and non-transferable (other than the exceptional
case referred to in Article 3, Paragraph 1) licensed to use the Licensed Software within the country of
the User. (the country where the User bought the Product(hereinafter the "Country")
Article 2 License
1. The license granted under this Agreement shall be the right to use the Licensed Software in the
Product.
2. The User shall not duplicate, copy, modify, add, translate or otherwise alter, or lease the Licensed
Software and any related documents, whether in whole or in part.
3. The use of the Licensed Software shall be limited to personal purpose, and the Licensed Software
shall not be distributed, licensed or sub-licensed whether it is for commercial purpose or not.
4. The User shall use the Licensed Software according to the directions described in the operation
manual or help file, and is prohibited to use or duplicate any data in a manner violating the
Copyright Law or any other laws and regulations by applying whole or a part of the Licensed
Software.
Article 3 Conditions for Grant of License
1. When the User transfers the Product, it may also transfer the license to use the Licensed Software
embedded in the Product (including any related materials, updates and upgrades) on condition
that no original, copies or related materials continue in the possession of the User, and that the
User shall cause the transferee to comply with this Software License Agreement.
2. The User shall not carry out reverse engineering, disassembling, decompiling or any other code
analysis works in connection with the Licensed Software.
Article 4 Right pertaining to the Licensed Software
Any and all copyrights and other rights pertaining to the Licensed Software and related documents
shall belong to the Licensor or the original holder of the right who granted to the Licensor the license
or sublicense for the Licensed Software (hereinafter the "Original Rightholder"), and the User shall not
be entitled to any right other than the license granted hereunder, in respect of the Licensed Software
and any related documents.
Article 5 Indemnification of Licensor
1. Neither the Licensor nor the Original Rightholder shall be liable for any damage incurred by the
User or any third party due to the exercise of the license granted to the User under this Agreement,
unless otherwise restricted by law.
2. The Licensor will offer no guarantee for the merchantability, convertibility and consistency with
certain objective of the Licensed Software.
Article 6 Liability to Third Party
If any dispute has arisen with any third party due to an infringement upon a copyright, patent or any
other intellectual property right that was caused by the User's use of the Licensed Software, the User
shall settle such dispute at its own cost and hold the Licensor and the Original Rightholder harmless
from any inconvenience it may cause.
Article 7 Confidentiality
The User shall keep the confidentiality of such portion of the Licensed Software, related documents
thereof or any other information to be granted under this Agreement, as well as the conditions of this
Agreement as has not yet entered the public domain, and shall not disclose or divulge the same to any
third party without approval of the Licensor.
Page 5

iv
Article 8 Termination
In case the User falls under any of the events described in the following items, the Licensor may immediately terminate this
Agreement or claim that the User compensates for the damage incurred by the Licensor due to such event:
(1) when the User violated any provision of this Agreement; or
(2) when a petition has been filed against the User for an attachment,
provisional attachment, provisional disposition or any other compulsory execution.
Article 9 Destruction of the Licensed Software
If this Agreement is terminated pursuant to the provision of Article 8, the User shall destroy the Licensed Software, any
related documents and copies thereof within two (2) weeks from such date of termination.
Article 10 Protection of Copyright
1. The copyright and all the other intellectual property rights relating to the Licensed Software shall belong to the Licensor
and the Original Rightholder, and in no event shall they be under the ownership of the User.
2. The User shall, whenever it uses the Licensed Software, comply with any laws relating to the copyright and other
intellectual property rights.
Article 11 Export Restriction
1. It is prohibited to export the Licensed Software and any related documents outside the country of the User (including
transmission thereof outside the country of the User via Internet of other communication tools).
2. The User shall understand that the Licensed Software shall be subject to the export restrictions adopted by the country
of User and any other countries.
3. The User shall agree that the software will be subject to any and all applicable international and domestic laws
(including the export control regulation of the country of User and any other countries, and any restrictions concerning
the end-users, the use by end-users and importing countries to be provided by the country of User and any other
countries, and any other governmental authorities).
Article 12 Miscellaneous
1. In the event any part of this Agreement is invalidated by operation of law, the residual provisions shall continue in force.
2. Matters not stipulated in this Agreement or any ambiguity or question raised in the construction of this Agreement shall
be provided or settled upon good-faith consultation between the Licensor and the User.
3. The Licensor and the User hereby agree that this Agreement is governed by the laws of Japan, and any dispute arising
from, and relating to the rights and obligations under, this Agreement shall be submitted to the exclusive jurisdiction of
the Tokyo District Court for its first instance.
Important Notice concerning the Software
-jansson
Copyright (c) 2009-2012 Petri Lehtinen <petri@digip.org>
Permission is hereby granted, free of charge, to any person obtaining a copy of
this software and associated documentation files (the "Software"), to deal in
the Software without restriction, including without limitation the rights to use,
copy, modify, merge, publish, distribute, sublicense, and/or sell copies of the
Software, and to permit persons to whom the Software is furnished to do so,
subject to the following conditions:
The above copyright notice and this permission notice shall be included in all
copies or substantial portions of the Software.
THE SOFTWARE IS PROVIDED "AS IS", WITHOUT WARRANTY OF ANY KIND,
EXPRESS OR IMPLIED, INCLUDING BUT NOT LIMITED TO THE WARRANTIES
OF MERCHANTABILITY, FITNESS FOR A PARTICULAR PURPOSE AND
NONINFRINGEMENT. IN NO EVENT SHALL THE AUTHORS OR COPYRIGHT HOLDERS
BE LIABLE FOR ANY CLAIM, DAMAGES OR OTHER LIABILITY, WHETHER IN AN
ACTION OF CONTRACT, TORT OR OTHERWISE, ARISING FROM, OUT OF OR IN
CONNECTION WITH THE SOFTWARE OR THE USE OR OTHER DEALINGS IN THE
SOFTWARE.
Page 6
2
CONTENTS
BEFORE USE
IMPORTANT
• To ensure proper use, please read through this manual before using this product. It is especially important
that you read and observe Warning and Caution in this manual.
• Please keep the manual in a safe and accessible place for future reference.
Warning
Do not operate any function that takes your attention away from safe driving.
Caution
Volume setting:
• Adjust the volume so that you can hear sounds outside the car to prevent accidents.
• Lower the volume before playing digital sources to avoid damaging the speakers by the sudden increase of
the output level.
General:
• Avoid using the external device if it might hinder safe driving.
• Make sure all important data has been backed up. We shall bear no responsibility for any loss of recorded
data.
• Never put or leave any metallic objects (such as coins or metal tools) inside the unit to prevent a short
circuit.
• If a disc error occurs due to condensation on the laser lens, eject the disc and wait for the moisture to
evaporate.
Remote control (RM-RK52):
• Do not leave the remote control in hot places such as on the dashboard.
• The Lithium battery is in danger of explosion if replaced incorrectly. Replace it only with the same or
equivalent type.
• The battery pack or batteries shall not be exposed to excessive heat such as sunshine, fire or the like.
• Keep the battery out of reach of children and in its original packaging when not in used. Dispose of used
batteries promptly. If swallowed, contact a physician immediately.
BEFORE USE 2
BASICS 3
GETTING STARTED 4
1
Cancel the demonstration
2 Set the clock
3 Set the basic settings
RADIO 5
CD / USB / iPod / ANDROID 7
Pandora® 9
iHeartRadio® 10
SiriusXM® Radio 11
BLUETOOTH® 14
AUX 20
AUDIO SETTINGS 20
DISPLAY SETTINGS 24
REFERENCES 26
Maintenance
More information
TROUBLESHOOTING 28
SPECIFICATIONS 30
INSTALLATION /
CONNECTION 32
How to read this manual
• Operations are explained mainly using buttons on the faceplate of
KW-R925BTS
.
• English indications are used for the purpose of explanation. You can select the display language from the
menu. (
5
)
•
[XX]
indicates the selected items.
• (
XX
) indicates references are available on the stated page.
Page 7
3
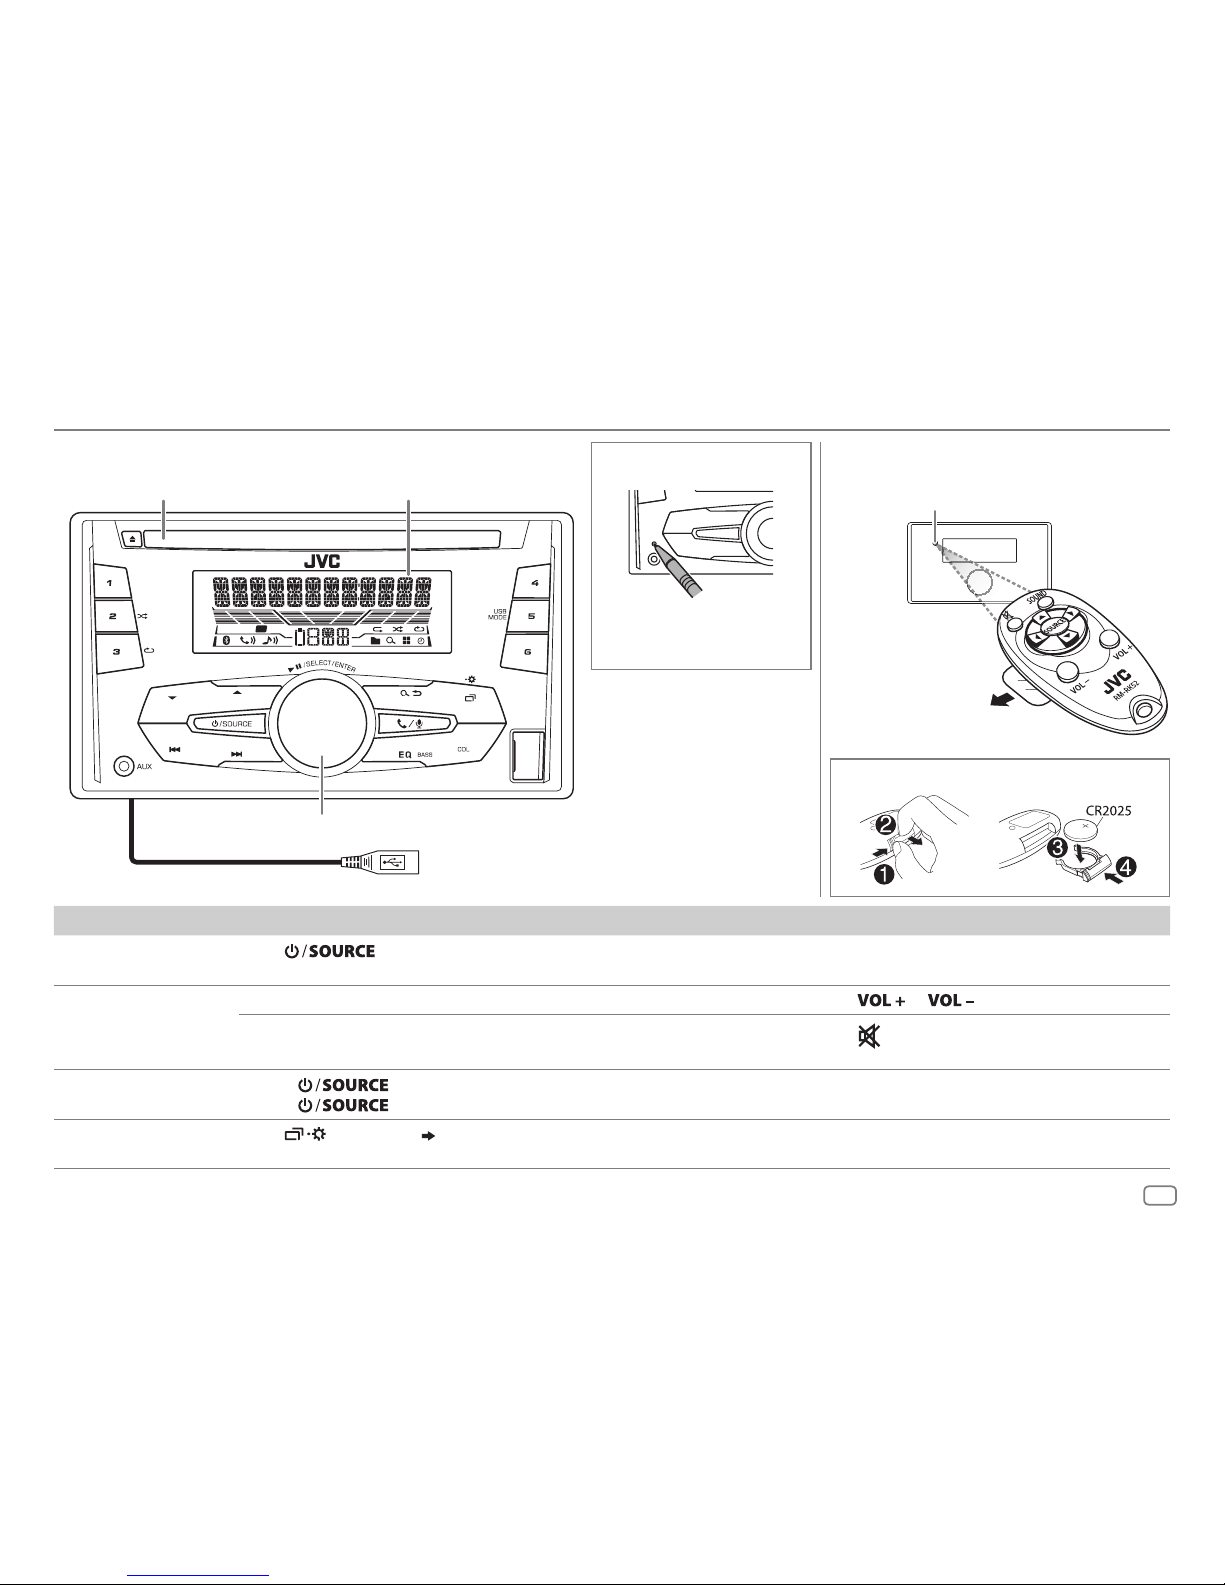
ENGLISH
BASICS
To On the faceplate On the remote control
Turn on the power Press .
• Press and hold to turn off the power.
( Not available )
Adjust the volume Turn the volume knob. Press
or .
Press the volume knob to mute the sound or pause playback.
• Press again to cancel.
Press
to mute the sound or pause playback.
• Press again to cancel.
Select a source • Press
repeatedly.
• Press
, then turn the volume knob within 2 seconds.
Press SOURCE repeatedly.
Change the display
information
Press
repeatedly.
( 26)
( Not available )
ST
T I
Remote control (RM-RK52)
How to reset
Press twice within
5seconds.
Volume knob
Loading slot Display window
Faceplate
How to replace the battery
Pull out the insulation sheet
when using for the first time.
Remote sensor (Do not expose
to bright sunlight.)
KW-R925BTS:
USB cable from the rear of the unit
Page 8
4
GETTING STARTED
Cancel the demonstration
When you turn on the power for the first time (or [
FACTORY RST
] is set to
[
YES
]), the display shows: “CANCEL DEMO” “PRESS” “VOLUME KNOB”
1 Press the volume knob.
[
YES
] is selected for the initial setup.
2 Press the volume knob again.
“DEMO OFF” appears.
Set the clock
1
Press and hold .
2 Turn the volume knob to select [
CLOCK
], then press the knob.
3 Turn the volume knob to select [
CLOCK SET
], then press the knob.
4 Turn the volume knob to make the settings, then press the knob.
Day
Hour Minute
5 Turn the volume knob to select [
24H/ 12H
], then press the knob.
6 Turn the volume knob to select [
12 HOUR
] or [
24 HOUR
], then press the
knob.
7 Press to exit.
To return to the previous setting item, press
.
1
2
Set the basic settings
1
Press and hold .
2 Turn the volume knob to select an item (see the following table),
then press the knob.
3 Repeat step 2 until the desired item is selected or activated.
4 Press to exit.
To return to the previous setting item, press
.
Default:
XX
SETTINGS
BEEP
(Not applicable when 3-way crossover is selected.)
ON
:Activates the keypress tone.;
OFF
:Deactivates.
SRC SELECT
AM
*
ON
:Enables AM in source selection.;
OFF
:Disables.
PANDORA *ON
:Enables PANDORA/PANDORA-F/PANDORA-R in source selection.;
OFF
:Disables.
IHEART
*
ON
:Enables IHEARTRADIO/IHEART FRONT/IHEART REAR in source selection.;
OFF
:Disables.
AUX
*
ON
:Enables AUX in source selection.;
OFF
:Disables.
F/W UPDATE
SYSTEM
F/W xxxx
YES
:Starts upgrading the firmware.; NO:Cancels (upgrading is not
activated).
For details on how to update the firmware, see:
<http://www.jvc.net/cs/car/>.
FACTORY RST YES
:Resets the settings to default (except the stored station).; NO:Cancels.
* Not displayed when the corresponding source is selected.
3
Page 9

ENGLISH
5
CLOCK
CLOCK SYNC
AUTO
:The clock time is automatically set using
the Clock Time (CT) data in FM Radio Broadcast
Data System signal.;
OFF
:Cancels.
CLOCK DISP ON
:The clock time is shown on the display even
when the unit is turned off.;
OFF
:Cancels.
ENGLISH
Select the display language for menu and music
information if applicable.
By default,
ENGLISH
is selected.
ESPANOL
RADIO
“ST” lights up when receiving an FM stereo broadcast with sufficient signal strength.
Search for a station
1
Press repeatedly to select FM or AM.
2 Press (or press on RM-RK52) to search for a station automatically.
(or)
Press and hold (or press and hold on RM-RK52) until “M” flashes, then
press repeatedly to search for a station manually.
Settings in memory
You can store up to 18 stations for FM and 6 stations for AM.
Store a station
While listening to a station....
Press and hold one of the number buttons (1 to 6).
(or)
1 Press and hold the volume knob until “PRESETMODE” flashes.
2 Turn the volume knob to select a preset number, then press the knob.
The preset number flashes and “MEMORY” appears.
GETTING STARTED
Page 10
6
Select a stored station
Press or one of the number buttons (1to6).
(or)
1 Press .
2 Turn the volume knob to select a preset number, then press the
knob to confirm.
Other settings
1
Press and hold .
2 Turn the volume knob to select [
TUNER
], then press the knob.
3 Turn the volume knob to select an item
(
see the following table),
then press the knob.
4 Repeat step 3 until the desired item is selected/activated or follow
the instructions stated on the selected item.
5 Press to exit.
To return to the previous setting item, press
.
Default:
XX
RADIO TIMER
Turns on the radio at a specific time regardless of the current source.
1 ONCE/ DAILY/ WEEKLY/ OFF
:Select how often the timer will be
turned on.
2 FM/ AM/ SIRIUS XM
*1:Select the source.
3 01
to 18 (for FM/ SIRIUS XM)/ 01 to 06 (for AM):Select the preset
station.
4
Set the activation day *2 and time.
“
M
” lights up when complete.
Radio Timer will not activate for the following cases.
• The unit is turned off.
• [
OFF
] is selected for [AM] in [
SRC SELECT]
after Radio Timer for AM is
selected.
( 4)
RADIO
SSM SSM 01 – 06
/
SSM 07 – 12
/
SSM 13 – 18
:Automatically presets up
to 18 stations for FM. “SSM” stops flashing when the first 6 stations are
stored. Select
SSM 07 – 12
/
SSM 13 – 18
to store the following 12
stations.
IF BAND AUTO
:Increases the tuner selectivity to reduce interference noises from
adjacent FM stations. (Stereo effect may be lost.);
WIDE
:Subjects to
interference noises from adjacent FM stations, but sound quality will not
be degraded and the stereo effect will remain.
MONO
*
3
ON
:Improves the FM reception, but the stereo effect will be lost.;
OFF
:Cancels.
AREA AREA US
: For North/Central/South America, AM/FM intervals:
10kHz/200kHz.;
AREA SA
:For some South American countries, AM/
FM intervals: 10kHz/50kHz.;
AREA EU
:For any other areas, AM/FM
intervals: 9kHz/50kHz.
PTY SEARCH
*3Select a PTY code (see below).
If there is a station broadcasting a program of the same PTY code as you
have selected, that station is tuned in.
PTY code: NEWS, INFORM
(information),
SPORTS, TALK, ROCK, CLS ROCK
(classic
rock),
ADLT HIT
(adult hits),
SOFT RCK
(softrock),
TOP 40, COUNTRY, OLDIES, SOFT
,
NOSTALGA
(nostalgia),
JAZZ, CLASSICL
(classical),
R & B
(rhythm and blues),
SOFT R&B
(soft rhythm and blues),
LANGUAGE, REL MUSC
(religious music),
REL TALK
(religious talk),
PERSNLTY
(personality),
PUBLIC, COLLEGE, HABL ESP
(Spanish talk),
MUSC ESP
(Spanish music),
HIP HOP, WEATHER
*
1
Selectable only when SiriusXM Vehicle Tuner is connected.
*
2
Selectable only when [
ONCE
] or [
WEEKLY
] is selected in step 1.
*
3
Only for FM source.
Page 11
ENGLISH
7
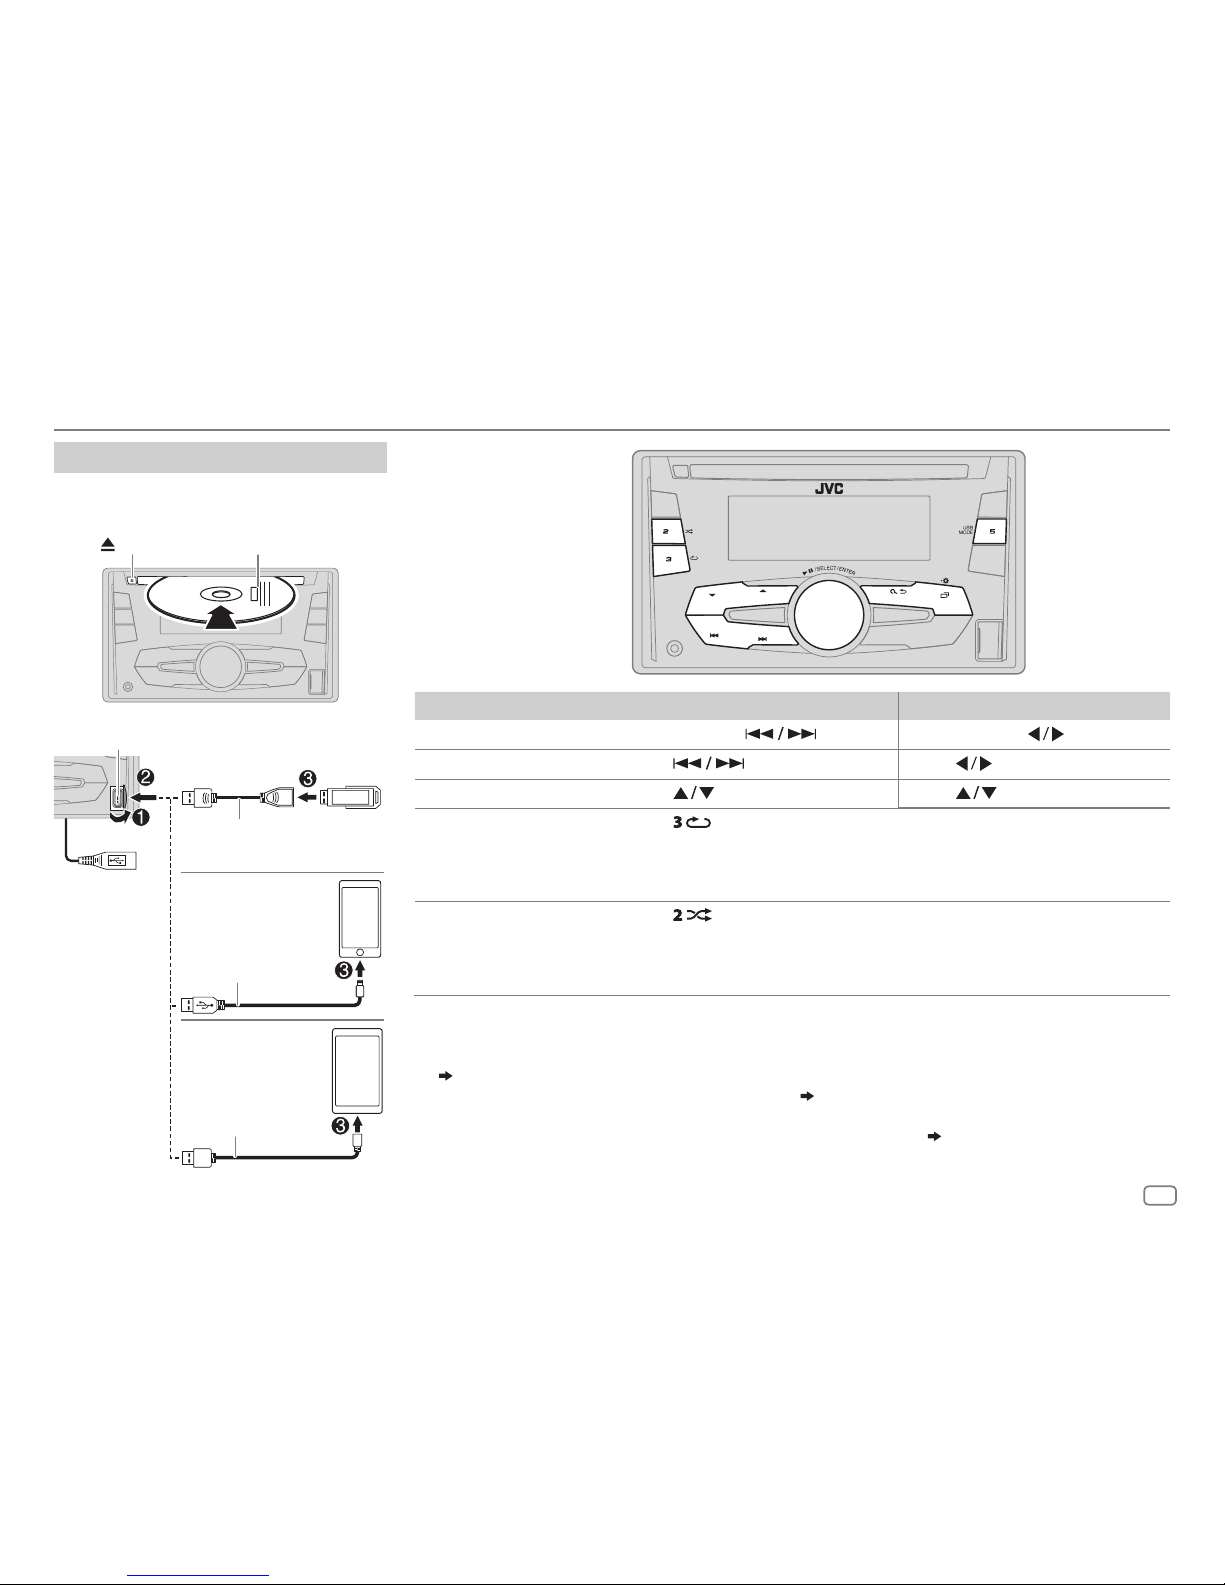
CD / USB / iPod / ANDROID
To On the faceplate On the remote control
Reverse / Fast-forward
*
3
Press and hold .
Press and hold
.
Select a track/file Press
.
Press
.
Select a folder
*
4
Press . Press .
Repeat play
*
5
Press repeatedly.
TRACK RPT/ ALL RPT
: Audio CD
TRACK RPT/ FOLDER RPT/ ALL RPT
: MP3/WMA/AAC/WAV/FLAC file
ONE RPT/ ALL RPT/ RPT OFF
: iPod or ANDROID
Random play
*
5
Press repeatedly.
ALL RND/ RND OFF
: Audio CD
FOLDER RND/ ALL RND/ RND OFF
: MP3/WMA/AAC/WAV/FLAC file
SONG RND/ ALL RND/ RND OFF
: iPod or ANDROID
*
1
Do not leave the cable inside the car when not using.
*
2
When connecting an Android device, “Press [VIEW] to install JVC MUSIC PLAY APP” is shown. Follow the instructions to install the
application. You can also install the latest version of JVC MUSIC PLAY application on your Android device before connecting.
(
26
)
*
3
For ANDROID: Applicable only when [
AUTO MODE
] is selected. ( 8)
*
4
For CD: Only for MP3/WMA/AAC files. This does not work for iPod/ ANDROID.
*
5
For iPod/ ANDROID: Applicable only when [
HEAD MODE
]/ [
AUTO MODE
] is selected. ( 8)
Start playback
The source changes automatically and
playback starts.
CD
Eject disc Label side
USB input terminal
USB 2.0 cable
*1
(commercially available)
Micro USB 2.0 cable
*
1
(commercially available)
(Accessory of the
iPod/iPhone)*
1
USB
iPod/iPhone
ANDROID
*
2
KW-R925BTS
:
You can also
connect to the USB
cable from the rear
of the unit.
Selectable source:
•
KW-R925BTS
: CD/ USB FRONT/
USB REAR/ IPOD FRONT/ IPOD
REAR/ ANDROID-F/ ANDROID-R
•
KW-R920BTS
: CD/ USB/
USB-IPOD/ ANDROID
Page 12
8
Select control mode
While in IPOD FRONT/ IPOD REAR/ USB-IPOD source, press
repeatedly.
HEAD MODE
: Control iPod from this unit.
IPHONE MODE
: Control iPod using the iPod itself.
However,
you can still
play/pause or file skip from this unit.
While in ANDROID/ ANDROID-F/ ANDROID-R source, press
repeatedly.
AUTO MODE
: Control Android device from this unit via JVC MUSIC PLAY
application installed in the Android device.
AUDIO MODE
: Control Android device using the Android device itself via
other media player applications installed in the Android
device. However, you can still play/pause or file skip from
this unit.
Select music drive
Press repeatedly.
Stored songs in the following drive will be played back.
• Selected internal or external memory of a smartphone (Mass Storage
Class).
• Selected drive of a multiple drives device.
Select a file from a folder/list
1
Press .
2 Turn the volume knob to select a folder/list, then press the knob.
3 Turn the volume knob to select a file, then press the knob.
Quick Search
If you have many files, you can search through them quickly.
Turn the volume knob quickly to browse through the list quickly.
– Not applicable for iPod.
Alphabet search
(applicable only for iPod):
You can search for a file according to the first character.
Press
or turn the volume knob quickly to select the desired
character (A to Z/ 0to9/ OTHERS).
– Select “OTHERS” if the first character is other than Ato Z, 0 to 9.
• To return to the previous setting item, press .
• To cancel, press and hold
.
• For iPod, applicable only when [
HEAD MODE
] is selected.
• For ANDROID, applicable only when [
AUTO MODE
] is selected.
CD / USB / iPod / ANDROID
Page 13
ENGLISH
9
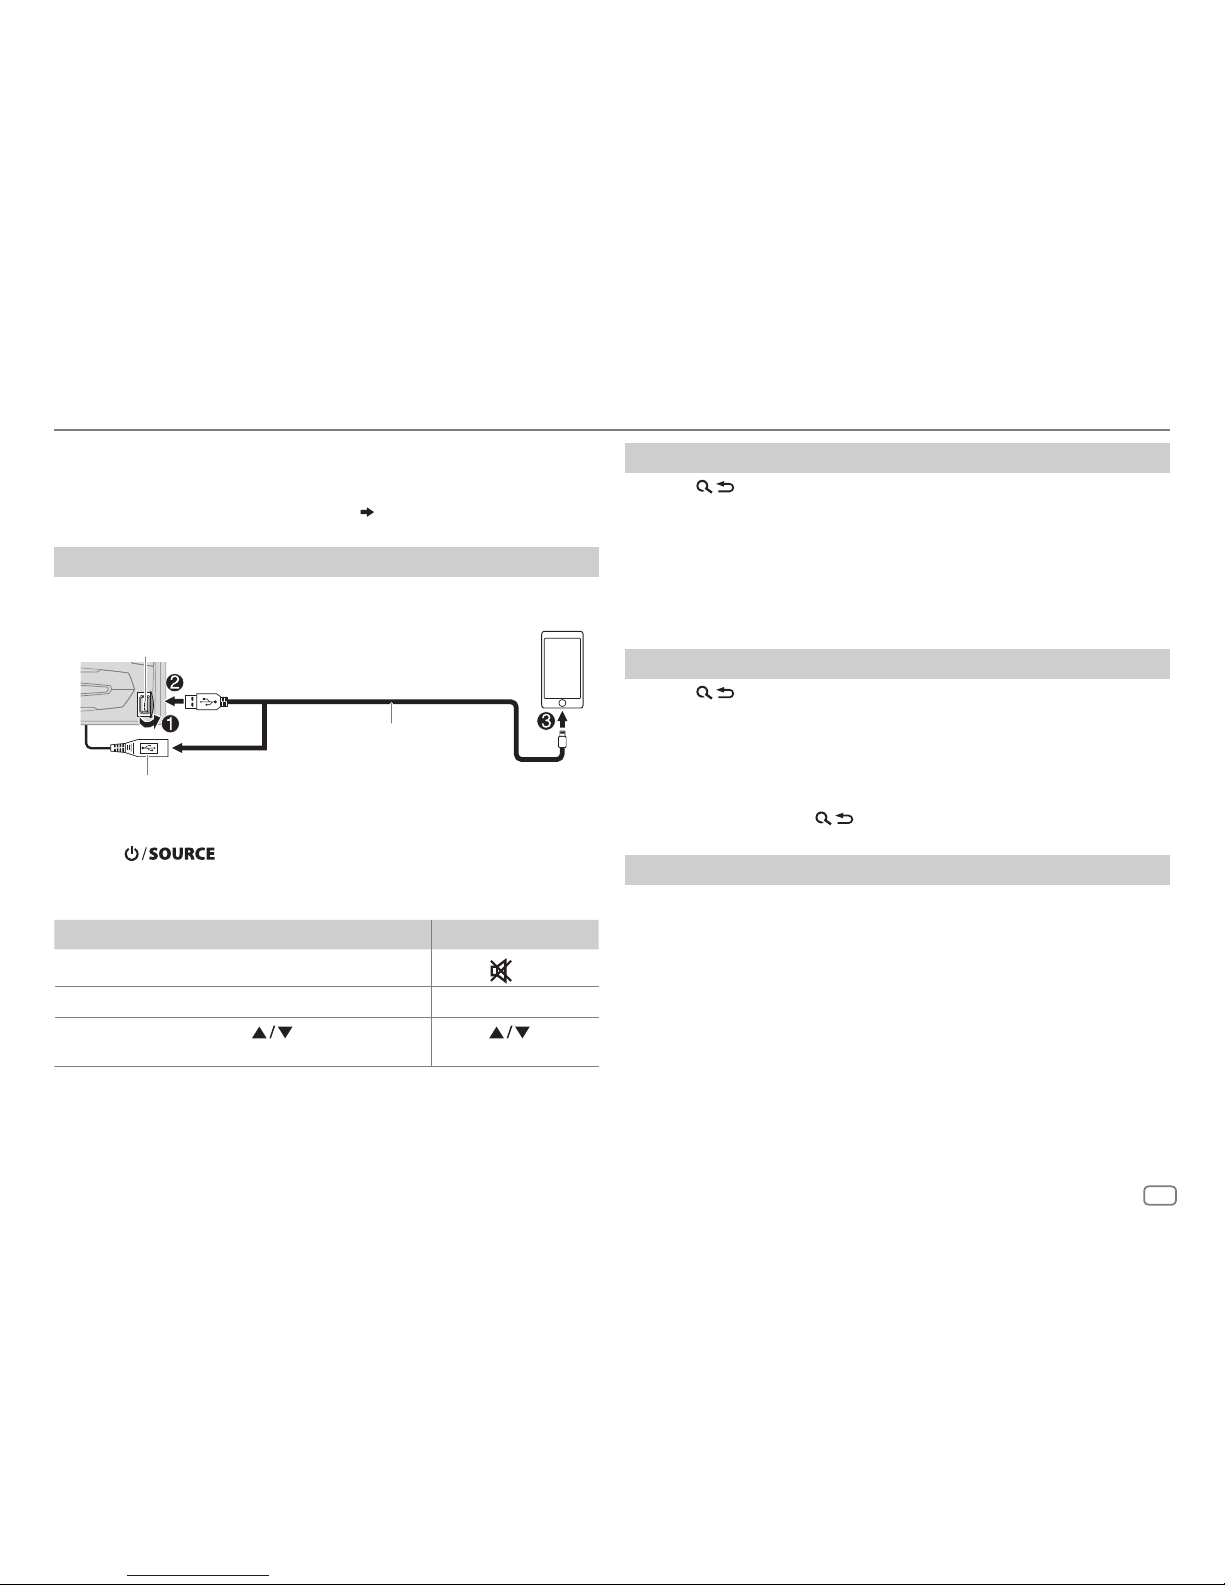
Pandora®
Preparation:
Install the latest version of the Pandora application on your device
(iPhone/ iPod touch), then create an account and log in to Pandora.
• Select [
ON
] for [
PANDORA
] in [
SRC SELECT
].
( 4)
Start listening
1
Open the Pandora application on your device.
2 Connect your device to the USB input terminal.
3 Press repeatedly to select PANDORA/ PANDORA-F/
PANDORA-R.
Broadcast starts automatically
To On the faceplate On the remote control
Playback / pause Press the volume knob.
Press
.
Skip a track
Press T. Press I.
Thumbs up or
thumbs down*
2
Press . Press .
*
1
Do not leave the cable inside the car when not using.
*
2
If thumbs down is selected, the current track is skipped.
Create and save a new station
1
Press .
2 Turn the volume knob to select [
NEW STATION
], then press the knob.
3 Turn the volume knob to select [
FROM TRACK
] or [
FROM ARTIST
], then
press the knob.
A new station is created based on the current song or artist.
4 Press and hold one of the number buttons (1to6) to store.
To select a stored station, press one of the number buttons (1to6).
Search for a registered station
1
Press .
2 Turn the volume knob to select an item, then press the knob.
[
BY DATE]:
According to the registered date.
[
A-Z]:
Alphabetical order.
3 Turn the volume knob to select the desired station, then press the
knob.
To cancel, press and hold
.
Bookmark current song information
Press and hold the volume knob.
“BOOKMARKED” appears and the information is stored to your device.
The bookmark is available on your Pandora account but not on this unit.
USB input terminal
(Accessory of the iPod/iPhone)
*
1
and / or
KW-R925BTS
:
You can also connect to the USB cable from the rear of the unit.
Page 14

10
iHeartRadio®
Preparation:
Install the latest version of iHeartAuto application on your device
(iPhone/ iPod touch), then create an account and log in to iHeartRadio.
• Select [
ON
] for [
IHEART
] in [
SRC SELECT
].
( 4)
Start listening
1
Open the iHeartAuto application on your device.
2 Connect your device to the USB input terminal.
3 Press repeatedly to select IHEARTRADIO/
IHEARTFRONT/ IHEART REAR.
Broadcast starts automatically
* Do not leave the cable inside the car when not using.
To On the faceplate On the remote control
Playback / pause Press the volume knob.
Press
.
Skip a track for
custom station
Press T. Press I.
Thumbs up or
thumbs down
Press
. Press .
Create a new/
custom station
Press and hold the
volume knob.
( Not available )
Scan for live station
1 Press 1 to start
scanning.
2 Press the volume
knob to listen to the
station.
( Not available )
Search and store a station
1
Press .
2 Turn the volume knob to select a category, then press the knob.
3 Turn the volume knob to select the desired station, then press the
knob.
When a city list appears, you can search cities in alphabetical order by
turning the volume knob quickly.
To cancel, press and hold
.
• To store a station: Press and hold one of the number buttons (2to6).
• To select a stored station: Press one of the number buttons (2to6).
USB input terminal
(Accessory of the iPod/iPhone)
*
and / or
KW-R925BTS
:
You can also connect to the USB cable from the rear of the unit.
Page 15

ENGLISH
11
SiriusXM® Radio
Start listening
1
Press repeatedly to select SIRIUSXM.
2 Press .
“
” lights up.
3 Turn the volume knob to select a CATEGORY, then press the knob.
4 Turn the volume knob to select a category from the list, then press the knob.
If “ALL CHANNEL” is selected, all the available channels will be shown.
5 Turn the volume knob to select a channel, then press the knob.
(or)
Press to search for a channel manually.
• Pressing and holding changes the channel rapidly.
If a locked channel or a mature channel is selected, a pass code input screen appears.
Enter the pass code to receive the channel.
( 13)
Store a channel
You can store up to 18 channels.
To Do this
Store a channel Press and hold one of the number buttons (1 to 6).
1 Press and hold the volume knob until “PRESETMODE” flashes.
2 Turn the volume knob to select a preset number, then press
the knob.
The preset number flashes and “MEMORY” appears.
Select a stored
channel
Press one of the number buttons (1 to 6).
1 Press .
2 Turn the volume knob to select PRESET, then press the knob.
3 Turn the volume knob to select a preset number, then press
the knob.
Press
on RM-RK52.
Only SiriusXM® brings you more of what you love
to listen to, all in one place. Get over 140 channels,
including commercial-free music plus the best sports,
news, talk, comedy and entertainment. Welcome to the
world of satellite radio. A SiriusXM Vehicle Tuner and
Subscription are required. For more information, visit
www.siriusxm.com.
Preparation:
1 Connect the optional SiriusXM Vehicle Tuner
(commercially available).
2 Check your Radio ID for activation.
The SiriusXM Radio ID is required for activation and
can be found by tuning to Channel 0 as well as on
the label found on the SiriusXM Connect tuner and
its packaging.
The Radio ID does not include the letters I, O, S or F.
3 Activate the subscription.
For users in the U.S.A.:
Online: Go to www.siriusxm.com
Phone: Call 1-866-635-2349
For users in Canada:
Online: Go to www.siriusxm.ca/activatexm
Phone: Call 1-877-438-9677
4 Press repeatedly to select SIRIUSXM
to start updating.
Antenna
Expansion port on
the rear panel
SiriusXM
Vehicle Tuner
Page 16

12
When you select a SmartFavorites channel, you can rewind and replay up
to 30 minutes of any of the missed news, talk, sports or music content.
• Playback starts from the beginning of the song if [
TUNE START
] is set to
[
ON
] ( 13) for most music channels stored as a SmartFavorite.
To On the faceplate
Select a stored
SmartFavorite
channel
Press one of the number buttons (1to6).
1 Press .
2 Turn the volume knob to select a preset number,
then press the knob to confirm.
Cancel
SmartFavorites
channels
1 Press .
2 Turn the volume knob to select PRESET, then
press the knob.
3 Turn the volume knob to select a preset number,
then press and hold the knob.
“
*
” are removed from the last character.
Reassign
SmartFavorites
channels
Repeat steps
1 to 3 of cancelling SmartFavorites
channels.
“
*
” appears at the last character.
TuneScan™
You can get a short preview of the songs that you have missed on each of
your SmartFavorite music channels or currently tuned music channel.
1 Press .
2 Turn the volume knob to select TUNE SCAN, then press the knob.
Scanning start for the first 6 seconds of the recorded music contents.
• To listen to the current song, press the volume knob to stop scanning.
The unit continues playing the current song.
• To select the previous/next song, press
.
• To cancel scanning, press and hold the volume knob. Playback returns
to the channel before you entered TuneScan.
SiriusXM Replay™
1
Press the volume knob.
“
” lights up and the unit memorizes this paused position.
2 Press the volume knob to start Replay.
Replay starts from the paused position in step
1.
During Replay...
To On the faceplate On the remote control
Playback / pause Press the volume knob.
Press
Skip the current song
backward/forward
Press .
Press
.
Rewind /
Fast-forward
Press and hold
.
Press and hold
.
Go to Live and exit
Replay
Press and hold the volume knob.
1 Press .
2 Turn the volume knob to select LIVE, then
press the knob.
SmartFavorites and TuneStart™
User preset channels are initially assigned as the SmartFavorites channels.
SmartFavorite channel is available with SXV200 or later SiriusXM tuner
models. The SiriusXM Vehicle Tuner automatically buffers the broadcast
audio content of the SmartFavorites channels in the background.
• Using SXV200: This unit can assign a maximum of 6 SmartFavorites
channels. If you try to assign the 7th channel, an error beep tone will be
heard. Initially, preset channels 1 to 6 are assigned as SmartFavorites.
Using SiriusXM tuner models later than SXV200: This unit can assign
a maximum of 18 SmartFavorites channels. Initially, all preset channels
are assigned as SmartFavorites.
• “
*
” appears at the last character of the channel name for the
SmartFavorites channels.
SiriusXM® Radio
Page 17

ENGLISH
13
SiriusXM settings
1
Press and hold .
2 Turn the volume knob to select [
SIRIUS XM
], then press the knob.
3 Turn the volume knob to select an item (see the following table), then
press the knob.
4 Repeat step 3 until the desired item is selected/activated or follow the
instructions stated on the selected item.
5 Press to exit.
To return to the previous setting item, press
.
Default:
XX
CH LOCK
To unlock settings:
1
Turn the volume knob to select a number.
2
Press to move to the entry position.
3
Repeat steps 1 and 2 to enter the current pass code.
(Initial pass code is 0000.)
4
Press the volume knob to confirm.
CODE SET
1
Press the volume knob to enter [
NEW CODE
].
2
Turn the volume knob to select a number.
3
Press to move to the entry position.
4
Repeat steps 2 and 3 to enter a new 4-digit pass code.
5
Press the volume knob to confirm.
6
Repeat steps 2 to 5 to reconfirm the pass code.
• Make a note of the new pass code to enter channel lock settings for next time.
LOCK SET MATURE CH
:Selects the SiriusXM-defined lock setting.;
USER
DEFINED
:Selects the individual channels the user wants to lock.;
OFF
:Cancels.
CH EDIT
*
1
1
Turn the volume knob to select a category, then press the knob.
2
Turn the volume knob to select a channel you want to lock, then press the
knob.
“L” appears in front of the channel number.
3
Press and hold
to exit.
CH CLEAR
*
1
YES
:Clears all the locked channels.; NO:Cancels.
TUNE START
*
2
ON
:All qualified music channels in the Smart Favorites will start
playback from the beginning of the song.;
OFF
:Cancels.
SIGNAL LVL NO SIGNAL/ WEAK/ GOOD/ STRONG
:Shows the strength of the
current received signal.
BUF USAGE 0%
—
100%(0
):Shows the memory usage for Replay buffer.
SXM RESET YES
:Resets stored channel and lock setting to default.;
NO
:Cancels.
*
1
Displayed only when [
USER DEFINED
] is selected.
*
2
Available only if the connected SiriusXM Vehicle Tuner is SXV200 or later that
supports SmartFavorites.
SiriusXM® Radio
Page 18

14
Pair and connect a Bluetooth device for the first time
1
Press to turn on the unit.
2 Search and select “JVC UNIT” on the Bluetooth device.
“BTPAIRING” flashes on the display.
• For some Bluetooth devices, you may need to enter the Personal Identification Number
(PIN) code immediately after searching.
3 Perform (A) or (B) depending on what scrolls on the display.
For some Bluetooth devices, pairing sequence may vary from the steps described below.
(A) “[Device Name]” “XXXXXX” “VOL–YES” “BACK–NO”
“XXXXXX” is a 6-digit passkey randomly generated during each pairing.
Ensure that the passkey which appears on the unit and Bluetooth device is the same.
Press the volume knob to confirm the passkey.
Operate the Bluetooth device to confirm the passkey.
(B) “[Device Name]” “VOL–YES” “BACK–NO”
Press the volume knob to start pairing.
• If “PAIRING” “PIN 0000” scrolls on the display, enter the PIN code “0000” into the
Bluetooth device.
You can change to a desired PIN code before pairing. (
18
)
• If only “PAIRING” appears, operate the Bluetooth device to confirm pairing.
“PAIRING COMPLETED” appears when pairing is completed and “
” will light up when the
Bluetooth connection is established.
ST
• This unit supports Secure Simple Pairing (SSP).
• Up to 10 devices can be registered (paired) in total.
• Once the pairing is completed, the Bluetooth device will remain registered in the unit even if
you reset the unit. To delete the paired device,
18, [
DELETE PAIR
].
• A maximum of two Bluetooth phones and one Bluetooth audio device can be connected at
any time.
• Some Bluetooth devices may not automatically connect to the unit after pairing. Connect the
device to the unit manually.
• Refer to the instruction manual of the Bluetooth device for more information.
BLUETOOTH®
BLUETOOTH — Connection
Supported Bluetooth profiles
– Hands-Free Profile (HFP)
– Advanced Audio Distribution Profile (A2DP)
– Audio/Video Remote Control Profile (AVRCP)
– Serial Port Profile (SPP)
– Phonebook Access Profile (PBAP)
Supported Bluetooth codecs
– Sub Band Codec (SBC)
– Advanced Audio Coding (AAC)
Connect the microphone
Adjust the microphone
angle
Secure using cord clamps
(not supplied) if necessary.
Microphone
(supplied)
Rear panel
Lights up to show the battery strength and signal strength.
*
* Functionality depends on the type of the phone used.
MIC (Microphone
input terminal)
Page 19

ENGLISH
15
Auto Pairing
When you connect the iPhone/ iPod touch/
Android device to the USB input terminal,
pairing request (via Bluetooth) is automatically
activated.
Press the volume knob to pair once you have
confirmed the device name.
Automatic pairing request is activated only if:
– Bluetooth function of the connected device is
turned on.
– [
AUTO CNNT
] is set to [ON]. ( 18)
– JVC MUSIC PLAY application is installed on
the Android device (
7) and [
AUTO MODE
] is
selected (
8).
BLUETOOTH — Mobile phone
Receive a call
When there is an incoming call:
• The buttons will blink in the color you have selected in [
RING COLOR
]. ( 16)
• The unit answers the call automatically if [
AUTO ANSWER
] is set to a selected time. ( 16)
During a call:
• The buttons stop blinking and illuminate in the color you have selected in [
RING COLOR
]. ( 16)
• If you turn off the unit, the Bluetooth connection is disconnected.
To On the faceplate On the remote control
First incoming call...
Answer a call
Press
or the volume knob.
Press
.
Reject a call
Press and hold
or the
volume knob.
Press and hold
.
End a call
Press and hold
or the
volume knob.
Press and hold
.
BLUETOOTH®
Page 20

16
To On the faceplate On the remote control
While talking on the first incoming call...
Answer another incoming
call and hold the current
call
Press
or the volume
knob.
( Not available )
Reject another incoming
call
Press and hold
or
the volume knob.
( Not available )
While having two active calls...
End current call and
activate held call
Press and hold
or
the volume knob.
Press and hold
.
Swap between the
current call and held call
Press
.
( Not available )
Adjust the phone volume
[00]
to
[35]
(Default:
[15]
)
Turn the volume knob
during a call.
• This adjustment will not
affect the volume of the
other sources.
( Not available )
Switch between hands-free
and private talk modes
Press
during a call.
• Operations may vary
according to the
connected Bluetooth
device.
( Not available )
Improve the voice quality
While talking on the phone....
1 Press and hold .
2 Turn the volume knob to select an item
(
see the following table), then press
the knob.
3 Repeat step 2 until the desired item is selected or activated.
4 Press to exit.
To return to the previous setting item, press
.
Default:
XX
MIC LEVEL
–10
—
+10(–4
):The sensitivity of the microphone increases
as the number increased.
NOISE RDCT –5
—+5(0):Adjust the noise reduction level until the least
noise is being heard during a phone conversation.
ECHO CANCEL –5
—+5(0):Adjust the echo cancellation delay time until the
least echo is being heard during a phone conversation.
Make the settings for receiving a call
1
Press to enter Bluetooth mode.
2 Turn the volume knob to select an item (see the following
table), then press the knob.
3 Repeat step 2 until the desired item is selected or
activated.
To return to the previous setting item, press
.
Default:
XX
SETTINGS
AUTO ANSWER
01 SEC —30 SEC
:The unit answers incoming call
automatically in the selected time (in seconds).;
OFF
:Cancels.
RING COLOR COLOR01
—
COLOR49(COLOR 08
): Selects the
notification light color for the buttons when there is an
incoming call and during a call.;
OFF
:Cancels.
BLUETOOTH®
Page 21

ENGLISH
17
Make a call
You can make a call from the call history, phonebook, or dialing the number.
Call by voice is also possible if your mobile phone has the feature.
1 Press to enter Bluetooth mode.
2 Turn the volume knob to select an item (see the following table), then
press the knob.
3 Repeat step 2 until the desired item is selected/activated or follow the
instructions stated on the selected item.
To return to the previous setting item, press
.
RECENT CALL
(Applicable only if the phone supports PBAP)
1
Press the volume knob to select a name or a phone number.
• “<” indicates call received, “>“ indicates call made, “M” indicates call missed.
• “NO HISTORY” appears if there is no recorded call history or call number.
2
Press the volume knob to call.
PHONEBOOK
(Applicable only if the phone supports PBAP)
1
Press to select the desired letter (A to Z, 0to9, and OTHERS).
• “OTHERS” appears if the first character is other than Ato Z, 0 to 9.
2
Turn the volume knob to select a name, then press the knob.
3
Turn the volume knob to select a phone number, then press the knob to call.
• The phonebook of the connected phone is automatically transferred to the unit
when pairing.
• This unit can display only non-accent letters. (Accent letters such as “Ú” is
showns as “U”.)
DIAL NUMBER
1
Turn the volume knob to select a number (0 to 9) or character ( , #, +).
2
Press to move the entry position.
Repeat steps
1
and 2 until you finish entering the phone number.
3
Press the volume knob to call.
VOICE
Speak the name of the contact you want to call or the voice command to control
the phone functions.
(
Make a call using voice recognition
)
BLUETOOTH®
Make a call using voice recognition
1
Press and hold to activate the connected phone.
2 Speak the name of the contact you want to call or the voice
command to control the phone functions.
• Supported Voice Recognition features vary for each phone. Refer
to the instruction manual of the connected phone for details.
• This unit also supports the intelligent personal assistant function
of iPhone.
Settings in memory
Store a contact in memory
You can store up to 6 contacts into the number buttons (1 to 6).
1 Press to enter Bluetooth mode.
2 Turn the volume knob to select [
RECENT CALL
], [
PHONEBOOK
], or
[
DIAL NUMBER
], then press the knob.
3 Turn the volume knob to select a contact or enter a phone
number.
If a contact is selected, press the volume knob to show the
phone number.
4 Press and hold one of the number buttons (1 to 6).
“MEMORY P(selected preset number)” appears when the
contact is stored.
To erase a contact from the preset memory, select [
DIAL NUMBER
] in
step
2 and store a blank number.
Make a call from memory
1
Press to enter Bluetooth mode.
2 Press one of the number buttons (1 to 6).
3 Press the volume knob to call.
“NO PRESET” appears if there is no contacts stored.
Page 22

18
Bluetooth mode settings
1
Press and hold .
2 Turn the volume knob to select [
BLUETOOTH
], then press the knob.
3 Turn the volume knob to select an item
(
see the following table), then press
the knob.
4 Repeat step 3 until the desired item is selected/activated or follow the
instructions stated on the selected item.
5 Press to exit.
To return to the previous setting item, press
.
Default:
XX
PHONE
*
1
Selects the phone or audio device to connect or disconnect.
“
” appears in front of the device name when connected.
AUDIO
*
1
APPLICATION
*1Shows the connected phone name using the JVC Smart Music Control
*2 app.
“
” appears in front of the device name when connected.
DELETE PAIR
1
Turn the volume knob to select a device to delete, then press the knob.
2
Turn the volume knob to select [
YES
] or [NO], then press the knob.
SET PINCODE
(0000)
Changes the PIN code (up to 6 digits).
1
Turn the volume knob to select a number.
2
Press to move the entry position.
Repeat steps
1
and 2 until you finish entering the PIN code.
3
Press the volume knob to confirm.
AUTO CNNCT ON
:The unit automatically reconnect when the last connected Bluetooth device is
within range.;
OFF
:Cancels.
AUTO PAIR ON
:The unit automatically pair supported Bluetooth device (iPhone/ iPod touch/
Android device) when it is connected through USB input terminal.Depending on the
operating system of the connected device, this function may not work. ;
OFF
:Cancels.
INITIALIZE YES
:Initializes all the Bluetooth settings (including stored pairing, phonebook, and
etc.).;
NO
:Cancels.
INFORMATION
MYBTNAME
: Displays the unit name (JVCUNIT).;
MYADDRESS
: Shows address of this unit.
*
1
You can only connect a maximum of two Bluetooth phones and one Bluetooth audio device at any time.
*
2
JVC Smart Music Control is designed to view JVC car receiver status and perform simple control
operations on Android smart phones.
For JVC Smart Music Control operations, visit JVC website: <http://www.jvc.net/cs/car/>.
Bluetooth compatibility check mode
You can check the connectivity of the supported profile
between the Bluetooth device and the unit.
• Make sure there is no Bluetooth device paired.
1 Press and hold .
“BLUETOOTH”
“CHECK MODE” appears. “SEARCH NOW
USING PHONE”
“PIN IS 0000” scrolls on the display.
2 Search and select “JVC UNIT” on the Bluetooth device
within 3minutes.
3 Perform (A), (B) or (C) depending on what appears on the
display.
(A) “PAIRING”
“XXXXXX” (6-digit passkey): Ensure that
the same passkey appears on the unit and Bluetooth
device, then operate the Bluetooth device to confirm the
passkey.
(B) “PAIRING”
“PIN IS 0000”: Enter “0000” on the
Bluetooth device.
(C) “PAIRING”: Operate the Bluetooth device to confirm
pairing.
After pairing is successful, “PAIRING OK”
“[Device Name]”
appears and Bluetooth compatibility check starts.
If “CONNECT NOW USING PHONE” appears, operate the
Bluetooth device to allow phonebook access to continue.
“TESTING” flashes on the display.
The connectivity result flashes on the display.
“PAIRING OK” and/or “H.FREE OK”*1 and/or “A.STREAM OK”*2
and/or “PBAP OK”*
3
: Compatible
*
1
Compatible with Hands-Free Profile (HFP)
*
2
Compatible with Advanced Audio Distribution Profile (A2DP)
*
3
Compatible with Phonebook Access profile (PBAP)
After 30 seconds, “PAIRING DELETED” appears to indicate that
pairing has been deleted, and the unit exits check mode.
• To cancel, press and hold
to turn off the power,
then turn on the power again.
BLUETOOTH®
Page 23

ENGLISH
19
BLUETOOTH®
Internet radio via Bluetooth
Listen to Pandora
You can listen to Pandora on the Android device via
Bluetooth on this unit.
Preparation:
Select [
ON
] for [
PANDORA
] in [
SRC SELECT
].
( 4)
1 Open the Pandora application on your device.
2 Connect your Bluetooth audio player via
Bluetooth connection. (
14)
3 Press repeatedly to select PANDORA.
The source switches and broadcast starts
automatically.
You can operate Pandora in the same way as Pandora
for iPod/iPhone. (
9)
Listen to iHeartRadio
You can listen to iHeartRadio on the Android device
via Bluetooth on this unit.
Preparation:
Select [
ON
] for [
IHEART
] in [
SRC SELECT
].
( 4)
1 Open the iHeartAuto application on your smart
phone.
2 Connect your smart phone via Bluetooth
connection. (
14)
3 Press repeatedly to select
IHEARTRADIO.
The source switches and broadcast starts
automatically.
You can operate iHeartRadio in the same way as
iHeartRadio for iPod/iPhone. (
10)
BLUETOOTH — Audio
Audio player via Bluetooth
1
Press repeatedly to select BTAUDIO (or press SOURCE on RM-RK52).
2 Operate the Bluetooth audio player to start playback.
To On the faceplate On the remote control
Playback / pause Press the volume knob.
Press
.
Select group or folder Press
. Press .
Reverse / Forward skip Press
.
Press
.
Reverse / Fast-forward Press and hold
.
Press and hold
.
Repeat play Press
repeatedly.
TRACK RPT, ALL RPT, RPT OFF
( Not available )
Random play
Press
repeatedly.
GROUP RND, ALL RND, RND OFF
( Not available )
Select a file from a folder/
list
Refer to “Select a file from a folder/
list” on page 8.
( Not available )
Operations and display indications may differ according to their availability on the
connected device.
Page 24

20
AUDIO SETTINGS
Select a preset equalizer
Press repeatedly.
(or)
Press
, then turn the volume knob within 5seconds.
Preset equalizer
:
FLAT(default)/
HARD ROCK/
POP/
HIP HOP/
R&B/
JAZZ/
CLASSICAL/
USER
Store your own sound settings
1
Press and hold to enter EASY EQ setting.
2 Turn the volume knob to select an item, then press the knob.
Refer to [
EASY EQ
] for setting (
21
) and the result is stored to [
USER
].
• To return to the previous setting item, press
.
• To exit, press
.
Other settings
1
Press and hold .
2 Turn the volume knob to select an item (
21
), then press the knob.
3 Repeat step 2 until the desired item is selected/activated or follow
the instructions stated on the selected item.
4 Press to exit.
To return to the previous setting item, press
.
Use a portable audio player
1
Connect a portable audio player (commercially available).
2 Select [
ON
] for [
AUX
] in [
SRC SELECT
]. ( 4)
3 Press repeatedly to select AUX.
4 Turn on the portable audio player and start playback.
Use a 3-core plug head stereo mini plug for optimum audio
output.
3.5mm (1/8") stereo mini plug with “L” shaped connector
(commercially available)
Portable audio player
Auxiliary input jack
AUX
Page 25

ENGLISH
21
SUB.W LEVEL
*
1
SPK-OUT
*
2
(Not applicable when 3-way crossover is selected.)
00
to
+06(+03
):Adjusts the output level of the subwoofer
connected via speaker lead. (
33)
PRE-OUT
*
3
–50
to
+10(00
):Adjusts the output level of the subwoofer
connected to the lineout terminals (SW or REAR/SW) through an
external amplifier. (
33)
SUB.W
*
3
ON
/
OFF
: Turns on or off the subwoofer output.
FADER
(Not applicable when 3-way crossover is selected.)
R15
—
F15(00
):Adjusts the front and rear speaker output balance.
BALANCE
*
4
L15
—
R15(00
):Adjusts the left and right speaker output balance.
VOLADJUST –15
—
+06(00
):Preset the initial volume level of each source (compared to
the FM volume level). Before adjustment, select the source you want to adjust.
AMPGAIN LOWPOWER
:Limits the maximum volume level to 25. (Select if the maximum
power of each speaker is less than 50W to prevent damaging the speakers.);
HIGH POWER
:The maximum volume level is 35.
SPK/PREOUT
(Not applicable when 3-way crossover is selected.)
Depending on the speaker connection method, select the appropriate setting to
get the desired output. (
22, Speaker output settings
)
SPK SIZE
Depending on the crossover type you have selected (see [
X ' OVER TYPE
]
below), 2-way crossover or 3-way crossover setting items will be shown. (
23,
Crossover settings)
By default, 2-way crossover type is selected.
X ' OVER
X ' OVER TYPE Caution
: Adjust the volume before changing the
X ' OVER TYPE
to avoid the
sudden increase or decrease of the output level.
X ' OVER 2-WAY
(Displayed only when [
X ' OVER 3-WAY
] is selected)
YES
:Selects two way crossover type.; NO:Cancels.
X ' OVER 3-WAY
(Displayed only when [
X ' OVER 2-WAY
] is selected)
YES
:Selects three way crossover type.; NO:Cancels.
*
1
Displayed only when [
SUB.W
] is set to [ON].
*
2
For 2-way crossover: Displayed only when [
SPK/PREOUT
] is set to [
SUB.W/SUB.W
]. ( 22)
*
3
For 2-way crossover: Displayed only when [
SPK/PREOUT
] is set to [
REAR/SUB.W
] or [
SUB.W/
SUB.W
]. ( 22)
*
4
This adjustment will not affect the subwoofer output.
AUDIO SETTINGS
Default:
XX
EQ SETTING
EQ PRESET
Select a preset equalizer suitable to the music genre. (Select [
USER
]
to use the settings made in [
EASY EQ
] or [
PRO EQ
].)
FLAT/
HARD ROCK/
POP/
HIP HOP/
R&B/
JAZZ/
CLASSICAL/
USER
EASY EQ
Adjust your own sound settings. The settings are stored to [
USER
].
• The settings made may affect the current settings of [
PRO EQ
].
SUB.W SP
*
1*2
:
00
to
+06
(Default:
03
SUB.W
*
1*3
:
–50
to
+10
00
BASS
LVL
:
–09
to
+09
00
MID
LVL
:
–09
to
+09
00
TRE
LVL
:
–09
to
+09
00)
PRO EQ
Adjust your own sound settings. The settings are stored to [
USER
].
• The settings made may affect the current settings of [
EASY EQ
].
62.5HZ
LVL –09
to
+09 (00):
Adjusts the level to memorize for each source.
(Before making an adjustment, select the source you want to adjust.)
BASS EXT ON
:Turns on the extended bass.;
BASS EXT OFF
:Cancels.
100HZ
/ 160HZ /
250HZ /
400HZ /
630HZ /
1KHZ /
1.6KHZ /
2.5KHZ /
4KHZ /
6.3KHZ /
10KHZ /
16kHZ
LVL –09
to
+09 (00):
(Refer above)
Q FACTOR
Q 1.35/ Q 1.50/ Q 2.00
:Adjust the quality factor.
AUDIO
BASS BOOST
+01
—
+05
: Selects your preferred bass boost level.;
OFF
:Cancels.
LOUD 01
/02:Boosts low or high frequencies to produce a well-balanced
sound at low volume.;
OFF
:Cancels.
Page 26

22
AUDIO SETTINGS
SND EFFECT
ENHANCE
(Not applicable for TUNER source.)
SML/ MED/ LRG
: Virtually enhances the sound space.;
OFF
:Cancels.
RESPONSE LV1/ LV2/ LV3
: Virtually makes the sound more realistic.;
OFF
:Cancels.
SOUND LIFT LV1/ LV2/ LV3
: Virtually adjust the sound position heard from the
speakers.;
OFF
:Cancels.
VOL LINK EQ ON
:Boosts the frequency to reduce the noise heard from outside the car
or running noise of the tyres.;
OFF
:Cancels.
K2
(Not applicable for TUNER source, SIRIUS XM source, AUX source.)
ON
:Improve the sound quality of compressed music.;
OFF
:Cancels.
Speaker output settings
(Only for
X ' OVER 2-WAY
)
Select the output setting for the speakers [
SPK/PRE OUT],
base on the
speaker connection method.
Connection via lineout terminals
For connections through an external amplifier. ( 33)
(For
KW-R925BTS
)
Setting on
[
SPK/PRE OUT]
Audio signal through lineout terminal
FRONT REAR SW
REAR/REAR
(default)
Front speakers
output
Rear speakers output Subwoofer output
REAR/SUB.W
( Not available ) ( Not available ) ( Not available )
SUB.W/SUB.W
Front speakers
output
L (left): Subwoofer output
R (right): (Mute)
Subwoofer output
(For
KW-R920BTS
)
Setting on
[
SPK/PRE OUT]
Audio signal through lineout terminal
FRONT REAR/SW
REAR/REAR
Front speakers output Rear speakers output
REAR/SUB.W
(default) Front speakers output Subwoofer output
SUB.W/SUB.W
Front speakers output Subwoofer output
Connection via speaker leads
For connections without using an external amplifier. However, with this
settings you can also enjoy the subwoofer output. (
33)
Setting on
[
SPK/PRE OUT]
Audio signal through rear speaker lead
L (left) R (right)
REAR/REAR
Rear speakers output Rear speakers output
REAR/SUB.W
Rear speakers output Rear speakers output
SUB.W/SUB.W
Subwoofer output (Mute)
If [
SUB.W/SUB.W
] is selected:
– [
FRQ 120HZ
] is selected in [
SUB.WLPF
] and [
THROUGH
] is not available.
– [
R02
] is selected in [
FADER
] and selectable range is [
R15
]to [00].
Page 27

ENGLISH
23
AUDIO SETTINGS
Crossover settings
Below are the available setting items for 2-way
crossover and 3-way crossover.
Caution
Select a crossover type according to how the speakers
are connected. (
33)
If you select a wrong type:
• The speakers may damage.
• The output sound level may be extremely high or
low.
SPK SIZE
(speaker size)
Selects according to the connected speaker size for
optimum performance.
•
The frequency and slope settings are
automatically set for the crossover of the selected
speaker.
•
If [
NONE
] is selected for [
TWEETER
] of [
FRONT
], [
REAR
]
and [
SUBWOOFER
] for [
SPK SIZE
], the [
X ‘ OVER
] setting
of the selected speaker is not available.
X ‘ OVER
(crossover)
[
FRQ
]/ [
HPF FRQ
]/ [
LPF FRQ
]:
Adjusts the crossover frequency for the selected
speakers (high pass filter or low pass filter).
•
If [
THROUGH
] is selected, all signals are sent to the
selected speakers.
[
SLOPE
]/ [
HPF SLOPE
]/ [
LPF SLOPE]:
Adjusts the crossover slope.
•
Selectable only if a setting other than [
THROUGH
]
is selected for the crossover frequency.
[PHASE]:
Selects the phase of the speaker output to be in
line with the other speaker output.
[
GAIN LEFT
]/ [
GAIN RIGHT
]/ [
GAIN]:
Adjusts the output volume of the selected speaker.
2-way crossover setting items
SPK SIZE
FRONT SIZE
3.5"/ 4"/ 4.75"/ 5"/ 6.5"/ 6.75"/ 7"/ 4×6"/ 5×7"/ 6×8"/ 6×9"/ 7×10"
TWEETER
SML/ MID/ LRG/ NONE
(not connected)
REAR
*
1
3.5"/ 4"/ 4.75"/ 5"/ 6.5"/ 6.75"/ 7"/ 4×6"/ 5×7"/ 6×8"/ 6×9"/ 7×10"/ NONE
(not
connected)
SUBWOOFER
*
2*3
6.5"/ 8"/ 10"/ 12"/ 15" OVER/ NONE
(not connected)
X ' OVER
TWEETER FRQ
1KHZ/ 1.6KHZ/ 2.5KHZ/ 4KHZ/ 5KHZ/ 6.3KHZ/ 8KHZ/ 10KHZ/12.5KHZ
GAIN LEFT
–08DB
to
00DB
GAIN RIGHT
–08DB
to
00DB
FRONT HPF FRQ
30HZ/ 40HZ/ 50HZ/ 60HZ/ 70HZ/ 80HZ/ 90HZ/ 100HZ/ 120HZ/ 150HZ/
180HZ
/
220HZ/ 250HZ/ THROUGH
SLOPE
–06DB/ –12DB/ –18DB/ –24DB
GAIN
–08DB
to
00DB
REAR HPF
*
1
FRQ 30HZ/ 40HZ/ 50HZ/ 60HZ/ 70HZ/ 80HZ/ 90HZ/ 100HZ/ 120HZ/ 150HZ/
180HZ
/
220HZ/ 250HZ/ THROUGH
SLOPE
–06DB/ –12DB/ –18DB/ –24DB
GAIN
–08DB
to
00DB
SUB.W LPF
*
2*3
FRQ 30HZ/ 40HZ/ 50HZ/ 60HZ/ 70HZ/ 80HZ/ 90HZ/ 100HZ/ 120HZ/ 150HZ/
180HZ
/
220HZ/ 250HZ/ THROUGH
SLOPE
–06DB/ –12DB/ –18DB/ –24DB
PHASE
REVERSE
(180°)/
NORMAL
(0°)
GAIN –08DB
to
00DB
*
1
Displayed only when [
SPK/PREOUT
] is set to [
REAR/REAR
] or [
REAR/SUB.W
]. ( 22)
*
2
For
KW-R920BTS:
Displayed only when [
SPK/PREOUT
] is set to [
REAR/SUB.W
] or [
SUB.W/SUB.W
]. ( 22)
*
3
Displayed only when [
SUB.W
] is set to [ON]. ( 21)
Page 28

24
AUDIO SETTINGS
1 Press and hold .
Press COL to enter [
COLOR
] directly.
2 Turn the volume knob to select an item (see the following table),
then press the knob.
3 Repeat step 2 until the desired item is selected/activated or follow
the instructions stated on the selected item.
4 Press to exit.
To return to the previous setting item, press
.
Default:
XX
DISPLAY
DIMMER
Dim the display and button illuminations.
OFF
:Dimmer is turned off.
ON
:Dimmer is turned on. Brightness changes to [
NIGHT
] setting.
( 25, [BRIGHTNESS])
DIMMER TIME
:Set the dimmer on and off time.
1
Turn the volume knob to adjust the [ON] time, then press the knob.
2
Turn the volume knob to adjust the [
OFF
] time, then press the knob.
(Default: [
ON
]: 18:00 or 6:00 PM
[
OFF
]: 6:00 or 6:00 AM)
AUTO
:Dimmer turns on and off automatically when you turn off or on the car
headlights. *
1
DISPLAY SETTINGS
3-way crossover setting items
SPK SIZE
TWEETER
SML/ MID/ LRG
MID RANGE
3.5"/ 4"/ 4.75"/ 5"/ 6.5"/ 6.75"/ 7"/ 4×6"/ 5×7"/ 6×8"/ 6×9"
WOOFER
*
6.5"/ 8"/ 10"/ 12"/ 15" OVER/ NONE
(not connected)
X ' OVER
TWEETER HPF FRQ
1KHZ/ 1.6KHZ/ 2.5KHZ/ 4KHZ/ 5KHZ/ 6.3KHZ/
8KHZ
/
10KHZ/ 12.5KHZ
SLOPE
–06DB/ –12DB
PHASE
REVERSE
(180°)/
NORMAL
(0°)
GAIN –08DB
to
00DB
MID RANGE HPF FRQ
30HZ/ 40HZ/ 50HZ/ 60HZ/ 70HZ/ 80HZ/ 90HZ/
100HZ
/
120HZ/ 150HZ/ 180HZ/ 220HZ/ 250HZ
/
THROUGH
HPF SLOPE
–06DB/ –12DB
LPF FRQ
1KHZ/ 1.6KHZ/ 2.5KHZ/ 4KHZ/ 5KHZ/ 6.3KHZ/
8KHZ
/
10KHZ/ 12.5KHZ/ THROUGH
LPF SLOPE
–06DB/ –12DB
PHASE
REVERSE
(180°)/
NORMAL
(0°)
GAIN –08DB
to
00DB
WOOFER
*
LPF FRQ 30HZ/ 40HZ/ 50HZ/ 60HZ/ 70HZ/ 80HZ/ 90HZ/
100HZ
/
120HZ/ 150HZ/ 180HZ/ 220HZ/ 250HZ
/
THROUGH
SLOPE
–06DB/ –12DB
PHASE
REVERSE
(180°)/
NORMAL
(0°)
GAIN –08DB
to
00DB
* Displayed only when [
SUB.W
] is set to [ON]. ( 21)
Page 29

ENGLISH
25
BRIGHTNESS
Set the brightness for button and display illuminations for day and night
separately.
1 DAY / NIGHT
:Select day or night.
2
Select a zone.
( 24)
3
Set the brightness level (00 to 31). (Default:
DAY:31
;
NIGHT:15
)
SCROLL
*
2
ONCE
:Scrolls the display information once.;
AUTO
:Repeats scrolling at
5-second intervals.;
OFF
:Cancels.
COLOR
PRESET
Select color for display and button illuminations separately.
Default color:
ALL ZONE
: [
COLOR 08
],
DISP ZONE
: [
COLOR 01
],
ZONE 1
: [
COLOR 08
],
ZONE 2
: [
COLOR 46
]
1
Select a zone.
( 24)
2
Select a color for the selected zone.
•
COLOR 01
to
COLOR 49
•
USER
: The color you have created for [
DAY COLOR
] or
[
NIGHT COLOR
] is shown.
•
COLOR FLOW01
to
COLOR FLOW03
: Color changes at different
speeds.
•
GROOVE/ TECHNO/ EMOTION/ RELAX/ SPECTRUM/ SWEEP
/
POP
: The selected color pattern is shown.*3 (Selectable only when
[
ALL ZONE
] is selected in step
1.)
*
1
The illumination control wire connection is required. ( 33)
*
2
Some characters or symbols will not be shown correctly (or will be blanked).
*
3
If one of these color pattern is selected, the [
ZONE 1
], [
DISP ZONE
], [
ZONE 2
] illumination
color will change to the default color.
DISPLAY SETTINGS
DAY COLOR
Store your own day and night colors for different zone.
1
Select a zone.
( 24)
2 RED
/
GREEN
/
BLUE
:Select a primary color.
3 00
to 31:Select the level.
Repeat steps
2
and 3 for all the primary colors.
• Your setting is stored to [
USER
] in [
PRESET
].
• If [
00
] is selected for all primary colors for [
DISP ZONE
], nothing
appears on the display.
NIGHT COLOR
COLOR GUIDE
ON
:Changes the button and display illuminations when settings are
performed on menu and list search. Display zone will automatically
change depending on volume level.;
OFF
:Cancels.
[
NIGHT COLOR
] or [
DAY COLOR
] is changed by turning on or off your car’s
headlight.
Page 30

26
REFERENCES
Change the display information
Each time you press , the display information changes.
• If the information is unavailable or not recorded, “NO TEXT”, “NO NAME”, or other
information (eg. station name) appears.
FM
or
AM
Frequency Day/Clock
(For FM Radio Broadcast Data System stations only)
Station name (PS) Frequency Program type (PTY)
Radiotext+
Day/Clock Level meter Level meter with
color synchronisation
* (back to the beginning)
CD
or
USB
/
USB FRONT
/
USB REAR
(For CD-DA)
Playing time Day/Clock Disc name Track title
Level meter
Level meter with color synchronisation
*
(backtothebeginning)
(For MP3/WMA/AAC/WAV/FLAC files)
Playing time Day/Clock Album title/Artist Track title
Folder/file name Level meter Level meter with color
synchronisation
* (back to the beginning)
USB-IPOD
/
IPOD FRONT
/
IPOD REAR
or
ANDROID
/
ANDROID-F
/
ANDROID-R
Playing time Day/Clock Album title/Artist Track title
Level meter Level meter with color synchronisation
*
(back to the beginning)
PANDORA
/
PANDORA-F
/
PANDORA-R
Station name
Shared/Radio Album title
Artist Track
title
Playing time Day/Clock Level meter Level meter
with color synchronisation
* (back to the beginning)
IHEARTRADIO
/
IHEART
FRONT
/
IHEART REAR
Station name Track title Track Artist Day/Clock
Level meter
Level meter with color synchronisation
*
(back to the beginning)
SIRIUS XM
Channel no./Channel name Artist Song title Content
information
Category name Day/Clock Level meter
Level meter with color synchronisation
* (back to the
beginning)
AUX
AUX Day/Clock Level meter Level meter with color synchronisation
*
(back to the beginning)
BT AUDIO
Playing time Day/Clock Album title/Artist Track title Level meter
Level meter with color synchronisation
* (back to the beginning)
* The color of the button illumination and display illumination changes and synchronises with
the sound level.
Maintenance
Cleaning the unit
Wipe off dirt on the faceplate with a dry silicone or soft cloth.
Handling discs:
• Do not touch the recording surface of the disc.
• Do not stick tape etc. on the disc, or use a disc with tape stuck on it.
• Do not use any accessories for the disc.
• Clean from the center of the disc and move outward.
• Clean the disc with a dry silicone or soft cloth. Do not use any solvents.
• When removing discs from this unit, pull them out horizontally.
• Remove burrs from the center hole and disc edge before inserting a disc.
More information
Visit also the following website <http://www.jvc.net/cs/car/> for:
– Latest firmware updates and latest compatible item list
– Android™ application JVC MUSIC PLAY
– Any other latest information
General
• This unit can only play the following CDs:
•
DualDisc playback:
The Non-DVD side of a “DualDisc” does not comply with the “Compact
Disc Digital Audio” standard. Therefore, the use of Non-DVD side of a DualDisc on this product
cannot be recommended.
Page 31

ENGLISH
27
• Detailed information and notes about the playable audio files are stated in an online manual
on the following website <http://www.jvc.net/cs/car/>.
Playable files
• Playable audio file: MP3 (.mp3)/ WMA (.wma)/ AAC (.aac)
• Playable disc media: CD-R/CD-RW/CD-ROM
• Playable disc file format: ISO 9660 Level 1/2, Joliet, Long file name.
• Playable USB device file system: FAT12, FAT16, FAT32
Even when audio files comply with the standards listed above, playback may be impossible
depending on the types or conditions of media or device.
The AAC (.m4a) file in a USB device or a CD encoded by iTunes cannot be played on this unit.
Unplayable discs
• Discs that are not round.
• Discs with coloring on the recording surface or discs that are dirty.
• Recordable/ReWritable discs that have not been finalized.
• 8cm CD. Attempting to insert using an adapter may cause malfunction.
About USB devices
• This unit can play MP3/ WMA/ AAC/ WAV/ FLAC files stored on a USB mass storage class
device.
• You cannot connect a USB device via a USB hub.
• Connecting a cable whose total length is longer than 5m may result in abnormal playback.
• This unit cannot recognize a USB device whose rating is other than 5V and exceeds 1.5A.
About iPod/iPhone
Made for
- iPod touch (2nd, 3rd, 4th, and 5th generation)
- iPod classic
- iPod nano (3rd, 4th, 5th, 6th, and 7th generation)
- iPhone 3G, 3GS, 4, 4S, 5, 5S, 5C, 6, 6 Plus
• It is not possible to browse video files on the “Videos” menu in
[HEAD MODE]
.
• The song order displayed on the selection menu of this unit may differ from that of the iPod/
iPhone.
• Depending on the version of the operating system of the iPod/iPhone, some functions may
not operate on this unit.
About Android device
• This unit supports Android OS 4.1 and above.
• Some Android devices (with OS4.1 and above) may not fully support Android Open Accessory
(AOA)2.0.
• If the Android device supports both mass storage class device and AOA2.0, this unit always
playback via AOA2.0 as priority.
About Pandora
• Pandora is only available in certain countries.
Please visit <http://www.pandora.com/legal> for more information.
• Because Pandora is a third-party service, the specifications are subject to change without
prior notice. Accordingly, compatibility may be impaired, or some or all of the services may
become unavailable.
• Some functions of Pandora cannot be operated from this unit.
• For issues using the application, please contact Pandora at pandora-support@pandora.com.
About iHeartRadio
• iHeartRadio® is a third-party service, therefore the specifications are subject to change
without prior notice. Accordingly, compatibility may be impaired or some or all of the
services may become unavailable.
• Some iHeartRadio® functionality cannot be operated from this unit.
About Bluetooth
• Depending on the Bluetooth version of the device, some Bluetooth devices may not be able
to connect to this unit.
• This unit may not work with some Bluetooth devices.
• Signal conditions vary, depending on the surroundings.
REFERENCES
Page 32

28
Symptom Remedy
General
Sound cannot be heard. • Adjust the volume to the optimum level.
• Check the cords and connections.
“MISWIRING CHECK
WIRING THEN PWR ON”
appears.
Turn the power off, then check to be sure the terminals of
the speaker wires are insulated properly. Turn the power
on again.
“PROTECTING SEND
SERVICE” appears.
Send the unit to the nearest service center.
Source cannot be selected. Check the [
SRC SELECT
] setting.
( 4)
Radio
• Radio reception is poor.
• Static noise while
listening to the radio.
Connect the antenna firmly.
CD / USB / iPod
Disc cannot be ejected.
Press and hold
to forcibly eject the disc. Be careful not
to drop the disc when it is ejected.
“IN DISC” appears. Make sure nothing is blocking the loading slot when you
eject the disc.
“PLEASE” and “EJECT”
appear alternately.
Press
, then insert the disc correctly.
Playback order is not as
intended.
The playback order is determined by the file name (USB)
or the order in which files were recorded (disc).
Elapsed playing time is
not correct.
This depends on the recording process earlier.
“NOT SUPPORT” appears
and track skips.
Check whether the track is a playable format.
( 27)
“READING” keeps flashing. • Do not use too many hierarchical levels and folders.
• Reload the disc or reattach the USB device.
“CANNOT PLAY” flashes
and/or connected device
cannot be detected.
• Check whether the connected device is compatible with this
unit and ensure the files are in supported formats. (
27)
• Reattach the device.
TROUBLESHOOTING
Symptom
Remedy
CD / USB / iPod
The iPod/iPhone does not
turn on or does not work.
• Check the connection between this unit and iPod/iPhone.
• Detach and reset the iPod/iPhone using hard reset.
“LOADING” appears when
you enter search mode by
pressing
.
This unit is still preparing the iPod/iPhone music list. It
may take some time to load, try again later.
Correct characters are not
displayed.
• This unit can only display uppercase letters, numbers,
and a limited number of symbols.
• Depending on the display language you have selected
(
5
), some characters may not be displayed correctly.
ANDROID
• Sound cannot be heard
during playback.
• Sound output only from
the Android device.
• Reconnect the Android device.
• If in [
AUDIO MODE
], launch any media player
application on the Android device and start playback.
• If in [
AUDIO MODE
], relaunch the current media player
application or use another media player application.
• Restart the Android device.
• If this does not solve the problem, the connected Android
device is unable to route the audio signal to unit. (
27
)
Cannot playback at
[
AUTO MODE
].
• Make sure JVC MUSIC PLAY APP is installed on the
Android device. ( 7)
• Reconnect the Android device and select the appropriate
control mode. (
8
)
• If this does not solve the problem, the connected Android
device does not support [
AUTO MODE
]. (
27
)
“NO DEVICE” or “READING”
keeps flashing.
• Switch off the developer options on the Android device.
• Reconnect the Android device.
• If this does not solve the problem, the connected Android
device does not support [
AUTO MODE
]. (
27
)
Playback is intermittent or
sound skips.
Turn off the power saving mode on the Android device.
“CANNOT PLAY” • Make sure Android device contains playable audio files.
• Reconnect the Android device.
• Restart the Android device.
Page 33

ENGLISH
29
TROUBLESHOOTING
Symptom Remedy
Pandora
“ADDERROR” New station creation is unsuccessful.
“CHKDEVICE” Check the Pandora application on your device.
“NOSKIPS” The skip limit has been reached.
“NOSTATIONS” No stations are found.
“STATIONLMT” The number of registered stations has reached its limit.
Retry after deleting unnecessary stations from your device.
“UPGRADEAPP” Make sure you have installed the latest version of the
Pandora application on your device.
“CONNECT ERR” Communication is unstable.
“RATING ERR” Registration of thumbs up/thumbs down has failed due to
insufficient network connectivity.
“THUMBS N/A” Registration of thumbs up/thumbs down is not allowed.
“LICENSE ERR” You try to access from a country which Pandora is not
deliverable.
iHeartRadio
Station cannot be selected. If “Explicit Content” in [Account Settings] is checked in
the web version of iHeartRADIO, custom stations become
unavailable.
“NOT CONNCTD” Link to the application is impossible.
SiriusXM® Radio
“CHLOCKED LOCK CODE?” The selected channel is locked. Enter the correct pass code
to unlock.
( 13)
“CHANUNSUB” The selected channel is unsubscribed.
Call 1-866-635-2349 in the U.S.A. or 1-877-438-9677 in
Canada to subscribe.
“CHUNAVAIL” The selected channel is unavailable. Visit
www.siriusxm.com for more information about the
SiriusXM channel lineup.
Symptom
Remedy
SiriusXM® Radio
“CHKANTENNA” Check that the antenna and its connection are in good
condition.
“CHECKTUNER” Make sure the SiriusXM Vehicle Tuner is connected to the
unit.
“NOSIGNAL” Make sure the antenna is mounted outside the vehicle.
“SUBSCRIPTION UPDATED –
PRESS ENTER TO CONTINUE.”
Your subscription is updated. Press the volume knob to
continue.
“CODE ERROR” Make sure you have entered the correct pass code.
( 13)
“NO CONTENT” There is insufficient content to start TuneScan.
“SCAN CANCEL” TuneScan has been aborted.
Bluetooth®
No Bluetooth device is
detected.
• Search from the Bluetooth device again.
• Reset the unit.
( 3)
Pairing cannot be made. • Make sure you have entered the same PIN code to both
the unit and Bluetooth device.
• Delete pairing information from both the unit and the
Bluetooth device, then perform pairing again.
( 14)
Echo or noise occurs. • Adjust the microphone unit’s position.
( 14)
• Check the
[ECHO CANCEL]
setting.
( 16)
Phone sound quality
is poor.
• Reduce the distance between the unit and the Bluetooth
device.
• Move the car to a place where you can get a better signal
reception.
Sound is being
interrupted or skipped
during playback of a
Bluetooth audio player.
• Reduce the distance between the unit and the Bluetooth
audio player.
• Turn off, then turn on the unit and try to connect again.
• Other Bluetooth devices might be trying to connect to
the unit.
Page 34

30
Symptom Remedy
Bluetooth®
The connected
Bluetooth audio
player cannot be
controlled.
• Check whether the connected Bluetooth audio player
supports Audio/Video Remote Control Profile (AVRCP).
(Refer to the instructions of your audio player.)
• Disconnect and connect the Bluetooth player again.
“PAIRING FULL” The number of registered devices has reached its limit.
Retry after deleting an unnecessary device.
( 18, DELETE
PAIR)
“PLEASE WAIT” The unit is preparing to use the Bluetooth function. If the
message does not disappear, turn off and turn on the unit,
then connect the device again.
“NOT SUPPORT” The connected phone does not support Voice Recognition
feature.
“ERROR” Try the operation again. If “ERROR” appears again, check if
the device supports the function you have tried.
“H/W ERROR” Reset the unit and try the operation again. If “H/W ERROR”
appears again, consult your nearest service center.
If you have any troubles, try the following:
1 Check TROUBLESHOOTING
2 Reset the unit (
3)
3 Contact (USA only)
Call: 1-800-252-5722 ( or ) visit: http://www.jvc.com
TROUBLESHOOTING
SPECIFICATIONS
Tuner
FM Frequency Range 87.9MHz — 107.9MHz (200kHz step)
87.5MHz — 108.0MHz (50kHz step)
Channel Space Selection 50kHz/200kHz
Usable Sensitivity (S/N=26dB) 8.2dBf (0.71μV/75Ω)
Quieting Sensitivity (DINS/N=46dB) 17.2dBf (2.0μV/75Ω)
Frequency Response (±3dB) 30Hz — 15kHz
Signal-to-Noise Ratio (MONO) 64dB
Stereo Separation (1kHz) 40dB
AM Frequency Range 530kHz — 1700kHz (10kHz step)
531kHz — 1611kHz (9kHz step)
Channel Space Selection 9kHz/10kHz
Usable Sensitivity (S/N=20dB) 29dBμ (28.2μV)
CD player
Laser Diode GaAIAs
Digital Filter (D/A) 8 times over sampling
Spindle Speed 500 rpm — 200 rpm (CLV)
Wow & Flutter Below measurable limit
Frequency Response (±1dB) 20 Hz — 20 kHz
Total Harmonic Distortion (1 kHz) 0.01 %
Signal-to-Noise Ratio (1 kHz) 105 dB
Dynamic Range 90 dB
Channel Separation 85 dB
MP3 Decode Compliant with MPEG-1/2 Audio Layer-3
WMA Decode Compliant with Windows Media Audio
AAC Decode AAC-LC “.aac” files
Page 35

ENGLISH
31
USB
USB Standard USB1.1, USB2.0 (Full speed)
Compatible Devices Mass storage class
File System FAT12/16/32
Maximum Supply Current DC5V
1.5A
Digital Filter (D/A) Converter 24 Bit
MP3 Decode Compliant with MPEG-1/2 Audio Layer-3
WMA Decode Compliant with Windows Media Audio
AAC Decode AAC-LC “.aac” files
WAV Decode Linear-PCM
FLAC Decode FLAC files
Auxiliary
Frequency Response (±3dB) 20Hz—20kHz
Input Maximum Voltage 1000mV
Input Impedance 30kΩ
Bluetooth
Version Bluetooth Ver.2.1+EDR/ Bluetooth 3.0
Frequency Range 2.402 GHz — 2.480 GHz
Output Power +4 dBm (MAX), 0 dBm (AVE) Power Class 2
Maximum Communication Range Line of sight approx. 10 m (32.8 ft)
Pairing SSP (Secure Simple Pairing)
Profile HFP1.6 (Hands-Free Profile)
A2DP (Advanced Audio Distribution Profile)
AVRCP1.5 (Audio/Video Remote Control Profile)
PBAP (Phonebook Access Profile)
SPP (Serial Port Profile)
Audio
Maximum Output Power 50W×4 or
50W×2 + 50W×1 (Subwoofer = 4Ω)
Full Bandwidth Power
(at less than 1% THD)
22W×4
Speaker Impedance 4Ω—8Ω
Preout Level/Load (CD/USB) 4000mV/10kΩ load
Preout Impedance ≤600Ω
General
Operating Voltage
(10.5V—16V allowable)
14.4V
Maximum Current Consumption 10A
Operating Temperature Range –10°C — +60°C
Installation Size (W×H×D) 178mm×100mm×158mm
(7-1/16"×3-15/16"×6-1/4")
Weight
1.3k
g
(3lbs)
Subject to change without notice.
SPECIFICATIONS
Page 36

32
Warning
• The unit can only be used with a 12V DC power supply, negative ground.
• Disconnect the battery’s negative terminal before wiring and mounting.
• Do not connect Battery wire (yellow) and Ignition wire (red) to the car chassis or
Ground wire (black) to prevent a short circuit.
• Insulate unconnected wires with vinyl tape to prevent a short circuit.
• Be sure to ground this unit to the car’s chassis again after installation.
Caution
• For safety’s sake, leave wiring and mounting to professionals. Consult the car audio
dealer.
• Install this unit in the console of your vehicle. Do not touch the metal parts of this
unit during and shortly after use of the unit. Metal parts such as the heat sink and
enclosure become hot.
• Do not connect the
wires of speakers to the car chassis or Ground wire (black), or
connect them in parallel.
• Connect speakers with a maximum power of more than 50W. If the maximum
power of the speakers is lower than 50W, change the
[AMP GAIN]
setting to avoid
damaging the speakers.
(21)
• Mount the unit at an angle of less than 30º.
• If your vehicle wiring harness does not have the ignition terminal, connect Ignition
wire (red) to the terminal on the vehicle’s fuse box which provides 12 V DC power
supply and is turned on and off by the ignition key.
• Keep all cables away from heat dissipate metal parts.
• After the unit is installed, check whether the brake lamps, blinkers, wipers, etc. on the
car are working properly.
• If the fuse blows, first make sure the wires are not touching car’s chassis, then replace
the old fuse with one that has the same rating.
Basic procedure
1
Remove the key from the ignition switch, then disconnect the
terminal of the car battery.
2 Connect the wires properly.
See Wiring connection.
(33)
3 Install the unit to your car.
See Installing the unit (in-dash mounting).
4 Connect the terminal of the car battery.
5 Press to turn on the power.
6 Reset the unit within 5 seconds.
(3)
Output terminals
For 2-way crossover setting For 3-way crossover setting
KW-R925BTS
REAR
FRONT
SW
: Rear output
: Front output
: Subwoofer output
: Tweeter output
: Mid Range output
: Woofer output
KW-R920BTS
FRONT
REAR/SW
: Front output
: Rear/subwoofer output
: Mid Range output
: Woofer output
Installing the unit (in-dash mounting)
Install onto the car brackets using the supplied screws
(B)
or
(C)
. The screw holes differ
depending on the model of the cars.
Do the required
wiring. (
33)
Dashboard of your car
Car bracket
Use only the specified screws. Using wrong screws
might damage the unit.
Part list for installation
(A)
Wiring harness
(B)
Flat head screw
M5 × 8mm (M5 × 3/8")
(C)
Round head screw
M5 × 8mm (M5 × 3/8")
INSTALLATION / CONNECTION
Page 37

ENGLISH
33
STEERING
WHEEL
REMOTE
Wiring connection
(Not used)
Output terminals (
32
)
Brown
Purple/black
Car fuse block
Ignition switch
Light blue/yellow
Blue/white: To amplifier
Blue: To power antenna
Make this connection if your vehicle factory wiring
harness does not have “12V ignition switch” wire.
Separate red wire
Signal cord (not supplied)
Remote wire
(not supplied)
To the steering
wheel remote
control adapter
Fuse (10A)Antenna terminal
Factory wiring
harness (vehicle)
Vehicle
dashboard
Black: Ground
Yellow: Battery 12V
White/black
Gray/black
Green/black
*
2
Join the same color wires together.
Red: Ignition 12V
Orange/white: Illumination
Blue/white: Remote (200mA max.)
Recommended connection
IMPORTANT
We recommend installing the unit with a
commercially available custom wiring harness
specific for your car and leave this job to
professionals for your safety. Consult your car
audio dealer.
JVC Amplifier
*
1
*
1
Firmly connect the
ground wire of the
amplifier to the
car’s chassis to avoid
damaging the unit.
*
2
You can also connect
a subwoofer speaker
directly using this lead
without an external
subwoofer amplifier.
For setting,
22.
Custom wiring harness
(separately purchased)
(For
KW-R925BTS
)
USB cable (DC 5 V
1.5 A)
(approx. 1.2 m/4 feet)
MIC (Microphone input
terminal)
( 14)
Expansion port (12 V 500mA)
To the optional SiriusXM Vehicle Tuner
(commercially available)
( 11)
White: Front speaker/For 3-way crossover: Mid range speaker (left)
Gray: Front speaker/For 3-way crossover: Mid range speaker (right)
Purple: Rear speaker/For 3-way crossover: Tweeter (right)
Green: Rear speaker
*2/For 3-way crossover: Tweeter (left)
Page 38

© 2015 JVC KENWOOD Corporation
1115DTSMDTJEIN
• Microsoft and Windows Media are either registered trademarks or trademarks of Microsoft
Corporation in the United States and/or other countries.
• “Made for iPod,” and “Made for iPhone” mean that an electronic accessory has been
designed to connect specifically to iPod, or iPhone, respectively, and has been certified
by the developer to meet Apple performance standards. Apple is not responsible for the
operation of this device or its compliance with safety and regulatory standards. Please
note that the use of this accessory with iPod or iPhone may affect wireless performance.
• iPhone, iPod, iPod classic, iPod nano, iPod touch and iTunes are trademarks of Apple Inc.,
registered in the U.S. and other countries.
• Lightning is a trademark of Apple Inc.
• Pandora, the Pandora logo, and the Pandora trade dress are trademarks or registered
trademarks of Pandora Media, Inc., used with permission.
• iHeartRadio® and iHeartAuto
TM
are trademarks owned by iHeartMedia, Inc. All uses are
authorized under license.
• Sirius, XM and all related marks and logos are trademarks of Sirius XM Radio Inc. All rights
reserved.
• Android is trademark of Google Inc.
• The Bluetooth® word mark and logos are registered trademarks owned by
Bluetooth SIG, Inc. and any use of such marks by JVC KENWOOD Corporation is under
license. Other trademarks and trade names are those of their respective owners.
libFLAC
Copyright (C) 2000,2001,2002,2003,2004,2005,2006,2007,2008,2009 Josh Coalson
Redistribution and use in source and binary forms, with or without modification, are
permitted provided that the following conditions are met:
- Redistributions of source code must retain the above copyright notice, this list of
conditions and the following disclaimer.
- Redistributions in binary form must reproduce the above copyright notice, this list of
conditions and the following disclaimer in the documentation and/or other materials
provided with the distribution.
- Neither the name of the Xiph.org Foundation nor the names of its contributors may be
used to endorse or promote products derived from this software without specific prior
written permission.
THIS SOFTWARE IS PROVIDED BY THE COPYRIGHT HOLDERS AND ONTRIBUTORS “AS IS”
AND ANY EXPRESS OR IMPLIED WARRANTIES, INCLUDING, BUT NOT LIMITED TO, THE
IMPLIED WARRANTIES OF MERCHANTABILITY AND FITNESS FOR A PARTICULAR PURPOSE
ARE DISCLAIMED. IN NO EVENT SHALL THE FOUNDATION OR CONTRIBUTORS BE LIABLE FOR
ANY DIRECT, INDIRECT, INCIDENTAL, SPECIAL, EXEMPLARY, OR CONSEQUENTIAL DAMAGES
(INCLUDING, BUT NOT LIMITED TO, PROCUREMENT OF SUBSTITUTE GOODS OR SERVICES;
LOSS OF USE, DATA, OR PROFITS; OR BUSINESS INTERRUPTION) HOWEVER CAUSED AND ON
ANY THEORY OF LIABILITY, WHETHER IN CONTRACT, STRICT LIABILITY, OR TORT (INCLUDING
NEGLIGENCE OR OTHERWISE) ARISING IN ANY WAY OUT OF THE USE OF THIS SOFTWARE,
EVEN IF ADVISED OF THE POSSIBILITY OF SUCH DAMAGE.
Page 39

. .
.
w
a:::
:z:
en
c:c
o
:::;)
~
ti
w
w
U)
~
c
:::::i
0
U)
i=
LL
W
:::::l
w
!z
1-
m
c:c
:z
w
0
~
......
~
<C
m
.....
w
<C
(.)
..J
0
'
~<~
:E
w
(.)
0
w
:::::l
a=:
ffi
c
LL
<(
W
......
(.)
f::
w
~
w
a:l
~
:::::l
~
~
s
W ' W
en
:::::l
w
-a
:::J:
i=
I=
1-
w
w
w
<(
(.)
>
__.
N
0
w
w
0:::
0::
::E
i=
i=
w
w
w
a=:
0:::
0::
1.\
CAUTION
CONNECT
BLACK
WIRE
(G)GND)
TO
GROUND
FIRST.
~
OTHERWISE,
DAMAGE TO YOUR
UNIT
MAY OCCUR.
INCORRECT CONNECTION CAUSES SERIOUS
DAMAGE
TO THIS UNIT
PLEASE
READ
INSTALLATION/CONNECTION
MANUAL
CAREFULLY.
CD
CONNECT GROUND
FIRST
METALLIC BODY
OR
CHASSIS
OF
THE
CAR
@
CONNECT OTHER WIRES
CONNECT POWER
CORD TO
THE
UNIT
Page 40

U.S.A.
JVCKENWOOD
USA
Corporation
TO OUR VALUED CUSTOMER
THANK
YOU FOR PURCHASING THIS JVC PRODUCT.
WE WANT TO HELP YOU ACHIEVE A PERFECT EXPERIENCE.
NEED HELP ON HOW TO HOOK UP?
NEED ASSISTANCE ON HOW TO OPERATE?
NEED
TO
LOCATE A
JVC
SERVICE CENTER?
LIKE
TO PURCHASE ACCESSORIES?
JVC IS HERE TO HELP!
TOLL FREE: 1 {800)252-5722
http://www.us.jvckenwood.com
Remember
to
retain
your
Bill
of
Sale
for
Warranty
Service.
Do
not
attempt
to
service
the
product
yourself
Caution
To
prevent
electrical
shock,
do
not
open
the
cabinet.
There
are
no
user
serviceable
parts
inside.
Please
refer
to
qualified
service
personnel
for repai
rs.
PRODUCT REGISTRATION
We
suggest
that
you
register
your
product
since
it
will
enable
us
to
contact
you
directly
if it
is
ever
necessary
to
correct a safety related
condition
in
your
product.
You
can
register
at
www.register.jvc.com
Please
note
that
failure
to
register
does
not
diminish
any
of
your
rights
during
the
warranty
period.
BT-50004-1
(15103)
.JVC
LIMITED
WARRANTY
ON
LY
FOR PRODUCT
PURCHAS
ED
IN U.S.A
.
JVCKENWOOD USA
Corporation
warran
ts this
produc
t and a
ll
parts th
ereo
f,
except
as set forth below ONLY
TO THE
ORIGINAL RETAIL
PURCHASER
to
be FREE
FRO
M DE
FECT
IVE
MATERIALS
AND WORK
MANS
HIP f
rom the
date of original
purchase
for the
period
shown
below. ("
The
Warr
anty Period")
PARTS
2 Y
RS I LABOR 2 YRS : Ca
r audio
ARSENAL series
PARTS
1 YR I
LABO
R 1 YR: All oth
er car
aud
io products
THIS
LIMITED
WARRANTY
IS
VALID
ONLY
IN
THE
FIFTY
(50)
UNITED
STATES, THE
DISTRICT OF
COLUMBIA
AND
IN THE
COMMONWEALTH
OF
PUERTO
RICO.
WHAT
WE
WILL
00:
If
this
product
is fo
und
to
be defective
with
in
the warranty
per1od, J
VC
will repair or
replace defec
tiv
e parts with n
ew
or
rebuilt equivalent
s at no
charge
to the origi
nal owne
r. Such repa
ir and repl
acement serv1ces shall
be rendered
by JVC
during normal busin
ess
hou
rs
at JVC authorized
service
cent
ers. Pari
s u
sed
for repla
cemen
t are warrant
ed
only
for the
remai
nder
of t
he Warranty Period. A
ll product
s may
be
brought
to
a J
VC
authorized
service
center
on a carry
-in
bas
is. Color televi
sion
s with a scre
en s
ize
of 37"cl
ass
or
gre
ate
r qualify for in-
home servic
e.
In such
cases
, a technici
an will come
to
your home
and either repa
ir the
TV
there or rem
ove
and retur
n it if
it
can
not be repair
ed
in
your home
.
WHAT
YOU
MUST
DO
FOR
WARRANTY
SERVICE:
Pl
ease
do not r
etu
rn
your product
to the retailer. I
nstead
, return your
product to the JVC
aut
horized servi
ce
center
nearest
you. If shippi
ng the
product
to the service
center
, pl
ease
be sure
to package it carefully, p
referably in the original
packaging,
and
include a br1
ef
description
of
t
he prob
lem(s) and a copy
of
the
proof
of purchas
e to veri
fy purch
ase date. Please call1-800-252·5722
to locate
the neares
t J
VC authorized
se
rvice center. Servi
ce location
s c
an also
be obtained fro
m our
webs
ite http
:/lwww.us.j
vckenwood
.com It y
our product
qualifi
es for
in-h
ome
ser
vic
e,
the serv
ice
repr
esentative wi
ll require cle
ar
acc
ess
to the produc
t.
If
you
have
any
questions
concerning
you
r JVC
Pro
duc
t. plea
se
contact our Cust
omer Ca
re
Cen
ter
at 800-252-5
722
WHAT
IS
NOT
COVERED:
Th
1s limited warranty prov
ided
by JVC does not
cove
r
1.
Prod
ucts whi
ch have
been
subject
to
abus
e, accident, altera
tion.
mod
ilication, tampering,
negligence
. mi
suse
. faul
ty insta
llat
ion
, la
ck
of
r
eas
onab
le care, or
if
repaired
or serviced
by
anyon
e other
than a se
rvice facil
ity
aut
hor
ized
by
JVC
to render
such service, or
if affixed
to
any
attachment not provided with
the product
s.
or
if
the mode
l or serial number
has
been altered. tam
per
ed wit
h. d
efaced
or
removed
;
2. Initial i
nstallation
, i
nstallation and removal from cabinets
or moun
ting
sys
tems.
3.
Operation
al adj
ustments covered
10
t
he
Own
er's Manual, normal main
tenance
, vi
deo
and audio
head
cleanin
g;
4.
Damage that occurs
in shipment,
due
to act of God,
and
cosmet
ic
dama
ge:
5.
Signal reception probl
ems
and failur
es
due to line
power surge;
6. User Re
mov
al
Mem
ory Devi
ces/Vi
deo Pick-
up Tubes/
CCD Image Senso
rs are c
overed
for
90
day
s from the date
of
purchase
;
7.
Accessories
;
8.
Batteri
es
(exce
pt
that Recharg
eable Batte
ries are co
vere
d for
90
days
fro
m the date
of
purchase);
9.
Prod
uct
s used for commercial purposes
, includin
g, b
ut not limi
ted
to rentaL
10. Loss of data result
ant f
rom malfunction
of hard
drive or
oth
er
dat
a s
torage
device
:
T
her
e are
no
express warranti
es
except
as
list
ed abov
e.
T
HE DURATION
OF ANY IMP
LIED WARRANTIES, INCLUDING THE IMPLIED
WARRAN
TY
OF MERCHANTABILIT
Y, IS LIMIT
ED
TO
T
HE DURATION
OF T
HE
EXPRESS
WARRAN
TY HEREIN.
JVC
SHA
LL
NOT
BE
LIAB
LE
FOR
ANY LOSS
OF USE
OF THE
PRODUCT
,
I
NCONVENIENC
E.
OR ANY
OTH
ER DA
MAGE
S, W
HET
HER DIREC
T, INCIDENT
AL
OR
CONSEQUEN
TIA
L (INCLUDING,
WITHO
UT
LIM
ITATION, D
AMAGE TO
TAPES
, RECOR
DS
OR DI
SCS)
RESULTI
NG FROM THE USE
OF THIS
PRODUCT, OR
ARISING OUT
OF
ANY
BREACH
OF THIS
WARRANTY. ALL E
XPRESS AND
IMPLI
ED WARRA
NTIES
. INCLUDI
NG THE WARR
ANTIE
S OF
MERCHANTABILI
TY AND
FITNESS
FOR
PARTICU
LAR
PURPOSE, ARE LIMIT
ED
TO T
HE WAR
RAN
TY
PERIOD SET
FOR
TH A
BOV
E.
Some stat
es
do
not all
ow
the exclusi
on
of inci
den
tal
or consequen
tial damages
or
lim
itations on
how
long an impli
ed warranty lasts,
so
t
hese
limi
tat
ions
or
exclusions
may
not
app
ly
to
you
This warr
anty gives
you
specific lega
l rig
hts and
you
may al
so
have other righ
ts
whi
ch
va
ry from
sta
te to s
tat
e.
JVCKENWOOD
USA
Corporation
PO B
ox 22745, 2201
East Dominguez Stre
et. Long
Beac
h,
CA90801-57
45
htt
p:/l
www
.us.ivckenwo
od.co
m
REFURBI
SHED PRODU
CTS
CARR
Y A SEPA
RATE WAR
RAN
TY, THIS WARR
ANTY
DOES
NOT
APP
LY
FOR
DETAIL OF R
EFURBISHED PRODUCT
WAR
RAN
TY, PL
EASE
REFER
TO THE
REFURBISHED PRO
DUCT WARRAN
TY INFORMATION PACK
AGED
WITH EACH
REFURB
ISH
ED
PRODUC
T.
For
customer
use:
Enter bel
ow
the Model
No. and S
eri
al No.
which
is loca
ted eithe
r on
the rea
r, bott
om or s
ide
of the
cabine
t. Retain this information for
future
r
eference.
Model No ..
Ser
ial No.:
Purchase dat
e:
Name
of dea
ler
Page 41

CANADA
JVCKENWOOD
CANADA
INC.
.Jvc
WARRANTY
Warranty
applies
only
to
PRODUCT dist
ributed
in
Canada
by JVCKENWOOD
CANADA INC.
JVCKENWOOD
CANADA
INC.
(he
rea
fter
called
"JVC
") giv
es
the f
ollowing
express warr
anty
for
each
new
JVC pro
duct
distributed
in
Canada
by
JVC
and
sold
by
an
authorized
JVC deal
er.
JVC
warrants
I h
at
this
JVC
product
is
fre
e, under normal
use
and
maintenance, from
any
defects
in
material
and
workmanship
subject
to th
e following
terms
and
conditions
:
1.
To
Obtain
Warranty
Service:
3.
Standards
:
(a)
JVC product
requiring servic
e must
be
presented together
If any def
ects
sho
uld
be fou
nd
in
a J
VC product
within t
he
with
proof
of
purchase
applicable terms
. n
ecessa
ry
repairs
sha
ll
be m
ade
at
no cost
to
(
b)
The
JVC
product
must
be
brought
in
for
service
to an
the pur
chaser
for
par
ts
or labour
when JVC
acknowled
ges that
authori
zed
JVC
Service
Centre.
such
defec
ts are
due
to faulty
material
or
workm
anship.
2.
Limitation:
This
Warranty
shall
not apply to:
(a)
Repair
or
replacement
of
any
cabinets.
batteries,
plat
es.
co
nnection
cords
, antenn
as. dust
covers,
knobs,
spea
ker
g
rill
s.
spe
aker
cones, proje
ction scre
ens, projection screen
savers.
and all
accesso
ries.
(b)
Any det
ects
caused
or
repairs required as
a result
of
misus
e.
abus1ve
operation,
negligence.
improper
use
and/or
i
ns
ufficient
care.
(
c) Any def
ect
caused
or
repair
s r
equired
as a result
of
not
following
the
instructions
in
the operation
manual.
(
d) Any
JVC
product
tamper
ed
wit
h,
adjusted
or
repaired
by
any par
ty
other
than JVC
or a
uthorized
JVC
Serv1ce Centr
e
pe
rsonnel
.
(e)
Any
JVC
products
on
whic
h the
ser
ial
num
ber has been
defaced,
modifi
ed
or remove
d.
(I)
Maintenance,
cleaning
or
per
iodic check-up
(
g)
Conversion
to
foreig
n or
domestic
voltage
or
frequenc
y.
(
h)
Any
JVC
product
without
the Canadi
an
Electrical
Safe
ty
R
egu
lations
10.
(
i)
Any
JVC
products
used for
commercial
or
institutional,
rental, or
display pur
poses.
Par
ts
..... 1 year (except vid
eo he
ad · 90
days)
La
bour 90
day
s
(j)
Any JVC
produ
ct which has been
resold and
no long
er
own
ed
by t
he ori
ginal
purchaser
(k) Prod
uct
purchased from "
outside
Canada",
"bankruptcy" or
"l
iquidator".
(I)
Any
defects
caused
by fire,
flood, lightning,
power surge, or
ot
her
events
beyond
the
control
of
JVC.
(m)FOR
AUTO
PRODUCTS
Warran
ty
does not cover
elimination
of
car static
or
ele
ctri
cal
interfer
ences
, cleani
ng of
head, adjustment
s,
or l
abour cos
t
for
the
remov
al
or reinstallation of
the
unit
for
repa
ir
4.
Exclusion
of
All Oth
er Express
Warranties:
This
warrant
y con
stitu
tes
the
entire
exp
ress
warran
ty g1ven
by
JVC
for
JVC pro
ducts and no
dealer
or servi
ce cent
re personnel
or
his
. its
or their
age
nt or e
mployee is. or a
re
authorized
to
extend
or enlarge this warra
nty
on
behalf
of JVC.
5.
Discla
imer
of
Consequential
Dam
age:
To
the
exten
t t
he law
perm
its
JVC disc
laims
any respons
ibi
lity
for
loss
of time
or u
se
of its
produc
t.
transportation costs,
or
any
oth
er ind
irec
t, Incide
ntal
or
consequent
ial d
amage
or
inconvenience.
WARRANTY
TERM
(VALID
FROM
THE
DATE
OF
PURCHASE)
Product
Parts
Labo
ur
(Year
s)
(Ye
ars)
Projection
TV
In-H
ome Service
Colour
TV In-
Home
(25" and
above)
1
1
D-ILA
Rear
Projection
In-Home
Service
LCD
TV
In-Home Servi
ce (25"
and abov
e)
*
In-Home
servi
ce
to
be
provided
where
availab
le.
Where
it
is
not
available, the
purchaser
must
ass
ume
the
responsibility and exp
ense for
the prope
r p
acki
ng, shipme
nt
and
all
costs associated with
the
delivery
of the equi
pment to
a
nd
from the cl
osest JVC Authori
zed
Service Centre
.
Rece1vers
and
Home Speakers
purchased
separately.
Front Proj
ection
and Car 2 2
Audio
"ARSENAL" Seri
es
AC
Adapters,
Rem
ote controls,
Headphones, Mi
crophon
es
and
Projector
90 days
90
days
lamps
Wood
Cone
Speakers
5 5
All Other Cat
egories
1 1
JVCKENWOOD
CANADA
INC.
6070
Kestrel
Road, Missi
ssauga,
Ontario,
L5T
1S8
Canada
TE
L:
(905) 670-3381
FAX
(905)670-7244
Service loll free
#: 1-
800-964-2650
htlp://www.jvc.c
a E-
mail
service@j
vc
ca
Product
Registration
We
suggest that
you reg
ist
er
your
product
since
it
will
enable
us
to
cont
act
you
directly
if
it is
ever necessa
ry
to
correct a safety
related
condition
in
your
product.
You can
register
at
hltp//www.jvc.c
a/www/Sup
port/Warrant
yaspx
For
customer
use:
Enter
below
the
Mod
el
No.
and Serial No.
which
is
loc
ated eit
her
on
the rear.
boll
om
or side of the
cabine
t.
Reta
in this
inf
ormation
for future
reference
.
Model
No
..
Serial
No.
Purchase
date:
Name of
dealer:
GARANTIE
La
gara
ntls'
applique
seuleme
nt
aux
PRODUITS
dist
rlbues
au Can
ada par JVCKENWOOD CANADA INC
.
J
VC
KENWOOD
CANADA INC. (ci-a pres
app
ele "JVC
")
en once
Ia
garantie
expr
esse sui
van
te pour tout nouveau produit J
VC
distrib
ue
au
Canada
par
JVC et
vendu
par un detaillant JVC auto rise. JVC
vous
garan
tit
que
ce produ
it est de
gage,
so
us
ut
ilisation
et entretien normal,
de
tout
deta
ut
materiel et
de
fabrication sous reserve des
moda
lites et
condi
tio
ns
sui
vantes:
1. Pour obtenir
un
service
de gara
nti
e:
(a) Les produits JVC
necessitant un service
do
it eir
e pr
esen
tee
avec
Ia pr
evue d'achat.
(b)
Le produ
it J
VC
doit
etre
apporte
pour service che
z un
centre
de service J
VC
aulorise
.
2.
Restriction
s:
Cette garantie
ne
s'appliq
ue
pas
aux
(a)
Rep
aration
au
rempla
cement de lout
cabine
t,
batt
e11
es.
panneau
ava
nt, cordons
de raccord, antennes
. ho
usses
de protect
ion. bo
uton
s,
couverts
de
hautparleur, cones
de
hautparleu
r, ecrans de proj
ectio
n. pr
otec
teu
rs
d'ecran
de
proje
cti
on el t
aus les acce
ssoire
s.
(b)
To
us detauts
occasionnes
ou r
epa
rations requises su
ite a une
u
tilisat
ion
abusive,
mauvaise, negli
gen
te
el/ou
une utilization
i
ncorrecte.
(c)
To
us defauts
occasionn
es
ou repa
rations
requ
ises sui
te
a !'
omission
de
sui
vre l
es
reco
mmandalions du manue
l
d
'instru
ct1
on.
(d)
Tout
produ
it
JVC alle
re, ajus
te
ou repa
re par to
ut aut
re
entreprise
que JVC
au
un cent
re
de servi
ce d'entre
tien
ou
de
s
ervice
autorise JVC
.
(
e)
Tou
t pr
odu
it
JVC doni le nume
ro
de
ser
ie a ete altere, modifie
au
enl
eve
.
(
f) L'entretien, les ver
ifi
cations perio
diques
et
netto
yage
(g)
La
conver
sion a une frequ
ence
au
une tens
ion elrangere
ou
domestiqu
e.
(h)
Tou
t produit JVC n'a
yant pas
le signe
d'i
denlilication qui
co
nforme aux norms et
ectriques
Canadiennes
(CSA).
(
i) Pour tout produ
it
utilise a des fins
comme
rci
ales
,
i
ns
tilulionnelfes, de loc
ation OU
Utilise
a d
es fins d'etalage.
Pi
eces
p . p • 1
An
(Excepte
les t
etes video-
90 tours)
Main d'o
euvre ...
90 Jou
rs
(
j)
Tou
t produil JVC
ayant
ete r
evendu
el
qui
n'est plus
Ia
pr
op
riete
de
l'a
cheteu
r original
(
k)
Produ1t ach
ete
a "l'
ex
terieur du
Canada", proven
ant
d'une
"fai
llite" ou d'
un
"liquidateu
r"
(I)
Tout dom
mage
cause
par le
feu
. une i
nondation,
un
ecl
air
,
une surte
ns
ion
ou tout aut
re
eveneme
nt hors
du
contro
le de
JVC
.
(
m)POUR LES
PROD
UITS D'AUT
OMOBILE
La garanti
e ne couvre p
as
!'elimination d'inte
rfe
rence
s
stat
iques ou electriqu
es
de
Ia voiture, le
nelloyage
de
tete
,
l
es
atustements et l
es coOts
de main d'
ceu
vre a
ssoc
ies a
l'enlevemen
l ou a Ia reinstallati
on
de l'u
nile pour
rep
aration.
3.
Criteres:
Si un
produ
it
JVC s'averait def
ectueux, se
ton les conditions
appli
cables
. l
es
repa
rat
ion
s nec
essa
ires seront
elfectue
s
sans coO
ts addi
tionne
ls a l'acheteur
pour les pieces
et Ia m
ain
d'
ceuv
re
lorsque
JVC
reconnail
que
de tell
s def
ectuosite
s s
on
I
causees par
une d1Hectuosile de materiel ou
de
fabrication
.
4. E
xclus
ion
de fo
utes
aut
res
garan
ties expr
esses:
Celie garant
ie
cons
litue l'
entiere
garant
ie expr
ess don
nee par
JVC
pour l
es
produits
JVC
. Nul representant
ou
employe d'un
detaillant
au
d'un service d'entretien n'est autori
se a pr
o longer
celle garantie au nom
de JVC
.
5.
D
ene
gation des dam
mages
indirects:
Da
ns
Ia
mesure
perm
ise par Ia loi, J
VC
nie toute
responsab
ili
te
po
ur perle de
temps
au d'
usage de
ses produits, des cools de
tran
spo
rt
ou tout
aut
re
dommage
ou i
nconveni
ent indirec
t.
ac
cidentel
el con
sequen
t.
CONDITIONS
DE
GARANTIE
(VALAB
LE a
PARTIR
DE
LA
DATE
D'ACHA
T)
Produ
it
Pi
eces
Ma
in-D'
oeuver
(
Annees) fAnnees)
Ecrans
de projection Servi
ce a Domicil
e
Ecrans de
TV Coule
ur Servi
ce
a D
omicile (25"
et
plus)
1
1
TV
project
ion a
rri
ere
D-I
LA Servi
ce a Domicile
Ecrans
de LCD
Ser
v1ce a Domicile (25"
el
plus
)
*Service a domicile lo
urni par un d!Haillant disponible.
S'
il n
'y a pas
de servi
ce J
VC
disponible a proximit
e. l'ach
ele
ur doit assumer
Ia
responsab
ili
te
et les coOts pou
r un emballa
ge
adequal, !'
exped
ition,
ainsi
que t
aus les
coO
ts associes
a Ia
liv
raison de l'
equipem
ent
chez
et depuis le
de
tailla
nt JVC
auto rise
le pl
us
pres p
our
un serv
ice
d'entr
etien
.
R
ecepteurs
el Hauts-Parleu
rs
acheles
separement, Proj
ecteur Ava
nt et Audio d'Aulo
2
2
de Ser
ie "ARSENAL"
Adaptate
urs AC, T
elecomma
nde, C
asque
90 Jou
rs
90 Jour
s
D'
ecou
te, M
icro
phon
es et Lampe
de Projecteur
E
nce
inte a Cone
en Bois
5 5
Toute
s l
es
aut
res cat
egories
1
1
JVCKENWDOD
CANADA
INC.
6070
Kestrel
Roa
d, Missi
ssauga, Ontario,
L5T
1S8
Cana
da
TE
L: (
905)
670-33
81 FAX
(905)670-7244 Service to
ll free#: 1-800-964-2650
hllp://www.jvc.ca E-mail servic
e@jvc.ca
Enregistrement
du
produit
No
us vous co
nseillo
ns
d'enr
egistr
er vot
re produit, car il no us permett
ra
de vous con
tacte
r di
recteme
nt
si
jamais elle
est
necessaire po
ur
c
orriger
un
probl
eme
lie a Ia securite
de
votre
pro
dui
l. Vous
pouvez vous inscrire a h
ttp
://
www jvc.ca/www/Support/Warranty
aspx
Pour
!'utilisation
des
clients:
Enlrez
ci-
dess
ous le n
ume
ro
de mode
le et le nu
mero
de
ser
ie qui
se trouve soil a
l'arriere
, en
bas
au sur
le
cote
de !'
armoire.
Conservez
ces
i
nformation
s pour re
feren
ce
fut
ure
No. de modele
No. de serie:
Da
le d'ac
hat
No
m du r
evendeu
r:
 Loading...