

Page 1

NAVIGATION/DVD RECEIVER
NAVIGATIONSSYSTEM/DVD-RECEIVER
SYSTÈME DE NAVIGATION/RÉCEPTEUR DVD
KW-NX7000
For canceling the display demonstration, see page 9.
Zum Abbrechen der Displaydemonstration siehe Seite 9.
Pour annuler la démonstration des affichages, référez-vous à la page 9.
ENGLISH
DEUTSCH
FRANÇAIS
For installation and connections, refer to the separate manual.
Für den Einbau und die Anschlüsse siehe das eigenständige Handbuch.
Pour l’installation et les raccordements, se référer au manuel séparé.
INSTRUCTIONS
BEDIENUNGSANLEITUNG
MANUEL D’INSTRUCTIONS
LVT1839-001A
[E]
Page 2
Please read all instructions carefully before operation, to ensure your complete understanding and to obtain the best
Thank you for purchasing a JVC product.
possible performance from the unit.
IMPORTANT FOR LASER PRODUCTS
1. CLASS 1 LASER PRODUCT
ENGLISH
2. CAUTION: Do not open the top cover. There are no user serviceable parts inside the unit; leave all servicing to
qualified service personnel.
3. CAUTION: Visible and/or invisible class 1M laser radiation when open. Do not view directly with optical
instruments.
4. REPRODUCTION OF LABEL: CAUTION LABEL, PLACED OUTSIDE THE UNIT.
WARNINGS:
This symbol is only valid in
the European Union.
Information for Users on Disposal of Old
Equipment
This symbol indicates that the product with
this symbol should not be disposed as general
household waste at its end-of-life. If you wish to
dispose of this product, please do so in accordance
with applicable national legislation or other rules in
your country and municipality. By disposing of this
product correctly, you will help to conserve natural
resources and will help prevent potential negative
effects on the environment and human health.
To prevent accidents and damage
• DO NOT install any unit or wire any cable in a
location where;
– it may obstruct the steering wheel and
gearshift lever operations.
– it may obstruct the operation of safety devices
such as air bags.
– it may obstruct visibility.
• DO NOT operate the unit while driving.
If you need to operate the unit while driving, be
sure to look around carefully.
• The driver must not watch the monitor while
driving.
• If the parking brake is not engaged, “Parking
Brake” flashes on the monitor, and no playback
picture will be shown.
– This warning appears only when the parking
brake wire is connected to the parking
brake system built in the car (refer to the
Installation/Connection Manual).
2
Page 3
Cautions on the monitor:
• The monitor built in this unit has been produced
with high precision, but it may have some
ineffective dots. This is inevitable and is not
malfunction.
• Do not expose the monitor to direct sunlight.
• Do not operate the touch panel using a ball-point
pen or similar tool with the sharp tip.
Touch the buttons on the touch panel with your
finger directly (if you are wearing a glove, take it
off).
• When the temperature is very cold or very hot...
– Chemical changes occur inside, causing
malfunction.
– Pictures may not appear clearly or may move
slowly. Pictures may not be synchronized with
the sound or picture quality may decline in
such environments.
For safety...
• Do not raise the volume level too much, as this will
block outside sounds, making driving dangerous.
• Stop the car before performing any complicated
operations.
Temperature inside the car...
If you have parked the car for a long time in hot or cold
weather, wait until the temperature in the car becomes
normal before operating the unit.
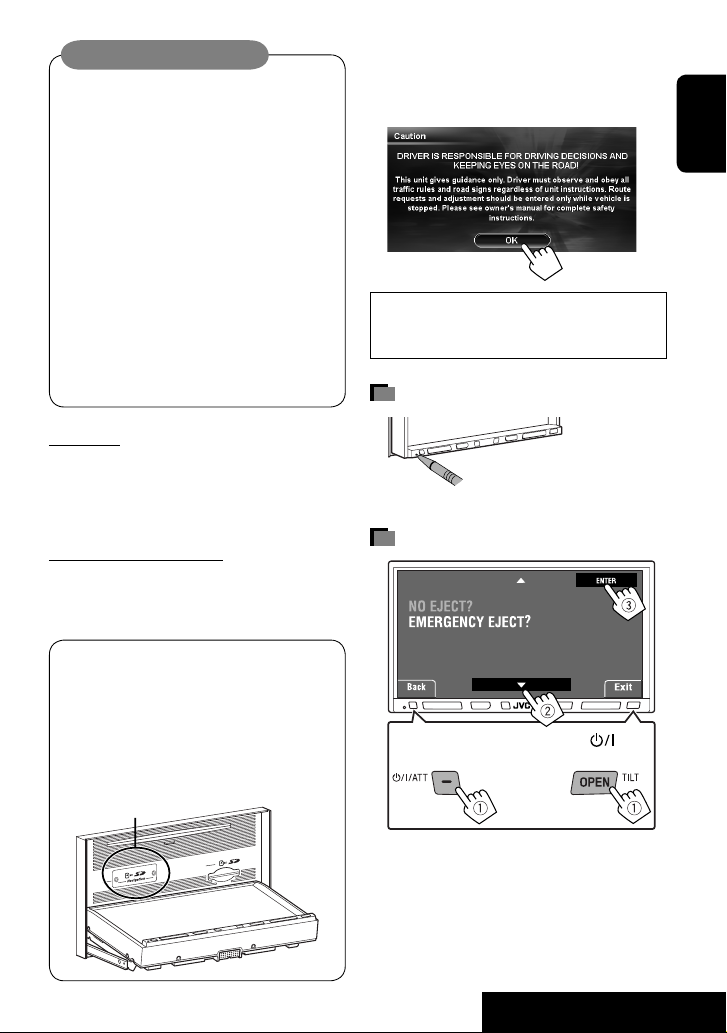
Every time you turn on the unit or attach the monitor
panel with the ignition switch turned on, the screen
below appears. Pay sufficient attention when operating
the unit and make sure of safe driving.
ENGLISH
This unit functions properly only when the speed
signal lead is connected (refer to the Installation/
Connection Manual).
How to reset your unit
• Your preset adjustments will also
be erased.
How to forcibly eject a disc
Notes on the SD slot for System
updating:
The SD slot marked below is for System updating. To
update the System, ☞ page 18.
• Do not remove the cover in any case other than
updating the System.
SD slot for system updating
Press and hold OPEN/TILT while holding
[Hold] [Hold]
• If this does not work, reset the unit.
For security reasons, a numbered ID card is provided
with this unit, and the same ID number is imprinted on
the unit’s chassis. Keep the card in a safe place, as it will
help the authorities to identify your unit if stolen.
3
INTRODUCTION
/ATT.
Page 4

Contents
INTRODUCTION
Before operations ........................... 5
ENGLISH
Initial settings ................................ 7
Basic operations — Monitor panel/
touch panel ................................. 10
Basic operations —
Remote controller (RM-RK250) ..... 11
Menu operations ............................ 15
NAVIGATION SYSTEM
Safety instructions for the Navigation
System ........................................ 18
Basic operations ............................. 19
Registering your home/favourite points
.................................................. 22
Starting guidance ........................... 25
Searching for a place ....................... 28
How you are guided ........................ 39
Arranging your route ...................... 43
Traffic information on the map
— TMC ....................................... 45
Navigation menu items ................... 48
Additional information ................... 53
AV OPERATIONS
Common operations on AV screens ... 58
Listening to the radio ..................... 60
Disc operations ............................... 67
SD operations ................................. 82
USB operations ............................... 84
Bluetooth® operations — Mobile
phone/audio player ..................... 86
Listening to the CD changer ............. 93
Listening to the DAB tuner .............. 95
Listening to the iPod ....................... 99
Using other external components .... 103
Sound equalization ......................... 105
Assigning titles to the sources ......... 106
AV menu items ............................... 107
Additional information ................... 115
REFERENCES
Maintenance .................................. 123
Troubleshooting ............................. 124
Specifications ................................. 129
4
Page 5
INTRODUCTION
Before operations
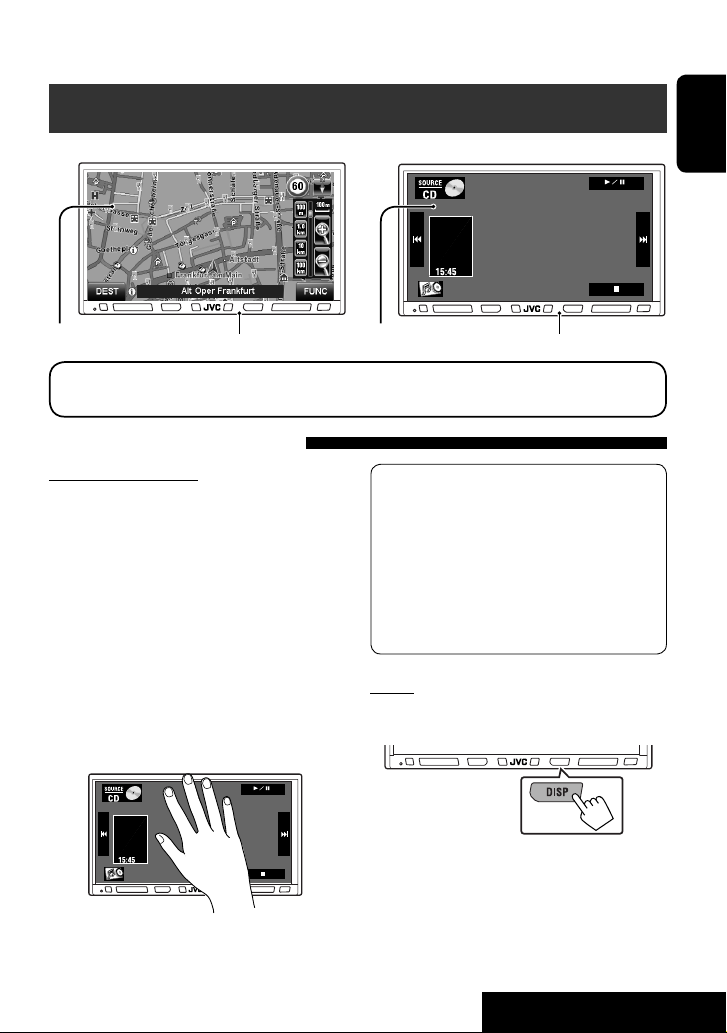
Map screen AV screen
Touch panel
In the explanation, operating buttons shown on the touch panel are indicated inside [ ].
For details on the touch panel operations, see each section.
Monitor panel Monitor panel
Touch panel
Features of the illumination
Monitor panel buttons
The lights of the monitor panel buttons are turned off
when no operation is done for about 5 seconds.
They are turned on again in the following cases:
– When you touch the touch panel or move your hand
nearby*
– When you use the remote controller
– When a call/SMS comes in (for Bluetooth mobile
phone)
– When the source is automatically changed by
receiving the Traffic Announcement/PTY programme
* Depending on the <Illumination> setting.
(☞ page 111)
The lights of the monitor panel buttons are always
turned on in the following cases:
– While operating buttons are displayed on the
map screen.
– While AV menu screen is displayed.
– While <Source Menu> screen is displayed.
– While <Open/Tilt> menu is displayed.
– When <Illumination> is set to <Normal>.
(☞ page 111)
Screen
While the unit is turned on, you can turn off the screen
by holding DISP.
ENGLISH
[Hold]
The screen is turned on again in the following cases:
– When you touch the touch panel
– When you press MAP on the monitor panel or press
DISP
– When a call/SMS comes in (for Bluetooth mobile
phone)
– When the signal from the rear view camera comes in
5
INTRODUCTION
Page 6
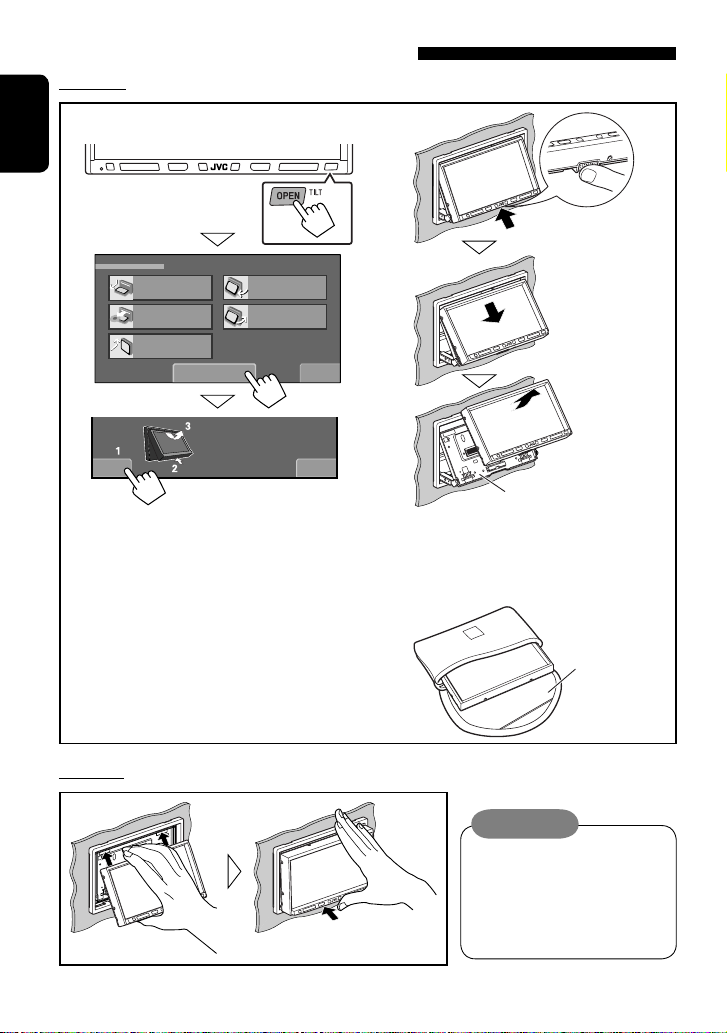
Detaching/attaching the monitor panel
Detaching
1 While the unit is turned on:
ENGLISH
Open/Tilt
Open
Eject
Close
Detach
Detach?Yes No
The monitor panel opens by about 50°.
• It closes automatically when no operation
is done for about a minute.
2
The monitor panel is
released.
Tilt +
Tilt –
Exit
Attaching plate
• The attaching plate closes automatically
about 10 seconds after the monitor panel is
released. Remove the monitor panel before
this happens.
3
Soft case
(supplied)
Attaching
Caution:
• Hold the monitor panel securely so
as not to drop it accidentally.
• Fit the monitor panel onto the
attaching plate until it is firmly
locked.
6
Page 7
Initial settings
Installation settings
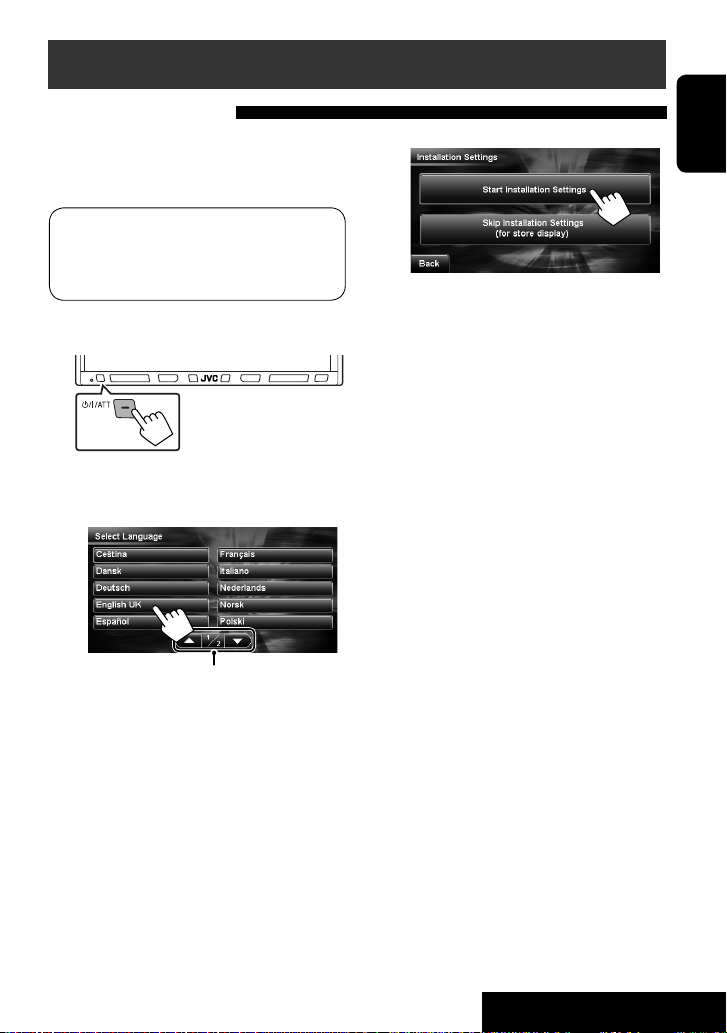
When you turn on the unit for the first time, the initial
setup screen appears. Follow the procedure below and
make the necessary settings.
Indication language:
In this manual, English indications are used for
the purpose of explanation. You can select the
indication language.
~ Turn on the power.
Ÿ Select the language you want for the
display and the voice guidance.
!
Normally select [Start Installation Settings].
• If you select [Skip Installation Settings
(for store display)], the System starts in the
navigation demonstration mode for stores
(☞ page 53).
You need to make the settings you turn on the
power next time.
ENGLISH
Moves to the next/previous list
The power is turned off then turned on
automatically so that your setting takes effect.
• Some languages are not available on AV
screen. (☞ page 108)
When you display the AV screen with the
unavailable language selected on the
navigation screen, the language previously
selected on the AV screen is used (if the
language setting on the AV screen is not
performed, English is used).
Continued on the next page
7
INTRODUCTION
Page 8
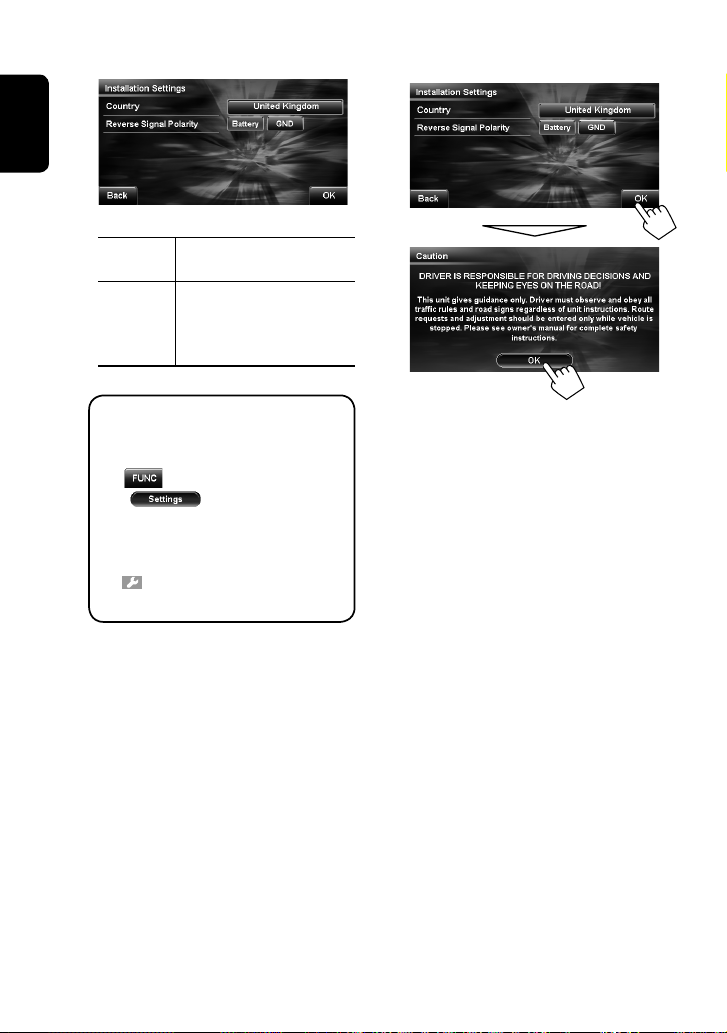
⁄ Adjust the settings.
ENGLISH
@ Finish the procedure.
Country* Select the country where you
Reverse
Signal
Polarity
You can also change these settings through
the menu screens as follows:
• Language:
<
- < (Map Settings)> <System> - <Language> (☞ page 51)
• Reverse Signal Polarity:
<AV Menu> - <Setup> < (Others)> - <Reverse Signal>
(☞ page 111)
* You can also change the country when
searching for a destination.
are living.
Select the reverse signal polarity
(<Battery> or <GND>)
according to the connection of
your car.
(Function Menu)>
8
Page 9
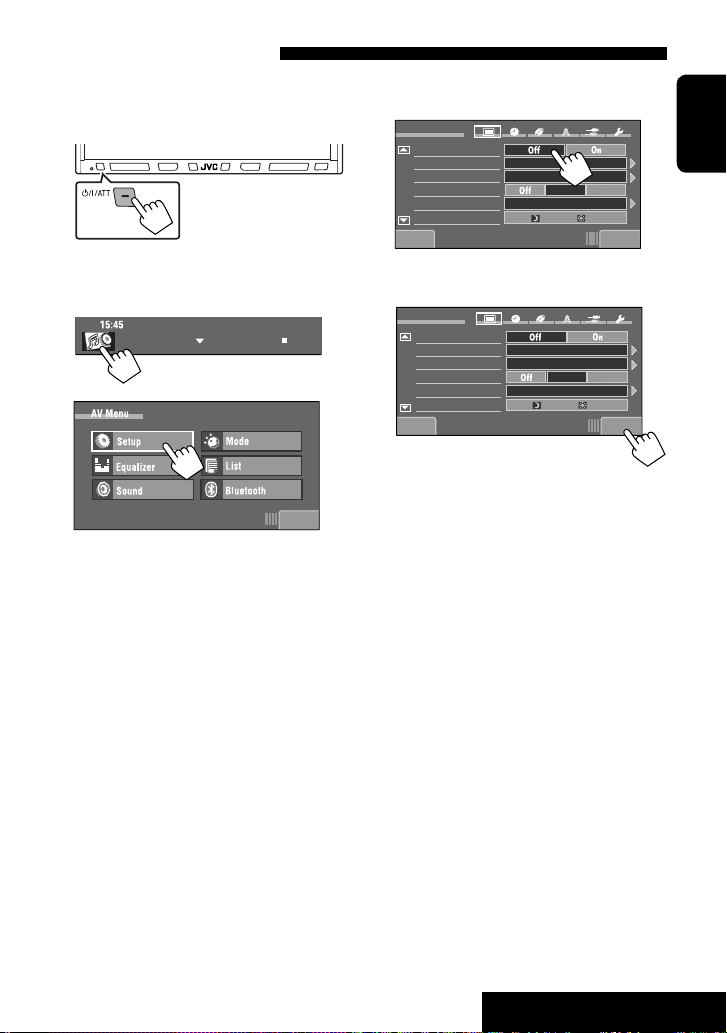
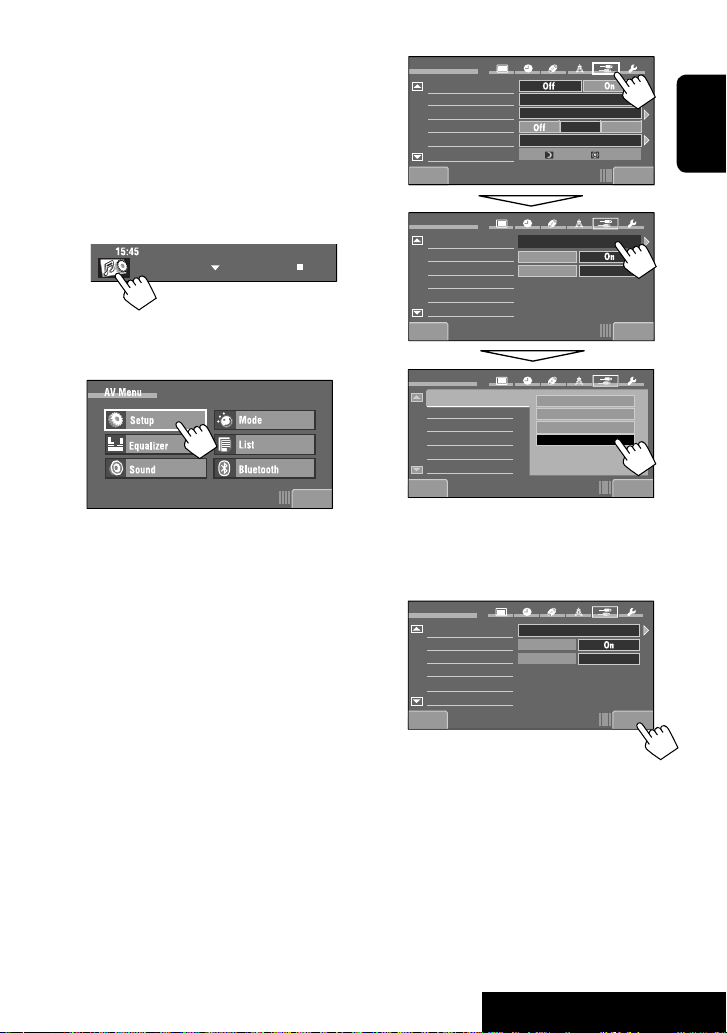
Canceling demonstration
You can cancel the demonstration on the screen.
1 Turn on the power.
If the map is displayed, switch the screen to the AV
screen by pressing DISP.
2
3
Exit
4 Cancel the demonstration.
Select <Off>.
Setup
Demonstration
Wall Paper
Color
Scroll
Dimmer
Dimmer Time Set
Back Exit
5 Finish the procedure.
Setup
Demonstration
Wall Paper
Color
Scroll
Dimmer
Dimmer Time Set
Back Exit
Metal
Blue
Auto
Metal
Blue
Auto
ENGLISH
AutoOnce
718
AutoOnce
718
9
INTRODUCTION
Page 10
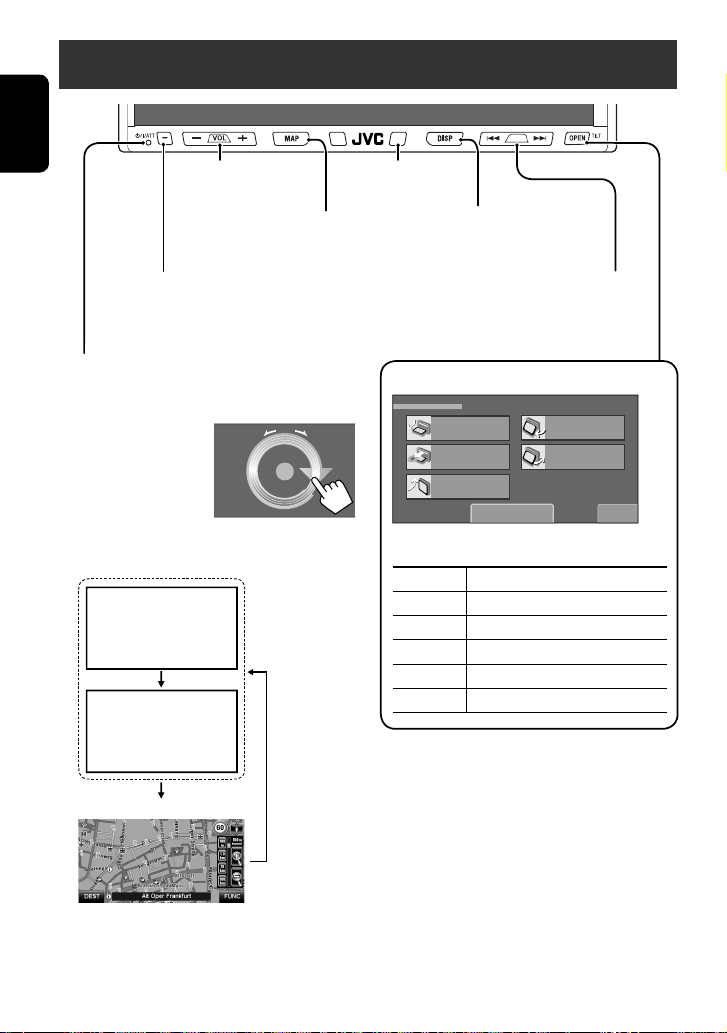
Basic operations — Monitor panel/touch panel
ENGLISH
Adjusts the volume.*
• Switches to the map screen.
• Displays your current position.
• Turns on the power.
• Turns off the power. [Hold]
• Attenuates the sound (if the power is on).
Resets the unit. ☞ page 3
• Use only when the internal system malfunctions.
1
*
Also adjustable on the
touch panel (on the AV
screen only): Move your
finger on the touch panel
as illustrated.
2
*
Each time you press DISP, the display changes to show
the various information.
The number and
AV screen 1
AV screen 2
contents of AV screens
vary depending on the
source.
1
Remote sensor
• Changes the display information.*
2
• Turns off the screen. [Hold]
• Operates the current source on the map screen.
• Searches for radio stations or ensembles.
• Selects tracks/chapters.
<Open/Tilt> menu
Open/Tilt
VOL
15
Open
Eject
Close
Detach
Tilt +
Tilt –
Exit
• Shaded items cannot be used.
[Open] Opens the monitor panel.
[Eject] Ejects the disc.
[Close] Closes the monitor panel.
[Tilt +/–] Tilts the monitor panel.
[Detach] To detach the monitor panel.
[Exit] Erases this screen.
Map screen
10
Page 11
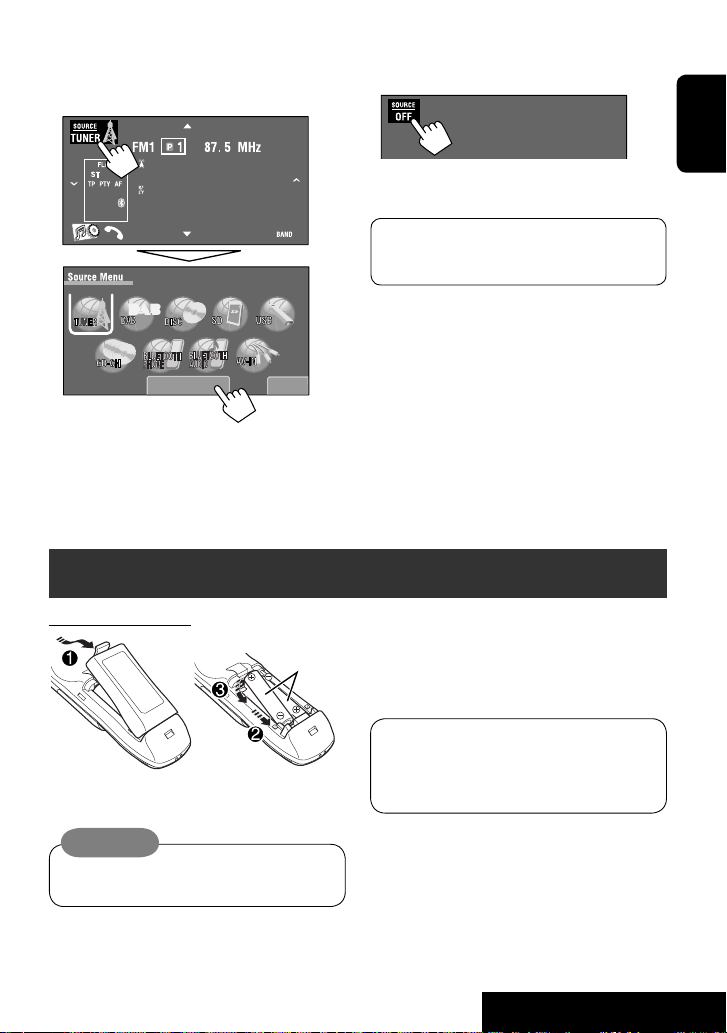
To turn off the AV function
• If the map is displayed, switch the screen to the AV
screen by pressing DISP.
• To activate the AV function:
Bayern Radio
Pop Music
15:45
For the operations on the AV screen
☞ page 58
Source Off
Exit
Basic operations — Remote controller (RM-RK250)
Installing the battery
R03/LR03/AAA
Insert the batteries into the remote controller by
matching the polarity (+ and –) correctly.
Before using the remote controller:
• Aim the remote controller directly at the remote
sensor on the unit.
• DO NOT expose the remote sensor to bright light
(direct sunlight or artificial lighting).
The unit is equipped with the steering wheel
remote control function.
• See the Installation/Connection Manual (separate
volume) for connection.
ENGLISH
Caution:
Battery shall not be exposed to excessive heat such
as sunshine, fire or the like.
• If the range or effectiveness of the remote controller
decreases, replace both batteries.
11
INTRODUCTION
Page 12

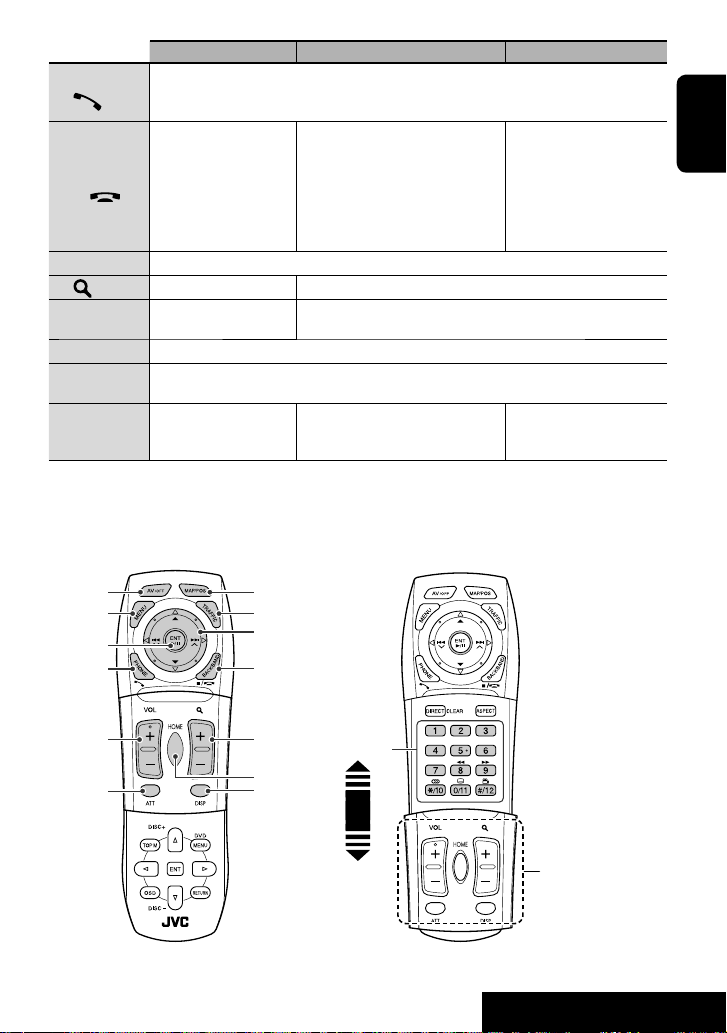
Main elements and features
For navigation system operations and AV operations
On the map screen On the AV screens On menu screens
ENGLISH
AV/OFF
1
MAP/POS
2
MENU
3
TRAFFIC
4
ENT 6
5
5/∞
6
7
Switches to the AV screen. Selects the source.
Turns off the AV function if pressed and held, and turns on the AV function again if pressed briefly.
Displays your current
position.
Switches <Destination
Menu>, <Function
Menu>, and the map
screen. (☞ page 15)
Displays <Traffic List>
screen. (☞ page 46)
(Not used)
Scrolls the map (in eight
directions).
/
Switches to the map screen. Displays your current position.
Displays <AV Menu> screen.
(☞ page 16)
(Not used)
• “DISC/SD/USB/USB iPod”: Plays/pauses.
• “Bluetooth PHONE”: Answers incoming
• “Bluetooth AUDIO”: Starts playback.
• Disc: Selects the title/group/program/
• File: Selects the folders.
• FM/AM: Selects preset stations.
• DAB tuner: Selects the services.
• “USB iPod”: Selects previous/next item.
• “iPod”: Enters the main menu (5), and
• FM/AM: Searches for stations.
• DAB tuner: Searches for ensembles.
• “DISC/SD/USB/USB iPod/iPod/
calls.
playlist.
pauses/resumes playback (∞).
Bluetooth AUDIO”: Selects tracks/
chapters/items.
• In navigation menus:
Switches to the AV screen.
• In <AV Menu> screen:
Selects the source.
• In <Destination Menu>
screen: Displays the map.
• In <AV Menu>screen:
Displays the top screen of
<AV Menu> or switches to
the AV screen.
Confirms the selection.
In navigation menus: Selects
an item.
12
Page 13
On the map screen On the AV screens On menu screens
PHONE
8
BACK/BAND
9
7/
VOL +/–
p
q
+/–
HOME
w
ATT
e
DISP
r
Number
t
keys
12
34
5
89
• Displays <Dial Menu> screen. (☞ page 89)
• Displays <Redial> list if pressed and held. (☞ page 89)
• Answers incoming calls.
“TUNER/DAB”: Selects the bands.
Repeats the last voice
guidance during guidance.
Adjust the volume.
Scales the map. (Not used)
Starts guidance to the home.
(☞ page 24)
Attenuates/restores the sound.
• Changes the display information. (☞ page 10)
• Turns off the screen if pressed and held, and turns on the screen again if pressed briefly. (☞ page 5)
(Not used)
•
• “DISC/SD/USB“: Stops playback.
• “Bluetooth PHONE”: Ends the call.
• “Bluetooth AUDIO”: Pauses.
(Not used)
• Enters numbers.
• “TUNER/DAB”: Selects the preset
station/service directly.
67
• In navigation menus: Displays
the map screen or the top
screen of current menu
(<Destination Menu> or
<Function Menu>).
• In <AV Menu> screen:
Switches to the AV screen.
In navigation menus: Enters
a phone number or house
number.
ENGLISH
pq
w
e
r
t
Slide to open
13
These buttons do not
function at this position.
Continued on the next page
INTRODUCTION
Page 14
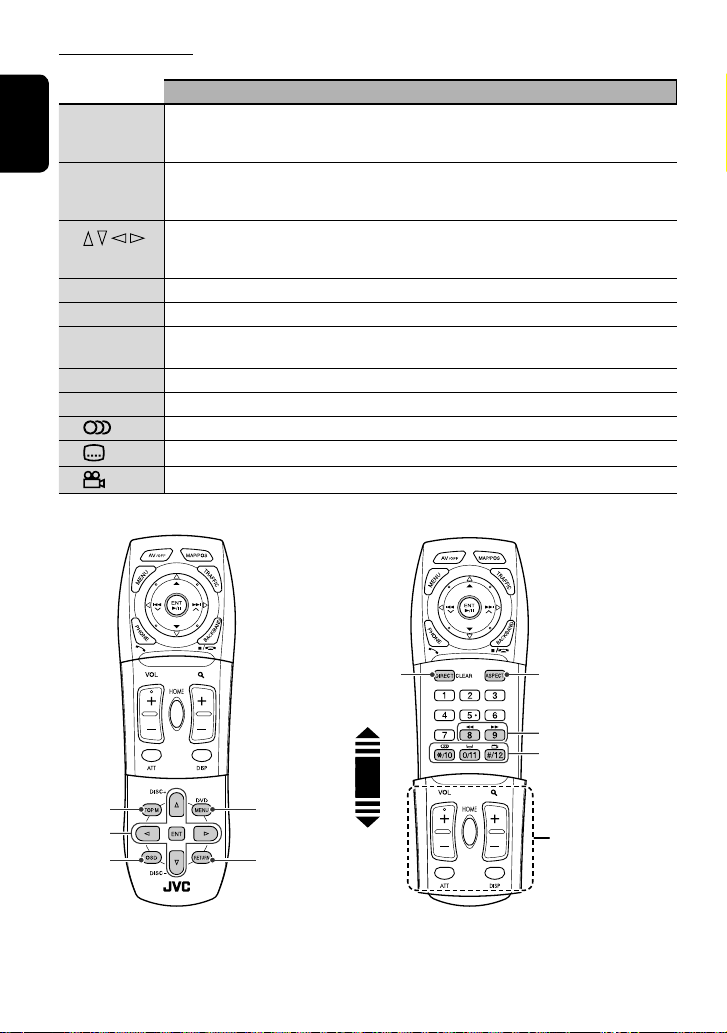
For AV operations only
TOP M
y
ENGLISH
DVD MENU
u
i
ENT
OSD
o
RETURN
;
DIRECT/
a
CLEAR
ASPECT
s
1/¡
d
f
g
h
On the AV screens
• DVD/DivX 6: Shows the disc menu. (☞ pages 75 and 77)
• VCD: Resumes PBC playback. (☞ page 79)
• DVD-VR: Shows the Original Program screen. (☞ page 76)
• DVD/DivX 6: Shows the disc menu. (☞ pages 75 and 77)
• VCD: Resumes PBC playback. (☞ page 79)
• DVD-VR: Shows the Playlist screen. (☞ page 76)
• Makes selection/settings.
• @ / #: Skips back or forward by 5 minutes for DivX/MPEG1/MPEG2. (☞ page 77)
• DISC +/– buttons: Changes discs for “CD-CH.”
Shows the on-screen bar. (☞ page 80)
VCD: Returns to the PBC menu. (☞ page 79)
• “DISC/SD/USB“: Switches the number entry mode. (☞ pages 75 to 79)
• Erases the misentry after entering a wrong number.
Changes the aspect ratio of the playback picture.
“DISC/SD/USB/USB iPod”: Reverse search/forward search.
Disc: Selects the audio language/audio stream/audio channel.
Disc: Selects the subtitles.
Disc: Selects the view angle.
a
y
i
o
u
;
Slide to open
s
d
fgh
These buttons do not
function at this position.
14
Page 15
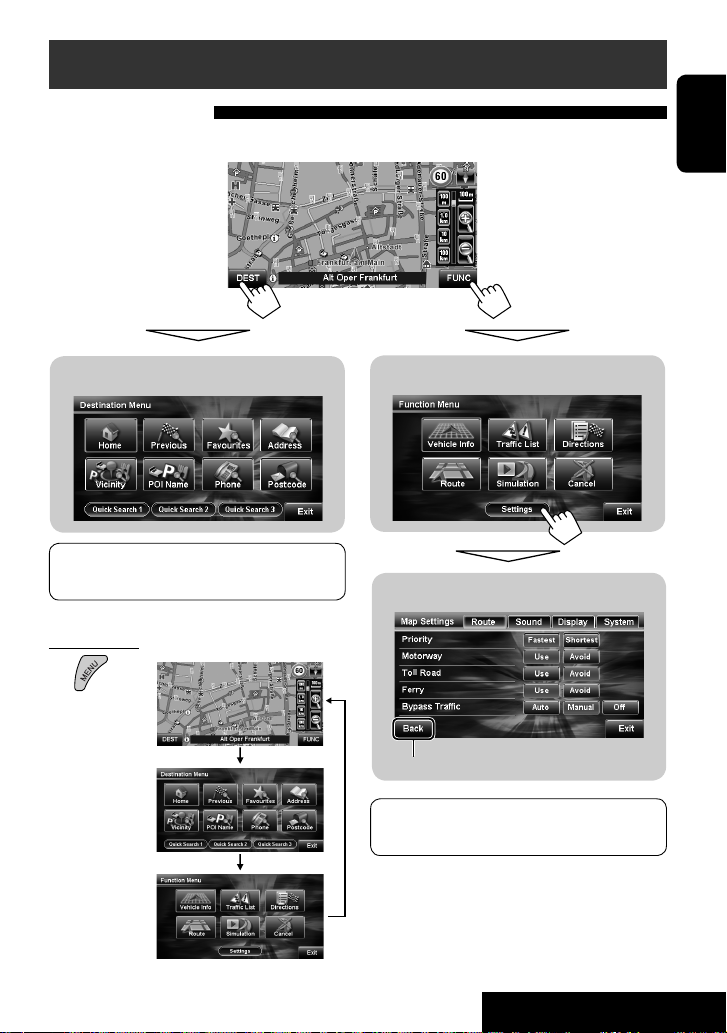
Menu operations
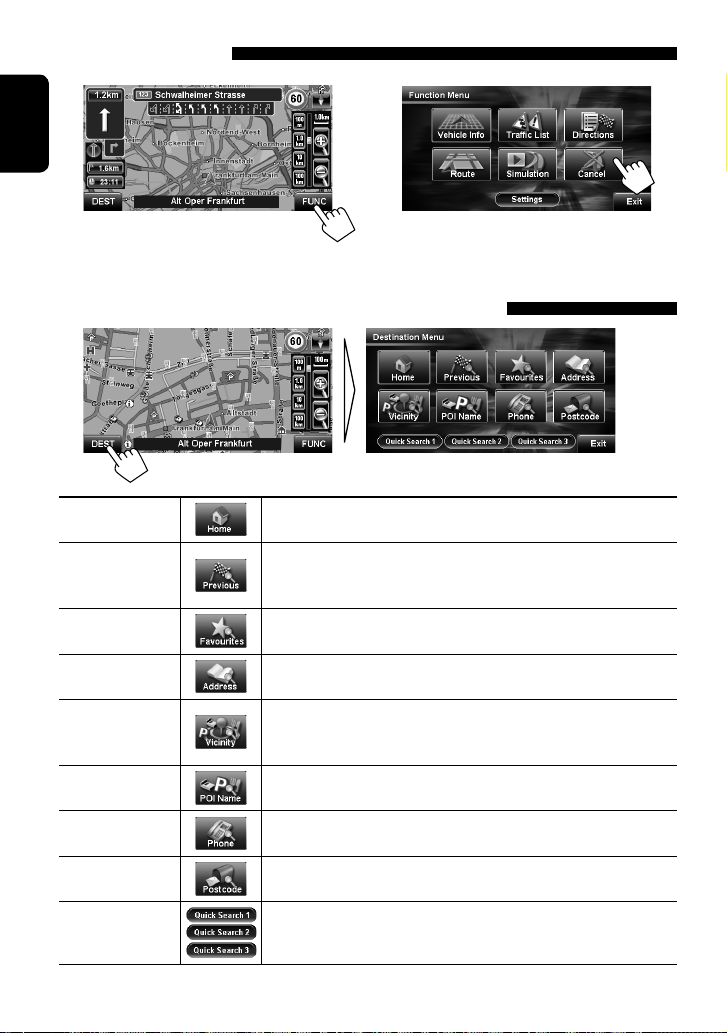
To display a menu
Navigation menus
Map screen
ENGLISH
• If the operating buttons are
not displayed, touch the
screen.
Destination Menu (☞ page 48)
To return to the map, press [Exit] on the touch
panel or MAP/POS on the remote controller.
On the remote:
Function Menu (☞ page 49)
Map Settings
Returns to <Function Menu> screen
To return to the map, press [Exit] on the touch
panel or MAP/POS on the remote controller.
(☞ page 50)
15
Continued on the next page
INTRODUCTION
Page 16

AV menu
AV screen
ENGLISH
On the remote:
Basic menu operations
Navigation menu
Ex.: <Sound> in <Map Settings> screen
Returns to the previous screen
AV Menu (☞ pages 107 to 114)
Exit
Setup (☞ page 107)
Setup
Demonstration
Wall Paper
Color
Scroll
Dimmer
Dimmer Time Set
Back Exit
Returns to <AV Menu> screen
To return to the AV screen, press [Exit] on the
touch panel or DISP on the remote controller.
Metal
Blue
Once
Auto
Auto
618
Moves to the
preceding
menu page
Moves to the succeeding
menu page
Current page/total
menu pages
Exits from the
menu screen
AV menu
Ex.: <Setup> menu in <AV Menu> screen
Moves to the preceding menu page
Setup
Demonstration
Wall Paper
Color
Scroll
Dimmer
Dimmer Time Set
Back Exit
Indicates the remaining time before the
current screen is erased automatically
Returns to the previous screen
Moves to the succeeding menu page
• Non-available items will be shaded on the menu
screen.
Metal
Blue
Once
Auto
Auto
618
Exits from the
menu screen
16
Page 17
The following steps are one of the fundamental
procedures. Some of the settings do not open the
sub-setting window, but just selecting an option will
change the setting.
• The display indications may change according to
change of the specifications.
Ex.: Changing the <AV Input> setting in <AV Menu>
screen
~
!
Setup
Demonstration
Wall Paper
Color
Scroll
Dimmer
Dimmer Time Set
Back Exit
Setup
AV Input
Camera Input
External Input
Metal
Blue
Once
Auto
Audio&Video
Off
iPod External
Auto
618
ENGLISH
• You can also use MENU on the remote
controller.
Ÿ
Back Exit
Setup
AV Input
Camera Input
External Input
Exit
Back Exit
Off
iPod (Off)
Audio&Video
Audio
• When operating on <AV Menu>, press
[Back] to close the selection list or to change
other settings.
⁄
Setup
AV Input
Camera Input
External Input
Back Exit
Audio
Off
iPod External
17
INTRODUCTION
Page 18

NAVIGATION SYSTEM
Safety instructions for the Navigation System
SAFETY INSTRUCTIONS
ENGLISH
Use of the Navigation System is only permitted if the
traffic conditions are suitable and you are absolutely
sure that no risk, obstruction or inconvenience will be
incurred to you, your passengers or other road users.
The requirements of the Road Traffic Regulations must
always be followed. The destination must not be
entered while driving the car.
The Navigation System serves solely as an aid to
navigation. It never releases the drivers from their
duties to drive carefully and to make own judgement
in road traffic. Inaccurate or incorrect instructions
may happen to be given due to changing traffic
conditions. The actual road signs and traffic regulations
must therefore always be observed. In particular,
the Navigation System cannot be used as an aid to
orientation when visibility is poor.
This Navigation System must only be used for its
intended purpose. The volume of the car radio/
Navigation System must be adjusted so that external
noise is still audible.
Navigation guidance is performed, based on the
database, therefore, it may not be applicable to
the current situation because of changes in traffic
conditions (e.g. changes in tollroads, principal roads,
one-way traffic, or other traffic regulations). In this
case, observe the current traffic signs or regulations.
• Traffic signs should be observed carefully while
driving using the Navigation System. Navigation
System is only an aid. Driver must always decide
whether or not to heed the information provided.
JVC does not accept liability for erroneous data
provided by the Navigation System.
• Traffic guidance is restricted to passenger vehicles
only. Special driving recommendations and
regulations for other vehicles (e.g. commercial
vehicles) are not included.
• Do not operate the unit while driving.
Terms of license
You are granted a non-exclusive license to use the
database for your personal purposes. The present
license does not authorize the granting of sublicenses.
Use of the data is only permitted in this specific JVC
system. It is forbidden to extract or make further use
of significant parts of the database content, or to
duplicate, modify, adapt, translate, analyze, decompile
or reverse-engineer any part thereof.
WARNING:
Road traffic regulations always take priority when a
vehicle is being driven in traffic. Navigation System is
only an aid. Errors may occur in individual data items/
entries. At all times, the driver must decide whether or
not to heed the information provided.
JVC does not accept liability for erroneous data provided
by the Navigation System.
© 2007-2008, Tele Atlas NV. All rights reserved.
When replacing/rotating the tyres:
It is required to clear all the accumulated calibration
data which is important for accurate navigation. To
clear the data, perform <Reset Calibration Data>.
(☞ page 52)
On map updating
If “Your map data is more than one year old, and the
update may be available. For more information, please
visit www.jvc-exad.com” appears on the monitor, visit
<http://www.jvc-exad.com>.
For details about updating your unit, visit <http://
www.jvc-exad.com> (English website only).
18
Page 19
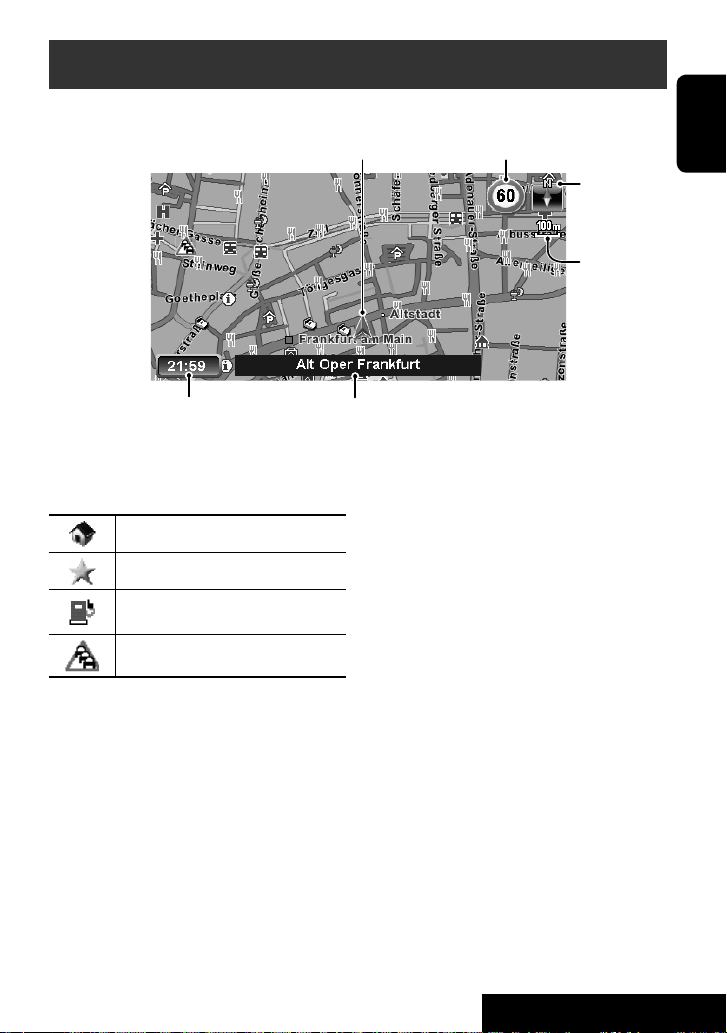
Basic operations
The map scrolls automatically so that your position is always at the centre of the map.
Your position
Current time
• The information on the map (such as street name, the POI information, and speed limit) may not be always
displayed depending on the condition (for example, if the System does not have the information of the position).
Current street
Speed limit on the current street
Direction
Scale
Icons on the map
Home (☞ pages 22 to 24)
Favourite points (☞ pages 22 to 24, 36)
POI (Point Of Interest) (☞ pages 30, 32
and 56)
TMC (☞ pages 45 and 57)
• Home and Favourite points icons are displayed when
registering home/favourite points or searching for a
destination.
• POI icons are displayed on the map when a group is
selected in the <POI Icon> setting (☞ page 51)
and the map scale is between 25 m and 400 m. (The
travel icons and leisure icons are displayed when the
map scale is between 25 m and 1 km.)
• The POI information of the selected travel or leisure
icon may not be displayed correctly when the System
displays the wide area of map. In this case, zoom in
the map to display the detailed map.
• TMC icons are displayed on the map when the
<Traffic Icon> setting is activated (☞ page 51)
and the map scale is between 25 m and 2.5 km.
ENGLISH
19
NAVIGATION SYSTEM
Page 20
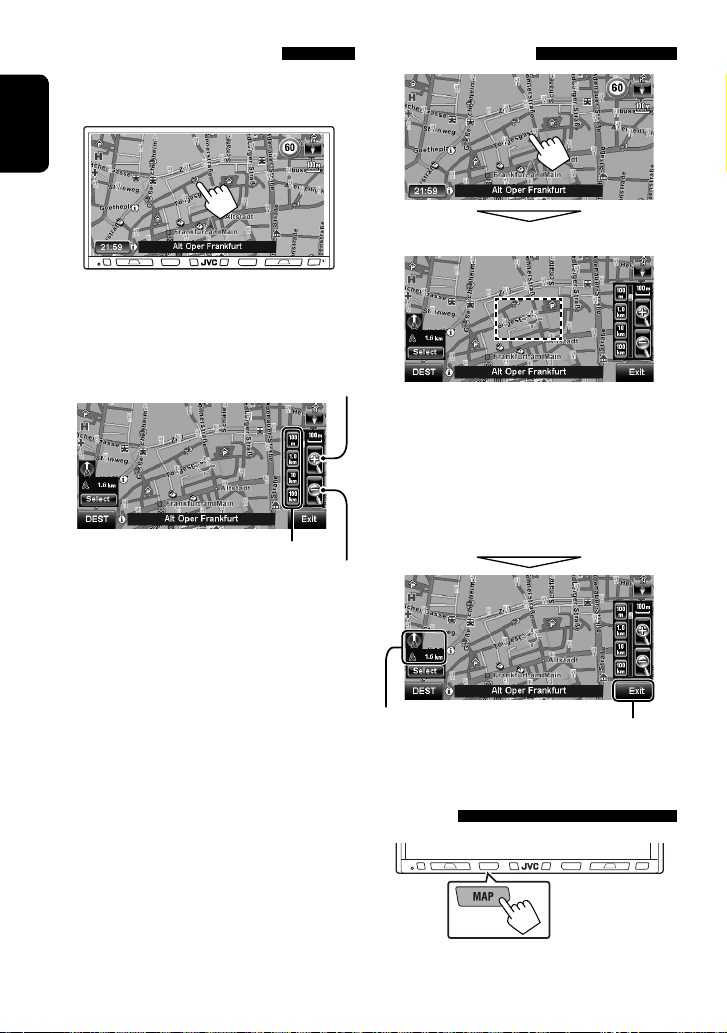
To change the map scale
1 Touch the screen to display the operating
buttons.
ENGLISH
• You can also display the buttons by moving your
hand close to the screen.
• The buttons disappear if no operation is done for
about 5 seconds.
2
Scale buttons
• You can also select a scale directly by pressing one of
the scale buttons.
To scroll the map
The position you touched is centred on the map.
Zoom in
The map scrolls to the direction you are touching and
holding.
• Touch and hold the map to keep scrolling the map.
• The scrolling speed varies depending on the position
you are touching and holding:
– Inner area: slow
– Outer area: fast
Zoom out
Direction and distance from
your current position
To display your current position
20
Displays current position
Page 21
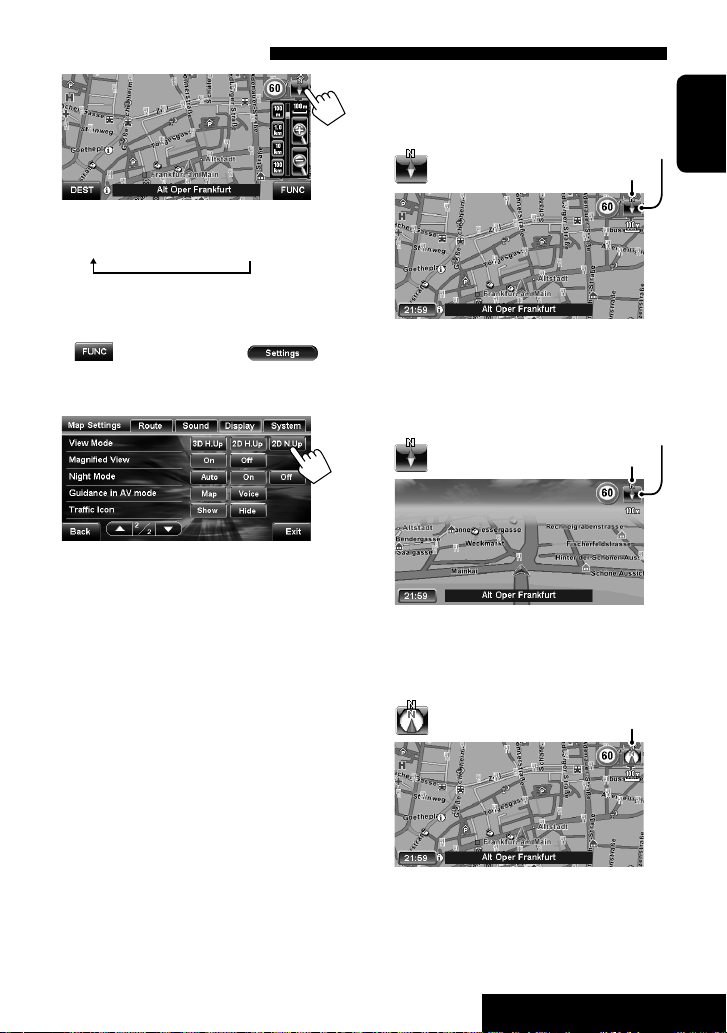
To change the map view
The map view changes as follows:
2D Heading Up = 3D Map = 2D North Up
• You can also change the map view through
<
(Function Menu)> - <
(Map Settings)> - <Display> - <View Mode>.
(☞ page 51)
2D Heading Up (2D H.Up)
The map rotates so that you are always displayed
heading “upwards.”
Shows the direction of north
Direction of the car
3D Map (3D H.Up)
The three dimensional map is displayed in “heading
up.”
Shows the direction of north
Direction of the car
ENGLISH
2D North Up (2D N.Up)
The map view is oriented with north “upwards,” as in
usual paper maps.
Direction of the car
21
NAVIGATION SYSTEM
Page 22
Registering your home/favourite points
Registering your home/favourite points
You can register one point as your home and 100
ENGLISH
favourite points.
• For guidance to your home, ☞ page 24.
• For guidance to a favourite point, ☞ page 36.
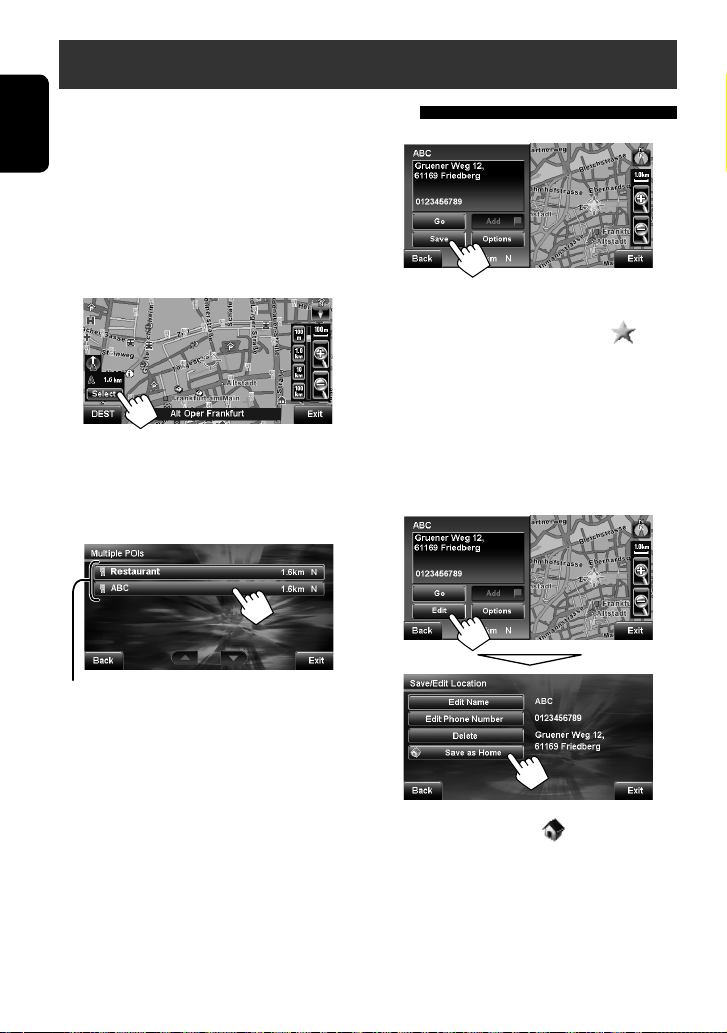
1 Place the cursor on the position where you
want to register. (☞ page 20)
2
• If there are several POIs on the selected position,
select one from the list.
– The list appears only when <POI Icon> is set
to <On>. (☞ page 51)
3
The selected position is saved as a favourite point
and the favourite point is marked with
on the map. (You cannot save the selected position
if 100 favourite points are already registered.)
• You can display the map of selected area on
whole screen by touching the map part once. (If
you press more than once, the map scrolls.) To
display above screen again, press [Select].
To register the selected position as your home:
icon
POIs
The home is marked with icon on the map.
• When the home is already registered, you
are asked if you want to replace the old home.
Press [Yes] to replace, or press [No] to cancel.
• To return to the map, press [Exit].
22
Page 23
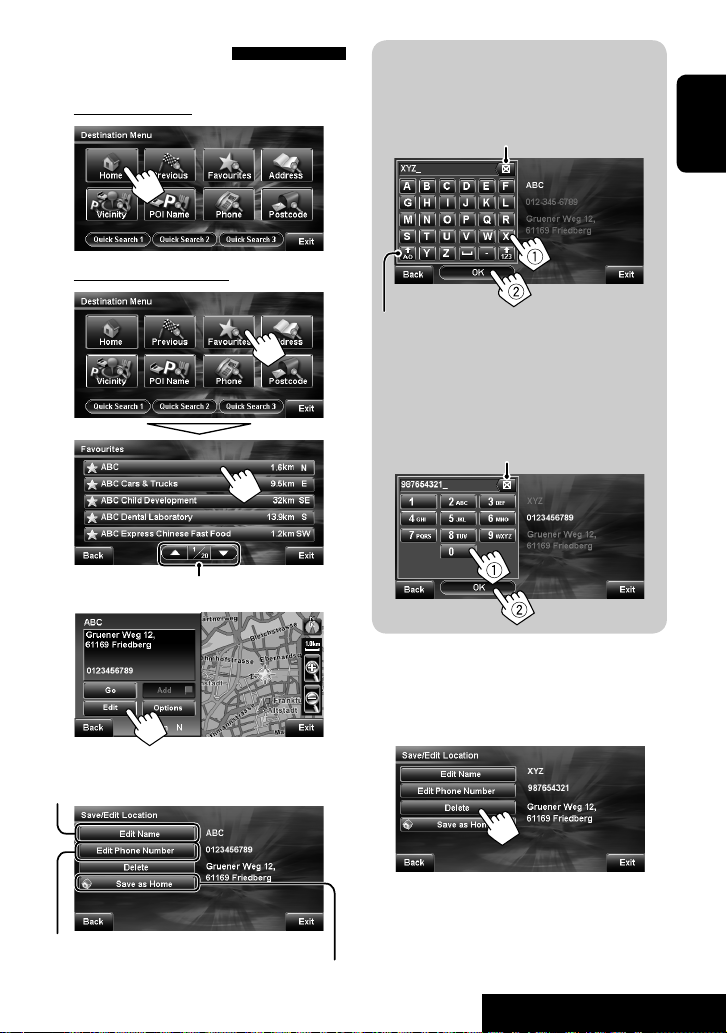
Editing information
1 Select a registered point you want to edit.
To select your home
To select a favourite point
Moves to the next/previous list
2
A To edit the name.
• You can use up to 31 characters.
Deletes the entry
• Press briefly: last character
• Press and hold: all characters
ENGLISH
Displays other keyboards*
* For available characters, ☞ page 55.
B To edit the phone number.
Deletes the entry
• Press briefly: last number
• Press and hold: all numbers
3 Edit the information.
A Displays the name editing screen
B Displays the phone number editing screen
Changes the registration of the favourite point to home
• To return to the map, press [Exit].
To delete the registration
Press [Delete] in step 3.
A confirmation message appears. Press [Yes] to confirm
the operation. Press [No] to cancel.
• To return to the map, press [Exit].
Continued on the next page
23
NAVIGATION SYSTEM
Page 24
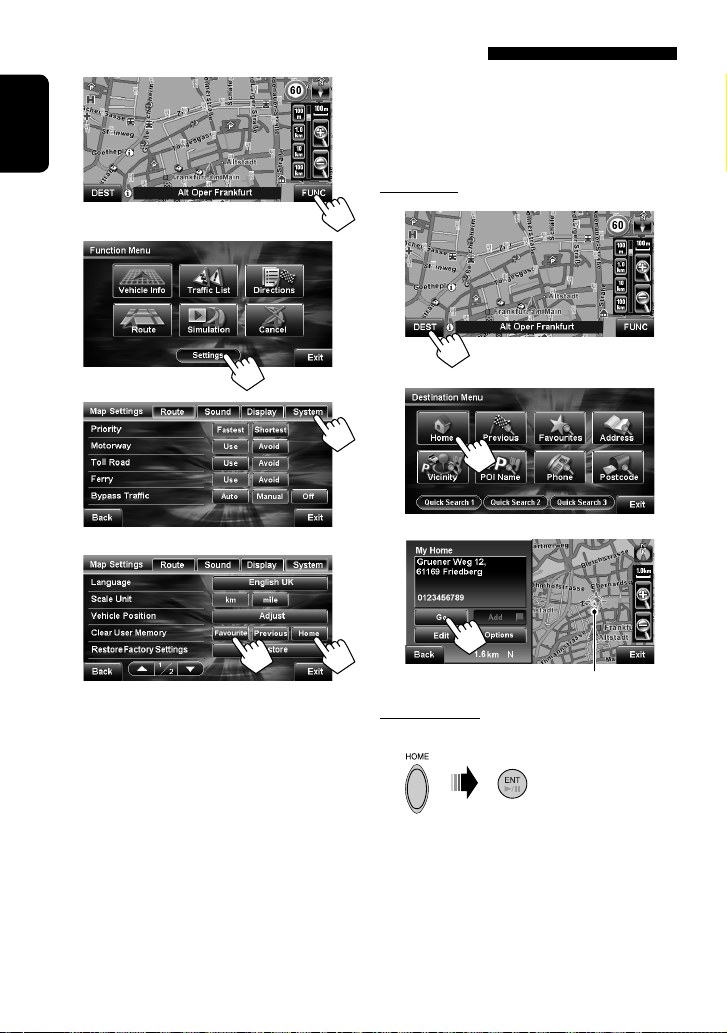
To delete all registered items
1
To go home
When you have registered your home, you can easily
get guided to home.
ENGLISH
2
3
4
[Home]: Deletes your home
[Favourite]: Deletes all favourite points
A confirmation message appears. Press [Yes] to
confirm the operation. Press [No] to cancel.
While not guided...
On the unit:
1
2
3
Your home
On the remote:
On the map screen only
• To return to the map, press [Exit].
• To cancel guidance, ☞ page 26.
24
Page 25
Starting guidance
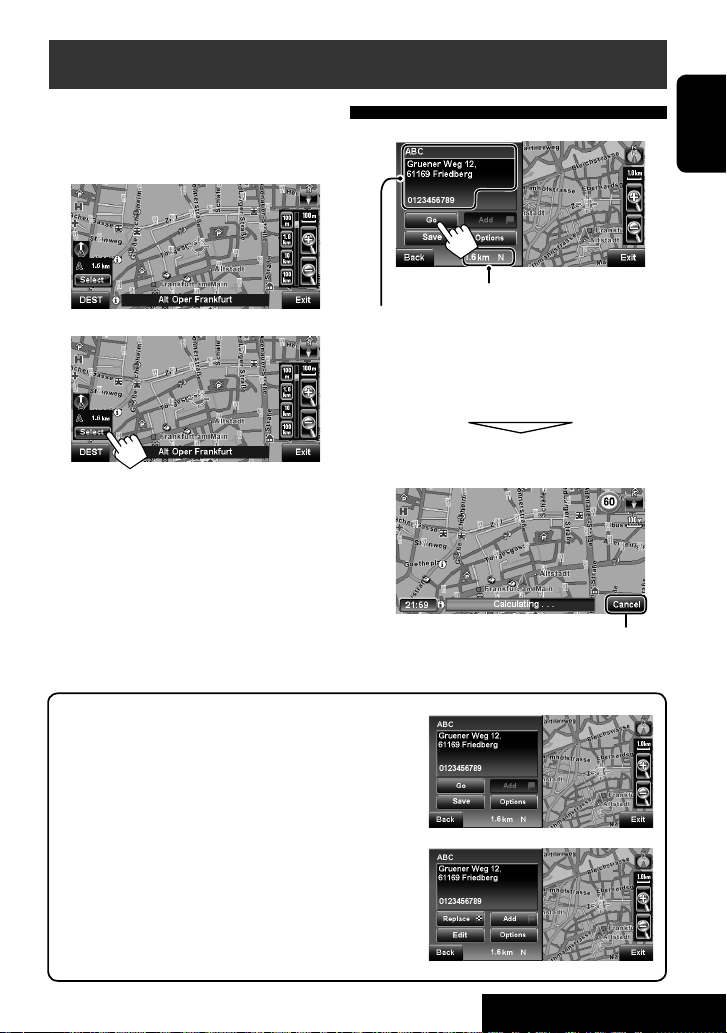
Setting a destination on the map
1 Touch the position where you want to select
as a destination. (☞ page 20)
2
• If there are several POIs on the selected position,
select one from the list.
– The list appears only when <POI Icon> is set
to <On>. (☞ page 51)
3
Distance and direction from your position
Information on the cursor-pointed position
• You can display the map of selected area on
whole screen by touching the map part once. (If
you press more than once, the map scrolls.) To
display above screen again, press [Select].
The System starts calculating the route to the
selected destination, and guidance starts.
Cancels the calculation
ENGLISH
After pressing [Select] on the map screen, you can do various
operations by pressing one of the buttons on the next screen.
Available buttons vary according to the type of the selected position
and the navigation status.
[Go]:
[Replace]: Changes the destination to the selected position.
[Save]:
[Edit]:
[Add]:
[Options]:
Starts guidance to a position. (☞ above)
Saves a position as a favourite point. (☞ page 22)
Edits the information of a position. (☞ page 23)
Adds a position to via points. (☞ page 43)
Modifies the route options. (☞ page 27)
25
NAVIGATION SYSTEM
Page 26
To cancel guidance
1 2
ENGLISH
A confirmation message appears. Press [Yes] to
confirm the operation. Press [No] to cancel.
Setting a destination using the Destination Menu
Home (☞ page 24)
Previous
(☞ page 35)
Favourites
(☞ page 36)
Address
(☞ page 28)
Vicinity
(☞ page 30)
POI Name
(☞ page 32)
Phone (☞ page 31)
Postcode
(☞ page 34)
Quick Search 1 – 3
(☞ page 37)
Goes to your home.
• Not selectable if no home is registered.
Searches from the history of previous destinations and via points (latest 50
points).
• Not selectable if there is no history.
Searches from your favourite points (maximum 100 points).
• Not selectable if no favourite point is registered.
Searches by an address.
Searches for POIs (Point Of Interest) around the following places: your
current position, the position selected on the map, the destination, or the
route you are taking.
Searches from the database of POI.
Searches by a telephone number.
Searches by a postcode.
Searches for POIs of a registered category.
26
Page 27
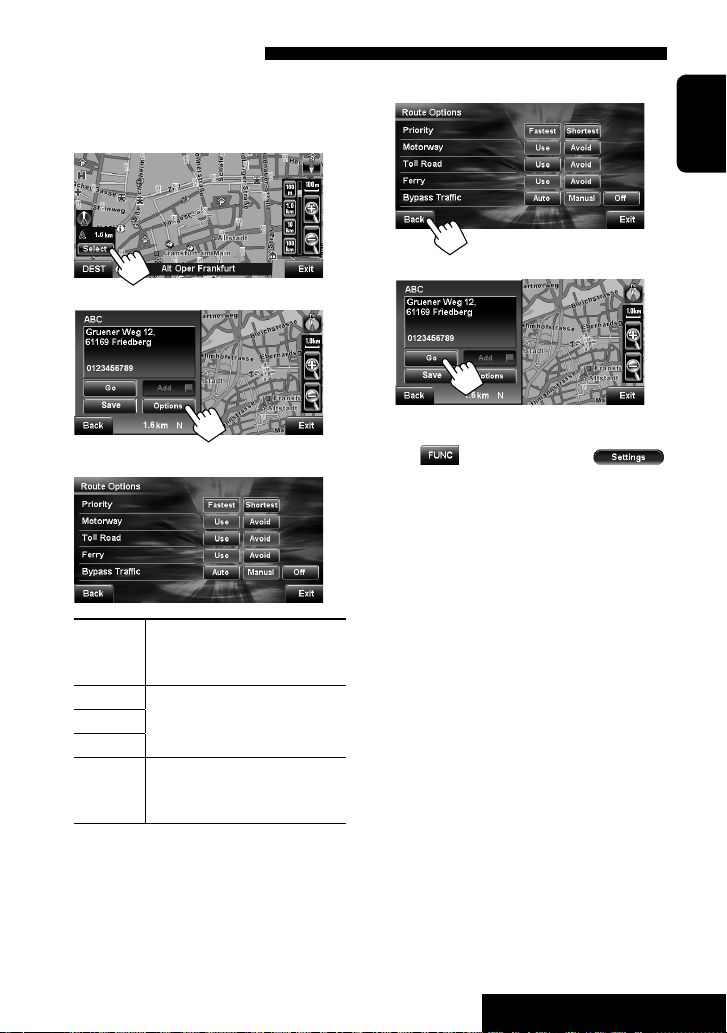
Changing route options
You can modify your route options each time before you
start guidance.
1 Place the cursor on your destination.
2
3
4 Set options.
Priority Select the priority for route
calculation (fastest route or shortest
route). (☞ page 50)
Motorway
Toll Road
Ferry
Bypass
Traffic
Select whether to use or avoid
these types of roads to go to the
destination. (☞ page 50)
Select how to reflect TMC
information to route calculation.
(☞ page 47)
5 Finish the settings.
ENGLISH
6
• You can also change these settings through
< (Function Menu)> - <
(Map Settings)> - <Route> (☞ page 50).
27
NAVIGATION SYSTEM
Page 28
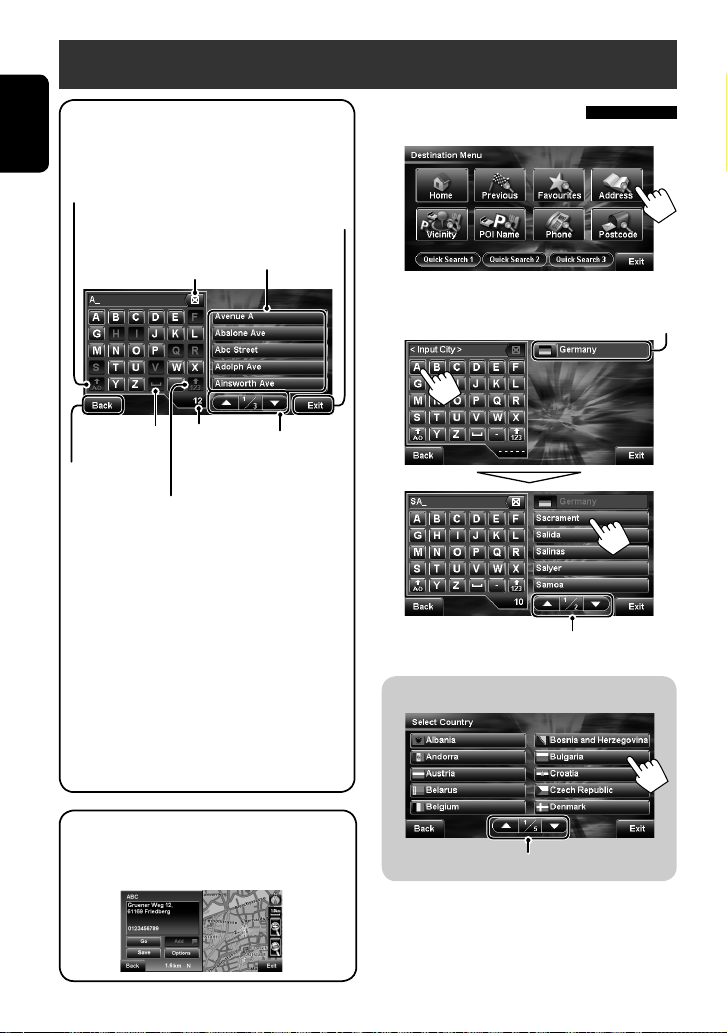
Searching for a place
To enter names, addresses, or
numbers
ENGLISH
Ex. Input screen for a street name
Displays other keyboards*
Deletes the entry
• Press briefly: last character
• Press and hold: all characters
Enters a space
Returns to the
previous input
screen
• Buttons vary depending on the input item.
• Non-available items will be shaded on the menu
screen.
• For some input screens, available characters are
automatically narrowed down as the System
searches its database for matches.
• Lower cases are not available.
*1 For available characters, ☞ page 55.
*2 When there are more than 100 matches, “100+”
is displayed and only first 100 matches are
displayed.
1
Exits the input screen and
returns to the map
List of matches
Number of
matches*
Displays the number and symbol keys*
Moves to the next/
2
previous list
By address <Address>
1
2 Enter the city name, then select from the list.
A Changes country
1
Moves to the next/previous list
A To change country
A search result is always displayed with the 2D
North Up (2D N.Up) map view, regardless the
<View Mode> setting. (☞ page 51)
Moves to the next/previous list
28
Page 29

3 Enter the street name, then select from the
list.
4 Enter the house number, then select from
the list.
ENGLISH
• You can also select the centre of the city by
pressing [Centre]. When selecting centre of the
city, go to step 5.
Moves to the next/previous list
• You can also select the centre of the street or an
intersection on the street by pressing [Middle of
the Road] or [Intersection].
– When selecting intersection on the street,
specify the crossing street after pressing
[Intersection].
• If no data of house number for the selected
street is available in the database, this step is
skipped.
Moves to the next/previous list
5
• You can display the map of selected area on
whole screen by touching the map part once. (If
you press more than once, the map scrolls.) To
display above screen again, press [Select].
29
NAVIGATION SYSTEM
Page 30
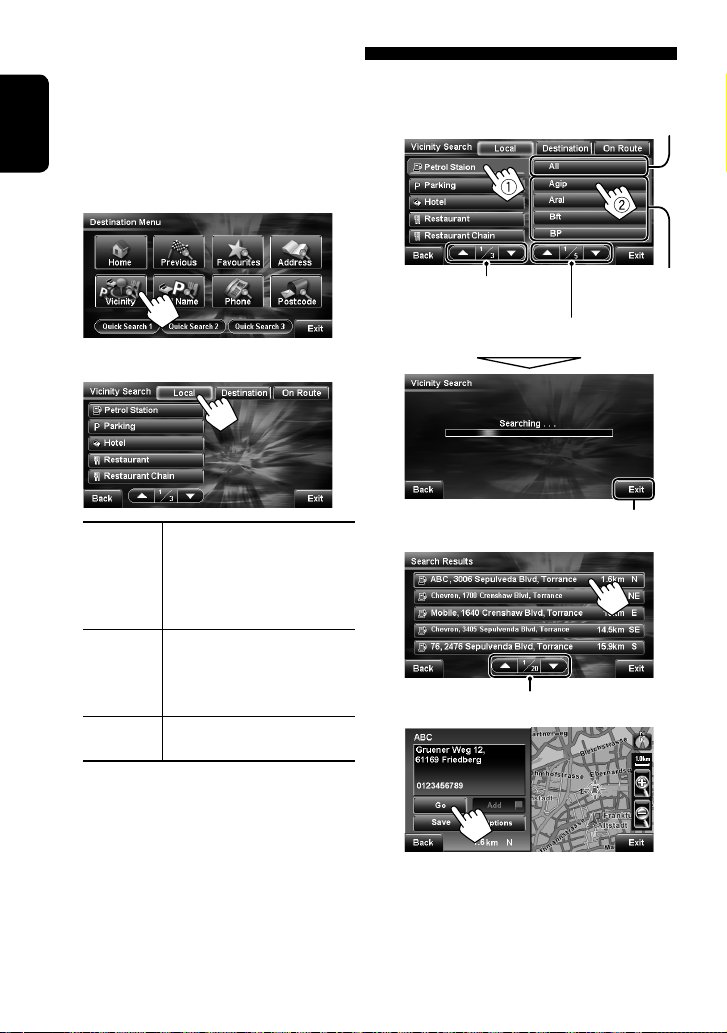
POI near a place/route <Vicinity>
The System has a huge database of POIs (Point Of
Interest), such as restaurants, petrol stations, hospitals,
etc.
You can search for a POI around the place where you are
ENGLISH
now. While guided, you can also search for a POI near
the destination or along the route.
1
3 Select a category, then a sub-category for the
POI.
Searches from all sub-categories
2 Select the area to search.
Local Within 20 km of your current
position or the position selected
on the map. If no POI is found in
this area, the System expands the
area to search.
Destination Within 20 km of the destination.
If no POI is found in this area,
the System expands the area to
search.
On Route 20 km along the route you are
taking.
Moves to the next/previous list
of categories
Moves to the next/previous list of
sub-categories
4 Select a POI from the list.
Moves to the next/previous list
5
Sub-categories
Cancels
• You can display the map of selected area on
whole screen by touching the map part once. (If
you press more than once, the map scrolls.) To
display above screen again, press [Select].
30
Page 31

By telephone number <Phone>
1
A To change country
ENGLISH
2 Enter the telephone number, then select
from the list.
A Changes country
• The country code of the selected country is
automatically added.
Moves to the next/previous list
3
• You can display the map of selected area on
whole screen by touching the map part once. (If
you press more than once, the map scrolls.) To
display above screen again, press [Select].
31
NAVIGATION SYSTEM
Page 32

From the list of POI <POI Name>
1
ENGLISH
2 Enter the city name, then select from the list.
A Changes country
Moves to the next/previous list
3 Enter the POI name, then start searching.
• You can also specify the category and sub-
category by pressing [Select Category].
(☞ page 33)
Cancels
A To change country
Moves to the next/previous list
32
Page 33

To specify the category and sub-category
Searches from all sub-categories
4 Select a POI from the list.
ENGLISH
Moves to the next/previous list
[A to Z]: Alphabetical order
[Distance]: From the nearest
5
Moves to the next/previous list
of categories
Moves to the next/previous list of
sub-categories
• Press [Cancel] to cancel the selected category.
(Previous screen is displayed.)
• You can start searching POIs only with
specifying a category/sub-category by pressing
[Search].
Sub-categories
• You can display the map of selected area on
whole screen by touching the map part once. (If
you press more than once, the map scrolls.) To
display above screen again, press [Select].
33
NAVIGATION SYSTEM
Page 34

By postcode <Postcode>
1
ENGLISH
2 Enter the postcode, then select from the list.
A Changes country
A To change country
3 Enter the street name, then select from the
list.
• You can also select the centre of the city by
pressing [Centre]. When selecting centre of the
city, go to step 5. (☞ page 35)
Moves to the next/previous list
34
Page 35

4 Enter the house number, then select from
the list.
• You can also select the centre of the street or an
intersection on the street by pressing [Middle of
the Road] or [Intersection].
– When selecting intersection on the street,
specify the crossing street after pressing
[Intersection].
• If no data of house number for the selected
street is available in the database, this step is
skipped.
Moves to the next/previous list
From previous destinations <Previous>
You can select a place from the last 50 destinations and
via points.
1
2 Select a place from the list of the previous
destinations/via points.
Moves to the next/previous list
3
ENGLISH
5
• You can display the map of selected area on
whole screen by touching the map part once. (If
you press more than once, the map scrolls.) To
display above screen again, press [Select].
• You can display the map of selected area on
whole screen by touching the map part once. (If
you press more than once, the map scrolls.) To
display above screen again, press [Select].
35
NAVIGATION SYSTEM
Continued on the next page
Page 36

To delete all the places in the list of
previous destinations/via points
1
ENGLISH
From your favourites <Favourites>
• For registering your favourite points, ☞ page 22.
1
2
3
4
A confirmation message appears. Press [Yes] to
confirm the operation. Press [No] to cancel.
• To return to the map, press [Exit].
2 Select a favourite point from the list.
Moves to the next/previous list
3
• You can display the map of selected area on
whole screen by touching the map part once. (If
you press more than once, the map scrolls.) To
display above screen again, press [Select].
36
Page 37

Quick Search
You have three [Quick Search] buttons in
<Destination Menu>. You can assign a POI category
to each button. When you press one of the buttons, the
System searches for a POI of the registered category
within about 20 km around your current position.
To register a category to the buttons
1 Select one of the [Quick Search] buttons to
register the category.
2 Select a category, then a sub-category of the
POI.
Searches from all sub-categories
3
Registered category
4 Repeat steps 1 to 3 until three categories
are registered.
The selected category (or sub-category) name is
assigned to the button.
To change a category assigned to the
Quick Search button
1 Select one of the [Quick Search] buttons
whose category you want to change.
ENGLISH
Moves to the next/previous
list of categories
The search for the selected category starts to
register it to the [Quick Search] button.
Sub-categories
Cancels
The search for the current category starts, then the
results are listed.
Continued on the next page
37
NAVIGATION SYSTEM
Cancels
Page 38

2
ENGLISH
3 Select a category, then a sub-category of the
POI.
Searches from all sub-categories
To use Quick Search
1 Press one of the [Quick Search] buttons to
start searching.
Moves to the next/previous
list of categories
The search for the selected category starts to
register it to the [Quick Search] button. The
category assignment is changed and the button
name is replaced.
• To return to the map, press [Exit].
Sub-categories
Cancels
2 Select a POI from the list.
Cancels
Moves to the next/previous list
3
• You can display the map of selected area on
whole screen by touching the map part once. (If
you press more than once, the map scrolls.) To
display above screen again, press [Select].
38
Page 39

How you are guided
Screen while guided
Name of the next street
Current street
Distance to the next turn.
• Press to listen to the last voice guidance again.
On the remote:
Next turn to make.
The second turn to make (if any).
Direction of the destination or a via point.
Distance to the destination (
• Press to change the information of distance and time to that of the next via point.
: Estimated time of arrival (ETA).
: Remaining time to the selected destination or a via point.
• Press to switch the information between estimated time of arrival (ETA) and remaining
time.
Speed limit on the current street
Lanes to take
• Yellow: Recommended lane
• White: The lane leading to the
destination
• Grey: Not the lane for the
destination
Route to take (green)
) or a via point ( ).
ENGLISH
• The information on the map (such as street name, the POI information, and speed limit) may not be always
displayed depending on the condition (for example, if the System does not have the information of the position).
• To cancel guidance, ☞ page 26.
• For settings of guidance and map display, ☞ pages 50 to 52.
39
NAVIGATION SYSTEM
Page 40

Guidance at turns
When you approach a turn, the System guides you with voice guidance and indications on the screen.
• Guidance voice comes out only through the front speakers (and the front line out on the rear).
The voice guides you several times as you approach
ENGLISH
the turn.
At the place close to the next turn
When you do not have to make
a turn, the System gives no
guidance.
Magnified map of the turn*
At the place closer to the next turn
Indicates the distance to the next turn
At the turn
“Turn right now.”
What if I miss a turn?
Don’t worry. The System calculates a new route quickly and guides you
to the destination.
* You can select whether or not to display the
magnified map through <
Menu)> - < (Map Settings)>
- <Display> - <Magnified View>. (☞ page 51)
(Function
• You can remove the magnified map by touching
the map part on the right side of the screen.
40
Page 41

Getting information on your route and places
To check the entire route/information on
the destination and via points
1
To confirm the information on your route
You can check the information on your route such as
ways you will use, destinations, and via points.
1
ENGLISH
2
3
[Overview]: Displays entire route
[Dest.]: Displays information of the destination
and via points
• To return to the map, press [Exit].
• When pressing [Dest.], select a desired point to
check its detailed information.
2
3
Moves to the next/previous list
• To return to the map, press [Exit].
41
NAVIGATION SYSTEM
Page 42

To confirm how your trip will go
1
ENGLISH
2
Drive simulation starts.
Shows the simulation just before the next turn
Customizing how you are guided
To adjust the volume of the voice
guidance
Adjust the volume level on <Guidance Volume>.
(☞ page 50)
To customize how the map is displayed
at turns
Select whether or not to display the magnified map at
turns on <Magnified View>. (☞ page 51)
To customize the voice guidance on an
AV screen
Select desired style of guidance on <Guidance in AV
Mode>. (☞ page 51)
To customize the mixing of audio sound
and voice guidance
Select the volume of the AV source sound while
the voice guidance is produced on <Music Mix>.
(☞ page 50)
Changes the speed of the drive simulation (normal/faster)
To cancel the simulation and resume guidance
Perform menu operation (< (Destination
Menu)> or < (Function Menu)>).
When switching to an AV screen
during guidance
The guidance continues even when you switch the
display to an AV screen.
• The system guides you when you approach a
turn by voice guidance or switching to map
screen.
42
Page 43

Arranging your route
Adding places to stop by
After selecting your destination, you can select up to
four places (“via points”) to stop by.
To add via points
After guidance has started...
1 Select a place you want to stop by.
• To search for a via point, ☞ page 28.
• To find a via point by scrolling the map,
☞ page 20.
2
To change the sequence of via points
1
2
ENGLISH
3
4
Destination
Via point
The System starts calculating the new route, and
guidance starts.
43
3
Continued on the next page
NAVIGATION SYSTEM
Page 44

4 Change the sequence of via points.
To optimise the sequence
ENGLISH
To rearrange the sequence manually
[Move Up]: Moves up the order of selected point
[Move Down]: Moves down the order of selected
point
• Repeat 1 and 2 to move other via points
before pressing [Recalculate].
Avoiding a congestion ahead
If you realize a congestion exists ahead...
While being guided...
1
2
3
The System starts calculating the new route, and
guidance starts.
To delete a via point
Press [Delete] after selecting the item you want
to delete, then press [Recalculate] in step 4.
4 Select the distance to avoid, then start
recalculating the route.
A detour is calculated, and guidance starts.
44
Page 45

Traffic information on the map — TMC
What is TMC?
TMC (Traffic Message Channel) is a technology for
delivering real-time traffic information to drivers.
The traffic information sent by a TMC radio station is
received and analyzed by the System. The System can
inform you of where congestion exists, and how you
can detour it.
• You do not have to tune in to a special radio station
to receive the TMC information.
How to get TMC information
This unit can receive the TMC information provided by
Trafficmaster and V-Trafic. It can also receive free TMC
information.
• TMC is not available in some countries.
As the TMC information is transmitted by radio
stations, JVC cannot assume responsibility for the
completeness or accuracy of the information.
TMC information on the map
TMC icon
ENGLISH
Congestion
• For the meanings of TMC icons, ☞ page 57.
• TMC icons and congested lines are displayed on the
map when <Traffic Icon> setting is activated.
(☞ page 51)
• TMC icons and congested lines are displayed on the
map when its scale is between 25 m and 2.5 km.
45
NAVIGATION SYSTEM
Page 46

Checking the TMC information
1
ENGLISH
3 Select a list, then a traffic alert.
2
Moves to the next/previous list
The icons of traffic alert which are not on your route are
shown in grey when all the information is displayed.
[All]: Lists all the information
[On Route]: Lists the information on your route
Details of the selected alert are displayed.
Moves to the next/previous information
• To return to the map, press [Exit].
• You can also use TRAFFIC on the remote controller to
display <Traffic List> screen.
46
Page 47

How TMC information is reflected in navigation
If <Bypass Traffic> is set to <Manual>
(☞ page 50), [Reroute] appears on the screen when
the TMC service informs the System of traffic accidents
or congestion ahead on your route.
To confirm detailed information of a TMC
icon on a map
1 Place the cursor on the TMC icon.
ENGLISH
Recalculates the route
Shows the detail of the alert
Appears when you approach a traffic
event on your route.
• The rerouting may be canceled while you are
checking due to a change of traffic conditions. The
rerouting is also canceled if you do not confirm the
rerouting in one minute.
If <Bypass Traffic> is set to <Auto>, the System
automatically calculates a new route when TMC informs
the System of an obstacle on your route.
If <Bypass Traffic> is set to <Off>, the System
does not take TMC information into account when
calculating a route.
Ignores the traffic alert
2
• If there are several POIs on the selected position,
select one from the list.
– The list appears only when <POI Icon> is set
to <On>. (☞ page 51)
POIs
• To return to the map, press [Exit].
47
NAVIGATION SYSTEM
Page 48

Navigation menu items
Destination Menu
ENGLISH
Menu items Selectable settings, [reference page]
1
Home*
1
Previous*
Favourites*
Address*
Vicinity*
POI Name*
Phone*
Postcode*
1
2
2
2
2
2
Quick Search
1
Selectable only when at least one place is registered.
*
2
*
Not available while driving.
Start guidance to the home. ☞ [24]
Search for a place using the database in the System. ☞ [28 – 38]
48
Page 49

Function Menu
Menu items Selectable settings, [reference page]
Drive You can check your drive information:
current direction, current velocity, maximum speed, average speed, trip
meter, current town and street name, longitude and latitude, altitude. ☞
[54]
Vehicle Info
System You can check your unit status:
unit properties and connections. ☞ [54]
All
On Route*
Traffic List
Directions*
Overview
3
Dest.
Edit
Route*
3
3
Detour
Simulation*
Cancel*
Settings*
3
Selectable only while guided.
*
2*3
3
2
You can check the TMC information. ☞ [46]
You can confirm the information on your route such as ways you will use,
destinations, and via points. ☞ [41]
You can confirm the entire route. ☞ [41]
You can confirm the list of via points and the destination. ☞ [41]
You can rearrange the order of via points. ☞ [43]
You can avoid a congestion ahead. ☞ [44]
Once the route is determined, you can simulate it on the map. ☞ [42]
Cancels the guidance. ☞ [26]
☞ [50 – 52]
The procedure for setting an item is shown on page 16.
ENGLISH
49
NAVIGATION SYSTEM
Page 50

Function Menu —Map Settings
ENGLISH
Menu items Selectable settings, [reference page]
Priority Fastest: The System calculates the shortest journey time.
Motorway Select whether to use or avoid these types of roads to go to the
Route
Toll Road
Ferry
Bypass Traffic
Attention Tone*
Guidance Volume*
Adaptive Volume When this function is activated, the System automatically increases the
Output Select the guidance output channel.
Music Mix You can turn down the volume of the AV source while voice guidance is
Sound
Speed Alert The System sounds an alarm when you surpass the speed limit of the
POI Alert Alert sounds when you approach a POI of the selected category.
1
When adjusting these items, test tone is produced.
*
1
1
Initial: Underlined
Shortest: The System calculates the shortest route to the destination.
• This setting is effective next time the System calculates a route.
destination.
Use, Avoid
• These settings are effective next time the System calculates a route.
Auto, Manual, Off ☞ [47]
Select the type of attention tone, which comes out before voice guidance.
Off, Normal, Prompt, A.I.
Adjust the volume of the voice guidance.
00 to 10 (05)
guidance volume level as the car speeds up.
Off, Min, Mid, Max
L ch., L+R ch., R ch.
produced.
Mute: The AV source sound does not come out.
Att.: The AV source sound is lowered.
Normal: The AV source sound is not affected.
current road by the set value. The unit (“km/h” or “mph”) follows the
<Scale Unit> setting. (☞ page 52)
Off, 5 km/h (3 mph), 10 km/h (6 mph), 15 km/h (10 mph),
25 km/h (15 mph), 35 km/h (20 mph)
• To select categories for POI alert, press [Edit], then select categories and
sub-categories (the selected items are marked with “√”). To activate POI
alert for selected categories, press [On]. To deactivate it, press [Off].
– You can select up to 3 categories.
50
Page 51

The procedure for setting an item is shown on page 16.
Menu items Selectable settings, [reference page]
POI Icon Select the categories of POI which you want to be displayed on the map.
• To select categories of POI, press [Edit], then select categories and sub-
categories (the selected items are marked with “√”). To display the icon
of selected categories on the map, press [On]. To hide it, press [Off].
Speed Limit Sign Select whether to show or hide the speed limit icon on the map.
Show, Hide ☞ [39]
Vehicle Icon Select the icon for your current position.
, ,
Current Street Name Select whether to show or hide the current street name on the map.
Show, Hide ☞ [39]
One Way Select whether to show or hide the information of one way road on the
map.
Show, Hide
View Mode
Display
Magnified View Select the display at turns.
3D H.Up, 2D H.Up, 2D N.Up ☞ [21]
On: The display is split into two, and a magnified map of the next turn is
displayed in the left pane
Off: No magnified map is displayed.
Night Mode Select the condition to switch the display to the night screen.
Auto: Switches to the night screen when you turn on the headlights.
On: Activates night screen.
Off: Deactivates night screen.
Guidance in AV mode Select the style of guidance while an AV screen is displayed.
Map: The screen automatically switches to the navigation mode when you
approach a turn.
Voice: Only voice guidances sound.
Traffic Icon Select whether to show or hide the TMC icon on the map.
Show, Hide ☞ [45]
Language*
2
Select the language used for on-screen information and voice guidance.
Ceština, Dansk, Deutsch, English UK, Español, Français, Italiano,
Nederlands, Norsk, Polski, Português, Suomi, Svenska, Türkçe,
System
Eλληvικα (English UK)*3, Руccĸий
• After you change the indication language setting, the power is turned
off then turned on automatically.
2
*
Some languages are not available on AV screen (☞ page 108). When you display the AV screen with the unavailable
language selected on the navigation screen, the language previously selected on the AV screen is used (if the
language setting on the AV screen is not performed, English is used).
*3 When <Eλληvικα (English UK)> is selected, on-screen information is shown in English (UK).
ENGLISH
51
NAVIGATION SYSTEM
Page 52

Function Menu —Map Settings (continued)
Menu items Selectable settings, [reference page]
ENGLISH
System
Scale Unit*1*
Vehicle Position If you find your current position displayed on a wrong place on the map,
Clear User Memory
Restore Factory Settings Initializes all your settings.
Reset Calibration Data The Navigation System is gradually optimised by automatic calibration.
Access Navi SD Select this to update your map database using an SD card.
Startup Message*
Shutdown Message*
2
Select the measuring units for distance.
km, mile
use this setting to correct your position.
• To change your position, move the cursor to the position where you
want to set as current position and press [OK], then adjust the direction
by pressing [
Favourite*
Previous*3: Initializes the list of previous destinations and via points. ☞
[36]
3
Home*
• When you press [Restore], a confirmation message appears. Press [Yes]
to confirm the operation. Press [No] to cancel.
Reset the calibration data in the following cases:
• When you reinstall the unit in another car.
• When you replace or rotate the tyres.
Once this is carried out, the calibration data is cleared.
• When you press [Reset], a confirmation message appears. Press [Yes]
to confirm the operation. Press [No] to cancel.
• When you press [Open the Front Panel], the front panel opens. Press
[Cancel] to cancel the operation.
• For details about updating your unit, visit <http://www.jvc-exad.com>
(English website only).
4
Edit the voice message at startup/shutdown of the System.
• To edit the message, press [Edit], enter the message, then press [OK].
4
You can listen to the edited message by pressing [Test].*
The procedure for setting an item is shown on page 16.
]/[ ] and press [OK].
3
: Initializes the list of your favourite points. ☞ [24]
: Initializes the registration of your home. ☞ [24]
Initial: Underlined
5
*1 The unit setting you find at your first access to the menu varies depending on your country selection in the initial
settings (☞ page 7); when <United Kingdom> was selected, <mile> was set; when other countries, <km>.
*2 Regardless of this setting, the distance unit for the voice guidance is always kilometers in languages other than
<English UK>. (☞ page 51)
*3 Selectable only when at least one place is registered.
*4 The languages available for the message are: English, Spanish, French, German, Italian, Dutch, Danish, Swedish,
Russian, and Portuguese.
*5 For entering the characters, ☞ page 28.
52
Page 53

Additional information
Initial settings
• If you skip the installation settings, the System starts
up in demonstration mode for stores, and the initial
setup screen appears every time you turn on the unit
after turning off and on the ignition switch. Finish the
installation settings to obtain the full performance
from the unit.
Searching for a place
• When there are more than a certain number of
matches, all matches are not displayed on the list of
the search result.
– When searching by vicinity, only the first 50
matches are displayed.
– When searching by the other methods, only first
100 matches are displayed.
• While driving at a speed faster than 10 km/h, you
cannot select a destination.
• The specified destination is displayed in 2D North Up
view regardless of your map view setting.
POI search
• If no POI data exists for the selected area, “Specified
destination is not found.” appears on the display.
Press [Back] and search again with different
conditions (such as different category or place).
• POI search in <On Route> is canceled if the
guidance finishes or if rerouting starts before the
search is completed.
Quick Search
• The selected category is registered to [Quick Search]
button even if you cancel the searching before the
search is completed.
Basic navigation procedure
• When you reach the area approximately within 40 m
around the destination/via point, the Navigation
System considers you to have reached your
destination/via point.
How you are guided
• If GPS signal reception is poor, navigation guidance
may not be correct.
• The System may not receive GPS signals in the
following places...
– in a tunnel or car park in a building
– under an overhead road
– in a place surrounded by high buildings or by
closely standing trees
• The position of your car may not be detected correctly
in the following cases...
– when driving on a road close to the other one
(e.g. a motorway and ordinary road running in
parallel)
– when turning at an almost straight fork in the
road
– when driving on a gridiron road
– after taking a ferry, etc.
– when driving on a steep mountain road
– when driving on a spiral road
– when turning left or right after running on a long
straight road
– when driving in a zigzag line on a broad road
– when starting your car shortly after starting the
engine
– when driving for the first time after installing the
unit
– when changing tyres or attaching chains on the
tyres
– when tyre slip occurs continuously and
frequently
– after driving on areas other than a road (e.g.
private lands or car parks)
– after driving in underground or tower type car
parks
– after rotating your car on a turntable
– after frequent stops and starts in a congestion
– when the accuracy of GPS is deteriorated
intentionally
– when driving on a road constructed recently
ENGLISH
53
Continued on the next page
NAVIGATION SYSTEM
Page 54

• The route calculated by the System is one of the
possible routes to your destination. The route is not
always the most appropriate one.
• If no-exit roads (only entering the roundabout from
the roads is allowed) exist on the roundabout, the noexit roads can neither be shown in the route guidance
ENGLISH
on the display nor counted in the route guidance
voice message.
• The following phenomena may occur even if the
System is working correctly...
– It may guide to a closed road or to a route
requiring U-turn.
– It may not guide to your destination if there
is only a narrow road or no road to your
destination.
– It may not avoid a congestion even if <Bypass
Traffic> is set to <Auto>.
– It may show a different road name.
– It may not ask you to turn at a junction even if
you need to.
– It may give guidance different from the actual
road conditions.
– It may give incorrect distance information.
Vehicle information
• The following items are displayed in <
(Function Menu)> - <Vehicle Info> - <Drive>.
(☞ page 49)
2
3
4
5
• The data shown on the screen are approximate
values for reference.
1 Direction of the car
2 Current speed
3 Maximum speed*
4 Average speed*
5 Distance you have traveled*
6 The street you are now on
1
p
1
1
1
7 The city you are now in
8 Latitude and longitude of your current position
9 Altitude of your current position
p Date/Local time
1
*
Press [Reset] to clear the record.
• The following items are displayed in <
(Function Menu)> - <Vehicle Info> <System>. (☞ page 49)
q
w
e
r
q Name of the unit
w Version of the software
e Version of the map database
r Version of the voice guidance database
t Connection status of the ILLUMINATION
CONTROL lead
<On>: The illumination signal is detected.
y Connection status of the PARKING BRAKE lead
<On>: The parking brake is engaged.
u Connection status of the REVERSE GEAR
SIGNAL lead
<On>: Reverse gear signal is detected.
i Number of the GPS satellites being utilized/
Number of all the available GPS satellites
6
7
8
9
o Status of the gyroscope
; Speed pulse rate
a Status of calibration
<Processing>: The current position cannot
be determined without data from GPS
satellites.
<Leaning>: The current position can be
determined even when the System cannot
receive data from GPS satellites.
<Learned>: The current position can be
determined accurately even when the System
cannot receive data from GPS satellites.
<Invalid>: Calibration is invalid.*
*2 Check the installation and connection of the
system if <Invalid> appears.
54
t
y
u
i
o
;
a
2
Page 55

Arranging your route
• Motorways are always used to calculate the route if
distance to a destination exceeds a certain distance.
• If the destination cannot be reached without using
motorways, ferries, or toll roads, they are used to
calculate the route without respect to the <Route>
settings.
• A detour may not be calculated with <Detour>
depending on the route.
Characters you can use
• When <Руccĸий> is selected for <Language>,
you can use the following characters for editing
<Startup Message> and <Shutdown
Message>. (☞ page 52)
Messages shown on the navigation screen
Messages Remedies/Causes
Route calculation failed. The destination/via point is too far from any road. Select another destination/
via point where is close to a road.
Route calculation is aborted
because destination is too far.
Specified destination is not found. Valid information is not found in the database. Search for another place by
No more items can be selected.
Please deselect any items.
There is no available traffic
information now.
The destination/via point is too far from the current position. Select another
destination/via point where is nearer to the current position.
changing conditions.
More than 3 categories are selected for <POI Alert> setting. (☞ page 50)
Cancel extra selections.
No valid TMC information is available now. Try one of the followings:
• Move to the place where you can receive TMC service.
• No TMC information on your route. Display the list of all TMC information.
(☞ page 46)
ENGLISH
55
NAVIGATION SYSTEM
Page 56

List of POI icons
ENGLISH
Petrol Station
Parking
Car Park
Open Parking Areas
Hotel
Restaurant
Restaurant Chain
Leisure
Amusement Park
Camping Ground
Golf Course
Marina
Recreation Facility
Shopping
Tourist Attraction
Travel Agency
Zoo
Entertainment
Art Galleries
Casino
Museum
Nightlife
Theatre
Vineyard
Travel
Airline Access
Airport
Bus/Coach Station
Ferry Terminal
Motorway Services
Train Station
Car Hire
Car Dealer & Service
56
Page 57

List of TMC icons
Medical
Dentist
Hospital/Polyclinic
Medical Service
Pharmacy
Community
Bank
Court House
Embassy
Exhibition Centre
Government Office
Library
Place of Worship
Police & Fire
Post Office
University & College
Traffic jam
Road works
Road is blocked or closed
No entry for vehicles
Road narrows (right side)
Road narrows (both sides)
No overtaking
Condition
Falling or fallen rocks
Strong winds
Snow
Pedestrian on the road
Wild animals
No cycling
Other Caution Event
ENGLISH
57
NAVIGATION SYSTEM
Page 58

AV OPERATIONS
Common operations on AV screens
ENGLISH
Displays <Source Menu> screen ☞ below
Displays and erases Short Cut icons ☞ page 59
Current Track Title
15:45
Displays <AV Menu> screen ☞ page 16
Selecting the playback source
• Available sources depend on the external
components you have connected, media you have
attached, and the < (Input)> settings you have
made (☞ pages 110 and 111).
On the unit:
Artist Name
Album Title
When you slide your finger on
the touch panel, it functions
in the same way as you touch
[5 / ∞ / 4 / ¢]
repeatedly.
On the remote:
“TUNER” = “DAB” = “DISC”(DVD/VCD/CD) =
“SD“ = “USB“ or “USB iPod“ = ”CD-CH”, “iPod”,
or “EXT-IN” = “Bluetooth PHONE” = “Bluetooth
AUDIO” = “AV-IN” = (back to the beginning)
15:45
Current source
Bayern Radio
Pop Music
Source Off
• You cannot select these sources if they are not ready.
Exit
58
Page 59

Using Short Cut Icons
You can easily access some frequently used functions by using Short Cut icons.
1
Bayern Radio
Pop Music
15:45
Short Cut window appears.
• To erase the window, press the button again.
2 Press a Short Cut icon.
3
Setup
Beep
Telephone Muting
Illumination
Motion Sensitiv.
Reverse Signal
Initialize
Back Exit
The corresponding screen is displayed.
Normal
Proximity/Motion
Touch Panel
Short Cut icons:
Available icons vary among the sources.
Displays <Illumination> menu.
☞ page 111
Changes the sound mode.
☞ page 105
Turns on or off Track/Chapter Repeat.
☞ pages 73, 83, 85, 94, and 101
Displays <Aspect> menu.
☞ page 108
Activates TA Standby Reception.
☞ page 65
Activates PTY Standby Reception.
☞ page 65
Activates Announcement Standby
Reception.
☞ page 97
Displays <PTy Search> menu.
☞ pages 63 and 64
Displays <Redial> menu.
☞ page 90
ENGLISH
59
AV OPERATIONS
Page 60

Listening to the radio
Preset no.
ENGLISH
Band
Sound mode
(☞ page 105)
Tuner/Standby Reception
indicators
Bayern Radio
Pop Music
~ Press [SOURCE], then press [TUNER]. (☞ page 58)
• You can also use AV/OFF on the remote controller. Press it repeatedly.
Ÿ Press [BAND].
! Press [ ] or [ ] to search for a station—Auto Search.
• Manual Search: Hold either [ ]or [ ] until “Manual Search” appears on the screen, then press it
repeatedly.
• The ST indicator lights up when receiving an FM stereo broadcast with sufficient signal strength.
PS (station name) for
FM RDS. If no PS signal
is coming in, “No Name”
appears.
PTY code for FM RDS
(☞ page 63)
60
Page 61

When an FM stereo broadcast is hard to receive
1
2
Exit
FM station automatic presetting —SSM (Strong-station Sequential Memory)
This function works only for FM bands.
You can preset six stations for each band.
1
2
ENGLISH
3
Mode
Mono
SSM
PTy Standby
PTy Code
Back Exit
Start
News
Reception improves, but stereo effect will be lost.
• The MONO indicator lights up.
To restore stereo effect, select <Off>.
3
Mode
Mono
SSM
PTy Standby
PTy Code
Back Exit
Start
News
[Hold]
Local FM stations with the strongest signals are
searched and stored automatically in the FM band.
Exit
61
AV OPERATIONS
Page 62

Manual presetting
Ex.: Storing FM station of 92.5 MHz into preset number
4 of the FM1 band.
1 Tune in to a station you want to preset.
ENGLISH
92.5 MHz
ABC Radio
15:45
• You can also display the Preset List by pressing
[
].
2 Display the Preset List.
Exit
Selecting a preset station
On the remote:
1
2
or
On the unit:
• To select directly on the touch panel
Bayern Radio
15:45
• To select from the Preset List
1
3 Select a preset number.
Back
The station selected in step 1 is now stored in
preset number 4.
You can also display the Preset List by pressing
[ 1 ] or holding [5 / ∞].
[Hold]
Exit
2
Back
62
Page 63

The following features are available only for FM RDS
stations.
Searching for FM RDS programme—PTY Search
You can search for your favourite programmes being
broadcast by selecting the PTY code for your favourite
programmes.
1 Display <PTy Search> menu.
Bayern Radio
Pop Music
15:45
2 Select a PTY code.
• In the example below, a PTY code is selected
from the Preset List.
If you enter <PTy Code> menu below, you can
select one from 29 PTY codes.
ENGLISH
Back Exit
Back ExitBack Exit
PTY Search starts.
If there is a station broadcasting a programme
of the same PTY code as you have selected, that
station is tuned in.
Available PTY codes:
News, Current Affairs, Information, Sport,
Education, Drama, Cultures, Science, Varied Speech,
Pop Music, Rock Music, Easy Listening, Light Classics
M, Serious Classics, Other Music, Weather & Metr,
Finance, Children’s Progs, Social Affairs, Religion,
Phone In, Travel & Touring, Leisure & Hobby, Jazz
Music, Country Music, National Music, Oldies Music,
Folk Music, Documentary
63
AV OPERATIONS
Page 64

Storing your favourite programme types
You can store your favourite PTY codes into the PTY
Preset List.
Ex.: Storing <Drama> into <Preset 1>
ENGLISH
1 Display <PTy Search> menu.
Bayern Radio
Pop Music
15:45
2
64
Page 65

Activating/deactivating TA/PTY Standby Reception
TA Standby Reception Indicator
To activate, display <
of <Setup> menu in <AV Menu>
screen, then press [On] for <TA
Standby>. (☞ page 110)
The unit will temporarily switch to
Traffic Announcement (TA) if available,
from any source other than AM.
• The volume changes to the preset
TA volume level if the current level is
lower than the preset level (☞ page
110).
Not yet activated. Tune in to another
station providing the RDS signals.
To deactivate, press [Off] for <TA
Standby>. (☞ page 110)
By pressing
or deactivate TA Standby Reception.
(Tuner)>
TP
Lights up
Flashes
Goes off
Short Cut icon, you can activate
PTY Standby Reception Indicator
To activate, display <AV Menu>
screen, press [Mode], then press [On]
for <PTy Standby>. (☞ page 113)
The unit will temporarily switch to your
favourite PTY programme from any
source other than AM.
Not yet activated. Tune in to another
station providing the RDS signals.
To deactivate, press [Off] for <PTy
Standby>. (☞ page 113)
By pressing Short Cut icon, you can activate
or deactivate PTY Standby Reception.
• When a DAB tuner is connected, TA Standby/PTY
Standby Reception also works for the DAB tuner and
searches for the services.
PTY
Lights up
Flashes
Goes off
ENGLISH
65
AV OPERATIONS
Page 66

To change the PTY code for PTY Standby
Reception
1
ENGLISH
2
3
Mode
Mono
SSM
PTy Standby
PTy Code
Start
News
Tracing the same programme— Network-Tracking Reception
When driving in an area where FM reception is not
sufficient enough, this unit automatically tunes in to
another FM RDS station of the same network, possibly
broadcasting the same programme with stronger
signals.
Programme A broadcasting on different frequency
areas (01 – 05)
A
Exit
Back Exit
4 Select your favourite PTY code.
Ex.: Selecting <Easy Listening>
Mode
Mono
SSM
PTy Standby
PTy Code
Back Exit
Start
Easy Listening
When shipped from the factory, Network-Tracking
Reception is activated.
To change the Network-Tracking Reception
setting, see <AF Regional>. (☞ page 110)
• When the DAB tuner is connected, refer also to
“Tracing the same programme—Alternative
Frequency Reception (DAB AF).” (☞ page 98)
Automatic station selection—
ExitBack
Programme Search
Usually when you select preset stations, the preset
station is tuned in.
If the signals from the FM RDS preset station are not
sufficient for good reception, this unit, using the AF
data, tunes in to another station broadcasting the
same programme as the original preset station is
broadcasting. To activate this function, select <On> for
<Program Search>. (☞ page 110)
• The unit takes some time to tune in to another
station using programme search.
66
Page 67

Disc operations
The disc type is automatically detected, then playback starts (for some discs, the top menu of the disc appears).
If a disc does not have any disc menu, all tracks on it will be played repeatedly until you change the source or eject
the disc.
” appears on the screen, the unit cannot accept the operation you have tried to do.
If “
• In some cases, without showing “ ,” operations will not be accepted.
~ Open the monitor panel.
<Open/Tilt> menu is displayed.
• By pressing and holding the button, you can
open the monitor panel and eject the disc.
Ÿ
! Insert a disc.
Label side
Monitor panel closes automatically.
If not, press [Close].
Caution:
Do not place your finger behind the monitor panel.
ENGLISH
Caution on volume setting:
Discs produce very little noise compared with other
sources. Lower the volume before playing a disc
to avoid damaging the speakers by the sudden
increase of the output level.
When playing back a multi-channel encoded disc, the multi-channel signals are downmixed.
• You can fully enjoy multi-channel sound by connecting an amplifier or a decoder compatible with these multichannel sources. (☞ also page 120)
67
AV OPERATIONS
Page 68

Playable disc types
Disc type Recording format, file type, etc. Playable
DVD DVD Video (Region Code: 2)*
1
ENGLISH
DVD Audio
DVD-ROM
DVD Recordable/Rewritable
(DVD-R/-RW*
2
, +R/+RW*3)
• DVD Video: UDF bridge
• DVD-VR
• DivX/MPEG1/MPEG2/JPEG/MP3/
WMA/WAV/AAC: ISO 9660 level
1, level 2, Romeo, Joliet
DVD Video
DVD-VR
DivX/MPEG1/MPEG2
JPEG
MP3/WMA/WAV/AAC*
MPEG4
4
DVD+VR
DVD-RAM
Dual Disc DVD side
Non-DVD side
CD/VCD Audio CD/CD Text (CD-DA)
VCD (Video CD)
5
DTS-CD*
SVCD (Super Video CD)
CD-ROM
CD-I (CD-I Ready)
CD Recordable/Rewritable
(CD-R/-RW)
• ISO 9660 level 1, level 2, Romeo,
Joliet
CD-DA
MP3/WMA/WAV/AAC*
JPEG
DivX/MPEG1/MPEG2
4
MPEG4
*1 If you insert a DVD Video disc of an incorrect Region Code, “Region code error” appears on the screen.
*2 DVD-R recorded in multi-border format is also playable (except for dual layer discs).
DVD-RW dual layer discs are not playable.
*3 It is possible to play back finalized +R/+RW (Video format only) discs.
+RW double layer discs are not playable.
*4 This unit can play back AAC files encoded using iTunes.
*5 To reproduce DTS sound, use the digital connection. (☞ Installation/Connection Manual)
Caution for DualDisc playback
The Non-DVD side of a “DualDisc” does not comply with the “Compact Disc Digital Audio” standard. Therefore,
the use of Non-DVD side of a DualDisc on this product may not be recommended.
68
Page 69

While playing the following discs, press DISP.
• Each time you press the button, the display changes to show the different information. (☞ page 10)
DVD Video: Title no./Chapter no./Playing time
DVD-VR: Program no. (or Playlist no.)/Chapter no./Playing time
1
*
Disc type
Audio format
Sound mode
(☞ page 105)
Playback mode
[
3 / 8] Starts playback/pauses
[
7] Stops playback
[
4 ¢] Press: Selects chapter
Hold: Reverse/forward search*
[5 ∞] Selects title/program/playlist
1
DVD-VR also indicates either VR-PRG (program) or VR-PLAY (playlist) playback.
*
3
*2 Indicates the button pressed.
*3 Search speed: x2 ] x10
: Buttons on the touch panel. In the explanation, they are indicated inside [ ].
These buttons also work when they are not shown on the touch panel (while watching the playback pictures
on the screen).
2
*
Sampling frequency/Bit
rate/Recorded signal
channel no.
ENGLISH
69
AV OPERATIONS
Page 70

While playing the following discs, press DISP.
• Each time you press the button, the display changes to show the different information (☞ page 10).
ENGLISH
Disc type
Sound mode
(☞ page 105)
3 / 8] Starts playback/pauses
[
[
7] Stops playback
[
4 ¢] Press: Selects track
Sound mode
(☞ page 105)
Video format
Folder Name
File Name.divx
Hold: Reverse/forward search for DivX/
MPEG1/MPEG2 *
1
The PBC indicator lights
when PBC is in use.
PBC
For DivX/MPEG1/MPEG2: Folder no./Track no./Playing time
For JPEG: Folder no./Track no.
2
*
[5 ∞] Press: Selects folder
Hold: Displays Folder/Track Lists
[
01
]:
01
Displays Folder/Track Lists
Track no./Playing time
2
*
[
3 / 8] Starts playback/pauses
[
7] Stops playback
[
4 ¢] Press: Selects track
*1 Search speed: ¡1 ] ¡2
*2 Indicates the button pressed.
*3 Search speed: x2 ] x10
Hold: Reverse/forward search*
70
3
Page 71

Track no./Playing time
Sound mode
(☞ page 105)
Audio format
(MP3/WMA/WAV/AAC)
Sound mode
(☞ page 105)
Current Track Title
15:45
[
3 / 8] Starts playback/pauses
[
7] Stops playback
[
4 ¢] Press: Selects track
Artist Name
Album Title
Hold: Reverse/forward search*
Folder no./Track no./Playing time
Current Folder Name
Current File Name.mp3
Current Track Title
Artist Name
15:45
Album Title
4
*
Only for CD
5*6
Text *
7
4
*
ENGLISH
Tag data appears
only when it is
5*6
recorded.*
[3 / 8] Starts playback/pauses
[
7] Stops playback
[
4 ¢] Press: Selects track
Hold: Reverse/forward search*
7
[5 ∞] Press: Selects folder
[
01
Displays Folder/Track Lists
*4 Indicates the button pressed.
*5 “No Name” appears for conventional CDs or if not recorded.
*6 Touching an information bar scrolls the text if all the text is not shown.
*7 Search speed: x2 ] x10
71
Hold: Displays Folder/Track Lists
]:
01
AV OPERATIONS
Page 72

Operation buttons on the screen
You can display the following operation buttons while watching the playback pictures on the screen.
• If no operation is done for about 5 seconds, the operation buttons disappear (except when a disc menu is
displayed).
ENGLISH
☞ pages 75 to 79 on how the operation buttons
particularly work for a variety of the discs
A
Touch the screen (centre portion).
2
*
15:45
Touch [KEY].
Touch [KEY].
Touch [KEY].
1
*
[SOURCE] Displays <Source Menu> screen
[
5 ∞] Selects folders
[
3 / 8] Starts playback/pause
[
4 ¢] Press: Selects tracks
Hold: Reverse/forward search
[ ] (*2) Displays Short Cut icons.
[
] Displays <AV Menu> screen
[
7] Stops playback
• The above buttons also work when they are not shown on
the screen (while watching the playback picture).
1
*
While a disc menu is played back for DVD, [KEY] is
automatically displayed. On the disc menu, you can select a
menu item directly by touching it on the screen.
B
For DVD/VCD/DivX menu operation playback
[
5 ∞ 2 3] Selects the menu items
[
ENTER] Confirms the selection
[
TOP MENU] Displays the disc menu
[
MENU] Displays the disc menu
[
RETURN] Returns to the previous menu or displays
the menu (only for VCD with PBC)
C
For entering the numbers
[
0]–[9]=[ENTER]
Enters numbers
[
Direct/CLR] • Switches between chapter/track entry
• Erases the last entry when you enter a
Ex.: To enter “105,” press [
and title/folder entry
wrong number
1], [0], [5], then [ENTER]
To erase the operation buttons, touch the screen
again.
72
Page 73

Selecting playback modes
You can use the following playback modes—Repeat or Random.
Ex.: To select Track Repeat
1
2
Exit
Disc type Repeat Random
Chapter: Repeats current chapter*
Title: Repeats current title
Chapter: Repeats current chapter*
Program: Repeats current program (not
available for Playlist playback)
Track: Repeats current track*
Folder: Repeats all tracks of the current
folder
3
When one of the playback modes is selected, the
corresponding indicator lights up on the source
information screen.
To cancel, select <Off>.
Folder: Randomly plays all tracks of current
folder, then tracks of next folders
Disc (All): Randomly plays all tracks
ENGLISH
—
—
* By pressing
Folder: Repeats all tracks of the current
folder
Track: Repeats current track* (PBC not in
use)
Track: Repeats current track* Disc (All): Randomly plays all tracks
Track: Repeats current track*
Folder: Repeats all tracks of the current
folder
Short Cut icon, you can also turn on or off Track/Chapter Repeat.
73
Disc (All): Randomly plays all tracks (PBC not
Folder: Randomly plays all tracks of current
Disc (All): Randomly plays all tracks
—
in use)
folder, then tracks of next folders
AV OPERATIONS
Page 74

Selecting tracks on the list
If a disc includes folders, you can display the Folder/
Track (File) Lists, then start playback.
1
ENGLISH
2
3 Select a folder (1), then a track (2).
1
*
List
Folder 01
Folder 02
Folder 03
2
*
Folder 04
Folder 05
Folder 06
Back Exit
1
*
Selected track starts playing.
1 Current folder number/total folder number
2 Current track number/total track number of
the current folder
*1 Press to move to the previous/next pages of the
lists
*2 See the following.
0003/00990005/0035
Track001.mp3
Track002.mp3
Track003.mp3
Track004.mp3
Track005.mp3
Track006.mp3
You can browse Folder/Track Lists by using the bar
as illustrated.
– Press : Skips the List up or down.
– Drag : Scrolls the List up or down.
List
Folder 01
Folder 02
Folder 03
Folder 04
Folder 05
Folder 06
Back Exit
Browses Folder List.
Exit
1
*
You can also display the Folder/Track Lists by
pressing [
2
*
01
0003/00990005/0035
Track061.mp3
Track062.mp3
Track063.mp3
Track064.mp3
Track065.mp3
Track066.mp3
Browses Track List.
/01 ] or holding [5 / ∞].
Prohibiting disc ejection
You can lock a disc in the loading slot.
1
*
Press and hold OPEN/TILT while holding
/ATT.
[Hold][Hold]
To cancel the prohibition, repeat the same
procedure to select <EJECT OK?>.
74
Page 75

Operations using the remote controller—RM-RK250
Stop playback.
Also functions as CLEAR:
Erases a misentry of the
number.
Start playback/pause (if pressed during playback).
Reverse/forward search.*
1
(No sound can be heard.)
Slow motion during pause.*2 (No sound can be heard.)
Press: Select chapter (during playback or pause).
Hold: Reverse/forward search.*
Select title (during playback or pause).
4
*
Select chapter.
Select title (when not playing).
4
(twice)
Select title (during playback or pause).
*
Select aspect ratio.
Select audio language.
Select subtitle language.
Select view angle.
Using menu driven features
1
2 Select an item you want to start playback.
3
3
(No sound can be heard.)
ENGLISH
1
Search speed: x2 ] x5 ] x10 ] x20 ] x60
*
*2 Slow motion speed: 1/32 ] 1/16 ] 1/8 ] 1/4 ] 1/2
3
*
Search speed: x2 ] x10
*4 To confirm the number entry, close the cover of remote controller, then press
ENT within 5 seconds after entering numbers.
Within 5 seconds
75
AV OPERATIONS
Page 76

ENGLISH
Also functions as CLEAR:
Erases a misentry of the
number.
Stop playback.
Start playback/pause (if pressed during playback).
Reverse/forward search.*
1
(No sound can be heard.)
Forward slow motion during pause.*2 (No sound can be heard.)
• Reverse slow motion does not work
Press: Select chapter (during playback or pause).
Hold: Reverse/forward search.*
3
Select program.
Select playlist (during playback or pause).
4
*
Select chapter.
Select program (when not playing).
4
(twice)
Select program/playlist (during playback or pause).
*
Select aspect ratio.
Select audio channel (ST: stereo, L: left, R: right).
Turn on/off subtitle.
Using Original Program/Playlist screens ( ☞ page 80)
1
For Original Program
For Playlist
2 Select an item you want to start playback.
3
1
Search speed: x2 ] x5 ] x10 ] x20 ] x60
*
2
*
Slow motion speed: 1/32 ] 1/16 ] 1/8 ] 1/4 ] 1/2
*3 Search speed: x2 ] x10
4
To confirm the number entry, close the cover of remote controller, then press
*
To erase the screen.
ENT within 5 seconds after entering numbers.
Within 5 seconds
76
Page 77

Stop playback.
Start playback/pause (if pressed during playback).
5
Reverse/forward search.*
Press: Select track.
Hold: Reverse/forward search.*
(No sound can be heard.)
6
(No sound can be heard.)
Select folder.
4
*
Select track (within the same folder).
4
*
(twice)
Select folder.
Select aspect ratio.
Select audio language. (DivX only)
Select subtitle language. (DivX only)
While playing...
Reverse/advance the scenes by 5 minutes.
Current playback position
2nd press 2nd press1st press 1st press 3rd press
ENGLISH
For DivX6: Using menu driven features
1
2 Select an item you want to start playback.
3
5
Search speed: ¡1 ] ¡2 ] ¡3
*
*6 Search speed: ¡1 ] ¡2
77
AV OPERATIONS
Page 78

ENGLISH
Also functions as CLEAR:
Erases a misentry of the
number.
(twice)
Stop playback.
Start playback. (Slide show: each file is shown for a few
seconds.)
Shows the current file until you change it if pressed during Slide
show.
Select file.
Select folder.
Select aspect ratio.
1
*
Select file (within the same folder).
1
*
Select folder.
Stop playback.
Start playback/pause (if pressed during playback).
Reverse/forward search.*
Press: Select track.
Hold: Reverse/forward search.*
2
3
Select folder.
1
*
Select track (within the same folder).
1
*
(twice)
1
*
To confirm the number entry, close the cover of remote controller, then press
Select folder.
ENT within 5 seconds after entering numbers.
Within 5 seconds
2
Search speed: x2 ] x5 ] x10 ] x20 ] x60
*
*3 Search speed: x2 ] x10
78
Page 79

Stop playback.
Start playback/pause (if pressed during playback).
Reverse/forward search.*
4
Press: Select track.
Hold: Reverse/forward search.*
1
*
4
Search speed: x2 ] x5 ] x10 ] x20 ] x60
*
*5 Search speed: x2 ] x10
Stop playback.
Start playback/pause (if pressed
during playback).
Reverse/forward search.*
6
can be heard.)
Forward slow motion during pause.*7
(No sound can be heard.)
• Reverse slow motion does not
work.
Press: Select track.
Hold: Reverse/forward search.*
sound can be heard.)
1
*
Select track.
Select aspect ratio.
Select audio channel (ST: stereo, L:
left, R: right).
5
Select track.
(No sound
8
(No
During PBC playback...
Select an item on the menu.
To return to the previous menu, press
To cancel PBC playback
1
2 Select the desired track.
• To resume PBC, press
ENGLISH
1
*
1
*
6
*
Search speed: x2 ] x5 ] x10 ] x20 ] x60
*7 Slow motion speed: 1/32 ] 1/16 ] 1/8 ] 1/4 ] 1/2
*8 Search speed: x2 ] x10
79
AV OPERATIONS
Page 80

Using the list screens
You can use Original Program or Playlist
screen anytime while playing DVD-VR with its data
recorded.
ENGLISH
1 Display the Original Program/Playlist screen.
2 Select an item you want.
Operations using the on-screen bar
These operations are possible on the screen using
the remote controller, while playing the following
discs—DVD/VCD/DivX/MPEG1/MPEG2/JPEG.
1 Display the on-screen bar. (☞page 81)
To erase the screen
1 Original Program/Playlist number
2 Recording date
3 Recording source (TV station, the input terminal of
the recording equipment, etc.)
4 Start time of recording
5 Title of the program/playlist*
6 Highlight bar (current selection)
7 Creating date of playlist
8 Total number of chapters included in the playlist
9 Playback time
* The title of the original program or playlist may not be
displayed depending on the recording equipment.
Ex.: For DVD Video
2 Select an item.
3 Make a selection.
If a pop-up menu appears...
• For entering time/numbers...
: Move the entry position
To remove the on-screen bar
80
: Select a number
Page 81

On-screen bar
Information
Operation
Above example is of DVD Video. Items shown on the bar vary due to the disc type.
ENGLISH
1 Disc type
2 • DVD: Audio signal format
• VCD: PBC
3 Playback mode *
1
DVD Video:
C. RPT: Chapter repeat
T. RPT: Title repeat
DVD-VR:
C. RPT: Chapter repeat
PG. RPT: Program repeat
DivX/MPEG1/MPEG2:
T. RPT: Track repeat
F. RPT: Folder repeat
F. RND: Folder random
A. RND: All (Disc) random
JPEG:
F. RPT: Folder repeat
VCD:
T. RPT: Track repeat
A. RND: All (Disc) random
4 Playback information
Current title/chapter
Current program/chapter
Current Playlist/chapter
Current track
Current folder/track
Current folder/file
5 Time indication
Elapsed playing time of the disc
Remaining title time (for DVD)
Remaining disc time (for others)
Elapsed playing time of the current
chapter/track *
Remaining time of the current
chapter/track *
2
2
6 Playback status
Play
Reverse/forward search
Reverse/forward slow-motion
Pause
Stop
7 Operation icons
Change time indication (see 5)
Time Search (Specify a certain
scene by entering time.)
Title Search (by its number)
Chapter Search (by its number)
Track Search (by its number)
Repeat play *
Random play *
1
1
Change the audio language, audio
stream, or audio channel
Change or erase the subtitle
language
Change the view angle
*1 ☞ page 73
*2 Not applicable for DVD-VR
81
AV OPERATIONS
Page 82

SD operations
This unit can play the JPEG/MP3/WMA/WAV/AAC*
files stored in SD card.
• You can operate the SD card in the same way you
ENGLISH
operate the files on discs. (☞ pages 70 to 74, 78, and
80)
• All tracks in the SD card will be played repeatedly
until you change the source.
• Make sure all important data has been backed up.
~ Open the monitor panel.
<Open/Tilt> menu is displayed.
Ÿ
* This unit can play back AAC files encoded using
iTunes. This unit cannot play back FairPlay-encrypted
files.
! Insert an SD card.
Push in the SD card until you hear a clicking sound.
The source changes to “SD” and playback starts.
⁄ Close the monitor panel.
• If <Open/Tilt> menu is still displayed:
You can also press [Close]
on <Open/Tilt> menu.
• If <Open/Tilt> menu is not displayed:
[Twice]
Caution:
Do not place your finger behind the monitor panel.
To eject the SD card
Push in the SD card lightly.
• You can also eject the SD card by holding OPEN (when
the monitor panel is closed).
Caution:
• Do not release your finger quickly; otherwise, the
SD card may pop up out from the loading slot.
82
Page 83

Selecting playback modes
You can use the following playback modes—Repeat or
Random.
Ex.: To select Track Repeat
1
3
ENGLISH
2
Exit
File type Repeat Random
Track: Repeats current track *
Folder: Repeats all tracks of the current
folder
Folder: Repeats all files of the current folder
* By pressing
Short Cut icon, you can also turn on or off Track Repeat.
When one of the playback modes is selected, the
corresponding indicator lights up on the source
information screen.
To cancel, select <Off>.
Folder: Randomly plays all tracks of current
folder, then tracks of next folders
SD (All): Randomly plays all tracks
—
83
AV OPERATIONS
Page 84

USB operations
You can connect a USB mass storage class device such as a USB memory, Digital Audio Player, portable HDD, etc. to
the unit.
• You can also connect the iPod to the USB terminal of the unit. For details of the operations, ☞ pages 99 to 101.
ENGLISH
~ Connect a USB device.
USB cable from the rear of the unit
• You cannot connect a computer to the USB (
terminal of the unit.
The source changes to “USB” and playback starts.
This unit can play JPEG/MPEG1/MPEG2*
WAV/AAC*2 files stored in USB mass storage class
device.
• You can operate the USB device in the same way you
operate the files on discs. (☞ pages 70 to 74, 77, 78,
and 80)
• All tracks in the USB device will be played repeatedly
until you change the source.
• Make sure all important data has been backed up.
*1 Except for MPEG2 files recorded by JVC Everio
camcorder (extension code <.mod>).
*2 This unit can play back AAC files encoded using
iTunes. This unit cannot play back FairPlay-encrypted
files.
1
/MP3/WMA/
)
Caution:
• Avoid using the USB device if it might hinder your
safety driving.
• Do not pull out and attach the USB device
repeatedly while “Now Reading...” is flashing on
the monitor screen.
• Do not start the car engine if a USB device is
connected.
• Stop playback before disconnecting a USB device.
• Do not leave a USB device in the car, expose to
direct sunlight, or high temperature to avoid
deformation or cause damages to the device.
• For more details about USB operations,
☞ page 117.
84
Page 85

Selecting playback modes
You can use the following playback modes—Repeat or
Random.
Ex.: To select Track Repeat
1
3
ENGLISH
2
Exit
File type Repeat Random
Track: Repeats current track *
Folder: Repeats all tracks of the current
folder
Track: Repeats current track *
Folder: Repeats all tracks of the current
folder
Folder: Repeats all files of the current folder
* By pressing
Short Cut icon, you can also turn on or off Track Repeat.
When one of the playback modes is selected, the
corresponding indicator lights up on the source
information screen.
To cancel, select <Off>.
Folder: Randomly plays all tracks of current
folder, then tracks of next folders
USB (All): Randomly plays all tracks
Folder: Randomly plays all tracks of current
folder, then tracks of next folders
USB (All): Randomly plays all tracks
—
85
AV OPERATIONS
Page 86

Bluetooth® operations — Mobile phone/audio player
For Bluetooth operations, it is required to connect the
Bluetooth Adapter (KS-BTA200) to the CD changer jack
on the rear.
ENGLISH
• Refer also to the instructions supplied with the
Bluetooth Adapter and the Bluetooth device.
• Refer to the list (included in the box) to see the
countries where you may use the Bluetooth®
function.
To use a Bluetooth device through the unit (“Bluetooth
PHONE” and “Bluetooth AUDIO”) for the first time,
you need to establish Bluetooth wireless connection
between the unit and the device.
• Once the connection is established, it is registered in
the unit even if you reset your unit. Up to five devices
can be registered in total.
• Only one device can be connected at a time for each
source (“Bluetooth PHONE” and “Bluetooth AUDIO”).
Connecting a new Bluetooth device
Registration (Pairing) methods
Use either of the following items in <Bluetooth>
menu to register and establish the connection with a
device.
• Select “Bluetooth PHONE” or “Bluetooth AUDIO” as
the source to operate <Bluetooth> menu.
Open Make the unit ready to establish
a new Bluetooth connection.
The connection is established by
operating the Bluetooth device.
Search Make the unit ready to establish
a new Bluetooth connection.
The connection is established by
operating this unit.
To register using <Open>
Preparation:
• Operate the Bluetooth device to turn on its Bluetooth
function.
• Make sure “NEW DEVICE” is selected. If not, press [5]
or [∞] to select it.
1
2
Exit
3
Go to other menu items
Device Name
ExitBack
4 Enter a PIN (Personal Identification
Number)* code to the unit.
• You can enter any number you like (1-digit to
16-digit number).
* Some devices have their own PIN code. Enter the
specified PIN code to the unit.
86
Page 87

You can enter [0] – [9] only.
• [BS]: Erases the character before the cursor.
• [Del]: Erases the character on the cursor.
• [Enter]: Confirms the entry.
5 Operate the Bluetooth device to connect
while “Open...” is displayed on the screen.
Enter the same PIN code (as entered in the above
step) on the device to be connected.
Now connection is established and you can use the
device through the unit.
To connect a special device <Special
Device>
1 Press [ ].
2 Press [Bluetooth].
3 Press [Special Device].
The unit displays the list of the preset devices.
4 Select a device you want to connect.
5 Use <Open> (or <Search>) to connect.
ENGLISH
The device remains registered even after you
disconnect the device. Use <Connect> (or activate
<Auto Connect>) to connect the same device
from next time (☞ page 114).
To register using <Search>
• Make sure “NEW DEVICE” is selected. If not, press [5]
or [∞] to select it.
1 Press [ ].
2 Press [Bluetooth].
3 Press [Search].
The unit searches for available devices and displays
the list of them. (If no available device is detected,
“Device Unfound” appears.)
4 Select a device you want to connect.
5 Enter the specific PIN code of the device to
the unit.
• Refer to the instructions supplied with the device
to check the PIN code.
6 Operate the Bluetooth device to connect
while “Connecting...” is displayed on the
screen.
Now connection is established and you can use the
device through the unit.
To connect/disconnect a registered
device
1 Select “Bluetooth PHONE” or “Bluetooth
AUDIO,” then select a registered device you
want to connect/disconnect.
2 Press [ ].
3 Press [Bluetooth].
4 Press [Connect] or [Disconnect].
• Select <Connect> to connect the selected
device.
• Select <Disconnect> to disconnect the selected
device.
To delete a registered device
1 Select “Bluetooth PHONE” or “Bluetooth
AUDIO,” then select a registered device you
want to delete.
2 Press [ ].
3 Press [Bluetooth].
4 Press [Delete Pairing].
Confirmation screen appears. Press [Yes].
87
AV OPERATIONS
Page 88

Using the Bluetooth mobile phone
☞ page 90
ENGLISH
Sound mode
(☞ page 105)
Status of the device
Signal strength/Battery
remainder (only when
the information comes
from the device)
[5 ∞] Selects the registered device
[ ] Hold: Activates <Voice Dialing> function
[ ] Displays <
1
*
When a mobile phone with audio function is connected, appears.
*2 This button appears when the Bluetooth Adapter is connected.
*3 This adjustment does not affect the volume level of the other sources.
Connected Device Name
2
Adjusts the volume of the incoming calls.*
*
(“NEW DEVICE” appears when a new device can be registered.)
Dial Menu
> screen.
1
*
Bluetooth icon lights
up when the adapter
is connected.
3
~ Press [SOURCE], then press [BLUETOOTH PHONE]. (☞ page 58)
• You can also use AV/OFF on the remote controller. Press it repeatedly.
Ÿ Press [ ].
! Press [Bluetooth].
⁄ Establish the connection with a device, then make a call (or settings using <Bluetooth>
menu).
(☞ pages 113 and 114)
When a call comes in...
The source is changed to “Bluetooth PHONE”
automatically.
When <Auto Answer> is deactivated...
To answer the incoming call
• Press the message displayed on the touch panel.
• Press any button on the monitor panel (except
/ATT or VOL +/–).
Name and phone number (if acquired)
When <Auto Answer> is activated...
The unit answers the incoming call automatically.
(☞ page 114)
To end the call
• Hold the message displayed on the touch panel.
• Hold any button on the monitor panel (except
/ATT or VOL +/–).
• You can adjust the microphone volume.
(☞ page 114)
88
Page 89

When an SMS comes in...
If the mobile phone is compatible with SMS (Short
Message Service), you can read the messages on the
screen.
• You cannot edit or send a message through the unit.
When <Message Info> is set to <Auto>...
The unit rings and the following screen is displayed to
inform you of a message arrival. (☞ page 114)
Device Name
Receiving Message
Read ?
Yes No
Jack
To read the message, press [Yes].
The source is changed to “Bluetooth PHONE.”
To read the message later, press [No].
• The message is stored into <Message> =
<Unread>. (☞ page 113)
When <Message Info> is set to <Manual>...
Access the message list to read messages.
(☞ page 114)
To make a call
1
2
Exit
3
Select a calling method, then call.
4
Back
Back Exit
Cancels.
Device Name
Redial Shows the list of the phone
numbers you have dialed.
Received Calls Shows the list of the received
calls.
Phonebook Shows the phone book of the
connected mobile phone.
Missed Calls Shows the list of the missed
calls.
Phone
Number
Shows the phone number
entry screen = “Entering a
phone number” (☞ page 90).
Voice Dialing (Only when the connected
mobile phone has the voice
recognition system): = Speak
the name you want to call.
ExitBack
Exit
ENGLISH
89
Continued on the next page
AV OPERATIONS
Page 90

• You can make a call from the navigation screen.
When displaying the information of the destination
where you want to call to, press [ ].
ENGLISH
To redial previously dialed numbers
1
To stop ringing (canceling the outgoing call)
Hold any button on the monitor panel (except /ATT
or VOL +/–).
Entering a phone number
• You cannot use the remote controller to enter phone
numbers.
You can enter [0] – [9], [*], [#] (up to 32 numbers)
• [BS]: Erases the character before the cursor.
• [Del]: Erases the character on the cursor.
• [Preset]: Goes to Preset List. You can preset the
entered number by selecting a preset
number. (☞ page 91)
• [Dial]: Calls the entered number.
By holding [ ], you can directly activate
<Voice Dialing> function.
2
3
Back Exit
When using the remote controller, you can
display <Redial> menu anytime .
[Hold]
90
Page 91

Presetting the phone numbers
You can preset up to six phone numbers.
1 Select the phone number you want to preset
from <Phonebook>, <Redial>, <Received
Calls>, or <Missed Calls>.
1 Press [
2 Press [Bluetooth].
3 Press [Dial Menu], then...
Ex.: Selecting <Received Calls>
2 Select a telephone number to store.
].
To call a preset number
1
2
3
List
ENGLISH
Exit
Back Back
3 Select a preset number.
Now “Tom” is stored into preset no. 1.
[Hold]
You can use the following buttons on the remote
controller for the Bluetooth phone operations.
• Displays <Dial Menu>
screen/Answers the incoming
call.
• Displays the <Redial> list if
pressed and held (regardless of
the current source).
Ends the call.
Adjusts the volume of the
incoming calls.
Makes a call to the preset
numbers.
91
AV OPERATIONS
Page 92

Using the Bluetooth audio player
ENGLISH
Sound mode
(☞ page 105)
Connected Device Name
1
*
Status of the device
Signal strength/Battery
remainder (only when
the information comes
from the device)
[3 / 8] [7] Starts playback/pauses
[
4 ¢] Reverse/forward search
[
5 ∞] Selects the registered device
(“NEW DEVICE” appears when a new device can be registered.*
[
] Displays <Dial Menu> screen.
2
*
*1 Indicates the button pressed. It may be different from the operation status.
*2 This button appears when the Bluetooth Adapter is connected.
*3 You cannot select “NEW DEVICE” when a Bluetooth audio player is connected.
~ Press [SOURCE], then press [BLUETOOTH
AUDIO].
(☞ page 58)
You can use the following buttons on the remote
controller for the Bluetooth audio operations.
• You can also use AV/OFF on the remote
controller. Press it repeatedly.
Ÿ Start playback.
• See page 86 for connecting a new device.
• See page 87 for connecting/disconnecting a
registered device.
• See page 87 for deleting a registered device.
Bluetooth icon lights
up when the adapter
is connected.
Starts playback/pauses.
Reverse/forward skip
Adjusts the volume.
3
)
Bluetooth Information:
If you wish to receive more information about Bluetooth, visit the following JVC web site: <http://www.jvc.
co.jp/english/car/> (English website only)
92
Page 93

Listening to the CD changer
It is recommended to use a JVC MP3-compatible CD changer with your unit.
• You can play only CDs (CD-DA) and MP3 discs.
Ex.: while playing an MP3 disc
DISC 1
Folder no./Track no./Playing time
ENGLISH
MP3 indicator
Sound mode
(☞ page 105)
Current Folder Name
Current File Name.mp3
Current Track Title
Artist Name
Album Title
[4 ¢] Press: Selects track
Hold: Reverse/forward search
[
5 ∞] Press: Selects folder (only for MP3)
Hold: Displays Disc List
Preparation:
Make sure <Changer> is selected for <External
Input>. (☞ page 111)
~ Press [SOURCE], then press [CD-CH].
(☞ page 58)
• You can also use AV/OFF on the remote
controller. Press it repeatedly.
Ÿ Press [ ].
! Press [List].
⁄ Select a disc to start playing.
Disc List
DISC 01
DISC 02
DISC 03
Back Exit
To go to the other list
DISC 04
MP3 DISC
DISC 06
Tag data appears only
when it is recorded.
You can also display the Disc List by holding
[5 / ∞].
• If you select an MP3 disc, the Track list of the current
folder appears. You can select a track and start
playing.
List
Folder 05
Folder 06
Folder 07
Folder 08
Folder 09
Folder 10
Back Exit
Track001.mp3
Track002.mp3
Track003.mp3
Track004.mp3
Track005.mp3
Track006.mp3
• If you select a folder on the list, you can start
playing the first track of the folder.
*1 Press to move to the previous/next pages of the
lists.
*2 You can also select folders/tracks by using the
bar (☞ page 74).
93
AV OPERATIONS
Page 94

Selecting playback modes
You can use following playback modes—Repeat or
Random.
Ex.: To select Track Repeat for an MP3 disc (for CDs, ☞
page 73)
ENGLISH
1
2
3
ExitBack
Exit
When one of the playback modes is selected, the
corresponding indicator lights up on the source
information screen.
To cancel, select <Off>.
Disc type Repeat Random
Track: Repeats current track *
Disc: Repeats all tracks of the current disc
Track: Repeats current track *
Folder: Repeats all tracks of the current
folder
Disc: Repeats all tracks of the current disc
* By pressing
You can use the following buttons on the remote controller to operate the CD changer.
Short Cut icon, you can also turn on or off Track Repeat.
Selects disc.
Selects folder (MP3 only).
• Press: Selects track.
• Hold: Reverse/forward search
Disc: Randomly plays all tracks of the
current disc
All: Randomly plays all tracks of all loaded
discs
Folder: Randomly plays all tracks of current
folder, then tracks of next folders
Disc: Randomly plays all tracks of the
current disc
All: Randomly plays all tracks of all loaded
discs
94
ExitBack
Page 95

Listening to the DAB tuner
Preset no.Band
ENGLISH
Sound mode
(☞ page 105)
DAB indicators */Standby
Reception indicators
* While tuning in a service with DLS (Dynamic Label Segment), the TEXT indicator lights up.
Service Label
DRC
LN
If no signal is received,
“No DAB Signal”
appears.
~ Press [SOURCE], then press [DAB]. (☞ page 58)
• You can also use AV/OFF on the remote controller. Press it repeatedly.
Ÿ Press [BAND].
! Press [ ] or [ ] to search for an ensemble—Auto Search.
• Manual Search: Hold either [ ]or [ ] until “Manual Search” appears on the screen, then press it
repeatedly.
⁄ Press [5 SERVICE] or [SERVICE ∞] to select a service (either primary or secondary) to
listen to.
95
AV OPERATIONS
Page 96

When surrounding sounds are noisy
Some services provide Dynamic Range Control (DRC)
signals together with their regular programme signals.
DRC will reinforce the low level sounds to improve your
ENGLISH
listening.
• The DRC indicator will light up while tuning in to a
service with the DRC signals.
1
2
Exit
3
Manual presetting
1 Tune in to a service you want to preset.
DAB1
15:45
2 Display the Preset List.
• You can also display the Preset List by holding
[5] or [∞].
3 Select a preset number.
1471.792MHz LL
Exit
• As the number increases, the effect becomes
stronger.
DAB1
DAB2
DAB3
Back Exit
The service selected in step 1 is now stored in
preset number 2.
96
[Hold]
Page 97

Selecting preset services
On the remote:
1
2
On the unit:
1
2
3
DAB1
DAB2
DAB3
Activating/deactivating Announcement Standby Reception
Announcement Standby Reception allows the unit
to switch temporarily to your favourite service
(announcement type).
Announcement Standby Reception Indicator
To activate, display <AV Menu>
screen, press [Mode], then press
[On] for <Announce Standby>.
(☞ below)
The unit will temporarily switch to your
favourite service from any source other
than FM/AM.
Not yet activated. Tune in to another
service providing the related signals.
To deactivate, press [Off] for
<Announce Standby> (☞ below).
Exit
To activate Announcement Standby
ANN
Lights up
Flashes
Goes off
Reception
1 Press [ ].
2 Press [Mode].
3
ENGLISH
Back Exit
Activating/deactivating TA/PTY Standby Reception
Operations are exactly the same as explained on page
65 for FM RDS stations.
• You cannot store PTY codes separately for the DAB
tuner and for the FM tuner.
Announcement Standby Reception is now
activated for PTY code <Transport News>: the
initial setting.
By pressing Short Cut icon, you can also
activate or deactivate Announcement Standby
Reception.
97
AV OPERATIONS
Page 98

To change the announcement type for
Announcement Standby Reception
1
ENGLISH
2
3
4
Select your favourite announcement type.
Tracing the same programme— Alternative Frequency Reception (DAB AF)
• While receiving a DAB service:
When driving in an area where a service cannot be
received, this unit automatically tunes in to another
ensemble or FM RDS station broadcasting the same
programme.
• While receiving an FM RDS station:
When driving in an area where a DAB service is
broadcasting the same programme as the FM RDS
Exit
station, this unit automatically tunes in to the DAB
service.
When shipped from the factory, Alternative Frequency
Reception is activated.
To deactivate the Alternative Frequency
Reception, select <Off> for <DAB AF>.
(☞ page 110)
Back Exit
Back Exit
Available announcement types:
Transport News, Warning, News, Weather, Event,
Special Event, Radio Info, Sports News, Financial
News
98
Page 99

Listening to the iPod
You can connect the iPod using the following cable or adapter:
Cable/adapter To operate
To listen to the music USB 2.0 cable (supplied for the iPod)
Interface Adapter for iPod—KS-PD100
(not supplied)
To watch the video USB Audio and Video cable for
iPod—KS-U20K (not supplied)
When connected with the USB cable
Sound mode
(☞ page 105)
Playback mode
(☞ page 101)
Current Track Title
Artist Name
Album Title
☞ “When connected with the USB
cable” below.
☞ “When connected with the interface
adapter” on page 102.
☞ “When connected with the USB
cable” below.
• Make sure <iPod (Off)> is selected
for <AV Input>. (☞ page 110)
Track no./Playing time
ENGLISH
[5 / ∞] Press: Moves to the previous/next item of a category (ex.: another album,
Hold: Enters <Search Mode> menu
[
4 / ¢] Press: Selects a track/video
Hold: Reverse/forward search
[
3 / 8] Starts playback/pause
*1 [5 / ∞] may not function depending on how you select the current track/video.
artist, playlist, etc.)*
1
~ Press [SOURCE], then press [USB iPod]. (☞ page 58)
Playback starts automatically.
• When you connect the iPod to the USB terminal, “USB iPod” is selected as the source and playback starts
automatically.
99
2
AV OPERATIONS
Ÿ Press [4] or [¢] to select a track/video.*
*2 You cannot resume playback for video sources.
Page 100

Selecting a track/video from <Search Mode>
1
1
*
Press to move to the previous/next pages of the
list
*2 You can also select Search Mode and tracks/
videos by using the bar. (☞page 74)
ENGLISH
2
3 Select <Music> or <Videos>.
Search Mode
Music
Videos
Shuffle Songs
Back Exit
Playlists
Artists
Albums
Songs
Podcasts
Genres
• Selecting <Shuffle Songs> starts playback.
4 Select a search mode (1), then desired item
(2).
Playlists
Artists
Albums
Songs
Podcasts
Genres
Back Exit
0003/0099
Track 01
Track 02
Track 03
Track 04
Track 05
Track 06
Search modes:
– For <Music>:
Playlists, Artists, Albums, Songs, Podcasts, Genres,
Composers, Audiobooks
– For <Videos>:
Video Playlists, Movies, Music Videos, TV shows,
Video Podcasts
Exit
• Available search modes depend on the type of your
iPod.
You can also display Search Mode and track/video
Lists by holding [5
/ ∞].
• Repeat step 2 until a desired track/video starts
playing.
1 Current track (video) number/total track
(video) number
100
 Loading...