

Page 1

DVD RECEIVER WITH MONITOR
RECEPTOR DVD CON MONITOR
RÉCEPTEUR DVD ET MONITEUR
KW-AVX848/KW-AVX840
ENGLISHESPAÑOLFRANÇAIS
Only for KW-AVX840
Sólo para KW-AVX840
Uniquement pour le KW-AVX840
For canceling the display demonstration, see page 7.
Para cancelar la demonstración en pantalla, consulte la página 7.
Pour annuler la démonstration des affichages, référez-vous à la page 7.
For installation and connections, refer to the separate manual.
Para la instalación y las conexiones, refiérase al manual separado.
Pour l’installation et les raccordements, se référer au manuel séparé.
INSTRUCTIONS
MANUAL DE INSTRUCCIONES
MANUEL D’INSTRUCTIONS
For customer Use:
Enter below the Model No. and
Serial No. which are located on
the top or bottom of the cabinet.
Retain this information for future
reference.
Model No.
Serial No.
LVT2180-001A
[J/JW]
Page 2
Thank you for purchasing a JVC product.
Please read all instructions carefully before operation, to ensure your complete understanding and to obtain the best
possible performance from the unit.
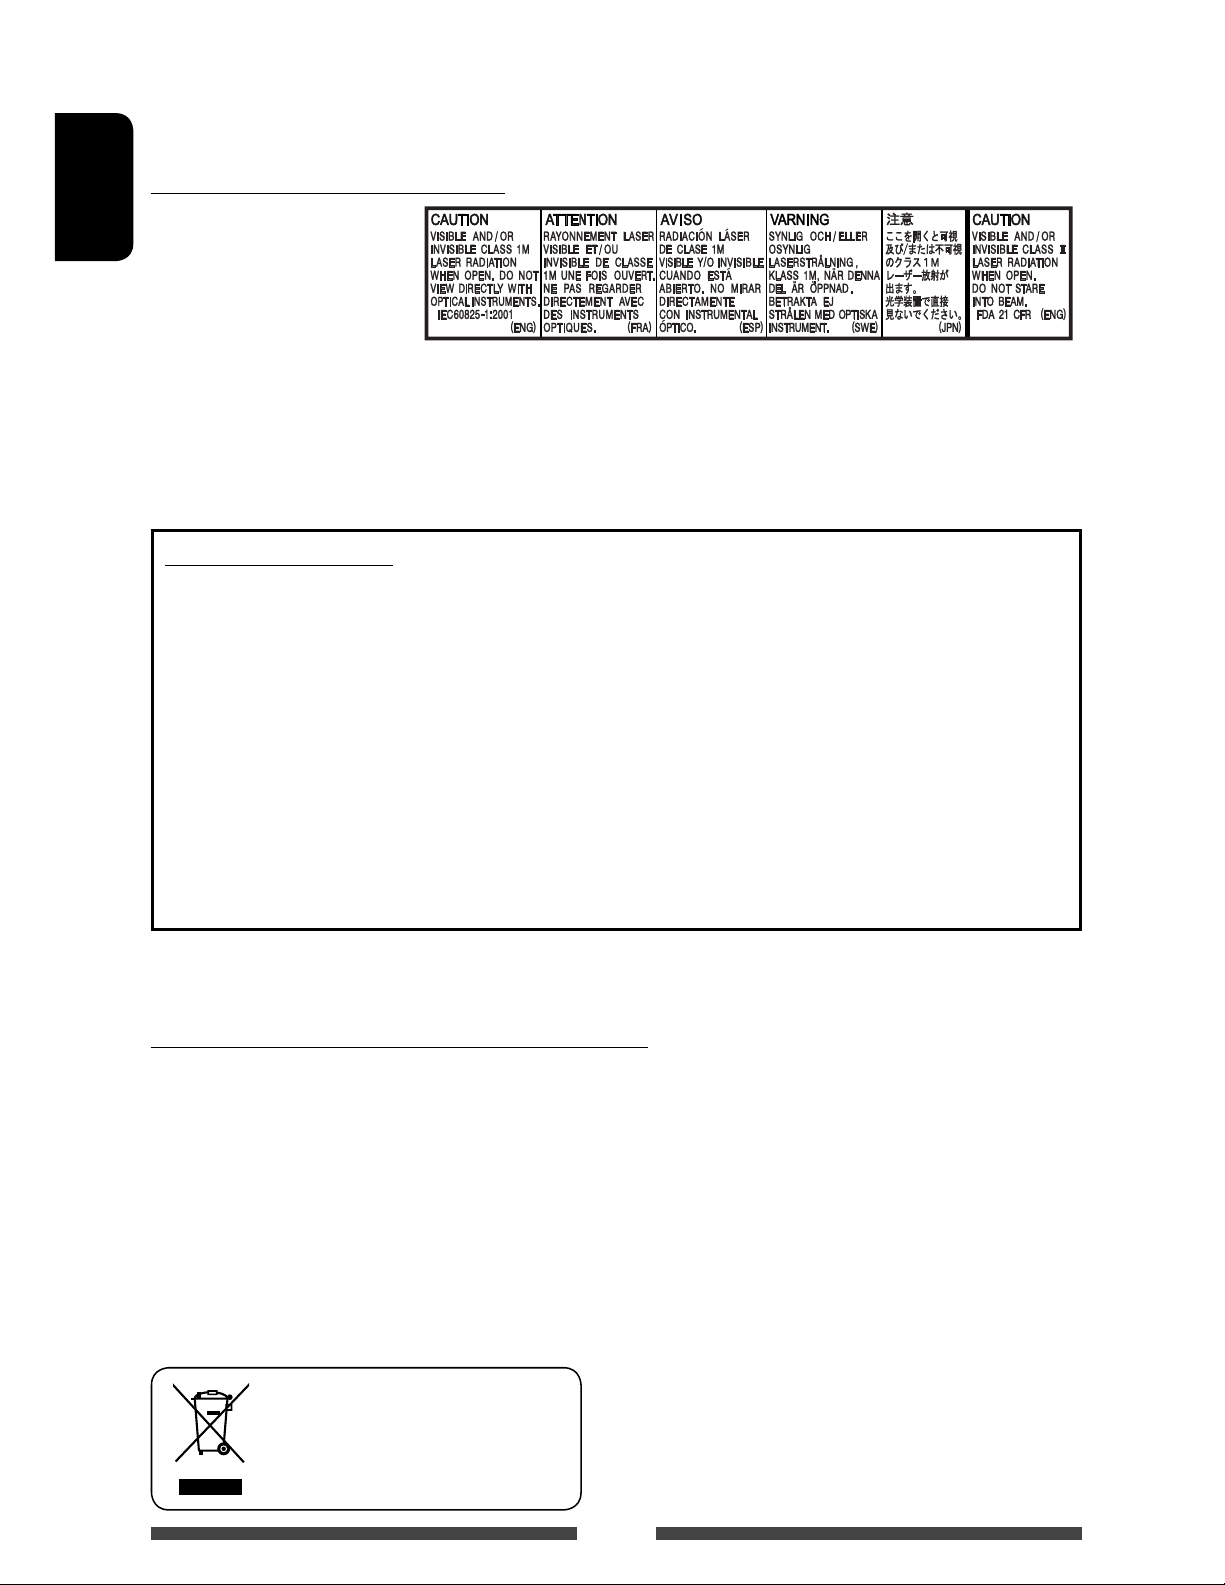
IMPORTANT FOR LASER PRODUCTS
1. CLASS 1 LASER PRODUCT
ENGLISH
2. CAUTION: Do not open the
top cover. There are no user
serviceable parts inside the
unit; leave all servicing to
qualified service personnel.
3. CAUTION: (For U.S.A.) Visible and/or invisible class II laser radiation when open. Do not stare into beam.
(For Canada) Visible and/or invisible class 1M laser radiation when open. Do not view directly with
optical instruments.
4. REPRODUCTION OF LABEL: CAUTION LABEL, PLACED OUTSIDE THE UNIT.
INFORMATION (For U.S.A.)
This equipment has been tested and found to comply with the limits for a Class B digital device, pursuant to Part
15 of the FCC Rules. These limits are designed to provide reasonable protection against harmful interference in
a residential installation. This equipment generates, uses, and can radiate radio frequency energy and, if not
installed and used in accordance with the instructions, may cause harmful interference to radio communications.
However, there is no guarantee that interference will not occur in a particular installation. If this equipment does
cause harmful interference to radio or television reception, which can be determined by turning the equipment
off and on, the user is encouraged to try to correct the interference by one or more of the following measures:
– Reorient or relocate the receiving antenna.
– Increase the separation between the equipment and receiver.
– Connect the equipment into an outlet on a circuit different from that to which the receiver is connected.
– Consult the dealer or an experienced radio/TV technician for help.
Caution:
Changes or modifications not approved by JVC could void the user’s authority to operate the equipment.
WARNINGS: (To prevent accidents and damage)
• DO NOT install any unit or wire any cable in a location
where;
– it may obstruct the steering wheel and gearshift
lever operations.
– it may obstruct the operation of safety devices
such as air bags.
– it may obstruct visibility.
[European Union only]
• DO NOT operate the unit while driving.
If you need to operate the unit while driving, be sure
to look around carefully.
• The driver must not watch the monitor while driving.
• The driver must not put on the headphones while
driving.
• Excessive sound pressure from earphones or
headphones can cause hearing loss when you listen
through earphones or headphones playing the rear
source.
2
Page 3
Cautions on the monitor:
• The monitor built in this unit has been produced with
high precision, but it may have some ineffective dots.
This is inevitable and is not considered defective.
• Do not expose the monitor to direct sunlight.
• Do not operate the touch panel using a ball-point
pen or similar tool with the sharp tip.
Touch the buttons on the touch panel with your
finger directly (if you are wearing a glove, take it off).
• When the temperature is very cold or very hot...
–
Chemical changes occur inside, causing malfunction.
– Pictures may not appear clearly or may move
slowly. Pictures may not be synchronized with
the sound or picture quality may decline in such
environments.
For safety...
• Do not raise the volume level too much, as this will
make driving dangerous by blocking outside sounds,
and may cause hearing loss.
• Stop the car before performing any complicated
operations.
How to reset your unit
ENGLISH
• Your preset adjustments will also be erased (except the
registered Bluetooth devices).
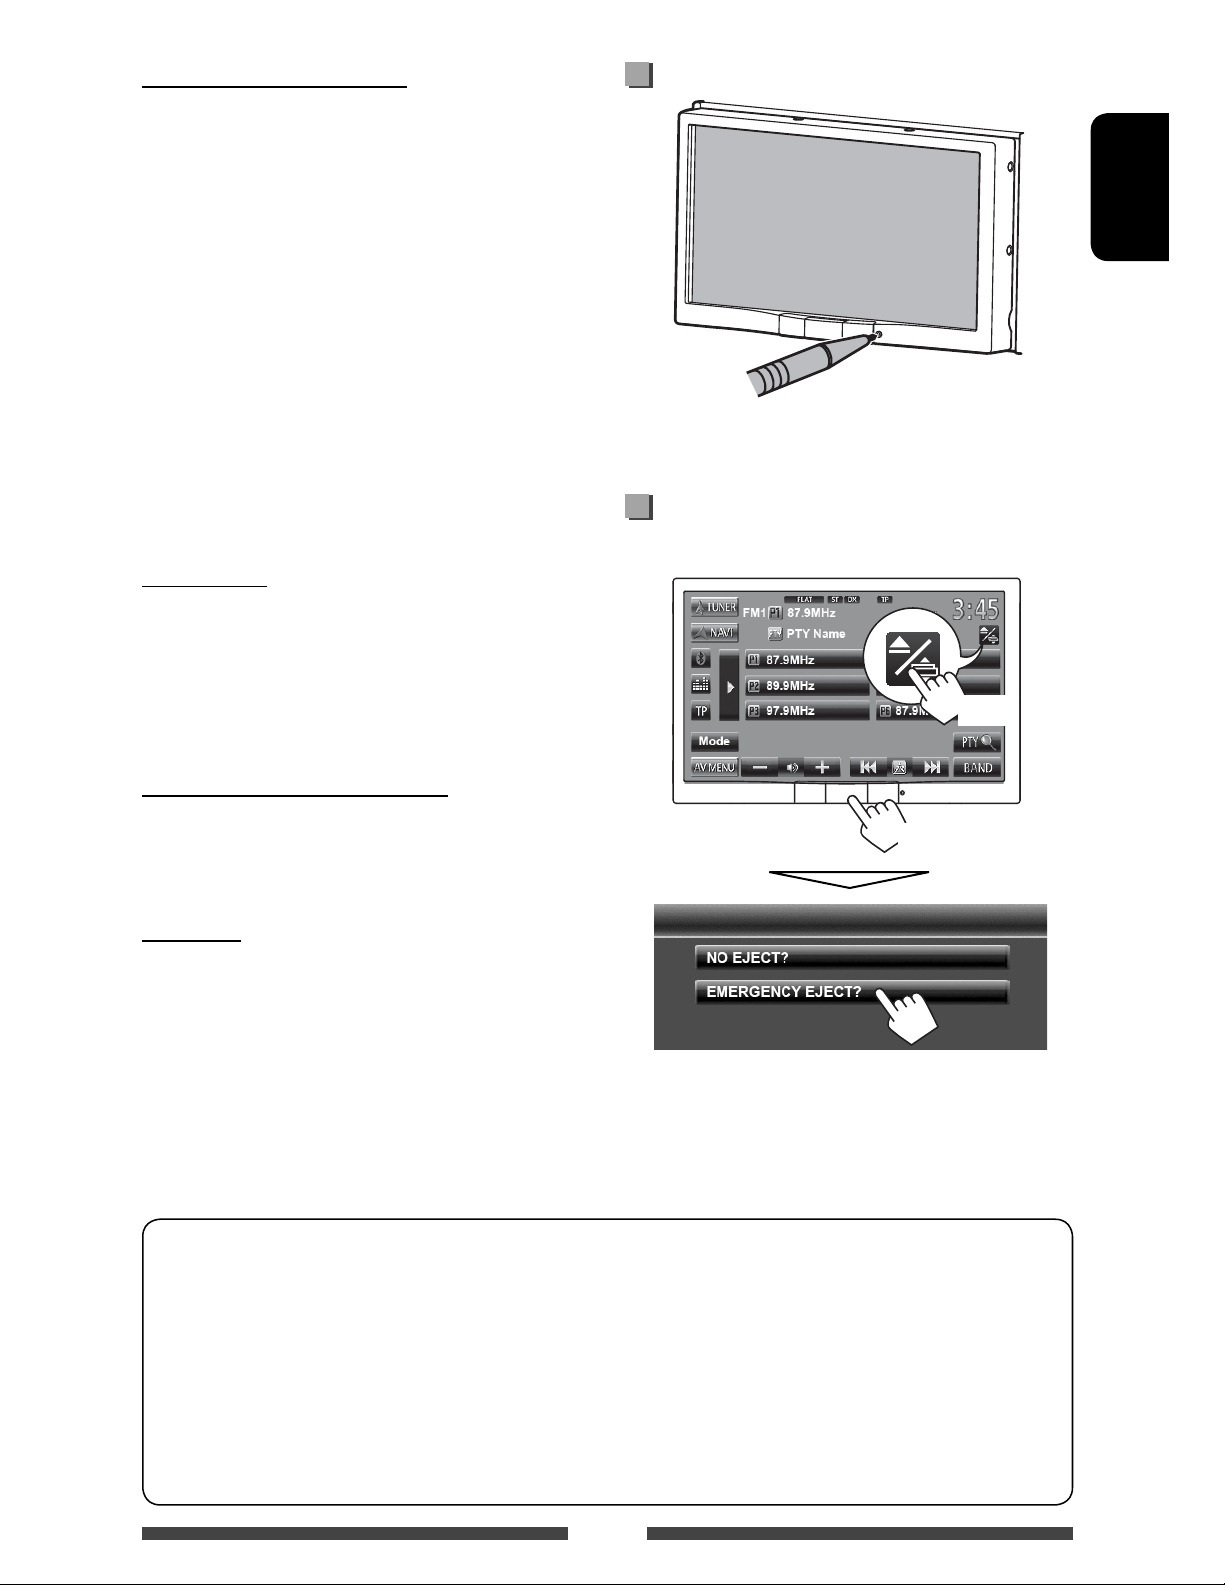
How to forcibly eject a disc
On the monitor panel and the source control screen:
(Hold)
Temperature inside the car...
If you have parked the car for a long time in hot or cold
weather, wait until the temperature in the car becomes
normal before operating the unit.
(Hold)
Caution
This product has a fluorescent lamp that
contains mercury. Disposal of these materials
may be regulated in your community due to
environmental considerations. For disposal or
recycling information, please contact your local
authorities or for USA, the Electronic Industries
Alliance: <http://www.eiae.org.>
How to read this manual:
• Illustrations of KW-AVX840 are mainly used for explanation.
• This manual mainly explains operations using the buttons on the monitor panel and touch panel. For
operations using the remote controller (RM-RK252: supplied only for KW-AVX848), page 58.
• < > indicates the variable screens/menus/operations/settings that appear on the touch panel.
• [ ] indicates the buttons on the touch panel.
• Indication language: English indications are used for the purpose of explanation. You can select the
indication language from the <Settings> menu. ( page 47)
• Be careful not to drop the disc when it ejects.
• If this does not work, reset your unit. ( above)
3
Page 4

Contents
How to reset your unit ........................................... 3
How to forcibly eject a disc ....................................3
ENGLISH
INTRODUCTIONS
Detaching/attaching the monitor panel ...5
Initial Settings .......................................6
Canceling the display demonstration and
Common operations ...............................9
Turning on the power ...........................................9
Turning off/on the screen ..................................... 9
Turning off/on the AV source ................................9
Adjusting the volume ......................................... 10
Touch screen operation ........................................10
Ejecting the disc/adjusting the monitor panel ....10
Switching screens ................................11
AV SOURCE OPERATIONS
Selecting the playback source ...............12
Listening to the radio ...........................13
Disc operations.....................................17
Playing a disc ......................................................17
Playable disc type ................................................ 18
Playback operations ...........................................19
Settings for disc playback ...................................23
USB operations.....................................24
Playing a USB device ........................................... 24
Listening to the iPod/iPhone device ......26
iPod/iPhone playback operations ....................... 27
Selecting a track/video from menu on the iPod/
iPhone ................................................................ 28
Setting for watching video .................................. 28
Using other external components ..........29
AV-IN ................................................................... 29
Using the external navigation unit .....................30
Listening to the satellite radio
Activating subscription .......................................31
Tuning in to a channel you want ......................... 32
setting the clock ..............................7
(Only for KW-AVX840) .....................31
Listening to the HD Radio™ broadcast
(Only for KW-AVX840) .....................34
Rear source operations .........................36
Sound adjustment ................................37
Using the sound equalization .............................37
Adjusting the cross over frequency ...................... 38
Changing display design .......................39
Setting for video playback ....................41
Picture adjustment ............................................. 41
Changing the aspect ratio ................................... 42
Zooming picture .................................................. 42
Using a rear view camera ......................43
Setting menu items ..............................44
Memorizing/recalling the settings ......................48
Adjusting the touch position ...............................48
BLUETOOTH OPERATIONS
Information for using Bluetooth®
devices..........................................49
Bluetooth operations ...........................49
Connecting Bluetooth devices ............................50
Using the Bluetooth mobile phone .....................52
Using the Bluetooth audio player ....................... 56
Bluetooth device settings ....................................57
REFERENCE
Using the remote controller
(Only for KW-AVX848) .....................58
Operations using the remote controller
(RM-RK252) ........................................................ 58
Maintenance ........................................61
More about this unit .............................62
Troubleshooting ...................................65
Specifications.......................................70
4
Page 5
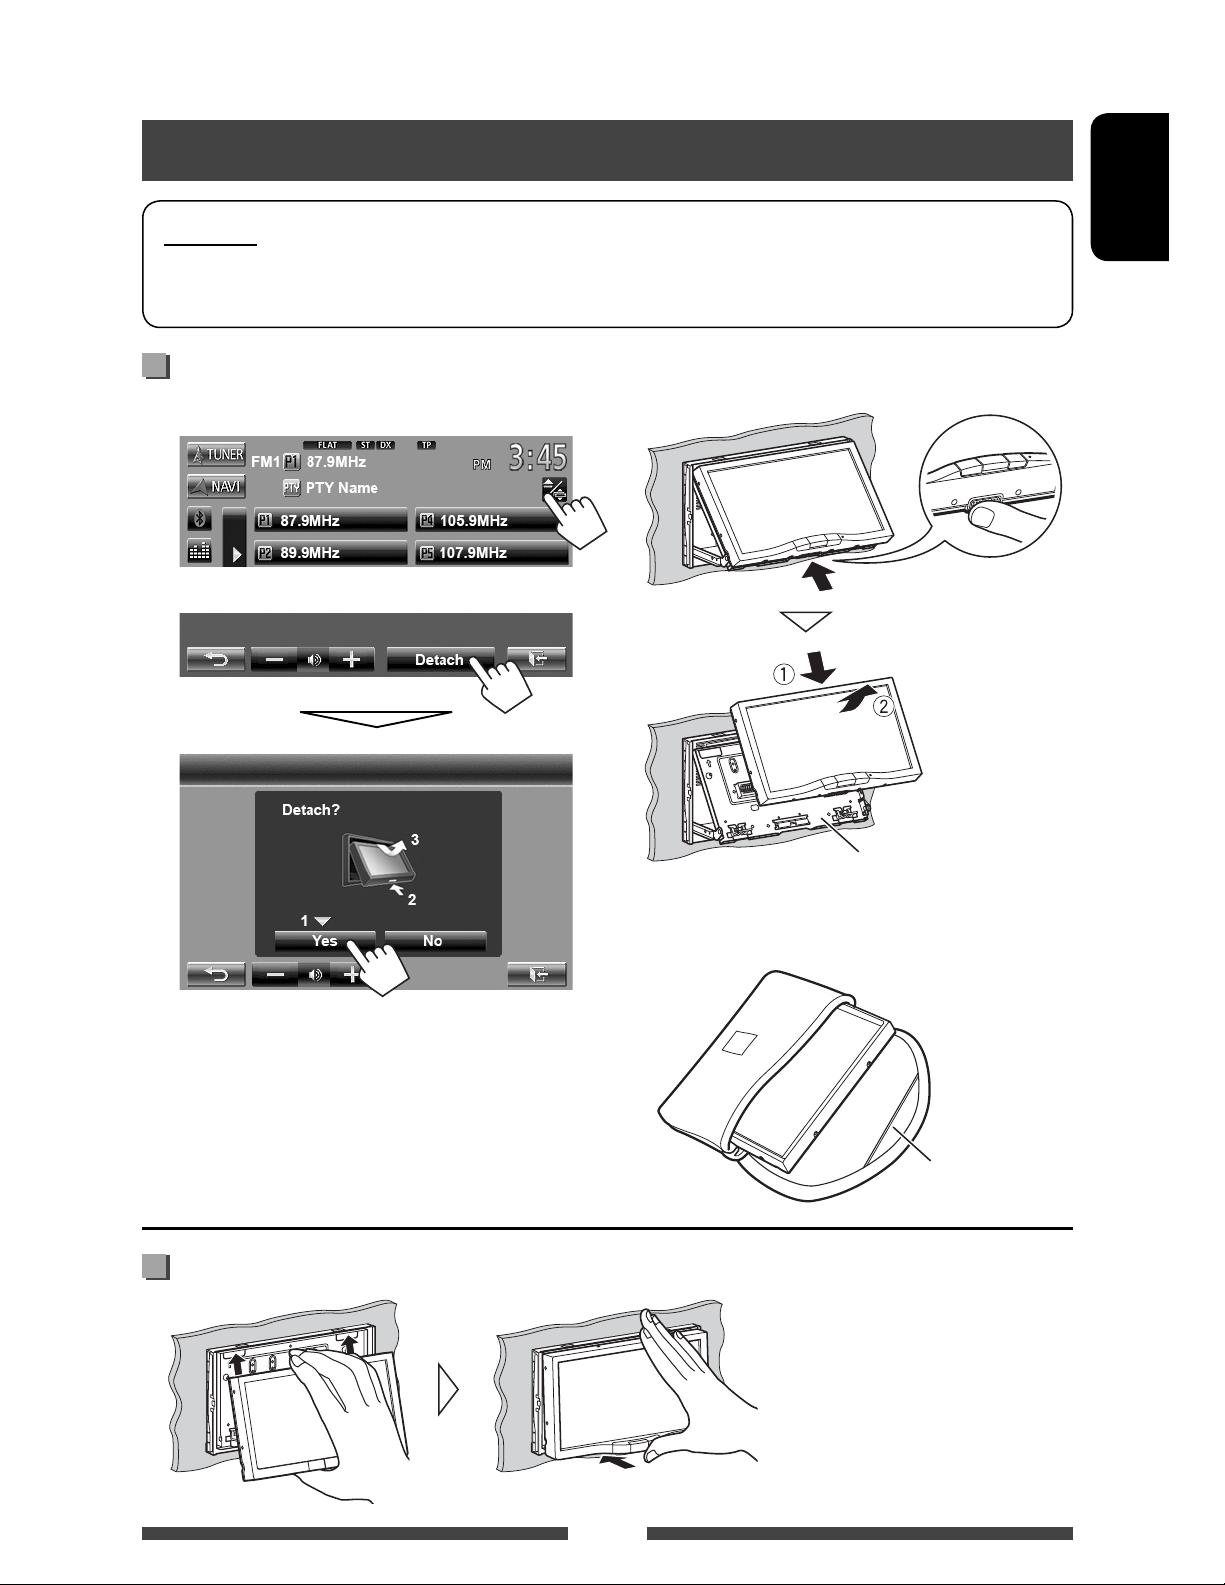
INTRODUCTIONS
Detaching/attaching the monitor panel
Cautions
• Hold the monitor panel securely so as not to drop it accidentally.
• Fit the monitor panel onto the attaching plate until it is firmly locked.
Detaching
1 On the source control screen:
3
2
ENGLISH
The monitor panel is
unlocked.
The monitor panel opens by about 50°.
• It closes automatically when no operation is
done for about 60 seconds.
Remove the monitor panel before this happens.
Attaching
Attaching plate
• The attaching plate closes automatically about
10 seconds after the monitor panel is unlocked.
4
Soft case (supplied)
5
Page 6
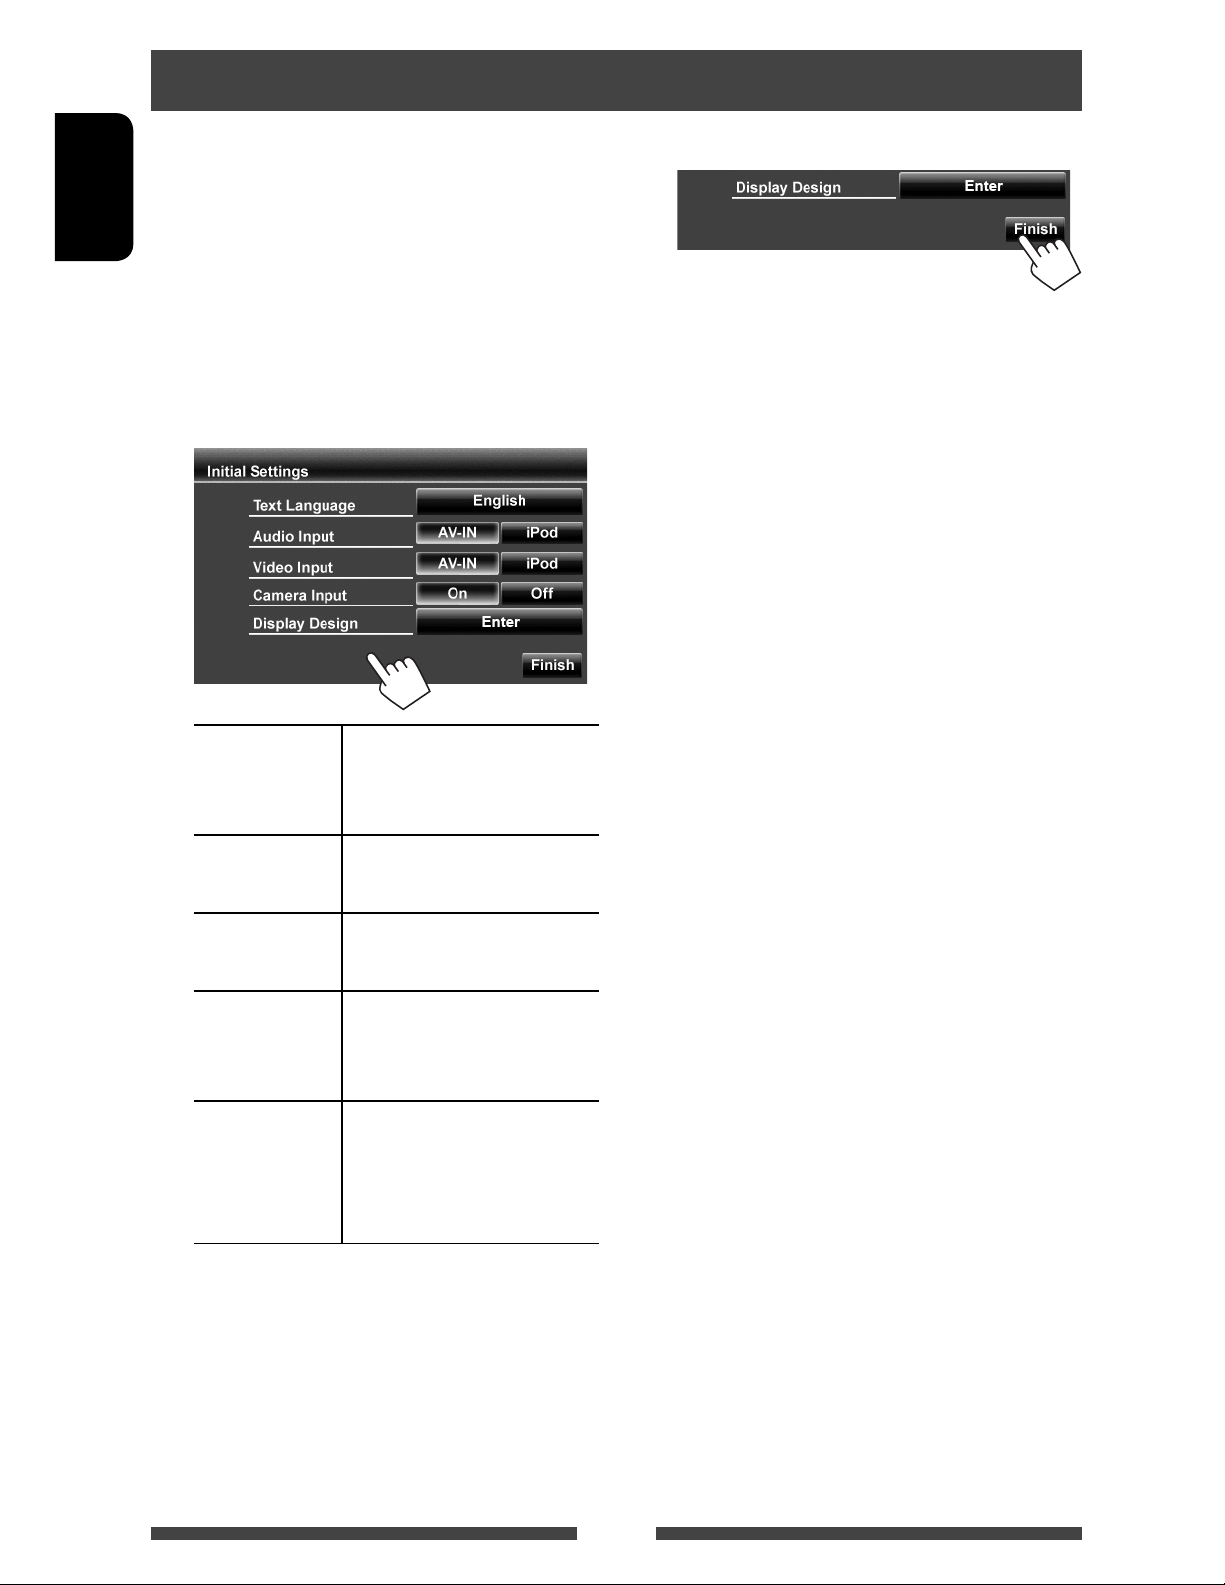
Initial Settings
When you power on the unit for the first time or reset
the unit, the initial setting screen appears.
• You can also change the settings on the <Settings>
ENGLISH
screen. ( page 44)
1 Turn on the ignition switch.
The power is turned on, and the initial setting
screen appears.
2
3 Finish the procedure.
Tex t
Language
Audio Input Select the use of the LINEIN
Video Input Select the use of the VIDEOIN
Camera Input Select <On> when
Display
Design
Select the text language used
for on-screen information.
(page 47)
jacks. ( page 46)
jack. ( page 46)
connecting the rear view
camera. ( page 46)
Select the background and
the colors of the text and the
touch panel buttons. (
page 39)
6
Page 7
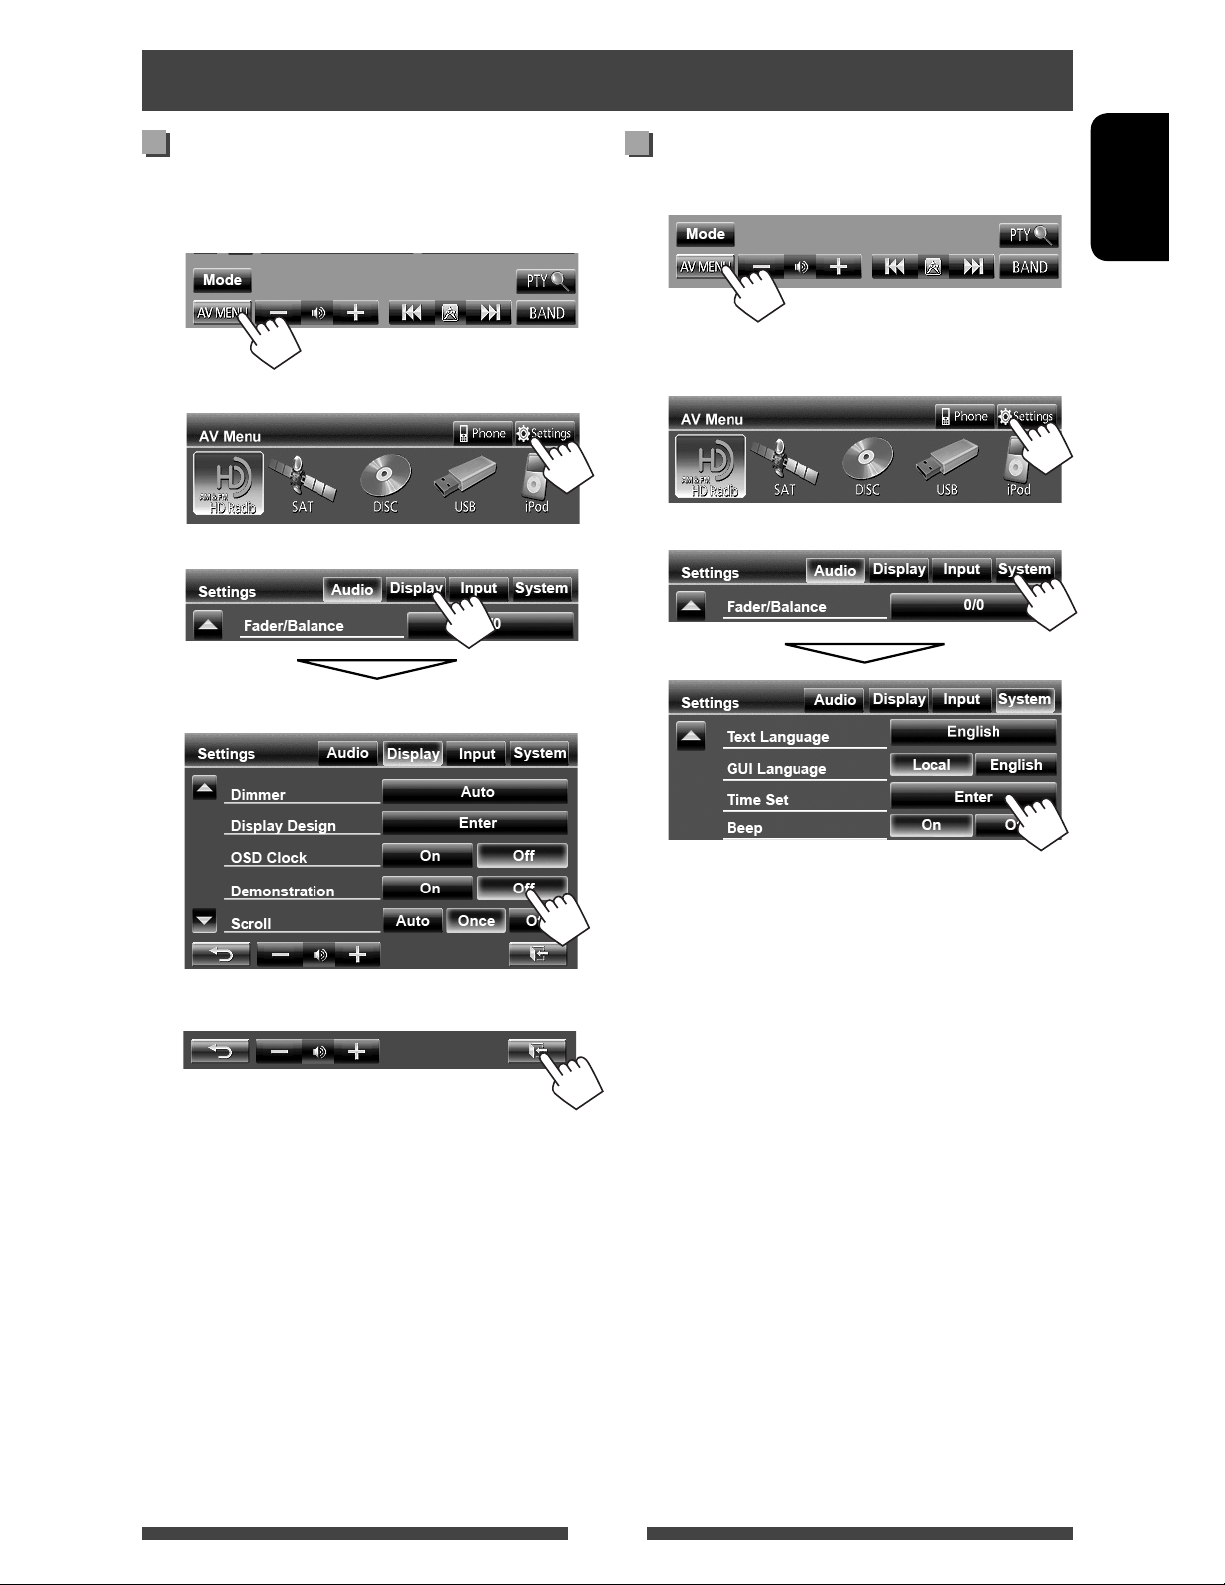
Canceling the display demonstration and setting the clock
Canceling the display
demonstration
1 Display <AV Menu> screen.
2 Display <Settings> screen.
3
Select <Off>.
Setting the clock
1 Display <AV Menu> screen.
ENGLISH
2 Display <Settings> screen.
3
4 Finish the procedure.
7
Page 8
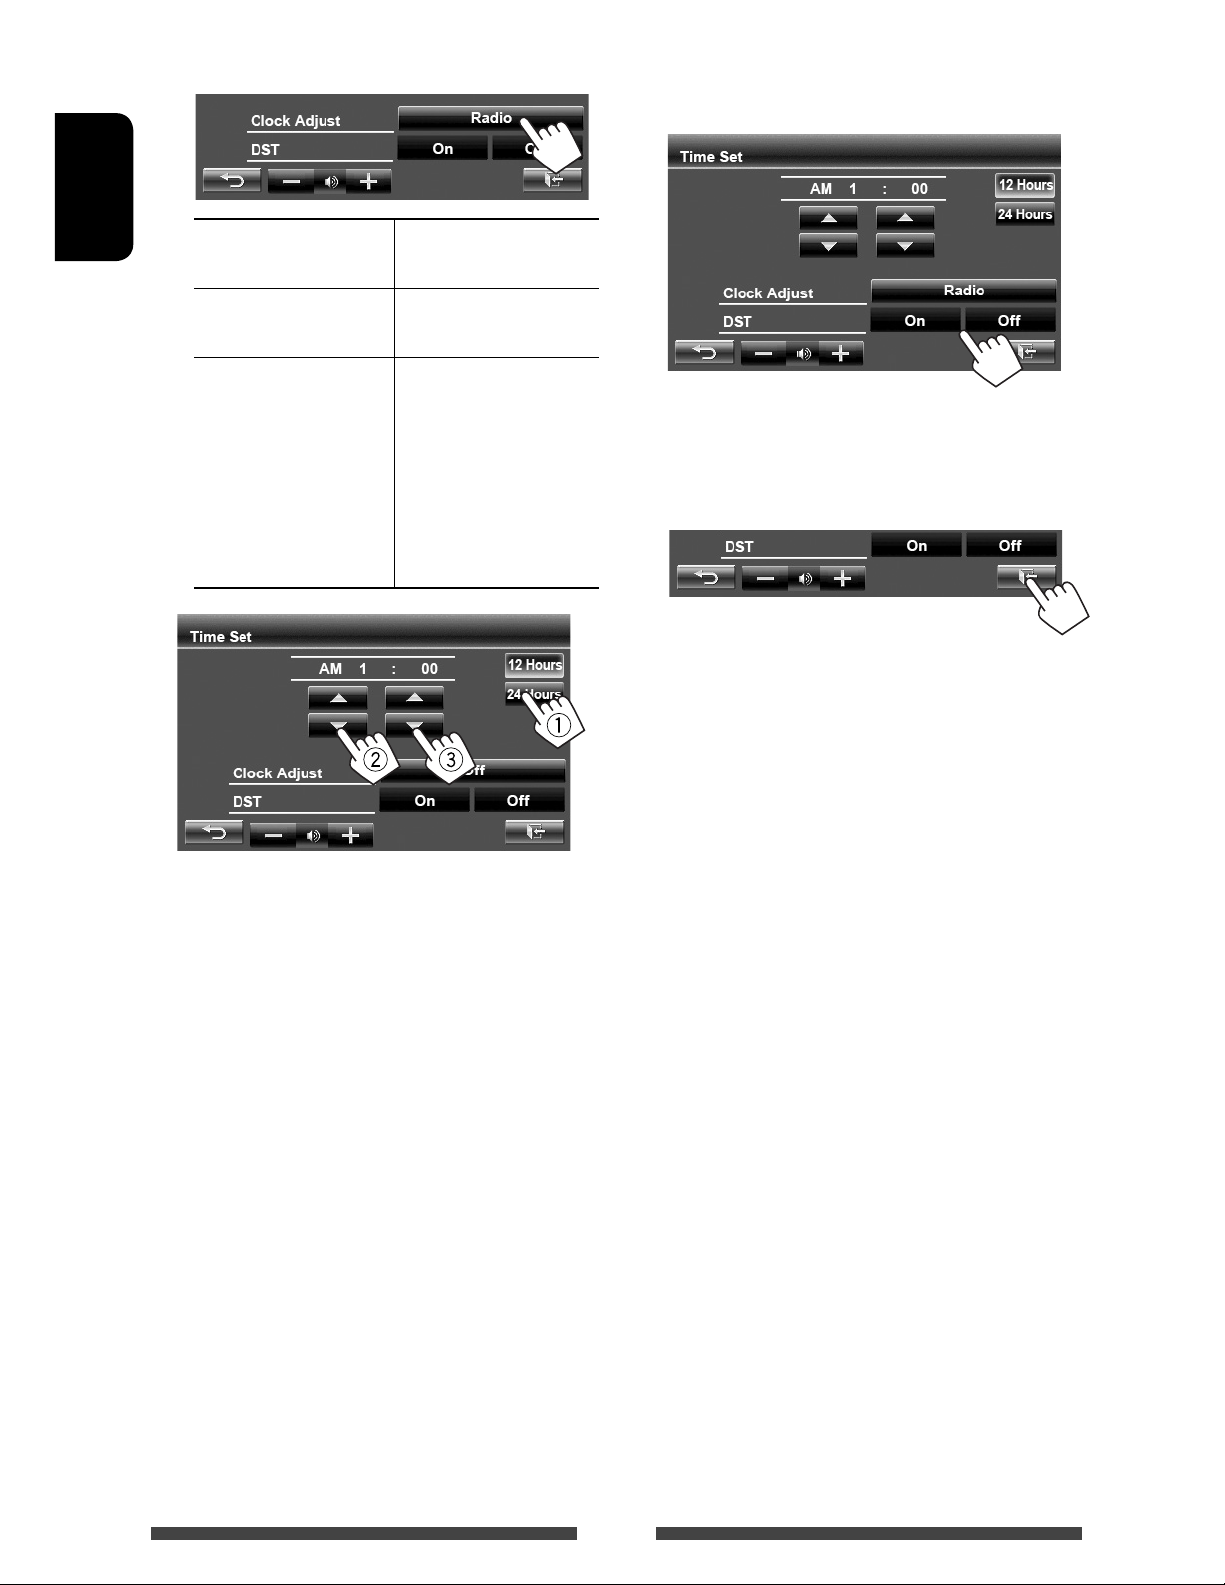
4 Set the clock time.
5 Select <Off> or <On> for Daylight
Saving Time.*
ENGLISH
<Off> Sets the clock
<Radio> Synchronizes the clock
<Alaska>,
<Pacific>,
<Mountain>,
<Central>,
<Eastern>,
<Atlantic>, or
<Newfoundland>*
manually. ( below)
time with FM RBDS.
Synchronizes the clock
time data from the
SIRIUS satellite radio
channel.
Select your residential
area.
• Select <On> if your residential area is subject
to Daylight Saving Time.
6 Finish the procedure.
* Only for KW-AVX840: Selectable only when SIRIUS
Satellite Radio is connected.
Select the time display format
1
Adjust the hour
2
Adjust the minute
3
8
Page 9
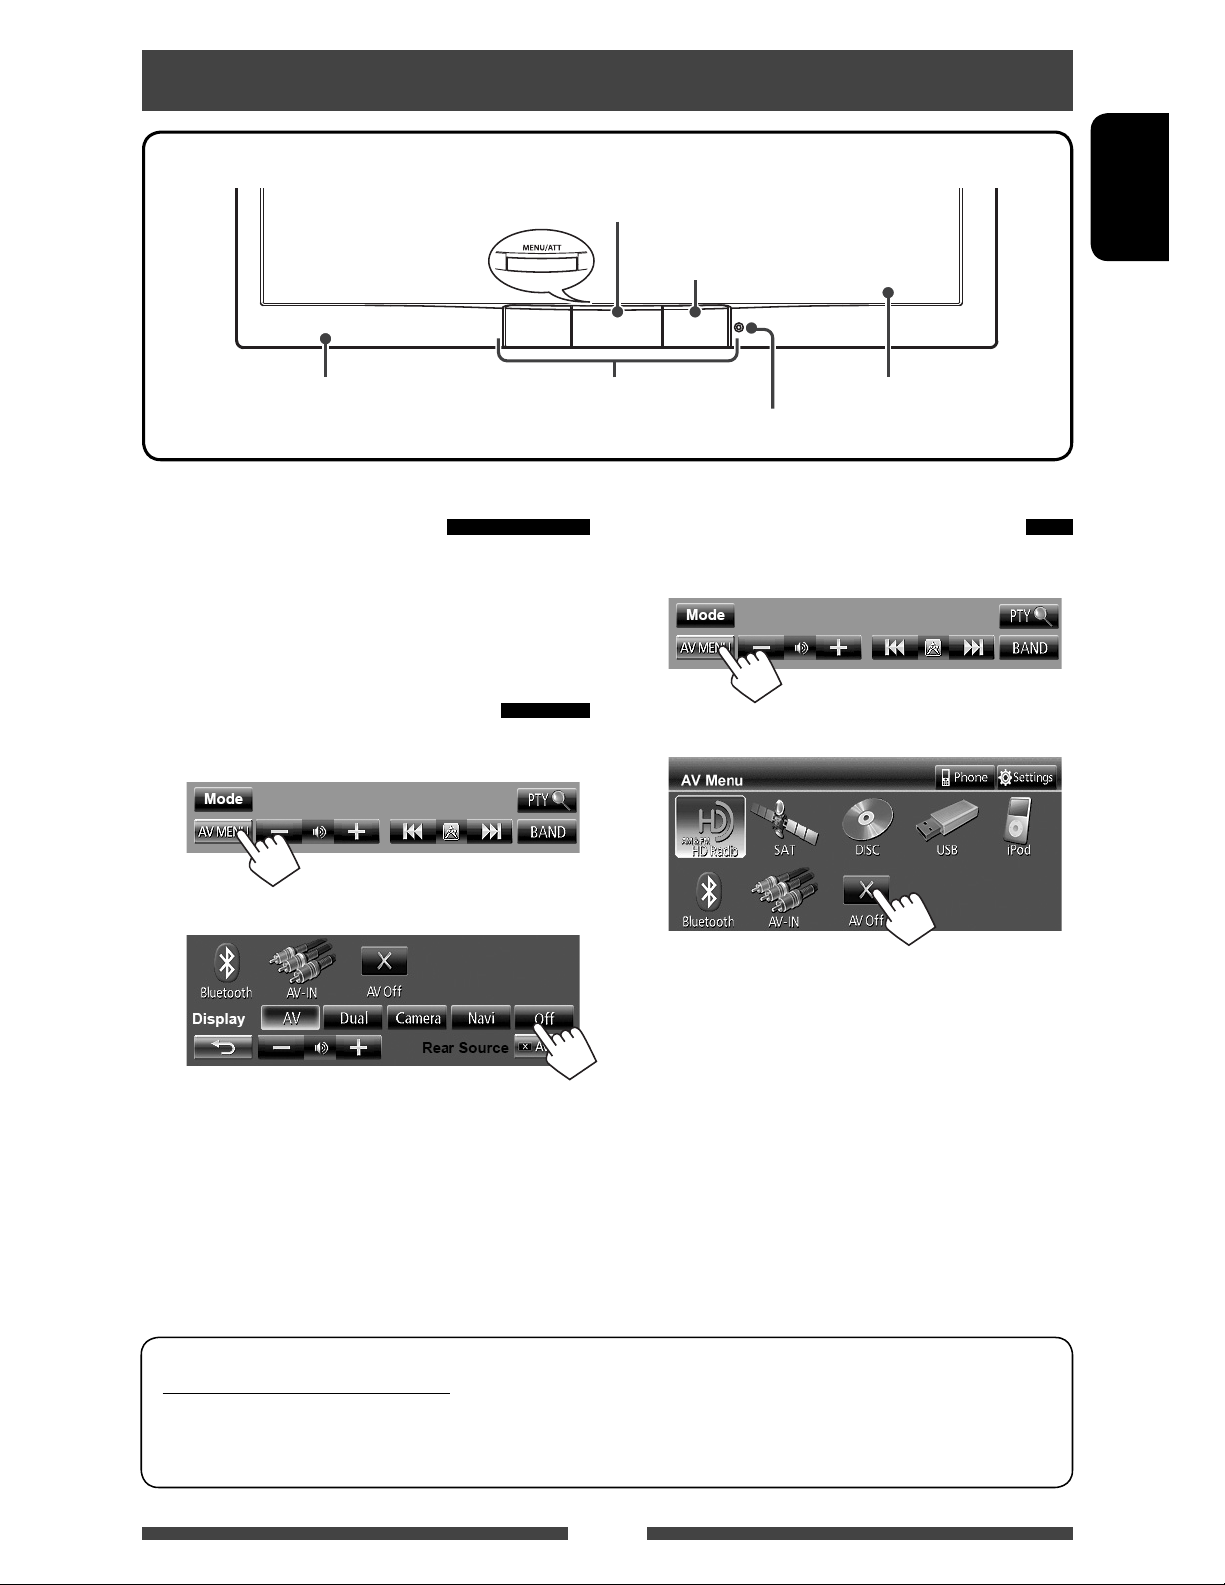
Common operations
• Attenuates the sound. (Press) (
• Displays <AV Menu> screen. (Hold) (
Motion sensor (
Turning on the power
Turn on the ignition switch.
• The power is turned off when the ignition switch is
turned off.
Turning off/on the screen
1 Display <AV Menu> screen.
page 10)
page 11)
Remote sensor
page 46)
Reset button (
Screen (touch panel)Monitor panel
page 3)
Turning off/on the AV source
1 Display <AV Menu> screen.
2
ENGLISH
2
AV source is turned off.
To activate the AV function, change the source.
The screen is turned off.
To turn on the screen, hold MENU/ATT.
Caution on volume setting:
Digital devices (CD/USB) produce very little noise compared with other sources. Lower the volume before
playing these digital sources to avoid damaging the speakers by sudden increase of the output level.
9
Page 10
Adjusting the volume
Ejecting the disc/adjusting the
To adjust the volume
• About the adjustable volume range, page 44
(<Amplifier Gain>).
ENGLISH
• You can also adjust the volume by moving your finger
on the touch panel as illustrated.
IncreaseDecrease
To attenuate the sound
The ATT indicator lights up.
To cancel the attenuation, press MENU/ATT.
Touch screen operation
Displays the video control menu.
monitor panel
1 On the source control screen:
2
[ Open]
[
Eject] Ejects the disc.
[
Close] Closes the monitor panel.
[
Tilt +/
Tilt –]
[Detach] To detach the monitor panel.
[
]
• When the ACC is off, you can also eject the disc. Hold
MENU/ATT to display the <Open/Tilt> screen.
Opens the monitor panel.
Tilts the monitor panel.
( page 5)
Goes back to the current source
screen.
Displays source control screen.
Goes to the previous
chapter/track.*
The operation buttons disappear when no operation is
done for about 10 seconds.
* Not available for video from an external component
and rear view camera.
Dragging your finger to left or right functions in the
same way as touching.
Goes to the next
chapter/track.*
(Hold)
10
Page 11
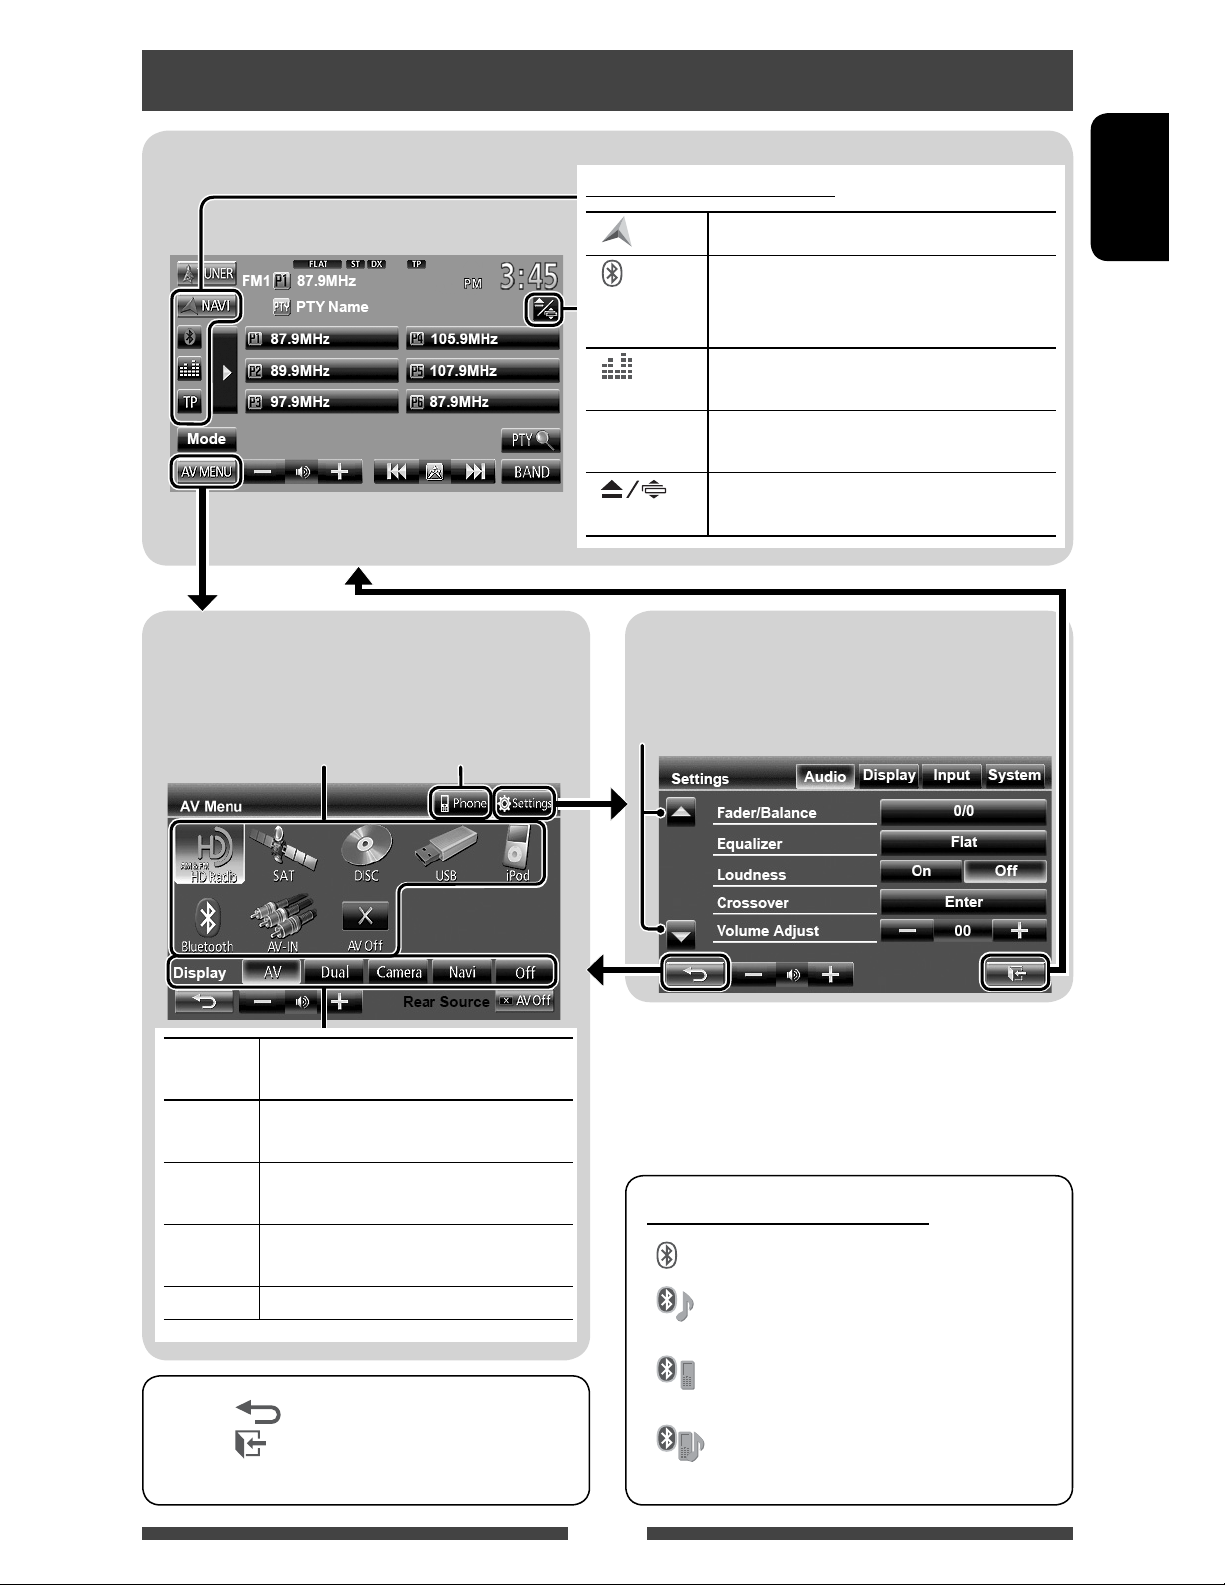
Switching screens
Source control screen
Common operating buttons
1
[ NAVI] *
[
]
( below)
[
]
[TP] Activates/deactivates TA standby reception
[
Displays navigation screen. *2 ( page 30)
• Displays the phone control screen. (Press)
• Switches to the last connected mobile
phone. (Hold) (
page 51)
Displays the sound adjustment screen.
(
page 37)
page 16)
mode. (
]
Displays <Open/Tilt> screen. (Press)
(
page 10)
ENGLISH
<AV Menu>
Displays source control screen/setting screen and
changes picture source.
Displays the phone
page 12
control screen
[AV] Displays the source control screen.
above)
(
[Dual] Displays the picture from the rear
source. (
page 36)
[Camera] Displays the picture from the rear view
2
(page 43)
[Navi] *
camera.*
1
Displays the navigation screen. *
(page 30)
[Off]
Turns off the screen. (
page 9 )
2
<Settings>
Changes the detailed settings. ( page 44 )
Changes the page
1
*
Appears only when <Navigation Input> is set to
<On>. ( page 30)
2
*
Displays the screen only when a rear view camera/
navigation unit is connected.
Icons for Bluetooth button
: No device is connected.
: A Bluetooth audio player is
connected.
• Press [ ] to return to the previous screen.
• Press [
] to display the current source control
screen.
: A Bluetooth mobile phone is
connected.
: Both Bluetooth mobile phone and
audio player are connected.
11
Page 12
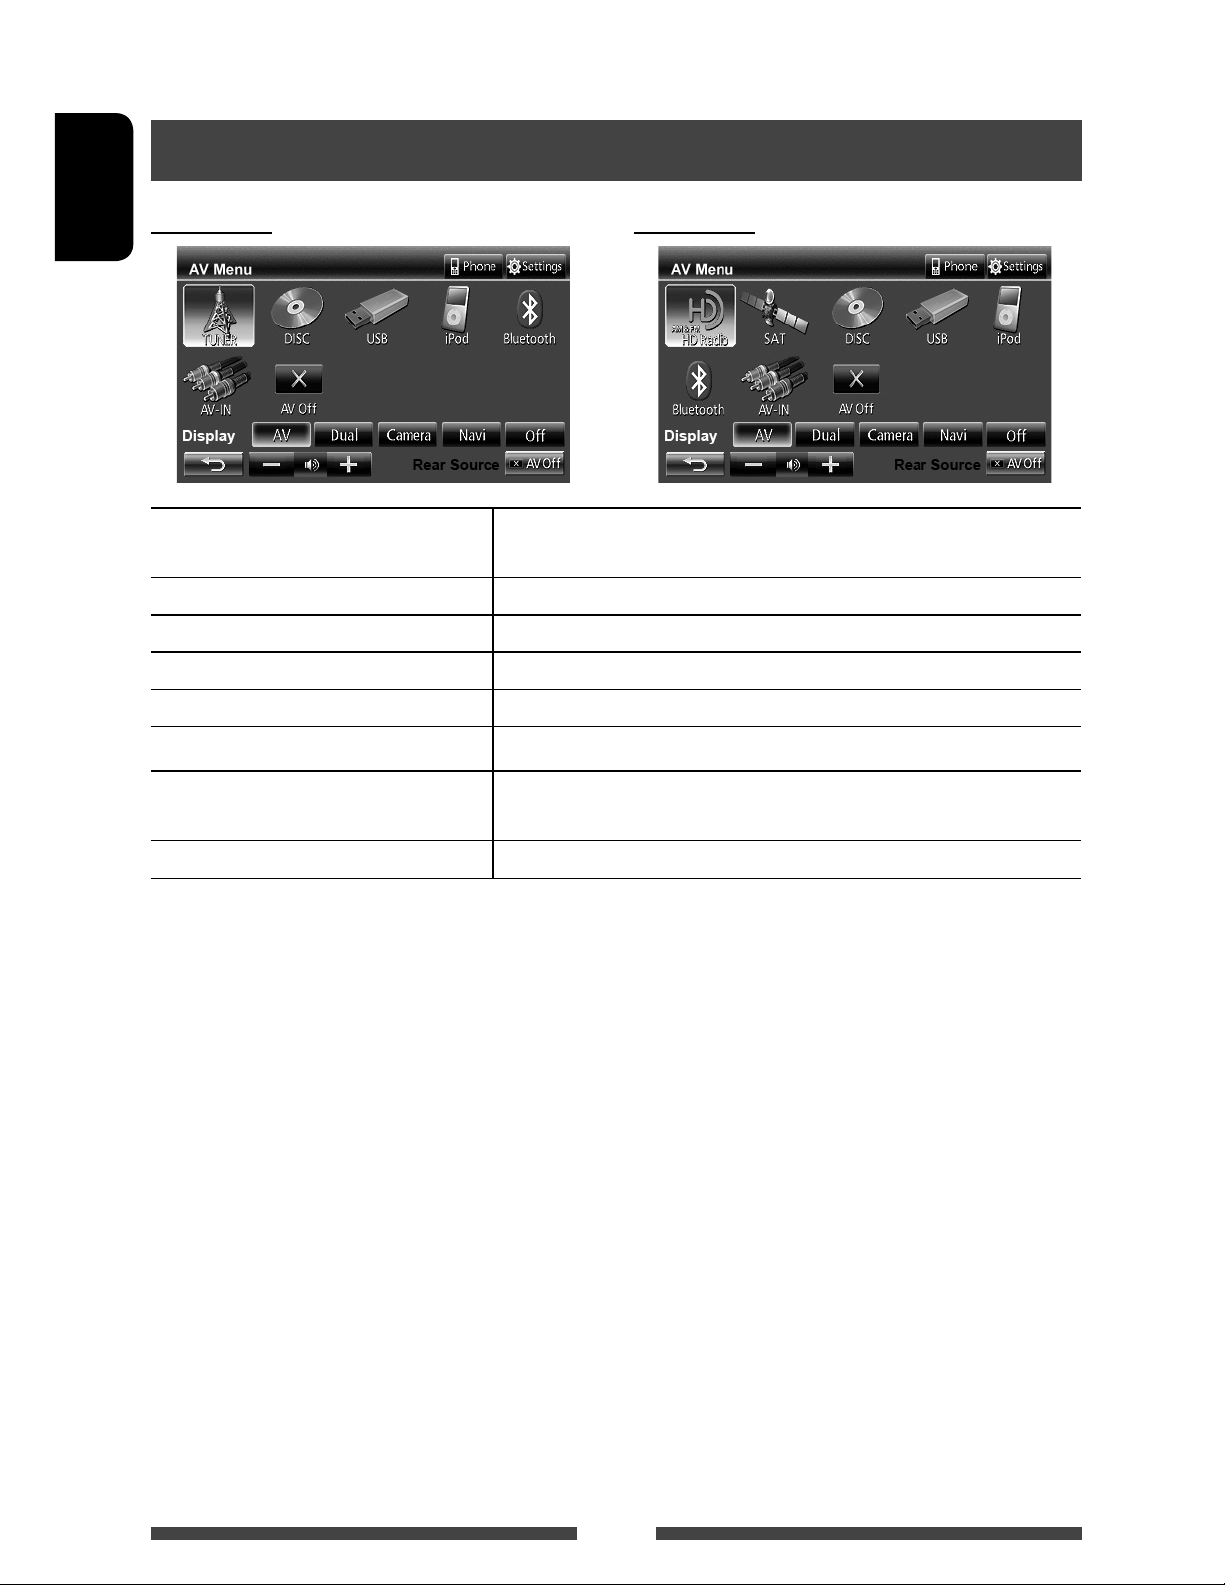
AV SOURCE OPERATIONS
Selecting the playback source
KW-AVX848 KW-AVX840
ENGLISH
TUNER
( page 34)
SAT
DISC
USB
iPod
Bluetooth
AV-IN
AV Off
1
*
2
*
3
*
( page 13)/
*1 ( page 31)
( page 17)
( page 24)
( page 26)
( page 56)
*3 ( page 29)
Only for KW-AVX840.
“HD RADIO” is shown as the source instead of “TUNER” when the HD Radio tuner box is connected.
Select an appropriate input setting on <Audio Input>. ( page 46)
HD RADIO
Switches to the conventional radio broadcast/HD Radio broadcast.
*1 *2
Switches to the satellite radio broadcast.
Plays a disc.
Plays files on a USB device.
Plays an iPod/iPhone.
Plays a Bluetooth audio player.
Switches to an external component connected to LINE IN/VIDEO IN jacks
on the rear panel.
Turns off the AV source.
12
Page 13
Listening to the radio
Preparation: Select the appropriate tuner channel interval for <Area Setting>. ( page 15)
ST/MO indicator
Sound mode ( page 37)
Preset no.
Band
page 16
• The ST indicator lights up when receiving an FM stereo broadcast with sufficient signal strength.
[P1] – [P6] • Tunes in the preset station. (Press)
• Presets the currently tuned
station. (Hold)
[TP]* Activates/deactivates TA standby
reception mode. (
Enters FM RBDS program search
[PTY
[3] Displays/hides the information of the
]*
mode. (
current station (
page 16)
page 16)
below).
DX/LO indicator
Standby reception indicator
[BAND] Selects the band.
[4]
[¢]
[ –]
[Mode] Displays tuner setting screen.
[AV MENU] Displays <AV Menu> screen.
[+]
The station frequency currently tuned
in/PS (station name) for FM RBDS when
PS signal is coming in
PTY code for FM RBDS
Preset list
Searches for a station.
• Auto search (Press)
• Manual search (Hold)
Adjusts the volume.
( pages 14 – 15)
ENGLISH
* Appears only when FM is selected as the source.
Displaying the information of the current station
Hides the text information
13
Text information
Scrolls the text information
Page 14
When an FM stereo broadcast is hard to
When the FM reception is interfered...
receive...
Activate monaural mode for better reception.
1
ENGLISH
2
On Activate monaural mode to improve FM
reception, but stereo effect will be lost.
The MO indicator lights up.
Off Restore the stereo effect.
1
2
Auto Increases the tuner selectivity to reduce
interference noises between adjacent
stations. (Stereo effect may be lost.)
Wide Subject to the interference from
adjacent stations, but sound quality
will not be degraded and the stereo
effect will remain.
To tune in FM stations only with strong
signals—LO/DX (Local/Distance-extreme)
1
2
Local Select this to tune in only to stations
with sufficient signal strength. The LO
indicator lights up.
DX Deactivate the function. The DX
indicator lights up.
14
Page 15
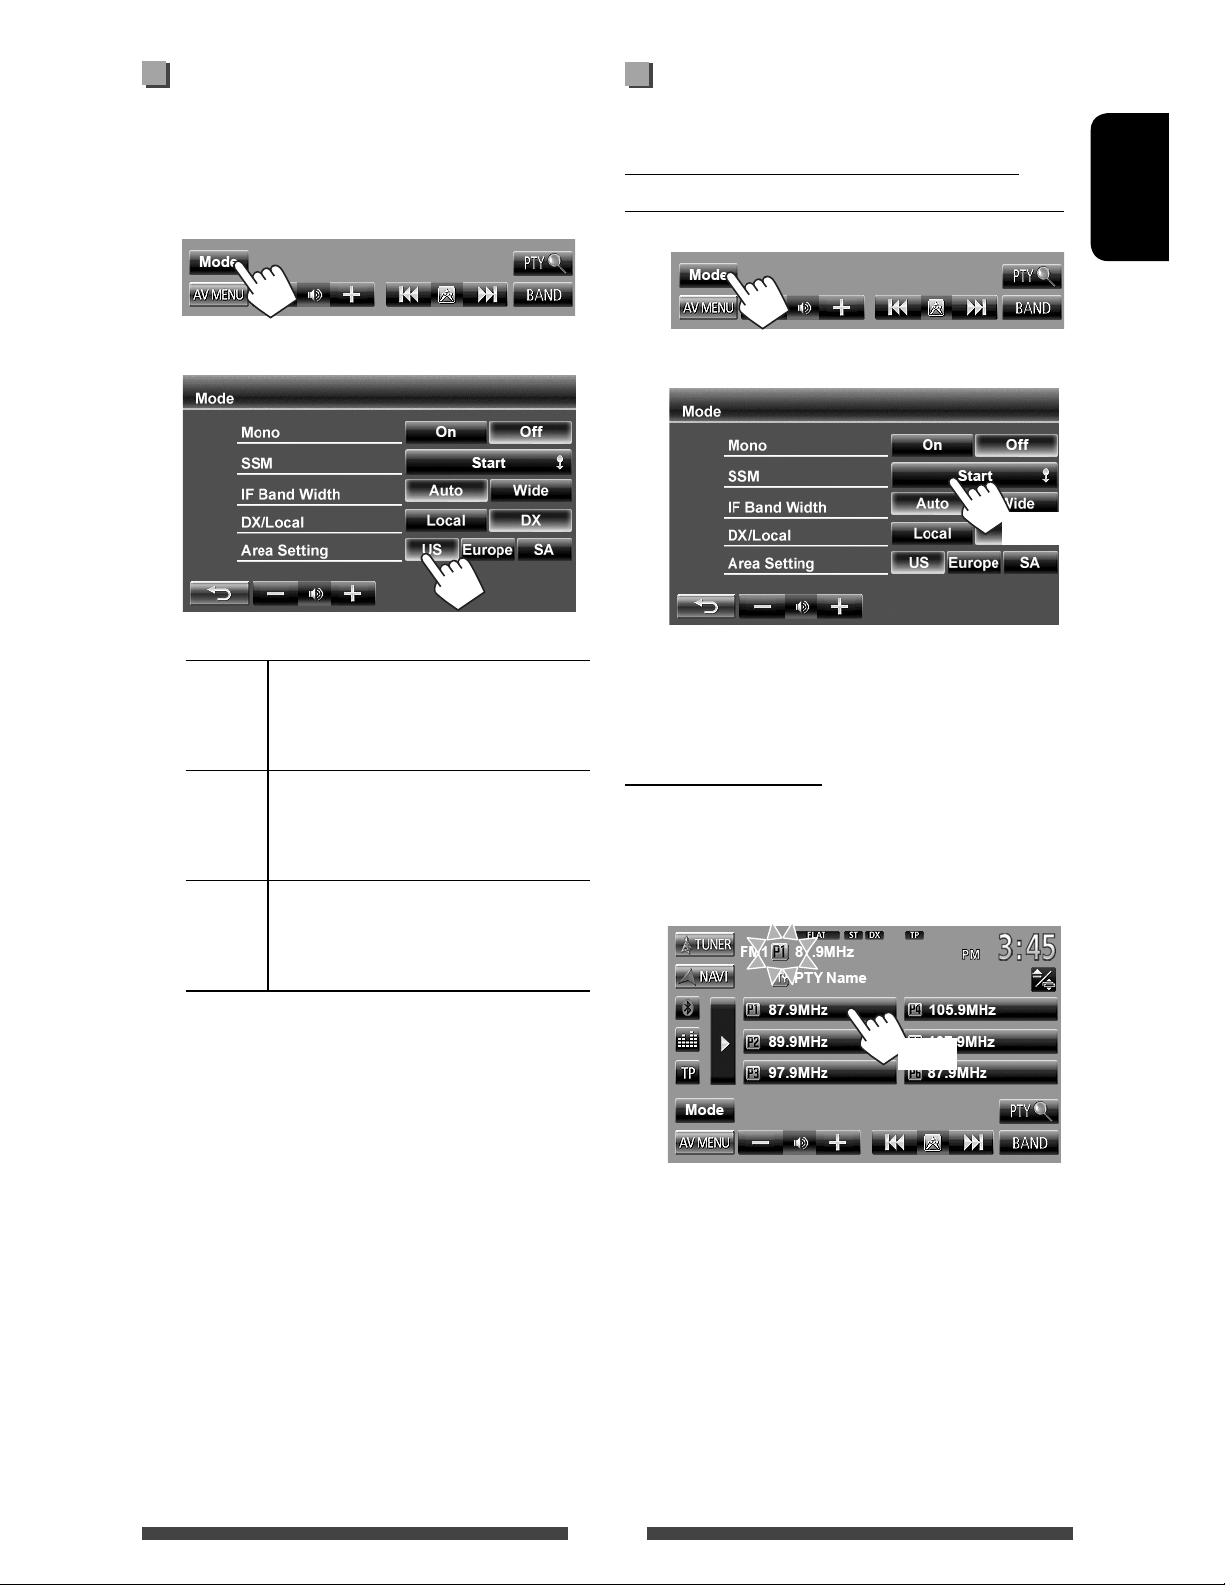
Changing the tuner channel
Storing stations in memory
interval
Tuner channel interval changes depending on the area
you use this unit.
1
2
US Select this when using in North/
Central/South America. FM/AM
intervals are set to 200 kHz/10 kHz.
Europe Select this when using in any other
areas. FM/AM intervals are set to 50
kHz/9 kHz.
SA Select this when using in South
American countries where FM interval
is 50 kHz. AM interval is set to 10 kHz.
You can preset six stations for each band.
Automatic presetting — SSM (Strongstation Sequential Memory) (For FM only)
1
2
(Hold)
Local stations with the strongest signals are searched
and stored automatically.
Manual presetting
1 Tune in to a station you want to preset.
( page 13)
2 Select a preset number.
ENGLISH
• Initial setting is <US> for KW-AVX840, and
<SA> for KW-AVX848.
(Hold)
The station selected in step 1 is stored.
15
Page 16
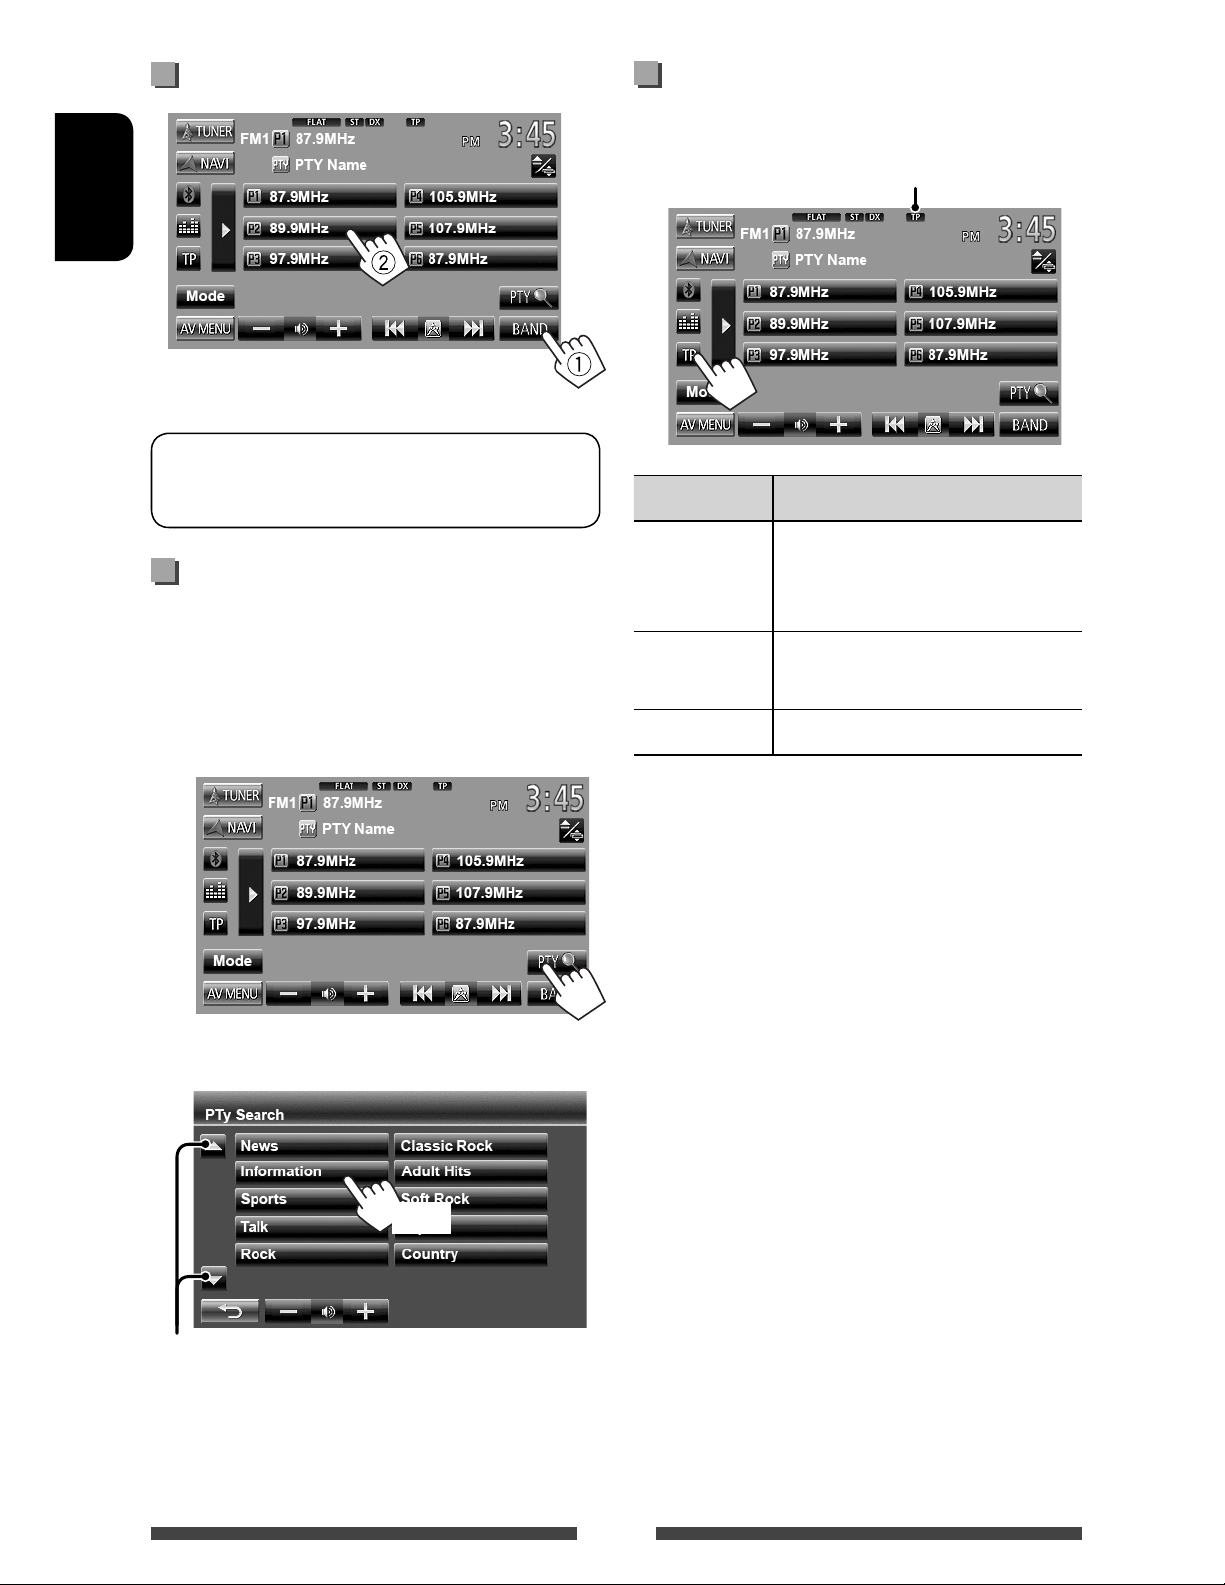
Selecting a preset station
ENGLISH
The following features are available only for FM
RBDS stations.
Searching for FM RBDS program—
PTY Search
Activating/deactivating TA Standby
Reception
TP indicator
TP indicator TA Standby Reception
Lights up The unit will temporarily switch
to Traffic Announcement (TA) if
available.
You can search for your favorite programs being
broadcast by selecting the PTY code for your favorite
programs.
1
2 Select a PTY code.
(Hold)
Flashes Not yet activated. Tune in to another
station providing the RBDS signals.
Goes off Deactivated.
• The volume adjustment for Traffic Announcement
is automatically memorized. The next time the unit
switches to Traffic Announcement, the volume is set
to the previous level.
Changes the page
PTY Search starts.
If there is a station broadcasting a program of the
same PTY code as you have selected, that station
is tuned in.
16
Page 17
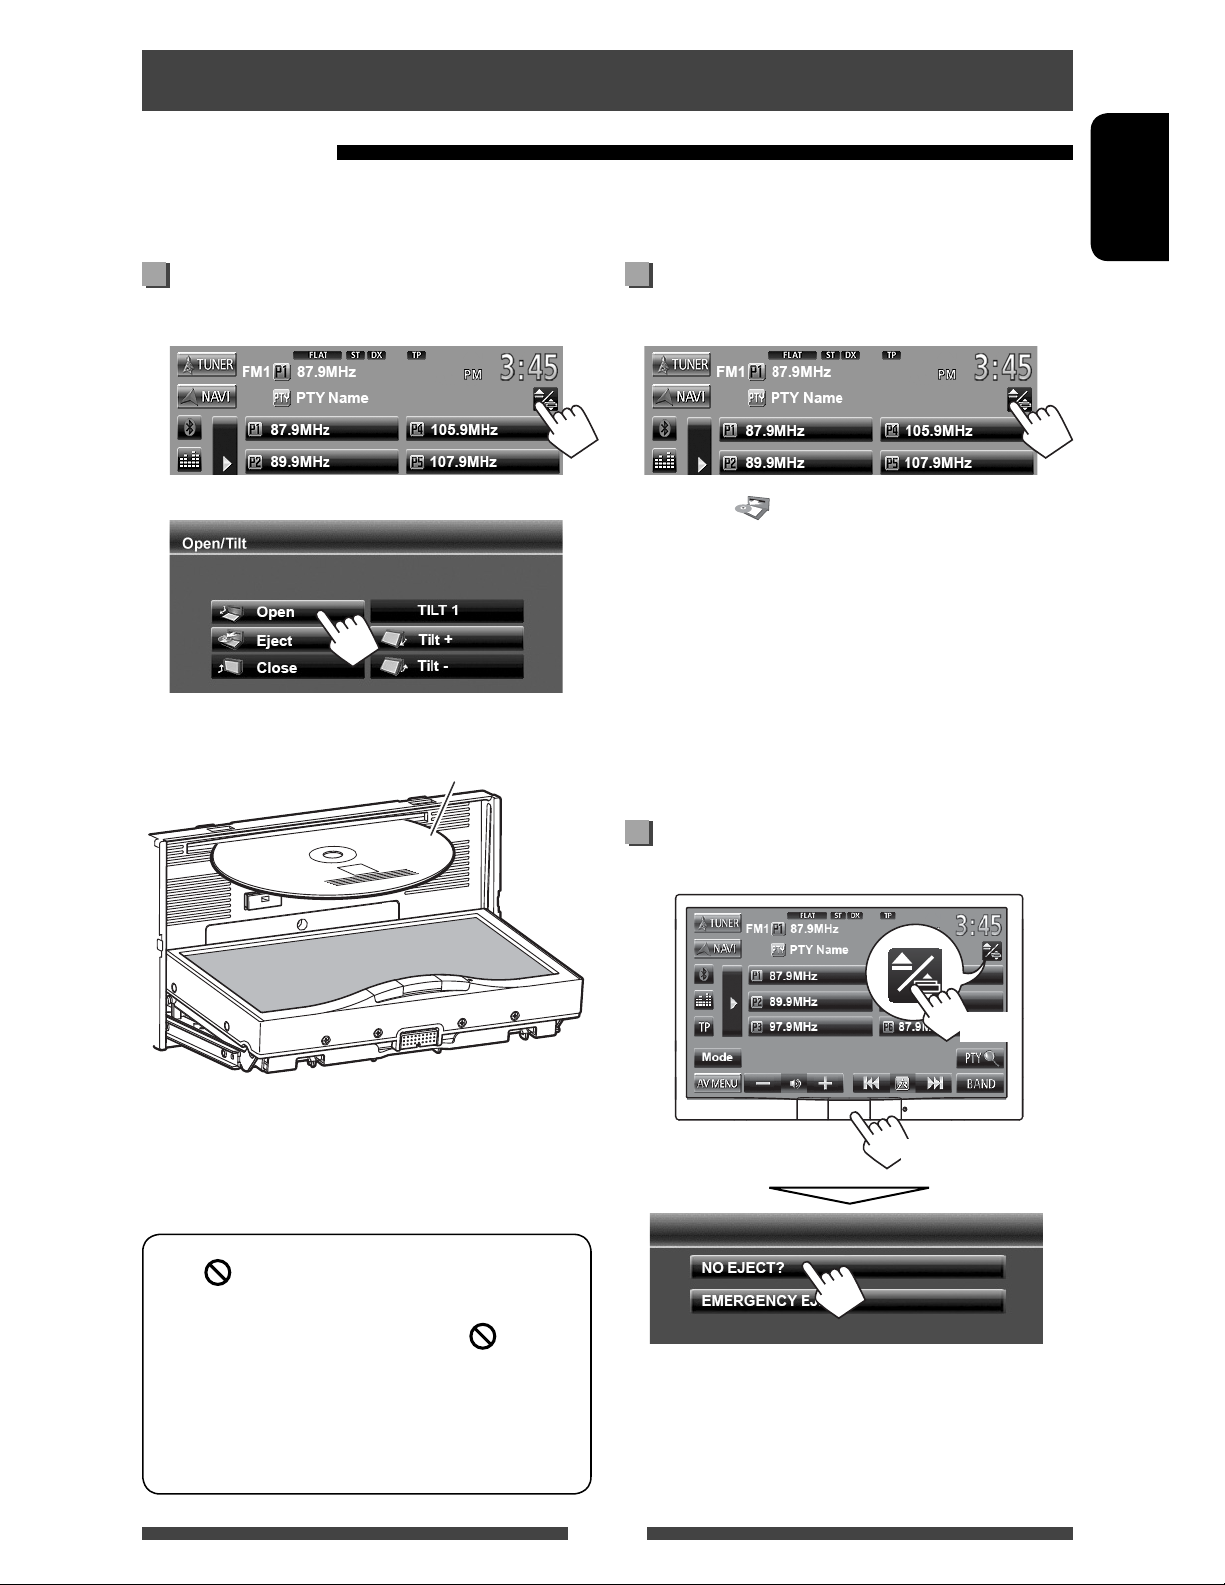
Disc operations
Playing a disc
• If a disc does not have any disc menu, all tracks on it will be played repeatedly until you change the source or eject
the disc.
ENGLISH
Inserting a disc
1 On the source control screen:
2
The monitor panel opens.
3
To eject a disc
1 On the source control screen:
2 Press [ Eject].
• You can eject a disc when playing another AV source.
• If the ejected disc is not removed within 15 seconds,
the disc is automatically inserted again into the
loading slot to protect it from dust.
• If the disc cannot be ejected, page 3.
When removing a disc, pull it horizontally.
Label side
To prohibit disc ejection
The source changes to “
• The DISC IN indicator lights up while a disc is inserted.
• If “
• When playing back a multi-channel encoded
” appears on the screen, the unit cannot
accept the operation you have tried to do.
– In some cases, without showing “
operations will not be accepted.
disc, the multi-channel signals are downmixed
to stereo.
DISC
” and playback starts.
,”
On the monitor panel and the source control screen:
(Hold)
(Hold)
To cancel the prohibition, repeat the same procedure
to select <EJECT OK?>.
17
Page 18
Playable disc type
Disc type Recording format, file type, etc Playable
DVD
• DTS sound cannot be
ENGLISH
reproduced or emitted from
this unit.
DVD-Video *
Region Code:
• For KW-AVX840 : 1
• For KW-AVX848 : 4
DVD-Audio/DVD-ROM
DVD Recordable/Rewritable
(DVD-R/-RW *
2
, +R/+RW *3)
DVD-Video
DVD-VR *
5
• DVD Video: UDF bridge
• DVD-VR
• DivX*
4
/MPEG1/MPEG2/JPEG/
MP3/WMA/WAV : ISO 9660 level
DivX*4 /MPEG1/MPEG2
JPEG
MP3/WMA/WAV
1, level 2, Romeo, Joliet
MPEG4/AAC/DVD+VR/DVD-RAM
Dual Disc DVD side
Non-DVD side
CD/VCD Audio CD/CD Text (CD-DA)
1
VCD (Video CD)
DTS-CD/SVCD (Super Video CD)/CD-ROM/CD-I(CD-I Ready)
CD Recordable/Rewritable
(CD-R/-RW)
• ISO 9660 level 1, level 2,
Romeo, Joliet
CD-DA
VCD (Video CD)
4
/MPEG1/MPEG2
DivX*
JPEG
MP3/WMA/WAV
MPEG4/AAC
1
*
If you insert a DVD Video disc of an incorrect Region Code, “Region Code Error” appears on the screen.
2
*
DVD-R recorded in multi-border format is also playable (except for dual layer discs). DVD-RW dual layer discs are not
playable.
3
*
It is possible to play back finalized +R/+RW (Video format only) discs. “DVD” is selected as its disc type when a
+R/+RW disc is loaded. +RW double layer discs are not playable.
4
*
Only for KW-AVX840.
5
*
This unit cannot play back contents protected with CPRM (Content Protection for Recordable Media).
Caution for DualDisc playback
The Non-DVD side of a “DualDisc” does not comply with the “Compact Disc Digital Audio” standard. Therefore, the use
of Non-DVD side of a DualDisc on this product may not be recommended.
18
Page 19
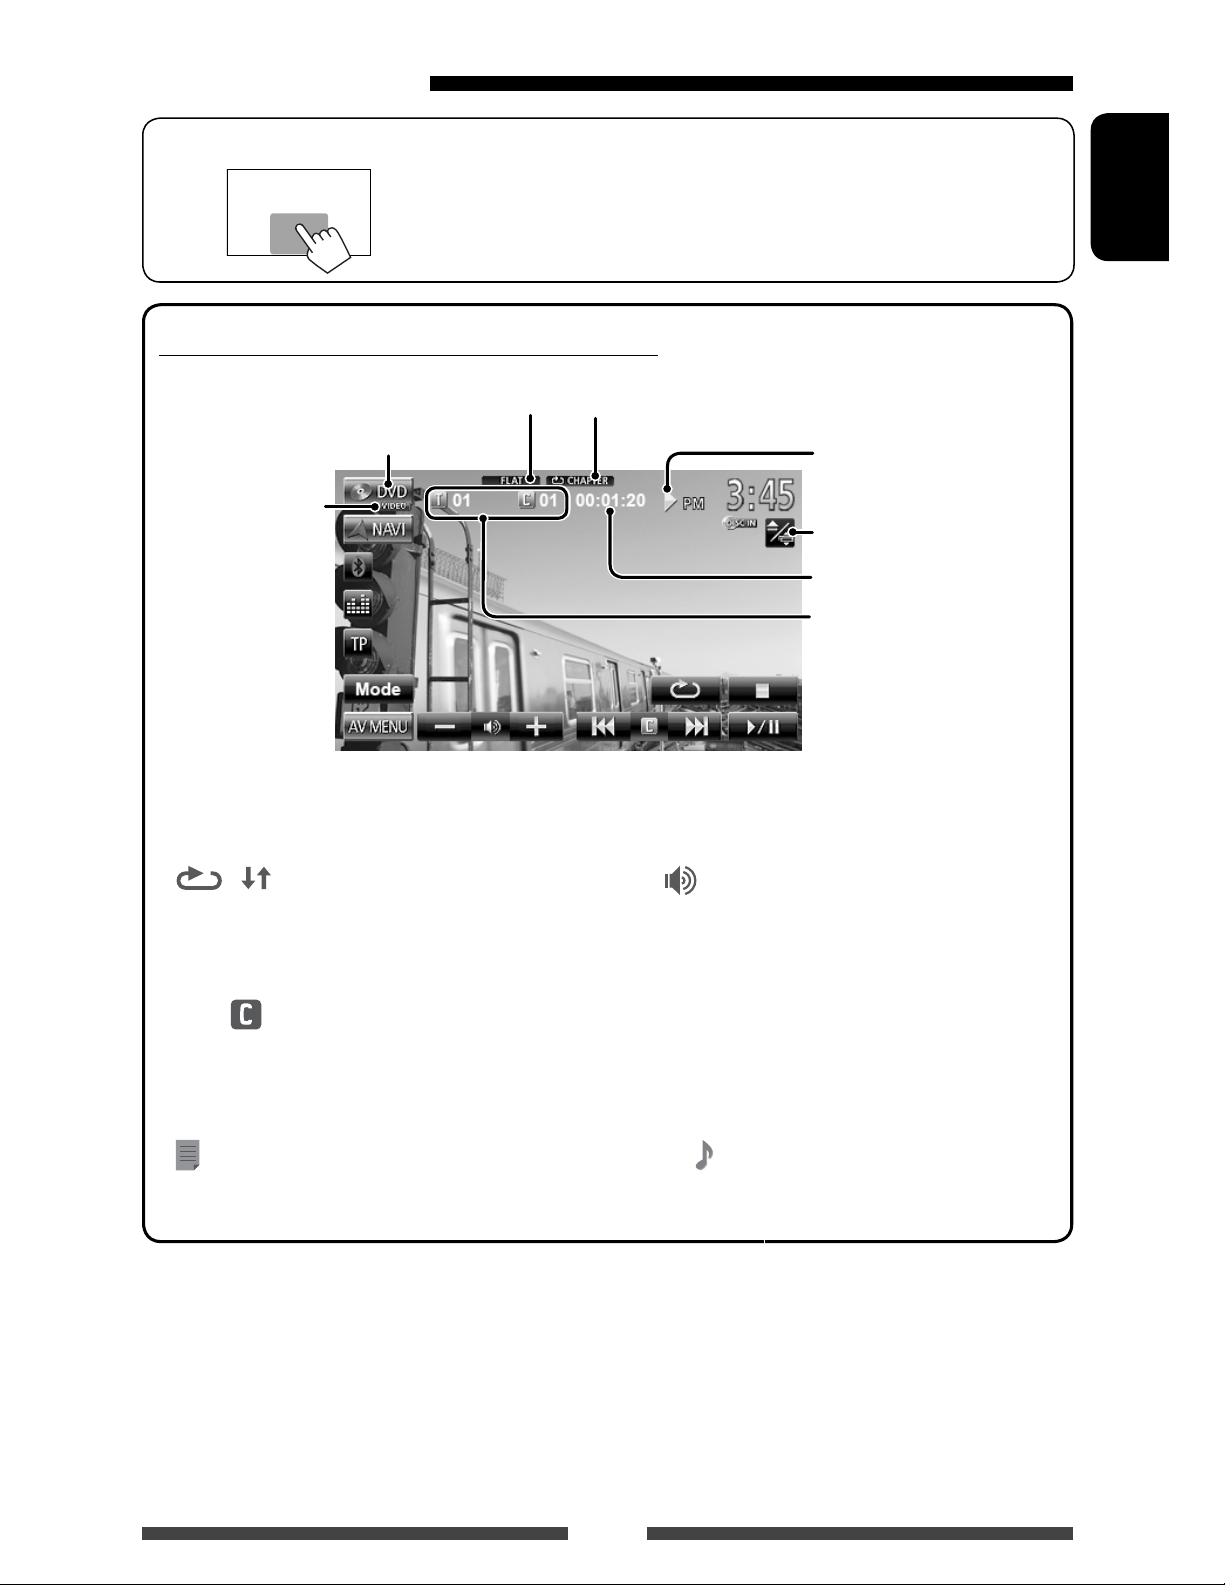
Playback operations
To display the source control screen ( below)
• The operation buttons disappear when no operation is done for about
10seconds.
For DVD/DVD-VR/VCD/DivX/MPEG1/MPEG2/JPEG
Sound mode ( page 37) Playback mode ( page 22)
ENGLISH
Video format/
Media type
playback mode—
VIDEO/VR-PRG
(program)/VR-PLAY
(playlist)/ DivX/
MPEG/PBC
[ ] [ ]*
2
Selects playback mode. (
page 22)
[6] Starts playback/pauses.
3
[7]*
[4]
[¢]
Stops playback.
• Selects chapter. (Press)
• Reverse/forward search.*
(Hold)
Playback status
(3: play / 8: pause / 7: stop)
page 10
Playing time
• DVD Video: Title no./
Chapter no.
• DVD-VR: Program no. (or
Playlist no.)/Chapter no.*
1
• DivX/MPEG1/MPEG2:
Folder no./Track no.
• JPEG: Folder no./File no.
• VCD: Track no.
[ –] [+]
[Mode]*
5
Adjusts the volume.
Changes the settings for disc
playback. ( page 23)
[AV MENU] Displays <AV Menu> screen.
4
• For VCD/DivX/MPEG1/MPEG2/JPEG, the following buttons also appear:
5
[
]*
1
*
To display the Original Program/Playlist screen, page21.
2
*
Does not appear for DVD/DVD-VR/JPEG.
3
*
Appears only for DVD/DVD-VR/VCD.
4
*
Search speed varies depending on the type of disc or file.
5
*
Does not appear for VCD.
6
*
Displayed icon varies depending on the type of disc or file.
Displays folder/track list. (
page 20)
[4] *6
[¢]
19
• Selects track. (Press)
• Reverse/forward search.*
(Hold)
4
Page 20
For CD/MP3/WMA/WAV
Sound mode ( page 37)
ENGLISH
While playing, “Jacket picture” is
shown if the file has the tag data
including “Jacket picture.”
[ ] [ ]
1
]*
[
[6] Starts playback/pauses.
[4]
[¢]
Audio format
Playback mode ( page 22)
Media type
Selects playback mode. ( page 22)
Displays folder/track list.
(below)
• Selects track. (Press)
• Reverse/forward search.*
2
(Hold)
Playback status
(3: play / 8: pause )Playing time
page 10
• MP3/WMA/WAV: Folder no./
Track no.
• CD: Track no.
Track/file information
• Touching an information bar scrolls the text if all the text is
not shown.
[ –] [+]
[Mode]*
1
Adjusts the volume.
Changes the settings for disc
playback. ( page 23)
[AV MENU] Displays <AV Menu> screen.
1
*
Does not appear for CD.
2
*
Search speed varies depending on the type of disc or file.
Selecting folder/track on the list
Changes the page
Plays tracks/files in the folder
Returns to the root folder
Returns to the upper layer
Playing Recordable/Rewritable discs
• This unit can recognize a total of 5 000 files and
250 folders (a maximum of 999 files per folder).
• Use only “finalized” discs.
• This unit can play back multi-session discs;
however, unclosed sessions will be skipped
while playing.
• Some discs or files may not be played back due
to their characteristics or recording conditions.
20
Page 21
Video menu operations
You can display the video menu screen while watching
the playback pictures on the screen.
• Available items on the screen differ depending on the
types of the loaded disc and playback files.
• The operation buttons disappear when no operation
is done for about 10 seconds.
Touch any position of the screen other than
operation buttons.
[ ] Selects the audio type.
• For DVD-VR: Selects the audio
channel (ST: stereo, L: left, R:
right).
[
] Selects the subtitle type.
[
]
Selects view angle.
[Menu] Displays the disc menu (DVD)/
playlist (DVD-VR).
[Top Menu] Displays the disc menu (DVD)/
original program (DVD-VR).
ENGLISH
• The screen for MPEG1/MPEG2 differs from the above.
[
]
Displays the menu/playlist/original
program item selecting screen.
• [5] [∞] [2] [3]: Selects an
item.
– For DivX only
[2] [3]: Skips back or
forward by about 5 minutes.
• [Enter]: Confirms the selection.
• [Return]: Returns to the
previous screen.
[
]
Switches to the direct selection
mode. Touch the target item to
select.
[Adjust] Displays picture adjustment screen.
( page 41)
[Aspect]
Selects aspect ratio. ( page 42)
[Zoom] Displays the picture size selecting
screen. ( page 42)
• Touching any position other than operation buttons
displays the source control screen.
21
Page 22
Only for VCD
1
ENGLISH
• To deactivate the PBC function, press [7] then the
direct selecting buttons to select a track number.
Selecting playback mode
For DVD/DVD-VR
2
Direct selecting buttons ( below)
[ ] Selects the audio channel (ST:
stereo, L: left, R: right).
[Return] Displays the previous screen or the
menu.
[Menu] Displays the disc menu.
[Adjust] Displays picture adjustment screen.
( page 41)
[Aspect]
[Zoom] Displays the picture size selecting
[
]
• To select a track directly
Selects aspect ratio. ( page 42)
screen. ( page 42)
Displays/hides the direct selecting
buttons. ( below)
Selects Repeat playback mode
For VCD (without PBC)/CD/DivX/MPEG1/MPEG2/MP3/
WMA/WAV
Selects Random
playback mode*
* You cannot activate the repeat mode and the random
mode at the same time.
• Each time you press the button, the playback mode
changes. (The corresponding indicator lights up.)
– Available items differ depending on the types of
loaded disc and playback file.
Indicator Playback mode
CHAPTER
TITLE
PROGRAM
SONGS
FOLDER
Repeats current chapter.
Repeats current title.
Repeats current program (not
available for Playlist playback).
Repeats current track.
Repeats all tracks of the current
folder.
Selects Repeat
playback mode*
– To switch between chapter/track entry and title/
folder entry, press [Direct/CLR].
– When you enter a wrong number, press [Direct/
CLR] to delete the last entry.
FOLDER
DISC
To cancel, press the button repeatedly until the
indicator disappears.
Randomly plays all tracks of
current folder, then tracks of next
folders.
Randomly plays all tracks.
22
Page 23
Settings for disc playback
Disc Setup items Selectable setting/item Initial: Underlined
ENGLISH
Menu Language
Audio Language
Subtitle
Down Mix When playing back a multi-channel disc, this setting affects the signals reproduced
For DVD/DVD-VR
D. (Dynamic)
Range Compres.
(Compression)
Monitor Type Select the monitor type to watch a wide screen picture on the external monitor.
Select the initial disc menu language; Initial English ( page 63).
Select the initial audio language; Initial English ( page 63).
Select the initial subtitle language or erase the subtitle (Off).
• Initial for KW-AVX840: Off, for KW-AVX848: English ( page 63)
through the FRONT OUT/REAR OUT jacks.
z Dolby Sur : Select this to enjoy multi-channel surround audio by
connecting an amplifier compatible with Dolby Surround.
z Stereo : Normally select this.
You can change the dynamic range while playing Dolby Digital software.
z Off : Select this to enjoy a powerful sound at a low volume
level with its full dynamic range.
z On : Select this to reduce the dynamic range a little.
z Dialog : Select this to reproduce the movie dialog more clearly.
z 16:9
z 4:3 LB (Letterbox) z 4:3 PS (PanScan)
VCD/CD
For discs except
File Type Select the playback file type when a disc contains different types of files.
video/picture files
For discs containing audio/
z Audio
z Still Picture
z Video
z Audio&Video
• For playable file types, page 18.
• If the disc contains no files of the selected type, the existing files are played in the
following order: audio, video, then still picture.
: Plays back audio files.
: Plays back JPEG files.
: Plays back DivX/MPEG1/MPEG2 files.
: Plays back audio files and DivX/MPEG1/MPEG2 files.
23
Page 24
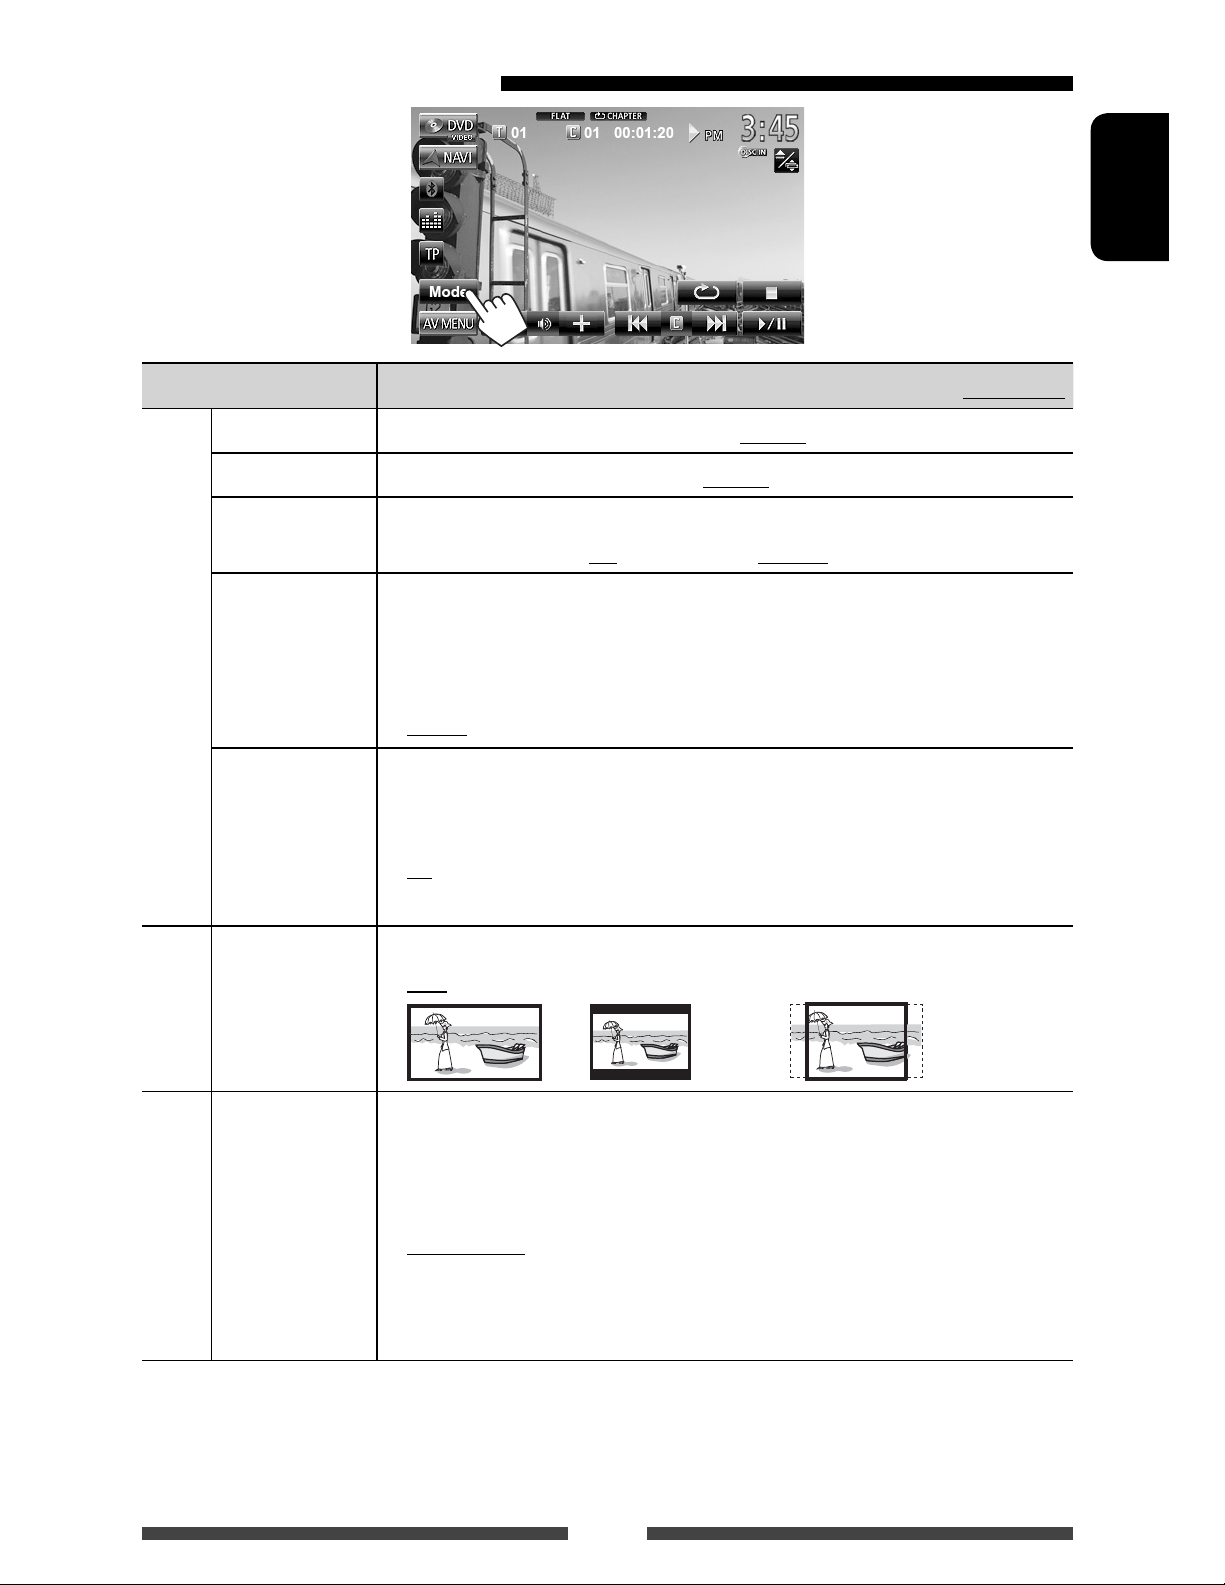
USB operations
Playing a USB device
• This unit can play JPEG/MPEG1/MPEG2 */MP3/WMA/
WAV files stored in USB mass storage class device.
ENGLISH
• This unit can recognize a total of 5 000 files and 250
folders (a maximum of 999 files per folder).
• Make sure all important data has been backed up to
avoid losing the data.
* Except for MPEG2 files recorded by JVC Everio
camcorder (extension code <.mod>).
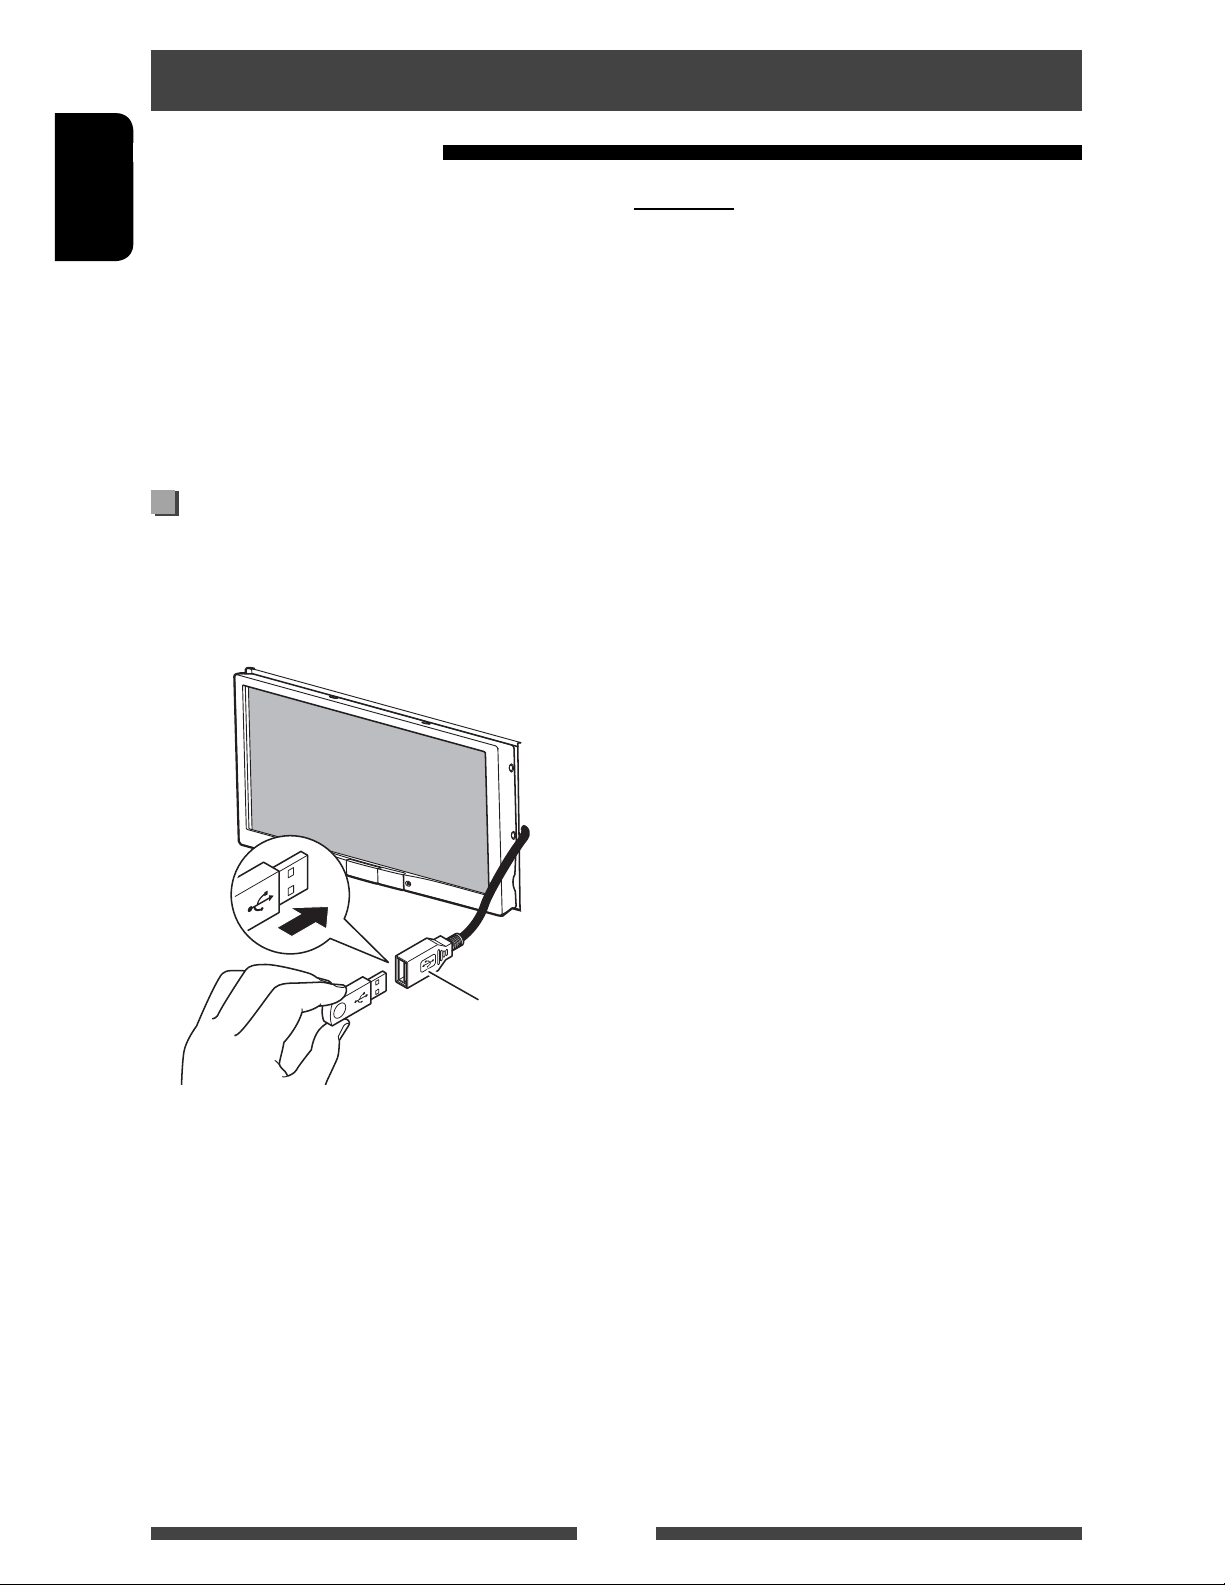
Connecting a USB device
You can connect a USB mass storage class device such as
a USB memory, Digital Audio Player etc. to the unit.
• You cannot connect a computer or portable HDD to
the USB cable from the rear of the unit.
USB cable from the
rear of the unit
The source changes to “
• All tracks in the USB device will be played repeatedly
until you change the source.
USB
” and playback starts.
Cautions:
• This unit may not play back files in a USB device
properly when using a USB extension cord.
• USB devices equipped with special functions such as
data security functions cannot be used with the unit.
• Do not use a USB device with 2 or more partitions.
• Depending on the shape of the USB devices and
connection ports, some USB devices may not be
attached properly or the connection might be loose.
• This unit cannot recognize a USB device whose rating
is other than 5 V and exceeds 1 A.
• This unit may not recognize a memory card inserted
into the USB card reader.
• Connect only one USB device to the unit at a time. Do
not use a USB hub.
• When connecting with a USB cable, use the USB 2.0
cable.
• The maximum number of characters for (when the
characters are 1 byte):
– Folder names : 50 characters
– File names : 50 characters
• Avoid using the USB device if it might effect driving
safety.
• Do not pull out and attach the USB device repeatedly
while “Now Reading” is shown on the screen.
• Electrostatic shock at connecting a USB device may
cause abnormal playback of the device. In this case,
disconnect the USB device then reset this unit and
the USB device.
• Operation and power supply may not work as
intended for some USB devices.
• Do not leave a USB device in the car, expose to direct
sunlight, or high temperature to avoid deformation
or cause damaging to the device.
24
Page 25
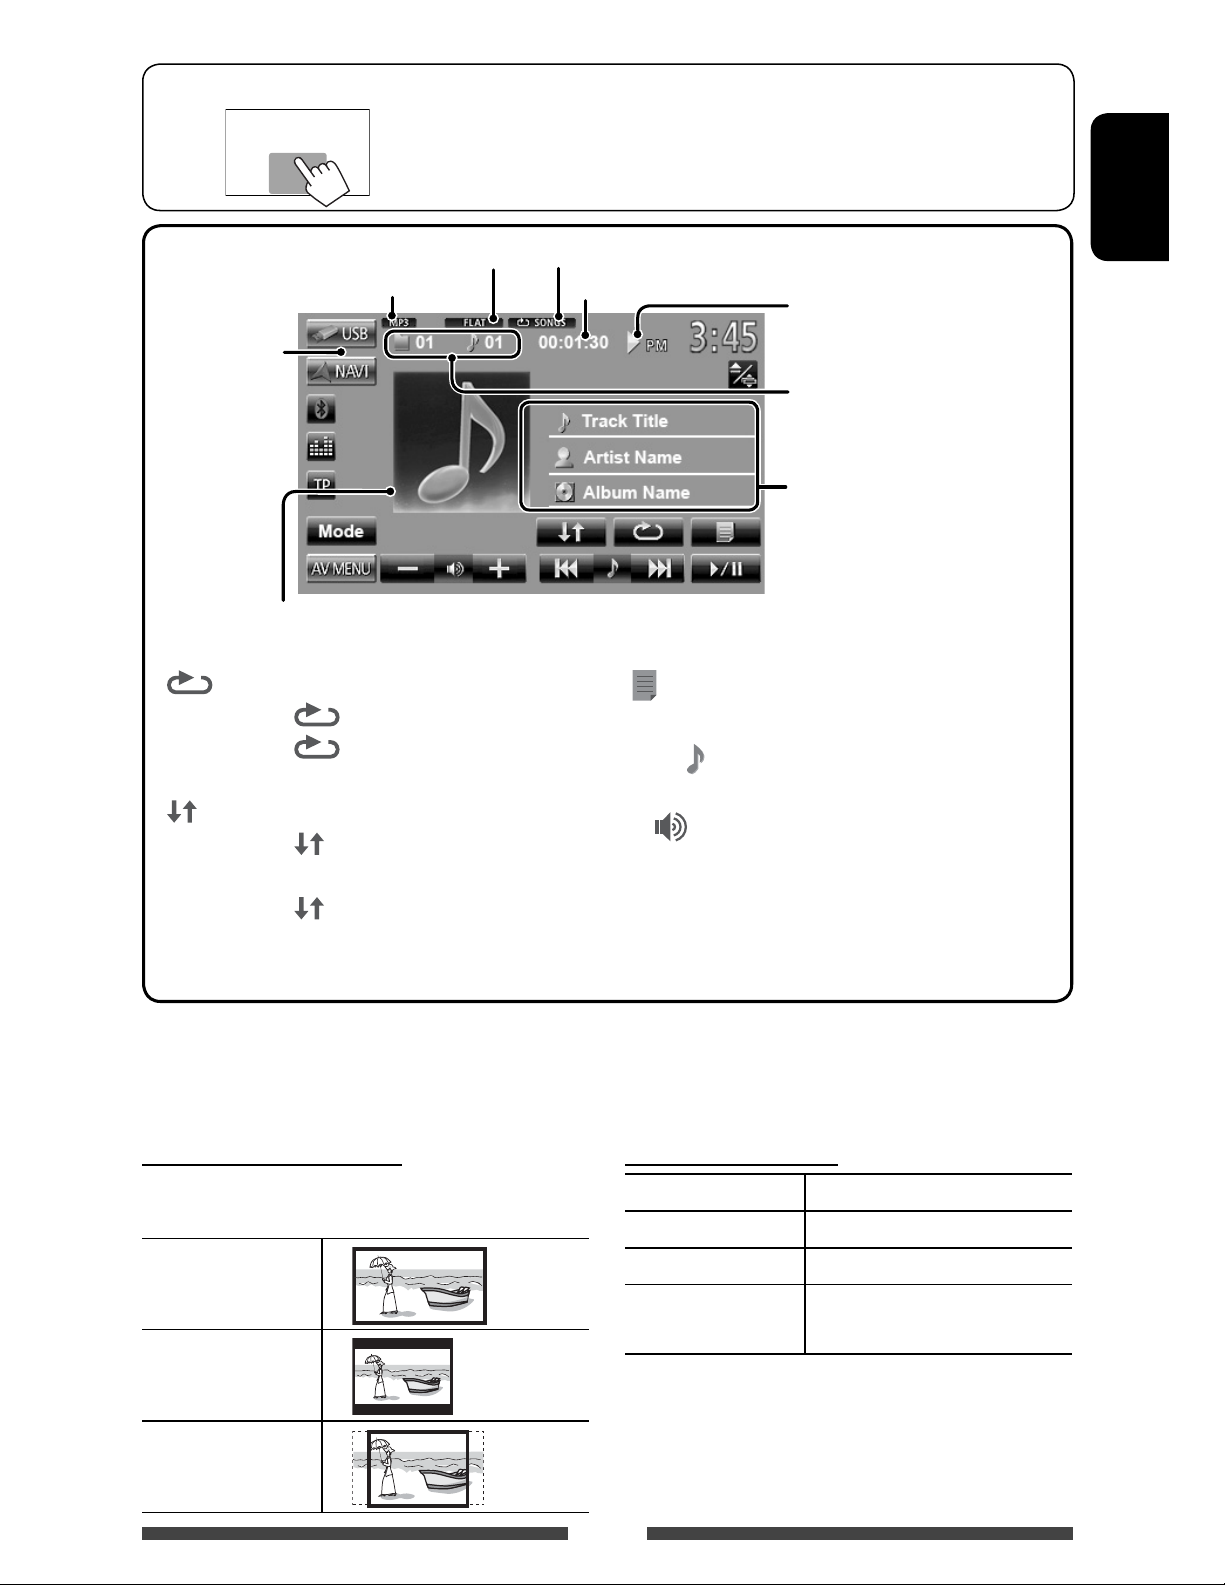
To display the source control screen ( below)
• The operation buttons disappear when no operation is done for about
10seconds.
• To change settings for video playback, page 41.
Sound mode ( page 37)
Audio format
Video
format—
MPEG/JPEG
While playing, “Jacket picture” is shown if the file
has the tag data including “Jacket picture.”
[ ]
Selects repeat mode. *
1 *2
• SONGS: Repeats current track.
•
FOLDER: Repeats all tracks of
the current folder.
[
] Selects random mode. *1 *
2
• FOLDER: Randomly plays all
tracks of the folder.
•
USB: Randomly plays all tracks.
Playback mode ( below)
Playing time
[
]
[6] Starts playback/pauses.
[4]
*3
[¢]
[ –]
[+]
[Mode] Changes the settings for file playback.
[AV MENU] Displays <AV Menu> screen.
Playback status
(3: play / 8: pause)
• MP3/WMA/WAV: Folder no./
Track no.
• JPEG: Folder no./File no.
Track/file information (for MP3/
WMA/WAV)
• Touching an information bar
scrolls the text if all the text is
not shown.
Displays folder/track list. ( page 20)
• Selects track. (Press)
• Reverse/forward search.*
4
(Hold)
Adjusts the volume.
(below)
ENGLISH
• Available items differ depending on the types of playback file.
1
*
To cancel random or repeat mode, press the button repeatedly until the indicator disappears.
2
*
You cannot activate the repeat mode and the random mode at the same time.
3
*
Displayed icon varies depending on the file type.
4
*
Search speed varies depending on the file type.
Setting <Monitor Type>
Select the monitor type to watch a wide screen picture
on the external monitor.
16:9
Setting <File Type>
Audio Plays back audio files.
Still Picture Plays back JPEG files.
Video Plays back MPEG1/MPEG2 files.
Audio&Video Plays back audio files and
4:3 LB (Letterbox)
• If the USB device contains no files of the selected
type, the existing files are played in the following
4:3 PS (PanScan)
order: audio, video, then still picture.
25
MPEG1/MPEG2 files.
Page 26
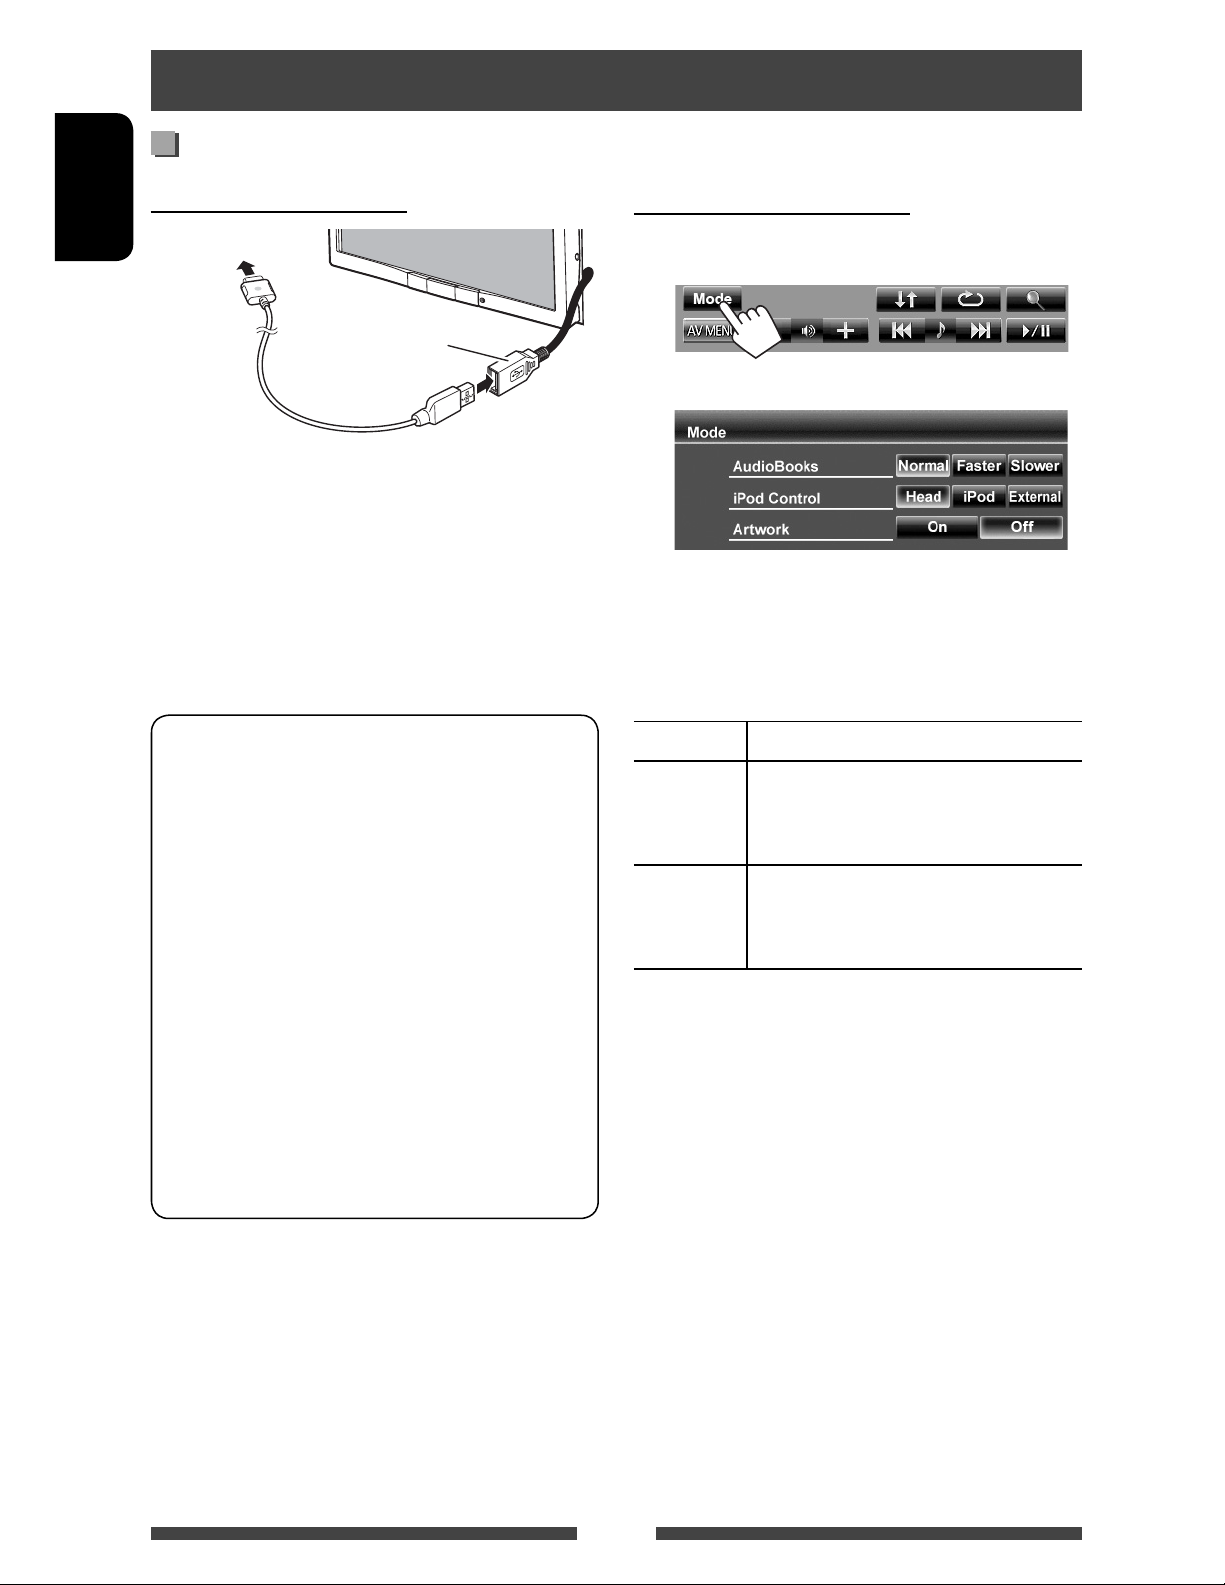
Listening to the iPod/iPhone device
Preparation
Connecting iPod/iPhone
ENGLISH
To iPod/iPhone
USB cable from the
rear of the unit
• Use the following cables:
– To listen to the music (digital): USB 2.0 cable
(accessory of the iPod/iPhone)
– To watch the video and to listen to the
music (analog): USB Audio and Video cable for
iPod/iPhone—KS-U30 (separately purchased)
(Installation/Connection Manual)
• Change the setting for watching video. ( page 28)
iPod/iPhone that can be connected to this unit:
– iPod with video (5th Generation)
– iPod classic
– iPod nano (6th Generation)
– iPod nano (5th Generation)
– iPod nano (4th Generation)
– iPod nano (3rd Generation)
– iPod nano (2nd Generation)
– iPod nano (1st Generation)
– iPod touch (4th Generation)
– iPod touch (3rd Generation)
– iPod touch (2nd Generation)
– iPod touch (1st Generation)
– iPhone 4
– iPhone 3G
– iPhone 3GS
– iPhone
Settings for iPod playback
When the source is “
iPod
”...
1
2
AudioBooks: Select the speed of audio books.
iPod Control:
• When using iPod nano (1st Generation) or iPod with
video (5th Generation), only <Head> mode is
selectable.
Head Controls playback from this unit.
iPod Controls audio/video playback from the
iPod/iPhone.
• Playback information is shown.
External * Allows any audio/video signals from
iPod/iPhone.
• No information is shown.
Artwork: Shows/hides the iPod artwork.
* When you turn on the power and play back a video
with <External> selected, caution message appears.
Press [Accept] to continue.
• When you use App of the iPod touch or iPhone, see
also page 64 for safety instructions.
26
Page 27
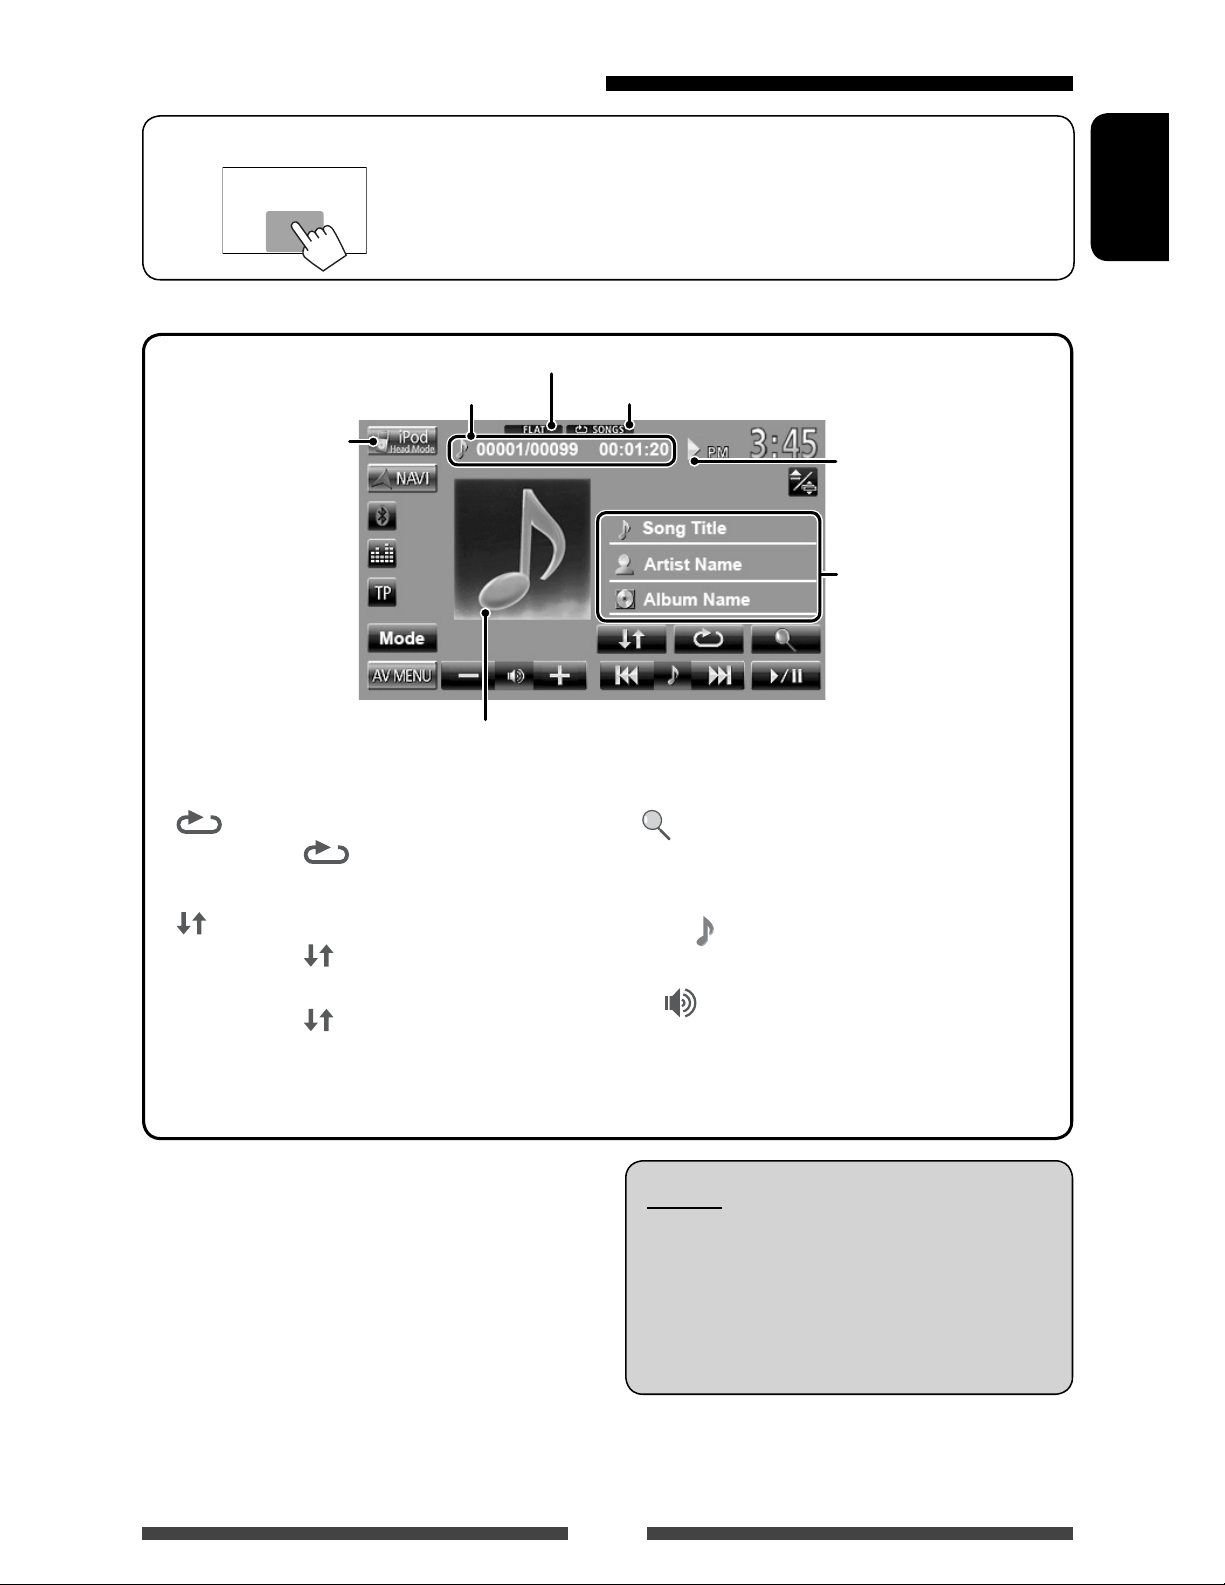
iPod/iPhone playback operations
To display the source control screen ( below)
• The operation buttons disappear when no operation is done for about
10seconds.
• To change settings for video playback, page 41.
• The operations explained in this manual are under <Head> mode ( page 26).
ENGLISH
Track no./Total track number/
Playing time
iPod control mode
( page 26)
While playing, Artwork (the picture displayed on the screen of iPod/iPhone) is shown if the song
contains the Artwork.*
[ ]
Selects Repeat playback mode. *
1
• SONGS: Functions the same
as “Repeat One.”
[
] Selects Random playback mode. *
• SONGS: Functions the same as
“Shuffle Songs.”
•
ALBUMS: Functions the same
as “Shuffle Albums.”
Sound mode ( page 37)
Playback mode ( below)
2
[ ]
[6] Starts playback/pauses.
2
[4]
[¢]
[ –]
[+]
[ Mode] Changes the settings for iPod
Playback status ( 3:
play/8: pause)
Song/video information
• Touching an information
Displays the Music/Video menu on
the iPod/iPhone. ( page 28)
• Selects a track/video. *
• Reverse/forward search. (Hold)
Adjusts the volume.
playback. ( page 26)
bar scrolls the text if all
the text is not shown.
3
(Press)
1
*
For changing the Artwork display setting, page 26.
2
*
To cancel random or repeat mode, press the button
repeatedly until the indicator disappears.
3
*
You cannot resume playback for video sources.
• When you turn on this unit, the iPod/iPhone is
charged through the unit.
– iPhone 4 can be charged only when connected
through KS-U30.
• The text information may not be displayed correctly.
[AV MENU] Displays <AV Menu> screen.
Notice:
When operating an iPod/iPhone, some operations
may not be performed correctly or as intended. In
this case, visit the following JVC web site: <http://
www.jvc.co.jp/english/car/> (English website
only)
27
Page 28
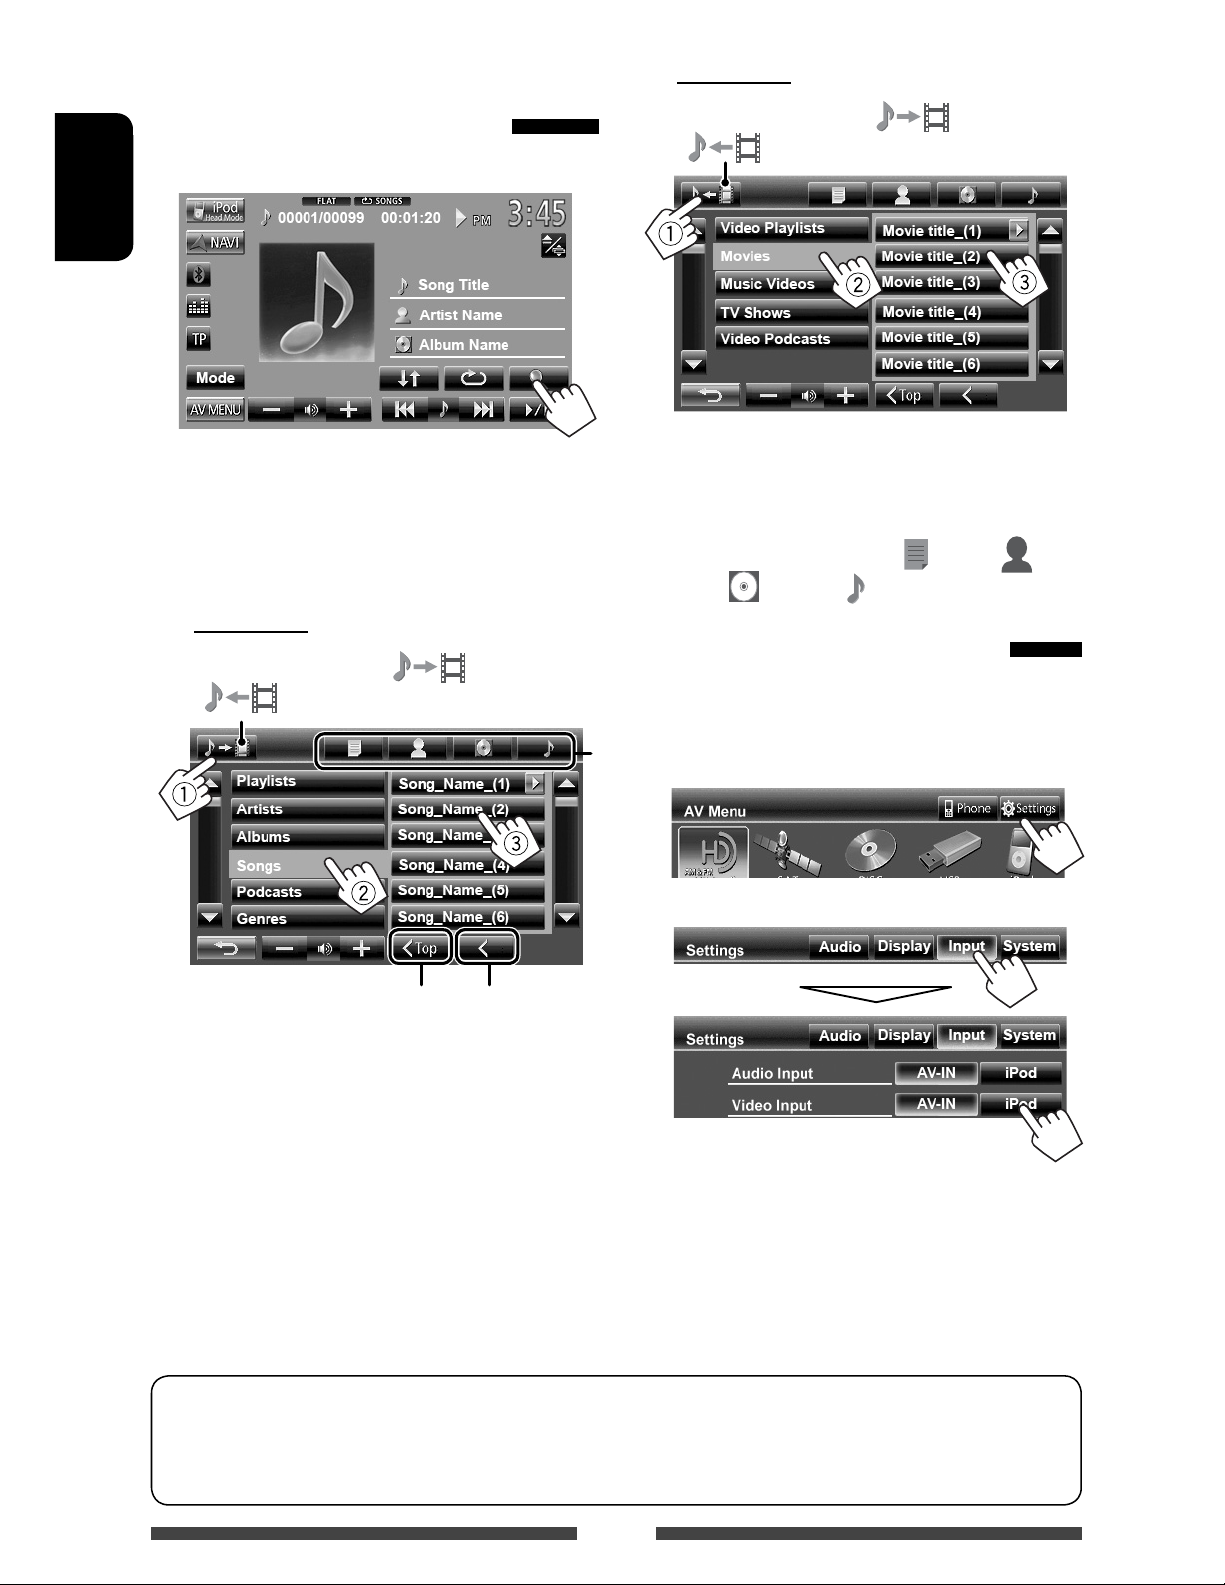
Selecting a track/video from
menu on the iPod/iPhone
1
ENGLISH
2 Select the menu (Music or Video) (1), a
category (2), then a desired item (3).
• Select the item in the selected layer until a
desired track starts playing.
Music menu:
Switches between Music ( ) and Video
(
)
Video menu:
Switches between Music ( ) and Video
(
• Available categories differ depending on the type of
your iPod/iPhone.
* You can switch to the top of the category by pressing
the corresponding tab: Playlist (
Albums (
)
), Artist ( ),
) or Songs( ).
Setting for watching video
You can change the setting only when the AV source is
turned off.
Returns to the top layer
Returns to the
previous layer
*
1 On <AV Menu> :
2
• When iPod with video (5th Generation) is
connected, also select <iPod> for <Audio
Input>.
For some iPod/iPhone models, the performance may be abnormal or unstable during operation. In this case,
disconnect the iPod/iPhone device, then check its condition.
If the performance is not improved or slow, reset your iPod/iPhone.
28
Page 29

Using other external components
To display the source control screen ( below)
• The operation buttons disappear when no operation is done for about
10seconds.
• To change settings for video playback, page 41.
AV-IN name ( below) Sound mode ( page 37)
ENGLISH
[Mode] Changes the AV-IN name.
• Press [2] or [3] to select an AV-IN name.
[AV MENU] Displays <AV Menu> screen.
AV-IN
You can connect an external component to the LINE IN/
VIDEO IN jacks. ( Installation/Connection Manual)
Preparation:
• To listen to the music from the connected
component, select <AV-IN> for <Audio Input>
setting. ( page 46)
• To watch the video from the connected component,
select <AV-IN> for <Video Input> setting. (
page 46)
1 Select “AV-IN” as the source. ( page 12)
2 Turn on the connected component and
start playing the source.
29
Page 30

Using the external navigation unit
You can connect a navigation unit (not supplied) to the RGB input terminal so that you can view the navigation
screen. ( the Installation/Connection Manual)
• Please contact your dealer to inquire about compatible navigation units.
ENGLISH
Activating the navigation function
1 On <AV Menu>:
2
• While the navigation screen is displayed, the
touch panel operations are available only for using
navigation function.
• The aspect ratio of the navigation screen is fixed to
<Full> regardless of the <Aspect> setting (
page 42).
• You can use the source “
audio source connected to the LINE IN jacks.
AV-IN
” for listening to an
To cancel the navigation screen
Hold MENU/ATT to display <AV Menu>, then press
[AV].
Settings for navigation unit
On <Navigation> ( step 3 on the left column):
3
To view the navigation screen
On the source control screen:
or
On <AV Menu> :
Navigation
Input
Output Select front speakers used for the
Volume Adjust the volume of the navigation
Navigation
Mute
Picture
Adjust
the left column
navigation guidance.
guidance. (0 to 35)
Select <On> to attenuate the
sound coming through speakers
other than the front speakers during
navigation guidance.
Adjust the brightness and black.
( page 41)
30
Page 31

Listening to the satellite radio (Only for KW-AVX840)
Before operating, connect either one of the following (not supplied) to the expansion port on the rear of the unit.
To listen to the SIRIUS Satellite radio SCC1 and KS-SRA100
D&P, SCVDOC1 and KS-SRA100
To listen to the XM Satellite radio JVC Smart Digital Adapter–XMDJVC100
CNP2000UCA and CNPJVC1
Activating subscription
For SIRIUS Radio
1 Select “
The SIRIUS Satellite radio starts updating all the
SIRIUS channels. (See “Channel Updates—SIRIUS/
XM” below.)
• Once completed, SIRIUS Satellite radio tunes in
SAT
” as the source. ( page 12)
to the Preview Channel.
2 Press [Mode] to display SIRIUS ID.
3 Contact SIRIUS on the internet at
<http://activate.siriusradio.com/> to
activate your subscription, or you can
call SIRIUS toll-free at 1-888-539-SIRIUS
(7474).
“Subscription updated Press any key to continue”
appears on the screen once subscription has been
completed.
For XM Radio
1 Select “
XM Tuner* starts updating all the XM channels.
“Channel 1” is tuned in automatically.
(See “Channel Updates—SIRIUS/XM” below.)
SAT
” as the source. ( page 12)
2 Check your XM Satellite Radio ID
labelled on the casing of the XM Tuner,
or tune in to “Channel 0.”
The 8-digit (alphanumeric) ID number is displayed
on the screen.
To cancel the ID number display, select any
channel other than “0.”
3 Contact XM Satellite radio on the
internet at <www.xmradio.com> and
click on “Activate Radio,” or you can call
1-800-XM-RADIO (1-800-967-2346).
Once activated, the unit can then be tuned to one
of the available channels.
ENGLISH
* XM Tuner: XMDirect
System
TM
Tuner Box or XMDirect2 Tuner
Channel Updates—SIRIUS/XM
• If channels are updated after subscription, updating starts automatically, and no sound can be heard:
– For SIRIUS Satellite radio: “UPDATING” appears.
– For XM Satellite radio: “UPDATING” (when XMDJVC100 is connected) or “UNAUTH” (when CNP2000UCA and
CNPJVC1 are connected) appears.
• Update takes a few minutes to complete.
• Do not press any buttons or perform any operations until updating is completed.
31
Page 32

Tuning in to a channel you want
Preset no.
ENGLISH
Band
[BAND] Selects the band.
For SIRIUS:
For XM:
[4]
[¢]
• Selects a channel. (Press)
• Changes the channel rapidly. (Hold)
Sound mode ( page 37)CATEGORY indicator (only for XM)
– While searching, invalid and
unsubscribed channels are
skipped.
Signal Reception indicator
Channel no./Channel name
Category name
Preset list
[ –]
[5]
[
[3] Displays/hides the information of
[Mode] Only for SIRIUS: Shows the SIRIUS
[AV MENU] Displays <AV Menu> screen.
[+]
[∞]
]
Adjusts the volume.
Selects a category.*
Displays the Category/Channel
List. ( page 33)
the current station. (
ID.
page 33)
* For SIRIUS Radio:
– To select a channel from all categories, select <ALL>.
For XM Radio:
– To select a channel from all categories (including non-categorized channels), press [5
– If you do not select a channel within 15 seconds, the category selected is canceled. (The CATEGORY indicator goes
off.) You can select a channel from all categories now.
• To learn more about SIRIUS/XM programming or to become a subscriber, please visit <www.siriusxm.com>.
] or [ ∞].
32
Page 33

Displaying the information of the current
station
Selecting a preset channels
ENGLISH
Selecting a channel on the list
1
2 Select a category (1), then a channel
Hides the text information
Text information
Scrolls the text information
Storing channels in memory
You can preset six channels for each band.
1 Tune in to a station you want to preset.
( page 32)
2 Select a preset number.
(Hold)
(2) from the selected category.
Current category Current channel
The channel selected in step 1 is stored.
33
Page 34

Listening to the HD Radio™ broadcast
(Only for KW-AVX840)
Before operating, connect HD Radio tuner box, KT-HD300 (separately purchased) to the expansion port on the rear
of the unit.
ENGLISH
What is HD Radio Technology?
HD Radio Technology can deliver high-quality digital sound—AM digital will have FM-like quality (in stereo) and FM
digital will have CD-like quality—with static-free and clear reception. Furthermore, stations can offer text and data,
such as artist names and song titles.
• When the HD Radio tuner box is connected, it can also receive conventional analog broadcasts.
• Many HD Radio stations also offer more than one channel of programming. This service is called multicasting.
• To find HD Radio stations in your area, visit www.hdradio.com <http://www.hdradio.com/>.
DX/LO indicator ( page 14)
ST/MO indicator ( page 14)
Sound mode ( page 37)
HD SEARCH indicator
Band
Preset number
[BAND] Selects the band.
[4]
[¢]
[5]
[∞]
Searches for a station.
• Auto search (Press)
• Manual search (Hold)
Selects a sub-channel when
receiving an HD Radio multicast
channel.
• “LINKING” appears while
linking to a multicast channel.
Reception indicator
• Lights up when receiving an HD Radio broadcast
HD Radio reception mode ( page 35)
Signal Reception indicator
Station Call Sign and channel number
PTY code for the HD Radio broadcast
Preset list
[ –] [+]
[3] Displays/hides the information of
[HD
[HOLD] Changes the HD Radio reception
[Mode] Displays the tuner setting screen.
[AV MENU] Displays <AV Menu> screen.
]
Adjusts the volume.
the current station. (
Enables to searches for HD Radio
stations only. (
mode. (
(
pages 14 – 15)
page 35)
page 35)
page 35)
• To improve FM reception, see “When an FM stereo broadcast is hard to receive...,” page 14.
• To search for FM stations with strong signals, see “To tune in FM stations only with strong signals—LO/DX
(Local/Distance-extreme),” page 14.
• To reduce interference noises, see “When the FM reception is interfered...,” page 14.
• To preset stations automatically, see “Automatic presetting — SSM (Strong-station Sequential Memory) (For
FM only)”, page 15.
34
Page 35

Displaying the information of the current
Changing HD Radio reception mode
channel
Hides the text information
Text information
Scrolls the text information
While receiving an HD Radio broadcast, the unit tunes
to digital or analog audio automatically due to the
receiving condition.
ENGLISH
ANALOG Tuning to analog audio only.
DIGITAL Tuning to digital audio only.
AUTO Switch between digital and analog audio
automatically.
• In the case when the radio station
forces the reception mode to digital,
the DIGITAL indicator flashes.
• The setting automatically changes to <AUTO> in the
following cases:
– When you tune in to another broadcast.
– When you change to another source.
– When you turn off the power.
Searching for HD Radio stations only
1
The HD SEARCH indicator appears.
2 Search for a station—Auto Search.
35
Page 36

Rear source operations
You can enjoy the rear source playback on the external monitor connected to the VIDEO OUT and 2nd AUDIO OUT
jacks, while listening to any source.
ENGLISH
Activating the rear source
Operations on the external monitor
1 On <AV Menu>:
2 Select the rear source.
Selects the rear source
• To deactivate the rear source, press [Same as Front].
Displaying the picture — Dual play
When the rear source is in use, you can display the
picture in the rear source while any source other than
“
DISC
”, “
USB
”, or “
iPod
” is selected.
• You can use the Dual play function only when the
parking brake is engaged.
On <AV Menu>:
(from the remote controller only)
Selecting a folder or track on the control
screen
For DivX/MPEG1/MPEG2/JPEG/MP3/WMA/WAV/
CD/iPod
• DivX/MPEG1/MPEG2/JPEG: While playback is
stopped.
• CD/iPod: Skip step 1.
1 Press @ / # to select “Folder” column or “Track”
column.
2 Press % / fi to select a Folder or Track.
Using the list screen
For DivX/MPEG1/MPEG2/JPEG/MP3/WMA/WAV
While playback is stopped.
1 Press TOP M or MENU to display the list screen.
2 Press % / fi / @ / # to select a folder/track on
the list.
• To go back to the folder list, press RETURN.
3 Press ENT to confirm the selection.
For iPod
1 Press TOP M or MENU to display the <SEARCH
MODE> screen.
2 Press % / fi / @ / # to select an item on the list.
• To go back to the playback control screen, press
RETURN or 6.
3 Press ENT to confirm the selection.
• Dual play cannot be used when there is no picture
data in the rear source.
36
Page 37

Sound adjustment
Using the sound equalization
• The adjustment is memorized for each source until you adjust sound again. If the source is a disc, the adjustment is
stored for each of the following categories.
– DVD/DVD-VR
– VCD/CD
– DivX/MPEG1/MPEG2/MP3/WMA/WAV
• You cannot adjust the sound when the AV source is turned off.
ENGLISH
Selecting a preset sound mode
1 On <AV Menu>:
or
On the source control screen:
Storing your own adjustment
Customizing preset sound mode
1 Select a sound mode. ( “Selecting a preset
sound mode”)
2 Adjust the level of each band (1), then
select the subwoofer level (2).
3
2 Select a sound mode.
Changes the page
The adjustments are stored and <User> is
activated.
37
Page 38

Adjusting the sound precisely
Adjusting the cross over
1 Perform steps 1 and 2 of “Selecting a
preset sound mode,” then...
ENGLISH
2 Select a band.
3 Adjust the sound .
frequency
1 On <AV Menu> :
2
3 Select the item to adjust, then make
adjustment.
Adjusts the cross over for front or rear speakers
(high pass filter).
Reset Changes level of Low/Mid/
High to 0.
Freq Selects frequency.
Q Adjusts the width of the
frequency.*
Bass Activates/deactivates bass.*
SW Level Adjusts subwoofer level.
The adjustments are stored and <User> is
activated.
• The adjustments are memorized until you
adjust sound again.
• To make adjustment for other bands, repeat
steps
2 and 3.
1
*
Fixed for “High” band.
2
*
Only for “Low” band.
1
2
Adjusts the cross over for subwoofer (low pass filter).
Adjusts the cross over frequency.
Selects the phase for the subwoofer.*
Adjusts the subwoofer level.
* Not selectable when <Freq> is set to <Through>.
38
Page 39

Changing display design
You can change the background, the color of text and touch panel buttons .
1 On <AV Menu>:
2
3 Select an item (<Backgrnd>, <Text> or
<Buttons>), then change the setting.
Select/
2
Dimmer setting: You can make selections for each
dimmer setting—<
adjust the color
Color palette
> (On) or < > (Off)
User color adjuster: You can make your own
color adjustment stored in <
Text/Buttons
For setting the color, above.
• On the button color selection screen, you can
select a color for touch panel buttons. (When
a touch panel button is pressed, the selected
color is shown.)
ENGLISH
User>
Background
Select a background
1
Basic image (default)
You can select a color on the color
palette or adjust the color on the user
color adjuster ( the right column)
For setting your favorite scene as the background,
page 40
39
Page 40

Using your favorite scene as the
5 Capture the image displayed on the
background
While playing a video or JPEG, you can capture an image
and use the captured image as a background.
• You cannot capture copyrighted content and image
ENGLISH
from iPod/iPhone.
• When using JPEG file as the background, make sure
that the resolution is 800 x 600 pixels.
• The color of the captured image may look different
from that of the actual scene.
1 Play back a video or JPEG.
2 Display <Display Design>. ( page 39)
3
screen.
Confirmation message appears. Press [Ye s] to
store the newly captured image. (The existing
image is replaced with the new one.)
• Press [No] to return to the previous screen.
4 Adjust the image.
[6] * Starts playback/pauses.
[E] * Advances scenes frame-by-frame.
[3] Magnifies the scene.
(<Zoom1> – <Zoom3>)
[5] [∞]
[2] [3]
• To cancel the capture screen, press [
* Not displayed when playing an external
component connected to LINE IN/VIDEO IN jacks.
Moves the zooming frame.
].
40
Page 41

Setting for video playback
You can change the setting for video playback.
Picture adjustment
You can adjust the picture quality.
1 Touch any position of the screen other
than operation buttons.
2
3 Select Dimmer On (< >) or Off
4 Adjust the picture (–15 to +15).
ENGLISH
Adjusts the
brightness
Adjusts the contrast
Adjusts the black
Adjusts the color
Adjusts the tint *
Adjusts the detail
* Adjustable only when the incoming signal is
NTSC.
(<
>).
41
Page 42

Changing the aspect ratio
Zooming picture
You can change the aspect ratio for video playback.
1 Touch any position of the screen other
than operation buttons.
ENGLISH
2
3
You can zoom the picture (<Zoom1> to <Zoom3>).
• When <Aspect> is set to <Panorama> or
<Auto> ( left column), the picture is zoomed
with the aspect ratio of the <Full> setting.
1 Touch any position of the screen other
than operation buttons.
2
4:3 signal 16:9 signal
Full*:
For 16:9 original
pictures
Panorama:
For viewing 4:3
pictures naturally
on the wide screen
Regular*:
For 4:3 original
pictures
Auto: • For “
DISC
”/“
USB
”
only: Aspect ratio is
automatically selected to
match to the incoming
signals.
3
[5] [∞] [2] [3] : Moves the zooming frame.
* While DivX is played back with <Monitor Type>
set to <16:9> ( page 23), the aspect ratio is not set
correctly.
42
Page 43

Using a rear view camera
• To use a rear view camera, the REVERSE GEAR SIGNAL lead connection is required. For connecting a rear view
camera, see the Installation/Connection Manual.
Activating the rear view camera
1 On <AV Menu>:
2
Displaying the picture from the rear
view camera
The rear view screen is displayed when you shift the
gear to the reverse (R) position.
• For KW-AVX840: To erase the caution message, touch
the screen.
To display the picture from the rear view
camera manually
On <AV Menu>:
ENGLISH
To deactivate, select <Off>.
When displaying the picture from the rear view
camera manually, you can change the setting of the
picture. (
To cancel the rear view screen, hold MENU/ATT to
display <AV Menu>, then press [AV].
page 41)
43
Page 44

Setting menu items
ENGLISH
• You cannot change <Audio> settings (except <Amplifier Gain>) when the AV source is turned off.
Menu item Selectable setting/item Initial: Underlined
Fader/Balance Fader : Adjust the front and rear speaker output balance.
z F6 to R6; Initial 0
• When using a two-speaker system, set the fader to the center (0).
Balance : Adjust the left and right speaker output balance.
z L6 to R6; Initial 0
Press [ 5/∞/2/3 ] or drag [
• To clear the adjustment, press [Center].
] to adjust.
Equalizer
Change the sound mode or adjust and store the equalization for each source.
( page 37)
z Flat/Natural/Dynamic/Vocal Boost/Bass Boost/Vibrant/User
Loudness You can activate/deactivate the loudness function.
z Off
z On
: Cancels.
: Boost low and high frequencies to produce a well-
balanced sound at a low volume level.
Crossover
Audio
Volume Adjust
Adjust the cross over frequency. ( page 38)
Adjust and store the auto-adjustment volume level for each source. (For
discs, the adjustment is stored for each of the following categories: DVD/
DVD-VR, VCD/CD, and DivX/MPEG1/MPEG2/MP3/WMA/WAV.) The volume
level will automatically increase or decrease when you change the source.
z –15 to +06; Initial 00
Amplifier Gain* You can change the maximum volume level of this unit.
z High : VOL 00 to 50
z Low : VOL 00 to 30
(Select this if the peak power of the speakers is less
than 50 W.)
z Off : Deactivates the built-in amplifier.
• If you change this setting from <High>/<Off> to <Low> while the
volume level is set higher than the maximum level of <Low>, the unit
automatically lowers the volume level to “VOL 30”).
* You can change the setting only when the AV source is turned off.
44
Page 45

Menu item Selectable setting/item Initial: Underlined
Speaker Select Select the size of the connected speaker.
Audio
z Standard/Narrow/Middle/Wide
Dimmer z Auto
: Dims the screen and button illumination when you turn
on the headlights.
• The ILLUMINATION CONTROL lead connection is
required. ( the Installation/Connection Manual)
z On
z Off
z Dimmer
Time Set
: Activates dimmer.
: Cancels.
: Sets the Dimmer On (
)/Off ( ) times.
• Press [5] or [∞] to set the time.
Display Design Change the display design (background, text color and touch panel button
color). ( page 39)
OSD Clock
Demonstration
Display
Scroll
z On
z Off
z On
z Off
z Auto
z Once
z Off
: Displays the clock while video source is played back.
: Cancels.
: Activates the demonstration on the screen.
: Cancels. ( page 7)
: Repeats scrolling.
: Scrolls the displayed information once.
: Cancels.
• Touching an information bar scrolls the text regardless of this setting.
ENGLISH
GUI Adjust Adjust the brightness and black color of the screen.
Select Dimmer On (
z –/ +
)/Off ( ), then change the following settings:
: Adjusts brightness (–15 to +15; Initial 00 for Dimmer
On/+15 for Dimmer Off).
NTSC/PAL
z BL–/BL+
Select the color system of the external monitor.
z NTSC, PAL
: Adjusts black (–15 to +15; Initial 00).
45
Page 46

Menu item Selectable setting/item Initial: Underlined
Display Sensor Change the condition for turning off/on the screen and the light of MENU/
ATT button.
Sensor: Select the condition of the screen for turning on.
ENGLISH
z Motion : The screen turns on when your hand moves closer to
the motion sensor.
z Touch : The screen turns on when your finger touches the touch
panel.
z Off : The screen is always turned on while the power is
turned on.
Motion Sensitiv.: Change the sensitivity of the sensor for <Sensor>. (
above)
Display
z High, Low
Time Out Mode: Select the condition of the screen when no operation is
performed for about 10 seconds while <Sensor> is set to <Motion> or
<Touch>. (above)
z Simple : Source control buttons are displayed, and the light of
MENU/ATT button is turned off.
z Backgrnd : The background and clock are shown, and the light of
MENU/ATT button is turned off.
• You can change the background. ( page 39)
z Black Out : The screen and the light of MENU/ATT button are
turned off.
Audio Input*
1
You can determine the use of LINE IN jacks.
z AV-IN : Select to listen to the music from an audio component
such as a portable audio player.*
z iPod : Select when connecting the iPod/iPhone using the USB
2
Audio and Video cable for iPod/iPhone. ( page 26)
Video Input*
Input
1
You can determine the use of VIDEO IN jack.
z AV-IN
z iPod
: Select to watch the video from an AV component such
as a camcorder.*
2
: Select when connecting the iPod/iPhone using the USB
Audio and Video cable for iPod/iPhone. ( page 26)
Camera Input
z On
: Displays the picture from rear view camera when you
shift the gear to the reverse (R) position.
z Off
Navigation
1
*
You can change the setting only when the AV source is turned off.
2
*
When you watch a video of an AV component, select <AV-IN> for both <Audio Input> and <Video Input>.
Change the navigation settings. ( page 30)
: Cancels.
46
Page 47

Menu item Selectable setting/item Initial: Underlined
Text Language* Select the text language used for on-screen information.
z English /Spanish/French/German/Italian/Dutch/Swedish/Danish/
Russian /Portuguese
GUI Language
Time Set
Beep Change the volume of the key-touch tone.
User Profile
System
Initialize Initialize all settings you have made. Hold [Enter] to initialize the settings.
Serial Number Displays the serial number.
Touch Panel Adjust
DivX(R) VOD
Only for KW-AVX840
Select the language (<English > or <Local >: the language selected
above) used on operation buttons and menu items.
Adjust the clock time. ( page 7)
z On
z Off
You can memorize, recall, or clear the settings you have made. ( page 48)
• When restoring the settings, adjust the settings on the <Initial
Settings> screen. ( page 6)
Adjust the touch position of the buttons on the screen. ( page 48)
This unit has its own Registration Code. Once you have played back a file
with which the Registration Code recorded, this unit’s Registration Code is
overwritten for copyright protection.
• Press [Enter] to display the information.
• To return to the previous screen, press [OK].
: Activates the key-touch tone.
: Cancels.
ENGLISH
* “Please Detach Front Panel” appears when the setting is changed. Detach the monitor panel then attach it to enable
the change.
47
Page 48

Memorizing/recalling the
settings
You can memorize the settings changed in the
<Settings> menu and recall the memorized settings
anytime.
ENGLISH
Memorizing your settings
1 On <Settings>:
2
2
Clears all settings memorized in <User1>,
<
User2> and < User3>
A confirmation message appears. Press [Yes].
Adjusting the touch position
You can adjust the touch position on the touch panel if
the position touched and the operation performed do
not match.
1 On <Settings>:
3 Select an item (<User1>, <User2> or
<User3>) to memorize the settings.
A confirmation message appears. Press [Yes].
Recalling your settings
On <User Profile> ( Step 2 above):
A confirmation message appears. Press [Yes].
Clearing your settings
1 On <User Profile> ( Step 2 above):
2 Touch the center of the marks at the
lower left and at the upper right as
instructed.
• To cancel, press [Cancel].
• To reset to the initial setting (center position),
press [Reset].
48
Page 49

BLUETOOTH OPERATIONS
Information for using Bluetooth® devices
• While driving, do not perform complicated
operation such as dialing the numbers, using
phone book, etc. When you perform these
operations, stop your car in a safe place.
• Some Bluetooth devices may not be connected
to this unit depending on the Bluetooth version
of the device.
• This unit may not work for some Bluetooth
devices.
• Connecting condition may vary depending on
circumstances around you.
• When the unit is turned off, the device is
disconnected.
Bluetooth operations
Bluetooth Information: If you wish to receive
more information about Bluetooth, visit the
following JVC web site: <http://www.jvc.co.jp/
english/car/> (English website only)
ENGLISH
Bluetooth is a short-range wireless radio
communication technology for the mobile device such
as mobile phones, portable PCs, and other devices. The
Bluetooth devices can be connected without cables and
communicate with each other.
• Refer to pages i and ii at the end of manual to
check the countries where may use the Bluetooth®
function.
When shipped from the factory, the Bluetooth
adapter (KS-UBT1) is inserted.
Bluetooth adapter
(KS-UBT1)
Bluetooth profile
This unit supports the following Bluetooth profiles;
• HFP (Hands-Free Profile) 1.5
• OPP (Object Push Profile) 1.1
• A2DP (Advanced Audio Distribution Profile) 1.2
• AVRCP (Audio/Video Remote Control Profile) 1.3
• PBAP (Phonebook Access Profile) 1.0
• Keep the Bluetooth adapter inserted when using
the Bluetooth function.
• This port is designed for the use with KS-UBT1
only. Other Bluetooth adapters or USB devices
cannot be used.
49
Page 50

Connecting Bluetooth devices
Connecting a new Bluetooth device
for the first time
When you connect a Bluetooth device to the unit
ENGLISH
for the first time, make pairing between the unit
and the device. Pairing allows Bluetooth devices to
communicate each other.
To make pairing, you may need to enter the PIN
(Personal Identification Number) code of your Bluetooth
device you want to connect.
• Once the connection is established, it is registered in
the unit even if you reset the unit. Up to 5 devices can
be registered in total.
• Only one device for Bluetooth phone and one for
Bluetooth audio can be connected at a time.
• To use the Bluetooth function, you need to turn on
Bluetooth function of the device.
1 Display the Bluetooth setting screen.
On <AV Menu> :
Mobile phone
2 Change the PIN code.
• If you skip changing PIN code, go to step 3.
PIN code (initial: 0000)
Deletes last character
3
Audio player
For connecting a Bluetooth mobile phone
The phone setting screen is displayed.
For connecting a Bluetooth audio player
<Mode> is displayed.
4
Cancel
5 Operate the Bluetooth device to
connect.
“Connected” appears. Press [OK] to confirm the
operation.
Now connection is established and you can use the
Bluetooth device through the unit.
50
Page 51

Connecting/disconnecting a
registered Bluetooth device
1 Display the Bluetooth setting screen.
To disconnect
( page 50)
• For Bluetooth mobile phone: Phone setting
screen
• For Bluetooth audio player: <Mode>
2 To connect
Select the device you want to connect.
A confirmation message appears. Press [Yes].
Deleting a registered Bluetooth
device
1 On <Connect Device> ( Step 2 on the left
column)
:
2 Select a device to delete the
registration.
ENGLISH
“Connected” appears. Press [OK] to confirm the
operation.
• All registered devices (mobile phone and audio
player) are listed on <Connect Device>.
– Selectable items depend on the device you
are operating.
• When a mobile phone is connected, holding
[
] on the source control screen switches
between the last connected mobile phone and
current one.
Confirmation message appears. Press [Ye s].
To detach the Bluetooth adapter
“J VC ”
• Store the Bluetooth adapter in the supplied bag.
• When inserting the Bluetooth adapter again,
insert it firmly with the JVC logo facing up.
51
Page 52

Using the Bluetooth mobile phone
Receiving a call
When a call comes in/making a call...
Status of the device/Battery
ENGLISH
reminder (only when the
information comes from the device)
Ends/rejects the call
• Phone operation is not available while the picture
from the rear view camera is displayed. ( page 43)
When <Auto Answer> is set to <On>
The unit answers the incoming call automatically.
( page 57 )
Call information
(if acquired)
Switching between handsfree mode
and phone mode
While talking...
Each time you press the button, the talking method is
switched (
mode).
: handsfree mode / : phone
Checking SMS reception
If the mobile phone is compatible with SMS (Short
Message Service), the unit tells you a message has been
received.
Adjusting the volume of calls/
earpiece/microphone
While talking...
Adjusts the volume of
calls/earpiece
• This adjustment does not affect the volume level of
the other sources.
Adjusts the
microphone volume
• The ring tone sounds only when the sorce is “
Audio
.”
To read a received message, operate the mobile
phone after stopping the car in a safe place.
• You cannot read, edit, or send a message
through the unit.
BT
52
Page 53

Making a call
Using the preset list/phone book/call lists
1 On the source control screen:
• You can also display the phone control screen by
pressing [
Phone] on <AV Menu>.
2 Select a method to make a call.
Direct number
below)
entry (
Preset list/call lists/phone
the right column)
book (
1
Preset From preset list
From dialled call list.
From received call list.
From missed call list.
From phone book.
• For copying the phone book,
ENGLISH
page 54.
Preset list (For presetting, page 54)
Voice dialing (
the right column)
Direct number entry
Presets the entered phone number on
the preset list (
page 54)
Deletes last character
Hold: Adds “+”
2
Voice Dialing
• Available only when the connected mobile phone has
the voice recognition system.
Speak the name you want to call.
• You can enter up to 32 numbers.
• To cancel, press [Cancel].
53
Page 54

Presetting the phone numbers
Copying the phone book
You can preset up to 6 phone numbers.
1 On the source control screen:
ENGLISH
2 Select an item from phone book/call
lists.
You can copy the phone book memory of a mobile
phone into the unit (up to 400 memories).
1 On the source control screen:
2
3 Select a phone number.
(Hold)
4 Select a preset number to store.
• You can also preset a phone number entered on the
direct number entry screen by pressing [Save]. (
page 53)
PIN code (initial: 0000)
Numbers of the phone book memories copied
3 Operate the target mobile phone.
• Refer to the instruction manual supplied with
your mobile phone.
• To cancel the transfer, press [Finish].
4 Finish the procedure.
54
The phone book memory is copied from the
mobile phone.
Page 55

Deleting the phone number
About mobile phone compatible
memory in the unit
1 Display the preset list/phone book/call
list you want to delete.
( page 53)
2
• You cannot delete data when <Phone> is
selected.
3 Select the item you want to delete.
with Phone Book Access Profile
(PBAP)
If your mobile phone supports PBAP, the phone book
and call lists are automatically copied to the unit when
the mobile phone is connected.
• Phone book: up to 5 000 entries
• Dialled calls, received calls, and missed calls: up to 50
entries each
To display the phonebook/call lists of the
mobile phone or the unit
Connected mobile phone
ENGLISH
Delete all the numbers/names in the selected item
A confirmation message appears. Press [Yes].
Unit
55
Page 56

Using the Bluetooth audio player
• To register a new device, page 50.
• To connect/disconnect a device, page 51.
ENGLISH
Battery reminder (only when the
information comes from the device)
Sound mode ( page 37)
Playback mode *
Track no./Playing time *
1
( below)
1
Playback status
(3: play / 8: pause)
page 11
Tag data (current track title/artist
name/album title) *
• Touching an information bar
scrolls the text if all the text is
not shown.
• The operation buttons, indications and information displayed on the screen differ depending on the
connected device.
[ ]
Selects Repeat playback mode. *
[ ] Selects Random playback
mode. *
1 *2
[3] Starts playback.
1 *2
[ –] [+]
Adjusts the volume.
[Mode] Displays the Bluetooth setting
screen. ( page 57)
[AV MENU] Displays <AV Menu> screen.
1
*
1
[8] Pauses.
• Selects track. (Press)
[4]
[¢]
1
*
Available only for the devices compatible with AVRCP 1.3.
2
*
To cancel random or repeat mode, press the button repeatedly until the indicator disappears.
• Reverse/forward search. (Hold)
56
Page 57

Bluetooth device settings
Mobile phone
Menu items Selectable setting/item Initial: Underlined
Bluetooth audio player
On “
BT Audio
” source control screen:
ENGLISH
Connection
z Connect
z Disconnect
: page 51
: page 51
PIN Code Changes the PIN code of the unit.
• Touch the current PIN code, enter a new PIN code, then press [Save].
Device Name Shows the device name to be shown on the Bluetooth device — ”JVC Unit.”
Device Address Shows the MAC address of the unit.
Phone Device*
Audio Device*
Auto connect
1
Shows the phone device name.
2
Shows the audio device name.
z Off
z On
: Cancels.
: The connection is automatically established with the last connected
Bluetooth device when the unit is turned on.
HF/Audio
Output
Select the speakers used for Bluetooth (both phone use and audio player).
z Front
z All
: From front speakers only.
: From all speakers.
Initialize Hold [Enter] to initialize all settings you have made for using Bluetooth mobile phone and
Bluetooth audio player.
Auto Answer *
1
z Off
: The unit does not answer the calls automatically. Answer the calls
manually.
: The unit answers the incoming calls automatically.
: The unit does not inform you of the arrival of a message.
: The unit informs you of the arrival of a message by ringing and
SMS Notify*
z On
1
z Off
z On
displaying “Receiving Message.”
Ring Mode*
1
z System
z Phone
: Selects the ring tone set on the unit.
: Selects the ring tone set on the mobile phone. (This function may not
work depending on the mobile phone.)
Ring Tone
Change*
1
*
Appears only for the phone setting screen.
2
*
Appears only for <Mode> while “
1
When <Ring Mode> is set to <System>, press [Enter], then select the ring tone for
received calls and SMS from <Tone1>, <Tone2>, <Tone3>.
z Call Tone
z Message Tone
: Selects the ring tone for phone calls.
: Selects the ring tone for SMS.
BT Audio
” is selected as the source.
57
Page 58

REFERENCE
Using the remote controller (Only for KW-AVX848)
For KW-AVX840: To use the remote controller, purchase RM-RK252P separately.
ENGLISH
Installing the batteries
R03/LR03/AAA
Insert the batteries into the remote controller by
matching the polarity (+ and –) correctly.
Caution:
• Danger of explosion if battery is incorrectly replaced.
Replace only with the same or equivalent type.
• Battery shall not be exposed to excessive heat such as
sunshine, fire, or the like.
If the effectiveness of the remote controller
decreases, replace the batteries.
Before using the remote controller:
• Aim the remote controller directly at the remote
sensor on the unit.
• DO NOT expose the remote sensor to bright light
(direct sunlight or artificial lighting).
The unit is equipped with the steering wheel
remote control function.
• See the Installation/Connection Manual
(separate volume) for connection.
• Operations may differ depending on the types of
the steering wheel remote control.
Operations using the remote controller (RM-RK252)
Button Operations
ATT /
DISP Does not function for this unit.
5 / ∞
Attenuates/restores the sound.
• Tuner: Selects the preset stations.
1
• HD Radio*
channel.
• Satellite radio *
category.
• Selects a title/item/folder.
: Selects a multicast
1
: Selects a
Button Operations
• Tuner/HD Radio*1 :
– Searches for stations
automatically.
– Searches for stations manually.
(Hold)
/
1 / ¡
• Satellite radio*
– Selects a channel.
– Selects a channel rapidly. (Hold)
• Selects track.
• Reverse search/forward search.
(Hold)
• Reverse search/forward search.
• DVD-Video/DVD-VR/VCD: Slow
motion playback (during pause).
– DVD-VR/VCD: Reverse slow
motion does not work.
1
:
58
Page 59

Button Operations
Button Operations
• Adjusts the volume level.
VOL +/VOL –
• “2nd VOL” function does not
work for this unit.
SOURCE Selects the source.
6
PHONE /
Starts/pauses*
Answers incoming calls.
2
playback.
• Selects the bands.
• Stops playback.
BAND / 7/
• Ends the call.
• Pauses playback of Bluetooth
audio.
• Enters a number while holding
0 – 9
( page 60)
SHIFT.
• “SETUP” function does not work
for this unit.
Enters preset station number while
1 – 6
holding SHIFT.
ENT Confirms selection.
OSD/
DUAL/
Does not function for this unit.
Does not function for this unit.
SHIFT Functions with other buttons.
• Enters direct search mode when
pressed with SHIFT button.
( page 60)
DIRECT/CLR
• Erases the misentry when
pressed with SHIFT button.
• “SURROUND” function does not
work for this unit.
1
*
Only for KW-AVX840.
2
*
Does not work while listening to Bluetooth audio.
ENGLISH
Changes the aspect ratio.
• To check the current aspect ratio
ASPECT
setting, operate on the touch
panel. ( page 42)
RETURN Returns to the previous screen.
• DVD-Video: Shows the disc
menu.
TOP M
• DVD-VR: Shows the Original
( page 60)
Program screen.
• VCD: Resumes PBC playback.
• DVD-Video: Shows the disc
menu.
MENU
• DVD-VR: Shows the Playlist
( page 60)
screen.
• VCD: Resumes PBC playback.
• DVD-Video: Makes selection/
settings.
% / fi / @ / #
• DivX*
1
: Skips back or forward by
about 5 minutes.
59
Page 60

Searching for an item directly
Various disc operations
Tuner frequency
1 Press DIRECT while holding SHIFT to enter the
search mode.
2 Press number buttons while holding SHIFT to enter
ENGLISH
a frequency.
• To erase a misentry, press CLR (clear) while
holding SHIFT.
3 Press ENT to confirm the entry.
DVD-Video/DVD-VR/DivX/MPEG1/MPEG2/JPEG/
MP3/WMA/WAV/VCD/CD
1 Press DIRECT while holding SHIFT to enter the
search mode.
• Each time you press DIRECT, the item to search
for changes.
2 Press a number button while holding SHIFT to
select a desired item.
• To erase a misentry, press CLR (clear) while
holding SHIFT.
3 Press ENT to confirm the selection.
Using the disc menu
• DVD-Video/DVD-VR
1 For DVD Video, press TOPM or MENU.
For DVD-VR, press...
TOP M: To display Original Program
MENU: To display Playlist
2 Press % / fi / @ / # to select an item you want to
start play.
3 Press ENT to confirm the selection.
• VCD
During PBC playback...
1 Press DIRECT while holding SHIFT to enter the
search mode.
2 Press a number button while holding SHIFT to
select the item you want to play.
3 Press ENT to confirm the selection.
• To return to the previous screen, press RETURN.
To cancel PBC playback
1 Press 7 to stop PBC playback.
2 Press DIRECT while holding SHIFT.
3 Press a number button while holding SHIFT to
select a desired track.
4 Press ENT to confirm the selection.
• To resume PBC, press TOP M or MENU.
60
Page 61

Maintenance
Caution on cleaning the unit
Do not use any
solvent (for
example, thinner,
benzine, etc.),
detergent, or
insecticide. This may damage the monitor or the unit.
Recommended cleaning method:
Gently wipe the panel with a soft, dry cloth.
How to clean the connector
Frequent detachment
will deteriorate the
connectors.
To minimize this
possibility, periodically
wipe the connectors
with a cotton swab
or cloth moistened with alcohol, being careful not to
damage the connectors.
Connectors
To keep discs clean
A dirty disc may not play correctly.
If a disc does become dirty, wipe it with a
soft cloth in a straight line from center to
edge.
• Do not use any solvents (for example, conventional
record cleaner, spray, thinner, benzine, etc.) to clean
discs.
To play new discs
New discs may have some rough spots
around the inner and outer edges. If
such a disc is used, this unit may reject
the disc.
To remove these rough spots, rub the edges with a
pencil or ball-point pen, etc.
Do not use the following discs:
3 inch disc Warped disc
ENGLISH
Moisture condensation
Moisture may condense on the lens inside the unit in
the following cases:
• After starting the heater in the car.
• If it becomes very humid inside the car.
Should this occur, the unit may malfunction. In this
case, eject the disc and leave the unit turned on for a
few hours until the moisture evaporates.
How to handle discs
When removing a disc from
its case, press down the center
holder of the case and lift the
disc out, holding it by the edges.
• Always hold the disc by the
edges. Do not touch its recording surface.
When storing a disc in its case, gently insert the
disc around the center holder (with the printed surface
facing up).
• Make sure to store discs in their cases after use.
Center holder
Sticker and sticker
residue Stick-on label
Unusual shape
Transparent or semi-
transparent parts on its
recording area
C-thru Disc (semi-
transparent disc)
61
Page 62

More about this unit
File playback
Playing DivX files (for discs only)
ENGLISH
• This unit can play back DivX files with the extension
code <.divx>, <.div>, or <.avi> (regardless of the
letter case—upper/lower).
• Audio stream should conform to MP3 or Dolby
Digital.
• The file encoded in the interlaced scanning mode
may not be played back correctly.
• The maximum bit rate for video signals (average) is
4 Mbps .
Playing MPEG1/MPEG2 files
• This unit can play back MPEG1/MPEG2 files with the
extension code <.mpg>, <.mpeg>, or <.mod>.
• The stream format should conform to MPEG system/
program stream.
The file format should be MP@ML (Main Profile at
Main Level)/SP@ML (Simple Profile at Main Level)/
MP@LL (Main Profile at Low Level).
• Audio streams should conform to MPEG1 Audio
Layer-2 or Dolby Digital.
• The maximum bit rate for video signals (average) is
4 Mbps .
Playing JPEG files
• This unit can play back JPEG files with the extension
code <.jpg>, or <.jpeg>.
• This unit can play back JPEG files that are at 32 x 32 to
8 192 x 7 680 resolution.
It may take time to display the file depending on its
resolution.
• This unit can play back baseline JPEG files.
Progressive JPEG files or lossless JPEG files cannot be
played.
Playing MP3/WMA/WAV files
• This unit can play back files with the extension code
<.mp3>, <.wma>, or <.wav> (regardless of the
letter case—upper/lower).
• This unit can play back the files meeting the
conditions below:
– Bit rate:
MP3/WMA: 32 kbps — 320 kbps
– Sampling frequency:
48 kHz, 44.1 kHz, 32 kHz (for MPEG1)
24 kHz, 22.05 kHz, 16 kHz (for MPEG2)
48 kHz, 44.1 kHz, 32 kHz, 22.05 kHz (for WMA)
44.1 kHz (for WAV)
• This unit can show ID3 Tag Version
1.0/1.1/2.2/2.3/2.4 (for MP3).
• This unit can also show WAV/WMA Tag.
• This unit can play back files recorded in VBR (variable
bit rate).
• Files recorded in VBR have a discrepancy in elapsed
time indication.
• This unit cannot play back the following files:
– MP3 files encoded with MP3i and MP3 PRO
format.
– MP3 files encoded with Layer 1/2.
– WMA files encoded with lossless, professional, and
voice format.
– WMA files which are not based upon Windows
Media® Audio.
– WMA files copy-protected with DRM.
JVC bears no responsibility for any loss
of data in an iPod/iPhone and USB mass
storage class device while using this unit.
62
Page 63

Sound signals emitted through the rear terminals
Through the analog terminals (Speaker out/REAR OUT /FRONT OUT )
2-channel signal is emitted. When playing multi-channel encoded disc, multi-channel signals are downmixed.
Language codes (for DVD/DivX language selection)
Code Language Code Language Code Language Code Language
AA Afar GL Galician MI Maori SO Somali
AB Abkhazian GN Guarani MK Macedonian SQ Albanian
AF Afrikaans GU Gujarati ML Malayalam SR Serbian
AM Ameharic HA Hausa MN Mongolian SS Siswati
AR Arabic HI Hindi MO Moldavian ST Sesotho
AS Assamese HR Croatian MR Marathi SU Sundanese
AY Aymara HU Hungarian MS Malay (MAY) SW Swahili
AZ Azerbaijani HY Armenian MT Maltese TA Tamil
BA Bashkir IA Interlingua MY Burmese TE Telugu
BE Byelorussian IE Interlingue NA Nauru TG Tajik
BG Bulgarian IK Inupiak NE Nepali TH Thai
BH Bihari IN Indonesian NO Norwegian TI Tigrinya
BI Bislama IS Icelandic OC Occitan TK Turkmen
BN Bengali, Bangla IW Hebrew OM (Afan) Oromo TL Tagalog
ENGLISH
BO Tibetan JA Japanese OR Oriya TN Setswana
BR Breton JI Yiddish PA Panjabi TO Tonga
CA Catalan JW Javanese PL Polish TR Turkish
CO Corsican KA Georgian PS Pashto, Pushto TS Tsonga
CS Czech KK Kazakh QU Quechua TT Tatar
CY Welsh KL Greenlandic RM Rhaeto-Romance TW Twi
DZ Bhutani KM Cambodian RN Kirundi UK Ukrainian
EL Greek KN Kannada RO Rumanian UR Urdu
EO Esperanto KO Korean (KOR) RW Kinyarwanda UZ Uzbek
ET Estonian KS Kashmiri SA Sanskrit VI Vietnamese
EU Basque KU Kurdish SD Sindhi VO Volapuk
FA Persian KY Kirghiz SG Sangho WO Wolof
FI Finnish LA Latin SH Serbo-Croatian XH Xhosa
FJ Fiji LN Lingala SI Singhalese YO Yoruba
FO Faroese LO Laothian SK Slovak ZU Zulu
FY Frisian LT Lithuanian SL Slovenian
GA Irish LV Latvian, Lettish SM Samoan
GD Scots Gaelic MG Malagasy SN Shona
63
Page 64

• Manufactured under license from Dolby Laboratories. Dolby and the double-D symbol are trademarks of Dolby
Laboratories.
• “DVD Logo” is a trademark of DVD Format/Logo Licensing Corporation registered in the US, Japan and other
countries.
• Microsoft and Windows Media are either registered trademarks or trademarks of Microsoft Corporation in the
United States and/or other countries.
ENGLISH
• “Made for iPod” and “Made for iPhone” mean that an electronic accessory has been designed to connect
specifically to iPod or iPhone, respectively, and has been certified by the developer to meet Apple performance
standards. Apple is not responsible for the operation of this device or its compliance with safety and regulatory
standards. iPhone, iPod, iPod classic, iPod nano, and iPod touch are trademarks of Apple Inc., registered in the U.S.
and other countries.
• This item incorporates copy protection technology that is protected by U.S. patents and other intellectual property
rights of Rovi Corporation. Reverse engineering and disassembly are prohibited.
• Font for this product is designed by Ricoh.
• The Bluetooth word mark and logos are owned by the Bluetooth SIG, Inc. and any use of such marks by Victor
Company of Japan, Limited (JVC) is under license. Other trademarks and trade names are those of their respective
owners.
Only for KW-AVX840:
• Ready to receive HD Radio broadcasts when connected to the KT-HD300, sold separately
• SIRIUS, XM and SAT Radio Ready, and related marks are registered trademarks of SIRIUS XM Radio Inc. All rights
reserved.
• DivX®, DivX Certified® and associated logos are trademarks of DivX, Inc. and are used under license.
• ABOUT DIVX VIDEO: DivX® is a digital video format created by DivX, Inc. This is an official DivX Certified® device that
plays DivX video. Visit divx.com for more information and software tools to convert your files into DivX video.
• ABOUT DIVX VIDEO-ON-DEMAND: This DivX Certified® device must be registered in order to play purchased DivX
Video-on-Demand (VOD) movies. To obtain your registration code, locate the DivX VOD section in your device
setup menu. Go to vod.divx.com for more information on how to complete your registration.
SAFETY INSTRUCTIONS
Use of the iPhone Navigation App is only permitted if the traffic conditions are suitable and you are absolutely
sure that no risk, obstruction or injury will be incurred to you, your passengers or other road users. The
requirements of the Road Traffic Regulations must always be followed and may vary by state. The destination
must not be entered while the vehicle is in motion.
iPhone Navigation guidance may not be applicable to the current situation because of changes in traffic
conditions (e.g. changes in tollroads, principal roads, one-way traffic, or other traffic regulations). In this
case, observe the current traffic signs or regulations.
• Traffic signs should be observed carefully while driving using the iPhone Navigation App. iPhone Navigation
App is only an aid. Driver must always decide whether or not to heed the information provided. JVC does
not accept liability for erroneous data provided by the iPhone Navigation App.
• Do not operate the unit while driving.
64
Page 65

Troubleshooting
What appears to be trouble is not always serious. Check the following points before calling a service center.
• For operations with the external components, refer also to the instructions supplied with the adapters used for the
connections (as well as the instructions supplied with the external components).
• Messages (enclosed in “ ”) in the tables below are shown in the language selected on <Text Language> (
page 47 ). Messages described here are in the language of this manual.
If the following messages appear
Message Remedy/Cause
“No Signal” • Start the playback on the external component connected to VIDEO IN jack.
• Check the cords and connections.
• Signal input is too weak.
ENGLISH
“Miswiring Check wiring
connection and then reset
unit”
“Warning Check wiring
connection and then reset
unit”
“Parking Brake” No playback picture is shown when the parking brake is not engaged.
“Eject Error”
“Loading Error”
“Restricted Device”
“USB Device Error” • The USB power voltage is abnormal.
“No BT Dongle” Bluetooth adapter (KS-UBT1) is removed.
“Connection Error” The device is registered but the connection has failed. Connect the registered device.
“Please Wait...”
A speaker cord has shorted or it has come in to contact with the car chassis. Wire or
insulate the speaker cord as appropriate, then reset the unit ( page 3). See also the
Installation/Connection Manual.
Eject the disc forcibly. ( page 3)
Check whether the connected iPod/iPhone is compatible with this unit. ( page 26)
• Turn off and turn on the unit.
• Connect another USB device.
( page 51)
The unit is preparing to use the Bluetooth function. If the message does not disappear,
turn off and turn on the unit, then connect the device again (or reset the unit).
“No Voice Device” The connected mobile phone does not have the voice recognition system.
“No Data” No phone book data is contained in the connected Bluetooth phone.
“Initialize Error” The unit has failed to initialize the Bluetooth module. Try the operation again.
“Dial Error” Dialing has failed. Try the operation again.
“Hung Up Error” The call has not ended yet. Park your car, and use the connected mobile phone to end
the call.
“Pick Up Error” The unit has failed to receive a call.
“Pairing Error” Pairing between the unit and Bluetooth device has failed. Register the device again.
( page 50)
65
Page 66

If there seems to be a problem
ENGLISH
Symptom Remedy/Cause
No sound comes out of the speakers. • Adjust the volume to the optimum level.
• Check the cords and connections.
No picture is displayed on the screen.
Turn on the screen. ( page 9)
The unit does not work at all.
<Display Sensor> function does not work
properly.
General
The remote controller* does not work.
SSM automatic presetting does not work.
TUNER
Static noise while listening to the radio. Connect the antenna firmly.
Disc can be neither recognized nor played
back.
Disc cannot be ejected.
• Recordable/Rewritable discs cannot be
played back.
• Tracks on the Recordable/Rewritable discs
cannot be skipped.
Disc in general
Reset the unit. ( page 3)
The sensor display may malfunction when there is an
object close to the motion sensor. In this case, select
<High> for <Sensitivity>. ( page 46)
• Deactivate the rear source. ( page 36) (While the rear
source is activated, the remote controller only functions
for operating the DVD/CD player.)
• Replace the battery.
Store stations manually. ( page 15)
Eject the disc forcibly. ( page 3)
Unlock the disc. ( page 17)
• Insert a finalized disc.
• Finalize the discs with the component which you used
for recording.
Playback does not start. The format of files is not supported by the unit.
No picture appears on the external monitor. • Connect the video cord correctly.
Disc cannot be played back. • Record the tracks using a compliant application on the
Tracks are not played back as you have
intended them to play.
DivX/MPEG1/MPEG2/
JPEG/MP3/WMA/WAV
* For KW-AVX840: Purchase RM-RK252P separately.
• Select the correct input on the external monitor.
appropriate discs. ( page 18)
• Add appropriate extension codes to the file names.
Playback order may differ from the one played back using
other players.
66
Page 67

Symptom Remedy/Cause
“Now Reading...” keeps flashing on the
screen.
USB
While playing a track, sound is sometimes
interrupted.
No sound comes out of the speakers. • Disconnect the iPod, then connect it again.
The iPod/iPhone does not turn on or does
not work.
Sound is distorted. Deactivate the equalizer either on this unit or the iPod/
iPod/iPhone
A lot of noise is generated. Turn off (uncheck) the “VoiceOver” feature of the iPod. For
Turn off the power and on again.
The tracks are not properly copied into the USB device.
Copy tracks again, and try again.
• Select another source and then reselect “iPod”.
• Check the connecting cable and its connection.
• Update the firmware version.
• Charge the battery.
• Check whether the iPod control mode is correctly
selected. ( page 26)
• Reset the iPod/iPhone.
iPhone.
details, visit <http://www.apple.com>.
ENGLISH
No operations are available when playing
back a track containing Artwork.
Sound does not synchronize with the video. Select <iPod> for both <Audio Input> and <Video
No picture appears on the screen. • Turn on the video component if it is not on.
AV-IN
Operate the unit after the Artwork is loaded. ( page 27)
Input>. ( page 46)
• Connect the video component correctly.
67
Page 68

Symptom Remedy/Cause
ENGLISH
“CALL 1-888-539-SIRIUS TO SUBSCRIBE”
appears on the screen.
“Acquiring Signal” or “NO SIGNAL” appears
on the screen.
“No Antenna” or “CHECK ANTENNA” appears
on the screen.
“Invalid channel” appears on the screen
for about 5 seconds, then returns to the
previous display when listening to the
SIRIUS Satellite radio.
“CH–––” or “CHANNEL UNAVL” appears on
the screen for about 2 seconds, then returns
to the previous channel while listening to
the XM Satellite radio.
SIRIUS Satellite Radio is connected but does not have an
active subscription. For information on how to subscribe,
page 31.
Make sure your Satellite Radio antenna is mounted outside
the vehicle. Move vehicle to an area with a clear view of
the sky.
Check your satellite radio antenna connection and be sure
it is firmly attached.
No broadcast on the selected channel.
Select another channel or continue listening to the
previous channel.
Selected channel is no longer available or is unauthorized.
Select another channel or continue listening to the
previous channel.
No information appears on the screen. No text information for the selected channel.
“UPDATING” or “UNAUTH” appears on the
Satellite radio (only for KW-AVX840)
screen and no sound can be heard.
“OFF AIR” appears on the screen while
listening to the XM Satellite radio.
“LOADING” appears on the screen while
listening to the XM Satellite radio.
“Reset08” appears on the screen. Reconnect this unit and the Satellite radio correctly and
Satellite radio does not work at all. Reconnect the Satellite radio after a few seconds.
• Sound quality changes when receiving HD
Radio stations.
• No sound can be heard. • <ANALOG> is selected when receiving all digital
AVX840)
The receiver is updating the channel information and
it takes a few minutes to complete.
Selected channel is not broadcasting at this time. Select
another channel or continue listening to the previous
channel.
The unit is loading the channel information and audio. Text
information is temporarily unavailable.
reset the unit.
Fix the reception mode either to <DIGITAL> or
<ANALOG>. ( page 35)
broadcast of HD Radio station. Select <DIGITAL> or
<AUTO>. ( page 35)
• <DIGITAL> is selected when receiving weak digital
signals or receiving conventional radio broadcast. Select
<ANALOG> or <AUTO>. ( page 35)
• “Reset08” appears on the screen. Reconnect this unit and the HD Radio tuner box correctly,
HD Radio reception (Only for KW-
then reset the unit.
68
Page 69

Symptom Remedy/Cause
Phone sound quality is poor. • Reduce the distance between the unit and the
Bluetooth mobile phone.
• Move the car to place where you can get a better signal
reception.
ENGLISH
The sound is interrupted or skipped while
using a Bluetooth audio player.
The connected audio player cannot be
controlled.
Bluetooth device does not detect the unit. • Check whether the Bluetooth adapter (KS-UBT1) is
Bluetooth
The unit does not make pairing with the
Bluetooth device.
Echo or noise occurs. Adjust the microphone unit position.
• Reduce the distance between the unit and the
Bluetooth audio player.
• Disconnect the device connected for Bluetooth phone.
• Turn off, then turn on the unit.
• (When the sound is not yet restored) connect the player
again.
Check whether the connected audio player supports AVRCP
(Audio Video Remote Control Profile).
inserted correctly.
• Search from the Bluetooth device again.
• When “Waiting...” appears on the screen, press [Cancel]
then connect a Bluetooth device.
Enter the same PIN code for both the unit and target
device. If the PIN code of the device is not indicated on its
instructions, try “0000” or “1234.”
The unit does not respond when you try to
copy the phone book to the unit.
You may have tried to copy the same entries (as stored)
to the unit.
69
Page 70

Specifications
Power Output
ENGLISH
Signal-to-Noise Ratio
Load Impedance 4
Equalizer Control Range Level ±12 dB
Audio Output Level
FRONT OUT, REAR OUT,
SUBWOOFER OUT
AMPLIFIER
Video Output (composite)
VIDEO OUT
Other Terminals Input LINE IN, VIDEO IN, CAMERA IN, USB
Frequency Range FM with channel interval set to 200 kHz 87.9 MHz to 107.9 MHz
20 W RMS × 4 Channels at 4
1% THD+N
80 dBA (reference: 1 W into 4
Line-Out Level/Impedance 4 V/20 k
Output Impedance 1 k
Color System PAL/NTSC
Video-Out Level/Impedance 1 Vp-p/75
Output 2nd AUDIO OUT
Others Expansion port*, OE REMOTE, RGB
and ≤
Ω)
Ω (4 Ω to 8 Ω allowance)
Ω load (full scale)
Ω
Ω
input, MIC IN, AUX, Antenna input
input
with channel interval set to 50 kHz 87.5 MHz to 108.0 MHz
AM with channel interval set to 10 kHz 530 kHz to 1 700 kHz
with channel interval set to 9 kHz 531 kHz to 1 611 kHz
FM Tuner Usable Sensitivity 9.3 dBf (0.8 μV/75
50 dB Quieting Sensitivity 16.3 dBf (1.8 μV/75
FM/AM TUNER
AM Tuner Sensitivity/Selectivity 20 μV/40 dB
Signal Detection System Non-contact optical pickup (semiconductor laser)
Frequency Response DVD, fs=48 kHz/96 kHz 16 Hz to 22 000 Hz
Dynamic Range 93 dB
DVD/CD
Signal-to-Noise Ratio 95 dB
Wow and Flutter Less than measurable limit
USB Standards USB 2.0 Full Speed
Data Transfer Rate Full Speed Maximum 12 Mbps
Alternate Channel Selectivity (400 kHz) 65 dB
Frequency Response 40 Hz to 15 000 Hz
Stereo Separation 40 dB
VCD/CD 16 Hz to 20 000 Hz
Ω)
Ω)
Low Speed Maximum 1.5 Mbps
USB
Compatible Device Mass storage class
Compatible File System FAT 32/16/12
Max. Current DC 5 V
* Only for KW-AVX840.
1 A
70
Page 71

Version Bluetooth 2.0 certified
Output Power +4 dBm Max. (Power class 2)
Service Area Within 10 m (10.9 yd)
Profile HFP (Hands-Free Profile) 1.5
BLUETOOTH
Screen Size 7 inch wide liquid crystal display
Number of Pixel 1 152 000 pixels: 800 (horizontal) × 3 (RGB) × 480 (vertical)
Drive Method TFT (Thin Film Transistor) active matrix format
MONITOR
Color System NTSC/PAL
Aspect Ratio 16:9 (wide)
Power Requirement Operating Voltage DC 14.4 V (11 V to 16 V allowance)
Grounding System Negative ground
Allowable Storage Temperature –10°C to +60°C (14°F to 140°F)
Allowable Operating Temperature 0°C to +40°C (32°F to 104°F)
Dimensions (W × H × D) Installation Size (approx.) 182 mm × 111 mm × 160 mm
GENERAL
OPP (Object Push Profile) 1.1
A2DP (Advanced Audio Distribution Profile) 1.2
AVRCP (Audio/Video Remote Control Profile) 1.3
PBAP (Phone Book Access Profile) 1.0
(7-3/16” × 4-3/8” × 6-5/16”)
Panel Size (approx.) 188 mm × 117 mm × 10 mm
(7-7/16” × 4-5/8” × 7/16”)
ENGLISH
Mass (approx.)
Design and specifications are subject to change without notice.
If a kit is necessary for your car, consult your telephone directory for the nearest car audio speciality shop.
2.8 k
g (6.2 lbs) (including the Trim plate and
Sleeve)
Required space for installation and the monitor ejection
20 (13/16)
4 (6-5/16)
Dashboard
CAUTION: When ejecting the monitor, leave
an open space for the monitor to come out.
If you do not, the monitor may obstruct the
steering wheel and gearshift lever operations,
and this may result in a traffic accident.
100 (3-15/16)
Unit: mm (inch)
160 (6-5/16) 91.6 (3-5/8)
71
Page 72

7
The countries where you may use the
Bluetooth® function
7
Die Länder, in denen Sie die Bluetooth® Funktion verwenden können
7
Pays où vous pouvez utiliser la fonction Bluetooth®
7
De landen waar u de Bluetooth®-functie mag gebruiken
7
Países en los que se puede utilizar la función Bluetooth®
7
Paesi nei quali è possibile utilizzare la funzione Bluetooth®
7
Länder där du kan använda Bluetooth®-funktionen
7
Lande, hvor du kan bruge Bluetooth®-funktionen
7
Land hvor du kan bruke Bluetooth®-funksjonen
7
Maat, joissa voi käyttää Bluetooth®-toimintoa
7
Países onde pode usar a função Bluetooth®
7
Οι χώρες όπου μπορείτε να χρησιμοποιήσετε τη λειτουργία Bluetooth®
7
Страны, где можно воспользоваться функцией Bluetooth®
7
Země, ve kterých můžete využívat funkci Bluetooth®
7
Azok az országok, amelyekben használhatjuk a Bluetooth®-funkciót
7
Kraje, w których można używać funkcji Bluetooth®
7
Države, kjer lahko uporabljate funkcijo Bluetooth®
7
Krajiny, v ktorých môžete využívať funkciu Bluetooth®
7
Valstis, kur jūs varat izmantot Bluetooth® funkciju
7
Šalys, kuriose galite naudotis „Bluetooth®“ funkcija
7
Il-pajjiżi fejn tista’ tuża l-funzjoni Bluetooth®
7
Lönd þar sem hægt er að nota Bluetooth®
7
Riigid, kus on võimalik kasutada Bluetooth® funktsiooni
7
Bluetooth® fonksiyonunu kullanabileceğiniz ülkeler
7
Na tíortha inar féidir leat feidhmiú Bluetooth® a úsáid
7
Länner an denen der d’Bluetooth® Funktioun benotze kënnt.
7
nhng quc gia mà bn có th s dng chc nng Bluetooth
7
Els països on podrà fer servir la funció Bluetooth®
7
Zemlje u kojima je dozvoljena upotreba Bluetooth® funkcije.
7
Zemlje u kojima možete koristiti Bluetooth® funkciju
7
Zemlje u kojima je dopušteno koristiti Bluetooth®.
7
Земји каде можете да ја користите функцијата Bluetooth®
7
Страните, в които можете да ползвате функцията Bluetooth®
7
Ţările în care puteţi utiliza funcţia Bluetooth®
7
Die lande waar u die Bluetooth®-funksie kan gebruik
7
Amazwe lapho ungasebenzisa khona uhlelo lwe-Bluetooth®
7
Ang mga bansa kung saan maaari kang gumamit ng Bluetooth® function
7
Negara-negara yang anda boleh menggunakan fungsi Bluetooth®
7
您能够使用 Bluetooth® 功能的国家
7
您能夠使用 Bluetooth® 功能的國家
7
Bluetooth® 기능을 사용할 수 있는 국가
®
7
i
Page 73

Country
Country
Country
Andorra
Australia
Österreich
Bosna i Hercegovina
Belgien
Belgique
България
Canada
Schweiz
Suisse
Chile
Κύπρος
Kıbrıs
Česká republika
Deutschland
Danmark
Eesti
España
Suomi
Finland
France
United Kingdom
Ελλάδα
Hong Kong
香港
香港
Hrvatska
Magyarország
Ireland
Éire
Ísland
Italia
대한민국
Lichtenstein
Lietuva
Luxemburg
Luxembourg
Lëtzebuerg
Latvija
Monaco
Crna Gora
Македонија
Malta
Malaysia
Nederland
Norge
New Zealand
Perú
Philippines
Pilipinas
Polska
Portugal
România
Srbija
Россия
Sverige
Singapore
新加坡
Singapura
Slovenija
Slovensko
Türkiye
台湾
United States of America
Venezuela
Vietnam
Vit Nam
South Africa
ENingizimu Afrika
Suid-Afrika
ii
09-1672-006
Page 74

Having TROUBLE with operation?
Please reset your unit
Refer to page of How to reset your unit
Still having trouble??
USA ONLY
Call 1-800-252-5722
http://www.jvc.com
We can help you!
EN, SP, FR
© 2011 Victor Company of Japan, Limited
0111NYMMDWJEIN
Page 75

KW-AVX848/KW-AVX840
Installation/Connection Manual
Manual de instalación/conexión
Manuel d’installation/raccordement
LVT2180-002A
[J/JW]
ENGLISH
This unit is designed to operate on 12 V DC, NEGATIVE ground
electrical systems. If your vehicle does not have this system, a
voltage inverter is required, which can be purchased at JVC car audio
dealers.
WARNINGS
• DO NOT install any unit or wire any cable in a location where;
– it may obstruct the steering wheel and gearshift lever operations,
as this may result in a traffic accident.
– it may obstruct the operation of safety devices such as air bags, as
this may result in a fatal accident.
– it may obstruct visibility.
• DO NOT operate any unit while manipulating the steering wheel, as
this may result in a traffic accident.
• The driver must not watch the monitor while driving. It may lead to
carelessness and cause an accident.
• If you need to operate the unit while driving, be sure to look around
carefully or you may be involved in a traffic accident.
• If the parking brake is not engaged, “Parking Brake” appears on the
monitor, and no playback picture will be shown.
– This warning appears only when the parking brake lead is
connected to the parking brake system built in the car.
To prevent short circuits, we recommend that you disconnect the
battery’s negative terminal and make all electrical connections before
installing the unit.
• Be sure to ground this unit t o the car’s chassis again afte r
installation.
• Be sure any cable is not caught on the car’s chassis or under seats.
Notes on elec trical connections:
• Replace the fuse with one of the specified rating. If the fuse blows
frequently, consult your JVC car audio dealer.
• It is recommended to connect speakers with maximum power
of more than 50 W (both at the rear and at the front, with an
impedance of 4 to 8 Ω).
If the maximum power is less than 50 W, change <Amplifier Gain>
setting to prevent the speakers from being damaged (see page 44 of
the INSTRUCTIONS).
• To prevent short circuits, cover the terminals of the UNUSED leads
with insulating tape.
• The heat sink becomes very hot after use. Be careful not to touch it
when removing this unit.
• At the time of installation, be sure to fix all wires (wires both from
this unit and from the car itself) in a way that any wires cannot
come into contact with heat sinks on the rear and side of the unit.
Heat sink
Sumidero térmico
Dissipateur de chaleur
Parts list for installation and connection
The following parts are provided for this unit.
If anything is missing, contact your dealer immediately.
Main unit/Sleeve/Trim plate
Unidad principal/Cubierta/Placa de guarnición
Appareil principal/Manchon/Plaque d’assemblage
Monitor panel and soft case
Panel del monitor y estuche blando
Panneau du moniteur et étui souple
ESPAÑOL
Esta unidad está diseñada para funcionar con 12 V de CC, con
sistemas eléctricos de masa NEGATIVA. Si su vehículo no posee
este sistema, será necesario un inversor de tensión, que puede ser
adquirido en los concesionarios de JVC de equipos de audio para
automóviles.
ADVERTENCIAS
• NO instale ningún receptor o tienda ningún cable en una
ubicación donde;
– donde pueda obstruir la maniobra del volante de dirección
y del cambio de engranajes, con el consiguiente riesgo de
accidentes de tráfico.
– donde pueda obstruir el funcionamiento de dispositivos de
seguridad tales como bolsas de aire, pues podría resultar en un
accidente fatal.
– donde pueda obstruir la visibilidad.
• NO OPERE la unidad mientras está maniobrando el volante de
dirección, pues podría producirse un accidente de tráfico.
• El conductor no debe mirar el monitor mientras conduce. Podría
producirse un descuido, y causar un accidente.
• Si necesita operar la unidad mientras conduce, asegúrese de
mirar atentamente a su alrededor pues de lo contrario, se podría
producir un accidente de tráfico.
• Si el freno de mano no está en uso, aparecerá “Parking Brake
(Freno de Mano)” en la pantalla y no se mostrará ninguna
secuencia de imagen.
– Esta advertencia aparece únicamente cuando el cable del freno
de estacionamiento se encuentra conectado al sistema del
freno de estacionamiento incorporado al automóvil.
Para evitar cortocircuitos, recomendamos que desconecte el
terminal negativo de la batería y que efectúe todas las conexiones
eléctricas antes de instalar la unidad.
• Asegúrese de volver a conectar a masa esta unidad al chasis
del automóvil después de la instalación.
• Asegúrese de que ningún cable quede atrapado en el chasis del
automóvil o debajo de los asientos.
Notas sobre las conexiones eléctricas:
• Reemplace el fusible por otro del régimen especificado. Si el
fusible se funde frecuentemente, consulte con su concesionario
de JVC de equipos de audio para automóviles.
• Se recomienda conectar los altavoces con una potencia máxima
de más de 50 W (tanto atrás como adelante, con una impedancia
de 4 a 8 Ω).
Si la potencia máxima es de menos de 50 W, cambie <Amplifier
Gain> para evitar daños en los altavoces (consulte la página 44
del MANUAL DE INSTRUCCIONES).
• Para evitar cortocircuitos, cubra los cables NO UTILIZADOS con
cinta aislante.
• El sumidero térmico estará muy caliente después del uso.
Asegúrese de no tocarlo al desmontar esta unidad.
• Al realizar la instalación, asegúrese de fijar todos los cables (tanto
los que proceden de esta unidad como los del vehículo en sí) de
manera tal que ninguno quede en contacto con los disipadores
térmicos de las partes traseras y laterales de la unidad.
Lista de piezas para instalación y conexión
Con esta unidad se suministran las siguientes piezas.
Si hay algún elemento faltante, póngase inmediatamente en
contacto con su concesionario.
Crimp connector
Conector de sujeción
Raccord à sertir
Mounting bolt—M4 x 20 mm/M4 x 13/16”
Perno de montaje—M4 x 20 mm/M4 x 13/16 pulgada
Boulon de montage—M4 x 20 mm/M4 x 13/16 pouces
Rubber cushion
Cojín de goma
Amortisseur en caoutchouc
0111NYMMDWJEIN
© 2011 Victor Company of Japan, Limited
EN, SP, FR
FRANÇAIS
Cet appareil est conçu pour fonctionner sur des sources de courant
continu de 12 V à masse NEGATIVE. Si votre véhicule n’offre pas ce
type d’alimentation, il vous faut un convertisseur de tension, que vous
pouvez acheter chez un revendeur d’autoradios JVC.
AVERTISSEMENTS
• N’INSTALLEZ aucun appareil ni aucun câble dans un endroit où:
– où il peut gêner l’accès au volant ou au levier de vitesse car cela
peut entraîner un accident de la circulation.
– où il peut gêner la manipulation de dispositifs de sécurité tels que
les airbags car cela peut entraîner un accident fatal.
– où il peut gêner la visibilité.
• NE COMMANDEZ PAS l’appareil lors de la manipulation du volant
car cela peut entraîner un accident de la circulation.
• Le conducteur ne doit pas regarder le moniteur lorsqu’il conduit. Cela
peut lui faire perdre sa concentration et causer un accident.
• Si vous souhaitez opérer l’appareil pendant que vous conduisez,
assurez-vous de bien regarder autour de vous afin de ne pas causer un
accident de la circulation.
• Si le frein à main n’est pas engagé, “Parking Brake (Frein à Main)”
s’affiche sur le moniteur et aucune image de lecture n’apparaît.
– Cet avertissement apparaît uniquement quand le fil du frein de
stationnement est connecté au système de frein de stationnement
intégré à la voiture.
Pour éviter tout court-circuit, nous vous recommandons de débrancher
la borne négative de la batterie et d’effectuer tous les raccordements
électriques avant d’installer l’appareil.
• Assurez-vou s de raccorder de nouveau la mise à la masse de
cet appareil au c hâssis de la voiture après l’in stallation.
• Assurez-vous qu’aucun câble n’est coincé sur châssis de la voiture ou
sous les sièges.
Remarques sur l es connexions électri ques:
• Remplacer le fusible par un de la valeur précisée. Si le fusible saute
souvent, consulter votre revendeur d’autoradios JVC.
• Il est recommandé de connecter des enceintes avec une puissance de
plus de 50 W (les enceintes arrière et les enceintes avant, avec une
impédance comprise entre 4 Ω et 8 Ω).
Si la puissance maximum est inférieure à 50 W, changez <Amplifier
Gain> pour éviter d’endommager vos enceintes (voir page 44 du
MANUEL D’INSTRUCTIONS).
• Pour éviter les court-circuits, couvrir les bornes des fils qui ne sont
PAS UTILISÉS avec de la bande isolante.
• Le dissipateur de chaleur devient très chaud après usage. Faire
attention de ne pas le toucher en retirant cet appareil.
• Au moment de l’installation, assurez-vous de fixer tous les fils (les fils
de cet appareil et aussi de la voiture elle-même) de façon qu’aucun
fil ne puisse entrer en contact avec les dissipateurs de chaleur situés à
l’arrière et sur le côté de l’appareil.
Liste des pièces pour l’installation et
raccordement
Les pièces suivantes sont fournies avec cet appareil.
Si quelque chose manquait, contactez votre revendeur immédiatement.
Washer (ø5)
Arandela (ø5)
Rondelle (ø5)
Lock nut (M5)
Tuerca de seguridad (M5)
Ecrou d’arrêt (M5)
Extension lead
Cable prolongador
Fil prolongateur
Flat head screws (M5 x 8 mm/M5 x 3/8”)
Round head screws (M5 x 8 mm/M5 x 3/8”)
Tornillos de cabeza plana
(M5 x 8 mm/M5 x 3/8 pulgada)
Tornillos de cabeza esférica
(M5 x 8 mm/M5 x 3/8 pulgada)
Vis à tête plate (M5 x 8 mm/M5 x 3/8 pouces)
Vis à tête ronde (M5 x 8 mm/M5 x 3/8 pouces)
Power cord
Cordón de alimentación
Cordon d’alimentation
Handles
Manijas
Poignées
Use these screws when installing the unit
without the supplied sleeve. (See page 2.)
Utilice estos tornillos cuando instale la unidad
sin la cubierta suministrada. (Consulte la
página 2.)
Utilisez ces vis lors de l’installation de l’appareil
sans le manchon fourni. (Voir page 2.)
Microphone
Micrófono
Microphone
Bluetooth adapter (inserted)
Adaptador Bluetooth (insertado)
KS-UBT1
1
Adaptateur Bluetooth (inséré)
Bag for storing the adapter
Funda para guardar el adaptador
Sac pour ranger l’adaptateur
Only for KW-AVX848 /
Sólo para KW-AVX848 /
Uniquement pour le KW-AVX848
Remote controller
Control remoto
Télécommande
Page 76

INSTALLATION
K
(IN-DASH MOUNTING)
The following illustration shows a typical installation. However, you
should make adjustments corresponding to your specific car. If you
have any questions or require information regarding installation kits,
consult your JVC car audio dealer or a company supplying kits.
• If you are not sure how to install this unit correctly, have it installed
by a qualified technician.
Before installing the unit
• Remove the audio system originally installed in the car, together
with its mounting brackets. Be sure to keep all the screws and parts
removed from your car for future use.
• When mounting the unit, be sure to use the screws provided, as
instructed. If other screws are used, parts could become loose or
damaged.
• When tightening screws or bolts, be careful not to pinch any
connection cord.
• Make sure not to block the fan on the rear to maintain proper
ventilation when installing the unit.
• You cannot install the unit on the car which has any obstacles in the
space shown in “Required space for installation and the monitor
panel ejection” below.
When installing the unit without using the sleeve
• Use flat head screws or round head screws, depending on
installation location. When you use flat head screws to install the
unit, use the screws removed in step 1 below. When you use screws
other than those supplied, use 8 mm (3/8”)-long screws. If longer
screws are used, they could damage the unit.
• Tighten the screws firmly to prevent the unit from falling off.
INSTALACIÓN
(MONTAJE EN EL TABLERO DE INSTRUMENTOS)
La siguiente ilustración muestra una instalación típica. Sin embargo
usted deberá efectuar los ajustes correspondientes a su automóvil.
Si tiene alguna pregunta o necesita información acerca de las
herramientas para instalación, consulte con su concesionario de
JVC de equipos de audio para automóviles o a una compañía que
suministra tales herramientas.
• Si no está seguro de poder instalar la unidad correctamente, déjela
en manos de un técnico cualificado.
Antes de instalar la unidad
• Desmonte el sistema de audio instalado originalmente en el coche,
junto con los ménsulas de montaje. Asegúrese de guardar todos los
tornillos y piezas quitados de su vehículo para poderlos usar en el
futuro.
• Al instalar la unidad, asegúrese de usar los tornillos suministrados,
de acuerdo con las instrucciones. El uso de otros tornillos podrá
provocar flojedad de o daños a las piezas.
• Al apretar los tornillos o los pernos, asegúrese de que ningún
cable de conexión quede pillado.
• Al efectuar la instalación, asegúrese de no bloquear el ventilador
del panel trasero a fin de mantener una ventilación correcta.
• No podrá instalar la unidad en un coche en que haya algún
obstáculo en el espacio indicado en “Espacio requerido para la
instalación y la expulsión del panel del monitor” más abajo.
Instalación de la unidad sin utilizar la cubierta
• Utilice tornillos de cabeza plana o esférica, dependiendo del lugar
de instalación. Si decide utilizar tornillos de cabeza plana para
instalar la unidad, utilice los extraídos en el paso 1, más abajo.
Si decide utilizar tornillos distintos de los suministrados, escoja
tornillos de 8 mm (3/8”) de largo. El uso de tornillos más largos
producir daños a la unidad.
•
Apriete los tornillos firmemente para evitar que la unidad se
caiga.
INSTALLATION
(MONTAGE DANS LE TABLEAU DE BORD)
L’illustration suivante est un exemple d’installation typique.
Cependant, vous devez faire les ajustements correspondant à votre
voiture. Si vous avez des questions ou avez besoin d’information sur des
kits d’installation, consulter votre revendeur d’autoradios JVC ou une
compagnie d’approvisionnement.
• Si vous n’êtes pas sûr de pouvoir installer l’appareil correctement,
faite-le installer par un technicien qualifié.
Avant d’installer l’appareil
• Retirez le système audio d’origine installé dans la voiture en même
temps que les supports de montage. Assurez-vous de conserver toutes
les vis et pièces détachées de votre voiture pour une utilisation dans le
future.
• Lors du montage de l’appareil, assurez-vous d’utiliser les vis fournies,
de la façon indiquée. Si vous utilisez d’autres vis, certaines pièces
peuvent être perdues ou endommagées.
• Lorsque vous serrez des vis ou des boulons, faites attention de ne pas
pincer un cordon de connexion.
• Assurez-vous de ne pas bloquer le ventilateur sur le panneau arrière
lors de l’installation afin de permettre une ventilation correcte.
• Vous ne pouvez pas installer l’appareil sur une voiture qui a
certains obstacles dans l’espace montré dans “Espace nécessaire pour
l’installation et l’éjection du panneau du moniteur” ci-dessous.
Lors de l’installation de l’appareil scans utiliser de
manchon
• Utilisez des vis à tête plate ou des vis à tête ronde, en fonction de
l’emplacement de l’installation. Quand vous utilisez des vis à tête
plage pour installer l’appareil, utilisez les vis retirées à l’étape 1 cidessous. Quand vous utilisez d’autres vis que les vis fournies, utilisez
des vis d’une longueur de 8 mm (3/8”). Vous risquez d’endommager
l’appareil si vous utilisez des vis plus longues.
• Serrez les vis solidement pour éviter que l’appareil tombe.
1 Detach the trim plate and remove the screws.
2 Detach the sleeve using the handles then slide off the sleeve.
3 Install the sleeve in the dashboard of the car.
4 Do the required electrical connections.
• See pages 3 – 6.
5 Attach the trim plate to the main unit, then install the main unit
in to the sleeve.
6 Attach the monitor panel.
1
Sleeve
Cubierta
Manchon
Flat head screws (M5 x 8 mm/M5 x 3/8”)
Tornillos de cabeza plana
(M5 x 8 mm/M5 x 3/8 pulgada)
Vis à tête plate (M5 x 8 mm/M5 x 3/8 pouces)
3
Bend the appropriate tabs to hold the sleeve firmly in place.
Doble las lengüetas apropiadas para retener firmemente la manga en su lugar.
Tordez les languettes appropriées pour maintenir le manchon en place.
Sleeve
Cubierta
Manchon
Trim plate
Placa de guarnición
Plaque d’assemblage
1 Desmonte la placa de guarnición y extraiga los tornillos.
2 Sujetando las asas, desmonte la cubierta deslizándola.
3 Instale la cubierta en el tablero del automóvil.
4 Realice todas las conexiones eléctricas necesarias.
• Consulte las páginas 3 – 6.
5
Fije la placa de guarnición a la unidad principal y, a continuación,
instale ésta en la
6 Fije el panel del monitor.
cubierta
.
2
Handles
Manijas
Poignées
4
1 Détachez la plaque d’assemblage et retirez les vis.
2 Détachez le manchon en utilisant les poignées puis retirez-le.
3 Installez le manchon dans le tableau de bord de la voiture.
4 Réalisez les connexions électriques.
• Voir pages 3 – 6.
5 Attachez la plaque de garniture sur l’appareil principale, puis
installez l’appareil dans le manchon.
6 Attachez le panneau du moniteur.
When you stand the unit, be careful
not to damage the fuse on the rear.
Al poner la unidad vertical, tenga
cuidado de no dañar el fusible
provisto en la parte posterior.
Lorsque vous mettez l’appareil à la
Sleeve
Cubierta
Manchon
For more stable attachment
Para una fijación más estable
Pour que la fixation soit plus stable
A
Stay (option) /
B Screw (option) / Tornillo (opción) / Vis (en option)
C Lock nut / Tuerca de seguridad / Ecrou d’arrêt
D Washer / Arandela / Rondelle
E
A
B
C
Mounting bolt / Perno de montaje / Boulon de montage
E
D
verticale, faire attention de ne pas
endommager le fusible situé sur
l’arrière.
Soporte (opción) /
To the rear panel
Al panel trasero
Sur le panneau arrière
Hauban (en option)
5
Sleeve
Cubierta
Manchon
Do not block the fan.
No tape las rejillas de ventilación.
Ne bloquez pas le ventilateur.
Required space for installation and the monitor
panel ejection
Espacio requerido para la instalación y la
expulsión del panel del monitor
Espace nécessaire pour l’installation et
l’éjection du panneau du moniteur
Slide the unit in until you hear a clicking sound.
Deslice la unidad hasta escuchar un chasquido.
Faites glisser l’appareil jusqu’à ce que vous entendiez un clic.
Trim plate
Placa de
guarnición
Plaque
d’assemblage
20 (13/16)
DO NOT press the panel (shaded in the illustration).
NO presione el panel (sombreado en la ilustración).
NE POUSSEZ PAS sur le panneau (en gris sur l’illustration).
4 (3/16)
100 (3-15/16)
160 (6-5/16) 91.6 (3-5/8)
2
Dashboard
Tablero de
instrumentos
Tableau de bord
Unit: mm
Unidad: mm
Unité: mm
6
O
Install the unit at an angle of less than 30˚.
Instale la unidad a un ángulo de
menos de 30˚.
Installez l’appareil avec un angle de
moins de 30°.
Monitor panel
Panel del monitor
Panneau du moniteur
30˚
Page 77

Removing the unit
Before removing the unit, release the rear section.
Extracción de la unidad
Antes de extraer la unidad, libere la sección trasera.
Retrait de l’appareil
Avant de retirer l’appareil, libérer la section arrière.
Detach the monitor panel (see
1 2
page 5 of the INSTRUCTIONS).
Desmonte el panel del monitor
(consulte la página 5 del
MANUAL DE INSTRUCCIONES).
Détachez le panneau du moniteur
(voir la page 5 du MANUEL
D’INSTRUCTIONS).
Detach the trim plate.
Desmonte la placa de guarnición.
Détachez la plaque d’assemblage.
Trim plate
Placa de guarnición
Plaque d’assemblage
ELECTRICAL CONNECTIONS CONEXIONES ELECTRICAS
PRECAUTIONS on p ower supply and speaker conne ctions:
• DO NOT conne ct the speaker leads of th e power cord to the
car batter y; otherwise, the unit wi ll be seriously damaged.
• BEFORE connecting the speaker leads of the power cord to the
speakers, check the speaker wiring in your car.
PRECAUCIONES s obre las conexiones de la fue nte de
alimentació n y de los altavoces:
• NO conecte los cond uctores de altavoz del cab le de
alimentació n a la batería de automóvil, pue s podrían producirse
graves daños en la unidad.
• ANTES de conectar a los altavoces los conductores de altavoz del
cable de alimentación, verifique el conexionado de altavoz de su
automóvil.
Insert the two handles, then pull them as
illustrated so that the unit can be removed.
3
Inserte las dos manijas y, a continuación,
jálelas tal como se muestra en la ilustración
para desmontar la unidad.
Insérez les deux poignées, puis tirez de la
façon illustrée de façon à retirer l’appareil.
RACCORDEMENTS ELECTRIQUES
PRECAUTIONS sur l ’a limentation et la connexi on des
enceintes:
• NE CONNEC TEZ PAS les fils d’enceintes du cordon
d’alimentation à la b atterie; sinon, l’appareil se rait
sérieusement endommagé.
• AVANT de connecter les fils d’enceintes du cordon d’alimentation
aux enceintes, vérifiez le câblage des enceintes de votre voiture.
Handles
Manijas
Poignées
Connecting the parking brake lead / Conexión del cable del freno de estacionamiento / Connexion du fil de frein de stationnement
Parking brake lead (light green)
Cable del freno de estacionamiento (verde claro)
Fil du frein de stationnement (vert clair)
To metallic body or chassis of the car
A un cuerpo metálico o chasis del automóvil
Vers corps métallique ou châssis de la voiture
KW-AVX848
KW-AVX840
Parking brake
Freno de estacionamiento
Frein de stationnement
Parking brake switch (inside the car)
Interruptor del freno de estacionamiento (dentro del automóvil)
Commutateur de frein de stationnement (intérieur de la voiture)
Crimp connector
Conector de sujeción
Raccord à sertir
Extension lead
Cable prolongador
Fil prolongateur
Connecting the reverse gear signal lead (for rear view camera) / Conexión del cable de señal del engranaje de marcha atrás (para cámara de retrovisión)
/ Connexion du fil de signal de marche arrière (pour la caméra de recul)
Locate the reverse lamp lead in the trunk.
Purple with white stripe
Púrpura con rayas blancas
Violet avec bande blanche
KW-AVX848
KW-AVX840
Localice el conductor de la luz de marcha atrás en el
portaequipajes.
Extension lead (not supplied for this unit)
Cable prolongador (no suministrado con esta unidad)
Fil prolongateur (non fourni avec cet autoradio)
Crimp connector (not supplied for this unit)
Conector de sujeción (no suministrado con esta unidad)
Raccord à sertir (non fourni avec cet autoradio)
Reverse lamp lead
Conductor de la luz de
marcha atrás
Fil des feux de recul
Localisez le fil des feux de recul dans le coffre.
To reverse lamp
A la luz de marcha atrás
Aux feux de recul
Reverse lamps
Luz de marcha atrás
Feux de recul
3
Page 78

ENGLISH
Before connecting: Check the wiring in the vehicle carefully.
Incorrect connection may cause serious damage to this unit.
The leads of the power cord and those of the connector from the car
body may be different in color.
1 Connect the colored leads of the power cord in the order specified
in the illustration below.
2 Connect the antenna cord.
3 Finally connect the wiring harness to the unit.
• The terminals and cables of all models are shown in the illustration
for the purpose of explanation.
Light green
Verde claro
Vert clair
PAR KI NG B RA KE
REVERSE
GEAR
SIGNAL
CAMERA IN
SUBWOOFER OUT
ESPAÑOL
Antes de la conexión: Verifique atentamente el conexionado del
vehículo. Una conexión incorrecta podría producir daños graves en
la unidad.
Los cordones del cable de alimentación y los del conector
procedentes de la carrocería del automóvil podrían ser de
diferentes en color.
1 Conecte los conductores de color del cable de alimentación en el orden
especificado en la ilustración de abajo.
2 Conecte el cable de antena.
3 Por último, conecte el cable de alimentación a la unidad.
• Los terminales y cables de todos los modelos se muestran en la
ilustración con fines explicativos.
Crimp connector / Conector de sujeción /
(see page 3 / consulte la página 3 / voir page 3)
Fan
Ventilador
Ventilateur
Raccord à sertir
See each diagram on pages 4 – 6.
Vea cada uno de los diagramas en las páginas 4 – 6.
Référez-vous à chaque diagramme des pages 4 – 6.
FRANÇAIS
Avant de commencer la connexion: Vérifiez attentivement le
câblage du véhicule. Une connexion incorrecte peut endommager
sérieusement l’appareil.
Le fil du cordon d’alimentation et ceux des connecteurs du châssis de
la voiture peuvent être différents en couleur.
1 Connectez les fils colorés du cordon d’alimentation dans l’ordre
spécifié sur l’illustration ci-dessous.
2 Connectez le cordon d’antenne.
3 Finalement, connectez le faisceau de fils à l’appareil.
• Les prises et les câbles de tous les modèles sont montrés sur les
illustrations dans un but explicatif.
To parking brake (see page 3)
Al freno de estacionamiento (consulte la página 3)
Au frein de stationnement (voir page 3)
Antenna
terminal
Terminal de
la antena
Borne de
l’antenne
Rear ground terminal
Terminal de tierra posterior
Borne arrière de masse
1
*
3
10 A fuse / Fusible de 10 A / Fusible 10 A
Black
Negro
Noir
3
Yellow *
3
Amarillo
*
3
Jaune *
Red
Rojo
Rouge
Blue
Azul
Bleu
Blue with white stripe
Azul con rayas blancas
Bleu avec bande blanche
Orange with white stripe
Naranja con rayas blancas
Orange avec bande blanche
Brown
Marrón
Marron
2
To metallic body or chassis of the car
A un cuerpo metálico o chasis del automóvil
1
(GND)
Vers corps métallique ou châssis de la voiture
To a live terminal in the fuse block connecting to the car battery
(bypassing the ignition switch) (constant 12 V)
A un terminal activo del bloque de fusibles conectado a la batería del
automóvil (desviando el interruptor de encendido) (12 V constantes)
A une borne sous tension du porte-fusible connectée à la batterie de la voiture
(en dérivant l’interrupteur d’allumage) (12 V constant)
(POWER ANTENNA)
1
To an accessory terminal in the fuse block
A un terminal accesorio del bloque de fusibles
3
Vers borne accessoire du porte-fusible
To automatic antenna if any (250 mA max.)
A la antena automática, si hubiere (250 mA máx.)
4
À l’antenne automatique s’il y en a une (250 mA max.)
To the remote lead of other equipment (200 mA max.)
Al conductor remoto del otro equipo (200 mA máx.)
5
Au fil de télécommande d’un autre appareil (200 mA max.)
To car light control switch
Al interruptor de control de las luces del automóvil
6
À l’interrupteur d’éclairage de la voiture
To mobile phone system
Al sistema de teléfono celular
7
À un système de téléphone cellulaire
To the OE remote adapter *
Al adaptador para control remoto OE *
4
/
Ignition switch
Interruptor de encendido
Interrupteur d’allumage
2
*
2
*
Fuse block
Bloque de
fusibles
Porte-fusible
4
/ Au adaptateur pour télécommande au volant *
4
9
White with black stripe
Blanco con rayas negras
Blanc avec bande noire
Connecting to the steering wheel remote controller / Conexión al control remoto del volante de dirección / Connexion de la télécommande
A
de volant
If your car is equipped with the steering wheel remote controller, you can operate this unit using the controller. For
connection, an exclusive remote adapter (not supplied) which matches your car is required. For details, consult the
same car audio dealer as where the unit is purchased.
Si su vehículo está equipado con control remoto en el volante de dirección, podrá hacer funcionar este receptor
utilizando dicho control. Para la conexión, se requiere un adaptador remoto exclusivo (no suministrado) que sea
adecuado para su automóvil. Para los detalles, consulte con el concesionario car audio donde compró el receptor.
Si votre voiture est munie d’une télécommande de volant, vous pouvez commander cet autoradio en utilisant la
télécommande. Pour la connexion, un adaptateur de télécommande exclusif (non fourni) correspondant à votre voiture
est requis. Pour en savoir plus, consultez le revendeur autoradio auprès duquel vous avez acheté cet autoradio.
*1 Only for KW-AVX840.
2
Not supplied for this unit.
*
3
*
Before checking the operation of this unit prior to installation, this lead
must be connected, otherwise power cannot be turned on.
Do not connect the lead directly to the battery.
4
Do not connect the lead to any device other than the OE remote
*
adapter. Doing so may cause malfunction.
5
Alter the wire of the OE remote adapter to connect to the steering wheel
*
remote lead.
White
Blanco
Blanc
Left speaker (front)
Altavoz izquierdo (delantero)
Enceinte gauche (avant)
Gray with black stripe
Gris con rayas negras
Gris avec bande noire
Gray
Green with black stripe
Gris
Verde con rayas negras
Gris
Vert avec bande noire
Right speaker (front)
Altavoz derecho (delantero)
Enceinte droit (avant)
KW-AVX848
KW-AVX840
*1 Sólo para KW-AVX840.
2
No suministrado con esta unidad.
*
3
*
Antes de comprobar el funcionamiento de esta unidad previa a de la
instalación, es necesario conectar este cable, de lo contrario no se podrá
conectar la alimentación. No conecte el conductor directamente a la batería.
*4 No conecte el cable a ningún otro dispositivo que no sea el adaptador
para control remoto OE. De lo contrario podría provocar un mal
funcionamiento.
5
*
Altere el cableado del adaptador para control remoto OE para
conectar al conductor remoto del volante de dirección.
Green
Purple with black stripe
Verde
Púrpura con rayas negras
Vert
Violet avec bande noire
Left speaker (rear)
Altavoz izquierdo (trasero)
Enceinte gauche (arrière)
OE remote adapter *2 *
Adaptador remoto OE *2 *
Adaptateur pour télécommande au volant *2 *
STEERING
WHEEL
REMOTE
Steering wheel remote controller (equipped in the car)
Control remoto del volante de dirección (equipado en el
vehículo)
Télécommande de volant (installée dans la voiture)
*1 Uniquement pour le KW-AVX840.
2
Non fourni avec cet appareil.
*
3
*
Pour vérifier le fonctionnement de cet appareil avant installation, ce fil
doit être raccordé, sinon l’appareil ne peut pas être mis sous tension.
Ne connectez pas le fil directement à la batterie.
4
Ne connectez pas ce fil à aucun autre appareil que l’adaptateur
*
de télécommande au volant. Cela pourrait causer un mauvais
fonctionnement.
5
*
Modifiez le fil de l’adaptateur de télécommande au volant pour le
connecté au fil de télécommande de volant.
5
5
Purple
Púrpura
Violet
Right speaker (rear)
Altavoz derecho (trasero)
Enceinte droit (arrière)
5
4
Page 79

Connecting the external amplifiers and subwoofer /
B
d’un caisson de grave
You can connect an amplifier to upgrade your car stereo system.
• Connect the remote lead (blue with white stripe) to the remote
lead of the other equipment so that it can be controlled through
this unit.
• Disconnect the spe akers from this unit, and co nnect
them to the ampl ifier. Leave the speaker leads of th is unit
unused.
• You can switch off the built-in amplifier and send the audio
signals only to the external amplifier(s) to get clear sounds and to
prevent internal heat built-up inside the unit. See page 44 of the
INSTRUCTIONS.
Conexión de los amplificadores y subwoofer /
Puede conectar amplificadores para mejorar su sistema car estéreo.
• Conecte el conductor remoto (azul con rayas blancas) al
conductor remoto del otro equipo para poderlo controlar a través
de esta unidad.
•
Desconecte los altavoces de esta unidad y conéctelos al
amplificador. Los cables de los altavoces de esta unidad quedan
sin usar.
• Podrá desconectar el amplificador incorporado y enviar las
señales de audio solamente al(los) amplificador(es) externo(s)
para obtener sonidos nítidos y evitar que se caliente el interior de
la unidad. Consulte la página 44 del MANUAL DE INSTRUCCIONES.
Connexion d’amplificateurs extérieurs et
Vous pouvez connecter un amplificateur pour améliorer votre système
autoradio.
• Connectez le fil de commande à distance (bleu avec bande blanche)
au fil de commande à distance de l’autre appareil de façon qu’il
puisse être commandé via cet appareil.
•
Déconnecte z les enceintes de cet apparei l et connectez-les à
l’amplifica teur. Laissez les fils d ’en ceintes de cet apparei l inutilisés.
•
Vous pouvez mettre hors service l’amplificateur intégré et envoyer les
signaux audio uniquement sur un ou plusieurs amplificateurs extérieurs
afin d’obtenir un son clair et d’éviter tout échauffement interne de
l’autoradio. Voir page 44 du MANUEL D’INSTRUCTIONS.
6
Remote lead *
Fil d’alimentation à distance *
Altavoces traseros
Connecting the external components / Conectando los componentes externos / Connexion des appareils extérieurs
C
Cable remoto *
Rear speakers
Enceintes arrière
JVC Amplifier
Amplificador de JVC
JVC Amplificateur
6
6
Remote lead (blue with white stripe)
Cable remoto (azul con rayas blancas)
Fil d’alimentation à distance (bleu avec
8
*
bande blanche)
7
*
Y-connector
6
*
/ Conector en Y *6 / Connecteur Y *
KW-AVX848
KW-AVX840
KW-AVX848/KW-AVX840
9
Camcorder etc.
Videocámara etc.
Caméscope etc.
Connecting the iPod or the iPhone / Conexión del iPod o iPhone /
Connexion d’un iPod ou d’un iPhone
USB 2.0 cable (accessory of the iPod/iPhone) / Cable USB 2.0 (accesorio del iPod/iPhone) /
Câble USB 2.0 (accessoire du iPod/iPhone)
*
7
*
• iPod is a trademark of Apple Inc., registered in the U.S. and other countries.
• iPhone is a trademark of Apple Inc.
• iPod es una marca comercial de Apple Inc., registrada en los EE.UU. y otros países.
• iPhone es una marca comercial de Apple Inc.
•
iPod est une marque de commerce d’Apple Inc., enregistrée aux États-Unis et dans les autres pays.
• iPhone est une marque de commerce de Apple Inc.
To the remote lead of other equipment
Al conductor remoto del otro equipo
6
Au fil de télécommande d’un autre appareil
7
*
CAMERA IN
7
*
Front speakers
Altavoces
delanteros
Enceintes avant
JVC Amplifier
Amplificador de JVC
JVC Amplificateur
8
*
9
*
7
*
JVC Amplifier
Amplificador de JVC
JVC Amplificateur
8
*
Subwoofer
Subwoofer
Caisson de grave
KV-CM10 *
Rear view camera
Cámara de reprovisión
Caméra de recul
External monitor
Monitor externo
Moniteur extérieur
6
USB devices / Dispositivos USB / Périphériques USB
KW-AVX848
KW-AVX840
– To watch the video: USB Audio and Video cable for iPod/iPhone—KS-U30 (not supplied) *
– To listen to the music: USB 2.0 cable (accessory of the iPod/iPhone)
– Para ver vídeo: Cable USB audio y video para iPod/iPhone—KS-U30 (no suministrado) *
– Para escuchar la música: Cable USB 2.0 (accesorio del iPod/iPhone)
–
Pour regarder une séquence vidéo: Câble USB Audio et Vidéo pour iPod/iPhone—KS-U30 (non fourni)
– Pour écouter la musique: Câble USB 2.0 (accessoire du iPod/iPhone)
Connecting the microphone / Conexión de la unidad de micrófono / Connexion du microphone
D
1
Microphone
Micrófono
Microphone
KW-AVX848
KW-AVX840
*6 Not supplied for this unit.
7
Audio cord (not supplied for this unit).
*
8
Firmly attach the ground wire to the metallic body or to the chassis of
*
the car—to the place uncoated with paint (if coated with paint, remove
the paint before attaching the wire). Failure to do so may cause damage
to the unit.
*9 Video cord (not supplied for this unit).
10
When using the cable, you need to change the setting on the unit (see
*
page 28 of the INSTRUCTIONS).
KS-U30
(not supplied / no suministrado /
non fourni)
10
10
2
Adhesive tape
Cinta adhesiva
Ruban adhésif
*6 No suministrado con esta unidad.
7
Cable de audio (no suministrado con esta unidad).
*
8
Fije firmemente el cable de tierra a la carrocería metálica o al chasis—a
*
un lugar no cubierto con pintura (si está cubierto con pintura, quítela
antes de fijar el cable). De lo contrario, se podrían producir daños en la
unidad.
*9 Cordón de video (no suministrado con esta unidad).
10
Cuando utilice el cable, deberá cambiar el ajuste en la unidad (consulte la
*
página 28 del MANUAL DE INSTRUCCIONES).
USB cable (approx. 1 m / 3.3 feet)
Cable USB (aprox. 1 m / 3,3 pies)
Câble USB (environ 1 m / 3,3 pieds)
10
*
KW-AVX848
KW-AVX840
3
USB device
Dispositivo USB
Périphérique USB
Secure the microphone cord using cord cramps
(not supplied) if necessary.
Si es necesario, asegure el cable del micrófono
por medio de abrazaderas (no suministradas).
Fixez si nécessaire le cordon du microphone en
utilisant des serre-fils (non fournis).
*6 Non fourni avec cet appareil.
7
Cordon audio (non fourni avec cet appareil).
*
8
Attachez solidement le fil de mise à la masse au châssis métallique de la
*
voiture—à un endroit qui n’est pas recouvert de peinture (s’il est recouvert
de peinture, enlevez d’abord la peinture avant d’attacher le fil). L’appareil
peut être endommagé si cela n’est pas fait correctement.
*9 Cordon vidéo (non fourni avec cet appareil).
10
Lors de l’utilisation du câble, vous devez changer le réglage sur l’appareil
*
(voir page 28 du MANUEL D’INSTRUCTIONS).
5
Page 80

Connecting an external navigation unit / Conexión de una unidad de navegación exterior / Connexion d’une unité de navigation extérieure
E
Connect an external navigation unit to the RGB input terminal.
The positional information detected on the touch panel and
picture signals from the navigation unit are transferred through the
terminal. Refer to the manual of the external navigation unit for
details.
External navigation unit *
Unidad de navegación exterior *
Unité de navigation extérieure *
• Please contact your dealer to inquire about compatible navigation
units.
• JVC cannot guarantee proper operation of the external devices
connected to the RGB input terminal.
Connecting external components (Only for KW-AVX840) / Conexión de los componentes externos (Sólo para KW-AVX840) / Connexion
F
d’appareils extérieurs (Uniquement pour le KW-AVX840)
When connecting the external components, refer also to the manuals
supplied for the components and adapter.
CAUTION: Before connecting the external components, make sure
that the unit is turned off.
You can connect the following JVC components to the expansion
port.
JVC component Model name
TM
tuner box KT-HD300
HD Radio
You can connect the following components to the extension port
using the appropriate JVC adapter.
• Connection cords may need to be purchased separately.
Component Adapter Model name
TM
XMDirect
Tuner Box
XMDirect2 Tuner
System
SIRIUS Satellite
Radio
Smart Digital Adapter XMDJVC100
XM Satellite Radio
System
SIRIUS Satellite Radio
System
11
11
11
CNP2000UCA and
CNPJVC1
SCC1 and KS-SRA100
D&P, SCVDOC1 and
KS-SRA100
• XM Radio and SIRIUS satellite radio cannot be used together.
Conecte una unidad de navegación exterior al terminal de entrada
RGB. La información posicional detectada en el panel táctil y
las señales de imagen procedentes de la unidad de navegación
se transfieren a través del terminal. Para obtener más detalles,
consulte el manual de instrucciones de la unidad de navegación
exterior.
KW-AVX848
KW-AVX840
• Consulte con su distribuidor para obtener información sobre las
unidades de navegación compatibles.
• JVC no puede garantizar la correcta operación de los dispositivos
externos conectados al terminal de entrada RGB.
Cuando conecte componentes externos, consulte, también, los
manuales suministrados con los componentes y el adaptador.
PRECAUCIÓN: Antes de conectar los componentes externos,
asegúrese de que la unidad esté apagada.
Puede conectar los siguientes componentes JVC al puerto de
expansión.
Componente JVC Nombre del modelo
Sintonizador HD Radio
Puede conectar los siguientes componentes al puerto de extensión
utilizando el adaptador JVC apropiado.
• Puede ser necesario comprar los cables de conexión por
separado.
Componente Adaptador Nombre del modelo
TM
XMDirect
Box
Sistema de
sintonizador
XMDirect2
Radio por satélite
SIRIUS
Tuner
TM
Adaptador digital
inteligente
Sistema de radio XM
Satellite
Sistema de radio
satelital SIRIUS
KT-HD300
XMDJVC100
CNP2000UCA y
CNPJVC1
SCC1 y KS-SRA100
D&P, SCVDOC1 y KSSRA100
• No puede utilizar juntas la radio XM y la radio satelital SIRIUS.
Connectez un unité de navigation extérieure à la prise d’entrée RVB.
L’information de position détectée sur le panneau tactile et les signaux
de l’image de l’unité de navigation sont transférés par cette prise.
Référez-vous au mode d’emploi de l’unité de navigation extérieure
pour les détails.
RGB input terminal
Terminal de entrada RGB
Prise d’entrée RVB
• Veuillez contacter votre revendeur pour connaître les unités de
navigation compatibles.
• JVC ne peut pas garantir un fonctionnement correct des appareils
extérieures connectés à la prise d’entrée RVB.
Lors de la connexion des appareils extérieurs, référez-vous aussi aux
manuels fournis avec les appareils et les adaptateurs.
PRECAUTION: Avant de con necter les apparei ls extérieurs,
assurez-vous que l ’apparei l est hors tension.
Vous pouvez connecter les appareils JVC suivants au port d’extension.
Appareil JVC Nom du modèle
Tuner HD Radio
Vous pouvez connecter les appareils suivants au port d’extension en
utilisant l’adaptateur JVC approprié.
• Vous pouvez avoir besoin d’acheter certains cordons de connexion
séparément.
Appareil Adaptateur Nom du modèle
XMDirect
Box
XMDirect2 Tuner
System
Radio satellite
SIRIUS
TM
TM
Tuner
Adaptateur numérique
intelligent
Système radio satellite XMCNP2000UCA et
Système radio satellite
SIRIUS
KT-HD300
XMDJVC100
CNPJVC1
SCC1 et KS-SRA100
D&P, SCVDOC1 et
KS-SRA100
• La radio XM et SIRIUS ne peuvent pas être utilisées en même temps.
KW-AVX840
Expansion port
Puerto de extensión
Port d’extension
*11 Not supplied for this unit.
12
*
Power cannot be supplied to the component through the expansion
port. You need to connect the power cord supplied for the component
separately.
13
This model is a component of SIRIUS Satellite Radio System.
*
14
*
This model is a component of XM Satellite Radio System.
KT-HD300 *12 /
KS-SRA100 *
XMDJVC100/
CNP2000UCA *
TROUBLESHOOTING
• The fuse blows.
* Are the red and black leads connected correctly?
• Power cannot be turned on.
* Is the yellow lead connected?
• No sound from the speakers.
* Is the speaker output lead short-circuited?
• Sound is distorted.
* Is the speaker output lead grounded?
* Are the “–” terminals of L and R speakers grounded in common?
• Noise interfere with sounds.
* Is the rear ground terminal connected to the car’s chassis using
shorter and thicker cords?
• This unit becomes hot.
* Is the speaker output lead grounded?
* Are the “–” terminals of L and R speakers grounded in common?
• This unit does not work at all.
* Have you reset your unit?
Ready to receive HD Radio broadcasts when connected to the KT-HD300, sold separately
To disconnect the connector / Para desconectar el conector / Pour déconnecter le connecteur
12 *13
/
14
*11 No suministrado con esta unidad.
12
La alimentación no se puede suministrar al componente a través
*
del puerto de expansión. Es necesario conectar, aparte, el cable de
alimentación suministrado con el componente.
13
Este modelo es un componente del sistema de radio satelital SIRIUS.
*
14
Este modelo es un componente del sistema de radio XM Satellite.
*
Grip the connector top tightly ( 1 ).
Sostenga el conector con firmeza (
Tenez fermement le haut de l’adaptateur (
1 ).
LOCALIZACIÓN DE AVERIAS
• El fusib le se quema.
* ¿Están los conductores rojo y negro correctamente conectados?
• No es posi ble conectar la alimenta ción.
* ¿Está el cable amarillo conectado?
• No sale so nido de los altavoces.
*
¿Está el cable de salida del altavoz cortocircuitado?
• El sonido presenta distorsión.
* ¿Está el cable de salida del altavoz conectado a masa?
* ¿Están los terminales “–” de los altavoces L y R conectados a una
masa común?
• Perturbación de ruido.
*
¿El terminal de tierra trasero está conectado al chasis del automóvil utilizando los
cordones más corto y más grueso?
• La unidad se calienta.
* ¿Está el cable de salida del altavoz conectado a masa?
* ¿Están los terminales “–” de los altavoces L y R conectados a una
masa común?
• Este rece ptor no funciona en absolut o.
* ¿Reinicializó el receptor?
Pull out ( 2 ).
Extráigalo (
2 ).
1 ).
*11 Non fourni avec cet appareil.
12
*
L’alimentation ne peut pas être fournie à l’appareil par le port d’extension.
Vous devez connecter séparément le cordon d’alimentation fourni pour
l’appareil.
13
Ce modèle est un composant du système radio satellite SIRIUS.
*
14
*
Ce modèle est un composant du système radio satellite XM.
Tirez (
2 ).
EN CAS DE DIFFICULTES
• Le fusible saute.
* Les fils rouge et noir sont-ils racordés correctement?
• L’appareil ne peut pas être mise sous tension.
* Le fil jaune est-elle raccordée?
• Pas de son des enceintes.
* Le fil de sortie d’enceinte est-il court-circuité?
• Le son est déformé.
* Le fil de sortie d’enceinte est-il à la masse?
* Les bornes “–” des enceintes gauche et droit sont-elles mises ensemble
à la masse?
• Interférence avec les sons.
* La prise arrière de mise à la terre est-elle connectée au châssis de la
voiture avec un cordon court et épais?
• L’appareil devient chaud.
* Le fil de sortie d’enceinte est-il à la masse?
* Les bornes “–” des enceintes gauche et droit sont-elles mises ensemble
à la masse?
• Cet appareil ne fonctionne pas du tout.
* Avez-vous réinitialisé votre appareil?
6
Page 81

Before
installation,
remove
the
screw.
Main
unit
Attaching
screws
x4
(M5x8nvn)
LV44661-007A
Page 82

When
it
is
not
required
to
detach
the
front
use
control
the
control
panel
provided
panel
to
from
screws
the
main
the
to
unit.
main
attach
unit,
the
J}
OPENTHE
(TURN
/
CD
THE
GEARINTHIS
PANEL
LV45165-001A
UNIT
DIRECTION)
Page 83

..Ive
KS-UBT1
USB
Bluetooth
USB
Bluetooth/USB-Bluetooth-Adapter/Adattatore
per
Bluetooth/Adaptador
adapter/USB
USB
Bluetooth
Bluetooth/npoaaplloytac;
USB
Bluetooth
aAanTep
lJ~'lllia~II~t1I91ai'
USB
~
USB
INSTRUCTIONS
MANUAL
MANUEL D'INSTRUCTIONS
BEDIENUNGSANLEITUNG
ISTRUZIONI
INSTRUqOES
GEBRUIKSAANW~ZING
BRUKSANVISNING
INSTRUKTIONSBOG
KAYTTOOHJE
TALiMATLAR
",HCTPYKI..{"''''
OJJHrtEE
Adapter/Adaptador
USBdeBluetooth/USB
Bluetooth-adapter/USB-Bluetooth-adapter
-sovitin/USB
Bluetooth
Bluetooth
adapter/USB
USB/Adaptor
USB/USB
.:,~~,
DE
J~
INSTRUCCIONES
no
3KCnnYATAI..{"''''
Bluetooth
USB
Bluetooth/USB
Bluetooth
/
USB
Bluetooth
INSTRUKCJA OBSt.UGI
PRiRUCKA K OBSLUZE
HASZNALA
IHCTPYKI..{Ii"
INSTRUqlUNI
",HCTPYKI..{"''''
fi1UU~.,h
1If§
ffltilJtfl.§.
..;,~/J..J~
IA
BUKU
o
Bluetooth
Adaptor/USB-aAanTep
USB/Adapter
Adapter/Bluetooth-
o:t
'11
El
/
)~\~j
TI
'JI'lJ1If
.}..I1.;;d...J
PETUNJUK
Bluetooth®
USB/Adaptateur
USB
Bluetooth
/
Bluetooth
Bluetooth
USB
~~H~~~
/
Adaptor
UTASiTASA
USB
aAanTep
Bluetooth
/
/
(For
This
this
may
Cet
seulement
erre
fonctionnementdudispositif.
/
21Af21
::>1::>121
AI~Ej%
.'i'.
Ail3':\:1.s:.
~~'i:I
CANADA)
device
complies
device
may
not
cause
undesired
appareil
est
conformeaureglement
aux
conditions
pretaaccepter
Type
No.:
ESD-CPE-0903971C
~~
~~:
!f.{j::>
<gJ
°
I~:
KS-UBTl
';!.)
0lolcl:
with
RSS-21Oofindustry
cause
interference,
operationofthe
suivantes:
tout
brouillage
TA-2008/1187
APPROVED
Canada
and
(2)
this
device.
CNR-210deI'industrieduCanada.
(1)ilnedoit
pas
radioelectrique
NTC
Accepted
Ol~:
("'lei 01£
!f.{jciIOIEi~~
I::>
I
~:
2009,February
JVC
Rules.
Operationissubjecttothe
device
must
accept
any
produiredebrouillageet(2)
re,u,
memesice
brouillage
following
interference,
inciuding
L'utilisationdece
dispositif
I'utilisateurdudispositif
est
susceptibledecompromenre
GN835
ApprovedbyTRA
MTC:OFICIONo8396·2008·MTU29
CONATEL
SUBTEL:
"This
certificate
30234/DFRS00045/F-49
telecommunication
NTC
13973/POSTEU2010
technical
2366
equipment
requirement"
TEClWR/I/MOD-08/02/135.APR
two
interference
No:
001516
conditions:
est
autorisee
doit
conforms
08
that
(1)
Ie
to
~
EN, SP,
FR,
PO,
GE, IT, PR, NL, SW,
CZ,
HU,
UK,
RO,
BU, TH, KO, CT, AR,
DA,
FI,
TR,
RU,
PE,
IN
JVC
JVC Technical Services Europe
EC
DeclarationofConformity
EG-Konformitatserkliirung
Registration No.: 7139 0
Identification:
Bezeichnung:
Description:
Beschreibung:
Accessory:
ll/beMr:
Intended
Purpose:
Verwendungszweck:
The
product to which this declaration relates to is in conformity with the essential protection requirements - as listed below communication terminalequipment,
Das
Produkt,
auf
genannt· qer Richtfinie
Protection requirements regarding health and safety (Article3 (1) a)):
SchutzanforderungeninBezug auf
Harmonised Standards:
Hermonisierte Normen:
JVC
USB
Radio Equipment (Class 1)
Funkanfage
Data transmission (built-in Bluetooth Module)
FunkOberlragung
des
skh
dies9
Erkljjru~g
des
Rates 1999J51EG
die
For
the Bluetooth Adapter: JVC, KS-UBTJ
EN 60950-1:2006 + A11:2009
GmbH·
•
0.61145
Yearofaffixing
KS-UBn
Bluetooth
(KJasse
of
the council directive 1999/5/EC on radio and tele-
if
it used asintended.
bezieht, stimmt mit
aberein,
Gesundheit und Sicherheit (Artikef 3 (1) a)):
Postfach (P.O. Box)
Friedberg,
Germany'
~09001
CAR037
2010
Adapter
1)
von
Datensigna/en (e;ngebautes Bluetooth
den
grundlegenden Anforderungen -
wenn
es bestimmungsmSfJig verwendet
GR,
100504
GET0617-001E
Moduf)
wie
unten
wird.
[K]
JVC
JVC Technical Services Europe
Protection requirements regarding eleetromagnetical compatibility (Article 3 (1)
SCnutzanforderungeninBezug auf
Harmonised Standards:
Harmonisierta Normen: EN 55022:2006
Measures
for
MaBnahmen
Te~t
PrtJfspBzifikation:
The
0984 ) with the registration nO.:AN09C10090
Die Obereinstimmung mit den
derbenann/en
This declaration is responsibly issued for the manufacturer:
Diese
issued by:
abgegeben durch:
the efficient
:zur
effizienten
Specification:
conformitytothe specifications is confirmedbythe notified
Stelle
Erl</lJrung
wird verantwortlich
die
For
the Bluetooth Adapter: JVC, KS-UBTJ
EN 55024:1998
EN 61000-3-2:2006
EN
61000-3-3:1995 +A1:2001 + A2:2005
For
the radio transmission:
EN 301 489-1 V1.8.1
EN301489-17V2.1.1
useofthe radio
Nutzung
des
EN 300 328 V1.7.1
Norman
mit der Kennnummer0984 bestafigt.
fOr
12, 3·chome,
Yokohama
Oliver Beck, Deputy Dept. ManagerofJVe
GmbH·
·0-61145 Friedberg, Germany'
elektromagnetische Ver1rllgfichkeit (Attike/3(1) b»'
Frequenzspektrums (Artikel3 (2)
wird
mit
den
Hersfefler:
Victor
Postfach (P.O. Box)1005 04
+'
A1:2007
+A1:2001
+A2:2003
frequency
spectrum (Article 3 (2)
b):
derRegistrierung AN09C10090
CompanyofJapan,
Moriya-cho,
(Kanagawa)
ltd.
Kanagawa-ku
221-8528,
Technical Services Europe GmbH
body
(identification no.:
Japan
b):
b»:
This document may
EC DoC 0 (v1.3).fp. Mar. 2000, jk
Dieses Dokument
For
the radio transmittermodule (health requirement):
EN 50371:2002
nol
be changed
or
darfnicht
gefjnderl
copied without authorisation.
oderohne
Auforisienmg verviefflJltigt werden.
Page 1
Friedberg,
Place, Date
Ort,
Datum
of2
EC DoC D (v1.3).fp, Mar. 2008,
2010/08123
(YYVY/MMIODI
This
document may not be changedorcopied without authorisation
Dieses Dokument dar( nicht geSndert
jk
oderohne
Autorisierung vervieifMigt werden.
Page20f2
Page 84

DeclarationofConformity
with
regardtotheR&TTE
Directive
1999/S/EC
English:
Hereby,
JVC,
declares
that
this
essential
requirements
1999/5/EC.
and
KS-UBTlisin
other
relevant
Deutsch:
Hiermit
erklart
JVe.
dass
sich
das
Obereinstimmung
und
den
Obrigen
1999/5/EG
befindet.
Hiermit
erklart
Obereinstimmung
Anforderungen
relevanten
(Wien)
Fran~is:
Parlapresente
aux
deladirective
Festlegungen
exigences
essentiellesetaux
1999/5/CE.
mit
einschlagigen
JVC
die
des
und
den
JVC
declare
Gerat
den
grundlegenden
Bestimmungen
Gerates
KS-UBTl
anderen
der
Richtlinie
que
I'appareil
autres
Nederlands:
.Hierbij
verklaart
JVC
dat
het
overeenstemmingismetdeessentiele
relevante
bepalingen
van
toestel
richtlijn
Dansk:
Undertegnede
overholderdev<esentlige
1999/5/EF
JVC
erkl<erer
herved,atf01gende
kravog0vrige
Espanol:
Por
mediodela
presente
JVC
requisitos
esencialesycualesquiera
exigiblesdela
Directiva
declara
otras
1999/5/CE
EAAI)vIKrj:
ME
THN
nAPOYIA
JVC
llHAONEI
npor
TIL
TIL
AOlnEr
OYLIOI1Elr
rXETlKEL
AnAITHHlr
I1IATA:Elr
OTI
KAI
THr
Italiano:
Conlapresente
requisiti
dalla
JVC
essenzialiedaile
direttiva
1999/5/CE.
dichiara
altre
che
questo
disposizioni
Malti:
Hawnhekk.
ntigijiet
fid-Dirrettiva
JVe.
jiddikjaraIidan
essenzjaliurna
1999/5/EC.
KS-UBTl
provvedimenti
Portugues:
JVC
declara
que
este
KS-UBTl
essenciaiseoutras
esta
disposi~oes
da
compliance
provisionsofDirective
KS-UBTl
in
Anforderungen
der
mit
den
1999/5/EG
KS-UBTl
dispositions
KS-UBTl
in
eisenende
1999/5/EG.
udstyr
relevante
queelKS-UBTl
disposiciones
KS-UBTl
LYMMOP$ONET
OllHrlAr
1999/5/EK.
KS-UBTleconforme
pertinenti
jikkonforma
onrajn
relevantiIihemm
conforme
comosrequisitos
Directiva
1999/5/CE.
(
E0984
with
the
Richtlinie
grundlegenden
befindet.
est
conforme
pertinentes
andere
KS-UBTl
kravidirektiv
cum
pie
con
los
aplicables
0
AI
ai
stabilite
mal-
Suomi:
JVC
vakuuttaa
taten
etta
KS-UBTl
1999/5/EY
muiden
ehtojen
oleellisten
mukainen.
vaatimustenjasita
tyyppinen
Svenska:
Harmed
intygar
JVC
att
denna
meddevasentliga
bestammelser
som
egenskapskrav
KS-UBTl
och
framgaravdirektiv
islenska:
Her
meO
Iysir
JVC
yfir
~vi
aO
og
aOrar
kriifur,
sem
gerOar
KS-UBTlerf
eruftilskipun
Norsk:
JVC
erkl<erer
grunnleggende
hervedatutstyret
kravog0vrige
KS-UBTleri
relevante
Cesky:
JVC
tfmto
prohlasuje,ietento
poiadavkya
dalsfmi
KS-UBTljeve
prfslusnymi
ustanovenfmi
Eesti:
Kaesolevaga
199915/EO
teistele
kinnitab
JVC
pohinouetelejanimetatud
asjakohastele
seadme
satetele.
KS-UBTl
Latviski:
ArsoJVC
deklare,kaKS-UBTl
butiskajam
prasibamuncitiemarto
atbilst
saistitajiem
Lietuviu:
Siuo
JVC
ir
kitas
deklaruoja.
1999/5/EB
kad
sis
KS-UBTl
Direktyvos
nuostatas.
Magyar:
Alulirott,
JVC
alapveto
kiivetelmenyeknekesaz
eloirasainak.
nyilatkozom,
hogyaKS-UBTl
1999/5/EC
Polski:
Niniejszym
wymogami
Dyrektywy
JVC
05wiadcza,ieKS-UBTl
oraz
pozosta/ymi
1999/5/EC.
stosownymi
Siovensko:
JVC
izjavlja,dajetaKS-UBTlvskladuzbistvenimi
ostalimi
relevantnimi
dolocili
direktive
Siovensky:
JVC
tYmto
vyhlasuje,ieKS-UBTl
vsetky
prislusne
ustanovenia
spina
Smernice
Romana:
Prin
aceasta,
JVe.
declaril
cil
acest
prevederile
generale~icu
alte
KS-UBTl
norme
6bnrapcKH:
C
HaaORlI\OTO
Ha
OCHOBH~Te
Ha
,Il~peKT~Ba
JVC
lIeKJlap~pa,
~3~CKBaH~R,
1999/5/EC.
4e
~3I1eR~eTO
KaKTO~Ha
laiteondirektiivin
koskevien
direktiivin
starIiiverensstammelse
iivriga
relevanta
1999/5/EG.
samr<emi
viO
1999/5/EC.
kravidirektiv
direktiivist
Direktivas
atitinka
jest
postanowieniami
1999/5/ES.
zakladne
1999/5/ES.
ale
Directivei
IIPyr~
grunnkriifur
samsvar
med
de
1999/5/EF.
shodesezakladnfmi
smernice
1999/5/ES.
vastavust
direktiivi
tulenevatele
1999/5/EK
noteikumiem.
esminius
reikalavimus
megfelelavonatkoz6
iranyelv
egyeb
zgodnyzzasadniczymi
zahtevami
poiiadavky
esteinconformitate
1999/5/EC.
KS-UBTl
CbOTBeTOBa
np~RO>K~M~
KJlaY3~
INFORMATION
This
equipment
These
limits
generates.
cause
harmful
installation.Ifthis
the
equipment
-
Reorientorrelocate
-
Increase
-
Connect
-
Consult
(For
has
are
designedtoprovide
uses.
and
interferencetoradio
equipment
off
and
the
separation
the
equipment
the
dealeroran
U.S.A.)
been
tested
and
foundtocomply
can
on,
the
reasonable
radiate
radio
frequency
communications.
does
cause
the
receiving
between
intoanoutletona
experienced
harmful
userisencouragedtotrytocorrect
antenna.
the
equipment
radiolTV
with
the
limits
protection
energy
and,ifnot
However.
interferencetoradioortelevision
and
receiver.
circuit
different
technician
foraClassBdigital
against
harmful
installed
thereisno
the
interferencebyoneormoreofthe
from
thattowhich
for
help.
interferenceina
and
usedinaccordance
guarantee
that
reception.
the
receiverisconnected.
-
device,
pursuanttoPart15of
residential
interference
which
the
FCC
installation.
with
the
instructions,
will
not
occurina
canbedeterminedbyturning
following
measures:
This
equipment
Rules.
may
particular
Caution:
Changesormodifications
Products
-
not
approvedbyJVC
Information
[European
These
household
If
you
legislationorother
By
disposingofthis
negative
for
Union
symbols
indicate
wasteatits
wishtodisposeofthis
effectsonthe
could
void
the
user's
authoritytooperate
UsersonDisposalofOld
only)
that
the
product
and
end-of-life.
product
rulesinyour
product
correctly,
environment
country
and
and
you
and
the
the
battery,
municipality.
will
human
Equipment
battery
helptoconserve
health.
and
with
this
pleasedosoinaccordance
natural
the
equipment.
Batteries
symbol
resources
should
notbedisposedasgeneral
with
applicable
and
will
help
national
prevent
potential
Notice:
The
word
mark
useofsuch
license.
owners.
has
been
use
this
also
the
(For
with
conditions:
must
undesired
void
signPbbelow
and
marksbyVictor
Other
designed
adapter
Instructions
U.S.A.)
Part15of
(1)
accept
operation.
not
the
user's
Battery
•
The
Bluetooth
Inc.
and
any
(JVC)isunder
their
respective
•
This
adapter
receivers.Donot
For
details,
see
in
INFORMATION
This
device
(2)
may
complies
two
this
cause
device
could
a
following
and
that
cu
Changesormodifications
compliance
the
symbol
logos
are
ownedbythe
trademarks
CompanyofJapan,
and
exclusively
with
any
supplied
the
FCC
This
device
may
any
interference
expressly
approvedbythe
authoritytooperate
for
batteries
Bluetooth
trade
for
use
other
with
Rules.
not
received,
limited
names
are
with
JVC's
car
receiver.
your
receiver.
Operationissubjecttothe
cause
harmful
including
manufacturer
the
equipment.
indicates
SIG,
those
of
car
interference,
interference
for
that
this
battery
Dear
Customer,
This
apparatusisin
directives
compatibility
European
is:
JVC
Technical
Postfach
61145
Friedberg
Germany
contains
lead.
conformance
and
standards
and
electrical
representativeofVictor
Services
100504
regarding
safety.
Europe
with
electromagnetic
CompanyofJapan,
GmbH
SPECIFICATION'S
1.
Bluetooth
2.
Power
Class:
3.
Service
4.
Power
Dimensions(Lx Wx
Area:
USB
Standards:
Consumption:
15
mmx
(5/8"x3/4"x1/4")
Bluetooth
Version:
C1ass2
10m(10.9
USB
54.3
H):
19mmx5.6mm
the
V
1.1
mM5
valid
2.0
Radio
(Full
European
certified
yd)
Speed)
V
(max.)
limited
Page 85

A CAUTION
The Bluetooth adapter (KS-UBT1)
when shipped from the factory. When you remove the
Bluetooth adapter (KS-UBT1) from the unit, store it
bag. For removing the Bluetooth adapter (KS-UBT1), refer
to the Instructions.
~
, "
is
inserted
Bluetooth
(KS-UBT1)
adapter
in
the unit
in
this
LVT2224-001A
Page 86

" '
: 1
~
::)
~,
o
LL.
~
W 8
~
ce
(.)'~~~
~
ow::::»
~
~
w
~
:::::»
~
U)
t!!
.:i
! :
(.)
w (.)
~
~
w::::»
~
te
~
1=
:::»
~
~
-I
Q,
~.
'*-,
~
....-------------
1
CD'
~
i METALLIC BODY OR CHASSIS
f':i\
CAUTION
INCORRECT CONNECTION CAUSES SERIOUS DAMAGE TO THIS UNIT
PLEASE READ
CONNECT GROUND FIRST
OF THE CAR
CONNECTANTENNATERMINAL
CONNECTBLAc$WIRE
OTHERWISE,
INSTALLATION/CONNEC~ION
......
D~AGE
-~'.
-------------1
«DGND)
TO YOUR UNIT MAY OCCUR.
MANUALCAREFULLY.
CONNECT OTHER WIRES
CONNECTP~RCORDTO
TO GROUND FIRST.
THE UNIT
=s
tn:::»w
e
:i:GIii
I-
~
O
~
Iii
~
~
~
,ffi
(.)
t:I
a::
~
~
,
Page 87

Caution on cleaning
the
unit
Do
detergent,
not
use any solvent (for example, thinner, benzine, etc.),
or
insecticide. This may damage the monitor
:::- .
"
'"
....
"
, "
,
,
....
....
or
the unit.
Recommended cleaning method:
Gently wipe the panel with a soft, dry cloth.
LVT1970-001 A
Page 88

Please do not send productsorother
correspondence to this address.
JVC AMERICAS CORP.
1700 Valley Road
Wayne, NJ 07470
PO BOX 1189
PLEASE
PLACE
STAMP
HERE
BEDFORD,
11
•••
1.11••11.111.111.1.1
TX
76095-1189
••••11•••
111••1.1.1111111.1.111111.11
PRODUCT REGISTRATION CARD I QUESTIONNAIRE
USA CUSTOMERS ONLY
Registering your product will allow us to contact you
event a product safety notification is required.
This form is for Product Registration purposes only. Failure to return
this form does not diminish your rights during the warranty period.
in
the unlikely
THANK YOU FOR PURCHASING THIS JVC PRODUCT
REGISTER ONLINE
AT:
REGISTER.JVC.COM
Page 89

First Name:
Last Name:
Address:
Apt.#
City:
State:
Zip Code:
Phone Number:
E-Mail Address:
Register online at REGISTER.JVC.COM
and receive a special offer!
PRODUCT REGISTRATION
1)
Would you like to receive the JVC Community e-mail newsletter?
2)
Would you like to receive special offers from JVC?
3)
Have you purchased an extended warranty for this product?
Date
of
Purchase
Model Number:
Serial Number:
Purchase Price:
Dealer:
5,
On a scale of 1 to
JVC product.
with 5 being the best, please rate each of the following attributes about your new
Performance
Features
Ease of use 1 2 3
1
1
2
2
3
3 4 5
4
4 5
Yes
Yes
Yes
No
No
No
5
COMMENTS:
BT-51044-1
(0208)
Design 1 2
Value
Instructions: Fold at crease and tape open edge in the middle.
1 2 3 4 5
3
4
5
Thank You
for completing
this questionnare.
Printed in Indonesia
Page 90

CANADA
ONLY
JVC
,...
OWNER'S COPY OF WARRANTY CARD
COPIE D'ENREGISTREMENTDELA
DU
PROPRIETAIRE
(Save sales docket together with this warranty card,asa proofofdateofpurchase.
La facture
MODEL
MODELE'
Purchase from.
Achete
Dealer's Address
Adresse du Vendeur" .....
CityorTown
Ville
Owner's
Nom
Owner's
Adresse du Proprietaire· .
CityorTown
Ville
BT-52008-1
(1007)
et
cette garantie
.
chez
'.
. .
No.
No
Name
du Proprietaire:...
Address .
sont
vos
No.
No
Detach here.
preuvesdela date
Provo
Provo
Provo
Provo
WARRANTY CONTROL CARD
DE
CARTE
IMPORTANT:
on
the
IMPORTANT:
dans
les 7
MODEL . SERIAL NO.
MODELE·
Purchased
Achete
chez
Dealer's Address
Adresse du Vendeur .
City or Town
Ville
Owner's
Nom du Propriataire' ...
Owner's
Adresse du Proprietaire
City or Town
Ville
WARRANTY
DISTRIBUTEDINCANADABYJVC
CONTROLEDELA
This
back
..........................•..
from
warranty
hereoforregister
Cette
HHHHHHHHH'
.
cartedoit etre
date
joursdela
N'o:
No
Name
Address
No.
.................................
,..-
__
You
at:www.jvc.ca
APPLIES
No
--:-_---,-
may also register on-line
ONLYTOPRODUCT
control
card
internet
renvoyee
,
-,,--,
INC.
mustbefilled in
within
sur
HHHHHHHHHHHHHHH
···········Street
Provo
Provo
Provo
Provo
via
d'achatoualler
(PLEASE PRINT/EN LETIRES MOULEESI
HHHHHHOOHHHOOHHHH
__
CANADA
GARANTIE
d'achat;
rangez-Ies.)
SERIAL
NO.
NO DE
SERlE
..
Date purchased .
Date achete .
Street
Rue
......................
Street
Rue
•••••••••••.•..•.•.......................
a
decouper
ici
GARANTIE
and
7 (seven)
dument
Ie site
NO DE SERlE
Rue
Street
Rue
...............................••..................................
...,..,----,.......,-------,
Vous
pouvez egalement vous
inscrire par internet a:www.ivc.ca
LA
GARANTIE
DlSTRIBUESAUCANADA
postedtothe
days
remplieaI'adresse
par
from
internet
HHHHHHHHHHHHHHHHHHHHHHHHH'
Date purchased .
H'
Date
achete
S'APPLIOUE
CANADA
SEULEMENT
H
Postal
Code
Apt.
App.
Postal
Code Postal
Printed in Indonesia
address
the
dateofpurchase.
indiquee au verso,
pour
I'enregistrement.
.
.
P"sial
Code
Apt.
App.
Postal
Code
SEULEMENT
PAR
JVC
CANADA
•••••••
Code
Postal
Code
code'
Postal
Code
Postal
AUX
PRODUITS
INC.
indicated
,
WARRANTY
GAIANTII
JVC
CANADA
21
Finchdene Square, Toronto,ONM1X
TEL: (416) 293-1311 FAX: (416) 293-8208
http://www.jvc.ca
JVC
CANADA
the following express warranty for each new
product distributed in Canada by
by an authorized JVC dealer.
JVC warrants that this
normal use and maintenance, from
material and workmanship subject to the following
terms and conditions:
1.ToObtain Warranty Service:
(a)
(b) This
(c) The
2.
Limitation:
This Warranty shall not apply to:
(a) Repairorreplacementofany
(b) Any defects caused or repairs required as a
(c) Any defect caused or repairs required as
(d) Any JVC product tampered with, adjusted
INC. (hereafter called "JVC") gives
JVC
JVC
and sold
JVC
product is free, under
any
defects in
The
JVC Warranty Control Card herein
provided must be completed in full and
posted or registered via internet within 7 days
of date of purchaseofthe
JVC
Warranty Control Card must be
JVC
product.
completed in full and presented together
with proofofpurchaseofthe
JVC
product
requiring service.
JVC
product must be brought in for
service to an authorized JVC Service Centre.
cabinets,
batteries, plates, connection cords, antennas, dust covers, knobs, speaker grills,
speaker cones, projection screens, projection
screen savers, and all accessories.
resultofmisuse, abusive operation, negligence, improper use and/or insufficient care.
a result of not following the instructions
the operation manual.
or repaired by any party other than JVC
authorized JVC Service Centre personnel.
INC.
1A7
JVC
CANADA
enonce la garantie expresse suivante pour tout
nouveau produit
et vendu par un detaillant JVC autorise.
JVC vous garantit que ce produit est degage, sous
utilisationetentretien normal, de
materieletde
modalitesetconditions suivantes :
1.
Pour obtenirunservice de garantie :
(a) La carte de contraledegarantie JVC ci-
inclusedoit
renseignements complets et etre postee ou
enregistree via internet
suivant I'achat du produit JVC.
(b) Cette carte de contrale de garantie
etre dument remplie et etre presentee avec
la
necessitant une reparation.
(c) Le
service
autorise.
2.
Restrictions:
Cette garantie ne s'applique pas aux :
(a)
Reparation
cabinet, batteries, panneau avant, cordons
de
protection, boutons,
parleur, cones de haut-parleur, ecrans de
projection, protecteurs d'ecran de projection
et tous les accessoires.
(b) Tous defauts occasionnes ou reparations
requises suite a
in
or
mauvaise, negligente et/ou une utilisation
incorrecte.
(c) Tous defauts occasionnes ou reparations
requises suite a I'omission de suivre les
recommandations du manuel d'instruction.
(d) Tout produit JVC altere, ajuste ou repare par
tout autre entreprise que JVC ou un centre
de
autorise JVC.
INC. ( ci-apres
JVC
distribue au Canada par JVC
fabrication sous reserve
etre
completee
preuve
produit
raccord,
d'achat
JVC
chez
doit etre apporte pour
un centredeservice
ou
remplacement
antennes,
une
service
d'entretien
appele
dans
du
produit
housses
couverts
utilisation abusive,
ou de
tout
avec
les 7
de
"JVC")
defaut
jours
JVC
de
haut-
service
des
les
doit
JVC
JVC
tout
de
Page 91

(e) Any
(f)
(g) Conversion to foreign or domestic voltage or
(h) Any
(i)Any JVC products used for commercial or
(j)
(k) Product purchased from "outside Canada",
JVC
num-ber has been defaced, modified or
removed.
Maintenance, cleaning or periodic check-up
frequency.
Electrical Safety Regulations
institutional, rental, or display purposes.
Parts
Labour...
Any JVC product which has been resold and
no longer owned by the original purchaser.
"bankruptcy" or "liquidator".
products on which the serial
JVC
product without the Canadian
1 year (except video head - 90
days)
90
days
10.
(e) Tout produit
ete altere, modifie ou enleve.
(f) L'entretien, les verifications periodiques et
nettoyage.
_(g) La
conversion
tension etrangere ou domestique.
Tout
(h)
(i)
produit
d'identification
electriques Canadiennes (CSA).
Pour
tout
commerciales, institutionnelles, de location
ou utilise
ades fins d'etalage.
Pieces............
Main d'ceuvre...
mTout produit
n'est plus la propriete de I'acheteur original.
(k) Produit achete
provenant d'une ''faillite'' ou d'un "Iiquidateur".
WARRANTYTERM (VALID FROM THE DATE OF PURCHASE)
CONDITIONS DE GARANTIE
PRODUCT
PRODUIT
ProjectionTVIn-Home Service
Colour TV In-Home
D-ILA
Rear
LCD
TV In-Home Service (25"
Ecransdeprojection Service11Domicile
EcransdeTV
TV projection arriere D-ILA Service11Domicile
Ecrans
de
• In-home servicetobe
Whereitis
packing, shipment
JVC
Authorized Service Centre.
• Service
S'il n'y a
couts pour
I'equipement
Receivers
Projection
RecepteursetHauts-Parleurs achetes separement, Projecteur
Avant
11
pasdeservice JVC disponible11proximite, I'acheteur doit assumerlaresponsabiliteetles
and
and
et
Audio
(25"
and
Projection In-Home Service
Couleur Service11Domicile (25"etplus)
LCD
Service11Domicile (25"etplus)
not
available, the Purchaser
and
domicile fourni parundetaillant disponible.
un
emballage adequat, I'expedition, ainsi que tous les couts associes11la
chezetdepuisIedetaillant JVC autoriseIeplus pres pourunservice d'entretien.
Home
Car Audio "ARSENAL" Series
d'AutodeSerie " ARSENAL»
above)
and
provided where available
all
costs associated
Speakers purchased separately, Front
above)
(VALABLE
must
assume
with
the deliveryofthe
it PARTIR DE
the
responsibility
PARTS
PIECES
equipmenttoand
JVC
dontIenumero de serie a
a une
frequence
JVC
n'ayant
conforme
produit
1 An (Excepte les tetes
video-
pasIesigle
aux
utiliseades
90 jours)
90 Jours
JVC
ayant ete revendu et qui
a "I'exterieur du Canada",
LA
DATE D'ACHAT)
(Years)
(annees)
1 1
and
expense for the proper
2 2
Labour (Years)
MAIN-D'OEUVER
from
the
livraison
closest
ou
une
normes
fins
(annees)
de
(I)Any defects caused by fire, flood, lightning,
power surge, or other events beyond the
control of JVC.
(m) FOR AUTO PRODUCTS
Warranty does not cover elimination of car
static or electrical interferences, cleaning
of head, adjustments, or labour cost for the
removal
repair.
3.
Standards:
If
anydefectsshould be foundina JVC product
within the applicable terms, necessary repairs
shall be made at no cost to the purchaser for
parts
such defects are due to faulty material or workmanship.
4.
ExclusionofAll
This warranty constitutes the entire express
warranty given by
no dealer or service centre personnel
its or their agentoremployee is,orare authorized to extend or enlarge this warranty on behalf of JVC.
5.
DisclaimerofConsequential
To
the extent the law permits
any responsibility for loss of time or use of its
product,
indirect, incidental or consequential damage
inconvenience.
8
or
or
labour when
transportation
And
You
reinstallation of the unit for
JVC
acknowledges that
Other
Express
JVC
for
mail
to the address below.
Warranties:
JVC
products and
Damage:
JVC
disclaims
costs,orany
may also register on-line
at:www.jvc.ca
Detach
or
other
here.
his,
(I) Tout
(m)
3.
Criteres:
Si
conditions
necessaires seront eftectues
additionnels
main d'ceuvre lorsque JVC reconnait que
defectuosites sont causees par une defectuosite
de materiel ou de fabrication.
4. Exclusion
Cette garantie constitue I'entiere garantie express
donnee par
representant ou employe d'un detaillant ou d'un
service d'entretien n'est autorise
garantie au nom de JVC.
5. DEmegation
Dans la mesure permise par la loi, JVC nie toute
responsabilite pour perte de temps
ses produits, des
or
dommage ou inconvenient indirect, accidentel et
consequent.
~
~
dommage
inondation, un eclair, une surtension ou tout
autre evenement hors du contrale de JVC.
POUR
LES
La garantie ne couvre pas I'elimination
d'interferences statiques ou electriques de
la
voiture, Ie nettoyage
ajustements
associes
reinstallation
un produit JVC s'averait defectueux, selon les
applicables, les reparations
cause
parIefeu,
PRODUITS
et
les coOtsdemain d'ceuvre
a
I'enlevement
de
I'unite pour reparation.
D'AUTOMOBILE
de
ou a la
sans
tete, les
coOts
a I'acheteur pour les pieces et la
de
telles
de
toutes autresgaranties
JVC
pour les produits JVC. Nul
expresses:
aprolonger cette
des
11
decouper
dommages
coOts
Veuillez
posteraI'adresse
Vous pouvez egalement vous
enregistrer par internet
ici
Plece.tamp
here
Plecez votre
timbre
indirects
de transport ou tout autre
:
ou
d'usage de
ci-dessous.
iI; www.jvc.ca
Icl
une
AC
Adapters,
Projector
Adaptateurs
et
LampedeProjecteur
Wood
Enceinte11ConeenBois
All
Other Categories
Toutes
Remote
Lamps
AC,
Telecommande, Casque D'ecoute, Microphones
Cone
Speakers
les autres categories
Controls, Headphones, Microphones
and
90
DAYS
90 JOURS 90 JOURS
5 5
1 1
90
DAYS
JVC CANADA INC.
21
Finchdene
Toronto,
ON
Square
M1X
1A7
Page 92

TO OUR VALUED CUSTOMER
THANKYOU FOR PURCHASING THIS JVC PRODUCT.
WE WANTTO HELPYOU ACHIEVE A PERFECT EXPERIENCE.
--
NEED HELP ON HOWTO
NEED ASSISTANCE ON HOWTO OPERATE?
NEEDTO LOCATE A
LIKETO PURCHASE ACCESSORIES?
JVC®IS
TOLL
Remembertoretain
HOOK
JVC
SERVICE CENTER?
HERETO
UP?
HELP!
FREE: 1(800)252-5722
http://www.jvc.com
your
BillofSale
for
Warranty
Service.
---
BT-51018-6
(1008)
Do
not
attempt
Caution
To
prevent electrical shock,
There
Please refer
are no
to
to
user
serviceable parts inside.
qualified service personnel
service
do
the
not
product
open
the
yourself
cabinet.
for
repairs.
PrintedinIndonesia
Page 93

•••••••••••••••••••
i
.JVC®
::
* JVC Americas Corp. (JVC) warrants this product and all parts thereof, except as set forth below ONLY TO THE
ORIGINAL RETAIL PURCHASER to be FREE FROM DEFECTIVE MATERIALS AND WORKMANSHIP from the date of *
::
* original purchase
* *
::
* 1
* *
*THIS LIMITED WARRANTY IS VALID ONLY
* *
::INTHE COMMONWEALTHOFPUERTO RICO.
WHAT WE WILL DO:
::
::
If this product is found to be defective within the warranty period, JVC will repair or replace defective parts with new or
* rebuilt equivalents atnocharge to the original owner. Such repair and replacement services shallberendered by JVC *
* during normal business hours at JVC authorized service centers. Parts used for replacement are warranted only for the
::
remainder of the Warranty Period. All products maybebrought to a JVC authorized service centerona carry-in basis. *
* Color televisions with a screen size of 37"class or greater qualify for in-home service.
::
come to your home and either repair the TV there or remove and returnitifitcannotberepairedinyour
::
WHAT
YOU
*Please do
::
Instead, return your producttothe JVC authorized service center nearest you. If shipping the product to the service
not
for
MUST DO
return your product
*center, please be sure
::
the problem(s). Please call 1-800-252-5722tolocate the nearest JVC authorized service center. Service locations
*can also
be
obtained from our website http://www.jvc.com. If your product qualifies
*representative will require clear access
* *
: If you have any questions concerning your JVC Product, please contact our Customer Care Center at 800-252-5722 :
***
••••••••••••••••
LIMITED
IONtY
the period shown below. ("The Warranty Period") *
I
PARTS
FOR
WARRANTY SERVICE:
to
packageitcarefully, preferably in the original packaging, and include a brief description
FOR
PRODUCT
YR
IN
THE FIFTY (50) UNITED STATES, THE DISTRICT
to
the retailer *
to
the prodUCt. *
***
•••••••••••••
WARRANTY
PURCHASEDINU.S.A.
I
LABOR
1
VR
***
••••••••••••••••••
1-1
I
USA
***
ONLY
I
OF
COLUMBIA AND *
In
such cases, a technician will *
for
in-home service, the service *
home.,
of
Ii
::
::
::
*
::
::
::
::
::
::
::
*
::
* *
*WHAT IS NOT COVERED: *
: This limited warranty providedbyJVC does not cover: :
*
1.
: installation, lack of reasonable care, or if repaired or serviced by anyone other than a service facility authorized
* JVC to render such service, or if affixed to any attachment not provided with the products, or if the model or serial *
* number has been altered, tampered with, defaced or removed; *
::
*
:
*
:
*
*
:
*
Products which have been
2.
Initial installation, installation and removal from cabinets or mounting systems. :
3.
Operational adjustments covered in the Owner's Manual, normal maintenance, video and audio head cleaning; *
4.
Damage that occursinshipment, due to act of God, and cosmetic damage; :
5.
Signal reception problems and failures due to line power surge; *
6.
User
Rem~:>val
7.
Accessones; *
8.
Batteries (except that Rechargeable Batteries are covered for 90 days from the date of purchase); :
9.
Products used for commercial purposes, including, but not limited to rental. *
10.
Loss of data resultant from malfunction of hard drive or other data storage device; *
Memory
SUbject
DevicesNideo
to abuse, accident, alteration, modification, tampering, negligence, misuse,
Pick-up
Tubes/CCD
Image
Sensors
are
covered
for90days
from
the
dateofpurchase;:
faulty*
by:
* *: There are no express warranties except as listed above. :
: THE DURATION OF ANY IMPLIED WARRANTIES, INCLUDING THE IMPLIED WARRANTY OF MERCHANTABILITY,
* LIMITED TO THE DURATION OF THE EXPRESS WARRANTY HEREIN. *
* JVC SHALL NOTBELIABLE FOR ANY LOSS OF USE OF THE PRODUCT, INCONVENIENCE, OR ANY OTHER *
* *
: DAMAGES, WHETHER DIRECT, INCIDENTAL OR CONSEQUENTIAL (INCLUDING, WITHOUT LIMITATION, :
* DAMAGE TO TAPES, RECORDS OR DISCS) RESULTING FROM THE USE OF THIS PRODUCT, OR ARISING OUT *
* OF ANY BREACH OF THIS WARRANTY. ALL EXPRESS AND IMPLIED WARRANTIES, INCLUDING THE *
: WARRANTIES OF MERCHANTABILITY AND FITNESS FOR PARTICULAR PURPOSE, ARE LIMITED TO
: WARRANTY PERIOD SET FORTH ABOVE. :
:
Some
statesdonot
* implied
: legal rights and you
warranty
* **
:
* http://www.jvc.com *
••••••••••••••••••••••••••••••••••••••••••••••••••••••••*•••••••••••••••••••••
* *
REFURBISHED PRODUCTS CARRY A SEPARATE WARRANTY, THIS WARRANTY DOES NOT APPLY. FOR DETAIL
OF REFURBISHED PRODUCT WARRANTY, PLEASE REFER TO THE REFURBISHED PRODUCT WARRANTY
INFORMATION PACKAGED WITH
allow
lasts,sothese
the
may
also have other rights which
exclusionofincidentalorconsequential
limitationsorexclusions
JVC
1700
Valley
EACH
REFURBISHED PRODUCT.
AMERICAS
Road,
may
not
vary
from state to state. :
Wayne, New Jersey 07470 :
apply
CORP.
damagesorlimitationsonhow
to you.
This
warranty
gives
you
IS
THE:
long
an
specific *
:
:
*
For
customer
Enter below the Model No. and Serial No. which is located either on the rear, bottom or side of the cabinet.
Retain this information for future reference.
Model
Purchase
use:
No.:
date:
Serial
No.:
Name of
dealer:
 Loading...