

Page 1
DVD RECEIVER WITH MONITOR
DVD-ПРИЕМНИК С МОНИТОРОМ
ПРИЙМАЧ ТА ПРОГРАВАЧ DVD-ДИСКІВ ІЗ МОНІТОРОМ
KW-AVX800
For canceling the display demonstration, see page 8.
Информацию об отмене демонстрации функций дисплея см. на стр. 8.
Інформацію щодо відміни демонстрації функцій дисплею див. на стор. 8.
ENGLISHРУCCKИЙУКРАЇНА
For installation and connections, refer to the separate manual.
Указания по установке и выполнению соединений приводятся в отдельной инструкции.
Вказівки по встановленню та виконанню підключень наведені у окремій інструкції.
INSTRUCTIONS
ИНСТРУКЦИИ ПО ЭКСПЛУАТАЦИИ
ІНСТРУКЦІЇ
LVT1666-005B
[EE]
Page 2
Thank you for purchasing a JVC product.
Please read all instructions carefully before operation, to ensure your complete understanding and to obtain the best
possible performance from the unit.
IMPORTANT FOR LASER PRODUCTS
ENGLISH
1. CLASS 1 LASER PRODUCT
2. CAUTION: Do not open the top cover. There are no user serviceable parts inside the unit; leave all servicing to
qualified service personnel.
3. CAUTION: Visible and/or invisible class 1M laser radiation when open. Do not view directly with optical
instruments.
4. REPRODUCTION OF LABEL: CAUTION LABEL, PLACED OUTSIDE THE UNIT.
WARNINGS:
To prevent accidents and damage
• DO NOT install any unit and wire any cable in
locations where;
– it may obstruct the steering wheel and
gearshift lever operations.
– it may obstruct the operation of safety devices
such as air bags.
– it may obstruct visibility.
• DO NOT operate the unit while driving.
If you need to operate the unit while driving, be
sure to look around carefully.
• The driver must not watch the monitor while
driving.
• The driver must not put on the headphones while
driving.
[European Union only]
Cautions on the monitor:
• The monitor built in this unit has been produced
with high precision, but it may have some
ineffective dots. This is inevitable and is not
malfunction.
• Do not expose the monitor to direct sunlight.
• Do not operate the touch panel using a ball-point
pen or similar tool with the sharp tip.
Touch the buttons on the touch panel with your
finger directly (if you wear a glove, take it off).
• When the temperature is very cold or very hot..
– Chemical changes occur inside, causing
malfunction.
– Pictures may not appear clearly or may move
slowly. Pictures may not be synchronized with
the sound or picture quality may decline in
such environments.
2
Page 3
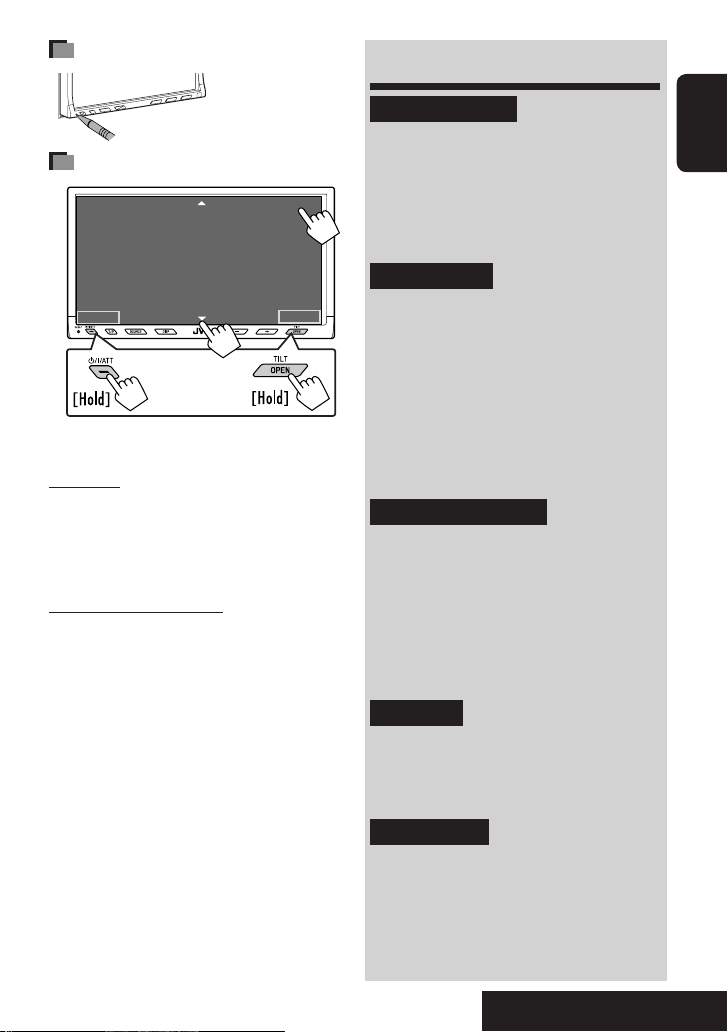
How to reset your unit
• Your preset
adjustments will also
be erased.
How to forcibly eject a disc
ENTER
NO EJECT?
EMERGENCY EJECT?
Back
2
at the same time
11
• If this does not work, reset the unit.
For safety...
• Do not raise the volume level too much, as this will
block outside sounds, making driving dangerous.
• Stop the car before performing any complicated
operations.
Temperature inside the car...
If you have parked the car for a long time in hot or cold
weather, wait until the temperature in the car becomes
normal before operating the unit.
3
Exit
Contents
INTRODUCTION
Playable disc type ............................ 4
Basic operations—
Monitor panel/touch panel ............ 5
Basic operations—
Remote controller (RM-RK251) ...... 6
OPERATIONS
Before operating the unit ................ 8
Common operations ........................ 9
Listening to the radio ...................... 10
Disc operations ................................ 16
Dual Zone operations ....................... 30
SD operations .................................. 33
USB operations ................................ 35
EXTERNAL DEVICES
Bluetooth® operations—
Cellular phone/audio player .......... 37
Listening to the CD changer .............. 44
Listening to the DAB tuner ............... 46
Listening to the iPod/D. Player ......... 50
Using other external components ..... 52
ENGLISH
SETTINGS
Sound equalization .......................... 55
Assigning titles to the sources .......... 56
Menu operations ............................. 57
REFERENCES
Maintenance ................................... 68
More about this unit ........................ 69
Troubleshooting .............................. 75
Specifications .................................. 80
3
INTRODUCTION
Page 4
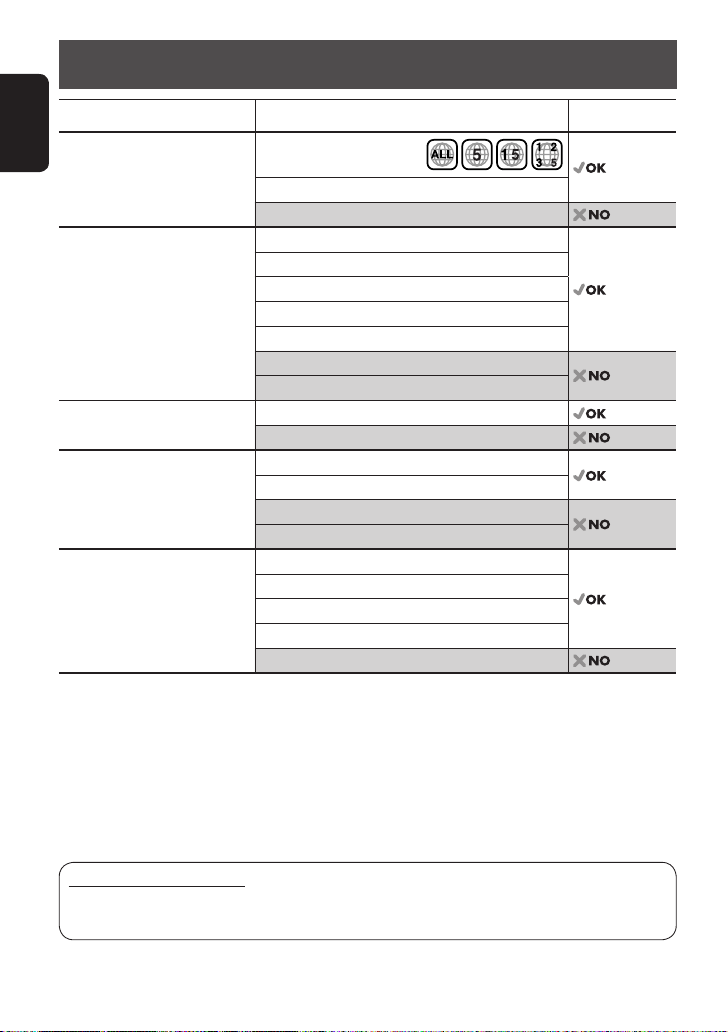
Playable disc type
Disc type Recording format, file type, etc. Playable
DVD DVD Video (Region Code: 5)*
ENGLISH
DVD Audio
DVD-ROM
DVD Recordable/Rewritable
(DVD-R*2/-RW, +R/+RW*3)
• DVD Video: UDF bridge
• DVD-VR
• DivX/MPEG1/MPEG2/JPEG/MP3/
WMA/WAV/AAC: ISO 9660 level
1, level 2, Romeo, Joliet
• DVD-RAM cannot be played.
DVD Video
DVD-VR (non-CPRM only)
DivX/MPEG1/MPEG2
JPEG
MP3/WMA/WAV/AAC*
MPEG4
DVD+VR
Dual Disc DVD side
Non-DVD side
CD/VCD Audio CD/CD Text (CD-DA)/DTS-CD
VCD (Video CD)
CD-ROM
CD-I (CD-I Ready)
CD Recordable/Rewritable
(CD-R/-RW)
• ISO 9660 level 1, level 2, Romeo,
Joliet
CD-DA
MP3/WMA/WAV/AAC*
JPEG
DivX/MPEG1/MPEG2
MPEG4
*1 If you insert a DVD Video disc of an incorrect Region Code, “Region code error” appears on the monitor.
*2 DVD-R recorded in multi-border format is also playable (except for dual layer discs).
*3 It is possible to play back finalized +R/+RW (Video format only) discs. However, the use of +R double layer disc is
not recommended.
*4 This unit can play back AAC files encoded using iTunes.
1
4
4
Caution for DualDisc playback
The Non-DVD side of a “DualDisc” does not comply with the “Compact Disc Digital Audio” standard. Therefore,
the use of Non-DVD side of a DualDisc on this product may not be recommended.
4
Page 5
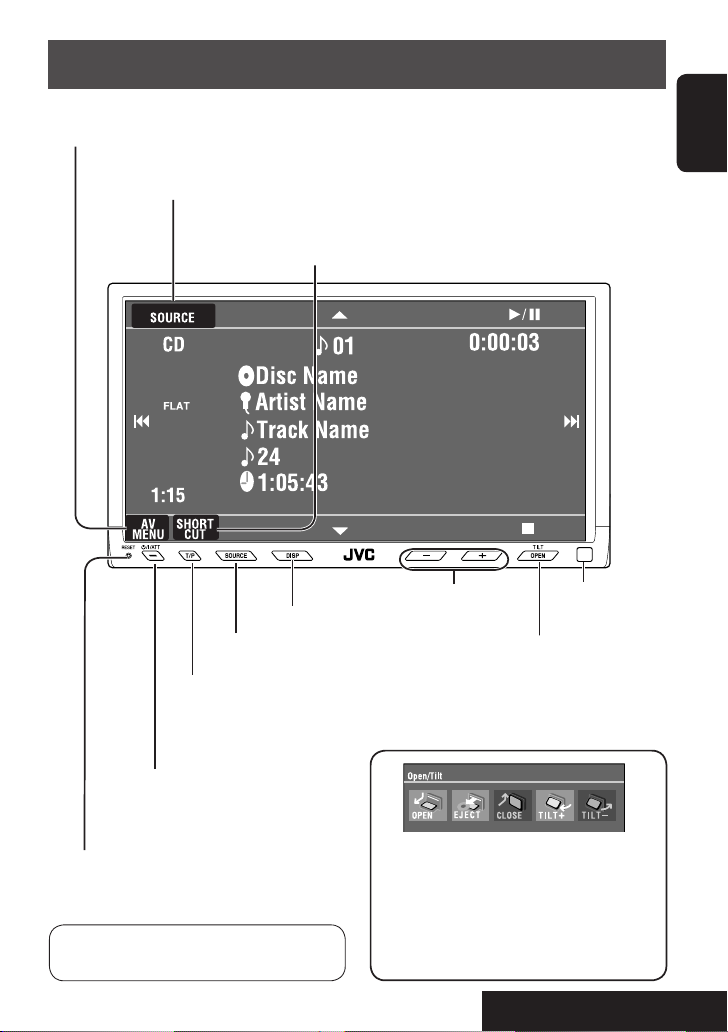
Basic operations — Monitor panel/touch panel
Display <AV Menu>.
• ☞ page 57.
Display <Source Menu>.
• ☞ pages 9 and 30.
Display and erase the Short Cut windows.
Available functions vary among the sources. For details, see each source
operation section.
ENGLISH
Change the display information.
Change the sources.
• ☞ page 9.
• Activate/deactivate TA
Standby Reception.
• Display <PTy Search> [Hold].
• ☞ page 12.
• Turn on the power.
• Turn off the power [Hold].
• Attenuate the sound (if the power is on).
Reset the unit.
• Use only when the internal system malfunctions.
• For details on the touch panel operations,
see each source operation sections.
Adjust the volume.
• Display the <Open/Tilt> screen
• Eject the disc and display the <Open/Tilt>
screen [Hold].
• Close the monitor panel when the <Open/Tilt>
screen is displayed.
• [OPEN]: Open the monitor panel.
• [EJECT]: Eject the disc.
• [CLOSE]: Close the monitor panel.
• [TILT +/–]: Tilt the monitor panel.
• [Exit]: Erase this screen.
• Shaded icons cannot be used at that time.
5
Remote sensor
INTRODUCTION
Page 6
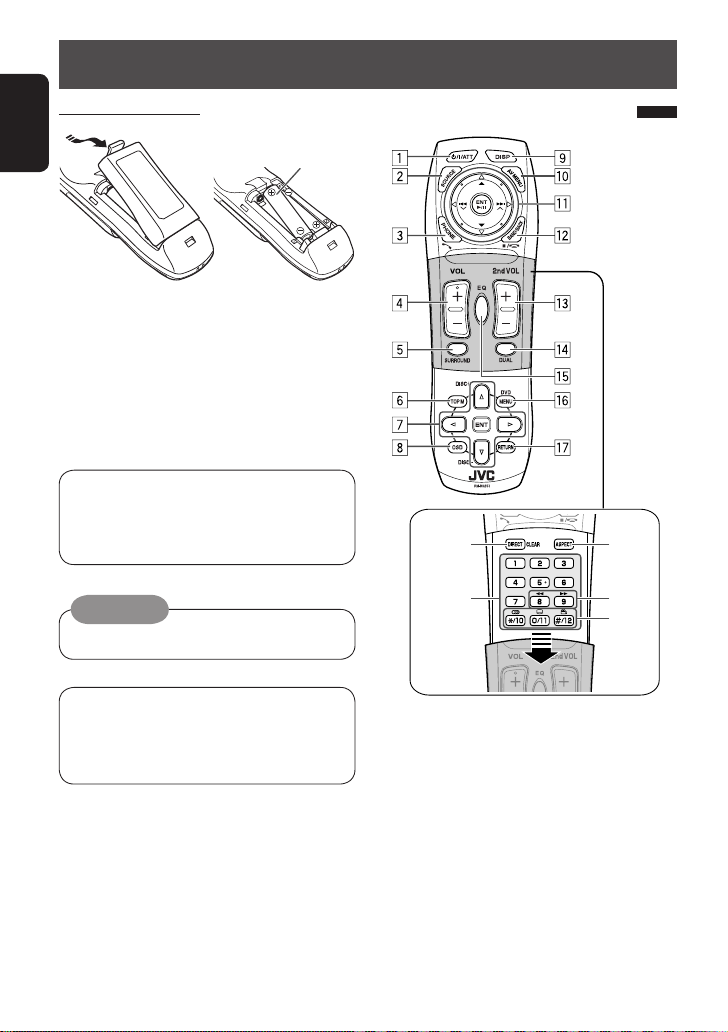
Basic operations — Remote controller (RM-RK251)
Installing the battery
ENGLISH
If the range or effectiveness of the remote controller
decreases, replace both batteries.
Before using the remote controller:
• Aim the remote controller directly at the remote
sensor on the unit.
• DO NOT expose the remote sensor to bright light
(direct sunlight or artificial lighting).
The unit is equipped with the steering wheel
remote control function.
• See the Installation/Connection Manual (separate
volume) for connection.
R03/LR03/AAA
Caution:
• Do not expose batteries to heat or flame.
Main elements and features
i
o
;
a
s
IMPORTANT:
If Dual Zone is activated (☞ page 30), the remote
controller functions only for operating the DVD/CD
player.
1*1 • Turns on the power.
• Attenuates the sound if the power is on.
• Turns off the power if pressed and held (while
the power is on).
2*1 Selects the source.
3*1 • Displays <Dial Menu>.
• Displays <Redial> list if pressed and held.
• Answers incoming calls.
1,2
4*
Adjusts the volume level.
6
Page 7

1,2
5*
Selects surround mode.
6 • DVD/DivX 6: Shows the disc menu.
• VCD: Resumes PBC playback.
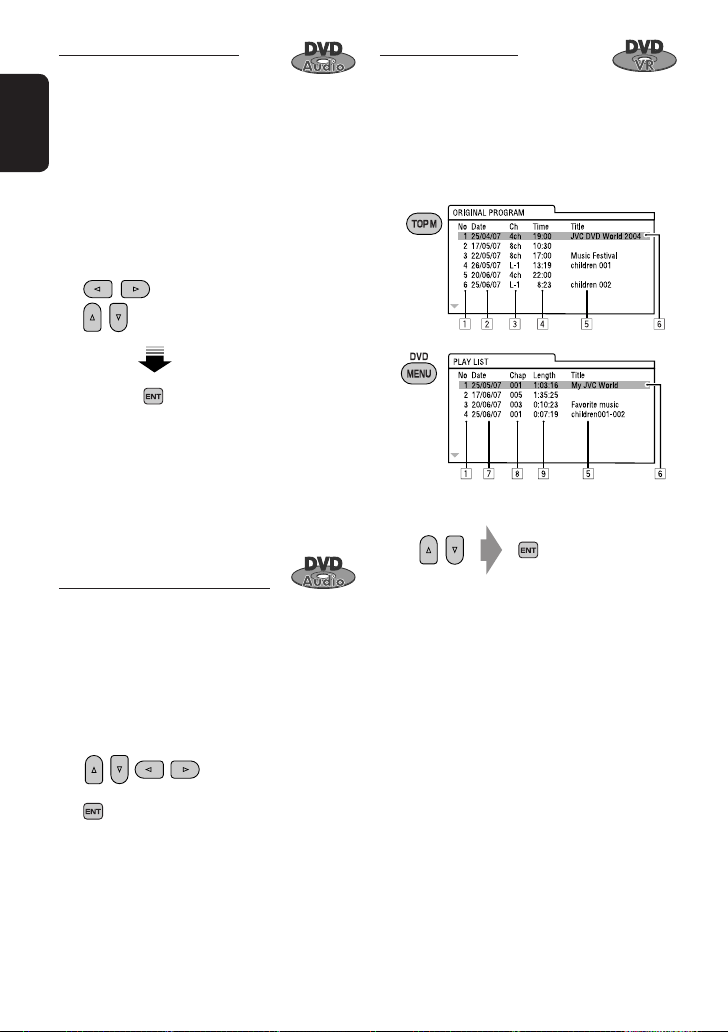
• DVD-VR: Shows the Original Program screen.
7 • Makes selection/settings.
• ~: Skips back or forward by 5 minutes for
DivX/MPEG1/MPEG2.
• DISC +/– buttons: Changes discs for “CD-CH.”
8 Shows the on-screen bar.
1
Changes the display information.
9*
p Display or erase <AV Menu>.
q For disc/SD/USB operations:
• 6: Plays/pauses.
• 5 / ∞:
DVD: Selects the title/group.
DVD-VR: Selects the program/playlist.
SD/USB/other discs (except VCD/CD): Selects
the folders.
• 4 / ¢:
– Press briefly: reverse skip/forward skip.
– Press and hold: reverse search/forward
search.
For FM/AM operations:
• 5 / ∞: Selects the preset stations.
• 4 / ¢: Functions to search for stations.
– Press briefly: Auto Search
– Press and hold: Manual Search
For DAB tuner operations:
• 5 / ∞: Select the services.
• 4 / ¢: Functions to search for
ensembles.
– Press briefly: Auto Search.
– Press and hold: Manual Search.
For Apple iPod/JVC D. player operations:
• ∞: Pauses/stops or resumes playback.
• 5: Enters the main menu (then 5 / ∞ /
4 / ¢ work as the menu selecting
3
buttons).*
• 4 / ¢ (in menu selecting mode)
– Selects an item if pressed briefly. (Then,
press ∞ to confirm the selection.)
– Skips 10 items at a time if pressed and held.
For Bluetooth operations:
• 4 / ¢: reverse skip/forward skip (for
audio operation)
• 6: Answers incoming calls (for “Bluetooth
PHONE”), plays/pauses (for “Bluetooth
AUDIO”).
w TUNER/DAB: Selects the bands.
DISC/SD/USB: Stops play.
Bluetooth PHONE: Ends the call.
Bluetooth AUDIO: Plays/pauses.
• This button does not function as the BACK
button for this model.
2
Adjusts the volume level through the 2nd AUDIO
e*
OUT plug.
r*2 Activates or deactivates Dual Zone.
1,2
Selects the sound mode.
t*
y • DVD Video/DivX 6: Shows the disc menu.
• VCD: Resumes PBC playback.
• DVD-VR: Shows the Play List screen.
u RETURN button
• For VCD: Returns to the PBC menu.
i DISC/SD/USB: Switches number entry mode.
• Also functions as CLEAR button to erase the
misentry after entering the wrong number.
o • Enter the numbers.
• FM/AM/DAB: Selects the preset station/
service directly.
• CD changer: Selects the disc directly.
;*1 Changes the aspect ratio of the playback
pictures.
a Reverse search/forward search for disc/SD/USB
operations.
s • DVD Video: Selects audio language ( ),
subtitles (
• DVD Audio: Selects audio stream (
), angle ( ).
).
• DVD-VR: Turn on/off subtitles ( ), and
selects audio channel ( )
• DivX: Selects audio language ( ),
subtitles ( ).
• VCD: Selects audio channel ( ).
*1 If Dual Zone is activated, these buttons cannot be
used.
*2 These buttons can be used only when the slide cover is
closed.
*3 5 : Returns to the previous menu.
∞ : Confirms the selection.
ENGLISH
7
INTRODUCTION
Page 8
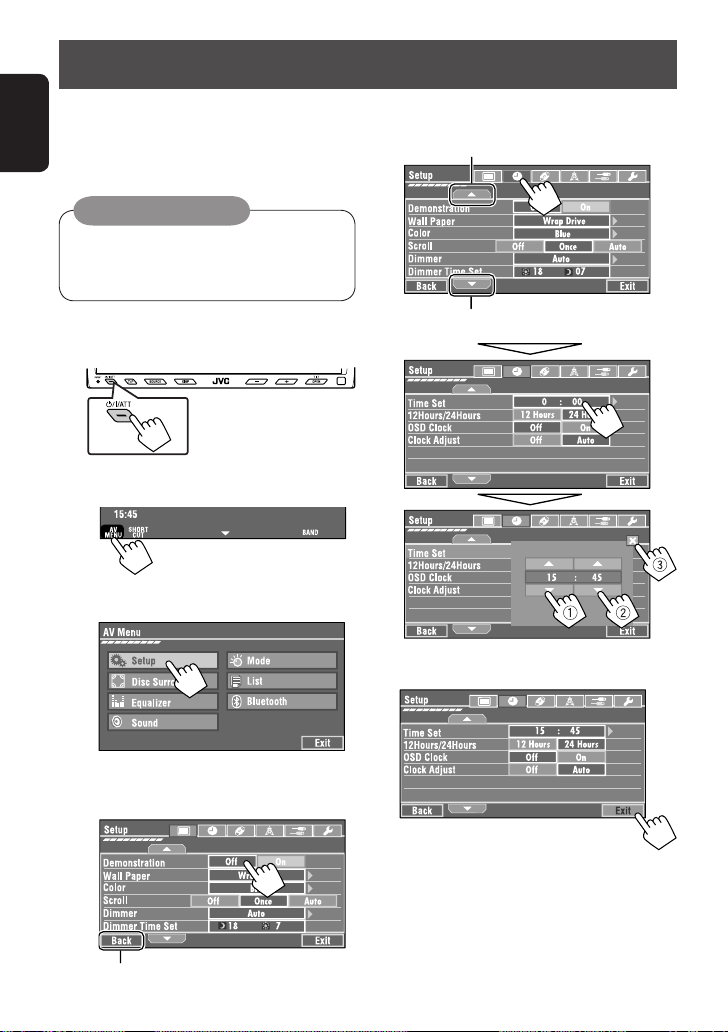
Before operating the unit
Cancel the display demonstration and set the clock (☞
pages 58 and 59 for details).
• Non-available items will be displayed being shaded
ENGLISH
on the AV Menu screens.
Indication language:
In this manual, English indications are used
for purpose of explanation. You can select the
indication language on the monitor. (☞ page 59)
~ Turn on the power.
Ÿ Display <AV Menu>.
! Display the <Setup> menu.
@ Set the clock settings.
Moves to the preceding menu page
Moves to the succeeding menu page
¤ Finish the procedure.
⁄ Cancel the display demonstrations.
Select <Off>.
Return to the previous screen.
8
Page 9
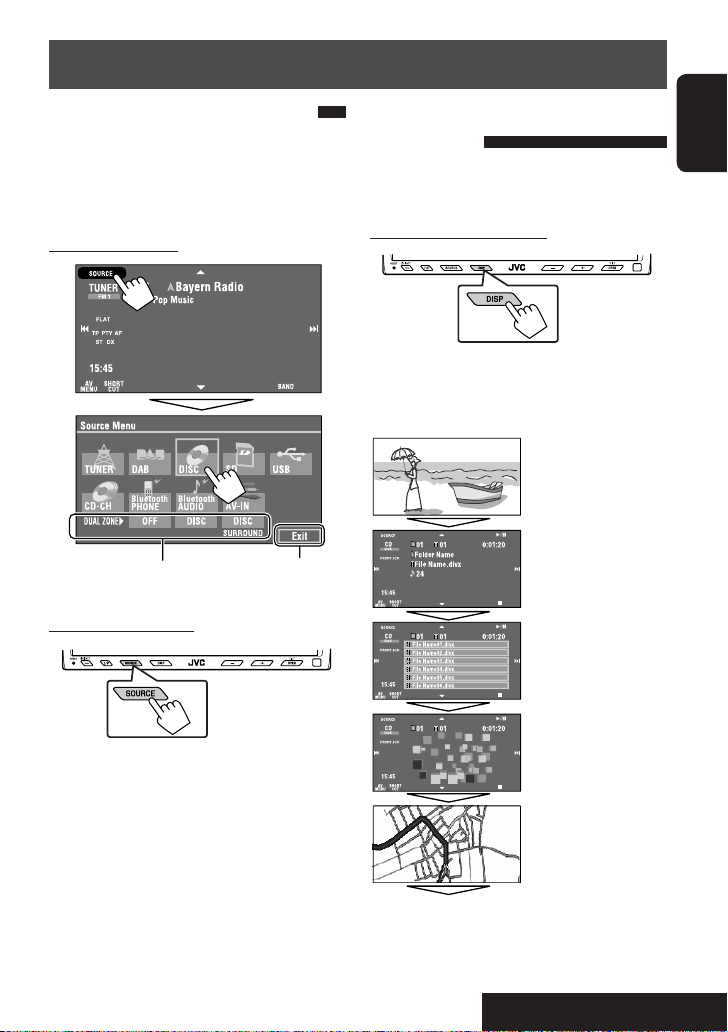
Common operations
Selecting the playback source
• Available sources depend on the external
components you have connected, media you have
attached, and the <Input> settings you have made
(☞ pages 62 and 63).
On the touch panel:
☞ page 30
On the monitor panel:
Exit
Changing the display
information
• Available display information varies among the
playback sources.
On the monitor panel only:
• Each time you press DISP, the display changes to
show the various information.
Ex. When the playback source is a DivX disc.
Playback picture screen
(only for video sources)
Source information screen
Preset station (service) list,
track (file) list, or phone
number list
ENGLISH
TUNER = DAB = DISC (DVD/VCD/CD) = SD
= USB =CD-CH, iPod, D.PLAYER, or EXT-IN =
Bluetooth PHONE = Bluetooth AUDIO = AV-IN
= (back to the beginning)
• You cannot select these sources if they are not ready.
Back to the beginning
9
Animation screen
Navigation screen
(When <
Navigation> is
selected for <
(
☞ page 62).
AV Input>):
OPERATIONS
Page 10
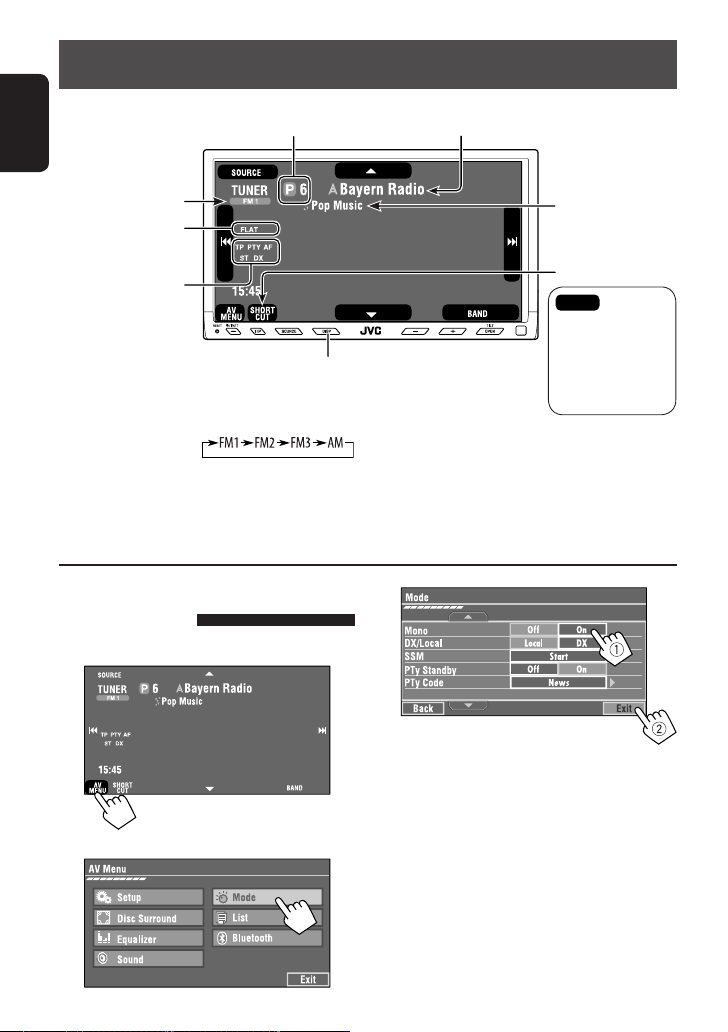
Listening to the radio
Preset No.
PS (station name) for FM RDS. If no PS signal is coming in,
the tuned frequency appears.
ENGLISH
Band
Sound mode
☞ page 55)
(
Tuner/Standby
Reception indicators
☞ page 9
~
Press [SOURCE], then press [TUNER]. ] (☞ page 9)
• You can also use SOURCE on the monitor panel. Press it repeatedly.
Ÿ Press [BAND].
! Press [4] or [¢] to search for a station—Auto Search.
• Manual Search: Hold either [4]or [¢] until “Manual Search” appears on the display, then press it
repeatedly.
• The ST indicator lights up when receiving an FM stereo broadcast with sufficient signal strength.
When an FM stereo broadcast is
hard to receive
1 Press [AV MENU].
3
PTY code for FM RDS
☞ page 12
: Buttons on the
touch panel. In the
explanation, they
are indicated inside
[ ].
2 Press [Mode].
Reception improves, but stereo effect will be lost.
• The MONO indicator lights up.
To restore stereo effect, select <Off>.
10
Page 11
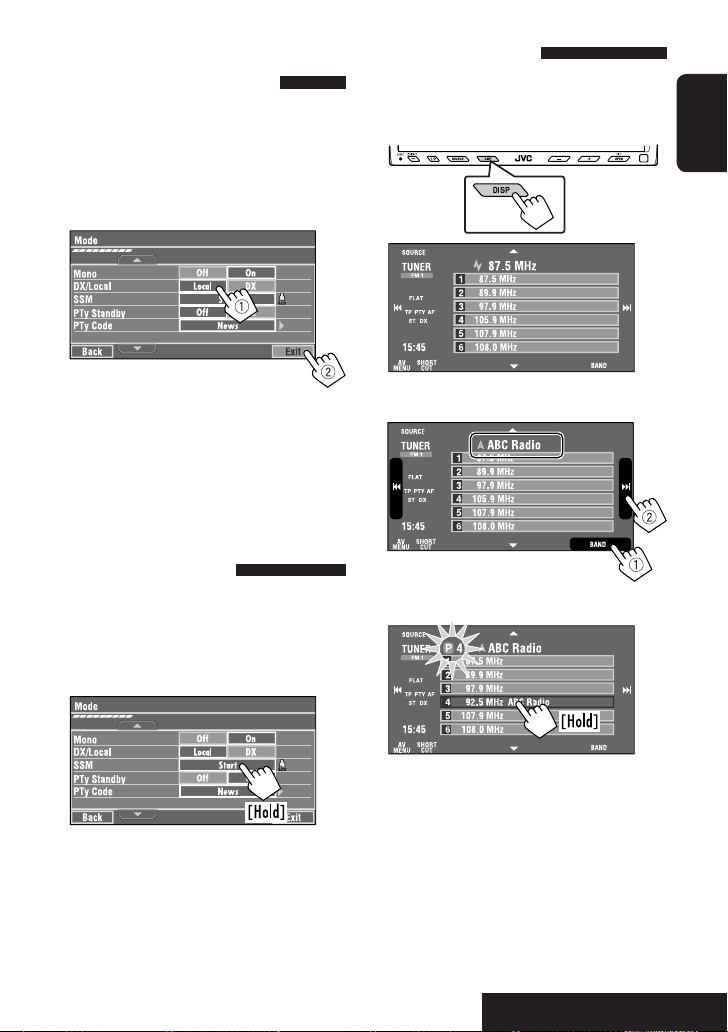
Tuning in to stations with
sufficient signal strength
This function works only for FM bands. Once you have
activated this function (selected <Local>), it always
works when searching for FM stations.
1 Press [AV MENU].
2 Press [Mode].
3
Manual presetting
Ex.: Storing FM station of 92.5 MHz into preset
number 4 of the FM1 band.
1 Display the Preset List.
ENGLISH
Only stations with sufficient signal strength will be
detected.
• The DX indicator goes off, then the LO indicator
lights up.
FM station automatic presetting
—SSM (Strong-station
Sequential Memory)
This function works only for FM bands.
You can preset six stations for each band.
1 Press [AV MENU].
2 Press [Mode].
3
Local FM stations with the strongest signals are
searched and stored automatically in the FM band.
2 Tune in to a station you want to preset.
3 Select a preset number.
The station selected in step 2 is now stored in
preset number 4.
11
OPERATIONS
Page 12
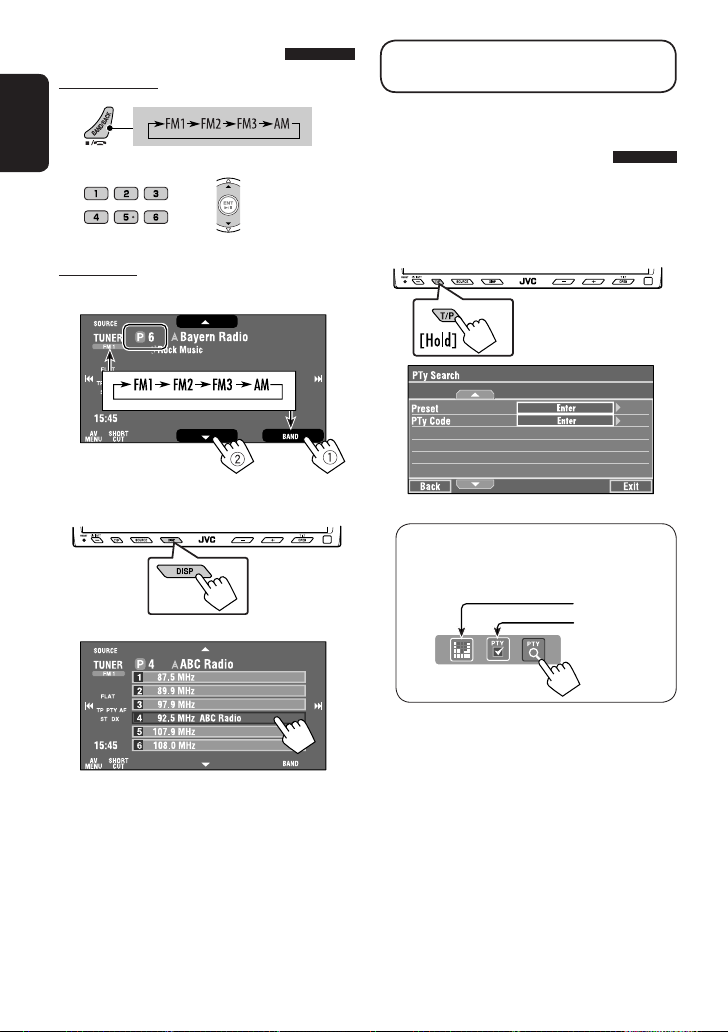
Selecting preset stations
On the remote:
1
ENGLISH
2
or
On the unit:
To select directly on the touch panel
To select from the Preset List
1
2
The following features are available only for FM RDS
stations.
Searching for FM RDS
programme—PTY Search
You can search for your favorite programmes being
broadcast by selecting the PTY code for your favorite
programmes.
1 Display <PTy Search> menu.
• <PTy Search> menu can also be accessed
by pressing [SHORT CUT] on the touch panel,
then...
☞ page 55
☞ page 14
12
Page 13
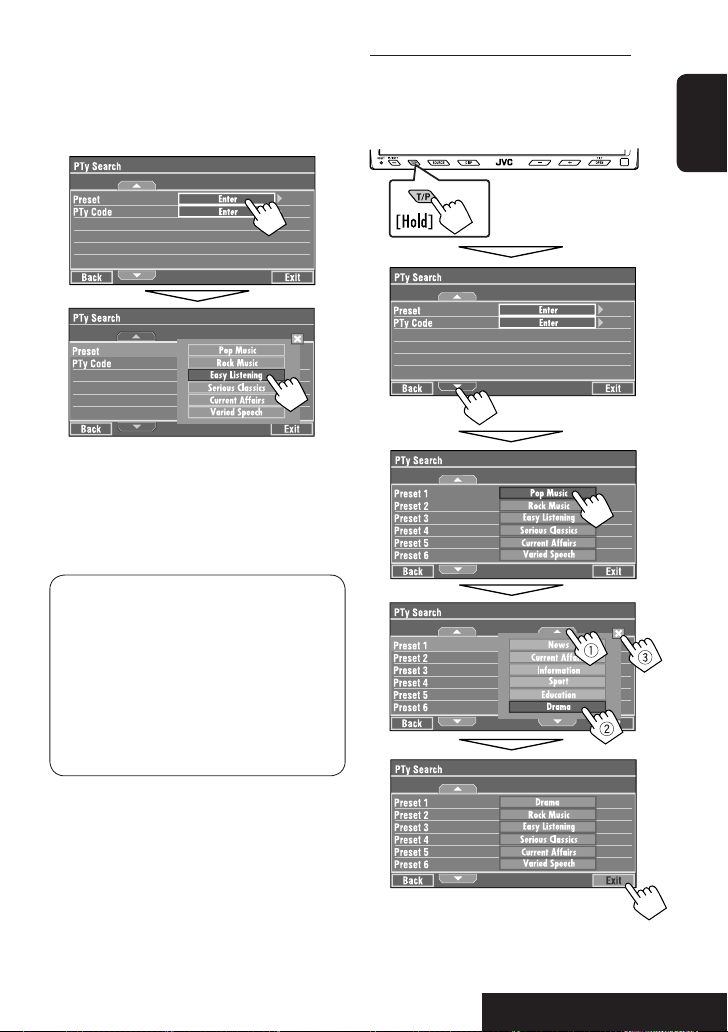
2 Select a PTY code.
• In the example below, a PTY code is selected
from the Preset List.
If you enter <PTy Code> below, you can select
one from 29 PTY codes.
PTY Search starts.
If there is a station broadcasting a programme
of the same PTY code as you have selected, that
station is tuned in.
Available PTY codes:
News, Current Affairs, Information, Sport,
Education, Drama, Cultures, Science, Varied Speech,
Pop Music, Rock Music, Easy Listening, Light Classics
M, Serious Classics, Other Music, Weather & Metr,
Finance, Children’s Progs, Social Affairs, Religion,
Phone In, Travel & Touring, Leisure & Hobby, Jazz
Music, Country Music, National Music, Oldies Music,
Folk Music, Documentary
Storing your favorite programme types
You can store your favorite PTY codes into the PTY
Preset List.
Ex.: Storing <Drama> into <Preset 1>.
ENGLISH
13
OPERATIONS
Page 14
Activating/deactivating TA/PTY
Standby Reception
TA Standby Reception Indicator
Press
ENGLISH
on the monitor panel to
activate.
The unit will temporarily switch
to Traffic Announcement (TA), if
available, from any source other than
AM.
The volume changes to the preset
TA volume level if the current level is
lower than the preset level (☞ page
62).
Not yet activated. Tune in to another
station providing the RDS signals.
to deactivate.
Press
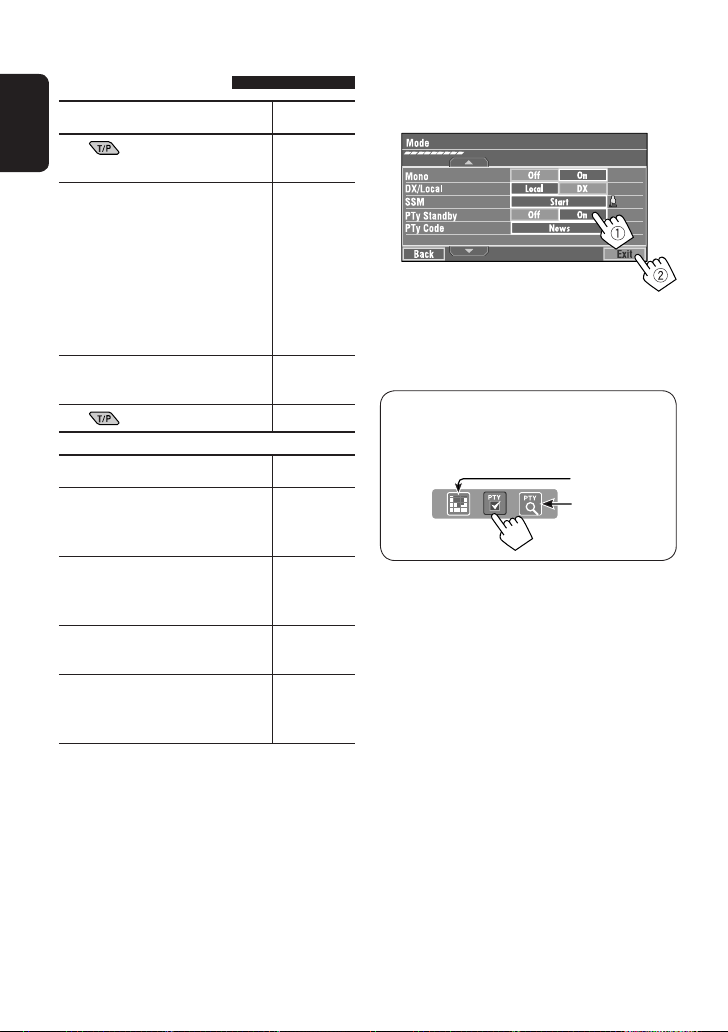
PTY Standby Reception Indicator
To activate, display <AV Menu>, then
select <Mode>, press [On] for <PTy
Standby> (☞ next column).
The unit will temporarily switch to
your favorite PTY programme from any
source other than AM.
Not yet activated. Tune in to another
station providing the RDS signals.
To deactivate, press [Off] for <PTy
Standby> in step 3 (☞ next
column).
TP
Lights up
Flashes
Goes off
PTY
Lights up
Flashes
Goes off
To activate PTY Standby Reception
1 Press [AV MENU].
2 Press [Mode].
3
PTY Standby Reception is now activated for PTY
code <News>: the initial setting.
• PTY Standby Reception can be easily activated
or deactivated by pressing [SHORT CUT] on the
touch panel, then...
☞ page 55
☞ page 12
• When a DAB tuner is connected, TA Standby/PTY
Standby Reception also works for the DAB tuner and
searches for the services.
14
Page 15
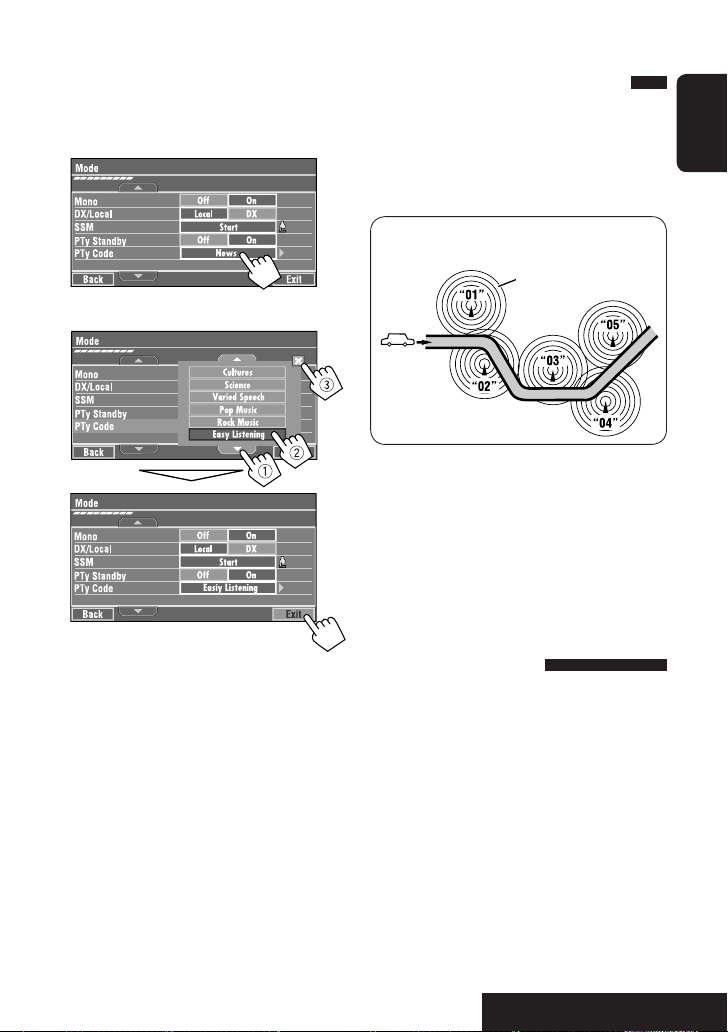
To change the PTY code for PTY Standby
Reception
1 Press [AV MENU].
2 Press [Mode].
3
4
Select your favorite PTY code.
Tracing the same programme—
Network-Tracking Reception
When driving in an area where FM reception is not
sufficient enough, this unit automatically tunes in to
another FM RDS station of the same network, possibly
broadcasting the same programme with stronger
signals.
Programme A broadcasting on different frequency
areas (01 – 05)
A
When shipped from the factory, Network-Tracking
Reception is activated.
To change the Network-Tracking Reception
setting, see <AF Regional> on page 62.
• When the DAB tuner is connected, refer also to
“Tracing the same programme—Alternative
Frequency Reception (DAB AF).” (☞ page 49)
ENGLISH
Automatic station selection—
Programme Search
Usually when you select preset stations, the preset
station is tuned in.
If the signals from the FM RDS preset station are not
sufficient for good reception, this unit, using the AF
data, tunes in to another frequency broadcasting the
same programme as the original preset station is
broadcasting. (☞ page 62)
• The unit takes some time to tune in to another
station using programme search.
15
OPERATIONS
Page 16
Disc operations
The disc type is automatically detected, and playback starts automatically (for some discs: automatic start depends
on its internal program).
ENGLISH
If a disc does not have any disc menu, all tracks in it will be played repeatedly until you change the source or eject the
disc.
” appears on the monitor, the unit cannot accept the operation you have tried to do.
If “
• In some cases, without showing “ ,” operations will not be accepted.
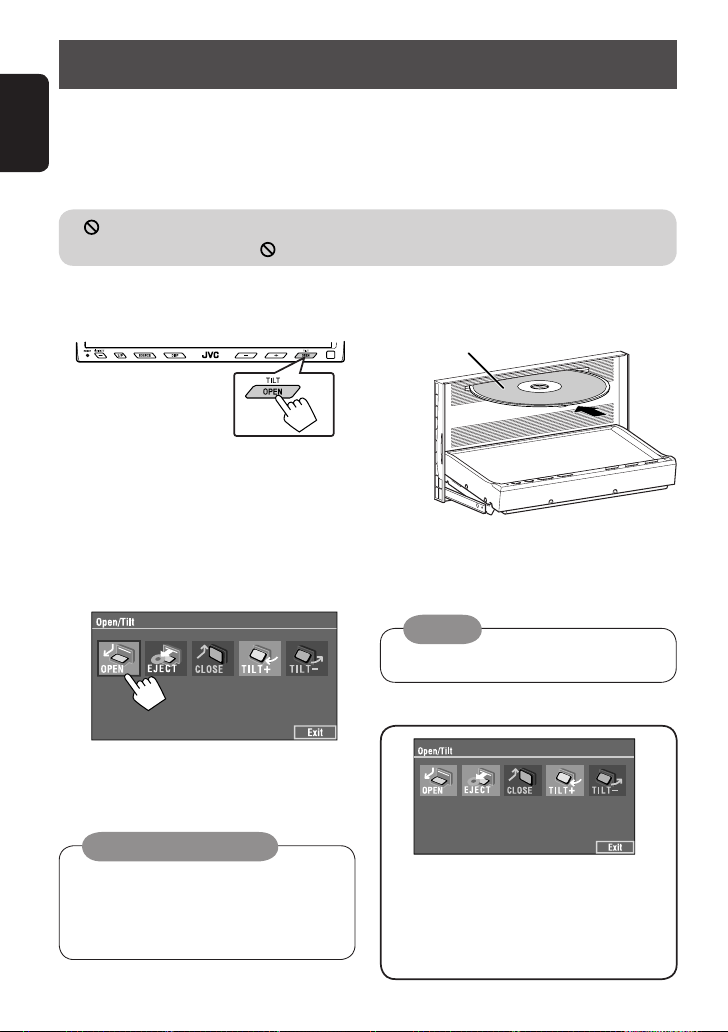
~ Open the monitor panel.
<Open/Tilt> menu appears.
• Shaded icons cannot be used at that time.
• By pressing and holding the button, you can
open the monitor panel and eject the disc.
Ÿ Press [OPEN].
Caution on volume setting:
Discs produce very little noise compared with other
sources. Lower the volume before playing a disc
to avoid damaging the speakers by the sudden
increase of the output level.
! Insert a disc.
Label side
Monitor panel closes automatically.
If not, press [CLOSE].
Caution:
Do not place your finger behind the monitor panel.
• [OPEN]: Open the monitor panel.
• [EJECT]: Eject the disc.
• [CLOSE]: Close the monitor panel.
• [TILT +/–]: Tilt the monitor panel.
• [Exit]: Erase this screen.
16
Page 17
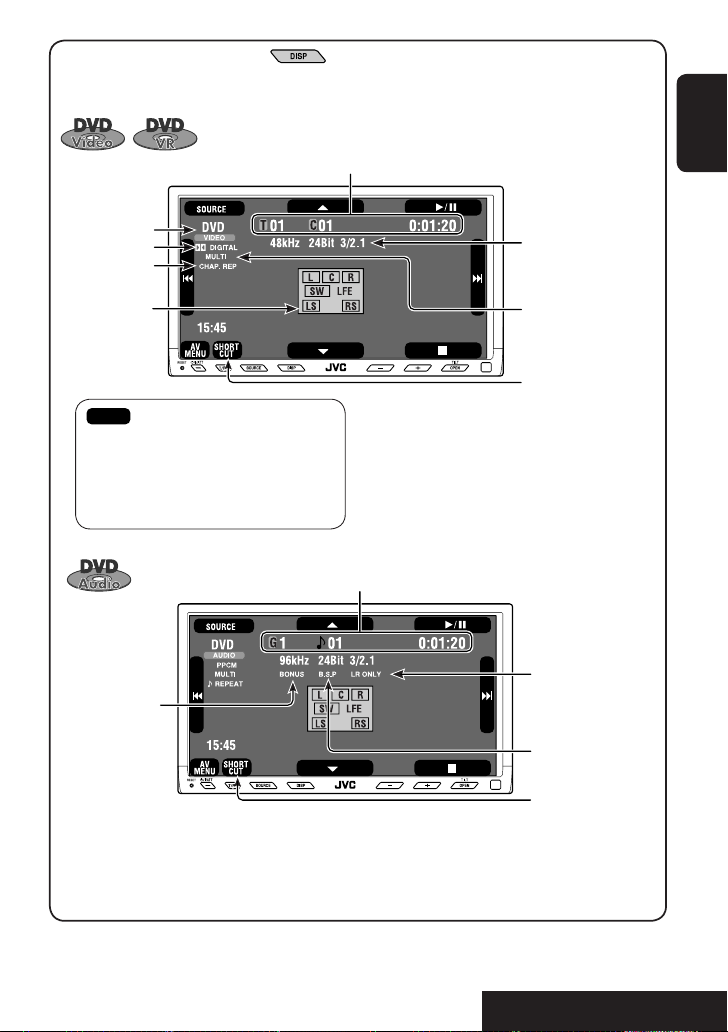
While playing the following discs, press .
• Each time you press the button, the display changes to show the different information (☞ page 9).
DVD Video: Title no./Chapter no./Playing time
DVD-VR: Program no. (or Playlist no.)/Chapter no./Play time
1
Disc type *
Audio format
Playback mode
Speaker/signal
indicators
(
☞ page 69)
: Buttons on the touch panel. In the explanation,
they are indicated inside [ ].
These buttons also work when they are not
shown on the touch panel (while watching
pictures on the screen).
BONUS indicator
(
☞ page 26)
[3 / 8] Start and pause playback
[
7] Stop playback
[
4 ¢] Press: Select track
Hold: Reverse/forward search
[5 ∞] Select group
3 / 8] Start and pause playback
[
[
7] Stop playback
[
4 ¢] Press: Select chapter
Hold: Reverse/forward search
[5 ∞] Select title/program/playlist
Group no./Track no./Playing time
2
*
Sampling frequency/Bit
rate/Recorded signal
channel no.
Surround mode
(
☞ page 27)
☞ page 22
2
*
Reproduced sound
indicator—
MULTI CH/LR ONLY
(
☞ page 70)
B.S.P indicator
(
☞ page 26)
☞ page 22
ENGLISH
*1 DVD-VR also indicates either PRG (program) or PLAY (playlist) playback.
*2 Search speed: x2 ] x10.
17
OPERATIONS
Page 18
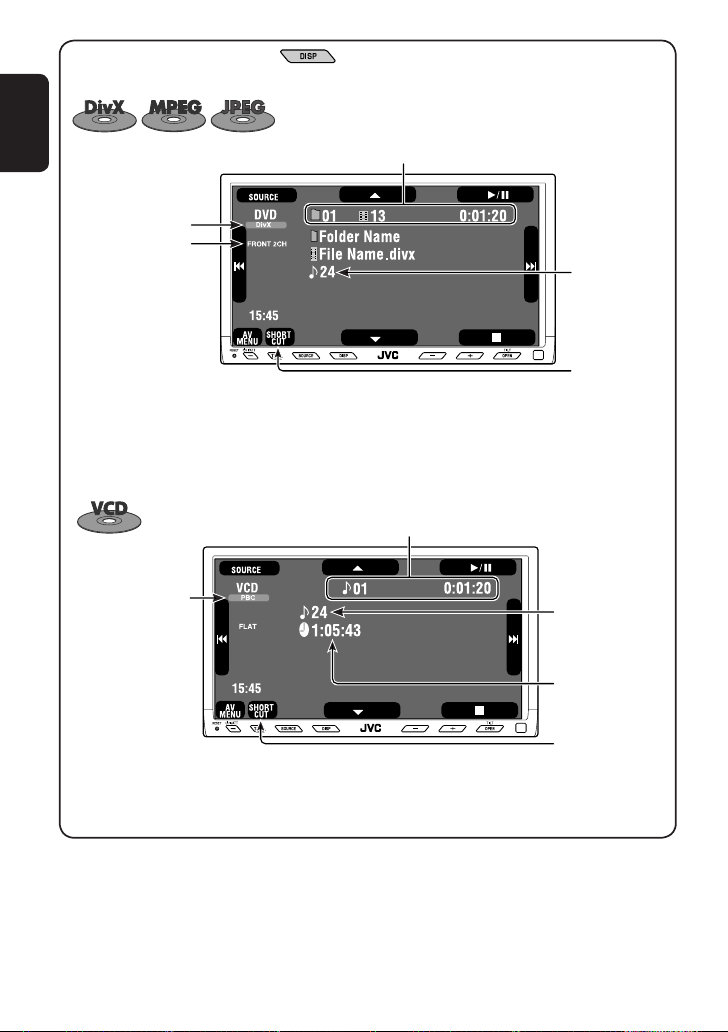
While playing the following discs, press .
• Each time you press the button, the display changes to show the different information (☞ page 9).
For DivX/MPEG1/MPEG2: Folder no./Track no./Playing time
ENGLISH
Surround mode *
Disc type
3
(☞ page 27)
For JPEG: Folder no./Track no.
Total track no.
included in the
disc
[
3 / 8] Start and pause playback
[
7] Stop playback
[
4 ¢] Press: Select track
Hold: Reverse/forward search for DivX/MPEG1/MPEG2
[5 ∞] Press: Select folder
Hold: Display Folder list
Track no./Playing time
PBC indicator
lights up when PBC is
in use.
[3 / 8] Start and pause playback
[
7] Stop playback
[
4 ¢] Press: Select track
Hold: Reverse/forward search
*2 Search speed: x2 ] x10.
*3 Surround mode and sound mode cannot be used at the same time.
*4 Search speed: ¡1 ] ¡2.
☞ page 22
4
*
Total track no.
included in the disc
Total play time
☞ page 22
2
*
18
Page 19
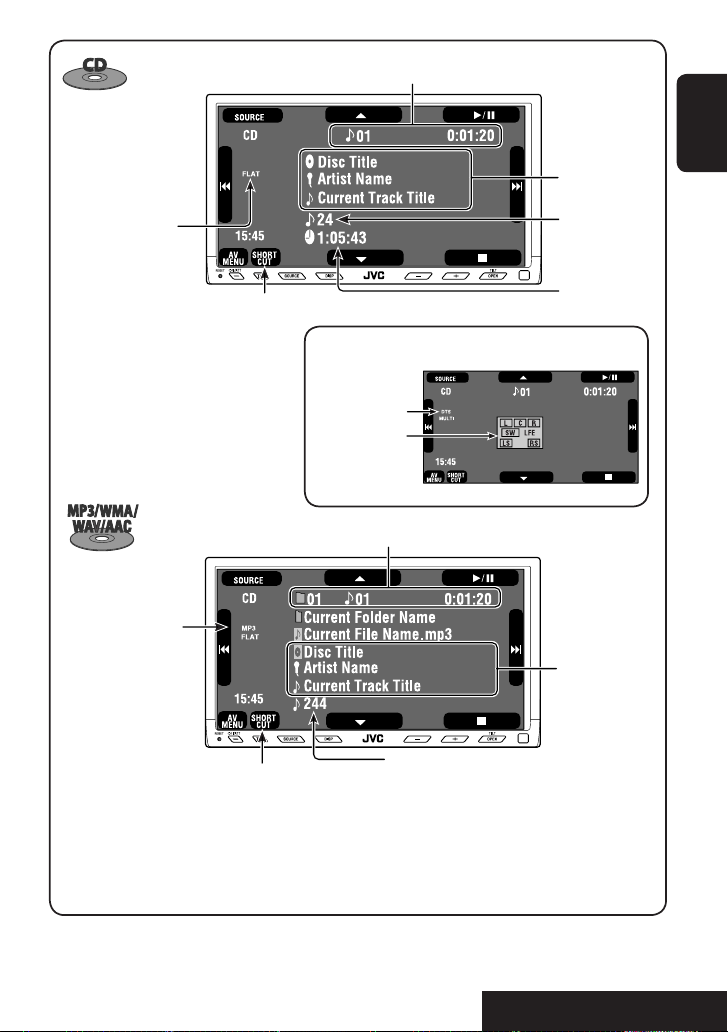
Track no./Playing time
Only for CD Text
ENGLISH
5
*
Sound mode *
3
(☞ page 55)
☞ page 22
[
3 / 8] Start and pause playback
[
7] Stop playback
[
4 ¢] Press: Select track
Hold: Reverse/forward search
Audio format
(MP3/WMA/WAV/AAC)
☞ page 22
3 / 8] Start and pause playback
[
[
7] Stop playback
[4 ¢] Press: Select track
Hold: Reverse/forward search
[5 ∞] Press: Select folder
Hold: Display Folder list
• While playing a DTS-CD
2
*
DTS indicator
Speaker/signal
indicators
(
☞ page 69)
Folder no./Track no./Playing time
Total track no. included in the disc
2
*
Total track no.
included in the disc
Total play time
Tag data appears
only when it is
recorded
*2 Search speed: x2 ] x10.
*5 “No Name” appears for conventional CDs.
19
OPERATIONS
Page 20
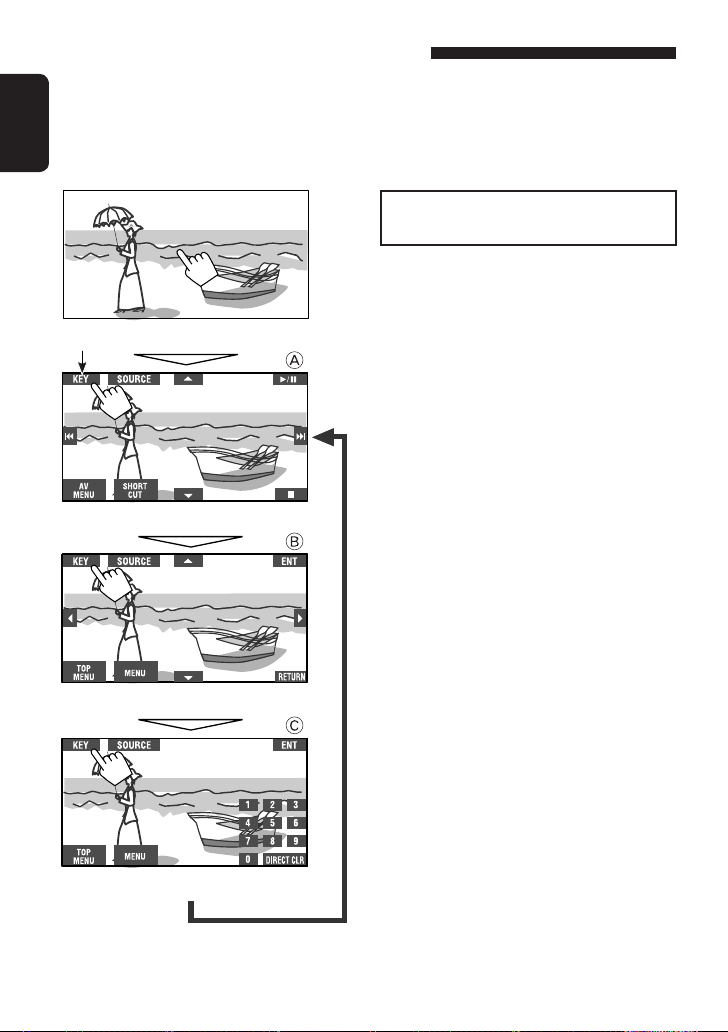
Operation buttons on the monitor screen
You can display the following operation buttons while watching the playback pictures on the monitor.
• While the operation buttons are displayed, aspect ratio is fixed to <Full> (☞ page 59).
• If no operation is done for about 5 seconds, the operation buttons disappears (except when a disc menu is
displayed).
ENGLISH
☞ pages 23 to 25 on how the operation buttons
particularly work for a variety of the discs
To erase the operations, touch the screen again.
A
Touch the screen (center portion).
*
Touch [KEY].
Touch [KEY].
Touch [KEY].
[SOURCE] Display the <Source Menu>
[
AV MENU] Display the <AV Menu>
[
SHORT CUT] Display the Short Cut buttons
[
3 / 8] Start and pause playback
[
7] Stop playback
[
4 ¢] Press: Select track
Hold: Reverse/forward search
[
5 ∞] Select folders
• The above buttons also work when they are not shown on
the touch panel (while watching pictures on the screen).
* While a disc menu is played back for DVD, [KEY] is
automatically displayed. On the disc menu, you can select a
menu item directly by touching it on the screen.
B
For DVD/VCD/DivX menu operation playback
[
2 3 5 ∞] Select the menu items
[
ENT] Confirm the selection
[
TOP MENU] Display the disc menu
[
MENU] Display the disc menu
[
RETURN] Return to the previous menu or display the
menu (only for VCD with PBC)
C
For entering the numbers
[
DIRECT CLR] Switch between chapter/track entry and
Erase the last entry when you enter a wrong
[
0]–[9]=[ENT] Enter the number
Ex. To enter “105”: press [
title/group/folder entry
number
1], [0], [5], then [ENT]
20
Page 21
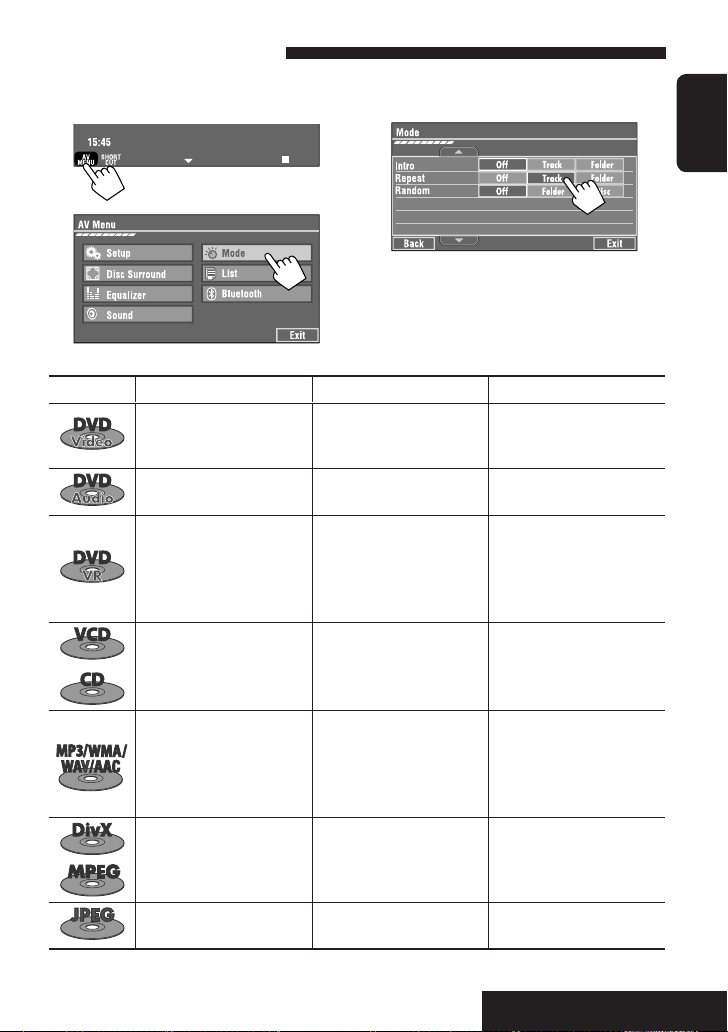
Selecting playback modes
You can use only one of the following playback modes—Intro/Repeat/Random.
Ex. To select Track Repeat
1
2
Disc type Intro Repeat Random
—
— Track: Repeats current track —
—
Track: Plays the first 15
seconds of each track (for
VCD: PBC not in use)
3
When one of the playback modes is selected, the
corresponding indicator lights up on the source
information screen.
To cancel, select <Off>.
Chapter: Repeats current
chapter
Title: Repeats current title
Chapter: Repeats current
chapter
Program: Repeats current
program (not available for
Playlist playback).
Track: Repeats current track*
(for VCD: PBC not in use)
1
Disc (All): Randomly plays all
tracks (for VCD: PBC not
in use)
ENGLISH
—
—
Track: Plays the first 15
seconds of each track
Folder: Plays the first 15
seconds of the first track of
each folder
—
—
1
You can also use [SHORT CUT] to turn on and off Track Repeat
*
Track: Repeats current track*
Folder: Repeats all tracks of
the current folder
Track: Repeats current track
Folder: Repeats current folder
Folder: Repeats current folder
21
1
Folder: Randomly plays all
tracks of current folder,
then tracks of next folders
Disc (All): Randomly plays all
tracks
—
—
OPERATIONS
Page 22
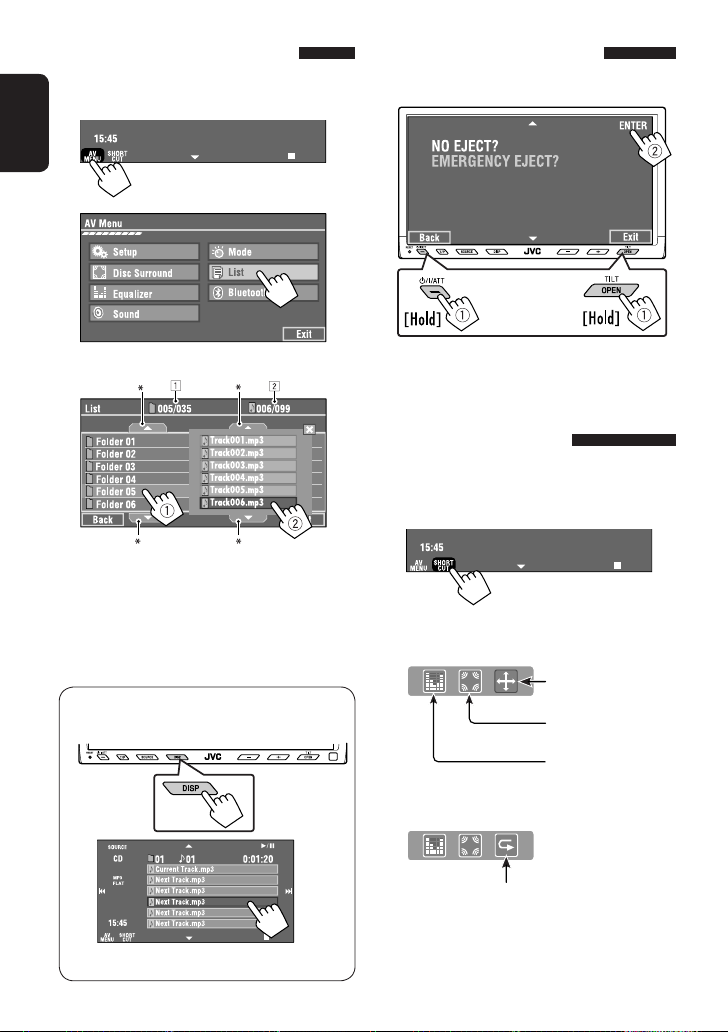
Selecting tracks on the list
If a disc includes folders, you can display the Folder/
Track (File) Lists, then start playback.
1
ENGLISH
2
Prohibiting disc ejection
You can lock a disc in the loading slot.
at the same time
3
Select a folder (1), then a track (2).
Selected track starts playing. (* Press to move to
the previous/next pages of the list)
1 Current folder list number/total folder list
number
2 Current track list number/total track list
number of the current folder
• Track List can also be accessed by pressing DISP
on the monitor panel.
To cancel the prohibition, repeat the same
procedure to select <EJECT OK?>.
Using Short Cut Icons
You can easily access the some frequently used
functions by using [SHORT CUT] on the touch panel.
1
2
• For video software:
Aspect ratio
☞ page 59)
(
Surround
(
☞ page 27)
Sound mode
(
☞ page 55)
• For audio software:
Turn on or off Track Repeat
(Repeat play:
☞ page 21)
Selected track starts playing.
22
Page 23
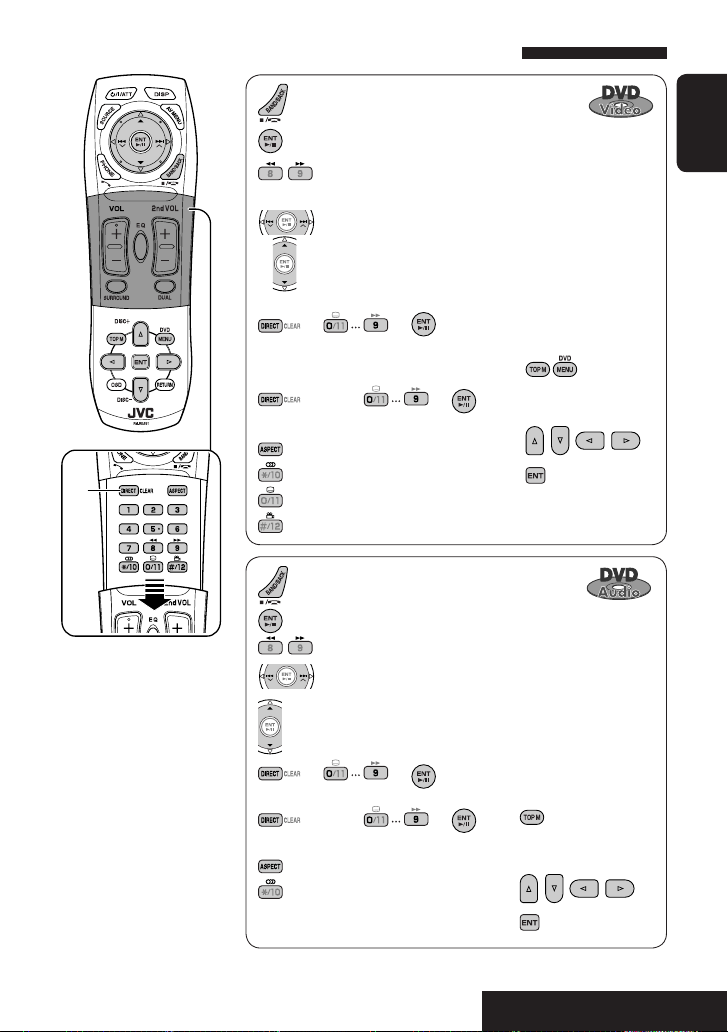
Operations using the remote controller—RM-RK251
: Stop playback.
: Start playback/pause (if pressed during playback).
: Reverse/forward search*2. (No sound can be heard.)
(Slow motion*3 during pause. No sound can be heard.)
: Press: Select chapter (during playback or pause).
Hold: Reverse/forward search*4.
: Select title (during playback or pause).
ENGLISH
1
*
*1 Erases the misentry of the
number.
*2 Search speed: x2 ] x5 ]
x10 ] x20 ] x60
*3 Slow motion speed: 1/32 ]
1/16 ] 1/8 ] 1/4 ] 1/2
*4 Search speed: x2 ] x10
= = :
Select chapter.
Select title (when not playing).
(twice) = = :
Select title (during playback or pause).
: Select aspect ratio.
: Select audio language.
: Select subtitle language.
: Select view angle.
: Stop playback.
: Start playback/pause (if pressed during playback).
: Reverse/forward search*2.
: Press: Select track.
Hold: Reverse/forward search*4.
: Select group.
= = :
Select track.
(twice) = = :
Select group.
: Select aspect ratio.
: Select audio stream.
Using menu driven
features
1
2 Select an item you want
to start play.
3
Using menu driven
features
1
2 Select an item you want
to start play.
3
23
OPERATIONS
Page 24
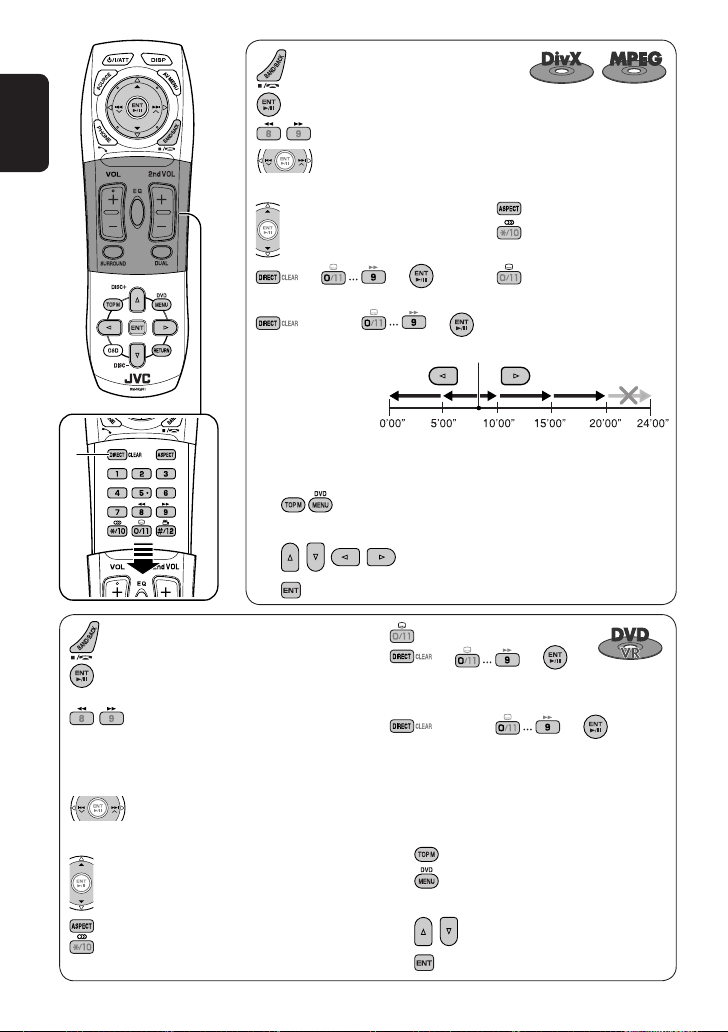
ENGLISH
1
*
: Stop playback.
: Start playback/pause (if pressed during playback).
: Reverse/forward search*5. (No sound can be heard.)
: Press: Select track.
6
Hold: Reverse/forward search*
. (No sound can be heard.)
: Select folder.
= = :
Select track (within the same folder).
(twice) = = :
Select folder.
Current playback position
While playing...
Back/advance
the scenes by
5 minutes.
2nd press
1st press
1st press
For DivX6: Using menu driven features
1
2 Select an item you want to start play.
3
: Select aspect ratio.
: Select audio language.
(DivX only)
: Select subtitle language.
(DivX only)
3rd press
2nd press
: Stop playback.
: Start playback/pause (if pressed during
playback).
: Reverse/forward search*2. (No sound can be
heard.)
(Slow motion*3 during pause. No sound can
be heard.)
• Reverse slow motion does not work.
: Press: Select chapter (during playback or
pause).
Hold: Reverse/forward search*4.
: Select program.
Select playlist (during playback or pause).
: Select aspect ratio.
: Select audio channel (ST: stereo, L: left, R:
Right).
: Turn on/off subtitle.
= = :
Select chapter.
Select program (when not playing).
(twice) = = :
Select program/playlist (during playback or
pause).
Using Original Program/Play List screens
( ☞ page 26)
1 : For Original Program
: For Play List
2 Select an item you want to start playing.
3 To erase the screen.
24
Page 25
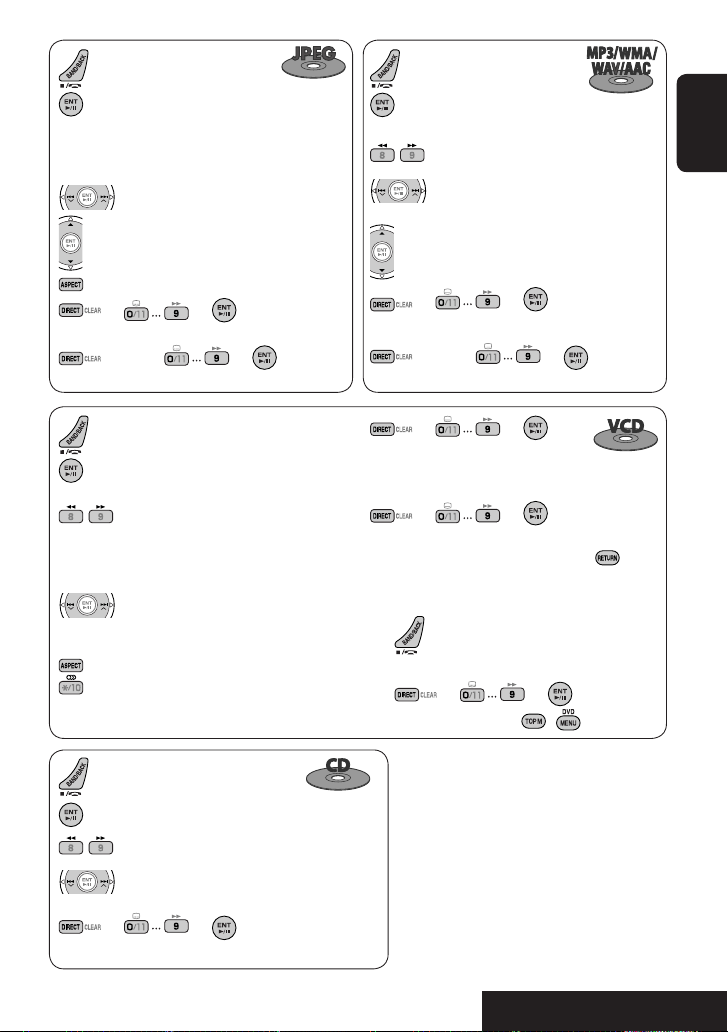
: Stop playback.
: Start playback. (Slide show: each file is
shown for a few seconds.)
Shows the current file until you change it
if pressed during Slide show.
: Select track.
: Stop playback.
: Start playback/pause (if
pressed during playback).
: Reverse/forward search*2.
: Press: Select track.
Hold: Reverse/forward search*4.
ENGLISH
: Select folder.
: Select aspect ratio.
= = :
Select track (within the same folder).
(twice) = = :
Select folder.
: Stop playback.
: Start playback/pause (if pressed during
playback).
: Reverse/forward search*2.
(Forward slow motion*3 during pause. No
sound can be heard.)
• Reverse slow motion does not work.
: Press: Select track.
Hold: Reverse/forward search*4 (No
sound can be heard.)
: Select aspect ratio.
: Select audio channel (ST: stereo, L: left, R:
Right).
: Stop playback.
: Start playback/pause (if pressed during playback).
: Reverse/forward search*2.
: Press: Select track.
Hold: Reverse/forward search*
= = :
Select track.
4
.
: Select folder.
= = :
Select track (within the same folder).
(twice) = = :
Select folder.
= = :
Select track.
During PBC playback...
= = :
Select an item on the menu.
To return to the previous menu, press
To cancel PBC playback
1
2 Start the desired track.
= =
• To resume PBC, press / .
*1 Erases the misentry of the number.
*2 Search speed: x2 ] x5 ] x10 ] x20 ] x60
*3 Slow motion speed: 1/32 ] 1/16 ] 1/8 ]
1/4 ] 1/2
*4 Search speed: x2 ] x10
*5 Search speed: ¡1 ] ¡2 ] ¡3
*6 Search speed: ¡1 ] ¡2
.
25
OPERATIONS
Page 26
Playing back a bonus group
If a DVD Audio including a “bonus group” is
detected, the BONUS indicator lights up on the source
information screen.
ENGLISH
To play a bonus group...
1 Select the bonus group.
• The bonus group is usually recorded as the last
group.
2 Enter the key number.
: Move the entry position
: Select a number
• “key number” (a kind of password) for the bonus
group is not open to public. The way of getting
the key number depends on the disc.
3 Follow the interactive instructions shown on
the monitor.
Using the list screens
You can use Original Program and Play
List screen anytime while playing DVD-VR with its data
recorded.
1 Display the Original Program/Play List
screen.
2 Select an item you want.
Selecting browsable still picture
When a disc including browsable still pictures is
detected, the B.S.P indicator lights up on the source
information screen.
When disc shows the BSP selecting icons such as @ or
# on the screen...
1 Select an item you want to display.
2
To erase the screen
1 Program/Play list number
2 Recording date
3 Recording source (TV station, the input terminal of
the recording equipment, etc.)
4 Start time of recording
5 Title of the program/play list*
6 Highlight bar (current selection)
7 Creating date of play lists
8 Total number of chapters included in the playlist
9 Playback time
* The title of the original program or play list may not be
displayed depending on the recording equipment.
26
Page 27
Enjoying surround sounds
You can enjoy multi-channel surround playback
through the front, center, surround speakers.
• After connecting the center speaker, make
sure to activate the center speaker; otherwise,
no sound comes out of the center speaker (☞
page 61).
• Surround mode can also be used for “USB” and “SD.”
4
ENGLISH
MULTI: For multi-channel encoded sources such as
Dolby Digital*
activated, “MULTI” is shown on the source
information screen.)
Dolby Pro Logic II (Movie/Music): For 2 channel
sources except for DivX/MPEG1/MPEG2 discs.
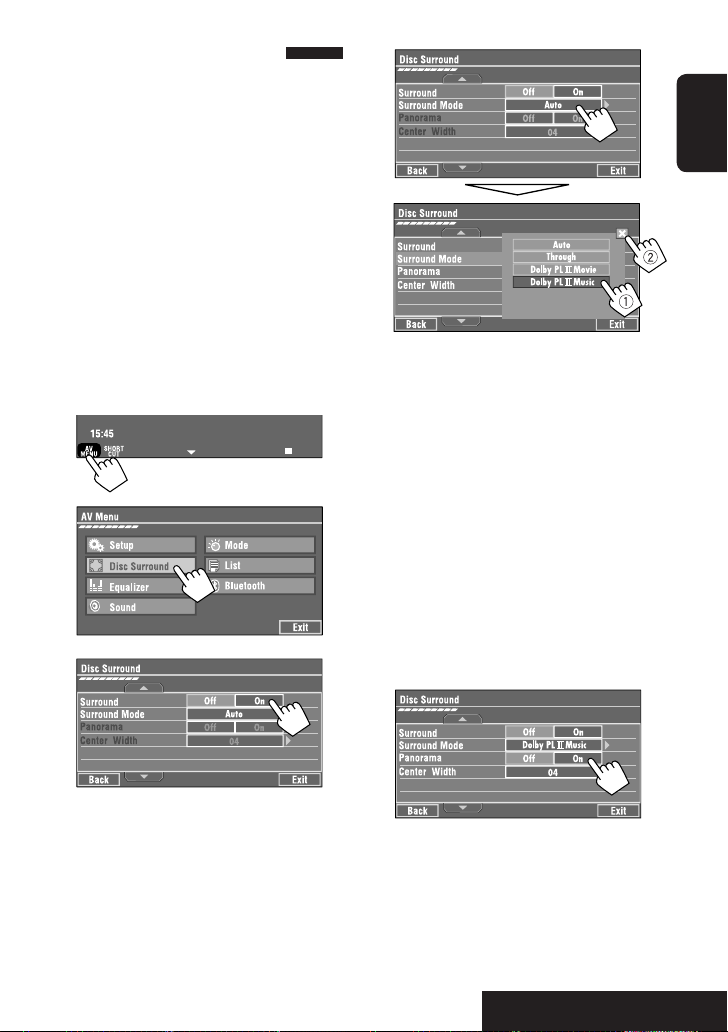
To turn on the surround...
1
, DTS*2, and DVD Audio. (When
1
2
3
• Off: Deactivates surround.
• On: Activates surround = go to the following
steps.
• Auto: When multi-channel digital signals come
in, “MULTI” surround is activated.
When 2-channel or 2.1-channel signals come in,
“4CH STEREO” is activated.
• Through: All incoming channel signals are sent
to the corresponding speakers.
• Dolby PL II Movie: Activates Dolby Pro Logic
Movie.
• Dolby PL II Music: Activates Dolby Pro Logic
II Music. You can adjust <Panorama> and
<Center Width> setting (☞below).
Only when selecting <Dolby PL II Music>
After step 4 above...
1 Activate <Panorama>.
• Panorama: Select <On> to add wraparound
sound effect.
II
27
Continued on the next page
OPERATIONS
Page 28
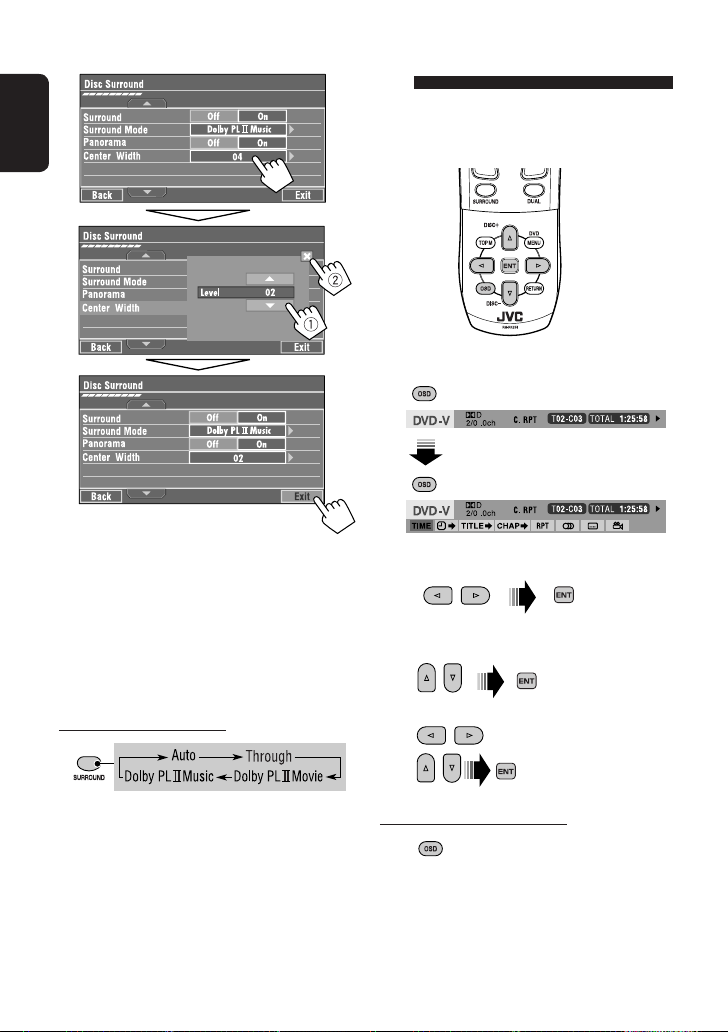
2 Adjust <Center Width>.
ENGLISH
Operations using the on-screen
bar
These operations are possible on the monitor using
the remote controller, while playing the following
discs—DVD/VCD/DivX/MPEG1/MPEG2/JPEG.
1 Display the on-screen bar. (☞page 29)
• Center Width: Adjust the center image so it
may be heard only from the center speaker,
only form the left/right front speaker as a
“phantom” center image, or various combination
of these speakers. As the number increases, the
“phantom” effect becomes stronger (normally
select <04>).
On the remote controller:
• You cannot change the <Dolby PL II Music>
settings using the remote controller.
*1 Manufactured under license from Dolby Laboratories.
Dolby, Pro Logic, and the double-D symbol are
trademarks of Dolby Laboratories.
*2 “DTS” and “DTS Digital Surround” are registered
trademarks of DTS, Inc.
2 Select an item.
3 Make a selection.
If a pop-up menu appears...
• For entering time/numbers...
To remove the on-screen bar
28
: Move the entry position
: Select a number
Page 29
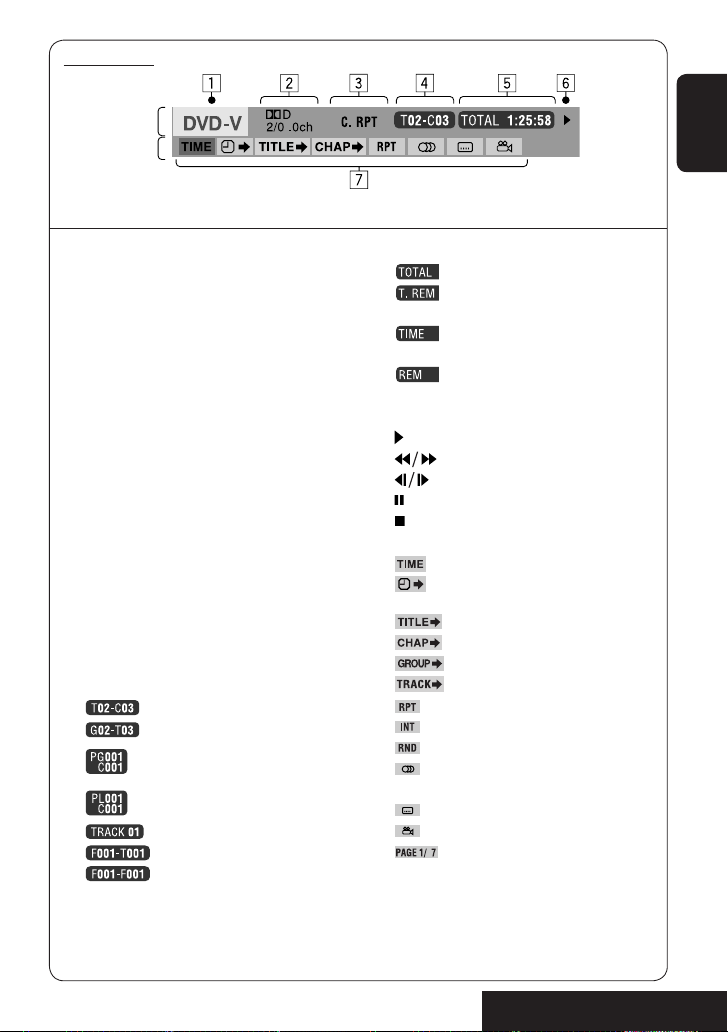
On-screen bar
Information
Operation
Above example is of DVD Video. Items shown on the bar vary due to the disc type.
ENGLISH
1 Disc type
2 • DVD: Audio signal format
• VCD: PBC
3 Playback mode *
1
DVD Video:
T. RPT: Title repeat
C. RPT: Chapter repeat
DVD Audio:
T. RPT: Track repeat
DVD-VR:
C. RPT: Chapter repeat
PG. RPT: Program repeat
DivX/MPEG1/MPEG2:
T. RPT: Track repeat
F. RPT: Folder repeat
JPEG:
F. RPT: Folder repeat
VCD:
T. RPT: Track repeat
A. RND: All (Disc) random
T. INT: Track intro
4 Playback information
Current title/chapter
Current group/track
Current program/chapter
Current playlist/chapter
Current track
Current folder/track
Current folder/file
1
☞ page 21
*
*2 Not applicable for DVD-VR
5 Time indication
Elapsed playing time of the disc
Remaining title time (for DVD)
Remaining disc time (for others)
Elapsed playing time of the current
chapter/track *
Remaining time of the current
chapter/track *
2
2
6 Playback status
Play
Reverse/forward search
Reverse/forward slow-motion
Pause
Stop
7 Operation icons
Change time indication (see 5)
Time Search (Specify a certain scene
by entering time.)
Title Search (by its number)
Chapter Search (by its number)
Group Search (by its number)
Track Search (by its number)
Repeat play *
Intro play *
Random play *
1
1
1
Change the audio language, audio
stream, or audio channel
Change or erase the subtitle language
Change the view angle
Change the browsable still pictures
(pages). The numbers in the indicator
shows the current page/total page
number
29
OPERATIONS
Page 30
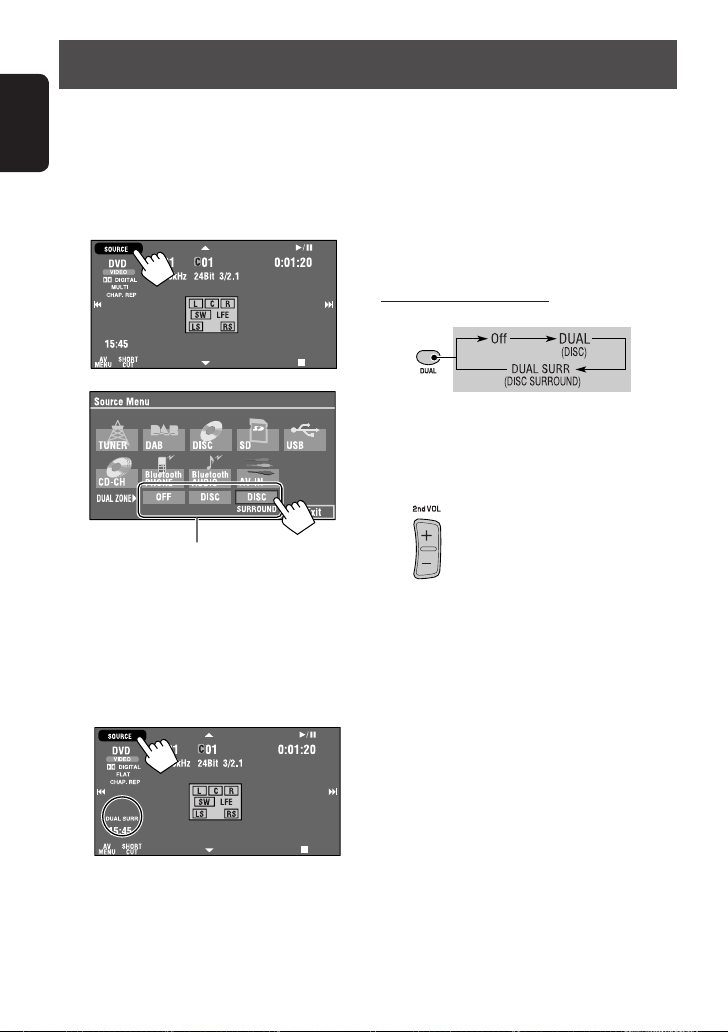
Dual Zone operations
You can enjoy a disc playback on the external monitor
connected to the VIDEO OUT and 2nd AUDIO OUT plugs,
while listening to any other source than “SD” and “USB”
ENGLISH
through the speakers.
• When Dual Zone is in use, you can only operate the
DVD/CD player using the remote controller.
1
2
When the main source is “SD” or “USB,” “DISC” and
“DISC SURROUND” cannot be displayed.
• OFF: Deactivates Dual Zone.
• DISC: Activates Dual Zone without applying
Headphone Surround*.
• DISC SURROUND: Activates Dual Zone and
applies Headphone Surround*.
To select a different source (main source) to
listen through the speakers:
Press SOURCE on the monitor panel.
• You cannot select “SD” and “USB” for the main
source.
• By using the buttons on the monitor panel, you
can operate the newly selected main source without
affecting Dual Zone (DISC) operations.
On the remote controller:
1
• When the main source is “SD” or “USB,” the
DUAL button does not work.
2 Adjust the volume through the 2nd AUDIO
OUT plug.
3
Operate the DVD/CD player.
* JVC original headphone virtual surround system. This
surround will also work for the main source “DISC” if
“DISC SURROUND” is selected as the sub-source. This
surround does not work for DivX/MPEG1/MPEG2 discs.
Ex. When [DISC SURROUND] is selected.
30
Page 31

Operations using the control
screen
For discs except DVD and VCD:
While Dual Zone is on,
the external monitor using the remote controller.
The control screen automatically appears when you
insert a disc. (For DivX/MPEG1/MPEG2/JPEG; while not
playing.)
• When Dual Zone is off, you can only watch the control
screen, but cannot operate it.
these operations are possible on
To select a folder or track
1 Select “Folder” column or “Track” column on
the control screen.
2 Select a folder or track.
• If necessary, press ENT to start playback.
ENGLISH
Ex.: MP3/WMA
1 Current folder (highlighted bar)
2 Current folder number/total folder number
3 Folder list
4 Selected playback mode (☞ page 32)
5 Elapsed playing time of the current track (not
displayed for JPEG)
6 Operation status
7 Current track number/total number of tracks in the
current folder (total number of tracks on the disc)
8 Track information (only for MP3/WMA/WAV/AAC)
9 Track list
p Current track (highlighted)
* If tag data includes “Jacket Picture” (baseline JPEG), it
will be displayed.
Ex.: CD Text
1 Playback mode selection window: appears when
OSD is pressed (☞ page 32).
2 Selected playback mode (☞ page 32)
3 Elapsed playing time of the current track
4 Operation status
5 Current track number/total number of tracks on the
disc
6 Track information
7 Track list
8 Current track (highlighted bar)
To select a track
• If necessary, press ENT to start playback.
Continued on the next page
31
OPERATIONS
Page 32

To change the playback modes
You can also change the playback modes.
• For CD/MP3/WMA/WAV/AAC: Intro/Repeat/Random
• For DivX/MPEG1/MPEG2/JPEG: Repeat
ENGLISH
1
2 Only for CD/MP3/WMA/WAV/AAC: Select a
playback mode.
3 Select your desired option.
4
Selectable playback mode
CD: T. RPT: Track repeat
A. RND: All random
T. INT: Track intro
MP3/WMA/WAV/AAC:
T. RPT: Track repeat
F. RPT: Folder repeat
F. RND: Folder random
A. RND: All random
T. INT: Track intro
F. INT: Folder intro
DivX/MPEG1/MPEG2:
T. RPT: Track repeat
F. RPT: Folder repeat
JPEG:
F. RPT: Folder repeat
Operations using the list
screen
For discs except DVD, VCD, and CD
While Dual Zone is on, these operations are possible on
the external monitor using the remote controller.
1 After stopping playback, display the list
screen.
or
2 Select a folder on the list.
3 Select a track on the list.
• To go back to the folder list, press .
1 Current folder number/total folder number
2 Current track number/total number of tracks in the
current folder
3 Current page/total number of the pages included
in the list
4 Current folder/track (highlighted bar)
32
Page 33

SD operations
This unit can play the JPEG/MP3/WMA/WAV/AAC*1
files stored in SD card.
• You can operate the SD card in the same way you
operate the files on discs (except OSD operation and
those on the external monitor). (☞ page 18 to 28)
• All tracks in the SD card will be played repeatedly
until you change the source.
• You cannot select “SD” when Dual Zone is in use.
• Make sure all important data has been backed up.
~ Open the monitor panel.
<Open/Tilt> menu appears.
• Shaded icons cannot be used at that time.
Ÿ Press [OPEN].
! Insert a SD card.
ENGLISH
Push in the SD card until you hear a clicking sound.
The source changes to “SD” and playback starts.
⁄ Close the monitor panel.
• If <Open/Tilt> menu is still displayed.
You can also press
[CLOSE] on the <Open/
Tilt> menu.
• If <Open/Tilt> menu is not displayed.
*1 This unit can play back AAC files encoded using
iTunes. This unit cannot play back AAC files purchased
from the iTunes Store.
To eject the SD card
Push in the SD card lightly.
Caution:
Do not place your finger behind the monitor panel.
Caution:
• Do not release your finger quickly; otherwise, the
SD card may pop up out from the loading slot.
33
OPERATIONS
Page 34

Selecting playback modes
You can use only one of the following playback
modes—Intro/Repeat/Random.
Ex. To select Track Repeat
1
ENGLISH
3
2
File type Intro Repeat Random
Track: Plays the first 15
seconds of each track
Folder: Plays the first 15
seconds of the first track of
each folder
—
1
You can also use [SHORT CUT] to turn on and off Track Repeat.
*
Track: Repeats current track *
Folder: Repeats all tracks of
Folder: Repeats current folder
When one of the playback modes is selected, the
corresponding indicator lights up on the source
information screen.
To cancel, select <Off>.
1
Folder: Randomly plays all
tracks of current folder,
the current folder
then tracks of next folders
SD (All): Randomly plays all
tracks
—
34
Page 35

USB operations
You can connect a USB mass storage class device such as a USB memory, Digital Audio Player *1, portable HDD, etc.
to the unit.
~
Press [SOURCE], then press [USB]. (☞ page 9)
Ÿ
• You can also use SOURCE on the monitor panel. Press it repeatedly.
USB cable from the rear of the unit
You cannot connect a computer to the USB ( ) terminal of the unit.
•
ENGLISH
This unit can play the DivX/JPEG/MPEG1/MPEG2*
MP3/WMA/WAV/AAC*3 files stored in USB mass
storage class device.
• You can operate the USB device in the same way you
operate the files on discs (except OSD operation and
those on the external monitor). (☞ page 18 to 28)
• All tracks in the USB device will be played repeatedly
until you change the source.
• You cannot select “USB” when Dual Zone is in use.
• Make sure all important data has been backed up.
*1 Except for JVC D. Player XA-HD500.
*2 Except for MPEG2 files recorded by JVC Everio
camcorder (extension code <.mod>).
*3 This unit can play back AAC files encoded using
iTunes. This unit cannot play back AAC files purchased
from the iTunes Store.
2
/
Caution:
• Avoid using the USB device if it might hinder your
safety driving.
• Do not pull out and attach the USB device
repeatedly while “Now Reading...” is flashing on
the monitor screen.
• Do not start the car engine if a USB device is
connected.
• Stop playback before disconnecting a USB device.
• Do not leave a USB device in the car, expose to
direct sunlight, or high temperature to avoid
deformation or cause damages to the device.
35
OPERATIONS
Page 36

Selecting playback modes
You can use only one of the following playback
modes—Intro/Repeat/Random.
Ex. To select Track Repeat
1
ENGLISH
2
File type Intro Repeat Random
Track: Plays the first 15
seconds of each track
Folder: Plays the first 15
seconds of the first track of
each folder
—
3
When one of the playback modes is selected, the
corresponding indicator lights up on the source
information screen.
To cancel, select <Off>.
Track: Repeats current track *
Folder: Repeats all tracks of
the current folder
Track: Repeats current track
Folder: Repeats current folder
1
Folder: Randomly plays all
USB (All): Randomly plays all
tracks of current folder,
then tracks of next folders
tracks
—
—
1
*
You can also use [SHORT CUT] to turn on and off Track Repeat.
Folder: Repeats current folder
36
—
OPERATIONS
Page 37

Bluetooth® operations — Cellular phone/audio player
For Bluetooth operations, it is required to connect the
Bluetooth Adapter (KS-BTA200) to the CD changer jack
on the rear.
• Refer also to the instructions supplied with the
Bluetooth Adapter and the Bluetooth device.
• Refer to the list (included in the box) to see the
countries where you may use the Bluetooth®
function.
To use a Bluetooth device through the unit (“Bluetooth
PHONE” and “Bluetooth AUDIO”) for the first time,
you need to establish Bluetooth wireless connection
between the unit and the device.
• Once the connection is established, it is registered in
the unit even if you reset your unit. Up to five devices
can be registered in total.
• Only one device can be connected at a time for each
source (“Bluetooth PHONE” and “Bluetooth AUDIO”).
Registering a Bluetooth device
Registration (Pairing) methods
Use either of the following items in the <Bluetooth>
menu to register and establish the connection with a
device.
• Select “Bluetooth PHONE” or “Bluetooth AUDIO” as
the source to operate the <Bluetooth> menu.
Menu item To do
Open Make the unit ready to establish
a new Bluetooth connection.
Connection is established by
operating the Bluetooth device.
Search Make the unit ready to establish
a new Bluetooth connection.
Connection is established by
operating this unit.
To register using <Open>
Preparation: Operate the device to turn on its
Bluetooth function.
1
• Make sure “New Device” is selected. If not, press
[5] or [∞] to select it.
2
3
Go to other menu items
4 Enter a PIN (Personal Identification
Number)* code to the unit.
• You can enter any number you like (1-digit to
16-digit number).
* Some devices have their own PIN code. Enter the
specified PIN code to the unit.
ENGLISH
37
Continued on the next page
EXTERNAL DEVICES
Page 38

You can enter [0] – [9] only.
• [BS]: Erases the previous character before the
cursor.
• [Del]: Erases the character on the cursor.
• [Enter]: Confirms the entry.
ENGLISH
5 Use the Bluetooth device to connect, while
“Open...” is displayed on the screen.
Enter the same PIN code (as entered in the above
step) on the device to be connected.
Now connection is established and you can use
the device through the unit.
The device remains registered even after you
disconnect the device. Use <Connect> (or activate
<Auto Connect>) to connect the same device
from next time. (☞ the following, and pages 66
and 67).
To register using <Search>
1 Press [AV MENU].
• Make sure “New Device” is selected. If not, press
[5] or [∞] to select it.
2 Press [Bluetooth].
3 Press [Search].
The unit searches for available devices and displays
the list of them. (If no available device is detected,
“Device Unfound” appears.)
4 Select a device you want to connect.
5 Enter the specific PIN code of the device.
• Refer to the instructions supplied with the device
to check the PIN code.
6 Use the Bluetooth device to connect, while
“Connecting...” is displayed on the screen.
To connect a special device <Special
Device>
1 Press [AV MENU].
2 Press [Bluetooth].
3 Press [Special Device].
The unit displays the list of the preset devices.
4 Select a device you want to connect.
5 Use <Open> (or <Search>) to connect.
To connect/disconnect a registered
device
1 Select “Bluetooth PHONE” or “Bluetooth
AUDIO,” then select a registered device you
want to connect/disconnect.
2 Press [AV MENU].
3 Press [Bluetooth].
4 Press [Connect] or [Disconnect].
• Select <Connect> to connect the selected
device.
• Select <Disconnect> to disconnect the selected
device.
To delete a registered device
1 Select “Bluetooth PHONE” or “Bluetooth
AUDIO,” then select a registered device you
want to delete.
2 Press [AV MENU].
3 Press [Bluetooth].
4 Press [Delete Pair].
Confirmation screen appears. Press [Yes].
Now connection is established and you can use
the device through the unit.
38
Page 39

Using the Bluetooth cellular phone
Sound mode
☞ page 55)
(
Bluetooth icon
lights up when
the adapter is
connected.
page 41
☞
: Buttons on the touch panel. In the
explanation, they are indicated inside
[ ].
*1 When a cellular phone with audio function is connected, appears.
*2 This adjustment does not affect the volume level of the other sources.
Adjust the volume of the incoming calls*
[
AV MENU
] Hold: Activates <Voice Dialing>
[5 ∞] Select the registered device
(“New Device” appears when a new device can be
registered.)
1
*
Status of the device
Signal strength/Battery
remainder
(only when the information
comes from the device)
2
~ Press [SOURCE], then press [Bluetooth PHONE]. (☞ page 9)
• You can also use SOURCE on the monitor panel. Press it repeatedly.
Ÿ Press [AV Menu].
! Press [Bluetooth].
⁄ Establish the connection with a device, then make a call (or settings using the
<Bluetooth> menu).
☞ pages 66 and 67
When a call comes in...
The source is changed to “Bluetooth PHONE”
automatically.
When <Auto Answer> is deactivated...
To answer the incoming call
• Press any button on the monitor panel (except
/ATT or +/–).
• Press the message displayed on the touch panel.
ENGLISH
Name and phone number (if acquired)
When <Auto Answer> is activated...
The unit answers the incoming calls automatically. (☞
page 67)
To end the call
• Hold any button on the monitor panel (except
/ATT or +/–).
• Hold the message displayed on the touch panel.
• You can adjust the microphone volume. (☞ page 67)
39
EXTERNAL DEVICES
Page 40

When an SMS comes in...
If the cellular phone is compatible with SMS (Short
Message Service), you can read the messages on the
monitor.
• You cannot edit or send a message through the unit.
ENGLISH
When <Message Info> is set to <Auto>...
The unit rings and the following screen is displayed on
the monitor to inform you of the arrival of the message.
(☞ page 67)
To read the message, press [Yes].
The source is changed to “Bluetooth PHONE.”
To read the message later, press [No].
• The message is stored into <Message> =
<Unread>. (☞ page 66)
3
Select a calling method, then call.
4
Cancel
When <Message Info> is set to <Manual>...
Access the message list to read a message. (☞ page 67)
To make a call
1
2
• Redial: Shows the list of the phone numbers
you have dialed.
• Received Calls: Shows the list of the received
calls.
• Phonebook: Shows the phone book of the
connected cellular phone.
• Missed Calls: Shows the list of the missed calls.
• Phone number: Shows the phone number
entry screen = “How to enter phone number”
(☞ page 41).
• Voice Dialing: (Only when the connected
cellular phone has the voice recognition system):
= Speak the name you want to call.
To stop ringing (canceling the outgoing call)
Hold any button on the monitor panel (except /ATT
or +/–).
40
Page 41

How to enter phone number
• You cannot use the remote controller to enter phone
numbers.
You can enter [0] – [9], [*], [#] (up to 32 numbers)
• [BS]: Erases the previous character before the cursor.
• [Del]: Erases the character on the cursor.
• [Preset]: Goes to Preset List. You can preset the
entered number by selecting preset number (☞
page 42)
• [Dial]: Calls the entered number.
• You can easily access <Dial Menu> by pressing
[SHORT CUT] on the touch panel, then...
You can also access <Dial Menu> by holding
SOURCE on the monitor panel.
• You can easily activate <Voice Dialing> by
pressing [SHORT CUT] on the touch panel,
then...
To redial the dialed numbers
1
ENGLISH
2
3
When using the remote controller, you can
display <Redial> list anytime (except when Dual
Zone is in use).
You can also activate <Voice Dialing> by
holding [AV MENU].
41
EXTERNAL DEVICES
Page 42

Presetting the phone numbers
You can preset up to six phone numbers.
1 Select the phone number you want to preset
from <Phonebook>, <Redial>, <Received
Calls>, or <Missed Calls>.
1 Press [AV MENU].
2 Press [Bluetooth].
3 Press [Dial Menu], then...
Ex.: Selecting <Received Calls>
2 Select a telephone number to store.
3 Select a preset number.
To call a preset number
1
2
You can use the following buttons on the remote
controller for the Bluetooth phone operations.
• Displays <Dial Menu>/Answer the
incoming call.
• Displays <Redial> list if pressed
and held (regardless of the current
source).
Now “Tom” is stored into preset no. 1.
: End the call.
: Adjust the volume.
: Make a call to the preset
numbers.
42
Page 43

Using the Bluetooth audio player
1
*
Sound mode
☞ page 55)
(
Bluetooth icon
lights up when
the adapter is
connected.
3 / 8] [7] Start and pause playback
: Buttons on the touch panel. In the
explanation, they are indicated inside
[ ].
*1 When a cellular phone with audio function is connected, appears.
*2 Indicates the button pressed. It may be different from the operation status.
*3 You cannot select “New Device” when a Bluetooth audio player is connected.
[
[
4 ¢] Reverse/forward search
[
5 ∞] Select the registered device
(“New Device” appears when a new device can be
registered.)
2
*
Status of the device
Signal strength/Battery
remainder
(only when the information
comes from the device)
☞ page 55
3
*
ENGLISH
~ Press [SOURCE], then press [Bluetooth
AUDIO].
(☞ page 9)
You can use the following buttons on the remote
controller for the Bluetooth audio operations.
• You can also use SOURCE on the monitor
panel. Press it repeatedly.
Ÿ Start playback.
• See page 37 for connecting a new device.
• See pages 38 for connecting/disconnecting a
registered device.
• See page 38 for deleting a registered device.
Bluetooth Information:
If you wish to receive more information about Bluetooth, visit our JVC web site.
43
: Start and pause playback.
: Reverse/forward skip.
: Adjust the volume.
EXTERNAL DEVICES
Page 44

Listening to the CD changer
MP3 indicator
Folder no./Track no./Play time
ENGLISH
Disc no.
Sound mode
(
☞ page 55)
☞ page 45
: Buttons on the touch panel.
In the explanation, they are
indicated inside [ ].
It is recommended to use a JVC MP3-compatible CD
changer with your unit.
• You can play only CDs (CD-DA) and MP3 discs.
Preparation:
Make sure <Changer> is selected for <External
Input>. (☞ page 63)
~ Press [SOURCE], then press [CD-CH]. (☞
page 9)
• You can also use SOURCE on the monitor
panel. Press it repeatedly.
Ÿ
Ex. while playing an MP3 disc
Tag data appears only when it is
recorded.
Total track no. included in the
disc
4 ¢] Press: Select track
[
Hold: Reverse/forward search
[
5 ∞] Press: Select folders (only for MP3)
Hold: Display Disc list
⁄ Select a disc to start playing.
To go to the other list
• If you select an MP3 disc, the Track list of the
current folder appears. You can select a track
and start playing. (☞ also page 22)
!
Display the Disc List.
• If you select a folder on the list, you can start
playing the first track of the folder.
44
Page 45

Selecting playback modes
You can use only one of the following playback
modes—Intro/Repeat/Random.
Ex. To select Track Repeat for an MP3 disc (for CDs, ☞
page 21.)
1 Press [AV MENU].
2 Press [Mode].
3
Disc type Intro Repeat Random
Track: Plays the first 15
seconds of each track
Disc: Plays the first 15 seconds
of the first track of all
loaded discs
Track: Plays the first 15
seconds of each track
Folder: Plays the first 15
seconds of the first track of
each folder
Disc: Plays the first 15 seconds
of the first track of all
loaded discs
When one of the playback modes is selected, the
corresponding indicator lights up on the source
information screen.
To cancel, select <Off>.
Track: Repeats current track
Disc: Repeats all tracks of the
current disc
Track: Repeats current track
Folder: Repeats all tracks of
the current folder
Disc: Repeats all tracks of the
current disc
Disc: Randomly plays all tracks
of the current disc
All: Randomly plays all tracks
of all loaded discs
Folder: Randomly plays all
tracks of current folder,
then tracks of next folders
Disc: Randomly plays all tracks
of the current disc
All: Randomly plays all tracks
of all loaded discs
ENGLISH
• You can easily turn on or off Track Repeat by
pressing [SHORT CUT] on the touch panel,
then...
page 55
☞
You can use the following buttons on the remote
controller to operate the CD changer.
: Select disc.
: Select folder (MP3 only).
: Press: Select track.
Hold: Reverse/forward search.
45
EXTERNAL DEVICES
Page 46

Listening to the DAB tuner
Preset No.
If no signal is received, “No DAB Signal” appears.
ENGLISH
Band
Sound mode
(
☞ page 55)
DAB indicators
* While tuning in a service with DLS (Dynamic Label
*/Standby
Reception indicators
Segment), the TEXT indicator lights up.
: Buttons on the touch panel. In the
explanation, they are indicated
inside [ ].
~ Press [SOURCE], then press [DAB]. (☞ page 9)
• You can also use SOURCE on the monitor panel. Press it repeatedly.
Ÿ Press [BAND].
! Press [4] or [¢] to search for an ensemble—Auto Search.
• Manual Search: Hold either [4]or [¢] until “Manual Search” appears on the display, then press it
repeatedly.
☞ page 49
⁄ Press [∞] or [5] to select a service (either primary or secondary) to listen to.
46
Page 47

When surrounding sounds are
noisy
Some services provide Dynamic Range Control (DRC)
signals together with their regular programme signals.
DRC will reinforce the low level sounds to improve your
listening.
• The DRC indicator will light up while tuning in a
service with the DRC signals.
1
2
3
• As the number increases, the effect becomes
stronger.
Manual presetting
1 Display the Preset List.
2 Tune in to a service you want to preset.
ENGLISH
3 Select a preset number.
The service selected in step 2 is now stored in
preset number 2.
47
EXTERNAL DEVICES
Page 48

Selecting preset services
On the remote:
1
ENGLISH
2
On the unit:
To select from the Preset List
1
2
Activating/deactivating TA/PTY
Standby Reception
• Operations are exactly the same as explained on page
14 for FM RDS stations.
• You cannot store PTY codes separately for the DAB
tuner and for the FM tuner.
Activating/deactivating
Announcement Standby
Reception
Announcement Standby Reception allows the
unit to switch temporarily to your favorite service
(announcement type).
Announcement Standby Reception Indicator
To activate, display <AV Menu>,
then select <Mode>, press [On] for
<Announce Standby> (☞ below).
The unit will temporarily switch to your
favorite service from any source other
than FM/AM.
Not yet activated. Tune in to another
service providing the related signals.
To deactivate, press [Off] for
<Announce Standby> (☞ below).
To activate Announcement Standby
Reception
1 Press [AV MENU].
2 Press [Mode].
3
Announcement Standby Reception is now
activated for PTY code <Transport News>: the
initial setting.
ANN
Lights up
Flashes
Goes off
48
Page 49

• You can easily activate and deactivate
Announcement Standby Reception by pressing
[SHORT CUT] on the touch panel, then...
page 55
☞
☞ page 14
To change the announcement type for
Announcement Standby Reception
1 Press [AV MENU].
2 Press [Mode].
3
4
Select your favorite announcement type.
Available announcement types:
Transport News, Warning, News, Weather, Event,
Special Event, Radio Info, Sports News, Financial
News.
ENGLISH
Tracing the same programme—
Alternative Frequency Reception
(DAB AF)
• While receiving a DAB service:
When driving in an area where a service cannot be
received, this unit automatically tunes in to another
ensemble or FM RDS station, broadcasting the same
programme.
• While receiving an FM RDS station:
When driving in an area where a DAB service is
broadcasting the same programme as the FM RDS
station, this unit automatically tunes in to the DAB
service.
When shipped from the factory, Alternative Frequency
Reception is activated.
To deactivate the Alternative Frequency
Reception, ☞ page 62.
49
EXTERNAL DEVICES
Page 50

Listening to the iPod/D. player
ENGLISH
Sound mode
(
☞ page 55)
: Buttons on the touch panel. In the
explanation, they are indicated
inside [ ].
Track no./Play time
[4 ¢] Press: Select track
Hold: Reverse/forward search
[
5] Enter player’s menu
[
∞] Pause/stop play
• To resume, press again.
☞ page 51
It is required to connect the interface adapter
(KS-PD100 for Apple iPod or KS-PD500 for JVC D. player)
to the CD changer jack on the rear.
Preparation:
Make sure <iPod> or <D. player> is selected for
<External Input>. (☞ page 63)
~ Press [SOURCE], then press [iPod] or
[D.PLAYER]
Playback starts automatically.
• You can also use SOURCE on the monitor
(☞ page 9)
panel. Press it repeatedly.
Ÿ Press [4] or [¢] to select a track.
Selecting a track from the
player’s menu
1 Press [5] to enter the player’s menu.
“SEARCH” flashes on the monitor during menu
operations.
• This mode will be canceled if no operations are
done for about 5 seconds.
2 Press [4] or [ ¢] to select the desired
item.
Press: Select an item.
Hold: Skip 10 items at a time if more than 10
items.
For iPod:
Playlists Ô Artists Ô Albums Ô Songs
Ô Genres Ô Composers Ô (back to the
beginning)
For D. player:
Playlist Ô Artist Ô Album Ô Genre Ô
Track Ô (back to the beginning)
50
Page 51

3 Press [∞] to confirm the selection.
4 Repeat steps 2 and 3 to select a track.
• When a track is selected finally, playback starts.
• To return to the previous menu, press [5].
Selecting playback modes
1
2
3 Select an appropriate option.
Repeat One: Functions the same as “Repeat
One” or “Repeat Mode
All: Functions the same as “Repeat
All” or “Repeat Mode = All.”
Random Album: Functions the same as
“Shuffle Albums” of the iPod.
Song/On: Functions the same as
“Shuffle Songs” or “Random Play
= On.”
• When the playback modes are selected, the
corresponding indicators lights up alternately on the
monitor.
To cancel, select <Off>.
= One.”
ENGLISH
• You can easily turn on or off Track Repeat by
pressing [SHORT CUT] on the touch panel,
then...
51
EXTERNAL DEVICES
☞ page 55
Page 52

Using other external components
AV-INPUT
You can connect an external component to the LINE IN/VIDEO IN plugs.
ENGLISH
Assigned title (☞ page 56)
: Buttons on the touch panel. In the explanation, they are indicated inside [ ].
These buttons also work when they are not shown on the touch panel (while watching pictures on the
screen).
Sound mode (
☞ page 55)
• You can easily access to <Aspect>
setting menu by pressing [SHORT CUT]
on the touch panel, then...
~ Press [SOURCE], then press [AV-IN]. (☞ page 9)
• You can also use SOURCE on the monitor panel. Press it repeatedly.
Ÿ Turn on the connected component and start playing the source.
☞ page 55
To display the operation buttons (☞ page 20) while watching the playback picture
Touch the screen (center portion).
• If no operations are done for about 5 seconds, the operation buttons disappear.
• [KEY] does not work when the source is “AV-IN.”
52
Touch the screen (center portion).
Page 53

Navigation screen
You can also connect a Navigation System to the VIDEO IN plug so that you can watch the navigation screen.
Preparation:
Make sure <Navigation> is selected for <AV Input>. (☞ page 62)
To view the navigation screen (and listen to the navigation guidance)*
~ Press DISP on the monitor panel repeatedly. (☞ page 9)
• The aspect ratio of the navigation screen is fixed to
<Full> regardless of the <Aspect> setting (☞ page
59)
.
* If your Navigation System is equipped with the voice guidance function.
To display the operation buttons (☞ page 20) while viewing the navigation screen
• The operation buttons displayed on the screen vary among the playback sources.
ENGLISH
Touch the screen (center portion).
• If no operations are done for about 5 seconds, the operation buttons disappear.
• The above buttons except [KEY] also work when they are not shown on the touch panel (while viewing the
navigation screen).
When <Navigation> is selected for <AV Input>. (☞ page 62)
• You can use the source <AV-IN> for listening to an audio source connected to the LINE IN plugs.
• Some status messages such as volume level will not appear on the monitor.
53
Touch the screen (center portion).
EXTERNAL DEVICES
Page 54

EXT-INPUT
You can connect an external component to the CD changer jack on the rear using the Line Input Adapter—KS-U57
(not supplied) or AUX Input Adapter—KS-U58 (not supplied).
Assigned title (☞ page 56)
ENGLISH
Sound mode
(
☞ page 55)
☞ page 55
: Buttons on the touch panel. In the explanation, they are indicated inside [ ].
Preparation:
Make sure <External> is selected for <External Input>. (☞ page 63)
~ Press [SOURCE], then press [EXT-IN]. (☞ page 9)
• You can also use SOURCE on the monitor panel. Press it repeatedly.
Ÿ Turn on the connected component and start playing the source.
54
EXTERNAL DEVICES
Page 55

Sound equalization
You can select a preset sound mode for 2-channel sources.
Selecting sound mode
~
Ÿ
Select a sound mode.
!
While playing any source other than
“Bluetooth PHONE,” <Equalizer>
menu can be easily accessed by pressing
[SHORT CUT] on the touch panel, then...
Storing your own adjustment
You can store your adjustment into User1, User2, and
User3.
1 Repeat steps ~ and Ÿ, then in step !...
2 Adjust (1), then store (2).
ENGLISH
Move to other 6 sound modes
• For preset values of each sound mode, ☞
page 74.
• For multi-channel source, the sound mode is
temporarily canceled.
Ex. When storing into [User 2].
55
SETTINGS
Page 56

Assigning titles to the sources
ENGLISH
Buttons on the touch panel. In the
explanation, they are indicated inside
[ ].
You can assign titles to “AV-IN” and “EXT-IN.”
~ Press [SOURCE], then press [AV-IN] or
[EXT-IN].
(☞ page 9)
• You can also use SOURCE on the monitor
panel. Press it repeatedly.
Ÿ Display <Title Entry> screen.
! Assign a title.
You can enter up to 16 characters (for available
characters, ☞ page 73).
• [Store]: Confirm the entry.
• [2/3]: Moves the cursor.
• [BS]: Erases the previous character before the
cursor.
• [Del]: Erases the character on the cursor.
• [Cap]: Changes the upper/lower cases.
• [Space]: Enter a space.
• [Change]: Change the character set.
⁄ Finish the procedure.
56
Page 57

Menu operations
ENGLISH
The following steps are one of the fundamental
procedures. Some of the settings do not open the
sub-setting window, but just selecting an option will
change the setting.
Ex. Changing the <AV Input> setting
~
Ÿ
Non-available items will be displayed being
shaded.
!
57
SETTINGS
Page 58

Setup
Menu items Selectable settings, [reference page]
Demonstration Off: Cancels.
ENGLISH
Wall Paper You can select the background picture of the monitor.
Color You can select the color of the <Wall Paper>.
Scroll Off: Cancels.
Dimmer Off: Cancels.
Display
Dimmer Time Set Sets the Dimmer On/Off times.
Dimmer Level You can preset the brightness for dimmer.
Bright You can adjust brightness of the monitor.
Picture Adjust*
2
On: Activates the demonstration on the monitor. To stop it temporarily,
touch the monitor screen.
Warp Drive, X-Face, Wave, Ring
Blue, Sky, Green, Red, Yellow, Purple, Dark-Blue, Dark-Sky, DarkGreen, Dark-Red, Brown, Black
Once: Scrolls the disc information once.
Auto: Repeats scrolling (5-second intervals).
• Holding DISP on the monitor panel scrolls the information regardless
of this setting.
On: Activates dimmer.
Auto: Dims the monitor when you turn on the headlights.*
Dimmer Time Set : Activates the Dimmer Time setting below.
00 (brightest) to 10 (darkest); Initial 05
–15 (darkest) to +15 (brightest); Initial 00
You can adjust the following to make the monitor clear and legible for
watching the playback picture. The setting will be stored—one for
“DISC/SD/USB,” (common) and the other for “AV-IN.”
–15 to +15; Initial 0
Bright: Adjust if the picture is too bright or too dark.
Contrast: Adjust the contrast.
Color: Adjust the color of the picture—lighter or darker.
Tint: Adjust the tint if the human skin color is unnatural.
• Press [5] or [∞] to adjust.
Initial: Underlined
1
1
The ILLUMINATION CONTROL lead connection is required. (☞ Installation/Connection Manual)
*
*2 Adjustable only when the source is a disc/SD/USB containing pictures or movies, or “AV-IN.”
58
Page 59

Menu items Selectable settings, [reference page]
3
Aspect*
You can change the aspect ratio of the picture.
Aspect ratio of incoming signal
4:3 16:9
Regular:
For 4:3 original pictures
Full:
For 16:9 original pictures
Panorama:
Display
For viewing 4:3 pictures
naturally on the wide
screen
Auto: • For “DISC”: Aspect ratio is automatically
selected to match to the incoming signals.
• For the other video sources: Aspect ratio is
fixed to <Regular>.
Language*
4
Select the indication language shown on the monitor.
English, Spanish, French, German, Italian, Dutch, Swedish,
Danish, Russian
Time Set
Initial 0:00, ☞ [8]
12Hours/24Hours Select either 12-hour system or 24-hour system.
12 Hours, 24 Hours, ☞ [8]
OSD Clock When <On> is selected, the clock time is displayed on the playback
Clock
pictures. The clock time is displayed in large on the animation screen
(☞ page 9)
Off, On
Clock Adjust Select <Auto> to adjust the clock automatically using the clock time
(CT) data from an FM RDS station.
Off, Auto, ☞ [8]
ENGLISH
3
*
Not adjustable when no picture is shown.
4
After you change the indication language setting, turn off then on the power so that your setting takes effect.
*
Continued on the next page
59
SETTINGS
Page 60

Menu items Selectable settings, [reference page]
Menu Language*
5
Select the initial disc menu language; Initial Russian (☞ also page
74).
Audio Language*
ENGLISH
Subtitle*
5
5
Select the initial audio language; Initial Russian (☞ also page 74).
Select the initial subtitle language or erase the subtitle (Off); Initial
Russian (☞ also page 74).
OSD Language*
5
Select the on-screen language used for the external monitor connected
to the VIDEO OUT plug; Initial Russian.
Monitor Type*
5
16:9 4:3LB
Select the monitor type to watch a wide screen picture on the external
monitor.
16:9 : Select when the aspect ratio of the external monitor is 16:9.
4:3PS
4:3LB (Letterbox)/4:3PS (Pan Scan): Select when the aspect ratio of
the external monitor is 4:3.
Refer to the illustrations on the left to see how the pictures are shown
on the monitor.
OSD Position*
Disc
5
Position 1 Position 2
Select the position of the on-screen bar, ☞ [28].
1: Higher position
2: Lower position
File Type*
5
Select playback file type when a disc/SD/USB contains different types
of files. You can store this setting separately for each source —“DISC/
SD/USB.”
Audio: Plays back audio files.
Picture: Plays back JPEG files.
Video: Plays back DivX/MPEG1/MPEG2 files. (Not applicable to “SD”)
5
Divx Regist. (Registration)*
This unit has its own Registration Code. Once you have played back a
file with which the Registration Code recorded, this unit’s Registration
Code is overwritten for copyright protection.
D. (Dynamic) Range Compres.
(Compression)*
5
You can enjoy a powerful sound at a low volume level while playing
Dolby Digital software.
Auto: Select to apply the effect to multi-channel encoded software.
On: Select to always use this function.
5
*
Selectable only for “DISC,” “SD,” and “USB.” (Playback stops when you change the setting.)
60
Page 61

Menu items Selectable settings, [reference page]
Speaker Size*
5
You can adjust the speaker size setting.
As you change the speaker size, the speaker on the screen changes its
size. When <None> or <Off> is selected, the speaker is shaded.
• L/R (Front): Small, Large
• C (Center): None, Small, Large
• LS/RS (Surround): None, Small, Large
• SW (Subwoofer): On, Off
• Speaker size: <Large> for 13-cm diameter or more; <Small> for
13 cm or less.
• If you select <Large> or <Small> for non-connected speakers, the
incoming signals for the non-connected speakers will not come out
of any other speakers.
• Front speakers and surround speakers cannot be adjusted separately
for left and right speakers.
Regardless of the setting above...
• No sound comes out of the subwoofer while playing Dolby Pro Logic
Disc
II Movie or Music if the front speaker is set to <Large>.
• No sound comes out of the center speaker when surround is
deactivated.
Speaker Level*
6
You can adjust the output level of the activated speakers (☞
<Speaker Size> above), monitoring the test tone.
L/C/R/RS/SW*7/LS: adjust the output level of each speaker in the
range of –10dB to +10dB; Initial 00dB.
• Press [Test] to turn on and off the test tone.
Speaker Distance*
6, 8
You can adjust the speaker output timing.
L/C/R/RS/LS: adjust the speaker distance from the listening position in
the range of 15cm/6 inches to 600 cm/240 inches in 15-cm/6inch step; Initial 120 cm/48 inches (for center speaker), 150
cm/60 inches (for other speakers).
• Press [cmÔinch] to change the measuring unit—cm and inch.
ENGLISH
5
*
Selectable only for “DISC,” “SD,” and “USB.” (Playback stops when you change the setting.)
*6 Selectable only for “DISC,” “SD,” and “USB.”
*7 This subwoofer level setting takes effect only when surround is activated. (☞ also page 27)
*8 This setting does not take effect for MPEG1/MPEG2 and DivX with MP3 audio track.
61
Continued on the next page
SETTINGS
Page 62

Menu items Selectable settings, [reference page]
IF Band Width Auto: Increases the tuner selectivity to reduce interference noises
between adjacent stations. (Stereo effect may be lost.)
Wide: Subject to the interference from adjacent stations, but sound
ENGLISH
quality will not be degraded and the stereo effect will remain.
AF Regional When the received signals from the current station become weak...
AF: Switches to another station. The programme may differ from the
one currently received (AF indicator lights up), ☞ [15].
Tuner
Off: Cancels—not selectable when <DAB AF> is set to <On>.
AF Reg. (Regional): Switches to another station broadcasting the same
programme. The REG indicator lights up.
TA Volume
Program Search
10
DAB AF*
11
AV Input*
00 to 30 or 50*
Off, On, ☞ [15]
Off, On, ☞ [49]
You can determine the use of LINE IN and VIDEO IN plugs.
9
; Initial 15, ☞ [14].
Off: Select when no component is connected (“AV-IN” is skipped while
selecting the source).
Audio&video: Select when connecting an AV component such as a
VCR. ☞ [52]
Audio: Select when connecting an audio component such as a digital
audio player. ☞ [52]
Navigation : Select when connecting a Navigation System. ☞ [53]
Input
Camera Input*
12
Off: Select when no rear view camera is connected to the CAMERA IN
plug.
Normal: Select when connecting the rear view camera to the CAMERA
IN plug. The picture from the camera is displayed as it is taken.
Mirror: The mirror image of the picture taken by the camera is
displayed on the monitor.
• While the pictures through the camera are shown on the monitor, no
message will be displayed.
9
*
Depends on the amplifier gain control. (☞ page 64)
*10 Appears only when DAB tuner is connected.
*11 Not selectable when “AV-IN” is selected as the source.
*12 Reverse lamp lead connection is required. See Installation/Connection Manual (separate volume). The rear view
through the camera appears on the monitor in <Full> aspect ratio (regardless of the aspect ratio setting) when you
shift the gear to the reverse (R) position. When you press DISP on the control panel, or when you shift the gear to
another position other than the reverse (R) position, the rear view screen is cleared.
62
Page 63

Menu items Selectable settings, [reference page]
External Input*
13
For connecting an external component to the CD changer jack on the
rear.
Changer/iPod/D. player*14: CD changer, iPod, or D. player
Input
☞ [44, 50]
External: Any other than the above. ☞ [54]
• For connecting the Bluetooth adapter and DAB tuner, this setting is
not required. It is automatically detected.
Beep Off: Cancels.
On: Activates the key-touch tone.
Telephone Muting*
15
Off: Cancels.
Muting1, Muting2: Select either one which mutes the sounds while
using the cellular phone.
Power LED Flash Off: Cancels.
Others
On: When the ignition is turned off, the lamp on the
flashes.
TouchPanel Sens. Change the sensitivity of the touch panel. As the number decreases,
sensitivity become higher. 1/2/3; Initial 2
Initialize Initialize all settings you have made in <AV Menu>. Press and hold
[Enter] to initialize the settings, then reset the unit (☞ page 3).
13
Not selectable when the component connected to the CD changer jack is selected as the source.
*
14
*
The name of the component detected through the CD changer jack is shown.
*15 The TEL MUTING lead connection is required. See Installation/Connection Manual (separate volume).
ENGLISH
button
Disc Surround*
16
Menu items Selectable settings, [reference page]
Surround
Surround Mode
Panorama
Center Width*
16
*
Selectable only for “DISC”, “SD,” and “USB.”
17
On, Off, ☞ [27]
Auto, Through, Dolby PLII Movie, Dolby PLII Music, ☞ [27]
On, Off, ☞ [27]
00 to 07; Initial 04, ☞ [28]
*17 This setting takes effect only when the center speaker is activated.
63
Continued on the next page
SETTINGS
Page 64

Equalizer
Flat/Hard Rock/R&B/Pop/Jazz/Dance/Country/Reggae/Classic/User1/User2/User3, ☞ [55]
ENGLISH
Sound
Menu items Selectable settings, [reference page]
Fader/Balance Adjust fader—speaker output balance between the front and rear speakers.
• Upmost—front only (F6)
• Downmost—rear only (R6)
When using a two-speaker system, set the fader to the center (0).
Adjust balance—speaker output balance between the left and right speakers.
• Leftmost—left only (L6)
• Rightmost—right only (R6)
Volume Adjust Adjust and store auto-adjustment volume level for each source, comparing to
the FM volume level. The volume level will automatically increase or decrease
when you change the source.
–12 to +12; Initial 00
• For Disc/SD/USB: An auto-adjustment level is commonly used when playing
DivX/MPEG1/MPEG2/MP3/WMA/WAV/AAC files
Subwoofer Phase Select either <Normal> or <Reverse>, which reproduces a better sound.
Subwoofer Level*
18
Adjust the subwoofer output level. Level: –06 to +08; Initial 00
High Pass Filter Through: Select when the subwoofer is not connected.
On: Select when the subwoofer is connected.
Crossover Adjust the crossover frequency between the front/rear speakers and the
subwoofer.
80Hz, 120Hz, 150Hz
Amplifier Gain You can change the maximum volume level of this unit.
Off: Deactivates the built-in amplifier.
Low: VOL 00 to 30 (Select this if the maximum power of the speakers is less
than 50 W)
High: VOL 00 to 50
Rear Speaker *
19
You can activate/deactivate the rear speakers.
Off, On
18
*
This subwoofer level setting takes effect only when surround is deactivated. (☞ also page 27)
19
*
This setting takes effect only when Dual Zone is activated. (☞ also page 30)
64
Page 65

20
Mode*
Menu items Selectable settings, [reference page]
Mono
DX/Local
SSM
PTy Standby
PTy Code
Title Entry
Intro/Repeat/Random
D.(Dynamic) Range Control
Announce Standby
Announce Code
20
Items listed under <Mode> vary among the playback sources.
*
Only for FM. (Off, On), ☞ [10]
Only for FM. (Local, DX), ☞ [11]
Only for FM. Press and hold to start SSM. ☞ [11]
Only for FM/DAB. (Off, On), ☞ [14]
Only for FM/DAB. (Initial News), ☞ [15]
Only for AV-IN and EXT-IN. ☞ [56]
☞ [21, 34, 36, 45, 51]
Only for DAB. (Off, DRC1, DRC2, DRC3), ☞ [47]
Only for DAB. (Off, On), ☞ [48]
Only for DAB. (Initial Transport News), ☞ [49]
List
For “DISC”: Folder List and Track List (☞ page 22)
For “CD-CH”: Disc List, Folder List, and Track List (☞ page 44)
• For the other playback sources, you can display a list by pressing DISP on the monitor panel (☞ page 9)
ENGLISH
65
Continued on the next page
SETTINGS
Page 66

Bluetooth*
21
Menu items Selectable settings, [reference page]
Dial Menu *
ENGLISH
Message*
22
23
Select the method to make a call. ☞ [40]
You can read a message from the following message histories.
Unread: Messages you have not read.
Read: Messages you have read.
Unsent: Messages you have not sent.
Sent: Messages you have sent.
• The number of messages in each history is also shown on the monitor.
Open
Search
☞ [37]
☞ [38]
Special Device Only for “New Device.”
Shows the list of Bluetooth devices which require some special procedure to
establish Bluetooth connection. Select a device you want to connect.
• After selecting the device, use <Open> or <Search> (☞ above) for
connection.
• Once the connection is established, it is registered in the unit. You can
connect the unit and the device by using <Connect> (☞ below) from
the next time.
Connect Only for the registered devices.
After selecting a device from among the registered devices (☞ page 37, 38),
establish the connection with it.
Disconnect Only for the device being connected.
Disconnect the current device before connecting another device.
Delete Pair Only for the registered devices.
Delete the registered devices.
21
Selectable only for “Bluetooth PHONE” or “Bluetooth AUDIO.” Select a device (or “New Device”) before operating the
*
menu.
*22 Only for the device connected for “Bluetooth PHONE.”
23
*
Selectable only when the source is “Bluetooth PHONE” and the device is compatible with SMS (Short Message
Service).
When operating the Bluetooth device, refer also to the instructions supplied with the device.
66
Page 67

Menu items Selectable settings, [reference page]
Auto Connect *
24
When the unit is turned on, the connection is established automatically
with...
Off: No Bluetooth device.
Last: The last connected Bluetooth device.
Order: The available registered Bluetooth device found at first.
Auto Answer *
25
Off: The unit does not answer the calls automatically. Answer the calls
manually.
On: The unit answers the incoming calls automatically.
Settings
Message Info *
25
Reject: The unit rejects all incoming calls.
Auto: The unit informs you of the arrival of a message by ringing and
displaying “Receiving Message.” To read the message, ☞ page 40.
Manual: The unit does not informs you of the arrival of a message.
MIC Setting *
25
Adjust microphone volume connected to the Bluetooth adapter.
01/02/03 Initial 02
26
Version *
24
Selectable only for “Bluetooth PHONE.”
*
The Bluetooth software and hardware versions are shown.
*25 Only for the device connected for “Bluetooth PHONE.” Not selectable when “New Device” is selected.
*26 If you wish to receive more information about Bluetooth, visit our JVC web site.
ENGLISH
67
SETTINGS
Page 68

Maintenance
Moisture condensation
Moisture may condense on the lens inside the unit in
ENGLISH
the following cases:
• After starting the heater in the car.
• If it becomes very humid inside the car.
Should this occur, the unit may malfunction. In this
case, eject the disc and leave the unit turned on for a
few hours until the moisture evaporates.
How to handle discs
When removing a disc from its
case, press down the center holder
of the case and lift the disc out,
holding it by the edges.
• Always hold the disc by the edges. Do not touch its
recording surface.
When storing a disc into its case, gently insert the
disc around the center holder (with the printed surface
facing up).
• Make sure to store discs into the cases after use.
Center holder
To keep discs clean
A dirty disc may not play correctly.
If a disc does become dirty, wipe it with
a soft cloth in a straight line from center
to edge.
• Do not use any solvent (for example, conventional
record cleaner, spray, thinner, benzine, etc.) to clean
discs.
To play new discs
New discs may have some rough spots
around the inner and outer edges. If
such a disc is used, this unit may reject
the disc.
To remove these rough spots, rub the edges with a
pencil or ball-point pen, etc.
Do not use the following discs:
Warped disc
Sticker
Sticker residue
Stick-on label
68
Page 69

More about this unit
General
Turning on the power
• By pressing SOURCE on the monitor panel, you
can also turn on the power. If the source is ready,
playback starts.
FM/AM
Storing stations in memory
• When SSM is over, received stations are preset in No.
1 (lowest frequency) to No. 6 (highest frequency).
Disc
General
• In this manual, words “track” and “file” are
interchangeably used.
• This unit can also play back 8 cm discs.
• This unit can only play back audio CD (CD-DA) files if
different type of audio files (MP3/WMA/WAV/AAC)
are recorded in the same disc.
• This unit can display only one-byte characters. No
other characters can be correctly displayed.
Inserting a disc
• When a disc is inserted upside down or has no
playable files, “Cannot play this disc Check the disc”
appears on the monitor. Eject the disc.
Ejecting a disc
• If “No disc“ appears after removing a disc, reattach a
disc or select another playback source.
• If the ejected disc is not removed within 15 seconds,
the disc is automatically inserted again into the
loading slot to protect it from dust.
Speaker/signal indicators for DVD
Speaker indicators
• The speaker indicators—square around the letters
lights in light blue when the corresponding speakers
are set to <Large> or <Small>.
• The center speaker indicator—square around “C”
lights in light blue, when the center speaker is set
to <Large> or <Small> and when surround is
activated.
• Sounds come out of the speakers whose speaker
indicators are lit.
• The SW indicator lights up when <SW (Subwoofer)>
is set to <On>.
• The signal indicators indicate the incoming
signals—L (front left) / R (front right) / C (center)
/ LFE (low frequency effect) / LS (left surround) / RS
(right surround) / S (monaural surround).
• If the speaker is activated, but the signals
corresponding to the speaker are not coming in, the
signal indicators changes their color from white to
black to indicate no signals coming in.
Changing the source
• If you change the source with Dual Zone deactivated,
playback also stops without ejecting the disc.
Next time you select “DISC” for the playback source,
disc play starts from where it has been stopped
previously.
Signal indicators
ENGLISH
69
Continued on the next page
REFERENCES
Page 70

Playing Recordable/Rewritable discs
• This unit can recognize a total of 5 000 files and 250
folders (a maximum of 999 files per folder).
• Use only “finalized” discs.
• This unit can play back multi-session discs; however,
ENGLISH
unclosed sessions will be skipped while playing.
• This unit can recognize a total 25 characters for file/
folder names.
• Some discs or files may not be played back due to
their characteristics or recording conditions.
Playing DVD audio
• Some DVD Audios prohibit downmix. When you play
back such a disc, “LR ONLY” appears on the monitor
and the unit plays back the left front and right front
signals.
• “MULTI CH” appears on the monitor after a beep
when you try to play a multi-channel disc with
Surround turned <Off>.
Playing DVD-VR
• This unit cannot play back CPRM (Content Protection
for Recordable Media) protected files.
• For details about DVD-VR format and play list, refer
to the instructions supplied with the recording
equipment.
File playback
Playing DivX files
• This unit can play back DivX files with the extension
code <.divx>, <.div>, <.avi> (regardless of the
letter case—upper/lower).
• This unit supports the DivX files whose resolution is
720 x 576 pixels or less.
• This unit supports DivX 6.x, 5.x, 4.x, and 3.11.
• Audio stream should conform to MP3 or Dolby Digital.
• The file encoded in the interlaced scanning mode
may not be played back correctly.
• The maximum bit rate for video signals (average) is
as follows.
– DVD: 4 Mbps
– USB: 2 Mbps
Playing MPEG1/MPEG2 files
• This unit can play back MPEG1/MPEG2 files with the
extension code <.mpg>, <.mpeg>, or <.mod>*.
* <.mod> is an extension code used for the MPEG2
files recorded by JVC Everio camcorders.
• The stream format should conform to MPEG system/
program stream.
The file format should be MP@ML (Main Profile at
Main Level)/SP@ML (Simple Profile at Main Level)/
MP@LL (Main Profile at Low Level).
• Audio streams should conform to MPEG1 Audio
Layer-2 or Dolby Digital.
• The maximum bit rate for video signals (average) is
as follows.
– DVD: 4 Mbps
– USB: 2 Mbps
Playing JPEG files
• This unit can play back JPEG files with the extension
code <.jpg>, or <.jpeg>.
• It is recommended that you record a file at 640 x 480
resolution.
• This unit can play back baseline JPEG files.
Progressive JPEG files or lossless JPEG files cannot be
played.
Playing MP3/WMA/WAV/AAC files
• This unit can play back files with the extension
code <.mp3>, <.wma>, <.wav>, or <.m4a>
(regardless of the letter case—upper/lower).
• This unit can play back the files meeting the
conditions below:
– Bit rate:
MP3/WMA: 32 kbps — 320 kbps
AAC: 16 kbps — 320 kbps
– Sampling frequency:
48 kHz, 44.1 kHz, 32 kHz (for MPEG1)
24 kHz, 22.05 kHz, 16 kHz (for MPEG2)
48 kHz, 44.1 kHz, 32 kHz, 22.05 kHz (for WMA)
44.1 kHz (for WAV)
48 kHz, 44.1 kHz (for AAC)
70
Page 71

• This unit can show ID3 Tag Version
1.0/1.1/2.2/2.3/2.4 (for MP3). This unit can also show
WAV/WMA/AAC Tag.
• This unit can play back files recorded in VBR (variable
bit rate).
• Files recorded in VBR have a discrepancy in elapsed
time indication.
• This unit cannot play back the following files:
MP3 files encoded with MP3i and MP3 PRO format.
–
– MP3 files encoded with Layer 1/2.
– WMA files encoded with lossless, professional,
and voice format.
– WMA files which are not based upon Windows
Media® Audio.
– WMA/AAC files copy-protected with DRM.
– AAC files encoded by using any other application
than iTunes.
– AAC files purchased from the iTunes Store.
– Files which have the data such as AIFF, ATRAC3,
etc.
Enjoying surround sounds
• If <Surround> is set to <On>, “MULTI” surround
playback automatically starts for multi-channel
encoded discs.
• You cannot activate surround for MPEG multi-channel
DVD Video, DivX 2-channel and MPEG 2-channel
sources. If <Surround> is set to <On>, stereo
sounds are emitted only through the front speakers.
“FRONT 2CH” appears on the source information
screen.
• When “FIX” appears on the source information
screen, no sound comes out of the subwoofer.
• When If <Surround> is set to <Auto>,
downsampling is performed for DVD Video (LPCM
only), DVD-VR (LPCM only), and DVD Audio with
fs=88.2 kHz/96 kHz and higher.
SD
• If “No SD Card“ appears after removing an SD card,
reattach an SD card or select another playback source.
• When the SD card has no playable files, or has not
been formatted correctly, “Cannot play this SD card
Check the SD card” appears on the monitor. Replace
the SD card. Do not pull out or attach the SD card
while “Now Reading...” is shown on the monitor.
• This unit can recognize a total of 5 000 files and 250
folders (a maximum of 999 files per folder).
• This unit can recognize a total 25 characters for file/
folder names.
USB
• If “No USB Device“ appears after removing a device,
reattach a device or select another playback source.
• When the USB device has no playable files, or has not
been formatted correctly, “Cannot play this device
Check the device” appears on the monitor.
• The unit cannot recognize a USB device whose rating
is other than 5 V and does not exceed 500 mA.
• While playing from a USB device, the playback order
may differ from other players.
• This unit may be unable to play back some USB
devices or some files due to their characteristics or
recording conditions.
• Depending on the shape of the USB devices and
connection ports, some USB devices may not be
attached properly or the connection might be loose.
• When connecting a USB device, refer also to its
instructions.
• Connect only one USB device to the unit at a time. Do
not use a USB hub.
• This unit may not recognize a USB device connected
through a USB card reader.
• This unit may not play back files in a USB device
properly when using a USB extension cord.
• This unit cannot assure proper functions or supply
power to all types of the devices.
• This unit can recognize a total of 5 000 files and 250
folders (a maximum of 999 files per folder).
• This unit can recognize a total 25 characters for file/
folder names.
ENGLISH
71
Continued on the next page
REFERENCES
Page 72

Bluetooth operations
General
• While driving, do not perform complicated operation
such as dialing the numbers, using phone book, etc.
When you perform these operations, stop your car in
ENGLISH
a safe place.
• Some Bluetooth devices may not be connected to
this unit depending on the Bluetooth version of the
device.
• This unit may not work for some Bluetooth devices.
• Connecting condition may vary depending on
circumstances around you.
• When the unit is turned off, the device is
disconnected.
Warning messages for Bluetooth operations
• Connection Error: The device is registered but the
connection has failed. Use <Connect> to connect
the device again. (☞ page 38)
• Error: Try the operation again. If “Error” appears
again, check if the device supports the function you
have tried.
• Device Unfound: No available Bluetooth device is
detected by <Search>.
• Loading: The unit is updating the phone book and/
or SMS.
• Please Wait...: The unit is preparing to use
the Bluetooth function. If the message does not
disappear, turn off and turn on the unit, then connect
the device again (or reset the unit).
• Reset 08: Check the connection between the
adapter and this unit.
Icons for phone types
• These icons indicate the phone type set on the device.
: Cellular phone
: Household phone
: Office
: General
: Other than above
CD changer
• If you select a folder, which does not include any
music files, on the list (☞ page 44), you will hear a
beep. Select another folder including music files.
DAB tuner
• Only the primary DAB service can be preset even
when you store a secondary service.
iPod/D. player operations
• When you turn on this unit, the iPod or D. player is
charged through the adapter connected to this unit.
• While the iPod or D. player is connected, all
operations from the iPod or D. player are disabled.
Perform all operations from this unit.
• The text information may not be displayed correctly.
• If the text information includes more than 8
characters, it scrolls on the display. This unit can
display up to 40 characters.
72
Page 73

Notice:
When operating an iPod or a D. player, some
operations may not be performed correctly or as
intended. In this case, visit the following JVC web
site:
For iPod users: <http://www.jvc.co.jp/english/car/
support/ks-pd100/index.html>
For D. player users: <http://www.jvc.co.jp/
english/car/support/ks-pd500/index.html>
Menu settings
• If you change the <Amplifier Gain> setting from
<High> to <Low> while the volume level is set
higher than “30,” the unit automatically changes the
volume level to “VOL 30.”
• After you change any of <Menu Language/Audio
Language/Subtitle> settings, turn off then on the
power, and re-insert the disc (or insert another disc)
so that your setting takes effect.
• When you select <16:9> for a picture whose aspect
ratio is 4:3, the picture slightly changes due to the
process for converting the picture width.
• Even if <4:3PS> is selected, the screen size may
become <4:3LB> for some discs.
• “DVD Logo” is a trademark of DVD Format/Logo
Licensing Corporation registered in the US, Japan and
other countries.
• DivX, DivX Ultra Certified, and associated logos are
trademarks of DivX, inc. and are used under license.
• Official DivX® Ultra Certified product
• Plays all versions of DivX® video (including DivX® 6)
with enhanced playback of DivX® media files and the
DivX® Media Format
• Microsoft and Windows Media are either registered
trademarks or trademarks of Microsoft Corporation in
the United States and/or other countries.
• The Bluetooth word mark and logos are owned by
the Bluetooth SIG, Inc. and any use of such marks
by Victor Company of Japan, Limited (JVC) is under
license. Other trademarks and trade names are those
of their respective owners.
• iPod and iTunes are trademarks of Apple Inc.,
registered in the U.S. and other countries.
• This product incorporates copyright protection
technology that is protected by U.S. patents and
other intellectual property rights. Use of this
copyright protection technology must be authorized
by Macrovision, and is intended for home and
other limited viewing uses only unless otherwise
authorized by Macrovision. Reverse engineering or
disassembly is prohibited.
ENGLISH
Characters shown on the monitor
In addition to the roman alphabet (A – Z, a – z), the following characters will be used to show the various
information on the monitor.
• You can also use the following characters to assign titles. (☞ page 56).
Numbers and symbols
Upper and lower cases
73
REFERENCES
Page 74

Language codes (for DVD/DivX language selection)
Code
Language
AA Afar FA Persian KL Greenlandic OC Occitan ST Sesotho
AB Abkhazian FI Finnish KM Cambodian OM (Afan) Oromo SU Sundanese
AF Afrikaans FJ Fiji KN Kannada OR Oriya SW Swahili
ENGLISH
AM Ameharic FO Faroese KO Korean (KOR) PA Panjabi TA Tamil
AR Arabic FY Frisian KS Kashmiri PL Polish TE Telugu
AS Assamese GA Irish KU Kurdish PS Pashto, Pushto TG Tajik
AY Aymara GD Scots Gaelic KY Kirghiz PT Portuguese TH Thai
AZ Azerbaijani GL Galician LA Latin QU Quechua TI Tigrinya
BA Bashkir GN Guarani LN Lingala RM
BE Byelorussian GU Gujarati LO Laothian RN Kirundi TL Tagalog
BG Bulgarian HA Hausa LT Lithuanian RO Rumanian TN Setswana
BH Bihari HI Hindi LV Latvian, Lettish RW Kinyarwanda TO Tonga
BI Bislama HR Croatian MG Malagasy SA Sanskrit TR Turkish
BN Bengali, Bangla HU Hungarian MI Maori SD Sindhi TS Tsonga
BO Tibetan HY Armenian MK Macedonian SG Sangho TT Tatar
BR Breton IA Interlingua ML Malayalam SH Serbo-Croatian TW Twi
CA Catalan IE Interlingue MN Mongolian SI Singhalese UK Ukrainian
CO Corsican IK Inupiak MO Moldavian SK Slovak UR Urdu
CS Czech IN Indonesian MR Marathi SL Slovenian UZ Uzbek
CY Welsh IS Icelandic MS Malay (MAY) SM Samoan VI Vietnamese
DZ Bhutani IW Hebrew MT Maltese SN Shona VO Volapuk
EL Greek JI Yiddish MY Burmese SO Somali WO Wolof
EO Esperanto JW Javanese NA Nauru SQ Albanian XH Xhosa
ET Estonian KA Georgian NE Nepali SR Serbian YO Yoruba
EU Basque KK Kazakh NO Norwegian SS Siswati ZU Zulu
Sound
mode
Flat 00 00 00 00 00 00 00
Hard Rock +03 +03 +01 00 00 +02 +01
R&B +03 +02 +02 00 +01 +01 +03
Pop 00 +02 00 00 +01 +01 +02
Jazz +03 +02 +01 +01 +01 +03 +02
Dance +04 +02 00 –02 –01 +01 +01
Country +02 +01 00 00 00 +01 +02
Reggae +03 00 00 +01 +02 +02 +03
Classic +02 +03 +01 00 00 +02 00
User 1/2/3 00 00 00 00 00 00 00
Code
Language
Preset equalizing values
60 Hz
150 Hz
400 Hz
1 kHz
2.5 kHz
Code
6.3 kHz
Language
Code
Language
Rhaeto-Romance
About sounds reproduced through the
rear terminals
• Speaker out/analog discrete output—LINE OUT
15 kHz
(FRONT/REAR)/CENTER OUT/SUBWOOFER:
Multi-channel signals are emitted for a multichannel encoded software. (When Dual Zone
is activated, the signal emitted through 2nd
AUDIO OUT plugs are emitted for the main source
“DISC.”)
• 2nd AUDIO OUT: 2-channel signal is emitted
when Dual Zone is activated. When playing
a multi-channel encoded disc, multi-channel
signals are downmixed (except for some DVD
Audio).
Code
TK Turkmen
Language
74
Page 75

Troubleshooting
What appears to be trouble is not always serious. Check the following points before calling a service center.
• For operations with the external components, refer also to the instructions supplied with the adapters used for the
connections (as well as the instructions supplied with the external components).
Symptoms Remedies/Causes
• No sound comes out of the center speaker.
• No sound comes out of the rear speakers, and
subwoofer.
• No sound comes out of the subwoofer while
playing in stereo.
• The monitor is not clear and legible. Sunshine from the windscreen may cause this symptom.
• You cannot select “SD” and “USB” as the
General
source.
• The remote controller does not work.
• “Position Error Push Open Key” appears on
the monitor.
• “Mecha Error Push Reset” appears on the
monitor, and the panel does not move.
• “SD Loading Error” appears on the monitor. SD is not inserted fully. Fully insert it into the slot to close
• Center speaker is not activated. (☞ page 61)
• Center speaker is used only for surround playback. No
sound comes out for stereo playback.
• Rear speakers and subwoofer are not activated. (☞
page 61)
• When Dual Zone is in use, this is normal with <Off>
selected for <Rear Speaker>. (☞ page 64)
This happens while playing some discs with <Auto>
selected for <Surround Mode> (☞ page 27).
Cancel surround.
Adjust <Bright>. (☞ page 58)
Deactivate Dual Zone. (☞ page 30)
(While Dual Zone is activated, you cannot select them as
the source.)
Deactivate Dual Zone. (☞ page 30)
(While Dual Zone is activated, the remote controller only
functions for operating the DVD/CD player.)
The monitor panel angle has been forcibly adjusted, or its
adjustment has been interrupted while opening or closing.
Press OPEN/TILT (CLOSE).
Reset the unit (☞ page 3).
the monitor panel.
ENGLISH
75
Continued on the next page
REFERENCES
Page 76

Symptoms Remedies/Causes
• “No Signal” appears. • Change the source.
• Start the playback on the external component connected
to VIDEO IN plug.
ENGLISH
General
• The buttons on the monitor panel do not
work.
• The unit does not work at all.
• SSM automatic presetting does not work.
• Static noise while listening to the radio. Connect the aerial firmly.
FM/AM
• Disc can be neither recognized nor played .
• Disc cannot be ejected.
• Recordable/Rewritable discs cannot be
played back.
• Tracks on the Recordable/Rewritable discs
cannot be skipped.
• Playback does not start. • Insert the disc correctly again.
• The playback picture is not clear and legible.
• Sound and pictures are sometimes
interrupted or distorted.
Disc in general
• No playback picture appears on the monitor. Parking brake lead is not connected properly.
• No picture appears on the external monitor. • Connect the video cord correctly.
• “Eject Error” or “Loading Error” appears on
the monitor.
• “Region code error” appears on the monitor
when you insert a DVD Video.
• Check the cords and connections.
• Signal input is too weak.
When the monitor panel is open, only VOL +/– and
OPEN/TILT (CLOSE) button work. The other buttons do not
function.
Reset the unit. (☞ page 3)
Store stations manually. (☞ page 11)
Eject the disc forcibly. (☞ page 3)
Unlock the disc. (☞ page 22)
• Insert a finalized disc.
• Finalize the discs with the component which you used
for recording.
• The format of files is not supported by the unit.
Adjust items in <Picture Adjust>. (☞ page 58)
• Stop playback while driving on rough roads.
• Change the disc.
(☞ Installation/Connection Manual)
• Select the correct input on the external monitor.
Changing the source by pressing SOURCE will solve this
error.
Region code is not correct. (☞ page 4)
76
Page 77

Symptoms Remedies/Causes
• Disc cannot be played back. • Change the disc.
• Record the tracks using a compliant application in the
appropriate discs. (☞ page 4)
• Add appropriate extension codes to the file names.
• Noise is generated. The track played back is not a playable file format. Skip to
another file.
• Tracks are not played back as you have
intended them to play.
• Elapsed playing time is not correct. This sometimes occurs during playback. This is caused by
DivX/MPEG1/MPEG2/MP3/WMA/WAV/AAC
• “Not Support” appears on the monitor and
track skips.
• Noise is generated. The track played back is not a playable file format. Skip to
• Tracks cannot play back as you have
intended them to play.
• “Now Reading...” keeps flashing on the
monitor.
SD/USB
• Correct characters are not displayed (e.g.
album name).
• While playing a track, sound is sometimes
interrupted.
Playback order may differs from the one played back using
other players.
how the tracks are recorded.
The track is unplayable.
another file.
Playback order may differs from the one played back using
other players.
• Readout time varies depending on the SD card/USB
device.
• Do not use too many hierarchy and folders.
• Turn off the power then on again.
For available characters, ☞ page 73.
The tracks are not properly copied into the SD card/USB
device. Copy tracks again, and try again.
ENGLISH
77
Continued on the next page
REFERENCES
Page 78

Symptoms Remedies/Causes
• Bluetooth device does not detect the unit. This unit can be connected with one Bluetooth cellular
phone and one Bluetooth audio device at a time.
While connecting a device, this unit cannot be detected
ENGLISH
• The unit does not detect the Bluetooth
device.
• The unit does not make pairing with the
Bluetooth device.
• Echo or noise occurs. Adjust the microphone unit position.
• Phone sound quality is poor. • Reduce the distance between the unit and the Bluetooth
Bluetooth
• The sound is interrupted or skipped during
playback of a Bluetooth audio device.
• “New Device” cannot be selected for
“Bluetooth AUDIO.”
• The connected audio device cannot be
controlled.
• “Reset 08” appears on the monitor. Check the connection between the adapter and this unit.
• “No Disc” appears on the monitor. Insert a disc into the magazine.
• “No Magazine” appears on the monitor. Insert the magazine.
• “Cannot play this disc Check the disc”
CD changer
appears on the monitor.
from another device. Disconnect currently connected device
and search again.
• Check the Bluetooth setting of the device.
• Search from the Bluetooth device. After the device
detects the unit, select <Open> on the unit to connect
the device. (☞ page 37)
• Enter the same PIN code for both the unit and target
device. If the PIN code of the device is not indicated on its
instructions, try “0000” or “1234.”
• Select the device name from <Special Device>, then
try to connect again. (☞ pages 38, 66)
audio device.
• Move the car to place where you can get a better signal
reception.
• Reduce the distance between the unit and the Bluetooth
audio device.
• Disconnect the device connected for “Bluetooth PHONE.”
• Turn off, then turn on the unit.
• (When the sound is not yet restored,) connect the device
again.
Bluetooth audio device is being connected. To select “New
Device,” disconnect it. (☞ page 38)
Check whether the connected audio device supports AVRCP
(Audio Video Remote Control Profile).
Disc does not include playable files. Replace the disc with
playable files.
78
Page 79

Symptoms Remedies/Causes
• “Reset 08” appears on the monitor. Connect this unit and the CD changer correctly and press
the reset button of the CD changer.
• “Reset 01” – “Reset 07” appears on the
monitor.
CD changer
• The CD changer does not work at all.
• “No DAB Signal” appears on the monitor. Move to an area with stronger signals.
• “Reset 08” appears on the monitor. Connect this unit and the DAB tuner correctly, then reset
• The DAB tuner does not work at all. Connect this unit and the DAB tuner correctly, then reset
DAB tuner
• “Antenna Power NG” appears on the
monitor.
• The iPod/D. player does not turn on or does
not work.
• Sound is distorted. Deactivate the equalizer either on this unit or the iPod/
• “Disconnect” appears on the monitor. Check the connecting cable and its connection.
• For iPod: Playback stops. The headphones are disconnected during playback. Restart
• No sound can be heard.
• “Error 01” appears on the monitor when
connecting a D. player.
iPod/D. player
• “No Files” or “No Track” appears on the
monitor.
• “Reset 01” – “Reset 07” appears on the
monitor.
• “Reset 08” appears on the monitor. Check the connection between the adapter and this unit.
• The iPod’s or D. player’s controls do not work
after disconnecting from this unit.
• No picture appears on the monitor. • Turn on the video component if it is not on.
AV-IN
• Playback picture is not clear and legible.
Press the reset button of the CD changer.
Reset the unit. (☞ page 3)
the unit. (☞ page 3)
the unit. (☞ page 3)
Check the cords and connections.
• Check the connecting cable and its connection.
• Charge the battery.
• For D. player: Update the firmware version.
D. player.
playback.
Disconnect the D. player from the adapter. Then, connect
them again.
No tracks are stored. Import tracks to the iPod or D. player.
Disconnect the adapter from both this unit and iPod/
D. player. Then, connect them again.
Reset the iPod or D. player.
• This unit is not connected to the video component
correctly. Connect it correctly.
Adjust items in <Picture Adjust>. (☞ page 58)
ENGLISH
79
REFERENCES
Page 80

Specifications
Maximum Power Output: Front/Rear: 50 W per channel
Continuous Power Output
(RMS):
ENGLISH
Load Impedance: 4 Ω (4 Ω to 8 Ω allowance)
Equalizer Control Range: Frequencies: 60 Hz, 150 Hz, 400 Hz, 1 kHz, 2.5 kHz,
Signal-to-Noise Ratio: 70 dB
Audio Output Level
AMPLIFIER
LINE OUT (FRONT/REAR)/
CENTER OUT/ SUBWOOFER:
Color System: PAL
Video Output (composite): 1 Vp-p/75 Ω
Other Terminals: Input: LINE IN, VIDEO IN, CAMERA IN, USB input
Frequency Range: FM: 87.5 MHz to 108.0 MHz
FM Tuner Usable Sensitivity: 11.3 dBf (1.0 μV/75 Ω)
FM/AM TUNER
MW Tuner Sensitivity/Selectivity: 20 μV/35 dB
LW Tuner Sensitivity: 50 μV
Signal Detection System: Non-contact optical pickup (semiconductor laser)
Frequency Response: DVD, fs=48 kHz: 16 Hz to 22 000 Hz
DVD/CD
Dynamic Range: 93 dB
Signal-to-Noise Ratio: 95 dB
Wow and Flutter: Less than measurable limit
Front/Rear: 20 W per channel into 4 Ω, 40 Hz to
20 000 Hz at no more than 0.8% total
harmonic distortion
6.3 kHz, 15 kHz
Level: ±10 dB
Line-Out Level/Impedance: 5.0 V/20 kΩ load (full scale)
Output Impedance: 1 kΩ
terminal, Aerial input
Output: 2nd AUDIO OUT, VIDEO OUT
Others: CD changer, OE REMOTE
AM: (MW) 522 kHz to 1 620 kHz
(LW) 144 kHz to 279 kHz
50 dB Quieting Sensitivity: 16.3 dBf (1.8 μV/75 Ω)
Alternate Channel Selectivity (400 kHz): 65 dB
Frequency Response: 40 Hz to 15 000 Hz
Stereo Separation: 35 dB
DVD, fs=192 kHz: 16 Hz to 88 000 Hz
VCD/CD: 16 Hz to 20 000 Hz
80
Page 81

Compatible File System: FAT 32/16/12
Capacity 8 Mbytes to 2 Gbytes
SD
Data Transfer Rate Maximum 10 Mbps
USB Standards: USB 1.1
Data Transfer Rate Full Speed: Maximum 12 Mbytes
USB
Compatible Device: Mass storage class
Compatible File System: FAT 32/16/12
Max. Current: Less than 500 mA/5V
Screen Size: 7 inch wide liquid crystal display
Number of Pixel: 336 960 pixels: 480 x 3 (horizontal) × 234 (vertical)
Drive Method: TFT (Thin Film Transistor) active matrix format
MONITOR
Color System: NTSC/PAL
Aspect Ratio: 16:9 (wide)
Power Requirement: Operating Voltage: DC 14.4 V (11 V to 16 V allowance)
Grounding System: Negative ground
Allowable Storage Temperature: –10°C to +60°C
Allowable Operating Temperature: 0°C to +40°C
Dimensions (W × H × D):
GENERAL
With trim plate and
•
sleeve attached
Mass (approx.): 3 kg (including trims and sleeve)
Low Speed: Maximum 1.5 Mbytes
Installation Size (approx.): 182 mm × 111 mm × 160 mm
Panel Size (approx.): 188 mm × 117 mm × 10 mm
ENGLISH
Required space for the monitor ejection
100
160 90.4
Design and specifications are subject to change without notice.
81
CAUTION: When ejecting the monitor, keep an
open space for the monitor to come out. If not,
the monitor may obstruct the steering wheel and
gearshift lever operations, as this may result in a
traffic accident.
Unit: mm
REFERENCES
Page 82

Перед тем, как приступать к эксплуатации, пожалуйста, внимательно прочитайте все инструкции с тем,
чтобы полностью изучить и обеспечить оптимальную работу этого устройства.
Благодарим Вас за приобретение изделия JVC.
ВАЖНО ДЛЯ ЛАЗЕРНОЙ АППАРАТУРЫ
1. ЛАЗЕРНАЯ АППАРАТУРА КЛАССА 1
2. ПРЕДУПРЕЖДЕНИЕ: Не открывайте верхнюю крышку. Внутри устройства нет частей, которые
пользователь может отремонтировать. Ремонт должен осуществляться квалифицированным
обслуживающим персоналом.
3. ПРЕДУПРЕЖДЕНИЕ: В открытом состоянии происходит видимое и/или невидимое излучение лазера
класса 1M. Не смотрите непосредственно в оптические инструменты.
4. ЭТИКЕТКА: ПРЕДУПРЕЖДАЮЩАЯ ЭТИКЕТКА, РАЗМЕЩЕННАЯ НА НАРУЖНОЙ СТОРОНЕ УСТРОЙСТВА.
РУCCKИЙ
ПРЕДУПРЕЖДЕНИЯ:
Предотвращение несчастных
случаев и повреждений
• НЕ устанавливайте устройства и не
прокладывайте провода в местах, где:
– оно может помешать рулевому управлению
и переключению передач;
– оно может помешать функционированию
средств безопасности, например,
пневмоподушкам;
– может ухудшиться обзор.
• НЕ управляйте устройством во время
вождения автомобиля.
При необходимости управления устройством
во время вождения автомобиля внимательно
следите за дорогой.
• Водителю не следует смотреть на монитор во
время вождения.
• Водителю не следует надевать наушники во
время вождения.
В соответствии с Законом Российской Федерации “О защите прав потре бителей” срок службы (годности) данного
товара “по истечении которого он может представлять опасность для жизни, здоровья потребителя, причинять вред
его имуществу или окружающей среде” составляет семь (7) лет со дня производства. Этот срок является временем,
в течение которого потребитель данного товара может безопасно им пользоваться при условии соблюдения
ин струк ции по эксплуатации данного товара, проводя необходимое обслуживание, включающее замену расходных
материалов и/или соответствующее ремонтное обеспечение в специализированном сервисном центре.
Дополнительные косметические материалы к данному товару, поставляе мые вместе с ним, могут храниться в
течение двух (2) лет со дня его производства.
Срок службы (годности), кроме срока хранения дополнительных космети ческих материалов, упомянутых в
предыдущих двух пунктах, не затрагивает никаких других прав потребителя, в частности, гарантийного свидетельства
JVC, которое он может получить в соответствии с законом о правах потребителя или других законов, связанных с ним.
Предостережения (монитор):
• Встроенный в устройство монитор изготовлен
с высокой точностью, однако он может иметь
нерабочие точки. Это явление неизбежно и не
является результатом неисправной работы
оборудования.
• Не подвергайте монитор воздействию прямых
солнечных лучей.
• Не используйте шариковую ручку и подобные
предметы с острым наконечником для работы
с сенсорной панелью.
Касайтесь кнопок на сенсорной панели
непосредственно пальцем (перчатки следует
снять).
• При слишком низкой или слишком высокой
температуре может произойти следующее:
– Внутри происходит химическая реакция,
приводящая к неисправности устройства.
–
Изображения могут отображаться нечетко
или воспроизводиться замедленно. Может
нарушаться синхронность изображения и
звука или ухудшаться качество изображения.
2
Page 83

Как перенастроить Ваше устройство
• Запрограммированные
настройки будут
также удалены.
Принудительное извлечение диска
ENTER
NO EJECT?
EMERGENCY EJECT?
Back
2
одновременно
11
• Если это не помогает, перезапустите
устройство.
Для Вашей безопасности...
• Не повышайте слишком сильно громкость,
поскольку в результате этого заглушаются
внешние звуки, что делает опасным управление
автомобилем.
• Остановите автомобиль перед тем, как выполнять
любые сложные операции.
Температура внутри автомобиля...
Если Вы припарковали Ваш автомобиль на
длительное время в жаркую или холодную погоду,
перед тем, как включать это устройство, подождите
до тех пор, пока температура в автомобиле не
придет в норму.
[только Европейсий Союз]
3
Exit
Содержание
ВВЕДЕНИЕ
Тип воспроизводимых дисков ....... 4
Основные операции—Панель
монитора/сенсорная панель ....... 5
Основные операции—Пульт
дистанционного управления
(RM-RK251) .................................. 6
ОПЕРАЦИИ
Подготовка к использованию ........ 8
Стандартные операции .................. 9
Прослушивание радио ................... 10
Операции с дисками ....................... 16
Операции в режиме “Dual Zone” ..... 30
Операции с SD-картами .................. 33
Операции с устройством USB .......... 35
ВНЕШНИЕ УСТРОЙСТВА
Операции Bluetooth®—Сотовых
телефонов и
аудиопроигрывателей ................ 37
Прослушивание с устройства
автоматической смены компакт-
дисков ........................................ 44
Прослушивание тюнера DAB .......... 46
Прослушивание с проигрывателя
iPod или D. .................................. 50
Использование других внешних
устройств .................................... 52
НАСТРОЙКИ
Звуковой эквалайзер ..................... 55
Присвоение названий источникам
Операции с меню ........................... 57
СПРАВОЧНАЯ ИНФОРМАЦИЯ
Обслуживание ................................ 68
Дополнительная информация о
приемнике .................................. 69
Устранение проблем ...................... 75
Технические характеристики ......... 80
... 56
РУCCKИЙ
3
ВВЕДЕНИЕ
Page 84

Тип воспроизводимых дисков
Тип диска Формат записи, тип файла и т.д. Поддерживаемые
DVD DVD Video (код региона: 5)*
Звуковые DVD-диски
DVD-ROM (данные)
DVD-диск однократной
или многократной записи
РУCCKИЙ
(DVD-R*2/-RW, +R/+RW*3)
• Видео DVD-диск: UDF-мост
• DVD-VR
• DivX/MPEG1/MPEG2/JPEG/
MP3/WMA/WAV/AAC: ISO
9660 level 1, level 2, Romeo,
Joliet
Видео DVD-диск
DVD-VR (только без CPRM)
DivX/MPEG1/MPEG2
JPEG
MP3/WMA/WAV/AAC*
MPEG4
DVD+VR
• Диски DVD-RAM не
воспроизводятся.
Dual Disc Сторона DVD
Сторона не-DVD
CD/VCD Звуковой компакт-диск/Экран управления для
CD-текста (CD-DA)/DTS-CD
VCD (Видео компакт-диск)
Компакт-диски формата CD-ROM
CD-I (CD-I Ready)
Компакт-диск
однократной или
многократной записи
(CD-R/-RW)
• ISO 9660 level 1, level 2,
Romeo, Joliet
CD-DA
MP3/WMA/WAV/AAC*
JPEG
DivX/MPEG1/MPEG2
MPEG4
*1 При установке диска DVD Video с неверным кодом региона на мониторе отображается ошибка “Region
code error”.
*2 Диски DVD-R, записанные в формате “multi-border”, тоже воспроизводятся (кроме двухслойных дисков).
*3 Возможно воспроизведение завершенных дисков +R/+RW (только в видеоформате). Не рекомендуется
использовать двухслойные диски +R.
*4 Данное устройство может воспроизводить файлы AAC, кодированные с помощью iTunes.
1
4
4
Предостережение для воспроизведения дисков DualDisc
Сторона диска DualDisc, отличная от DVD, не совместима со стандартом “Compact Disc Digital Audio”.
Поэтому не рекомендуется использовать сторону диска DualDisc, отличную от DVD, на данном устройстве.
4
Page 85

Основные операции — Панель монитора/сенсорная панель
Отображение экрана <AV Menu>.
• ☞ cтр. 57.
Отображение экрана <Source Menu>.
• ☞ стр. 9 и 30.
Отображение и скрытие окон “Short Cut”.
Набор доступных функций зависит от конкретного источника. Более
подробную информацию см. в разделе по работе с каждым источником.
РУCCKИЙ
Изменение отображаемой информации.
Смена источников.
• ☞ cтр. 9.
• Включение или выключение
функции резервного приема TA.
• Отображение экрана <PTy Search>
[удерживании].
• ☞ cтр. 12.
• Включение питания.
• Выключение питания [Удерживании].
• Ослабление звука (при включенном
питании).
Перенастройте приемник.
• Используйте только при появлении внутренних
ошибок системы.
• Более подробную информацию о
сенсорной панели см. в разделе по
работе с каждым источником.
Настройте громкость.
• Отображение экрана <Open/Tilt>
• Извлечение диска и отображение экрана
<Open/Tilt> [Удерживании].
• Закрытие панели монитора при
отображении экрана <Open/Tilt>.
• [OPEN]: Открытие панели монитора.
• [EJECT]: Извлечение диска.
• [CLOSE]: Закройте панель монитора.
• [TILT +/–]: Наклон панели монитора.
• [Exit]: Скрытие экрана.
• В этот момент затемненные значки
использовать нельзя.
5
Телеметрический
датчик
ВВЕДЕНИЕ
Page 86

Основные операции — Пульт дистанционного управления (RM-RK251)
Установка аккумуляторной батареи
R03/LR03/AAA
РУCCKИЙ
При уменьшении радиуса действия или
эффективности пульта дистанционного управления
замените обе батареи.
Перед использованием пульта
дистанционного управления выполните
следующие действия:
• Направьте пульт дистанционного управления
непосредственно на телеметрический датчик
приемника.
• НЕ подвергайте телеметрический датчик
воздействию яркого света (прямых солнечных
лучей или искусственного освещения).
Приемник поставляется с функцией рулевого
пульта дистанционного управления.
• Для получения информации о подключении
монитора см. Руководство по установке/
подключению (в отдельном издании).
Основные элементы и функции
i
o
;
a
s
Внимание:
• Не подвергайте батареи воздействию высокой
температуры или огня.
ВАЖНО:
Если включен режим “Dual Zone” (☞ стр. 30),
пульт дистанционного управления используется
только для управления проигрывателем
компакт-дисков или DVD-дисков.
1*1 • Включение питания.
• Ослабление звука при включенном
питании.
• При нажатии и удерживании нажатой
отключает питание (если оно включено).
2*1 Выбор источников.
3*1 • Отображение меню набора <Dial Menu>.
• Отображение списка <Redial>, если
нажать и удерживать.
• Ответ на входящие вызовы.
1,2
4*
Настройка уровня звука.
6
Page 87

1,2
5*
Выбор режима объемного звука.
6 • DVD/DivX 6: Отображение меню дисков.
• Для диска VCD: Возобновление
воспроизведения PBC.
• DVD-VR: Отображение экрана “Original
Program”.
7 • Выбор или выполнение настроек.
• ~: Переход назад или вперед на 5 минут
при воспроизведении DivX/MPEG1/MPEG2.
Кнопки DISC +/– : Смена дисков для “CD-CH”.
•
8 Отображение строки состояния.
9*1 Изменение отображаемой информации.
p Отображение или удаление <AV Menu>.
q Для операций с диском/SD-картой/
устройством USB:
• 6: Воспроизведение/пауза.
• 5 / ∞:
DVD: Выбор названия/группы.
DVD-VR: Выбор программы/списка
воспроизведения.
SD-карта/устройство USB/другие диски
(кроме VCD/CD): Выбор папок.
• 4 / ¢:
– Нажать кратковременно: прокрутка
назад/прокрутка вперед.
– Нажать и удерживать: поиск назад/поиск
вперед.
При работе с диапазонами FM/AM:
• 5 / ∞: Выбор запрограммированных
радиостанций.
• 4 / ¢: Поиск радиостанций.
– Нажать кратковременно:
автоматический поиск
– Нажать и удерживать: поиск вручную
Для операций с тюнером DAB:
• 5 / ∞: Выбор служб.
• 4 / ¢: Поиск ансамблей.
– Нажать кратковременно:
автоматический поиск.
– Нажать и удерживать: поиск вручную.
Операции с проигрывателем Apple iPod
или JVC D.:
• ∞: Пауза/останов или возобновление
воспроизведения.
• 5: Вход в главное меню (затем кнопки
5 / ∞ / 4 / ¢ служат для
перемещения по меню).*
3
• 4 / ¢ (в режиме выбора меню для
воспроизведения)
– Выбор элемента при кратковременном
нажатии. (Затем нажмите ∞ для
подтверждения выбора.)
– Пропуск сразу 10 элементов при нажатии
и удерживании нажатой.
При работе с Bluetooth:
• 4 / ¢: прокрутка назад/прокрутка
вперед (при управлении звуком)
• 6: Ответ на входящие вызовы (для
“Bluetooth PHONE”), воспроизведение/
пауза (для “Bluetooth AUDIO”).
w TUNER/DAB: Выбор диапазонов частот.
DISC/SD/USB: Останов воспроизведения.
Bluetooth PHONE: Завершение вызова.
Bluetooth AUDIO: Воспроизведение/пауза.
• Эта кнопка не функционирует как кнопка
BACK в данной модели.
2
Настройка громкости сигнала, получаемого
e*
через разъем 2nd AUDIO OUT.
2
Включение или отключение функции “Dual Zone”.
r*
1,2
t*
Выбор режимов звучания.
y • Видео DVD-диск/DivX 6: Отображение меню
дисков.
• Для диска VCD: Возобновление
воспроизведения PBC.
• DVD-VR: Отображение экрана “Play List”.
u Кнопка RETURN
• Для VCD-диска: Возврат к меню PBC.
i DISC/SD/USB: Переключение режима ввода
номера.
• Позволяет также удалить неправильно
набранный номер (действует в качестве
клавиши CLEAR).
o • Ввод номеров.
• FM/AM/DAB: Непосредственный выбор
запрограммированной радиостанции или
службы.
• Устройство автоматической смены
компакт-дисков: Выбор диска напрямую.
;*1 Изменение формата воспроизводимых
изображений.
a Поиск назад или вперед для операций с
диском/SD-картой/устройством USB.
s • Видео DVD-диск: Выбор языка звукозаписи
( ), субтитров ( ), угла ( ).
• Звуковые DVD-диски: Выбор звукового
потока ( ).
• DVD-VR: Включение/выключение субтитров
( ) и выбор звукового канала ( )
• DivX: Выбор языка звукозаписи ( ),
субтитров ( ).
• Для диска VCD: Выбор звукового канала
( ).
*1 Если включена функция “Dual Zone”, эти кнопки
использовать нельзя.
*2 Эти кнопки можно использовать только при
закрытой крышке панели.
*3 5 : Возврат к предыдущему меню.
∞ : Подтверждение выбора.
7
ВВЕДЕНИЕ
РУCCKИЙ
Page 88

Подготовка к использованию
Отмена демонстрации функций дисплея и настройка
часов (☞ сведения на стр. 58 и 59).
• Недоступные элементы будут затемнены на
экранах “AV Menu”.
Язык отображения:
В данном руководстве английский язык
используется в качестве примера языка
РУCCKИЙ
отображения. Язык отображения сообщений на
мониторе можно выбрать. (☞ cтр. 59)
~ Включение питания.
Ÿ Отображение экрана <AV Menu>.
! Вызовите меню <Setup>.
@ Установите время на часах.
Возврат к предыдущей странице меню
Переход на следующую страницу меню
¤ Завершите процедуру.
⁄ Отмена демонстрации функций
дисплея.
Выберите <Off>.
Возврат к предыдущему экрану.
8
Page 89

Стандартные операции
Выбор источника
воспроизведения
• Доступные источники зависят от подключенных
внешних устройств, используемых носителей и
настроек, выполненных на экране <Вход>
(☞ стр. 62 и 63).
На сенсорной панели:
☞ cтр. 30
На панели монитора:
Выход
Изменение информации на
дисплее
• Информация, отображаемая на дисплее, зависит
от источников воспроизведения.
Только на панели монитора:
РУCCKИЙ
• При каждом нажатии кнопки DISP информация на
дисплее изменяется.
Пример: Источником воспроизведения является диск DivX.
Экран изображения
воспроизведения
(только для источников
видеоизображения)
Экран информации об
источнике
Список
запрограммированных
радиостанций (служб),
список дорожек (файлов)
или список номеров
телефонов
TUNER = DAB = DISC (DVD/VCD/CD) = SD =
USB = CD-CH, iPod, D.PLAYER, или EXT-IN =
Bluetooth PHONE = Bluetooth AUDIO = AV-IN
= (возврат в начало)
• Если эти источники не готовы, их невозможно
выбрать.
9
Bозврат в начало
Экран анимации
Экран навигации
(Для параметра <
Input> выбрано значение
<
Navigation>):
(
☞ cтр. 62).
AV
ОПЕРАЦИИ
Page 90

Прослушивание радио
Запрограммированный номер
Диапазон частот
Режим звучания
☞ cтр. 55)
(
РУCCKИЙ
Индикаторы селектора
телевизионных
каналов/резервного
~
приема
Нажмите [SOURCE], затем нажмите [TUNER]. (☞ cтр. 9)
• Можно также использовать SOURCE на панели монитора. Нажмите несколько раз.
PS (название радиостанции) для радиостанций FM RDS. При отсутствии
входящего сигнала на экране появляется частота настройки.
Код PTY для FM RDS
☞ cтр. 12
: Кнопки на сенсорной
панели. В примере
☞ cтр. 9
они показаны
внутри [ ].
Ÿ Нажмите [BAND].
! Нажмите [4] или [¢] для поиска радиостанций—автоматический поиск.
• Поиск вручную: Удерживайте нажатой кнопку [4] или [¢] до появления на экране надписи
“Manual Search”. Затем нажмите эту кнопку несколько раз подряд.
• Индикатор ST загорается при приеме стереовещания FM при достаточном уровне сигнала.
При слабом стереофоническом
радиовещании на частоте FM
1 Нажмите [AV MENU].
3
2 Нажмите [Mode].
Прием улучшается, но стереоэффект будет
потерян.
• Загорается индикатор MONO.
Для восстановления стереоэффекта выберите
<Off>.
10
Page 91

Настройка на радиостанции с
достаточным уровнем сигнала
Эта функция действует только для FM-диапазонов.
Если эта функция активирована (выбрано <Local>),
она всегда включается при поиске FM-радиостанций.
1 Нажмите [AV MENU].
2 Нажмите [Mode].
3
Будут обнаружены только радиостанции с
достаточно сильным уровнем сигнала.
•
Индикатор DX гаснет, и загорается индикатор LO.
Автоматическое
программирование FMрадиостанций—SSM (Strongstation Sequential Memory—
последовательная память для
радиостанций с устойчивым
сигналом)
Эта функция действует только для FM-диапазонов.
Для каждого диапазона частот можно
запрограммировать 6 радиостанций.
1 Нажмите [AV MENU].
2 Нажмите [Mode].
3
Программирование вручную
Пример: Сохранение FM-радиостанции с частотой
92,5 МГц для запрограммированного
канала с номером 4 диапазона FM1.
1 Отображение списка
запрограммированных телестанций.
РУCCKИЙ
2 Настройтесь на радиостанцию, которую
необходимо запрограммировать.
3 Выберите запрограммированный номер.
Осуществляется поиск местных FMрадиостанций с наиболее сильными сигналами и
их автоматическое сохранение в диапазоне FM.
Радиостанция, выбранная в действии 2,
сохранена под номером 4.
11
ОПЕРАЦИИ
Page 92

Выбор запрограммированных
радиостанций
На пульте дистанционного управления:
1
2
или
РУCCKИЙ
На устройстве:
Выбор непосредственно на сенсорной
панели
Следующие функции доступны только при
прослушивании радиостанций FM RDS.
Поиск программы FM RDS—
поиск PTY
Можно осуществлять поиск предпочитаемых
программ, которые передаются, выбирая код PTY
предпочитаемых программ.
1 Вызовите меню <PTy Search>.
Выбор из списка
запрограммированных кодов
1
2
• Для доступа к меню <PTy Search> можно
также нажать [SHORT CUT] на сенсорной
панели, а затем...
☞ cтр. 55
☞ cтр. 14
12
Page 93

2 Выберите код PTY.
•
В приведенном ниже примере в списке
запрограммированных кодов выбран код PTY.
Если ввести <PTy Code> ниже, можно
выбрать один из 29 кодов PTY.
Начинается поиск PTY.
Если есть радиостанция, передающая в эфир
программу того же кода PTY, что был Вами
выбран, осуществляется настройка на эту
радиостанцию.
Доступные коды PTY:
News, Current Affairs, Information, Sport,
Education, Drama, Cultures, Science, Varied Speech,
Pop Music, Rock Music, Easy Listening, Light Classics
M, Serious Classics, Other Music, Weather & Metr,
Finance, Children’s Progs, Social Affairs, Religion,
Phone In, Travel & Touring, Leisure & Hobby, Jazz
Music, Country Music, National Music, Oldies Music,
Folk Music, Documentary
Сохранение любимых программ
Можно хранить предпочитаемые коды PTY в списке
запрограммированных кодов PTY.
Пример: Сохранение <Drama> в <Preset 1>.
РУCCKИЙ
13
ОПЕРАЦИИ
Page 94

Включение или выключение
функции резервного приема
сообщений о движении на
дорогах (TA) или PTY
Резервный прием TA Индикатор
Нажмите
для включения.
Устройство временно переключается
РУCCKИЙ
на прием сообщений о движении
на дорогах (TA) от всех источников,
кроме AM, если они доступны.
Громкость устанавливается на
запрограммированный уровень
TA, если текущий уровень ниже
запрограммированного (☞ стр. 62).
Еще не активировано. Настройтесь
на другую радиостанцию,
передающую сигналы RDS.
Нажмите
Резервный прием PTY Индикатор
Для включения откройте <AV
Menu>, затем выберите <Mode>,
нажмите [On] для <PTy Standby>
(☞ следующий столбец).
Устройство временно переключается
на предпочитаемую программу PTY
от любого источника, кроме AM.
Еще не активировано. Настройтесь
на другую радиостанцию,
передающую сигналы RDS.
Для выключения нажмите [Off] для
<PTy Standby> в действии 3
(☞ следующий столбец).
на панели монитора
для выключения.
TP
Индикатор
загорается
Мигает
Гаснет
PTY
Индикатор
загорается
Мигает
Гаснет
Включение функции резервного
приема PTY
1 Нажмите [AV MENU].
2 Нажмите [Mode].
3
Теперь функция резервного приема PTY
включена для кода PTY <News>: начальная
настройка.
• Функцию резервного приема PTY можно легко
включить или выключить, нажав [SHORT CUT]
на сенсорной панели, затем...
☞ cтр. 55
☞ cтр. 12
• При подключении тюнера DAB резервный прием
TA/PTY используется также для тюнера DAB и
поиска служб.
14
Page 95

Изменение кода PTY для функции
резервного приема PTY
1 Нажмите [AV MENU].
2 Нажмите [Mode].
3
4
Выберите предпочитаемый код PTY.
Отслеживание той же программы
(сеть-отслеживающий прием)
При поездке по региону, где невозможен
качественный прием в диапазоне FM, данный
приемник автоматически настраивается на другую
радиостанцию FM RDS в той же сети, которая может
передавать в эфир ту же программу с помощью
более сильных сигналов.
Радиовещание программы A в других
диапазонах частот (01 – 05)
A
В настройках, установленных на заводеизготовителе, сеть-отслеживающий прием включен.
Для получения информации об изменении
параметров сеть-отслеживающего приема,
см. <AF Regional> на стр. 62.
• Если подключен тюнер DAB, см. также раздел
“Отслеживание той же программы—Поиск
альтернативной частоты (DAB AF)”. (☞ cтр. 49)
РУCCKИЙ
Автоматический выбор
радиостанции—поиск
программы
При выборе запрограммированных
радиостанций обычно выполняется настройка на
запрограммированную станцию.
Если уровень сигналов от запрограммированной
радиостанции FM RDS является недостаточным
для качественного приема, данное устройство
с помощью данных AF настраивается на другую
частоту, по которой может передаваться та
же программа, что передает первоначальная
запрограммированная радиостанция. (☞ cтр. 62)
• Настройка устройства на другую радиостанцию с
помощью поиска программы занимает некоторое
время.
15
ОПЕРАЦИИ
Page 96

Операции с дисками
Устройство автоматически распознает диск и начинает его воспроизведение (для некоторых дисков:
автоматическое воспроизведение зависит от внутренней программы).
Если на диске нет дискового меню, все дорожки будут воспроизводиться последовательно до тех пор, пока не
произойдет смена источника или диск не будет извлечен.
Если на мониторе появляется знак “
выполнить.
• Иногда операция не выполняется и при отсутствии значка “ ”.
РУCCKИЙ
”, устройство не поддерживает операцию, которую Вы пытаетесь
~ Открытие панели монитора.
Появляется меню <Open/Tilt>.
• В этот момент затемненные значки
использовать нельзя.
• Нажав и удерживая нажатой эту кнопку,
можно открыть панель монитора и
извлечь диск.
Ÿ Нажмите [OPEN].
! Вставьте диск.
Верхняя сторона
Панель монитора закрывается
автоматически.
В противном случае нажмите [CLOSE].
Внимание:
Не просовывайте пальцы за панель монитора.
Предостережение, касающееся
настройки громкости:
По сравнению с другими источниками звука
диски создают незначительный шум. Уменьшите
громкость перед воспроизведением диска,
чтобы предотвратить повреждение динамиков
из-за внезапного повышения уровня громкости
на выходе.
• [OPEN]: Открытие панели монитора.
• [EJECT]: Извлечение диска.
• [CLOSE]: Закройте панель монитора.
• [TILT +/–]: Наклон панели монитора.
• [Exit]: Скрытие экрана.
16
Page 97

При воспроизведении следующих дисков нажимайте .
• При каждом нажатии этой кнопки на дисплее отображается другая информация (☞ стр. 9).
DVD-VR: № программы (или № списка воспроизведения)/№ раздела/время воспроизведения
1
Тип диска *
Аудиоформат
Режим
воспроизведения
Индикаторы
динамиков/
сигнала
(
☞ cтр. 69)
: Кнопки на сенсорной панели. В примере они
показаны внутри [ ].
Эти кнопки функционируют даже в том случае,
если они не отображаются на сенсорной панели
(при просмотре изображений на экране).
Индикатор
BONUS
(
☞ cтр. 26)
[3 / 8] Начало и приостановка воспроизведения
[
7] Останов воспроизведения
[
4 ¢] Нажатие: Выберите дорожку
Удерживать: Поиск назад или вперед
[5 ∞] Выбор группы
Видео DVD-диск: № названия/№ раздела/время воспроизведения
№ группы/№ дорожки/время воспроизведения
Частота дискретизации/
скорость в битах/№
канала записанного
сигнала
Режим объемного
звука
(
☞ cтр. 27)
☞ cтр. 22
3 / 8] Начало и приостановка
[
воспроизведения
[
7] Останов воспроизведения
[
4 ¢] Нажатие: Выбор раздела
Удерживать: Поиск назад или вперед
[5 ∞] Выбор названия/программы/списка
воспроизведения
Индикатор
воспроизводимого
звука—
MULTI CH/LR ONLY
(
☞ cтр. 70)
Индикатор B.S.P
(
☞ cтр. 26)
☞ cтр. 22
2
*
РУCCKИЙ
2
*
*1
Для диска DVD-VR отображается также воспроизведение PRG (программа) или PLAY (список воспроизведения).
*2 Скорость поиска: x2 ] x10.
17
ОПЕРАЦИИ
Page 98

При воспроизведении следующих дисков нажимайте .
• При каждом нажатии этой кнопки на дисплее отображается другая информация (☞ стр. 9).
Для DivX/MPEG1/MPEG2: № папки/№ дорожки/время воспроизведения
Для JPEG: № папки/№ дорожки
Тип диска
Режим объемного
РУCCKИЙ
звука
(☞ cтр. 27)
3
*
Общее
количество
дорожек,
записанных на
диске
[
3 / 8] Начало и приостановка воспроизведения
[
7] Останов воспроизведения
[
4 ¢] Нажатие: Выберите дорожку
Удерживать: Прямой или обратный поиск DivX/MPEG1/MPEG2
[5 ∞] Нажатие: Выберите папку
Удерживать: Отображение списка папок
№ дорожки/время воспроизведения
Индикатор PBC
функции PBC
загорается
индикатор PBC.
[3 / 8] Начало и приостановка воспроизведения
[
7] Останов воспроизведения
[
4 ¢] Нажатие: Выберите дорожку
Удерживать: Поиск назад или вперед
2
*
*2 Скорость поиска: x2 ] x10.
*3 Режим объемного звука и режим звучания нельзя использовать одновременно.
*4 Скорость поиска: ¡1 ] ¡2.
☞ cтр. 22
4
*
Общее количество
дорожек,
записанных на диске
Общее время
воспроизведения
☞ cтр. 22
18
Page 99

Режим звучания *
3
(☞ cтр. 55)
☞ cтр. 22
[
3 / 8] Начало и приостановка
[
7] Останов воспроизведения
[
4 ¢] Нажатие: Выберите дорожку
Удерживать: Поиск назад или
(MP3/WMA/WAV/AAC)
воспроизведения
вперед
Аудиоформат
2
*
№ папки/№ дорожки/время воспроизведения
№ дорожки/время воспроизведения
• При воспроизведении диска DTS-CD
Индикатор DTS
Индикаторы
динамиков/
сигнала
(
☞ cтр. 69)
Только для CD-
5
текста
*
Общее количество
дорожек,
записанных на диске
Общее время
воспроизведения
Метки данных
отображаются
только при
записи
РУCCKИЙ
☞ cтр. 22
3 / 8] Начало и приостановка воспроизведения
[
[
7] Останов воспроизведения
[4 ¢] Нажатие: Выберите дорожку
Удерживать: Поиск назад или вперед
[5 ∞] Нажатие: Выберите папку
Удерживать: Отображение списка папок
Общее количество дорожек, записанных на диске
*2 Скорость поиска: x2 ] x10.
*5 Для традиционных компакт-дисков отображается “No Name“.
19
2
*
ОПЕРАЦИИ
Page 100

Кнопки операций на экране монитора
При просмотре воспроизводимых изображений на мониторе можно вывести на дисплей следующие кнопки
операций.
• После отображения кнопок операций для формата изображения устанавливается значение <Full>
(☞ стр. 59).
• Если в течение 5 секунд не выполняется никаких действий, кнопки операций исчезают (за исключением
случая, когда отображается меню диска).
☞ стр. с 23 по 25 (порядок работы кнопок при
воспроизведении различных дисков)
РУCCKИЙ
*
Коснитесь экрана (в центре).
Коснитесь кнопки [KEY].
Коснитесь кнопки [KEY].
Коснитесь кнопки [KEY].
Чтобы скрыть операции, коснитесь экрана еще
раз.
A
[SOURCE] Отображение экрана <Source Menu>
[
AV MENU] Отображение экрана <AV Menu>
[
SHORT CUT] Отображение кнопок “Short Cut“
[
3 / 8] Начало и приостановка воспроизведения
[
7] Останов воспроизведения
[
4 ¢] Нажатие: Выберите дорожку
Удерживать: Поиск назад или вперед
[
5 ∞] Выбор папок
• Эти кнопки работают даже в том случае, если они не
отображаются на сенсорной панели (при просмотре
изображений на экране).
* При воспроизведении меню диска для DVD
автоматически отображается [KEY]. Для выбора
элемента меню в меню диска просто коснитесь его на
экране.
B
Для воспроизведения операций меню DVD/VCD/DivX
[
2 3 5 ∞] Выбор элементов меню
[
ENT] Подтвердите выбор
[
TOP MENU] Отображение меню диска
[
MENU] Отображение меню диска
[
RETURN] Возврат к предыдущему меню или
отображение меню (только для дисков
VCD с функцией PBC)
C
Для ввода чисел
[
DIRECT CLR] Переключение между разделом/
Удаление последнего неправильно
[
0]–[9]=[ENT] Ввод числа
Пример: Ввод числа ”105“: нажмите [
[
ENT]
дорожкой/названием/группой/папкой
введенного символа
1], [0], [5], затем
20
 Loading...