

Page 1

KD-SR72
CD RECEIVER
INSTRUCTION MANUAL
RÉCEPTEUR CD
MANUEL D’INSTRUCTIONS
RECEPTOR CON CD
MANUAL DE INSTRUCCIONES
ENGLISH
FRANÇAIS
ESPAÑOL
For customer Use:
Enter below the Model No. and Serial No. which are
located on the top or bottom of the cabinet. Retain this
information for future reference.
Model No.
Serial No.
B5A-1265-00 [K]
Page 2
CONTENTS BEFORE USE
BEFORE USE 2
BASICS 3
GETTING STARTED 4
1
Cancel the demonstration
2 Set the clock
3 Set the basic settings
RADIO 5
AUX 6
CD / USB / iPod / ANDROID 7
Pandora® 9
iHeartRadio® 10
AUDIO SETTINGS 11
DISPLAY SETTINGS 13
REFERENCES 14
Maintenance
More information
TROUBLESHOOTING 16
SPECIFICATIONS 18
INSTALLATION /
CONNECTION 20
IMPORTANT
• To ensure proper use, please read through this manual before using this product. It is especially important
that you read and observe Warning and Caution in this manual.
• Please keep the manual in a safe and accessible place for future reference.
Warning
Do not operate any function that takes your attention away from safe driving.
Caution
Volume setting:
• Adjust the volume so that you can hear sounds outside the car to prevent accidents.
• Lower the volume before playing digital sources to avoid damaging the speakers by the sudden increase of
the output level.
General:
• Avoid using the external device if it might hinder safe driving.
• Make sure all important data has been backed up. We shall bear no responsibility for any loss of recorded
data.
• Never put or leave any metallic objects (such as coins or metal tools) inside the unit, to prevent a short
circuit.
• If a disc error occurs due to condensation on the laser lens, eject the disc and wait for the moisture to
evaporate.
Remote control (RM-RK52):
• Do not leave the remote control in hot places such as on the dashboard.
• The Lithium battery is in danger of explosion if replaced incorrectly. Replace it only with the same or
equivalent type.
• The battery pack or batteries shall not be exposed to excessive heat such as sunshine, fire or the like.
• Keep the battery out of reach of children and in its original packaging when not in used. Dispose of used
batteries promptly. If swallowed, contact a physician immediately.
How to read this manual
• Operations are explained mainly using buttons on the faceplate.
• English indications are used for the purpose of explanation. You can select the display language from the
menu. (
4
•
[XX]
• (
)
indicates the selected items.
XX
) indicates references are available on the stated page.
2
Page 3
BASICS
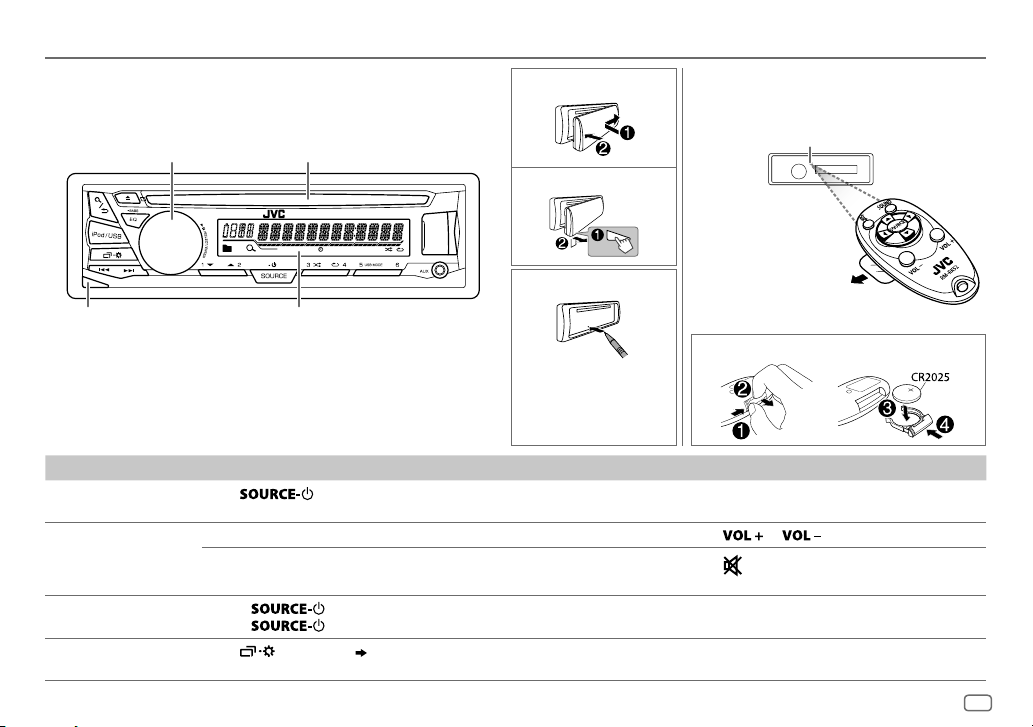
Attach
Volume knob Loading slot
Detach
ST
How to reset
Detach button Display window
Your preset adjustments
will be erased except
stored radio stations.
To On the faceplate On the remote control
Turn on the power
Adjust the volume Turn the volume knob. Press
Select a source
Change the display
information
Press
• Press and hold to turn off the power.
Press the volume knob to mute the sound or pause playback.
• Press again to cancel.
• Press
• Press
Press
.
repeatedly.
, then turn the volume knob within 2 seconds.
repeatedly.
( 16)
Remote control (RM-RK52)Faceplate
Remote sensor (Do not expose
to bright sunlight.)
Pull out the insulation
sheet when using for
the first time.
How to replace the battery
( Not available )
or .
Press
to mute the sound or pause playback.
• Press again to cancel.
Press SOURCE repeatedly.
( Not available )
ENGLISH
3
Page 4
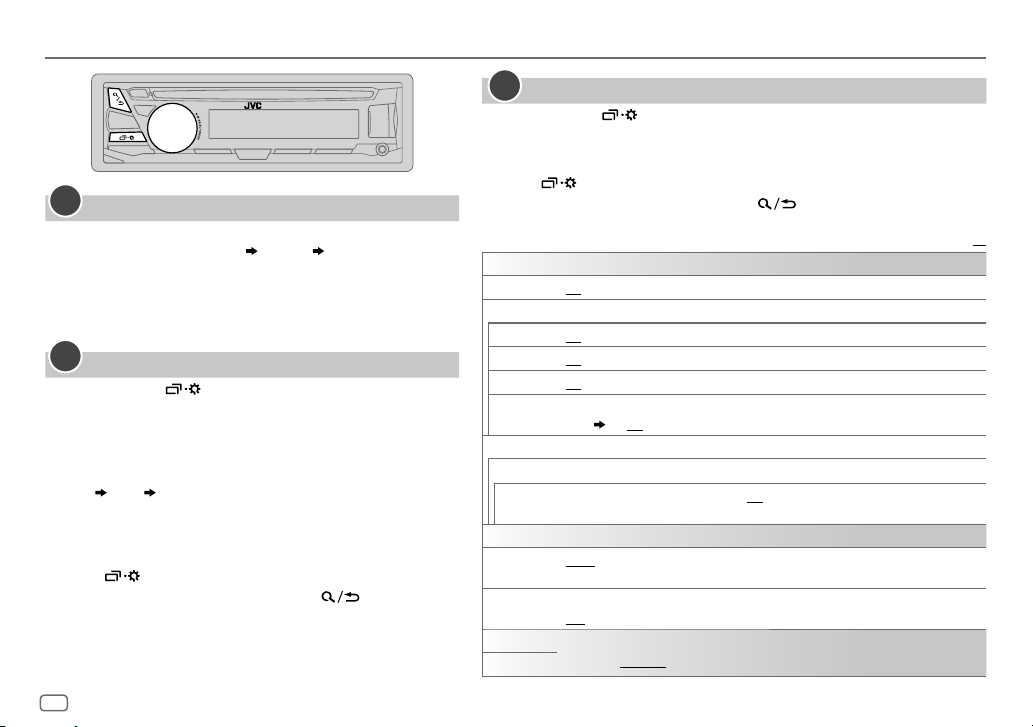
GETTING STARTED
1
Cancel the demonstration
When you turn on the power (or after you reset the unit), the
display shows: “CANCEL DEMO”
1 Press the volume knob.
[
YES
] is selected for the initial setup.
2 Press the volume knob again.
“DEMO OFF” appears.
2
Set the clock
Press and hold .
1
2 Turn the volume knob to select [
3 Turn the volume knob to select [
knob.
4 Turn the volume knob to make the settings, then press the
knob.
Day
Hour Minute
5 Turn the volume knob to select [
knob.
6 Turn the volume knob to select [
press the knob.
7 Press to exit.
To return to the previous setting item, press .
4
“PRESS” “VOLUME KNOB”
CLOCK
], then press the knob.
CLOCK SET
], then press the
24H/ 12H
], then press the
12 HOUR
] or [
24 HOUR
], then
3
Set the basic settings
Press and hold .
1
2 Turn the volume knob to select an item (see the following table), then
press the knob.
3 Repeat step 2 until the desired item is selected or activated.
4 Press to exit.
To return to the previous setting item, press .
Default:
SETTINGS
BEEP
SRC SELECT
AM
PANDORA*ON
IHEART
AUX
F/W UPDATE
SYSTEM
F/W xxxx
CLOCK
CLOCK SYNC
CLOCK DISP ON
ENGLISH
ESPANOL
* Not displayed when the corresponding source is selected.
ON
:Activates the keypress tone.;
*
ON
:Enables AM in source selection.;
:Enables PANDORA in source selection.;
*ON
:Enables IHEARTRADIO in source selection.;
*
BT ADAPTER
jack. (
YES
For details on how to update the firmware, see: <http://www.jvc.net/cs/car/>.
AUTO
Broadcast Data System signal.;
OFF
Select the display language for menu and music information if applicable.
By default,
:Selects when the KS-BTA100 Bluetooth adapter is connected to the AUX
6
); ON:Enables AUX in source selection.;
:Starts upgrading the firmware.; NO:Cancels (upgrading is not activated).
:The clock time is automatically set using the Clock Time (CT) data in FM Radio
:The clock time is shown on the display even when the unit is turned off.;
:Cancels.
ENGLISH
is selected.
OFF
OFF
:Deactivates.
OFF
:Disables.
:Cancels.
OFF
:Disables.
OFF
:Disables.
OFF
:Disables.
XX
Page 5
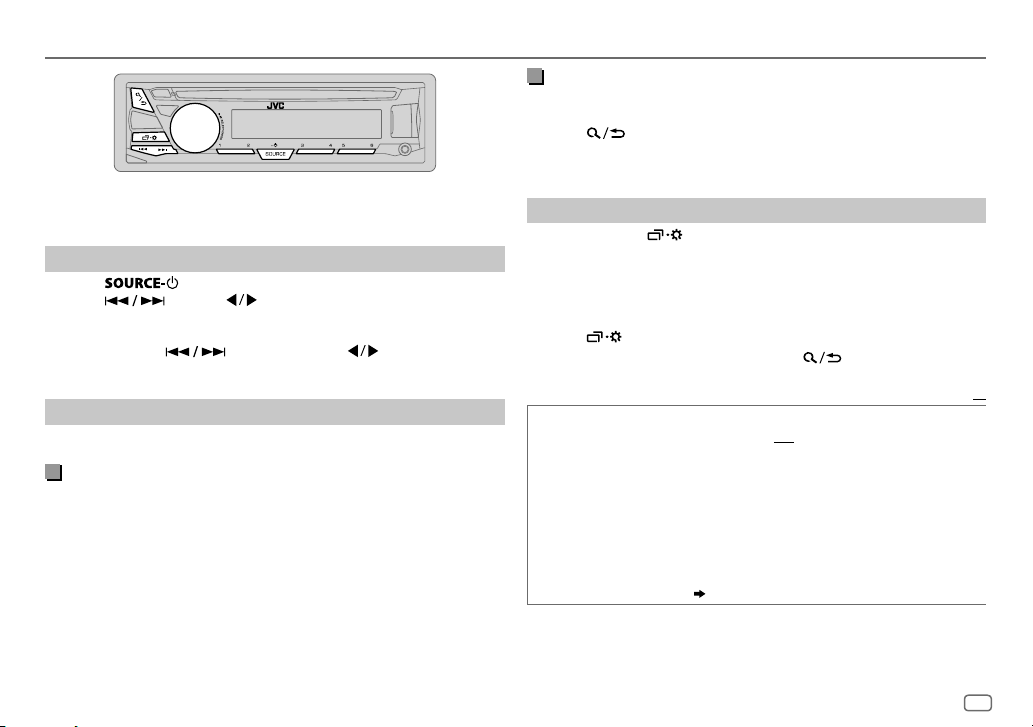
RADIO
“ST” lights up when receiving an FM stereo broadcast with sufficient
signal strength.
Search for a station
Press repeatedly to select FM or AM.
1
2 Press (or press on RM-RK52) to search for a station
automatically.
(or)
Press and hold (or press and hold on RM-RK52) until
“M” flashes, then press repeatedly to search for a station manually.
Settings in memory
You can store up to 18 stations for FM and 6 stations for AM.
Store a station
While listening to a station....
Press and hold one of the number buttons (1 to 6).
(or)
1 Press and hold the volume knob until “PRESETMODE” flashes.
2 Turn the volume knob to select a preset number, then press the
knob.
The preset number flashes and “MEMORY” appears.
Select a stored station
Press one of the number buttons (1to6).
(or)
1 Press .
2 Turn the volume knob to select a preset number, then press the
knob to confirm.
Other settings
Press and hold .
1
2 Turn the volume knob to select [
3 Turn the volume knob to select an item
then press the knob.
TUNER
], then press the knob.
(
see the following table),
4 Repeat step 3 until the desired item is selected/activated or follow
the instructions stated on the selected item.
5 Press to exit.
To return to the previous setting item, press .
Default:
RADIO TIMER
1
*
Selectable only when [
Turns on the radio at a specific time regardless of the current source.
1 ONCE/ DAILY/ WEEKLY/ OFF
turned on.
2 FM/ AM
:Select the source.
3 01
to 18 (for FM)/ 01 to 06 (for AM):Select the preset station.
4
Set the activation day *1 and time.
“
M
” lights up when complete.
Radio Timer will not activate for the following cases.
• The unit is turned off.
• [
OFF
] is selected for [AM] in [
selected.
( 4)
ONCE
] or [
WEEKLY
:Select how often the timer will be
SRC SELECT]
] is selected in step 1.
after Radio Timer for AM is
XX
ENGLISH
5
Page 6
RADIO
SSM SSM 01 – 06
IF BAND AUTO
2
*
MONO
AREA AREA US
PTY SEARCH
PTY code: NEWS, INFORM
rock),
ADLT HIT
NOSTALGA
SOFT R&B
REL TALK
(Spanish talk),
2
*
Only for FM source.
6
to 18 stations for FM. “SSM” stops flashing when the first 6 stations are
stored. Select
stations.
:Increases the tuner selectivity to reduce interference noises from
adjacent FM stations. (Stereo effect may be lost.);
interference noises from adjacent FM stations, but sound quality will not
be degraded and the stereo effect will remain.
ON
:Improves the FM reception, but the stereo effect will be lost.;
OFF
:Cancels.
10kHz/200kHz.;
FM intervals: 10kHz/50kHz.;
intervals: 9kHz/50kHz.
2
*
Select a PTY code (see below).
If there is a station broadcasting a program of the same PTY code as you
have selected, that station is tuned in.
(information),
(adult hits),
(nostalgia),
(soft rhythm and blues),
(religious talk),
JAZZ, CLASSICL
MUSC ESP
/
SSM 07 – 12
SSM 07 – 12
: For North/Central/South America, AM/FM intervals:
SOFT RCK
PERSNLTY
(Spanish music),
/
SSM 13 – 18
/
SSM 13 – 18
AREA SA
:For some South American countries, AM/
AREA EU
SPORTS, TALK, ROCK, CLS ROCK
(softrock),
(classical),
LANGUAGE, REL MUSC
(personality),
HIP HOP, WEATHER
:Automatically presets up
to store the following 12
:For any other areas, AM/FM
TOP 40, COUNTRY, OLDIES, SOFT
R & B
(rhythm and blues),
PUBLIC, COLLEGE, HABL ESP
WIDE
(religious music),
Default:
:Subjects to
(classic
AUX
XX
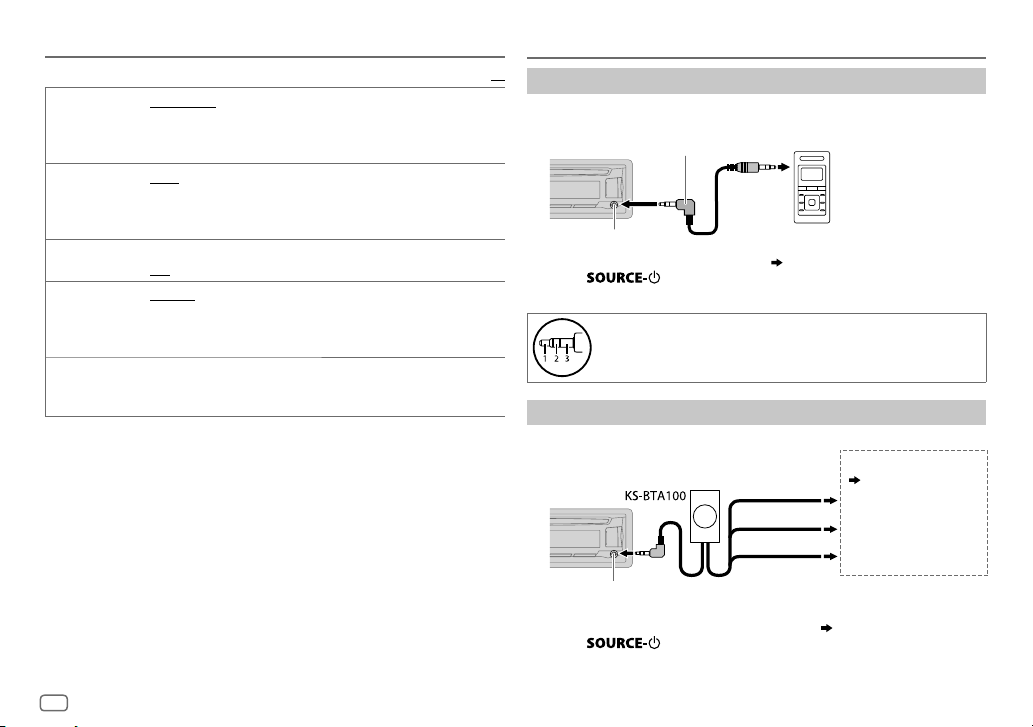
Use a portable audio player
Connect a portable audio player (commercially available).
1
3.5mm (1/8") stereo mini plug with “L” shaped connector
(commercially available)
] in [
Blue/white
Black
Brown
SRC SELECT
Portable audio player
]. ( 4)
Auxiliary input jack
2 Select [
ON
] for [
AUX
] in [
SRC SELECT
3 Press repeatedly to select AUX.
4 Turn on the portable audio player and start playback.
Use a 3-core plug head stereo mini plug for optimum audio
output.
Use a Bluetooth® device
Connect the Bluetooth adapter, KS-BTA100 (separately purchased).
1
,
Auxiliary input jack
2 Register (pair) the Bluetooth device with KS-BTA100.
3 Select [
BT ADAPTER
] for [
AUX
4 Press repeatedly to select BT AUDIO.
5 Start using the Bluetooth device.
For details, refer to the instruction manual of KS-BTA100.
Wiring harness of the unit
(
21
Blue/white: Remote
Black: Ground
Brown: Tel muting
]. ( 4)
)
Page 7
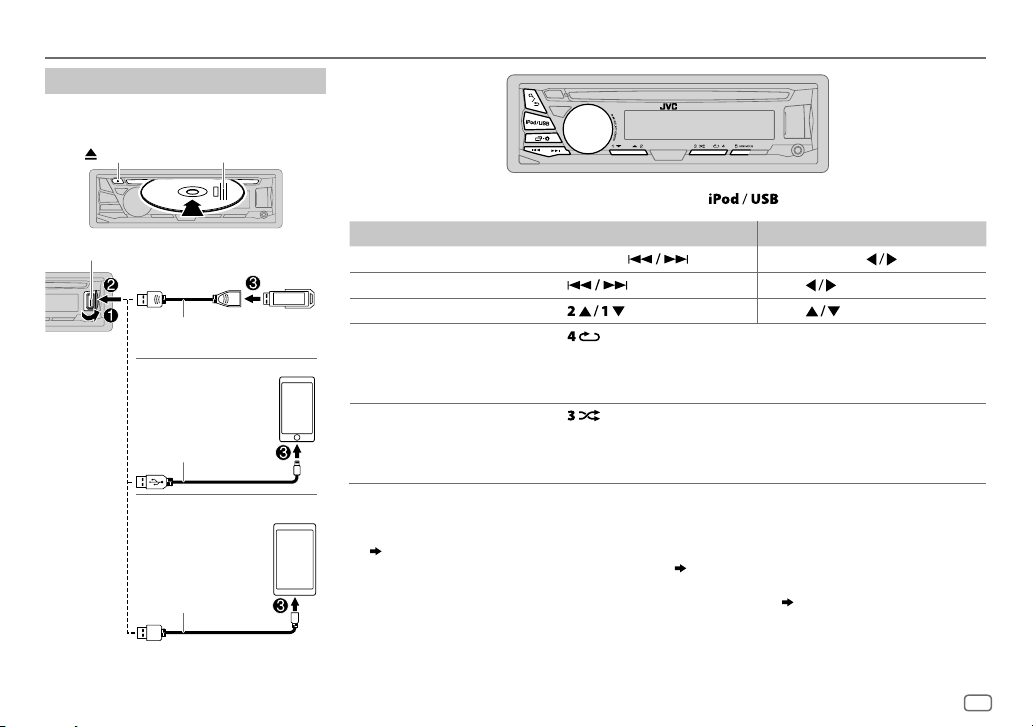
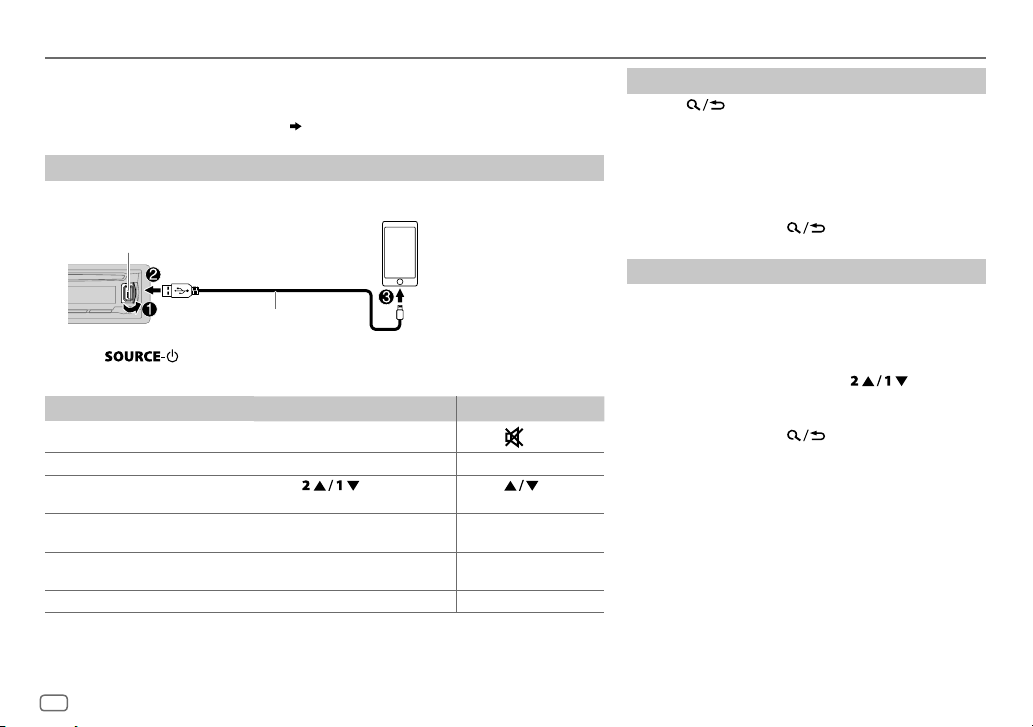
CD / USB / iPod / ANDROID
Start playback
The source changes automatically and
playback starts.
CD
Eject disc Label side
To directly select USB/ USB-IPOD/ ANDROID source, press .
USB input terminal
USB
USB 2.0 cable
*1
(commercially available)
iPod/iPhone
(Accessory of the
iPod/iPhone)*
ANDROID
1
2
*
Micro USB 2.0 cable
(commercially available)
To On the faceplate On the remote control
3
Reverse / Fast-forward
Select a track/file Press
Select a folder
5
Repeat play
*
Random play
1
*
Do not leave the cable inside the car when not using.
2
*
When connecting an Android device, “Press [VIEW] to install JVC MUSIC PLAY APP” is shown. Follow the instructions to install
*
Press and hold .
.
4
*
Press . Press .
Press and hold
Press
.
.
Press repeatedly.
TRACK RPT/ ALL RPT
TRACK RPT/ FOLDER RPT/ ALL RPT
ONE RPT/ ALL RPT/ RPT OFF
5
*
Press repeatedly.
ALL RND/ RND OFF
FOLDER RND/ ALL RND/ RND OFF
SONG RND/ ALL RND/ RND OFF
: Audio CD
: MP3/WMA/WAV/FLAC file
: iPod or ANDROID
: Audio CD
: MP3/WMA/WAV/FLAC file
: iPod or ANDROID
the application. You can also install the latest version of JVC MUSIC PLAY application on your Android device before connecting.
(
14
)
3
*
For ANDROID: Applicable only when [
4
1
*
*
For CD: Only for MP3/WMA files. This does not work for iPod/ ANDROID.
5
*
For iPod/ ANDROID: Applicable only when [
AUTO MODE
HEAD MODE
] is selected. ( 8)
]/ [
AUTO MODE
] is selected. ( 8)
ENGLISH
7
Page 8
CD / USB / iPod / ANDROID
Select control mode
While in USB-IPOD source, press repeatedly.
HEAD MODE
IPHONE MODE
While in ANDROID source, press repeatedly.
AUTO MODE
AUDIO MODE
: Control iPod from this unit.
: Control iPod using the iPod itself.
pause or file skip from this unit.
: Control Android device from this unit via JVC MUSIC PLAY
application installed in the Android device.
: Control Android device using the Android device itself via
other media player applications installed in the Android device.
However, you can still play/pause or file skip from this unit.
However,
you can still play/
Select music drive
Press repeatedly.
Stored songs in the following drive will be played back.
• Selected internal or external memory of a smartphone (Mass Storage Class).
• Selected drive of a multiple drives device.
Change the playback speed of the Audiobook
While listening to the iPod and [
HEAD MODE
] is selected....
1 Press and hold .
2 Turn the volume knob to select [
3 Press the volume knob to select [
IPOD
], then press the knob.
AUDIOBOOKS
].
4 Turn the volume knob to select an item, then press the knob.
0.5× SPEED
Audiobooks sound file in your iPod/iPhone.
(Default: Depends on your iPod/iPhone setting.)
/
1× SPEED
/
2× SPEED
: Select the desired playback speed of the
5 Press to exit.
To return to the previous setting item, press .
Select a file from a folder/list
Press .
1
2 Turn the volume knob to select a folder/list, then press the
knob.
3 Turn the volume knob to select a file, then press the knob.
Quick Search
If you have many files, you can search through them quickly.
Turn the volume knob quickly to browse through the list
quickly.
– Not applicable for iPod.
Alphabet search
You can search for a file according to the first character.
Press or turn the volume knob quickly to select the
desired character (A to Z/ 0to9/ OTHERS).
– Select “OTHERS” if the first character is other than Ato Z, 0 to 9.
• To return to the previous setting item, press .
• To cancel, press and hold
• For iPod, applicable only when [
• For ANDROID, applicable only when [
(applicable only for iPod):
.
HEAD MODE
AUTO MODE
] is selected.
] is selected.
8
Page 9
Pandora®
Preparation:
Install the latest version of the Pandora application on your device
(iPhone/ iPod touch), then create an account and log in to Pandora.
• Select [
ON
] for [
PANDORA
] in [
SRC SELECT
].
( 4)
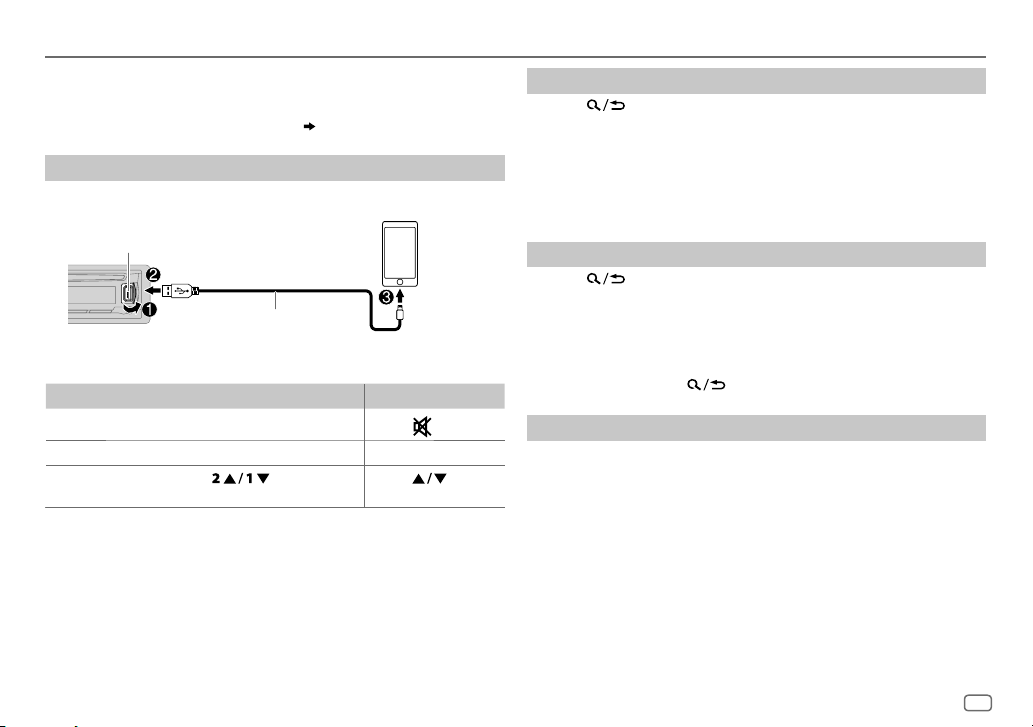
Start listening
Open the Pandora application on your device.
1
2 Connect your device to the USB input terminal.
USB input terminal
1
(Accessory of the iPod/iPhone)
The source changes to PANDORA and broadcast starts.
To On the faceplate On the remote control
Playback / pause Press the volume knob.
Skip a track
Thumbs up or
thumbs down*
1
*
Do not leave the cable inside the car when not using.
2
*
If thumbs down is selected, the current track is skipped.
Press T. Press I.
Press . Press .
2
*
.
Press
Create and save a new station
Press .
1
2 Turn the volume knob to select [
3 Turn the volume knob to select [
press the knob.
A new station is created based on the current song or artist.
NEW STATION
FROM TRACK
], then press the knob.
] or [
FROM ARTIST
], then
4 Press and hold number button 3, 4, 5 or 6 to store.
To select a stored station, press number button 3, 4, 5 or 6.
Search for a registered station
Press .
1
2 Turn the volume knob to select an item, then press the knob.
[
BY DATE]:
[
According to the registered date.
A-Z]:
Alphabetical order.
3 Turn the volume knob to select the desired station, then press the
knob.
To cancel, press and hold
.
Bookmark current song information
Press and hold the volume knob.
“BOOKMARKED” appears and the information is stored to your device.
The bookmark is available on your Pandora account but not on this unit.
ENGLISH
9
Page 10
iHeartRadio®
Preparation:
Install the latest version of iHeart Link for JVC application on your device (iPhone/ iPod
touch), then create an account and log in to iHeartRadio.
• Select [
ON
] for [
IHEART
] in [
SRC SELECT
].
( 4)
Start listening
Open the iHeart Link application on your device.
1
2 Connect your device to the USB input terminal.
USB input terminal
1
(Accessory of the iPod/iPhone)
3 Press repeatedly to select IHEARTRADIO.
Broadcast starts automatically
To
Playback / pause Press the volume knob.
Skip a track for custom station
Thumbs up or thumbs down
for custom station*
Create a new/custom station Press and hold the volume
Add to favorite stations for live
station
Scan for live station Press 4. ( Not available )
1
*
Do not leave the cable inside the car when not using.
2
*
If thumbs down is selected, the current track is skipped.
2
On the faceplate On the remote control
Press T. Press I.
Press . Press .
knob.
Press 3.
*
.
Press
( Not available )
( Not available )
Search for a station
Press .
1
2 Turn the volume knob to select a category, then
press the knob.
3 Turn the volume knob to select the desired station,
then press the knob.
When a city list appears, you can skip cities in
alphabetical order.
To cancel, press and hold
.
Skip cities by alphabetical order
While a city list appears during search...
1 Turn the volume knob quickly to enter character
search.
You can search through the list quickly according to
the first character (A to Z).
2 Turn the volume knob or press to select
the character to be searched for.
3 Press the volume knob to start searching.
To cancel, press and hold .
10
Page 11
AUDIO SETTINGS
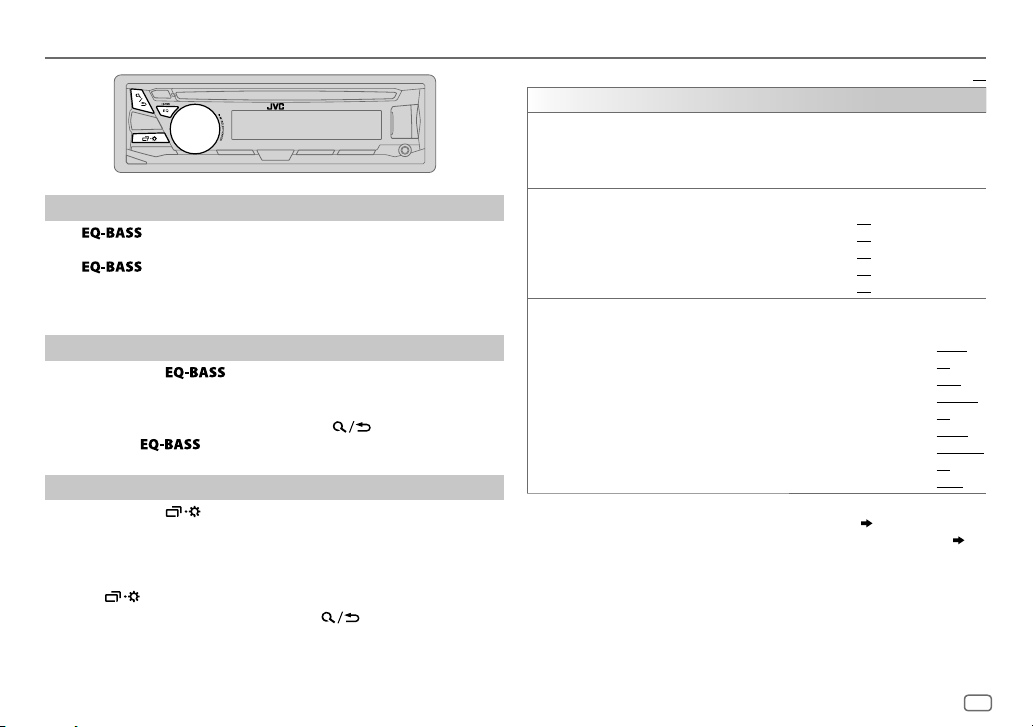
Select a preset equalizer
Press repeatedly.
(or)
Press
Preset equalizer: FLAT
VOCAL BOOST, BASS BOOST, CLASSICAL, DANCE
Store your own sound settings
Press and hold to enter EASY EQ setting.
1
2 Turn the volume knob to select an item, then press the knob.
Refer to [
• To return to the previous setting item, press .
• To exit, press
Other settings
Press and hold .
1
2 Turn the volume knob to select an item (see the following table),
then press the knob.
3 Repeat step 2 until the desired item is selected/activated or follow
the instructions stated on the selected item.
4 Press to exit.
To return to the previous setting item, press .
, then turn the volume knob within 5seconds.
(default),
EASY EQ
] for setting and the result is stored to [
HARD ROCK, HIP HOP, JAZZ, POP, R&B, TALK, USER
.
USER
].
EQ SETTING
EQ PRESET
EASY EQ
,
PRO EQ
1
*
Displayed only when [
2
*
Displayed only when [
3
*
Displayed only when [
Select a preset equalizer suitable to the music genre. (Select [
settings made in [
FLAT
VOCAL BOOST/
Adjust your own sound settings. The settings are stored to [
SUB.W SP
SUB.W
BASS
MID
LVL
TRE
LVL
1 BASS
2
Adjust the sound elements of the selected sound tone.
BASS
Level:
Q:
MIDDLE
Level:
Q:
TREBLE
Level:
Q:
EASY EQ
(Default) / HARD ROCK/
1*2
*
1*3
*
:
LVL
:
:
:
/
MIDDLE
Frequency: 60/ 80/
Frequency:
Frequency:
SUB.W
SPK/PREOUT
SPK/PREOUT
].)
BASS BOOST/
: 00to
+06
–08
to
+08
–06
to
+06
–06
to
+06
–06
to
+06
/
TREBLE
–06
Q1.0/ Q1.25/ Q1.5/ Q2.0
0.5/ 1.0/ 1.5/ 2.5 KHZ
–06
Q0.75/ Q1.0/ Q1.25
10.0/ 12.5/ 15.0/ 17.5 KHZ
–06
Q FIX
] is set to [ON].
] is set to [
] is set to [
HIP HOP/
JAZZ/
CLASSICAL/
(Default:
00)
:Select a sound tone.
100/ 200 HZ
to
+06
to
+06
to
+06
SUB.W/SUB.W
REAR/SUB.W
POP/
DANCE
03
00
00
00
(
(Default:
]. ( 12)
] or [
SUB.W/SUB.W
Default:
USER
R&B/
TALK/
USER
].
Default:
(Default:
] to use the
USER/
80 HZ
00
Q1.0
)
1.0 KHZ
00
Q1.25
10.0 KHZ
00
Q FIX
)
]. ( 12)
XX
)
ENGLISH
11
Page 12
AUDIO SETTINGS
AUDIO
BASS BOOST
LOUD 01
+01
—
+05(+01
OFF
:Cancels.
/02:Boosts low or high frequencies to produce a well-balanced
sound at low volume.;
4
SUB.W LEVEL
*
SPK-OUT
PRE-OUT
6
*
SUB.W
SUB.WLPF
ON
/
OFF
: Turns on or off the subwoofer output.
4
*
THROUGH
MID85HZ
55Hz/ 85Hz/ 120Hz are sent to the subwoofer.
4
SUB.W PHASE
*
REVERSE
output to be in line with the speaker output for optimum performance.
(Selectable only if a setting other than [
[
SUB.WLPF
FADER R06
7
*
BALANCE
VOLADJUST –15
L06
—
—
—
F06(00
R06(00
+06(00
(compared to the FM volume level). Before adjustment, select the
source you want to adjust. (“VOLADJFIX” appears if FM is selected.)
AMPGAIN LOWPOWER
the maximum power of each speaker is less than 50W to prevent
damaging the speakers.);
is 35.
): Selects your preferred bass boost level.;
OFF
:Cancels.
5
*
00
to
+06(+03
):Adjusts the output level of the
subwoofer connected via speaker lead. (
6
*
–08
to
+08(00
):Adjusts the output level of the
subwoofer connected to the lineout terminals (REAR/
SW) through an external amplifier. (
:All signals are sent to the subwoofer. ;
/
HIGH 120HZ
(180°)/
:Audio signals with frequencies lower than
NORMAL
(0°):Selects the phase of the subwoofer
THROUGH
LOW55HZ
] is selected for
].)
):Adjusts the front and rear speaker output balance.
):Adjusts the left and right speaker output balance.
):Preset the initial volume level of each source
:Limits the maximum volume level to 25. (Select if
HIGH POWER
:The maximum volume level
21)
21)
D.T.EXP
(Digital Track
Expander)
TELMUTING
SPK/PREOUT
4
*
Displayed only when [
5
*
Displayed only when [
6
*
Displayed only when [
7
*
This adjustment will not affect the subwoofer output.
8
*
Does not work if [BT
ON
:Creates realistic sound by compensating the high-frequency
components and restoring the rise-time of the waveform that are lost in
audio data compression.;
8
*
ON
:Mutes the sounds while using the cellular phone (not connected
through KS-BTA100).;
OFF
OFF
:Cancels.
:Cancels.
Depending on the speaker connection method, select the appropriate
setting to get the desired output. (
SUB.W
] is set to [ON].
SPK/PREOUT
SPK/PREOUT
ADAPTER
] is set to [
] is set to [
] is selected for [
13, Speaker output settings
SUB.W/SUB.W
REAR/SUB.W
AUX
] in [
] or [
SRCSELECT
].
SUB.W/SUB.W
)
].
]. ( 4)
/
12
Page 13
AUDIO SETTINGS
Speaker output settings
Select the output setting for the speakers [
speaker connection method.
SPK/PRE OUT],
base on the
Connection via lineout terminals
For connections through an external amplifier. ( 21)
Setting on
[
SPK/PRE OUT]
REAR/REAR
REAR/SUB.W
SUB.W/SUB.W
Front speakers output Rear speakers output
Front speakers output Subwoofer output
Front speakers output Subwoofer output
Audio signal through lineout terminal
FRONT REAR/SW
Connection via speaker leads
For connections without using an external amplifier. However, with this
settings you can also enjoy the subwoofer output. (
Setting on
[
SPK/PRE OUT]
REAR/REAR
REAR/SUB.W
SUB.W/SUB.W
If [
SUB.W/SUB.W
HIGH 120HZ
– [
R01
] is selected in [
– [
Rear speakers output Rear speakers output
Rear speakers output Rear speakers output
Subwoofer output (Mute)
] is selected:
] is selected in [
FADER
Audio signal through rear speaker lead
L (left) R (right)
SUB.WLPF
] and selectable range is [
] and [
THROUGH
21)
] is not available.
R06
]to [00]
DISPLAY SETTINGS
1 Press and hold .
2 Turn the volume knob to select an item (see the following table),
then press the knob.
3 Repeat step 2 until the desired item is selected/activated or follow
the instructions stated on the selected item.
4 Press to exit.
To return to the previous setting item, press .
Default:
DISPLAY
DIMMER
BRIGHTNESS
1
*
The illumination control wire connection is required.
Dim the display and buttons illumination.
OFF
:Dimmer is turned off.
ON
:Dimmer is turned on. Brightness changes to [
([BRIGHTNESS])
DIMMER TIME
1
Turn the volume knob to adjust the [ON] time, then press the knob.
2
Turn the volume knob to adjust the [
(Default: [
[
AUTO
headlights. *
Set the button, display and USB input terminal brightness for day and night
separately.
1 DAY / NIGHT
2
Select a zone.
3
Set the brightness level (00 to 31). (Default:
:Set the dimmer on and off time.
ON
]: 18:00 or 6:00 PM
OFF
]: 6:00 or 6:00 AM)
:Dimmer turns on and off automatically when you turn off or on the car
1
:Select day or night.
NIGHT
] setting.
OFF
] time, then press the knob.
DAY:31
;
( 21)
NIGHT:15
)
XX
ENGLISH
13
Page 14
DISPLAY SETTINGS
2
SCROLL
*
ONCE
:Scrolls the display information once.;
5-second intervals.;
COLOR
PRESET
DAY COLOR
NIGHT COLOR
COLOR GUIDE
[
NIGHT COLOR
headlight.
2
*
Some characters or symbols will not be shown correctly (or will be blanked).
3
*
If one of these color pattern is selected, the [
color will change to the default color.
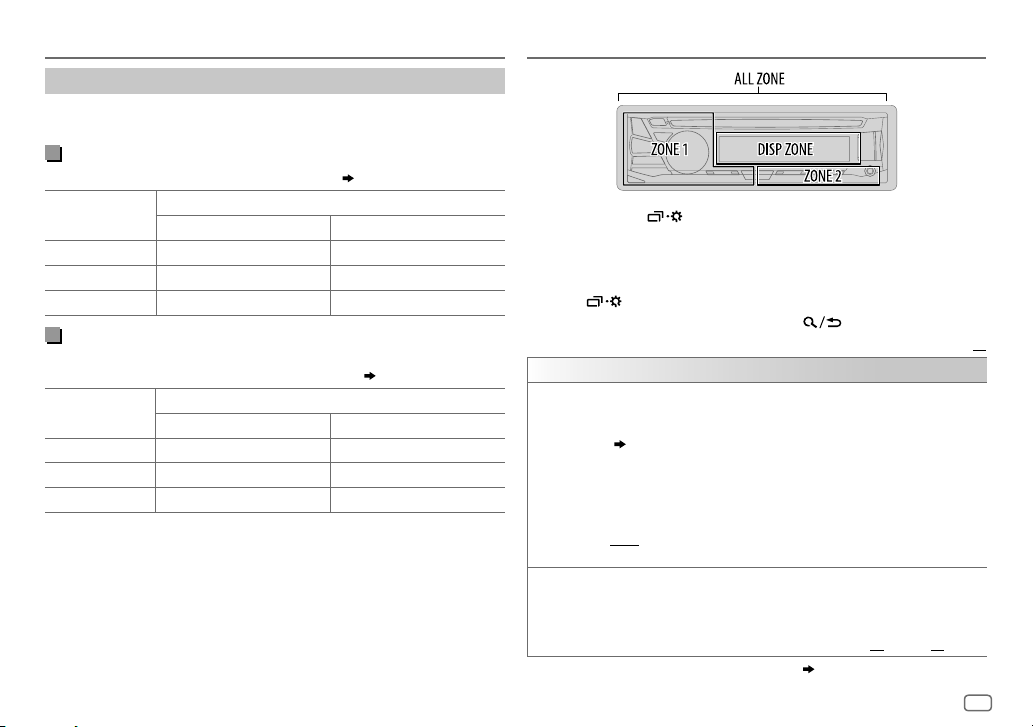
Select color for display and button illumination separately.
Default color:
ALL ZONE
ZONE 1
: [
1
Select a zone.
2
Select a color for the selected zone.
•
COLOR 01
•
USER
[
NIGHT COLOR
•
COLOR FLOW01
speeds.
•
GROOVE/ TECHNO/ EMOTION/ RELAX/ SPECTRUM/ SWEEP
POP
[
ALL ZONE
Store your own day and night colors for different zone.
1
Select a zone.
2 RED
3 00
to 31:Select the level.
Repeat steps
• Your setting is stored to [
• If [
00
appears on the display.
ON
:Changes the button, display, and auxiliary input jack illumination
when settings are performed on menu and list search. Display zone will
automatically change depending on volume level.;
] or [
DAY COLOR
OFF
:Cancels.
: [
COLOR 08
],
COLOR 08
: The color you have created for [
: The selected color pattern is shown.*3 (Selectable only when
/
GREEN
] is selected for all primary colors for [
DISP ZONE
],
ZONE 2
: [
COLOR 46
to
COLOR 49
] is shown.
to
COLOR FLOW03
] is selected in step
/
BLUE
:Select a primary color.
2
and 3 for all the primary colors.
] is changed by turning on or off your car’s
USER
ZONE 1
AUTO
: [
COLOR 01
]
DAY COLOR
: Color changes at different
1.)
] in [
PRESET
].
DISP ZONE
], [
DISP ZONE
14
:Repeats scrolling at
],
] or
], nothing
OFF
:Cancels.
], [
ZONE 2
] illumination
REFERENCES
Maintenance
Cleaning the unit
Wipe off dirt on the faceplate with a dry silicone or soft cloth.
Cleaning the connector
Detach the faceplate and clean the connector
gently with a cotton swab, being careful not to
damage the connector.
Handling discs:
• Do not touch the recording surface of the disc.
• Do not stick tape etc. on the disc, or use a disc with tape stuck on it.
• Do not use any accessories for the disc.
• Clean from the center of the disc and move outward.
• Clean the disc with a dry silicone or soft cloth. Do not use any solvents.
/
• When removing discs from this unit, pull them out horizontally.
• Remove burrs from the center hole and disc edge before inserting a disc.
More information
Visit also the following website <http://www.jvc.net/cs/car/> for:
– Latest firmware updates and latest compatible item list
– Android™ application JVC MUSIC PLAY
– Any other latest information
About discs and audio files
• This unit can only play the following CDs:
• This unit can play back multi-session discs; however, unclosed sessions will be skipped
during playback.
•
Unplayable discs:
- Discs that are not round.
- Discs with coloring on the recording surface or discs that are dirty.
- Recordable/ReWritable discs that have not been finalized.
- 8 cm CD. Attempting to insert using an adapter may cause malfunction.
Connector (on the reverse
side of the faceplate)
Page 15

REFERENCES
•
DualDisc playback:
Disc Digital Audio” standard. Therefore, the use of Non-DVD side of a DualDisc on this product
cannot be recommended.
•
Playable files:
- File extensions: MP3(.mp3), WMA(.wma)
- Bit rate: MP3: 8kbps — 320kbps
WMA: 32kbps — 192kbps
- Sampling frequency:
MP3: 48kHz, 44.1kHz, 32kHz, 24kHz, 22.05kHz, 16kHz, 12kHz, 11.025kHz, 8kHz
WMA: 8kHz — 48kHz
- Variable bit rate (VBR) files.
•
Maximum number of characters for file/folder name:
It depends on the disc format used (includes 4 extension characters—<.mp3> or <.wma>.
- ISO 9660 Level 1 and 2: 32 characters
- Romeo: 32 characters
- Joliet: 32 characters
- Windows long file name: 32 characters
About USB devices
• This unit can play MP3/WMA/WAV/FLAC files stored on a USB mass storage class device.
• You cannot connect a USB device via a USB hub.
• Connecting a cable whose total length is longer than 5m may result in abnormal playback.
• The maximum number of characters for:
- Folder names: 64 characters
- File names: 64 characters
- MP3 Tag: 64 characters
- WMA Tag: 64 characters
- WAV Tag: 64 characters
- FLAC Tag: 64 characters
• This unit can recognize a total of 15 000 files, 500 folders (999 files per folder including folder
without unsupported files), and of 8 hierarchies.
• This unit cannot recognize a USB device whose rating is other than 5V and exceeds 1A.
The Non-DVD side of a “DualDisc” does not comply with the “Compact
About iPod/iPhone
Made for
- iPod touch (2nd, 3rd, 4th, and 5th generation)
- iPod classic
- iPod nano (3rd, 4th, 5th, 6th, and 7th generation)
- iPhone 3G, 3GS, 4, 4S, 5, 5S, 5C, 6, 6 Plus
• It is not possible to browse video files on the “Videos” menu in
• The song order displayed on the selection menu of this unit may differ from that of the iPod/
iPhone.
About Android device
• This unit supports Android OS 4.1 and above.
• Some Android devices (with OS4.1 and above) may not fully support Android Open Accessory
(AOA)2.0.
• If the Android device supports both mass storage class device and AOA2.0, this unit always
playback via AOA2.0 as priority.
About Pandora
• Pandora is only available in certain countries.
Please visit <http://www.pandora.com/legal> for more information.
• Because Pandora is a third-party service, the specifications are subject to change without
prior notice. Accordingly, compatibility may be impaired, or some or all of the services may
become unavailable.
• Some functions of Pandora cannot be operated from this unit.
• For issues using the application, please contact Pandora at pandora-support@pandora.com.
About iHeartRadio
• iHeartRadio® is a third-party service, therefore the specifications are subject to change
without prior notice. Accordingly, compatibility may be impaired or some or all of the
services may become unavailable.
• Some iHeartRadio® functionality cannot be operated from this unit.
[HEAD MODE]
.
ENGLISH
15
Page 16
REFERENCES
Change the display information
Each time you press , the display information changes.
• If the information is unavailable or not recorded, “NO TEXT”, “NO NAME”, or other
information (eg. station name) appears.
FM
or
AM
Frequency Day/Clock
(For FM Radio Broadcast Data System stations only)
CD
or
USB (For CD-DA)
USB-IPOD
or
ANDROID
PANDORA
IHEARTRADIO
AUX
BT AUDIO
Station name (PS) Frequency Program type (PTY)
Day/Clock
Playing time Day/Clock Disc name Track title
(backtothebeginning)
(For MP3/WMA/WAV/FLAC files)
Playing time Day/Clock Album title/Artist Track title
Folder/file name
Playing time Day/Clock Album title/Artist Track title
(back to the beginning)
Station name
Playing time
Station name Track title Track Artist Day/Clock
(backtothebeginning)
AUX Day/Clock
BT AUDIO Day/Clock
(back to the beginning)
(back to the beginning)
Shared/Radio Album title
Day/Clock (back to the beginning)
Artist Track title
Radiotext+
TROUBLESHOOTING
Symptom Remedy
Sound cannot be heard. • Adjust the volume to the optimum level.
“MISWIRING CHECK
WIRING THEN PWR ON”
appears.
General
“PROTECTING SEND
SERVICE” appears.
Source cannot be selected. Check the [
• Radio reception is poor.
• Static noise while
Radio
listening to the radio.
Disc cannot be ejected.
“IN DISC” appears. Make sure nothing is blocking the loading slot when you
“PLEASE” and “EJECT”
appear alternately.
Playback order is not as
intended.
CD / USB / iPod
Elapsed playing time is not
correct.
“NOT SUPPORT” appears
and track skips.
“READING” keeps flashing. • Do not use too many hierarchical levels and folders.
• Check the cords and connections.
Turn the power off, then check to be sure the terminals
of the speaker wires are insulated properly. Turn the
power on again.
Send the unit to the nearest service center.
SRC SELECT
] setting.
( 4)
Connect the antenna firmly.
Press and hold
to drop the disc when it is ejected.
eject the disc.
Press
The playback order is determined by the file name (USB)
or the order in which files were recorded (disc).
This depends on the recording process earlier.
Check whether the track is a playable format.
( 14, 15)
• Reload the disc or reattach the USB device.
to forcibly eject the disc. Be careful not
, then insert the disc correctly.
16
Page 17
TROUBLESHOOTING
Symptom
“CANNOT PLAY” flashes and/
or connected device cannot
be detected.
The iPod/iPhone does not
turn on or does not work.
Correct characters are not
CD / USB / iPod
displayed.
• Sound cannot be heard
during playback.
• Sound output only from
the Android device.
Cannot playback at [
].
MODE
ANDROID
“NO DEVICE” or “READING”
keeps flashing.
Playback is intermittent or
sound skips.
“CANNOT PLAY” • Make sure Android device contains playable audio files.
Remedy
• Check whether the connected device is compatible with this unit
and ensure the files are in supported formats. (
• Reattach the device.
• Check the connection between this unit and iPod/iPhone.
• Detach and reset the iPod/iPhone using hard reset.
• This unit can only display uppercase letters, numbers, and a
limited number of symbols.
• Depending on the display language you have selected (
some characters may not be displayed correctly.
• Reconnect the Android device.
AUDIO MODE
• If in [
the Android device and start playback.
AUDIO MODE
• If in [
application or use another media player application.
• Restart the Android device.
• If this does not solve the problem, the connected Android device
is unable to route the audio signal to unit. (
• Make sure JVC MUSIC PLAY APP is installed on the Android
AUTO
device. ( 7)
• Reconnect the Android device and select the appropriate control
mode. (
• If this does not solve the problem, the connected Android device
does not support [
• Switch off the developer options on the Android device.
• Reconnect the Android device.
• If this does not solve the problem, the connected Android device
does not support [
Turn off the power saving mode on the Android device.
• Reconnect the Android device.
• Restart the Android device.
], launch any media player application on
], relaunch the current media player
8
)
AUTO MODE
AUTO MODE
]. (
15
]. (
15
Symptom Remedy
14, 15)
4),
15
)
)
)
“ADDERROR” New station creation is unsuccessful.
“CHKDEVICE” Check the Pandora application on your device.
“NOSKIPS” The skip limit has been reached.
“NOSTATIONS” No stations are found.
“STATIONLMT” The number of registered stations has reached
“UPGRADEAPP” Make sure you have installed the latest version
Pandora
“CONNECT ERR” Communication is unstable.
“RATING ERR” Registration of thumbs up/thumbs down has
“THUMBS N/A” Registration of thumbs up/thumbs down is not
“LICENSE ERR” You try to access from a country which Pandora
Station cannot be selected. If “Explicit Content” in [Account Settings] is
“CREATE ERR” Custom station name creation is unsuccessful.
“SAVE ERROR” Addition to the favorite category failed.
“DISCONNCTED” Check the connection to the device.
iHeartRadio
“NOSKIPS” The skip limit has been reached. Retry later.
“NOSTATIONS” No stations are found.
“NOT CONNCTD” Link to the application is impossible.
its limit. Retry after deleting unnecessary
stations from your device.
of the Pandora application on your device.
failed due to insufficient network connectivity.
allowed.
is not deliverable.
checked in the web version of iHeartRADIO,
custom stations become unavailable.
ENGLISH
17
Page 18
TROUBLESHOOTING
SPECIFICATIONS
Symptom Remedy
“UPDATE APP” Make sure you have installed the latest version of the
“PLS LOGIN” You haven’t log in. Log in again.
“STATION NOT AVAILABLE” Broadcast from the station is over.
“STATION NOT SELECTED” No station is selected.
iHeartRadio
“STREAM ERR” Broadcast data is interrupted.
“THUMBS ERR” Registration of Thumbs Up/Down has failed.
“TIMED OUT” The request has resulted in time-out.
iHeart Link for JVC application on your device.
If you have any troubles, try the following:
1 Check TROUBLESHOOTING
2 Reset the unit ( 3)
3 Contact (USA only)
Call: 1-800-252-5722 ( or ) visit: http://www.jvc.com
FM Frequency Range 87.9MHz — 107.9MHz (200kHz step)
Channel Space Selection 50kHz/200kHz
Usable Sensitivity (S/N=26dB) 8.2dBf (0.71μV/75Ω)
Quieting Sensitivity (DINS/N=46dB) 17.2dBf (2.0μV/75Ω)
Frequency Response (±3dB) 30Hz — 15kHz
Signal-to-Noise Ratio (MONO) 64dB
Tuner
Stereo Separation (1kHz) 40dB
AM Frequency Range 530kHz — 1700kHz (10kHz step)
Channel Space Selection 9kHz/10kHz
Usable Sensitivity (S/N=20dB) 29dBμ (28.2μV)
Laser Diode GaAIAs
Digital Filter (D/A) 8 times over sampling
Spindle Speed 500 rpm — 200 rpm (CLV)
Wow & Flutter Below measurable limit
Frequency Response (±1dB) 20 Hz — 20 kHz
Total Harmonic Distortion (1 kHz) 0.01 %
CD player
Signal-to-Noise Ratio (1 kHz) 105 dB
Dynamic Range 90 dB
Channel Separation 85 dB
MP3 Decode Compliant with MPEG-1/2 Audio Layer-3
WMA Decode Compliant with Windows Media Audio
87.5MHz — 108.0MHz (50kHz step)
531kHz — 1611kHz (9kHz step)
18
Page 19
SPECIFICATIONS
USB Standard USB1.1, USB2.0 (Full speed)
Compatible Devices Mass storage class
File System FAT12/16/32
Maximum Supply Current DC5V
USB
MP3 Decode Compliant with MPEG-1/2 Audio Layer-3
WMA Decode Compliant with Windows Media Audio
WAV Decode Linear-PCM
FLAC Decode FLAC files
Frequency Response (±3dB) 20Hz—20kHz
Input Maximum Voltage 1000mV
Auxiliary
Input Impedance 30kΩ
Maximum Output Power 50W×4 or
Full Bandwidth Power
(at less than 1% THD)
Audio
Speaker Impedance 4Ω—8Ω
Preout Level/Load CD/USB: 2500mV/10kΩ load
Preout Impedance ≤600Ω
1A
50W×2 + 50W×1 (Subwoofer = 4Ω)
22W×4
Operating Voltage
(10.5V—16V allowable)
Maximum Current Consumption 10A
Operating Temperature Range –10°C — +60°C
General
Installation Size (W×H×D) 182mm×53mm×158mm
Weight
Subject to change without notice.
14.4V
(7-3/16"×2-1/8"×6-1/4")
1.1k
g
(2.43lbs)
ENGLISH
19
Page 20
Warning
• The unit can only be used with a 12V DC power supply, negative ground.
• Disconnect the battery’s negative terminal before wiring and mounting.
• Do not connect Battery wire (yellow) and Ignition wire (red) to the car
chassis or Ground wire (black) to prevent a short circuit.
• Insulate unconnected wires with vinyl tape to prevent a short circuit.
• Be sure to ground this unit to the car’s chassis again after installation.
Caution
• For safety’s sake, leave wiring and mounting to professionals. Consult the
car audio dealer.
• Install this unit in the console of your vehicle. Do not touch the metal
parts of this unit during and shortly after use of the unit. Metal parts such
as the heat sink and enclosure become hot.
• Do not connect the
(black), or connect them in parallel.
• Connect speakers with a maximum power of more than 50W. If the
maximum power of the speakers is lower than 50W, change the
[AMP GAIN]
• Mount the unit at an angle of less than 30º.
• If your vehicle wiring harness does not have the ignition terminal,
connect Ignition wire (red) to the terminal on the vehicle’s fuse box
INSTALLATION / CONNECTION
which provides 12 V DC power supply and is turned on and off by the
ignition key.
• Keep all cables away from heat dissipate metal parts.
• After the unit is installed, check whether the brake lamps, blinkers,
wipers, etc. on the car are working properly.
• If the fuse blows, first make sure the wires are not touching car’s chassis,
then replace the old fuse with one that has the same rating.
wires of speakers to the car chassis or Ground wire
setting to avoid damaging the speakers. (
12)
Basic procedure
1
Remove the key from the ignition switch, then
disconnect the
terminal of the car battery.
2 Connect the wires properly.
See Wiring connection.
(21)
3 Install the unit to your car.
See Installing the unit (in-dash mounting).
4 Connect the terminal of the car battery.
5 Reset the unit.
(3)
20
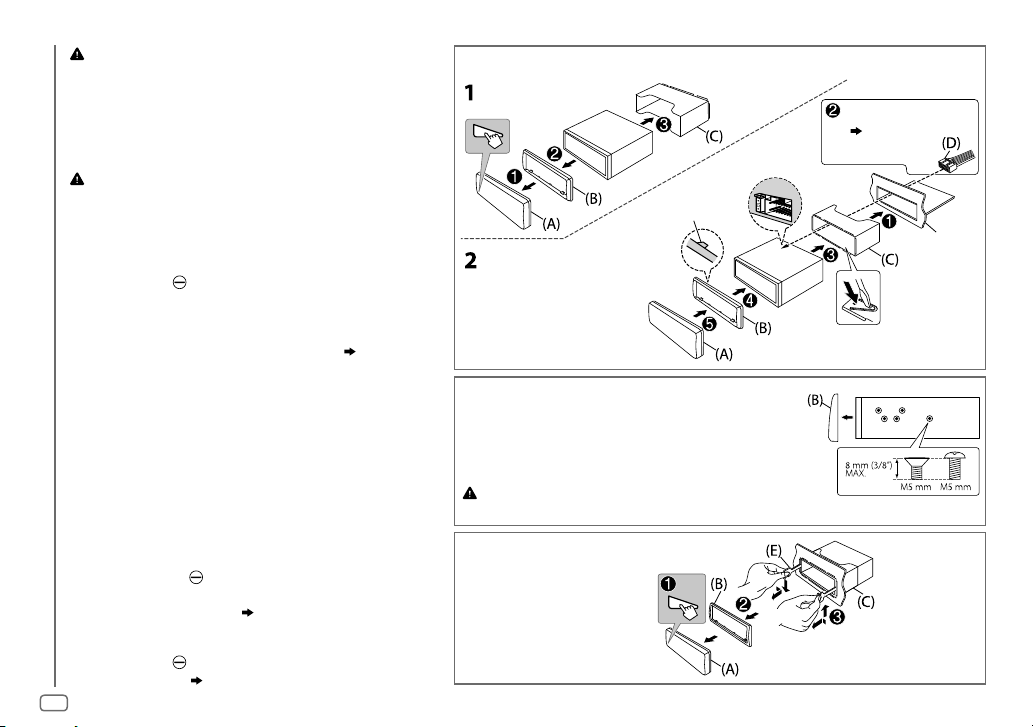
Installing the unit (in-dash mounting)
Hook on the top side
Orientate the trim plate as
illustrated before fitting.
When installing without the mounting sleeve
1
Remove the mounting sleeve and trim plate
from the unit.
2 Align the holes in the unit (on both sides) with
the vehicle mounting bracket and secure the
unit with screws (commercially available).
Use only the specified screws. Using wrong screws might damage
the unit.
How to remove the unit
Do the required wiring.
(21)
Dashboard of
your car
Bend the appropriate tabs to
hold the sleeve firmly in place.
Page 21

Wiring connection
IMPORTANT
We recommend installing the unit with a commercially available
custom wiring harness specific for your car and leave this job to
professionals for your safety. Consult your car audio dealer.
Vehicle
dashboard
Output terminals
Signal cord (not supplied)
Fuse (10A)
JVC Amplifier
Remote wire
(not supplied)
1
*
Firmly connect the ground wire
of the amplifier to the car’s
chassis to avoid damaging the
1
*
unit.
Part list for
installation
(A)
Faceplate
Factory wiring
harness (vehicle)
Custom wiring harness
(separately purchased)
2
*
You can also connect
a subwoofer speaker
directly using this
lead without an
external subwoofer
amplifier. For setting,
Connection via
speaker leads, 13
.
Recommended connection
To the steering wheel
remote control adapter
Blue: To power antenna
Blue/white: To amplifier
Antenna terminal
Light blue/yellow
STEERING
WHEEL
REMOTE
Join the same color wires together.
Blue/white: Remote (200mA max.)
Orange/white: Illumination
Brown: Tel muting
Yellow: Battery 12V
Red: Ignition 12V
Black: Ground
Gray: Front speaker (right)
Gray/black
White: Front speaker (left)
White/black
Purple: Rear speaker (right)
Purple/black
Green: Rear speaker (left)
Green/black
2
*
2
*
Ignition switch
Car fuse block
Separate red wire
Make this connection if
your vehicle factory wiring
harness does not have “12V
ignition switch” wire.
(B)
Trim plate
(C)
Mounting sleeve
(D)
Wiring harness
(E)
Extraction key
ENGLISH
21
Page 22

TABLE DES MATIERES
AVANT L’UTILISATION 2
FONCTIONNEMENT DE BASE 3
PRISE EN MAIN 4
1 Annulez la démonstration
2 Réglez l’horloge
3 Faites les réglages de base
RADIO 5
AUX 6
CD / USB / iPod / ANDROID 7
Pandora® 9
iHeartRadio® 10
RÉGLAGES AUDIO 11
RÉGLAGES D’AFFICHAGE 13
RÉFÉRENCES 14
Entretien
Plus d’informations
GUIDE DE DÉPANNAGE 16
SPÉCIFICATIONS 18
INSTALLATION /
RACCORDEMENT 20
AVANT L’UTILISATION
IMPORTANTES
• Pour utiliser correctement l’appareil, veuillez ce manuel complément avant de l’utiliser. Il est particulièrement important que
vous lisiez et acceptiez les avertissements et les précautions de ce manuel.
• Veuillez garder ce manuel dans un endroit sûr et accessible pour une utilisation future.
Avertissement
N’utilisez aucune fonction qui risque de vous distraire de la conduite sure de votre véhicule.
Précautions
Réglage du volume:
• Ajustez le volume de façon à pouvoir entendre les sons extérieurs à la voiture afin d’éviter tout risque d’accident.
• Réduisez le volume avant de reproduire des sources numériques afin d’éviter d’endommager les enceintes par la soudaine
augmentation du niveau de sortie.
Généralités:
• Éviter d’utiliser le périphérique extérieur s’il peut gêner une conduite en toute sécurité.
• Assurez-vous que toutes les données importantes ont été sauvegardées. Nous ne pouvons pas être tenu responsable pour toute
perte des données enregistrées.
• Veuillez faire en sorte de ne jamais mettre ou laisser d’objets métalliques (tels que des pièces ou des outils) dans l’appareil, afin
d’éviter tout risque de court-circuit.
• Si une erreur de disque se produit à cause de la condensation sur l’objectif laser, éjectez le disque et attendez que l’humidité
s’évapore.
Télécommande (RM-RK52):
• Ne laissez pas la télécommande dans des endroits exposés à la chaleur, comme sur le tableau de bord par exemple.
• La pile au lithium risque d’exploser si elle est remplacée incorrectement. Ne la remplacez uniquement qu’avec le même type de
pile ou son équivalent.
• Le boîtier de la pile ou les piles ne doivent pas être exposés à des chaleurs excessives telles que les rayons du soleil, du feu, etc.
• Gardez la pile hors de la portée des enfants et dans son emballage d’origine quand elle n’est pas utilisée. Débarrassez-vous des
piles usagées rapidement. En cas d’ingestion, contactez un médecin immédiatement.
Comment lire ce manuel
• Les opérations sont expliquées principalement en utilisant les touches de la façade.
• Les indications en anglais sont utilisées dans un but explicatif. Vous pouvez choisir la langue d’affichage à partir du menu.
(
4
)
•
[XX]
indique les éléments choisis.
• (
XX
) indique que des références sont disponibles aux page citées.
2
Page 23

FONCTIONNEMENT DE BASE
Attachez
Bouton de volume Fente d’insertion
Détachez
ST
Comment réinitialiser
Touche de détachement Fenêtre d’affichage
Vos ajustements préréglés
seront effacés sauf les
stations radio mémorisées.
Pour Sur la façade Sur la télécommande
Mettez l’appareil sous
tension
Ajustez le volume
Sélectionner la source
Changez l’information
sur l’affichage
Appuyez sur .
• Maintenez la touche enfoncée pour mettre l’appareil hors tension.
Tournez le bouton de volume. Appuyez sur ou .
Appuyez sur le bouton de volume pour couper le son ou mettre la lecture en pause.
• Appuyez une nouvelle fois pour annuler.
• Appuyez répétitivement sur .
• Appuyez sur
Appuyez répétitivement sur .
, puis tournez le bouton de volume avant 2 secondes.
( 16)
Télécommande (RM-RK52)Façade
Capteur de télécommande (Ne l’exposez
Pas à la lumière directe du soleil.)
Retirez la feuille d’isolant
lors de la première
utilisation.
Comment remplacer la pile
( Non disponible )
Appuyez sur
lecture en pause.
• Appuyez une nouvelle fois pour annuler.
Appuyez répétitivement sur
( Non disponible )
pour couper le son ou mettre la
SOURCE
.
FRANÇAIS
3
Page 24

PRISE EN MAIN
1
Annulez la démonstration
Quand vous mettez l’appareil sous tension (ou après une réinitialisation de
l’appareil), l’affichage apparaît: “CANCEL DEMO”
1 Appuyez sur le bouton de volume.
[
YES
] est choisi pour le réglage initial.
2 Appuyez de nouveau sur le bouton de volume.
“DEMO OFF” apparaît.
2
Réglez l’horloge
Maintenez enfoncée .
1
2 Tournez le bouton de volume pour choisir [
sur le bouton.
3 Tournez le bouton de volume pour choisir [
appuyez sur le bouton.
4 Tournez le bouton de volume pour faire les réglages, puis
appuyez sur le bouton.
Jour Heure Minute
5 Tournez le bouton de volume pour choisir [
appuyez sur le bouton.
6 Tournez le bouton de volume pour choisir [
puis appuyez sur le bouton.
7 Appuyez sur pour quitter.
Pour retourner à l’option de réglage précédente, appuyez sur .
“PRESS” “VOLUME KNOB”
CLOCK
], puis appuyez
CLOCK SET
], puis
24H/ 12H
], puis
12 HOUR
] ou [
24 HOUR
3
Faites les réglages de base
Maintenez enfoncée .
1
2 Tournez le bouton de volume pour sélectionner un élément (voir le tableau
suivant), puis appuyez sur le bouton.
3 Répétez l’étape 2 jusqu’à ce que l’élément souhaité soit sélectionné ou activé.
4 Appuyez sur pour quitter.
Pour retourner à l’option de réglage précédente, appuyez sur .
SETTINGS
ON
BEEP
SRC SELECT
*
AM
PANDORA*ON
IHEART *ON
*
AUX
F/W UPDATE
SYSTEM
F/W xxxx
CLOCK
],
CLOCK SYNC
CLOCK DISP ON
ENGLISH
ESPANOL
* Pas d’affichage quand la source correspondante est sélectionnée.
:Met en service la tonalité des touches.;
ON
:Met en service AM dans la sélection de la source.;
:Met en service PANDORA dans la sélection de la source.;
:Met en service IHEARTRADIO dans la sélection de la source.;
BT ADAPTER
AUX. (
YES
Pour en savoir plus sur la mise à niveau du micrologiciel, référez-vous à: <http://www.jvc.net/cs/car/>.
AUTO
données du signal FM Radio Broadcast Data System.;
Sélectionnez la langue d’affichage pour le menu et l’information sur le morceau si elle est disponible.
Par défaut,
:Sélectionne ce réglage quand l’adaptateur Bluetooth KS-BTA100 est connecté à la prise
6
); ON:Met en service AUX dans la sélection de la source.;
:Démarrer la mise à niveau du micrologiciel.; NO:Annulation (la mise à niveau n’est pas activée).
:L’horloge est réglée automatiquement à l’aide des données d’horloge (CT) comprises dans les
:L’horloge apparaît sur l’affichage même quand l’appareil est hors tension.;
ENGLISH
est sélectionné.
OFF
:Met hors service la fonction.
OFF
:Hors service.
OFF
OFF
OFF
:Annulation.
:Hors service.
:Hors service.
OFF
:Hors service.
OFF
:Annulation.
Défaut:
XX
4
Page 25

RADIO
Sélectionnez une station mémorisée
Appuyez sur l’une des touches numériques (1à6).
(ou)
1 Appuyez sur .
2 Tournez le bouton de volume pour choisir un numéro de préréglage,
puis appuyez sur le bouton pour valider.
“ST” s’allume lors de la réception d’une émission FM stéréo avec un signal suffisamment
fort.
Recherchez une station
Appuyez répétitivemenent sur pour sélectionner FM ou AM.
1
2 Appuyez sur (ou appuyez sur sur la RM-RK52) pour
rechercher une station automatiquement.
(ou)
Maintenez en enfoncé (ou maintenez pressée sur la
RM-RK52) jusqu’à ce que “M” clignote, puis appuyez répétitivement
dessus pour rechercher une station manuellement.
Réglages en mémoire
Vous pouvez mémoriser un maximum de 18 stations pour FM et de 6 stations pour AM.
Mémorisez une station
Pendant l’écoute d’une station....
Maintenez pressée une des touches numériques (1 à 6).
(ou)
1 Maintenez enfoncé le bouton de volume jusqu’à ce que “PRESETMODE”
clignote.
2 Tournez le bouton de volume pour choisir un numéro de préréglage,
puis appuyez sur le bouton.
Le numéro de préréglage clignote et “MEMORY” apparaît.
Autres paramètres
Maintenez enfoncée .
1
2 Tournez le bouton de volume pour choisir [
bouton.
3 Tournez le bouton de volume pour sélectionner un élément
tableau suivant
4 Répétez l’étape 3 jusqu’à ce que l’élément souhaité soit sélectionné/
activé ou suivez les instructions données pour l’élément sélectionné.
5 Appuyez sur pour quitter.
Pour retourner à l’option de réglage précédente, appuyez sur .
RADIO TIMER
1
*
Sélectionnable uniquement quand [
)
, puis appuyez sur le bouton.
Met la radio sous tension à une heure spécifique quelle que soit la source actuelle.
1
ONCE/ DAILY/ WEEKLY/ OFF
minuterie.
2 FM/ AM:Sélectionner la source.
3 01 à 18 (pour FM)/ 01 à 06 (pour AM):Sélectionnez la station préréglée.
4
Réglez l’heure et le jour *1 de mise en service.
“
M
” s’allume quand le réglage est terminé.
La minuterie de radio ne se met pas en service dans les cas suivants.
• L’appareil est mis hors tension.
• [
OFF
] est sélectionné pour [AM] dans [
minuterie de radio pour AM.
ONCE
] ou [
TUNER
], puis appuyez sur le
(
voir le
:Sélectionnez la fréquence de mise en service de la
SRC SELECT
( 4)
WEEKLY
] après la sélection de la
] est choisi à l’étape 1.
Défaut:
FRANÇAIS
XX
5
Page 26

RADIO
SSM SSM 01 – 06
IF BAND AUTO
2
*
MONO
AREA AREA US
PTY SEARCH
Code PTY: NEWS, INFORM
ADLT HIT
(nostalgique),
blues soft),
PERSNLTY
(musique espagnole),
2
*
Uniquement pour la source FM.
maximum de 18 stations pour FM. “SSM” s’arrête de clignoter quand les 6 premières stations
sont mémorisées. Sélectionnez
12 stations suivantes.
:Augmente la sélectivité du tuner pour réduire les interférences des stations FM
adjacentes. (L’effet stéréo peut être perdu.);
adjacentes, mais la qualité du son n’est pas dégradée et l’effet stéréo est conservé.
ON
:Améliore la réception FM mais l’effet stéréo sera perdu.;
AREA SA
AREA EU
2
*
Sélectionnez un code PTY (voir ci-dessous).
S’il y a une station diffusant un programme du code PTY que vous avez choisi, la station
est accordée.
(hits adultes),
LANGUAGE, REL MUSC
(personnalité),
(information),
SOFT RCK
JAZZ, CLASSICL
PUBLIC, COLLEGE, HABL ESP
HIP HOP, WEATHER
Défaut:
XX
/
SSM 07 – 12
/
SSM 13 – 18
SSM 07 – 12
: Pour l’Amérique du Nord/Centrale/du Sud, intervalles AM/FM: 10kHz/200kHz.;
:Pour les pays d’Amérique du Sud, intervalles AM/FM: 10kHz/50kHz.;
:Pour les autres régions, intervalles AM/FM: 9kHz/50kHz.
SPORTS, TALK, ROCK, CLS ROCK
(rock soft),
(classique),
TOP 40, COUNTRY, OLDIES, SOFT, NOSTALGA
R & B
(musique religieuses),
(rhythm et blues),
:Prérègle automatiquement un
/
SSM 13 – 18
WIDE
REL TALK
(discussion en espagnol),
pour mémoriser les
:Il y a des interférences des stations FM
OFF
:Annulation.
(rock classique),
SOFT R&B
(rhythm et
(discussion religieuse),
MUSC ESP
AUX
Utilisation d’un lecteur audio portable
Connectez un lecteur audio portable (en vente dans le commerce).
1
Mini fiche stéréo de 3,5 mm (1/8 pouces) avec connecteur en forme de “L”
(en vente dans le commerce)
Prise d’entrée auxiliaire
2 Sélectionnez [
3 Appuyez répétitivement sur pour sélectionner AUX.
4 Mettez sous tension le lecteur audio portable et démarrez la lecture.
ON
] pour [
AUX
] dans [
Utilisez une mini fiche stéréo munie d’une fiche à 3 connecteurs pour
obtenir une sortie audio optimum.
Utilisation d’un périphérique Bluetooth®
Connectez l’adaptateur Bluetooth, KS-BTA100 (vendu séparément).
1
Prise d’entrée auxiliaire
2 Enregistrement (pairage) d’un appareil Bluetooth avec le KS-BTA100.
3 Sélectionnez [
4 Appuyez répétitivement sur pour sélectionner BT AUDIO.
5 Commencez à utiliser le périphérique Bluetooth.
Pour plus de détails, se reporter au manuel d’instructions du KS-BTA100.
BT ADAPTER
] pour [
Lecteur audio portable
SRC SELECT
Bleu/blanc
Noir
Marron
AUX
] dans [
]. ( 4)
Faisceau de fils de l’appareil
(
21
Bleu/blanc: Télécommande
Noir: Masse
Marron: Sourdine téléphonique
SRC SELECT
]. ( 4)
)
6
Page 27

CD / USB / iPod / ANDROID
Démarrez la lecture
La source change automatiquement et le lecture
démarre.
CD
Éjectiez le disque Face portant l’étiquette
Prise d’entrée USB
USB
*1
Câble USB 2.0
(en vente dans le commerce)
iPod/iPhone
(Accessoire du iPod/iPhone)*
ANDROID
Câble Micro USB 2.0
(en vente dans le commerce)
1
2
*
1
*
Pour sélectionner directement la source USB/ USB-IPOD/ ANDROID, appuyez sur .
Pour Sur la façade Sur la télécommande
Recherche rapide vers
l’arrière / vers l’avant
Sélectionnez un une
plage ou un fichier
Sélectionnez un dossier
5
Répéter la lecture
Lecture aléatoire
1
*
Ne laissez pas le câble à l’intérieur de la voiture quand il n’est pas utilisé.
2
*
Lors de la connexion d’un périphérique Android, “Press [VIEW] to install JVC MUSIC PLAY APP” apparaît. Suivez les instructions pour
installer l’application. Vous pouvez aussi intaller la dernière version de l’application JVC MUSIC PLAY sur votre périphérique Android avant
la connexion. (
3
*
Pour ANDROID: Fonctionne uniquement quand [
4
*
Pour CD: Uniquement pour les fichiers MP3/WMA. Cela ne fonctionne pas pour l’iPod/ ANDROID.
5
*
Pour l’iPod/ ANDROID: Fonctionne uniquement quand [
*
5
*
14
)
Maintenez enfoncée .
3
*
Appuyez sur
4
*
Appuyez sur . Appuyez sur .
.
Maintenez enfoncée
Appuyez sur
Appuyez répétitivement sur .
TRACK RPT/ ALL RPT
TRACK RPT/ FOLDER RPT/ ALL RPT
ONE RPT/ ALL RPT/ RPT OFF
: CD Audio
: Fichier MP3/WMA/WAV/FLAC
: iPod ou ANDROID
Appuyez répétitivement sur .
ALL RND/ RND OFF
FOLDER RND/ ALL RND/ RND OFF
SONG RND/ ALL RND/ RND OFF
: CD Audio
: iPod ou ANDROID
AUTO MODE
] est sélectionné. ( 8)
HEAD MODE
]/ [
: Fichier MP3/WMA/WAV/FLAC
AUTO MODE
] est sélectionné. ( 8)
.
.
FRANÇAIS
7
Page 28

CD / USB / iPod / ANDROID
Sélectionnez le mode de commande
Quand la source est USB-IPOD, appuyez répétitivement sur .
HEAD MODE
: Commande l’iPod à partir de cet appareil.
IPHONE MODE
Quand la source est ANDROID, appuyez répétitivement sur .
AUTO MODE
AUDIO MODE
: Commande l’iPod en utilisant l’iPod lui-même. Cependant, vous pouvez
encore utiliser la lecture/pause ou le saut de fichier de cet appareil.
: Commandez le périphérique Android à partir de cet appareil via
l’application JVC MUSIC PLAY installée sur le périphérique Android.
: Commandez le périphérique Android en utilisant le périphérique Android
lui-même via une autre application multimédia installée sur le périphérique
Android. Cependant, vous pouvez encore utiliser la lecture/pause ou le saut
de fichier de cet appareil.
Sélectionnez le lecteur de musique
Appuyez répétitivement sur .
Les morceaux mémorisés dans le lecture suivant seront lus.
• Mémoire sélectionnée interne ou externe d’un smartphone (Mass Storage Class).
• Lecteur sélectionné parmi plusieurs lecteurs.
Change la vitesse de lecture des livres audio
Pendant l’écoute de l’iPod et quand [
1 Maintenez enfoncée .
2 Tournez le bouton de volume pour choisir [
bouton.
3 Appuyez sur le bouton de volume pour sélectionner [
4 Tournez le bouton de volume pour choisir un élément, puis appuyez sur le
bouton.
0.5× SPEED
/
sonore des livres audio dans votre iPod/iPhone.
(Défaut: Dépend du réglage de votre iPod/iPhone.)
5 Appuyez sur pour quitter.
Pour retourner à l’option de réglage précédente, appuyez sur .
1× SPEED
HEAD MODE
] est sélectionné....
IPOD
], puis appuyez sur le
/
2× SPEED
: Choisissez la vitesse de lecture souhaité du fichier
AUDIOBOOKS
].
Sélectionnez un fichier à partir d’un dossier/liste
Appuyez sur .
1
2 Tournez le bouton de volume pour sélectionner un dossier/liste, puis
appuyez sur le bouton.
3 Tournez le bouton de volume pour choisir un fichier, puis appuyez
sur le bouton.
Recherche rapide
Si vous avez beaucoup de fichiers, vous pouvez effectuer une recherche
rapide parmi eux.
Tournez rapidement le bouton de volume pour parcourir la liste
rapidement.
– Ne peut pas être utilisé pour iPod.
Recherche alphabétique (applicable uniquement pour iPod)
Vous pouvez rechercher un fichier en fonction du premier caractère.
Appuyez sur ou tournez le bouton de volume
rapidement pour sélectionner le caractère souhaité (A à Z/ 0à 9/
OTHERS).
– Sélec tionnez “OTHERS” si le premier caractère est autre que Aà Z, 0 à 9.
• Pour retourner à l’option de réglage précédente, appuyez sur
• Pour annuler, maintenez enfoncée
• Pour l’iPod, applicable uniquement quand [
• Pour ANDROID, applicable uniquement quand [
.
HEAD MODE
AUTO MODE
:
] est sélectionné.
] est sélectionné.
.
8
Page 29

Pandora®
Préparation:
Installez la dernière version de l’application Pandora sur votre appareil (iPhone/ iPod
touch), puis créez un compte et connectez-vous sur Pandora.
• Sélectionnez [
Démarrez l’écoute
Ouvrez l’application Pandora sur votre appareil.
1
2 Connectez votre appareil à la prise d’entrée USB.
La source change sur PANDORA et la diffusion démarre.
Pour Sur la façade Sur la télécommande
Lecture / pause Appuyez sur le bouton de
Sauter une plage
Fait défiler vers
le haut ou vers le
bas*
1
*
Ne laissez pas le câble à l’intérieur de la voiture quand il n’est pas utilisé.
2
*
Si le défilement vers le bas est sélectionné, la plage actuelle est sautée.
Prise d’entrée USB
2
ON
] pour [
PANDORA
] dans [
SRC SELECT
].
( 4)
(Accessoire du iPod/iPhone)
volume.
Appuyez sur T. Appuyez sur I.
Appuyez sur . Appuyez sur .
1
*
Appuyez sur
.
Création et sauvegarde d’une nouvelle station
Appuyez sur .
1
2 Tournez le bouton de volume pour choisir [
sur le bouton.
3 Tournez le bouton de volume pour choisir [
puis appuyez sur le bouton.
Une nouvelle station est créée sur la base du morceau ou de l’artiste actuel.
4 Maintenez enfoncé la touche numérique 3, 4, 5 ou 6 pour mémoriser.
Pour sélectionner une station mémorisée, appuyez sur la touche numérique 3, 4, 5
ou
6
.
NEW STATION
FROM TRACK
], puis appuyez
] ou [
FROM ARTIST
],
Recherchez une station mémorisée
Appuyez sur .
1
2 Tournez le bouton de volume pour choisir un élément, puis appuyez sur
le bouton.
[
BY DATE
[
3 Tournez le bouton de volume pour choisir la station souhaitée, puis
Pour annuler, maintenez enfoncée .
]: En fonction de la date d’enregistrement.
A-Z
]: Ordre alphabétique.
appuyez sur le bouton.
Enregistrez un signet sur le morceau actuel
Maintenez enfoncé le bouton de volume
“BOOKMARKED” apparaît et l’information est mémorisée sur votre périphérique.
Le signet est disponible sur votre compte Pandora mais pas sur cet appareil.
.
FRANÇAIS
9
Page 30

iHeartRadio®
Préparation:
Installez la dernière version de l’application iHeart Link for JVC sur votre appareil (iPhone/ iPod touch), puis
créez un compte et connectez-vous sur iHeartRadio.
• Sélectionnez [
Démarrez l’écoute
Ouvrez l’application iHeart Link sur votre appareil.
1
2 Connectez votre appareil à la prise d’entrée USB.
3 Appuyez répétitivement sur pour sélectionner IHEARTRADIO.
La diffusion démarre automatiquement
Pour
Lecture / pause Appuyez sur le bouton de
Saute une plage pour choisir une
station personnalisée
Fait défiler vers le haut ou le
bas pour choisir une station
personnalisée*
Crée une nouvelle station/station
personnalisée
Ajoute la station en direct aux
stations préférées
Recherche d’une station en direct
1
*
Ne laissez pas le câble à l’intérieur de la voiture quand il n’est pas utilisé.
2
*
Si le défilement vers le bas est sélectionné, la plage actuelle est sautée.
ON
] pour [
Prise d’entrée USB
2
IHEART
] dans [
(Accessoire du iPod/iPhone)
SRC SELECT
].
( 4)
1
*
Sur la façade Sur la télécommande
volume.
Appuyez sur T. Appuyez sur I.
Appuyez sur . Appuyez sur .
Maintenez enfoncé le bouton
de volume.
Appuyez sur 3.
Appuyez sur
4.
Appuyez sur
( Non disponible )
( Non disponible )
( Non disponible )
.
Recherchez une station
Appuyez sur .
1
2 Tournez le bouton de volume pour choisir une
catégorie, puis appuyez sur le bouton.
3 Tournez le bouton de volume pour choisir la station
souhaitée, puis appuyez sur le bouton.
Quand une liste des villes apparaît, vous pouvez sauter les villes
dans l’ordre alphabétique.
Pour annuler, maintenez enfoncée
.
Saute les villes dans l’ordre alphabétique
Quand une liste de villes apparaît pendant la recherche...
1 Tournez le bouton de volume rapidement pour entrer
en recherche de caractères.
Vous pouvez rechercher rapidement dans la liste à l’aide du
premier caractère (A à Z).
2 Tournez le bouton du volume ou appuyez sur
pour choisir le caractère à rechercher.
3 Appuyez sur le bouton de volume pour démarrer la
recherche.
Pour annuler, maintenez enfoncée .
10
Page 31

RÉGLAGES AUDIO
Choisissez un égaliseur préréglé
Appuyez répétitivement sur .
(ou)
Appuyez sur
Égaliseur préréglé: FLAT
BOOST
,
BASS BOOST, CLASSICAL, DANCE
Mémorisez vos propres ajustements sonores
Maintenez pressé pour accéder au réglage EASY EQ.
1
2 Tournez le bouton de volume pour choisir un élément, puis appuyez sur
le bouton.
Reportez-vous à [
• Pour retourner à l’option de réglage précédente, appuyez sur
• Pour quitter, appuyez sur
Autres paramètres
Maintenez enfoncée .
1
2 Tournez le bouton de volume pour sélectionner un élément (voir le
tableau suivant), puis appuyez sur le bouton.
3 Répétez l’étape 2 jusqu’à ce que l’élément souhaité soit sélectionné/
activé ou suivez les instructions données pour l’élément sélectionné.
4 Appuyez sur pour quitter.
Pour retourner à l’option de réglage précédente, appuyez sur .
, puis tournez le bouton de volume avant 5 secondes.
(défaut),
HARD ROCK, HIP HOP, JAZZ, POP, R&B, TALK, USER, VOCAL
EASY EQ
] pour le réglage et le réglage est mémorisé dans [
.
.
USER
].
EQ SETTING
EQ PRESET
EASY EQ
PRO EQ
1
*
Affiché uniquement quand [
2
*
Affiché uniquement quand [
3
*
Affiché uniquement quand [
(
Sélectionne un égaliseur préréglé adapté à votre genre de musique. (Sélectionnez [
utiliser les réglages réalisés dans [
FLAT
(défaut) /
VOCAL BOOST
Ajustez vos propres ajustements sonores. Les réglages sont mémorisés dans [
SUB.W SP
SUB.W
BASS LVL
MID LVL
TRE LVL
1 BASS
2
Ajustez les éléments sonores de la tonalité de son choisie.
BASS
Niveau:
Q:
MIDDLE
Niveau:
Q:
TREBLE
Niveau:
Q:
12)
BASS BOOST
: 00à
–08
–06
–06
–06
/
TREBLE
] est réglé sur [ON].
EASY EQ
/
HIP HOP
/
+06
à
+08 00
à
+06 00
à
+06 00
à
+06 00
:Choisissez une tonalité de son.
–06
Q1.0/ Q1.25/ Q1.5/ Q2.0
0.5/ 1.0/ 1.5/ 2.5 KHZ
–06
Q0.75/ Q1.0/ Q1.25
10.0/ 12.5/ 15.0/ 17.5 KHZ
–06
Q FIX
] est réglé sur [
] est réglé sur [
HARD ROCK
/
2
*1*
3
*1*
:
:
:
:
/
MIDDLE
Fréquence: 60/ 80/
Fréquence:
Fréquence:
SUB.W
SPK/PREOUT
SPK/PREOUT
Défaut:
XX
USER
].)
/
JAZZ
/
POP
/
R&B
/
CLASSICAL
/
DANCE
(Défaut:
100/ 200 HZ
à
+06
à
+06
à
+06
SUB.W/SUB.W
REAR/SUB.W
TALK
03
)
(Défaut:
(Défaut:
]. ( 12)
] ou [
/
USER
/
USER
].
(Défaut:
80 HZ
00
Q1.0
1.0 KHZ
00
Q1.25
10.0 KHZ
00
Q FIX
SUB.W/SUB.W
] pour
)
)
)
].
FRANÇAIS
11
Page 32

RÉGLAGES AUDIO
AUDIO
+01
—
BASS BOOST
LOUD 01
4
SUB.W LEVEL
*
+05(+01
OFF
:Annulation.
/02:Accentue les basses ou hautes fréquences pour produire un son plus équilibré
aux faibles niveaux de volume.;
SPK-OUT
PRE-OUT
6
*
SUB.W
*
SUB.W LPF
SUB.W PHASE
FADER R06
7
*
BALANCE
VOL ADJUST –15
AMP GAIN LOW POWER
ON
/
OFF
: Active ou désactive la sortie de caisson de grave.
4
THROUGH
MID 85HZ
55Hz/ 85Hz/ 120Hz sont envoyés sur le caisson de grave.
4
*
REVERSE
à synchroniser avec la sortie des enceintes afin d’obtenir des performances optimales.
(Peut être uniquement sélectionné si un réglage autre que [
[
SUB.W LPF
—
F06(00
L06
—
R06(00
—
+06(00
comparaison avec le niveau de volume FM). Avant un ajustement, choisissez la source
que vous souhaitez ajuster. (“VOLADJFIX” apparaît si FM est choisi.)
maximum de chaque enceinte est inférieure à 50 W pour éviter tout dommage des
enceintes.);
): Choisit votre niveau préféré d’accentuation des graves.;
OFF
:Annulation.
5
*
00
à
+06(+03
connecté par le câble d’enceinte. (
6
*
–08
grave connecté aux prises de sortie de ligne (REAR/SW) via un
amplificateur extérieur. (
:Tous les signaux sont envoyés au caisson de grave. ;
/
HIGH 120HZ
(180°)/
NORMAL
].)
):Ajuste le niveau de sortie du caisson de grave
à
+08(00
):Ajuste le niveau de sortie du caisson de
21)
21)
:Les signaux audio avec des fréquences inférieures à
LOW 55HZ
(0°):Sélectionne la phase de la sortie du caisson de grave
THROUGH
] est choisi pour
):Règle la balance de sortie des enceintes avant et arrière.
):Règle la balance de sortie des enceintes gauche et droite.
):Préréglez le niveau de volume initial de chaque source (en
:Limite le volume maximum à 25. (Choisissez ce réglage si la puissance
HIGH POWER
:Le niveau de volume maximum est de 35.
D.T.EXP
(Extension numérique
de plage)
TEL MUTING
SPK/PRE OUT
4
*
Affiché uniquement quand [
5
*
Affiché uniquement quand [
6
*
Affiché uniquement quand [
7
*
L’ajustement ne peut pas affecter la sortie du caisson de grave.
8
*
Ne fonctionne pas si [BT
ON
:Crée un son réaliste en compensant les composants haute fréquence et en
rétablissant le temps de montée de la forme d’onde qui est perdu lors de la compression
des données audio.;
8
*
ON
:Coupe le son pendant l’utilisation d’un téléphone portable (non connecté par le
KS-BTA100).;
En fonction de la méthode de connexion des enceintes, sélectionner le réglage approprié
pour obtenir la sortie souhaitée. (
ADAPTER
OFF
OFF
:Annulation.
SUB.W
] est réglé sur [ON].
SPK/PREOUT
SPK/PREOUT
] est sélectionné pour [
:Annulation.
13, Réglages de sortie d’enceinte
] est réglé sur [
] est réglé sur [
SUB.W/SUB.W
REAR/SUB.W
AUX
] dans [
].
] ou [
SRCSELECT
SUB.W/SUB.W
]. ( 4)
)
].
/
12
Page 33

RÉGLAGES AUDIO
Réglages de sortie d’enceinte
Sélectionnez le réglage de sortie pour les enceintes [
méthode de connexion des enceintes.
SPK/PRE OUT],
sur la base de la
Connexion via les prises de sortie de ligne
Pour les connexions via un amplificateur extérieur. ( 21)
Réglage
[
SPK/PRE OUT
REAR/REAR
REAR/SUB.W
SUB.W/SUB.W
]
Sortie des enceintes avant Sortie des enceintes arrière
Sortie des enceintes avant Sortie de caisson de grave
Sortie des enceintes avant Sortie de caisson de grave
Signal audio via la prise de sortie de ligne
FRONT REAR/SW
Connexion via les câbles d’enceinte
Pour les connexions sans utiliser un amplificateur extérieur. Cependant, avec ces
réglages vous pouvez aussi profiter de la sortie du caisson de grave. (
Réglage
[
SPK/PRE OUT
REAR/REAR
REAR/SUB.W
SUB.W/SUB.W
Si [
SUB.W/SUB.W
HIGH 120HZ
– [
– [
] est sélectionné dans [
R01
] est sélectionné dans [
]
Sortie des enceintes arrière Sor tie des enceintes arrière
Sortie des enceintes arrière Sor tie des enceintes arrière
Sortie de caisson de grave (Sourdine)
] est sélectionné:
Signal audio via le fil de l’enceinte arrière
L (gauche) R (droite)
SUB.WLPF
] et [
FADER
] et la plage sélectionnable est de [
THROUGH
21)
] n’est pas disponible.
R06
]à [00].
RÉGLAGES D’AFFICHAGE
1 Maintenez enfoncée .
2 Tournez le bouton de volume pour sélectionner un élément (voir le
tableau suivant), puis appuyez sur le bouton.
3 Répétez l’étape 2 jusqu’à ce que l’élément souhaité soit sélectionné/
activé ou suivez les instructions données pour l’élément sélectionné.
4 Appuyez sur pour quitter.
Pour retourner à l’option de réglage précédente, appuyez sur .
DISPLAY
DIMMER
BRIGHTNESS
1
*
La connexion du fil de commande de l’éclairage est requise.
Assombrit l’éclairage de l’affichage de des touches.
OFF
:Le gradateur est désactivé.
ON
:Le gradateur est activé. La luminosité change sur le réglage [
([BRIGHTNESS])
DIMMER TIME
1
Tournez le bouton de volume pour régler l’heure de mise en service [ON], puis appuyez sur le
2
Tournez le bouton de volume pour régler l’heure de mise en service [
(Défaut: [
[
AUTO
les feux de la voiture. *
Règle la luminosité des touches, de l’affichage et de la prise d’entrée USB séparément pour le
jour et la nuit.
1 DAY / NIGHT
2
Choisissez une zone.
3
Réglez le niveau de luminosité (00 à 31). (Défaut:
:Réglez l’heure de mise en et hors service du gradateur.
bouton.
le bouton.
ON
]: 18:00 ou 6:00 PM
OFF
]: 6:00 ou 6:00 AM)
:Le gradateur est activé et désactivé automatiquement quand vous éteignez ou allumez
1
:Choisissez le jour ou la nuit.
DAY:31
( 21)
NIGHT
;
NIGHT:15
].
OFF
], puis appuyez sur
)
FRANÇAIS
Défaut:
XX
13
Page 34

RÉGLAGES D’AFFICHAGE
2
SCROLL
*
ONCE
:Fait défiler une fois les informations de l’affichage.;
5 secondes d’intervalle.;
COLOR
PRESET
DAY COLOR
NIGHT COLOR
COLOR GUIDE
NIGHT COLOR
[
la voiture.
2
*
Certains caractères ou symboles n’apparaissent pas correctement (ou un blanc apparaît à leur
place).
3
*
Si un de ces motifs de couleur est sélectionné, la couleur d’éclairage [
[
ZONE 2
Choisissez la couleur de l’affichage de l’éclairage des touches séparément.
Couleur par défaut:
ALL ZONE
ZONE 1
1
Choisissez une zone.
2
Choisissez une couleur pour la zone sélectionnée.
•
COLOR 01
•
USER
apparaît.
•
COLOR FLOW01
•
GROOVE/ TECHNO/ EMOTION/ RELAX/ SPECTRUM/ SWEEP/ POP
de couleur sélectionné apparaît.*
est choisi à l’étape
Mémorisez vos propres couleurs du jour et de la nuit pour une zone différente.
1
Choisissez une zone.
2 RED
3 00
Répétez les étapes
• Votre réglages est mémorisé sur [
• Si [
00
sur l’affichage.
ON
:Change l’éclairage des touches, de l’affichage et de la prise d’entrée auxiliaire quand
les réglages sont réalisés sur le menu et la recherche de liste. La zone d’affichage change
automatiquement en fonction niveau de volume.;
] ou [
DAY COLOR
] change sur la couleur par défaut.
OFF
:Annulation.
: [
COLOR 08
],
DISP ZONE
: [
: [
COLOR 08
],
ZONE 2
à
COLOR 49
: La couleur que vous avez créée pour [
à
1
.)
/
GREEN
/
BLUE
à 31:Sélectionnez le niveau.
2
et 3 pour toutes les couleurs primaires.
] est choisi pour toutes les couleurs primaires pour [
] est changé quand vous allumez ou éteignez les feux de
COLOR 01
: [
COLOR 46
COLOR FLOW03
3
(Sélectionnable uniquement quand [
:Choisissez une couleur primaire.
USER
AUTO
:Répète le défilement à
],
]
DAY COLOR
] ou [
NIGHT COLOR
: La couleur change à une vitesse différente.
] dans [
PRESET
].
DISP ZONE
], rien n’apparaît
OFF
:Annulation.
ZONE 1
], [
DISP ZONE
: Le motif
ALL ZONE
],
RÉFÉRENCES
Entretien
Nettoyage de l’appareil
Essuyez la saleté de la façade avec un chiffon sec au silicone ou un chiffon doux.
Nettoyage du connecteur
Détachez la façade et nettoyez le connecteur à l’aide d’un coton
tige en faisant attention de ne pas endommager le connecteur.
Manipulation des disques:
• Ne pas toucher la surface d’enregistrement du disque.
• Ne pas coller de ruban adhésif, etc. sur les disques et ne pas
utiliser de disque avec du ruban adhésif collé dessus.
]
• N’utilisez aucun accessoire pour le disque.
• Nettoyer le disque en partant du centre vers l’extérieur.
• Nettoyez le disque avec un chiffon sec au silicone ou un chiffon doux. N’utilisez aucun solvant.
• Pour retirer les disques de cet appareil, tirez-les horizontalement.
]
• Retirez les ébarbures du bord du trou central du disque avant d’insérer un disque.
Plus d’informations
Consultez aussi le site web suivant <http://www.jvc.net/cs/car/> pour:
– Les dernières mise à jour du micrologiciel et la liste de compatibilité la plus récente
– Application Android™ JVC MUSIC PLAY
– Autres informations récentes
À propos des disques et des fichiers audio
• Cet appareil ne peut lire que les CD suivants:
• Cet autoradio peut reproduire les disques multi-session; mais les sessions non fermée sont sautées pendant la
lecture.
•
Disques ne pouvant pas être lus:
- Disques qui ne sont pas ronds.
- Disques avec des colorations sur la surface d’enregistrement ou disques sales.
- Disques enregistrables/réinscriptibles qui n’ont pas été finalisés.
- CD de 8 cm. Essayer d’insérer un disque à l’aide d’un adaptateur peut entraîner un dysfonctionnement de
l’appareil.
Connecteur (sur la face arrière de la façade)
14
Page 35

RÉFÉRENCES
•
Lecture de disques à double face:
standard “Compact Disc Digital Audio”. Par conséquent, l’utilisation de la face non DVD d’un disque à double face sur
cet appareil ne peut pas etre recommandée.
•
Fichiers pouvant être lus:
- Extensions de fichier: MP3(.mp3), WMA(.wma)
- Débit binaire: MP3: 8kbps — 320kbps
WMA: 32kbps — 192kbps
- Fréquence d’échantillonnage:
MP3: 48kHz, 44,1kHz, 32kHz, 24kHz, 22,05kHz, 16kHz, 12kHz, 11,025kHz, 8kHz
WMA: 8kHz — 48kHz
- Fichiers à débit binaire variable (VBR).
•
Nombre maximum de caractères pour le nom d’un fichier/dossier:
Ca dépend du format de disque utilisé (y compris les 4 caractères de l’extension—<.mp3> ou <.wma>).
- ISO 9660 Niveau 1 et 2: 32 caractères
- Romeo: 32 caractères
- Joliet: 32 caractères
- Nom de fichier long Windows: 32 caractères
À propos des périphériques USB
• Cet appareil peut reproduire les fichiers MP3/WMA/WAV/FLAC mémorisés sur un périphérique USB à mémoire de
grande capacité.
• Vous ne pouvez pas connecter un périphérique USB via un hub USB.
• La connexion d’un câble dont la longueur totale dépasse 5 m peut avoir pour conséquence un fonctionnement
anormal de la lecture.
• Nombre maximum de caractère pour:
- Noms de dossier: 64 caractères
- Noms de fichier: 64 caractères
- Balises MP3: 64 caractères
- Balises WMA: 64 caractères
- Balises WAV: 64 caractères
- Balises FLAC: 64 caractères
• Cet appareil peut reconnaître un maximum de 15 000 fichiers, 500 dossiers (999 fichiers par dossier y compris les
dossiers sans fichier) et 8 hiérarchies.
• Cet appareil ne peut pas reconnaître les périphériques USB dont l’alimentation n’est pas de 5 V et dépasse 1 A.
La face non DVD d’un disque à “DualDisc” n’est pas compatible avec le
À propos de l’iPod/iPhone
Made for
- iPod touch (2nd, 3rd, 4th et 5th generation)
- iPod classic
- iPod nano (3rd, 4th, 5th, 6th et 7th generation)
- iPhone 3G, 3GS, 4, 4S, 5, 5S, 5C, 6, 6 Plus
• Il n’est pas possible de parcourir les fichiers vidéo sur le menu “Videos” en mode
• L’ordre des morceaux affichés sur le menu de sélection de cet appareil peut être différent de celui de iPod/iPhone.
À propos du périphérique Android
• Cet appareil prend en charge Android OS 4.1 et ultérieur.
• Certains périphériques Android (avec OS 4.1 et ultérieur) peuvent ne pas prendre en charge complétement Android
Open Accessory (AOA) 2.0.
• Si le périphérique Android prend en charge à la fois le protocole mass storage class et AOA 2.0, cet appareil utilise
toujours en priorité la lecture via AOA 2.0.
À propos de Pandora
• Pandora est disponible uniquement dans certains pays.
Veuillez consulter <http://www.pandora.com/legal> pour en savoir plus.
• Puisque Pandora est un service tiers, les spécifications sont sujettes à changement sans notification préalable.
Par conséquent, la compatibilité peut réduite ou certains services ou même tous les services peuvent devenir
indisponibles.
• Certaines fonction de Pandora ne peuvent pas être utilisées à partir de cet appareil.
• Pour les problèmes lors de l’utilisation de l’application, veuillez contacter Pandora à
pandora-support@pandora.com.
À propos de iHeartRadio
• iHeartRadio® est un ser vice tiers, et par conséquent les spécifications sont sujettes à changement sans notification
préalable. Par conséquent, la compatibilité peut réduite ou certains services ou même tous les services peuvent
devenir indisponibles.
• Certaines fonction de iHear tRadio® ne peuvent pas être utilisées à partir de cet appareil.
[HEAD MODE]
.
FRANÇAIS
15
Page 36

RÉFÉRENCES
Changez l’information sur l’affichage
Chaque fois que vous appuyez sur , les informations affichées changent.
• Si aucune information n’est disponible ou si aucune information n’est enregistrée, “NO TEXT”, “NO NAME”, ou une
autre information (par ex. le nom de la station) apparaît.
FM
ou
AM
Fréquence Jour/Horloge
(Pour les stations FM Radio Broadcast Data System uniquement)
Nom de la station (PS) Fréquence Type de programme (PTY) Radio texte+
CD
ou
USB (Pour CD-DA)
USB-IPOD
ou
ANDROID
PANDORA
IHEARTRADIO
AUX
BT AUDIO
Jour/Horloge
Durée de lecture Jour/Horloge Nom du disque Titre de plage (retour au début)
(Pour les fichiers MP3/WMA/WAV/FLAC)
Durée de lecture Jour/Horloge Titre d’album/Artiste Titre de plage
Noms de dossier/fichier
Durée de lecture Jour/Horloge Titre d’album/Artiste Titre de plage
(retour au début)
Nom de la station Partagée/Radio Titre d’album Artiste Titre de plage
Durée de lecture
Nom de la station Titre de plage Plage Artiste Jour/Horloge (retour au début)
AUX Jour/Horloge
BT AUDIO Jour/Horloge
(retour au début)
(retour au début)
Jour/Horloge (retour au début)
GUIDE DE DÉPANNAGE
Symptôme Remède
Le son ne peut pas être entendu. • Ajustez le volume sur le niveau optimum.
“MISWIRING CHECK WIRING
THEN PWR ON” apparaît.
Généralités
“PROTECTING SEND SERVICE”
apparaît.
Vous ne pouvez pas choisir
la source.
• La réception radio est
mauvaise.
Radio
• Bruit statique pendant l’écoute
de la radio.
Le disque ne peut pas être éjecté.
“IN DISC” apparaît. Assurez-vous que rien ne bloque la fente d’insertion quand vous
“PLEASE” et “EJECT” apparaissent
alternativement.
L’ordre de lecture n’est pas celui
que vous pensiez.
CD / USB / iPod
La durée de lecture écoulée n’est
pascorrecte.
“NOT SUPPORT” apparaît et la
plage est sautée.
“READING” clignote sur. • N’utilisez pas trop de niveaux de hiérarchie et de dossiers.
• Vérifiez les cordons et les connexions.
Mettez l’appareil hors tension, puis assurez-vous que les prises des
câbles d’enceinte sont correctement isolées. Mettez de nouveau
l’appareil sous tension.
Envoyez l’appareil au centre de service le plus proche.
Cochez le réglage [
Connectez l’antenne solidement.
Maintenez enfoncée
attention que le disque ne tombe pas quand il est éjecté.
éjectez le disque.
Appuyez sur
L’ordre de lecture est déterminé par le nom du fichier (USB) ou l’ordre
dans lequel les fichiers ont été enregistrés (disque).
Cela dépend du processus d’enregistrement utilisé.
Vérifiez si la plage est dans un format compatible.
• Remettez le disque en place ou reconnectez le périphérique USB.
SRC SELECT
].
( 4)
pour éjecter le disque de force. Faites
, puis insérez le disque correctement.
( 14, 15)
16
Page 37

GUIDE DE DÉPANNAGE
Symptôme Remède
“CANNOT PLAY” clignote et/ou le
périphérique connecté ne peut pas
etre détecté.
iPod/iPhone ne peut pas être mis
sous tension ou ne fonctionne pas.
CD / USB / iPod
Les caractères corrects ne sont pas
affichés.
• Aucun son ne peut être entendu
pendant la lecture.
• Le son sort uniquement du
périphérique Android.
Lecture impossible en mode [
MODE
].
ANDROID
“NO DEVICE” ou “READING”
clignote sur.
La lecture est intermittente ou le
son saute.
“CANNOT PLAY” • Assurez-vous que le périphérique Android contient des fichiers audio
• Vérifiez si le périphérique connecté est compatible avec cet appareil et assurezvous que les fichiers sont dans un format compatible. (
• Reconnectez le périphérique.
• Vérifiez la connexion entre cet appareil et l’iPod/iPhone.
• Détachez et réinitialisez l’iPod/iPhone en utilisant un réinitialisation matérielle.
• Cet appareil peut uniquement afficher les lettres majuscules, les chiffres et un
nombre limité de symboles.
• En fonction de la langue d’affichage que vous avez choisie (
caractères peuvent ne pas être affichés correctement.
• Reconnectez le périphérique Android.
• En mode [
AUDIO MODE
le périphérique Android et démarrez la lecture.
• En mode [
AUDIO MODE
utilisez une autre application multimédia.
• Redémarrez le périphérique Android.
• Si cela ne résout pas le problème, c’est que le périphérique Android connecté ne
peut pas diriger le signal audio sur l’appareil. (
AUTO
• Assurez-vous que JVC MUSIC PLAY APP est installé sur le périphérique Android.
( 7)
• Reconnectez le périphérique Android et sélectionnez le mode de commande
approprié. (
• Si cela ne résout pas le problème, c’est que le périphérique Android connecté ne
prend pas en charge [
• Déactivez les options développeur sur le périphérique Android.
• Reconnectez le périphérique Android.
• Si cela ne résout pas le problème, c’est que le périphérique Android connecté ne
prend pas en charge [
Déactivez le mode d’économie d’énergie sur le périphérique Android.
compatibles.
• Reconnectez le périphérique Android.
• Redémarrez le périphérique Android.
], lancez n’importe quelle application multimédia sur
], relancez l’application multimédia actuelle ou
15
8
)
AUTO MODE
]. (
15
)
AUTO MODE
]. (
15
)
)
14, 15)
4), certains
Symptôme Remède
“ADDERROR” La création d’une nouvelle station n’a pas réussie.
“CHK DEVICE” Vérifiez l’application Pandora sur votre appareil.
“NO SKIPS” La limite de saut a été atteinte.
“NO STATIONS” Aucune station n’a été trouvée.
“STATIONLMT” Le nombre de stations enregistrées a atteint la limite. Essayez
“UPGRADE APP” Assurez-vous que vous avez bien installé la dernière version
Pandora
“CONNECT ERR” La communication est instable.
“RATING ERR” L’enregistrement des pouces vers le haut/vers le bas a échoué
“THUMBS N/A” L’enregistrement de pouces vers le haut/vers le bas n’est
“LICENSE ERR” Vous avez essayé d’accéder à un pays pour lequel Pandora
La station ne peut pas être choisie. Si “Explicit Content” est coché pour [Account Settings] dans
“CREATE ERR” La création d’un nom de station personnalisé n’a pas réussi.
“SAVE ERROR” L’ajout à la catégorie préférée a échoué.
“DISCONNCTED” Vérifiez la connexion à l’appareil.
iHeartRadio
“NO SKIPS” La limite de saut a été atteinte. Réessayez plus tard.
“NO STATIONS” Aucune station n’a été trouvée.
“NOT CONNCTD” La liaison à l’application est impossible.
de nouveau après avoir supprimer des stations inutiles de
votre appareil.
de l’application Pandora sur votre appareil.
à cause d’une connectivité réseau insuffisante.
pas permis.
n’est pas disponible.
la version web de iHeartRADIO, les stations personnalisées
deviennent disponibles.
FRANÇAIS
17
Page 38

GUIDE DE DÉPANNAGE
SPÉCIFICATIONS
Symptôme Remède
“UPDATE APP” Assurez-vous que vous avez bien installé la dernière version de
“PLS LOGIN” Vous n’êtes pas connecté. Connectez-vous de nouveau.
“STATION NOT AVAILABLE” La diffusion de la station est terminée.
“STATION NOT SELECTED” Aucune station n’est sélectionnée.
iHeartRadio
“STREAM ERR” La diffusion des données est interrompue.
“THUMBS ERR” L’enregistrement du défilement vers le haut/vers le bas a échoué.
“TIMED OUT” Le délai autorisé pour la demande a expiré.
l’application iHeart Link for JVC sur votre appareil.
En cas de problèmes, essayez ce qui suit:
1 Vérifiez la section GUIDE DE DÉPANNAGE
2 Réinitialisez l’appareil ( 3)
3 Contactez (USA uniquement)
Appelez: 1-800-252-5722 ( ou ) consultez:
http://www.jvc.com
FM Plage de fréquences 87,9MHz — 107,9MHz (pas de 200kHz)
Sélection de l’intervalle entre les canaux 50kHz/200kHz
Sensibilité utilisable (S/B = 26dB) 8,2dBf (0,71μV/75Ω)
Seuil de sensibilité (DINS/N=46dB) 17,2dBf (2,0μV/75Ω)
Réponse en fréquence (±3 dB) 30Hz — 15kHz
Tuner
Taux de Signal/Bruit (MONO) 64 dB
Séparation stéréo (1 kHz) 40 dB
AM Plage de fréquences 530kHz — 1700kHz (pas de 10kHz)
Sélection de l’intervalle entre les canaux 9 kHz/10 kHz
Sensibilité utilisable (S/B = 20dB) 29dBμ (28,2μV)
Diode laser GaAIAs
Filtre numérique (D/A) 8 fois suréchantillonnage
Vitesse de rotation 500 t/min. — 200 t/min. (CLV)
Pleurage et scintillement Non mesurables
Réponse en fréquence (±1 dB) 20 Hz — 20 kHz
Distorsion harmonique totale (1 kHz) 0,01 %
Lecteur CD
Taux de Signal/Bruit (1 kHz) 105 dB
Gamme dynamique 90 dB
Séparation des canaux 85 dB
Décodage MP3 Compatible avec le format MPEG-1/2 Audio Layer-3
Décodeur WMA Compatible Windows Media Audio
87,5MHz — 108,0MHz (pas de 50kHz)
531kHz — 1611kHz (pas de 9kHz)
18
Page 39

SPÉCIFICATIONS
Standard USB USB1.1, USB2.0 (Vitesse maximale)
Périphériques compatibles À mémoire de grande capacité
Système de fichiers FAT12/16/32
Courant d’alimentation maximum CC5 V
USB
Décodage MP3 Compatible avec le format MPEG-1/2 Audio Layer-3
Décodeur WMA Compatible Windows Media Audio
Décodeur WAV PCM linéaire
Décodeur FLAC Fichiers FLAC
Réponse en fréquence (±3 dB) 20Hz—20kHz
Tension maximum d’entrée 1000 mV
Auxiliaire
Impédance d’entrée 30kΩ
Puissance de sortie maximum 50W×4 ou
Pleine Puissance de Largeur de Bande
(avec moins de 1% DHT)
Audio
Impédance d’enceinte 4Ω—8Ω
Niveau de préamplification/charge CD/USB: 2500 mV/10kΩ en charge
Impédance du préamplificateur ≤600Ω
1A
50W×2 + 50W×1 (Caisson de grave = 4Ω)
22W×4
Tension de fonctionnement
(10,5 V — 16V admissible)
Consommation de courant maximale 10A
Gamme de température de fonctionnement –10°C — +60°C
Dimensions d’installation (L × H × P) 182 mm×53 mm×158mm
Généralités
Poids 1,1k
Sujet à changement sans notification.
14,4V
(7-3/16 pouces×2-1/8 pouces×6-1/4 pouces)
g
(2,43 livres)
FRANÇAIS
19
Page 40

Avertissement
• L’appareil peut uniquement être utilisé avec une alimentation de 12 V CC, à masse négative.
• Déconnectez la borne négative de la batterie avant le câblage et le montage.
• Ne connectez pas le fil de batterie (jaune) et le fil d’allumage (rouge) au châssis de la voiture
ou au fil de masse (noir) pour éviter les courts-circuits.
• Isolez les fils non connectés avec du ruban adhésif pour éviter les courts-circuits.
• Assurez-vous de raccorder de nouveau la mise à la masse de cet appareil au châssis de la
voiture après l’installation.
Précautions
• Pour des raison de sécurité, laissez le travail de câblage et de montage des professionnels.
Consultez votre revendeur autoradio.
• Installez cet appareil dans la console de votre véhicule. Ne touchez pas les parties
métalliques de cet appareil pendant ou juste après son utilisation. Les parties métalliques,
comme le dissipateur de chaleur et le boîtier, deviennent chaudes.
• Ne connectez pas les fils
en parallèle.
• Connectez des enceintes avec une puissance maximum de plus de 50 W. Si la puissance
maximum des enceintes est inférieure à 50W, changez le réglage
éviter d’endommager les enceintes.
• Montez l’appareil avec un angle de moins de 30˚.
• Si le faisceau de fils de votre véhicule ne possède pas de borne d’allumage, connectez
le fil d’allumage (rouge) à la borne du boîtier de fusible de votre véhicule qui offre une
alimentation de 12 V CC et qui se met en et hors service avec la clé de contact.
• Gardez tous les câbles à l’écart des dissipateurs thermiques.
• Après avoir installé l’appareil, vérifiez si les lampes de frein, les indicateurs, les clignotants,
etc. de la voiture fonctionnent correctement.
INSTALLATION / RACCORDEMENT
• Si un fusible saute, assurez-vous d’abord que les câbles ne touches pas le châssis de la
voiture puis remplacez le vieux fusible par un nouveau de même valeur.
Procédure de base
1
Retirez la clé de contact, puis déconnectez la borne de
la batterie de la voiture.
2 Connectez les fils correctement.
Reportez-vous à Connexions.
3 Installez l’appareil dans votre voiture.
Reportez-vous à Installation de l’appareil (montage encastré).
4 Connectez la borne de la batterie de la voiture.
5 Réinitialisez l’appareil.
des l’enceintes au châssis de la voiture, au fil de masse (noir) ou
(12)
( 21)
(3)
[AMP GAIN]
pour
Installation de l’appareil (montage encastré)
Crochet sur le côté supérieur
Orientez la plaque de garniture de la
façon illustrée avant la fixation.
Lors d’une installation sans manchon de montage
1 Retirez le manchon de montage et la plaque
d’assemblage de l’appareil.
2 Alignez les entailles de l’appareil (des deux côtés)
avec le support de montage du véhicule et fixez
l’appareil avec les vis (en vente dans le commerce).
N’utiliser que les vis spécifiés. L’utilisation de vis incorrects peut endommager
l’appareil.
Comment retirer l’appareil
Réalisez les connexions
nécessaires.
(21)
Tableau de bord
de votre voiture
Tordez les languettes appropriées pour
maintenir le manchon en place.
20
Page 41

Connexions
IMPORTANTES
Nous recommandons d’installer l’appareil en utilisant un harnais de câblage
en vente dans le commerce recommandé spécifiquement pour votre voiture et,
pour votre sécurité, de laisser ce travail a des professionnels. Consultez votre
revendeur autoradio.
Tableau de bord du
véhicule
Prises de sortie
Cordon de signal (non fournie)
Fusible (10 A)
JVC
Amplificateur
Fil de télécommande
(non fournie)
1
*
Connectez solidement le câble de
masse de l’amplificateur au châssis de
la voiture pour éviter d’endommager
l’appareil.
1
*
Liste des pièces pour
l’installation
(A)
Façade
Faisceau de câbles de
l’usine (véhicule)
Faisceau de fils personnalisé
(vendu séparément)
2
*
Vous pouvez aussi
connecter directement
un caisson de grave en
utilisant ce câble sans
amplificateur de caisson
de grave extérieur.
Pour les réglages,
Connexion via les
câbles d’enceinte, 13
Connexion recommandée
.
À l’adaptateur de télécommande
Bleu: À l’antenne alimentée
Bleu/blanc: À l’amplificateur
volant
Borne de l’antenne
Bleu clair/jaune
STEERING
WHEEL
REMOTE
Joignez les fils de même couleur ensemble.
Bleu/blanc: Télécommande (200mA max.)
Orange/blanc: Éclairage
Marron: Sourdine téléphonique
Jaune: Batterie 12 V
Rouge: Allumage 12V
Noir: Masse
Gris: Enceinte avant (droite)
Gris/noir
Blanc: Enceinte avant (gauche)
Blanc/noir
Violet: Enceinte arrière (droite)
Violet/noir
Vert: Enceinte arrière (gauche)
2
Vert/noir
*
2
*
Interrupteur d’allumage
Porte fusible
Fil rouge séparé
Réalisez cette connexion si le
faisceau de fils du fabricant de
votre voiture ne possède pas de
“Interrupteur d’allumage 12 V”.
(B)
Plaque d’assemblage
(C)
Manchon de montage
(D)
Faisceau de fils
(E)
Clé d’extraction
FRANÇAIS
21
Page 42

CONTENIDO ANTES DEL USO
ANTES DEL USO 2
PUNTOS BÁSICOS 3
PROCEDIMIENTOS INICIALES 4
1 Cancele la demostración
2 Puesta en hora del reloj
3 Realice los ajustes básicos
RADIO 5
AUX 6
CD / USB / iPod / ANDROID 7
Pandora® 9
iHeartRadio® 10
AJUSTES DE AUDIO 11
AJUSTES DE VISUALIZACIÓN 13
REFERENCIAS 14
Mantenimiento
Más información
LOCALIZACIÓN Y SOLUCIÓN
DE PROBLEMAS 16
ESPECIFICACIONES 18
INSTALACIÓN / CONEXIÓN 20
IMPORTANTE
• Antes de utilizar este producto y para asegurar su uso correcto, lea completamente este manual. En especial, lea y observe las
Advertencias y Precauciones incluidas en este manual.
• Guarde el manual en un lugar seguro y accesible para futuras consultas.
Advertencia
No utilice ninguna función que pueda desviar su atención mientras está conduciendo el vehículo.
Precaución
Ajuste del volumen:
• Ajuste el volumen a un nivel que le permita oír los ruidos del exterior para impedir accidentes.
• Antes de reproducir fuentes digitales, baje el volumen para evitar que el repentino aumento del nivel de salida cause daños a
los altavoces.
General:
• Evite el uso de dispositivos externos cuando puedan afectar la seguridad de conducción.
• Asegúrese de tener una copia de respaldo de todos los datos importantes. No aceptamos responsabilidad alguna por la pérdida
de los datos grabados.
• Para evitar cortocircuitos, nunca coloque ni deje objetos metálicos (por ejemplo, monedas o herramientas metálicas) dentro de
la unidad.
• Si ocurre un error de disco debido a la condensación en el lente láser, extraiga el disco y espere hasta que se evapore la
humedad.
Mando a distancia (RM-RK52):
• No deje el mando a distancia sobre superficies calientes, tales como el salpicadero.
• Si la batería de litio no se instala correctamente, existirá el peligro de una explosión. Sustituya la pila únicamente por otra del
mismo tipo o un tipo equivalente.
• El bloque de baterías no debe exponerse a una fuente de calor excesiva, como luz solar, fuego o similar.
• Mantenga la batería fuera del alcance de los niños y en su estuche original cuando no esté en uso. Deseche las baterías
utilizadas de forma rápida. En caso de tragarse, póngase con un médico inmediatamente.
Cómo leer este manual
• Las operaciones se explican utilizando principalmente los botones de la placa frontal.
• Se utilizan indicaciones en inglés para las explicaciones. Puede seleccionar el idioma de visualización desde el menú. (
•
[XX]
indica los elementos seleccionados.
• (
XX
) significa que hay información disponible en la página indicada.
4
)
2
Page 43

PUNTOS BÁSICOS
Fijar
Rueda de
volumen Ranura de carga
Desmontar
ST
Cómo reinicializar
Botón de
liberación
Ventanilla de
visualización
Se borrarán los ajustes
preestablecidos, excepto
las emisoras de radio
memorizadas.
Para En la placa frontal En el mando a distancia
Encender la unidad
Ajustar el volumen Gire la rueda de volumen. Pulse
Seleccionar una fuente
Cambiar la información en
pantalla
Pulse
• Pulse y mantenga pulsado para apagar la unidad.
Pulse la rueda de volumen para enmudecer el sonido o pausar la reproducción.
• Pulse otra vez para cancelar.
• Pulse
• Pulse
transcurran 2 segundos.
Pulse
.
repetidamente.
y, a continuación, gire la rueda de volumen antes de que
repetidamente.
( 16)
Mando a distancia (RM-RK52)Placa frontal
Retire la hoja aislante cuando
se utilice por primera vez.
Cómo cambiar la batería
( No disponible )
o .
Pulse
para enmudecer el sonido o pausar la reproducción.
• Pulse otra vez para cancelar.
Pulse
SOURCE
repetidamente.
( No disponible )
Sensor remoto (DO lo exponga a la
luz solar brillante.)
ESPAÑOL
3
Page 44

PROCEDIMIENTOS INICIALES
1
Cancele la demostración
Cuando enciende la unidad (o después de reinicializarla) la pantalla muestra:
“CANCEL DEMO”
1 Pulse la rueda de volumen.
Se selecciona [
2 Pulse de nuevo la rueda de volumen.
Aparece “DEMO OFF”.
2
Pulse y mantenga pulsado .
1
2 Gire la rueda de volumen para seleccionar [
púlsela.
3 Gire la rueda de volumen para seleccionar [
púlsela.
4 Gire la rueda de volumen para realizar los ajustes y, a
continuación, púlsela.
Día Hora Minutos
5 Gire la rueda de volumen para seleccionar [
púlsela.
6 Gire la rueda de volumen para seleccionar [
y luego púlsela.
7 Pulse para salir.
Para volver al elemento de ajuste anterior, pulse .
“PRESS” “VOLUME KNOB”
YES
] para la configuración inicial.
Puesta en hora del reloj
CLOCK
] y luego
CLOCK SET
24H/ 12H
12 HOUR
] y luego
] y luego
] o [
24 HOUR
]
3
Realice los ajustes básicos
Pulse y mantenga pulsado .
1
2 Gire la rueda de volumen para seleccionar un elemento (consulte la siguiente
tabla) y luego púlsela.
3 Repita el paso 2 hasta que se seleccione o active el elemento deseado.
4 Pulse para salir.
Para volver al elemento de ajuste anterior, pulse .
Predeterminado:
SETTINGS
BEEP
ON
:Activa el tono de pulsación de teclas.;
OFF
:Se desactiva.
SRC SELECT
*
AM
PANDORA*ON
IHEART *ON
AUX
ON
:Habilita AM en la selección de la fuente.;
:Habilita PANDORA en la selección de la fuente.;
:Habilita IHEARTRADIO en la selección de la fuente.;
*
BT ADAPTER
(
:Selecciónelo cuando el adaptador Bluetooth KS-BTA100 está conectado a la toma de AUX.
6
); ON:Habilita AUX en la selección de la fuente.;
OFF
:Se deshabilita.
OFF
:Se deshabilita.
OFF
:Se deshabilita.
OFF
:Se deshabilita.
F/W UPDATE
SYSTEM
F/W xxxx
YES
:Se empieza a actualizar el firmware.; NO:Se cancela (la actualización no se activa).
Para obtener información sobre cómo actualizar el firmware, consulte: <http://www.jvc.net/cs/car/>.
CLOCK
CLOCK SYNC
CLOCK DISP ON
ENGLISH
ESPANOL
* No se visualiza cuando se ha seleccionado la fuente correspondiente.
AUTO
:El reloj se ajusta automáticamente en sincronización con los datos de CT (hora del reloj) de la señal
del FM Radio Broadcast Data System.;
:La hora del reloj siempre se visualiza en la pantalla cuando la unidad está apagada.;
Seleccione el idioma de visualización para el menú y la información de la música, si corresponde.
Por defecto, se selecciona
ENGLISH
OFF
.
:Se cancela.
OFF
:Se cancela.
XX
4
Page 45

RADIO
Seleccione una emisora almacenada
Pulse uno de los botones numéricos (1a6).
(o)
1 Pulse .
2 Gire la rueda de volumen para seleccionar un número de preajuste y, a
continuación, pulse la rueda para confirmar.
“ST” se enciende cuando se recibe una radiodifusión FM estéreo con una intensidad de
señal suficiente.
Búsqueda de una emisora
Pulse repetidas veces para seleccionar FM o AM.
1
2 Pulse (o pulse en el RM-RK52) para la búsqueda
automática de emisoras.
(o)
Pulse y mantenga pulsado (o pulse y mantenga pulsado
en el RM-RK52) hasta que parpadee “M” y, a continuación, pulse
repetidamente para la búsqueda manual de emisoras.
Ajustes en la memoria
Puede almacenar hasta 18 emisoras de FM y 6 emisoras de AM en la memoria.
Almacene una emisora
Mientras escucha una emisora....
Pulse y mantenga pulsado uno de los botones numéricos (1 a 6).
(o)
1 Pulse y mantenga pulsada la rueda de volumen hasta que
“PRESETMODE” parpadee.
2 Gire la rueda de volumen para seleccionar un número de preajuste y
luego púlsela.
El número de preajuste parpadea y aparece “MEMORY”.
Otros ajustes
Pulse y mantenga pulsado .
1
2 Gire la rueda de volumen para seleccionar [
3 Gire la rueda de volumen para seleccionar un elemento
siguiente tabla
4 Repita el paso 3 hasta que se seleccione o active el elemento que desee
o siga las instrucciones indicadas en el elemento seleccionado.
)
y luego púlsela.
TUNER
] y luego púlsela.
(
consulte la
5 Pulse para salir.
Para volver al elemento de ajuste anterior, pulse .
Predeterminado:
RADIO TIMER
1
*
Puede seleccionarse solo si se selecciona [
Enciende la radio a una hora específica, independientemente de la fuente actual.
1
ONCE/ DAILY/ WEEKLY/ OFF
temporizador.
2
FM/ AM
:Seleccionar una fuente.
3
01
a 18 (para FM)/ 01 a 06 (para AM):Seleccione la emisora preajustada.
4
Define el día *1 la hora de activación.
Se ilumina “
M
” al finalizar.
El temporizador de la radio no se activará en los siguientes casos.
• La unidad está apagada.
• Se ha seleccionado [
seleccionado AM para el temporizador de la radio.
OFF
:Selecciona la frecuencia de activación del
] para [AM] en [
ONCE
] o [
WEEKLY
SRC SELECT
] en el paso 1.
] después de haber
( 4)
ESPAÑOL
XX
5
Page 46

RADIO
SSM SSM 01 – 06
IF BAND AUTO
2
*
MONO
AREA AREA US
PTY SEARCH
Código PTY: NEWS, INFORM
ADLT HIT
NOSTALGA
SOFT R&B
REL TALK
HABL ESP
2
*
Solo para la fuente de FM.
18 emisoras para FM. “SSM” deja de destellar cuando se almacenan las primeras 6 emisoras.
Seleccione
:Aumenta la selectividad del sintonizador para reducir las interferencias
con emisoras FM adyacentes. (Se puede perder el efecto estéreo.);
interferencias de las emisoras FM adyacentes, pero la calidad del sonido no se degrada y se
conserva el efecto estereofónico.
ON
:Mejora la recepción de FM pero se puede perder el efecto estéreo.;
AREA SA
AREA EU
2
*
Seleccione un código PTY (véase más abajo).
Si hay una emisora que esta difundiendo un programa que tenga el mismo código PTY que
el seleccionado por usted, se sintonizará esa emisora.
(éxitos antiguos),
(nostalgia),
(ritmos y blues suaves),
(charlas sobre religión),
(charlas en español),
SOFT RCK
JAZZ, CLASSICL
Predeterminado:
/
SSM 07 – 12
SSM 07 – 12
/
/
SSM 13 – 18
SSM 13 – 18
:Configura automáticamente hasta
para almacenar las 12 emisoras siguientes.
WIDE
OFF
: Intervalos de AM/FM para América del Norte/Central/Sur: 10kHz/200kHz.;
:Intervalos de AM/FM para algunos países de América del Sur: 10kHz/50kHz.;
:Intervalos de AM/FM para otras áreas: 9kHz/50kHz.
(información),
MUSC ESP
SPORTS, TALK, ROCK, CLS ROCK
(rock suave),
(clásica),
TOP 40, COUNTRY, OLDIES, SOFT
R & B
LANGUAGE, REL MUSC
PERSNLTY
(personalidad),
(música española),
(ritmos y blues),
(música religiosa),
PUBLIC, COLLEGE
HIP HOP, WEATHER
XX
:Sujeto a
:Se cancela.
(rock clásico),
,
,
AUX
Uso de un reproductor de audio portátil
Conecte un reproductor de audio portátil (disponible en el mercado).
1
Miniclavija estéreo de 3,5 mm (1/8 pulgada) con conector en “L”
(disponible en el mercado)
] en [
SRC SELECT
Azul/blanco
Negro
Marrón
AUX
Reproductor de audio portátil
]. ( 4)
] en [
SRC SELECT
]. ( 4)
Mazo de conductores de la
unidad (
21
)
Azul/blanco: Mando a distancia
Negro: Tierra
Marrón: Silenciamiento del teléfono
Toma de entrada auxiliar
2 Seleccione [
3 Pulse repetidas veces para seleccionar AUX.
4 Encienda el reproductor de audio portátil e inicie la reproducción.
ON
] para [
AUX
Para una salida de audio óptima, utilice una miniclavija estéreo auricular
de 3 contactos.
Uso de un dispositivo Bluetooth®
Conecte el adaptador Bluetooth, KS-BTA100 (vendido por separado).
1
Toma de entrada auxiliar
2 Registre (empareje) un dispositivo Bluetooth con el KS-BTA100.
3 Seleccione [
4 Pulse repetidas veces para seleccionar BT AUDIO.
5 Comience a usar el dispositivo Bluetooth.
Para obtener más información, consulte el manual de instrucciones del KS-BTA100.
BT ADAPTER
] para [
6
Page 47

CD / USB / iPod / ANDROID
Inicie la reproducción
La fuente cambia automáticamente y se inicia la
reproducción.
CD
Expulsa el disco Lado de la etiqueta
Terminal de entrada USB
USB
1
Cable USB 2.0*
(disponible en el mercado)
iPod/iPhone
(Accesorio del
iPod/iPhone)*
ANDROID
Cable Micro USB 2.0
(disponible en el mercado)
1
2
*
1
*
Para seleccionar directamente la fuente USB/ USB-IPOD/ ANDROID, pulse .
Para En la placa frontal En el mando a distancia
Retroceder / avanzar
rápidamente
Seleccionar una pista/
archivo
Seleccionar una carpeta
Repetir reproducción
Reproducción aleatoria
1
*
No deje el cable dentro del vehículo cuando no lo esté utilizando.
2
*
Cuando conecte un dispositivo Android, se mostrará “Press [VIEW] to install JVC MUSIC PLAY APP”. Siga las instrucciones para instalar
la aplicación. Antes de la conexión, también puede instalar la versión más reciente de la aplicación JVC MUSIC PLAY en su dispositivo
Android. (
3
*
Para ANDROID: Aplicable sólo cuando se selecciona [
4
*
Para CD: Sólo para archivos MP3/WMA. Esto no funciona para iPod/ ANDROID.
5
*
Para iPod/ ANDROID: Aplicable sólo cuando se selecciona [
3
*
14
)
Pulse y mantenga pulsado
Pulse .
4
*
Pulse . Pulse .
5
*
Pulse repetidamente.
TRACK RPT/ ALL RPT
.
: CD de audio
TRACK RPT/ FOLDER RPT/ ALL RPT
ONE RPT/ ALL RPT/ RPT OFF
5
*
Pulse repetidamente.
ALL RND/ RND OFF
FOLDER RND/ ALL RND/ RND OFF
SONG RND/ ALL RND/ RND OFF
AUTO MODE
: iPod o ANDROID
: CD de audio
HEAD MODE
: Archivo MP3/WMA/WAV/FLAC
: iPod o ANDROID
]. ( 8)
]/ [
AUTO MODE
Pulse y mantenga pulsado
Pulse
: Archivo MP3/WMA/WAV/FLAC
]. ( 8)
.
.
ESPAÑOL
7
Page 48

CD / USB / iPod / ANDROID
Seleccionar modo de control
Pulse repetidamente mientras está en una fuente USB-IPOD.
HEAD MODE
IPHONE MODE
Pulse repetidamente mientras está en una fuente ANDROID.
AUTO MODE
AUDIO MODE
: Controla el iPod desde esta unidad.
: Controla el iPod desde el propio iPod. No obstante, podrá seguir
controlando la reproducción/pausa o el salto de archivos desde esta
unidad.
: Controla el dispositivo Android desde esta unidad a través de la aplicación
JVC MUSIC PLAY instalada en el dispositivo Android.
: Controla el dispositivo Android desde el propio Android a través de otras
aplicaciones del reproductor de medios instalado en el dispositivo Android.
No obstante, podrá seguir controlando la reproducción/pausa o el salto de
archivos desde esta unidad.
Seleccionar Music drive
Pulse repetidamente.
Se reproducirán las canciones almacenadas en la siguiente unidad.
• Memoria interna o externa seleccionada de un smartphone (Clase de almacenamiento
masivo).
• Unidad seleccionada de un dispositivo de múltiples unidades.
Cambio de la velocidad de reproducción de los Audiolibros
Mientras escucha el iPod con [
HEAD MODE
] seleccionado....
1 Pulse y mantenga pulsado .
2 Gire la rueda de volumen para seleccionar [
3 Pulse la rueda de volumen para seleccionar [
4 Gire la rueda de volumen para seleccionar un elemento y, a continuación,
púlsela.
0.5× SPEED
desee del archivo de sonido de Audiolibros en el iPod/iPhone.
(Predeterminado: Depende de la configuración del iPod/iPhone.)
/
1× SPEED
/
2× SPEED
: Seleccione la velocidad de reproducción que
IPOD
] y luego púlsela.
AUDIOBOOKS
].
5 Pulse para salir.
Para volver al elemento de ajuste anterior, pulse .
Seleccionar un archivo de una carpeta/lista
Pulse .
1
2 Gire la rueda de volumen para seleccionar una carpeta/lista y luego
púlsela.
3 Gire la rueda de volumen para seleccionar un archivo y luego
púlsela.
Búsqueda rápida
Si existen numerosos archivos, puede realizar una búsqueda rápida.
Gire la rueda de volumen rápidamente para navegar por la lista
con rapidez.
– No aplicable para iPod.
(
Búsqueda alfabética
Puede realizar la búsqueda de un archivo por el primer carácter.
Pulse o gire rápidamente la rueda de volumen para
seleccionar el carácter deseado (A a Z/ 0a9/ OTHERS).
– Seleccione “OTHERS” si el primer carácter no es una letra (A a Z) ni un número (0 a 9).
• Para volver al elemento de ajuste anterior, pulse
• Para cancelar, pulse y mantenga pulsado
• Para iPod, aplicable solo cuando se selecciona [
• Para ANDROID, aplicable solo cuando se selecciona [
aplicable solo para iPod
):
.
HEAD MODE
AUTO MODE
.
].
].
8
Page 49

Pandora®
Preparativos:
Instale la última versión de la aplicación Pandora en su dispositivo (iPhone/ iPod touch)
y, a continuación, cree una cuenta e inicie sesión en Pandora.
• Seleccione [
Comience a escuchar
1
2 Conecte su dispositivo al terminal de entrada USB.
La fuente cambia a PANDORA y se inicia su emisión.
Para En la placa frontal
Reproducción /
pausa
Saltar una pista
Pulgar arriba o
pulgar abajo*
1
*
No deje el cable dentro del vehículo cuando no lo esté utilizando.
2
*
Si selecciona pulgar abajo, se omitirá la pista actual.
ON
] para [
PANDORA
] en [
SRC SELECT
Abra la aplicación Pandora en su dispositivo.
Terminal de entrada USB
(Accesorio del iPod/iPhone)*
Pulse la rueda de volumen.
Pulse
T. Pulse I.
Pulse . Pulse .
2
].
( 4)
1
En el mando a
distancia
Pulse
.
Crear y guardar una emisora nueva
Pulse .
1
2 Gire la rueda de volumen para seleccionar [
3 Gire la rueda de volumen para seleccionar [
luego púlsela.
Una nueva emisora se crea en base a la canción o al artista actual.
4 Para programar, pulse y mantenga pulsado el botón numérico
NEW STATION
FROM TRACK
] y luego púlsela.
] o [
FROM ARTIST
3, 4, 5 o 6.
Para seleccionar una emisora programada, pulse el botón 3, 4, 5 o 6.
Buscar una emisora registrada
Pulse .
1
2 Gire la rueda de volumen para seleccionar un elemento y, a
continuación, púlsela.
[
BY DATE
[
3 Gire la rueda de volumen para seleccionar la emisora deseada y luego
Para cancelar, pulse y mantenga pulsado .
]: Según la fecha de registro.
A-Z
]: Por orden alfabético.
pulse la rueda.
Para marcar la información sobre la canción actual
Pulse y mantenga pulsada la rueda de volumen.
Aparece “BOOKMARKED” y la información se almacena en su dispositivo.
El marcador está disponible en su cuenta de Pandora pero no en esta unidad.
] y
ESPAÑOL
9
Page 50

iHeartRadio®
Preparativos:
Instale la última versión de la aplicación iHeart Link for JVC en su dispositivo (iPhone/ iPod touch) y, a
continuación, cree una cuenta e inicie sesión en iHeartRadio.
• Seleccione [
Comience a escuchar
1
2 Conecte su dispositivo al terminal de entrada USB.
3 Pulse repetidas veces para seleccionar IHEARTRADIO.
El programa de difusión se inicia automáticamente
Para
Reproducción / pausa
Omitir una pista para personalizar
una emisora
Pulgar arriba o pulgar abajo para
personalizar una emisora*
Crear una emisora nueva/
personalizada
Agregar emisoras favoritas para
emisoras en vivo
Buscar una emisora en vivo
1
*
No deje el cable dentro del vehículo cuando no lo esté utilizando.
2
*
Si selecciona pulgar abajo, se omitirá la pista actual.
ON
] para [
IHEART
] en [
SRC SELECT
Abra la aplicación iHeart Link en su dispositivo.
Terminal de entrada USB
(Accesorio del iPod/iPhone)*
].
( 4)
1
En la placa frontal En el mando a distancia
Pulse la rueda de volumen.
Pulse T. Pulse I.
2
Pulse . Pulse .
Pulse y mantenga pulsada la
rueda de volumen.
Pulse 3.
Pulse 4.
Pulse
.
( No disponible )
( No disponible )
( No disponible )
Búsqueda de una emisora
Pulse .
1
2 Gire la rueda de volumen para seleccionar una
categoría y luego púlsela.
3 Gire la rueda de volumen para seleccionar la emisora
deseada y luego pulse la rueda.
Cuando aparezca una lista de ciudades, podrá omitir ciudades
en orden alfabético.
Para cancelar, pulse y mantenga pulsado
.
Omisión de ciudades en orden alfabético
Mientras se está mostrando una lista de ciudades durante la
búsqueda...
1 Gire rápidamente la rueda de volumen para acceder a la
búsqueda de caracteres.
Puede realizar la búsqueda rápida en la lista por carácter inicial
(A a Z).
2 Gire la rueda de volumen o pulse para
seleccionar el carácter que desee buscar.
3 Pulse la rueda de volumen para iniciar la búsqueda.
Para cancelar, pulse y mantenga pulsado .
10
Page 51

AJUSTES DE AUDIO
Seleccionar un ecualizador preajustado
Pulse repetidamente.
(o)
Pulse
transcurran 5 segundos.
Ecualizador preajustado: FLAT
R&B, TALK, USER, VOCAL BOOST, BASS BOOST, CLASSICAL, DANCE
Almacenar sus propios ajustes de sonido
Pulse y mantenga pulsado para acceder a la configuración
1
EASY EQ.
2 Gire la rueda de volumen para seleccionar un elemento y, a
continuación, púlsela.
Consulte [
• Para volver al elemento de ajuste anterior, pulse .
• Pulse
Otros ajustes
Pulse y mantenga pulsado .
1
2 Gire la rueda de volumen para seleccionar un elemento (consulte la
siguiente tabla) y luego púlsela.
3 Repita el paso 2 hasta que se seleccione o active el elemento que desee
o siga las instrucciones indicadas en el elemento seleccionado.
4 Pulse para salir.
Para volver al elemento de ajuste anterior, pulse .
y, a continuación, gire la rueda de volumen antes de que
(predeterminado),
EASY EQ
] para la configuración y el resultado se guarda en [
para salir.
HARD ROCK, HIP HOP, JAZZ, POP
USER
,
].
EQ SETTING
EQ PRESET
Selecciona un ecualizador predefinido adecuado para el género musical. (Seleccione [
utilizar los ajustes creados en [
FLAT
VOCAL BOOST
EASY EQ
Ajuste su propia configuración de sonido. Los ajustes se guardan en [
SUB.W SP
SUB.W
BASS LVL
MID LVL
TRE LVL
PRO EQ
1 BASS
2
Ajuste los elementos de sonido del tono seleccionado.
Nivel:
Q:
Nivel:
Q:
Nivel:
Q:
1
*
Se visualiza sólo cuando [
2
*
Se visualiza sólo cuando [
3
*
Se visualiza sólo cuando [
(
12)
(predeterminado) /
/
BASS BOOST
2
*1*
: 00a
3
*1*
:
:
:
:
/
MIDDLE
BASS
Frecuencia: 60/ 80/
MIDDLE
Frecuencia:
TREBLE
Frecuencia:
SUB.W
SPK/PREOUT
SPK/PREOUT
EASY EQ
]).
HARD ROCK
/
HIP HOP
/
CLASSICAL
/
/
DANCE
JAZZ
/
POP
/
USER
+06
(Predeterminado:
–08
a
+08 00
–06
a
+06 00
–06
a
+06 00
–06
a
+06 00
/
TREBLE
:Seleccione un nombre preajustado.
100/ 200 HZ
–06
a
+06
Q1.0/ Q1.25/ Q1.5/ Q2.0
0.5/ 1.0/ 1.5/ 2.5 KHZ
–06
a
+06
Q0.75/ Q1.0/ Q1.25
10.0/ 12.5/ 15.0/ 17.5 KHZ
–06
a
+06
Q FIX
] se ajusta a [ON].
] se ajusta a [
] se ajusta a [
SUB.W/SUB.W
REAR/SUB.W
03
(Predeterminado:
(Predeterminado:
(Predeterminado:
]. ( 12)
] o [
SUB.W/SUB.W
Predeterminado:
USER
] para
R&B
/
TALK
/
USER
].
)
80 HZ
00
Q1.0
)
1.0 KHZ
00
Q1.25
10.0 KHZ
00
Q FIX
)
].
XX
/
)
ESPAÑOL
11
Page 52

AJUSTES DE AUDIO
AUDIO
BASS BOOST
LOUD 01
SUB.W LEVEL
+01
—
+05(+01
OFF
:Se cancela.
/02:Refuerza las frecuencias altas o bajas para producir un sonido bien balanceado
a bajos niveles de volumen.;
4
*
SPK-OUT
PRE-OUT
6
*
SUB.W
SUB.W LPF
SUB.W PHASE
FADER R06
*
BALANCE
VOL ADJUST –15
AMP GAIN LOW POWER
ON
/
OFF
: Activa o desactiva la salida del subwoofer.
4
*
THROUGH
HIGH 120HZ
se envían al subwoofer.
4
*
REVERSE
de acuerdo con la salida de los altavoces, para lograr un desempeño óptimo.
(Puede seleccionarse solo si se seleccionó un ajuste distinto de [
[
SUB.W LPF
—
F06(00
7
L06
—
R06(00
—
+06(00
compararse con el nivel de volumen de FM). Antes del ajuste, seleccione la fuente que
desea ajustar. (Aparece “VOLADJFIX” si se selecciona FM.)
máxima de cada altavoz es inferior a 50 W, con el fin de evitar posibles daños en los
altavoces.);
): Selecciona su nivel de refuerzo de graves preferido.;
OFF
:Se cancela.
5
*
00
a
+06(+03
conectado a través del cable del altavoz. (
6
*
–08
conectado a los terminales de salida de línea (REAR/SW) a través del
amplificador externo. (
:Todas las señales se envían al subwoofer. ;
:Las señales de audio con frecuencias inferiores a 55Hz/ 85Hz/ 120Hz
(180°)/
NORMAL
):Ajusta el nivel de salida del subwoofer
a
+08(00
):Ajusta el nivel de salida del subwoofer
21)
21)
LOW 55HZ
(0°):Selecciona la fase de la salida del subwoofer
/
MID 85HZ
THROUGH
].)
):Ajusta el balance de salida de los altavoces delanteros y traseros.
):Ajusta el balance de salida de los altavoces izquierdo y derecho.
):Preajuste el nivel de volumen inicial de cada fuente (al
:Limita el nivel de volumen máximo a 25. (Selecciónelo si la potencia
HIGH POWER
:El nivel máximo de volumen es 35.
] para
D.T.EXP
(Expansor digital de
pistas)
TEL MUTING
SPK/PRE OUT
4
*
Se visualiza sólo cuando [
5
*
Se visualiza sólo cuando [
6
*
Se visualiza sólo cuando [
7
*
El ajuste no afecta a la salida del subwoofer.
8
*
No funciona si se ha seleccionado [BT
/
ON
restableciendo el tiempo de subida de la forma de onda que se pierde en la compresión de
los datos de audio.;
8
*
ON
KS-BTA100).;
Dependiendo del método de conexión del altavoz, seleccione la configuración apropiada
para obtener la salida deseada. (
:Crea un sonido real compensando los componentes de alta frecuencia y
OFF
:Se cancela.
:Enmudece el sonido durante el uso del celular (no conectado a través de
OFF
:Se cancela.
SUB.W
] se ajusta a [ON].
SPK/PREOUT
SPK/PREOUT
] se ajusta a [
] se ajusta a [
ADAPTER
13, Ajustes salida altavoz
SUB.W/SUB.W
REAR/SUB.W
] para [
AUX
] en [
SRCSELECT
].
] o [
SUB.W/SUB.W
)
]. ( 4)
].
12
Page 53

AJUSTES DE AUDIO
Ajustes salida altavoz
Seleccione la configuración de salida para los altavoces [
método de conexión del altavoz.
SPK/PRE OUT
], basándose en el
Conexión a través de los terminales de salida de línea
Para conexiones a través de un amplificador externo. ( 21)
Configuración de
[
SPK/PRE OUT
REAR/REAR
REAR/SUB.W
SUB.W/SUB.W
]
Salida de los altavoces delanteros Salida de los altavoces traseros
Salida de los altavoces delanteros Salida del subwoofer
Salida de los altavoces delanteros Salida del subwoofer
Señal de audio a través de la terminal de salida de línea
FRONT REAR/SW
Conexión a través de los cables de los altavoces
Para conexiones que no utilizan un amplificador externo. No obstante, con estos ajustes
puedes gozar también de la salida del subwoofer. (
Configuración de
[
SPK/PRE OUT
REAR/REAR
REAR/SUB.W
SUB.W/SUB.W
Si se selecciona [
– Se selecciona [
– Se selecciona [
]
Salida de los altavoces traseros Salida de los altavoces traseros
Salida de los altavoces traseros Salida de los altavoces traseros
Salida del subwoofer (Silencio)
SUB.W/SUB.W
HIGH 120HZ
R01
] en [
Señal de audio a través del cable del altavoz trasero
L (izquierdo) R (derecho)
]:
] en [
SUB.WLPF
FADER
] y el rango seleccionable es de [
] y [
21)
THROUGH
] no está disponible.
R06
]a [00].
AJUSTES DE VISUALIZACIÓN
1 Pulse y mantenga pulsado .
2 Gire la rueda de volumen para seleccionar un elemento (consulte la
siguiente tabla) y luego púlsela.
3 Repita el paso 2 hasta que se seleccione o active el elemento que desee
o siga las instrucciones indicadas en el elemento seleccionado.
4 Pulse para salir.
Para volver al elemento de ajuste anterior, pulse .
Predeterminado:
DISPLAY
DIMMER
BRIGHTNESS
1
*
Se requiere la conexión del cable de control de iluminación.
Oscurece la iluminación de la pantalla y de los botones.
OFF
:El dimmer está desactivado.
ON
:El dimmer está activado. El brillo cambia a la configuración [
NIGHT
].
([BRIGHTNESS])
DIMMER TIME
1
Gire la rueda de volumen para ajustar el tiempo de activación [ON] y luego presione la
2
Gire la rueda de volumen para ajustar el tiempo de activación [
(Predeterminado: [
[
AUTO
faros del vehículo. *
Ajusta separadamente el brillo de los botones, la pantalla y del terminal de entrada USB para
día y noche.
1 DAY / NIGHT
2
Selecciona una zona.
3
Ajusta el nivel de brillo (00 a 31). (Predeterminado:
:Establece el tiempo de activación y desactivación del dimmer.
rueda.
rueda.
:El dimmer se enciende y se apaga automáticamente cuando se apagan o encienden los
ON
]: 18:00 o 6:00 PM
OFF
]: 6:00 o 6:00 AM)
1
:Selecciona ajuste diurno o nocturno.
DAY:31
OFF
] y luego presione la
;
NIGHT:15
)
( 21)
ESPAÑOL
XX
13
Page 54

AJUSTES DE VISUALIZACIÓN
2
SCROLL
*
ONCE
:Desplaza una vez la información en pantalla.;
intervalos de 5 segundos.;
OFF
:Se cancela.
AUTO
:El desplazamiento se repite a
COLOR
PRESET
DAY COLOR
NIGHT COLOR
COLOR GUIDE
NIGHT COLOR
[
2
*
Algunos caracteres o símbolos no se mostrarán correctamente (o aparecerán en blanco).
3
*
Si se selecciona uno de estos patrones de color, el color de la iluminación de [
[
DISP ZONE
Seleccione el color para la pantalla y la iluminación de los botones de forma separada.
Color predeterminado:
ALL ZONE
: [
COLOR 08
],
DISP ZONE
: [
COLOR 01
ZONE 1
: [
COLOR 08
],
ZONE 2
: [
COLOR 46
1
Selecciona una zona.
2
Seleccione un color para la zona seleccionada.
•
COLOR 01
a
•
•
•
Guarda sus propios colores para el día y la noche para las diferentes zonas.
1
Selecciona una zona.
2 RED
3 00
Repita los pasos
• Su ajuste se guarda en [
• Si seleccionó [
nada en la pantalla.
ON
:Cambia la iluminación de los botones, de la pantalla y de la toma de entrada auxiliar
cuando se realizan ajustes en el menú y la búsqueda de lista. La zona de visualización cambia
automáticamente según el nivel de volumen.;
] o [
DAY COLOR
COLOR 49
USER
: Se muestra el color que ha creado para [
COLOR FLOW01
GROOVE/ TECHNO/ EMOTION/ RELAX/ SPECTRUM/ SWEEP/ POP
muestra el patrón del color seleccionado.*
[
ALL ZONE
/
a 31:Seleccione el nivel.
a
COLOR FLOW03
] en el paso1.)
GREEN
/
BLUE
:Seleccione un color primario.
2
y 3 para todos los colores primarios.
USER
] para [
00
] para todos los colores primarios para [
] cambian al encender o apagar los faros de su vehículo.
PRESET
],
]
DAY COLOR
: El color cambia según las velocidades.
3
(Puede seleccionarse sólo si se selecciona
].
] o [
DISP ZONE
OFF
:Se cancela.
ZONE 1
], [
ZONE 2
] cambiará al color predeterminado.
NIGHT COLOR
], no aparecerá
],
REFERENCIAS
Mantenimiento
Limpieza de la unidad
Limpie la suciedad de la placa frontal con un paño suave o paño de silicona seco.
Limpieza del conector
Desmonte la placa frontal y limpie el conector con un palillo de
algodón, teniendo cuidado de no dañarlo.
Cómo manipular los discos:
• No toque la superficie de grabación del disco.
• No pegue cinta etc. sobre el disco ni utilice un CD con cinta
pegada sobre él.
• No utilice accesorios para el disco.
].
• Limpie desde el centro del disco hacia el exterior.
• Limpie el disco con un paño seco o de silicona. No utilice disolventes.
: Se
• Cuando extraiga los discos de esta unidad, tire de estos en sentido horizontal.
• Antes de insertar un disco, quite las rebabas de los bordes del orificio central y del borde exterior.
Más información
Visite también el siguiente sitio web <http://www.jvc.net/cs/car/> para:
– Últimas ac tualizaciones de firmware y lista de los últimos elementos compatibles
– Aplicación Android™ JVC MUSIC PLAY
– Cualquier otra información más reciente
Acerca de los discos y archivos de audio
• Esta unidad puede reproducir sólo los siguientes CD:
• Este receptor puede reproducir discos multisesión; no obstante, las sesiones no cerradas serán omitidas durante la
reproducción.
•
Discos no reproducibles:
– D iscos que no son redondos.
– D iscos con la superficie de grabación pintada o discos sucios.
– D iscos grabables/reescribibles que no hayan sido finalizados.
– CD de 8 cm. Si intenta inser tarlo con un adaptador podrán causar fallos de funcionamiento.
Conector (en el reverso de la
placa frontal)
14
Page 55

REFERENCIAS
•
Reproducción DualDisc:
Digital Audio”. Por consiguiente, no se recomienda usar en este producto, el lado no DVD de un DualDisc.
•
Archivos reproducibles:
– Ex tensiones de archivos: MP3(.mp3), WMA(.wma)
– Velocidad de bit: MP3: 8kbps — 320kbps
WMA: 32 kbps — 192 kbps
– Frecuencia de muestreo:
MP3: 48kHz, 44,1kHz, 32kHz, 24kHz, 22,05kHz, 16kHz, 12kHz, 11,025kHz, 8kHz
WMA: 8 kHz—48 kHz
– Archivos a una velocidad de bits variable (VBR).
•
Número máximo de caracteres para el nombre de archivo/carpeta:
Depende del formato de disco utilizado (incluye extensión de 4 caracteres—<.mp3> o <.wma>).
– ISO 9660 Nivel 1 y 2: 32 caracteres
– Romeo: 32 carac teres
– Joliet: 32 carac teres
– Nombre de archivo largo de Windows: 32 caracteres
Acerca de los dispositivos USB
• Esta unidad puede reproducir archivos MP3/WMA/WAV/FLAC guardados en un dispositivo de clase de
almacenamiento masivo USB.
• No es posible conectar un dispositivo USB a través de un concentrador USB.
• La conexión con un cable de más de 5 m de largo puede ocasionar una reproducción anormal.
• Número máximo de caracteres para:
– Nombres de las carpetas: 64 caracteres
– Nombres de los archivos: 64 caracteres
– Etiqueta MP3: 64 carac teres
– Etiqueta WMA: 64 caracteres
– Etiqueta WAV: 64 caracteres
– Etiqueta FLAC: 64 caracteres
• Esta unidad puede reconocer un total de 15 000 archivos, 500 carpetas (999 archivos por carpeta incluyendo carpeta
sin archivos no compatibles) y 8 jerarquías.
• Esta unidad no puede reconocer ningún dispositivo USB cuyo régimen sea distinto de 5 V y que exceda de 1 A.
El lado no DVD de un “DualDisc” no es compatible con la norma “Compact Disc
Acerca del iPod/iPhone
Made for
- iPod touch (2nd, 3rd, 4th y 5th generation)
- iPod classic
- iPod nano (3rd, 4th, 5th, 6th y 7th generation)
- iPhone 3G, 3GS, 4, 4S, 5, 5S, 5C, 6, 6 Plus
• No se puede navegar a través de archivos de video en el menú “Videos” en
• El orden de canciones mostrado en el menú de selección de esta unidad puede diferir del que se encuentra en el
iPod/iPhone.
Acerca del dispositivo Android
• Esta unidad es compatible con Android OS 4.1 y superior.
• Algunos dispositivos Android (con OS 4.1 y superior) pueden no ser completamente compatibles con Android Open
Accessory (AOA) 2.0.
• Si el dispositivo Android es compatible con dispositivos de clase de almacenamiento masivo y con AOA2.0, esta
unidad siempre reproducirá con prioridad a través de AOA 2.0.
Acerca de Pandora
• Pandora está disponible sólo en algunos países.
Visite <http://www.pandora.com/legal> para más información.
• Debido a que el ser vicio de radio por Internet Pandora es de un tercero, las especificaciones se encuentran sujetas
a cambios sin previo aviso. Por consiguiente, la compatibilidad podría verse afectada, y alguno o todos los servicios
podrían dejar de estar disponibles.
• Algunas funciones de Pandora no están disponibles desde esta unidad.
• Si tiene alguna duda sobre el uso de esta aplicación, póngase en contacto con pandora-support@pandora.com.
Acerca de iHeartRadio
• Debido a que iHear tRadio® es un servicio de terceros, las especificaciones se encuentran sujetas a cambios sin previo
aviso. Por consiguiente, la compatibilidad podría verse afectada, y alguno o todos los servicios podrían dejar de estar
disponibles.
• Algunas funciones de iHeartRadio® no se pueden controlar desde esta unidad.
[HEAD MODE]
.
ESPAÑOL
15
Page 56

REFERENCIAS
Cambiar la información en pantalla
Cada vez que pulsa , la información en pantalla cambia.
• Si la información no está disponible o no está registrada, aparecerá “NO TEXT”, “NO NAME”, u otra información (por
ej., nombre de la emisora).
FM
o
AM
CD
o
USB (Para CD-DA)
USB-IPOD
o
ANDROID
PANDORA
IHEARTRADIO
AUX
BT AUDIO
Frecuencia Día/Reloj
(Solo para emisoras del FM Radio Broadcast Data System)
Nombre de la emisora (PS) Frecuencia Tipo de programa (PTY) Radio texto+
Día/Reloj
(vuelta al comienzo)
Tiempo de reproducción Día/Reloj Nombre del disco Título de la pista
(vuelta al comienzo)
(Para archivos MP3/WMA/WAV/FLAC)
Tiempo de reproducción Día/Reloj Título del álbum/Artista Título de la pista
Nombre de la carpeta/archivo
Tiempo de reproducción Día/Reloj Título del álbum/Artista Título de la pista
(vuelta al comienzo)
Nombre de la emisora Compartida/Radio Título del álbum Artista
Título de la pista
Nombre de la emisora Título de la pista Pista Artista Día/Reloj (vuelta al comienzo)
AUX Día/Reloj
BT AUDIO Día/Reloj
(vuelta al comienzo)
Tiempo de reproducción Día/Reloj (vuelta al comienzo)
LOCALIZACIÓN Y SOLUCIÓN DE PROBLEMAS
Síntoma Solución
El sonido no se escucha. • Ajuste el volumen al nivel óptimo.
Aparece “MISWIRING CHECK
WIRING THEN PWR ON”.
General
Aparece “PROTECTING SEND
SERVICE”.
La fuente no se puede seleccionar.
• Recepción de radio deficiente.
• Ruidos estáticos mientras se
Radio
escucha la radio.
El disco no puede ser expulsado.
Aparece “IN DISC”. Asegúrese de que no hay ningún obstáculo en la ranura de carga
“PLEASE” y “EJECT” aparecen
alternativamente.
El orden de reproducción no es el
que se esperaba.
CD / USB / iPod
El tiempo de reproducción
transcurrido no escorrecto.
Aparece “NOT SUPPORT” y se
omiten las pistas.
El mensaje “READING” sigue
destellando.
• Inspeccione los cables y las conexiones.
Apague la unidad y luego compruebe que los terminales de los cables
de altavoz estén correctamente aislados. A continuación, vuelva a
encender la unidad.
Lleve la unidad al centro de servicio más cercano.
Verifique el ajuste [
Conecte firmemente la antena.
Pulse y mantenga pulsado
cuidado de no dejar caer el disco cuando sea expulsado.
cuando se expulsa el disco.
Pulse
El orden de reproducción se determina por el nombre del archivo (USB)
o por el orden de grabación de los archivos (disco).
Esto depende del proceso de grabación anterior.
Compruebe que la pista sea de un formato reproducible.
SRC SELECT
, luego inserte un disco correctamente.
].
( 4)
para forzar la expulsión del disco. Tenga
( 14, 15)
• No utilice demasiados niveles de jerarquías y carpetas.
• Cargue el disco o vuelva a conectar el dispositivo USB.
16
Page 57

LOCALIZACIÓN Y SOLUCIÓN DE PROBLEMAS
Síntoma Solución
“CANNOT PLAY” parpadea y/o
el dispositivo conectado no se
puede detectar.
El iPod/iPhone no se enciende o
no funciona.
CD / USB / iPod
No se visualizan los caracteres
correctos.
• El sonido no se escucha
durante la reproducción.
• El sonido se genera solo por
el dispositivo Android.
No se puede reproducir en
AUTO MODE
[
ANDROID
El mensaje “NO DEVICE” o
“READING” sigue destellando.
Reproducción intermitente o
con saltos de sonido.
“CANNOT PLAY” • Asegúrese de que el dispositivo Android contenga archivos de audio que puedan
].
• Verifique si el dispositivo conectado es compatible con esta unidad y
asegúrese de que los archivos estén en formatos compatibles. (
• Vuelva a conectar el dispositivo.
• Verifique la conexión entre esta unidad y el iPod/iPhone.
• Desconecte y realice el reinicio forzado del iPod/iPhone.
• Esta unidad visualiza sólo letras mayúsculas, números, y un número limitado de
símbolos.
• Dependiendo del idioma en pantalla que haya seleccionado en (
caracteres podrían no visualizarse correctamente.
• Vuelva a conectar el dispositivo Android.
AUDIO MODE
• Si está en [
medios en el dispositivo Android e inicie la reproducción.
AUDIO MODE
• Si está en [
medios actual o utilice otra aplicación.
• Vuelva a iniciar el dispositivo Android.
• Si con esto no se consigue resolver el problema, el dispositivo Android conectado no
podrá enviar la señal de audio a la unidad. (
• Asegúrese de que JVC MUSIC PLAY APP esté instalado en el dispositivo Android.
( 7)
• Vuelva a conectar el dispositivo Android y seleccione el modo de control apropiado.
8
)
(
• Si con esto no se consigue resolver el problema, el dispositivo Android conectado no
es compatible con [
• Desactive las opciones del desarrollador en el dispositivo Android.
• Vuelva a conectar el dispositivo Android.
• Si con esto no se consigue resolver el problema, el dispositivo Android conectado no
es compatible con [
Desactive el modo de ahorro de energía en el dispositivo Android.
reproducirse.
• Vuelva a conectar el dispositivo Android.
• Vuelva a iniciar el dispositivo Android.
], arranque la aplicación de cualquier reproductor de
], vuelva a arrancar la aplicación del reproductor de
15
)
AUTO MODE
AUTO MODE
]. (
15
)
]. (
15
)
14, 15)
4), algunos
Síntoma Solución
“ADDERROR” Fracasó la creación de la nueva emisora.
“CHK DEVICE” Verifique la aplicación Pandora en su dispositivo.
“NO SKIPS” Se ha llegado al límite de saltos.
“NO STATIONS” No se pueden encontrar emisoras.
“STATIONLMT” Se alcanzó el número límite de emisoras registradas. Vuelva
“UPGRADE APP” Asegúrese de haber instalado la última versión de la
Pandora
“CONNECT ERR” La comunicación es inestable.
“RATING ERR” El registro con el pulgar arriba/abajo ha fracasado debido a
“THUMBS N/A” El registro con el pulgar arriba/abajo no está permitido.
“LICENSE ERR” Está intentando acceder desde un país donde Pandora no
No se pudo seleccionar la emisora. Si se marca “Explicit Content” en [Account Settings] en la
“CREATE ERR” Fracasó la creación del nombre de la emisora personalizada.
“SAVE ERROR” Fracasó la adición a la categoría de favoritos.
“DISCONNCTED” Verifique la conexión con el dispositivo.
iHeartRadio
“NO SKIPS” Se ha llegado al límite de saltos. Vuelva a intentar más tarde.
“NO STATIONS” No se pueden encontrar emisoras.
“NOT CONNCTD” El enlace con la aplicación es imposible.
a intentarlo después de eliminar emisoras que no necesite
de su dispositivo.
aplicación Pandora en su dispositivo.
conectividad a red insuficiente.
está disponible.
versión web de iHeartRADIO, las emisoras personalizadas no
estarán disponibles.
ESPAÑOL
17
Page 58

LOCALIZACIÓN Y SOLUCIÓN DE PROBLEMAS
ESPECIFICACIONES
Síntoma Solución
“UPDATE APP” Asegúrese de haber instalado en su dispositivo, la última versión de la
“PLS LOGIN” No se inició sesión. Inicie sesión otra vez.
“STATION NOT AVAILABLE” Finalizó la difusión de la emisora.
“STATION NOT SELECTED” No hay ninguna emisora seleccionada.
iHeartRadio
“STREAM ERR” Se ha interrumpido la difusión de datos.
“THUMBS ERR” El registro con el pulgar arriba/abajo ha fracasado.
“TIMED OUT” Ha expirado el tiempo de la solicitud.
aplicación iHeart Link for JVC.
Si experimenta problemas, intente lo siguiente:
1 Verifique la LOCALIZACIÓN Y SOLUCIÓN DE
PROBLEMAS
2 Reinicialice la unidad ( 3)
3 Llame al (solo EE.UU.)
Llame al: 1-800-252-5722 ( o ) visite:
http://www.jvc.com
FM Gama de frecuencias 87,9MHz — 107,9MHz (pasos de 200kHz)
Selección de espacio entre canales 50kHz/200kHz
Sensibilidad útil (Relación señal/ruido = 26dB) 8,2 dBf (0,71V/75)
Sensibilidad de silenciamiento
(DIN S/N = 46dB)
Respuesta de frecuencia (±3 dB) 30Hz—15kHz
Relación señal a ruido (MONO) 64dB
Sintonizador
Separación estéreo (1 kHz) 40dB
AM Gama de frecuencias 530kHz — 1 700kHz (pasos de 10kHz)
Selección de espacio entre canales 9 kHz/10 kHz
Sensibilidad útil (Relación señal/ruido = 20dB) 29 dBµ (28,2 µV)
Diodo láser GaAIAs
Filtro digital (D/A) 8 veces sobremuestreo
Velocidad de giro 500rpm — 200rpm (CLV)
Fluctuación y trémolo Por debajo del límite medible
Respuesta de frecuencia (±1 dB) 20 Hz—20 kHz
Distorsión armónica total (1 kHz) 0,01 %
Relación señal a ruido (1 kHz) 105 dB
Reproductor de CD
Gama dinámica 90 dB
Separación de canales 85 dB
MP3 decodificado Compatible con MPEG-1/2 Audio Layer-3
WMA decodificado Compatible con Windows Media Audio
87,5MHz — 108,0MHz (pasos de 50kHz)
17,2 dBf (2,0V/75)
531kHz — 1 611kHz (pasos de 9kHz)
18
Page 59

ESPECIFICACIONES
Estándar USB USB1.1, USB2.0 (Alta velocidad)
Dispositivos compatibles Clase de almacenamiento masivo
Sistema de archivos FAT12/16/32
Corriente máxima de alimentación 5 V CC
USB
MP3 decodificado Compatible con MPEG-1/2 Audio Layer-3
WMA decodificado Compatible con Windows Media Audio
WAV decodificado PCM lineal
FLAC decodificado Archivos FLAC
Respuesta de frecuencia (±3 dB) 20 Hz — 20 kHz
Voltaje de entrada máximo 1 000mV
Auxiliar
Impedancia de entrada 30k
Potencia de salida máxima 50W×4 ó
Potencia en todo el ancho de banda
(a menos del 1 % THD)
Audio
Impedancia del altavoz 4—8
Nivel de salida de preamplificador/carga CD/USB: 2 500 mV/10k de carga
Impedancia de salida de preamplificador ≤600
1A
50W×2 + 50W×1 (Subwoofer = 4)
22W×4
Voltaje de trabajo (10,5 V —16 V admisibles) 14,4V
Consumo de corriente máxima 10A
Gama de temperaturas de funcionamiento –10°C — +60°C
General
Tamaño de instalación (An×Al× F) 182mm×53mm×158mm
Peso
Sujeto a cambios sin previo aviso.
(7-3/16 pulgada×2-1/8 pulgada×6-1/4 pulgada)
1,1kg
ESPAÑOL
19
Page 60

Advertencia
• La unidad puede utilizarse solamente con una fuente de alimentación de 12 V CC con
negativo a masa.
• Desconecte el terminal negativo de la batería antes de realizar el cableado y el montaje.
• Para evitar un cortocircuito, no conecte el cable de la batería (amarillo) ni el cable de
encendido (rojo) al chasis del vehículo o cable de conexión a masa (negro).
• Para evitar un cortocircuito, utilice una cinta de vinilo para aislar los cables no conectados.
• Asegúrese de volver a conectar a masa esta unidad al chasis del automóvil después de la
instalación.
Precaución
• Para fines de seguridad, deje que un profesional realice el cableado y el montaje. Consulte
con un distribuidor de productos de audio para automóviles.
• Instale esta unidad en la consola de su vehículo. No toque las partes metálicas de la unidad
durante o un poco después del uso de la unidad. Las partes metálicas, tales como el
disipador de calor o la carcasa, pueden estar muy calientes.
• No conecte los cables
(negro) o en paralelo.
• Conecte altavoces con una potencia máxima de más de 50 W. Si la potencia máxima de
los altavoces es inferior a 50 W, cambie el ajuste
mismos.
INSTALACIÓN / CONEXIÓN
(12)
• Monte la unidad a un ángulo de menos de 30˚.
• Si el mazo de conductores de su vehículo no dispone de terminal de encendido, conecte el
cable de encendido (rojo) al terminal de la caja de fusibles del vehículo, el cual suministrará
una alimentación de 12 V CC y podrá conectarse y desconectarse mediante la llave de
encendido.
• Mantenga todos los cables alejados de las partes metálicas disipadoras de calor.
• Después de instalar la unidad, compruebe que las lámparas de freno, las luces
intermitentes, el limpiaparabrisas, etc. funcionen satisfactoriamente.
• Si se funde el fusible, en primer lugar asegúrese de que los cables no estén en contacto
con el chasis del vehículo y, a continuación, reemplace el fusible usado por otro del mismo
régimen.
Procedimiento básico
1
Quite la llave del interruptor de encendido; después,
desconecte el terminal
2 Conecte los cables correctamente.
Consulte Conexión del cableado.
3 Instale la unidad en su automóvil.
Consulte Instalación de la unidad (montaje en el tablero).
4 Conecte el terminal de la batería del automóvil.
5 Reinicialice la unidad.
de los altavoces al chasis del vehículo, al cable de conexión a masa
[AMP GAIN]
de la batería del automóvil.
para evitar daños en los
( 21)
(3)
Instalación de la unidad (montaje en el tablero)
Gancho en el lado superior
Antes del montaje, oriente la placa
embellecedora tal como se muestra
en la ilustración.
Cuando instale sin el manguito de montaje
1
Retire de la unidad, el manguito de montaje y la
placa embellecedora.
2 Alinee los orificios de la unidad (en ambos lados)
con la ménsula de montaje del vehículo y asegure la
unidad con los tornillos (disponibles en el mercado).
Utilice solo los tornillos especificados. El uso de tornillos incorrectos puede dañar
la unidad.
Cómo desmontar la unidad
Prepare el cableado
necesario.
(21)
Salpicadero del
automóvil
Doble las lengüetas apropiadas para
retener firmemente la manga en su lugar.
20
Page 61

Conexión del cableado
IMPORTANTE
Se recomienda instalar la unidad con un mazo de cables disponible en el
mercado que sea adecuado para su automóvil y, para fines de seguridad, deje
esta tarea en manos de profesionales. Consulte con un distribuidor de productos
de audio para automóviles.
Salpicadero del
vehículo
Terminales de salida
Cable de señal (no suministrado)
Fusible (10 A)
Amplificador de
1
JVC *
Cable remoto
(no suministrado)
1
*
Para evitar daños a la unidad, conecte
firmemente el cable de conexión a masa
del amplificador al chasis del vehículo.
Lista de piezas para
la instalación
(A)
Placa frontal
Mazo de cables de
fábrica (vehículo)
Mazo de conductores
personalizado (adquirido por
separado)
2
*
También es posible
conectar directamente
un subwoofer con
este conductor sin el
amplificador externo
para subwoofer. Para la
configuración,
Conexión a
través de los cables
de los altavoces, 13
Conexión recomendada
Al adaptador del mando a distancia
Azul: A la antena motriz
Azul/blanco: Al amplificador
.
del volante de la dirección
Terminal de la antena
Luz azul/amarilla
STEERING
WHEEL
REMOTE
Junte los cables del mismo color.
Azul/blanco: Remoto (200 mA máx.)
Naranja/blanco: Iluminación
Marrón: Silenciamiento del teléfono
Amarillo: Batería de 12 V
Rojo: Encendido de 12 V
Negro: Tierra
Gris: Altavoz delantero (derecho)
Gris/negro
Blanco: Altavoz delantero (izquierdo)
Blanco/negro
Púrpura: Altavoz trasero (derecho)
Púrpura/negro
Verde: Altavoz trasero (izquierdo) *
2
Verde/negro *
(B)
Placa embellecedora
(C)
Interruptor de encendido
Bloque de fusibles
del vehículo
Cable rojo
separado
Realice esta conexión si el mazo
de conductores de fábrica de su
vehículo no incluye el cable del
“interruptor de encendido de 12 V”.
2
Manguito de montaje
(D)
Mazo de conductores
(E)
Herramienta de extracción
ESPAÑOL
21
Page 62

Page 63

Page 64

CAUTION
Use of controls or adjustments or performance of procedures other
than those specified herein may result in hazardous radiation
exposure.
In compliance with Federal Regulations, following are reproductions
of labels on, or inside the product relating to laser product safety.
JVC KENWOOD Corporation
2967-3, ISHIKAWA-MACHI,
HACHIOJI-SHI, TOKYO, JAPAN
THIS PRODUCT COMPLIES WITH DHHS RULES 21CFR
SUBCHAPTER J IN EFFECT AT DATE OF MANUFACTURE.
Location : Top Plate
FCC WARNING
This equipment may generate or use radio frequency energy. Changes
or modifications to this equipment may cause harmful interference
unless the modifications are expressly approved in the instruction
manual. The user could lose the authority to operate this equipment if
an unauthorized change or modification is made.
FCC NOTE
This equipment has been tested and found to comply with the limits
for a Class B digital device, pursuant to Part 15 of the FCC Rules. These
limits are designed to provide reasonable protection against harmful
interference in a residential installation. This equipment may cause
harmful interference to radio communications, if it is not installed
and used in accordance with the instructions. However, there is no
guarantee that interference will not occur in a particular installation. If
this equipment does cause harmful interference to radio or television
reception, which can be determined by turning the equipment off and
on, the user is encouraged to try to correct the interference by one or
more of the following measures:
• Reorient or relocate the receiving antenna.
• Increase the separation between the equipment and receiver.
• Connect the equipment into an outlet on a circuit different from
that to which the receiver is connected.
• Consult the dealer or an experienced radio/TV technician for help.
© 2016 JVC KENWOOD Corporation
Información acerca de la eliminación de equipos
eléctricos y electrónicos al final de la vida útil
(aplicable a los países que hayan adoptado sistemas
independientes de recogida de residuos)
• Microsoft and Windows Media are either registered trademarks or
trademarks of Microsoft Corporation in the United States and/or
other countries.
• “Made for iPod,” and “Made for iPhone” mean that an electronic
accessory has been designed to connect specifically to iPod, or
iPhone, respectively, and has been certified by the developer to
meet Apple performance standards. Apple is not responsible for
the operation of this device or its compliance with safety and
regulatory standards. Please note that the use of this accessory
with iPod or iPhone may affect wireless performance.
• iPhone, iPod, iPod classic, iPod nano, and iPod touch are
trademarks of Apple Inc., registered in the U.S. and other countries.
• Lightning is a trademark of Apple Inc.
• Pandora, the Pandora logo, and the Pandora trade dress are
trademarks or registered trademarks of Pandora Media, Inc., used
with permission.
• iHeartRadio® and iHeartAuto
iHeartMedia, Inc. All uses are authorized under license.
• Android is trademark of Google Inc.
Los productos con el símbolo de un contenedor
con ruedas tachado no podrán ser desechados
como residuos domésticos. Los equipos eléctricos
y electrónicos al final de la vida útil, deberán ser
reciclados en instalaciones que puedan dar el
tratamiento adecuado a estos productos y a sus
subproductos residuales correspondientes. Póngase
en contacto con su administración local para
obtener información sobre el punto de recogida
más cercano. Un tratamiento correcto del reciclaje
y la eliminación de residuos ayuda a conservar
los recursos y evita al mismo tiempo efectos
perjudiciales en la salud y el medio ambiente.
TM
are trademarks owned by
libFLAC
Copyright (C) 2000,2001,2002,2003,2004,2005,2006,2007,2008,
2009 Josh Coalson
Redistribution and use in source and binary forms, with or without
modification, are permitted provided that the following conditions
are met:
- Redistributions of source code must retain the above copyright
notice, this list of conditions and the following disclaimer.
- Redistributions in binary form must reproduce the above copyright
notice, this list of conditions and the following disclaimer in
the documentation and/or other materials provided with the
distribution.
- Neither the name of the Xiph.org Foundation nor the names of its
contributors may be used to endorse or promote products derived
from this software without specific prior written permission.
THIS SOFTWARE IS PROVIDED BY THE COPYRIGHT HOLDERS AND
CONTRIBUTORS “AS IS” AND ANY EXPRESS OR IMPLIED WARRANTIES,
INCLUDING, BUT NOT LIMITED TO, THE IMPLIED WARRANTIES OF
MERCHANTABILITY AND FITNESS FOR A PARTICULAR PURPOSE ARE
DISCLAIMED. IN NO EVENT SHALL THE FOUNDATION OR CONTRIBUTORS
BE LIABLE FOR ANY DIRECT, INDIRECT, INCIDENTAL, SPECIAL,
EXEMPLARY, OR CONSEQUENTIAL DAMAGES (INCLUDING, BUT NOT
LIMITED TO, PROCUREMENT OF SUBSTITUTE GOODS OR SERVICES; LOSS
OF USE, DATA, OR PROFITS; OR BUSINESS INTERRUPTION) HOWEVER
CAUSED AND ON ANY THEORY OF LIABILITY, WHETHER IN CONTRACT,
STRICT LIABILITY, OR TORT (INCLUDING NEGLIGENCE OR OTHERWISE)
ARISING IN ANY WAY OUT OF THE USE OF THIS SOFTWARE, EVEN IF
ADVISED OF THE POSSIBILITY OF SUCH DAMAGE.
Informação sobre a eliminação de pilhas
Este produto não deve ser eliminado como lixo doméstico geral.
Devolva a pilha usada ao revendedor ou entidade autorizada para que
a mesma seja devolvida ao fabricante ou importador.
A reciclagem e a eliminação de lixo de maneira apropriada ajudarão
a conservar os recursos naturais ao mesmo tempo que prevenirão os
efeitos prejudicais à nossa saúde e ao meio ambiente.
CALIFORNIA, USA ONLY
This product contains a CR Coin Cell Lithium Battery which contains
Perchlorate Material—special handling may apply.
See www.dtsc.ca.gov/hazardouswaste/perchlorate
0216DTSMDTJEIN
 Loading...