

Page 1

CD RECEIVER
CD-RECEIVER
RECEPTEUR CD
CD-RECEIVER
ENGLISH
DEUTSCH
KD-S9R
ATT
/
/I
For installation and connections, refer to the separate manual.
Für den Einbau und die Anschlüsse siehe das eigenständige Handbuch.
Pour l’installation et les raccordements, se référer au manuel séparé.
Bijzonderheden over de installatie en aansluiting van het apparaat vindt u in de desbetref fende
handleiding.
INSTRUCTIONS
BEDIENUNGSANLEITUNG
MANUEL D’INSTRUCTIONS
GEBRUIKSAANWIJZING
45Wx4
DISP
RDS
TP
PTY
7 8 9 10 11 12
SCM
MO
RND
SSM
RPT
CD
FM
AM
FRANÇAIS
NEDERLANDS
GET0007-001A
[E]
Page 2
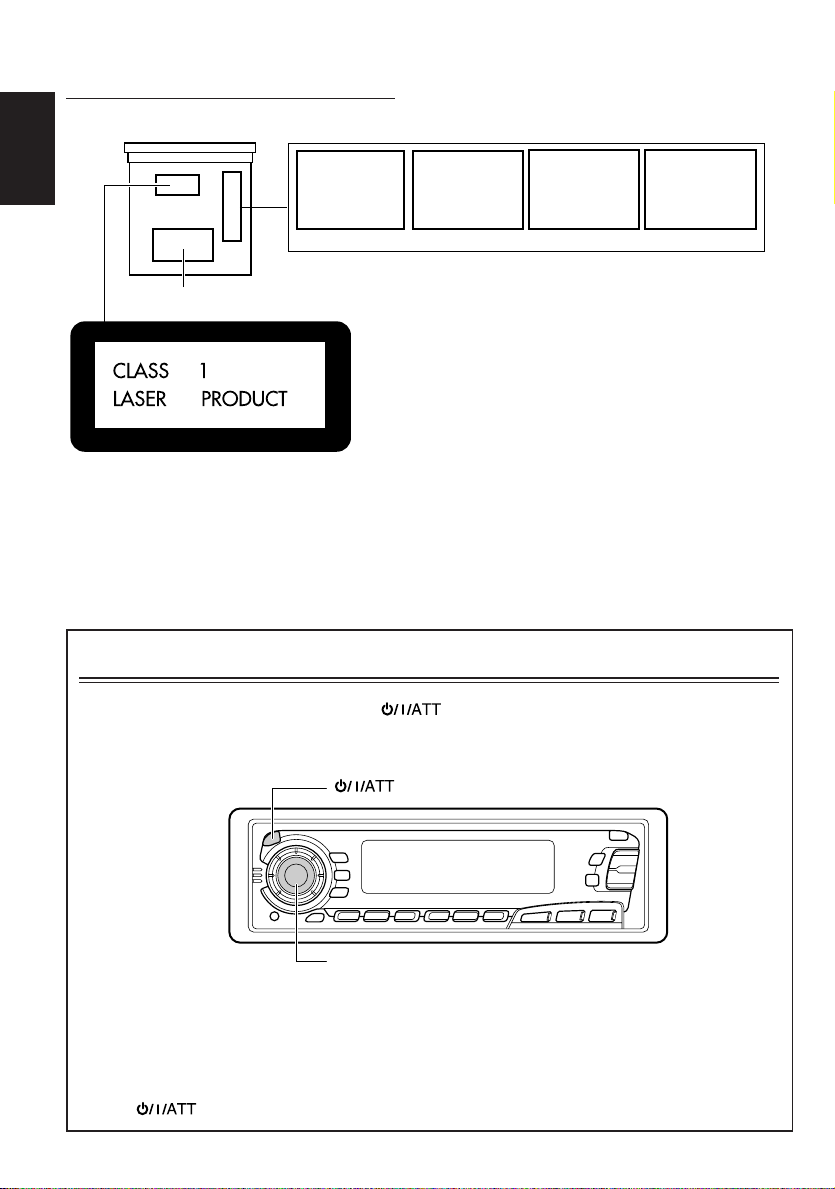
Position And Reproduction Of Labels
Bottom panel of the main unit
ADVARSEL: Usynlig laserstråling ved åbning, når
sikkerhedsafbrydere er ude
af funkti on. Undgåudsættelse for stråling. (d)
VARNING: Osynlig laser-
strålning när denna del
är öppnad och spärren
urkopplad. Betrakta ej
strålen. (s)
VARO : Avattaessa ja suojalukitus ohitettaessa olet
är
alttiina näkymättömälle
lasersäteilylle. Älä katso
säteeseen. (f)
ENGLISH
DANGER: Invisible laser
radiation when open and
interlock failed or defeated.
AVOID DIRECT EXPOSURE
TO BEAM. (e )
IMPORTANT FOR LASER PRODUCTS
Name/Rating plate
Caution:
This product contains a laser component
of higher laser class than Class 1.
Precautions:
1.CLASS 1 LASER PRODUCT
2.DANGER: Invisible laser radiation when open and
interlock failed or defeated. Avoid direct exposure to
beam.
3.CAUTION: Do not open the top cover. There are no
user-serviceable parts inside. Leave all servicing to
qualified service personnel.
4.CAUTION: This CD player uses invisible laser
radiation and is equipped with safety switches to
prevent radiation emission when unloading CDs. It is
dangerous to defeat the safety switches.
5.CAUTION: Use of controls, adjustments or
performance of procedures other than those specified
herein may result in hazardous radiation exposure.
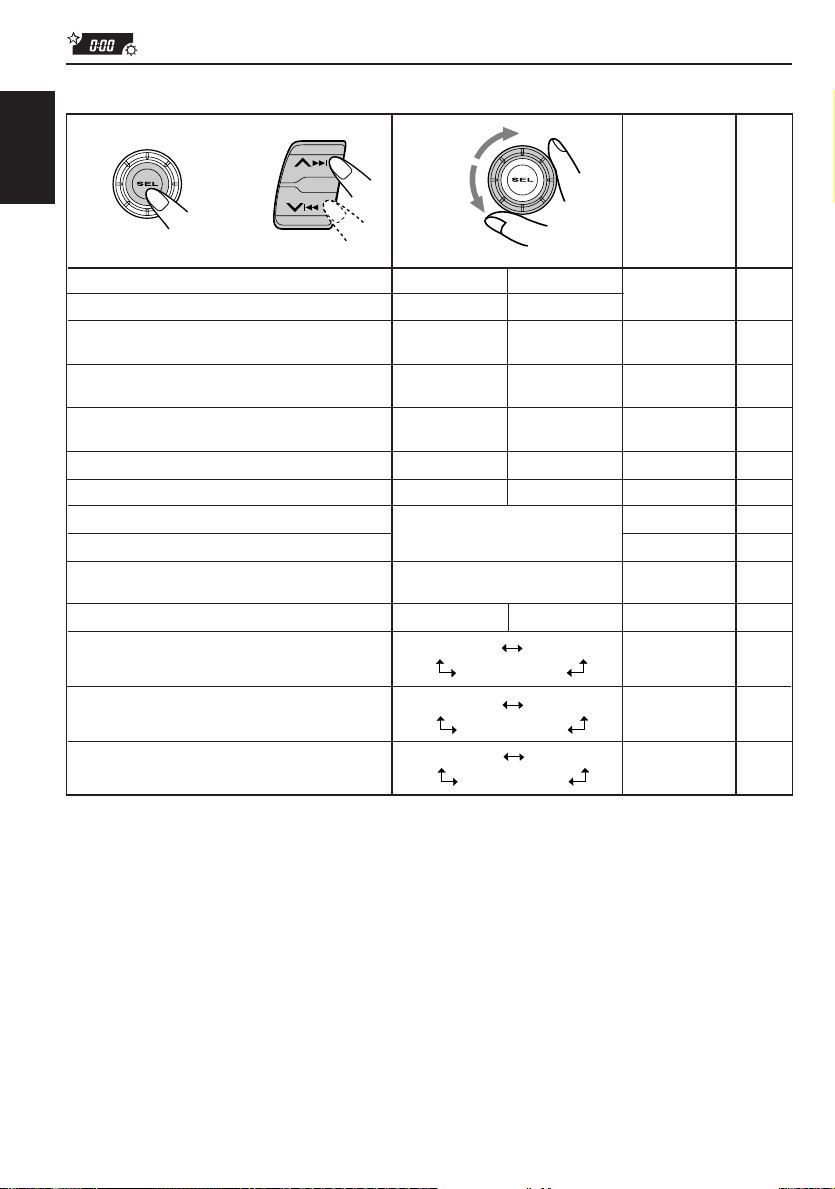
How to reset your unit
Press and hold both the SEL (select) and (standby/on/attenuator) buttons at the same
time for several seconds.
This will reset the built-in microcomputer.
(standby/on/attenuator)
SEL (select)
Notes:
• Your preset adjustments — such as preset channels or sound adjustments — will also be erased.
• If a CD is in the unit, “PLEASE” and “EJECT” appear on the display alternately. In this case, press 0 to
eject the CD. Pay attention not to drop the CD.
* When you reset the unit with no CD loaded…
After you open and close the control panel, nothing may be displayed although the unit is on. In this case,
press to return to the normal state.
2
Page 3

Thank you for purchasing a JVC product. Please read all instructions carefully before operation,
to ensure your complete understanding and to obtain the best possible performance from the unit.
CONTENTS
How to reset your unit............................... 2
LOCATION OF THE BUTTONS............ 4
Control panel ........................................... 4
BASIC OPERATIONS ...................... 5
Turning on the power ................................ 5
RADIO BASIC OPERATIONS ............. 6
Listening to the radio ................................ 6
Storing stations in memory ....................... 7
Tuning into a preset station....................... 8
RDS OPERATIONS ........................ 9
What you can do with RDS EON.............. 9
Other convenient RDS functions and
adjustments........................................... 12
CD OPERATIONS .......................... 14
Playing a CD............................................ 14
Locating a track or a particular portion on a
CD ......................................................... 15
Selecting CD playback modes.................. 15
Playing a CD Text .................................... 16
Prohibiting CD ejection ............................. 16
SOUND ADJUSTMENTS .................. 17
Adjusting the sound ................................. 17
Using the sound control memory ............. 17
Storing your own sound adjustments ....... 18
OTHER MAIN FUNCTIONS ............... 19
Setting the clock ...................................... 19
Changing the general settings (PSM) ...... 19
Detaching the control panel...................... 22
TROUBLESHOOTING...................... 23
MAINTENANCE ............................ 24
Handling CDs .......................................... 24
SPECIFICATIONS .......................... 25
ENGLISH
Note:
For security reasons, a numbered ID card is provided with this unit, and the same ID number is imprinted on
the unit’s chassis. Keep the card in a safe place, as it will help the authorities to identify your unit if stolen.
BEFORE USE
*
For safety....
• Do not raise the volume level too much, as this will
block outside sounds, making driving dangerous.
• Stop the car before performing any complicated
operations.
*
Temperature inside the car....
If you have parked the car for a long time in hot or
cold weather, wait until the temperature in the car
becomes normal before operating the unit.
3
Page 4
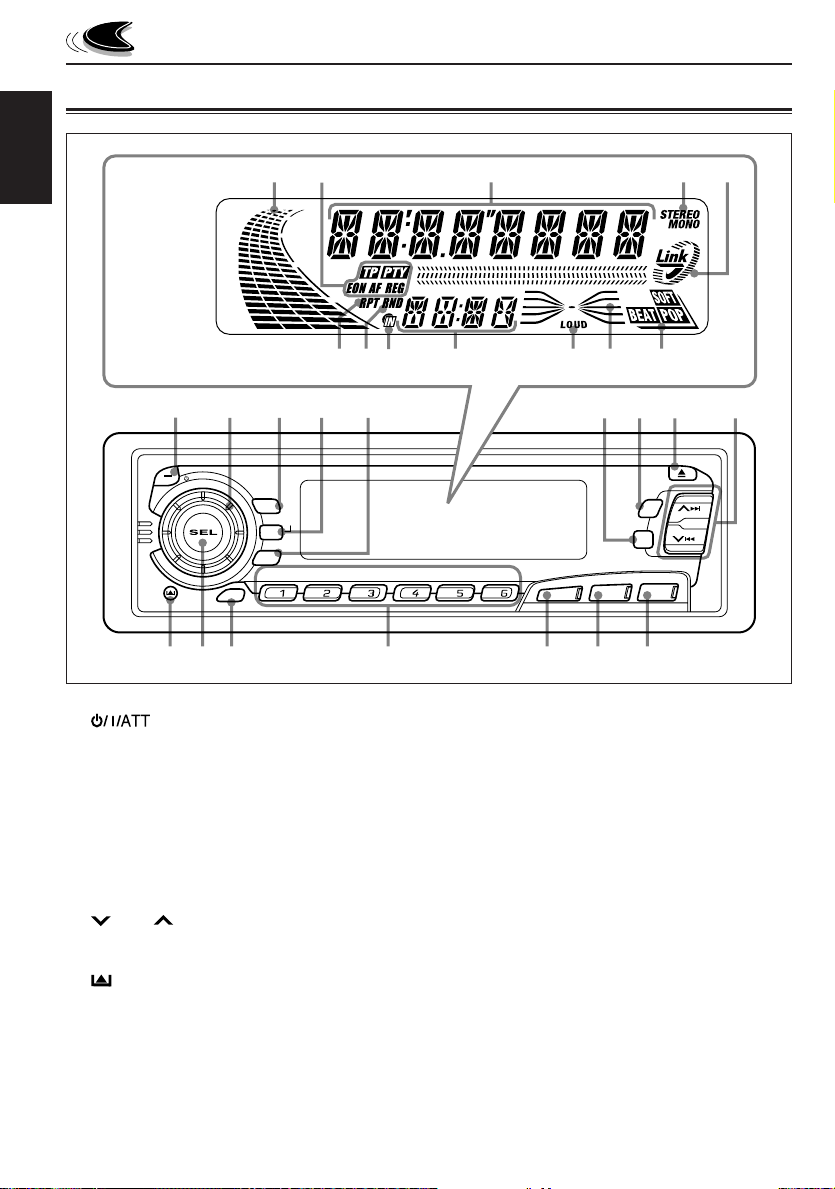
Control panel
ENGLISH
Display window
LOCATION OF THE BUTTONS
uo;a
i
kjhgfds
13245
ATT
/
/I
DISP
RDS
TP
PTY
7 8 9 10 11 12
SCM
1 (standby/on/attenuator) button
2 Control dial
3 DISP (display) button
4 TP (traffic programme)
RDS (radio data system) button
5 PTY (programme type) button
6 RPT (repeat) button
7 MO (monaural) button
RND (random) button
8 0 (eject) button
9 4 / ¢ buttons
•
Also functions as SSM buttons when pressed
together.
p (control panel release) button
q SEL (select) button
w SCM (sound control memory) button
e Number buttons
r AM button
t FM button
y CD button
678 9
MO
RND
RPT
CD
FM
AM
ytrewqp
Display window
u Volume level indicator
i RDS indicators
TP, PTY, EON, AF, REG
o Main display
; Tuner reception indicators
STEREO, MONO
a “Link” indicator
s RPT (repeat) indicator
d RND (random) indicator
f CD IN indicator
g Source/clock display
h LOUD indicator
j Equalization pattern indicator
k Sound mode indicators
SOFT, BEAT, POP
SSM
4
Page 5
ATT
/
/I
DISP
TP
PTY
SCM
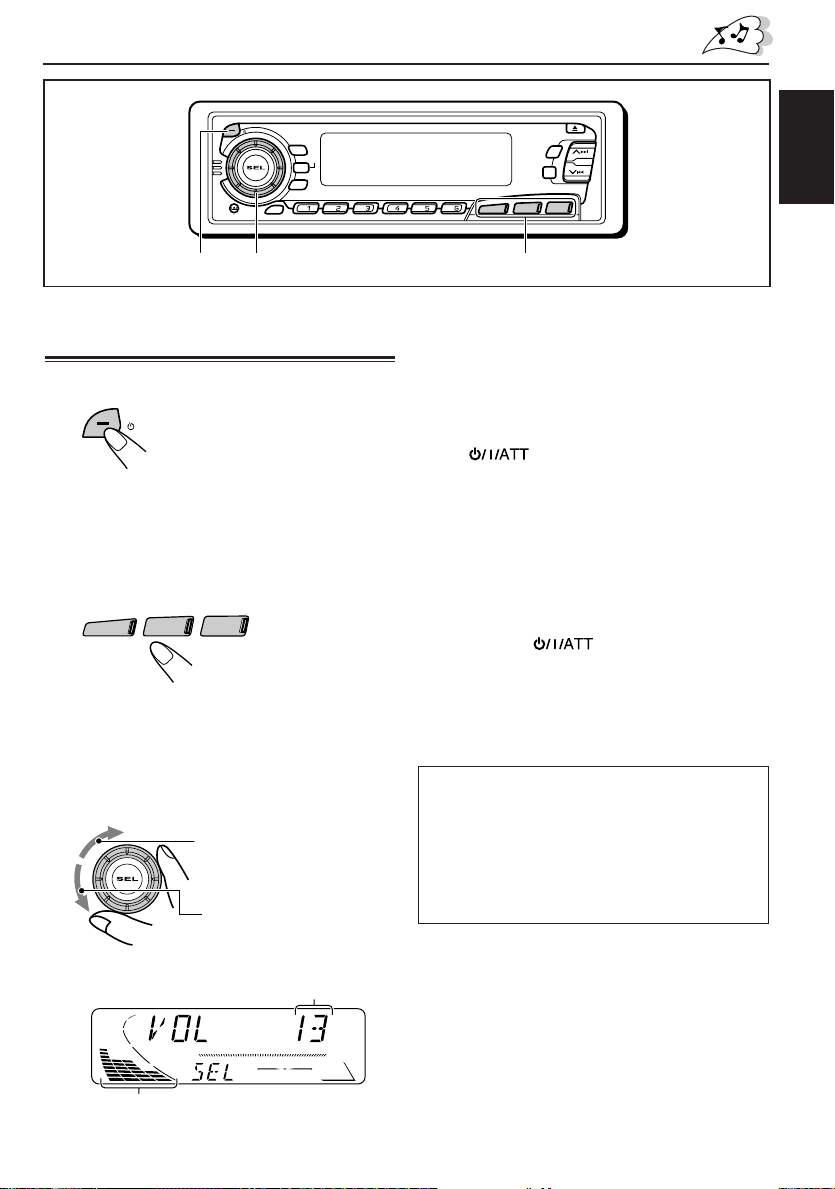
Turning on the power
1
Turn on the power.
ATT
/
/I
Note on One-Touch Operation:
When you select a source in step 2 below, the
power automatically comes on. You do not have
to press this button to turn on the power.
2
Select the source.
CD
FM
AM
BASIC OPERATIONS
RDS
7 8 9 10 11 12
4
To drop the volume in a moment
Press briefly while listening to any
source. “ATT” starts flashing on the display, and
the volume level will drop in a moment.
To resume the previous volume level, press the
button briefly again.
• If you rotate the control dial clockwise, you can
also restore the sound.
To turn off the power
Press and hold for more than 1 second.
MO
RND
SSM
RPT
CD
FM
AM
231
Adjust the sound as you want (see
page 17).
ENGLISH
To operate the tuner (AM or FM),
see pages 6 – 13.
To operate the CD player,
see pages 14 – 16.
3
Adjust the volume.
To increase the volume.
To decrease the volume.
Volume level indicator
Note:
When you use this unit for the first time, set the built-in
clock correctly, see page 19.
CAUTION on Volume Setting
CDs produce very little noise compared with other
sources. If the volume level is adjusted for the
tuner, for example, the speakers may be damaged
by the sudden increase in the output level.
Therefore, lower the volume before playing a disc
and adjust it as required during playback.
Volume level appears.
5
Page 6
ENGLISH
RADIO BASIC OPERATIONS
ATT
/
/I
DISP
RDS
TP
PTY
7 8 9 10 11 12
SCM
AM
MO
RND
SSM
RPT
CD
FM
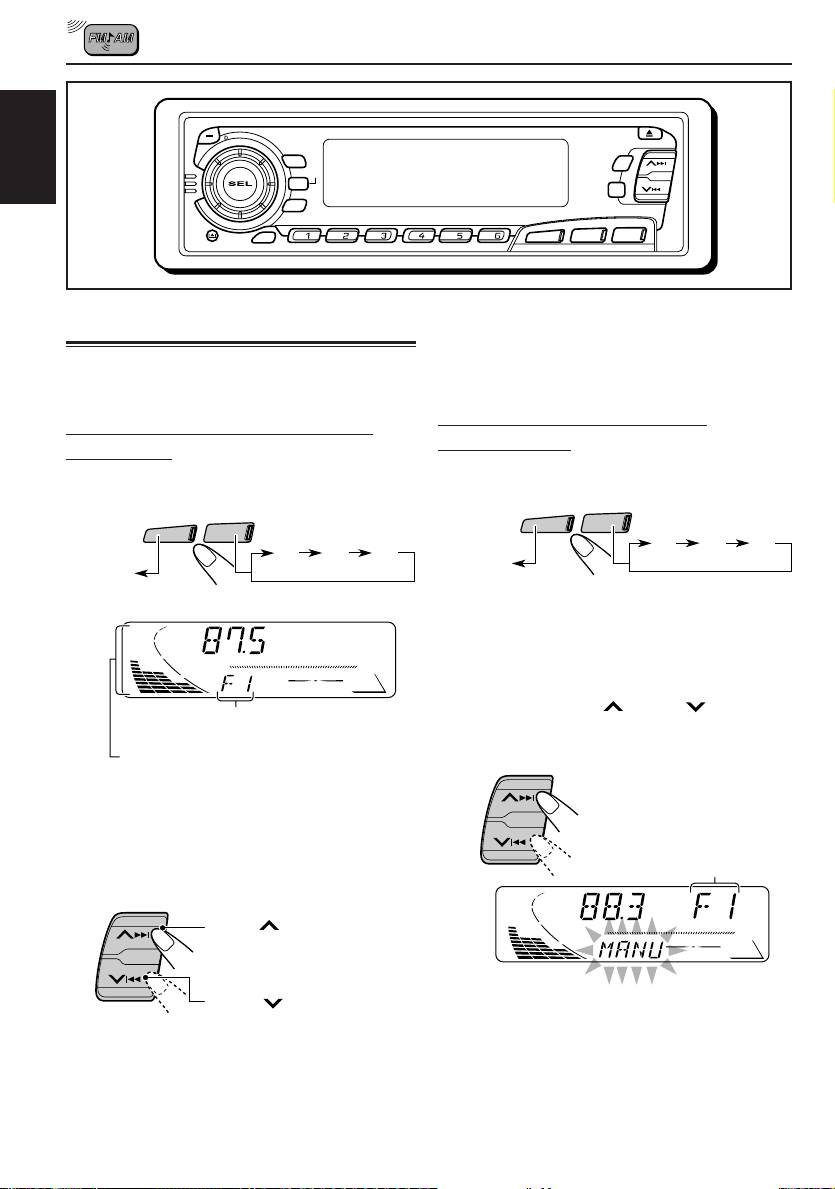
Listening to the radio
You can use either automatic searching or manual
searching to tune into a particular station.
Searching a station automatically:
Auto search
1
Select the band (AM, FM1 – 3).
FM
AM
F1
F2
(FM1)
AM
Selected band (or clock time: see page 21)
appears.
Audio (see page 21) or volume level indicator
Note:
This receiver has three FM bands (FM1, FM2,
FM3). You can use any one of them to listen to an
FM broadcast.
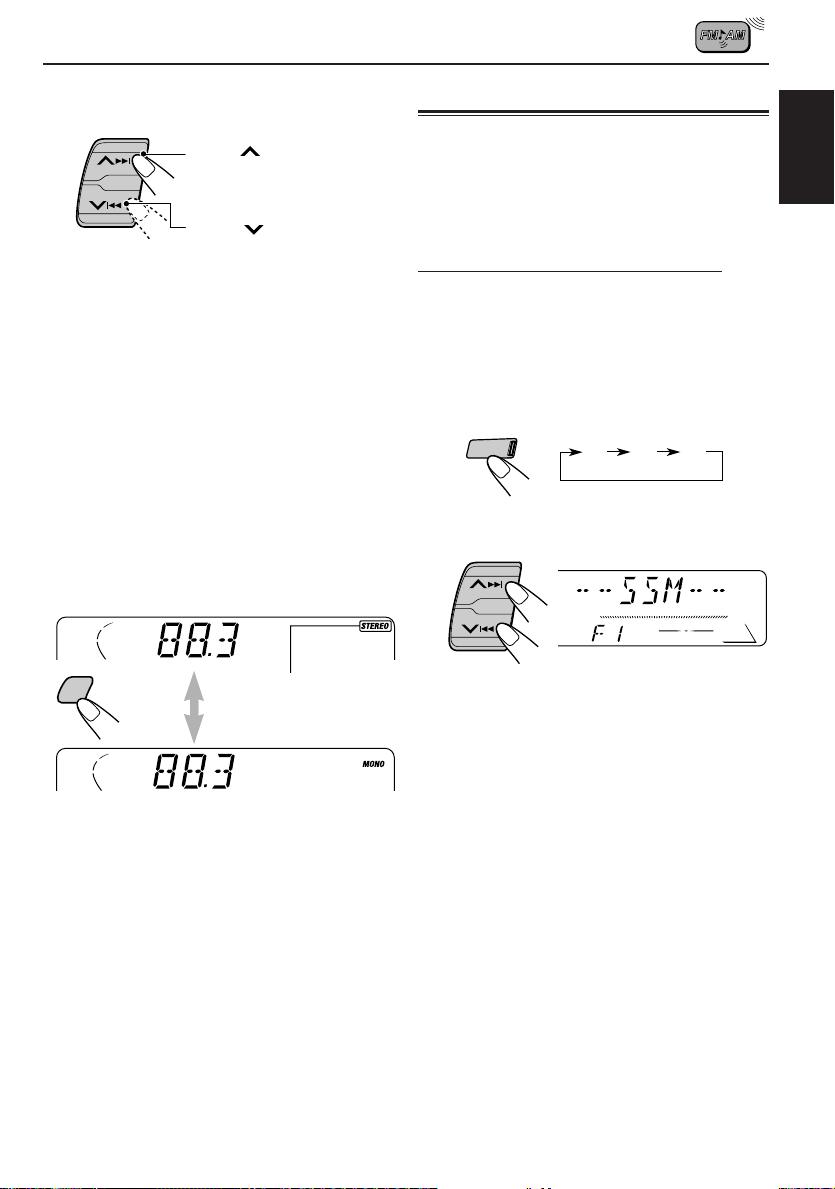
2
Start searching a station.
(FM2)F3(FM3)
To stop sear ching before a station is received,
press the same button you have pressed for
searching.
Searching a station manually:
Manual search
1
Select the band (AM, FM1 – 3).
FM
AM
F1
F2
(FM1)
AM
Note:
This receiver has three FM bands (FM1, FM2,
FM3). You can use any one of them to listen to an
FM broadcast.
2
Press and hold ¢ or 4 until
“MANU” (manual) starts flashing on
the display.
Selected band appears.
(FM2)F3(FM3)
Press ¢ to search
stations of higher
frequencies.
Press 4 to search
stations of lower
frequencies.
When a station is received, searching
stops.
6
Page 7
3
SSM
Tune into a station you want while
“MANU” is flashing.
Press ¢ to search
stations of higher
frequencies.
Press 4 to search
stations of lower
frequencies.
• If you release your finger from the button,
the manual mode will automatically turn off
after 5 seconds.
• If you hold down the button, the frequency
keeps changing (in 50 kHz intervals for FM
and 9 kHz intervals for AM – MW/LW) until
you release the button.
When an FM stereo broadcast is hard to
receive:
Press MO RND (monaural/random) while
listening to an FM stereo broadcast.
• Each time you press the button, the MONO
indicator lights up and goes off alternately.
Storing stations in memory
You can use one of the following two methods to
store broadcasting stations in memory.
• Automatic preset of FM stations: SSM (Strongstation Sequential Memory)
• Manual preset of both FM and AM stations
FM station automatic preset: SSM
Y ou can preset 6 local FM stations in each FM band
(FM1, FM2 and FM3).
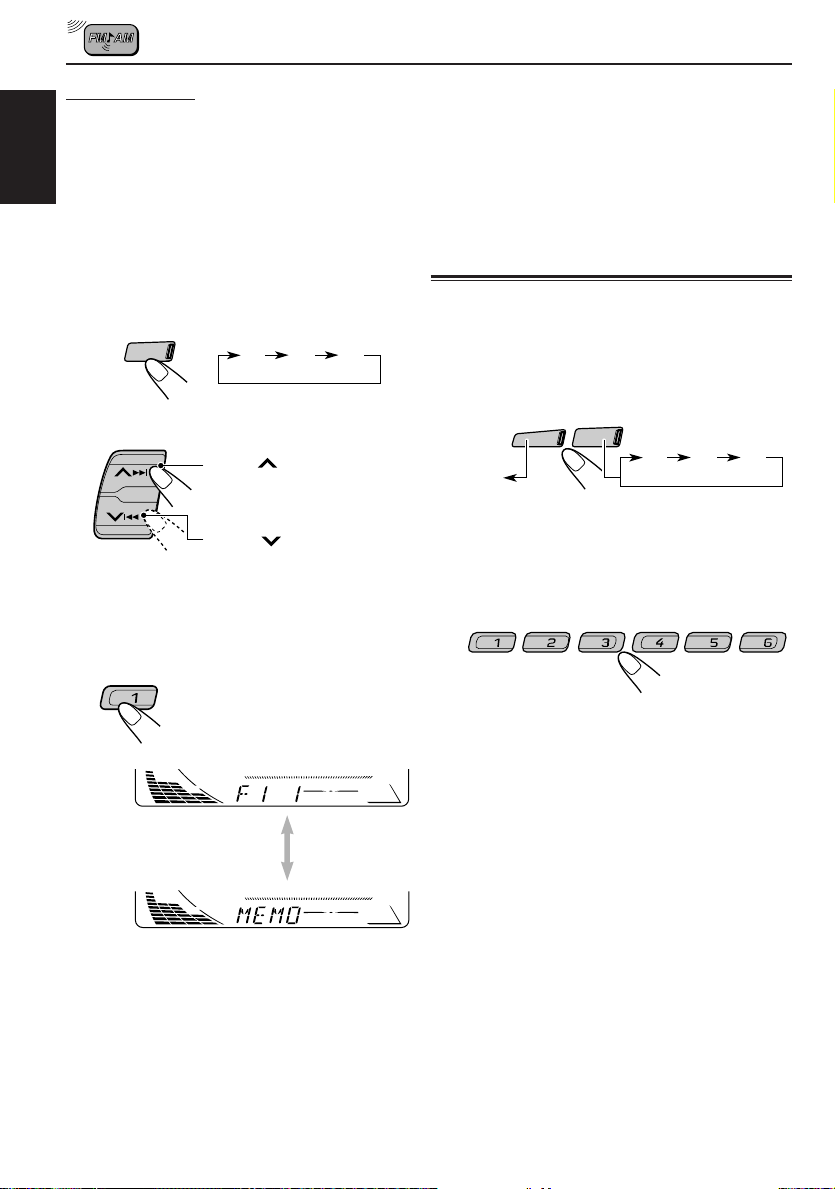
1
Select the FM band (FM1 – 3) you want
to store FM stations into.
• Each time you press the button, the FM
band changes as follows:
FM
2
Press and hold both buttons for more
than 2 seconds.
F1
(FM1)F2(FM2)F3(FM3)
ENGLISH
MO
RND
When the MONO indicator is lit on the display,
the sound you hear becomes monaural but the
reception will be improved (the STEREO
indicator goes off).
Lights up when receiving an
FM broadcast in stereo.
“SSM” appears, then disappears
when automatic preset is over.
Local FM stations with the strongest signals are
searched and stored automatically in the band
number you have selected (FM1, FM2 or FM3).
These stations are preset in the number buttons —
No.1 (lowest frequency) to No .6 (highest frequency).
When automatic preset is over, the station stored
in number button 1 will be automatically tuned in.
7
Page 8
Manual preset
Y ou can preset up to 6 stations in each band (FM1,
FM2, FM3 and AM) manually.
Ex: Storing an FM station of 88.3 MHz into the
ENGLISH
preset number 1 of the FM1 band
1
Select the FM band (FM1 – 3) you
want to store FM stations into (in
this example, FM1).
• Each time you press the button, the FM
band changes as follows:
FM
2
Tune into a station of 88.3 MHz.
3
Press and hold the number button (in
this example, 1) for more than 2
seconds.
F1
(FM1)F2(FM2)F3(FM3)
Press ¢ to tune in
stations of higher
frequencies.
Press 4 to tune in
stations of lower
frequencies.
Notes:
• A pre viously preset station is erased when a ne w station
is stored in the same preset number.
• Preset stations ar e erased when the power supply to the
memory circuit is interrupted (for example, during
battery replacement). If this occurs, preset the stations
again.
Tuning into a preset station
You can easily tune into a preset station.
Remember that you must store stations first. If you
have not stored them yet, see “Storing stations in
memory” on page 7.
1
Select the band (AM, FM1 – 3).
FM
AM
F1
F2
(FM1)
AM
2
Select the number (1 – 6) for the preset
station you want.
(FM2)F3(FM3)
Band/preset number and
“MEMO” flash alternately
for a while.
4
Repeat the above procedure to store
other stations into other preset
numbers.
8
Page 9
RDS OPERATIONS
What you can do with RDS EON
RDS (Radio Data System) allows FM stations to
send an additional signal along with their regular
programme signals. For example , the stations send
their station names, as well as information about
what type of programme they broadcast, such as
sports or music, etc.
Another advantage of RDS function is called “EON
(Enhanced Other Networks).” The EON indicator
lights up while receiving an FM station with the EON
data. By using the EON data sent from a station,
you can tune into a different station of a different
network broadcasting your favorite programme or
traffic announcement while listening to another
programme or to another source such as CD.
By receiving the RDS data, this unit can do the
following:
• Tracing the same programme automatically
(Network-Tracking Reception)
• Standby Reception of TA (T raffic Announcement)
or your favorite programme
• PTY (Programme Type) search
• Programme search
• And some other functions
Tracing the same programme
automatically (Network-Tracking
Reception)
When driving in an area where FM reception is not
good, the tuner built in this unit automatically tunes
into another RDS station, broadcasting the same
programme with stronger signals. So, you can
continue to listen to the same programme in its
finest reception, no matter where you drive. (See
the illustration on the next page.)
Two types of the RDS data are used to make
Network-Tracking Reception work correctly — PI
(Programme Identification) and AF (Alternative
Frequency).
Without receiving these data correctly from the RDS
station you are listening to, Network-Tracking
Reception will not operate.
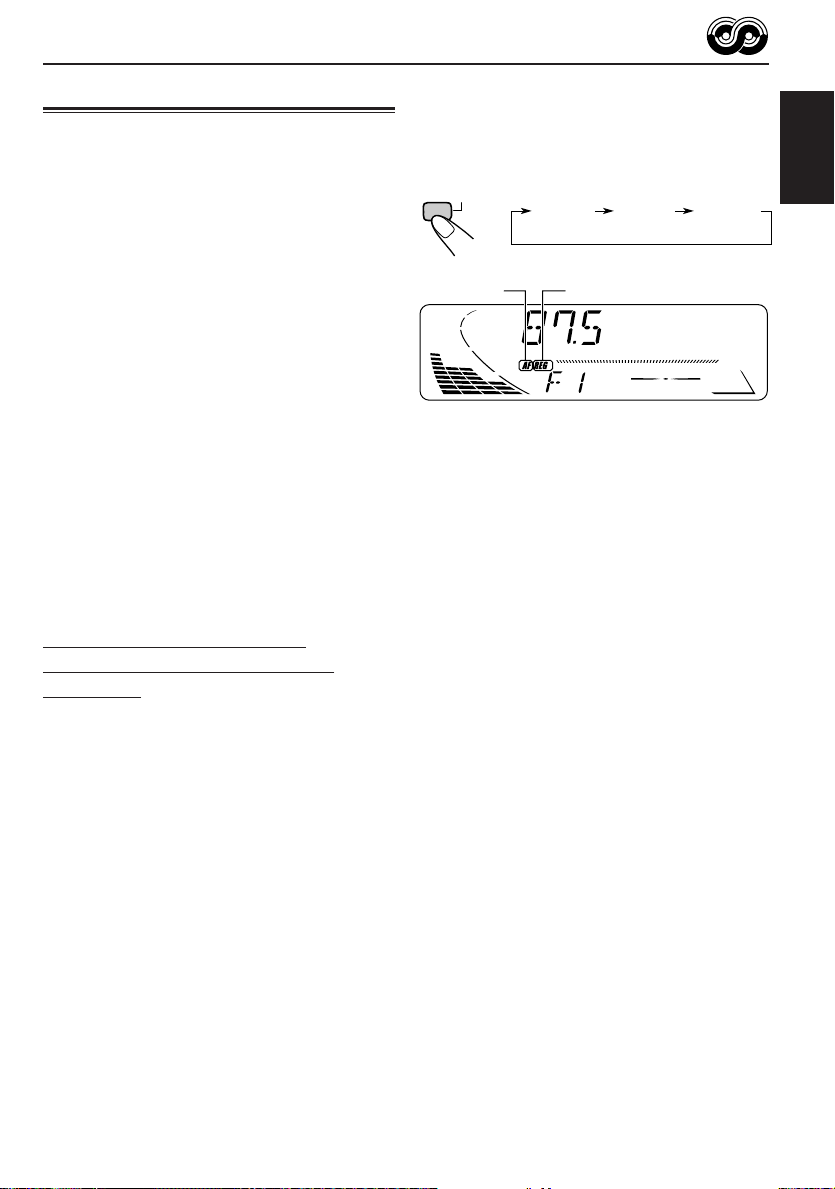
To use Network-Tracking Reception, press and
hold TP RDS (Traffic Programme/Radio Data
System) for more than 1 second. Each time you
press and hold the button, Network-Tracking
Reception modes change as follows:
RDS
TP
AF indicator
Mode 1
The AF indicator lights up but the REG indicator
does not.
Network-Tracking Reception is activated with
Regionalization set to “off.”
Switches to another station within the same network
when the receiving signals from the current station
become weak.
• In this mode, the programme may differ from the one
currently received.
Mode 2
Both the AF indicator and the REG indicator light
up.
Network-Tracking Reception is activated with
Regionalization set to “on.”
Switches to another station, within the same
network, broadcasting the same programme when
the receiving signals from the current station
become weak.
Mode 3
Neither the AF indicator nor the REG indicator lights
up.
Network-Tracking Reception is deactivated.
Mode 1 Mode 2 Mode 3
REG indicator
ENGLISH
9
Page 10

The same programme can be received on
different frequencies.
Programme 1
broadcasting
on frequency A
ENGLISH
Programme 1
broadcasting
on frequency B
Programme 1
broadcasting
on frequency C
Programme 1
broadcasting
on frequency E
Programme 1
broadcasting
on frequency D
Using Standby Reception
Standby Reception allows the unit to switch
temporarily to your favorite programme (PTY:
Programme Type) and Traffic Announcement (TA)
from the current source (another FM station and
CD)
• Standby Reception will not work if you are listening
to an AM station.
TA Standby Reception
RDS
When you press TP RDS while listening
TP
to an FM station, the TP indicator is lit
during reception of a TP (Traffic
Programme) station and the TA standby
mode is engaged.
• When the station being received is not a TP station,
the TP indicator flashes. Press ¢ or 4
to engage the TA standby mode. “SEARCH” appears
on the display, and TP station search starts. When a
TP station is tuned in, the TP indicator is lit.
7 If you are listening to a CD and wish to listen to a
TP station, press TP RDS to enter the T A standb y
mode. (The TP indicator lights up.)
To deactivate the TA standby mode, press TP
RDS again.
PTY Standby Reception
When you press PTY while listening to
PTY
an FM station, the PTY indicator is lit
during reception of a PTY station and the
PTY standby mode is engaged. The
selected PTY name stored on page 11
flashes for 5 seconds.
• When the station being received is not a PTY station,
the PTY indicator flashes. Press ¢ or 4
to engage the PTY standby mode. “SEARCH” appears
on the display, and PTY station sear ch starts. When a
PTY station is tuned in, the PTY indicator is lit.
7 If you are listening to a CD and wish to listen to a
selected PTY broadcast, press PTY to enter the
PTY standby mode. (The PTY indicator lights up.)
If the selected PTY programme starts broadcasting
while the PTY standby mode is active, the selected
PTY name appears and the playback source
changes to the FM band. The selected PTY
programme can then be heard.
To deactiv ate the PTY standby mode, press PTY
again.
Selecting your favorite programme for
PTY Standby Reception
You can select your favorite programme for PTY
Standby Reception to store in memory .
When shipped from the factory, “NEWS” is stored
as the programme type for PTY Standby Reception.
1
Press and hold SEL (select) for more
than 2 seconds so that one of the PSM
items appears on the display.
(PSM: see page 20.)
If a traffic programme starts broadcasting while the
T A standby mode is activ e, “TRAFFIC” appears and
the playback source changes to the FM band. The
volume increases to the preset TA volume level (see
page 13) and the traffic programme can be heard.
10
Page 11
2
Select “PTY STBY” (standby) if not
shown on the display.
3
Select one of twenty-nine PTY codes.
Selected code name appears
on the display and is stored
into memory.
• For details, see the table
below.
4
Finish the setting.
PTY codes
NEWS: News
AFFAIRS: Topical programmes expanding
INFO: Programmes which impart
SPORT: Sport events
EDUCATE: Educational programmes
DRAMA: Radio plays
CULTURE: Programmes on national or
SCIENCE: Programmes on natural science
VARIED: Other programmes like comedies
POP M: Pop music
ROCK M: Rock music
EASY M: Easy-listening music
LIGHT M: Light music
CLASSICS: Classical music
OTHER M: Other music
WEATHER: Weather information
FINANCE: Reports on commerce, trading,
CHILDREN: Entertainment programmes for
on current news or affairs
advice on a wide variety of
topics
regional culture
and technology
or ceremonies
the Stock Market, etc.
children
Searching your favorite programme
You can search one of your 6 favorite programme
types stored in memory. When shipped from the
factory , the following 6 prog ramme types have been
stored in the number buttons (1 to 6).
To store y our favorite pr ogramme types, see below .
To search your favorite programme type, see
page 12.
1
POP M
45
CLASSICS
2
ROCK M EASY M
AFFAIRS
To store your favorite programme types
1
Press and hold SEL (select) for more
than 2 seconds so that one of the PSM
items appears on the display.
(PSM: see page 20.)
CONTINUED ON THE NEXT PAGE
SOCIAL: Programmes on social
RELIGION: Programmes dealing with any
PHONE IN: Programmes where people can
TRAVEL: Programmes about travel
LEISURE: Programmes concerned with
JAZZ: Jazz music
COUNTRY: Country music
NATION M: Current popular music from
OLDIES: Classic pop music
FOLK M: Folk music
DOCUMENT: Programmes dealing with
activities
aspect of belief or faith, or the
nature of existence or ethics
express their views either by
phone or in a public forum
destinations, package tours,
and travel ideas and
opportunities
recreational activities such as
gardening, cooking, fishing,
etc.
another nation or region, in that
country’s language
factual matters, presented in
an investigative style
3
6
VARIED
ENGLISH
11
Page 12
2
Select “PTY SRCH” (search) if not
shown on the display.
ENGLISH
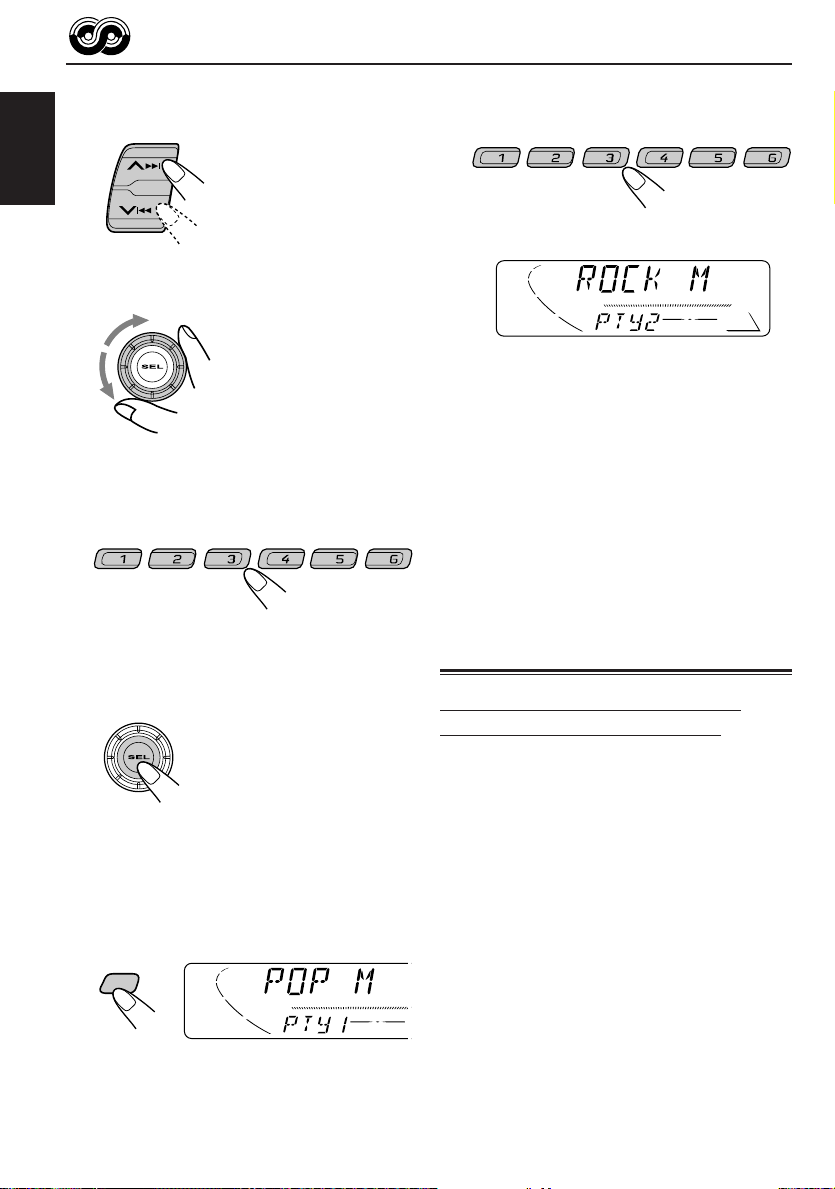
3
Select one of twenty-nine PTY codes.
(See page 11.)
Selected code name appears
on the display.
• If the code already stored
in memory is selected, it
will flash on the display.
4
Press and hold the number button
for more than 2 seconds to store the
PTY code selected into the preset
number you want.
2
Select one of PTY codes stored in
preset number buttons (1 to 6).
PTY search for your fa vorite programme starts
after 5 seconds.
Ex. When “ROCK M” is stored in preset number
button 2
• If there is a station broadcasting a programme of
the same PTY code you selected, that station is
tuned in.
• If there is no station broadcasting a programme
of the same PTY code you selected, the station
will not change.
Note:
In some areas, the PTY search will not work correctly.
PTY preset number appears, and selected
code name and “MEMORY” alter nate on the
display.
5
Finish the setting.
To search your favorite programme type
1
Press and hold PTY (programme type)
for more than 1 second while listening
to an FM station.
PTY
The last selected PTY code and preset number
appear.
12
Other convenient RDS functions
and adjustments
Automatic selection of the station
when using the number buttons
Usually when you press the number button, the
preset station is tuned in.
However , when the preset station is an RDS station,
something different will happen. If the signals from
that preset station are not sufficient for good
reception, this unit, using the AF data, tunes in
another frequency broadcasting the same
programme as the original preset station is
broadcasting. (Programme search)
Page 13
T o activate programme search, f ollow the procedure
below.
• Programme search takes a while.
• See also “Changing the general settings (PSM)”
on page 19.
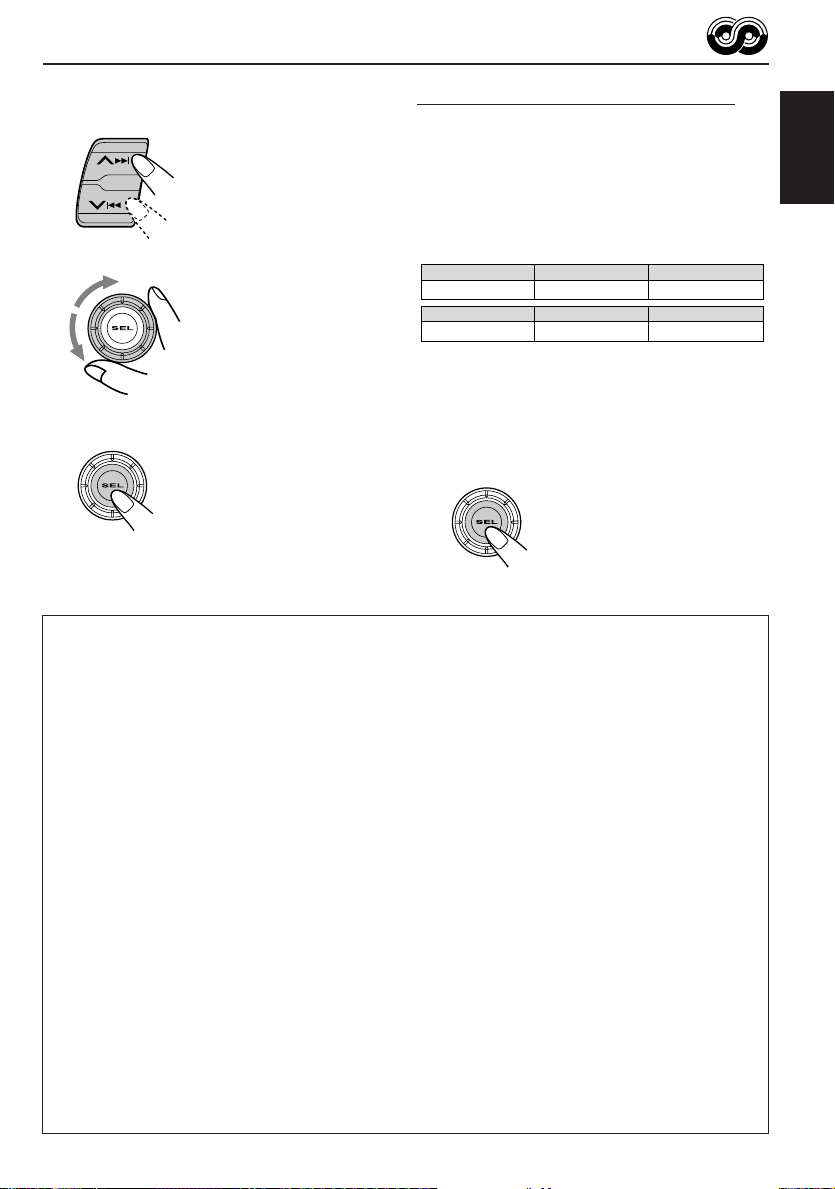
1 Press and hold SEL (select) for more than 2
seconds so that one of the PSM items appears
on the display.
2 Press ¢ or 4 to select
“P(Programme)-SEARCH.”
3 Rotate the control dial clockwise to select “ON.”
Now programme search is activated.
To cancel programme search, repeat the same
procedure and select “OFF” in step 3 by rotating the
control dial counterclockwise.
Changing the display mode while
listening to an FM station
You can change the initial indication on the display
to either station name (PS NAME) or to station
frequency (FREQ), while listening to an FM RDS
station.
• See also “Changing the general settings (PSM)”
on page 19.
1 Press and hold SEL (select) for more than 2
seconds so that one of the PSM items appears
on the display.
2 Press ¢ or 4 to select “TU DISP
(tuner display).”
3 Rotate the control dial to set to the desired
indication (“PS NAME” or “FREQ”).
Note:
By pressing DISP, you can also change the display while
listening to an FM RDS station.
Each time you press the button, the following information
appears on the display:
Station name
(PS NAME)
Programme type
• Then, the display goes back to the original indication
in several seconds.
Station frequency
(FREQ)
(PTY)
Setting the TA volume level
You can preset the volume level for TA Standby
Reception. When a traffic programme is received,
the volume level automatically changes to the preset
level.
• See also “Changing the general settings (PSM)”
on page 19.
1 Press and hold SEL (select) for more than 2
seconds so that one of the PSM items appears
on the display.
2 Press ¢ or 4 to select “TA VOL.”
3 Rotate the control dial to set to the desired
volume.
You can set it from “VOL 00” to “VOL 50.”
Automatic clock adjustment
When shipped from the factory, the clock built in
this unit is set to be readjusted automatically using
the CT (Clock Time) data in the RDS signal.
If you do not want to use automatic clock
adjustment, follow the procedure below.
• See also “Changing the general settings (PSM)”
on page 19.
1 Press and hold SEL (select) for more than 2
seconds so that one of the PSM items appears
on the display.
2 Press ¢ or 4 to select “AUTO ADJ.”
3 Rotate the control dial counterclockwise to select
“OFF.”
Now automatic clock adjustment is canceled.
To reactiv ate cloc k adjustment, repeat the same
procedure and select “ON” in step 3 by rotating the
control dial clockwise.
Note:
It takes about 2 minutes to adjust the time using the CT
data. So, you should not change the station for more
than 2 minutes continuously; otherwise, the clock time
will not be adjusted.
ENGLISH
13
Page 14
ENGLISH
CD OPERATIONS
ATT
/
/I
DISP
RDS
TP
PTY
7 8 9 10 11 12
SCM
MO
RND
SSM
RPT
CD
FM
AM
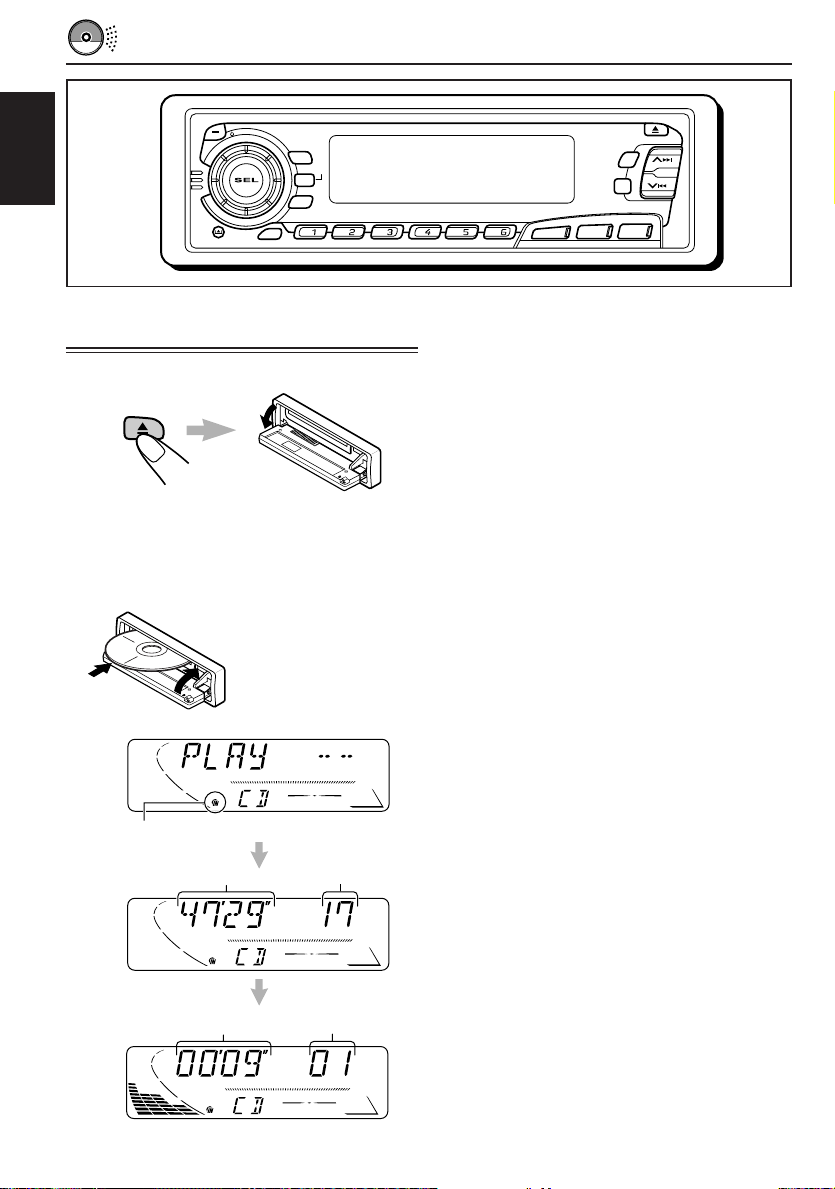
Playing a CD
1
Open the control panel.
Note on One-Touch Operation:
When a CD is already in the loading slot,
pressing CD turns on the unit and starts
playback automatically.
2
Insert a disc into the loading slot.
The unit turns on,
draws a CD and starts
playback automatically.
3
Close the control panel by hand.
The CD IN indicator lights up.
Total playing time of
the inserted disc
Total track number of
the inserted disc
Notes:
• When a CD is inserted upside down, “PLEASE” and
“EJECT” appear on the display alternately.
When you open the control panel by pressing 0, the
CD automatically ejects.
• When you play a CD T ext, the disc title and performer
appear on the display. Then the current track and
elapsed playing time appears on the display. See also
“Playing a CD Text” (page 16) and
“To select the scroll mode – SCROLL” (page 21).
If a CD T ext includes much te xt information, some may
not appear on the display.
To stop play and eject the CD
Press 0.
CD play stops, the control panel opens, then the
CD automatically ejects from the loading slot.
If you change the source to FM or AM, the CD
play also stops (without ejecting the CD this
time).
Notes:
• If the ejected disc is not removed for about 15
seconds, the disc is automatically inserted again
into the loading slot to protect it from dust. (CD
play will not start this time.)
• You can eject the CD even when the unit is turned
off.
14
Current trackElapsed playing time
Page 15
Locating a track or a particular
portion on a CD
To fast-forward or reverse the track
Press and hold ¢, while
playing a CD, to fast-forward the
track.
Press and hold 4, while
playing a CD, to reverse the
track.
To go to the next tracks or the previous
tracks
Press ¢ briefly, while
playing a CD, to go ahead to the
beginning of the next track. Each
time you press the button
consecutively, the beginning of
the next tracks is located and
played back.
Press 4 briefly, while
playing a CD, to go back to the
beginning of the current track.
Each time you press the button
consecutively, the beginning of
the previous tracks is located
and played back.
To go to a particular track directly
7 8 9 10 11 12
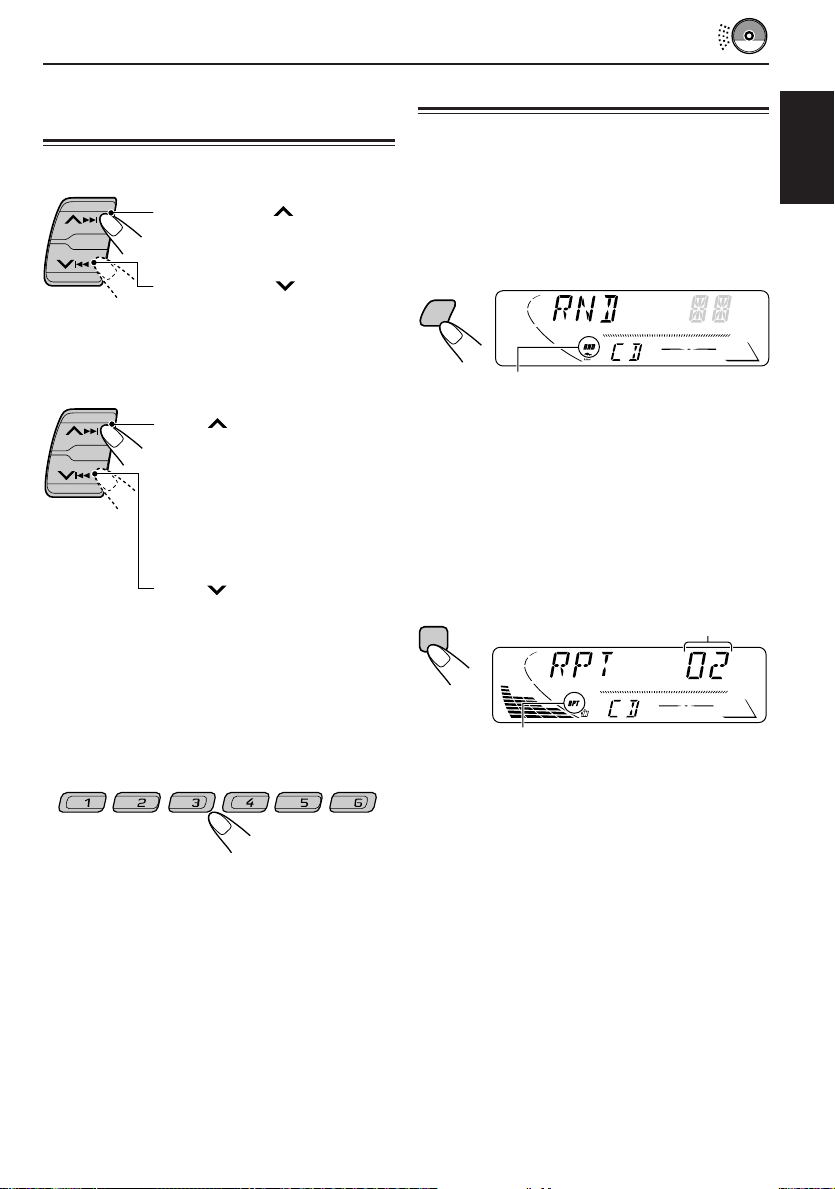
Selecting CD playback modes
To play back tracks at random (Random
Play)
You can play back all tracks on the CD at
random.
Each time you press MO RND (monaural/
random) while playing a CD, CD random play
mode turns on and off alternately.
MO
RND
The RND indicator
When the random mode is turned on, the RND
indicator lights up on the display and a track
randomly selected starts playing.
To play back tracks repeatedly (Repeat
Play)
You can play back the current track repeatedly.
Each time you press RPT (repeat) while playing a
CD, CD repeat play mode turns on and off
alternately.
RPT
The RPT indicator
When the repeat mode is turned on, the RPT
indicator lights up on the display.
Track number of the currently
playing track
ENGLISH
Press the number button corresponding to the
track number to start its playback.
• To select a track number from 1 – 6:
Press 1 (7) – 6 (12) briefly.
• To select a track number from 7 – 12:
Press and hold 1 (7) – 6 (12) for more than 1
second.
15
Page 16
Playing a CD Text
/I
ATT
/
Prohibiting CD ejection
In a CD Text, some information about the disc (its
disc title, performer and track title) is recorded.
You can show these disc information on the
ENGLISH
display.
Select text display mode while playing a
CD Text.
DISP
Each time you press the button, the display
changes as follows:
Disc Title / Performer
Track Title
Current track and
Elapsed playing time
Notes:
• The display shows up to 8 characters at one time
and scrolls if there are more than 8 characters.
See also “To select the scroll mode – SCROLL” on
page 21.
Some characters or symbols will not be shown (and
be blanked) on the display.
(Ex. “ABCå!d#” ]“ABCA D ”)
• When you press DISP (display) while playing a
conventional CD, “NO NAME” appears for the disc
title/performer and the track title.
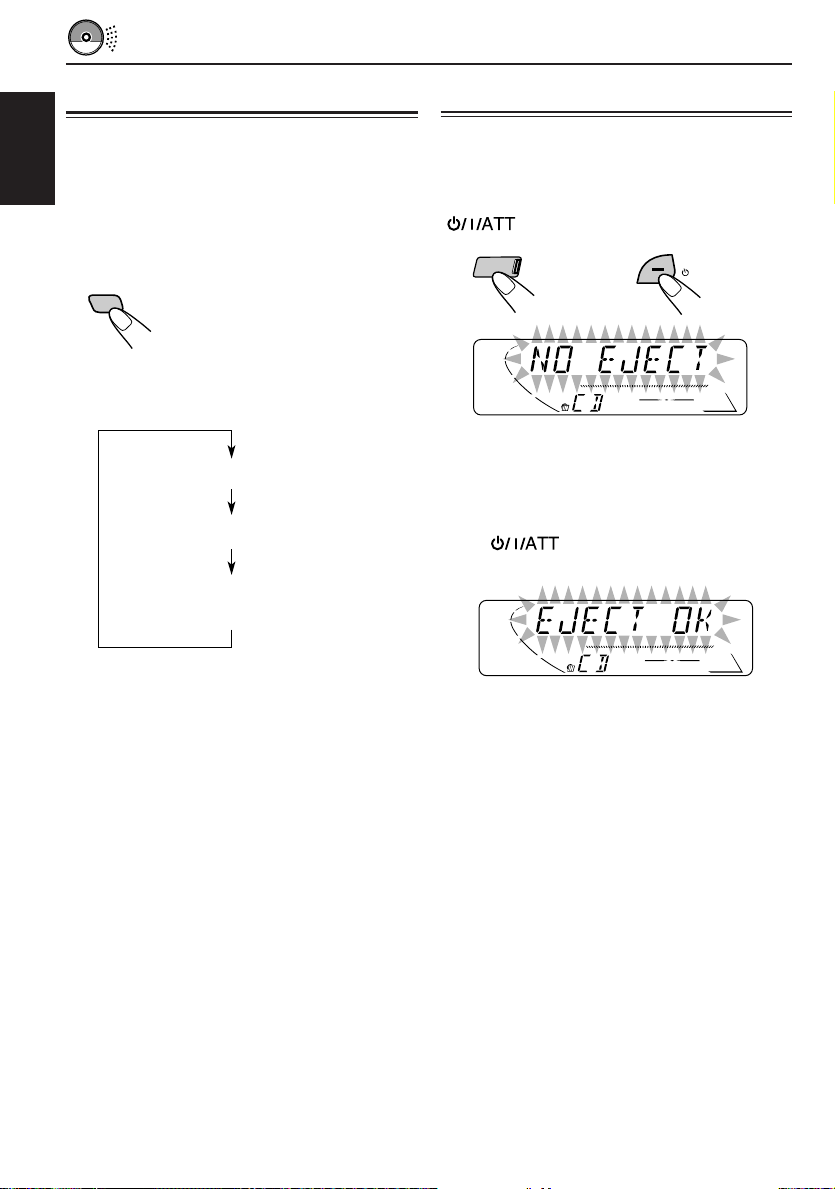
You can prohibit CD ejection and can lock a CD
in the loading slot.
While pressing CD, press and hold
for more than 2 seconds.
CD
“NO EJECT” flashes on the display for about 5
seconds, and the CD is locked and cannot be
ejected.
To cancel the prohibition and unlock the CD,
press again for more than 2 seconds,
while pressing CD.
“EJECT OK” flashes on the display for about 5
seconds, and the CD is unlocked.
16
Page 17
SOUND ADJUSTMENTS
Adjusting the sound
You can adjust the sound characteristics to your
preference.
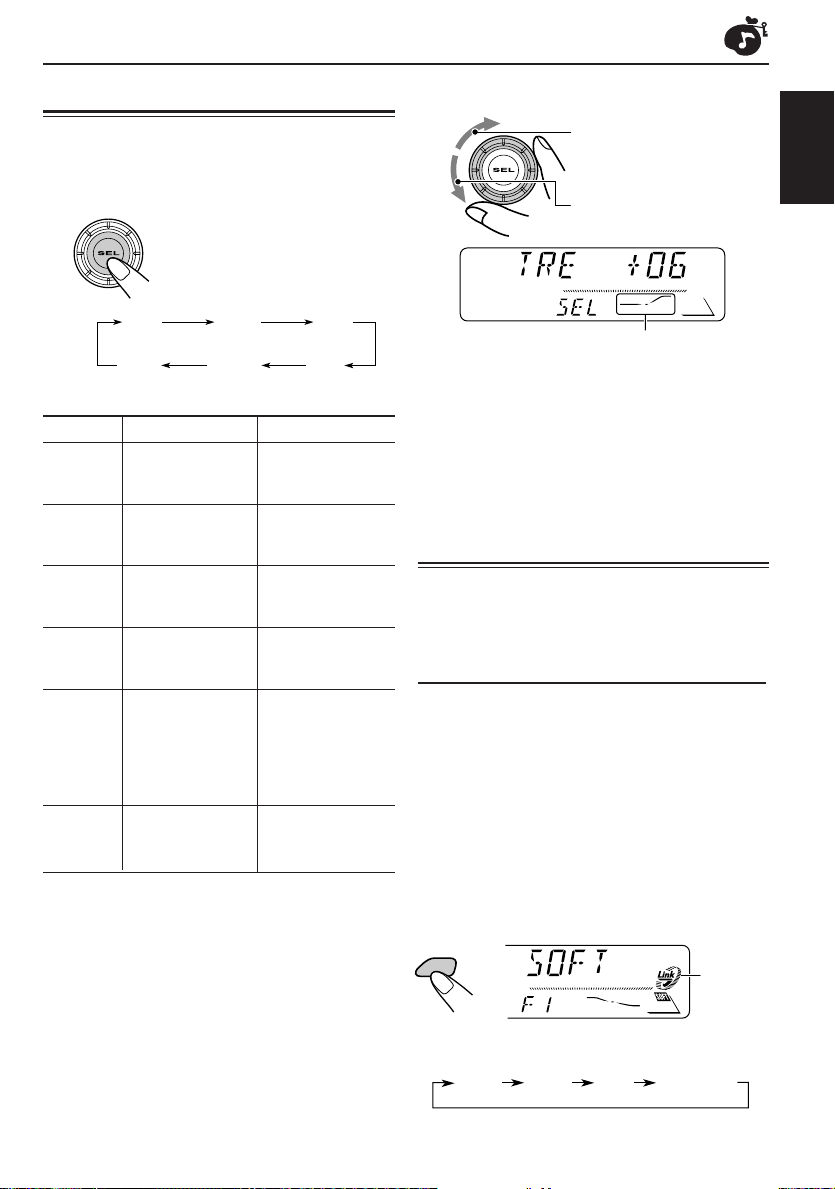
1
Select the item you want to adjust.
Each time you press the button, the
adjustable items change as
follows:
2
Adjust the level.
To increase the level.
ENGLISH
To decrease the level.
BAS
(bass) (treble) (fader)
VOL
(volume)
Indication To do: Range
BAS Adjust the bass. –06 (min.)
TRE Adjust the treble. –06 (min.)
FAD* Adjust the front R06 (Rear only)
BAL Adjust the left L06 (Left only)
LOUD Boost low and high
VOL Adjust the volume. 00 (min.)
* If you are using a two-speaker system, set the fader
level to “00.”
and rear speaker |
balance. F06 (Front only)
and right speaker |
balance. R06 (Right only)
frequencies to LOUD ON
produce a well- |
balanced sound LOUD OFF
at low volume
level.
TRE
LOUD
(loudness)
FAD
BAL
(balance)
|
+06 (max.)
|
+06 (max.)
|
50 (max.)
Equalization pattern changes as you adjust
the bass or treble.
Note:
Normally the control dial works for volume
adjustment. So you do not have to select “VOL” to
adjust the volume level.
Using the sound control
memory
Y ou can select and store a preset sound adjustment
suitable for each playback source.
(Advanced SCM)
Selecting and storing the sound modes
Once you select a sound mode, it is stored in
memory. It will be recalled every time you select
the same source and will be shown on the display.
A sound mode can be stored for each of the
following sources — FM1, FM2, FM3, AM and CD .
• If you do not want to store the sound mode
separately for each playbac k source, b ut want to
use the same sound mode for all the sources,
see “To cancel Advanced SCM – SCM LINK” on
page 21.
Select the sound mode you want.
SCM
Each time you press the button, the sound mode
changes as follows:
BEAT
SOFT
POP SCM OFF
"Link"
indicator
17
Page 18
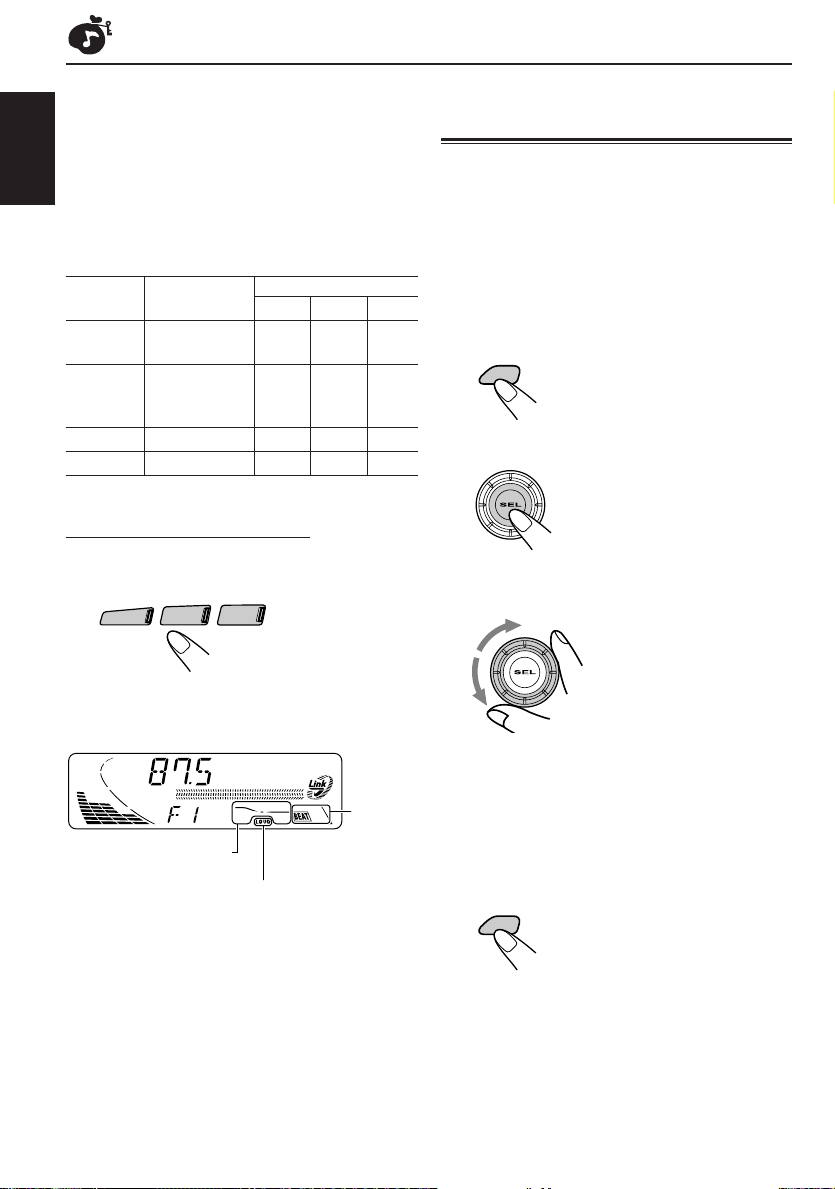
• If the “Link” indicator is lit on the display (with
“SCM LINK” set to “LINK ON” — see page 21),
the selected sound mode can be stored in
memory for the current source, and the effect
applies to the current source.
ENGLISH
• If the “Link” indicator is NOT lit on the display
(with “SCM LINK” set to “LINK OFF”), the
selected sound mode effect applies to any
source.
Indication For: Preset values
BEAT Rock or disco +02 00 ON
music
SOFT Quiet +01 –03 OFF
background
music
POP Light music +04 +01 OFF
SCM OFF (Flat sound) 00 00 ON
BAS TRE LOUD
Recalling the sound modes
Select the source while the “Link”
indicator is lit on the display.
CD
FM
AM
Storing your own sound
adjustments
You can adjust the sound modes (BEAT, SOFT,
POP) to your preference and store your own
adjustments in memory.
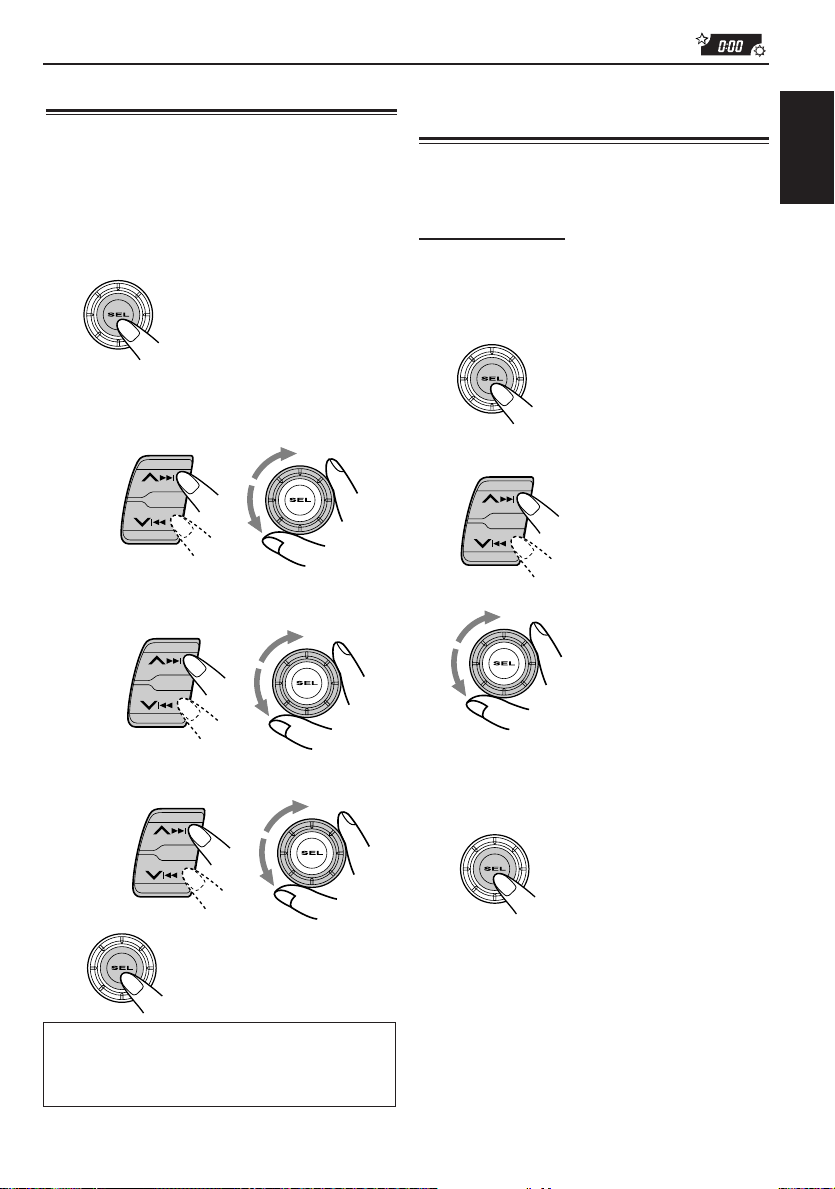
• There is a time limit in doing the following
procedure. If the setting is canceled before you
finish, start from step 1 again.
1
Call up the sound mode you want to
adjust.
• See the left column for details.
SCM
2
Select “B AS” (Bass), “TRE” (T reble) or
“LOUD” (Loudness).
3
Adjust the bass or treble level or turn
the loudness function ON/OFF.
• See page 17 for details.
The “Link” indicator starts flashing, and the sound
mode stored in memory for the selected source is
recalled.
Equalization pattern of
the selected sound mode
appears.
Notes:
• You can adjust each sound mode to your preference,
and store it in memory.
If you want to adjust and store your original sound
mode, see “Storing your own sound adjustments”
on the right column.
• To adjust the bass and treble reinforcement levels or
to turn on/off the loudness function temporarily, see
page 17. (Your adjustments will be canceled if
another source is selected.)
LOUD (loudness) indicator
18
Sound
mode
indicator
4
Repeat steps 2 and 3 to adjust the
other items.
5
Press and hold SCM until the sound
mode you have selected in step 1
flashes on the display.
Your adjustment made for the selected
sound mode is stored in memory.
SCM
6
Repeat the same procedure to store
other sound modes.
To reset to the factory settings
Repeat the same procedure and reassign the
preset values listed in the table on the left
column.
Page 19
OTHER MAIN FUNCTIONS
Setting the clock
Y ou can also set the cloc k system to either 24 hours
or 12 hours.
1
Press and hold SEL (select) for more
than 2 seconds so that one of the PSM
items appears on the display.
(See page 20.)
2
Set the hour.
1 Select “CLOCK H” if not shown on the
display.
2 Adjust the hour.
1
3
Set the minute.
1 Select “CLOCK M.”
2 Adjust the minute.
1
2
2
Changing the general settings
(PSM)
You can change the items listed on the next page
by using the PSM (Preferred Setting Mode) control.
Basic Procedure
1
Press and hold SEL (select) for more
than 2 seconds so that one of the PSM
items appears on the display.
(See page 20.)
2
Select the PSM item you want to
adjust. (See page 20.)
3
Adjust the PSM item selected above.
ENGLISH
4
Set the clock system.
1 Select “24H/12H.”
2 Select “24H” or “12H.”
1
5
Finish the setting.
T o check the current clock time while the unit
is turned off, press DISP (display).
The power turns on, the clock time is shown for
5 seconds, then the power turns off.
2
4
Repeat steps 2 and 3 to adjust the
other PSM items if necessary.
5
Finish the setting.
19
Page 20
Preferred Setting Mode (PSM) items
1
2
ENGLISH
Hold.
CLOCK H Hour adjustment
CLOCK M Minute adjustment
SCM LINK Sound control
24H/12H 24/12-hour time
AUTO ADJ Automatic clock
CLOCK Clock display
TU DISP Tuner display
PTY STBY PTY standby
PTY SRCH PTY search
TA VOL Traffic announcement
P-SEARCH Programme search
LEVEL Level display
TEL Telephone muting
SCROLL Name display
Select.
memory linkage
display
setting
volume
3
Set.
Counterclockwise
Back Advance
LINK OFF
12H
OFF
OFF
FREQ PS NAME
29 programme types
(see page 11.)
VOL 00 – VOL 50 VOL 20
AUDIO 1
MUTING 1
ONCE
OFF
OFF
OFF
Clockwise
AdvanceBack
LINK ON
24H
ON
ON
ONOFF OFF
AUDIO 2
MUTING 2
AUTO
Factorypreset
settings
0:00
LINK ON
24H
ON
ON
PS NAME
NEWS
(See page 11.)
AUDIO 2
OFF
ONCE
See
page
19
18, 21
19
13
21
13
10
11
13
13
21
21
21
• Press SEL (select) to finish the setting.
20
Page 21

To cancel Advanced SCM – SCM LINK
Y ou can cancel the Adv anced SCM (Sound Control
Memory), and unlink the sound modes and the
playback sources.
When shipped from the factory, a different sound
mode can be stored in memory for each source so
that you can change the sound modes simply by
changing the sources.
• LINK ON: Advanced SCM (different sound
• LINK OFF: Conventional SCM (one sound
modes for different sources)
mode for all sources)
To set the clock display – CLOCK
You can set the clock to be shown on the display
when the unit is turned on. When shipped from the
factory , the cloc k is set to be shown on the displa y.
• ON: Clock display is turned on.
• OFF: Clock display is turned off. When
“OFF” is selected, the current source
name or station band appears
instead of the clock
To check the other information during play
Press DISP (display). Each time you press the button,
the other information (either the clock or the source
name) will be shown on the lower part of the display
for a while.
display.
To select the telephone muting – TEL
This mode is used when a cellular phone system is
connected. Depending on the phone system used,
select either “MUTING 1” or “MUTING 2, ” whichever
mutes the sounds from this unit. When shipped from
the factory, this mode is deactivated.
• MUTING 1: Select this if this setting can mute
the sounds.
• MUTING 2: Select this if this setting can mute
the sounds.
• OFF: Cancels the telephone muting.
To select the scroll mode – SCROLL
You can select the scroll mode for the name
display and disc information if it consists of more
than 8 characters. When shipped from the
factory, scroll mode is set to “ONCE.”
• ONCE: Scrolls only once.
• AUTO: Repeats the scroll (5-second
intervals in between).
• OFF: Cancels the scroll mode.
Note:
Even if the scroll mode is set to “OFF,” you can scroll
the display by pressing DISP for more than 1 second.
ENGLISH
To select the level meter – LEVEL
You can select the level display according to your
preference. When shipped from the factory,
“AUDIO 2” is selected.
• AUDIO 1:
• AUDIO 2:
• OFF:
Shows the audio level indicator and
the equalization pattern indicator.
Alternates “AUDIO 1” setting and
illumination display.
Erases the audio level indicator and
the equalization pattern indicator.
21
Page 22
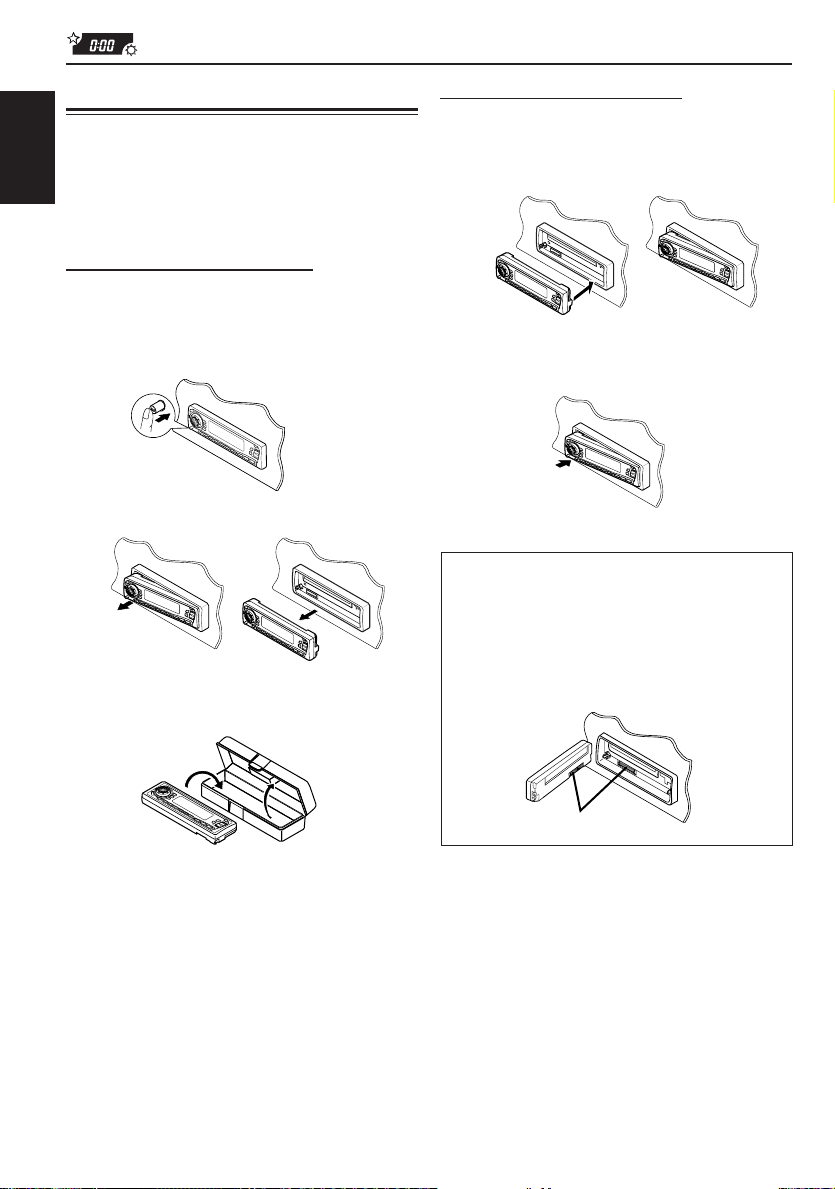
Detaching the control panel
You can detach the control panel when leaving
the car.
When detaching or attaching the control panel,
ENGLISH
be careful not to damage the connectors on the
back of the control panel and on the panel holder.
Detaching the control panel
Before detaching the control panel, be sure to
turn off the power.
1
Unlock the control panel.
2
Pull the control panel out of the unit.
3
Put the detached control panel into
the provided case.
Attaching the control panel
1
Insert the right side of the control
panel into the groove on the panel
holder.
2
Press the left side of the control
panel to fix it to the panel holder.
Note on cleaning the connectors:
If you frequently detach the control panel, the
connectors will deteriorate.
To minimize this possibility, periodically wipe the
connectors with a cotton swab or cloth moistened
with alcohol, being careful not to damage the
connectors.
22
Connectors
Page 23

TROUBLESHOOTING
What appears to be trouble is not always serious. Check the following points before calling a service
center.
Symptoms
• CD cannot be played back.
• CD sound is sometimes
interrupted.
• Sound is sometimes
interrupted.
• Sound cannot be heard from
the speakers.
• SSM (Strong-station
Sequential Memory)
automatic preset does not
work.
• Static noise while listening to
the radio.
• “NO DISC” appears on the
display.
• CD cannot be ejected.
Causes
CD is inserted upside down.
You are driving on rough roads.
The disc is scratched.
Connections are incorrect.
Connections are incorrect.
The volume is turned to the
minimum level.
Connections are incorrect.
Signals are too weak.
The antenna is not connected
firmly.
No CD is inserted.
CD is locked.
Remedies
Insert the CD correctly.
Stop playing CD while driving on
rough roads.
Change the disc.
Check the cords and
connections.
Check the cords and
connections.
Adjust it to the optimum level.
Check the cords and
connections.
Store stations manually.
Connect the antenna firmly.
Insert a CD correctly.
Unlock the CD (see page 16).
ENGLISH
• CD can be neither played
back nor ejected.
• This unit does not work at all.
The unit may function
incorrectly.
The built-in microcomputer may
function incorrectly due to noise,
etc.
Press and hold both CD and
SEL at the same time for several
seconds.
(“PLEASE” and “EJECT” appear
on the display alternately.)
When you open the control
panel by pressing 0, be careful
not to drop CD when it is
ejected.
Press and hold both SEL and
at the same time for
several seconds to reset the
unit. (The clock setting and
preset stations stored in
memory are erased.) (See page
2.)
23
Page 24

MAINTENANCE
Handling CDs
This unit has been designed only to reproduce
the CDs bearing the following marks.
COMPACT
ENGLISH
DIGITAL AUDIO
• Other discs cannot be played back.
How to handle CDs
When removing a CD
from its case, press
down the center holder
of the case and lift the
CD out, holding it by the
edges.
• Always hold the CD by the edges. Do not touch
its recording surface.
When storing a CD into its case, gently insert the
CD around the center holder (with the printed
surface facing up).
• Make sure to store CDs into the cases after
use.
To keep CDs clean
A dirty CD may not play
correctly. If a CD does
become dirty, wipe it with a
soft cloth in a straight line
from center to edge.
To play new CDs
New CDs may have some
rough spots around the
inner and outer edges. If
such a CD is used, this unit
may reject the CD.
To remove these rough
spots, rub the edges with a
pencil or ball-point pen, etc.
About mistracking:
Mistracking may result from driving on extremely
rough roads. This does not damage the unit and the
CD, but will be annoying.
We recommend that you stop CD play while
driving on such rough roads.
Center holder
Moisture condensation
Moisture may condense on the lens inside the
CD player in the following cases:
• After starting the heater in the car.
• If it becomes very humid inside the car.
Should this occur, the CD player may
malfunction. In this case, eject the CD and leave
the unit turned on for a few hours until the
moisture evaporates.
When playing a CD-R (Recordable)
You can play back your original CD-Rs on this
receiver.
• Before playing back CD-Rs, read their
instructions or cautions carefully.
• Some CD-Rs recorded on CD recorders may
not be played back on this receiv er because of
their disc characteristics, and of the following
reasons:
– Discs are dirty or scratched.
– Moisture condensation occurs on the lens
inside the unit.
– The pickup lens inside the CD player is dirty.
• Use only “finalized” CD-Rs.
• CD-RWs (Rewritable) cannot be played back
on this receiver.
• Do not use CD-Rs with stickers or sticking
labels on the surface. They may cause
malfunctions.
CAUTIONS:
• Do not insert 8 cm CDs (single CDs) into the
loading slot. (Such CDs cannot be ejected.)
• Do not insert any CD of unusual shape — like a
heart or flower; otherwise, it will cause a
malfunction.
• Do not expose CDs to direct sunlight or any heat
source or place them in a place subject to high
temperature and humidity. Do not leave them in
a car.
• Do not use any solvent (for example,
conventional record cleaner, spray, thinner,
benzine, etc.) to clean CDs.
24
Page 25

SPECIFICATIONS
AUDIO AMPLIFIER SECTION
Maximum Power Output:
Front: 45 W per channel
Rear: 45 W per channel
Continuous Power Output (RMS):
Front: 17 W per channel into 4 Ω, 40 Hz
to 20 000 Hz at no more than
0.8% total harmonic distortion.
Rear: 17 W per channel into 4 Ω, 40 Hz
to 20 000 Hz at no more than
0.8% total harmonic distortion.
Load Impedance: 4 Ω (4 Ω to 8 Ω allowance)
Tone Control Range:
Bass: ±10 dB at 100 Hz
Treble: ±10 dB at 10 kHz
Frequency Response: 40 Hz to 20 000 Hz
Signal-to-Noise Ratio: 70 dB
Line-Out Level/Impedance:
2.0 V/20 kΩ load (full scale)
Output Impedance: 1 kΩ
TUNER SECTION
Frequency Range:
FM: 87.5 MHz to 108.0 MHz
AM: (MW) 522 kHz to 1 620 kHz
(LW) 144 kHz to 279 kHz
CD PLAYER SECTION
Type: Compact disc player
Signal Detection System: Non-contact optical
pickup (semiconductor laser)
Number of channels: 2 channels (stereo)
Frequency Response: 5 Hz to 20 000 Hz
Dynamic Range: 96 dB
Signal-to-Noise Ratio: 98 dB
Wow and Flutter: Less than measurable limit
GENERAL
Power Requirement:
Operating Voltage: DC 14.4 V
(11 V to 16 V allowance)
Grounding System: Negative ground
Allowable Operating Temperature: 0°C to +40°C
Dimensions (W × H × D):
Installation Size: 182 mm × 52 mm × 160 mm
Panel Size: 188 mm × 58 mm × 8 mm
Mass: 1.7 kg (excluding accessories)
Design and specifications subject to change without
notice.
ENGLISH
[FM Tuner]
Usable Sensitivity: 11.3 dBf (1.0 µV/75 Ω)
50 dB Quieting Sensitivity:
16.3 dBf (1.8 µV/75 Ω)
Alternate Channel Selectivity (400 kHz):
65 dB
Frequency Response: 40 Hz to 15 000 Hz
Stereo Separation: 30 dB
Capture Ratio: 1.5 dB
[MW Tuner]
Sensitivity: 20 µV
Selectivity: 35 dB
[LW Tuner]
Sensitivity: 50 µV
25
Page 26

Having TROUBLE with operation?
Please reset your unit
Refer to page of How to reset your unit
Haben Sie PROBLEME mit dem Betrieb?
Bitte setzen Sie Ihr Gerät zurück
Siehe Seite Zurücksetzen des Geräts
Vous avez des PROBLÈMES de fonctionnement?
Réinitialisez votre appareil
Référez-vous à la page intitulée Comment réinitialiser votre appareil
Hebt u PROBLEMEN met de bediening?
Stel het apparaat terug
Zie de pagina met de paragraaf Het apparaat terugstellen
EN, GE, FR, NL
VICTOR COMPANY OF JAPAN, LIMITED
0900MNMMDWJES
JVC
Page 27
KD-S9R
Installation/Connection Manual
Einbau/Anschlußanleitung
Manuel d’installation/raccordement
GET0007-003A
[E]
0900MNMMDWJES
JVC
EN, GE, FR
ENGLISH
• This unit is designed to operate on 12 V DC , NEGATIVE ground
electrical systems.
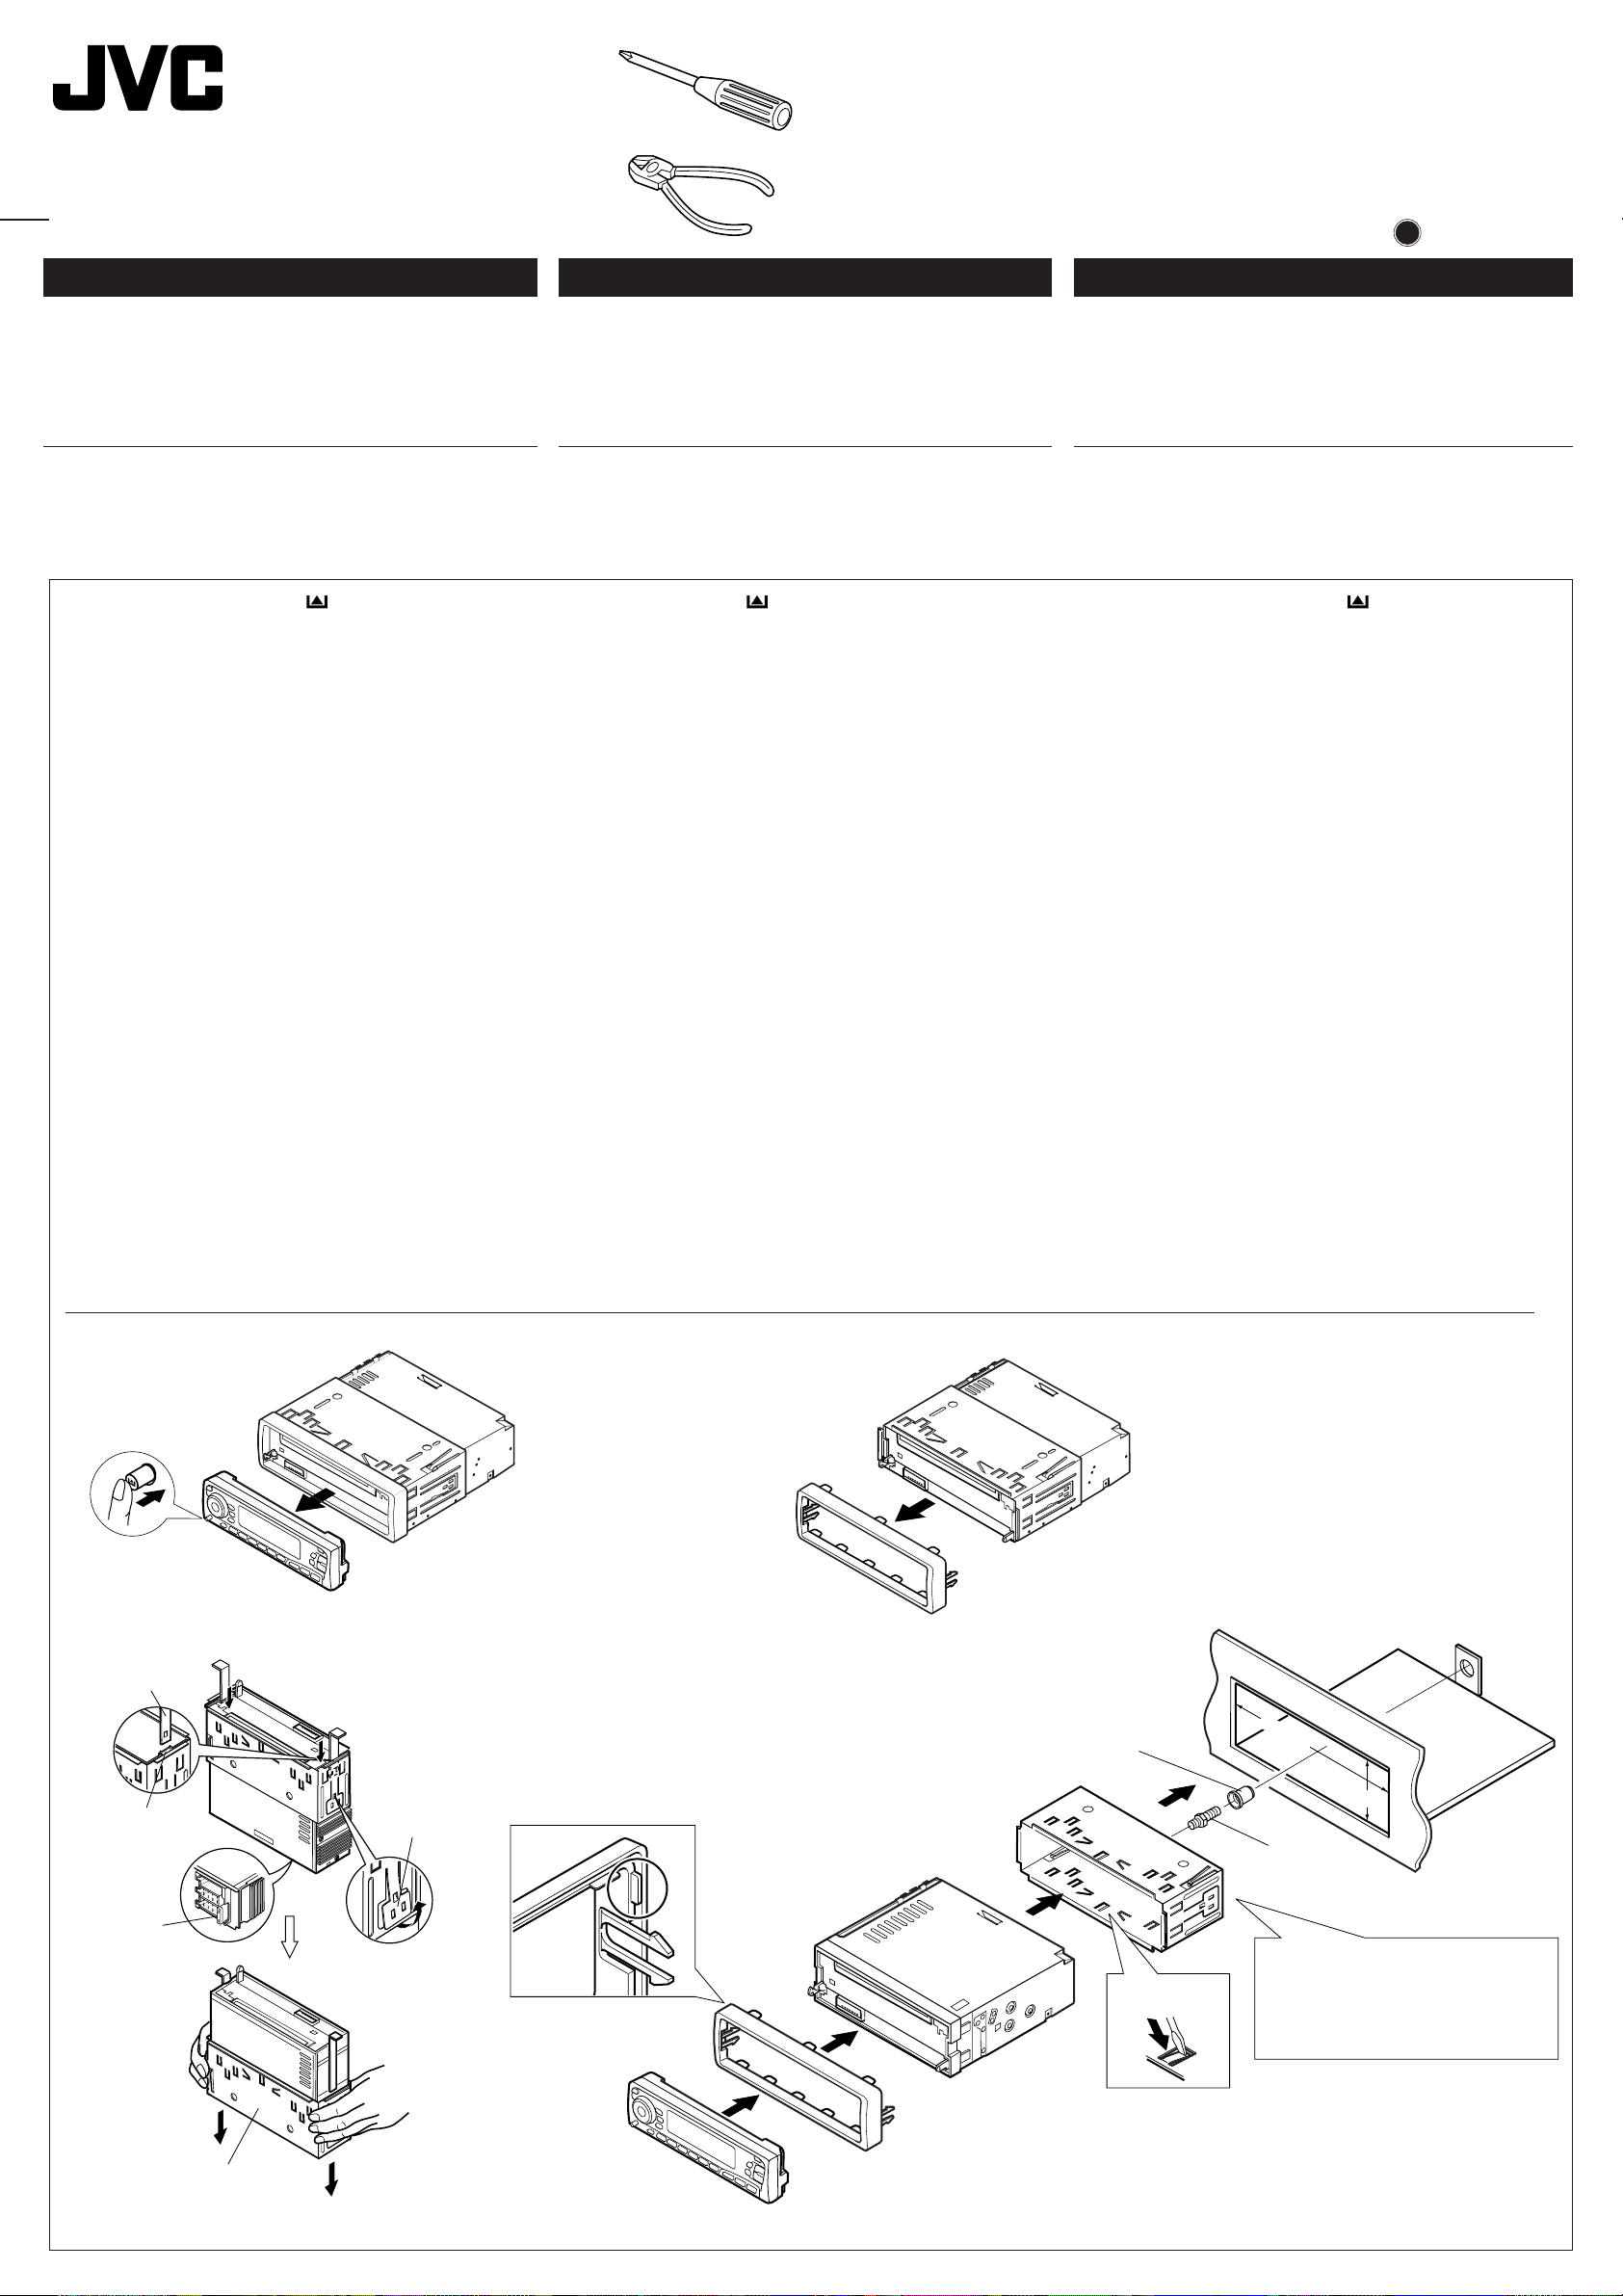
INSTALLATION
(IN-DASH MOUNTING)
• The following illustration shows a typical installation. However,
you should make adjustments corresponding to your specific
car. If you have any questions or require information regarding
installation kits, consult your JVC IN-CAR ENTERTAINMENT
dealer or a company supplying kits.
1
Before mounting: Press (Control Panel Release
button) to detach the control panel.
2
Remove the trim plate.
3
Remove the sleeve after disengaging the sleeve locks.
1 Stand the unit.
Note: When you stand the unit, be careful not to damage
the fuse on the rear.
2 Insert the 2 handles between the unit and the sleeve, as
illustrated, to disengage the sleeve locks.
3 Remove the sleeve.
Note: Be sure to keep the handles for future use after
installing the unit.
4
Install the sleeve into the dashboard.
* After the sleeve is correctly installed into the dashboard,
bend the appropriate tabs to hold the sleeve firmly in place,
as illustrated.
5
Fix the mounting bolt to the rear of the unit’s body and place
the rubber cushion over the end of the bolt.
6
Do the required electrical connections.
7
Slide the unit into the sleeve until it is locked.
8
Attach the trim plate so that the projection on the trim plate
is fixed to the left side of the unit.
9
Attach the control panel.
DEUTSCH
• Dieses Gerät ist für einen Betrieb in elektrischen Anlagen mit
12 V Gleichstrom und (–) Erdung ausgelegt.
EINBAU
(IM ARMATURENBRETT)
• Die folgende Abbildung zeigt einen typischen Einbau. Dennoch
müssen Sie entsprechend Ihrem jeweiligen Auto Anpassungen
vornehmen. Bei irgendwelchen Fragen oder wenn Sie
Informationen hinsichtlich des Einbausatzes brauchen, wenden
Sie sich an ihren JVC Autoradiohändler oder ein Unternehmen
das diese Einbausätze vertreibt.
1
Vor dem Einbau: (Schalttafel-Freigabetaste) zum
Lösen der Schalttafel drücken.
2
Den Frontrahmen herausnehmen.
3
Die Halterung nach dem Entriegeln der Halterungensperren
abnehmen.
1 Das Gerät aufstellen.
Hinweis: Beim Aufstellen des Geräts darauf achten,
daß die Sicherung auf der Rückseite nicht beschädigt
wird.
2 Die 2 Griffe zwischen dem Gerät und der Halterung wie
abgebildet einstecken und die Halterungensperren
entriegeln.
3 Die Halterung entfernen.
Hinweis: Sicherstellen, daß die Griffe für künftigen
Gebrauch nach dem Einbau des Geräts aufbewahrt
werden.
4
Die Halterung im Armaturenbrett einbauen.
* Nach dem korrekten Einbau der Halterung im
Armaturenbrett, die entsprechenden Riegel umknicken,
um die Halterung an ihrem Platz zu sichern, siehe
Abbildung.
5
Die Befestigungsschraube an der Rückseite des
Gerätekörpers befestigen und das Ende der Schraube mit
einem Gummipuffer abdecken.
6
Nehmen Sie die erforderlichen elektrischen Anschlüsse vor.
7
Das Gerät in die Halterung schieben, bis es einrastet.
8
Befestigen Sie die Frontrahmen in der Form, daß der
Fortsatz der Frontrahmen auf der linken Seite des Geräts
befestigt wird.
9
Die Schalttafel anbringen.
FRANÇAIS
•
Cet appareil est conçu pour fonctionner sur des sources de
courant continu de 12 V à masse NEGATIVE.
INSTALLATION
(MONTAGE DANS LE TABLEAU DE BORD)
•
L’illustration suivante est un exemple d’installation typique.
Cependant, vous devez faire les ajustements correspondant à
votre voiture particulière. Si vous avez des questions ou avez
besoin d’information sur des kits d’installation, consulter votre
revendeur d’autoradios JVC ou une compagnie
d’approvisionnement.
1
Avant le montage:
du panneau de commande) pour détacher le panneau de
commande.
2
Retirer la plaque d’assemblage.
3
Libérer les verrous du manchon et retirer le manchon.
1
Poser l’appareil à la verticale.
Remarque:
faire attention de ne pas endommager le fusible situé
sur l’arrière.
2
Insérer les 2 poignées entre l’appareil et le manchon
comme indiqué pour désengagé les verrous de manchon.
3
Retirer le manchon.
Remarque:
utilisation ultérieur, après l’installation de l’appareil.
4
Installer le manchon dans le tableau de bord.
* Après installation correcte du manchon dans le tableau
de bord, plier les bonnes pattes pour maintenir fermement
le manchon en place, comme montré.
5
Monter le boulon de montage sur l’arrière du corps de
l’appareil puis passer l’amortisseur en caoutchouc sur
l’extrémité du boulon.
6
Réalisez les connexions électriques.
7
Faire glisser l’appareil dans le manchon jusqu’à ce qu’il soit
verrouillé.
8
Attachez la plaque d’assemblage de façon que la projection
de la plaque d’assemblage soit fixée sur le côté gauche de
l’appareil.
9
Remonter le panneau de commande.
Appuyer sur (touche de libération
Lorsque vous mettez l’appareil à la verticale,
S’assurer de garder les poignées pour une
1
3
Fuse
Sicherung
Fusible
Handle
Griffe
Poignée
Slot
Schlitz
Fente
Control Panel
Schalttafel
Panneau de command
Lock Plate
Arretierplättchen
Plaque de verrouillage
9
2
8
Sleeve
Halterung
Manchon
7
Trim plate
Frontrahmen
Plaque d’assemblage
Rubber cushion
Gummipuffer
Amortisseur en
caoutchouc
4
4
Dashboard
Armaturenbrett
Tableau de bord
184 mm
53 mm
5
Mounting bolt
Befestigungsschraube
Boulon de montage
6
See “ELECTRICAL CONNECTIONS. ”
*
Siehe „ELEKTRISCHE ANSCHLÜSSE“.
Référez-vous “RACCORDEMENTS
ELECTRIQUES”.
Sleeve
Halterung
Manchon
Control Panel
Schalttafel
Panneau de command
Trim plate
Frontrahmen
Plaque d’assemblage
Page 28
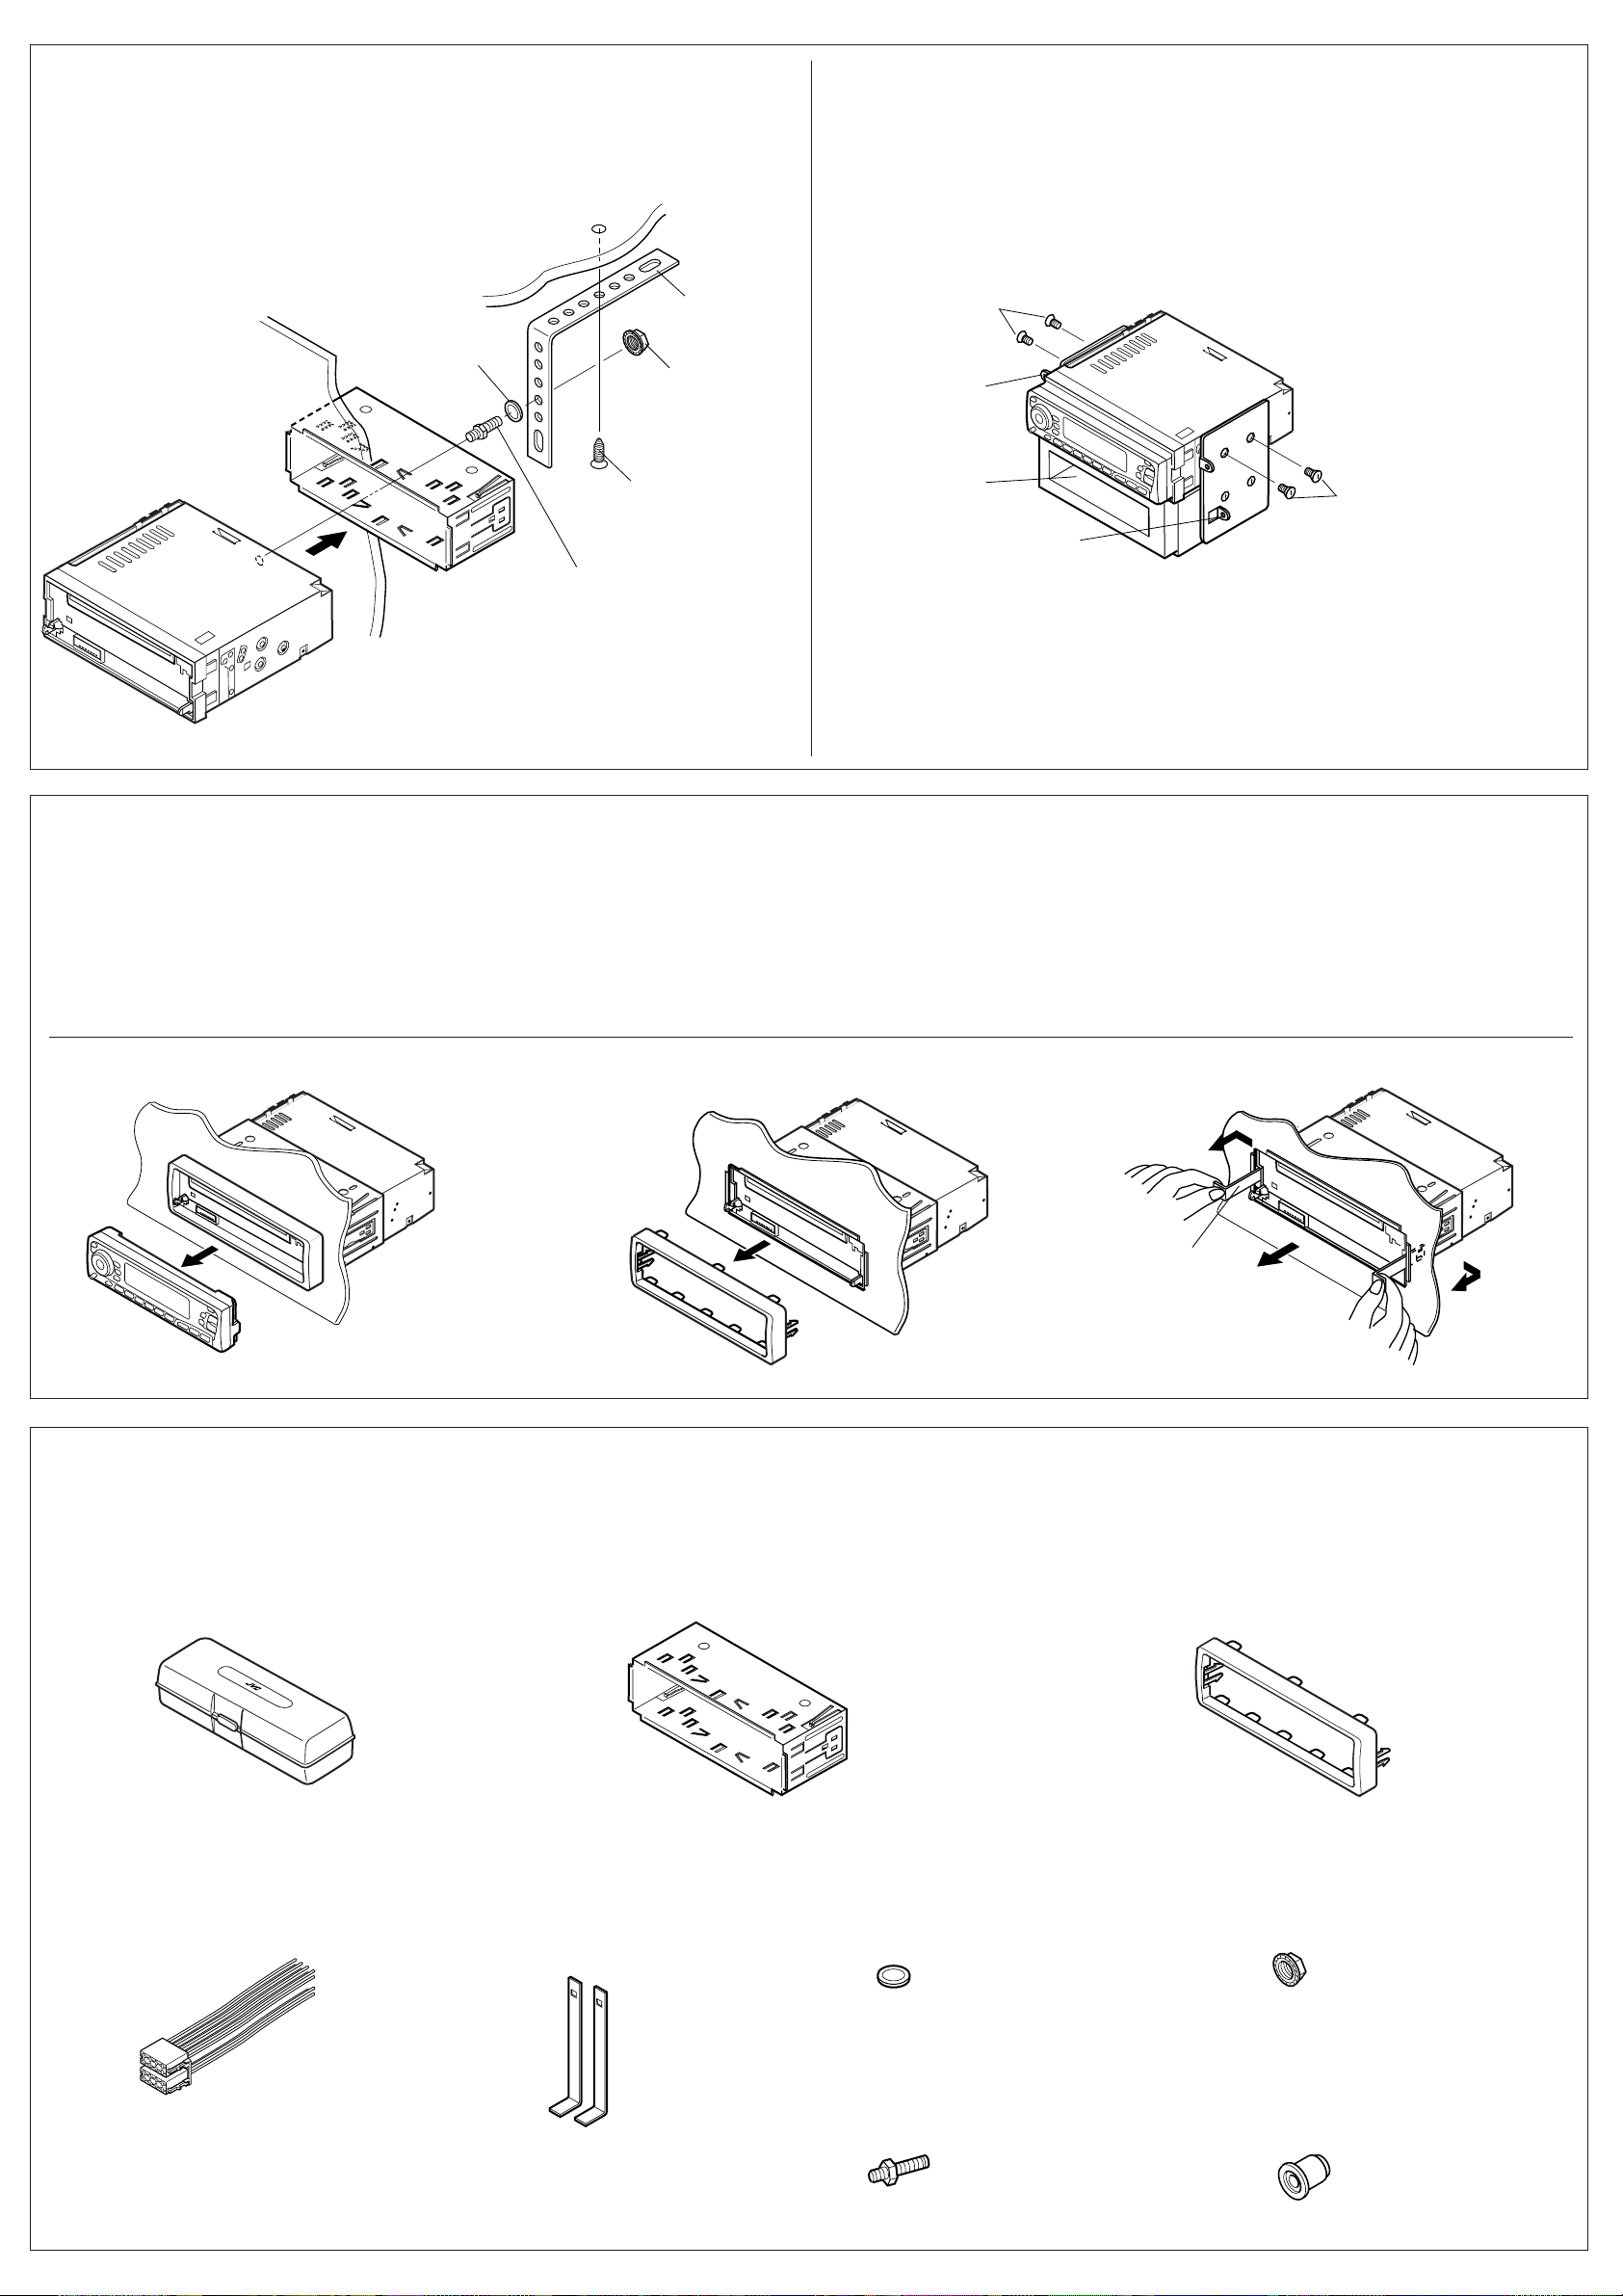
• When using the optional stay
• Beim Verwenden der Anker-Option
• Lors de l’utilisation du hauban en option
Washer
Unterlegscheibe
Dashboard
Armaturenbrett
Tableau de bord
Rondelle
Fire wall
Feuerwand
Cloison
Stay (option)
Anker (Option)
Hauban (en option)
Lock nut
Sicherungsmutter
Ecrou d’arrêt
• When installing the unit without using the sleeve
• Beim Einbau des Geräts ohne Halterung
• Lors de l’installation de l’appareil scans utiliser de manchon
In a Toyota for example, first remove the car radio and install the unit in its place.
Zum Beispiel in einem Toyota zuerst das Autoradio ausbauen und dann das Gerät an seinem Platz einbauen.
Par exemple dans une Toyota, retirer d’abord l’autoradio et installer l’appareil à la place.
* Not included with this unit.
Flat type screws (M5 x 6 mm)*
Senkkopfschrauben (M5 x 6 mm)*
Vis à tête plate (M5 x 6 mm)*
Bracket*
Konsole*
Support*
* Nicht Teil dieses Geräts.
*
Non fourni avec cet appareil.
Sleeve
Halterung
Manchon
Removing the unit
• Before removing the unit, release the rear section.
1
Remove the control panel.
2
Remove the trim plate.
3
Insert the 2 handles into the slots, as shown. Then, while
gently pulling the handles away from each other, slide out the
unit. (Be sure to keep the handles after installing it.)
Screw (option)
Schraube (Option)
Vis (en option)
Mounting bolt
Befestigungsschraube
Boulon de montage
Note: When installing the unit on the mounting brack et, make sure to use the 6 mm-long screws. If
Pocket
Taschen
Poche
longer screws are used, they could damage the unit.
Hinweis: Beim Anbringen des Gerät an der Konsole sicherstellen, daß 6 mm lange Schrauben
verwendet werden. Werden längere Schrauben verwendet, können sie das Gerät beschädigen.
Remarque:
Lors de l’installation de l’appareil sur le support de montage, s’assurer d’utiliser des vis
d’une longueur de 6 mm. Si des vis plus longues sont utilisées , elles peuvent endommager l’appareil.
Ausbau des Geräts
• Vor dem Ausbau des Geräts den hinteren Teil freigeben.
1
Die Schalttafel herausnehmen.
2
Den Frontrahmen abnehmen.
3
Die 2 Griffe in die Schlitze wie gezeigt stecken. Dann die Griffe
behutsam auseinander ziehen und das Gerät herausziehen.
(Die Griffe nach dem Einbau auf jeden Fall aufbewahren.)
Bracket*
Konsole*
Support*
Flat type screws (M5 x 6 mm)*
Senkkopfschrauben (M5 x 6 mm)*
Vis à tête plate (M5 x 6 mm)*
Retrait de l’appareil
•
Avant de retirer l’appareil, libérer la section arrière.
1
Retirer le panneau de commande.
2
Retirer la plaque d’assemblage.
3
Introduire les deux poignées dans les fentes, comme montré.
Puis, tout en tirant doucement les poignées écartées, faire
glisser l’appareil pour le sortir.
poignées après l’installation de l’appareil.)
(S’assurer de conserver les
Control Panel
Schalttafel
Panneau de command
Parts list for installation and connection
The following parts are provided with this unit.
After checking them, please set them correctly.
Hard case
Etui
Etui de transport
Trim plate
Frontrahmen
Plaque d’assemblage
Teileliste für den Einbau und Anschluß
Die folgenden Teile werden zusammen mit diesem Gerät geliefert.
Nach ihrer Überprüfung, die Teile richtig einsetzen.
Sleeve
Halterung
Manchon
321
Handle
Griff
Poignée
Liste des pièces pour l’installation et
raccordement
Les pièces suivantes sont fournies avec cet appareil.
Après vérification, veuillez les placer correctement.
Trim plate
Frontrahmen
Plaque d’assemblage
Pow er cord
Stromkabel
Cordon d’alimentation
Handles
Griffe
Poignées
Washer (ø5)
Unterlegscheibe(ø5)
Rondelle (ø5)
Mounting bolt (M5 x 20 mm)
Befestigungsschraube (M5 x 20 mm)
Boulon de montage (M5 x 20 mm)
Lock nut (M5)
Sicherungsmutter (M5)
Ecrou d’arrêt (M5)
Rubber cushion
Gummipuffer
Amortisseur en caoutchouc
Page 29
ENGLISH
DEUTSCH
FRANÇAIS
ELECTRICAL CONNECTIONS
T o prev ent short circuits, we recommend that you disconnect the battery’s
negative terminal and make all electrical connections before installing
the unit. If y ou are not sure how to install this unit correctly , hav e it installed
by a qualified technician.
Note:
This unit is designed to operate on 12 V DC, NEGATIVE ground
electrical systems. If y our vehicle does not ha v e this system, a voltage
inverter is required, which can be purchased at JVC IN-CAR
ENTERTAINMENT dealers.
• Replace the fuse with one of the specified rating. If the fuse blows
frequently, consult your JVC IN-CAR ENTERTAINMENT dealer.
• If noise is a problem...
This unit incorporates a noise filter in the power circuit. However, with
some vehicles, clicking or other unwanted noise may occur. If this
happens, connect the unit’s rear ground terminal (see connection
diagram) to the car’s chassis using shorter and thicker cords , such as
copper braiding or gauge wire. If noise still persists, consult your JVC
IN-CAR ENTERTAINMENT dealer.
• Maximum input of the speakers should be more than 45 W at the rear
and 45 W at the front, with an impedance of 4 Ω to 8 Ω.
• Be sure to ground this unit to the car’s chassis.
• The heat sink becomes very hot after use. Be careful not to touch it
when removing this unit.
ELEKTRISCHE ANSCHLÜSSE
Zur Vermeidung von Kurzschlüssen empfehlen wir, daß Sie den
negativen Batterieanschluß abtrennen und alle elektrischen
Anschlüsse herstellen, bevor das Gerät eingebaut wird. Sind Sie sich
über den richtigen Einbau des Geräts nicht sicher, lassen Sie es von
einem qualifizierten Techniker einbauen.
Hinweis:
Dieses Gerät ist für eine Betrieb in elektrischen Anlagen mit 12 V
Gleichstrom und (–) Erdung ausgelegt. Verfügt Ihr Fahrzeug nicht
über diese Anlage, ist ein Spannungsinverter erforderlich, der bei
JVC Autoradiohändler erworben werden kann.
• Die Sicherung mit einer der entsprechenden Nennleistung ersetzen.
Brennt die Sicherung häufig durch, wenden Sie sich an ihren JVC
Autoradiohändler.
• Sind Störgeräusche ein Problem...
Dieses Gerät enthält ein Störfilter im Stromkreis. Bei manchen
Fahrzeugen kann jedoch ein Klicken oder andere unerwünschte
Störgeräusche auftreten. Sollte das der Fall sein, die hintere
Erdungscanschlußklemme (siehe Schaltplan) des Geräts am
Fahrwerk des Fahrzeugs anschließen, dabei kürzere und dickere
Kabel wie beispielsweise Kupfergeflechtdraht oder Stahldraht
verwenden. Bleibt Störgeräusch bestehen, wenden Sie sich an Ihren
JVC Autoradiohändler.
• Maximale Eingangsleistung der Lautsprecher muß höher als 45 W
hinten und 45 W vorne sein, mit einer Impedanz von 4 Ω bis 8 Ω.
• Sicherstellen, daß das Gerät am Fahrwerk geerdet wird.
• Das Abstrahlblech wird nach dem Gebrauch sehr heiß. Beim
Ausbau des Geräts darauf achten, das Abstrahlblech nicht zu
berühren.
RACCORDEMENTS ELECTRIQUES
Pour éviter tout court-circuit, nous vous recommandons de débrancher
la borne négative de la batterie et d’effectuer tous les raccordements
électriques avant d’installer l’appareil. Si l'on n’est pas sûr de pouvoir
installer correctement cet appareil, le faire installer par un technicien
qualifié.
Remarque:
Cet appareil est conçu pour fonctionner sur des sources de courant
continu de
type d’alimentation, il vous faut un conver tisseur de tension, que vous
pouvez acheter chez un revendeur d’autoradios JVC.
•
Remplacer le fusible par un de la valeur précisée. Si le fusible saute
souvent, consulter votre revendeur d’autoradios JVC.
•
Si le bruit est un problème...
Cet appareil incorpore un filtre de bruit dans le circuit d’alimentation.
Cependant, avec certains véhicules, quelques claquements ou autres
bruits non désirés risquent de se produire. Si cela arrive , raccorder la
borne arrière de masse
diagramme de raccordement) en utiliscant des cordons les plus gros
et les plus courts possibles telle qu'une barre de cuivre ou une tresse.
Si le bruit persiste, consulter votre revendeur d’autoradios JVC.
•
La puisscance admissible des haut-parleurs doit être supérieure à
45 W à l’arrière et à 45 W l’avant, avec une impédance de
• S’assurer de raccorder la mise à la masse de cet appareil au
châssis de la voiture.
•
Le dissipateur de chaleur devient très chaud après usage. Faire
attention de ne pas le toucher en retirant cet appareil.
12 V à masse NEGATIVE
de l’appareil au châssis de la voiture (voir le
. Si votre véhicule n’offre pas ce
4 Ω à 8 Ω
.
Heat sink
Abstrahlblech
Dissipateur de chaleur
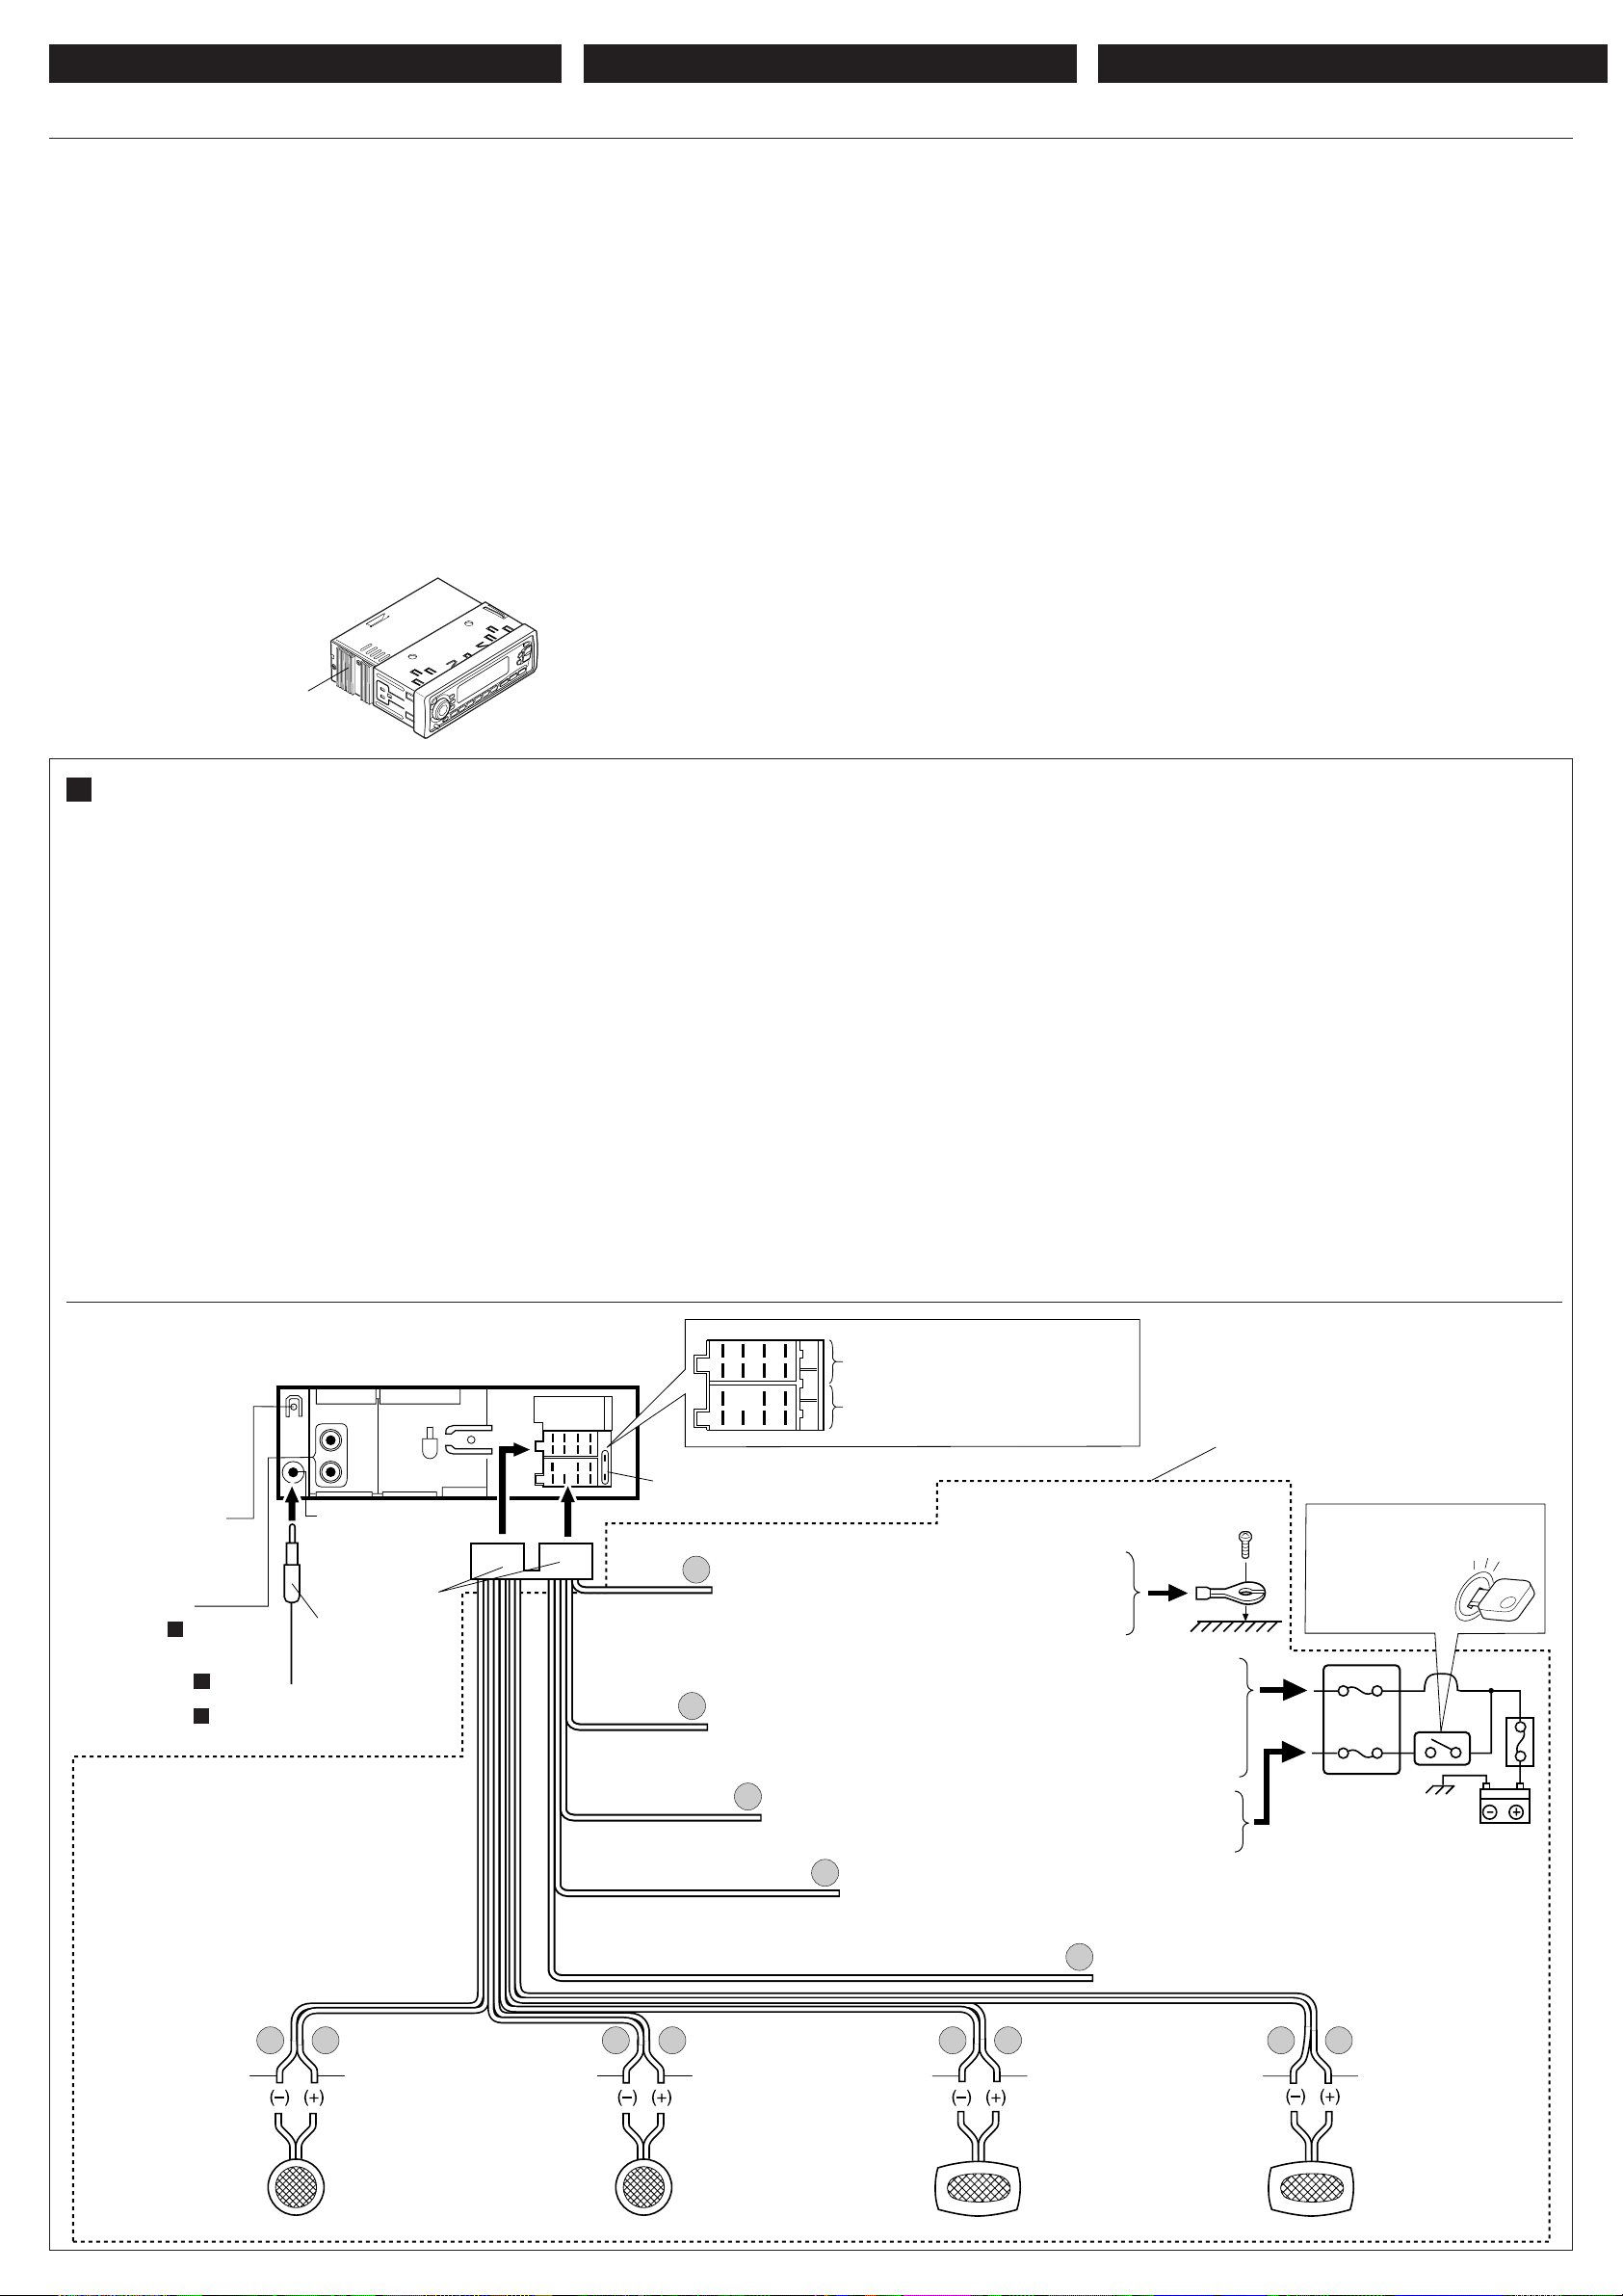
A Typical Connections / Typische Anschlüsse / Raccordements typiques
Before connecting: Check the wiring in the vehicle carefully.
Incorrect connection may cause serious damage to this unit.
1
Connect the colored leads of the power cord to the car battery ,
speakers and power aerial (if any) in the following sequence.
1 Black: ground
2 Yellow: to car battery (constant 12 V)
3 Red: to an accessory terminal
4 Blue with white stripe: to power aerial (200 mA max.)
5 Brown: to cellular phone system (For details, refer to the
instructions of the cellular phone.)
6 Others: to speakers
2
Connect the aerial cord.
3
Finally connect the wiring harness to the unit.
Note: If your vehicle does not hav e any accessory terminal, move
the fuse from the fuse position 1 (initial position) to fuse position
2, and connect the red lead (A7) to the positive (+) battery terminal.
• The yellow lead (A4) is not used in this case.
V or dem Anschließen: Die Verdrahtung im Fahrzeug sorgfältig
überprüfen. Falsche Anschlüsse können ernsthafte Schäden am
Gerät hervorrufen.
1
Die farbigen Leitungen des Spannunsgversorgungskabels an
der Autobatterie, den Lautsprechern und dem Motorantenne
(sofern vorhanden) in folgender Reihenfolge anschließen.
1 Schwarz: Erdung
2 Gelb: an Autobatterie (konstant 12 V)
3 Rot: an Zubehöranschlußklemme
4 Blau mit weißem Streifen: an Motorantenne (max. 200 mA)
5 Braun: an Mobiltelefon (Weitere informationen entnehmen
Sie bitte der Bedienungscanleitung des Mobiltelefons.)
6 Andere: an Lautsprecher
2
Das Antennenkabel anschließen.
3
Die Kabelbäume am Gerät anschließen.
Hinweis: Verfügt Ihr Fahrzeug nicht über eine
Zubehöranschlußklemme, die Sicherung von der 1.
Sicherungsposition (Erstposition) in die 2. Sicherungsposition
versetzen, die rote Leitung (A7) an der (+)
Batterieanschlußklemme anschließen.
• Die gelbe Leitung (A4) wird in diesem Fall nicht verwendet.
Avant de commencer la connexion:
vérifiez attentivement le
câblage du véhicule. Une connexion incorrecte peut endommager
sérieusement l’appareil.
1
Connectez les fils de couleur du cordon d’alimentation à la
batterie de la voiture, aux enceintes et à l’antenne automatique
(s’il y en a une) dans l’ordre suivant.
1
Noir: a la masse
2
Jaune: a la batterie de la voiture (12 V constant)
3
Rouge: à la prise accessoire
4
Bleu avec bande blanche: à l’antenne automatique
(200 mA max.)
5
Marron: à un système de téléphone cellulaire (Pour les
détails, se référer aux instructions du téléphone cellulaire.)
6
Autres: aux enceintes
2
Connectez le cordon d’antenne.
3
Finalement, connectez le faisceau de fils à l’appareil.
Remarque:
Si votre véhicule ne possède pas de borne
accessoire, déplacez le fusible de la position de fusible 1 (position
originale) à la position de fusible 2 et connectez le fil rouge (A7)
à la borne positive (+) de la batterie.
• Le fil jaune (A4) n’est pas utilisé dans ce cas.
Rear ground terminal
Hintere
Erdungscanschlußklemme
Borne arrière de masse
Line out
(see diagram B )
Schutz kappen
Signalausgang
(siehe Schaltplan B )
Sortie de ligne
(voir le diagramme B )
*1: Before checking the operation of this unit prior to
installation, this lead must be connected, otherwise
power cannot be turned on.
*1: Vor der Überprüfung der Funktionsfähigkeit des Geräts
vor dem Einbau, muß diese Leitung angeschlossen
werden, da sonst die Stromversorgung nicht
eingeschaltet werden kann.
*1:Pour vérifier le fonctionnement de cet appareil avant
installation, ce fil doit être raccordé, sinon l’appareil
ne peut pas être mis sous tension.
Aerial terminal
Antennenanschlußklemme
Borne de l’antenne
3
2
To aerial
Zur Antenne
A l’antenne
B110B3 B5 B7
B2 B4 B6 B8
A5 A7
A8
A2 A4 A6
Yellow*
Gelb*
Jaune*
Red
Rot
Rouge
Blue with white stripe
Blau mit weißem Streifen
Bleu avec bande blanche
Brown / Braun /
15 A fuse
15 A Sicherung
Fusible 15 A
Black
Schwarz
Noir
1
1
1
A8
A4
Marron
B1 B3 B5 B7
B2 B4 B6 B8
A5 A7
A2 A4 A6 A8
To metallic body or chassis of the car
Zur metallenen Karosserie oder zum Fahrwerk des
1
Autos
Vers corps métallique ou châssis de la voiture
To a live terminal in the fuse block connecting to the car battery
(bypassing the ignition swich)
Zur einer stromführenden Anschlußklemme im Sicherungsblock zum
Anschließen an die Autobatterie (Umgehen des Zündschalters)
2
A une borne sous tension du porte-fusible connectée à la batterie de la
voiture (en dérivant l’interrupteur d’allumage)
A7
3
Fuse position 2
2. Sicherungsposition
Position de fusible 2
Fuse position 1
1. Sicherungsposition
Position de fusible 1
Not included with this unit.
*
Wird nicht mit Gerät mitgeliefert.
Non fourni avec cet appareil.
To an accessory terminal in the fuse block
Zur einer Zubehöranschlußklemme im Sicherungsblock
Vers borne accessoire du porte-fusible
A5
To power aerial if any
Zur Motorantenne, sofern vorhanden
4
Vers l’antenne automatique, s’il y en a une
A2
5
1
Ignition switch
Zündschalter
*
Interrupteur d’allumage
*
Fuse block
Sicherungsblock
Porte-fusible
To cellular phone system
Zur Moblitelephon
À un système de téléphone cellulaire
White with black stripe
Weiß mit schwarzem
Streifen
Blanc avec bande noire
B6 B5 B4 B3 B8 B7 B2 B1
White
Weiß
Blanc
Left speaker (front)
Linker Lautsprecher (vorne)
Enceinte gauche (avant)
6
Gray with black stripe
Grau mit schwarzem
Streifen
Gris avec bande noire
Gray
Grau
Gris
Right speaker (front)
Rechter Lautsprecher (vorne)
Enceinte droit (avant)
Green with black stripe
Grün mit schwarzem
Streifen
V ert avec bande noire
Green
Grün
Vert
Left speaker (rear)
Linker Lautsprecher (hinten)
Enceinte gauche (arrière)
Purple with black stripe
Lila mit schwarzem Streifen
Violet avec bande noire
Purple
Lila
Violet
Right speaker (rear)
Rechter Lautsprecher
(hinten)
Enceinte droit (arrière)
Page 30
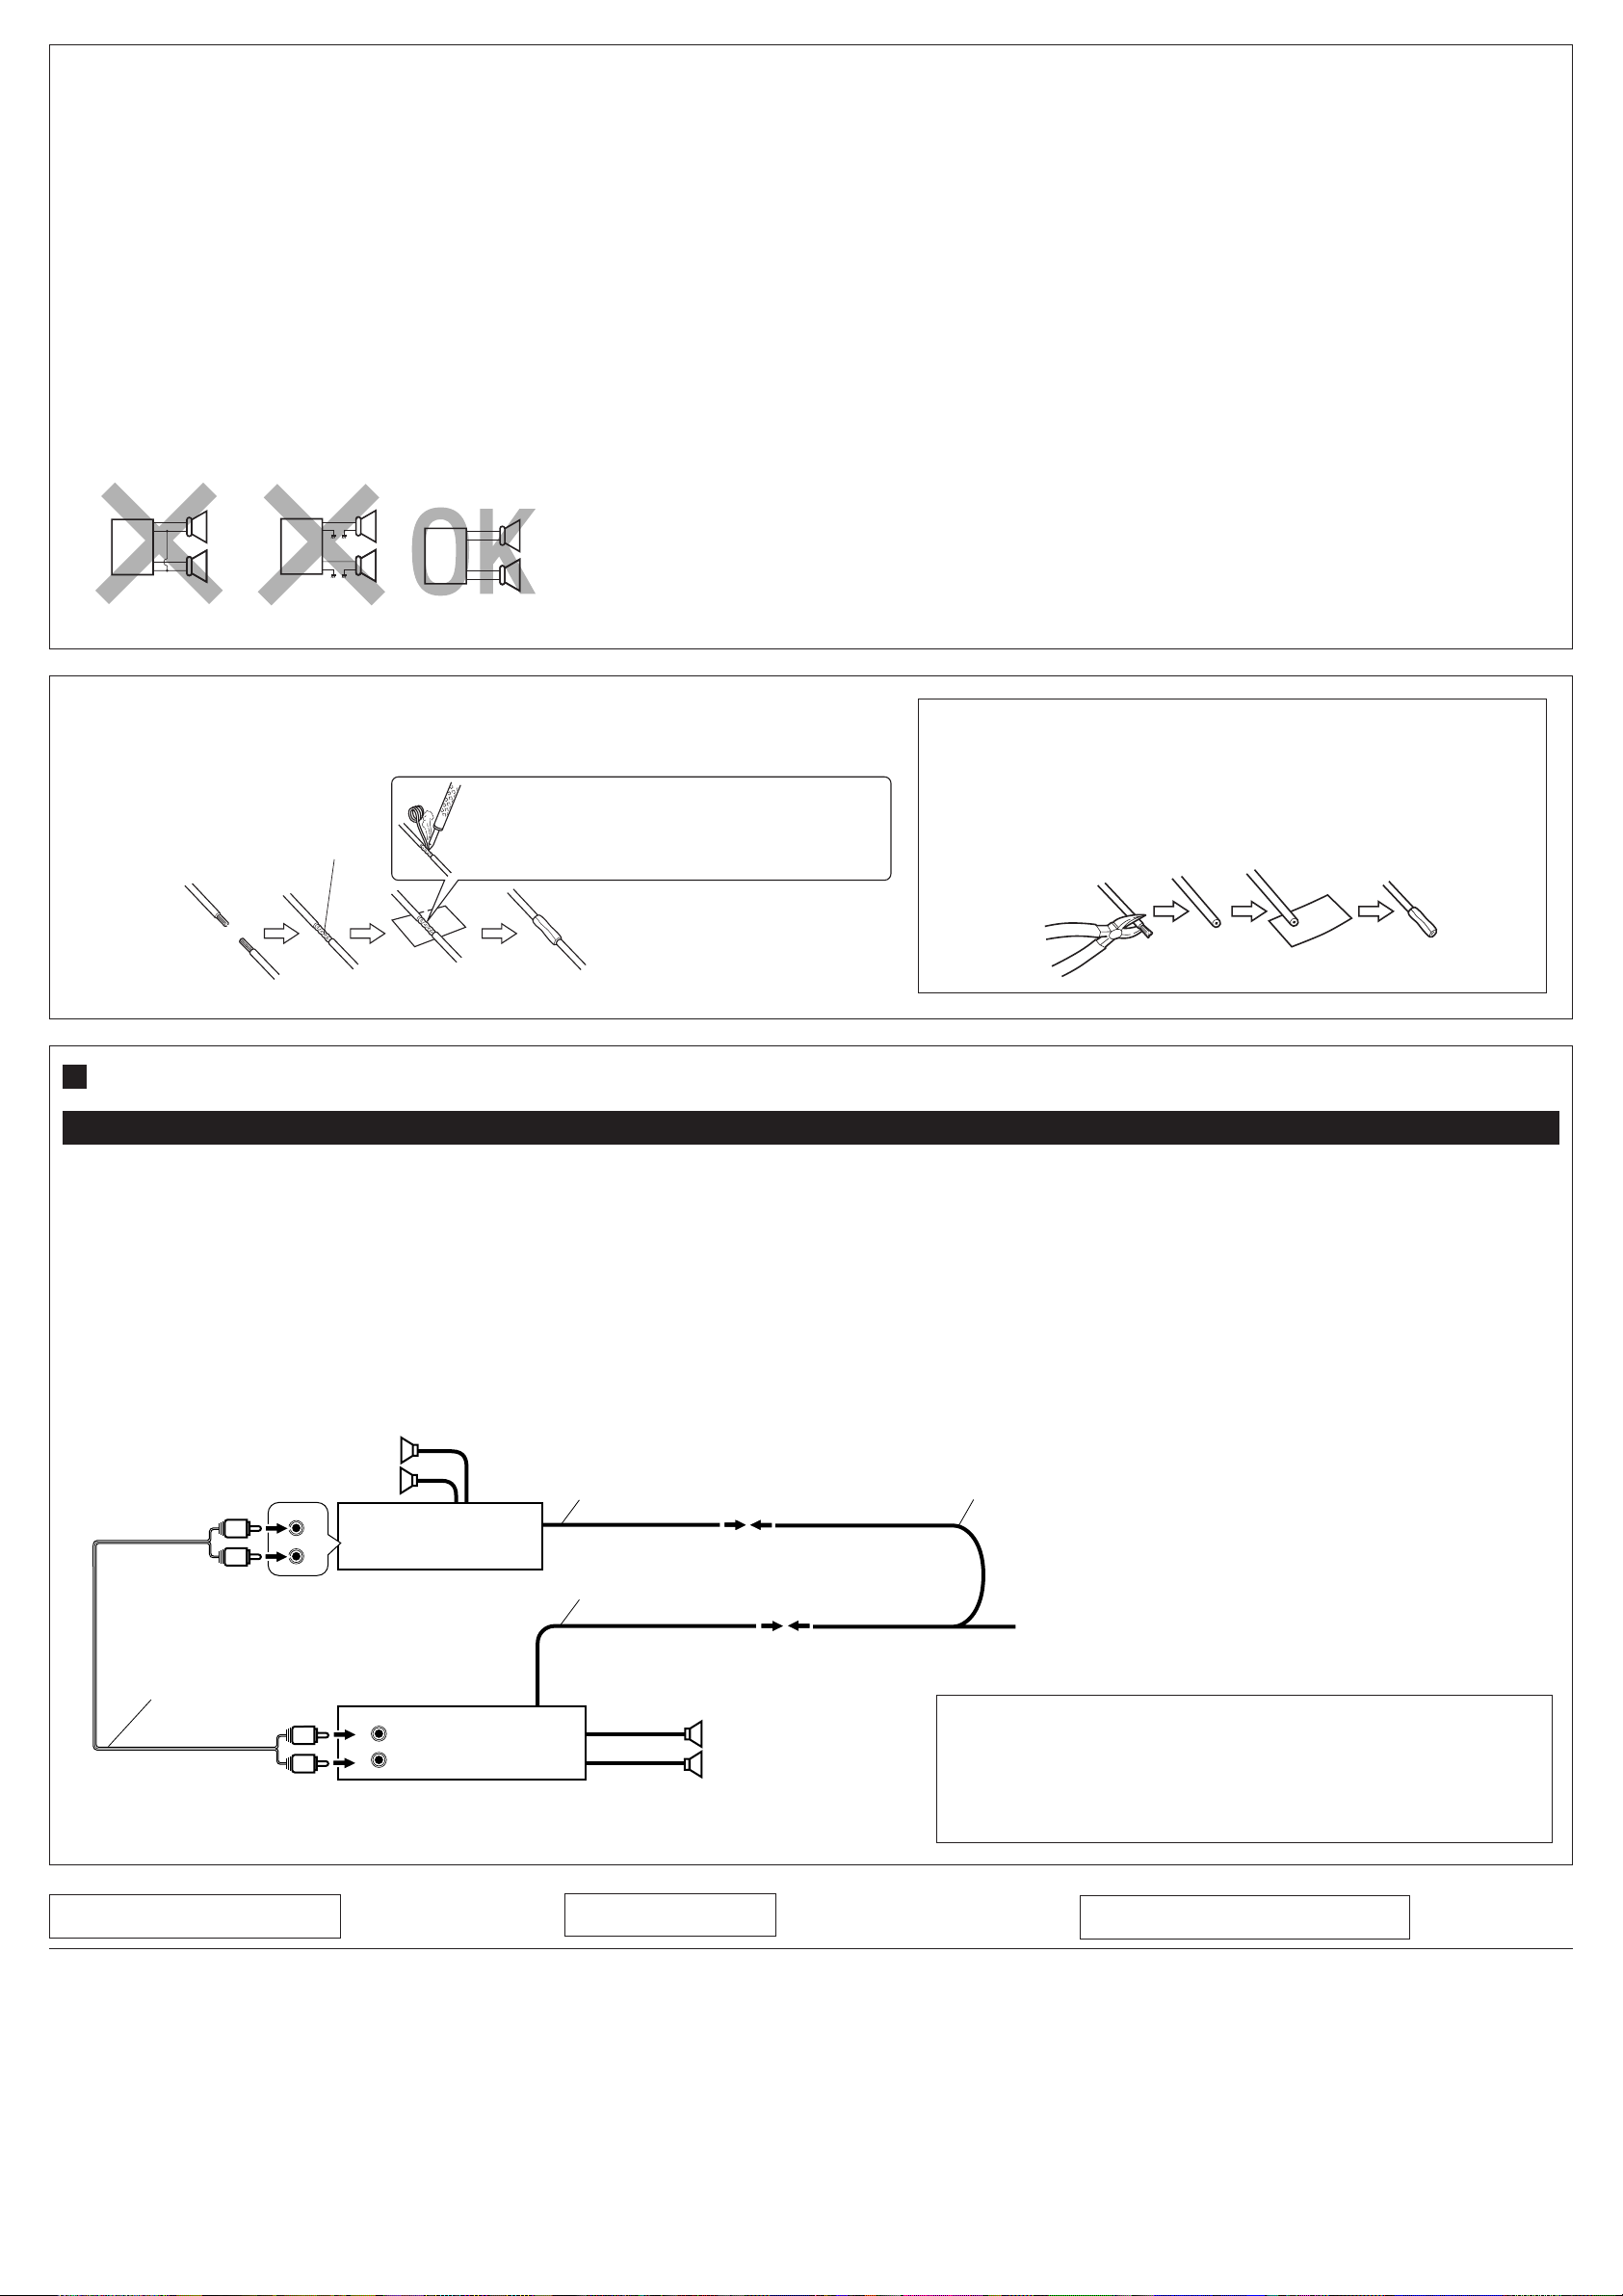
PRECAUTIONS on power supply and speaker
connections:
• DO NOT connect the speaker leads of the power cord to
the car battery; otherwise, the unit will be seriously
damaged.
• Connect the black lead (ground), yellow lead (to car battery,
constant 12 V), and red lead (to an accessory terminal)
correctly.
• BEFORE connecting the speaker leads of the power cord to
the speakers, check the speaker wiring in your car.
– If the speaker wiring in your car is as illustrated in Fig. 1
and Fig. 2 below , DO NOT connect the unit using that original
speaker wiring. If y ou do , the unit will be seriously damaged.
Redo the speaker wiring so that you can connect the unit to
the speakers as illustrated in Fig. 3.
– If the speaker wiring in your car is as illustrated in Fig. 3,
you can connect the unit using the original speaker wiring in
your car .
– If you are not sure of the speaker wiring of your car, consult
your car dealer.
+
+
L
-
-
+
+
R
-
-
Fig. 2Fig. 1 Fig. 3
+
+
L
-
-
+
+
R
-
-
+
+
L
-
-
+
+
R
-
-
VORSICHTSMASSREGELN beim Anschließen der
Stromversorgung und Lautsprecher:
• Die Lautsprecherleitungen des Netzkabels NICHT an der
Autobatterie anschließen, da sonst das Gerät schwer
beschädigt wird.
• Die schwarze Leitung (Erdung), die gelbe Leitung (zur
Autobatterie, konstant 12 V) und die rote Leitung (zur
Zubehöranschlußklemme) richtig anschließen.
• VOR dem Anschließen der Lautsprecherleitungen des
Spannunsgversorgungskabels an die Lautsprecher, die
Lautsprecherverdrahtung in Ihrem Auto überprüfen.
– Ist die Lautsprecherverdrahtung wie unten in “Fig. 1”
und “Fig. 2” abgebildet, das Gerät NICHT mit der
Originalverdrahtung der Lautsprecher anschließen, da
sonst das Gerät schwer beschädigt wird.
Die Lautsprecherverdrahtung erneuern, so daß Sie das Gerät
an den Lautsprechern wie in “Fig. 3” abgebildet anschließen
können.
– Ist die Lautsprecherverdrahtung in Ihrem Auto wie in
“Fig. 3” abgebildet, können Sie das Gerät mit der
Originalverdrahtung der Lautsprecher in Ihrem Auto
anschließen.
– Sind Sie sich über die Lautsprecherverdrahtung in Ihrem Auto
nicht sicher, wenden Sie sich an Ihren Autohändler.
PRECAUTIONS sur l’alimentation et la
connexion des enceintes:
• NE CONNECTEZ PAS les fils d’enceintes du cordon
d’alimentation à la batterie; sinon, l’appareil serait
sérieusement endommagé.
Connectez correctement le fil noir (a la masse), le fil jaune (a
•
la batterie de la voiture,12 V constant) et le fil rouge (à la prise
accessoire).
•
AVANT de connecter les fils d’enceintes du cordon
d’alimentation aux enceintes, vérifiez le câblage des enceintes
de votre voiture.
Si le câblage des enceintes de votre voiture est réalisé
–
comme montré sur la Fig. 1 ou Fig. 2 ci-dessous,
CONNECTEZ P AS l’appareil en utiliscant ce câb lage original
d’enceintes. Si vous le faites, l’appareil sera sérieusement
endommagé.
Recommencez le câblage des enceintes de façon que v ous
puissiez connecter l’appareil aux enceintes comme montré
sur la Fig. 3.
Si le câblage des enceintes de votre voiture est comme
–
montré sur la Fig. 3,
vous pouvez connecter l’appareil en
utiliscant ce câblage original d’enceintes pour votre voiture .
– Si vous n’êtes pas sûrs du câblage d’enceintes de votre
voiture, consulter le concessionnaire de votre voiture.
NE
Connecting the leads / Anschließen der Leitungen / Raccordement des fils
CAUTION / VORSICHT / PRECAUTION:
• To prevent short-circuit, cover the terminals of the UNUSED leads with
insulating tape.
T wist the core wires when connecting.
Die Kerndrähte beim Anschließen
verdrehen.
Torsader les âmes des fils en les
raccordant.
Solder the core wires to connect them securely.
Die Kerndrähte anlöten, um sie fest anzuschließen.
Souder les âmes des fils pour les raccorder entre eux
de façon sûre.
• Zur Vermeidung eines Kurzschlusses die Anschlußklemmen der NICHT
VERWENDETEN Leitungen mit Isolierklebeband umwickeln.
• Pour éviter les court-circuits, couvrir les bornes des fils qui ne sont
PAS utilisés avec de la bande isolante.
B Connections Adding Other Equipment / Anschlüsse zum Hinzufügen von anderer Ausrüstung / Raccordement pour ajouter d’autres appareils
Amplifier / Verstärker / Amplificateur
Y ou can connect an amplifier to upgr ade your car stereo system.
• Connect the remote lead (blue with white stripe) to the remote
lead of the other equipment so that it can be controlled through
this unit.
• Connect this unit’s line-out terminals to the amplifier’s line-in
terminals.
• Disconnect the speakers from this unit, connect them to
the amplifier. Leave the speaker leads of this unit unused.
(Cover the terminals of these unused leads with insulating
tape, as illustrated above.)
Sie können einen Verstärker anschließen, um Ihre
Autostereoanlage zu erweitern.
• Schließen Sie das Fernbedienungskabel (blau mit weißem
Streifen) an das Fernbedienungskabel des anderen Geräts an,
so daß es über dieses Gerät gesteuert werden kann.
• Die Anschlußklemmen am Ausgang dieses Gerät an den
Anschlußklemmen des Eingangs des Verstärkers anschließen.
• Die Lautsprecher von diesem Gerät abtrennen und am
Verstärker anschließen. Die Lautsprecherleitungen dieses
Geräts unbenutzt lassen. (Die Anschlußklemmen dieser
nicht verwendeten Leitungen mit Isolierklebeband
umwickeln, siehe Abbidung oben.)
Vous pouvez connecter un amplificateur pour améliorer votre
système autoradio.
•
Connectez le fil de commande à distance (bleu avec bande
blanche) au fil de commande à distance de l’autre appareil de
façon qu’il puisse être commandé via cet appareil.
•
Raccorder les bornes de sortie ligne de cet appareil aux bornes
d’entrée ligne de l’amplificateur.
• Déconnectez les enceintes de cet appareil et connectez-
les à l’amplificateur. Laissez les fils d’enceintes de cet
appareil inutilisés. (Recouvrir les extrémités de ces fils
inutilisés avec de la bande isolante comme montré cidessus.)
Rear speakers
Hintere Lautsprecher
Enceintes arrière
INPUT
L
R
Signal cord (not supplied with this unit)
Einzelleitung (nicht mit diesem Gerät mitgeliefert)
Cordon de signal (non fourni avec cet appareil)
L
R
L
L
R
R
JVC Amplifier
JVC Verstärker
JVC Amplificateur
LINE OUT
L
REAR
R
KD-S9R
TROUBLESHOOTING
• The fuse blows.
* Are the red and black leads connected correctly?
• Power cannot be turned on.
* Is the yellow lead connected?
• No sound from the speakers.
* Is the speaker output lead short-circuited?
• Sound is distorted.
* Is the speaker output lead grounded?
* Are the “–” terminals of L and R speakers grounded in common?
• Unit becomes hot.
* Is the speaker output lead grounded?
* Are the “–” terminals of L and R speakers grounded in common?
Remote lead
Fernbedienungsleitung
Fil d’alimentation à distance
Remote lead (Blue with white stripe)
Fernbedienungsleitung (Blau mit weißem Streifen)
Fil d’alimentation à distance (Bleu avec bande blanche)
Front speakers
Vordere Lautsprecher
Enceintes avant
Y-connector (not supplied with this unit)
Y-Anschluß (nicht mit diesem Gerät mitgeliefert)
Connecteur Y (non fourni avec cet appareil)
To power aerial if any
Zur Motorantenne, sofern vorhanden
Vers l’antenne automatique, s’il y en a une
CAUTION / VORSICHT / PRECAUTION:
• T o prevent internal heat b uildup inside this unit, place this unit UNDER
the other equipment.
• Zur V ermeidung eines Hitzestaus in diesem Gerät, dieses Gerät UNTER
die andere Geräteansrüstung stellen.
• Pour éviter un échauffement interne de cet appareil, placez-le SOUS
l’autre appareil.
FEHLERSUCHE
• Die Sicherung brennt durch.
* Sind die roten und schwarzen Leitungen richtig angeschlossen?
• Stromversorgung kann nicht eingeschaltet werden.
* Ist die gelbe Leitung angeschlossen?
• Kein Ton aus den Lautsprechern.
* Ist die Lautsprecherausgangsleitung kurzgeschlossen?
• Ton verzerrt.
* Ist die Lautsprecherausgangsleitung geerdet?
* Sind die (–) Anschlußklemmen der linken und rechten
Lautsprecher zusammen geerdet?
• Gerät wird heiß.
* Ist die Lautsprecherausgangsleitung geerdet?
* Sind die (–) Anschlußklemmen der linken und rechten
Lautsprecher zusammen geerdet?
EN CAS DE DIFFICULTÉS
• Le fusible saute.
Les fils rouge et noir sont-ils racordés correctement?
*
• L’appareil ne peut pas être mise sous tension.
*
Le fil jaune est-elle raccordée?
• Pas de son des haut-parleurs.
Le fil de sortie de enceinte est-il court-circuité?
*
• Le son est déformé.
Le fil de sortie de enceinte est-il à la masse?
*
*
Les bornes “–” des enceintes gauche et droit sont-elles mises
ensemble à la masse?
• L’appareil devient chaud.
*
Le fil de sortie de enceinte est-il à la masse?
*
Les bornes “–” des enceintes gauche et droit sont-elles mises
ensemble à la masse?
Page 31

CD RECEIVER
RECEPTOR CON CD
SINTOAMPLIFICATORE CON RIPRODUTTORE DI CD
CD-SPELARE MED MOTTAGARE
CD-VASTAANOTIN
KD-S9R
ATT
/
/I
45Wx4
DISP
RDS
TP
PTY
7 8 9 10 11 12
SCM
MO
RND
RPT
CD
FM
AM
Para la instalación y las conexiones, refiérase al manual separado.
Per le istruzioni d’installazione e di collegamento, vedere il manuale a parte.
Se separat handbok för installation och anslutning.
Katso asennus- ja liitäntäohjeet erillisestä ohjekirjasta.
INSTRUCTIONS
MANUAL DE INSTRUCCIONES
ISTRUZIONI
BRUKSANVISNING
KÄYTTÖOHJE
SSM
NEDERLANDS
ESPAÑOL
ITALIANO
SVENSKA
SUOMI
GET0007-002A
[E]
Page 32

Tarrojen sijainti ja merkinnät
Päälaitteen pohja
DANGER: Invisible laser
radiation when open and
interlock failed or defeated.
AVOID DIRECT EXPOSURE
TO BEAM. (e )
Nimi/Arvolevy
Huomautus:
Caution:
Tässä laitteessa on laserluokan 1 ylittävä
This product contains a laser component
laserkomponentti.
of higher laser class than Class 1.
Laitteen Säätö alkutilaan
ADVARSEL: Usynlig la serstråling ved åbning, når
sikkerhedsafbrydere er ude
af funkti on. Undgåudsættelse for stråling. (d)
VARNING: Osynlig laser-
strålning när denna del
är öppnad och spärren
urkopplad. Betrakta ej
strålen. (s)
VARO : Avattaessa ja suojalukitus ohitettaessa olet
är
alttiina näkymättömälle
lasersäteilylle. Älä katso
säteeseen. (f)
Tärkeää laserlaitteille
Huomautuksia:
1.LUOKAN 1 LASERLAITE
2.VAARA: Näkymätöntä lasersäteilyä, kun laite avataan
ja kun sisälukitus ei toimi tai on säädetty
toimimatomaksi. Vältä suoraa altistumista säteelle.
3.HUOMAUTUS: Älä avaa yläkantta. Laitteen sisällä ei
ole käyttäjän huollettavissa olevia osia. Jätä kaikki
huoltotoimet ammattihenkilön suoritettavaksi.
4.HUOMAUTUS: Tämä CD-soitin käyttää näkymätöntä
lasersäteilyä ja siinä on turvakytkimet, jotka estävät
säteilyn välittymisen CD-levyjen poisoton aikana.
Turvakytkimien säätäminen toimimattomiksi on
vaarallista.
5.HUOMAUTUS: Muiden kuin tässä käyttöohjeessa
mainittujen säätimien, säätöjen ja toimenpiteiden
käyttö saattaa altistaa käyttäjän vaaralliselle säteilylle.
Paina sekä SEL (valinta)- että (valmiustila/päällä/vaimennin)-nappia yhtä aikaa ja pidä ne
alaspainettuina usean sekunnin ajan.
Tämä säätää sisäänrakennetun mikrotietokonen alkutilaan.
(valmiustila/päällä/vaimennin)
SEL (valinta)
Huom!
• Esiasetetut säädöt, kuten esim. esiasetetut kanava- tai äänisäädöt, pyyhitään myös pois.
• Jos CD-levy on jo laitteessa, näyttöön ilmestyy vuorotellen “PLEASE” ja “EJECT”. Paina tässä
SUOMI
tapauksessa 0-näppäintä CD:n poistamiseksi. Varo pudottamasta CD:tä.
* Säädettäessä laite alkutilaan kun CD-levyä ei ole asetettu paikalleen…
Kun olet avannut ja sulkenut etulevyn, mitään ei kenties näy näytössä, vaikka laite on kytkeytynyt. Palauta
tässä tapauksessa normaali tila painamalla painiketta .
2
Page 33

Kiitämme tämän JVC-tuotteen ostosta. Lue kaikki ohjeet tarkasti ennen käyttöä,
jotta ymmärrät ne täysin ja näin saat parhaan mahdollisen hyödyn laitteesta.
SISÄLLYS
Laitteen Säätö alkutilaan .......................... 2
NÄPPÄINTEN JA SÄÄDINTEN SIJAINTI .. 4
Etulevyn ................................................... 4
PERUSKÄYTTÖ ............................ 5
Kytke virta ................................................ 5
RADION PERUSKÄYTTÖ ................. 6
Radion kuuntelu....................................... 6
Asemien tallennus muistiin....................... 7
Viritys esiasetetun aseman taajuudelle .... 8
RDS TOIMINNOT .......................... 9
Mihin RDS- ja EON-toimintoja
käytetään? .......................................... 9
Muita käytännöllisiä RDS-toimintoja ja
säätöjä ................................................ 12
CD-LEVYN KÄYTTÖ ....................... 14
CD-levyn soittaminen ............................... 14
Kappaleen tai tietyn kohdan haku
CD-levyltä.............................................. 15
CD:n toistotilojen valinta ........................... 15
CD-tekstin toisto ...................................... 16
CD-levyn vapautuksen esto...................... 16
ÄÄNEN SÄÄDÖT ........................... 17
Äänen säätö ............................................ 17
Äänensäätömuistin käyttö ........................ 17
Omien äänisäätöjen tallennus .................. 18
MUUT PÄÄTOIMINNOT ................... 19
Kellon asetus ........................................... 19
Yleisasetusten muuttaminen (PSM) ......... 19
Etulevyn irrotus ........................................ 22
VIANETSINTÄ .............................. 23
HUOLTO .................................... 24
CD-levyjen käsittely ................................. 24
TEKNISET TIEDOT......................... 25
Huom!
Tämä laite on varustettu numeroidulla tunnuskortilla. Sama numero on merkitty myös itse laitteeseen. Säilytä
tämä kortti tallessa, sillä sen avulla laite on helppo tunnistaa varkauden yhteydessä.
ENNEN KÄYTTÖÄ
*
Turvallisuuden tähden....
• Älä lisää äänenvoimakkuuden tasoa liikaa, koska
tämä tukkii ulkopuoliset äänet, minkä johdosta
ajaminen voi olla vaarallista.
• Pysäytä auto ennen monimutkaisiin toimiin
ryhtymistä.
*
Auton sisälämpötila....
Jos olet pysäköinyt auton pitemmäksi aikaa kuumassa
tai kylmässä säässä, odota kunnes lämpötila autossa
muuttuu normaaliksi ennen laitteen käyttöä.
SUOMI
3
Page 34

Etulevyn
Näyttöikkuna
NÄPPÄINTEN JA SÄÄDINTEN SIJAINTI
uo;a
i
kjhgfds
13245
ATT
/
/I
DISP
RDS
TP
PTY
7 8 9 10 11 12
SCM
1 (valmiustila/päällä/vaimennin)
-näppäin
2 Säätövalitsin
3 DISP (näyttö) -näppäin
4 TP (liikenneohjelma)
RDS (radiotietojärjestelmän) -näppäin
5 PTY (ohjelmatyypin) -näppäin
6 RPT (toisto) -näppäin
7 MO (mono) -näppäin
RND (satunnaissoitto) -näppäimet
8 0 (vapautus) -näppäin
9 4 / ¢ -näppäin
•
Toimii myös SSM-näppäimenä, kun niitä
painetaan yhtä aikaa.
p (ohjauspaneelin vapautus) -näppäin
q SEL (valinta) -näppäin
w SCM (äänensäätömuisti) -näppäin
SUOMI
e Numeronäppäimiä
r AM-näppäin
t FM-näppäin
y CD-näppäin
4
678 9
MO
RND
SSM
RPT
CD
FM
AM
ytrewqp
Näyttöikkuna
u Äänenvoimakkuuden merkkivalo
i RDS-merkkivalot
TP, PTY, EON, AF, REG
o Päänäyttö
; Virittimen vastaanoton merkkivalot
STEREO, MONO
a “Linkki”-merkkivalo
s RPT (toisto) -merkkivalo
d RND (satunnaissoitto) -merkkivalo
f CD IN-merkkivalo
g Ohjelmalähteen/kellon näyttö
h LOUD-merkkivalo
j Tasauskuvion merkkivalo
k Äänitilan merkkivalot
SOFT, BEAT, POP
Page 35

ATT
/
/I
DISP
TP
PTY
SCM
Kytke virta
1
Kytke virta.
ATT
/
/I
Pikavalintanäppäimen käyttöä koskeva
huomautus:
Kun valitset virittimen audiolähteeksi alla
olevassa vaiheessa 2, virta kytkeytyy laitteeseen
automaattisesti, joten sinun ei tarvitse painaa
tätä näppäintä virran kytkemiseksi.
2
Toista audiolähdettä.
CD
FM
AM
RDS
7 8 9 10 11 12
4
Äänenvoimakkuuden häivytys hetkeksi
Paina -säädintä pikaisesti
kuunnellessasi mitä audiolähdettä tahansa. “ATT”
alkaa vilkkua näytössä ja äänenvoimakkuuden
taso putoaa hetkeksi.
Kun haluat palauttaa aikaisemman
äänenvoimakkuuden tason, paina näppäintä taas
pikaisesti.
• Jos kierrät säätövalitsinta myötäpäivään, voit
palauttaa äänen.
Virran katkaiseminen
Paina ja pidä sitä alhaalla yli sekunnin
ajan.
PERUSKÄYTTÖ
MO
RND
SSM
RPT
CD
FM
AM
231
Säädä ääni haluamaksesi (ks. sivua
17).
Virittimen (AM tai FM) käyttö,
ks. sivuja 6 – 13.
CD-soittimen käyttö,
ks. sivuja 14 – 16.
3
Säädä äänenvoimakkuus.
Suurennetaan
äänenvoimakkuutta.
Pienennetään
äänenvoimakkuutta.
Näkyviin tulee äänenvoimakkuuden taso.
Äänenvoimakkuuden merkkivalo
Huom!
Kun käytät tätä laitetta ensimmäisen kerran, aseta sen
sisäänrakennettu kello oikein, ks. sivua 19.
Äänenvoimakkuuden asetusta koskeva VAROITUS
CD- levyt synnyttävät hyvin vähän häiriöääntä
muihin ohjelmalähteisiin verrattuna. Jos
esimerkiksi radion äänenvoimakkuuden tasoa
säädetään, lähtötason äkkinäinen lisäys voi
vahingoittaa kaiuttimia.
Näin ollen äänenvoimakkuutta tulisi pienentää
ennen levyn soittamista ja säätää se sitten
halutuksi toiston aikana.
SUOMI
5
Page 36
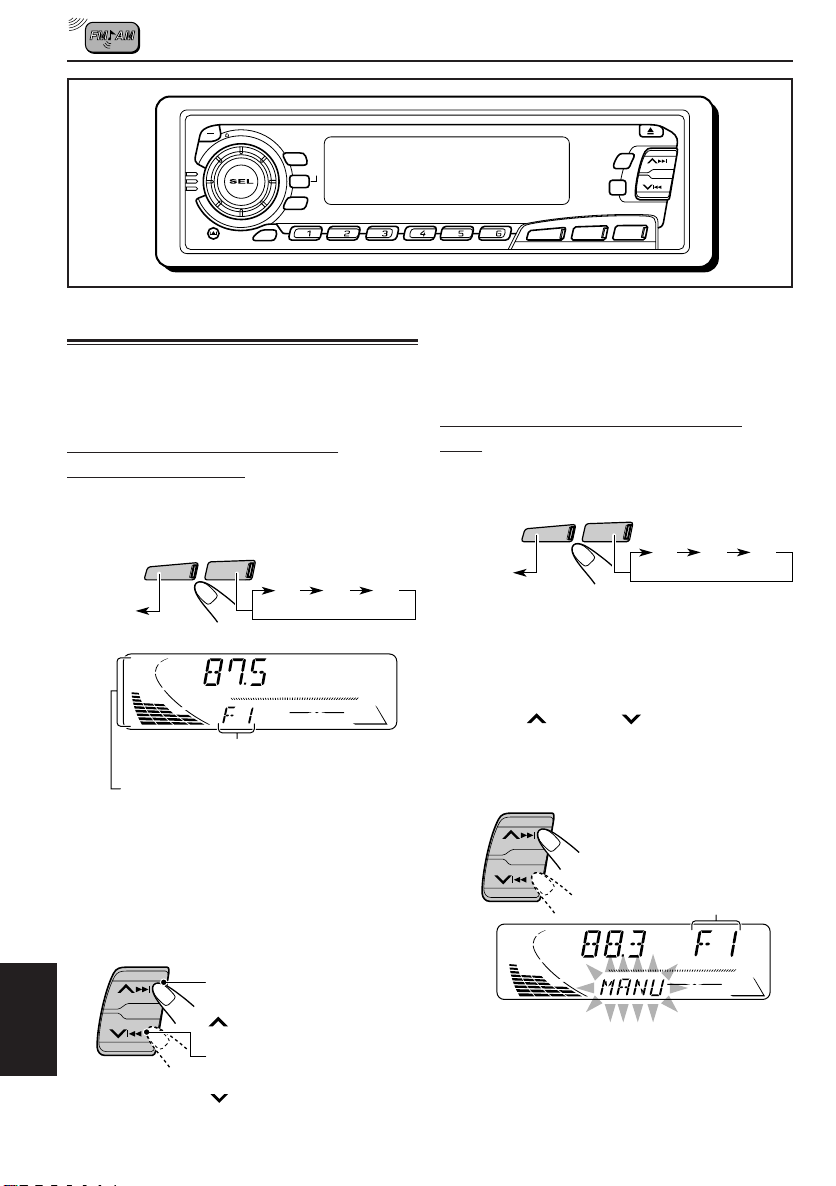
RADION PERUSKÄYTTÖ
ATT
/
/I
DISP
RDS
TP
PTY
7 8 9 10 11 12
SCM
MO
RND
SSM
RPT
CD
FM
AM
Radion kuuntelu
Kun haluat virittää jonkin tietyn aseman
taajuudelle, voit käyttää joko automaattista tai
manuaalista hakua.
Aseman haku automaattisesti:
automaattinen haku
1
Valitse kaista (AM, FM1 – 3).
FM
AM
F1
F2
(FM1)
AM
Näkyviin tulee valittu taajuuskaista (tai
kellonaika: ks. sivua 21).
Äänen (ks. sivua 21) tai äänenvoimakkuuden
merkkivalo
Huom!
Tässä vastaanottimessa on kolme FMtaajuuskaistaa (FM1, FM2, FM3). Voit käyttää
mitä tahansa näistä FM-lähetyksen kuunteluun.
(FM2)F3(FM3)
Kun haluat lopettaa haun, ennen kuin asema
kuuluu, paina samaa näppäintä, jota painoit
hakua varten.
Aseman haku käsin: manuaalinen
haku
1
Valitse kaista (AM, FM1 – 3).
FM
AM
F1
F2
(FM1)
AM
Huom!
Tässä vastaanottimessa on kolme FMtaajuuskaistaa (FM1, FM2, FM3). Voit käyttää
mitä tahansa näistä FM-lähetyksen kuunteluun.
2
Paina ¢- tai 4 -näppäintä
ja pidä sitä alhaalla, kunnes
näytössä alkaa vilkkua “MANU”
(manuaalinen).
(FM2)F3(FM3)
Näkyviin tulee valittu
taajuuskaista.
2
Aloita aseman haku.
SUOMI
6
Kun asema kuuluu, haku päättyy.
Haku suurempitaajuuksisten
asemien kohdalle painamalla
¢ -näppäintä.
Haku pienempitaajuuksisten
asemien kohdalle painamalla
4 -näppäintä.
Page 37

3
SSM
Viritä haluamallesi asemalle
“MANU”:n vilkkuessa.
Viritä suurempitaajuuksisten
asemien kohdalle painamalla
¢ -näppäintä.
Viritä pienempitaajuuksisten
asemien kohdalle painamalla
4 -näppäintä.
• Jos päästät sormen näppäimeltä,
manuaalitila kytkeytyy automaattisesti pois
päältä 5 sekunnin jälkeen.
• Jos pidät näppäintä alhaalla, taajuus
vaihtuu jatkuvasti (FM: 50 kHz:n välein ja
AM – MW/LW: 9 kHz:n välein), kunnes
vapautat näppäimen.
Kun FM-stereolähetyksen kuuluvuus on
huono:
Paina MO RND (mono/satunnaissoitto)
-näppäintä kuunnellessasi FM-stereolähetystä.
• Joka kerta kun näppäintä painetaan, MONOmerkkivalo syttyy ja sammuu vuorotellen.
Asemien tallennus muistiin
Voit käyttää jompaakumpaa seuraavista kahdesta
menetelmästä lähetysasemien tallentamiseksi
muistiin.
• FM-asemien automaattinen esiasetus: SSM
(Strong-station Sequential Memory — vahvan
aseman peräkkäismuisti)
• Sekä FM- että AM-aseman esiasetus käsin
FM-aseman automaattinen esiasetus:
SSM
Voit esiasettaa 6 paikallista FM-asemaa kullakin
FM-taajuusalueella (FM1, FM2 ja FM3).
1
Valitse FM-taajuusalueen numero
(FM1 – 3), johon haluat tallentaa
FM-asemat.
• Joka kerta kun näppäintä painetaan, FMkaista vaihtuu seuraavasti:
FM
2
Paina molempia näppäimiä ja pidä
niitä alhaalla yli 2 sekuntia.
F1
(FM1)F2(FM2)F3(FM3)
MO
RND
Kun näytössä palaa MONO-merkkivalo,
kuulemasi ääni muuttuu monoksi, mutta
vastaanotto paranee (STEREO-merkkivalo
sammuu).
Syttyy, kun FM-lähetyksen
vastaanotto on stereona.
“SSM” tulee näkyviin ja katoaa
sitten, kun automaattinen
esiasetus on lopussa.
Paikalliset FM-asemat, joilla on voimakkaimmat
signaalit, haetaan ja ne tallennetaan
automaattisesti valitsemaasi
taajuusaluenumeroon (FM1, FM2 tai FM3).
Nämä asemat on asetetaan numeronäppäimiin
— nro 1 (pienin taajuus) – nro 6 (suurin taajuus).
Kun automaattinen esiasetus on lopussa,
numeronäppäimeen 1 tallennettu asema
viritetään automaattisesti.
SUOMI
7
Page 38

Esiasetus käsin
V oit esiasettaa käsin enintään 6 asemaa kullakin
taajuusalueella (FM1, FM2, FM3 ja AM).
Esim.: 88‚3 MHz:n FM-aseman tallennus FM1-
taajuusalueen esiasetettuun numeroon 1
1
Valitse FM-taajuusalueen numero
(FM1 – 3), johon haluat tallentaa
FM-asemat (tässä esimerkissä
FM1).
• Joka kerta kun näppäintä painetaan, FMkaista vaihtuu seuraavasti:
FM
2
Viritä 88‚3 MHz:n asemaan.
3
Paina numeronäppäintä (tässä
esimerkissä numeroa 1) ja pidä sitä
alhaalla yli 2 sekunnin ajan.
F1
(FM1)F2(FM2)F3(FM3)
Viritä suurempitaajuuksisten
asemien kohdalle painamalla
¢ -näppäintä.
Viritä pienempitaajuuksisten
asemien kohdalle painamalla
4 -näppäintä.
Huom!
• Aikaisemmin esiasetettu asema pyyhitään pois, kun
uusi asema tallennetaan samaan
esiasetetusnumeroon.
• Esiasetetut asemat pyyhitään pois, kun virtalähde
muistipiiriin keskeytetään (esim. akun vaihdon
aikana). Jos näin tapahtuu, esiaseta asemat
uudelleen.
Viritys esiasetetun aseman
taajuudelle
Voit virittää kätevästi esiasetetun aseman
taajuudelle.
Muistathan, että sinun täytyy tallentaa asemat
ensin. Jos et ole tallentanut niitä vielä, katso
“Asemien tallennus muistiin” sivuja 7.
1
Valitse kaista (AM, FM1 – 3).
FM
AM
F1
F2
(FM1)
AM
2
Valitse haluamasi esiasetusaseman
numero (1 – 6) haluamasi
esiasetusaseman.
(FM2)F3(FM3)
Kaista/esiasetettu numero
ja “MEMO” vilkkuvat
vuorotelleen hetken aikaa.
4
Toista yllä kuvattu toimenpide
tallentaaksesi toisen aseman
muihin esiasetusnumeroihin.
SUOMI
8
Page 39
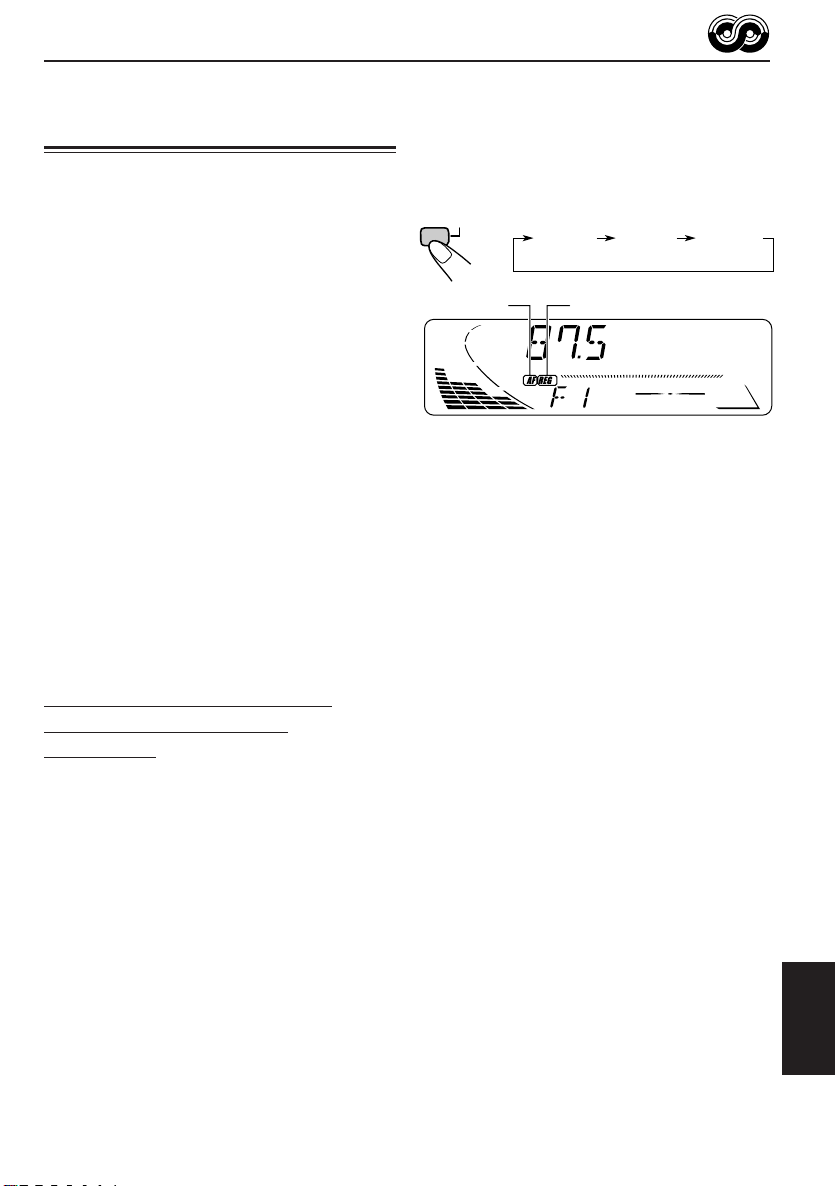
RDS TOIMINNOT
Mihin RDS- ja EON-toimintoja
käytetään?
RDS:n (radiotietojärjestelmän) avulla FM-asemat
voivat lähettää lisäsignaalin normaalien
ohjelmasignaalien lisäksi. Esimerkiksi asemat
voivat lähettää asemansa nimen sekä tietoja siitä,
minkä tyyppisiä ohjelmia ne lähettävät, kuten
esim. urheilua tai musiikkia yms.
Eräs toinen RDS-toiminnon eduista on nimeltä
“EON (muiden asemaryhmien tarkkailu)”. EONmerkkivalo syttyy, kun FM-asema otetaan
vastaan EON-datalla. Käyttämällä joltakin
asemalta lähetettyä EON-dataa voit virittää eri
verkossa suosikkiohjelmaasi tai
liikennetiedotuksia lähettävälle eri asemalle
kuunnellessasi jotain toista ohjelmaa tai
ohjelmalähdettä, kuten CD.
Ottamalla vastaan RDS-tietoja tämä laite pystyy
seuraaviin toimintoihin:
• Saman ohjelman automaattinen seuranta
(verkkoseurannan vastaanotto)
• TA:n (liikennetiedotuksen) tai suosikkiohjelmasi
vastaanoton valmiustila
• PTY:n (ohjelmatyypin) haku
• Ohjelman haku
• Sekä joitakin muita toimintoja
Kun haluat käyttää verkkoseurannan
vastaanottoa, paina TP RDS (liikenneohjelma/
radiotietojärjestelmän) -näppäintä ja pidä sitä
alhaalla yli 1 sekunnin ajan. Joka kerta kun
painat näppäintä ja pidät sitä alhaalla,
verkkoseurannan vastaanottotilat vaihtuvat
seuraavasti:
RDS
TP
Tila 1
AF-merkkivalo syttyy, mutta REG-merkkivalo jää
syttymättä.
Verkkoseuranta on aktivoitu ja aluetila on asetettu
kohdalle “off”.
Vaihtuu jonkin toisen aseman taajuudelle saman
verkon piirissä, kun vastaanottosignaalit
nykyiseltä asemalta heikkenevät.
• Tässä tilassa ohjelma voi olla erilainen kuin tällä
hetkellä vastaanotettu ohjelma.
Tila 1 Tila 2 Tila 3
REG-merkkivaloAF-merkkivalo
Saman ohjelman automaattinen
seuranta (verkkoseurannan
vastaanotto)
Kun ajat alueella, jossa FM-kuuluvuus on huono,
tämän laitteen sisään rakennettu viritin virittää
automaattisesti jollekin toiselle RDS-asemalle,
joka lähettää samaa ohjelmaa voimakkaammilla
signaaleilla. Joten voit jatkaa saman ohjelman
kuuntelemista sen parhaimmalla kuuluvuudella,
ajoitpa missä tahansa. (Ks. seuraavalla sivulla
olevaa kuvaa.)
Käytettyjä RDS-tietoja, jotka saavat
verkkoseurannan vastaanoton toimimaan oik ein,
on kahta tyyppiä: PI (ohjelman tunnistus) ja AF
(vaihtoehtotaajuudet).
Jos tämän datan vastaanotto kuuntelemaltasi
RDS-asemalta ei tapahdu oikein,
verkkoseurannan vastaanotto ei toimi.
Tila 2
Sekä AF-merkkivalo että REG-merkkivalo
syttyvät.
Verkkoseuranta on aktivoitu ja aluetila on asetettu
kohdalle “on”.
Vaihtuu jonkin toisen, samaa ohjelmaa lähettävän
aseman taajuudelle saman verkon piirissä, kun
vastaanottosignaalit nykyiseltä asemalta
heikkenevät.
Tila 3
Sekä AF-merkkivalo että REG-merkkivalo jäävät
syttymättä.
Verkkoseuranta on passivoitu.
SUOMI
9
Page 40

Sama ohjelma voidaan ottaa vastaan eri
taajuuksilla.
TA-valmiustila lopetetaan painamalla uudelleen
TP RDS -painiketta.
Taajuudella A
lähettävä
ohjelma 1
Taajuudella B
lähettävä
ohjelma 1
Taajuudella C
lähettävä
ohjelma 1
Taajuudella E
lähettävä
ohjelma 1
Taajuudella D
lähettävä
ohjelma 1
Vastaanottovalmiuden käyttö
Vastaanottovalmiuden avulla laite kytketään
väliaikaisesti nykyiseltä ohjelmalähteeltä (jokin
toinen FM-asema, ja CD) suosikkiohjelmallesi
(PTY: ohjelmatyyppi) ja liikennetiedotukselle (TA).
• Vastaanottovalmius ei toimi, jos kuuntelet AM-
asemaa.
TA:n vastaanottovalmius
Kun TP RDS -näppäintä painetaan
RDS
jotain FM-asemaa kuunneltaessa, TP-
TP
merkkivalo syttyy TP-aseman
(liikenneohjelman) vastaanoton aikana,
ja TA-valmiustila kytkeytyy päälle.
• Kun vastaanotettu asema ei olekaan TP-asema, TP-
merkkivalo vilkkuu. Paina ¢- tai 4
-näppäintä TA-valmiustilan kytkemiseksi päälle.
Näyttöön ilmestyy “SEARCH”, ja TP-aseman haku
alkaa. Kun TP-asema on viritetty, TP-merkkivalo
syttyy.
7 Jos CD-levyä kuunnellessasi haluatkin
kuunnella TP-asemaa, siirry valmiustilaan
painamalla TP RDS -näppäintä (TP-merkkivalo
syttyy).
Jos jonkin liikenneohjelman lähetys alkaa TAvalmiustilan toimiessa, näkyviin tulee “TRAFFIC”,
SUOMI
ja toiston ohjelmalähde vaihtuu FMtaajuusalueelle. Äänenvoimakkuus suurenee
esiasetetulle T A-äänen voimakkuustasolle
(ks. sivua 13.), ja liikenneohjelma alkaa kuulua.
10
PTY:n vastaanottovalmius
Kun PTY-näppäintä painetaan jotain
PTY
FM-asemaa kuunneltaessa, PTYmerkkivalo syttyy PTY-aseman
vastaanoton aikana, ja PTY-valmiustila
kytkeytyy päälle. Sivulta 11 näkyvällä
tavalla tallennettu ja valittu PTY-nimi
vilkkuu 5 sekunnin ajan.
• Kun vastaanotettu asema ei olekaan PTY-asema,
PTY-merkkivalo vilkkuu. Paina ¢- tai
4 -näppäintä PTY-valmiustilan kytkemiseksi
päälle. Näyttöön ilmestyy “SEARCH”, ja PTYaseman haku alkaa. Kun PTY-asema on viritetty,
PTY-merkki valo syttyy.
7 Jos CD-levyä kuunnellessasi haluatkin
kuunnella PTY-lähetystä, siirry valmiustilaan
painamalla PTY-näppäintä (PTY-merkkivalo
syttyy).
Jos valitsemasi PTY-ohjelman lähetys alkaa PTYvalmiustilan toimiessa, näkyviin tulee valittu PTYnimi, ja toiston ohjelmalähde vaihtuu FMtaajuusalueelle. Valitsemasi PTY-ohjelma alkaa
kuulua.
PTY-valmiustila lopetetaan painamalla
uudelleen PTY-painiketta.
Suosikkiohjelmasi valinta PTY:
n vastaanottovalmiutta varten
Voit valita suosikkiohjelmasi PTY:n
vastaanottovalmiutta varten muistiin
tallennettavaksi.
Kun laite toimitetaan tehtaalta, “NEWS” on
tallennettu ohjelmatyypiksi PTY:n
vastaanottovalmiutta varten.
1
Paina SEL (valinta) -näppäintä ja
pidä sitä alhaalla yli 2 sekunnin ajan
niin, että näyttöön ilmestyy yksi
PSM-kohdista. (PSM: ks. sivua 20.)
Page 41

2
Valitse “PTY STBY” (valmiustila), jos
sitä ei näy näytöstä.
3
Valitse yksi 29:stä PTY-koodista.
Valittu koodinimi ilmestyy
näyttöön, ja se tallennetaan
muistiin.
• Ks. tarkemmat tiedot alla
olevasta taulukosta.
4
Asetus on valmis.
PTY-koodien kuvaus
NEWS: Uutisia
AFFAIRS: Ajankohtaisia uutisia ja
tapahtumia laajemmin
INFO: Ohjelmia, joiden tarkoitus on
SPORT: Urheilutapahtumia
EDUCATE: Koulutusohjelmaa
DRAMA: Kuunnelmia
CULTURE: Ohjelmaa valtakunnallisista ja
SCIENCE: Ohjelmaa luonnontieteistä ja
VARIED: Muuta ohjelmaa kuten
POP M: Pop-musiikkia
ROCK M: Rock-musiikkia
EASY M: Kevyttä kuunneltavaa
LIGHT M: Kevyttä musiikkia
CLASSICS: Klassista musiikkia
OTHER M: Muuta musiikkia
WEATHER: Säätietoja
FINANCE: Tiedotuksia liike-elämästä,
käsittelevää ohjelmaa
antaa neuvoja eri aloilta
alueellisista
kulttuuritapahtumista
teknologiasta
komedioita ym
kaupasta,osakemarkkinoista jne.
Suosikkiohjelmasi haku
Voit hakea yhden kuudesta muistiin tallennetusta
suosikkiohjelmatyypistä.Kun laite toimitetaan
tehtaalta, numeronäppäimiin (1 – 6) on
tallennettu seuraavat kuusi ohjelmatyyppiä:
Katso alta, miten tehtaalla esiasetetut
asetukset vaihdetaan.
Katso sivulta 12, miten haetaan suosikkiohjelma.
1
POP M
45
CLASSICS
2
ROCK M EASY M
AFFAIRS
Näin tallennetaan suosikkiohjelmatyypit
1
Paina SEL (valinta) -näppäintä ja
pidä sitä alhaalla yli 2 sekunnin ajan
niin, että näyttöön ilmestyy yksi
PSM-kohdista. (PSM: ks. sivua 20.)
JATKUU SEURAAVALLA SIVULLA
CHILDREN: Viihdeohjelmaa lapsille
SOCIAL: Ohjelmia yhteiskunnallisista
RELIGION: Ohjelmia uskonnon ja uskon
PHONE IN: Ohjelmia, joissa ihmiset voivat
TRAVEL: Ohjelmia matkakohteista,
LEISURE: Ohjelmia virkistystoiminnasta
JAZZ: Jazz-musiikkia
COUNTRY: Country-musiikkia
NATION M: Suosittua nykymusiikkia muista
OLDIES: Klassista pop-musiikkia
FOLK M: Folk-musiikkia
DOCUMENT: T utkivia ja pohdiskelevia
harrasteista
eri aloilta, olemassaolosta ja
etiikasta
ilmaista mielipiteensä joko
soittamalla tai yleisissä
keskusteluissa
turistimatkoista, matkaideoita
jamahdollisuuksia
kuten puutarhanhoidosta,
ruoanlaitosta, kalastuksesta
jne.
maista kyseisen maan kielellä
dokumenttiohjelmia eri aiheista
3
6
VARIED
SUOMI
11
Page 42

2
Valitse “PTY SRCH”(haku), jos sitä ei
näy näytöstä.
3
Valitse yksi 29:stä PTY-koodista.
(Ks. sivua 11.)
Valittu koodinimi ilmestyy
näyttöön.
• Jos aikaisemmin muistiin
tallennettu koodi valitaan,
se vilkkuu näytöstä.
4
Paina numeronäppäintä ja pidä sitä
alhaalla yli 2 sekuntia tallentaaksesi
valitsemasi PTY-koodin haluamaasi
esiasetusnumeroon.
2
Valitse yksi esiasetusnumeroihin
(1 – 6) tallennetuista PTY-koodeista.
Suosikkiohjelmasi PTY-haku alkaa viiden
sekunnin kuluttua.
Esim. Kun “ROCK M” on tallennettu
esiasetettuun numeronäppäimeen 2.
• Jos jokin asema lähettää samaa juuri
valitsemaasi PTY-koodiohjelmaa, kyseinen
asema viritetään oikealle taajuudelle.
• Jos mikään asema ei lähetä samaa juuri
valitsemaasi PTY-koodiohjelmaa, asema ei
vaihdu.
Huom!
Joillakin alueilla PTY-haku ei toimi kunnolla.
Näkyviin tulee PTY:n esiasetusnumero, ja
valittu koodinimi sekä “MEMORY” näkyvät
vuorotellen näytöstä.
5
Asetus on valmis.
Näin haetaan suosikkiohjelmatyyppi
1
Paina PTY (ohjelmatyyppi)
-näppäintä ja pidä sitä alhaalla yli 1
sekunnin ajan kuunnellessasi FMasemaa.
PTY
SUOMI
Viimeksi valittu PTY-koodi ja
esiasetusnumero ilmestyvät näyttöön.
12
Muita käytännöllisiä RDStoimintoja ja säätöjä
Aseman automaattinen valinta
numeronäppäimillä
Normaalisti numeronäppäintä painettaessa
esiasetettu asema viritetään oikealle taajuudelle.
Kun esiasetettu asema on kuitenkin RDS-asema,
tapahtuu jotain muuta. Jos esiasetetulta asemalta
tulevien signaalien voimakkuus ei ole riittävä
hyvälle kuuluvuudelle, tämä laite aloittaa samaa
ohjelmaa lähettävän aseman haun käyttämällä
AF-dataa (Ohjelman haku).
Page 43

Ohjelman haku aktivoidaan noudattamalla alla
olevia toimenpiteitä:
• Ohjelman haku kestää vähän aikaa.
• Ks. myös sivulta 19 näkyvää osaa
“Yleisasetusten muuttaminen (PSM)”.
1 Paina SEL-näppäintä (valinta) ja pidä sitä
alhaalla yli 2 sekunnin ajan niin, että näyttöön
ilmestyy yksi PSM-kohdista.
2 Valitse “P(ohjelma)-SEARCH” ¢- tai
4 -näppäimellä.
3 Valitse “ON” kiertämällä säätövalitsinta
myötäpäivään.
Ohjelman haku on nyt aktivoitu.
Kun haluat peruuttaa ohjelman haun, toista
sama toimintosarja ja valitse “OFF” vaiheessa 3
kiertämällä säätövalitsinta vastapäivään.
Näyttötilan vaihto FM-asemaa
kuunneltaessa
Voit vaihtaa alkunäytön joko aseman nimelle
(PS NAME) tai aseman taajuudelle (FREQ)
kunnellessasi FM RDS -asemaa.
• Ks. myös sivulta 19 näkyvää osaa
“Yleisasetusten muuttaminen (PSM)”.
1 Paina SEL-näppäintä (valinta) ja pidä sitä
alhaalla yli 2 sekunnin ajan niin, että näyttöön
ilmestyy yksi PSM-kohdista.
2 Valitse “TU DISP” (virittimen näyttö) ¢- tai
4 -näppäimellä.
3 Aseta haluamasi merkki (“PS NAME” tai
“FREQ”) kiertämällä säätövalitsinta.
TA:n äänenvoimakkuuden asetus
Voit esiasettaa äänenvoimakkuuden TA:n
vastaanottovalmiutta varten. Kun liikenneohjelma
otetaan vastaan, äänenvoimakkuus vaihtuu
automaattisesti esiasetetulle tasolle.
• Ks. myös sivulta 19 näkyvää osaa
“Yleisasetusten muuttaminen (PSM)”.
1 Paina SEL-näppäintä (valinta) ja pidä sitä
alhaalla yli 2 sekunnin ajan niin, että näyttöön
ilmestyy yksi PSM-kohdista.
2 Valitse “TA VOL” (äänenvoimakkuus) ¢-
tai 4 -näppäimellä.
3 Aseta haluamasi äänenvoimakkuus kiertämällä
säätövalitsinta.
Se voidaan säätää välille “VOL 00” – “VOL 50”.
Automaattinen kellon säätö
Kun tämä laite toimitetaan tehtaalta, sen sisään
rakennettu kello on asetettu säädettäväksi
automaattisesti uudelleen käyttämällä RDSsignaalin CT-dataa (kellonaika).
Jos et halua käyttää automaattista kellon säätöä,
noudata alta näkyviä toimenpiteitä.
• Ks. myös sivulta 19 näkyvää osaa
“Yleisasetusten muuttaminen (PSM)”.
1 Paina SEL-näppäintä (valinta) ja pidä sitä
alhaalla yli 2 sekunnin ajan niin, että näyttöön
ilmestyy yksi PSM-kohdista.
2 Valitse “A UT O ADJ”(säätö) ¢- tai 4
-näppäimellä.
3 Valitse “OFF” kiertämällä säätövalitsinta
vastapäivään.
Automaattinen kellon säätö on nyt peruttu.
Huom!
Painamalla DISP-näppäintä näyttö voidaan vaihtaa
myös FM RDS -asemaa kuunneltaessa.
Joka kerta kun näppäintä painetaan , näytön yläosaan
ilmestyvät seuraavat tiedot:
Aseman nimi
(PS NAME)
Aseman taajuus
(FREQ)
Ohjelmatyyppi
(PTY)
• Näyttö muuttuu sitten alkuperäiseksi muutaman
sekunnin kuluttua.
Kellon säätö aktivoidaan uudelleen toistamalla
sama toimintosarja ja valitsemalla “ON”
vaiheessa 3 kiertämällä säätövalitsinta
myötäpäivään.
Huom!
Ajan säätö kestää n. 2 minuuttia käyttämällä CTdataa. Joten asemaa ei saisi vaihtaa yli 2 minuuttiin
keskeytyksettä, muuten kellonaika ei säädy.
SUOMI
13
Page 44

CD-LEVYN KÄYTTÖ
ATT
/
/I
DISP
RDS
TP
PTY
7 8 9 10 11 12
SCM
MO
RND
SSM
RPT
CD
FM
AM
CD-levyn soittaminen
1
Avaa etulevy.
Pikavalintanäppäimen käyttöä koskeva
huomautus:
Kun CD-levy on jo latausaukossa, CD:n
painallus kytkee laitteen päälle ja aloittaa
toiston automaattisesti.
2
Aseta levy levyaukkoon.
Laitteen virta kytkeytyy,
CD-levy vetäytyy
sisään ja toisto alkaa
automaattisesti.
3
Sulje etulevy käsin.
CD IN -merkkivalo syttyy.
Soitettavan levyn
kokonaissoittoaika
Soitettavan levyn
kokonaiskappalenumero
Huom!
• Jos CD-levy asetetaan ylösalaisin, näyttöön ilmestyy
vuorotellen “PLEASE” ja “EJECT”.
Kun etulevy avataan painiketta 0 painamalla,
CD-levy työntyy automaattisesti pois.
• Kun CD-tekstiä toistetaan, levyn nimi ja esittäjä
ilmestyvät näyttöön. Sitten näyttöön tulevat tällä
hetkellä soiva kappale ja kulunut soittoaika. Ks.
myös osia “CD-tekstin toisto” (sivu 16) ja
“Vieritystilan valinta – SCROLL” (sivu 21).
Jos CD-teksti sisältää paljon tekstitietoja, osa
siitä ei mahdollisesti tule näyttöön.
Soiton lopettaminen ja CD:n vapautus
Paina 0.
CD:n soittaminen loppuu ja etulevy avautuu.
Sitten CD-levy työntyy automaattisesti ulos
latausaukosta. Jos vaihdat ohjelmalähteen FM:lle
tai AM:lle, CD:n soittaminen loppuu myös nyt
(työntämättä CD:tä ulos tällä kertaa).
Huom!
• Jos vapautettua levyä ei oteta pois n. 15 sekunnin
sisällä, levy palaa automaattisesti latausaukkoon,
joka suojaa sitä pölyltä. (Tällä kertaa CD ei ala
soida.)
• Voit vapauttaa CD:n, kun laitteessa ei ole virtaa.
SUOMI
14
Tämänhetkinen kappaleKulunut soittoaika
Page 45
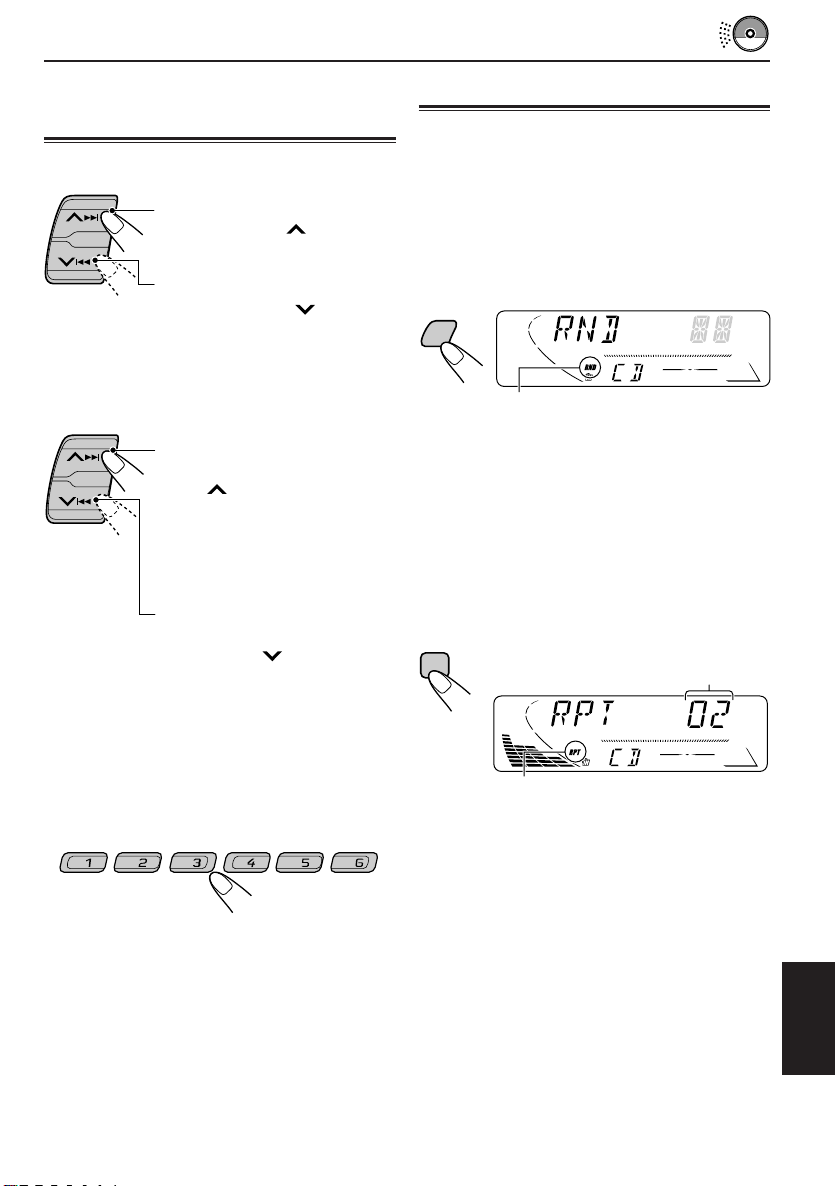
Kappaleen tai tietyn kohdan
haku CD-levyltä
Kappaleen kelaus eteen- tai taaksepäin
Kun haluat kelata kappaletta
eteenpäin, paina ¢ ja pidä
sitä alhaalla soittaessasi CDlevyä.
Kun haluat kelata kappaletta
taaksepäin, paina 4 ja
pidä sitä alhaalla soittaessasi
CD-levyä.
CD:n toistotilojen valinta
Kappaleiden toisto sattumanvaraisesti
(satunnaissoitto)
Voit soittaa kaikki CD-levyllä olevat kappaleet
umpimähkään.
Joka kerta kun painat MO RND (mono/
satunnaissoitto) soittaessasi CD-levyä, CD:n
satunnaissoittotila kytkeytyy vuorotellen päälle ja
pois päältä.
MO
RND
Seuraavaan tai edelliseen kappaleeseen
siirtyminen
Kun haluat siirtyä eteenpäin
seuraavan kappaleen alkuun,
paina ¢ nopeasti
soittaessasi CD-levyä. Joka
kerta kun painat näppäintä
peräkkäin, seuraavan kappaleen
alku haetaan ja toistetaan.
Kun haluat siirtyä taaksepäin
tämänhetkisen kappaleen
alkuun, paina 4 nopeasti
soittaessasi CD-levyä. Joka
kerta kun painat näppäintä
peräkkäin, edellisen kappaleen
alku haetaan ja toistetaan.
Näin siirryt suoraan tiettyyn kappaleeseen
7 8 9 10 11 12
Paina kappaleen numeroa vastaavaa
numeronäppäintä aloittaaksesi sen toiston.
• Kun haluat valita kappaleen numeron 1 – 6:
Paina nopeasti 1 (7) – 6 (12).
• Kun haluat valita kappaleen numeron 7 – 12:
Paina 1 (7) – 6 (12) ja pidä sitä alhaalla yli
sekunnin ajan.
RND-merkkivalo
Kun satunnaissoittotila on päällä, RNDmerkkivalo syttyy näyttöön ja umpimähkään
valittu kappale alkaa soida.
Kappaleiden toisto jatkuvasti (jatkuva
soitto)
Voit soittaa tämänhetkistä kappaletta jatkuvasti.
Joka kerta kun painat RPT (toisto) -näppäintä
soittaessasi CD-levyä, CD:n jatkuva soittotila
kytkeytyy vuorotellen päälle ja pois päältä.
RPT
RPT-merkkivalo
Kun jatkuva soittotila on päällä, RPT-merkkivalo
syttyy näyttöön.
Tällä hetkellä soitetun
kappaleen kappalenumero
SUOMI
15
Page 46

CD-tekstin toisto
/I
ATT
/
CD-levyn vapautuksen esto
CD-tekstiin on tallennettu joitakin levyä koskevia
tietoja (mm. levyn nimi, esittäjä ja kappaleen
nimi). Nämä levytiedot voidaan saada näyttöön.
Valitse tekstin näyttötila toistaessasi CDtekstiä.
DISP
Joka kerta kun näppäintä painetaan, näyttö
vaihtuu seuraavalla tavalla:
Levyn nimi / esittäjä
Kappaleen nimi
Tällä hetkellä soiva kappale
ja kulunut soittoaika
Huom!
• Näytöstä näkyy enintään 8 kirjainta kerrallaan, ja
näyttö vierii, jos kirjaimia on yli 8. Ks. myös sivulta
21 näkyvää osaa “Vieritystilan valinta – SCROLL”.
Joitakin kirjaimia tai merkkejä ei näytetä (ja ne
tyhjätään) näytöstä.
(Esim. “ABCå!d#” ] “ABCA D ”)
• Kun DISP-näppäintä painetaan tavallisen CDlevyn soiton aikana, levyn nimen/esittäjän ja
kappaleen nimen kohdalle ilmestyy “NO NAME”.
Voit estää CD-levyn vapautuksen ja lukita CD:n
latausaukkoon.
Paina -näppäintä ja pidä sitä
alhaalla 2 sekunnin ajan samalla, kun
painat CD-näppäintä.
CD
Näytössä vilkkuu “NO EJECT” n. 5 sekuntia ja
CD on lukittu eikä sitä voida vapauttaa.
Kun haluat perua vapautuksen eston ja avata
CD:n lukituksesta, paina -näppäintä
uudelleen yli 2 sekunnin ajan samalla, kun painat
CD-näppäintä.
Näytössä vilkkuu “EJECT OK” n. 5 sekunnin ajan
ja CD on avattu lukituksesta.
SUOMI
16
Page 47

Äänen säätö
Voit säätää ääniominaisuudet mieleisiksi.
1
Valitse kohta, jonka haluat säätää.
Joka kerta kun näppäintä
painetaan, säädettävät kohdat
vaihtuvat seuraavasti:
ÄÄNEN SÄÄDÖT
2
Säädä taso.
Suurennetaan tasoa.
Pienennetään tasoa.
BAS
(basso) (diskantti) (hälvytys)
VOL
(äänenvoimakkuus)
Merkki Toimenpide: Alue
BAS Säädä basso. –06 (min)
TRE Säädä diskantti. –06 (min)
FAD* Säädä etu- ja R06 (vain taka)
BAL Säädä vasemman
LOUD Korosta matalia ja
VOL Säädä 00 (min)
* Jos käytät kaksikaiuttimista järjestelmää, aseta
takakaiuttimen |
tasapaino. F06 (vain etu)
ja oikean
kaiuttimen
tasapaino.
korkeita taajuuksia,
jotta ääni kuuluu
tasapainoisena
pienelläkin
äänenvoimakkuudella.
äänenvoimakkuus. |
vaimentimen taso kohdalle “00”.
TRE
LOUD
(loudness)
FAD
BAL
(tasapaino)
|
+06 (maks)
|
+06 (maks)
L06 (vain vasen)
|
R06 (vain oikea)
LOUD ON
(kytketty)
|
LOUD OFF
(katkaistu)
50 (maks)
Tasauskuvio vaihtuu bassoa ja
diskanttia säädettäessä.
Huom!
Tavallisesti äänenvoimakkuus säädetään
säätövalitsimella. Joten sinun ei tarvitse valita
“VOL (äänenvoimakkuus)” säätääksesi
äänenvoimakkuuden tason.
Äänensäätömuistin käyttö
Kuhunkin soittolähteeseen sopiva esiasetettu
äänen säätö voidaan valita ja tallentaa.
(Huipputekninen SCM)
Äänitilojen valinta ja tallennus
Kun äänitila on valittu, se tallennetaan muistiin.
Se tulee esiin joka kerta, kun sama ohjelmalähde
valitaan ja se näkyy näytöstä.
Se tulee esiin joka kerta, kun sama ohjelmalähde
valitaan. Äänitila voidaan tallentaa seuraavia
ohjelmalähteitä varten — FM1, FM2, FM3, AM
sekä CD.
• Jos et halua tallentaa jokaisen soittolähteen
äänitilaa erikseen, vaan haluat käyttää samaa
äänitilaa kaikkiin ohjelmalähteisiin, katso sivulla
21 olevaa osaa “Huipputeknisen SCM:n
peruutus – SCM LINK”.
Valitse haluamasi äänitila.
SCM
“Linkki”
-merkkivalo
Joka kerta kun näppäintä painetaan, äänitila
vaihtuu seuraavasti:
BEAT
SOFT
POP SCM OFF
SUOMI
17
Page 48

• Jos näyttöön syttyy “Linkki”-merkkivalo (“SCM
LINK” asetettu kohdalle “LINK ON” — ks. sivua
21), valittu äänitila voidaan tallentaa muistiin
tällä hetkellä soivaa ohjelmalähdettä varten, ja
sen vaikutus pätee parhaillaan soivaan
ohjelmalähteeseen.
• Jos näyttöön EI syty “Linkki”-merkkivaloa
(“SCM LINK” asetettu kohdalle “LINK OFF”),
valitun äänitilan vaikutus pätee kaikkiin
ohjelmalähtisiin.
Merkki Kuuntelukohde: Esiasetetut arvot
BEAT Rock- tai +02 00 ON
disko-musiikki
SOFT Hiljainen +01 –03 OFF
tausta-musiikki
POP Kevyt musiikki +04 +01 OFF
SCM OFF (Alennettu ääni) 00 00 ON
BAS TRE LOUD
Äänitilojen esiin tuominen
Valitse ohjelmalähde, kun näytössä
palaa “Linkki”-merkkivalo.
CD
FM
AM
Omien äänisäätöjen tallennus
Voit asettaa äänensäätötilat (BEAT, SOFT, POP)
haluamiksesi ja tallentaa omat säätösi muistiin.
• Seuraavien vaiheiden suorituksessa on
aikaraja. Jos asetus perutaan, ennen kuin olet
saanut sen valmiiksi, aloita uudelleen vaiheesta 1.
1
Hae esiin äänitila, jonka haluat
säätää.
• Katso tarkemmat tiedot vasemmasta
sarakkeesta.
SCM
2
Valitse “BAS ” (basso), “TRE”
(diskantti) tai “LOUD” (loudness).
3
Säädä basson tai diskantin taso tai
kytke loudness-toiminto ON/OFF.
• Katso yksityiskohdat sivulta 17.
“Linkki”-merkkivalo alkaa vilkkua ja muistiin
tallennettu äänitila valittua ohjelmalähdettä varten
tulee esiin.
Näkyviin ilmestyy valitun
äänitilan tasauskuvio.
LOUD (loudness –
Huom!
• Voit säätää esiasetetun äänensäätötilan
haluamaksesi ja tallentaa sen muistiin.
Jos haluat säätää ja tallentaa alkuperäisen
äänensäätötilan, oikealla olevassa sarakkeessa osaa
“Omien äänisäätöjen tallennus”.
• Jos haluat säätää basson ja diskantin
SUOMI
vahvistustasoa tai kytkeä loudness-toiminnon
väliaikaisesti päälle/pois päältä, katso sivua 17.
(Kyseiset säädöt peruutetaan, jos jokin toinen
ohjelmalähde valitaan.)
kuuluvuus) -merkkivalo
18
Äänitilan
merkkivalo
4
Säädä muut toiminnot toistamalla
vaiheet 2 ja 3.
5
Paina SCM-näppäintä ja pidä sitä
alhaalla, kunnes valitsemasi äänitila
vilkkuu näytössä.
Valittua äänensäätötilaa varten tehty säätö
tallennetaan muistiin.
SCM
6
Tallenna muut äänitilat toistamalla
sama toimintosarja.
Tehdasasetusten uudelleenasetus
Toista sama toimintosarja ja määrää uudelleen
vasemmalla olevasta sarakkeesta näkyvässä
taulukossa olevat esiasetetut arvot.
Page 49
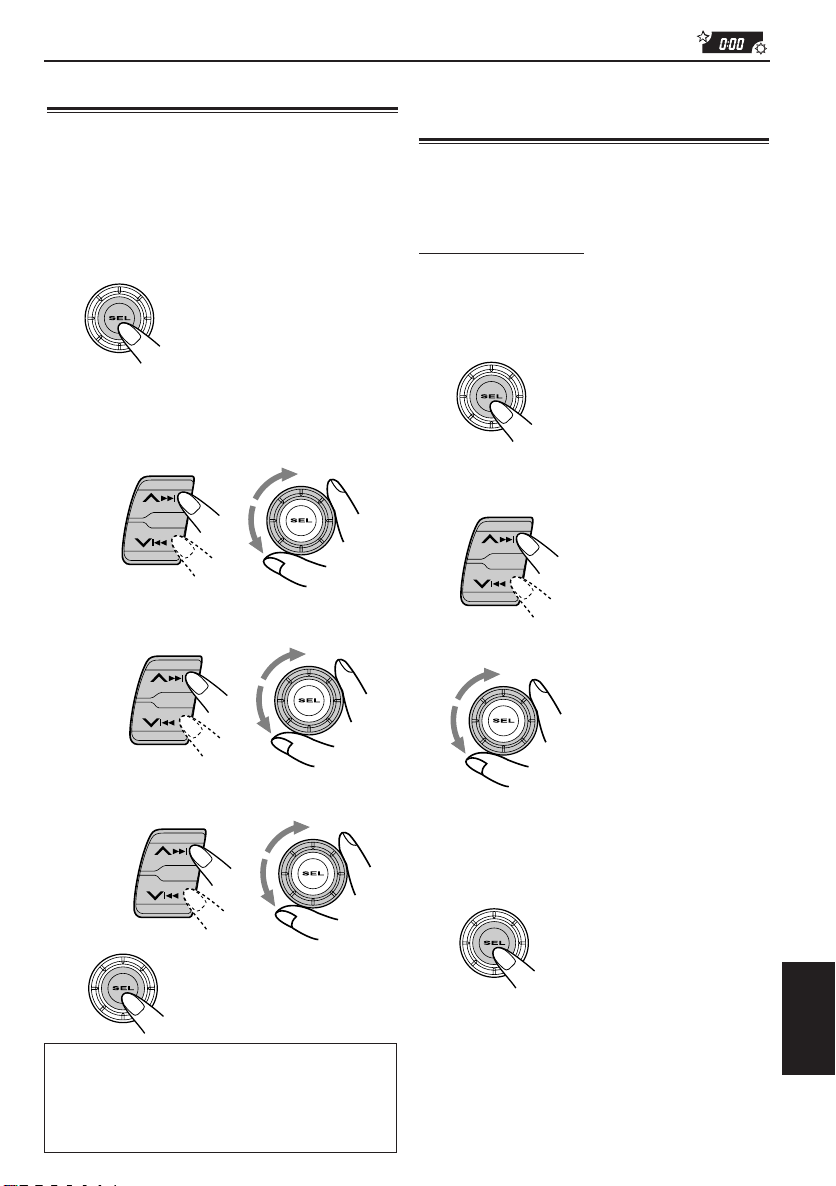
MUUT PÄÄTOIMINNOT
Kellon asetus
Voit asettaa kellojärjestelmän joko 24- tai 12tuntiseksi.
1
Paina SEL (valinta) -näppäintä ja pidä
sitä alhaalla yli 2 sekunnin ajan niin,
että näyttöön ilmestyy yksi PSMkohdista. (Ks. sivua 20.)
2
Tuntilukeman asetus.
1 Valitse “CLOCK H”, ellei sitä näy
näytöstä.
2 Säädä tuntilukema.
1
3
Minuuttilukeman asetus.
1 Valitse “CLOCK M”.
2 Säädä minuuttilukema.
1
2
2
Yleisasetusten muuttaminen
(PSM)
Voit muuttaa seuraavalla sivulla lueteltuja kohtia
käyttämällä PSM-säädintä (haluttu asetustila).
Perustoimenpiteet
1
Paina SEL (valinta) -näppäintä ja pidä
sitä alhaalla yli 2 sekunnin ajan niin,
että näyttöön ilmestyy yksi PSMkohdista. (Ks. sivua 20.)
2
Valitse PSM-kohta, jonka haluat
säätää. (Ks. sivua 20.)
3
Säädä yllä valittu PSM-asetus.
4
Kellojärjestelmän asetus.
1 Valitse “24H/12H”.
2 Valitse “24H” tai “12H”.
1
5
Asetus on valmis.
Jos haluat tarkistaa tämänhetkisen
kellonajan laitteen ollessa poissa päältä,
paina DISP (näyttö) -näppäin.
Virta kytkeytyy päälle ja kellonaika näkyy 5
sekunnin ajan. Sitten virta kytkeytyy pois päältä.
2
4
Säädä tarvittaessa muut PSMtoiminnot toistamalla vaiheet 2 ja 3.
5
Asetus on valmis.
SUOMI
19
Page 50

Haluttu asetustila (PSM) osiot
1
Pidä sitä
alhaalla.
CLOCK H Tuntilukeman säätö
CLOCK M
SCM LINK Äänensäätömuistin
24H/12H 24/12 tunnin
AUTO ADJ Automaattinen kellon
CLOCK Kellon näyttö
TU DISP Virittimen näyttötila
PTY STBY PTY-v almius
PTY SRCH PTY-haku
TA VOL Liikennetiedotuksen
P-SEARCH Ohjelman haku
LEVEL Tasonäytön
TEL Autopyuhelimen
2
Valitse.
Minuuttilukeman säätö
linkitys
aikanäyttö
säätö
äänenvoimakkuus
vaimennus
3
Säädä.
Vastapäivään
Taakse
Taakse
LINK OFF
12H
(12 tunnin näyttö)
OFF
OFF
FREQ
(taajuus)
29 ohjelmatyyppiä
(Ks. sivua 11.)
VOL 00 – VOL 50
(äänenvoimakkuus)
AUDIO 1
MUTING 1
Myötäpäivään
Eteen
Eteen
LINK ON
24H
(24 tunnin näyttö)
ON
ON
PS NAME
(ohjelmapalvelun nimi)
ONOFF OFF
AUDIO 2
OFF
MUTING 2
OFF
Tehtaalla
tehty säätö
0:00
LINK ON
24H
ON
ON
PS NAME
NEWS
(Ks. sivua
11.)
VOL 20
AUDIO 2 21
OFF
Ks.
sivua
19
18, 21
19
13
21
13
10
11
13
13
21
SCROLL Nimen näyttö
• Päätä asetus painamalla SEL (valinta) -näppäintä.
SUOMI
20
ONCE
OFF
AUTO
ONCE
21
Page 51

Huipputeknisen SCM:n peruutus
– SCM LINK
Huipputekninen SCM (Sound Control Memory —
äänensäätömuisti) voidaan peruuttaa ja äänitilat
sekä soittolähteet irrottaa linkityksestä.
Kun laite toimitetaan tehtaalta, muistiin voidaan
tallentaa eri äänitila kutakin ohjelmalähdettä
varten. Näin äänitilat voidaan vaihtaa helposti
ohjelmalähteitä vaihtamalla.
• LINK ON: Huipputekninen SCM
(eri äänitilat eri ohjelmalähteille).
• LINK OFF: Tavanomainen SCM (yksi äänitila
kaikille ohjelmalähteille).
Kellon näytön valinta – CLOCK
Kello voidaan asettaa niin, että se näkyy näytön,
kun laitteeseen kytketään virta. Kun laite
toimitetaan tehtaalta, kello on asetettu näkymään
näytöstä.
• ON: Kellon näyttö on kytketty
päälle.
• OFF: Kellon näyttö on kytketty pois
päältä. Kun valittuna on “OFF”,
tulee näkyviin tämänhetkisen
ohjelmalähteen nimi tai aseman
taajuuskaista kellon näytön
asemesta.
Muiden tietojen tarkistus soiton aikana
Paina DISP(näyttö) -näppäintä. Joka kerta kun
näppäintä painetaan, muut tiedot (joko kello tai
ohjelmalähteen nimi) näkyvät hetken näytön
alaosasta.
Puhelinvaimennuksen valinta – TEL
Tätä tilaa käytetään, kun autopuhelinjärjestelmä
on liitetty. Käytetystä puhelinjärjestelmästä
riippuen voit valita joko “MUTING 1” tai
“MUTING 2” eli sen, joka vaimentaa äänet tästä
laitteesta. Kun laite toimitetaan tehtaalta, tämä
tila on passivoitu.
• MUTING 1: Valitse tämä, jos kyseinen asetus
voi vaimentaa äänet.
• MUTING 2: Valitse tämä, jos kyseinen asetus
voi vaimentaa äänet.
• OFF: Peruu puhelimen vaimennuksen.
Vieritystilan valinta – SCROLL
Voit valita vieritystilan nimen näyttöä ja levytietoja
varten, jos kirjaimia on enemmän kuin 8. Kun
laite toimitetaan tehtaalta, vieritystila on asetettu
kohdalle “ONCE”.
• ONCE: Vierittää vain kerran.
• AUTO: Toistaa vierityksen (5-sekunnin
tauot välissä).
• OFF: Peruu vierityksen.
Huom!
Vaikka vieritystila onkin asetettu kohdalle “OFF”,
voit siitä huolimatta vierittää näyttöä painamalla
DISP-näppäintä yli 1 sekunnin ajan.
Tasomittarin valinta – LEVEL
Voit valita näyttötason haluamaksesi. Kun laite
toimitetaan tehtaalta, valittuna on “AUDIO 2”.
• AUDIO 1:
• AUDIO 2:
• OFF:
Näytössä äänenvoimakkuuden
tason osoitin ja tasauskuvion
osoitin.
Vuorottelee “AUDIO 1”-asetuksen
ja valaistusnäytön välillä.
Poistaa äänenvoimakkuuden tason
osoittimen ja tasauskuvion
osoittimen.
SUOMI
21
Page 52

Etulevyn irrotus
Voit irrottaa etulevyn, kun lähdet autosta.
Kun irrotat tai kiinnität etulevyä, varo
vahingoittamasta etulevyn takana ja levyn
pitimessä olevia liittimiä.
Näin irrotat etulevyn
Katkaise virta laitteesta ennen etulevyn irrotusta.
1
Avaa etulevyn lukitus.
2
Nosta ja vedä etulevy laitteesta.
3
Pane irrotettu etulevy mukana
tulevaan koteloon.
Näin kiinnität etulevyn
1
Pane etulevyn oikea puoli levyn
pitimessä olevaan uraan.
2
Paina etulevyn vasenta puolta
kiinnittääksesi levyn pitimeen.
Liitinten puhdistusta koskeva huomautus:
Jos irrotat etulevyn usein, liittimet kuluvat.
Tämän minimoimiseksi pyyhi liittimet silloin tällöin
alkoholiin kostutetulla puuvillatukolla tai -rievulla
ja varo vahingoittamasta liittimiä.
SUOMI
22
Liittimet
Page 53

VIANETSINTÄ
Vialta näyttävä seikka ei ole aina vakava. Tarkista seuraavat kohdat, ennen kuin soitat
huoltokeskukseen.
Vian merkit
• CD-levyä ei voi soittaa.
• CD-levyn ääni keskeytyy
joskus.
• Ääni keskeytyy joskus.
• Kaiuttimista ei kuulu ääntä.
• SSM (Strong-station Sequential
Memory — vahvan aseman
peräkkäismuisti) automaattinen
esiasetus ei toimi.
• Staattista kohinaa radiota
kuunneltaessa.
• Näyttöön ilmestyy “NO DISC”.
Syyt
CD-levy on pantu sisään
ylösalaisin.
Ajat kuoppaisilla teillä.
CD-levy on naarmuuntunut.
Liitännät on tehty väärin.
Liitännät on tehty väärin.
Äänenvoimakkuuden taso on
asetettu pienimmälle.
Liitännät on tehty väärin.
Signaalit ovat liian heikkoja.
Antennia ei ole kytketty lujasti.
CD-levyä ei ole pantu sisään.
Korjaukset
Pane CD-levy sisään kunnolla.
Lopeta CD-levyjen soittaminen
ajaessasi kuoppaisilla teillä.
Vaihda CD-levy.
Tarkista johdot ja liitännät.
Tarkista johdot ja liitännät.
Säädä se optimitasolle.
Tarkista johdot ja liitännät.
Tallenna asemat käsin.
Kytke antenni lujasti.
Pane CD-levy sisään oikein
päin.
• CD-levyä ei voi vapauttaa.
• CD-levyä ei voi soittaa eikä
vapauttaa.
• Tämä laite ei toimi lainkaan.
CD on lukittu.
CD-soitin voi toimia väärin.
Sisäänrakennettu mikro voi
toimia väärin kohinan yms.
takia.
Avaa CD lukituksesta (ks. sivua
16).
Pidä sekä CD- että SEL
näppäin alaspainettuna useiden
sekuntien ajan.
(Näyttöön ilmestyy vuorotellen
“PLEASE” ja “EJECT”.) Kun
etulevy avataan painamalla
painiketa 0, varo, että CD-levy
ei pääse putoamaan
poistyöntyessään.
Paina sekä SEL-että
-nappia yhtä aikaa ja pidä ne
alaspainettuina usean sekunnin
ajan nollataksesi laitteen.
(Muistiin tallennetut kellonajan
asetukset ja esiasetetut asemat
pyyhitään pois.) (Ks. sivua 2.)
SUOMI
23
Page 54
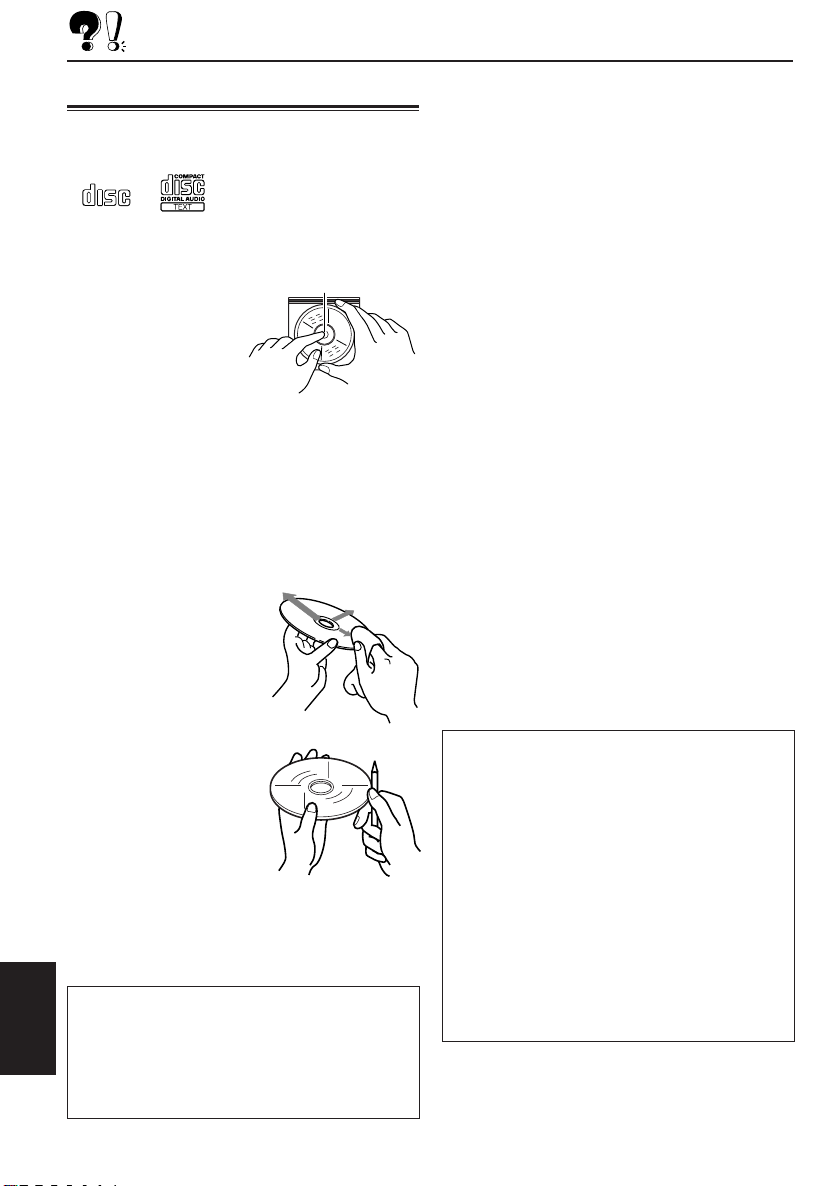
HUOLTO
CD-levyjen käsittely
Tämä laite on suunniteltu toistamaan vain CDlevyjä, joissa on alta näkyvät merkit.
COMPACT
DIGITAL AUDIO
• Muita levyjä ei voida soittaa.
Näin käsittelet CDlevyjä
Kun otat CD-levyn ulos
sen kotelosta, paina
kotelon keskipidikettä ja
nosta CD ulos pitäen
sen reunoista kiinni.
• Pitele CD-levyä aina reunoista. Sen
äänityspintaan ei saa koskea.
Kun panet CD-levyn takaisin koteloon, pane se
varovasti keskipidikkeeseen (tekstipuoli ylöspäin).
• CD-levyt on säilytettävä niiden omissa
koteloissaan käytön jälkeen.
Näin pidät CD-levyt
puhtaina
Likainen CD ei ehkä soi
kunnolla. Jos CD likaantuu,
pyyhi se pehmeällä rievulla
keskustasta reunoihin päin
suorassa linjassa.
Keskipidike
Kosteuden tiivistyminen
Kosteus voi tiivistyä CD-soittimen sisällä olevaan
linssiin seuraavissa tapauksissa:
• Auton lämmittimen käynnistyksen jälkeen.
• Jos auton sisäilma muuttuu hyvin kosteaksi.
Mikäli näin tapahtuu, CD-soittimessa voi esiintyä
toimintahäiriö. Vapauta tässä tapauksessa CDlevy ja jätä laitteeseen virta päälle muutamaksi
tunniksi, kunnes kosteus haihtuu.
Soitettaessa CD-R-levyä (äänitettävä)
Tällä vastaanottimella voidaan soittaa
alkuperäisiä CD-R-levyjä.
• Lue CD-RD-levyjen ohjeet tai varoitukset
huolellisesti ennen niiden soittamista.
• Tällä vastaanottimella ei voi soittaa joitakin CDtallentimilla äänitettyjä CD-R-levyjä niiden
levyominaisuuksien takia sekä seuraavista
syistä:
– Levyt ovat likaisia tai naarmuisia.
– Kosteus tiivistyy laitteen sisällä olevaan
linssiin.
– CD-soittimen sisällä oleva lukulinssi on
likainen.
• Käytä vain “viimeisteltyjä” CD-R-levyjä.
• Tällä vastaanottimella ei voi soittaa CD-RWlevyjä (kirjoitettava).
• CD-R-levyjen pintaan ei saa käyttää tarroja tai
liimaetikettejä. Ne voivat aiheuttaa
käyttöhäiriöitä.
Uuden CD-levyn
soittaminen
Uusien CD-levyjen sisä- ja
ulkoreunoissa voi olla
joitakin epätasaisia
kohtia. Jos tällaista CDlevyä käytetään, tämä laite
saattaa estää sen soittamisen.
Nämä epätasaiset kohdat poistetaan
hankaamalla reunoja lyijy- tai
kuulakärkikynällä tms.
Tracking-häiriö:
Erittäin kuoppaisilla teillä ajamisesta voi olla
seurauksena tracking-häiriö. Tämä ei vahingoita
SUOMI
laitetta eikä CD-levyä, vaikkakin se on kiusallista.
Suosittelemme, ettet soita CD-levyjä ajaessasi
kuoppaisilla teillä.
24
VAROITUS!
• 8 cm:n CD-levyjä (sinkkuja) ei saa panna
latausaukkoon. (Sellaisia CD-levyjä ei voida
vapauttaa.)
• Epätavallisen muotoisia CD-levyjä — kuten
sydän tai kukka tms.— ei saa panna sisään,
muuten seurauksena on ongelmia.
• CD-levyjä ei saa jättää suoraan auringonvaloon
tai minkään lämmönlähteen lähelle eikä niitä
saa panna paikkaan, jossa ne ovat alttiina
korkealle lämpötilalle ja kosteudelle. Niitä ei saa
jättää autoon.
• Mitään liuotteita (esim. tavallista äänilevyjen
puhdistusainetta, suihketta, tinneriä, bensiiniä
yms.) ei saa käyttää CD-levyjen puhdistukseen.
Page 55

TEKNISET TIEDOT
ÄÄNEN VAHVISTINOSA
Suurin lähtöteho:
Etu: 45 W/kanava
T aka: 45 W/kanava
Jatkuva lähtöteho (RMS):
Etu: 17 W/kanava 4 Ω:iin,
40 Hz – 20 000 Hz harmonisen
kokonaissärön ollessa alle 0,8 %.
T aka: 17 W/kanava 4 Ω:iin,
40 Hz – 20 000 Hz harmonisen
kokonaissärön ollessa alle 0,8 %.
Kuorman impedanssi: 4 Ω (4 Ω – 8 Ω poikkeama)
Äänensävyn säätöalue:
Basso: ±10 dB 100 Hz:ssä
Diskantti:±10 dB 10 kHz:ssä
Taajuustoisto: 40 Hz – 20 000 Hz
Signaalikohinasuhde: 70 dB
Linjalähtötaso/impedanssi:
2,0 V/20 kΩ kuorma (täysimittainen)
Antoimpedanssi: 1 kΩ
VIRITINOSA
Taajuusalue:
FM: 87,5 MHz – 108,0 MHz
AM: (MW) 522 kHz – 1 620 kHz
(LW) 144 kHz – 279 kHz
CD-SOITINOSA
Tyyppi: CD-soitin
Signaalinilmaisujärjestelmä: kosketukseton
optinen äänirasia (puolijohdelaser)
Kanavien lukumäärä: 2 kanavaa (stereo)
Taajuustoisto: 5 Hz – 20 000 Hz
Dynamiikka-alue: 96 dB
Signaalikohinasuhde: 98 dB
Huojunta ja värinä: alle mitattavan rajan
YLEISTÄ
Tehovaatimukset:
Käyttöjännite: tasavirta 14,4 V
(11 V – 16 V vara)
Maattojärjestelmä: negatiivinen maatto
Sallittu käyttölämpötila: 0°C – +40°C
Mitat (L × K × S):
Asennuskoko: 182 mm × 52 mm × 160 mm
Etulevyn koko: 188 mm × 58 mm × 8 mm
Paino: 1,7 kg (lisävarusteita ukuunottamatta)
Mallia ja teknisiä tietoja voidaan muuttaa
ilmoittamatta siitä etukäteen.
[FM-viritin]
Käyttöherkkyys: 11,3 dBf (1,0 µV/75 Ω)
50 dB Mykistysherkkyys:
16,3 dBf (1,8 µV/75 Ω)
Vuorottainen kanavan selektiivisyys (400 kHz):
65 dB
Taajuustoisto: 40 Hz – 15 000 Hz
Stereon erotus: 30 dB
Sieppaussuhde: 1,5 dB
[MW-viritin]
Herkkyys: 20 µV
Selektiivisyys: 35 dB
[LW-viritin]
Herkkyys: 50 µV
SUOMI
25
Page 56

¿Tiene PROBLEMAS con la operación?
Por favor reinicialice su unidad
Consulte la páfina de Cómo reposicionar su unidad
PROBLEMI di funzionamento?
Inizializzare l'apparecchio
Fare riferimento alla pagina di Come inizialiazzare l'apparecchio
Har DRIFTPROBLEM uppstått?
Nollställ i så fall apparaten
Vi hänvisar till sidan med rubriken Hur apparaten nollställs
Onko Käytössä ONGELMIA?
Säädä laite alkutilaan
Katso kohtaa Laitteen Säätö alkutilaan
SP, IT, SW, FI
VICTOR COMPANY OF JAPAN, LIMITED
0900MNMMDWJES
JVC
Page 57
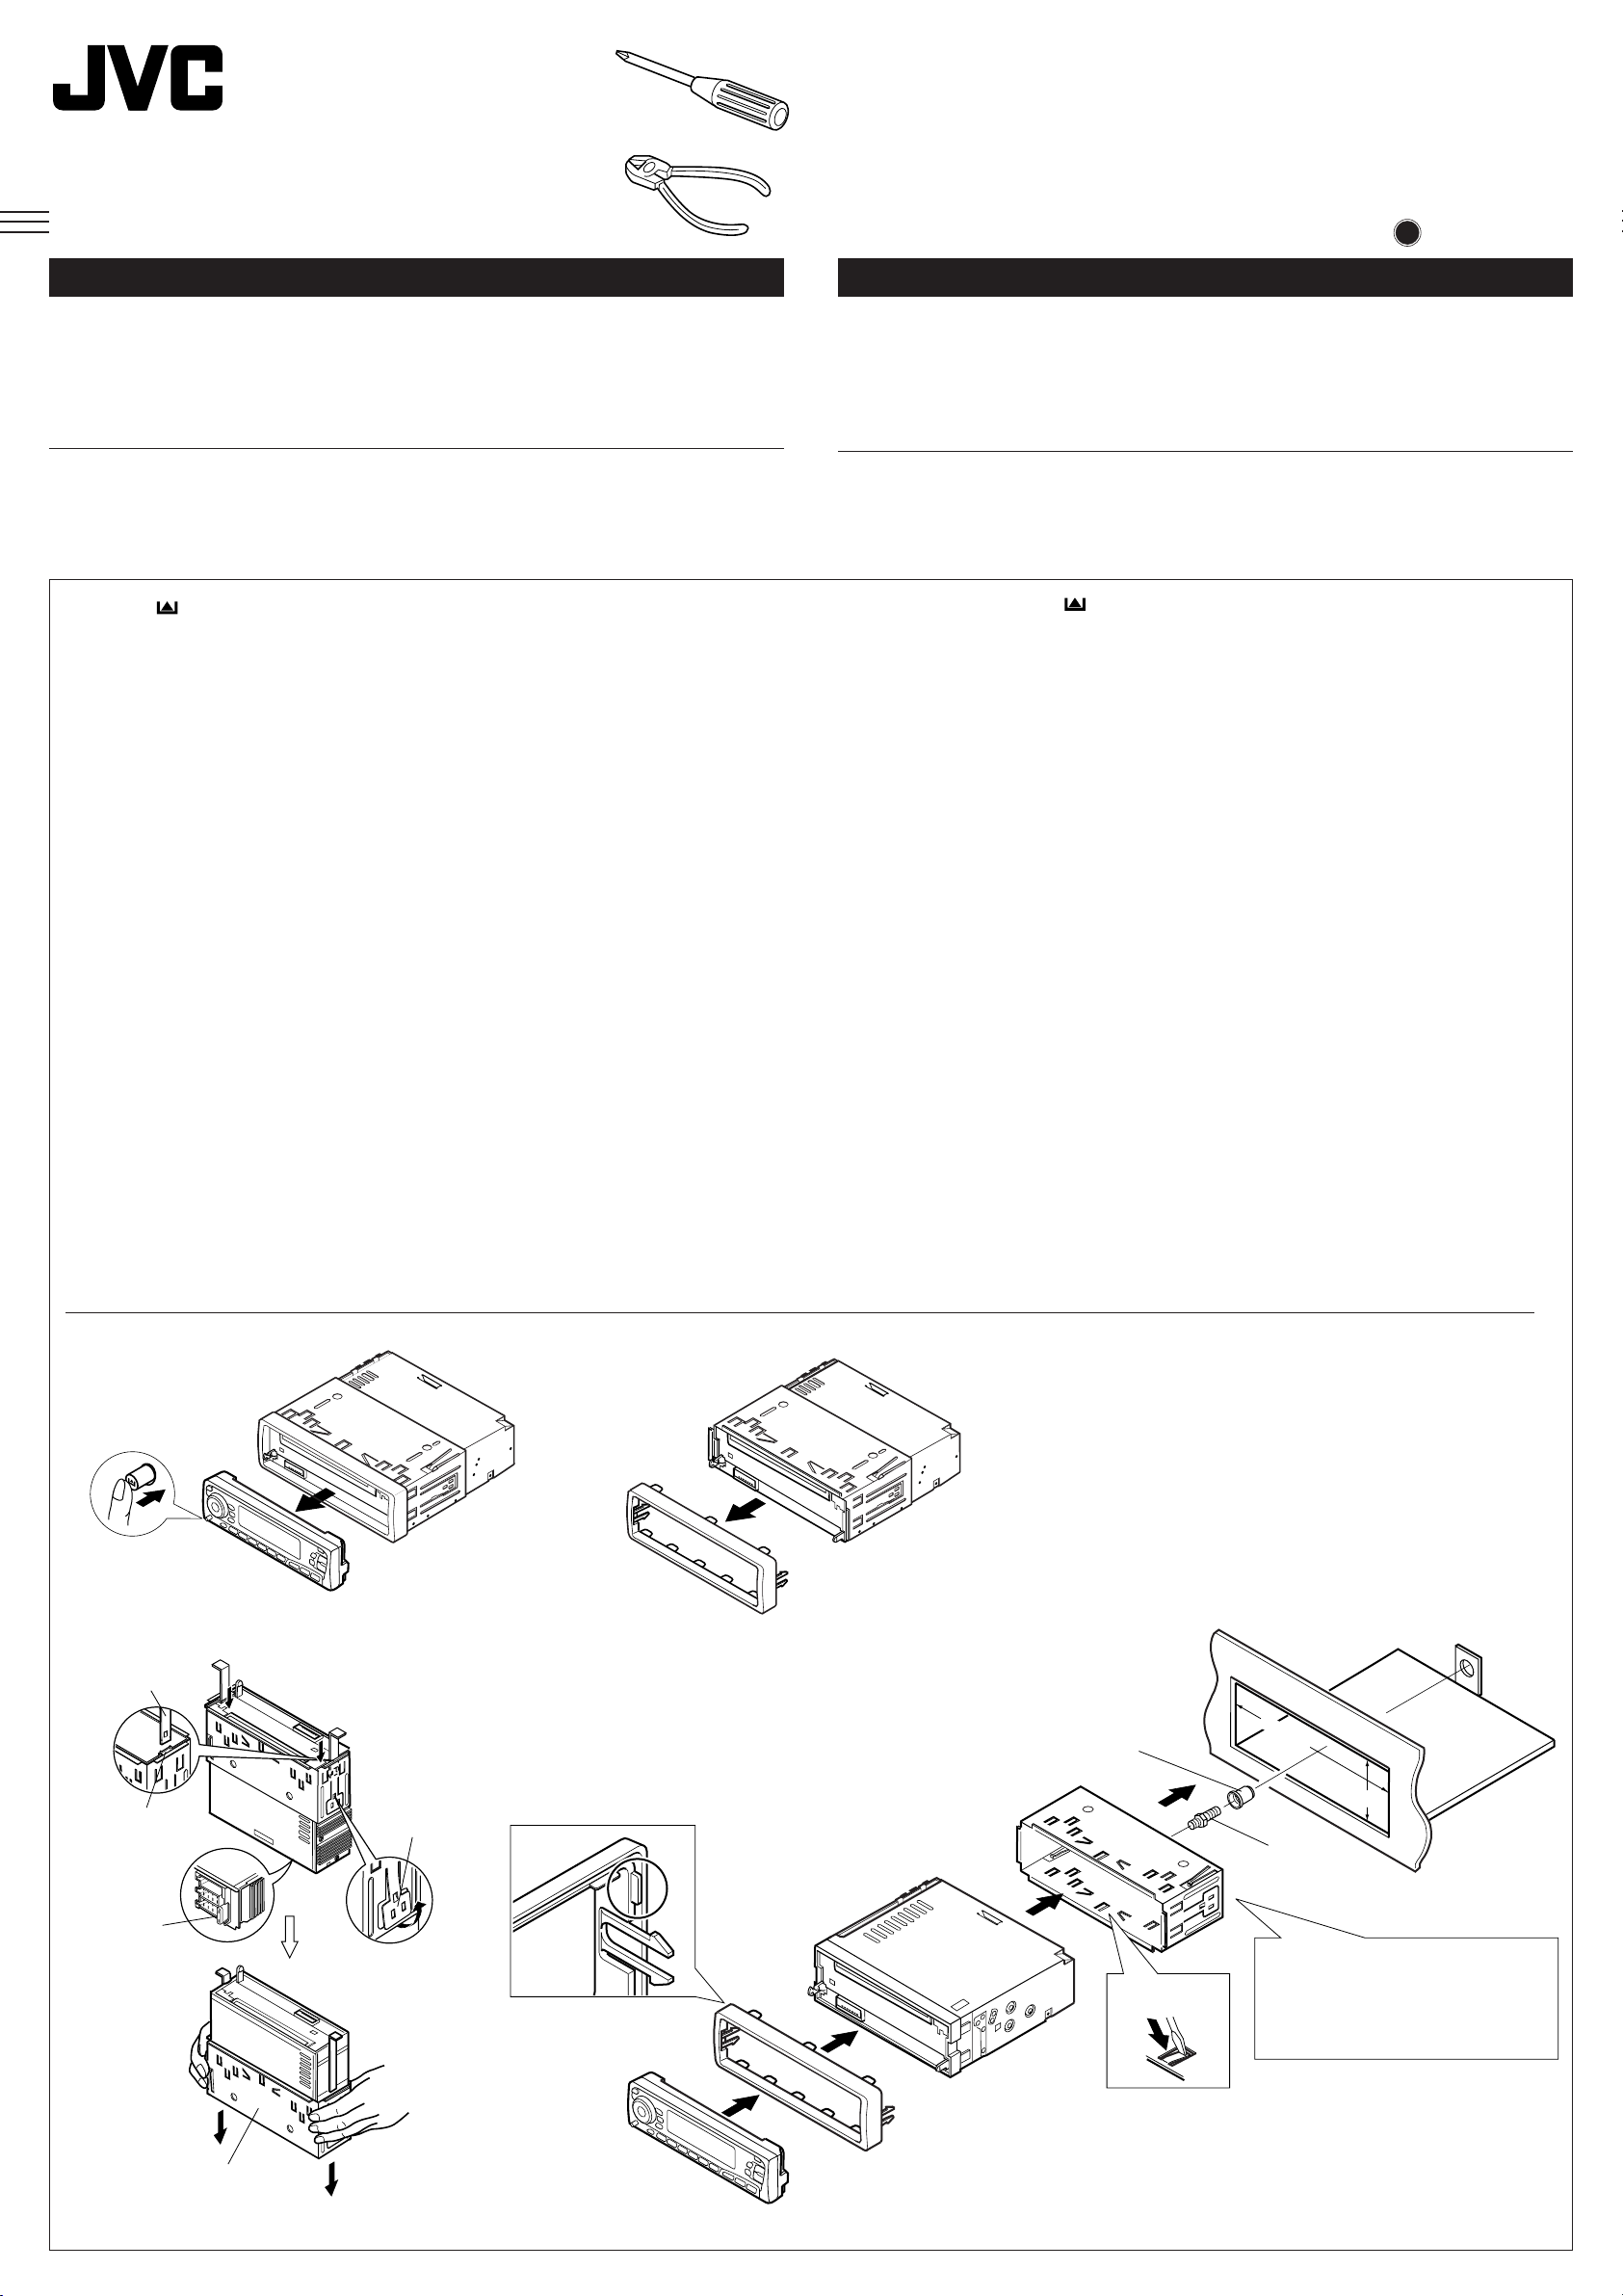
KD-S9R
Installations/anslutningshandbok
Asennus/liitäntäohjekirja
GET0007-005A
[E]
SVENSKA
• Enheten får drivas av 12 V likströmsystem med NEGATIV jordning.
INSTALLATION
(MONTERING I INSTRUMENTBRÄDA)
• Illustrationen nedan visar en normal installation. Du ska emellertid göra de anpassningar som är
lämpliga för just din bil. Har du frågor, eller behöver information om installationssatser, ska du
kontakta återförsäljaren för JVC BILRADIO/CD-SPELARE eller ett företag som säljer satser.
1
T ryck på (knappen för kontrollpanelfrigöring) för att lossa kontrollpanelen före montering.
2
Ta bort kantplåten.
3
Lossa på hylsspärrarna och ta bort hylsan.
1 Ställ enheten på högkant.
OBS: Var försiktig så att du inte skadar säkringen på baksidan när du ställer enheten på
högkant.
2 För in de två handtagen mellan enheten och hylsan, som på bilden, för att lossa
hylsspärrarna.
3 Ta bort hylsan.
OBS: Tänk på att spara handtagen när du har installerat enheten, för framtida bruk.
4
Installera hylsan i instrumentbrädan.
* När hylsan sitter på plats ordentligt i instrumentbrädan böjer du ut tillämpliga flikar för att
hålla hylsan på plats ordentligt. Se illustrationen.
5
Skruva i monteringsbulten på baksidan av enhetens kåpa och placera gummibufferten över
bulthuvudet.
6
Utför de elektriska anslutningarna.
7
För in enheten i hylsan tills den låser fast på plats .
8
Fäst kantplåten så att utbuktningen på plåten sitter t.v. om enheten.
9
Sätt tillbaka kontrollpanelen.
0900MNMMDWJES
JVC
SW, FI
SUOMI
• Tämä laite on suunniteltu käytettäväksi 12 V tasavirran NEGATIIVISISSA
maattosähköjärjestelmissä.
ASENNUS
(KOJELAUTAAN KIINNITYS)
• Alla olevista kuvista näkyy tyypillinen asennus. Sinun tulisi kuitenkin tehdä omaan autoosi sopivia
säätöjä. Jos sinulla on kysyttävää tai haluat asennussarjoja koskevia tietoja, ota yhteys JVCautohifilaitteiston jälleenmyyjään tai sarjoja toimittavaan yhtiöön.
1
Ennen asennusta: paina (etulevyn vapautusnappi) irrottaaksesi etulevyn.
2
Irrota peitelevy.
3
Irrota vaippa avattuasi ensin vaipan lukot.
1 Pane laite pystyyn.
Huom! un panet laitteen seisomaan, varo vahingoittamasta takana olevaa varoketta.
2 Aseta molemmat kahvat laitteen ja vaipan väliin kuvasta näkyvällä tavalla avataksesi
vaipan lukot.
3 Irrota vaippa.
Huom! Pidä kahvat tallessa laitteen asennuksen jälkeen tulevan käytön varalta.
4
Asenna vaippa kojelautaan.
* Kun vaippa on asennettu oikein kojelautaan, taivuta asianmukaiset salvat, jotka pitävät
vaipan tukevasti paikoillaan, kuvasta näkyvällä tavalla.
5
Kiinnitä kiinnityspultti laitteen rungon takaosaan ja pane kumityyny pultin päähän.
6
Tee tarpeelliset sähköliitännät.
7
Työnnä laite vaippaan, kunnes se lukkiutuu.
8
Kiinnitä peitelevy siten, että peitelevyssä oleva ulkonema kiinnittyy laitteen vasemmalle
puolelle.
9
Kiinnitä etulevy.
1
3
Handtag
Kahvat
Skåra
Aukko
Säkring
Varoke
Kontrollpanelen
Etulevyn
Låsplatta
Lukkolevy
2
8
Kantplåt
Peitelevy
Hylsa
Vaippa
7
Gummibuffert
Kumityyny
4
4
Instrumentbräda
Kojelauta
184 mm
53 mm
5
Monteringsbult
Kiinnityspultti
6
*
Se “ELANSLUTNINGAR”.
Ks. “SÄHKÖLIITÄNNÄT”.
Hylsa
Vaippa
9
Kontrollpanelen
Etulevyn
Kantplåt
Peitelevy
Page 58

•Vid användning av det valfria stödet
•Käytettäessä lisätukea
Bricka
Aluslevy
• Vid installation av enheten utan att använda hylsan
• Asennettaessa laitetta ilman vaippaa
I en Toyota ska man ex empelvis först ta bort bilradion, och sedan installera enheten på dess plats.
Esim. Toyotassa: irrota ensin autoradio ja asenna laite sitten sen paikalle.
Brandvägg
Paloseinä
* Levereras inte med enheten.
* Ei tule tämän laitteen mukana.
Skruvar med platt huvud (M5 x 6 mm)*
Litteätyyppiset ruuvit (M5 x 6 mm)
Stöd (tillägg)
Tuki (lisävaruste)
Låsmutter
Instrumentbräda
Kojelauta
Hylsa
Vaippa
Monteringsbult
Kiinnityspultti
Lukkomutteri
Skruv (tillägg)
Ruuvi (lisävaruste)
Ta bort enheten
• Lossa den bakre delen innan enheten tas bort.
1
Ta bort kontrollpanelen.
2
Ta bort kantplåten.
3
Sätt in de två handtagen i skårorna, som i illustrationen. Dra försiktigt isär handtagen och skjut
ut enheten. (Tänk på att spara handtagen när installationen är klar.)
Fäste*
Teline*
Fick
Tasku
Fäste*
Teline*
Skruvar med platt huvud
(M5 x 6 mm)*
Litteätyyppiset ruuvit (M5 x 6 mm)*
OBS: De 6 millimeter långa skruv arna måste användas när enheten installeras på monteringsfästet.
Om längre skruvar används kan enheten skadas.
Huom! Kun laitetta asennetaan kiinnitystelineeseen, on varmistettava, että käytössä olevat ruuvit
ovat 6 mm pitkiä. Jos käytetään pitempiä ruuveja, ne voivat vahingoittaa laitetta.
Laitteen irrotus
• Vapauta takaosa ennen laitteen irrotusta.
1
Irrota etulevy.
2
Irrota peitelevy.
3
Aseta molemmat kahvat aukkoihin kuvasta näkyvällä tavalla. Vedä laite sitten ulos samalla,
kun työnnät kahvoja toisistaan pois päin. (Pidä kahvat tallessa laitteen asennuksen
jälkeen.)
Kontrollpanelen
Etulevyn
Detaljlistor för installation och anslutning
Följande delar levereras med enheten.
Placera dem på rätt sätt, efter att ha kontrollerat att alla finns med.
Hård kåpa
Kova kotelo
Hylsa
Vaippa
321
Handtag
Kahvat
Kantplåt
Peitelevy
Osaluettelo asennusta ja liitäntää varten
Alla olevat osat toimitetaan tämän laitteen mukana.
Kun olet tarkistanut ne, aseta ne oikein.
Kantplåt
Peitelevy
Nätsladd
Verkkojohto
Handtag
Kahvat
Bricka (ø5)
Aluslevy (ø5)
Monteringsbult (M5 x 20 mm)
Kiinnityspultti (M5 x 20 mm)
Låsmutter (M5)
Lukkomutteri (M5)
Gummibuffert
Kumityyny
Page 59

SVENSKA
SUOMI
ELANSLUTNINGAR
För att eliminera risken för kortslutningar rekommenderar vi dig att koppla loss batteriets negativa anslutning
och utföra alla elektriska anslutningar innan enheten installeras. Om du är osäker på hur du ska installera
enheten på korrekt sätt ska du låta en kvalificerad tekniker utföra installationen.
OBS:
Enheten får drivas av 12 V likströmsystem med NEGATIV jordning. Om ditt fordon inte har ett sådant
system behöver du en spänningsomvandlare. Du kan skaffa en sådan hos återförsäljaren för JVC
BILRADIO/CD-SPELARE
• Byt ut säkringen mot en med specificerad kapacitet. Kontakta återförsäljaren för JVC BILRADIO/CDSPELARE om säkringen går ofta.
• Om du får problem med störningar...
Denna enhet är försedd med ett brusfilter i strömkretsen. I vissa fordon kan emellertid ett klickande
ljud, eller andra oönskade störningar, uppträda. Om så är fallet ska bakre jordningsuttag (se
kopplingsschemat) anslutas till bilens chassi med kortare och tjockare kablar , ex empelvis omspunnen
kopparkabel eller annan grövre kabel. K ontakta återförsäljaren för JVC BILRADIO/CD-SPELARE om
störningarna ändå inte försvinner.
• Högtalarnas maximala ineffekt ska vara på mer än 45 W bak och på 45 W fram, med en impedans på
4 Ω till 8 Ω.
• Var noga med att jorda enheten till bilens chassi.
• Kyldonet blir mycket varmt efter användning. Var försiktig så att du inte kommer åt det när du tar ut
enheten.
.
Kyldonet
Jäähdytyslevy
SÄHKÖLIITÄNNÄT
Oikosulun estämiseksi suosittelemme, että kytket akun negatiivisen navan irti ja suoritat kaikki
sähköliitännät ennen laitteen asennusta. Jos et ole varma siitä, miten tämä laite asennetaan oikein,
pyydä pätevää asentajaa asentamaan se.
Huom!
Tämä laite on suunniteltu käytettäväksi 12 V tasavirran NEGA TIIVISISSA maattosähköjärjestelmissä.
Jos ajoneuvossasi ei ole tätä järjestelmää, tarvitset jänniteinvertterin, jonka voit ostaa JVCautohifilaitteiston jälleenmyyjältä.
• Vaihda varoke uuteen, jonka tehoarvo on määrätty. Jos varoke palaa usein, ota yhteys
JVC-autohifilaitteiston jälleenmyyjään.
• Jos ongelmana on kohina...
Tämän laitteen päävirtapiirissä on kohinasuodatin. Joissakin ajoneuvoissa voi kuitenkin esiintyä
naksahtelua tai muuta ei-toivottua häiriöääntä. Jos näin tapahtuu, liitä laitteen takamaadoitusliitin
(ks. liitäntäkaaviota) auton alustaan käyttämällä lyhyempiä ja paksumpia johtoja, kuten esim.
kuparipunosta tai mittajohdinta. Jos kohina jatkuu edelleen, ota yhteys JVC-autohifilaitteiston
jälleenmyyjään.
• Kaiuttimien suurimman tulotehon tulisi olla yli 45 W takana ja 45 W edessä 4 Ω – 8 Ω impedanssilla.
• Tämä laite on maatettava auton alustaan.
• Jäähdytyslevy kuumenee käytössä. Varo koskettamasta sitä irrottaessasi tätä laitetta.
A Vanlig anslutning / Tyypilliset liitännät
Före anslutning: Kontrollera ledningsdragningen i f ordonet noga. F elaktig anslutning kan skada
enheten allvarligt.
1
Anslut nätsladdens färgade ledare till bilens batteri, till högtalarna och till den elektriska
antennen (om sådan finns). Anslut i denna ordningsföljd.
1 Svart : jord
2 Gul : till bilens batteri (konstant 12 V)
3 Röd : till ett tillbehörsuttag
4 Blå med vit rand : till den elektriska antennen (Max. 200 mA.)
5 Brun : till mobiltelefonsystem (se anvisningarna på mobiltelefonen för ytterligare
information.)
6 Övriga : till högtalarna
2
Anslut antennsladden.
3
Anslut slutligen kablagen till enheten.
OBS: Om fordonet inte har något tillbehörsuttag flyttar du säkringen från säkringsposition 1
(initialpositionen) till säkringsposition 2 och ansluter den röda ledaren (A7) till det positiva
batteriuttaget (+).
• Den gula ledaren (A4) används inte i detta fall.
B1 B3 B5 B7
B2 B4 B6 B8
A2 A4 A6 A8
15 A-säkring
15 A varoke
A8
1
A4
Bakre jordningsuttag
Takamaadoitusliitin
Linje ut
(se schema B )
Linjatulo
(ks. kaaviota B )
Antennuttag
Antenniliitin
2
Till antenn
Antenniin
3
B110B3 B5 B7
B2 B4 B6 B8
A5 A7
A2 A4 A6
A8
Svart
Taka
1
Gul*
Keltainen*
1
2
*1: Innan enhetens funktion kontrolleras före installationen
måste denna ledning anslutas. Annars kan strömmen
inte slås på.
*1: Tämä johdin on liitettävä ennen tämän laitteen
toiminnan tarkistusta, ennen asennusta, muuten virtaa
ei voida kytkeä.
Röd
Punainen
Blå med vit rand
Sininen, jossa valkoinen
raita
A7
Ennen liitäntää: tarkista ajoneuvon johdotus huolellisesti. Vääristä liitännöistä voi olla
seurauksena tämän laitteen vakava vaurioituminen.
1
Kytke verkkojohdon värilliset johtimet auton akkuun, kaiuttimiin ja tehoantenniin (mikäli
käytössä) alla annetussa järjestyksessä.
1 Musta: maatto
2 Keltainen: auton akkuun (vakio 12 V)
3 Punainen: lisäliittimeen
4 Sininen, jossa valkoinen raita: tehoantenniin (Enintään 200 mA.)
5 Ruskea: matkapuhelinjärjestelmään (Ks. yksityiskohdat matkapuhelimen käyttöohjeista.)
6 Muut : kaiuttimiin
2
Kytke antennijohto.
3
Kytke lopuksi johtosarjat laitteeseen.
Huom! Jos ajoneuvossasi ei ole lisäliitintä, siirrä varoke varokeasennosta 1 (alkuasento)
varokeasentoon 2. Kytke punainen johdin (A7) positiiviseen (+) akun napaan.
• Keltaista johdinta (A4) ei käytetä tässä tapauksessa.
Säkringsposition 2
Varokeasento 2
A5 A7
Till metallkropp eller bilens chassi
Auton metallikoriin tai alustaan
Till ett strömförande uttag i säkringsblocket, som är anslutet till bilens
batteri (dragning förbi tändningslåset)
Varokeryhmän jännitteiseen napaan, joka kytketään auton akkuun
(ohittaen virtalukon)
3
Säkringsposition 1
Varokeasento 1
Levereras inte med enheten.
*
Ei tule tämän laitteen mukana.
Till ett tillbehörsuttag i säkringsblocket
Varokeryhmän lisäliittimeen
A5
Till elektrisk antenn, om sådan finns
4
Tehoantenniin, mikäli käytössä
1
Tändningslås
*
Virtalukko
*
Säkringsblock
Varokeryhmä
Vit med svart rand
Valkoinen,jossa
musta raita
Brun / Ruskea
B6 B5 B4 B3 B8 B7 B2 B1
Vit
Valkoinen
Vänster högtalare (främre)
Vasen kaiutin (etu)
6
Grå med svart rand
Harmaa, jossa musta
raita
Grå
Harmaa
Höger högtalare (främre)
Oikea kaiutin (etu)
Grön med svart rand
Vihreä, jossa musta
raita
A2
Green
Grün
Vert
Vänster högtalare (bakre)
Vasen kaiutin (taka)
Till mobiltelefonsystem
5
Matkapuhelinjärjestelmään
Lila med svart rand
Sinipunainen, jossa musta
raita
Lila
Sinipunainen
Höger högtalare (bakre)
Oikea kaiutin (taka)
Page 60
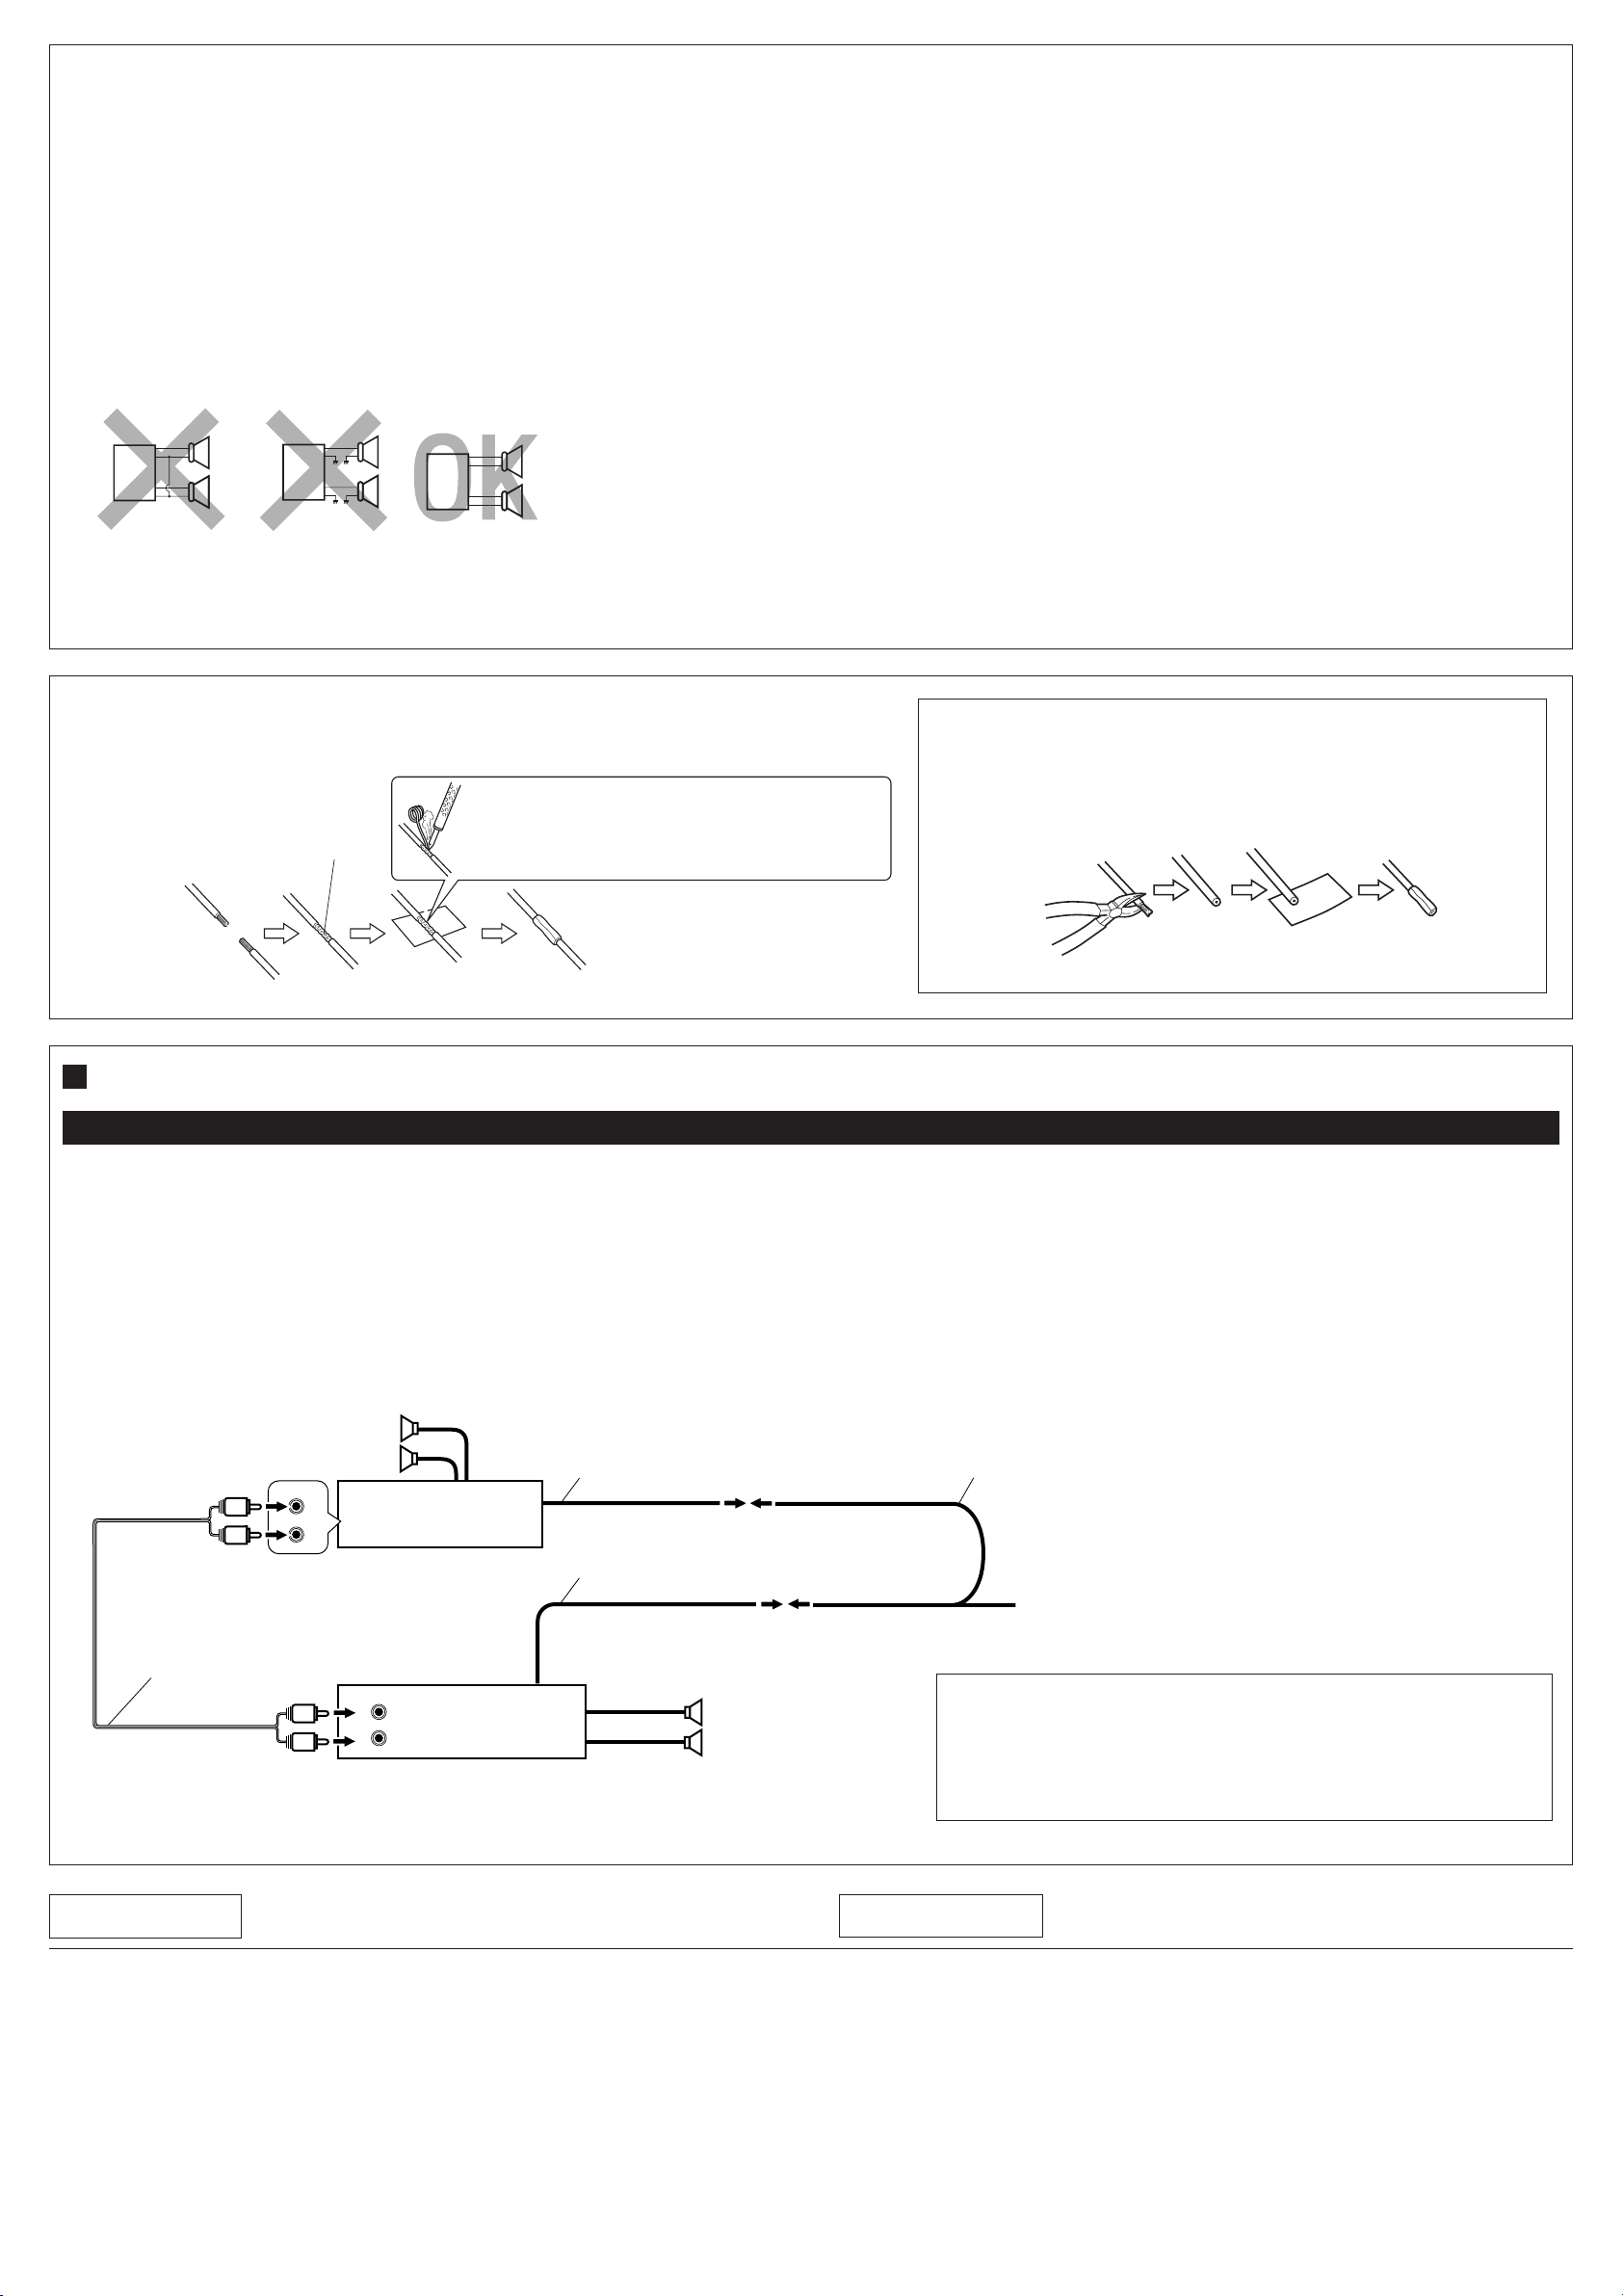
FÖRSIKTIGHETSANVISNINGAR för ström- och högtalaranslutningar:
• Anslut INTE nätsladdens högtalarledare till bilens batteri. Gör du det kommer enheten
att skadas allvarligt.
• Anslut den svarta ledaren (jord), den gula ledaren (till bilens batteri, konstant 12 V) och den
röda ledaren (till ett tillbehörsuttag) på korrekt sätt.
• Kontrollera högtalarledningarna i bilen INNAN nätsladdens högtalarledningar ansluts till
högtalarna.
– Om högtalarledningarna i bilen är dragna som i Fig. 1 och Fig. 2 nedan ska enheten
INTE anslutas med dessa ursprungliga högtalarledningar. Gör du det kommer enheten att
skadas allvarligt.
Dra om högtalarledningarna så att du kan ansluta enheten till högtalarna som i Fig. 3.
– Om högtalarledningarna i bilen är dragna som i Fig. 3 kan du ansluta enheten med hjälp
av bilens ursprungliga högtalarledningar.
– Kontakta bilföretaget om du är osäker på hur högtalarledningarna är dragna i din bil.
Virtalähdettä ja kaiutinliitäntöjä koskevat VAROTOIMET:
• ÄLÄ kytke verkkojohdon kaiutinjohtimia auton akkuun, muuten laite voi vahingoittua
vakavasti.
• Kytke musta (maatto), keltainen (auton akkuun, vakio 12 V) ja punainen johdin (lisäliittimeen)
oikein.
• Tarkista autosi kaiutinjohdotus ENNEN verkkojohdon kaiutinjohtimien kytkemistä kaiuttimiin.
– Jos autosi kaiutinjohdotus on tehty alla olevista “Fig. 1” ja “Fig. 2” näkyvällä tavalla,
ÄLÄ kytke laitetta käyttämällä ko. alkuperäistä kaiutinjohdotusta, muuten laite voi
vahingoittua vakavasti.
Tee kaiutinjohdotus uudelleen siten, että voit kytkeä laitteen kaiuttimiin “Fig. 3” näkyvällä
tavalla.
– Jos autosi kaiutinjohdotus on tehty “Fig. 3” näkyvällä tavalla, voit kytkeä laitteen
käyttämällä autosi alkuperäistä kaiutinjohdotusta.
– Jos et ole varma autosi kaiutinjohdotuksesta, ota yhteys autokauppiaaseen.
+
+
L
-
-
+
+
R
-
-
+
+
L
-
-
+
+
R
-
-
+
L
-
+
R
-
Fig. 2Fig. 1 Fig. 3
Ansluta ledningarna / Johdinten kytkentä
Tvinna kärntråden vid anslutning.
Kierrä sydänlankoja niitä kytkiessäsi.
Löd fast kärntråden så att den blir ordentligt ansluten.
Juota sydänlangat kytkeäksesi ne tanakasti.
+
-
+
-
VARNING / VAROITUS:
• Tejpa över de ledare som INTE ANVÄNDS med isoleringstejp för att
eliminera risken för kortslutning.
• Päällystä KÄYTTÄMÄTTÖMIEN johtimien liittimet eristysnauhalla
oikosulun estämiseksi.
B Anslutningar med tillsats av annan utrustning / Liitännät – Muiden laitteiden lisääminen
Förstärkaren / Vahvistin
Du kan uppgradera ditt bilstereosystem genom att ansluta en förstärkare.
• Anslut fjärrkabeln (blå med vit rand) till fjärrkabeln på den andra utrustningen så att den kan
styras genom denna enhet.
• Anslut denna enhets linjeutgångar till förstärkarens linjeingångar.
• Koppla bort högtalarna från denna enhet och anslut dem till för stärkaren. Lämna denna
enhets högtalarledare oanvända. (Täck över ändarna på de oanvända ledarna med
isoleringstejp, som i illustrationen ovan.)
Bakre högtalare
Takakaiuttimet
INPUT
L
R
L
R
JVC Förstärkaren
JVC:n Vahvistin
Signalledning (levereras inte med denna enhet)
Signaalijohto (ei toimiteta tämän laitteen mukana)
Fjärrledare
Erillisjohdin
Fjärrledare (Blå med vit rand)
Erillisjohdin (Sininen, jossa valkoinen raita)
Voit päivittää autostereojärjestelmäsi kytkemällä vahvistimen.
• Kytke ulkojohto (sininen, jossa valkea raita) muun laitteiston ulkojohtoon niin, että sitä voidaan
ohjata tästä laitteesta.
• kytke tämän laitteen linjalähtöliittimet vahvistimen linjatuloliittimiin.
• Irrota kaiuttimet tästä laitteesta ja liitä ne v ahvistimeen. Jätä tämän laitteen kaiutinjohdot
käyttämättä. (Peitä näiden käyttämättömien johtojen päätteet eristysnauhalla yllä
näkyvällä tavalla.)
Y-kontakt (levereras inte med denna enhet)
Y-kytkin (ei toimiteta tämän laitteen mukana)
Till elektrisk antenn, om sådan finns
Tehoantenniin, mikäli käytössä
LINE OUT
L
L
R
R
L
REAR
R
KD-S9R
FELSÖKNING
• Säkringen går.
* Är de röda och svarta ledarna korrekt anslutna?
• Strömmen kan inte slås på.
* Är den gula ledaren ansluten?
• Inget ljud från högtalarna.
* Är den utgående högtalarsladden kortsluten?
• Ljudet är förvrängt.
* Är den utgående högtalarsladden jordad?
* Är de vänstra och högra högtalarnas “–”-uttag gemensamt jordade?
• Enheten blir varm.
* Är den utgående högtalarsladden jordad?
* Är de vänstra och högra högtalarnas “–”-uttag gemensamt jordade?
Främre högtalare
Etukaiuttimet
VARNING / VAROITUS:
• För att hindra att värmen stiger inuti enheten bör denna placeras
UNDER den övriga utrustningen.
• Aseta tämä laite muun laitteiston ALAPUOLELLE estääksesi sisäisen
lämmönmuodostuksen tähän laitteeseen.
VIANETSINTÄ
• Varoke palaa.
* Ovatko punaiset ja mustat johtimet liitetty oikein?
• Virran kytkentä ei onnistu.
* Onko keltainen johdin kytketty?
• Kaiuttimista ei kuulu ääntä.
* Onko kaiuttimen lähtöjohtimessa tapahtunut oikosulku?
• Ääni on vääristynyt.
* Onko kaiuttimen lähtöjohdin maatettu?
* Ovatko vasemman ja oikean kaiuttimen “–”-navat maatettu yhdessä?
• Laite kuumenee.
* Onko kaiuttimen lähtöjohdin maatettu?
* Ovatko vasemman ja oikean kaiuttimen “–”-navat maatettu yhdessä?
Page 61

CD RECEIVER
CD-RECEIVER
RECEPTEUR CD
CD-RECEIVER
ENGLISH
DEUTSCH
KD-S9R
ATT
/
/I
For installation and connections, refer to the separate manual.
Für den Einbau und die Anschlüsse siehe das eigenständige Handbuch.
Pour l’installation et les raccordements, se référer au manuel séparé.
Bijzonderheden over de installatie en aansluiting van het apparaat vindt u in de desbetref fende
handleiding.
INSTRUCTIONS
BEDIENUNGSANLEITUNG
MANUEL D’INSTRUCTIONS
GEBRUIKSAANWIJZING
45Wx4
DISP
RDS
TP
PTY
7 8 9 10 11 12
SCM
MO
RND
SSM
RPT
CD
FM
AM
FRANÇAIS
NEDERLANDS
GET0007-001A
[E]
Page 62

Emplacement et reproduction des étiquettes
Panneau inférieur de l’appareil principal
DANGER: Invisible laser
radiation when open and
interlock failed or defeated.
AVOID DIRECT EXPOSURE
TO BEAM. (e )
ADVARSEL: Usynlig la serstråling ved åbning, når
sikkerhedsafbrydere er ude
af funkti on. Undgåudsættelse for stråling. (d)
VARNING: Osynlig laser-
strålning när denna del
är öppnad och spärren
urkopplad. Betrakta ej
strålen. (s)
VARO : Avattaessa ja suojalukitus ohitettaessa olet
är
alttiina näkymättömälle
lasersäteilylle. Älä katso
säteeseen. (f)
Nom/plaque d’identification
IMPORTANT POUR PRODUITS LASER
Précautions:
1.PRODUIT LASER CLASSE 1
2.DANGER: Radiation laser invisible quand l’appareil
est ouvert ou que le verrouillage est en panne ou
désactivé. Éviter une exposition directe au rayon.
3.ATTENTION: Ne pas ouvrir le volet supérieur. Il n’y a
FRANÇAIS
Caution:
Attention:
This product contains a laser component
Ce produit contient un composant laser de
of higher laser class than Class 1.
classe laser supérieure à la Classe 1.
pas de pièce réparable par l’utilisateur à l’intérieur.
Confier le service après-vente à un personnel qualifié.
4.ATTENTION: Ce lecteur CD utilise une radiation laser
invisible, toutefois, il est équipé de commutateurs de
sécurité qui empêchent l’émission de radiation en
retirant les disques. Il est dangereux de désactiver les
commutateurs de sécurité.
5.ATTENTION: L’utilisation des commandes des
réglages et effectuer des procédures autres que celles
spécifiées dans ce manuel peut provoquer une
exposition aux radiations dangereuses.
Comment réinitialiser votre appareil
Maintenez pressée les touches SEL (sélection) et (attente/en service/sourdine) en même
temps pendant quelques secondes.
Cela réinitialisera le microprocesseur intégré.
(attente/en service/sourdine)
SEL (sélection)
Remarques:
• Les ajustements que vous avez préréglés — tels que les canaux préréglés ou les ajustements sonores —
seront aussi effacés.
• Si un CD se trouve dans l’appareil, “PLEASE” et “EJECT” apparaissent alternativement sur l’affichage.
Dans ce cas, appuyez sur 0 pour éjecter le CD. Faites attention de ne pas faire tomber le CD.
*
Si vous réinitialisez l’appareil alors qu’aucun CD n’est inséré…
Après avoir ouvert puis refermé le panneau de commande, il se peut que r ien ne soit affiché bien que l’appar eil
soit sous tension. Dans ce cas, appuyez sur pour ramener l’appareil dans un état normal.
2
Page 63

Merci pour avoir acheté un produit JVC. Veuillez lire attentivement toutes les instructions avant
d’utiliser l’appareil afin de bien comprendre son fonctionnement et d’obtenir les meilleures
performances possibles.
TABLE DES MATIERES
Comment réinitialiser votre appareil......... 2
EMPLACEMENT DES TOUCHES ......... 4
Panneau de command ............................. 4
OPERATIONS DE BASE ................... 5
Mise sous tension .................................... 5
FONCTIONNEMENT DE BASE DE LA
RADIO...................................... 6
Ecoute de la radio.................................... 6
Mémorisation des stations........................ 7
Accord d’une station présélectionnée ...... 8
FONCTIONNEMENT RDS ................. 9
Présentation du RDS EON ....................... 9
Autres fonctions RDS pratiques
et ajustements ...................................... 12
FONCTIONNEMENT DU LECTEUR CD ....
Lecture d’un CD....................................... 14
Localisation d’une plage ou d’un point
particulier sur un CD .............................. 15
Sélection des modes de lecture de CD .... 15
Lecture des CD Text ................................. 16
Interdiction de l’éjection de CD................. 16
AJUSTEMENT DU SON ................... 17
Ajustement du son................................... 17
Utilisation de la mémoire de commande
du son ................................................... 17
Mémorisation de votre propre
ajustement sonore ................................. 18
AUTRES FONCTIONS PRINCIPALES .... 19
Réglage de l’horloge................................. 19
Modification des réglages
généraux (PSM) ......................................
Détachement du panneau de commande ....
DEPANNAGE ............................... 23
ENTRETIEN ................................ 24
Manipulation des CD ................................ 24
SPECIFICATIONS .......................... 25
14
19
22
FRANÇAIS
Remarque:
Pour des raisons de sécurité, une carte d’identification numérotée est fournie avec cet appareil, et le même
numéro d’identification est imprimé sur le châssis de l’appareil. Conserver cette carte dans un endroit sûr,
elle pourra aider les autorités pour identifier votre appareil en cas de vol.
AVANT D’UTILISER L’APPAREIL
*
Par sécurité....
• N’augmentez pas trop le volume car cela bloquerait
les sons de l’extérieur rendant la conduite
dangereuse.
• Arrêtez la voiture avant de réaliser toute opération
compliquée.
*
Température à l’intérieur de la voiture....
Si votre voiture est restée garée pendant longtemps
dans un climat chaud ou froid, attendez que la
température à l’intérieur de la voiture redevienne
normale avant d’utiliser l’appareil.
3
Page 64
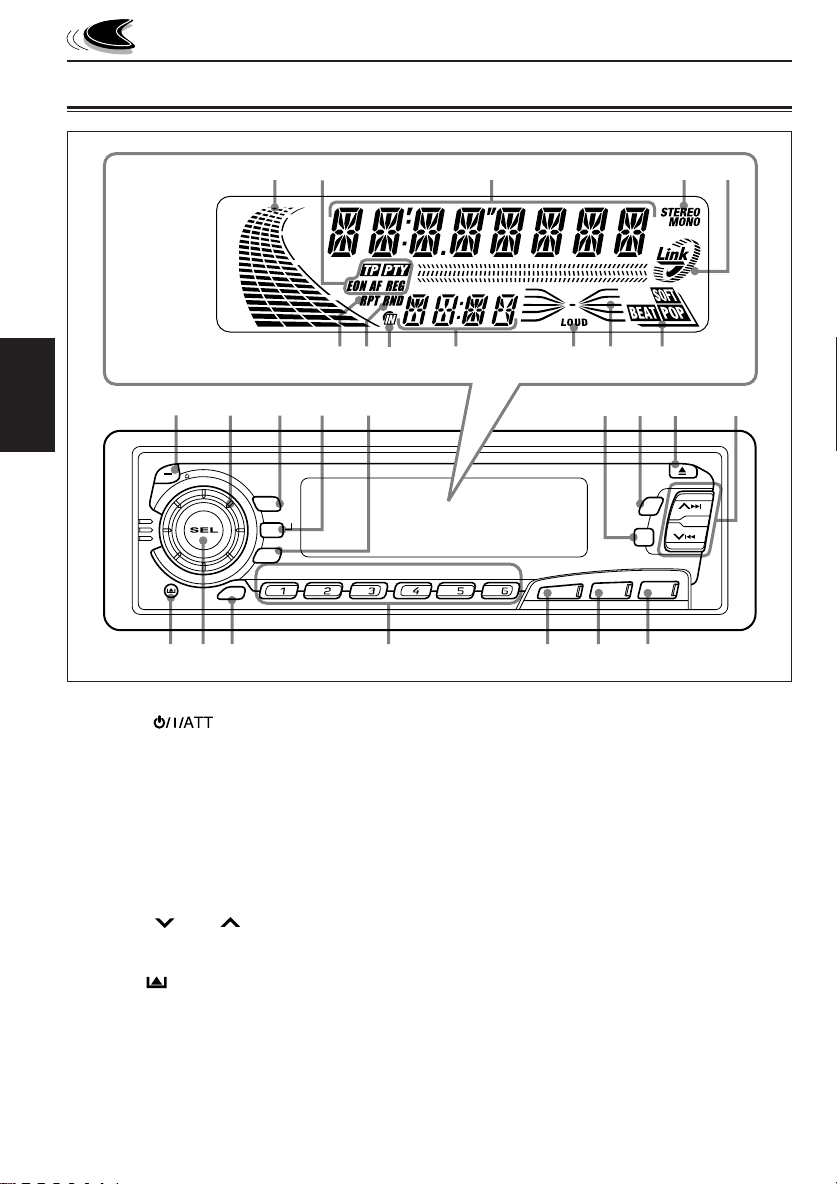
EMPLACEMENT DES TOUCHES
Panneau de command
Fenêtre
d’affichage
uo;a
i
kjhgfds
13245
FRANÇAIS
ATT
/
/I
DISP
RDS
TP
PTY
7 8 9 10 11 12
SCM
1
Touche (attente/en service/sourdine)
2 Molette de commande
3 Touche DISP (affichage)
4 Touche TP (Émission d’informations routières)
RDS (Radio Data System)
5 Touche PTY (Type de programme)
6 Touche RPT (répétition)
7 Touche MO (monaural)
Touche RND (lecture aléatoire)
8 Touche 0 (éjection)
9 Touches 4 / ¢
•
Fonctionnent aussi comme touches SSM quand
elles sont pressées en même temps.
p Touche (retrait du panneau de commande)
q Touche SEL (sélection)
w Touche SCM (mémoire de commande sonore)
e Touches numériques
r Touche AM
t Touche FM
y Touche CD
678 9
MO
RND
RPT
CD
FM
AM
ytrewqp
Fenêtre d’affichage
u Indicateur de niveau de volume
i Indicateurs RDS
TP, PTY, EON, AF, REG
o Affichage principal
; Indicateurs de réception du tuner
STEREO, MONO
a Indicateur “Link”
s Indicateur RPT (répétition)
d Indicateur RND (lecture aléatoire)
f Indicateur CD IN (CD en place)
g Affichage de la source/horloge
h Indicateur LOUD
j Indicateur de courbe d’égalisation
k Indicateurs de mode sonore
SOFT, BEAT, POP
SSM
4
Page 65

ATT
/
/I
DISP
RDS
TP
PTY
7 8 9 10 11 12
SCM
Mise sous tension
1
Mettez l’appareil sous tension.
ATT
/
/I
Remarque sur le fonctionnement monotouche:
Quand vous choisissez tuner comme source à
l’étape 2 ci-dessous, l’appareil se met
automatiquement sous tension. Vous n’avez donc
pas besoin d’appuyer d’abord sur cette touche
pour mettre l’appareil sous tension.
2
Choisissez la source.
CD
FM
AM
Pour utiliser le tuner (AM ou FM),
voir les pages 6 – 13.
Pour utiliser le lecteur CD,
voir les page 14 – 16.
3
Ajustez le volume.
Pour augmenter le volume.
Pour diminuer le volume.
Le niveau de volume apparaît.
OPERATIONS DE BASE
MO
RND
SSM
RPT
CD
FM
AM
231
4
Ajustez le son comme vous le
souhaitez (voir la page 17).
Pour baisser le son instantanément
Appuyez brièvement sur pendant
l’écoute de n’importe quelle source. “ATT”
commence à clignoter sur l’affichage, et le niveau
de volume est baissé instantanément.
Pour revenir au niveau de volume précédent,
appuyez de nouveau brièvement sur la touche.
• Si vous tournez la molette de commande dans
le sens des aiguilles d’une montre, vous
pouvez aussi rétablir le son.
Pour mettre l’appareil hors tension
Maintenez pressée pendant plus d’une
seconde.
Remarque:
Si vous utilisez cet appareil pour la première fois,
réglez l’horloge intégrée en vous reportant à la page
19.
PRECAUTION sur le réglage du volume
Les CD produisent très peu de bruit comparé avec
les autres sources. Si le niveau de volume est
ajusté, par exemple, pour le tuner, les enceintes
risquent d’être endommagées par l’augmentation
soudaine du niveau de sortie.
Par conséquent, diminuez le volume avant de
reproduire un disque et ajustez-le comme vous le
souhaitez pendant la lecture.
FRANÇAIS
Indicateur le niveau de volume
5
Page 66
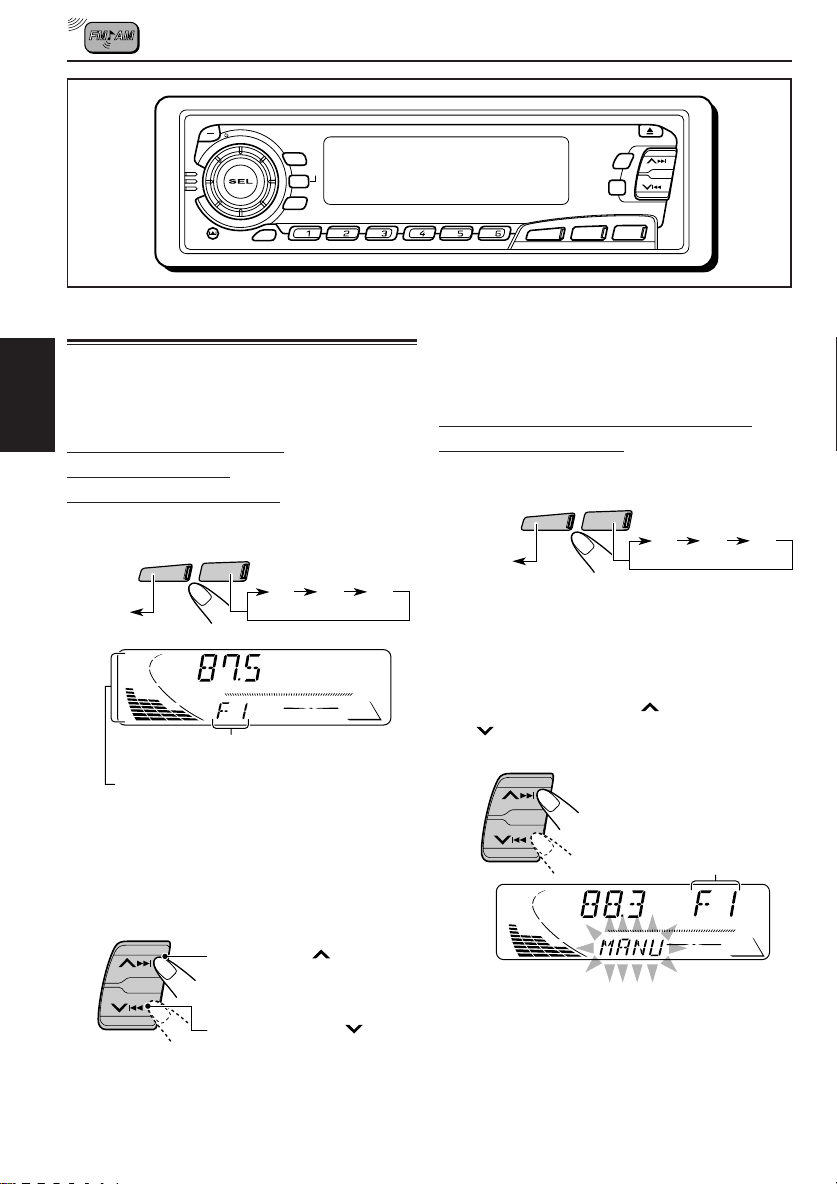
FONCTIONNEMENT DE BASE DE LA RADIO
ATT
/
/I
DISP
RDS
TP
PTY
7 8 9 10 11 12
SCM
AM
MO
RND
SSM
RPT
CD
FM
Ecoute de la radio
Vous pouvez utiliser la recherche automatique ou
l’accord manuel pour accorder une station
particulière.
FRANÇAIS
Recherche d’une station
automatiquement:
Recherche automatique
1
Choisissez la bande (AM, FM1 – 3).
FM
AM
F1
F2
(FM1)
AM
La bande choisie (ou l’affichage de l’horloge:
voir la page 21) apparaît.
Indicateur de niveau audio (voir la page 21)
ou volume
Remarque:
Cet appareil a trois bandes FM (FM1, FM2, FM3).
Vous pouv ez utiliser n’importe laquelle pour
écouter une station FM.
(FM2)F3(FM3)
Pour arrêter la recherche avant qu’une station
ne soit accordée, appuyez sur la même touche
que vous avez utilisée pour la recherche.
Recherche manuelle d’une station:
Recherche manuelle
1
Choisissez la bande (AM, FM1 – 3).
FM
AM
F1
F2
(FM1)
AM
Remarque:
Cet appareil a tr ois bandes FM (FM1, FM2, FM3).
Vous pouvez utiliser n’importe laquelle pour
écouter une station FM.
2
Maintenez pressée ¢ ou
4 jusqu’à ce que “MANU”
(manuel) clignote sur l’affichage.
La bande choisie apparaît.
(FM2)F3(FM3)
2
Commencez la recherche d’une station.
Appuyez sur ¢ pour
rechercher des stations de
fréquences supérieures.
Appuyez sur 4 pour
rechercher des stations de
fréquences inférieures.
Quand une station est accordée, la
recherche s’arrête.
6
Page 67

3
SSM
Accordez une station souhaitée
pendant que “MANU” clignote.
Appuyez sur ¢ pour
accorder des stations de
fréquences supérieures.
Appuyez sur 4 pour
accorder des stations de
fréquences inférieures.
• Si vous relâchez la touche, le mode manuel
est mis automatiquement hors service après
5 secondes.
• Si vous maintenez la touche pressée, la
fréquence continue de changer (par intervalle
de 50 kHz pour la bande FM et par intervalle
de 9 kHz pour la bande AM – PO/GO) jusqu’à
ce que vous la relâchiez.
Quand une émission FM stéréo est difficile
à recevoir:
Appuyez sur MO RND (monaural/lecture
aléatoire) lors de l’écoute d’une station FM
stéréo.
• Chaque fois que vous appuyez sur la touche,
l’indicateur MONO s’allume et s’éteint
alternativement.
Mémorisation des stations
Vous pouvez utiliser l’une des deux méthodes
suivantes pour mémoriser les stations reçues.
• Présélection automatique des stations FM:
SSM (Strong-station Sequential Memory)
• Présélection manuelle des stations FM et AM
Présélection automatique des stations
FM: SSM
Vous pouvez présélectionner 6 stations locales
dans chaque bande FM (FM1, FM2 et FM3).
1
Choisissez le numéro de la bande
FM (FM1 – 3) où vous souhaitez
mémoriser la station.
• Chaque fois que vous appuyez sur la
touche la bande FM change comme suit:
FM
2
Maintenez pressées les deux touches
pendant plus de 2 secondes.
F1
(FM1)F2(FM2)F3(FM3)
FRANÇAIS
MO
RND
Lorsque l’indicateur MONO est allumé sur
l’affichage, le son que vous entendez est
monaural mais la réception est améliorée
(l’indicateur STEREO s’éteint).
S’allume lors de la réception
d’une émission FM stéréo.
“SSM” apparaît, puis disparaît
quand la présélection automatique
est terminée.
Les stations locales FM avec les signaux les plus
forts sont recherchées et mémorisées
automatiquement dans le numéro de bande que
vous avez choisi (FM1, FM2 ou FM3). Ces
stations sont mémorisées sur les touches de
présélection de station — No. 1 (fréquence la
plus basse) à No. 6 (fréquence la plus haute).
Quand la présélection est terminée, la station
mémorisée automatiquement sur la touche de
présélection de station 1 est accordée
automatiquement.
7
Page 68
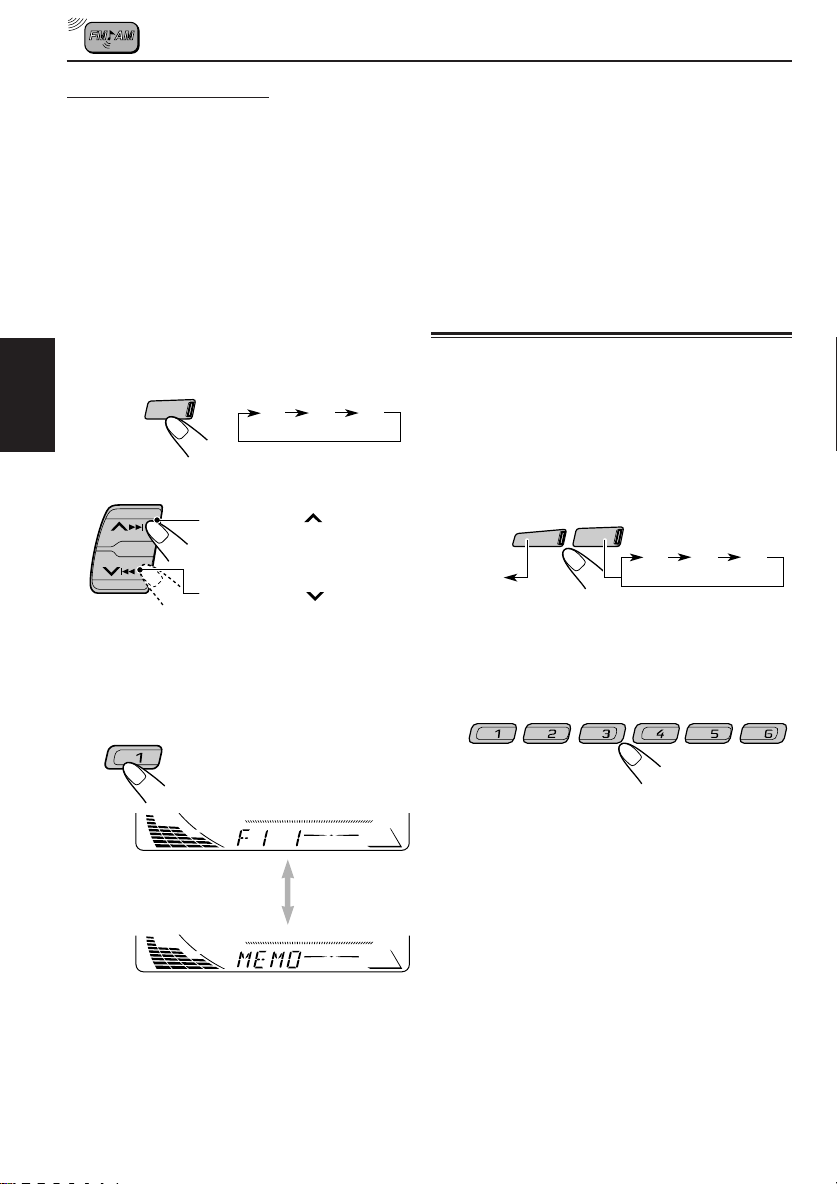
Présélection manuelle
Vous pouvez présélectionner manuellement un
maximum de 6 stations pour chaque bande (FM1,
FM2, FM3 et AM).
Ex.: Mémorisation de la station FM située à 88,3
MHz sur le numéro de présélection 1 de la
bande FM1
1
Choisissez le numéro de la bande
FM (FM1 – 3) où vous souhaitez
mémoriser la station (dans cet
exemple, FM1).
• Chaque fois que vous appuyez sur la
touche la bande FM change comme suit:
FM
FRANÇAIS
2
Accordez une station à 88,3 MHz.
3
Maintenez pressée la touche
numérique (dans cet exemple, 1)
pendant plus de 2 secondes.
F1
(FM1)F2(FM2)F3(FM3)
Appuyez sur ¢ pour
accorder des stations de
fréquences supérieures.
Appuyez sur 4 pour
accorder des stations de
fréquences inférieures.
Remarques:
• La station précédemment présélectionnée est effacée
quand une nouvelle station est mémorisée sur le même
numéro de présélection.
• Les stations présélectionnées sont effacées si
l’alimentation du circuit mémoire est interrompue (par
exemple, pendant le changement de la batterie). Si cela
se produit, présélectionnez de nouveau les stations.
Accord d’une station
présélectionnée
Vous pouvez accorder facilement une station
présélectionnée.
Rappelez-vous que vous devez d’abord mémoriser
les stations. Si vous ne les avez pas encore
mémorisées, référez-vous à “Mémorisation des
stations” à la page 7.
1
Choisissez la bande (AM, FM1 – 3).
FM
AM
F1
F2
(FM1)
AM
2
Choisissez le numéro (1 – 6) de la
station présélectionnée souhaitée.
(FM2)F3(FM3)
La bande/numéro de
préréglage et “MEMO”
clignotent alternativement
pendant un moment.
4
Répétez la procédure ci-dessus pour
mémoriser d’autres stations sur
d’autres numéros de présélection.
8
Page 69

FONCTIONNEMENT RDS
Présentation du RDS EON
Le RDS (Radio Data System) permet aux stations
FM d’envoyer un signal supplémentaire en même
temps que les signaux de leurs programmes
ordinaires. Par exemple, les stations envoient leur
nom, de même que des informations sur le type de
programme qu’elle diffusent, comme par exemple
du sport, de la musique, etc.
Un autre avantage de la fonction RDS est appelé
“EON (Enhanced Other Networks)”. L’indicateur
EON s’allume lors de la réception d’une station FM
émettant des données EON. En utilisant les
données EON envoyées d’une station, v ous pouvez
accorder une station différente d’un autre réseau
diffusant votre programme favori ou des
informations routières pendant que vous écoutez
un autre programme ou une autre source, comme
par exemple une CD.
A l’aide des données RDS qu’il reçoit, c’est
appareil peut faire les choses suivantes:
• Localisation du même programme
automatiquement (Réception de suivi de
réseau)
• Attente de réception TA (Informations routières)
ou votre programme favori
• Recherche PTY (Type de programme)
• Recherche de programme
• Et quelques autres informations routières
Localisation du même programme
automatiquement (Réception de suivi
de réseau)
Lorsque vous travaillez dans une région où la
réception FM n’est pas bonne, le tuner intégré dans
cet appareil accorde automatiquement une autre
station RDS diffusant le même programme mais
avec un signal plus f ort. De cette façon, vous pouv ez
continuer à écouter le même programme avec la
meilleure réception possible, où que vous alliez.
(Voir l’illustration à la page suivante.)
Deux types de données RDS sont utilisés pour que
la réception de suivi de réseau fonctionne
correctement — les données PI (Identification de
programme) et AF (Fréquence alternative).
Si vous ne recevez pas ces données correctement
de la station RDS que vous écoutez, la réception
de suivi de réseau ne fonctionnera pas.
Pour utiliser la réception de suivi de réseau,
maintenez pressée TP RDS (Traffic Programme/
Radio Data System) pendant plus d’une seconde.
Chaque fois que la touche est maintenue pressée,
le mode de réception de suivi de réseau change
comme suit:
RDS
TP
Indicateur AF
Mode 1
L’indicateur AF s’allume mais pas l’indicateur
REG.
Le suivi de réseau est en service avec la
régionalisation réglée sur “éteint”.
Commute sur une autre station du même réseau
quand le signal de réception de la station actuelle
devient faible.
• Dans ce mode, le programme peut être différent du
programme actuellement reçu.
Mode 2
Les indicateurs AF et REG s’allument tous les
deux.
Le suivi de réseau est en service et la
régionalisation est réglée sur “allume”.
Commute sur une autre station du même réseau
et émettant le même programme quand le signal
de réception de la station actuelle devient faible.
Mode 3
Aucun des indicateurs AF et REG ne s’allume.
Le suivi de réseau est hors service.
Mode 1 Mode 2 Mode 3
Indicateur REG
FRANÇAIS
9
Page 70

Le même programme peut être reçu sur
différente fréquences.
Programme 1
émit sur la
fréquence A
Programme 1
émit sur la
fréquence B
FRANÇAIS
Utilisation de l’attente de réception
L’attente de réception permet à l’appareil de
commuter temporairement sur votre programme
favori (PTY: Type de programme) ou des
informations routières (TA) à par tir de la source
actuelle (une autre station FM ou une CD).
• L’attente de réception ne fonctionnera pas si vous
écoutez une station AM.
Programme 1
émit sur la
fréquence C
Programme 1
émit sur la
fréquence E
Programme 1
émit sur la
fréquence D
Attente de réception TA
RDS
Quand vous appuyez sur TP RDS lors
TP
de l’écoute d’une station FM, l’indicateur
TP s’allume pendant la réception d’une
station TP (émission d’informations
routières) et le mode d’attente TA est mis
en service.
• Si la station reçue n’est pas une station TP, l’indicateur
TP clignote. Appuyez sur ¢ ou 4 pour
mettre en service le mode d’attente TA. “SEARCH”
apparaît sur l’affichag e et la r echer che de sta tion TP
démarre. Quand une station TP est accordée,
l’indicateur TP s’allume.
7 Si vous écoutez une CD et souhaitez écouter une
station TP, appuyez sur TP RDS pour entrer en
mode d’attente TA. (L’indicateur TP s’allume.)
Si une émission d’informations routières commence
a être diffusée pendant que le mode d’attente TA
est en service, “TRAFFIC” apparaît et le source de
lecture change sur la bande FM. Le volume
augmente au niveau de volume TA préréglé (voir la
page 13) et l’émission d’informations routières peut
être entendu.
10
Pour désactiver le mode d’attente TA, appuyer
de nouveau sur TP RDS.
Attente de réception PTY
Quand vous appuyez sur PTY lors de
PTY
l’écoute d’une station FM, l’indicateur
PTY s’allume pendant la réception d’une
station PTY et le mode d’attente PTY
est mis en service. Le nom du type PTY
choisi mémorisé à la page 11 clignote
pendant 5 secondes.
• Si la station reçue n’est pas une station PTY,
l’indicateur PTY clignote. Appuyez sur ¢ ou
4 pour mettre en service le mode d’attente PTY.
“SEARCH” apparaît sur l’affichage et la recherche
de station PTY démarre. Quand une station PTY est
accordée, l’indicateur PTY s’allume.
7 Si vous écoutez une CD souhaitez écouter une
émission PTY du type choisie, appuyez sur PTY
pour entrer en mode d’attente PTY. (L’indicateur
PTY s’allume.)
Si une émission du type PTY choisi commence a
être diffusée pendant que le mode d’attente PTY
est en service, le nom du type PTY choisi apparaît
et le source de lecture change sur la bande FM.
L’émission du type PTY choisi peut être entendu.
Pour désactiver le mode d’attente PTY , appuyer
de nouveau sur PTY.
Sélection de votre programme préféré
pour l’attente de réception PTY
Vous pouv ez choisir votre programme préféré pour
l’attente de réception PTY et le mémoriser.
A l’expédition de l’usine, “NEWS” est mémorisé pour
le type de programme de l’attente de réception PTY .
1
Maintenez pressée SEL (sélection)
pendant plus de 2 secondes de façon
que l’un des éléments PSM apparaisse
sur l’affichage.
(PSM: voir la page 20.)
Page 71

2
Choisissez “PTY STBY” (standby) s’il
n’apparaît pas sur l’affichage.
3
Choisissez l’un des 29 codes PTY.
4
Terminez le réglage.
Le nom du code choisi
apparaît sur l’affichage et il
est mémorisé.
• Pour plus d’informations,
référez-vous au tableau
ci-dessous.
Codes PTY
NEWS: Information
AFFAIRS: Programmes d’actualité sur les
INFO: Programmes qui communiquent
SPORT: Evénements sportifs
EDUCATE: Programmes éducatifs
DRAMA: Pièces radio
CULTURE: Programmes culturels au
SCIENCE: Programmes sur les sciences
VARIED: Autres programmes comme des
POP M: Musique Pop
ROCK M: Musique de rock
EASY M: Musique d’écoute facile ou
LIGHT M: Musique légère
CLASSICS: Musique classique
OTHER M: Autre musique
WEATHER: Informations météo
FINANCE: Rapports sur le commerce, les
CHILDREN: Programmes de loisirs pour les
affaires ou l’information
courante
des conseils sur une grande
variété de sujets
niveau régional ou national
naturelles et la technologie
comédies ou des cérémonies
musique douce
affaires, la bourse, etc.
enfants
Recherche de votre programme préférée
Vous pouvez rechercher l’un de vos 6 types de
programme préféré enregistré en mémoire. Lors de
l’expédition de l’usine, les 6 types de programme
suivants ont été mémorisés sur les touches
numériques (1 à 6).
Pour mémoriser vos types de programme
préférés, référez-vous à la procédure ci-dessous.
Pour rechercher votre type de programme
préféré, voir la page 12.
1
POP M
45
CLASSICS
2
ROCK M EASY M
AFFAIRS
Pour mémoriser vos types de programme
préférée
1
Maintenez pressée SEL (sélection)
pendant plus de 2 secondes de façon
que l’un des éléments PSM apparaisse
sur l’affichage.
(PSM: voir la page 20.)
SUITE À LA PAGE SUIVANTE
SOCIAL: Programmes sur des activités
RELIGION: Programmes traitant des
PHONE IN: Programmes où les gens
TRAVEL: Programmes sur des
LEISURE: Programmes concernés par
JAZZ: Musique de jazz
COUNTRY: Musique régionale
NATION M:
OLDIES: Musique pop classique
FOLK M: Musique folklorique
DOCUMENT: Programmes traitant de faits
sociales
aspects de la foi ou de la
croyance, de la nature de la vie
ou d’éthique
peuvent exprimer leurs
opinions par téléphone ou dans
un forum
destinations de voyage, des
voyages en g roupe et des idées
et opportunités de voyage
des activités récréatives
comme le jardinage, la cuisine,
la pêche, etc.
Musique populaire actuelle d’un
autre pays ou d’une autre région,
dans la langue de ce pays
réels, présentés dans un style
d’enquête
3
6
VARIED
FRANÇAIS
11
Page 72

2
Choisissez “PTY SRCH” (search) s’il
n’apparaît pas sur l’affichage.
2
Choisissez l’un des codes PTY
mémorisés sur les touches
numériques de préréglage (1 à 6).
3
Choisissez l’un des 29 codes PTY.
(Voir la page 11.)
Le nom du code choisi
apparaît sur l’affichage.
• Si un code déjà enregistré
en mémoire est choisi, il
clignote sur l’affichage.
4
Maintenez pressée la touche
FRANÇAIS
numérique pendant plus de 2
secondes pour mémoriser le code
PTY choisi sur le numéro de
préréglage souhaité.
Le numéro de préréglage PTY apparaît, et le
nom de code choisi et “MEMORY”
apparaissent alternativement sur l’affichage.
5
Terminez le réglage.
Pour rechercher votre type de programme
préférée
1
Maintenez pressée PTY (type de
programme) pendant plus d’une
seconde pendant l’écoute d’une
station FM.
PTY
La recherche PTY pour votre programme
préféré commence après 5 secondes.
Ex.Quand “ROCK M” est mémorisé sur le
numéro de préréglage 2.
• S’il y a une station diffusant un programme du
type PTY que vous avez choisi, cette station est
accordée.
• S’il n’y a aucune station diffusant un programme
du type PTY que vous avez choisi, la station ne
change pas.
Remarque:
Dans certaines régions, la recherche PTY ne
fonctionnera pas correctement.
Autres fonctions RDS pratiques
et ajustements
Sélection automatique de la station lors
de l’utilisation des touches numériques
Habituellement quand vous appuyez sur une touche
numérique, la station préréglée est accordée.
Cependant si la station préréglée est une station
RDS, quelque chose de différent se produit. Si le
signal de la station préréglée n’est pas
suffisamment fort pour assurer une bonne
réception, cet appareil, en utilisant les données AF ,
accorde une autre station diffusant le même
programme que la station préréglée originale.
(Recherche de programme)
12
Le dernier code PTY choisi ainsi que le numéro
de préréglage apparaissent.
Page 73

Pour mettre en service la recherche de programme,
suivez la procédure suivante.
• La recherche de programme peut prendre un
certain temps.
• Référez-vous aussi à “Modification des réglages
généraux (PSM)” à la page 19.
1 Maintenez pressée SEL (sélection) pendant plus
de 2 secondes de façon que l’un des éléments
PSM apparaisse sur l’affichage.
2 Appuyez sur ¢ ou 4 pour choisir
“P(programme)-SEARCH”.
3 Tournez la molette de commande dans le sens
des aiguilles d’une montre pour choisir “ON”.
La recherche de programme est maintenant en
service.
Pour annuler la recherche de programme,
répétez la même procédure et choisissez “OFF” à
l’étape 3 en tournant la molette de commande dans
le sens contraire des aiguilles d’une montre.
Modification du mode d’affichage lors
de l’écoute d’une station FM
Vous pouvez changer l’indication initiale sur
l’affichage sur le nom de la station (PS NAME) ou
sur la fréquence de la station (FREQ), lors de
l’écoute d’une station FM RDS.
• Référez-vous aussi à “Modification des réglages
généraux (PSM)” à la page 19.
1 Maintenez pressée SEL (sélection) pendant plus
de 2 secondes de façon que l’un des éléments
PSM apparaisse sur l’affichage.
2 Appuyez sur ¢ ou 4 pour choisir
“TU DISP” (affichage du tuner).
3 Tournez la molette de commande pour régler
l’indication souhaitée (“PS NAME” ou “FREQ”).
Remarque:
En appuyant sur DISP, vous pouvez aussi changer
l’affichage pendant l’écoute d’une station FM RDS.
Chaque fois que vous appuyez sur la touche,
l’information suivante apparaît sur l’affichage:
Fréquence
Nom de la station
(PS NAME)
Type de programme
(PTY)
• Puis, l’affichage retourne à l’indication d’origine
après quelques secondes.
de la station
(FREQ)
Réglage du niveau de volume TA
Vous pouvez prérégler le niveau de volume pour
l’attente de réception TA. Quand un programme
d’informations routières est reçu, le niveau de
volume change automatiquement sur le niveau
préréglé.
• Référez-vous aussi à “Modification des réglages
généraux (PSM)” à la page 19.
1 Maintenez pressée SEL (sélection) pendant plus
de 2 secondes de façon que l’un des éléments
PSM apparaisse sur l’affichage.
2 Appuyez sur ¢ ou 4 pour choisir
“T A V OL”.
3 Tournez la molette de commande pour régler le
volume souhaité.
Vous pouvez le régler entre “VOL 00” et
“VOL 50”.
Ajustement automatique de l’horloge
Lors de l’expédition de l’usine, l’horloge intégrée à
cet appareil est réglée pour être réajustée
automatiquement en utilisant les données CT
(Clock Time) du signal RDS.
Si vous ne souhaitez pas utiliser l’ajustement
automatique de l’horloge, suivez la procédure
ci-dessous.
• Référez-vous aussi à “Modification des réglages
généraux (PSM)” à la page 19.
1 Maintenez pressée SEL (sélection) pendant plus
de 2 secondes de façon que l’un des éléments
PSM apparaisse sur l’affichage.
2 Appuyez sur ¢ ou 4 pour choisir
“AUTO ADJ”.
3 Tournez la molette de commande dans le sens
contraire des aiguilles d’une montre pour choisir
“OFF”.
L’ajustement automatique de l’horloge est
maintenant annulé.
Pour régler à nouveau l’horloge, répétez la même
procédure en choisissant “ON” à l’étape 3 en
tournant la molette de commande dans le sens des
aiguilles d’une montre.
Remarque:
Il faut environ 2 minutes pour ajuster l’heur e en utilisant
les données CT. Alors, vous ne devez pas changer la
station avant plus de 2 minutes, car l’heure ne serait
alors pas ajustée.
FRANÇAIS
13
Page 74

FONCTIONNEMENT DU LECTEUR CD
ATT
/
/I
DISP
RDS
TP
PTY
7 8 9 10 11 12
SCM
AM
MO
RND
SSM
RPT
CD
FM
Lecture d’un CD
1
Ouvrez le panneau de commande.
FRANÇAIS
Remarque sur le fonctionnement monotouche:
Si un CD se trouve déjà dans la fente d’insertion,
appuyer sur CD met l’appareil sous tension et
commence la lecture automatiquement.
2
Insérez un disque dans la fente de
chargement.
L’appareil se met en
marche, tire le CD et
commence la lecture
automatiquement.
3
Fermez le panneau de commande à la main.
L’indicateur CD IN s’allume.
Durée de lecture
totale du disque inséré
Durée de
lecture écoulée
Nombre total de plages
du disque inséré
Plage actuelle
Remarques:
• Si un CD est inséré à l’envers, “PLEASE” et
“EJECT” apparaissent alternativement sur
l’affichage.
Lorsque vous ouvrez le panneau de commande en
appuyant sur 0, le CD est éjecté automatiquement.
• Quand vous reproduisez un CD Text, le titre du
disque et l’interprète apparaît sur l’affichage. La
plage actuelle et la durée de lecture écoulée
apparaissent ensuite. Référez-vous aussi à “Lecture
des CD Text” (page 16) et “Sélection du mode de
défilement – SCROLL” (page 21).
Si un CD Text comprend beaucoup d’informations
textes, certaines peuvent ne pas apparaître sur
l’affichage.
Pour arrêter la lecture et éjecter le CD
Appuyez sur 0.
La lecture CD s’arrête, le panneau de commande
s’ouvre, puis le CD est éjecté automatiquement
de la fente de chargement.
Si vous changez la source sur FM ou AM, la
lecture du CD s’arrête aussi (mais dans ce cas,
le CD n’est pas éjecté).
Remarques:
• Si le CD éjecté n’est pas retiré avant environ 15
secondes, le disque est automatiquement réinséré
dans la fente d’insertion pour le protégé de la
poussière. (Dans ce cas, la lecture du CD ne
commence pas.)
• Vous pouvez éjecter le CD quand l’appareil est hors
tension.
14
Page 75
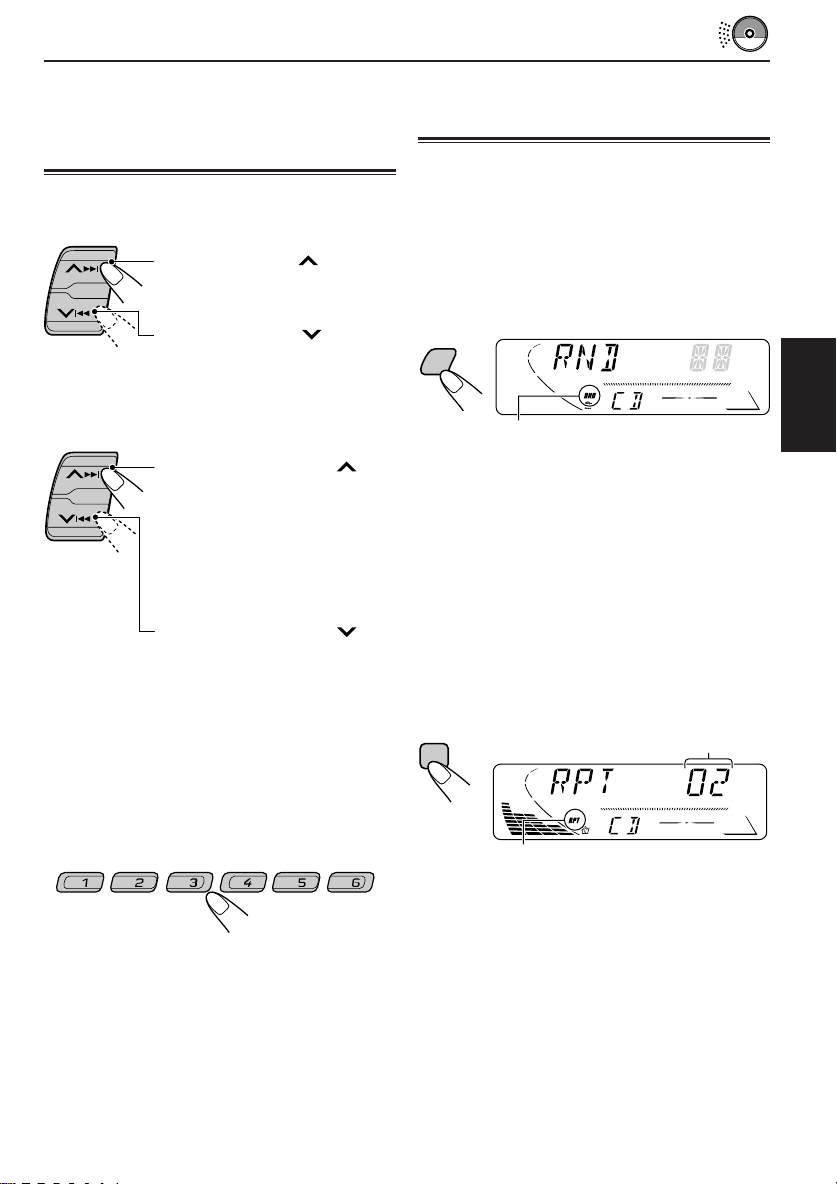
Localisation d’une plage ou
d’un point particulier sur un
CD
Pour avancer rapidement ou inverser une
plage
Maintenez pressée ¢,
pendant la reproduction d’un CD,
pour avancer rapidement la plage.
Maintenez pressée 4,
pendant la reproduction d’un CD,
pour inverser la plage.
Pour aller aux plages suivantes ou aux
plages précédentes
Appuyez brièvement sur ¢
lors de la reproduction d’un CD,
pour avancer jusqu'au début de
la plage suivante. Chaque fois
que vous appuyez répétitivement
sur la touche, le début des
plages suivantes est localisé et
celle-ci est reproduite.
Appuyez brièvement sur
lors de la reproduction d’un CD,
pour revenir au début de la plage
actuelle. Chaque fois que vous
appuyez répétitivement sur la
touche, le début des plages
précédentes est localisé et celleci est reproduite.
4
Sélection des modes de
lecture de CD
Pour reproduire les plage aléatoirement
(Lecture aléatoire)
Vous pouvez reproduire toutes les plages du CD
dans un ordre aléatoire.
Chaque fois que vous appuyez sur MO RND
(monaural/aléatoire) pendant la reproduction d’un
CD, le mode de lecture aléatoire se met
alternativement en et hors service.
MO
RND
Indicateur RND
Quand le mode de lecture aléatoire est en
service, l’indicateur RND s’allume sur l’affichage
et une plage choisie aléatoirement est reproduite.
Pour reproduire les plages répétitivement
(Lecture répétée)
Vous pouvez reproduire la plage actuelle
répétitivement.
Chaque fois que vous appuyez sur RPT
(Répétition) lors de la lecture d’un CD, le mode
de lecture répétée de CD se met alternativement
sous et hors service.
Numéro de plage de la plage
RPT
actuellement reproduite
FRANÇAIS
Pour aller directement à une plage
particulière
7 8 9 10 11 12
Appuyez sur la touche numérique
correspondante au numéro de plage souhaité
pour commencer sa reproduction.
• Pour choisir un numéro de plage de 1 – 6:
Appuyez brièvement sur 1 (7) – 6 (12).
• Pour choisir un numéro de plage 7 – 12:
Maintenez pressé 1 (7) – 6 (12) pendant plus
d’une seconde.
Indicateur RPT
Quand le mode de lecture répétée est en service,
l’indicateur RPT s’allume sur l’affichage.
15
Page 76
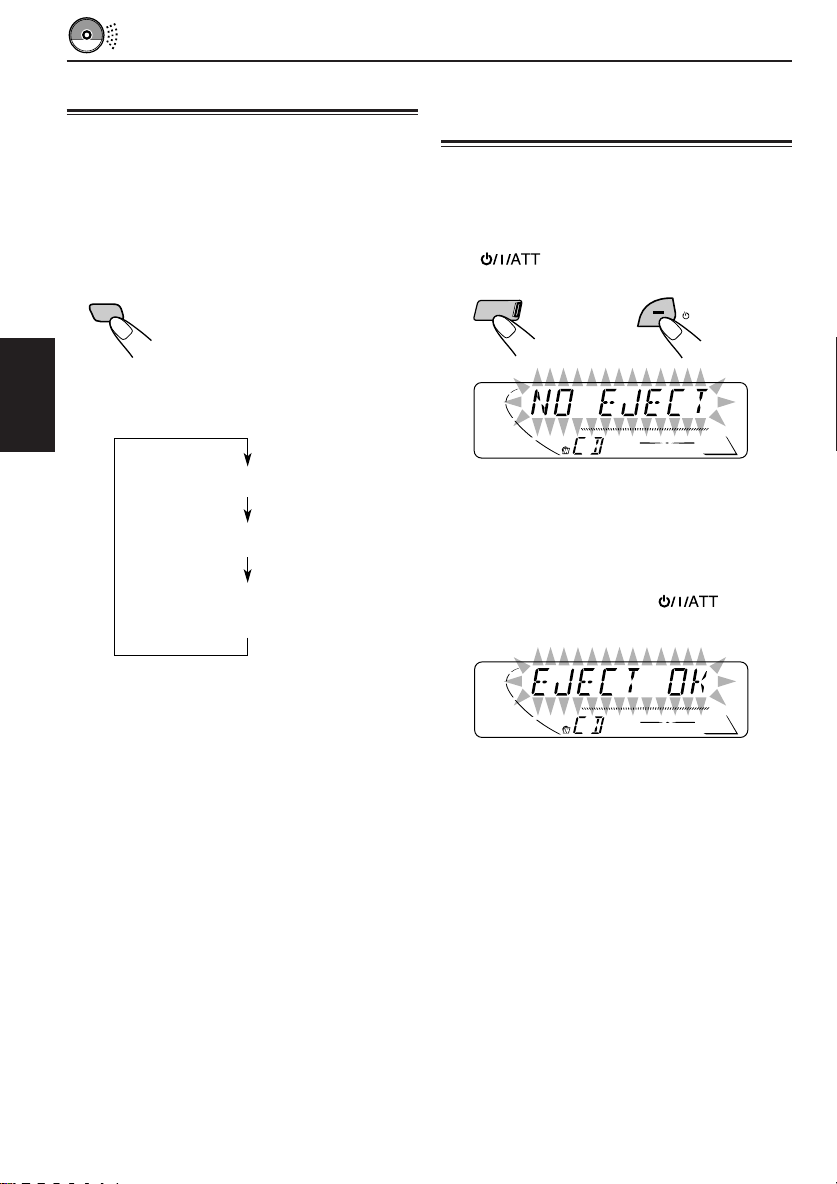
Lecture des CD Text
/I
ATT
/
Dans un CD Text, certaines informations à
propos du disque (son titre, l’interprète et le titre
de la plage) sont enregistrées. Vous pouvez
afficher certaines de ces informations sur
l’affichage.
Choisissez le mode d’affichage de texte
lors de la reproduction d’un CD Text.
DISP
Chaque fois que vous appuyez sur la touche,
l’affichage change comme suit:
FRANÇAIS
Interdiction de l’éjection de
CD
Vous pouvez interdire l’éjection d’un CD et le
verrouiller dans la fente d’insertion.
Tout en maintenant pressée CD, appuyez
sur pendant plus de
2 secondes.
CD
Titre du disque / Interprète
Titre de la plage
Plage actuelle et durée
de lecture écoulée
Remarques:
• L’affichage montre un maximum de 8 caractères à la
fois et défile s’il y en a plus.
Référez-vous aussi à “Sélection du mode de
défilement – SCROLL” à la page 21.
Certains caractères ou symboles n’apparaîtront pas
(et seront laissés en blanc) sur l’affichage.
(Ex. “ABCå!d#” ] “ABCA D ”)
• Quand vous appuyez sur DISP (affichage) lors de la
lecture d’un CD ordinaire, “NO NAME” apparaît
pour le titre/interprète du disque et pour le titre de
la plage.
“NO EJECT” clignote sur l’affichage pendant
environ 5 secondes, le CD est verrouillé et ne
peut plus être éjecté.
Pour annuler l’interdiction et déverrouiller le
CD, appuyez de nouveau sur pendant
plus de 2 secondes, tout en maintenant pressée
CD.
“EJECT OK” clignote sur l’affichage pendant
environ 5 secondes et le lecteur CD est
déverrouillé.
16
Page 77

AJUSTEMENT DU SON
Ajustement du son
Vous pouvez ajuster les caractéristiques du son à
votre préférence.
1
Choisissez l’élément que vous
souhaitez ajuster.
Chaque fois que vous appuyez sur
la touche, l’élément ajustable
change comme suit:
2
Ajustez le niveau.
Pour augmenter le niveau.
Pour diminuer le niveau.
BAS
(graves) (aigus) (fader)
VOL
(volume)
Indication Pour: Plage
BAS
TRE Ajuster les aigus. –06 (min.)
FAD* Ajuster l’équilibre R06 (Arrière
BAL Ajuster l’équilibre L06 (Gauche
LOUD Relève les
VOL Ajuster le volume. 00 (min.)
Ajuster les graves.
entre les enceintes
avant et arrière. |
entre les enceintes
gauche et droite. |
fréquences LOUD ON
basses et élevées
pour produire un LOUD OFF
son bien équilibré
à faible niveau de
volume.
TRE
LOUD
(contour)
FAD
BAL
(balance)
–06 (min.)
|
+06 (max.)
|
+06 (max.)
seulement)
F06 (Avant
seulement)
seulement)
R06 (Droite
seulement)
|
|
50 (max.)
La courbe d’égalisation change quand vous
ajustez les graves ou les aigus.
Remarque:
Normalement la molette de commande fonctionne
pour ajuster le volume. Alors, vous n’avez pas
besoin de choisir “VOL” pour ajuster le niveau de
volume.
Utilisation de la mémoire de
commande du son
Vous pouvez choisir et mémoriser un ajustement
du son spécifique pour chaque source de lecture.
(SCM avancé)
Sélection et mémorisation des modes
sonores
Une fois que vous avez choisi un mode sonore, il
est mémorisé. Il est rappelé et apparaît sur l’affichage
chaque fois que vous choisissez la même source.
Un mode sonore peut être mémorisé pour chacune
des sources suivantes — FM1, FM2, FM3, AM et
CD.
• Si vous ne souhaitez pas mémoriser le mode
sonore séparément pour chaque source de
lecture, mais souhaitez utiliser le même mode
sonore pour toutes les sources, référez-vous à
“Annulation de SCM avancé – SCM LINK” à la
page 21.
Choisissez le mode sonore souhaité.
SCM
Indicateur
“Link”
FRANÇAIS
* Si vous utilisez un système à deux enceintes, réglez le
niveau de fader sur “00”.
Chaque fois que vous appuyez sur la touche, le
mode sonore change comme suit:
BEAT
SOFT
POP SCM OFF
17
Page 78

• Si l’indicateur “Link” est allumé sur l’affichage
(avec “SCM LINK” réglé sur “LINK ON” —
référez-vous à la page 21), le mode sonore
choisi peut être mémorisé pour la source
actuelle, et l’effet appliqué à la source actuelle.
• Si l’indicateur “Link” N’EST PAS allumé sur
l’affichage (avec “SCM LINK” réglé sur “LINK
OFF”), le mode sonore choisi s’applique à
toutes les sources.
Indication Pour: Valeurs préréglées
BAS TRE
BEAT Musique rock +02 00 ON
ou disco
SOFT Musique de +01 –03 OFF
fond
POP Musique +04 +01 OFF
FRANÇAIS
SCM OFF (Son plat ) 00 00 ON
légère
Rappel des modes sonores
Choisissez la source pendant que
l’indicateur “Link” est allumé sur
l’affichage.
CD
FM
AM
LOUD
Mémorisation de votre propre
ajustement sonore
Vous pouvez ajuster les modes sonore (BEAT,
SOFT, POP) comme vous le souhaitez et
mémoriser votre propre ajustement.
• Il y a un temps limite pour effectuer les étapes
suivantes. Si le réglage est annulé avant que v ous
ne terminiez, recommencez à partir de l’étape 1.
1
Appelez le mode sonore que vous
souhaitez ajuster.
• Référez-vous à la colonne de gauche pour
les détails.
SCM
2
Choisissez “BAS” (graves), “TRE”
(aigus) ou “LOUD” (contour).
3
Ajustez le niveau des graves ou des
aigus ou mettez la fonction loudness
en/hors service (ON/OFF).
• Référez-vous à la page 17 pour les détails.
L’indicateur “Link” commence à clignoter et le
mode sonore mémorisé pour la source choisie
est rappelé.
La courbe d’égalisation
du mode sonore choisi
apparaît.
Remarques:
• Vous pouvez ajuster le mode sonore préréglé comme
vous le souhaitez et le mémoriser.
Si vous souhaitez ajuster et mémoriser votre propre
mode sonore, référez-vous à “Mémorisation de
votre propre ajustement sonore” sur la colonne de
droite.
• Pour ajuster les niveaux d’accentuation des graves
et des aigus ou pour mettre en/hors service
temporairement la fonction loudness, référez-vous à
la page 17. (Vos ajustements sont annulés si une
autre source est choisie.)
Indicateur LOUD (contour)
18
Indicateurs
du mode
sonore
4
Répétez les étapes 2 et 3 pour ajuster
d’autres éléments.
5
Maintenez pressé SCM jusqu'à ce que
le mode sonore que vous avez choisi
clignote sur l'affichage.
L’ajustement réalisé pour le mode sonore
choisi est mémorisé.
SCM
6
Répétez la même procédure pour
mémoriser d’autres modes sonores.
Pour réinitialiser l’appareil aux réglages
de l’usine
Répétez la même procédure et réattribuez les valeurs
préréglées du tableau de la colonne à la gauche.
Page 79

AUTRES FONCTIONS PRINCIPALES
Réglage de l’horloge
Vous pouv ez aussi régler le système de l’horloge sur
un affichage par cycle de 24 heures ou de 12 heures.
1
Maintenez pressée SEL (sélection)
pendant plus de 2 secondes de façon
que l’un des éléments PSM apparaisse
sur l’affichage. (Voir la page 20.)
2
Réglez les heures.
1 Choisissez “CLOCK H” s’il n’apparaît pas
sur l’affichage.
2 Ajustez les heures.
1
3
Réglez les minutes.
1 Choisissez “CLOCK M”.
2 Ajustez les minutes.
1
2
2
Modification des réglages
généraux (PSM)
Vous pouv ez modifier les éléments de la liste de la
page suivante en utilisant la commande PSM
(Preferred Setting Mode — Mode de réglage
préféré).
Procédure de base
1
Maintenez pressée SEL (sélection)
pendant plus de 2 secondes de façon
que l’un des éléments PSM apparaisse
sur l’affichage. (Voir la page 20.)
2
Choisissez l’élément PSM que vous
souhaitez ajuster. (Voir la page 20.)
3
Ajustez l’élément PSM choisi
ci-dessus.
FRANÇAIS
4
Réglez le système de l’horloge.
1 Choisissez “24H/12H”.
2 Choisissez “24H” ou “12H”.
1
5
Terminez le réglage.
Pour vérifier l’heure actuelle quand l’appareil
est hors tension, appuyez sur DISP (affichage).
L’appareil se met sous tension, l’heure apparaît
pendant 5 secondes, puis l’appareil se remet
hors tension.
2
4
Répétez, si nécessaire, les étapes 2
et 3 pour ajuster les autres éléments
PSM.
5
Terminez le réglage.
19
Page 80
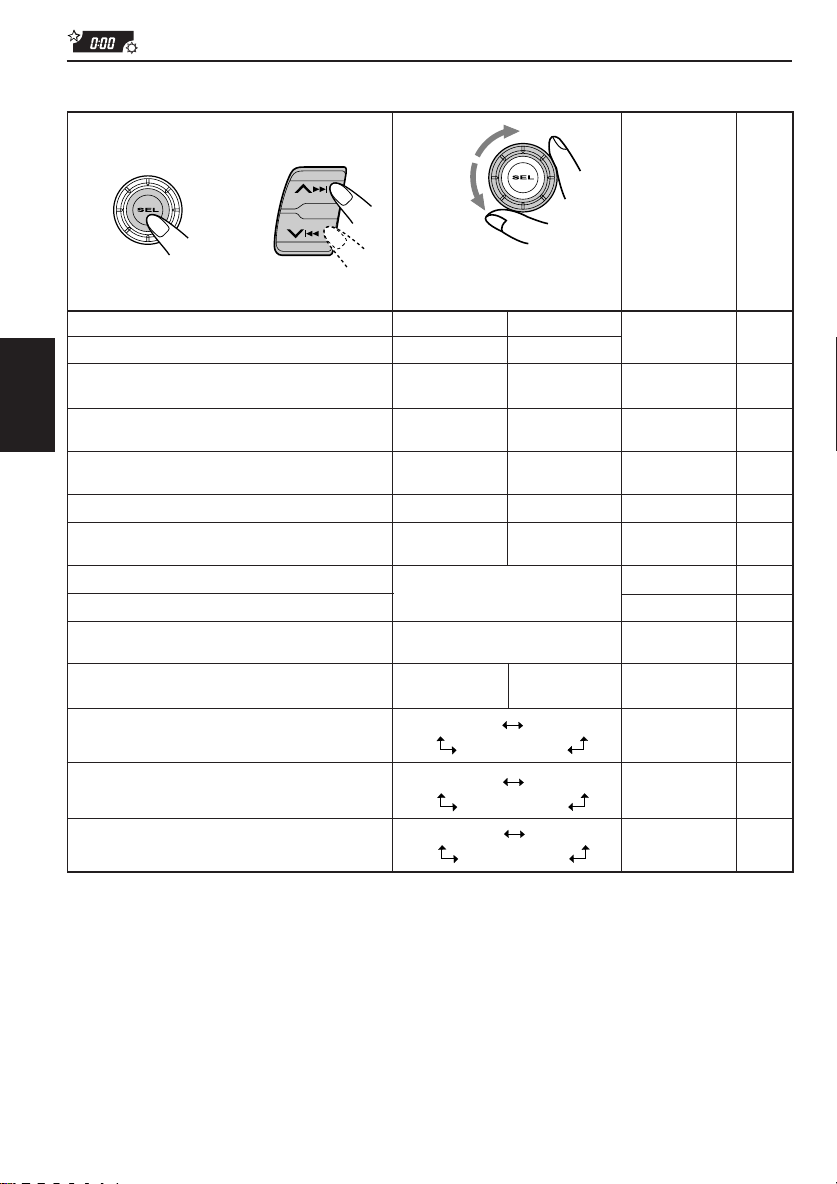
Les éléments Preferred Setting Mode — Mode de réglage préféré (PSM)
1
CLOCK H Réglage des heures
CLOCK M Réglage des minutes
SCM LINK Liaison mémoire de
24H/12H Affichage de l’horloge
FRANÇAIS
AUTO ADJ Réglage automatique
CLOCK Affichage de l’horloge
TU DISP Mode d’affichage du
PTY STBY Attente PTY
PTY SRCH Recherche PTY
TA VOL Volume des
P-SEARCH Recherche de
LEVEL Affichage du niveau
TEL Silencieux
SCROLL Affichage des noms
2
Choisissez.Maintenez pressée.
commande du son
sur 24/12 heures
de l’horloge
tuner
informations routières
programme
téléphonique
3
Réglez.
Sens
contraire des
aiguilles
d’une montre
Recule Avance
LINK OFF
12H
OFF
OFF
FREQ PS NAME
29 types de programmes
(Voir la page 11.)
VOL 00 – VOL 50 VOL 20
AUDIO 1
MUTING 1
ONCE
Sens des
aiguilles
d’une
montre
AvanceRecule
LINK ON
24H
ON
ON
ONOFF OFF
AUDIO 2
OFF
MUTING 2
OFF
AUTO
OFF
Préréglages
d’usine
0:00
LINK ON
24H
ON
ON
PS NAME
NEWS
(
Voir la page
AUDIO 2
OFF
ONCE
11.)
Voir la
page
19
18, 21
19
13
21
13
10
11
13
13
21
21
21
• Appuyez sur SEL (sélection) pour terminer le réglage.
20
Page 81

Annulation de SCM avancé – SCM LINK
Vous pouvez annuler les réglages SCM (mémoire
de commande sonore) avancés et annuler les
liaisons des modes sonores avec les sources de
lecture.
À l’expédition de l’usine, un mode sonore
différent peut être mémorisé pour chaque source
de façon à ce que vous puissiez changer les
modes sonores simplement ne changeant de
source.
• LINK ON: Réglages SCM avancés (Modes
• LINK OFF: Réglages SCM ordinaires (Un seul
Sélection de l’affichage de l’horloge –
Vous pouvez régler l’horloge de façon à ce
qu’elle apparaisse dans l’affichage quand
l’appareil est sous tension. À l’expédition de
l’usine, l’horloge est réglée pour apparaître sur
l’affichage.
• ON: L’horloge apparaît sur l’affichage.
• OFF: L’affichage de l’horloge est mis
Pour vérifier l’autre information pendant la lecture
Appuyez sur DISP (Affichage). Chaque fois que vous
appuyez sur la touche, l’autre information (l’horloge
ou le nom de la source) apparaît sur la partie
inférieure de l’affichage pendant un certain temps.
sonores différents pour chaque
source).
mode sonore pour toutes les
sources).
CLOCK
hors service. Quand “OFF” est
choisi, le nom de la source actuelle
ou la gamme de la station apparaît
à la place de l’horloge sur
l’affichage.
Sélection du silencieux téléphonique – TEL
Ce mode est utilisé quand un système de téléphone
cellulaire est connecté. Selon le système de
téléphone utilisé, choisissez “MUTING 1” ou
“MUTING 2”, celui qui atténue le son de cet appareil.
À l’expédition de l’usine, ce mode est hors
service.
• MUTING 1: Choisissez ce réglage s’il peut
atténuer le son.
• MUTING 2: Choisissez ce réglage s’il peut
atténuer le son.
• OFF: Met hors service le silencieux
téléphonique.
Sélection du mode de défilement – SCROLL
Vous pouvez choisir le mode de défilement pour
l’affichage des noms et des informations des
disques s’ils comprennent plus de 8 caractères. À
l’expédition de l’usine, le mode de défilement est
réglé sur “ONCE”.
• ONCE: Répète le défilement seulement une
fois.
• AUTO: Répète le défilement. (Intervalle de
5 secondes.)
• OFF: Annule mode de défilement.
Remarque:
Même si le mode de défilement est réglé sur “OFF”,
vous pouvez faire défiler l’affichage en appuyant sur
DISP pendant plus d’une seconde.
FRANÇAIS
Pour choisir l’affichage du niveau – LEVEL
Vous pouvez choisir l’affichage du niveau en
fonction de vos préférences. À l’expédition de
l’usine, “AUDIO 2” est choisi.
• AUDIO 1: Montre l’indicateur du niveau
sonore et l’indicateur de la courbe
d’égalisation.
• AUDIO 2: Alterne entre le réglage “AUDIO 1”
et l’affichage de l’éclairage.
• OFF: Efface l’indicateur du niveau
sonore et l’indicateur de la courbe
d’égalisation.
21
Page 82

Détachement du panneau de
commande
Vous pouvez détacher le panneau de commande
quand vous quittez la voiture.
Lors du détachement ou de la remise en place du
panneau de commande, faites attention de ne
pas endommager les connecteurs situés à
l’arrière du panneau et sur le porte-panneau.
Comment détacher le panneau de
commande
Avant de détacher le panneau de commande,
assurez-vous de mettre l’appareil hors tension.
1
Déverrouillez le panneau de
FRANÇAIS
commande.
2
Levez et tirez le panneau de
commande de l’appareil.
Comment attacher le panneau de
commande
1
Insérez le côté droit du panneau de
commande dans la rainure située du
côté droit du porte-panneau.
2
Appuyez sur le côté gauche du
panneau de commande pour le fixer
au porte-panneau.
Remarque sur le nettoyage des connecteurs:
Si vous détachez fréquemment le panneau de
commande, les connecteurs se détérioreront.
Pour réduire cette détérioration, essuyez
périodiquement les connecteurs avec un coton-tige
ou un tissu imprégné d’alcool, en faisant attention
de ne pas endommager les connecteurs.
22
3
Mettez le panneau de commande
détaché dans la boîte fournie.
Connecteurs
Page 83

DEPANNAGE
Ce qui apparaît comme un problème n’est pas toujours très sérieux. Vérifier les points suivants avant
d’appeler un centre de réparation.
Symptômes
• Le CD ne peut pas être
reproduit.
• Le son du CD est interrompu
par moment.
• Le son est interrompu par
moment.
• Le son ne peut pas être
entendu des enceintes.
• La présélection automatique
SSM (Strong-station
Sequential Memory) ne
fonctionne pas.
• Il y a du bruit statique lors de
l’écoute de la radio.
• “NO DISC” apparaît sur
l’affichage.
• Le CD ne peut pas être
éjecté.
• Le CD ne peut être ni
reproduit ni éjecté.
• Cet appareil ne fonctionne
pas du tout.
Causes
Le CD est inséré à l’envers.
Vous conduisez sur une route
accidentée.
Le CD est rayé.
Les connexions sont
incorrectes.
Les connexions sont
incorrectes.
Le niveau de volume est réglé
au niveau minimum.
Les connexions sont
incorrectes.
Les signaux sont trop faibles.
L’antenne n’est pas connectée
fermement.
Il n’y a pas de CD en place.
Le CD est verrouillé.
Le lecteur de CD fonctionne
peut-être incorrectement.
Le micro-ordinateur intégré peut
fonctionner incorrectement à
cause de bruit, etc.
Remèdes
Insérez-le correctement.
Arrêtez la lecture du CD quand
vous conduisez sur une route
accidentée.
Changez le CD.
Vérifiez les cordons et les
connexions.
Vérifiez les cordons et les
connexions.
Ajustez-la sur le niveau
optimum.
Vérifiez les cordons et les
connexions.
Mémorisez les stations
manuellement.
Connectez l’antenne
fermement.
Insérez un CD correctement.
Déverrouillé le CD (voir la page
16).
Maintenez pressée en même
temps les deux touches CD et
SEL pendant plusieurs secondes.
(“PLEASE” et “EJECT”
apparaissent alternativement sur
l’affichage.) Lorsque vous ouvrez
le panneau de commande en
appuyant sur 0, faire attention de
ne pas faire tomber le disque
quand il est éjecté.
Maintenez pressée SEL et
en même temps
pendant quelques secondes
pour réinitialiser l’appareil. (Le
réglage de l’horloge et les
stations présélectionnées
enregistrées en mémoire sont
effacées.) (Voir la page 2.)
FRANÇAIS
23
Page 84

ENTRETIEN
Manipulation des CD
Cet appareil a été conçu uniquement pour
reproduire les CD portant les marques suivantes.
COMPACT
DIGITAL AUDIO
• Les autres disques ne peuvent pas être
reproduits.
Manipulation des CD
Pour retirer un CD de
son boîtier, faites
pression sur le support
central du boîtier et
retirez le CD en le tenant par ses arêtes.
• Tenez toujours le CD par ses arêtes. Ne
FRANÇAIS
touchez pas la surface enregistrée.
Pour remettre un CD dans son boîtier, insérez
délicatement le CD autour du support central (la
surface imprimée dirigée vers le haut).
• Remettez les CD dans leur boîtier après
utilisation.
Pour garder propre vos CD
Un CD sale peut ne pas être
reproduit correctement. Si
un CD devient sale,
essuyez-le avec un chiffon
doux, en ligne droite, du
centre vers les arêtes.
Avant de reproduire un
CD neuf
Les CD neufs peuvent avoir
des ébarbures sur les
arêtes intérieures et
extérieures. Si un tel CD
est utilisé, cet appareil risque de rejeter le CD.
Pour retirer ces ébarbures, frottez les arête avec
un crayon, un stylo, etc.
A propos du désaligement:
Un désalignement peut être la conséquence d’une
conduite sur un terrain accidenté. Cela
n’endommage pas l’appareil ni le CD, mais cela
peut être agaçant.
Nous vous recommandons d’arrêter la lecture de
CD lors d’une conduite sur un tel terrain.
24
Support central
Condensation d’humidité
De l’humidité peut se condenser sur la lentille à
l’intérieur du lecteur CD dans les cas suivant:
• Après avoir mis le chauffage dans la voiture.
• Si l’intérieur de la voiture devient très humide.
Si cela se produit, le lecteur CD peut ne pas
fonctionner correctement. Dans ce cas, éjectez le
CD et laissez l’appareil sous tension pendant
quelques heures, jusqu’à ce que l’humidité se
soit évaporée.
Lors de la reproduction d’un CD-R
(enregistrable)
Vous pouvez reproduire vos CD-R originaux dans
cet appareil.
• Avec de reproduire un CD-R, lisez
attentivement les instructions et les précautions
qui l’accompagnent.
• Certains CD-R enregistrés sur des
enregistreurs de CD ne peuvent pas être
reproduits sur cet appareil à cause de leurs
caractéristiques ou des raisons suivantes:
– Le disque est sale ou rayé.
– De la condensation d’humidité s’est produite
sur la lentille à l’intérieur de l’appareil.
– La lentille du capteur à l’intérieur du lecteur
CD est sale.
• Utilisez uniquement des CD-R “finalisés”.
• Les CD-RW (réinscriptibles) ne peuvent pas
être reproduits sur cet appareil.
• N’utilisez pas de CD-R avec des autocollants
ou des étiquettes collées sur leur surface. Cela
peut causer un mauvais fonctionnement.
ATTENTION:
• N’insérez pas des CD de 8 cm (CD single) dans
la fente d’insertion. (De tels CD ne peuvent pas
être éjectés.)
• N’insérez pas des CD avec une forme
inhabituelle — comme le cœur d’une fleur; cela
pourrait causer un mauvais fonctionnement.
• N’exposez pas les CD à la lumière directe du
soleil ou à toute source de chaleur, ni ne les
placez pas dans un endroit soumis à des hautes
température ou à l’humidité. Ne les laissez pas
dans la voiture.
• N’utilisez aucun solvant (comme par exemple:
un nettoyant pour disque analogique, un diluant
en bombe, du benzine, etc.) pour nettoyer les
CD.
Page 85

SPECIFICATIONS
SECTION AMPLIFICATEUR AUDIO
Puissance de sortie maximum:
Avant: 45 W par canal
Arrière: 45 W par canal
Puissance de sortie en mode continu (efficace):
Avant: 17 W par canal pour 4 Ω, 40 Hz à
20 000 Hz à moins de 0,8% de
distorsion harmonique totale.
Arrière: 17 W par canal pour 4 Ω, 40 Hz à
20 000 Hz à moins de 0,8% de
distorsion harmonique totale.
Impédance de charge: 4 Ω (4 Ω à 8 Ω tolérés)
Plage de commande de la tonalité:
Graves: ±10 dB à 100 Hz
Aigus: ±10 dB à 10 Hz
Réponse en fréquence: 40 Hz à 20 000 Hz
Rapport signal sur bruit: 70 dB
Niveau de sortie de ligne/Impédance:
2,0 V/20 kΩ en charge (pleine échelle)
Impédance de sortie: 1 kΩ
SECTION TUNER
Plage de fréquence:
FM: 87,5 MHz à 108,0 MHz
AM: (PO) 522 kHz à 1620 kHz
(GO) 144 kHz à 279 kHz
SECTION LECTEUR CD
Type: lecteur de disque compact
Système de détection de signal: capteur sans
contact optique (semiconducteur laser)
Nombre de canaux: 2 canaux (stéréo)
Réponse en fréquence: 5 Hz à 20 000 Hz
Plage dynamique: 96 dB
Rapport signal sur bruit: 98 dB
Pleurage et scintillement:
inférieur à la limite mesurable
GENERAL
Alimentation:
Tension de fonctionnement: CC 14,4 V
(11 V à 16 V tolérés)
Système de mise à la masse: Masse négative
Température de fonctionnement admissible:
0°C à +40°C
Dimensions (L × H × P):
Taille d’installation:
182 mm × 52 mm × 160 mm
Taille du panneau:
188 mm × 58 mm × 8 mm
Masse: 1,7 kg (sans les accessoires)
FRANÇAIS
[Tuner FM]
Sensibilité utilisable: 11,3 dBf (1,0 µV/75 Ω)
Sensibilité utile à 50 dB:
16,3 dBf (1,8 µV/75 Ω)
Sélectivité de canal alterné (400 kHz):
65 dB
Réponse en fréquence: 40 Hz à 15 000 Hz
Séparation stéréo: 30 dB
Rapport de synchronisation: 1,5 dB
[Tuner PO]
Sensibilité: 20 µV
Sélectivité: 35 dB
[Tuner GO]
Sensibilité: 50 µV
La conception et les spécifications sont sujettes à
changement sans notification.
25
Page 86

Having TROUBLE with operation?
Please reset your unit
Refer to page of How to reset your unit
Haben Sie PROBLEME mit dem Betrieb?
Bitte setzen Sie Ihr Gerät zurück
Siehe Seite Zurücksetzen des Geräts
Vous avez des PROBLÈMES de fonctionnement?
Réinitialisez votre appareil
Référez-vous à la page intitulée Comment réinitialiser votre appareil
Hebt u PROBLEMEN met de bediening?
Stel het apparaat terug
Zie de pagina met de paragraaf Het apparaat terugstellen
EN, GE, FR, NL
VICTOR COMPANY OF JAPAN, LIMITED
0900MNMMDWJES
JVC
Page 87

KD-S9R
Installation/Connection Manual
Einbau/Anschlußanleitung
Manuel d’installation/raccordement
GET0007-003A
[E]
0900MNMMDWJES
JVC
EN, GE, FR
ENGLISH
• This unit is designed to operate on 12 V DC , NEGATIVE ground
electrical systems.
INSTALLATION
(IN-DASH MOUNTING)
• The following illustration shows a typical installation. However,
you should make adjustments corresponding to your specific
car. If you have any questions or require information regarding
installation kits, consult your JVC IN-CAR ENTERTAINMENT
dealer or a company supplying kits.
1
Before mounting: Press (Control Panel Release
button) to detach the control panel.
2
Remove the trim plate.
3
Remove the sleeve after disengaging the sleeve locks.
1 Stand the unit.
Note: When you stand the unit, be careful not to damage
the fuse on the rear.
2 Insert the 2 handles between the unit and the sleeve, as
illustrated, to disengage the sleeve locks.
3 Remove the sleeve.
Note: Be sure to keep the handles for future use after
installing the unit.
4
Install the sleeve into the dashboard.
* After the sleeve is correctly installed into the dashboard,
bend the appropriate tabs to hold the sleeve firmly in place,
as illustrated.
5
Fix the mounting bolt to the rear of the unit’s body and place
the rubber cushion over the end of the bolt.
6
Do the required electrical connections.
7
Slide the unit into the sleeve until it is locked.
8
Attach the trim plate so that the projection on the trim plate
is fixed to the left side of the unit.
9
Attach the control panel.
DEUTSCH
• Dieses Gerät ist für einen Betrieb in elektrischen Anlagen mit
12 V Gleichstrom und (–) Erdung ausgelegt.
EINBAU
(IM ARMATURENBRETT)
• Die folgende Abbildung zeigt einen typischen Einbau. Dennoch
müssen Sie entsprechend Ihrem jeweiligen Auto Anpassungen
vornehmen. Bei irgendwelchen Fragen oder wenn Sie
Informationen hinsichtlich des Einbausatzes brauchen, wenden
Sie sich an ihren JVC Autoradiohändler oder ein Unternehmen
das diese Einbausätze vertreibt.
1
Vor dem Einbau: (Schalttafel-Freigabetaste) zum
Lösen der Schalttafel drücken.
2
Den Frontrahmen herausnehmen.
3
Die Halterung nach dem Entriegeln der Halterungensperren
abnehmen.
1 Das Gerät aufstellen.
Hinweis: Beim Aufstellen des Geräts darauf achten,
daß die Sicherung auf der Rückseite nicht beschädigt
wird.
2 Die 2 Griffe zwischen dem Gerät und der Halterung wie
abgebildet einstecken und die Halterungensperren
entriegeln.
3 Die Halterung entfernen.
Hinweis: Sicherstellen, daß die Griffe für künftigen
Gebrauch nach dem Einbau des Geräts aufbewahrt
werden.
4
Die Halterung im Armaturenbrett einbauen.
* Nach dem korrekten Einbau der Halterung im
Armaturenbrett, die entsprechenden Riegel umknicken,
um die Halterung an ihrem Platz zu sichern, siehe
Abbildung.
5
Die Befestigungsschraube an der Rückseite des
Gerätekörpers befestigen und das Ende der Schraube mit
einem Gummipuffer abdecken.
6
Nehmen Sie die erforderlichen elektrischen Anschlüsse vor.
7
Das Gerät in die Halterung schieben, bis es einrastet.
8
Befestigen Sie die Frontrahmen in der Form, daß der
Fortsatz der Frontrahmen auf der linken Seite des Geräts
befestigt wird.
9
Die Schalttafel anbringen.
FRANÇAIS
•
Cet appareil est conçu pour fonctionner sur des sources de
courant continu de 12 V à masse NEGATIVE.
INSTALLATION
(MONTAGE DANS LE TABLEAU DE BORD)
•
L’illustration suivante est un exemple d’installation typique.
Cependant, vous devez faire les ajustements correspondant à
votre voiture particulière. Si vous avez des questions ou avez
besoin d’information sur des kits d’installation, consulter votre
revendeur d’autoradios JVC ou une compagnie
d’approvisionnement.
1
Avant le montage:
du panneau de commande) pour détacher le panneau de
commande.
2
Retirer la plaque d’assemblage.
3
Libérer les verrous du manchon et retirer le manchon.
1
Poser l’appareil à la verticale.
Remarque:
faire attention de ne pas endommager le fusible situé
sur l’arrière.
2
Insérer les 2 poignées entre l’appareil et le manchon
comme indiqué pour désengagé les verrous de manchon.
3
Retirer le manchon.
Remarque:
utilisation ultérieur, après l’installation de l’appareil.
4
Installer le manchon dans le tableau de bord.
* Après installation correcte du manchon dans le tableau
de bord, plier les bonnes pattes pour maintenir fermement
le manchon en place, comme montré.
5
Monter le boulon de montage sur l’arrière du corps de
l’appareil puis passer l’amortisseur en caoutchouc sur
l’extrémité du boulon.
6
Réalisez les connexions électriques.
7
Faire glisser l’appareil dans le manchon jusqu’à ce qu’il soit
verrouillé.
8
Attachez la plaque d’assemblage de façon que la projection
de la plaque d’assemblage soit fixée sur le côté gauche de
l’appareil.
9
Remonter le panneau de commande.
Appuyer sur (touche de libération
Lorsque vous mettez l’appareil à la verticale,
S’assurer de garder les poignées pour une
1
3
Fuse
Sicherung
Fusible
Handle
Griffe
Poignée
Slot
Schlitz
Fente
Control Panel
Schalttafel
Panneau de command
Lock Plate
Arretierplättchen
Plaque de verrouillage
9
2
8
Sleeve
Halterung
Manchon
7
Trim plate
Frontrahmen
Plaque d’assemblage
Rubber cushion
Gummipuffer
Amortisseur en
caoutchouc
4
4
Dashboard
Armaturenbrett
Tableau de bord
184 mm
53 mm
5
Mounting bolt
Befestigungsschraube
Boulon de montage
6
See “ELECTRICAL CONNECTIONS. ”
*
Siehe „ELEKTRISCHE ANSCHLÜSSE“.
Référez-vous “RACCORDEMENTS
ELECTRIQUES”.
Sleeve
Halterung
Manchon
Control Panel
Schalttafel
Panneau de command
Trim plate
Frontrahmen
Plaque d’assemblage
Page 88

• When using the optional stay
• Beim Verwenden der Anker-Option
• Lors de l’utilisation du hauban en option
Washer
Unterlegscheibe
Dashboard
Armaturenbrett
Tableau de bord
Rondelle
Fire wall
Feuerwand
Cloison
Stay (option)
Anker (Option)
Hauban (en option)
Lock nut
Sicherungsmutter
Ecrou d’arrêt
• When installing the unit without using the sleeve
• Beim Einbau des Geräts ohne Halterung
• Lors de l’installation de l’appareil scans utiliser de manchon
In a Toyota for example, first remove the car radio and install the unit in its place.
Zum Beispiel in einem Toyota zuerst das Autoradio ausbauen und dann das Gerät an seinem Platz einbauen.
Par exemple dans une Toyota, retirer d’abord l’autoradio et installer l’appareil à la place.
* Not included with this unit.
Flat type screws (M5 x 6 mm)*
Senkkopfschrauben (M5 x 6 mm)*
Vis à tête plate (M5 x 6 mm)*
Bracket*
Konsole*
Support*
* Nicht Teil dieses Geräts.
*
Non fourni avec cet appareil.
Sleeve
Halterung
Manchon
Removing the unit
• Before removing the unit, release the rear section.
1
Remove the control panel.
2
Remove the trim plate.
3
Insert the 2 handles into the slots, as shown. Then, while
gently pulling the handles away from each other, slide out the
unit. (Be sure to keep the handles after installing it.)
Screw (option)
Schraube (Option)
Vis (en option)
Mounting bolt
Befestigungsschraube
Boulon de montage
Note: When installing the unit on the mounting brack et, make sure to use the 6 mm-long screws. If
Pocket
Taschen
Poche
longer screws are used, they could damage the unit.
Hinweis: Beim Anbringen des Gerät an der Konsole sicherstellen, daß 6 mm lange Schrauben
verwendet werden. Werden längere Schrauben verwendet, können sie das Gerät beschädigen.
Remarque:
Lors de l’installation de l’appareil sur le support de montage, s’assurer d’utiliser des vis
d’une longueur de 6 mm. Si des vis plus longues sont utilisées , elles peuvent endommager l’appareil.
Ausbau des Geräts
• Vor dem Ausbau des Geräts den hinteren Teil freigeben.
1
Die Schalttafel herausnehmen.
2
Den Frontrahmen abnehmen.
3
Die 2 Griffe in die Schlitze wie gezeigt stecken. Dann die Griffe
behutsam auseinander ziehen und das Gerät herausziehen.
(Die Griffe nach dem Einbau auf jeden Fall aufbewahren.)
Bracket*
Konsole*
Support*
Flat type screws (M5 x 6 mm)*
Senkkopfschrauben (M5 x 6 mm)*
Vis à tête plate (M5 x 6 mm)*
Retrait de l’appareil
•
Avant de retirer l’appareil, libérer la section arrière.
1
Retirer le panneau de commande.
2
Retirer la plaque d’assemblage.
3
Introduire les deux poignées dans les fentes, comme montré.
Puis, tout en tirant doucement les poignées écartées, faire
glisser l’appareil pour le sortir.
poignées après l’installation de l’appareil.)
(S’assurer de conserver les
Control Panel
Schalttafel
Panneau de command
Parts list for installation and connection
The following parts are provided with this unit.
After checking them, please set them correctly.
Hard case
Etui
Etui de transport
Trim plate
Frontrahmen
Plaque d’assemblage
Teileliste für den Einbau und Anschluß
Die folgenden Teile werden zusammen mit diesem Gerät geliefert.
Nach ihrer Überprüfung, die Teile richtig einsetzen.
Sleeve
Halterung
Manchon
321
Handle
Griff
Poignée
Liste des pièces pour l’installation et
raccordement
Les pièces suivantes sont fournies avec cet appareil.
Après vérification, veuillez les placer correctement.
Trim plate
Frontrahmen
Plaque d’assemblage
Pow er cord
Stromkabel
Cordon d’alimentation
Handles
Griffe
Poignées
Washer (ø5)
Unterlegscheibe(ø5)
Rondelle (ø5)
Mounting bolt (M5 x 20 mm)
Befestigungsschraube (M5 x 20 mm)
Boulon de montage (M5 x 20 mm)
Lock nut (M5)
Sicherungsmutter (M5)
Ecrou d’arrêt (M5)
Rubber cushion
Gummipuffer
Amortisseur en caoutchouc
Page 89

ENGLISH
DEUTSCH
FRANÇAIS
ELECTRICAL CONNECTIONS
T o prev ent short circuits, we recommend that you disconnect the battery’s
negative terminal and make all electrical connections before installing
the unit. If y ou are not sure how to install this unit correctly , hav e it installed
by a qualified technician.
Note:
This unit is designed to operate on 12 V DC, NEGATIVE ground
electrical systems. If y our vehicle does not ha v e this system, a voltage
inverter is required, which can be purchased at JVC IN-CAR
ENTERTAINMENT dealers.
• Replace the fuse with one of the specified rating. If the fuse blows
frequently, consult your JVC IN-CAR ENTERTAINMENT dealer.
• If noise is a problem...
This unit incorporates a noise filter in the power circuit. However, with
some vehicles, clicking or other unwanted noise may occur. If this
happens, connect the unit’s rear ground terminal (see connection
diagram) to the car’s chassis using shorter and thicker cords , such as
copper braiding or gauge wire. If noise still persists, consult your JVC
IN-CAR ENTERTAINMENT dealer.
• Maximum input of the speakers should be more than 45 W at the rear
and 45 W at the front, with an impedance of 4 Ω to 8 Ω.
• Be sure to ground this unit to the car’s chassis.
• The heat sink becomes very hot after use. Be careful not to touch it
when removing this unit.
ELEKTRISCHE ANSCHLÜSSE
Zur Vermeidung von Kurzschlüssen empfehlen wir, daß Sie den
negativen Batterieanschluß abtrennen und alle elektrischen
Anschlüsse herstellen, bevor das Gerät eingebaut wird. Sind Sie sich
über den richtigen Einbau des Geräts nicht sicher, lassen Sie es von
einem qualifizierten Techniker einbauen.
Hinweis:
Dieses Gerät ist für eine Betrieb in elektrischen Anlagen mit 12 V
Gleichstrom und (–) Erdung ausgelegt. Verfügt Ihr Fahrzeug nicht
über diese Anlage, ist ein Spannungsinverter erforderlich, der bei
JVC Autoradiohändler erworben werden kann.
• Die Sicherung mit einer der entsprechenden Nennleistung ersetzen.
Brennt die Sicherung häufig durch, wenden Sie sich an ihren JVC
Autoradiohändler.
• Sind Störgeräusche ein Problem...
Dieses Gerät enthält ein Störfilter im Stromkreis. Bei manchen
Fahrzeugen kann jedoch ein Klicken oder andere unerwünschte
Störgeräusche auftreten. Sollte das der Fall sein, die hintere
Erdungscanschlußklemme (siehe Schaltplan) des Geräts am
Fahrwerk des Fahrzeugs anschließen, dabei kürzere und dickere
Kabel wie beispielsweise Kupfergeflechtdraht oder Stahldraht
verwenden. Bleibt Störgeräusch bestehen, wenden Sie sich an Ihren
JVC Autoradiohändler.
• Maximale Eingangsleistung der Lautsprecher muß höher als 45 W
hinten und 45 W vorne sein, mit einer Impedanz von 4 Ω bis 8 Ω.
• Sicherstellen, daß das Gerät am Fahrwerk geerdet wird.
• Das Abstrahlblech wird nach dem Gebrauch sehr heiß. Beim
Ausbau des Geräts darauf achten, das Abstrahlblech nicht zu
berühren.
RACCORDEMENTS ELECTRIQUES
Pour éviter tout court-circuit, nous vous recommandons de débrancher
la borne négative de la batterie et d’effectuer tous les raccordements
électriques avant d’installer l’appareil. Si l'on n’est pas sûr de pouvoir
installer correctement cet appareil, le faire installer par un technicien
qualifié.
Remarque:
Cet appareil est conçu pour fonctionner sur des sources de courant
continu de
type d’alimentation, il vous faut un conver tisseur de tension, que vous
pouvez acheter chez un revendeur d’autoradios JVC.
•
Remplacer le fusible par un de la valeur précisée. Si le fusible saute
souvent, consulter votre revendeur d’autoradios JVC.
•
Si le bruit est un problème...
Cet appareil incorpore un filtre de bruit dans le circuit d’alimentation.
Cependant, avec certains véhicules, quelques claquements ou autres
bruits non désirés risquent de se produire. Si cela arrive , raccorder la
borne arrière de masse
diagramme de raccordement) en utiliscant des cordons les plus gros
et les plus courts possibles telle qu'une barre de cuivre ou une tresse.
Si le bruit persiste, consulter votre revendeur d’autoradios JVC.
•
La puisscance admissible des haut-parleurs doit être supérieure à
45 W à l’arrière et à 45 W l’avant, avec une impédance de
• S’assurer de raccorder la mise à la masse de cet appareil au
châssis de la voiture.
•
Le dissipateur de chaleur devient très chaud après usage. Faire
attention de ne pas le toucher en retirant cet appareil.
12 V à masse NEGATIVE
de l’appareil au châssis de la voiture (voir le
. Si votre véhicule n’offre pas ce
4 Ω à 8 Ω
.
Heat sink
Abstrahlblech
Dissipateur de chaleur
A Typical Connections / Typische Anschlüsse / Raccordements typiques
Before connecting: Check the wiring in the vehicle carefully.
Incorrect connection may cause serious damage to this unit.
1
Connect the colored leads of the power cord to the car battery ,
speakers and power aerial (if any) in the following sequence.
1 Black: ground
2 Yellow: to car battery (constant 12 V)
3 Red: to an accessory terminal
4 Blue with white stripe: to power aerial (200 mA max.)
5 Brown: to cellular phone system (For details, refer to the
instructions of the cellular phone.)
6 Others: to speakers
2
Connect the aerial cord.
3
Finally connect the wiring harness to the unit.
Note: If your vehicle does not hav e any accessory terminal, move
the fuse from the fuse position 1 (initial position) to fuse position
2, and connect the red lead (A7) to the positive (+) battery terminal.
• The yellow lead (A4) is not used in this case.
V or dem Anschließen: Die Verdrahtung im Fahrzeug sorgfältig
überprüfen. Falsche Anschlüsse können ernsthafte Schäden am
Gerät hervorrufen.
1
Die farbigen Leitungen des Spannunsgversorgungskabels an
der Autobatterie, den Lautsprechern und dem Motorantenne
(sofern vorhanden) in folgender Reihenfolge anschließen.
1 Schwarz: Erdung
2 Gelb: an Autobatterie (konstant 12 V)
3 Rot: an Zubehöranschlußklemme
4 Blau mit weißem Streifen: an Motorantenne (max. 200 mA)
5 Braun: an Mobiltelefon (Weitere informationen entnehmen
Sie bitte der Bedienungscanleitung des Mobiltelefons.)
6 Andere: an Lautsprecher
2
Das Antennenkabel anschließen.
3
Die Kabelbäume am Gerät anschließen.
Hinweis: Verfügt Ihr Fahrzeug nicht über eine
Zubehöranschlußklemme, die Sicherung von der 1.
Sicherungsposition (Erstposition) in die 2. Sicherungsposition
versetzen, die rote Leitung (A7) an der (+)
Batterieanschlußklemme anschließen.
• Die gelbe Leitung (A4) wird in diesem Fall nicht verwendet.
Avant de commencer la connexion:
vérifiez attentivement le
câblage du véhicule. Une connexion incorrecte peut endommager
sérieusement l’appareil.
1
Connectez les fils de couleur du cordon d’alimentation à la
batterie de la voiture, aux enceintes et à l’antenne automatique
(s’il y en a une) dans l’ordre suivant.
1
Noir: a la masse
2
Jaune: a la batterie de la voiture (12 V constant)
3
Rouge: à la prise accessoire
4
Bleu avec bande blanche: à l’antenne automatique
(200 mA max.)
5
Marron: à un système de téléphone cellulaire (Pour les
détails, se référer aux instructions du téléphone cellulaire.)
6
Autres: aux enceintes
2
Connectez le cordon d’antenne.
3
Finalement, connectez le faisceau de fils à l’appareil.
Remarque:
Si votre véhicule ne possède pas de borne
accessoire, déplacez le fusible de la position de fusible 1 (position
originale) à la position de fusible 2 et connectez le fil rouge (A7)
à la borne positive (+) de la batterie.
• Le fil jaune (A4) n’est pas utilisé dans ce cas.
Rear ground terminal
Hintere
Erdungscanschlußklemme
Borne arrière de masse
Line out
(see diagram B )
Schutz kappen
Signalausgang
(siehe Schaltplan B )
Sortie de ligne
(voir le diagramme B )
*1: Before checking the operation of this unit prior to
installation, this lead must be connected, otherwise
power cannot be turned on.
*1: Vor der Überprüfung der Funktionsfähigkeit des Geräts
vor dem Einbau, muß diese Leitung angeschlossen
werden, da sonst die Stromversorgung nicht
eingeschaltet werden kann.
*1:Pour vérifier le fonctionnement de cet appareil avant
installation, ce fil doit être raccordé, sinon l’appareil
ne peut pas être mis sous tension.
Aerial terminal
Antennenanschlußklemme
Borne de l’antenne
3
2
To aerial
Zur Antenne
A l’antenne
B110B3 B5 B7
B2 B4 B6 B8
A5 A7
A8
A2 A4 A6
Yellow*
Gelb*
Jaune*
Red
Rot
Rouge
Blue with white stripe
Blau mit weißem Streifen
Bleu avec bande blanche
Brown / Braun /
15 A fuse
15 A Sicherung
Fusible 15 A
Black
Schwarz
Noir
1
1
1
B2 B4 B6 B8
A2 A4 A6 A8
A8
A4
Marron
B1 B3 B5 B7
A5 A7
To metallic body or chassis of the car
Zur metallenen Karosserie oder zum Fahrwerk des
1
Autos
Vers corps métallique ou châssis de la voiture
To a live terminal in the fuse block connecting to the car battery
(bypassing the ignition swich)
Zur einer stromführenden Anschlußklemme im Sicherungsblock zum
Anschließen an die Autobatterie (Umgehen des Zündschalters)
2
A une borne sous tension du porte-fusible connectée à la batterie de la
voiture (en dérivant l’interrupteur d’allumage)
A7
3
Fuse position 2
2. Sicherungsposition
Position de fusible 2
Fuse position 1
1. Sicherungsposition
Position de fusible 1
Not included with this unit.
*
Wird nicht mit Gerät mitgeliefert.
Non fourni avec cet appareil.
To an accessory terminal in the fuse block
Zur einer Zubehöranschlußklemme im Sicherungsblock
Vers borne accessoire du porte-fusible
A5
To power aerial if any
Zur Motorantenne, sofern vorhanden
4
Vers l’antenne automatique, s’il y en a une
A2
5
1
Ignition switch
Zündschalter
*
Interrupteur d’allumage
*
Fuse block
Sicherungsblock
Porte-fusible
To cellular phone system
Zur Moblitelephon
À un système de téléphone cellulaire
White with black stripe
Weiß mit schwarzem
Streifen
Blanc avec bande noire
B6 B5 B4 B3 B8 B7 B2 B1
White
Weiß
Blanc
Left speaker (front)
Linker Lautsprecher (vorne)
Enceinte gauche (avant)
6
Gray with black stripe
Grau mit schwarzem
Streifen
Gris avec bande noire
Gray
Grau
Gris
Right speaker (front)
Rechter Lautsprecher (vorne)
Enceinte droit (avant)
Green with black stripe
Grün mit schwarzem
Streifen
V ert avec bande noire
Green
Grün
Vert
Left speaker (rear)
Linker Lautsprecher (hinten)
Enceinte gauche (arrière)
Purple with black stripe
Lila mit schwarzem Streifen
Violet avec bande noire
Purple
Lila
Violet
Right speaker (rear)
Rechter Lautsprecher
(hinten)
Enceinte droit (arrière)
Page 90

PRECAUTIONS on power supply and speaker
connections:
• DO NOT connect the speaker leads of the power cord to
the car battery; otherwise, the unit will be seriously
damaged.
• Connect the black lead (ground), yellow lead (to car battery,
constant 12 V), and red lead (to an accessory terminal)
correctly.
• BEFORE connecting the speaker leads of the power cord to
the speakers, check the speaker wiring in your car.
– If the speaker wiring in your car is as illustrated in Fig. 1
and Fig. 2 below , DO NOT connect the unit using that original
speaker wiring. If y ou do , the unit will be seriously damaged.
Redo the speaker wiring so that you can connect the unit to
the speakers as illustrated in Fig. 3.
– If the speaker wiring in your car is as illustrated in Fig. 3,
you can connect the unit using the original speaker wiring in
your car .
– If you are not sure of the speaker wiring of your car, consult
your car dealer.
+
+
L
-
-
+
+
R
-
-
Fig. 2Fig. 1 Fig. 3
+
+
L
-
-
+
+
R
-
-
+
+
L
-
-
+
+
R
-
-
VORSICHTSMASSREGELN beim Anschließen der
Stromversorgung und Lautsprecher:
• Die Lautsprecherleitungen des Netzkabels NICHT an der
Autobatterie anschließen, da sonst das Gerät schwer
beschädigt wird.
• Die schwarze Leitung (Erdung), die gelbe Leitung (zur
Autobatterie, konstant 12 V) und die rote Leitung (zur
Zubehöranschlußklemme) richtig anschließen.
• VOR dem Anschließen der Lautsprecherleitungen des
Spannunsgversorgungskabels an die Lautsprecher, die
Lautsprecherverdrahtung in Ihrem Auto überprüfen.
– Ist die Lautsprecherverdrahtung wie unten in “Fig. 1”
und “Fig. 2” abgebildet, das Gerät NICHT mit der
Originalverdrahtung der Lautsprecher anschließen, da
sonst das Gerät schwer beschädigt wird.
Die Lautsprecherverdrahtung erneuern, so daß Sie das Gerät
an den Lautsprechern wie in “Fig. 3” abgebildet anschließen
können.
– Ist die Lautsprecherverdrahtung in Ihrem Auto wie in
“Fig. 3” abgebildet, können Sie das Gerät mit der
Originalverdrahtung der Lautsprecher in Ihrem Auto
anschließen.
– Sind Sie sich über die Lautsprecherverdrahtung in Ihrem Auto
nicht sicher, wenden Sie sich an Ihren Autohändler.
PRECAUTIONS sur l’alimentation et la
connexion des enceintes:
• NE CONNECTEZ PAS les fils d’enceintes du cordon
d’alimentation à la batterie; sinon, l’appareil serait
sérieusement endommagé.
Connectez correctement le fil noir (a la masse), le fil jaune (a
•
la batterie de la voiture,12 V constant) et le fil rouge (à la prise
accessoire).
•
AVANT de connecter les fils d’enceintes du cordon
d’alimentation aux enceintes, vérifiez le câblage des enceintes
de votre voiture.
Si le câblage des enceintes de votre voiture est réalisé
–
comme montré sur la Fig. 1 ou Fig. 2 ci-dessous,
CONNECTEZ P AS l’appareil en utiliscant ce câb lage original
d’enceintes. Si vous le faites, l’appareil sera sérieusement
endommagé.
Recommencez le câblage des enceintes de façon que v ous
puissiez connecter l’appareil aux enceintes comme montré
sur la Fig. 3.
Si le câblage des enceintes de votre voiture est comme
–
montré sur la Fig. 3,
vous pouvez connecter l’appareil en
utiliscant ce câblage original d’enceintes pour votre voiture .
– Si vous n’êtes pas sûrs du câblage d’enceintes de votre
voiture, consulter le concessionnaire de votre voiture.
NE
Connecting the leads / Anschließen der Leitungen / Raccordement des fils
CAUTION / VORSICHT / PRECAUTION:
• To prevent short-circuit, cover the terminals of the UNUSED leads with
insulating tape.
T wist the core wires when connecting.
Die Kerndrähte beim Anschließen
verdrehen.
Torsader les âmes des fils en les
raccordant.
Solder the core wires to connect them securely.
Die Kerndrähte anlöten, um sie fest anzuschließen.
Souder les âmes des fils pour les raccorder entre eux
de façon sûre.
• Zur Vermeidung eines Kurzschlusses die Anschlußklemmen der NICHT
VERWENDETEN Leitungen mit Isolierklebeband umwickeln.
• Pour éviter les court-circuits, couvrir les bornes des fils qui ne sont
PAS utilisés avec de la bande isolante.
B Connections Adding Other Equipment / Anschlüsse zum Hinzufügen von anderer Ausrüstung / Raccordement pour ajouter d’autres appareils
Amplifier / Verstärker / Amplificateur
Y ou can connect an amplifier to upgr ade your car stereo system.
• Connect the remote lead (blue with white stripe) to the remote
lead of the other equipment so that it can be controlled through
this unit.
• Connect this unit’s line-out terminals to the amplifier’s line-in
terminals.
• Disconnect the speakers from this unit, connect them to
the amplifier. Leave the speaker leads of this unit unused.
(Cover the terminals of these unused leads with insulating
tape, as illustrated above.)
Sie können einen Verstärker anschließen, um Ihre
Autostereoanlage zu erweitern.
• Schließen Sie das Fernbedienungskabel (blau mit weißem
Streifen) an das Fernbedienungskabel des anderen Geräts an,
so daß es über dieses Gerät gesteuert werden kann.
• Die Anschlußklemmen am Ausgang dieses Gerät an den
Anschlußklemmen des Eingangs des Verstärkers anschließen.
• Die Lautsprecher von diesem Gerät abtrennen und am
Verstärker anschließen. Die Lautsprecherleitungen dieses
Geräts unbenutzt lassen. (Die Anschlußklemmen dieser
nicht verwendeten Leitungen mit Isolierklebeband
umwickeln, siehe Abbidung oben.)
Vous pouvez connecter un amplificateur pour améliorer votre
système autoradio.
•
Connectez le fil de commande à distance (bleu avec bande
blanche) au fil de commande à distance de l’autre appareil de
façon qu’il puisse être commandé via cet appareil.
•
Raccorder les bornes de sortie ligne de cet appareil aux bornes
d’entrée ligne de l’amplificateur.
• Déconnectez les enceintes de cet appareil et connectez-
les à l’amplificateur. Laissez les fils d’enceintes de cet
appareil inutilisés. (Recouvrir les extrémités de ces fils
inutilisés avec de la bande isolante comme montré cidessus.)
Rear speakers
Hintere Lautsprecher
Enceintes arrière
INPUT
L
R
Signal cord (not supplied with this unit)
Einzelleitung (nicht mit diesem Gerät mitgeliefert)
Cordon de signal (non fourni avec cet appareil)
L
R
L
L
R
R
JVC Amplifier
JVC Verstärker
JVC Amplificateur
LINE OUT
L
REAR
R
KD-S9R
TROUBLESHOOTING
• The fuse blows.
* Are the red and black leads connected correctly?
• Power cannot be turned on.
* Is the yellow lead connected?
• No sound from the speakers.
* Is the speaker output lead short-circuited?
• Sound is distorted.
* Is the speaker output lead grounded?
* Are the “–” terminals of L and R speakers grounded in common?
• Unit becomes hot.
* Is the speaker output lead grounded?
* Are the “–” terminals of L and R speakers grounded in common?
Remote lead
Fernbedienungsleitung
Fil d’alimentation à distance
Remote lead (Blue with white stripe)
Fernbedienungsleitung (Blau mit weißem Streifen)
Fil d’alimentation à distance (Bleu avec bande blanche)
Front speakers
Vordere Lautsprecher
Enceintes avant
Y-connector (not supplied with this unit)
Y-Anschluß (nicht mit diesem Gerät mitgeliefert)
Connecteur Y (non fourni avec cet appareil)
To power aerial if any
Zur Motorantenne, sofern vorhanden
Vers l’antenne automatique, s’il y en a une
CAUTION / VORSICHT / PRECAUTION:
• T o prevent internal heat b uildup inside this unit, place this unit UNDER
the other equipment.
• Zur V ermeidung eines Hitzestaus in diesem Gerät, dieses Gerät UNTER
die andere Geräteansrüstung stellen.
• Pour éviter un échauffement interne de cet appareil, placez-le SOUS
l’autre appareil.
FEHLERSUCHE
• Die Sicherung brennt durch.
* Sind die roten und schwarzen Leitungen richtig angeschlossen?
• Stromversorgung kann nicht eingeschaltet werden.
* Ist die gelbe Leitung angeschlossen?
• Kein Ton aus den Lautsprechern.
* Ist die Lautsprecherausgangsleitung kurzgeschlossen?
• Ton verzerrt.
* Ist die Lautsprecherausgangsleitung geerdet?
* Sind die (–) Anschlußklemmen der linken und rechten
Lautsprecher zusammen geerdet?
• Gerät wird heiß.
* Ist die Lautsprecherausgangsleitung geerdet?
* Sind die (–) Anschlußklemmen der linken und rechten
Lautsprecher zusammen geerdet?
EN CAS DE DIFFICULTÉS
• Le fusible saute.
Les fils rouge et noir sont-ils racordés correctement?
*
• L’appareil ne peut pas être mise sous tension.
*
Le fil jaune est-elle raccordée?
• Pas de son des haut-parleurs.
Le fil de sortie de enceinte est-il court-circuité?
*
• Le son est déformé.
Le fil de sortie de enceinte est-il à la masse?
*
*
Les bornes “–” des enceintes gauche et droit sont-elles mises
ensemble à la masse?
• L’appareil devient chaud.
*
Le fil de sortie de enceinte est-il à la masse?
*
Les bornes “–” des enceintes gauche et droit sont-elles mises
ensemble à la masse?
Page 91

CD RECEIVER
CD-RECEIVER
RECEPTEUR CD
CD-RECEIVER
ENGLISH
DEUTSCH
KD-S9R
ATT
/
/I
For installation and connections, refer to the separate manual.
Für den Einbau und die Anschlüsse siehe das eigenständige Handbuch.
Pour l’installation et les raccordements, se référer au manuel séparé.
Bijzonderheden over de installatie en aansluiting van het apparaat vindt u in de desbetref fende
handleiding.
INSTRUCTIONS
BEDIENUNGSANLEITUNG
MANUEL D’INSTRUCTIONS
GEBRUIKSAANWIJZING
45Wx4
DISP
RDS
TP
PTY
7 8 9 10 11 12
SCM
MO
RND
SSM
RPT
CD
FM
AM
FRANÇAIS
NEDERLANDS
GET0007-001A
[E]
Page 92

Abbildung und Position der am Gerät befindlichen Aufkleber
Geräteunterseite
ADVARSEL: Usynlig laser stråling ved åbning, når
sikkerh edsafbryd ere e r u de
af funktion. Undgåudsættelse for stråling. (d)
VARNING: Osynlig laser-
strålning när denna del
är öppnad och spärren
urkopplad. Betrakta ej
strålen. (s)
WICHTIG FÜR LASER-GERÄTE
Vorsichtsmaßregeln:
1.LASER-PRODUKT DER KLASSE 1
2.GEFAHR: Unsichtbare Laserstrahlung bei Öffnung
und fehlerhafter oder beschädigter Sperre. Direkten
Kontakt mit dem Strahl vermeiden!
3.ACHTUNG: Das Gehäuseoberteil nicht abnehmen.
Das Gerät enthält keinerlei Teile, die vom Benutzer
gewartet werden können. Überlassen Sie
Wartungsarbeiten qualifizierten KundendienstFachleuten.
4.ACHTUNG: Der Compact Disc-Player arbeitet mit
unsichtbaren Laserstrahlen und ist mit
Sicherheitsschaltern ausgestattet, die die
Aussendung von Strahlen verhindern, wenn bei
Öffnen des CD-Halters die Sicherheitssperren
gestört oder beschädigt sind. Es ist gefährlich, die
Sicherheitsschaltung zu deaktivieren.
5.ACHTUNG: Falls die Verwendung der Regler,
Einstellungen oder Handhabung von den hierin
gegebenen Anleitungen abweichen, kann es zu einer
gefährlichen Strahlenfreisetzung kommen.
Typenschild
DEUTSCH
Caution:
Achtung:
This product contains a laser component
Die Klassifikation der Laserkomponente in
of higher laser class than Class 1.
diesem Gerät liegt über Laser-Klasse 1.
DANGER: Invisible laser
radiation when op en and
interlock failed or defeated.
AVOID DIRECT EXPOSURE
TO BEAM. (e)
VARO: Avattaessa ja suojalukitus ohitettaessa olet
är
alttiina näkymättömälle
lasersäteilylle. Älä katso
säteeseen. (f)
Zurücksetzen des Geräts
Die Tasten SEL (Auswahl) und (Bereitschaft/Netz/Dämpfer) mehrere Sekunden lang
gleichzeitig gedrückt halten.
Dadurch wird der eingebaute Mikro-Computer zurückgesetzt.
(Bereitschaft/Netz/Dämpfer)
SEL (Auswahl)
Hinweise:
• Ihre Voreinstellungen — wie Vorwahlkanäle oder Klangeinstellungen — werden ebenfalls gelöscht.
• Wenn sich eine CD im Gerät befindet, werden „PLEASE“ und „EJECT“ abwechselnd im Display
angezeigt. Drücken Sie in diesem Fall die Taste 0, um die CD auszuwerfen. Achten Sie darauf, die CD
nicht fallenzulassen.
* Zurücksetzen des Geräts ohne eingelegte CD…
Wenn das Bedienfeld geöffnet und geschlossen wird, kann keine Anzeige erscheinen, obwohl das Gerät
eingeschaltet ist. In diesem Fall drücken Sie , um zum Normalzustand zurückzukehren.
2
Page 93

Wir danken Ihnen für den Kauf eines JVC Produkts. Bitte lesen Sie die Anleitung vollständig durch,
bevor Sie das Gerät in Betrieb nehmen, um sicherzustellen, daß Sie alles vollständig verstehen und
die bestmögliche Leistung des Geräts erhalten.
INHALT
Zurücksetzen des Geräts ......................... 2
ANORDNUNG DER TASTEN.............. 4
Schalttafel ................................................ 4
GRUNDBEDIENUNGEN ................... 5
Einschalten der Stromversorgung ............ 5
RADIOGRUNDBETRIEB................... 6
Radiohören .............................................. 6
Speichern der Sender .............................. 7
Anwahl eines vorabgestimmten Senders .. 8
RDS-BETRIEB ............................. 9
Betriebsmöglichkeiten mit der Funktion
RDS EON.............................................. 9
Weitere praktische RDS-Funktionen
und -Einstellungsmöglichkeiten ............. 12
CD-BETRIEB ............................... 14
Abspielen einer CD.................................. 14
Finden eines Titels oder eines bestimmten
Abschnittes auf einer CD ....................... 15
Wählen der CD-Abspielbetriebsarten....... 15
Wiedergeben einer CD mit CD-Text ......... 16
Unterdrücken des CD-Auswurfs ............... 16
KLANGEINSTELLUNG..................... 17
Klang-Einstellschritte ................................ 17
Verwenden des Klangregelungsspeichers
(SCM) .................................................... 17
Speichern Ihrer eigenen
Klangeinstellungen................................. 18
ANDERE WICHTIGE FUNKTIONEN ...... 19
Stellen der Uhr......................................... 19
Ändern der allgemeinen Einstellungen
(PSM) .................................................... 19
Abnehmen der Schalttafel ........................ 22
FEHLERSUCHE ............................ 23
WARTUNG ................................. 24
Handhaben der CDs................................. 24
TECHNISCHE DATEN...................... 25
DEUTSCH
Hinweis:
Zu diesem Gerät wird eine Identifikationskarte mitgeliefert, auf der die Gerätechassis-Nummer vermerkt ist.
Heben Sie diese Karte getrennt vom Gerät auf. Im Falle eines Diebstahls kann sie die Geräteidentifizierung
erleichtern.
VOR DEM GEBRAUCH
*
Für die Sicherheit....
• Die Lautstärke nicht zu laut stellen, da dadurch
Außengeräusche überdeckt und das Autofahren
gefährlich wird.
• Das Auto vor dem Durchführen von komplizierten
Bedienschritten anhalten.
*
Temperatur im Auto....
Wenn Sie das Auto für lange Zeit in heißem oder
kaltem Wetter parken, bitte warten, bis sich die
Temperatur im Auto sich normalisiert hat, bevor Sie
das Gerät einschalten.
3
Page 94

Schalttafel
Displayfenster
DEUTSCH
ANORDNUNG DER TASTEN
uo;a
i
kjhgfds
13245
ATT
/
/I
DISP
RDS
TP
PTY
7 8 9 10 11 12
SCM
1 Taste (Bereitschaft/Netz/Dämpfer)
2 Steuerregler
3 Taste DISP (Display)
4 Taste TP (Verkehrsinformationen)
RDS (Das Radiodatensystem)
5 Taste PTY (Sendungstypen)
6 Taste RPT (Wiederholung)
7 Taste MO (Monaural)
Taste RND (Zufall)
8 Taste 0 (auswerfen)
9 Tasten 4 / ¢
•
Dienen auch als Tasten SSM, wenn sie
zusammen gedrückt werden.
p Taste (Steuerblende auslösen)
q Taste SEL (Auswahl)
w Taste SCM (Sound Control Memory)
e Zifferntasten
r Taste AM
t Taste FM
y Taste CD
678 9
MO
RND
SSM
RPT
CD
FM
AM
ytrewqp
Displayfenster
u Anzeige des Lautstärkepegels
i Anzeigen des RDS-Modus
TP, PTY, EON, AF, REG
o Hauptdisplay
; Anzeigen des Tunerempfangsmodus
STEREO, MONO
a Anzeige „Link“
s Anzeige RPT (Wiederholung)
d Anzeige RND (Zufall)
f Anzeige CD IN
g Anzeige Signalquelle/Uhrzeit
h Anzeige LOUD
j Anzeige der Entzerrungscharakteristik
k Anzeigen des Klangmodus
SOFT, BEAT, POP
4
Page 95

GRUNDBEDIENUNGEN
ATT
/
/I
DISP
RDS
TP
PTY
7 8 9 10 11 12
SCM
AM
MO
RND
SSM
RPT
CD
FM
231
DEUTSCH
Einschalten der Stromversorgung
1
Das Gerät einschalten.
ATT
/
/I
Hinweis zum Ein-Tastendruck-Betrieb:
Wenn Sie die Programmquelle Tuner in Schritt 2
unten wählen, wird das Gerät automatisch
eingeschaltet. Sie brauchen dafür nicht
2
Die Programmquelle abspielen.
Für die Bedienung des Tuners (AM (MW/LW)
Für die Bedieneng des CD-Spielers,
3
Die Lautstärke einstellen.
zu drücken.
CD
FM
AM
oder UKW), siehe Seiten 6 – 13.
siehe Seiten 14 – 16.
So erhöhen Sie die
Lautstärke.
So verringern Sie die
Lautstärke.
Der Lautstärkepegel wird angezeigt.
4
Den Klang wie gewünscht einstellen
(siehe Seite 17).
Für ein sofortiges Absenken der Lautstärke
Kurz beim Hören einer beliebigen
Programmquelle drücken. „ATT“ blinkt auf der
Anzeige und die Lautstärke fällt sofort ab.
Zur Wiederherstellung der vorherigen
Lautstärkepegel die Taste nochmals kurz
drücken.
• Wenn Sie den Steuerregler im Uhrzeigersinn
drehen, können Sie die Lautstärke auch
wiederherstellen.
Zum Ausschalten des Geräts
drücken und länger als 1 Sekunde halten.
Hinweis:
Wenn Sie das Gerät erstmals verwenden, stellen Sie
bitte die eingebaute Uhr korrekt ein, siehe Seite 19.
VORSICHT beim Einstellen der Lautstärke
CDs produzieren sehr wenig Geräusche im
Vergleich zu anderen Signalquellen. Wenn zum
Beispiel die Lautstärke für den Tuner eingestellt
wurde, können die Lautsprecher durch den
plötzlichen Anstieg des Ausgangssignals
beschädigt werden.
Verringern Sie daher die Lautstärke, bevor Sie
eine CD abspielen, und justieren Sie die
Lautstärke dann während des Abspielens je nach
Bedarf nach.
Anzeige des Lautstärkepegels
5
Page 96

RADIOGRUNDBETRIEB
ATT
/
/I
DISP
RDS
TP
PTY
7 8 9 10 11 12
SCM
MO
RND
SSM
RPT
CD
FM
AM
DEUTSCH
Radiohören
Um einen Sender einzustellen, können Sie
entweder den automatischen Suchlauf verwenden,
oder Sie können den Sender manuell einstellen.
Automatisches Suchen eines Senders:
Automatischer Suchlauf
1
Wählen Sie das Band (AM, FM1 – 3).
FM
AM
F1
F2
(FM1)
AM
Das gewählte Frequenzband (oder die
Uhrzeit: siehe Seite 21) wird angezeigt.
Anzeige des audiopegels (siehe Seite 21)
oder Lautstärkepegels
Hinweis:
Dieser Receiver verfügt über drei UKWFrequenzbänder (FM1, FM2, FM3). Sie können
ein beliebiges Frequenzband wählen, um sich
eine UKW-Sendung anzuhören.
(FM2)F3(FM3)
Zum Anhalten der Suche bevor ein Sender
empfangen wird, die gleiche Taste, die Sie für
die Suche gedrückt haben, nochmals drücken.
Manuelles Suchen eines Senders:
Manueller Suchlauf
1
Wählen Sie das Band (AM, FM1 – 3).
FM
AM
F1
F2
(FM1)
AM
Hinweis:
Dieser Receiver verfügt über drei UKWFrequenzbänder (FM1, FM2, FM3). Sie können
ein beliebiges Frequenzband wählen, um sich
eine UKW-Sendung anzuhören.
2
Drücken Sie die T aste ¢ oder
4, und halten Sie sie gedrückt,
bis „MANU“ (manuell) im Display zu
blinken beginnt.
(FM2)F3(FM3)
2
Beginnen Sie mit der Suche nach
einem Sender.
Drücken Sie ¢, um
Suchen von Sendern mit
höherer Frequenz.
Drücken Sie 4, um
Suchen von Sendern mit
niedrigerer Frequenz.
Wenn ein Sender empfangen wird, Stoppt
6
die Suche.
Das gewählte Frequenzband wird angezeigt.
Page 97
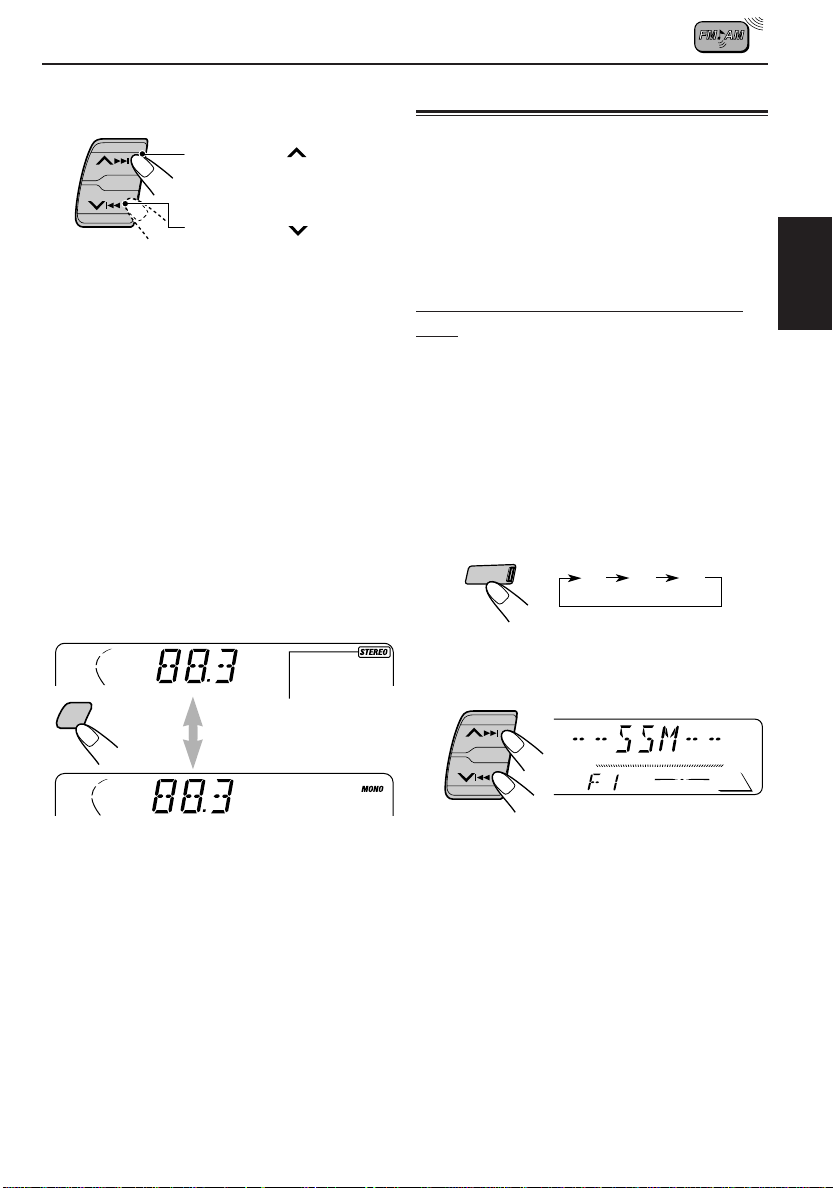
3
SSM
Stellen Sie den gewünschten Sender
ein, während „MANU“ blinkt.
Drücken Sie ¢, um
Sender einzustellen, die
auf höheren Frequenzen
senden.
Drücken Sie 4, um
Sender einzustellen, die
auf niedrigeren Frequenzen
senden.
• Wenn Sie die Taste loslassen, wird der
manuelle Betrieb automatisch nach 5
Sekunden deaktiviert.
• Wenn Sie die Taste gedrückt halten, ändert
sich die Frequenz (in 50 kHz Intervallen bei
UKW und 9 kHz Intervallen bei AM – MW/
LW), bis Sie die Taste freigeben.
Schlechter Empfang einer UKWStereosendung:
Drücken Sie die Taste MO RND (Monaural/Zufall),
während ein UKW-Sender wiedergegeben wird.
• Wenn Sie diese Taste mehrfach hintereinander
drücken, wird die Anzeige MONO abwechselnd
ein- und ausgeschaltet.
RND
MO
Leuchtet auf, wenn eine
UKW-Sendung in Stereo
empfangen wird.
Speichern der Sender
Sie können Rundfunksender auf zwei Arten
abspeichern.
• Automatisches Vorabstimmen der UKW-Sender:
SSM (Strong-station Sequential Memory =
Sequentialspeicher für starke Sender)
• Manuelles V orabstimmen für UKW- und MW/LWSender
Automatische UKW-Vorabstimmung:
SSM
Sie können 6 lokale UKW-Sender pro UKWEmpfangsbereich (FM1, FM2 und FM3)
vorabstimmen.
1
Die gewünschte Empfangsbereichzahl
(FM1 – 3), in der UKW-Sender
gespeichert werden sollen, wählen.
• Wenn Sie diese Taste mehrfach
hintereinander drücken, ändert sich das
UKW-Band wie folgt:
FM
2
Drücken Sie beiden Tasten, und
halten Sie sie länger als 2 Sekunden
gedrüct.
F1
(FM1)F2(FM2)F3(FM3)
DEUTSCH
Wenn die Anzeige MONO im Display leuchtet,
erfolgt die Wiedergabe monophon. Allerdings
verbessert sich dadurch der Empfang (die
Anzeige STEREO schaltet sich aus).
„SSM“ erscheint und erlischt bei
Abschluß der automatischen
Vorabstimmung wieder.
Die lokalen UKW-Sender mit den stärksten
Signalen werden gesucht und automatisch in der
Empfangsbereichszahl (FM1, FM2 oder FM3),
die Sie gewählt haben, gespeichert. Diese
vorabgestimmten Sender werden auf den
Nummerntasten abgespeichert — Nr. 1
(niedrigste Frequenz) bis Nr. 6 (höchste
Frequenz). Wenn die automatische
Vorabstimmung abgeschlossen ist, wird der
Sender der Taste 1 automatisch angewählt.
7
Page 98

Manuelles Vorabstimmen
Sie können bis zu 6 Sender pro Empfangsbereich
(FM1, FM2, FM3 und AM) von Hand
vorabstimmen.
Beispiel: Speichern des UKW-Senders
1
DEUTSCH
2
88,3 MHz auf der numerischen
Taste 1 des FM1-Empfangsbereichs.
Die gewünschte Empfangsbereichzahl
(FM1 – 3), in der UKW-Sender
gespeichert werden sollen, wählen
(in diesem Beispiel FM1).
• Wenn Sie diese Taste mehrfach
hintereinander drücken, ändert sich das
UKW-Band wie folgt:
FM
F1
(FM1)F2(FM2)F3(FM3)
Auf den Sender 88,3 MHz
abstimmen.
Drücken Sie ¢, um
Sender einzustellen, die
auf höheren Frequenzen
senden.
Drücken Sie 4, um
Sender einzustellen, die
auf niedrigeren Frequenzen
senden.
Hinweise:
• Ein vorheriger vorabgestimmter Sender wird gelöscht,
wenn ein neuer Sender auf der gleichen numerischen
Taste abgespeichert wird.
• Vorabgestimmte Sender werden gelöscht, wenn die
Stromversor gung des Speicherstr omkreises unterbr ochen
wird (z.B. beim Wechseln der Batterie). In diesem Fall
die Sender nochmals vorabstimmen.
Anwahl eines vorabgestimmten
Senders
Sie können einfach einen vorabgestimmten Sender
aufrufen.
Bedenken Sie, daß Sie zuerst Sender speichern
müssen. Wenn Sie das noch nicht getan haben,
siehe „Speichern der Sender“ auf Seite 7.
1
Wählen Sie das Band (AM, FM1 – 3).
FM
AM
F1
F2
(FM1)
AM
2
Die gewünschte Nummer (1 – 6) für den
vorabgestimmten Sender wählen.
(FM2)F3(FM3)
3
Drücken Sie die Ziffertaste (in diesem
Beispiel 1), und halten Sie sie länger
als 2 Sekunden gedrückt.
Das Band/die
Speicherplatznummer
und, „MEMO“ blinken
abwechselnd
einen Augenblick lang.
4
Das obige Verfahren zum Speichern
der anderen Sender auf andere
numerische Tasten wiederholen.
8
Page 99

RDS-BETRIEB
Betriebsmöglichkeiten mit der
Funktion RDS EON
Das Radiodatensystem (RDS) ermöglicht es
UKW-Sendern, zusammen mit den regulären
Sendesignalen ein zusätzliches Signal zu
übertragen. Beispielsweise können Sender ihren
Sendernamen sowie Informationen über die
aktuelle Sendung übermitteln, wie z. B. Sport
oder Musik etc.
Eine weitere Eigenschaft des RDS-Systems heißt
„EON (Enhanced Other Networks)“. Die Anzeige
EON schaltet sich ein, wenn ein UKW-Sender mit
EON-Daten empfangen wird. Wenn Sie die EONDaten verwenden, die von einem Sender
übertragen werden, können Sie einen anderen
Sender eines anderen Netzes einstellen, der Ihr
Lieblingsprogramm oder Verkehrsnachrichten
überträgt, während Sie eine andere Sendung
hören oder eine andere Signalquelle
wiedergeben, wie beispielsweise eine CD.
Wenn das Gerät RDS-Daten empfängt, sind
folgende Funktionen möglich:
• Automatisches V erf olgen derselben Sendung
(Empfang mit Sendernetzerfassung).
• Es kann auf Bereitschaftsempfang von
Verkehrsnachrichten (TA: Verkehrsnachrichten)
oder Ihrer Lieblingssendung geschaltet werden.
• Ein Sendungstyp (PTY: Sendungstyp) kann
gesucht werden.
• Sendungssuchlauf.
• Einige weitere Funktionen sind möglich.
Automatisches Verfolgen derselben
Sendung (Empfang mit
Sendernetzerfassung)
Wenn Sie in einem Bereich fahren, in dem der
UKW-Empfang schlecht ist, stellt der Tuner, der in
dieses Gerät integriert ist, automatisch einen
anderen RDS-Sender ein, der dieselbe Sendung
mit stärkeren Signalen ausstrahlt. So können Sie
dieselbe Sendung auf der gesamten Fahrtstrecke
mit bestem Empfang hören (Sehen Sie sich die
Abbildung auf der nächsten Seite an).
Es werden zwei Arten von RDS-Daten verwendet,
damit der Empfang mit Sendernetzerfassung
richtig funktioniert: PI (Sendungskenndaten) und
AF (Alternativfrequenzdaten).
Wenn diese Daten vom eingestellten RDS-Sender
nicht richtig empfangen werden, ist ein Empfang
mit Sendernetzerfassung nicht möglich.
Wenn Sie den Empfang mit Sendernetzerfassung
verwenden wollen,
(Verkehrsinformationen/Das Radiodatensystem)
und länger als 1 Sekunde halten. Wenn Sie diese
Taste mehrfach hintereinander gedrückt halten,
ändert sich der Empfang mit Sendernetzerfassung
zyklisch wie folgt:
RDS
TP
Anzeige AF
Modus 1
Die Anzeige AF schaltet sich ein, nicht jedoch die
Anzeige REG.
Die Sendernetzerfassung ist bei aktivierter
Regionalisierung ausgeschaltet.
Es wird auf einen anderen Sender innerhalb
desselben Sendernetzes umgeschaltet, wenn die
Eingangssignale des aktuellen Senders schwach
werden.
• In dieser Betriebsart kann die Sendung von der aktuell
empfangenen Sendung abweichen.
Modus 2
Sowohl die Anzeige AF als auch die Anzeige REG
schalten sich ein.
Die Sendernetzerfassung ist bei aktivierter
Regionalisierung eingeschaltet.
Es wird auf einen anderen Sender innerhalb
desselben Sendernetzes umgeschaltet, der
dieselbe Sendung ausstrahlt, wenn die
Eingangssignale des aktuell eingestellten
Senders schwach werden.
Modus 3
Weder die Anzeige AF noch die Anzeige REG
schaltet sich ein.
Die Sendernetzerfassung ist deaktiviert.
drücken Sie die Taste TP RDS
Modus 1 Modus 2 Modus 3
Anzeige REG
DEUTSCH
9
Page 100

Dieselbe Sendung kann auf verschiedenen
Frequenzen empfangen werden.
Sendung 1 wird
auf Frequenz A
ausgestrahlt.
Sendung 1 wird
DEUTSCH
auf Frequenz B
ausgestrahlt.
Sendung 1 wird
auf Frequenz C
ausgestrahlt.
Sendung 1 wird
auf Frequenz E
ausgestrahlt.
Sendung 1 wird
auf Frequenz D
ausgestrahlt.
Verwenden des Bereitschaftsempfangs
Mit Hilfe des Bereitschaftsempfangs können Sie
das Gerät vorübergehend von der aktuellen
Signalquelle (anderer UKW-Sender und CD) auf
eine Lieblingssendung (PTY: Sendungstyp) und
Verkehrsnachrichten (TA) umschalten.
• Der Bereitschaftsempfang funktioniert nicht, wenn Sie
einen MW/LW-Sender empfangen.
Empfangsbereitschaft für
Verkehrsnachrichten (TA)
RDS
Wenn Sie die Taste TP RDS drücken,
TP
während Sie einen UKW-Sender
wiedergeben, leuchtet die Anzeige
TP während des Empfangs eines
TP-Senders, und der TABereitschaftsbetrieb wird aktiviert.
• Wenn der empfangene Sender kein
Verkehrsfunksender ist, blinkt die Anzeige TP.
Drücken Sie die Taste ¢ oder 4, um
den TA-Bereitschaftsbetrieb zu aktivieren.
„SEARCH“ wird im Display angezeigt, und die
Suche nach einem Verkehrsfunksender beginnt.
Sobald ein Verkehrsfunksender eingestellt wurde,
leuchtet die Anzeige TP.
7 Wenn Sie gerade eine CD und einen Sender
mit Verkehrsinformationen (TP) hören möchten,
drücken Sie die Taste TP RDS, um das Gerät in
den TA-Bereitschaftsmodus zu schalten. (Die
Anzeige TP schaltet sich ein.)
Wenn eine Verkehrsdurchsage übertragen wird,
während der TA-Bereitschaftsbetrieb aktiviert ist,
wird „TRAFFIC“ angezeigt, und das UKWFrequenzband wird als Signalquelle eingestellt.
Die Lautstärke wird auf den Lautstärkepegel
angehoben, der für Verkehrsdurchsagen
voreingestellt wurde (siehe Seite 13), und die
Verkehrsdurchsage wird wiedergegeben.
10
Um die TA-Bereitschaft zu deaktivieren,
nochmals die Taste TP RDS drücken.
Bereitschaftsempfang für Sendungstypen
(PTY)
Wenn Sie die Taste PTY drücken,
PTY
während Sie einen UKW-Sender
wiedergeben, leuchtet die Anzeige
PTY während des Empfangs eines
PTY-Senders,
Bereitschaftsbetrieb wird aktiviert. Der
gewählte PTY-Code (siehe Liste auf
Seite 11) blinkt 5 Sekunden lang.
• Wenn es sich beim empfangenen Sender nicht um
einen PTY-Sender handelt, blinkt die Anzeige PTY.
Drücken Sie die Taste ¢ oder 4, um
den PTY-Bereitschaftsbetrieb zu aktivieren.
„SEARCH“ wird im Display angezeigt, und die
nach einem PTY-Sender beginnt. Sobald ein PTYSender eingestellt wurde, leuchtet die Anzeige PTY.
7 Wenn Sie gerade eine CD und einen gewählten
Sendungstyp hören möchten, drücken Sie die
Taste PTY, um das Gerät in den PTYBereitschaftsmodus zu schalten. (Die Anzeige
PTY schaltet sich ein.)
Wenn die gewählte PTY-Sendung übertragen
wird, während der PTY-Bereitschaftsbetrieb
aktiviert ist, wird der gewählte PTY-Code
angezeigt, und das UKW-Frequenzband wird
als Signalquelle eingestellt. Der gewählte
PTY-Sendung wird dann wiedergegeben.
Um die PTY-Bereitschaft zu deaktivieren,
nochmals die Taste PTY drücken.
und der
PTY-
Suche
Auswählen Ihrer Lieblingssendung für
den Bereitschaftsempfang von
Sendungstypen (PTY)
Sie können Ihre Lieblingssendung für den
Bereitschaftsempfang von Sendungstypen (PTY)
im Speicher sichern.
Bei Auslieferung ab Werk ist „NEWS“ als
Sendungstyp für den Bereitschaftsempfang von
Sendungstypen gespeichert.
1
Drücken Sie die T aste SEL (Auswahl),
und halten Sie sie länger als 2
Sekunden gedrückt, bis eine der
PSM-Elemente im Display angezeigt
wird. (Informationen über PSM siehe
Seite 20.)
 Loading...