

Page 1

CD RECEIVER
РЕСИВЕР С ПРОИГРЫВАТЕЛЕМ КОМПАКТ-ДИСКОВ
KD-S717
В соответствии с Законом Российской Федерации “О защите
прав потребителей” срок службы (годности) данного товара “по
истечении которого он может представлять опасность для жизни,
здоровья потребителя, причинять вред его имуществу или
окружающей среде” составляет семь (7) лет со дня производства.
Этот срок является временем, в течение которого потребитель
COMPACT
DIGITAL AUDIO
For installation and
connections, refer to the
separate manual.
Указания по установке и
выполнению соединений
приводятся в отдельной
инструкции.
данного товара может безопасно им пользоваться при условии
соблюдения инструкции по эксплуатации данного товара, проводя
необходимое обслуживание, включающее замену расходных
материалов и/или соответствующее ремонтное обеспечение в
специализированном сервисном центре.
Дополнительные косметические материалы к данному товару,
поставляемые вместе с ним, могут храниться в течение двух (2) лет
со дня его производства.
Срок службы (годности), кроме срока хранения дополнительных
косметических материалов, упомянутых в предыдущих двух пунктах,
не затрагивает никаких других прав потребителя, в частности,
гарантийного свидетельства JVC, которое он может получить в
соответствии с законом о правах потребителя или других законов,
связанных с ним.
ENGLISH
РУССКИЙ
INSTRUCTIONS
ИНСТРУКЦИИ ПО ЭКСПЛУАТАЦИИ
GET0014-001A
[EE]
Page 2
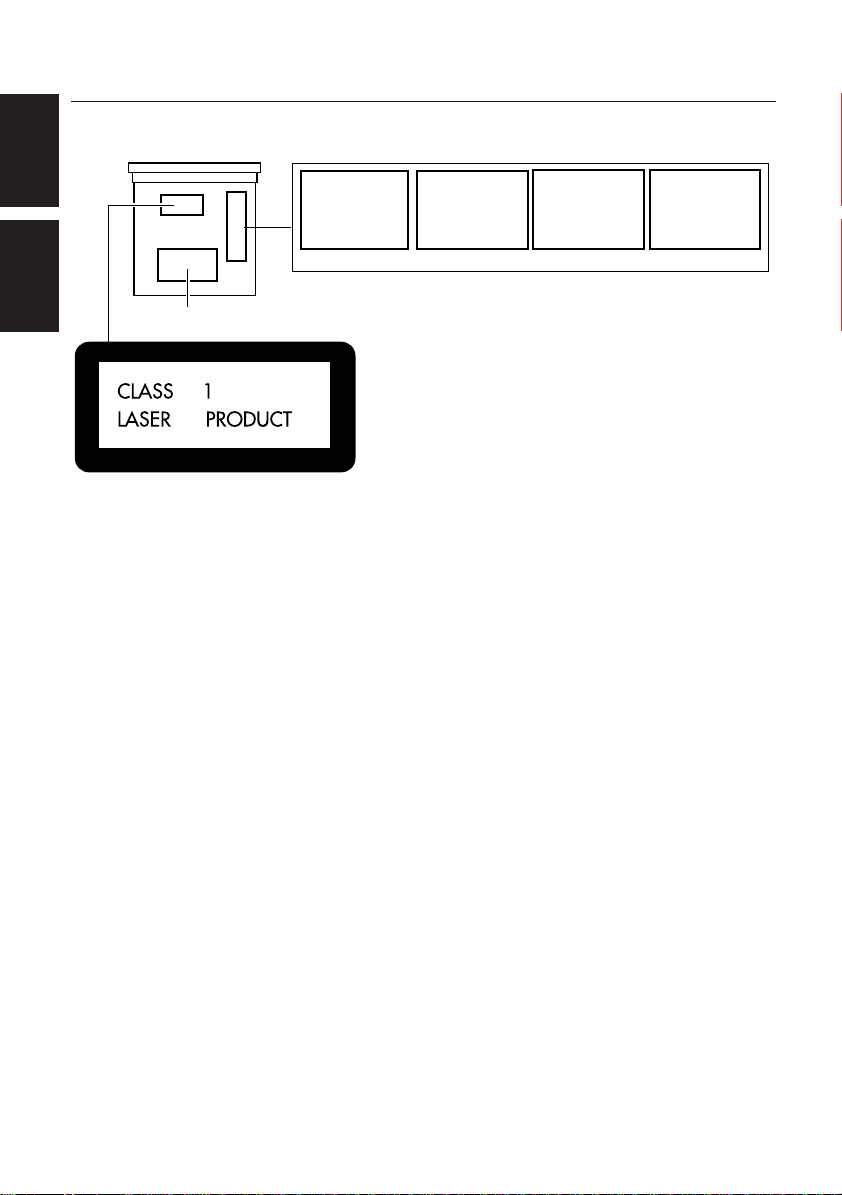
Position And Reproduction Of Labels / Расположение и внешний вид маркировок
Bottom panel of the main unit
Дно основного устройства
ENGLISH
DANGER: Invisible laser
radiation when open and
interlock failed or defeated.
AVOID DIRECT EXPOSURE
TO BEAM. (e )
ADVARSEL: Usynlig laserstråling ved åbning, når
sikkerhedsafbrydere er ude
af funkti on. Undgåudsæ ttelse for stråling. (d)
VARNING: Osynlig laser-
strålning när denna del
är öppnad och spärren
urkopplad. Betrakta
strålen. (s)
VARO : Avattaessa ja suojalukitus ohitettaessa olet
är
alttiina näkymättömälle
ej
lasersäteilylle. Älä katso
säteeseen. (f)
РУССКИЙ
Name/Rating plate
Название/Классификационная табличка
Caution:
This product contains a laser component
of higher laser class than Class 1.
Предостережение:
Это устройство оснащено лазерным
компонентом, превышающим
ограничения для лазерных устройств
класса 1.
IMPORTANT FOR LASER PRODUCTS
Precautions:
1. CLASS 1 LASER PRODUCT
2.DANGER: Invisible laser radiation when open and
interlock failed or defeated. Avoid direct exposure to
beam.
3.CAUTION : Do not open the top cover. There are no
user-serviceable parts inside. Leave all servicing to
qualified service personnel.
4.CAUTION : This CD player uses invisible laser
radiation and is equipped with safety switches to
prevent radiation emission when unloading CDs. It is
dangerous to defeat the safety switches.
5.CAUTION : Use of controls, adjustments or
performance of procedures other than those specified
herein may result in hazardous radiation exposure.
ИНФОРМАЦИЯ О ЛАЗЕРНЫХ УСТРОЙСТВАХ
Предостережения:
1. ЛАЗЕРНОЕ УСТРОЙСТВО КЛАССА 1
2.ОПАСНОСЬ: В случае открытия и удаления кожу-
ха существует опасность невидимого лазерного
излучения. Избегайте непосредственного
воздействия луча.
3.ПРЕДОСТЕРЕЖЕНИЕ: Не открывайте верхний
кожух. Внутри устройства нет деталей, обслуживаемых пользователем. Пользуйтесь услугами
квалифицированного персонала.
4.ПРЕДОСТЕРЕЖЕНИЕ: Этот проигрыватель
компакт-дисков использует невидимое лазерное
излучение и оснащен переключателями безопасности, устраняющими излучение при удалении
компакт-дисков. Устранять переключатели
безопасности опасно.
5.ПРЕДОСТЕРЕЖЕНИЕ: Использование средств
управления, настроек, или выполнение процедур,
отличных от указанных ниже, может подвергнуть
Вас опасному воздействию излучения.
2
Page 3

How to reset your unit / Перезагрузка Вашего устройства
Press and hold both the SEL (select) and (standby/on/attenuator) buttons at the same
time for several seconds.
This will reset the built-in microcomputer.
Одновременно нажмите кнопки SEL (выбор) и
и удерживайте нажатыми в течение нескольких секунд.
Это приведет к перезагрузке встроенного микрокомпьютера.
(Standby (ожидание)/On (включено)/Attenuator (приглушение))
SEL (Select/Выбор)
Notes:
• Your preset adjustments — such as preset channels or sound adjustments — will also be erased.
• If a CD is in the unit, it will eject when you reset the unit. Pay attention not to drop the CD.
Примечания:
• Выполненные Вами настройки — например, запрограммированные каналы или настройки звучания
— также будут удалены.
• Если в устройстве остался компакт-диск, при перезагрузке он будет выдвинут. Следите за тем,
чтобы компакт-диск не упал.
(ожидание/включено/приглушение)
ENGLISH
РУССКИЙ
3
Page 4

Thank you for purchasing a JVC product. Please read all instructions carefully before operation,
to ensure your complete understanding and to obtain the best possible performance from the unit.
CONTENTS
How to reset your unit............................... 3
ENGLISH
LOCATION OF THE BUTTONS............ 5
Control panel ............................................ 5
BASIC OPERATIONS ...................... 6
Turning on the power................................ 6
RADIO BASIC OPERATIONS ............. 7
Listening to the radio ................................ 7
Storing stations in memory ....................... 8
Tuning into a preset station ...................... 9
CD OPERATIONS .......................... 10
Playing a CD............................................ 10
Locating a track or a particular portion
on a CD ................................................. 11
Selecting CD playback modes ................. 11
Prohibiting CD ejection ............................. 11
SOUND ADJUSTMENTS .................. 12
Turning on/off the loudness function ........ 12
Adjusting the sound ................................. 12
Using the Sound Control Memory ............ 12
Storing your own sound adjustments ....... 13
OTHER MAIN FUNCTIONS ............... 14
Setting the clock ...................................... 14
Changing the general settings (PSM) ...... 14
Detaching the control panel...................... 16
TROUBLESHOOTING...................... 17
MAINTENANCE ............................ 18
Handling CDs .......................................... 18
SPECIFICATIONS .......................... 19
BEFORE USE
*
For safety....
• Do not raise the volume level too much, as this will
block outside sounds, making driving dangerous.
• Stop the car before performing any complicated
operations.
4
*
Temperature inside the car....
If you have parked the car for a long time in hot or
cold weather, wait until the temperature in the car
becomes normal before operating the unit.
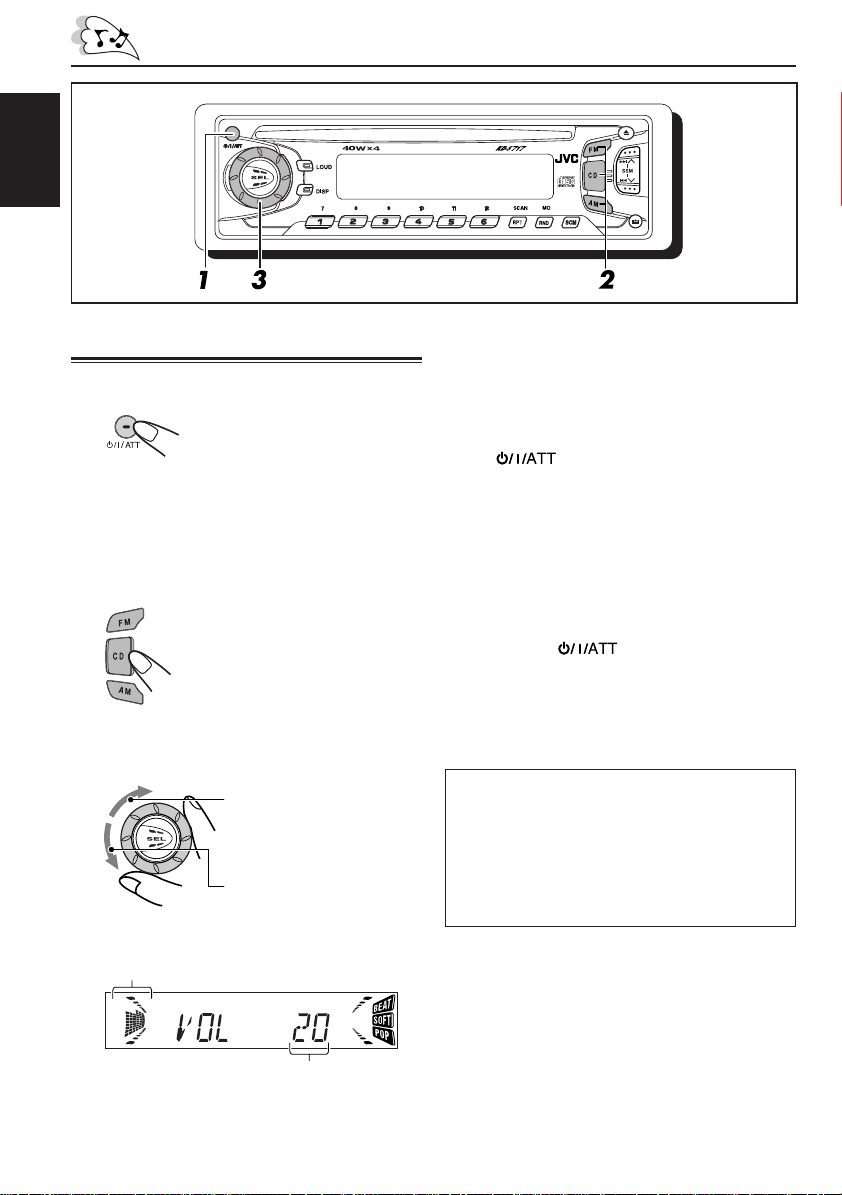
Page 5

Control panel
LOCATION OF THE BUTTONS
y
Display window
u;as
fgd
32671854
9rt
1 (standby/on/attenuator) button
2 Control dial
3 LOUD button
4 AM button
5 CD button
6 FM button
7 0 (eject) button
8 4 /¢ buttons
•
Also functions as SSM buttons when pressed
together.
9 SEL (select) button
p DISP (display) button
q Number buttons
w SCAN
RPT (repeat) button
e MO (monaural)
RND (random) button
r SCM (sound control memory) button
t (control panel release) button
p
oi
h
ewq
Display window
y Volume (or audio) level indicator
Equalization Pattern indicator
u Tuner reception indicators
MO, ST
i RND (random) indicator
o RPT (repeat) indicator
; “SCM” indicator
a LOUD indicator
s Sound mode indicators
SOFT, BEAT, POP
d CD indicator
f Band indicators
FM1, FM2, FM3, AM
g Main display
h CD IN indicator
ENGLISH
5
Page 6
ENGLISH
BASIC OPERATIONS
Turning on the power
1
Turn on the power.
Note on One-Touch Operation:
When you select a source in step 2 below, the
power automatically comes on. You do not have
to press this button to turn on the power.
2
Select the source.
To operate the tuner (AM or FM),
see pages 7 – 9.
To operate the CD player,
see pages 10 – 12.
3
Adjust the volume.
To increase the volume.
To decrease the volume.
4
Adjust the sound as you want
(see page 13.)
To drop the volume in a moment
Press briefly while listening to any
source. “ATT” starts flashing on the display, and
the volume level will drop in a moment.
To resume the previous volume level, press the
button briefly again.
• If you rotate the control dial clockwise, you can
also restore the sound.
To turn off the power
Press and hold for more than 1 second.
Note:
When you use this unit for the first time, set the built-in
clock correctly, see page 15.
CAUTION on Volume Setting
CDs produce very little noise compared with other
sources. If the volume level is adjusted for the tuner,
for example, the speakers may be damaged by the
sudden increase in the output level. Ther efore , lower
the volume before playing a disc and adjust it as
required during playback.
Volume level indicator
6
Volume level appears.
Page 7

RADIO BASIC OPERATIONS
ENGLISH
Listening to the radio
Y ou can use either automatic searching or manual
searching to tune into a particular station.
Searching a station automatically:
Auto search
1
Select the band (AM, FM1 – 3).
FM1AMFM2 FM3
FM1 and FM2: 87.5 MHz – 108 MHz
FM3: 65 MHz – 74 MHz
Selected band (or clock time: see page 17)
appears.
Audio (see page 17) or volume level indicator
Note:
This receiver has three FM bands (FM1, FM2,
FM3). You can use any one of them to listen to
an FM broadcast.
To stop searching before a station is received,
press the same button you have pressed for
searching.
Searching a station manually:
Manual search
1
Select the band (AM, FM1 – 3).
FM1AMFM2 FM3
Note:
This receiver has three FM bands (FM1, FM2,
FM3). You can use any one of them to listen to an
FM broadcast.
2
Press and hold ¢ or 4
until “M”(manual) starts flashing on
the display .
2
Start searching a station.
Press ¢ to search
stations of higher frequencies.
Press 4 to search
stations of lower frequencies.
When a station is received, searching stops.
Selected band appears.
CONTINUED ON THE NEXT PAGE
7
Page 8

3
T une into a station you want while “M”
is flashing.
ENGLISH
• If you release your finger from the button,
the manual mode will automatically turn off
after 5 seconds.
• If you hold down the button, the frequency
keeps changing (in 50 kHz intervals
(87.5 MHz - 108 MHz), in 30 kHz intervals
(65 MHz - 74 MHz) for FM and 9 kHz
intervals for AM — MW/LW) until you
release the button.
Press ¢ to search
stations of higher frequencies.
Press 4 to search
stations of lower frequencies.
When an FM stereo broadcast is hard to
receive:
Press MO RND (monaural/random) while
listening to an FM stereo broadcast.
• Each time you press the button, the MO
indicator lights up and goes off alternately.
Lights up when receiving an FM broadcast in stereo.
Storing stations in memory
You can use one of the following two methods to
store broadcasting stations in memory.
• Automatic preset of FM stations: SSM
(Strong-station Sequential Memory)
• Manual preset of both FM and AM stations
FM station automatic preset: SSM
Y ou can preset 6 local FM stations in each FM band
(FM1, FM2 and FM3).
1
Select the FM band (FM1 – 3) you
want to store FM stations into.
• Each time you press the button, the FM
band changes as follows:
FM1 FM2 FM3
2
Press and hold both buttons for more
than 2 seconds.
When the MO indicator is lit on the display, the
sound you hear becomes monaural but the
reception will be improved (the ST indicator
goes off).
8
“SSM” appears, then disappears when automatic
preset is over.
Local FM stations with the strongest signals are
searched and stored automatically in the band
number you have selected (FM1, FM2 or FM3.)
These stations are preset in the number buttons —
No.1 (lowest frequency) to No.6 (highest frequency).
When automatic preset is over, the station stored
in number button 1 will be automatically tuned in.
Page 9
Manual preset
You can preset up to 6 stations in each band
(FM1, FM2, FM3 and AM) manually.
Ex: Storing an FM station of 88.3 MHz into the
preset number 1 of the FM1 band
1
Select the FM band (FM1 – 3) you
want to store FM stations into
(in this example, FM1).
• Each time you press the button, the FM
band changes as follows:
FM1 FM2 FM3
Notes:
• A previously preset station is erased when a new
station is stored in the same preset number.
• Preset stations are erased when the power supply to
the memory circuit is interrupted (for example, during
battery replacement). If this occurs, preset the stations
again.
Tuning into a preset station
You can easily tune into a preset station.
Remember that you must store stations first. If you
have not stored them yet, see “Storing stations in
memory” on page 8.
1
Select the band (AM, FM1 – 3).
ENGLISH
2
Tune into a station of 88.3 MHz.
Press ¢ to tune in
stations of higher
frequencies.
Press 4 to tune in
stations of lower
frequencies.
3
Press and hold the number button
(in this example, 1) for more than
2 seconds.
“P1” flashes for a few seconds.
4
Repeat the above procedure to
store other stations into other
preset numbers.
FM1AMFM2 FM3
2
Select the number (1 – 6) for the
preset station you want.
8 9 10 11 127
9
Page 10

ENGLISH
CD OPERATIONS
Playing a CD
1
Insert a disc into the loading slot.
The unit turns on,
draws a CD and starts
playback automatically.
The CD IN indicator lights up.
Total playing time of the
inserted disc
Total track number of
the inserted disc
Notes:
• When a CD is inserted upside down, the CD
automatically ejects.
To stop play and eject the CD
Press 0.
CD play stops and the CD automatically ejects from
the loading slot.
If you change the source to FM or AM, the CD play
also stops (without ejecting the CD this time).
Notes:
• If the ejected disc is not removed for about 15
seconds, the disc is automatically inserted again
into the loading slot to protect it from dust. (CD
play will not start this time.)
• You can eject the CD even when the unit is turned off .
10
Elapsed playing time
Current track
Page 11
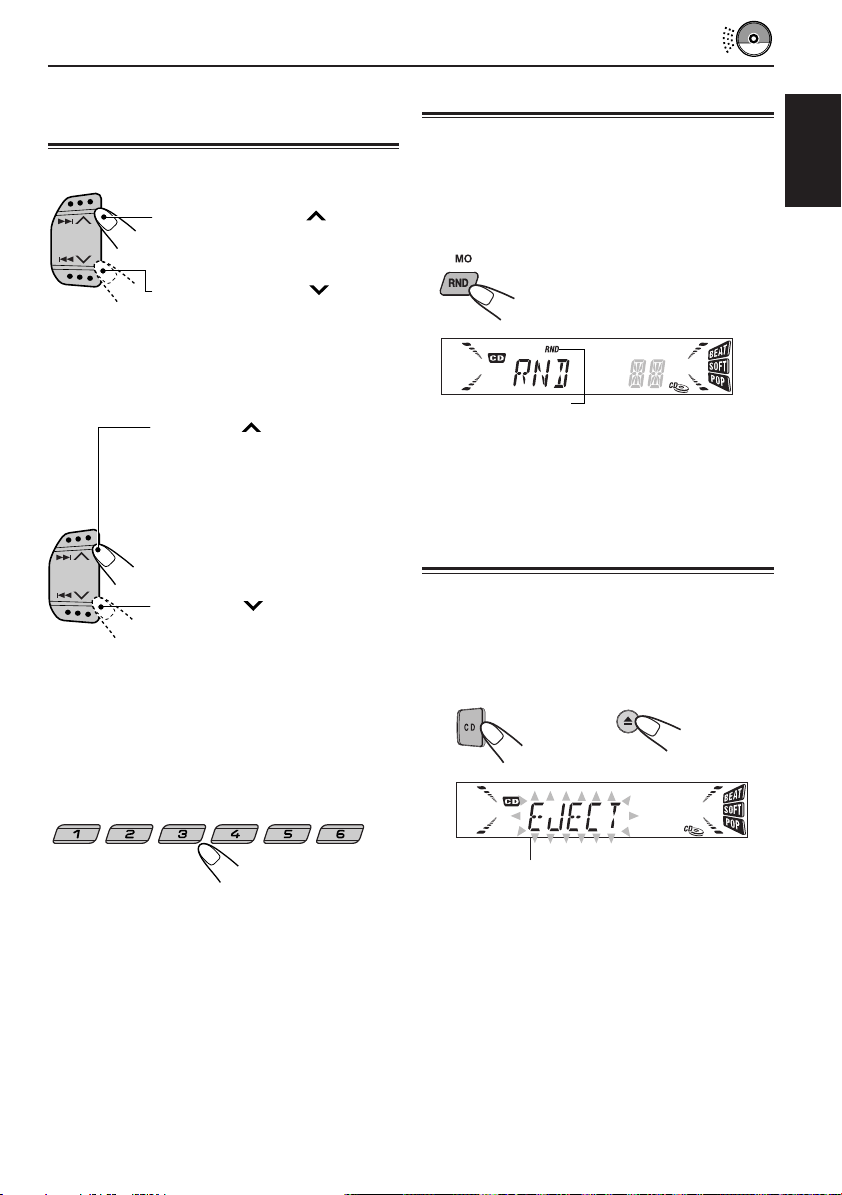
Locating a track or a particular portion on a CD
To fast-forward or reverse the track
Press and hold ¢ , while
playing a CD, to fast-forward the
track.
Press and hold 4 , while
playing a CD, to reverse the
track.
To go to the next tracks or the previous
tracks
Press ¢ briefly, while
playing a CD, to go ahead to the
beginning of the next track. Each
time you press the button
consecutively, the beginning of
the next tracks is located and
played back.
Selecting CD playback modes
To play back tracks at random (Random Play)
You can play back all tracks on the CD at random.
Each time you press MO RND (monaural/random)
while playing a CD, CD random play mode turns
on and off alternately.
The RND indicator
When the random mode is turned on, the RND
indicator lights up on the display and a track
randomly selected starts playing.
Prohibiting CD ejection
ENGLISH
Press 4 briefly, while
playing a CD, to go back to the
beginning of the current track.
Each time you press the button
consecutively, the beginning of
the previous tracks is located
and played back.
To go to a particular track directly
8 9 10 11 127
Press the number button corresponding to the
track number to start its playback.
• To select a track number from 1 – 6:
Press 1 (7) – 6 (12) briefly.
• To select a track number from 7 – 12:
Press and hold 1 (7) – 6 (12) for more than 1
You can prohibit CD ejection and can lock a CD
in the loading slot.
While pressing CD, press and hold 0 for
more than 2 seconds.
“EJECT” flashes on the display for about
5 seconds, and the CD is locked and
cannot be ejected.
To cancel the prohibition and unlock the CD,
press 0 again for more than 2 seconds, while
pressing CD. “EJECT” appears on the display,
and the CD ejects from the loading slot.
11
Page 12
SOUND ADJUSTMENTS
Turning on/off the loudness function
The human ear is less sensitive to low and high
ENGLISH
frequencies at low volumes.
The loudness function can boost these
frequencies to produce a well-balanced sound at
low volume levels.
Each time you press LOUD, the loudness
function turns on/off alternatively .
2
Adjust the level.
To increase the level.
To decrease the level.
Equalization pattern changes as you adjust the
bass or treble.
Adjusting the sound
You can adjust the sound characteristics to your
preference.
1
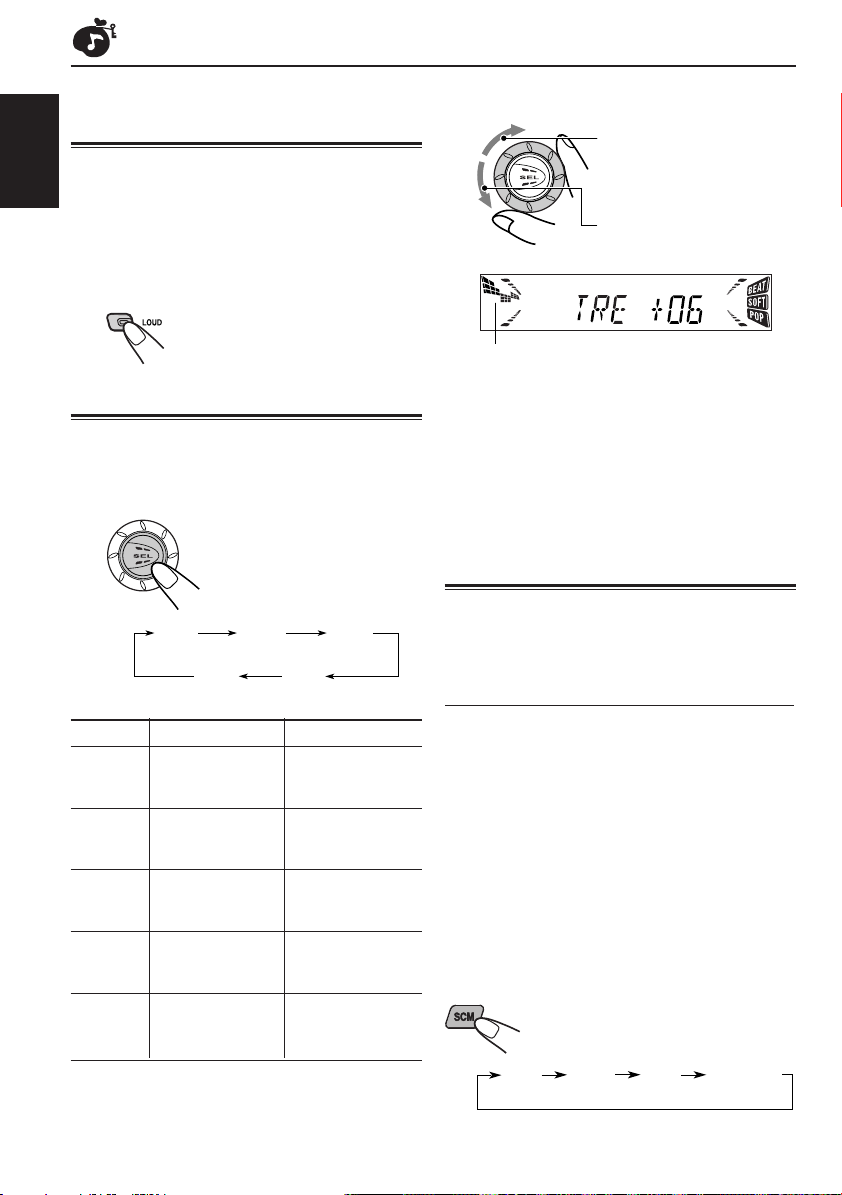
Select the item you want to adjust.
Each time you press the
button, the adjustable items
change as follows:
BAS
(bass)
Indication To do: Range
BAS Adjust the bass. –06 (min.)
TRE Adjust the treble. –06 (min.)
FAD* Adjust the front R06 (Rear only)
BAL Adjust the left L06 (Left only)
VOL Adjust the volume. 00 (min.)
* If you are using a two-speaker system, set the fader
and rear speaker |
balance. F06 (Front only)
and right speaker |
balance. R06 (Right only)
VOL
(volume)
TRE
(treble)
BAL
(balance)
|
+06 (max.)
|
+06 (max.)
|
50 (max.)
FAD
(fader)
Note:
Normally the control dial works for volume
adjustment. So you do not have to select “VOL”
to adjust the volume level.
Using the Sound Control Memory
You can select and store a preset sound
adjustment
(Advanced SCM)
Selecting and storing the sound modes
Once you select a sound mode, it is stored in
memory. It will be recalled every time you select
the same source and will be shown on the
display.
A sound mode can be stored for each of the
following sources — FM1, FM2, FM3, AM and CD.
• If you do not want to store the sound mode
separately for each playback source, but want
to use the same sound mode for all the
sources, see “To cancel Advanced SCM – SCM
LINK” on page 15.
Select the sound mode you want.
suitable for each playback source.
Each time you press the button, the
sound mode changes as follows:
BEAT SOFT POP
SCM OFF
12
Page 13

• When “SCM LINK” is set to “LINK ON”, the
selected sound mode can be stored in memory
for the current source and the effect applies
only to the current source. Each time you
change the playback source, the SCM indicator
flashes on the display.
• When “SCM LINK” is set to “LINK OFF”, the
selected sound mode effect applies to any
source.
Indication For: Preset values
BAS TRE LOUD
BEAT Rock or disco +02 00 ON
music
SOFT Quiet +01 –03 OFF
background
music
POP Light music +04 +01 OFF
SCM OFF (Flat sound) 00 00 ON
Recalling the sound modes
When “SCM LINK” is set to “LINK ON,”
Select the source.
Storing your own sound adjustments
You can adjust the sound modes (BEAT, SOFT,
POP) to your preference and store your own
adjustments in memory.
• There is a time limit in doing the following
procedure. If the setting is canceled before you
finish, start from step 1 again.
1
Call up the sound mode you want to
adjust.
• See the left column for details.
2
Select “BAS (Bass),” “TRE (Treble)”
or “LOUD (Loudness).”
3
Adjust the bass or treble level or
turn the loudness function ON/OFF.
• See page 12 for details.
ENGLISH
The sound mode stored in memory for the
selected source is recalled.
Notes:
• You can adjust each sound mode to your preference,
and store it in memory.
If you want to adjust and store your original sound
mode, see “Storing your own sound adjustments”
on the right column.
• To adjust the bass and treble reinforcement levels or
to turn on/off the loudness function temporarily, see
page 12. (Your adjustments will be canceled if
another source is selected.)
4
Repeat steps 2 and 3 to adjust the
other items.
5
Press and hold SCM until the sound
mode you have selected in step 1
flashes on the display.
Your adjustment made for the selected
sound mode is stored in memory.
6
Repeat the same procedure to store
other sound modes.
To reset to the factory settings
Repeat the same procedure and reassign the preset
values listed in the table on the left column.
13
Page 14

OTHER MAIN FUNCTIONS
Setting the clock
1
Press and hold SEL (select) for more
than 2 seconds so that one of the
PSM items appears on the display .
ENGLISH
(See page 15.)
2
Set the hour.
1 Select “CLOCK H” if not shown on the
display.
2 Adjust the hour.
1
3
Set the minute.
1 Select “CLOCK M.”
2 Adjust the minute.
12
2
Changing the general settings (PSM)
You can change the items listed on the next page
by using the PSM (Preferred Setting Mode)
control.
Basic Procedure
1
Press and hold SEL (select) for more
than 2 seconds so that one of the
PSM items appears on the display .
(See page 15.)
2
Select the PSM item you want to
adjust. (See page 15.)
3
Adjust the PSM item selected above.
4
Finish the setting.
To check the current clock time while the
unit is turned off, press DISP (display).
The power turns on, the clock time is shown
for 5 seconds, then the power turns off.
14
4
Repeat steps 2 and 3 to adjust the
other PSM items if necessary.
5
Finish the setting.
Page 15

Preferred Setting Mode (PSM) items
1
Hold.
CLOCK H Hour adjustment
CLOCK M Minute adjustment
SCM LINK Sound control
LEVEL Level display
TEL Telephone muting
• Press SEL (select) to finish the setting.
2
Select.
memory linkage
To cancel Advanced SCM – SCM LINK
You can cancel the Advanced SCM (Sound
Control Memory), and unlink the sound modes
and the playback sources.
When shipped from the factory, a different sound
mode can be stored in memory for each source
so that you can change the sound modes simply
by changing the sources.
• LINK ON: Advanced SCM (different sound
• LINK OFF: Conventional SCM (one sound
modes for different sources)
mode for all sources)
3
Set.
Counterclockwise
Back Advance
Back
LINK OFF
AUDIO 1
MUTING 1
OFF
OFF
Clockwise
Advance
LINK ON
AUDIO 2
MUTING 2
To select the telephone muting – TEL
This mode is used when a cellular phone system is
connected. Depending on the phone system used,
select either “MUTING 1” or “MUTING 2,” whichever
mutes the sounds from this unit.
When shipped from the factory, this mode is
deactivated.
• MUTING 1: Select this if this setting can mute
• MUTING 2: Select this if this setting can mute
• OFF: Cancels the telephone muting.
the sounds.
the sounds.
Factorypreset
settings
0:00
LINK ON
AUDIO 2
OFF
See
page
14
12,13,
15
15
15
ENGLISH
To select the level meter – LEVEL
You can select the level display according to
your preference.
When shipped from the factory, “AUDIO 2” is
selected.
• AUDIO 1:
• AUDIO 2:
• OFF:
Level meter illuminates from
bottom to top.
Alternates level meter (moves from
bottom to top) and illumination
display.
Erases the audio level indicator.
15
Page 16

Detaching the control panel
You can detach the control panel when leaving
the car.
When detaching or attaching the control panel,
ENGLISH
be careful not to damage the connectors on the
back of the control panel and on the panel holder.
Detaching the control panel
Before detaching the control panel, be sure to
turn off the power.
1
Unlock the control panel.
2
Pull the control panel out of the unit.
3
Put the detached control panel into
the provided case.
Attaching the control panel
1
Insert the left side of the control
panel into the groove on the panel
holder.
2
Press the right side of the control
panel to fix it to the panel holder.
Note on cleaning the connectors:
If you frequently detach the control panel, the
connectors will deteriorate.
To minimize this possibility, periodically wipe the
connectors with a cotton swab or cloth moistened
with alcohol, being careful not to damage the
connectors.
16
Connectors
Page 17

TROUBLESHOOTING
What appears to be trouble is not always serious. Check the following points before calling a service
center.
Symptoms
• CD cannot be played back.
• CD sound is sometimes
interrupted.
• Sound is sometimes
interrupted.
• Sound cannot be heard from
the speakers.
• SSM (Strong-station
Sequential Memory)
automatic preset does not
work.
• Static noise while listening to
the radio.
• “NO DISC” appears on the
display.
Causes
CD is inserted upside down.
You are driving on rough roads.
The disc is scratched.
Connections are incorrect.
Connections are incorrect.
The volume is turned to the
minimum level.
Connections are incorrect.
Signals are too weak.
The antenna is not connected
firmly.
No CD is inserted.
Remedies
Insert the CD correctly.
Stop playing CD while driving
on rough roads.
Change the disc.
Check the cords and connections.
Check the cords and
connections.
Adjust it to the optimum level.
Check the cords and
connections.
Store stations manually.
Connect the antenna firmly.
Insert a CD correctly.
ENGLISH
• CD cannot be ejected.
• CD can be neither played
back nor ejected.
• This unit does not work at all.
CD is locked.
The unit may function
incorrectly.
The built-in microcomputer may
function incorrectly due to
noise, etc.
Unlock the CD (see page 11).
Press and hold both
and 0 at the same time for
several seconds.
Be careful not to drop CD when
it is ejected.
Press and hold both SEL and
at the same time for
several seconds to reset the
unit. (The clock setting and
preset stations stored in
memory are erased.)
(See page 3.)
17
Page 18

MAINTENANCE
Handling CDs
This unit has been designed only to reproduce
the CDs bearing the following marks.
COMPACT
ENGLISH
DIGITAL AUDIO
• Other discs cannot be played back.
How to handle CDs
When removing a CD
from its case, press
down the center holder
of the case and lift the
CD out, holding it by the
edges.
• Always hold the CD by the edges. Do not touch
its recording surface.
When storing a CD into its case, gently insert the
CD around the center holder (with the printed
surface facing up).
• Make sure to store CDs into the cases after
use.
To keep CDs clean
A dirty CD may not play
correctly. If a CD does
become dirty, wipe it with a
soft cloth in a straight line
from center to edge.
To play new CDs
New CDs may have some
rough spots around the
inner and outer edges. If
such a CD is used, this unit
may reject the CD.
To remove these rough
spots, rub the edges with a
pencil or ball-point pen, etc.
About mistracking:
Mistracking may result from driving on extremely
rough roads. This does not damage the unit and the
CD, but will be annoying.
We recommend that you stop CD play while
Center holder
Moisture condensation
Moisture may condense on the lens inside the
CD player in the following cases:
• After starting the heater in the car.
• If it becomes very humid inside the car.
Should this occur, the CD player may
malfunction. In this case, eject the CD and leave
the unit turned on for a few hours until the
moisture evaporates.
When playing a CD-R (Recordable)
You can play back your original CD-Rs on this
receiver.
• Before playing back CD-Rs, read their
instructions or cautions carefully.
• Some CD-Rs recorded on CD recorders may
not be played back on this receiver because of
their disc characteristics, and of the following
reasons:
– Discs are dirty or scratched.
– Moisture condensation occurs on the lens
inside the unit.
– The pickup lens inside the CD player is dirty.
• Use only “finalized” CD-Rs.
• CD-RWs (Rewritable) cannot be played back
on this receiver.
• Do not use CD-Rs with stickers or sticking
labels on the surface. They may cause
malfunctions.
CAUTIONS:
• Do not insert 8 cm CDs (single CDs) into the
loading slot. (Such CDs cannot be ejected.)
• Do not insert any CD of unusual shape — like a
heart or flower; otherwise, it will cause a
malfunction.
• Do not expose CDs to direct sunlight or any heat
source or place them in a place subject to high
temperature and humidity. Do not leave them in
a car.
• Do not use any solvent (for example,
conventional record cleaner, spray, thinner,
benzine, etc.) to clean CDs.
18
Page 19

SPECIFICATIONS
AUDIO AMPLIFIER SECTION
Maximum Power Output:
Front: 40 W per channel
Rear: 40 W per channel
Continuous Power Output (RMS):
Front: 16 W per channel into 4 Ω, 40 Hz
to 20 000 Hz at no more than
0.8% total harmonic distortion.
Rear: 16 W per channel into 4 Ω, 40 Hz
to 20 000 Hz at no more than
0.8% total harmonic distortion.
Load Impedance: 4 Ω (4 Ω to 8 Ω allowance)
Tone Control Range:
Bass: ±10 dB at 100 Hz
Treble: ±10 dB at 10 kHz
Frequency Response: 40 Hz to 20 000 Hz
Signal-to-Noise Ratio: 70 dB
Line-Out Level/Impedance:
2.0 V/20 kΩ load (full scale)
Output Impedance: 1 kΩ
TUNER SECTION
Frequency Range:
FM1/FM2: 87.5 MHz to 108.0 MHz
FM3: 65 MHz to 74 MHz
AM: (MW) 522 kHz to 1 620 kHz
(LW) 144 kHz to 279 kHz
[FM Tuner]
Usable Sensitivity: 11.3 dBf (1.0 µV/75 Ω)
50 dB Quieting Sensitivity:
16.3 dBf (1.8 µV/75 Ω)
Alternate Channel Selectivity (400 kHz):
65 dB
Frequency Response: 40 Hz to 15 000 Hz
Stereo Separation: 30 dB
Capture Ratio: 1.5 dB
[MW Tuner]
Sensitivity: 20 µV
Selectivity: 35 dB
[LW T uner]
Sensitivity: 50 µV
CD PLAYER SECTION
Type: Compact disc player
Signal Detection System: Non-contact optical
pickup (semiconductor laser)
Number of channels: 2 channels (stereo)
Frequency Response: 5 Hz to 20 000 Hz
Dynamic Range: 96 dB
Signal-to-Noise Ratio: 98 dB
Wow and Flutter: Less than measurable limit
GENERAL
Power Requirement:
Operating Voltage:DC 14.4 V
(11 V to 16 V allowance)
Grounding System: Negative ground
Allowable Operating Temperature: 0°C to +40°C
Dimensions (W × H × D):
Installation Size: 182 mm × 52 mm × 160 mm
Panel Size: 188 mm × 58 mm × 8 mm
Mass: 1.7 kg
(excluding accessories)
Design and specifications subject to change without
notice.
ENGLISH
19
Page 20

Position And Reproduction Of Labels / Расположение и внешний вид маркировок
Bottom panel of the main unit
Дно основного устройства
ENGLISH
DANGER: Invisible laser
radiation when open and
interlock failed or defeated.
AVOID DIRECT EXPOSURE
TO BEAM. (e )
ADVARSEL: Usynlig laserstråling ved åbning, når
sikkerhedsafbrydere er ude
af funkti on. Undgåudsæ ttelse for stråling. (d)
VARNING: Osynlig laser-
strålning när denna del
är öppnad och spärren
urkopplad. Betrakta
strålen. (s)
VARO : Avattaessa ja suojalukitus ohitettaessa olet
är
alttiina näkymättömälle
ej
lasersäteilylle. Älä katso
säteeseen. (f)
РУССКИЙ
Name/Rating plate
Название/Классификационная табличка
Caution:
This product contains a laser component
of higher laser class than Class 1.
Предостережение:
Это устройство оснащено лазерным
компонентом, превышающим
ограничения для лазерных устройств
класса 1.
IMPORTANT FOR LASER PRODUCTS
Precautions:
1. CLASS 1 LASER PRODUCT
2.DANGER: Invisible laser radiation when open and
interlock failed or defeated. Avoid direct exposure to
beam.
3.CAUTION : Do not open the top cover. There are no
user-serviceable parts inside. Leave all servicing to
qualified service personnel.
4.CAUTION : This CD player uses invisible laser
radiation and is equipped with safety switches to
prevent radiation emission when unloading CDs. It is
dangerous to defeat the safety switches.
5.CAUTION : Use of controls, adjustments or
performance of procedures other than those specified
herein may result in hazardous radiation exposure.
ИНФОРМАЦИЯ О ЛАЗЕРНЫХ УСТРОЙСТВАХ
Предостережения:
1. ЛАЗЕРНОЕ УСТРОЙСТВО КЛАССА 1
2.ОПАСНОСЬ: В случае открытия и удаления кожу-
ха существует опасность невидимого лазерного
излучения. Избегайте непосредственного
воздействия луча.
3.ПРЕДОСТЕРЕЖЕНИЕ: Не открывайте верхний
кожух. Внутри устройства нет деталей, обслуживаемых пользователем. Пользуйтесь услугами
квалифицированного персонала.
4.ПРЕДОСТЕРЕЖЕНИЕ: Этот проигрыватель
компакт-дисков использует невидимое лазерное
излучение и оснащен переключателями безопасности, устраняющими излучение при удалении
компакт-дисков. Устранять переключатели
безопасности опасно.
5.ПРЕДОСТЕРЕЖЕНИЕ: Использование средств
управления, настроек, или выполнение процедур,
отличных от указанных ниже, может подвергнуть
Вас опасному воздействию излучения.
2
Page 21

How to reset your unit / Перезагрузка Вашего устройства
Press and hold both the SEL (select) and (standby/on/attenuator) buttons at the same
time for several seconds.
This will reset the built-in microcomputer.
Одновременно нажмите кнопки SEL (выбор) и
и удерживайте нажатыми в течение нескольких секунд.
Это приведет к перезагрузке встроенного микрокомпьютера.
(Standby (ожидание)/On (включено)/Attenuator (приглушение))
SEL (Select/Выбор)
Notes:
• Your preset adjustments — such as preset channels or sound adjustments — will also be erased.
• If a CD is in the unit, it will eject when you reset the unit. Pay attention not to drop the CD.
Примечания:
• Выполненные Вами настройки — например, запрограммированные каналы или настройки звучания
— также будут удалены.
• Если в устройстве остался компакт-диск, при перезагрузке он будет выдвинут. Следите за тем,
чтобы компакт-диск не упал.
(ожидание/включено/приглушение)
ENGLISH
РУССКИЙ
3
Page 22

Мы благодарим Вас за приобретение изделия JVC. Перед началом эксплуатации ознакомьтесь,
пожалуйста, с этой инструкцией целиком для достижения наилучших результатов при
эксплуатации устройства
.
СОДЕРЖАНИЕ
Перезагрузка Вашего устройства ........ 3
РАСПОЛОЖЕНИЕ ОРГАНОВ УПРАВЛЕНИЯ .. 5
Панель управления ................................ 5
ОСНОВНЫЕ ОПЕРАЦИИ ........................... 6
Включение питания ............................... 6
РУССКИЙ
ОСНОВНЫЕ ФУНКЦИИ ПРИЕМНИКА..... 7
Прослушивание радио ........................... 7
Сохранение настроек на радиостанции
в памяти ............................................... 8
Настройка на запрограммированную
станцию ................................................ 9
ФУНКЦИИ ПРОИГРЫВАТЕЛЯ КОМПАКТ-
ДИСКОВ ................................................. 10
Воспроизведение компакт-диска ......... 10
Поиск фрагмента или отдельной
части на компакт-диске ...................... 11
Выбор режима воспроизведения
компакт-диска ..................................... 11
Запрет на выброс компакт-диска ........ 11
НАСТРОЙКА ЗВУЧАНИЯ .......................... 12
Включение/выключение функции
компенсации громкости ...................... 12
Настройка звучания .............................. 12
Использование Памяти Управления
Звучанием ............................................ 12
Сохранение Ваших настроек звучания .. 13
ДРУГИЕ ОСНОВНЫЕ ФУНКЦИИ .............. 14
Настройка часов .................................... 14
Изменение основных настроек (PSM) ... 14
Отсоединение панели управления....... 16
ВОЗМОЖНЫЕ НЕИСПРАВНОСТИ ........... 17
ТЕХНИЧЕСКОЕ ОБСЛУЖИВАНИЕ .......... 18
Обращение с компакт-дисками ............ 18
ТЕХНИЧЕСКИЕ ХАРАКТЕРИСТИКИ ....... 19
ПЕРЕД НАЧАЛОМ ЭКСПЛУАТАЦИИ
*
Для Вашей безопасности....
• Не устанавливайте слишком высокий уровень
громкости, так как это приведет к заглушению
внешних звуков и сделает управление опасным.
• Остановите машину при выполнении каких-либо
сложных операций.
4
*
Tемпература внутри автомобиля....
Если Вы припарковали автомобиль на долгое время
в чрезмерно жаркую или холодную погоду, перед
началом эксплуатации этого устройства выждите, пока температура в машине не придет в норму.
Page 23

РАСПОЛОЖЕНИЕ ОРГАНОВ УПРАВЛЕНИЯ
Панель управления
y
Окно дисплея
u
fgd
i
32671854
9rt
1 Кнопка (ожидание/включено/
приглушение)
2 Диск настройки
3 Кнопка LOUD
4 Кнопка AM
5 Кнопка CD
6 Кнопка FM
7 Кнопка 0 (выброс)
8 Кнопки 4
•
При совместном нажатии функционируют
также как кнопки SSM.
9 Кнопка SEL (выбор)
p Кнопка DISP (дисплей)
q Цифровые кнопки
w Кнопка SCAN
RPT (повтор)
e Кнопка MO (моно)
RND (произвольный режим)
r Кнопка SCM (память управления звучанием)
t Кнопка (освобождения панели
управления)
p
/¢
o
;as
h
ewq
Окно дисплея
y Индикатор уровня громкости (или звука)
Индикатор Эквализации
u Индикаторы режима приема тюнера
MO (моно), ST (стерео)
i Индикатор RND (произвольный режим)
o Индикатор RPT (повтор)
; Индикатор “SCM”
a Индикатор LOUD
s Индикаторы режима звучания
SOFT, BEAT, POP
d Индикатор CD
f Индикаторы диапазонов
FM1, FM2, FM3, AM
g Основной дисплей
h Индикатор CD IN (компакт-диск
установлен)
РУССКИЙ
5
Page 24

ОСНОВНЫЕ ОПЕРАЦИИ
РУССКИЙ
Включение питания
1
Включите питание.
Примечание, касающееся управления “одним
нажатием”:
Если Вы выбираете источник сигнала в
пункте 2 ниже, питание включается
автоматически. Вам не нужно нажимать эту
кнопку для включения питания.
2
Выберите источник .
Для получения информации по
управлению приемником
(AM или FM),
см. страницы 7 – 9.
Для получения информации по
управлению проигрывателем компакт-дисков,
см. страницы 10 – 12.
4
Отрегулируйте звучание
(см. страницу 13.)
Для немедленного приглушения звука
Кратко нажмите кнопку во время
прослушивания любого источника сигнала. На
дисплее начнет мигать “ATT” и уровень громкости мгновенно упадет.
Для восстановления исходной громкости
звука кратко нажмите кнопку снова.
• Вы также можете восстановить исходную
громкость звука, повернув диск по часовой
стрелке.
Для отключения питания
Нажмите кнопку и удерживайте в
течение 1 сeкунды.
Примечание:
При первом использовании этого устройства
настройте встроенные часы (см. страницу 15).
3
Настройте громкость.
Индикатор уровня громкости
6
Для увеличения
громкости.
Для снижения
громкости.
Появляется уровень громкости.
ПРЕДОСТЕРЕЖЕНИЕ, касающееся настройки
.
громкости
По сравнению с другими источниками сигнала,
компакт-диски воспроизводятся с очень малым
количеством помех. Если громкость была установлена для прослушивания приемника, громкоговорители могут быть повреждены при резком
увеличении громкости. Поэтому, перед воспроизведением компакт-диска понизьте громкость и
настройте ее во время воспроизведения, если это
необходимо.
Page 25

ОСНОВНЫЕ ФУНКЦИИ ПРИЕМНИКА
Прослушивание радио
Для настройки на желаемую радиостанцию Вы
можете воспользоваться как автоматическим,
так и ручным поиском.
Поиск радиостанций автоматически:
Aвтоматический поиск
1
Выберите диапазон (AM, FM1 – 3).
FM1AMFM2 FM3
FM1 и FM2: 87,5 MГц – 108 MГц
FM3: 65 MГц – 74 MГц
Появляется выбранный диапазон (или
часы: см. страницу 17).
Индикатор уровня звука (см. страницу 17)
или индикатор уровня громкости
Примечание:
Этот приемник имеет три диапазона приема
FM (FM1, FM2 и FM3). Для прослушивания радиопередач Вы можете пользоваться любым из них.
Для прекращения поиска перед окончанием настройки на станцию нажмите ту же
кнопку, которую Вы использовали для начала
поиска.
Поиск радиостанций вручную:
Ручной поиск
1
Выберите диапазон (AM, FM1 – 3).
FM1AMFM2 FM3
Примечание:
Этот приемник имеет три диапазона приема FM (FM1, FM2 и FM3). Для прослушивания
радиопередач Вы можете пользоваться любым
из них.
2
Нажмите и удерживайте кнопку ¢
или 4 до тех пор, пока на
дисплее не замигает “M”(ручная
настройка).
РУССКИЙ
2
Начнется поиск радиостанции.
Нажмите кнопку ¢
для поиска станции на
более высоких частотах.
Нажмите кнопку 4
для поиска станции на
более низких частотах.
После осуществления настройки на
станцию поиск прекратится.
Здесь отображается выбранный диапазон.
ПРОДОЛЖЕНИЕ НА СЛЕДУЮЩЕЙ СТРАНИЦЕ
7
Page 26

3
Настройтесь на желаемую радиостанцию пока на дисплее мигает “M”.
Сохранение настроек на
радиостанции в памяти
Нажмите кнопку ¢ для
поиска станции на более
высоких частотах.
Нажмите кнопку 4
поиска станции на более
низких частотах.
• Если Вы отпустите кнопку, режим ручной
РУССКИЙ
настройки отключится автоматически по
истечении 5 секунд.
• Если Вы будете удерживать кнопку нажатой, частота начнет меняться (с шагом 50 кГц (87,5 МГц – 108 МГц), 30 кГц
(65 МГц – 74 МГц) и 9 кГц для АМ - MW/
LW) до тех пор, пока Вы не отпустите
кнопку.
Если стереофоническая передача FM
принимается плохо:
Нажмите кнопку MO RND (Монофонический/
Случайный) во время прослушивания стереофонической передачи FM.
• После каждого нажатия кнопки индикатор
МО попеременно загорается и гаснет.
Загорается, когда передача FM принимается в
стереофоноческом режиме.
Для сохранения настроек на радиостанции в
памяти Вы можете воспользоваться одним из
двух следующих методов.
• Автоматическое программирование радио-
для
станций FM: SSM (Последовательное сохранение в памяти настроек на радиостанции с
наиболее сильным сигналом)
• Ручное программирование радиостанций FM и АМ
Автоматическое программирование радиостанций FM: SSM
Вы можете запрограммировать до 6 местных
радиостанций FM в каждом диапазоне FM
(FM1, FM2 и FM3).
1
Выберите диапазон FM (FM1 – 3), в
котором ведет передачи желаемая
радиостанция.
• После каждого нажатия кнопки диапазон
приема FM переключается в такой
последовательности:
FM1 FM2 FM3
2
Нажмите и удерживайте обе кнопки
в течение 2 и более секунд.
Когда на дисплее горит индикатор МО,
приемник воспроизводит монофонический
звук, но качество приема улучается
(индикатор ST не горит).
8
Появится “SSM”, а затем, когда автоматическое
программирование закончится, исчезнет.
Местные радиостанции FM с наиболее сильным
сигналом в выбранном диапазоне (FM1, FM2
или FM3) будут найдены и сохранены в памяти
автоматически. Эти станции будут присвоены
цифровым кнопкам — от №1 (самая низкая
частота) до № 6 (самая высокая частота).
По окончании автоматического программирования приемник автоматически настроится
на станцию, сохраненную под номером 1.
Page 27

Ручная настройка
Вы можете запрограммировать до 6 радиостанций в каждом диапазоне FM (FM1, FM2,
FM3 и АМ) вручную.
ПРИМЕР: Сохранение радиостанции FM 88,3 Мгц
под номером 1 диапазона FM1
1
Выберите диапазон FM (FM1 – 3),
в котором Вы желаете сохранять
радиостанции FM (в этом примере, FM1).
• После каждого нажатия кнопки диапазон приема FM переключается в такой
последовательности:
FM1 FM2 FM3
2
Настройтесь на станцию 88,3 MГц.
Нажмите кнопку ¢
для поиска станции на
более высоких частотах.
Нажмите кнопку 4
для поиска станции на
более низких частотах.
3
Нажмите и удерживайте цифровую кнопку (в этом примере, 1) в
течение 2 сeкунд или более.
Примечания:
• При программировании новой станции, станция, запрограммированная под тем же номером, стирается.
• Запрограммированные радиостанции стираются
из памяти, когда прерывается подача питания
(например, во время замены аккумулятора). В этом
случае запрограммируйте станции снова.
Настройка на запрограммированную станцию
Вы можете легко настроиться на запрограммированную станцию.
Запомните, что сначала Вы должны сохранить
настройки на радиостанции в памяти. Если Вы
еще этого не сделали, обратитесь к разделу
“Сохранение настроек на радиостанции в
памяти” на странице 8.
1
Выберите диапазон (AM, FM1 – 3).
FM1AMFM2 FM3
2
Выберите номер запрограммированной радиостанции (1 – 6).
8 9 10 11 127
РУССКИЙ
В течение нескольких секунд
на дисплее будет мигать “P1”.
4
Повторяйте процедуру для
настройки и программирования
остальных радиостанций.
9
Page 28

ФУНКЦИИ ПРОИГРЫВАТЕЛЯ КОМПАКТ-ДИСКОВ
РУССКИЙ
Воспроизведение компактдиска
1
Установите компакт-диск в отверстие для установки диска.
Устройство включится, затянет компактдиск и начнет воспроизведение
автоматически.
Загорится индикатор CD IN.
Общее время
воспроизведения
установленного диска
Общее количество
фрагментов на
установленном
диске
Примечания:
• При установке компакт-диска вверх ногами диск
будет автоматически выдвинут.
Для прекращения воспроизведения и
выброса компакт-диска
Нажмите кнопку 0.
Воспроизведение компакт-диска прекратится
и компакт-диск будет автоматически выдвинут.
Если Вы переключили источник сигнала на
AM или FM, воспроизведение компакт-диска
также прекращается (без удаления компактдиска).
Примечания:
• Если выдвинутый диск не убран в течение 15 секунд, проигрыватель автоматически втягивает
диск обратно в отверстие, чтобы защитить его
от пыли. (Воспроизведение компакт-диска в
этом случае не начинается.)
• Вы можете удалить компакт-диск, даже если
питание не включено.
10
Время, прошедшее с
начала
воспроизведения
Текущий
фрагмент
Page 29

Поиск фрагмента или отдельной части на компакт-диске
Выбор режима воспроизведения компакт-диска
Для перемотки фрагмента вперед или назад
Нажмите и удерживайте кнопку ¢
ведения компакт-диска для
перемотки фрагмента вперед.
Нажмите и удерживайте кнопку 4
ведения компакт-диска для
перемотки фрагмента назад.
, во время воспроиз-
, во время воспроиз-
Для воспроизведения фрагментов в случайной последовательности (Случайное
воспроизведение)
Вы можете воспроизвести все фрагменты на
компакт-диске в случайной последовательности.
После каждого нажатия кнопки MO RND
(монофонический/случайный) во время
воспроизведения компакт-диска включается
и выключается режим случайного воспроизведения компакт-диска.
Для перехода к следующему или предыдущему фрагменту
Кратко нажмите кнопку ¢
о время воспроизведения
компакт-диска для перехода к
началу следующего фрагмента. После каждого нажатия
будет найдено и начнет воспроизводиться начало следующего фрагмента.
Кратко нажмите кнопку 4
во время воспроизведения
компакт-диска для перехода к
началу текущего фрагмента.
После каждого нажатия будет
найдено и начнет воспроизводиться начало предыдущего
фрагмента.
Для прямого перехода к желаемому
фрагменту
8 9 10 11 127
Индикатор RND
Когда режим случайного воспроизведения
включен, на дисплее загорается индикатор
RND и начинается воспроизведение случайно
выбранного фрагмента.
Запрет на выброс компакт-диска
Вы можете установить запрет на выброс
компакт-диска и “зафиксировать” компактдиск в отсеке для компакт-дисков.
Нажимая кнопку CD, нажмите и удерживайте кнопку 0 в течение 2 и более
секунд.
РУССКИЙ
Нажмите цифровую кнопку, соответствующую
номеру желаемого фрагмента для начала его
воспроизведения.
• Для выбора фрагмента под номером 1 – 6:
Кратко нажмите кнопку1 (7) – 6 (12).
• Для выбора фрагмента под номером 7 – 12:
Нажмите и удерживайте в течение секунды
кнопку 1 (7) – 6 (12).
На дисплее примерно на 5 секунд замигает
“EJECT”, и компакт-диск будет зафиксирован.
Для отмены запрета и освобождения компакт-диска снова нажмите и удерживайте
кнопки CD и 0 в течение 2 секунд. На дисплее появится “EJECT”, и компакт-диск будет
выдвинут автоматически.
11
Page 30

НАСТРОЙКА ЗВУЧАНИЯ
Включение/выключение функции компенсации громкости
Человеческое ухо менее чувствительно к звуку с
низкой и высокой частотой при низкой громкости.
Функция компенсации громкости предназначена для форсирования низких и высоких
частот, что приводит к получению сбалансированного звучания на низкой громкости.
После каждого нажатия кнопки LOUD функция компенсации громкости попеременно
РУССКИЙ
включается и выключается.
Настройка звучания
Вы можете настраивать характеристики
звучания по Вашему вкусу.
1
Выберите настраиваемый параметр.
После каждого нажатия кнопки настраиваемые параметры
переключаются
последовательности:
BAS TRE FAD
(низкие частоты)
(высокие частоты) (затухание)
VOL
(громкость)
Индикация Для чего:
BAS Настройка низких
TRE
FAD* Настройка баланса
BAL Настройка баланса
VOL
* Если Вы используете систему из двух громкогово-
рителей, установите уровень затухания.
частот.
Настройка высоких
частот.
фронтальных и
тыловых громкоговорителей.
левых и правых
громкоговорителей.
Настройка
громкости.
12
в следующей
BAL
(баланс)
Диапазон
–06 (мин)
+06 (макс)
–06 (мин)
+06 (макс)
R06 (только
задние)
F06 (только
передние)
L06 (только
левые)
R06 (только
правые)
00 (мин)
50 (макс)
2
Настройте громкость.
Для увеличения громкости.
Для снижения громкости.
По мере настройки уровня низких или
высоких частот графическое отображение
эквализации меняется.
Примечание:
В обычном режиме диск настройки служит
для регулирования громкости. Таким образом,
для настройки громкости Вам не нужно
выбирать “VOL”.
Использование Памяти
Управления Звучанием
Вы можете выбирать и сохранять в памяти
настроенные режимы звучания для каждого
источника сигнала. (Усовершенствованная
функция SCM).
Выбор и сохранение режимов звучания
После выбора режима звучания он сохраняется в памяти. Этот режим будет вызван из памяти и отображен на дисплее при следующем
включении данного источника сигнала.
Вы можете сохранить звуковой режим для каждого
из следующих источников сигнала — FM1, FM2,
FM3, AM и проигрывателя компакт-дисков.
• Если Вы не желаете сохранять звуковые режимы для каждого источника сигнала по отдельности, а желаете использовать один режим
звучания для всех источников сигнала, см. раздел “Отключение Усовершенствованной функции SCM — SCM LINK” на странице 15.
Выберите желаемый режим звучания.
После каждого нажатия кнопки
режим звучания меняется в
следующем порядке:
BEAT SOFT POP
SCM OFF
Page 31

• Если функция “SCM LINK” настроена как
“LINK ON”, выбранный режим звучания может быть сохранен в памяти для текущего
источника сигнала, и этот режим будет
действовать только для текущего источника
сигнала. При каждом изменении источника
сигнала на дисплее мигает индикатор SCM.
• Если функция “SCM LINK” настроена как
“LINK OFF”, выбранный режим звучания будет
действовать для всех источников сигнала.
Индикация
BEAT Рок или дис- +02 00 ON
SOFT Спокойная +01 –03 OFF
POP
SCM OFF
Для чего: Запрогр. значения
BAS TRE LOUD
ко музыка
фоновая
музыка
Легкая музыка
(Ровный звук)
+04 +01 OFF
00 00 ON
Загрузка режимов звучания
Когда функция “SCM LINK” настроена
как “LINK ON,”
Выберите источник сигнала.
Сохранение Ваших настроек звучания
Вы можете настроить режим звучания (BEAT,
SOFT, POP) в соответствии с Вашими вкусами и
сохранить настройки в памяти.
• Время выполнения этой процедуры ограничено.
Если режим настройки отключился прежде
чем Вы завершили процедуру настройки,
начните снова с пункта 1.
1
Вызовите режим звучания, который Вы желаете настраивать.
• Для получения более подробной информации ознакомьтесь с левым столбцом.
2
Выберите “BAS (низкие частоты)”,
“TRE (высокие частоты)” или
“LOUD (компенсация громкости)”.
3
Настройте уровень высоких или
низких частот или включите/
выключите (ON/OFF) функцию
компенсации громкости.
• Для более подробной информации см. стр. 12.
РУССКИЙ
Будет вызван режим звучания, сохраненный
для текущего источника сигнала.
Примечания:
• Вы можете отрегулировать запрограммированные режимы звучания и сохранить их в памяти.
Если Вы желаете создать и сохранить Ваш режим звучания, см. раздел “Сохранение Ваших
настроек звучания” в правом столбце.
• Для получения информации о настройке уровня
усиления низких и высоких частот или о временном включении/выключении функции компенсации громкости см. страницу 12. (При выборе
другого источника сигнала выполненные Вами
настройки будут отменены.)
4
Повторите пункты 2 и 3 для
настройки других параметров.
5
Нажмите и удерживайте нажатой
кнопку SCM до тех пор, пока выбранный Вами в пункте 1 режим
звучания не замигает на дисплее.
Ваши настройки параметров выбранного
режима звучания сохранены в памяти.
6
Повторите ту же процедуру для настройки других режимов звучания.
Для восстановления фабричных значений
Повторите те же процедуры и установите
значения согласно списку фабричных значений,
приведенных в левом столбце.
13
Page 32

ДРУГИЕ ОСНОВНЫЕ ФУНКЦИИ
Настройка часов
1
Нажмите кнопку SEL (выбор) и
удерживайте в течение 2 секунд,
пока на дисплее не появится один
из пунктов PSM. (См. страницу 15.)
РУССКИЙ
2
Настройте час.
1 Выберите “CLOCK H” (час), если это
не отображается на дисплее.
2 Настройте час.
1
3
Настройте минуту.
1 Выберите “CLOCK M” (минута).
2 Настройте минуту.
2
21
Изменение основных настроек
(PSM)
Вы можете изменить параметры, приведенные
на следующей странице, при помощи режима
PSM (Режим Пользовательской Настройки).
Основная процедура
1
Нажмите кнопку SEL (выбор) и
удерживайте в течение 2 секунд,
пока на дисплее не появится один
из пунктов PSM. (См. страницу 15.)
2
Выберите параметр PSM, который
Вы желаете настроить. (См.
страницу 15.)
4
Завершите процедуру настройки.
Для проверки текущего времени, когда
устройство отключено, нажмите кнопку
DISP. Питание включится, на дисплее на 5
секунд появится текущее время, затем
питание отключится снова.
14
3
Настройте параметр PSM, выбранный выше.
4
Повторите пункты 2 и 3 для настройки других параметров PSM,
если это необходимо.
5
Завершите процедуру настройки.
Page 33

Параметры режима Пользовательских Настроек (PSM)
1
Удерживайте.
CLOCK H Настройка часа
CLOCK M Настройка минуты
SCM LINK Настройка присвое-
LEVEL Отображение
TEL Снижение громкос-
• Нажмите кнопку SEL (выбор) для завершения настроки.
2
Выберите.
ния звуковых полей
источникам сигнала
уровня
ти при использовании сотового
телефона
Отключение Усовершенствованной
функции SCM – SCM LINK
Вы можете отключить Усовершенствованную
функцию SCM (сохранение звуковых полей в
памяти) и отделить режимы звучания от
источников сигнала.
При поставке с фабрики в памяти могут
храниться различные режимы звучания для
разных источников сигнала, и Вы можете
менять режимы звучания, просто переключая
источники сигнала.
• LINK ON: Усовершенствованная функция
• LINK OFF: Обычная функция SCM (один
SCM (различные режимы звучания
для разных источников сигнала)
режим звучания для всех
источников сигнала)
3
Настройка.
Против часовой
стрелки
Назад
Назад
LINK OFF
AUDIO 1
MUTING 1
Снижение громкости при использовании
сотового телефона – TEL
Этот режим используется при подключении
сотового телефона. В зависимости от
системы используемого телефона выберите
либо “MUTING 1”, либо “MUTING 2”, и
проверьте, какое из значений приводит к
отключению звука.
При поставке с фабрики этот режим
отключен.
•
MUTING 1: Выберите этот режим, если он
•
MUTING 2: Выберите этот режим, если он
•
OFF: Отключение функции снижения
Выбор отображения уровня – LEVEL
Вы можете настроить отображение уровня в
соответствии с Вашими предпочтениями.
При поставке устройства с фабрики выбран
режим “AUDIO 2”.
• AUDIO 1:
• AUDIO 2: Попеременно отображается уро-
• OFF: Индикация уровня звука исчезает.
Индикация уровня звука
подсвечивается снизу вверх.
вень звука (перемещается снизу
вверх) и подсвеченный дисплей.
Значение,
установленПо
часовой
стрелке
Вперед
Вперед
LINK ON
AUDIO 2
OFF
MUTING 2
OFF
приводит к отключению звука.
приводит к отключению звука.
громкости при использовании
сотового телефона.
ное по
умолчанию
0:00
LINK ON
AUDIO 2
OFF
См.
стр.
14
РУССКИЙ
12, 13,
15
15
15
15
Page 34

Отсоединение панели
управления
Вы можете отсоединить панель управления,
когда покидаете машину.
При отсоединении или установке панели
управления соблюдайте осторожность, чтобы
не повредить разъемы на задней части
панели управления и на держателе панели.
Как отсоединить панель управления
РУССКИЙ
Перед отсоединением панели управления не
забудьте выключить питание.
1
Освободите панель управления.
2
Вытащите панель управления из
устройства.
Как присоединить панель управления
1
Вставьте левую сторону панели
управления в паз на держателе
панели.
2
Нажмите на правую сторону
панели управления для того,
чтобы надеть панель на
держатель.
Примечание по чистке контактов:
Если Вы часто отделяете панель управления,
контакты могут прийти в негодность.
Для сведения к минимуму такой возможности,
периодически протирайте контакты ватой
или тканью, смоченной в спирте, стараясь не
повредить контакты.
16
3
Поместите панель управления в
полученный в комплекте футляр.
Контакты
Page 35

ВОЗМОЖНЫЕ НЕИСПРАВНОСТИ
То, что поначалу представляется неисправностью, может не представлять серьезной
проблемы. Перед обращением в центр обслуживания проверьте следующее.
Причины Рекомендуемые мерыСимптомы
• Компакт-диск не
воспроизводится
• Звучание компакт-диска
иногда прерывается.
• Звук иногда прерывается. Неправильное подключение.
• Звук не выводится из
громкоговорителей.
• Не работает функция SSM
(Последовательная память
о станциях с сильным
сигналом).
• Во время прослушивания
радио слышны статические
помехи.
• На дисплее появляется
“NO DISC”.
• Компакт-диск не
удаляется.
• Компакт-диск не
воспроизводится и не
выбрасывается.
• Устройство не работает
совсем.
Компакт-диск вставлен
вверх ногами.
Вы едете по неровной
дороге.
Компакт-диск поцарапан.
Неправильное подключение.
Регулятор громкости
установлен на минимальное
значение.
Неправильное подключение.
Сигналы слишком слабые. Настройте станции в ручную.
Антенна подключена
неправильно.
Компакт-диск не установлен
в отсек для компакт-дисков.
Компакт-диск зафиксирован. Освободите компакт-диск
Проигрыватель компактдисков функционирует
неправильно.
Встроенный микропроцессор
функционирует неправильно
по причине помех и др.
Установите компакт-диск
правильно.
Остановите воспроизведение
компакт-диска при движении
по неровной дороге.
Замените компакт-диск.
Проверьте кабели и разъемы.
Проверьте кабели и разъемы.
Настройте громкость.
Проверьте кабели и разъемы.
Подключите антенну
правильно.
Установите компакт-диск.
(см. страницу 11).
Одновременно нажмите
кнопки
удерживайте их в течение
нескольких секунд.
Постарайтесь не уронить
компакт-диск, когда он будет
выброшен.
Одновременно нажмите
кнопки
удерживайте их в течение
нескольких секунд для
перезагрузки устройства.
(Настройки часов и
запрограммированные радиостанции, хранящиеся в памяти, будут удалены.)
(См. страницу 3.)
и 0 и
и SEL и
РУССКИЙ
17
Page 36

ТЕХНИЧЕСКОЕ ОБСЛУЖИВАНИЕ
Обращение с компакт-дисками
Это устройство разработано только для воспроизведения дисков, несущих следующую
маркировку.
COMPACT
DIGITAL AUDIO
• Диски других типов не могут быть
воспроизведены этим устройством.
Как держать
РУССКИЙ
компакт-диски
Для того, чтобы вынуть
компакт-диск из коробки,
нажмите на центральный
выступ коробки и выньте
компакт-диск, держа его за края.
• Держите компакт-диск только за края. На
прикасайтесь к записанной поверхности.
Для того, чтобы поместить компакт-диск в коробку, аккуратно наденьте компакт-диск на центральный выступ (стороной с этикеткой вверх).
• После использования не забывайте возвращать диски в коробки.
Для поддержания
чистоты компакт-дисков
Загрязненный компакт-диск
может не воспроизводиться
правильно. Если компактдиск загрязнился, протрите
его мягкой тканью по
прямой в направлении от
центра к краям.
При воспроизведении
нового компакт-диска
Новые компакт-диски
могут иметь некоторые
неровности на внутренних
и внешних краях. При
использовании такого компакт-диска
устройство может выкинуть компакт-диск.
Для удаления неровностей протрите края
карандашом или шариковой ручкой.
О сбоях фрагментов:
Сбои фрагментов могут возникнуть при движении по неровной дороге. Это не приводит к
повреждению устройства или компакт-диска, но
причиняет беспокойство.
Мы рекомендуем Вам прекратить воспроизведение компакт-дисков при движении на таких
дорогах.
18
Центральный выступ
Конденсация влаги
В следующих случаях на линзах
проигрывателя компакт-дисков влага может
сконденсироваться:
• После включения обогревателя в машине.
• При повышении влажности в машине.
В этом случае проигрыватель компакт-дисков
может работать неправильно. Удалите компакт-диск и оставьте устройство включенным
на несколько часов, пока не испарится влага.
При воспроизведении дисков CD-R
(записываемых дисков)
Вы можете воспроизводить записанные Вами
диски CD-R на этом устройстве.
• Перед началом воспроизведения диска CDR тщательно ознакомьтесь с его инструкциями или предостережениями.
• Некоторые диски CD-R, записанные на других устройствах, могут не воспроизводиться
на этом устройстве в связи с характеристиками диска, а также по следующим причинам:
– Диск загрязнен или поцарапан.
– На линзах внутри устройства сконденси-
ровалась влага.
– Снимающие линзы внутри проигрывателя
компакт-дисков загрязнились.
• Пользуйтесь только “завершенными” дисками CD-Rs.
• Диска CD-RWs (перезаписываемые) не могут быть воспроизведены этим устройством.
• Не пользуйтесь дисками CD-R, на которых
что-либо наклеено. Это может привести к
неисправности.
ПРЕДОСТЕРЕЖЕНИЯ:
• Не используйте компакт-диски 8 см
(одиночные компакт-диски). (Такие компактдиски не могут быть удалены.)
• Не используйте компакт-диски необычной
формы — например, в форме сердца или цветка. Это может привести к неисправности.
• Не подвергайте компакт-диски воздействию
прямых солнечных лучей и не оставляйте их в
условиях чрезмерно высокой температуры или
влажности. Не оставляйте их в машине.
• Не используйте никаких химических средств
(например, чистящих средств, растворителей, бензина) для чистки компакт-дисков.
Page 37

ТЕХНИЧЕСКИЕ ХАРАКТЕРИСТИКИ
СЕКЦИЯ АУДИО УСИЛИТЕЛЯ
Максимальная выходная мощность:
Фронтальные: 40 Вт на канал
Тыловые: 40 Вт на канал
Номинальная выходная мощность (RMS):
Фронтальные: 16 Вт на канал в 4 Ω, от
40 Гц до 20000 Гц при не
более чем 0,8% гармонических искажений.
Тыловые: 16 Вт на канал в 4 Ω, от
40 Гц до 20000 Гц при не
более чем 0,8% гармонических искажений.
Сопротивление нагрузки: 4 Ω (от 4 Ω дo 8 Ω
приемлемо)
Диапазон управления тональностью:
Низкие частоты: ±10 dB на 100 Гц
Высокие частоты: ±10 dB на 10 кГц
Частотный диапазон: от 40 Гц дo 20 000 Гц
Соотношение сигнал/шум: 70 дБ
Уровень линейного выхода/сопротивление:
2,0 В/20 кΩ нагрузка (полный диапазон)
Выходное сопротивление: 1 кΩ
СЕКЦИЯ ТЮНЕРА
Частотный диапазон:
FM1/FM2: 87,5 MГц дo 108,0 MГц
FM3: 65 MГц дo 74 MГц
AM: (MW) 522 кГц дo 1 620 кГц
(LW) 144 кГц дo 279 кГц
[Тюнер FM]
Чувствительность: 11,3 дБф (1,0 мкВ/75 Ω)
50 дБ чувствительность затухания:
16,3 дБф (1,8 мкВ/75 Ω)
Альтернативная избирательность каналов
(400 кГц): 65 дБ
Частотный диапазон: 40 Гц дo 15000 Гц
Стерео разделение: 30 дБ
Коэффициент захвата: 1,5 дБ
[Тюнер MW]
Чувствительность: 20 мкВ
Избирательность: 35 дБ
[Тюнер LW]
Чувствительность: 50 мкВ
CЕКЦИЯ ПРОИГРЫВАТЕЛЯ КОМПАКТДИСКОВ
Тип: Проигрыватель компакт-дисков
Система распознавания сигнала:
Неконтактный оптический прием
(полупроводниковый лазер)
Количество каналов: 2 канала (стерео)
Частотный диапазон: от 5 Гц дo 20 000 Гц
Динамический диапазон: 96 дБ
Соотношение сигнал/шум: 98 дБ
Высокочастотные и низкочастотные
детонационные искажения:
Менее измеримой величины
ОБЩИЕ ХАРАКТЕРИСТИКИ
Требования к питанию:
Эксплуатационное напряжение:
постоянное
напряжение 14,4 В
(приемлемо от 11 В дo
16 В)
Система заземления: минус на массе
Эксплуатационная температура:
от 0°C дo +40°C
Размеры (Ш × В × Д):
Размер установки: 182 мм × 52 мм × 160 мм
Размер панели: 188 мм × 58 мм × 8 мм
Вес: 1,7 кг
(исключая
принадлежности)
РУССКИЙ
Дизайн и технические характеристики могут
меняться без дополнительного уведомления.
19
Page 38

Having TROUBLE with operation?
Please reset your unit
Refer to page of How to reset your unit
Затруднения при эксплуатации?
Пожалуйста, перезагрузите Ваше устройство
Для получения информации о перезагрузке Вашего
устройства обратитесь на соответствующую страницу
EN, RU
VICTOR COMPANY OF JAPAN, LIMITED
0101AOMCAPJES
JVC
 Loading...