

Page 1
CD RECEIVER
CD-RECEIVER
RECEPTEUR CD
CD-RECEIVER
KD-S6060
COMPACT
DIGITAL AUDIO
ENGLISH
DEUTSCH
FRANÇAIS
LOUD
SEL
DISP
MO
8
7 9 10 12
11
RPT
RND
FM
CD
SSM
AM
SCMMODE
NEDERLANDS
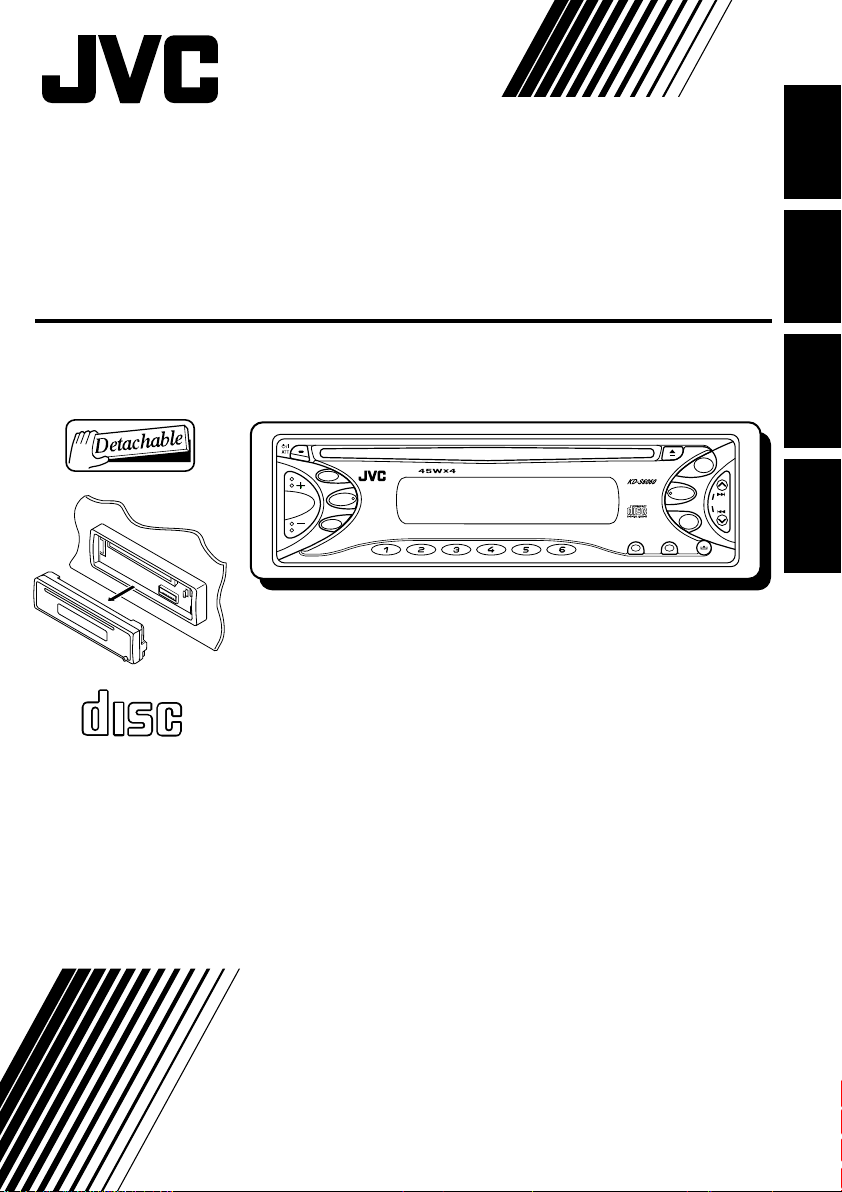
For installation and connections, refer to the separate manual.
Für den Einbau und die Anschlüsse siehe das eigenständige Handbuch.
Pour l’installation et les raccordements, se référer au manuel séparé.
Bijzonderheden over de installatie en aansluiting van het apparaat vindt u in de
desbetreffende handleiding.
INSTRUCTIONS
BEDIENUNGSANLEITUNG
MANUEL D’INSTRUCTIONS
GEBRUIKSAANWIJZING
GET0173-001A
[E/EX]
Page 2
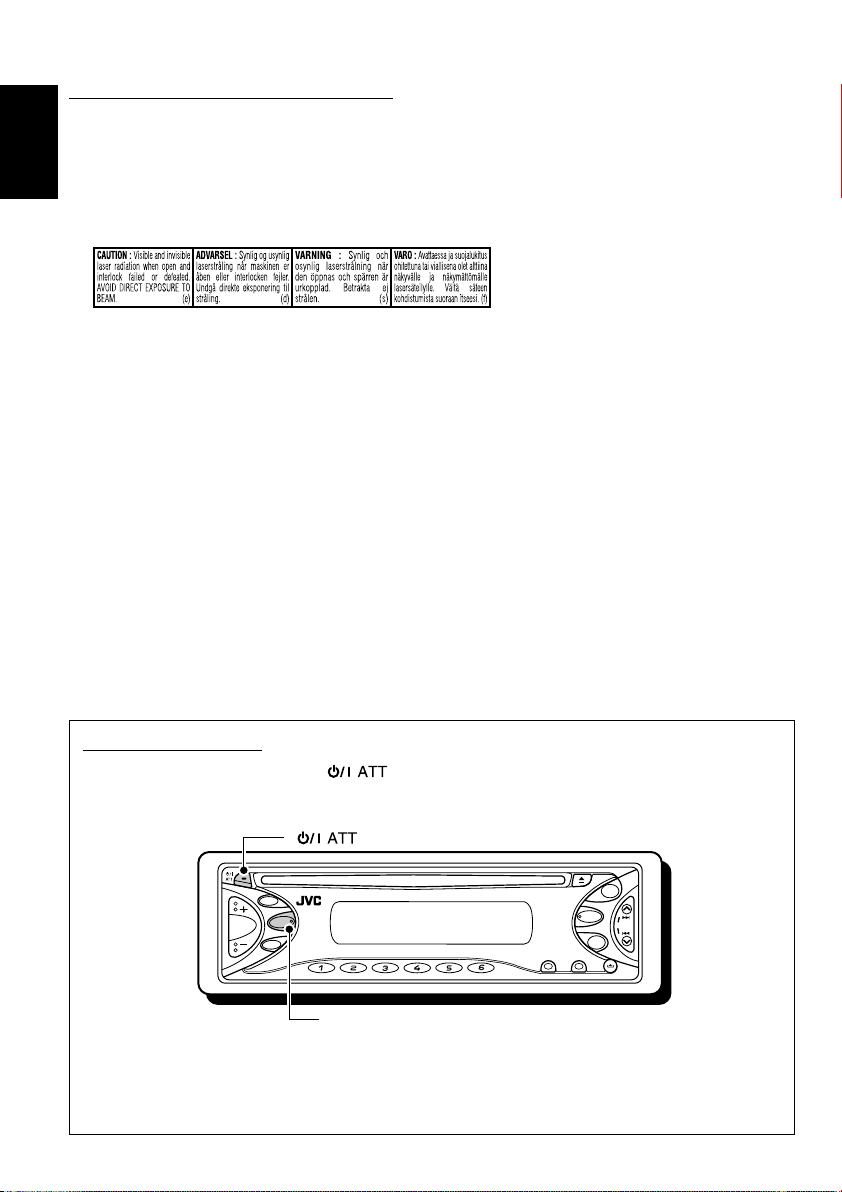
IMPORTANT FOR LASER PRODUCTS
1. CLASS 1 LASER PRODUCT
2. CAUTION: Do not open the top cover. There are no user serviceable parts inside the unit; leave all
servicing to qualified service personnel.
ENGLISH
3. CAUTION: Visible and invisible laser radiation when open and interlock failed or defeated. Avoid
direct exposure to beam.
4. REPRODUCTION OF LABEL: CAUTION LABEL, PLACED OUTSIDE THE UNIT.
How to reset your unit
While holding SEL (select), press (standby/on attenuator) for more than 2 seconds.
This will reset the built-in microcomputer.
(standby/on attenuator)
LOUD
SEL
DISP
MO
7 9 10 12
8
11
RPT
RND
SEL (select)
Notes:
• Your preset adjustments—such as preset channels or sound adjustments—will also be erased.
• If a CD is in the unit, it will eject when you reset the unit. Be careful not to drop the CD.
2
FM
CD
SSM
AM
SCMMODE
Page 3

Thank you for purchasing a JVC product. Please read all instructions carefully before operation,
to ensure your complete understanding and to obtain the best possible performance from the unit.
CONTENTS
How to reset your unit ............................... 2
How to use the MODE button ................... 3
LOCATION OF THE BUTTONS ............ 4
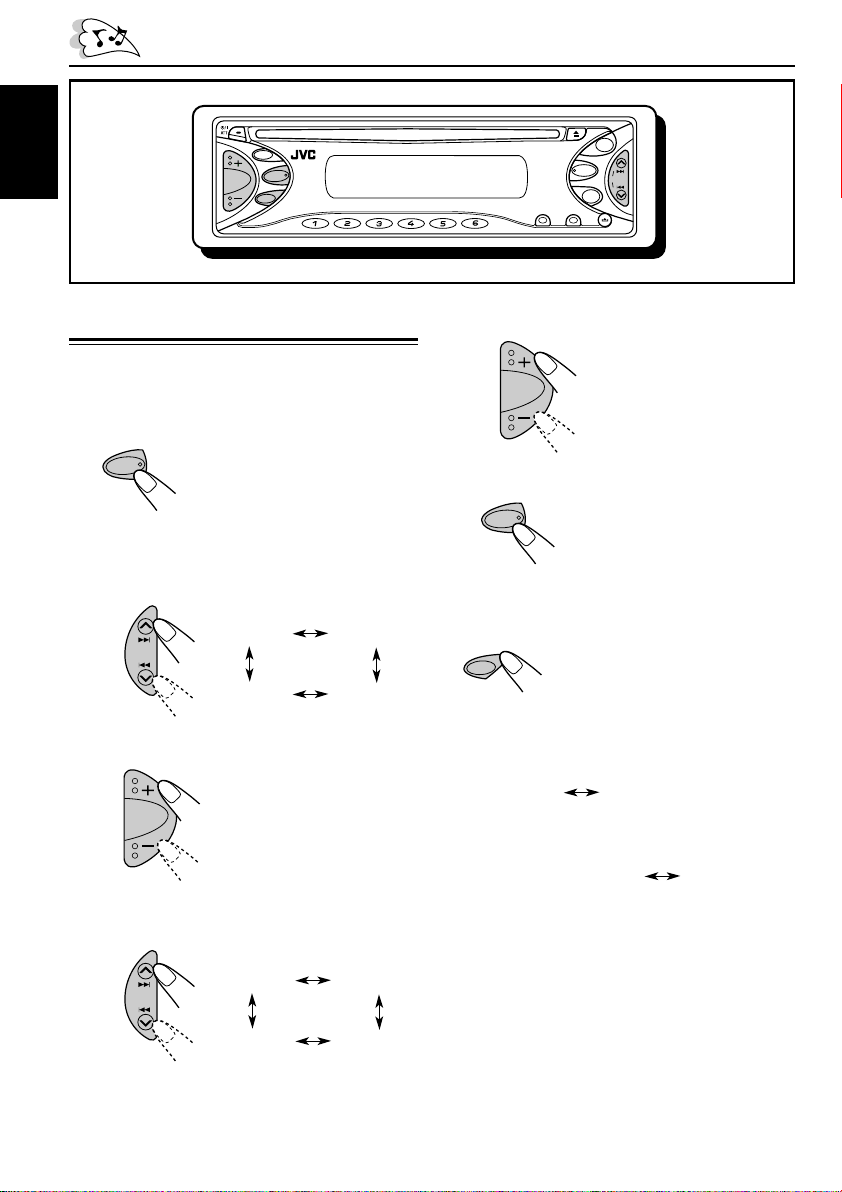
Control panel ............................................. 4
BASIC OPERATIONS ....................... 5
Turning on the power ................................ 5
Setting the clock ........................................ 6
RADIO OPERATIONS ...................... 7
Listening to the radio ................................. 7
Storing stations in memory ....................... 9
Tuning in to a preset station ...................... 10
CD OPERATIONS ........................... 11
Playing a CD ............................................. 11
Locating a track or a particular portion
on a CD .................................................. 12
Selecting CD playback modes .................. 12
Prohibiting CD ejection ............................. 13
How to use the MODE button
If you press MODE, the unit goes into functions mode and the number buttons work as different
function buttons.
MODE
SOUND ADJUSTMENTS ................... 14
Adjusting the sound .................................. 14
Turning on/off the loudness function ......... 14
Using the sound control memory (SCM) ... 15
Storing your own sound adjustments ........ 16
OTHER MAIN FUNCTIONS ................ 17
Selecting the level display—LEVEL .......... 17
Canceling Advanced SCM—SCM LINK ... 17
Detaching the control panel ...................... 18
TROUBLESHOOTING ...................... 19
MAINTENANCE ............................. 20
Handling discs ........................................... 20
SPECIFICATIONS........................... 21
ENGLISH
MO
8
To use these buttons as number buttons again after pressing MODE, wait for 5 seconds
without pressing any number button until the functions mode is cleared.
• Pressing MODE again also clears the functions mode.
910 127
MO
11
RPT
RND
Time countdown indicator
Note:
For security reasons, a numbered ID card is provided with this unit, and the same ID number is imprinted on
the unit’s chassis. Keep the card in a safe place, as it will help the authorities to identify your unit if stolen.
BEFORE USE
*
For safety....
• Do not raise the volume level too much, as this will
block outside sounds, making driving dangerous.
• Stop the car before performing any complicated
operations.
*
Temperature inside the car....
If you have parked the car for a long time in hot or
cold weather, wait until the temperature in the car
becomes normal before operating the unit.
3
Page 4
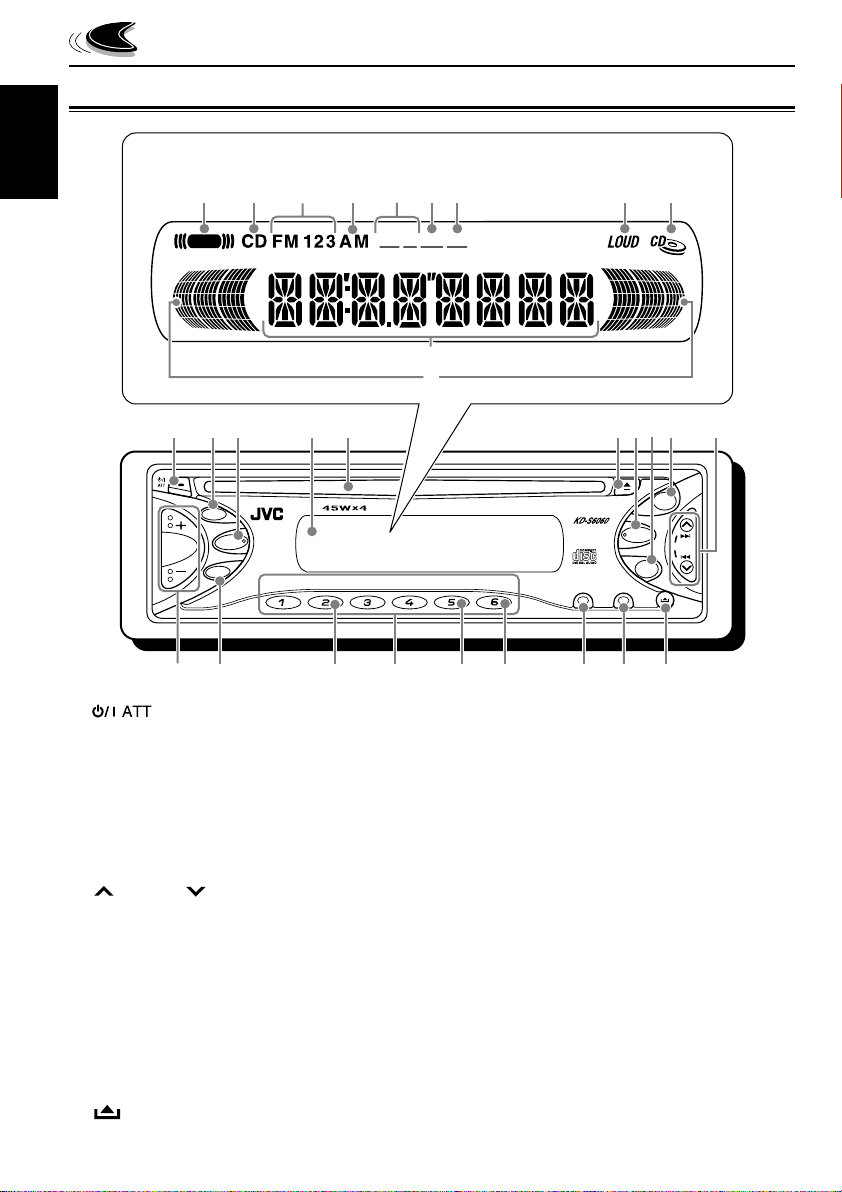
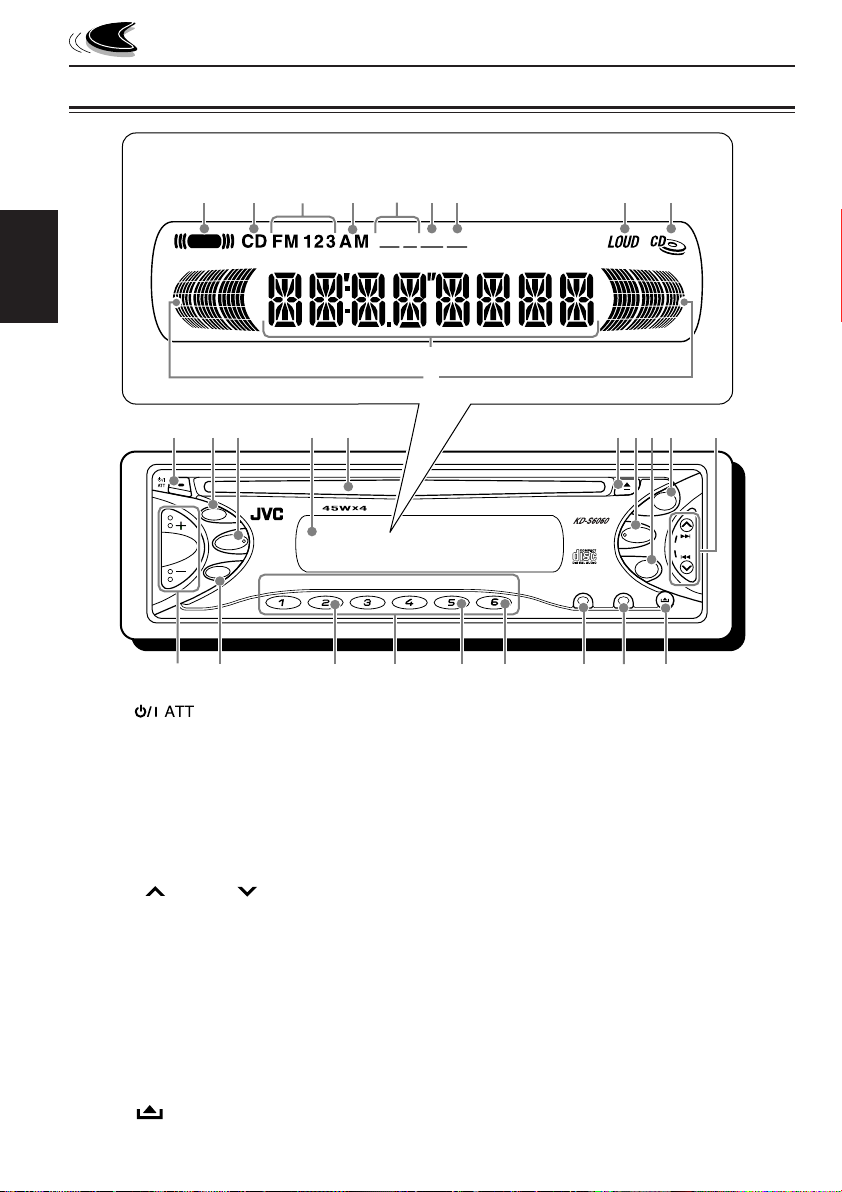
Control panel
ENGLISH
LOCATION OF THE BUTTONS
Display window
;dga
SCM
s
f
MO
h
ST RND RPT
l
/
j
k
1
q
2
LOUD
3
SEL
DISP
7 9 10 12
w
1 (standby/on attenuator) button
2 LOUD (loudness) button
3 SEL (select) button
4 Display window
5 Loading slot
6 0 (eject) button
7 CD button
8 AM button
9 FM button
p ¢/4 buttons
• Also functions as SSM buttons when pressed
together.
q +/– buttons
w DISP (display) button
e MO (monaural) button
r Number buttons
t RPT (repeat) button
y RND (random) button
u MODE button
i SCM (sound control memory) button
o (control panel release) button
4
7
69
54
MO
8
e
RND
11
RPT
tyr
ui
8
CD
AM
SCMMODE
p
FM
SSM
o
Display window
; SCM (sound control memory) indicator
a CD source indicator
s FM band indicators (FM1, FM2, FM3)
d AM band indicator
f Tuner reception indicators
MO (monaural), ST (stereo)
g RND (random) indicator
h RPT (repeat) indicator
j LOUD (loudness) indicator
k CD–in indicator
l Main display
/ Volume level indicator
Page 5
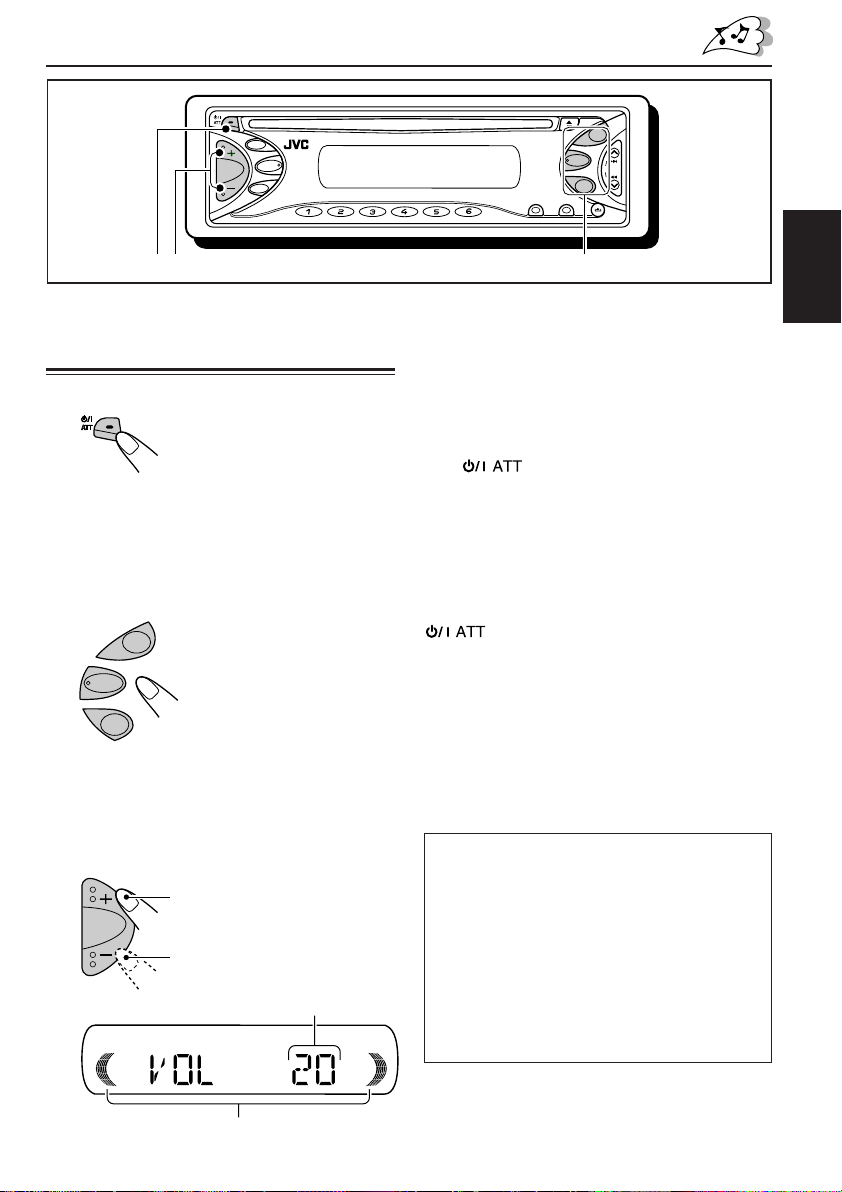
BASIC OPERATIONS
LOUD
SEL
DISP
123
Turning on the power
1
Turn on the power.
Note on One-Touch Operation:
When you select a source in step 2 below, the
power automatically comes on. You do not have
to press this button to turn on the power.
2
Select the source.
FM
CD
AM
To operate the tuner (FM or AM),
see pages 7 – 10.
To play a CD,
see pages 11 – 13.
3
Adjust the volume.
To increase the volume
MO
8
7 9 10 12
11
RPT
4
To drop the volume in a moment
Press briefly while listening to any
source. “AT T ” starts flashing on the display, and
the volume level will drop in a moment.
To resume the previous volume level, press the
button briefly again.
To turn off the power
Press and hold for more than one
second.
“SEE YOU” appears, then the unit turns off.
• If you turn off the power while listening to a
CD, CD play will start from where playback has
been stopped previously, next time you turn on
the power.
CAUTION on Volume Setting:
CDs produce very little noise compared with other
sources. If the volume level is adjusted for the
tuner, for example, the speakers may be damaged
by the sudden increase in the output level.
Therefore, lower the volume before playing a CD
and adjust it as required during playback.
FM
CD
SSM
RND
AM
SCMMODE
Adjust the sound as you want.
(See pages 14 – 16.)
ENGLISH
To decrease the volume
Volume level appears.
Volume level indicator (see page 17)
5
Page 6
ENGLISH
DISP
ClockFrequency
LOUD
SEL
DISP
7 9 10 12
FM
CD
SSM
MO
8
RND
11
RPT
AM
SCMMODE
Setting the clock
1
Press and hold SEL (select) for more
than 2 seconds.
“CLOCK H,” “CLOCK M,” “SCM LINK,” or
“LEVEL” appears on the display.
SEL
2
Set the hour.
1 Select “CLOCK H” (hour) if not shown on
the display.
CLOCK H CLOCK M
LEVEL SCM LINK
2 Adjust the hour.
2 Adjust the minute.
4
Finish the setting.
SEL
To check the current clock time or change the
display mode
Press DISP (display) repeatedly.
Each time you press the
button, the display mode
changes as follows:
• During tuner operation:
• During CD operation:
ClockElapsed playing time
3
Set the minute.
1 Select “CLOCK M” (minute).
6
CLOCK H CLOCK M
LEVEL SCM LINK
• During power off:
The power turns on and the clock time is
shown for 5 seconds, then the power turns
off.
Page 7
RADIO OPERATIONS
LOUD
SEL
DISP
MO
8
7 9 10 12
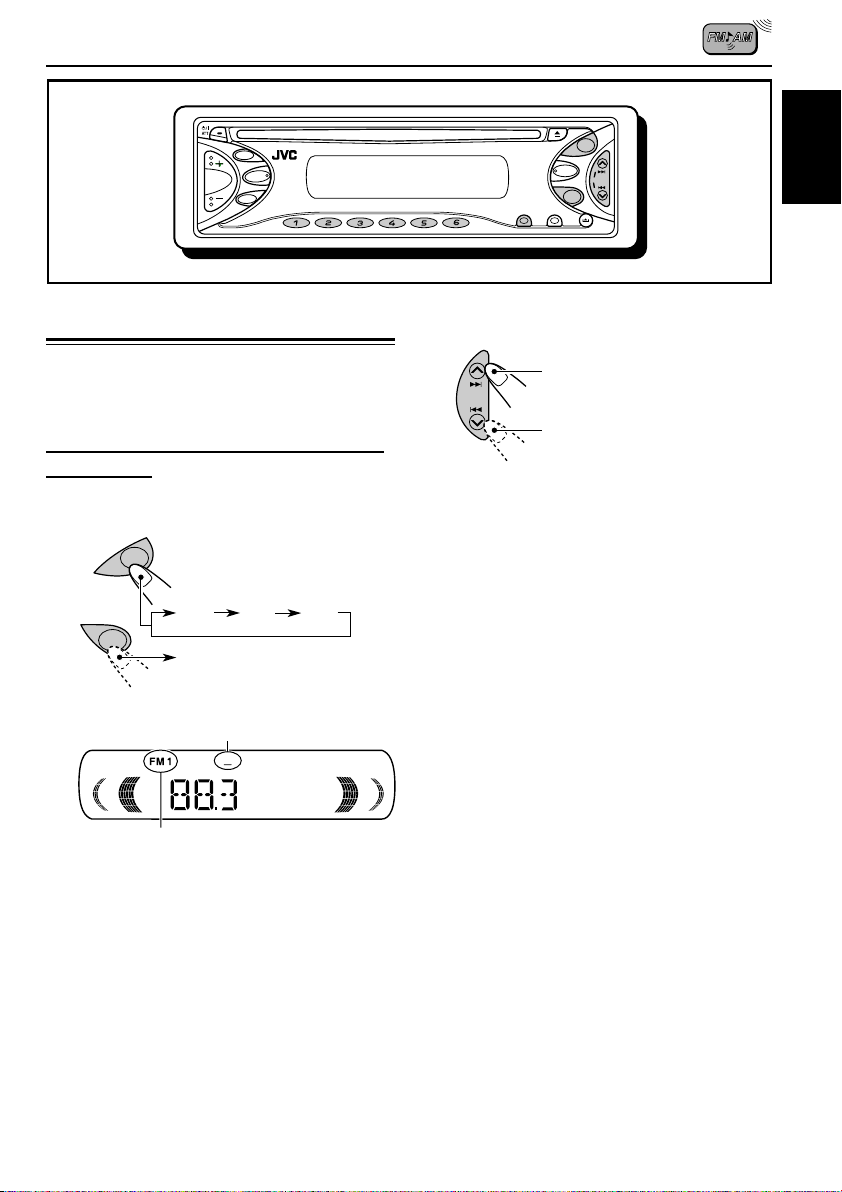
Listening to the radio
You can use either automatic searching or
manual searching to tune in to a particular
station.
Searching for a station automatically:
Auto search
1
Select the band (FM1 – 3, AM).
FM
FM1 FM2 FM3
AM
AM
Lights up when receiving an FM stereo
broadcast with sufficient signal strength.
ST
FM
CD
SSM
RND
11
RPT
2
Start searching for a station.
AM
SCMMODE
To search for stations of higher
frequencies
To search for stations of lower
frequencies
When a station is received, searching stops.
To stop searching before a station is
received, press the same button you have
pressed for searching.
ENGLISH
Selected band appears.
Note:
This receiver has three FM bands (FM1, FM2,
FM3). You can use any one of them to listen to
an FM broadcast.
7
Page 8
Searching for a station manually:
Manual search
1
ENGLISH
Select the band (FM1 – 3, AM).
FM
FM1 FM2 FM3
AM
AM
Note:
This receiver has three FM bands (FM1, FM2,
FM3). You can use any one of them to listen to
an FM broadcast.
2
Press and hold ¢ or 4
until “M” (manual) starts flashing on
the display.
When an FM stereo broadcast is hard to
receive:
MODE
MO
8
When the MO indicator is lit on the display, the
sound you hear becomes monaural but the
reception will be improved.
1 Press MODE to enter the
functions mode while listening
to an FM stereo broadcast.
2 Press MO (monaural), while
still in the functions mode, so
that the MO indicator lights up
on the display.
Each time you press the
button, the MO indicator lights
up and goes off alternately.
MO (monaural) indicator
MO
3
Tune in to a station you want while
“M” (manual) is flashing.
To tune in to stations of higher
frequencies
To tune in to stations of lower
frequencies
• If you release your finger from the button,
the manual mode will automatically turns
off after 5 seconds.
• If you hold down the button, the frequency
keeps changing (in 50 kHz intervals for FM
and 9 kHz intervals for AM—MW/LW) until
you release the button.
8
Page 9
Storing stations in memory
You can use one of the following two methods to
store broadcasting stations in memory.
• Automatic preset of FM stations: SSM (Strongstation Sequential Memory)
• Manual preset of both FM and AM stations
FM station automatic preset: SSM
You can preset 6 local FM stations in each FM
band (FM1, FM2, and FM3).
1
Select the FM band (FM1 – 3) you
want to store FM stations into.
FM
Manual preset
You can preset up to 6 stations in each band
(FM1, FM2, FM3, and AM) manually.
Ex.: Storing FM station of 92.5 MHz into the
preset number 1 of the FM1 band.
1
Select the band (FM1 – 3, AM) you
want to store stations into (in this
example, FM1).
FM
FM1 FM2 FM3
AM
AM
ENGLISH
FM1 FM2 FM3
2
Press and hold both buttons for
more than 2 seconds.
SSM
“SSM” appears, then disappears
when automatic preset is over.
Local FM stations with the strongest signals are
searched and stored automatically in the band
number you have selected (FM1, FM2, or FM3).
These stations are preset in the number
buttons—No.1 (lowest frequency) to No.6
(highest frequency).
When automatic preset is over, the station stored
in number button 1 will be automatically tuned in.
2
Tune in to a station (in this example,
of 92.5 MHz).
To tune in to stations of higher
frequencies
To tune in to stations of lower
frequencies
CONTINUED ON THE NEXT PAGE
9
Page 10
3
Press and hold the number button
(in this example, 1) for more than
2 seconds.
ENGLISH
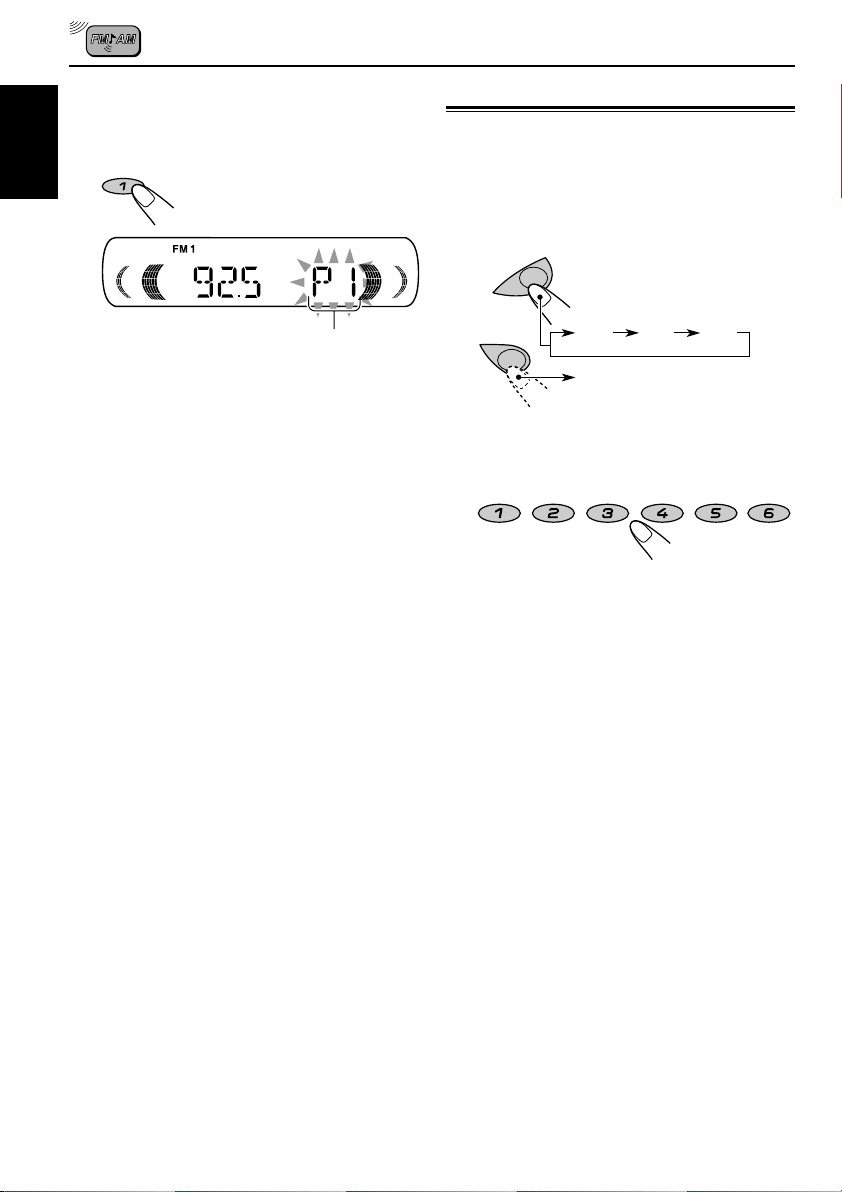
Tuning in to a preset station
You can easily tune in to a preset station.
7
Remember that you must store stations first. If
you have not stored them yet, see “Storing
stations in memory” on pages 9 and 10.
1
Select the band (FM1 – 3, AM).
FM
“P1” flashes for a few seconds.
4
Repeat the above procedure to store
other stations into other preset
numbers.
Notes:
• A previously preset station is erased when a new
station is stored in the same preset number.
• Preset stations are erased when the power supply to
the memory circuit is interrupted (for example,
during battery replacement). If this occurs, preset
the stations again.
FM1 FM2 FM3
AM
AM
2
Select the number (1 – 6) for the
preset station you want.
8
910 127
MO
11
RPT
RND
10
Page 11
CD OPERATIONS
LOUD
SEL
DISP
MO
8
7 9 10 12
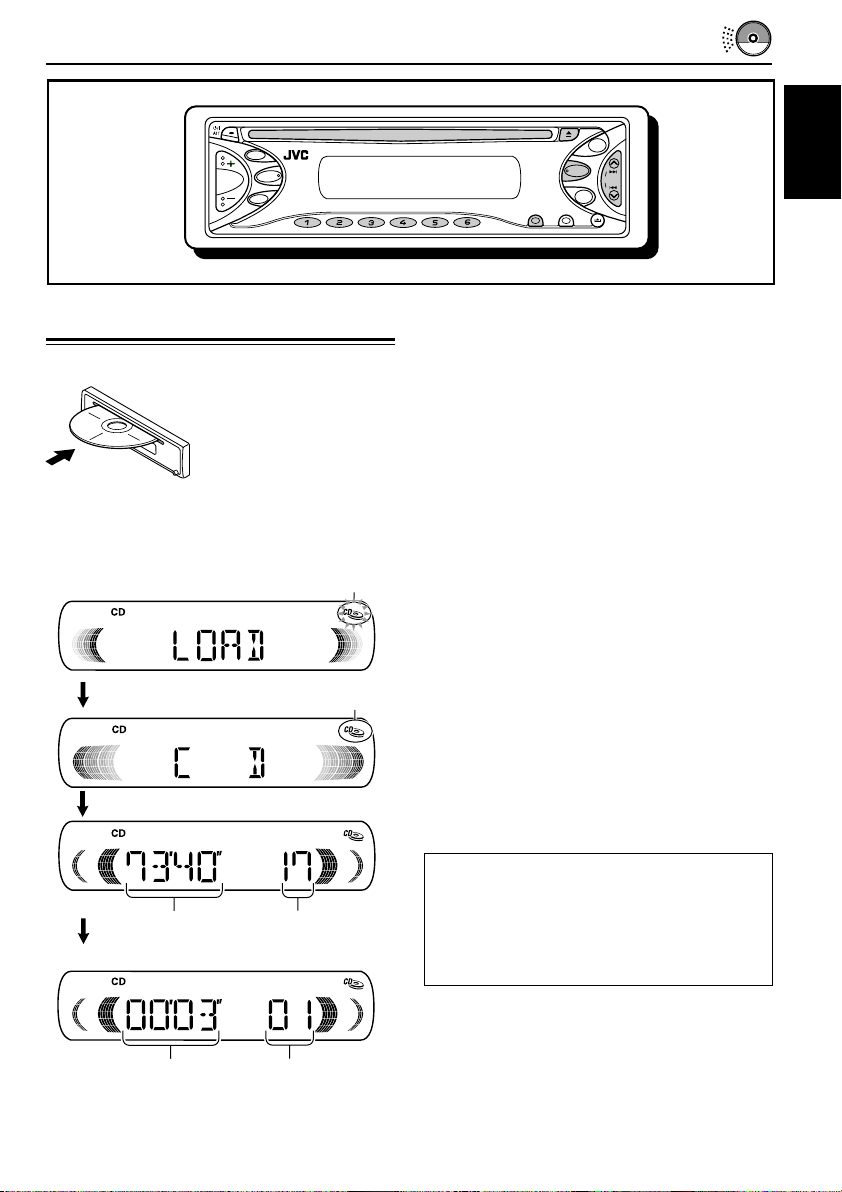
Playing a CD
Insert a CD into the loading slot.
The unit turns on, draws
the CD and starts
playback automatically.
Note on One-Touch Operation:
When a CD is already in the loading slot, pressing
CD turns on the unit and starts playback
automatically.
The CD–in indicator flashes.
The CD–in indicator lights up.
FM
CD
SSM
RND
11
RPT
AM
SCMMODE
Note:
When a CD is inserted upside down, “EJECT”
appears on the display and the CD automatically
ejects.
To stop play and eject the CD
Press 0.
CD play stops and the CD automatically ejects
from the loading slot. The source changes to the
tuner (you will hear the last received station.)
• If you change the source, CD play also stops
(without ejecting the CD).
Next time you select “CD” as the source, CD
play starts from where playback has been
stopped previously.
Notes:
• If the ejected disc is not removed for about
15 seconds, the disc is automatically inserted again
into the loading slot to protect it from dust.
(CD play will not start this time.)
• You can eject the CD even when the unit is turned
off.
ENGLISH
Total playing time
of the inserted disc
Total track number
of the inserted disc
Elapsed playing time Current track
All tracks will be played repeatedly until you stop
playback.
About mistracking:
Mistracking may result from driving on extremely
rough roads. This does not damage the unit and
the CD, but will be annoying.
We recommend that you stop CD play while
driving on such rough roads.
11
Page 12
Locating a track or a
particular portion on a CD
To fast-forward or reverse the track
ENGLISH
Press and hold ¢, while
playing a CD, to fast-forward the
track.
Press and hold 4 , while
playing a CD, to reverse the track.
To go to the next or previous tracks
Press ¢ briefly, while playing
a CD, to go ahead to the beginning
of the next track.
Each time you press the button
consecutively, the beginning of the
next tracks is located and played
back.
Press 4 briefly, while playing
a CD, to go back to the beginning
of the current track.
Each time you press the button
consecutively, the beginning of the
previous tracks is located and
played back.
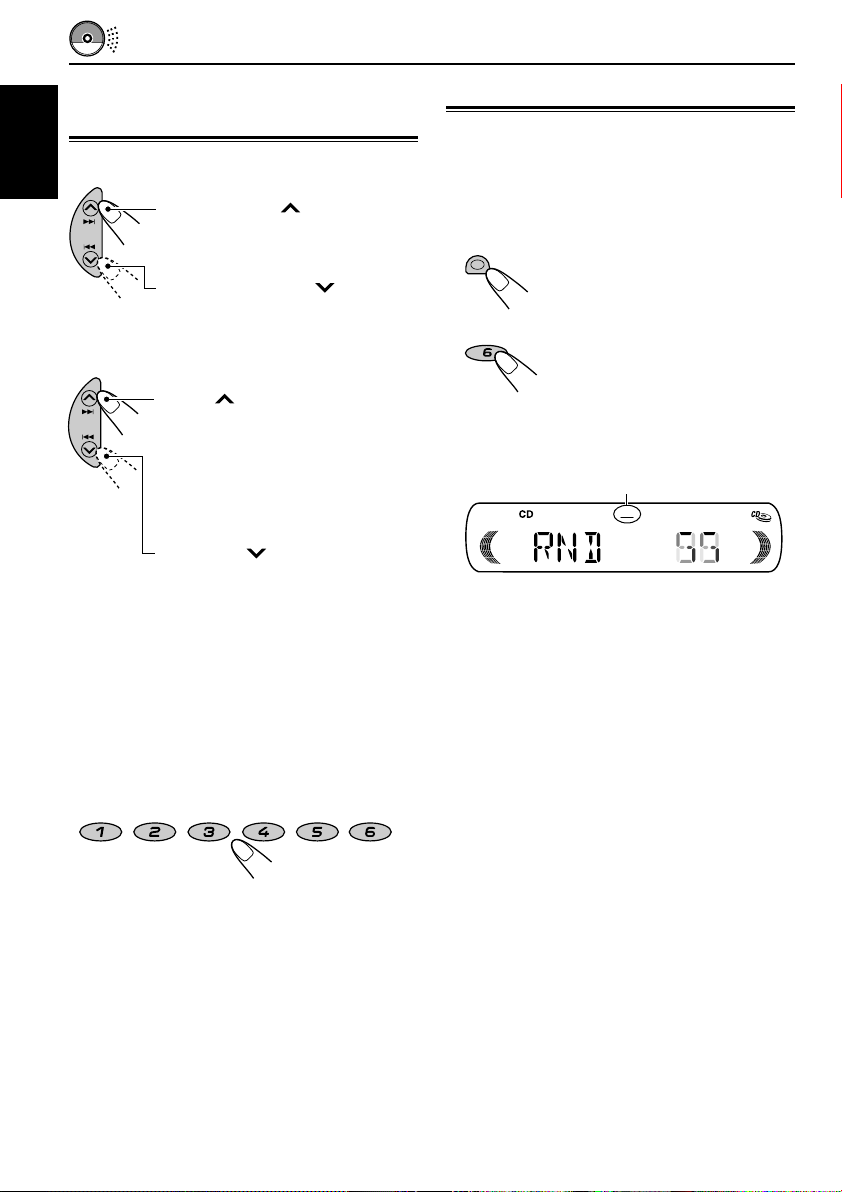
Selecting CD playback modes
To play back tracks at random
(Random Play)
You can play back all tracks on the CD at
random.
MODE
12
RND
When Random Play is turned on, the RND
indicator lights up on the display. A track
randomly selected starts playing.
1 Press MODE to enter the
functions mode while playing a
CD.
2 Press RND (random), while
still in the functions mode, so
that the RND indicator lights
up on the display.
Each time you press the
button, CD random play mode
turns on and off alternately.
RND indicator
RND
To go to a particular track directly
Press the number button corresponding to the
track number to start its playback.
8
910 127
MO
• To select a track number from 1 – 6:
Press 1 (7) – 6 (12) briefly.
• To select a track number from 7 – 12:
Press and hold 1 (7) – 6 (12) for more than one
second.
12
11
RPT
RND
Page 13
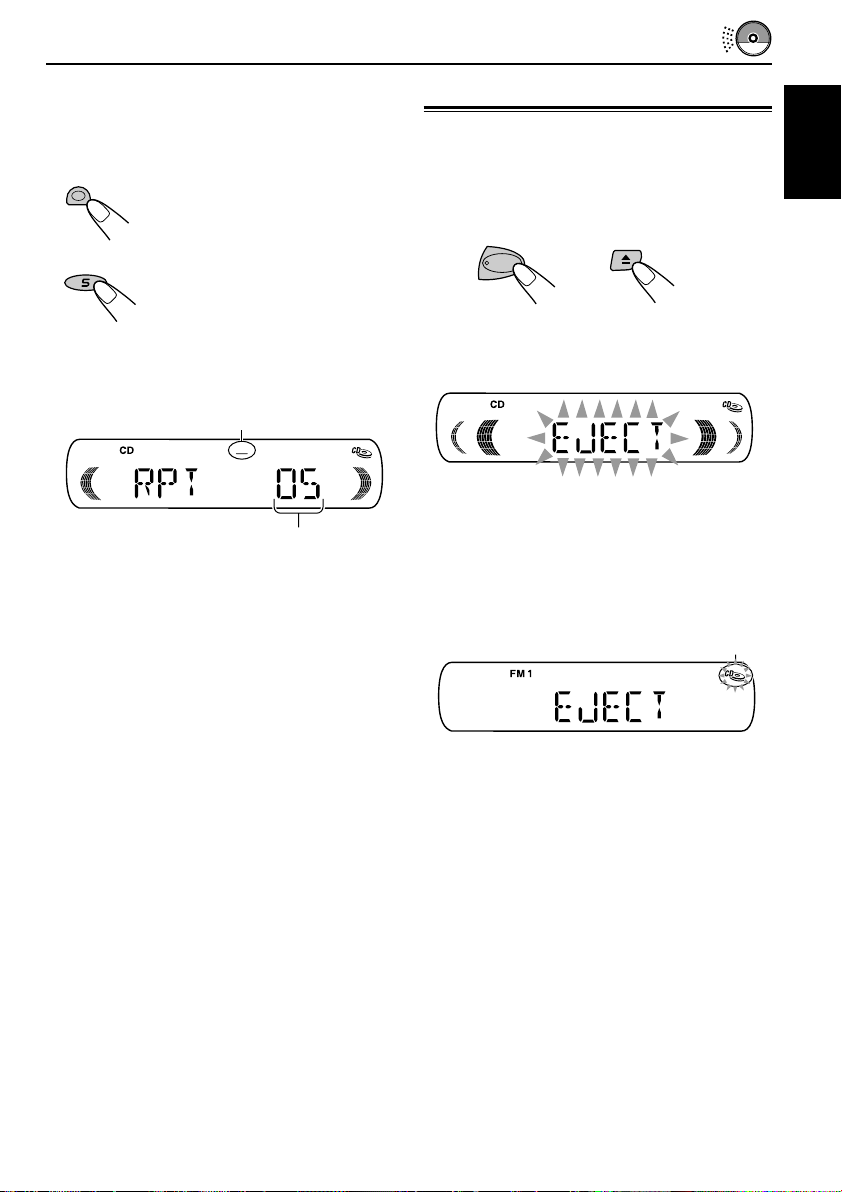
To play back tracks repeatedly
(Repeat Play)
You can play back the current track repeatedly.
MODE
11
RPT
When Repeat Play is turned on, the RPT
indicator lights up on the display. The current
track starts playing repeatedly.
1 Press MODE to enter the
functions mode while playing a
CD.
2 Press RPT (repeat), while still
in the functions mode, so that
the RPT indicator lights up on
the display.
Each time you press the
button, CD repeat play mode
turns on and off alternately.
RPT indicator
RPT
Track number of the
currently playing track
Prohibiting CD ejection
You can prohibit CD ejection and can lock a CD
in the loading slot.
ENGLISH
While pressing CD, press and hold 0 for
more than 2 seconds.
CD
“EJECT” flashes on the display for about
5 seconds, and the CD is locked and cannot be
ejected.
To cancel the prohibition and unlock the
CD
While pressing CD, press and hold 0 again for
more than 2 seconds.
“EJECT” appears on the display, and the CD
ejects from the loading slot.
The CD–in indicator flashes.
13
Page 14
SOUND ADJUSTMENTS
LOUD
Adjusting the sound
You can adjust the sound characteristics to your
preference.
ENGLISH
1
Select the item you want to adjust.
SEL
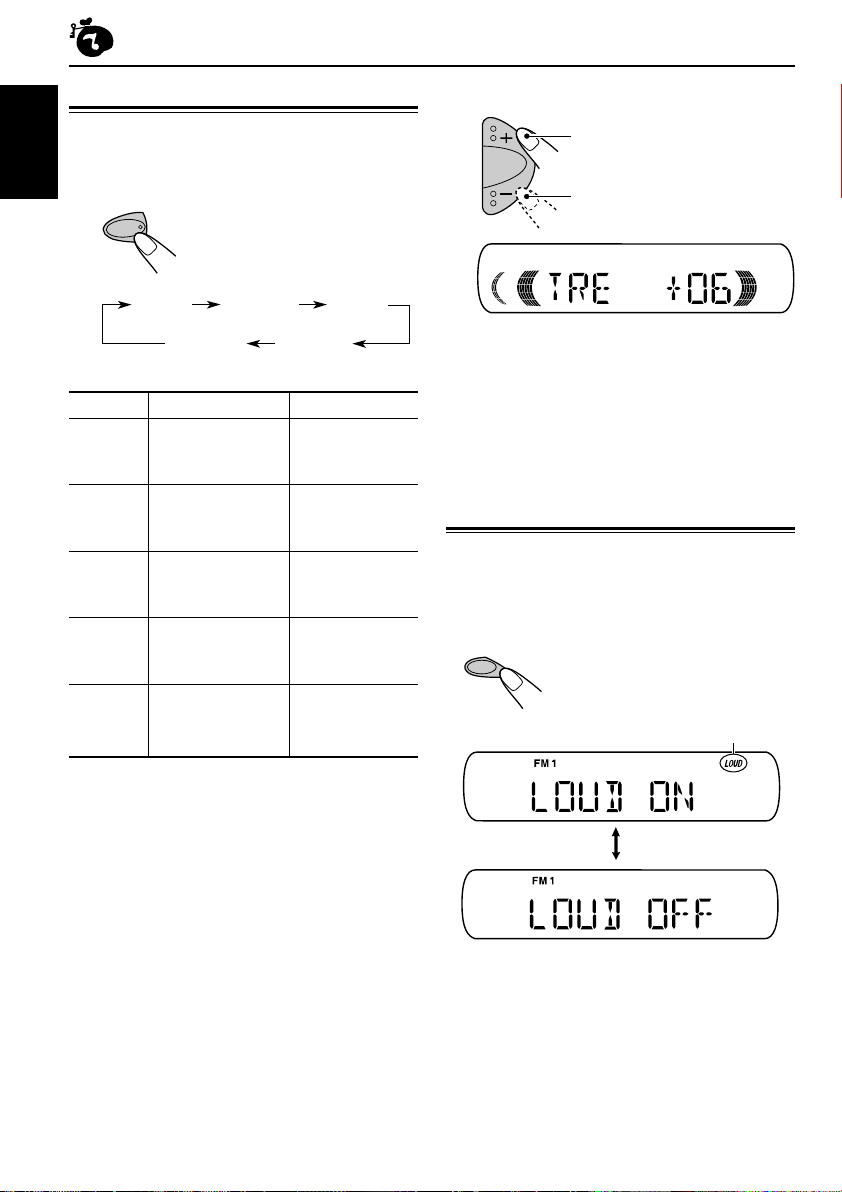
Indication To do: Range
BAS Adjust the bass. –06 (min.)
TRE Adjust the treble. –06 (min.)
FAD* Adjust the front R06 (Rear only)
BAL Adjust the left L06 (Left only)
VOL Adjust the volume. 00 (min.)
Each time you press the
button, the adjustable items
change as follows:
BAS
(bass)
(volume)
and rear speaker |
balance. F06 (Front only)
and right speaker |
balance. R06 (Right only)
VOL
TRE
(treble)
BAL
(balance)
|
+06 (max.)
|
+06 (max.)
|
50 (max.)
(fader)
FAD
2
Adjust the level.
To increase the level
To decrease the level
Ex.: When you adjust “TRE” (treble)
Note:
Normally, the + and – buttons work as the volume
control buttons. So you do not have to select “VOL”
to adjust the volume level.
Turning on/off the loudness
function
The human ear is less sensitive to low and high
frequencies at low volumes.
The loudness function can boost these
frequencies to produce a well-balanced sound at
low volume levels.
Each time you press LOUD,
the loudness function turns on
and off alternately.
LOUD (loudness) indicator
* If you are using a two-speaker system, set the fader
level to “00.”
14
Page 15
Using the sound control
memory (SCM)
You can select and store a preset sound
adjustment suitable for each playback source
(Advanced SCM).
Selecting and storing the sound
modes
Once you select a sound mode, it is stored in
memory. It will be recalled every time you select
the same source and will be shown on the
display.
A sound mode can be stored for each of the
following sources—FM1, FM2, FM3, AM, and
CD.
• If you do not want to store the sound mode
separately for each playback source, but want
to use the same sound mode for all the
sources, see “Canceling Advanced SCM—
SCM LINK” on page 17.
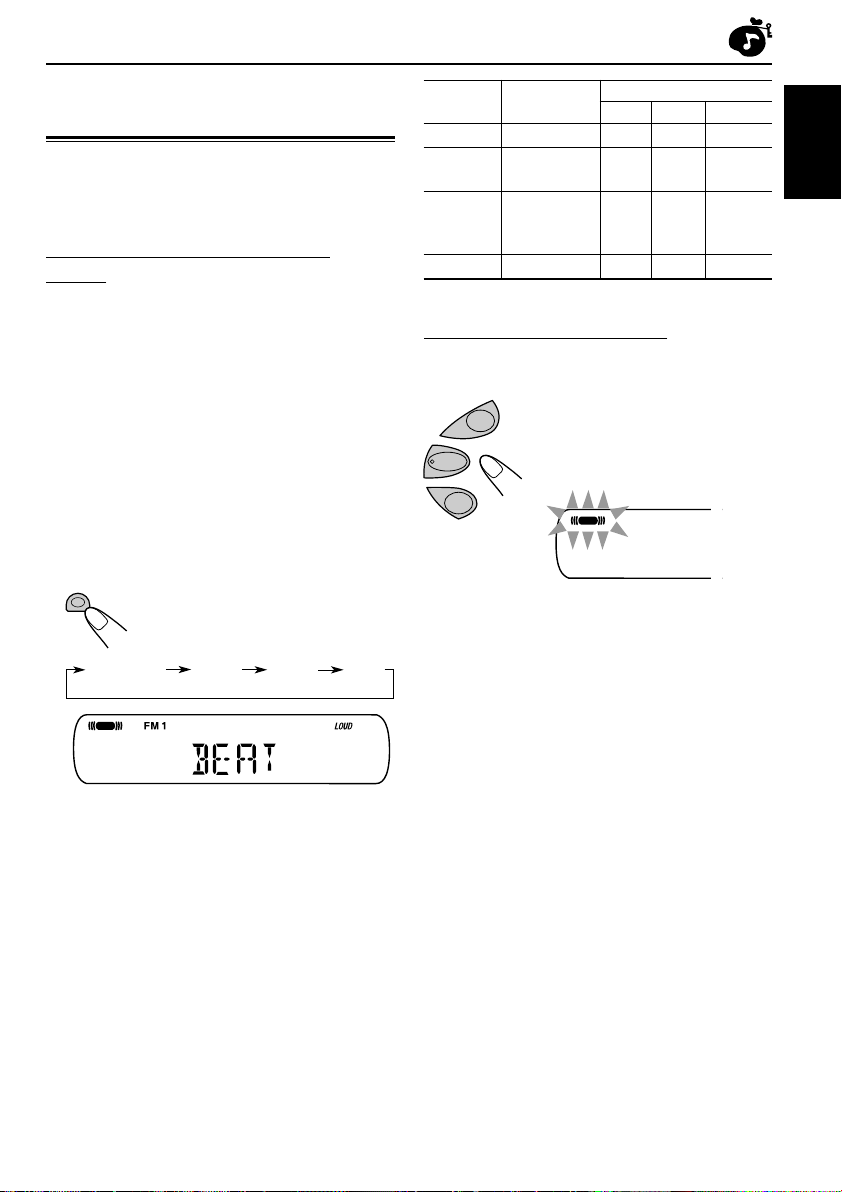
Select the sound mode you want.
SCM
Each time you press the
button, the sound mode
changes as follows:
Indication For: Preset values
SCM OFF (Flat sound) 00 00 ON
BEAT Rock or +02 00 ON
disco music
SOFT Quiet +01 –03 OFF
background
music
POP Light music +04 +01 OFF
BAS TRE LOUD
Recalling the sound modes
When “SCM LINK” is set to “LINK ON,”
select the source.
FM
CD
AM
The sound mode stored in memory for the
selected source is recalled.
Each time you change the
playback source, the SCM
indicator flashes on the
display.
SCM
ENGLISH
SCM OFF
SCM
Ex.: When you select “BEAT”
• When “SCM LINK” is set to “LINK ON,” the
selected sound mode can be stored in memory
for the current source and the effect applies
only to the current source.
• When “SCM LINK” is set to “LINK OFF,” the
selected sound mode effect applies to any
source.
BEAT
SOFT
POP
Notes:
• You can adjust each sound mode to your preference,
and store it in memory.
If you want to adjust and store your original sound
mode, see “Storing your own sound adjustments”
on page 16.
• To adjust the bass and treble reinforcement levels or
to turn on/off the loudness function temporarily, see
page 14. (Your adjustments will be canceled if
another source is selected.)
15
Page 16
Storing your own sound
adjustments
You can adjust the sound modes (BEAT, SOFT,
ENGLISH
POP) to your preference and store your own
adjustments in memory.
• There is a time limit in doing the following
procedure. If the setting is canceled before you
finish, start from step 1 again.
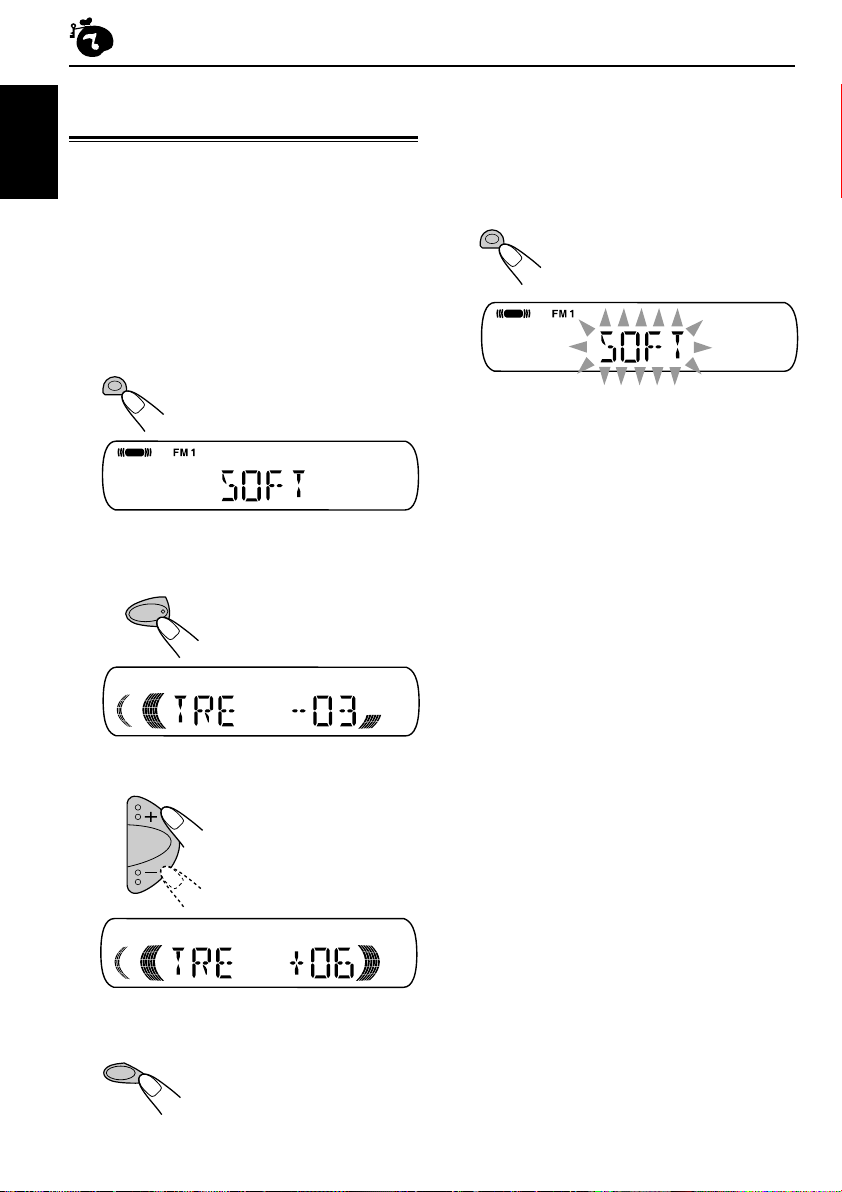
1
Call up the sound mode you want to
adjust.
SCM
SCM
• See page 15 for details.
3
Repeat step 2 to adjust the other
items.
4
Press and hold SCM until the sound
mode you have selected in step
flashes on the display.
SCM
SCM
5
Repeat the same procedure to store
Your adjustment made for the
selected sound mode is stored
in memory.
other sound modes.
1
Ex.: When you select “SOFT”
2
To adjust the bass or treble level.
1 Select “BAS” (bass) or “TRE” (treble).
SEL
Ex.: When you select “TRE” (treble)
2 Adjust the level.
To turn on or off the loudness
function.
LOUD
• See page 14 for details.
To reset to the factory settings, repeat the
same procedure and reassign the preset values
listed in the table on page 15.
16
Page 17
OTHER MAIN FUNCTIONS
Selecting the level display
—LEVEL
You can select the level display according to your
preference.
When shipped from the factory, “VOL 2” is
selected.
• VOL 1: Shows the volume level indicator.
• VOL 2: Alternates “VOL 1” setting and
• OFF: Erases the volume level indicator.
1
2
illumination display.
Press and hold SEL (select) for more
than 2 seconds.
“CLOCK H,” “CLOCK M,” “SCM LINK,” or
“LEVEL” appears on the display.
SEL
Select “LEVEL” if not shown on the
display.
CLOCK H CLOCK M
LEVEL SCM LINK
Canceling Advanced SCM
—SCM LINK
You can cancel the Advanced SCM (Sound
Control Memory), and unlink the sound modes
and the playback sources.
When shipped from the factory, a different sound
mode can be stored in memory for each source
so that you can change the sound modes simply
by changing the sources.
• LINK ON: Advanced SCM (different sound
• LINK OFF: Conventional SCM (one sound
1
Press and hold SEL (select) for more
than 2 seconds.
“CLOCK H,” “CLOCK M,” “SCM LINK,” or
“LEVEL” appears on the display.
2
Select “SCM LINK” if not shown on
the display.
modes for different sources.)
mode for all sources.)
SEL
CLOCK H CLOCK M
ENGLISH
3
Select the desired mode—“VOL 1,”
“VOL 2,” or “OFF.”
VOL 2VOL 1
OFF
4
Finish the setting.
SEL
LEVEL SCM LINK
3
Select “LINK OFF.”
4
Finish the setting.
SEL
To activate Advanced SCM (Sound Control
Memory), repeat the same procedure and press
+ to select “LINK ON” in step 3.
17
Page 18

Detaching the control panel
You can detach the control panel when leaving
the car.
When detaching or attaching the control panel,
ENGLISH
be careful not to damage the connectors on the
back of the control panel and on the panel
holder.
Detaching the control panel
Before detaching the control panel, be sure to
turn off the power.
1
Unlock the control panel.
2
Lift and pull the control panel out of
the unit.
Attaching the control panel
1
Insert the left side of the control
panel into the groove on the panel
holder.
2
Press the right side of the control
panel to fix it to the panel holder.
Note on cleaning the connectors:
If you frequently detach the control panel, the
connectors will deteriorate.
To minimize this possibility, periodically wipe the
connectors with a cotton swab or cloth moistened
with alcohol, being careful not to damage the
connectors.
18
3
Put the detached control panel into
the provided case.
Connectors
Page 19
TROUBLESHOOTING
What appears to be trouble is not always serious. Check the following points before calling a service
center.
Symptoms
• Sound cannot be heard
from the speakers.
• This unit does not work at
all.
General
• SSM (Strong-station
Sequential Memory)
automatic preset does not
work.
FM/AM
• Static noise while listening
to the radio.
• CD automatically ejects.
• CD-R cannot be played
back.
• Tracks on the CD-R cannot
be skipped.
• CD can be neither played
back nor ejected.
CD Playback
• CD sound is sometimes
interrupted.
•“NO DISC” appears on the
display.
Causes
The volume level is set to the
minimum level.
Connections are incorrect.
The built-in microcomputer
may have functioned
incorrectly due to noise, etc.
Signals are too weak.
The aerial is not connected
firmly.
CD is inserted upside down.
CD-R is not finalized.
CD is locked.
The CD player may have
functioned incorrectly.
You are driving on rough
roads.
CD is scratched.
Connections are incorrect.
No CD in the loading slot.
CD is inserted incorrectly.
Remedies
Adjust it to the optimum level.
Check the cords and
connections.
While holding SEL (select),
press (standby/on
attenuator) for more than
2 seconds to reset the unit. (The
clock setting and preset stations
stored in memory are erased.)
(See page 2.)
Store stations manually.
Connect the aerial firmly.
Insert the CD correctly.
• Insert a finalized CD-R.
• Finalize the CD-R with the
component which you used
for recording.
Unlock the CD. (See page 13.)
While holding
(standby/on attenuator), press
0 (eject) for more than
2 seconds. Be careful not to
drop the CD when it is ejected.
Stop playback while driving on
rough roads.
Change the CD.
Check the cords and
connections.
Insert a CD into the loading slot.
Insert the CD correctly.
ENGLISH
19
Page 20
MAINTENANCE
Handling discs
This unit has been designed to reproduce CDs
and CD-Rs (Recordable).
• This unit is not compatible with MP3 discs.
ENGLISH
How to handle discs
When removing a disc
from its case, press down
the center holder of the case and
lift the disc out, holding
it by the edges.
• Always hold the disc by the edges. Do not
touch its recording surface.
When storing a disc into its case, gently insert
the disc around the center holder (with the
printed surface facing up).
• Make sure to store discs into the cases after
use.
To keep discs clean
A dirty disc may not play correctly.
If a disc does become dirty, wipe it
with a soft cloth in a straight line
from center to edge.
To play new discs
New discs may have some rough
spots around the inner and outer
edges. If such a disc is used, this
unit may reject the disc.
To remove these rough spots, rub
the edges with a pencil or ball-point pen, etc.
Moisture condensation
Moisture may condense on the lens inside the
CD player in the following cases:
• After starting the heater in the car.
• If it becomes very humid inside the car.
Should this occur, the CD player may
malfunction. In this case, eject the disc and leave
the unit turned on for a few hours until the
moisture evaporates.
Center holder
When playing a CD-R
Before playing back CD-Rs, read their instructions
or cautions carefully.
• Use only “finalized” CD-Rs.
• Some CD-Rs may not play back on this unit
because of their disc characteristics, and for
the following reasons:
– Discs are dirty or scratched.
– Moisture condensation on the lens inside the
unit.
– The pickup lens inside the unit is dirty.
• CD-Rs are susceptible to high temperatures or
high humidity, so do not leave them inside your
car.
• Do not use following CD-Rs:
– Discs with stickers, labels, or protective seal
stuck to the surface.
– Discs on which labels can be directly printed
by an ink jet printer.
Using these discs under high temperatures or
high humidity may cause malfunctions or
damage to discs. For example,
– Stickers or labels may shrink and warp a
disc.
– Stickers or labels may peel off so discs
cannot be ejected.
– Print on discs may get sticky.
Read instructions or cautions about labels and
printable discs carefully.
• CD-RWs (Rewritable) cannot be played back
on this unit.
CAUTIONS:
• Do not insert 8 cm discs (single CDs) into the
loading slot. (Such discs cannot be ejected.)
• Do not insert any disc of unusual shape—like a
heart or flower; otherwise, it will cause a
malfunction.
• Do not expose discs to direct sunlight or any
heat source or place them in a place subject to
high temperature and humidity. Do not leave
them in a car.
• Do not use any solvent (for example,
conventional record cleaner, spray, thinner,
benzine, etc.) to clean discs.
20
Warped
disc
Sticker
Sticker
residue
Disc
Stick-on
label
Page 21

SPECIFICATIONS
AUDIO AMPLIFIER SECTION
Maximum Power Output:
Front: 45 W per channel
Rear: 45 W per channel
Continuous Power Output (RMS):
Front: 17 W per channel into 4 Ω, 40 Hz
to 20 000 Hz at no more than
0.8% total harmonic distortion.
Rear: 17 W per channel into 4 Ω, 40 Hz
to 20 000 Hz at no more than
0.8% total harmonic distortion.
Load Impedance: 4 Ω (4 Ω to 8 Ω allowance)
Tone Control Range:
Bass: ±10 dB at 100 Hz
Treble: ±10 dB at 10 kHz
Frequency Response: 40 Hz to 20 000 Hz
Signal-to-Noise Ratio: 70 dB
Line-Out Level/Impedance:
2.0 V/20 kΩ load (full scale)
Output Impedance: 1 kΩ
TUNER SECTION
Frequency Range:
FM: 87.5 MHz to 108.0 MHz
AM: (MW) 522 kHz to 1 620 kHz
(LW) 144 kHz to 279 kHz
CD PLAYER SECTION
Type: Compact disc player
Signal Detection System: Non-contact optical
pickup (semiconductor laser)
Number of channels: 2 channels (stereo)
Frequency Response: 5 Hz to 20 000 Hz
Dynamic Range: 90 dB
Signal-to-Noise Ratio: 95 dB
Wow and Flutter: Less than measurable limit
GENERAL
Power Requirement:
Operating Voltage: DC 14.4 V
(11 V to 16 V allowance)
Grounding System: Negative ground
Allowable Operating Temperature: 0°C to +40°C
Dimensions (W × H × D):
Installation Size (approx.):
182 mm × 52 mm × 150 mm
Panel Size (approx.):
188 mm × 58 mm × 11 mm
Mass (approx.):
1.3 kg (excluding accessories)
ENGLISH
[FM Tuner]
Usable Sensitivity:
11.3 dBf (1.0 µV/75 Ω)
50 dB Quieting Sensitivity:
16.3 dBf (1.8 µV/75 Ω)
Alternate Channel Selectivity (400 kHz):
65 dB
Frequency Response: 40 Hz to 15 000 Hz
Stereo Separation: 30 dB
Capture Ratio: 1.5 dB
[MW Tuner]
Sensitivity: 20 µV
Selectivity: 35 dB
[LW Tuner]
Sensitivity: 50 µV
Design and specifications are subject to change
without notice.
21
Page 22
WICHTIG FÜR LASER-GERÄTE
1. LASER-PRODUKT DER KLASSE 1
2. ACHTUNG: Die obere Abdeckung nicht öffnen. Das Gerät enthält keine Teile, die vom Benutzer
gewartet werden können. Wartungen nur von qualifziertem Fachpersonal durchführen lassen.
3. ACHTUNG: Sichtbare und unsichtbare Laserstrahlung bei offenem Gerät und Defekt oder
Umgehen der Verriegelung. Setzen Sie sich dem Strahl nicht direkt aus.
4. ANBRINGEN DES ETIKETTS: WARNHINWEIS-ETIKETT, AUSSEN AM GERÄT ANGEBRACHT.
DEUTSCH
Zurücksetzen des Geräts
Die Tasten SEL (Auswahl) und (Bereitschaft/Netz dämpfer) länger als 2 Sekunden
gleichzeitig gedrückt halten.
Dadurch wird der eingebaute Mikro-Computer zurückgesetzt.
(Bereitschaft/Netz dämpfer)
LOUD
SEL
DISP
MO
7 9 10 12
8
11
RPT
RND
SEL (Auswahl)
Hinweise:
• Ihre Voreinstellungen—wie Vorwahlkanäle oder Klangeinstellungen—werden ebenfalls gelöscht.
• Wenn eine CD im Gerät eingelegt ist, wird sie beim Rücksetzen des Geräts ausgeworfen. Achten Sie
darauf, die CD nicht fallenzulassen.
2
FM
CD
SSM
AM
SCMMODE
Page 23
Wir danken Ihnen für den Kauf eines JVC Produkts. Bitte lesen Sie die Anleitung vollständig durch,
bevor Sie das Gerät in Betrieb nehmen, um sicherzustellen, daß Sie alles vollständig verstehen und
die bestmögliche Leistung des Geräts erhalten.
INHALT
Zurücksetzen des Geräts .......................... 2
Verwenden der Taste MODE ..................... 3
ANORDNUNG DER TASTEN............... 4
Schalttafel ................................................. 4
GRUNDBEDIENUNGEN .................... 5
Einschalten der Stromversorgung............. 5
Stellen der Uhr .......................................... 6
RADIO-BETRIEB ............................ 7
Radiohören ............................................... 7
Speichern der Sender ............................... 9
Anwahl eines vorabgestimmten Senders... 10
CD-BETRIEB ................................ 11
Abspielen einer CD ................................... 11
Finden eines Titels oder eines
bestimmten Abschnittes auf einer CD .... 12
Wählen der CD-Abspielbetriebsarten ....... 12
Unterdrücken des CD-Auswurfs ................ 13
Verwenden der Taste MODE
Wenn die Taste MODE gedrückt wird, geht das Gerät in den Funktionsbetrieb und die Zifferntasten
dienen als verschiedene Funktionstasten.
MODE
KLANGEINSTELLUNG ..................... 14
Klang-Einstellschritte ................................ 14
Die Lautstärkefunktion ein/ausschalten .... 14
Verwenden des Klangregelungsspeichers
(SCM) ..................................................... 15
Speichern Ihrer eigenen
Klangeinstellungen ................................. 16
ANDERE WICHTIGE FUNKTIONEN ....... 17
Auswählen der Pegelanzeige—LEVEL ..... 17
Deaktivieren der erweiterten
SCM-Funktion—SCM LINK .................... 17
Abnehmen der Schalttafel......................... 18
FEHLERSUCHE ............................. 19
WARTUNG .................................. 20
Handhaben der Discs ............................... 20
TECHNISCHE DATEN ...................... 21
DEUTSCH
MO
8
Nach dem Drücken der Taste MODE etwa 5 Sekunden ohne Verwenden der Zifferntaste warten,
bis der Funktionsbetrieb wieder gelöscht ist und die Tasten können wieder als Zifferntasten
verwendet werden.
• Die Taste MODE nochmals drücken und der Funktionsbetrieb wird ebenfalls gelöscht.
910 127
MO
11
RPT
RND
Countdown-Zeitanzeige
Hinweis:
Zu diesem Gerät wird eine Identifikationskarte mitgeliefert, auf der die Gerätechassis-Nummer vermerkt ist.
Heben Sie diese Karte getrennt vom Gerät auf. Im Falle eines Diebstahls kann sie die Geräteidentifizierung
erleichtern.
VOR DEM GEBRAUCH
*
Für die Sicherheit....
• Die Lautstärke nicht zu laut stellen, da dadurch
Außengeräusche überdeckt und das Autofahren
gefährlich wird.
• Das Auto vor dem Durchführen von komplizierten
Bedienschritten anhalten.
*
Temperatur im Auto....
Wenn Sie das Auto für lange Zeit in heißem oder
kaltem Wetter parken, bitte warten, bis sich die
Temperatur im Auto sich normalisiert hat, bevor Sie
das Gerät einschalten.
3
Page 24
ANORDNUNG DER TASTEN
Schalttafel
Displayfenster
;dga
SCM
s
DEUTSCH
1
q
1 Taste (Bereitschaft/Netz dämpfer)
2 Taste LOUD (Lautstärkekontur)
3 Taste SEL (Auswahl)
4 Displayfenster
5 Ladeschlitz
6 Taste 0 (Auswerfen)
7 Taste CD
8 Taste AM
9 Taste FM
p Tasten ¢/4
• Dienen auch als Tasten SSM, wenn sie
zusammen gedrückt werden.
q Tasten +/–
w Taste DISP (Display)
e Taste MO (Monophon)
r Zifferntasten
t Taste RPT (Wiederholung)
y Taste RND (Zufall)
u Taste MODE
i Taste SCM (Sound Control Memory)
o Taste (Freigabe der Bedienungsblende)
4
2
LOUD
3
SEL
DISP
w
MO
7 9 10 12
8
e
f
ST RND RPT
MO
h
j
k
l
/
7
69
54
RND
11
RPT
tyr
ui
8
CD
AM
SCMMODE
p
FM
SSM
o
Displayfenster
; Anzeige SCM (Sound Control Memory)
a Anzeige der Signalquelle CD
s Anzeigen des FM-Frequenzbands
(FM1, FM2, FM3)
d Anzeige des AM-Frequenzbands
f Anzeigen des Tunerempfangsmodus
MO (Monophon), ST (Stereo)
g Anzeige RND (Zufall)
h Anzeige RPT (Wiederholung)
j Anzeige LOUD (Lautstärkekontur)
k Anzeige für eingelegte CDs
l Hauptdisplay
/ Anzeige des Lautstärkepegels
Page 25
GRUNDBEDIENUNGEN
LOUD
SEL
DISP
123
Einschalten der
Stromversorgung
1
Das Gerät einschalten.
Hinweis zum Ein-Tastendruck-Betrieb:
Wenn Sie die Programmquelle in abspielen
Schritt 2 unten wählen, wird das Gerät
automatisch eingeschaltet. Sie brauchen dafür
nicht die Taste zu drücken.
2
Die Programmquelle wählen.
FM
CD
AM
Für die Bedienung des Tuners (UKW oder
MW/LW), siehe Seiten 7 – 10.
Für die Wiedergabe eine CD,
siehe Seiten 11 – 13.
MO
8
7 9 10 12
11
RPT
4
Für ein sofortiges Absenken der
Lautstärke
Kurz beim Hören einer beliebigen
Programmquelle drücken. „AT T “ blinkt auf der
Anzeige und die Lautstärke fällt sofort ab.
Zur Wiederherstellung der vorherigen
Lautstärkepegel die Taste nochmals kurz
drücken.
Zum Ausschalten des Geräts
halten.
Es erscheint „SEE YOU“ und das Gerät schaltet
ab.
• Wenn Sie die Stromversorgung
ausschalten, während Sie eine CD hören,
wird die CD beim nächsten Einschalten an
derselben Stelle wiedergeben, an der Sie die
Stromversorgung ausgeschaltet haben.
FM
CD
SSM
RND
AM
SCMMODE
Den Klang wie gewünscht einstellen.
(Siehe Seiten 14 – 16).
drücken und länger als 1 Sekunde
DEUTSCH
3
Die Lautstärke einstellen.
So erhöhen Sie die
Lautstärke
So verringern Sie die
Lautstärke
Der Lautstärkepegel wird angezeigt.
Anzeige des Lautstärkepegels
(siehe Seite 17)
VORSICHT beim Einstellen der Lautstärke:
CDs produzieren sehr wenig Geräusche im
Vergleich zu anderen Signalquellen. Wenn zum
Beispiel die Lautstärke für den Tuner eingestellt
wurde, können die Lautsprecher durch den
plötzlichen Anstieg des Ausgangssignals
beschädigt werden.
Verringern Sie daher die Lautstärke, bevor Sie
eine CD abspielen, und justieren Sie die
Lautstärke dann während des Abspielens je nach
Bedarf nach.
5
Page 26

LOUD
UhrzeitFrequenz
SEL
DISP
7 9 10 12
FM
CD
SSM
MO
8
RND
11
RPT
AM
SCMMODE
DEUTSCH
Stellen der Uhr
1
Drücken Sie die Taste SEL (Auswahl),
und halten Sie sie länger als 2
Sekunden gedrückt.
„CLOCK H“, „CLOCK M“, „SCM LINK“ oder
„LEVEL“ wird im Display angezeigt.
SEL
2
Stellen Sie die Stunden ein.
1 Wählen Sie „CLOCK H“ (Stunden),
sofern diese Option im Display noch nicht
angezeigt wird.
2 Stellen Sie die Stunden ein.
CLOCK H CLOCK M
LEVEL SCM LINK
2 Stellen Sie die Minuten ein.
4
Beenden Sie die Einstellung.
SEL
So zeigen Sie die aktuelle Uhrzeit an oder
ändern den Anzeigenbetriebsart
DISP
DISP (Display) wiederholt
drücken.
Wenn Sie diese Taste
merhrfach hintereinander
drücken, andert sich die
Anzeigenbetriebsart wie folgt:
• Während des Betriebs einer tuner:
• Während des Betrieb einer CD:
3
Stellen Sie die Minuten ein.
1 Wählen Sie „CLOCK M“ (Minuten).
CLOCK H CLOCK M
LEVEL SCM LINK
6
UhrzeitVerstrichene Spielzeit
• Bei ausgeschalteter Stromversorgung:
Die Stromversorgung wird eingeschaltet, und
die Uhrzeit wird 5 Sekunden lang angezeigt.
Anschließend wird die Stromversorgung
ausgeschaltet.
Page 27

RADIO-BETRIEB
LOUD
SEL
DISP
MO
8
7 9 10 12
Radiohören
Um einen Sender einzustellen, können Sie
entweder den automatischen Suchlauf
verwenden, oder Sie können den Sender
manuell einstellen.
Automatisches Suchen eines Senders:
Automatischer Suchlauf
1
Wählen Sie das Band (FM1 – 3, AM).
FM
FM1 FM2 FM3
AM
AM
FM
CD
SSM
RND
11
RPT
2
Beginnen Sie mit der Suche nach
AM
SCMMODE
einem Sender.
Um Suchen von Sendern mit
höherer Frequenz
Um Suchen von Sendern mit
niedrigerer Frequenz
Wenn ein Sender empfangen wird, Stoppt
die Suche.
Zum Anhalten der Suche bevor ein Sender
empfangen wird, die gleiche Taste, die Sie für
die Suche gedrückt haben, nochmals drücken.
DEUTSCH
Leuchtet auf, wenn eine UKWStereosendung mit ausreichender
Signalstärke empfangen wird.
ST
Das gewählte Frequenzband
wird angezeigt.
Hinweis:
Dieser Receiver verfügt über drei UKWFrequenzbänder (FM1, FM2, FM3). Sie können
ein beliebiges Frequenzband wählen, um sich
eine UKW-Sendung anzuhören.
7
Page 28

Manuelles Suchen eines Senders:
Manueller Suchlauf
1
Wählen Sie das Band (FM1 – 3, AM).
FM
FM1 FM2 FM3
AM
DEUTSCH
Hinweis:
Dieser Receiver verfügt über drei UKWFrequenzbänder (FM1, FM2, FM3). Sie können
ein beliebiges Frequenzband wählen, um sich
eine UKW-Sendung anzuhören.
2
Drücken Sie die Taste ¢ oder
4
bis „M“ (manuell) im Display zu
blinken beginnt.
AM
, und halten Sie sie gedrückt,
Schlechter Empfang einer UKWStereosendung:
MODE
MO
8
Wenn die Anzeige MO im Display leuchtet,
erfolgt die Wiedergabe Monophon. Allerdings
verbessert sich dadurch der Empfang.
1 Die Taste MODE drücken,
um bei laufender UKWStereosendung in den
Funktionsbetrieb zu
gelangen.
2 Die Taste MO (Monophon),
im Funktionsbetrieb
drücken, damit die MOAnzeigeleuchten auf dem
Display aufleuchten.
Wenn Sie diese Taste
mehrfach hintereinander
drücken, wird die Anzeige
MO abwechselnd ein- und
ausgeschaltet.
Anzeige MO (Monophon)
MO
3
Stellen Sie den gewünschten Sender
ein, während „M“ (manuell) blinkt.
Um Sender einzustellen, die
auf höheren Frequenzen
senden
Um Sender einzustellen, die
auf niedrigeren Frequenzen
senden
• Wenn Sie die Taste loslassen, wird der
manuelle Betrieb automatisch nach 5
Sekunden deaktiviert.
• Wenn Sie die Taste gedrückt halten,
ändert sich die Frequenz (in 50 kHz
Intervallen bei UKW- und 9 kHz Intervallen
8
bei MW/LW), bis Sie die Taste freigeben.
Page 29

Speichern der Sender
Sie können Rundfunksender auf zwei Arten
abspeichern.
• Automatisches Vorabstimmen der UKWSender: SSM (Strong-station Sequential
Memory = Sequentialspeicher für starke
Sender)
• Manuelles Vorabstimmen für UKW- und
MW-/LW-Sender
Automatische UKW-Vorabstimmung:
SSM
Sie können 6 lokale UKW-Sender pro UKWEmpfangsbereich (FM1, FM2 und FM3)
vorabstimmen.
Manuelles Vorabstimmen
Sie können bis zu 6 Sender pro
Empfangsbereich (FM1, FM2, FM3 und AM)
von Hand vorabstimmen.
Beispiel: Speichern des UKW-Senders 92,5 MHz
auf der numerischen Taste 1 des
FM1-Empfangsbereichs.
1
Die gewünschte Empfangsbereichzahl (FM1 – 3, AM), in der
Sender gespeichert werden sollen,
wählen (in diesem Beispiel FM1).
FM
DEUTSCH
1
Die gewünschte Empfangsbereichzahl (FM1 – 3), in der UKWSender gespeichert werden sollen,
wählen.
FM
FM1 FM2 FM3
2
Drücken Sie beiden Tasten, und
halten Sie sie länger als 2 Sekunden
gedrückt.
SSM
„SSM“ erscheint und erlischt bei Abschluß
der automatischen Vorabstimmung wieder.
Die lokalen UKW-Sender mit den stärksten
Signalen werden gesucht und automatisch in der
Empfangsbereichszahl (FM1, FM2 oder FM3),
die Sie gewählt haben, gespeichert. Diese
vorabgestimmten Sender werden auf den
Nummerntasten abgespeichert—Nr. 1 (niedrigste
Frequenz) bis Nr. 6 (höchste Frequenz).
Wenn die automatische Vorabstimmung
abgeschlossen ist, wird der Sender der Taste 1
automatisch angewählt.
FM1 FM2 FM3
AM
AM
2
Auf den Sender (in diesem Beispiel
92,5 MHz abstimmen).
Um Sender einzustellen, die
auf höheren Frequenzen
senden
Um Sender einzustellen, die
auf niedrigeren Frequenzen
senden
FORTSETZUNG AUF DER NÄCHSTEN SEITE
9
Page 30

3
Drücken Sie die Ziffertaste (in
diesem Beispiel 1), und halten Sie
sie länger als 2 Sekunden gedrückt.
7
DEUTSCH
„P1“ blinkt einige Sekunden lang.
4
Das obige Verfahren zum Speichern
der anderen Sender auf andere
numerische Tasten wiederholen.
Hinweise:
• Ein vorheriger vorabgestimmter Sender wird
gelöscht, wenn ein neuer Sender auf der gleichen
numerischen Taste abgespeichert wird.
• Vorabgestimmte Sender werden gelöscht, wenn die
Stromversorgung des Speicherstromkreises
unterbrochen wird (z.B. beim Wechseln der
Batterie). In diesem Fall die Sender nochmals
vorabstimmen.
Anwahl eines
vorabgestimmten Senders
Sie können einfach einen vorabgestimmten
Sender aufrufen.
Bedenken Sie, daß Sie zuerst Sender speichern
müssen. Wenn Sie das noch nicht getan haben,
siehe „Speichern der Sender“ auf Seiten 9 und
10.
1
Wählen Sie das Band (FM1 – 3, AM).
FM
FM1 FM2 FM3
AM
AM
2
Die gewünschte Nummer (1 – 6) für
den vorabgestimmten Sender
wählen.
8
910 127
MO
11
RPT
RND
10
Page 31

CD-BETRIEB
LOUD
SEL
DISP
MO
7 9 10 12
8
Abspielen einer CD
Eine CD in den Ladeschlitz einschieben.
Das Gerät schaltet sich
ein, zieht die CD ein und
startet die Wiedergabe
automatisch.
Hinweis zum Ein-Tastendruck-Betrieb:
Befindet sich bereits eine CD im Ladeschlitz, wird
durch Drücken von CD das Gerät eingeschaltet und
das Abspielen beginnt automatisch.
Die Anzeige für eingelegte CDs blinkt.
Die Anzeige für eingelegte CDs
wird eingeschaltet.
FM
CD
SSM
RND
11
RPT
AM
SCMMODE
Hinweis:
Wenn Sie eine CD falsch einlegen, wird „EJECT“ im
Display angezeigt, und die CD wird automatisch
ausgeworfen.
Zum Beenden des Abspielens und
Auswerfen der CD
Drücken Sie die Taste 0.
Das Abspielen der CD wird unterbrochen und die
CD automatisch aus dem Ladeschlitz
ausgeworfen. Als Signalquelle wird der Tuner
aktiviert (und der zuletzt empfangene Sender
wird wiedergegeben).
• Die CD-Wiedergabe wird auch angehalten
(ohne dass die CD ausgeworfen wird), wenn
die Signalquelle gewechselt wird.
Wenn Sie das nächste Mal „CD“ als
Signalquelle auswählen, wird die CD an
derselben Stelle wiedergegeben, an der Sie
die Wiedergabe gestoppt haben.
DEUTSCH
Gesamtspielzeit
der eingelegten CD
Verstrichene Spielzeit
Gesamttitelzahl
der eingelegten CD
Derzeitiger Titel
Alle Titel werden wiederholt wiedergegeben, bis
Sie die Wiedergabe beenden.
Hinweise:
• Wird die ausgeworfene CD nicht innerhalb von 15
Sekunden entnommen, wird die CD automatisch
wieder in den Ladeschlitz eingefahren, um sie vor
Staub zu schützen.
(Die CD wird diesmal jedoch nicht abgespielt).
• Sie können die CD auswerfen lassen, indem Sie das
Gerät ausschalten.
Sprunghaftes Abspielen:
Ein sprunghaftes Abspielen kann auf sehr
holprigen Straßen vorkommen. Dadurch wird das
Gerät und die CD nicht beschädigt, ist jedoch sehr
ärgerlich.
Wir empfehlen von einem Abspielen von CDs auf
holprigen Straßen abzusehen.
11
Page 32

Finden eines Titels oder eines
bestimmten Abschnittes auf
einer CD
Zum schnellen Vor- oder Rücklauf des
Titels
Bei laufender CD ¢ drücken
DEUTSCH
Weitergehen zu nächsten oder
vorhergehenden Titeln
und halten, um den Titel schnell
vorzuspulen.
Bei laufender CD 4 drücken
und halten, um den Titel
zurückzuspulen.
¢ kurz bei laufender CD
drücken, um zum nächsten
Titelanfang zu kommen.
Wenn Sie diese Taste weiteren
drücken, wird der Anfang der
jeweils nächsten Titeln gesucht
und abgespielt.
4 kurz bei laufender CD
drücken, um zum derzeitigen
Titelanfang zu kommen.
Wenn Sie diese Taste weiteren
drücken, wird der Anfang der
jeweils vorhergehenden Titeln
gesucht und abgespielt.
Wählen der CDAbspielbetriebsarten
Zum Abspielen der Titel nach dem
Zufallsprinzip (Zufallswiedergabe)
Sie können alle Titel der CD in zufälliger
Reihenfolge wiedergeben.
MODE
12
RND
Wenn die Wiedergabe in zufälliger Reihenfolge
aktiviert worden ist, leuchtet die Anzeige RND im
Display. Es wird ein zufällig ausgewählter Titel
wiedergegeben.
1 Die Taste MODE drücken, um
bei abspielender CD in den
Funktionsbetrieb zu gelangen.
2 Die Taste RND (Zufall) im
Funktionsbetrieb drücken,
damit die RNDAnzeigeleuchten auf dem
Display aufleuchten.
Wenn Sie diese Taste
mehrfach hintereinander
drücken, wird die Wiedergabe
in zufälliger Reihenfolge
abwechselnd ein- und
ausgeschaltet.
Anzeige RND
RND
Zum direkten Anwählen eines bestimmten
Titels
Die Ziffertaste, die der Titelnummer entspricht
drücken, um sein Abspielen zu beginnen.
8
• Zum Wählen einer Titelnummer von 1 – 6:
1 (7) – 6 (12) kurz drücken.
• Zum Wählen einer Titelnummer von 7 – 12:
1 (7) – 6 (12) drücken und länger als 1
Sekunde halten.
910 127
MO
12
11
RPT
RND
Page 33

Zum wiederholten Abspielen der Titel
(Wiederholung)
Sie können den aktuellen Titel wiederholt
wiedergeben.
MODE
11
RPT
Wenn die wiederholte Wiedergabe aktiviert
worden ist, leuchtet die Anzeige RPT im Display.
Der aktuelle Titel wird wiederholt wiedergegeben.
1 Die Taste MODE drücken, um
bei abspielender CD in den
Funktionsbetrieb zu gelangen.
2 Die Taste RPT (Wiederholung)
im Funktionsbetrieb drücken,
damit die RPTAnzeigeleuchten auf dem
Display aufleuchten.
Wenn Sie diese Taste
mehrfach hintereinander
drücken, wird die wiederholte
Wiedergabe abwechselnd einund ausgeschaltet.
Anzeige RPT
RPT
Titelnummer des derzeit
abspielenden Titels
Unterdrücken des CD-Auswurfs
Sie können den CD-Auswurf blockieren und eine
CD im Ladeschlitz verriegeln.
Drücken Sie die Taste CD, und halten
Sie die Taste 0 gleichzeitig länger als
2 Sekunden gedrückt.
CD
DEUTSCH
„EJECT“ blinkt etwa 5 Sekunden lang im Display.
Die CD ist damit verriegelt und läßt sich nicht
auswerfen.
Wenn Sie die Verriegelung aufheben
wollen
Während Sie die Taste CD gedrückt halten
drücken und halten Sie die Taste 0 länger als 2
Sekunden erneut gedrückt.
„EJECT“ wird im Display angezeigt und die CD
wird aus dem Ladeschlitz ausgeworfen.
Die Anzeige für eingelegte CDs blinkt.
13
Page 34

KLANGEINSTELLUNG
Klang-Einstellschritte
Sie können das Klangbild wie gewünscht
einstellen.
1
Die einzustellende Position wählen.
SEL
DEUTSCH
(Tiefen)
Anzeige Zutun: Bereich
BAS Einstellen der –06 (min.)
TRE Einstellen der –06 (min.)
FAD* Einstellen des
BAL Einstellen des
VOL Einstellen der 00 (min.)
Wenn Sie diese Taste
mehrfach hintereinander
drücken, ändern sich die
einstellbaren Funktionen wie
folgt:
BAS
(
Lautstärke
Tiefen. |
Höhen. |
vorderen und R06 (Nur hinten)
hinteren |
Lautsprecheraus- F06 (Nur vorne)
gleichs.
linken und L06 (Nur links)
rechten |
Lautsprecheraus- R06 (Nur rechts)
gleichs.
Lautstärke. |
VOL
TRE
(
Höhen
)
)
BAL
(Balance)
+06 (max.)
+06 (max.)
50 (max.)
FAD
(Faeder)
2
Lautstärkekontur einstellen.
So erhöhen Sie den Pegel
So verringern Sie den Pegel
Beispiel: „TRE“ (Höhen) wird eingestellt
Hinweis:
Normalerweise dienen die Tasten + und – als
Lautstärke-Regelungstasten. Sie müssen daher nicht
„VOL“ wählen, um die Lautstärke einzustellen.
Die Lautstärkefunktion
ein/ausschalten
Das menschliche Gehör ist weniger empfindlich
für niedrige und hohe Frequenzen bei geringer
Lautstärke.
Die Lautstärkenfunktion kann diese Frequenzen
verstärken, um einen gut ausgeglichenen Ton bei
geringer Lautstärke zu schaffen.
LOUD
Wenn Sie diese Taste LOUD
mehrfach hintereinander
drücken, wird die
Lautstärkenfunktion jeweils
ein-und ausgeschaltet.
Anzeige LOUD (Lautstärkekontur)
* Wenn Sie eine Anlage mit zwei Lautsprechern
verwenden, setzen Sie den Ausblender auf „00“.
14
Page 35

Verwenden des
Klangregelungsspeichers (SCM)
Sie können für alle Wiedergabesignalquellen
eine vorgegebene Klangeinstellung auswählen
und speichern (Erweiterte SCM-Funktion).
Auswählen und Speichern der
Klangbetriebsarten
Sobald Sie einen Klangbetriebsart ausgewählt
haben, wird er im Speicher gesichert und immer
wieder abgerufen und im Display angezeigt,
wenn Sie dieselbe Signalquelle auswählen.
Ein Klangbetriebsart kann für alle folgenden
Signalquellen gespeichert werden: FM1, FM2,
FM3, AM und CD.
• Wenn Sie nicht möchten, daß ein separater
Klangbetriebsart für jede einzelne
Wiedergabesignalquelle gespeichert wird,
sondern statt dessen derselbe
Klangbetriebsart für alle Signalquellen
verwenden wird, finden Sie hierzu weitere
Informationen siehe Seite 17 unter
„Deaktivieren der erweiterten SCM-Funktion—
SCM LINK“.
Wählen Sie den gewünschen
Klangbetriebsart.
SCM
SCM OFF
SCM
Beispiel: Die Einstellung „BEAT“ wird
• Wenn „SCM LINK“ auf „LINK ON“ gesetzt ist,
kann der ausgewählte Klangbetriebsart für die
aktuelle Signalquelle gespeichert werden.
• Wenn „SCM LINK“ auf „LINK OFF“ gesetzt ist,
wird der ausgewählte Klangbetriebsart auf jede
Signalquelle angewendet.
Wenn Sie diese Taste
mehrfach hintereinander
drücken, ändert sich der
Klangbetriebsart wie folgt:
BEAT
ausgewählt
SOFT
POP
Anzeige Für: Voreingestellte Werte
BAS TRE LOUD
SCM OFF (Lineare 00 00 ON
Einstellung)
BEAT Rock- oder +02 00 ON
Disko-Musik
SOFT Ruhige +01 –03 OFF
POP
Hintergrundsmusik
Leichte Musik
+04 +01 OFF
Abrufen der Klangbetriebsarten
Wenn „SCM LINK“ auf „LINK ON“
wählen Sie die Signalquelle aus.
FM
CD
AM
Der Klangbetriebsart, der für die ausgewählte
Signalquelle im Speicher gesichert wurde, wird
abgerufen.
Hinweise:
• Sie können die vorgegebenen Klangbetriebsarten
nach Ihren Wünschen ändern und im Speicher
sichern.
Wenn Sie eigene Klangeinstellungen ändern und
speichern wollen, finden Sie hierzu weitere
Informationen unter „Speichern Ihrer eigenen
Klangeinstellungen“ auf Seite 16.
• Siehe Seite 14 wird beschrieben, wie Sie die
Baß- und Höhenverstärkung anpassen oder die
Lautstärkekontur-Funktion ein- oder ausschalten
können. (Die Einstellungen werden deaktiviert,
wenn eine andere Signalquelle ausgewählt wird).
Wenn Sie die
Wiedergabequelle ändern,
blinkt die Anzeige SCM im
Display.
SCM
DEUTSCH
15
Page 36

Speichern Ihrer eigenen
Klangeinstellungen
Sie können die Klangbetriebsarten (BEAT, SOFT,
POP) nach eigenem Geschmack anpassen und
diese Einstellungen im Speicher sichern.
• Es besteht ein Zeitlimit für die Ausführung der
folgenden Schritte. Wenn die Einstellung
abgebrochen wird, bevor Sie sie fertiggestellt
haben, beginnen Sie erneut mit Schritt 1.
DEUTSCH
1
Rufen Sie die Klangbetriebsart, die
Sie einstellen möchten, auf.
SCM
SCM
• Siehe Seite 15 für
Einzelheiten.
Zum Ein- oder Ausschalten der
Lautstärkenfunktion.
LOUD
3
Wiederholen Sie Schritt 2, um
• Siehe Seite 14 für
Einzelheiten.
weitere Optionen zu ändern.
4
Drücken Sie die Taste SCM, und
halten Sie sie gedrückt, bis der
Klangbetriebsart, den Sie in Schritt
1
ausgewählt haben, im Display
blinkt.
SCM
SCM
Die Anpassungen, die Sie für
die gewählte Klangbetriebsart
vorgenommen haben, werden
im Speicher gesichert.
Beispiel: Die Einstellung „SOFT“ wird
2
Zum Einstellen der Tiefen oder
ausgewählt
Höhen-Tonpegels.
1 Wählen Sie „BAS“ (Tiefen) oder „TRE“
(Höhen).
SEL
Beispiel: Die Einstellung „TRE“ (Höhen)
2 Lautstärkekontur einstellen.
wird ausgewählt
5
Wiederholen Sie dasselbe Verfahren,
um andere Klangbetriebsarten zu
speichern.
So stellen Sie die Werkseinstellungen wieder
her, indem Sie das Verfahren wiederholen, und
weisen Sie die gespeicherten Werte wieder zu,
die in der Tabelle auf Seite 15.
16
Page 37

ANDERE WICHTIGE FUNKTIONEN
Auswählen der Pegelanzeige
—LEVEL
Sie können die Pegelanzeige nach Ihrem
Geschmack auswählen.
Werkseitig wurde die Einstellung „VOL 2“ aktiviert.
• VOL 1: Der Lautstärkepegel wird angezeigt.
• VOL 2: Die Einstellung „VOL 1“ und die
Displaybeleuchtung werden
• OFF: Der Lautstärkepegel wird gelöscht.
1
2
3
abwechselnd ausgewählt.
Drücken Sie die Taste SEL
(Auswahl), und halten Sie sie länger
als 2 Sekunden gedrückt.
„CLOCK H“, „CLOCK M“, „SCM LINK“ oder
„LEVEL“ wird im Display angezeigt.
SEL
Valitse „LEVEL“, sofern diese option
noch nicht im Display angezeigt
wird.
CLOCK H CLOCK M
LEVEL SCM LINK
Wählen Sie den gewünschten
Betriebsart—„VOL 1“, „VOL 2“ oder
„OFF“.
Deaktivieren der erweiterten
SCM-Funktion—SCM LINK
Sie können die erweiterte SCM-Funktion (Sound
Control Memory-Funktion) deaktivieren und die
Verknüpfung zwischen den Klangbetriebsarten
und Wiedergabesignalquellen aufheben.
Es ist möglich, daß werkseitig für alle
Signalquellen ein separater Klangbetriebsart
gespeichert wurde. Sie können die
Klangbetriebsarten
Signalquellen ändern.
• LINK ON:
• LINK OFF: Konventionelle SCM-Funktion (ein
1
Drücken Sie die Taste SEL (Auswahl),
und halten Sie sie länger als 2
Sekunden gedrückt.
„CLOCK H“, „CLOCK M“, „SCM LINK“ oder
„LEVEL“ wird im Display angezeigt.
SEL
2
Valitse „SCM LINK“, sofern diese
option noch nicht im Display
angezeigt wird.
ändern, indem Sie einfach die
Erweiterte SCM-Funktion
(unterschiedliche Klangbetriebsarten
für verschiedene Klangquellen).
Klangbetriebsarten für alle
Signalquellen).
CLOCK H CLOCK M
LEVEL SCM LINK
DEUTSCH
4
Beenden Sie die Einstellung.
SEL
OFF
3
Wählen Sie „LINK OFF“.
VOL 2VOL 1
4
Beenden Sie die Einstellung.
SEL
Sie können die erweiterte SCM-Funktion
(Sound Control Memory-Funktion) aktivieren,
indem Sie das Verfahren wiederholen, und auf
die Taste + drücken, um „LINK ON“ auszuwählen
(siehe Schritt 3).
17
Page 38

Abnehmen der Schalttafel
Sie können die Schalttafel abnehmen, wenn Sie
das Fahrzeug verlassen.
Wenn Sie die Schalttafel abnehmen oder wieder
einsetzen, achten Sie darauf, daß Sie die
Anschlüsse auf der Rückseite der Schalttafel und
am Schalttafelhalter nicht beschädigen.
Abnehmen der Schalttafel
DEUTSCH
Bevor Sie die Schalttafel abnehmen, schalten
Sie unbedingt die Stromversorgung aus.
1
Entriegeln Sie die Schalttafel.
2
Das Schalttafel anheben und
abnehmen.
Anbringen der Schalttafel
1
Führen Sie die linke Seite der
Schalttafel in die Nut des
Schalttafelhalters ein.
2
Drücken Sie auf die rechte Seite der
Schalttafel, damit sie im
Schalttafelhalter einrastet.
18
3
Legen Sie die abgenommene
Schalttafel in das mitgelieferte Etui.
Hinweis zum Reinigen der Anschlüsse:
Wenn Sie die Schalttafel häufig abnehmen, kann
sich der Zustand der Anschlüsse verschlechtern.
Um diese Möglichkeit zu minimieren, wischen Sie
die Anschlüsse in regelmäßigen Abständen mit
einem Wattestäbchen oder einem Tuch ab, die
zuvor mit Alkohol angefeuchtet wurden. Achten Sie
darauf, daß Sie die Anschlüsse nicht beschädigen.
Anschlüsse
Page 39

FEHLERSUCHE
Was wie ein Problem aussieht, muß nicht immer eines sein. Die folgenden Punkte vor einem Anruf bei
einer Kundendienststelle überprüfen.
Symptome
• Die Lautsprecher geben
keinen Ton wieder.
• Dieses Gerät arbeitet
überhaupt nicht.
Allgemeines
• Automatische SSMAbspeicherung
(Sequentialspeicher für
starke Sender) arbeitet
nicht.
FM/AM
• Störgeräusche beim
Radiohören.
• CD wird automatisch
ausgeworfen.
• Die CD-R wird nicht
wiedergegeben.
• Titel auf der CD-R können
nicht angesteuert werden.
• Ton der CD ist manchmal
unterbrochen.
CD-Wiedergabe
• CD kann weder abgespielt
noch ausgeworfen werden.
•„NO DISC“ wird im Display
angezeigt.
Ursachen
Die Lautstärke ist auf den
kleinsten Pegel eingestellt.
Anschlüsse sind falsch.
Die Funktion des eingebauten
Mikrocomputers wurde u. U.
durch Störstrahlungen o. ä.
beeinträchtigt.
Signale sind zu schwach.
Die Antenne ist nicht fest
angeschlossen.
CD ist falsch herum eingelegt.
Die CD-R ist nicht
abgeschlossen.
Die CD ist gesperrt.
Es liegt eine Funktionsstörung
des CD-Spielers vor.
Sie fahren auf einer holprigen
Straße.
CD ist verkratzt.
Anschlüsse sind falsch.
Im Ladeschlitz befindet sich
keine disc.
Die CD ist falsch eingelegt.
Abhilfen
Auf optimales Niveau einstellen.
Die Kabel und Anschlüsse
überprüfen.
Die Tasten SEL (Auswahl) und
(Bereitschaft/Netz
dämpfer) länger als 2 Sekunden
gleichzeitig gedrückt halten, um
das Gerät zurückzusetzen. (Die
im Speicher gespeicherte
Uhreinstellung und die
Sendervoreinstellung wird
gelöscht). (Siehe Seite 2).
Die Sender von Hand
speichern.
Die Antenne fest anschließen.
CD richtig herum einlegen.
• Legen Sie eine
abgeschlossene CD-R ein.
• Schließen Sie die CD-R in
dem Gerät ab, mitdem Sie die
CD gebrannt haben.
Heben Sie die CD-Sperre auf.
(Siehe seite 13).
Die Tasten
(Bereitschaft/Netz dämpfer) und
0 (Auswerfen) länger als 2
Sekunden gleichzeitig gedrückt
halten. Achten Sie darauf, dass
Sie die CD nach dem Auswerfen
nicht fallen lassen.
Keine Disc auf holpriger Straße
abspielen.
CD wechseln.
Die Kabel und Anschlüsse
überprüfen.
Eine CD in den Ladeschlitz
einschieben.
CD richtig herum einlegen.
DEUTSCH
19
Page 40

WARTUNG
Handhaben der Discs
Dieses Gerät ist so ausgelegt, daß CDs und
CD-Rs (beschreibbar) wiedergegeben werden
können.
• Das Gerät ist nicht mit MP3-Discs kompatibel.
Umgehen mit Discs
Beim Entnehmen einer Disc
aus ihrer Hülle den mittleren
Halter der Hülle nach unten
drücken und die Disc herausheben,
DEUTSCH
wobei sie an der Außenkante
festgehalten wird.
• Die Disc immer an der Außenkante festhalten.
Niemals die Aufnahmeoberfläche berühren.
Beim Aufbewahren einer Disc in ihrer Hülle
die Disc behutsam um den mittleren Halter der
Hülle legen (mit der bedruckten Seite nach
oben).
• Die Discs nach dem Gebrauch immer in ihren
Hüllen aufbewahren.
Zum Sauberhalten der Discs
Eine schmutzige Disc kann evtl.
nicht richtig abspielen.
Ist eine Disc verschmutzt, den
Schmutz mit einem weichen
Tuch in gerader Linie von der Mitte
aus zur Außenkante abwischen.
Zum Abspielen neuer Discs
Neue Discs können an der Innenund Außenkante rauhe Stellen
haben. Wird eine solche Disc
verwendet, kann das Gerät ein
Abspielen der Disc verweigern. Zum Entfernen
dieser rauhen Stellen die Kanten mit einem
Bleistift oder Kugelschreiber o.ä. nachfahren.
Feuchtigkeitskondensation
Feuchtigkeit kann auf den Linsen im Innern des
CD-Spielers in folgenden Fällen kondensieren:
• Nach dem Einschalten der Autoheizung.
• Wenn es im Auto feucht wird.
In diesen Fällen kann der CD-Spieler evtl. nicht
richtig funktionieren. Daher die Disc auswerfen
und das Gerät für einige Stunden eingeschaltet
lassen, bis die Feuchtigkeit verdampft ist.
Mittlerer Halter
Bei der Wiedergabe einer CD-R
Lesen Sie vor der Wiedergabe einer CD-R die
zugehörigen Anleitungen bzw.
Vorsichtsmaßnahmen sorgfältig durch.
• Verwenden Sie nur „finalisierte“ CD-Rs.
• Manche CD-Rs können aufgrund ihrer Disc
Charakteristiken aus folgenden Gründen nicht
mit diesem Gerät wiedergegeben werden:
– Die Discs sind schmutzig oder verkratzt.
– Kondenswasserbildung auf der Linse im
Innern dieses Geräts.
– Die Aufnahmelinse in diesem Gerät ist
verschmutzt.
• CD-Rs sind gegen hohe Temperaturen oder
hohen Feuchtigkeitsgehalt empfindlich. Lassen
Sie die CSs aus diesem Grund nicht in Ihrem
Wagen liegen.
• Verwenden die folgenden CD-Rs nicht:
– Discs mit Aufklebern, Etiketten oder mit
Schutzfolie auf der Oberfläche.
– Discs, auf deren Etikett direkt mit einem
Tintenstrahldrucker gedruckt werden kann.
Die Verwendung dieser Discs bei hohen
Temperaturen oder hoher Luftfeuchtigkeit kann
zu Fehlfunktionen oder Schäden an den Discs
führen. Zum Beispiel:
– Aufkleber oder Etikette können schrumpfen
und eine Disc verziehen.
– Aufkleber oder Etikette können sich ablösen und
die Disc können nicht ausgeworfen werden.
– Der Druck auf den Discs kann klebrig werden.
Der Druck auf den Discs kann klebrig werden.
Lesen Sie die Anweisungen oder Warnhinweise
über Etikette und bedruckbare Discs aufmerksam
durch.
• CD-RWs (wiederbeschreibbar) können auf
dieser Einheit nicht wiedergegeben werden.
VORSICHT
• Keine Single-Discs (8 cm) im Ladeschlitz
einlegen. (Diese Discs können nicht
ausgeworfen werden).
• Keine Discs mit ungewöhnlicher Form einlegen
—z.B. Herz- oder Blumenform, da das Probleme
bereitet.
• Discs nicht dem direkten Sonnenlicht und einer
Wärmequelle aussetzen oder sie an einem Ort
aufbewahren, der hohen Temperaturen oder
Feuchtigkeit unterliegt. Discs nicht im Auto
lassen.
• Keine Lösungsmittel (z.B. konventionelle
Schallplattenreinger, -sprays, Verdünner, Benzin
usw.) zum Reinigen der Discs verwenden.
20
Verzogene
CD
Aufkleber
Klebriger
Rückstand
Disc
Klebeetikett
Page 41

TECHNISCHE DATEN
AUDIO-VERSTÄRKERTEIL
Max. Leistungsabgabe:
Vorne: 45 W pro Kanal
Hinten: 45 W pro Kanal
Kontinuierliche Leistungsabgabe (RMS):
Vorne: 17 W pro Kanal an 4 Ω, 40 Hz bis
20 000 Hz bei nicht mehr als
0,8% Gesamtklirrfaktor.
Hinten: 17 W pro Kanal an 4 Ω, 40 Hz bis
20 000 Hz bei nicht mehr als
0,8% Gesamtklirrfaktor.
Last-Impedanz: 4 Ω (4 Ω bis 8 Ω zulässig)
Tonregelbereich:
Tiefen: ±10 dB bei 100 Hz
Höhen: ±10 dB bei 10 kHz
Frequenzgang: 40 Hz bis 20 000 Hz
Signal/Störabstand: 70 dB
Line-Ausgangspegel/Impedanz:
2,0 V pro 20 kΩ Last (voll ausgesteuert)
Ausgangsimpedanz: 1 kΩ
TUNER-TEIL
Frequenzbereich:
UKW: 87,5 MHz bis 108,0 MHz
AM: (MW) 522 kHz bis 1 620 kHz
(LW) 144 kHz bis 279 kHz
CD-SPIELERTEIL
Typ: Kompakt-CD-Spieler
Signalerkennungssystem: Kontaktlose, optische
Aufnahme (Halbleiterlaser)
Anz. der Kanäle: 2 Kanäle (Stereo)
Frequenzgang: 5 Hz bis 20 000 Hz
Dynamikbereich: 90 dB
Signal/Störabstand: 95 dB
Tonhöhenschwankung: Unter meßbarem
Grenzwert
DEUTSCH
ALLGEMEIN
Spannungsversorgung:
Betriebsspannung: DC 14,4 V
(11 V bis 16 V zulässig)
Erdungssystem: Negative Masse
Zugelassene Arbeitstemperatur: 0°C bis +40°C
Abmessungen (B × H × T):
Einbaugröße (ca.):
182 mm × 52 mm × 150 mm
Bedienteilgröße (ca.):
188 mm × 58 mm × 11 mm
Gewicht (ca.):
1,3 kg (ausschließlich Zubehör)
[UKW-Tuner]
Nutzbare Empfindlichkeit:
11,3 dBf (1,0 µV/75 Ω)
50 dB Geräuschberuhigung:
16,3 dBf (1,8 µV/75 Ω)
Ausweichkanalabstimmschärfe (400 kHz):
65 dB
Frequenzgang: 40 Hz bis 15 000 Hz
Stereotrennabstand: 30 dB
Einfangsverhältnis: 1,5 dB
[MW-Tuner]
Empfindlichkeit: 20 µV
Trennschärfe: 35 dB
[LW-Tuner]
Empfindlichkeit: 50 µV
Änderungen der Konstruktion und technischen Daten
ohne Vorankündigung möglich.
21
Page 42

IMPORTANT POUR PRODUITS LASER
1. PRODUIT LASER CLASSE 1
2. ATTENTION: N’ouvrez pas le couvercle supérieur. Il n’y a aucune pièce réparable par l’utilisateur à
l’intérieur de l’appareil; confiez toute réparation à un personnel qualifié.
3. ATTENTION: Risque de radiations laser visible et invisible quand l’appareil est ouvert et que le
système de verrouillage ne fonctionne pas ou a été mis hors service. Évitez toute exposition directe
au rayon.
4. REPRODUCTION DE L’ÉTIQUETTE: ÉTIQUETTE DE PRÉCAUTION PLACÉE À L’EXTÉRIEUR
DE L’APPAREIL.
FRANÇAIS
Comment réinitialiser votre appareil
Tout en maintenant SEL (sélection) pressée, appuyez sur (attente/en service sourdine)
pendant plus de 2 secondes.
Cela réinitialisera le microprocesseur intégré.
(attente/en service sourdine)
LOUD
SEL
DISP
MO
8
7 9 10 12
11
RPT
RND
SEL (sélection)
Remarques:
• Les ajustements que vous avez préréglés—tels que les canaux préréglés ou les ajustements sonores
—seront aussi effacés.
• Si un CD se trouve dans l’appareil, il est éjecté quand celui-ci est réinitialisé. Faites attention de ne pas
faire tomber le CD.
2
FM
CD
SSM
AM
SCMMODE
Page 43

Merci pour avoir acheté un produit JVC. Veuillez lire attentivement toutes les instructions avant
d’utiliser l’appareil afin de bien comprendre son fonctionnement et d’obtenir les meilleures
performances possibles.
TABLE DES MATIERES
Comment réinitialiser votre appareil ......... 2
Comment utiliser la touche MODE............ 3
EMPLACEMENT DES TOUCHES .......... 4
Panneau de command .............................. 4
FONCTIONNEMENT DE BASE ............ 5
Mise sous tension ..................................... 5
Réglage de l’horloge ................................. 6
FONCTIONNEMENT DE LA RADIO ....... 7
Ecoute de la radio ..................................... 7
Mémorisation des stations ........................ 9
Accord d’une station présélectionnée ....... 10
FONCTIONNEMENT DU LECTEUR CD ... 11
Lecture d’un CD ........................................ 11
Localisation d’une plage ou d’un point
particulier sur un CD ................................
Sélection des modes de lecture de CD..... 12
Interdiction de l’éjection de CD ................. 13
Comment utiliser la touche MODE
Si vous appuyez sur MODE, l’appareil entre en mode de fonctions et les touches numériques
peuvent être utilisées comme touches de fonction.
MODE
AJUSTEMENT DU SON .................... 14
Ajustement du son .................................... 14
Mise en/hors service de la fonction
loudness ................................................. 14
Utilisation de la mémoire de commande
du son (SCM) ......................................... 15
Mémorisation de votre propre ajustement
sonore .................................................... 16
AUTRES FONCTIONS PRINCIPALES..... 17
Sélection de l’affichage du niveau
—LEVEL ................................................. 17
Annulation de SCM avancé—SCM LINK...
Détachement du panneau de
commande .............................................. 18
DEPANNAGE ................................ 19
12
ENTRETIEN ................................. 20
Manipulation des disques ......................... 20
SPECIFICATIONS........................... 21
17
FRANÇAIS
MO
8
Pour utiliser de nouveau ces touches comme touches numériques après avoir appuyer sur
MODE, attendez 5 secondes sans appuyer sur aucune touche, jusqu’à ce que le mode de
fonctions soit annulé.
• Appuyer de nouveau sur MODE annule aussi le mode de fonctions.
910 127
MO
11
RPT
RND
Indicateur de durée restante
Remarque:
Pour des raisons de sécurité, une carte d’identification numérotée est fournie avec cet appareil, et le même
numéro d’identification est imprimé sur le châssis de l’appareil. Conserver cette carte dans un endroit sûr,
elle pourra aider les autorités pour identifier votre appareil en cas de vol.
AVANT D’UTILISER L’APPAREIL
*
Par sécurité....
• N’augmentez pas trop le volume car cela bloquerait
les sons de l’extérieur rendant la conduite
dangereuse.
• Arrêtez la voiture avant de réaliser toute opération
compliquée.
*
Température à l’intérieur de la voiture....
Si votre voiture est restée garée pendant longtemps
dans un climat chaud ou froid, attendez que la
température à l’intérieur de la voiture redevienne
normale avant d’utiliser l’appareil.
3
Page 44

EMPLACEMENT DES TOUCHES
Panneau de command
Fenêtre d’affichage
FRANÇAIS
1
q
;dga
SCM
3
2
LOUD
SEL
DISP
w
s
54
MO
7 9 10 12
8
e
1 Touche (attente/en service sourdine)
2 Touche LOUD (contour)
3 Touche SEL (sélection)
4 Fenêtre d’affichage
5 La fente d’insertion
6 Touche 0 (éjection)
7 Touche CD
8 Touche AM
9 Touche FM
p Touches ¢/4
• Fonctionnent aussi comme touches SSM quand
elles sont pressées en même temps.
q Touches +/–
w Touche DISP (affichage)
e Touche MO (monaural)
r Touches numériques
t Touche RPT (répétition)
y Touche RND (aléatoire)
u Touche MODE
i Touche SCM
(mémoire de commande sonore)
o Touche (déblocage du panneau de
commande)
4
f
ST RND RPT
MO
j
h
k
l
/
7
69
8
CD
RND
11
RPT
tyr
ui
AM
SCMMODE
p
FM
SSM
o
Fenêtre d’affichage
; Indicateur SCM (mémoire de commande
sonore)
a Indicateur de source CD
s Indicateurs de bande FM (FM1, FM2, FM3)
d Indicateur de bande AM
f Indicateurs de réception du tuner
MO (monaural), ST (stéréo)
g Indicateur RND (aléatoire)
h Indicateur RPT (répétition)
j Indicateur LOUD (contour)
k Indicateur de présence de CD
l Affichage principal
/ Indicateur le niveau de volume
Page 45

FONCTIONNEMENT DE BASE
LOUD
SEL
DISP
7 9 10 12
123
Mise sous tension
1
Mettez l’appareil sous tension.
Remarque sur le fonctionnement monotouche:
Quand vous choisissez la source à l’étape 2 cidessous, l’appareil se met automatiquement sous
tension. Vous n’avez donc pas besoin d’appuyer
d’abord sur cette touche pour mettre l’appareil
sous tension.
2
Choisissez la source.
FM
CD
AM
Pour utiliser le tuner (FM ou AM),
voir les pages 7 – 10.
Pour reproduire un CD,
voir les pages 11 – 13.
3
Ajustez le volume.
Pour augmenter le volume
Pour diminuer le volume
FM
CD
SSM
MO
8
RND
11
RPT
4
Ajustez le son comme vous le
AM
SCMMODE
souhaitez. (Voir les pages 14 – 16).
Pour baisser le son instantanément
Appuyez brièvement sur pendant
l’écoute de n’importe quelle source. “ATT ”
commence à clignoter sur l’affichage, et le
niveau de volume est baissé instantanément.
Pour revenir au niveau de volume précédent,
appuyez de nouveau brièvement sur la touche.
FRANÇAIS
Pour mettre l’appareil hors tension
Maintenez pressée pendant plus d’une
seconde.
“SEE YOU” apparaît et l’appareil se met hors
tension.
• Si vous mettez l’appareil hors tension lors
de l’écoute d’un CD, la lecture du CD
débutera à partir de l’endroit où elle a été
interrompue la prochaine fois que vous mettez
l’appareil sous tension.
PRECAUTION sur le réglage du volume:
Les CD produisent très peu de bruit comparé avec
les autres sources. Si le niveau de volume est
ajusté, par exemple, pour le tuner, les enceintes
risquent d’être endommagées par l’augmentation
soudaine du niveau de sortie.
Par conséquent, diminuez le volume avant de
reproduire un CD et ajustez-le comme vous le
souhaitez pendant la lecture.
Le niveau de volume apparaît
Indicateur le niveau de volume
(voir la page 17)
5
Page 46

LOUD
HorlogeFréquence
SEL
DISP
7 9 10 12
FM
CD
SSM
MO
8
RND
11
RPT
AM
SCMMODE
Réglage de l’horloge
1
Maintenez pressée SEL (sélection)
pendant plus de 2 secondes.
FRANÇAIS
“CLOCK H”, “CLOCK M”, “SCM LINK” ou
“LEVEL” apparaît sur l’affichage.
SEL
2
Réglez les heures.
1 Choisissez “CLOCK H” (heures) s’il
n’apparaît pas sur l’affichage.
CLOCK H CLOCK M
LEVEL SCM LINK
2 Ajustez les heures.
3
Réglez les minutes.
1 Choisissez “CLOCK M” (minutes).
CLOCK H CLOCK M
LEVEL SCM LINK
2 Ajustez les minutes.
4
Terminez le réglage.
SEL
Pour vérifier l’heure actuelle ou changer le
mode d’affichage
DISP
Appuyez sur DISP (affichage)
répétitivement.
Chaque fois que vous appuyez
sur la touche, le mode
d’affichage change comme
suit:
• Pendant l’utilisation du tuner:
• Pendant l’utilisation du CD:
HorlogeDurée de lecture écoulée
• Quand l’appareil est hors tension:
L’appareil se met sous tension et l’horloge
apparaît pendant 5 secondes. Puis, l’appareil
se remet hors tension.
6
Page 47

FONCTIONNEMENT DE LA RADIO
LOUD
SEL
DISP
MO
8
7 9 10 12
Ecoute de la radio
Vous pouvez utiliser la recherche automatique
ou l’accord manuel pour accorder une station
particulière.
Recherche d’une station
automatiquement: Recherche
automatique
1
Choisissez la bande (FM1 – 3, AM).
FM
FM1 FM2 FM3
AM
AM
FM
CD
SSM
RND
11
RPT
2
Commencez la recherche d’une
AM
SCMMODE
station.
Pour rechercher des stations
de fréquences supérieures
Pour rechercher des stations
de fréquences inférieures
Quand une station est accordée, la
recherche s’arrête.
Pour arrêter la recherche avant qu’une station
ne soit accordée, appuyez sur la même touche
que vous avez utilisée pour la recherche.
FRANÇAIS
S’allume lors de la réception d’une émission
FM stéréo de signal suffisamment for.
ST
La bande choisie apparaît.
Remarque:
Cet appareil a trois bandes FM (FM1, FM2,
FM3). Vous pouvez utiliser n’importe laquelle
pour écouter une station FM.
7
Page 48

Recherche manuelle d’une station:
Recherche manuelle
1
Choisissez la bande (FM1 – 3, AM).
FM
FM1 FM2 FM3
AM
AM
Remarque:
Cet appareil a trois bandes FM (FM1, FM2,
FM3). Vous pouvez utiliser n’importe laquelle
FRANÇAIS
pour écouter une station FM.
2
Maintenez pressée ¢ ou
4
jusqu’à ce que “M” (manuel)
clignote sur l’affichage.
Quand une émission FM stéréo est
difficile à recevoir:
MODE
MO
8
l’indicateur MO s’allume et
Lorsque l’indicateur MO est allumé sur
l’affichage, le son que vous entendez est
monaural mais la réception est améliorée.
1 Appuyez sur MODE pour
entrer en mode de fonction
pendant l’écoute d’une station
FM.
2 Appuyez sur MO (monaural),
pendant le mode de fonction,
de façon que l’indicateur MO
s’allume sur l’affichage.
Chaque fois que vous
appuyez sur la touche,
s’éteint alternativement.
Indicateur MO (monaural)
MO
3
Accordez une station souhaitée
pendant que “M” (manuel) clignote.
Pour accorder des stations de
fréquences supérieures
Pour accorder des stations de
fréquences inférieures
• Si vous relâchez la touche, le mode
manuel est mis automatiquement hors
service après 5 secondes.
• Si vous maintenez la touche pressée, la
fréquence continue de changer (par
intervalle de 50 kHz pour la bande FM et
par intervalle de 9 kHz pour la bande
AM—PO/GO) jusqu’à ce que vous la
relâchiez.
8
Page 49

Mémorisation des stations
Vous pouvez utiliser l’une des deux méthodes
suivantes pour mémoriser les stations reçues.
• Présélection automatique des stations FM:
SSM (Strong-station Sequential Memory)
• Présélection manuelle des stations FM et AM
Présélection automatique des stations
FM: SSM
Vous pouvez présélectionner 6 stations locales
dans chaque bande FM (FM1, FM2 et FM3).
1
Choisissez le numéro de la bande
FM (FM1 – 3) où vous souhaitez
mémoriser la station.
FM
FM1 FM2 FM3
2
Maintenez pressées les deux
touches pendant plus de 2
secondes.
Présélection manuelle
Vous pouvez présélectionner manuellement un
maximum de 6 stations pour chaque bande
(FM1, FM2, FM3 et AM).
Ex.: Mémorisation de la station FM située à
92,5 MHz sur le numéro de présélection 1
de la bande FM1.
1
Choisissez le numéro de la bande
(FM1 – 3, AM) où vous souhaitez
mémoriser la station (dans cet
exemple, FM1).
FM
FM1 FM2 FM3
AM
AM
2
Accordez une station (dans cet
exemple à 92,5 MHz).
Pour accorder des stations de
fréquences supérieures
FRANÇAIS
SSM
“SSM” apparaît, puis disparaît quand la
présélection automatique est terminée.
Les stations locales FM avec les signaux les plus
forts sont recherchées et mémorisées
automatiquement dans le numéro de bande que
vous avez choisi (FM1, FM2 ou FM3).
Ces stations sont mémorisées sur les touches de
présélection de station—No. 1 (fréquence la plus
basse) à No. 6 (fréquence la plus haute).
Quand la présélection est terminée, la station
mémorisée automatiquement sur la touche de
présélection de station 1 est accordée
automatiquement.
Pour accorder des stations de
fréquences inférieures
SUITE À LA PAGE SUIVANTE
9
Page 50

3
Maintenez pressée la touche
numérique (dans cet exemple, 1)
pendant plus de 2 secondes.
7
“P1” clignote pendant quelques secondes.
4
Répétez la procédure ci-dessus pour
mémoriser d’autres stations sur
FRANÇAIS
d’autres numéros de présélection.
Remarques:
• La station précédemment présélectionnée est
effacée quand une nouvelle station est mémorisée
sur le même numéro de présélection.
• Les stations présélectionnées sont effacées si
l’alimentation du circuit mémoire est interrompue
(par exemple, pendant le changement de la
batterie). Si cela se produit, présélectionnez de
nouveau les stations.
Accord d’une station
présélectionnée
Vous pouvez accorder facilement une station
présélectionnée.
Rappelez-vous que vous devez d’abord
mémoriser les stations. Si vous ne les avez pas
encore mémorisées, référez-vous à
“Mémorisation des stations” à les pages 9 et 10.
1
Choisissez la bande (FM1 – 3, AM).
FM
FM1 FM2 FM3
AM
AM
2
Choisissez le numéro (1 – 6) de la
station présélectionnée souhaitée.
8
910 127
MO
11
RPT
RND
10
Page 51

FONCTIONNEMENT DU LECTEUR CD
LOUD
SEL
DISP
MO
7 9 10 12
8
Lecture d’un CD
Insérez un disque dans la fente de
d’insertion.
L’appareil se met en
marche, tire le CD et
commence la lecture
automatiquement.
Remarque sur le fonctionnement monotouche:
Si un CD se trouve déjà dans la fente d’insertion,
appuyer sur CD met l’appareil sous tension et
commence la lecture automatiquement.
L’indicateur de présence de CD clignote.
L’indicateur de présence
de CD s’allume.
FM
CD
SSM
RND
11
RPT
AM
SCMMODE
Remarque:
Quand un CD est inséré à l’envers, “EJECT”
apparaît sur l’affichage et le CD est éjecté
automatiquement.
Pour arrêter la lecture et éjecter le CD
Appuyez sur 0.
La lecture du CD s’arrête automatiquement et le
CD est automatiquement éjecté de la fente
d’insertion. La source change sur le tuner (vous
entendez la dernière station reçue).
• Si vous changez la source, la lecture de CD
s’arrête aussi (sans éjecter le CD).
La prochaine fois que vous choisissez “CD”
comme source, la lecture du CD commence à
partir de l’endroit où elle a été interrompue.
Remarques:
• Si le CD éjecté n’est pas retiré avant environ
15 secondes, le disque est automatiquement
réinséré dans la fente d’insertion pour le protégé de
la poussière. (Dans ce cas, la lecture du CD ne
commence pas).
• Vous pouvez éjecter le CD quand l’appareil est hors
tension.
FRANÇAIS
Durée de lecture
totale du disque
inséré
Nombre total de
plages du disque
inséré
Durée de lecture écoulée Plage actuelle
Toutes les plages sont reproduites répétitivement
jusqu’à ce que vous arrêtiez la lecture.
A propos du désaligement:
Un désalignement peut être la conséquence d’une
conduite sur un terrain accidenté. Cela
n’endommage pas l’appareil ni le CD, mais cela
peut être agaçant.
Nous vous recommandons d’arrêter la lecture de
CD lors d’une conduite sur un tel terrain.
11
Page 52

Localisation d’une plage ou
d’un point particulier sur un CD
Sélection des modes de
lecture de CD
Pour avancer rapidement ou inverser une
plage
Maintenez pressée ¢,
pendant la reproduction d’un CD,
pour avancer rapidement la plage.
Maintenez pressée 4 ,
pendant la reproduction d’un CD,
pour inverser la plage.
Pour aller aux plages suivantes ou
précédentes
FRANÇAIS
Appuyez brièvement sur ¢
lors de la reproduction d’un CD,
pour avancer jusqu'au début de
la plage suivante.
Chaque fois que vous appuyez
répétitivement sur la touche, le
début des plages suivantes est
localisé et celle-ci est reproduite.
Appuyez brièvement sur 4
lors de la reproduction d’un CD,
pour revenir au début de la plage
actuelle.
Chaque fois que vous appuyez
répétitivement sur la touche, le
début des plages précédentes est
localisé et celle-ci est reproduite.
Pour reproduire les plages dans un ordre
aléatoire (Lecture aléatoire)
Vous pouvez reproduire toutes les plages du
disque dans un ordre aléatoire.
MODE
12
RND
Quand le lecture aléatoire est en service,
l’indicateur RND s’allume sur l’affichage. Puis,
une plage choisie aléatoirement est reproduite.
1 Appuyez sur MODE pour
entrer en mode de fonction
pendant l’écoute d’un CD.
2 Appuyez sur RND (aléatoire),
pendant le mode de fonctions,
de façon que l’indicateur RND
s’allume sur l’affichage.
Chaque fois que vous
appuyez sur la touche, le
mode de lecture aléatoire de
CD se met alternativement en
et hors service.
Indicateur RND
RND
Pour aller directement à une plage
particulière
Appuyez sur la touche numérique
correspondante au numéro de plage souhaité
pour commencer sa reproduction.
8
• Pour choisir un numéro de plage de 1 – 6:
Appuyez brièvement sur 1 (7) – 6 (12).
• Pour choisir un numéro de plage de 7 – 12:
Maintenez pressé 1 (7) – 6 (12) pendant plus
d’une seconde.
910 127
MO
12
11
RPT
RND
Page 53

Pour reproduire les plages répétitivement
(Lecture répétée)
Vous pouvez reproduire la plage actuelle
répétitivement.
MODE
11
RPT
Quand le lecture répétée est en service,
l’indicateur RPT s’allume sur l’affichage. Puis, la
plage en cours de lecture est reproduite
répétitivement.
1 Appuyez sur MODE pour
entrer en mode de fonction
pendant l’écoute d’un CD.
2 Appuyez sur RPT (répétition),
pendant le mode de fonctions,
de façon que l’indicateur RPT
s’allume surl’affichage.
Chaque fois que vous
appuyez sur la touche, le
mode de lecture répétée se
met alternativement en et hors
service.
Indicateur RPT
RPT
Numéro de plage de la plage
actuellement reproduite
Interdiction de l’éjection de
CD
Vous pouvez interdire l’éjection d’un CD et le
verrouiller dans la fente d’insertion.
Tout en maintenant pressée CD,
appuyez sur 0 pendant plus de 2
secondes.
CD
“EJECT” clignote sur l’affichage pendant environ
5 secondes, le CD est verrouillé et ne peut plus
être éjecté.
Pour annuler l’interdiction et
déverrouiller le CD
Tout en appuyant sur CD, maintenez de nouveau
pressée 0 pendant plus de 2 secondes.
“EJECT” apparaît sur l’affichage et le CD est
éjecté de la fente d’insertion.
L’indicateur de présence de CD clignote.
FRANÇAIS
13
Page 54

AJUSTEMENT DU SON
Ajustement du son
Vous pouvez ajuster les caractéristiques du son
à votre préférence.
1
Choisissez l’élément que vous
souhaitez ajuster.
SEL
(graves)
Indication Pour: Plage
FRANÇAIS
BAS Ajuster les graves. –06 (min.)
TRE Ajuster les aigus. –06 (min.)
FAD* Ajuster l’équilibre R06 (Arrièrer
BAL Ajuster l’équilibre L06 (Gauche
VOL Ajuster le volume. 00 (min.)
Chaque fois que vous
appuyez sur la touche,
l’élément ajustable change
comme suit:
BAS
(volume)
entre les seulement)
enceintes avant |
et arrière. F06 (Avant
entre les seulement)
enceintes gauche |
et droite. R06 (Droit
VOL
TRE
(aigus)
BAL
(balance)
|
+06 (max.)
|
+06 (max.)
seulement)
seulement)
|
50 (max.)
FAD
(fader)
2
Ajustez le niveau.
Pour augmenter le niveau
Pour diminuer le niveau
Ex.: Quand vous ajustez “TRE” (aigus)
Remarque:
Normalement les touches + et – fonctionnent comme
touches de commande du volume. Alors, vous n’avez
pas besoin de choisir “VOL” pour ajuster le niveau
de volume.
Mise en/hors service de la
fonction loudness
L’oreille humaine est moins sensible aux basses
et hautes fréquences à faible volume.
La fonction loudness peut accentuer ces
fréquences pour produire un son bien équilibré à
faible volume.
LOUD
Chaque fois que vous
appuyez sur LOUD, la fonction
loudness se met
alternativement en et hors
service.
Indicateur LOUD (contour)
* Si vous utilisez un système à deux enceintes, réglez
le niveau de fader sur “00”.
14
Page 55

Utilisation de la mémoire de
commande du son (SCM)
Vous pouvez choisir et mémoriser un ajustement
du son spécifique pour chaque source de lecture
(SCM avancé).
Sélection et mémorisation des modes
sonores
Une fois que vous avez choisi un mode sonore, il
est mémorisé. Il est rappelé et apparaît sur
l’affichage chaque fois que vous choisissez la
même source.
Un mode sonore peut être mémorisé pour
chacune des sources suivantes—FM1, FM2,
FM3, AM et CD.
• Si vous ne souhaitez pas mémoriser le mode
sonore séparément pour chaque source de
lecture, mais souhaitez utiliser le même mode
sonore pour toutes les sources, référez-vous à
“Annulation de SCM avancé—SCM LINK” à la
page 17.
Choisissez le mode sonore souhaité.
SCM
SCM OFF
SCM
Ex.: Quand vous choisissez “BEAT”
• Quand “SCM LINK” est réglé sur “LINK ON”, le
mode sonore choisi peut être mémorisé pour la
source actuelle et l’effet ne s’applique qu’à la
source actuelle.
• Quand “SCM LINK” est réglé sur “LINK OFF”,
l’effet du mode sonore choisi s’applique à
toutes les sources.
Chaque fois que vous
appuyez sur la touche, le
mode sonore change comme
suit:
BEAT
SOFT
POP
Indication Pour: Valeurs préréglées
BAS TRE LOUD
SCM OFF (Son plat) 00 00 ON
BEAT Musique +02 00 ON
SOFT Musique +01 –03 OFF
POP Musique +04 +01 OFF
rock ou
disco
de fond
légère
Rappel des modes sonores
Quand “SCM LINK” est réglé sur
“LINK ON”, choisissez la source.
FM
CD
AM
Le mode sonore mémorisé pour la source
choisie est rappelé.
Remarques:
• Vous pouvez ajuster le mode sonore préréglé
comme vous le souhaitez et le mémoriser.
Si vous souhaitez ajuster et mémoriser votre propre
mode sonore, référez-vous à “Mémorisation de
votre propre ajustement sonore” à la page 16.
• Pour ajuster les niveaux d’accentuation des graves
et des aigus ou pour mettre en/hors service
temporairement la fonction contour, référez-vous à
la page 14. (Vos ajustements sont annulés si une
autre source est choisie).
Chaque fois que vous
changez la source de lecture,
l’indicateur SCM clignote sur
l’affichage.
SCM
FRANÇAIS
15
Page 56

Mémorisation de votre propre
ajustement sonore
Vous pouvez ajuster les modes sonore (BEAT,
SOFT, POP) comme vous le souhaitez et
mémoriser votre propre ajustement.
• Il y a un temps limite pour effectuer les étapes
suivantes. Si le réglage est annulé avant que
vous ne terminiez, recommencez à partir de
l’étape 1.
1
Appelez le mode sonore que vous
souhaitez ajuster.
FRANÇAIS
SCM
SCM
Ex.: Quand vous choisissez “SOFT”
2
Pour ajuster le niveau sonore des
graves ou des aigus.
1 Choisissez “BAS” (graves) ou
“TRE” (aigus).
SEL
• Référez-vous à la page 15
pour les détails.
Pour mettre la fonction loudness en
ou hors service.
LOUD
3
Répétez l’étape 2 pour ajuster
• Référez-vous à la page
14 pour les détails.
d’autres éléments.
4
Maintenez pressé SCM jusqu’à ce
que le mode sonore que vous avez
1
choisi à l’étape
l’affichage.
SCM
SCM
5
Répétez la même procédure pour
clignote sur
L’ajustement réalisé pour le
mode sonore choisi est
mémorisé.
mémoriser d’autres modes sonores.
Pour réinitialiser l’appareil aux réglages de
l’usine, répétez la même procédure et
réattribuez les valeurs préréglées du tableau à la
page 15.
16
Ex.: Quand vous choisissez “TRE” (aigus)
2 Ajustez le niveau.
Page 57

AUTRES FONCTIONS PRINCIPALES
Sélection de l’affichage du
niveau—LEVEL
Vous pouvez choisir l’affichage du niveau en
fonction de vos préférences.
À l’expédition de l’usine, “VOL 2” est choisi.
• VOL 1: Affiche l’indicateur de niveau de
• VOL 2: Alterne entre le réglage “VOL 1” et
• OFF: Fait disparaître l’indicateur de niveau
1
2
volume.
l’affichage de l’éclairage.
de volume.
Maintenez pressée SEL (sélection)
pendant plus de 2 secondes.
“CLOCK H”, “CLOCK M”, “SCM LINK” ou
“LEVEL” apparaît sur l’affichage.
SEL
Choisissez “LEVEL” s’il n’apparaît
pas sur l’affichage.
CLOCK H CLOCK M
LEVEL SCM LINK
Annulation de SCM avancé
—SCM LINK
Vous pouvez annuler les réglages SCM
(mémoire de commande sonore) avancés est
annuler les liaisons des modes sonores avec les
sources de lecture.
À l’expédition de l’usine, un mode sonore différent
peut être mémorisé pour chaque source de façon
à ce que vous puissiez changer les modes
sonores simplement ne changeant de source.
• LINK ON: Réglages SCM avancés (modes
• LINK OFF: Réglages SCM ordinaires (un seul
1
Maintenez pressée SEL (sélection)
pendant plus de 2 secondes.
“CLOCK H”, “CLOCK M”, “SCM LINK” ou
“LEVEL” apparaît sur l’affichage.
2
Choisissez “SCM LINK” s’il
n’apparaît pas sur l’affichage.
sonores différents pour chaque
source).
mode sonore pour toutes les
sources).
SEL
FRANÇAIS
3
Choisissez le mode—“VOL 1”,
“VOL 2” ou “OFF”.
OFF
4
Terminez le réglage.
SEL
CLOCK H CLOCK M
LEVEL SCM LINK
VOL 2VOL 1
3
Choisissez “LINK OFF”.
4
Terminez le réglage.
SEL
Pour mettre en service la fonction SCM
(mémoire de commande sonore), répetez la
même procédure et appuyez sur + pour choisir
“LINK ON” à l’étape 3.
17
Page 58

Détachement du panneau de
commande
Vous pouvez détacher le panneau de commande
quand vous quittez la voiture.
Lors du détachement ou de la remise en place
du panneau de commande, faites attention de ne
pas endommager les connecteurs situés à
l’arrière du panneau et sur le porte-panneau.
Comment détacher le panneau de
commande
Avant de détacher le panneau de commande,
assurez-vous de mettre l’appareil hors tension.
FRANÇAIS
1
Déverrouillez le panneau de
commande.
Comment attacher le panneau de
commande
1
Insérez le côté gauche du panneau
de commande dans la rainure située
du côté droit du porte-panneau.
2
Appuyez sur le côté droit du
panneau de commande pour le fixer
au porte-panneau.
18
2
Levez et tirez le panneau de
commande de l’appareil.
3
Mettez le panneau de commande
détaché dans la boîte fournie.
Remarque sur le nettoyage des connecteurs:
Si vous détachez fréquemment le panneau de
commande, les connecteurs se détérioreront.
Pour réduire cette détérioration, essuyez
périodiquement les connecteurs avec un coton-tige
ou un tissu imprégné d’alcool, en faisant attention
de ne pas endommager les connecteurs.
Connecteurs
Page 59

DEPANNAGE
Ce qui apparaît comme un problème n’est pas toujours très sérieux. Vérifier les points suivants avant
d’appeler un centre de réparation.
Symptoms
• Le son ne peut pas être
entendu des enceintes.
• Cet appareil ne fonctionne
pas du tout.
Général
• La présélection automatique
SSM (Strong-station
Sequential Memory) ne
fonctionne pas.
FM/AM
• Il y a du bruit statique lors de
l’écoute de la radio.
• Le CD est éjecté
automatiquement.
• Le CD-R ne peut pas être
reproduit.
• Les plages sur un CD-R ne
peuvent pas être sautées.
• Le CD ne peut être ni
reproduit ni éjecté.
Lecture de CD
• Le son du CD est interrompu
par moment.
•“NO DISC” apparaît sur
l’affichage.
Causes
Le niveau de volume est réglé
au niveau minimum.
Les connexions sont
incorrectes.
Le micro-ordinateur intégré
peut fonctionner incorrectement
à cause de parasites, etc.
Les signaux sont trop faibles.
L’antenne n’est pas connectée
fermement.
Le CD est inséré à l’envers.
Le CD-R n’est pas finalisé.
Le CD est verrouillé.
Le lecteur de CD fonctionne
peut-être incorrectement.
Vous conduisez sur une route
accidentée.
Le CD est rayé.
Les connexions sont
incorrectes.
Il n’y a pas de CD dans la
fente d’insertion.
Le CD n’est pas inséré
incorrectement.
Remèdes
Ajustez-la sur le niveau optimum.
Vérifiez les cordons et les
connexions.
Tout en maintenant SEL
(sélection) pressée, appuyez sur
sourdine) pendant plus de 2
secondes pour réinitialiser
l’appareil. (Le réglage de l’horloge
et les stations présélectionnées
enregistrées en mémoire sont
effacées). (Voir la page 2).
Mémorisez les stations
manuellement.
Connectez l’antenne fermement.
Insérez-le CD correctement.
• Insérez un CD-R finalisé.
•
Déverrouillez le CD. (Voir la page
13).
Tout en maintenant
(attente/en service sourdine)
pressée, appuyez sur 0 (éjection)
pendant plus de 2 secondes.
Faites attention de ne pas faire
tomber le CD quand il est éjecté.
Arrêtez la lecture quand vous
conduisez sur des routes
accidentées.
Changez le CD.
Vérifiez les cordons et les
connexions.
Insérez un CD dans la fente
d’insertion.
Insérez-le CD correctement.
(attente/en service
Finalisez le CD-R avec l’appareil
utilisé pour l’enregistrement.
FRANÇAIS
19
Page 60

ENTRETIEN
Manipulation des disques
Cet appareil a été conçu uniquement pour
reproduire les CD et CD-R (enregistrables).
• Cet appareil n’est pas compatible avec les
disques MP3.
Manipulation des disques
Pour retirer un disque de
son boîtier, faites pression
sur e support central du boîtier
et retirez le disque en le tenant
par ses arêtes.
• Tenez toujours le disque par ses arêtes. Ne
touchez pas la surface enregistrée.
Pour remettre un disque dans son boîtier,
insérez délicatement le CD autour du support
FRANÇAIS
central (la surface imprimée dirigée vers le haut).
• Remettez les disques dans leur boîtier après
utilisation.
Pour garder propres vos disques
Un disque sale peut ne pas être
reproduit correctement. Si un
disque devient sale, essuyez-le
avec un chiffon doux, en ligne
droite, du centre vers les arêtes.
Avant de reproduire un disque neuf
Les disques neufs peuvent avoir
des ébarbures sur les arêtes
intérieures et extérieures. Si un tel
disque est utilisé, cet appareil
risque de rejeter le disque. Pour retirer ces
ébarbures, frottez les arêtes avec un crayon, un
stylo, etc.
Condensation d’humidité
De l’humidité peut se condenser sur la lentille à
l’intérieur du lecteur de CD dans les cas suivants:
• Après avoir mis le chauffage dans la voiture.
• Si l’intérieur de la voiture devient très humide.
Si cela se produit, le lecteur de disque peut ne
pas fonctionner correctement. Dans ce cas,
éjectez le disque et laissez l’appareil sous
tension pendant quelques heures, jusqu’à ce que
l’humidité se soit évaporée.
Support central
Lors de la reproduction d’un CD-R
Avant de reproduire un CD-R, lisez attentivement
leurs instructions et précautions.
• Utilisez uniquement des CD-R finalisés.
• Certains CD-Rs ne peuvent pas être reproduits
sur cet appareil à cause de leurs
caractéristiques et pour les raisons suivantes.
– Les disques sont sales ou rayés.
– De l’humidité s’est condensée sur la lentille,
à l’intérieur de l’appareil.
– La lentille du capteur, à l’intérieur de
l’appareil, est sale.
• Les CD-R sont sensibles aux hautes
températures ou à une humidité importante.
Ne les laissez pas à l’intérieur de la voiture.
• N’utilisez les CD-R suivants.
– Disques avec des autocollants, des
étiquettes ou des cachets de protection
collés sur leur surface.
– Disques sur lesquels une étiquette peut être
imprimée directement avec, par exemple,
une imprimante à jet d’encre.
L’utilisation de ce type de disque par haute
température ou humidité peut entraîner un
mauvais fonctionnement de l’appareil ou
endommager le disque. Par exemple:
– L’autocollant ou l’étiquette peut rétrécir et
gondoler le disque.
– L’autocollant ou l’étiquette peut se détacher
et le disque ne peut plus être éjecté.
– L’impression sur le disque peut devenir
collante.
Lisez attentivement les instructions et les
précautions sur les étiquettes et les disques
imprimables.
• Les CD-RW (réinscriptibles) ne peuvent pas
être reproduits sur cet appareil.
ATTENTION:
• N’insérez pas des disques de 8 cm (CD single) dans
la fente d’insertion. (De tels disques ne peuvent pas
être éjectés).
• N’insérez pas des disques avec une forme
inhabituelle—comme le cœur d’une fleur; cela
pourrait causer un mauvais fonctionnement.
• N’exposez pas les disques à la lumière directe du
soleil ou à toute source de chaleur, ni ne les placez
pas dans un endroit soumis à des hautes
températures ou à l’humidité. Ne les laissez pas
dans la voiture.
• N’utilisez aucun solvant (comme par exemple: un
nettoyant pour disque analogique, un diluant en
bombe, de la benzine, etc.) pour nettoyer les disques.
20
Disque
gondolé
Autocollant
Reste
collant
Disque
Etiquette
spécialisée
Page 61

SPECIFICATIONS
SECTION AMPLIFICATEUR AUDIO
Puissance de sortie maximum:
Avant: 45 W par canal
Arrière: 45 W par canal
Puissance de sortie en mode continu (RMS):
Avant: 17 W par canal pour 4 Ω, 40 Hz à
20 000 Hz à moins de 0,8% de
distorsion harmonique totale.
Arrière: 17 W par canal pour 4 Ω, 40 Hz à
20 000 Hz à moins de 0,8% de
distorsion harmonique totale.
Impédance de charge: 4 Ω (4 Ω à 8 Ω tolérés)
Plage de commande de la tonalité:
Graves: ±10 dB à 100 Hz
Aigus: ±10 dB à 10 kHz
Réponse en fréquence: 40 Hz à 20 000 Hz
Rapport signal sur bruit: 70 dB
Niveau de sortie de ligne/Impédance:
2,0 V/20 kΩ en charge (pleine échelle)
Impédance de sortie: 1 kΩ
SECTION TUNER
Plage de fréquence:
FM: 87,5 MHz à 108,0 MHz
AM: (PO) 522 kHz à 1 620 kHz
(GO) 144 kHz à 279 kHz
SECTION LECTEUR CD
Type: Lecteur de disque compact
Système de détection de signal: Capteur sans
contact optique (semiconducteur laser)
Nombre de canaux: 2 canaux (stéréo)
Réponse en fréquence: 5 Hz à 20 000 Hz
Plage dynamique: 90 dB
Rapport signal sur bruit: 95 dB
Pleurage et scintillement:
Inférieur à la limite mesurable
GÉNÉRAL
Alimentation:
Tension de fonctionnement: DC 14,4 V
(11 V à 16 V tolérés)
Système de mise à la masse: Masse négative
Température de fonctionnement admissible:
0°C à +40°C
Dimensions (L × H × P):
Taille d’installation (approx.):
182 mm × 52 mm × 150 mm
Taille du panneau (approx.):
188 mm × 58 mm × 11 mm
Masse (approx.):
1,3 kg (sans les accessoires)
FRANÇAIS
[Tuner FM]
Sensibilité utilisable:
11,3 dBf (1,0 µV/75 Ω)
Sensibilité utile à 50 dB:
16,3 dBf (1,8 µV/75 Ω)
Sélectivité de canal alterné (400 kHz):
65 dB
Réponse en fréquence: 40 Hz à 15 000 Hz
Séparation stéréo: 30 dB
Rapport de synchronisation: 1,5 dB
[Tuner PO]
Sensibilité: 20 µV
Sélectivité: 35 dB
[Tuner GO]
Sensibilité: 50 µV
La conception et les spécifications sont sujettes à
changement sans notification.
21
Page 62

BELANGRIJK VOOR LASERPRODUKTEN
1. KLASSE 1 LASERPRODUKT
2. VOORZICHTIG: Open de bovenste afdekking niet. Er zijn geen door de gebruiker te repareren
onderdelen in het toestel; laat onderhoud en reparatie over aan erkend onderhoudspersoneel.
3. VOORZICHTIG: Zichtbare en onzichtbare laserstraling indien open en interlock defect of buiten
werking gesteld. Voorkom directe blootstelling aan de straal.
4. REPRODUCTIE VAN LABEL: WAARSCHUWINGSLABEL, OP BUITENKANT VAN TOESTEL
AANGEBRACHT.
NEDERLANDS
Het apparaat terugstellen
Houd SEL (selecteren) ingedrukt en druk tegelijkertijd langer dan 2 seconden op
(standby/aan attenuator).
De ingebouwde microcomputer wordt hierdoor teruggesteld.
(standby/aan attenuator)
LOUD
SEL
DISP
MO
7 9 10 12
8
11
RPT
RND
SEL (selecteren)
Opmerkingen:
• De geheugeninstellingen—zoals de voorkeurzenders en de geluidsinstellingen—zullen eveneens gewist
worden.
• Als er een CD in het apparaat is, zal deze naar buiten komen wanneer u het apparaat terugstelt. Let op dat
de CD niet valt.
2
FM
CD
SSM
AM
SCMMODE
Page 63

Hartelijk dank voor de aanschaf van dit JVC-product! Wij verzoeken u de gebruiksaanwijzing goed
door te lezen voordat u het apparaat gaat gebruiken. Zo krijgt u een volledig inzicht in de functies van
het apparaat en kunt u de mogelijkheden optimaal benutten.
INHOUDSOPGAVE
Het apparaat terugstellen .......................... 2
Hoe u de toets MODE gebruikt ................. 3
PLAATSING VAN DE TOETSEN ........... 4
Bedieningspaneel ..................................... 4
BASISBEDIENING .......................... 5
De stroomtoevoer inschakelen ................. 5
Klok instellen ............................................. 6
GEBRUIK VAN DE RADIO ................. 7
Naar de radio luisteren .............................. 7
Radiozenders in het geheugen
vastleggen .............................................. 9
Afstemmen op een voorkeuzezender ....... 10
GEBRUIK VAN DE CD-SPELER ........... 11
Een CD afspelen ....................................... 11
Een muziekstuk of een bepaald punt op
de CD zoeken ......................................... 12
Afspeelmodus selecteren .......................... 12
Voorkomen dat de CD terugspringt ........... 13
GELUID REGELEN .......................... 14
Geluid aanpassen ..................................... 14
LOUD in-/uitschakelen .............................. 14
Werken met aangepaste geluidsmodi
(SCM) ..................................................... 15
Geluidsweergave aanpassen en
opslaan ................................................... 16
ANDERE HOOFDFUNCTIES ............... 17
Een niveauweergave selecteren
—LEVEL ................................................. 17
Advanced SCM annuleren—SCM LINK ... 17
Bedieningspaneel verwijderen .................. 18
PROBLEMEN OPLOSSEN ................. 19
ONDERHOUD ............................... 20
Omgaan met discs .................................... 20
SPECIFICATIES ............................. 21
Hoe u de toets MODE gebruikt
Als u op de toets MODE drukt, schakelt de apparaat over naar de functiemodus en werken de
cijfertoetsen enigszins anders.
MODE
MO
8
Als u deze toetsen nadat u op de toets MODE hebt gedrukt weer als cijfertoetsen wilt
gebruiken, moet u 5 seconden wachten zonder op een cijfertoets te drukken. De functiemodus
wordt dan automatisch opgeheven.
• Ook als u nogmaals op de toets MODE drukt, wordt de functiemodus geannuleerd.
910 127
MO
Opmerking:
Voor de veiligheid is een genummerde identificatiekaart bij het apparaat geleverd. Het identificatienummer
is tevens op de behuizing van het apparaat gedrukt. Bewaar de kaart op een veilige plaats. Deze kaart is
belangrijk voor identificaatie indien het apparaat is gestolen.
ALVORENS HET APPARAAT TE GEBRUIKEN
*
Denk aan de veiligheid....
• Zet het volume onder het rijden niet te hard. Dit is
gevaarlijk, omdat u de geluiden buiten de auto niet
meer hoort.
• Zet de auto stil voordat u ingewikkelde handelingen
met het apparaat gaat verrichten.
11
RPT
RND
Indicator die tijd aftelt
*
Temperatuur binnen de auto....
Als de auto gedurende lange tijd in de kou of in de
warmte heeft gestaan, mag u het apparaat pas
gebruiken nadat de temperatuur in de auto weer
normaal waarden heet bereikt.
NEDERLANDS
3
Page 64

PLAATSING VAN DE TOETSEN
Bedieningspaneel
Het display-venster
NEDERLANDS
1
q
;dga
SCM
3
2
LOUD
SEL
DISP
w
s
54
MO
7 9 10 12
8
e
1 De toets (standby/aan attenuator)
2 De toets LOUD (loudness)
3 De toets SEL (selecteren)
4 Het display-venster
5 CD-lade
6 De toets 0 (uitwerpen)
7 De toets CD
8 De toets AM
9 De toets FM
p De toetsen ¢/4
• Deze toetsen doen dienst als SSM-toets wanneer
beide toetsen tegelijk worden ingedrukt.
q De toetsen +/–
w De toets DISP (display)
e De toets MO (mono)
r De cijfertoetsen
t De toets RPT (repeat)
y De toets RND (random)
u De toets MODE
i De toets SCM (sound control memory)
o De toets (het bedieningspaneel vrijgeven)
4
f
ST RND RPT
MO
j
h
k
l
/
7
69
8
FM
CD
SSM
RND
11
RPT
tyr
ui
AM
SCMMODE
o
Het display-venster
; De indicator SCM (sound control memory)
a De indicator CD-bron
s De indicators voor de FM-band
(FM1, FM2, FM3)
d De indicator voor de AM-band
f Indicators voor de ontvangst van de tuner
MO (mono), ST (stereo)
g De indicator RND (random)
h De indicator RPT (repeat)
j De indicator LOUD (loudness)
k De indicator CD-geplaatst
l Hoofdvenster
/ Indicator voor het volumeniveau
p
Page 65

BASISBEDIENING
LOUD
SEL
DISP
MO
8
7 9 10 12
123
De stroomtoevoer inschakelen
1
Schakel de spanning in.
Opmerking over de “One-Touch”-bediening:
Bij het selecteren van de geluidsbron in stap
hieronder wordt het apparaat automatisch
ingeschakeld. U hoeft niet op deze toets te
drukken om het apparaat in te schakelen.
2
Start de weergave van de
geluidsbron.
FM
CD
AM
Voor gebruik van de radio (FM of AM),
zie bladzijden 7 – 10.
Voor het afspelen van CD’s,
zie bladzijden 11 – 13.
3
Regel het volume.
Het volume verhogen
Het volume verlagen
Het door u ingestelde geluidsniveau verschijnt.
2
FM
CD
SSM
RND
11
RPT
4
Stel het geluid in zoals u zelf wilt.
AM
SCMMODE
(Zie bladzijden 14 – 16).
Volume in een oogwenk zachter zetten
Druk tijdens het luisteren naar een willekeurige
geluidsbron kort op . Op het
afleesvenster begint de tekst “ATT ” te knipperen
en het volume zal in een oogwenk dalen.
Om het eerdere volume te herstellen, drukt u
nogmaals kort op dezelfde toets.
Spanning uitschakelen
Druk op en houd de cijfertoets langer
dan 1 seconde ingedrukt.
“SEE YOU” wordt getoond en vervolgens wordt
het toestel uitgeschakeld.
• Indien u de stroom uitschakelt tijdens het
beluisteren van een CD, zal de volgende keer
bij het weer inschakelen van de stroom de
weergave vanaf het hiervoor gestopte punt op
de disc worden voortgezet.
LET OP bij het instellen van het volume:
Bij CD’s is in vergelijking tot andere
geluidsdragers nauwelijks sprake van
achtergrondruis. Wanneer het volume van
bijvoorbeeld de tuner wordt aangepast, kan het
gebeuren dat de luidsprekers door de plotselinge
toename van het geluid beschadigd raken.
Draai het volume daarom voordat u een CD
afspeelt eerst terug en pas het geluid daarna aan
uw wensen aan.
NEDERLANDS
Indicator voor het volumeniveau
(zie bladzijde 17)
5
Page 66

LOUD
SEL
DISP
7 9 10 12
FM
CD
SSM
MO
8
RND
11
RPT
AM
SCMMODE
Klok instellen
1
Druk op SEL (selecteren) in en houd
deze ten minste 2 seconden
ingedrukt.
“CLOCK H”, “CLOCK M”, “SCM LINK” of
“LEVEL” verschijnt op de display.
SEL
NEDERLANDS
2
Stel het uur in.
1 Selecteer de vermelding “CLOCK H”
(uur) als deze al niet meteen op de
display wordt weergegeven.
2 Pas het uur aan.
CLOCK H CLOCK M
LEVEL SCM LINK
2 Pas de minuten aan.
4
Voltooi de instelling.
SEL
De huidige kloktijd opvragen of de
weergavemodus wijzigen
DISP
Druk meerdere malen op DISP
(display).
Elke keer wanneer u op de
toets drukt, verandert het
weergavemodus als volgt:
• Tijdens de bediening van de tuner:
KlokFrequentie
• Tijdens de bediening van de CD:
3
Stel de minuten in.
1 Selecteer de vermelding “CLOCK M”
(minuten).
CLOCK H CLOCK M
LEVEL SCM LINK
6
KlokVerstreken afspeeltijd
• Met de stroom uit:
De stroom wordt ingeschakeld en de tijd
wordt 5 seconden op de klok getoond. De
stroom schakelt vervolgens uit.
Page 67

GEBRUIK VAN DE RADIO
LOUD
SEL
DISP
MO
8
7 9 10 12
Naar de radio luisteren
Om op een bepaalde zender af te stemmen kunt
u kiezen tussen automatisch zoeken en
handmatig zoeken.
Automatisch naar een station zoeken:
Auto search
1
Selecteer de omroepband
(FM1 – 3, AM).
FM
FM1 FM2 FM3
AM
AM
FM
CD
SSM
RND
11
RPT
2
Zoek een station.
AM
SCMMODE
Afstemmen op een station met
een hogere frequentie
Afstemmen op een station met
een lagere frequentie
Wanneer een station wordt ontvangen, stopt
het zoeken.
Druk nogmaals op dezelfde toets wanneer u het
zoeken wilt stoppen voordat op een zender is
afgestemd.
NEDERLANDS
Licht op bij ontvangst van een stereo
FM-uitzending met een redelijk sterk signaal.
ST
De geselecteerde omroepband
wordt weergegeven.
Opmerking:
Deze ontvanger heeft drie FM-banden (FM1,
FM2 en FM3). U kunt elk van deze banden
kiezen om naar FM-stations te luisteren.
7
Page 68

Handmatig naar een station zoeken:
Manual search
1
Selecteer de omroepband
(FM1 – 3, AM).
FM
FM1 FM2 FM3
AM
AM
Opmerking:
Deze ontvanger heeft drie FM-banden (FM1,
FM2 en FM3). U kunt elk van deze banden
kiezen om naar FM-stations te luisteren.
2
Druk op ¢ of op 4 en
houd deze ingedrukt tot de
vermelding “M” (voor “manual”:
NEDERLANDS
handmatig zoeken) op de display
begint te knipperen.
• Als u de toets loslaat, wordt de
handmatige modus na 5 seconden
automatisch uitgeschakeld.
• Als u de toets ingedrukt houdt, blijft de
frequentie veranderen (bij FM steeds met
50 kHz en bij AM—MG/LG steeds met
9 kHz) totdat u de toets loslaat.
Als een FM-stereo-uitzending slecht te
ontvangen is:
MODE
MO
8
toets drukt, gaat de indicator
MO aan of uit.
1 Druk op de toets MODE om
de functiemodus te activeren
terwijl u in stereo naar een
FM-stereo-uitzending luistert.
2 Druk op de toets MO (mono),
terwijl de functiemodus is
geactiveerd, zodat de indicator
MO op de display aangaat.
Elke keer wanneer u op de
De indicator MO (mono)
MO
3
Stem af op het station van uw keuze.
U kunt dit doen zolang de
vermelding “M” (voor “manual”:
handmatig zoeken) op de display
knippert.
Als u wilt afstemmen op een
station dat op een hogere
frequentie uitzendt
Als u wilt afstemmen op een
station dat op een lagere
frequentie uitzendt
8
Als de indicator MO op de display aan is, wordt
het geluid in mono weergegeven en verbetert de
ontvangstkwaliteit.
Page 69

Radiozenders in het geheugen
vastleggen
U kunt één van de volgende twee methoden
gebruiken om de radiozenders in het geheugen
vastteleggen.
• Automatisch vasteleggen van FM-zenders:
SSM (Strong-station Sequential Memory)
• Handmatig vasteleggen van FM en AMzenders
Automatisch vasteleggen van
FM-zenders: SSM
U kunt 6 lokale FM-stations instellen voor elke
FM-golfband (FM1, FM2 en FM3).
1
Selecteer het nummer van de
FM-golfband (FM1 – 3) waarop u
FM-zenders wilt vasteleggen.
FM
FM1 FM2 FM3
2
Druk op beide toetsen en houd ze
langer dan 2 seconden ingedrukt.
Handmatig vastleggen van zenders
U kunt handmatig maximaal 6 zenders voor
iedere golfband (FM1, FM2, FM3 en AM)
vastleggen.
Bijv.: Een FM-zender op 92,5 MHz vastleggen
onder nummer 1 van FM1-golfband.
1
Selecteer het nummer van de
golfband (FM1 – 3, AM) waarop u
zenders wilt vasteleggen (in dit
voorbeeld cijfertoets FM1).
FM
FM1 FM2 FM3
AM
AM
2
Stem af op een zender (in dit
voorbeeld op 92,5 MHz).
Als u wilt afstemmen op een
station dat op een hogere
frequentie uitzendt
Als u wilt afstemmen op een
station dat op een lagere
frequentie uitzendt
NEDERLANDS
SSM
De tekst “SSM” verschijnt op het
afleesvenster en verdwijnt wanneer het
automatisch instellen van radiozenders is
beëindigd.
Lokale FM-zenders met de sterkste signalen
worden opgezocht en automatisch voor de
gekozen golfband (FM1, FM2 of FM3) onder de
cijfertoetsen vastgelegd—nummer 1 (laagste
frequentie) t/m nummer 6 (hoogste frequentie).
De voorkeuzezender die onder cijfertoets 1 is
vastgelegd wordt na het automatisch vastleggen
van de zenders opgeroepen.
VERVOLG, ZIE OMMEZIJDE
9
Page 70

3
Druk op de cijfertoets (in dit
voorbeeld cijfertoets 1) en houd
deze langer dan 2 seconden
ingedrukt.
7
Afstemmen op een
voorkeuzezender
U kunt in een handomdraai afstemmen op een
vastgelegde voorkeuzezender.
Denk eraan dat u de zenders eerst moet
vastleggen! Zie ook de paragraaf “Radiozenders
in het geheugen vastleggen” op bladzijden 9 en
10, als u dat nog niet hebt gedaan.
1
Selecteer de omroepband
(FM1 – 3, AM).
De vermelding “P1” knippert gedurende
enkele seconden op de display.
4
Herhaal bovenstaande procedure
om andere zenders onder andere
nummers op te slaan.
Opmerkingen:
• Een eerder vastgelegde zender wordt gewist
wanneer een hieuwe zender wordt opgeslagen
NEDERLANDS
onder hetzelfde nummer.
• Ingestelde zenders worden gewist wanneer de
spannings toevoer naar het geheugen wordt
onderbroken (bijvoorbeeld bij het vervangen van de
accu). Als dit gebeurt, moeten de zenders opnieuw
worden ingesteld.
FM
FM1 FM2 FM3
AM
AM
2
Selecteer het nummer (1 – 6) van de
gewenste zender.
8
910 127
MO
11
RPT
RND
10
Page 71

GEBRUIK VAN DE CD-SPELER
LOUD
SEL
DISP
MO
7 9 10 12
8
Een CD afspelen
Plaats een CD in de lade.
De apparaat gaat aan,
pakt een CD en begint
automatisch te spelen.
Opmerking over de “One-Touch”-bediening:
Wanneer er al een CD in de CD-lade zit, drukt u op
CD om het apparaat aan te zetten en het afspelen
automatisch te laten beginnen.
De indicator CD-geplaatst knippert.
De indicator CD-geplaatst gaat aan.
FM
CD
SSM
RND
11
RPT
AM
SCMMODE
Opmerking:
Als een CD ondersteboven in de CD-speler wordt
geplaatst, wordt de vermelding “EJECT” op de
display weergegeven en wordt de CD automatisch
uitgeworpen.
Stoppen met afspelen en de CD terug
laten springen
Druk op 0.
De CD wordt niet langer afgespeeld en de CD
springt automatisch terug uit de CD-lade. De
tuner wordt als afspeelbron geselecteerd (het
station waarop als laatste was afgestemd, wordt
ten gehore gebracht).
• De CD-weergave stopt tevens wanneer u van
bron verandert (zonder de CD uit te werpen).
Bij het later weer kiezen van “CD” als bron, zal
de CD-weergave starten vanaf het punt waar u
hiervoor was gestopt.
NEDERLANDS
Totale afspeeltijd
van de CD die in
de CD-lade is
geplaatst
Verstreken afspeeltijd
Totaal aantal
muziekstukken op
de CD die in de
CD-lade is geplaatst
Huidige muziekstuk
Alle muziekstukken worden herhaald afgespeeld
totdat u de weergave stopt.
Opmerkingen:
• Als de teruggesprongen CD niet binnen ongeveer
15 seconden uit de CD-lade wordt verwijderd,
wordt de CD automatisch opnieuw in de CD-lade
geplaatst, zodat hij niet stoffig wordt. (Deze keer
wordt niet automatisch met afspelen begonnen).
• U kunt de CD uit de CD-lade laten springen
wanneer het apparaat is uitgezet.
Haperingen:
De CD kan haperen wanneer u op hobbelige
wegen rijdt. Het apparaat en de CD worden
hierdoor niet beschadigd, maar het is wel storend.
Wij adviseren u om het afspelen te beëindigen
wanneer u op dergelijke wegen rijdt.
11
Page 72

Een muziekstuk of een
bepaald punt op de CD zoeken
Het muziekstuk versneld vooruit afspelen
of achteruit afspelen
Druk tijdens het afspelen van een
CD op ¢ en houd deze toets
ingedrukt om het muziekstuk
versneld vooruit af te spelen.
Druk tijdens het afspelen van een
CD op 4 en houd deze toets
ingedrukt om het muziekstuk
achteruit af te spelen.
Naar het volgende of naar het vorige
fragment gaan
Druk tijdens het afspelen van een
CD kort op ¢ om naar het
begin van het volgende muziekstuk
te gaan.
NEDERLANDS
Telkens wanneer u meerdere
malen op deze toets drukt, wordt
het begin van het volgende
muziekstuk gezocht en afgespeeld.
Druk tijdens het afspelen van een
CD kort op 4 om naar het
begin van het huidige muziekstuk
te gaan.
Telkens wanneer u meerdere
malen op deze toets drukt, wordt
het begin van het vorige
muziekstuk gezocht en afgespeeld.
Afspeelmodus selecteren
Muziekstukken in willekeurige volgorde
afspelen (Random Play)
U kunt alle muziekstukken van de CD in
willekeurige volgorde afspelen.
MODE
12
RND
Met de functie voor Willekeurige weergave van
een disc geactiveerd, lichten de RND indicator
op het display op. De weergave van een
willekeurig gekozen fragment start.
1 Druk op de toets MODE om
de functiemodus te activeren
terwijl u een CD afspeelt.
2 Druk op de toets RND
(random) terwijl de
functiemodus nog is
geactiveerd, zodat de indicator
RND op de display aangaat.
Elke keer wanneer u op deze
toets drukt, de willekeurige
afspeelmodus voor CD’s
worden in- of uitgeschakeld.
De indicator RND
RND
Direct naar een bepaald muziekstuk gaan
Druk op de cijfertoets die bij een bepaald
muziekstuk hoort, om het afspelen van dat
muziekstuk te laten beginnen.
8
• Om een muziekstuk met nummer 1 – 6
te selecteren:
Druk kort op 1 (7) – 6 (12).
• Om een muziekstuk met nummer 7 – 12
te selecteren:
Druk op 1 (7) – 6 (12) en houd de cijfertoets
langer dan 1 seconde ingedrukt.
910 127
MO
12
11
RPT
RND
Page 73

Muziekstukken meerdere keren afspelen
(Repeat Play)
U kunt het huidige muziekstuk meerdere keren
afspelen.
MODE
11
RPT
toets drukt, de herhaald
afspeelmodus voor CD’s
worden in- of uitgeschakeld.
1 Druk op de toets MODE om
de functiemodus te activeren
terwijl u een CD afspeelt.
2 Druk op de toets RPT (repeat)
terwijl de functiemodus nog is
geactiveerd, zodat de indicator
RPT op de display aangaat.
Elke keer wanneer u op deze
De indicator RPT
RPT
Voorkomen dat de CD
terugspringt
U kunt voorkomen dat de CD uit de lade springt
door deze in de lade te vergrendelen.
Druk op de CD en tegelijkertijd minste
2 seconden op de 0.
CD
De vermelding “EJECT” knippert gedurende 5
seconden op de display. De CD is nu
vergrendeld en kan niet meer uit de CD-lade
terugspringen.
Nummer van het muziekstuk
dat wordt afgespeeld
Met de functie voor herhaalde weergave
geactiveerd, lichten de RPT indicator op het
display op. Het huidige fragment wordt herhaald
afgespeeld.
Voor het annuleren van de vergrendeling
en verwijderen van de CD
Druk op CD en houd tegelijkertijd 0 nogmaal
langer dan 2 seconden ingedrukt.
Op het display verschijnt de tekst “EJECT” en de
CD springt terug uit de CD-lade.
De indicator CD-geplaatst knippert.
NEDERLANDS
13
Page 74

GELUID REGELEN
Geluid aanpassen
U kunt de geluidskarakteristieken naar wens
instellen.
1
Selecteer de functie die u wilt
aanpassen.
SEL
Indicatie Doel: Bereik
BAS Bastonen –06 (min.)
TRE Treble –06 (min.)
NEDERLANDS
FAD* Evenwicht tussen R06 (Allen
BAL Evenwicht tussen L06 (Allen links)
VOL Het volume 00 (min.)
Elke keer wanneer u op deze
toets drukt, wordt de
aanpasbare tijd als volgt
gewijzigd:
BAS
(bas)
(volume)
aanpassen. |
aanpassen. |
voor- en achterin)
achterspeakers |
aanpassen. F06 (Allen
linker- en |
rechterspeaker R06 (Allen
aanpassen. rechts)
aanpassen. |
VOL
TRE
(treble)
(faden)
BAL
(balans)
+06 (max.)
+06 (max.)
voorin)
50 (max.)
FAD
2
Pas het niveau aan.
Het niveau verhogen
Het niveau verlagen
Bijv.: Als u “TRE” (treble) aanpast
Opmerking:
Normaal gesproken werken de toetsen + en – als
volumeregelaars. U hoeft “VOL” dus niet te
selecteren als u het geluidsniveau wilt aanpassen.
LOUD in-/uitschakelen
Het menselijke oor is bij lage volumes minder
gevoelig voor lage en hoge frequenties.
Met LOUD worden deze frequenties versterkt,
waardoor er ook bij lage geluidsniveaus een
evenwichtig geluid kan worden geproduceerd.
LOUD
Elke keer wanneer u op LOUD
drukt, wordt deze functie
afwisselend in- en
uitgeschakeld.
De toets LOUD (loudness)
* Als u een systeem met twee speakers gebruikt moet
u FAD op “00” zetten.
14
Page 75

Werken met aangepaste
geluidsmodi (SCM)
U kunt voor elke afspeelbron een aangepaste
geluidsmodus selecteren en vastleggen. Dit is
mogelijk dankzij de voorziening met de naam
“Advanced SCM (Sound Control Memory)”.
De geluidsmodi selecteren en opslaan
Als u een geluidsmodus hebt geselecteerd,
wordt deze in het geheugen opgeslagen en
steeds opnieuw opgeroepen wanneer u dezelfde
afspeelbron selecteert. De geluidsmodus wordt
dan tevens op de display weergegeven.
Voor elk van de volgende geluidsbronnen kan
een geluidsmodus worden opgeslagen
—FM1, FM2, FM3, AM en CD.
• Als u de geluidsmodus van uw keuze niet voor
elke geluidsbron apart wilt instellen, maar wel
elke geluidsbron dezelfde geluidsmodus wilt
toekennen, verwijzen we u naar de instructies
in de paragraaf “Advanced SCM annuleren
—SCM LINK” op bladzijde 17.
De geluidsmodus van uw keuze
selecteren.
SCM
Elke keer wanneer u op de
toets drukt, verandert de
geluidsmodus en wel als volgt:
Indicatie Voor: Vooraf ingestelde
waarden
BAS TRE LOUD
SCM OFF (Vlak geluid) 00 00 ON
BEAT Rock- of +02 00 ON
SOFT Rustige +01 –03 OFF
POP Lichte muziek +04 +01 OFF
discoritme
achtergrondmuziek
De geluidsmodi oproepen
Als voor “SCM LINK” de instelling
“LINK ON”, selecteer de afspeelbron.
FM
CD
AM
De geluidsmodus die voor de geselecteerde
afspeelbron in het geheugen ligt opgeslagen
wordt opgeroepen.
Elke keer wanneer u een
andere afspeelbron selecteert,
gaat de SCM-indicator op de
display knipperen.
SCM
NEDERLANDS
SCM OFF
SCM
Bijv.: Als u “BEAT” aanpast
• Als voor “SCM LINK” de instelling “LINK ON” is
geselecteerd, kan de geselecteerde
geluidsmodus voor de huidige afspeelbron in
het geheugen worden opgeslagen en zal het
effect alleen op de huidige afspeelbron van
toepassing zijn.
• Als voor “SCM LINK” de instelling “LINK OFF”
is geselecteerd, is de geselecteerde
afspeelmodus op elke afspeelbron van
toepassing.
BEAT
SOFT
POP
Opmerkingen:
• U kunt de vooraf ingestelde geluidsweergave
wijzigen en in het geheugen opslaan.
Meer bijzonderheden over het aanpassen en
opslaan van uw eigen geluidsinstellingen treft u aan
in de paragraaf “Geluidsweergave aanpassen en
opslaan” op bladzijde 16.
• Als u de versterkingsfactor voor de hoge of lage
tonen wilt aanpassen of de geluidsterktefunctie
tijdelijk wilt uitschakelen, verwijzen we u naar de
instructies op bladzijde 14. (De aanpassingen die u
hebt aangebracht, worden geannuleerd zodra u een
andere geluidsbron selecteert).
15
Page 76

Geluidsweergave aanpassen
en opslaan
Het is mogelijk om de geluidskarakteristieken
(BEAT, SOFT, POP) aan uw eigen wensen aan
te passen en in het geheugen op te slaan.
• Voor het uitvoeren van de onderstaande
stappen geldt een tijdslimiet. Als de procedure
wordt afgebroken voordat u deze hebt voltooid,
moet u opnieuw bij stap 1 beginnen.
1
Roep de geluidsweergave op die u
wilt aanpassen.
SCM
• Zie bladzijde 15 voor meer
informatie.
3
Herhaal stap 2 als u nog andere
items wilt aanpassen.
4
Druk op SCM en houd deze
ingedrukt tot de in stap
geluidsmodus op de display
knippert.
SCM
SCM
De wijziging van de
geselecteerde
geluidsbesturingsmodus wordt
nu in het geheugen
opgeslagen.
1
gekozen
SCM
Bijv.: Als u “SOFT” aanpast
NEDERLANDS
2
Kies bas of treble als u het niveau
van de bas of treble wilt aanpassen.
1 Selecteer de vermelding “BAS” (bas) of
“TRE” (treble).
SEL
Bijv.: Als u “TRE” (treble) aanpast
2 Pas het niveau aan.
5
Herhaal deze procedure als u andere
geluidsmodi wilt opslaan.
De fabrieksinstellingen herstellen, herhaal de
procedure en ken de fabrieksinstellingen toe. U
vind deze in de tabel op bladzijde 15.
16
Of schakel loud in of uit.
LOUD
• Zie bladzijde 14 voor
meer informatie.
Page 77

ANDERE HOOFDFUNCTIES
Een niveauweergave
selecteren—LEVEL
U kunt zelf bepalen welk niveau u in de display
weergegeven wilt hebben.
De standaardinstellingen van de eenheid bij het
verlaten van de fabriek is “VOL 2”.
• VOL 1: Toont de volumeniveau-indicator.
• VOL 2: Geeft de instelling van “VOL 1” en het
• OFF: Wist de volumeniveau-indicator.
1
2
3
verlichte display weer.
Druk op SEL (selecteren) in en houd
deze ten minste 2 seconden
ingedrukt.
“CLOCK H”, “CLOCK M”, “SCM LINK” of
“LEVEL” verschijnt op de display.
SEL
Selecteer de vermelding “LEVEL”,
als deze niet al meteen op de
display wordt weergegeven.
CLOCK H CLOCK M
LEVEL SCM LINK
Selecteer de gewenste modus—
“VOL 1”, “VOL 2” of “OFF”.
Advanced SCM annuleren
—SCM LINK
Het is mogelijk om de voorziening Advanced SCM
(Sound Control Memory) te annuleren en de
aangebrachte koppeling tussen de geluidsmodi en
afspeelbronnen weer op te heffen.
Standaard kan voor elke afspeelbron een eigen,
aangepaste geluidsmodus in het geheugen
worden opgeslagen. In de praktijk kunt u dus een
andere geluidsmodus te horen krijgen als u een
andere afspeelbron selecteert.
•
LINK ON: De voorziening Advanced SCM is
•
LINK OFF: De voorziening Advanced SCM is
1
2
ingeschakeld (voor elke afspeelbron
een andere geluidsmodus).
uitgeschakeld (voor elke afspeelbron
geldt een en dezelfde geluidsbron).
Druk op SEL (selecteren) in en houd
deze ten minste 2 seconden
ingedrukt.
“CLOCK H”, “CLOCK M”, “SCM LINK” of
“LEVEL” verschijnt op de display.
SEL
Selecteer de vermelding
“SCM LINK”, als deze niet op de
display wordt weergegeven.
CLOCK H CLOCK M
LEVEL SCM LINK
NEDERLANDS
4
Voltooi de instelling.
SEL
OFF
3
VOL 2VOL 1
Selecteer “LINK OFF”.
4
Voltooi de instelling.
SEL
Voor het activeren van Advanced SCM
(Sound Control Memory), herhaalt u dezelfde
handelingen en drukt u op + om “LINK ON” in
stap 3 te kiezen.
17
Page 78

Bedieningspaneel verwijderen
U kunt het bedieningspaneel verwijderen,
wanneer u uit de auto stapt.
U moet het bedieningspaneel voorzichtig
verwijderen en weer op zijn plaats bevestigen,
zodat de connectors op de achterkant van het
bedieningspaneel en de houder van het
bedieningspaneel niet worden beschadigd.
Hoe moet u het bedieningspaneel
verwijderen?
Voordat u het bedieningspaneel verwijdert, moet
u er zeker van zijn dat de spanning is
uitgeschakeld.
1
Ontgrendel het bedieningspaneel.
NEDERLANDS
2
Druk het bedieningspaneel miets
omhoog en trek tegelijkertijd naar u
toe van het apparaat.
Hoe moet u het bedieningspaneel
weer op zijn plaats bevestigen?
1
Stop de linkerkant van het
bedieningspaneel in de uitsparing
op de houder.
2
Druk op de rechterkant van het
bedieningspaneel totdat dit in de
houder vastzit.
Opmerking over het reinigen van de connectors:
Als u het bedieningspaneel vaak verwijdert, zullen
de connectors op een gegeven moment minder
goed gaan functioneren.
Om deze mogelijkheid tot het minimum te
beperken, moet u de connectors van tijd tot tijd
met een met alcohol bevochtigde katoenen doek
schoonmaken. Zorg ervoor dat u de connectors
daarbij niet beschadigt.
18
3
Stop het losgemaakte
bedieningspaneel in het daarvoor
bestemde doosje.
Connectors
Page 79

PROBLEMEN OPLOSSEN
Een probleem hoeft niet altijd ernstig te zijn. Voordat u hulp inroept van een dienstverlenende
instantie, moet u eerst de volgende punten controleren.
Symptomen
• Er komt geen geluid uit de
speakers.
• Het apparaat werkt
helemaal niet.
Algemeen
• Automatisch instellen van
zenders—SSM (Strongstation Sequential Memory)
—functioneert niet.
FM/AM
• U hoort ruis terwijl u naar
de radio luister.
• De CD wordt automatisch
uitgeworpen.
• CD-R kan niet worden
afgespeeld.
• Overslaan van
muziekstukken van de
CD-R is niet mogelijk.
• CD kan niet worden
afgespeeld en springt niet
terug.
CD-weergave
• Geluid van de CD wordt
soms onderbroken.
• Op het afleesvenster
verschijnt de tekst “NO
DISC”.
Oorzaken
Het volume is ingesteld op het
minimale niveau.
Verkeerde verbindingen.
De ingebouwde
microprocessor functioneert
mogelijk niet juist vanwege
interferentie, enz.
De signalen zijn te zwak.
De antenne zit niet goed vast.
CD zit ondersteboven in het
apparaat.
De CD-R is niet afgerond
(“finalized”).
De CD is vergrendeld.
De CD-speler functioneert
mogelijk niet juist.
U rijdt op een hobbelige weg.
Er zitten krassen op de CD.
Verkeerde verbindingen.
Er is geen CD geplaats.
De CD is verkeerd geplaatst.
Oplossingen
Pas het geluid aan totdat het
optimale niveau is bereikt.
Controleer de bedrading en de
verbindingen.
Houd SEL (selecteren)
ingedrukt en druk tegelijkertijd
langer dan 2 seconden op
(standby/aan
attenuator) om het toestel terug
te stellen. (De instelling voor de
klok en de voorkeurzenders
worden uit het geheugen
gewist). (Zie bladzijde 2).
Leg de zenders handmatig vast.
Zorg dat de antenne stevig vast
zit.
Plaats de CD op de juiste
manier in CD-lade.
• Plaats een afgeronde CD-R.
• Rond de CD-R met de voor
opname gebruikte apparatuur
af.
Ontgrendel de CD. (Zie
bladzijde 13).
Houd (standby/aan
attenuator) ingedrukt en druk
tegelijkertijd langer dan 2
seconden op 0 (uitwerpen).
Wees voorzichtig bij het
uitwerpen zodat de CD niet valt.
Stop met afspelen op hobbelige
wegen.
Gebruik een andere CD.
Controleer de bedrading en de
verbindingen.
Plaats een CD in de lade.
Plaats de CD juist.
NEDERLANDS
19
Page 80

ONDERHOUD
Omgaan met discs
Dit apparaat is gemaakt om CD’s en CD-R’s
(opneembare discs) af te spelen.
• Er kunnen geen MP3 discs op dit apparaat
worden afgespeeld.
De manier waarop u met discs moet omgaan
Wanneer u een disc
uit het opbergdoosje
haalt, moet u het rondje in het
midden van de doos naar
beneden duwen en de disc uit het
doosje halen terwijl u de disc aan
de rand vasthoudt.
• Houd de disc altijd aan de randen vast. Raak
de opnamekant niet aan.
Wanneer u de disc wilt opbergen, leg deze
dan voorzichtig om het rondje in het midden (met
de bedrukte kant boven).
• Berg de discs na gebruik altijd op in het doosje.
Discs schoonhouden
Het geluid wordt niet goed
NEDERLANDS
weergegeven indien de disc vuil is.
Als een disc vuil is, moet u deze
reinigen met een zachte doek.
Veeg in een rechte lijn van het
midden naar de rand de disc schoon.
Nieuwe discs afspelen
Sommige nieuwe discs hebben
oneffenheden langs de binnenof buitenrand. Dergelijke discs
worden mogelijk door het apparaat
geweigerd.
U kunt deze oneffenheden verwijderen door de
randen glad te wrijven met een potlood, ballpoint
enz.
Condensvorming
In onderstaande gevallen kan zich condens
vormen op de lens in de discspeler:
• Nadat de verwarming in de auto is aangezet.
• Wanneer het erg vochtig wordt in de auto.
Soms zal de discspeler hierdoor niet meer juist
werken. In dat geval moet u de disc uit de
disclade halen en moet u het apparaat een paar
uur aan laten staan totdat het vocht is verdampt.
Rondje in het midden
Voor het afspelen van een CD-R
Alvorens een CD-R af te spelen, moet u de bij de
disc geleverde aanwijzingen goed doorlezen.
• Gebruik uitsluitend “afgeronde” CD-R’s.
• Bepaalde CD-R’s kunnen vanwege de
disckarakteristieken en de volgende redenen
mogelijk niet worden afgespeeld:
– Indien de disc vuil is of krassen heeft.
– Indien er condens op de lens in het toestel is
gevormd.
– Indien de aftastlens in het toestel vuil is.
• CD-R’s worden mogelijk beschadigd door hoge
temperaturen of een hoge vochtigheidsgraad.
Laat ze derhalve niet in de auto liggen.
• Gebruik niet de volgende CD-R’s en:
– Discs met stickers, labels of beschermvellen
die op de disc zijn geplakt.
– Discs waarop labels direct met een ink jet
printer kunnen worden gedrukt.
Het gebruik van dergelijke discs bij hoge
temperaturen of een hoge vochtigheidsgraad
kan een onjuiste werking veroorzaken of zelfs
de discs beschadigen. Bijvoorbeeld:
– Stickers of labels kunnen krimpen waardoor
de disc krom trekt.
– Stickers of labels kunnen half los raken
waardoor de disc niet meer kan worden
uitgeworpen.
– De afdruk op disc kan plakkering worden.
Lees de aanwijzingen en waarschuwingen
over labels en te bedrukken discs beslist goed.
• CD-RW’s (herschrijfbare discs) kunnen niet
met dit apparaat worden afgespeeld.
LET OP!
• Plaats geen 8-cm discs (single CD’s) in de
disclade. (Deze discs kunnen niet worden
uitgeworpen).
• Plaats geen discs met afwijkende vorm
(bijvoorbeeld hartvormig) in de disclade;
dergelijke discs veroorzaken problemen.
• Stel discs niet bloot aan direct zonlicht of een
andere warmtebron en leg ze niet neer op
plaatsen waar het zeer warm of vochtig is.
• Gebruik geen oplosmiddelen (zoals
reinigingsmiddelen voor gewone platen, spray,
verdunningsmiddelen, wasbenzine, enz.) om
discs te reinigen.
Kromgetrokken
disc
20
Sticker
Resterend
plakmiddel
Disc
Opplakbaar
label
Page 81

SPECIFICATIES
GELUIDSVERSTERKER
Maximum uitgangsvermogen:
Voorin: 45 W per kanaal
Achterin: 45 W per kanaal
Ononderbroken uitgangsvermogen (RMS):
Voorin: 17 W per kanaal in 4 Ω, 40 Hz tot
20 000 Hz met niet meer dan
0,8% totale harmonische
vervorming van het geluid.
Achterin: 17 W per kanaal in 4 Ω, 40 Hz tot
20 000 Hz met niet meer dan
0,8% totale harmonische
vervorming van het geluid.
Belastingsimpedantie: 4 Ω (speling 4 Ω tot 8 Ω)
Regelbereik tonen:
Bas: ±10 dB bij 100 Hz
Treble: ±10 dB bij 10 kHz
Weergavekarakteristiek: 40 Hz tot 20 000 Hz
Signaal/ruisverhouding: 70 dB
Uitgangsvermogen/Impedantie:
2,0 V/20 kΩ belasting (maximaal vermogen)
Uitgangsimpedantie: 1 kΩ
RADIO
Frequentiebereik:
FM: 87,5 MHz tot 108,0 MHz
AM: (MG) 522 kHz tot 1 620 kHz
(LG) 144 kHz tot 279 kHz
CD-SPELER
Type: CD-speler
Signaaldetectiesysteem: Pickup-lens
(halfgeleider-laser)
Aantal kanalen: 2 kanalen (stereo)
Weergavekarakteristiek: 5 Hz tot 20 000 Hz
Dynamisch vermogen: 90 dB
Signaal/ruisverhouding: 95 dB
Zweving: Minder dan de meetbare limiet
ALGEMEEN
Voeding:
Werkspanning: Gelijkstroom DC 14,4 V
(speling 11 V tot 16 V)
Aardingssysteem: Negatieve aarding
Bedrijfstemperatuur: 0°C tot +40°C
Afmetingen (breedte × hoogte × diepte):
Afmetingen apparaat
(ten behoeve van installatie)
(bij benadering):
182 mm × 52 mm × 150 mm
Afmetingen paneel (bij benadering):
188 mm × 58 mm × 11 mm
Gewicht (bij benadering):
1,3 kg (excl. accessoires)
NEDERLANDS
[FM-zenders]
Gevoeligheid bij normaal bedrijf:
11,3 dBf (1,0 µV/75 Ω)
Gevoeligheid bij 50 dB geluidsdemping:
16,3 dBf (1,8 µV/75 Ω)
Selectiviteit alternatief kanaal (400 kHz):
65 dB
Weergavekarakteristiek: 40 Hz tot 15 000 Hz
Stereo-scheiding: 30 dB
Vangbereik: 1,5 dB
[MG-zenders]
Gevoeligheid: 20 µV
Selectiviteit: 35 dB
[LG-zenders]
Gevoeligheid: 50 µV
Ontwerp en specificaties kunnen zonder kennisgeving
worden gewijzigd.
21
Page 82

Having TROUBLE with operation?
Please reset your unit
Refer to page of How to reset your unit
Haben Sie PROBLEME mit dem Betrieb?
Bitte setzen Sie Ihr Gerät zurück
Siehe Seite Zurücksetzen des Geräts
Vous avez des PROBLÈMES de fonctionnement?
Réinitialisez votre appareil
Référez-vous à la page intitulée Comment réinitialiser votre appareil
Hebt u PROBLEMEN met de bediening?
Stel het apparaat terug
Zie de pagina met de paragraaf Het apparaat terugstellen
EN, GE, FR, NL
© 2003 VICTOR COMPANY OF JAPAN, LIMITED
0903KKSMDTJEIN
 Loading...