

Page 1
CD RECEIVER
RECEPTOR CON CD
RECEPTEUR CD
CD RECE∑VER
KD-S6060
COMPACT
DIGITAL AUDIO
ENGLISH
ESPAÑOL
FRANÇAIS
LOUD
SEL
DISP
MO
8
7 9 10 12
11
RPT
RND
FM
CD
SSM
AM
SCMMODE
TÜRKÇE
For installation and connections, refer to the separate manual.
Para la instalación y las conexiones, refiérase al manual separado.
Pour l’installation et les raccordements, se référer au manuel séparé.
Montaj ve ba∂lantΩlar için di∂er elkitabΩna bakΩn.
INSTRUCTIONS
MANUAL DE INSTRUCCIONES
MANUEL D’INSTRUCTIONS
TAL∑MATLAR
GET0173-004A
[EU]
Page 2
IMPORTANT FOR LASER PRODUCTS
1. CLASS 1 LASER PRODUCT
2. CAUTION: Do not open the top cover. There are no user serviceable parts inside the unit; leave all
servicing to qualified service personnel.
ENGLISH
3. CAUTION: Visible and invisible laser radiation when open and interlock failed or defeated. Avoid
direct exposure to beam.
4. REPRODUCTION OF LABEL: CAUTION LABEL, PLACED OUTSIDE THE UNIT.
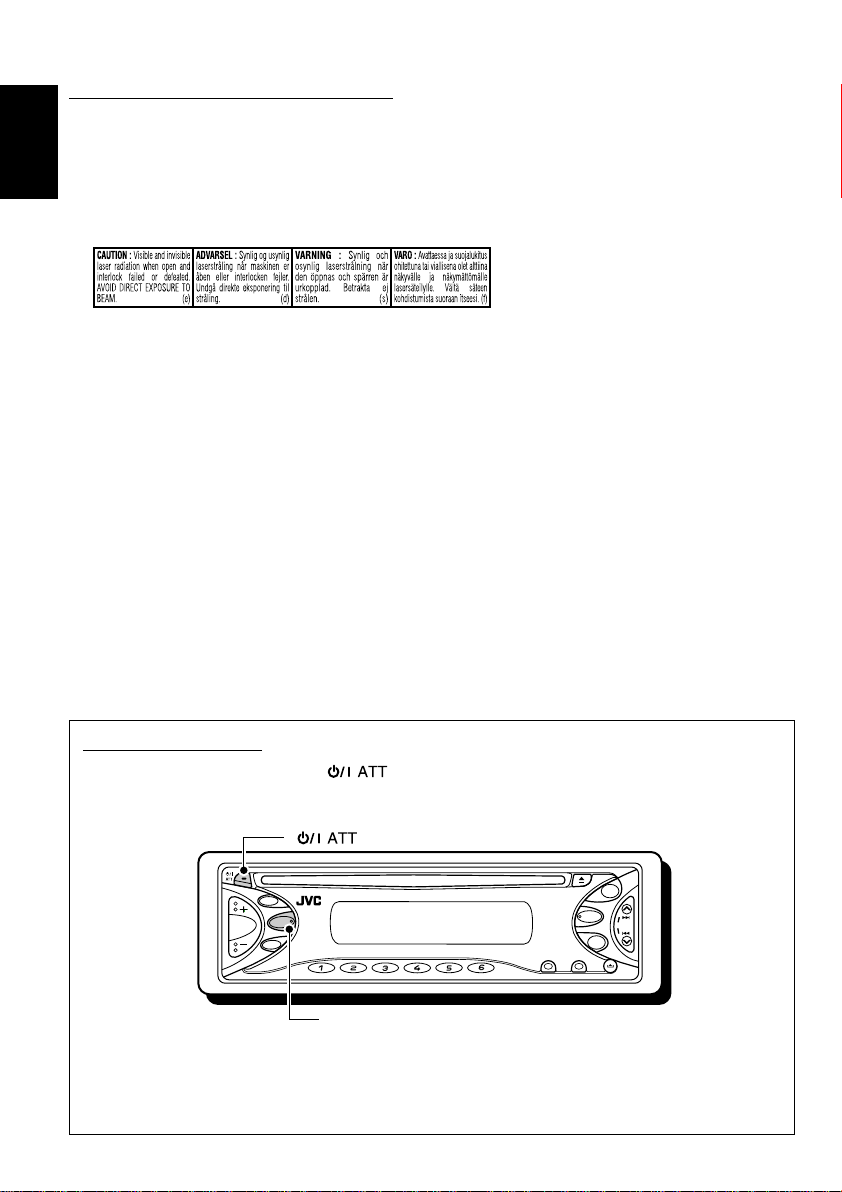
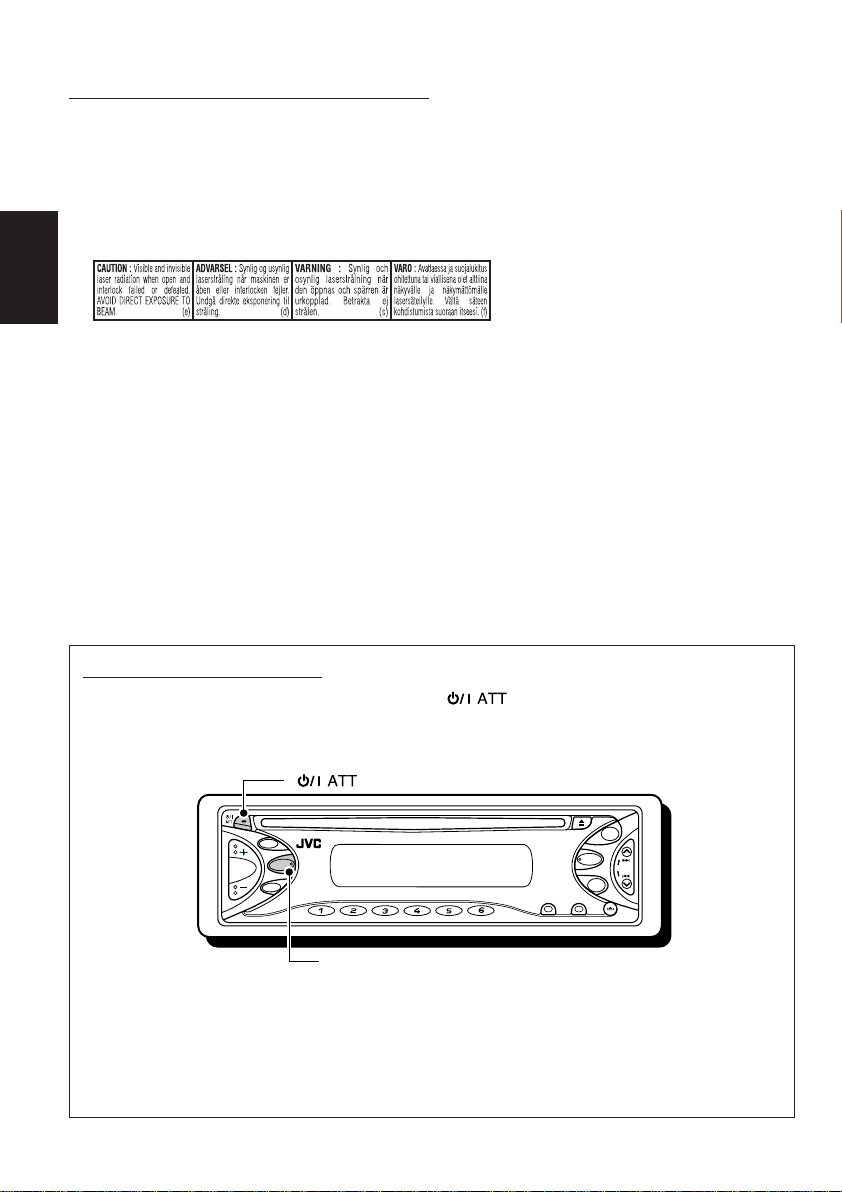
How to reset your unit
While holding SEL (select), press (standby/on attenuator) for more than 2 seconds.
This will reset the built-in microcomputer.
(standby/on attenuator)
LOUD
SEL
DISP
MO
7 9 10 12
8
11
RPT
RND
SEL (select)
Notes:
• Your preset adjustments—such as preset channels or sound adjustments—will also be erased.
• If a CD is in the unit, it will eject when you reset the unit. Be careful not to drop the CD.
2
FM
CD
SSM
AM
SCMMODE
Page 3
Thank you for purchasing a JVC product. Please read all instructions carefully before operation,
to ensure your complete understanding and to obtain the best possible performance from the unit.
CONTENTS
How to reset your unit ............................... 2
How to use the MODE button ................... 3
LOCATION OF THE BUTTONS ............ 4
Control panel ............................................. 4
BASIC OPERATIONS ....................... 5
Turning on the power ................................ 5
Setting the clock ........................................ 6
RADIO OPERATIONS ...................... 7
Listening to the radio ................................. 7
Storing stations in memory ....................... 9
Tuning in to a preset station ...................... 10
CD OPERATIONS ........................... 11
Playing a CD ............................................. 11
Locating a track or a particular portion
on a CD .................................................. 12
Selecting CD playback modes .................. 12
Prohibiting CD ejection ............................. 13
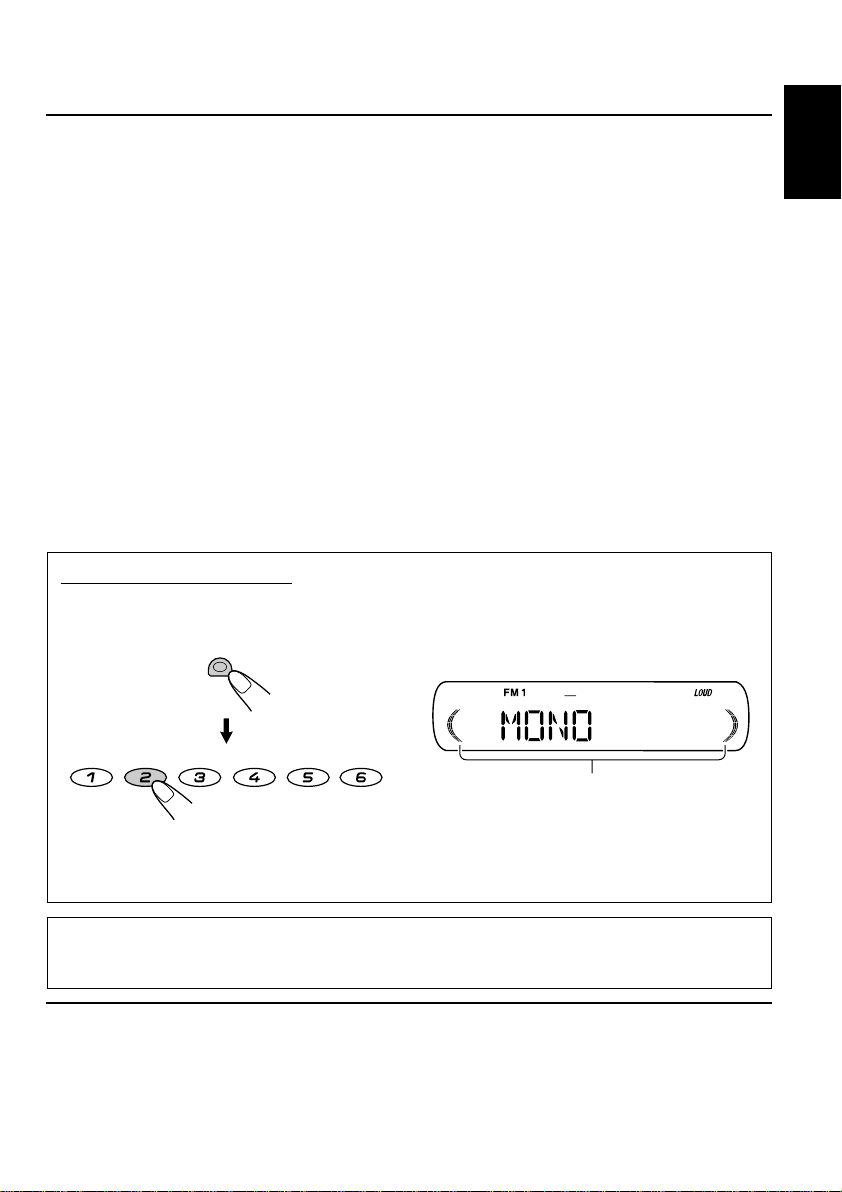
How to use the MODE button
If you press MODE, the unit goes into functions mode and the number buttons work as different
function buttons.
MODE
SOUND ADJUSTMENTS ................... 14
Adjusting the sound .................................. 14
Turning on/off the loudness function ......... 14
Using the sound control memory (SCM) ... 15
Storing your own sound adjustments ........ 16
OTHER MAIN FUNCTIONS ................ 17
Selecting the level display—LEVEL .......... 17
Canceling Advanced SCM—SCM LINK ... 17
Detaching the control panel ...................... 18
TROUBLESHOOTING ...................... 19
MAINTENANCE ............................. 20
Handling discs ........................................... 20
SPECIFICATIONS........................... 21
ENGLISH
MO
8
To use these buttons as number buttons again after pressing MODE, wait for 5 seconds
without pressing any number button until the functions mode is cleared.
• Pressing MODE again also clears the functions mode.
910 127
MO
11
RPT
RND
Time countdown indicator
Note:
For security reasons, a numbered ID card is provided with this unit, and the same ID number is imprinted on
the unit’s chassis. Keep the card in a safe place, as it will help the authorities to identify your unit if stolen.
BEFORE USE
*
For safety....
• Do not raise the volume level too much, as this will
block outside sounds, making driving dangerous.
• Stop the car before performing any complicated
operations.
*
Temperature inside the car....
If you have parked the car for a long time in hot or
cold weather, wait until the temperature in the car
becomes normal before operating the unit.
3
Page 4
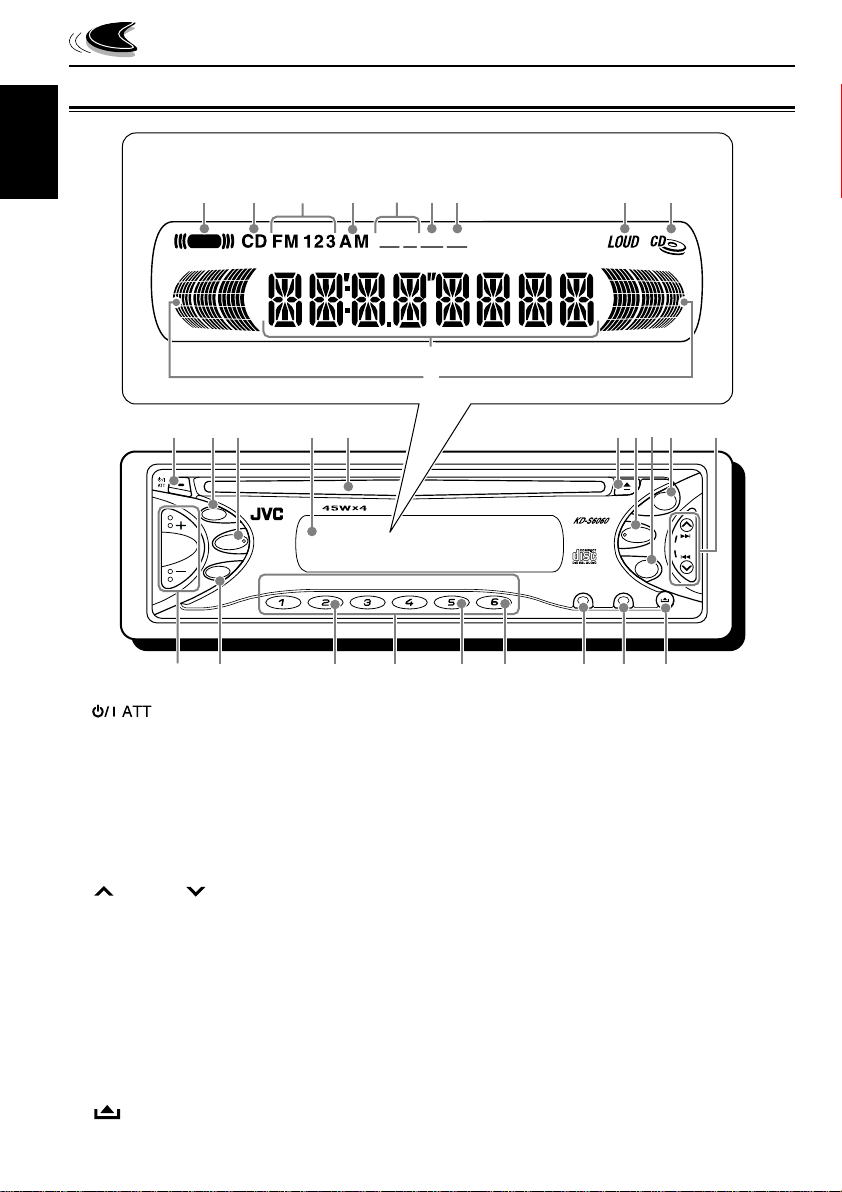
Control panel
ENGLISH
LOCATION OF THE BUTTONS
Display window
;dga
SCM
s
f
MO
h
ST RND RPT
l
/
j
k
1
q
2
LOUD
3
SEL
DISP
7 9 10 12
w
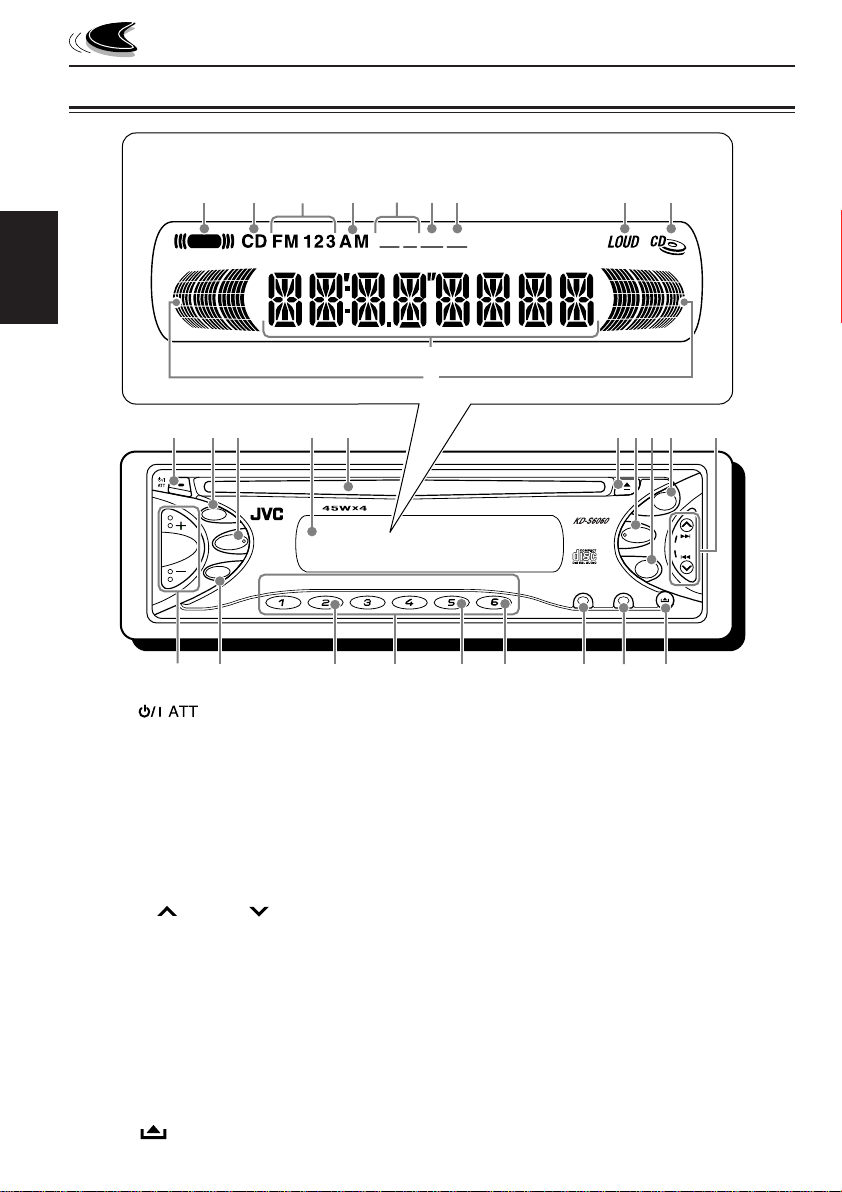
1 (standby/on attenuator) button
2 LOUD (loudness) button
3 SEL (select) button
4 Display window
5 Loading slot
6 0 (eject) button
7 CD button
8 AM button
9 FM button
p ¢/4 buttons
• Also functions as SSM buttons when pressed
together.
q +/– buttons
w DISP (display) button
e MO (monaural) button
r Number buttons
t RPT (repeat) button
y RND (random) button
u MODE button
i SCM (sound control memory) button
o (control panel release) button
4
7
69
54
MO
8
e
RND
11
RPT
tyr
ui
8
CD
AM
SCMMODE
p
FM
SSM
o
Display window
; SCM (sound control memory) indicator
a CD source indicator
s FM band indicators (FM1, FM2, FM3)
d AM band indicator
f Tuner reception indicators
MO (monaural), ST (stereo)
g RND (random) indicator
h RPT (repeat) indicator
j LOUD (loudness) indicator
k CD–in indicator
l Main display
/ Volume level indicator
Page 5
BASIC OPERATIONS
LOUD
SEL
DISP
123
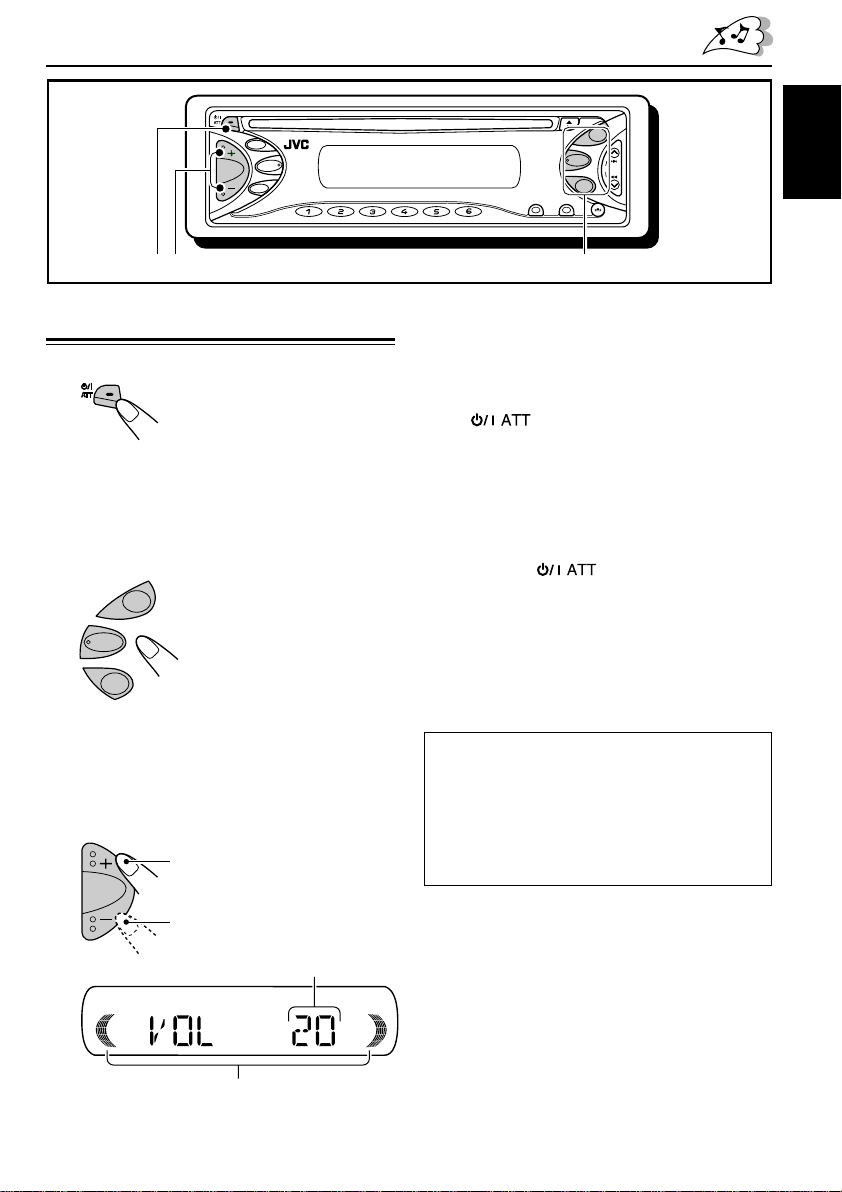
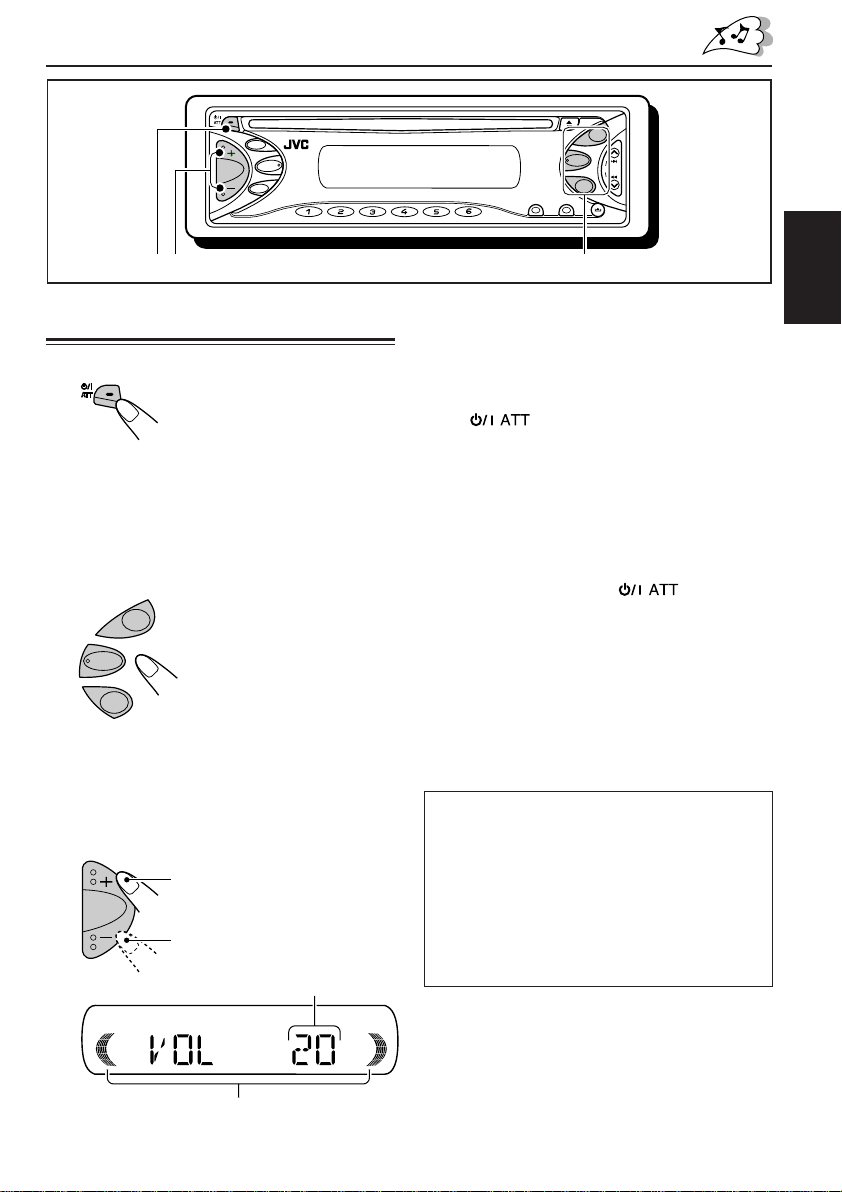
Turning on the power
1
Turn on the power.
Note on One-Touch Operation:
When you select a source in step 2 below, the
power automatically comes on. You do not have
to press this button to turn on the power.
2
Select the source.
FM
CD
AM
To operate the tuner (FM or AM),
see pages 7 – 10.
To play a CD,
see pages 11 – 13.
3
Adjust the volume.
To increase the volume
MO
8
7 9 10 12
11
RPT
4
To drop the volume in a moment
Press briefly while listening to any
source. “AT T ” starts flashing on the display, and
the volume level will drop in a moment.
To resume the previous volume level, press the
button briefly again.
To turn off the power
Press and hold for more than one
second.
“SEE YOU” appears, then the unit turns off.
• If you turn off the power while listening to a
CD, CD play will start from where playback has
been stopped previously, next time you turn on
the power.
CAUTION on Volume Setting:
CDs produce very little noise compared with other
sources. If the volume level is adjusted for the
tuner, for example, the speakers may be damaged
by the sudden increase in the output level.
Therefore, lower the volume before playing a CD
and adjust it as required during playback.
FM
CD
SSM
RND
AM
SCMMODE
Adjust the sound as you want.
(See pages 14 – 16.)
ENGLISH
To decrease the volume
Volume level appears.
Volume level indicator (see page 17)
5
Page 6
ENGLISH
DISP
ClockFrequency
LOUD
SEL
DISP
7 9 10 12
FM
CD
SSM
MO
8
RND
11
RPT
AM
SCMMODE
Setting the clock
1
Press and hold SEL (select) for more
than 2 seconds.
“CLOCK H,” “CLOCK M,” “SCM LINK,” or
“LEVEL” appears on the display.
SEL
2
Set the hour.
1 Select “CLOCK H” (hour) if not shown on
the display.
CLOCK H CLOCK M
LEVEL SCM LINK
2 Adjust the hour.
2 Adjust the minute.
4
Finish the setting.
SEL
To check the current clock time or change the
display mode
Press DISP (display) repeatedly.
Each time you press the
button, the display mode
changes as follows:
• During tuner operation:
• During CD operation:
ClockElapsed playing time
3
Set the minute.
1 Select “CLOCK M” (minute).
6
CLOCK H CLOCK M
LEVEL SCM LINK
• During power off:
The power turns on and the clock time is
shown for 5 seconds, then the power turns
off.
Page 7
RADIO OPERATIONS
LOUD
SEL
DISP
MO
8
7 9 10 12
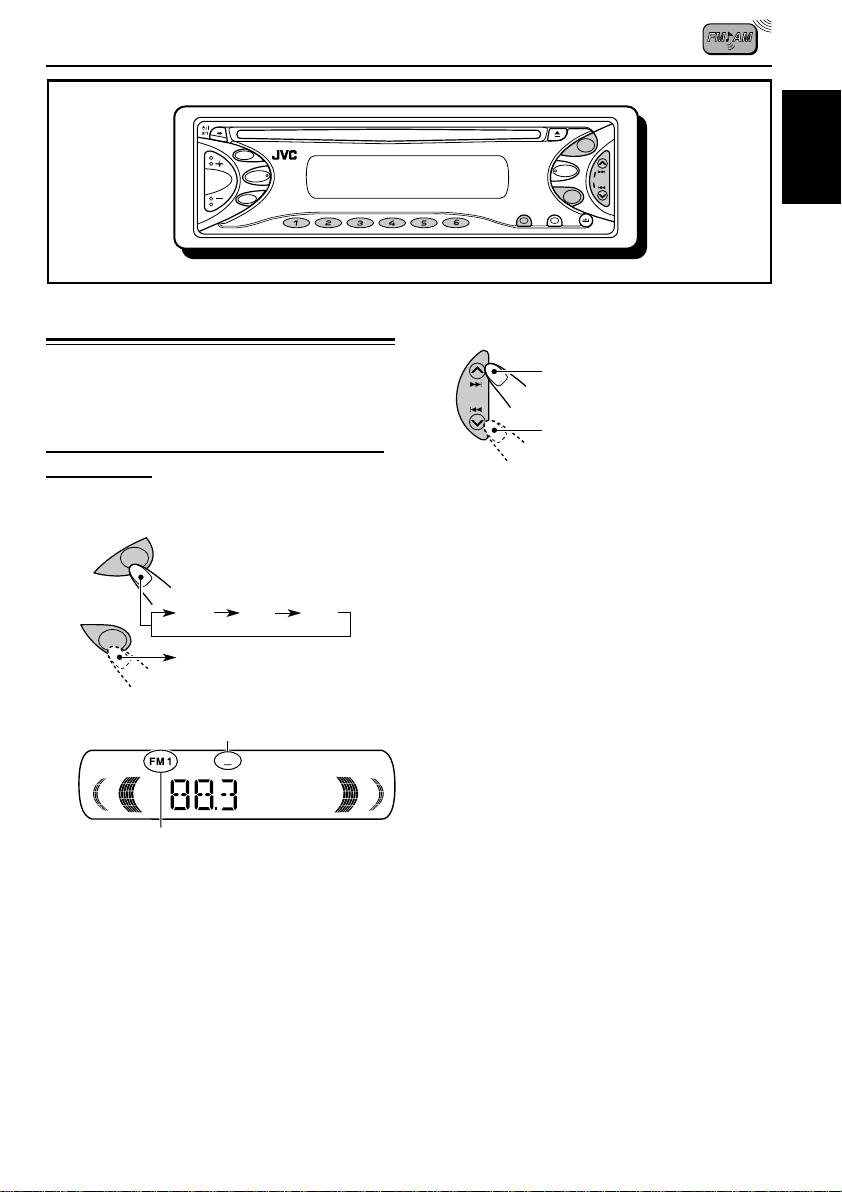
Listening to the radio
You can use either automatic searching or
manual searching to tune in to a particular
station.
Searching for a station automatically:
Auto search
1
Select the band (FM1 – 3, AM).
FM
FM1 FM2 FM3
AM
AM
Lights up when receiving an FM stereo
broadcast with sufficient signal strength.
ST
FM
CD
SSM
RND
11
RPT
2
Start searching for a station.
AM
SCMMODE
To search for stations of higher
frequencies
To search for stations of lower
frequencies
When a station is received, searching stops.
To stop searching before a station is
received, press the same button you have
pressed for searching.
ENGLISH
Selected band appears.
Note:
This receiver has three FM bands (FM1, FM2,
FM3). You can use any one of them to listen to
an FM broadcast.
7
Page 8
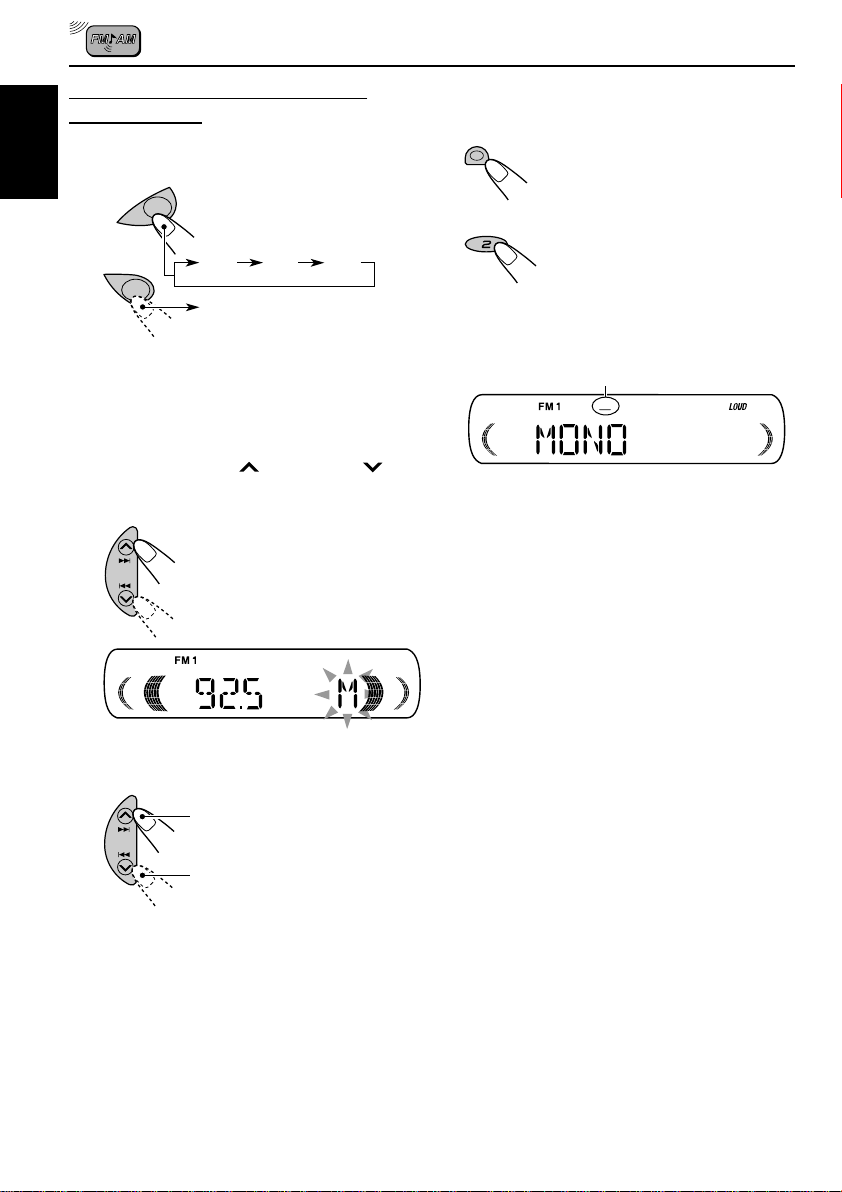
Searching for a station manually:
Manual search
1
ENGLISH
Select the band (FM1 – 3, AM).
FM
FM1 FM2 FM3
AM
AM
Note:
This receiver has three FM bands (FM1, FM2,
FM3). You can use any one of them to listen to
an FM broadcast.
2
Press and hold ¢ or 4
until “M” (manual) starts flashing on
the display.
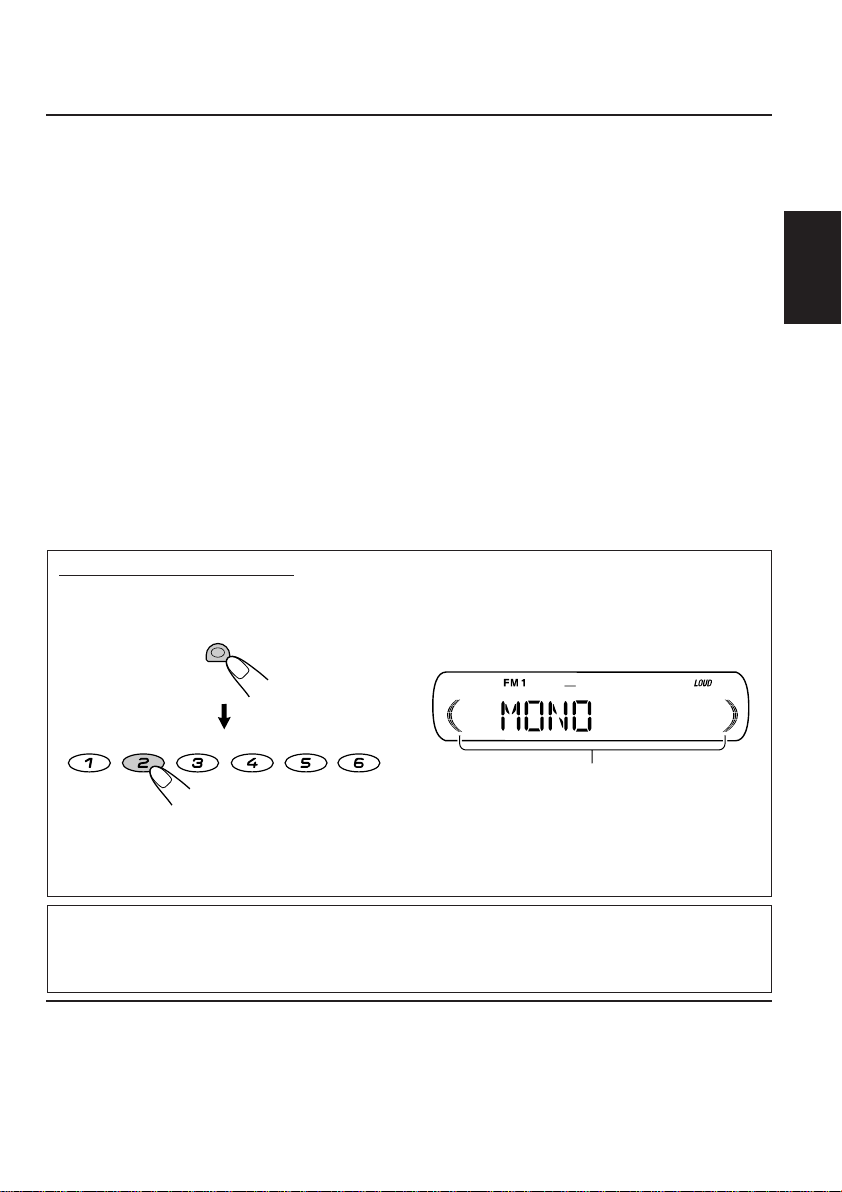
When an FM stereo broadcast is hard to
receive:
MODE
MO
8
When the MO indicator is lit on the display, the
sound you hear becomes monaural but the
reception will be improved.
1 Press MODE to enter the
functions mode while listening
to an FM stereo broadcast.
2 Press MO (monaural), while
still in the functions mode, so
that the MO indicator lights up
on the display.
Each time you press the
button, the MO indicator lights
up and goes off alternately.
MO (monaural) indicator
MO
3
Tune in to a station you want while
“M” (manual) is flashing.
To tune in to stations of higher
frequencies
To tune in to stations of lower
frequencies
• If you release your finger from the button,
the manual mode will automatically turns
off after 5 seconds.
• If you hold down the button, the frequency
keeps changing (in 50 kHz intervals for FM
and 9 kHz intervals for AM—MW/LW) until
you release the button.
8
Page 9
Storing stations in memory
You can use one of the following two methods to
store broadcasting stations in memory.
• Automatic preset of FM stations: SSM (Strongstation Sequential Memory)
• Manual preset of both FM and AM stations
FM station automatic preset: SSM
You can preset 6 local FM stations in each FM
band (FM1, FM2, and FM3).
1
Select the FM band (FM1 – 3) you
want to store FM stations into.
FM
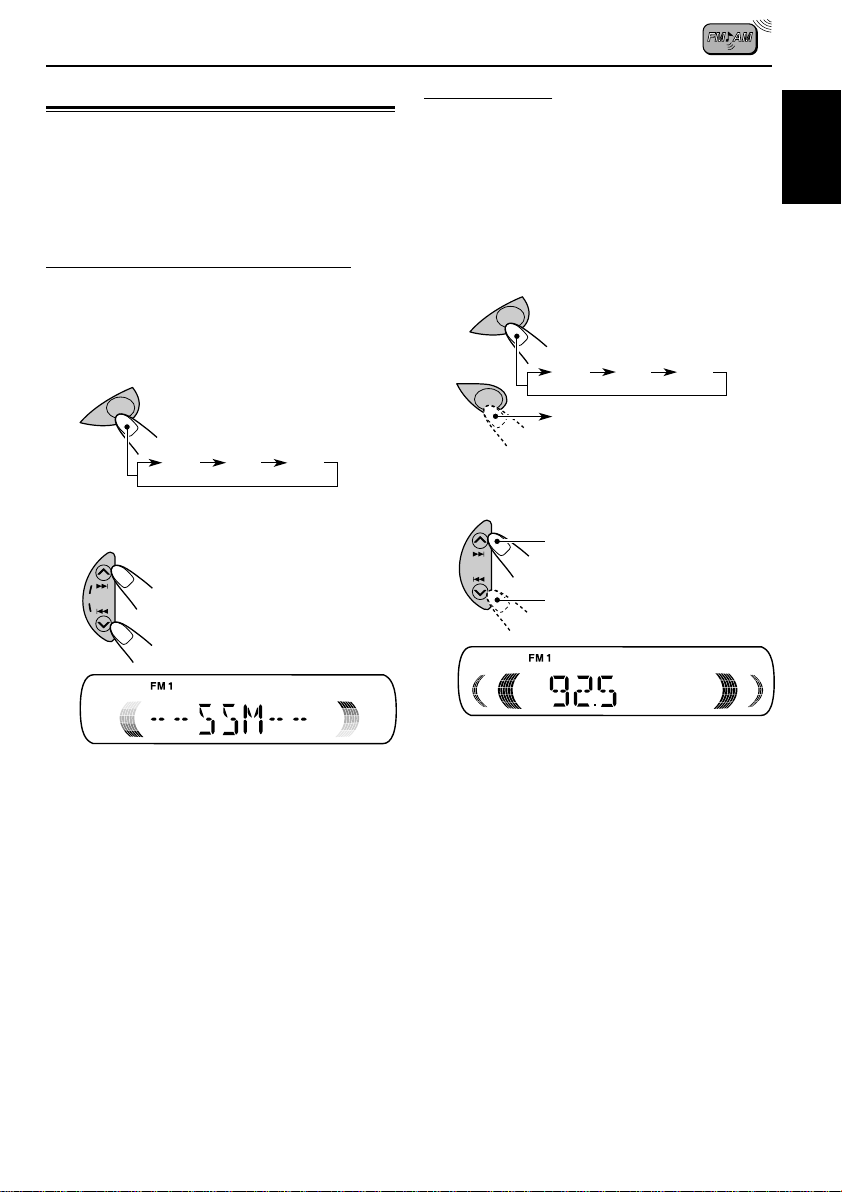
Manual preset
You can preset up to 6 stations in each band
(FM1, FM2, FM3, and AM) manually.
Ex.: Storing FM station of 92.5 MHz into the
preset number 1 of the FM1 band.
1
Select the band (FM1 – 3, AM) you
want to store stations into (in this
example, FM1).
FM
FM1 FM2 FM3
AM
AM
ENGLISH
FM1 FM2 FM3
2
Press and hold both buttons for
more than 2 seconds.
SSM
“SSM” appears, then disappears
when automatic preset is over.
Local FM stations with the strongest signals are
searched and stored automatically in the band
number you have selected (FM1, FM2, or FM3).
These stations are preset in the number
buttons—No.1 (lowest frequency) to No.6
(highest frequency).
When automatic preset is over, the station stored
in number button 1 will be automatically tuned in.
2
Tune in to a station (in this example,
of 92.5 MHz).
To tune in to stations of higher
frequencies
To tune in to stations of lower
frequencies
CONTINUED ON THE NEXT PAGE
9
Page 10

3
Press and hold the number button
(in this example, 1) for more than
2 seconds.
ENGLISH
Tuning in to a preset station
You can easily tune in to a preset station.
7
Remember that you must store stations first. If
you have not stored them yet, see “Storing
stations in memory” on pages 9 and 10.
1
Select the band (FM1 – 3, AM).
FM
“P1” flashes for a few seconds.
4
Repeat the above procedure to store
other stations into other preset
numbers.
Notes:
• A previously preset station is erased when a new
station is stored in the same preset number.
• Preset stations are erased when the power supply to
the memory circuit is interrupted (for example,
during battery replacement). If this occurs, preset
the stations again.
FM1 FM2 FM3
AM
AM
2
Select the number (1 – 6) for the
preset station you want.
8
910 127
MO
11
RPT
RND
10
Page 11
CD OPERATIONS
LOUD
SEL
DISP
MO
8
7 9 10 12
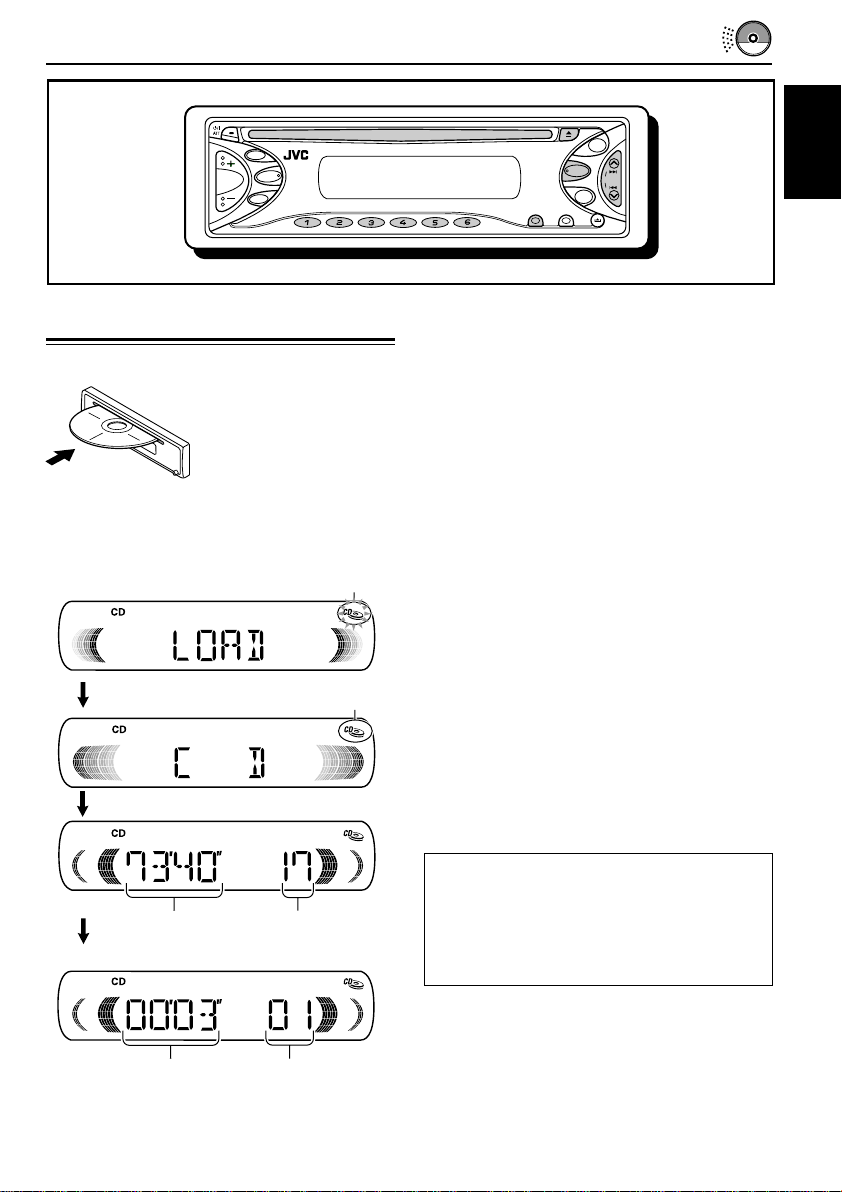
Playing a CD
Insert a CD into the loading slot.
The unit turns on, draws
the CD and starts
playback automatically.
Note on One-Touch Operation:
When a CD is already in the loading slot, pressing
CD turns on the unit and starts playback
automatically.
The CD–in indicator flashes.
The CD–in indicator lights up.
FM
CD
SSM
RND
11
RPT
AM
SCMMODE
Note:
When a CD is inserted upside down, “EJECT”
appears on the display and the CD automatically
ejects.
To stop play and eject the CD
Press 0.
CD play stops and the CD automatically ejects
from the loading slot. The source changes to the
tuner (you will hear the last received station.)
• If you change the source, CD play also stops
(without ejecting the CD).
Next time you select “CD” as the source, CD
play starts from where playback has been
stopped previously.
Notes:
• If the ejected disc is not removed for about
15 seconds, the disc is automatically inserted again
into the loading slot to protect it from dust.
(CD play will not start this time.)
• You can eject the CD even when the unit is turned
off.
ENGLISH
Total playing time
of the inserted disc
Total track number
of the inserted disc
Elapsed playing time Current track
All tracks will be played repeatedly until you stop
playback.
About mistracking:
Mistracking may result from driving on extremely
rough roads. This does not damage the unit and
the CD, but will be annoying.
We recommend that you stop CD play while
driving on such rough roads.
11
Page 12
Locating a track or a
particular portion on a CD
To fast-forward or reverse the track
ENGLISH
Press and hold ¢, while
playing a CD, to fast-forward the
track.
Press and hold 4 , while
playing a CD, to reverse the track.
To go to the next or previous tracks
Press ¢ briefly, while playing
a CD, to go ahead to the beginning
of the next track.
Each time you press the button
consecutively, the beginning of the
next tracks is located and played
back.
Press 4 briefly, while playing
a CD, to go back to the beginning
of the current track.
Each time you press the button
consecutively, the beginning of the
previous tracks is located and
played back.
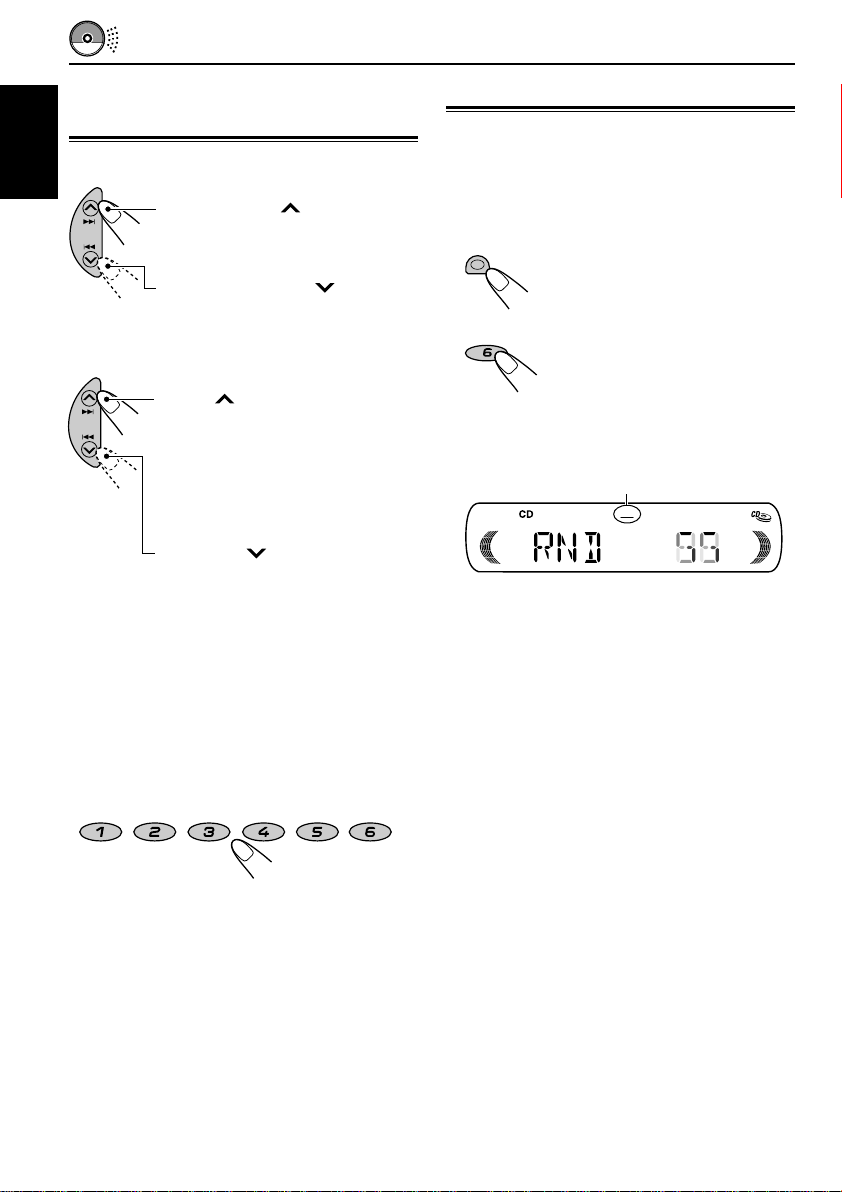
Selecting CD playback modes
To play back tracks at random
(Random Play)
You can play back all tracks on the CD at
random.
MODE
12
RND
When Random Play is turned on, the RND
indicator lights up on the display. A track
randomly selected starts playing.
1 Press MODE to enter the
functions mode while playing a
CD.
2 Press RND (random), while
still in the functions mode, so
that the RND indicator lights
up on the display.
Each time you press the
button, CD random play mode
turns on and off alternately.
RND indicator
RND
To go to a particular track directly
Press the number button corresponding to the
track number to start its playback.
8
910 127
MO
• To select a track number from 1 – 6:
Press 1 (7) – 6 (12) briefly.
• To select a track number from 7 – 12:
Press and hold 1 (7) – 6 (12) for more than one
second.
12
11
RPT
RND
Page 13
To play back tracks repeatedly
(Repeat Play)
You can play back the current track repeatedly.
MODE
11
RPT
When Repeat Play is turned on, the RPT
indicator lights up on the display. The current
track starts playing repeatedly.
1 Press MODE to enter the
functions mode while playing a
CD.
2 Press RPT (repeat), while still
in the functions mode, so that
the RPT indicator lights up on
the display.
Each time you press the
button, CD repeat play mode
turns on and off alternately.
RPT indicator
RPT
Track number of the
currently playing track
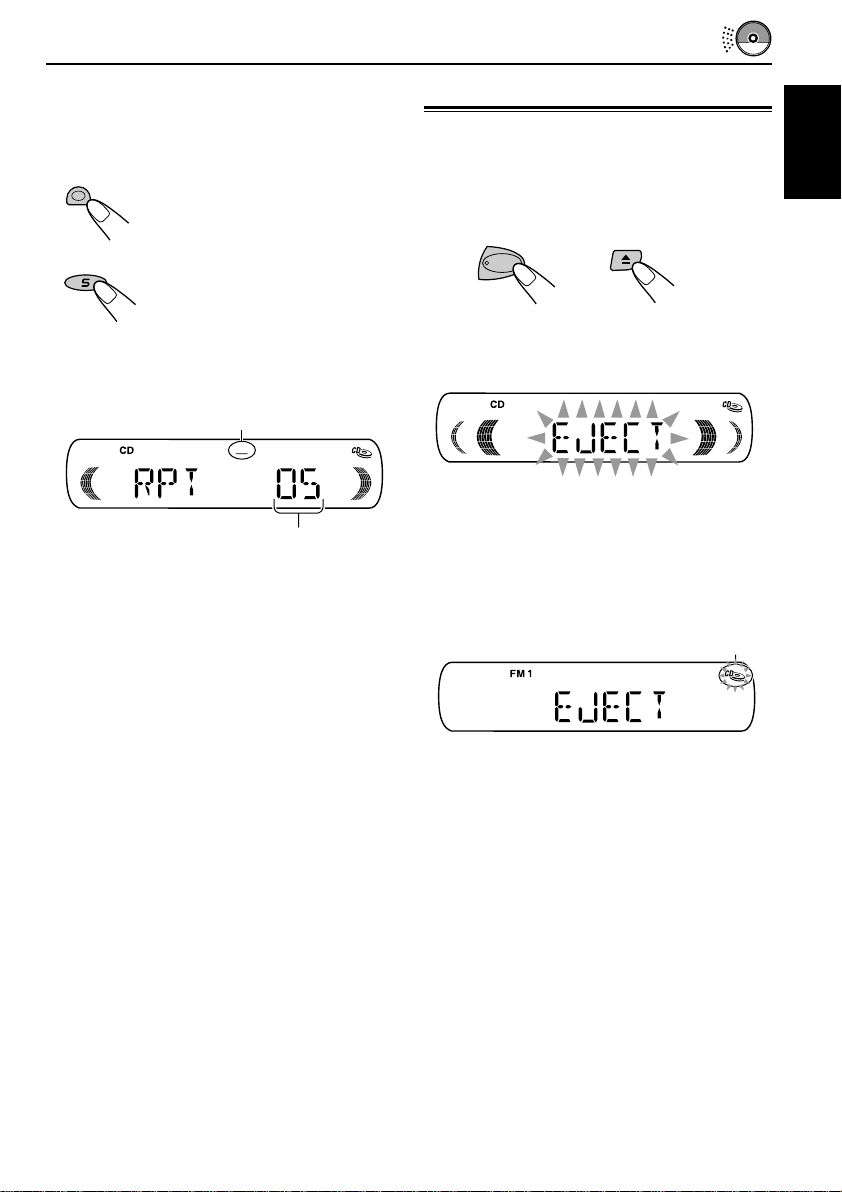
Prohibiting CD ejection
You can prohibit CD ejection and can lock a CD
in the loading slot.
ENGLISH
While pressing CD, press and hold 0 for
more than 2 seconds.
CD
“EJECT” flashes on the display for about
5 seconds, and the CD is locked and cannot be
ejected.
To cancel the prohibition and unlock the
CD
While pressing CD, press and hold 0 again for
more than 2 seconds.
“EJECT” appears on the display, and the CD
ejects from the loading slot.
The CD–in indicator flashes.
13
Page 14
SOUND ADJUSTMENTS
LOUD
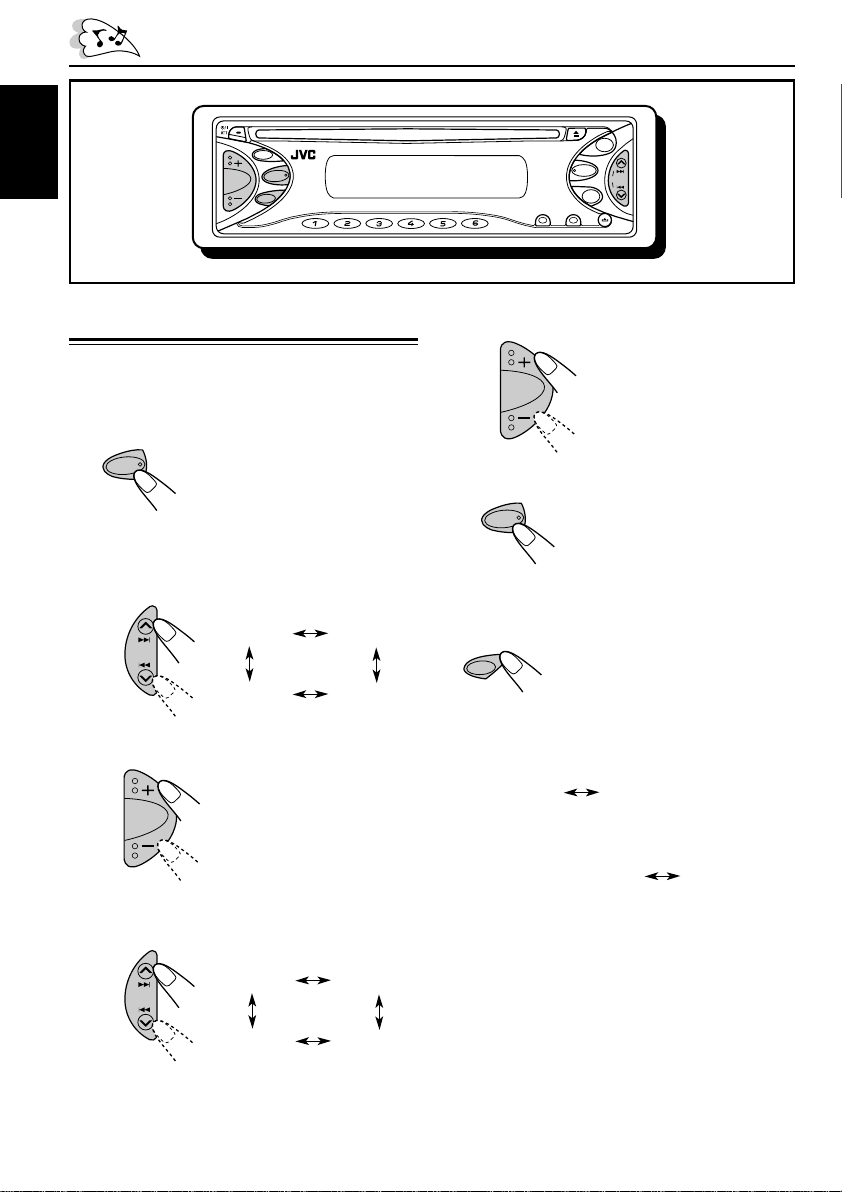
Adjusting the sound
You can adjust the sound characteristics to your
preference.
ENGLISH
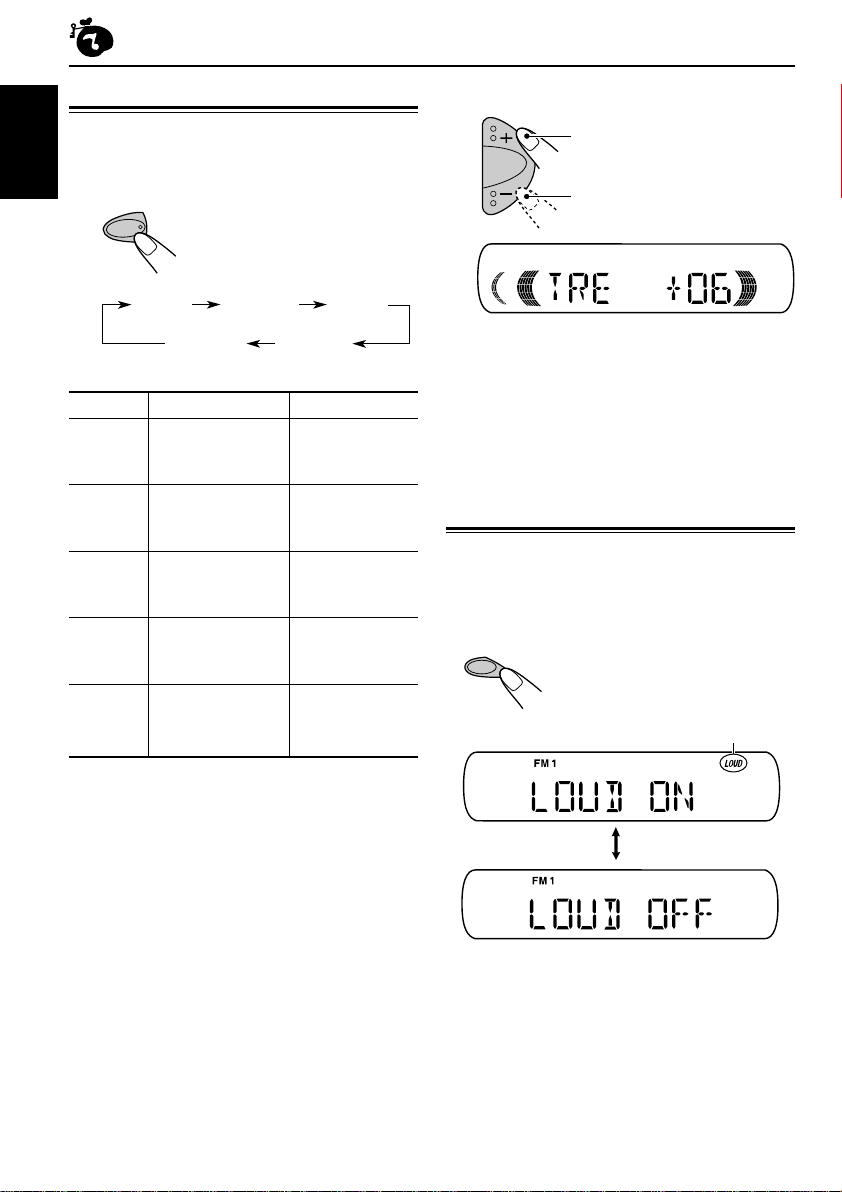
1
Select the item you want to adjust.
SEL
Indication To do: Range
BAS Adjust the bass. –06 (min.)
TRE Adjust the treble. –06 (min.)
FAD* Adjust the front R06 (Rear only)
BAL Adjust the left L06 (Left only)
VOL Adjust the volume. 00 (min.)
Each time you press the
button, the adjustable items
change as follows:
BAS
(bass)
(volume)
and rear speaker |
balance. F06 (Front only)
and right speaker |
balance. R06 (Right only)
VOL
TRE
(treble)
BAL
(balance)
|
+06 (max.)
|
+06 (max.)
|
50 (max.)
(fader)
FAD
2
Adjust the level.
To increase the level
To decrease the level
Ex.: When you adjust “TRE” (treble)
Note:
Normally, the + and – buttons work as the volume
control buttons. So you do not have to select “VOL”
to adjust the volume level.
Turning on/off the loudness
function
The human ear is less sensitive to low and high
frequencies at low volumes.
The loudness function can boost these
frequencies to produce a well-balanced sound at
low volume levels.
Each time you press LOUD,
the loudness function turns on
and off alternately.
LOUD (loudness) indicator
* If you are using a two-speaker system, set the fader
level to “00.”
14
Page 15
Using the sound control
memory (SCM)
You can select and store a preset sound
adjustment suitable for each playback source
(Advanced SCM).
Selecting and storing the sound
modes
Once you select a sound mode, it is stored in
memory. It will be recalled every time you select
the same source and will be shown on the
display.
A sound mode can be stored for each of the
following sources—FM1, FM2, FM3, AM, and
CD.
• If you do not want to store the sound mode
separately for each playback source, but want
to use the same sound mode for all the
sources, see “Canceling Advanced SCM—
SCM LINK” on page 17.
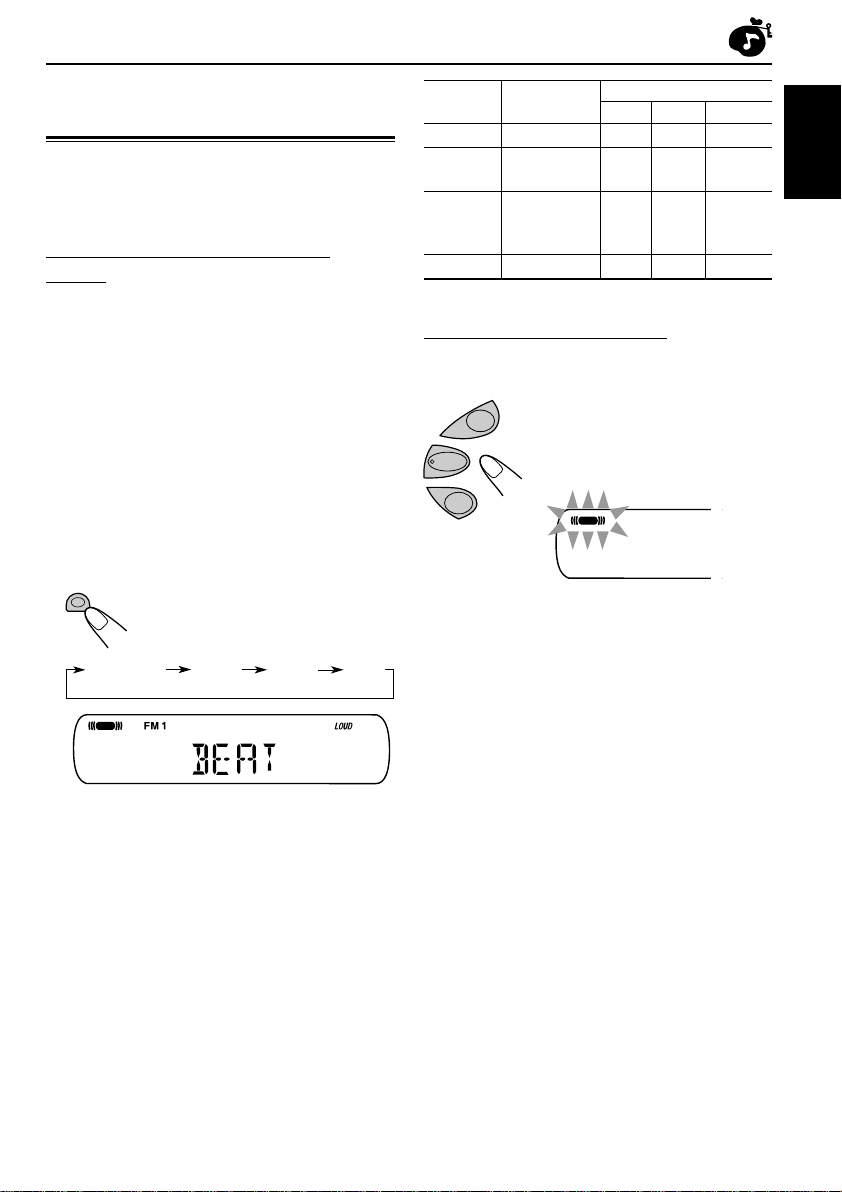
Select the sound mode you want.
SCM
Each time you press the
button, the sound mode
changes as follows:
Indication For: Preset values
SCM OFF (Flat sound) 00 00 ON
BEAT Rock or +02 00 ON
disco music
SOFT Quiet +01 –03 OFF
background
music
POP Light music +04 +01 OFF
BAS TRE LOUD
Recalling the sound modes
When “SCM LINK” is set to “LINK ON,”
select the source.
FM
CD
AM
The sound mode stored in memory for the
selected source is recalled.
Each time you change the
playback source, the SCM
indicator flashes on the
display.
SCM
ENGLISH
SCM OFF
SCM
Ex.: When you select “BEAT”
• When “SCM LINK” is set to “LINK ON,” the
selected sound mode can be stored in memory
for the current source and the effect applies
only to the current source.
• When “SCM LINK” is set to “LINK OFF,” the
selected sound mode effect applies to any
source.
BEAT
SOFT
POP
Notes:
• You can adjust each sound mode to your preference,
and store it in memory.
If you want to adjust and store your original sound
mode, see “Storing your own sound adjustments”
on page 16.
• To adjust the bass and treble reinforcement levels or
to turn on/off the loudness function temporarily, see
page 14. (Your adjustments will be canceled if
another source is selected.)
15
Page 16
Storing your own sound
adjustments
You can adjust the sound modes (BEAT, SOFT,
ENGLISH
POP) to your preference and store your own
adjustments in memory.
• There is a time limit in doing the following
procedure. If the setting is canceled before you
finish, start from step 1 again.
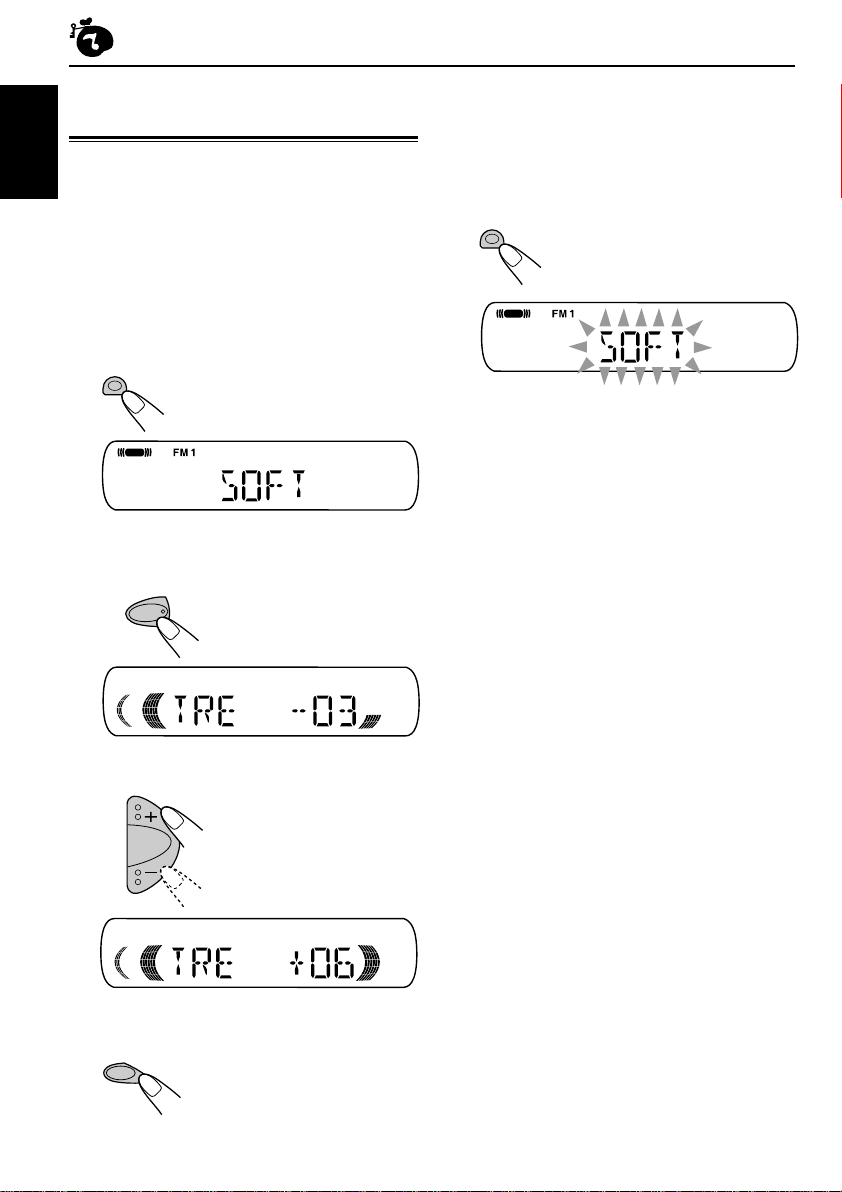
1
Call up the sound mode you want to
adjust.
SCM
SCM
• See page 15 for details.
3
Repeat step 2 to adjust the other
items.
4
Press and hold SCM until the sound
mode you have selected in step
flashes on the display.
SCM
SCM
5
Repeat the same procedure to store
Your adjustment made for the
selected sound mode is stored
in memory.
other sound modes.
1
Ex.: When you select “SOFT”
2
To adjust the bass or treble level.
1 Select “BAS” (bass) or “TRE” (treble).
SEL
Ex.: When you select “TRE” (treble)
2 Adjust the level.
To turn on or off the loudness
function.
LOUD
• See page 14 for details.
To reset to the factory settings, repeat the
same procedure and reassign the preset values
listed in the table on page 15.
16
Page 17
OTHER MAIN FUNCTIONS
Selecting the level display
—LEVEL
You can select the level display according to your
preference.
When shipped from the factory, “VOL 2” is
selected.
• VOL 1: Shows the volume level indicator.
• VOL 2: Alternates “VOL 1” setting and
• OFF: Erases the volume level indicator.
1
2
illumination display.
Press and hold SEL (select) for more
than 2 seconds.
“CLOCK H,” “CLOCK M,” “SCM LINK,” or
“LEVEL” appears on the display.
SEL
Select “LEVEL” if not shown on the
display.
CLOCK H CLOCK M
LEVEL SCM LINK
Canceling Advanced SCM
—SCM LINK
You can cancel the Advanced SCM (Sound
Control Memory), and unlink the sound modes
and the playback sources.
When shipped from the factory, a different sound
mode can be stored in memory for each source
so that you can change the sound modes simply
by changing the sources.
• LINK ON: Advanced SCM (different sound
• LINK OFF: Conventional SCM (one sound
1
Press and hold SEL (select) for more
than 2 seconds.
“CLOCK H,” “CLOCK M,” “SCM LINK,” or
“LEVEL” appears on the display.
2
Select “SCM LINK” if not shown on
the display.
modes for different sources.)
mode for all sources.)
SEL
CLOCK H CLOCK M
ENGLISH
3
Select the desired mode—“VOL 1,”
“VOL 2,” or “OFF.”
VOL 2VOL 1
OFF
4
Finish the setting.
SEL
LEVEL SCM LINK
3
Select “LINK OFF.”
4
Finish the setting.
SEL
To activate Advanced SCM (Sound Control
Memory), repeat the same procedure and press
+ to select “LINK ON” in step 3.
17
Page 18
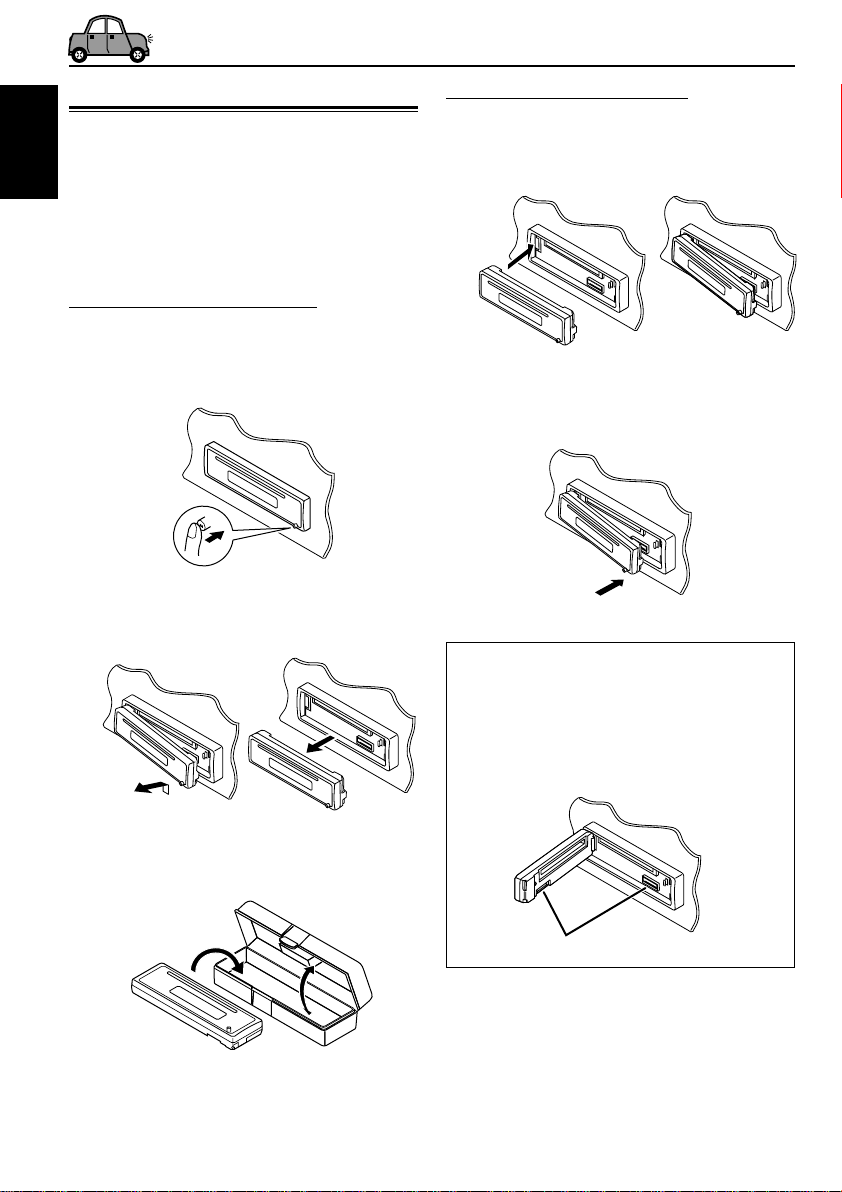
Detaching the control panel
You can detach the control panel when leaving
the car.
When detaching or attaching the control panel,
ENGLISH
be careful not to damage the connectors on the
back of the control panel and on the panel
holder.
Detaching the control panel
Before detaching the control panel, be sure to
turn off the power.
1
Unlock the control panel.
2
Lift and pull the control panel out of
the unit.
Attaching the control panel
1
Insert the left side of the control
panel into the groove on the panel
holder.
2
Press the right side of the control
panel to fix it to the panel holder.
Note on cleaning the connectors:
If you frequently detach the control panel, the
connectors will deteriorate.
To minimize this possibility, periodically wipe the
connectors with a cotton swab or cloth moistened
with alcohol, being careful not to damage the
connectors.
18
3
Put the detached control panel into
the provided case.
Connectors
Page 19
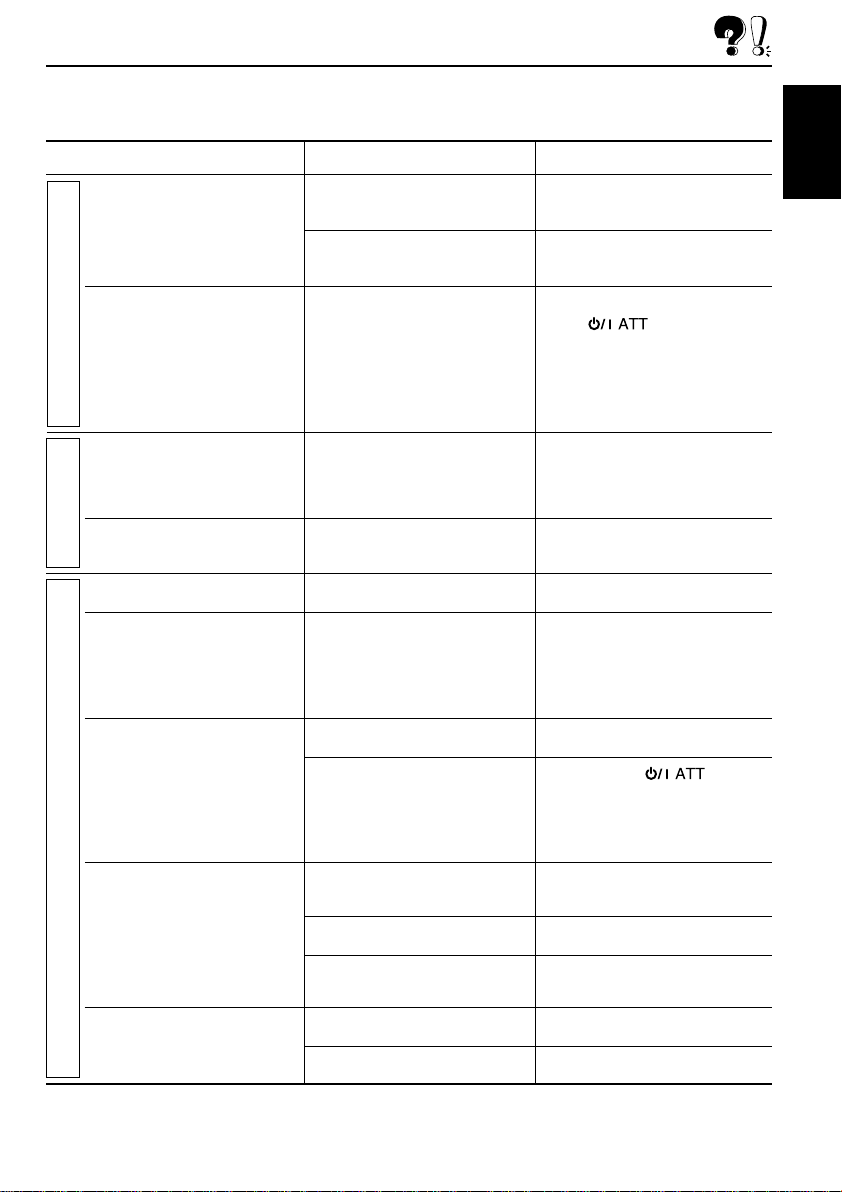
TROUBLESHOOTING
What appears to be trouble is not always serious. Check the following points before calling a service
center.
Symptoms
• Sound cannot be heard
from the speakers.
• This unit does not work at
all.
General
• SSM (Strong-station
Sequential Memory)
automatic preset does not
work.
FM/AM
• Static noise while listening
to the radio.
• CD automatically ejects.
• CD-R cannot be played
back.
• Tracks on the CD-R cannot
be skipped.
• CD can be neither played
back nor ejected.
CD Playback
• CD sound is sometimes
interrupted.
•“NO DISC” appears on the
display.
Causes
The volume level is set to the
minimum level.
Connections are incorrect.
The built-in microcomputer
may have functioned
incorrectly due to noise, etc.
Signals are too weak.
The aerial is not connected
firmly.
CD is inserted upside down.
CD-R is not finalized.
CD is locked.
The CD player may have
functioned incorrectly.
You are driving on rough
roads.
CD is scratched.
Connections are incorrect.
No CD in the loading slot.
CD is inserted incorrectly.
Remedies
Adjust it to the optimum level.
Check the cords and
connections.
While holding SEL (select),
press (standby/on
attenuator) for more than
2 seconds to reset the unit. (The
clock setting and preset stations
stored in memory are erased.)
(See page 2.)
Store stations manually.
Connect the aerial firmly.
Insert the CD correctly.
• Insert a finalized CD-R.
• Finalize the CD-R with the
component which you used
for recording.
Unlock the CD. (See page 13.)
While holding
(standby/on attenuator), press
0 (eject) for more than
2 seconds. Be careful not to
drop the CD when it is ejected.
Stop playback while driving on
rough roads.
Change the CD.
Check the cords and
connections.
Insert a CD into the loading slot.
Insert the CD correctly.
ENGLISH
19
Page 20
MAINTENANCE
Handling discs
This unit has been designed to reproduce CDs
and CD-Rs (Recordable).
• This unit is not compatible with MP3 discs.
ENGLISH
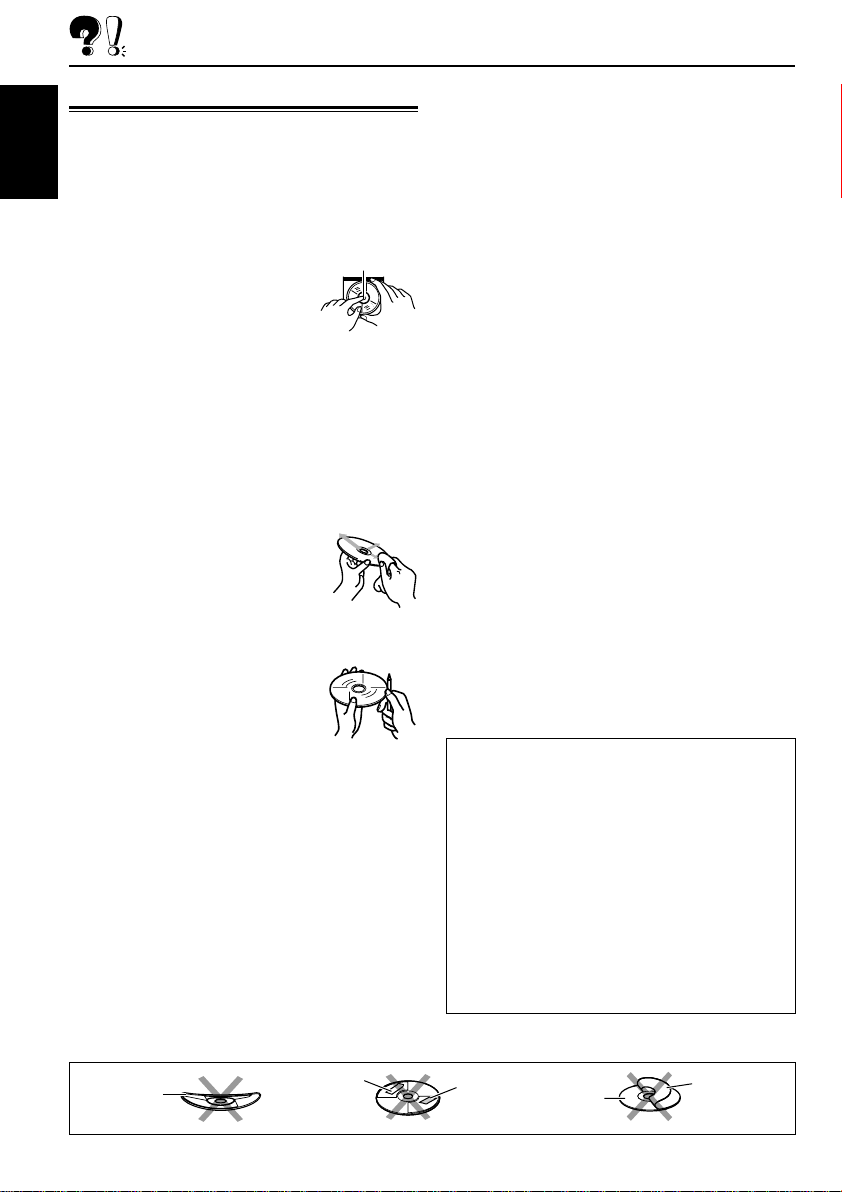
How to handle discs
When removing a disc
from its case, press down
the center holder of the case and
lift the disc out, holding
it by the edges.
• Always hold the disc by the edges. Do not
touch its recording surface.
When storing a disc into its case, gently insert
the disc around the center holder (with the
printed surface facing up).
• Make sure to store discs into the cases after
use.
To keep discs clean
A dirty disc may not play correctly.
If a disc does become dirty, wipe it
with a soft cloth in a straight line
from center to edge.
To play new discs
New discs may have some rough
spots around the inner and outer
edges. If such a disc is used, this
unit may reject the disc.
To remove these rough spots, rub
the edges with a pencil or ball-point pen, etc.
Moisture condensation
Moisture may condense on the lens inside the
CD player in the following cases:
• After starting the heater in the car.
• If it becomes very humid inside the car.
Should this occur, the CD player may
malfunction. In this case, eject the disc and leave
the unit turned on for a few hours until the
moisture evaporates.
Center holder
When playing a CD-R
Before playing back CD-Rs, read their instructions
or cautions carefully.
• Use only “finalized” CD-Rs.
• Some CD-Rs may not play back on this unit
because of their disc characteristics, and for
the following reasons:
– Discs are dirty or scratched.
– Moisture condensation on the lens inside the
unit.
– The pickup lens inside the unit is dirty.
• CD-Rs are susceptible to high temperatures or
high humidity, so do not leave them inside your
car.
• Do not use following CD-Rs:
– Discs with stickers, labels, or protective seal
stuck to the surface.
– Discs on which labels can be directly printed
by an ink jet printer.
Using these discs under high temperatures or
high humidity may cause malfunctions or
damage to discs. For example,
– Stickers or labels may shrink and warp a
disc.
– Stickers or labels may peel off so discs
cannot be ejected.
– Print on discs may get sticky.
Read instructions or cautions about labels and
printable discs carefully.
• CD-RWs (Rewritable) cannot be played back
on this unit.
CAUTIONS:
• Do not insert 8 cm discs (single CDs) into the
loading slot. (Such discs cannot be ejected.)
• Do not insert any disc of unusual shape—like a
heart or flower; otherwise, it will cause a
malfunction.
• Do not expose discs to direct sunlight or any
heat source or place them in a place subject to
high temperature and humidity. Do not leave
them in a car.
• Do not use any solvent (for example,
conventional record cleaner, spray, thinner,
benzine, etc.) to clean discs.
20
Warped
disc
Sticker
Sticker
residue
Disc
Stick-on
label
Page 21

SPECIFICATIONS
AUDIO AMPLIFIER SECTION
Maximum Power Output:
Front: 45 W per channel
Rear: 45 W per channel
Continuous Power Output (RMS):
Front: 17 W per channel into 4 Ω, 40 Hz
to 20 000 Hz at no more than
0.8% total harmonic distortion.
Rear: 17 W per channel into 4 Ω, 40 Hz
to 20 000 Hz at no more than
0.8% total harmonic distortion.
Load Impedance: 4 Ω (4 Ω to 8 Ω allowance)
Tone Control Range:
Bass: ±10 dB at 100 Hz
Treble: ±10 dB at 10 kHz
Frequency Response: 40 Hz to 20 000 Hz
Signal-to-Noise Ratio: 70 dB
Line-Out Level/Impedance:
2.0 V/20 kΩ load (full scale)
Output Impedance: 1 kΩ
TUNER SECTION
Frequency Range:
FM: 87.5 MHz to 108.0 MHz
AM: (MW) 522 kHz to 1 620 kHz
(LW) 144 kHz to 279 kHz
CD PLAYER SECTION
Type: Compact disc player
Signal Detection System: Non-contact optical
pickup (semiconductor laser)
Number of channels: 2 channels (stereo)
Frequency Response: 5 Hz to 20 000 Hz
Dynamic Range: 90 dB
Signal-to-Noise Ratio: 95 dB
Wow and Flutter: Less than measurable limit
GENERAL
Power Requirement:
Operating Voltage: DC 14.4 V
(11 V to 16 V allowance)
Grounding System: Negative ground
Allowable Operating Temperature: 0°C to +40°C
Dimensions (W × H × D):
Installation Size (approx.):
182 mm × 52 mm × 150 mm
Panel Size (approx.):
188 mm × 58 mm × 11 mm
Mass (approx.):
1.3 kg (excluding accessories)
ENGLISH
[FM Tuner]
Usable Sensitivity:
11.3 dBf (1.0 µV/75 Ω)
50 dB Quieting Sensitivity:
16.3 dBf (1.8 µV/75 Ω)
Alternate Channel Selectivity (400 kHz):
65 dB
Frequency Response: 40 Hz to 15 000 Hz
Stereo Separation: 30 dB
Capture Ratio: 1.5 dB
[MW Tuner]
Sensitivity: 20 µV
Selectivity: 35 dB
[LW Tuner]
Sensitivity: 50 µV
Design and specifications are subject to change
without notice.
21
Page 22
IMPORTANTE PARA PRODUCTOS LASER
1. PRODUCTO LASER CLASE 1
2. PRECAUCIÓN: No abra la tapa superior. En el interior de la unidad no hay piezas que pueda
reparar el usuario; encargue el servicio a personal técnico cualificado.
3. PRECAUCIÓN: Radiación láser visible e invisible en caso de apertura o con interbloqueo averiado
o defectuoso. Evite la exposición directa a los haces.
4. REPRODUCCIÓN DE LA ETIQUETA: ETIQUETA DE PRECAUCIÓN, COLOCADA EN EL
EXTERIOR DE LA UNIDAD.
ESPAÑOL
Cómo reposicionar su unidad
Mientras mantiene pulsado SEL (selección), pulse (en espera/encendido atenuador)
durante más de 2 segundos.
Esto hará que se reposicione el microcomputador incorporado.
(en espera/encendido atenuador)
LOUD
SEL
DISP
7 9 10 12
MO
8
RND
11
RPT
FM
CD
SSM
AM
SCMMODE
SEL (selección)
Notas:
• También se borrarán los ajustes preestablecidos por usted—como por ejemplo los canales preajustados
o los ajustes de sonido.
• Si hay un CD insertado en la unidad, el mismo será expulsado al reposicionar la unidad. Preste atención
para evitar que se caiga el CD.
2
Page 23
Muchas gracias por la compra de un producto JVC. Como primer paso, por favor lea
detenidamente este manual para comprender a fondo todas las instrucciones y obtener un
máximo disfrute de esta unidad.
CONTENIDO
Cómo reposicionar su unidad ................... 2
Cómo utilizar el botón MODE ................... 3
UBICACION DE LOS BOTONES ........... 4
Panel de control ........................................ 4
OPERACIONES BASICAS .................. 5
Conexión de la alimentación ..................... 5
Ajuste del reloj .......................................... 6
OPERACIONES DE LA RADIO............. 7
Para escuchar la radio .............................. 7
Cómo almacenar emisoras en la memoria ... 9
Cómo sintonizar una emisora preajustada ... 10
OPERACION DEL REPRODUCTOR
DE CD ..................................... 11
Para reproducir un CD .............................. 11
Cómo encontrar una pista o un punto
determinado de un CD ........................... 12
Selección de los modos de
reproducción de CD ............................... 12
Prohibición de la expulsión del CD ........... 13
Cómo utilizar el botón MODE
Si pulsa botón MODE, la unidad accederá al modo de funciones y los botones numéricos
funcionarán como botones de funciones diferentes.
MODE
AJUSTES DEL SONIDO .................... 14
Ajuste del sonido ....................................... 14
Activado/desactivado de la
función de sonoridad .............................. 14
Utilización de la memoria de
control de sonido (SCM) ......................... 15
Cómo almacenar sus propios
ajustes de sonido ................................... 16
OTRAS FUNCIONES PRINCIPALES ...... 17
Selección de la pantalla de nivel—LEVEL .... 17
Cancelación del SCM avanzado
—SCM LINK ........................................... 17
Desmontaje del panel de control .............. 18
LOCALIZACIÓN DE AVERIAS ............. 19
MANTENIMIENTO .......................... 20
Manipulación de los discos ....................... 20
ESPECIFICACIONES ....................... 21
ESPAÑOL
MO
8
Para volver a usar estos botones como botones numéricos después de haber pulsado
botón MODE, espere durante 5 segundos sin pulsar ningún botón numérico, hasta que se
cancele el modo de funciones.
• Pulsado botón MODE otra vez también se cancela el modo de funciones.
910 127
MO
11
RPT
RND
Indicador de cuenta atrás
Nota:
Por razones de seguridad, esta unidad está provista con una tarjeta de ID. numerada, y el mismo No. de ID.
está impreso en el chasis de la unidad. Conserve la tarjeta en un lugar seguro, ya que la misma ayudará a
las autoridades para identificar su unidad si es robada.
ANTES DE USAR
*
Para fines de seguridad....
• No aumente demasiado el nivel de volumen pues es
muy peligroso conducir si no se escuchan los
sonidos exteriores.
• Detenga el automóvil antes de efectuar cualquier
operación complicada.
*
Temperatura dentro del automóvil....
Si ha dejado el automóvil estacionado durante largo
tiempo en un sitio cálido o frío, no opere la unidad
hasta que se normalice la temperatura del habitáculo.
3
Page 24
UBICACION DE LOS BOTONES
Panel de control
Ventanilla de visualización
;dga
SCM
s
ESPAÑOL
1
q
1 Botón (en espera/encendido
atenuador)
2 Botón LOUD (sonoridad)
3 Botón SEL (selección)
4 Ventanilla de visualización
5 Ranura de carga
6 Botón 0 (expulsión)
7 Botón CD
8 Botón AM
9 Botón FM
p Botones ¢/4
• También funcionan como botones SSM cuando
se los pulsa conjuntamente.
q Botones +/–
w Botón DISP (pantalla)
e Botón MO (monofónico)
r Botones numéricos
t Botón RPT (repetición)
y Botón RND (aleatorio)
u Botón MODE
i Botón SCM (memoria de control de sonido)
o Botón (soltar panel de control)
4
2
LOUD
3
SEL
DISP
w
MO
7 9 10 12
8
e
f
ST RND RPT
MO
h
j
k
l
/
7
69
54
RND
11
RPT
tyr
ui
8
CD
AM
SCMMODE
p
FM
SSM
o
Ventanilla de visualización
; Indicador SCM (memoria de control de
sonido)
a Indicador de la fuente de CD
s Indicadores de banda FM (FM1, FM2, FM3)
d Indicador de banda AM
f Indicadores de recepción del sintonizador
MO (monofónico), ST (estéreo)
g Indicador RND (aleatorio)
h Indicador RPT (repetición)
j Indicador LOUD (sonoridad)
k Indicador de CD insertado
l Pantalla principal
/ Indicador de nivel de volumen
Page 25
OPERACIONES BASICAS
LOUD
SEL
DISP
MO
8
7 9 10 12
123
Conexión de la alimentación
1
Encienda la unidad.
Nota sobre la operación con pulsación única:
La unidad se enciende automáticamente cuando
usted selecciona la fuente en el paso 2 de abajo.
No necesitará presionar este botón para
encender la unidad.
2
Reproduzca la fuente.
FM
CD
AM
Para operar el sintonizador (FM o AM),
consulte las páginas 7 – 10.
Para reproducir un CD,
consulte las páginas 11 – 13.
3
Ajuste el volumen.
Para aumentar el volumen
Para reducir el volumen
Aparece el nivel de volumen.
FM
CD
SSM
RND
11
RPT
4
Ajuste el sonido según se desee.
AM
SCMMODE
(Consulte las páginas 14 – 16.)
Para disminuir el volumen en un instante
Pulse por un tiempo breve mientras
está escuchando cualquier fuente. “AT T ”
comienza a destellar en la pantalla, y el nivel de
volumen disminuirá en un instante.
Para regresar al nivel de volumen anterior,
vuelva a presionar brevemente el botón.
Para apagar la unidad
Pulse y mantenga pulsado durante
más de 1 segundo.
Aparece “SEE YOU” y seguidamente la unidad
se apaga.
• Si desconecta la alimentación mientras
está escuchando un CD, cuando vuelva a
conectar la alimentación la próxima vez el CD
se empezará a reproducir desde el punto en
que fue detenido previamente.
PRECAUCIÓN sobre el ajuste del volumen:
Los CDs producen muy poco ruido al compararse
con otras fuentes. Si ajusta el nivel de volumen
para el sintonizador, por ejemplo, los altavoces
podrían dañarse debido a un repentino aumento
del nivel de salida.
Por lo tanto, antes de reproducir un CD,
disminuya el volumen y ajústelo al nivel deseado
durante la reproducción.
ESPAÑOL
Indicador de nivel de volumen
(consulte la página 17)
5
Page 26

LOUD
SEL
DISP
7 9 10 12
FM
CD
SSM
MO
8
RND
11
RPT
AM
SCMMODE
ESPAÑOL
Ajuste del reloj
1
Pulse y mantenga pulsado SEL
(selección) durante más de
2 segundos.
Aparece “CLOCK H”, “CLOCK M”,
“SCM LINK” o “LEVEL” en la pantalla.
SEL
2
Ajuste la hora.
1 Seleccione “CLOCK H” (hora) si no está
visualizado en la pantalla.
2 Ajuste la hora.
CLOCK H CLOCK M
LEVEL SCM LINK
2 Ajuste los minutos.
4
Finalice el ajuste.
SEL
Para verificar la hora actual en el reloj o
cambiar el modo de pantalla
DISP
Pulse repetidamente DISP
(pantalla).
Cada vez que pulsa el botón,
el modo de pantalla cambia de
la siguiente manera:
• Durante la operación del sintonizador:
RelojFrecuencia
• Durante la operación del CD:
3
Ajuste los minutos.
1 Seleccione “CLOCK M” (minutos).
CLOCK H CLOCK M
LEVEL SCM LINK
6
RelojTiempo de reproducción
transcurrido
• Durante el apagado:
La unidad se enciende y la hora del reloj
aparece durante 5 segundos. Luego, la
unidad se apaga.
Page 27

OPERACIONES DE LA RADIO
LOUD
SEL
DISP
MO
8
7 9 10 12
Para escuchar la radio
Podrá sintonizar una determinada emisora
mediante búsqueda automática o búsqueda
manual.
Para buscar una emisora
automáticamente:
Búsqueda automática
1
Seleccione la banda (FM1 – 3, AM).
FM
FM1 FM2 FM3
AM
AM
FM
CD
SSM
RND
11
RPT
2
Comience la búsqueda de la
AM
SCMMODE
emisora.
Para buscar emisoras de
frecuencias más altas
Para buscar emisoras de
frecuencias más bajas
La búsqueda se interrumpe cada vez que
se recibe una emisora.
Para cancelar la búsqueda antes de recibir
una emisora, pulse el mismo botón que el
pulsado para la búsqueda.
ESPAÑOL
Se enciende cuando se recibe una
radiodifusión en FM estéreo de
intensidad suficiente.
ST
Aparece la banda seleccionada.
Nota:
Este receptor tiene tres bandas FM (FM1, FM2,
FM3). Podrá usar cualquiera de ellas para
escuchar un radiodifusión en FM.
7
Page 28

Para buscar una emisora
manualmente: Búsqueda manual
1
Seleccione la banda (FM1 – 3, AM).
FM
FM1 FM2 FM3
AM
ESPAÑOL
Nota:
Este receptor tiene tres bandas FM (FM1, FM2,
FM3). Podrá usar cualquiera de ellas para
escuchar un radiodifusión en FM.
2
Pulse y mantenga pulsado ¢ o
4
comience a destellar en la pantalla.
AM
hasta que “M” (Manual)
Cuando una radiodifusión en FM estéreo
sea difícil de recibir:
MODE
MO
8
Cuando el indicador MO se enciende en la
pantalla, el sonido escuchado se vuelve
monofónico, pero se consigue mejorar la
recepción.
1 Pulse MODE para acceder al
modo de funciones mientras
se está escuchando una
radiodifusión en FM.
2 Pulse MO (monofónico),
mientras permanece en el
modo de funciones, de
manera que el indicador
MO se encienda en la
pantalla.
Cada vez que pulsa el botón,
el indicador MO se enciende y
apaga alternativamente.
Indicador MO (monofónico)
MO
3
Sintonice la emisora deseada
mientras “M” (Manual) está
destellando.
Para sintonizar emisoras de
frecuencias más altas
Para sintonizar emisoras de
frecuencias más bajas
• Si aparta su dedo del botón, el modo
manual se desactivará automáticamente
después de 5 segundos.
• Si mantiene el botón pulsado, la
frecuencia cambiará continuamente
(a intervalos de 50 kHz para FM y a
intervalos de 9 kHz para AM—OM/OL)
hasta soltarlo.
8
Page 29

Cómo almacenar emisoras en
la memoria
Las emisoras podrán almacenarse en la
memoria mediante uno de los dos métodos
siguientes.
• Preajuste automático de emisoras FM: SSM
(Memoria secuencia de las emisoras fuertes)
• Preajuste manual de ambas emisoras FM y AM
Preajuste automático de emisoras FM:
SSM
Pueden preajustarse 6 emisoras FM locales en
cada banda FM (FM1, FM2 y FM3).
1
Seleccione la FM banda (FM1 – 3) en
que desea almacenar las emisoras
FM.
FM
Preajuste manual
Podrá preajustar manualmente hasta 6 emisoras
en cada banda (FM1, FM2, FM3 y AM).
Ej.: Almacenamiento de una emisora FM de
92,5 MHz en el número de preajuste 1 de la
banda FM1.
1
Seleccione la banda (FM1 – 3, AM)
en que desea almacenar las
emisoras (en este ejemplo, FM1).
FM
FM1 FM2 FM3
AM
AM
2
Sintonice la emisora (en este
ejemplo de 92,5 MHz).
ESPAÑOL
FM1 FM2 FM3
2
Pulse y mantenga pulsado ambos
botones durante más de
2 segundos.
SSM
Aparece y se mantiene visualizado “SSM”
hasta finalizar el preajuste automático.
Las emisoras FM locales con las señales más
intensas serán exploradas y almacenadas
automáticamente en el número de banda
seleccionado (FM1, FM2 o FM3).
Estas emisoras quedan preajustadas en los
botones—No.1 (frecuencia más baja) a No.6
(frecuencia más alta).
Cuando finalice el preajuste automático, se
sintonizará automáticamente la emisora
almacenada en el botón número 1.
Para sintonizar emisoras de
frecuencias más altas
Para sintonizar emisoras de
frecuencias más bajas
CONTINUA EN LA PAGINA SIGUIENTE
9
Page 30

3
Pulse y mantenga pulsado el botón
numérico (en este ejemplo, 1),
durante más de 2 segundos.
7
ESPAÑOL
“P1” destella durante algunos segundos.
4
Repita el procedimiento de arriba
para almacenar otras emisoras en
los otros números de preajuste.
Notas:
• La emisora preajustada previamente se borra
cuando se almacena una emisora nueva en el
mismo número de preajuste.
• Si se deja de suministrar energía al circuito de la
memoria (por ejemplo, durante el reemplazo de la
batería) se borrarán todas las emisoras
preajustadas. Si así sucede, vuelva a preajustar las
emisoras.
Cómo sintonizar una emisora
preajustada
Las emisoras preajustadas pueden sintonizarse
fácilmente.
Tenga presente que primero deberá almacenar
las emisoras. Si todavía no lo ha hecho, consulte
“Cómo almacenar emisoras en la memoria” en
las páginas 9 y 10.
1
Seleccione la banda (FM1 – 3, AM).
FM
FM1 FM2 FM3
AM
AM
2
Seleccione el número (1 – 6) en que
desea preajustar la emisora.
8
910 127
MO
11
RPT
RND
10
Page 31

OPERACION DEL REPRODUCTOR DE CD
LOUD
SEL
DISP
MO
7 9 10 12
8
Para reproducir un CD
Inserte un CD en la ranura de carga.
Se conecta la alimentación
de la unidad, entra el CD y
comienza la reproducción
automáticamente.
Nota sobre la operación con pulsación única:
Si pulsa CD cuando hay un CD introducido en la
ranura de carga, la unidad se enciende y se empieza a
reproducir el disco automáticamente.
El indicador de CD insertado se destella.
El indicador de CD
insertado se enciende.
FM
CD
SSM
RND
11
RPT
AM
SCMMODE
Nota:
Si inserta el CD boca abajo, aparecerá “EJECT” en
la pantalla y el CD será expulsado automáticamente.
Para interrumpir la reproducción y
expulsar el CD
Pulse 0.
Se interrumpe la reproducción del CD, que será
expulsado automáticamente de la ranura de
carga. La fuente cambia a sintonizador (se
escuchará la emisora recibida en último
término).
• Si cambia la fuente, la reproducción del CD
también se interrumpe (sin que el CD sea
expulsado).
La próxima vez que selecciona “CD” como
fuente, la reproducción del CD se iniciará
desde donde la detuvo.
ESPAÑOL
Tiempo de
reproducción total
del disco insertado
Tiempo de reproducción
Número total de
pistas del disco
insertado
Pista actual
transcurrido
Todas las pistas se reproducirán repetidamente
hasta que usted pare la reproducción.
Notas:
• Si no saca el disco expulsado en unos 15 segundos,
será reinsertado automáticamente en la ranura de
carga para protegerlo del polvo. (En este caso no se
reproduce el CD).
• Podrá expulsar el CD incluso cuando la unidad esté
apagada.
Acerca del mal seguimiento:
El mal seguimiento es un defecto que podría
suceder cuando conduce por caminos muy
accidentados. Esto no produce daños a la unidad
ni al CD, pero resultará muy molesto.
Se recomienda detener la reproducción del CD
cuando conduzca por caminos accidentados.
11
Page 32

Cómo encontrar una pista o
un punto determinado de un
CD
Para efectuar la búsqueda progresiva o
regresiva de la pista
Pulse y mantenga pulsado
¢, mientras se está
ESPAÑOL
Para seleccionar las pistas siguientes o
anteriores
reproduciendo el CD para la
búsqueda progresiva de la pista.
Pulse y mantenga pulsado
4 , mientras se está
reproduciendo el CD para la
búsqueda regresiva de la pista.
Pulse ¢ por un tiempo breve
mientras se está reproduciendo un
CD para saltar al comienzo de la
pista siguiente.
Cada vez que pulse el botón
consecutivamente, se localiza el
comienzo de las pistas siguientes
y se efectúa la reproducción.
Pulse 4 por un tiempo breve
mientras se está reproduciendo un
CD para regresar al comienzo de
la pista actual.
Cada vez que pulse el botón
consecutivamente, se localiza el
comienzo de las pistas anteriores y
se efectúa la reproducción.
Selección de los modos de
reproducción de CD
Para reproducir las pistas de forma
aleatoria (Reproducción aleatoria)
Podrá reproducir todas las pistas del CD de
forma aleatoria.
MODE
12
RND
Cuando esté activado el reproducción aleatoria,
se encenderá el indicador RND en la pantalla.
Se empezará a reproducir una pista
seleccionada de forma aleatoria.
1 Pulse MODE para acceder al
modo de funciones mientras
se está reproduciendo un CD.
2 Pulse RND (aleatoria)
mientras se encuentra en
el modo de funciones para
que el indicador RND se
encienda en la pantalla.
Cada vez que pulsa el botón,
el modo de reproducción
aleatoria de CD se activa y
desactiva alternativamente.
Indicador RND
RND
Para seleccionar directamente una
determinada pista
Pulse el botón de número correspondiente al
número de pista que desea reproducir.
8
• Para seleccionar un número de pista del 1 – 6:
Pulse ligeramente 1 (7) – 6 (12).
• Para seleccionar un número de pista del 7 – 12:
Pulse y mantenga pulsado 1 (7) – 6 (12)
durante más de 1 segundo.
910 127
MO
12
11
RPT
RND
Page 33

Para reproducir las pistas repetidamente
(Reproducción repetida)
Podrá escuchar la pista actual repetidamente.
MODE
11
RPT
Cuando esté activado el reproducción repetida,
se encenderá el indicador RPT en la pantalla.
Se empezará a reproducir la pista actual de
forma repetida.
1 Pulse MODE para acceder al
modo de funciones mientras
se está reproduciendo un CD.
2 Pulse RPT (repetición)
mientras se encuentra en el
modo de funciones para que
el indicador RPT se encienda
en la pantalla.
Cada vez que pulsa el botón,
el modo de reproducción
repetida de CD se activa y
desactiva alternativamente.
Indicador RPT
RPT
Número de pista que
se está reproduciendo
Prohibición de la expulsión
del CD
Es posible inhibir la expulsión del CD y bloquear
el CD dentro de la ranura de carga.
Mientras pulsa CD, pulse y mantenga
pulsado 0 durante más de 2 segundos.
CD
ESPAÑOL
“EJECT” destella en la pantalla durante
aproximadamente 5 segundos, y el CD queda
bloqueado para que no pueda expulsarse.
Para cancelar la prohibición y
desbloquear el CD
Mientras se pulsa CD, pulse y mantenga pulsado
0 de nuevo durante más de 2 segundos.
“EJECT” aparece en la pantalla, y el CD será
expulsado de la ranura de carga.
El indicador de CD insertado se destella.
13
Page 34

AJUSTES DEL SONIDO
Ajuste del sonido
Usted puede ajustar las características de
sonido a su preferencia.
1
Seleccione el ítem que desea
ajustar.
SEL
ESPAÑOL
(graves)
Indicación Para: Gama
BAS Ajustar los graves. –06 (min.)
TRE Ajustar los agudos. –06 (min.)
FAD* Ajustar el balance R06 (Trasero
BAL Ajustar el balance L06 (Izquierdo
VOL Ajustar el volumen. 00 (min.)
Cada vez que pulsa el botón,
los ítems ajustables cambian
de la siguiente manera:
BAS
(volumen)
de los altavoces solamente)
delantero y |
trasero. F06 (Delantero
de los altavoces solamente)
izquierdo y |
derecho. R06 (Derecho
VOL
TRE
(agudos)
(desvanecedor)
BAL
(balance)
|
+06 (max.)
|
+06 (max.)
solamente)
solamente)
|
50 (max.)
FAD
2
Ajuste el nivel.
Para aumentar el nivel
Para reducir el nivel
Ej.: Cuando usted ajusta a “TRE” (agudos)
Nota:
Normalmente los botones + y – funcionan como
botones de control de volumen. Por consiguiente no es
necesario seleccionar “VOL” para ajustar el nivel de
volumen.
Activado/desactivado de la
función de sonoridad
A volúmenes bajos, el oído humano es menos
sensible a las frecuencias bajas y altas.
La función de sonoridad puede reforzar estas
frecuencias para producir un sonido bien
equilibrado a bajos niveles de volumen.
LOUD
Cada vez que pulsa LOUD, la
función de sonoridad se activa
y desactiva alternativamente.
Indicador LOUD (sonoridad)
* Si está usando un sistema de dos altavoces, ajuste
el nivel del desvanecedor a “00”.
14
Page 35

Utilización de la memoria de
control de sonido (SCM)
Usted puede seleccionar y almacenar un ajuste
de sonido preestablecido para cada fuente de
reproducción (SCM avanzado).
Selección y almacenamiento de los
modos de sonidos
Una vez que seleccione un modo de sonido,
será almacenado en la memoria y llamado cada
vez que seleccione la misma fuente y se
visualiza en la pantalla.
El modo de sonido se puede almacenar para
cada una de las siguientes fuentes—FM1, FM2,
FM3, AM y CD.
• Si en lugar de almacenar separadamente el
modo de sonido para cada fuente de
reproducción, desea utilizar un mismo modo
de sonido para todas las fuentes, consulte
“Cancelación del SCM avanzado—SCM LINK”
en la página 17.
Seleccione el modo de sonido deseado.
SCM
SCM OFF
SCM
Ej.: Cuando usted selecciona “BEAT”
• Cuando “SCM LINK” está a “LINK ON”, el
modo de sonido seleccionado podrá ser
almacenado en la memoria para la fuente
actual, y el efecto será aplicado sólo a la
fuente actual.
• Cuando “SCM LINK” está a “LINK OFF”, el
efecto del modo de sonido seleccionado será
aplicado a cualquier fuente.
Cada vez que pulsa el
botón, el modo de sonido
cambia de la siguiente
manera:
BEAT
SOFT
POP
Indicación Para: Valores preajustados
BAS TRE LOUD
SCM OFF (Sonido plano) 00 00 ON
BEAT Música de +02 00 ON
SOFT Música de +01 –03 OFF
POP Música liviana +04 +01 OFF
rock o de
discoteca
fondo suave
Llamada de los modos de sonido
Cuando “SCM LINK” está a “LINK ON”,
seleccione la fuente.
FM
CD
AM
Se llama el modo de sonido almacenado en la
memoria para la fuente que se ha seleccionado.
Notas:
• Podrá ajustar el sonido preajustado para adaptarlo
a su gusto y almacenarlo en la memoria.
Si desea ajustar y almacenar su modo de sonido
original, consulte “Cómo almacenar sus propios
ajustes de sonido”en la página 16.
• Para ajustar los niveles de refuerzo de los graves y
agudos o para activar/desactivar temporalmente la
función de sonorided, consulte la página 14. (Los
ajustes realizados por usted se cancelan si
selecciona otra fuente).
Cada vez que cambia la
fuente de reproducción, el
indicador SCM destella en la
pantalla.
SCM
ESPAÑOL
15
Page 36

Cómo almacenar sus propios
ajustes de sonido
Usted podrá ajustar los modos de sonido (BEAT,
SOFT, POP) a su gusto y almacenar sus propios
ajustes en la memoria.
• Hay un límite de tiempo para realizar los
siguientes pasos. Si se cancelan los ajustes
antes de haber terminado, comience otra vez
desde el paso 1.
ESPAÑOL
1
Llame el modo de sonido que desea
ajustar.
SCM
SCM
• Para los detalles, consulte
la página 15.
3
Repita el paso 2 para ajustar los
otros ítems.
4
Pulse y mantenga pulsado SCM
hasta que el modo de sonido
seleccionado por usted en el paso
destelle en la pantalla.
SCM
SCM
5
Repita el mismo procedimiento para
El ajuste del modo de control
de sonido seleccionado
quedará almacenado en la
memoria.
almacenar los otros modos de
sonido.
1
Ej.: Cuando usted selecciona “SOFT”
2
Para ajustar el nivel de los graves o
agudos.
1 Seleccione “BAS” (graves) o “TRE”
(agudos).
SEL
Ej.: Cuando usted selecciona “TRE” (agudos)
2 Ajuste el nivel.
Para activar o desactivar la función
de sonoridad.
LOUD
• Para los detalles,
consulte la página 14.
16
Para reposicionar los ajustes de fábrica,
repita el mismo procedimiento y vuelva a asignar
los valores preajustados indicados en la tabla de
la página 15.
Page 37

OTRAS FUNCIONES PRINCIPALES
Selección de la pantalla de
nivel—LEVEL
Usted puede seleccionar la indicación de nivel a
su gusto.
La unidad se entrega de fábrica con “VOL 2”
seleccionado.
• VOL 1: Muestra el indicador de nivel de
• VOL 2: Aparecen alternativamente “VOL 1” y
• OFF: Desaparece el indicador de nivel de
1
2
volumen.
la pantalla de iluminación.
volumen.
Pulse y mantenga pulsado SEL
(selección) durante más de
2 segundos.
Aparece “CLOCK H”, “CLOCK M”,
“SCM LINK” o “LEVEL” en la pantalla.
SEL
Seleccione “LEVEL” si no se
encuentra visualizado en la pantalla.
CLOCK H CLOCK M
Cancelación del SCM
avanzado—SCM LINK
Usted puede cancelar el SCM avanzado
(memoria de control de sonido) y desenlazar los
modos de sonido y las fuentes de reproducción.
La unidad se entrega de fábrica para que pueda
almacenar en la memoria un modo de sonido
diferente para cada fuente, de manera que sea
posible cambiar los modos de sonido con sólo
cambiar las fuentes.
• LINK ON: SCM avanzado (modos de sonido
• LINK OFF: SCM convencional (un modo de
1
Pulse y mantenga pulsado SEL
(selección) durante más de
2 segundos.
Aparece “CLOCK H”, “CLOCK M”,
“SCM LINK” o “LEVEL” en la pantalla.
2
Seleccione “SCM LINK” si no se
encuentra visualizado en la pantalla.
diferentes para fuentes diferentes).
sonido para todas las fuentes).
SEL
ESPAÑOL
LEVEL SCM LINK
3
Seleccione el modo deseado
—“VOL 1”, “VOL 2” o “OFF”.
4
Finalice el ajuste.
SEL
OFF
CLOCK H CLOCK M
LEVEL SCM LINK
3
Seleccione “LINK OFF”.
VOL 2VOL 1
4
Finalice el ajuste.
SEL
Para activar SCM avanzado (memoria de
control de sonido), repita el mismo
procedimiento y pulse + para seleccionar
“LINK ON” en el paso 3.
17
Page 38

Desmontaje del panel de
control
Podrá desmontar el panel de control cuando
salga de su automóvil.
Al desmontar o instalar el panel de control,
preste atención para no dañar los conectores
provistos al dorso del panel de control y en el
portapanel.
ESPAÑOL
Cómo desmontar el panel de control
Antes de desmontar el panel de control,
asegúrese de desconectar la alimentación.
1
Desbloquee el panel de control.
2
Eleve y extraiga el panel de control
de la unidad.
Cómo instalar el panel de control
1
Inserte el lado izquierdo del panel
de control en la ranura del
portapanel.
2
Pulse el lado derecho del panel de
control para fijarlo al portapanel.
Nota sobre la limpieza de los conectores:
Si acostumbra a desmontar frecuentemente el
panel de control, se podrán deteriorar los
conectores.
Para reducir al mínimo esta posibilidad, limpie
periódicamente los conectores con un palillo de
algodón o con un lienzo humedecido con alcohol
teniendo cuidado de no dañar los conectores.
18
3
Ponga el panel de control
desmontado en el estuche
suministrado.
Conectores
Page 39

LOCALIZACIÓN DE AVERIAS
Lo que aparenta ser una avería podría resolverse fácilmente. Verifique los siguientes puntos antes de
acudir al centro de servicio.
Síntomas
• El sonido no sale por los
altavoces.
Causas
El nivel de volumen está
ajustado al mínimo.
Las conexiones son
incorrectas.
Ajustarlo al nivel óptimo.
Verifique los cables y las
conexiones.
Remedios
• Esta unidad no funciona en
absoluto.
Generalidades
• El preajuste automático
SSM (Memoria secuencia
de las emisoras más
fuertes) no funciona.
FM/AM
• Hay ruidos estáticos
mientras se escucha la
radio.
• El CD es expulsado
automáticamente.
• El CD-R no se puede
reproducir.
• Las pistas del CD-R no
pueden ser omitidas.
• No se puede reproducir ni
expulsar el CD.
• El sonido del CD se
interrumpe algunas veces.
Reproducción de CD
El microcomputador
incorporado podría haber
funcionado incorrectamente
debido a los ruidos, etc.
Las señales son muy débiles.
La antena no está firmemente
conectada.
El CD está insertado boca
abajo.
El CD-R no está finalizado.
El CD está bloqueado.
El reproductor de CD podría
estar funcionando
incorrectamente.
Está conduciendo por
caminos accidentados.
Mientras mantiene pulsado SEL
(selección), pulse (en
espera/encendido atenuador)
durante más de 2 segundos
para reinicializar la unidad. (El
ajuste del reloj y las emisoras
preajustadas en la memoria se
borran). (Consulte la página 2).
Almacene las emisoras
manualmente.
Conecte la antena firmemente.
Inserte el CD correctamente.
• Inserte un CD-R finalizado.
• Finalice el CD-R con el
componente utilizado para
la grabación.
Desbloquee el CD. (Consulte la
página 13).
Mientras mantiene pulsado
(en espera/encendido
atenuador), pulse 0 (expulsión)
durante más de 2 segundos.
Tenga cuidado de no dejar caer
el CD cuando sea expulsado.
Pare la reproducción mientras
conduce sobre caminos
accidentados.
ESPAÑOL
•“NO DISC” aparece en la
pantalla.
El CD está rayado.
Las conexiones son
incorrectas.
No hay CD en la ranura de
carga.
CD incorrectamente
insertado.
Cambie el CD.
Verifique los cables y las
conexiones.
Inserte un CD en la ranura de
carga.
Inserte el CD correctamente.
19
Page 40

MANTENIMIENTO
Manipulación de los discos
Esta unidad ha sido diseñada para reproducir
CDs y CD-Rs (grabables).
• Esta unidad no es compatible con discos
MP3.
Cómo tratar los discos
Cuando saque un disco de
su caja, presione el sujetador
central de la caja y extraiga el
disco agarrándolo por los bordes.
ESPAÑOL
• Siempre sujete el disco por los
bordes. No toque su superficie de grabación.
Cuando guarde el disco en su caja, insértelo
suavemente alrededor del sujetador central (con
la superficie impresa hacia arriba).
• Asegúrese de guardar los discos en sus cajas
después del uso.
Para mantener los discos limpios
Un disco sucio podría no reproducir
correctamente. Si el disco se llegara
a ensuciar, utilice un lienzo suave y
limpie con movimientos rectos
desde el centro hacia el borde.
Para reproducir discos nuevos
Algunos discos nuevos podrían
presentar ciertas irregularidades
en sus bordes interior y exterior.
Si intenta introducir un disco así,
podría suceder que la unidad
rechace el disco.
Elimine las irregularidades raspando con un
lápiz, bolígrafo, etc.
Condensación de humedad
Podría condensarse humedad en la lente alojada
en el interior del reproductor de CD en los
siguientes casos:
• Después de encender el calefactor del
automóvil.
• Si hay mucha humedad en el habitáculo.
En estos casos el reproductor de discos podría
no funcionar correctamente. Haga expulsar el
disco y deje la unidad encendida durante
algunas horas hasta que se evapore la unidad.
Sujetador central
Cuando se reproduce un CD-R
Antes de reproducir los CD-Rs, lea atentamente
sus instrucciones o precauciones.
• Utilice únicamente CD-Rs “finalizados”.
• Es posible que algunos CD-Rs no se puedan
reproducir en esta unidad debido a las
características propias del disco y por los
siguientes motivos:
– Discos sucios o rayados.
– Hay condensación de humedad en el lente
interior de la unidad.
– Suciedad en el lente captor del interior del
reproductor.
• Los CD-Rs son afectados por las altas
temperaturas o la alta humedad; por lo tanto,
no los deje en el interior de su automóvil.
• No utilice los siguientes CD-Rs:
– Discos con pegatinas, etiquetas o sellos
protectores adheridos a la superficie.
– Discos que tengan etiquetas que se puedan
imprimir con una impresora de chorro de tinta.
El uso de estos discos bajo altas temperaturas
o alta humedad pueden producir fallos de
funcionamiento o daños a los discos. Por
ejemplo,
– Las etiquetas o las pegatinas se podrían
encoger y provocar la curvatura del disco.
– Las etiquetas o las pegatinas se podrían
despegar y entorpecer la expulsión del disco.
– Las partes impresas del disco podrían
volverse pegajosas.
Lea atentamente las instrucciones o
precauciones acerca de las etiquetas y de los
discos que se pueden imprimir.
• Los CD-RWs (Reescribibles) no se pueden
reproducir en esta unidad.
PRECAUCIÓNES:
• No inserte discos de 8cm (CD simples) en la
ranura de carga. (Estos tipos de discos no
pueden ser expulsados).
• No inserte ningún disco cuya forma no sea la
habitual—un corazón o una flor, por ejemplo,
pues se producirá una avería.
• No exponga los discos a los rayos directos del
sol ni a otra fuente de calor, ni los deje en sitios
sujetos a temperatura y humedad elevadas. No
los deje dentro del automóvil.
• No utilice ningún solvente (por ejemplo,
limpiador de discos convencional,
pulverizadores, diluyente, bencina, etc.) para
limpiar los discos.
20
Disco
curvado
Etiqueta
Resto de
etiqueta
Disco
Etiqueta
autoadhesiva
Page 41

ESPECIFICACIONES
SECCION DEL AMPLIFICADOR DE
AUDIO
Máxima potencia de salida:
Delantera: 45 W por canal
Trasera: 45 W por canal
Potencia de salida continua (RMS):
Delantera: 17 W por canal en 4 Ω, 40 Hz a
20 000 Hz con una distorsión
armónica total no mayor de 0,8%.
Trasera: 17 W por canal en 4 Ω, 40 Hz a
20 000 Hz con una distorsión
armónica total no mayor de 0,8%.
Impedancia de carga:
4 Ω (tolerancia de 4 Ω a 8 Ω)
Gama de control de tonos:
Graves: ±10 dB a 100 Hz
Agudos: ±10 dB a 10 kHz
Respuesta de frecuencias: 40 Hz a 20 000 Hz
Relación señal a ruido: 70 dB
Nivel de salida de línea/impedancia:
2,0 V/20 kΩ de carga (plena escala)
Impedancia de salida: 1 kΩ
SECCION DEL SINTONIZADOR
Gama de frecuencias:
FM: 87,5 MHz a 108,0 MHz
AM: (OM) 522 kHz a 1 620 kHz
(OL) 144 kHz a 279 kHz
[Sintonizador de FM]
Sensibilidad útil:
11,3 dBf (1,0 µV/75 Ω)
Umbral de silenciamiento de 50 dB:
16,3 dBf (1,8 µV/75 Ω)
Selectividad de canal alternativo (400 kHz):
65 dB
Respuesta de frecuencias: 40 Hz a 15 000 Hz
Separación estereofónica: 30 dB
Relación de captura: 1,5 dB
SECCION DEL REPRODUCTOR DE CD
Tipo: Reproductor de discos compactos
Sistema de detección de la señal: Captor óptico
sin contacto (láser de semiconductor)
Número de canales: 2 canales (estéreo)
Respuesta de frecuencias: 5 Hz a 20 000 Hz
Gama dinámica: 90 dB
Relación señal a ruido: 95 dB
Lloro y trémolo: Inferior al límite medible
GENERALIDADES
Requisitos de potencia:
Voltaje de funcionamiento: 14,4 V CC
(tolerancia de 11 V a 16 V)
Sistema de puesta a tierra: Masa negativa
Temperatura de trabajo permisible: 0°C a +40°C
Dimensiones (An × Al × Pr):
Dimensiones de instalación (aprox.):
182 mm × 52 mm × 150 mm
Dimensiones del panel (aprox.):
188 mm × 58 mm × 11 mm
Peso (aprox.):
1,3 kg (excluyendo accesorios)
El diseño y las especificaciones se encuentran sujetos
a cambios sin previo aviso.
ESPAÑOL
[Sintonizador de OM]
Sensibilidad: 20 µV
Selectividad: 35 dB
[Sintonizador de OL]
Sensibilidad: 50 µV
21
Page 42

IMPORTANT POUR PRODUITS LASER
1. PRODUIT LASER CLASSE 1
2. ATTENTION: N’ouvrez pas le couvercle supérieur. Il n’y a aucune pièce réparable par l’utilisateur à
l’intérieur de l’appareil; confiez toute réparation à un personnel qualifié.
3. ATTENTION: Risque de radiations laser visible et invisible quand l’appareil est ouvert et que le
système de verrouillage ne fonctionne pas ou a été mis hors service. Évitez toute exposition directe
au rayon.
4. REPRODUCTION DE L’ÉTIQUETTE: ÉTIQUETTE DE PRÉCAUTION PLACÉE À L’EXTÉRIEUR
DE L’APPAREIL.
FRANÇAIS
Comment réinitialiser votre appareil
Tout en maintenant SEL (sélection) pressée, appuyez sur (attente/en service sourdine)
pendant plus de 2 secondes.
Cela réinitialisera le microprocesseur intégré.
(attente/en service sourdine)
LOUD
SEL
DISP
MO
8
7 9 10 12
11
RPT
RND
SEL (sélection)
Remarques:
• Les ajustements que vous avez préréglés—tels que les canaux préréglés ou les ajustements sonores
—seront aussi effacés.
• Si un CD se trouve dans l’appareil, il est éjecté quand celui-ci est réinitialisé. Faites attention de ne pas
faire tomber le CD.
2
FM
CD
SSM
AM
SCMMODE
Page 43

Merci pour avoir acheté un produit JVC. Veuillez lire attentivement toutes les instructions avant
d’utiliser l’appareil afin de bien comprendre son fonctionnement et d’obtenir les meilleures
performances possibles.
TABLE DES MATIERES
Comment réinitialiser votre appareil ......... 2
Comment utiliser la touche MODE............ 3
EMPLACEMENT DES TOUCHES .......... 4
Panneau de command .............................. 4
FONCTIONNEMENT DE BASE ............ 5
Mise sous tension ..................................... 5
Réglage de l’horloge ................................. 6
FONCTIONNEMENT DE LA RADIO ....... 7
Ecoute de la radio ..................................... 7
Mémorisation des stations ........................ 9
Accord d’une station présélectionnée ....... 10
FONCTIONNEMENT DU LECTEUR CD ... 11
Lecture d’un CD ........................................ 11
Localisation d’une plage ou d’un point
particulier sur un CD ................................
Sélection des modes de lecture de CD..... 12
Interdiction de l’éjection de CD ................. 13
Comment utiliser la touche MODE
Si vous appuyez sur MODE, l’appareil entre en mode de fonctions et les touches numériques
peuvent être utilisées comme touches de fonction.
MODE
AJUSTEMENT DU SON .................... 14
Ajustement du son .................................... 14
Mise en/hors service de la fonction
loudness ................................................. 14
Utilisation de la mémoire de commande
du son (SCM) ......................................... 15
Mémorisation de votre propre ajustement
sonore .................................................... 16
AUTRES FONCTIONS PRINCIPALES..... 17
Sélection de l’affichage du niveau
—LEVEL ................................................. 17
Annulation de SCM avancé—SCM LINK...
Détachement du panneau de
commande .............................................. 18
DEPANNAGE ................................ 19
12
ENTRETIEN ................................. 20
Manipulation des disques ......................... 20
SPECIFICATIONS........................... 21
17
FRANÇAIS
MO
8
Pour utiliser de nouveau ces touches comme touches numériques après avoir appuyer sur
MODE, attendez 5 secondes sans appuyer sur aucune touche, jusqu’à ce que le mode de
fonctions soit annulé.
• Appuyer de nouveau sur MODE annule aussi le mode de fonctions.
910 127
MO
11
RPT
RND
Indicateur de durée restante
Remarque:
Pour des raisons de sécurité, une carte d’identification numérotée est fournie avec cet appareil, et le même
numéro d’identification est imprimé sur le châssis de l’appareil. Conserver cette carte dans un endroit sûr,
elle pourra aider les autorités pour identifier votre appareil en cas de vol.
AVANT D’UTILISER L’APPAREIL
*
Par sécurité....
• N’augmentez pas trop le volume car cela bloquerait
les sons de l’extérieur rendant la conduite
dangereuse.
• Arrêtez la voiture avant de réaliser toute opération
compliquée.
*
Température à l’intérieur de la voiture....
Si votre voiture est restée garée pendant longtemps
dans un climat chaud ou froid, attendez que la
température à l’intérieur de la voiture redevienne
normale avant d’utiliser l’appareil.
3
Page 44

EMPLACEMENT DES TOUCHES
Panneau de command
Fenêtre d’affichage
FRANÇAIS
1
q
;dga
SCM
3
2
LOUD
SEL
DISP
w
s
54
MO
7 9 10 12
8
e
1 Touche (attente/en service sourdine)
2 Touche LOUD (contour)
3 Touche SEL (sélection)
4 Fenêtre d’affichage
5 La fente d’insertion
6 Touche 0 (éjection)
7 Touche CD
8 Touche AM
9 Touche FM
p Touches ¢/4
• Fonctionnent aussi comme touches SSM quand
elles sont pressées en même temps.
q Touches +/–
w Touche DISP (affichage)
e Touche MO (monaural)
r Touches numériques
t Touche RPT (répétition)
y Touche RND (aléatoire)
u Touche MODE
i Touche SCM
(mémoire de commande sonore)
o Touche (déblocage du panneau de
commande)
4
f
ST RND RPT
MO
j
h
k
l
/
7
69
8
CD
RND
11
RPT
tyr
ui
AM
SCMMODE
p
FM
SSM
o
Fenêtre d’affichage
; Indicateur SCM (mémoire de commande
sonore)
a Indicateur de source CD
s Indicateurs de bande FM (FM1, FM2, FM3)
d Indicateur de bande AM
f Indicateurs de réception du tuner
MO (monaural), ST (stéréo)
g Indicateur RND (aléatoire)
h Indicateur RPT (répétition)
j Indicateur LOUD (contour)
k Indicateur de présence de CD
l Affichage principal
/ Indicateur le niveau de volume
Page 45

FONCTIONNEMENT DE BASE
LOUD
SEL
DISP
7 9 10 12
123
Mise sous tension
1
Mettez l’appareil sous tension.
Remarque sur le fonctionnement monotouche:
Quand vous choisissez la source à l’étape 2 cidessous, l’appareil se met automatiquement sous
tension. Vous n’avez donc pas besoin d’appuyer
d’abord sur cette touche pour mettre l’appareil
sous tension.
2
Choisissez la source.
FM
CD
AM
Pour utiliser le tuner (FM ou AM),
voir les pages 7 – 10.
Pour reproduire un CD,
voir les pages 11 – 13.
3
Ajustez le volume.
Pour augmenter le volume
Pour diminuer le volume
FM
CD
SSM
MO
8
RND
11
RPT
4
Ajustez le son comme vous le
AM
SCMMODE
souhaitez. (Voir les pages 14 – 16).
Pour baisser le son instantanément
Appuyez brièvement sur pendant
l’écoute de n’importe quelle source. “ATT ”
commence à clignoter sur l’affichage, et le
niveau de volume est baissé instantanément.
Pour revenir au niveau de volume précédent,
appuyez de nouveau brièvement sur la touche.
FRANÇAIS
Pour mettre l’appareil hors tension
Maintenez pressée pendant plus d’une
seconde.
“SEE YOU” apparaît et l’appareil se met hors
tension.
• Si vous mettez l’appareil hors tension lors
de l’écoute d’un CD, la lecture du CD
débutera à partir de l’endroit où elle a été
interrompue la prochaine fois que vous mettez
l’appareil sous tension.
PRECAUTION sur le réglage du volume:
Les CD produisent très peu de bruit comparé avec
les autres sources. Si le niveau de volume est
ajusté, par exemple, pour le tuner, les enceintes
risquent d’être endommagées par l’augmentation
soudaine du niveau de sortie.
Par conséquent, diminuez le volume avant de
reproduire un CD et ajustez-le comme vous le
souhaitez pendant la lecture.
Le niveau de volume apparaît
Indicateur le niveau de volume
(voir la page 17)
5
Page 46

LOUD
HorlogeFréquence
SEL
DISP
7 9 10 12
FM
CD
SSM
MO
8
RND
11
RPT
AM
SCMMODE
Réglage de l’horloge
1
Maintenez pressée SEL (sélection)
pendant plus de 2 secondes.
FRANÇAIS
“CLOCK H”, “CLOCK M”, “SCM LINK” ou
“LEVEL” apparaît sur l’affichage.
SEL
2
Réglez les heures.
1 Choisissez “CLOCK H” (heures) s’il
n’apparaît pas sur l’affichage.
CLOCK H CLOCK M
LEVEL SCM LINK
2 Ajustez les heures.
3
Réglez les minutes.
1 Choisissez “CLOCK M” (minutes).
CLOCK H CLOCK M
LEVEL SCM LINK
2 Ajustez les minutes.
4
Terminez le réglage.
SEL
Pour vérifier l’heure actuelle ou changer le
mode d’affichage
DISP
Appuyez sur DISP (affichage)
répétitivement.
Chaque fois que vous appuyez
sur la touche, le mode
d’affichage change comme
suit:
• Pendant l’utilisation du tuner:
• Pendant l’utilisation du CD:
HorlogeDurée de lecture écoulée
• Quand l’appareil est hors tension:
L’appareil se met sous tension et l’horloge
apparaît pendant 5 secondes. Puis, l’appareil
se remet hors tension.
6
Page 47

FONCTIONNEMENT DE LA RADIO
LOUD
SEL
DISP
MO
8
7 9 10 12
Ecoute de la radio
Vous pouvez utiliser la recherche automatique
ou l’accord manuel pour accorder une station
particulière.
Recherche d’une station
automatiquement: Recherche
automatique
1
Choisissez la bande (FM1 – 3, AM).
FM
FM1 FM2 FM3
AM
AM
FM
CD
SSM
RND
11
RPT
2
Commencez la recherche d’une
AM
SCMMODE
station.
Pour rechercher des stations
de fréquences supérieures
Pour rechercher des stations
de fréquences inférieures
Quand une station est accordée, la
recherche s’arrête.
Pour arrêter la recherche avant qu’une station
ne soit accordée, appuyez sur la même touche
que vous avez utilisée pour la recherche.
FRANÇAIS
S’allume lors de la réception d’une émission
FM stéréo de signal suffisamment for.
ST
La bande choisie apparaît.
Remarque:
Cet appareil a trois bandes FM (FM1, FM2,
FM3). Vous pouvez utiliser n’importe laquelle
pour écouter une station FM.
7
Page 48

Recherche manuelle d’une station:
Recherche manuelle
1
Choisissez la bande (FM1 – 3, AM).
FM
FM1 FM2 FM3
AM
AM
Remarque:
Cet appareil a trois bandes FM (FM1, FM2,
FM3). Vous pouvez utiliser n’importe laquelle
FRANÇAIS
pour écouter une station FM.
2
Maintenez pressée ¢ ou
4
jusqu’à ce que “M” (manuel)
clignote sur l’affichage.
Quand une émission FM stéréo est
difficile à recevoir:
MODE
MO
8
l’indicateur MO s’allume et
Lorsque l’indicateur MO est allumé sur
l’affichage, le son que vous entendez est
monaural mais la réception est améliorée.
1 Appuyez sur MODE pour
entrer en mode de fonction
pendant l’écoute d’une station
FM.
2 Appuyez sur MO (monaural),
pendant le mode de fonction,
de façon que l’indicateur MO
s’allume sur l’affichage.
Chaque fois que vous
appuyez sur la touche,
s’éteint alternativement.
Indicateur MO (monaural)
MO
3
Accordez une station souhaitée
pendant que “M” (manuel) clignote.
Pour accorder des stations de
fréquences supérieures
Pour accorder des stations de
fréquences inférieures
• Si vous relâchez la touche, le mode
manuel est mis automatiquement hors
service après 5 secondes.
• Si vous maintenez la touche pressée, la
fréquence continue de changer (par
intervalle de 50 kHz pour la bande FM et
par intervalle de 9 kHz pour la bande
AM—PO/GO) jusqu’à ce que vous la
relâchiez.
8
Page 49

Mémorisation des stations
Vous pouvez utiliser l’une des deux méthodes
suivantes pour mémoriser les stations reçues.
• Présélection automatique des stations FM:
SSM (Strong-station Sequential Memory)
• Présélection manuelle des stations FM et AM
Présélection automatique des stations
FM: SSM
Vous pouvez présélectionner 6 stations locales
dans chaque bande FM (FM1, FM2 et FM3).
1
Choisissez le numéro de la bande
FM (FM1 – 3) où vous souhaitez
mémoriser la station.
FM
FM1 FM2 FM3
2
Maintenez pressées les deux
touches pendant plus de 2
secondes.
Présélection manuelle
Vous pouvez présélectionner manuellement un
maximum de 6 stations pour chaque bande
(FM1, FM2, FM3 et AM).
Ex.: Mémorisation de la station FM située à
92,5 MHz sur le numéro de présélection 1
de la bande FM1.
1
Choisissez le numéro de la bande
(FM1 – 3, AM) où vous souhaitez
mémoriser la station (dans cet
exemple, FM1).
FM
FM1 FM2 FM3
AM
AM
2
Accordez une station (dans cet
exemple à 92,5 MHz).
Pour accorder des stations de
fréquences supérieures
FRANÇAIS
SSM
“SSM” apparaît, puis disparaît quand la
présélection automatique est terminée.
Les stations locales FM avec les signaux les plus
forts sont recherchées et mémorisées
automatiquement dans le numéro de bande que
vous avez choisi (FM1, FM2 ou FM3).
Ces stations sont mémorisées sur les touches de
présélection de station—No. 1 (fréquence la plus
basse) à No. 6 (fréquence la plus haute).
Quand la présélection est terminée, la station
mémorisée automatiquement sur la touche de
présélection de station 1 est accordée
automatiquement.
Pour accorder des stations de
fréquences inférieures
SUITE À LA PAGE SUIVANTE
9
Page 50

3
Maintenez pressée la touche
numérique (dans cet exemple, 1)
pendant plus de 2 secondes.
7
“P1” clignote pendant quelques secondes.
4
Répétez la procédure ci-dessus pour
mémoriser d’autres stations sur
FRANÇAIS
d’autres numéros de présélection.
Remarques:
• La station précédemment présélectionnée est
effacée quand une nouvelle station est mémorisée
sur le même numéro de présélection.
• Les stations présélectionnées sont effacées si
l’alimentation du circuit mémoire est interrompue
(par exemple, pendant le changement de la
batterie). Si cela se produit, présélectionnez de
nouveau les stations.
Accord d’une station
présélectionnée
Vous pouvez accorder facilement une station
présélectionnée.
Rappelez-vous que vous devez d’abord
mémoriser les stations. Si vous ne les avez pas
encore mémorisées, référez-vous à
“Mémorisation des stations” à les pages 9 et 10.
1
Choisissez la bande (FM1 – 3, AM).
FM
FM1 FM2 FM3
AM
AM
2
Choisissez le numéro (1 – 6) de la
station présélectionnée souhaitée.
8
910 127
MO
11
RPT
RND
10
Page 51

FONCTIONNEMENT DU LECTEUR CD
LOUD
SEL
DISP
MO
7 9 10 12
8
Lecture d’un CD
Insérez un disque dans la fente de
d’insertion.
L’appareil se met en
marche, tire le CD et
commence la lecture
automatiquement.
Remarque sur le fonctionnement monotouche:
Si un CD se trouve déjà dans la fente d’insertion,
appuyer sur CD met l’appareil sous tension et
commence la lecture automatiquement.
L’indicateur de présence de CD clignote.
L’indicateur de présence
de CD s’allume.
FM
CD
SSM
RND
11
RPT
AM
SCMMODE
Remarque:
Quand un CD est inséré à l’envers, “EJECT”
apparaît sur l’affichage et le CD est éjecté
automatiquement.
Pour arrêter la lecture et éjecter le CD
Appuyez sur 0.
La lecture du CD s’arrête automatiquement et le
CD est automatiquement éjecté de la fente
d’insertion. La source change sur le tuner (vous
entendez la dernière station reçue).
• Si vous changez la source, la lecture de CD
s’arrête aussi (sans éjecter le CD).
La prochaine fois que vous choisissez “CD”
comme source, la lecture du CD commence à
partir de l’endroit où elle a été interrompue.
Remarques:
• Si le CD éjecté n’est pas retiré avant environ
15 secondes, le disque est automatiquement
réinséré dans la fente d’insertion pour le protégé de
la poussière. (Dans ce cas, la lecture du CD ne
commence pas).
• Vous pouvez éjecter le CD quand l’appareil est hors
tension.
FRANÇAIS
Durée de lecture
totale du disque
inséré
Nombre total de
plages du disque
inséré
Durée de lecture écoulée Plage actuelle
Toutes les plages sont reproduites répétitivement
jusqu’à ce que vous arrêtiez la lecture.
A propos du désaligement:
Un désalignement peut être la conséquence d’une
conduite sur un terrain accidenté. Cela
n’endommage pas l’appareil ni le CD, mais cela
peut être agaçant.
Nous vous recommandons d’arrêter la lecture de
CD lors d’une conduite sur un tel terrain.
11
Page 52

Localisation d’une plage ou
d’un point particulier sur un CD
Sélection des modes de
lecture de CD
Pour avancer rapidement ou inverser une
plage
Maintenez pressée ¢,
pendant la reproduction d’un CD,
pour avancer rapidement la plage.
Maintenez pressée 4 ,
pendant la reproduction d’un CD,
pour inverser la plage.
Pour aller aux plages suivantes ou
précédentes
FRANÇAIS
Appuyez brièvement sur ¢
lors de la reproduction d’un CD,
pour avancer jusqu'au début de
la plage suivante.
Chaque fois que vous appuyez
répétitivement sur la touche, le
début des plages suivantes est
localisé et celle-ci est reproduite.
Appuyez brièvement sur 4
lors de la reproduction d’un CD,
pour revenir au début de la plage
actuelle.
Chaque fois que vous appuyez
répétitivement sur la touche, le
début des plages précédentes est
localisé et celle-ci est reproduite.
Pour reproduire les plages dans un ordre
aléatoire (Lecture aléatoire)
Vous pouvez reproduire toutes les plages du
disque dans un ordre aléatoire.
MODE
12
RND
Quand le lecture aléatoire est en service,
l’indicateur RND s’allume sur l’affichage. Puis,
une plage choisie aléatoirement est reproduite.
1 Appuyez sur MODE pour
entrer en mode de fonction
pendant l’écoute d’un CD.
2 Appuyez sur RND (aléatoire),
pendant le mode de fonctions,
de façon que l’indicateur RND
s’allume sur l’affichage.
Chaque fois que vous
appuyez sur la touche, le
mode de lecture aléatoire de
CD se met alternativement en
et hors service.
Indicateur RND
RND
Pour aller directement à une plage
particulière
Appuyez sur la touche numérique
correspondante au numéro de plage souhaité
pour commencer sa reproduction.
8
• Pour choisir un numéro de plage de 1 – 6:
Appuyez brièvement sur 1 (7) – 6 (12).
• Pour choisir un numéro de plage de 7 – 12:
Maintenez pressé 1 (7) – 6 (12) pendant plus
d’une seconde.
910 127
MO
12
11
RPT
RND
Page 53

Pour reproduire les plages répétitivement
(Lecture répétée)
Vous pouvez reproduire la plage actuelle
répétitivement.
MODE
11
RPT
Quand le lecture répétée est en service,
l’indicateur RPT s’allume sur l’affichage. Puis, la
plage en cours de lecture est reproduite
répétitivement.
1 Appuyez sur MODE pour
entrer en mode de fonction
pendant l’écoute d’un CD.
2 Appuyez sur RPT (répétition),
pendant le mode de fonctions,
de façon que l’indicateur RPT
s’allume surl’affichage.
Chaque fois que vous
appuyez sur la touche, le
mode de lecture répétée se
met alternativement en et hors
service.
Indicateur RPT
RPT
Numéro de plage de la plage
actuellement reproduite
Interdiction de l’éjection de
CD
Vous pouvez interdire l’éjection d’un CD et le
verrouiller dans la fente d’insertion.
Tout en maintenant pressée CD,
appuyez sur 0 pendant plus de 2
secondes.
CD
“EJECT” clignote sur l’affichage pendant environ
5 secondes, le CD est verrouillé et ne peut plus
être éjecté.
Pour annuler l’interdiction et
déverrouiller le CD
Tout en appuyant sur CD, maintenez de nouveau
pressée 0 pendant plus de 2 secondes.
“EJECT” apparaît sur l’affichage et le CD est
éjecté de la fente d’insertion.
L’indicateur de présence de CD clignote.
FRANÇAIS
13
Page 54

AJUSTEMENT DU SON
Ajustement du son
Vous pouvez ajuster les caractéristiques du son
à votre préférence.
1
Choisissez l’élément que vous
souhaitez ajuster.
SEL
(graves)
Indication Pour: Plage
FRANÇAIS
BAS Ajuster les graves. –06 (min.)
TRE Ajuster les aigus. –06 (min.)
FAD* Ajuster l’équilibre R06 (Arrièrer
BAL Ajuster l’équilibre L06 (Gauche
VOL Ajuster le volume. 00 (min.)
Chaque fois que vous
appuyez sur la touche,
l’élément ajustable change
comme suit:
BAS
(volume)
entre les seulement)
enceintes avant |
et arrière. F06 (Avant
entre les seulement)
enceintes gauche |
et droite. R06 (Droit
VOL
TRE
(aigus)
BAL
(balance)
|
+06 (max.)
|
+06 (max.)
seulement)
seulement)
|
50 (max.)
FAD
(fader)
2
Ajustez le niveau.
Pour augmenter le niveau
Pour diminuer le niveau
Ex.: Quand vous ajustez “TRE” (aigus)
Remarque:
Normalement les touches + et – fonctionnent comme
touches de commande du volume. Alors, vous n’avez
pas besoin de choisir “VOL” pour ajuster le niveau
de volume.
Mise en/hors service de la
fonction loudness
L’oreille humaine est moins sensible aux basses
et hautes fréquences à faible volume.
La fonction loudness peut accentuer ces
fréquences pour produire un son bien équilibré à
faible volume.
LOUD
Chaque fois que vous
appuyez sur LOUD, la fonction
loudness se met
alternativement en et hors
service.
Indicateur LOUD (contour)
* Si vous utilisez un système à deux enceintes, réglez
le niveau de fader sur “00”.
14
Page 55

Utilisation de la mémoire de
commande du son (SCM)
Vous pouvez choisir et mémoriser un ajustement
du son spécifique pour chaque source de lecture
(SCM avancé).
Sélection et mémorisation des modes
sonores
Une fois que vous avez choisi un mode sonore, il
est mémorisé. Il est rappelé et apparaît sur
l’affichage chaque fois que vous choisissez la
même source.
Un mode sonore peut être mémorisé pour
chacune des sources suivantes—FM1, FM2,
FM3, AM et CD.
• Si vous ne souhaitez pas mémoriser le mode
sonore séparément pour chaque source de
lecture, mais souhaitez utiliser le même mode
sonore pour toutes les sources, référez-vous à
“Annulation de SCM avancé—SCM LINK” à la
page 17.
Choisissez le mode sonore souhaité.
SCM
SCM OFF
SCM
Ex.: Quand vous choisissez “BEAT”
• Quand “SCM LINK” est réglé sur “LINK ON”, le
mode sonore choisi peut être mémorisé pour la
source actuelle et l’effet ne s’applique qu’à la
source actuelle.
• Quand “SCM LINK” est réglé sur “LINK OFF”,
l’effet du mode sonore choisi s’applique à
toutes les sources.
Chaque fois que vous
appuyez sur la touche, le
mode sonore change comme
suit:
BEAT
SOFT
POP
Indication Pour: Valeurs préréglées
BAS TRE LOUD
SCM OFF (Son plat) 00 00 ON
BEAT Musique +02 00 ON
SOFT Musique +01 –03 OFF
POP Musique +04 +01 OFF
rock ou
disco
de fond
légère
Rappel des modes sonores
Quand “SCM LINK” est réglé sur
“LINK ON”, choisissez la source.
FM
CD
AM
Le mode sonore mémorisé pour la source
choisie est rappelé.
Remarques:
• Vous pouvez ajuster le mode sonore préréglé
comme vous le souhaitez et le mémoriser.
Si vous souhaitez ajuster et mémoriser votre propre
mode sonore, référez-vous à “Mémorisation de
votre propre ajustement sonore” à la page 16.
• Pour ajuster les niveaux d’accentuation des graves
et des aigus ou pour mettre en/hors service
temporairement la fonction contour, référez-vous à
la page 14. (Vos ajustements sont annulés si une
autre source est choisie).
Chaque fois que vous
changez la source de lecture,
l’indicateur SCM clignote sur
l’affichage.
SCM
FRANÇAIS
15
Page 56

Mémorisation de votre propre
ajustement sonore
Vous pouvez ajuster les modes sonore (BEAT,
SOFT, POP) comme vous le souhaitez et
mémoriser votre propre ajustement.
• Il y a un temps limite pour effectuer les étapes
suivantes. Si le réglage est annulé avant que
vous ne terminiez, recommencez à partir de
l’étape 1.
1
Appelez le mode sonore que vous
souhaitez ajuster.
FRANÇAIS
SCM
SCM
Ex.: Quand vous choisissez “SOFT”
2
Pour ajuster le niveau sonore des
graves ou des aigus.
1 Choisissez “BAS” (graves) ou
“TRE” (aigus).
SEL
• Référez-vous à la page 15
pour les détails.
Pour mettre la fonction loudness en
ou hors service.
LOUD
3
Répétez l’étape 2 pour ajuster
• Référez-vous à la page
14 pour les détails.
d’autres éléments.
4
Maintenez pressé SCM jusqu’à ce
que le mode sonore que vous avez
1
choisi à l’étape
l’affichage.
SCM
SCM
5
Répétez la même procédure pour
clignote sur
L’ajustement réalisé pour le
mode sonore choisi est
mémorisé.
mémoriser d’autres modes sonores.
Pour réinitialiser l’appareil aux réglages de
l’usine, répétez la même procédure et
réattribuez les valeurs préréglées du tableau à la
page 15.
16
Ex.: Quand vous choisissez “TRE” (aigus)
2 Ajustez le niveau.
Page 57

AUTRES FONCTIONS PRINCIPALES
Sélection de l’affichage du
niveau—LEVEL
Vous pouvez choisir l’affichage du niveau en
fonction de vos préférences.
À l’expédition de l’usine, “VOL 2” est choisi.
• VOL 1: Affiche l’indicateur de niveau de
• VOL 2: Alterne entre le réglage “VOL 1” et
• OFF: Fait disparaître l’indicateur de niveau
1
2
volume.
l’affichage de l’éclairage.
de volume.
Maintenez pressée SEL (sélection)
pendant plus de 2 secondes.
“CLOCK H”, “CLOCK M”, “SCM LINK” ou
“LEVEL” apparaît sur l’affichage.
SEL
Choisissez “LEVEL” s’il n’apparaît
pas sur l’affichage.
CLOCK H CLOCK M
LEVEL SCM LINK
Annulation de SCM avancé
—SCM LINK
Vous pouvez annuler les réglages SCM
(mémoire de commande sonore) avancés est
annuler les liaisons des modes sonores avec les
sources de lecture.
À l’expédition de l’usine, un mode sonore différent
peut être mémorisé pour chaque source de façon
à ce que vous puissiez changer les modes
sonores simplement ne changeant de source.
• LINK ON: Réglages SCM avancés (modes
• LINK OFF: Réglages SCM ordinaires (un seul
1
Maintenez pressée SEL (sélection)
pendant plus de 2 secondes.
“CLOCK H”, “CLOCK M”, “SCM LINK” ou
“LEVEL” apparaît sur l’affichage.
2
Choisissez “SCM LINK” s’il
n’apparaît pas sur l’affichage.
sonores différents pour chaque
source).
mode sonore pour toutes les
sources).
SEL
FRANÇAIS
3
Choisissez le mode—“VOL 1”,
“VOL 2” ou “OFF”.
OFF
4
Terminez le réglage.
SEL
CLOCK H CLOCK M
LEVEL SCM LINK
VOL 2VOL 1
3
Choisissez “LINK OFF”.
4
Terminez le réglage.
SEL
Pour mettre en service la fonction SCM
(mémoire de commande sonore), répetez la
même procédure et appuyez sur + pour choisir
“LINK ON” à l’étape 3.
17
Page 58

Détachement du panneau de
commande
Vous pouvez détacher le panneau de commande
quand vous quittez la voiture.
Lors du détachement ou de la remise en place
du panneau de commande, faites attention de ne
pas endommager les connecteurs situés à
l’arrière du panneau et sur le porte-panneau.
Comment détacher le panneau de
commande
Avant de détacher le panneau de commande,
assurez-vous de mettre l’appareil hors tension.
FRANÇAIS
1
Déverrouillez le panneau de
commande.
Comment attacher le panneau de
commande
1
Insérez le côté gauche du panneau
de commande dans la rainure située
du côté droit du porte-panneau.
2
Appuyez sur le côté droit du
panneau de commande pour le fixer
au porte-panneau.
18
2
Levez et tirez le panneau de
commande de l’appareil.
3
Mettez le panneau de commande
détaché dans la boîte fournie.
Remarque sur le nettoyage des connecteurs:
Si vous détachez fréquemment le panneau de
commande, les connecteurs se détérioreront.
Pour réduire cette détérioration, essuyez
périodiquement les connecteurs avec un coton-tige
ou un tissu imprégné d’alcool, en faisant attention
de ne pas endommager les connecteurs.
Connecteurs
Page 59

DEPANNAGE
Ce qui apparaît comme un problème n’est pas toujours très sérieux. Vérifier les points suivants avant
d’appeler un centre de réparation.
Symptoms
• Le son ne peut pas être
entendu des enceintes.
• Cet appareil ne fonctionne
pas du tout.
Général
• La présélection automatique
SSM (Strong-station
Sequential Memory) ne
fonctionne pas.
FM/AM
• Il y a du bruit statique lors de
l’écoute de la radio.
• Le CD est éjecté
automatiquement.
• Le CD-R ne peut pas être
reproduit.
• Les plages sur un CD-R ne
peuvent pas être sautées.
• Le CD ne peut être ni
reproduit ni éjecté.
Lecture de CD
• Le son du CD est interrompu
par moment.
•“NO DISC” apparaît sur
l’affichage.
Causes
Le niveau de volume est réglé
au niveau minimum.
Les connexions sont
incorrectes.
Le micro-ordinateur intégré
peut fonctionner incorrectement
à cause de parasites, etc.
Les signaux sont trop faibles.
L’antenne n’est pas connectée
fermement.
Le CD est inséré à l’envers.
Le CD-R n’est pas finalisé.
Le CD est verrouillé.
Le lecteur de CD fonctionne
peut-être incorrectement.
Vous conduisez sur une route
accidentée.
Le CD est rayé.
Les connexions sont
incorrectes.
Il n’y a pas de CD dans la
fente d’insertion.
Le CD n’est pas inséré
incorrectement.
Remèdes
Ajustez-la sur le niveau optimum.
Vérifiez les cordons et les
connexions.
Tout en maintenant SEL
(sélection) pressée, appuyez sur
sourdine) pendant plus de 2
secondes pour réinitialiser
l’appareil. (Le réglage de l’horloge
et les stations présélectionnées
enregistrées en mémoire sont
effacées). (Voir la page 2).
Mémorisez les stations
manuellement.
Connectez l’antenne fermement.
Insérez-le CD correctement.
• Insérez un CD-R finalisé.
•
Déverrouillez le CD. (Voir la page
13).
Tout en maintenant
(attente/en service sourdine)
pressée, appuyez sur 0 (éjection)
pendant plus de 2 secondes.
Faites attention de ne pas faire
tomber le CD quand il est éjecté.
Arrêtez la lecture quand vous
conduisez sur des routes
accidentées.
Changez le CD.
Vérifiez les cordons et les
connexions.
Insérez un CD dans la fente
d’insertion.
Insérez-le CD correctement.
(attente/en service
Finalisez le CD-R avec l’appareil
utilisé pour l’enregistrement.
FRANÇAIS
19
Page 60

ENTRETIEN
Manipulation des disques
Cet appareil a été conçu uniquement pour
reproduire les CD et CD-R (enregistrables).
• Cet appareil n’est pas compatible avec les
disques MP3.
Manipulation des disques
Pour retirer un disque de
son boîtier, faites pression
sur e support central du boîtier
et retirez le disque en le tenant
par ses arêtes.
• Tenez toujours le disque par ses arêtes. Ne
touchez pas la surface enregistrée.
Pour remettre un disque dans son boîtier,
insérez délicatement le CD autour du support
FRANÇAIS
central (la surface imprimée dirigée vers le haut).
• Remettez les disques dans leur boîtier après
utilisation.
Pour garder propres vos disques
Un disque sale peut ne pas être
reproduit correctement. Si un
disque devient sale, essuyez-le
avec un chiffon doux, en ligne
droite, du centre vers les arêtes.
Avant de reproduire un disque neuf
Les disques neufs peuvent avoir
des ébarbures sur les arêtes
intérieures et extérieures. Si un tel
disque est utilisé, cet appareil
risque de rejeter le disque. Pour retirer ces
ébarbures, frottez les arêtes avec un crayon, un
stylo, etc.
Condensation d’humidité
De l’humidité peut se condenser sur la lentille à
l’intérieur du lecteur de CD dans les cas suivants:
• Après avoir mis le chauffage dans la voiture.
• Si l’intérieur de la voiture devient très humide.
Si cela se produit, le lecteur de disque peut ne
pas fonctionner correctement. Dans ce cas,
éjectez le disque et laissez l’appareil sous
tension pendant quelques heures, jusqu’à ce que
l’humidité se soit évaporée.
Support central
Lors de la reproduction d’un CD-R
Avant de reproduire un CD-R, lisez attentivement
leurs instructions et précautions.
• Utilisez uniquement des CD-R finalisés.
• Certains CD-Rs ne peuvent pas être reproduits
sur cet appareil à cause de leurs
caractéristiques et pour les raisons suivantes.
– Les disques sont sales ou rayés.
– De l’humidité s’est condensée sur la lentille,
à l’intérieur de l’appareil.
– La lentille du capteur, à l’intérieur de
l’appareil, est sale.
• Les CD-R sont sensibles aux hautes
températures ou à une humidité importante.
Ne les laissez pas à l’intérieur de la voiture.
• N’utilisez les CD-R suivants.
– Disques avec des autocollants, des
étiquettes ou des cachets de protection
collés sur leur surface.
– Disques sur lesquels une étiquette peut être
imprimée directement avec, par exemple,
une imprimante à jet d’encre.
L’utilisation de ce type de disque par haute
température ou humidité peut entraîner un
mauvais fonctionnement de l’appareil ou
endommager le disque. Par exemple:
– L’autocollant ou l’étiquette peut rétrécir et
gondoler le disque.
– L’autocollant ou l’étiquette peut se détacher
et le disque ne peut plus être éjecté.
– L’impression sur le disque peut devenir
collante.
Lisez attentivement les instructions et les
précautions sur les étiquettes et les disques
imprimables.
• Les CD-RW (réinscriptibles) ne peuvent pas
être reproduits sur cet appareil.
ATTENTION:
• N’insérez pas des disques de 8 cm (CD single) dans
la fente d’insertion. (De tels disques ne peuvent pas
être éjectés).
• N’insérez pas des disques avec une forme
inhabituelle—comme le cœur d’une fleur; cela
pourrait causer un mauvais fonctionnement.
• N’exposez pas les disques à la lumière directe du
soleil ou à toute source de chaleur, ni ne les placez
pas dans un endroit soumis à des hautes
températures ou à l’humidité. Ne les laissez pas
dans la voiture.
• N’utilisez aucun solvant (comme par exemple: un
nettoyant pour disque analogique, un diluant en
bombe, de la benzine, etc.) pour nettoyer les disques.
20
Disque
gondolé
Autocollant
Reste
collant
Disque
Etiquette
spécialisée
Page 61

SPECIFICATIONS
SECTION AMPLIFICATEUR AUDIO
Puissance de sortie maximum:
Avant: 45 W par canal
Arrière: 45 W par canal
Puissance de sortie en mode continu (RMS):
Avant: 17 W par canal pour 4 Ω, 40 Hz à
20 000 Hz à moins de 0,8% de
distorsion harmonique totale.
Arrière: 17 W par canal pour 4 Ω, 40 Hz à
20 000 Hz à moins de 0,8% de
distorsion harmonique totale.
Impédance de charge: 4 Ω (4 Ω à 8 Ω tolérés)
Plage de commande de la tonalité:
Graves: ±10 dB à 100 Hz
Aigus: ±10 dB à 10 kHz
Réponse en fréquence: 40 Hz à 20 000 Hz
Rapport signal sur bruit: 70 dB
Niveau de sortie de ligne/Impédance:
2,0 V/20 kΩ en charge (pleine échelle)
Impédance de sortie: 1 kΩ
SECTION TUNER
Plage de fréquence:
FM: 87,5 MHz à 108,0 MHz
AM: (PO) 522 kHz à 1 620 kHz
(GO) 144 kHz à 279 kHz
SECTION LECTEUR CD
Type: Lecteur de disque compact
Système de détection de signal: Capteur sans
contact optique (semiconducteur laser)
Nombre de canaux: 2 canaux (stéréo)
Réponse en fréquence: 5 Hz à 20 000 Hz
Plage dynamique: 90 dB
Rapport signal sur bruit: 95 dB
Pleurage et scintillement:
Inférieur à la limite mesurable
GÉNÉRAL
Alimentation:
Tension de fonctionnement: DC 14,4 V
(11 V à 16 V tolérés)
Système de mise à la masse: Masse négative
Température de fonctionnement admissible:
0°C à +40°C
Dimensions (L × H × P):
Taille d’installation (approx.):
182 mm × 52 mm × 150 mm
Taille du panneau (approx.):
188 mm × 58 mm × 11 mm
Masse (approx.):
1,3 kg (sans les accessoires)
FRANÇAIS
[Tuner FM]
Sensibilité utilisable:
11,3 dBf (1,0 µV/75 Ω)
Sensibilité utile à 50 dB:
16,3 dBf (1,8 µV/75 Ω)
Sélectivité de canal alterné (400 kHz):
65 dB
Réponse en fréquence: 40 Hz à 15 000 Hz
Séparation stéréo: 30 dB
Rapport de synchronisation: 1,5 dB
[Tuner PO]
Sensibilité: 20 µV
Sélectivité: 35 dB
[Tuner GO]
Sensibilité: 50 µV
La conception et les spécifications sont sujettes à
changement sans notification.
21
Page 62

LAZER ÜRÜNLER∑ ∑Ç∑N ÖNEML∑ NOTLAR
1. SINIF 1 LAZER ÜRÜNÜ
2. D∑KKAT: Üst kapa∂Ω açmayΩn. Ünitenin içinde kullanΩcΩ tarafΩndan servis edilebilir hiçbir parça
yoktur; tüm servis iπlerini yetkili personele bΩrakΩn.
3. D∑KKAT: AçΩk durumdayken ara kilidi arΩzalΩ veya devre dΩπΩ oldu∂unda görünür ve görünmez lazer
ΩπΩnΩmΩ vardΩr. IπΩna do∂rudan maruz kalmaktan kaçΩnΩn.
4. ET∑KET∑N KOPYASI: D∑KKAT ET∑KET∑, ÜN∑TEN∑N DI∏INDADIR.
TÜRKÇE
Ünitenizin sΩfΩrlanmasΩ
SEL (seç) tuπunu basΩlΩ tutarak, 2 saniyeden uzun bir süreyle (bekleme/zayΩflatΩcΩda)
tuπuna basΩn.
Bu uygulama, ünitenin mikroiπlemcisini sΩfΩrlayacaktΩr.
(bekleme/zayΩflatΩcΩda)
LOUD
SEL
DISP
MO
7 9 10 12
8
11
RPT
RND
SEL (seç)
Notlar:
• Kanal ya da ses ayarlarΩ gibi önceden kurmuπ oldu∂unuz ayarlar da silinecektir.
• Ünitenin içinde CD varsa, ünite sΩfΩrlandΩ∂Ωnda CD dΩπarΩ çΩkartΩlacaktΩr. CD’yi düπürmemek için dikkat
edin.
2
FM
CD
SSM
AM
SCMMODE
Page 63

Bir JVC ürünü satΩn aldΩ∂ΩnΩz için teπekkür ederiz. TalimatlarΩ tümüyle anlamak ve üniteden olasΩ en iyi
performansΩ elde etmek için, çalΩπtΩrmadan önce tüm talimatlarΩ dikkatle okuyun.
∑Ç∑NDEK∑LER
Ünitenizin sΩfΩrlanmasΩ............................... 2
MODE tuπunun kullanΩlmasΩ ..................... 3
TU∏LARIN YERLER∑ ..................... 4
Kumanda panosu ...................................... 4
TEMEL ∑∏LEMLER ......................... 5
Ünitenin açΩlmasΩ ...................................... 5
Saatin ayarlanmasΩ ................................... 6
RADYO ∑∏LEMLER∑ ....................... 7
Radyo dinleme .......................................... 7
∑stasyonlarΩn belle∂e kaydedilmesi ........... 9
Önceden ayarlamΩπ bir istasyonu
dinlemek ................................................. 10
CD ∑∏LEMLER∑ ............................... 11
CD çalmak................................................. 11
CD üzerinde parça veya parça içinde bir
kΩsmΩ bulmak .......................................... 12
CD çalma modlarΩnΩn seçilmesi ................. 12
CD’nin dΩπarΩ çΩkartΩlmasΩnΩ önlemek ..........
MODE tuπunun kullanΩlmasΩ
MODE tuπuna bastΩ∂ΩnΩzda ünite iπlevler moduna geçer ve numara tuπlarΩ de∂iπik iπlev tuπlarΩ
olarak görev yaparlar.
MODE
SES AYARLARI ............................. 14
Sesin ayarlanmasΩ .................................... 14
Gürlük iπlevinin açΩlΩp kapatΩlmasΩ ............. 14
Ses kumanda belle∂inin (SCM)
kullanΩlmasΩ ............................................ 15
Kendi ses ayarlarΩnΩzΩn kaydedilmesi........ 16
D∑µER ANA ∑∏LEVLER ................. 17
Düzey—LEVEL ekranΩnΩn seçilmesi ......... 17
∑leri SCM Sisteminin ∑ptali—SCM LINK .... 17
Kumanda panosunun sökülmesi ............... 18
ARIZA G∑DERME ........................... 19
BAKIM ............................................ 20
Disklerin kullanΩlmasΩ ................................ 20
TEKN∑K ÖZELL∑KLER ................... 21
13
TÜRKÇE
MO
8
MODE tuπuna bastΩktan sonra bu tuπlarΩ yine numara tuπlarΩ olarak kullanmak için, iπlevler
modu devre dΩπΩ kalana kadar 5 saniye hiçbir numara tuπuna basmadan bekleyin.
• MODE tuπuna tekrar basΩlmasΩ da iπlevler modunu devre dΩπΩ bΩrakΩr.
Not:
Güvenlik nedenleriyle, bu üniteyle birlikte bir kimlik kartΩ verilmiπ olup, aynΩ kimlik numarasΩ ünitenin
πasisine de basΩlmΩπtΩr. Üniteniz çalΩndΩ∂Ω takdirde kimli∂inin yetkili makamlarca tespit edilmesine yardΩm
edecek olan bu kartΩ emin bir yerde saklayΩn.
KULLANMADAN ÖNCE
*Güvenlik için....
• Ses düzeyini çok fazla yükseltmeyin; aksi takdirde
dΩπarΩdan gelen sesler tümüyle bloke edilecek ve
dolayΩsΩyla taπΩtΩn sürücülü tehlikeli olacaktΩr.
• Basit olmayan herhangi bir iπlemi yapmadan önce
taπΩtΩ durdurun.
910 127
MO
11
RPT
RND
Süre gerisayΩm göstergesi
*TaπΩt içinin sΩcaklΩ∂Ω....
TaπΩtΩ sΩcak veya so∂uk hava πartlarΩnda uzun süre
park ettiyseniz, üniteyi çalΩπtΩrmadan önce taπΩtΩn
içindeki sΩcaklΩk normale dönene kadar bekleyin.
3
Page 64

TU∏LARIN YERLER∑
Kumanda panosu
Ekran penceresi
TÜRKÇE
1
q
;dga
SCM
3
2
LOUD
SEL
DISP
w
s
7 9 10 12
1 (bekleme/zayΩflatΩcΩda) tuπu
2 LOUD (gürlük) tuπu
3 SEL (seç) tuπu
4 Ekran penceresi
5 Yükleme yuvasΩ
6 0 (çΩkart) tuπu
7 CD tuπu
8 AM tuπu
9 FM tuπu
p ¢/4 tuπlarΩ
• AyrΩca, birlikte basΩldΩklarΩnda SSM tuπlarΩ
olarak görev yaparlar.
q +/– tuπlarΩ
w DISP (ekran) tuπu
eMO (mono ses) tuπu
r Numara tuπlarΩ
t RPT (tekrar) tuπu
y RND (rasgele) tuπu
u MODE tuπu
i SCM (ses kumanda belle∂i) tuπu
o (kumanda panosunu çΩkartma) tuπu
4
f
ST RND RPT
MO
h
j
k
l
/
7
69
54
MO
8
e
RND
11
RPT
tyr
ui
8
CD
AM
SCMMODE
p
FM
SSM
o
Ekran penceresi
; SCM (ses kumanda belle∂i) göstergesi
a CD kaynak göstergesi
s FM bandΩ göstergeleri (FM1, FM2, FM3)
d AM bandΩ göstergesi
f Tüner (radyo) alΩcΩ göstergeleri
MO (mono ses), ST (stereo)
g RND (rasgele) göstergesi
h RPT (tekrar) göstergesi
j LOUD (gürlük) göstergesi
k CD–içeride göstergesi
l Ana ekran
/ Ses düzeyi göstergesi
Page 65

TEMEL ∑∏LEMLER
LOUD
SEL
DISP
123
Ünitenin açΩlmasΩ
1
Üniteyi açΩn.
Tek Temasla ÇalΩπtΩrma (One-Touch
Operation) hakkΩnda not:
Aπa∂Ωdaki 2. adΩmda bir kaynak seçti∂inizde
ünite otomatik olarak açΩlΩr. Üniteyi açmak için
bu tuπa basmanΩz πart de∂ildir.
2
Kayna∂Ω seçin.
FM
CD
AM
Tüneri (FM veya AM) çalΩπtΩrmak için
7. – 10. sayfalara baπvurun.
CD çalmak için
11. – 13. sayfalara bakΩn.
3
Sesi ayarlayΩn.
Sesi yükseltmek için
Sesi düπürmek için
MO
8
7 9 10 12
11
RPT
4
Ses düzeyini bir anda düπürmek için
Herhangi bir kayna∂Ω dinlerken, kΩsa bir süre için
yanΩp sönmeye baπlar ve bir anda ses düzeyi
düπer.
Önceki ses düzeyine dönmek istedi∂inizde kΩsa
bir süre için tekrar aynΩ tuπa basΩn.
Üniteyi kapatmak için
süreyle basΩlΩ tutun.
“SEE YOU” sözcükleri görüntülenir ve ardΩndan
ünite kapanΩr.
• Üniteyi CD dinlerken kapatΩrsanΩz, tekrar
açtΩ∂ΩnΩzda CD kaldΩ∂Ω yerden çalmaya devam
edecektir.
Ses AyarΩna iliπkin D∑KKAT edilecek
hususlar:
CD, di∂er kaynaklara kΩyasla çok az gürültü
yapar. Örne∂in, ses düzeyi tüner (radyo) için
ayarlanmΩπsa, çΩkΩπ düzeyindeki ani artΩπ nedeniyle
hoparlörler hasara u∂rayabilir. Bu nedenle, CD
çalmadan önce ses düzeyini düπürüp, daha sonra
çalarken istedi∂iniz düzeye ayarlayΩn.
FM
CD
SSM
RND
AM
SCMMODE
Sesi istedi∂iniz düzeye ayarlayΩn.
(14. – 16. sayfalara bakΩn.)
tuπuna basΩn. “ATT” harfleri ekranda
tuπunu bir saniyeden daha uzun
TÜRKÇE
Ses düzeyi görüntülenir.
Ses düzeyi göstergesi (17. sayfaya bakΩn)
5
Page 66

LOUD
SEL
DISP
7 9 10 12
FM
CD
SSM
MO
8
RND
11
RPT
AM
SCMMODE
Saatin ayarlanmasΩ
1
SEL (seç) tuπunu 2 saniyeden daha
uzun süreyle basΩlΩ tutun.
Ekranda “CLOCK H”, “CLOCK M”, “SCM
LINK” veya “LEVEL” sözcükleri görüntülenir.
SEL
2
TÜRKÇE
Saat hanesini ayarlayΩn.
1 Ekranda görüntülenmiyorsa, “CLOCK H”
(saat hanesi) seçimini yapΩn.
CLOCK H CLOCK M
LEVEL SCM LINK
2 Saat hanesini ayarlayΩn.
2 Dakika hanesini ayarlayΩn.
4
AyarΩ bitirin.
SEL
Yürürlükteki saati kontrol etmek veya ekran
modunu de∂iπtirmek için
DISP
Arka arkaya DISP (ekran)
tuπuna basΩn.
Tuπa her bastΩ∂ΩnΩzda, ekran
modu aπa∂Ωdaki gibi de∂iπir:
• Ünite tüner (radyo) modundayken:
SaatFrekans
• Ünite CD modundayken:
SaatGeçen çalma süresi
3
Dakika hanesini ayarlayΩn.
1 “CLOCK M” (dakika hanesi) seçimini
yapΩn.
CLOCK H CLOCK M
LEVEL SCM LINK
6
• Ünite kapalΩyken:
Ünite açΩlΩr ve 5 saniye süreyle saat
görüntülendikten sonra ünite kapanΩr.
Page 67

RADYO ∑∏LEMLER∑
LOUD
SEL
DISP
MO
8
7 9 10 12
Radyo dinleme
Belli bir istasyonu dinlemek için otomatik arama
veya elle arama seçeneklerini kullanabilirsiniz.
Bir istasyonun otomatik olarak
aranmasΩ: Otomatik arama
1
BandΩ seçin (FM1 – 3, AM).
FM
FM1 FM2 FM3
AM
AM
Yeterli sinyal kuvvetine sahip bir stereo FM
yayΩnΩ alΩndΩ∂Ωnda yanar.
ST
FM
CD
SSM
RND
11
RPT
2
Bir istasyon aramaya baπlayΩn.
AM
SCMMODE
Daha yüksek frekanslΩ
istasyonlarΩ aramak için
Daha düπük frekanslΩ
istasyonlarΩ aramak için
Bir istasyonun sinyali alΩndΩ∂Ωnda arama
durur.
Bir istasyonun sinyali alΩnmadan aramayΩ
durdurmak için, arama yapmak üzere bastΩ∂ΩnΩz
tuπa basΩn.
TÜRKÇE
Seçilen bant görüntülenir.
Not:
Bu “receiver”Ωn üç FM bandΩ vardΩr (FM1,
FM2, FM3). Bir FM yayΩnΩ dinlemek için
bunlardan herhangi birini kullanabilirsiniz.
7
Page 68

Bir istasyonun elle aranmasΩ:
Elle arama
1
BandΩ seçin (FM1 – 3, AM).
FM
FM1 FM2 FM3
AM
AM
Not:
Bu “receiver”Ωn üç FM bandΩ vardΩr (FM1,
FM2, FM3). Bir FM yayΩnΩ dinlemek için
bunlardan herhangi birini kullanabilirsiniz.
2
Göstergede “M” (el ile) iπareti yanΩp
sönmeye baπlayana kadar
veya 4
TÜRKÇE
tuπunu basΩlΩ tutun.
¢
Stereo FM yayΩnΩ almak zor
oldu∂unda:
MODE
MO
8
MO göstergesi ekranda görüntülendi∂inde,
duydu∂unuz ses “mono” dur, ancak alΩnan sinyal
daha kuvvetlidir.
1 Bir stereo FM yayΩnΩ dinlerken
MODE tuπuna basarak iπlevler
moduna girin.
2 ∑πlevler modundayken MO
(mono ses) tuπuna basarak
ekranda MO göstergesinin
görüntülenmesini sa∂layΩn.
Tuπa her bastΩ∂ΩnΩzda, MO
göstergesi sΩrasΩyla yanar
veya söner.
MO (mono ses) göstergesi
MO
3
“M” (el ile) iπareti yanΩp sönerken bir
istasyona ayarlayΩn.
Daha yüksek frekanslΩ
istasyonlara ayarlamak için
Daha düπük frekanslΩ
istasyonlara ayarlamak için
• Parma∂ΩnΩzΩ tuπtan çekti∂inizde, elle
arama modu 5 saniye sonra otomatik
olarak devreden çΩkar.
• Tuπu basΩlΩ tutarsanΩz, tuπu serbest
bΩrakana kadar frekans (FM için 50 kHz
basamaklarla ve AM—OD/UD için 9 kHz
basamaklarla) de∂iπme∂e devam eder.
8
Page 69

∑stasyonlarΩn belle∂e
kaydedilmesi
YayΩn yapan istasyonlarΩ belle∂e kaydetmek için
aπa∂Ωdaki iki yöntemden birini kullanabilirsiniz.
• FM istasyonlarΩnΩn otomatik olarak ön ayarΩ:
SSM (ArdΩπΩk Kuvvetli ∑stasyon Belle∂i)
• FM ve AM istasyonlarΩnΩn elle ön ayarΩ
FM istasyonu otomatik ön ayarΩ:
SSM
Her FM bandΩnda (FM1, FM2 ve FM3) 6 yerel
FM istasyonunu önceden ayarlayabilirsiniz.
1
FM istasyonlarΩnΩ kaydetmek
istedi∂iniz FM bandΩnΩ (FM1 – 3)
seçin.
Elle ön ayarlama
Her bantta (FM1, FM2, FM3 ve AM) 6 istasyonu
elle önceden ayarlayabilirsiniz.
Örn.: 92.5 MHz frekanslΩ FM istasyonunun FM1
bandΩndaki 1 numaralΩ belle∂e
kaydedilmesi.
1
∑stasyonlarΩ kaydetmek istedi∂iniz
bandΩ (FM1 – 3, AM) seçin (bu
örnekte FM1).
FM
FM1 FM2 FM3
AM
AM
FM
FM1 FM2 FM3
2
Her iki tuπu 2 saniyeden daha uzun
süreyle basΩlΩ tutun.
SSM
Ekranda “SSM” harfleri görüntülenir ve
otomatik ön ayar tamamlandΩktan sonra
görüntü kaybolur.
En kuvvetli sinyale sahip yerel FM istasyonlarΩ
aranΩr ve seçti∂iniz banda (FM1, FM2 ya da
FM3) otomatik olarak kaydedilir. Bu istasyonlar
No.1 (en düπük frekans) ila No.6 (en yüksek
frekans) numara tuπlarΩna kurulur.
Otomatik ön ayarlama tamamlandΩktan sonra,
radyo otomatik olarak 1 numaralΩ tuπtaki istasyon
yayΩnΩna gider.
2
Bir istasyonu ayarlayΩn (bu örnekte
92.5 MHz).
Daha yüksek frekanslΩ
istasyonlara ayarlamak için
Daha düπük frekanslΩ
istasyonlara ayarlamak için
TÜRKÇE
DEVAMI B∑R SONRAK∑ SAYFADADIR
9
Page 70

3
Numara tuπunu (bu örnekte 1
numaralΩ tuπ) 2 saniyeden daha
uzun süreyle basΩlΩ tutun.
7
Birkaç saniye süreyle ekranda
“P1” iπareti yanΩp söner.
4
Baπka istasyonlarΩ di∂er numaralara
kaydetmek için yukarΩdaki
prosedürü tekrarlayΩn.
Notlar:
• AynΩ numaralΩ belle∂e yeni bir istasyon
kaydedilirse, eski istasyon ayarΩ silinir.
• Bellek devresinin elektrik kayna∂Ωnda kesinti olursa
TÜRKÇE
(örne∂in, akü de∂iπtirildi∂i zaman) önceden
ayarlanmΩπ istasyonlar silinir. Böyle bir durumda,
istasyonlarΩ yeniden ayarlamanΩz gerekecektir.
Önceden ayarlamΩπ bir
istasyonu dinlemek
Önceden ayarlamΩπ bir istasyona kolayca
gidebilirsiniz.
UnutmayΩnΩz, önce istasyonlarΩ kaydetmeniz
πarttΩr. Henüz kaydetmediyseniz, 9. ve 10.
sayfalardaki “∑stasyonlarΩn belle∂e kaydedilmesi”
baπlΩklΩ kΩsma baπvurun.
1
BandΩ seçin (FM1 – 3, AM).
FM
FM1 FM2 FM3
AM
AM
2
∑stedi∂iniz ön ayarlΩ istasyonun
numarasΩnΩ seçin (1 – 6).
8
910 127
MO
11
RPT
RND
10
Page 71

CD ∑∏LEMLER∑
LOUD
SEL
DISP
MO
7 9 10 12
8
CD çalmak
Yükleme yuvasΩna bir CD yerleπtirin.
Ünite otomatik olarak
açΩlΩr, CD’yi içeri çeker ve
çalmaya baπlar.
Tek Temasla ÇalΩπtΩrma (One-Touch
Operation) hakkΩnda not:
Yükleme yuvasΩnda zaten CD varsa, CD tuπuna
basΩldΩ∂Ωnda ünite otomatik olarak açΩlΩr ve çalmaya
baπlar.
CD–içeride göstergesi yanΩp söner.
CD–içeride göstergesi yanar.
FM
CD
SSM
RND
11
RPT
AM
SCMMODE
Not:
CD ters yerleπtirilirse, ekranda “EJECT” sözcü∂ü
görüntülenir ve CD otomatik olarak dΩπarΩ çΩkartΩlΩr.
ÇalmayΩ durdurmak ve CD’yi
çΩkartmak için
0 tuπuna basΩn.
CD’nin çalΩnmasΩ durdurulur ve CD otomatik
olarak yükleme yuvasΩndan dΩπarΩ çΩkartΩlΩr.
Kaynak tüner (radyo) olarak de∂iπir (alΩnan son
istasyonun yayΩnΩ duyulur).
• Kayna∂Ω de∂iπtirdi∂iniz takdirde de CD’nin
çalΩnmasΩ (CD dΩπarΩ çΩkartΩlmadan) durdurulur.
“CD” yi daha sonra kaynak olarak seçti∂inizde,
CD daha önce durdu∂u yerden çalmaya devam
eder.
Notlar:
• DΩπarΩ çΩkartΩlan CD yaklaπΩk 15 saniye içinde
yuvadan alΩnmazsa, tozdan korumak için otomatik
olarak yeniden içeri çekilir. (Ancak bu kez CD
çalmaya baπlamaz).
• CD’yi ünite kapalΩ oldu∂unda da dΩπarΩ
çΩkartabilirsiniz.
TÜRKÇE
Yerleπtirilen diskin
toplam çalma süresi
Yerleπtirilen diskteki
toplam parça sayΩsΩ
Geçen çalma süresi ÇalΩnan parça
Tüm parçalar, siz durdurana dek devamlΩ olarak
çalΩnacaktΩr.
Atlama hakkΩnda:
Atlama, taπΩtΩ düzgün olmayan yollarda
kullanΩrken meydana gelebilir. Bu olay üniteye
veya CD’ye zarar vermemekle birlikte, rahatsΩz
edici olabilir.
Düzgün olmayan yollarda giderken CD’yi
çalmamanΩz tavsiye edilir.
11
Page 72

CD üzerinde parça veya
parça içinde bir kΩsmΩ
bulmak
Parça içinde hΩzlΩ ileri veya geri
gitmek için
Parça içinde hΩzlΩ ileri gitmek için,
CD çalarken ¢ tuπunu basΩlΩ
tutun.
CD çalma modlarΩnΩn
seçilmesi
ParçalarΩ rasgele sΩrayla çalmak
(Rasgele Çalma) için
CD üzerindeki tüm parçalarΩ rasgele sΩrayla
çalabilirsiniz.
MODE
1 CD çalarken MODE tuπuna
basarak iπlevler moduna girin.
Parça içinde hΩzlΩ geri gitmek için,
CD çalarken 4 tuπunu basΩlΩ
tutun.
Önceki veya sonraki parçalara
gitmek
CD çalarken, bir sonraki parçanΩn
baπΩna gitmek için ¢ tuπuna
kΩsa süreyle basΩn.
TÜRKÇE
Tuπa arka arkaya bastΩ∂ΩnΩzda,
daha sonra gelen parçalarΩn
baπlangΩçlarΩ bulunur ve çalΩnΩr.
CD çalarken, çalan parçanΩn
baπΩna gitmek için 4 tuπuna
kΩsa süreyle basΩn.
Tuπa arka arkaya bastΩ∂ΩnΩzda,
önceki parçalarΩn baπlangΩçlarΩ
bulunur ve çalΩnΩr.
Do∂rudan belli bir parçaya gitmek
Belli bir parçayΩ çalmak için parçanΩn sΩra
numarasΩnΩ numara tuπlarΩna basarak girin.
8
910 127
MO
11
RPT
RND
12
RND
Rasgele Çalma mode devreye girdi∂inde, RND
göstergesi ekranda görüntülenir. Rasgele seçilen
bir parça çalmaya baπlar.
2 ∑πlevler modundayken RND
(rasgele) tuπuna basarak
ekranda RND göstergesinin
görüntülenmesini sa∂layΩn.
Tuπa her bastΩ∂ΩnΩzda, rasgele
çalma modu sΩrayla devreye
girer ve çΩkar.
RND (rasgele) göstergesi
RND
• 1 – 6 numaralΩ parçalarΩ seçmek için:
KΩsa süreyle 1 (7) – 6 (12) tuπlarΩna basΩn.
• 7 – 12 numaralΩ parçalarΩ seçmek için:
1 (7) – 6 (12) tuπlarΩnΩ bir saniyeden daha uzun
süreyle basΩlΩ tutun.
12
Page 73

ParçalarΩ tekrarlΩ olarak çalmak
(Tekrar Çalma) için
Yürürlükteki parçayΩ tekrarlΩ olarak çalabilirsiniz.
MODE
11
RPT
1 CD çalarken MODE tuπuna
basarak iπlevler moduna girin.
2 ∑πlevler modundayken RPT
(tekrar) tuπuna basarak
ekranda RPT göstergesinin
görüntülenmesini sa∂layΩn.
Tuπa her bastΩ∂ΩnΩzda, tekrar
çalma modu sΩrayla devreye
girer ve çΩkar.
RPT (tekrar) göstergesi
RPT
CD’nin dΩπarΩ çΩkartΩlmasΩnΩ
önlemek
CD’nin yükleme yuvasΩ içinde kilitlenmesini
sa∂layarak dΩπarΩ çΩkartΩlmasΩnΩ önleyebilirsiniz.
Bir yandan CD tuπuna basarken, aynΩ
anda 0 tuπunu 2 saniyeden daha uzun
süreyle basΩlΩ tutun.
CD
Ekranda “EJECT” sözcü∂ü yaklaπΩk 5 saniye
süreyle yanΩp söner, CD ünite içinde kilitlenir ve
dΩπarΩ çΩkartΩlmaz.
Halen çalmakta olan
parçanΩn numarasΩ
Tekrar Çalma mode devreye girdi∂inde, RPT
göstergesi ekranda görüntülenir. Yürürlükteki
parça derhal çalmaya baπlar.
CD kilitleme iπlevini devreden çΩkarmak
için
Bir yandan CD tuπuna basarken, aynΩ anda 0
tuπunu 2 saniyeden daha uzun süreyle basΩlΩ
tutun.
Ekranda “EJECT” sözcü∂ü görüntülenir ve CD
yükleme yuvasΩndan dΩπarΩ çΩkartΩlΩr.
CD-içeride göstergesi yanΩp söner.
TÜRKÇE
13
Page 74

SES AYARLARI
Sesin ayarlanmasΩ
Sesin niteliklerini tercihinize göre
ayarlayabilirsiniz.
1
Ayarlamak istedi∂iniz ö∂eyi seçin.
SEL
Gösterge YaptΩ∂Ω iπ: AralΩk
BAS Bas ayarΩ. –06 (min.)
TRE Tiz ayarΩ. –06 (min.)
TÜRKÇE
FAD* Ön ve arka R06 (Sadece arka)
BAL Sol ve sa∂ L06 (Sadece sol)
VOL Ses düzeyinin 00 (min.)
Tuπa her bastΩ∂ΩnΩzda,
ayarlanabilir ö∂eler aπa∂Ωdaki
gibi de∂iπir:
BAS
(
bas
)
(
ses düzeyi
hoparlör |
dengesinin ayarΩ. F06 (Sadece ön)
hoparlör |
dengesinin ayarΩ. R06
ayarΩ. |
VOL
TRE
(
tiz
)
(
balans, sa∂/
)
sol dengesi
FAD
(
fader - ön/
arka dengesi
BAL
)
|
+06 (maks.)
|
+06 (maks.)
(Sadece sa∂)
50 (maks.)
2
Ses düzeyini ayarlayΩn.
Ses düzeyini yükseltmek için
Ses düzeyini düπürmek için
)
Not:
Normalde, + ve – tuπlarΩ ses kumanda tuπlarΩ olarak
görev yaparlar. DolayΩsΩyla, ses düzeyini ayarlamak
için “VOL” seçimini yapmanΩz gerekmez.
Örn.: “TRE” (tiz) ayarΩ yaparken
Gürlük iπlevinin açΩlΩp
kapatΩlmasΩ
∑nsan kula∂Ω, düπük ses düzeylerinde düπük ve
yüksek frekanslara daha az duyarlΩdΩr.
Gürlük iπlevi, bu frekanslarΩn gücünü artΩrarak,
düπük ses düzeylerinde daha dengeli bir ses
üretebilir.
LOUD
LOUD tuπuna her
bastΩ∂ΩnΩzda, gürlük iπlevi
sΩrayla devreye girer ve çΩkar.
LOUD (gürlük) göstergesi
* ∑ki hoparlörlü bir sistem kullanΩyorsanΩz, fader
düzeyini “00”a ayarlayΩn.
14
Page 75

Ses kumanda belle∂inin
(SCM) kullanΩlmasΩ
Ses ayarΩnΩ her playback kayna∂Ωna göre
önceden düzenleyip belle∂e kaydedebilirsiniz
(∑leri SCM).
Ses modlarΩnΩn seçilmesi ve
kaydedilmesi
Bir ses modunu seçti∂inizde, belle∂e kaydedilir.
AynΩ kayna∂Ω her seçti∂inizde bellekten
ça∂rΩlarak ekranda görüntülenecektir.
Ses modu, FM1, FM2, FM3, AM ve CD
kaynaklarΩnΩn her biri için belle∂e kaydedilebilir.
• Her playback kayna∂Ω için ayrΩ bir ses modu
kaydetmek istemiyor ve aynΩ ses modunu tüm
kaynaklar için kullanmak istiyorsanΩz, 17.
sayfadaki “∑leri SCM Sisteminin ∑ptali—SCM
LINK” baπlΩklΩ kΩsma baπvurun.
∑stedi∂iniz ses modunu seçin.
SCM
Tuπa her bastΩ∂ΩnΩzda, ses
modu aπa∂Ωdaki gibi de∂iπir:
Gösterge Uygulama: Ön ayarlar
BAS TRE LOUD
SCM OFF (Düz ses) 00 00 ON
BEAT Rock veya +02 00 ON
SOFT Sakin fon +01 –03 OFF
POP Hafif müzik +04 +01 OFF
disko müzi∂i
müzi∂i
Ses modlarΩnΩn bellekten
ça∂rΩlmasΩ
“SCM LINK” modu “LINK ON”
seçene∂ine ayarlandΩ∂Ωnda kayna∂Ω
seçin.
FM
CD
AM
Playback kayna∂ΩnΩ
de∂iπtirdi∂iniz her seferinde
SCM göstergesi ekranda
yanΩp söner.
SCM
TÜRKÇE
SCM OFF
SCM
Örn.: “BEAT” modunu seçti∂inizde
• “SCM LINK” modu “LINK ON” seçene∂ine
ayarlandΩ∂Ωnda, seçilen ses modu yürürlükteki
kaynak için belle∂e kaydedilir ve bu etki
sadece yürürlükteki kaynak için geçerli olur.
• “SCM LINK” modu “LINK OFF” seçene∂ine
ayarlandΩ∂Ωnda, seçilen ses modu her kayna∂a
uygulanΩr.
BEAT
SOFT
POP
Seçilen kaynak için belle∂e kaydedilmiπ ses
modu ça∂rΩlΩr.
Notlar:
• Her ses modunu kendi tercihinize göre
ayarlayabilir ve belle∂e kaydedebilirsiniz.
Kendi orijinal ses modunuzu ayarlayΩp kaydetmek
istiyorsanΩz, 16. sayfadaki “Kendi ses ayarlarΩnΩzΩn
kaydedilmesi” baπlΩklΩ kΩsma baπvurun.
• Bas ve tiz amplifikasyon düzeylerini ayarlamak
veya gürlük iπlevini geçici olarak devreye sokmak
ya da devreden çΩkarmak için, 14. sayfaya
baπvurun. (Baπka bir kaynak seçilirse ayarlarΩnΩz
iptal edilecektir).
15
Page 76

Kendi ses ayarlarΩnΩzΩn
kaydedilmesi
Ses modlarΩnΩ (BEAT, SOFT, POP) kendi
tercihinize göre ayarlayabilir ve yaptΩ∂ΩnΩz
ayarlarΩ belle∂e kaydedebilirsiniz.
• Aπa∂Ωdaki prosedürün yapΩlmasΩ için bir süre
sΩnΩrΩ vardΩr. AyarlarΩnΩzΩ bitirmeden önce iptal
edilirse, tekrar 1. adΩmdan baπlayΩn.
1
Ayarlamak istedi∂iniz ses modunu
ça∂ΩrΩn.
SCM
TÜRKÇE
2
Bas veya tiz düzeyini ayarlamak için:
1 “BAS” (bas) veya “TRE” (tiz) seçimini
SCM
yapΩn.
SEL
• AyrΩntΩlar için 15. sayfaya
baπvurun.
Örn.: “SOFT” modunu seçti∂inizde
3
Di∂er ö∂eleri ayarlamak için 2. adΩmΩ
tekrarlayΩn.
4
1
. adΩmda seçti∂iniz ses modu
ekranda yanΩp sönene kadar SCM
tuπunu basΩlΩ tutun.
SCM
SCM
5
Di∂er ses modlarΩnΩ kaydetmek için
Seçilen ses modu için yapmΩπ
oldu∂unuz ayarlar belle∂e
kaydedilmiπtir.
aynΩ prosedürü tekrarlayΩn.
Fabrika ayarlarΩna dönmek için, aynΩ
prosedürü tekrarlayarak 15. sayfada verilen ön
ayar de∂erlerini girin.
16
Örn.: “TRE” (tiz) ayarΩnΩ seçti∂inizde
2 Düzeyi ayarlayΩn.
Gürlük iπlevi açmak veya kapatmak
için:
LOUD
• AyrΩntΩlar için 14. sayfaya
baπvurun.
Page 77

D∑µER ANA ∑∏LEVLER
Düzey—LEVEL ekranΩnΩn
seçilmesi
Düzey ekranΩnΩ tercihinize göre seçebilirsiniz.
Fabrika çΩkΩπΩnda “VOL 2” seçene∂i devrededir.
• VOL 1: Ses düzeyi göstergesini görüntüler.
• VOL 2: “VOL 1” ayarΩ ve aydΩnlatma ekranΩ
• OFF: Ses düzeyi göstergesini siler.
1
2
3
arasΩnda geçiπ yapar.
SEL (seç) tuπunu 2 saniyeden daha
uzun süreyle basΩlΩ tutun.
Ekranda “CLOCK H,” “CLOCK M,” “SCM
LINK” veya “LEVEL” sözcükleri görüntülenir.
SEL
Ekranda görüntülenmiyorsa,
“LEVEL” (düzey) seçimini yapΩn.
CLOCK H CLOCK M
LEVEL SCM LINK
∑stenen modu seçin—“VOL 1”, “VOL
2” veya “OFF”.
∑leri SCM Sisteminin
∑ptali—SCM LINK
∑leri SCM (Ses Kumanda Belle∂i) iπlevini iptal
edebilir ve ses modlarΩyla playback kaynaklarΩ
arasΩndaki ba∂lantΩyΩ kesebilirsiniz.
Fabrika çΩkΩπΩnda, her kayna∂Ωn belle∂ine baπka
bir ses modu kaydedilir ve böylece sadece ses
kayna∂ΩnΩ de∂iπtirerek ses modunu
de∂iπtirmenize olanak sa∂lanΩr.
• LINK ON: ∑leri SCM (farklΩ kaynaklar için
• LINK OFF: Geleneksel SCM (her kaynak için
1
SEL (seç) tuπunu 2 saniyeden daha
uzun süreyle basΩlΩ tutun.
Ekranda “CLOCK H,” “CLOCK M,” “SCM
LINK” veya “LEVEL” sözcükleri görüntülenir.
2
Ekranda görüntülenmiyorsa, “SCM
LINK” seçimini yapΩn.
farklΩ ses modlarΩ).
tek bir ses modu).
SEL
CLOCK H CLOCK M
LEVEL SCM LINK
TÜRKÇE
4
AyarΩ bitirin.
SEL
OFF
VOL 2VOL 1
3
“LINK OFF” seçimini yapΩn.
4
AyarΩ bitirin.
SEL
∑leri SCM (Ses Kumanda Belle∂i) iπlevini
devreye sokmak için aynΩ prosedürü
tekrarlayΩp, 3. adΩmda + tuπuna basarak “LINK
ON” seçimini yapΩn.
17
Page 78

Kumanda panosunun
sökülmesi
TaπΩtΩ terk ederken kumanda panosunu
sökebilirsiniz.
Kumanda panosunu sökerken veya takarken,
kumanda panosunun arkasΩndaki ve pano
tutaca∂ΩnΩn üzerindeki konektörlere hasar
vermemek için dikkat edin.
Kumanda panosunun sökülmesi
Kumanda panosunu sökmeden önce üniteyi
kapattΩ∂ΩnΩzdan emin olun.
1
Kumanda panosunun kilidini açΩn.
TÜRKÇE
2
Kumanda panosunu kaldΩrΩn ve
üniteden dΩπarΩ do∂ru çekin.
Kumanda panosunun takΩlmasΩ
1
Kumanda panosunun sol tarafΩnΩ,
pano tutaca∂ΩnΩn üzerindeki yuvaya
yerleπtirin.
2
Kumanda panosunun sa∂ tarafΩna
basarak pano tutaca∂Ωna
sabitleπtirin.
Konektörlerin temizlenmesi hakkΩnda not:
Kumanda panosunu sΩk sΩk sökerseniz,
konektörlerin performansΩ düπecektir.
Bu olasΩlΩ∂Ω minimuma indirmek için, konektörlere
hasar vermemeye dikkat ederek, alkole batΩrΩlmΩπ
pamuklu çubuk veya bezle konektörleri silin.
18
3
Söktü∂ünüz kumanda panosunu
üniteyle birlikte gelen kutuya
yerleπtirin.
Konektörler
Page 79

ARIZA G∑DERME
Görünürde ciddi olan sorunlar bazen kolayca giderilebilir. Servis merkezini aramadan önce aπa∂Ωdaki
noktalarΩ kontrol edin.
Belirtiler
• Hoparlörlerden ses
gelmiyor.
• Bu ünite hiç çalΩπmΩyor.
Genel
• SSM (ArdΩπΩk Kuvvetli
∑stasyon Belle∂i) otomatik
ön ayarlarΩ çalΩπmΩyor.
FM/AM
• Radyoyu dinlerken parazit
var.
• CD otomatik olarak
yuvadan çΩkΩyor.
• CD-R çalΩnamΩyor.
• CD-R üzerindeki parçalar
atlanamΩyor.
• CD ne çalΩyor ne de dΩπarΩ
çΩkΩyor.
Nedenler
Ses düzeyi minimuma
ayarlanmΩπtΩr.
Ba∂lantΩlar yanlΩπtΩr.
Ünitenin mikroiπlemcisi
parazit vs. nedeniyle hatalΩ
iπlem yapmΩπtΩr.
Sinyaller çok zayΩftΩr.
Antenin ba∂lantΩsΩ gerekti∂i
gibi de∂ildir.
CD ters yerleπtirilmiπtir.
CD-R’nin kayΩt iπlemleri
gerekti∂i gibi bitirilmemiπtir.
CD kilitlenmiπtir.
Çözümler
Optimum düzeye ayarlayΩn.
KablolarΩ ve ba∂lantΩlarΩ kontrol
edin.
Üniteyi sΩfΩrlamak için, SEL (seç)
tuπunu basΩlΩ tutarak, 2
saniyeden uzun bir süreyle
(bekleme/
zayΩflatΩcΩda) tuπuna basΩn.
(Saat ayarΩ ve belle∂e
kaydedilmiπ istasyon ön ayarlarΩ
silinir). (2. sayfaya bakΩn.)
∑stasyonlarΩ elle kaydedin.
Anten ba∂lantΩsΩnΩ gerekti∂i gibi
yapΩn.
CD’yi do∂ru yerleπtirin.
• Bitirilmiπ bir CD-R yerleπtirin.
• CD-R’nin bitirme iπlemini,
kayΩt için kullandΩ∂ΩnΩz cihazla
yapΩn.
CD’nin kilidini devre dΩπΩ bΩrakΩn.
(13. sayfaya bakΩn.)
TÜRKÇE
CD Playback
• CD sesi bazen kesiliyor.
• Ekranda “NO DISC (disk
yok)” sözcükleri
görüntüleniyor.
CD-çalar hatalΩ çalΩπmΩπ
olabilir.
Düzgün olmayan bir
yoldasΩnΩz.
CD çizilmiπtir.
Ba∂lantΩlar yanlΩπtΩr.
Yükleme yuvasΩnda CD
yoktur.
CD yanlΩπ yerleπtirilmiπtir.
zayΩflatΩcΩda) tuπunu basΩlΩ
(bekleme/
tutarak, 2 saniyeden uzun bir
süreyle 0 (çΩkart) tuπuna basΩn.
DΩπarΩ çΩktΩ∂Ωnda CD’yi
düπürmemek için dikkat edin.
Düzgün olmayan yollarda CD
çalmayΩn.
CD’yi de∂iπtirin.
KablolarΩ ve ba∂lantΩlarΩ kontrol
edin.
Yükleme yuvasΩna bir CD
yerleπtirin.
CD’yi do∂ru yerleπtirin.
19
Page 80

BAKIM
Disklerin kullanΩlmasΩ
Bu ünite, CD ve CD-R (Kaydedilebilir) disklerini
çalmak üzere tasarlanmΩπtΩr.
• Bu ünite MP3 diskleriyle uyumlu de∂ildir.
Disklerin kullanΩlmasΩ
Diski kutusundan çΩkarΩrken,
kutunun merkezine basarak, diski
kenarlarΩndan tutup kaldΩrΩn.
• Diski daima kenarlarΩndan tutun.
KayΩt yüzeyine dokunmayΩn.
Diski kutusuna yerleπtirirken, diski nazikçe
merkez tutaca∂ΩnΩn çevresine oturtun (diskin
baskΩlΩ yüzeyi yukarΩ bakmalΩdΩr).
• Diskleri kullandΩktan sonra kutularΩna
yerleπtirin.
Diskleri temiz tutmak için
Kirli bir disk gerekti∂i gibi
çalmayabilir.
Disk kirlenirse, yumuπak bir bezle
TÜRKÇE
merkezden kenara do∂ru düz bir
çizgi üzerinde silin.
Yeni diskleri çalmak için
Yeni disklerin iç ve dΩπ kenarlarΩnda
bazΩ kaba noktalar olabilir. Böyle bir
disk kullanΩlΩrsa bu ünite diski
reddedebilir.
Bu kaba noktalarΩ gidermek için, kenarlarΩ kurπun
veya tükenmez kalem vs. ile düzgünleπtirin.
Nem yo∂unlaπmasΩ
Aπa∂Ωdaki durumlarda, CD-çalarΩn içindeki
merce∂in üzerinde nem yo∂unlaπabilir:
• TaπΩtΩn ΩsΩtΩcΩsΩnΩ çalΩπtΩrdΩktan sonra.
• TaπΩtΩn için çok nemli olursa.
Böyle bir durumda CD-çalar gerekti∂i gibi
çalΩπmayabilir. O zaman diski çΩkartΩp, nem
buharlaπana kadar birkaç saat üniteyi açΩk
bΩrakΩn.
Merkez tutaca∂Ω
CD-R çalarken
CD-R’yi çalmadan önce, talimatlarΩnΩ veya uyarΩ
beyanlarΩnΩ dikkatle okuyun.
• Sadece “bitirilmiπ (finalized)” CD-R kullanΩn.
• BazΩ CD-R’ler, diskin nitelikleri yüzünden ve
aπa∂Ωdaki nedenlerle bu ünitede çalmayabilir:
– Disk kirli veya çiziktir.
– Ünitenin içindeki mercek üzerinde nem
yo∂unlaπmΩπtΩr.
– Ünitenin içindeki “pickup” merce∂i
kirlenmiπtir.
• CD-R’ler yüksek sΩcaklΩk ve yüksek neme
duyarlΩ oldu∂undan taπΩtΩnΩzΩn içinde
bΩrakmayΩn.
• Aπa∂Ωdaki CD-R’leri kullanmayΩn:
– Yüzeyine etiket, çΩkartma veya koruyucu film
yapΩπmΩπ diskler.
– Mürekkep püskürtmeli (ink jet) yazΩcΩlarla
üzerlerine do∂rudan etiket basΩlabilen
diskler.
Bu disklerin yüksek sΩcaklΩk veya yüksek nem
içeren ortamlarda kullanΩlmasΩ, ünitenin hatalΩ
çalΩπmasΩna veya disklerin hasar görmesine yol
açabilir. Örne∂in,
– Etiket veya çΩkartmalar zamanla çekip
küçülerek diskin e∂rilip çarpΩlmasΩna yola
açabilir.
– Etiket veya çΩkartmalar yapΩπtΩklarΩ yerden
çΩkarak disklerin üniteden dΩπarΩ çΩkmasΩnΩ
engelleyebilir.
– Disk üzerine basΩlanlar yapΩπkanlaπabilir.
Etiket ve yazΩcΩda basΩlabilir diskler hakkΩndaki
talimatlarΩ ve uyarΩlarΩ iyice okuyun.
• CD-RW’lar (yeniden yazΩlabilir diskler) bu
ünitede çalΩnamaz.
D∑KKAT:
•
Yükleme yuvasΩna 8 cm’lik disk (single CD)
yerleπtirmeyin. (Bu tür diskler dΩπarΩ çΩkartΩlamaz).
•
Kalp, çiçek veya baπka anormal πekilli hiçbir diski
kullanmayΩn; bu tür diskler ünitenin
arΩzalanmasΩna yol açar.
•
Diskleri direkt güneπ ΩπΩ∂Ωna veya herhangi bir ΩsΩ
kayna∂Ωna maruz bΩrakmayΩn; yüksek sΩcaklΩk veya
yüksek nem içeren ortamlarda bΩrakmayΩn.
Diskleri taπΩtΩnΩzΩn içinde bΩrakmayΩn.
•
Diskleri temizlemek için herhangi bir solvent
(örne∂in, geleneksel plak temizleyicisi, sprey,
tiner, benzin vs.) kullanmayΩn.
20
ÇarpΩk disk
ÇΩkartma/
etiket
ÇΩkartma/
etiket kalΩntΩsΩ
Disk
YapΩπkanlΩ
etiket
Page 81

TEKN∑K ÖZELL∑KLER
SES AMPL∑F∑KATÖR KISMI
Maksimum Güç ÇΩkΩπΩ:
Ön: Kanal baπΩna 45 W
Arka: Kanal baπΩna 45 W
Sürekli Güç ÇΩkΩπΩ (RMS):
Ön: Toplam harmonik bozunum
%0.8’den fazla olmamak üzere
kanal baπΩna 17 W, 4 Ω, 40 Hz ila
20 000 Hz
Arka: Toplam harmonik bozunum
%0.8’den fazla olmamak üzere
kanal baπΩna 17 W, 4 Ω, 40 Hz ila
20 000 Hz
Yük EmpedansΩ: 4 Ω (4 Ω ila 8 Ω uygundur)
Ton Kontrol AralΩ∂Ω:
Bas: ±100 Hz’de ±10 dB
Tiz: ±10 kHz’de ±10 dB
Frekans YanΩtΩ: 40 Hz ila 20 000 Hz
Sinyal-Gürültü OranΩ: 70 dB
ÇΩkΩπ HattΩnΩn Düzeyi/EmpedansΩ:
2.0 V/20 kΩ yük (tam ölçek)
ÇΩkΩπ EmpedansΩ: 1 kΩ
TÜNER (RADYO) KISMI
Frekans AralΩ∂Ω:
FM: 87.5 MHz ila 108.0 MHz
AM: (OD) 522 kHz ila 1 620 kHz
(UD) 144 kHz ila 279 kHz
[FM Tüner]
KullanΩlabilir DuyarlΩlΩk:
11.3 dBf (1.0 µV/75 Ω)
50 dB Sessizleπtirme DuyarlΩlΩ∂Ω:
16.3 dBf (1.8 µV/75 Ω)
Alternatif Kanal Seçicili∂i (400 kHz):
65 dB
Frekans YanΩtΩ: 40 Hz ila 15 000 Hz
Stereo AyΩrma: 30 dB
Yakalama OranΩ: 1.5 dB
CD-ÇALAR KISMI
Tip: Yo∂un disk çalar
Sinyal AlgΩlama Sistemi: TemassΩz optik algΩlama
(yarΩiletken lazeri)
Kanal sayΩsΩ: 2 kanal (stereo)
Frekans YanΩtΩ: 5 Hz ila 20 000 Hz
Dinamik AralΩ∂Ω: 90 dB
Sinyal-Gürültü OranΩ: 95 dB
Wow ve Flutter: Ölçülebilir sΩnΩrΩn altΩnda
GENEL
Güç Gereksinimi:
ÇalΩπma VoltajΩ: DC 14.4 V
(11 V – 16 V uyumlu)
Topraklama Sistemi: Negatif toprak
Uygun ÇalΩπma SΩcaklΩ∂Ω: 0°C ila +40°C
Boyutlar (G × Y × D):
Montaj BoyutlarΩ (yaklaπΩk):
182 mm × 52 mm × 150 mm
Pano BoyutlarΩ (yaklaπΩk):
188 mm × 58 mm × 11 mm
A∂ΩrlΩk (yaklaπΩk):
1.3 kg (aksesuarlar hariç)
TasarΩm ve teknik özellikler bildiri verilmeden
de∂iπtirilebilir.
TÜRKÇE
[OD Tüner]
DuyarlΩlΩk: 20 µV
Seçicilik: 35 dB
[UD Tüner]
DuyarlΩlΩk: 50 µV
21
Page 82

Having TROUBLE with operation?
Please reset your unit
Refer to page of How to reset your unit
¿Tiene PROBLEMAS con la operación?
Por favor reinicialice su unidad
Consulte la páfina de Cómo reposicionar su unidad
Vous avez des PROBLÈMES de fonctionnement?
Réinitialisez votre appareil
Référez-vous à la page intitulée Comment réinitialiser votre appareil
ÇalΩπtΩrmakta GÜÇLÜK mü
çekiyorsunuz?
Lütfen ünitenizi sΩfΩrlayΩn
“Ünitenizin sΩfΩrlanmasΩ” sayfasΩna baπvurun
EN, SP, FR, TR
© 2003 VICTOR COMPANY OF JAPAN, LIMITED
0903KKSMDTJEIN
 Loading...