

Page 1
DVD/CD RECEIVER
RECEPTOR CON DVD/CD
ENGLISH
RÉCEPTEUR DVD/CD
KD-ADV49/KD-AVX44
ESPAÑOL
FRANÇAIS
For canceling the display demonstration, see page 7.
Para cancelar la demonstración en pantalla, consulte la página 7.
Pour annuler la démonstration des affichages, référez-vous à la page 7.
For installation and connections, refer to the separate manual.
Para la instalación y las conexiones, refiérase al manual separado.
Pour l’installation et les raccordements, se référer au manuel séparé.
INSTRUCTIONS
MANUAL DE INSTRUCCIONES
MANUEL D’INSTRUCTIONS
For customer Use:
Enter below the Model No.
and Serial No. which are
located on the top or bottom
of the cabinet. Retain this
information for future
reference.
Model No.
Serial No.
LVT1797-001A
[J/C]
Page 2

Thank you for purchasing a JVC product.
Please read all instructions carefully before operation, to ensure your complete understanding and to obtain the best
possible performance from the unit.
IMPORTANT FOR LASER PRODUCTS
1. CLASS 1 LASER PRODUCT
ENGLISH
2. CAUTION: Do not open the top cover. There are no user serviceable parts inside the unit; leave all servicing to
qualified service personnel.
3. CAUTION: (For U.S.A.) Visible and/or invisible class II laser radiation when open. Do not stare into beam.
(For Canada) Visible and/or invisible class 1M laser radiation when open. Do not view directly with
optical instruments.
4. REPRODUCTION OF LABEL: CAUTION LABEL, PLACED OUTSIDE THE UNIT.
INFORMATION (For U.S.A.)
This equipment has been tested and found to
comply with the limits for a Class B digital device,
pursuant to Part 15 of the FCC Rules. These limits are
designed to provide reasonable protection against
harmful interference in a residential installation. This
equipment generates, uses, and can radiate radio
frequency energy and, if not installed and used in
accordance with the instructions, may cause harmful
interference to radio communications. However,
there is no guarantee that interference will not occur
in a particular installation. If this equipment does
cause harmful interference to radio or television
reception, which can be determined by turning the
equipment off and on, the user is encouraged to
try to correct the interference by one or more of the
following measures:
– Reorient or relocate the receiving antenna.
– Increase the separation between the equipment
and receiver.
– Connect the equipment into an outlet on a
circuit different from that to which the receiver is
connected.
– Consult the dealer or an experienced radio/TV
technician for help.
Caution
Changes or modifications not approved by JVC could
void the user’s authority to operate the equipment.
[European Union only]
WARNINGS:
To prevent accidents and damage
• DO NOT install any unit or wire any cable in a
location where;
– it may obstruct the steering wheel and gearshift
lever operations.
– it may obstruct the operation of safety devices
such as air bags.
– it may obstruct visibility.
• DO NOT operate the unit while driving.
If you need to operate the unit while driving, be
sure to look around carefully.
• The driver must not watch the monitor while
driving.
• The driver must not put on the headphones while
driving.
Cautions on the monitor:
• The monitor built in this unit has been produced
with high precision, but it may have some
ineffective dots. This is inevitable and is not
malfunction.
• Do not expose the monitor to direct sunlight.
• When the temperature is very cold or very hot...
– Chemical changes occur inside, causing
malfunction.
– Pictures may not appear clearly or may move
slowly. Pictures may not be synchronized with
the sound or picture quality may decline in such
environments.
2
Page 3
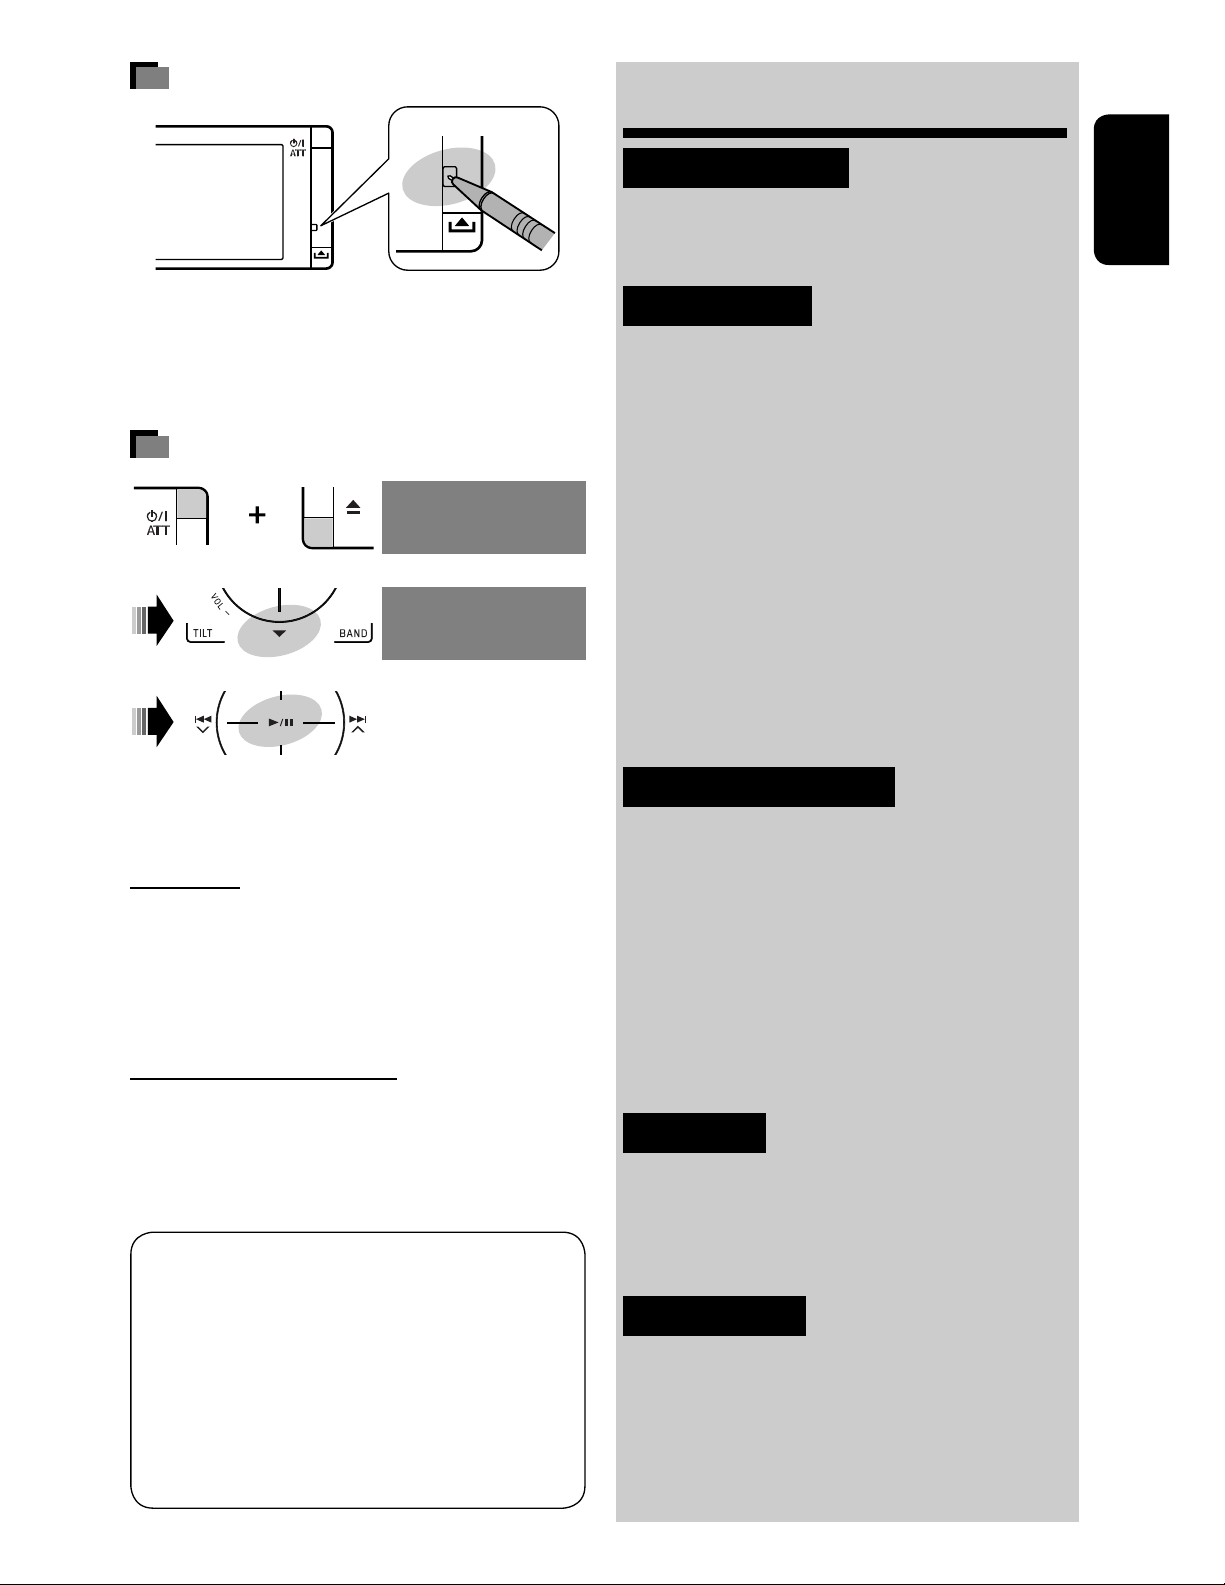
How to reset your unit
Contents
INTRODUCTION
Playable disc type ............................ 4
Before operations
............................ 5
ENGLISH
• Your preset adjustments (except for the registered
Bluetooth devices) will also be erased.
How to forcibly eject a disc
NO EJECT?
[Hold]
• If this does not work, reset the unit.
For safety...
• Do not raise the volume level too much, as this will
block outside sounds, making driving dangerous.
• Stop the car before performing any complicated
operations.
EMERGENCY EJECT?
NO EJECT?
EMERGENCY EJECT?
OPERATIONS
Basic operations—AV menu ............. 6
Basic operations—Control panel
...... 8
Basic operations—
Remote controller (RM-RK252) ...... 10
Listening to the radio ...................... 12
Disc operations ................................ 14
Dual Zone operations ....................... 26
USB operations ................................ 29
Bluetooth® operations—
Cellular phone/audio player .......... 31
EXTERNAL DEVICES
Listening to the iPod ........................ 38
Listening to the CD changer
.............. 41
Listening to the satellite radio ......... 43
Listening to
the HD Radio™ Broadcast .............. 46
Temperature inside the car...
If you have parked the car for a long time in hot or cold
weather, wait until the temperature in the car becomes
normal before operating the unit.
This product incorporates copyright protection
technology that is protected by U.S. patents and
other intellectual property rights. Use of this
copyright protection technology must be authorized
by Macrovision, and is intended for home and
other limited viewing uses only unless otherwise
authorized by Macrovision. Reverse engineering or
disassembly is prohibited.
Listening to
other external components ........... 48
SETTINGS
Sound equalization .......................... 50
Assigning titles to the sources
.......... 51
Menu items ..................................... 52
REFERENCES
Maintenance ................................... 61
More about this unit
........................ 62
Troubleshooting .............................. 68
Specifications .................................. 74
3
Page 4
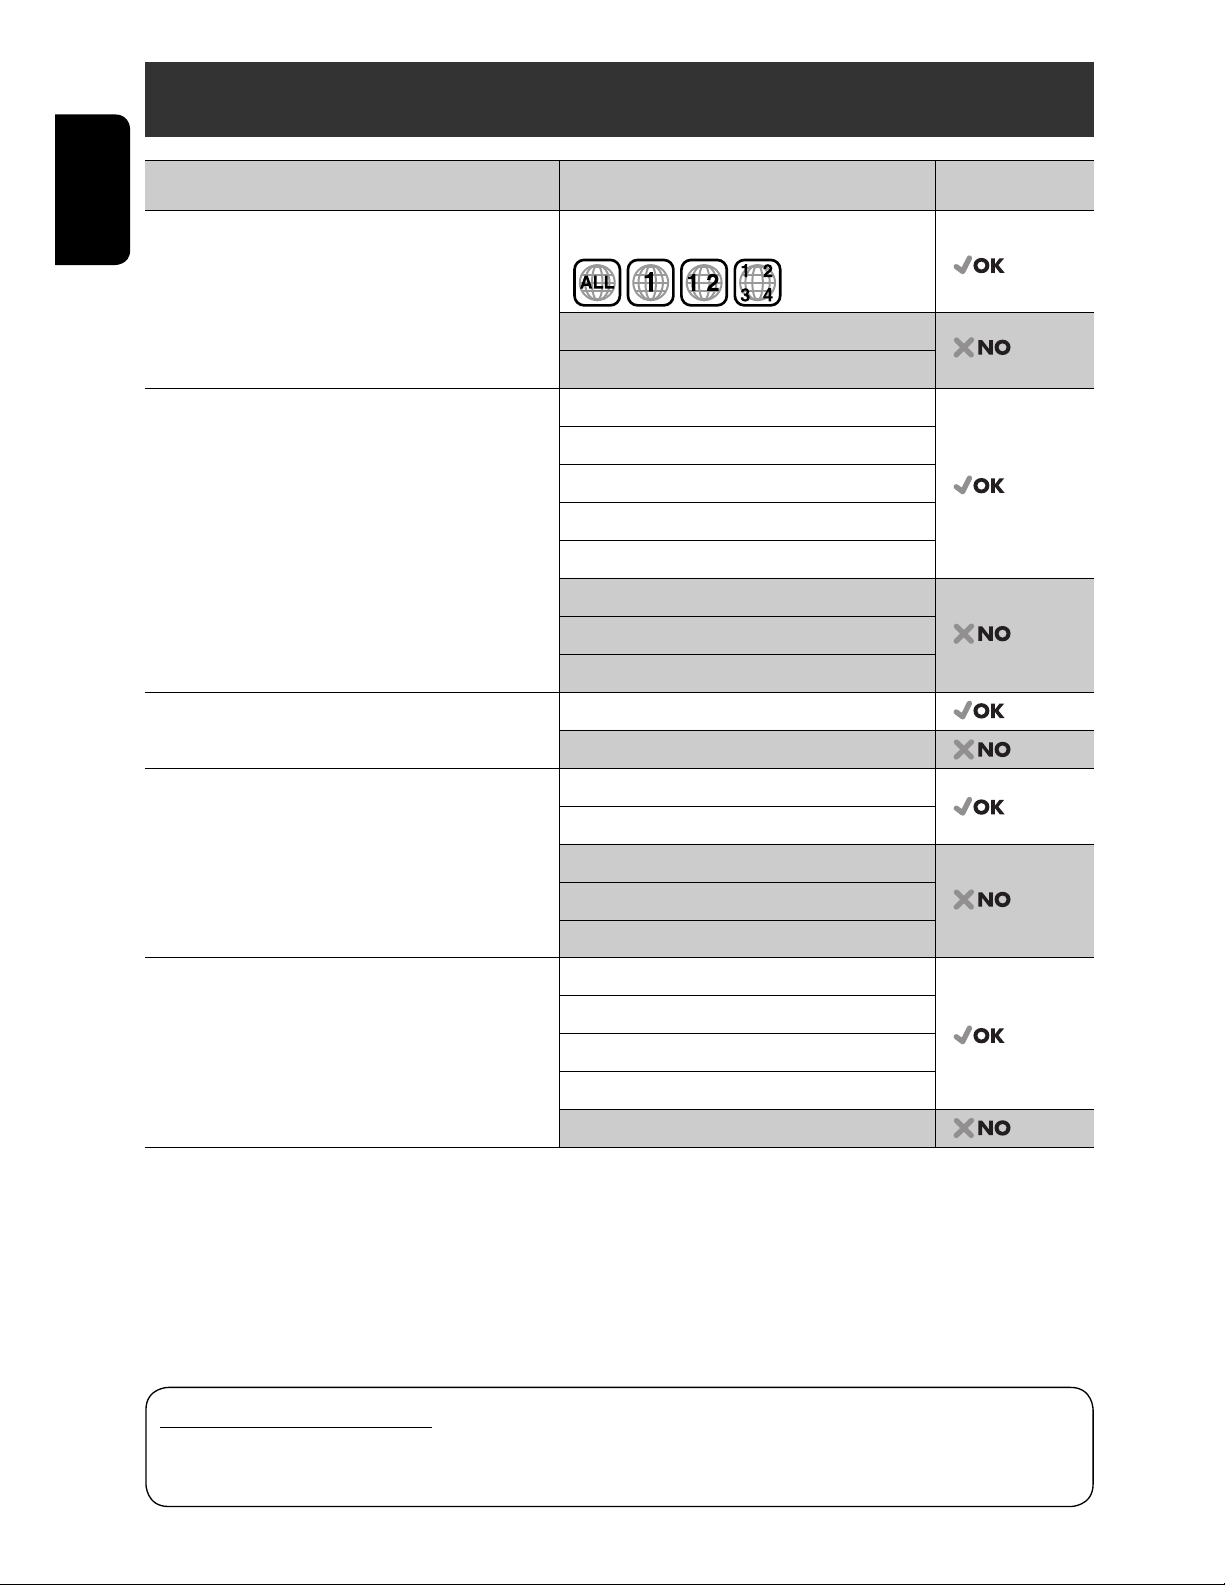
Playable disc type
Disc type Recording format, file type, etc. Playable
DVD DVD Video (Region Code: 1)*
ENGLISH
DVD Audio
DVD-ROM
DVD Recordable/Rewritable
(DVD-R/-RW*
2
, +R/+RW*3)
• DVD Video: UDF bridge
DVD Video
DVD-VR
DivX/MPEG1/MPEG2
• DVD-VR
• DivX/MPEG1/MPEG2/JPEG/MP3/WMA/WAV/
AAC: Compliant to ISO 9660 level 1, level 2,
Romeo, Joliet
JPEG
MP3/WMA/WAV/AAC*
MPEG4
DVD+VR
DVD-RAM
DualDisc DVD side
Non-DVD side
CD/VCD Audio CD/CD Text (CD-DA)/DTS-CD
1
4
VCD (Video CD)
SVCD (Super Video CD)
CD-ROM
CD-I (CD-I Ready)
CD Recordable/Rewritable
(CD-R/-RW)
• Compliant to ISO 9660 level 1, level 2, Romeo,
CD-DA
MP3/WMA/WAV/AAC*
JPEG
4
Joliet
DivX/MPEG1/MPEG2
MPEG4
1
*
If you insert a DVD Video disc of an incorrect Region Code, “Region code error” appears on the monitor.
2
DVD-R recorded in multi-border format is also playable (except for dual layer discs).
*
DVD-RW dual layer discs are not playable.
3
It is possible to play back finalized +R/+RW (Video format only) discs.
*
+RW double layer discs are not playable.
4
This unit can play back AAC files encoded using iTunes.
*
Caution for DualDisc playback
The Non-DVD side of a “DualDisc” does not comply with the “Compact Disc Digital Audio” standard. Therefore,
the use of Non-DVD side of a DualDisc on this product may not be recommended.
4
Page 5
Before operations
ENGLISH
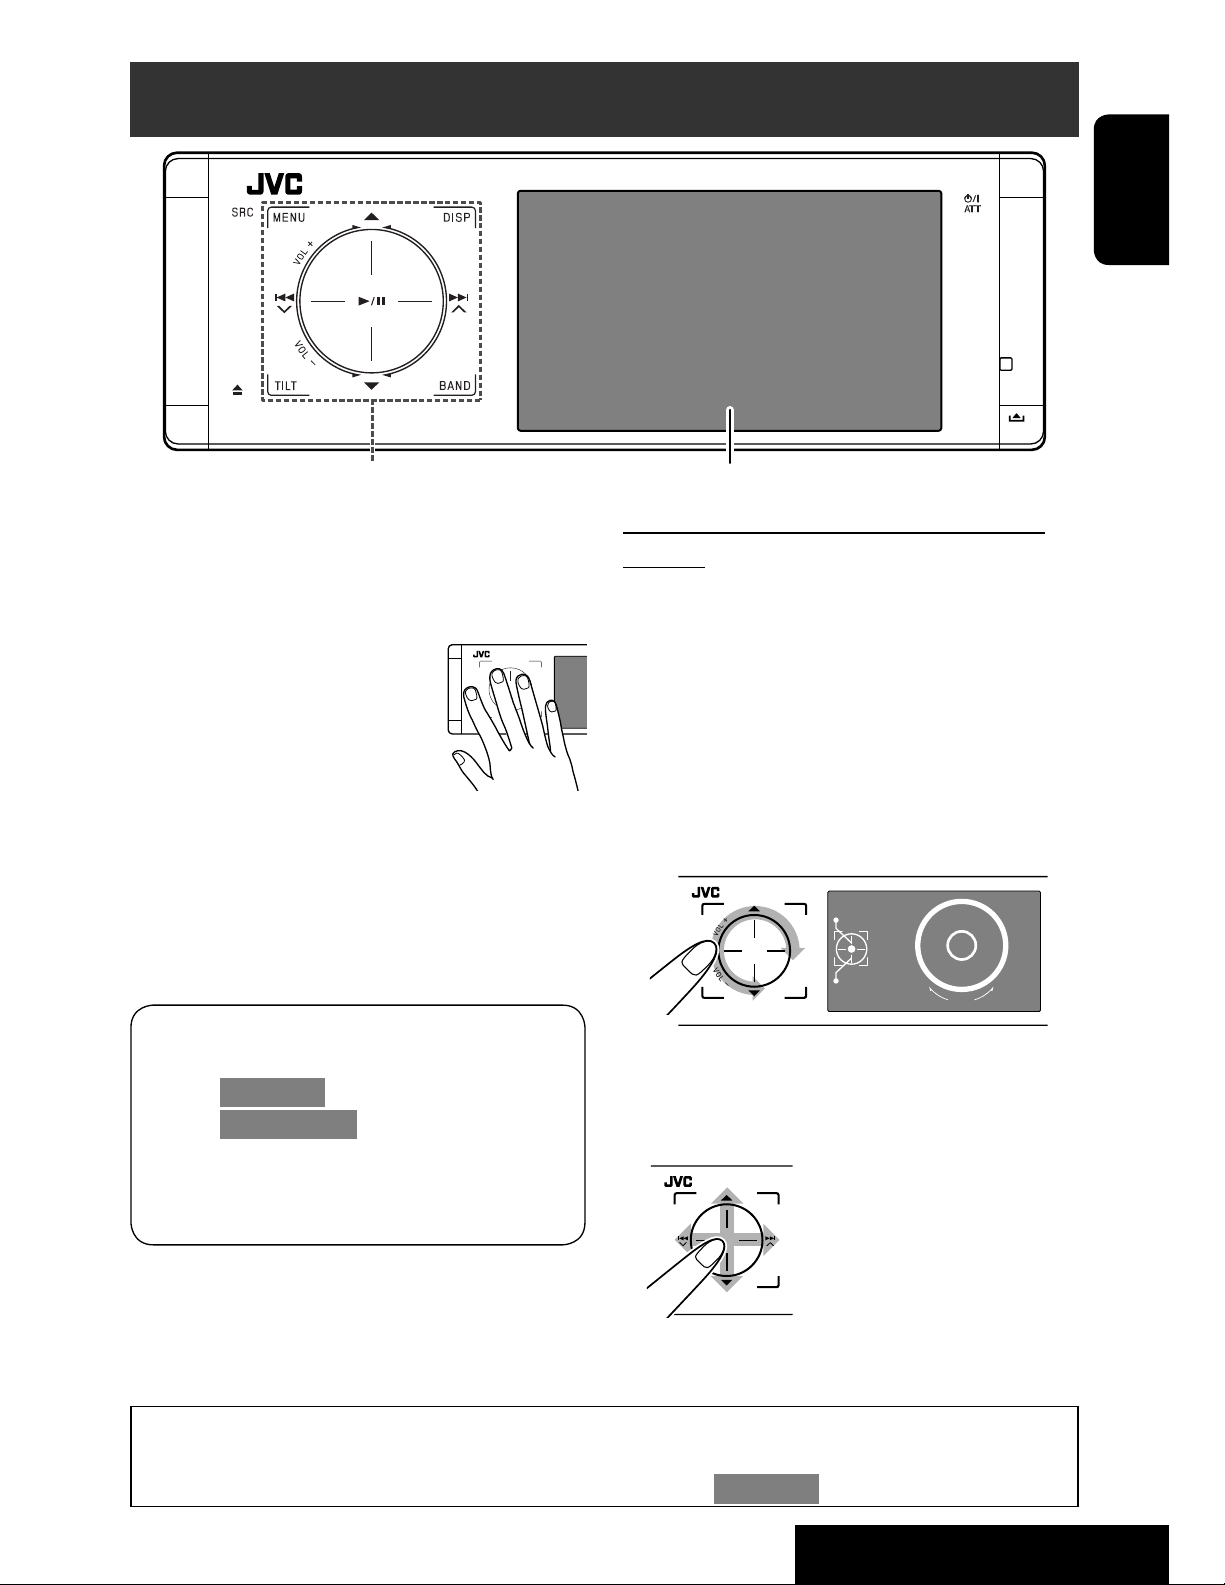
Touch pad controls
The lights of the touch pad controls and monitor are
turned off when no operation is done for about 10
seconds.
The lights are turned on in the following cases:
– When you move your hand close
to the touch pad controls.*
– When your finger touches the
touch pad controls.*
– When you use the remote
controller.
– When a call/text message comes in.
– When the signal from the rear view camera comes in.
* Depending on the setting. To change the setting,
page 57.
The lights are always turned on in the following
cases:
– While <AV Menu> is displayed.
– While <Source Menu> is displayed.
While the control panel is open.
–
– When <Illumination> is set to <Normal>. (
page 57)
Monitor
How to operate the unit by the touch pad
controls
You can operate the unit by touching the appropriate
part of the touch pad controls.
• To adjust the volume, move your finger on the
touch pad knob as illustrated below to display the
animation on the monitor, then press 5 or ∞
repeatedly.
– You can also adjust the volume by just continuing
to move your finger on the touch pad knobs as
illustrated below.
Vol+
15
Vol-
• When you slide your finger on the touch pad knob
as illustrated below, it functions in the same way as
touching 5 / ∞ / 4 / ¢.
VOL
• Operations are explained mainly using the touch pad controls and buttons of the unit; however, the buttons
on the remote controller can work in the same way if they have the same names or marks.
• In the explanation, the screen names are highlighted. For example, <AV Menu>.
5
INTRODUCTION
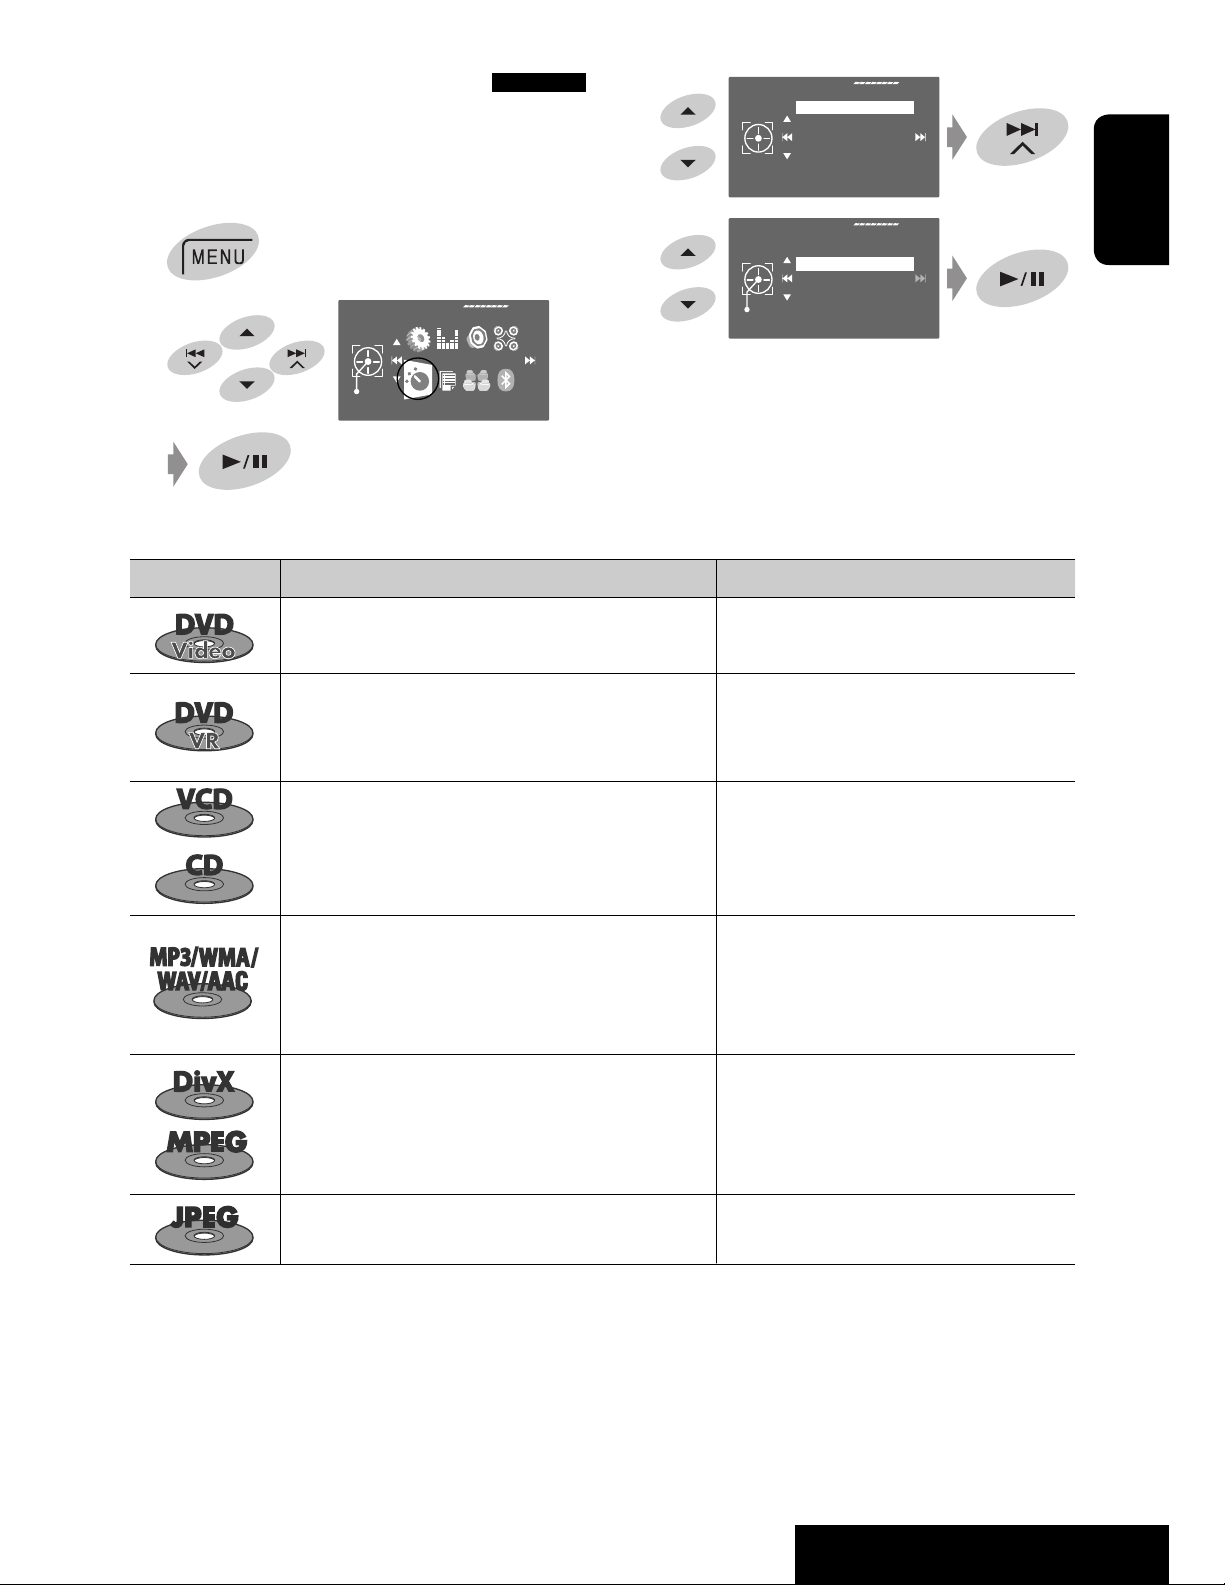
Page 6
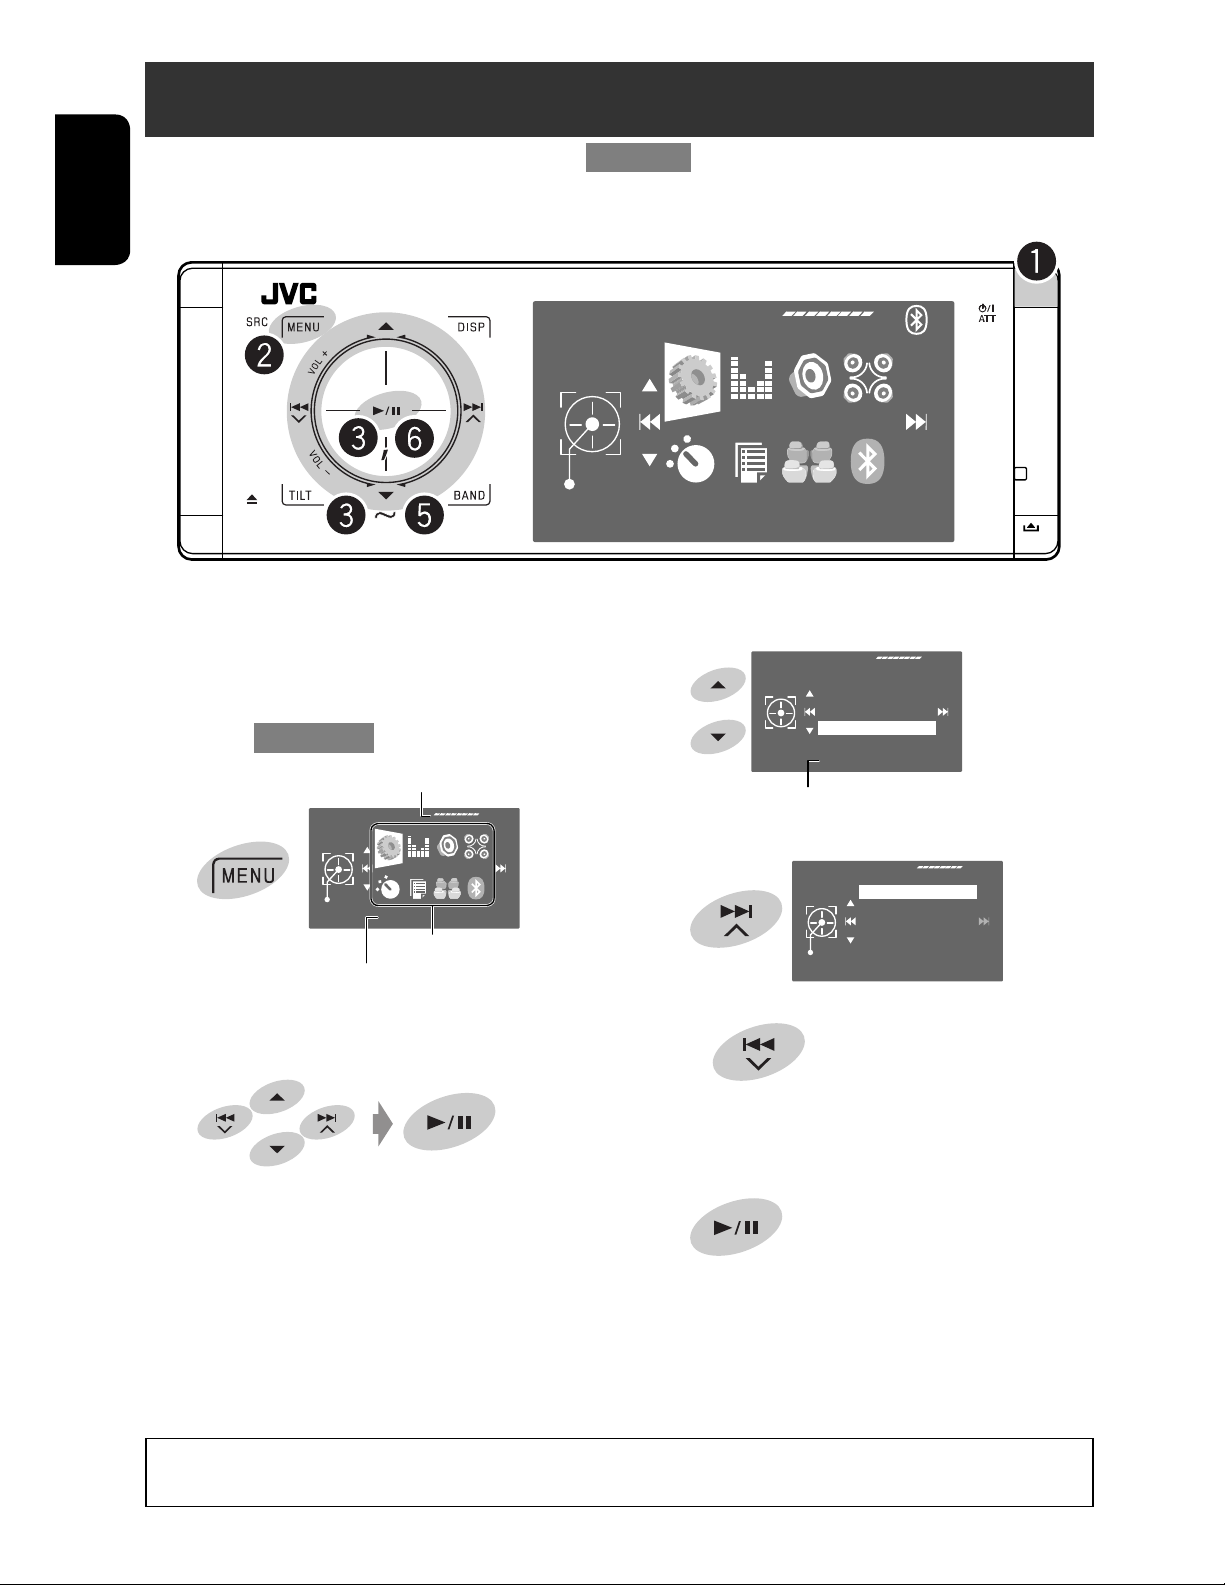
Basic operations— AV menu
You can use the menus to set up various settings from <AV Menu>. For details of each menu and setting, see “Menu
items.” ( pages 52 to 60)
ENGLISH
AV Menu
Enter
Setup
~ Turn on the power.
The lights of the touch pad controls and monitor
are turned on.
Ÿ Enter <AV Menu>.
Time countdown indicator
AV Menu
Enter
Setup
Setup icons
Current selected icon name
• Non-available items will be shaded.
! Select an icon to enter the setup screen.
⁄ Select an item.
Sound
Current setting of the selected item
Fader/Balance
Volume Adjust
Subwoofer Level
High Pass Filter
Crossover
Through
@ Enter the next screen.
High Pass Filter
Exit
• To return to the previous screen:
• Repeat steps ⁄ and @ to set the sub-item if
needed.
Through
On
¤ Finish the procedure.
In this manual, English indications are used for purpose of explanation. You can select the indication
language on the monitor. ( page 53)
6
Page 7
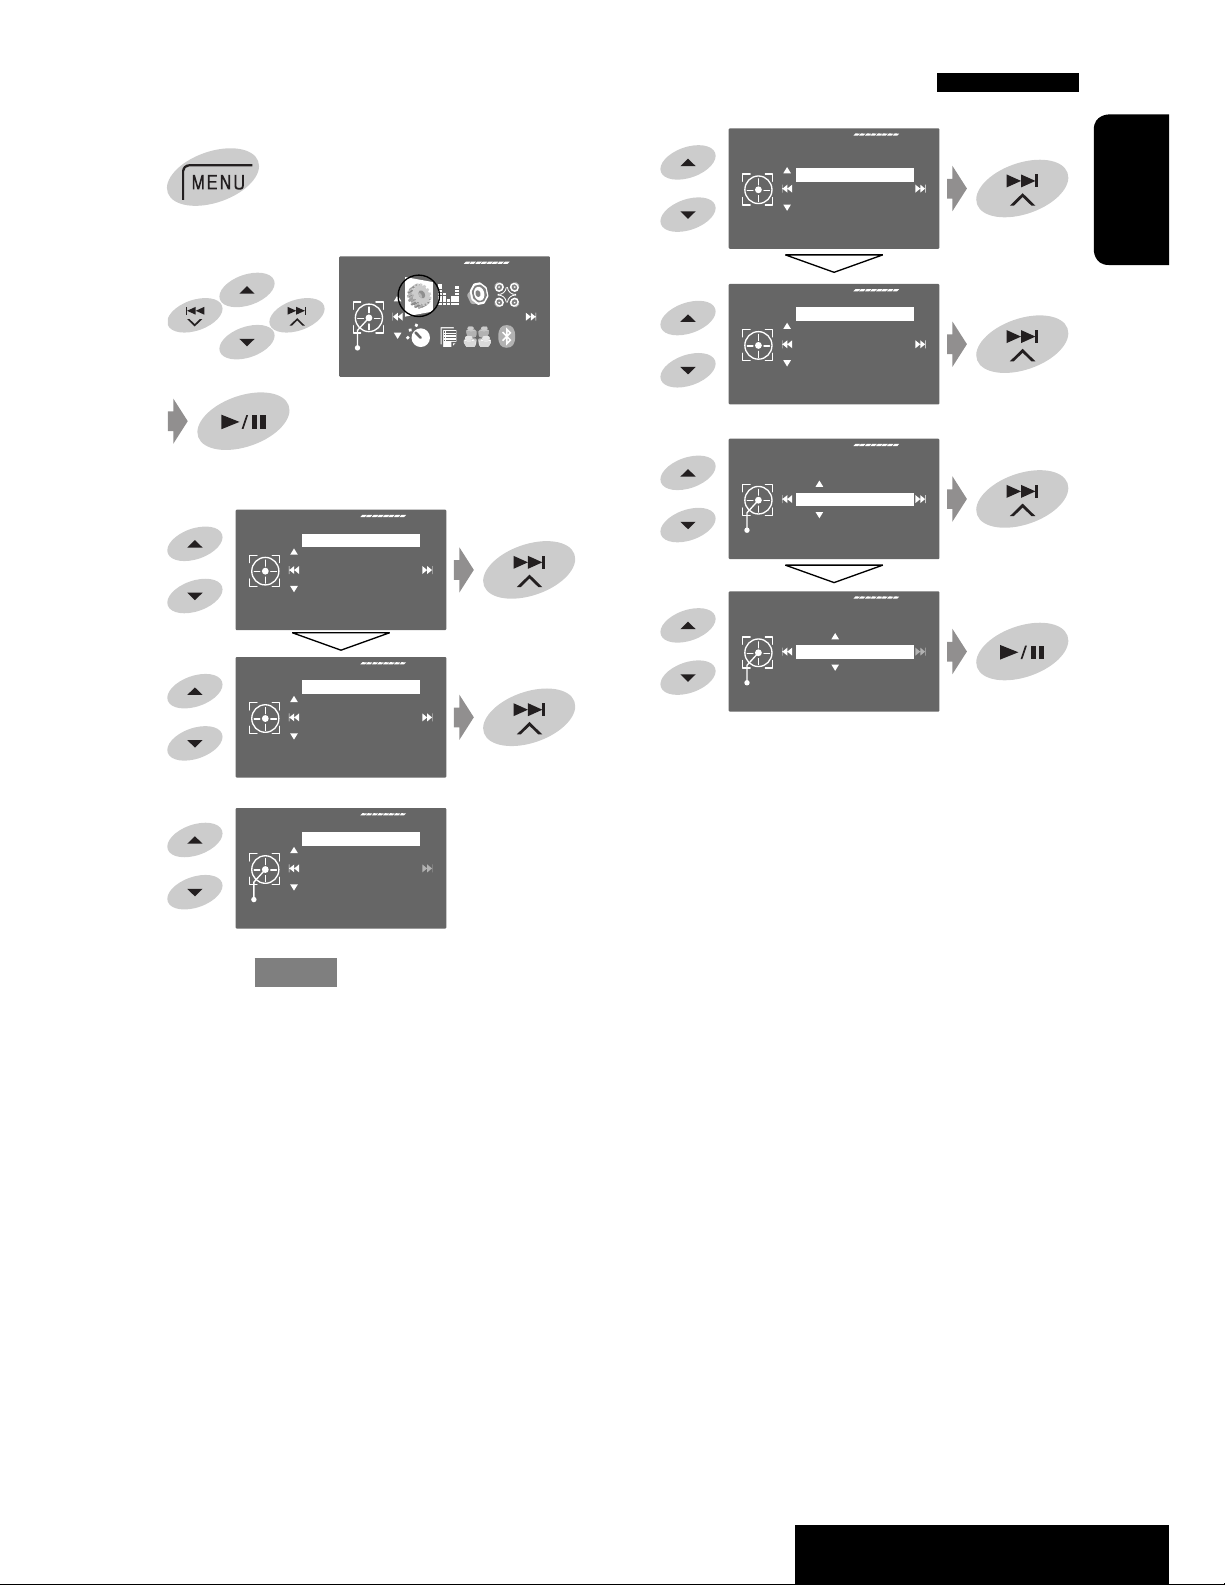
Canceling the display demonstration and setting the clock
1
2
3
Setup
Display
AV Menu
Display
Clock
Disc Setup 1
Disc Setup 2
Tuner
Demonstration
Wall Paper
Color
Scroll
Tag Display
On
Enter
Setup
6
7
Setup
Clock
Time Set
Exit
Time Set
Exit
Display
Clock
Disc Setup 1
Disc Setup 2
Tuner
Time Set
Time Format
OSD Clock
Clock Adjust
1:00AM
Hours
3:00PM
Minutes
3:35PM
ENGLISH
4
5
Return to <Setup> by touching 4
Demonstration
Exit
Off
On
repeatedly.
7
OPERATIONS
Page 8
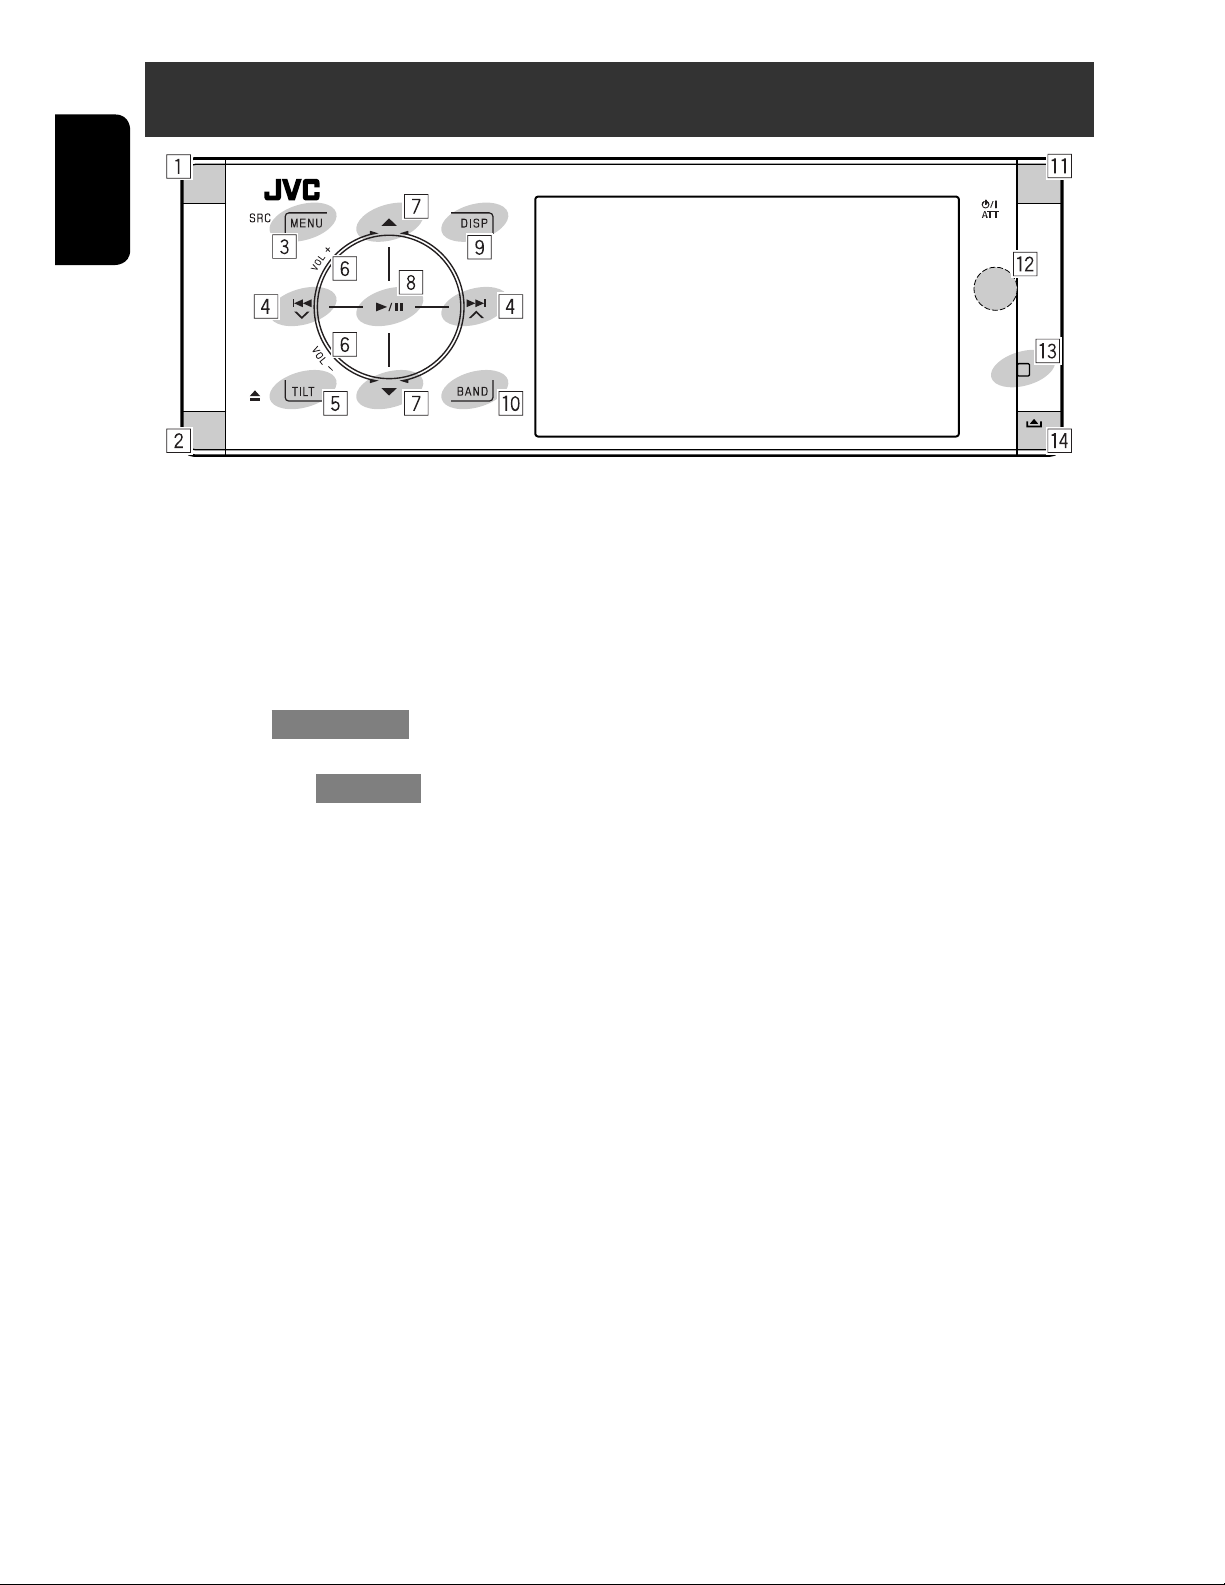
Basic operations — Control panel
ENGLISH
1 Selects sources.
*1
“Tuner” or “HD Radio” = “Satellite Radio
(SIRIUS/XM)” = “Disc” = “USB” or ”USB iPod”
= “Changer,” ”iPod,” or ”External Input” =
“Bluetooth” = “AV Input”
• You can also select sources by touching
5 / ∞ / 4 / ¢ after holding SRC for
entering <Source Menu>.
• Ejects the disc.
2
3 • Enters or exits <AV Menu>.
• Activates Voice Dialling [Hold].
• While talking: Adjusts the built-in microphone
volume.
4 • “Tuner” and “HR Radio”: Searches for stations.
• “Satellite Radio”: Selects channels.
• “Disc,” “USB,” “USB iPod,” “Changer,” “iPod,” and
“Bluetooth”: Reverse skip/forward skip
• On menus:
– Enters the previous/next screen.
– Selects items.
5 Tilts the control panel. ( page 9)
6 Adjusts the volume level. ( page 5)
7*2 • “Tuner”: Selects preset stations.
• “HD Radio”: Selects multicast channels.
• “Satellite Radio”: Selects categories.
• “Disc,” “USB,” and “Changer”: Selects titles/
folders.
• “USB iPod”: Selects the next/previous items.
• “iPod”: Enters the player’s menu and pauses
playback.
• “Bluetooth”: Selects group/folder.
• On menus: Selects items.
8 • “Disc,” “USB,” “USB iPod,” and “Changer”: Starts
and pauses playback.
• “Bluetooth”: Starts playback.
• On menus: Enters the next screen or exits the
displayed screen.
9 Changes the display information. ( page 9)
p • “Tuner,” “HD Radio,” and “Satellite Radio”:
Selects the bands.
• “Disc” and “USB”: Stops playback.
• “Bluetooth”: Pauses playback.
q • Turns on the power.
• Turns off the power [Hold].
• Attenuates the sound (when the power is on).
w Remote sensor
e Resets the unit.
• Use only when the internal system malfunctions.
r Detaches the control panel. ( page 9)
1
You cannot select these sources if they are not ready.
*
2
By holding 5 / ∞, you can display the list accessible
*
for the selected source.
8
Page 9
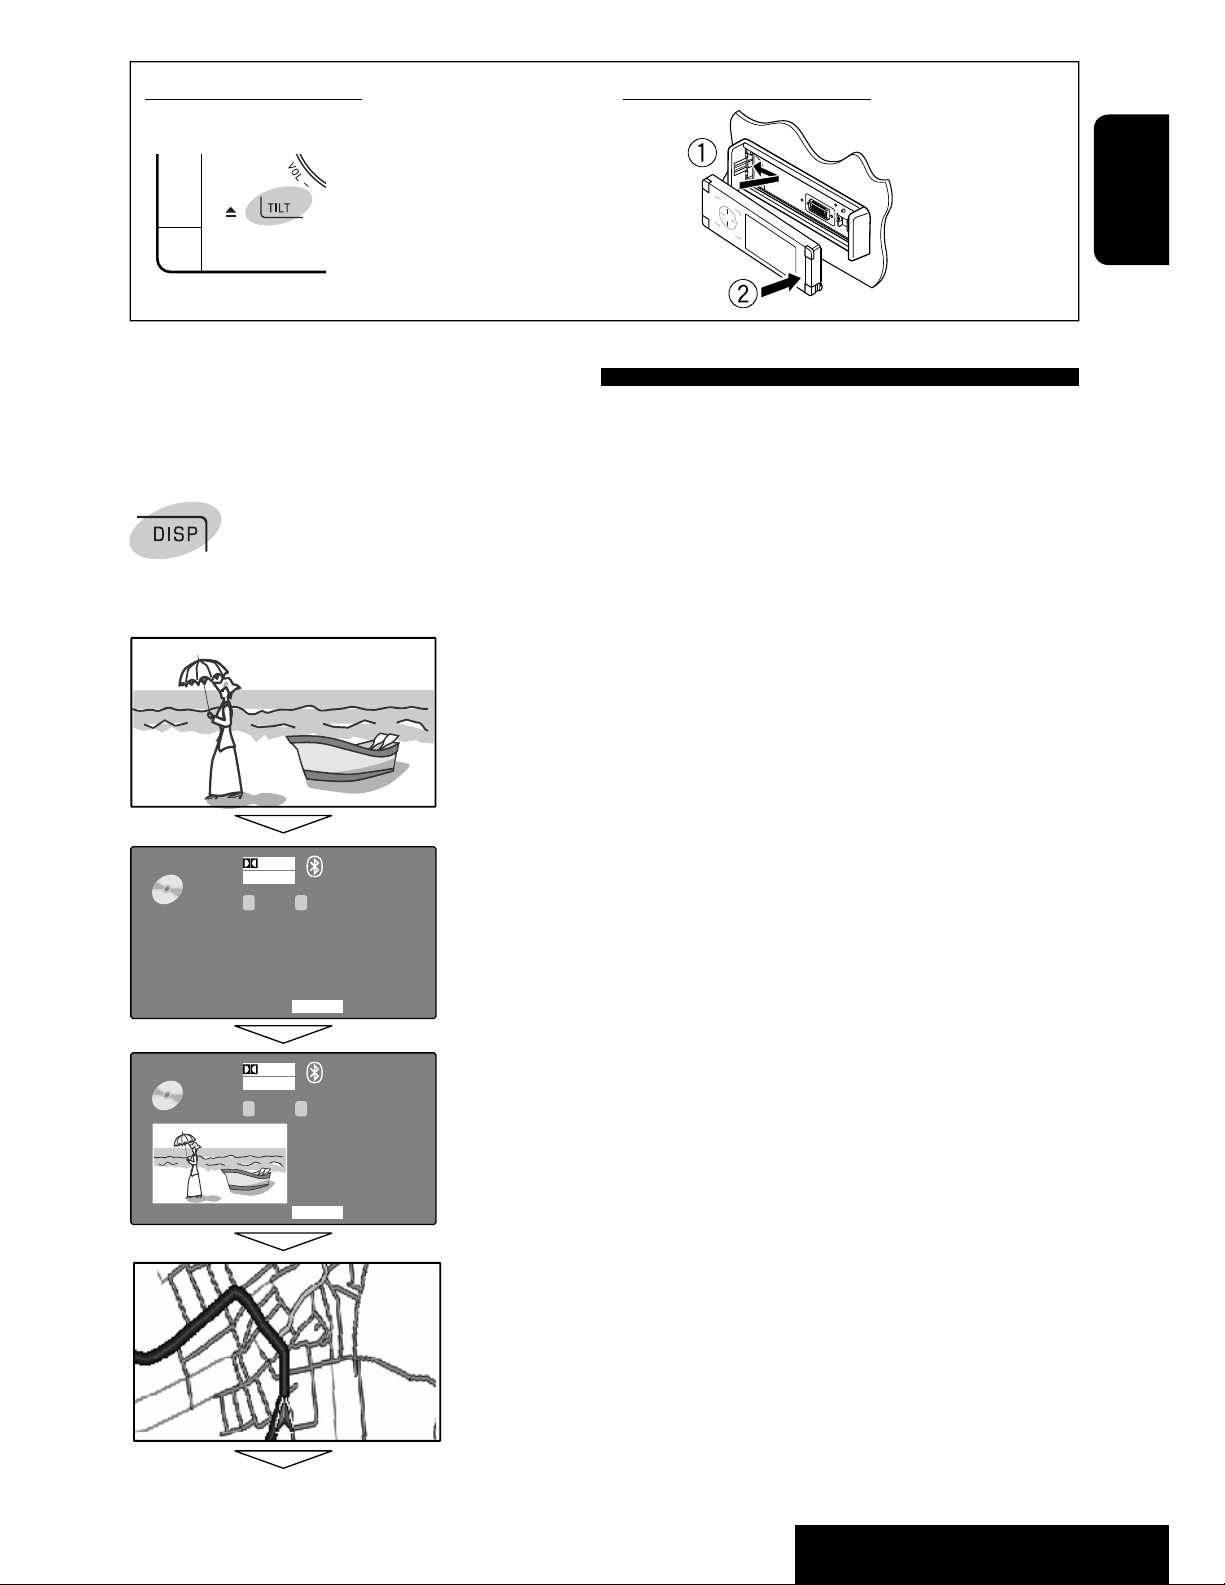
To tilt the control panel
To attach the control panel
Touch TILT repeatedly.
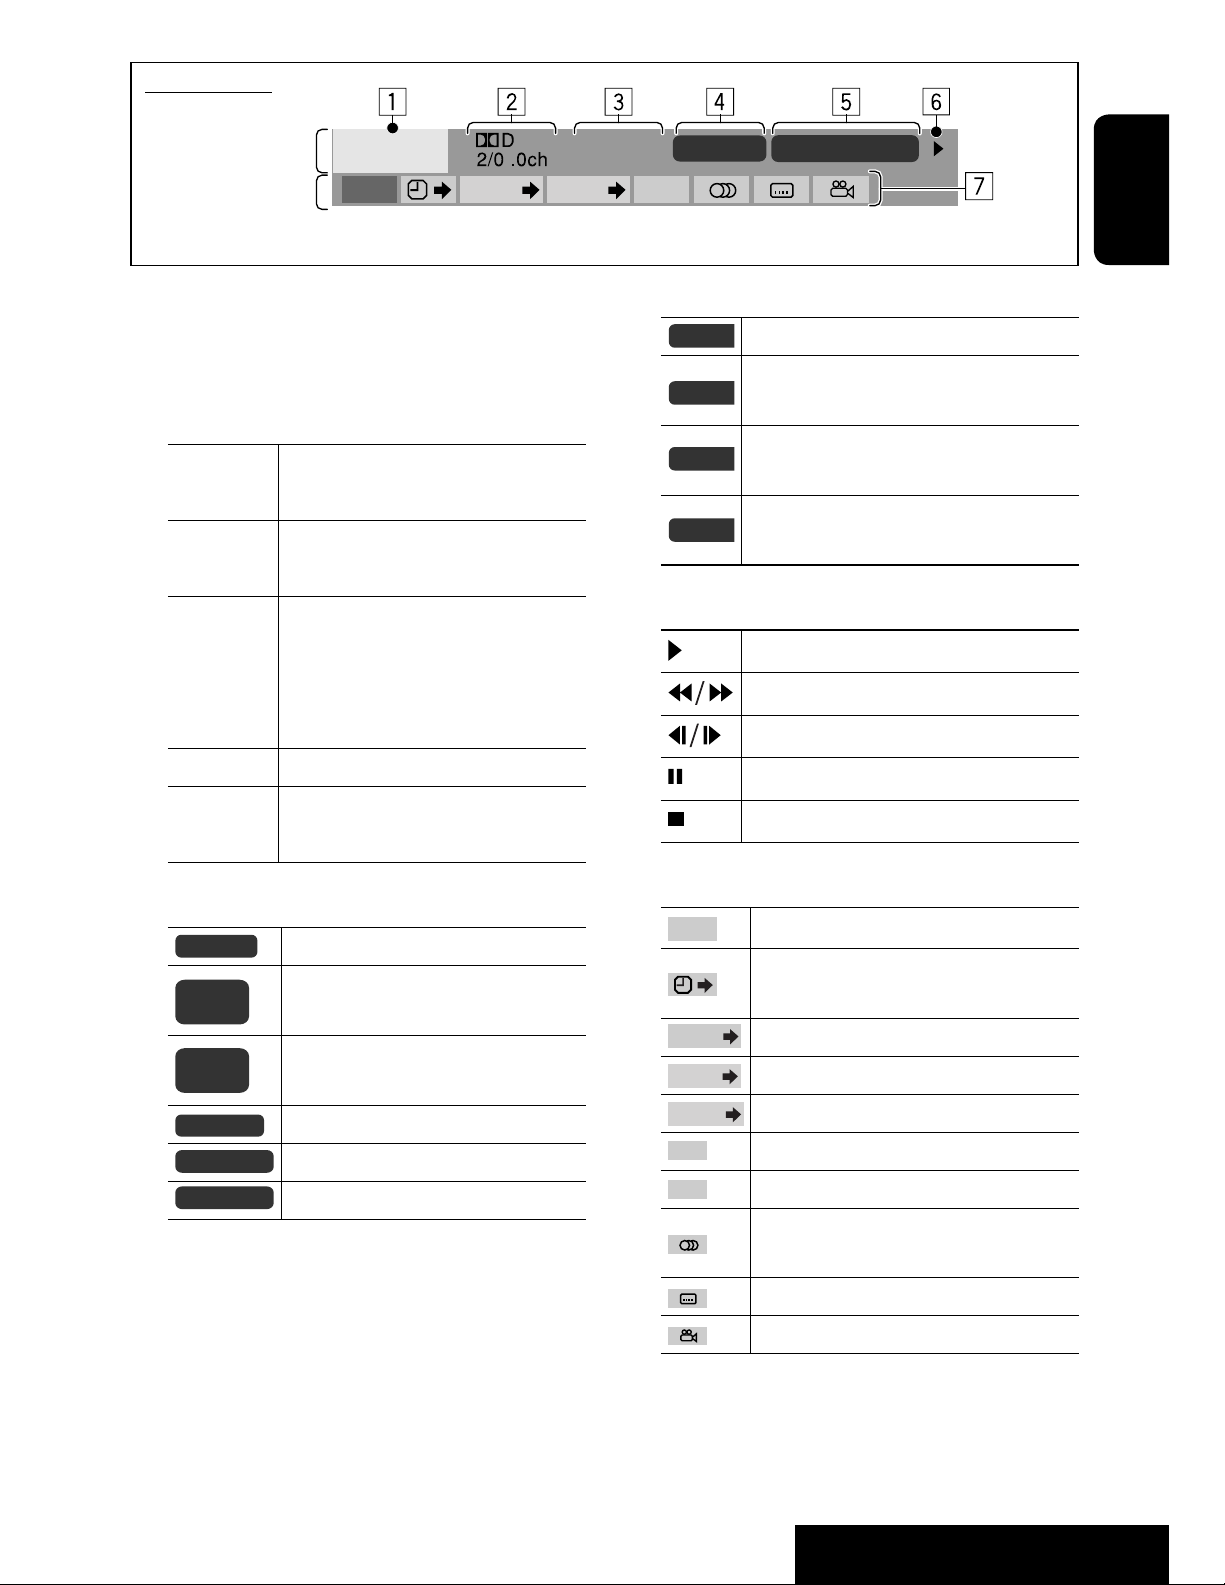
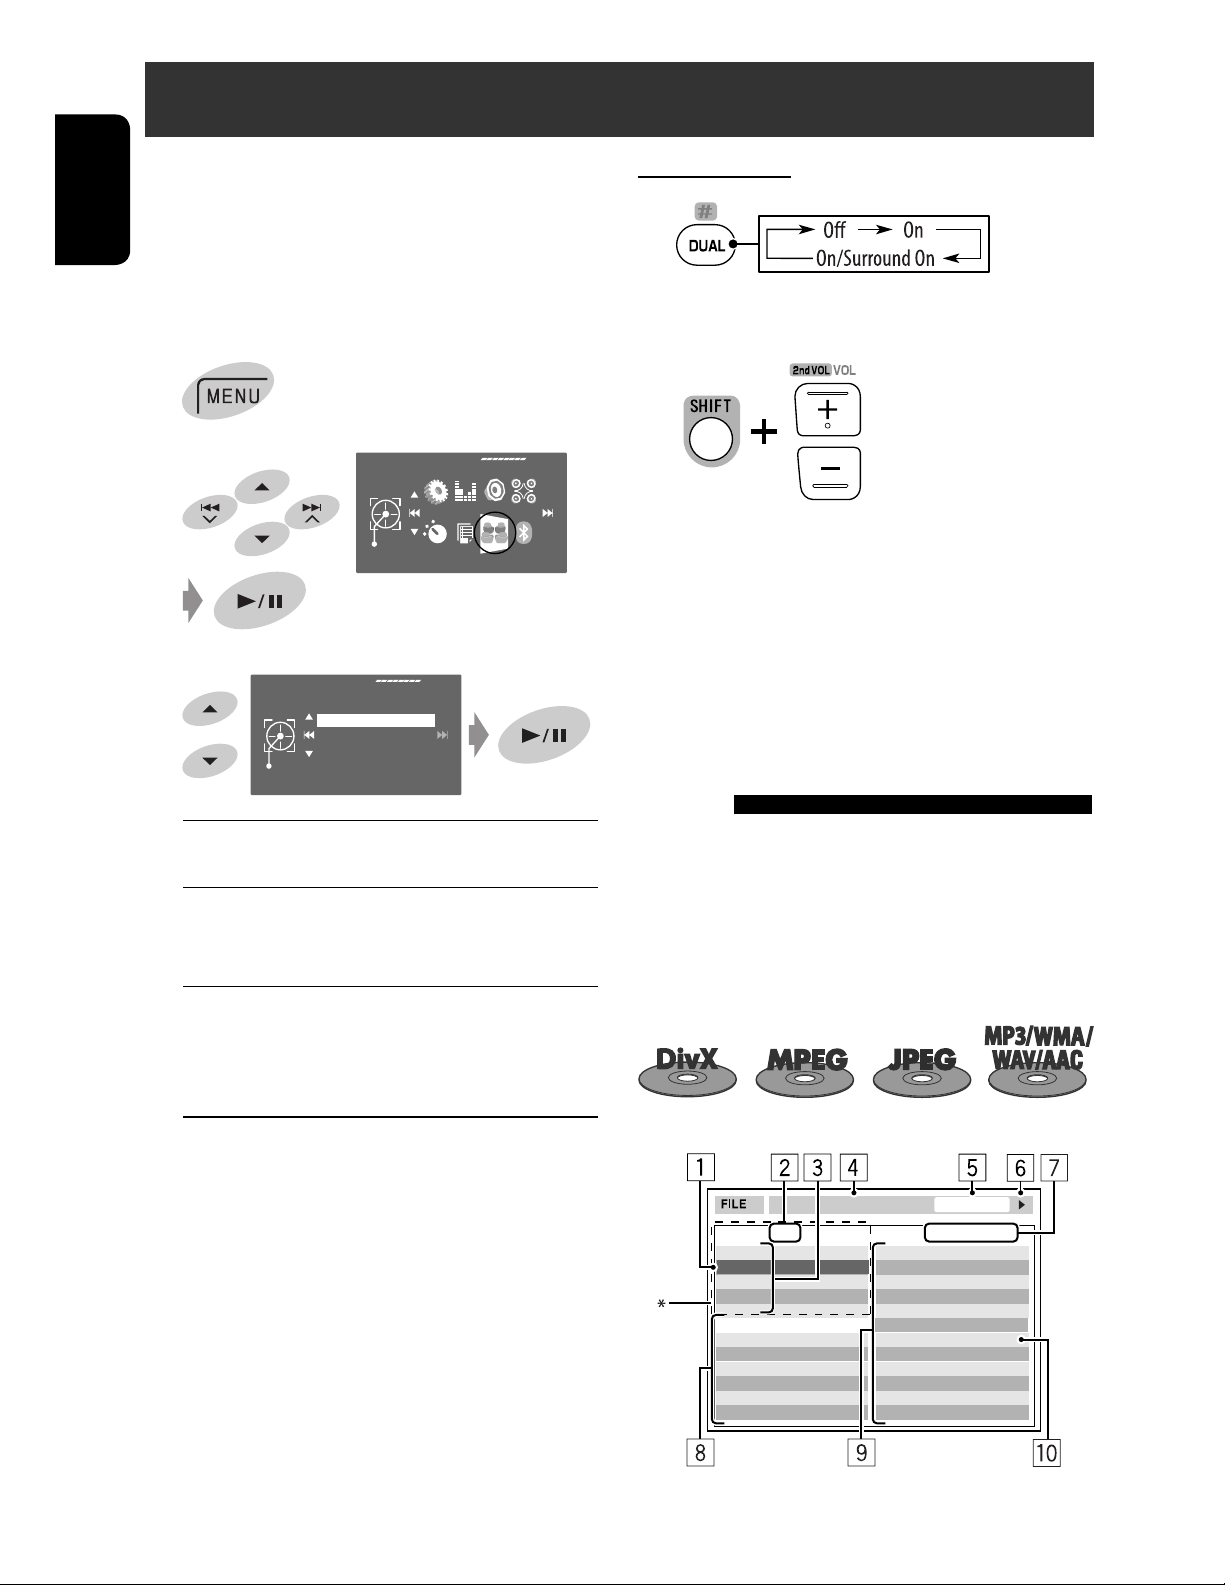
Changing the display information
Available display information varies among the playback sources.
Each time you touch DISP, the display changes to show the various information.
Ex.: When the playback source is a DVD video disc.
Playback picture screen (only for video sources)
ENGLISH
DVD
VIDEO
01 02 0:01:20
DVD
VIDEO
01 02 0:01:20
DIGITAL
MULTI
DIGITAL
MULTI
CT
CHAP.RPT
CT
3:45
CHAP.RPT
3:45
PM
PM
Source information screen
Playback picture and the source information screen
Navigation screen
• This screen is displayed when <Navigation> is selected for <AV Input>.
( page 56)
Back to the beginning
9
OPERATIONS
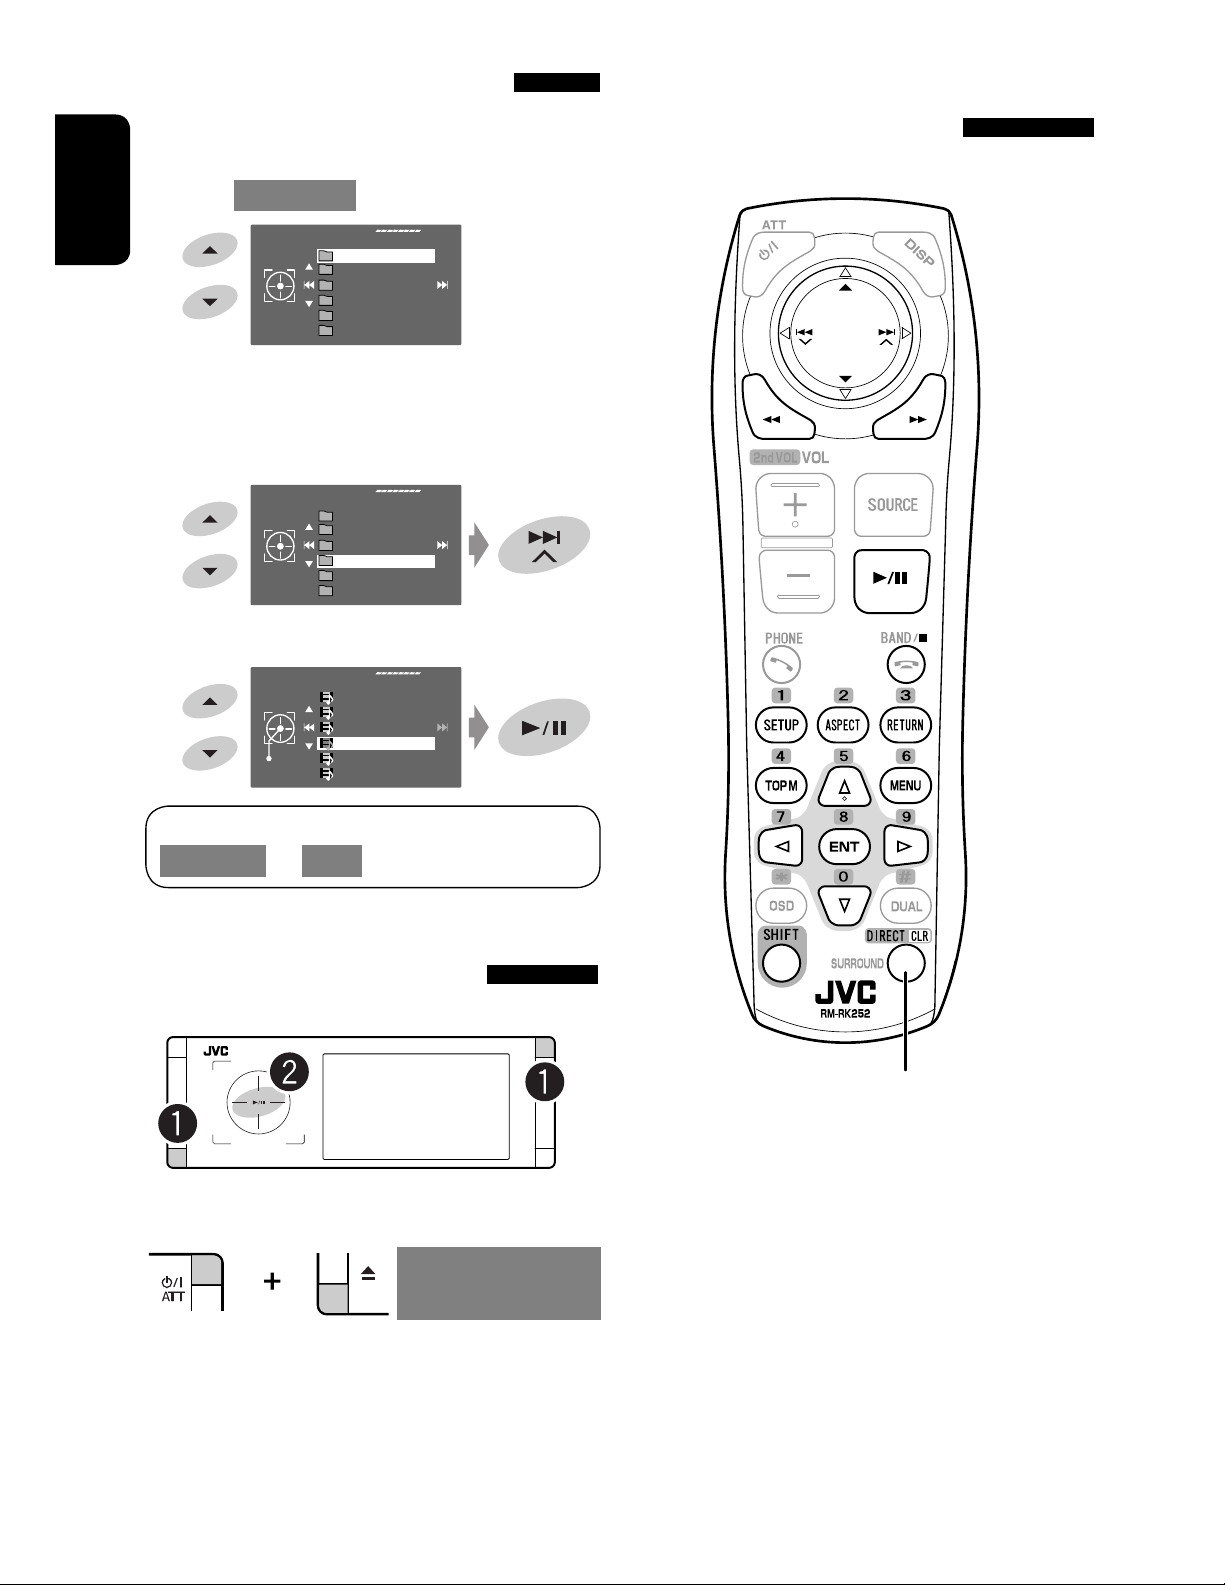
Page 10
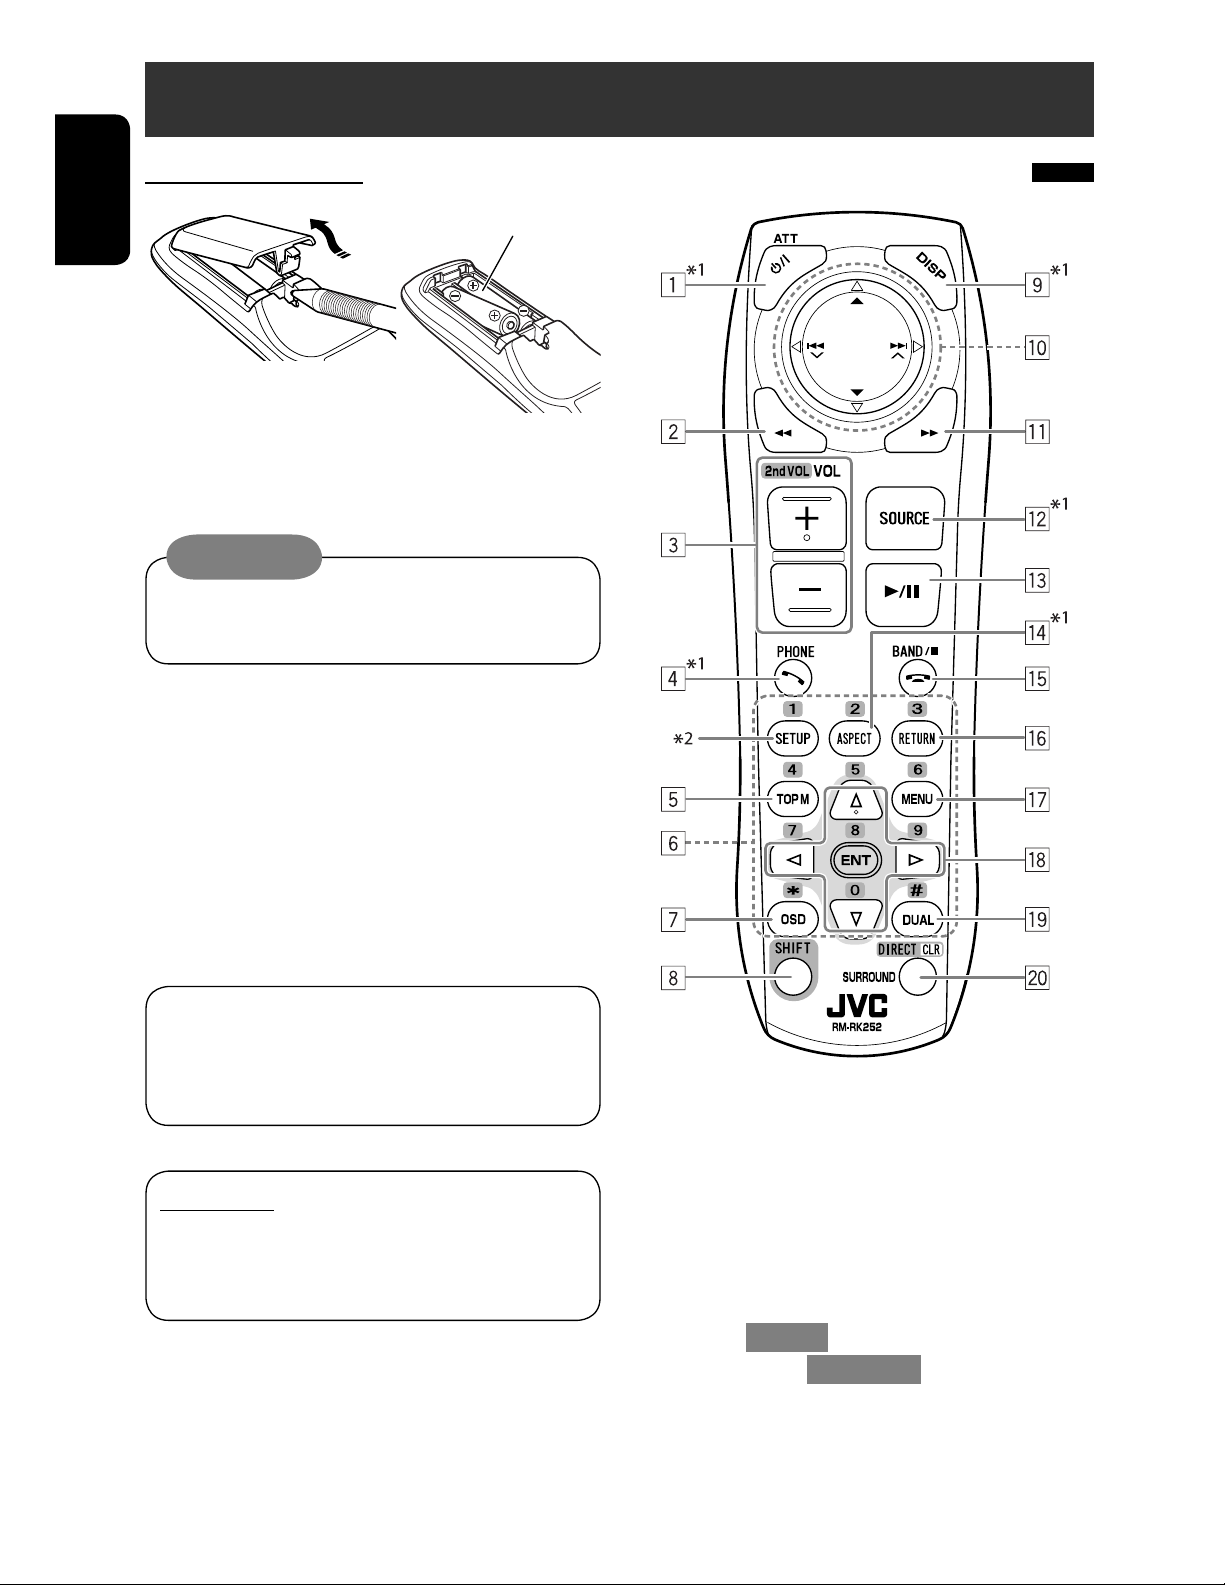
Basic operations — Remote controller (RM-RK252)
Installing the battery
ENGLISH
Insert the batteries into the remote controller by
matching the polarity (+ and –) correctly.
R03/LR03/AAA
Caution:
Battery shall not be exposed to excessive heat
such as sunshine, fire or the like.
If the range or effectiveness of the remote
controller decreases, replace both batteries.
Main elements and features
Before using the remote controller:
• Aim the remote controller directly at the remote
sensor on the unit.
• DO NOT expose the remote sensor to bright light
(direct sunlight or artificial lighting).
The unit is equipped with the steering wheel
remote control function.
• See the Installation/Connection Manual (separate
volume) for connection.
IMPORTANT:
When Dual Zone is activated ( page 26), the
remote controller functions only for operating the
DVD/CD player.
1 • Turns on the power.
• Turns off the power [Hold].
• Attenuates the sound (when the power is on).
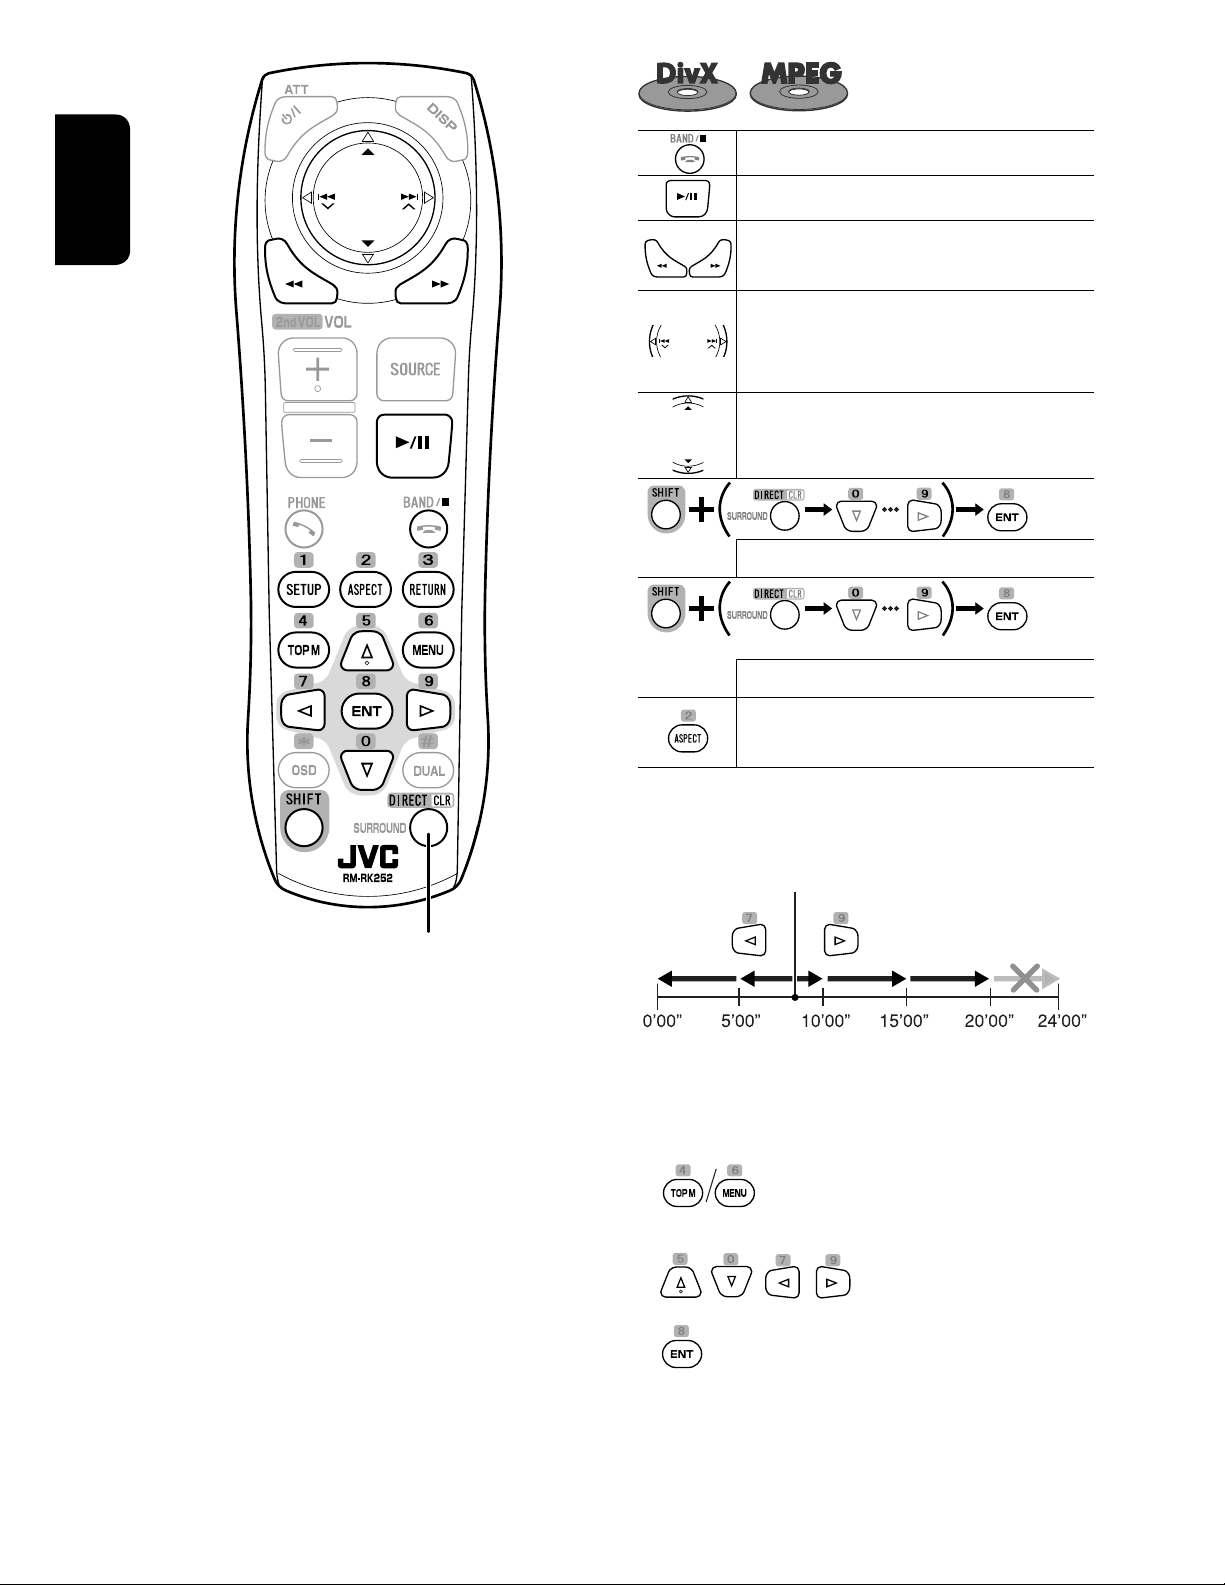
2 “Disc,” “USB,” and “USB iPod”: Reverse search
3 • Adjusts the volume level.
• Adjusts the volume level through the 2nd AUDIO
OUT plug (while holding SHIFT). ( page 26)
4 • Answers incoming calls.
• Enters <Redial> [Hold].
• You can enter <Dial Menu> by pressing the
button then touching 6 on the unit.
• DVD/DivX 6: Displays the disc menu.
5
• VCD: Resumes PBC playback ( page 21).
• DVD-VR: Displays the Original Program screen.
10
Page 11

6 • Enters numbers (while holding SHIFT). ( pages
13, 19 to 22, 36, and 45)
• Selects the preset phone number.
• “Tuner,” “HD Radio,” and “Satellite Radio”:
Selects the preset stations.
7 Displays the on-screen bar.
8 Functions with other buttons (see 3, 6, and ;)
9 Displays the display information.
p “Tuner”:
• 5 / ∞: Selects preset stations.
• 4 / ¢: Searches for stations.
– Auto Search
– Manual Search [Hold]
“HD Radio”:
• 5 / ∞: Selects multicast channels.
• 4 / ¢: Searches for stations.
– Auto Search
– Manual Search [Hold]
“Satellite Radio”:
• 5 / ∞: Selects categories.
• 4 / ¢:
– Selects channels.
– Selects channels rapidly. [Hold]
“Disc” and “Changer”:
• 5 / ∞:
– DVD: Selects the title.
– DVD-VR: Selects the program/play list.
– Other discs (except VCD/CD): Selects the
folders.
• 4 / ¢:
– Reverse skip/forward skip
– Reverse search/forward search [Hold]
“USB”:
• 5 / ∞: Selects the folders.
• 4 / ¢:
– Reverse skip/forward skip
– Reverse search/forward search [Hold]
“USB iPod”:
• 5 / ∞: Selects previous/next item.
• 4 / ¢:
– Reverse skip/forward skip
– Reverse search/forward search [Hold]
“iPod”:
• ∞: Pauses or resumes playback.
• 5: Enters the main menu (then 5 / ∞ / 4 /
¢ work as the menu selecting buttons).
*3
• 4 / ¢:
– Reverse skip/forward skip
– Reverse search/forward search [Hold]
In menu selecting mode:
– Selects an item. (Then, press ∞ to confirm the
selection.)
– Skips 10 items at a time [Hold].
“Bluetooth”:
• 5 / ∞: Selects group/folder.
• 4 / ¢:
– Reverse skip/forward skip
– Reverse search/forward search [Hold]
q “Disc,” “USB,” and “USB iPod”: Forward search
w Selects the source.
e • “Disc,” “USB,” and “USB iPod”: Starts and pauses
playback.
• “Bluetooth”: Starts playback.
• Answers incoming calls.
r Changes the aspect ratio of the playback pictures.
t • “Tuner,” “HD Radio,” and “Satellite Radio”:
Selects the bands.
• “Disc” and “USB”: Stops playback.
• “Bluetooth”: Pauses playback.
• Ends the call.
y VCD: Returns to the PBC menu.
u • DVD Video/DivX 6: Displays the disc menu.
• VCD: Resumes PBC playback. ( page 21)
• DVD-VR: Displays the Play List screen.
i • Makes selection/settings.
• @ / #: Skips back or forward by 5 minutes for
DivX/MPEG1/MPEG2.
• % / fi: Changes discs for “Changer.”
o Activates or deactivates Dual Zone.
*1
; • Changes the surround mode.
( page 23)
• “Disc” and “USB”: Switches the number entry
mode (while holding SHIFT).
• Erases the misentry after entering a wrong
number (while holding SHIFT).
1
When Dual Zone is activated, these buttons cannot be
*
used.
2
Functions as a number button only (see 6 ).
*
3
*
5 : Returns to the previous menu.
∞ : Confirms the selection.
11
OPERATIONS
ENGLISH
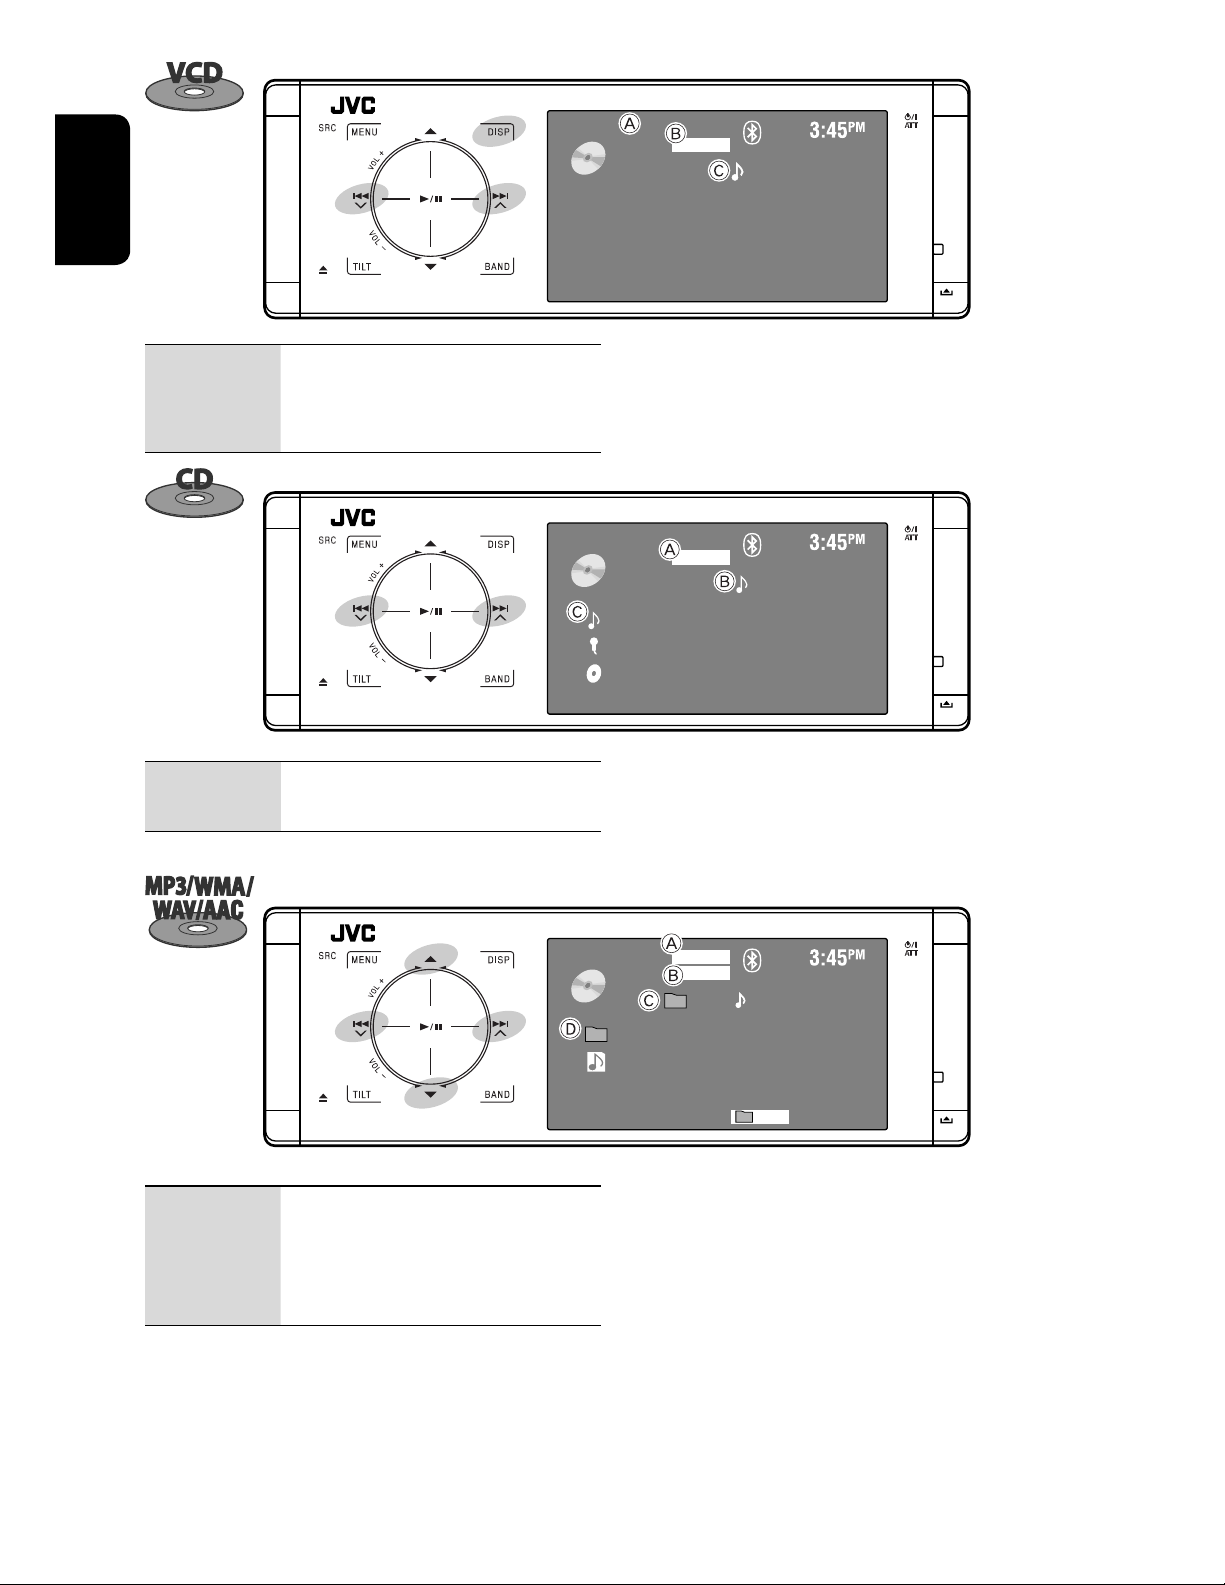
Page 12

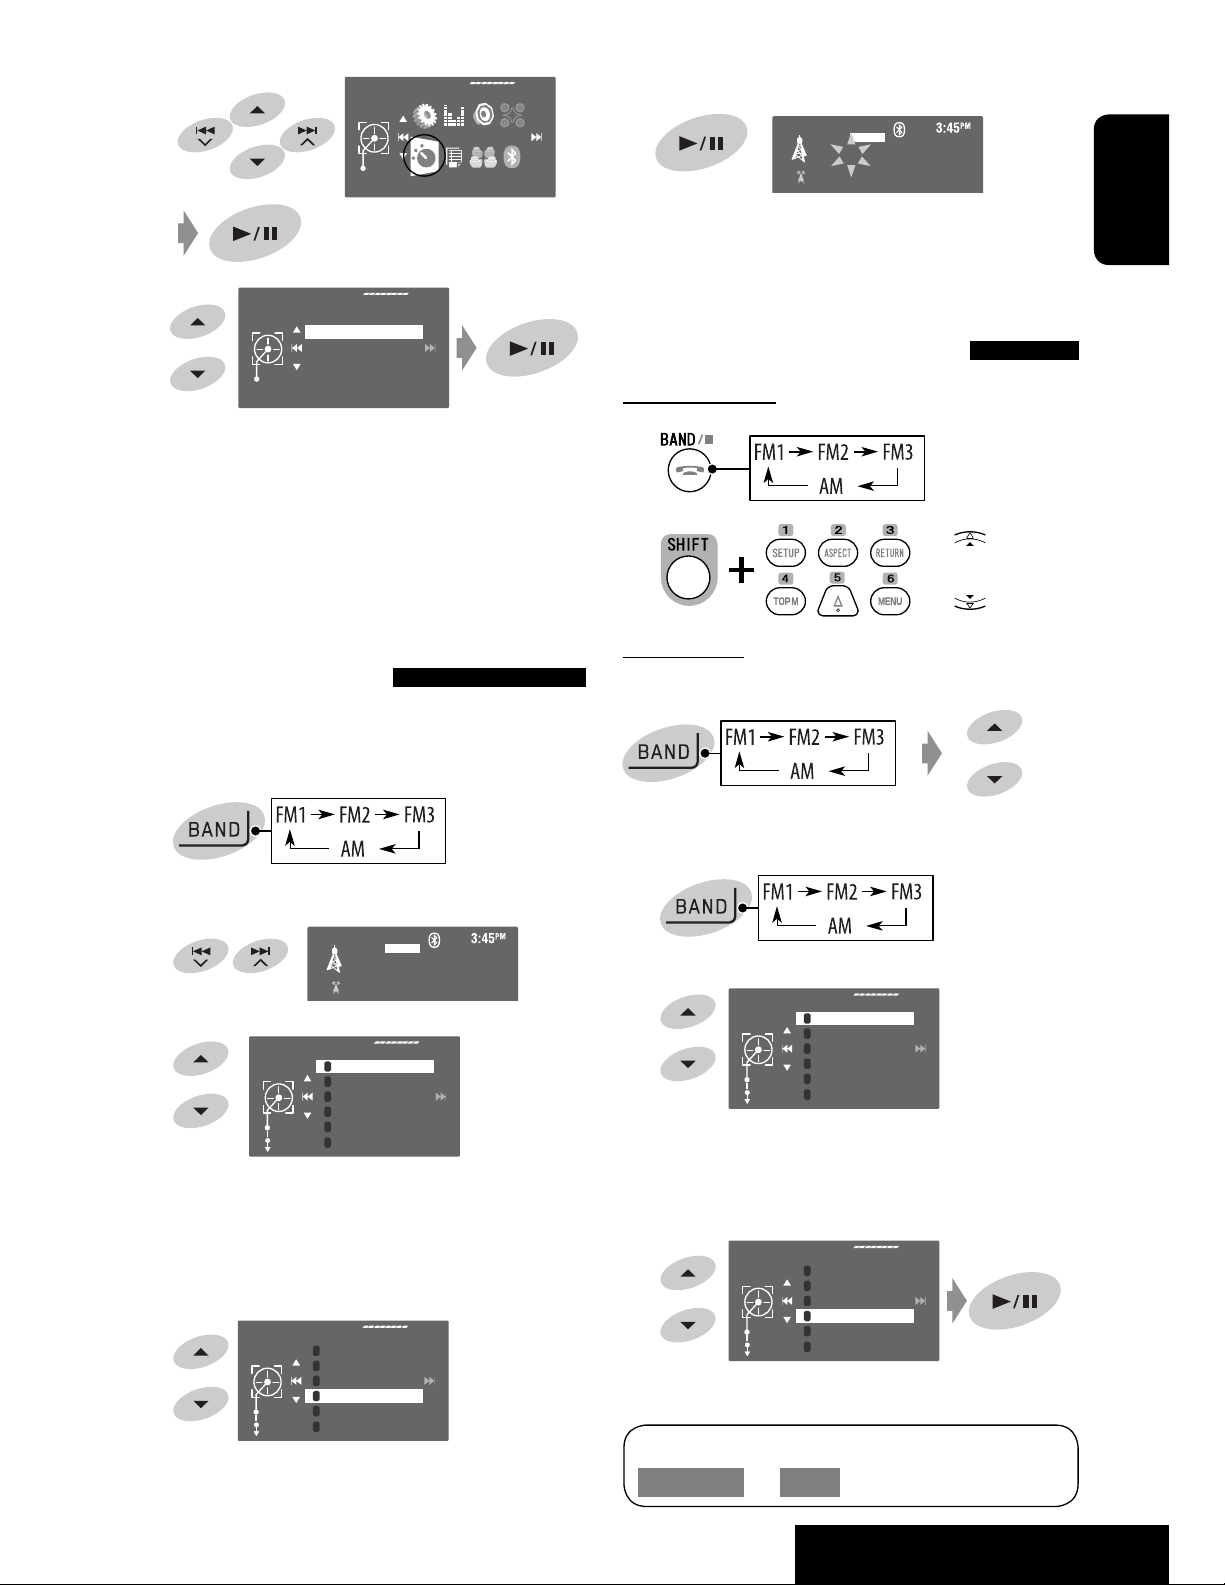
Listening to the radio
ENGLISH
A Band
B Sound mode (
C Preset no.
D Frequency
E Assigned station name (
F FM reception indicator
~ Select “Tuner.”
Ÿ Select the band.
page 50)
page 51)
TUNER
FLAT
FM1 P1 87.5 MHz
ABC Radio
MO
! Search for a station—Auto Search.
• Manual Search: Hold either or until
“Manual Search” appears on the monitor, then
touch it repeatedly.
• The ST indicator lights up when receiving an
FM stereo broadcast with sufficient signal
strength.
When an FM stereo broadcast is
hard to receive
1
2
3
Mode
Mono
SSM
Title Entry
Off
AV Menu
Enter
Mode
4
Reception improves, but the stereo effect will be
lost.
• The MO indicator lights up.
To restore the stereo effect, select <Off> in step 4.
Mono
Exit
Off
On
FM station automatic presetting
—SSM (Strong-station
Sequential Memory)
This function works only for FM bands.
You can preset six stations for each band.
1
12
Page 13
2
AV Menu
5 Store the station.
Enter
Mode
3
Mode
Start
Mono
SSM
Title Entry
Local FM stations with the strongest signals are
searched and stored automatically in the FM band.
• When an HD Radio tuner box is connected ( page
46), you can also search and store the AM station
automatically.
Manual presetting
Ex.: Storing the FM station of 92.5 MHz into preset
number 4 of the FM1 band.
TUNER
FLAT
FM1 P4 92.5 MHz
No Name
[Hold]
The station selected in step 2 is now stored in
preset number 4.
Selecting preset stations
On the remote:
1
2
or
On the unit:
To select directly
ENGLISH
1
2
Tune in to a station you want to preset.
3
[Hold]
FM1
Enter
Store
TUNER
1
87.5
2
89.9
3
97.9
4
105.9
5
108.0
6
87.5
FLAT
FM1 92.5 MHz
No Name
The Preset List appears
• For FM: Each time you hold 5 / ∞ , you can
change the bands.
4 Select a preset number.
FM1
Enter
Store
1
2
3
4
5
6
87.5
89.9
97.9
105.9
108.0
87.5
To select from the Preset List
1
2
[Hold]
• For FM: Each time you hold 5 / ∞ , you can
FM1
Enter
Store
1
2
3
4
5
6
87.5
89.9
97.9
105.9
108.0
87.5
change the bands.
3 Select the preset number.
FM1
The Preset List can also be accessed through
<AV Menu> = <List>.
Enter
Store
1
2
3
4
5
6
87.5
89.9
97.9
105.9
108.0
87.5
13
OPERATIONS
Page 14
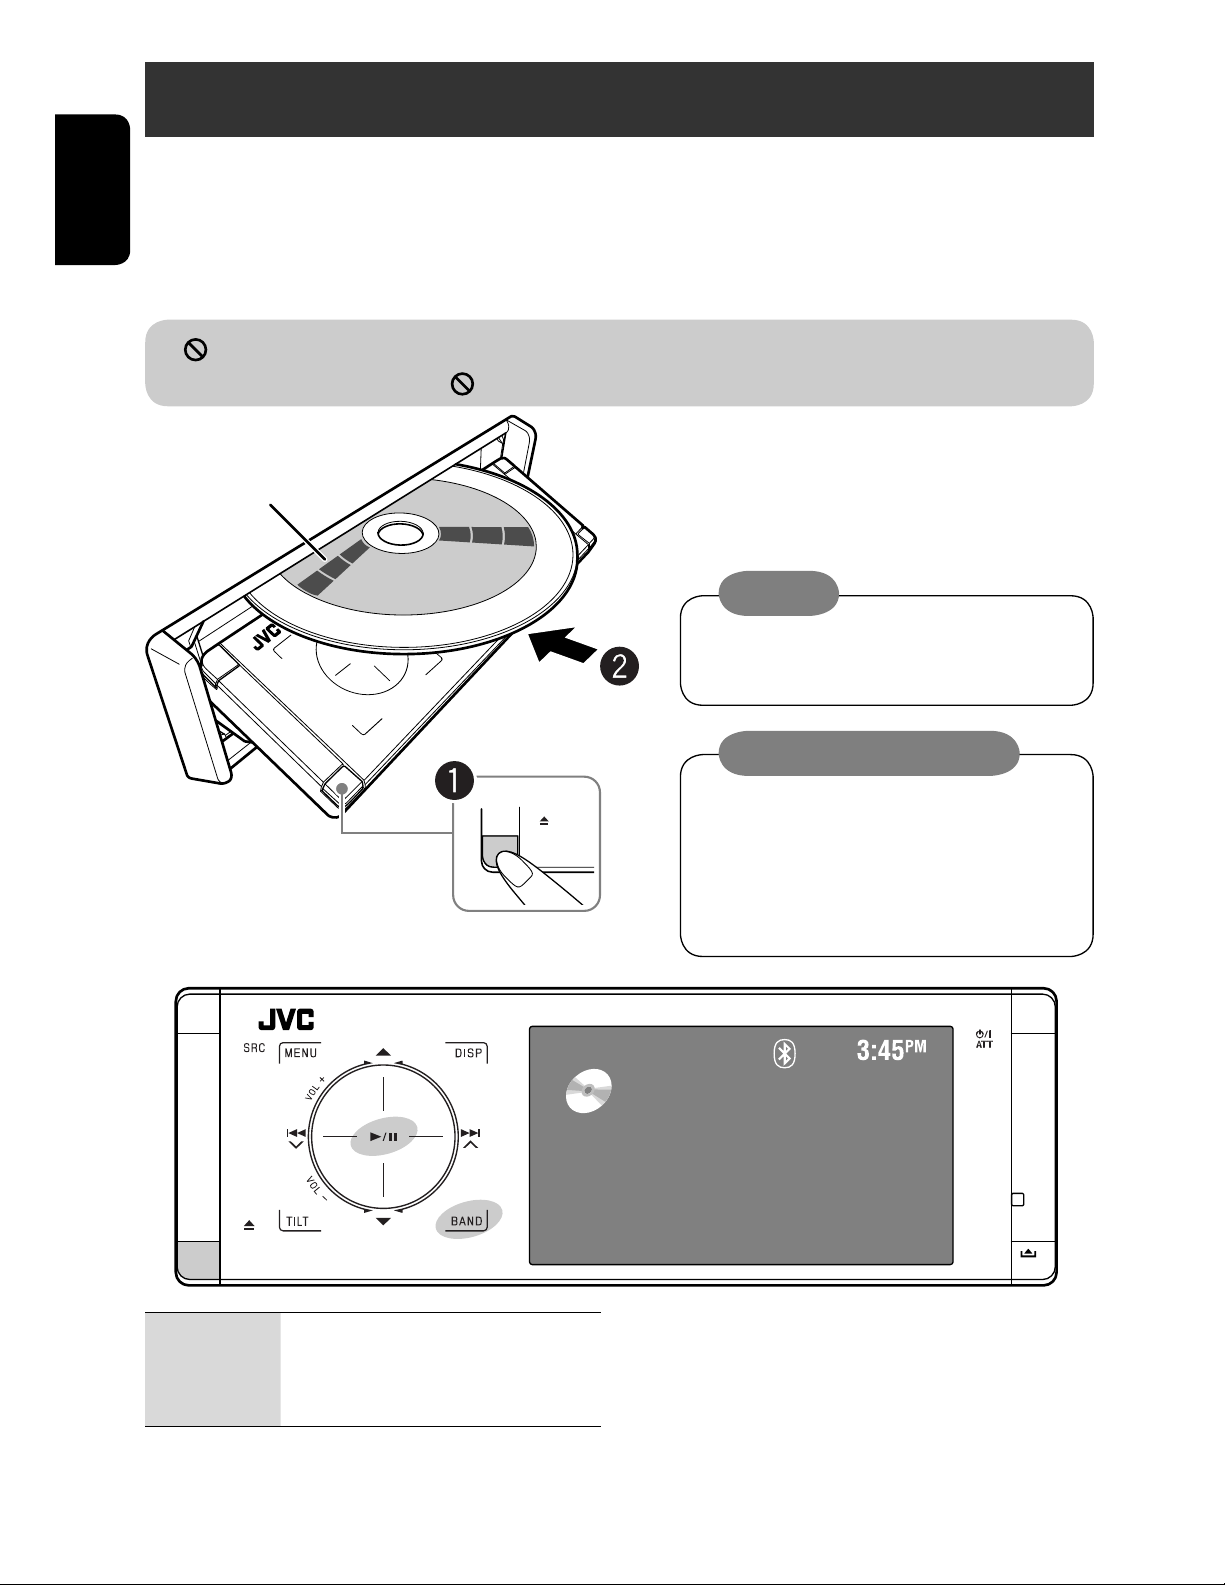
Disc operations
The disc type is automatically detected, and playback starts automatically (for some discs: automatic start depends
on its internal program).
ENGLISH
If a disc does not have any disc menu, all tracks in it will be played repeatedly until you change the source or eject the
disc.
” appears on the monitor, the unit cannot accept the operation you have tried to do.
If “
• In some cases, without showing “
,” operations will not be accepted.
~ Open the front panel.
Label side
Ÿ Insert the disc.
Playback starts automatically.
Caution:
Do not place your finger behind the control
panel.
Caution on volume setting:
Discs and connected USB devices produce
very little noise compared with other sources.
Lower the volume before playing a disc to
avoid damaging the speakers by the sudden
increase of the output level.
DISC
0: Ejects the disc.
3/8: Starts and pauses playback.
BAND: Stops playback.
Now Reading...
14
Page 15
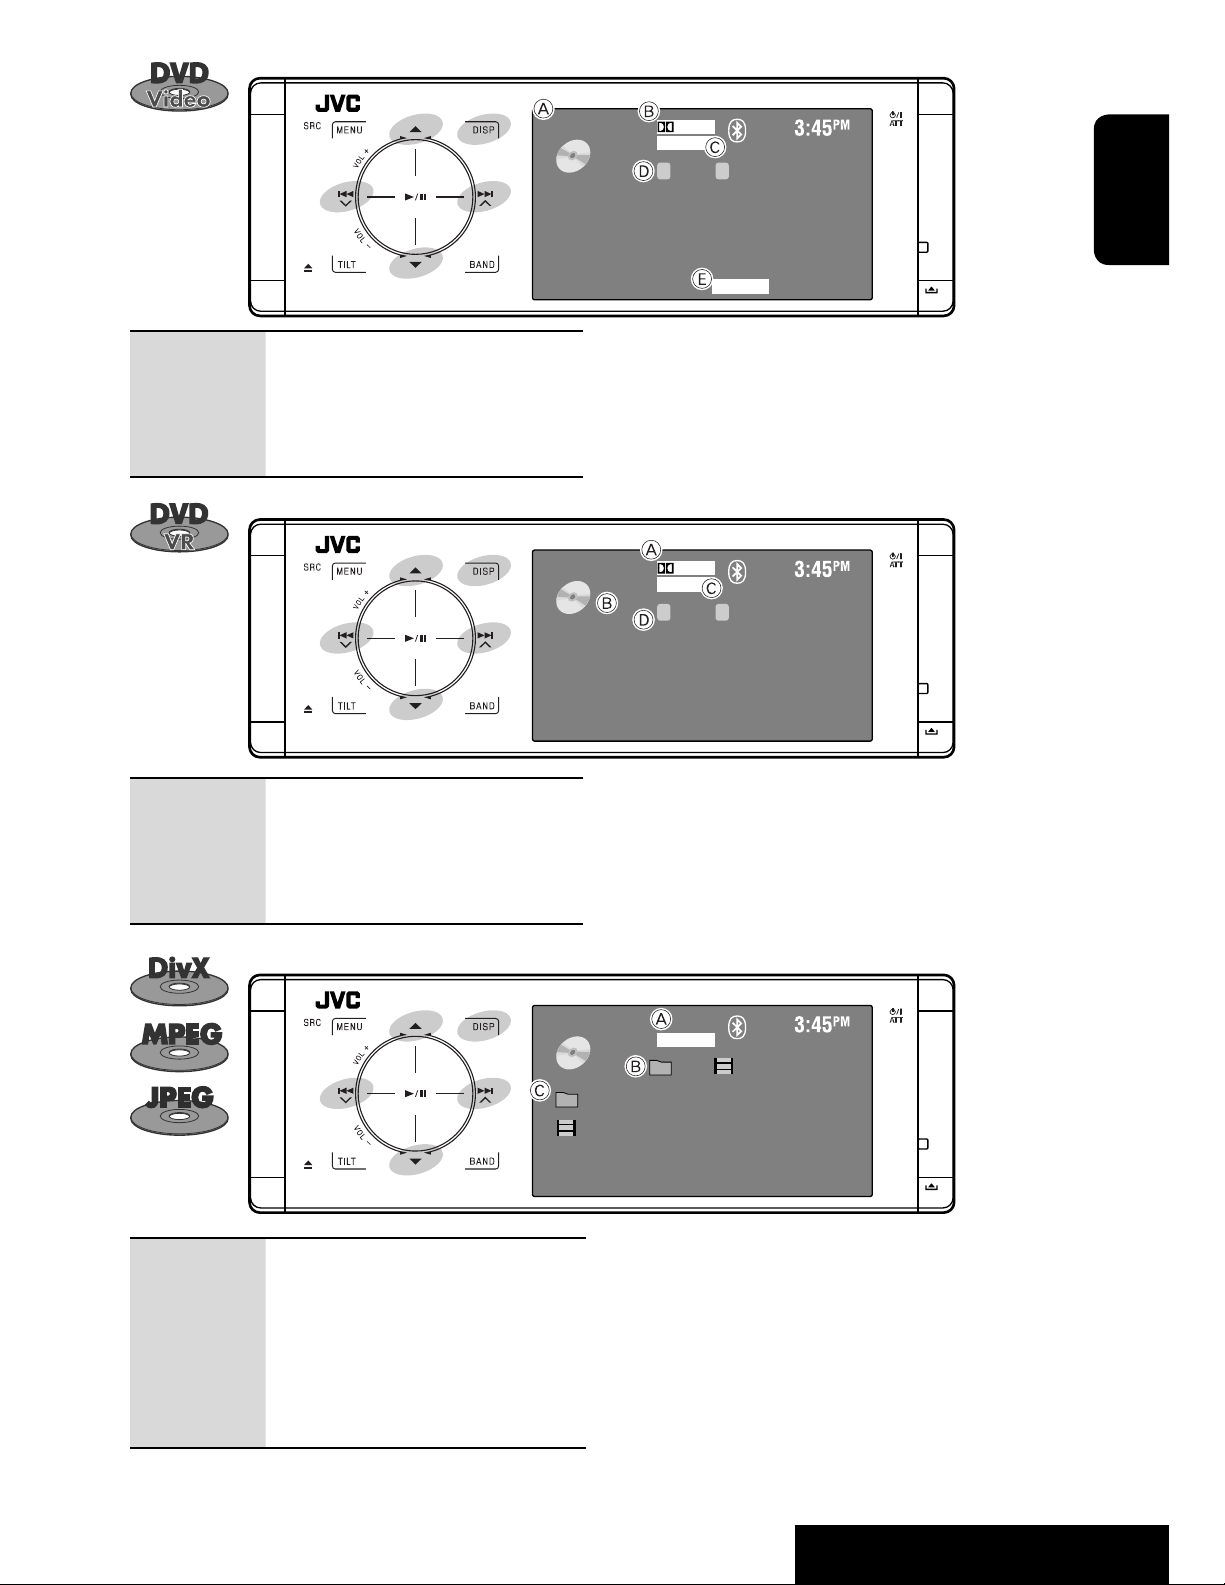
DVD
VIDEO
01 02 0:01:20
DIGITAL
MULTI
CT
CHAP.RPT
ENGLISH
4 ¢: Touch: Selects chapter.
Hold: Reverse/forward search
*1
5 ∞: Selects title.
DISP:
Touch if necessary ( page 9).
4 ¢: Touch: Selects chapter.
Hold: Reverse/forward search
*1
5 ∞: Selects program no./Play List no.
DISP:
Touch if necessary ( page 9).
A Disc type
B Audio format
C Sound/surround mode (
D Title no./Chapter no./Playing time
E Playback mode
DVD
VR-PRG
01 02 0:01:20
DIGITAL
FLAT
CP
A Audio format
B VR-PRG: Original program
VR-PL: Play List
C Sound/surround mode (
D Program no. (or Play List no.)/Chapter no./Playing time
pages 22 and 50)
pages 22 and 50)
4 ¢: Touch: Selects track.
Hold: Reverse/forward search for
DivX/MPEG
*2
5 ∞: Touch: Selects folder.
Hold: Displays Folder List.
DISP:
Touch if necessary ( page 9).
DVD
01 02 0:01:20
Current Folder Name
Current File Name.avi
DivX
FRONT 2CH
A Sound/surround mode ( pages 22 and 50)
B For DivX/MPEG: Folder no./Track no./Playing time
For JPEG: Folder no./File no.
C Current folder name/current file name
*1 Search speed: x2 ] x10
2
Search speed: ¡1 ] ¡2
*
15
OPERATIONS
Page 16
ENGLISH
VCD
PBC
FLAT
02 0:01:20
4 ¢: Touch: Selects track.
Hold: Reverse/forward search
DISP:
Touch if necessary ( page 9)
4 ¢: Touch: Selects track.
Hold: Reverse/forward search
A PBC indicator lights up when PBC is in use.
*1
B Sound/surround mode (
pages 22 and 50)
C Track no./Playing time
CD
Current Track Title
Artist Name
Disc Title
FLAT
02 0:01:20
A Sound/surround mode ( pages 22 and 50)
*1
B Track no./Playing time
C Track title (only for CD Text)/Artist Name/Disc title
*2
4 ¢: Touch: Selects track.
Hold: Reverse/forward search
5 ∞: Touch: Selects folder.
Hold: Displays Folder List.
CD
01 02 0:01:20
Current Folder Name
Current File Name.mp3
MP3
FLAT
RPT
A Audio format (MP3/WMA/WAV/AAC)
*1
B Sound/surround mode (
pages 22 and 50)
C Folder no./Track no./Playing time
D Current folder name/current file name
*3
*1 Search speed: x2 ] x10
2
*
“No Name” appears for conventional CDs.
3
Tag data will be shown instead of folder/file names
*
when they are recorded and <Tag Display> is set to
<On>. ( page 52)
16
Page 17
Selecting playback modes
You can use Repeat or Random playback mode.
3
Mode
Repeat
Random
Repeat
Set
Off
Off
Track
Folder
Ex.: To select Track Repeat
1
2
AV Menu
Enter
Mode
4
When one of the playback modes is selected, the
corresponding indicator lights up on the source
information screen.
To cancel, select <Off> in step 4.
Disc type Repeat Random
Chapter: Repeats current chapter.
Title: Repeats current title.
Chapter: Repeats current chapter.
Program: Repeats current program (not available
for Playlist playback).
ENGLISH
—
—
Track: Repeats current track (for VCD: PBC not
in use).
Disc (All): Randomly plays all tracks (for
VCD: PBC not in use).
Track: Repeats current track. Folder: Randomly plays all tracks of
current folder, then tracks of
next folders.
Folder: Repeats all tracks of the current folder. Disc (All): Randomly plays all tracks.
Track: Repeats current track. Folder: Randomly plays all tracks of
current folder, then tracks of
next folders.
Folder: Repeats all tracks of the current folder. Disc (All): Randomly plays all tracks.
Folder: Repeats all tracks of the current folder.
—
17
OPERATIONS
Page 18
Selecting tracks on the list
Operations using the remote
If a disc includes folders, you can display the Folder/
Track (File) Lists, then start playback.
1 Enter <Folder List>.
ENGLISH
[Hold]
• Hold the button to display the next/previous
folders.
Folder List
My Best
Cinema
Pops
My Best2
Favorite Song
Cinema2
2 Select a folder.
Folder List
My Best
Cinema
Pops
My Best2
Favorite Song
Cinema2
3 Select a file.
File List
Enter
Song011.mp3
Song012.mp3
Song013.mp3
Song014.mp3
Song015.mp3
Song016.mp3
controller—RM-RK252
The Folder List can also be accessed through
<AV Menu> = <List>.
Prohibiting disc ejection
You can lock a disc in the loading slot.
~ Hold the buttons at the same time.
NO EJECT?
[Hold]
EMERGENCY EJECT?
Ÿ Activate the prohibition.
“No Eject” appears.
Also functions as CLR (clear):
Erases a misentry if pressed while
holding SHIFT.
To cancel the prohibition, repeat the same procedure
to select <EJECT OK?>.
18
Page 19
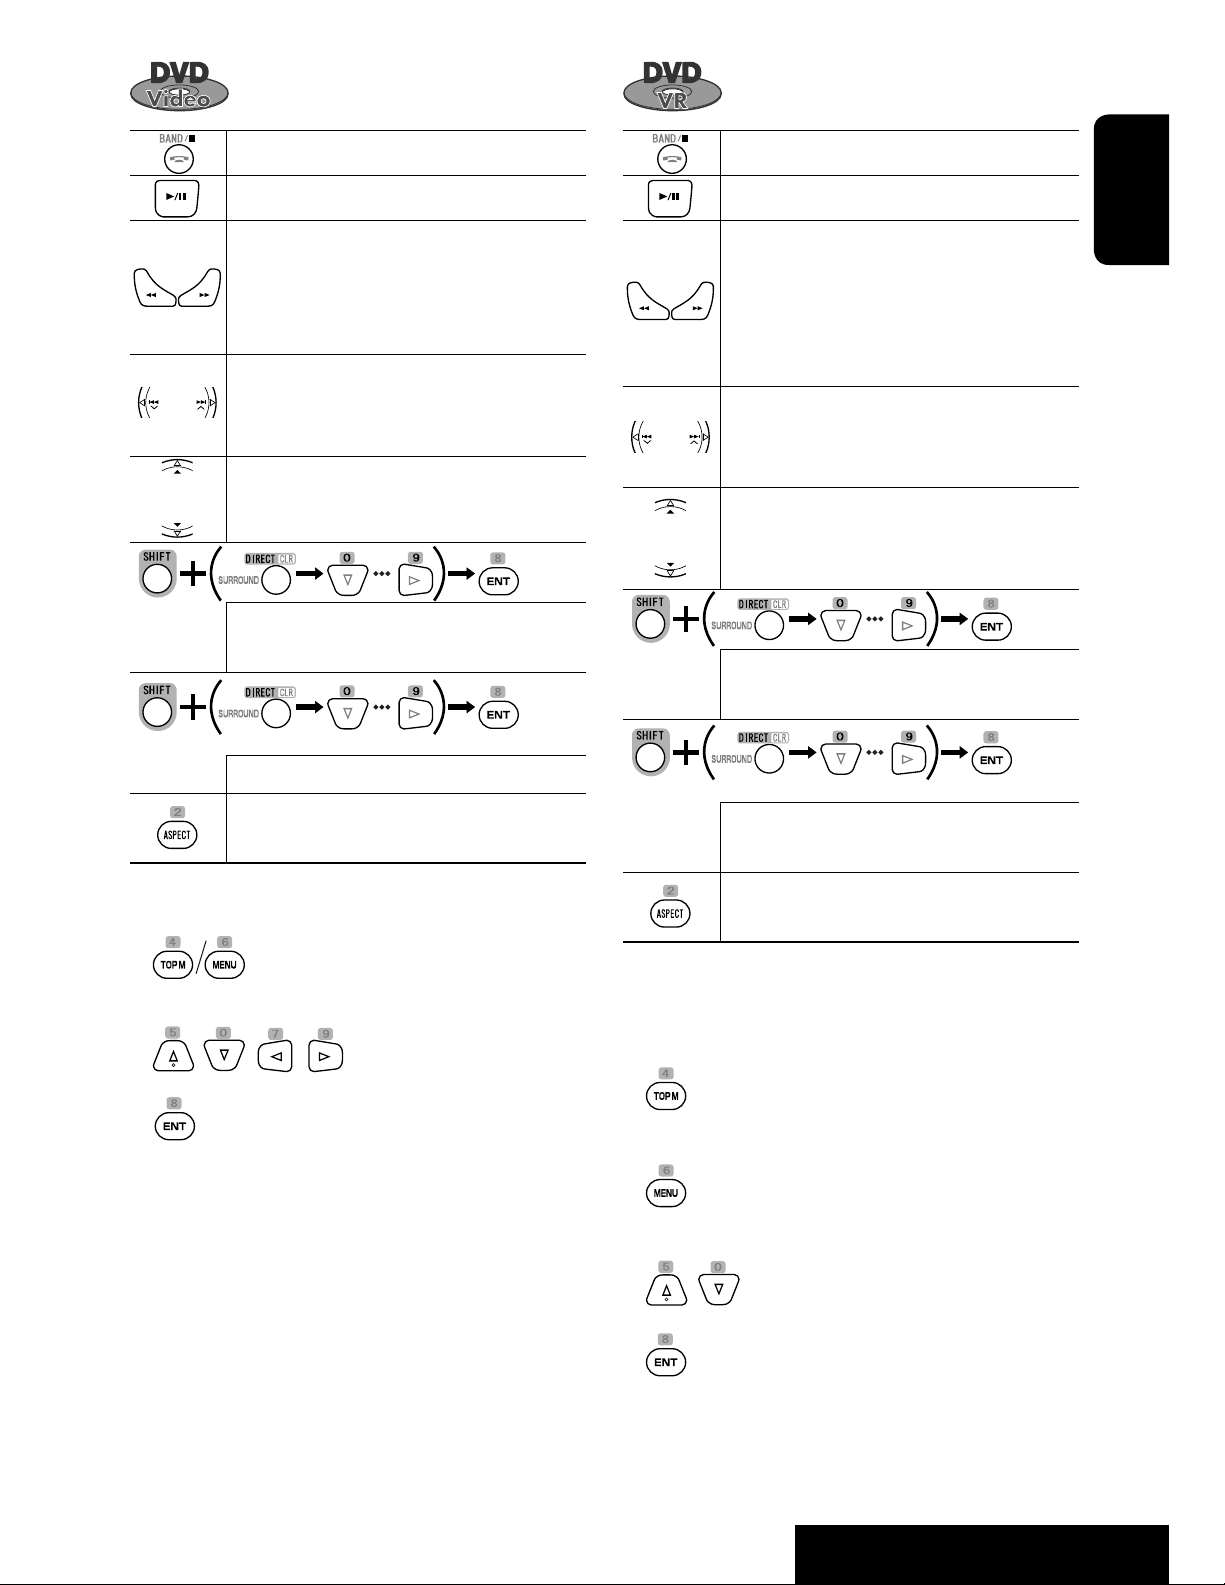
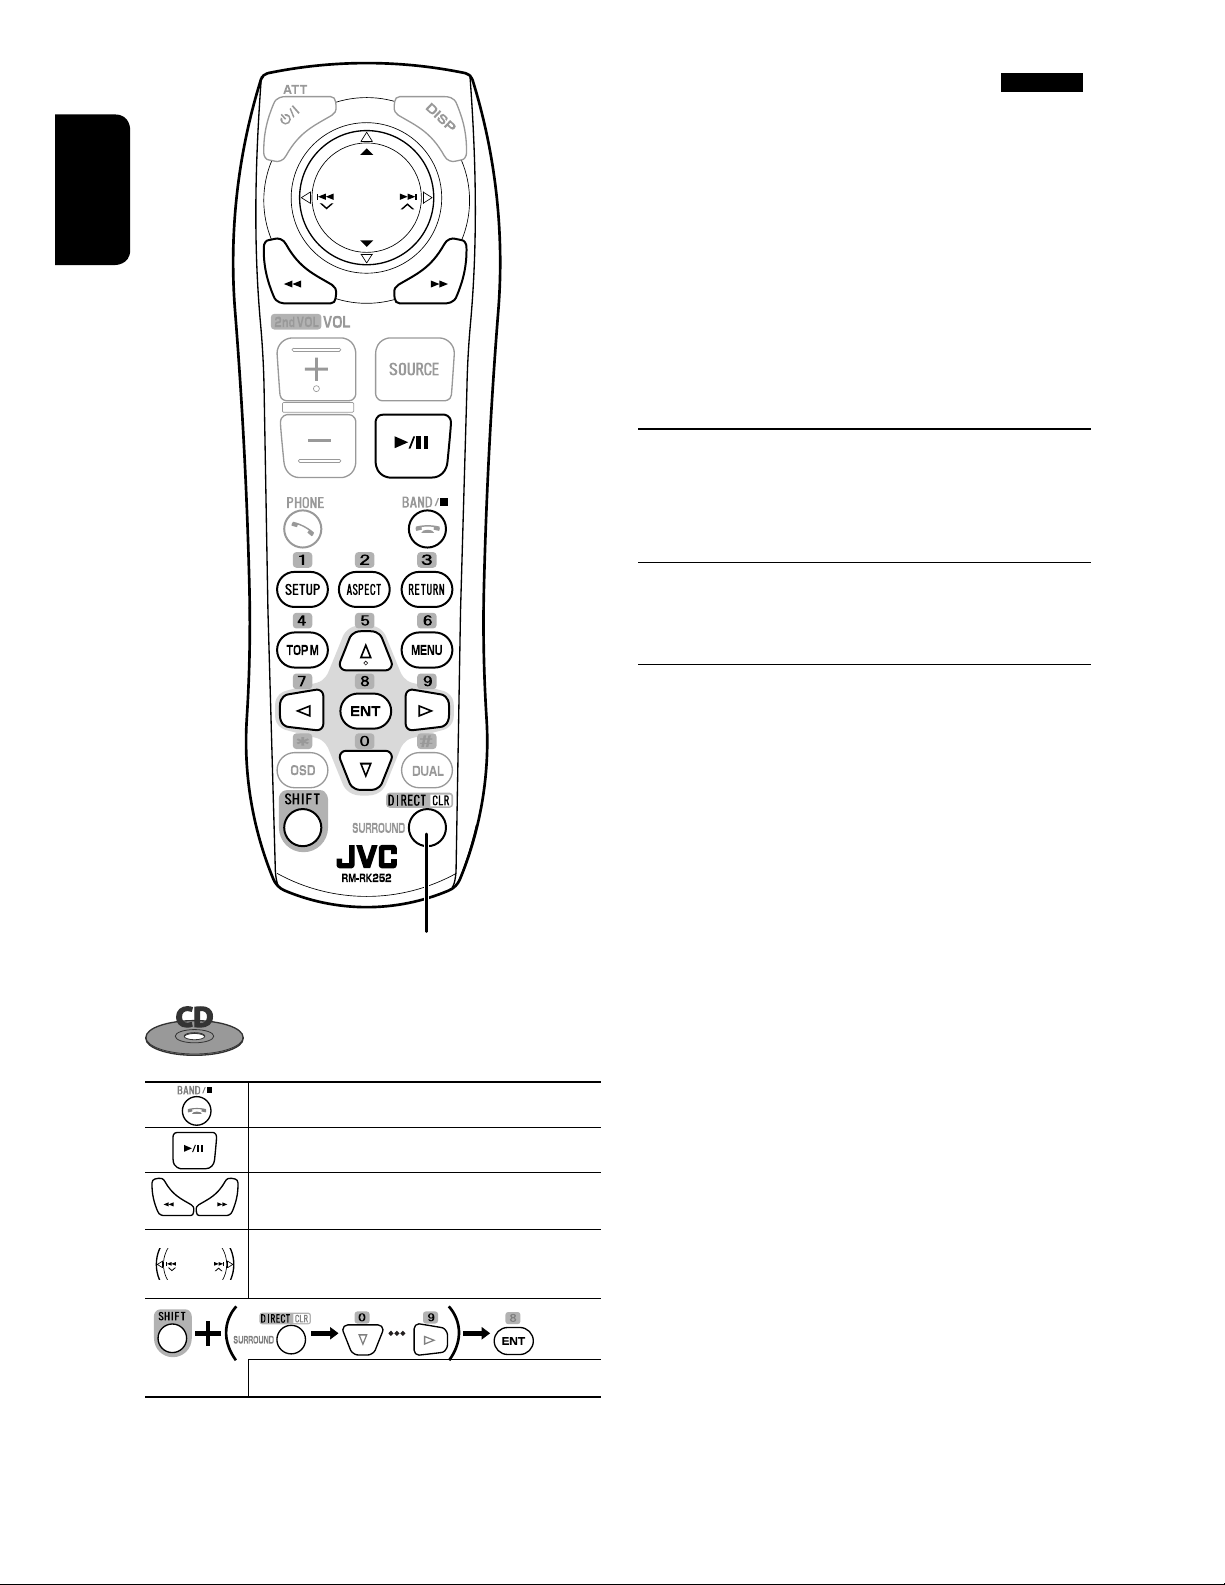
Stops playback.
Stops playback.
Starts or pauses playback.
*1
• Reverse/forward search
(No sound
can be heard.)
*2
• Slow motion
during pause. (No sound
can be heard.)
• Selects chapter (during playback or
pause).
• Reverse/forward search
*3
[Hold]
Selects title (during playback or pause).
• Selects chapter.
• Selects title (when not playing).
[Twice]
Selects title (during playback or pause).
Changes the aspect ratio of the playback
pictures.
Starts or pauses playback.
*1
• Reverse/forward search
(No sound
can be heard.)
*2
• Forward slow motion
during pause.
(No sound can be heard.)
• Reverse slow motion does not work.
• Select chapter (during playback or
pause).
• Reverse/forward search
*3
[Hold]
• Selects program.
• Selects Play List (during playback or
pause).
• Selects chapter.
• Selects program (when not playing).
[Twice]
Selects program/Play List (during
playback or pause).
ENGLISH
Using menu driven features
1.
2. Select an item you want to start playback.
3.
Changes the aspect ratio of the playback
pictures.
Using Original Program/Play List screens ( page
28)
1. For Original Programs:
For Play List:
2. Select the item you want to start playback.
3.
*1 Search speed: x2 ] x5 ] x10 ] x20 ] x60
2
Slow motion speed: 1/32 ] 1/16 ] 1/8 ] 1/4
*
] 1/2
3
*
Search speed: x2 ] x10
19
OPERATIONS
Page 20
ENGLISH
Stops playback.
Starts or pauses playback.
Reverse/forward search
*1
(No sound can
be heard.)
• Selects track.
• Reverse/forward search
*2
[Hold] (No
sound can be heard.)
Selects folder.
Selects track (within the same folder).
[Twice]
Selects folder.
Changes the aspect ratio of the playback
pictures.
Also functions as CLR (clear):
Erases a misentry if pressed while
holding SHIFT.
While playing...
Back/advance the scenes by 5 minutes.
Current playback position
1st press
1st press 2nd press
3rd press2nd press
For DivX6: Using menu driven features
1.
2. Select the item you want to start playback.
3.
20
Page 21
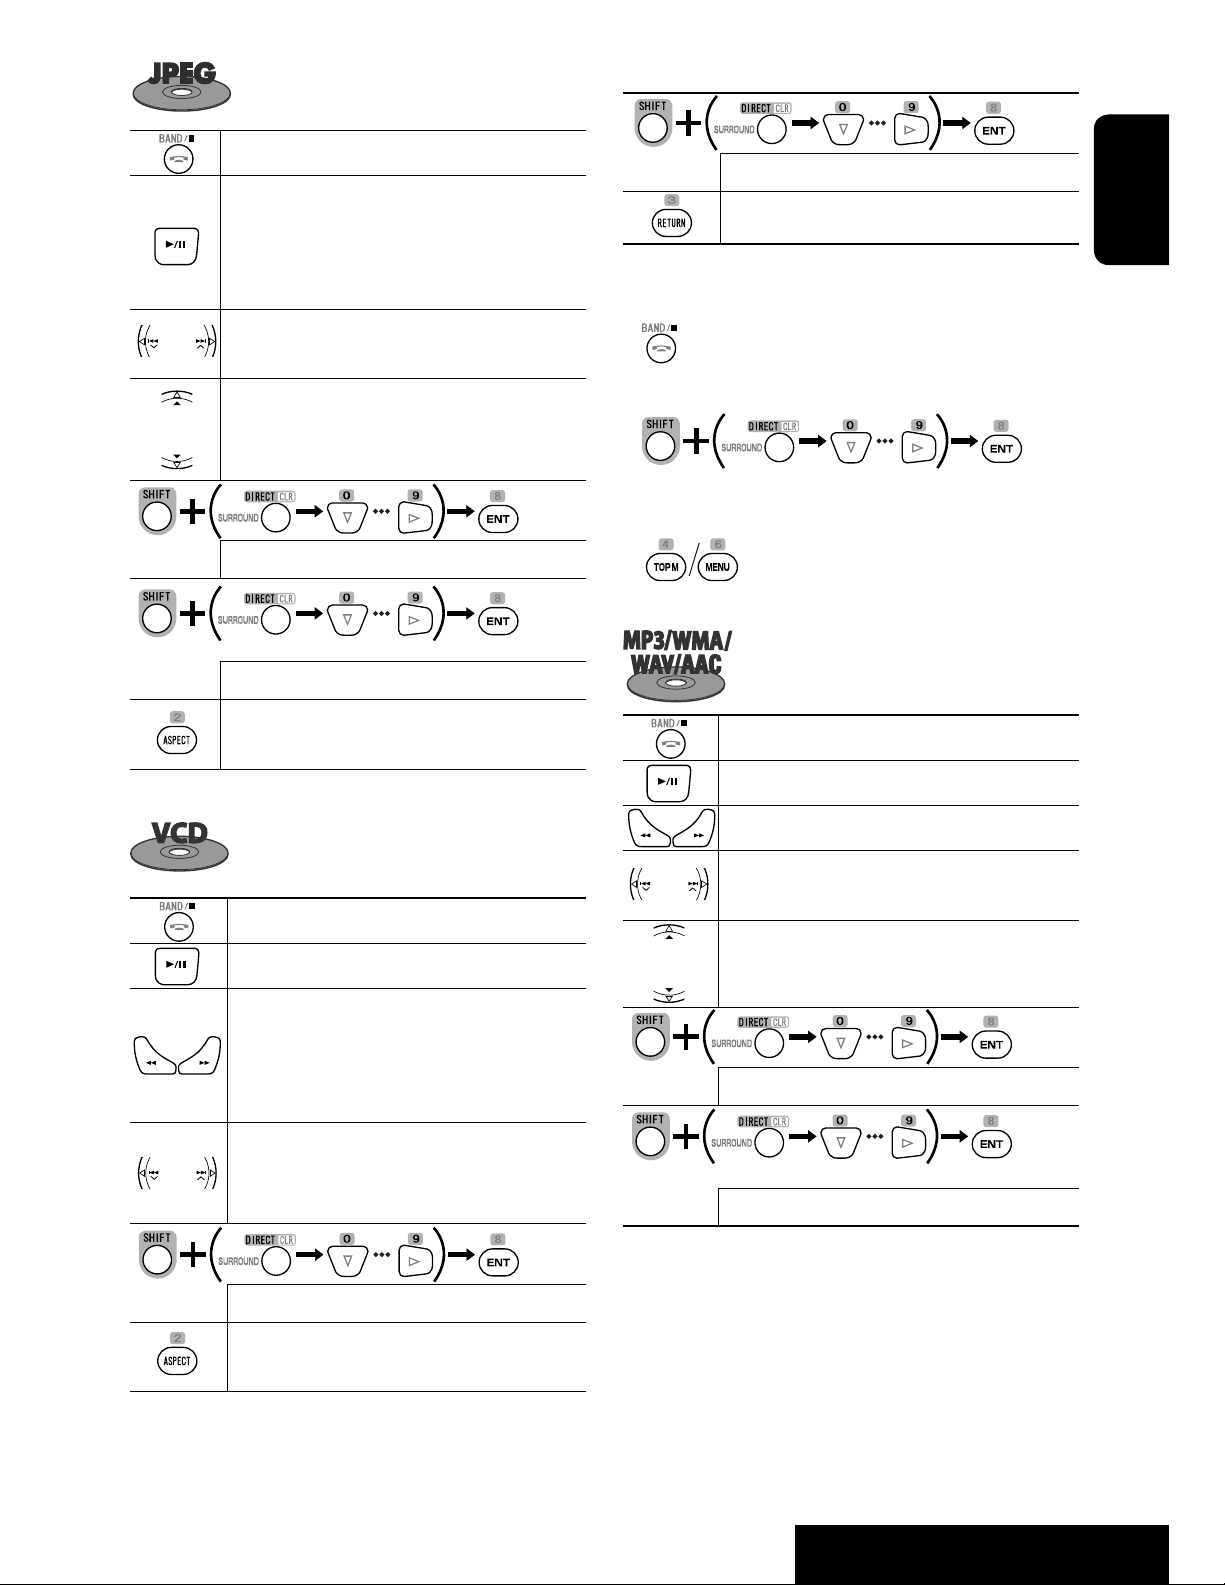
During PBC playback...
Stops playback.
Starts or pauses playback. (Slide show:
each file is shown for a few seconds.)
Shows the current file until you change it if
pressed during Slide show.
Selects track.
Selects folder.
Selects track (within the same folder).
[Twice]
Selects folder.
Changes the aspect ratio of the playback
pictures.
Selects an item on the menu.
Returns to the previous menu.
ENGLISH
To cancel PBC playback
1
2 Start the desired track.
• To resume PBC:
Stops playback.
Starts or pauses playback.
Stops playback.
Starts or pauses playback.
• Reverse/forward search*
3
• Forward slow motion*4 during pause.
(No sound can be heard.)
• Reverse slow motion does not work.
• Selects track.
• Reverse/forward search
*5
[Hold] (No
sound can be heard.)
Selects track.
Changes the aspect ratio of the playback
pictures.
Reverse/forward search
*3
• Selects track.
*5
• Reverse/forward search
[Hold]
Selects folder.
Selects track (within the same folder).
[Twice]
Selects folder.
*1 Search speed: ¡1 ] ¡2 ] ¡3
2
*
Search speed: ¡1 ] ¡2
3
Search speed: x2 ] x5 ] x10 ] x20 ] x60
*
4
Slow motion speed: 1/32 ] 1/16 ] 1/8 ] 1/4
*
] 1/2
5
*
Search speed: x2 ] x10
21
OPERATIONS
Page 22
ENGLISH
Enjoying surround sounds
You can enjoy multi-channel surround playback
through the front, center, surround speakers.
• After connecting the center speaker, make sure to
activate the center speaker; otherwise, no sound
comes out of the center speaker ( page 55).
• You cannot activate this function in the following
cases:
– When “USB iPod” is selected as the source.
– When Dual Zone is in use.
MULTI:
For multi-channel encoded sources such as Dolby
*3
Digital
on the source information screen.)
Dolby Pro Logic II (Movie/Music):
For 2 channel sources except for DivX/MPEG1/MPEG2
discs.
and DTS*4. (When activated, “MULTI” is shown
Also functions as CLR (clear):
Erases a misentry if pressed while
holding SHIFT.
Stops playback.
Starts or pauses playback.
Reverse/forward search
*1
• Selects track.
*2
• Reverse/forward search
[Hold]
3
*
Manufactured under license from Dolby Laboratories.
Dolby, Pro Logic, and the double-D symbol are
trademarks of Dolby Laboratories.
4
“DTS” and “DTS Digital Surround” are registered
*
trademarks of DTS, Inc.
Selects track.
*1 Search speed: x2 ] x5 ] x10 ] x20 ] x60
2
Search speed: x2 ] x10
*
22
Page 23

To turn on the surround
To change the <Dolby PLII Music> setting
1
2
AV Menu
Enter
Disc Surround
3
Disc Surround
Surround Off:
Deactivates surround.
Surround On:
Activates surround. = Go to the following step.
4
Surround On
Exit
Auto:
• When multi-channel digital signals come in,
“MULTI” surround is activated.
• When 2-channel or 2.1-channel signals
in, “4CH STEREO” is activated.
Surround Off
Surround On
Auto
Auto
Through
Dolby PLII Movie
Dolby PLII Music
*5
come
In step 4 in the left column...
1 Select <Dolby PLII Music>.
Surround On
Auto
Through
Dolby PLII Movie
Dolby PLII Music
2 Enter each sub-screen then select the desired
setting.
EX.: When <Panorama> is selected in step 1.
Dolby PLII Music
Panorama
Exit
Panorama
Center Width
Off
Off
On
Panorama:
Select <On> to add wraparound sound effect.
Center Width:
Adjust the center image so it may be heard only
from the center speaker, only from the left/right
front speaker as a “phantom” center image, or
various combination of these speakers.
As the number increases, the “phantom” effect
becomes stronger (normally select <04>).
3
ENGLISH
Through:
All incoming channel signals are sent to the
corresponding speakers.
Dolby PLII Movie:
Activates Dolby Pro Logic II Movie.
Dolby PLII Music:
Activates Dolby Pro Logic II Music. You can adjust
<Panorama> and <Center Width> settings. (
right column)
5
*
Except signals of DivX/MPEG1/MPEG2 discs.
On the remote:
• You cannot change the <Dolby PL II Music> settings
using the remote controller.
23
OPERATIONS
Page 24
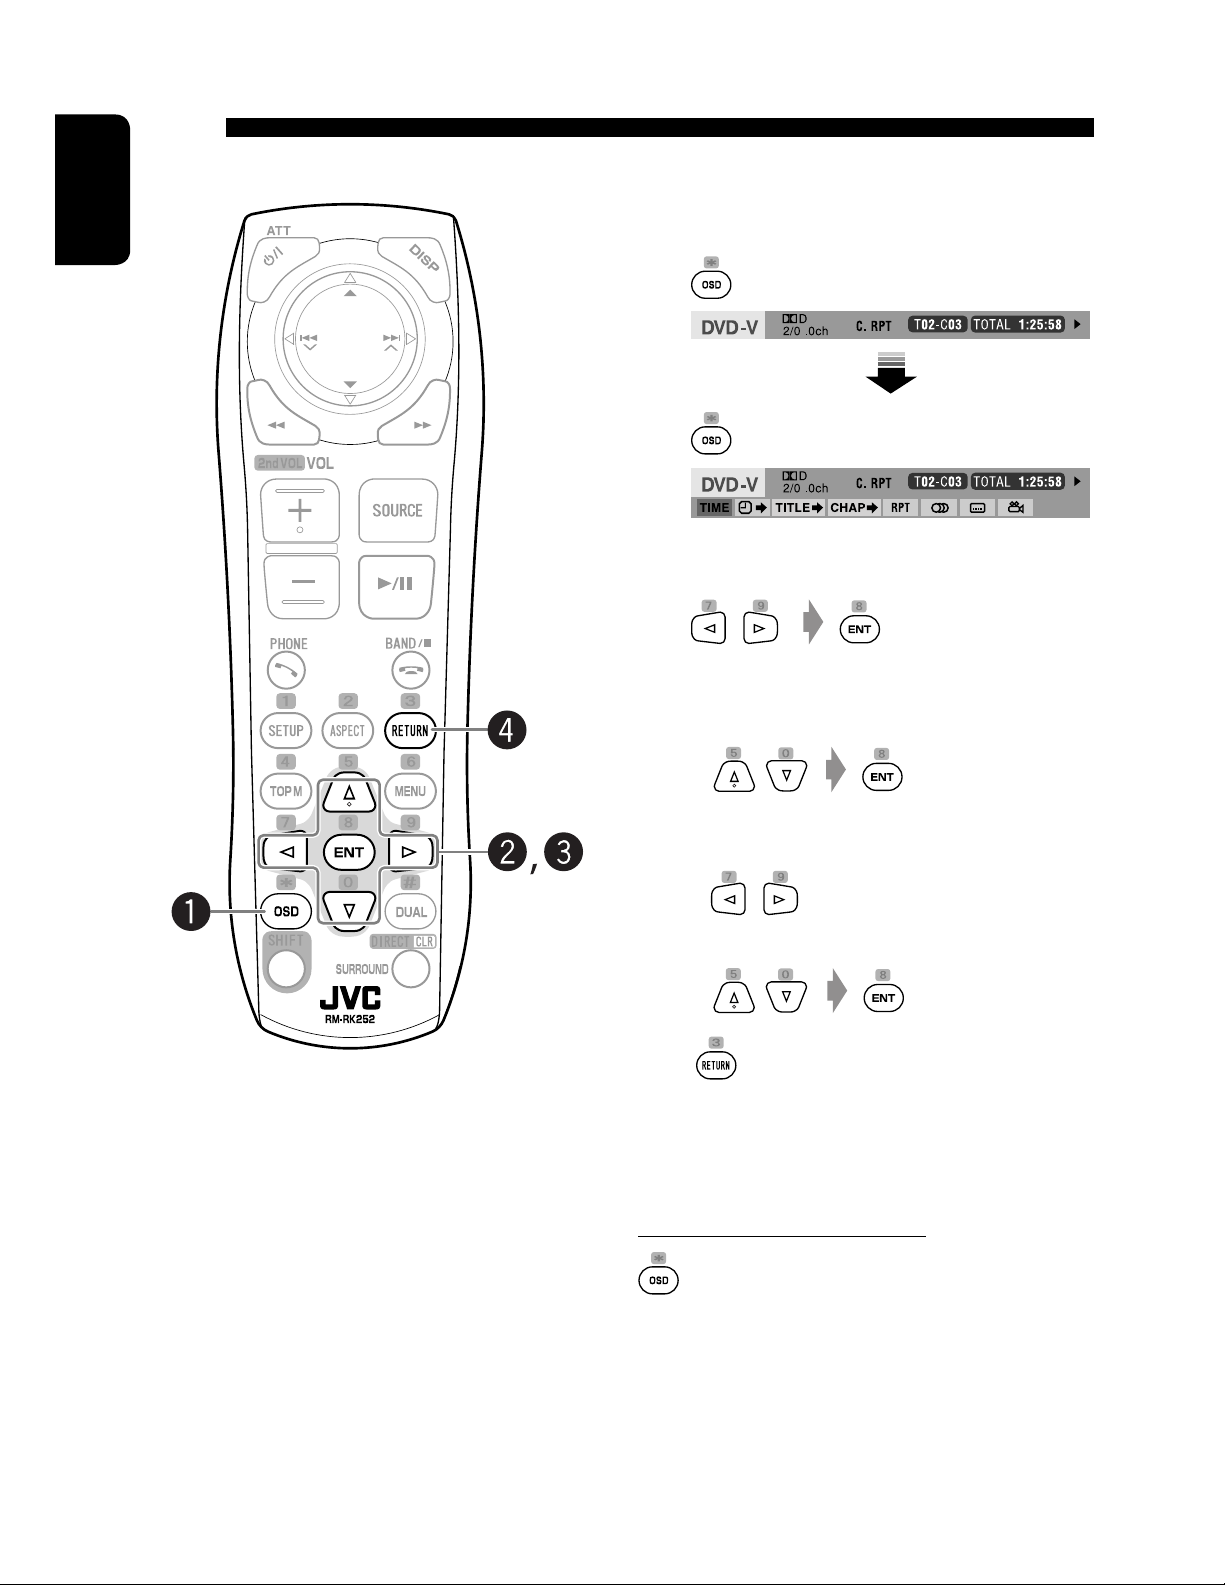
Operations using the on-screen bar (DVD/VCD/DivX/MPEG1/MPEG2/
JPEG)
These operations are possible on the monitor using the remote controller.
ENGLISH
~ Display the on-screen bar. ( page 25)
Ÿ Select an item.
! Make a selection.
• When a pop-up menu appears...
• For entering time/numbers...
To move the entry position:
To select a number:
⁄
Repeat steps Ÿ and ! to set other items if
needed.
To remove the on-screen bar
24
Page 25
On-screen bar
Information
Operation
DVD -V
TIME TITLE CHAP
C. RPT
T02-C03 TOTAL 1:25:58
RPT
Above example is of DVD Video. Items shown on the bar vary depending on the disc type.
1 Disc type
2 • DVD: Audio signal format
• DTS-CD: DTS
• VCD: PBC
3 Playback mode*
1
DVD Video C. RPT: Chapter repeat
T. RPT: Title repeat
DVD-VR C. RPT: Chapter repeat
5 Time indication
TOTAL
Elapsed playing time of the disc
• Remaining title time (for DVD)
T. REM
TIME
• Remaining disc time (for others)
Elapsed playing time of the current
chapter/track
REM
Remaining time of the current chapter/
track
*2
PG. RPT: Program repeat
DivX/
MPEG1/
MPEG2
T. RPT: Track repeat
F. RPT: Folder repeat
F. RND: Folder random
6 Playback status
Play
Reverse/forward search
ENGLISH
*2
A. RND: All (disc) random
JPEG F. RPT: Folder repeat
VCD T. RPT: Track repeat
A. RND: All (Disc) random
4 Playback information
T02-C03
PG-001
C-002
PL-003
C-004
TRACK 01
F001-T001
F002-F002
Current title/chapter
Current program/chapter
Current playlist/chapter
Current track
Current folder/track
Current folder/file
Reverse/forward slow-motion
Pause
Stop
7 Operation icons
TIME
Change time indication (see 5)
Time Search (Specify a certain scene
by entering the time.)
TITLE
CHAP
TRACK
RPT
RND
Title Search (by its number)
Chapter Search (by its number)
Track Search (by its number)
Repeat play
Random play
Change the audio language, audio
channel or audio stream
Change the subtitle language
*1
*1
1
*
page 17
2
Not applicable for DVD-VR.
*
25
Change the view angle
OPERATIONS
Page 26
Dual Zone operations
You can enjoy disc playback on the external monitor
connected to the VIDEO OUT and 2nd AUDIO OUT plugs,
while listening to any source other than “USB” through
ENGLISH
the speakers.
• When Dual Zone is in use, you can only operate the
DVD/CD player using the remote controller.
1
2
AV Menu
Enter
Dual Zone
3
Dual Zone
Set
Off
On
On/Surround On
On the remote:
1
2
Adjust the volume through the 2nd AUDIO OUT
plug.
3 Operate the DVD/CD player.
* JVC original headphone virtual surround system. This
surround will also work for the main source “Disc” if
“On/Surround On” is selected as the sub-source. This
surround does not work for DivX/MPEG1/MPEG2 discs.
Operations using the control
Off:
Deactivates Dual Zone.
On:
Activates Dual Zone without applying Headphone
*
Surround
. The DUAL indicator lights up.
On/Surround On:
Activates Dual Zone and applies Headphone
Surround. “Headphone Surround” appears and the
DUAL-SURROUND indicator lights up.
When Dual Zone is activated, the main source is
changed to “Disc.”
To select a different source (main source) to listen to
through the speakers:
Press SRC on the control panel.
• By using the touch pad controls, you can operate
the newly selected source without affecting Dual
Zone (Disc) operations.
• You cannot select “USB” for the main source.
screen
For discs except DVD and VCD:
While Dual Zone is on, these operations are possible on
the external monitor using the remote controller.
The control screen automatically appears when you
insert a disc. (For DivX/MPEG1/MPEG2/JPEG; while not
playing.)
Ex.: MP3/WMA
TIME 00:00:14T. RPT
Folder : 2 / 3
01 Music
02 Music
03 Music
Track Information
Album
Weather
Artist
Robert M. Smith
Title
Rain
Track : 6 / 14 (Total 41)
Cloudy.mp3
Fair.mp3
Fog.mp3
Hail.wma
Indian summer.mp3
Rain.mp3
Shower.mp3
Snow.mp3
Thunder.wma
Typhoon.mp3
Wind.mp3
Winter sky.mp3
26
Page 27
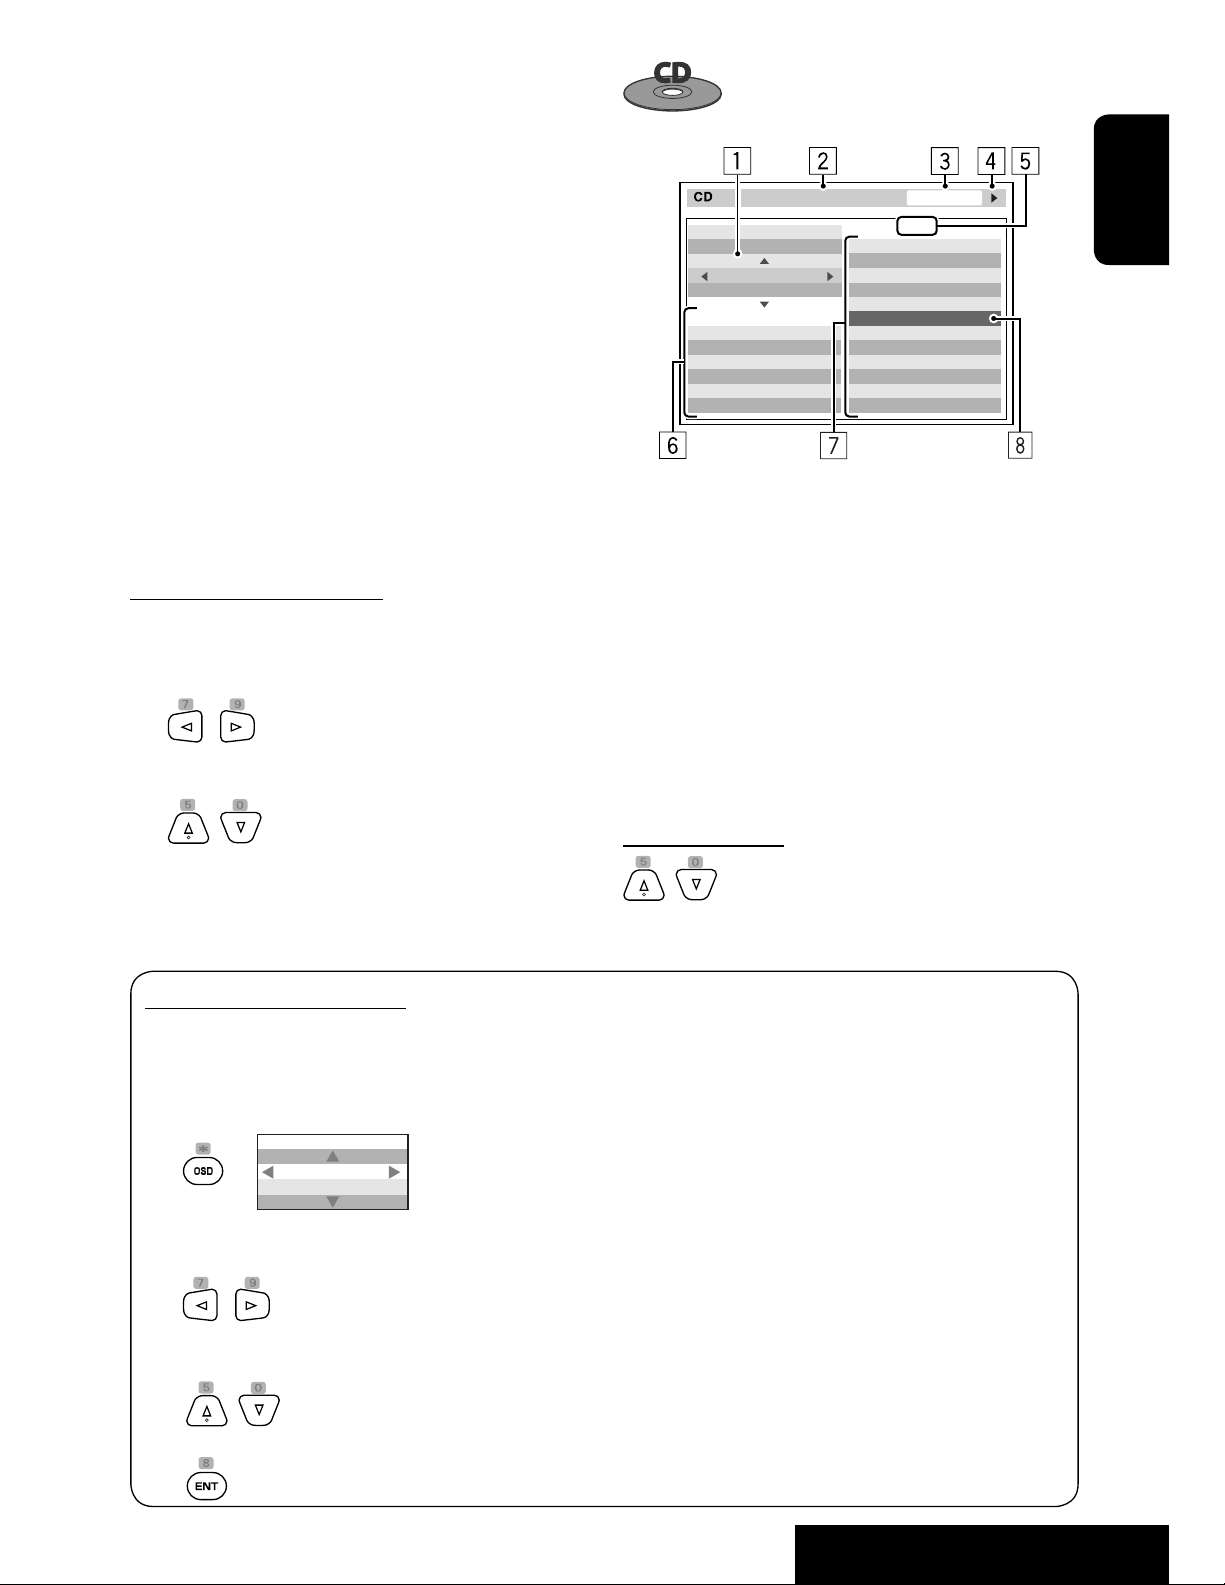
1 Current folder (highlighted bar)
2 Current folder no./total folder no.
3 Folder list
* If tag data includes “Jacket Picture” (baseline JPEG), it
will be displayed. If you press OSD, the playback mode
selection window appears. ( below)
4 Selected playback mode ( below)
5 Elapsed playing time of the current track (not
displayed for JPEG)
6 Operation status
7 Current track no./total number of tracks in the
current folder (total number of tracks on the disc)
8 Track information (only for MP3/WMA/WAV/AAC)
9 Track list
p Current track (highlighted)
To select a folder or track
1 Select “Folder” column or “Track” column on the
control screen.
2 Select a folder or track.
Ex.: CD Text
TIME 00:14
Track : 6 / 14
Cloudy
Fair
Fog
Hail
Indian summer
Rain
Shower
Snow
Thunder
Typhoon
Wind
Winter sky
MODE
REPEAT
TRACK
Track Information
Album
Four seasons
Artist
Robert M. Smith
Title
Rain
T. RPT
1 The playback mode selection window: appears
when OSD is pressed ( below).
2 Selected playback mode ( below)
3 Elapsed playing time of the current track
4 Operation status
5 Current track number/total number of tracks on the
disc
6 Track information
7 Track list
8 Current track (highlighted bar)
ENGLISH
• If necessary, press 6 to start playback.
Selecting playback modes
You can also change the playback modes using the
playback mode selection window.
• For JPEG, Random cannot be selected.
1
2
Except for JPEG: Select a playback mode.
MODE
REPEAT
OFF
3 Select your desired option.
To select a track
• If necessary, press 6 to start playback.
Selectable playback mode
• DivX/MPEG1/MPEG2/JPEG: page 25
• MP3/WMA/WAV/AAC:
– T. RPT: Track repeat
– F. RPT: Folder repeat
– F. RND: Folder random
– A. RND: All (Disc) random
• CD:
– T. RPT: Track repeat
– A. RND: All (Disc) random
4
27
OPERATIONS
Page 28
Operations using the list
screen
For discs other than DVD, VCD, and CD
While Dual Zone is on, these operations are possible on
the external monitor using the remote controller.
ENGLISH
While not playing...
1 Display the list screen.
Folder : 144/240 Track 144/198 Page : 4/7
fol120
fol121
fol122
fol123
fol124
fol125
fol126
fol127
fol128
fol129
fol130
fol131
fol132
fol133
fol134
fol135
fol136
fol137
fol138
fol139
fol140
fol141
fol142
fol143
fol144
fol145
fol146
fol147
fol148
fol149
fol150
fol151
fol152
fol153
fol154
fol155
fol156
fol157
fol158
fol159
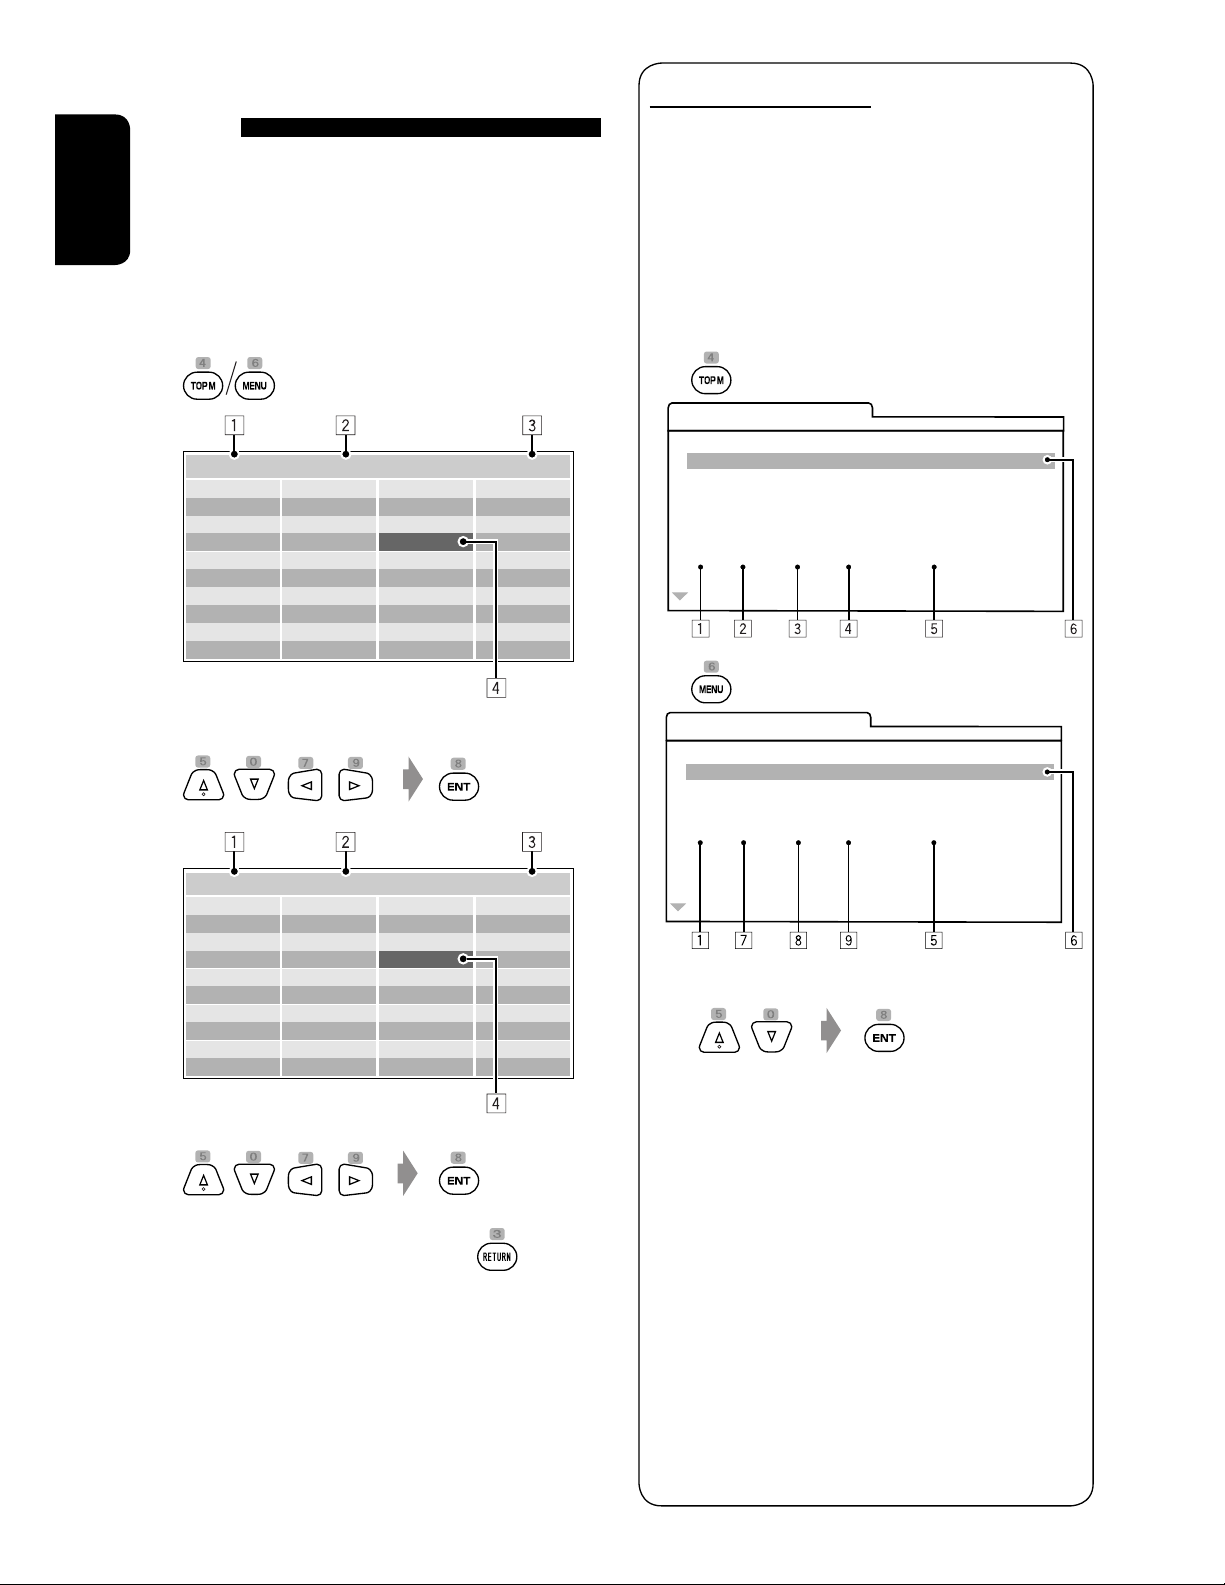
List screen for DVD-VR
You can use the Original Program and Play List
screen anytime while playing DVD-VR with its data
recorded.
• These screens can be displayed on the built-in
monitor and the external monitor.
1 Display the Original Program/Play List
screen.
ORIGINAL PROGRAM
No Date Ch ime itle
1 04/25/08 4ch 19:00 JVC DVD World 2008
2 05/17/08 8ch 10:30
3 05/22/08 8ch 17:00 Music Festival
4 05/26/08 L-1 13:19 children 001
5 06/20/08 4ch 22:00
6 06/25/08 L-1 8:23 children 002
TT
2 Select a folder on the list.
Folder : 144/240 Track 144/198 Page : 4/5
file0121.mp3
file0122.mp3
file0123.wma
file0124.mp3
file0125.mp3
file0126.wma
file0127.wma
file0128.mp3
file0129.mp3
file0130.wma
file0131.mp3
file0132.mp3
file0133.mp3
file0134.mp3
file0135.wma
file0136.mp3
file0137.wma
file0138.mp3
file0139.wma
file0140.wma
file0141.wma
file0142.mp3
file0143.wma
file0144.mp3
file0145.mp3
file0146.mp3
file0147.mp3
file0148.wma
file0149.wma
file0150.wma
file0151.wma
file0152.mp3
file0153.wma
file0154.mp3
file0155.wma
file0156.wma
file0157.wma
file0158.wma
file0159.mp3
file0160.wma
3 Select a track on the list.
• To go back to the folder list, press
1 Current folder number/total folder number
2 Current track number/total number of tracks in the
current folder
3 Current page/total number of the pages included
in the list
4 Current folder/track (highlighted bar)
.
PLAY LIST
No Date Chap Length Title
1 05/25/08 001 1:03:16 My JVC World
2 06/17/08 005 1:35:25
3 06/20/08 003 0:10:23 Favorite music
4 06/25/08 001 0:07:19 children001-002
2 Select the item you want.
1 Program/Play List number
2 Recording date
3 Recording source (TV station, the input terminal
of the recording equipment, etc.)
4 Start time of recording
5 Title of the program/Play List
6 Highlighted bar (current selection)
7 Creating date of Play Lists
8 Total number of chapters
9 Playback time
* The title of the original program or Play List may not
be displayed depending on the recording equipment.
*
28
Page 29
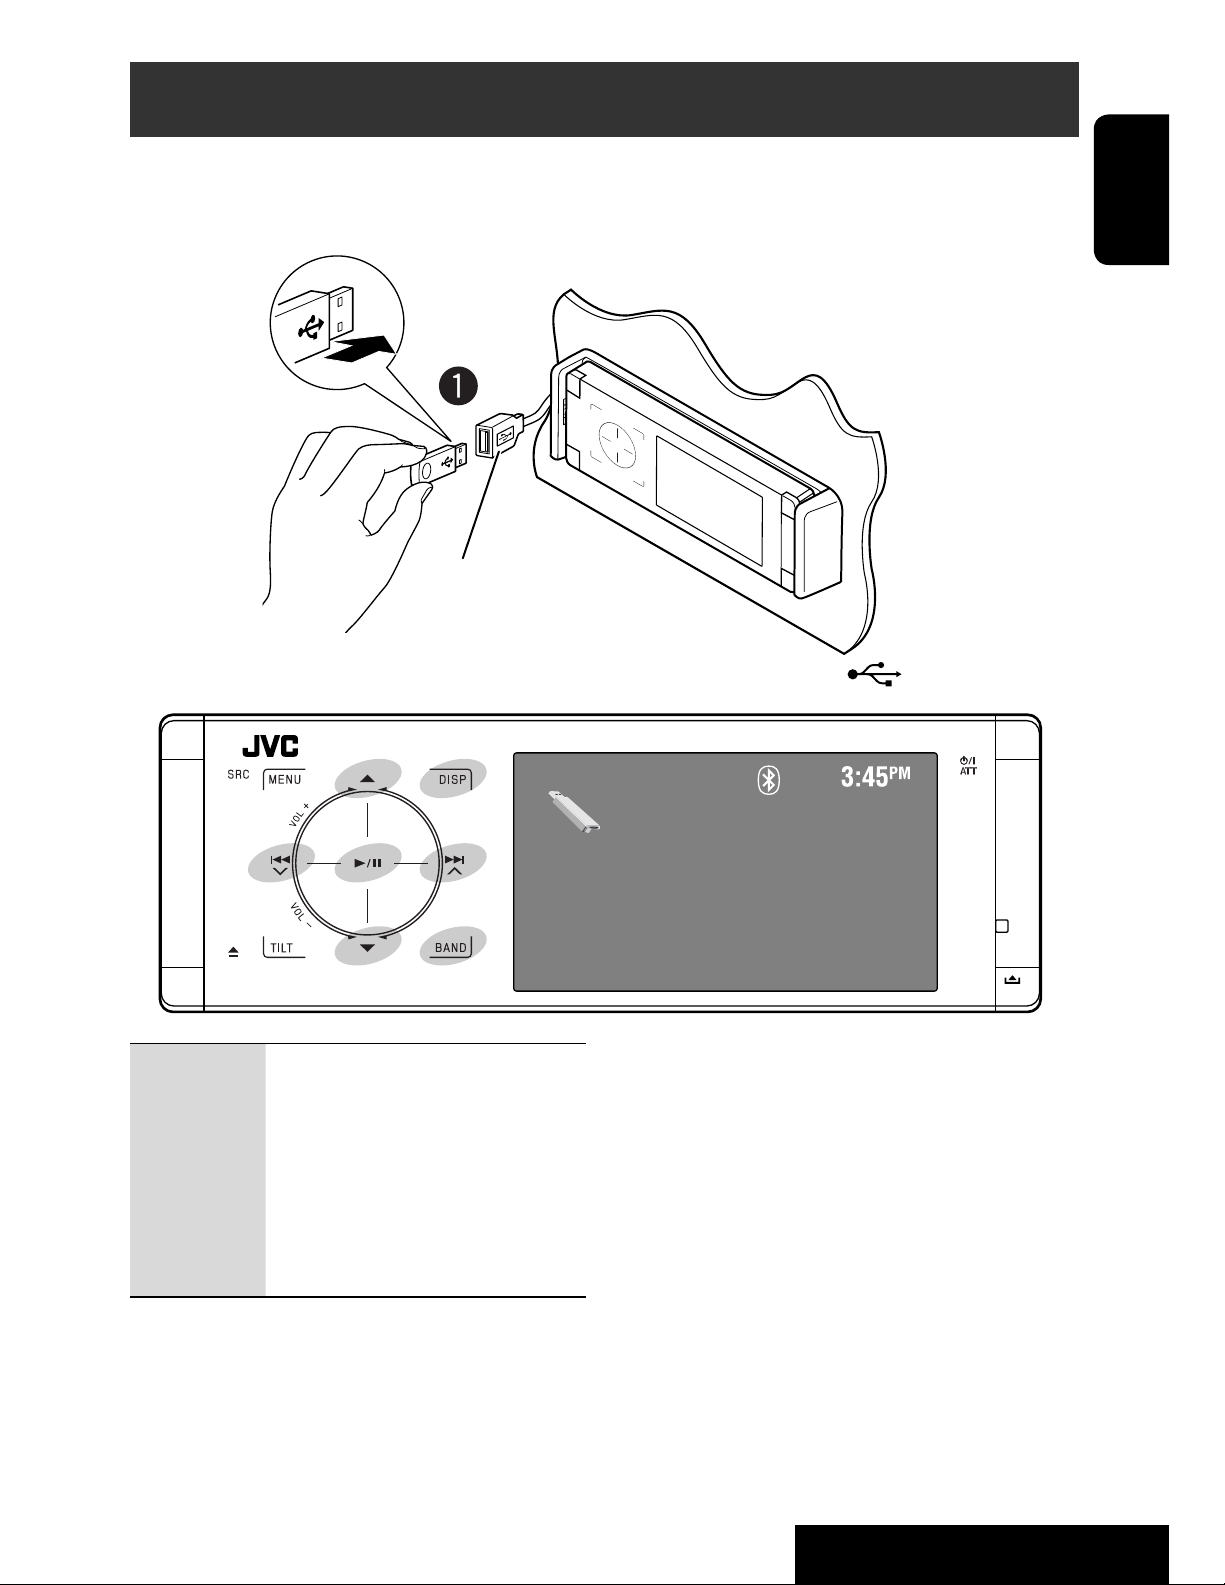
USB operations
You can connect a USB mass storage class device such as a USB memory, Digital Audio Player, portable HDD, etc. to
the unit.
• You can also connect the iPod to the USB terminal of the unit. For details of the operations, pages 38 and 39.
USB cable from the rear of the unit.
• You cannot connect a computer to the USB ( ) terminal of the unit.
ENGLISH
4 ¢: Touch: Selects track
Hold: Reverse/forward search
5 ∞: Touch: Selects folder
Hold: Displays Folder List
3 / 8: Starts/pauses playback.
DISP:
BAND: Stops playback.
Touch if necessary. ( page 9)
~ Connect a USB device.
“USB” is selected as the source and playback
starts automatically.
USB
Now Reading...
*1
This unit can play JPEG/MPEG1/MPEG2
*2
WAV/AAC
device.
• You can operate the USB device in the same way you
operate the files on discs. ( pages 17 to 25)
• You cannot select “USB” when Dual Zone is in use.
• All tracks on the USB device will be played repeatedly
until you change the source.
1
Except for MPEG2 files recorded by JVC Everio
*
camcorder (extension code <.mod>).
2
This unit can play back AAC files encoded using
*
iTunes. This unit cannot play back FairPlay-encrypted
files.
files stored on a USB mass storage class
/MP3/WMA/
29
OPERATIONS
Page 30

Caution:
• Avoid using the USB device if it might hinder your safety driving.
• Do not pull out and attach the USB device repeatedly while “Now Reading...” is flashing on the monitor.
• Do not start the car engine if a USB device is connected.
• Stop playback before disconnecting a USB device.
ENGLISH
• Make sure all important data has been backed up to avoid losing the data.
• Do not leave a USB device in the car, expose to direct sunlight, or high temperature to avoid deformation or
cause damages to the device.
• For more details about USB operations, page 64.
Selecting playback modes
You can use Repeat or Random playback mode.
Ex.: To select Track Repeat
1
2
AV Menu
4
Repeat
Set
Off
Track
Folder
When one of the playback modes is selected, the
corresponding indicator lights up on the source
Enter
Mode
information screen.
To cancel, select <Off> in step 4.
3
Mode
Repeat
Random
Off
File type Repeat Random
Track: Repeats current track. Folder: Randomly plays all tracks of current
folder, then tracks of next folders.
Folder: Repeats all tracks of the current
USB (All): Randomly plays all tracks.
folder.
Track: Repeats current track. Folder: Randomly plays all tracks of current
folder, then tracks of next folders.
Folder: Repeats all tracks of the current
folder.
Folder: Repeats all tracks of the current
folder.
USB (All): Randomly plays all tracks.
—
30
Page 31

Bluetooth® operations — Cellular phone/audio player
Connecting a Bluetooth device
for the first time
Pairing and PIN Code
Bluetooth is a short-range wireless radio
communication technology for the mobile device such
as mobile phones, portable PCs, and other devices. The
bluetooth devices can be connected without cables and
communicate with each other.
• Refer to the list (included in the box) to see the
countries where you may use the Bluetooth®
function.
Bluetooth profile
This unit supports the following Bluetooth profiles;
HFP (Hands-Free Profile) 1.5
OPP (Object Push Profile) 1.1
A2DP (Advanced Audio Distribution Profile) 1.2
AVRCP (Audio/Video Remote Control Profile) 1.3
When you connect a Bluetooth device to the unit
for the first time, make pairing between the unit
and the device. Pairing allows Bluetooth devices to
communicate each other.
To make pairing, you may need to enter the PIN
(Personal Identification Number) code of your Bluetooth
device you want to connect.
• Once the connection is established, it is registered in
the unit even if you reset the unit. Up to five devices
can be registered in total.
• Only one device for Bluetooth phone and one for
Bluetooth audio can be connected at a time.
• To use the Bluetooth function, you need to turn on
Bluetooth function of the device.
ENGLISH
Features
You can operate Bluetooth devices through the unit as
follows:
• Receiving a call
• Making a call—from phone book, from call history
(Redial and Received Call), by dialing number, by
preset numbers, by voice command
• Receiving the text message
• Playing back a Bluetooth audio player
Refer also to the instructions supplied with the
Bluetooth device.
• The Bluetooth word mark and logos are owned by
the Bluetooth SIG, Inc. and any use of such marks
by Victor Company of Japan, Limited (JVC) is under
license. Other trademarks and trade names are those
of their respective owners.
Preparation: Operate the device to turn on its
Bluetooth function.
Registration (Pairing) method
Register and establish the connection with a device.
1
2
AV Menu
Enter
Bluetooth
Continued on the next page
31
OPERATIONS
Page 32
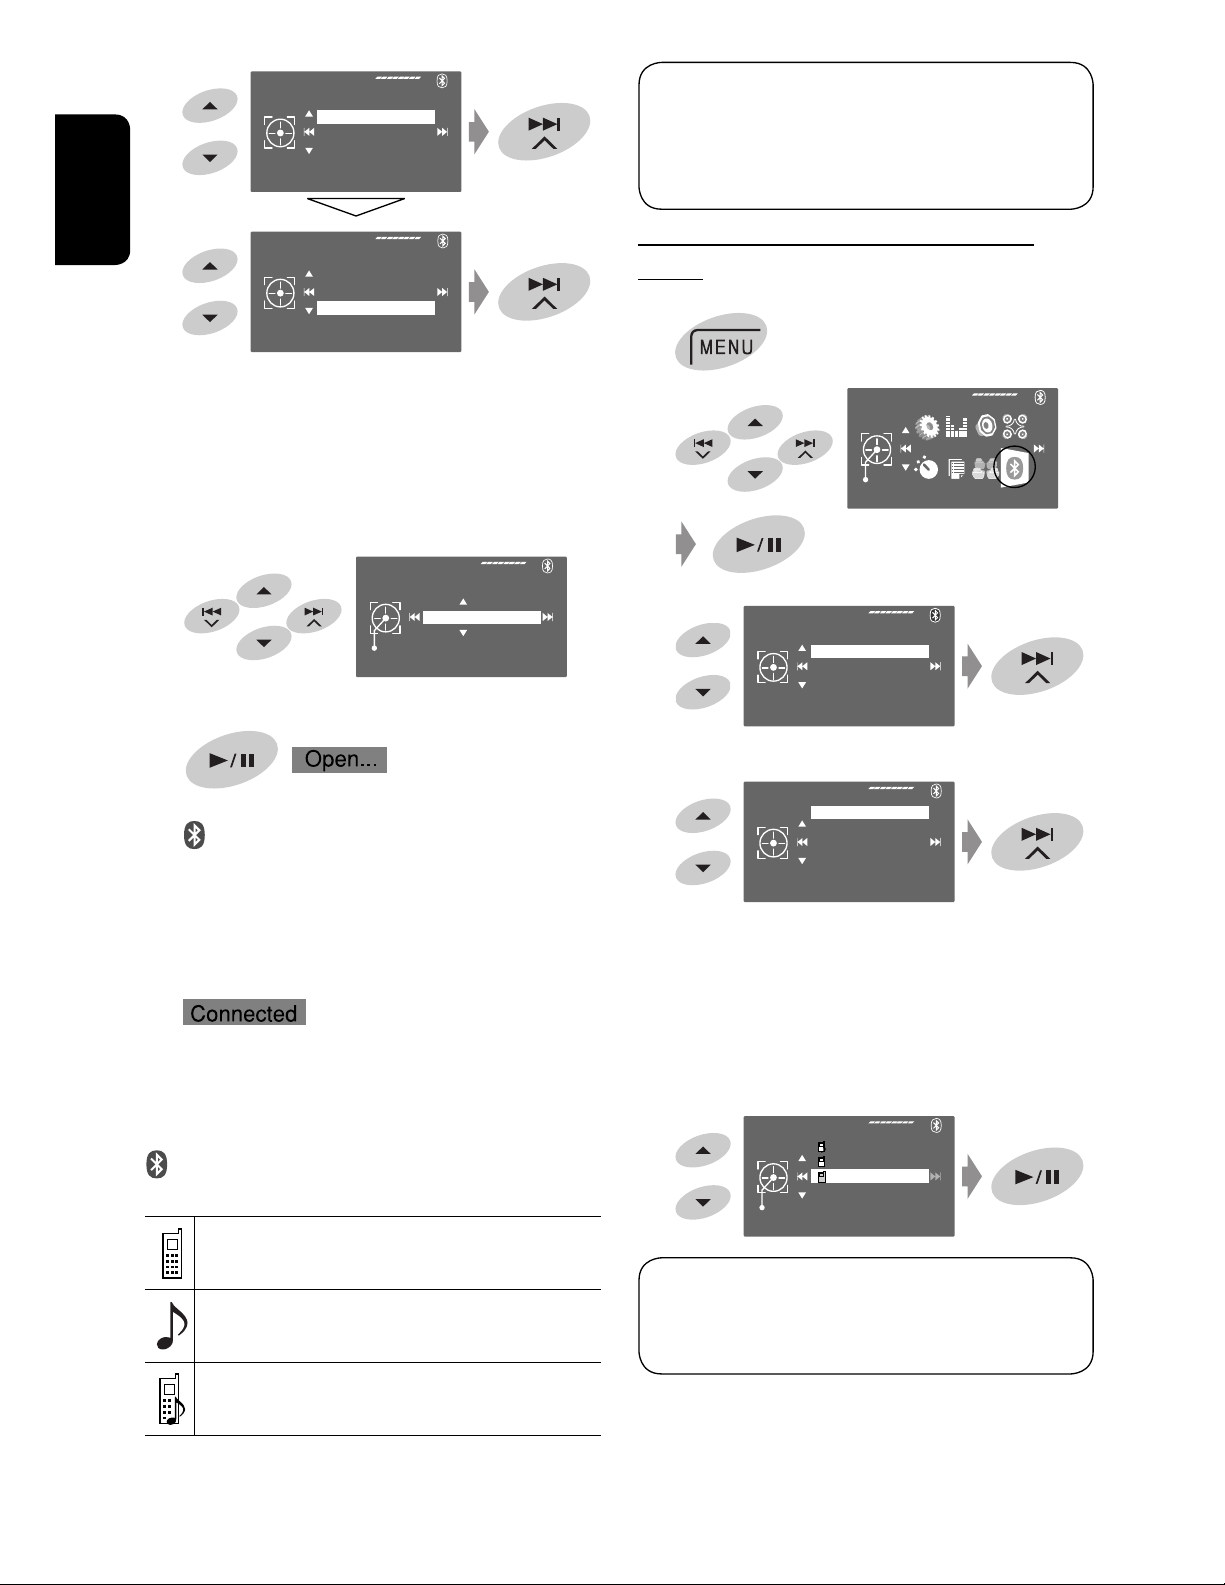
3
Bluetooth
Dial Menu
Device Menu
Settings
Phone Connect
The device remains registered even after you
disconnect the device. Use <Phone Connect> (or
activate <Auto Connect>) to connect the same
device from next time on. ( page 60)
ENGLISH
4
Enter a PIN (Personal Identification Number)*
Deviec Menu
Phone Connect
Audio Connect
Delete Pairing
New Pairing
code to the unit.
• You can enter any number you like (1-digit to
16-digit number).
* Some devices have their own PIN code. Enter the
specified PIN code to the unit.
New Pairing
Enter
Pin Code
1234
• To delete an unwanted digit, select a blank.
5
starts flashing.
6 Operate the target Bluetooth device. (While
“Open...” is flashing on the monitor.)
Enter the same PIN code (as entered in the above
step) on the device to be connected.
Connecting/disconnecting a registered
device
1
2
AV Menu
Enter
Bluetooth
3
Bluetooth
4
Select the desired setting.
Deviec Menu
• For connecting: Select<Phone Connect>/
<Audio Connect> then go to the next step.
• For disconnecting: Select <Phone Disconnect>/
<Audio Disconnect>.
Dial Menu
Device Menu
Settings
Phone Connect
Phone Connect
Audio Connect
Delete Pairing
New Pairing
*
Now connection is established and you can use the
device through the unit.
turns blue and the following icon appears when the
connection is established.
Appears when the Bluetooth phone is
connected.
Appears when the Bluetooth audio player is
connected.
Appears when the Bluetooth phone and the
Bluetooth audio player are connected.
5 Select the registered device you want to
connect.
Phone Connect
Enter
You can set the unit to connect a Bluetooth device
automatically when the unit is turned on. ( page
60)
* When a device has already connected to the unit,
<Phone Connect> and <Audio Connect> do not
appear and vice versa.
32
W21T
P901i
P6200
Page 33

Deleting a registered device
Making a call
1
2
3
Bluetooth
Deviec Menu
AV Menu
Enter
Dial Menu
Device Menu
Settings
Phone Connect
Phone Connect
Audio Connect
Delete Pairing
New Pairing
Bluetooth
You can make hands-free calls using the unit.
The built-in microphone is behind the upper left hand
corner of the unit.
The sound comes out from the connected speakers.
1
2
AV Menu
Enter
Bluetooth
ENGLISH
Select the registered device you want to delete.
4
5
Delete Pairing
Delete
Enter
W21T
P901i
P6200
No
Yes
3
Bluetooth
Dial Menu
Device Menu
Settings
Redial
Continued on the next page
33
OPERATIONS
Page 34

4 Select the method to make a call.
ENGLISH
Redial
Shows the list of phone numbers you have dialed.
= Go to the following step.
Received Calls
Shows the list of the received calls. = Go to the
following step.
Phonebook
Shows the phone book copied from a cellular
phone. = Go to the following step.
Preset Calls
Shows the list of preset numbers. = Go to the
following step.
Phone Number
Shows the phone number entry screen. = “How
to enter a phone number” page 35
Voice Dialling
(Only when the connected cellular phone has the
voice recognition system):
Speak the name you want to call. (Refer to the
instruction manual supplied with your cellular
phone.)
Dial Menu
*1
*2
*3
Redial
Received Calls
Phonebook
Preset Calls
Phone Number
09845671234
*1
5 Select the name/phone number/preset number
you want to call.
Redial
Delete
Dial
Store
08945671234
12312341234
*1
Displays only when the dialed or received number is
made through the unit.
*2
For copying, page 35.
*3
For presetting, page 36.
You can also enter <Dial Menu> by pressing
on the remote controller then touching 6 on the
unit.
When a call comes in...
Name and phone number
(if acquired)
The source is automatically changed to “Bluetooth.”
When <Auto Answer> is activated...
The unit answers the incoming calls automatically.
( page 60)
• When <Auto Answer> is deactivated, press SRC
or touch any control to answer the incoming call.
To end the call or reject an incoming call
Hold SRC or any control.
Answering a waiting call
If your cellular phone is equipped with the call
waiting function, you can put the current call on
hold and answer the waiting call.
Press SRC or touch any control.
• To restore the on-hold call, press SRC or touch any
control again.
• When you end one call, you can connect to the
other.
• When the sound is stopped or interrupted during the
use of a Bluetooth device, turn off, then turn on the
unit.
– If the sound is not yet restored, connect the device
again. ( “Connecting/disconnecting a registered
device” on page 32)
• While talking, you can enter <MIC Setting> to adjust
the built-in microphone volume level by touching
MENU. ( page 60)
When a Text message comes in...
If the cellular phone is compatible with Text
message and <SMS Notify> is set to <On> (
page 60), the unit rings and “Receiving Message”
appears on the monitor to inform you of the arrival
of the message.
34
Page 35

How to enter a phone number
To copy the phone book
1
Select a number. Move the entry position.
• To delete an unwanted digit, select a blank.
• To erase all digits, hold DISP.
2
How to delete the phone numbers/names
• Make sure that the Bluetooth phone is connected.
1 Display the list of phone numbers/names using
<Redial>, <Received Calls>, or <Phonebook>
in <Dial Menu>.
• Follow
steps 1 to 4 of “Making a call” on pages
33 and 34.
2 Select the phone number/name you want to
delete.
Redial
3
Delete
Dial
Store
Delete
Enter
08945671234
12312341234
No
One
All
[Hold]
You can copy the phone book memory of a cellular
phone into the unit.
1
2
3
Enter a PIN* code to the unit.
4
• You can enter any number you like (1-digit to
* Some cellular phones have their own PIN code.
Bluetooth
Settings
Open
16-digit number).
Enter the specified PIN code to the unit.
AV Menu
Dial Menu
Device Menu
Settings
Auto connect
Auto Connect
Auto Answer
SMS Notify
Add Phonebook
MIC Setting
Add Phonebook
Enter
Bluetooth
Pin Code
1234
Enter
ENGLISH
No: Cancels.
One: Deletes the selected phone number/name.
All: Deletes the phone numbers/names listed
in step 1.
35
• To delete an unwanted digit, select a blank.
Continued on the next page
OPERATIONS
Page 36

5
Operate the target cellular phone.
6
Enter the same PIN code (as entered in the above
step) on the cellular phone then transfer the phone
ENGLISH
book memory to the unit. (Refer to the instruction
manual supplied with your cellular phone.)
7 Finish the procedure.
• If you try to copy a 51st phone book entry,
“Phonebook Full” appears on the monitor. Delete
unwanted names before copying ( page 35).
Presetting the phone numbers
To call a preset number
On the remote:
On the unit:
See ”Making a call.” ( pages 33 and 34)
In step 4...
1 Select <Preset Calls>.
The Preset Calls List appears.
2 Select the preset number.
Preset Calls
Dial
1
11122223333
2
22233336666
3
44455556666
4
99988887777
5
55566668888
6
11133334444
You can preset up to six phone numbers.
1 Display the phone number you want to
preset by using <Redial>, <Received Calls>,
<Phonebook>, or <Phone Number>.
2
[Hold]
3
Select a preset number.
Preset Memory
Store
Preset Memory
Store
1
2
3
4
5
6
1
11122223333
2
22233336666
3
44455556666
4
99988887777
5
55566668888
6
11133334444
11122223333
22233336666
44455556666
99988887777
55566668888
11133334444
4 Store the phone number.
Switching conversation media
(the unit/cellular phone)
During a phone call conversation...
Then, continue your conversation using the other
media.
You can use the following buttons on the remote
controller for the Bluetooth phone operations. For
details, pages 10 and 11.
The phone number selected in step 1 is now stored
in preset number 5.
36
Page 37

Using the Bluetooth audio player
• Operations and display indications differ depending on their availability on the connected audio player.
Bluetooth
4 ¢: Touch: Reverse/forward skip
Hold: Reverse/forward search
5 ∞: Selects group/folder.
6: Starts playback.
BAND: Pauses playback.
A Sound mode ( page 50)
B
page 32
C Status of the device
Signal strength/Battery remainder
D Track no./Playing time
E Indicates the touched control or pressed button. It may be
different from the operation status.
F Track title/Artist Name/Album title
* Appears only when the information comes from the
device.
*
~ Select “Bluetooth.”
Ÿ Start playback.
FLAT
01 0:02:39
Current Track Title
Artist Name
Album Title
3
Selecting playback modes
You can use Repeat or Random playback mode.
1 Enter <AV Menu> = <Mode>.
2 Select <Repeat> or <Random>.
3 Select a playback mode.
Repeat: Off: Cancels.
Track: Repeats current track.
Group: Repeats all tracks of the
current group/folder.
All: Repeats all tracks.
Random: Off: Cancels.
Group: Randomly plays all tracks of
current group/folder, then tracks of
next groups/folders.
All: Randomly plays all tracks.
When one of the playback modes is selected, the
corresponding indicator lights up on the source
information screen.
ENGLISH
• See pages 31 and 32 for connecting a new device.
• See page 32 for connecting/disconnecting a
registered device.
• See page 33 for deleting a registered device.
• When the sound is stopped or interrupted during the
use of a Bluetooth device, turn off, then turn on the
unit.
– If the sound is not yet restored, connect the device
again. ( “Connecting/disconnecting a registered
device” on page 32)
To cancel, select <Off> in step 3.
You can use the following buttons on the remote
controller for the Bluetooth audio operations. For
details, pages 10 and 11.
Bluetooth Information:
If you wish to receive more information about
Bluetooth, visit the following JVC web site: <http://
www.jvc-victor.co.jp/english/car/>
37
OPERATIONS
Page 38

Listening to the iPod
You can connect the iPod using the following cable or adapter:
Cable/adapter To operate
To listen to the music USB 2.0 cable (supplied for the iPod)
ENGLISH
Interface Adapter for iPod—
KS-PD100 (not supplied)
To watch the video USB Audio and Video cable for
iPod—KS-U20K (not supplied)
When connected with the USB cable
USB iPod
A Source name
B Sound mode (
C Track or video no./Playing time
page 50)
“When connected with the USB cable” below.
“When connected with the interface adapter”
on page 40.
“When connected with the USB cable” below.
• Make sure <iPod (Off)> is selected for
<AV Input>. ( page 56)
FLAT
Track Title
Artist Name
Album Title
Ÿ Select a track/video
Touch: Selects track/video.
Hold: Reverse/forward search
01 0:01:20
*2
.
6: Starts/pauses playback.
5 ∞: Moves to the previous/next item of a
category (ex.: another album, artist, playlist,
*1
etc.).
DISP:
1
*
Touch if necessary. ( page 9)
5 / ∞ may not function depending on how you
select the current track/video.
~ Select “USB iPod.”
Playback starts automatically.
• When you connect the iPod to the USB
terminal, “USB iPod” is selected as the source
and playback starts automatically.
2
You cannot resume playback for video sources.
*
You can display iPod Artwork on the monitor. (
pages 54 and 65)
Selecting a track/video from <Search Mode>
1 Enter <Search Mode>.
Search Mode
[Hold]
Music
Videos
Shuffle Songs
2 Select <Music> or <Videos>.
Search Mode
Music
Videos
Shuffle Songs
38
Page 39

3 Select an item.
EX.: When <Music> is selected in step 2.
Music
• Repeat the procedure to select the desired
track/video.
Playlists
Artists
Albums
Songs
Podcasts
Genres
4
Repeat
Set
Off
One
All
Repeat: One: Functions the same as “Repeat
One” of the iPod.
All: Functions the same as “Repeat
All” of the iPod.
ENGLISH
4 Confirm the selection.
<Search Mode> can also be accessed through
<AV Menu> = <List>.
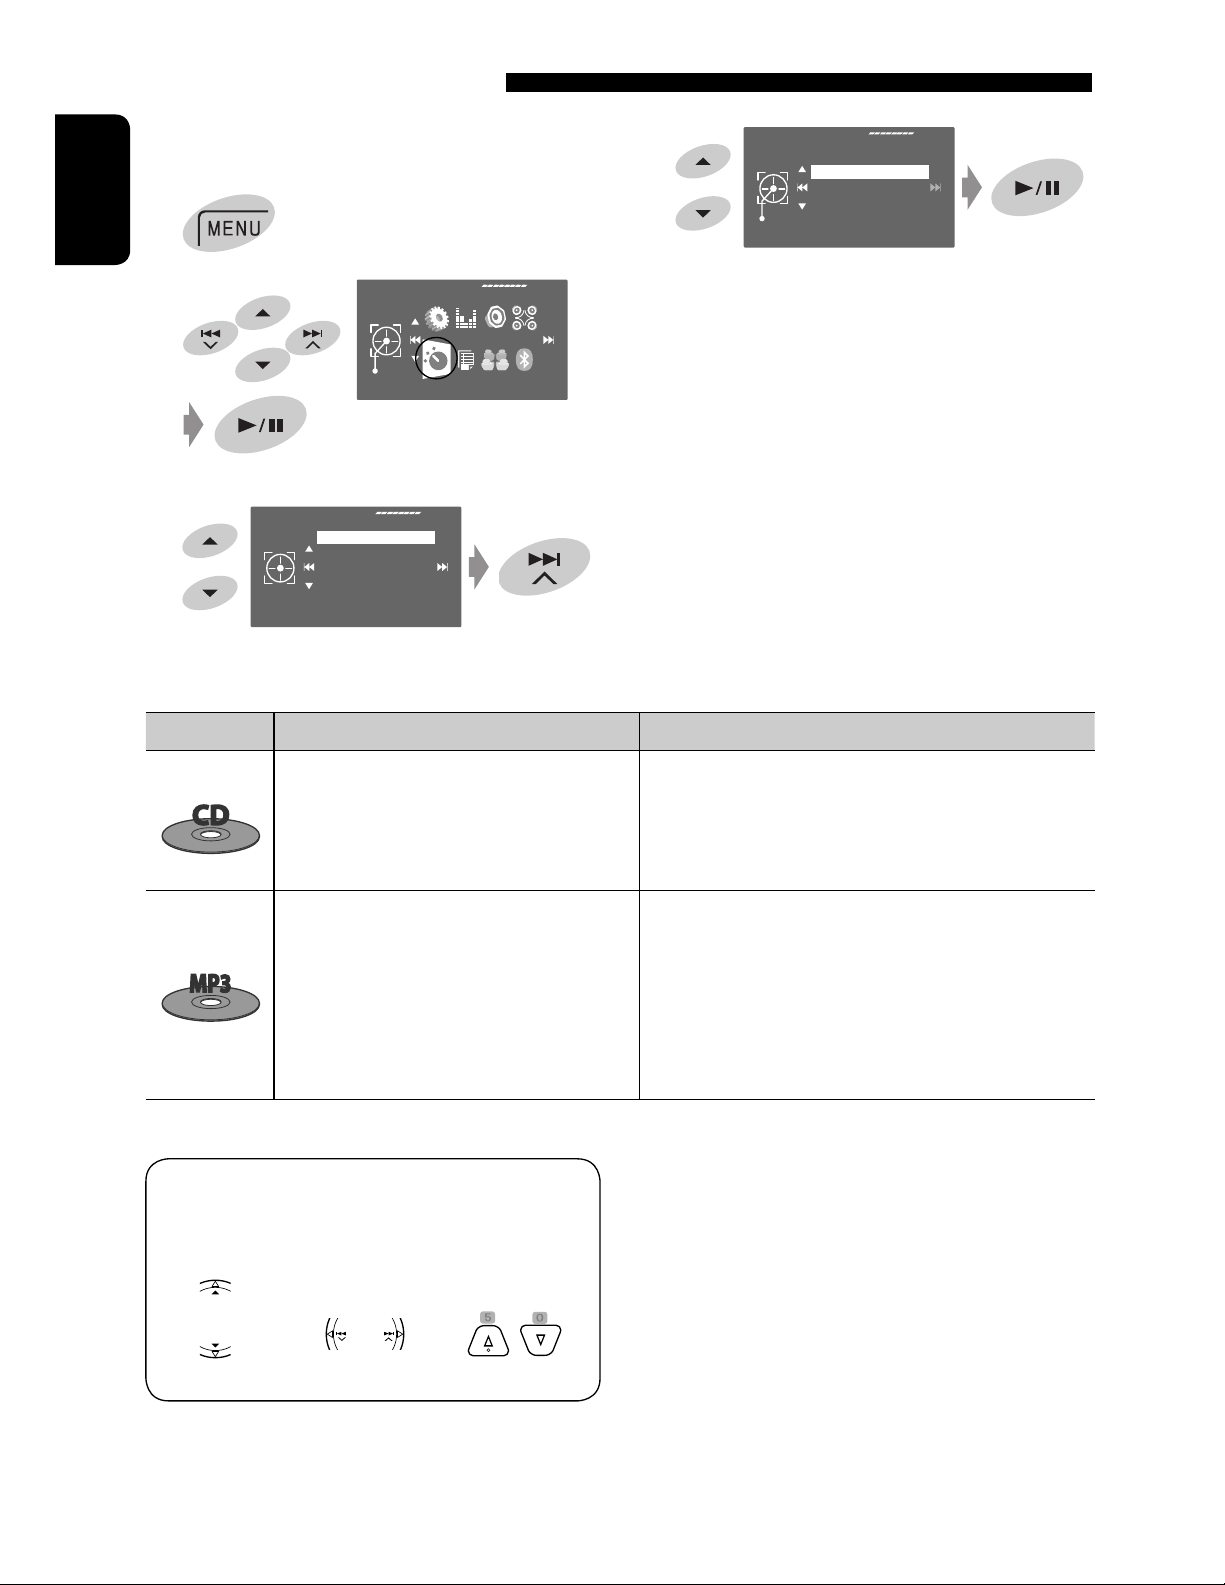
Selecting playback modes
You can use Repeat or Random playback mode.
Ex.: To select Track Repeat
1
2
AV Menu
Random: Song: Functions the same as “Shuffle
Songs” of the iPod.
*
Album: Functions the same as
“Shuffle Albums” of the iPod.
When playback modes are selected, the
corresponding indicators light up on the source
information screen.
To cancel, select <Off> in step 4.
* You can also activate the playback mode through
<Search Mode>.
To activate, select <Shuffle Songs> then touch 6 in
step 2 on page 38.
Changing the play speed of the
3
Mode
Repeat
Random
AudioBooks
Off
Enter
Mode
audiobooks
You can change the play speed of the audiobooks.
Follow steps 1 to 3 in the left column.
In step 3...
1
2
Select the desired speed.
39
Mode
AudioBooks
Set
Repeat
Random
AudioBooks
Normal
Normal
Faster
Slower
EXTERNAL DEVICES
Page 40

When connected with the interface adapter
ENGLISH
∞: Pauses playback
– To resume, touch again
A Source name
B Sound mode (
C Track no./Playing time
Preparation:
When operating through the CD changer jack, make
sure <iPod> is selected for the external input setting.
( page 56)
page 50)
iPod
Track Title
Artist Name
Album Title
FLAT
01 0:01:20
Selecting a track from the player’s menu
1 Enter the player’s menu.
• This mode will be canceled if no operations are
done for about 5 seconds.
The SEARCH indicator lights up.
2 Select the desired item.
Touch: Select an item
Hold: Skip 10 items at a time
~ Select “iPod.”
Playback starts automatically.
Ÿ Select a track.
Touch: Selects track.
Hold: Reverse/forward search
<Playlists> Ô <Artists> Ô <Albums>
Ô <Songs> Ô <Genres> Ô
<Composers> Ô (back to the beginning)
3 Confirm the selection.
4 Repeat steps 2 and 3 to select a track.
• When a track is selected finally, playback starts.
• To return to the previous menu, touch 5.
Selecting playback modes
Operations are exactly the same as explained on page
39.*
* “AudioBooks” is not displayed in step 3.
40
Page 41

Listening to the CD changer
4 ¢: Touch: Selects track.
Hold: Reverse/forward search
5 ∞: Touch: Selects folder (MP3 only).
Hold: Displays Disc List.
A MP3 indicator (MP3 only)
B Sound mode (
C Disc no./Folder no./Track no./Playing time
D Current track title/Artist name/Disc title
“No Name” appears for conventional CDs.
page 50)
CD-CH
01 01 01 0:01:20
Current Track Title
Artist Name
Disc Title
! Select a disc to start playing.
While playing an MP3 disc, you can select and start
playing a track in the disc using the Lists:
<Disc List> (select the current disc) =
<Folder List> = <File List> then start playing a
track you want.
MP3
FLAT
Disc List
Enter
MP3 DISC
DISC 02
DISC 03
DISC 04
DISC 05
DISC 06
ENGLISH
It is recommended to use a JVC MP3-compatible CD
changer with your unit.
• You can play only CDs (CD-DA) and MP3 discs.
Preparation:
Make sure <Changer> is selected for the external input
setting. ( page 56)
~ Select “Changer.”
Ÿ Enter <Disc List>.
Disc List
[Hold]
• Each time you hold the button, you can display
the other list of the remaining discs.
MP3 DISC
DISC 02
DISC 03
DISC 04
DISC 05
DISC 06
Disc List
[Hold]
Folder List
File List
Enter
MP3 DISC
DISC 02
DISC 03
DISC 04
DISC 05
DISC 06
My Best
Cinema
Pops
My Best2
Favorite Song
Cinema2
Song011.mp3
Song012.mp3
Song014.mp3
Song014.mp3
Song015.mp3
Song016.mp3
Each List can also be accessed through <AV Menu>
= <List> = <Disc List> = <Folder List> =
41
<File List>.
EXTERNAL DEVICES
Page 42
Selecting playback modes
You can use Repeat or Random playback mode.
Ex.: To select Track Repeat
1
ENGLISH
2
3
Mode
Repeat
Random
Off
AV Menu
Enter
Mode
4
Repeat
Set
Off
Track
Folder
Disc
When one of the playback modes is selected, the
corresponding indicator lights up on the source
information screen.
To cancel, select <Off> in step 4.
Disc type Repeat Random
Track: Repeats current track. Disc: Randomly plays all tracks of the current
disc.
Disc: Repeats all tracks of the current
disc.
All: Randomly plays all tracks of all loaded
discs.
Track: Repeats current track. Folder: Randomly plays all tracks of current folder,
then tracks of next folders.
Folder: Repeats all tracks of the current
folder.
Disc: Repeats all tracks of the current
disc.
Disc: Randomly plays all tracks of the current
disc.
All: Randomly plays all tracks of all loaded
discs.
You can use the following buttons on the remote
controller to operate the CD changer. For details,
pages 10 and 11.
MP3 only
42
Page 43

Listening to the satellite radio
Before operating, connect either one of the following (separately purchased) to the CD changer jack on the rear of
this unit.
• JVC SIRIUS Satellite radio interface, KS-SRA100, for listening to SIRIUS Satellite radio.
• JVC Smart Digital Adaptor, XMDJVC100, for listening to XM Satellite radio.
ENGLISH
For SIRIUS Radio
Activate your subscription after connection:
1 Turn on the power.
2 Select “Satellite Radio.”
The SIRIUS Satellite radio starts updating all the
SIRIUS channels. ( “GCI update” column below.)
• Once completed, SIRIUS Satellite radio tunes in
to the preset channel, CH184.
3 Check your SIRIUS ID, page 56.
4 Contact SIRIUS on the internet at <http://
activate.siriusradio.com/> to activate your
subscription, or you can call SIRIUS toll-free at
1-888-539-SIRIUS (7474).
“Subscription updated Press any Key to continue”
appears on the monitor once subscription has been
completed.
For XM Radio
Activate your subscription after connection:
• Only Channel 0, 1, and 247 are available before
activation.
1 Turn on the power.
2 Select “Satellite Radio.”
The XMDirect™ Universal Tuner Box starts updating
all the XM channels. “Channel 1” is tuned in
automatically. ( “GCI update” column below.)
3 Check your XM Satellite radio ID labelled on the
casing of the XMDirect™ Universal Tuner Box, or
tune in to “Channel 0” ( page 44).
4 Contact XM Satellite radio on the internet at
<http://xmradio.com/activation/> to activate
your subscription, or you can call 1-800-XMRADIO (1-800-967-2346).
Once completed, the unit tunes in to one of the
available channels (Channel 4 or higher).
GCI (Global Control Information) update:
• If channels are updated after subscription, updating starts automatically, and no sound can be heard.
For SIRIUS: “Channel is updating XX% completed” appears.
For XM: “UPDATING” appears.
• Update takes a few minutes to complete.
• Do not touch any touch pad control, press any button, or perform any operation until updating is completed.
43
EXTERNAL DEVICES
Page 44

SAT
FLAT
XM1 P1 01ch
ENGLISH
DISP: Touch to display the program
information—artist name/song
name (/composer name: only for
SIRIUS Satellite radio).
For SIRIUS Radio
~ Select “Satellite Radio.”
Ÿ Select the band.
Category Name
Channel Name
A Sound mode ( page 50)
B SIRIUS/XM Band
C Preset no.
D Channel no.
E Category name
F Channel name
G Signal strength
For XM Radio
~ Select “Satellite Radio.”
Ÿ Select the band.
! Select a category.
• To select a channel from all categories, select
<All>.
⁄ Make a channel to listen.
• Holding either or changes the
channels rapidly.
• While searching, invalid and unsubscribed
channels are skipped.
• “SIRIUS” and the SIRIUS dog logo are registered
trademarks of SIRIUS Satellite Radio Inc.
• XM and its corresponding logos are registered
trademarks of XM Satellite Radio Inc.
• “SAT Radio”, the SAT Radio logo and all related marks
are trademarks of SIRIUS Satellite Radio Inc., and XM
Satellite Radio, Inc.
! Select a category.
• To select a channel from all categories
(including non-categorised channels), skip this
step.
• If you do not select a channel within 15
seconds, the category selected is canceled. You
can select a channel from all categories now.
⁄ Select a channel to listen.
• Holding either or changes the
channels rapidly.
• While searching, invalid and unsubscribed
channels are skipped.
Checking the XM Satellite radio ID
Select Channel “0.”
The 8-digit (alphanumeric) ID number is displayed
on the monitor.
To cancel the ID number display, select any
channel other than channel “0.”
44
Page 45
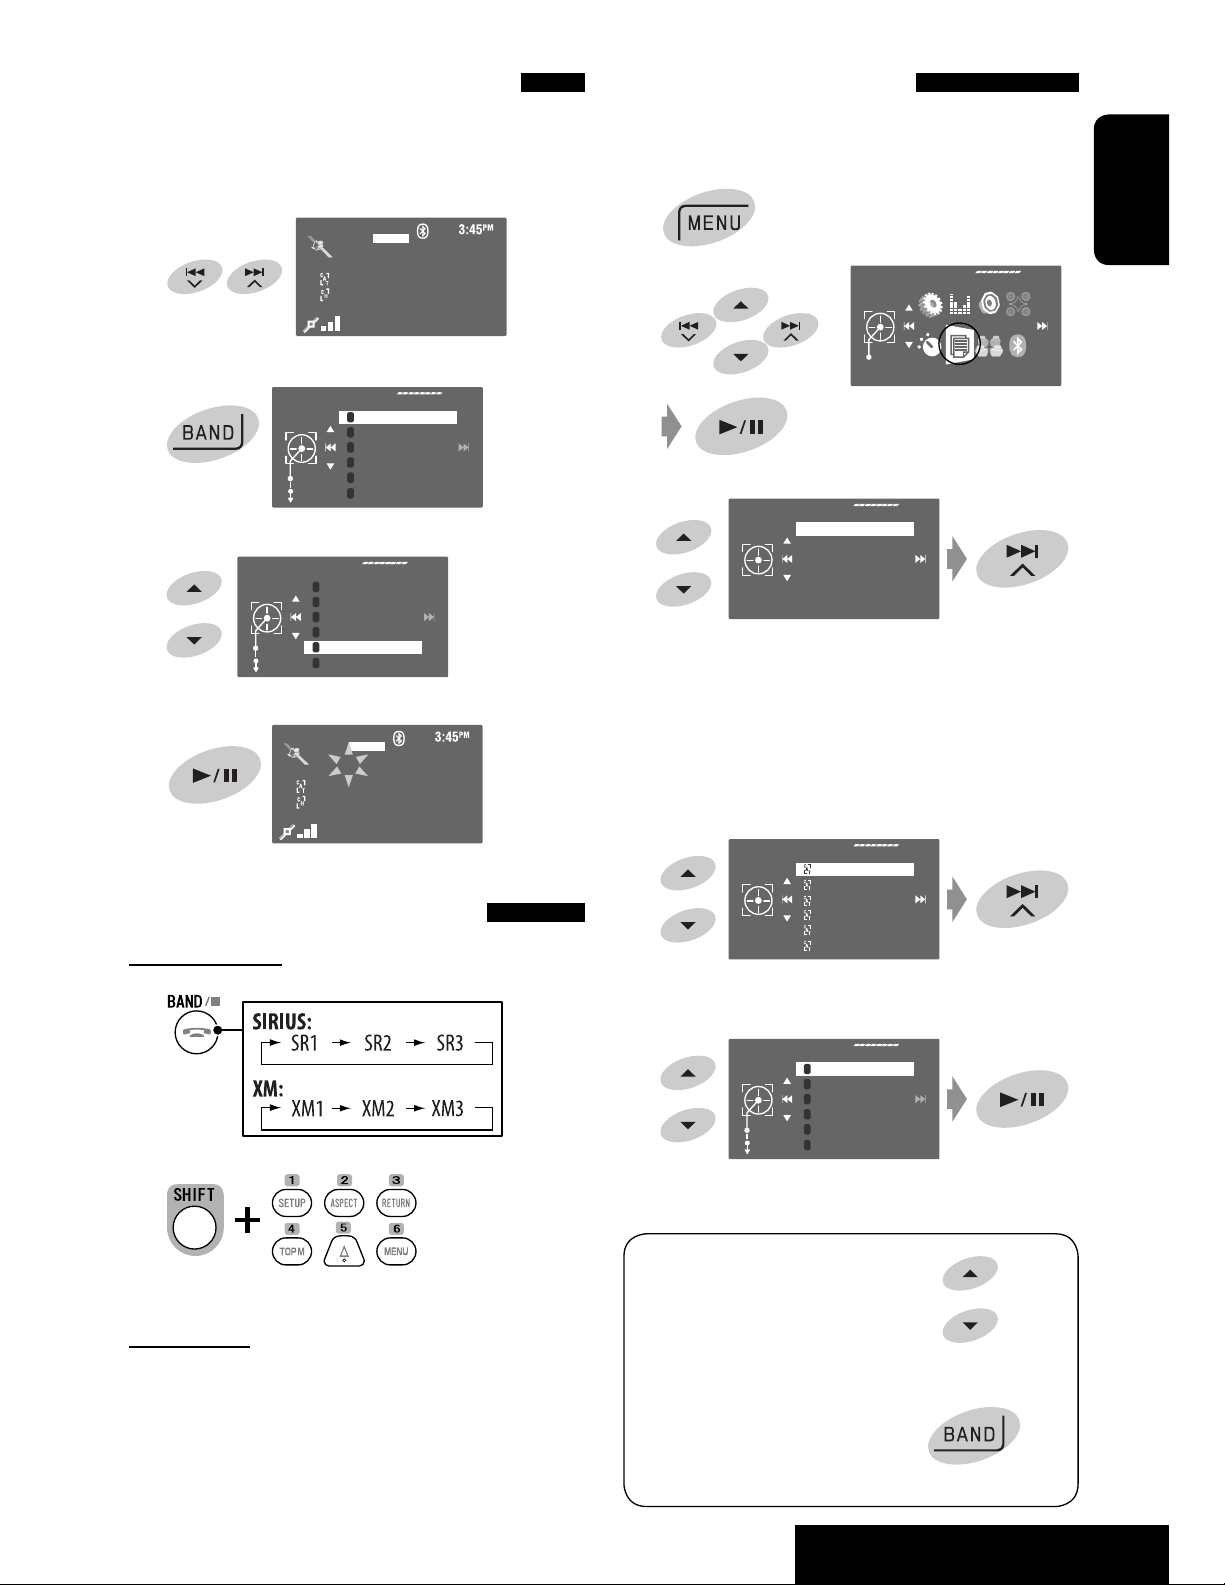
Storing channels in memory
Selecting on the lists
You can preset six channels for each band.
Ex.: Storing a channel into preset number 5
1 Tune in to a channel you want to preset.
SAT
FLAT
XM1 38ch
Rock
XM Music Club
2 Display the Preset List.
XM1
[Hold]
Enter
Store
1
Channel Name
2
The City
3
40 at 40
4
Hank's Place
5
Audio Visions
6
Preview
3 Select a preset number.
XM1
Enter
Store
1
Channel Name
2
The City
3
40 at 40
4
Hank's Place
5
Audio Visions
6
Preview
4 Store the channel.
SAT
[Hold]
FLAT
XM1 P5 38ch
Rock
XM Music Club
Selecting preset channels
On the remote:
1
2
You can select a channel using one of the following
lists—Preset List/Category List/Channel List.
1
2
Select a desired list.
3
List
• Preset List: Displays your preset channels.
step 5
• Category List: Displays the categories. step 4
• Channel List: Displays all channels within the
selected category. step 5
AV Menu
Preset List
Category List
Channel List
Enter
List
4 Select a desired category.
Category List
DECADES
COUNTRY
HITS
ROCK
URBAN
JAZZ & BLUES
5 Select a desired channel.
EX.: When <Preset List> is selected in step 3.
XM1
Enter
Store
1
Channel Name
2
The City
3
40 at 40
4
Hank's Place
5
Audio Visions
6
Preview
ENGLISH
On the unit:
See “Selecting on the lists” in the right column.
• Category List can also be
accessed by...
• Preset List can also be
accessed by...
45
[Hold]
[Hold]
EXTERNAL DEVICES
Page 46

Listening to the HD Radio™ Broadcast
Before operating, connect HD Radio tuner box, KT-HD300 (separately purchased) to the CD changer jack on the rear
of the unit.
ENGLISH
What is HD Radio Technology?
HD Radio Technology can deliver high-quality digital sound—AM digital will have FM-like quality (in stereo) and FM
digital will have CD-like quality—with static-free and clear reception. Furthermore, stations can offer text and data,
such as artist names and song titles.
• When the HD Radio tuner box is connected, it can also receive conventional analog broadcasts.
• Many HD Radio stations also offer more than one channel of programming. This service is called multicasting.
• To find HD Radio stations in your area, visit www.hdradio.com <http://www.hdradio.com/>.
HD Radio
FLAT
HD
FM1 P1 87.5 MHz
WXYZ-FM
5 ∞: Selects multicast channels.
DISP: Touch to display the program
information—song name/artist
name/album title.
A Flashes first then lights up when a digital audio broadcast
is tuned in.
B Station Call Sign
C Program type
D Signal strength
E HD Radio reception indicators (
F DX/Local indicator (
* When an HD Radio multicast channel is received, the
first four letters of Call Sign and channel number are
displayed.
*
page 47)
page 47)
ROCK
AUTO
Refer also to page 12 for basic radio operations.
DX
When receiving HD Radio multicast
channels...
Select your desired channel.
“LINKING” appears while linking to a multicast channel.
Searching for HD Radio stations only:
~
The “HD SEARCH” indicator appears.
46
Ÿ
Page 47

Changing HD Radio reception
Tuning in to stations with
mode
While receiving an HD Radio broadcast, the unit tunes
to digital or analog audio automatically due to the
receiving condition.
1
2
3
Mode
Blend Hold
Exit
Mono
DX/Local
SSM
Blend Hold
Auto
Analog
Digital
Auto
AV Menu
Enter
Mode
sufficient signal strength
This function works only for FM bands.
Once you have activated this function (selected
<Local>), it always works when searching for FM
stations.
1
2
3
Mode
DX/Local
Mono
DX/Local
SSM
Blend Hold
DX
DX
Local
AV Menu
Enter
Mode
ENGLISH
Analog: Tuning to analog audio only
Digital: Tuning to digital audio only
Auto: Switch between digital and analog
audio automatically
• If no sound can be heard from the selected setting,
change the setting to <ANALOG> or <DIGITAL>.
• The setting automatically changes to <AUTO> if you
tuned in to or change to another station, or if you
turned off the power.
• This setting cannot take effect for the conventional
FM/AM stations.
• If the radio station forces the reception mode to
digital, the DIGITAL indicator flashes.
Exit
Only stations with sufficient signal strength will be
detected.
• The DX indicator goes off, then the LO indicator
lights up.
• During SSM search ( page 12), this function
cancels temporarily.
47
EXTERNAL DEVICES
Page 48

Listening to other external components
AV-INPUT
You can connect an external component to the LINE IN/VIDEO IN plugs.
ENGLISH
AV-IN
DISP:
A Sound mode ( page 50)
B Assigned title (
Touch if necessary. ( page 9)
page 51)
Preparation:
Make sure the appropriate <AV Input> setting is
selected for the connected component. ( page 56)
FLAT
AV-INPUT
Navigation screen
When you connect a Navigation System to the unit,
you can view the navigation screen regardless of
the source.
Preparation:
Make sure <AV Input> setting is selected for
<Navigation>. ( page 56)
~ Select “AV Input.”
Ÿ Turn on the connected component and
start playing the source.
To watch the navigation screen, touch DISP
repeatedly. ( page 9)
• The aspect ratio of the navigation screen is fixed
to <Full> regardless of the <Aspect> setting.
( page 53)
• When you do not connect the Navigation System
but connect an audio component to LINE IN
plugs, you can use “AV Input” for listening to the
audio source.
48
Page 49

EXT-INPUT
You can connect an external component to the CD changer jack on the rear using the Line Input Adapter—KS-U57
(not supplied) or AUX Input Adapter—KS-U58 (not supplied).
A Sound mode ( page 50)
B Assigned title (
page 51)
Preparation:
EXT-IN
EXT-INPUT
FLAT
ENGLISH
Make sure <External Input> is selected for <External Input>. ( page 56)
~ Select “External Input.”
Ÿ Turn on the connected component and start playing the source.
49
EXTERNAL DEVICES
Page 50

Sound equalization
ENGLISH
Selecting a sound mode
~
Ÿ
AV Menu
Enter
Equalizer
Edit
Store
+03
60.0 Hz
Storing your own adjustments
You can store your adjustments into <User1>,
<User2>, and <User3>.
1 Follow steps ~ and Ÿ on the left.
2 Select the item you want to adjust.
Equalizer
Edit
Exit
Flat
Hard Rock
R&B
Pop
Jazz
Select a sound mode.
!
Equalizer
Edit
Exit
Flat
Hard Rock
R&B
Pop
Jazz
You can select one of the following sound modes:
<Flat>, <Hard Rock>, <R&B>, <Pop>,
<Jazz>, <Dance>, <Country>, <Reggae>,
<Classic>, <User1>, <User2>, or <User3>
• For preset equalizing values of each sound
mode, page 67.
• For multi-channel source, the sound mode is
temporarily canceled.
3 Adjust each setting.
Edit
+03
Store
60.0 Hz
4 Select <User1>, <User2>, or <User3> then
store the setting.
User Store
Store
User1
User2
User3
50
Page 51

Assigning titles to the sources
You can assign titles as follows.
FM/AM stations*Up to 16 characters—up to 30
stations
“AV Input”
Up to 16 characters
“External Input”
• If you try to assign a title to a 31st station,
“Name Full” flashes on the monitor. Delete unwanted
titles before assignment.
Title Entry
A-a-0
Store
⁄ Assign a title.
AV-In Name
AV-INPUT
Title Entry
A-a-0
Store
AV-In Name
AV-INPUT
1 Select a character, then move the entering
position.
ENGLISH
* You cannot assign titles to the HD Radio stations.
Ex.: Assigning title to “AV Input”
~ Select “AV Input.”
• For FM/AM stations: Select the band, then tune
into a station.
Ÿ
!
Mode
AV Menu
Enter
Mode
Title Entry
• To change the character set, touch DISP.
(For available characters, page 66.)
• To erase the whole characters, hold DISP.
2 Repeat step 1 until you finish entering the
title.
@ Finish the procedure.
51
SETTINGS
Page 52

Menu items
Menu operations
For details of the menu operations, page 6.
ENGLISH
AV Menu
Enter
Setup
• The display indications may
change according to change
of the specifications.
Setup
Equalizer
Sound
Disc Surround
Mode
List
Dual Zone
Display
Clock
Disc Setup 1
Disc Setup 2
Tuner
Input
Others
Bluetooth
Initial: Underlined
Setup
Menu items Selectable settings, [reference page]
Demonstration Off: Cancels.
On: Activates the demonstration on the monitor.
Wall Paper You can select the background picture of the monitor.
Grid, Silk, Metal, Plain
Color You can select the background color of the monitor.
Blue, Light-Blue, Red, Orange, Yellow, Green, Purple, Dark-Blue,
Dark-Green, Brown, Light-Brown, Black
Scroll Off: Cancels.
Display
Once: Scrolls the source information once.
Auto: Repeats scrolling (5-second intervals).
• Holding DISP (on the unit) scrolls the information regardless of this
setting.
Tag Display Off: Cancels.
On: Shows the Tag data while playing MP3/WMA/WAV/AAC tracks.
52
Page 53

Menu items Selectable settings, [reference page]
Dimmer Off: Cancels.
On: Activates dimmer.
Auto: Dims the monitor when you turn on the headlights.
Time Set: Touch ¢ to display the time setting screen, then set the
Dimmer On/Off times.
Bright You can adjust brightness of the monitor.
–15 (darkest) to +15 (brightest); Initial 00
Picture Adjust
*2
You can adjust the following to make the monitor clear and legible for
watching the playback picture. The setting will be stored for
“Disc/USB” and “AV Input.”
–15 to +15; Initial 0
Bright: Adjust if the picture is too bright or too dark.
Contrast: Adjust the contrast.
Color: Adjust the color of the picture—lighter or darker.
Tint: Adjust the tint if the human skin color is unnatural.
Aspect
*3
You can change the aspect ratio of the picture.
*1
ENGLISH
Display
Aspect ratio of incoming signal
4:3 16:9
Full:
For 16:9 original pictures
Auto: • For “Disc”: Aspect ratio is automatically
selected to match to the incoming
signals.
• For other video sources: Aspect ratio is
fixed at <Regular>.
Regular:
For 4:3 original pictures
Language
*4
Select the indication language shown on the monitor.
English, Español, Français, Deutsch, Italiano, Nederlands, Svenska,
Dansk, Руccĸий, Português
• The characters you can enter for assigning the titles also change
according to the language selected, [66]
1
*
The ILLUMINATION CONTROL lead connection is required. ( “Installation/Connection Manual”)
2
Adjustable only when the source is a disc or USB containing pictures or movies, or “AV Input.”
*
3
Not adjustable for audio sources.
*
4
After you change the indication language setting, turn off then on the power so that your setting takes effect.
*
53
SETTINGS
Page 54

Menu items Selectable settings, [reference page]
Time Set
Time Format 12Hours, 24Hours
OSD Clock Off: Cancels.
ENGLISH
Clock Adjust Off: Cancels.
Clock
Time Zone
DST
Menu Language
Audio Language
Subtitle Select the initial subtitle language or erase the subtitle (<Off>); Initial
Monitor Type Select the monitor type to watch a wide screen picture on the external
Initial 1:00 AM, [7]
On: Displays the clock time while playing back a video source.
Auto: The built-in clock is automatically adjusted using the clock time
data provided via the satellite radio channel.
*1*2
Select your residential area from one of the following time zones for
clock adjustment.
Alaska, Pacific, Mountain, Central, Eastern, Atlantic, Newfoundland
*1*2
(Daylight Saving Time) Activates this if your residential area is subject to DST.
Off: Cancels.
On: Activates daylight saving time.
Select the initial disc menu language; Initial English ( also page 67).
Select the initial audio language; Initial English ( also page 67).
Off ( also page 67).
16:9 4:3 Letterbox
monitor.
16:9:
Select when the aspect ratio of the external monitor is 16:9.
4:3 Pan Scan
4:3 Letterbox/4:3 Pan Scan:
Select when the aspect ratio of the external monitor is 4:3. Refer to
the illustrations on the left to see how the pictures are shown on the
monitor.
OSD Position
*3
Position 1 Position 2
Select the position of the on-screen bar, [25].
1: Higher position
2: Lower position
Disc Setup 1
File Type Select playback file type when a disc/USB contains different types of files.
You can store this setting separately for each source —“Disc” and “USB.”
Audio: Plays back audio files.
Still Picture: Plays back JPEG files.
Video: Plays back DivX/MPEG1/MPEG2 files.
Audio&Video: Plays back audio files and DivX/MPEG1/MPEG2 files.
DivX Regist. (Registration) This unit has its own Registration Code. Once you have played back a file
with which the Registration Code recorded, this unit’s Registration Code
is overwritten for copyright protection.
iPod Artwork Off: Cancels.
On: Activates artwork display. To display artwork, touch DISP repeatedly.
[9]
• Refer also to page 65.
54
Page 55

Menu items Selectable settings, [reference page]
D. (Dynamic) Range Compres.
(Compression)
You can enjoy a powerful sound at a low volume level while playing
Dolby Digital software.
Auto: Select to apply the effect to multi-channel encoded software.
On: Select to always use this function.
Speaker Size You can adjust the speaker size setting.
Select the
speaker
Adjust the
speaker size
• Front SPK: Small, Large
• Center SPK: None, Small, Large
• Rear SPK: None, Small, Large
• Subwoofer: On, Off
• Speaker size: <Large> for 13 cm (5-1/4 inch) diameter or more;
<Small> for 13 cm (5-1/4 inch) or less.
• Front speakers and rear speakers cannot be adjusted separately the
left and right.
*3
Regardless of the setting above...
• No sound comes out of the subwoofer while playing Dolby Pro
Logic II Movie or Music if the front speaker is set to <Large>.
• No sound comes out of the center speaker when surround is
deactivated.
Disc Setup 2
Speaker Level
Select the
speaker
Adjust the
speaker level
You can adjust the output level of the activated speakers (
<Speaker Size> above), monitoring the test tone.
Front Lch/Center Ch/Front Rch/Rear Rch/Subwoofer
Adjust the output level of each speaker in the range of –10dB to
+10dB; Initial 0dB.
• Hold 6 to turn on and off the test tone.
*4
/Rear Lch:
ENGLISH
Speaker Distance You can adjust the speaker output timing.
Select the
speaker
Adjust the
speaker
distance
Front Lch/Center Ch/Front Rch/Rear Rch/Rear Lch:
Adjust the speaker distance from the listening position in the range
of 15 cm/6 inches to 600 cm/240 inches in 15 cm/6 inch step; Initial
120 cm/48 inch (for center speaker), 150 cm/60 inch (for other
speakers).
• Hold DISP to change the measuring unit—cm and inch.
1
*
Appears only when SIRIUS Satellite Radio or XM Satellite Radio is connected.
2
*
Set <Clock Adjust> to <Auto> then touch ¢ to display these setting items.
3
Selectable only for “Disc” and “USB.” (Playback stops when you select one of the items.)
*
4
This subwoofer level setting takes effect only when surround is activated. ( also pages 22 and 23)
*
55
SETTINGS
Page 56

Menu items Selectable settings, [reference page]
IF Band Width
ENGLISH
Area Setting US: When using in North/Central/South America. FM/AM intervals are
TUNER
SIRIUS ID
AV Input
Input
External Input
*1
Auto: Increases the tuner selectivity to reduce interference noises
between adjacent stations. (Stereo effect may be lost.)
Wide: Subject to the interference from adjacent stations, but sound
quality will not be degraded and the stereo effect will remain.
set to 200 kHz/10 kHz.
Europe: When using in any other areas. FM/AM intervals are set to
50 kHz (100 kHz during auto search)/9 kHz.
South America: When using in South American countries where FM
interval is 100 kHz. AM interval is set to 10 kHz.
*2
*3
Your SIRIUS identification number appears on the monitor.
You can determine the use of LINE IN and VIDEO IN plugs.
Off: Select when no component is connected (“AV Input” is skipped
while selecting the source).
iPod (Off): Select when connecting the iPod using the USB Audio and
Video cable for iPod. [38]
Audio&Video: Select when connecting an AV component such as a VCR.
Audio: Select when connecting an audio component such as a portable
audio player.
*4
Camera
: Select when connecting the rear view camera.
Navigation: Select when connecting a Navigation System. [48]
*5
For connecting an external component to the CD changer jack on the
rear.
*6
Changer/iPod
: CD changer or iPod [40, 41]
External Input: Any other than the above. [49]
• For connecting KS-SRA100/XMDJVC100, this setting is not required. It
is automatically detected.
Beep Off: Cancels.
On: Activates the key-touch tone.
Telephone Muting
Others
*7
Off: Cancels.
Muting1, Muting2: Select either one which mutes the sounds while
using the cellular phone.
56
Page 57

Menu items Selectable settings, [reference page]
Illumination You can turn off the touch pad controls and monitor lights while turning
on the unit. [5]
Touch pad controls Monitor
Normal: Always lights.
Proximity/Motion: Lights up when your hand
Always lights.
moves close to the controls.
Proxi/Motion-LCD: Light up when your hand moves close to the
Others
Touch Pad: Lights up when your finger
controls.
Always lights.
touches the controls.
Touch Pad-LCD: Light up when your finger touches the controls.
Initialize
Initialize all settings you have made in <AV Menu>. Hold 6, then
reset the unit. [3]
Equalizer
Flat/Hard Rock/R&B/Pop/Jazz/Dance/Country/Reggae/Classic/User1/User2/User3, [50]
1
Appears only when an HD Radio tuner box is connected.
*
2
Appears only when a SIRIUS Satellite Radio is connected.
*
3
*
Not selectable when “AV Input” is selected as the source.
4
The REVERSE GEAR SIGNAL lead connection is required “Installation/Connection Manual.” The rear view through
*
the camera appears on the monitor in “Full” aspect ratio (regardless of the aspect ratio setting) when you shift the
gear to the reverse (R) position.
5
Not selectable when the component connected to the CD changer jack is selected as the source.
*
6
The name of the component detected through the CD changer jack is shown.
*
7
The TEL MUTING lead connection is required. “Installation/Connection Manual.“
*
ENGLISH
57
SETTINGS
Page 58

Sound
Menu items Selectable settings, [reference page]
Fader/Balance Adjust fader—speaker output balance between the front and rear speakers.
Adjusts fader
ENGLISH
Adjust balance
Volume Adjust Adjust and store auto-adjustment volume level for each source, comparing to
Subwoofer Level
*1
High Pass Filter Through: Select when the subwoofer is not connected.
• Upmost—front only
• Downmost—rear only
When using a two-speaker system, set the fader to the center (00).
Adjust balance—speaker output balance between the left and right speakers.
• Leftmost—left only
• Rightmost—right only
the FM volume level. The volume level will automatically increase or decrease
when you change the source.
–12 to +12; Initial 00
• For digital sources: You can make the adjustments separately depending on
the audio format—Dolby Digital/DTS and the others.
Adjust the subwoofer output level.
–06 to +08; Initial 00
On: Select when the subwoofer is connected.
Crossover Adjust the crossover frequency between the front/rear speakers and the
subwoofer.
80Hz, 120Hz, 150Hz
Amplifier Gain You can change the maximum volume level of this unit.
Off: Deactivates the built-in amplifier.
Low Power: Select this if the maximum power of the speakers is less than
50 W.
High Power
Rear Speaker
*2
You can activate/deactivate the rear speakers.
Off, On
Disc Surround
*3
Menu items Selectable settings, [reference page]
Surround Off Select to deactivate the surround function.
Surround On
Select to activate the surround function. [23]
Auto, Through, Dolby PLII Movie, Dolby PLII Music
• When you select <Dolby PLII Music>, you can adjust <Panorama> and
<Center Width>.
*4
58
Page 59

Mode
*5
Menu items Selectable settings, [reference page]
Mono
SSM
DX/Local
*6
Blend Hold
Title Entry
*6
Only for FM bands. (Off, On), [12]
Only for FM bands of “Tuner” and FM/AM bands of “HD Radio.” [12, 47]
Only for FM bands of “HD Radio.” (DX, Local), [47]
Only for “HD Radio.” [47]
Only for FM/AM stations of “Tuner,” “AV Input,” and “External Input.” [51]
Repeat/Random Only for “Disc,” “USB,” “USB iPod,” “Changer,” “iPod,” and “Bluetooth.”
[17, 30, 37, 39, 40, 42]
AudioBooks
Only for “USB iPod.” (Normal, Faster, Slower) [39]
List
The accessible lists differ depending on the source. [13, 18, 38, 41, 45]
Dual Zone
Off, On, On/Surround On, [26]
ENGLISH
Bluetooth
Menu items Selectable settings, [reference page]
Redial
*7
Received Calls
Phonebook
Preset Calls
Phone Number
Dial Menu
Voice Dialling
1
This setting takes effect only when surround is deactivated. ( also pages 22 and 23)
*
2
This setting takes effect only when Dual Zone is activated. ( also page 26)
*
3
Selectable only for “Disc” and “USB.”
*
4
This setting takes effect only when the center speaker is activated.
*
5
Items listed under <Mode> vary among the playback sources.
*
6
Appears only when an HD Radio tuner box is connected.
*
7
*
Only for the device connected for Bluetooth phone.
Select one of the call methods, [34]
59
Continued on the next page
SETTINGS
Page 60

Menu items Selectable settings, [reference page]
Phone Connect/Audio Connect Only for the registered devices.
Establish the connection with the registered device, [32]
Phone Disconnect/
Audio Disconnect
ENGLISH
Delete Pairing Only for the registered devices.
New Pairing
Device Menu
Auto Connect When the unit is turned on, the connection is established automatically
Auto Answer Off: The unit does not answer the calls automatically. Answer the calls
SMS Notify On: The unit informs you of the arrival of a message by ringing and
Only for the device being connected.
Disconnect the current device before connecting another device, [32]
Delete the registered devices, [33]
Enter the PIN code to establish the connection, [32]
Once the connection is established, it is registered in the unit. You
can connect the unit and the device by using <Phone Connect>/
<Audio Connect> ( above) from the next time on.
with...
Off: No Bluetooth device.
Last: The last connected Bluetooth device.
manually.
On: The unit answers the incoming calls automatically.
Reject: The unit refuses all incoming calls.
displaying “Receiving Message.”
Off: The unit does not inform you of the arrival of a message.
Add Phonebook Copy the phone book memory of a cellular phone into the unit. You can
register up to 50 phone numbers, [35]
MIC Setting Adjust the built-in microphone volume.
Settings
01, 02, 03
Phone Volume Adjust the phone volume.
*1
, Initial 15
Initialize
00 to 30 or 50
Initialize all settings you have made in <Bluetooth>.
Yes: Initializes the settings.
No: Cancels.
Information The following information is shown:
Name: The unit name
Address: The Mac address of the unit
Version: The Bluetooth software/hardware versions
Phone Device/Audio Device: The connected device names
1
*
Depends on the amplifier gain control. ( page 58)
2
If you wish to receive more information about Bluetooth, visit the following JVC web site:
*
<http://www.jvc-victor.co.jp/english/car/>
*2
When operating the Bluetooth device, refer also to the instructions supplied with the device.
60
Page 61

Maintenance
How to clean the connector
Frequent detachment will deteriorate the connectors.
To minimize this possibility, periodically wipe the
connectors with a cotton swab or cloth moistened with
alcohol, being careful not to damage the connectors.
Connectors
Moisture condensation
Moisture may condense on the lens inside the unit in
the following cases:
• After starting the heater in the car.
• If it becomes very humid inside the car.
Should this occur, the unit may malfunction. In this
case, eject the disc and leave the unit turned on for a
few hours until the moisture evaporates.
To keep discs clean
A dirty disc may not play correctly.
If a disc does become dirty, wipe it with
a soft cloth in a straight line from center
to edge.
• Do not use any solvent (for example, conventional
record cleaner, spray, thinner, benzine, etc.) to clean
discs.
To play new discs
New discs may have some rough spots
around the inner and outer edges. If
such a disc is used, this unit may reject
the disc.
To remove these rough spots, rub the edges with a
pencil or ball-point pen, etc.
Do not use the following discs:
Single CD—8 cm (3-3/16") disc Warped disc
ENGLISH
How to handle discs
When removing a disc from its
case, press down the center holder
of the case and lift the disc out,
holding it by the edges.
• Always hold the disc by the
edges. Do not touch its recording surface.
When storing a disc into its case, gently insert the
disc around the center holder (with the printed surface
facing up).
• Make sure to store discs into the cases after use.
Center holder
Unusual shape
Transparent or semi-transparent
parts on its recording area
61
Stick-on labelSticker and sticker residue
C-thru Disc (semi-transparent disc)
REFERENCES
Page 62

More about this unit
General
Turning on the power
ENGLISH
• By pressing SRC (source) on the unit, you can also
turn on the power. If the source is ready, playback
starts.
Tuner (FM only)
Storing stations in memory
• When SSM is over, received stations are preset in
No. 1 (lowest frequency) to No. 6 (highest frequency).
Disc
General
• In this manual, words “track” and “file” are
interchangeably used.
• This unit can only play back audio CD (CD-DA) files if
different type of audio files (MP3/WMA/WAV/AAC)
are recorded in the same disc.
• This unit can display only one-byte characters. No
other characters can be correctly displayed.
Changing the source
• If you change the source, playback also stops without
ejecting the disc.
Next time you select “Disc” for the playback source,
disc play starts from where it stopped previously.
Playing Recordable/Rewritable discs
• This unit can recognize a total of 5 000 files and 250
folders (a maximum of 999 files per folder).
• Use only “finalized” discs.
• This unit can play back multi-session discs; however,
unclosed sessions will be skipped while playing.
• This unit can recognize a total 25 characters for file/
folder names.
• Some discs or files may not be played back due to
their characteristics or recording conditions.
Playing DVD-VR
• For details about DVD-VR format and play list, refer
to the instructions supplied with the recording
equipment.
Inserting a disc
• When a disc is inserted upside down or has no
playable files, “Cannot play this disc Check the disc”
appears on the monitor. Eject the disc.
Ejecting a disc
• If the ejected disc is not removed within 15 seconds,
the disc is automatically inserted again into the
loading slot to protect it from dust.
File playback
Playing DivX files
• This unit can play back DivX files with the extension
code <.divx>, <.div>, <.avi> (regardless of the
letter case—upper/lower).
• This unit supports the DivX files whose resolution is
720 x 576 pixels or less.
• Audio stream should conform to MP3 or Dolby Digital.
• The file encoded in the interlaced scanning mode
may not be played back correctly.
• The maximum bit rate for video signals (average) is
4 Mbps .
62
Page 63

Playing MPEG1/MPEG2 files
• This unit can play back MPEG1/MPEG2 files with the
extension code <.mpg>, <.mpeg>, or <.mod>*.
* <.mod> is an extension code used for the MPEG2
files recorded by JVC Everio camcorders. The
MPEG2 files with the <.mod> extension code
cannot be played back when stored on a USB mass
storage class device.
• The stream format should conform to MPEG system/
program stream.
• The file format should be MP@ML (Main Profile at
Main Level)/SP@ML (Simple Profile at Main Level)/
MP@LL (Main Profile at Low Level).
• Audio streams should conform to MPEG1 Audio
Layer-2 or Dolby Digital.
• The maximum bit rate for video signals (average) is
4 Mbps.
Playing JPEG files
• This unit can play back JPEG files with the extension
code <.jpg>, or <.jpeg>.
• It is recommended that you record a file at 640 x 480
resolution.
• This unit can play back baseline JPEG files.
Progressive JPEG files or lossless JPEG files cannot be
played.
Playing MP3/WMA/WAV/AAC files
• This unit can play back files with the extension
code <.mp3>, <.wma>, <.wav>, or <.m4a>
(regardless of the letter case—upper/lower).
• This unit can play back the files meeting the
conditions below:
– Bit rate:
MP3/WMA: 32 kbps — 320 kbps
AAC: 16 kbps — 320 kbps
– Sampling frequency:
48 kHz, 44.1 kHz, 32 kHz (for MPEG1)
24 kHz, 22.05 kHz, 16 kHz (for MPEG2)
48 kHz, 44.1 kHz, 32 kHz, 22.05 kHz (for WMA)
44.1 kHz (for WAV)
48 kHz, 44.1 kHz (for AAC)
• This unit can show ID3 Tag Version
1.0/1.1/2.2/2.3/2.4 (for MP3). This unit can also show
WAV/WMA/AAC Tag.
• This unit can play back files recorded in VBR (variable
bit rate).
Files recorded in VBR have a discrepancy in elapsed
time indication.
• This unit cannot play back the following files:
– MP3 files encoded with MP3i and MP3 PRO
format.
– MP3 files encoded with Layer 1/2.
– WMA files encoded with lossless, professional,
and voice format.
– WMA files which are not based upon Windows
Media® Audio.
– WMA/AAC files copy-protected with DRM.
– AAC files copy-protected with FairPlay (except
those stored on an iPod).
– Files which have the data such as AIFF, ATRAC3,
etc.
Enjoying surround sounds
• If <Surround On> is selected, “MULTI” surround
playback automatically starts for multi-channel
encoded discs regardless of the <Surround On>
setting.
• You cannot activate surround for MPEG multi-channel
DVD Video, DivX 2-channel and MPEG 2-channel
sources. If <Surround On> is selected, stereo sounds
are emitted only through the front speakers. “FRONT
2CH” appears on the source information screen.
• When “FIX” appears on the source information
screen, no sound comes out of the subwoofer.
• When <AUTO> is selected, downsampling is
performed for DVD Video (LPCM only) and DVD-VR
(LPCM only).
ENGLISH
63
REFERENCES
Page 64

USB
Bluetooth operations
• If “No USB device“ appears after removing a device,
reattach a device or select another playback source.
• When the USB device has no playable files, or has not
been formatted correctly, “Cannot play this device
ENGLISH
Check the device” appears on the monitor.
• The unit cannot recognize a USB device whose rating
is other than 5 V and exceeds 500 mA.
• While playing from a USB device, the playback order
may differ from other players.
• This unit may be unable to play back some USB
devices or some files due to their characteristics or
recording conditions.
• USB devices equipped with special functions such as
data security functions cannot be used with the unit.
• Do not use a USB device with 2 or more partitions.
• Depending on the shape of the USB devices and
connection ports, some USB devices may not be
attached properly or the connection might be loose.
• When connecting a USB device, refer also to its
instructions.
• Connect only one USB device to the unit at a time. Do
not use a USB hub.
• This unit may not recognize a USB device connected
through a USB card reader.
• When connecting with a USB cable, use the USB 2.0
cable.
• This unit may not play back files in a USB device
properly when using a USB extension cord.
• This unit cannot assure proper functions or supply
power to all types of the devices.
• This unit can recognize a total of 5 000 files and 250
folders (a maximum of 999 files per folder).
• This unit can recognize a total of 25 characters for
file/folder names.
• For MPEG1/2 files: The maximum bit rate for video
signals (average) is 2 Mbps.
General
• While driving, do not perform complicated operation
such as dialing the numbers, using phone book, etc.
When you perform these operations, stop your car in
a safe place.
• Some Bluetooth devices may not be connected to
this unit depending on the Bluetooth version of the
device.
• This unit may not work for some Bluetooth devices.
• Connecting condition may vary depending on
circumstances around you.
• When the unit is turned off, the device is
disconnected.
Warning messages for Bluetooth operations
Connection Error:
The device is registered but the connection has failed.
Use <Phone Connect>/<Audio Connect> to connect
the device again. ( page 32)
Error:
Try the operation again. If “Error” appears again, check
if the device supports the function you have tried.
Please Wait...:
The unit is preparing to use the Bluetooth function. If
the message does not disappear, turn off and turn on
the unit, then connect the device again (or reset the
unit).
64
Page 65

Icons for phone types
• These icons indicate the phone type set on the device.
Cellular phone
Household phone
Office
Notice:
When operating an iPod, some operations may not be
performed correctly or as intended. In this case, visit
the following JVC web site:
– For the USB connection: <http://www.jvc-victor.
co.jp/english/car/>
– For the interface adapter connection: <http://
www.jvc.co.jp/english/car/support/ks-pd100/
index.html>
ENGLISH
General
Other than above
iPod operations
• You can control the following types of iPods:
– Through the USB 2.0 cable
• iPod video (5th Generation)
• iPod nano
• iPod nano (2nd Generation)
– Through the interface adapter
• iPod with dock connector (3rd Generation)
• iPod with Click Wheel (4th Generation)
• iPod mini
• iPod photo
• iPod nano
• iPod video (5th Generation)
*
To watch the video, connect the iPod using USB
Audio and Video cable (not supplied).
• If the iPod does not play correctly, update your iPod
software to the latest version. For details about
updating your iPod, visit <http://www.apple.com>.
• When you turn on this unit, the iPod is charged
through the unit.
• While the iPod is connected, all operations from the
iPod are disable. Perform all operations from this
unit.
• The text information may not be displayed correctly.
• The text information scrolls on the monitor. This
unit can display up to 40 characters when using the
interface adapter and up to 128 characters when
using the USB 2.0 cable or USB Audio and Video
cable.
*
For the USB connection:
When <iPod Artwork> is set to <On>:
Do not press any keys during the first 30 seconds or
more of playing back any track containing artwork
*
.
It takes 30 seconds or more to display artwork and no
operations are available while loading it.
*
The picture displayed on the iPod’s screen while
playing back a track.
HD Radio reception
• During SSM search...
– All stations including conventional FM/AM
stations are searched and stored for the selected
band.
Satellite radio operations
• You can also connect the JVC SIRIUS radio PnP
(Plug and Play), using the JVC SIRIUS radio adapter,
KS-U100K (not supplied) to the CD changer jack on
the rear. (Select “External Input” as the source.)
By turning on/off the power of the unit, you can turn
on/off the JVC PnP. However, you cannot control it
from this unit.
• To know more about SIRIUS Satellite radio or to sign
up, visit <http://www.sirius.com>.
• For the latest channel listings and programming
information, or to sign up for XM Satellite radio, visit
<http://www.xmradio.com>.
65
REFERENCES
Page 66

Menu items
Characters you can enter for titles
• If you change the <Amplifier Gain> setting from
<High Power> to <Low Power> while the volume
level is set higher than “30,” the unit automatically
changes the volume level to “VOL 30.”
ENGLISH
• After you change any of <Menu Language/Audio
Language/Subtitle> settings, turn off then on the
power, and re-insert the disc (or insert another disc)
so that your setting takes effect.
• When you select <16:9> for a picture whose aspect
ratio is 4:3, the picture slightly changes due to the
process for converting the picture width.
• Even if <4:3 Pan Scan> is selected, the screen size
may become <4:3 Letterbox> for some discs.
About sounds reproduced through the rear
terminals
• Speaker out/analog discrete output—LINE OUT
(FRONT/REAR)/CENTER OUT/SUBWOOFER OUT:
Multi-channel signals are emitted for a multichannel encoded software. (When Dual Zone is
activated, the same signal emitted through 2nd
AUDIO OUT plugs are emitted for the main source
“Disc.”)
• 2nd AUDIO OUT: 2-channel signal is emitted when
Dual Zone is activated. When playing a multichannel encoded disc, multi-channel signals are
downmixed.
In addition to the roman alphabet (A – Z, a – z), you
can use the following characters to assign titles. (
page 51)
• When <Руccĸий> is selected for <Language>. (
page 53)
Upper and lower cases
Numbers and symbols
• When any language other than <Руccĸий> is
selected for <Language>. ( page 53)
Upper and lower cases
• “DVD Logo” is a trademark of DVD Format/Logo
Licensing Corporation registered in the US, Japan and
other countries.
• DivX, DivX Ultra Certified, and associated logos are
trademarks of DivX, Inc. and are used under license.
• Official DivX® Ultra Certified product
• Plays all versions of DivX® video (including DivX® 6)
with enhanced playback of DivX® media files and the
DivX® Media Format
• Microsoft and Windows Media are either registered
trademarks or trademarks of Microsoft Corporation in
the United States and/or other countries.
• iPod and iTunes are trademarks of Apple Inc.,
registered in the U.S. and other countries.
• HD Radio™ and the HD Radio Ready logo are
proprietary trademarks of iBiquity Digital Corp.
Numbers and symbols
66
Page 67
Preset equalizing values
Frequency
60.0 Hz 150.0 Hz 400.0 Hz 1.0kHz 2.5kHz 6.3kHz 15.0kHz
Sound mode
Flat 00 00 00 00 00 00 00
Hard Rock +03 +03 +01 00 00 +02 +01
R&B +03 +02 +02 00 +01 +01 +03
Pop 00 +02 00 00 +01 +01 +02
Jazz +03 +02 +01 +01 +01 +03 +02
Dance +04 +02 00 –02 –01 +01 +01
Country +02 +01 00 00 00 +01 +02
Reggae +03 00 00 +01 +02 +02 +03
Classic +02 +03 +01 00 00 +02 00
User1/2/3 00 00 00 00 00 00 00
Language codes (for DVD/DivX language selection)
Code Language Code Language Code Language Code Language Code Language
AA Afar FA Persian KK Kazakh NO Norwegian ST Sesotho
AB Abkhazian FI Finnish KL Greenlandic OC Occitan SU Sundanese
AF Afrikaans FJ Fiji KM Cambodian OM (Afan) Oromo SW Swahili
AM Ameharic FO Faroese KN Kannada OR Oriya TA Tamil
AR Arabic FY Frisian KO Korean (KOR) PA Panjabi TE Telugu
AS Assamese GA Irish KS Kashmiri PL Polish TG Tajik
AY Aymara GD Scots Gaelic KU Kurdish PS Pashto, Pushto TH Thai
AZ Azerbaijani GL Galician KY Kirghiz QU Quechua TI Tigrinya
BA Bashkir GN Guarani LA Latin RM Rhaeto-
Romance
BE Byelorussian GU Gujarati LN Lingala RN Kirundi TL Tagalog
BG Bulgarian HA Hausa LO Laothian RO Rumanian TN Setswana
BH Bihari HI Hindi LT Lithuanian RW Kinyarwanda TO Tonga
BI Bislama HR Croatian LV Latvian, Lettish SA Sanskrit TR Turkish
BN Bengali, Bangla HU Hungarian MG Malagasy SD Sindhi TS Tsonga
BO Tibetan HY Armenian MI Maori SG Sangho TT Tatar
BR Breton IA Interlingua MK Macedonian SH Serbo-Croatian TW Twi
CA Catalan IE Interlingue ML Malayalam SI Singhalese UK Ukrainian
CO Corsican IK Inupiak MN Mongolian SK Slovak UR Urdu
CS Czech IN Indonesian MO Moldavian SL Slovenian UZ Uzbek
CY Welsh IS Icelandic MR Marathi SM Samoan VI Vietnamese
DZ Bhutani IW Hebrew MS Malay (MAY) SN Shona VO Volapuk
EL Greek JA Japanese MT Maltese SO Somali WO Wolof
EO Esperanto JI Yiddish MY Burmese SQ Albanian XH Xhosa
ET Estonian JW Javanese NA Nauru SR Serbian YO Yoruba
EU Basque KA Georgian NE Nepali SS Siswati ZU Zulu
TK Turkmen
ENGLISH
67
REFERENCES
Page 68

Troubleshooting
What appears to be trouble is not always serious. Check the following points before calling a service center.
ENGLISH
• No sound comes out of the center speaker.
• The monitor is not clear and legible. Sunshine from the windscreen may cause this symptom.
• The unit does not work at all.
• The remote controller does not work.
• “No Signal” appears. • Change the source.
General
• “Mecha Error Push Reset” appears on the
Symptoms Remedies/Causes
• Center speaker is not activated. ( page 55)
Once you have reset the unit, make sure to activate the
speaker again.
• Center speaker is used only for surround playback. No
sound comes out for stereo playback.
Adjust <Bright>. ( page 53)
Reset the unit. ( page 3)
Deactivate Dual Zone. ( page 26)
(While Dual Zone is activated, the remote controller only
functions for operating the DVD/CD player.)
• Start the playback on the external component connected
to VIDEO IN plug.
• Check the cords and connections.
• Signal input is too weak.
Reset the unit. ( page 3)
monitor, and the control panel does not
move.
• The touch pad controls do not respond
properly.
• <Illumination> function does not work
properly.
• Keep your hands and controls clean and dry.
• Eliminate static electricity and do not place magnetic
items near the unit.
• Leave the unit until the temperature becomes stable in
the car.
• A rubber mat on the floor may cause this symptom. In
this case, do not use the rubber mat.
68
Page 69

Symptoms Remedies/Causes
• SSM automatic presetting does not work.
• Static noise while listening to the radio. Connect the antenna firmly.
FM/AM
• Disc can be neither recognized nor played .
• Disc cannot be ejected.
• Recordable/Rewritable discs cannot be
played back.
• Tracks on the Recordable/Rewritable discs
cannot be skipped.
• Playback does not start. • Insert the disc correctly again.
• The playback picture is not clear and legible.
Disc playback
• Sound and pictures are sometimes
interrupted or distorted.
• No playback picture appears on the monitor. Parking brake lead is not connected properly.
Store stations manually. ( page 13)
Eject the disc forcibly. ( page 3)
Unlock the disc. ( page 18)
• Insert a finalized disc.
• Finalize the discs with the component which you used
for recording.
• Region code of the DVD is not correct. ( page 4)
• The format of files is not supported by the unit.
Adjust items in <Picture Adjust>. ( page 53)
• Stop playback while driving on rough roads.
• Change the disc.
( “Installation/Connection Manual”)
ENGLISH
• No picture appears on the external monitor. • Connect the video cord correctly.
• Select the correct input on the external monitor.
• “Eject Error” or “Loading Error” appears on
the monitor.
• Disc cannot be played back. • Change the disc.
• Noise is generated. The track played back is not a playable file format. Skip to
• Tracks are not played back as you have
intended them to play.
File playback
• Elapsed playing time is not correct. This sometimes occurs during playback. This is caused by
• “Not Support” appears on the monitor and
track skips.
Changing the source by pressing SRC will solve this error.
• Record the tracks using a compliant application in the
appropriate discs. ( page 4)
• Add appropriate extension codes to the file names.
another file.
Playback order may differ from the one played back using
other players.
how the tracks are recorded.
The track is unplayable.
69
REFERENCES
Page 70

• Noise is generated. • The track played back is not a playable file format (MP3/
ENGLISH
Symptoms Remedies/Causes
WMA/WAV/AAC). Skip to another file.
• Do not add the extension code <.mp3>, <.wma>,
<.wav>or <.m4a> to non-MP3/WMA/WAV/AAC
tracks.
• Tracks cannot play back as you have intended
them to play.
• “Now Reading...” keeps flashing on the
monitor.
USB playback
• Correct characters are not displayed (e.g.
album name).
• While playing a track, sound is sometimes
interrupted.
Playback order may differ from the one played back using
other players.
• Readout time varies depending on the USB device.
• Do not use too many hierarchy, folders and empty
folders.*
* Folder that is physically empty or folder that contains
data but does not contain valid MP3/WMA/WAV/AAC
track.
• Turn off the power then on again.
• Do not pull out or connect the USB device repeatedly
while “Now Reading...” is displayed on the monitor.
For available characters, page 66.
The tracks have not been properly copied into the USB
device. Copy tracks again into the USB device, and try
again.
70
Page 71

Symptoms Remedies/Causes
• Bluetooth device does not detect the unit. • Search from the Bluetooth device again.
• Reset the unit. When “Open...” appears on the monitor,
search from the Bluetooth device again.
• The unit does not make pairing with the
Bluetooth device.
• Phone sound quality is poor. • Reduce the distance between the unit and the Bluetooth
• The sound is interrupted or skipped while
using a Bluetooth audio player.
Bluetooth
• The connected audio player cannot be
controlled.
• The unit does not response when you tried to
copy the phone book to the unit.
• “No Audio Device” appears on the monitor. Connect this unit and the Bluetooth audio player correctly.
• Enter the same PIN code for both the unit and target
device. If the PIN code of the device is not indicated on
its manuals, try “0000” or “1234.”
cellular phone.
• Move the car to place where you can get a better signal
reception.
• Reduce the distance between the unit and the Bluetooth
audio player.
• Disconnect the device connected for Bluetooth phone.
• Turn off, then turn on the unit.
• (When the sound is not yet restored,) connect the device
again.
Check whether the connected audio player supports AVRCP
(Audio/Video Remote Control Profile).
You may have tried to copy the same entries (as stored) to
the unit. Touch BAND to exit.
ENGLISH
• “No Voice Device” appears on the monitor. The connected cellular phone does not have the voice
recognition system.
• The iPod does not turn on or does not work. • Check the connecting cable and its connection.
• Charge the battery.
• The sound is distorted. Deactivate the equalizer either on this unit or the iPod.
• “Disconnect” appears on the monitor. Check the connecting cable and its connection.
• Playback stops. The headphones are disconnected during playback. Restart
playback.
• “No Files” appears on the monitor. No tracks are stored. Import tracks to the iPod.
• “Reset 01” – “Reset 07” appears on the
monitor.
• “Reset 08” appears on the monitor. Check the connection between the adapter and this unit.
iPod playback
• The iPod’s controls do not work after
disconnecting from this unit.
• “Restricted Device” appears on the monitor. Check whether the connected iPod is compatible with this
• No operations are available while playing
back a track containing artwork.
Disconnect the adapter from both this unit and iPod. Then,
connect them again.
Reset the iPod.
unit. ( page 65)
Operate the unit after the artwork is loaded. ( page 65)
71
REFERENCES
Page 72

Symptoms Remedies/Causes
• “No Disc” appears on the monitor. Insert a disc into the magazine.
• “No Magazine” appears on the monitor. Insert the magazine.
• “Cannot play this disc Check the disc” appears
ENGLISH
• “Reset 08” appears on the monitor. Connect this unit and the CD changer correctly and press
CD changer
• “Reset 01” – “Reset 07” appears on the
• The CD changer does not work at all.
• “CALL 1-888-539-SIRIUS TO SUBSCRIBE”
• “No Signal” or “NO SIGNAL” appears on the
• “No Antenna” or “CHECK ANTENNA” appears
• “Invalid Channel” appears on the monitor for
Satellite radio
• “CHANNEL–––” appears on the display for
on the monitor.
monitor.
appears on the monitor.
monitor.
on the monitor.
about 5 seconds, then returns to the previous
display when listening to the SIRIUS Satellite
radio.
about 2 seconds, then returns to the previous
channel while listening to the XM Satellite
radio.
Disc does not include playable files. Replace the disc with
playable files.
the reset button of the CD changer.
Press the reset button of the CD changer.
Reset the unit. ( page 3)
Starts subscribing SIRIUS Satellite radio. ( page 43)
Move to an area with stronger signals.
Connect the antenna firmly.
No broadcast on the selected channel. Select another
channel or continue listening to the previous channel.
Selected channel is no longer available or is unauthorized.
Select another channel or continue listening to the
previous channel.
72
Page 73

Symptoms Remedies/Causes
• “No Name” or “–––” appears on the monitor. No text information for the selected channel.
• “Channel is Updating XX% completed” or
“UPDATING” appears on the monitor and no
sound can be heard.
• “OFF AIR” appears on the monitor while
listening to the XM Satellite radio.
• “LOADING” appears on the monitor while
Satellite radio
listening to the XM Satellite radio.
• “Reset08” flashes on the monitor. Reconnect this unit and the Satellite radio correctly and
• Satellite radio does not work at all. Reconnect the Satellite radio after a few seconds.
• Sound quality changes when receiving HD
Radio stations.
• No sound can be heard. • <Analog> is selected when receiving all digital
HD Radio reception
The receiver is updating the channel information and it
takes a few minutes to complete.
Selected channel is not broadcasting at this time. Select
another channel or continue listening to the previous
channel.
The unit is loading the channel information and audio. Text
information is temporarily unavailable.
reset the unit.
Fix the reception mode either to <Digital> or <Analog>
( page 47).
broadcast of HD Radio station. Select <Digital> or
<Auto> ( page 47).
• <Digital> is selected when receiving weak digital
signals or receiving conventional radio broadcast. Select
<Analog> or <Auto> ( page 47).
ENGLISH
• “Reset 8” appears on the display. Recconect this unit and the HD Radio tuner box correctly,
then reset the unit.
• No picture appears on the monitor. • Turn on the video component if it is not on.
• This unit is not connected to the video component
AV-IN
• The playback picture is not clear and legible.
correctly. Connect it correctly.
Adjust items in <Picture Adjust>. ( page 53)
73
REFERENCES
Page 74

Specifications
Power Output: 20 W RMS × 4 Channels at 4 Ω and
≤ 1% THD+N
ENGLISH
Signal-to-Noise Ratio: 80 dBA (reference: 1 W into 4 Ω)
Load Impedance: 4 (4 to 8 allowance)
Equalizer Control Range: Frequencies: 60.0 Hz, 150.0 Hz, 400.0 Hz, 1.0kHz,
Audio Output Level
LINE OUT (FRONT/
REAR)/CENTER OUT/
AMPLIFIER
SUBWOOFER OUT:
Color System: NTSC
Video Output (composite): 1 Vp-p/75
Other Terminals: Input: LINE IN, VIDEO IN, USB input terminal,
Frequency Range: FM (with channel interval set to
2.5kHz, 6.3kHz, 15.0kHz
Level: ±10 dB
Line-Out Level/Impedance: 5.0 V/20 k load (full scale)
Output Impedance: 1 k
Antenna input
Output: 2nd AUDIO OUT, VIDEO OUT
Others: CD changer, OE REMOTE
87.5 MHz to 107.9 MHz
100 kHz or 200 kHz):
FM (with channel interval set to
50 kHz):
87.5 MHz to 108.0 MHz
AM (with channel interval set to
10 kHz):
AM (with channel interval set to 9 kHz): 531 kHz to 1 602 kHz
FM Tuner: Usable Sensitivity: 11.3 dBf (1.0 μV/75 Ω)
FM/AM TUNER
AM Tuner: Sensitivity/Selectivity: 20 μV/35 dB
Signal Detection System: Non-contact optical pickup (semiconductor laser)
Frequency Response: DVD, fs=48 kHz: 16 Hz to 22 000 Hz
DVD/CD
Dynamic Range: 93 dB
Signal-to-Noise Ratio: 94 dB
Wow and Flutter: Less than measurable limit
50 dB Quieting Sensitivity: 16.3 dBf (1.8 μV/75 Ω)
Alternate Channel Selectivity (400 kHz): 65 dB
Frequency Response: 40 Hz to 15 000 Hz
Stereo Separation: 35 dB
DVD, fs=96 kHz: 16 Hz to 44 000 Hz
VCD/CD: 16 Hz to 20 000 Hz
530 kHz to 1 710 kHz
74
Page 75

Screen Size: 3.5 inch wide liquid crystal display
Number of Pixel:
Drive Method: TFT (Thin Film Transistor) active matrix format
Color System: PAL/NTSC
MONITOR
Aspect Ratio: 16:9 (wide)
Allowable Storage Temperature: –10°C to +60°C (14°F to 140°F)
Allowable Operating Temperature: 0°C to +40°C (32°F to 104°F)
USB Standards: USB 2.0 Full Speed
Data Transfer Rate: Full Speed: Maximum 12 Mbytes
USB
Compatible Device: Mass storage class
Compatible File System: FAT 32/16/12
Max. Current: Less than 500 mA/5 V
Version: Bluetooth 1.2 certified
Output Power: +4 dBm Max. (Power class 2)
Service Area: Within 10 m (10.9 yd)
Profile: HFP (Hands-Free Profile) 1.5
BLUETOOTH
211 200 pixels: 960 (horizontal) × 220 (vertical)
Low Speed: Maximum 1.5 Mbytes
OPP (Object Push Profile) 1.1
A2DP (Advanced Audio Distribution Profile) 1.2
AVRCP (Audio/Video Remote Control Profile) 1.3
ENGLISH
Power Requirements: Operating Voltage: DC 14.4 V (11 V to 16 V allowance)
Grounding System: Negative ground
Allowable Operating Temperature: 0°C to +40°C (32°F to 104°F)
Dimensions (W × H × D):
GENERAL
Mass (approx.): 2.2 kg (4.9 lbs) (excluding accessories)
Design and specifications are subject to change without notice.
If a kit is necessary for your car, consult your telephone directory for the nearest car audio speciality shop.
Installation Size (approx.):
Panel Size (approx.):
182 mm × 52 mm × 160 mm
(7-3/16” × 2-1/16” × 6-5/16”)
188 mm × 58 mm × 12 mm
(7-7/16” × 2-5/16” × 1/2”)
75
REFERENCES
Page 76

Having TROUBLE with operation?
Please reset your unit
Refer to page of How to reset your unit
Still having trouble??
USA ONLY
Call 1-800-252-5722
http://www.jvc.com
We can help you!
EN, SP, FR
© 2008 Victor Company of Japan, Limited
0108MNMMDWJEIN
Page 77

.lye
KD·ADV49
KD·AVX44
lVT1797-002A
[J/C]
This
unit
is designedto operate
electricalsystems.
voltage inverter
dealers.
is
If
required, which can be purchased at JVC car audio
InstaliationlConnertion
Manual
Manuel
on
your vehicle does
de
instaladonlconexion
d'installation/raccordement
12V
DC,
NEGATIVE
not
have this system, a
ground
WARNINGS
• DO NOT install any unitorwire any cable in a location where;
- it may obstruct the steering wheel
as this may result ina traffic accident.
- it may obstruct the operationofsafety devices such as air bags, as
may;
this
- it may obstruct viSibility.
• DO
this may result in a traffic accident.
• The driver must
carelessness
• The driver must
dangerous to shut offthe outside sounds while driving.
•
If
you need to operate the
carefully.
•
If
the parking brakeisnot
monitor, and
- This warning appears only when the parking brake lead
connected to the parkingbrake system built in the car.
result in a fatal accident.
NOT
operate any unit while manipulatingthe steering wheel, as
not
watch the monitor while driving.Itmaylead to
and
causeanaccident.
not
putonthe headphones while driving.Itis
unit
no
playback picture
engaged, "Parking Brake" appearsonthe
Notesonelectricalconnections:
• Replace
• It
• To prevent short circuits, cover the terminals
• The heat sink becomes very
the
fuse with
frequently, consult your JVC car audio dealer.
is
recommended to connect speakers with a maximum power
of
more than 50 W (both at the rear
impedance
If
the maximum powerisless than 50W,change"
setting to prevent the speakers from being damaged (see page
the INSTRUCTIONS).
with insulating tape.
when removing this unit.
of
Dissipateurdechaleur
oneofthe specified rating.Ifthe
4 0to8
Sumidero
0).
Heat sink
termico
and
gearshift lever operations,
while driving, be sure to look
will
beshown.
and
at the front, with
Amplifier Gain"
of
the UNUSED leads
hot
after use.Becareful
not
is
fuse blows
an
to touch it
Manual
around
58
of
Esta
unidad
esta
sistemas
este
adquiridoenlos
automoviles.
e"ctrlcosdemasa
sistema,
sera
disenada
concesionarios
para
funcionar
NEGATIVA.
necesariouninversordetension, que puede
de
con
JVC
de
equiposdeaudio
12 V
5isuvehfculo no
ADVERTENCIAS
•NOinstale
donde;
- Donde
cambiodeengranajes.
de
- Donde
seguridad
accidente
- Donde
•
NO
direccion,
•
EI
producirseundescuido,ycausarunaccidente.
•
EI
Es
conducci6n.
•
5iesnecesario
mlrar atentamenteentodas
•5iel
de
imagen.
-
estacionamientoseencuentra conectadoalsistema
estacionamiento incorporadoalautomovil.
Notas
•
ReemplaceelfUSible
fusiblesequemase
de
•
5e
mas
40
5ilapotencia
Gain"
MANUALDEIN5TRUCClONE5).
Para
•
aislante.
•Etsumidero termico
denotoea
ningun receptor 0 tienda ningun
pueda
obstruirlamaniobra
trafico.
pueda
obstruirelfuncionamientodedispositivos
tales
como
fatal.
pueda
obstruirlavisibilidad.
OPERElaunidad mientras
pues
pod
ria
producirseunaccidentedetrafico.
conductor no debe
conductor no
muy peligroso no
frenodemana no
Mano)"enla
Esta
advertencia
sobrelas
JVC
de
equiposdeaudio
recomienda conectar
de
SO
W(tanto
mirarelmonitor mientras conduce.
debera
escuchar
operarlaunidad
estaenusc,
pantalla y nosemostrara
aparece
conexi
ones
por uno
frecuentemente consulte
atras
a 8 0).
maximaesde
para
evitar
danosenlos
evitar cortocircuitos,
estara
rioaldesmontar
cableenuna
del
volantededirecci6n y
conelconsiguiente
bolsasdeaire.
esta
ponerse
las
unicamente cuandoelcable
pues
pod
maniobrandoelvolante
los
auriculares
los
ruidos
exteriores
mientras
direcciones.
maneja,
aparecera
ninguna
e"ctrlcas:
conlacorriente
para
autom6viles.
los
altavoces
como
menos
cubra
muy caliente
esta
con
adelante,
altavoces
los
unidad.
una
con
de
SO
W,
(consultelapagina58del
cablesNOUTILIZADOS
despues
de
ee,
con
posee
ser
para
ubicacion
riesgodeaccidentes
de
ria
resultarenun
de
Pod
ria
mientras conduce.
durante
la
asegurese
"Parking
secuencia
especificada.5iel
consuconcesionario
potencia
una
impedancia
cambie •Amplifier
'
del
Brake
del
del freno
maxima
uso.
Asegurese
de
(Freno
de
freno
de
con cinta
©2008 Victor Company of Japan,
f HI\NC)\I'J
Cet
appareil
continu de12V d masse NEGATIVE. Si
type
pouvez
est
confU
pourfonctionner sur
d'alimentation,ilvous
acheter
chezunrevendeur d'autoradios IVe.
AVERTISSEMENTS
• N'INSTALLEZ aucun
-ouil
peut
gener
del
de
de
de
peutentrainer un accidentdela
-ouil
peut
les
airbags
-ouil
peutgenerlavisibilite.
NE
COMMANDEZ
•
car
cela
peut entrainer un accidentdela
Le
conducteurnedoit
•
peutluifaire perdresaconcentration et
•Leconducteurnedoit
volant.IIesteneffet dangereuxdebloquer
routiere pendant
• Si
vous
devez commander l'appareil pendantque
assurez-vous
• Si
Ie
frein Ii main n'est
s'affiche sur
-
Cet
avertissement apparait uniquement quandIefil du frein
stationnement
integreIila
Remarques
• RemplacerIefusible par undela
souvent, consulter
•
II
est
recommandedeconnecter
plus
de
50 W
impedance
Silapuissance maximum
Gain"pour
MANUEL D'INSTRUCTIONS).
•
Pour
eviter
PAS
UTILISEs
•Ledissipateurdechaleur devient
attentiondene
l'accesauvolantouau
generlamanipulationdedispositifsdesecurite
car
cela
peutentrainerunaccidentfatal.
pas
la
conduite d'un
de
bien
regarder
Ie
moniteur et aucune
est
connecte
voiture.
sur
les connexlons
votre
(les
enceintes
comprise
hiter
les
entre 4 D et8
d'endommager
court-circuits, couvrir
avecdela
pasIetoucherenretirant
0108MNMMDWJEIN
des
sourcesdecourant
votre
fautunconvertisseurdetension,
appareilniaucun
circulation.
l'appareillorsdela
pas
regarderIemoniteur lorsqu'il conduit.
pas
utiliser un
pas
engage,
casque
vehicule.
autourdevous.
"Parking
imagedelecturen'apparait.
au systemedefreindestationnement
vehicule
etlble
dans
un endroit
levierdevitesse
manipulationduvolant
circulation.
causerunaccident.
d'ecoute quandilest
les
sonsdela
vous
Brake
(Frein
"ectrlques:
valeur
precisee.SiIe
revendeur d'autoradios IVe.
des
enceintes
arriereetles
est
inferieure a50
bande
enceintes avant,
D).
vos
enceintes (voir
les
isolante.
tres
chaud
bornes
apres
cet
appareil.
fusible saute
avec
une puissance
W,
changez "Amplifier
page58du
des
fils quinesont
usage.
EN,SP,
limited
n'offre
pas
que
car
cela
tels
circulation
conduisez,
Ii Main)"
avec
une
Faire
FR
ce
vous
ou:
que
Cela
au
de
de
Required
Espado requerido para la
Espace neeessaire
space
for installation
pour
,'Installation
instalad6n
5 mm (1/4")
•
Trim plateisdetachedonthis illustration for explanation.
Para
fines
explicativos,seha
esta
ilustracion.
La plaque
pour
de
les
besoinsdel'explication.
garniture
retiradolaplacadeguarnicion
est
montree
detachee
sur cette illustration
en
and
Parts listfor installation
de
plezas
para
Lista
des
Liste
The
Con
Les
®/®
Hard case/Control panel
Estuche
Etuidetransport/Panneaudecommande
®
Crimp connector
Conectordesujeci6n
Raccordasertir
Q)
Lock
Tuercadeseguridad
Ecrou
pieces
following parts are provided for this unit. After checking them, please set them correctly.
esta
unidadsesurninistran
pieces
suivantes sontfournies
duro/Paneldecontrol
nut
(MS)
d'arret
(M5)
Instalacl6n y conexl6n
pour
I'lnstallationetraccordement
(MS)
•
connection
las
siguientes
avec
Han~es~
ManlJas
® J
Poignt?es
piezas.
cet
appareil.
©
Sleeve
Cubierta
Manchon
@
Remote controller
Control
Telecommande
Q
Despuesdeinspeccionarlas,
Apres verification, veuillez
remota
RM-RK252
©
Rubber cushion
Cojin
degoma
Amortisseur
caoutcJwl4c.
en
coloquelascorrectarnente.
les
placer
@
Trim plate
Placadeguarnici6n
Plaque
~
~
correctement.
d'assemblage
®
Batteries
~t:
~~
~
Mounting
(MS
x 13/16")
Pernodemontaje-MS x20mm
(MSx13/16
Boulondemontage-M5x 20 mm
(M5
x 13/16
®
Power cord
Cord6ndealimentaci6n
Cordon
d'alimentation
CD
Washer (05)
Arandela
Rondelle
bolt-MS
x 20 mm
pulgada)
pouces)
(05)
(,,5) ©
~
1
Page 78

Page 79

To
prevent
battery's
installing
negative
•Besure
installation.
short
the
circuits,we
terminal
unit.
~ecom~enJ
and
make
toground this unitto the
that';o~
all electrical
car's
disconnect
connections
chassis
again after
the
before
CONEXIONES
Para
evitar cortocircuitos, recomendamos que desconecte
negativo
antes
•
delabaterfa
de instalarlaunidad.
Aseguresedevolver a conedar amasa
del autom6vll
ELEaRICAS
yque efectue todas
despuesdela
Instalaci6n.
las
conexiones electricas
esta
unldadalchasls
el
terminal
RACCORDEMENTS'ElEaRIQUES
Pour eviter tout court-circuit, nous vous recommandonsdedebrancher
la
borne negativedela
electriques avant d'installer l'appareil.
•
Assurez-vousderaccorderdenouveaulamise
cet
apparellauchassis
batterie et d'effectuer tous
les
raccordements
delavoltur.apr.sI'lnstallation.
Ala
masse
de
PRECAUTIONS on power supplyand speaker
connedions:
DO
NOT
•
car
•
BEFORE
speakers,
connect
battery; otherwise, the unit willbeseriously
connecting
check
the
the
speaker
the
speaker
leads
speaker
leadsofthe
wiringinyour
ofthe power
power
car.
Typical connedlons
Before
connecting:
Incorrect
The
body
,
2
J Finally
connection
leadsofthe
maybedifferentincolor.
Connect
in
Connect
the
the
illustration below.
the
connect
power
colored
antenna
the
Check
the
may
cause
cord
and
leadsofthe
cord.
wiring
harnesstothe
wiringinthe
serious
damagetothis
thoseofthe
power
cordinthe
vehicle carefully.
connector
unit.
cord
damaged.
cordtothe
unit.
from
order
specified .
to the
the
car
PRECAUCIONES
sobre las conexionesdela fuente
alimentacl6nydelos altavoces:
NO
conecte
•
allmentaci6n alabaterfadeautom6vll,
produclrse
•
ANTES
cabledealimentaci6n, verifiqueelconexionado de altavozdesu
autom6vil.
los
conductoresdealtavoz
graves
de conectar a
dafiosenla
los
altavoces
del
cable
de
pues
podrfan
uniclad.
los
conductoresdealtavoz del
Conexiones tlplcas
Antesdela
vehiculo.
unidad.
Los
cordones del cabledealimentaci6n y
procedentes
en
color.
, (onecte
orden especificadoenlai1ustraci6ndeabajo.
2(onecte
J
Por
conexi6n: Verifique atentamente
Una
conexi6n incorrecta podrfa producir danos
delacarrocerfa
los
conductoresdecolor del cabledealimentaci6nenel
el
cabledeantena.
ultimo, conecteelcabledealimentaci6n alaunidad.
del autom6vil podrfan
los
el
del
conexionado del
conector
serdediferentes
graves
de
PR~CAUTIONS
sur I'allmentationetla connexlon des
encelntes:
•
NE
CONNECTEZ
d'allmentatlon
serleusement
• A
VANTdeconnecter
awe
enceintes, verifiezIecablage
PAS
Ala
endommagtt
Raccordements typlques
Avantdecommencerlaconnexion:
en
la
cablage
du vthicule.
serieusement l'appareil.
Le
fil du cordon d'alimentation et ceux
voiture peuvent etre differentsencouleur.
, Connectez
specifie surl'illustration ci-dessous.
2Connectez
les
fils
colores
le
cordon d'antenne.
J Finalement, connectez
les
fils d'enceintesducordon
batterle;
les
Une
connexion incorrecte peut endommager
Ie
sinon,
I'apparell seralt
fils d'enceintes du cordon d'alimentation
des
enceintes
des
du cordon d'alimentation dans l'ordre
faisceaudefils Ii l'appareil.
de'
votre voiture.
Wrifiez attentivement
connecteurs du chassisdela
Ie
Toanexternal
(see diagram
Auncomponente
(vease
Pour
connecterunappareil
exterieur
component
II)
diagrama
(voirIediagramme
-,
Not included for this unit
-3
No
suministrado con
-,
Non
fourni
-.
Before checking the operationofthis
installation, this lead
power cannot
-.
Antesdecomprobarelfuncionamiento de
unidad
conectar
conectar
-.
Pour
verifierIefonctionnementdecet
installation,cefil doit
peut
pas
Rear
Terminaldetierra
Borne
externo
II
)
II)
esta
unidad
avec
cet
appareil
must
be turned on.
previa
adelainstalaci6n,esnecesario
este
cable,
la
alimentaci6n.
etre
mis
sous
be connected. otherwise
de10contrario nosepodra
etre
raccorde,
tension.
ground
terminal
arrieredemasse
unit
prior
appareil
sinon
l'appareil
posterior
3
to
esta
avant
ne
~;;;r=::::::r::;-r--15
~~--,
Blue with white stripe
Azul
Bleu
Orange with white stripe
Naranja
Orange
II
~~===================::i
Brown
Marr6n
Marron
Light green
Verde
t-::====================:::::::.@
®
+--+--------
Afuse
Fusiblede15
Fusible
ISA
-_.
__
_
Black
Negro
Noir
I
~========~
Yellow
-.
Amarillo
Jaune
-.
~[j===;:J=====~
.;:
Red
Rojo
Rouge
~========:::I®
Blue
Azul
Bleu
can
rayas
avec
bande
con
avec
claro
Vert
clair
(GND) Tometallic
-.
blancas
blanche
rayas
blancas
bande
blanche
Fan
Ventilador
Ventilateur
A
G)
Auncuerpo
Vers
To
a live terminalinthe
(bypassing the ignition switch) (constant12V)
~
Aunterminal
autom6vil
A
une
voiture
Toanaccessory terminalinthe fuse block
Aunterminal
Vers
(POWER ANTENNA)
(REMOTE OUT)
(ILLUMINATION
(PARKING BRAKE)
1
~
bodyorchassisofthe
metalico0chasis
corps
metalliqueouchassisdela
fuse block connecting to
activo
del
(desviandoelinterruptordeencendido)
borne
sous
(en
derivant l'interrupteur
borne
accesorio
accessoireduporte-fusible
bloquedefusibles
tensionduporte-fusible
del
@ A
5
®
CONTROL) ®
car
del
autom6vil
d'allumage)
bloquedefusibles
To
automatic
la
antena
Al'antenne automatique
To
the remote leadofother
AI
conductor
Au fildeUlecommande
To
car
.6
AI
interruptordecontroldelas
Al'interrupteur
To
parkingbrake (see diagram [AI)
AI
frenadeestacionamiento
Au
freindestationnement
_--------------- .
voiture
the
car
battery
conectadoala
connecteeala
(12 V constant)
antennaifany
automatica,sihubiere
remoto
del
light control switch
d'eclairagedela
baterfa
(12Vconstantes)
batteriedela
(250 rnA max.)
s'il
otro equipo
d'un autre
(250mAmax.)
yenaune
equipment
(200mAmax.)
appareil
luces
voiture
(vease
(voirIediagram
del
(250
(200 rnA max.)
del
diagrama
Fuse block
r;
Bloquedefusibles
Porte-fusible
}
mA max.)
(200
mA max.)
autom6vil
[AI)
me
[AI
)
Ignition switch
Interruptordeencendido
Interrupteur
d'allumage
0
White with black stripe
Blanco
can
rayas
Blanc
avec
bande
negras
noire
(-)
~
(+)
White
Blanco
Blanc
L<ft
""""'«fro"t)
Altavoz
Enceinte
Gray with black stripe
Gris
Gris
izquierdo
gauche
(frontal)
(avant)
con
avec
rayas
bande
negras
noire
_)
(
~
Gray Greenwith black stripe Green Purple with black stripe Purple
(+)
GGrni~s
Right
Altavoz
Enceinte
Verde
con
rayas
Vertavecbandenoire
""""~
(fro"t)
derecho
(frontal)
droit (avant)
3
negras
~
(-)
_
(+)
Verde
Vert
Left
speaker (rear)
Altavoz
Enceinte
Purpura
con
Violetavecbandenoire
Izquierdo
gauche
(trasero)
(arriere)
rayas
negras
(-)
~
_
Purpura
(+)
Violet
Right speaker (rear)
Altavoz
Enceinte
derecho
droit
(trasero)
(arriere)
Page 80

I SPANOI
f
r~I\N(
1\1\
A Connecting
Connect the parking brake lead to the parking brake system built in the car.
(onecteelcable
ConnectezIefildefreindestationnement au
the
parking brake
del
frenodeestacionamientoalsistemadefrenodeestacionamiento
Iud
IConexl6ndel cabledel IrenodeestacionamlentoI ConnexlonducordondeIrelndestatlonnement
s)'stemedefreindestationnement.
Parking brake
Interruptor
(dentro
Commutateurdefreindestationnement
(interieurdela
switch
del
del
autom6vil)
(inside
frenodeestacionamiento
voiture)
the
car)
del
autom6vil.
Parking brake
Cable
Fi!
dufreindestationnement
To
metallic
A
un
cuerpo
Vers
corps
lead
del
frenodeestacionamiento
(light green)
body or
metalico0chasis
metalliqueouchassisdela
(vert
clair)
chassisofthe car
del
autom6vil
(verde
voiture
claro)
B Connecting
signaldemarche
Locate the reverse lamp lead in the trunk.
Localiceelconductordela
LocalisezIefil
Reverse
Conductordela
Fil
Connectingtothe
If
your carisequipped with the steering wheel remote controller, you can operate this unit
using the controller. For connection, an exclusive remote adapter (not supplied) which
matches your car
is
purchased.
Sisuvehiculo
funcionar
remoto
consulte
Si
autoradioenutilisantlateMcommande.
exclusif
revendeur autoradio
este
exclusivo
conelconcesionario
votre
voiture est munie d'une telecommandedevolant,
(non
the
des
feuxderecul
lamp
des
feuxderecul
reverse
lead
luz
arrl.re
luz
traseraenel
dansIecoffre.
trasera
gear
signal lead (for rearview camera) I Conexi6n del cabledeseAal del engranajedemarcha
(pour la camera du retrovlseur)
compartimientodeequipajes.
Reverse
lamps
Luces
traseras
Feuxderecul
(REVERSE
~~!!!!!ir.:"~
t
steeringwheel remotecontrollerI Conexl6n al control remoto del volantededlrecci6n I Connexlondela telecommandedevolant
is
required. For details, consult the same caraudio dealeraswhere the unit
esta
equipado
receptor utilizando dicho control.
(no
fourni) correspondant avotre voiture
con
control remotoenel
suministrado) que
car
audio donde compr6elreceptor.
aupres
duquel
vous
volantededirecci6n,
Paralaconexi6n,serequiereunadaptador
sea
adecuado
Pourlaconnexion, un adaptateurdeteMcommande
avez achete
parasuautom6vil.
vous
pouvez commander
est
requis.
Pourensavoir
cet
autoradio.
Para
plus,
podra
los
hacer
detalles
cet
consultez
GEAR
•.
Ie
SIGNAL)
Entrada
Extension
Cable
prolongador
Cordon
To
reverse
Alaluz
Auxfeuxderecul
Crimp connector (not supplied)
Con
ectordesujeci6n
Raccordasertir
del
control
E.""
lead
(no
prolongateur
lamp
trasera
(no
(non
fourni)
Steering
remoto
del
"'"
,..",.-"'"'""""'"
KD-ADV48
KD-A
(not supplied)
suministrado)
(non
suministrado)
wheel
volantededirecci6n
VX44Steering
atr's
(para la
fourni)
..
+.
(REVERSE
To
car battery
Alabaterfa
Alabatteriedela
Reverse
lamp
Conductordela
Fi!
des
feuxderecul
OE
OE
REMOTE
remote input Adaptateur pour
remote adapter (not supplied)
Adaptador
l
wheel
Control
Telecommandedevolant
remote controller (equipped in
remoto
del
amara
trasera) I Connexlon
KD-ADY49
KD-AYX44
y
GEAR
SIGNAL)
del
autom6vil
voiture
lead
luz
trasera
para
control
remotoOE(no
telecommandeauvolant
-'-
~
volantededirecci6n
(installee
lwi
Purpura
Violet
danslavoiture)
...
con
avec
suministrado)
_
~
the
(equipadoenel
wbi
rayas
bande
(non
car)
du
........
blancas
blanche
fourni)
fli
de
vehiculo)
TROUBLESHOOTING
• The fuse blows.
• Are the red and black leads connected correctly?
• Power cannotbeturnedon.
• Is the yellow lead connected?
•Nosoundfrom
• Is the speaker output lead short-circuited?
• SoundIsdistorted.
•Isthe speaker output lead grounded?
• Are the
"-"
• Noise Interfere with sounds.
•Isthe rear ground terminal connected to the car's chassis using
shorter and thicker cords?
• Unit becomes hot.
..Isthe speaker output lead grounded?
• Are the "-"
• This unitdoes
• Have you reset your unit?
the
speakers.
terminals
termi"nalsofLand Rspeakers grounded in common?
ofL
not
workatall.
and R speakers grounded in common?
LOCALIZACION
DE
AVERIAS
•EIfusiblesequema.
•
lEstan
los
conductores rojo y
•Noes
•
•NoAle
•
poslbleconectar la allmentacl6n.
lEstaelcable
amarilloconectado?
sonldo;delosaltavoces.
lEstaelcabledesalida
del
negro
altavoz
correctamente
cortocircuitado?
•EIsonldopresentadlstorsl6n.
.• l
Estaelcabledesalida
•
lEstan
los
terminales
masa
comun?
del
.~.
altavoz
d¢
los
altavoces
conectado
·Perturbacl6nderuldo.
•
lEI
terminaldetierra
utilizando
•
La
•
,Estaelcabledesalida
•
,Estan
masa
los
unldadsecallenta.
los
terminales
comun?
cordones
trasero
mas
del
altavoz
'-'delos
esta
coneetadoatchasis
corto y
mas
conectado
altavoces
• Esta unldad nofunclonaenabsoluto.
•
,Ha
reinlcializadosuunidad?
amasa?
Ly R
cOQectadosauna
grueso?
amasa?
Ly R
coneetadosauna
conectados?
del
autom6vil
.
•
Le
fusible
Aute.
.,~
Les
fils
rouge
et noir sont-ils
•.L'apparell ne
...
Lefil jaune est-elleraccordee?
• Pasdeson
..
Le
fildesortie d'enceintt est-it court-circuite?
•Leson
...
Le
fildesortie d'enceinte est-it Iilamasse?
..
Les
bornes
Ii
la
masse?
•
Interf'rence
•Laprise arriere
. .
voiture
peut
des
encelntes.
est
dMorm'.
«-"
des
enceintes gauche et droit sont-elles
avec les sons.
de
avecuncordon
mise a
pas
ttre
la
terre
court et
• L'apparell devlentchaud.
..Lefildesortie d'enceinte est-it Iilamasse?
•
Les
bornes"-"des
a
la
masse?
• Cet apparell ne
• Avez-vous reinitialise votre
enceintesgauche et droit sont-elles
fondlonne
appareil?
racordes
correctement?
misesoustenslon.
est-elle
epais?
connectee au
pasdutout.
mises
ensemble
chdssisdela
mises
ensemble
4
Page 81

: Connecting
. .
the
extemalamplifiers I Conexl6na
Iosamplffludore.
externosIConnexlond'empllfluteurs
ext'rleurs
You can connectamplifiers to upgrade
" Connect the remote lead (blue with white stripe)
lead
of
the other equipment so
this unit.
For
amplifier
•
-
After
to
activate
.outofthe
INSTRUCTIONS.
-
Disconnect
amplifier. Leave
- You can switch off
signals only
and
INSTRUCTIONS.
only:
you
have
connected
the
center
speaker;
connected
the
to
to prevent internal heat buildup. See page58of
Fil
d'alimentation a
Altavoces
center
speakers
the
the external amplifier(s) to get
Rear speakers
Enceintes
from
speaker
the
built-in amplifier
Remote lead
Cable
posteriores
arriere
your
car stereo system.
that
it can be controlled
the
center
speaker,
otherwise,nosound
speaker, see page 55ofthe
this
unit,
connect
leadsofthis
remoto
distance
unit
and
to
the
remote
through
make
sure
comes
themtothe
unused.
send the audio
dear
sounds
the
Front speakers
Altavoces
Enceintes
delanteros
avant
Usted
podra conectar amplificadores
desuautom6vil.
Conecte
remoto del otro equipo
unidad.
•
5610
- Asegur.se
el
conductor remoto
parael ampllflcador:
de
actlvar.1 altavoz central
conedarlo;de10
mlsmo,
consultelapagina55del
para
contrario, no
- Desconectelosaltavocesdeesta unldad y
ampllflcador. Lo. cables
para
mejorarelsistema
(azul
con
rayas
blancas)alconductor
poderlo controlar a
travesdeesta
despHs
saldr'
sonldoa
MANUALDEINSTRUCCIONES.
conktelos
de
los altavoce.d.e.ta
tray's
quedan sin usar.
-
Podra
desconectarelamplificador incorporado y
seriales
de audio
obtener sonidos nitidos y evitar quesecalienteelinteriordela
unidad.
Yeaselapagina58de
Remote lead (Blue with white stripe)
Cable
remoto
Fil
d'alimentation a
~-'""'"
,---~-C::::J
,..,..L..I-
(Azul
sola
con
rayas
distance
mente
blancas)
(Bleu
al(los)
amplificador(es) externo(s)
las
MANUALDEINSTRUCCIONES.
avec
bande
c::::::::)----~'---e::=:J
.-_
........•••........
. .
: SUBWOOFER OUT
• • I •
~_
••••••••••••__._
--,
enviar
blanche)
estereo
de
del
al
unldad
las
Y-connector (not supplied for this unit)
(onector
ConnecteurY(non
Vous pouvez connecter
systeme auto
• ConnectezIefildecommande a distance (bleu avec bande blanche)
aufil
puisse etre commande via
• Pour I'amplificateurseulement:
-
Apres
mettreen service "enceinte centrale; sinon, aucun son ne sort
de I'enceinte centrale connectee, rijerez·vous a
MANUEL D'INSTRUCfIONS.
- Deconnectez
I'amplificateur. Laissez les
para
enY(no
inutilises.
- Vous pouvezdesactiver l'amplificateur integre et envoyer
signaux audio uniquement a un ou plusieurs amplificateurs
exteneurs afin d'obtenir un
echauffement interne
MANUEL D'INSTRUCTIONS.
suministrado
fourni
To the remote leadofother equipment
AI
conductor
Aufildetelecommandedel'autre
radio.
de
commande a distancedel'autre appareildefafon qu'il
avoirconnecte I'enceinte centrale, auurez-vous de
les
con
avec
cet
appareil)
remotodeotro equipo
- -
·5
1'-]
•••••_•••_••••_.__
._....
des
amplificateurs pour ameliorer votre
cet
appareil.
la
page 55 du
enceintes de cet appareil et connectez-Ies a
fils
d'
enceintes deenaPfNJreil
les
son
clair et pour eviter un
l'appareil. Referez-vous alapage58du
appareil
-.-
JVC Amplifier
-
..
----------~
esta
de
unidad)
A~~~~~c~~~C
*5
Audio cord (not supplied)
*5
Cabledeaudio
"5
Cordon
audio
(no
(nonfourni)
Front speakers
Altavoces
delanteros
Enceintes
JVCAmplifier
Ampliflcador de
/VC Ampliftcateur A
avant
---_
suministrado)
[L'.t-
NC
....
KD·ADV49
KD-AVX44
.•.......................
LINE OUT (REAR)
LINE OUT (FRONT)
L
II
·5
---
•.........•.•...........••.
*.
Firmly attach the ground wire to the metallic body or to the chassisofthe
the paint before attaching the wire). Failure to do so may cause damage to the unit.
".
Fije
firmementeelcabledetierraala
antesdefijarelcable).De10
quftela
". AttachezsolidementIefildemiseala
recouvertdepeinture.
,.....
CENTER OUT
*5
JVC Amplifier
'
enlevez
AmplifIcador de
/VC Ampliftcateur
carroceria
contra
masseauchdssis
d'abordlapeinture avant d'attacherIefil).
metalica 0alchasis-aunlugar no cubierto con pintura
rio,sepodrfan producir dariosenla
·6
metal/iquedela
JVC
--
...•.......
Center speaker
Altavoz
Enceinte
voiture-aunendroit qui
--,
central
centrale
car-to
L'appareil
~-._
the place uncoated with paint
unidad.
peut
etre
endommagesicela
_---_.-.-
n'est
pas
recouvertdepeinture
Subwoofer
Subwoofer
Caissondegrave
..
-.-_
..
_._
..-
(if
coated with paint, remove
(si
esta
cubierto con pintura,
fait
correctement.
(s'il
n'est
pas
est
Connectionsfor external componentplaybackI Conexlone. paraIereproduccl6n del componenteexternoI Connexlons pourun apparelldelecture exterleur
KS-HP2
Cordless headphones (not supplied)
Auriculares
Casque
KY-MR9010
9-INCH
WIDESCREEN
(not supplied)
MONITORDEPANTALLA
PULGADAS
MONITEUR
LARGE
(no
DE
9 roUCES
D
suministrado)
COULEUR
(non
inalambricos
d'ecoute
sans
MONITOR
ANCHADE9
A£CRAN
fourni)
(no
fil
(non
..1!tJt----""'lj-------c::
*7
suministrado)
fourni)
·7
"7
Video cord (not supplied)
Cord6ndevideo
Cordon
•
{
*5
KY-CM1
Rear
view camera (notsupplied)
Camaradereprovisi6n
Cameraderecul
Camcorder, Navigation System. etc.
Videocamara,
Camescope.
sistemadenavegaci6n,
systemedenavigation.
(nonfournie)
(no
(non
suministrado)
fourni)
"'"
I •
"..
Audio/video cords (not supplied)
Cablesdeaudio/video
Cordon
video
~_f
(no
suministrado)
etc.
etc.
VIDEO
OUT
~(l--2iiiin-d-AUiiiiDf_O-O-UT
VIDEO IN
.
•
"
"
.
LINE
IN
......
--_
•
(no
audio/video (nonfourni)
suministrados)
·7
To listen to disc playback sound while in Dual Zone operations
(see page
·7
Para
se
MANUALDEINSTRUCClONE5).
·7
Pour
mode
26ofINSTRUCTIONS).
escucharelsonido de reproducci6ndedisco mientras
estaenoperaciones
kouterIesondelecture
Dual
Zone
(voir
Dual
Zone (consultelapagina26del
des
dis4iue
page26du
larsdel'utilisation
MANUEL
KD-ADV49
KD-AVX44
du
D'INSTRUCTIONS).
5
Page 82

Connecting
the
external components I Conexi6ndelos componentes
extemos
I Connexlon
des
apparellsext6rleurs
When connecting the external components, refer also to the
manuals supplied for the components and adapter.
You
can also connect the following components through the
JVC
various
• Connection cords may need to be purchased separately.
iPod
XMDirect- Universal Tuner
Box
SIRIUS
JVC
Portable audio player with Line input adapter
lineou
Portable audio player with
3.5
'ack
When connecting more than one component (maximum: three),
is
it
explained below.
XM
•
When
Cuando coneeta
Lorsdela
adapters.
Interface adapter
for iPod
Smart Digital
Ada ter
satellite radio
SIRIUS
PnP
ut 'acks
mm (3/16") stereo mini
recommended that you connect the components in series
Radio and
SIRIUS
connedlngtwo
dos
SIRIUS
satellite
radio interface
SIRIUS
radio
ada ter
AUX
input adapter
satellite radio cannot be used together.
componentsInseries
componentesenserle
KS-PDlOO
XMDJVClOO
KS-SRA100
KS-UlOOK
KS-US7
KS-US8
connulondedeuxapp1rellsens6rle
as
KD-ADY49
KD-AYX44
r:;o.-}.J
l!f
CD
changer jack
.lack
para el cambladordeCD
Priseduchangeur
When connecting
Cuando
Lorsdela
CD
coneda
connexlondetroisapparellsenserle
1 n
three
compon.ntsInseries
tres
component"enserle
L.EII.
®
KT-HD300·./KS-SRA100·./XMDNC100
@.& CD-CH/
Cuando conecte componentes extemos, consulte, tambien,
manuales suministrados con
Tambien puede conectar
diversos adaptadores
• Puede ser necesario comprar
iPod
Sintonizador universal Adaptador digital
XMDireeto™
Radio
por satelite
SIRIUS
PnPdeJVC
Reproductor de audio
con jacksdesalida de
Reproduetor de audio portatil
con jack
3,5
Cuando coneete mas de un componente
recomienda que conecte
continuaci6n.
•
mm (3/16
No
puede
mini
SIRIUS
estereo de entrada
pul
ada)
utilizar
juntaslaradio
los
componentes yeladaptador.
los
siguientes componentes mediante
JVc.
los
cables de conexi6n por separado.
Adaptador de
interfaz para
inteligente
Interfaz para radio
por satelite
Adaptador para
radio
SIRIUS
portiHii
linea
Adaptador de
entrada por
Adaptador
AUX
(maximo:
los
componentes en serie, como se explica a
XMyla
radio satelital
n.
.Id
KS-PD1.OO
ll(S.,USl
/KS..US81.KS-U1
OOK
iPod
SIRIUS
linea
de
KS-PD1OO
XMDJVC100
KS-SRA100
KS-U1OOK
KS-U57
KS-U58
tres), se
SIRIUS.
.&
••
.&
••
.&
••
los
To
use
the
Power cannotbesuppliedtothe component through theCDchanger
need to connect the power cord supplied
Para
correctamente (consulte
No
cambiador de
sumiflistrado con
Pour
MANUEL
L'alimentationnepeut
Vow
Lorsdela
manuelsfoumis
los
INSTRUCTIONS)
puede suministrar energia electricaalcomponente a traves del jack del
Vous
adaptateurs
•
iPod Adaptateur
Tuner universel XMDirect-
Radio satellite SIRIUS
jVCSIRIUS
Lecteur audio portable
Lecteur audio portable
minifiche
(3116
Lorsdela
recommande que
l'
expliquons
•LaradioXMet
these components, set
utilizar
estos componentes, configureelajuste de entrada extema
utiliser
ces
D'INSTRUCTIONS).
devez
connecter
connexion
pouvez
Vous
pouvez avoir
separement.
risesdesortiedeli
stereo
ouces)
connexiondeplus d'un appareil (maximum:
temps.
.
CD.Esnecesario coneetar, aparte,elcable de alimentaci6n
el
componente.
appareils,
pas
separementIecordon
des
appareils extbieurs, rtjirez-vous aussi aux
avec
les
appareilset
aussi
connecter
jVc.
besoin
d'acheter certains
PnP
avec
e
avec
de
3,5 mm auxiliaire
vous
connectiez
ci-dessous.
SIRIUSnepeuventpas itre utiliseesenmime
the
external input setting correctly
for
la
pagina56del
reglez
l'entree
exterieure
itre
fournieIil'appareil
les
adaptateurs.
les
appareils
d'int
Adaptateur
numeri
Interface pour
satellite
Adaptateur
SIRIUS
Adaptateurd'entree KS-U57
delie
Adaptateurd'entree
the component separately.
MANUALDEINSTRUCCIONES)
d'alimentation fourni
suivantsenutilisant
cordonsdeconnexion
ace
ouriPod
ue
intelli ent
radio
SIRIUS
radio
les
appareilsensene comme
correctement
parlaprisedechangeurdeCD.
(voir
(see
pour
divers
KS-PD100
XMDjVC100
KS-SRA100
KS-U100K
KS-U58
trois),
ilest
nous
page56of
jack.
You
.
page56du
l'appareil.
KD-ADY49
KD-AYX44
~,.--}.J
CD
changer
Jack
Priseduchangeur
USB
jack
paraelcambiador de
CD ©.. KS-PD100 / KS-U57 / KS-U58 / KS-U100K
devicesI Dlsposltlvos
1 n
CD
l·EII·
USB
I P6rlph6riques
n. n.
® KT-HD300··
@ KS-SRA100··/ XMDJVC100
USB
Disposltivo
Pbiphhique
~
KD-ADY48
KD-AYX44
USB
cable-approx.
Cable
USB-aprox.
Cable
USB-environ 1,2 m (3,9
1.2
m
1,2m(3,9
(3.9
feet)
pies)
pieds)
USB
.m.
device
USB
USB
I
.0
Conntdlng
prlseUSB
You can connect the iPod to the
- To listen to the music:
- To watch the video:
Puede conectar
Para
-
-
Para
Vous
pouvez connecterIeiPodIila
Pour
-
- Pour
the
IPodtothe
USB
USB
Audio and Video cable for iPod-KS-U20K (not supplied)·lO
el
iPodalterminal
escucharlamusica: Cable
ver video: Cable
ecouterlamusique:
regarder
une
USB
audio y video para iPod-KS-U20K (no suministrado)·lO
Gable
sequence
r-
1r;==
__
=-===,,;,V=ID;,;;E~O.;;IN=+".aJ
n======~==4-'::J
KD-ADV4.
KD-AVX44
To
cIIsconnect
Pour
lItconnederIeconnedeur
USB
terminalI
USB
terminal using the
2.0
cable (supplied for the iPod)
USB
utilizado
USB
2.0
(suministrado coneliPod)
prise
USBenutilisant
USB
2.0
(joumi pourIeiPod)
video:
Cable
USB
~L;::;IN:iEi.::IN::..i<::~
the
connectorIPara
Conedar
follOwing
los
siguientes cables:
les
cables
AuJio et Video pour iPod-KS-
==
....
~
desconectartIcable
Hold the connector top tightly
(®).
out
Sujete firmementelaparte superior del conector
(D)
y seguidamente, extraigalo
TenezfermementIeconnecteurpar-dessus
tirez
vers
I'exterieur
.IIPod
cables:
suivants:
KS-U20K
_~~l-_
....
al termIna
U20K
+-
__
+_..J
USB
(non
(®).
foumi)*lO
I
«D),
(®).
I Connexlon
AppleiPod
Apple
iPodApple
m:::::J=+_J
·
·
·
·
·
·
·
·
·
·
·
·
~
...
1:I:::Jl--~-L=:::~
-
o
AppleiPod
Apple
iPodApple
__
USB
Cable
Cdble
then pull it
du
iPod
iPod
2.0
cable
USB
2.0
USB
2.0
(D)
IPod
et
ill
la
You
cannot connect a computer to the
No
se puede conectarunordenadoralterminal
Vousnepouvez
• HD Radio-isa proprietary trademarkofiBiquity Digital Corp.
• iPodisa trademarkofApple Inc., registered in the
countries.
pas
connecterunordinateur Iilaprise
USB
(~)
terminalofthe unit.
(~)
U.S.
USBdela
USB
(~)
and other
unidad.
de
I'appareil.
•
•
·10
When
·10
Cuando
MANUALDEINSTRUCCIONES).
·10
LorsdeI'utllisationdece
D'INSTRUCTIONS)
HD
Radia™
es una marca comercialdeiBiquity
iPod
es una marca comercial de Apple
UU.
Yotros paises.
using
the
cable.
make
sure
<iPod
(Off»isselected
uti
liceelcable. aseguresedehaber selecdonado <iPod
cable,
.
Inc.,
6
assurez-vous
Digital
registrada en
Corp.
los
EE.
que
<iPodYOjJ»
.
• HD Radio- est une marque
•
for<AV Input>
est
choisi
iPod
est une marquedecommerce d'Apple
Etats-Unis et
(Off»
pour<AV
dans
(see
page56of the
para
<AV
les
autres
Input> (consultelapagina56del
Input>
de
pays.
INSTRUCTIONS).
(voir
page56du
commerce d'iBiquity Digital
Inc.,
MANUEL
enregistree
Corp
aux
.
Page 83

· .
W
0::
:z
en « 0
~
w W en
0:::
en -
~ ~
C
:::::i
o en t=
LL
W Z
al
W
t-
«
;:)
t-
:z
~
h\,
CAUTION CONNECT
OTHERWISE, DAMAGE TO YOUR UNIT MAY OCCUR.
INCORRECT CONNECTION CAUSES SERIOUS DAMAGE TO THIS UNIT
PLEASE READ INSTALLATION/CONNECTION
CONNECT GROUND FIRST
BLACK
WIRE
(G)GND)
MANUAL
CONNECT OTHER WIRES
TO GROUND FIRST.
CAREFULLY.
w 0
.....I
al
c::(
U
:i:
5:::!
0::
t;
oW
.....I
W
o W
0:::
LL
....J U
W .....I
al
c::( C
.....I
en
:i:
t-
W
~ C
« W
W
~
W
~
Q
t-
W W
<td.
~
«
W
.....I
CO
<<(
(.)
~
t-
tu
~
C1
t=
-w
w
t-
t-
(.)
> .-.J N
o W W
:!:
W
_ W W
__
0:::
t-
0:::: 0::::
0::
t-
CD
METALLIC BODY OR CHASSIS
OF THE CAR
CONNECT ANTENNA TERMINAL
3 _ I r
@
/ "
..
(2)
CONNECT POWER CORD TO
THE UNIT
@
~
~
Page 84

When it is not required to detach the
front control panel from the main unit,
use the provided screws to attach the
control panel to the main unit.
LV
42208-001A
Page 85

.Ive
LVT1865-001A
..
.
Cautionsondisplaying
.
,Precautions
/
Precauciones
sur
I'affichagedeI'illustration/Voorzorgen
sobrelavisualizadondeiPod
..diillustrazioni/Forsiktighetsatgarder
OTHOCIiTenbHO
oTo6paJKeHIIJI
iPod
Artwork/VorsichtsmaBregeln
vid
06nO)l(Kil/Cuidados
zur
Anzeige
voor
het
lIustracion/Avvertenze
visningaviPod
com
Bildmaterial/
a
visualiza~o
voniPod
tonen-van
sulla
visualizzazione
npeAynpeJKAeHIIJI
de
GrafismosdoiPod
Cover
/
iPodlllustratie
ENGLISH
Do
not
press
any
keys
during
the
first30secondsormoreofplaying
track
containing
operations
*.
.
The
picture
To
~~ivate
·Set
uiPod
T.
display
Press
D1SP
Artwork*.lt
are
available
displaye~
the
Artwork
Artwo~k"iouOn"
takes30secondsormoretodisplay
while
loading
on
the
iPod's
screen
display
in
the
Menu.
Artwork
repeatedlytodisplay
the
DEUTSCH
Drucken
Sie
wahrend
Cover*
enthaltenden
Cover
ang~eigt
zur
Verrugung.
*
Dos
auf
Zur
Aktivierung
Stellen
Sie
ZUr
Anzelge
Drucken
dem
uiPod
Sie
DISP
Hildschirm
von
mindestens
Tracks
wird,
und
des
der
Anzelge
Cover"imMenU
(over
wiederholt
der
keine
wahrend
iPod
wohrend
von
auf
zur
Anzeige
FRAN<;AIS
N'appuyez
lecture
----,a"ffi""ch·er
chargemerit.
*
Pour
Reglez
Pour
Appuyez
plageencoursdelecture.
sur
aucune
touche
d'une
plage
contenant
11l1ustratlon·etaucune
.
L'image
affichee
sur
I'ecranduiPod
mettreenservice
"Illustration"
afficher
repetitivement
sur
rlllustration
pendant
une
operalionnepeul
I'affichagedel'iIIustration
"On"
dansIemenu.
sur
DISP
pour
'
NEDERLANDS
Di'uk
tijdanstenminste
met
IIlus~ratie*
lIIustrat~
uitvoeren.
*
Activeren
Stel
Tonen
Druk
te
tonen
Het
beeld
dotophet
van
UiPod
lIIustratie"op"On"inhet
van
lIIustratie
herhaaldelijkopDISPomde
.de
njetopeen
enukunt
scherm
het
lIIustratie
eerste30seconden
vandetoetsen.
tijdens
vandeiPod
display
ESPANOL
No
pulse
ninguna
teda
durante
los
pista
que
contenga
lIustraci6nymientrassecarga,nose
*
Imagen
visualizadaen10
Para
adivarlavisualizad6ndelIustracion
Ajuste
uiPod
Para
vlsualizarlaIlustrad6n
Pulse
DISP
reproduciendo.
EN, GE, FR, NL, SP, IT, SW, RU, PR
una
lIustraci6n*.Setardan30segundos0masenvisualizar
pontalla
lIustraci6n"a"On"enel
repetidamente
para
del
visualizarlalIustraci6ndela
back
any
Artwork
it.
while
playing
bockatrack.
Artworkofthe
ersten30Sekunden
Tasten.Esdauert30Sekunden
des
ladevorgangs
der
track
Wiedergabe
being
played
der
Wiedergabe
oder
stehenkeine
angezeigte
Hild.
back.
mehr,
Bedienungen
(over
"On".
von
Cover
fur
den
abgespielten
les30premieres
iIIustration*.1I
pendant10lecture
afficher
van
Het
het
laden
wardt
getoond
menu.
lIIustratie
van
primeros30segundos0masdecualquier
podra
realizar
iPod
mientrassereproduce
menu.
secondesouplusdela
faut30secondesouplus
etie
effeCtuee
d'une
plage.
l'iIIustration
duurt30secondenoflanger
van
het
correspondantala
weergave
lIIustratie
tijdens
weergave
spelende
ninguna
una
van
geen
fragmenttetonen.
operaci6n.
pista
pendant
een
fragment
bediening
von
een
pista.
queseesta
Track.
and
no
eines
bis
pour
son
om
fragment.
la
ITALIANO
Non
premere
alcun
tasto
duranteiprimi
tracciaacuieassociata
necessari
e
*
almeno30secondi:
nonepossibile
Immagine
Per
Impostare
Per
Per
visualizzata
attlvarelavlsualizzazlone
"lIlustrazione"su"On"
visualizzare
visualizza~e
un'iIIustrazione*.
durante
eseguire
alcuna
sullo
schermo
un'illustrazione
I'ill.ustrazione
della
questo
operazione.
dell'iPod
dllllustrazione
nel
menu.
tracciainriproduzione
SVENSKA
T
ryck
intepanagra
uppspelningavett
mer
att
visa
hamtar
det.
*
Hilden
visaspoiPod-spelarens
Aktivera
Stallin"Bildmaterial"pa"On"imenyn.
Visa
bildmaterlal
T
ryckpaDISP
tangenter
spar
bildmaterial
underdeforsta30sekunderna
som
innehaller
och
det
gar
skorm
visnlngavblldmaterial
flera
ganger
for
att
visa
inte-att
medon
bildmaterialet
PYCCKIIIIII
He
HalKMMaMTe
ceKyHA
06nolKKIl
HeJ\oaynHbI.
*
KapmuHKa,
BIUlIO'leHMe
YCTaHoBIlTe
OT06palKeHMe06nolKKM
AnR
oT06palKeHMR
KHonKy
KaKMe-nM60
Bocnpoll3BeAeHIlR
Tpe6yeTCRHeMeHee30ceKYHJI,IlBO
om06palKaeMaRHa3KpoHe
oT06palKeHMI
A1JR
HaCTPOMKIl
DISP.
K1laBMWMBTe4eHMe
AOPOlKKIl,
06nolKIOl
"06nolKKiI"
06nolKKIl
BOcnPOIl3BOJ\IlMOM
cOAeplKaU(eM
iPodsospeMR
PORTUGUES
Nao
prima
nenhuma
reprodu~ao
apareceremosGrafismose,durante
opera~iies.
* A
imagem
Para
adivara
Defina
"iPod
Para
verosGrafismos
Prima
DISP
reproduzida.
teda
duranteosprimeiros30segundosoumais
de
uma
faixa
com
Grafismos*.
que
aparecenoecriidoiPod
visualiza~o
Grafismos"
repetidamente
dos
como
"On",noMenu.
para
esse
duranteareprodu{iiodeuma
Grafismos
verosGrafismosdafaixa
300
pili
secondidiriproduzionediuna
PerlavisualizzazionediiIIustrazioni
periodo
l'iIIustrazione
durante10riproduzionediuna
bildmaterial*.
ett
3Ha4eHIle
Demora30segundosoumais
tempo,
Det
anvanda
nagra
spar
spelas
upp.
till
spa
nepBblx
06nOlKKY*
BpeMR
3iIrpY3KM
BOCnp0u38rotHUR
"On'~
B
J\OPOlKKM
nao
estarao
que
KaK
.,',
MeHIO.
viene
traccia.
premere
pili
volte
eller
mer
vid
tar30sekunder
funktioner
ret
nOBTopHO
disponfveis
medan
som
spelas
MMHIlMyM
.AnR
estiveraser
30
oT06palKeHMR
Bce
onepa"IlM
iJoPOIKKU.
HalKMMaMTe
de
a
faixa.
sono
caricata
DISP.
eller
du
upp.
Page 86

iPod
(izimlerini
3acrepeJKeHHR
aqoAo
Em
iPod
O~E~
gosterme
BiATBOpeHHR
iPod
.:If.
AI
hakkmda
306paJKeHb,
ti.mJ)t
-f!~
~21
Waspada
uyarllar/iPod
3aKpiMeH"X3aMp
••
IJi
/
A.~
saat
menampilkan
..s
)J
~;i
~)'S
~)J)~
iPo~
0J~
....H..M..
~~
anb6oMaM"
J~
/U8i1111:1,u~R1nUnl1"dft~
iPod
Artwork
~\.b~1
~"!!
;;/
iPod
/
iPod
(Artwork)
Artwork
/
/
IDIiImI
ilk30saniye
hi~bir
ve
bunu
*
Bir
(fzim
Menii'de
(fzimi
~alman
)L:..i
YKPAiHA
npOTAroM
306palKeHHA,
6YAb-AKI1X
a60
*
AITIlBaQiJI
B
MeHIO
BiATBOpeHHR
lUo6
HaTI1CHiTb
boyunca
tu~a
basmaym.
yiiklerken
par(o
(olmtrken
gOsterimini
MiPod
Artwork"
Gistennek
par~nm
..:......1...5)J
ll?"
J,)"':'
0,)1,)
.,).,.:.
~
..:......\
nepwl1x30a60
3aKpinneHi3aMY3114Hl1Ml1
KHonOK.
6inbwe,ini,lt
306{JQJ1leHHR,
BiATBOpl1TI1
UjO
BiAlBopeHHR
BCTaHOBiTb
306palKeHb
D1SP.
veya
Artwork
(~izim)*
i~eren
herhangi
~izimin
giisterilmesi30saniye
herhangi
bir
i~lem
yapllamaz.
iPod
ekronmdo
goriintiilenen
etkinle~tinnek
iigesini
ipn:
~izimini
giistermek
.::J)
I.SJl.>-
~L.;...5)J...5)
..5"0J
~L.;
6inbwe
AnA
BiATBopeHHR
4ac
'3.iBaHTalKeHHR
BiiJmBOplOflTlb(J/HOeKpaHi
306palKeHb
pelKl1M
MO
306palKeHHR
"On"
oS
~I;
.,)\.)
~
~
Jl.>-
.J')
ceKyHA
n"
AlIA
Artwork
Artwork
ipn:
(A~lk)
i~in
DISP
~
l;..L.:.5
i~1
('~iPod
...l:-",);I)
oS
~I;
anb6oMaMl1
306palKeHb
lKOAHi
ArtwOlt
"iPod
AlIA
veya
resim.
olarak
ayarlaym.
diigmesine
i~ 4
JJI
l.S'
J»
~4~lS
y
cJl
~
cJi
.........
...s)j
~)j
"On"
I.SJ) I)
...5.J
.::J)
J
BiATBopeHHA
(Artwork*),HeHamCKaMTe
Artwork
onepa~ii
HeAocrynHi.
iPod
niiJ
~O(
npalpaBOHHR
Artwork".
nOT04HoI
AOpilKKl1,
bir
par~a
~ahmrken
biraz
daha
fazla
siirebilir
arka
arkaya
basm.
~lS
'l'"
),)1)
1.S..l::1S"
-
'l'"
')J'>'>.
..,;I~)~i~J~
..P
•.t.:•
.>/.>
tAw
/~
~ww
~~.;S
J\a;
MiPod
Artwork"
...s)j
~)l
~'...;
l;
..l:-"').JL:..i
AOpilKOK,
nOTpi6HO30ceKYHA
I)~
UjO
MiCTATb
-- -
iJopiiKKU.
AeKinbKa
pa3iB
ll?"
*..l:-""lj
o$'J'!
f-"),)
o$lJ'!
I)
DISP
)l..w..o
..,1
~
~I~
'it9~1914lJ
.~
LJ-oO
~
r·
~L...u..o
~
~
~.i.l1
)l.w..eJ1
914lJr·J91
o)~,
vO.r'
~W/iPod
,4...QJLiJI
0)9-"'"
LJ-oO
vO,rL!
mmI
O~E%l*ol
¥
;11£
~ol1:R£I~:l~cr!oll:::::
*
c~
.
* E
O~.5..jf
DlI-rrO\IA~
O~.5..jf~
DISP~
Llc~.
~~!E!
~5.AI
El/~
.A!I~"5I::
C1~!ti!tIOI
"iPod
l1AI~at~
O~2~~~2~A~
E~~
D~~AI2..
~e!
••
Artwork
AH~~?:1¥
O~E%lOlltAI£I:::::
O~¥'C!
iPod
~f!101!
~.'8I-at~
"~
"On"
AH~~E~2.I
..
~wl
~
.1
,Ll,w,
MO
"
n
~
~~£
gj{gO!
oJ..,..aJ1
~lL.o
.>0)9-""'"
':0.:-.3
8
~
j:wl.::..~
~
J...i:>p.1.41/
uQ~
MiPod
o)..,..aJ1
~
*~~
30~
it:.r
.IlA!!i/L/cf
~~
~~~Llc~
O~E%l¥
..
-51
~
~
h _
Artwork
DISP
%£!
1::11
30~
~~Ll
ltAI~
~~
DJ,..."J/-
,~,
;
M
~I
uQJo&J
~l
O~
01
.
.
't
151
*
-.
:tf1l1:&'2ilitmlll*l'f9fffiiJlttI§
WtiC.o~~~30f.Y!iX]I!*I'f9Ifi¥~U~tmlll'~~Ifi¥~~~ffff
fiiJttf'F 0
*
l/f1l/iXdbfJlIi¥'••t£iPodIRIJ.1:.I1JJJl
I'f9jftj30f.Y!iX]I!*I'f9Ifi¥/lr,pq
0
,
~mtiCff
m!@8IlJtI.llffiW
:tf~fI'lt:P~
"iPod
Artwork"
~~~
"On"
0
m!@lIffitl.
&tJ:tiCDISP.'
TR, PE, UK, CT, AR, KG, TH,
U~PJT1I1:&1ttI§l'f9tmlll
0
IN
INDONESIA
Jangan
tekan
tombol
memutar
atau
tersedia
*
Untuk
Atur
Untuk
Tekan
kembali
lebih
untuk
sewaktu
Gambar
ditompilkon
mengaktifkan
MiPod
Artwork"ke"On"
menampllkan
DISP
berulang
apapun
selama30detik
trek
apapun
yang
menampilkan
memuatkan
pado
kali
Artwork
artwork
layor
iPod
tampilan
dalam
Artwork
untuk
pertama
berisi
Artwork*.
dan
tidak
tersebut.
sewoktu
memutor
Artwork
Menu.
menampilkan
ada
kembali
Artwork
atau
lebih
sewaktu
Diperlukan
pengoperasian
trek
waktu30detik
trek,
yang
sedang
yang
diputar.
Page 87

..lye
LVT1857-001
To
turnonthe
Zum
Einschalten
Pour
mettre
Drukopde
Para
encenderlaunidad,
Per
accendere
Satt
iging
Para
Iigaraunidade,
A
unit,
der
I'appareil
Cb/
I/A"
I'unita,
apparaten
press
Einheit
toetsofSRC
genom
primanobotaoCb/I/A"ouSRC
Notesonthe
Remarques
bediening
Note
sui
kontroll
the
Cb/
I/A"
buttonorSRC
driicken
sous
tension,
pulseelboton
premereiIpulsante
Sie
die
appuyez
(bron)
toetsomhet
Cb/
att
tryckapiknappen
front
panel
control/
Hinweiseander
surlacommandedupanneau
met
het
voorpaneel/Notas
pannellodicomando
anel/
I/A"0
Cb/
Notasnocontrolodoainel
(source)
Taste
Cb/
I/A"
surlatouche
toestelinte
SRC
I/A"0iIpulsante
Cb/
(Origem).
button.
oder
Cb/
I/A"ousurlatouche
(fuente).
I/A"
eller
anteriore/Meddelandenpifrontpanelens
die
Taste
SRC
schake
len.
SRC
(sorgente).
SRC
(kalla).
Frontplattensteuerung
avant/Opmerkingen
sobreelcontrol
frontal
(Quelle).
SRC
(source).
del
panel
aangaande
frontal
/
/
While
the
unitisturnedon.../Bei
Mientraslaunidad
Touch
pad
controls
Controlesde10
The
To
turnonthe
Die
Zum
L'edairagedupanneau
Pour
De
verlichting
blijft
Weer
Las
Para
Le
Iud
Per
Belysningenavreglagenpapekpanelen
51ipibelysningen:
As
luzes
Para
almohadilla
lights
ofthe
Lampen
der
Einsehalten
allumer
gewoon
inschakelen
lucesdelos
eneender
dei
comandi
aeeendereIeIud:
dos
controlosdoecra
ligarasluzes:
esta
encendida
,
,
ITouchpad-Bedienelemente/Panneau
tdcti//Comandi
touch
pad
controls
lights:
Move
Touchpad-Bedienelemente
der
Lampen:
tactile
I'edairage:
van
het
aanraak-bedieningspaneel
ingeschakeld.)
vandeverliehting:
controlesdela
las
luees:
Muevasumana
sensibilialtoccosispengonoseil
Avvicinarelamanaaicomandi
Flytta
Movaamao
sensibili01tocco/Reg/agepdpekpane/en/Contr%sdoeaa
are
turned
your
hand
Bewegen
s'eteint
quand
Approchez
handen
votre
almohadilla
nara
tactil
sao
para
perto
eingeschalteter
.../Quando
Einheit
.../Pendant
I'unitaeaccesa
queI'appareil
.../Medan
apparatenarpislagen
-
I--
tactile/Aanraak-bedieningspanee/
tactil
offifno
operationisdone
dosetothe
Brenguwhandinde
och
reglagenpapekpanelen.SeBRUKSANVISNINGEN
desligadas
touch
werden
ausgeschaltet,
Sie
Ihre
Handindie
aucune
operation
main
presdupanneau
wordt
uitgeschakeld
tactilseapagan
cercadelos
skarmen
dos
controlesdela
dispositivo
sensibilialtocco.
slacks
se,
durante10segundos,
controlosdoecra
pad
trasunperfododeinactividaddeaproximadamente10segundos.
nar
for
about10seconds.
controls.
For
details,
wenn
ca.10Sekunden
Nahe
der
Touchpad-Bedienelemente.
n,est
buurt
non
ingen
tactil.
effectuee
tactile.
viene
pendant
Pour
wanneerergedurende
van
het
aanraak-bedieningspaneel.
almohadilla
utilizzato
Per
ulteriori
atgard
gorspacirka10sekunder.
nao
Para
informa~oes
see
the
INSTRUCTIONS.
lang
environ10secondes.
les
details,
referez-vousauMANUEL
tactil.
Para
per10secondi
dettagli
for
for
efectuada
mais
est
sous
tension
.../Comaunidade
~iVG
(The
unit
remains
turned
keine
Bedienung
Einzelheiten
ongeveer10seconden
obtener
circa.
fare
riferimento
mer
information.
nenhuma
detalhadas,
erfolgt.
siehe
(L'appareil
liedeGEBRUIKSAANWlJllNG
mas
detalles,
(L'unita
rimane
aile
ISTRUllONI.
(Apparaten
opera~ao.
forblir
(A
consulte
.../Met
D'INSTRUCTIONS.
geen
consulteelMANUALDEINSTRUCCIONES.
unidade
as
het
toestel
ingeschakeld
ligada
...
on.)
(Die
Einheit
bleibt
eingeschaltet.)
BEDIENUNGSANLEITUNG.
reste
sous
tension.)
bediening
accesa).
paslagen.)
INSTRU~()ES.
wordt
voor
(La
unidad
permanece
permanece
uitgevoerd.
details.
Iigada.)
(Het
encendida).
...
/
",
-
J
r;;;-
toestel
EN, GE, FR, NL, SP, IT, SW, PR
Page 88

AnR
BKllIO'IeHMR
AnR
BKllIO'IeHHR
Oniteyi
~I~~
a9"ak
~.@I1J~.·~
YCTpOMCTBa
i~in,
.
~J';I.:.A
7-tat~(}j/I/Alll::ti::OIL..
....
'unl'Uil"'ft1tHlaU
KorAa
YCTPOMCTBO
",J!;
It
nf
~,~o~tJl
HaJKMMTe
npMCTpOIO
(}jl
HaTMCHiTb
I/ATT
I.;
(~)
diigmesine
.(,~I)
(}jl
I/ATT
ilm
•
'"
I •
'"n
..tlll
(}jl
• •
BKllIO'IeHo
KHOnKY
KHOnKY
SRC.wSJ
SRCJj,1(}j/l/ATT
SRC
OIl&iJJtil)
I/ATT
";8t11l
•••1npM
yBiMKHeHoMy
u,.~.;;L.o~
(}jl
I/All
MnM
(}jl
I/All
'1M
veya
SRC
(kaynak)
~(}j/I/ATT
SRC
.wSJ
Jj
.h.Wf
0
(±~)
SRC
(,181d)
,ol$;;.,.J
I::ti::~
~
JKMBneHHi1Unite
1.~.8@11J~
SRC
(MCTO'lHMK).
SRC
(AJKepeno).
diigmesine
iJJ;S
.o~tJl
basm
~".;
J!;
.!r-§-L.lc
/
Ail
~
•
4S1.J<!
.~.;
,
•.
a~lk
oldugunda
0I
7-t
~
~~
•••
I
...
w...,1
o~
~)';
O~J
~
.;J
1
...I
UQl::~'ft~8~'ilU,ilfl8!
...
.JVC
#---------------,
"T~l
I v
:,
I ' I
" I
..
~---..;----~:
JneMeHmbl
v-JJL.t
~HAHKaTOpbl3IleMeHTOB
(YcrpOHCTBO
AnR
niAcBi4YBaHHll
AnR
Yakla~lk
Iflklana911ak ipn:
ynpaBneHUR
J-J".oJ1
ocraeTCll
BIUlIO'IeHMR MHAMKaTopOB:
opraHiB
BBiMKHeHHR niACBi'lyBaHHR:
10
saniye
(.~I
~**K810
;'!1!@lt!llIll!jij :
'2t
.H.AI~*
lltr~'
t.Hjil<:J&1'ijjHT1ffiiJ~f'F
10~
%~
7-t2=l~:
vl'lltN~1fl11J~llm')1imu;1lJ,)::1J1JtruFln'\)::~lH'1~
''In;8~nl1'';''CU'''~ftd~1~
.......
I :
,
,
,
,
ceHcopHoiJ
L.,.J.JI
boyunca
Elinizi
( .
...:;.,~
n~FFf~~~fIlmM!IMiID:t&
O~¥-~
nOHenu1KepyBoHHR
~
~I
Au!1
AllJll§fhlJilffllX
ynpaBlleHHll
BKIlI04eHHblM.)
KepyBaHHllHaceHcopHiH
herhangi
dokunmatik
..;~~<f~.)~
ceHcopHoH
nOAHeCHTe
niAHeciTb
bir
i~lem
yapllmazsa,
yiizey
diigmelerine
.J.iS
~,
.,i
0.>.>,.11
~)
.':'~I
.:e~
~I
.~Li..o.II
••
f~~lliljiIDf&i¥J~ajJn~~MM
0
~~£
"5~AI
E-I*Ili/l~
''''I~tlulltll~11tfln~~1fl11J~llm')1imu;1lJ,)::1J1JtruFln'
'1epe3
ceHcopHy
1
~f
~1
naHellH
BbiKIlI04aIOTCll,
pyKyK31leMeHTaM
naHelli
mCaE,llKl1\O
PYKY
BnpHTyIlAOopraHiB
dokunmatik
yakla~tlrln.
y
J}
.
.J...:.
~I.,>-
~Ir
~I.)y...~
.~~
LlI~
I·
~
J~
g!Fm
'
~lJafre:ffl~ajJt!f
?i'0~
~E~
E-I*lliH~
J~mOI~
;l'~iitm
nOHenb1Dokunmotik
JJ//.E.
f{j
ynpaBlleHHll
npoTllroM10ceKyHAHe3AiHCHeHO
yiizey
Aynntllar
..;
yt>
~,~...:;.,l.:-l
.PL>
~
.~4-
i
;~lUI
fl~tl~I~UI
yilzey
dilgmeleri
.5:*1
i'7mvfJuomimlJi')(I1::vvt5JIJ'rr
eCllHBTe4eHHe
ceHcopHOH
KepyBaHHllHaceHcopHiH
diigmelerinin
~r;i~1
15
0
(*~OJ?'I.\~:I.t@fllJ:fj\m;
0
~E~
J~}\~~L1c~.
npH61lH3HTellbHo10ceKYHAHeBbmOIlHlleTCll
naHellH.
1~lklan
i~in,
TAliMATlARA
...,,;~
7':"1.S1.r.
.J.iS
1
~I~!
(>~
.i.ll.>
J.o..&j
~I
4.>,.LJI-~
liAI~OI
A~AilE!-
ilUl1tmh::llltli101Ul;l
~mn::lfjlJ~I~1l1;j1l1;'utilllu::lh'um')';
1
...,-..J
-.4..-
t.>'+f
?
,lIonollHHTellbHble
lKOAHO'i
naHelli.
,IleTallbHy
stiner.
(Unite
bakm.
\ •
...:;.,~..;~
..,-J
~
.:ri
~4
~I
0 )
7J1~L1cL
4l-§-:=
(ll~l
cBeAeHHll
onepal4ii.
iH~OpMal4ilO
a~lk
kahr.)
~
<f~.)~
1.Sl+!?~I.)
J.o..&j
~I
JIJil
;.0
(J\il¥:=
AI~~
fl1tl~1
~UV~tHl
KaKHX-IlH60
CM.
B
~HGPYKU~llX.
OKHBlleHHllJaIlHwaETbCll
HaBeAeHOyIHGPYKUfi.
Y J
~
~
">-1.S4=---~
4.>,.LJ1
..,."..i.I4
7=j~
~~"5~~AI2.
:~\~
.:ri
~I
~~~~:~f~'tf
j:H~
onepal4HM.
YBiMKHeHHM.)
~
1.Sl+!?
I.JJ~
~"J
A,)
~I,....l
J!;
*AI'!§L1c~.)
i1~tly)
I.S\¥-I~
~IJ'!
~
I~';
,
RU,UK,TR,PE,AR,CT,KO,TH
Page 89

JVC
.
The
countries where you may
Die
Lander,indenen
Paysouvous
De
landen waar ude Bluetoothe·functie mag gebruiken/
Parsesenlos
Paesinei
Lander dar du
Lande,
Land
hvordukan
Maat,joissa voi kayttaa Bluetoothe·toimintoa/
Parses
0,
CTpaHbI,
Zeme,vekte,ych muietevyuirvatfunkci Bluetooth
Azokazorszdgok,
Kraje,
Driave,
Krajiny,vktorych
Valstis, kurjus varat izmantot Bluetoothefunkciju/
Salys,
I/-pajjiii
Land
Riigid,
Bluetoothefonksiyonunu
onde
XWPE{
w kt6rych mozna uzywacfunkcji Bluetoothe/
kuriose
I>ar
kusonv6imalik
pouvez
quesepuede
qualie
kan
hvordukan
pode
6"ou
Il"OpE£rEvaXP'lOIIlO"OlryOETE
rAe
MO>KHO
kjer
lahko uporabljate funkcijo Bluetooth·1
galite naudotis
fejn
tista'tuiaI-funzjoni
sem
haegt
Sie
die BluetootheFunktion verwenden konnen/
utiliserlafonction
possibile
bruke
usarafunc;:ao
amelyekben
m6iete vyui{vaffunkciu
utiliziareiafunzione
anvanda Bluetoothe-funktionenl
bruge Bluetoothe·funktionen/
Bluetoothe-funksjonen/
Bocnonb30BaTbCJl
er ali nota Bluetoothe/
kasutada
kullanabileceginiz
l.I~lrlA'ih';,uA"I.I,,.n'~
Na
trortha inar feidir leat feidhmiu Bluetootheausaid/
Lannerandenender
(]
nhfrng
Eis
pa'isos
Zemlje u
Zemljeukojima
Zemlje u kojima
3eMj&.1
quOc
on podra fer servirlafunci6 Bluetooth
kojima
KaAe
MO>KeTeAaja
d'BluetootheFunktioun
gia
rna
b~ne6th~
jedozvoljena upotreba BluetoothefunkcijeJ
moietekoristiti
je
dopustenokoristiti Bluetooth
KOp&.1CT&.1Te
use
the Bluetoothefunction/
Bluetooth
utilizarlafunci6n Bluetooth
Bluetooth
cl>YHK14MeM
haszndlhatjuka
Bluetooth
nBluetoothell
Bluetooth
Bluetooth· funktsiooni/
Bluetooth
Bluetoothefunkcijul
e
e
yf"titfu/
Slr
d~ng
c1>yHK1.4&.1jaTa
e
/
Bluetooth
e
/
T'l
'AElTOupy(a
Bluetooth·1
e
/
Bluetoothe-funkci6t/
e
/
funkcijal
/
ii1keler/
benotze
ehue
kennt./
nang
e
/
e
./
Bluetooth
e
/
e
/
Bluetooth·/
Bluetooth@/
e
/
LVT1672-001
A
Page 90

Instructions
Foldsoopeningisat
Tapeinmiddleoron
Thank
the
top.
front.
you
for
purchasing
Pleasedonot
correspondencetothis
JVC
1700
Wayne,NJ07470
307C
send
AMERICAS
Valley
Road
productsorother
CORP
PRODUCT
address.
JVC®
PO
BOX
PEORIA
REGISTRATION
9580
IL
61612-9580
1.111111111.111111.11
PLACE
FIRST-CLASS
"
••
1.11.1
III
•••
1.1.1111.11'111111.11'11111111
STAMP
HERE
CARD/QUESTIONNAIRE
Registering
event
This
this
a product
formisfor
form
does
THANK
REGISTER
your
Product
not
YOU
I
us
product
safety
notificationisrequired.
Registration
diminish
FOR
PURCHASING
ONLINE
CUSTOMERS
will
allowusto
purposes
your
rights
during
AT:
ONLY
contact
THIS
I
youinthe
only.
the
warranty
JVC
unlikely
Failuretoreturn
period.
PRODUCT
WWW.JVC.COM
Page 91

JVC"
Product
Registration
IMPORTANT: Please fill-out and return
10 days or Log to JVC.com
and register On-Line
First Name:
Last Name:
Address:
Apt#"
City:
State:
Zip:
Phone:
Email Address:
Thank yout We appreciate your responses to this questionnaire.
The information you choose to share with us will be used by JVC to offer you
product information and other communications that may interest you.
If you prefer not to be contacted about these special offers, please check here. { }
Date of Purchase
Model Number
Serial Number
Purchase Price
Dealer
in
1) Did you:
- Purchase this product your self?
- Receive this product as a gift?
2) Is this Product:
- The first product of this type you have ever owned?
- A replacement for a similar JVC product?
- A replacement for a similar product made by another
company?
- An addition to a similar product you are still using?
3) What factors most influenced your
decision to purchase this product?
- JVC brand reputation
- Previous experience with JVC products
- Price
- Specific product features
- Style/appearance
- Salesperson's recommendation
- Friend/relative's recommendation
- Warranty coverage
- Other
4) How did you learn about this product?
- Magazine Advertisement
- Newspaper Advertisement
- TV/Radio Announcement
- Product Brochure
- Direct Mail
- Mail Order Catalog
- Friend/Relative Recommendations
- Salesperson/Store Recommendation
- Internet
- Dealer Event
-Other
BT-51041-1
(0406)
5) Your Gender:
- Male
- Female
6) Your Marital Status
- Married
- Single
7) What is your approximate annual
household income level?
- Under $25,000
- $25,000 - $49,000
- $50,000 - $74,000
- $75,000 - $99,000
- $100,000 and over
Comments:
JVC
Thanks you for completing this
questionnaire.
Your responses will help
offers that
If
you
prefer
may
Interest you.
not
to receive these offers
us reach you with
please checkhere { }
PrintedinIndonesia
Page 92
CANADA
ONLY
CANADA
SEULEMENT
JVC
OWNER'S COPY OFWARRANTY CARD
COPIE D'ENREGISTREMENTDELA
DU
PROPRIETAIRE
(Save sales docket together with this warranty card,asa proof of date of purchase.
La
facture et cette garantie sont vos preuvesdefa
MODEL . SERIAL
MODELE'
Purchase from.
Achete chez .
Dealer's Address .
Adresse du Vendeu( .
City or
Town
Ville
Owner's Name .
Nom du Proprietaire:.....
Owner's Address .
Adresse du Proprietaire· .
City or
Town
Ville
BT-52008-1
(1007)
No.
No
WARRANTY
DE
CARTE
IMPORTANT: This warranty control card mustbefilledinand posted to the address indicated
on the back hereof or register via internet within 7 (seven) days from the date of purchase.
IMPORTANT: Cette carte doit etre renvoyee dument remplie
dans les 7 jours de
MODEL
MODELE
Purchased from . Date purchased .
Achet"
chez
Deater's Address
du
Adresse
CiiY·o;To~;;
Ville
Owner's Name .
NomduProprietaire' . .
Owner's Address .
Adresse du Proprietaire' : .
GiiY
.~.;
T;;';;~""""""""""""
Ville
WARRANTY
DISTRIBUTEDINCANADABYJVC
CONTROLEDELA GARANTIE
. SERIAL NO.
:.........................................................................
Vendeur
.,
..····..·······
You
may.
also register on·line Iyous.pouve", egalement
at:www.lVc.ca Inscnre par Internet a:www.lVc.ca
APPLIES
..
Provo
Provo
No.
No
Provo
Provo
Detach here.
CONT~OL
fa
date d'achatoualler surIesite par internet pour I'enregistrement.
No
No.
No
ONLYTOPRODUCT
CARD
(PLEASE PRINT/EN LETTRES MOULEES)
······
·p'ov.··
Provo
;;~~~
Provo
CANADA
INC.
GARANTIE
date d'achat; rangez-fes.)
NO.
NODESERlE .
Street
Rue
NO DE SERlE .
",
Rue
LA
GARANTIE
DISTRIBUESAUCANADA
.
Date
Date
Street
Rue
adecouper ici
aI'adresse indiquee
Date
Street
Rue
S'APPUQUE
purchased.
achete : .
Postal Code
Code Postal
Apt.
App.
Postal Code
Code Postal
PrintedinIndonesia
au
verso,
achet.. . .
·····
..
·posiilj·CO,ie·
Code
'Posi;,i'
Code
vou~
SEULEMENT
PAR
JVC
CANADA
Postal
C;;,ie·········
Postal
I
AUX
PRODUITS
INC.
.. ·· ..
WARRANTY
GARANTII
JVC CANADA INC.
21
Finchdene
TEL:
JVC CANADA INC. (hereafter called "JVC") gives
the following express warranty for each new JVC
product distributed
by an authorized JVC dealer.
JVC warrants that this JVC product is free, under
normal use and maintenance, from any defects
material and workmanship subjecttothe following
terms and conditions:
Obtain
1. To
(a) The JVC Warranty Control Card herein
provided must be completed
posted
of date of purchase of the JVC product.
(b) This JVC Warranty Control Card must
completedinfull and presented together
with proof of purchase of the JVC product
requiring service.
(c)
The JVC product mustbebroughtinfor
service to
2. Limitation:
This Warranty shall not apply to:
(a) Repair or replacement of any cabinets,
batteries, plates, connection cords, antennas, dust covers, knobs, speaker grills,
..
..
speaker
screen savers, and all accessories.
(b)
Any
defects caused or repairs required as a
result of misuse, abusive operation, negligence,
(c) Any defect caused or repairs required as
a result of not following the instructions
the
operation manual.
(d) Any JVC product tampered with, adjusted
or repaired by any party other than JVC or
authorized JVC Service Centre personnel.
in
Canada by JVC and sold
Warranty
or registered via intemet within 7
an
cones,
improper use and/or insufficient
Service:
authorized JVC Service
projection screens, projection
Square,
(416) 293-1311
http://www.jvc.ca
in
full and
days
be
Centre.
care.
Toronto,
FAX:
JVC CANADA INC. ( ci-apres appele "JVC")
enonce
nouveau produit JVC distribue
et vendu par
JVC vous garantit que ce produit est degage, sous
utilisation et entretien normal, de tout defaut
in
materiel et de fabrication sous reserve des
modalites et conditions suivantes :
1.
2. Restrictions:
in
ON
M1X
1A7
(416)
293-8208
la
garantie expresse suivante pour tout
un
detaililmt JVC autorise.
Pour
obtenirunservicedegarantie
ta)
La
carte de controle de garantie JVC ci-
incluse doit etre completee avec les
renseignements complets et etre postee
enregistree via internet dans les 7 jours
suivant I'achat du produit JVC.
(b) Cette carte de controle de garantie JVC doit
etre dOment remplie et etre presentee avec
la preuve
necessitant une reparation.
(c) Le produit JVC doit etre apporte pour
service chez un centre de service JVC
autorise.
Cette garantie ne s'applique pas aux :
Reparation
(a)
cabinet, batteries, panneau avant, cordons
de raccord, antennes, housses de
protection, boutons, couverts de hautparleur, cones de haut-parleur, ecrans de
projection, protecteurs d'ecran de projection
et tous les accessoires.
(b) Tous defauts occasionnes
requises suite
mauvaise, negligente
incorrecte.
(c)
Tous defauts occasionnesoureparations
requises suite
recommandations du manuel d'instruction.
Tout
(d)
produit JVC altere,
tout autre entreprise que JVC ou
de service d'entretien
autorise JVC.
d'achat
ou
au
Canada par JVC
du
produit JVC
remplacement
a une utilisation abusive,
ou
eVou
une utilisation
a I'omission de suivre les
ajusteourepare
ou
:
ou
de
tout
reparations
par
un
centre
de service
Page 93

(e) Any
(f)
(g) Conversion to foreign ordomestic voltage or
(h) Any
(i)Any JVC products used for commercial or
(j)
(k) Product purchased from "outside Canada",
JVC
num-ber has been defaced, modified or
removed.
Maintenance, cleaning orperiodic check-up
frequency.
Electrical Safety Regulations ID.
institutional, rental, or display purposes.
Parts
Labour...90days
Any JVC product which has been resold and
no longer ownedbythe original purchaser.
"bankruptcy" or "liquidator".
products on which the serial
JVC
product without the Canadian
......
1 year (except video head - 90
days)
(e) Tout produit
ete altere, modifie ou enleve.
(f) L'entretien, les verifications periodiques et
nettoyage.
(g) La
conversionaune
tension etrangere ou domestique.
(h)
Tout
produit
d'identification
electriques Canadiennes (CSA).
(i)
Pour
tout
commerciales, institutionnelles, de location
ou utilise
G)
Tout produit
n'est plus la propriete
(k) Produit achete a "I'exterieur du Canada",
provenant d'une ''faillite'' ou d'un "Iiquidateur".
ades fins d'etalage.
Pieces............
Main d'reuvre...
WARRANTYTERM (VALID FROM THE DATEOFPURCHASE)
CONDITIONS DE GARANTIE (VALABLE
PRODUCT
PRODUIT
Projection TV In-Home Service
TV In-Home (25" and
Colour
D-ILA
Rear Projection In-Home Service
LCDTVIn-Home Service (25"
de
Ecrans
Ecrans
TV
Ecrans
• In-home servicetobe
Whereitis not available,
packing, shipment and
JVC
• Service
S'i1
coOts
I'equipement chez et depuisIedetaillant
Receivers and
Projection and Car Audio "ARSENAL" Series
Recepteurs et Hauts-Parleurs achetes separement, Projecteur
Avant
projection Service aDomicile
de
TV Couleur Service aDomicile (25"
projection arriere D-ILA Service aDomicile
de
LCD
Service aDomicile (25"
Authorized Service Centre.
adomicile fourni par
n'y a pasdeservice
pourunemballage adequat, I'expedition, ainsi que tous les
Home
et Audio d'AutodeSerie " ARSENAL"
above)
and
above)
et
et
plus)
provided where available
the
Purchaser
all
costs associated
un
JVC
Speakers purchased separately, Front
must
assume
with
the
detaillant disponible.
disponible aproximite, I'acheteur doit assumer la responsabilite et les
JVC
autoriseIeplus pres pourunservice d'entretien.
aPARTIR DE
plus)
the
responsibility
deliveryofthe
PARTS
PIECES
equipmenttoand
coOts
JVC
dontIenumerodeserie a
frequenceouune
JVC
n'ayant
con
forme aux
produit
utiliseades
1 An (Excepte les tetes
90 jours)
video-
90
JVC
and
Jours
ayant ete revendu et qui
de
I'acheteur original.
LA
DATED'ACHAT)
(Years)
(annees)
1 1
expense
associes a
2 2
labour
MAIN-D'OEUVER
for
the
from
the closest
la
livraison
pasIesigle
normes
(Years)
(annees)
proper
de
fins
(
I)
Any defects caused by fire, flood, lightning,
power surge,orother events beyond the
controlofJVC.
(m) FOR AUTO PRODUCTS
Warranty does not cover elimination of car
static or electrical interferences, cleaning
of head, adjustments, or labour cost for the
removalorreinstallation of the unit for
repair.
3.
Standards:
If any defects should be foundina JVC product
within the applicable terms, necessary repairs
shall be made at no cost to the purchaser for
parts or labour when
such defects are due to faulty material or workmanship.
4.
Exclusion
This
warranty given by
no
its
rized to extend or enlarge this warranty on behalf
5.
DisclaimerofConsequential
To the extent the law permits
any
product,
indirect, incidental or consequential damage or
inconvenience.
~
of
warranty constitutes the entire express
dealer or service centre personnel or his,
or their agent or employee is, or are autho-
of JVC.
responsibility for lossoftime or use of its
transportation
And
You
JVC
acknowledges that
All
Other
Express
JVC
for
mailtothe address below.
may.
also register on-line
Warranties:
JVC
products and
Damage:
JVC
costs,orany
disclaims
at:www.lvc.ca
Detach
other
here.
(I) Tout
(m)
3.
Criteres:
Si un produit
conditions
necessaires
additionnels
main d'reuvre lorsque
defectuosites sont causees par une defectuosite
de
4. Exclusion
Cette garantie constitue I'entiere garantie express
don
representant ou employe d'un detaillant ou d'un
service d'entretien n'est autorise
garantie au nomdeJVC.
5.
Denegation
Dans la mesure permise par la loi, JVC nie toute
responsabilite pour perte de temps ou d'usage
ses produits, des coutsdetransport ou tout autre
dommage ou inconvenient indirect, accidentel et
consequent.
r;:;::::::] Veuillez poster it
~
adecouper
dommage
inondation, un eclair, une surtension ou tout
evenement
autre
POUR
LES
La garantie
d'interferences statiques ou electriques
la voiture, Ie
ajustements
associes
reinstallationdeI'unite
JVC
applicables,
cause
par
Ie feu,
horsducontraledeJVC.
PRODUITS
ne
et
les
a
I'enlevement
s'averait defectueux, selon les
seront
D'AUTOMOBILE
couvre
nettoyage
pas
I'elimination
pour
les
de
ou a
reparation.
repara:tions
sans
coutsdemain d'reuvre
effectues
tete, les
a I'acheteur pour les pieces et la
JVC
reconnait quedetelles
materiel ou de fabrication.
de
toutes
autres
nee par
JVC
garanties
pour
les produits JVC. Nul
expresses:
aprolonger cette
des
dommages
Vous
pouvez egalement vous
enregistrer par internet
ici
Place stamp
here
Placez votre
timbre
indirects
I'adresse
ici
ci-dessous.
a;
www.jvc.ca
une
de
la
couts
:
de
AC
Adapters, Remote Controls, Headphones. Microphones
Projector Lamps
Adaptateurs
et
LampedeProjecteur
Wood
Enceinte aCone
All
Other Categories
Toutes
AC,
Telecommande, Casque D'ecoute, Microphones
Cone Speakers
les autres categories
en
Bois
and
90
DAYS
90
JOURS
5 5
1 1
90
90
DAYS
JOURS
JVC CANADA INC.
21
Finchdene
Toronto,ONM1X
Square
1A7
Page 94

TO
OUR VALUED CUSTOMER
--
THANK
WE WANT TO HELP
YOU
FOR PURCHASING THIS JVC PRODUCT.
NEED HELP ON HOWTO HOOK UP?
NEED ASSISTANCE ON HOWTO OPERATE?
NEEDTO LOCATE A
LIKETO PURCHASE ACCESSORIES?
JVC®
TOLL
FREE: 1(800)252-5722
http://www.jvc.com
YOU
ACHIEVE A PERFECT EXPERIENCE.
JVC
SERVICE CENTER?
-
IS HERETO HELP!
Remembertoretain
---
Do
not
Caution
To
prevent electrical shock,
There
Please refer
your
attempt
are no
BillofSale
user
to
qualified service personnel for repairs.
for
Warranty
to
service the product yourself
do
serviceable parts inside.
Service.
not
open the cabinet.
8T-51018-5
(0306)
Printed in Indonesia
Page 95

••••••••••••••••••••••••••••••••••••••*•••••••••••••••••••••••••••••••••*•••••
iJvc®
: I
LIMITED
ONLY
FOR
PRODUCT
WARRANTY
PURCHASEDINU.S.A.
1-1
IUSAONLYli
I :
*JVC Americas Corp. (JVC) warrants this product and all parts thereof, except as set forth below ONLY TO THE :
of
: ORIGINAL RETAIL PURCHASER to be FREE FROM DEFECTIVE MATERIALS AND WORKMANSHIP from the date
*
* original purchase for the period shown below. ("The Warranty Period") *
* *
: I
* 1
* *
*.
*THIS LIMITED WARRANTY IS VALID ONLY
:INTHE COMMONWEALTH OF PUERTO RICO. :
: WHAT WE WILL DO: :
: If this product is found to be defective within the warranty period, JVC will 'repair or replace defective parts with new or :
PARTS
YR
IN
THE FIFTY
I
LABOR
(SO)
UNITED STATES, THE DISTRICT OF COLUMBIA AND *
1
YR
:
*
*
*rebuilt equivalents at no charge to the original owner. Such repair and replacement services shall be rendered by JVC *
: during normal business hours at JVC authorized service centers. Parts used for replacement are warranted only for the :
*remainder of the Warranty Period. All products may be brought to a JVC authorized service center
*
Color televisions with a screen size of 27" or greater qualify for in-home service.
: to your home and either repair the TV there or remove and return it if it cannot be repaired in your home. :
DO
: WHAT YOU MUST
*Please do
: Instead, return your producttothe JVC authorized service center nearest you.Ifshipping the producttothe service :
not
return your producttothe ret
*center, please be sure
*
the problem(s). Please call 1-800-252-5722
: can also be obtained from
*representative will require clear access
* *
: If you have any questions concerning your JVC Product, please contact our Customer Care Center at 800-252-5722 :
*WHAT IS NOT COVERED: *
* *
: This limited warranty provided by JVC does not cover: :
*
1.
Products which have been subject to abuse, accident, alteration, modification, tampering, negligence, misuse, faulty *
: installation, lack of reasonable care, or if repaired or serviced by anyone other than a service facility authorized by :
FOR WARRANTY SERVICE: :
siler
to
packageitcarefully, preferably in the original packaging, and include a brief description
our
website http://www.lvc.com.Ifyour product qualifies
to
locate the nearest JVC authoriZed service center. service locations *
to
the product. *
In
such cases, a technician will come *
for
In-home service, the
on
a carry-in basis. *
service:
of
*
*
* JVC to render such service, or if affixed to any attachment not provided with the products, or if the model or serial *
* number has been altered, tampered with, defaced or removed; *
:
2.
Initial installation, installation and removal from cabinets or mounting systems. :
*
3.
:
*
:
*
:
*
Operational adjustments covered in the Owner's Manual, normal maintenance, video and audio head cleaning; *_
4.
Damage that occursinshipment, due to act of God, and cosmetic damage; :
5.
Signal reception problems and failures due to line power surge; *
6.
User
Removal
7.
Accessories; *
8.
Batteries (except that Rechargeable Batteries are covered for 90 days from the date of purchase); *
9.
Products used for commercial purposes, including, but not limited to rental. :
Memory
DevicesNideo
Pick-up
Tubes/CCD
Image
Sensors
are
covered
for90days
from
the
dateofpurchase;
:
*10. Loss of data resultant from malfunction of hard drive or other data storage device; *
: There are no express warranties except as listed above. :
* *
IS
: THE DURATION OF ANY IMPLIED WARRANTIES, INCLUDING THE IMPLIED WARRANTY OF MERCHANTABILITY,
:
*LIMITED TO THE DURATION OF THE EXPRESS WARRANTY HEREIN. *
* *
*JVC SHALL NOT
: DAMAGES, WHETHER DIRECT, INCIDENTAL OR CONSEQUENTAL (INCLUDING, WITHOUT LIMITATION, :
*DAMAGE TO TAPES, RECORDS OR DISCS) RESULTING FROM THE USE OF THIS PRODUCT,
BE
LIABLE FOR ANY LOSS OF USE OF THE PRODUCT, INCONVIENCE, OR ANY OTHER *
OR
ARISING OUT *
*OF ANY BREACH OF THIS WARRANTY. ALL EXPRESS AND IMPLIED WARRANTIES, INCLUDING THE *
: WARRANTIES OF MERCHANTABILITY AND FITNESS FOR PARTICULAR PURPOSE, ARE LIMITED TO
: WARRANTY PERIOD SET FORTH ABOVE. :
Some
:
*implied
: legal rights and you
* *
* JVC
:
statesdonot
warranty
*
* *
******************************************************************************
REFURBISHED PRODUCTS CARRY A SEPARATE WARRANTY, THIS WARRANTY DOES NOT APPLY. FOR DETAIL
OF REFURBISHED PRODUCT WARRANTY, PLEASE REFER TO THE REFURBISHED PRODUCT WARRANTY
INFORMATION PACKAGED
allow
lasts,sothese
the
may
also have other rights which vary from statetostate. :
WITH
exclusionofincidentalorconsequential
limitationsorexclusions
1700
Valley
EACH
REFURBISHED PRODUCT.
AMERICAS
Road,
~~~
Wayne,
may
not
applytoyou.
CORP.
New
Jersey 07470 :
damagesorlimitationsonhow
This
warranty
gives
you
THE:
long
an
specific *
:
*
*
customer
For
Enter below the Model No. and Serial No. which is located either on the rear, bottom
Retain this information for future reference.
Model
Purchase
use:
No.:
date:
Serial
No.:
Nameofdealer:
or
side of the cabinet.
 Loading...