

Page 1
KD-A815/KD-R810
CD RECEIVER / RECEPTOR CON CD /
RÉCEPTEUR CD
ENGLISH
ESPAÑOL
FRANÇAIS
For canceling the display demonstration, see page 4. / Para cancelar la demostración en pantalla,
consulte la página 4. / Pour annuler la démonstration des affichages, référez-vous à la page 4.
For installation and connections, refer to the separate manual.
Para la instalación y las conexiones, refiérase al manual separado.
Pour l’installation et les raccordements, se référer au manuel séparé.
INSTRUCTIONS
MANUAL DE INSTRUCCIONES
MANUEL D’INSTRUCTIONS
For customer Use:
Enter below the Model
No. and Serial No. which
are located on the top or
bottom of the cabinet.
Retain this information
for future reference.
Model No.
Serial No.
GET0651-001A
[J]
Page 2
INFORMATION (For U.S.A.)
This equipment has been tested and found to comply with the limits for a Class B digital device,
pursuant to Part 15 of the FCC Rules. These limits are designed to provide reasonable protection
against harmful interference in a residential installation. This equipment generates, uses, and can
radiate radio frequency energy and, if not installed and used in accordance with the instructions,
may cause harmful interference to radio communications. However, there is no guarantee that
interference will not occur in a particular installation. If this equipment does cause harmful
interference to radio or television reception, which can be determined by turning the equipment
off and on, the user is encouraged to try to correct the interference by one or more of the
following measures:
– Reorient or relocate the receiving antenna.
– Increase the separation between the equipment and receiver.
– Connect the equipment into an outlet on a circuit different from that to which the receiver is
connected.
– Consult the dealer or an experienced radio/TV technician for help.
Caution:
Changes or modifications not approved by JVC could void the user’s authority to operate the
equipment.
IMPORTANT FOR LASER PRODUCTS
1. CLASS 1 LASER PRODUCT
2. CAUTION: Do not open the top cover. There are no user serviceable parts inside the unit; leave
all servicing to qualified service personnel.
3. CAUTION: (For U.S.A.) Visible and/or invisible class II laser radiation when open. Do not stare
into beam.
(For Canada) Visible and/or invisible class 1M laser radiation when open. Do not
view directly with optical instruments.
4. REPRODUCTION OF LABEL: CAUTION LABEL, PLACED OUTSIDE THE UNIT.
For safety...
• Do not raise the volume level too much, as
[European Union only]
this will block outside sounds, making driving
dangerous.
• Stop the car before performing any
complicated operations.
Warning:
If you need to operate the unit while driving,
be sure to look around carefully or you may be
involved in a traffic accident.
Temperature inside the car...
If you have parked the car for a long time in
hot or cold weather, wait until the temperature
in the car becomes normal before operating
the unit.
2 ENGLISH
Page 3
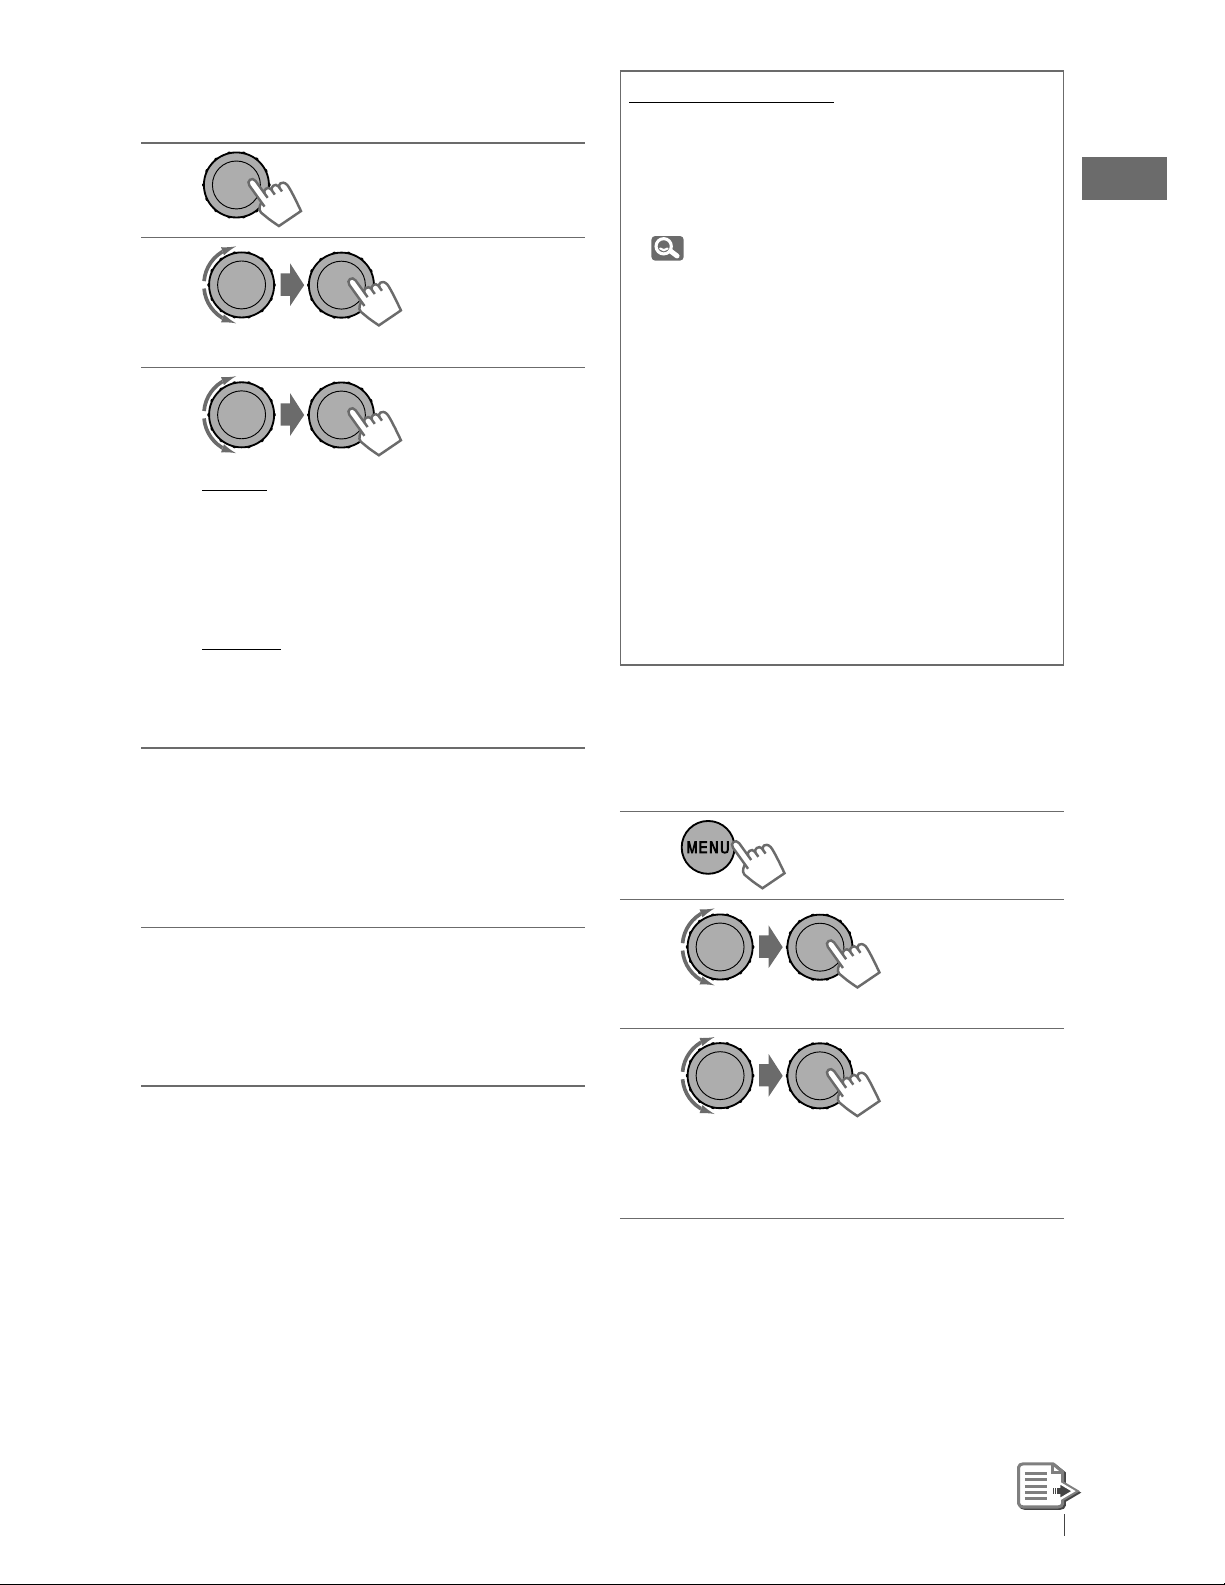
How to read this manual
The following icons/symbols are used to
indicate:
Press and hold the button(s)
[Hold]
until the desired operation
begins.
Turn the control dial.
Turn the control dial
to make a selection,
then press to confirm.
Thank you for purchasing a JVC product.
Please read all instructions carefully before
operation, to ensure your complete
understanding and to obtain the best possible
performance from the unit.
CONTENTS
3
How to read this manual
3
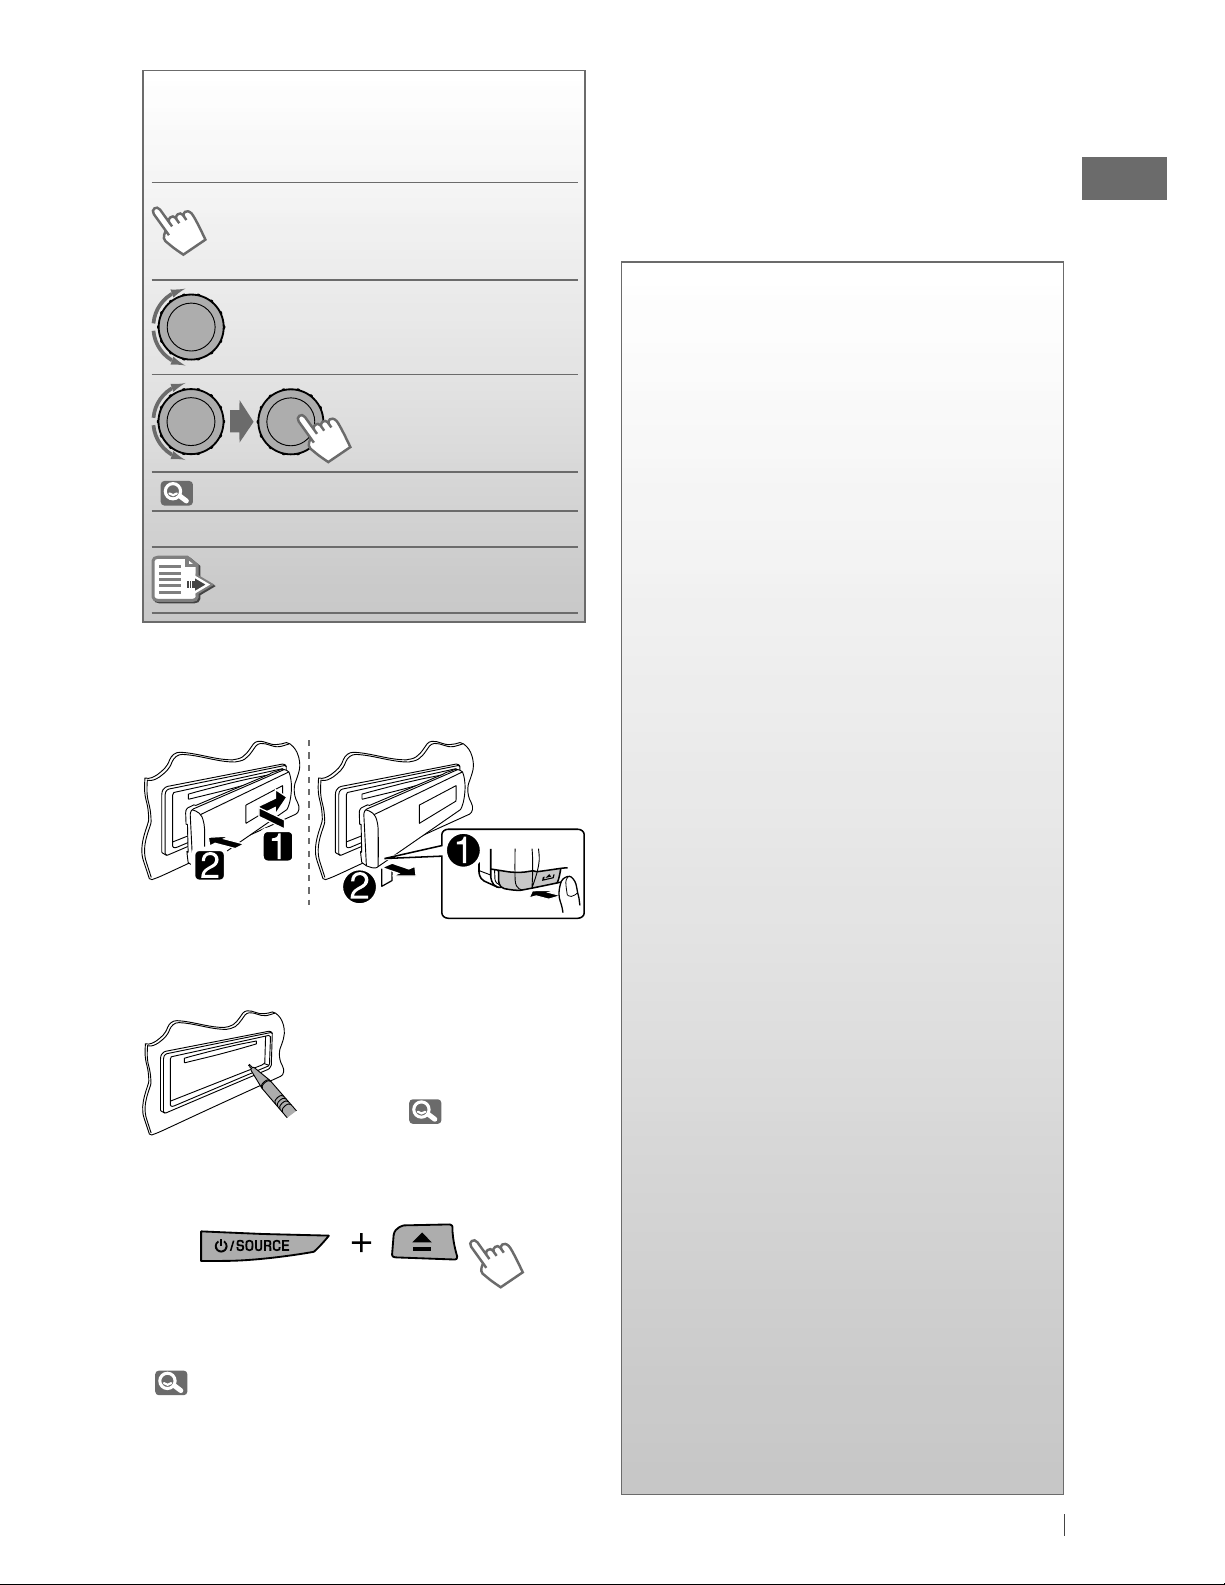
How to attach/detach the control
panel
3
How to reset your unit
3
How to forcibly eject a disc
(
XX)
<XXXX> Menu setting item
Reference page number
Continued on the next page
How to attach/detach the control
panel
How to reset your unit
Your preset adjustments
will also be erased (except
the registered Bluetooth
device). (
14 )
4
Canceling the display
demonstration
4 Setting the clock
5 Preparing the remote controller
(RM-RK50)
6 Basic operations
8 Listening to the radio
10 Listening to a disc
11 Listening to the USB device
13 Using the Bluetooth ® device
15
Using a Bluetooth mobile phone
18
Using a Bluetooth audio player
19
Changing the Bluetooth settings
21 Listening to the HD Radio ™
Broadcast
22 Listening to the satellite radio
24 Listening to the iPod/iPhone
27 Listening to the other external
components
How to forcibly eject a disc
[Hold]
• You can forcibly eject the loaded disc even
if the disc is locked. To lock/unlock the disc,
10.
• Be careful not to drop the disc when it ejects.
• If this does not work, reset your unit.
28 Selecting a preset sound mode
29 Menu operations
36 More about this unit
41 Maintenance
42 Troubleshooting
48 Specifications
3ENGLISH
Page 4
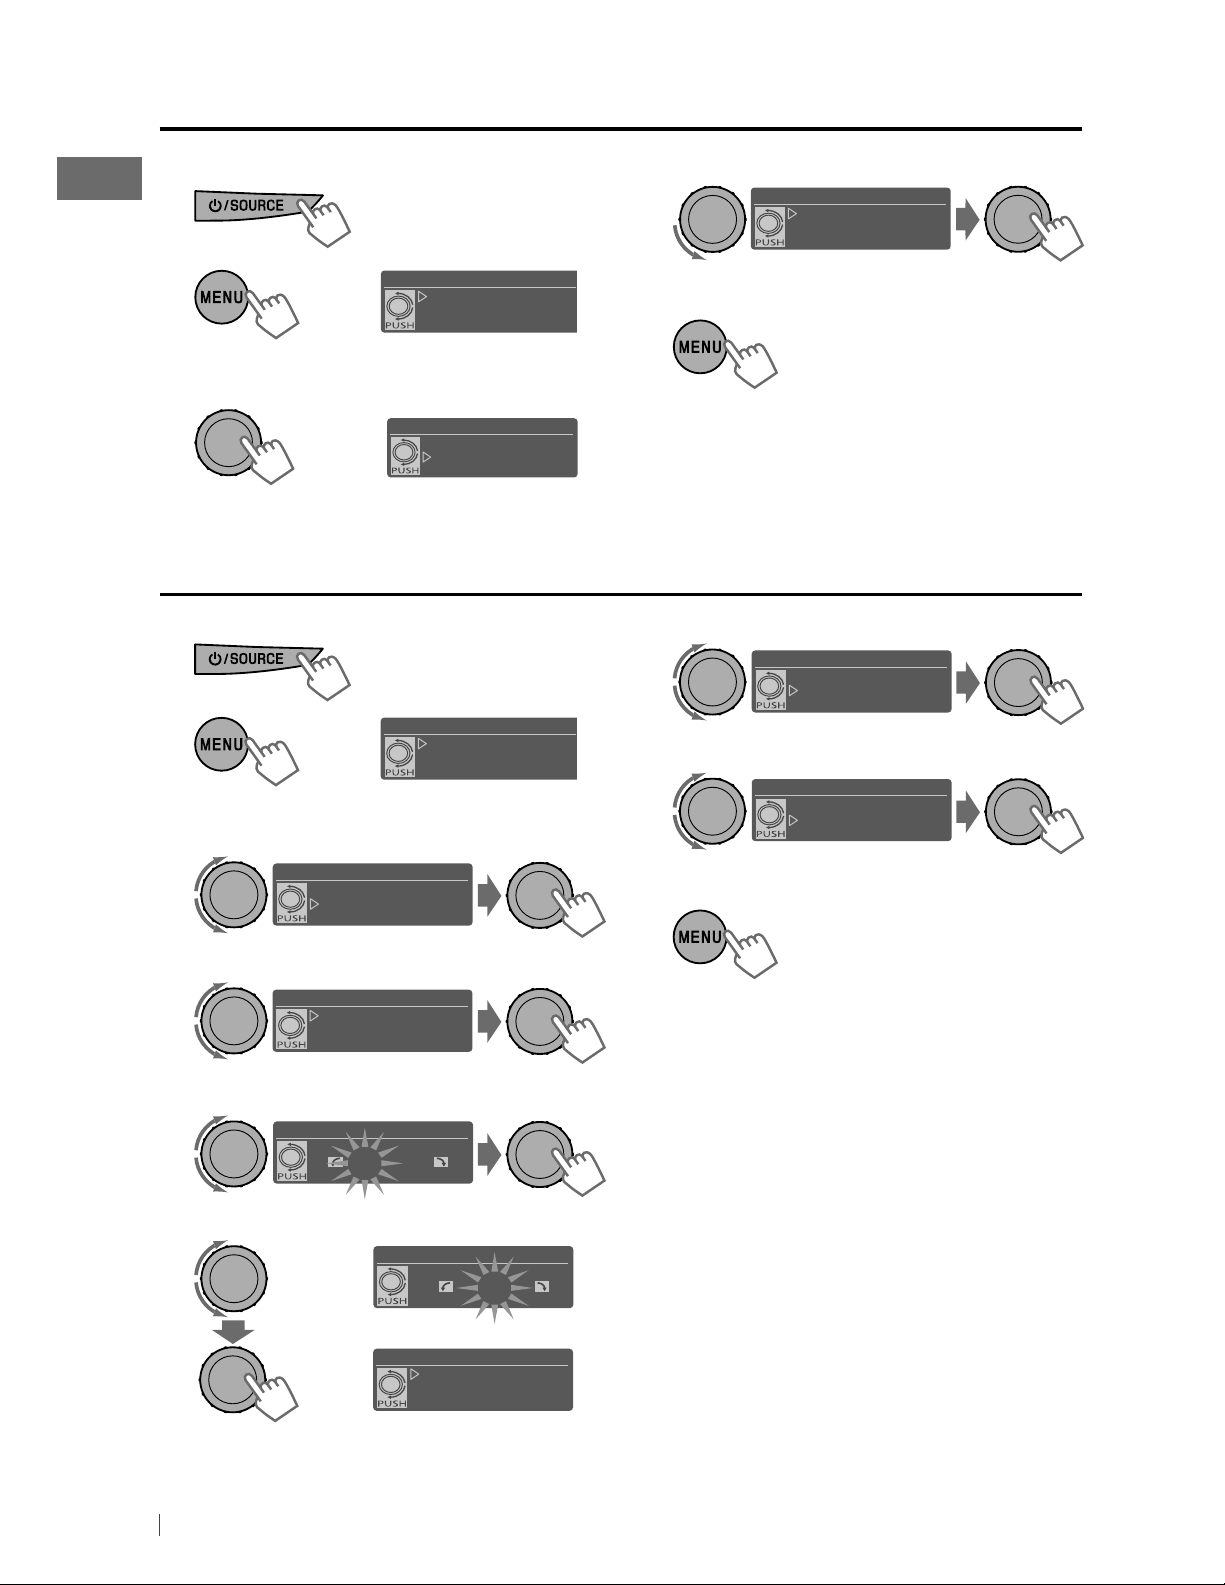
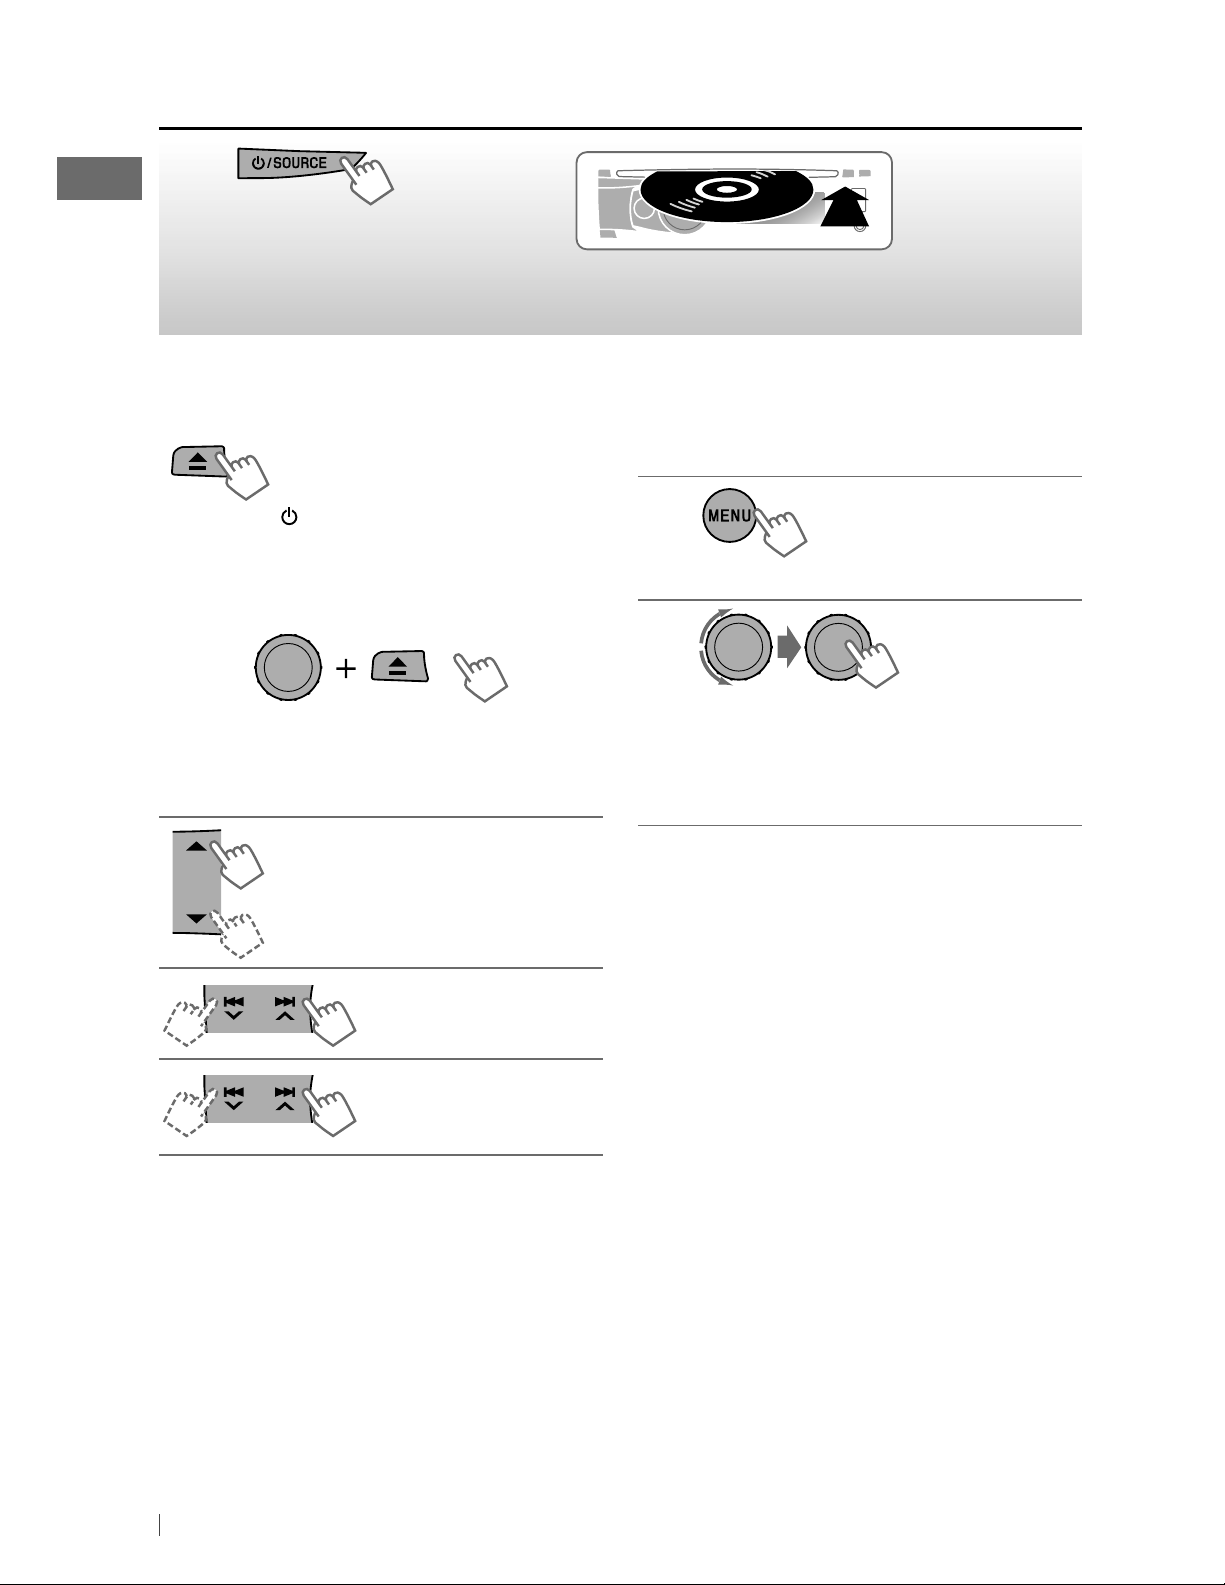
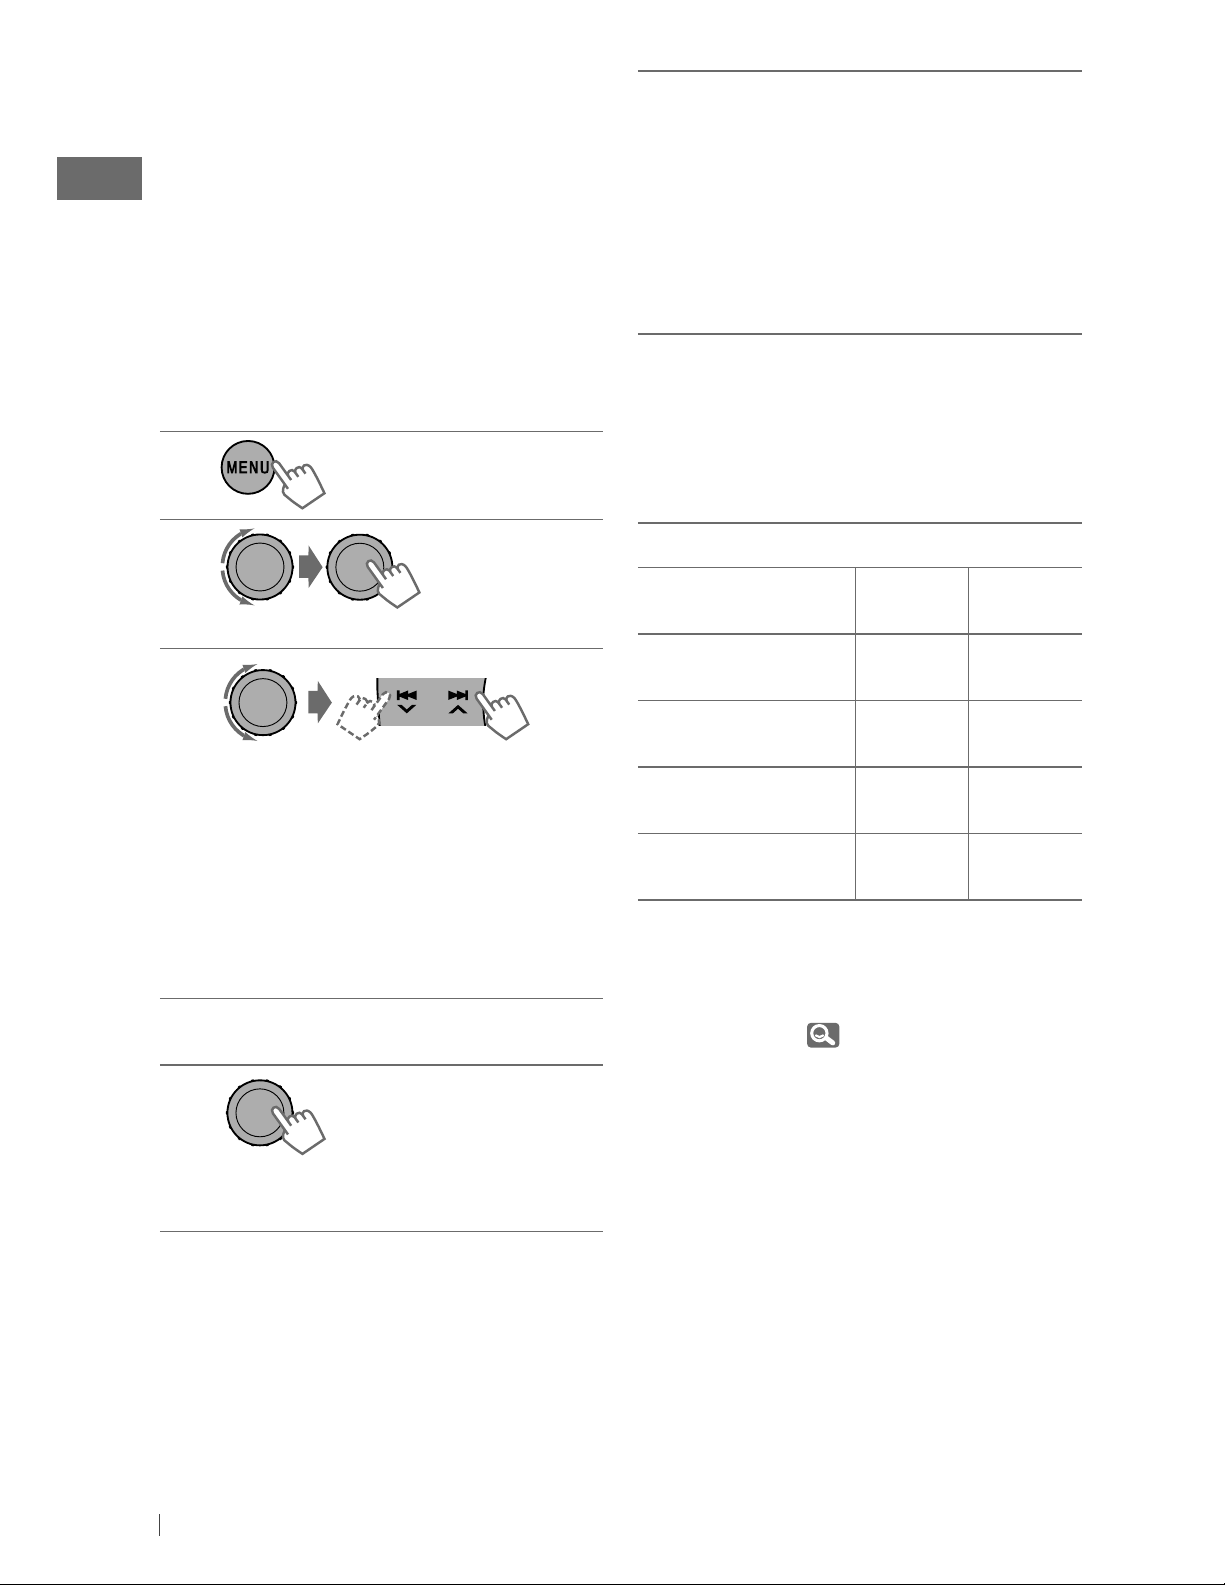
Canceling the display demonstration
1
Turn on the power.
4
Select <Off>.
DEMO
Off
On
2
3
Select <DEMO>.
[Hold]
SET UP
DEMO
Clock
PRO EQ
(Initial setting)
DEMO
Off
On
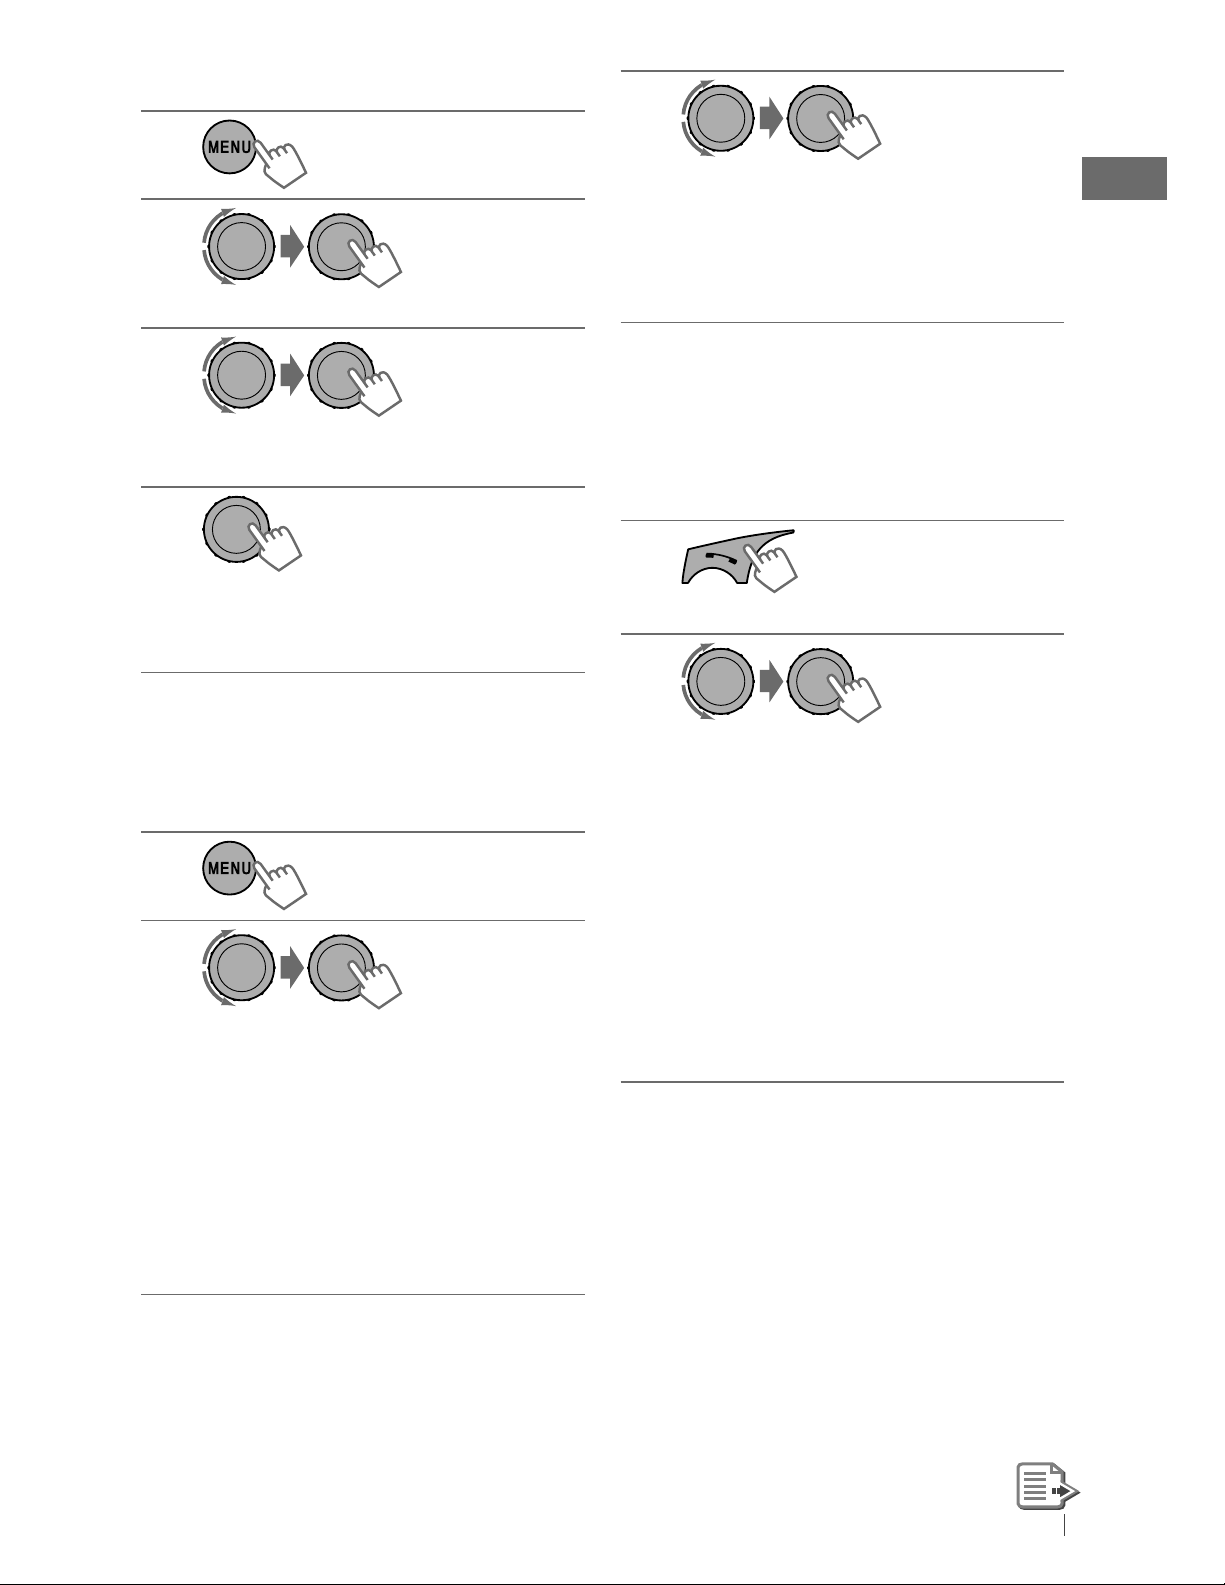
Setting the clock
1
Turn on the power.
2
3
Select <Clock>.
[Hold]
SET UP
DEMO
Clock
PRO EQ
SET UP
DEMO
Clock
PRO EQ
(Initial setting)
5
Finish the procedure.
7
Select <24H/12H>.
Clock
Set Clock
24H/12H
Clock Adjust
8
Select <24Hours> or <12Hours>.
24H/12H
24Hours
12Hours
9
Finish the procedure.
4
Select <Set Clock>.
5
Adjust the hour.
6
Adjust the minute.
4 ENGLISH
Clock
Set Clock
24H/12H
Clock Adjust
Set Clock
1 : 00 AM
Set Clock
Clock
1 : 00 AM
Set Clock
24H/12H
Clock Adjust
Page 5
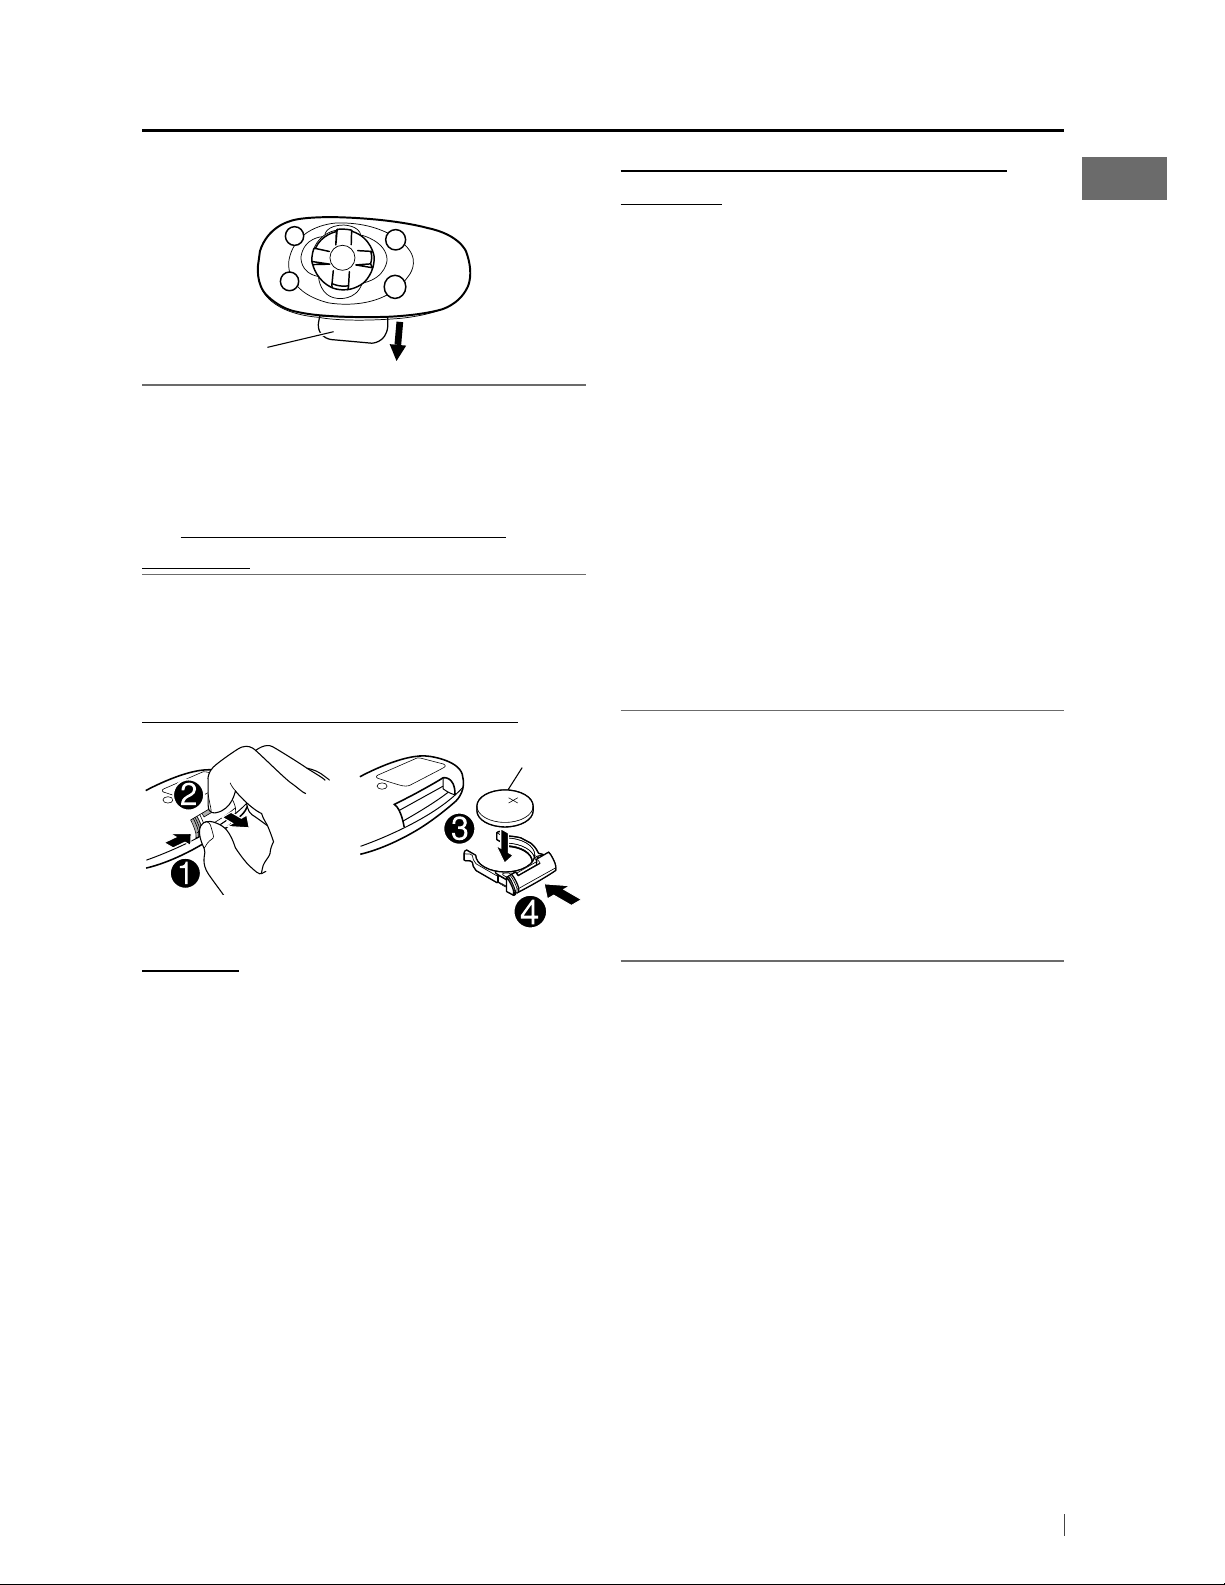
Preparing the remote controller (RM-RK50)
When you use the remote controller for the first
time, pull out the insulation sheet.
Insulation sheet
For USA-California Only:
This product contains a CR Coin Cell Lithium
Battery which contains Perchlorate Material—
special handling may apply.
See www.dtsc.ca.gov/hazardouswaste/
perchlorate
If the effectiveness of the remote controller
decreases, replace the battery.
Replacing the lithium coin battery
CR2025
Caution:
Warning (to prevent accidents and
damage):
• Do not install any battery other than CR2025
or its equivalent.
• Do not leave the remote controller in a place
(such as dashboards) exposed to direct
sunlight for a long time.
• Store the battery in a place where children
cannot reach.
• Do not recharge, short, disassemble, heat the
battery, or dispose of it in a fire.
• Do not leave the battery with other metallic
materials.
• Do not poke the battery with tweezers or
similar tools.
• Wrap the battery with tape and insulate when
throwing away or saving it.
KD-A815 is equipped with the steering wheel
remote control function.
Before operating, connect an exclusive remote
adapter (not supplied) which matches your car
to the steering wheel remote input terminal on
the rear of the unit.
• For details, refer also to the instructions
supplied with the remote adapter.
• Danger of explosion if battery is incorrectly
replaced. Replace only with the same or
equivalent type.
• Battery shall not be exposed to excessive heat
such as sunshine, fire, or the like.
5ENGLISH
Page 6
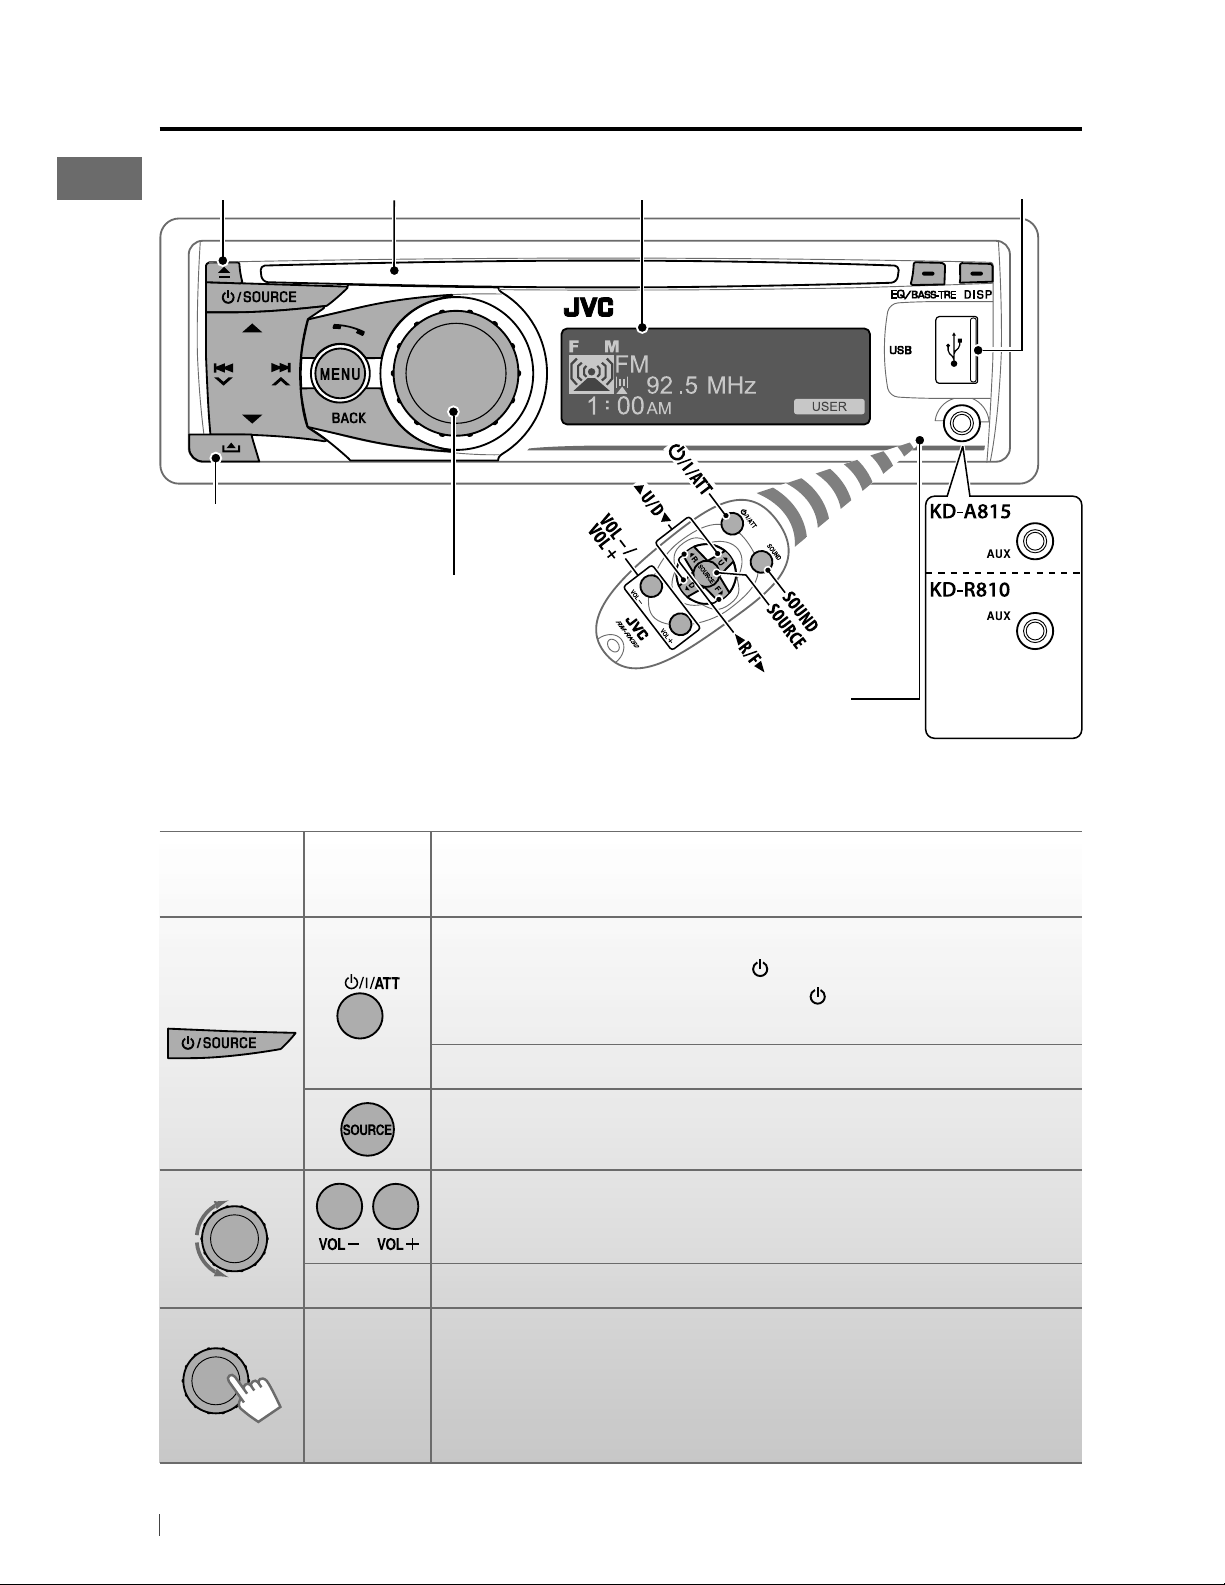
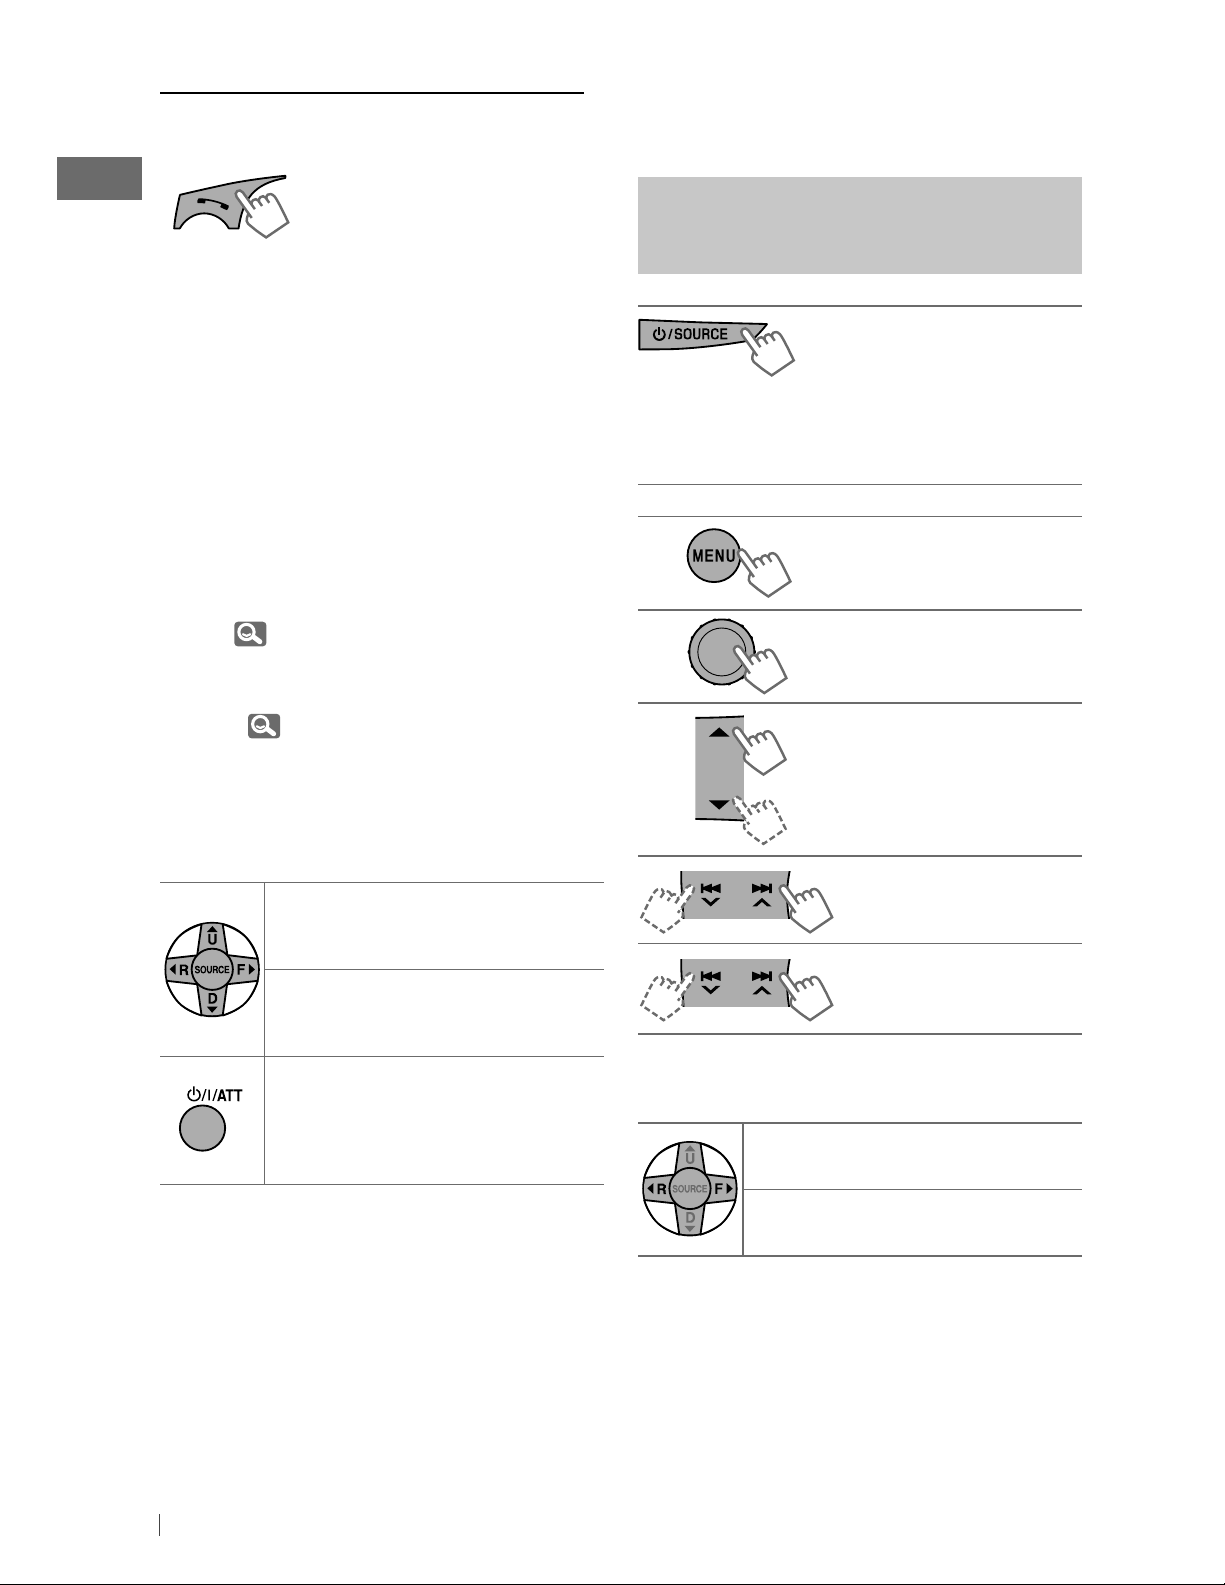
Basic operations
Ejects the disc Loading slot USB (Universal Serial Bus) input terminalDisplay window
Detaches the panel
Control dial
• DO NOT expose to bright sunlight.
Remote sensor
Auxiliary input
jack
When you press or hold the following button(s)...
Main unit
Remote
controller
Turns on.
• When the power is on, pressing
also mutes the sound or pauses. Press
muting or resume playback.
Turns off if pressed and held.
Selects the available sources (if the power is turned on).
• If the source is ready, playback also starts.
Adjusts the volume level.
— Selects items.
• Mutes the sound while listening to a source. If the source is “CD,”
“USB FRONT/USB REAR” or “iPod FRONT/iPod REAR,” playback
—
pauses. Press the control dial again to cancel muting or resume
playback.
• Confirms selection.
General operation
/I/ATT on the remote controller
/I/ATT again to cancel
6 ENGLISH
Page 7
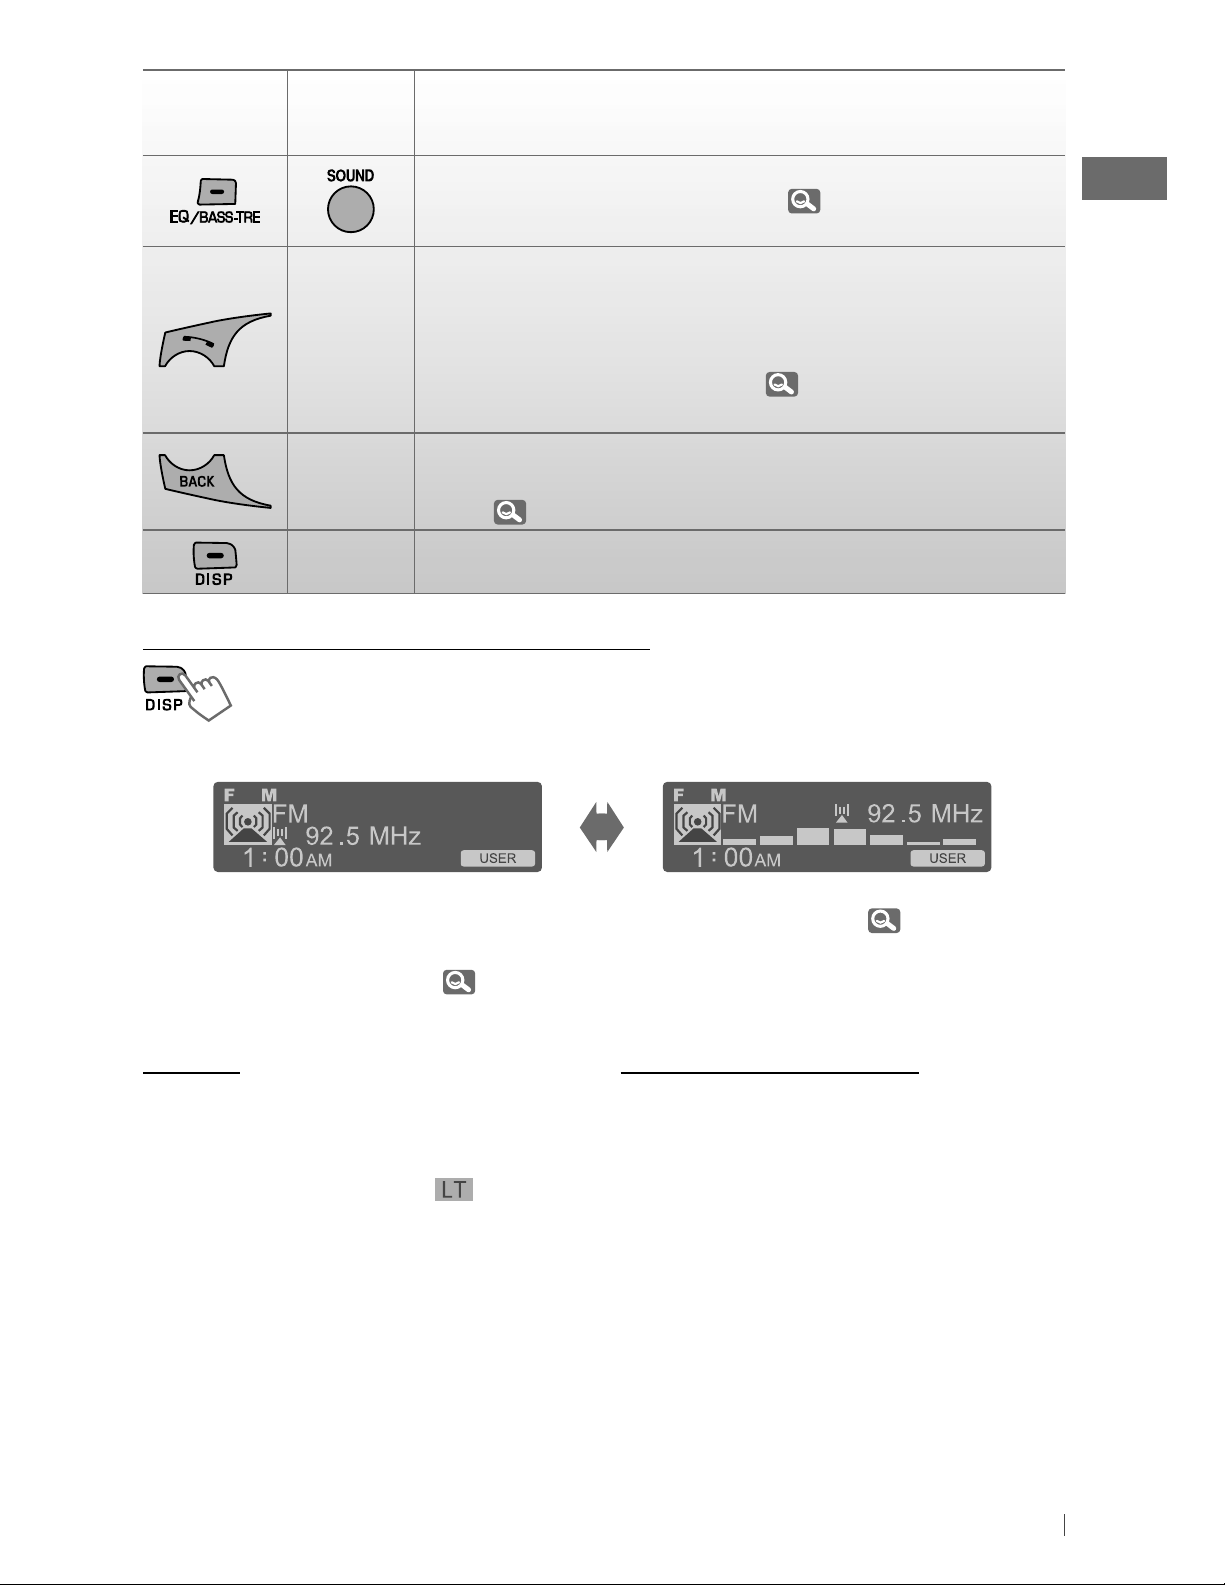
Main unit
Remote
controller
—
—
General operation
Selects the sound mode.
• Enters tone level adjustment directly (
EQ/BASS-TRE on the main unit.
• Enters “Call Menu” screen * or answers incoming call when the unit
rings.
• Ends a call if pressed and held after a phone call conversation.
• Switches the connected mobile phone to the last connected
mobile phone if pressed and held. (
* If there is no call list, the unit beeps.
• Returns to the previous menu.
• Switches the controlling terminal for iPod playback if pressed and
held. (
24, 33 )
28 ) if pressed and held
18 )
—
Power off : Checks the current clock time.
Power on : Changes the display information and pattern.
Changing the display information and pattern
Ex.: When tuner is selected as the source
Source operation display
• If a station has been assigned a title, station
title appears after about 5 seconds.
• To assign a title to a station,
Caution:
If the temperature inside the car is below 0°C
(32°F), the movement of animation and text
scroll will be halted on the display to prevent
the display from being blurred.
the display.
When the temperature increases, and the
operating temperature is resumed, these
functions will start working again.
9.
appears on
Caution on volume setting:
Digital devices (CD/USB) produce very little
noise compared with other sources. Lower the
volume before playing these digital sources
to avoid damaging the speakers by sudden
increase of the output level.
Audio level meter display
(<Level Meter>,
31)
7ENGLISH
Page 8
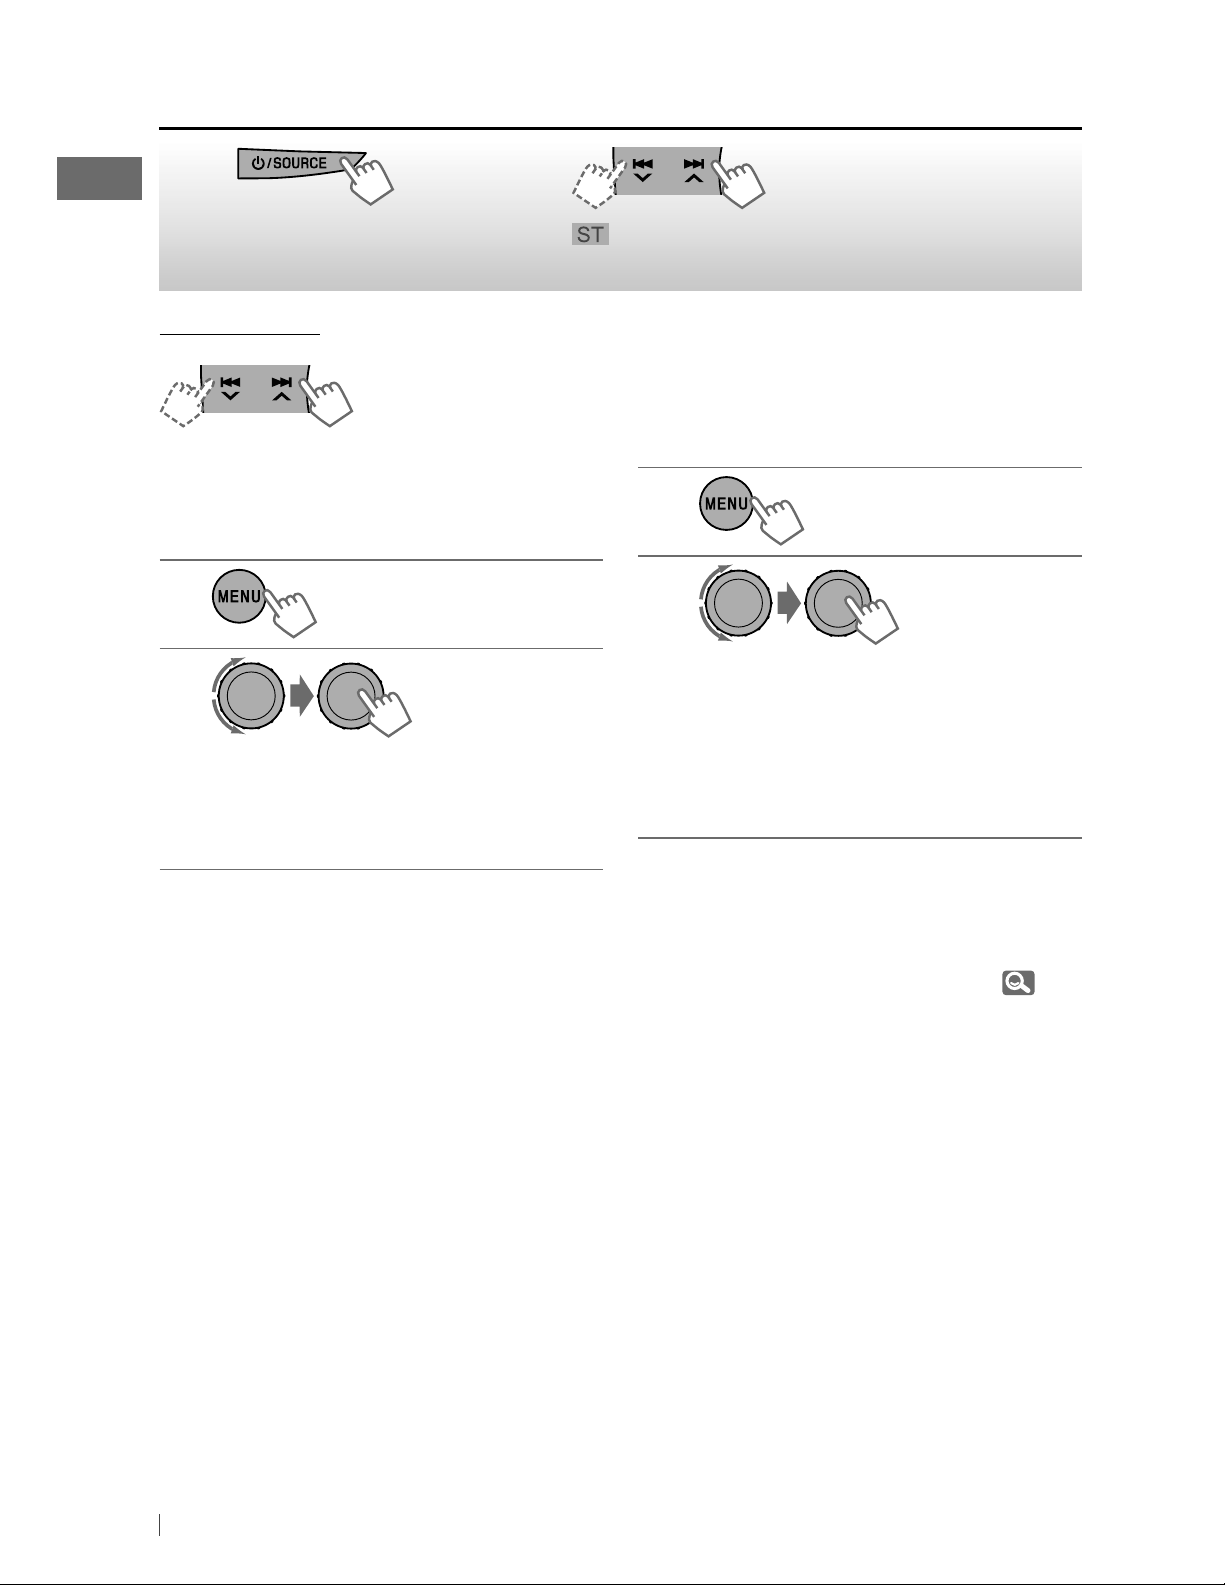
Listening to the radio
~
]
“FM” or “AM”
Manual search
[Hold]
“M” appears, then press
the button repeatedly.
Ÿ
with sufficient signal strength.
When an FM stereo broadcast is
hard to receive
1
[Hold]
2
]
<Tuner> ] <Stereo/Mono> ]
<Mono>
Reception improves, but stereo effect
will be lost.
To restore the stereo effect, repeat the same
procedure to select <Stereo>.
lights up when receiving an FM stereo broadcast
Automatic presetting (FM)—
SSM (Strong-station Sequential Memory)
You can preset up to 18 stations for FM.
While listening to a station...
1
[Hold]
2
]
<Tuner> ] <SSM> ]
<SSM 01 – 06 / SSM 07 – 12 /
SSM 13 – 18>
“SSM” appears and local stations with
the strongest signals are searched and
stored automatically.
To preset another 6 stations, repeat the above
procedure by selecting one of the other 6 SSM
setting ranges.
8 ENGLISH
If an HD Radio tuner box is connected (
you can also search and store 6 stations for AM
by following the above operations.
21 ),
Page 9

Manual presetting (FM/AM)
Title assignment
You can preset up to 18 stations for FM and 6
stations for AM.
Ex.: Storing FM station of 92.50 MHz into preset
number “4.”
1
]
“92.50MHz”
2
[Hold]
]
Shows the “Preset Mode” screen.
3
]
Selects preset number “4.”
“04” flashes.
Selecting a preset station
1
You can assign titles up to 30 station
frequencies (FM and AM) using 8 characters
(maximum) for each title.
• If you try to assign titles to more than 30
station frequencies, “Name Full” appears.
Delete unwanted titles before assignment.
• When HD Radio tuner box is connected
(
21 ), this feature will be disabled.
1
]
“FM” or “AM”
2
]
Shows the title entry screen.
[Hold]
3
]
Selects a character.
4
or
2
Using the remote controller
5 U
/ D ∞: Changes the preset
stations
2 R
/ F 3: Searches for stations
]
Moves to the next (or previous)
character position.
Repeat steps 3 and 4 until you have
5
finished entering the title.
6
To erase the entire title, press and hold
after step 2, then press the control dial.
Available characters
A – Z (upper case), a – z (lower case), 0 – 9
(numbers), and the following symbols:
!”#$%
*+,–./:;<
=>?@
&
' space
–
DISP
’()
9ENGLISH
Page 10
Listening to a disc
~
]
Turn on the power.
Ÿ
All tracks will be played repeatedly until you change
the source or eject the disc.
Stopping playback and ejecting
the disc
“No Disc” appears.
Remove the disc, then press
/
SOURCE
playback source.
to listen to another
Prohibiting disc ejection
[Hold]
To cancel the prohibition, repeat the same
procedure.
Selecting a folder/track on the
list
While listening to a disc....
1
]
Enter the list menu.
2
]
Select your desired item.
MP3/WMA: Select your desired folder,
then the desired track by repeating
this step.
Selects folder of the MP3/WMA
Selects track
Fast-forwards or
[Hold]
reverses the track
• If the MP3/WMA disc contains many tracks,
you can fast search (±10, ±100, ±1000)
through the disc by turning the control dial
quickly.
BACK
• To return to the previous menu, press
For MP3/WMA disc, you can also use the search
menu (A to Z, 0 to 9, and OTHERS) to scroll
through the list menu.
• “OTHERS” appears if the 1st character is not A
to Z or 0 to 9, such as #, —, !, and etc.
While in list menu....
1
Press 5/∞ to show the search menu.
• The first character of the current folder/file
name appears.
2
Press 5/∞ to select your desired character.
Then press the control dial to confirm.
• The track list with the selected character
appears.
.
10 ENGLISH
Page 11
3
Turn the control dial to select your desired
track. Then press the control dial to confirm.
• Only the existing characters will be shown on
the search menu.
• Press and hold
the character of the search menu.
• If your disc contains many tracks, searching
take some time.
5/∞
to continuously change
Selecting the playback modes
You can use only one of the following playback
modes at a time.
1
[Hold]
3
Repeat
Track : Repeats current track
Folder : Repeats current folder
Random
Folder : Randomly plays all tracks of
current folder, then tracks of
next folders
All : Randomly plays all tracks
To cancel repeat play or random play, select
“Off.”
Using the remote controller
2
]
“Repeat” j “Random”
5 U
/ D ∞: Selects folder of the
MP3/WMA
2 R
/ F 3: Selects track
2 R
/ F
3
: Fast-forwards or
[Hold]
reverses the track
Listening to the USB device
This unit is equipped with two USB input terminals (on the control panel and USB cable from the
rear of the unit). You can use these two terminals at the same time.
• You can also connect a USB Bluetooth Adapter, KS-UBT1 (supplied), (
iPod/iPhone (
24) to the USB input terminal(s).
13) and/or an Apple
This unit can play MP3/WMA/WAV tracks stored in a USB mass storage class device (such
as a USB memory, Digital Audio Player, etc.).
11ENGLISH
Page 12
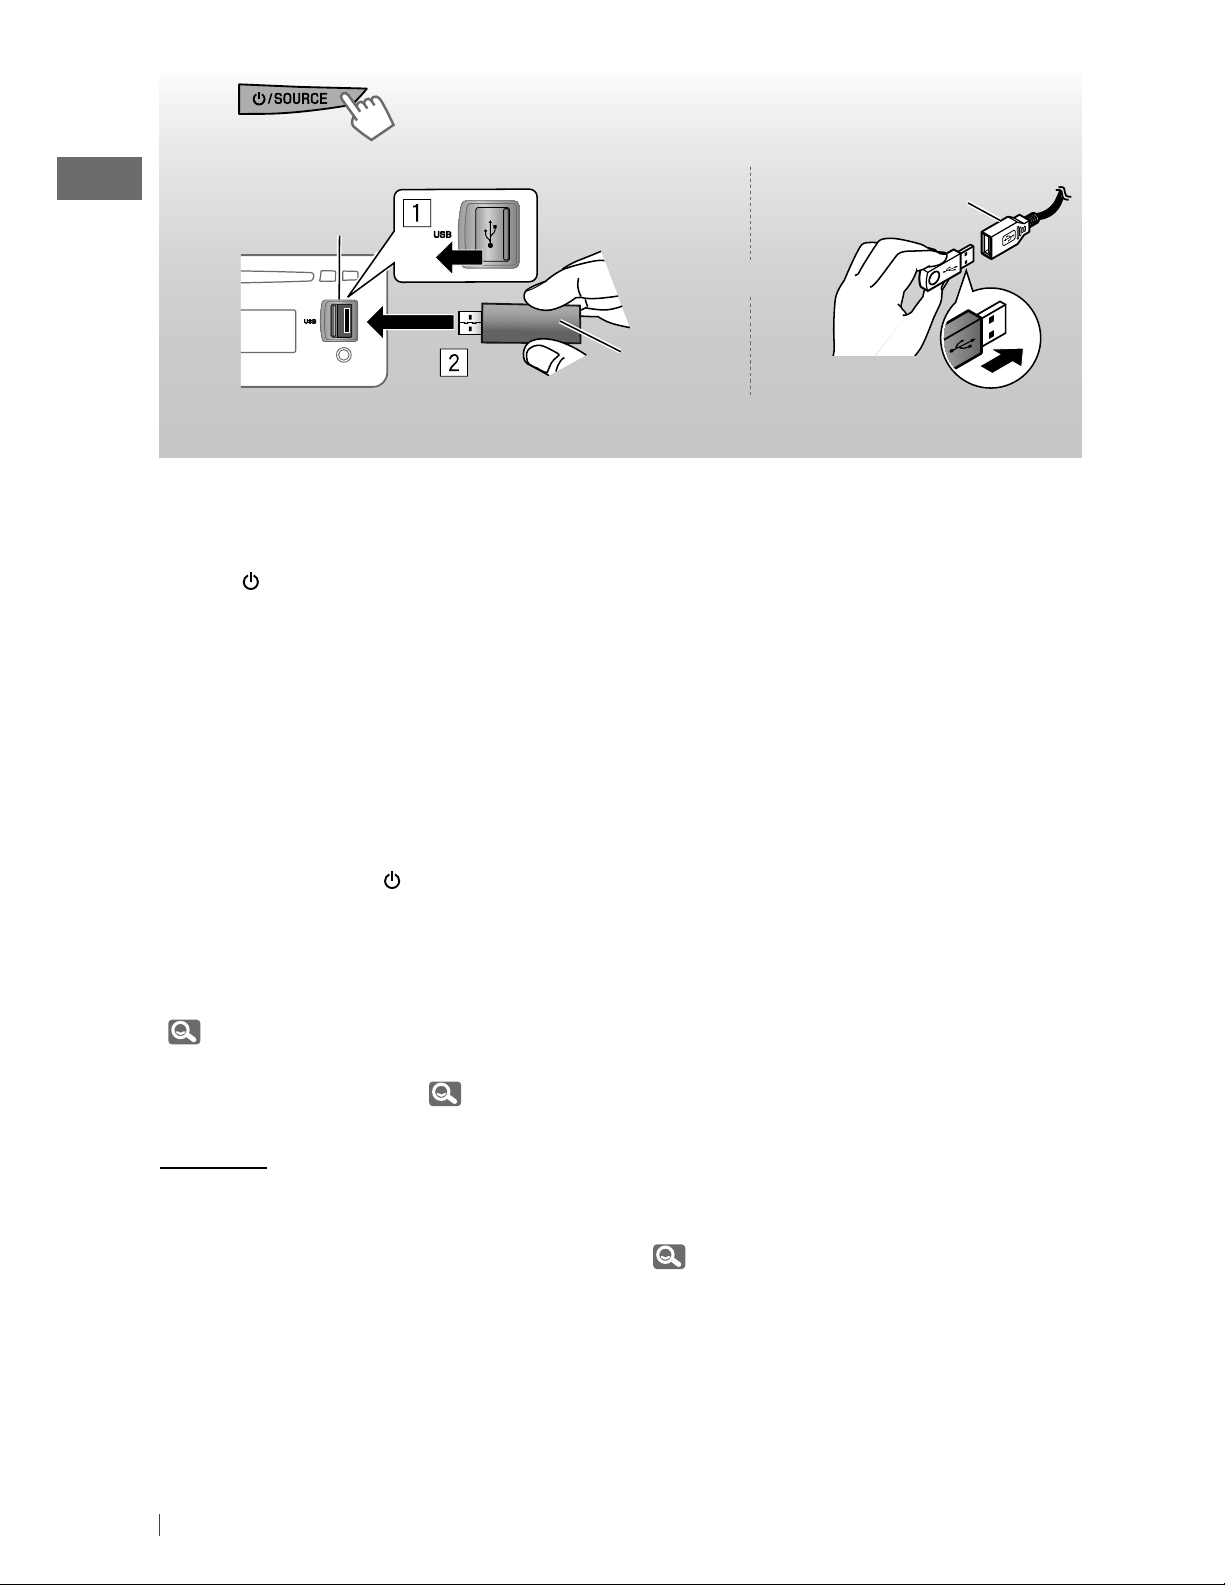
~
]
Turn on the power.
Ÿ
If you have turned off the power (without
detaching the USB device)...
Pressing
playback starts from where it has been stopped
previously.
• If a different USB device is currently attached,
playback starts from the beginning.
USB input
terminal
USB memory
All tracks will be played repeatedly until you change the source or detach the USB device.
/ SOURCE
turns on the power and
Stopping playback and detaching
the USB device
Straightly pull it out from the unit.
“No USB” appears. Press
another playback source.
You can operate the USB device in the same
way you operate the files on a disc.
(
10, 11)
• You can listen to WAV files by following the
MP3/WMA file operations. (
/ SOURCE
Cautions:
• Avoid using the USB device if it might hinder
your safety driving.
• While “Reading” is shown on the display:
– Do not pull out and attach the USB device
repeatedly.
– Do not pull out or attach another USB
device.
to listen to
10, 11)
USB cable from the
rear of the unit
and / or
• Do not start the car engine if a USB device is
connected.
• This unit may not be able to play the files
depending on the type of USB device.
• Operation and power supply may not work as
intended for some USB devices.
• You cannot connect a computer to the USB
input terminal of the unit.
• Make sure all important data has been backed
up to avoid losing the data.
• Electrostatic shock at connecting a USB
device may cause abnormal playback of the
device. In this case, disconnect the USB device
then reset this unit and the USB device.
• Do not leave a USB device in the car, expose
to direct sunlight, or high temperature to
avoid deformation or cause damages to the
device.
• Some USB devices may not work immediately
after you turn on the power.
• The detect time and response time may
be very long for some USB devices (such as
Digital Audio Player, etc.).
• For more details about USB operations,
37, 38.
12 ENGLISH
Page 13
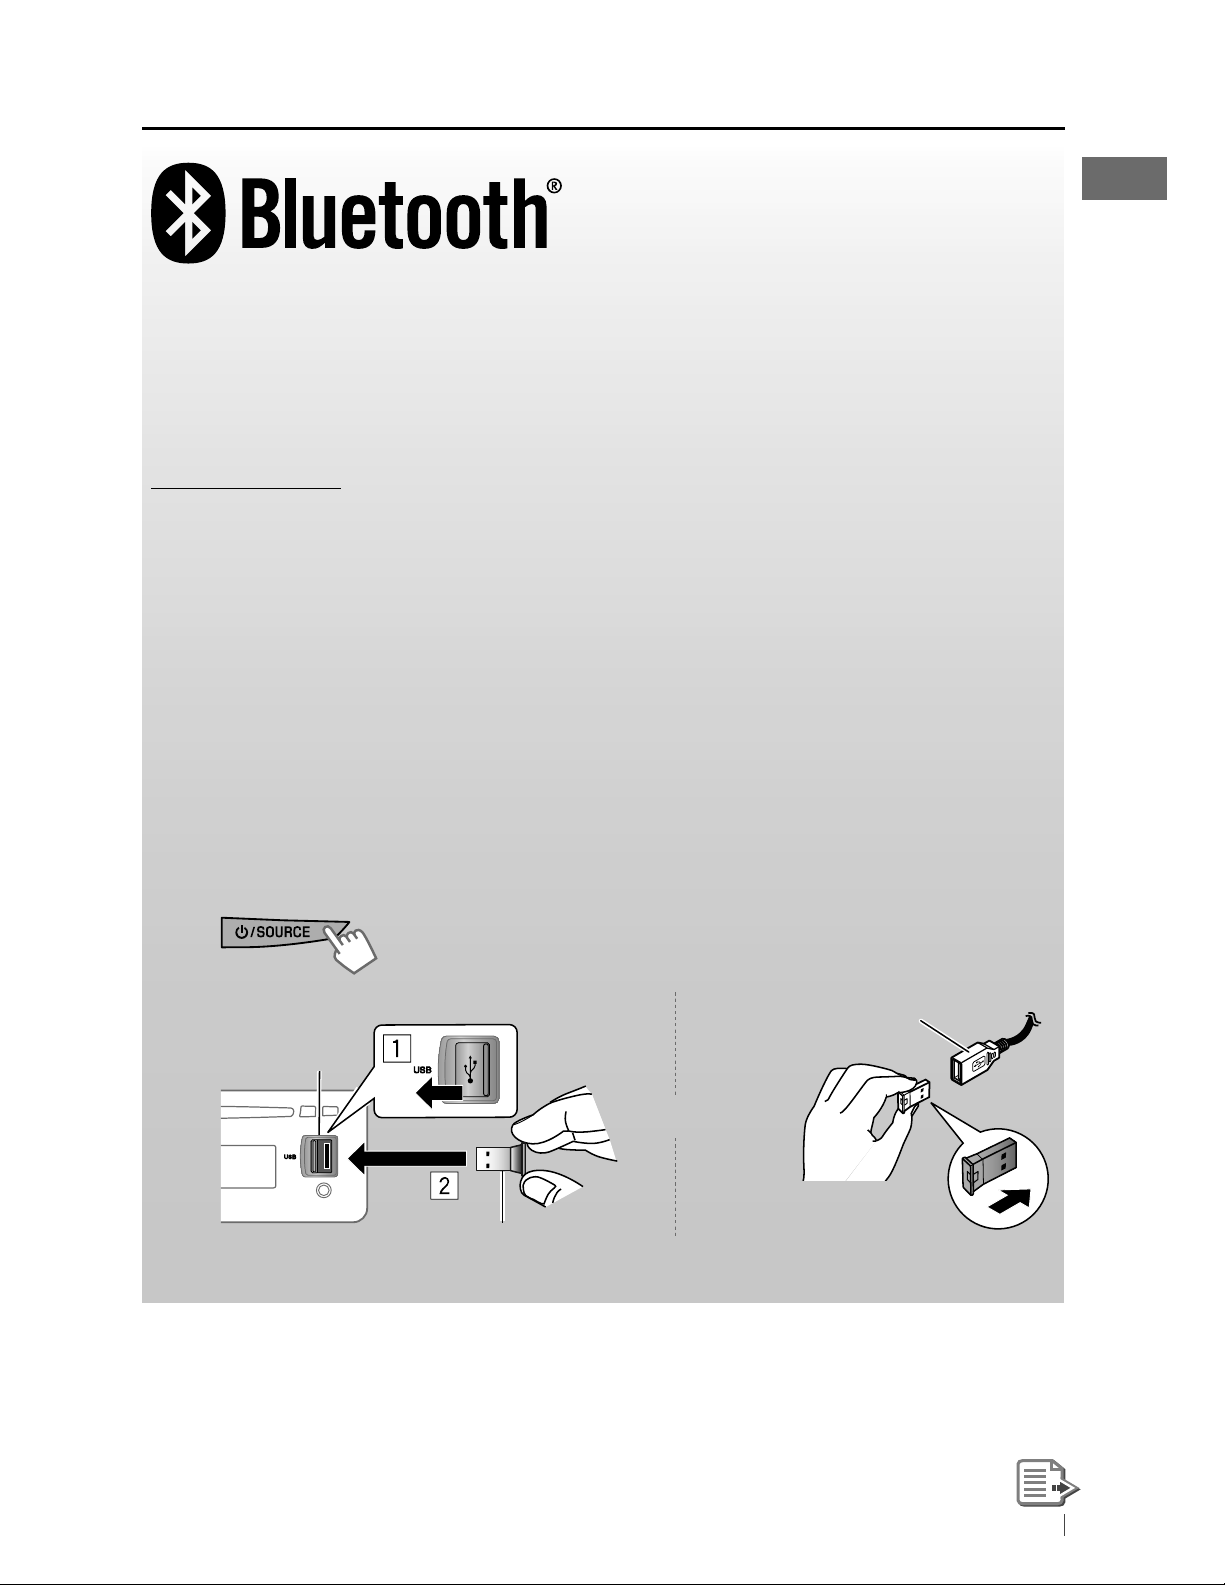
Using the Bluetooth ® device
Bluetooth is a short-range wireless radio communication technology for the mobile device such
as mobile phones, portable PCs, and other devices. The Bluetooth devices can be connected
without cables and communicate with each other.
• Refer to page 4 of the Installation/Connection Manual (separate volume) to check the countries
where you may use the Bluetooth® function.
Bluetooth profile
This unit supports the following Bluetooth profiles;
HFP (Hands-Free Profile) 1.5
OPP (Object Push Profile) 1.1
PBAP (Phonebook Access Profile) 1.0
A2DP (Advanced Audio Distribution Profile) 1.2
AVRCP (Audio/Video Remote Control Profile) 1.3
Refer also to the instructions supplied with the Bluetooth device.
Preparation:
• Connect the supplied USB Bluetooth Adapter (KS-UBT1) to one of the USB input terminals of the
unit.
• Operate the device to turn on its Bluetooth function.
]
~
Ÿ
USB input
terminal
Only one USB Bluetooth Adapter can be detected at a time.
Turn on the power.
USB cable from the
rear of the unit
or
KS-UBT1
13ENGLISH
Page 14
Pairing a device
When you connect a Bluetooth device to the
unit for the first time, make pairing between
the unit and the device.
• Once the connection is established, it is
registered in the unit even if you reset the
unit. Up to five devices can be registered in
total.
• Only one device for Bluetooth phone and one
for Bluetooth audio can be connected at a
time.
1
[Hold]
2
Use the Bluetooth device to search.
6
On the device to be connected, enter
the same PIN code you have just
entered for this unit.
“Pairing OK“ appears for a while, then
“Connect Now Using Phone” appears.
Phone icon appears when Bluetooth
connection is established.
Use the Bluetooth device to connect *.
7
• Refer to the table below for
connectivity results shown on the
display.
* Operations may be different according
to the connected device.
] <Bluetooth> ] <New Pairing>
3
]
Enter a PIN (Personal Identification
Number) code in to the unit.
You can enter any number you like
(1-digit to 16-digit number).
[Initial: 0000]
• Some devices have their own PIN
code. Enter the specified PIN code in
to the unit.
Repeat step 3 until you have finished
4
entering the PIN code.
5
Display result
Connect OK
[Device Name]
Handsfree OK
[Device Name]
Audio Stream OK
[Device Name]
Connect Fail Try
Reconnect
The device remains registered even after you
disconnect the device. Use <Connect Phone>
or <Connect Audio> (or activate
<Auto Connect>,
device from next time on.
Hands-
Free Call
‡‡
‡
—
——
20) to connect the same
Audio
Streaming
—
‡
]
Confirm the entry.
“Search Now Using Phone” appears.
14 ENGLISH
Page 15
Deleting a registered device
3
1
[Hold]
2
] <Bluetooth> ] <Delete Pairing>
3
]
Select a device you want to delete.
“Delete OK?” appears on the display.
4
]
Delete the selection.
“OK” appears when the device is
deleted.
• To return to the previous menu, press
BACK
]
Select a device you want to connect.
• “Connecting...” appears, then
“Connected [Device Name]” appears
on the display when the device is
connected.
Using a Bluetooth mobile
phone
Making a call
1
] Enter “Call Menu” screen.
2
.
Connecting/disconnecting a
registered device
1
[Hold]
2
] <Bluetooth> ] <Connect Phone /
Connect Audio> or <Disconnect
Phone / Disconnect Audio>
• For connecting a device, go to step 3.
• For disconnecting a device,
“Disconnecting” appears, then
“Disconnected [Device Name]”
appears on the display when the
device is disconnected.
] Select the method to make a call.
• Dialed Calls *1: Shows the list of the
phone numbers you have dialed. Go
to the following step.
• Received Calls *
the received calls. Go to the following
step.
• Missed Calls *
missed calls. Go to the following step.
*1 “No History Found” appears and the
unit beeps if there is no history stored.
1
: Shows the list of
1
: Shows the list of the
15ENGLISH
Page 16

• Phonebook *2: Shows the name/
phone number of the phonebook
registered in the unit or from the
20.
3
. Go to the
20.
right column)
20.
connected phone *
following step.
– To copy the phonebook memory,
<Phonebook Trans>,
– If the phonebook contains many
numbers, you can fast search (±10,
±100, ±1000 numbers) through the
phonebook by turning the control
dial quickly.
– To search through the phonebook,
right column.
• Dial Number: Shows the “Dial
Number” screen. (
• Voice Dial (only accessible when
the connected mobile phone has
the voice recognition system): Speak
the name (registered words) you
want to call when “Say Name Clearly”
appears *
2
*
“No Entries Found” or “Send
Phonebook Manually” appears
depending on the <Phonebook
Select> settings,
3
Depends on the <Phonebook Select>
*
settings,
4
Operations may be different according
*
to the connected device.
5
*
“Not Support” appears if the
connected phone does not support
this feature.
4, *5
.
3
How to enter phone number
1
Turn the control dial to select a number.
2
Press
3
Repeat steps 1 and 2 until you finish
4
Press the control dial to confirm the entry.
4
/
¢
to move the entry
position.
entering the phone number.
How to delete name/phone number
Only when <In Unit> is selected for
<Phonebook Select>,
1
Press to enter “Call Menu” screen.
2
Display the list of name/phone numbers
using one of the dialing method (see step 2
of “Making a call,”
3
Turn the control dial to select the name/
phone number you want to delete.
4
Press and hold
Entries” screen.
5
Turn the control dial to select “Delete” or
“Delete All.”
• If “Delete” is selected, the selected name/
phone number in step
• If “Delete All” is selected, the listed
numbers in step
6
Press the control dial to confirm.
BACK
20.
15).
to enter the “Delete
3
is deleted.
2
selection are deleted.
Selecting a contact from the
phonebook
1
] Enter “Call Menu” screen.
2
]
Select the name/phone number you
want to call.
• When the sound is stopped or
interrupted during the use of a
Bluetooth device, turn off, then turn
on the unit.
– If the sound is not yet restored,
connect the device again using
<Connect Phone>.
16 ENGLISH
]
<Phonebook>
Page 17
3
]
Show the search menu (A to Z, 0 to
9, and OTHERS).
The first character of the first contact on
the phonebook appears.
• “OTHERS” appears if the 1st character
is not A to Z or 0 to 9, such as #, —, !,
and etc.
4
]
Select your desired character.
The name list of the selected character
appears.
Receiving/ending a phone call
When a call comes in, the source is
automatically changed to “BT FRONT/BT REAR.”
“Receiving... [Phone number/name]” appears
on the display.
• The display will flash in blue. (<Ring Color>,
30)
When <Auto Answer> is activated....
The unit answers the incoming calls
automatically,
• Press
the incoming call when <Auto Answer> is
deactivated.
• Press
(01 – 03) during a phone call conversation.
To preset the microphone volume,
• Press
Reduction and Echo Cancelation mode. To
preset,
or the control dial to answer
5/∞
4
/
20.
to adjust the microphone volume
20.
¢
to turn on/off the Noise
20.
5
]
Select your desired contact.
BACK
• To return to the previous menu, press
• Only the existing characters will be shown on
the search menu.
• Press and hold
the character of the search menu.
• If your phonebook contains many contacts,
searching take some time.
5/∞
to continuously change
.
To end a call or reject an incoming call, press
and hold
or the control dial.
Switching conversation media (the unit/
mobile phone)
Press the control dial during a phone call
conversation, then continue your conversation
using the other media.
• Operations may be different according to the
connected Bluetooth device.
17ENGLISH
Page 18
Switching the connected mobile phone
You can switch the current connected mobile
phone to the last connected mobile phone.
Using a Bluetooth audio
player
[Hold]
Phone icon appears and “Connecting” flashes
on the display. When the last connected
phone is being reconnected again, “Connected
[Device Name]” appears on the display. Now
you can use the last connected mobile phone
with the unit.
Arriving of a text message
When a text message comes in, the unit rings
if your mobile phone is compatible with text
message and <Message Notice> is set to
<On>. (
• “Received Message” appears on the display
and the display illuminate in blue. (<Ring
Color>,
• You cannot read, edit, or send a message
through the unit.
20)
30)
Operations and display indications differ
depending on their availability on the
connected device.
] Select “BT FRONT” or
“BT REAR.”
• If playback does not start
operate the Bluetooth audio player to start
playback.
automatically,
Starts or resumes
playback
Mutes the sound
Selects group/folder
Using the remote controller
5 U
/ D ∞ / 2 R / F 3 /
SOURCE
5 U
/ D ∞ / 2 R / F 3 /
SOURCE
: Switches the conversation media
(between the unit and mobile
phone) during a phone call
conversation
[Hold]
: Answers calls
: Rejects calls
Forward skips or reverse
skips
Fast-forwards or
[Hold]
reverses the track
Using the remote controller
2 R
/ F 3: Reverse skips/
Forward skips
2 R
/ F
3
: Fast-forwards or
[Hold]
reverses the track
18 ENGLISH
Page 19
Selecting the playback modes
• For Bluetooth devices that support AVRCP 1.3.
1
[Hold]
2
]
“Repeat” j “Random”
3
Repeat
Track
All
Group
Random
All
Group
: Repeats current track
: Repeats all tracks
: Repeats all track of current
group
: Randomly plays all tracks
: Randomly plays all track of
current group
Warning messages
Connection Error
The device is registered but the connection
has failed. Use <Connect Phone / Connect
Audio> to connect the device again.
( 15)
Error
Try the operation again. If “Error” appears
again, check if the device supports the
function you have tried.
Please Wait...
The unit is preparing to use the Bluetooth
function. If the message does not disappear,
turn off and turn on the unit, then connect
the device again (or reset the unit).
Please Reset...
Reset the unit and try the operation again. If
“Please Reset...” appears again, consult your
nearest JVC car audio dealers.
Changing the Bluetooth
To cancel repeat play or random play, select
“Off.”
BACK
• To return to the previous menu, press
Bluetooth Information:
If you wish to receive more information
about Bluetooth, visit the following JVC web
site: <http://www.jvc.co.jp/english/car/>
(English website only)
.
settings
1
2
] <Bluetooth> ] <Setting>
3
]
Select a setting item, then repeat
the procedure to change the setting
accordingly.
• To return to the previous menu, press
• To exit from the menu, press
[Hold]
DISP
or
BACK
MENU
.
.
19ENGLISH
Page 20
Setting item Selectable setting, [
Initial: Underlined
]
Auto Connect • Last
• Off
Auto Answer
• On
• Off
Message
• On
Notice
• Off
MIC Setting —
NR/EC Mode
• On
• Off
Ringing Tone
• In Unit
• In Phone
: The connection is established automatically with the last
connected Bluetooth device when you turn on the unit.
: The unit does not connect the Bluetooth device automatically.
Connect the device manually. (
15)
: The unit answers the incoming calls automatically.
: The unit does not answer the calls automatically. Answer the
calls manually. (
17)
: The unit informs you of the arrival of a message by ringing and
displaying “Received Message.”
: The unit does not inform you of the arrival of a message.
: Adjust the volume of the microphone connected to the unit.
[ Level 01/02/03 ]
: The unit adjusts the Noise Reduction and Echo Cancelation of
the microphone connected to the unit for clearer sound.
: Cancels.
: The unit rings to alert you when a call/Text Message comes in.
Call: Select your preferred ring tone when a call comes
in. [ Tone 1/2/3 ]
Message: Select your preferred ring tone when a Text
Message comes in. [ Tone 1/2/3 ]
: The unit rings (using the connected phones’ ring tone) to
alert you when a call/Text Message comes in. (The connected
mobile phone rings if it does not support this feature.)
Phonebook
Trans
— : You can copy the phonebook memory of a mobile phone into
the unit (via OPP).
Enter the PIN code to the unit to transfer the phonebook into
the unit. You can transfer a maximum of 400 numbers.
Phonebook
Select *
1
Initialize
• In Phone
• In Unit
• Yes
: The unit browses the phonebook of the connected phone.
: The unit browses the phonebook registered in the unit.
: Initialize all the Bluetooth settings (including stored pairing,
phonebook, and etc.).
• No
Information • My BT Name
• My Address
• BT Software Ver
• Connected Phone *
• Connected Audio *
1
*
Selectable only when the connected phone supports PBAP.
2
Displayed only when a Bluetooth phone/audio player is connected.
*
: Cancels.
2
2
: Shows the unit name.
: Shows address of USB Bluetooth Adapter.
: Shows the software version.
: Shows connected phone name.
: Shows connected audio device name.
20 ENGLISH
Page 21

Listening to the HD Radio ™ Broadcast
Before operating, connect HD Radio tuner box,
KT-HD300 (not supplied) to the expansion port
on the rear of the unit.
• For details, refer also to the instructions
supplied with the HD Radio tuner box.
What is HD Radio Technology?
HD Radio Technology can deliver high-quality
digital sound—AM digital will have FM-like
quality (in stereo) and FM digital will have
CD-like quality—with static-free and clear
reception. Furthermore, stations can offer text
and data, such as artist names and song titles.
• When the HD Radio tuner box is connected,
it can also receive conventional analog
broadcasts.
• Many HD Radio stations also offer more than
one channel of programming. This service is
called multicasting.
• To find HD Radio stations in your area, visit
<http://www.hdradio.com/>.
For basic radio operations,
8, 9.
Select your desired channel.
j
HD1
j
“Linking” appears while linking to a multicast
channel.
HD2 j .... j HD8
(back to the beginning)
Searching for HD Radio stations
only
[Hold]
Changing HD Radio reception
mode
While receiving an HD Radio broadcast, the unit
receives digital or analog audio automatically
due to the receiving condition.
When receiving...
An HD Radio station
WXYZ-HD1
Station Call Sign appears.
HD Radio multicast channels
Channel number
First four letters of Call Sign
While listening to an HD Radio station...
1
[Hold]
2
]
<Tuner> ] <Blend Hold> ]
<Auto / Analog / Digital>
lights up when holding the digital
reception or flashes when holding the
analog reception.
• If no sound can be heard with <Auto>,
change the setting to <Analog> or <Digital>.
• The setting automatically changes to <Auto>
if you tune in to or change to another station,
or if you turn off the power.
21ENGLISH
Page 22

• This setting cannot take effect for the
conventional FM/AM stations.
• If the radio station forces the reception
mode to digital or analog, the
indicator lights up.
or
Using the remote controller
5 U
/ D ∞: Changes the preset
stations
2 R
/ F 3: Searches for stations
Listening to the satellite radio
Before operating, connect either one of the following systems (not supplied) to the expansion port
on the rear of this unit.
For listening to a SIRIUS Satellite radio:
• SC-C1 and KS-SRA100
• PnP, SC-VDOC1 and KS-SRA100
• For details, refer also to the instructions supplied with the other components.
For listening to an XM Satellite radio:
• JVC Smart Digital Adapter (XMDJVC100)
• CNP2000UC and CNPJVC1
GCI (Global Control Information) update
• If channels are updated after subscription, updating starts automatically. The following appears
and no sound can be heard:
– For SIRIUS Satellite radio: “Updating”
– For XM Satellite radio: “UPDATING”
• Update takes a few minutes to complete.
• During update, you cannot operate your satellite radio.
~
Ÿ
]
“SIRIUS” or “XM”
]
Select a category.
SIRIUS: If you select “ALL,” you can
tune in to all the channels of all
categories.
!
]
Select a channel to listen.
Holding the button changes the channels
rapidly.
While searching, invalid and unsubscribed
channels are skipped.
XM: If you do not select a channel
within 15 seconds, category selected in
step
Ÿ
is canceled. You can select all
channels of all categories now (including
non-categorised channels).
22 ENGLISH
Page 23

Activate your SIRIUS subscription after
connection
1
Checking the satellite radio ID
While selecting “SIRIUS” or “XM”...
]
“SIRIUS”
SIRIUS Satellite radio starts updating all
the SIRIUS channels. Once completed,
SIRIUS Satellite radio tunes in to the
preset channel, CH184.
Check your SIRIUS ID. ( 32)
2
Contact SIRIUS on the internet at
3
<http://activate.siriusradio.com/> to
activate your subscription, or you can
call SIRIUS toll-free at 1-888-539-SIRIUS
(7474).
• “Sub Updated Press Any Key” scrolls on
the display once subscription has been
completed.
Activate your XM subscription after
connection
• Only Channel 0, 1, and 247 are available
before activation.
]
Select “Channel 0.”
SIRIUS: SIRIUS identification number is
displayed after “Channel 0” is selected.
XM: The display alternately shows “RADIO ID”
and the 8-digit (alphanumeric) ID number.
To cancel the ID number display, select any
channel other than “Channel 0.”
Storing channels in memory
You can preset up to 18 channels for both
SIRIUS and XM.
Ex.: Storing channel into preset number “04.”
Tune in to a channel you want to store.
1
~
(Steps
– !, 22.)
2
[Hold]
]
Shows the “Preset Mode” screen.
1
]
“XM”
XMDirect ™ Tuner Box or XMDirect2
Tuner System starts updating all the
XM channels. “Channel 1” is tuned in
automatically.
Check your XM Satellite radio ID labelled
2
on the casing of the XMDirect™ Tuner
Box or XMDirect2 Tuner System, or tune
in to “Channel 0”. (
Contact XM Satellite radio on the internet
3
at <http://xmradio.com/activation/> to
activate your subscription, or you can call
1-800-XM-RADIO (1-800-967-2346).
• Once completed, the unit tunes in to
one of the available channels (Channel
4 or higher).
right column)
3
]
Selects preset number “4.”
23ENGLISH
Page 24

Selecting preset station/category/
Using the remote controller
channel on the list
1
]
Shows the “List” screen.
2
]
Selects <Preset / Category /
Channel>
If a category is selected, the first channel
of this category is tuned in.
3
]
Selects a preset station/category/
channel to listen.
5 U
/ D ∞: Changes the
categories
2 R
/ F 3: Changes the channels
2 R
/ F
3
: Changes the channels
[Hold]
Information:
• To know more about SIRIUS Satellite radio
or to sign up, visit <http://www.sirius.com>.
• For the latest channel listings and
programming information, or to sign up
for XM Satellite radio, visit <http://www.
xmradio.com>.
rapidly
Listening to the iPod/iPhone
You can connect the iPod/iPhone using the USB 2.0 cable (accessory of the iPod/iPhone) to the
USB input terminal on the control panel or USB cable from the rear of the unit.
There are three control terminals:
• <Headunit Mode> Control by this unit;
• <iPod Mode> Control by the connected iPod/iPhone;
• <External Mode> The sound of any functions (musics, games, applications, etc.) running on
the connected iPod/iPhone is emitted through the speakers connected to
this unit.
Preparation:
Select the controlling terminal, <Headunit Mode>, <iPod Mode>, or <External Mode> for iPod
playback:
• Press and hold
• Make the selection from <iPod Switch> setting,
BACK
button.
33.
24 ENGLISH
Page 25

The operations explained below are under <Headunit Mode>.
]
~
Turn on the power.
Ÿ
USB input
terminal
USB 2.0 cable (accessory of the iPod/iPhone)
USB cable from the
rear of the unit
USB 2.0 cable (accessory of the iPod/iPhone)
Playback starts automatically.
iPod/iPhone
and/or
iPod/iPhone
Caution:
• Some of the applications in the connected
iPod/iPhone may not work correctly with this
unit.
• Avoid using the iPod/iPhone if it might hinder
your safety while driving.
• Make sure all important data has been backed
up to avoid losing the data.
Stopping playback
and
detaching the iPod/iPhone
Straightly pull the USB 2.0 cable out from the
unit.
“No USB” appears. Press
another playback source.
• For details, refer also to the instructions
supplied with your iPod/iPhone.
/ SOURCE
to listen to
The following is not applicable in
<External Mode>.
Starts playback or pauses/
resumes playback
• While in <External Mode>, the
sound mutes.
Selects track or
chapter
Fast-forwards or
[Hold]
Notice:
When operating an iPod, some operations
may not be performed correctly or as
intended. In this case, visit the following JVC
web site: <http://www.jvc.co.jp/english/car/>
(English website only).
reverses the track
25ENGLISH
Page 26

Selecting a track from the menu
The following is not applicable in <iPod Mode>
and <External
Mode>.
1
2
• Only the existing characters will be shown on
the search menu.
•
Press and hold
the character of the search menu.
• If your iPod/iPhone contains many tracks,
searching take some time.
• Searching may not work on some of the layers
of the selected menu.
5/∞
to continuously change
]
Select the desired menu.
Playlists j Artists j Albums j
Songs j Podcasts j Genres j
Composers j Audiobooks j (back
to the beginning)
3
]
Select your desired track.
Repeat this procedure until the desired
track is selected.
• If the selected menu contains many tracks,
you can fast search (±10, ±100, ±1000)
through the menu by turning the control dial
quickly.
BACK
• To return to the previous menu, press
You can also use the search menu (A to Z and 0
to 9) to scroll through the desired menu.
After you have selected your desired menu (in
step 2)....
1
Press 5/∞ to show the search menu.
• The first character of the current file name
appears.
2
Press 5/∞ to select your desired character.
Then press the control dial to confirm.
• The track list with the selected character
appears.
3
Turn the control dial to select your desired
track. Then press the control dial to confirm.
.
Selecting the playback modes
The following is not applicable in <iPod Mode>
and <External Mode>.
1
[Hold]
2
]
“Repeat” j “Random”
3
Repeat
One : Functions the same as
“Repeat One” of the iPod
All : Functions the same as
“Repeat All” of the iPod
Random
Song :
Album : Functions the same as
• To cancel repeat play or random play, select
“Off.”
• “Random Album” is not available for some
iPod/iPhone.
• To return to the previous menu, press
Functions the same as
“Shuffle Songs” of the iPod
“Shuffle Albums” of the iPod
BACK
.
26 ENGLISH
Page 27

Using the remote controller
The following is not applicable in <External Mode>.
2 R
/ F 3: Selects track or chapter
2 R
/ F
3
: Fast-forwards or reverses the track
[Hold]
Listening to the other external
components
You can connect an external component to:
• EXT IN: Expansion port on the rear of this unit using the following adapters (not supplied):
– KS-U57, Line Input Adapter
– KS-U58, AUX Input Adapter
Preparation: Make sure <Show> is selected for the <Source Select> = <Ext Input> setting.
33)
(
• AUX IN: AUX (auxiliary) input jack on the control panel.
Preparation: Make sure <Show> is selected for the <Source Select>
33)
(
• For details, refer also to the instructions supplied with the adapter or external components.
~
Ÿ
]
“EXT INPUT” or “AUX IN”
Turn on the connected
component and start
!
⁄
]
Adjust the volume.
Adjust the sound as you want.
(
28)
=
<Aux Source> setting.
playing the source.
Connecting an external component to the AUX input jack
3.5 mm (3/16”) stereo mini plug
(not supplied)
Portable audio player,
etc.
27ENGLISH
Page 28

Selecting a preset sound mode
You can select a preset sound mode suitable
for the music genre.
FLAT = NATURAL = DYNAMIC = VOCAL
=
BASS = USER = (back to the beginning)
While listening, you can adjust the tone level of
the selected sound mode.
1
[Hold]
2
]
Select the tone (Bass / Middle /
Treble).
3
Storing your own sound mode
You can store your own adjustments in
memory.
1
[Hold]
2
]
<PRO EQ> ] <Bass / Middle /
Treble>
Adjust the sound elements of the
3
selected tone. (
1
Press
2
Press 5 / ∞ to adjust the level.
3
Turn the control dial to adjust the
4
Press the control dial to store the
4
frequency.
Q-slope.
adjustment.
table on the left)
/
¢
to adjust the
]
Adjust the level (–06 to +06) of the
selected tone.
The sound mode is automatically stored
and changed to “USER.”
Tone Sound element
Bass Frequency: 50 Hz, 100 Hz, 200 Hz
Level: –06 to +06
Q: Q0.7, Q1.0, Q1.4, Q2.0
Middle Frequency: 0.5 kHz, 1.0 kHz, 2.0 kHz
Level: –06 to +06
Q: Q0.7, Q1.0, Q1.4, Q2.0
Treble Frequency: 5.0 kHz, 10.0 kHz, 15.0 kHz
Level: –06 to +06
Q: Q0.7, Q1.0, Q1.4, Q2.0
Repeat steps 2 and 3 to adjust other
4
tones.
5
]
Exit from the menu.
The adjustments made will be stored
automatically in “USER.”
The current sound mode changes to “USER”
automatically.
or
28 ENGLISH
Page 29

Menu operations
1 2 3
[Hold]
Category
DEMO
Display demonstration
Menu item Selectable setting, [
• On
• Off
Set Clock [ 1:00AM ]
24H/12H
Clock Adjust *
• 12Hours
• 24Hours
1
• Auto
• Off
: Display demonstration will be activated
automatically if no operation is done for about
20 seconds.
: Cancels. (
: Adjust the hour, then the minute. (
: Select the time display mode. (
: The built-in clock is automatically adjusted using
the clock data provided via the satellite radio
channel.
: Cancels.
Repeat step 2 if necessary.
• To return to the previous menu,
BACK
press
• To exit from the menu, press
MENU
or
Initial: Underlined
4)
.
.
]
4)
4)
DISP
1, *2
Time Zone *
Clock
1, *2
DST *
Daylight savings
time
Bass —
Middle
PRO EQ
Treble
1
Displayed only when SIRIUS Satellite radio or XM Satellite radio is connected.
*
2
Displayed only when <Clock Adjust> is set to <Auto>.
*
Eastern,
Atlantic,
Newfndlnd,
Alaska,
Pacific,
Mountain,
Central
• On
• Off
: Select your residential area from one of the time
zones for clock adjustment.
: Activates daylight savings time if your residential
area is subject to DST.
: Cancels.
: For settings,
28.
29ENGLISH
Page 30

Category
Menu item Selectable setting, [
Initial: Underlined
]
Button Zone Color 01 —
Display Zone
Color
All Zone
Color 29,
User, Color
Flow 1, 2, 3
Day Color • Button Zone
•
Night Color
Menu Color
Display Zone
• On
• Off
Ring Color *
3
• On
Color Setup
• Off
: For settings,
34.
: For settings, 34, 35.
: Changes the display and buttons (except for
EQ/BASS-TRE
/
DISP
) illumination during menu, list
search and playback mode operations.
: Cancels.
: When a call comes in, the display will flash in blue.
• The display will change to the original color
when the call is answered or the incoming call
stops.
When the unit receives a text message, the
display only illuminate in blue.
: Cancels.
Fad/Bal *
Fader/balance
4, *5
R6 – F6, [ 0 ]
L6 – R6, [ 0 ]
: Fad (fader): Press 5 / ∞ to adjust the front and
rear speaker output balance.
: Bal (balance): Press
the left and right speaker output balance.
Loud
Loudness
Volume Adjust
Audio
•
Loud 1/2/3
• Off
Level –5 —
Level +5,
[ Level 0 ]
: Boost low and high frequencies to produce a
well-balanced sound at a low volume level.
: Cancels.
: Preset the volume adjustment level of each source
(except FM), compared to the FM volume level.
The volume level will automatically increase or
decrease when you change the source.
• Before making an adjustment, select the source
you want to adjust.
• “FIX” appears on the display if “FM” is selected as
the source.
3
Displayed only when USB Bluetooth adapter, KS-UBT1 is connected.
*
4
*
If you are using a two-speaker system, set the fader level to <0>.
5
This adjustment will not affect the subwoofer output.
*
4
/
¢
to adjust
30 ENGLISH
Page 31

Category
Menu item Selectable setting, [
Initial: Underlined
]
Subwoofer • LPF
HPF
High Pass Filter
Audio
Beep
Keytouch tone
Amplifier
6
Gain *
: Turn the control dial to select the cutoff
frequency to the subwoofer.
Off: All signals are sent to the subwoofer.
LPF 55Hz/LPF 85Hz/LPF 120Hz: Frequencies
higher than 55 Hz/85 Hz/120 Hz are cut off.
• Level
: Turn the control dial to adjust the subwoofer
output level. Level 00 to Level 08 [ Level 04 ]
• Phase
: Turn the control dial to select the subwoofer
phase. 0 Deg (normal) or 180 Deg (reverse)
Select the cutoff frequency to the front/rear speakers. Set this to
match the LPF settings.
• 62Hz/95Hz/
135Hz
• Off
• On
• Off
• High Power
• Low Power
: Frequencies lower than 62 Hz/95 Hz/135 Hz are
cut off.
: All signals are sent to the front/rear speakers.
: Activates the keypress tone.
: Deactivates the keypress tone.
: Vol 00 – Vol 50
: Vol 00 – Vol 30 (Select if the maximum power
of each speaker is less than 50 W to prevent
damaging the speakers.)
7
• Off *
: Deactivates the built-in amplifier.
Dimmer •
Level Meter
Display
Scroll *
9, *10
Auto
• On
• Time Set
• Off
• Meter 1
• Meter 2
• Once
• Auto
• Off
Pressing
DISP
: Dims the display when you turn on the
headlights. *
8
: Dims the display and button illumination.
: Set the timer for dimmer. (
35)
: Cancels.
: Selects the different level meter patterns. (
DISP
• Press
to show the selected level meter.
: Scrolls the displayed information once.
: Repeats scrolling (at 5-second intervals).
: Cancels.
for more than one second can scroll the display
7)
regardless of the setting.
6
The volume level automatically changes to “Vol 30” if you change to <Low Power> with the volume
*
level set higher than “Vol 30.”
7
*
Only for KD-A815.
8
The illumination control lead connection is required. (See “Installation/Connection Manual.”)
*
9
*
Some characters or symbols will not be shown correctly (or will be blanked) on the display.
10
Not applicable to HD Radio text scrolling.
*
31ENGLISH
Page 32

Category
Menu item Selectable setting, [
Initial: Underlined
]
Tag Display • On
• Off
LCD Type • Negative
• Positive
• Auto
Display
Contrast
Level 01 —
Level 08
[ Level 05 ]
12
*
: For Bluetooth operations, 14 – 16.
: For Bluetooth settings,
Bluetooth
13
SSM *
Strong-station
Sequential
• SSM 01 – 06 *
• SSM 07 – 12
• SSM 13 – 18
Memory
19, 20.
: Shows the Tag information while playing
MP3/WMA/WAV tracks.
: Cancels.
: Negative pattern of the display.
: Positive pattern of the display.
: Positive pattern will be selected during the
11
day time *
used during the night time *
; while negative pattern will be
11
.
: Adjust the display contrast to make the
display indications clear and legible.
14
: For settings,
8.
Area Change
Tuner channel
interval
• US
• EU
: When using in North/Central/South America.
AM/FM intervals are set to 10 kHz/200 kHz.
: When using in any other areas. AM/FM
intervals are set to 9 kHz/50 kHz (100 kHz
during auto search).
• SA
Tuner
: When using in South American countries
where FM interval is 100 kHz. AM interval is
set to 10 kHz.
IF Band
Intermediate
frequency band
• Auto
• Wide
: Increases the tuner selectivity to reduce
interference noises between adjacent
stations. (Stereo effect may be lost.)
: Subject to interference noises from adjacent
stations, but sound quality will not be
degraded and the stereo effect will remain.
Sirius ID *
11
Depends on the <Dimmer> setting.
*
12
Displayed only when the USB Bluetooth Adapter (KS-UBT1) is connected.
*
13
*
Displayed only when the source is “FM” or “HD Radio.”
14
If an HD Radio tuner box is connected, you can also search and store the AM stations to
*
15
: The 12-digit SIRIUS identification number appears on the display.
(
23)
<SSM 01 – 06>.
15
Displayed only when SIRIUS Satellite radio is connected.
*
32 ENGLISH
Page 33

Category
Menu item Selectable setting, [
Initial: Underlined
]
Blend Hold *
HD Radio
reception mode
Tuner
Stereo/Mono *
Ext Input *
AM Source *
Aux Source *
Source Select
Bluetooth
Audio *
22
Drive Change
USB *
21
18
19
16
17
• Auto
• Analog
• Digital
• Stereo
• Mono
: Switch between digital and analog audio
automatically. (
21, 22)
: Tune in to analog audio only.
: Tune in to digital audio only.
: Restore the stereo effect.
: Activate monaural mode to improve FM
reception, but stereo effect will be lost. (
20
• Show
• Hide
• Show
• Hide
• Show
• Hide
• Show
• Hide
: Enable “EXT IN” in source selection.
: Disable “EXT IN” in source selection.
: Enable “AM” in source selection.
: Disable “AM” in source selection.
: Enable “AUX IN” in source selection.
: Disable “AUX IN” in source selection.
: Enable “BT FRONT/BT REAR” in source selection.
: Disable “BT FRONT/BT REAR” in source selection.
: Select to change the drive when a multiple drives device is
connected to the USB input terminal (FRONT/REAR).
8)
iPod Switch
iPod/iPhone
control
24
•
Headunit Mode
• iPod Mode
• External
Mode *
23
: Controls iPod playback through the unit.
: Controls iPod playback through the iPod/
iPhone.
: The sound of any functions (musics, games,
applications, etc.) running on the connected
iPod/iPhone is emitted through the speakers
iPod *
Audiobooks
Speed control of
“Audiobooks”
• Normal
• Faster
• Slower
connected to this unit.
: You can select the playback speed of the
Audiobooks sound file in your iPod/iPhone.
• Initial selected item depends on your iPod/
iPhone setting.
16
Displayed only when HD Radio tuner box is connected.
*
17
Displayed only when the source is “FM.”
*
18
Displayed only when any source other than “EXT IN” is selected.
*
19
*
Displayed only when any source other than “AM” is selected.
20
Displayed only when any source other than “AUX IN” is selected.
*
21
*
Displayed only when any source other than “BT FRONT/BT REAR” is selected.
22
Displayed only when the source is “USB FRONT/USB REAR.”
*
23
While in <External Mode>, the display always show “External Mode.”
*
24
Displayed only when the source is “iPod FRONT/iPod REAR.”
*
33ENGLISH
Page 34

Selecting the variable buttons and display color illumination
You can select your preferred color for buttons
illumination (except for
display color seperately.
Button zone
All zone
EQ/BASS-TRE
Display zone
/
DISP
) and
1
[Hold]
2
]
<Color> ] <Button Zone / Display
Zone / All Zone>
3
]
Select your preferred color from one
of the 29 preset colors, <User> color, or
<Color Flow 1/2/3>.
Repeat steps 2 and 3 to select a
4
different zone and your preferred color.
• If <All Zone> is selected in step 2,
the buttons and display illumination
changed to the current/selected
<Button Zone> color.
You can also change the <All Zone>
color to one of your preferred color by
performing step 3.
5
]
Exit from the setting.
Creating your own day and night colors—User
You can create your own colors for <Day Color> and <Night Color> to apply to button zone and
display zone.
• <Day Color> Displayed when <Dimmer> is set to <Off>. (
• <Night Color> Displayed when <Dimmer> is set to <On>. (
Menu hierarchy Operation
Color Setup
Day Color
Night Color
• Button Zone
• Display Zone Press
• Button Zone Press
• Display Zone
35)
(
BACK
in step 2. (
BACK
step 2. (
after step 4, then select <Display Zone>
35)
after step 4, then select <Night Color> in
35)
31)
31)
34 ENGLISH
Page 35

Ex.: Creating <User> color for <Button Zone> in <Day Color>.
1
[Hold]
2
]
<Color Setup> ] <Day Color> ]
<Button Zone>
3
]
Select a primary color (Red j
Green
(00 to 31).
• Repeat this procedure until you have
j
Blue), then adjust the level
adjusted all the three primary colors.
4
]
Confirm the settings.
5
]
Exit from the setting.
If “00” is selected for all the primary colors (as in
step 3) for <Display Zone>, nothing appear on
the display.
Setting the time for dimmer
You can set the start/end time for dimmer.
1
[Hold]
2
]
<Display> ] <Dimmer> ]
<Time Set>
3
4
5
]
Adjust the dimmer start time.
]
Adjust the dimmer end time.
]
Exit from the setting.
35ENGLISH
Page 36

More about this unit
Basic operations
General
• If you turn off the power while listening to
a track, playback will start from where it had
been stopped previously next time you turn
on the power.
• If no operation is done for about 60 seconds
MENU
after pressing
be canceled.
button, the operation will
Tuner operations
Storing stations in memory
• During SSM search...
– All previously stored stations are erased and
the stations are stored anew.
– When SSM is over, the station stored in the
lowest preset number will be automatically
tuned in.
• When storing a station manually, the
previously preset station is erased when
a new station is stored in the same preset
number.
Disc/USB operations
Caution for DualDisc playback
• The Non-DVD side of a “DualDisc” does not
comply with the “Compact Disc Digital Audio”
standard. Therefore, the use of Non-DVD side
of a DualDisc on this product may not be
recommended.
General
• This unit has been designed to reproduce
CDs/CD Texts, and CD-Rs (Recordable)/CDRWs (Rewritable) in audio CD (CD-DA), MP3
and WMA formats.
• If you change the source while listening to a
disc, playback stops. Next time you select “CD”
as the playback source, playback will start
from where it had been stopped previously.
• When a disc is inserted upside down,
“Please Eject” appears on the display. Press
to eject the disc.
• If the ejected disc is not removed within
15 seconds, it is automatically inserted into
the loading slot again to protect it from dust.
• In this manual words “track” and “file” are
interchangeably used.
• While fast-forwarding or reversing on an MP3/
WMA/WAV file, you can only hear intermittent
sound.
• File/folder list may not appear correctly if too
many hierarchies and folders are used.
0
Playing a CD-R or CD-RW
• Use only “finalized” CD-Rs or CD-RWs.
• This unit can only play back files of the same
type as those detected first if a disc includes
both audio CD (CD-DA) files and MP3/WMA
files.
• This unit can play back multi-session discs;
however, unclosed sessions will be skipped
while playing.
• Some CD-Rs or CD-RWs may not play back on
this unit because of their disc characteristics,
or for the following reasons:
– Discs are dirty or scratched.
– Moisture condensation has occurred on the
lens inside the unit.
– The pickup lens inside the unit is dirty.
– The files on the CD-R/CD-RW are written
using the “Packet Write” method.
– There are improper recording conditions
(missing data, etc.) or media conditions
(stained, scratched, warped, etc.).
• CD-RWs may require a longer readout time
since the reflectance of CD-RWs is lower than
that of regular CDs.
36 ENGLISH
Page 37

• Do not use the following CD-Rs or CD-RWs:
– Discs with stickers, labels, or a protective seal
stuck to the surface.
– Discs on which labels can be directly printed
by an ink jet printer.
Using these discs under high temperature
or high humidity may cause malfunctions or
damage to the unit.
Playing an MP3/WMA disc
• This unit can play back MP3/WMA files with
the extension code <.mp3> or <.wma>
(regardless of the letter case—upper/lower).
• This unit can show the names of albums,
artists (performer), and Tag (Version 1.0, 1.1,
2.2, 2.3, or 2.4) for MP3 files and show WMA
Tag.
• This unit can display only one-byte characters.
No other characters can be correctly
displayed.
• This unit can play back MP3/WMA files
meeting the conditions below:
– Bit rate of MP3/WMA: 5 kbps — 320 kbps
– Sampling frequency of MP3:
32 kHz, 44.1 kHz, 48 kHz (for MPEG-1)
16 kHz, 22.05 kHz, 24 kHz (for MPEG-2)
– Sampling frequency of WMA:
8 kHz — 48 kHz
• The maximum number of characters for file/
folder names is 25 characters (including
<.mp3>, <.wma>); 128 characters for MP3/
WMA Tag.
• This unit can recognize a total of 20 000 files
and 2 000 folders (999 files per folder).
• This unit can play back files recorded in VBR
(variable bit rate).
Files recorded in VBR have a discrepancy
in the elapsed time display, and do not
show the actual elapsed time. In particular,
this difference becomes noticeable after
performing the search function.
• This unit cannot play back the following files:
– MP3 files encoded in MP3i and MP3 PRO
format.
– MP3 files encoded in an inappropriate
format.
– MP3 files encoded with Layer 1/2.
– WMA files encoded in lossless, professional,
and voice format.
– WMA files which are not based upon
Windows Media® Audio.
– WMA files copy-protected with DRM.
– Files which have data such as AIFF, ATRAC3,
etc.
• The search function works but search speed is
not constant.
Playing MP3/WMA/WAV tracks from a
USB device
• While playing from a USB device, the playback
order may differ from other players.
• This unit may be unable to play back some
USB devices or some files due to their
characteristics or recording conditions.
• This unit is compatible with the USB
Full-Speed.
• Depending on the shape of the USB devices
and connection ports, some USB devices may
not be attached properly or the connection
might be loose.
• When connecting a USB mass storage class
device, refer also to its instructions.
• This unit may not work properly with some
USB hub or USB card reader.
• If the connected USB device does not have
the correct files, “No File” appears.
• This unit can show ID3 Tag (Version 1.0, 1.1,
2.2, 2.3, or 2.4) for MP3 and WMA/WAV Tag.
37ENGLISH
Page 38

• This unit can play back MP3/WMA/WAV files
meeting the conditions below:
MP3:
– Bit rate: 32 kbps — 320 kbps (for MPEG-1)
8 kbps — 160 kbps (for MPEG-2)
– Sampling frequency:
32 kHz, 44.1 kHz, 48 kHz (for MPEG-1)
16 kHz, 22.05 kHz, 24 kHz (for MPEG-2)
WMA:
– Bit rate: 5 kbps — 320 kbps
– Sampling frequency: 8 kHz — 48 kHz
– Channel: 1 ch/2 ch
WAV:
– Bit rate: Linear PCM at 705 kbps and
1 411 kbps
– Sampling frequency: 44.1 kHz
– Channel: 1 ch/2 ch
• This unit can play back MP3 files recorded in
VBR (variable bit rate).
• The maximum number of characters for folder
and file names is 25 characters (including
<.mp3>, <.wma>, <.wav>); 128 characters for
MP3/WMA/WAV Tag.
• This unit can recognize a total of 20 000 files
and 2 000 folders (999 files per folder).
• The unit cannot recognize a USB mass storage
class device whose rating is other than 5 V
and exceeds 500 mA.
• USB devices equipped with special functions
such as data security functions cannot be
used with the unit.
• Do not use a USB device with 2 or more
partitions.
• When connecting with a USB cable, use the
USB 2.0 cable.
• This unit may not recognized some of the USB
device connected through a USB card reader.
• This unit may not play back files in a USB
device properly when using a USB extension
cord.
• This unit cannot assure proper functions or
supply power to all types of USB devices.
Bluetooth operations
• While driving, do not perform complicated
operation such as dialing the numbers, using
phonebook, etc. When you perform these
operations, stop your car in a safe place.
• Some Bluetooth devices may not be
connected to this unit depending on the
Bluetooth version of the device.
• If you connect a different USB Bluetooth
Adapter, all the registered devices and
information will be cleared.
• This unit may not work for some Bluetooth
devices.
• Connecting condition may vary depending
on the circumstances around you.
• If you turn off the unit, detach the control
panel, or unplug the USB Bluetooth Adapter
during a phone call conversation, the
Bluetooth connection is disconnected.
Continue the conversation using your mobile
phone.
• When the unit is turned off, the device is
disconnected.
Icons for phone types:
These icons indicate
the phone type of
number entries in
the Phonebook
: Cellular phone : Phone only
: Household
phone
: Office : Audio only
: General
: Other than
above
: Unknown
These icons indicate
the type of connected
phone/audio devices
: Phone/Audio
38 ENGLISH
Page 39

HD Radio reception
Menu operations
• HD Radio broadcasting can normally
be received in the USA, and it may also
be received in countries where limited
broadcasting has already begun.
• During SSM search...
– All stations including conventional FM/AM
stations are searched and stored for the
selected band.
iPod/iPhone operations
• You can control the following types of iPods/
iPhone:
– iPod with video (5th Generation) *
– iPod classic
– iPod nano (1st Generation) *
– iPod nano (2nd, 3rd, 4th, 5th Generation)
– iPod touch
– iPod touch (2nd Generation)
– iPhone/iPhone 3G/iPhone 3GS
* <iPod Mode> and <External Mode> are not
available.
• It is not possible to browse video files on the
“Videos” menu in <Headunit Mode>.
• If the iPod does not play correctly, please
update your iPod software to the latest
version. For details about updating your iPod,
visit <http://www.apple.com>.
• When you turn on this unit, the iPod is
charged through this unit.
• iPod shuffle cannot be used with this unit.
• The song order displayed on the selection
menu of this unit may differ from that of the
iPod.
• The text information may not be displayed
correctly (eg. accented letters).
• If the text information includes more than 16
characters, it scrolls on the display. This unit
can display up to 128 characters (ASCII code).
• <Auto> setting for <Dimmer> may not work
correctly on some vehicles, particularly on
those having a control dial for dimming. In
this case, change the <Dimmer> setting to
any other than <Auto>.
• If <LCD Type> is set to <Auto>, the display
pattern will change to the <Positive> or
<Negative> pattern depending on the
<Dimmer> setting.
JVC bears no responsibility for any loss of data
in an iPod/iPhone and/or USB mass storage
class device while using this System.
39ENGLISH
Page 40

• Microsoft and Windows Media are either registered trademarks or trademarks of Microsoft
Corporation in the United States and/or other countries.
•
The Bluetooth word mark and logos are owned by the Bluetooth SIG, Inc. and any use of such
marks by Victor Company of Japan, Limited (JVC) is under license. Other trademarks and trade
names are those of their respective owners.
• HD Radio ™ and the HD Radio Ready logo are proprietary trademarks of iBiquity Digital Corp.
• “SIRIUS” and the SIRIUS dog logo are registered trademarks of SIRIUS Satellite Radio Inc.
• XM and its corresponding logos are registered trademarks of XM Satellite Radio Inc.
• “SAT Radio,” the SAT Radio logo and all related marks are trademarks of SIRIUS Satellite Radio
Inc., and XM Satellite Radio, Inc.
• “Made for iPod” means that an electronic accessory has been designed to connect specifically
to iPod and has been certified by the developer to meet Apple performance standards.
• “Works with iPhone” means that an electronic accessory has been designed to connect
specifically to iPhone and has been certified by the developer to meet Apple performance
standards.
• Apple is not responsible for the operation of this device or its compliance with safety and
regulatory standards.
• iPod is a trademark of Apple Inc., registered in the U.S. and other countries.
• iPhone is a trademark of Apple Inc.
40 ENGLISH
Page 41

Maintenance
How to clean the connectors
Frequent detachment will deteriorate the
connectors.
To minimize this possibility, periodically wipe
the connectors with a cotton swab or cloth
moistened with alcohol, being careful not to
damage the connectors.
Connectors
Moisture condensation
Moisture may condense on the lens inside the
unit in the following cases:
• After starting the heater in the car.
• If it becomes very humid inside the car.
Should this occur, the unit may malfunction.
In this case, eject the disc and leave the unit
turned on for a few hours until the moisture
has evaporated.
How to handle discs
When removing a disc
from its case, press down
the center holder of the case
and lift the disc out, holding
it by the edges.
• Always hold the disc by the edges. Do not
touch its recording surface.
When storing a disc in its case, gently insert
the disc around the center holder (with the
printed surface facing up).
• Make sure to store discs in cases after use.
Center holder
To keep discs clean
A dirty disc may not play
correctly. If a disc does become
dirty, wipe it with a soft cloth
in a straight line from center to
edge.
• Do not use any solvents (for example,
conventional record cleaner, spray, thinner,
benzine, etc.) to clean discs.
To play new discs
New discs may have some
rough spots around the inner
and outer edges. If such a disc
is used, this unit may reject the
disc.
To remove these rough spots, rub the edges
with a pencil or ball-point pen, etc.
Do not use the following discs:
Single CD—8 cm
(3-3/16”) disc
Sticker and sticker
residue
Unusual shape
Warped disc
Stick-on label
C-thru Disc
(semitransparent
disc)
Transparent or
semitransparent
parts on its recording
area
41ENGLISH
Page 42

Troubleshooting
Symptom Remedy/Cause
Sound cannot be heard from the
speakers.
The unit does not work at all.
“Connect Error” appears on the
General
display.
“AUX IN” cannot be selected. Check the <Source Select>
Nothing appear on the display.
SSM automatic presetting does
not work.
Static noise while listening to the
radio.
FM/AM
“AM” cannot be selected. Check the <Source Select>
Disc cannot be played back. Insert the disc correctly.
• Adjust the volume to the optimum level.
• Make sure the unit is not muted/paused (
• Check the cords and connections.
Reset the unit. (
Remove the control panel, wipe the connector,
then attach it again. (
setting. (
Check the <User> color settings. (
Store stations manually.
Connect the antenna firmly.
setting. (
33)
33)
3)
3)
=
<Aux Source>
=
<AM Source>
6).
34, 35)
• CD-R/CD-RW cannot be played
back.
• Tracks on the CD-R/CD-RW
cannot be skipped.
• Disc can neither be played back
nor ejected.
• “No Eject“ appears on the display.
Disc sound is sometimes
interrupted.
Disc playback
Disc cannot be recognized (“No
Disc,” “CD Loading Error,” or “Eject
Error” flashes).
“Please Eject“ appears on the
display.
• Insert a finalized CD-R/CD-RW.
• Finalize the CD-R/CD-RW with the component
which you used for recording.
• Unlock the disc. (
• Eject the disc forcibly. (
• Stop playback while driving on rough roads.
• Change the disc.
• Check the cords and connections.
Eject the disc forcibly. (
This occurs sometimes due to over-heating. Eject
the disc or change to another playback source.
10)
3)
3)
42 ENGLISH
Page 43

Symptom Remedy/Cause
Disc cannot be played back. • Use a disc with MP3/WMA tracks recorded in a format
compliant with ISO 9660 Level 1, Level 2, Romeo, or
Joliet.
• Add the extension code <.mp3> or <.wma> to the file
names.
Noise is generated. Skip to another track or change the disc. (Do not add
the extension code <.mp3> or <.wma> to non-MP3 or
WMA tracks.)
A longer readout time is
required (“Reading” keeps
flashing on the display).
Tracks do not play back in the
order you have intended them
to play.
The elapsed playing time is not
MP3/WMA playback
correct.
“Please Eject” appears on the
display.
The unit beeps when a folder
is selected.
“Not Support” appears on the
display and track skips.
Do not use too many hierarchical levels and folders.
The playback order is determined by the file name.
Folder with numbers on the initial as their names
are sorted in numerical order. However, folder with
no numbers on the initial of their names are sorted
according to the file system of the CD.
This sometimes occurs during playback. This is caused
by how the tracks are recorded on the disc (eg. variable
bit rate).
Insert a disc that contains MP3/WMA tracks.
Selected folder is an empty folder*. Select another
folder that contains MP3/WMA tracks.
Skip to the next track encoded in an appropriate format
or to the next non-copy-protected WMA track.
The correct characters are not
displayed (e.g. album name).
* Folder that is physically empty or folder that contains data but does not contain valid MP3/WMA track.
This unit can only display letters (capital: A – Z,
small: a – z), numbers, and a limited number of symbols.
(
9)
43ENGLISH
Page 44

Symptom Remedy/Cause
Noise is generated. The track played back is not an MP3/WMA/WAV track.
Skip to another file. (Do not add the extension code
<.mp3>, <.wma>, or <.wav> to non-MP3/WMA/WAV
tracks.)
“Reading” keeps flashing on the
display.
“Read Failed” appears on the
display.
“No File” appears on the
display.
“Not Support” appears and
track skips.
Tracks/folders are not played
back in the order you have
USB device playback
intended.
• “No USB” appears on the
display.
• The unit cannot detect the
USB device.
• Readout time varies depending on the USB device.
• Do not use too many hierarchy or folders.
• Turn off the power then on again.
• Do not pull out or connect the USB device repeatedly
while “Reading” is displayed on the display.
The connected USB device is not working properly.
Connect the USB device again.
Check whether the selected folder, the connected USB
device, or the iPod/iPhone contains a playable file.
Check whether the track is a playable file format.
The playback order is determined by the file name.
Folders with numbers on the initial of their names
are sorted in numerical order. However, folders with
no numbers on the initial of their names are sorted
according to the file system of the USB device.
• Check whether the connected USB device or the iPod/
iPhone is compatible with this unit.
• The USB device is not connected properly. Connect
the USB device again.
While playing a track, sound is
sometimes interrupted.
Correct characters are not
displayed (e.g. album name).
44 ENGLISH
The tracks have not been properly copied into the USB
device. Copy tracks again into the USB device, and try
again.
This unit can only display letters (capital: A – Z,
small: a – z), numbers, and a limited number of symbols.
9)
(
Page 45

Symptom Remedy/Cause
The unit does not detect the
Bluetooth device.
The unit does not make pairing
with the Bluetooth device.
Echo or noise occurs. Adjust the microphone unit’s position.
Phone sound quality is poor. • Reduce the distance between the unit and the
The unit does not response
when you tried to copy the
phonebook to the unit.
The sound is interrupted or
skipped during playback of a
Bluetooth audio player.
Bluetooth
• Search from the Bluetooth device again.
• Reset the unit (
device again.
Enter the same PIN code for both the unit and target
device.
Bluetooth mobile phone.
• Move the car to a place where you can get a better
signal reception.
You may have tried to copy the same entries (as stored)
to the unit. Press
• Reduce the distance between the unit and the
Bluetooth audio player.
• Disconnect the device connected for Bluetooth
Phone.
• Turn off, then turn on the unit.
• Connect the player again, when the sound is not yet
restored.
3), then search from the Bluetooth
DISP
or
BACK
to exit.
The connected audio player
cannot be controlled.
“Voice Dial” is not successful. • Use “Voice Dial” calling method in a more quiet
Sound quality changes when
receiving HD Radio stations.
No sound can be heard. • <Analog> is selected when receiving all digital
HD Radio reception
• Check whether the connected audio player supports
AVRCP (Audio/Video Remote Control Profile).
(Operations depend on the connected audio player.)
• Disconnect and connect the Bluetooth player again.
environment.
• Reduce the distance from the microphone when you
speak the name.
• Change the <NR/EC Mode> to <Off> (
try again.
Fix the reception mode either to <Digital> or <Analog>.
21, 22, 33)
(
broadcast of HD Radio station. Select <Digital> or
<Auto>. (
• <Digital> is selected when receiving weak digital
signals or receiving conventional radio broadcast.
Select <Analog> or <Auto>. (
21, 22, 33)
21, 22, 33)
20), then
“Reset 08” appears on the
display.
Reconnect this unit and the HD Radio tuner box
correctly, then reset the unit. (
3)
45ENGLISH
Page 46

Symptom Remedy/Cause
“CALL 1-888-539-SIRIUS TO SUBSCRIBE”
scrolls on the display while listening to
the SIRIUS Satellite radio.
No sound can be heard. “Updating”
appears on the display.
“No Signal” appears on the display. Move to an area where signals are stronger.
“No Antenna” appears on the display. Connect the antenna firmly.
“Invalid Channel” appears on the
display for about 5 seconds, then
returns to the previous channel or
default channel while listening to the
SIRIUS Satellite radio.
The display is blank while listening to
the SIRIUS Satellite radio/XM Satellite
radio.
“CHANNEL---” or “CH UNAVAIL”
Satellite Radio
appears on the display for about
2 seconds, then returns to the previous
channel while listening to the XM
Satellite radio.
Starts subscribing to SIRIUS Satellite radio.
23)
(
The unit is updating the channel information
and it takes a few minutes to complete.
No broadcast on the selected channel.
Select another channel or continue listening to
the previous channel or default channel.
No text information for the selected channel.
Selected channel is no longer available or is
unauthorized.
Select another channel or continue listening to
the previous channel.
“Off Air” appears on the display while
listening to the XM Satellite radio.
“Loading” appears on the display while
listening to the XM Satellite radio.
• “Reset 08” appears on the display.
• Satellite radio does not work at all.
Selected channel is not broadcasting at this
time.
Select another channel or continue listening to
the previous channel.
The unit is loading the channel information and
audio.
Text information are temporarily unavailable.
Reconnect this unit and the satellite radio
correctly and reset this unit.
46 ENGLISH
Page 47

Symptom Remedy/Cause
The iPod does not turn on or does not
work.
The sound is distorted. Deactivate the equalizer either on this unit or
A lot of noise is generated. Turn off (uncheck) the “VoiceOver” feature of the
iPod/iPhone
Playback stops. The headphones are disconnected during
“No File” appears on the display. No tracks are stored. Import tracks to the iPod/
• Check the connecting cable and its
connection.
• Update the firmware version of the iPod/
iPhone.
• Charge the battery of the iPod/iPhone.
• Reset the iPod/iPhone.
• Check whether <iPod Switch> setting is
appropriate. (
the iPod/iPhone.
iPod. For details, visit <http://www.apple.com>.
playback. Restart the playback operation.
25)
(
iPhone.
33)
“Restricted” appears on the display. Check whether the connected iPod/iPhone is
compatible with this unit. (
39)
47ENGLISH
Page 48

Specifications
Power Output: 20 W RMS × 4 Channels
at 4 Ω and ≤ 1% THD+N
Signal-to-Noise Ratio: 80 dBA (reference: 1 W
into 4 Ω)
Load Impedance: 4 Ω (4 Ω to 8 Ω allowance)
Tone Control Range: Bass: ±12 dB (50 Hz, 100 Hz, 200 Hz)
Frequency Response: 40 Hz to 20 000 Hz
AUDIO AMPLIFIER SECTION
Line-Out/subwoofer-Out Level/
Impedance:
Q0.7, Q1.0, Q1.4, Q2.0
Middle: ±12 dB (0.5 kHz, 1.0 kHz, 2.0 kHz)
Q0.7, Q1.0, Q1.4, Q2.0
Treble: ±12 dB (5.0 kHz, 10.0 kHz, 15.0 kHz)
Q0.7, Q1.0, Q1.4, Q2.0
KD-A815: 5.0 V/20 kΩ load (full scale)
KD-R810: 2.5 V/20 kΩ load (full scale)
Output Impedance: 1 kΩ
Other Terminal: AUX (auxiliary) input jack, USB input terminal, USB
cable, Antenna input, Expansion port, Steering
wheel remote input (for KD-A815)
Frequency Range: FM: with channel interval set to
100 kHz or 200 kHz
with channel interval set to
50 kHz
AM: with channel interval set to
10 kHz
with channel interval set to
9 kHz
FM Tuner: Usable Sensitivity: 9.3 dBf (0.8 μV/75 Ω)
50 dB Quieting Sensitivity: 16.3 dBf (1.8 μV/75 Ω)
TUNER SECTION
Alternate Channel Selectivity
(400 kHz):
87.5 MHz to 107.9 MHz
87.5 MHz to 108.0 MHz
530 kHz to 1 710 kHz
531 kHz to 1 602 kHz
65 dB
AM Tuner: Sensitivity: 20 μV
48 ENGLISH
Frequency Response: 40 Hz to 15 000 Hz
Stereo Separation: 40 dB
Selectivity: 40 dB
Page 49

Type: Compact disc player
Signal Detection System: Non-contact optical pickup
(semiconductor laser)
Number of Channels: 2 channels (stereo)
Frequency Response: 5 Hz to 20 000 Hz
Dynamic Range: 96 dB
Signal-to-Noise Ratio: 98 dB
CD PLAYER SECTION
Wow and Flutter: Less than measurable limit
MP3 Decoding Format: (MPEG1/2 Audio Layer 3) Max. Bit Rate: 320 kbps
WMA (Windows Media® Audio) Decoding Format: Max. Bit Rate: 320 kbps
USB Standard: USB 1.1, USB 2.0
Data Transfer Rate: Full Speed: Max. 12 Mbps
Low Speed: Max. 1.5 Mbps
Compatible Device: Mass storage class (except HDD)
Compatible File System: FAT 32/16/12
USB SECTION
Playable Audio Format: MP3/WMA/WAV
Max. Current: DC 5 V
Version: Bluetooth 2.0 certified
Power Class: Class 2 Radio (possible distance 10 m)
Service Area: 10 m
Profile: HFP 1.5, OPP 1.1, A2DP 1.2, AVRCP 1.3,
BLUETOOTH
PBAP 1.0
Power Requirement: Operating Voltage: DC 14.4 V (11 V to 16 V allowance)
Grounding System: Negative ground
Allowable Operating Temperature: 0°C to +40°C (32°F to 104°F)
Dimensions (W × H × D):
(approx.)
GENERAL
Installation Size: 182 mm × 52 mm × 160 mm
(7-3/16” × 2-1/16” × 6-5/16”)
Panel Size: 188 mm × 58 mm × 6 mm
(7-7/16” × 2-5/16” × 1/4”)
Mass: 1.4 kg (3.1 lbs) (excluding accessories)
Design and specifications are subject to change without notice.
500 mA
If a kit is necessary for your car, consult your telephone directory for the nearest car audio speciality
shop.
49ENGLISH
Page 50

Having TROUBLE with operation?
Please reset your unit
Refer to page of How to reset your unit
Still having trouble??
USA ONLY
Call 1-800-252-5722
http://www.jvc.com
We can help you!
EN, SP, FR
0110DTSMDTJEIN© 2010 Victor Company of Japan, Limited
Page 51

KD-A815/KD-R810
Installation/Connection Manual
Manual de instalación/conexión
GET0651-002A
[J]
ENGLISH / ESPAÑOL / FRANÇAIS
You need the installation kits which corresponds to your car. /
Necesitará los kits de instalación que corresponden con su vehículo.
/ Vous avez besoin des kits d’installation correspondants à votre voiture.
Manuel d’installation/raccordement
Check the battery system in your car / Verifique el sistema de batería
de su vehículo / Vérifiez le système de batterie de votre voiture
12 V DC, NEGATIVE ground / 12 V CC, NEGATIVO a masa / 12 V CC, masse NÉGATIVE
0110DTSMDTJEIN
© 2010 Victor Company of Japan, Limited
To the car system / Al sistema de automóvil
/ Au système autoradio
EN, SP, FR
WARNINGS / ADVERTENCIAS / AVERTISSEMENTS
• To prevent short circuits:
– Disconnect the battery’s negative terminal and make all electrical
connections before installing the unit.
– Cover the terminals of the UNUSED leads with insulating tape.
• Be sure to ground this unit to the car’s chassis again after installation.
• Replace the fuse with one of the specified rating.
• Connect speakers with a maximum power of more than 50 W
(impedance of 4 Ω to 8 Ω). Otherwise, change the <Amplifier Gain>
setting. (See page 31 of the INSTRUCTIONS.)
• The heat sink becomes very hot after use. Be careful not to touch it
when removing this unit.
Heat sink / Sumidero térmico / Dissipateur de chaleur
• Para evitar cortocircuitos:
– Desconecte el terminal negativo de la batería y realice todas las
conexiones eléctricas antes de instalar la unidad.
– Cubra los terminales de los conductores NO UTILIZADOS con
cinta aislante.
• Asegúrese de volver a conectar a masa esta unidad al chasis del
automóvil después de la instalación.
• Reemplace el fusible por uno con la corriente especificada.
• Conecte los altavoces con una potencia máxima de más de
50 W (impedancia de 4 Ω a 8 Ω). De lo contrario, cambie el
ajuste <Amplifier Gain>. (Véase la página 31 del MANUAL DE
INSTRUCCIONES).
• El sumidero térmico estará muy caliente después del uso. Asegúrese
de no tocarlo al desmontar esta unidad.
INSTALLATION / INSTALACION / INSTALLATION
The following illustration shows a typical installation. If you have any
questions or require information regarding installation kits, consult
your JVC car audio dealer or a company supplying kits.
In-dash mounting / Montaje en el tablero / Montage encastré
Do the required electrical connections.
Realice las conexiones eléctricas requeridas.
Réalisez les connexions électriques.
La siguiente ilustración muestra una instalación típica. Si tiene alguna
pregunta o necesita información acerca de las herramientas para
instalación, consulte con su concesionario de JVC de equipos de audio
para automóviles o a una compañía que suministra tales herramientas.
• Pour éviter les courts-circuits:
– Déconnectez la borne négative de la batterie et réaliser toutes les
connexions avant d’installer l’appareil.
– Recouvrez les prises des fils NON UTILISÉS avec du ruban isolant.
• Assurez-vous de raccorder de nouveau la mise à la masse de cet appareil
au châssis de la voiture après l’installation.
• Remplacer le fusible par un de la valeur précisée.
• Connectez des enceintes avec une puissance maximum de 50 W
(impédance de 4 Ω à 8 Ω). Sinon, changez le réglage <Amplifier Gain>.
(Voir la page 31 du MANUEL D’INSTRUCTIONS.)
• Le dissipateur de chaleur devient très chaud après usage. Faire attention
de ne pas le toucher en retirant cet appareil.
L’illustration suivante est un exemple d’installation typique. Si vous avez des
questions ou avez besoin d’information sur des kits d’installation, consulter
votre revendeur d’autoradios JVC ou une compagnie d’approvisionnement.
Part list / Lista de componentes / Liste
de pièces
A Hard case / Estuche duro / Etui de
transport (×1)
B Control panel / Panel de control /
Panneau de commande (×1)
C Sleeve / Cubierta / Manchon (×1)
D Trim plate / Placa de guarnición /
Plaque d’assemblage (×1)
1
*
Install the unit at an angle of less than 30˚.
Instale la unidad a un ángulo de menos de 30˚.
Installez l’appareil avec un angle de moins de 30˚.
E Power cord / Cordón de
alimentación / Cordon d’alimentation
(×1)
F Handles / Manijas / Poignées (×2)
G Microphone / Micrófono /
Microphone (×1)
H Microphone clips / Presilla para
micrófono / Attache de microphone
(×2)
I KS-UBT1: USB Bluetooth adapter /
Adaptador Bluetooth USB /
Adaptateur USB Bluetooth (×1)
Bend the appropriate tabs to hold the sleeve firmly in place.
Doble las lengüetas apropiadas para retener firmemente la manga en
su lugar.
Tordez les languettes appropriées pour maintenir le manchon en place.
When installing the unit without using the sleeve / Instalación de la unidad
sin utilizar la cubierta / Lors de l’installation de l’appareil scans utiliser de
manchon
Flat head screws—M5 × 8 mm (M5 × 3/8") /
Tornillos de cabeza plana—M5 × 8 mm
(M5 × 3/8 pulgada) / Vis à tête plate—
M5 × 8 mm (M5 × 3/8 pouces) *
Pocket / Compartimiento / Poche
1
*
When you stand the unit, be careful not to damage the fuse on the
rear.
2
*
Not supplied for this unit.
2
Bracket / Ménsula / Support *
1
*
Al poner la unidad vertical, tenga cuidado de no dañar el fusible
provisto en la parte posterior.
2
*
No suministrado con esta unidad.
2
1
Removing the unit / Extracción de la unidad / Retrait de
l’appareil
Release the rear section first... / Primero libere la sección trasera... / Ouvrez la section arrière en
premier...
1
*
Lorsque vous mettez l’appareil à la verticale, faire attention de ne pas
endommager le fusible situé sur l’arrière.
2
*
Non fourni avec cet appareil.
Page 52

ELECTRICAL CONNECTIONS / CONEXIONES ELECTRICAS / RACCORDEMENTS ELECTRIQUES
IMPORTANT: A custom wiring harness (separately purchased) which
is suitable for your car is recommended for connection between the
unit and your car.
• Consult your JVC car audio dealer or a company supplying kits for
details.
IMPORTANTE: Para la conexión entre la unidad y su vehículo, se
recomienda utilizar un mazo de cables personalizado (vendido
separadamente) que sea adecuado para su vehículo.
• Si desea información más detallada, consulte con su distribuidor de
equipos de Car audio JVC o con una compañía proveedora de kits.
IMPORTANT: Un faisceau de câbles personnalisé (vendu séparément)
correspondant à votre voiture est recommandé pour raccorder l’appareil
et votre voiture.
• Pour en savoir plus, consultez votre revendeur autoradio JVC ou une
compagnie fournissant des kits.
PRECAUTIONS on power supply and speaker
connections
• DO NOT connect the speaker leads of the power cord to the car
battery; otherwise, the unit will be seriously damaged.
• BEFORE connecting the speaker leads of the power cord to the
speakers, check the speaker wiring in your car.
Connecting a subwoofer (through a JVC amplifier) / Conexión de un subwoofer
(a través de un amplificador JVC) / Connexion d’un caisson de grave (à travers
un amplificateur JVC)
Connecting the front speakers (through a JVC amplifier) / Conexión de los
altavoces delanteros (a través de un amplificador JVC) / Connexion des enceintes
avant (à travers un amplificateur JVC)
Reset the unit. / Reinicialice el receptor. /
Réinitialisez l’autoradio.
Connecting the rear speakers (through a JVC amplifier) / Conexión de los
altavoces traseros (a través de un amplificador JVC) / Connexion des enceintes
arrière (à travers un amplificateur JVC)
PRECAUCIONES sobre las conexiones de la
fuente de alimentación y de los altavoces
•
NO conecte los conductores de altavoz del cable de alimentación a la
batería de automóvil, pues podrían producirse graves daños en la unidad.
•
ANTES de conectar a los altavoces los conductores de altavoz del cable
de alimentación, verifique el conexionado de altavoz de su automóvil.
JVC Amplifier /
Amplificador de JVC /
JVC Amplificateur
JVC Amplifier /
Amplificador de JVC /
JVC Amplificateur
Front speakers / Altavoces
delanteros / Enceintes avant
PRECAUTIONS sur l’alimentation et la
connexion des enceintes
• NE CONNECTEZ PAS les fils d’enceintes du cordon d’alimentation à la
batterie; sinon, l’appareil serait sérieusement endommagé.
• AVANT de connecter les fils d’enceintes du cordon d’alimentation aux
enceintes, vérifiez le câblage des enceintes de votre voiture.
Subwoofer / Subwoofer /
Caisson de grave
To the blue (white stripe) lead of
the unit / Al conductor azul (rayas
blancas) de la unidad / Au fil bleu
(bande blanche) de l’appareil
MIC (microphone input
terminal / terminal de entrada
de micrófono / prise d’entrée de
microphone)
Antenna input /
Entrada de antena /
Entrée d’antenne
Steering wheel remote input (for KD-A815) / Entrada del control remoto del volante
de dirección (para KD-A815) / Entrée de la télécommande de volant (pour KD-A815)
Front speaker (left) /
Altavoz delantero (izquierdo) /
Enceintes avant (gauche)
Front speaker (right) /
Altavoz delantero (derecho) /
Enceintes avant (droit)
Rear speaker (left) /
Altavoz trasero (izquierdo) /
Enceintes arrière (gauche)
Rear speaker (right) /
Altavoz trasero (derecho) /
Enceintes arrière (droit)
1
*
Not supplied for this unit.
*2 Firmly attach the ground wire to the metallic body or to the chassis
of the car—to the place uncoated with paint.
3
Before checking the operation of this unit prior to installation, this
*
lead must be connected; otherwise, the power cannot be turned on.
White / Blanco / Blanc
White (black stripe) / Blanco (rayas
negras) / Blanc (bande noire)
Gray / Gris / Gris
Gray (black stripe) / Gris (rayas
negras) / Gris (bande noire)
Green / Verde / Vert
Green (black stripe) / Verde (rayas
negras) / Vert (bande noire)
Purple / Púrpura / Violet
Purple (black stripe) / Púrpura (rayas
negras) / Violet (bande noire)
JVC Amplifier /
Amplificador de JVC /
JVC Amplificateur
Rear ground terminal / Terminal de tierra posterior / Borne arrière de masse
Expansion port / Puerto de expansión / Port d’extension
15 A fuse /
Fusible de 15 A /
Fusible 15 A
E Power cord / Cordón de alimentación /
Cordon d’alimentation
Black / Negro /
Noir
Yellow / Amarillo /
3
Jaune *
Red / Rojo /
Rouge
Blue (white stripe) / Azul (rayas
blancas) / Bleu (bande blanche)
Orange (white stripe) / Naranja
(rayas blancas) / Orange (bande
blanche)
*1 No suministrado con esta unidad.
*2 Fije firmemente el cable de tierra a la carrocería metálica o al
chasis—a un lugar no cubierto con pintura.
3
Antes de comprobar el funcionamiento de esta unidad previa a de
*
la instalación, es necesario conectar este cable, de lo contrario no se
podrá conectar la alimentación.
2
Rear speakers / Altavoces
posteriores / Enceintes arrière
USB cable (approx. 1.2 m/4 feet) / Cable USB (aprox. 1,2 m/4 pie) /
Câble USB (environ 1,2 m/4 pieds)
To the metallic body or chassis of the car /
A un cuerpo metálico o chasis del automóvil /
Vers corps métallique ou châssis de la voiture
To a live terminal (constant 12 V) /
A un terminal activo (12 V constantes) /
À une borne sous tension (12 V constant)
To an accessory terminal / A un
terminal para accesorios / À une prise
accessoire
Å Signal cord / Cable de señal /
Cordon de signal *
ı Remote lead / Cable remoto /
Fil d’alimentation à distance
Ç Y-connector / Conector en Y /
Connecteur Y *
Ignition switch /
Interruptor de encendido /
Interrupteur d’allumage
Fuse block /
Bloque de fusibles /
Porte-fusible
To the remote lead of other equipment or automatic antenna if any
(200 mA max.) / Al conductor remoto de otro equipo o de la antena
automática, si hubiere (máx. 200 mA) / Au fil de télécommande de
l’autre appareil ou à l’antenne automatique s’il y en a une (200 mA max.)
To car light control switch / Al interruptor de control de las luces del
automóvil / À l’interrupteur d’éclairage de la voiture
1
*
Non fourni avec cet appareil.
*2 Attachez solidement le fil de mise à la masse au châssis métallique de la
voiture—à un endroit qui n’est pas recouvert de peinture.
3
Pour vérifier le fonctionnement de cet appareil avant installation, ce fil
*
doit être raccordé, sinon l’appareil ne peut pas être mis sous tension.
1
1
Page 53

Connecting the microphone unit / Conexión de la unidad de micrófono / Connexion du microphone
G Microphone / Micrófono / Microphone
or / o / ou
H Microphone clip / Presilla para micrófono /
Attache de microphone
Adjust the microphone angle /
Ajuste el ángulo del micrófono /
Ajustez l’angle du microphone
Secure the microphone cord using cord cramps
Si es necesario, asegure el cable del micrófono por medio de
abrazaderas
*1. / Fixez si nécessaire le cordon du microphone en
utilisant des serre-fils
*1.
*1 if necessary. /
H Microphone clip / Presilla para micrófono /
Attache de microphone
Connecting the external components in series / Conexión de componentes externos en serie / Connexion d’appareils extérieurs en série
When connecting the external components, refer also to the manuals
supplied for the components and adapter.
Caution:
Before connecting the external components, make sure that the
unit is turned off.
Expansion port of the unit / Puerto de expansión
de la unidad / Port d’extension de l’appareil
To disconnect... /
Para desconectar... /
Pour déconnecter...
Cuando conecte componentes externos, consulte, también, los
manuales suministrados con los componentes y el adaptador.
Precaucion:
Antes de conectar los componentes externos, asegúrese de que la
unidad esté apagada.
Two components / Dos componentes / Deux appareils:
A KT-HD300 *2 / KS-SRA100 *2, *3 / XMDJVC100 / CNP2000UC *
B*5 KS-U57 / KS-U58
Three components / Tres componentes / Trois appareils:
A KT-HD300 *2
B KS-SRA100
C*5 KS-U57 / KS-U58
2, *3
*
/ XMDJVC100 / CNP2000UC *
2,*4
Lors de la connexion des appareils extérieurs, référez-vous aussi aux
manuels fournis avec les appareils et les adaptateurs.
Precaution:
Avant de connecter les appareils extérieurs, assurez-vous que
l’appareil est hors tension.
2,*4
You can connect the HD Radio
following components through the various JVC adapters or system to
the expansion port.
•
Connection cords may need to be purchased separately.
TM
tuner box (KT-HD300) or the
Component / Componente / Appareil Adapter/System / Adaptador/Sistema / Adaptateur/Système
Puede conectar el sintonizador HD RadioTM (KT-HD300) o los
siguientes componentes al puerto de expansión, a través de los diversos
adaptadores o sistema JVC.
•
Puede ser necesario comprar los cables de conexión por separado.
Vous pouvez connecter le tuner HD Radio
suivants à l’aide de divers adaptateur JVC ou système au port d’extension.
•
Vous pouvez avoir besoin d’acheter certains cordons de connexion
séparément.
TM
(KT-HD300) ou les appareils
Model name / Nombre del
modelo / Nom du modèle
XMDirect ™ Tuner Box / XMDirect ™ Tuner Box / XMDirect ™ Tuner Box Smart Digital Adapter / Adaptador digital inteligente / Adaptateur numérique intelligent XMDJVC100
XMDirect2 Tuner System / Sistema de sintonizador XMDirect2 / XMDirect2 Tuner System XM satellite radio System / Sistema de radio XM Satellite / Système radio satellite XM CNP2000UC, CNPJVC1
SIRIUS satellite radio / Radio por satélite SIRIUS / Radio satellite SIRIUS SIRIUS satellite radio System / Sistema de radio satelital SIRIUS / Système radio satellite SIRIUS
Portable audio player with line output jacks / Reproductor de audio portátil con jacks de
salida de línea / Lecteur audio portable avec prises de sortie de ligne
Portable audio player with 3.5 mm (3/16") stereo mini jack / Reproductor de audio
portátil con jack mini estéreo de 3,5 mm (3/16 pulgada) / Lecteur audio portable avec
mini fiche stéréo de 3,5 mm (3/16 pouces)
XM Radio and SIRIUS satellite radio cannot be used together.
• HD Radio ™ is a proprietary trademark of iBiquity Digital Corp.
*1 Not supplied for this unit.
*2 Connect the power cord supplied for the component separately for
power supply.
3
This model is a component of SIRIUS satellite radio System.
*
4
This model is a component of XM satellite radio System.
*
*5 To use these components, set the external input setting correctly
(see page 33 of the INSTRUCTIONS).
No puede utilizar juntas la radio XM y la radio satelital SIRIUS.
• HD Radio
1
*
No suministrado con esta unidad.
2
*
Conecte el cable de alimentación suministrado separadamente para
el componente.
3
*
Este modelo es un componente del sistema de radio satelital SIRIUS.
*4 Este modelo es un componente del sistema de radio XM Satellite.
5
*
Para utilizar estos componentes, configure el ajuste de entrada
externa correctamente (consulte la página 33 del
INSTRUCCIONES
Line input adapter / Adaptador de entrada por línea / Adaptateur d’entrée de ligne KS-U57
AUX input adapter / Adaptador de entrada AUX / Adaptateur d’entrée auxiliaire KS-U58
TM
es una marca comercial de iBiquity Digital Corp.
).
MANUAL DE
La radio XM et SIRIUS ne peuvent pas être utilisées en même temps.
• HD Radio ™ est une marque de commerce d’iBiquity Digital Corp.
*1 Non fourni avec cet appareil.
*2 Connectez le cordon d’alimentation fourni avec les appareils
séparément à l’alimentation.
3
Ce modèle est un composant du système radio satellite SIRIUS.
*
4
Ce modèle est un composant du système radio satellite XM.
*
*5 Pour utiliser ces appareils, réglez l’entrée extérieure correctement (voir
page 33 du MANUEL D’INSTRUCTIONS).
SC-C1, KS-SRA100
PnP, SC-VDOC1, KS-SRA100
3
Page 54

7
The countries where you may use the
Bluetooth® function
7
Die Länder, in denen Sie die Bluetooth® Funktion verwenden können
7
Pays où vous pouvez utiliser la fonction Bluetooth®
7
De landen waar u de Bluetooth®-functie mag gebruiken
7
Países en los que se puede utilizar la función Bluetooth®
7
Paesi nei quali è possibile utilizzare la funzione Bluetooth®
7
Länder där du kan använda Bluetooth®-funktionen
7
Lande, hvor du kan bruge Bluetooth®-funktionen
7
Land hvor du kan bruke Bluetooth®-funksjonen
7
Maat, joissa voi käyttää Bluetooth®-toimintoa
7
Países onde pode usar a função Bluetooth®
7
Οι χώρες όπου μπορείτε να χρησιμοποιήσετε τη λειτουργία Bluetooth®
7
Страны, где можно воспользоваться функцией Bluetooth®
7
Země, ve kterých můžete využívat funkci Bluetooth®
7
Azok az országok, amelyekben használhatjuk a Bluetooth®-funkciót
7
Kraje, w których można używać funkcji Bluetooth®
7
Države, kjer lahko uporabljate funkcijo Bluetooth®
7
Krajiny, v ktorých môžete využívať funkciu Bluetooth®
7
Valstis, kur jūs varat izmantot Bluetooth® funkciju
7
Šalys, kuriose galite naudotis „Bluetooth®“ funkcija
7
Il-pajjiżi fejn tista’ tuża l-funzjoni Bluetooth®
7
Lönd þar sem hægt er að nota Bluetooth®
7
Riigid, kus on võimalik kasutada Bluetooth® funktsiooni
7
Bluetooth® fonksiyonunu kullanabileceğiniz ülkeler
7
Na tíortha inar féidir leat feidhmiú Bluetooth® a úsáid
7
Länner an denen der d’Bluetooth® Funktioun benotze kënnt.
7
nhng quc gia mà bn có th s dng chc nng Bluetooth
7
Els països on podrà fer servir la funció Bluetooth®
7
Zemlje u kojima je dozvoljena upotreba Bluetooth® funkcije.
7
Zemlje u kojima možete koristiti Bluetooth® funkciju
7
Zemlje u kojima je dopušteno koristiti Bluetooth®.
7
Земји каде можете да ја користите функцијата Bluetooth®
7
Страните, в които можете да ползвате функцията Bluetooth®
7
Ţările în care puteţi utiliza funcţia Bluetooth®
7
Die lande waar u die Bluetooth®-funksie kan gebruik
7
Amazwe lapho ungasebenzisa khona uhlelo lwe-Bluetooth®
7
Ang mga bansa kung saan maaari kang gumamit ng Bluetooth® function
7
Negara-negara yang anda boleh menggunakan fungsi Bluetooth®
7
您能够使用 Bluetooth® 功能的国家
7
您能夠使用 Bluetooth® 功能的國家
7
Bluetooth® 기능을 사용할 수 있는 국가
Country
Andorra
Australia
Österreich
Bosna i Hercegovina
Belgien
Belgique
България
Canada
Schweiz
Suisse
Chile
Κύπρος
Kıbrıs
Česká republika
Deutschland
Danmark
Eesti
España
Suomi
Finland
®
France
United Kingdom
Ελλάδα
Hong Kong
香港
香港
Hrvatska
Magyarország
Ireland
Éire
7
Country
Ísland
Italia
대한민국
Lichtenstein
Lietuva
Luxemburg
Luxembourg
Lëtzebuerg
Latvija
Monaco
Crna Gora
Македонија
Malta
Malaysia
Nederland
Norge
New Zealand
Perú
Philippines
Pilipinas
Polska
Portugal
România
Srbija
Росси я
Sverige
Singapore
新加坡
Singapura
Slovenija
Slovensko
Country
Türkiye
台湾
United States of America
Venezuela
Vietnam
Vit Nam
South Africa
ENingizimu Afrika
Suid-Afrika
TROUBLESHOOTING / LOCALIZACION DE AVERIAS / EN CAS DE DIFFICULTES
• The fuse blows. ] Are the red and black leads connected correctly?
]
• Power cannot be turned on.
• No sound from the speakers. ] Is the speaker output lead shortcircuited?
• Sound is distorted.
the “–” terminals of L and R speakers grounded in common?
• Noise interfere with sounds.
connected to the car’s chassis using shorter and thicker cords?
• This unit becomes hot.
Are the “–” terminals of L and R speakers grounded in common?
• This unit does not work at all.
Is the yellow lead connected?
]
Is the speaker output lead grounded? ; Are
]
Is the rear ground terminal
]
Is the speaker output lead grounded? ;
]
Have you reset your unit?
]
• El fusible se quema.
correctamente conectados?
• No es posible conectar la alimentación.
conectado?
• No sale sonido de los altavoces.
altavoz cortocircuitado?
• El sonido presenta distorsión.
conectado a masa? ; ¿Están los terminales “–” de los altavoces L y R
conectados a una masa común?
Perturbación de ruido. ] ¿El terminal de tierra trasero está conectado
•
al chasis del automóvil utilizando los cordones más corto y más grueso?
• Esta unidad se calienta. ] ¿Está el cable de salida del altavoz
conectado a masa? ; ¿Están los terminales “–” de los altavoces L y R
conectados a una masa común?
• Esta unidad no funciona en absoluto.
¿Están los conductores rojo y negro
]
¿Está el cable amarillo
]
¿Está el cable de salida del
]
¿Está el cable de salida del altavoz
]
¿Reinicializó la unidad?
09-1672-006
• Le fusible saute.
• L’appareil ne peut pas être mise sous tension.
elle raccordée?
Pas de son des enceintes. ] Le fil de sortie d’enceinte est-il court-circuité?
•
•
Le son est déformé. ] Le fil de sortie d’enceinte est-il à la masse? ; Les
bornes “–” des enceintes gauche et droit sont-elles mises ensemble à la masse?
• Interférence avec les sons. ] La prise arrière de mise à la terre est-elle
connectée au châssis de la voiture avec un cordon court et épais?
• Cet appareil devient chaud.
masse? ; Les bornes “–” des enceintes gauche et droit sont-elles mises
ensemble à la masse?
• Cet appareil ne fonctionne pas du tout.
votre appareil?
]
Les fils rouge et noir sont-ils racordés correctement?
]
Le fil jaune est-
]
Le fil de sortie d’enceinte est-il à la
]
Avez-vous réinitialisé
4
Page 55

..Ive
KS-UBT1
USB
Bluetooth
USB
BluetoothIUSB-Bluetooth-AdapterIAdattatore
per
BluetoothIAdaptador
adapterIUSB
USB
Bluetooth
BluetoothInpoacxPlJoy&CXc;
USB
Bluetooth
aAanTep
USB
~~,~t~~
USB
Bluetooth
AdapterIAdaptador
Bluetooth
USBdeBluetoothIUSB
Bluetooth-adapterIUSB-Bluetooth-adapter
-sovitinIUSB
adapterIUSB
USB
IlJ~'llif)::II~Ulfl'J't
I
USB
,)~I.:li
I
Bluetooth
Bluetooth
Bluetooth
USBIUSB
~
':'~9-4J'
Adaptor
Bluetooth
AdaptorIUSB-aAanrep
USBIAdapter
AdapterIBluetooth-
Bluetooth
J~
o
Bluetooth®
USBIAdaptateur
USB
Bluetooth
Bluetooth
o-l
~
E-~
I
USB
I
I
USB
(For
This
this
may
Cet
seulement
etre
fonctionnementdudispositif.
I
CANADA)
device
complies
device
may
not
cause
undesired
appareil
est
conformeaureglement
aux
conditions
pretaaccepter
a
v
Type
No.:
ESD-CPE-0903971C
with
RSS-210of
cause
interference,
operationofthe
suivantes:
tout
brouillage
TA-2008/i
APPROVED
NTC
Accepted
industry
Canada
Rules.
and
(2)
device.
CNR-210deI'industrieduCanada.l'utilisationdece
(1)ilne
doit
radioelectrique
187
Operationissubjecttothe
this
device
must
accept
pas
produiredebrouillageet(2)
relu,
memesice
any
brouillage
ON835
interference,
est
ApprovedbyTRA
MTC:OFICIONo8396-2008-MTC/29
CONATEL
SUBTEL:
certificate
30234/DFRS00045/F-49
following
two
conditions:
including
interference
dispositif
est
No:
autorisee
doit
001516
I'utilisateurdudispositif
susceptibledecompromettre
that
(1)
Ie
INSTRUCTIONS
MANUAL DE INSTRUCCIONES
MANUEL D'INSTRUCTIONS
BEDIENUNGSANLEITUNG
ISTRUZIONI
INSTRUC;OES
GEBRUlKSAANWIJZING
BRUKSANVISNING
INSTRUKTlONSBOG
KAYTTOOHJE
TALiMATLAR
HHCTPYKL/H/Ifno3KCnnYATAL//If/lf
(1§
EN,
SP, FR, GE, IT, PR, NL, SW, DA, FI, TR, RU,
GR, PO, CZ, HU, UK, TH, KO, CT, AR, PE,
OIJHrlEI
INSTRUKCJA OBSLUGI
PRfRUCKA K OBSLUZE
HASZNALATI UTASfTASA
IHCTPYKL/li"
ff1uu:ah
/liS
!!!'lJ/tf
fi!ffllfl/J§.
.:;,t....J.;J1
J..J~
1Aj..;1.J;"'.J
BUKU
PETUNJUK
IN
.Ive
JVC Technical Services Europe
EC
DeclarationofConformity
EG-Konformitiitserkliirung
Registration
Identification:
Bezeichnung
Description:
Beschreibung:
Acceslory:
ZubenOf':
Intended Purpose:
Verwendungszweck:
The product to which this declaration relates toisin conformity with the essential protec·
tion requirements· as listed
communication terminal equipment, if it used as intended
Das
Produkt,
auf
genannt·
der
Richtlinie
..Ive
USB Bluetooth Adapter
Radio Equipment (Class
Funkanlage (Klasse
Data transmission (built·in Bluetooth Module)
FunkOberlragung
below·
das
siGh
diese
Erk/lirung
des
Rates
1999/5lEG aberein, wennesbestimmungsm3t:!Jg veswendet wird.
GmbH·
'0-61145
No'
Yearofaffixing
KS·UBT1
of the council directive 1999/5/EC on radio and tele-
bezieht,
Postfach (P.O, Box) 100504
Friedberg,
Germany'
61380·09001
1)
von
stimmt
CAR017
2009
1)
Datensignelen (eingebHutes Bluetooth Modul)
mit
den
grundlegenden
Anforderungen • wie unlen
GET0617-001B
@
~&At!~-@l~1
£IAf£1
7171£1
AI::'::'E:i~
.'i'.
:>:il3".\:J5:.
~~'2J
[K]
'l!g~~:
~~
~~:
JVC-KSUBTl
Ol~:
('T')c-j
'i'-dclI0IEl~~
01£
'i'-d7171
~aI~:
KS-UBTl
':l.!
~:
2009,February
0foICl:JVC
.Ive
JVC Technical Services Europe
Protection requirements regarding electromagnetical compatibility (Article 3
SchutzanforcJerungeninBezug
Harmonised Standards:
Harmonisierte
Measures for
Maf!..nahmen
Test
Prtifspezifikation:
The
Die ObereinsJimmung
der
Normen'
the
zurefflzienten
Specification:
conformity to the specifications is confirmed bythe notified body (identification no.
0984 )
with
the
benannten
Stelle mit
auf
die
elektromagnetische
For
the Bluetoath Adapter: JVG, KS-UBT1
EN
61000-3-2:2006
EN
61000-3-3:1995 +
EN
55022:2006
E;N
55024:1998 +A1:2001 +1'.2:2003
For
the radio transmission:
E;N
301489-1
EN301489-17V1.2.1
efficient
use
of the radio frequency spectrum (Article 3
Nutz~ng
des
EN
300 328
registration noCCS 0804702
mit
den
Normen
wird
der
Kennnummer0984
GmbH·
·0-61145
Friedberg,
V1.6.1
Frequenzspektrums
V1.7.1
mit
der
Registrierung
bes/atigt.
Postfach
(p.O.
+A2:2005
(2) b)):
CCS
Box) 10
0804702
Germany'
Vertffiglichkeit (Artike/ 30)b)):
A1:2001
(Artike/3
05 04
(2)
(1)
b»:
b»:
Protection requirements regarding health
Schutzanforderungen in Bezug
Harmonised Standards:
Hannonisierte Normen:
EC
DoC
0 (vl.3).fp,
aufd;e
Gesundheit
For
the Bluetooth Adapter: JVG, KS-UBT1
EN
60950-1:2001 + A11:2004
For the radio transmitter module (health requirement):
EN
50371
:2002
This document may notbechangedorcopied without authorisation.
Dieses Dokument dart nichf
Mar.
2008,
ge~nderl
jk
and
safety (Article 3
und
Sichemeit
oderohneAutorisierung vervielfS/tigt werden.
(Artikel3
(1)
(1) a)):
a»:
Page
1012
This declaration is responsibly issued for the manufacturer:
Diese
Erk/Mmg
wird
issued by:
abgegeben
durch:
Friedberg,
Place, Date
Ort, Datum
EC DoC 0 (v1.3).fp,
verantwortlich
2009/01107
(YVYY/MMlDDj
Dieses Dokument dartnicht
Mar.
fOr
den
Herstsller:
Victor CompanyofJapan, Ltd.
12, 3--chome,
Yokohama (Kanagawa) 221-8528, Japan
Seijun
FUkaya,
This document may not be changedorcopied without authorisation.
2008, jk
Department
geandm1
Moriya~cho,
ManagerofJVC
oderohne Autorisierung
Kanagawa·ku
legal
valid
rechtsgOltige Unterschrift
Technical
signature
vef'VielfaJtigt
Services
Europe
werden
GmbH
Page
2of2
Page 56

DeclarationofConformity
with
regard
to theR&TTE
Directive
1999/S/EC
English:
Hereby,
JVC,
declares
with
the
essential
provisionsofDirective
Deutsch:
Hiermit
Obereinstimmung
und
Richtlinie
Hiermit
Obereinstimmung
grundlegenden
relevanten
befindet.
franla;s:
Parlapresente
est
conforme
dispositions
Nederlands:
.Hierbij
overeenstemmingismet
relevante
Dansk:
Undertegnede
KI-UBTl
relevante
Espanol:
Por
mediodela
con
los
aplicables0exigiblesdela
lliqVIKoj:
ME
THN
LYMMOPiDONETAI
TIL
AOInEL
Italiano:
Conlapresente
conformeairequisiti
pertinenti
Malti:
Hawnhekk,
mal-htigijiet
relevantiIihemm
Portugues:
JVC
requisitos
1999/5/CE.
requirements
erklart
JVC,
dass
den
declara
mit
Ubrigen
einschlagigen
1999/5/EG
erklart
JVC
die
des
Anforderungen
Festlegungen
(Wien)
JVC
declare
aux
exigences
pertinentesdela
verklaart
JVC
bepalingen
JVC
erkl",rer
overholderdev",sentlige
kravidirektiv
presente
requisitos
esencialesycualesquiera
nAPOYLA
JVC
npOLTIL
LXETIKEL
JVC
dichiara
stabilite
dalla
JVC,
jiddikjaraIidan
essenzjaiiuma
fid-Dirrettiva
que
este
essenciaiseoutras
that
this
KI-UBTlisin
and
1999/5/EC
sich
das
Gerat
den
grundlegenden
Bestimmungen
befindet.
Gerates
KI-UBTl
und
der
Richtlinie
que
I'appareil
essentiellesetaux
directive
dat
het
toestel
de
essentiele
van
richtlijn
1999/5/EG.
herved,atfolgende
kravogo"ige
1999/5/EF
JVC
declara
queelKI-UBTl
Directiva
1999/5/CE
6HAONEI
OTI
OmOMIL
61ATHILTHL
che
questo
essenzialiedaile
direttiva
1999/5/CE.
K5-UBTl
provvedimenti
1999/5/EC
KI-UBTl
esta
conforme
disposi<:oes
other
relevant
KI-UBTl
Anforderungen
mit
den
den
anderen
1999/5/EG
KI-UBTl
1999/5/CE.
K5-UBTl
eisenende
otras
KI-UBTl
AnAITHHIL
06HrlAL
KI-UBTl
altre
disposizioni
jikkonforma
da
(
E0984
compliance
in
der
autres
in
andere
udstyr
cumple
disposiciones
KAI
1999/5/EK.
e
ohrajn
com
os
Dlrectiva
Suomi:
JVC
vakuuttaa
taten
etta
KI-UBTl
direktiivin
1999/5/EY
koskevien
direktiivin
Svenska:
Harmed
intygar
overensstammelse
ovriga
1999/5/EG.
islenska:
Her
grunnkrofurogaorar
1999/5/EC
Norsk:
JVC
de
1999/5/EF.
Cesky:
JVC
zakladnimi
smernice
Eesti:
Kaesolevaga
direktiivi
tulenevatele
Latviski:
ArsoJVC
EK
noteikumiem.
Lietuviu:
Siuo
reikalavimusirkitas
Magyar:
Alulirott,
vonatkozo
iranyelv
Polski:
Niniejszym
zasadniczymi
postanowieniami
Siovensko:
JVC
in
Siovensky:
JVC
a
vsetky
JVC
meddevasentliga
relevanta
bestammelser
meo
Iysir
JVC
yfir
erkl",rer
hervedatutstyret
grunnleggende
timto
butiskajam
JVC
izjavlja,dajetaKS-UBTlvskladuzbistvenimi
ostalimi
timto
kravog."ige
prohlaluje,ietento
poiadavkyadalSimi
1999/5/EI.
kinnitab
1999/5/EO
teistele
deklare,kaKI-UBTl
prasibamuncitiemarto
deklaruoja,
JVC
nyilatkozom,
alapveto
egyeb
eloirasainak.
JVC
oswiadaa,ieKS-UBTl
wymogami
Dyrektywy
relevantnimi
vyhlasuje,ieKS-UBTl
prislulne
ustanovenia
tyyppinen
oleellisten
vaatimustenjasita
muiden
ehtojen
att
denna
KI-UBTl
sam
pviaoKI-UBTleri
krOfur,
sem
geroar
KI-UBTleri
relevante
K5-UBTljeve
prislulnymi
JVC
seadme
KI-UBTl
pohinouetelejanimetatud
asjakohastele
satetele.
atbilst
kad
lis
KS-UBTl
1999/S/EB
Direktyvos
hogyaKI-UBTl
kovetelmenyeknekesaz
oraz
pozostatymi
1999/5/EC
dolocili
direktive
spina
Smernice
laite
on
mukainen.
stlr I
egenskapskrav
framgaravdirektiv
samr",mi
vio
eruitilskipun
samsvar
kravidirektiv
shode
se
ustanovenimi
vastavust
direktiivist
Direktivas
1999/SI
saistitajiem
atitinka
esminius
nuostatas.
megfelel
1999/S/EC
jest
zgodny
z
stosownymi
zahtevami
1999/S/ES.
zakladne
poiiadavky
1999/S/ES.
och
med
a
INFORMATION
This
the
installation.
in
accordance
guarantee
to
radioortelevision
trytocorrect
-
Reorientorrelocate
-
Increase
-
Connect
-
Consult
Caution:
Changesormodifications
Products
-
Battery
•
The
Bluetooth
CompanyofJapan,
trademarks
owners.
•
This
car
receiver.
For
receiver.
INFORMATION
This
to
the
interference,
including
Changesormodifications
for
compliance
equipment.
(For
equipment
has
FCC
Bluetooth
adapter
receivers.Donot
details,
device
been
Rules.
These
This
equipment
with
the
that
interference
the
interferencebyoneormoreofthe
the
separation
the
equipment
the
dealeroran
Information
[European
These
general
If
you
national
By
potential
Notice:
The
word
SIG,
Inc.
and any
Limited
and
trade
has
been
see
also
the
(For
complies
follOWing
two
and
(2)
interference
could
limits
reception,
disposingofthis
mark
use
U.s.A.)
with
conditions:
this
void
U.S.A.)
tested
and
foundtocomply
are
designedtoprovide
generates,
instructions,
may
will
not
occurina
which
canbedeterminedbyturning
the
receiving
antenna.
between
the
intoanoutletona
experienced
not
approvedbyJVC
for
UsersonDisposalofOld
Union
only]
symbols
indicate
household
wasteatits
wishtodisposeofthis
legislationorother
produa
negative
effectsonthe
signPbbelow
and
logos
useofsuch
IJVC)isunder
names
are
designed
this
adapter
Instructions
Part15of
device
that
may
not
expressly
the
user's
the
are
thoseoftheir
exclusively
with
supplied
the
(1)
This
must
accept
cause
undesired
authoritytooperate
reasonable
uses,
and
can
cause
harmful
particular
following
equipment
and
circuit
different
radiolTV
technician
could
void
that
the
product
end-of-life.
product
rulesin,our
correctly,
environment
symbol
for
batteries
ownedbythe
marksbyViaor
license.
Other
respective
for
use
with
any
other
with
your
FCC
Rules.
Operationissubject
device
may
any
interference
operation.
approvedbythe
with
the
limits
proteaion
radiate
radio
frequency
interferencetoradio
installation.Ifthis
measures:
receiver.
from
thattowhich
for
help.
the
user's
authoritytooperate
Equipment
and
the
battery
and
the
battery,
country
you
will
helptoconserve
and
indicates
JVC's
car
not
cause
harmful
received,
manufacturer
the
foraClassBdigital
against
harmful
energy
and,ifnot
communications.
equipment
the
equipment
off
the
receiverisconnected.
and
Batteries
with
this
symbol
pleasedosoinaccordance
and
municipality.
natural
human
health.
that
this
battery
Dear
Customer,
This
apparatusisin
European
directives
electromagnetic
European
Limitedis:
JVC
Postfach1005 04
61145
Germany
compatibility
representativeofVictor
Technical
Services
Friedberg
SPECIFICATIONS
1.
Bluetooth
2.
Power
3.
Service
4.
USB
Itandards:
Power
Consumption:
Dimensions(LxWx
1Smmx19mmxS.6mm
(5/8"x314"x1/4")
device,
pursuanttoPart15of
interferenceina
installed
However,
does
cause
harmful
and
on,
the
userisencouraged
the
equipment.
should
notbedisposed
with
resources
and
contains
lead.
conformance
and
standards
and
Europe
GmbH
Version:
Class:
Class2
Area:10m
USB
54.3
HI:
residential
and
used
thereisno
interference
applicable
will
help
prevent
with
the
valid
regarding
electrical
safety.
CompanyofJapan,
Bluetooth
2.0
certified
Radio
(10.9
yd)
Vl.l
(Fuil
Speed)
mAiSV(max.)
to
as
IMPORTANTE
Este
conformidad
para
generayutiliza
podrian
produzeanenuna
cual
una
-
-
-
-
PreGlucion:
Los
cambios0modificacionesnoaprobados
Productos
-
Baterias/pilas
•Lamarca
Bluetooth
CompanyofJapan,
Otras
propietarios.
•
Este
con
adaptador
Para
suministradas
(EE.UU.l
equiposeha
sometidoatodo
conlaParte15de
asegurar
una
energiaderadiofrecuencia.Sinoseinstalayutiliza
producirse
puede
comprobarse
combinaciondelas
Reorientelaantena
Aumente
103
separaci6n
Enchufeelequipoauna
Consulteasu
distribuidor
Bluetoothysus
IIG,
Inc.,ycualquier
marcasynombres
adaptadorhasido
los
receptores
con
ningun
obtener
mas
consureceptor.
las
proteccion
razonable
interferenciasenradiocomunicaciones.
instalaci6n
determinada.Sieste
mediantelaconexion0desconexion
siguientes
receptora0cambieladelugar.
entreelequipoyel
tomadecorriente
0 a
Informacion
[Solo
Union
Estos
simbolos
conlabasura
Si
desea
desechar
u
otras
normativasdesu
Si
desechaelproducto
prevenir
los
posibles
Atencion:
La
indicacionPbdebajo
logotipos
uso
Limited
(JVC)serealiza
comerciales
disenado
para
automovildeJVCNouti
otro
receptor
detalles,
consulte
tipodepruebasycumple
reg
lasdela
FCC
(Comision
contra
este
tipodeinterferenciasenlas
equipo
medidas:
aparato
situadaenun
un
teenico
expertoenradio/television.
por
JVC
pueden
para
los
usuarios
Europea]
indican
domesticaalfinaldesu
este
son
de
sondesus
para
para
tambien
sobrelaeliminaciondeequipos
queelproductoyla
productoyla
paisymunicipio.
correctamente,
efectos
negativosenel
del
simbolodebateria/pila
propiedad
de
105
mismos
por
bajo
licencia.
respectivos
usarse
exclusivamente
lice
este
autom6vil.
las
instrucciones
con
las
normas
establecidas
FederaldeComunicaciones).
debidamente,esdecir,
lin
embargo,nose
ocasiona
interferenciasenla
del
equipo,elproblema
receptor.
circuito
distinto
del
anularlaautoridad
bateria
que
vida
bateria,
estara
Victor
Ilevan
util.
hagalodeconformidad
contribuyendoaconservar
medio
ambienteyenlasaluddelas
indica
Apreciado
Este
aparato
europeas
compatibilidad
EI
representante
Limited
es:
JVC
Technical
Postfach
61145
Friedberg
Aiemania
instalaciones
garantiza
aparato
del
usuario
este
simbolonodeben
que
esta
contiene
c1iente,
cumple
respeao
electromagnetica.
europeodeVictor
lervices
100504
para
dispositivosdeClaseB,de
ESlas
regias
residenciales.
conformealas
que
estas
interferenciasnose
recepci6nderadio
podra
corregirse
receptor.
para
operarelequipo.
ybaterias/pilas
conlalegislacion
los
recursos
personas.
plomo.
con
las
normativasynormas
ala
seguridad
electricayala
Europe
GmbH
estan
disenadas
Este
equipo
instrucciones,
0
television,
usados
nacional
una
junto
vigente
ya
10
0
mediante
desecharse
naturales
CompanyofJapan,
-
............
_
....
Attention:
Tout
changementoumodification
Produits
-
)t
Pile
•Lamarquedumotetles
de
Bluetooth
Victor
les
autres
leur
proprietaire
•
Cet
adaptateuraete
un
auto
autoradio.
Pour
avec
Produkte
-
Batterie
Die
Wortmarke
Bluetooth
durch
Lizenz.
ihrer
OIeser
Auto-Receivern
Adapter
Einzelheiten
Bedienungsanleitung.
_------------------,-.
Informations
utilisateurs
[Union
Ces
symboles
menagerala
Si
vous
autres
En
eliminant
prevention
Notification:
La
marquePben
SIG,
Inc.ettoute
CompanyofJapan,
marquesetnomsdecommerce
respectif.
con\u
radio
JVC
N'utilisez
plusdedetails,
votre
die
jeweiligen
referez-vous
autoradio.
Benutzerinformationen
[Nur
Diese
Haushaltsabfall
Wenn
entsprechenden
Die
korrekte
die
Umwelt
Hinweis:
Das
2eichenPbunterhalb
Bluetooth
SIG,
Inc.,
und
Victor
CompanyofJapan,
Andere
Warenzeichen
Besitzer
Adapter
wurde
von
JVC
nicht
mit
einem
siehe
mit
non
relatives
europeenne
signifient
findeson
souhaitez
eliminerceproduitetles
reglesenvigueur
correctementceproduit,
des
eventuels
dessousdusymbole
logos
Bluetooth
utilisationdeces
Limited
(JVC)
specialement
pas
cet
aux
Europaische
Symbole
zeigen
entsorgt
5ie
dieses
Produkt
Landesgesetze
Entsorgung
und
die
und
die
Logos
jegliche
Verwendung
Limited
und
Handelsnamen
und
werden
ausschlieBlich
entworfen.
anderen
Auto-Receiver.
Ihrem
Receiver
approuve
par
ill'elimination
seulement)
queIeproduitetles
cycledevie.
dans
votre
effets
sontlapropr;ete
est
faite
sontlapropriete
pour
etre
adaptateur
avecunautre
instructions
zur
Union]
an,
dass
das
werden
und
die
dieses
menschliche
des
Batteriesymbols
sind
Eigentum
soleher
(JVC)
von
uns
anerkannt.
zur
Verwendung
Verwenden
mitgelieferte
JVC
peut
paysetvotre
vous
negatifs
sur
des
marques
par
sous
licence.
utilise
avec
fournies
Entsorgung
damit
gekennzeichnete
sollen.
Batterie
entsorgen
und
andere
Produkts
dient
Gesundheit.
der
Marken
geschieht
unter
sind
Eigentum
mit
Sie
diesen
annuler
I'autoritedeI'utilisateur
des
appareilsetdes
pilesnedoivent
piles,
faites-Ie
conformementala
municipalite.
contribuezala
I'environnementetla
piles
indique
que
Cherie)
client(e),
Cet
appareil
europeennesenvigueur
elearomagnetique
de
Representant
Japan,
Limited:
JVC
Technical
Postfach10OS
61145
Friedberg
Allemagne
alter
Gerate
mochten,
RegelungeninIhrem
dem
Umweitschutz
gibt
an,
dass
Sehr
geehrter
dieses
Gerat
Richtlinien
Vertraglichkeit
Die
europaische
Japan,
Limited
JVC
Technical
Postfach
61145
Friedberg
Deutschland
piles
pas
Hre
eli
conservation
sante
cette
pile
contientduplomb.
est
conforme
europeendela
Services
04
und
Batterien
Produkt
bzw.
halten
Sie
Land
und
diese
Batterie
Kunde,
stimmt
und
Normen
und
Vertretung
ist:
lervices
100504
d'utiliser
I'appareil.
usages.
ill'intention
minesentant
que
dechet
legislation
nationale
des
ressources
humaine.
etala
die
sich
bzw.
verhindert
sehr
mit
elektrischer
naturelles
aux
directivesetnormes
concernantlacompatibilite
securite
electrique.
societe
Victor
Europe
GmbH
Batterie
nicht
als
dabei
bitteandie
Ihrer
Gemeinde.
mogliche
Blei
enthalt.
geehrte
Kundin,
den
gUitigen
europaischen
bezUglich
elektromagnetischer
Sicherheit
fUr
die
Victor
Europe
GmbH
des
ou
etala
Company
normaler
Schaden
oberein.
Company
of
fUr
of
Page 57

Informazioni
[Eselusivamente
Questi
rifiuti
Prodotti
-
)t
Batteria
•IImarchioeilogo
a
CompanyofJapan,
marchienomidifabbrica
•
l'adattatoreestato
impiegato
deve
Per
relativo
Produtos
-
)t
• A
da
pela
Os
respectivos
•
Este
receptoresdeautomovel
nenhum
Para
com0seu
Qualorasidesideri
normativa
Mediante10smaltimento
prevenire
Nota:
il
simboloPbsottoiIsimbolo
Bluetooth
SIG,
Inc.eI'usoditali
coniricevitoridimarca
quindi
essere
maggiori
informazioniinmeritosipregadivedere
manuale
d'istruzioni.
Informacao
[Apenas
Estes
mesma
Se
aplicavelauoutras
Ao
potencJais
Aviso:
Pilha
o
sinalPbabaixodosimbolo
palavra,
marcaselogotipos
Bluetooth
SIG,
Inc.equalquer
Victor
CompanyofJapan,
outros
names
comerciaisemarcas
proprietarios.
adaptador
foi
outro
receptordeautomove!.
mais
detalhes,
receptor.
per
gli
per
simboli
indicano
domestici
generici
smaltireiIprodottoela
nazionale
applicabile0aile
potenziali
effetti
mondialidiBluetooth
impiegato
pretender
desenhado
marchi
limited
(JVC)econcessoinIicenza.
appattengonoairispettivi
concepito
esdusivamente
JVC
(on
ricevitoridialtra
paraosutilizadores
paraaUniao
simbolos
indicam
forma
que
outros
descattar-se
elirninar
consulte
regrasemvigornoseu
este
produtodaforma
efeitos
negativosnoambienteesaude
Bluetooth
u!iliza\aodetais
limited
para
uso
JVc.
Nao
utilize
tambemasinstru\Oes
utenti
sullo
smaltimento
l'Unione
Europea]
cheilprodottoela
alia
fine
della
loro
altre
correttodiquesto
negativi
sull'ambienteesulla
delle
batterie
appattengono
fattodaVictor
Altri
titolari.
per
essere
per
automeui.
Non
marC3.
il
acercadaelimina"odeeouipamento
Europeia]
que0produtoeapilha
aparelhos
domesticos,nofimdasua
deste
produtoeda
correeta,
para
pilhas
saodepropriedade
marcas
(JVC)
esta
sob
exclusivo
este
adaptador
sao
dos
com
fomecidas
licen\a.
seus
registadas
delle
apparecchiature e batterie obsolete
batteriasucui
vita
batteria,
indica
pars
indica
com
essi
appaiono
non
utile.
effettuare10smaltimentoinconformita
leggi
della
propria
prodotto,sicontribuiraapreservareIerisorse
salute
che
questa
batteria
Gentile
C1iente.
Questa
apparecchiaturaeconforme
e
aile
norme
elettromagneticaealia
II
rappresentante
limitede:
JVC
Technical
Postfach1005
61145
Friedberg
Germania
que
tiverem
este
pilha,
por
favor
municipio.
a
conservar
humana.
que
esta
pilha
Caro
Cliente,
Este
aparelho
directlvas
compatibilidade
o
representante
limited
e:
JVCTechnical
Postfach
61145Friedberg
Alemanha
fa\a-odeacordo
contem
Europeias
1005
au
ajudara
devono
nazioneedel
proprio
umana.
contiene
piombo.
europee
relative
sicureua
europeadiVictor
Services
Europe
04
usadoepUhas
simbolo
nao
vidadeutiliza\ao.
devem
comalegisla\ao
recursos
naturaise
chumbo.
encontra-seemconformidade
validasepadroes
magneticaeseguran\a
europeudaVictor
Services
Europe
04
essere
smaltiti
comune.
naturaIiea
aile
direttive
alia
compatibilita
elemica.
CompanyofJapan,
GmbH
ser
descattados
ajudara
a
referentes
electrica.
CompanyofJapan,
GmbH
alia
evitar
tra
da
nacional
com
as
a
i
Informatie
[AileendeEurope..Unie]
Deze
gebruiksduur
Producten
-
Batterij
Het
en
CompanyofJapan,
Overige
overeenkomende
•
Deze
auto-receivers.
receivers.
lie
voor
Produkter
-
Batteri
•
Ordmarket
Inc.
of
varunamn
•
Denna
tillsammans
till
Se
Wanneerudit
of
Door
hulpbronnenenmet
volksgezondheid.
Opmerking:
Het
woord
Bluetoothende
logo's
zijn
eigendom
handelsmerl<enennamen
adapterison!Worpen
Gebruik
tevensdebijuwreceiver
details.
Information
[Galler
Dessa
hushallsavfall,
OmduviII
gallerIlandet
Genomanavytlra
negativa
Observera!
MarkningenPbunder
och
logotypen
och
varje
anvandningavdessa
Japan,
limited
tillhiir
respektive
adapterarspecialkonstruerad
medenJVC
sam
mans
med
aven
bruksanvisningen
symbolen
andere
regelsinuw
dit
product
tekenPbonder
bijbehorende
van
limited
eigenaren.
voor
deze
endast
symboler
kassera
effekterpamiljiin
fiir
(JVC)
skerpalicens.
-bilstereo.
nagon
annan
till
voor
geblUikers
geven
aan
niet
met
het
productende
landengemeente.
naar
het
het
het
Bluetooth
SIG,
(JVC)
gebruikt
zijn
eigendom
exclusief
adapter
niet
geleverde
gebruiksaanwijzing
for
anvandare gallande
EU-Iander]
anger
att
nardeinte
denna
och
kommunen
denna
symbolen
Bluetooth
markenavVictor
Andra
agare.
fiir
Anvand
bilstereo.
bilstereon
batterijsymbool
agsavBluetooth
over
het
verwUderen
dat
het
productende
normaIehuishoudelijk
batterij
inzamelingspunttebrengen,
voorkomen
markeringen
Inc.enVictor
deze
onder
van
gebruik
met
met
andere
produkter
ska
anvandas
produkt
och
dardubor.
produktparatt
och
den
fOr
varumarken
anvandning
inte
adaptem
angaende
batterij
wilt
weggooien,
van
polentiele
geeft
aan
licentie.
de
JVC
auto-
bortskaffningavgammal
och
batterier
mer.
batteri,saska
san,
bidrardutill
manskliga
halsan.
batterier
indikerar
SIG,
Company
och
detaljer.
van
oude
appalatuurenbatteriien
met
dit
symbool
worden
weggegooid.
aandegeldende
aan
effectenophet
lood
bevat.
klant,
voldoet
aandegeldende
vettegenwoordiger
is:
Services
04
utrustning
symbol
inte
att
bevara
naturen
baneri
innehaller
overenlltammer
standarder
och
elsakerhet.
for
04
bij
het
inzake
Europe
ska
Victor
Europe
alval
mogen
houdtudan
werk!umee
negatieve
dat
deze
batterij
Geachte
Oit
apparaat
normenenrichtlijnen
compatibiliteitenelektrische
De
Europese
Japan,
limited
JVC
Technical
Postfach10OS
61145
Friedberg
Duitsland
med
denna
detta
gorasienlighet
att
dena
Basta
kund!
Denna
apparat
direktiv
och
kompatibilitet
Europarepresentant
limitedar:
JVC
Technical5ervices
Postfach10OS
6114SFriedberg
Tyskland
NEDERLANDS
het
einde
van
de
nationale
behoud
van
natuurlijke
milieuende
Europese
elektromagnetische
veiligheid.
van
Victor
GmbH
SVENSKA
och
batterier
kasseras
som
vanligt
med
den
lagstiftning
och
fOrhindrar
potentiellt
bly.
med
gallande
betraffande
elektromagnetisk
CompanyofJapan,
GmbH
wetgeving
Company
som
EU-
of
BlUgerinforlBationombortskaffelseafgammelt
Ikun
Disse
almindeligt
enhver
limited
navne
brugt
bilreceivere.
anden
desuden
Akku
brugafsadanne
(JVCI
som
bilreceiver.
vejledningen,
oplysninger.
Tietoia
Jos
Hvisduonskeratbottskaffe
gifldende
Vedatbottskaffe
eventuelle
Bema!rk:
TegnetPbunder
[vain
Nama
kun
kunnassasi
Kun
ymparisto-jaterveyshaittoja.
Huomautus:
Akkusymoblin
Produkter
-
)t
Batteri
Bluetooth-ordmifrket
og
Japan,
og
ejere.
,
Adapterenerdesignet
JVCs
nogen
Se
yderligere
Tuotteet
-
)t
EU]
symboler
angiver,atproduktetogbatteriet
husholdningsaffald,
nationallovgivning
dene
negative
symbolet
samt
logoer
mifrker
foregar
under
varemifrker
tilhorer
udelukkende
Adapterenmaikke
der
folger
vanhojen
Euroopan
unionil
symbolittarkoittavat,
sen
elinkaari
paanyy.
haluat
havittaa
voimassa
havitat
tuotteen
alapuolella
udstyrogbatteri
med
nar
det
dette
produk!ogbatteriet,
eller
andre
produkt
korrekt
for
batterierne
SIG,
Company
of
Andre
varemifrker
respektive
sammen
med
sammen
for
ettei
symbolilla
tuoneenjaakun,
maaraysten
tavalla,
oleva
Pb-merkima
medvirkerdutilatbevare
pavirkningerafmlljoetogfolkesundheden.
ejesafBluetooth
afVictor
licens.
deres
til
brug
anvendes
med
receiveren,
laitteideniaakkuien
taman
olevien
asianmukaisella
dette
skal
smides
ud.
bedesdugore
ioveogbestemmelseridit
angiver,atdette
Inc.
Kif,e
kunde
Dene
apparateri
europifiske
elektromagnetisk
Europifisk
limited
JVC
Postfach10OS
6114SFriedberg
Tyskland
varustettua
niin
kansallisen
autat
saastamaan
tarkoittaa,
er:
Technical
tuotena
etta
med
havittamisesta
tee
mukaan.
..
symbol
ikkemabottskaffes
detioverenlltemmelse
landogkommune.
naturens
rellourcer
batteri
indeholder
bly.
overenlltemmelse
direktiverogstandarder
kompatibilitetogelektrisk
reprifsentant
for
Services
Europe
04
eika
akkua
saa
lainsaadannon
luonnonvarojajaestamaan
akku
sisaltaa
Iyijya.
som
samt
med
vedrorende
Victor
CompanyofJapan,
GmbH
lainaa
talousjaneisiin,
tai
muiden
DANSK
med
forhindre
gifldende
sikkerhed.
SUOMI
maassasi
mahdollisia
ja
)t
Saym
MUlteri,
-
Bu
cihaz,
elektromanyetik
tasarrufu
a\lIlndan
standatlan
ile
Victor
temsilelsl:
JVC
Postfach10OS
6114SFriedberg
Almanya
uyum
CompanyofJapan,
Technical
Services
&aTape.
[sadece
Avrupa
Birligi]
uyumlulukveelektrik
ge\erll
Avrupa
yonetmeligi
i\indedir.
limited
li,ketinin
Europe
04
GmbH
(seAeH""
AlIA
OtMBOIlbl
nOnblOBaTeneM
EsponeiicMii
YKa3b1BaIOTHaTO,
YTMnM"poBaTbCll,
AaHHoro
laKOHO.Qarel1bCTBa
npaBMnbHylO
01MBOIlOM
[TonbKo
JUt
CJ1)'lK6~HeAon"'H~
YTMnM3a~M~
HallHOHaIlbHoro
06ecne.MBa"
pecypc",MnpeAoTBpaU\aeTe
YseAOMlleHMe:
Ha.nnHCbPbnOA
ve
Avrupa
(OK"]
410
M3AenM~
M
6aTapfM
YTMnM3a~MIO
B03MO"'H"'.
6aTape~
•
Bluetooth
markallvelogolan
Victor
CompanyofJapan,
olarak
kullanmaktadlf.
kendi
sahiplerine
•Buadaptor
JVC'nin
iizel
olarak
tasarlanmlltlr.Buadaptoru
ahclIl
ile
kullanmaymlz.
Aynntllar
i\in
ahoOlzla
no
YTMJlMlaUMM
113.Qemte
KaK
MJlH
YKa3b1BaeTHaTO,
CTaporo
H6arapefl,HaKOTOpble
06~.H~e
6~ToB~e
Aon",,,
0CYU\e<TBJlOTbCI1BcOOTBeTCTBMMcTpe60BaHMRMM
APyrHMH
npaBHnaMH,
AaHHoro
npoAyKra,
yU\ep6
JIll"
oKpy",alOU\e.
4TO
Bluetooth
limited
Diger
tiear;
ainir.
ara\
all(llan
ile
birlikte
verilen
060pYAOSaHMA
OHM
HaHe<€HbI,BKOHll€
OTJIOA~·
Ae~CTBYlOutHMI4
Bbl
nOMoraeTe
cpeA'"M3AOPOBb"
AaHHaR
6aTapeR
SIG,
Inc.'a
(JVC)bumarkalan
marl<alarveticari
birlikte
kullaOilmak
balka
herhangl
talimatlara
M
6aTaDeH
CpOKa
B
BaweM
apaHe
c6epe4b
npMpoAHble
nIOAe
coAep>IUtT
cSHHe~.
aittir
adlar
bakm.
H
•.
ve
Iisansh
iizere
bir
rOpOA€.
ara\
Bluetooth-merkkijalogot
Victor
CompanyofJapan,
Muut
tavaramerkitja
omistajille.
•
Tama
sovitinonsuunniteltu
JVC
-autovastaanottimilla.
autovastaanottimien
Katso
tarkempia
toimitetuista
tietoja
kayttoohjeista.
kuuluvat
limited
tuotenimet
erityisesti
Ala
kanssa.
myos
vastaanonimen
kuuluvat
kayta
(JVC)
Bluetooth
kayttaa
vastaaville
kaytettavaksi
tata
sovitinta
SIG,
Inelle
niita
muiden
mukana
ja
lisenllilla.
Hyva
asiakas,
Tama
laiteonyhdenmukainen
eurooppalaisten
jotka
sahkoturvallisuutta.
Victor
on:
JVC
Postfach10OS
6114S
Saksa
direktiivienjastandardien
koskevat
sahkomagneettista
CompanyofJapan,
Technical
Services
04
Friedberg
limited:in
Europe
niiden
voimassa
kanssa,
yhteensopivuutta
Euroopan
GmbH
olevien
edustaja
ja
•
TeKCToBbl.
TOBapHbl.
norOTHnbl
RsnRIOTCR
SIG,
Inc.MMcnonb3ylOTC"
Japan,
limited
np04He
co6aBeHHoubIO
•
)laHH"'.
Hcnonb30BaHHR
Hcnonb3Y~Te
)lononHMTenbHylO
nouaBllReMOM c
(JVC)nocooTBeTCTBYIOU\e.
TOBapHbie
a~anTep
AaHHbl~
3HaK
BluetoothMcooTBeTCTBylOU\,e
co6aseHHoublO
3HaKH
COOTBeTUSylOll.IHX
npeAHa3Ha.eH
COBMeUHOcnpHeMHHKaMHNCHe
aAamep C
MH$opMa~MIO
npHeMHHKOM.
KOMnaHHH
KOMnaH".
Victor
HToproBble
MapKH
BJlaAellbueB.
MCKJlIO."enbHO
APyrHMH
CM.BpyKoBoACTBe,
Company
nM~eH3MM.
RBnRIOTc.R
npHeMHHKaMH.
Bluetooth
of
JIll"
YBa>t<aeMbl~
KIlHeHT.
,llaHHoe
YCTPO~CTBO
EBpone~CKHM
3JleKTpOMarHItTHO~
6e30naCHooH.
np€AaaBHT€JlbCTBO
Japan,
JVC
Technical
Postfach1005
61145
repMaHM"
COOTBeTCTByeT
,QHpeKntBaMHoaHAapTaM
COBMeCTHMOCTHH:llleKTpH4eCKOH
limitedBEBpone:
Services
04
Friedberg
,Qe~CTBHTenbHblM
KOMnaHHH
Victor Company
Europe
GmbH
no
of
Page 58

npoioVTa
-
MnaTapia
• H
Ai(~
KallO
AOyOTuno
Bluetaath
SIG,
l~V
ab'iac.
IbIOK1~oia
• 0
~,bimc
npooap~oyia
ria
napixoVlOl
•
Znak
Inc.,
Japan,
handlowe
•
Adapter
odbiornikami
adapterazinnym
Wi~cej
odbiornika.
Inc.
Victor
CompanyafJapan,
AMa
,~nopIKo
lWV
aVli010lXwv
npooap~oyia,
Produkty
-
Baleria
aU16c
aUloKlvljlOu
~,onOlobljnoTE
.,mo~ip",c,
~a(i
~"0
slownyilogo
wszelkie
u;ycie
limited
(JVC)
s~
w!asnosci~
zosta!
zaprojektowany
samochodowymi
informacjinaten
nAnpocpopilC
unOloplCdV.
[Eupwna'KIj
Ta
anoppimoVlOlw,oIKIaKO
Eov
vo~oe,"ia
H
,vb'X6~,vwv
Emalj~avaq:
T0
avalpi(TE
Informacie
[Kraje
Symbole
zakonczeniu
W
z
miejscowosci.
Obaj~c0prawidlow~
zmniejszasz
Uwaga:
Oznaczenie
odbiornikiem
aU~~OAa
aUHi
eiAm
va
~
OW(IT~
an6ppI~~
a~~a
Pb
K01W
Bluetooth
KOI
KOe,
xp~a~
limited
a~~ala
IbIOK1~lWV
iX"
ox,bla01,i
1~,
JVe.
mio~e
MK1~.
Unii
przedstawione
razie
konieczno"i
lokalnymi
przepisami
Pb,
Bluetooth
s~
tych
znak6w
jest
licencjonowane.
ich
odpowiednich
temat
Via
TOUt:
xonOUC
lvwCll\
~ovo]
b~AWVOUV
an6~A~TO
anoppi~m
10
oMou,
Kavovla~ou,
aUTou
TOU
apv~lIKwv
mlmwa,wv
an610
au~~oAo
,ivQllbloK1~aia
lWV'vAOYW
(JVC)
yivnQl
Kal
,~nopIKic ovo~aoi,c
10UC.
ylO
anOKA"01IK~
M~
XP~Ol~ono"iTE
oMo
MK1~
aUloKlvljlOU.
(ITle
ab~yi,c
dla
uMkownikow
EuropejskiejJ
obok
okresu
ich
eksploatacji
pozbycia
lub
innymi
utylizacj~
negatywny
wplyw
znajduj~ce
si~
wlasnosci~
Bluetooth
przez
Victor
Inne
w!ascicieli.
do
wyl~cznego
JVe.
Nie
naleiy
samochodowym.
podano
si~
w
instrukcji
GYctlKGUftnv
6T110
npoi6v
Kal0lo
npoi6v
aU16
nou
npoi6Vlo,
010
Yla
TI,
l~C
a~~olwv
Kalomv
aU16v
nou
dO!yaace
oznaaaj~,iesprz~tu
nie
si~
niniejszego
zasadami
produktu,
oddzialywanianasrodowiskoizdrowie
pod
symbolem
SIG,
Company
znakiinazwy
uiytku
z
uiywae
obs!ugi
anoppuIJn
KOI
~
~nQ1apia
nou
liAO,
1~, W<piAI~~,
KOll~V
~naTOpia,
laxuouv
O1~
xwpa
~
~o~eo
n,pl~oMov
~nalapi"
an6
,iVOl
xpljo~
10V
naleiy
przyczyniasz
of
l~V
O1~
blal~p~o~
Kall~v
b~AWV"6HaUl~~~nalapia
Ayan~li
n'Aol~,
~
OUOKEulj
EupwnciiKi,
~Ampo~aYV~lIKlj
~Amplo~6.
o
EupwnciiK6e
Japan,
limited
JVC
Technical
Postfach
100504
61145
Friedberg
r,p~avia
Dozbywania
elektrycznegoielektronicznego
wyrzucae
razemzodpadami
produktuibaterii
post~powania
si~
do
baterii
wskazuje,ieta
Szanowny
Niniejsze
urz~dzenie
europejskich
kompatybilnosci
urz~dzen
elektrycznych.
Europejskim
Japan,
limited
JVC
Technical
Postfach
1005
61145
Friedberg
Niemcy
<pipouv
Kom
n,plox~
avepwmv~
aUllj
Ob~yi,C
sit zulytego
obowi~zuj~cymi
ochrony
Kliencie,
dyrektywistandard6wwzakresie
TaU
noAa.o'
tEonAlouou
KG.
au16,0
OU~~OAO
b,v
(w~,
lOU,.
10
au~<pwva~,
aa,.
lWV
<pUOlKWV
uy,ia.
oU~~OP<PWVHOl
KOI
np6TUna
OU~~Q161~TO
aVllQp6ownoe
EivOl:
Services
Europe
SDrZtluibalerii
gospodarczymi.
naleiy
post~powae
zasob6w
ludzi.
bateria
zawiera
spe!nia
elektromagnetycznejibezpieczenstwa
przedstawicielem
jest
Services
Europe
04
npin"
l~V
laxuouaa
nopwv
KOI
O1~V
np6A~~~
n,plix"
~6Au~bo.
~,
TIC
loxuouo'e
0XHlKO
~,
l~V
KQll~V
aO<poA"a
l~C
Victor
Company
GmbH
oraz
baterii
zgodnie
w
danym
kraju
i
naturalnych
i
oI6w.
wymogi
obowi~zuj~cych
Victor
Company
GmbH
,eVIK~
TlIlV
va
of
po
of
an6
1!
Produkty
-
Balerie
•
Znaekualogo
Inc.
Jakekoli
pouiivani
CompanyofJapan,
licence.
Ostatni
phslusnym
vlastnikum.
•
Tento
adapter
JVCdovozidla.
do
vozidla.
Podrobnosti
najdete
pfijimaeem.
Termekek
-
Akkumulator
• A
Bluetooth
es
log6ja,esa
alapjan
hasznaljaejelzeseket.Atobbi
es
megnevezesazerintett
•Ezaz
adapter
probalkozzunk
A
reszleteket
Informace
Dro
[Pouze
Tyto
likvidovany
Pfejete-Iisizlikvidovat
zakony
Spravnou
potencialnich
Upozorneni:
ZnaekaPbpod
Bluetoothavlastni
limited
ochranne
byl
navrien
Nepouiivejte
Felhasz",;loi
[(sak
Ezekaszimb61umok
elettartama
A
jelen
vagyazadott
A
termek
kornyezetreesaz
Megjegyzes:
Az
sz6aBluetooth
Vietor
kizar61agaJVC
mas
Iasdavevohoz
ulivalele k
pro
Evropskou
symboly
nebo
likvidaci
techto
UVC)
znamkyaobchodni
vyluene
rovneivphruece
Europai
termekesakkumulMor
megfelelo
alabbiPbszimb61um-haazakkumulMoron
CompanyofJapan,
tulajdonosok
aut6radi6kat
unii)
znamenaji,ieproduktabateriestimto
jako
bezny
odpad.
tento
jinymi
pfedpisy
tohoto
produktu
negativnich
dopadunaiivotni
symbolem
pro
spoleenost
znaeek
tento
vegen
SIG,
aut6radi6khoz
mellekelt
Bluetooth
spoleenosti
podleha
podminkam
nazvy
pro
pouiitisphjimaeem
adaptersjinym
dodanesVailm
infoRmacioazelhasznall
Unio]
azt
jelzik,
nem
szabad
orszagban,
illetve
artalmatlanitasaval
egeszsegre
Inc.
sajM
tulajdonu
Limited
kereskedelmi
birtokaban
hasznalhat6.
megtaplalni
utmutat6kban.
Iikvidaci
stareho zan.enia balerii
produktabaterii,
platnymivevasi
pomuiete
baterie
znamena,ietata
SIG,
Victor
naleieji
pfijimaeem
hogyazilyen
haziartasi
szemetkent
hulladekkent
helyhat6sagi
segit
gyakorolt
artalmas
jelzese
(JVC)
licenc
vedjegy
van.
Ne
vele.
symbolem
nesmi
by!poskoneeni
provedletoprosLmvsouladusphslusnymi
zeOliaobcl.
zachovat
phrodn;
prostfed;alidske
Vazeny
tento
smernicemianormami
kompatibilityabezpeenosti
Evropsky
Japan,
JVC
Postfach
61145
Nemecko
berendezesekesakkumulalorok
jelzessel
kezelesekor
korzetben
megorizniatermeszetes
hatasokat.
megtalalhat6-aztjelzi,
Tiszteltvasarl6!
Ezatermek
kompatibilitasr61,azelektromoseselektronikus
berendezesek
szabvanyainak.
A
kepviseloje:
JVC
Postfach
61145
Nemetorszag
zdrojeanapomahate
zdrav!.
baterie
obsahuje
zakazniku,
phstrojjev
zastupce
Limited
je:
Technical
Services
1005
04
Friedberg
ellMott
termeketesakkumulatort
kezelni.
jarjunk
elazidevag6
ervenyes
megfelelazEur6pai
biztonsagr61
Vietor
CompanyofJapan,
Technical
Services
100504
Friedberg
olovo.
souladusplatnymi
ohledne
elektromagneticke
elektrickych
spoleenosti
Vietor
Europe
GmbH
elhelyezeserol
orszagos
egyeb
eloirasok
szerint.
er6forrasokat,esmegelozheti
hogyazakkumulator
Uni6
sz616
iranyelveinek
limited
Europe
GmbH
iivotnosti
narodn;mi
prevenci
evropskymi
phstroju.
Company
of
hasznos
rendelkezesek
olmot
tartalmaz.
elektromagneses
es
europai
a
;:""":~'!~'.!'~!""'~~~~~~~~~~~-~~~~~~"'~~"-
[TiabK.
All'
)t
-
WaHOBHI1~
nOKyneLtb!
lle~
npJ.1na,LI
Bi,LInOBi,LIaE
,LIl1peKH1BaMTaCTaH,LIapTaM
cyMicHOCTiTaeneKTpl14HO'i6e3neKI1,
npeACTaBH.K
limited:
JVC
Postfach
61145
HiMe44J.1Ha
Technical
100504
Friedberg
KOMnaHiiVictor
Services
EBpone.cbKoro
4J.1HHI1M
lltOAO
CompanyofJapan,
Europe
GmbH
EBpOne~(bKHM
eneKTpOMarHiTHo'i
-
-
::-"~~-~.
~~~~~~~-.~~~.-
-
CoI03Y]
.
TeKCToBa
TopriB€JlbHa
BaaCHiCTIa
KOMnaHiEIO
3.Qi~(HlOfTbOl
laproai
Ha3Bl.1
•
AaHIr1~
aAamep
3
aBTOM06inbHI1MM
BI1Kopl1CToByBaTM
aBTOM06inbHI1MI1
JlnR
6inbW
lltO
BXO,LIMTb,LIO
•
1'Cll~nil:afl~il-ll11J1Ufil~1
SIG,lnc.
H'Cl~m'li;ltliil-1111J1U~-Ifl~111~HJ1J;iiYl
CompanY,of
\11!lUm'i~lll'Cl~;il'l11-1m'ifl1Vw"l
11"flli-lfl'Cll1
•
tl~ILiltJL"tl{d'<Ai'tJnl'i6[1flUUu111,.£n1JqtJmwi'uffryq/lW'l..l
'it1Ul.l~"il-1
ffCIJClJ1W1l.l'it1t1Uo;1"llUilihJ'l
ff'll1i'U'iltla::t6tJil~U'l
i'tJffCIJI.1J1W"il-lllW
•
Bluetooth'i1<>1
'?]
;1:-I}
Ai
,*011l!6~
cr.
c}e
JE~
"J-~oJt..]q.
~<>1~~i:'-M*%~~~~%~.'i'.~W
-.5]
"i13J-'i'!
%:'<t
~~7]"i]
r:i
AtAll~
~
{}-3:'5r{]
•
Bluetooth
:f.:o
Victor
ffl
0
:1'tft!lJm~:mJm
JiJT:ft
0
•
~ilEil'ic~~:f.:o
tJJ
0JoW:1'tft!lAJJJtt&t11I~
~f.tw~OOIlifiJtt&t11IIlfH1'J'i8f<efflmAJl~o
MapKaTaJlorontmt
Bluetooth
SIG,
Inc.
Victor
CompanyofJapan,
3a
fli4eH3i€lO,
IHWi
Han€>t<aTb
Bi.QnoBi.QHI1M
p03po6n€HIr1I1
npM~Ma4aMI1
AaHJ.1~
a,LIanrep36Y,LIb-RKI1MJ.1
npl1~Ma4aMI1,
AeTanbHoro
03Ha~OMneHHR
KOMnneKry
nooa4aHHR
Bluetooth
Jap!n,
limite~
U,vC)
JVClvilt!l.l
,flth1'£[I::ILEltJlilflHl'nuqumwi'u
ltJ'i"~il1flti1jil~~"rl-litY~!mJf1tJlfliiH
JEA]
01u]Vietor
,¥;j(f:mt~m~
CompanyofJapan,
':l1
CompanyofJapan,
'ld-0tAi
AerR£}-
Aer~~
'):!0Jt..]q.
0]
At%-.5t
ZJ.5'.i:'-
~~71"i1
Al.2..
Jl,;gm7tJj~~:1'tft!lJiMl~
JVC
AJJJtt&jIJHI~f<effljjijiS!iIT
Bluetooth
B.Kop",aHH'
limited
TopriB€JlbHi
BIr1Kfl104HO
KOMnaHii
I~W'lil>1lJ;ilYl
.~m.'~fil,p~tyl"l~l"i.,
1~l.l'i,.,.iYi"-1ltn"mlfl"'i0>1l11Jltlfl
.'i'.Jl.
i:'-
Bluetooth
01
JEA]~
'8fl~
<>1~IOI~
7
] pt{]A].2..
"ili''i'!
Bluetooth
limited
(JVC)
i!Qf<effl~ilEil'ic~
E
4.'
MapoK
(lVC)
MapK~
Ta
BnaCHIr1KaM.
,D,IUI
BI-1KOplr1CTaHHR
JVL
3a60pOHeHO
iHWI1MI1
,LII1BiTbOI
iHOpyKLtilO,
npl1~Ma4a,
Bluetooth
Vietor
SIG,
Inc.
limited
(JVC)"i!
At%~t..]
~*T~
AJ-
qi"'-
At
"J',P'i
SIG,
Inc.
JiJT:ft,
1:Eii'FllJT
.~~:"~'~.iS~>40~~~~-"~lL.l.~'
",LolWl
0';"
Victor
CompanyofJapan,
~L.o...w~19
s,.,..>YI
4....)4--D1
~~""""""pl
~
,,1
~
J,.....JI
......
l..o.4Jl
",~I
c:.5
r-
.
.w~
~L.
JVC
cSl.o.J,;.:J L
cr.1
o-L.:.
4JI)
if'
",.b
jl
.~I
~~l)
[Hanya
'"
("''No
cr.1jl0,lA:..-1.;~/'
CiL:.;
r-L...
J.
y.J'
'"
J.fib]
c\~
...
m
;:a~~~~~"'IiI"'~~~~~~~~~-'·T~a~nd~a~k~at~a~da~n~IO~9~0~B~lu~et~ooth
-
il1
f<e
0
0
,-:BI~ue~t~oo~th~4J.S~·""·-
J4.I
pl
............
1
"I,
.Bluetooth
limited-(JVC)
uLo~1
~;J
.~L....olt
............
llJJ,.....Jll
I';"
p~
~
'W.,1,Jo.;1 .J"..>uo.Jl
.
.:.4~L>..JI~
J.l.:..
Ci]
cS~L:.;
J
J..l:..\~
if'
cS.r-
Vietor
CompanyofJapan,
y..Y'
cS-,o,.::
0,lA:..-1
•.w.....-ij. j".o.,,1
~
Uni
Eropaj
Bluetooth
j~
~JJ~l
cSl.o
it; J
•
cSlf-l"...,.,...,.. -,.fib]
'~J'
P;)
~
~~
~""~.~~~~~~~~~~~~~~~~
SIG,
Inc.
.is'''';'
4.b....1><
~~
~
ill",
"'~L..DI
....
~,.;·
JVC
iJ-O
',l;.=J1
.,.,..;-jDJ~
"'"
J~
Bluetooth...l5
limited
J-'o,.::
vl.?)l.klLSI.r.
SIG,
Inc.
J:J
(JVC)
cSl.o
..w~d'
cr.1
u"
~
r-L...
.Ir-"
.-0'~
•
•
•
~
.1Y.f..sl...l.
~u...'-"'~I...,:-,IJ~l:A..J~I<S;\fj\.."
:Vietor
Inc.
dan
segala
CompanyofJapan,
Merek
dagang
tnl
receiver
ini
rincian
aiat
dan
memlllki
[alat
dengan
selengkapnya,
penerima.
masing-masing.
Adaptor
car
adaptor
Untuk
dengan
~
[.b.4j -r'",ltl
.;1.J,,;l:.....1
CompanyofJapan,
JVC
~
penggunaan
tanda
Limited
(JVC)
nama
dagang
desatn
eksklusif
penerimadimobil)
unit
penerima
baca
,w~ll
J
Technical
dimiliki
)t
_
<f\}.;1~?
tersebut
untuk
JVe.
mobil
-
,.:...1)';'"
limited
",'pol'""\.;
Services
Europe
Postfach
61145
oleh
Bluetooth
oleh
Victor
berdasarkan
adalah
hak
digunakan
Jangan
yang
lain.
yang
~
gunakan
dibekalkan
o..$.l~J.;1
adalah
lainnya
petunjuk
ol~::......:;,,:r-I
.:;)1.:1
GmbH
1005
04
Friedberg
CiWT
SIG,
lisensi.
pemilik
dengan
Page 59

WHEN
IT
IS
NOT
REQUIRED
TO
DETACH
PANEL
USE
THE
ATTACH
THE
MAIN
THE
FROM
THE
PROVIDED
THE
CONTROL
UNIT.
FRONT
MAIN
SCREW
CONTRO.
UNIT,
TO
PANEL
TO
\
GE40401-001A
Page 60

w
~
en
c:(
;::)
en
~
W w
0::::
c
o en
LL
w
W
!Z
OJ
c:(
W 0
U
....J
D::
OJ
~
« 0
<.,)
-w
-J
:!E
W
o W
0::::
~
LL
~
....J
-J
W W
OJ c
:3
~
W
en
~
- a
:%:
i=
I--
W
w
:5
~
W
0:::
:!E
i=
w W
0::::
0:::
:z
o
~
en
:::::i
i=
~
~
:z
:g:
«
W
-J
[0
<c:(
u
~
c
w
1=
w
~
a
i=
-W
W
1=
W
U
N
W
0:::
i=
w
0:::
A\,
~
CAUTION CONNECT BLACK WIRE (CDGND)
OTHERWISE, DAMAGE
INCORRECT CONNECTION CAUSES SERIOUS DAMAGE TO THIS UNIT
PLEASE READ INSTALLATION/CONNECTION MANUAL CAREFULLY.
CONNECT GROUND FIRST
CD
----(I
METALLIC BODY OR CHASSIS
OFTHE
@ CONNECT ANTENNA TERMINAL
CAR
@
TO
GROUND FIRST.
TO
YOUR UNIT MAY OCCUR.
CONNECT OTHER WIRES
CONNECT POWER CORD
THE UNIT
TO
Page 61

CANADA
ONLY
CANADA
SEULEMENT
JVC
OWNER'S COPY
OF
WARRANTY CARD
COPIE D'ENREGISTREMENTDElA
DU
PROPRIETAIRE
(Save
sales
docket
together
with
La
factureetcette
MODEL
MODELE'
Purchase
Achete
chez
Dealer's
Address
Adresse
du
CityorTown
Ville
Owner's
Name
NomduProprietaire:
Owner's
Address
AdresseduProprietaire·
....................
CityorTown
Ville
from.
Vendeur'
garantie
No.
No
.
.
sont
No.
No
this
vas
preuvesdela
..
...
BT-52008-1
(1007)
WARRANTY CONTROL CARD
CARTE
IMPORTANT:
on
IMPORTANT:
dans
MODEL
MODELE
Purchased from .
Achete
Dealer's Address
Adresse
CityorTown
Ville
Owner's Name
Nom du Proprietaire' ....
Owner's Address
Adresse
City or Town
Ville
WARRANTY
DlSTRIBUTEOINCANADABYJVC
DE
the
back
hereoforregister
les 7 joursdela
chez
................................•
du
Vendeur
du
Proprietaire
r-----,----,---"..--,
You
may
at:www.jvc.ca
APPLIES
CONTROlEDElA
This
Cette
'N'a:
also register on-line
Detach
warranty
control
via
cartedoit
date
.
No
No.
No
internet
etre
renvoyee
d'achataualler
(PLEASE PRINT/EN
.................NODE
ONLYTOPROOUCT
CANADA
INC.
GARANTIE
warranty
Provo
Provo
..
Provo
Provo
here.
card,asa
SERIAL
NODESERlE
Street
Rue
proofofdateofpurchase.
date
d'achat;
rangez-Ies.)
NO.
.
Date
Date
achete
Street
Rue
a
decouper
ici
purchased.
GARANTIE
card
mustbefilledinand
within7(seven)
dOment
surIesite
LETIRES
SERIAL NO.
SERlE
postedtothe
days
from
remplieaI'adresse
par
internet
MOULEES)
.........
the
pour
.
Date purchased .
Date achete
··········..·sireet·..· .
Rue
Provo
Provo
Street
Rue
Provo
Provo
r--------,------,
Vous pouvez egalement vous
inscrire par internet a:www.jvc.ca
LA
GARANTIE
S'APPLIQUE
DlSTRIBUESAUCANADA
SEULEMENT
PAR
..
. .
Postal
Code
Postal
Code
Apt.
App.
Postal
Code
Code
Postal
Printed in Indonesia
address
dateofpurchase.
indiqueeauverso,
I'enregistrement.
..................•.....
.........
........
JVC
CANADA
indicated
..
·pa'i'iCodo··
Code Postal
Apt.
App.
·p"'i'icDdo··
Code Postal
AUX
PRODUITS
INC.
WAIRANTY
GAIANTIE
JVC CANADA INC.
21
Finchdene
TEL:
JVC CANADA INC. (hereafter called "JVC") gives
the following express warranty for each new JVC enonce la garantie expresse suivante pour tout
product distributed
by an authorized
JVC warrants that this JVC product is free, under JVC vous garantit que ce produit est degage, sous
normal use and maintenance, from any defects in utilisation et entretien normal,
material and workmanship subject to the following materiel et
terms and conditions: modalites et conditions suivantes :
1.
To
Obtain
(a) The
provided must be completed
posted or registered via internet within 7 days
of date of purchase of the JVC product.
(b) This
completed in full and presented together
with proof of purchase of the JVC product
requiring service.
(c) The
servicetoan authorized JVC Service Centre.
2.
Limitation:
This Warranty shall not apply to:
(a) Repairorreplacement of any cabinets,
batteries, plates, connection cords, antennas, dust covers, knobs, speaker grills,
speaker cones, projection screens, projection
screen savers, and all accessories.
(b) Any defects caused or repairs required as a
result of misuse, abusive operation, negligence, improper use and/or insufficient care.
(c) Any defect caused or repairs reqUired as
a result of not following the instructions
the operation manual.
(d) Any
JVC
or repaired by any party other than JVC or
authorized
in
Canada by JVC and sold nouveau produit JVC distribue au Canada par JVC
JVC
dealer. et vendu par un detaillant JVC autorise.
Warranty
JVC
JVC
JVC
product tampered with, adjusted
Service:
Warranty Control Card herein
Warranty Control Card must be
product must be brought in for
JVC
Service Centre personnel.
(416)
293-1311
in
Square,
http://www.jvc.ca
full and
Toronto,
FAX:
JVC
1.
2.
in
ON
M1X
1A7
(416)
293-8208
CANADA
Pour
(a) La carte de contrale de garantie JVC ci-
incluse doit etre
renseignements complets et etre postee ou
enregistree via internet
suivant I'achat du produit JVC.
(b) Cette carte de contrale de garantie JVC doit
etre dument remplie et etre presentee avec
la
necessitant une reparation.
(c) Le produit
service chez un centre
autorise.
Restrictions:
Cette garantie ne s'applique pas aux :
(a)
Reparation
cabinet, batteries, panneau avant, cordons
de
protection, boutons,
parleur, cones
projection, protecteurs d'ecran de projection
et tous les accessoires.
(b) Tous defauts occasionnes ou reparations
requises suite
mauvaise, negligente et/ou une utilisation
incorrecte. '
(c) Tous defauts occasionnes ou reparations
requises suite
recommandations du manuel d'instruction.
(d) Tout produit JVC altere, ajuste ou repare par
tout autre entreprise que
de
autorise JVC.
INC. ( ci-apres appeh3 "JVC")
de
de
fabrication
obtenirunservicedegarantie
completee
preuve
raccord,
d'achat
JVC
doit etre apporte pour
ou
remplacement
antennes,
couverts
de
haut-parleur, ecrans de
sous
dans
du
de
tout
reserve des
les 7 jours
produit
service
housses
a une utilisation abusive,
service
a I'omission
d'entretien
de
JVC
ou un centre
ou
de
defaut
:
avec
les
JVC
JVC
de
tout
de
de
haut-
suivre les
service
Page 62

(e) Any
(f)
(g) Conversion to foreign or domestic voltage or
(h) Any
(i)Any JVC products used for commercial or
(
j)
(k) Product purchased from "outside Canada",
JVC
num-ber has been defaced, modified or
removed.
Maintenance, cleaning or periodic check-up
frequency.
Electrical Safety Regulations
institutional, rental, or display purposes.
Parts 1 year (except video head - 90
Labour ... 90 days
Any JVC product which has been resold and
no longer owned by the original purchaser.
"bankruptcy" or "liquidator".
products on which the serial
JVC
product without the Canadian
days)
ID.
(e) Tout produit JVC dont
ete altere, moditie
(f) L'entretien, les verifications periodiques et
nettoyage.
conversionaune
(g) La
tension etrangere
(h) Tout
(i)
(j) Tout produit JVC ayant ete revendu et qui
(k) Produit achete
produit
d'identification conforme
electriques Canadiennes (CSA).
Pour
tout
commerciales, institutionnelles,delocation
ou utilise
n'est plus la propriete de I'acheteur original.
provenant d'une "faillite" ou d'un "Iiquidateur".
ades fins d'etalage.
Pieces............
Main d'ceuvre... 90 Jours
WARRANTYTERM (VALID FROM THE DATE OF PURCHASE)
CONDITIONS DE GARANTIE (VALABLE
PRODUCT
PRODUIT
ProjectionTVIn-Home Service
Colour
TV
D-ILA
~CD
~crans
Ecrans
TV
Ecrans
* In-home service
Whereitis
packing, shipment
JVC
• Service adomicile fourni par
S'il n'y a
coats
I'equipement chezetdepuisIedetaillant
Receivers
Projection
RecepteursetHauts-Parleurs achetes separement, Projecteur
AvantetAudio d'AutodeSerie
In-Home (25"
Rear
Projection In-Home Service
TV
In-Home Service (25"
de
projection Service aDomicile 1 1
de
TV Couleur Service aDomicile (25"
projection arriere
de
LCD
not
available,
Authorized Service
pasdeservice
pourunemballage
and
Home
and
Car
and
above)
and
above)
D-ILA
Service aDomicile (25"
Service aDomicile
tobeprovided
the
and
Audio
Purchaser
all
costs associated with
Centre.
JVC
adequat,
Speakers purchased separately, Front
"ARSENAL"
et
piUS)
where
available
must
assume
un
detaillant disponible.
disponible aproximite, I'acheteur doit assumer
I'expedition, ainsi
JVC
autoriseIeplus
Series
" ARSENAL»
et
plus)
the
aPARTIR DE LA DATE D'ACHAT)
PARTS
PIECES
the
responsibility
deliveryofthe
que
equipmenttoand
tous
les coats associes a
pres
pourunservice d'entretien.
Ie
numero de serie a
ou
enleve.
frequence
ou
domestique.
JVC
n'ayant
produit
1 An (Excepte les tetes
video- 90 jours)
pasIesigle
aux
utilise
a "I'exterieur du Canada",
(Years)
(annees)
and
expense for
2 2
labour
MAIN-D'OEUVER
the
proper
from
the
closest
la
responsabiliteetles
la
livraison
a
des
(Years)
ou une
normes
fins
(annees)
de
(I)Any defects caused by fire, flood, lightning,
power surge, or other events beyond the
control of JVC.
(m) FOR AUTO PRODUCTS
Warranty does not cover elimination of car
static or electrical interferences, cleaning
of head, adjustments, or labour cost for the
removal or reinstallation of the unit for
repair.
3.
Standards:
If
any defects should be foundina JVC product
within the applicable terms, necessary repairs
shall be made at no cost to the purchaser for
parts or labour when JVC acknowledges that
such defects are due to faulty material or workmanship.
4.
ExclusionofAll
This warranty constitutes the entire express
warranty given by JVC for JVC products and
no dealer or service centre personnel or his,
its or their agent or employee
rized to extend or enlarge this warranty on behalf of JVC.
5.
DisclaimerofConsequential
To
the extent the law permits JVC disclaims
any responsibility for loss of time or use of its
prOduct,
indirect, incidental or consequential damage or
inconvenience.
~
Other
Express
transportation
And
mail to the address below.
You
may also register on-line
costs,orany
Warranties:
is,
or are autho-
Damage:
at:www.jvc.ca
Detach
other
here.
(I) Tout dommage cause
inondation, un eclair, une surtension ou tout
autre evenement hors du controle de JVC.
(m) POUR LES
La garantie ne couvre pas I'elimination
d'interferences statiques ou electriques de
la voiture, Ie nettoyage de tete, les
ajustements et les coOts
associes
reinstallation de I'unite pour reparation.
Criteres:
3.
Si
un produit JVC s'averait defectueux, selon les
conditions applicables, les reparations
necessaires seront effectues sans coOts
additionnels
main d'ceuvre lorsque JVC reconnait que de telles
defectuosites sont causees par une defectuosite
de materiel
4. Exclusion
Cette garantie constitue I'entiere garantie express
donnee par JVC pour les produits JVC. Nul
representant
service d'entretien n'est autorise
garantieaunom de JVC.
Denegation
5.
Dans
la
mesure permise parlaloi, JVC nie toute
responsabilite pour perte de temps
ses produits, des
dommage
consequent.
I
Nouveau
I Vous pouvez egalement vous
PRODUITS
a
I'enlevement
a I'acheteur pour les pieces et la
ou
de fabrication.
de
toutes autresgaranties
ou
employe d'un detaillantoud'un
des
dommages
coOts
ou
inconvenient indirect, accidentel et
Veuillez
posteraI'adresse
enregistrer
adecouper
ici
Place stamp
here
Placez votre
timbre
parIefeu, une
D'AUTOMOBILE
de
main d'ceuvre
ou a
expresses:
aprolonger cette
indirects
ou
de transportoutout autre
par
internet
ici
d'usage de
ci-dessous.
it;
www.jvc.ca
la
:
AC
Adapters,
Projector Lamps
Adaptateurs
et
LampedeProjecteur
Wood
Enceinte a
All
Other Categories
Toutes
Remote
AC,
Cone Speakers
ConeenBois
les
autres categories
Controls, Headphones, Microphones
Teh3commande,
Casque
D'ecoute, Microphones
and
90
DAYS
90
JOURS
5
1 1
90
90
DAYS
JOURS
5
JVC CANADA INC.
21
Finchdene
Toronto,ONM1X
Square
1A7
Page 63

Please do not send products or other
correspondence to this address.
JVC AMERICAS CORP.
1700 Valley Road
Wayne, NJ 07470
PO BOX 1189
PLEASE
PLACE
STAMP
HERE
BEDFORD,
11
•••
1.111111
•••
1.1
TX
•••
1.1
76095-1189
••••11•••
111111.1.1••1••1.1.1111
•••
11
PRODUCT REGISTRATION CARD I QUESTIONNAIRE
USA CUSTOMERS ONLY
Registering your product will allow us to contact you
in
the unlikely
event a product safety notification is required.
This form is for Product Registration purposesonly. Failure to return
this form does not diminish your rights during the warranty period.
THANK YOU FOR PURCHASING THIS JVC PRODUCT
REGISTER ONLINE
AT:
REGISTER.JVC.COM
Page 64

First Name:
Last Name:
Address:
Apt.#
City:
State:
Zip Code:
Phone Number:
E-Mail Address:
Register online at REGISTER.JVC.COM
and receive a special offer!
PRODUCT REGISTRATION
1) Would you like to receive the JVC Community e-mail newsletter?
2) Would you like to receive special offers from JVC?
3) Have you purchased an extended warranty for this product?
Date
of
Purchase
Model Number:
Serial Number:
Purchase Price:
Dealer:
of
On a scale
JVC product.
1 to5,with 5 being the best, please rate eachofthe following attributes about your new
Yes
Yes No
Yes
No
No
8T-51044-1
(0208)
Instructions: Fold at crease and tape open edgeinthe middle.
Printed
in
Indonesia
Page 65

TO OUR VALUED CUSTOMER
--
THANK
YOU
FOR PURCHASING THIS JVC PRODUCT.
WE WANT TO HELPYOU ACHIEVE A PERFECT EXPERIENCE.
NEED HELP ON HOWTO HOOK UP?
NEED ASSISTANCE
NEED
TO
LOCATE A JVC SERVICE CENTER?
ON
HOWTO OPERATE?
LIKETO PURCHASE ACCESSORIES?
.JVC®
TOLL
FREE: 1(800)252-5722
IS HERETO HELP!
http://www.jvc.com
Remembertoretain
---
Do
not
Caution
To
prevent
There
Please refer
your
BillofSale
attempttoservice the
electrical shock,
are
no
user
to
qualified
for
Warranty
do
serviceable
service
Service.
product
not
open
parts inside.
personnel
the
yourself
cabinet.
for
repairs.
BT-51
(0306)
029-3
Printed in Indonesia
Page 66

***********************************
•••••**••••••••••••*••••••••
***************
* *
i
JVC®
: I
: JVC Americas Corp. (JVC) warrants this product and all parts thereof, except as set forth below ONLY TO THE *
* ORIGINAL RETAIL PURCHASER tobeFREE FROM DEFECTIVE MATERIALS
LIMITED
ONLY
FOR
PRODUCT
WARRANTY
PURCHASEDINU.S.A.
2-2
I
USA
ONLY
I :
AND
WORKMANSHIP from the date of :
Ii
*original purchase for the period shown below. ("The Warranty Period") *
* *
: IPARTS ILABOR :
* . 2
* *
* THIS LIMITED WARRANTYISVALID ONLYINTHE FIFTY (50) UNITED STATES, THE DISTRICT OF COLUMBIA
* *
:INTHE COMMONWEALTH OF PUERTO RICO. :
: WHAT
:Ifthis productisfound tobedefective within the warranty period, JVC will repair or replace defective parts with new or :
* rebuilt equivalents at no charge to the original owner. Such repair and replacement services shall
: during normal business hours at JVC authorized service centers. Parts used for replacement are warranted only for the :
* remainder of the Warranty Period. All products maybebrought to a JVC authorized service centerona carry-in basis. *
* Color televisions with a screen size of 27" or greater qualify for in-home service.
: to your home and either repair the TV there or remove and return it if it cannotberepairedinyour home. :
: WHAT
*Please do
: Instead, return your producttothe JVC authorized service center nearest you. If shipping the producttothe service :
*center, please
: the problem(s). Please call 1-800-252-5722
* can also
* representative will require clear access
* *
: If you have any questions concerning your JVC Product, please contact our Customer Care Center at 800-252-5722 :
WE
WILL DO: :
YOU
MUSTDOFOR
not
return your product to the retailer *
be
suretopackageitcarefully, preferably in the original packaging, and include a brief descriptionof*
be
obtained from our website http://www.ivc.com. If your product qualifies for in-home service, the service *
WARRANTY SERVICE: :
to
YRS
to
locate the nearest JVC authorized service center. Service locations :
the prodUCt. *
2
VRS
AND*
be
rendered by JVC *
In
such cases, a technician will come *
*
* WHAT IS NOT COVERED: *
* *
: This limited warranty provided by
*
1.
Products which have been subject to abuse, accident, alteration, modification, tampering, negligence, misuse, faulty *
: installation, lack of reasonable care, or if repaired or serviced by anyone other than a service facility authorized
* JVC to render such service, or if affixed to any attachment not provided with the products, or if the model or
* number has been altered, tampered with, defaced or removed; *
2.
Initial installation, installation and removal from cabinets or mounting systems. :
:
*
3.
Operational adjustments covered in the Owner's Manual, normal maintenance, video and audio head cleaning; *
:
4.
Damage that occurs in shipment, due to act of God, and cosmetic damage; :
5.
Signal reception problems and failures due to line power surge; *
*
:
6.
User
Rem<;>val
*
7.
Accessones; *
*
8.
Batteries (except that Rechargeable Batteries are covered for 90 days from the date of purchase); *
: 9. Products used for commercial purposes, including, but not limited to rental. :
* 10. Loss of data resultant from malfunction of hard drive or other data storage device; *
: There are no express warranties except as listed above. :
* *
: THE DURATIONOFANY
* LIMITED
* JVC SHALL NOT
* *
: DAMAGES, WHETHER DIRECT, INCIDENTAL OR CONSEQUENTAL (INCLUDING, WITHOUT LIMITATION, :
* DAMAGE TO TAPES, RECORDS
* OF ANY BREACH OF THIS WARRANTY. ALL EXPRESS AND IMPLIED WARRANTIES, INCLUDING THE *
: WARRANTIES OF MERCHANTABILITY AND FITNESS
: WARRANTY PERIOD SET FORTH ABOVE. :
:
Some
* implied warranty lasts,sothese limitationsorexclusions
: legal rights and you may also have other rights which vary from state to state. :
* JVC
* *
:
*
* *
***************
REFURBISHED PRODUCTS CARRY A SEPARATE WARRANTY, THIS WARRANTY DOES NOT APPLY. FOR DETAIL
OF
INFORMATION
TO
statesdonot
REFURBISHED PRODUCT WARRANTY, PLEASE REFER TO THE REFURBISHED PRODUCT WARRANTY
Memory
THE DURATION OF THE EXPRESS WARRANTY HEREIN. *
DevicesNideo
IMPLIED WARRANTIES, INCLUDING THE IMPLIED WARRANTY OF MERCHANTABILITY,IS:
BE
LIABLE
allow
•••••••••••••••••••
PACKAGED
JVC
does not cover: :
Pick-up
FOR
ANY LOSS OF USE OF THE PRODUCT, INCONVIENCE, OR ANY OTHER *
OR
DISCS) RESULTING FROM THE USE OF THIS PRODUCT, OR ARISING OUT *
the
exclusionofincidentalorconsequential
1700
Tubes/CCD
Valley
Image
FOR
may
AMERICAS
Road,
Wayne,
http://www.jvc.com
Sensors
CORP.
New
****************.*••*.*.*****.**************
WITH
EACH
REFURBISHED
PRODUCT.
by:
serial*
are
covered
PARTICULAR PURPOSE, ARE LIMITED TO
damagesorlimitationsonhow
not apply to you. This warranty gives you specific *
Jersey 07470 :
for90days
from
the
dateofpurchase;
long
THE:
an
:
:
*
*
For
customer
Enter below the Model No. and Serial No. which is located either on the rear, bottom or side of the cabinet.
Retain this information for future reference.
Model
Purchase
use:
No.:
date:
Serial
No.:
Name of
dealer:
 Loading...