

Page 1
DIGITAL VIDEO CAMERA
Dear Customer,
Thank you for purchasing this digital
video camera. Before use, please
read the safety information and
precautions contained in the pages
2 – 4 and 10 to ensure safe use of
this product.
ENGLISH
GR-D347U
Please visit our Homepage on the World Wide Web for
Digital Video Camera:
http://www.jvc.co.jp/english/cyber/
For Accessories
http://www.jvc.co.jp/english/accessory/
:
GETTING STARTED
VIDEO RECORDING &
PLAYBACK
ADVANCED FEATURES
REFERENCES
TERMS
For Customer Use:
Enter below the Model No. and
Serial No. which is located on the
bottom of the camcorder. Retain this
information for future reference.
Model No.
Serial No.
7
17
22
35
43
INSTRUCTIONS
To deactivate the demonstration,
set “DEMO MODE” to “OFF”.
(
pg. 22, 25)
LYT1636-001B
EN
Page 2
2
EN
Read This First!
●
Before recording important video, be sure to
make a trial recording.
Play back your trial recording to make sure the
video and audio have been recorded properly.
●
We recommend cleaning your video heads before
use.
If you haven’t used your
camcorder for awhile, the
heads may be dirty. We
recommend periodically
cleaning the video heads
with a cleaning cassette
(optional).
●
Be sure to store your
cassette tapes and camcorder in the proper
environment.
Video heads can become dirty more easily if your
cassette tapes and camcorder are stored in a
dusty area. Cassette tapes should be removed
from the camcorder and stored in cassette cases.
Store the camcorder in a bag or other container
●
Use SP (Standard) mode for important video
recordings.
LP (Long Play) mode lets you record 50% more
video than SP (Standard) mode, but you may
experience mosaic-like noise during playback
depending on the tape characteristics and the
usage environment.
So, for important recordings, we recommend
using SP mode.
●
For safety and reliability.
It is recommended only genuine JVC batteries
and accessories are used in this camcorder.
●
This product includes patented and other
proprietary technology and will operate only with
JVC Data Battery. Use the JVC BN-VF707U/
VF714U/VF733U battery packs. Using generic
non-JVC batteries can cause damage to the
internal charging circuitry.
●
Make sure you only use cassettes with the Mini
DV mark
●
Remember that this camcorder is intended for
private consumer use only.
Any commercial use without proper permission is
prohibited. (Even if you record an event such as a
show, performance or exhibition for personal
enjoyment, it is strongly recommended that you
obtain permission beforehand.)
●
DO NOT leave the unit
- in place of over 50°C (122°F)
- in place where humidity is extremely low (below
35%) or extremely high (80%).
- in direct sunlight.
- in a closed car in summer.
- near a heater.
●
The LCD monitor is made with high-precision
technology. However, black spots or bright spots
of light (red, green or blue) may appear constantly
on the LCD monitor. These spots are not
recorded on the tape. This is not due to any
defect of the unit. (Effective dots: more than
99.99%)
●
Do not leave the battery pack attached when the
camcorder is not in use and check the unit
regularly whether it is working or not.
Page 3
SAFETY PRECAUTIONS
CAUTION
RISK OF ELECTRIC SHOCK
DO NOT OPEN
CAUTION: TO REDUCE THE RISK OF ELECTRIC SHOCK,
DO NOT REMOVE COVER (OR BACK).
NO USER-SERVICEABLE PARTS INSIDE.
REFER SERVICING TO QUALIFIED SERVICE PERSONNEL.
The lightning flash with arrowhead symbol, within an
equilateral triangle, is intended to alert the user to the
presence of uninsulated "dangerous voltage" within the
product's enclosure that may be of sufficient magnitude
to constitute a risk of electric shock to persons.
The exclamation point within an equilateral triangle is
intended to alert the user to the presence of important
operating and maintenance (servicing) instructions in
the literature accompanying the appliance.
WARNING: TO PREVENT FIRE OR SHOCK
HAZARD, DO NOT EXPOSE THIS UNIT TO
RAIN OR MOISTURE.
CAUTIONS:
●
This camcorder is designed to be used with
NTSC-type color television signals. It cannot be
used for playback with a television of a different
standard. However, live recording and LCD
monitor/viewfinder playback are possible
anywhere.
●
This product includes patented and other
proprietary technology and will operate only
with JVC Data Battery. Use the JVC
BN-VF707U/VF714U/VF733U battery packs
and, to recharge them or to supply power to the
camcorder from an AC outlet, use the provided
multi-voltage AC Adapter. (An appropriate
conversion adapter may be necessary to
accommodate different designs of AC outlets in
different countries.)
This product contains a CR Coin Cell Lithium
Battery which contains Perchlorate Material special handling may apply.
See www
.dtsc.ca.gov/hazardouswaste/
perchlorate
NOTES:
●
The rating plate (serial number plate) and
safety caution are on the bottom and/or the
back of the main unit.
●
The rating information and safety caution of the
AC Adapter are on its upper and lower sides.
EN
3
Page 4
4
EN
When the equipment is installed in a cabinet or on
a shelf, make sure that it has sufficient space on
all sides to allow for ventilation (10 cm (3–15/16")
or more on both sides, on top and at the rear).
Do not block the ventilation holes.
(If the ventilation holes are blocked by a
newspaper, or cloth etc. the heat may not be able
to get out.)
No naked flame sources, such as lighted candles,
should be placed on the apparatus.
When discarding batteries, environmental
problems must be considered and the local rules
or laws governing the disposal of these batteries
must be followed strictly.
The apparatus shall not be exposed to dripping or
splashing.
Do not use this equipment in a bathroom or
places with water.
Also do not place any containers filled with water
or liquids (such as cosmetics or medicines, flower
vases, potted plants, cups etc.) on top of this unit.
(If water or liquid is allowed to enter this
equipment, fire or electric shock may be caused.)
Do not point the lens or the viewfinder directly into
the sun. This can cause eye injuries, as well as
lead to the malfunctioning of internal circuitry.
There is also a risk of fire or electric shock.
CAUTION!
The following notes concern possible physical
damage to the camcorder and to the user.
When carrying, be sure to always securely attach
and use the provided strap. Carrying or holding
the camcorder by the viewfinder and/or the LCD
monitor can result in dropping the unit, or in a
malfunction.
Take care not to get your finger caught in the
cassette holder cover. Do not let children operate
the camcorder, as they are particularly
susceptible to this type of injury.
Do not use a tripod on unsteady or unlevel
surfaces. It could tip over, causing serious
damage to the camcorder.
CAUTION!
Connecting cables (Audio/Video, S-Video, etc.) to
the camcorder and leaving it on top of the TV is
not recommended, as tripping on the cables will
cause the camcorder to fall, resulting in damage.
IMPORTANT SAFETY INSTRUCTIONS
1. Read these instructions.
2. Keep these instructions.
3. Heed all warnings.
4. Follow all instructions.
5. Do not use this apparatus near water.
6. Clean only with dry cloth.
7. Do not block any ventilation openings. Install in
accordance with the manufacturer’s instructions.
8. Do not install near any heat sources such as
radiators, heat registers, stoves, or other
apparatus (including amplifiers) that produce
heat.
9. Only use attachments/accessories specified by
the manufacturer.
10. Use only with the
cart, stand, tripod,
bracket, or table
specified by the
manufacturer, or
sold with the
apparatus. When a
cart is used, use
caution when
moving the cart/
apparatus combination to avoid injury from tipover.
11. Unplug this apparatus during lightning storms or
when unused for long periods of time.
12. Refer all servicing to qualified service
personnel. Servicing is required when the
apparatus has been damaged in any way, such
as power-supply cord or plug is damaged, liquid
has been spilled or objects have fallen into the
apparatus, the apparatus has been exposed to
rain or moisture, does not operate normally, or
has been dropped.
Page 5
Major Features of this Camcorder
EN
5
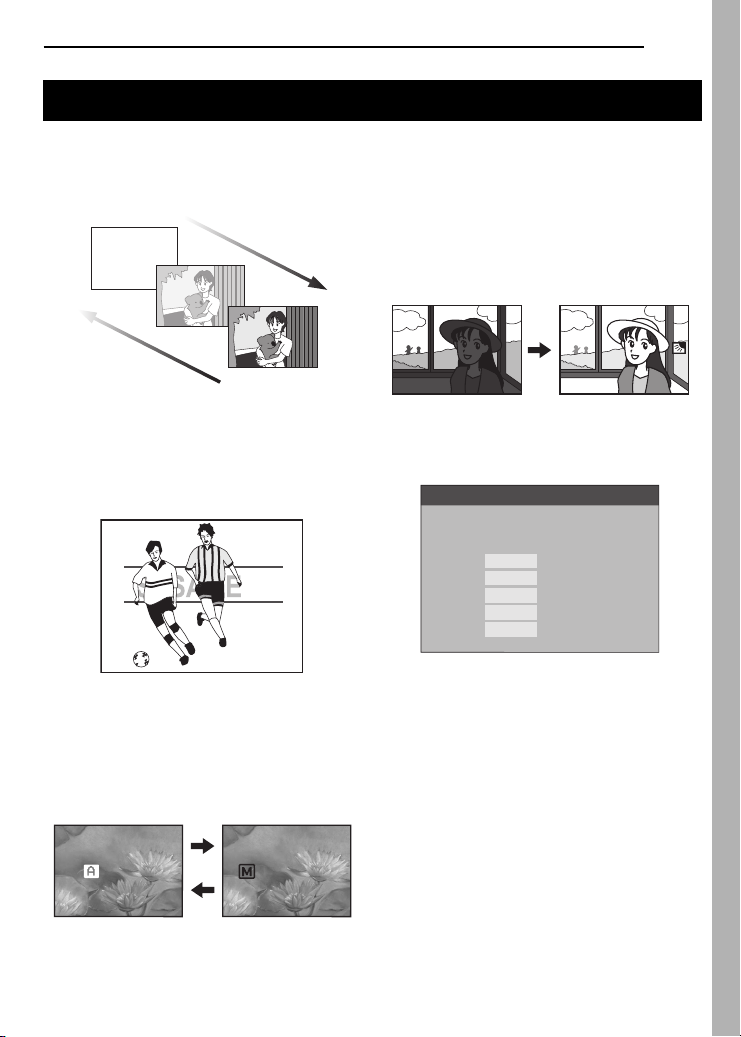
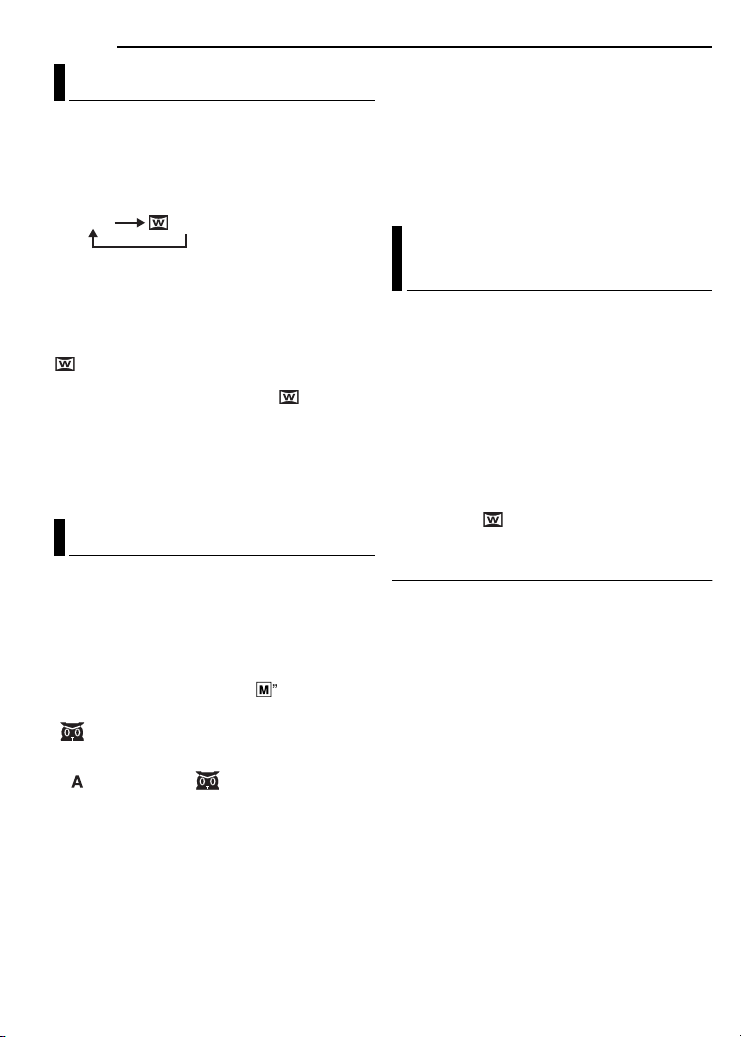
Wipe/Fader Effects
You can use the Wipe/Fader Effects to make
pro-style scene transitions. ( pg. 30)
Fade in
Fade out
Program AE, Effects and Shutter Effects
For example, “SPORTS” mode allows fast-
moving images to be captured one frame at a
time, for vivid, stable slow-motion. ( pg. 31)
Auto Button
You can change the recording mode between
manual setting to the standard mode setting
of the camcorder by pressing the
button.( pg. 13)
AUTO
Backlight Compensation
Simply pressing the
brightens the image darkened by backlight.
( pg. 28)
●
You can also select a spot metering area so
that more precise exposure compensation
is available. ( pg. 27, Exposure Control)
BACKLIGHT
button
Data Battery
You can check the battery status by simply
pressing the
DATA
button. ( pg. 12)
BATTERY CONDITION
MAX TIMELEVEL
100
%
LCD
50
0
FINDER
90min
100min
AUTO
MANUAL
Page 6

EN
CONTENTS
6
GETTING STARTED 7
Index ................................................................. 7
Provided Accessories .....................................10
Power.............................................................. 11
Operation Mode .............................................. 13
Language Settings ..........................................14
Date/Time Settings .........................................14
Grip Adjustment .............................................. 14
Viewfinder Adjustment .................................... 15
Brightness Adjustment Of The Display ........... 15
Tripod Mounting ..............................................15
Loading/Unloading A Cassette .......................16
VIDEO RECORDING & PLAYBACK 17
VIDEO RECORDING............................................17
Basic Recording.............................................. 17
Tape Remaining Time ................................17
LCD Monitor And Viewfinder ......................18
Zooming......................................................18
Journalistic Shooting................................... 19
Time Code ..................................................19
Quick Review..............................................19
Recording From The Middle Of A Tape......19
VIDEO PLAYBACK..............................................20
Normal Playback............................................. 20
Still Playback ..............................................20
Shuttle Search ............................................20
Blank Search ..............................................20
Playback Snapshot ..................................... 20
Connections To A TV Or VCR ........................ 21
ADVANCED FEATURES 22
MENUS FOR DETAILED ADJUSTMENT ..................22
Changing The Menu Settings .........................22
Recording Menus............................................ 23
Playback Menus..............................................25
FEATURES FOR RECORDING ...............................26
Wide Mode......................................................26
Night-Alive.......................................................26
Snapshot (Record Still Image On Tape) .........26
Manual Focus .................................................27
Exposure Control ............................................27
Iris Lock...........................................................28
Backlight Compensation .................................28
Spot Exposure Control.................................... 29
White Balance Adjustment.............................. 29
Manual White Balance Adjustment .................30
Wipe Or Fader Effects ....................................30
Program AE, Effects And Shutter Effects .......31
EDITING............................................................32
Dubbing To A VCR .........................................32
Dubbing To Or From A Video Unit Equipped With
A DV Connector (Digital Dubbing) .............. 33
Connection To A Personal Computer .............34
REFERENCES 35
TROUBLESHOOTING ..........................................35
USER MAINTENANCE .........................................38
CAUTIONS.........................................................39
SPECIFICATIONS................................................42
TERMS 43
Page 7
Index
GETTING STARTED
8
9
EN
7
1
2
3
4
5
6
7
!%&"
#$
GETTING STARTED
(
Page 8

8
GETTING STARTED
EN
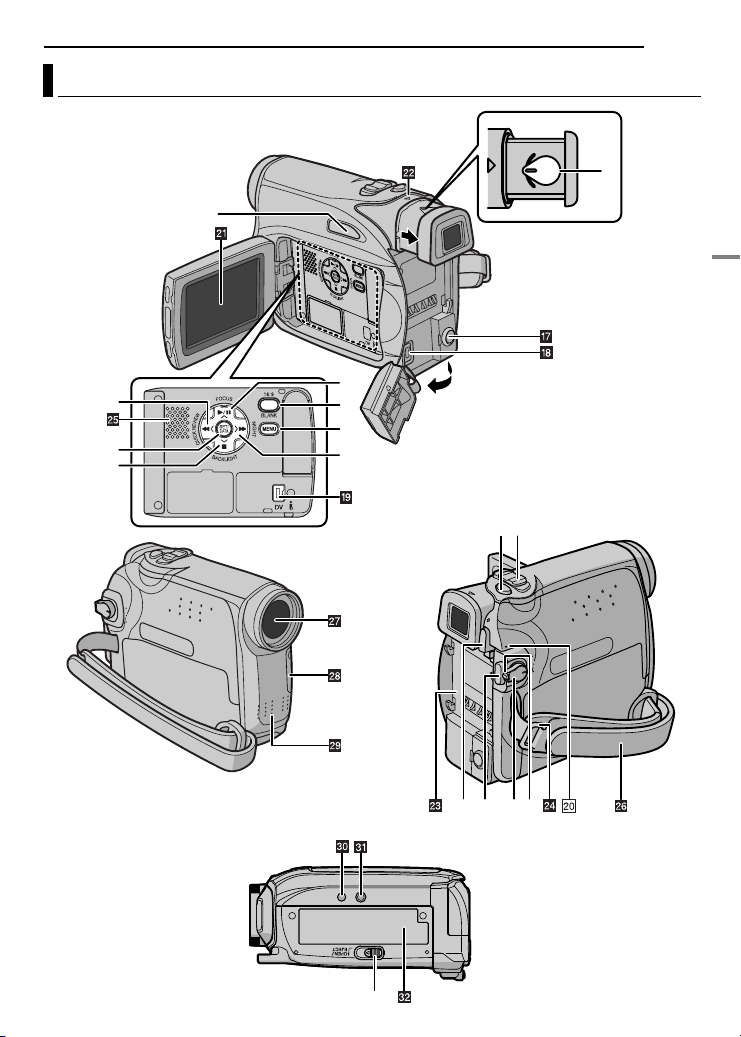
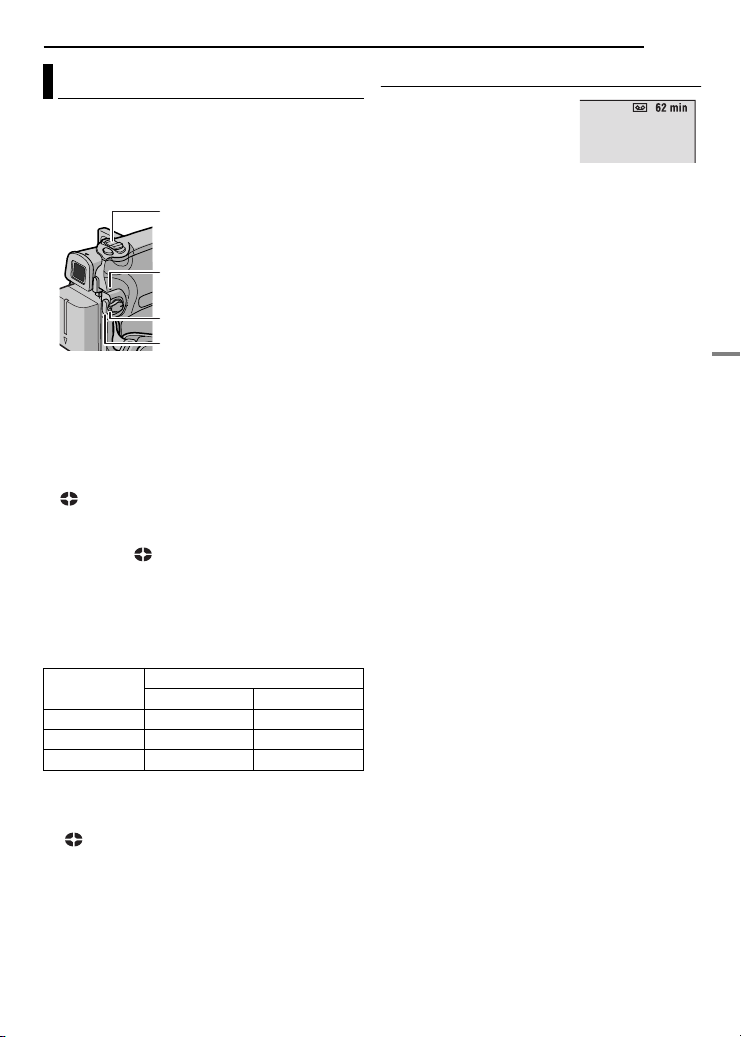
Controls
1
Rewind Button [1] ( pg. 20)
Left Button [
Quick Review Button [QUICK REVIEW]
(
pg. 19)
2
Set Button [SET] ( pg. 14)
Data Battery Button [DATA] (
3
Stop Button [7] ( pg. 20)
Backlight Compensation Button
[BACKLIGHT] (
Down Button [
4
Play/Pause Button [6] ( pg. 20)
Manual Focus Button [FOCUS] (
Up Button [
5
Wide 16:9 Button [16:9] ( pg. 26)
Blank Search Button [BLANK] (
6
Menu Button [MENU] ( pg. 22)
7
Fast-Forward Button [¡] ( pg. 20)
Right Button [>] (
Night Button [NIGHT] (
8
Diopter Adjustment Control ( pg. 15)
9
Auto Button [AUTO] ( pg. 13)
!
Snapshot Button [SNAPSHOT] ( pg. 26)
"
Power Zoom Lever [T/W] ( pg. 18)
Speaker Volume Control [VOL. +, –]
(
pg. 20)
#Battery Release Button [PUSH BATT.]
( pg. 11)
$Recording Start/Stop Button ( pg. 17)
%Power Switch [REC, OFF, PLAY] ( pg. 13)
&Lock Button ( pg. 13)
(Cassette Open/Eject Switch [OPEN/EJECT]
( pg. 16)
1
] ( pg. 14)
pg. 28)
4
] ( pg. 22)
3
] ( pg. 22)
pg. 14)
pg. 26)
pg. 12)
pg. 27)
pg. 20)
Connectors
The connectors are located beneath the covers.
á
Audio/Video Output Connector [AV]
( pg. 21, 32)
à
DC Input Connector [DC] ( pg. 11)
â
Digital Video Connector [DV IN/OUT] (i.LINK*)
( pg. 33, 34)
* i.LINK refers to the IEEE1394-1995 industry
specification and extensions thereof. The logo
is used for products compliant with the i.LINK
standard.
Indicators
ä
POWER/CHARGE Lamp ( pg. 11, 17)
Other Parts
ã
LCD Monitor ( pg. 18, 19)
å
Viewfinder ( pg. 15)
ç
Battery Pack Mount ( pg. 12)
é
Shoulder Strap Eyelet ( pg. 11)
è
Speaker ( pg. 20)
ê
Grip Strap ( pg. 14)
ë
Lens
í
Camera Sensor
(Be careful not to cover this area, a sensor
necessary for shooting is built-in here.)
ì
Stereo Microphone
î
Stud Hole ( pg. 15)
ï
Tripod Mounting Socket ( pg. 15)
ñ
Cassette Holder Cover ( pg. 16)
Page 9

LCD Monitor/Viewfinder Indications
SOUND
B/ W
12BIT
30min
min62
05:20
PAUSE
12006
9:52
JAN. .
–1EXPOSURE
–1BRIGHT
12354
678
During Video Recording
%$
&
(
)
~
+
!
9
8
1
2
3
4
5
6
7
1
B/ W
,- .
#
"
x
0
1Auto/Manual Mode Indicator
A
: Auto Mode
M
: Manual Mode
2 : Night-Alive Indicator ( pg. 26)
: Gain Up Mode ( pg. 24)
3Shutter Speed ( pg. 31)
4White Balance Indicator ( pg. 29)
5Effect Mode Indicator ( pg. 31)
6Program AE Mode Indicator ( pg. 31)
7SOUND 12BIT/16BIT: Sound Mode Indicator
( pg. 23) (Appears for approx. 5 seconds
after turning on the camcorder.)
8Battery Remaining Power Indicator
( pg. 37)
9Approximate Zoom Ratio ( pg. 18)
!Zoom indicator ( pg. 18)
"Digital Image Stabilizer ( pg. 23)
#Wide 16:9 Mode Indicator ( pg. 26)
$Recording Speed Mode (SP/LP) ( pg. 23)
(Only LP indicator is displayed)
%Tape Running Indicator ( pg. 17)
(Rotates while tape is running.)
&Tape Remaining Time ( pg. 17)
(REC: (Appears during recording.) ( pg. 17)
PAUSE: (Appears during Record-Standby
mode.) ( pg. 17)
PHOTO: (Appears when taking snapshot.)
( pg. 26)
GETTING STARTED
EN 9
) : Spot Exposure Control Indicator
( pg. 29)
: Backlight Compensation Indicator
( pg. 28)
: Iris Lock Indicator ( pg. 28)
±: Exposure Adjustment Indicator ( pg. 27)
~Wipe/Fader Mode indicator ( pg. 30)
+Wind Cut Indicator ( pg. 24)
,Time Code ( pg. 24, 25)
-Manual Focus Adjustment Indicator
( pg. 27)
Brightness Control Indicator (LCD monitor/
Viewfinder)( pg. 15)
.Date/Time ( pg. 14)
During Video Playback
25min
12BIT
9
1Battery Remaining Power Indicator
( pg. 37)
2Blank Search Indicator ( pg. 20)
3Tape Speed (SP/LP) ( pg. 23) (Only LP
indicator is displayed)
4Cassette Indicator
53: Playback
¡: Fast-Forward/Shuttle Search
1: Rewind/Shuttle Search
8: Pause
6Date/Time ( pg. 14)
7VOLUME: Volume Level Indicator ( pg. 20)
BRIGHT: Brightness Control Indicator (LCD
monitor/Viewfinder) ( pg. 15)
8Time Code ( pg. 24, 25)
9Sound Mode Indicator ( pg. 23, 25)
BLANK SEARCH
"
SUPHSTOPBUTTON
"
OCANCELT
VOLUME
15:29:03
JAN. .
9:52
12006
GETTING STARTED
Page 10
10 EN
GETTING STARTED
Before Using This Camcorder
Make sure you only use cassettes with the Mini
DV mark .
This camcorder is designed exclusively for the
digital video cassette. Only cassettes marked
“” can be used with this unit.
Remember that this camcorder is not
compatible with other digital video formats.
Remember that this camcorder is intended for
private consumer use only.
Any commercial use without proper permission is
prohibited. (Even if you record an event such as a
show, performance or exhibition for personal
enjoyment, it is strongly recommended that you
obtain permission beforehand.)
Before recording important video, be sure to
make a trial recording.
Play back your trial recording to make sure the
video and audio have been recorded properly.
We recommend cleaning your video heads
before use.
If you haven’t used your camcorder for a while, the
heads may be dirty. We recommend periodically
cleaning the video heads with a cleaning cassette
(optional).
Be sure to store your cassette tapes and
camcorder in the proper environment.
Video heads can become dirty more easily if your
cassette tapes and camcorder are stored in a dusty
area. Cassette tapes should be removed from the
camcorder and stored in cassette cases. Store the
camcorder in a bag or other container.
Use SP (Standard) mode for important video
recordings.
LP (Long Play) mode lets you record 50% more
video than SP (Standard) mode, but you may
experience mosaic-like noise during playback
depending on the tape characteristics and the
usage environment.
So, for important recordings, we recommend using
SP mode.
It is recommended that you use JVC brand
cassette tapes.
Your camcorder is compatible with all brands of
commercially available cassette tapes complying
with the MiniDV standard, but JVC brand cassette
tapes are designed and optimized to maximize the
performance of your camcorder.
Also read “CAUTIONS” on pages 39 – 41.
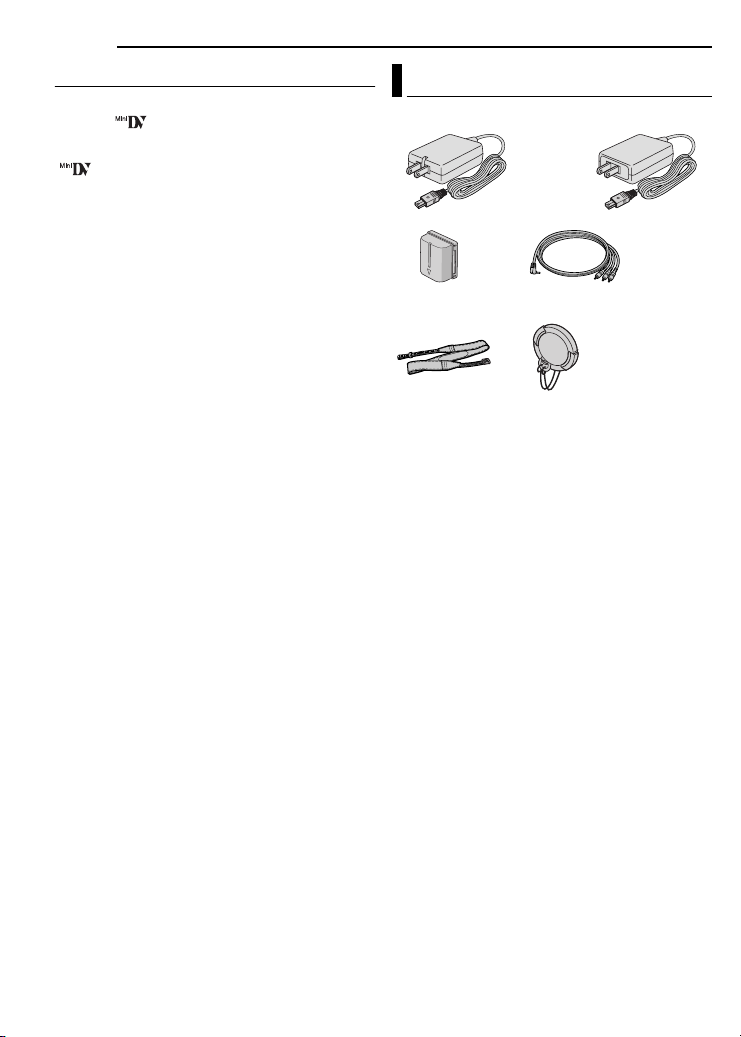
Provided Accessories
1
OR
2
4
1 AC Adapter AP-V14U or AP-V18U
2 Battery Pack BN-VF707U
3 Audio/Video Cable (ø3.5 mini-plug to RCA
plug)
4 Shoulder Strap ( pg. 11 for attachment)
5 Lens Cap ( pg. 11 for attachment)
● In order to maintain optimum performance of
the camcorder, provided cables may be
equipped with one or more core filter. If a cable
has only one core filter, the end that is closest
to the filter should be connected to the
camcorder. Make sure to use the provided
cables for connections. Do not use any other
cables.
3
5
Page 11
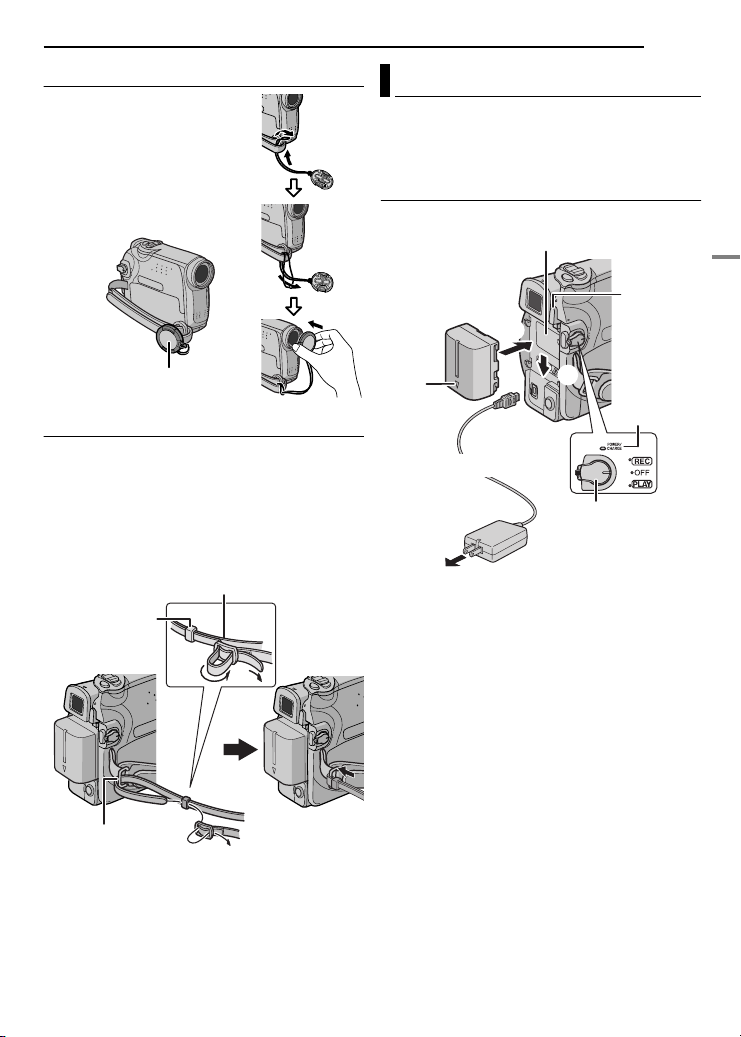
How To Attach The Lens Cap
To protect the lens, attach
the provided lens cap to the
camcorder as shown in the
illustration.
NOTE:
To confirm the lens cap is on
correctly make sure the cap is
flush to the camcorder.
GETTING STARTED
EN 11
Power
This camcorder’s 2-way power supply system
lets you choose the most appropriate source of
power. Do not use provided power supply units
with other equipment.
Charging The Battery Pack
Battery pack mount
PUSH
Battery pack
1
BATT.
Place here during
shooting.
How To Attach The Shoulder Strap
Follow the illustration.
1 Thread the strap through the eyelet.
2 Fold it back and thread it through the strap
guide and the buckle.
● To adjust the length of the strap, loosen and then
tighten the strap in the buckle.
3 Slide the strap guide fully towards the eyelet.
Buckle
Strap guide
1
Eyelet
2
2
3
Arrow
To DC connector
To AC outlet
2
AC Adapter
Power
switch
POWER/
CHARGE
lamp
1 Set the Power Switch to “OFF”.
2 With the arrow on the battery pack pointing
downward, push the battery pack slightly against
the battery pack mount 1.
3 Slide down the battery pack until it locks in
place 2.
4 Connect the AC Adapter to the camcorder.
5 Plug the AC Adapter into an AC outlet. The
POWER/CHARGE lamp on the camcorder
blinks to indicate charging has started.
6 When the POWER/CHARGE lamp goes out,
charging is finished. Unplug the AC Adapter
from the AC outlet. Disconnect the AC Adapter
from the camcorder.
GETTING STARTED
Page 12

12 EN
A
GETTING STARTED
To detach the battery pack
Slide the battery pack upward while pressing
PUSH BATT. to detach it.
Battery pack Charging time
BN-VF707U* Approx. 1 hr. 30 min.
BN-VF714U Approx. 2 hrs. 40 min.
BN-VF733U Approx. 5 hrs. 40 min.
* Provided
NOTES:
● This product includes patented and other
proprietary technology and will operate only
with JVC Data Battery. Use the JVC BNVF707U/VF714U/VF733U battery packs. Using
generic non-JVC batteries can cause damage
to the internal charging circuitry.
● If the protective cap is attached to the battery
pack, remove it first.
● During charging, the camcorder cannot be
operated.
● Charging is not possible if the wrong type of
battery is used.
● When charging the battery pack for the first time
or after a long storage period, the POWER/
CHARGE lamp may not light. In this case, remove
the battery pack from the camcorder, then try
charging again.
● If the battery operation time remains extremely
short even after having been fully charged, the
battery is worn out and needs to be replaced.
Please purchase a new one.
● Since the AC Adapter processes electricity
internally, it becomes warm during use. Be sure to
use it only in well-ventilated areas.
● Using the optional AA-VF7 Battery Charger, you
can charge the BN-VF707U/VF714U/VF733U
battery pack without the camcorder.
● After 5 minutes have elapsed in Record-Standby
mode with the cassette inserted and no operation
is performed (
appear), the camcorder will automatically turn off
its power supplied from the AC adapter. In this
case, the battery charge starts if the battery is
attached to the camcorder.
“ PAUSE” indicator may not
Using The Battery Pack
Perform steps 2 – 3 in “Charging The Battery
Pack”.
Maximum continuous recording time
Battery pack
BN-VF707U* 1 hr. 30 min. 1 hr. 40 min.
BN-VF714U 3 hrs. 3 hrs. 25 min.
BN-VF733U 7 hrs. 8 hrs.
* Provided
LCD monitor
on
Viewfinder on
NOTES:
● Recording time is reduced significantly under the
following conditions:
● Zoom or Record-Standby mode is engaged
repeatedly.
● The LCD monitor is used repeatedly.
● The playback mode is engaged repeatedly.
● Before extended use, it is recommended that you
prepare enough battery packs to cover 3 times the
planned shooting time.
TTENTION:
Before detaching the power source, make sure that
the camcorder’s power is turned off. Failure to do so
can result in a camcorder malfunction.
Data Battery System
You can check the remaining battery power and
the recordable time.
1) Make sure the battery is attached and the
Power Switch is set to “OFF”.
2) Open the LCD monitor fully.
3) Press DATA, and the battery status screen
appears.
● It is displayed for approx. 5 seconds if the
button is pressed and released quickly, and for
approx. 15 seconds if the button is pressed
and hold for several seconds.
● If “COMMUNICATION ERROR” appears
instead of the battery status even though you
tried to press DATA several times, there may
be a problem with your battery. In such a case,
consult your nearest JVC dealer.
CONTINUED ON NEXT PAGE
Page 13
Using AC Power
Perform step 4 in “Charging The Battery Pack”.
NOTE:
The provided AC Adapter features automatic
voltage selection in the AC range from 110 V to
240 V.
About Batteries
DANGER! Do not attempt to take the batteries
apart, or expose them to flame or excessive
heat, as it may cause a fire or explosion.
WARNING! Do not allow the battery or its
terminals to come in contact with metals, as this
can result in a short circuit and possibly start a
fire.
To resume the original function of the
accurate battery power indication
If the battery power indication differs from the
actual operating time, fully charge the battery,
and then run it down. However this function may
not turn back if the battery was used for a long
period of time under extremely high/low
temperature condition or charged too many
times.
GETTING STARTED
EN 13
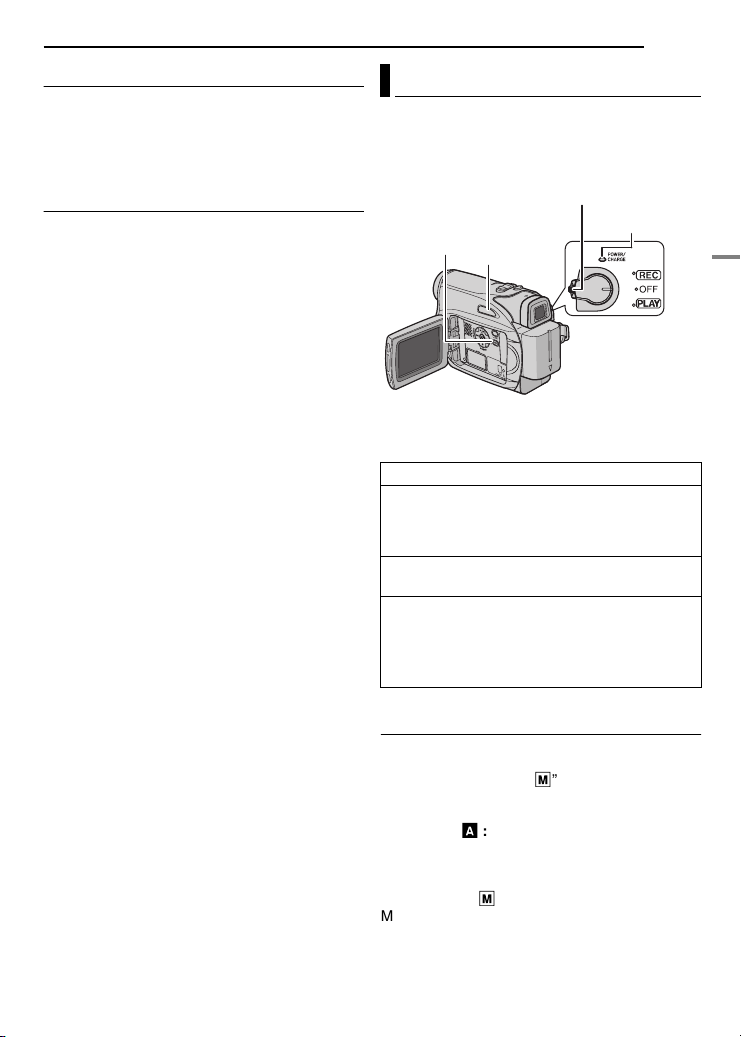
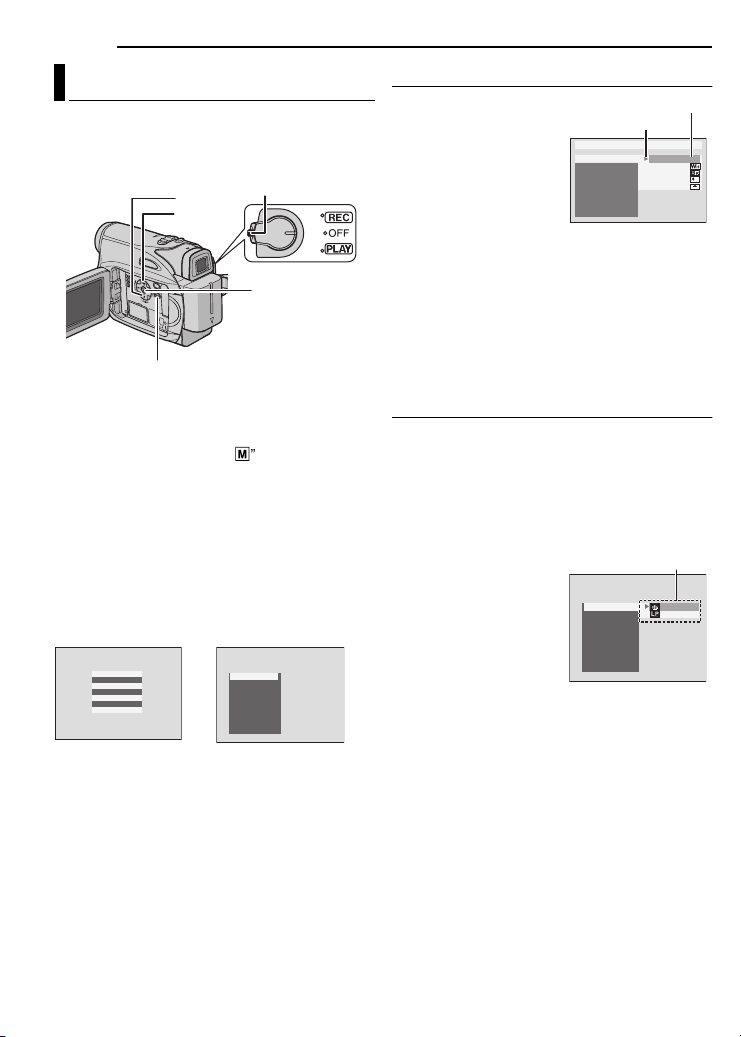
Operation Mode
To turn on the camcorder, set the Power Switch
to any operation mode except “OFF” while
pressing down the Lock Button located on the
switch.
MENU
AUTO
Choose the appropriate operation mode
according to your preference using the Power
Switch.
Power Switch Position
REC:
● Allows you to perform recording on the tape.
● Allows you to set various recording functions
using the Menus. ( pg. 22)
OFF:
Allows you to switch off the camcorder.
PLAY:
● Allows you to play back a recording on the
tape.
● Allows you to set various playback functions
using the Menus. ( pg. 22)
Lock
Button
POWER/
CHARGE lamp
GETTING STARTED
Auto/Manual Mode
Press AUTO button repeatedly to switch to auto/
manual recording mode. When manual mode is
selected, the indicator “M” appears on the LCD
monitor.
Auto Mode A :
You can record using no special effects or
manual adjustments.
Manual Mode M :
Manual recording is possible by setting various
functions.
Page 14
14 EN
GETTING STARTED
Power-Linked Operation
When the Power Switch is set to “REC”, you can
also turn on/off the camcorder by opening/
closing the LCD monitor or pulling out/pushing in
the viewfinder.
INFORMATION:
The following explanations in this manual
supposes the use of LCD monitor in your
operation. If you want to use the viewfinder,
close the LCD monitor and pull out the
viewfinder fully.
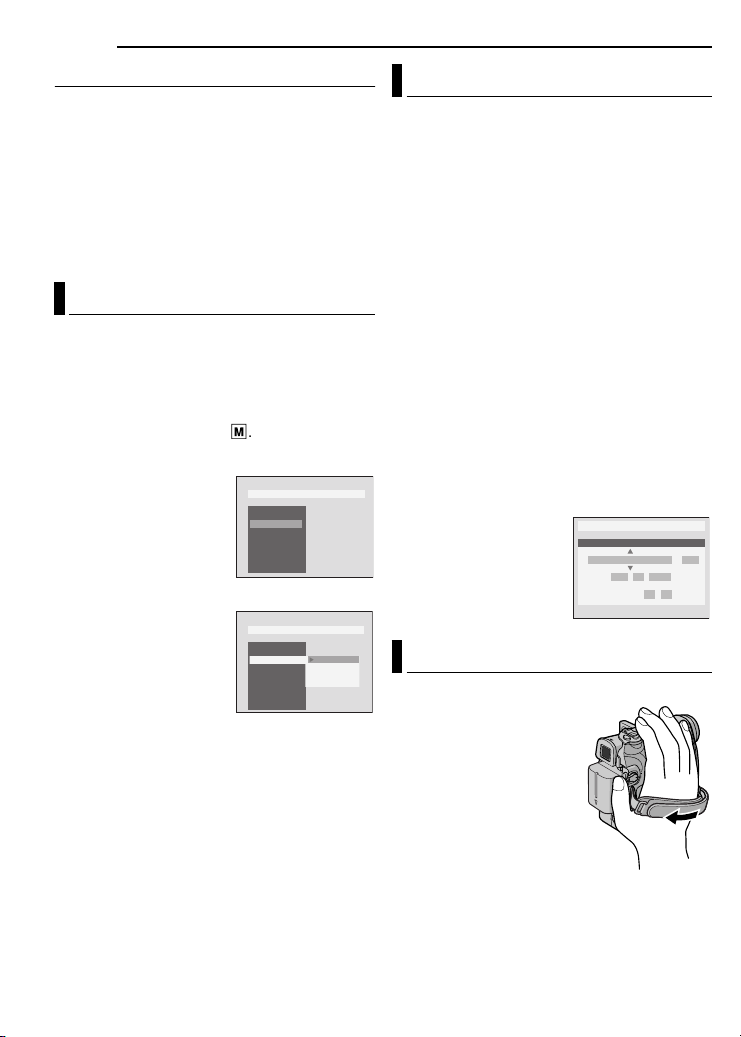
Language Settings
The language on the display can be changed.
( pg. 22, 24)
1 Set the Power Switch to “REC” while pressing
down the Lock Button located on the switch.
2 Open the LCD monitor fully. ( pg. 18)
Set the recording mode to M. ( pg. 13)
3 Press MENU. The Menu Screen appears.
4 Press 3 or 4 to select
“DISPLAY”, and press
SET or 2. The DISPLAY
Menu appears.
5 Press 3 or 4 to select
“LANGUAGE”, and press
SET or 2.
6 Press 3 or 4 to select
the desired language, and
press SET or 2.
7 Press MENU. The
Menu Screen closes.
NOTE:
Press 1 whenever you want to return to the
previous menu screen.
DISPLAY
BR I GH T
CLOCK A DJ .
LANGUAGE
DAT E / T I M E
ON SCRE E N
TIME CODE
DEMO MODE
DISPLAY
BR I GH T
CLOCK A DJ .
LANGUAGE ENGL ISH
DAT E / T I M E
ON SCRE E N
TIME CODE
DEMO MODE
FRANÇAIS
ESPAÑOL
PORTUGUÊS
Date/Time Settings
The date/time is recorded onto the tape at all
times, but its display can be turned on or off
during playback. ( pg. 22, 24)
1 Perform steps 1 – 4 in “Language Settings”
on the left column.
2 Press 3 or 4 to select “CLOCK ADJ.”, and
press SET or 2. The date display format is
highlighted.
3 Press 3 or 4 to select the desired date
display format, then press SET or 2. Select from
“MONTH.DATE.YEAR”, “DATE.MONTH.YEAR”
or “YEAR.MONTH.DATE”.
4 Press 3 or 4 to select the time display
format, then press SET or 2. Select from “24h”
or “12h”.
5 Set the year, month, date, hour and minute.
Press 3 or 4 to select the value, then press SET
or 2. Repeat this step until you have input all the
settings.
NOTE:
Press 1 to return to the previous setting.
6 Press MENU.The Menu
screen closes.
CLOCK ADJ .
O
MNTH
JAN
DISPLAY
DATE YEAR..
12006
..
0:00
24h
Grip Adjustment
1 Adjust the velcro strip.
● Before making the
adjustment, remove any
security tag that may be
attached to the velcro.
2 Pass your right hand
through the loop and grasp
the grip.
3 Adjust your thumb and
fingers through the grip to
easily operate the
Recording Start/Stop
Button, Power Switch and Power Zoom Lever.
Be sure to fasten the velcro strip to your
preference.
Page 15
GETTING STARTED
–1BRIGHT
EN 15
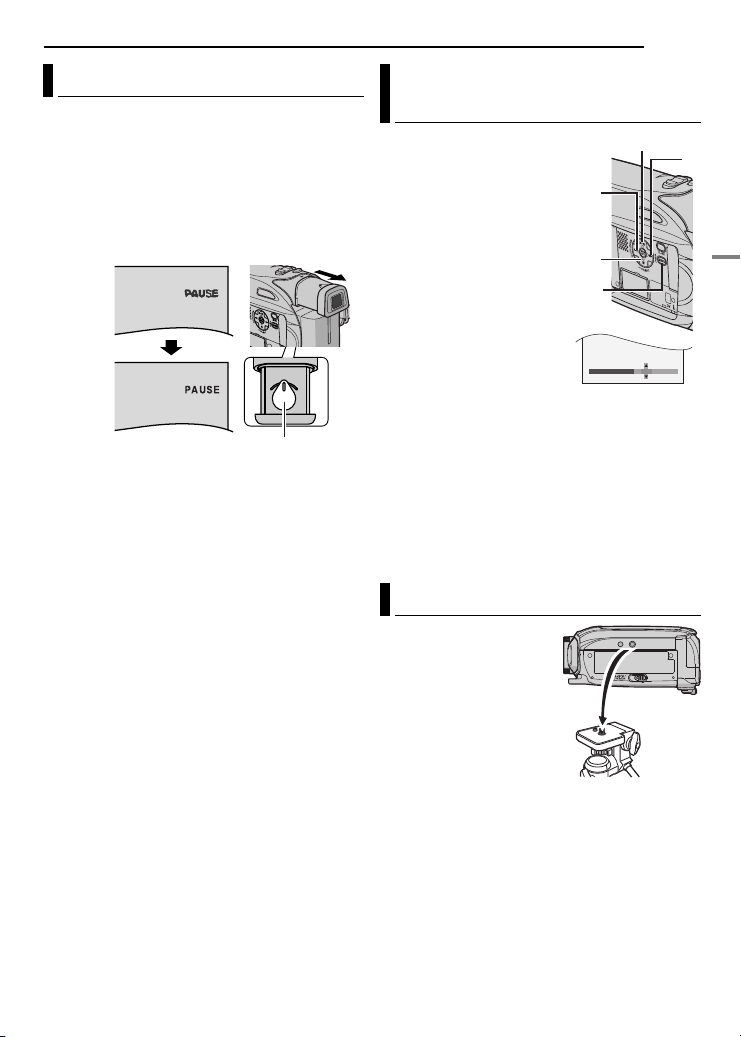
Viewfinder Adjustment
1 Set the Power Switch to “REC” while pressing
down the Lock Button located on the switch.
2 Make sure the LCD monitor is closed and
locked. Pull out the viewfinder fully and adjust it
manually for best viewability.
3 Turn the Diopter Adjustment Control until the
indications in the viewfinder are clearly focused.
Example:
Diopter Adjustment Control
CAUTION:
When retracting the viewfinder, take care not to
pinch your fingers.
Brightness Adjustment Of The
Display
1 Set the Power Switch
to “REC” or “PLAY” while
pressing down the Lock
Button located on the
switch.
2 Open the LCD monitor
fully. ( pg. 18)
● To adjust the brightness of
the viewfinder, pull out the
viewfinder fully and set
“PRIORITY” to “FINDER”
( pg. 22, 24).
MENU
3 Press MENU. The
Menu Screen appears. If
you are in Playback mode,
please proceed to Step 5.
4 Press 3 or 4 to select “DISPLAY”, and press
SET or 2. The DISPLAY Menu appears.
5 Press 3 or 4 to select “BRIGHT”, and press
SET or 2. The Menu Screen closes and the
brightness control menu appears.
6 Press 3 or 4 until the appropriate brightness
is reached and press SET or 2.
7 Press MENU. The menu screen closes.
33
33
11
11
44
44
Tripod Mounting
To attach the camcorder
to a tripod, align the
direction stud and screw
to the mounting socket
and stud hole on the
camcorder. Then tighten
the screw clockwise.
● Some tripods are not
equipped with studs.
22
22
GETTING STARTED
Page 16
16 EN
GETTING STARTED
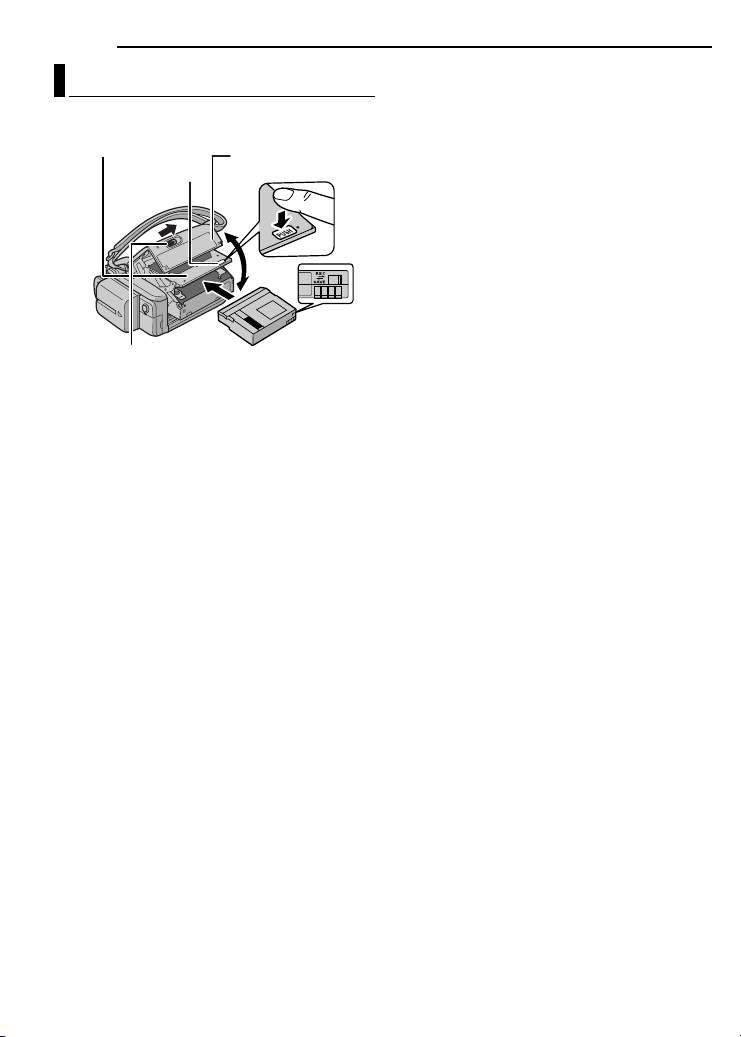
Loading/Unloading A Cassette
The camcorder needs to be powered up to load
or eject a cassette.
Cassette holder
PUSH
Cassette holder
cover
NOTES:
● If you wait a few seconds and the cassette holder
does not open, close the cassette holder cover
and try again. If the cassette holder still does not
open, turn the camcorder off then on again.
● If the tape does not load properly, open the
cassette holder cover fully and remove the
cassette. A few minutes later, insert it again.
● When the camcorder is suddenly moved from a
cold place to a warm environment, wait a short
time before opening the cassette holder cover.
OPEN/EJECT
Make sure the window side
is facing out.
Erase
protection tab
1 Slide and hold OPEN/EJECT in the direction
of the arrow, then pull the cassette holder cover
open until it locks. The cassette holder opens
automatically.
● Do not touch internal components.
2 Insert or remove a tape and press “PUSH” to
close the cassette holder.
● Be sure to press only the section labelled “PUSH”
to close the cassette holder; touching other parts
may cause your finger to get caught in the
cassette holder, resulting in injury or product
damage.
● Once the cassette holder is closed, it recedes
automatically. Wait until it recedes completely
before closing the cassette holder cover.
● When the battery pack’s charge is low, you may
not be able to close the cassette holder cover. Do
not apply force. Replace the battery pack with a
fully charged one or use AC power before
continuing.
3 Close the cassette holder cover firmly until it
locks into place.
To protect valuable recordings
Slide the erase protection tab on the back of the
tape in the direction of “SAVE”. This prevents the
tape from being recorded over. To record on this
tape, slide the tab back to “REC” before loading
it.
Page 17
Basic Recording
NOTE:
Before continuing, perform the procedures listed
below:
● Power ( pg. 11)
● Loading A Cassette ( pg. 16)
Zoom Lever
POWER/CHARGE Lamp
Lock Button
Recording Start/Stop Button
1 Remove the lens cap. ( pg. 11)
2 Open the LCD monitor fully.
3 Set the Power Switch to “REC” while pressing
down the Lock Button located on the switch.
● The POWER/CHARGE lamp lights and the
camcorder enters the Record-Standby mode.
“ PAUSE” is displayed.
● To record in LP (Long Play) mode, pg. 23.
4 To start recording, press the Recording Start/
Stop Button. “ REC” appears on the display
while recording is in progress.
5 To stop recording, press the Recording Start/
Stop Button again. The camcorder re-enters the
Record-Standby mode.
Approximate recording time
Tape
30 min. 30 min. 45 min.
60 min. 60 min. 90 min.
80 min. 80 min. 120 min.
NOTES:
● If the Record-Standby mode continues for
5 minutes and no operation is performed
“ PAUSE” indicator may not appear), the
(
camcorder’s power shuts off automatically. To turn
the camcorder on again, push back and pull out
the viewfinder again or close and re-open the LCD
monitor.
● When a blank portion is left between recorded
scenes on the tape, the time code is interrupted
and errors may occur when editing the tape. To
avoid this, refer to “Recording From The Middle Of
A Tape” ( pg. 19).
● To turn the melody sounds off, pg. 22, 24.
Recording mode
SP LP
VIDEO RECORDING
EN
17
Tape Remaining Time
Approximate tape remaining
time appears on the display.
“---min” means the
camcorder is calculating the
remaining time. When the
remaining time reaches 2 minutes, the indication
starts blinking.
● The time required to calculate and display the
remaining tape length, and the accuracy of the
calculation, may vary according to the type of tape
used.
VIDEO RECORDING & PLAYBACK
Page 18
18 EN
VIDEO RECORDING
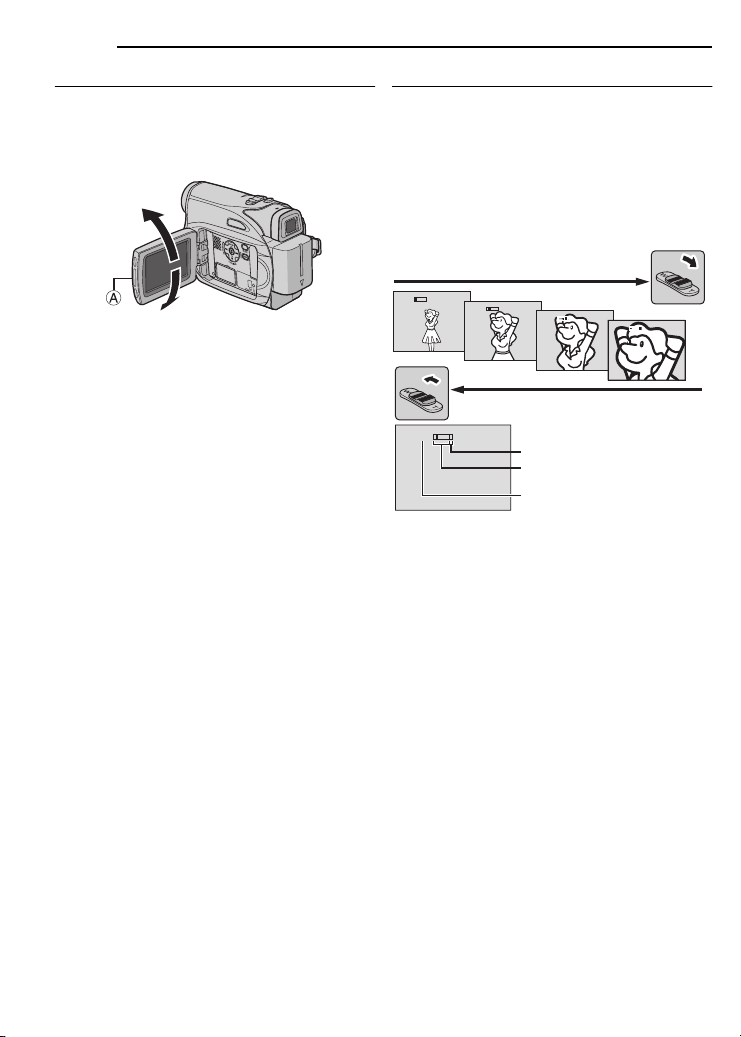
LCD Monitor And Viewfinder
While using the LCD monitor:
Make sure the viewfinder is pushed back in. Pull
on the end A of the LCD monitor and open the
LCD monitor fully. It can rotate 270
downward, 180
° upward).
180˚
90˚
While using the viewfinder:
Make sure the LCD monitor is closed and
locked. Pull out the viewfinder fully.
NOTES:
● The image will not appear simultaneously on the
LCD monitor and the viewfinder. When the
viewfinder is pulled out while the LCD monitor is
opened, you can select which one to use. Set
“PRIORITY” to the desired mode in SYSTEM
Menu. ( pg. 22, 24)
● Colored bright spots may appear all over the LCD
monitor or the viewfinder. However, this is not a
malfunction. ( pg. 36)
° (90°
Zooming
Produces the zoom in/out effect, or an
instantaneous change in image magnification.
Zoom In
Slide the Power Zoom Lever towards “T”.
Zoom Out
Slide the Power Zoom Lever towards “W”.
● The further you slide the Power Zoom Lever, the
quicker the zoom action.
Zoom in (T: Telephoto)
1
x
NOTES:
● Focusing may become unstable during Zooming.
In this case, set the zoom while in RecordStandby, lock the focus by using the manual focus
( pg. 27), then zoom in or out in Record mode.
● Zooming is possible to a maximum of 800X, or it
can be switched to 28X magnification using the
optical zoom. ( pg. 23)
● Zoom magnification of over 28X is done through
Digital image processing, and is therefore called
Digital Zoom.
● During Digital zoom, the quality of image may
suffer.
● Macro shooting (as close as approx. 5 cm
the subject) is possible when the Power Zoom
Lever is set all the way to “W”. Also see “TELE
MACRO” in FUNCTION Menu on page 23.
● When shooting a subject close to the lens, zoom
out first. If zoomed-in in the auto focus mode, the
camcorder may automatically zoom out
depending on the distance between the
camcorder and the subject. This will not occur
when “TELE MACRO” is set to “ON”. ( pg. 23)
10
x
20
x
40
x
Zoom out (W: Wide angle)
10
x
Digital zoom zone
28X (optical) zoom zone
Approximate zoom ratio
(2")
to
Page 19
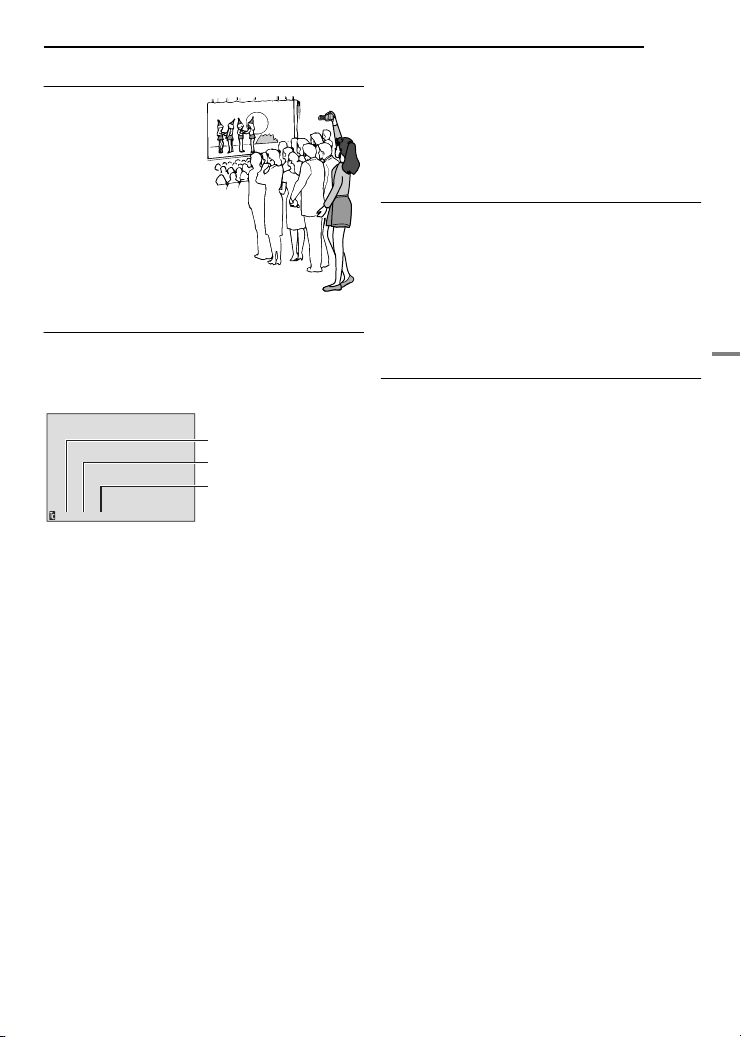
Journalistic Shooting
In some situations,
different shooting
angles may provide
more dramatic results.
Hold the camcorder in
the desired position
and tilt the LCD
monitor in the most
convenient direction. It
can rotate 270
downward, 180
° (90°
°
upward).
Time Code
During recording, a time code is recorded on the
tape. This code is to confirm the location of the
recorded scene on the tape during playback.
Display
Minutes
Seconds
Frames*
12:34:24
* Frames are not displayed during recording.
If recording starts from a blank portion, the time
code begins counting from “00:00:00”
(minute:second:frame). If recording starts from
the end of a previously recorded scene, the time
code continues from the last time code number.
If during recording a blank portion is left partway
through the tape, the time code is interrupted.
When recording is resumed, the time code
starts counting up again from “00:00:00”. This
means the camcorder may record the same time
codes as those existing in a previously recorded
scene. To prevent this, perform Recording From
The Middle Of A Tape ( pg. 19) in the following
cases;
● When shooting again after playing back a
recorded tape.
● When power shuts off during shooting.
● When a tape is removed and re-inserted during
shooting.
● When shooting using a partially recorded tape.
● When shooting on a blank portion located partway
through the tape.
● When shooting again after shooting a scene then
opening/closing the cassette holder cover.
(30 frames = 1 second)
VIDEO RECORDING
EN 19
NOTES:
● The time code cannot be reset.
● During fast-forwarding and rewinding, the time
code indication does not move smoothly.
● The time code is displayed only when “TIME
CODE” is set to “ON”. ( pg. 24)
Quick Review
Enables to check the end of the last recording.
1) Press QUICK REVIEW during the Recording-
Standby mode.
2) Tape is rewound for about several seconds
and played back automatically, then pauses in
the Recording-Standby mode for the next shot.
● Distortion may occur at start of playback. This is
normal.
Recording From The Middle Of A Tape
1) Play back a tape or use Blank Search
( pg. 20) to find the spot at which you want to
start recording, then engage the Still Playback
mode. ( pg. 20)
2) Set the Power Switch to “REC” while pressing
down the Lock Button located on the switch,
then start recording.
VIDEO RECORDING & PLAYBACK
Page 20
20 EN
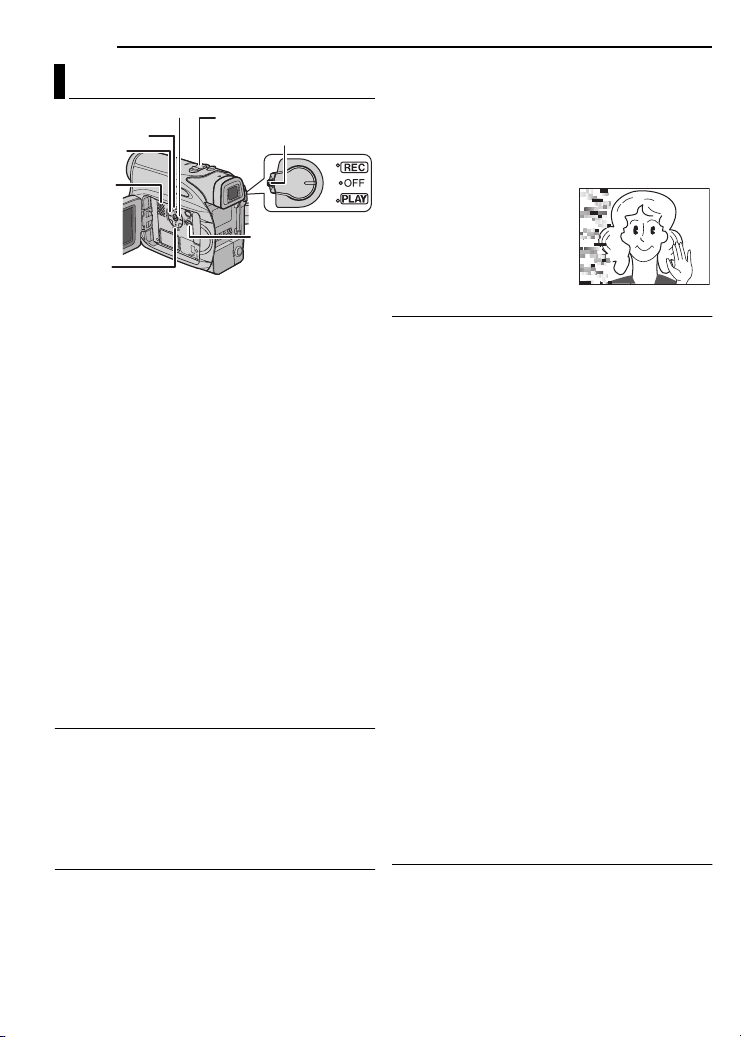
A
VIDEO PLAYBACK
Normal Playback
¡¡
¡¡
66
66
11
11
Speaker
7
VOL. +/–
Lock Button
MENU
● During playback, press and hold ¡ or 1. The
search continues as long as you hold the button.
Once you release the button, normal playback
resumes.
● A slight mosaic effect appears on the display
during Shuttle Search. This is not a malfunction.
TTENTION:
During Shuttle Search, parts
of the picture may not be
clearly visible, particularly on
the left side of the screen.
1 Load a cassette. ( pg. 16)
2 Set the Power Switch to “PLAY” while
pressing down the Lock Button located on the
switch.
3 To start playback, press 6.
4 To stop playback, press 7.
● During Stop mode, press 1 to rewind, or ¡ to
fast-forward the tape.
To control the speaker volume
Slide the Power Zoom Lever (VOL. +/–) towards
“+” to turn up the volume, or towards “–” to turn
down the volume.
NOTES:
● The playback picture can be viewed in the LCD
monitor, viewfinder or on a connected TV.
( pg. 21)
● If Stop mode continues for 5 minutes when power
is supplied from a battery, the camcorder shuts off
automatically. To turn on again, set the Power
Switch to “OFF”, then to “PLAY”.
● When a cable is connected to the AV connector,
the sound is not heard from the speaker.
Still Playback
Pauses during video playback.
1) Press 6 during playback.
2) To resume normal playback, press 6 again.
● If still playback continues for more than about
3 minutes, the camcorder’s Stop mode is
automatically engaged.
Shuttle Search
Allows high-speed search in either direction
during video playback.
1) During playback, press ¡ for forward
search, or 1 for reverse search.
2) To resume normal playback, press 6.
Blank Search
Helps you find where you should start recording
in the middle of a tape to avoid time code
interruption. ( pg. 19)
1 Load a cassette. ( pg. 16)
2 Set the Power Switch to “PLAY” while
pressing down the Lock Button located on the
switch.
3 Press BLANK.
● The “BLANK SEARCH” indication appears and
the camcorder automatically starts reverse or
forward search, then stops at the spot which is
about 3 seconds of tape before the beginning of
the detected blank portion.
● To cancel Blank Search, press 7 or
NOTES:
● Before starting Blank Search, if the current
position is at a blank portion, the camcorder
searches in the reverse direction. If the current
position is at a recorded portion, the camcorder
searches in the forward direction.
● If the beginning or end of the tape is reached
during Blank Search, the camcorder stops
automatically.
● A blank portion which is shorter than 5 seconds of
tape may not be detected.
● The detected blank portion may be located
between recorded scenes. Before you start
recording, make sure there is no recorded scene
after the blank portion.
Playback Snapshot
This camcorder allows you to take snapshots
during video playback.
Press SNAPSHOT.
BLANK.
Page 21
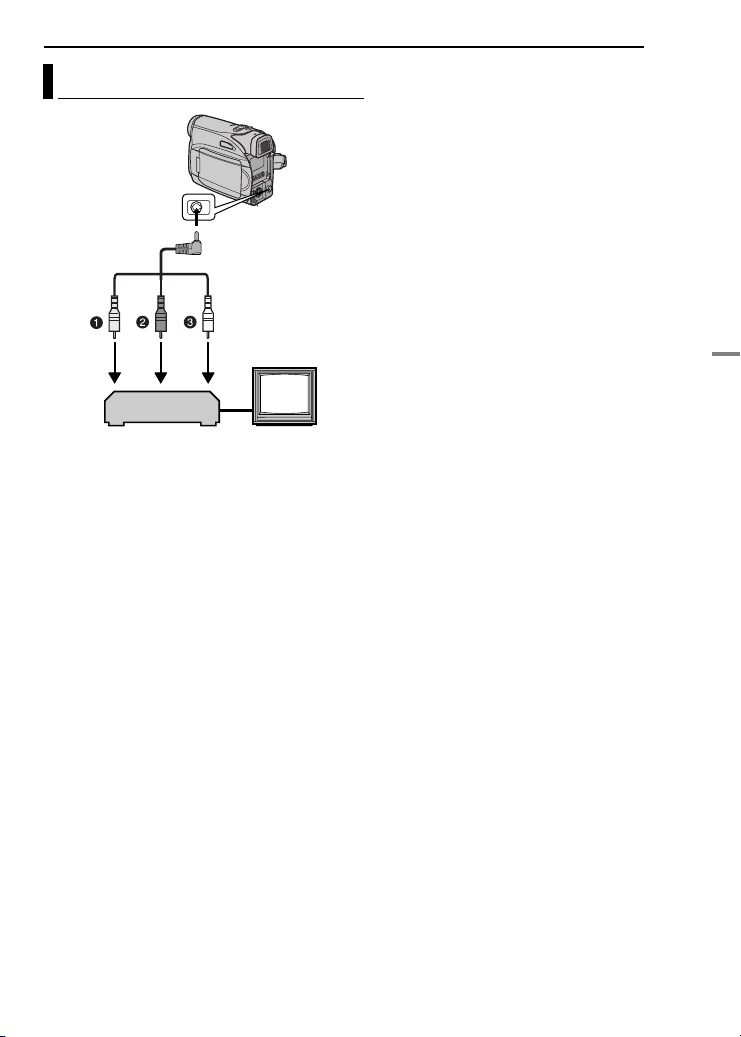
Connections To A TV Or VCR
To AV
connector
Audio/Video
cable
(provided)
TV
VCR
1Yellow to VIDEO IN (Connect when your TV/
VCR has only A/V input connectors.)
2Red to AUDIO R IN*
3White to AUDIO L IN*
* Not required for watching still images only.
VIDEO PLAYBACK
EN 21
1 Make sure all units are turned off.
2 Connect the camcorder to a TV or VCR as
shown in the illustration.
If using a VCR, go to step 3.
If not, go to step 4.
3 Connect the VCR output to the TV input,
referring to your VCR’s instruction manual.
4 Turn on the camcorder, the VCR and the TV.
5 Set the VCR to its AUX input mode, and set
the TV to its VIDEO mode.
6 Start playback on the camcorder. ( pg. 20)
To choose whether or not the following
displays appear on the connected TV
● Date/Time
Set “DATE/TIME” to “ON” or “OFF”.
( pg. 22, 25)
● Time Code
Set “TIME CODE” to “ON” or “OFF”.
( pg. 22, 25)
● Indications other than date/time and time code
Set “ON SCREEN” to “OFF”, “LCD” or “LCD/TV”.
( pg. 22, 25)
NOTES:
÷÷÷÷It is recommended to use the AC Adapter as
the power supply instead of the battery pack.
( pg. 13)
● To monitor the picture and sound from the
camcorder without inserting a tape, set the
camcorder’s Power Switch to “REC”, then set your
TV to the appropriate input mode.
● Make sure you adjust the TV sound volume to its
minimum level to avoid a sudden burst of sound
when the camcorder is turned on.
VIDEO RECORDING & PLAYBACK
Page 22
22 EN
Sub Menu
MENUS FOR DETAILED ADJUSTMENT
Changing The Menu Settings
This camcorder is equipped with an easy-to-use,
on-screen menu system that simplifies many of
the more detailed camcorder settings.
( pg. 22 – 25)
MENU
1 For Video Recording Menus:
● Set the Power Switch to “REC” while pressing
down the Lock Button located on the switch.
● Set the recording mode to “M”.
For Video Playback Menus:
Set the Power Switch to “PLAY” while pressing
down the Lock Button located on the switch.
2 Open the LCD monitor fully. ( pg. 18)
3 Press MENU. The Menu Screen appears.
4 Press 3 or 4 to select the desired function,
and press SET or 2.
Screen for Video
Recording Menu
FUNCT ION
SETTI NG
SYSTEM
DISPLAY
5 Setting procedure hereafter depends on the
selected function.
NOTES:
÷ Press 1 whenever you want to cancel or return
to the previous Menu Screen.
● You cannot enter Menu Screen during recording.
Lock Button
44
44
33
33
Screen for Video
Playback Menu
REC MODE
SOUND MODE
NARRA T I ON
BR I GHT
DA ETT/IME
ON S RCEEN
TIME CODE
SET
( pg. 13)
Video Recording Menus
FUNCTION ( pg. 23)
SETTING ( pg. 23)
SYSTEM ( pg. 24)
DISPLAY ( pg. 24)
1) Press 3 or 4 to select
the desired selection
and press SET or 2. The
Sub Menu appears.
● Example: FUNCTION
Menu
2) Press 3 or 4 to select the desired parameter
and press SET or 2. Selection is complete.
● Repeat the procedure if you wish to set other
function menus.
● The “3” indicator shows the setting that is
currently saved inside the camcorder’s memory.
3) Press MENU. The Menu Screen closes.
Selected parameter
3
indicator
FUNCT ION
WIPE /FADER
EFFECT
PROGRAM
SHUTT ER
EXPOSURE
W.BALANCE
TELE MACRO
OFF
WH I T E
BLACK
AE
SL IDE
SCROL L
Video Playback Menus
REC MODE ( pg. 25)
SOUND MODE ( pg. 25)
NARRATION ( pg. 25)
BRIGHT ( pg. 25)
DATE/TIME ( pg. 25)
ON SCREEN ( pg. 25)
TIME CODE ( pg. 25)
1) The Sub Menu
appears.
● Example: REC MODE
Menu
Press 3 or 4 to select
the desired parameter
and press SET or 2.
Selection is complete.
REC MODE
SOUND MODE
NARRA T I ON
BR I GHT
DA ETT/IME
ON S RCEEN
TIME CODE
● Repeat the procedure if
you wish to set other
function menus.
● The “3” indicator shows the setting that is
currently saved inside the camcorder’s memory.
2) Press MENU. The Menu Screen closes.
Page 23
Recording Menus
FUNCTION
The menu settings can be changed only when
the Power Switch is set to “REC”.
[ ]
= Factory-preset
WIPE/FADER
pg. 30), “Wipe or Fader Effects”
(
EFFECT
(
pg. 31), “Program AE, Effects and Shutter
Effects”
PROGRAM AE
(
pg. 31), “Program AE, Effects and Shutter
Effects”
SHUTTER
pg. 31), “Program AE, Effects and Shutter
(
Effects”
EXPOSURE
(
pg. 27), “Exposure Control”
W. BALANCE
(
pg. 29), “White Balance Adjustment”
TELE MACRO
[OFF]
: Disables the function.
ON
: When the distance to the subject is less
than 1 m (3.3 ft), set “TELE MACRO” to “ON”.
You can shoot a subject as large as possible at a
distance of approx. 40 cm (1.4 ft).
Depending on the zoom position, the lens may go
out of focus.
SETTING
The menu settings can be changed only when
the Power Switch is set to “REC”.
[ ]
= Factory-preset
REC MODE
[SP]
*: To record in the SP (Standard Play) mode
LP
: Long Play—more economical, providing 1.5
times the recording time.
MENUS FOR DETAILED ADJUSTMENT
EN
NOTES:
÷
If the recording mode is switched, the playback
picture will be blurred at the switching point.
●
It is recommended that tapes recorded in the LP
mode on this camcorder be played back on this
camcorder.
●
During playback of a tape recorded on another
camcorder, blocks of noise may appear or there
may be momentary pauses in the sound.
SOUND MODE
[12BIT]
: Enables video recording of stereo
sound on four separate channels. (Equivalent to
the 32 kHz mode of previous models)
16BIT
: Enables video recording of stereo sound
on two separate channels. (Equivalent to the
48 kHz mode of previous models)
DIS
OFF
: Disables the function.
[ON ]
caused by camera-shake, particularly at high
magnification.
: To compensate for unstable images
NOTES:
÷
Accurate stabilization may not be possible if hand
shake is excessive, or depending on the shooting
condition.
●
The “ ” indicator blinks or goes out if the
Stabilizer cannot be used.
Switch off this mode when recording with the
camcorder on a tripod.
ZOOM
[28X]
: When set to “28X” while using digital
zoom, the zoom magnification will reset to 28X
since digital zoom will be disengaged.
56X
: Allows you to use the Digital Zoom. By
digitally processing and magnifying images,
zooming is possible from 28X (the optical zoom
limit), to a maximum of 56X digital magnification.
800X
: Allows you to use the Digital Zoom. By
digitally processing and magnifying images,
zooming is possible from 28X (the optical zoom
limit), to a maximum of 800X digital
magnification.
23
ADVANCED FEATURES
* SP indicator does not appear on the screen.
Page 24
24 EN
OFF: Allows you to shoot dark scenes with no
picture brightness adjustment.
[AGC]: The overall appearance may be grainy,
but the image is bright.
AUTO : The shutter speed is automatically
adjusted. Shooting a subject in low or poor
lighting at slow shutter speed provides a brighter
image than in the AGC mode, but the subject’s
movements are not smooth or natural. The
overall appearance may be grainy. While the
shutter speed is being automatically adjusted,
“” is displayed.
[OFF]: Disengages the function.
ON : Helps cut down on noise created by
wind. The “” indicator appears. The quality of
the sound will change. This is normal.
MENUS FOR DETAILED ADJUSTMENT
GAIN UP
WIND CUT
SYSTEM
The “SYSTEM” functions which are set when
the Power Switch is set to “REC” are also
applied when the Power Switch is set to “PLAY”.
[ ] = Factory-preset
MELODY
OFF: Even though not heard while shooting,
shutter sound is recorded on the tape.
[ON]: A melody sounds when any operation is
performed. It also activates the shutter sound
effect. ( pg. 26)
CAM RESET
EXECUTE: Resets all settings to the factory-
preset.
[RETURN]: Does not reset all settings to the
factory-preset.
PRIORITY
[LCD]: The image is displayed on the LCD
monitor when the viewfinder is pulled out while
the LCD monitor is opened.
FINDER: The image is displayed in the
viewfinder when the viewfinder is pulled out
while the LCD monitor is opened.
DISPLAY
● The menu settings can be changed only when the
Power Switch is set to “REC”.
● The DISPLAY settings except “BRIGHT” and
“LANGUAGE” are effective only for shooting.
[ ] = Factory-preset
BRIGHT
pg. 15, “Brightness Adjustment Of The
Display”
CLOCK ADJ.
pg. 14, “Date/Time Settings”
LANGUAGE
[ENGLISH] / FRANÇAIS
ESPAÑOL / PORTUGUÊS
The language setting can be changed.
( pg. 14)
DATE/TIME
[OFF]: The date/time does not appear.
ON: The date/time is always displayed.
ON SCREEN
LCD: Keeps the camcorder’s display (except the
date, time and time code) from appearing on the
connected TV screen.
[LCD/TV]: Makes the camcorder’s display
appear on screen when the camcorder is
connected to a TV.
TIME CODE
[OFF]: Time code is not displayed.
ON: Time code is displayed on the camcorder
and on the connected TV. Frame numbers are
not displayed during recording. ( pg. 19)
Page 25

DEMO MODE
OFF: Automatic demonstration will not take
place.
[ON]: Demonstrates certain functions such as
Wipe/Fader and Effects, etc., and can be used
to confirm how these functions operate.
Demonstration starts in the following cases:
● When the Menu Screen is closed after “DEMO
MODE” is turned “ON”.
● With “DEMO MODE” set to “ON”, if there is no
operation for about 3 minutes after the Power
Switch is set to “REC”.
● Performing any operation during the
demonstration stops the demonstration
temporarily. If no operation is performed for more
than 3 minutes after that, the demonstration will
resume.
NOTES:
÷ If a cassette is in the camcorder, the
demonstration cannot be turned on.
● “DEMO MODE” remains “ON” even if the
camcorder power is turned off.
● If “DEMO MODE” remains “ON”, some functions
will not be available. After viewing demo, set to
“OFF”.
Playback Menus
[ ] = Factory-preset
SOUND MODE and NARRATION
During tape playback, the camcorder detects the
sound mode in which the recording was made,
and plays the sound back. Select the type of
sound to accompany your playback picture.
According to the menu access explanation on
page 22, select “SOUND MODE” or
“NARRATION” from the Menu Screen and set it
to the desired parameter.
The settings below are effective only for video
playback except “BRIGHT”.
The parameters (except “OFF” in ON SCREEN,
SOUND MODE and NARRATION settings) are the
same as in the description on page 23, 24.
REC MODE [SP]* / LP
Allows you to set the video recording mode (SP
or LP) depending on your preference. It is
recommended you use “REC MODE” in
Playback Menu when using this camcorder as a
recorder during dubbing. ( pg. 32, 33)
*SP indicator does not appear on the screen.
MENUS FOR DETAILED ADJUSTMENT
EN 25
SOUND MODE
[STEREO ]: Sound is output on both “L” and
“R” channels in stereo.
SOUND L : Sound from the “L” channel is
output.
SOUND R : Sound from the “R” channel is
output.
NARRATION
Although it is not possible to perform audio
dubbing with this camcorder, you can hear
sound from an audio-dubbed tape during
playback using this function.
[OFF]: Original sound is output on both “L” and
“R” channels in stereo.
ON: Dubbed sound is output on both “L” and “R”
channels in stereo.
MIX: Original and dubbed sounds are combined
and output in stereo on both “L” and “R”
channels.
BRIGHT
pg. 15, “Brightness Adjustment Of The
Display”
DATE/TIME
[OFF]: The date/time does not appear.
ON: The date/time is always displayed.
ON SCREEN OFF / [LCD] / LCD/TV
When set to “OFF”, the camcorder’s display
disappears.
TIME CODE [OFF] / ON
pg. 19, “Time Code”
ADVANCED FEATURES
Page 26
26 EN
FEATURES FOR RECORDING
Wide Mode
This camcorder allows you to choose the type of
image output format for recording.
1 Set the Power Switch to “REC”.
2 Press 16:9 button repeatedly to choose your
selection.
4:3 16:9
[4:3]: Records with no change in the screen
ratio. For playback on a TV with a normal screen
ratio. When using this mode on a TV with a
normal screen ratio, refer to your TV’s instruction
manual.
16:9: For playback on TVs with an aspect
ratio of 16:9. Naturally expands the image to fit
the screen without distortion. The indicator
appears. When using this mode, refer to your
wide-screen TV’s instruction manual. During
playback/recording on 4:3 TVs/LCD monitor/
viewfinder, the image is elongated vertically.
[ ] = Factory-preset
Night-Alive
Makes dark subjects or areas even brighter than
they would be under good natural lighting.
Although the recorded image is not grainy, it may
look as if it is strobing due to the slow shutter
speed.
1 Set the Power Switch to “REC”.
2 Set the recording mode to “
3 Press NIGHT so that the Night-Alive indicator
“” appears.
● The shutter speed is automatically adjusted to
provide up to 30 times sensitivity.
● “” appears beside “” while the shutter speed
is being automatically adjusted.
To deactivate Night-Alive
Press NIGHT again so that the Night-Alive
indicator disappears.
M
”. ( pg. 13)
NOTES:
÷ During Night-Alive, “GAIN UP” or “DIS” in
SETTING Menu ( pg. 23) cannot be activated.
● Night-Alive cannot be activated simultaneously
with “SNOW” or “SPORTS” of “PROGRAM AE”, or
all modes of “SHUTTER”. ( pg. 31)
● During Night-Alive, it may be difficult to bring the
camcorder into focus. To prevent this, use of a
tripod is recommended.
Snapshot (Record Still Image On
Tape)
This feature lets you record still images that look
like photographs onto a tape.
1 Set the Power Switch to “REC”.
2 Press SNAPSHOT.
● There is the sound effect of a shutter closing.
PHOTO
● The “
will be recorded for approx. 5 seconds, then the
camcorder re-enters the Record-Standby mode.
● You can perform Snapshot also during recording.
A still image will be recorded for approx.
5 seconds, then the normal recording resumes.
● Snapshot mode cannot be used when the 16:9
Wide mode (
( pg. 26)
Motor Drive Mode
Keeping SNAPSHOT pressed in step 2 provides
an effect similar to serial photography. (Interval
between still images: approx. 1 second)
” indication appears and a still image
16:9 indicator) is selected.
Page 27
FEATURES FOR RECORDING
EN 27
Manual Focus
The camcorder’s Full Range AF system offers
continuous shooting ability from close-up (as
close as approx. 5 cm (2") to the subject) to
infinity.
However, correct focus may not be obtained
depending on the shooting condition. In this
case, use the manual focus mode.
1 Set the Power Switch to
“REC”.
2 Set the recording mode
to “M”.
( pg. 13)
3 Press FOCUS. The
manual focus indicator
appears.
4 Press 2 or 1 to focus
on a subject.
● When the focus level cannot be adjusted any
further or closer, “” or “” will blink.
5 Press SET. Focus adjustment is complete.
To reset to Auto Focus
Press FOCUS twice.
Manual focus is recommended in situations
listed below.
● When two subjects overlap in the same scene.
● When illumination is low.*
● When the subject has no contrast (difference in
brightness and darkness), such as a flat, onecolor wall, or a clear, blue sky.*
● When a dark object is barely visible in the LCD
monitor or the viewfinder.*
● When the scene contains minute patterns or
identical patterns that are regularly repeated.
● When the scene is affected by sunbeams or light
reflecting off the surface of a body of water.
● When shooting a scene with a high-contrast
background.
* The following low-contrast warnings appear
blinking: , , and .
Manual focus
indicator
Exposure Control
Manual exposure control is recommended in the
following situations:
● When shooting using reverse lighting or when the
background is too bright.
● When shooting on a reflective natural background
such as at the beach or when skiing.
● When the background is overly dark or the subject
is bright.
1 Set the Power Switch to “REC”.
2 Set the recording mode to “
3 Set “EXPOSURE” to “MANUAL” in
FUNCTION Menu. ( pg. 22)
● The exposure control menu appears.
4 To brighten the image, press 3. To darken the
image, press 4. (maximum ±6)
● +3 exposure has the same effect as the backlight
compensation. ( pg. 28)
● –3 exposure has the same effect as when
“PROGRAM AE” is set to “SPOTLIGHT”.
( pg. 31)
5 Press SET or 2. Exposure adjustment is
complete.
To return to automatic exposure control
Select “AUTO” in step 3.
NOTES:
÷ You cannot use the manual exposure control at
the same time when “PROGRAM AE” is set to
“SPOTLIGHT” or “SNOW” ( pg. 31), or with the
backlight compensation.
● If the adjustment does not cause any visible
change in brightness, set “GAIN UP” to “AUTO”.
( pg. 22, 24)
M
”. ( pg. 13)
ADVANCED FEATURES
Page 28

28 EN
FEATURES FOR RECORDING
Iris Lock Backlight Compensation
Like the pupil of the human eye, the iris
contracts in well-lit environments to keep too
much light from entering, and dilates in dim
environments to allow in more light.
Use this function in the following situations:
● When shooting a moving subject.
● When the distance to the subject changes (so its
size in the LCD monitor or the viewfinder
changes), such as when the subject is backing
away.
● When shooting on a reflective natural background
such as at the beach or when skiing.
● When shooting objects under a spotlight.
● When zooming.
1 Set the Power Switch to “REC”.
2 Set the recording mode to “
M
”. ( pg. 13)
3 Set “EXPOSURE” to “MANUAL” in
FUNCTION Menu. ( pg. 22)
● The exposure control menu appears.
4 Adjust zoom so that the subject fills the LCD
monitor or the viewfinder, then press and hold
SET for over 2 seconds. The “” indication
appears.
5 Press SET or 2. The iris is locked.
6 Press MENU. The Menu Screen closes. The
“” indicator appears.
To return to automatic iris control
Select “AUTO” in step 3.
● The exposure control indicator and “”
disappear.
To lock the exposure control and the iris
After step 3, adjust the exposure by pressing 3
or 4. Then lock the iris in steps 4 – 6. For
automatic locking, select “AUTO” in step 3. The
exposure control and the iris become automatic.
Backlight compensation brightens the subject
quickly.
With simple operation, backlight compensation
feature brightens the dark subject portion by
increasing the exposure.
1 Set the Power Switch to “REC”.
2 Set the recording mode to “
3 Press BACKLIGHT so that the Backlight
Compensation indicator “” appears.
To cancel Backlight Compensation
Press BACKLIGHT twice so that the “”
indicator disappears.
NOTE:
Using Backlight Compensation may cause the light
around the subject to become too bright and the
subject to become white.
M
”. ( pg. 13)
Page 29

FEATURES FOR RECORDING
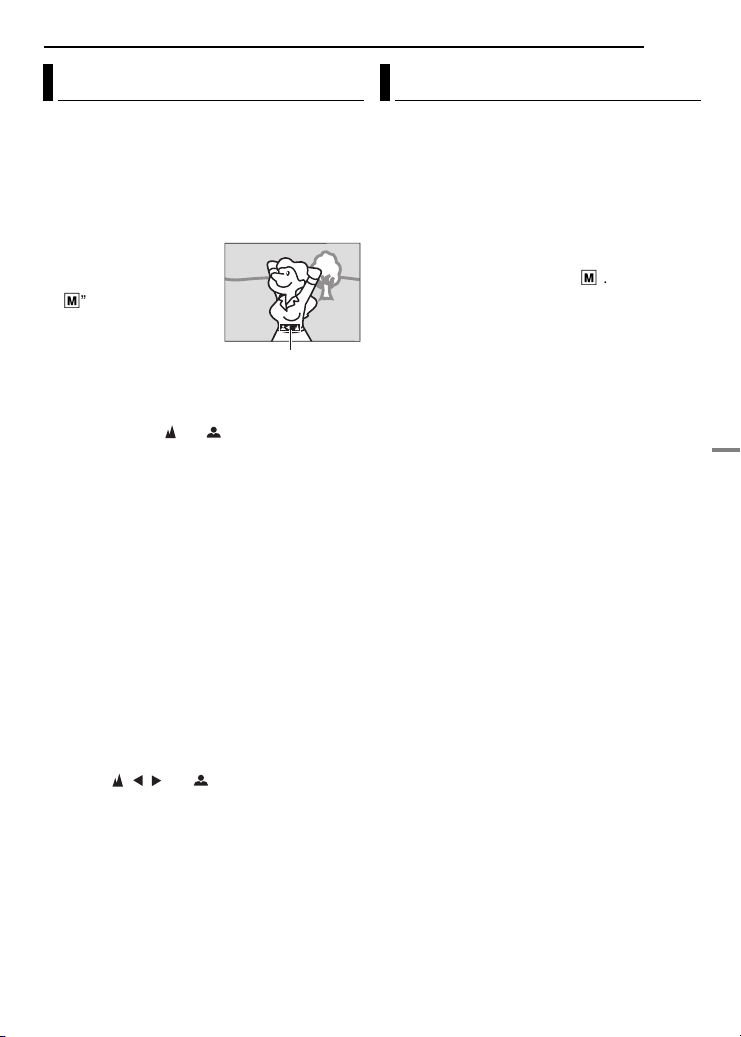
Spot Exposure Control White Balance Adjustment
Selection of a spot metering area enables more
precise exposure compensation. You can select
one of the three metering areas on the LCD
monitor/viewfinder.
1 Set the Power Switch to “REC”.
2 Set the recording mode to “
M
”. ( pg. 13)
3 Press BACKLIGHT twice so that the Spot
Exposure Control indicator “” appears.
● A spot metering area frame appears at the
centre of the LCD monitor/viewfinder.
4 Press 2 or 1 to select the desired spot
metering area frame.
5 Press SET.
● Spot Exposure Control is engaged.
● Exposure is adjusted to make the brightness of
the selected area most appropriate.
To lock the iris
After step 4, press and hold SET over 2
seconds. The “” indication appears and the iris
is locked.
To cancel Spot Exposure Control
Press BACKLIGHT once so that the “”
indicator disappears.
NOTES:
÷ You cannot use the Spot Exposure Control at the
same time with following functions.
● “ 16:9” in “WIDE MODE” ( pg. 26)
● “STROBE” in “EFFECT” ( pg. 31)
● Digital Zoom ( pg. 18)
● Depending on the shooting location and condition,
optimum result may not be attained.
The white balance refers to the correctness of
color reproduction under various lighting. If the
white balance is correct, all other colors will be
accurately reproduced.
The white balance is usually adjusted
automatically. However, more advanced
camcorder operators control this function
manually to achieve a more professional color/
tint reproduction.
To change the setting
Set “W.BALANCE” in FUNCTION Menu.
( pg. 23)
● The selected mode indicator except “AUTO”
appears.
[AUTO]: White balance is adjusted
automatically.
MWB : Adjust the white balance manually
when shooting under various types of lighting.
( pg.30, “Manual White Balance Adjustment”)
FINE : Outdoors on a sunny day.
CLOUD : Outdoors on a cloudy day.
[ ] = Factory-preset
To return to automatic white balance
Set “W.BALANCE” to “AUTO”. ( pg. 23)
EN 29
ADVANCED FEATURES
Page 30

30 EN
FEATURES FOR RECORDING
Manual White Balance Adjustment
Adjust the white balance
manually when shooting
under various types of
lighting.
1 Set the Power Switch
to “REC”.
2 Set the recording
mode to “M”.
( pg. 13)
3 Hold a sheet of plain white paper in front of
the subject. Adjust zoom or position yourself so
that the white paper fills the screen.
4 Select FUNCTION Menu. ( pg. 22)
5 Select “MWB” in “W.BALANCE” menu
( pg. 22), then press and hold SET or 2 until
begins blinking.
● When the setting is completed, stops blinking.
6 Press SET or 2 to engage the setting.
7 Press MENU. The Menu Screen closes and
the Manual White Balance indicator is
displayed.
NOTES:
÷ In step 3, it may be difficult to focus on the white
paper. In such a case, adjust focus manually.
( pg. 27)
● A subject can be shot under various types of
lighting conditions indoors (natural, fluorescent,
candlelight, etc.). Because the color temperature
is different depending on the light source, the
subject tint will differ depending on the white
balance settings. Use this function for a more
natural result.
● Once you adjust white balance manually, the
setting is retained even if the power is turned off or
the battery removed.
White paper
Wipe Or Fader Effects
These effects let you make pro-style scene
transitions. Use them to spice up the transition
from one scene to the next.
Wipe or Fader works when video recording is
started or stopped.
1 Set the Power Switch to “REC”.
2 Set the recording mode to “
3 Set “WIPE/FADER” in FUNCTION Menu.
( pg. 22)
● The WIPE/FADER menu disappears and the
effect is reserved.
● The selected effect indicator appears.
4 Press the Recording Start/Stop Button to
activate the Fade-in/out or Wipe-in/out.
To deactivate the selected effect
Select “OFF” in step 3. The effect indicator
disappears.
NOTE:
You can extend the length of a Wipe or Fader by
pressing and holding the Recording Start/Stop
Button.
WIPE/FADER
OFF: Disables the function. (Factory-preset)
WHITE : Fade in or out with a white screen.
BLACK : Fade in or out with a black screen.
SLIDE : Wipe in from right to left, or wipe out
from left to right.
SCROLL : The scene wipes in from the
bottom to the top of a black screen, or wipes out
from top to bottom, leaving a black screen.
M
”. ( pg. 13)
Page 31

Program AE, Effects And Shutter
Effects
1 Set the Power Switch to “REC”.
2 Set the recording mode to “
3 Set “EFFECT”, “PROGRAM AE” or
“SHUTTER” in FUNCTION Menu. ( pg. 22)
● The EFFECT, PROGRAM AE or SHUTTER menu
disappears and the selected effect is activated.
● The selected effect indicator appears.
To deactivate the selected effect
Select “OFF” in step 3. The effect indicator
disappears.
NOTES:
÷ Program AE, Effects and Shutter Effects can be
changed during Record-Standby.
● Some modes of Program AE and Shutter Effects
cannot be used during Night-Alive.
● When a subject is too bright or reflective, a
vertical streak may appear (smear phenomenon).
Smear phenomenon tends to occur when
“SPORTS” or any mode of “SHUTTER 1/500 – 1/
4000” is selected.
EFFECT
OFF: Disables the function. (Factory-preset)
SEPIA : Recorded scenes have a brownish
tint like old photos.
MONOTONE : Like classic black and white
films, your footage is shot in B/W.
CLASSIC : Gives recorded scenes a strobe
effect.
STROBE : Your recording looks like a series
of consecutive snapshots.
M
”. ( pg. 13)
FEATURES FOR RECORDING
EN 31
PROGRAM AE
OFF: Disables the function. (Factory-preset)
SPORTS
(Variable Shutter Speed: 1/250 – 1/4000):
This setting allows fast-moving images to be
captured one frame at a time, for vivid, stable
slow-motion playback. The faster the shutter
speed, the darker the picture becomes. Use the
shutter function under good lighting conditions.
SNOW : Compensates for subjects that may
otherwise appear too dark when shooting in
extremely bright surroundings such as in the
snow.
SPOTLIGHT : Compensates for subjects that
may otherwise appear too bright when shooting
under extremely strong direct lighting such as
spotlights.
TWILIGHT : Makes evening scenes look
more natural. White Balance ( pg. 29) is
automatically set to “”, but can be changed to
your desired setting. When Twilight is chosen,
the camcorder automatically adjusts the focus
from approx. 10 m (32 ft) to infinity. From less
than 10 m, adjust the focus manually.
SHUTTER
OFF: Disables the function. (Factory-preset)
SHUTTER 1/60: The shutter speed is fixed
at 1/60th of a second. Black bands that usually
appear when shooting a TV screen become
narrower.
SHUTTER 1/100: The shutter speed is
fixed at 1/100th of a second. The flickering that
occurs when shooting under a fluorescent light
or mercury-vapour lamp is reduced.
SHUTTER 1/500/SHUTTER 1/4000: These
settings allow fast-moving images to be
captured one frame at a time, for vivid, stable
slow-motion playback by fixing shutter speed
variables. Use these settings when an automatic
adjustment does not work well, using SPORTS
mode. The faster the shutter speed, the darker
the picture becomes. Use the shutter function
under good lighting conditions.
ADVANCED FEATURES
Page 32
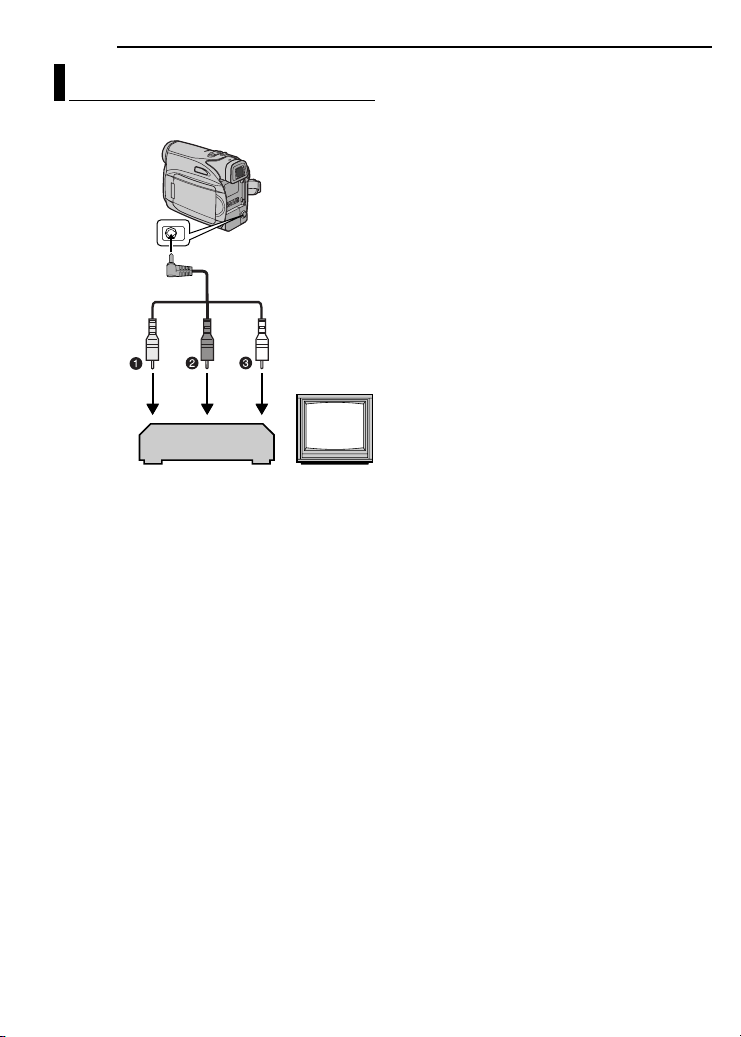
32 EN
EDITING
Dubbing To A VCR
To AV connector
Audio/Video
cable
(provided)
VCR
1Yellow to VIDEO IN
2Red to AUDIO R IN
3White to AUDIO L IN
TV
1 Following the illustrations, connect the
camcorder and the VCR’s input connectors.
2 Start playback on the camcorder. ( pg. 20)
3 At the point you want to start dubbing, start
recording on the VCR. (Refer to the VCR’s
instruction manual.)
4 To stop dubbing, stop recording on the VCR,
then stop playback on the camcorder.
NOTES:
÷÷÷÷It is recommended to use the AC Adapter as
the power supply instead of the battery pack.
( pg. 13)
● To choose whether or not the following displays
appear on the connected TV
● Date/time
Set “DATE/TIME” to “ON” or “OFF”.
( pg. 22, 25)
● Time code
Set “TIME CODE” to “OFF” or “ON”.
( pg. 22, 25)
● Indications other than date/time and time code
Set “ON SCREEN” to “OFF”, “LCD” or “LCD/
TV”. ( pg. 22, 25)
Page 33
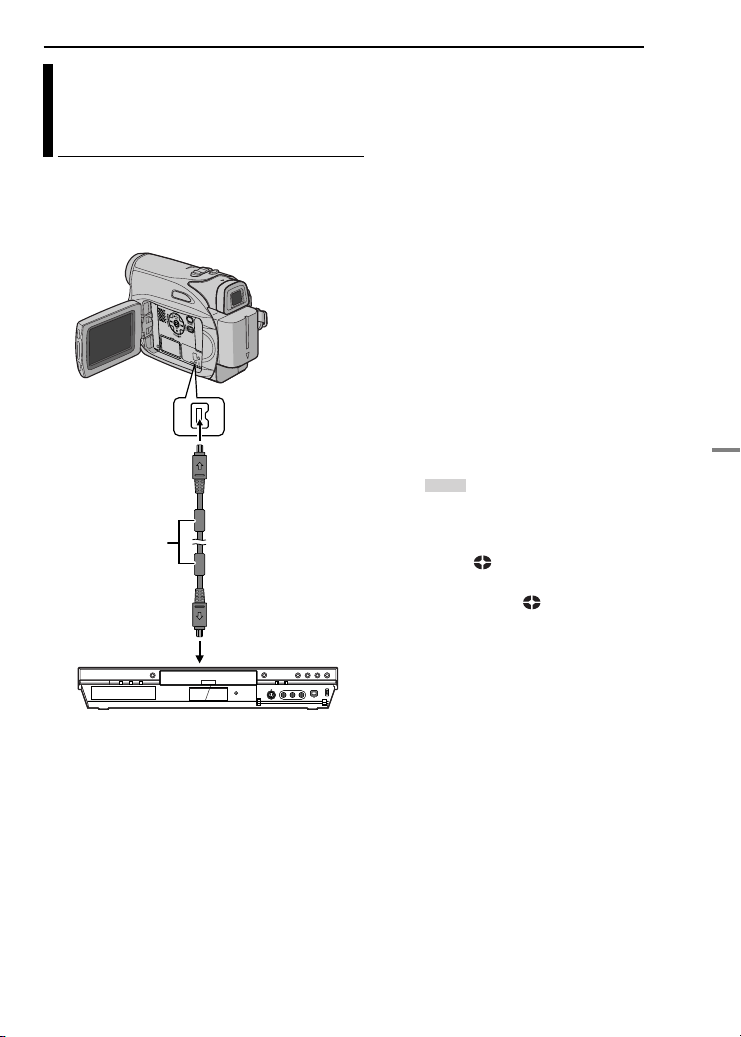
Dubbing To Or From A Video Unit
Equipped With A DV Connector
(Digital Dubbing)
It is also possible to copy recorded scenes from
the camcorder onto another video unit equipped
with a DV connector. Since a digital signal is
sent, there is little, if any, image or sound
deterioration.
To DV IN/OUT
Core filter
Video unit equipped with DV connector
To use this camcorder as a player
1 Make sure all units are turned off.
2 Connect this camcorder to a video unit
equipped with a DV input connector using a DV
cable as shown in the illustration.
3 Start playback on the camcorder. ( pg. 20)
4 At the point you want to start dubbing, start
recording on the video unit. (Refer to the video
unit’s instruction manual.)
5 To stop dubbing, stop recording on the video
unit, then stop playback on this camcorder.
DV cable (optional)
To DV IN/OUT
EDITING
NOTES:
÷÷÷÷It is recommended to use the AC Adapter as
the power supply instead of the battery pack.
( pg. 13)
● If a blank portion or disturbed image is played
back on the player during dubbing, the dubbing
may stop so that an unusual image is not dubbed.
● Even though the DV cable is connected correctly,
sometimes the image may not appear in step 4. If
this occurs, turn off the power and make
connections again.
● When using a DV cable, be sure to use the
optional JVC VC-VDV204U DV cable.
To use this camcorder as a recorder
EN 33
1 Make sure all units are turned off.
2 Connect this camcorder to a video unit
equipped with a DV output connector using a DV
cable as shown in the illustration.
3 Set the camcorder’s Power Switch to “PLAY”.
4 Set “REC MODE” to “SP” or “LP”. ( pg. 25)
5 Press the Recording Start/Stop Button to
engage the Record-Pause mode.
● The “” indication appears on the screen.
DV IN
6 Start playback on the player.
7 At the point you want to start dubbing, press
the Recording Start/Stop Button to start
dubbing. The indication rotates.
8 Press the Recording Start/Stop Button again
to stop dubbing. The indication stops
rotating.
9 Press 7 to return to the normal playback
mode.
NOTE:
Digital Dubbing is performed in the sound mode
recorded on the original tape, regardless of the
current “SOUND MODE” setting. ( pg. 23)
ADVANCED FEATURES
Page 34

34 EN
EDITING
Connection To A Personal Computer
It is also possible to transfer still/moving images
to a PC with a DV connector by using the
software equipped with the PC or commercially
available software.
If you are using a Windows
Windows
®
Messenger to conduct video
conferences over the Internet, using a
camcorder. For details, refer to the help for the
Windows
®
Messenger.
®
XP, you can use
To DV IN/OUT
Core filter
DV cable
(optional)
Core filter
NOTES:
÷÷÷÷It is recommended to use the AC Adapter as
the power supply instead of the battery pack.
( pg. 13)
● When using a DV cable, be sure to use the
optional JVC VC-VDV206U or VC-VDV204U DV
cable depending on the type of DV connector
(4 or 6 pins) on the PC.
● The date/time information cannot be captured into
the PC.
● Refer to the instruction manuals of the PC and
Software.
● The still images can also be transferred to a PC
with a DV connector-equipped capture board.
● The system may not work properly depending on
the PC or capture board you are using.
When connecting the camcorder to a PC
using a DV cable, make sure to follow the
procedure below. Connecting the cable
incorrectly may cause malfunctions to the
camcorder and/or the PC.
● Connect the DV cable first to the PC, and then
to the camcorder.
● Connect the DV cable (plugs) correctly
according to the shape of the DV connector.
To DV connector
PC with DV connector
Page 35

If, after following the steps in the chart below, the
problem still exists, please consult your nearest
JVC dealer.
The camcorder is a microcomputer-controlled
device. External noise and interference (from a
TV, a radio, etc.) might prevent it from
functioning properly. In such cases, first
disconnect its power supply unit (battery pack,
AC Adapter, etc.) and wait a few minutes; and
then re-connect it and proceed as usual from
the beginning.
Power
No power is supplied.
●
The power is not connected properly.
➜
Connect the AC Adapter securely. ( pg. 13)
●
The battery pack is not attached firmly.
➜
Detach the battery pack once again and re-attach
it firmly. ( pg. 12)
●
The battery is dead.
➜
Replace the dead battery with a fully charged
one. ( pg. 12)
Video Recording
Recording cannot be performed.
●
The tape’s erase protection tab is set to “SAVE”.
➜
Set the tape’s erase protection tab to “REC”.
( pg. 16)
●
“TAPE END” appears.
➜
Replace with new cassette. ( pg. 16)
●
The cassette holder cover is open.
➜
Close the cassette holder cover.
When shooting a subject illuminated by
bright light, vertical lines appear.
●
This is not a malfunction.
When the screen is under direct sunlight
during shooting, the screen becomes red or
black for an instant.
●
This is not a malfunction.
During recording, the date/ time does not
appear.
●
“DATE/TIME” is set to “OFF”.
➜
Set “DATE/TIME” to “ON”. ( pg. 22, 24)
TROUBLESHOOTING
EN
The LCD monitor or viewfinder indications
blink.
●
Effects and “DIS” functions that cannot be used
together are selected at the same time.
➜
Re-read the sections covering Effects and “DIS”.
( pg. 22, 23, 31)
Digital Zoom does not work.
●
28X optical zoom is selected.
➜
Set “ZOOM” to “56X” or “800X”. ( pg. 23)
Video Playback
The tape is moving, but there is no picture.
●
Your TV has AV input terminals, but is not set to
its VIDEO mode.
➜
Set the TV to the mode or channel appropriate for
video playback. ( pg. 21)
●
The cassette holder cover is open.
➜
Close the cassette holder cover. ( pg. 16)
Blocks of noise appear during playback, or
there is no playback picture and the screen
becomes blue.
➜
Clean the video heads with an optional cleaning
cassette. ( pg. 40)
Advanced features
The focus does not adjust automatically.
●
Focus is set to the Manual mode.
➜
Set Focus to the Auto mode. ( pg. 27)
●
The lens is dirty or covered with condensation.
➜
Clean the lens and check the focus again.
( pg. 38)
Snapshot mode cannot be used.
●
The16:9 Wide mode ( 16:9 indicator) is
selected.
➜
Disengage the 16:9 ( 16:9 indicator) Wide
mode. ( pg. 22, 26)
35
REFERENCES
Page 36

36 EN
TROUBLESHOOTING
The color of Snapshot looks strange.
● The light source or the subject does not include
white. Or there are various different light sources
behind the subject.
➜Find a white subject and compose your shot so
that it also appears in the frame. ( pg. 26)
The image taken using Snapshot is too
dark.
● Shooting was performed under backlit conditions.
➜Press BACKLIGHT. ( pg. 28)
The image taken using Snapshot is too
bright.
● The subject is too bright.
➜Set “PROGRAM AE” to “SPOTLIGHT”.
( pg. 31)
White Balance cannot be activated.
● The Sepia (SEPIA) or Monotone (MONOTONE)
mode is activated.
➜Disengage the Sepia (SEPIA) or Monotone
(MONOTONE) mode before setting White
Balance. ( pg. 31)
The image looks like the shutter speed is
too slow.
● When shooting in the dark, the unit becomes
highly sensitive to light when “GAIN UP” is set to
“AUTO”.
➜If you want the lighting to look more natural, set
“GAIN UP” to “AGC” or “OFF”. ( pg. 22, 24)
Other problems
The POWER/CHARGE lamp on the
camcorder does not light during charging.
● Charging is difficult in places subject to extremely
high/low temperatures.
➜To protect the battery, it is recommended to
charge it in places with a temperature of 10°C to
35°C (50°F to 90°F). ( pg. 39)
● The battery pack is not attached firmly.
➜Detach the battery pack once again and re-attach
it firmly. ( pg. 12)
“SET DATE/TIME!” appears.
● The date/time is not set.
➜Set the date/time. ( pg. 14)
● The built-in clock battery has run out and the
previously set date/time has been erased.
➜Consult your nearest JVC dealer for replacement.
When the image is printed from the printer,
a black bar appears at the bottom of the
screen.
● This is not a malfunction.
➜By recording with “DIS” activated ( pg. 22, 23)
this can be avoided.
When the camcorder is connected via the
DV connector, the camcorder does not
operate.
● The DV cable was plugged/unplugged with power
turned on.
➜Turn the camcorder’s power off and on again,
then operate it.
Images on the LCD monitor appear dark or
whitish.
● In places subject to low temperature, images
become dark due to the characteristics of the
LCD monitor. This is not a malfunction.
➜Adjust the brightness and angle of the LCD
monitor. ( pg. 15, 18)
● When the LCD monitor’s fluorescent light reaches
the end of its service life, images on the LCD
monitor become dark.
➜Consult your nearest JVC dealer.
Colored bright spots appear all over the
LCD monitor or the viewfinder.
● The LCD monitor and the viewfinder are made
with high-precision technology. However, black
spots or bright spots of light (red, green or blue)
may appear constantly on the LCD monitor or the
viewfinder. These spots are not recorded on the
tape. This is not due to any defect of the unit.
(Effective dots: more than 99.99%)
The cassette will not load properly.
● The battery’s charge is low.
➜Install a fully charged battery. ( pg. 12)
Page 37
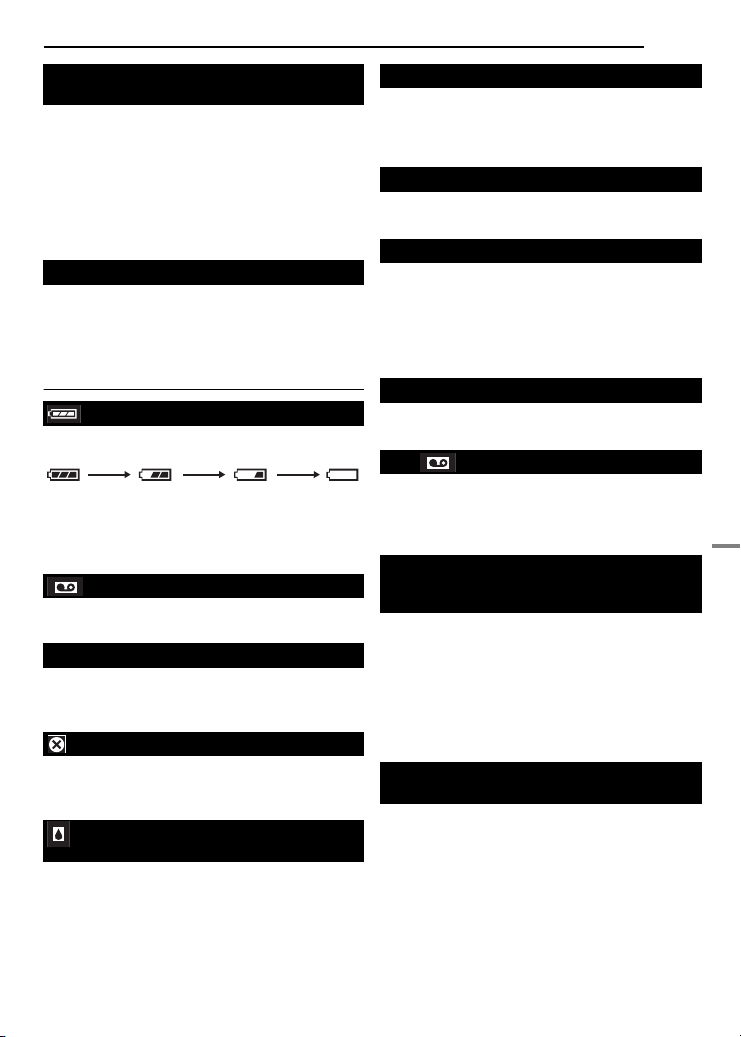
Picture does not appear on the LCD
monitor.
● The viewfinder is pulled out and “PRIORITY” is
set to “FINDER”.
➜Push the viewfinder back in or set “PRIORITY” to
“LCD”. ( pg. 18, 22, 24)
● The LCD monitor’s brightness setting is too dark.
➜Adjust the brightness of the LCD monitor.
( pg. 15)
➜If the monitor is tilted upward 180 degrees, open
the monitor fully. ( pg. 18)
An error indication (01 – 04 or 06) appears.
● A malfunction of some kind has occurred. In this
case the camcorder’s functions become
unusable.
➜ pg. 37.
Warning Indications
Displays the battery remaining power.
Remaining power level
ExhaustedHigh
As the battery power comes close to nil, the
battery remaining power indicator blinks.
When the battery power is exhausted, power
turns off automatically.
● Appears if a tape is loaded. ( pg. 16)
● Blinks when no tape is loaded. ( pg. 16)
CHECK TAPE’S ERASE PROTECTION TAB
Appears when the erase protection tab is set to
“SAVE” while the Power Switch is set to “REC”.
( pg. 13)
USE CLEANING CASSETTE
Appears if dirt is detected on the heads during
recording. Use an optional cleaning cassette.
( pg. 40)
CONDENSATION, OPERATION
PAUSED PLEASE WAIT
Appears if condensation occurs. When this
indication is displayed, wait more than 1 hour
until condensation disappears.
TROUBLESHOOTING
EN 37
TAPE!
Appears if a tape is not loaded when the
Recording Start/Stop Button or SNAPSHOT
Button is pressed while the Power Switch is set
to “REC”.
TAPE END
Appears when the tape ends during recording or
playback.
SET DATE/TIME!
● Appears when the date/time is not set.
( pg. 14)
● The built-in clock battery has run out and the
previously set date/time has been erased.
Consult your nearest JVC dealer for
replacement.
LENS CAP
Appears for 5 seconds after power is turned on if
the lens cap is attached or when it is dark.
HDV
Appears when pictures recorded in the HDV
format are detected. The pictures in the HDV
format cannot be played back with this
camcorder.
UNIT IN SAFEGUARD MODE
REMOVE AND REATTACH BATTERY
OR DC PLUG
The error indications (01, 02 or 06) show what
type of malfunction has occurred. When an error
indication appears, the camcorder turns off
automatically. Remove the power supply
(battery, etc.) and wait a few minutes for the
indication to clear. When it does, you can
resume using the camcorder. If the indication
remains, consult your nearest JVC dealer.
UNIT IN SAFEGUARD MODE
EJECT AND REINSERT TAPE
The error indications (03 or 04) show what type
of malfunction has occurred. When an error
indication appears, the camcorder turns off
automatically. Eject the cassette once and reinsert it, then check if the indication clears.
When it does, you can resume using the
camcorder. If the indication remains, consult
your nearest JVC dealer.
REFERENCES
Page 38

38 EN
USER MAINTENANCE
Cleaning The Camcorder
Before cleaning, turn off the camcorder and
remove the battery pack and AC Adapter.
To clean the exterior
Wipe gently with a soft cloth. Put the cloth in
diluted mild soap and wring it well to wipe off
heavy dirt. Then wipe again with a dry cloth.
To clean the LCD monitor
Wipe gently with a soft cloth. Be careful not to
damage the monitor. Close the LCD monitor.
To clean the lens
Blow it with a blower brush, then wipe gently
with lens cleaning paper.
To clean the viewfinder lens
Remove dust from the viewfinder using a blower
brush.
NOTES:
● Avoid using strong cleaning agents such as
benzine or alcohol.
● Cleaning should be done only after the battery
pack has been removed or other power units have
been disconnected.
● Mould may form if the lens is left dirty.
● When using a cleaner or chemically treated cloth
refer to the cautions of each product.
● To clean the viewfinder, please consult your
nearest JVC dealer.
Page 39

AC Adapter
When using the AC Adapter in areas other than
the USA
The provided AC Adapter features automatic
voltage selection in the AC range from 110 V to
240 V.
USING HOUSEHOLD AC PLUG ADAPTER
In case of connecting the unit’s power cord to an
AC wall outlet other than American National
Standard C73 series type use an AC plug adapter,
called a “Siemens Plug”, as shown.
For this AC plug adapter, consult your nearest JVC
dealer.
Plug adapter
Battery Packs
The supplied battery
pack is a lithium-ion
battery. Before using the
supplied battery pack or
an optional battery pack,
be sure to read the
following cautions:
● To avoid hazards
...do not burn.
...do not short-circuit the terminals. When
transporting, make sure the provided battery cap
is attached to the battery. If the battery cap is
misplaced, carry the battery in a plastic bag.
...do not modify or disassemble.
...do not expose the battery to temperatures
exceeding 60°C (140°F), as this may cause the
battery to overheat, explode or catch fire.
...use only specified chargers.
● To prevent damage and prolong service
life
...do not subject to unnecessary shock.
...charge in an environment where temperatures
are within the tolerances shown in the chart
below. This is a chemical reaction type battery —
cooler temperatures impede chemical reaction,
while warmer temperatures can prevent
complete charging.
...store in a cool, dry place. Extended exposure to
high temperatures will increase natural discharge
and shorten service life.
...fully charge and then fully discharge the battery
every 6 months when storing the battery pack
over a long period time.
Terminals
CAUTIONS
... remove from charger or powered unit when not in
use, as some machines use current even when
switched off.
EN 39
The Benefits Of Lithium-Ion Batteries
Lithium-ion battery packs are small but have a
large power capacity. However, when one is
exposed to cold temperatures (below 10°C/
50
°F), its usage time becomes shorter and it
may cease to function. If this happens, place
the battery pack in your pocket or other warm,
protected place for a short time, then reattach it to the camcorder.
NOTES:
● It is normal for the battery pack to be warm after
charging, or after use.
Temperature Range Specifications
Charging: 10°C to 35°C (50°F to 95°F)
Operation: 0°C to 40°C (32°F to 104°F)
Storage: –20°C to 50°C (–4°F to 122°F)
● The lower the temperature, the longer recharging
takes.
● Charging times are for a fully discharged battery
pack.
Cassettes
To properly use and store your cassettes, be
sure to read the following cautions:
● During use
...make sure the cassette bears the Mini DV mark.
...be aware that recording onto prerecorded tapes
automatically erases the previously recorded
video and audio signals.
...make sure the cassette is positioned properly
when inserting.
...do not load and unload the cassette repeatedly
without allowing the tape to run at all. This
slackens the tape and can result in damage.
...do not open the front tape cover. This exposes
the tape to fingerprints and dust.
● Store cassettes
...away from heaters or other heat sources.
...out of direct sunlight.
...where they won’t be subject to unnecessary
shock or vibration.
...where they won’t be exposed to strong magnetic
fields (such as those generated by motors,
transformers or magnets).
...vertically, in their original cases.
REFERENCES
Page 40
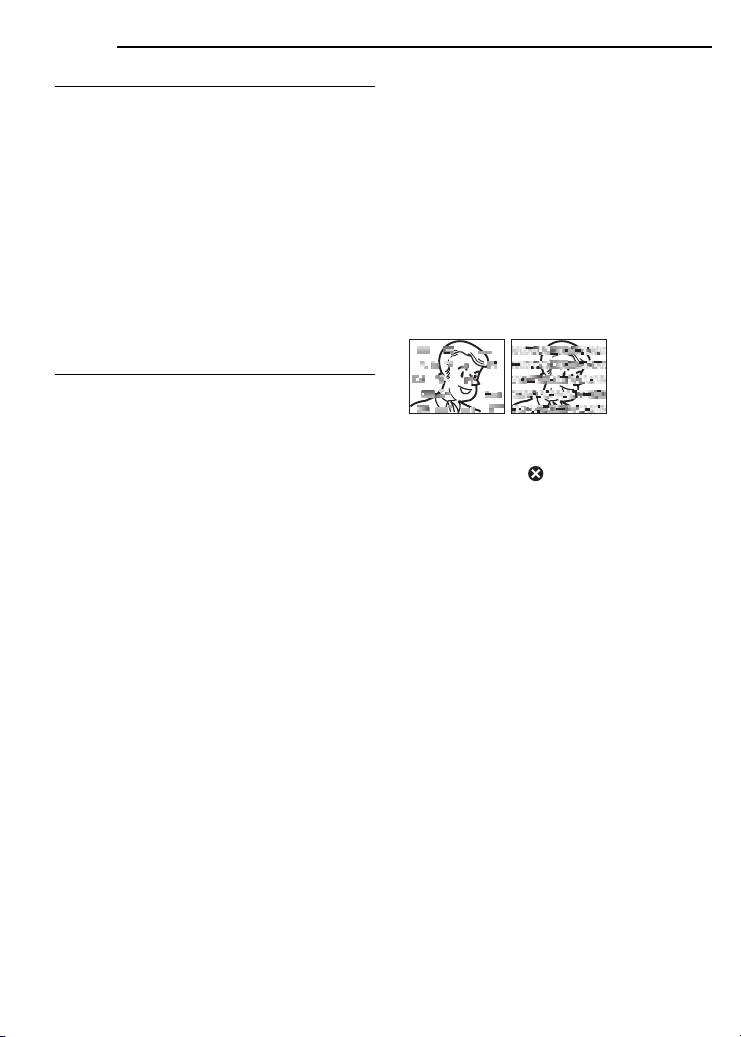
40 EN
CAUTIONS
LCD Monitor
● To prevent damage to the LCD monitor, DO
NOT
...push it strongly or apply any shocks.
... place the camcorder with the LCD monitor on the
bottom.
● To prolong service life
...avoid rubbing it with coarse cloth.
● Be aware of the following phenomena for
LCD monitor use. These are not
malfunctions
...While using the camcorder, the surface around
the LCD monitor and/or the back of the LCD
monitor may heat up.
...If you leave power on for a long time, the surface
around the LCD monitor becomes hot.
Main Unit
● For safety, DO NOT
...open the camcorder’s chassis.
...disassemble or modify the unit.
...short-circuit the terminals of the battery pack.
Keep it away from metallic objects when not in
use.
...allow inflammables, water or metallic objects to
enter the unit.
... remove the battery pack or disconnect the power
supply while the power is on.
...leave the battery pack attached when the
camcorder is not in use.
● Avoid using the unit
...in places subject to excessive humidity or dust.
... in places subject to soot or steam such as near a
cooking stove.
...in places subject to excessive shock or vibration.
...near a television set.
...near appliances generating strong magnetic or
electric fields (speakers, broadcasting antennas,
etc.).
...in places subject to extremely high (over 40°C or
104°F) or extremely low (under 0°C or 32°F)
temperatures.
● DO NOT leave the unit
...in places of over 50°C (122°F).
...in places where humidity is extremely low (below
35%) or extremely high (above 80%).
...in direct sunlight.
...in a closed car in summer.
...near a heater.
● To protect the unit, DO NOT
...allow it to become wet.
...drop the unit or strike it against hard objects.
...subject it to shock or excessive vibration during
transportation.
... keep the lens directed at extremely bright objects
for long periods.
...expose the lens and viewfinder’s lens to direct
sunlight.
...carry it by holding the LCD monitor or the
viewfinder.
... swing it excessively when using the hand strap or
the grip.
... swing the soft camera case excessively when the
camcorder is inside it.
● Dirty heads can cause the following
problems:
...No picture during playback.
...Blocks of noise appear during playback.
...During recording or playback, the Head Clog
Warning indicator “” appears.
...Recording cannot be performed properly.
In such cases, use an optional cleaning
cassette. Insert it and play back. If the cassette
is used more than once consecutively, damage
to the video heads may result. After the
camcorder plays back for about 20 seconds, it
stops automatically. Also refer to the cleaning
cassette’s instructions.
If, after using the cleaning cassette, the
problems still exist, consult your nearest JVC
dealer.
Mechanical moving parts used to move the
video heads and video tape tend to become
dirty and worn out over time. In order to maintain
a clear picture at all times, periodic check-ups
are recommended after using the unit for about
1,000 hours. For periodic check-ups please
consult your nearest JVC dealer.
Page 41

About moisture condensation
● You have observed that pouring a cold liquid
into a glass will cause drops of water to form on
the glass outer surface. This same
phenomenon occurs on the head drum of a
camcorder when it is moved from a cool place
to a warm place, after heating a cold room,
under extremely humid conditions or in a place
directly subjected to the cool air from an air
conditioner.
● Moisture on the head drum can cause severe
damage to the video tape, and can lead to
internal damage to the camcorder itself.
Serious malfunctioning
If malfunctioning occurs, stop using the unit
immediately and consult your local JVC
dealer.
The camcorder is a microcomputer-controlled
device. External noise and interference (from
a TV, a radio, etc.) might prevent it from
functioning properly. In such cases, first
disconnect its power supply unit (battery pack,
AC Adapter, etc.) and wait a few minutes and
then re-connect it and proceed as usual from
the beginning.
CAUTIONS
EN 41
Declaration of Conformity
Model Number : GR-D347U
Trade Name : JVC
Responsible party : JVC AMERICAS
CORP.
Address : 1700 Valley Road
Wayne, N. J. 07470
Telephone Number : 973–317–5000
This device complies with Part 15 of FCC
Rules. Operation is subject to the following
two conditions: (1) This device may not cause
harmful interference, and (2) this device must
accept any interference received, including
interference that may cause undesired
operation.
Changes or modifications not approved by
JVC could void the user’s authority to operate
the equipment. This equipment has been
tested and found to comply with the limits for a
Class B digital device, pursuant to Part 15 of
the FCC Rules. These limits are designed to
provide reasonable protection against harmful
interference in a residential installation. This
equipment generates, uses, and can radiate
radio frequency energy and, if not installed
and used in accordance with the instructions,
may cause harmful interference to radio
communications. However, there is no
guarantee that interference will not occur in a
particular installation. If this equipment does
cause harmful interference to radio or
television reception, which can be determined
by turning the equipment off and on, the user
is encouraged to try to correct the interference
by one or more of the following measures:
Reorient or relocate the receiving antenna.
Increase the separation between the
equipment and receiver.
Connect the equipment into an outlet on a
circuit different from that to which the
receiver is connected.
Consult the dealer or an experienced radio/
TV technician for help.
REFERENCES
This Class B digital apparatus complies with
Canadian ICES-003.
Cet appareil numérique de la classe B est
conforme à la norme NMB-003 du Canada.
Page 42

42 EN
SPECIFICATIONS
Camcorder
For General
Power supply
DC 11 V (Using AC Adapter)
DC 7.2 V (Using battery pack)
Power consumption
Approx. 2.8 W (LCD monitor off, viewfinder on)
Approx. 3.2 W (LCD monitor on, viewfinder off)
Approx. 6.5 W (Maximum; when charging the
battery pack)
Dimensions (W x H x D)
59 mm x 94 mm x 114 mm (2 5/16" x 3 11/16" x
4 1/2") (with the LCD monitor closed and the
viewfinder pushed back in)
Weight
Approx. 400 g (0.88 lbs) (without battery, cassette
and lens cap)
Approx. 480 g (1.06 lbs) (incl. battery, cassette and
lens cap)
Operating temperature
0°C to 40°C (32°F to 104°F)
Operating humidity
35% to 80%
Storage temperature
–20°C to 50°C (–4°F to 122°F)
Pickup
1/6" CCD
Lens
F 2.0, f = 2.3 mm to 64.4 mm, 28:1 power zoom lens
Filter diameter
ø27 mm
LCD monitor
2.5" diagonally measured, LCD panel/TFT active
matrix system
Viewfinder
Electronic viewfinder with 0.33" black/white
Speaker
Monaural
For Digital Video Camera
Format
DV format (SD mode)
Signal format
NTSC standard
Recording/Playback format
Video: Digital component recording
Audio: PCM digital recording, 32 kHz 4-channel
(12-BIT), 48 kHz 2-channel (16-BIT)
Cassette
Mini DV cassette
Tape speed
SP: 18.8 mm/s, LP: 12.5 mm/s
Maximum recording time (using 80 min.
cassette)
SP: 80 min., LP: 120 min.
For Connectors
AV
Video output: 1.0 V (p-p), 75 Ω, analog
Audio output: 300 mV (rms), 1 kΩ, analog, stereo
DV
Input/output: 4-pin, IEEE1394 compliant
AC Adapter
Power requirement
AC 110 V to 240 V~ , 50 Hz/60 Hz
Output
DC 11 V =, 1 A
Specifications shown are for SP mode unless
otherwise indicated. E & O.E. Design and
specifications subject to change without notice.
Page 43

A
AC Adapter .............................................. 13, 39
Auto / Manual Mode ...................................... 13
B
Backlight Compensation ................................ 28
Battery Pack ......................................11, 12, 39
Blank Search .................................................20
C
Changing The Menu Settings ................ 22 – 25
Charging The Battery Pack ........................... 11
Connection To A Personal Computer ............ 34
Connections To A TV Or VCR ....................... 21
D
Data Battery ................................................... 12
Date/Time Settings ........................................ 14
Demonstration Mode .....................................25
Digital Image Stabilization (DIS) .................... 23
Dubbing ................................................... 32, 33
E
Effect Mode ................................................... 31
Exposure Control ........................................... 27
I
Iris Lock .........................................................28
L
LCD Monitor and Viewfinder .................... 16, 18
Loading A Cassette .......................................16
M
Manual Focus ................................................ 27
Melody ........................................................... 24
Motor Drive Mode .......................................... 26
N
Night-Alive ..................................................... 26
TERMS
EN 43
P
Playback Sound ............................................. 25
Power-Linked Operation ................................ 14
Priority............................................................. 24
Program AE, Effects And Shutter Effects ...... 31
Q
Quick Review ................................................. 19
R
Recording Capacity
Tape ........................................................ 17
S
Shutter Effects ............................................... 31
Snapshot Mode .............................................. 26
Sound Mode ............................................23, 25
Speaker Volume ........................................ 7, 20
Specifications ................................................. 42
Spot Exposure Control ................................... 29
T
Tape Speed (REC MODE) ......................23, 25
Tele Macro ..................................................... 23
Time Code ......................................... 19, 24, 25
Tripod Mounting ............................................. 15
Troubleshooting ........................................35-37
W
Warning Indications ....................................... 37
White Balance ................................................ 29
Wide Mode ..................................................... 26
Wipe Or Fader Effects ................................... 30
Z
Zooming ................................................... 18, 23
Page 44

EN
GR-D347U
© 2006 Victor Company of Japan, Limited
Printed in Malaysia
US
0806ASR-NF-VM
Page 45

VIDEOCÁMARA DIGITAL
Estimado cliente:
Gracias por comprar esta
videocámara digital. Antes de usarla,
lea la información de seguridad y las
precauciones contenidas en las
páginas 2 – 4 y 10 para garantizar un
uso seguro de este producto.
ESPAÑOL
GR-D347U
Por favor, visite nuestra página en Internet para cámara de
vídeo digital:
http://www.jvc.co.jp/english/cyber/
Para
accesorios:
http://www.jvc.co.jp/english/accessory/
PREPARATIVOS
GRABACIÓN Y
REPRODUCCIÓN DE VÍDEO
FUNCIONES AVANZADAS
REFERENCIAS
TÉRMINOS
7
17
22
35
43
MANUAL DE INSTRUCCIONES
Para desactivar la demostración,
ajuste “MODO DEMO” en “OFF”.
(
p. 22, 25)
LYT1636-001B
SP
Page 46

2
ES
¡Lea primero esto!
●
Antes de grabar vídeos importantes asegúrese
de efectuar una grabación de prueba.
Reproduzca su grabación de prueba para
asegurarse de que el vídeo y el audio se han
grabado como es debido.
●
Recomendamos limpiar los cabezales del vídeo
antes de usarlo.
Si no se ha utilizado la
videocámara durante un
tiempo, los cabezales
pueden estar sucios.
Recomendamos limpiar
periódicamente los
cabezales de vídeo con
una cinta de limpieza
(opcional).
●
Asegúrese de guardar las cintas y la
videocámara en el lugar apropiado.
Los cabezales de vídeo se pueden ensuciar más
fácilmente si las cintas y la videocámara se
guardan en entornos polvorientos. Las cintas
deben extraerse de la videocámara y guardarse
en sus carcasas respectivas. Guarde la
videocámara en una bolsa o en algún otro
contenedor.
●
Use el modo SP (Reproducción estándar) para
grabaciones de vídeo importantes.
El modo LP (Larga reproducción) le permite
grabar un 50% de vídeo más que el modo SP
(Reproducción estándar), pero es posible que se
observen perturbaciones en forma de mosaico
durante la reproducción, dependiendo de las
características de la cinta y de las condiciones de
uso.
De modo que para grabaciones importantes,
recomendamos usar el modo SP.
●
Para seguridad y fiabilidad.
Se recomiendan sólo auténticas pilas JVC y los
accesorios que son utilizados en esta
videocámara.
●
Este producto incluye tecnología patentada y
otras tecnologías privadas, y sólo funciona con
batería de datos JVC. Utilice las baterías
recargables BN-VF707U/VF714U/VF733U JVC.
El uso de baterías genéricas que no sean JVC
puede ocasionar daños en el circuito de carga
interno.
●
Asegúrese de utilizar cassettes con la marca
exclusivamente.
●
Recuerde que la videocámara es para usuarios
privados exclusivamente.
Está prohibido cualquier uso comercial sin la
autorización correspondiente. (Aunque grabe
eventos tales como espectáculos, o exhibiciones
para entretenimiento personal, se recomienda
especialmente que obtenga autorización previa.)
●
NO deje el aparato
- en lugares con más de 50°C.
- en lugares con humedad extremadamente baja
(inferior al 35%) o extremadamente alta (80%).
- bajo luz solar directa.
- en un coche cerrado en verano.
- cerca de una calefacción.
●
El monitor LCD está hecho con tecnología de alta
precisión. Sin embargo, las manchas oscuras o
claras de luz (rojo, verde o azul) pueden aparecer
constantemente sobre el monitor LCD. Estas
manchas no quedan registradas en la cinta. Esto
no es debido a un defecto de la unidad. (Puntos
eficaces: más del 99,99%)
●
No deje las baterías puestas cuando no se esté
utilizando la videocámara y compruebe la unidad
regularmente por si está en funcionamiento o no.
Page 47

PRECAUCIONES DE SEGURIDAD
ADVERTENCIA: PARA EVITAR RIESGO DE
INCENDIOS O ELECTROCUCIONES, NO
EXPONGA ESTE APARATO A LA LLUVIA O
HUMEDAD.
PRECAUCIONES:
●
Esta videocámara está diseñada para ser
utilizada con señales de televisión en color tipo
NTSC. No puede emplearse para reproducir en
un televisor de otra norma. Sin embargo, son
posibles grabar en vivo y reproducir en el
monitor LCD o el visor en cualquier lugar.
●
Este producto incluye tecnología patentada y
otras tecnologías privadas, y sólo funciona con
batería de datos JVC. Utilice las baterías
recargables BN-VF707U/VF714U/VF733U
JVC y, para recargarlas o para suministrar
alimentación a la videocámara desde un
tomacorriente de CA, utilice el adaptador de
CA de multivoltaje suministrado. (Posiblemente
sea necesario un adaptador de conversión
apropiado que se adecúe al tipo de toma de
corriente de su país.)
Este producto contiene una batería de litio CR de
tipo botón que contiene perclorato (puede
requerirse una manipulación especial).
Visite www
perchlorate
NOTAS:
●
●
.dtsc.ca.gov/hazardouswaste/
La placa indicadora (placa del número de
serie) y la precaución de seguridad están en la
parte inferior y/o en la parte trasera de la
unidad principal.
La información del valor nominal y las
precauciones de seguridad del adaptador de
CA están en la parte superior e inferior del
mismo.
ES
3
Page 48

4
ES
Cuando el equipo se encuentra instalado en un
gabinete o en un estante, asegúrese que tenga
suficiente espacio en todos los lados para
permitir la ventilación (10 cm o más en cada lado,
en la parte superior y en la parte trasera).
No bloquee los orificios de ventilación.
(Si los orificios de ventilación están bloqueados
por un periódico, o paño, etc., el calor no podrá
salir.)
Ningúna fuente de llama sin protección, tales
como velas encendidas, deberá ser colocada en
el aparato.
Cuando descarte las pilas, deberá considerar los
problemas ambientales y respetar estrictamente
las normas locales o leyes vigentes para la
eliminación de estas pilas.
La unidad no deberá ser expuesta a goteos ni
salpicaduras.
No use esta unidad en un cuarto de baño o en
lugares con agua.
Tampoco no coloque ningún envase lleno de
agua o líquidos (tales como cosméticos o
medicinas, floreros, macetas, vasos, etc.) en la
parte superior de la unidad.
(Si penetra agua o líquidos en la unidad, podrá
producirse electrocuciones o incendios.)
No apunte el objetivo o el visor directamente
hacia el sol. Esto puede causarle lesiones en los
ojos así como también fallas en los circuitos
internos de la cámara. Esto también puede
producir riesgo de incendio o de choque eléctrico.
¡PRECAUCIÓN!
Las siguientes notas indican posibles daños a la
cámara de video o lesiones al usuario.
Cuando transporte la cámara de video asegúrese
de colocar y utilizar la correa suministrada. El
transportar o sostener la videocámara por el visor
y/o el monitor LCD puede resultar en la caída o
en fallas de la unidad.
Tome precauciones para no atraparse los dedos
en la cubierta del portacassette. No permita que
los niños operen la videocámara, ya que ellos
son particularmente susceptibles a este tipo de
accidente.
No utilice el trípode sobre superficies inestables o
desniveladas ya que la videocámara puede
caerse, produciendo graves daños a la misma.
¡PRECAUCIÓN!
Evite conectar los cables (audio/video, S-video,
etc.) a la videocámara y dejar la unidad sobre el
TV, ya que el tropezar con uno de los cables
puede derribar la videocámara resultando ésta
dañada.
IINSTRUCCIONES IMPORTANTES DE SEGURIDAD
1. Lea estas instrucciones.
2. Conserve estas instrucciones.
3. Preste atención a las advertencias.
4. Siga todas las instrucciones.
5. No utilice este aparato cerca del agua.
6. Limpie sólo con paño seco.
7. No bloquee ninguna abertura de ventilación.
Instale de acuerdo con las instrucciones del
fabricante.
8. No lo instale cerca de ninguna fuente de calor
tales como, radiadores, calefactores, cocinas, u
otros aparatos (incluyendo amplificadores) que
produzcan calor.
9. Sólo utilice dispositivos/accesorios
especificados por el fabricante.
10. Utilice sólo con la
carretilla, estante,
trípode, soporte o
mesa especificado
por el fabricante o
vendido con el
aparato. Cuando
utilice una carretilla,
sea cauteloso al
mover el conjunto de
carretilla/aparato para evitar lesiones
provocadas por caídas.
11. Desenchufe este aparato durante estruendos
de relámpagos o cuando esté fuera de uso por
largo tiempo.
12. Refiera toda reparación a personal de servicio
calificado. Se requiere de reparación cuando el
aparato ha sido dañado de alguna manera, por
ejemplo, si el cable o enchufe de alimentación
está dañado, si ocurrió derrame de líquidos o
caída de objetos dentro del aparato, si el
aparato fue expuesto a la lluvia o humedad, si
no funciona normalmente, o sufrió caídas.
Page 49
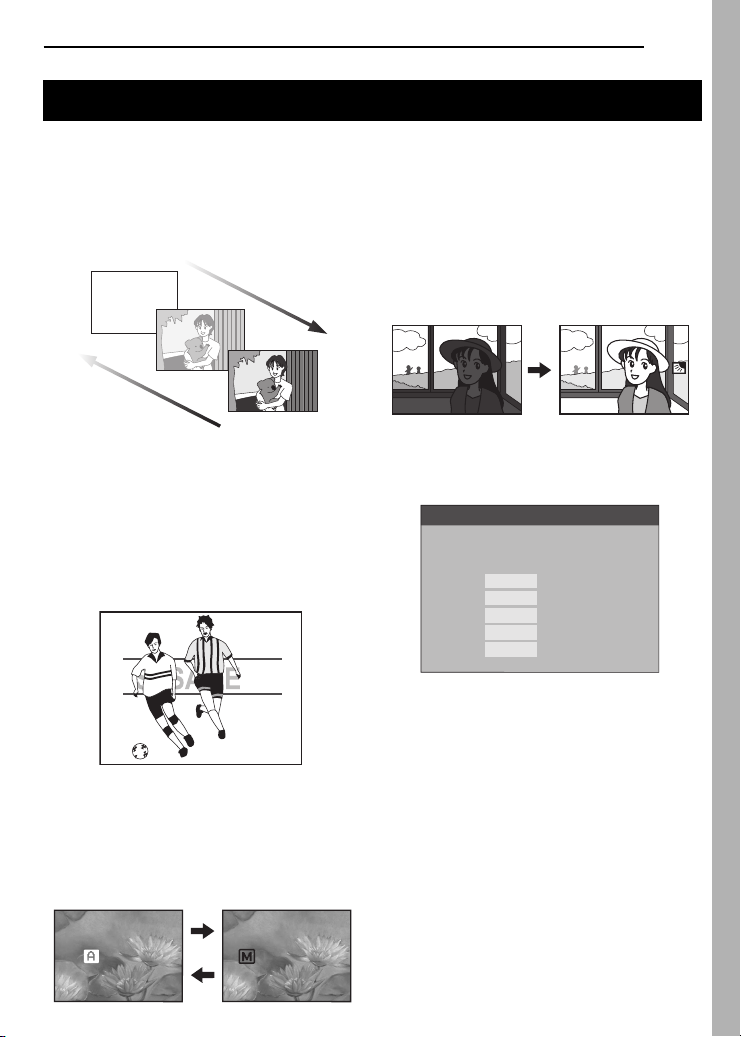
Principales funciones de esta videocámara
ES
5
Efectos de reemplazo (cortinilla)/fundido de
imagen
Puede utilizar los efectos de cortinilla/fundido
para insertar transiciones entre escenas
como un profesional. ( p. 30)
Fundido de
entrada
Fundido de salida
Programa AE, efectos y efectos de
obturación
Por ejemplo, el modo “DEPORTE” permite la
captura fotograma a fotograma de imágenes
en movimiento rápido, con el fin de obtener
un movimiento a cámara lenta estable y
vívido. ( p. 31)
Compensación de contraluz
Simplemente pulsando el botón
BACKLIGHT
oscurecida por el contraluz. ( p. 28)
●
También puede seleccionar una zona de
fotometría puntual con objeto de disponer
de una compensación de exposición más
precisa. ( p. 27, Control de exposición)
, se abrillanta la imagen
Datos de batería
El estado de la batería se puede comprobar
con sólo presionar el botón
ESTADO DE LA BATERÍA
100
%
50
0
TIEMPO MÁXNIVEL
DATA
LCD
90min
VISOR
100min
. ( p. 12)
Botón AUTO (Automático)
Usted puede cambiar el modo de grabación
del ajuste manual al ajuste de modo estándar
de la videocámara presionando el botón
AUTO
. ( p. 13)
AUTO
MANUAL
Page 50

ES
CONTENIDO
6
PREPARATIVOS 7
Índice ................................................................7
Accesorios suministrados ............................... 10
Alimentación ...................................................11
Modo de funcionamiento.................................13
Configuración de idioma ................................. 14
Ajustes de fecha/hora ..................................... 14
Ajuste de la empuñadura................................14
Ajuste del visor................................................15
Ajuste de brillo de la pantalla..........................15
Soporte del trípode .........................................15
Carga/descarga de una cinta.......................... 16
GRABACIÓN Y REPRODUCCIÓN
DE VÍDEO
GRABACIÓN DE VÍDEO ......................................17
Grabación básica............................................17
Tiempo restante de cinta ............................17
Monitor LCD y visor ....................................18
Zoom...........................................................18
Filmación periodística ................................. 19
Código de tiempo........................................19
Revisión rápida ...........................................19
Grabación desde un punto intermedio de una
cinta ............................................................19
REPRODUCCIÓN DE VÍDEO.................................20
Reproducción normal...................................... 20
Reproducción de imagen fija ......................20
Búsqueda rápida.........................................20
Búsqueda de partes en blanco ...................20
Reproducción de foto..................................21
Conexiones a un televisor o una grabadora de
vídeo ...........................................................21
17
MENÚS PARA UN AJUSTE DETALLADO 22
MENÚS PARA UN AJUSTE DETALLADO................22
Cambiar las configuraciones de menú............22
Menús de grabación .......................................23
Menús de reproducción ..................................25
FUNCIONES DE GRABACIÓN...............................26
Modo ancho ....................................................26
Filmación nocturna..........................................26
Fotografiado (Imagen grabada en la cinta)..... 26
Enfoque manual.............................................. 27
Control de exposición .....................................27
Bloqueo del diafragma....................................28
Compensación de contraluz ...........................28
Control de exposición puntual.........................29
Ajuste del balance del blanco .........................29
Ajuste manual del balance del blanco ............30
Efectos de reemplazo (cortinilla) o fundido de
imagen ........................................................30
Programa AE, efectos y efectos de obturación
................................................................... 31
EDICIÓN............................................................32
Copia en grabadora de vídeo .........................32
Copia en o desde un aparato de vídeo equipado
con un conector DV (Copia digital) ............. 33
Conexión a un PC........................................... 34
REFERENCIAS 35
SOLUCIÓN DE PROBLEMAS ................................35
MANTENIMIENTO DEL USUARIO.........................38
PRECAUCIONES .................................................39
ESPECIFICACIONES.............................................42
TÉRMINOS 43
Page 51

Índice
PREPARATIVOS
8
9
ES
7
1
2
3
4
5
6
7
!%&"
#$
PREPARATIVOS
(
Page 52
8
PREPARATIVOS
ES
Controles
1
Botón de rebobinado [1] ( p. 20)
Botón para ir hacia la izquierda [
Botón de revisión rápida [QUICK REVIEW]
(
p. 19)
2
Botón de ajuste [SET] ( p. 14)
Botón de información de batería [DATA]
(
p. 12)
3
Botón de parada [7] ( p. 20)
Botón de compensación de contraluz
[BACKLIGHT] (
Botón para bajar [
4
Botón de reproducción/pausa [6] ( p. 20)
Botón de enfoque manual [FOCUS] (
Botón para subir [
5
Botón de selección de ancho 16:9 [16:9]
(
p. 26)
Botón de búsqueda de espacios [BLANK]
(
p. 20)
6
Botón de menú [MENU] ( p. 22)
7
Botón de avance rápido [¡] ( p. 20)
Botón para ir hacia la derecha [>] (
Botón de noche [NIGHT] (
8
Control de ajuste de dioptría ( p. 15)
9
Botón de automático [AUTO] ( p. 13)
!
Botón de fotografiado [SNAPSHOT] ( p. 26)
"
Palanca del zoom motorizado [T/W] ( p. 18)
Control del volumen del altavoz [VOL. +, –]
(
p. 20)
#Botón de liberación de la batería [PUSH
BATT.] ( p. 11)
$Botón de inicio/parada de grabación
( p. 17)
%Interruptor de alimentación [REC, OFF,
PLAY] ( p. 13)
&Botón de bloqueo ( p. 13)
(Interruptor de abrir/expulsar cinta [OPEN/
EJECT] ( p. 16)
p. 28)
4
3
] ( p. 22)
] ( p. 22)
p. 26)
1
] ( p. 14)
p. 14)
p. 27)
Conectores
Los conectores están situados junto a las tapas.
á
Conector de salida de Audio/Vídeo [AV]
( p. 21, 32)
à
Conector de entrada de CC [DC] ( p. 11)
â
Conector de vídeo digital [DV IN/OUT]
(i.LINK*) ( p. 33, 34)
* i.LINK se refiere a la especificación industrial
IEEE1394-1995 y extensiones correspondientes.
El logotipo se utiliza para productos
compatibles con la norma i.Link.
Indicadores
ä
Lámpara POWER/CHARGE ( p. 11, 17)
Otras piezas
ã
Monitor LCD ( p. 18, 19)
å
Visor ( p. 15)
ç
Montura de batería ( p. 12)
é
Ojal de correa hombrera ( p. 11)
è
Altavoz ( p. 20)
ê
Correa de empuñadura ( p. 14)
ë
Objetivo
í
Sensor de cámara
(Tenga cuidado para no tapar esta zona, que
lleva incorporado un sensor necesario para
las tomas.)
ì
Micrófono estereofónico
î
Agujero para tornillo ( p. 15)
ï
Zócalo de fijación del trípode ( p. 15)
ñ
Tapa del portacintas ( p. 16)
Page 53
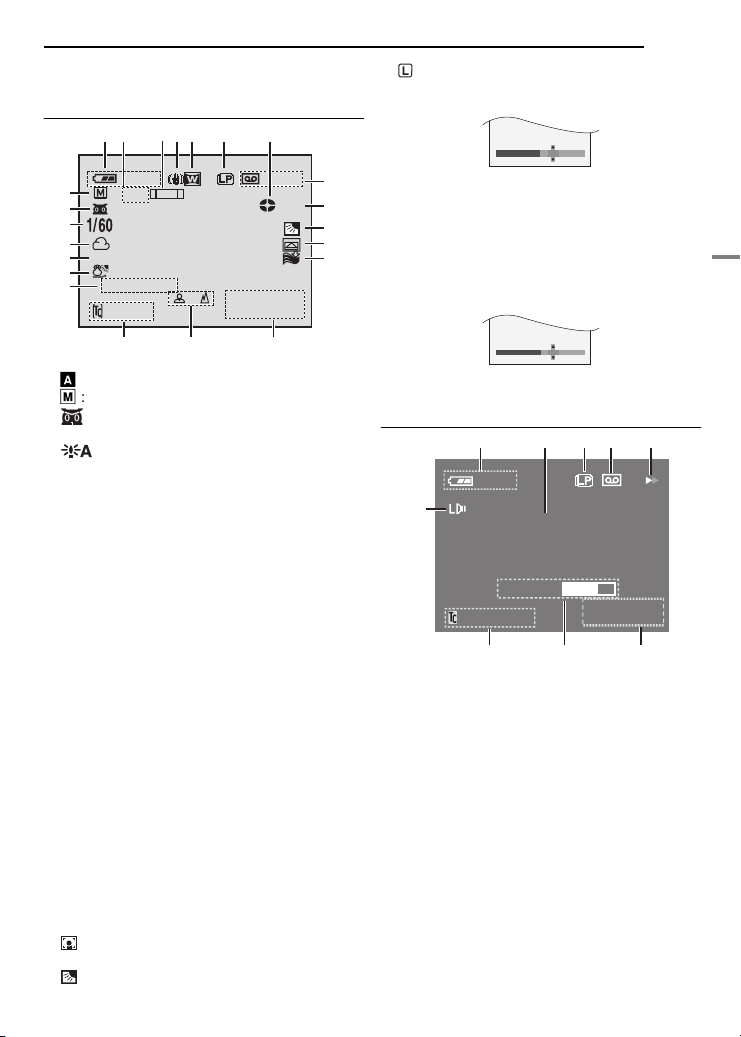
Indicaciones de Monitor LCD/Visor
AUDIO
B/ W
12BIT
30min
min62
05:20
PAU.
12006
9:52
JAN. .
–1EXPOSICIÓN
–1BRILLO
41235
678
Durante la grabación de vídeo
!
9
8
1
2
3
4
5
6
7
1
B/ W
#
"
x
0
%$
&
(
)
~
+
PREPARATIVOS
: Indicador de bloqueo del diafragma
( p. 28)
±: Indicador de ajuste de exposición ( p. 27)
~Indicador de modo cortinilla/fundido de
imagen ( p. 30)
+Indicador de reducción de viento ( p. 24)
,Código de tiempo ( p. 25)
-Indicador de ajuste de enfoque manual
( p. 27)
Indicador de control de brillo (monitor LCD/
visor) ( p. 15)
ES 9
1Indicador de modo automático/manual
,- .
A
: Modo automático
M
: Modo manual
2 : Indicador de filmación nocturna
( p. 26)
: Modo de ganancia de luz ( p. 24)
3Velocidad del obturador ( p. 31)
4Indicador de balance del blanco ( p. 29)
5Indicador de modo de efectos ( p. 31)
6Indicador de modo de programa AE
( p. 31)
7AUDIO 12BIT/16BIT: Indicador de modo de
sonido ( p. 23) (Aparece durante unos 5
segundos después de encender la
videocámara.)
8Indicador de energía restante de la batería
( p. 37)
9Porcentaje aproximado del zoom ( p. 18)
!Indicador de zoom ( p. 18)
"Estabilizador de imagen digital ( p. 23)
#Indicador de modo ancho 16:9 ( p. 26)
$Indicador de modo de velocidad de grabación
(SP/LP) ( p. 23)
(Sólo el indicador de LP es mostrado)
%Indicador de cinta en funcionamiento
( p. 17)
(Gira mientras la cinta está funcionando.)
&Tiempo restante de cinta ( p. 17)
(GRB: (Aparece durante la grabación.)
( p. 17)
PAU.: (Aparece durante modo de espera de
grabación.) ( p. 17)
PHOTO
: (Aparece cuando se está haciendo
una fotografía.) ( p. 26)
) : Indicador de control de exposición
puntual ( p. 29)
: Indicador de compensación de contraluz
( p. 28)
.Fecha/hora ( p. 14)
Durante la reproducción de vídeo
25min
12BIT
9
15:29:03
1Indicador de energía restante de la batería
( p. 37)
2Indicador de búsqueda de partes en blanco
( p. 20)
3Velocidad de la cinta (SP/LP) ( p. 23) (Sólo
el indicador de LP es mostrado)
4Indicador de cassette
53: Reproducción
¡: Avance rápido/búsqueda rápida hacia
adelante
1: Rebobinado/búsqueda rápida hacia
atrás
8: Pausa
6Fecha/hora ( p. 14)
7VOLUMEN: Indicador de nivel de volumen
( p. 20)
BRILLO: Indicador de control de brillo
(monitor LCD/visor) ( p. 15)
8Código de tiempo ( p. 24)
9Indicador de modo de sonido ( p. 23, 25)
L
BÚS.B ANCO
T
E
O
LUPSBÓN ”STOP”
PAR
C R
ANNCE LAA
E
VOLUM
JAN. .
9:52
12006
PREPARATIVOS
Page 54

10 ES
PREPARATIVOS
Antes de usar esta videocámara
Asegúrese de utilizar cassettes con la marca
exclusivamente.
Esta videocámara está diseñada exclusivamente
para cassettes de video digital. Solamente
cassettes de marca “ ” pueden ser utilizadas
con esta unidad.
Recuerde que la videocámara no es compatible
con otros formatos de video digital.
Recuerde que la videocámara es para usuarios
privados exclusivamente.
Está prohibido cualquier uso comercial sin la
autorización correspondiente. (Aunque grabe
eventos tales como espectáculos, o exhibiciones
para entretenimiento personal, se recomienda
especialmente que obtenga autorización previa.)
Antes de grabar vídeos importantes asegúrese
de efectuar una grabación de prueba.
Reproduzca su grabación de prueba para
asegurarse de que el vídeo y el audio se han
grabado como es debido.
Recomendamos limpiar los cabezales del vídeo
antes de usarlo.
Si no se ha utilizado la videocámara durante un
tiempo, los cabezales pueden estar sucios.
Recomendamos limpiar periódicamente los
cabezales de vídeo con una cinta de limpieza
(opcional).
Asegúrese de guardar las cintas y la
videocámara en el lugar apropiado.
Los cabezales de vídeo se pueden ensuciar más
fácilmente si las cintas y la videocámara se
guardan en entornos polvorientos. Las cintas deben
extraerse de la videocámara y guardarse en sus
carcasas respectivas. Guarde la videocámara en
una bolsa o en algún otro contenedor.
Use el modo SP (Reproducción estándar) para
grabaciones de vídeo importantes.
El modo LP (Larga reproducción) le permite grabar
un 50% de vídeo más que el modo SP
(Reproducción estándar), pero es posible que se
observen perturbaciones en forma de mosaico
durante la reproducción, dependiendo de las
características de la cinta y de las condiciones de
uso.
De modo que para grabaciones importantes,
recomendamos usar el modo SP.
Se recomienda utilizar cintas de la marca JVC.
Su videocámara es compatible con todas las
marcas de cintas disponibles en el mercado y
homologadas conforme al estándar MiniDV, pero
las cintas de la marca JVC han sido diseñadas para
optimizar el funcionamiento de su videocámara.
Lea también “PRECAUCIONES” en las páginas
39 – 41.
Accesorios suministrados
1
O bien
2
4
1 Adaptador de CA AP-V14U o AP-V18U
2 Batería BN-VF707U
3 Cable de audio/vídeo (miniclavija de ø3,5
para clavija RCA)
4 Correa hombrera ( pg. 11 para el
acoplamiento)
5 Tapa del objetivo ( pg. 11 para el
acoplamiento)
● Para mantener un rendimiento óptimo de la
videocámara, los cables suministrados
pueden ser equipados con uno o más filtros de
núcleo. Si un cable tiene sólo un filtro de
núcleo, deberá conectarse a la videocámara el
extremo más cercano al filtro. Compruebe que
está usando los cables suministrados para las
conexiones. No use ningún otro cable.
3
5
Page 55

Cómo colocar la tapa del objetivo
Para proteger el objetivo,
coloque la tapa del objetivo
suministrada en la
videocámara, como se
muestra en la ilustración.
NOTA:
Para confirmar que la tapa del
objetivo está correctamente
colocada, compruebe que la
tapa está nivelada con la
vídeocámara.
PREPARATIVOS
ES 11
Alimentación
Esta videocámara posee un sistema de
alimentación de 2 vías que le permite
seleccionar la fuente de alimentación más
apropiada. No utilice los equipos de
alimentación eléctrica suministrados con otros
aparatos.
Carga de la batería
Montura de batería
PUSH
Batería
1
BATT.
PREPARATIVOS
Coloque aquí durante
lafilmación.
Cómo colocar la correa hombrera
Siga la ilustración.
1 Pase la correa a través del ojal.
2 Dóblela hacia atrás y pásela por la guía de la
correa y la hebilla.
● Para ajustar el largo de la correa, afloje y luego
apriete la correa en la hebilla.
3 Deslice la guía de la correa completamente
hacia el ojal.
Guía de la
correa
Ojal
1
Hebilla
2
2
3
Flecha
A conector de CC
A toma de CA
2
Interruptor de
alimentación
Adaptador de CA
Lámpara
POWER/
CHARGE
1 Ajuste el interruptor de alimentación en
“OFF”.
2 Con la flecha de la batería apuntando hacia
abajo, empuje la batería ligeramente contra la
montura de la misma 1.
3 Deslice hacia abajo la batería hasta que
encaje en su sitio 2.
4 Conecte el adaptador de CA a la
videocámara.
5 Enchufe el adaptador de CA a una toma de
CA. La lámpara POWER/CHARGE de la
videocámara parpadea para indicar que la
carga se ha iniciado.
6 Cuando la lámpara POWER/CHARGE se
apaga, la carga ha finalizado. Desenchufe el
adaptador de CA de la toma de CA. Desconecte
el adaptador de CA de la videocámara.
Page 56

12 ES
A
PREPARATIVOS
Para extraer la batería
Deslice hacia arriba la batería al tiempo que
presiona PUSH BATT. para soltarla.
Batería Tiempo de carga
BN-VF707U* Aprox. 1 h 30 min.
BN-VF714U Aprox. 2 hs, 40 min.
BN-VF733U Aprox. 5 hs, 40 min.
* Suministrada
NOTAS:
● Este producto incluye tecnología patentada y
otras tecnologías privadas, y sólo funciona
con batería de datos JVC. Utilice las baterías
recargables BN-VF707U/VF714U/VF733U JVC.
El uso de baterías genéricas que no sean JVC
puede ocasionar daños en el circuito de carga
interno.
● Si la batería tiene colocada la tapa protectora,
quítela primero.
● Durante la carga, la videocámara no se puede
utilizar.
● La carga no es posible si se utiliza una batería
equivocada.
● Cuando se carga la batería por primera vez o
después de un periodo de almacenamiento
prolongado, es posible que la lámpara POWER/
CHARGE no se encienda. En tal caso, retire la
batería de la videocámara e intente la carga de
nuevo.
● Si el tiempo de funcionamiento de la batería sigue
siendo demasiado corto después de una carga
completa, la batería está gastada y hay que
cambiarla. Deberá comprar una nueva.
● Dado que el adaptador de CA procesa la
electricidad internamente, se calienta con el uso.
Asegúrese de utilizarlo solamente en zonas bien
ventiladas.
● Por medio del cargador de batería AA-VF7
opcional, puede cargar la batería BN-VF707U/
VF714U/VF733U sin la videocámara.
● Cuando transcurran más de 5 minutos en el modo
de espera de grabación con el cassette insertado
y sin ningún tipo de operación, la videocámara se
apagará automáticamente desde el adaptador de
corriente alterna
indicador de
este caso, la carga de la batería comienza si la
batería es conectada a la videocámara.
(durante este lapso, el
“ PA U.” puede no aparecer). En
Uso de la batería
Siga los pasos 2 – 3 de “Carga de la batería”.
Tiempo máximo de grabación continua
Batería
BN-VF707U* 1 h 30 min. 1 h 40 min.
BN-VF714U 3 hs 3 hs 25 min.
BN-VF733U 7 hs 8 hs
* Suministrada
Monitor LCD
conectado
Visor
conectado
NOTAS:
● El tiempo de grabación se reduce
considerablemente en las siguientes condiciones:
● Uso repetido del modo Zoom o del modo de
espera de grabación.
● Uso repetido del monitor LCD.
● Uso repetido del modo de reproducción.
● Antes de un uso prolongado, se recomienda
preparar baterías suficientes para cubrir 3 veces
el tiempo de filmación previsto.
TENCIÓN:
Antes de desconectar la fuente de alimentación,
compruebe que la videocámara está apagada. De
lo contrario, se podría producir un fallo de
funcionamiento de la cámara.
Sistema de datos de batería
Se puede comprobar la energía restante de la
batería y el tiempo disponible para grabación.
1) Asegúrese de que la batería está conectada y
de que el interruptor de encendido está ajustado
en “OFF”.
2) Abra por completo el monitor LCD.
3) Presione DATA , y aparecerá la pantalla de
estado de la batería.
● Se mostrará durante aprox. 5 segundos si el
botón se presiona y se suelta rápidamente, y
durante aprox. 15 segundos si el botón se
presiona durante varios segundos.
● Si en lugar del estado de la batería aparece la
indicación “ERROR DE COMUNICACIÓN”
pese a haber presionado DATA varias veces,
es posible que la batería tenga algún
problema. En tal caso, consulte a su
distribuidor de JVC más cercano.
SIGUE EN PÁGINA SIGUIENTE
Page 57
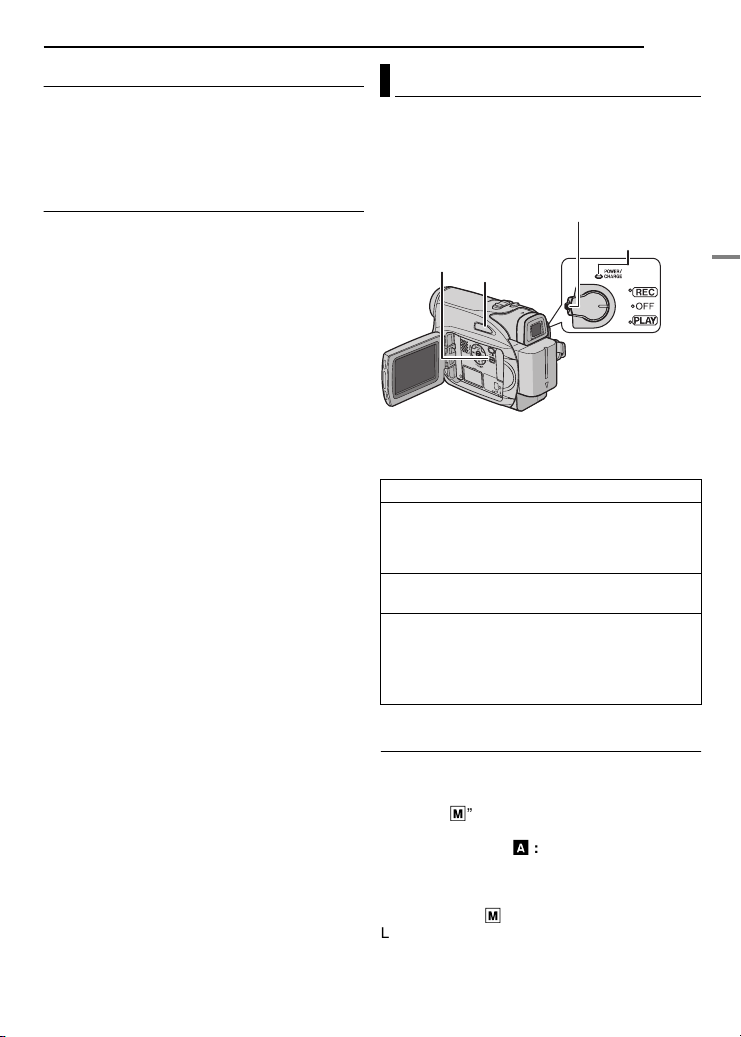
Uso con alimentación de CA
Siga el paso 4 de “Carga de la batería”.
NOTA:
El adaptador de CA suministrado tiene una función
de selección automática de tensión en la escala de
corriente alterna de 110 V a 240 V.
Sobre las baterías
¡PELIGRO! No intente desmontar las baterías ni
exponerlas a fuego o calor excesivo, pues
podría producirse un incendio o una explosión.
¡ADVERTENCIA! No permita que la batería ni
sus terminales entren en contacto con metales,
pues podría producirse un cortocircuito, con
peligro de incendio.
Para reanudar la función original de
indicación precisa de energía de la batería
Si la indicación de energía de la batería difiere
del tiempo de funcionamiento real, cargue
completamente la batería, y luego deje que se
agote. Sin embargo, esta función puede no
recuperarse si la batería se ha usado durante un
periodo prolongado de tiempo bajo condiciones
extremas de temperaturas altas o bajas, o si se
ha cargado demasiadas veces.
PREPARATIVOS
ES 13
Modo de funcionamiento
Para encender la videocámara, ajuste el
interruptor de alimentación en cualquier modo
de funcionamiento excepto “OFF”, a la vez que
mantiene presionado el botón de bloqueo
situado en el interruptor.
MENU
AUTO
Seleccione el modo de funcionamiento
adecuado según sus preferencias, mediante el
interruptor de alimentación.
Posición del interruptor de alimentación
REC:
● Le permite realizar la grabación en la cinta.
● Le permite ajustar diversas funciones de
grabación mediante los menús. ( p. 22)
OFF:
Le permite apagar la videocámara.
PLAY:
● Le permite reproducir una grabación en la
cinta.
● Le permite ajustar diversas funciones de
reproducción mediante los menús. ( p. 22)
Botón de
bloqueo
POWER/CHARGE
Lámpara
PREPARATIVOS
Modo manual/automático
Presione el botón AUTO repetidas veces para
cambiar al modo de grabación manual/
automático. Si selecciona el modo manual, el
indicador “M” aparecerá en el monitor LCD.
Modo automático A :
Usted puede grabar sin utilizar efectos
especiales o ajustes manuales.
Modo manual M :
La grabación manual es posible programando
varias funciones.
Page 58

14 ES
PREPARATIVOS
Operación relacionada con la alimentación
Cuando el interruptor de alimentación está
ajustado en “REC”, también puede encender y
apagar la videocámara abriendo y cerrando el
monitor LCD o desplegando y plegando el visor.
INFORMACIÓN:
Las explicaciones que vienen a continuación en
este manual presuponen el uso del monitor
LCD en sus operaciones. Si quiere usar el visor,
cierre el monitor LCD y despliegue
completamente el visor.
Configuración de idioma
Se puede cambiar el idioma de la pantalla.
( p. 22, 24)
1 Ajuste el interruptor de alimentación en
“REC” a la vez que mantiene presionado el
botón de bloqueo situado en el interruptor.
2 Abra por completo el monitor LCD. ( p. 18)
Ajuste el modo de grabación a M. ( p. 13)
3 Pulse MENU. Aparece la pantalla de menú.
4 Presione 3 o 4 para
seleccionar “DISPLAY”, y
presione SET o 2.
Aparecerá el menú en
DISPLAY.
5 Pulse 3 o 4 para
seleccionar
“LANGUAGE”, y pulse SET o 2.
6 Pulse 3 o 4 para
seleccionar el idioma
deseado, y pulse SET o 2.
7 Pulse MENU. Se cierra
la pantalla de menú.
NOTA:
Presione 1 cuando quiera volver a la pantalla de
menú anterior.
DISPLAY
BR I GH T
CLOCK A DJ .
LANGUAGE
DAT E / T I M E
ON SC RE E N
TIME CODE
DEMO MODE
DISPLAY
BR I GH T
CLOCK A DJ .
LANGUAGE ENGL ISH
DAT E / T I M E
ON SC RE E N
TIME CODE
DEMO MODE
FRANÇAIS
ESPAÑOL
PORTUGUÊS
Ajustes de fecha/hora
La fecha/hora se graba en la cinta en todo
momento, pero su visualización puede activarse
o desactivarse durante la reproducción.
( p. 22, 24)
1 Aplique los pasos 1 – 4 en “Configuración de
idioma” en la columna de la izquierda.
2 Pulse 3 o 4 para seleccionar
“AJUS.RELOJ”, y pulse SET o 2. El formato de
visualización de fecha es destacado.
3 Presione 3 o 4 para seleccionar el formato
de visualización de fecha deseado, luego
presione SET o 2. Seleccione de
“MONTH.DATE.YEAR”, “DATE.MONTH.YEAR”
ó “YEAR.MONTH.DATE”.
4 Presione 3 o 4 para seleccionar el formato
de visualización de tiempo, luego presione SET
ó 2. Seleccione “24h” ó “12h”.
5 Ajuste el año, mes, día, hora y minutos.
Presione 3 o 4 para seleccionar el valor, luego
presione SET o 2. Repita este paso hasta que
ingrese todos los ajustes.
NOTA:
Presione 1 para volver a la configuración anterior.
6 Pulse MENU. Se cierra
la pantalla de menú.
AJU S . RE LOJ
O
MNTH
JAN
CACIDNIIONESCÁMARA
DATE YEAR..
12006
..
0:00
24h
Ajuste de la empuñadura
1 Ajuste la correa de velcro.
● Antes de hacer el ajuste,
quite cualquier etiqueta
de seguridad que esté
adherida al velcro.
2 Pase su mano derecha
por el lazo y agarre la
empuñadura.
3 Adapte los dedos de la
mano a la empuñadura,
para manejar con facilidad
el botón de inicio/parada
de grabación, el interruptor de alimentación y la
palanca del zoom motorizado. Apriete la correa
de velcro según su preferencia.
Page 59

PREPARATIVOS
–1BRILLO
ES 15
Ajuste del visor
1 Ajuste el interruptor de alimentación en
“REC” a la vez que mantiene presionado el
botón de bloqueo situado en el interruptor.
2 Asegúrese de que el monitor LCD está
cerrado y bloqueado. Extraiga por completo el
visor y ajústelo manualmente para optimizar la
visibilidad.
3 Gire el control de ajuste de dioptría hasta que
las indicaciones del visor queden claramente
enfocadas.
Ejemplo:
Control de ajuste de dioptría
PRECAUCIÓN:
Al cerrar el visor, tenga cuidado de no pillarse los
dedos.
Ajuste de brillo de la pantalla
1 Ajuste el interruptor de
alimentación en “REC” o
en “PLAY” a la vez que
mantiene presionado el
botón de bloqueo situado
en el interruptor.
2 Abra por completo el
monitor LCD. ( p. 18)
● Para ajustar el brillo del
visor, ábralo
completamente y ajuste
“PRIORIDAD” en “VISOR”
( p. 22, 24).
MENU
3 Pulse MENU. Aparece
la pantalla de menú. Si la
unidad está en modo de reproducción, por favor
continúe al Paso 5.
4 Pulse 3 o 4 para seleccionar
“INDICACIONES CÁMARA”, y pulse SET o 2.
Aparecerá el menú en INDICACIONES
CÁMARA.
5 Pulse 3 o 4 para seleccionar “BRILLO”, y
pulse SET o 2. La pantalla de menú se cierra y
aparece indicador de control de brillo.
6 Pulse 3 o 4 hasta alcanzar el brillo
apropiado y pulse SET o 2.
7 Pulse MENU. Se cierra la pantalla de menú.
33
33
11
11
44
44
Soporte del trípode
Para montar la
videocámara sobre un
trípode, alinee el tornillo
y el perno de dirección al
zócalo de fijación y al
agujero para el perno de
la videocámara. Luego
apriete el tornillo en el
sentido de las agujas del
reloj.
● Algunos trípodes no vienen equipados con
pernos.
22
22
PREPARATIVOS
Page 60

16 ES
PREPARATIVOS
Carga/descarga de una cinta
La videocámara debe encenderse para colocar
o expulsar una cinta.
Portacintas
PUSH
Tapa del
portacintas
NOTAS:
● Si espera unos segundos y el portacintas no se
abre, cierre la tapa del portacintas e inténtelo de
nuevo. Si el portacintas sigue sin abrirse, apague
y vuelva a encender la videocámara.
● Si la cinta no se carga correctamente, abra por
completo la tapa del portacintas y extraiga la
cinta. Unos segundos más tarde, vuelva a
insertarla.
● Cuando la videocámara se traslade de forma
repentina de un lugar frío a un entorno más
cálido, espere un poco antes de abrir la tapa del
portacintas.
OPEN/EJECT
Asegúrese de que el lateralde
la ventana mira hacia afuera.
Lengüeta de
protección
contra
borrado
1 Deslice y mantenga presionado OPEN/
EJECT en la dirección de la flecha, y a
continuación abra la tapa del portacintas hasta
que se abra completamente. El portacintas se
abre automáticamente.
● No toque las piezas internas.
2 Inserte o extraiga una cinta y presione
“PUSH” para cerrar el portacintas.
● Asegúrese de presionar solamente en la sección
etiquetada “PUSH” para cerrar el portacintas; si
toca otras piezas, su dedo puede quedar
enganchado en el portacintas, con posible lesión
o daño del producto.
● Una vez cerrado el portacintas, retrocede
automáticamente. Espere a que retroceda por
completo antes de cerrar la tapa del portacintas.
● Cuando la carga de la batería esté baja, es
posible que no pueda cerrar la tapa del
portacintas. No haga fuerza. Cambie la batería
por una totalmente cargada o utilice la
alimentación de CA antes de continuar.
3 Cierre con fuerza la tapa del portacintas
hasta que encaje bien.
Para proteger grabaciones valiosas
Mueva la lengüeta de protección contra borrado,
situada en la parte trasera de la cinta, en la
dirección de “SAVE”. Esto impide volver a
grabar en la cinta. Para grabar en esta cinta,
vuelva a mover la lengüeta hasta “REC” antes
de cargarla.
Page 61

Grabación básica
NOTA:
Antes de continuar, aplique los siguientes
procedimientos:
● Alimentación ( p. 11)
● Carga de una cinta ( p. 16)
Palanca del zoom
Lámpara POWER/CHARGE
Botón de bloqueo
Botón de inicio/parada de
grabación
1 Extraiga la tapa del objetivo. ( p. 11)
2 Abra por completo el monitor LCD.
3 Ajuste el interruptor de alimentación en
“REC” a la vez que mantiene presionado el
botón de bloqueo situado en el interruptor.
÷ La lámpara POWER/CHARGE se enciende y la
videocámara entra en el modo de espera de
grabación. Aparece en pantalla
÷ Para grabar en modo LP (larga reproducción),
p. 23.
4 Para comenzar la grabación, pulse el botón
de inicio/parada de grabación. Aparece.
“ GRB” en la pantalla durante el transcurso de
la grabación.
5 Para detener la grabación, pulse de nuevo el
botón de inicio/parada de grabación. La
videocámara vuelve a entrar en el modo de
espera de grabación.
Tiempo de grabación aproximado
Cinta
30 min. 30 min. 45 min.
60 min. 60 min. 90 min.
80 min. 80 min. 120 min.
NOTAS:
÷ Cuando transcurran más de 5 minutos en el modo
de espera de grabación con el cassette insertado
y sin ningún tipo de operación, la videocámara se
apagará automáticamente (durante este lapso, el
indicador de (
volver a encender la videocámara, repliegue y
despliegue de nuevo el visor, o cierre y abra de
nuevo el monitor LCD.
“ PAU . ” puede no aparecer). Para
“ PAU . ”.
Modo de grabación
SP LP
GRABACIÓN DE VÍDEO
● Cuando se deja una parte en blanco entre
escenas grabadas de la cinta, el código de hora
se interrumpe y pueden producirse errores al
editar la cinta. Para evitar esto, consulte
“Grabación desde un punto intermedio de una
cinta” ( p. 19).
● Para apagar la melodía, p. 22, 24.
ES
17
Tiempo restante de cinta
Aparece en la pantalla el
tiempo restante de cinta
aproximado. “---min”
significa que la videocámara
está calculando el tiempo
restante. Cuando el tiempo restante llega a los
2 minutos, la indicación empieza a parpadear.
● El tiempo necesario para calcular y visualizar la
duración restante de cinta, así como la precisión
del cálculo, pueden variar según el tipo de cinta
utilizada.
GRABACIÓN Y REPRODUCCIÓN DE VÍDEO
Page 62

18 ES
GRABACIÓN DE VÍDEO
Monitor LCD y visor
Durante el uso del monitor LCD:
Asegúrese de que el visor está plegado. Tire del
extremo A del monitor LCD y abra el monitor
LCD completamente. Puede girar 270° (90°
hacia abajo, 180° hacia arriba).
180˚
90˚
Durante el uso del visor:
Asegúrese de que el monitor LCD está cerrado
y bloqueado. Extraiga por completo el visor.
NOTAS:
÷ La imagen no aparecerá simultáneamente en el
monitor LCD y el visor. Cuando se despliega el
visor mientras está abierto el monitor LCD, usted
puede seleccionar cuál de los dos desea usar.
Ajuste “PRIORIDAD”en el modo deseado en el
menú SISTEMA. ( p. 22, 24)
● Pueden aparecer puntos de color claro por todo el
monitor LCD o en el visor. No obstante, esto no es
un fallo de funcionamiento. ( p. 36)
Zoom
Producir el efecto de ampliación/reducción o un
cambio instantáneo en el porcentaje de la
imagen.
Ampliación
Deslice la palanca del zoom motorizado hacia la
“T”.
Reducción
Deslice la palanca del zoom motorizado hacia la
“W”.
● Cuanto más se desplaza la palanca del zoom
motorizado, más rápida es la acción del zoom.
Ampliación (T: Telefoto)
1
x
NOTAS:
÷ El enfoque puede ser inestable durante el uso del
zoom. En tal caso, ajuste el zoom cuando esté en
modo de espera de grabación, bloquee el
enfoque mediante el enfoque manual ( p. 27), y
luego utilice el zoom para ampliar o reducir en el
modo de grabación.
● Se puede utilizar el zoom hasta un máximo de
800X, o se puede recurrir a la ampliación de 28X
mediante el zoom óptico. ( p. 23)
● La ampliación mediante zoom de más de 28X se
realiza a través de procesamiento de imagen
digital y se denomina por tanto zoom digital.
● Durante el zoom digital, la calidad de la imagen
puede resultar afectada.
● La toma en Macro (acercándose hasta unos 5 cm
del sujeto) es posible cuando el palanca del zoom
motorizado está totalmente ajustado en “W”.
Véase también “TELE MACRO” en el menú
FUNCIÓN, en la página 23.
● Antes de filmar un sujeto cercano al objetivo,
desactive el zoom. Si se aplica el zoom en el
modo de enfoque automático, la videocámara
puede desactivar automáticamente el zoom,
según la distancia entre la videocámara y el
sujeto. Esto no sucederá si “TELE MACRO” está
ajustado en “ON”. ( p. 23)
10
x
20
x
40
x
Reducción (W: Gran angular)
10
x
Zona del zoom digital
Zona del zoom (óptico) de
28X
Relación aproximada del
zoom
Page 63

Filmación periodística
En determinadas
situaciones, unos
ángulos de filmación
distintos pueden
proporcionar unos
resultados más
atractivos. Mantenga la
videocámara en la
posición deseada e
incline el monitor LCD
en la dirección más
cómoda. Puede girar
270° (90° hacia abajo,
180° hacia arriba).
Código de tiempo
Durante la grabación, se graba un código de
tiempo en la cinta. Este código sirve para
confirmar la ubicación de la escena grabada en
la cinta durante la reproducción.
Pantalla
Minutos
Segundos
Fotogramas*
(30 fotogramas =
12:34:24
* Los fotogramas no se visualizan durante la
grabación.
Si la grabación comienza desde una parte en
blanco, el código de tiempo empieza a contar
desde “00:00:00” (minuto:segundo:fotograma).
Si la grabación comienza desde el final de una
escena grabada anteriormente, el código de
tiempo sigue desde el último número de código
de tiempo. Si durante la grabación se deja una
parte en blanco en un punto intermedio de la
cinta, el código de tiempo se interrumpe.
Cuando la grabación se reanuda, el código de
tiempo empieza a contar de nuevo desde
“00:00:00”. Esto significa que la videocámara
puede grabar los mismos códigos de tiempo de
una escena grabada anteriormente. Para
impedir esto, realice la operación de Grabación
desde un punto intermedio de una cinta
( p. 19) en los casos siguientes;
● Cuando vuelva a filmar después de reproducir
una cinta grabada.
● Cuando el aparato se apaga durante la filmación.
● Cuando se extrae una cinta y se reinserta durante
la filmación.
1 segundo)
GRABACIÓN DE VÍDEO
● Cuando se filme con una cinta parcialmente
grabada.
● Cuando se filma sobre una parte en blanco
situada en un punto intermedio de la cinta.
● Cuando se filma de nuevo después de filmar una
escena y luego abrir/cerrar la tapa del portacintas.
ES 19
NOTAS:
÷ El código de tiempo no puede reajustarse.
● Durante el avance rápido y el rebobinado, la
indicación del código de tiempo no se mueve
suavemente.
● El código de tiempo se muestra solamente
cuando “CÓD.TIEMPO” se ajusta en “ON”.
( p. 24)
Revisión rápida
Permite comprobar el final de la última
grabación.
1) Presione QUICK REVIEW durante el modo
de espera de grabación.
2) La cinta se rebobina durante unos segundos
y se reproduce automáticamente, y a
continuación se pausa en el modo de espera de
grabación para la siguiente toma.
÷ Pueden producirse distorsiones al comienzo de la
reproducción. Esto es normal.
Grabación desde un punto intermedio de una cinta
1) Reproduzca una cinta o utilice la búsqueda
de partes en blanco ( p. 20) para encontrar el
punto donde quiere iniciar la grabación, y luego
active el modo de reproducción de imagen fija.
( p. 20)
2) Ajuste el interruptor de alimentación en
“REC” a la vez que mantiene presionado el
botón de bloqueo situado en el interruptor, y
luego inicie la grabación.
GRABACIÓN Y REPRODUCCIÓN DE VÍDEO
Page 64
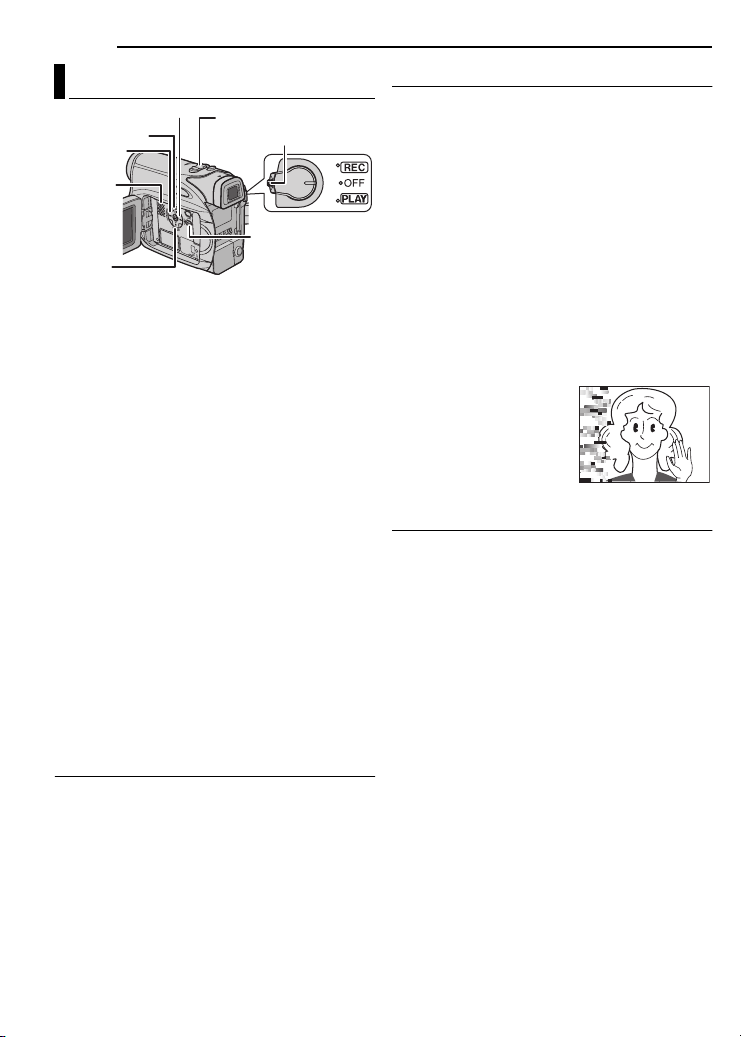
20 ES
A
REPRODUCCIÓN DE VÍDEO
Reproducción normal
¡¡
¡¡
VOL. +/–
66
66
11
11
Altavoz
7
1 Coloque una cinta. ( p. 16)
2 Ajuste el interruptor de alimentación en
“PLAY” a la vez que mantiene presionado el
botón de bloqueo situado en el interruptor.
3 Para iniciar la reproducción, pulse 6.
4 Para interrumpir la reproducción, pulse 7.
÷ Durante el modo de parada, pulse 1 para
rebobinar o ¡ para realizar el avance rápido de
la cinta.
Para controlar el volumen del altavoz
Deslice la palanca del zoom motorizado
(VOL. +/–) hacia “+” para subir el volumen, o
hacia “–” para bajarlo.
NOTAS:
÷ La imagen de reproducción puede verse en el
monitor LCD, el visor o un televisor conectado.
( p. 21)
● Si el modo de parada se mantiene durante
5 minutos cuando la alimentación se suministra
desde una batería, la videocámara se apaga
automáticamente. Para volverla a encender,
ajuste el interruptor de alimentación en “OFF”, y
luego en “PLAY”.
● Cuando hay un cable conectado al conector AV, el
altavoz no emite sonido.
Reproducción de imagen fija
Se hace pausa durante la reproducción de
vídeo.
1) Pulse 6 durante la reproducción.
2) Para reanudar la reproducción normal, pulse
de nuevo 6.
÷ Si la reproducción de imagen fija se mantiene
durante más de unos 3 minutos, el modo de
parada de la videocámara se activa
automáticamente.
Botón de bloqueo
MENU
Búsqueda rápida
Permite la búsqueda de alta velocidad en
cualquier dirección durante la reproducción de
vídeo.
1) Durante la reproducción, pulse ¡ para
búsqueda hacia adelante, o 1 para búsqueda
hacia atrás.
2) Para reanudar la reproducción normal, pulse
6.
÷ Durante la reproducción, pulse y mantenga
pulsado ¡ o 1. La búsqueda continúa
mientras se mantenga presionado el botón. Al
soltar el botón, se reanuda la reproducción
normal.
÷ Durante la búsqueda rápida aparece en pantalla
un ligero efecto de mosaico. Esto no es un fallo de
funcionamiento.
TENCIÓN:
Durante la búsqueda rápida,
partes de la imagen pueden
no ser claramente visibles,
especialmente en el lado
izquierdo de la pantalla.
Búsqueda de partes en blanco
Le ayuda a encontrar el punto donde iniciar la
grabación en medio de una cinta para evitar la
interrupción del código de tiempo. ( p. 19)
1 Coloque una cinta. ( p. 16)
2 Ajuste el interruptor de alimentación en
“PLAY” a la vez que mantiene presionado el
botón de bloqueo situado en el interruptor.
3 Pulse BLANK.
÷ La indicación “BÚS.BLANCO” aparece y la
videocámara inicia automáticamente la búsqueda
hacia atrás o hacia adelante, y luego se detiene
en el punto situado en unos 3 segundos de la
cinta antes del inicio de la parte en blanco
detectada.
÷ Para cancelar la búsqueda de partes en blanco,
pulse 7 o
NOTAS:
÷ Antes de iniciar la búsqueda de partes en blanco,
si la posición actual está en una parte en blanco,
la videocámara busca en la dirección de
retroceso. Si la posición actual está en una parte
grabada, la videocámara busca en la dirección de
avance.
● Si se llega al comienzo o al final de la cinta
durante la búsqueda de partes en blanco, la
videocámara se detiene automáticamente.
BLANK.
Page 65

● Una parte en blanco inferior a 5 segundos de
cinta puede no ser detectada.
● La parte en blanco detectada puede estar situada
entre escenas grabadas. Antes de iniciar la
grabación, compruebe que no hay ninguna
escena grabada después de la parte en blanco.
Reproducción de foto
Esta videocámara le permite tomar fotos
durante la video reproducción.
Presione SNAPSHOT.
Conexiones a un televisor o una grabadora de vídeo
A conector AV
Cable de audio/
(suministrado)
1Amarillo a VIDEO IN (Se conecta cuando su
2Rojo a AUDIO R IN*
3Blanco a AUDIO L IN*
* No es necesario para ver solamente imágenes
fijas.
vídeo
TV
Grabadora de
vídeo
TV/grabadora de vídeo sólo tiene conectores
de entrada A/V.)
REPRODUCCIÓN DE VÍDEO
ES 21
1 Compruebe que todos los equipos están
apagados.
2 Conecte la videocámara a un TV o una
grabadora de vídeo tal como se muestra en la
ilustración.
Si utiliza una grabadora de vídeo, vaya al
paso 3.
De lo contrario, vaya al paso 4.
3 Conecte la salida de la grabadora de vídeo a
la entrada TV, siguiendo el manual de
instrucciones de su grabadora de vídeo.
4 Encienda la videocámara, la grabadora de
vídeo y el televisor.
5 Ajuste la grabadora de vídeo en su modo de
entrada AUX, y ajuste el televisor en su modo
VIDEO.
6 Inicie la reproducción en la videocámara.
( p. 20)
Para decidir si las siguientes indicaciones
aparecen o no en el televisor conectado
● Fecha/hora
Ajuste “FECHA/HORA” en “ON” o “OFF”.
( p. 22, 25)
● Código de tiempo
Ajuste “CÓD.TIEMPO” en “ON” o “OFF”.
( p. 22, 25)
● Otras indicaciones aparte de la fecha y la hora y
del código de tiempo
Ajuste “EN PANT.” en “OFF”, “LCD” o “LCD/TV”.
( p. 22, 25)
NOTAS:
÷÷÷÷Se recomienda utilizar el adaptador de CA
como fuente de alimentación en lugar de la
batería. ( p. 13)
● Para controlar la imagen y el sonido de la
videocámara sin insertar una cinta, ajuste el
interruptor de alimentación de la videocámara en
“REC”, y a continuación ajuste su televisor en el
modo de entrada adecuado.
● Asegúrese de ajustar el volumen de sonido del
televisor en su nivel mínimo para evitar un
estallido repentino de sonido al encender la
videocámara.
GRABACIÓN Y REPRODUCCIÓN DE VÍDEO
Page 66

22 ES
Submenú
MENÚS PARA UN AJUSTE DETALLADO
Cambiar las configuraciones de
menú
Esta videocámara está equipada con un
sistema de menús de información en pantalla,
fácil de usar, que simplifica muchas de las
configuraciones más detalladas de la
videocámara. ( p. 22 – 25)
MENU
1 Para los menús de grabación de vídeo:
● Ajuste el interruptor de alimentación en “REC” a
la vez que mantiene presionado el botón de
bloqueo situado en el interruptor.
● Ajuste el modo de grabación a “M”.
Para los menús de reproducción de vídeo:
Ajuste el interruptor de alimentación en “PLAY”
a la vez que mantiene presionado el botón de
bloqueo situado en el interruptor.
2 Abra por completo el monitor LCD. ( p. 18)
3 Pulse MENU. Aparece la pantalla de menú.
4 Pulse 3 o 4 para seleccionar la función
deseada, y pulse SET o 2.
Pantalla para menú de
grabación de vídeo
FUNC IÓN
RAC I ÓN
CONFI GU
SISTEM
INDICACAIONES
CÁMARA
5 El siguiente procedimiento de ajuste
depende de la función seleccionada.
NOTAS:
● Presione 1 cuando quiera volver a la pantalla
de menú anterior.
● No puede entrar en la pantalla de menú durante
la grabación.
Botón de bloqueo
44
44
33
33
SET
Pantalla para menú de
reproducción de vídeo
MOD G RA
B.
MODOOUD I O
NARRA CAI ÓN
BR I L LO
FE HC/AHO.R
EN P NATT
CÓD. IEMP
A
O
( p. 13)
Menús de grabación de video.
FUNCIÓN ( p. 23)
CONFIGURACIÓN
( p. 23)
SYSTEMA ( p. 24)
INDICACIONES
CÁMARA ( p. 24)
1) Pulse 3 o 4 para
elegir la selección
deseada y pulse SET o
2. Aparece el submenú.
● Ejemplo: Menú FUNCIÓN
2) Pulse 3 o 4 para seleccionar el parámetro
deseado y pulse SET o 2. La selección está
completa.
● Repita el procedimiento si desea ajustar otros
menús de función.
● El indicador “3” muestra la configuración que está
guardada en estos momentos en la memoria de
la videocámara.
3) Pulse MENU. Se cierra la pantalla de menú.
Parámetro seleccionado
FUNCIÓN
A
Ó
O
3
OFF
BLANC
NEGRO
HORI ZOONTALAL
VER T I C
Indicador
CORT . / FUN
EFECTO
PROGRAM
OBTU R .
EXPOSI C I
BAL . BLA NC
TELE MACRO
Menús de reproducción de video
MODO GRAB. ( p. 25)
MODO AUDIO ( p. 25)
NARRACIÓN ( p. 25)
BRILLO ( p. 25)
FECHA/HORA ( p. 25)
EN PANT. ( p. 25)
CÓD.TIEMPO ( p. 25)
1) Aparece el submenú.
● Ejemplo: Menú MODO
GRAB.
Pulse 3 o 4 para
seleccionar el
parámetro deseado, y
presione SET o 2. La
selección está
MOD GRA
MODOOUD I O
NARRACAI ÓN
BRI LLO
FE HC/AHO.R
EN P NATT
CÓD. IEMP
completa.
● Repita el procedimiento
si desea ajustar otros menús de función.
● El indicador “3” muestra la configuración que está
guardada en estos momentos en la memoria de
la videocámara.
2) Pulse MENU. Se cierra la pantalla de menú.
.B
A
O
Page 67

Menús de grabación
FUNCIÓN
Los ajustes del menú pueden ser cambiados
sólo cuando el interruptor de alimentación es
puesto en “REC”.
[ ]
= Preajuste de fábrica
CORT./FUND.
p. 30), “Efectos de reemplazo (cortinilla) o
(
fundido de imagen”
EFECTO
p. 31), “Programa AE, efectos y efectos de
(
obturación”
PROGRAMA AE
p. 31), “Programa AE, efectos y efectos de
(
obturación”
OBTUR.
(
p. 31), “Programa AE, efectos y efectos de
obturación”
EXPOSICIÓN
p. 27), “Control de exposición”
(
BAL. BLANCO
(
p. 29), “Ajuste del balance del blanco”
TELE MACRO
[OFF]
: Desactive esta función.
ON
: Cuando la distancia al motivo sea inferior a
1 m, ajuste “TELE MACRO” en “ON”. Se puede
filmar un motivo de máximo tamaño a una
distancia de aproximadamente 40 cm.
Según la posición del zoom, el objetivo se puede
desenfocar.
CONFIGURACIÓN
Los ajustes del menú pueden ser cambiados
sólo cuando el interruptor de alimentación es
puesto en “REC”.
[ ]
= Preajuste de fábrica
MODO GRAB.
[SP]
*: Para grabar en el modo SP
(Reproducción estándar)
LP
: Larga reproducción—más económica,
aumenta 1,5 veces el tiempo de grabación.
MENÚS PARA UN AJUSTE DETALLADO
NOTAS:
●
Si se conmuta el modo de grabación, la imagen
que se está reproduciendo se volverá borrosa en
el punto de conmutación.
●
Se recomienda reproducir con esta videocámara
las cintas grabadas en modo LP con esta
videocámara.
●
Durante la reproducción de una cinta grabada con
otra videocámara, pueden producirse bloques de
ruido o pausas momentáneas en el sonido.
MODO AUDIO
[12BITS]
sonido estéreo en cuatro canales separados.
(Equivalente al modo de 32 kHz en modelos
anteriores)
16BITS
sonido estereofónico en dos canales distintos.
(Equivalente al modo de 48 kHz en modelos
anteriores)
OFF
[ON ]
inestables ocasionadas por sacudidas de la
cámara, especialmente en casos de gran
amplificación.
NOTAS:
●
●
Desactive este modo cuando vaya a grabar con
la videocámara montada sobre un trípode.
[28X]
del zoom digital, la ampliación mediante zoom
se reajustará en 28X, pues el zoom digital se
desactivará.
56X
Mediante procesamiento digital y ampliación de
las imágenes, la función de zoom es posible
desde 28X (el límite del zoom óptico), hasta un
máximo de ampliación digital de 56X.
800X
Mediante procesamiento digital y ampliación de
las imágenes, la función de zoom es posible
desde 28X
máximo de ampliación digital de 800X.
: Permite la grabación en video de
: Permite la grabación de vídeo de
DIS
: Desactive esta función.
: Para compensar las imágenes
Puede resultar imposible efectuar una
estabilización precisa si el temblor de la mano es
excesivo, o las condiciones de filmación no lo
permiten.
El indicador “ ” parpadea o se apaga si no se
puede utilizar el estabilizador.
ZOOM
: Cuando se ajusta en “28X” durante el uso
: Le permite utilizar el zoom digital.
: Le permite utilizar el zoom digital.
(el límite del zoom óptico), hasta un
ES
23
FUNCIONES AVANZADAS
* El indicador SP no aparece en la pantalla.
Page 68
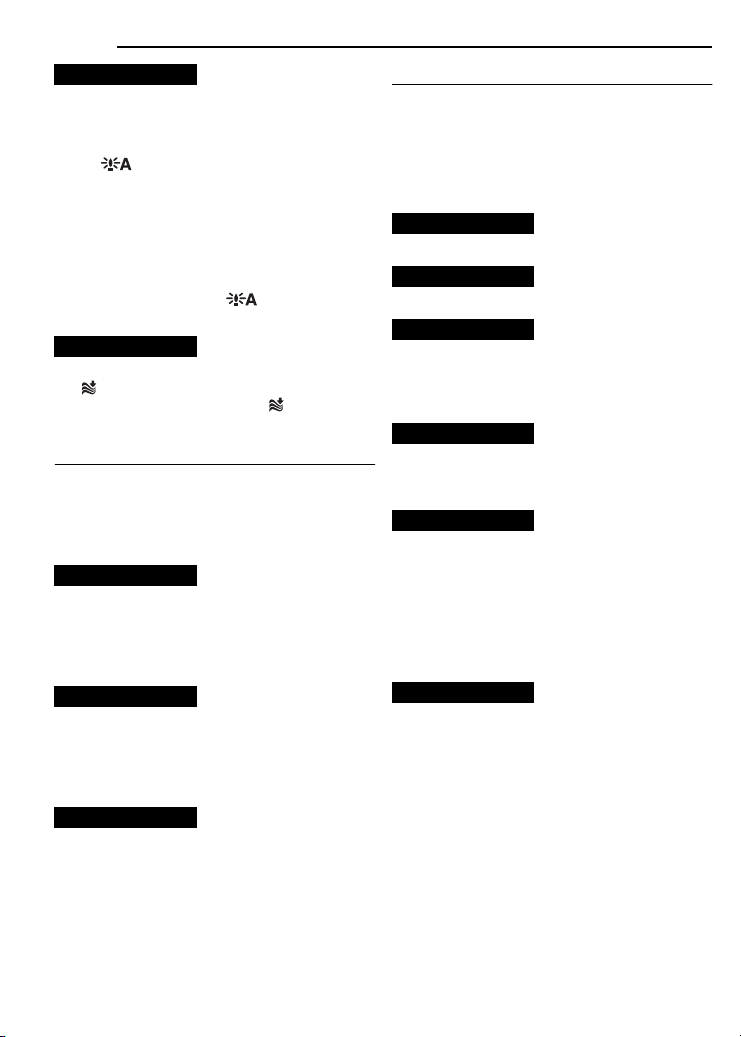
24 ES
OFF: Permite filmar escenas oscuras sin ajuste
de brillo de imagen.
[AGC]: El aspecto general puede ser granulado,
pero la imagen es clara.
AUTO : La velocidad de obturación se
ajusta automáticamente. Filmar un sujeto con
poca o insuficiente iluminación y con una
velocidad lenta de obturación produce una
imagen más clara que en el modo AGC, pero los
movimientos del sujeto no son suaves ni
naturales. El aspecto general puede ser
granulado. Durante el ajuste automático de la
velocidad de obturación, “ ” aparece en
pantalla.
[OFF]: Desactiva la función.
ON : Ayuda a reducir el ruido ocasionado por
el viento. Aparece la indicación “ ”. La calidad
del sonido cambiará. Esto es normal.
MENÚS PARA UN AJUSTE DETALLADO
GANANCIA
SIN VIENTO
SYSTEMA
Las funciones “SISTEMA” ajustadas cuando el
interruptor de alimentación está ajustado en
“REC” se aplican también cuando el interruptor
de alimentación se ajusta en “PLAY”.
[ ] = Preajuste de fábrica
MELODÍA
OFF: Incluso aunque no oiga mientras filma, el
sonido de obturador es registrado en la cinta.
[ON]: Cuando se realiza cualquier operación
suena una melodía. También activa el efecto de
sonido del obturador. ( p. 26)
REAJUSTAR
EJECUTAR: Reajusta todas las configuraciones
en los valores preajustados en fábrica.
[VOLVER]: No reajusta todas las
configuraciones en los valores preajustados en
fábrica.
PRIORIDAD
[LCD]: La imagen aparece en el monitor LCD
cuando el visor se despliega mientras el monitor
LCD está abierto.
VISOR: La imagen aparece en el visor cuando
éste se despliega mientras el monitor LCD está
abierto.
INDICACIONES CÁMARA
● Los ajustes del menú pueden ser cambiados
sólo cuando el interruptor de alimentación es
puesto en
● La configuración de INDICACIONES CÁMARA
excepto “BRILLO” i “LANGUAGE” son solamente
efectivas durante la grabación.
[ ] = Preajuste de fábrica
BRILLO
p. 15, “Ajuste de brillo de la pantalla”
AJUS. RELOJ
p. 14, “Ajustes de fecha/hora”
LANGUAGE
[ENGLISH] / FRANÇAIS
ESPAÑOL / PORTUGUÊS
Se puede cambiar la configuración de idioma.
( p. 14)
FECHA/HORA
[OFF]: Los datos de fecha/hora no aparecen.
ON: Los datos de fecha/hora se muestran
permanentemente.
EN PANT.
LCD: Impide que los datos de visualización de
la videocámara (excepto fecha, hora y código de
tiempo) aparezcan en la pantalla del televisor
conectado.
[LCD/TV]: Hace que los datos de visualización
de la videocámara aparezcan en la pantalla
cuando la videocámara está conectada a un
televisor.
CÓD.TIEMPO
[OFF]: El código de tiempo no se visualiza.
ON: El código de tiempo se visualiza en la
videocámara y en el televisor conectado. Los
números de fotogramas no se visualizan
durante la grabación. ( p. 19)
“REC”.
Page 69

MODO DEMO
OFF: No se realizará la demostración
automática.
[ON]: Hace una demostración de funciones
como el programa AE con efectos especiales y
de obturación, etc., y se puede usar para
confirmar cómo funcionan. La demostración se
inicia en los casos siguientes:
● Cuando el menú de pantalla se cierra después de
haber ajustado “MODO DEMO” en “ON”.
● Con “MODO DEMO” ajustado en “ON”, el aparato
no funciona durante unos 3 minutos después de
haberse ajustado el interruptor de alimentación
en “REC”.
● La realización de cualquier operación durante la
demostración interrumpe temporalmente la
demostración. Si no se realiza ninguna operación
durante más de 3 minutos después de eso, la
demostración se reanudará.
NOTAS:
● Si hay una cinta en la videocámara, la
demostración no podrá activarse.
● “MODO DEMO” se mantiene en “ON” incluso si la
videocámara se apaga.
● Si “MODO DEMO” sigue ajustado en “ON”,
algunas funciones no estarán disponibles.
Después de ver la demostración, ajuste en “OFF”.
Menús de reproducción
[ ] = Preajuste de fábrica
MODO AUDIO y NARRACIÓN
Durante la reproducción de la cinta, la
videocámara detecta el modo de sonido en que
se realizó la grabación y reproduce dicho
sonido. Seleccione el tipo de sonido con el que
desea acompañar su imagen de reproducción.
Según la explicación de acceso al menú, en
página 22, seleccione “MODO AUDIO” o
“NARRACIÓN” en la pantalla de menú y ajuste
el parámetro deseado.
Los ajustes de abajo son efectivos sólo para la
video reproducción excepto “BRILLO”.
Los parámetros (excepto los ajustes de “OFF” en
EN PANT., MODO AUDIO y NARRACIÓN son los
mismos que los descriptos en la página 23, 24.
MENÚS PARA UN AJUSTE DETALLADO
MODO GRAB. [SP]* / LP
Permite ajustar el modo de grabación de video
(SP o LP) según su preferencia. Se recomienda
utilizar “MODO GRAB.” en el menú de
reproducción cuando se utilice esta
videocámara como grabadora durante la copia.
( p. 32, 33)
*El indicador SP no aparece en la pantalla.
MODO AUDIO
[STEREO ]: El sonido sale en estereofónico
por los canales izquierdo y derecho (“L” y “R”).
SOUND L : El sonido sale por el canal
izquierdo “L”.
SOUND R : El sonido sale por el canal
derecho “R”.
NARRACIÓN
A pesar de que no es posible hacer doblaje con
esta videocámara, puede oir el sonido con una
cinta doblada en audio durante la reproducción
utilizando esta función.
[OFF]: El sonido original sale en estereofónico
por los canales izquierdo y derecho (“L” y “R”).
ON: El sonido de la copia sale en estereofónico
por los canales izquierdo y derecho (“L” y “R”).
MIX: Los sonidos original y de la copia se
combinan y salen por los canales izquierdo y
derecho (“L” y “R”).
BRILLO
p. 15, “Ajuste de brillo de la pantalla”
FECHA/HORA
[OFF]: Los datos de fecha/hora no aparecen.
ON: Los datos de fecha/hora se muestran
permanentemente.
EN PANT. OFF / [LCD] / LCD/TV
Cuando está ajustada en “OFF”, los datos de
visualización de la videocámara están apagada.
CÓD.TIEMPO [OFF] / ON
p. 19, “Código de tiempo”
ES 25
FUNCIONES AVANZADAS
Page 70
26 ES
FUNCIONES DE GRABACIÓN
Modo ancho
Esta videocámara le permite elegir el tipo de el
tipo de formato de salida de imagen para la
grabación.
1 Ajuste el interruptor de alimentación en
“REC”.
2 Pulse el botón 16:9 repetidas veces para
elegir su selección.
4:3 16:9
[4:3]: Graba sin modificar la relación de
pantalla. Para reproducción en un televisor con
una relación de pantalla normal. Usando este
modo por una TV con una proporción de
pantalla normal, refiérase al manual de
instrucciones de su TV.
16:9: Para reproducción en televisores con
una relación de aspecto de 16:9. Expande la
imagen de forma natural para que se adapte a la
pantalla sin distorsión. Aparece el indicador
Cuando utilice este modo, consulte el manual de
instrucciones de su televisor de pantalla ancha.
Durante la reproducción/grabación en
televisores de 4:3/monitor LCD/visor, la imagen
se alarga verticalmente.
[ ] = Preajuste de fábrica
Filmación nocturna
Proporciona a sujetos o zonas oscuras mayor
claridad incluso de la que tendrían en
condiciones de buena iluminación natural.
Aunque la imagen grabada no sale granulosa,
puede parecer estroboscópica debido a la lenta
velocidad de obturación.
1 Ajuste el interruptor de alimentación en
“REC”.
2 Ajuste el modo de grabación a “
3 Pulse NIGHT de modo que aparezca el
indicador de filmación nocturna “ ”.
● La velocidad de obturación se ajusta
automáticamente para proporcionar una
sensibilidad hasta 30 veces superior.
● “ ” aparece junto a “ ” durante el ajuste
automático de la velocidad de obturación.
Para desactivar la filmación nocturna
Pulse otra vez NIGHT para que desaparezca el
indicador de filmación nocturna.
M
”. ( p. 13)
NOTAS:
● “GANANCIA” o “DIS” no pueden ser activados en
el menú de CONFIGURACIÓN durante la
filmación nocturna ( p. 23).
● “NIEVE” y “DEPORTE” del “PROGRAMA AE”, o
todos los modos de “OBTUR.” no pueden ser
activados simultáneamente, en la filmación
nocturna. ( p. 31)
● Durante la filmación nocturna, puede resultar
difícil enfocar la videocámara. Para evitarlo, se
recomienda utilizar un trípode.
Fotografiado (Imagen grabada en
la cinta)
Esta función le permite grabar en una cinta
imágenes fijas como fotografías.
1 Ajuste el interruptor de alimentación en
“REC”.
2 Pulse SNAPSHOT.
● Se produce el efecto de sonido de cierre de un
obturador.
● Aparece la indicación “
durante unos 5 segundos una imagen fija, y a
continuación la videocámara vuelve al modo de
espera de grabación.
● Puede ejecutar el fotografiado también durante la
grabación. Se graba una imagen fija durante unos
5 segundos y luego se reanuda la grabación
normal.
● No puede ejecutar el modo fotografiado cuando el
modo ancho 16:9 (
seleccionado.
Modo motorizado
Mantener SNAPSHOT pulsado en el paso 2
proporciona un efecto similar al de la fotografía
en serie. (Intervalo entre imágenes fijas: aprox.
1 segundo)
PHOTO
indicador 16:9) es
( p. 26)
” y se grabará
Page 71
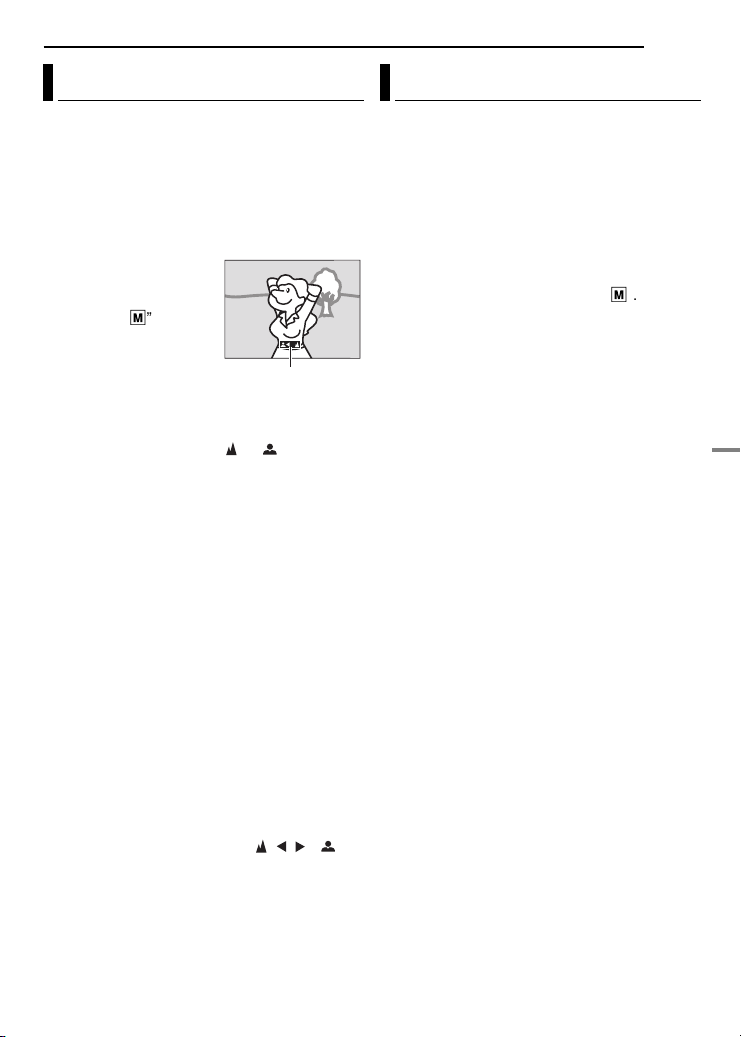
FUNCIONES DE GRABACIÓN
ES 27
Enfoque manual
El sistema de enfoque automático de gama
completa de la vídeocámara permite filmar de
forma continuada en distancias desde primer
plano (a unos 5 cm del sujeto) hasta infinito.
No obstante, puede resultar imposible enfocar
correctamente dependiendo de las condiciones
de filmación. En tal caso, utilice el modo de
enfoque manual.
1 Ajuste el interruptor de
alimentación en “REC”.
2 Ajuste el modo de
grabación a “M”.
3 Pulse FOCUS. Aparece
el indicador de enfoque
manual.
4 Pulse 2 o 1 para
enfocar un motivo.
● Cuando el nivel de enfoque no se pueda ajustar
en más lejos o más cerca, “” o “” parpadeará.
5 Pulse SET. El ajuste de enfoque ha
terminado.
Para reajustar en enfoque automático
Pulse FOCUS dos veces.
Se recomienda el enfoque manual en las
situaciones enumeradas a continuación.
● Cuando se superponen dos sujetos en una
misma escena.
● Cuando la iluminación es insuficiente.*
● Cuando el sujeto no tiene contraste
(diferenciaentre claridad y oscuridad), por
ejemplo una pared plana y monocroma o un cielo
azul despejado.*
● Cuando un objeto oscuro apenas se puede ver en
el monitor LCD o el visor.*
● Cuando la escena contiene detalles mínimos o
idénticos que se repiten con frecuencia.
● Cuando la escena resulta afectada por la luz solar
o la luz reflejada en una superficie de agua.
● Cuando se toma una escena con un fondo muy
contrastado.
* Aparecen parpadeando las siguientes
advertencias de bajo contraste: , , y .
( p. 13)
Indicador de
enfoque manual
Control de exposición
Se recomienda el control de exposición manual
en las siguientes situaciones:
● Cuando se filme con iluminación trasera o cuando
el fondo sea demasiado claro.
● Cuando se filme sobre un fondo natural
reflectante, por ejemplo en la playa o esquiando.
● Cuando el fondo sea muy oscuro o el sujeto muy
claro.
1 Ajuste el interruptor de alimentación en
“REC”.
2 Ajuste el modo de grabación a “
3 Ajuste “EXPOSICIÓN” a “MANUAL” en menú
FUNCIÓN. ( p. 22)
● Aparece el menú de control de exposición.
4 Para aclarar la imagen, pulse 3. Para
oscurecer la imagen, pulse 4. (máximo ±6)
● La exposición +3 tiene el mismo efecto que la
compensación de contraluz. ( p. 28)
● La exposición –3 tiene el mismo efecto que
cuando “PROGRAMA AE” está ajustado en
“FOCO”. ( p. 31)
5 Pulse SET o 2. El ajuste de exposición ha
terminado.
Para volver al control automático de
exposición
Seleccione “AUTO” en el paso 3.
NOTAS:
● No puede utilizar el control de exposición manual
al mismo tiempo que “PROGRAMA AE” está
ajustado en “FOCO” o “NIEVE” ( p. 31), ni con
la compensación de contraluz.
● Si el ajuste no produce ningún cambio visible en
el brillo, ajuste “GANANCIA” en “AUTO”.
( p. 22, 24)
M
”. ( p. 13)
FUNCIONES AVANZADAS
Page 72

28 ES
FUNCIONES DE GRABACIÓN
Bloqueo del diafragma Compensación de contraluz
Al igual que la pupila del ojo humano, el
diafragma se contrae en entornos bien
iluminados para impedir la entrada de luz
excesiva, y se dilata en entornos poco
iluminados para permitir la entrada de más luz.
Utilice esta función en las situaciones
siguientes:
● Cuando filme un sujeto en movimiento.
● Cuando cambie la distancia con respecto al
sujeto (de modo que cambia su tamaño en el
monitor LCD o en el visor), por ejemplo cuando el
sujeto retrocede.
● Cuando se filme sobre un fondo natural
reflectante, por ejemplo en la playa o esquiando.
● Cuando filme objetos bajo un foco de luz.
● Cuando utilice el zoom.
1 Ajuste el interruptor de alimentación en
“REC”.
2 Ajuste el modo de grabación a “
M
”. ( p. 13)
3 Ajuste “EXPOSICIÓN” a “MANUAL” en menú
FUNCIÓN. ( p. 22)
● Aparece el menú de control de exposición.
4 Ajuste el zoom de modo que el sujeto llene el
monitor LCD o el visor, y luego pulse y
mantenga pulsado SET durante más de 2
segundos. Aparece la indicación “”.
5 Pulse SET o 2. El diafragma es bloqueado.
6 Pulse MENU. Se cierra la pantalla de menú.
Aparece la indicación “”.
Para volver al control automático del
diafragma
Seleccione“AUTO” en el paso 3.
● El indicador de control de exposición y “”
desaparecen.
Para bloquear el control de exposición y el
diafragma
Después del paso 3, ajuste la exposición
pulsando 3 o 4. Luego, bloque el diafragma en
en pasos 4 – 6. Para bloqueo automático,
seleccione “AUTO” en el paso 3. El control de la
exposición y el iris se realiza automáticamente.
La compensación de contraluz proporciona
rápidamente más claridad al sujeto.
En la operación simple, la función de
compensación de contraluz abrillanta la porción
oscurecida del motivo incrementando la
exposición.
1 Ajuste el interruptor de alimentación en
“REC”.
2 Ajuste el modo de grabación a “
3 Pulse BACKLIGHT para que aparezca el
indicador de compensación de contraluz “”.
Para cancelar la compensación de contraluz
Pulse BACKLIGHT dos veces para que
desaparezca el indicador “”.
NOTA:
El uso de la compensación de contraluz puede
hacer que la luz alrededor del sujeto resulte
demasiado clara de modo que el sujeto aparece
blanco.
M
”. ( p. 13)
Page 73
FUNCIONES DE GRABACIÓN
Control de exposición puntual Ajuste del balance del blanco
La selección de una zona de fotometría puntual
permite una compensación de exposición más
precisa. Puede seleccionar una de las tres
zonas de fotometría en el monitor LCD/visor.
1 Ajuste el interruptor de alimentación en
“REC”.
2 Ajuste el modo de grabación a “
M
”. ( p. 13)
3 Pulse BACKLIGHT dos veces para que
aparezca el indicador de control de exposición
puntual “”.
÷ Aparece un cuadro de zona de fotometría
puntual en el centro del monitor LCD/visor.
4 Pulse 2 o 1 para seleccionar el cuadro de
zona de fotometría puntual deseado.
5 Pulse SET.
÷ El control de exposición puntual está
habilitada.
÷ La exposición se ajusta para optimizar el brillo
de la zona seleccionada.
Para fijar el iris
Después del paso 4, pulse y mantenga pulsado
SET durante más de 2 segundos. Aparece la
indicación “” y el iris queda fijado.
Para cancelar el control de exposición
puntual
Pulse BACKLIGHT una vez para que
desaparezca el indicador “”.
NOTAS:
● No se puede usar el control de exposición puntual
al mismo tiempo que las siguientes funciones.
● “ 16:9” en “MODO ANCHO” ( p. 26)
● “ESTROBOSC.” en “EFECTO” ( p. 31)
● Zoom digital ( p. 18)
● Dependiendo de la ubicación y las condiciones de
la filmación, no siempre es posible obtener
resultados óptimos.
El balance del blanco se refiere a la correcta
reproducción de colores con distintas
iluminaciones. Si el balance del blanco es
correcto, todos los demás colores se
reproducirán con precisión.
El balance del blanco suele ajustarse
automáticamente. No obstante, los usuarios de
videocámaras más avanzados controlan esta
función manualmente para lograr una
reproducción de color/tono más profesional.
Para cambiar el ajuste
Ajuste “BAL.BLANCO” en menú FUNCIÓN.
( p. 23)
● Aparece el indicador del modo seleccionado
excepto “AUTO”.
[AUTO]: El balance del blanco se ajusta
automáticamente.
BAL.B MAN. : Ajuste manualmente el
balance del blanco cuando filme bajo distintos
tipos de iluminación. ( p. 30, “Ajuste manual
del balance del blanco”)
SOLEADO : Al aire libre en un día soleado.
NUBLADO : Al aire libre en un día nublado.
[ ] = Preajuste de fábrica
Para volver al balance automático del blanco
Ajuste “BAL.BLANCO” en “AUTO”. ( p. 23)
ES 29
FUNCIONES AVANZADAS
Page 74

30 ES
FUNCIONES DE GRABACIÓN
Ajuste manual del balance del blanco
Ajuste manualmente el
balance del blanco
cuando filme bajo
distintos tipos de
iluminación.
1 Ajuste el interruptor
de alimentación en
“REC”.
2 Ajuste el modo de grabación a “
3 Coloque una hoja de papel blanco normal
frente al sujeto. Ajuste el zoom o colóquese
usted de modo que el papel blanco llene la
pantalla.
4 Seleccione menu FUNCIÓN. ( p. 22)
5 Seleccione el “BAL.B MAN” en el menú
“BAL.BLANCO” ( p. 22) y a continuación
mantenga pulsado SET o 2 hasta que
empiece a parpadear.
● Cuando termina el ajuste, deja de parpadear.
6 Pulse SET o 2 para elegir el ajuste.
7 Pulse MENU. La pantalla de menú se cierra y
aparece el indicador de balance manual del
blanco .
NOTAS:
● En el paso 3, puede resultar difícil enfocar sobre
el papel blanco. En tal caso, ajuste el enfoque
manualmente. ( p. 27)
● Es posible filmar un sujeto con distintos tipos de
iluminación en interiores (natural, fluorescente,
luz de vela, etc.). Dado que la temperatura de
color varía según la fuente de luz, el tono de color
del sujeto cambiará según las configuraciones del
balance del blanco. Utilice esta función para
obtener un resultado más natural.
● Una vez ajustado manualmente el balance del
blanco, la configuración se conserva aunque se
desconecte la alimentación o se extraiga la
batería.
Papel blanco
M
”. ( p. 13)
Efectos de reemplazo (cortinilla) o fundido de imagen
Estos efectos permiten realizar transiciones de
escenas de estilo profesional. Utilícelos para
enriquecer la transición de una escena a la
siguiente.
El reemplazo (cortinilla) o el fundido de imagen
funciona cuando se inicia o se interrumpe la
grabación de vídeo.
1 Ajuste el interruptor de alimentación en
“REC”.
2 Ajuste el modo de grabación a “
3 Ajuste CORT./FUND. en menú FUNCIÓN
( p. 22)
● El menú CORTINILLA/FUNDIDO desaparece y el
efecto se invierte.
● Aparece el indicador del efecto seleccionado.
4 Para activar el fundido de entrada/salida o la
cortinilla de entrada/salida, pulse el botón de
inicio/parada de grabación.
Para desactivar el efecto seleccionado
Seleccione “OFF” en el paso 3. Desaparece el
indicador de efecto.
NOTA:
Puede ampliar la grabación de una operación
dereemplazo (cortinilla) o de fundido manteniendo
pulsado el botón de inicio/parada de grabación.
CORTINILLA/FUNDIDO
OFF: Desactive esta función. (Preajuste de
fábrica)
BLANCO : Fundido de entrada o de salida
con pantalla blanca.
NEGRO : Fundido de entrada o de salida
con pantalla negra.
HORIZONTAL : Cortinilla de entrada de
derecha a izquierda, o cortinilla de salida de
izquierda a derecha.
VERTICAL : La escena aparece en forma
de cortinilla de abajo arriba en una pantalla
negra, o desaparece de arriba abajo, dejando
una pantalla negra.
M
”. ( p. 13)
Page 75

Programa AE, efectos y efectos de obturación
1 Ajuste el interruptor de alimentación en
“REC”.
2 Ajuste el modo de grabación a “
3 Ajuste “EFECTO”, “PROGRAMA AE” o
“OBTUR.” en menú FUNCIÓN. ( p. 22)
● El menú EFECTO, PROGRAMA AE o OBTUR.
desaparece y el efecto seleccionado es activado.
● Aparece el indicador del efecto seleccionado.
Para desactivar el efecto seleccionado
Seleccione “OFF” en el paso 3. Desaparece el
indicador de efecto.
NOTAS:
● El programa AE, los efectos y los efectos de
obturación pueden ser cambiados durante la
espera de grabación.
● Algunos modos de programa AE y efectos de
obturación no pueden ser usados durante la
filmación nocturna.
● Cuando el motivo es demasiado brillante o
reflectante, puede aparecer un destello vertical
(fenómeno de corrimiento). El fenómeno de
corrimiento tiende a ocurrir cuando se selecciona
“DEPORTE” o cualquier modo de “OBTUR. 1/250
– 1/4000”.
EFECTO
OFF: Desactive esta función. (Preajuste de
fábrica)
SEPIA : Las escenas grabadas adquieren
un tono sepia como el de las fotografías
antiguas.
MONOCROMO : Como las películas en
blanco y negro, la filmación se realiza en blanco
y negro.
FILM CLAS. : Proporciona a las escenas
grabadas un efecto estroboscópico.
ESTROBOSC. : Su grabación tendrá el
aspecto de una serie de fotografías
consecutivas.
M
”. ( p. 13)
FUNCIONES DE GRABACIÓN
ES 31
PROGRAMA AE
OFF: Desactive esta función. (Preajuste de
fábrica)
DEPORTE
(Velocidad variable de obturación: 1/250 – 1/
4000):
Este ajuste permite la captura de imágenes de
movimiento rápido fotograma por fotograma,
para una reproducción intensa y estable a
cámara lenta. Cuanto mayor sea la velocidad de
obturación, más oscura se vuelve la imagen.
Utilice la función del obturador en condiciones
de iluminación adecuadas.
NIEVE : Realiza una compensación de
sujetos que aparecerían demasiado oscuros al
filmar en ambientes demasiado claros, por
ejemplo en la nieve.
FOCO : Realiza una compensación de
sujetos que aparecerían demasiado claros al
filmar en condiciones de iluminación directa
demasiado intensa, por ejemplo focos.
ATARDECER : Hace que las escenas de
atardecer parezcan más naturales. El balance
del blanco ( p. 29) se ajusta automáticamente
en “”, pero se puede modificar a la
configuración deseada. Cuando se selecciona
la función de atardecer, la vídeocámara ajusta
automáticamente el enfoque de unos 10 m a
infinito. Para menos de unos 10 m, ajuste el
enfoque manualmente.
OBTUR.
OFF: Desactive esta función. (Preajuste de
fábrica)
OBTUR. 1/60: La velocidad de obturación
se fija en 1/60 de segundo. Las barras negras
que suelen aparecer cuando se filma una
pantalla de TV se estrechan.
OBTUR. 1/100: La velocidad de
obturación se fija en 1/100 de segundo. Se
reduce el parpadeo que se produce al filmar
bajo luz fluorescente o lámpara de vapores de
mercurio.
OBTUR. 1/500/OBTUR. 1/4000: Estas
configuraciones permiten la captura fotograma a
fotograma de imágenes en movimiento rápido,
para obtener una reproducción a cámara lenta
estable y vívida mediante la fijación de las
variables de velocidad del obturador. Utilice
estas configuraciones desde el modo
DEPORTE cuando un ajuste automático no
funcione bien.
FUNCIONES AVANZADAS
Page 76

32 ES
EDICIÓN
Copia en grabadora de vídeo
A conector AV
Cable de audio/
(suministrado)
1Amarillo a VIDEO IN
2Rojo a AUDIO R IN
3Blanco a AUDIO L IN
vídeo
Grabadora de
vídeo
TV
1 Tal como se indica en las ilustraciones,
conecte la videocámara y los conectores de
entrada de la grabadora de vídeo.
2 Inicie la reproducción en la videocámara.
( p. 20)
3 Comience a grabar en la grabadora de vídeo
en el punto en el que desee iniciar la copia.
(Consulte el manual de instrucciones de su
grabadora de vídeo.)
4 Para detener la copia, pare la grabación de la
grabadora de vídeo, y a continuación detenga la
reproducción de la videocámara.
NOTAS:
÷ Se recomienda utilizar el adaptador de CA
como fuente de alimentación en lugar de la
batería. ( p. 13)
● Para decidir si las siguientes indicaciones
aparecen o no en el televisor conectado
● Fecha/hora
Ajuste “FECHA/HORA” en “ON” o “OFF”.
( p. 22, 25)
● Código de tiempo
Ajuste “CÓD.TIEMPO” en “OFF” o “ON”.
( p. 22, 25)
● Otras indicaciones aparte de la fecha y la hora y
del código de tiempo
Ajuste “EN PANT.” en “OFF”, “LCD” o “LCD/TV”.
( p. 22, 25)
Page 77

Copia en o desde un aparato de vídeo equipado con un conector DV (Copia digital)
También es posible copiar escenas grabadas
desde la videocámara a otro aparato de vídeo
equipado con un conector DV. Dado que se
envía una señal digital, el deterioro de imagen o
de sonido es mínimo o inexistente.
A DV IN/OUT
Filtro de núcleo
Aparato de vídeo equipado con conector DV
Para usar esta videocámara como
reproductor
1 Compruebe que todos los equipos están
apagados.
2 Conecte esta videocámara a un aparato de
vídeo equipado con un conector de entrada DV,
mediante un cable DV, como se muestra en la
ilustración.
3 Inicie la reproducción en la videocámara.
( p. 20)
4 Comience a grabar en el aparato de vídeo en
el punto en el que desee iniciar la copia.
Cable DV (opcional)
A DV IN/OUT
EDICIÓN
(Consulte el manual de instrucciones de su
aparato de vídeo.)
ES 33
5 Para detener la copia, pare la grabación del
aparato de vídeo, y a continuación detenga la
reproducción en esta videocámara.
NOTAS:
÷ Se recomienda utilizar el adaptador de CA
como fuente de alimentación en lugar de la
batería. ( p. 13)
● Si durante la copia se reproduce en el lector una
parte en blanco o una imagen alterada, la copia
puede interrumpirse, para no copiar imágenes
extrañas.
● Aunque el cable DV se conecte correctamente, a
veces la imagen puede no aparecer en el paso 4.
Si sucede esto, apague la alimentación y realice
de nuevo las conexiones.
÷ Cuando utilice un cable DV, asegúrese de
utilizar el cable DV opcional JVC VCVDV204U.
Para usar esta videocámara como grabadora
1 Compruebe que todos los equipos están
apagados.
2 Conecte esta videocámara a un aparato de
vídeo equipado con un conector de salida DV,
mediante un cable DV, como se muestra en la
ilustración.
3 Ajuste el interruptor de alimentación de la
videocámara en “PLAY”.
4 Ajuste “MODO GRAB.” en “SP” o “LP”.
( p. 25)
5 Para activar el modo de grabación-pausa,
pulse el botón de inicio/parada de grabación.
● Aparece en la pantalla la indicación “”.
DV IN
6 Inicie la reproducción en el reproductor.
7 En el punto en el que desee iniciar la copia,
pulse el botón de inicio/parada de grabación
para comenzar la copia. La indicación gira.
8 Para interrumpir la copia, pulse de nuevo el
botón de inicio/parada de grabación. La
indicación deja de girar.
9 Pulse 7 para regresar al modo de
reproducción normal.
NOTA:
La copia digital se realiza en el modo de sonido
grabado en la cinta original, con independencia de
la configuración actual de “MODO AUDIO”.
( p. 23)
FUNCIONES AVANZADAS
Page 78

34 ES
EDICIÓN
Conexión a un PC
También es posible transferir imágenes fijas o
en movimiento a un PC con un conector DV
utilizando el software incluido en el PC, o
software disponible en el mercado.
Si su sistema operativo es Windows
usar Windows
®
Messenger para efectuar
videoconferencias por Internet mediante una
videocámara. Para obtener detalles, consulte la
ayuda de e Windows
®
Messenger.
A DV IN/OUT
Filtro de núcleo
Cable DV
(opcional)
Filtro de núcleo
®
XP, puede
NOTAS:
÷ Se recomienda utilizar el adaptador de CA
como fuente de alimentación en lugar de la
batería. ( p. 13)
÷ Cuando utilice un cable DV, asegúrese de
utilizar el cable DV opcional JVC VC-VDV206U
o VC-VDV204U, según el tipo de conector DV
(4 ó 6 patillas) del PC.
● La información de fecha/hora no puede
transferirse al PC.
● Consulte los manuales de instrucciones del PC y
del software.
● Las imágenes fijas también pueden transferirse a
un PC con una placa de captura equipada con
conector DV.
÷ Es posible que el sistema no funcione
correctamente, según el PC o la placa de captura
utilizados.
Al conectar la videocámara a un PC por
medio de un cable DV, asegúrese de ceñirse
al siguiente procedimiento. Una conexión
incorrecta del cable puede ocasionar averías
en la videocámara o en el PC.
● Conecte el cable DV primero al PC, y luego a la
videocámara.
● Conecte el cable DV (sus clavijas)
correctamente de acuerdo con el perfil del
conector DV.
A conector DV
PC con conector DV
Page 79

Si el problema sigue existiendo después de
seguir los pasos indicados en el siguiente
cuadro, consulte con su distribuidor JVC más
próximo.
La videocámara es un dispositivo controlado
por microcomputadora. El ruido externo y las
interferencias (de un televisor, una radio, etc.)
podrían impedir su correcto funcionamiento.
En tales casos, desconecte primero su
dispositivo de suministro de energía (batería,
adaptador de CA, etc.), espere unos minutos y
a continuación vuelva a conectarlo y siga el
procedimiento habitual desde el principio.
Alimentación
No hay alimentación.
●
La fuente de alimentación no está correctamente
conectada.
➜
Conecte bien el adaptador de CA. ( p. 13)
●
La batería no está bien sujeto.
➜
Suelte la batería y vuelva a instalarla de manera
que quede bien sujeto. ( p. 12)
●
La batería está agotada.
➜
Cambie la batería agotada por otra totalmente
cargada. ( p. 12)
Grabación de vídeo
SOLUCIÓN DE PROBLEMAS
ES
Las indicaciones del monitor LCD o del
visor parpadean.
●
Los efectos y las funciones “DIS” que no pueden
utilizarse juntas se seleccionan al mismo tiempo.
➜
Vuelva a leer las secciones que traten los efectos
y “DIS”. ( p. 22, 23, 31)
El zoom digital no funciona.
●
Se ha seleccionado el zoom óptico de 28X.
➜
Ajuste “ZOOM” en “56X” o “800X”. ( p. 23)
Reproducción de vídeo
La cinta se mueve, pero no hay imagen.
●
Su televisor tiene terminales de entrada AV, pero
no está ajustado en su modo VIDEO.
➜
Ajuste el televisor en el modo o canal adecuado
para la reproducción de vídeo. ( p. 21)
●
La tapa del portacintas está abierta.
➜
Cierre la tapa del portacintas. ( p. 16)
Aparecen bloques de ruido durante la
reproducción, o no hay imagen de
reproducción y la pantalla se vuelve azul.
➜
Limpie los cabezales del vídeo con una cinta de
limpieza opcional. ( p. 40)
Funciones avanzadas
35
La grabación no puede realizarse.
●
La lengüeta de protección contra borrado de la
cinta está ajustada en “SAVE”.
➜
Ajuste la lengüeta de protección contra borrado
de la cinta en “REC”. ( p. 16)
●
Aparece “FIN DE CINTA”.
➜
Utilice una cinta nueva. ( p. 16)
●
La tapa del portacintas está abierta.
➜
Cierre la tapa del portacintas.
Cuando filme un sujeto iluminado con luz
clara, aparecerán líneas verticales.
●
Esto no es un fallo de funcionamiento.
Cuando la pantalla está bajo luz solar
directa durante la filmación, se vuelve roja
o negra durante un instante.
●
Esto no es un fallo de funcionamiento.
Durante la grabación, los datos de fecha/
hora no aparecen.
●
“FECHA/HORA” está ajustado en “OFF”.
➜
Ajuste “FECHA/HORA” en “ON”. ( p. 22, 24)
El enfoque no se ajusta automáticamente.
●
El enfoque está ajustado en el modo Manual.
➜
Ajuste el enfoque en modo automático. ( p. 27)
●
El objetivo está sucio o cubierto de
condensación.
➜
Limpie el objetivo y compruebe de nuevo el
enfoque. ( p. 38)
No puede utilizarse el modo Fotografiado.
●
El modo ancho16:9 ( indicador 16:9 ) es
seleccionado.
➜
Desconecta el modo ancho 16:9 ( indicador
16:9 ). ( p. 22, 26)
REFERENCIAS
Page 80

36 ES
SOLUCIÓN DE PROBLEMAS
El color de Fotografiado parece extraño.
● La fuente de luz o el sujeto no incluye el blanco.
O hay diversas fuentes de luz detrás del sujeto.
➜Busque un sujeto blanco y componga la toma de
modo que también aparezca en el encuadre.
( p. 26)
La imagen tomada mediante Fotografiado
es demasiado oscura.
● La toma se realizó en condiciones de contraluz.
➜Pulse BACKLIGHT. ( p. 28)
La imagen tomada mediante Fotografiado
es demasiado clara.
● El sujeto es demasiado claro.
➜Ajuste “PROGRAMA AE” a “FOCO”. ( p. 31)
El balance del blanco no puede activarse.
● Se ha activado el modo Sepia (SEPIA) o
Monotono (MONOCROMO).
➜Desactive el modo Sepia (SEPIA) o Monotono
(MONOCROMO) antes de configurar el balance.
( p. 31)
La imagen parece indicar que la velocidad
del obturador es demasiado lenta.
● Cuando se filma en la oscuridad, el aparato se
vuelve muy sensible a la luz cuando
“GANANCIA” se ajusta en “AUTO”.
➜Si desea que la iluminación parezca más natural,
ajuste “GANANCIA” en “AGC” o “OFF”.
( p. 22, 24)
Otros problemas
La lámpara POWER/CHARGE de la
videocámara no se enciende durante la
carga.
● La carga resulta difícil en lugares sometidos a
temperaturas extremadamente altas/bajas.
➜Para proteger la batería, se recomienda cargarla
en lugares con una temperatura de 10°C a 35°C.
( p. 39)
● La batería no está bien sujeto.
➜Suelte la batería y vuelva a instalarla de manera
que quede bien sujeto. ( p. 12)
Aparece “¡AJ. FECHA/HORA!”.
● La fecha/hora no está ajustada.
➜Ajuste la fecha/hora. ( p. 14)
● La batería integrada del reloj se ha gastado y la
fecha/hora ajustada anteriormente se ha borrado.
➜Consulte a su distribuidor JVC más cercano para
gestionar el recambio.
Cuando la imagen se imprime desde la
impresora, aparece una barra negra en la
parte inferior de la pantalla.
● Esto no es un fallo de funcionamiento.
➜Esto puede evitarse si se graba con “DIS”
activado ( p. 22, 23).
Cuando la videocámara se conecta mediante
el conector DV, la videocámara no funciona.
● El cable DV se ha enchufado o desenchufado con
el aparato encendido.
➜Apague y encienda de nuevo la videocámara y
póngala en funcionamiento.
Las imágenes aparecen oscuras o
blancuzcas en el monitor LCD.
● En lugares sometidos a baja temperatura, las
imágenes se oscurecen debido a las
características del monitor LCD. Esto no es un
fallo de funcionamiento.
➜Ajusta el brillo y el ángulo del monitor LCD.
( p. 15, 18)
● Cuando la luz fluorescente del monitor LCD llega
al término de su vida útil, las imágenes del
monitor LCD se oscurecen.
➜Consulte con su distribuidor JVC más próximo.
Aparecen puntos de color claro por todo el
monitor LCD o en el visor.
● El monitor LCD y el visor han sido fabricados con
tecnología de alta precisión. No obstante, puntos
negros o puntos claros de luz (rojo, verde o azul)
pueden aparecer constantemente en el monitor
LCD o en el visor. Estos puntos no se graban en
la cinta. Esto no se debe a ningún defecto del
aparato. (Puntos efectivos: más de 99,99%)
La cinta no se carga correctamente.
● La carga de la batería está baja.
➜Instale una batería totalmente cargada. ( p. 12)
Page 81

La imagen no aparece en el monitor LCD.
● El visor se despliega y “PRIORIDAD” se pone en
“VISOR”.
➜Vuelva a plegar el visor o ponga “PRIORIDAD” en
“LCD”. ( p. 18, 22, 24)
● La configuración de brillo del monitor LCD es
demasiado oscura.
➜Ajuste el brillo del monitor LCD. ( p. 15)
➜Si el monitor está inclinado 180 grados hacia
arriba, abra el monitor por completo. ( p. 18)
Aparece una indicación de error (01–04 o 06).
● Se ha producido algún tipo de fallo de
funcionamiento. En este caso, las funciones de la
videocámara no se pueden utilizar.
➜ p. 37.
Indicaciones de advertencia
Muestra la energía restante en la batería.
Nivel de energía restante
AgotadaAlto
Cuando la energía de la batería está a punto de
agotarse, el indicador de energía restante de la
batería parpadea.
Cuando la energía de la batería está agotada, el
aparato se apaga automáticamente.
● Aparece si hay una cinta cargada. ( p. 16)
● Parpadea cuando no hay una cinta cargada.
( p. 16)
COMPRUEBE LENGÜETA PROTECCIÓN
CINTA
Aparece cuando la lengüeta de protección de
borrado está ajustada en “SAVE” mientras el
interruptor de alimentación está ajustado en
“REC”. ( p. 13)
USE CINTA DE LIMPIEZA
Aparece si se detecta suciedad en los
cabezales durante la grabación. Utilice una cinta
de limpieza opcional. ( p. 40)
CONDENSACIÓN, OPERACIÓN EN
PAUSA ESPERE
Aparece si se produce condensación. Cuando
aparezca esta indicación, espere más de 1 hora
hasta que la condensación desaparezca.
SOLUCIÓN DE PROBLEMAS
ES 37
¡CINTA!
Aparece si no hay una cinta cargada cuando el
botón de inicio/parada de grabación o el botón
SNAPSHOT se pulsa mientras el interruptor de
alimentación está ajustado en “REC”.
FIN DE CINTA
Aparece cuando la cinta se termina durante la
grabación o la reproducción.
¡AJ. FECHA/HORA!
● Aparece cuando no se han ajustado los datos
de fecha/hora. ( p. 14)
● La batería integrada del reloj se ha gastado y
la fecha/hora ajustada anteriormente se ha
borrado. Consulte a su distribuidor JVC más
cercano para gestionar el recambio.
TAPA DEL OBJETIVO
Aparece durante 5 segundos al encenderse el
aparato si la tapa del objetivo está acoplada o si
está oscuro.
HDV
Aparece cuando se detectan imágenes
grabadas en formato HDV. En esta videocámara
no se pueden reproducir imágenes en formato
HDV.
UNIDAD EN MODO SEGURO RETIRE Y
RECONECTE BATERíA/ENCHUFE CC
Las indicaciones de error (01, 02 o 06) muestran
el tipo de fallo de funcionamiento producido.
Cuando aparece una indicación de error, la
videocámara se apaga automáticamente. Retire
la fuente de alimentación (batería, etc.) y espere
unos minutos hasta que desaparezca la
indicación. Cuando desaparezca, puede volver
a utilizar la videocámara. Si la indicación se
mantiene, consulte con su distribuidor JVC más
próximo.
UNIDAD EN MODO SEGURO
EXPULSE Y REINSERTE CINTA
Las indicaciones de error (03 o 04) muestran el
tipo de fallo de funcionamiento producido.
Cuando aparece una indicación de error, la
videocámara se apaga automáticamente.
Expulse la cinta una vez y vuelva a insertarla, y
compruebe si la indicación desaparece. Cuando
desaparezca, puede volver a utilizar la
videocámara. Si la indicación se mantiene,
consulte con su distribuidor JVC más próximo.
REFERENCIAS
Page 82

38 ES
MANTENIMIENTO DEL USUARIO
Limpieza de la videocámara
Antes de proceder a la limpieza, apague la
videocámara y saque la batería y el adaptador
de CA.
Para limpiar el exterior
Pase con cuidado un trapo suave. Ponga el
trapo en jabón suave diluido y escúrralo bien
para eliminar la suciedad profunda. Luego, pase
un trapo seco.
Para limpiar el monitor LCD
Pase con cuidado un trapo suave. Tenga
cuidado para no dañar el monitor. Cierre el
monitor LCD.
Para limpiar el objetivo
Sóplelo con un cepillo de aire, y luego límpielo
suavemente con papel de limpieza para
objetivos.
Para limpiar el objetivo del visor
Quitar el polvo del visor utilizando un cepillo.
NOTAS:
● Evite utilizar agentes limpiadores fuertes como
bencina o alcohol.
● La limpieza se debe hacer solamente después
de haber quitado la batería o haber desconectado
otros aparatos eléctricos.
● Si el objetivo se deja sucio, se puede formar
moho.
● Cuando se utilice un limpiador o un trapo tratado
químicamente, consulte las medidas de
precaución de cada producto.
● Para limpiar el visor, le rogamos que consulte a su
distribuidor JVC más próximo.
Page 83

Adaptador de CA
Cuando emplea el adaptador de CA en áreas
que no sean EE.UU.
El adaptador de CA suministrado tiene una
función de selección automática de tensión en la
escala de corriente alterna de 110 V a 240 V.
USO DEL ENCHUFE ADAPTADOR DE CA
En caso de conectar el cable de alimentación de
la unidad a un tomacorriente de CA que no sea de
la serie American National Standard C73, emplee
un enchufe adaptador de CA, denominado
“Siemens Plug”, como el mostrado.
Consulte con su distribuidor JVC más cercano por
este enchufe adaptador.
Enchufe adaptador
Baterías
La batería suministrada
es una batería de ion de
litio. Antes de utilizar la
batería suministrada o
una batería opcional, lea
las precauciones
siguientes:
● Para evitar riesgos
...no quemar.
...no haga ningún cortocircuito en los terminales.
Durante el transporte, no olvide colocar en la
batería la tapa suministrada. Si la tapa de la
batería está mal colocada, guarde la batería en
una bolsa de plástico.
...no modifique ni desmonte la batería.
...no exponga la batería a temperaturas superiores
a 60°C, pues esto puede provocar
sobrecalentamiento, explosión o incendio de la
batería.
...utilice solamente cargadores especificados.
● Para evitar daños y prolongar la vida útil
...no la someta a sacudidas innecesarias.
...cárguela en un entorno con temperaturas dentro
de las tolerancias indicadas en la siguiente tabla.
Esta es una batería de reacción química — las
temperaturas más frías dificultan la reacción
química, mientras que las temperaturas más
cálidas pueden impedir la carga completa.
...guardar en lugar fresco y seco. La exposición
prolongada a temperaturas elevadas aumentará
la descarga natural y reducirá el periodo de vida
útil.
...se debe cargar totalmente y luego descargar
totalmente la batería cada seis meses cuando se
Terminales
PRECAUCIONES
guarde la batería durante un periodo de tiempo
prolongado.
...cuando no se utilice, se debe retirar del cargador
o dispositivo eléctrico, pues algunas máquinas
utilizan corriente incluso estando apagadas.
ES 39
Ventajas de las baterías de ion de litio
Las baterías de ion de litio son pequeñas
pero de gran potencia. No obstante, cuando
se exponen a bajas temperaturas (inferiores a
10
°C), su tiempo de utilización se reduce y
puede dejar de funcionar. En tal caso,
coloque la batería en su bolsillo o en otro
lugar cálido y protegido durante un breve
tiempo, y luego vuelva a colocarla en la
videocámara.
NOTAS:
● Es normal que la batería esté caliente después de
su carga o después de su uso.
Especificaciones de margen de temperatura
Carga: 10°C a 35°C
Funcionamiento: 0°C a 40°C
Almacenamiento: –20°C a 50°C
● Cuanto más baja sea la temperatura, más tiempo
se necesita para la recarga.
● Los tiempos de carga se refieren a una batería
totalmente descargada.
Cintas
Para utilizar y almacenar correctamente sus
cintas, lea las siguientes precauciones:
● Durante el uso
...asegúrese de que la cinta tiene la marca Mini DV.
...recuerde que la grabación sobre cintas
pregrabadas borra automáticamente las señales
de vídeo y audio previamente grabadas.
...al insertarla, compruebe que la cinta está
colocada correctamente.
...no debe cargar y descargar la cinta
repetidamente sin esperar a que se ponga en
marcha. La cinta puede aflojarse y deteriorarse.
...no abra la tapa frontal de la cinta. Esto expone la
cinta a huellas dactilares y polvo.
● Guarde las cintas
...lejos de calefacciones u otras fuentes de calor.
...lejos de la luz solar directa.
...en lugares donde no estén sometidas a
sacudidas o vibraciones innecesarias.
...en lugares donde no estén expuestas a campos
magnéticos fuertes (como los generados por
motores, transformadores o imanes).
...verticalmente, en sus estuches originales.
REFERENCIAS
Page 84
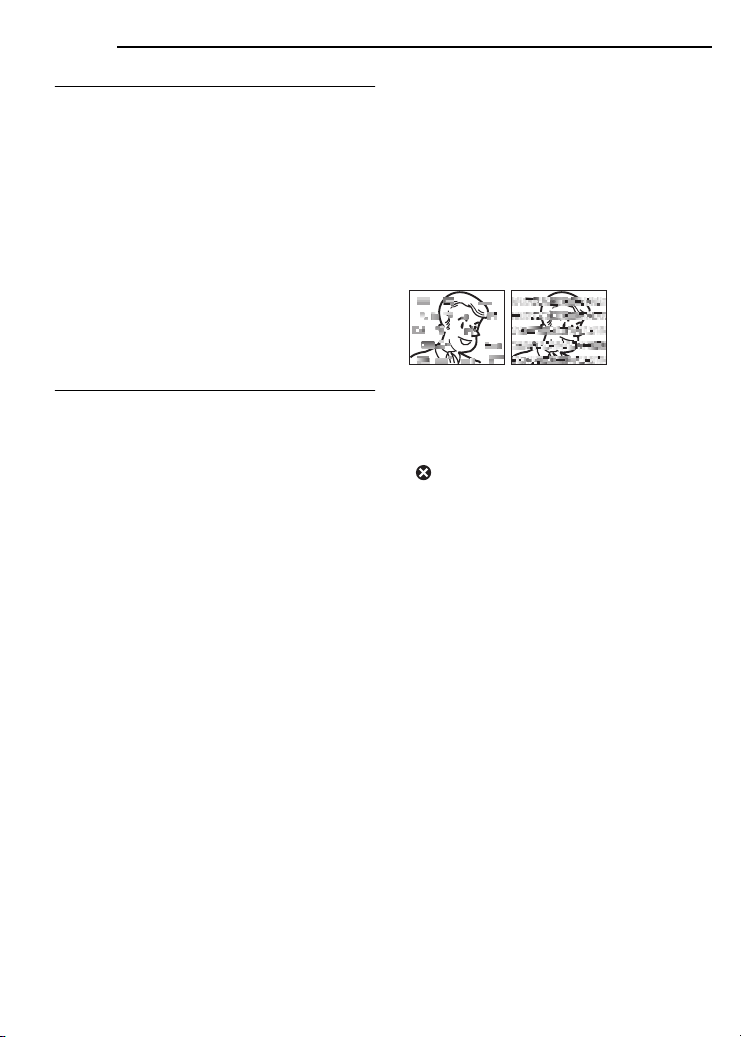
40 ES
PRECAUCIONES
Monitor LCD
● Para prevenir daños al monitor LCD, NO
...empujar con fuerza ni aplicar ninguna sacudida.
... colocar la videocámara con el monitor LCD hacia
abajo.
● Para prolongar la vida útil
...evite frotarlo con un trapo basto.
● Tenga en cuenta los siguientes
fenómenos en relación con el uso del
monitor LCD. No son fallos de
funcionamiento
...Durante el uso de la videocámara, la superficie
alrededor del monitor LCD y/o la parte trasera
del monitor LCD pueden calentarse.
...Si deja el aparato encendido durante mucho
tiempo, la superficie alrededor del monitor LCD
se calienta.
Equipo principal
● Por seguridad, NO DEBE
...abrir el chasis de la videocámara.
...desmontar o modificar el aparato.
...cortocircuitar los terminales de la batería. Debe
mantenerla alejada de objetos metálicos cuando
no se utilice.
...permitir que productos inflamables, agua u
objetos metálicos entren en la unidad.
...quitar la batería ni desconectar el suministro de
energía con el aparato encendido.
...dejar la batería colocada cuando la videocámara
no se utilice.
● Evite utilizar este aparato
...en lugares sometidos a excesiva humedad o
demasiado polvo.
...en lugares con hollín o vapor, por ejemplo cerca
de una cocina.
...en lugares sometidos a sacudidas o vibraciones
excesivas.
...cerca de un televisor.
...cerca de aparatos que generen campos
magnéticos o eléctricos fuertes (altavoces,
antenas de emisión, etc.).
...en lugares sometidos a temperaturas
extremadamente altas (superiores a 40°C) o
extremadamente bajas (inferiores a 0°C).
● NO deje el aparato
...en lugares con más de 50°C.
...en lugares con humedad extremadamente baja
(inferior al 35%) o extremadamente alta (superior
al 80%).
...bajo luz solar directa.
...en un coche cerrado en verano.
...cerca de una calefacción.
● Para proteger el aparato, NO DEBE
...permitir que se humedezca.
...dejar caer el aparato ni golpearlo contra objetos
duros.
...someterlo a sacudidas o vibración excesiva
durante su transporte.
...mantener el objetivo dirigido hacia a objetos
demasiado brillantes durante largos periodos.
...exponer el objetivo y el objetivo del visor a la luz
solar directa.
...moverlo sujetándolo por el monitor LCD o por el
visor.
...balancearlo excesivamente cuando utilice la
correa manual o la empuñadura.
...mover demasiado la bolsa de la cámara con la
videocámara dentro.
● Los cabezales sucios pueden causar los
problemas siguientes:
...No se ve ninguna imagen durante la
reproducción.
...Aparecen bloques de ruido durante la
reproducción.
...Durante la grabación o reproducción, aparece el
indicador de advertencia de atasco de cabezal
“”.
...La grabación no puede realizarse correctamente.
En tales casos, utilice una cinta de limpieza
opcional. Inserte la cinta y póngala en marcha.
Si la cinta se utiliza consecutivamente más de
una vez, se pueden dañar los cabezales de
vídeo. Después de funcionar durante unos 20
segundos, la videocámara se para
automáticamente. Consulte también las
instrucciones de la cinta de limpieza.
Si después de utilizar la cinta de limpieza los
problemas persisten, consulte con su
distribuidor JVC más próximo.
Las piezas mecánicas móviles utilizadas para
mover los cabezales de vídeo y la cinta de vídeo
tienden a ensuciarse y desgastarse con el
tiempo. Para mantener una imagen clara en
todo momento, se recomiendan
comprobaciones periódicas después de utilizar
el aparato durante unas 1.000 horas. Para las
comprobaciones periódicas, consulte con su
distribuidor JVC más próximo.
Page 85

Acerca de la condensación por humedad
● Habrá observado que el vertido de un líquido
frío en un vaso de cristal hace que se formen
gotas de agua en la superficie externa del
vaso. Este mismo fenómeno se produce en el
tambor de la cabeza de una videocámara
cuando se mueve de un lugar frío a un lugar
cálido, después de calentar una habitación fría,
en condiciones extremadamente húmedas o en
un lugar directamente sometido al aire frío de
un aparato de aire acondicionado.
● La humedad en el tambor de la cabeza de
vídeo puede provocar serios daños en la cinta
de vídeo y puede producir daños internos en la
propia videocámara.
Graves fallos de funcionamiento
Si se produce un fallo de funcionamiento, deje
de usar inmediatamente el aparato y consulte
con su distribuidor local de JVC.
La videocámara es un dispositivo controlado
por microcomputadora. El ruido externo y las
interferencias (de un televisor, una radio, etc.)
podrían impedir su correcto funcionamiento.
En tales casos, desconecte primero su
dispositivo de suministro de energía (batería,
adaptador de CA, etc.), espere unos minutos
y a continuación vuelva a conectarlo y siga el
procedimiento habitual desde el principio.
PRECAUCIONES
ES 41
Declaración de conformidad
Número de modelo : GR-D347U
Nombre comercial : JVC
Parte responsable : JVC AMERICAS
CORP.
Dirección : 1700 Valley Road
Wayne, N. J. 07470
Número de teléfono : 973–317–5000
Este dispositivo cumple con el Apartado 15
de la reglamentación FCC. La operación está
sujeta a las dos condiciones siguientes: (1)
Este dispositivo no debe causar interferencia
perniciosa y (2) este dispositivo debe aceptar
cualquier interferencia recibida, incluyendo la
interferencia que pueda causar fallas de
funcionamiento.
Los cambios o modificaciones no aprobados
por JVC, puede anular la autoridad del
usuario para operar el equipo. Este equipo ha
sido examinado y cumple con los límites de
dispositivos digitales Clase B, de acuerdo al
Apartado 15 de la reglamentación FCC. Estos
límites están diseñados para suministrar una
protección razonable contra interferencia
perniciosa en una instalación residencial.
Este equipo genera, usa y puede irradiar
radiofrecuencia y si no se lo instala y emplea
de acuerdo con las instrucciones puede
causar interferencia perniciosa a las
comunicaciones de radio. Sin embargo, no se
garantiza que no ocurra interferencia en una
instalación en particular. Si este equipo causa
interferencia perniciosa a la recepción de
radio o televisión, lo cual puede ser
determinado desconectando y conectando la
alimentación del equipo, se alienta al usuario
a que intente corregir la interferencia por
medio de una o más de las siguientes
medidas:
Reoriente o recoloque la antena de
recepción.
Aumente la separación entre el equipo y el
receptor.
Conecte el equipo en un tomacorriente en
un circuito diferente al del receptor
conectado.
Consulte con su distribuidor o con un téncio
experimentado de radio/TV.
REFERENCIAS
Page 86

42 ES
ESPECIFICACIONES
Videocámara
Aspectos generales
Fuente de alimentación eléctrica
DC 11 V (Con adaptador de CA)
DC 7,2 V (Con batería)
Consumo eléctrico
Aprox. 2,8 W (Monitor LCD desconectado, visor
conectado)
Aprox. 3,2 W (Monitor LCD conectado, visor
desconectado)
Aprox. 6,5 W (Máximo; cuando se carga la batería)
Dimensiones (anchura x altura x fondo)
59 mm x 94 mm x 114 mm (con el monitor LCD
cerrado y el visor replegado)
Peso
Aprox. 400 g (sin batería, cassette y tapa del
objetivo)
Aprox. 480 g (con batería, cassette y tapa del
objetivo)
Temperatura de funcionamiento
0°C a 40°C
Humedad operativa
35% a 80%
Temperatura de almacenamiento
–20°C a 50°C
Fonocaptor
CCD 1/6"
Objetivo
F 2,0, f = 2,3 mm a 64,4 mm, objetivo con
capacidad de zoom 28:1
Diámetro del filtro
ø27 mm
Monitor LCD
Panel LCD/sistema de matriz activa TFT con
medición diagonal de 2,5"
Visor
Visor electrónico con pantalla LCD monocroma de
0,33"
Altavoz
Monoaural
Para videocámara digital
Formato
Formato DV (modo SD)
Formato de señal
Norma NTSC
Formato de grabación/reproducción
Vídeo: grabación de componente digital
Audio: grabación digital PCM, 4-canales de 32 kHz
(12 BITS), 2-canales de 48 kHz (16 BITS)
Cinta de casete
Cinta Mini DV
Velocidad de cinta
SP: 18,8 mm/s, LP: 12,5 mm/s
Tiempo máximo de grabación (con cinta de
80 minutos)
SP: 80 min., LP: 120 min.
Para conectores
AV
Salida de vídeo: 1,0 V (p-p), 75 Ω, analógica
Salida de audio: 300 mV (rms), 1 kΩ, analógica
estéreo
DV
Entrada/salida: 4-patillas, compatible IEEE1394
Adaptador de CA
Requisito de alimentación eléctrica
CA 110 V a 240 V~ , 50 Hz/60 Hz
Salida
DC 11 V =, 1 A
Las especificaciones mostradas se refieren al modo
SP, a menos que se indique otra cosa. Salvo error u
omisión, el diseño y las especificaciones pueden
sufrir modificaciones sin previo aviso.
Page 87

A
Adaptador de CA ..................................... 13, 39
Ajuste de teleobjetivo .................................... 24
Ajustes de fecha/hora..................................... 14
B
Balance del blanco ........................................29
Batería ............................................... 11, 12, 39
Bloqueo del diafragma ................................... 28
Búsqueda de partes en blanco....................... 20
C
Cambiar las configuraciones de menú .. 22 – 25
Capacidad de grabación
Cinta .......................................................12
Carga de la batería ........................................ 11
Carga de una cinta ........................................16
Código de tiempo ........................................... 19
Compensación de contraluz ........................... 28
Conexión a un PC .......................................... 34
Conexiones a un televisor o una grabadora de
vídeo ....................................................... 21
Control de exposición ..................................... 27
Control de exposición puntual ........................29
Copia ......................................................32 – 33
D
Datos batería ................................................. 12
E
Efectos............................................................ 31
Efectos de obturacion..................................... 31
Efectos de reemplazo (cortinilla) o fundido de
imagen ........................................................... 31
Enfoque manual ............................................ 27
Especificaciones............................................. 42
Estabilización de imagen digital (DIS) ............ 23
F
Filmación nocturna ........................................26
I
Indicaciones de advertencia .......................... 37
TÉRMINOS
ES 43
M
Melodia ........................................................... 24
Modo Ancho ................................................... 26
Modo de demostración ................................... 25
Modo de fotografiado...................................... 26
Modo de sonido ........................................ 23, 25
Modo motorizado............................................ 26
Monitor LCD y visor ........................................ 18
O
Operación relacionada con la alimentación ... 13
P
Programa AE ................................................. 31
R
Revisión rápida .............................................. 19
S
Solución de problemas .......................... 35 – 37
Sonido de reproducción ................................ 25
Soporte del trípode ........................................ 15
V
Velocidad de cinta (MODO GRAB.)................ 20
Volumen del altavoz .......................................20
Z
Zoom ........................................................ 18, 23
Page 88

SP
GR-D347U
© 2006 Victor Company of Japan, Limited
Impreso en Malasia
US
0806ASR-NF-VM
 Loading...