


Geschirrspüler
Lave-vaisselle
Afwasmachine
Dishwasher
JSI 3741
Gebrauchsanweisung |
Gebruiksaanwijzing |
Mode d’emploi |
Instruction booklet |

ENGLISH
CONTENTS |
|
|
|
Warnings . . . . . . . . . . . . . . . . . . . . . . . . . . . . . . . . . . . |
. . . . . . . . . . . . . . . . . . . . . . . . . . . . . . |
. . . . . .page |
45 |
Installation . . . . . . . . . . . . . . . . . . . . . . . . . . . . . . . . . . |
. . . . . . . . . . . . . . . . . . . . . . . . . . . . . . . |
. . . . .page |
46 |
Positioning, levelling, water supply connections, water outlet connection, electrical connections . |
. . . . .page |
46 |
|
Use . . . . . . . . . . . . . . . . . . . . . . . . . . . . . . . . . . . . . . . . . |
. . . . . . . . . . . . . . . . . . . . . . . . . . . . . . . |
. . . . .page |
47 |
Control panel . . . . . . . . . . . . . . . . . . . . . . . . . . . . . . . . . . |
. . . . . . . . . . . . . . . . . . . . . . . . . . . . . . . |
. . . . .page |
47 |
The water softener, filling with salt . . . . . . . . . . . . . . . . . . |
. . . . . . . . . . . . . . . . . . . . . . . . . . . . . . . |
. . . . .page |
48 |
Use of rinse aid, use of detergent . . . . . . . . . . . . . . . . . . . |
. . . . . . . . . . . . . . . . . . . . . . . . . . . . . . . |
. . . . .page |
49 |
Loading the machine, use of the lower basket, use of the upper basket . . . . . . . . . . . . . . . . . . . . |
. . . . .page |
50 |
|
Helpful hints . . . . . . . . . . . . . . . . . . . . . . . . . . . . . . . . |
. . . . . . . . . . . . . . . . . . . . . . . . . . . . . . . |
. . . . .page |
51 |
Washing programmes . . . . . . . . . . . . . . . . . . . . . . . |
. . . . . . . . . . . . . . . . . . . . . . . . . . . . . . . |
. . . . .page |
52 |
Operating sequence . . . . . . . . . . . . . . . . . . . . . . . . . . . . . |
. . . . . . . . . . . . . . . . . . . . . . . . . . . . . . . |
. . . . .page |
53 |
Maintenance and cleaning . . . . . . . . . . . . . . . . . . |
. . . . . . . . . . . . . . . . . . . . . . . . . . . . . . . |
. . . . .page |
54 |
Cleaning the central filters, cleaning the large filter, internal and external cleaning . . . . . . . . . . . . |
. . . . .page |
54 |
|
Prolonged periods of Non-Operation . . . . . . . . . . . . . . . . |
. . . . . . . . . . . . . . . . . . . . . . . . . . . . . . . |
. . . . .page |
54 |
Servicing . . . . . . . . . . . . . . . . . . . . . . . . . . . . . . . . . . . |
. . . . . . . . . . . . . . . . . . . . . . . . . . . . . . . |
. . . . .page |
55 |
Building-in instructions . . . . . . . . . . . . . . . . . . . . . |
. . . . . . . . . . . . . . . . . . . . . . . . . . . . . . . |
. . . . .page |
56 |
TECHNICAL SPECIFICATIONS |
|
|
|
DIMENSIONS |
Width |
44,6 cm |
|
|
Height |
81,8 ÷ 87,8 cm |
|
|
Max depth |
57 cm |
|
|
Max depth with door open |
115 cm |
|
ELECTRICAL CONNECTION |
Voltage |
220-230 V/50Hz |
|
POWER OF HEATING ELEMENT |
|
2800 W |
|
OVERALL POWER |
|
3000 W |
|
WATER SUPPLY PRESSURE |
minimum |
5 N/cm2 |
|
|
maximum |
80 N/cm2 |
|
CAPACITY (STANDARD IEC PLACE SETTINGS) |
|
|
9 |
CONSUMPTION: |
Water |
|
18 lt |
|
Electricity |
1.2 kW/h |
|
This appliance complies with the following E.E.C. Directives:
-73/23 of 19.2.73 (Low Voltage Directive) and subsequent modifications;
-89/336 of 3.5.89 (Electromagnetic Compatibility Directive) and subsequent modifications.
PID05GB
44

WARNINGS
It is most important that this instruction book should be retained with the appliance for future reference.
Should the appliance be sold or transferred to another owner, or should you move house and leave the appliance, always ensure that the book is left with the appliance in order that the new owner can get to know the functioning of the appliance and the relevant warnings.
These warnings are provided in the interest of safety. You MUST read them carefully before installing or using the appliance.
■Unplug the appliance and turn off the water after use.
■If the appliance is supplied with obvious damage, consult the supplier before installing it.
■Any plumbing work required to install this appliance should be carried out by a qualified plumber or competent person.
■Any electrical work required to install this appliance should be carried out by a qualified electrician or competent person.
■This appliance is designed to be operated by adults. Children should not be allowed to tamper with controls or play with the product.
■Care must be taken to ensure that the appliance does not stand on the electrical supply cable or on the water inlet and drain hoses.
■These dishwashers are designed to be used for washing normal household utensils. Items that are contaminated by petrol, paint, steel or iron debris, corrosive, acidic or alkaline chemicals are not to be washed in a dishwasher.
■Under no circumstances should you open the door whilst, the appliance is in operation. Always turn off the appliance before opening the door.
However, the dishwasher features a special safety device which cuts off the water inlet, should the door be accidentally opened, thus avoiding water leaks.
■Never touch the heating element during or immediately after the end of the washing cycle.
■When finishing loading or unloading close the door, as an open door can be a hazard.
■It is dangerous to lean or to sit on the dishwasher door: the appliance could tip over.
■Built-in dishwashers only: the appliance must be secured to the underside of the worktop using the brackets provided. Failure to do this could result in an unstable appliance which may cause damage or injury.
■Under no circumstances should you attempt to repair the machine yourself. Repairs carried out by inexperienced persons may cause injury or serious malfunctioning.
■This appliance should be serviced only by an authorised Service Centre.
■Before disposing of the appliance, disconnect the water hose, cut the electrical cable and ensure that the door cannot close.
■For proper disposal of the appliance, contact your local waste collection service.
ENGLISH
PAV05GB
45

INSTALLATION
ENGLISH
Remove all packaging before positioning the machine.
Positioning
If possible, position the machine next to a water tap and a drain.
The dishwasher features fill and drain hoses which can be turned either to the left or the right to suit the installation.
Levelling
Good levelling is essential for correct closure and sealing of the door.
Loosen or tighten the adjustable support feet, until the machine is perfectly level.
Water Outlet Connection
The end of the drain hose can be connected as follows:
to the sink outlet siphon, securing it if necessary with a clip;
to a wall outlet provided with vent-hole, minimum internal diameter 4 cm;
The waste connection must be at a height of between 30 cm (minimum) and 100 cm (maximum) from the floor.
It makes no difference which way the drain hose faces, either to the right or left of the dishwasher.
Avoid bending or kinking the hose as this could prevent or slow down the discharge of water.
If you use a drain hose extension it must be no longer than 2 metres and its internal diameter must be no smaller than the diameter of the hose provided.
Likewise the internal diameter of the couplings used for connection to the waste outlet must be no smaller than the diameter of the drain hose.
|
21 |
|
|
|
|
4 cm |
Ø |
|
18 |
Ø 18 |
Ø 21 |
min |
|
|
Ø |
|||||
|
|
|
||||
|
|
|
|
|
|
|
|
|
|
|
|
+ 2 m max |
min 30 cm max 100 cm |
|
|
|
|
|
max100cm |
|
CS01 |
|
|
|
|
|
|
Water Supply Connections
This dishwasher must be plumbed into a cold water supply and it is preferable for it to be permanently plumbed in.
The water pressure must be within the limits given in the technical specifications, as it will not function correctly if outside these specifications.
For making the connection itself, the coupling nut fitted to the machine's supply hose is designed to screw onto either a 3/4 inch gas thread spout, or to a purpose made quick-coupling tap such as the PressBlock.
|
|
This hose is fitted with a |
|
|
safety device which stops |
|
|
the water inflow in the event |
|
|
of the internal tube breaking |
|
|
due to wear. The problem is |
A |
|
signalled by the appear- |
|
B |
ance of a red marker in the |
|
window (B). If this happens, |
|
|
|
|
CA01 |
|
shut the water tap and have |
|
|
the hose replaced.
Be sure to incorporate the strainer (A) supplied with the machine into the joint.
The water pressure must be within the limits given in the technical specifications, as it will not function correctly if pressure is outside these specifications.
CA06 |
Note: the end of the hose connected to the machine can be positioned as required, by simply slackening the retaining ring.
Caution: the retaining ring must be properly fitted so as to avoid water leaks.
Re-tighten the ring securely to avoid water leaks. Avoid bends or kinks in the hose, which could prevent or slow down the flow of water.
If the machine is connected to new pipes or pipes which have not been used for a long time, you are advised to run the water for a few minutes before connecting the inlet hose. This will prevent deposits of sand or rust clogging the inlet hose filter.
Electrical connection
Electrical connection 220 - 230V (50 Hz). Maximum power absorbed 3.00 kW ca.
The domestic wiring system (including wall sockets, interior wiring, fuses and electricity meters) should therefore be adequate and suitable to carry such a load.
Safety standards require the appliance to be earthed.
The Manufacturer accepts no liability for failure to observe the above safety precautions.
PIN14GB
46
USE
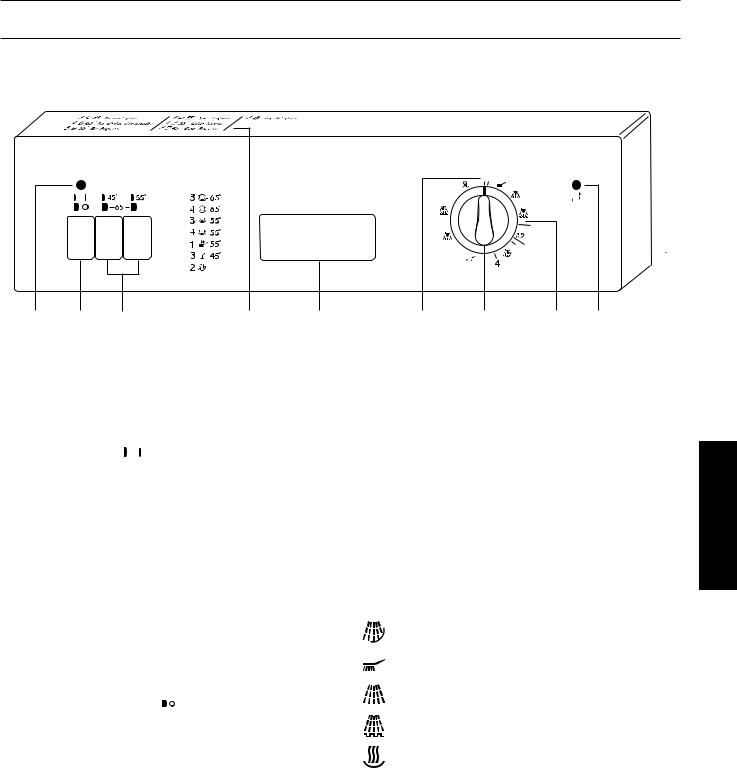
Control panel
 1
1

 2
2
3
1 |
2 |
3 |
4 |
5 |
6 |
7 |
8 |
9 |
1 «Mains-on» indicator light
This comes on when the ON/OFF button (2) is depressed, indicating that the appliance is switched on.
2 On/Off button 

On
When this button is depressed, the machine starts operating and, at the same time, the «mains on» indicator light (1) comes on.
Off
When the washing programme has finished, the machine stops automatically and the «mains on» indicator light (1) remains on. To switch the indicator light off or to stop the machine at any time, press the same button again.
Before selecting a washing programme or changing an operating programme, switch off the machine pressing the On/Off button 
 .
.
3 Washing temperature selection buttons
These buttons allow you to select the temperature of the washing water.
If no button is depressed, the water will be heated to 65°C.
4 Programme guide
This is a summary of the «washing programme chart» which will help you to select the correct programme.
6 Programme marker (●)
7 Programme selector knob
This allows you to select the required washing programme. Turn the knob clockwise until the number of the programme required is opposite the mark on the knob.
8 Programme sequence indicator
This continuously indicates what phase in the washing programme the appliance has reached. Each phase is represented by a symbol:
Prewash - Hold
Wash
Cold rinse
Hot rinse
Hot air drying
9 Salt refill indicator light 
This comes on when the salt has run out, to remind you to refill the container.
4 Door handle
To open the door, press the catch in the top of the recess and pull the door towards you at the same time.
To close the door, simply push it.
PPC03GB
ENGLISH
47
 Loading...