

Page 1

English – 1
SVENSKA
J O N S E R E D S E R V I C E
108 87 55-30
HT 2122T
HT 2126T
HT 2130
Owner's manual
Read these instructions carefully and make sure you
under-stand them before using the machine.
Bedienungsanleitung
Lesen Sie die Bedienungsanweisung sorgfältig durch
und machen Sie sich mit dem Inhalt vertraut, bevor
Sie die Maschine benutzen.
Manuel d'utilisation
Lire attentivement et bien assimiler le manuel
d'utilisation avant de se servir de la machine.
Istruzioni per l'uso
Prima di mettere in esercizio la macchina leggere
accuratamente le seguenti istruzioni.
Instruções para uso
Leia as instruções para o uso com toda a atenção e
compreenda o seu conteúdo antes de fazer uso da
máquina.
Instruções para uso
Leia as instruções para o uso com toda a atenção e
compreenda o seu conteúdo antes de fazer uso da
máquina.
Page 2

2 – English
Key to symbols
Read the instructions carefully and
make sure you understand them
before using the machine.
Always wear:
• Hearing protection
• Eye protection
Switch off the engine by moving the
stop switch to the STOP position
before carrying out any checks or
maintenance.
Always wear safety gloves.
Regular cleaning is required.
Visual check.
Safety glasses or visor must be worn.
Do not touch the clippers
without first switching off the
engine.
This product is in accordance with
applicable CE directives.
WARNING!
Hedge trimmers can be danger-
ous!
Negligence or incorrect use can
result in serious, even fatal
injury.
ENGLISH
Page 3

English – 3
SVENSKA
Contents
Husqvarna AB has a policy of continuous
product development and therefore
reserves the right to modify the design
and appearance of products without prior
notice.
IMPORTANT!
A too lean carburettor adjustment significantly
increases the risk of an engine breakdown.
Insufficient care of the air filter will cause deposits
on the spark plug resulting in starting difficulties.
WARNING!
Under no circumstances may the design
of the machine be modified without the
permission of the manufacturer. Always
use genuine accessories. Non-authorised
modifications and/or accessories can
result in serious personal injury or the
death of the operator or others.
Symbols explanation
Symbols _______________________________________ 2
Contents
Before using a new machine _______________________ 3
Contents ______________________________________ 3
Safety instructions
Personal safety equipment _________________________ 4
The machine’s safety equipment ____________________ 4
Control, maintenance and service of the machine’s safety
equipment _____________________________________ 6
Sharpening of the clippers _________________________ 7
Checking the clippers ____________________________ 7
General safety instructions_________________________ 7
General working instructions ______________________ 8
Basic safety precautions ___________________________ 8
Basic work technique _____________________________ 9
What is what?
What is what? _________________________________ 10
Technical data
HT 2122 T, HT 2126 T _________________________ 10
HT 2130 _____________________________________ 11
Assembly
Assembly _____________________________________ 12
Fuel handling
Petrol ________________________________________ 12
Two-stroke oil _________________________________ 12
Mixture ______________________________________ 12
Fuelling ______________________________________ 13
Start and stop
Cold engine ___________________________________ 13
Varm engine __________________________________ 13
Start _________________________________________ 13
Stopping _____________________________________ 14
Maintenance
Carburettor setting _____________________________ 14
Air filter ______________________________________ 14
Spark plug ____________________________________ 14
Replacement of starter cord and/or return spring ______ 15
Silencer ______________________________________ 15
Blades _______________________________________ 16
Gear case _____________________________________ 16
Cooling system ________________________________ 16
Maintenance schedule ___________________________ 16
ENGLISH
Page 4
4 – English
A
B
The machine‘s safety equipment
This section describes the machine‘s safety equipment, its
function and how checks and maintenance are carried out to
ensure that it operates correctly. (See the chapter “What is
what“ to locate where this equipment is positioned on your
machine.)
IMPORTANT INFORMATION
• Incorrect or careless use of this machine can
turn it into a dangerous tool that can cause
serious or even fatal injury.
It is extremely important that you read and
understand this manual.
• When using this machine the safety equipment
approved by the appropriate authorities must be
used. Personal safety equipment does not
eliminate the risk of accidents, however, it can
reduce the effects of an injury in the event of an
accident. Ask your dealer for help when choosing
safety equipment.
1. Throttle trigger
lock
The throttle trigger lock is
designed to prevent the
throttle from accidentally
being engaged. When the
trigger lock (A) is pressed
into the handle the throttle
(B) is released. When the
grip on the handle is
released the throttle and the
throttle trigger lock return
to their original positions.
This takes place via two
independent return spring
systems. This means that
the throttle is automatically
locked in its "idling"
position.
2. Stop switch
The stop switch should be
used to stop the engine.
3. Blad guard
Reduces the risk of the
hand coming in contact
with the clippers if it slides
off the handle.
WARNING!
Never use a machine with defective safety
equipment. Follow the control,
maintenance and service instructions
described in this section.
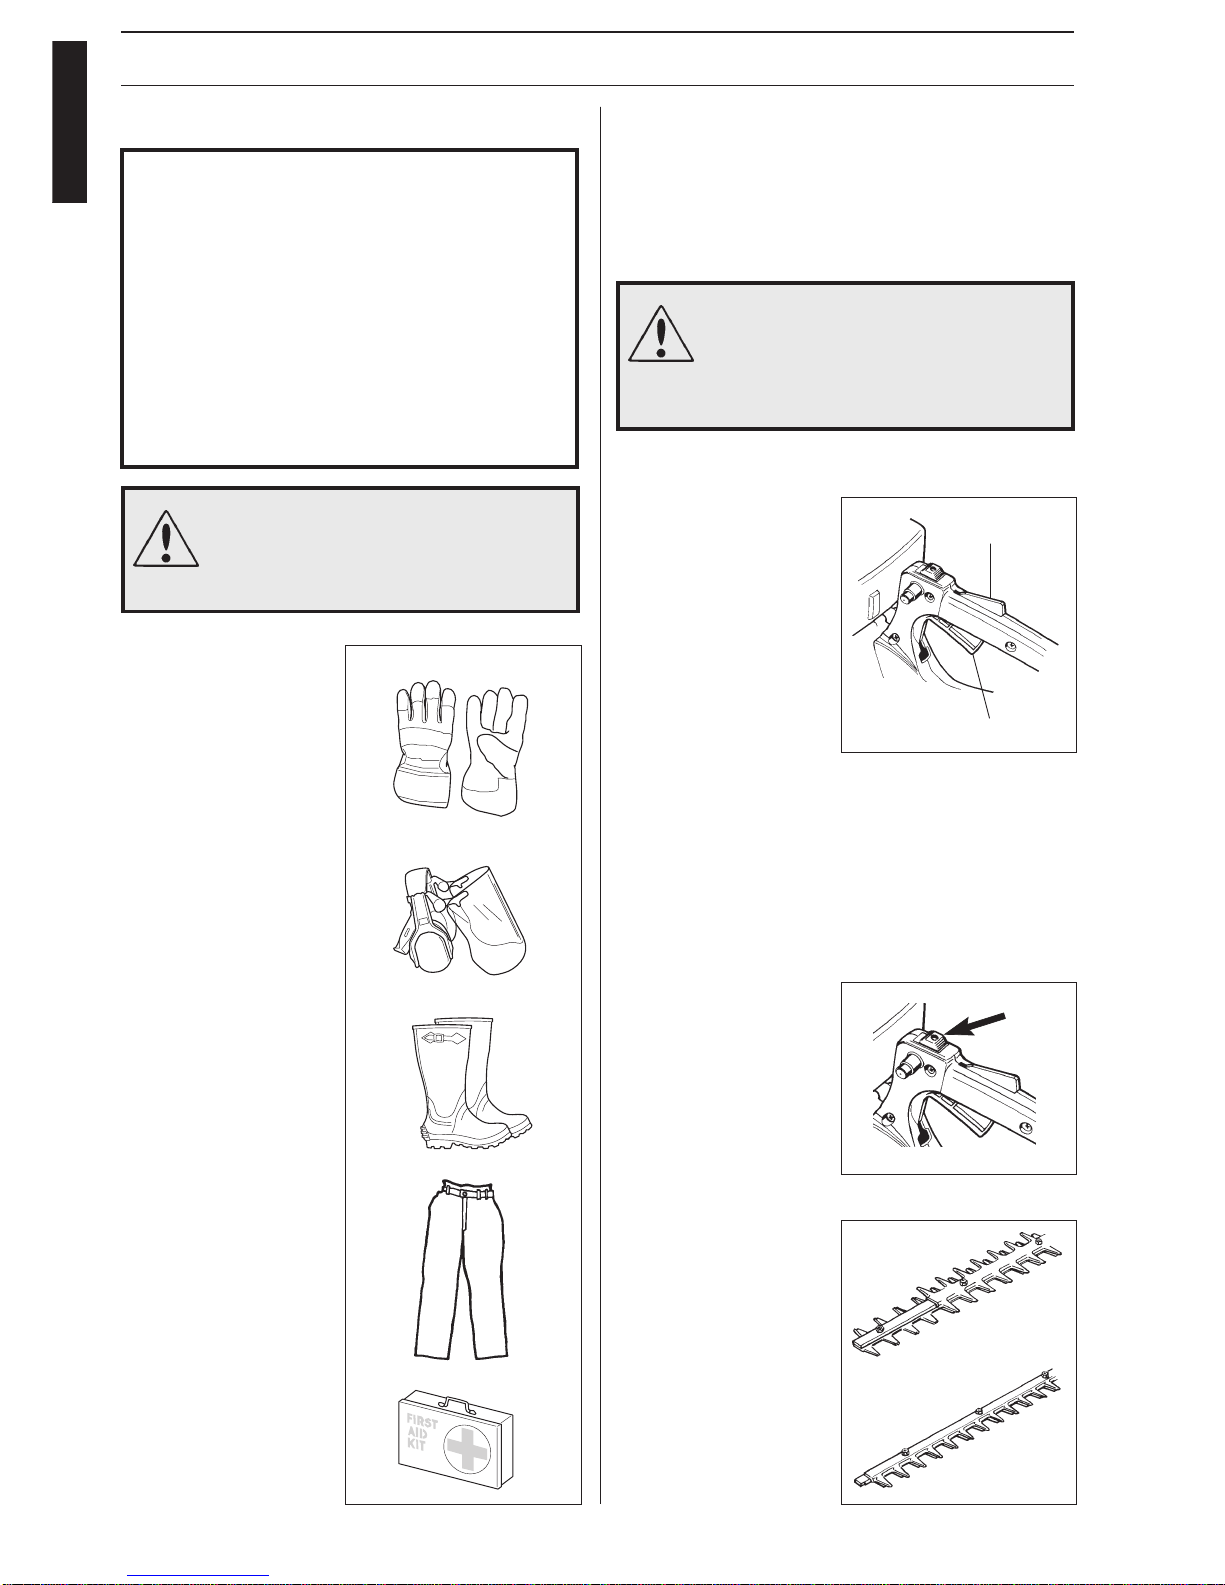
Gloves
Gloves should be worn
when necessary, e.g.,
when assembling cutting
equipment.
Ear protection
Ear protection offering
sufficient dampening
effect should be used.
Eye protection
Blows from branches or
objects thrown by the
rotating cutting
equipment can damage
the eyes.
Shoes or boots
Use anti-slip and sturdy
footwear.
Clothing
Wear clothes made of a
strong fabric and avoid
loose clothing that can
catch on shrubs and
branches. Always wear
heavy-duty long pants.
Do not wear jewellery,
shorts, sandals or go
barefoot. Secure hair so it
is above shoulder level.
First aid kit
A first aid kit should
always be carried by the
operator.
Safety instructions
Personal safety equipment
ENGLISH
WARNING!
Remove your hearing protection as soon
as you stop the engine, so that you can
hear any noises or warning signals.
Page 5
English – 5
SVENSKA
A
4. Hand guard
The guard is fitted in front
of the front handle (mod.
HT 2122 T and HT 2126
T) and has the purpose of
protecting the left hand
from injury, e.g. from twigs
and branches.
Model HT 2130 has a
similar guard.
Safety instructions
5. Vibration damp ing system
Your machine is equipped
with a vibration damping
system, which is designed to
give as vibration-free and
comfortable use as possible.
The machine‘s vibration
damping system reduces the
transfer of vibrations
between the engine unit/
cutting equipment and the
machine‘s handles.
6. Silencer
The silencer is designed to
give the lowest possible noise
level and to direct the
engine‘s exhaust fumes away
from the operator.
The engine‘s exhaust fumes
are hot and can contain
sparks, which can lead to the
outbreak of fire.
It is extremely important that the instructions for checking,
maintaining and servicing the silencer are followed. (See the
section "Control, maintenance and service of the machine's
safety equipment).
WARNING!
During use and for some time after the
silencer is very hot. Do not touch the
silencer if it is hot!
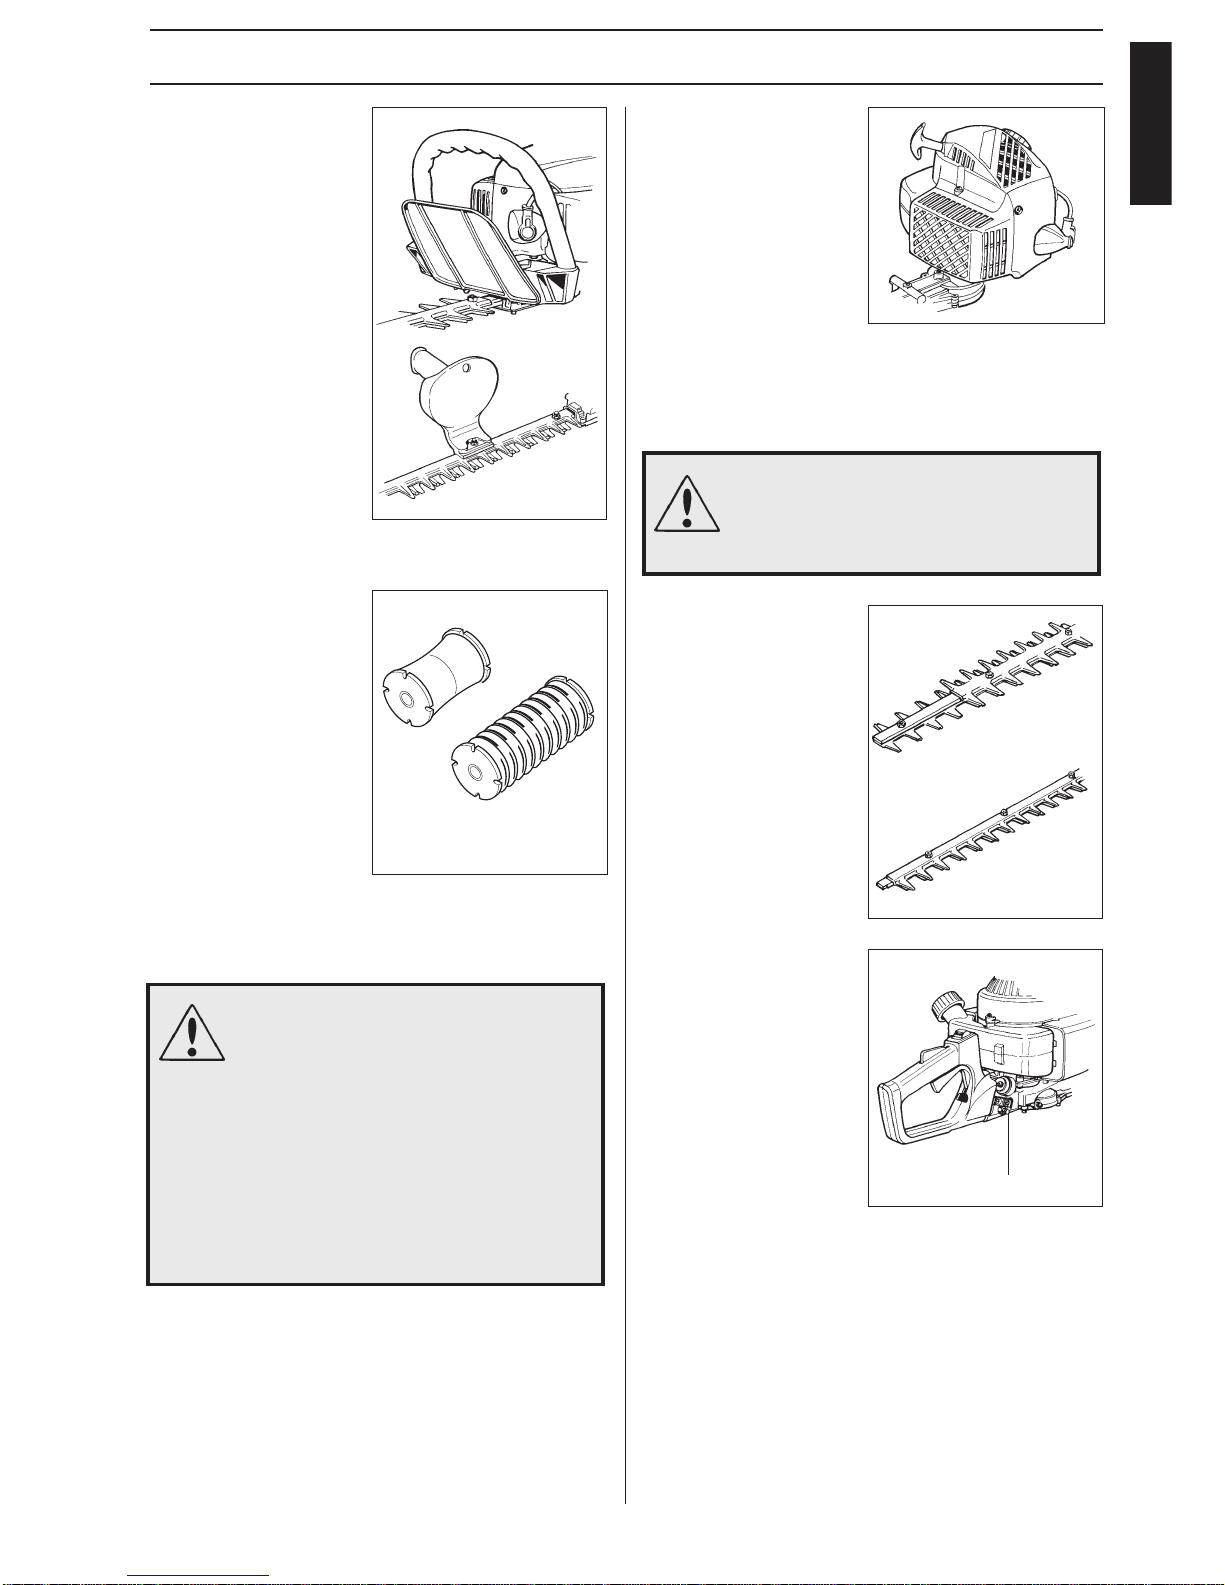
7. Clippers
Make sure that the clippers
are not damaged by cutting
steel wire, nails, or by
excessive force.
NOTE!
During transport and
storage the transport
guard should always
be fitted over the
clippers.
WARNING!
Over exposure to vibrations can result in
blood-vessel or nerve injury to persons
suffering with blood circulation problems.
Seek medical attention if you experience
physical symptoms that can be related to
over exposure to vibrations. Examples of
such symptoms are "numbness", lack of
feeling, "tickling", "pricking", "pain", lack
of or a reduction in normal strength,
changes in the colour of the skin or its
surfaces. These symptoms normally
appear in the fingers, hands or wrists.
On Mod. HT 2122 T and
HT 2126 T the rear grip can
be turned to ensure a good
working position for the
hand, when for example
trimming the side of a
hedge.
NOTE!
Check that the nut (A)
is well tightened after
adjusting the grip.
ENGLISH
Page 6

6 – English
A
B
Safety instructions
Control, maintenance and service of
the machine's safety equipment
IMPORTANT INFORMATION
• All service and repairs to the machine require
special training.
• This applies especially to the machine's safety
equipment. If the machine does not meet any of
the controls listed below you should contact your
service workshop.
• The purchase of one of our products guarantees
that professional repair and servicing will be
carried out on it. If the point of purchase is not
one of our servicing dealers, please ask for
details of the closest service workshop.
1. Throttle trigger
lock
• Check that the throttle
(B) is locked in the
“idling position“ when
the throttle trigger lock
is in its original position.
• Press in the throttle
trigger lock (A) and
make sure it returns to
its original position
when released.
• Ensure that the throttle
and throttle trigger lock
move easily and that
their return spring
systems function.
• Start the machine and
apply full throttle.
Release the throttle and
check that the cutting
equipment stops and
remains at a standstill. If
the cutting equipment
rotates with the throttle
in the idling position
then the carburettor‘s
idling setting must be
checked. See chapter
“Maintenance“.
3. Vibration damping system
• Check the vibration
damping elements
regularly for material
cracks and distortion.
• Check that the vibration
damping elements are
securely attached
between the engine unit
and the cutting
equipment.
4. Silencer
• Never use a machine that
has a defective silencer.
• Check regularly that the
silencer is secure.
5. Cutting equipment
This section describes how through correct maintenance and
through using the right type of cutting equipment you can:
• Ensure maximum clearing capacity.
• Increase the service life of the cutting equipment.
A. Only use the
recommended clippers!
B. Keep the clippers well
oiled and correctly
maintained! Insufficient
oiling increases wear.
C. Check that the screws
which hold the clippers
together are always tight.
2. Stop switch
• Start the engine and
make sure that the
engine stops when the
stop switch is moved to
the stop position.
ENGLISH
Page 7

English – 7
SVENSKA
45°
6. Blade and hand guard
Sharpening of
the clippers
It is important that the
clippers are always sharp to
ensure full cutting capacity
and clean cuts.
Dismantle the blade guard
and use a plain file to
sharpen the teeth. The filing
angle should be 45°.
Safety instructions
WARNING!
Never use a machine with defective safety
equipment. The safety equipment should
be maintained as described in this section.
If your machine does not meet any of
these controls you should contact your
service workshop.
Check the clippers each time
they are used for:
• Damage and wear to the
the teeth.
• Wear on the blade’s
guide slots, screws and
washers.
• Warping of the blade.
• Oiling of the blade and
gear case.
See chapter ”Maintenance”
for appropriate measures.
Checking the clippers
WARNING!
Defective clippers can increase the risk of
accidents.
IMPORTANT INFORMATION
• The machine is only designed for cutting hedges.
• The only accessories to be used with the engine
as a drive source are the cutting units we
recommend.
• Never use the machine if you are tired, if you
have consumed alcohol, or if you are taking
medicines that can affect your sight, your
judgement or the control of your body.
• Use personal safety equipment. See the section
"Personal safety equipment".
• Never use a machine that has been modified so
that it no longer corresponds with the original
design.
• Never use a machine that is faulty. Follow the
maintanence, control and service instructions
in this Operator's Manual.
Some maintenance and service actions should
be carried out by trained and qualified
specialists. See the chapter
"
Maintenance"..
• All covers and guards must be fitted before
starting the machine. Check that the spark plug
cap and HT lead are not damaged, otherwise
you could get an electric shock.
General safety instructions
Check that the blade guard
is secure and not damaged.
Check that the left and right
hand guard are in good
condition without visible
defects, e.g. cracking.
ENGLISH
Page 8

8 – English
Safety instructions
A. Start
• Never start the engine indoors. The toxic exhaust gases are
hazardous to inhale.
• Make sure that there is no risk of people or animals coming
in contact with the clippers.
• Place the machine on the
ground and make sure that
the clippers are free from
branches and stones.
Press the engine to the
ground with the left hand.
Grip the start handle with
the right hand and slowly
pull out until a resistance
is felt (start hooks engage).
Now give a quick and
strong pull.
B. Fuel safety
• Always use a fuel contai-
ner with an anti-spill
valve.
• Never fill the machine
while the engine is
running.
• Provide good ventilation
when filling or mixing
fuel.
• Move the machine at least
3 m from the filling
position before starting.
• Never start the machine.
a) If you have spilt fuel on
it:
Wipe up all spillage.
b) If you have spilt fuel on
yourself or your clotches:
Change your clotches.
c) If there is a fuel leak:
Replace damaged parts.
Make regular checks for
leakage from the fuel cap
and the fuel supply pipes.
C. Storage
• Store the machine and fuel so that any leakage or fumes
do not risk coming into contact with sparks or naked
flames. For example, electric machines, electric motors,
electrical switches/power switches, heaters or the like.
• When storing fuel approved containers intended for this
purpose must be used.
• When storing the machine for long periods the fuel tank
must be emptied. Contact your local petrol station to find
out how to dispose of excess fuel.
• The guard over the clippers should always be fitted when
the machine is not in use.
WARNING!
Exercise great care when handling fuel.
Bear in mind the risk of fire, explosions
and inhaling fumes.
IMPORTANT INFORMATION
• This section takes up the basic safety precautions.
• If you encounter a situation where you are
uncertain how to proceed you should ask an
expert. Contact your dealer or your service
workshop.
• Avoid all usage which you consider to be beyond
your capability.
1. Observe your surroundings.
• To ensure that people,
animals or other things
cannot affect your
control of the machine.
• To ensure that the above
mentioned do not come
into contact with the
cutting equipment or
objects that can be
thrown by the cutting
equipment.
WARNING!
Never use a machine without the
possibility of calling for help in the
event of an accident.
General working instructions
Basic safety precautions
ENGLISH
Page 9

English – 9
SVENSKA
15–30°
A
Safety instructions
2. Avoid usage in unfavourable weather conditions. For
example, thick fog, heavy rain, strong winds or extreme
cold, etc. To work in bad weather conditions is tiring and
can create dangerous circumstances, e.g. slippery surface.
3. Make sure you can walk
and stand safely Look
out for any obstacles
with unexpected
movement (roots,
stones, branches, pits,
ditches, etc.). Take great
care when working on
slopin ground.
When trimming the top of a
hedge the clippers should be
held so that the blade is at
an angle of between 15° and
30° to the horizontal plane.
Swing the clippers in an arch
over the hedge so that cut
branches are swept off.
To ensure a good working
position for the hand when
trimming hedge sides the
rear grip can be turned on
mod. HT 2122 T and HT
2126 T.
Release the nut (A) and turn
the handle 90° in either
direction.
NOTE!
Remember to tighten
the nut well after
making the adjustment.
When trimming the sides of
the hedge hold the blade
vertically and swing the
clippers in an arch.
4. When moving over longer distances and transporting the
transport guard should be used.
5. Never put the machine down with the engine running
unless you have good sight of it.
6. Never allow children to use the machine.
Basic working technique
• Always cut with the engine at full throttle.
• Let the engine idle after each work phase. Full revs without
loading the engine can seriously damage the engine.
• Observe great caution when working close to power lines
and wire fencing.
ENGLISH
Page 10

10 – English
What is what? – Technical data
Owner's manual
ENGLISH
18
HT 2122 T
HT 2126 T
Page 11

English – 11
SVENSKA
What is what? – Technical data
Owner's manual
ENGLISH
HT 2130
Page 12

12 – English
Petrol
• Use unleaded or quality
leaded petrol.
• The lowest recommended
octane rating is 90. If you
run the engine on a petrol
with a lower octane rating
than 90 so-called
"knocking" can occur.
This leads to an increased
engine temperature,
which can result in a
serious engine breakdown.
• When working at
continuous high revs a
higher octane rating is
recommended.
Assembly – Fuel handling
Assembly
WARNING!
The hedge trimmers must only be used
with the clippers which are fitted on the
original machine.
Model HT 2122 T and HT
2126 T is delivered assembled
and ready for use.
Model HT 2130 is delivered
with the front handle loose.
Fit it on the appropriate screw
on the bar. Use the screw and
the hole in the handle which
gives the best working
position.
WARNING!
The machine is fitted with a two-stroke
engine and must always be run on a
mixture of petrol and two-stroke oil. To
ensure the correct mixture proportions it
is important to measure the quantity of oil
accurately. When mixing small amounts of
fuel small discrepancies in the amount of
oil has a great bearing on the proportions
of the fuel mixture. Always provide good
ventilation when handling fuel.
Two-stroke oil
• For the best results use Jonsered two-stroke oil. Mixing
ratio 1:50 (2%).
• If Jonsered two-stroke oil is not available you can se a high
quality two-stroke oil intended for air cooled engines.
Contact your dealer when selecting an oil.
Mixing ratio: 1:33 (3%).
• Never use two-stroke oil intended for water cooled
outboard motors, so-called outboard motor oil.
• Never use oil intended for four-stroke engines.
Mixture
• Always mix petrol and oil in a clean container intended for
petrol
• Always start by filling half the quantity of petrol required.
Then add the entire oil quantity. Mix (shake) the fuel
mixture. Fill the remaining quantity of petrol
• Mix (shake) the fuel mixture carefully before filling in the
machine's fuel tank.
• Do not mix fuel for more than approx. 2 months use.
• If the machine is not used for a long period of time, the
fuel tank should be emptied and cleaned.
Petrol Oil
Lit. Lit.
2 % (1:50) 3 % (1:33)
5 0,10 0,15
10 0,20 0,30
15 0,30 0,45
20 0,40 0,60
NOTE!
Do not tighten the screw so tightly that the blade is clamped
tight. See chapter "Maintenance" for information on blade
adjustment.
ENGLISH
Model HT 2130 can be
fitted with a collector plate
for cut material, fitted on
the cutter member.
Remove the three main nuts
on the cutter member.
Tighten the bolts and then
unscrew them a half turn.
Place the plate over the bolts
and tighten the nuts. Make
sure that the bolts do not
turn when tightened!
Page 13

English – 13
SVENSKA
1
1
2
SVENSKA
3
Fuel handling
Start and stop
Cold engine
1. Push the short-circuiting
switch (1) to "ON"
(forwards).
2. Push the choke control
to closed position (2).
3. Press in the air purge(3)
3 – 4 times.
Varm engine
Use the same starting
procedure as for the cold
engine, but do not set the
choke control in the choke
position.
Start
Grip the starter handle and
slowly pull out the starter
cord until a resistance is felt
(starter prawl engages).
Now give a quick and strong
pull.
NOTE!
Do note pull the starter cord
out completely and do not
release the starter cord from
the fully extended position.
This can damage the
machine.
Move the choke control
back to the initial position
immediately when the
engine fires, and make
repeated attempts to start
until the engine starts.
Fuel handling – Start and stop
Fuelling
WARNING!
The following precautions reduce the
risk of fire:
Do not smoke or place any source of
heat in the vicinity of the fuel.
Never refuel when the engine is running.
Open the fuel cap slowly when fuelling
so that any over pressure is released
slowly.
Tighten the fuel cap carefully after
refuelling.
Always move the machine from the
fuelling place before starting.
WARNING!
• Always move the machine from the
filling position before starting.
• Place the hedge trimmers on a firm
surface and make sure that you
are standing in a well-balanced
position before starting the engine.
• Make sure that no unauthorised
persons are in the working area.
• Check before starting that the
clippers cannot bite into any
object.
WARNING!
Beware of the moving cutting blades
when the engine is started.
• Clean around the fuel
cap. Contamination in
the tank can disrupt
operations.
• Ensure that the fuel is
well mixed by shaking
the container before
filling the tank.
ENGLISH
Page 14

14 – English
0,5 mm
Start and stop – Maintenance
Stopping
The engine is stopped by
switching off the ignition.
Move the stop switch
backwards to the STOP
position.
Carburettor setting
In the carburettor, fuel is
mixed with air. When the
engine is test run at the
factory, the carburettor is
basically adjusted. A further
adjustment may be required,
according to climate and
altitude. The carburettor has
one adjustment possiblity:
T = Idle speed adjustment
screw ”IDLE”.
Adjustment (T) ”IDLE”
Check that the air filter is clean.
When the idle speed is correct, the cutter will not move.
If adjustment is required, close (clockwise) the T-screw, with
the engine running, until the cutter starts to move . Open
(counter-clockwise) the screw until the cutter stops. You have
reached the correct idle speed when the engine runs smoothly
in all positions well below the rpm when the cutter starts to
move.
If the cutter still moves after idle speed adjustment, contact
your service workshop.
WARNING!
When the engine is idling the cutter must
under no circumstances move.
Air filter
The air filter must be
cleaned from dust and dirt
in order to avoid:
• Carburettor malfunctions.
• Starting problems.
• Engine power reduction.
• Unnecessary wear on the
engine parts.
• Abnormal fuel
consumption.
Cleaning/changing the air filter
Clean the filter after every 25 hours or more regularly if
operating conditions are exceptionally dusty.
Dismantle the air filter cover and remove the air filter. Wash
in clean, warm soapy water.
Ensure that the filter is dry before refitting.
An air filter used for a long period of time can never be
cleaned completely. Therefore it is necessary to replace the
filter from time to time with a new filter. A damaged air filter
must always be replaced.
Spark plug
The condition of the spark
plug is affected by:
• An incorrect carburettor
setting.
• An incorrect fuel mixture
(too much oil).
• A dirty air filter.
These factors cause deposits
on the spark plug electrode
that may result in
malfunction or starting
difficulties.
If the machine is low on power, difficult to start or runs
poorly while idling always check the spark plug first.
If the spark plug is dirty, clean it and at the same time check
that the electrode gap is 0.5 mm. The spark plug should be
changed after about one month of operation or earlier if
necessary.
NOTE!
Always use the recommended type of spark plug. An incorrect
spark plug can damage the cylinder/piston.
ENGLISH
Page 15

English – 15
SVENSKA
3 r
4 r
3 r
Maintenance
WARNING!
• The return spring is tensioned in the
starter housing and can with negligent
handling spring out and cause injury.
• Observe care when replacing the starter
spring or starter line. Use protective
glasses.
Replacement of
starter cord and/
or return spring
1. Remove the 4 screws
which hold the starter
device, and lift off.
2. Make sure that the
return spring is
untensioned and
dismantle the screw
which holds the pulley.
Lift off the pulley.
3. Remove the defective
return spring replace
with a new one.
WARNING!
The spring can with negligent handling
spring out and cause injury. Use
protective glasses.
Lubricate the spring with
thin motor oil.
1. Insert a new starter cord
through the hole in the
starter and anchor it in
the pulley and starter
handle with a knot.
2. Wind 4 turns on line on
the pulley anti-clockwise.
3. Place the pulley over the
journal and make sure
that the return spring
grips in the pulley. Fit
the centre screw with the
accompanying washer.
4. Lift up the cord in the
recess on the pulley and
turn the wheel about 3
turns anti-clockwise to
tension the return spring.
5. Check that the pulley
can be turned an
additional 1/2 turn when
the starter cord is fully
withdrawn.
6. Fit the starter by first
pulling out the starter
cord a little and then
placing the starter in
position against the
crankcase. Now release
the starter cord slowly so
that the start hooks grip
in the pulley.
7. Tighten the screws which
hold the starter.
Silencer
The silencer is designed to
dampen the noise level and
to direct the exhaust fumes
away from the user. The
exhaust fumes are hot and
can contain sparks, which
can result in fire if the
exhaust fumes are directed
towards a dry or
inflammable material.
NOTE!
Never use a machine with a
defective silencer.
ENGLISH
Page 16

16 – English
1/2 r
1
2
1
1
4
2
3
Blades
The blades have been fitted
in the blade guide with four
resp. five screws. These
screws must be tightened so
that the clearance is
sufficient for the blades to
move freely.
When there is not
enough clearance:
The blades cannot move
freely. There is too much
friction on the sliding
surfaces.
When there is too
much clearance:
The blades do not cut
efficiently.
Adjusting the
clearance:
1. Release the nuts on the
blades.
2. Tighten the screws as far
as possible, and then
release the screws a half
turn.
3. Tighten the nuts without
turning the screws.
Replace the screws in the
blade guide as soon as they
have been worn or damaged.
Replace the blades as soon as
they have been damaged.
NOTE!
Lubricate the sliding surfaces
of the blades with machine
oil.
Maintenance
Cooling system
To maintain as low an
operating temperature as
possible the engine is
equipped with a cooling
system.
The cooling system consists
of:
1. An air intake on the
starte unti.
2. Cooling fins on the
flywheel.
3. Cooling fins on the
cylinder.
4. Cylinder cover (leads
cold air onto the
cylinder).
WARNING!
Gloves should always be worn when
handling the blades.
Gear case
Apply a good quality lithium
based grease through the
grease fitting until a small
amount comes out between
the cutter blades and the gear
case. Lubrication shold be
applied at 50 hour intervals
and more frequent at heavy
use.
Clean the cooling system using a brush at least once a week,
in difficult conditions more often.
A dirty or blocked cooling system leads to the
engine overheating resulting in damage to the
cylinder and piston.
Maintenance schedule
Below you will find some general maintenance instructions.
For futher information please contact your service dealer.
Daily maintenance
• Clean the exterior of the hedge trimmer.
• Check the blade guard and hand guard for damage or
cracking.
• Check that the teeth on the blades are sharp and
undamaged.
• Check that the blade nuts are sufficiently tightened.
• Check that nuts and screws are sufficiently tightened.
Weekly maintenance
• Check the starter, especially cord and return spring.
• Clean the exterior of the spark plug.
• Remove the spark plug and check the electrode gap. Adjust
it to 0.5 mm, or change the spark plug.
• Clean the cooling fins on the cylinder and check that the
air intake at the starter is not clogged.
• Clean the air filter.
• Check that the gear case is filled with grease.
Monthly maintenance
• Rinse the fuel tank with gasoline.
• Clean the exterior of the carburettor and the space around
it.
• Clean the fan and the space around it.
ENGLISH
 Loading...