

Page 1
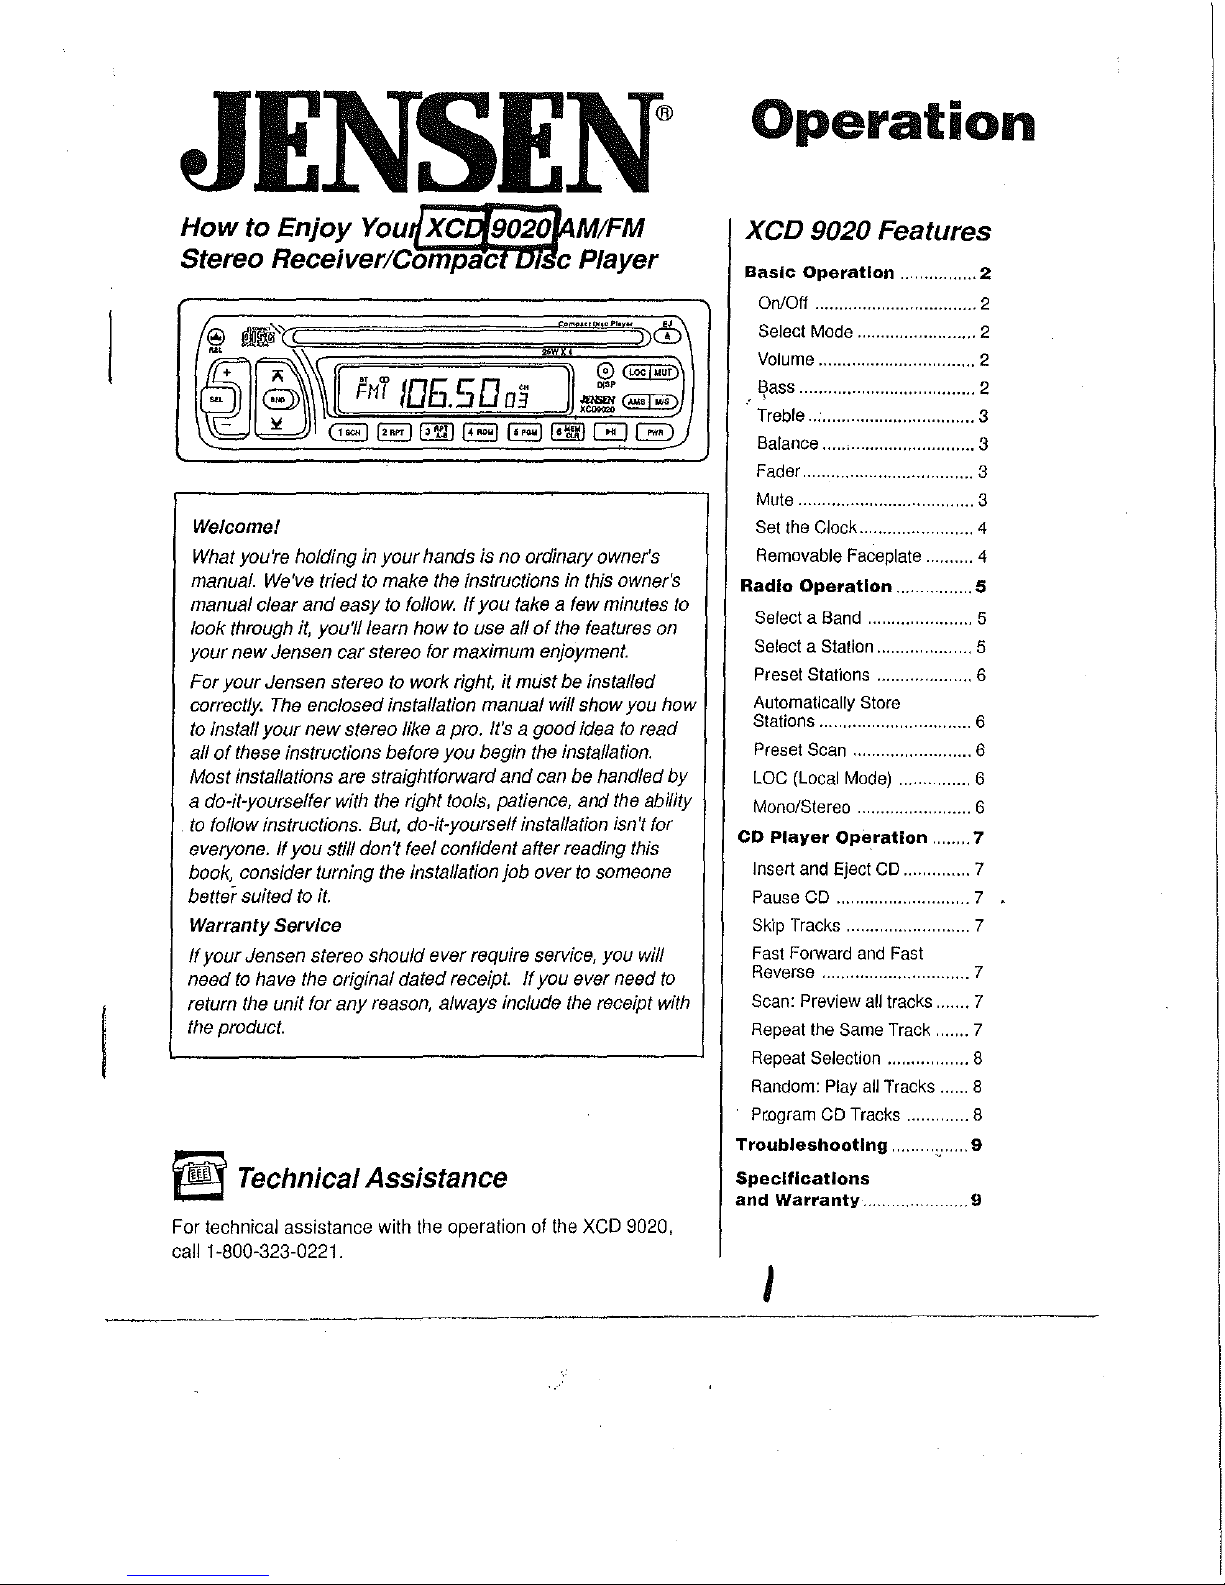
JENSEN
Operation
M/FM
Welcome!
What
you're holding
manual.
manual clear and easy
look through
your new Jensen car stereo for maximum enjoyment.
For your Jensen stereo
correctly.
to
all
Most installations are straightforward and
a do-it-yourselfer with
to
everyone.
book,
better suited
Warranty Service
If
your Jensen stereo should ever require service, you will
need
return
the
M
For technical assistance with the operation of the
call 1-800-323-0221.
We've
it,
The
install your new stereo like a pro.
of
these
instructions before you begin
follow instructions.
If you still don't feel confident after reading this
consider turning
to
to
have
the
the
unit for any
product.
Technical
in
your hands is
tried
to
make
the
to
follow.
you'll learn how
to
work right, it must
enclosed installation manual will show you how
the
right tools, patience, and
But,
do-it-yourself installation isn't for
the
installation job over
it.
original dated receipt.
reason,
always include
no
ordinary owner's
instructions
If you
take a few
to
use all
It's
a good idea
If
in
this
of
the
features
be
installed
the
installation.
can
be
to
you ever need
the
Assistance
XeD
owner's
minutes
handled by
the
someone
receipt
to
read
ability
9020,
to
on
to
with
xeD
BasiC
.'
Radio
CD
Troubleshooting..
Specifications
and
9020 Features
Operation.
OnlOff .................................. 2
Select
Mode
......................... 2
Volume
~ass
Treble
Balance
Fader
Mute
Set
Removable
Select a Band
Select a Station
Preset
Automatically
Stations ................................ 6
Preset
LOC
Mono/Stereo
Insert
Pause
Skip
Fast
Reverse
Scan:
Repeat
Repeat
Random:
Pr.ogram
................................. 2
..................................... 2
................................... 3
..... , .......................... 3
.................................... 3
..................................... 3
the
Clock
....................... 4
Faceplate .......... 4
Operation
Stations .................... 6
Scan
(Local
Player
Warranty..
Operation
and
Eject
CD
............................ 7
Tracks
FOlWard
............................... 7
Preview
the
Selection
Play
CD
............... 5
...................... 5
.................... 5
Store
......................... 6
Mode)
. . ........... 6
....................... 6
CD
.............. 7
......................... 7
and
Fast
all
tracks
Same
Track
................. 8
all
Tracks
Tracks
. ........... 9
........ 7
....... 7
....... 7
...2
...... 8
...
. .... 9
8
J
Page 2
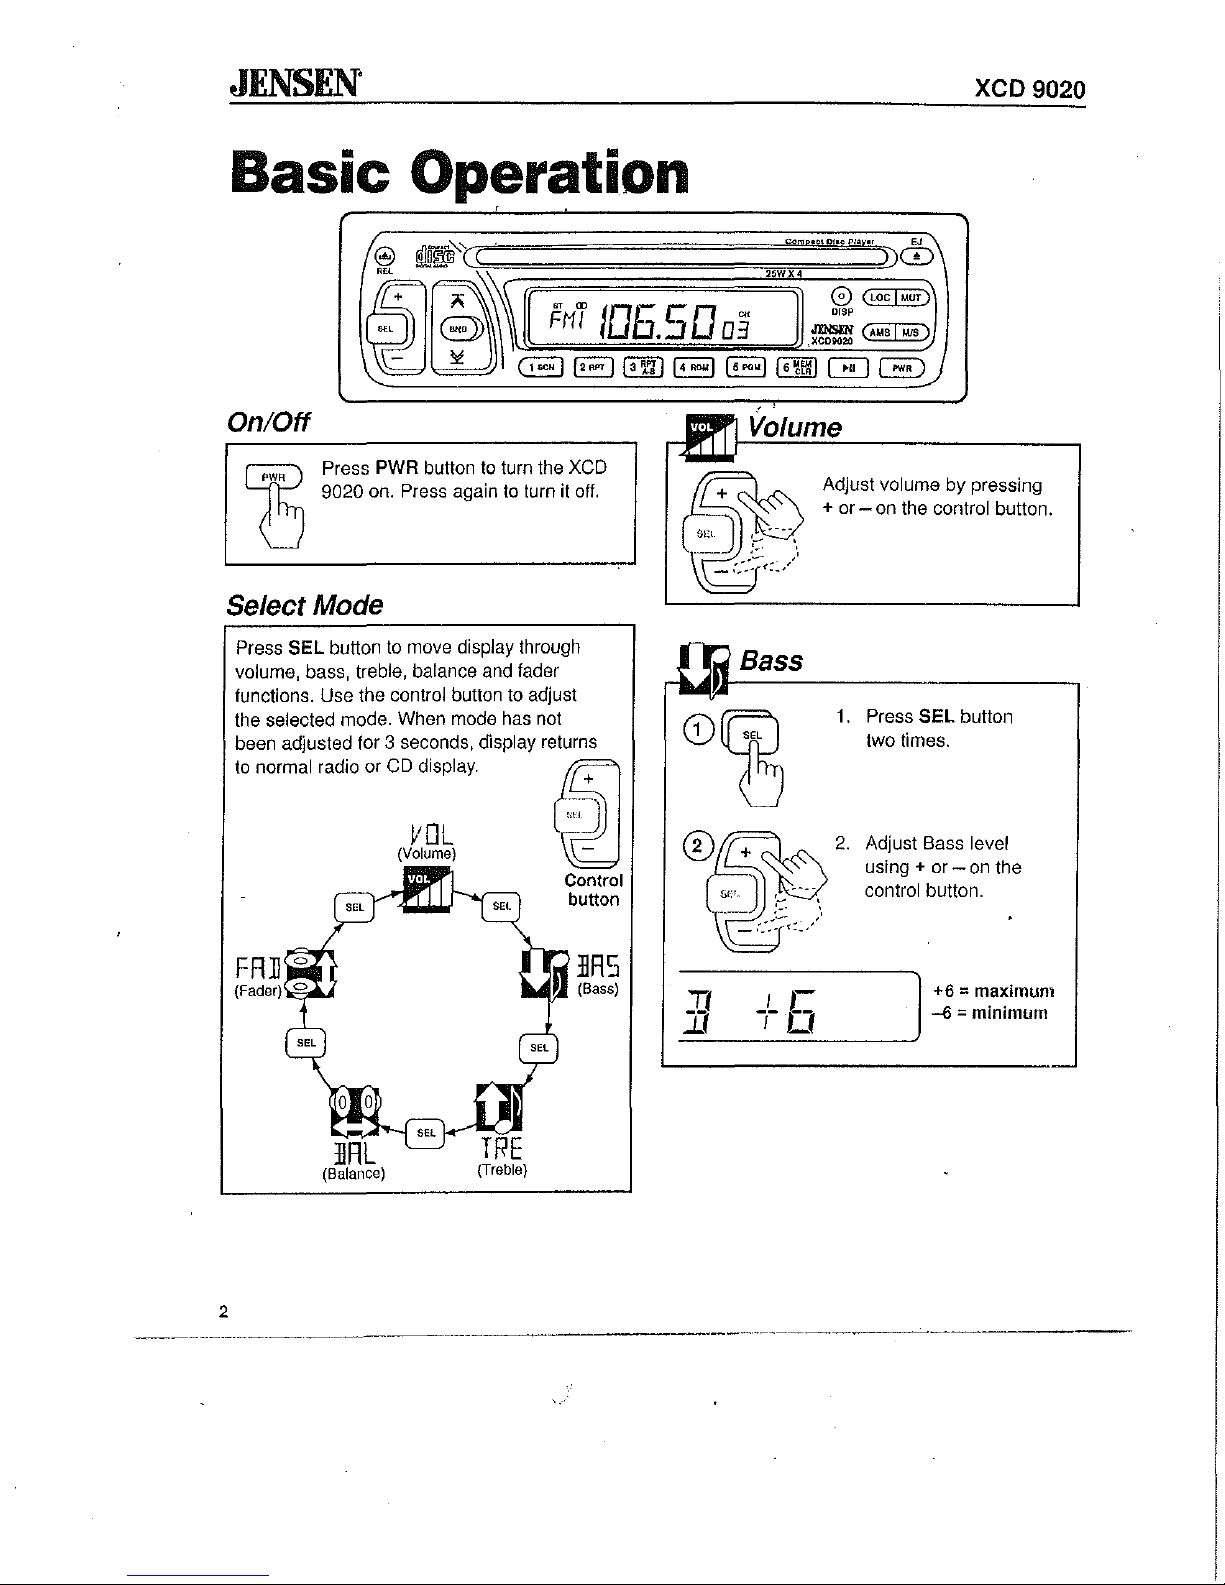
JENSEN'
xeD
9020
Basic Operation
On/Off
~
Press PWR button
to
turn
the
XeD
(]
9020
on.
Press
again
to
turn
it
off.
SeJectMode
2
Press SEL button
to
move
display through
volume, bass, treble, balance
and
fader
functions. Use the control button
to
adjust
the selected mode.
When
mode
has
not
been adjusted for 3 seconds, display returns
,.
oo,m.'
,,",.
•
CO
'''''"
~J'l
VDL-_
(Volume)
FR]
Control
button
lIRS
(Sass)
Bass
Adjust volume by pressing
+
or -on
the control button.
1.
Press SEL button
<D~
®~0)f?'
two times.
Adjust Bass level
using +
or -on
the
control button.
Page 3

xeD
9020
JENSEN"
Treble
1.
Press SEL button
three times.
Treble level
Adjust
T
using + or control button.
I L J
+6
=
on
maximum
1- 0 -<i = minimum
------~~------
o 0 Balance
Press SEL button four
CD~1.
sec
times.
Adjust sound
2.
and right using + or -
the control button.
balance left
the
on
Fader
CD~
2
0
or
Mute
F12
R12 = Rear
Press MUT button to silence the
receiver. MUTE appears in the
display. Press again to resume
listening.
1.
Press SEL button five
times.
Adjust sound
front
.
and
- on the control button.
F
= Front speakers only
R
balance
rear
using + or
12
speakers only
12
or
+
R
R12
L
12
L
12
= Right speaker only
= Left speaker only
12
3
Page 4

JENSEN"
4
Set the Clock
Press
DSP
to
display clock.
eD
~
1.
Press and hold DSP
osp
button for two seconds
2
Se.
until colon
and
AM
flash.
CD
M
2.
H
Press
fii;
to
change minutes,
~
to
change
hours.
Note: There
is
no
PM
indicator
in
the
display, only AM.
xeD
9020
Removable Faceplate
1.
Press REL button and pull gently on left
side of faceplate
to
remove.
2.
To
reinstall, slip right edge into radio.
3.
Press into place.
4.
Press PWR
to
play radio
or
tape.
When front panel is removed and ignition
is
off, a red LED on the front of the unit will flash
indicating that the front panel has been removed.
Flashing
LED
Page 5

xeD
9020
• Radio Operation
@
@J~'«
+
. ~
."
~
8'>
,d
sr
Q)
FHI
105.:3003
r:
CIt
-"
comp''''
1 :
0100
0
DISP
P14yo,
'"
))0
(LOC!MUT)
(A",I",,)
JENSEN'
~~
Select a Band
"
'FH
If
J
'IFH2IFH3f
b
Press BND button to change radio between
FM
three
band stores up to six preset stations.
bands and two AM bands. Each
§)"'"
t
, 1
RH
IJ
RH2
,,~,
j
..
-II'··II·'" 0
Select a Station
C"')
J
Manual Tune
Press a tune button (:i
or
;0;;)
for less than one
second to move the radio
frequency up or down.
Seek
Tuning
Press a tune button
(:i or
;0;;)
for more
than one second to
move to next station
automaticali
y.
5
Page 6
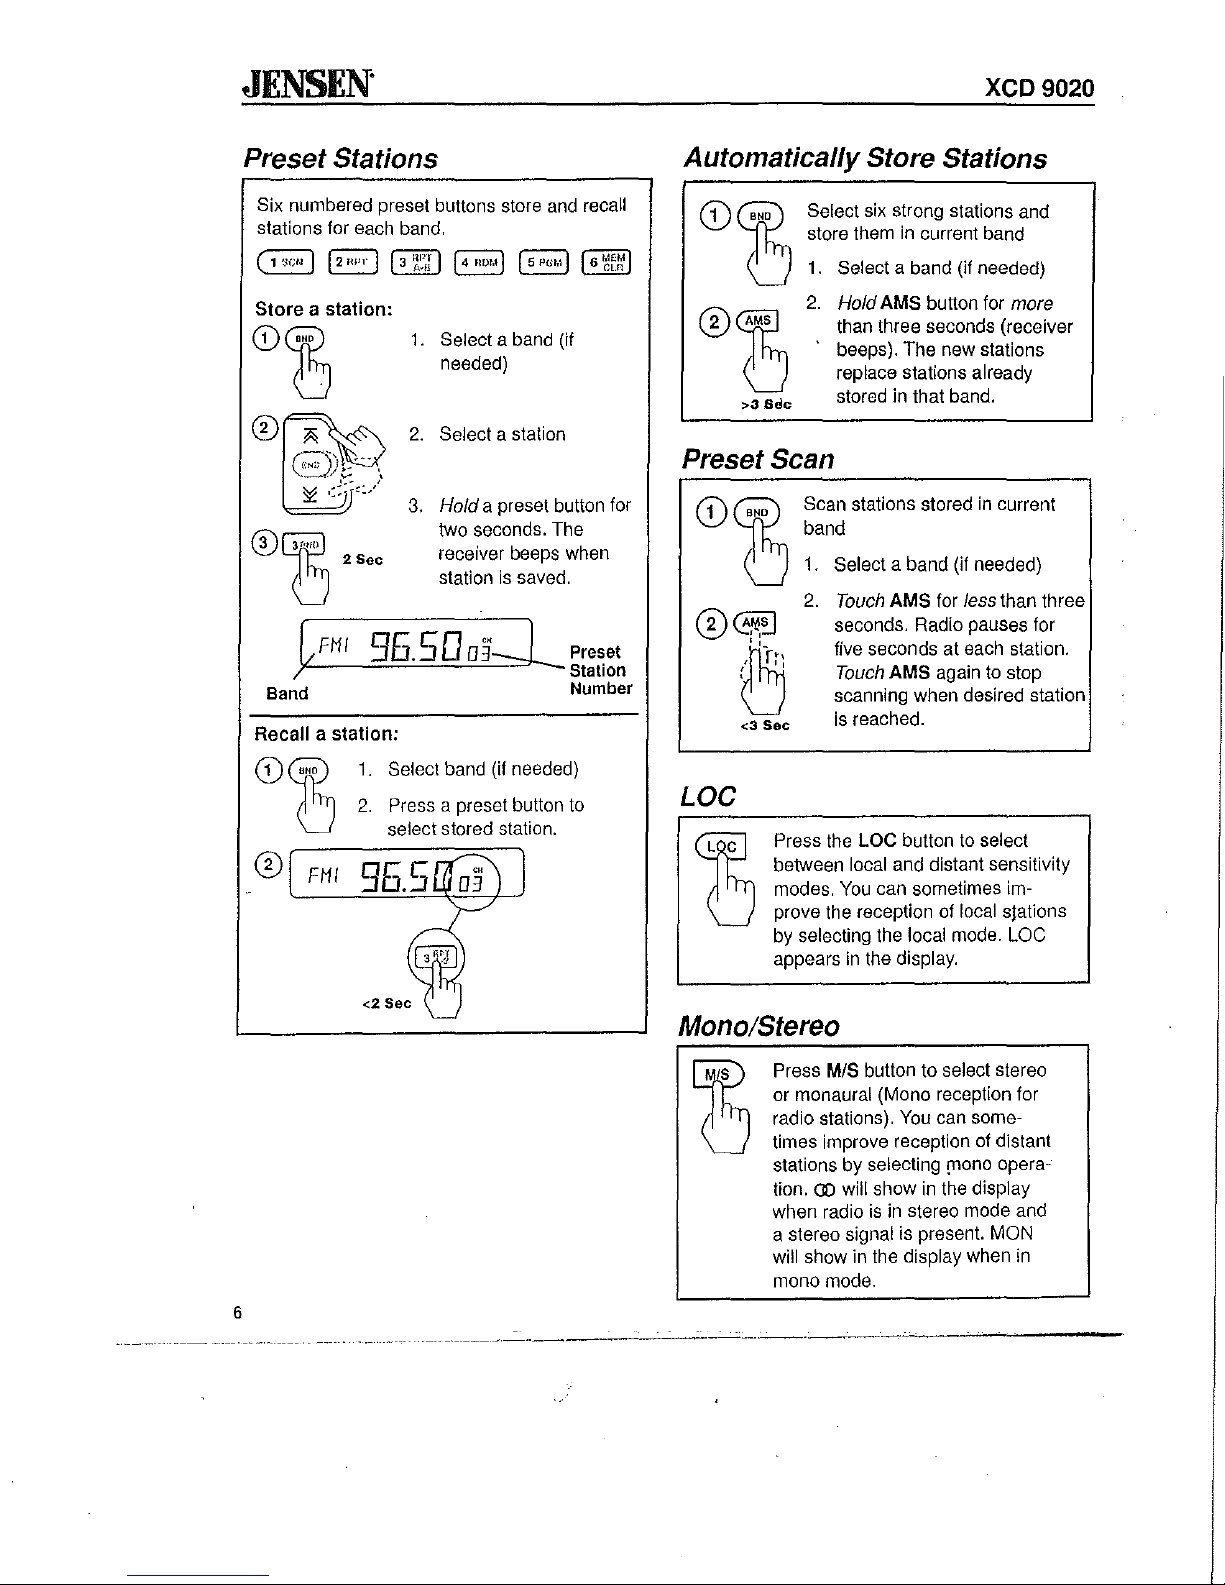
JENSEN'
xeD
9020
Preset Stations
Six numbered preset buttons store and recall
stations for each band.
Store a station:
1.
Select a band (if
<D~
needed)
2.
Select a station
®~
~=)
®Gffl
(]
2Sec
~FMI
Band
Recall a
station:
3.
Hold a preset button for
two seconds. The
receiver beeps when
station
is
saved.
']5.5003'2 Preset
Station
Number
Automatically Store Stations
Select six strong stations and
in
current band
more
>3
Sdc
store them
1.
Select a band (if needed)
2.
Hold AMS button for
than three seconds (receiver
beeps). The new stations
replace stations already
stored in that band.
Preset Scan
<3
Scan stations stored
band
1.
Select a band (if needed)
2.
Touch
seconds. Radio pauses for
five seconds at each station.
Touch
scanning when desired station
is
Sec
reached.
AMS for
AMS again
in
current
less
than three
to
stop
CD
6
FMI
1.
Select band
2.
Press a preset button to
select stored station.
(if
needed)
LOC
Press the LOC button to select
between
modes.
prove
the reception of local slations
by selecting the local mode. LOC
appears
Mono/Stereo
Press MIS button to select stereo
or monaural (Mono reception for
radio stations).
times improve reception of distant
stations by selecting
tion.
(])
when radio
a stereo signal is present.
will show in the display when
mono mode.
local and distant sensitivity
You
can sometimes im-
in
the display.
You
can some-
[I1ono
opera-
will show
in
the display
is
in
stereo mode and
MON
in
Page 7
~XC~D~9~O=20~
____________________________
~JENSEN·
~
Insert
Push a
and
CD
4
~
Insert
label side up
EJ
_
Press'"
eject CD from slot. Receiver switches
to radio operation.
~
CD Player Operation
:25WX4
0
(locl"UT)
D~P
)
JfNS/1N
(""":::5""1-::"15::--)
XC09020
Eject CD
into slot. The
CD
(eject)
to
CD
will begin to play.
stop CD play and
l5I'GMI16~E~1
Skip Tracks
Fast Forward
Scan: Preview a/l Tracks
0 G
Press ~ or ~ to advance to
next track. Track numbers
show
on
display.
and
Fast Reverse
Press and hold ~ or
forward or reverse in audible
search. CD play starts from
when you release the button.
.
~
(0
fast
Pause CD
~II
~
Press
and silence the receiver.
appears
again to resume CD play.
~II
button
to
in
the display. Press
pause
CD
PAUS
play
~II
,
seN
Press SeN
of each track
again to stop scan and listen to track.
to
play first ten seconds
on
current CD. Press
13
Repeat the Same Track
APT
"
Press APT to continuously repeat
same track.
repeat.
Press again to stop
b
.--
..
-
....
-.... -
..
~-.-~--.----
7
Page 8

JENSEN
Repeat Selection (RPT A-B)
The Repeat A-8 function allows
yciu
to con-
tinuously repeat a selection of music.
1.
Press RPT A·B to set the
beginning point (A).
~,
0:00
R
2.
Press
RPT
A·B again to set
the end point (b).
~,
/:25
b
The chosen selection of music will repeat
over and over until
RPT
A·B
is pressed
again.
Random: Playa/l Tracks
8
~
ROM
Press ROM to play
all
tracks
on
CD
in
random order one time.
Press again to stop random play.
XCD9020
Program CD Tracks
Note:
Use Program function to select up to
24
CD tracks to play in any order.
Program works by allowing you to
select a track number for each spot in
the playing sequence. A CD must be
inserted to use Program.
1.
Press ~ or
S!:
to choose
track number.
Press MEM/CLR
to
enter
track number into memory.
Display shows next track
number in sequence. Continue (up to
24
times) for all
desired tracks.
Press PGM to play CD
in
programmed order.
• Driving on bumpy roads may cause CD
player
to
skip.
• Moisture
and
high humidity can cause
malfunction
of
CD player.
• Do not expose CD player
to
extremely
high
or
low temperatures.
• Do not drive with ejected CD in the slot.
-
---~.,-----
.-----.-~-----
..
-.~-
.. -------.----,
..
-
Page 9

Troubleshooting
Problem
ER-1
a~pears
on
disp
ER-2
a~pears
on
disp
ER-3
~pea(s
on
dlsp
CD
skips
much
Can't find
cause
of
problem
ay
ay
ay
100
Cause
Disc reading
malfunction
Disc loading Press RESET button.
or
elect
mal unction
High
temperature
Receiver
mount
solid
or
backstrap
Is
not secure
Corrective Action
Try
disc may
or
dirty
Insert disc and try again
Wait until temperature
returns to normal
Check mounting
Is
not
backstrap,
needed
Call Jensen Technical
Assistance
(1-800-323-0221
a different disc. The
be
damaged
and
tighten
if
)
Specifications
CD
Player
81gnal/noise
Frequency response
Channel separation
O/A
FM
Tuning range ........... .
FM mono sensitivity
50 dB quieting sensitivity (stereo)
Stereo separation @ 1 kHz
AM
Tuning range ................... .
Amplltler
Total
Power output ........
General
Power supply ...... ".""...... 11-16 VDC, negative ground
Speaker output Impedance , ................. " .......................... , 4-8 Ohms
Fuses ....... " ............
Specifications subject to change without notice.
ratio ...
converter ........ .
Tuner
Tuner
system power .......
"".
..
,
,:
...
",
fast blow
..
".,.,.,
.. " .. " ..
.
..
, ... " .......... "
............................. >65 dB
. .................... 16
.
..
87,5 MHz-107.9
................ " .. "
530 kHz-1710 kHz
...........
AGe
(two
1-amp
. 20
.
100 walls peak
.
...
front: 2 x
rear:
and
one 10-amp)
Limited One Year Warranty-USA and Canada
length
of
Electronics shall be
the date of the
Persons
the original owner and any subsequent owners during the
warranty period
an authorized Jensen dealer
warranty service is required,
What
this warranty covers
ship
resulting from accident, misuse, abuse, neglect, product
modification, improper installation, incorrect line voltage,
unauthorized repair or failure
with the product; damage occurring during shipment (claims
must be presented
or other eleclricallnlerferences: any product purchased
outside
has been defaced, modified or removed.
How
U.S.
1-800-323-4815,
and address
will service the product or will advise you
product to a factory service center.
Canadian Purchasers. The product should
to the Jensen dealer from whom it was purchased
such dealer either will service or arrange for service of
the product.
Warranty, This warranty from Recoton Mobile
Protected. This warranty will
Is Covered. Except
In
this product. The following are not covered: damage
USA or Canada, or
You Can Get Service,
Purchasers, Please telephone Jensen at
in
effect for a period of one year from
first consumer purchase,
be
enforceable by
so
long
as
proof of date
is
presented whenever
as
all defects in material and workman-
to
We
of
an
authorized Jensen repair station which
otherwise specified below,
to
the carrier): elimination of car static
on
which the serial number
will either inform you of the name
01
purchase from
follow instructions supplied
to
send the
be
returned
and
If shipment of the product
securely. The original dated bill
Included with the product
What
W.
Will
material expenses required to repair the product, but you
must pay any labor costs for the removal and/or installation
of the product.
service,
Jensen
returned
limitation
Condltlons.
conditions,
ability,
limited In dUration
are
Exclusion
limited to the repair or replacement,
defective product and shall not include incidental or
consequential economic damages
Some states andlor provinces
how long
exclusion or
damages, so the above
apply
10
This warranty gives you specific legal rights,
also have other rights which vary
province
Pay
if
you
must prepay
will
pay the return shipping charges if
to
an
address Inside the USA or Canada.
of
Implied
AU
implied or statutory warranties and
Including warranties or conditions of merchant-
fitness for particular purposes and non-infringement,
of
Certain Damages. Jensen's liability is
an
implied warranty iasts andlor do not allow the
limitation of incidental or consequential
you.
to
province.
is
required, it should
01
as
For.
We
the product is shipped for warranty
the
or
Statutory Warranties
to
the length of this warranty.
limitations
sale must always
proof
of
warranty coverage,
will
pay
lor
initial shipping charges, but
at
our option,
of
any kind.
do
not allow limitations
and
from
state
be
all
labor
and
the
product is
and
exclusions may not
and
you may
to
state and
JENSEN'
.. _ ......
_._
........... _ .... _ ..
Recoton
A Division
A
Lake
©2000 Recolon Audio Corporation
_--------------_.
Mobile
of
Recoton
RECOTON"
1
090
Emma
Mary,
Florida
Electronics
Audio
Corporation
COMPANY
Oaks
Trail
32746
.. " >86
dB
Hz
- 20 kHz
BIUCH
MHz
..
".12
dBf
....
".16
dBf
.
..
40 dB
25W
2 x
25W
packed
be
ot~any
on
t
r
,
Page 10

JENSEN·
How to Install
the
XCH
6RF
6·Disc
Compact
Disc
Changer
~
• •
.
.'
.(oc
Welcome!
What you're holding in
your
hands is
no
ordinary owner's
manual. We've tried to make the instructions
in
this book
clear
and
easy to follow.
For
your
Jensen
CD
changer
to
work right, it must be
installed correctfy. This manual will show you how
to
install
your
new
CD changer like a pro. It's a good idea
to
read all
of
these instructions belore you begin the installation. Most
installations are straightforward and can be handled
by
a
do-it-yourselfer with the right tools, patience, and
the
ability
to follow instructions.
But, do-it-yourself installation isn't for
everyone.
If
you still don't feel confident after reading this
book,. consider turning the installation job over
to
someone
better suited
to
it.
Warranty
Service
If
your Jensen CD changer should ever require selVice, you
will need to have the original dated receipt. If you ever need
to
return the unit for
any
reason, always include the receipt
with the product.
pIDj
Technical
Assistance
For
technical
assistance
with the installation
of
the
XCH
6RF, call
1-800-323-0221.
Installation
Contents
Installation
..
. .... 2
Before
You
Begin Installation ............ 2
Tools
and
Supplies Needed .............. 2
Disconnect Battery ............................ 2
Adapters for Easier
Installation ......... 2
Prepare CD Changer for
Installation ......................................... 2
Choose a Location ........................... 3
Select Horizontal or Vertical
Installation
........................................ 3
Install the Compact Disc Changer .... 4
Wiring
...
.
..
5
•
Connections
........... " ............. " . 5
•
Crimp
Connections
..... " ...
" ........ 5
Wiring Diagram ................................ 6
Install Display .......................... .
.
..
6
Testing ...
Reconnect
Battery
.
. ......... 7
Reset
..
Test
Wiring
..
Specifications
and
Warranty."
. ........ 7
.
...
7
. ... 7
.8
Page 11

JENSEN"
XCH 6RF
Installation
Before
You
Begin Installation
Before you begin, you will need tools, supplies
and
adapters.
It
is
best
to
make sure you have
everything you need before you begin.
Tools
and Supplies
Needed
• Hand tools
• Supplies for making wire connections
(electrical tape, twist-type wire connectors, or crimp-on terminals; for best
results, make soldered
connections)
• Power tools (to drill holes to mount
compact disc changer to vehicle)
Disconnect Battery
Before you begin,
disconnect the battery
negative terminal.
Adapters
for
Easier
Installation
2
1990 and newer GM cars have a small
antenna connector.
You
will need two adapt-
ers when installing this
CD
changer
in
a
newer GM
car.
Prepare
CD
Changer
for
Installation
Remove Shipping Screws
The
XCH
6RF compact disc changer
is
shipped with the shock-absorbing mechanism
secured.
Remove the shipping label and 4 shipping
screws from the sides of the compact disc
changer before installation. Keep the screws,
as they will
be
required
if
you transport the
player again.
""
Label
Cover the screw holes with round self-adhesive labels.
Install Door
Install the door by sliding
on
from the right.
Page 12

XCH 6RF
Choose a Location
Important:
Incorrect instal/ation
can
cause
the
CD
changer
to
"skip." Mount
the
unit firmly
in
place using supplied brackets and
screws.
Select a location for the
CD
changer that:
• Provides sufficient ventilation
• Does not have high temperatures (such
as
the back window or near the heater outlet)
•
Is
not exposed to direct sunlight
• Allows the unit to be located within
15
degrees of horizontal or vertical.
Some possible
locations are under the
dashboard, under a seat,
on
the trunk floor or
hanging under the package shelf
in
the trunk.
The unit
will work best when
it
is
closest
to
the
center of the vehicle.
P==
t
~
Top
t
Il;;;-ll-.~"I
Top
~;iL_,
___
.'~.
-'
.
Horizonlal
Mount
Verti~unt
(preferred
mounting
method)
JENSEN'
Select
Horizontal or
Vertical
Installation
Adjust the compact disc changer's internal
shock-absorbing mechanism for horizontal or
vertical mounting. Selection screws are
located
on
both sides of the compact disc
changer. Incorrect selection may cause
skipping, especially wilen driving over bumps.
Choose Horizontal or Vertical
Mounting
Loosen lock screw. Slide to align with
Horizontal (H) or
Vertical (V) and tighten lock
screw. Repeat for both sides
3
Page 13

JENSEN'
Install
the
Compact
Disc
Changer
Floor Mounting (horizontal or vertical)
1.
Temporarily assemble the compact disc
changer brackets to the disc changer.
2.
Pull back carpet.
3.
With compact disc changer in position, mark
location of brackets
on
floor. Drill
1/6
inch (4.5
mm)
holes through the floor panel.
4.
Unbolt the compact disc changer
from floor brackets.
5.
Mark carpet and cut
an
"X"
for
each hole
you
drilled.
6.
Lay down carpet
and
screw
compact disc changer brackets
to
the holes in the floor. Install
the changer
to
the brackets.
Vertical
/
Hanging Mounting (under package shelf or under dashboard)
XCH 6RF
2
1.
Assemble the compact disc changer brackets
to
the
changer.
2.
With compact disc changer
in
position, mark location
Of~~====::;o"",~~
~~
JD.4
brackets on the parcel shelf or dashboard. /
~
'L
\/
3.
Drill four 1/6 inch (4.5
mm)
mounting
~I
~
__
holes.
/'.....
~
4
4.
Attach compact disc changer using
four
!l5X16 tapping screws.
Page 14

XCH 6RF
JENSEN'
WlU
Important
If wiring connections
Follow
technician.
Wiring
are
made
the
installation instructions
wrong,
carefully,
the
. . -
Connections
Good wire connections are very important for
best sound and
two methods:
Splice
1.
Strip 1/2 inch (12 mm) of insulation from
both wires.
2.
Wrap wires together
3.
Fold wires
:::::g;;;:~'
::
CD
~
long-term reliability. Here
over
Splice
~I
Strip
Wire
112"
(12mm)
Solder
unit
will not operate properly and it could
or
have
the
installation handled by
Crimp Connections
Purchase crimp connectors and crimping
are
tool. Connectors are color coded. This
Jensen radio uses BLUE connectors
gage wire).
1.
Strip 1/4 inch (6mm) of insulation from
both wires.
2.
Insert into connector.
3.
Crimp tightly.
You
can make permanent splices (using
butt connectors) or select connectors that
can
be
removed
and reinstalled.
be
an
experienced
damaged.
(12-14
the
Heal
splice.
wires
~rzf!a
4.
Stretch electrical
Solder
Solder is the best way
takes skill and practice. Splice the wires (as
above).
shown
(not the solder). When
enough, touch the solder
will flow
solder
cal tape tightly
tape
tightly
over
to
connect wires, but
Before taping, heat
the
wires are warm
to
the splice. The
over
the wires. Stretch electri-
over
splice.
CD§
s,';p
w;<e
114'
(6mm)
it
®~
I~
ill
~
'II
5
Page 15

XCH 6RF
JENSEN"
~
Before you finish the installation, you should do the following tests to make sure the wiring is correct
and everything is operating properly.
Reconnect Battery
When wiring is complete,
reconnect the battery
negative terminal.
Reset
Press RESET only when one of these
conditions occur:
" The compact disc changer is first installed
"
"
Testing
~'$_
'"
There is an error in operation (E01, E02,
E03 or E06 may appear
Vehicle power is interrupted (as when
replacing the battery).
on
the display).
._
_
Test Wiring
Load at least two CDs into
the magazine and insert into
changer.
2.
Turn ignition switch on.
should hear the changer
operate, checking
slots.
If
the changer does not
operate, check for proper
connection of red,
black wires.
3.
The display should light.
cable between the modulator and display.
T -
..
4.
Turn
on
the radio and tune to FM station
selected on the modulator (88.7 or 89.1
FM).
You
should hear the CD playing. If
not, check the .antenna connections on
the
modulator.
d's
..
..
If
not, check the
You
all six
yellow and
:[
To
use RESET: .
1.
Open the compact disc changer
use a pencil tip (or other
to
press the RESET button. The compact
disc changer ejects the magazine. Any disc
played
is
being
2.
Rernove
zine.
3.
Reinstall the ernpty magazine. The compact
disc changer returns the compact disc
magazine and ejects the magazine again.
4.
Press RESET again.
not returned
all
compact discs from
non-metallic object)
door,
to
the magazine.
the
then
maga-
to
the
'"'"
BHl
,
•
,oe
If
sound, change the
the modulator. Change the station on the
radio and test again.
'1;1·','"
t_
a radio station interferes with the CD
n,
~2~
.,uo
selected frequency
5.
Press DISC and TRACK
buttons
CD
normally.
connections on the modulator and the CD changer.
to
ensure that the
changer responds
If
not, check cable
on
7
Page 16

Specifications
Frequency response (+/-2dB) .................................................................................... 20 Hz - 20 kHz
Signal/noise ratio ..... ..... .... ....... ....... . .................................................. ?90
Stereo separation @ 1
kHz.
...... . ........................................................................................... ?70 dB
Total harmonic distortion @ 1 kHz .......................................................................................
General
Power supply
....
Dimensions .................
Weight ....................... .
FM
modulator frequency ....... .
, ....... .
. ..................................
11.4" X 3.5" X 7.7" (284mm X 74mm X 186.5mm)
.....
. ......................................... 5.5
. ............................... 88.7 MHz/89.1 MHz
10-16 VDC, negative ground
dB
at 1 kHz
SO.1
%
Ibs. (2.5 kg)
Specifications
Limited
Length
of
Electronics shall be
the date of the first consumer purchase.
Persons
the original owner and any subsequent owners during the
warranty period
an
warranty service is required.
What
this
ship
resulting from accident, misuse, abuse, neglect, product
modification, improper installation, incorrect line voltage,
unauthorized repair or
wittl the product; damage occurring during shipment (claims
must be presented to tile carrier); elimination of car static
or other electrical interferences; any product purchased
outside
has been defaced, modified or removed.
How
U.S.
1-800-323-4815.
and address of an au\tlOrized Jensen ropair station which
will service the product or will advise you
product to a factory s(!rvice center.
Canadian
to the Jensen dealer from whom it was purchased and
such deater either will service or arrange
the product.
Warranty.
Protected.
authorized Jensen dealer is presented whenever
is
Covered.
warranty covers all defects in material and workman·
in
this product. The following are not covered: damage
USA
You Can
Purchasers.
Purchasers.
subject
to
change
without
One Year Warranty-USA and Canada
This warranty from Recalon Mobile
in
effect for a period of one year from
This warranty will be enforceable by
so
long as
proof
of dale of purchase from
Except as otherwise specified below,
failure \0 follow instructions supplied
or Canada, or on which the serial number
Get
Service.
Please telephone Jensen at
We
will either inform you'of the name
to
send
the
The product
SllOUld
for
be returned
service of
notice.
JENSEN'
Recoton Mobile Electronics
A Division
of
Recoton Audio Corporation
RECOTON" COMPANY
A
1 090 Emma Oaks Trail
Lake
Mary,
©199S Recoton Audio Corporation
If
shipment of the product is required, it should be
securely. The original dated bill of sale
included with the product as proof of warranty coverage.
What
We
Will
Pay
For.
material expenses required to repair the product, but you
must pay any labor costs for the removal
of the product.
service, you must prepay the initial shipping ctlarges, but
Jensen will pay the return shipping charges if the product is
returned to
Limitation
Conditions.
conditions, including warranties or conditions of merchantability. fitness for particular purposes and non·infringement,
are limited in duration to the length of this warranty.
Exclusion
limited to the repair or replacement, at our option, of any
defective product and shall not include incidental or
consequential economic damages of any kind.
Sorne states and/or provinces do not allow limitallons on
how (ong
exclusion or limitation of incidental or consequential
damages, so the above limitations and exclusions may
apply to you.
This warranty gives you specific legal rights, and you may
also have other rights which vary from state to
province to province.
If the product is shipped for warranty
an
address inside the USA or Canada.
of
Implied
All implied or statutory warranties
of
Certain
an
implied warranty lasts and/or do not allow
We will pay for all labor and
or
Statutory
Damages.
must
always be
andlor installation
Warrantfes
Jensen's liability is
and
and
stale
Florida 32746
packed
\lw
not
and
Page 17

How
to
Enjoy
Your
XCH
6RF
6-Disc
Compact
Disc
Changer
"-
'-'-~--'f
dO
0
~
/
~
..
, . -
-"\
::: [it" I" r
-"o·,,~)
:~
0'
......
..........oW,o
C§)
@)
=
G5-Cb
Welcome!
What you're holding in your hands
is
no ordinary owner's
manual. We've tried
to
make the instructions
in
this owner's
manual clear
and
easy to follow.
If
you take a few minutes to
look through
it,
you'll learn
how
to
use all
of
the features on
your
new
Jensen CD changer for maximum enjoyment.
For
your
Jensen CD changer
to
work right, it must be installed correctly. The enclosed installation manual will show
you
how
to
install your
new
CD changer like a pro. It's a good
idea
to
read
all
of
these instructions before you begin the
installation. Most installations are straightforward and can be
handled
by
a do-it-yourselfer with the right tools; patience,
and
the ability
to
follow instructions. But, do-it-yourself instal-
lation isn't for everyone. If you still don't feel confident after
reading this book, consider turning the installation job over to
someone better suited to
it.
Warranty
Service
If your Jensen CD changer should ever require service, you
will need
to
have the original dated receipt. If you ever need
to return the unit for any reason, always include the receipt
with the product.
M
Technical
Assistance
For technical assistance with the operation
of
the
XCH
6RF,
call t -800-323-022 t .
Operation
XCH
6RF
Features
Playing
compact
Discs
...
2
Controls
........................................ 2
Power/Start
Playing
....................... 2
Play/Pause
CD
.............................. 3
Select
Disc
..................................... 3
Skip
Tracks
.................................... 3
Repeat
the
Same
Track
................. 3
Intro:
Preview
All
Tracks
................ 3
Program
CD
Playback
.................. 4
Reset
............................................. 4
Loading
the
CD
Changer
........ 5
Insert
compact
discs
in
the
magazine
................................ 5
Remove
compact
discs
from
the
magazine
....................................... 5
Load
the
magazine
into
the
CD
changer ......................................... 5
Troubleshooting
......
Specifications
and
Warranty
...6
.......... 7
Page 18

JENSEN'
XCH 6RF
S Playing Compact Discs
~~--~I-------------
G·OISI;C()I.tPM;Tf>I.<;COWIGfn
f
dO
/~--,
\,.~~~~~
=~=L--------
__
J((
~
r,
INmo~:c
R'~@
Compact Disc Changer
A"'"
I T - 0 S I
Controls
Control the CD changer with the display,
~",
..
'_~
REllOIE
'<1-,.
,0.
....
'0.
...
O
@lJ"
TRAC~
,9
."~
@D
(INTRO)
~
ci)
0
Display
Power/Start Playing
1.
Turn
on
the radio and
tune to
FM
station
selected on the
modulator (88.7 or
89.1 FM).
Leave
in
stereo operation.
2.
Press
PWR
button
once to turn the XCH
6RF
on.
CD will begin
to play. Press again
to turn it off.
Page 19

XCH 6RF
Play/Pause CD
CD~
1.
Press Play/Pause (
..
III)
while
CD
changer
is
playing to pause
CD
play.
....
.".~
II"
"'-
~
......
,-rlL':'
,&
.&
,&
.&
.&
.~
0~
2.
Press again to continue
disc play.
Disc
Disc
Track
Pla\in
g
/number
number
\.
DISC
,
.........
T
lin
Af"
___
-
~~~
:,
,
L'
C/
,&
,&
,~
.~
,~
.&
The compact disc changer plays all songs
on
a disc, then advances to the next disc
in
order (1-2-3-4-5-6).
Select Disc
The magazine holds up
to
6 compact discs,
numbered 1 to 6 (starting at the bottom).
Press DISC
to
select
the next disc
in
order.
r,;
.'
cs:z
2<>-
JG-
4<0-
/
The display indicates which discs
are loaded
in
the magazine.
The compact disc changer begins playing the
lirst track
on
the next disk.
If
you press DISC while a disc
is
playing, the
current disc stops immediately and the next
disc plays.
JENSEN"
Skip Tracks
Press
TRACK
(v
or
A)
button to go to
another track on the
current disc.
Repeat the Same Track
Press
RPT
to
continuously repeat the
same track.
Press again to stop
repeat.
Intro: Preview
al/
Tracks
Press
INTRO
to play the first ten
seconds of each track
on
all discs in
the magazine. Press again to stop
"INTRO" and listen
to
track.
[
•
III1AO
rnsc
_,
...~~
:;
~"'''
-
Ie;.
'G-
lG-
I
-,.O..lJ
3
Page 20

JENSEN'
Reset
Press
RESET only
conditions occur:
•
The
compact disc changer
•
There
is
an
error
E03
or
E06
may appear
•
Vehicle
replacing
To
use
1.
Open
use a pencil
to
disc
being
2.
Remove
zine.
3.
Reinstall
disc
magazine
4.
Press
RESET:
the
press
changer
played
changer
RESET
power
the
compact
tip
the
RESET
ejects
is
all
compact
the
empty
returns
and
when
in
is
interrupted
battery).
disc
(or
other
the
not
returned
magazine.
ejects
again.
one
of
operation
on
changer
non-metallic
button.
magazine.
to
discs
from
the
compact
the
magazine
these
is
first installed
(E01,
E02,
the
display).
(as
when
door,
object)
The
compact
Any
the
magazine.
the
maga-
The
compact
disc
again.
then
disc
to
the
XCH 6RF
Page 21

XCH 6RF
JENSEN'
Loading
Insert Compact
Magazine
Discs
1.
The compact disc ejector
knob pops out. Do not
insert more than one disc
into a
than one disc into a
magazine slot could
damage the compact
disc, the magazine and
the compact disc changer.
the
in
Insert one compact disc with the
label side up into
each slot in the
magazine.
slot. Inserting more
CD Changer
the
Load
the
Magazine
into
the
CD Changer
Slide compact disc changer door to the right.
Insert magazine. Close door.
the XCH 6RF check how many discs are
the magazine.
You
will hear
in
Remove
the
Magazine
Press the compact disc ejector knob to eject
the compact disc from the magazine.
Compact
Discs
from
Note: Always keep the compact disc changer
door closed during operation.
5
Page 22

JENSEN'
XCH 6RF
~
Problem
CD
operate
Disc
no
Music
when
Troubleshooting
changer
is
playing
sound
"skips"
going
over
does
not
but
there
excessively
bumps
Cause
Fuse
Bad
CD
Magazine
in
magazine/discs
incorrectly
is
Poor
modulator
Bad
Fuse
Receiver
station
Condensation
CD
changer
in
humid,
aner
Shipping
VerticaVilorizontal
selected
blown
ground
to
changer
overheated
not
connections
ground
on
blown
not
tuned
(88.7
or
(moisture)
laser
rainy
turning
on
screws
correctly
CD
changer
installedino
installed
to
FM
FM
modulator
to
correct
89.1
FM)
optics
heater)
not
removed
position
(occurs
conditions
the
discs
on
or
not
Correction
locate
and
locate
and
Allow
air
Install
discs
Correct
and
receiver
locate
and
locate
and
Tune
recelver
Remove
open
and
Remove
Select
position
replace
repair
ground
to
circulate
and
magazine
connections
repair
ground
replace
magazine,
wait
approximately
shipping
screws
fuse
around
at
modulator,
luse
leave
changer
CD
connection
CD
changer
one
hour
changer
door
"EOr,
appears
"E08"
Can't
6
"E02",
on
display
appears
find
problem
"E03"
on
or
"E06"
display
Unit
installed
than
15
degrees
or
horizontal
Disc
loading
malfunction
Disc
dirty
Disc
inserted
at
an
angle
lrom
vertical
or
eject
incorrectly
more
Reinstall
Press
Insert a disc
Clean
Insert
Contact
(1-800-323-0221
properly
"RESET'
and
the
disc
the
disc
Jensen
correctly
button
try
again
Technical
)
Assistance
Page 23

Specifications
Frequency response
Signal/noise ratio .........................................................................................................
Stereo separation @ 1 kHz ....................................................................................................... :,:70 dB
Total harmonic distortion
General
Power supply ....................................................................................... 10-16 VDC, negative ground
Dimensions ..........................................................
Weight ...................................................................................................................... 5.5
FM
modulator frequency ..................................................................................... 88.7 MHz/89.1 MHz
(+/-
2dB) ................................................................................... 20 Hz - 20 kHz
:,:90
dB at 1 kHz
@ 1 kHz .............................................................................................
11.4" X 3.5" X 7.7" (284mm X 74mm X 186.5mm)
Ibs. (2.5 kg)
:'00.1%
Specifications
Limited
Length
of
Electronics
the date of
Persons
the original owner and any subsequent owners during the
warranty period so
an authorized Jensen dealer
warranty service is required.
What
tl1;S
ship in this product.
resulting from accident, rnisuse, abuse, neglect, product
modification, irnproper
unauthorized repair or failure
with
must be presented
or other electrical interferences; any product purchased
outside
has been defaced, modified
How
U.S.
1-800-323-4815. We
and address of an authorized Jensen repair station wtlich
will service the product
product to a factory service center.
Canadian
to
Ole
such dealer either
the product.
Warranty. Tllis warranty from Recoton Mobile
Protected.
is
Covered. Except as otherwise specified below,
warranty covers all defects in material
the product; damage occurring during shiprnent (claims
USA or Canada, or on wtlich the serial nurnber
You Can Get Service.
Purchasers.
Purchasers.
Jensen dealer
subject
to
change
One Year Warranty-USA and Canada
shall be
in
the first consumer purchase.
effect for a period
This warranty will be enforceable by
long
as
proof of date
is
presented whenever
The
following are not covered: damage
installation, incorrect line vollage,
to
follow instructions supplied
to
the carrier); elimination
or
removed.
Please telephone Jensen
wirr
either inform you
or
will advise you
The
product
frorn
whorn
will service
SllOUld
it
was purchased and
or
arrange
without
of
one year from
of
purchase from
and
workman-
of
car static
at
of
the
name
to
send
the
be returned
for
service of
notice.
JENSEN'
Recoton Mobile Electronics
of
A Division
Recoton Audio Corporation
A RECOTON®
Emma Oaks Trail
1090
Lake
Mary,
©1998 Recoton Audio Corporation
If shipment of
securely.
included
What
material expenses required to repair the product, but you
must pay any labor costs
of
the product.
service, you must prepay the initial shipping charges, but
Jensen wifl pay
returned
limitation
Conditions.
conditions, including warranties or conditions of
ability, fitness for particular purposes and non-infringement,
are
limited
Exclusion
limited
defective product and
consequential economic damages of any kind.
Some states and/or provinces do not allow limitations on
110W
long
exclusion or limitation
damages,
to
apply
This warranty gives you specific legal rights, and you may
also have other rights which vary from state
province
the
product is required,
The
original dated bill of sale must always be
with
the
product
as
proof of warranty coverage.
We
Will Pay For. We will pay
for
If
the product
the
to
to
the repair or replacement,
an
sO
you.
to
return shipping charges if the product
an
address inside the USA or Canada.
of
Implied
All implied or statutory warranties and
in
duration
of
Certain Damages. Jensen's liability
implied warranty lasts andlor do not allow the
the above limitations and exclusions may not
province.
the removal and/or installation
or
Statutory
to
the length of this warranty.
shall not include incidental or
of
incidental or consequential
it
should be packed
for
all labor and
is
shipped for warranty
Warranties and
at
our option, of any
to
merchant-
state and
COMPANY
Florida 32746
is
is
 Loading...