


PRO-STYLE® DUAL FUEL CONVECTION RANGES
USE AND CARE GUIDE
CUISINIÈRES À CONVECTION
À BI-COMBUSTIBLE PRO-STYLE
®
GUIDE D’UTILISATIONET D’ENTRETIEN
Para una versión de estas instrucciones en español, visite www.jennair.com
W11090434A
SP: W11093222
For questions about features, operation/performance, parts, accessories, or service in the U.S.A., call:
1-800-JENNAIR (1-800-536-6247) or visit our website at www.jennair.com.
In Canada, call: 1-800-JENNAIR (1-800-536-6247) or visit our website at www.jennair.ca.
Au Canada, pour assistance, installation ou service, composez le 1-800-JENNAIR (1-800-536-6247)
ou visitez notre site web à www.jennair.ca.
Table of Contents
SAFETY INFORMATION ................................................................3
The Anti-Tip Bracket
PARTS AND FEATURES.................................................................6
Range ................................................................................6
Oven Interior
Electronic Oven Controls
......................................................................7
.........................................................4
..................................................7
COOKTOP FEATURES
Burners
Chrome Electric Griddle
USING YOUR OVEN
Control Panel...................................................................10
Display
Interactive Touch Display
Kitchen Timer
Setup Menu
Know Your Oven
Cooking Modes
Special Modes
CARE AND CLEANING
Cooktop Surface
Sealed Surface Burners
Porcelain-Coated Grates and Caps
Griddle
Cooktop Controls
Stainless Steel
Control Panel...................................................................30
Door Exterior
Door Interior
Oven Racks
Oven Cavity
Self-Cleaning the Oven
Oven Lights
TROUBLESHOOTING
..............................................................................8
.....................................................................10
.............................................................................10
.....................................................................11
.............................................................................29
...................................................................30
....................................................................31
.....................................................................31
.....................................................................31
.....................................................................34
...................................................................8
....................................................9
................................................10
..................................................................10
.............................................................16
...............................................................18
................................................................23
................................................................28
.............................................................28
..................................................28
...............................29
............................................................30
.................................................................30
...................................................31
..................................................................35
ASSISTANCE OR SERVICE
ACCESSORIES
WARRANTY
.............................................................................37
..................................................................................38
.........................................................37
SAFETY INFORMATION
Your safety and the safety of others are very important.
We have provided many important safety messages in this manual and on your appliance. Always read and obey all safety
messages.
This is the safety alert symbol.
This symbol alerts you to potential hazards that can kill or hurt you and others.
All safety messages will follow the safety alert symbol and either the word “DANGER” or “WARNING.”
These words mean:
You can be killed or seriously injured if you don't immediately
DANGER
WARNING
All safety messages will tell you what the potential hazard is, tell you how to reduce the chance of injury, and tell you what can
happen if the instructions are not followed.
WARNING: If the information in these instructions is not followed exactly, a fire or
explosion may result causing property damage, personal injury or death.
follow instructions.
You
can be killed or seriously injured if you don't
instructions.
follow
– Do not store or use gasoline or other flammable vapors and liquids in the vicinity of this
or any other appliance.
– WHAT TO DO IF YOU SMELL GAS:
Do not try to light any appliance.
•
Do not touch any electrical switch.
•
Do not use any phone in your building.
•
Immediately call your gas supplier from a neighbor's phone. Follow the gas supplier's
•
instructions.
If you cannot reach your gas supplier, call the fire department.
•
– Installation and service must be performed by a qualified installer, service agency or
the gas supplier.
WARNING: Gas leaks cannot always be detected by smell.
Gas suppliers recommend that you use a gas detector approved by UL or CSA.
For more information, contact your gas supplier.
If a gas leak is detected, follow the “What to do if you smell gas” instructions.
State of California Proposition 65 Warnings:
WARNING: This product contains one or more chemicals known to the State of California to cause cancer.
WARNING: This product contains one or more chemicals known to the State of California to cause birth defects or other
reproductive harm.
3
SAFETY INFORMATION
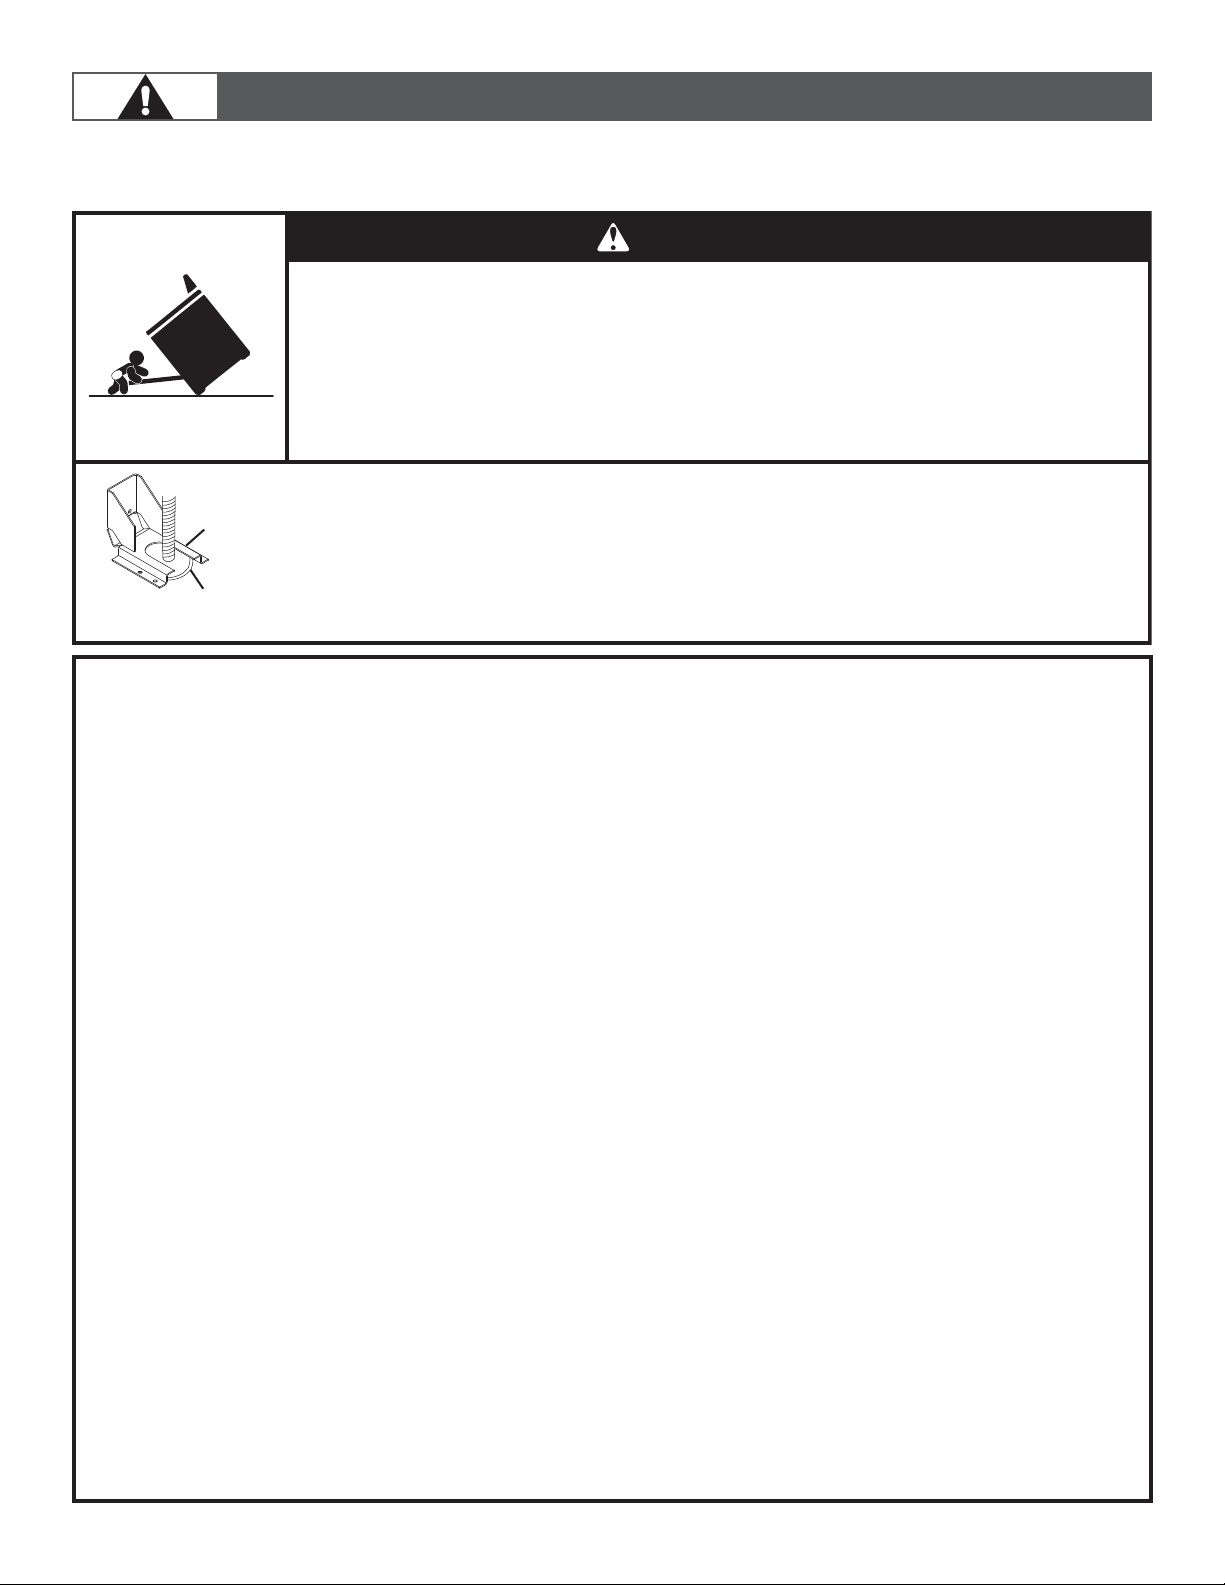
THE ANTI-TIP BRACKET
The range will not tip during normal use. However, the range can tip if you apply too much force or weight to the open door without
the anti-tip bracket fastened down properly.
WARNING
Tip Over Hazard
A child or adult can tip the range and be killed.
Verify the anti-tip bracket has been properly installed and engaged per installation instructions.
Re-engage the anti-tip bracket if the range is moved.
Do not operate range without anti-tip bracket installed and engaged.
Failure to follow these instructions can result in death or serious burns to children and adults.
To verify the anti-tip bracket is installed and engaged:
Anti-Tip
Bracket
Range Foot
• Slide range forward.
• Look for the anti-tip bracket securely attached to floor or wall.
Slide range back so rear range foot is under anti-tip bracket.•
• See installation instructions for details.
IMPORTANT SAFETY INSTRUCTIONS
WARNING: To reduce the risk of fire, electrical shock, injury to
persons, or damage when using the range, follow basic
precautions, including the following:
■ WARNING: TO REDUCE THE RISK OF TIPPING OF THE
RANGE, THE RANGE MUST BE SECURED BY PROPERLY
INSTALLED ANTI-TIP DEVICES. TO CHECK IF THE DEVICES
ARE INSTALLED PROPERLY, SLIDE RANGE FORWARD,
LOOK FOR ANTI-TIP BRACKET SECURELY ATTACHED TO
FLOOR OR WALL, AND SLIDE RANGE BACK SO REAR
RANGE FOOT IS UNDER ANTI-TIP BRACKET.
■ WARNING: TO REDUCE THE RISK OF BURNS, DO NOT
MOVE THE RANGE WHILE HOT. THIS RANGE IS PROVIDED
WITH WHEELS TO FACILITATE MOVEMENT. TO REDUCE THE
RISK OF INJURY DUE TO TIPPING OF THE APPLIANCE,
VERIFY THE REINSTALLATION OF THE RANGE INTO THE
ANTI-TIP DEVICE PROVIDED, AND EXTEND LEVELING FEET
AFTER RETURNING THE RANGE TO THE ORIGINAL
INSTALLED POSITION.
■ WARNING: NEVER use this appliance as a space heater to
heat or warm the room. Doing so may result in carbon monoxide
poisoning and overheating of the oven.
■ WARNING: NEVER cover any slots, holes or passages in the
oven bottom or cover an entire rack with materials such as
aluminum foil. Doing so blocks air flow through the oven and
may cause carbon monoxide poisoning. Aluminum foil linings
may also trap heat, causing a fire hazard.
■ CAUTION: Do not store items of interest to children in
cabinets above a range or on the backguard of a range –
children climbing on the range to reach items could be seriously
injured.
■ Do Not Leave Children Alone – Children should not be left alone
or unattended in area where the range is in use. They should
never be allowed to sit or stand on any part of the range.
■ Wear Proper Apparel – Loose-fitting or hanging
garments should never be worn while using the range.
■ User Servicing – Do not repair or replace any part of the
range unless specifically recommended in the manual.
All other servicing should be referred to a qualified
technician.
■ Storage in or on the Range – Flammable materials
should not be stored in an oven or near surface units.
■ Do Not Use Water on Grease Fires – Smother fire or
flame or use dry chemical or foam-type extinguisher.
■ Use Only Dry Potholders – Moist or damp potholders on
hot surfaces may result in burns from steam. Do not let
potholder touch hot heating elements. Do not use a
towel or other bulky cloth.
■ DO NOT TOUCH SURFACE UNITS OR AREAS NEAR
UNITS – Surface units may be hot even though they are
dark in color. Areas near surface units may become hot
enough to cause burns. During and after use, do not
touch, or let clothing or other flammable materials
contact surface units or areas near units until they have
had sufficient time to cool. Among those areas are the
cooktop and surfaces facing the cooktop.
■ Never Leave Surface Units Unattended at High Heat
Settings – Boilover causes smoking and greasy
spillovers that may ignite.
■ Glazed Cooking Utensils – Only certain types of glass,
glass/ceramic, ceramic, earthenware, or other glazed
utensils are suitable for range-top service without
breaking due to the sudden change in temperature.
SAVE THESE INSTRUCTIONS
4

SAFETY INFORMATION
IMPORTANT SAFETY INSTRUCTIONS
■ Utensil Handles Should Be Turned Inward and Not Extend Over
Adjacent Surface Units – To reduce the risk of burns, ignition of
flammable materials, and spillage due to unintentional contact
with the utensil, the handle of a utensil should be positioned so
that it is turned inward, and does not extend over adjacent
surface units.
■ Clean Cooktop With Caution – If a wet sponge or cloth is used
to wipe spills on a hot cooking area, be careful to avoid steam
burn. Some cleaners can produce noxious fumes if applied to a
hot surface.
■ Use Care When Opening Door – Let hot air or steam escape
before removing or replacing food.
■ Do Not Heat Unopened Food Containers – Build-up of pressure
may cause container to burst and result in injury.
■ Keep Oven Vent Ducts Unobstructed.
■ Placement of Oven Racks – Always place oven racks in desired
location while oven is cool. If rack must be moved while oven is
hot, do not let potholder contact hot heating element in oven.
■ DO NOT TOUCH HEATING ELEMENTS OR INTERIOR
SURFACES OF OVEN – Heating elements may be hot even
though they are dark in color. Interior surfaces of an oven
become hot enough to cause burns. During and after use, do
not touch, or let clothing or other flammable materials contact
heating elements or interior surfaces of oven until they have had
sufficient time to cool. Other surfaces of the appliance may
become hot enough to cause burns – among these surfaces are
oven vent openings and surfaces near these openings, oven
doors, and windows of oven doors.
■ Proper Installation – The range, when installed, must be
electrically grounded in accordance with local codes or, in the
absence of local codes, with the National Electrical Code,
ANSI/NFPA 70. In Canada, the range must be electrically
grounded in accordance with Canadian Electrical Code. Be sure
the range is properly installed and grounded by a qualified
technician.
■ Disconnect the electrical supply before servicing the
appliance.
■ Injuries may result from the misuse of appliance doors
or drawers such as stepping, leaning, or sitting on the
doors or drawers.
■ Maintenance – Keep range area clear and free from
combustible materials, gasoline, and other flammable
vapors and
■ Top burner flame size should be adjusted so it does not
liquids.
extend beyond the edge of the cooking utensil.
For self-cleaning ranges –
■ Do Not Clean Door Gasket – The door gasket is
essential for a good seal. Care should be taken not to
rub, damage, or move the gasket.
■ Do Not Use Oven Cleaners – No commercial oven
cleaner or oven liner protective coating of any kind
should be used in or around any part of the oven.
■ Clean Only Parts Listed in Manual.
■ Before Self-Cleaning the Oven – Remove broiler pan
and other utensils. Wipe off all excessive spillage before
initiating the cleaning cycle.
For units with ventilating hood –
■ Clean Ventilating Hoods Frequently – Grease should not
be allowed to accumulate on hood or filter.
■ When flambéing foods under the hood, turn the fan on.
SAVE THESE INSTRUCTIONS
5
PARTS AND FEATURES
These instructions cover several different models. The range you have purchased may have some or all of the items listed.
The locations and appearances of the features shown here may not match those of your model. Refer to these instructions
or the Frequently Asked Questions (FAQs) section of our website at www.jennair.com for more detailed instructions. In
Canada, refer to the Customer Service Section at www.jennair.ca.
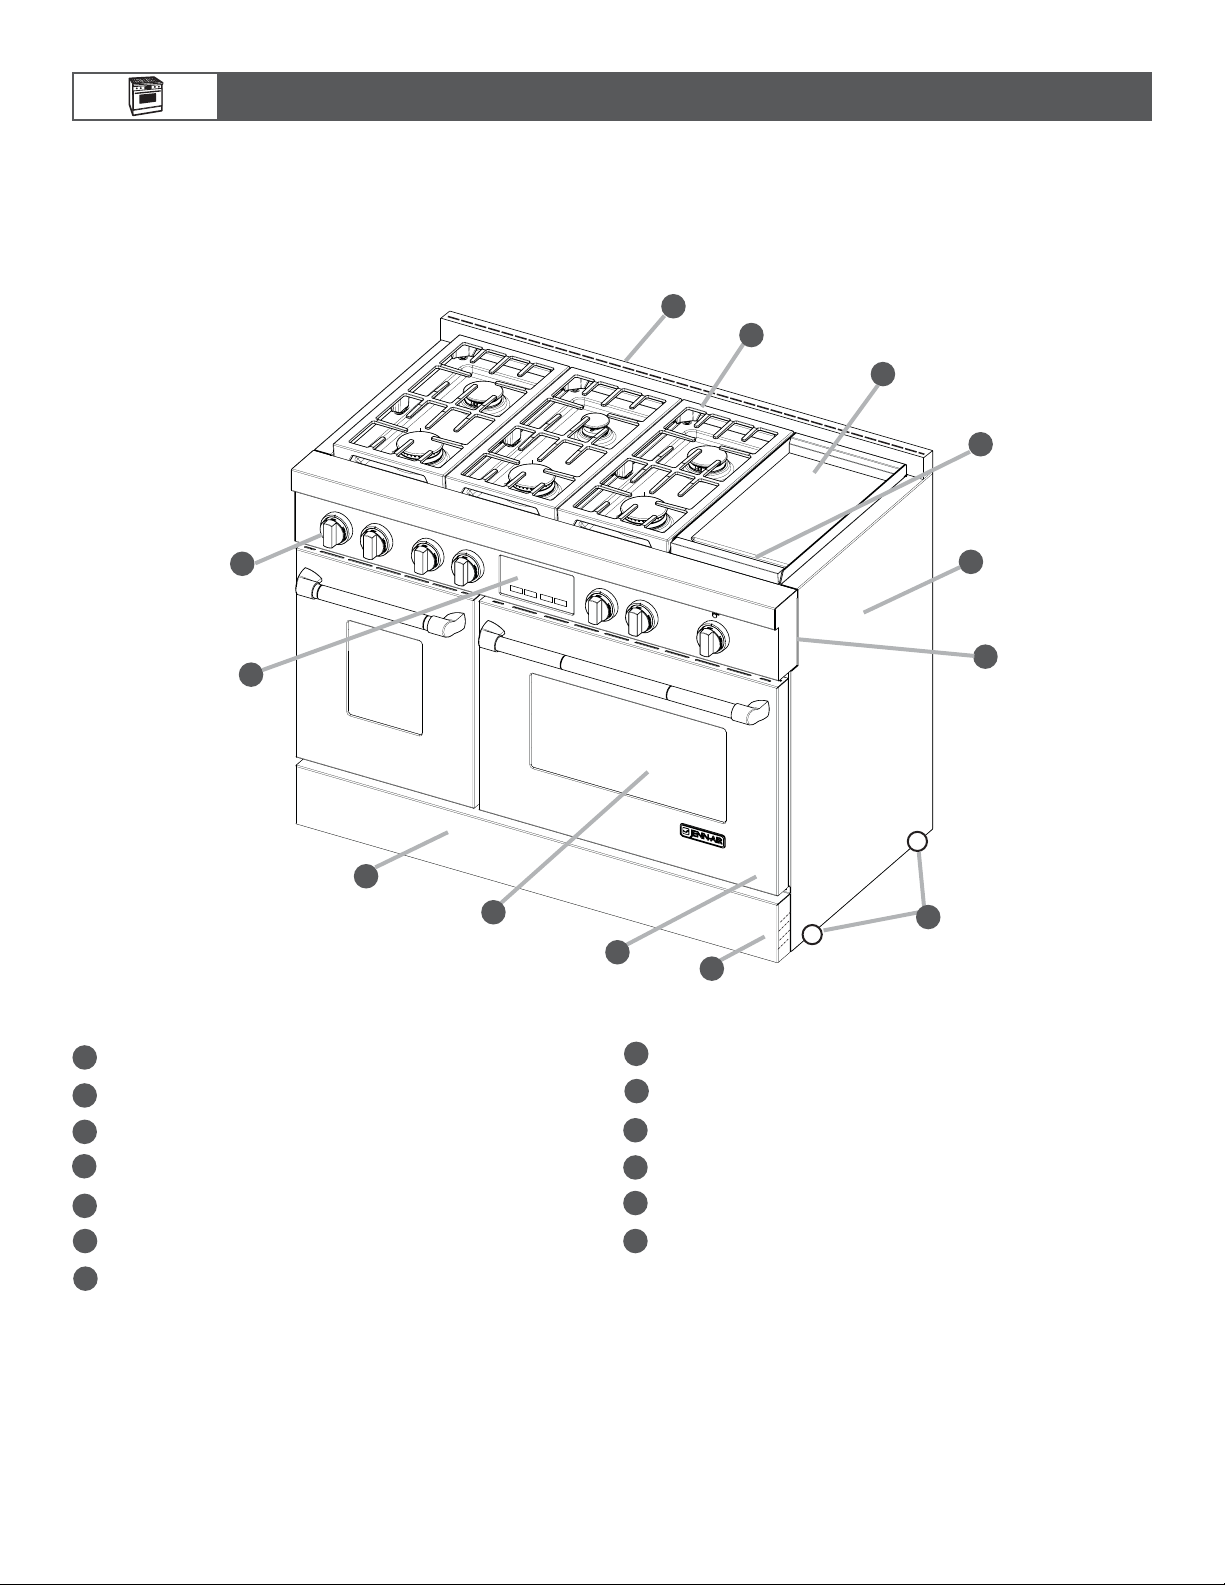
RANGE
1
2
3
4
13
12
Island trim
1
Cooktop grate
2
Electric griddle (on some models)
3
11
10
9
48" (121.9 cm) range shown
8
Leveling rods
9
Oven doors
10
Window
5
6
7
8
4
Drip tray
Side panels
5
6
Console panel
7
Roller feet
See the “Accessories” section for additional attachments and options.
6
11
Lower panel/kick plate
12
Touch-screen oven control
13
Control knobs
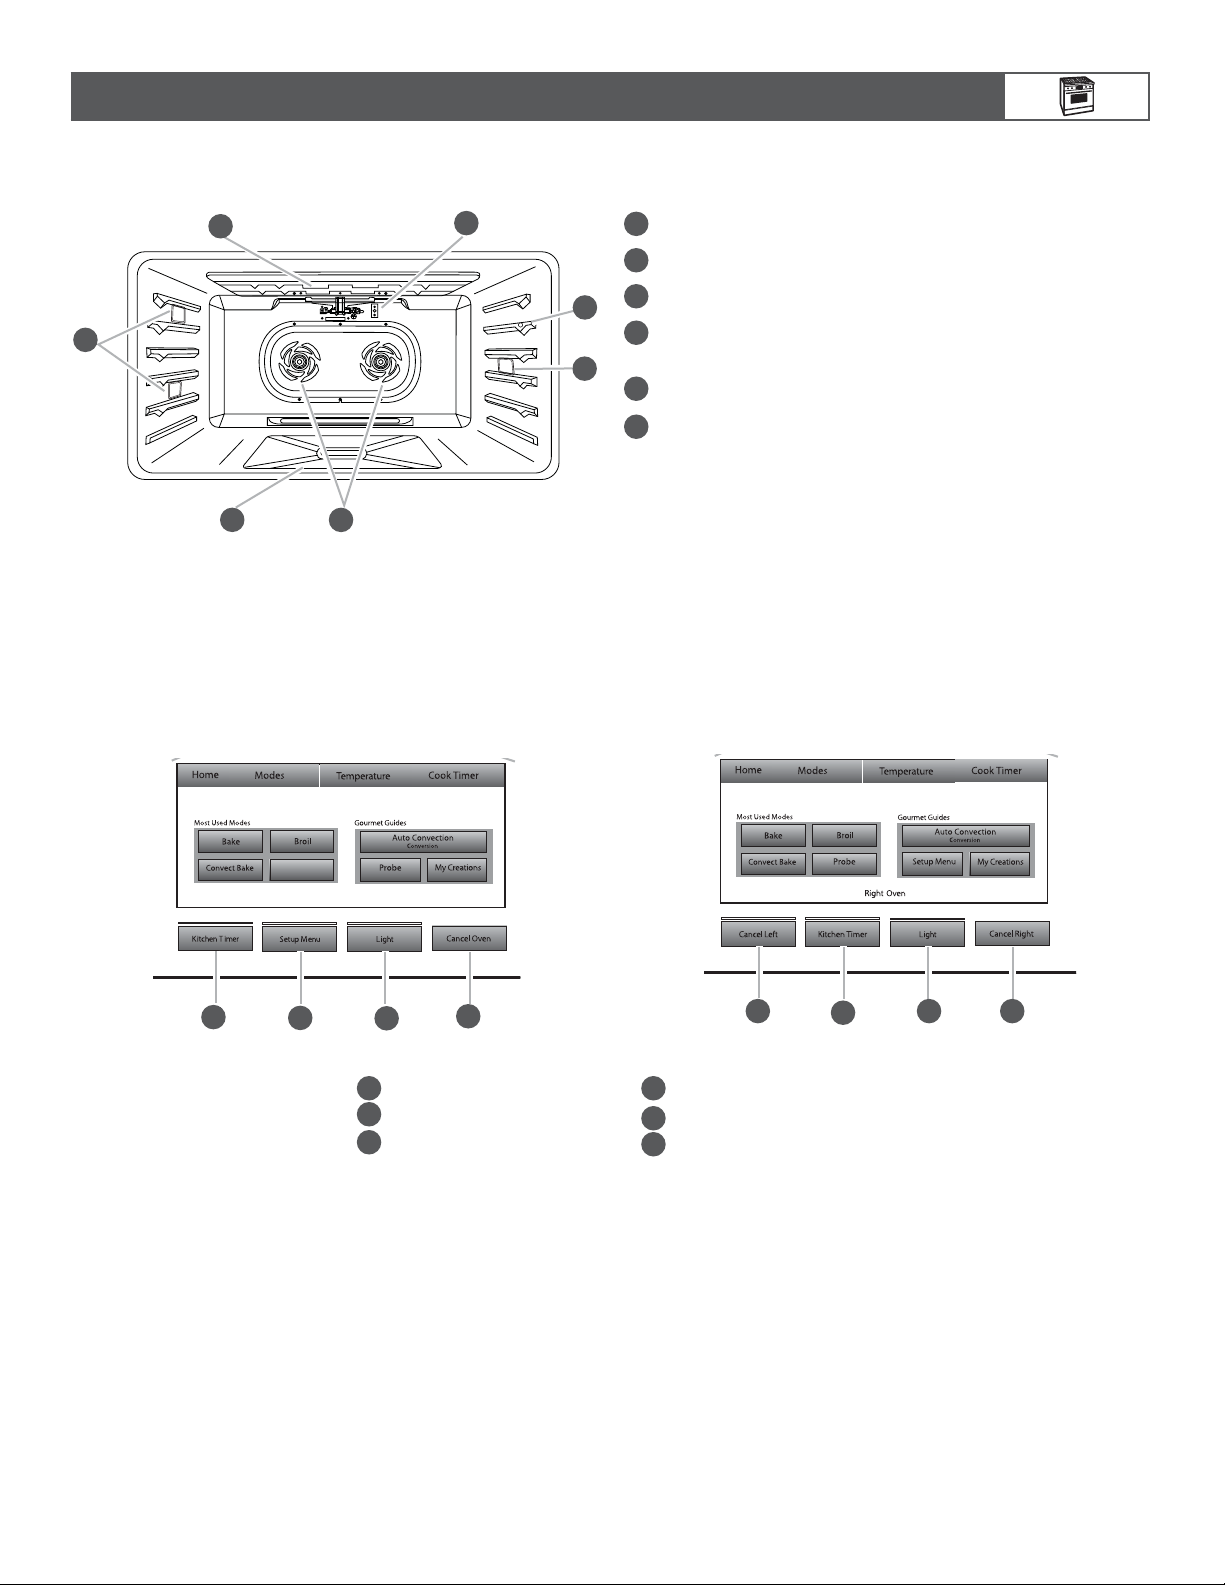
OVEN INTERIOR
PARTS AND FEATURES
B
2
1
A
F
6
E
5
3
C
4
D
A
1
Halogen lights
1
2
Broil elements with broil reflector
3
Oven cavity sensor
4
Temperature probe jack (not available in the left
oven cavity on 48" [121.9 cm] models)
5
Convection fan(s)
6
Bake burner cover
ELECTRONIC OVEN CONTROLS
The oven’s controls are accessed through its control panel and interactive-touch display.
NOTE: Due to the sensitivity of the control panel, see the “Care and Cleaning” section for special instructions for cleaning.
30" (76.2 CM) AND 36" (91.4 CM)
48" (121.9 CM)
Keep War m
F
F
4
E
3
D
2
Cancel oven
1
Oven light
2
Set-up menu
3
C
1
Kitchen timer
4
Cancel right oven
5
Cancel left oven
6
6
E
4
D
C
52
7

COOKTOP FEATURES
BURNERS
WARNING
Fire Hazard
Do not let the burner flame extend beyond the edge of
the pan.
Turn off all controls when not cooking.
Failure to follow these instructions can result in death
or fire.
BTU/hr
UltraPower
stacked
burner
Medium
burner
BURNER
APPEARANCE
FEATURES
This burner has an upper
and lower level of flame. The
Power Hi setting uses both
flame levels at full power to
provide the highest heat.
It is ideal for cooking large
quantities of food or liquid
and using large pots and
pans. The Simmer Hi and
Lo settings use the upper
flame only.
This burner is ideal for
cooking smaller quantities
of food and melting
chocolate or butter.
Igniting Burners:
■ Electric igniters automatically light the surface burners
when control knobs are turned to LITE.
■ Before setting a control knob, place filled cookware on the
grate. Do not operate a burner using empty cookware or
without any cookware on the grate.
■ Visually check that the burner has lit. If the burner does not
ignite, listen for the clicking sound. If you do not hear the
igniter click, turn off the burner. Check for a tripped circuit
breaker or blown fuse.
■ Check that the control knob is pressed completely down
on the valve shaft. If the spark igniter still does not operate,
call a trained repair specialist.
■ When the control knobs for any small or medium burner are
turned to the Lite position, all small and medium burners
will click. When the control knob for the large burner is turned
to the Lite position, these burners will click independent of
the other burners. In both cases, only the burner with the
control knob turned to LITE will produce a flame.
REMEMBER: When range is in use or during the SelfCleaning cycle, the entire cooktop area may become hot.
Flame-Sensing™ Reignition Feature
During cooktop use, if one or more burners are extinguished
due to external causes (such as a water spill, wind, or
ventilation draft), the ignition system will turn on to reignite
the flame. When the flame comes back on, the system will
stop sparking. If the draft in the room is not removed, occasional
sparking may continue. Sparking may also occasionally occur
when using the low setting on a burner.
To Set a Burner:
1.
Push in and turn
counterclockwise
2. Turn knob
counterclockwise
Simmer
burner
8
This burner reaches a low
of 500 BTU/hr. It provides
the gentle low temperatures
required for simmering
soups, stewing, and melting
delicate ingredients like
butter, cheese, and
chocolate.
to LITE.
Push in one more time to get from LO to Simmer HI.
between HI and LO.
In Case of Power Failure
Hold a lit match near a
burner and turn knob
counterclockwise to HI.
After burner lights, turn
knob to desired setting.

COOKTOP FEATURES
Sealed Surface Burners
Sealed surface burners are designed to minimize gaps and
seams that can allow liquids and spills to get under the cooktop.
This design makes cleanup quick and easy.
Burner cap
Stacked Power Burner
Medium Burner
3
C
Simmer Burner
1
2
1
2
1
2
1
Burner base
2
Choke (for use with
3
medium burner,
propane only)
CHROME ELECTRIC GRIDDLE
(on some models)
The chrome electric griddle provides the perfect cooking
surface for grilled sandwiches, pancakes, eggs, burgers, sautéed
vegetables, and many more family favorites. The attractive
low-stick surface is designed to make cleanup easy.
2
1
A
Drip tray
1
Griddle
2
The chrome electric griddle system provides an evenly heated
cooking surface.
■ Be sure plastic film has been removed and wash with hot
water before first use.
■ To avoid scratching the griddle, do not place any pots or
pans on the griddle. Use only heat-resistant plastic or
wooden utensils.
■ The griddle surface is ready to use and does not need to be
seasoned.
■ Pouring cold water on a hot griddle may warp the griddle,
resulting in an uneven cooking surface.
B
IMPORTANT: Do not obstruct the flow of combustion and
ventilation air around the burner grate edges.
Burner cap: Always keep the burner cap in place when using
a surface burner. A clean burner cap will help avoid poor ignition
and uneven flames. Always clean the burner cap after a spillover,
and routinely remove and clean the caps according to the
“Care and Cleaning” section.
Gas opening: Gas must flow freely throughout the gas opening
for the burner to light properly. Keep this area free of soil and do
not allow spills, food, cleaning agents, or any other material to
enter the gas opening. Keep spillovers out of the gas opening
by always using a burner cap.
1-1¹⁄2"
1
1
(2.5-3.8 cm)
Burner
2
ports
2
Burner Ports:
Check burner flames occasionally for proper size and shape as
shown above. A good flame is blue in color, not yellow. Keep this
area free of soil and do not allow spills, food, cleaning agents, or
any other material to enter the burner ports.
To Use:
1. Position drip tray.
2. Push in and turn
knob.
The griddle light will turn off when the griddle has finished
preheating. The griddle light will turn on and off during use to
indicate that the griddle element is maintaining the selected
surface temperature.
3. Place food
on griddle
and cook to desired doneness.
9
G
s
s
A
n
M
:
H
C
Bake
B
l
C
r
C
C
r
C
C
r
C
H
Sta
5°
5°
:
N
:
k
N
C
r
-
k
N
:
k
G
s
s
A
n
C
n
M
Home
e
T
e
C
r
C
e
e
l
C
Home
C
n
r
e
T
r
-
C
e
C
r
H
C
n
r
e
T
r
3
5
67890
r
-
:
C
e
Home
C
r
e
T
0
:
30
3567890
C
e
Clear
Home
C
n
r
de
T
r
3
5
67890
r
H
-
:
C
e
USING YOUR OVEN
:
N
C
:
g
l
:
N
:
CONTROL PANEL
The control panel houses the control menu and function
controls. The control keypads are very sensitive and require
only a light touch to activate.
For more information about the individual controls, see their
respective sections in these instructions.
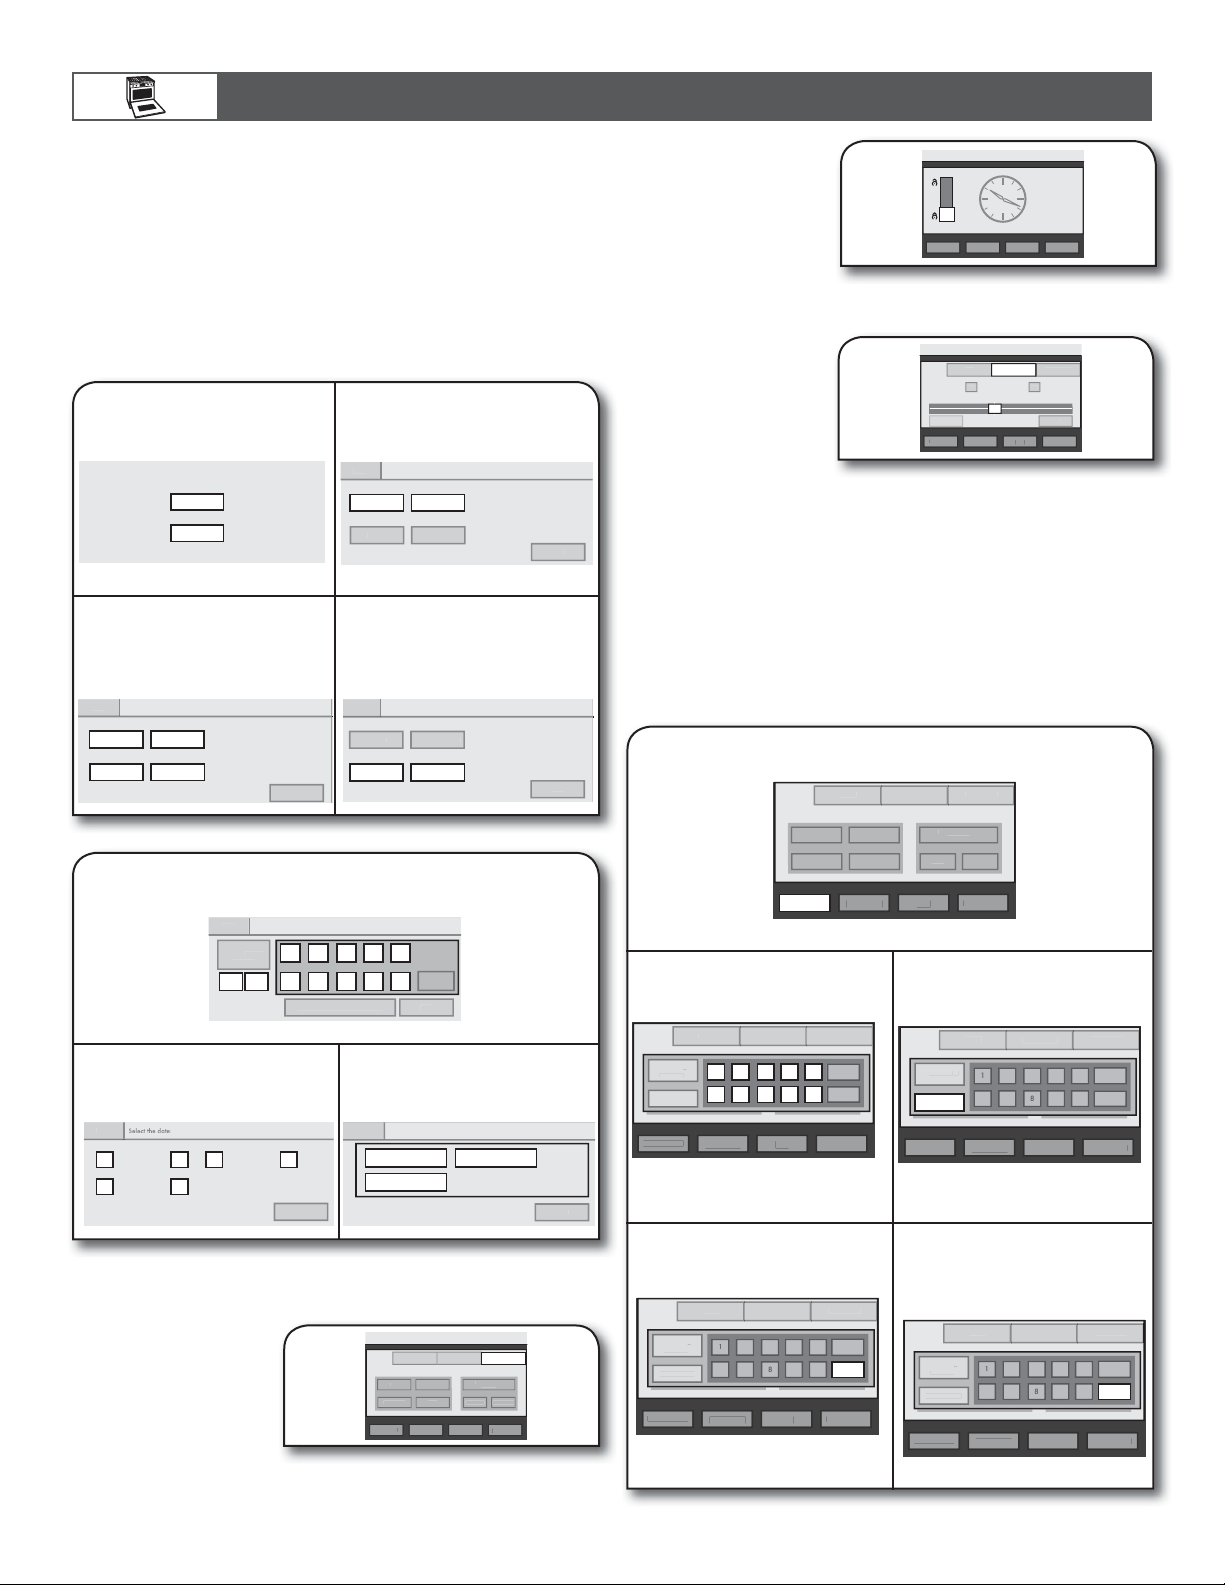
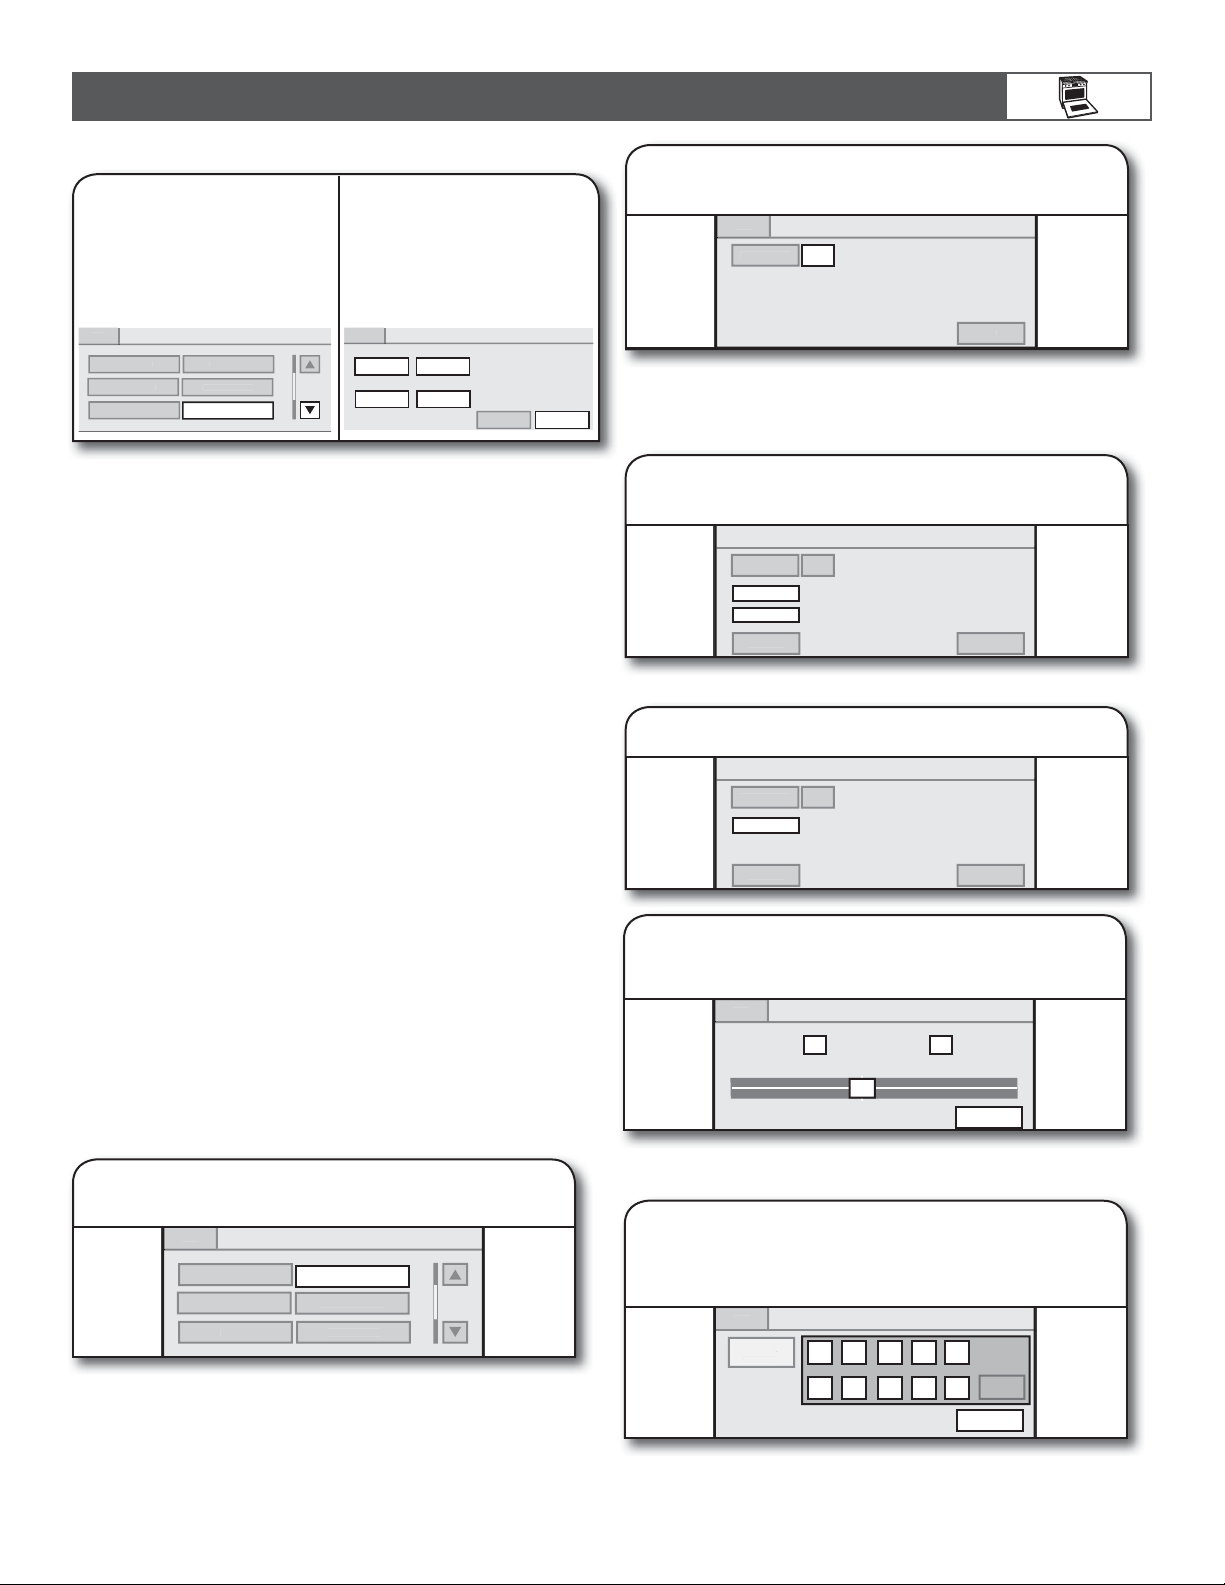
Welcome Guide
This appears on the display the first time the oven is powered up.
The Welcome Guide allows you to set up your new oven.
1. Select language.
3. Select clock
units.
Welcome! Please Select your language.
English
;b^go^gn^LbeohnlieZ´m'''
Français
2. Select temperature
BackRegional Settings
Select clock units:
AM/PM 24-Hour (Military)
lock style
Analo
Digita
4. Set clock style.
ext
units and daylight
savings.
BackRegional Settings
Select temperature degree units:
Fahrenheit Celsius
Daylight-Savings-Time observed:
Yes
No
ext
BackRegional Settings
Select clock units
AM/PM24-Hour (Military)
Clock style:
Analog
Digital
ext
5. Enter current clock time.
Enter Clock Time
Bac
1 2 3 4 5
- - : -
HR:MIN
PMAM
6. Select today’s
date.
Bac
Month:
< >January
Year:
< >2010
Day:
< >1
6 7 8 9 0
Enter a valid time, the press Next.
7. Select screen
Bac
ext
lea
ext
appearance.
Select a screen theme to match your style
Dark/BlueDark/Orange
Light/Blue
Done
■ After approximately
2 minutes of inactivity,
the display will go into
Standby (sleep) mode
and the backlight of
the display will dim.
When the oven is in
operation, the display
will remain active.
■ During programming,
Slide up bar to unlock screen and
return to Home screen.
ancel Left
Slide to unlock.
Kitchen Time
Light
ancel Right
the display shows
menus and the
appropriate selections
for the respective
cooking function.
ome BakeTemperatu re Timer Not Set
ancel Left
200° 250°
-
Kitchen Time
+
350°
350° 400°
300°
550°
450°
500°
Light
ancel Right
rtDelay Start
Example for Bake menu
INTERACTIVE TOUCH DISPLAY
From the Home and Modes menu, all automatic cooking
programs can be activated; all manual cooking can be
programmed; settings can be adjusted; and instructions,
preparation, and tips can be accessed.
KITCHEN TIMER
The Kitchen Timer is an independent timer not associated with
the Cook Timers.
1. Touch KITCHEN TIMER.
ost Used Modes:
Bak
onvect Bak
Kitchen Timer
30" (76.2 cm) and 36" (91.4 cm) models shown
2. Enter desired
time.
HR:MIN:SEC
Start Time
Kitchen Time
Mod
-:--:
emperatureCook Timer
1 2 3 4 5
6 7 8 9 0
Setup Menu
Light
Mod
los
lea
ancel Ove
emperatur
Broi
Keep Warm
Setup Menu
ourmet Guide
uto Convectio
onversio
ProbeMy Creation
Light
ook Time
ancel Oven
4. Touch START
TIMER.
Mod
0:01
HR:MIN:SEC
Start Timer
Kitchen Time
When time reaches 0:00,
tones will sound.
Setup Menu
emperatureCook Timer
2
Light
los
ancel Oven
DISPLAY
■ When the oven(s) are
in use (Active mode),
the display shows
the clock, mode,
oven temperature,
and timer, if set. If the
timer is not set, you
can set it from this screen.
omeModeTemperature Cook Timer
ost Used Modes
onvect Bake
ancel Left
Kitchen Time
ourmet Guide
uto Convection
roi
Conversio
Setup MenuMy Creation
Probe
Light
ancel Right
3. Touch CLEAR
to reset time.
ome
Mod
-:--
HR:MIN:SEC
Start Time
Kitchen Time
This clears Kitchen Timer back
to (- - : - - : - -).
Setup Menu
emperatureCook Time
Clear
Light
ancel Ove
5. Touch OK or
CLEAR, and
then CLOSE.
R:MIN:SEC
Start Time
Kitchen Time
Mo
-:--
Setup Menu
los
This exits and clears display.
emperatureCook Time
2
Light
los
Clear
ancel Ove
10
USING YOUR OVEN
G
s
s
A
C
n
M
:
Conv
e
l
M
C
r
k
n
e
O
:
C
l
k
n
O
C
l
k
:
C
r
M
k
n
k
e
M
r
1
234
5
67890
r
--:--:
r
OK
00:00
0
3567890
C
r
e
M
r
--:--:
C
e
C
r
e
M
--:-1:
20
C
e
C
r
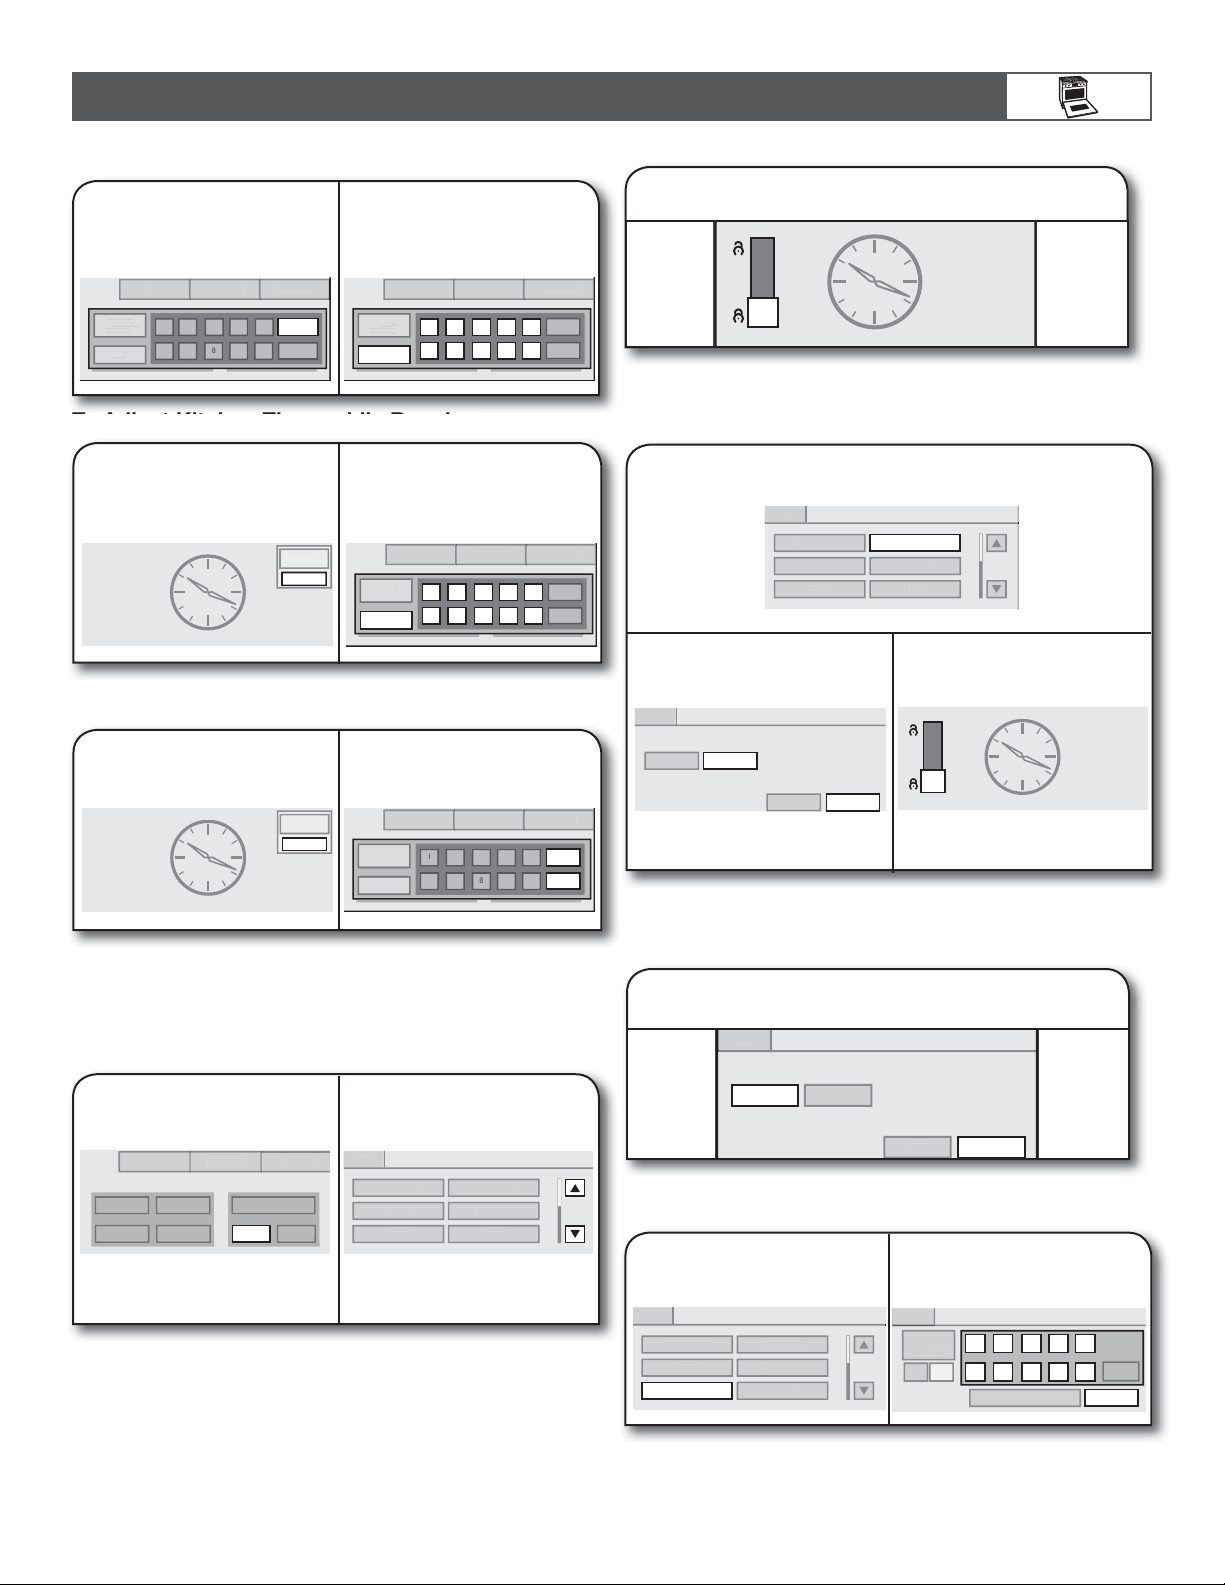
To Add Extra Time when Time Expires:
1. Touch ADD
MORE TIME.
2. Enter time,
and then touch
START TIMER.
Home Mode
:0
HR:MIN:SEC
To Adjust Kitchen Timer while Running:
1. Touch ADJUST.
1
Temper atureCook Time
Add More Time
Hom
lea
HR:MIN:SEC
Start Timer
ode
1 2 3 4 5
6 7 8 9 0
2. Enter new time,
and then touch
START TIMER.
00:00
Adjust
Hom
:42
To Exit while Kitchen Timer Is Running:
1. Touch ADJUST.
2. Touch CLEAR
HR:MIN:SEC
Start Timer
ode
1 2 3 4 5
6 7 8 9 0
and then CLOSE.
00:00
Adjust
Hom
:42
ode
HR:MIN:SEC
Start Time
Temper atureCook Time
los
lea
Temper atureCook Timer
los
lea
Temper atureCook Time
Close
Clear
To unlock keypads/screens:
Slide up bar.
Slide to unlock.
Automatic Lock
To activate:
1. Touch AUTOMATIC LOCK.
BackSetup Menu
Lock Buttons Now Automatic Lock
2. Touch ON
and then SAVE.
Button lock:
Bac
Automatically lock after each use
ff On
ance
Self-clea
Set Time Set Date
Sound Volume
3. Slide up bar
Save
to continue using the control
after setting Automatic Lock.
to unlock
Slide to unlock.
SETUP MENU
This oven provides the ability to control several of the default
settings and access information through the on-screen display.
1. Touch SETUP
MENU.
ode
Home
ost Used Modes
Bak
ect Bake
48" (121.9 cm)
model shown
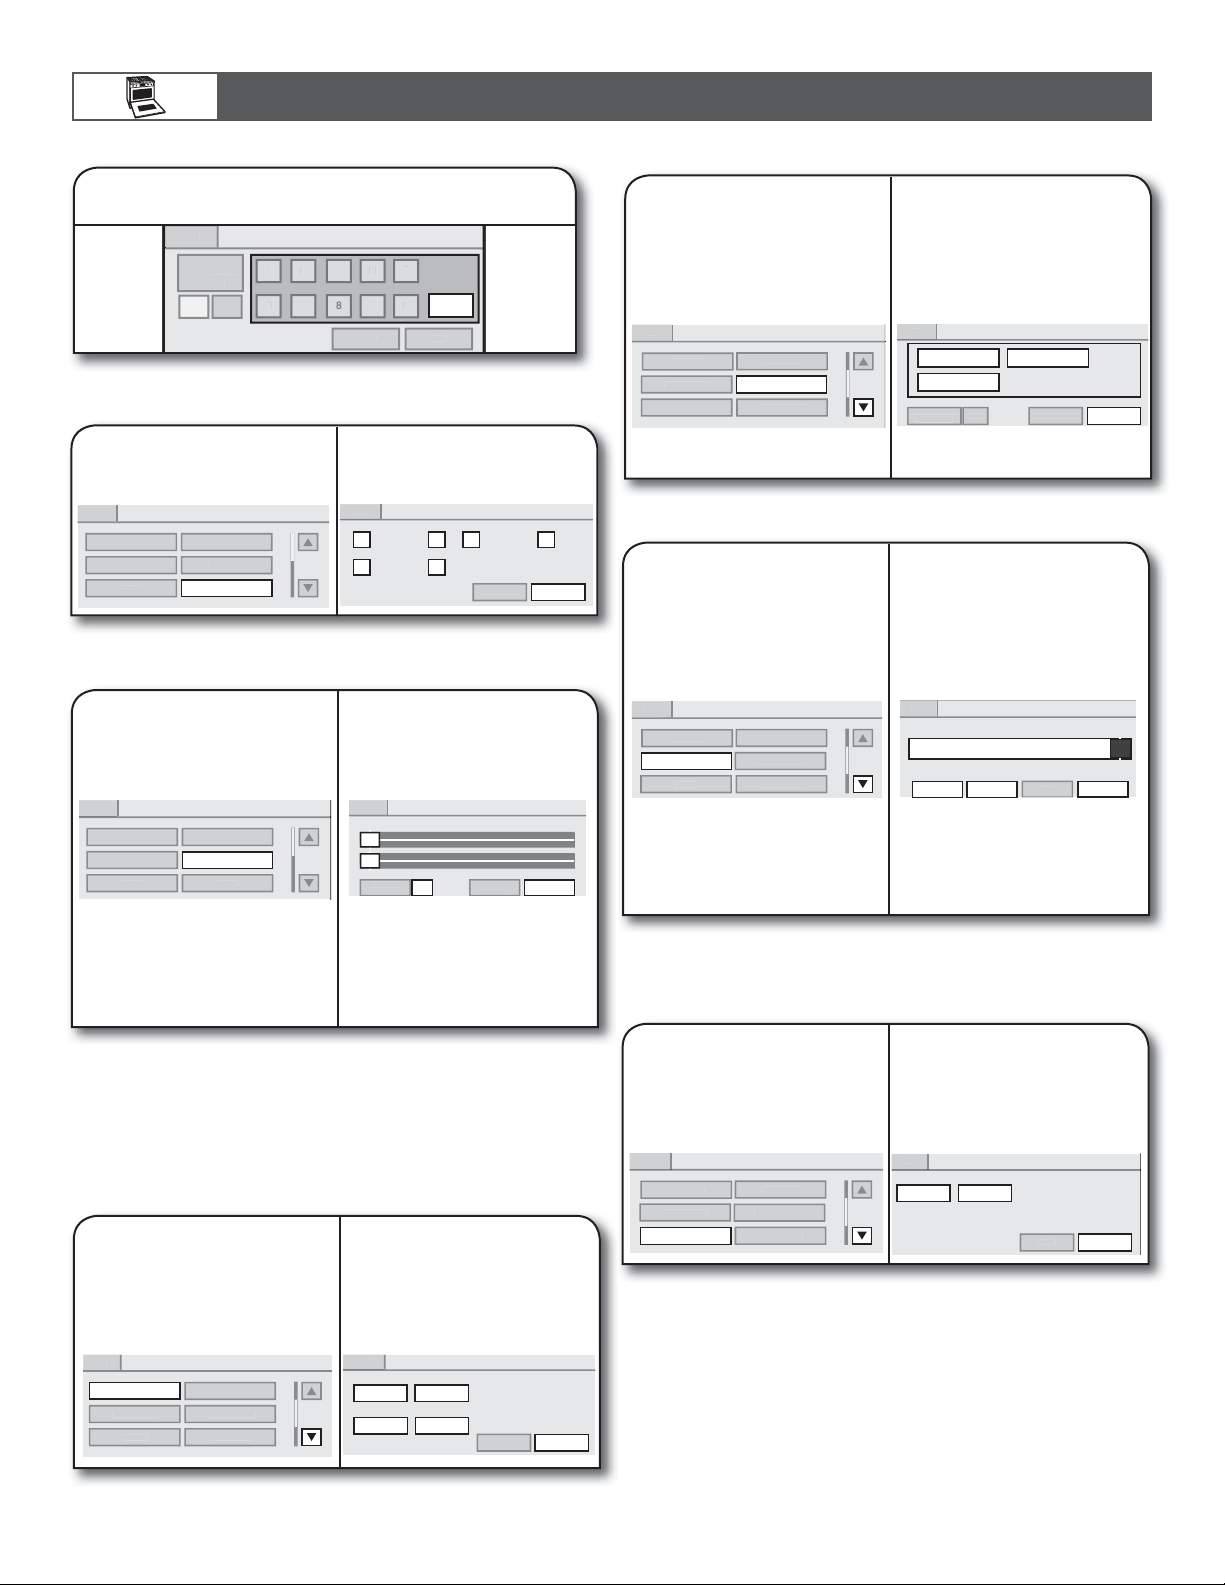
Self-Clean
This setting is disabled while oven is in use.
Lock Keypads Now
This function allows all the keypads to be locked. It is automatically
disabled if the Kitchen Timer is running or the oven is in use.
Temper ature
ourmet Guide
Broi
Probe
uto Convection
onversio
Setup Menu My Creation
2. Use up and
down arrows.
ook Time
BackSetup Menu
Lock Buttons Now Automatic Loc
Self-clea
Set Tim
Lets you view and access
settings. If the oven is in use,
Setup Menu is disabled.
Sound Volume
Set Date
To deactivate:
Touch OFF and SAVE.
Button lock
Bac
Automatically lock after each use
Setting Time
1. Touch SET TIME.
Setup MenuBac
Lock Buttons Now Automatic Loc
Self-clea
Set Time Set Date
Sound Volume
nOff
ance
Save
2. Enter time, and
then touch SAVE.
BackEnter Clock Time
1 2 3 4 5
HR:MIN
6 7 8 9 0
PMA
Enter a valid time, the press Save.
lea
Save
11
:
e
3567890
M
C
l
k
k
n
e
k
:
k
C
s
C
s
C
l
k
C
s
e
s
k
:
k
C
l
s
:
On
C
s
e
s
:
l
k
C
s
s
s
k
k
:
C
l
w
k
e
k
s
C
l
s
:
d
k
USING YOUR OVEN
To clear clock to 00:00:
Touch CLEAR.
Enter Clock Time
Bac
1
1
HR:MIN
AMP
Setting Date
1. Touch SET DATE.
Setup MenuBac
Lock Buttons Now Automatic Loc
Self-clea
Set Time Set Date
Sound Volum
Setting Sound Volume
1. Touch SOUND
VOLUME.
Setup MenuBac
Lock Buttons No
Self-clean Sound Volume
Set Tim
Automatic Loc
Set Date
Clear
ance
Sav
2. Choose date, and
then touch SAVE.
Select the date
Bac
Month:
< >January
Year:
< >2010
Day:
< >1
Save
ancel
2. Adjust sounds,
and then touch
SAVE.
Set the desired volume level
Bac
Off
Start-up and
hut down sounds
Off
ance
Use the slider bar to adjust
timer/alert or keypad-press
sound levels. Then touch
ON/OFF to toggle between
settings for start-up and
shut-down sounds.
Lou
Save
Setting Screen Appearance
1.
Touch the down
arrow keypad,
and then touch
2. Select screen
appearance, and
then touch SAVE.
SCREEN
APPEARANCE.
Select a screen theme to match your style
Setup MenuBac
lock Option
Screen Brightness
Languag
Sabbath Mode
Screen Appearance
Regional Setting
Bac
Show animation
when cooking
Dark/BlueDark/Orange
Light/Blue
ance
Select the screen appearance
to match your oven.
Setting Screen Brightness
1.
Touch the down
arrow keypad,
and then
SCREEN
touch
2. Adjust screen
brightness and
idle setting, and
then touch SAVE.
BRIGHTNESS.
Bac
BackSetup Menu
lock Option
Screen Brightness
Lanuag
Sabbath Mode
Screen Appearance
Regional Setting
NOTE: If the Cancel keypad is touched, the screen brightness
will go to the recommended level.
Setting Language
Select the screen brightness
Dim
When the appliance has not been used
for 5 minutes:
Dim the screen
Recommended Bright
Turn of f the
Cance
screen
Save
Use slider bar. Choose “DIM
THE SCREEN” or “TURN
OFF THE SCREEN” for use
when oven has been idle for
5 minutes.
Save
When ON, the oven will make a sound when it transitions
in and out of Idle mode. When OFF, no sound will be made.
NOTE: If the Cancel keypad is touched, the sound settings
will go to the recommended level.
Setting Clock Options
1. Touch the down
arrow keypad,
and then touch
CLOCK OPTIONS.
BackSetup Menu
Clock Options Sabbath Mode
Screen Brightness Screen Appearance
Language Regional Setting
2. Select clock
units and style,
and then touch
SAVE.
lock Option
Bac
Select clock units:
AM/PM 24-Hour (Military)
Clock Style:
Analog
Digital
ance
Touch the down
arrow keypad,
and then
touch
LANGUAGE.
Bac
Setup Menu
lock Option
Screen Brightnes
Language
NOTE: Touch the Cancel keypad to return to the default setting.
Save
Sabbath Mode
Screen Appearance
Regional Setting
2. Select language,
and then touch
SAVE.
Bac
Select your language
English Français
Save
ance
1.
12
s
e
C
s
s
e
k
:
k
W
:
OK
:
:
O
:
k
:
k
C
r
-
N
:
g
t
t
:
:
O
Making Regional Settings
C
s
s
k
:
k
C
l
1. Touch the down
arrow keypad,
and then touch
REGIONAL
SETTINGS.
Bac
Setup Menu
lock Option
Screen Brightnes
Language
Sabbath Mode
Screen Appearance
Regional Settings
2.
Select temperature
units and daylight
savings, and then
touch SAVE.
Bac
Regional Settings
Select temperature degree units:
Fahrenheit Celsius
Daylight-Savings-Time observed:
Yes
No
USING YOUR OVEN
2. Turn on Sabbath mode.
Bac
Sabbath Mode
Sabbath Mode:Off
hen the oven is running in Sabbath mode
-The standard 12-hour shutoff is disabled.
-All prompts, messages, and beeps will be deactivated.
-The set temperature will be displayed, not the actual oven temperature.
-The cavity light will remain in whatever state it is now.
Read on-screen instructions and touch OFF to turn Sabbath
mode on.
Save
ance
On 48" (121.9 cm) ranges, touch Left Oven or Right Oven
keypad to select oven to set up.
Sabbath Mode
■ The Sabbath mode sets the oven to remain ON in a bake
setting until turned off.
■ A timed Sabbath mode can also be set to keep the oven ON
for only part of the Sabbath.
■ When the Sabbath mode is set, only the number, start, and
cancel keys will function.
■ No tones will sound and the display will not show messages
or temperatures changes.
■ The heat source icons will appear lit on the oven display
throughout the Sabbath mode.
■ When the oven door is opened or closed, the oven light will
not turn on or off and the heating elements will not turn on
or off immediately.
■ If a power failure occurs when the Sabbath mode is set,
the oven will remain in Sabbath mode but will no longer be
actively cooking. When power returns, the display will read
“SABBATH MODE – Power outage has occurred.” Touch
CANCEL to return to the normal operating mode (nonSabbath mode, not cooking).
■ The Sabbath mode must be enabled each time it is used.
■ Sabbath mode disables the 12-hour shutoff. All lights and
displays are disabled so that no visible activity takes place
when the oven door is opened.
NOTE: If you touch Sabbath mode while the temperature
probe is set, the message “Probe not inserted” appears.
Remove the probe and touch NEXT to enter the Sabbath
mode. Touch CANCEL to return to the Bake mode.
To Use Sabbath Mode:
1. Select SABBATH MODE.
3. Select oven to set up.
Sabbath Mode
Sabbath Mode
Left Oven
Right Oven
n
< Touch to set
< Touch to set
StartDelay Start
For single ovens:
Touch COOK SETTINGS.
Sabbath Mode
Sabbath Mode
Cook Settings
n
< Touch to set
StartDelay Start
4. Select desired oven temperature,
and then touch NEXT.
Bac
Sabbath Mode - Select oven temperature
-5°
200° 250°
300°
350°
350° 400°
Use slider to enter desired temperature or touch -5°F (-1°C)
or +5°F (+1°C) to decrease or increase the temperature.
450°
+5°
550°
500°
Next >
Bac
Setup Menu
lock Option
Screen Brightnes
Languag
Sabbath Mode
Screen Appearanc
Regional Setting
Use scroll bar until Sabbath mode appears and touch
SABBATH MODE.
5. If desired, set Cook Timer, and then
touch NEXT (even if a Cook Timer is
not desired).
Sabbath Mode - Select cook timer
Bac
-:--:-
HR:MIN:SEC
ote
-In Sabbath Mode,
settin
imer is optional.
- When the timer ends,
he oven cavity will
stop heating.
1 2 3 4 5
6 7 8 9 0
lea
Next >
On 48" (121.9 cm) ranges, repeat steps 1 through 5 to set the
second oven, if desired.
13
 Loading...