

Page 1

PRO-STYLE® DUAL FUEL CONVECTION RANGES
USE AND CARE GUIDE
CUISINIÈRES À CONVECTION
À BI-COMBUSTIBLE PRO-STYLE
®
GUIDE D’UTILISATIONET D’ENTRETIEN
Para una versión de estas instrucciones en español, visite www.jennair.com
W10837387B
SP: W10837407
For questions about features, operation/performance, parts, accessories, or service in the U.S.A., call:
1-800-JENNAIR (1-800-536-6247) or visit our website at www.jennair.com.
In Canada, call: 1-800-JENNAIR (1-800-536-6247) or visit our website at www.jennair.ca.
Au Canada, pour assistance, installation ou service, composez le 1-800-JENNAIR (1-800-536-6247)
ou visitez notre site web à www.jennair.ca.
Page 2

Table of Contents
SAFETY INFORMATION ................................................................3
The Anti-Tip Bracket .........................................................4
Table de matières
INFORMATIONS DE SÉCURITÉ..................................................39
Le pied antibasculement .................................................40
PARTS AND FEATURES ................................................................6
Range ................................................................................6
Oven Interior ......................................................................7
Electronic Oven Controls ..................................................7
COOKTOP FEATURES ................................................................... 8
Burners ..............................................................................8
Chrome Electric Griddle ....................................................9
USING YOUR OVEN .....................................................................10
Control Panel...................................................................10
Display .............................................................................10
Interactive Touch Display ................................................10
Kitchen Timer ..................................................................10
Setup Menu .....................................................................11
Know Your Oven .............................................................16
Cooking Modes ...............................................................18
Special Modes ................................................................23
CARE AND CLEANING ................................................................28
Cooktop Surface .............................................................28
Sealed Surface Burners ..................................................28
Porcelain-Coated Grates and Caps ...............................29
Griddle .............................................................................29
Cooktop Controls ............................................................30
Stainless Steel .................................................................30
Control Panel...................................................................30
Door Exterior ...................................................................30
Door Interior ....................................................................31
Oven Racks .....................................................................31
Oven Cavity .....................................................................31
Self-Cleaning the Oven ...................................................31
Oven Lights .....................................................................34
TROUBLESHOOTING ..................................................................35
PIÈCES ET CARACTÉRISTIQUES ..............................................42
Gamme ............................................................................42
Intérieur du four ...............................................................43
Commandes électroniques du four ................................43
CARACTÉRISTIQUES DE LA TABLE DE CUISSON ..................44
Brûleurs ...........................................................................44
Plaque à frire chromée ....................................................46
UTILISATION DU FOUR ............................................................... 47
Tableau de commande ...................................................47
Affichage .........................................................................47
Afficheur tactile interactif ................................................47
Minuterie de cuisine ........................................................48
Menu de réglage .............................................................49
Connaître votre four ........................................................54
Modes de cuisson ...........................................................57
Modes spéciaux ..............................................................63
ENTRETIEN ET NETTOYAGE ...................................................... 69
Surface de la table de cuisson .......................................69
Brûleurs de surface scellés .............................................69
Grilles et chapeaux émaillés ...........................................70
Plaque à frire ...................................................................70
Commandes de la table de cuisson ...............................71
Acier inoxydable ..............................................................72
Tableau de commande ...................................................72
Extérieur de la porte ........................................................72
Intérieur de la porte .........................................................72
Grilles du four ..................................................................73
Cavité du four ..................................................................73
Autonettoyage du four ....................................................73
Lampes du four ...............................................................76
DÉPANNAGE .................................................................................77
ASSISTANCE OR SERVICE .........................................................37
ACCESSORIES .............................................................................37
WARRANTY ..................................................................................38
ASSISTANCE OU SERVICE .........................................................79
ACCESSOIRES .............................................................................79
GARANTIE .....................................................................................80
Page 3

SAFETY INFORMATION
Your safety and the safety of others are very important.
We have provided many important safety messages in this manual and on your appliance. Always read and obey all safety
messages.
This is the safety alert symbol.
This symbol alerts you to potential hazards that can kill or hurt you and others.
All safety messages will follow the safety alert symbol and either the word “DANGER” or “WARNING.”
These words mean:
You can be killed or seriously injured if you don't immediately
DANGER
WARNING
All safety messages will tell you what the potential hazard is, tell you how to reduce the chance of injury, and tell you what can
happen if the instructions are not followed.
WARNING: If the information in this manual is not followed exactly, a fire or explosion
may result causing property damage, personal injury or death.
follow instructions.
You
can be killed or seriously injured if you don't
instructions.
follow
– Do not store or use gasoline or other flammable vapors and liquids in the vicinity of this
or any other appliance.
– WHAT TO DO IF YOU SMELL GAS:
Do not try to light any appliance.
•
Do not touch any electrical switch.
•
Do not use any phone in your building.
•
Immediately call your gas supplier from a neighbor's phone. Follow the gas supplier's
•
instructions.
If you cannot reach your gas supplier, call the fire department.
•
– Installation and service must be performed by a qualified installer, service agency or
the gas supplier.
WARNING: Gas leaks cannot always be detected by smell.
Gas suppliers recommend that you use a gas detector approved by UL or CSA.
For more information, contact your gas supplier.
If a gas leak is detected, follow the “What to do if you smell gas” instructions.
State of California Proposition 65 Warnings:
WARNING: This product contains one or more chemicals known to the State of California to cause cancer.
WARNING: This product contains one or more chemicals known to the State of California to cause birth defects or other
reproductive harm.
3
Page 4
SAFETY INFORMATION
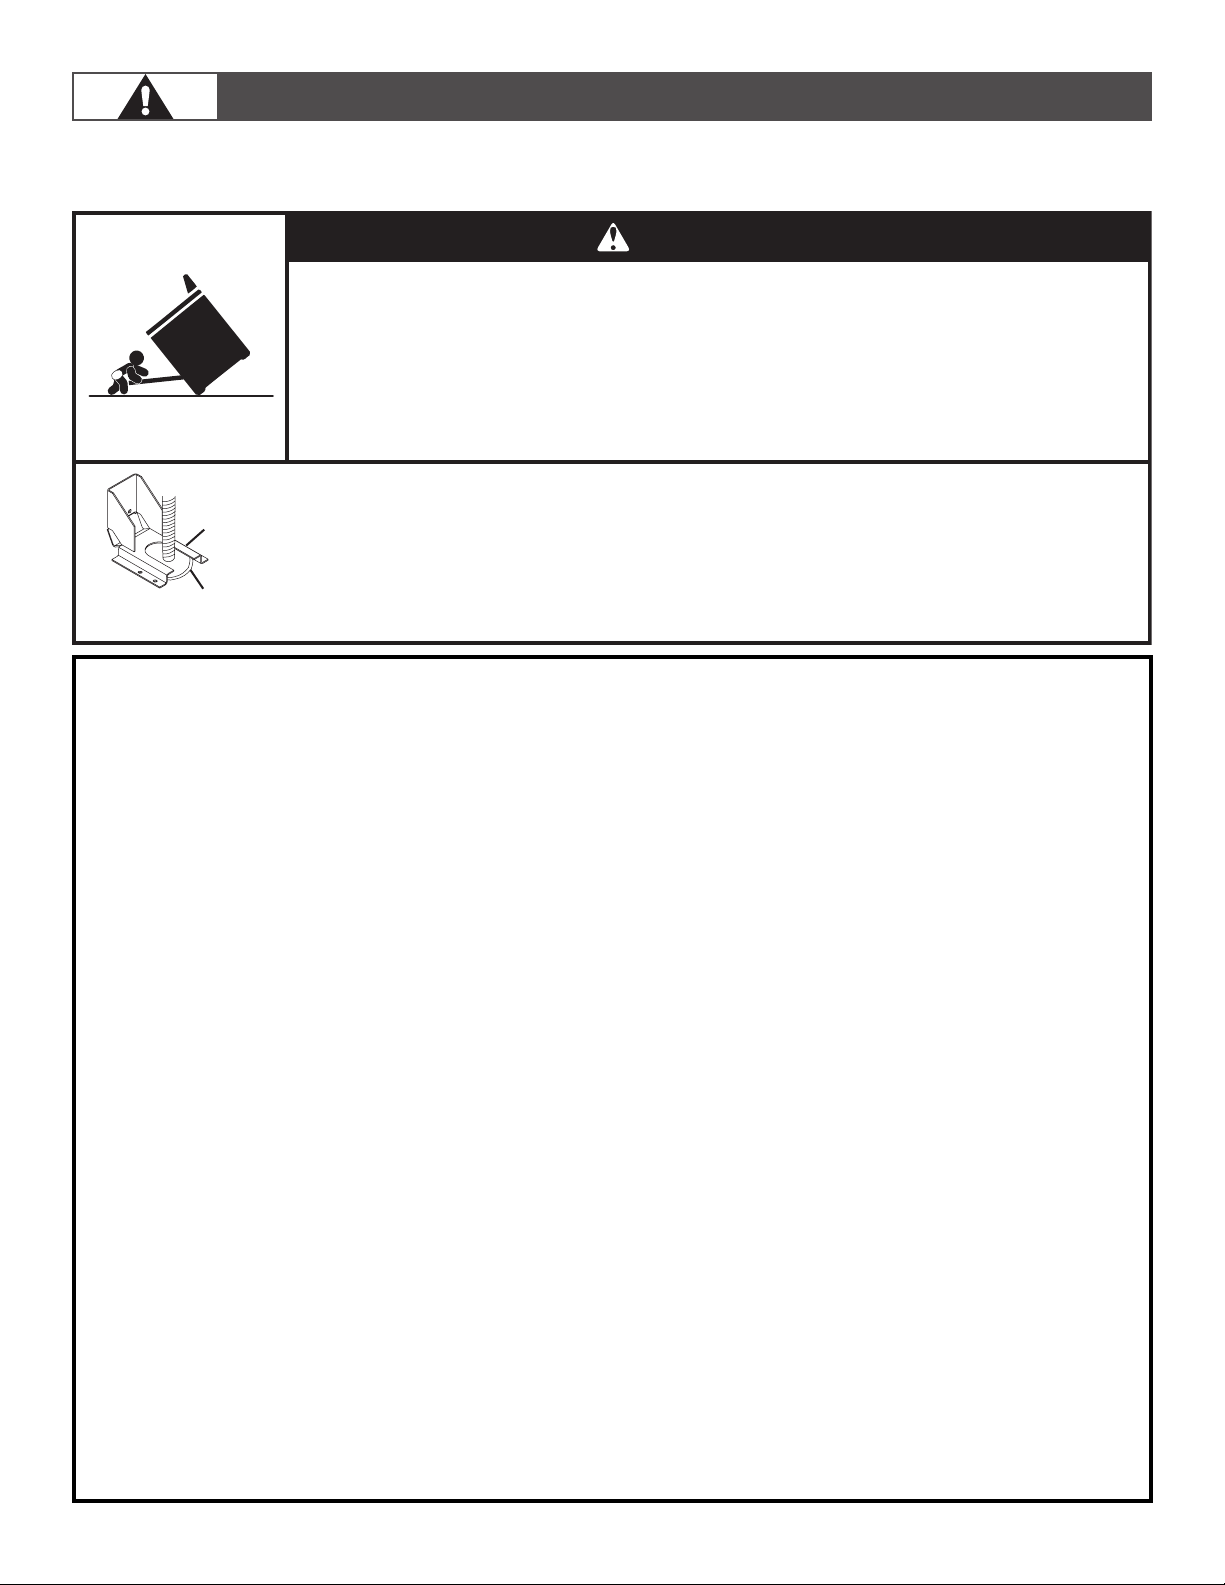
THE ANTI-TIP BRACKET
The range will not tip during normal use. However, the range can tip if you apply too much force or weight to the open door without
the anti-tip bracket fastened down properly.
WARNING
Tip Over Hazard
A child or adult can tip the range and be killed.
Verify the anti-tip bracket has been properly installed and engaged per installation instructions.
Re-engage the anti-tip bracket if the range is moved.
Do not operate range without anti-tip bracket installed and engaged.
Failure to follow these instructions can result in death or serious burns to children and adults.
To verify the anti-tip bracket is installed and engaged:
Anti-Tip
Bracket
Range Foot
• Slide range forward.
• Look for the anti-tip bracket securely attached to floor or wall.
Slide range back so rear range foot is under anti-tip bracket.•
• See installation instructions for details.
IMPORTANT SAFETY INSTRUCTIONS
WARNING: To reduce the risk of fire, electrical shock, injury to
persons, or damage when using the range, follow basic
precautions, including the following:
■
WARNING:
RANGE, THE RANGE MUST BE SECURED BY PROPERLY
INSTALLED ANTI-TIP DEVICES. TO CHECK IF THE DEVICES
ARE INSTALLED PROPERLY, SLIDE RANGE FORWARD,
LOOK FOR ANTI-TIP BRACKET SECURELY ATTACHED TO
FLOOR OR WALL, AND SLIDE RANGE BACK SO REAR
RANGE FOOT IS UNDER ANTI-TIP BRACKET.
■ WARNING:
MOVE THE RANGE WHILE HOT. THIS RANGE IS PROVIDED
WITH WHEELS TO FACILITATE MOVEMENT. TO REDUCE THE
RISK OF INJURY DUE TO TIPPING OF THE APPLIANCE,
VERIFY THE REINSTALLATION OF THE RANGE INTO THE
ANTI-TIP DEVICE PROVIDED, AND EXTEND LEVELING FEET
AFTER RETURNING THE RANGE TO THE ORIGINAL
INSTALLED POSITION.
■ WARNING: NEVER use this appliance as a space heater to
heat or warm the room. Doing so may result in carbon monoxide
poisoning and overheating of the oven.
■ WARNING:
oven bottom or cover an entire rack with materials such as
aluminum foil. Doing so blocks air flow through the oven and
may cause carbon monoxide poisoning. Aluminum foil linings
may also trap heat, causing a fire hazard.
■ CAUTION: Do not store items of interest to children in
cabinets above a range or on the backguard of a range –
children climbing on the range to reach items could be seriously
injured.
■ Do Not Leave Children Alone – Children should not be left alone
or unattended in area where the range is in use. They should
never be allowed to sit or stand on any part of the range.
TO REDUCE THE RISK OF TIPPING OF THE
TO REDUCE THE RISK OF BURNS, DO NOT
NEVER cover any slots, holes or passages in the
Wear Proper Apparel – Loose-fitting or hanging
■
garments should never be worn while using the range.
User Servicing – Do not repair or replace any part of the
■
range unless specifically recommended in the manual.
All other servicing should be referred to a qualified
technician.
Storage in or on the Range – Flammable materials
■
should not be stored in an oven or near surface units.
Do Not Use Water on Grease Fires – Smother fire or
■
flame or use dry chemical or foam-type extinguisher.
■ Use Only Dry Potholders – Moist or damp potholders on
hot surfaces may result in burns from steam. Do not let
potholder touch hot heating elements. Do not use a
towel or other bulky cloth.
■ DO NOT TOUCH SURFACE UNITS OR AREAS NEAR
UNITS – Surface units may be hot even though they are
dark in color. Areas near surface units may become hot
enough to cause burns. During and after use, do not
touch, or let clothing or other flammable materials
contact surface units or areas near units until they have
had sufficient time to cool. Among those areas are the
cooktop and surfaces facing the cooktop.
Never Leave Surface Units Unattended at High Heat
■
Settings – Boilover causes smoking and greasy
spillovers that may ignite.
■ Glazed Cooking Utensils – Only certain types of glass,
glass/ceramic, ceramic, earthenware, or other glazed
utensils are suitable for range-top service without
breaking due to the sudden change in temperature.
SAVE THESE INSTRUCTIONS
4
Page 5

SAFETY INFORMATION
IMPORTANT SAFETY INSTRUCTIONS
Utensil Handles Should Be Turned Inward and Not Extend Over
■
Adjacent Surface Units – To reduce the risk of burns, ignition of
flammable materials, and spillage due to unintentional contact
with the utensil, the handle of a utensil should be positioned so
that it is turned inward, and does not extend over adjacent
surface units.
■ Clean Cooktop With Caution – If a wet sponge or cloth is used
to wipe spills on a hot cooking area, be careful to avoid steam
burn. Some cleaners can produce noxious fumes if applied to a
hot surface.
■ Use Care When Opening Door – Let hot air or steam escape
before removing or replacing food.
Do Not Heat Unopened Food Containers – Build-up of pressure
■
may cause container to burst and result in injury.
■ Keep Oven Vent Ducts Unobstructed.
■ Placement of Oven Racks – Always place oven racks in desired
location while oven is cool. If rack must be moved while oven is
hot, do not let potholder contact hot heating element in oven.
■ DO NOT TOUCH HEATING ELEMENTS OR INTERIOR
SURFACES OF OVEN – Heating elements may be hot even
though they are dark in color. Interior surfaces of an oven
become hot enough to cause burns. During and after use, do
not touch, or let clothing or other flammable materials contact
heating elements or interior surfaces of oven until they have had
sufficient time to cool. Other surfaces of the appliance may
become hot enough to cause burns – among these surfaces are
oven vent openings and surfaces near these openings, oven
doors, and windows of oven doors.
■ Proper Installation – The range, when installed, must be
electrically grounded in accordance with local codes or, in the
absence of local codes, with the National Electrical Code,
ANSI/NFPA 70. In Canada, the range must be electrically
grounded in accordance with Canadian Electrical Code. Be sure
the range is properly installed and grounded by a qualified
technician.
■ Disconnect the electrical supply before servicing the
appliance.
■ Injuries may result from the misuse of appliance doors
or drawers such as stepping, leaning, or sitting on the
doors or drawers.
■ Maintenance – Keep range area clear and free from
combustible materials, gasoline, and other flammable
vapors and
■ Top burner flame size should be adjusted so it does not
liquids.
extend beyond the edge of the cooking utensil.
For self-cleaning ranges –
■ Do Not Clean Door Gasket – The door gasket is
essential for a good seal. Care should be taken not to
rub, damage, or move the gasket.
Do Not Use Oven Cleaners – No commercial oven
■
cleaner or oven liner protective coating of any kind
should be used in or around any part of the oven.
■ Clean Only Parts Listed in Manual.
■ Before Self-Cleaning the Oven – Remove broiler pan
and other utensils. Wipe off all excessive spillage before
initiating the cleaning cycle.
For units with ventilating hood –
■ Clean Ventilating Hoods Frequently – Grease should not
be allowed to accumulate on hood or filter.
■ When flambéing foods under the hood, turn the fan on.
SAVE THESE INSTRUCTIONS
5
Page 6

PARTS AND FEATURES
This manual covers several different models. The range you have purchased may have some or all of the items listed. The locations
and appearances of the features shown here may not match those of your model. Refer to this manual or the Frequently Asked
Questions (FAQs) section of our website at www.jennair.com for more detailed instructions. In Canada, refer to the Customer Service
Section at www.jennair.ca.
RANGE
1
2
3
4
13
12
Island trim
1
Cooktop grate
2
Electric griddle (on some models)
3
11
10
9
48" (121.9 cm) range shown
8
Leveling rods
9
Oven doors
10
Window
5
6
7
8
4
Drip tray
Side panels
5
6
Console panel
7
Roller feet
See the “Accessories” section for additional attachments and options.
6
11
Lower panel/kick plate
12
Touch-screen oven control
13
Control knobs
Page 7
B
B
C
D
E
F
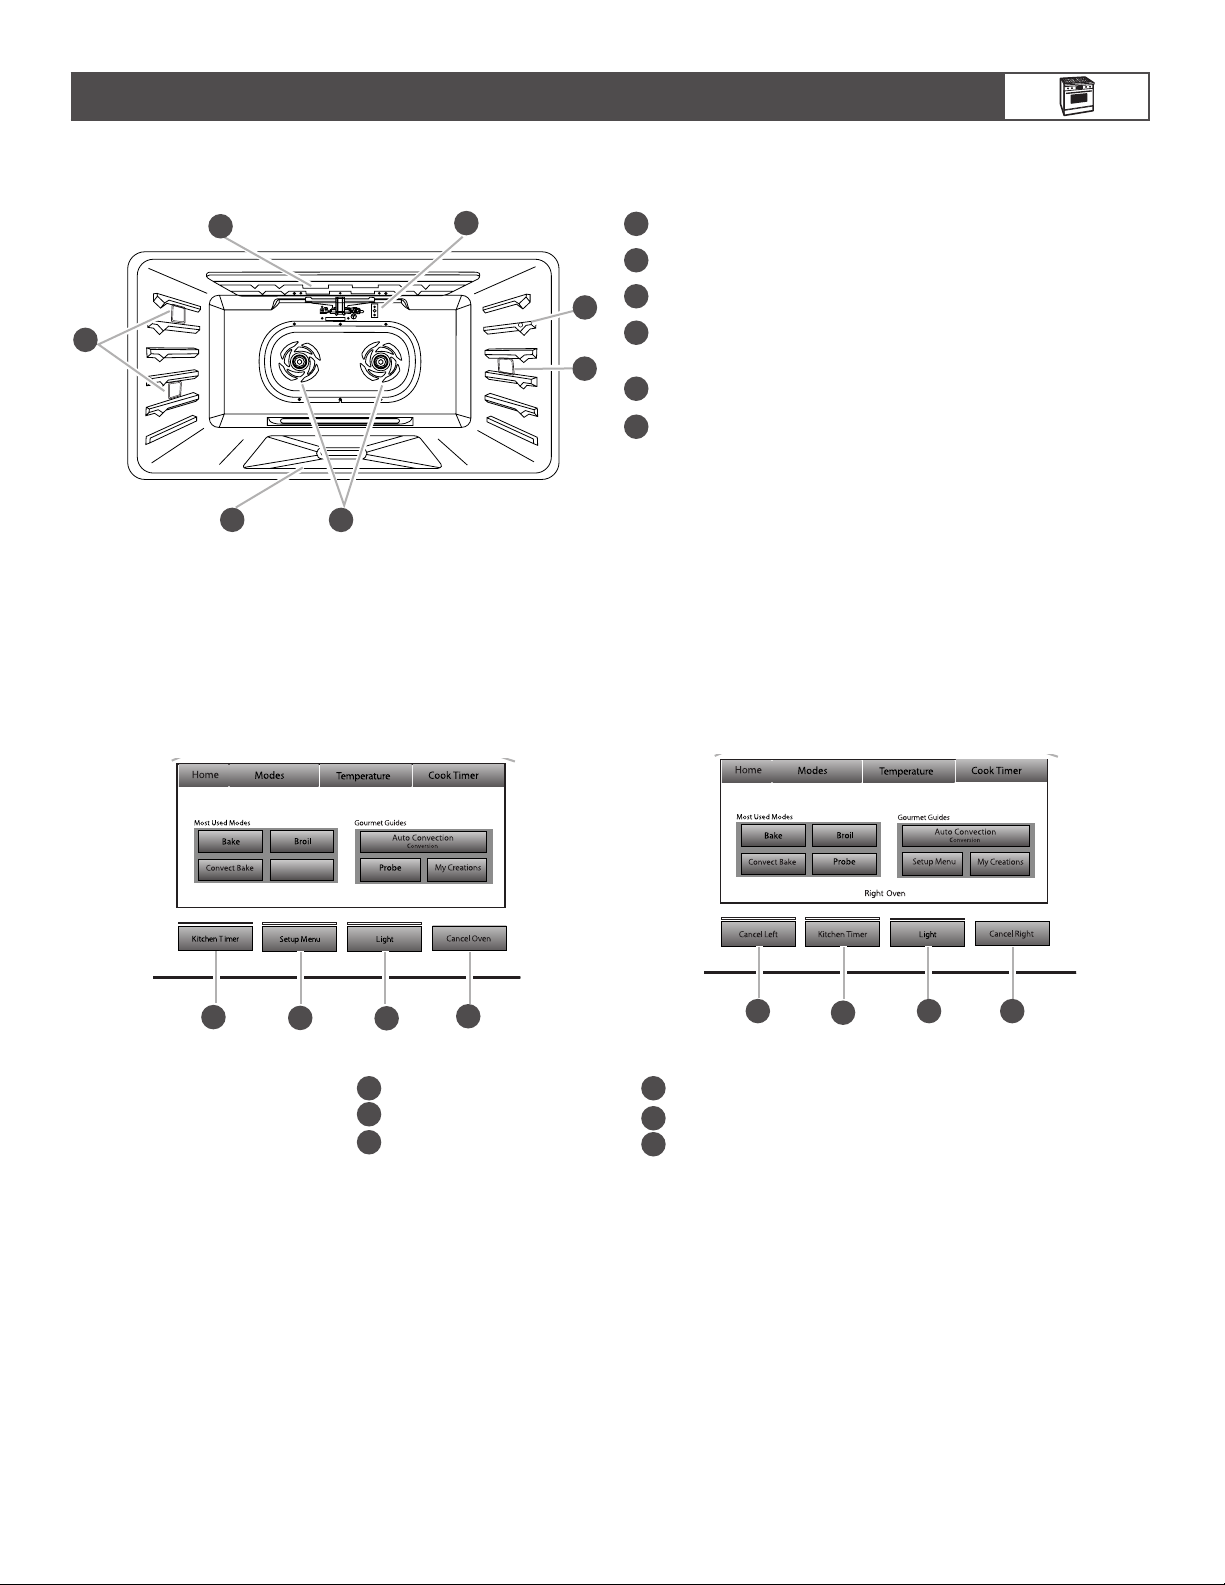
OVEN INTERIOR
PARTS AND FEATURES
B
2
1
A
F
6
E
5
3
C
4
D
A
1
Halogen lights
1
2
Broil elements with broil reflector
3
Oven cavity sensor
4
Temperature probe jack (not available in the left
oven cavity on 48" [121.9 cm] models)
5
Convection fan(s)
6
Bake burner cover
ELECTRONIC OVEN CONTROLS
The oven’s controls are accessed through its control panel and interactive-touch display.
NOTE: Due to the sensitivity of the control panel, see the “Care and Cleaning” section for special instructions for cleaning.
30" (76.2 CM) AND 36" (91.4 CM)
48" (121.9 CM)
Keep Warm
F
4
E
3
D
2
Cancel oven
1
Oven light
2
Set-up menu
3
C
1
Kitchen timer
4
Cancel right oven
5
Cancel left oven
6
6
4
52
7
Page 8
COOKTOP FEATURES
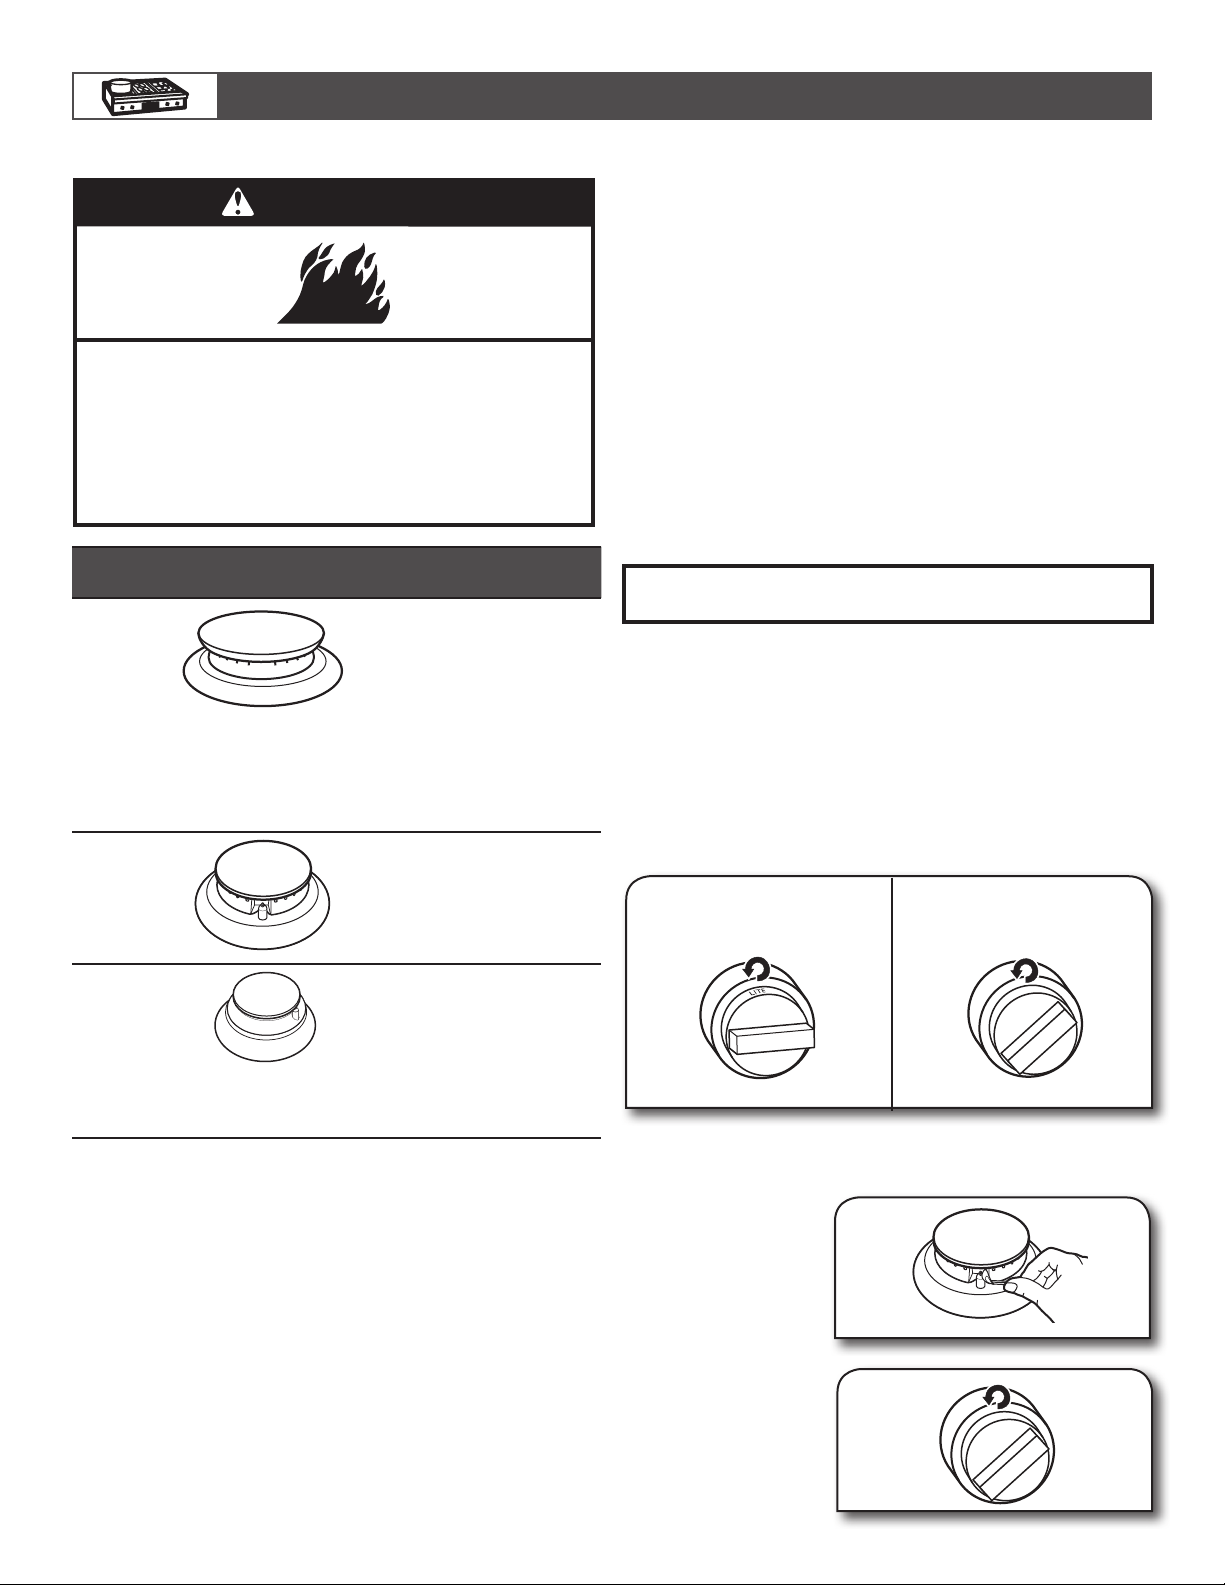
BURNERS
WARNING
Fire Hazard
Do not let the burner flame extend beyond the edge of
the pan.
Turn off all controls when not cooking.
Failure to follow these instructions can result in death
or fire.
BTU/hr
UltraPower
stacked
burner
Medium
burner
BURNER
APPEARANCE
FEATURES
This burner has an upper
and lower level of flame. The
Power Hi setting uses both
flame levels at full power to
provide the highest heat.
It is ideal for cooking large
quantities of food or liquid
and using large pots and
pans. The Simmer Hi and
Lo settings use the upper
flame only.
This burner is ideal for
cooking smaller quantities
of food and melting
chocolate or butter.
Igniting Burners:
■ Electric igniters automatically light the surface burners
when control knobs are turned to LITE.
■ Before setting a control knob, place filled cookware on the
grate. Do not operate a burner using empty cookware or
without any cookware on the grate.
■ Visually check that the burner has lit. If the burner does not
ignite, listen for the clicking sound. If you do not hear the
igniter click, turn off the burner. Check for a tripped circuit
breaker or blown fuse.
■ Check that the control knob is pressed completely down
on the valve shaft. If the spark igniter still does not operate,
call a trained repair specialist.
■ When the control knobs for any small or medium burner are
turned to the Lite position, all small and medium burners
will click. When the control knob for the large burner is turned
to the Lite position, these burners will click independent of
the other burners. In both cases, only the burner with the
control knob turned to LITE will produce a flame.
REMEMBER: When range is in use or during the SelfCleaning cycle, the entire cooktop area may become hot.
Flame-Sensing™ Reignition Feature
During cooktop use, if one or more burners are extinguished
due to external causes (such as a water spill, wind, or
ventilation draft), the ignition system will turn on to reignite
the flame. When the flame comes back on, the system will
stop sparking. If the draft in the room is not removed, occasional
sparking may continue. Sparking may also occasionally occur
when using the low setting on a burner.
To Set a Burner:
1.
Push in and turn
counterclockwise
2. Turn knob
counterclockwise
Simmer
burner
8
This burner reaches a low
of 500 BTU/hr. It provides
the gentle low temperatures
required for simmering
soups, stewing, and melting
delicate ingredients like
butter, cheese, and
chocolate.
to LITE.
Push in one more time to get from LO to Simmer HI.
between HI and LO.
In Case of Power Failure
Hold a lit match near a
burner and turn knob
counterclockwise to HI.
After burner lights, turn
knob to desired setting.
Page 9

COOKTOP FEATURES
A
B
C
B
Sealed Surface Burners
Sealed surface burners are designed to minimize gaps and
seams that can allow liquids and spills to get under the cooktop.
This design makes cleanup quick and easy.
Burner cap
Stacked Power Burner
Medium Burner
3
Simmer Burner
1
2
1
2
1
2
1
Burner base
2
Choke (for use with
3
medium burner, LP
gas only)
CHROME ELECTRIC GRIDDLE
(on some models)
The chrome electric griddle provides the perfect cooking
surface for grilled sandwiches, pancakes, eggs, burgers, sautéed
vegetables, and many more family favorites. The attractive
low-stick surface is designed to make cleanup easy.
2
1
A
Drip tray
1
Griddle
2
The chrome electric griddle system provides an evenly heated
cooking surface.
■ Be sure plastic film has been removed and wash with hot
water before first use.
■ To avoid scratching the griddle, do not place any pots or
pans on the griddle. Use only heat-resistant plastic or
wooden utensils.
■ The griddle surface is ready to use and does not need to be
seasoned.
■ Pouring cold water on a hot griddle may warp the griddle,
resulting in an uneven cooking surface.
To Use:
IMPORTANT: Do not obstruct the flow of combustion and
ventilation air around the burner grate edges.
Burner cap: Always keep the burner cap in place when using
a surface burner. A clean burner cap will help avoid poor ignition
and uneven flames. Always clean the burner cap after a spillover,
and routinely remove and clean the caps according to the
“Care and Cleaning” section.
Gas opening: Gas must flow freely throughout the gas opening
for the burner to light properly. Keep this area free of soil and do
not allow spills, food, cleaning agents, or any other material to
enter the gas opening. Keep spillovers out of the gas opening
by always using a burner cap.
1-1¹⁄2"
1
1
(25-38 mm)
Burner
2
ports
2
Burner Ports:
Check burner flames occasionally for proper size and shape as
shown above. A good flame is blue in color, not yellow. Keep this
area free of soil and do not allow spills, food, cleaning agents, or
any other material to enter the burner ports.
1. Position drip tray.
2. Push in and turn
knob.
The griddle light will turn off when the griddle has finished
preheating. The griddle light will turn on and off during use to
indicate that the griddle element is maintaining the selected
surface temperature.
3. Place food
on griddle
and cook to desired doneness.
9
Page 10
Gourmet Guides
Setup Menu
My Creations
Auto Convection
Conversion
Most Used Modes:
Home
Mode
Temperature
Convect Bake
Bake
Broil
Probe
Cancel Right
Light
Kitchen Timer
Cancel Left
Cancel Right
Light
Kitchen Timer
Cancel Left
Cancel Right
Light
Kitchen Timer
Cancel Left
Home
Bake
Timer Not Set
Start
Delay Start
-5°
+5°
Back
Regional Settings:
Next
Enter Clock Time:
Back
Next
Enter a valid time, the press Next.
Clear
HR:MIN
- - : - -
Select the date:
Back
Next
Select a screen theme to match your style:
Done
Back
Gourmet Guides
Probe
My Creations
Auto Convection
Conversion
Most Used Modes:
Home
Mode
Temperature
Cook Timer
Convect Bake
Bake
Broil
Keep Warm
Cancel Oven
Light
Setup Menu
Gourmet Guides
Probe
My Creations
Auto Convection
Conversion
Most Used Modes:
Home
Convect Bake
Bake
Broil
Keep Warm
Cancel Oven
Light
Setup Menu
Kitchen Timer
Mode
Temperature
Cook Timer
Start Timer
HR:MIN:SEC
--:--:--
Close
Clear
Gourmet Guides
Probe
My Creations
Auto Convection
Conversion
Most Used Modes:
Home
Convect Bake
Bake
Broil
Keep Warm
Cancel Oven
Light
Setup Menu
Kitchen Timer
Mode
Temperature
Cook Timer
1 2 3 4 5
6 7 8 9 0
Start Timer
HR:MIN:SEC
--:--:--
Close
Gourmet Guides
Probe
My Creations
Auto Convection
Conversion
Most Used Modes:
Home
Convect Bake
Bake
Broil
Keep Warm
Cancel Oven
Light
Setup Menu
Kitchen Timer
Mode
Temperature
Cook Timer
HR:MIN:SEC
00:01:30
12345
67890
Close
Clear
Gourmet Guides
Probe
My Creations
Auto Convection
Conversion
Most Used Modes:
Home
Convect Bake
Bake
Broil
Keep Warm
Cancel Oven
Light
Setup Menu
Kitchen Timer
Mode
Temperature
Cook Timer
1 2 3 4 5
6 7 8 9 0
Start Timer
HR:MIN:SEC
--:--:--
Close
USING YOUR OVEN
Back
Regional Settings:
Next
Clock style:
Analog
Digital
Back
Regional Settings:
Next
Select clock units:
AM/PM
24-Hour (Military)
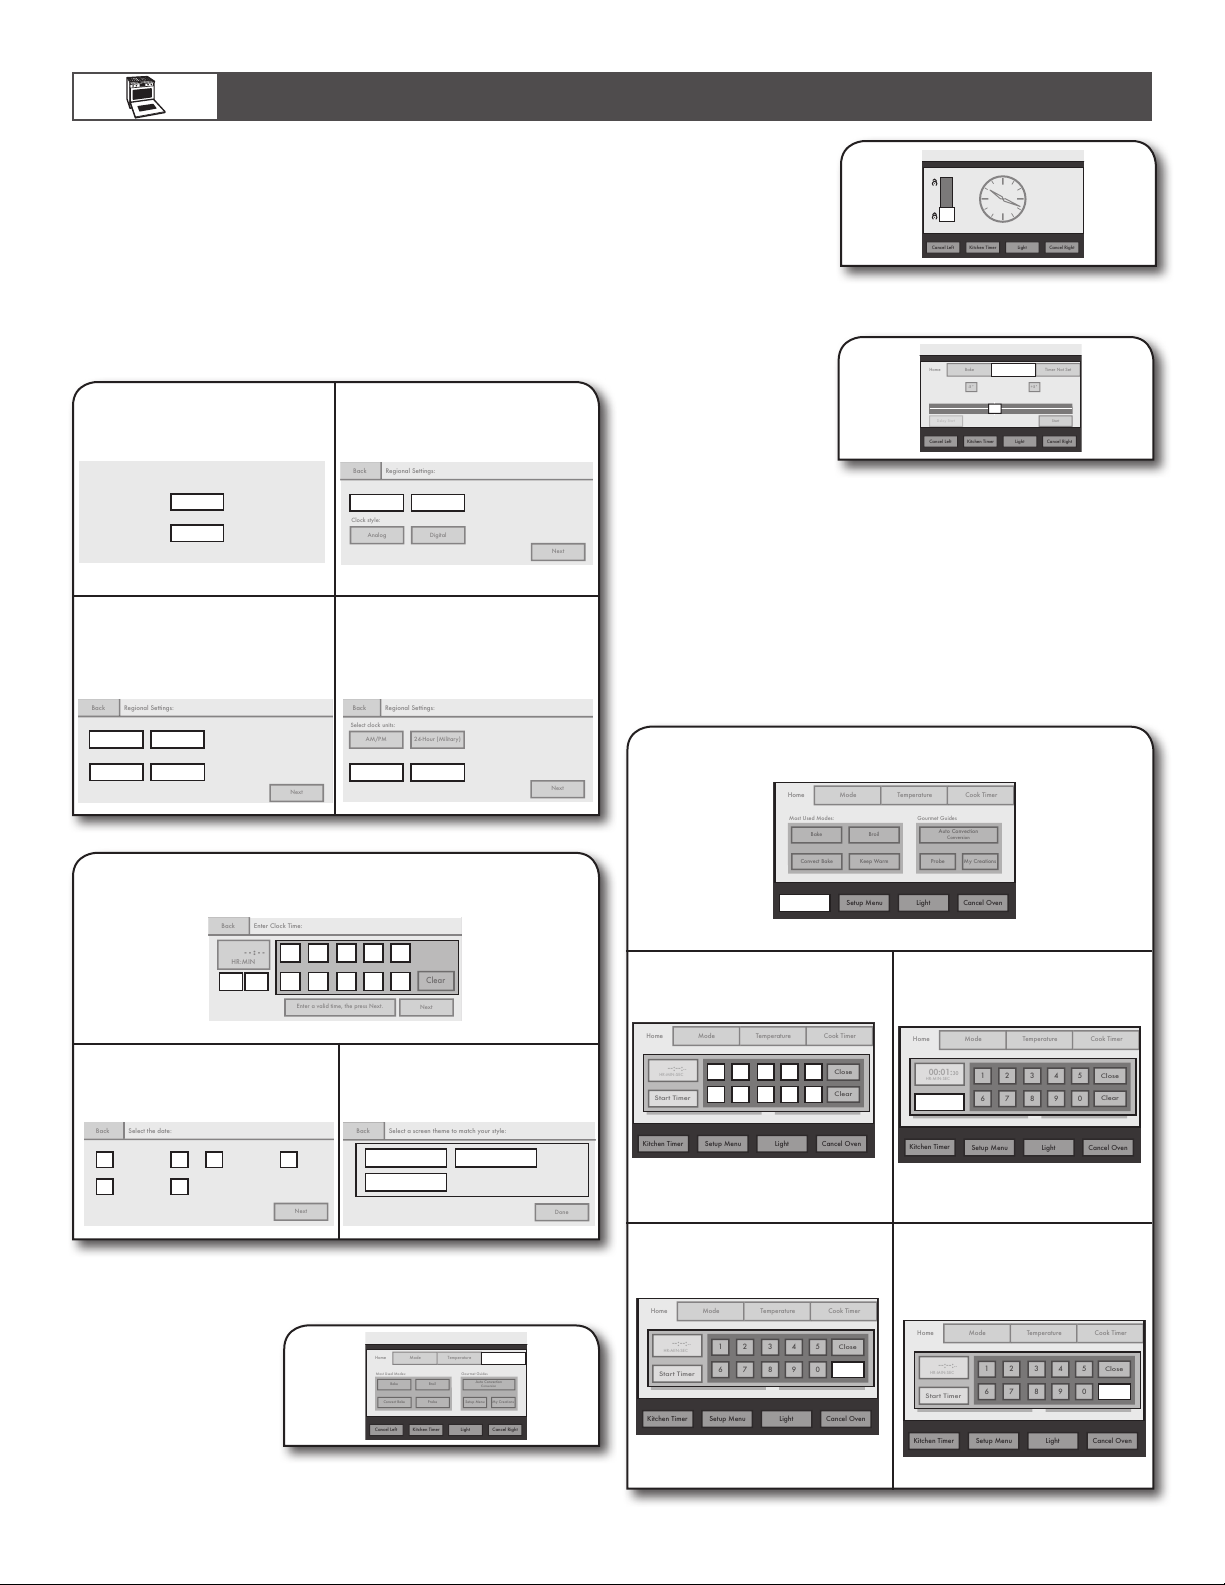
CONTROL PANEL
The control panel houses the control menu and function
controls. The control keypads are very sensitive and require
only a light touch to activate.
For more information about the individual controls, see their
respective sections in this manual.
Welcome Guide
This appears on the display the first time the oven is powered up.
The Welcome Guide allows you to set up your new oven.
1. Select language.
Welcome! Please Select your language.
English
Bienvenue! Sʼil vous plaît...
Français
2. Select temperature
units and daylight
savings.
Select temperature degree units:
Fahrenheit Celsius
Daylight-Savings-Time observed:
Yes
No
3. Select clock
units.
Select clock units:
AM/PM 24-Hour (Military)
4. Set clock style.
Clock style:
Analog
Digital
■ After approximately
2 minutes of inactivity,
the display will go into
Standby (sleep) mode
and the backlight of
Slide to unlock.
the display will dim.
When the oven is in
operation, the display
will remain active.
■ During programming,
Slide up bar to unlock screen and
return to Home screen.
the display shows
menus and the
appropriate selections
for the respective
200° 250°
Temperature
350°
350° 400°
300°
550°
450°
500°
cooking function.
Example for Bake menu
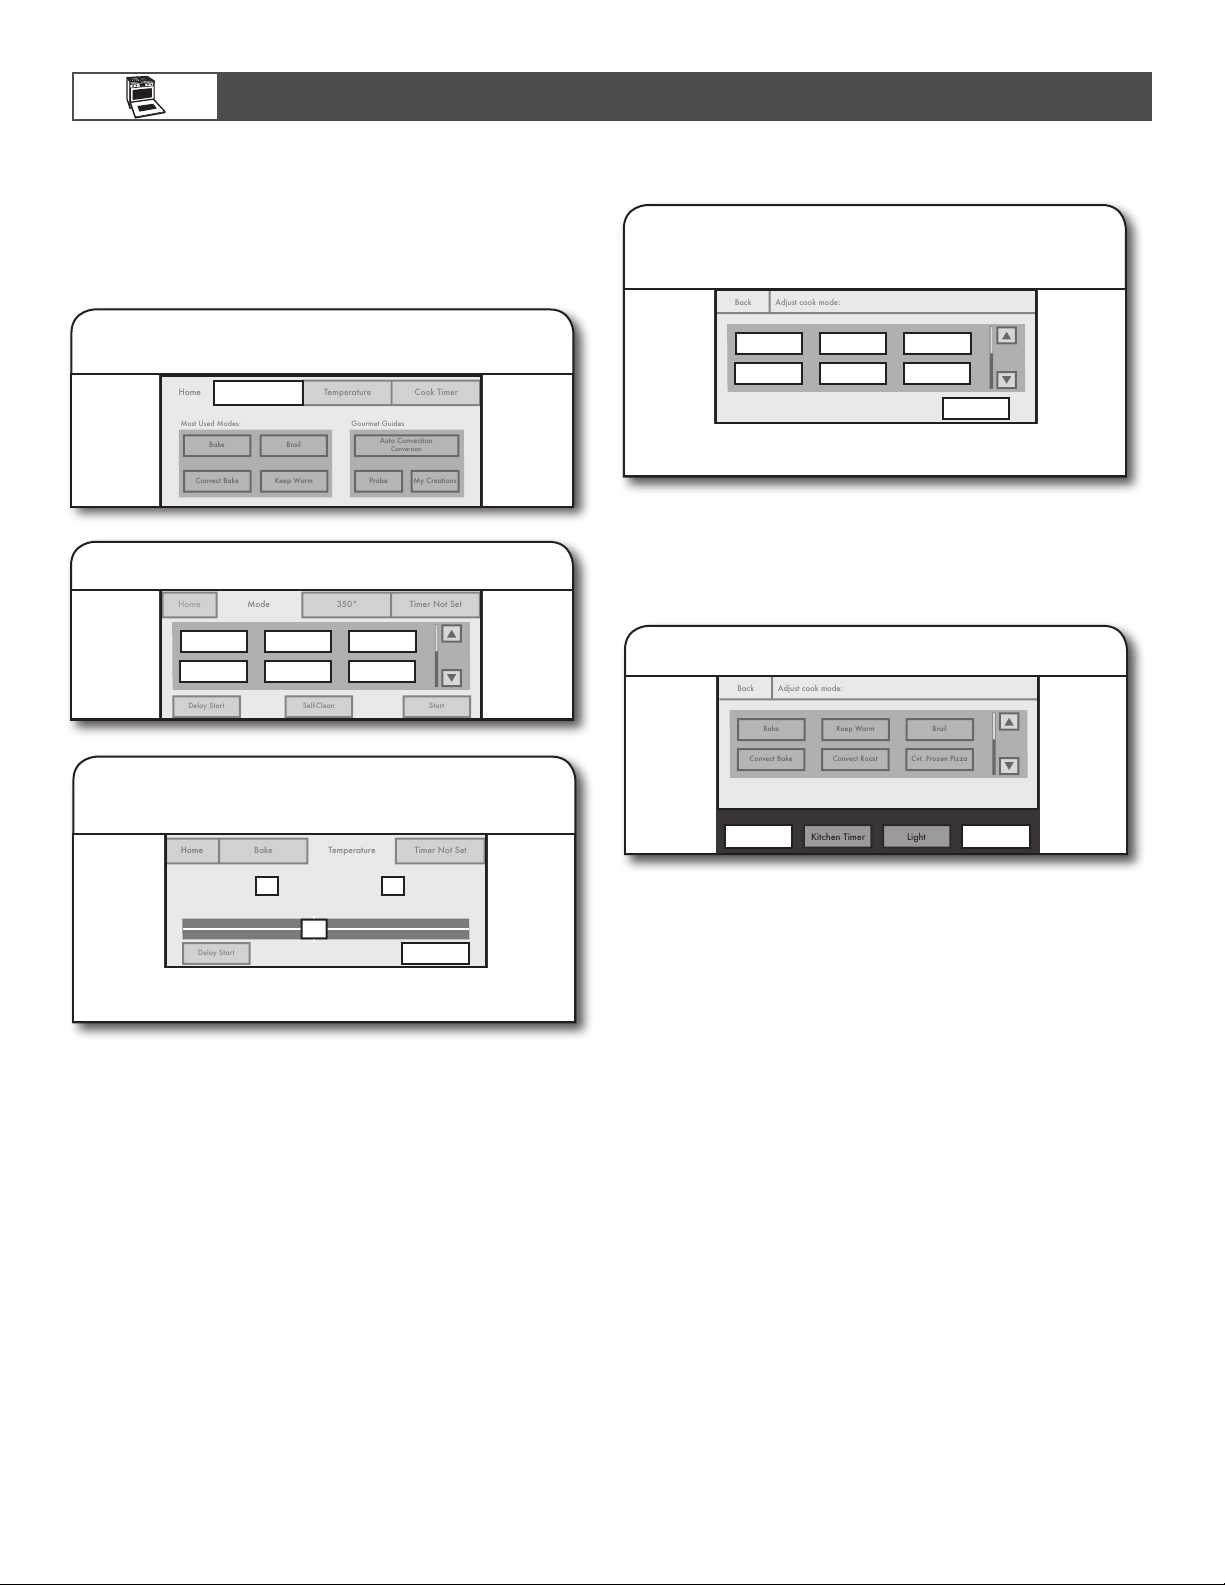
INTERACTIVE TOUCH DISPLAY
From the Home and Modes menu, all automatic cooking
programs can be activated; all manual cooking can be
programmed; settings can be adjusted; and instructions,
preparation, and tips can be accessed.
KITCHEN TIMER
The Kitchen Timer is an independent timer not associated with
the Cook Timers.
1. Touch KITCHEN TIMER.
5. Enter current clock time.
1 2 3 4 5
6 7 8 9 0
PMAM
6. Select today’s
date.
Month:
< >January
Year:
< >2010
DISPLAY
■ When the oven(s) are
in use (Active mode),
the display shows
the clock, mode,
oven temperature,
and timer, if set. If the
timer is not set, you
can set it from this screen.
Day:
< >1
7. Select screen
appearance.
Dark/BlueDark/Orange
Light/Blue
Cook Timer
Kitchen Timer
30" and 36" models shown
2. Enter desired
time.
1 2 3 4 5
6 7 8 9 0
3. Touch CLEAR
to reset time.
Clear
This clears Kitchen Timer back
to (- - : - - : - -).
4. Touch START
TIMER.
Start Timer
When time reaches 0:00,
tones will sound.
5. Touch OK or
CLEAR, and
then CLOSE.
Clear
This exits and clears display.
10
Page 11

USING YOUR OVEN
Gourmet Guides
My Creations
Auto Convection
Conversion
Most Used Modes:
Home
Convect Bake
Bake
Broil
Probe
Mode
Temperature
Cook Timer
Lock Buttons Now
Automatic Lock
Self-clean
Sound Volume
Set Time
Set Date
Back
Setup Menu
On
Button lock:
Cancel
Back
Lock Buttons Now
Self-clean
Sound Volume
Set Time
Set Date
Back
Setup Menu
Off
Button lock:
Cancel
Back
Back
Enter Clock Time:
Enter a valid time, the press Save.
Clear
HR:MIN
10:29
PM
AM
Lock Buttons Now
Automatic Lock
Self-clean
Sound Volume
Set Date
Setup Menu
Back
Gourmet Guides
Probe
My Creations
Auto Convection
Conversion
Most Used Modes:
Home
Convect Bake
Bake
Broil
Keep Warm
Mode
Temperature
Cook Timer
1 2 3 4 5
6 7 8 9 0
Start Timer
HR:MIN:SEC
--:--:--
00:00
:42
00:00
:42
Gourmet Guides
Probe
My Creations
Auto Convection
Conversion
Most Used Modes:
Home
Convect Bake
Bake
Broil
Keep Warm
Mode
Temperature
Cook Timer
OK
HR:MIN:SEC
00:00:00
12345
67890
Clear
Gourmet Guides
Probe
My Creations
Auto Convection
Conversion
Most Used Modes:
Home
Convect Bake
Bake
Broil
Keep Warm
Mode
Temperature
Cook Timer
HR:MIN:SEC
--:--:--
Close
Clear
Gourmet Guides
Probe
My Creations
Auto Convection
Conversion
Most Used Modes:
Home
Convect Bake
Bake
Broil
Keep Warm
Mode
Temperature
Cook Timer
HR:MIN:SEC
--:-1:20
Close
Clear
To Add Extra Time when Time Expires:
1. Touch ADD
MORE TIME.
2. Enter time,
and then touch
START TIMER.
Add More Time
Start Timer
To Adjust Kitchen Timer while Running:
1. Touch ADJUST.
2. Enter new time,
1 2 3 4 5
6 7 8 9 0
and then touch
START TIMER.
Adjust
Start Timer
To Exit while Kitchen Timer Is Running:
1 2 3 4 5
6 7 8 9 0
To unlock keypads/screens:
Slide up bar.
Slide to unlock.
Automatic Lock
To activate:
1. Touch AUTOMATIC LOCK.
Automatic Lock
2. Touch ON
and then SAVE.
3. Slide up bar
to unlock
1. Touch ADJUST.
2. Touch CLEAR
and then CLOSE.
Adjust
Close
Clear
SETUP MENU
This oven provides the ability to control several of the default
settings and access information through the on-screen display.
1. Touch SETUP
MENU.
Setup Menu
48" model shown
Self-Clean
This setting is disabled while oven is in use.
2. Use up and
down arrows.
Lets you view and access
settings. If the oven is in use,
Setup Menu is disabled.
Automatically lock after each use
On
To deactivate:
Touch OFF and SAVE.
Automatically lock after each use
Off
Setting Time
1. Touch SET TIME.
Set Time
Save
Slide to unlock.
to continue using the control
after setting Automatic Lock.
Save
2. Enter time, and
then touch SAVE.
1 2 3 4 5
6 7 8 9 0
Save
Lock Keypads Now
This function allows all the keypads to be locked. It is automatically
disabled if the Kitchen Timer is running or the oven is in use.
11
Page 12

Enter Clock Time:
Save
12345
67890
HR:MIN
09:13
AM
PM
Cancel
Back
Lock Buttons Now
Automatic Lock
Self-clean
Sound Volume
Set Time
Setup Menu
Back
Select the date:
Back
Cancel
Sabbath Mode
Screen Brightness
Screen Appearance
Language
Regional Settings
Back
Setup Menu
Clock Options
Cancel
Back
Sabbath Mode
Screen Brightness
Clock Options
Language
Regional Settings
Setup Menu
Back
Select a screen theme to match your style:
Back
Cancel
Show animations
when cooking:
On
Sabbath Mode
Screen Appearance
Clock Options
Lanuage
Regional Settings
Back
Setup Menu
Select the screen brightness:
Cancel
screen
Back
Sabbath Mode
Screen Appearance
Clock Options
Screen Brightness
Regional Settings
Setup Menu
Back
Back
Select your language:
Cancel
Lock Buttons Now
Automatic Lock
Self-clean
Set Time
Set Date
Setup Menu
Back
Set the desired volume levels
Cancel
Start-up and
shut down sounds:
Loud
Back
USING YOUR OVEN
To clear clock to 00:00:
Touch CLEAR.
Setting Date
1. Touch SET DATE.
Set Date
Setting Sound Volume
1. Touch SOUND
VOLUME.
Clear
2. Choose date, and
then touch SAVE.
Month:
< >January
Year:
< >2010
Day:
< >1
Save
2. Adjust sounds,
and then touch
SAVE.
Setting Screen Appearance
1.
Touch the down
arrow keypad,
and then touch
SCREEN
APPEARANCE.
Screen Appearance
Setting Screen Brightness
1.
Touch the down
2. Adjust screen
arrow keypad,
and then
touch
SCREEN
BRIGHTNESS.
Screen Brightness
2. Select screen
appearance, and
then touch SAVE.
Dark/BlueDark/Orange
Light/Blue
Save
Select the screen appearance
to match your oven.
brightness and
idle setting, and
then touch SAVE.
Dim
When the appliance has not been used
for 5 minutes:
Dim the screen
Recommended Bright
Turn off the
Save
Off
Sound Volume
Off
Use the slider bar to adjust
timer/alert or keypad-press
sound levels. Then touch
ON/OFF to toggle between
settings for start-up and
shut-down sounds.
When ON, the oven will make a sound when it transitions
in and out of Idle mode. When OFF, no sound will be made.
NOTE: If the Cancel keypad is touched, the sound settings
will go to the recommended level.
Setting Clock Options
1. Touch the down
arrow keypad,
and then touch
CLOCK OPTIONS.
Clock Options
2. Select clock
units and style,
and then touch
SAVE.
Select clock units:
AM/PM 24-Hour (Military)
Clock Style:
Analog
Digital
Use slider bar. Choose “DIM
THE SCREEN” or “TURN
OFF THE SCREEN” for use
Save
when oven has been idle for
5 minutes.
NOTE: If the Cancel keypad is touched, the screen brightness
will go to the recommended level.
Setting Language
1.
Touch the down
arrow keypad,
and then
touch
2. Select language,
and then touch
SAVE.
LANGUAGE.
English Français
Language
NOTE: Touch the Cancel keypad to return to the default setting.
Save
Save
12
Page 13
Regional Settings
Screen Appearance
Clock Options
Screen Brightness
Language
Setup Menu
Back
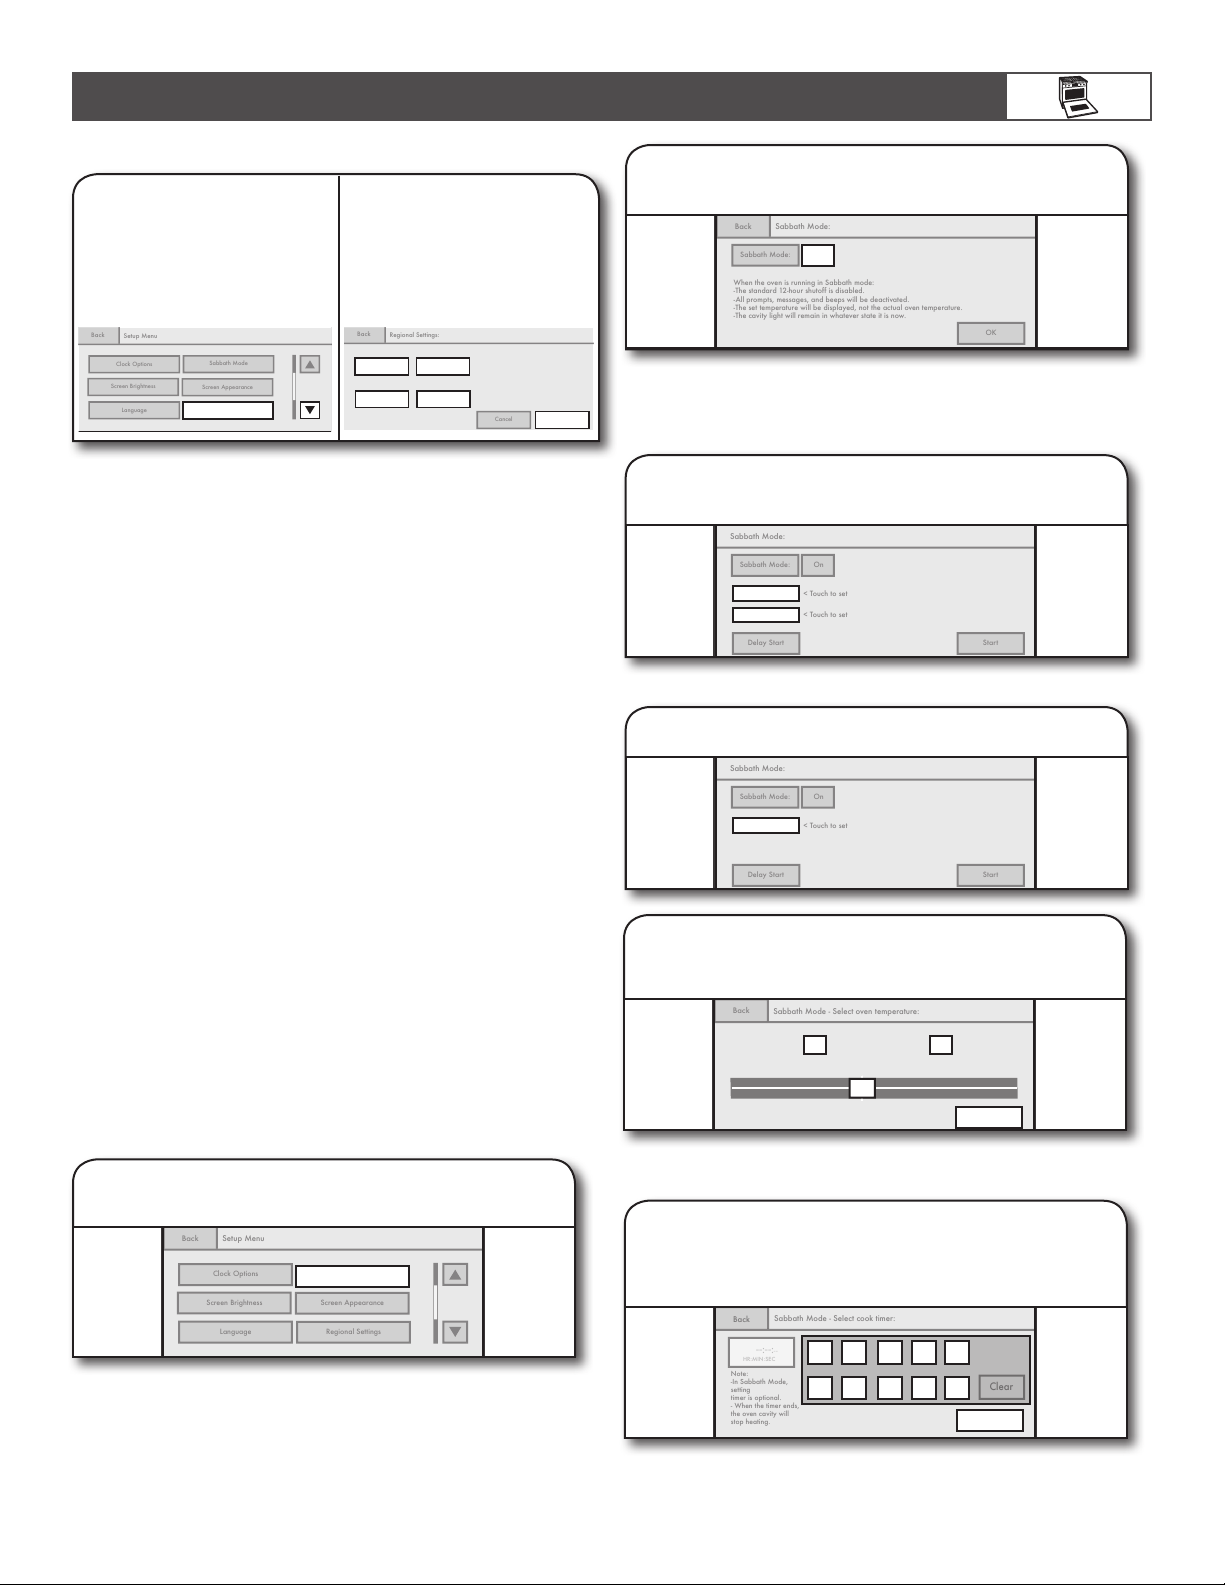
Sabbath Mode:
Back
When the oven is running in Sabbath mode:
-The standard 12-hour shutoff is disabled.
-All prompts, messages, and beeps will be deactivated.
-The set temperature will be displayed, not the actual oven temperature.
-The cavity light will remain in whatever state it is now.
Sabbath Mode:
OK
Sabbath Mode:
Sabbath Mode:
On
Start
Delay Start
< Touch to set
< Touch to set
Sabbath Mode - Select oven temperature:
Back
Sabbath Mode - Select cook timer:
Back
Clear
HR:MIN:SEC
--:--:--
Note:
-In Sabbath Mode,
setting
timer is optional.
- When the timer ends,
the oven cavity will
stop heating.
Sabbath Mode:
Sabbath Mode:
On
Start
Delay Start
< Touch to set
Making Regional Settings
Sabbath Mode
Screen Appearance
Clock Options
Screen Brightness
Language
Setup Menu
Back
Regional Settings:
Back
Cancel
1. Touch the down
arrow keypad,
and then touch
REGIONAL
SETTINGS.
Regional Settings
2.
Select temperature
units and daylight
savings, and then
touch SAVE.
Select temperature degree units:
Fahrenheit Celsius
Daylight-Savings-Time observed:
Yes
No
USING YOUR OVEN
2. Turn on Sabbath mode.
Off
Read on-screen instructions and touch OFF to turn Sabbath
mode on.
Save
On 48" (121.9 cm) ranges, touch Left Oven or Right Oven
keypad to select oven to set up.
Sabbath Mode
■ The Sabbath mode sets the oven to remain ON in a bake
setting until turned off.
■ A timed Sabbath mode can also be set to keep the oven ON
for only part of the Sabbath.
■ When the Sabbath mode is set, only the number, start, and
cancel keys will function.
■ No tones will sound and the display will not show messages
or temperatures changes.
■ The heat source icons will appear lit on the oven display
throughout the Sabbath mode.
■ When the oven door is opened or closed, the oven light will
not turn on or off and the heating elements will not turn on
or off immediately.
■ If a power failure occurs when the Sabbath mode is set,
the oven will remain in Sabbath mode but will no longer be
actively cooking. When power returns, the display will read
“SABBATH MODE – Power outage has occurred.” Touch
CANCEL to return to the normal operating mode (nonSabbath mode, not cooking).
■ The Sabbath mode must be enabled each time it is used.
■ Sabbath mode disables the 12-hour shutoff. All lights and
displays are disabled so that no visible activity takes place
when the oven door is opened.
NOTE: If you touch Sabbath mode while the temperature
probe is set, the message “Probe not inserted” appears.
Remove the probe and touch NEXT to enter the Sabbath
mode. Touch CANCEL to return to the Bake mode.
To Use Sabbath Mode:
1. Select SABBATH MODE.
3. Select oven to set up.
Left Oven
Right Oven
For single ovens:
Touch COOK SETTINGS.
Cook Settings
4. Select desired oven temperature,
and then touch NEXT.
-5°
200° 250°
300°
350°
350° 400°
Use slider to enter desired temperature or touch -5°F (-1°C)
or +5°F (+1°C) to decrease or increase the temperature.
450°
+5°
550°
500°
Next >
Use scroll bar until Sabbath mode appears and touch
SABBATH MODE.
Sabbath Mode
5. If desired, set Cook Timer, and then
touch NEXT (even if a Cook Timer is
not desired).
1 2 3 4 5
6 7 8 9 0
Next >
On 48" (121.9 cm) ranges, repeat steps 1 through 5 to set the
second oven, if desired.
13
Page 14
Light
Kitchen Timer
-25°
-25°
00:01:00
350°
Sabbath Bake
LEFT
Back
Select when cooking should begin:
Begin:
11 :10pm
Sabbath Mode:
Left Oven:
Right Oven:
Start
00:01:00
350°
Sabbath Bake
LEFT
Touchscreen Calibration
Reset All Settings
Service Information
Back
Setup Menu
Next >Cancel
Temperature Calibration
Back
Cancel
Temperature Calibration
Select the temperature off-set:
If oven seems to cool.
If oven seems to hot.
Back
0°
Light
Kitchen Timer
-25°
-25°
00:01:00
350°
Sabbath Bake
LEFT
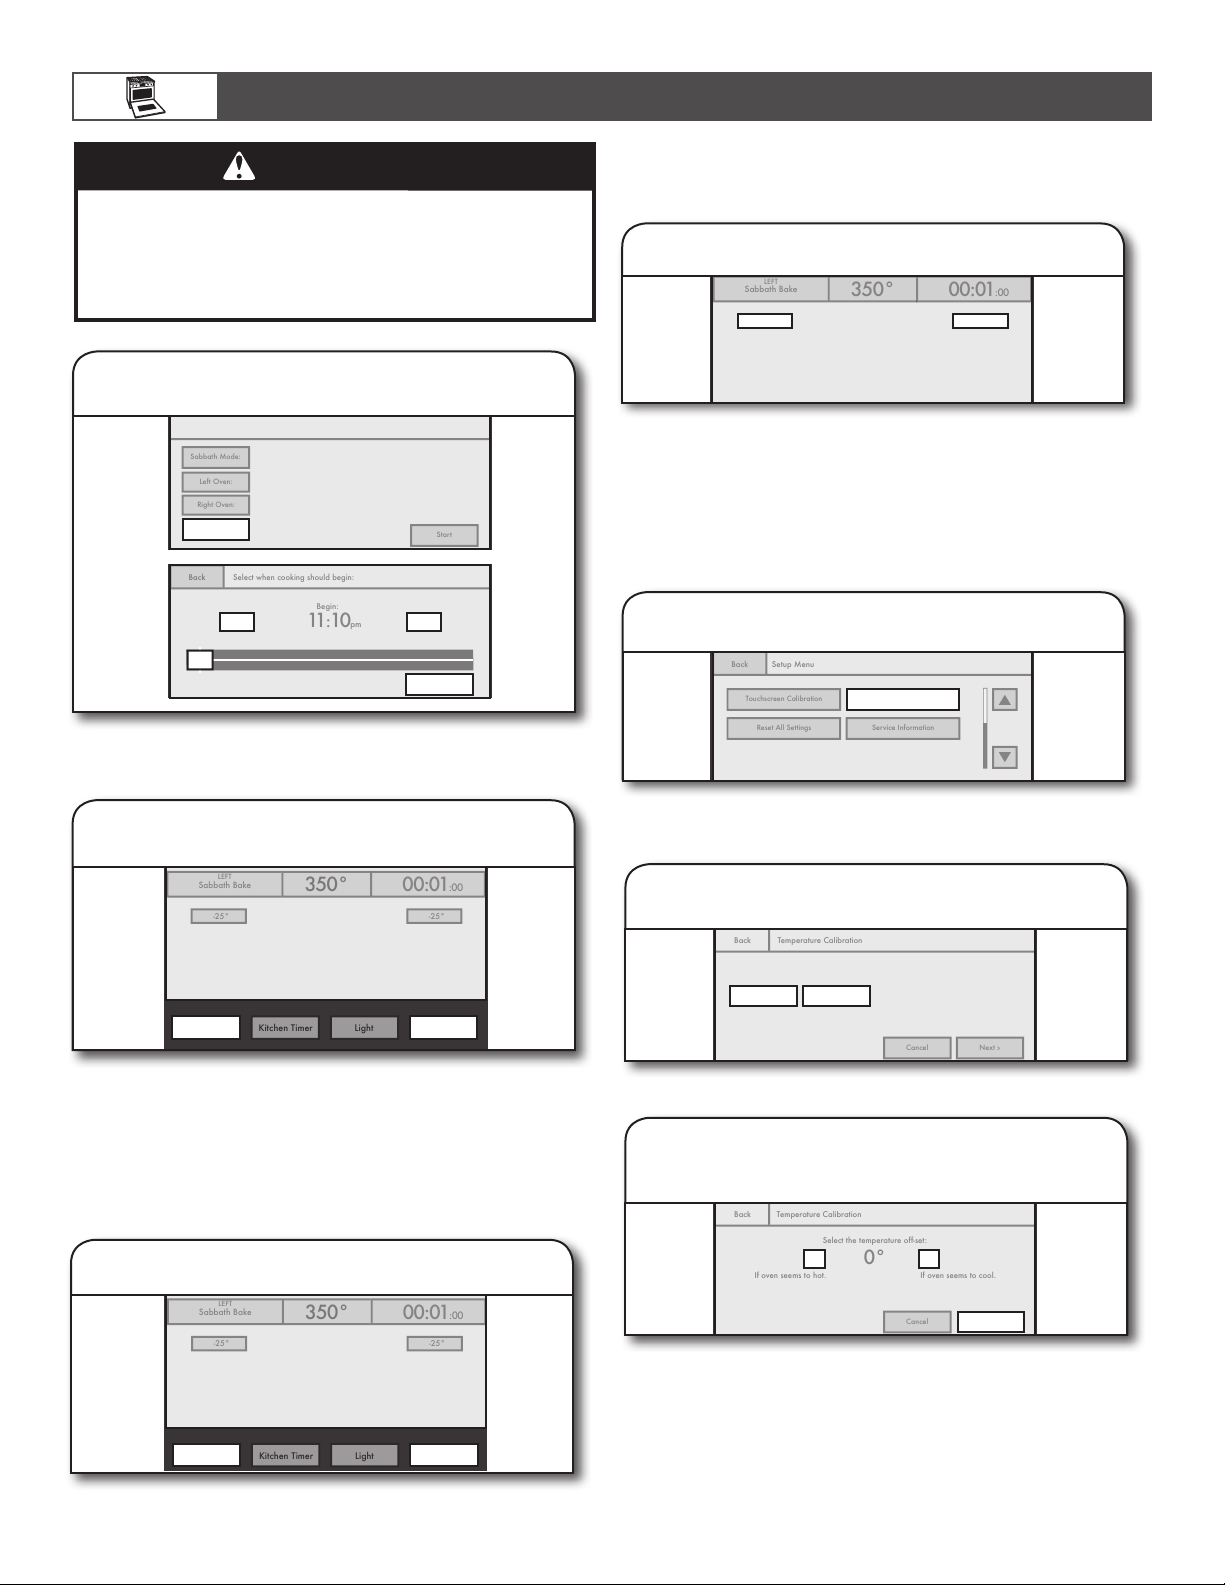
USING YOUR OVEN
WARNING
Food Poisoning Hazard
Do not let food sit in oven more than one hour before
or after cooking.
Doing so can result in food poisoning or sickness.
6. (Optional) Set desired time.
Sabbath Mode: Press Start to begin heating.
o
Bake, 350
Touch to set.
Delay Start
To Change Temperature:
The oven temperature can be changed when the oven(s) are in
Sabbath mode. No tones will sound and the display will not change.
Touch -25°F (-14°C) or +25°F (+14°C).
-25° -25°
Press Cancel to exit Sabbath mode.
Touch -25°F (-14°C) or +25°F (+14°C) keypad once for each
25°F (14°C) temperature change desired.
NOTE: On double ovens, if both ovens are operating
in Sabbath mode, the temperature of each oven can be
changed independently.
Making Temperature Calibrations
-15 min +15 min
12:00 2:001:00 4:003:00 5:00 6:00 7:00 8:00 9:00 10:00 11:00
Set Delay
Touch DELAY START, use slide bar, and touch SET DELAY. When
the start time is reached, the oven will automatically turn on.
7. Turn off oven.
Press Cancel to exit Sabbath mode.
Cancel Left
Touch CANCEL OVEN (CANCEL LEFT or CANCEL
RIGHT on 48" [121.9 cm] models) to turn off oven.
To Disable Sabbath Mode:
Sabbath mode will automatically be disabled when a cook
time ends,
Cancel Right
1.
Touch TEMPERATURE CALIBRATION.
Temperature Calibration
On 48" (121.9 cm) ranges only, select which oven to calibrate
by touching LEFT or RIGHT.
2. Select oven.
Which oven do you want to calibrate?
Left Right
3. Select temperature offset, and then
touch SAVE.
OR
Touch CANCEL.
14
Cancel Left
-1° +1°
Save
Press Cancel to exit Sabbath mode.
Press -1° keypad if oven seems too hot or +1° keypad if oven
seems too cold. The oven can be adjusted ±35°F.
Cancel Right
Page 15

Temperature Calibration
Reset All Settings
Service Information
Back
Setup Menu
Cancel
Touchscreen Calibration
Back
Cancel
Temperature Calibration
Touchscreen Calibration
Service Information
Setup Menu
Back
Reset all settings to factory defaults?
Back
Temperature Calibration
Touchscreen Calibration
Reset All Settings
Setup Menu
Back
Cancel
Service information:
For help with your product, consult:
- The Use and Care Manual
-ww.JennAir.com/service
- 1-800-Jenn-Air
Back
USING YOUR OVEN
Making Touchscreen Calibrations
IMPORTANT: If the keypads on the screen are difficult to touch
accurately, you may need to calibrate the touchscreen.
1.
Touch TOUCHSCREEN CALIBRATION.
Touchscreen Calibration
2. Touch NEXT.
If buttons on the screen are difficult to press accurately, you may need to calibrate the touchscreen.
You will be asked to press and hold three targets to calibrate.
Next
>
3. Choose targets to calibrate.
Resetting All Settings to Factory Defaults
1. Touch RESET ALL SETTINGS.
Reset All Settings
2. Touch RESET or CANCEL.
The following settings will be lost:
- Most used modes
- My Creations
- Date/Time
- Lanuage
The Welcome Guide will appear to help you reset these.
Reset
If Reset is touched, the following settings will be lost: mostused modes, My Creations, Date/Time, Temperature Units,
and Language. You will be returned to the Welcome Guide
to reset settings.
Cancel
Touch & hold center:
Target 1
Touch & hold center:
Target 2
Target 3
Touch & hold center:
Touch, hold, and release 3 different targets to calibrate. Touch
targets again within 10 seconds. If calibration fails, the process
will restart at Step 2.
4. Test calibration.
Test calibration by moving the circle around the screen. Ensure you can reach
all the corners.
Try Again
Test calibration by moving the circle around the screen.
Ensure you can reach all the corners. Touch TRY AGAIN
to run calibration again or touch SAVE to save the setting.
NOTE: If the Cancel keypad is touched, the Touchscreen
Calibration will be canceled.
Save
Getting Service Information
1. Touch SERVICE INFORMATION.
Service Information
2. Choose Demo mode setting, and then
touch SAVE.
Store-Aisle Demo Mode
(heating will be disabled)
Choose ON or OFF for Demo mode.
IMPORTANT: This feature is intended for use on the sales floor
with 120V power connection and permits the control features
to be demonstrated without heating elements turning on. If this
feature is activated, the oven will not work.
NOTE: If CANCEL is touched, the Service Information will go
back to the default setting.
Demo Mode:
Off
Save
15
Page 16
A
B
C
USING YOUR OVEN
KNOW YOUR OVEN
■ Odors and smoke are normal when the oven is used the first
few times or when it is heavily soiled.
■ During oven use, the heating elements will not remain on but
will cycle on and off throughout oven operation.
IMPORTANT: The health of some birds is extremely sensitive
to the fumes given off. Exposure to the fumes may result in
death to certain birds. Always move birds to another closed
and well-ventilated room.
Aluminum Foil
IMPORTANT: To avoid permanent damage to the oven bottom
finish, do not line the oven bottom with any type of foil or liner.
■ For best cooking results, do not cover rack with foil because
air must be able to move freely.
Positioning Racks and Bakeware
IMPORTANT: To avoid permanent damage to the porcelain
finish, do not place food or bakeware directly on the oven door
or bottom.
Racks
■ Position racks before
turning on the oven.
■ Do not position racks
with bakeware on
them.
■ Make sure racks
are level.
Bakeware
To cook food evenly,
hot air must be able to
circulate. Allow 2"
(5.0 cm) of space around
bakeware and oven
walls.
5
4
3
2
1
(5 cm)
2"
2"
(5 cm)
Closed and Engaged Position
1
A
2
B
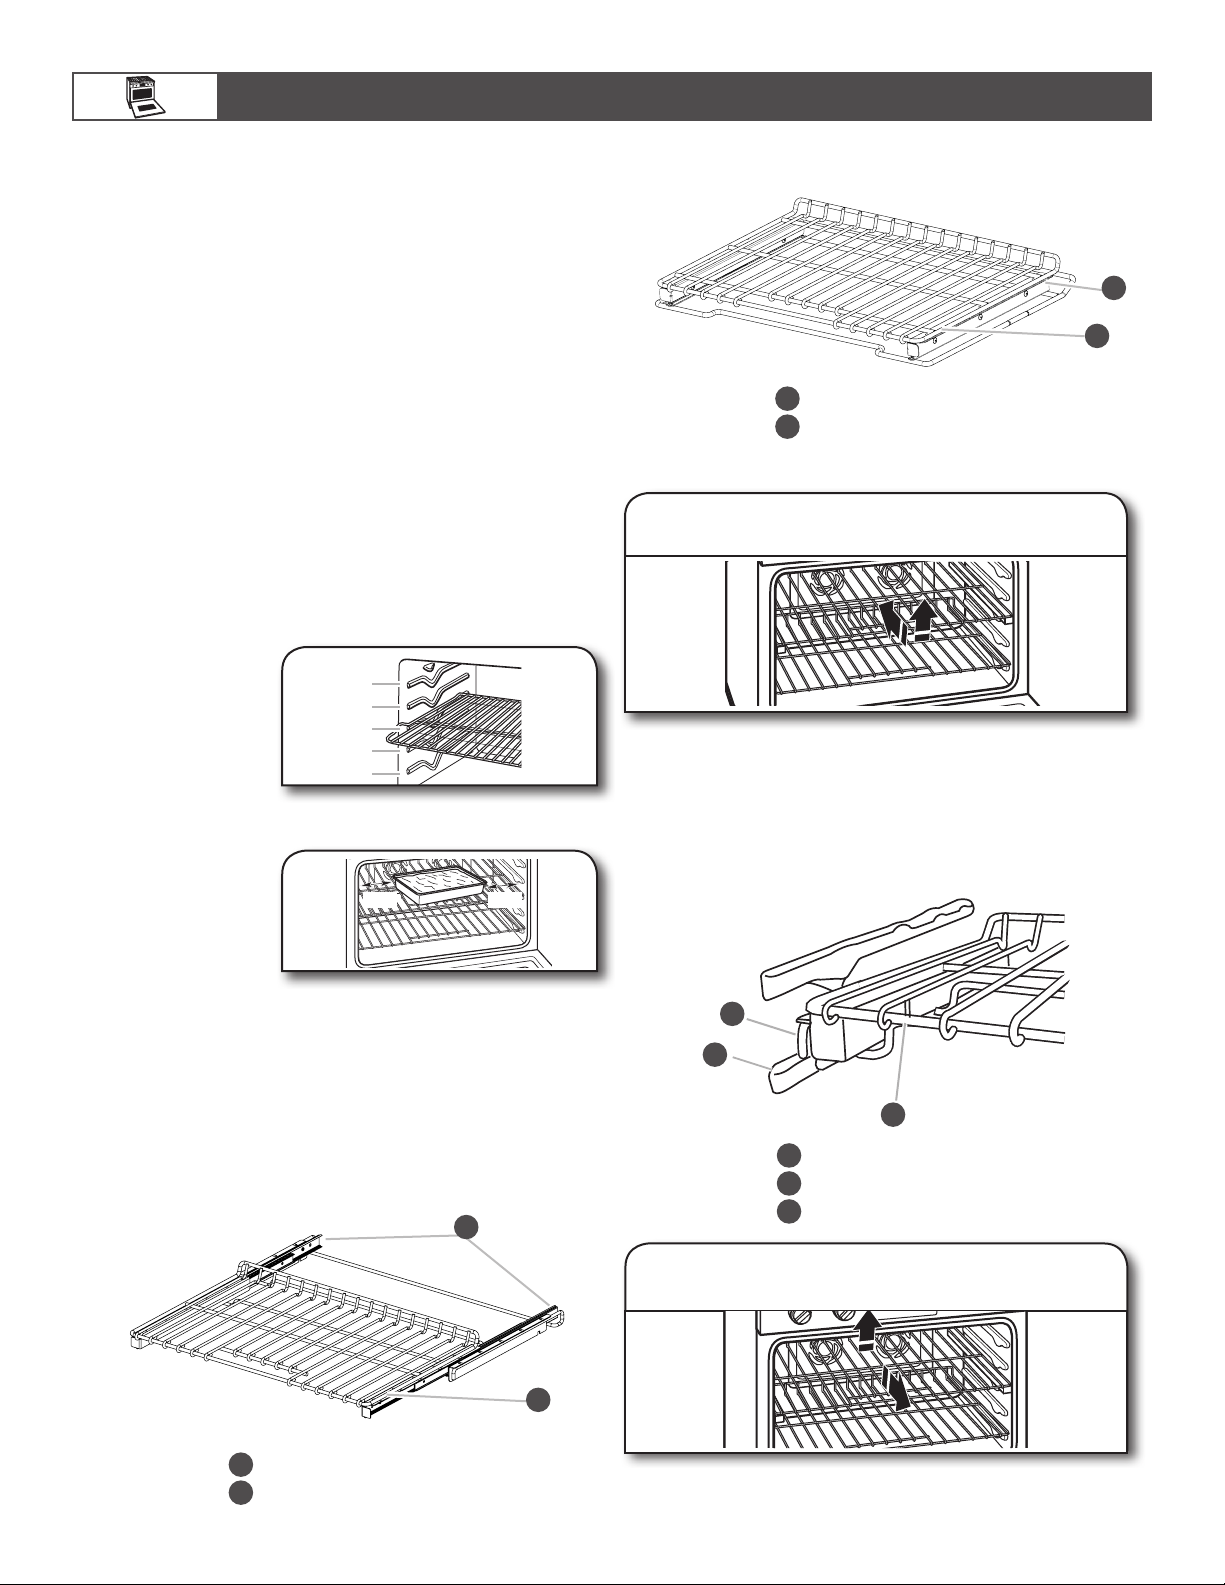
Extendable roller rack
1
Sliding shelves
2
To remove the Extendable Roller Rack:
1. Lift up rack/shelf front and slide in.
Rack must be closed and engaged with sliding shelf. Using 2
hands, lift up on front edge of rack and sliding shelf together.
Slowly push both to back wall of oven.
The front edge of the sliding shelf should sit on the rack guide
located on the sides of the oven.
The front edge of the rack and the sliding shelf should be
higher than the back edge.
A
1
2
Extendable Roller Rack
The extendable roller rack allows easy access to position
and remove food in the oven. It can be used in rack positions
1 through 4. The extendable roller rack will not fit in position 5.
Open Position
1
Sliding shelf
1
Rack guide
2
Extendable roller rack
3
3
2. Lift up rack/shelf rear.
Extendable roller rack
1
Sliding shelves
2
16
2
B
Using 2 hands, lift up back of rack and sliding shelf so that
back and front are level on rack guide. Pull out.
Page 17
USING YOUR OVEN
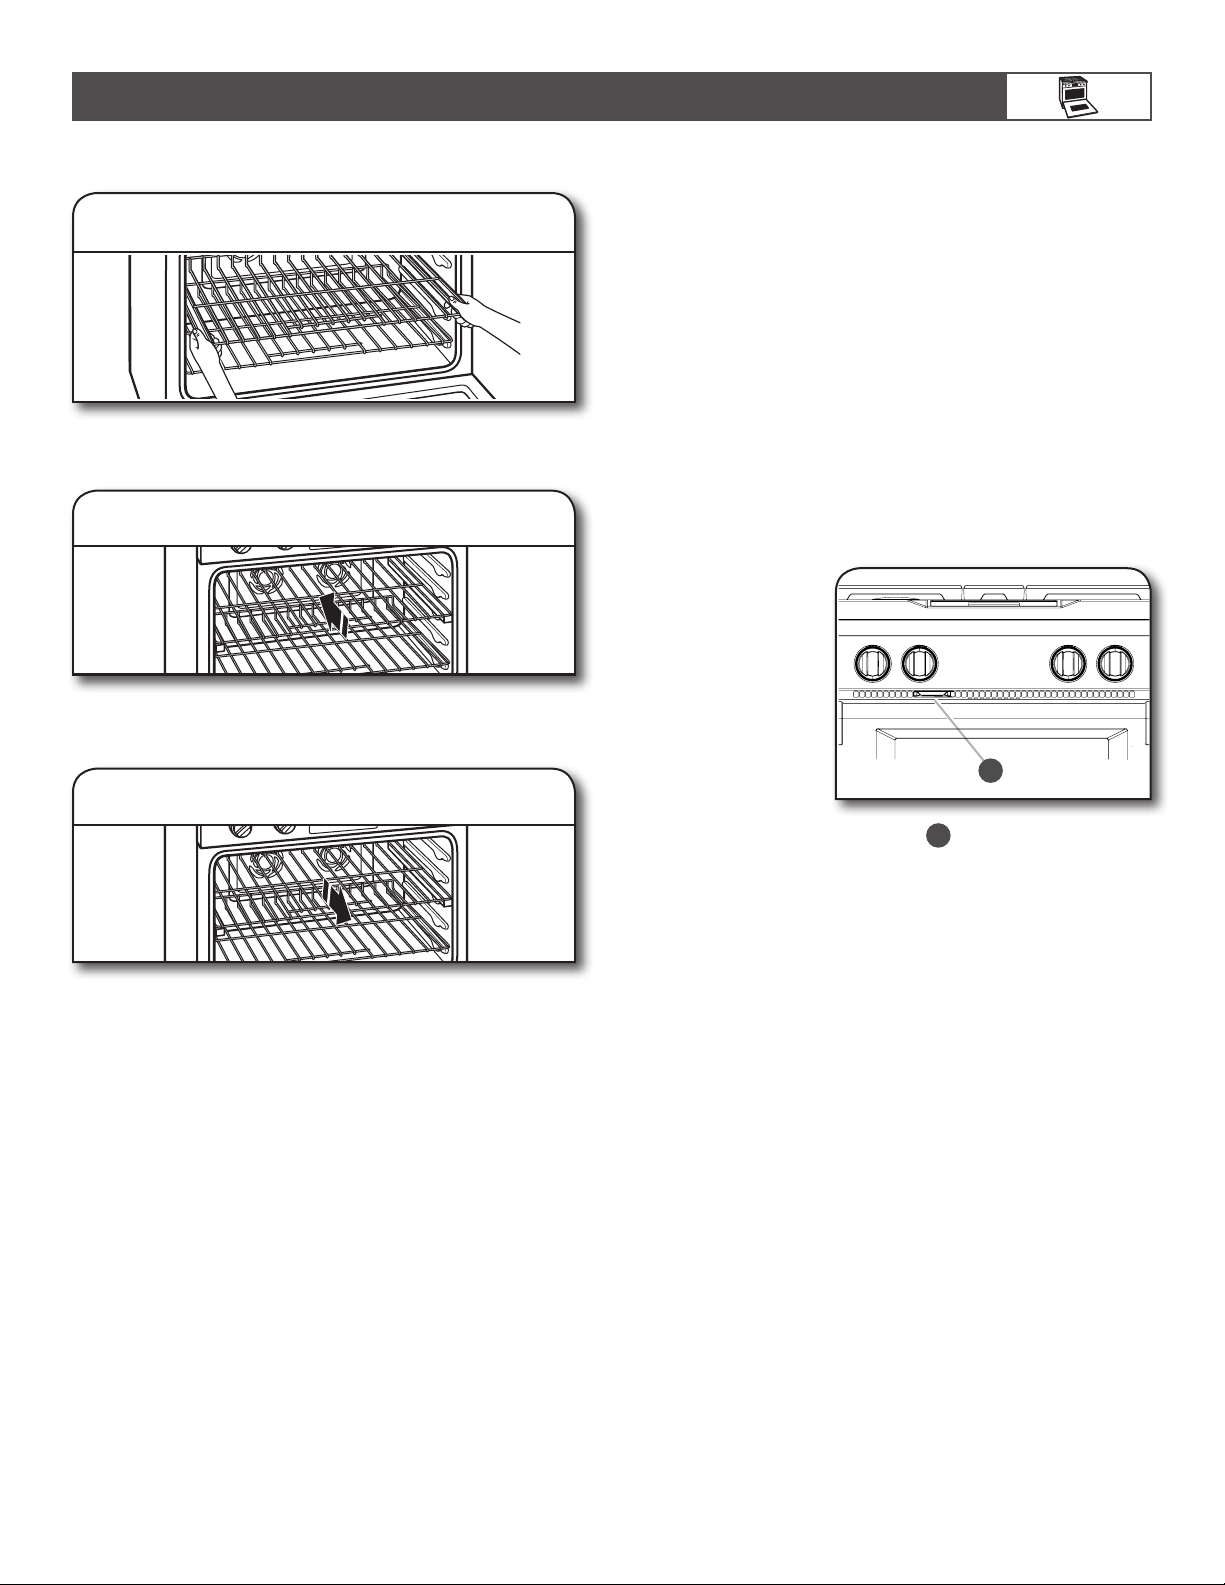
To Replace the Extendable Roller Rack:
1. Place on rack guide.
Using 2 hands, grasp front of the closed rack and sliding shelf.
Place the closed rack and sliding shelf on the rack guide.
2. Slide in rack/shelf.
Slowly push the rack and sliding shelf to the back of oven until
the back edge of the sliding shelf drops.
3. Pull rack/shelf forward.
Pull the rack and sliding shelf slightly forward until the front
edge drops and the sliding shelf is on the rack guide.
Know your Racks
■ To avoid damage to the sliding shelves, do not place more
than 25 lbs (11.4 kg) on the rack.
■ Do not clean the extendable roller rack in a dishwasher.
It may remove the rack’s lubricant and affect its ability
to slide.
■ See the “Care and Cleaning” section for more information.
Meat Thermometer
On models without a temperature probe, use a meat
thermometer to determine whether meat, poultry, and fish
are cooked to the desired degree of doneness. The internal
temperature, not appearance, should be used to determine
doneness. A meat thermometer is not supplied with this
appliance. Follow manufacturer’s directions for using
a meat thermometer.
Oven Vent
The oven vent should
not be blocked or
covered since it allows
the release of hot air and
moisture from the oven.
Blocking or covering the
vent will cause poor air
circulation, affecting
cooking and cleaning
results. Do not set
plastics, paper, or other
items that could melt or
burn near the oven vent.
1
Oven vent
1
A
Cooling Fan
The oven has a 2-speed cooling fan motor.
When the oven temperature reaches 475°F (246°C) or is in the
Self-Cleaning cycle, the fan will operate at its highest speed to
increase airflow and better exhaust the hotter air through the
oven vent(s). An increase in noise may be noticeable until the
oven cools.
17
Page 18
Home
Bake
Temperature
Timer Not Set
Delay Start
Light
Kitchen Timer
Adjust cook mode:
Convect Bake
Bake
Convect Roast
Keep Warm
Cvt. Frozen Pizza
Broil
Back
Adjust cook mode:
Back
Gourmet Guides
Probe
My Creations
Auto Convection
Conversion
Most Used Modes:
Home
Temperature
Cook Timer
Convect Bake
Bake
Broil
Keep Warm
Home
Mode
350°
Timer Not Set
StartDelay Start Self-Clean
USING YOUR OVEN
COOKING MODES
(BAKE, BROIL, KEEP WARM, CONV BAKE, CONV PASTRY,
CONV ROAST, CONV/SLOW ROAST, CONV FROZEN PIZZA,
PROOF, RAPID PROOF)
The Home tab allows for easy access to the most-used modes
and Culinary Assistants.
1. Touch Mode tab.
Mode
2. Select option.
Bake
Convect Bake
Keep Warm
Convect Roast
Broil
Cvt. Frozen Pizza
Changing a Mode, Temperature, or Cook Time
while Oven Is Active
Touch appropriate tab to make new
selection, and then touch OK.
Bake
Convect Bake
Follow the instructions for the selected mode. See the desired
cooking mode in the “Cooking Mode” section for more
information.
To Turn Off Oven:
Keep Warm
Convect Roast
Example
Broil
Cvt. Frozen Pizza
OK
Touch CANCEL OVEN.
3. Enter desired cooking temperature,
and then touch START.
-5°
200° 250°
300°
350°
350° 400°
Example for Bake
Move slider to enter a desired cooking temperature or touch
-5ºF (-1ºC) or +5ºF (+1ºC) keypads.
NOTE: See the desired cooking mode in the “Cooking Mode”
section for more information.
OPTIONS:
Cook Timer — See the “Cook Timer” section.
Delay Start — See the “Delay Start” section.
450°
+5°
550°
500°
Start
Cancel Left
Cancel Right
Touch CANCEL LEFT or CANCEL RIGHT on 48" (121.9 cm)
models.
18
Page 19
A
A
USING YOUR OVEN
BAKED GOODS
Cakes Bake, Convect Bake Three racks — 1, 3, 5
Cookies Bake, Convect Bake Three racks — 1, 3, 5
RECOMMENDED
MODE(S)
RECOMMENDED RACK
POSITION(S) TIPS
Two racks — 2 and 4
One rack — 3
Two racks — 2 and 4, 1 and 4
(Convect Bake only)
One rack — 3
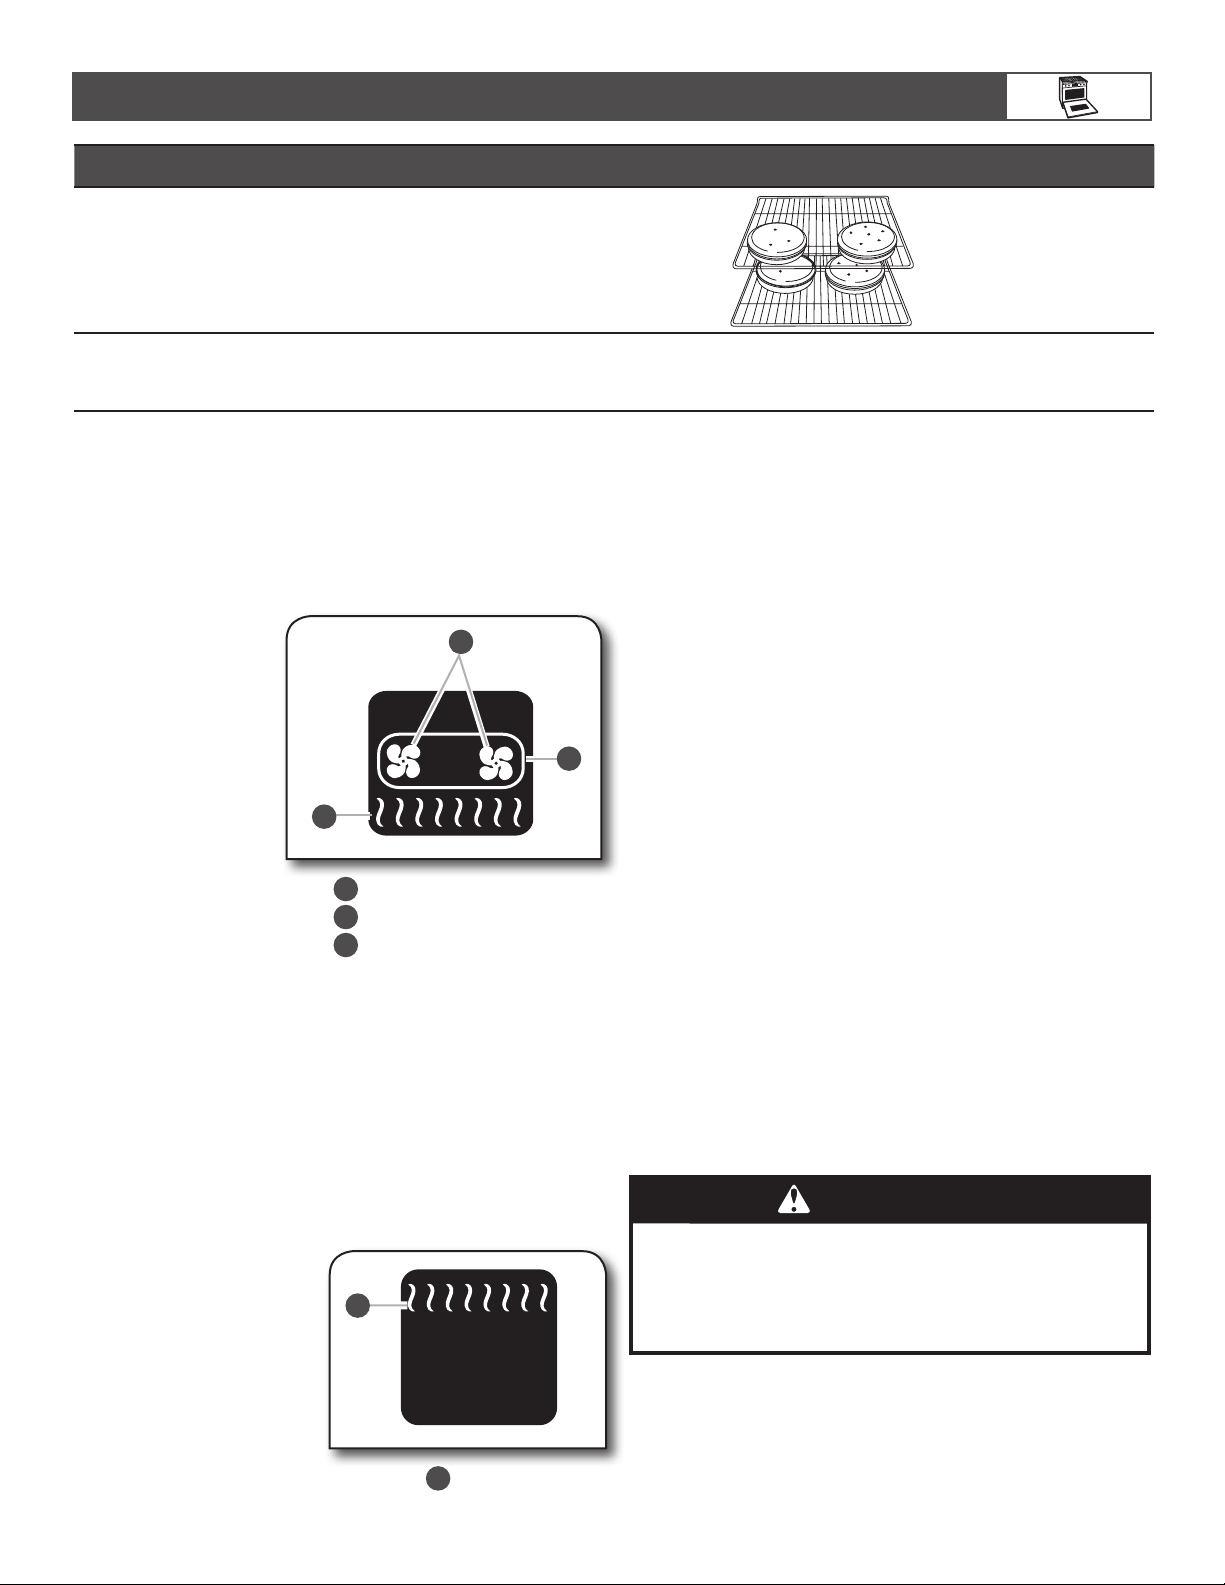
BAKE
The Bake mode relies primarily on heat from the lower bake
element and radiant heat from the oven cavity to produce the
perfect conditions for cakes, cookies, quick breads, yeast
breads, meatloaf, and baked desserts. This mode is perfect
for foods that require both upper and lower browning.
Know Your Bake Mode
■ During baking, the
appropriate heating
elements and fan(s)
will cycle on and off
in intervals to maintain
the oven temperature.
■ Bake is used to cook
up to 2 racks of food.
■ For best results, allow
the oven to preheat
prior to placing food
in the oven.
■ If the oven door is
opened during baking,
the bake burner will
turn off approximately
30 seconds after
the door is opened.
It will turn on again
approximately
30 seconds after
the door is closed.
C
3
Convection fan
1
Convection element
2
Bake element
3
1
B
2
For best results when
baking cakes on 2 racks,
place the cakes on the
racks as shown.
■ If the oven door is opened during broiling, the broil element
will turn off in approximately 30 seconds. When the oven door
is closed, the elements will come back on approximately
30 seconds after the door is closed.
■ For best results, use a broiler pan and grid. It is designed
to drain juices and help avoid spatter and smoke.
■ For proper draining, do not cover the grid with foil. The
bottom of the broiler pan may be lined with aluminum foil
for easier cleaning.
■ Trim excess fat to reduce spattering. Slit the remaining fat
on the edges to avoid curling.
■ When broiling, changing the temperature allows more
precise control. Lowering the temperature causes food to
cook slower. Thicker cuts and unevenly shaped pieces of
meat, fish, and poultry may cook better at lower broiling
temperatures.
■ Pull out oven rack to stop position before turning or removing
food. Use tongs to turn food to avoid the loss of juices. Very
thin cuts of fish, poultry, or meat may not need to be turned.
■ After broiling, remove the pan of food from the oven.
Drippings will bake on the pan if left in the heated oven,
making cleaning more difficult.
To Use Broil:
It is not necessary to wait for the oven to preheat before putting
food in unless recommended in the recipe. Position food on the
grid on the broiler pan, then place pan in the center of the oven
rack with the longest side parallel to the door. Continue with
setting steps in the “Cooking Modes” section.
BROIL
The Broil mode uses intense heat from above to cook foods
quickly and is ideal when you want rich, flavorful browning
of exterior surfaces. Use for steak, chicken, pork, fish, or
vegetables like onions and peppers. This mode can also
brown and crisp desserts or casserole toppings.
Keep Warm™ Option
The Keep Warm™ option allows hot cooked foods to stay
at serving temperature. It can also be used at the end of
a timed cook.
WARNING
Know Your Broil Mode
NOTE: This feature is not
available on the left oven
on 48" (121.9 cm) models.
■ Broiling uses direct
radiant heat to cook food.
■ The broil burner cycles
on and off in intervals
to maintain the oven
temperature.
1
Broil
1
Do not let food sit in oven more than one hour before
or after cooking.
Doing so can result in food poisoning or sickness.
IMPORTANT: Food must be at serving temperature before
placing it in the warmed oven. Food may be held up to 1 hour;
however, breads and casseroles may become too dry if left in
the oven during the Keep Warm™ function.
Food Poisoning Hazard
19
Page 20
Home
Bake
170 °
Cook Timer
Start
Clear
12345
67890
HR:MIN:SEC
--:--:--
Delay Start
Broil
170°
RIGHT
--:--:
--
Preheating to: 170°
Set Timer
Use Left Oven
Back
Adjust cook temperature:
Home
Bake
170 °
Cook Timer
Clear
HR:MIN:SEC
--:--:--
Keep Warm:
On
Delay Start
A
Start
Delay Start
-5°
+5°
Home
Bake
Temperature
USING YOUR OVEN
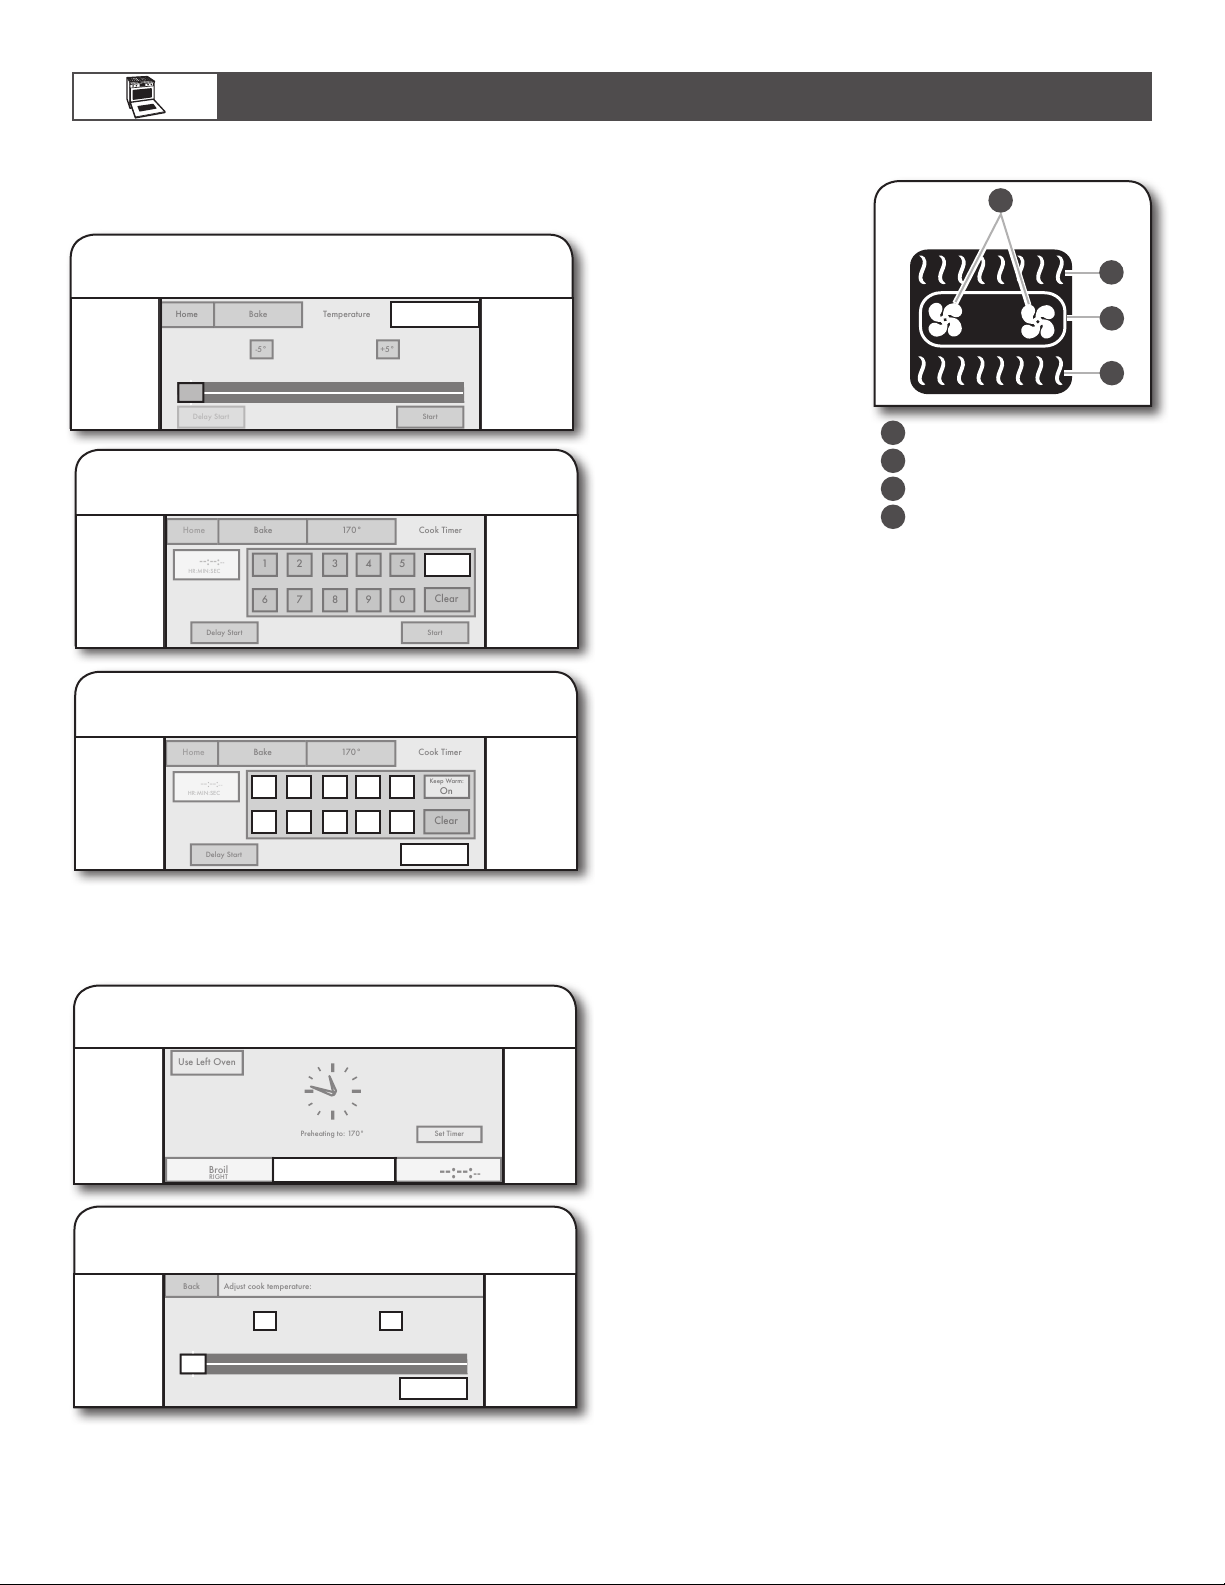
To Use Keep Warm™ Option at the End
of a Cooking Cycle:
During setup of cooking cycle:
1. Touch TIMER NOT SET/COOK TIME.
Timer Not Set
170°
200° 250°
300°
350° 400°
450°
500°
550°
2. Set KEEP WARM to ON.
Keep Warm:
On
3.
Enter cook time, and then touch START.
CONVECTION COOKING
Convection cooking can
cook foods more evenly and
faster than regular cooking.
■ The convection elements
are located in the rear
of the oven cavity. They
are assisted by the
convection fans
to provide balanced,
efficient heating.
NOTE: The left oven cavity
on 48" (121.9 cm) models
has only one convection fan
and no convection element.
Convection fans
1
Broil element
2
Convection element
3
Bake element
4
1
2
B
C
3
D
4
CONVECT BAKE
The Convection Bake mode uses multiple elements and a
fan to circulate hot air throughout the oven, resulting in baking
10–20% faster than traditional baking. Convection baking can
be used for most baked goods, but it is exceptional for baking
cookies, biscuits, pies, pasta dishes, casseroles, and frozen
or convenience foods.
Know Your Convect Bake Mode
1 2 3 4 5
6 7 8 9 0
Start
The oven will automatically go into Keep Warm™ mode when
the cook timer ends.
To change the Keep Warm™ temperature during the Keep
Warm™ cycle:
1. Touch programmed temperature.
2.
Adjust temperature, and then touch OK.
-5°
200° 250°
300°
170°
350° 400°
450°
+5°
550°
500°
OK
■ When cooking an oven meal with several different types
of foods, be sure to select recipes that require similar
temperatures. Cookware should sit in the oven with at
least 1" (2.5 cm) of space between the cookware and
the sides of the oven.
■ During convection baking preheat, the convection, bake,
and broil elements all heat the oven cavity. After preheat,
the convection, bake, and broil elements and the fans will
cycle on and off in intervals to maintain oven temperature.
■ If the oven door is opened during convection baking, the
fans turn off immediately when the door is opened and
turn on immediately when the door is closed. Convection,
bake, and broil elements will turn off approximately 30
seconds after the door is opened. They will turn on again
approximately 30 seconds after the door is closed.
■ Check food at shortest recommended package or recipe
time. Allow more time for baking when using multiple racks.
■ Use cookie sheets with no sides to allow air to move freely
around the food.
CONVECT PASTRY
This mode provides progressive baking, first promoting maximum
rise of flaky, delicate dough and finishing with the right balance of
heat to promote golden browning. The recipe temperature does
not need to be reduced for this mode. Convect Pastry is ideal
for single- or multi-rack baking of cream puffs, turnovers, and
croissants.
CONVECT ROAST
The Convect Roast mode uses multiple elements and a fan
to stream heated air throughout the cavity. The circulating air
caramelizes food surfaces for enhanced flavor while maintaining
moist and tender interiors. Convect Roast is perfect for roasting
meats, poultry, firm-fleshed fish, and vegetables. The consistent
and even heat distribution speeds cooking up to 25% compared
to traditional roasting. The recipe temperature does not need to
be reduced for this mode.
20
Page 21

Gourmet Guides
Probe
My Creations
Auto Convection
Conversion
Most Used Modes:
Home
Temperature
Cook Timer
Convect Bake
Bake
Broil
Keep Warm
Convect Slow
Roast
Rapid Proof
Convect Pastry
Start
Home
Mode
325°
Time Not Set
Self-Clean
Delay Start
Home
Temperature
Delay Start
Proof
100°
The oven controls temperature in proofing modes.
USING YOUR OVEN
Know Your Convect Roast Mode
■ If the oven door is opened during convection roasting, the
fans turn off immediately and turn on immediately when the
door is closed. Bake, broil, and convect elements will turn
off approximately 30 seconds after the door is opened. They
will turn on again approximately 30 seconds after the door is
closed.
■ The cook time should be reduced 15–30%. It is not
necessary to reduce the oven temperature.
■ For best results, use a broiler pan, grid, and roasting rack
designed to drain juices and help avoid spatter and smoke.
Before Using Convect Roast:
■ It is not necessary to wait for the oven to preheat before
putting in food, unless recommended in the recipe.
■ Use the roasting rack on top of the broiler pan and grid.
This holds the food above the grid and allows air to circulate
completely around all surfaces.
CONVECT SLOW ROAST
The Convect Slow Roast mode uses low temperatures to help
retain moisture for longer cooking times, resulting in more tender
meat. Convect Slow Roast is particularly good for medium to
large cuts of beef, poultry, and pork as well as less-tender
cuts of meat. Food can be cooked up to 12 hours. The recipe
temperature does not need to be reduced for this mode.
PROOF
The Proof cycle prepares dough for baking by activating the
yeast. Follow recipe or package for number of times to proof
dough.
Know Your Proof Mode
■ The set temperature of 100ºF (38ºC) cannot be changed.
■ The Proof mode can be used even if the temperature is above
the preset temperature for the Proof mode.
Before Using Proof:
1. Place dough in a lightly greased bowl. Place bowl on rack
position 3.
2. Place the food in the oven and close the door.
To Use Proof:
1. Touch MODE.
Mode
Know Your Convect Slow Roast Mode
■ Food should be completely thawed.
■ Cover foods to keep food moist.
■ Prior to slow roasting, meat can be pan-seared or broiled
on sides to enhance browning, flavor, and tenderness.
CONVECT FROZEN PIZZA
Convect Frozen Pizza is used to bake thick- or thin-crust
frozen pizzas. During Convect Frozen Pizza, the broil, convection,
and bake elements will cycle on and off in intervals to maintain
oven temperature. The convection fans remain on continuously
to circulate hot oven air around the pizza.
Know Your Convect Frozen Pizza Mode
■ If the oven door is opened during Convect Frozen Pizza, the
fans turn off immediately. They will turn back on immediately
after the door is closed. The bake, broil, and convection
elements will turn off approximately 30 seconds after
the door is closed.
■ The bake temperature should be reduced 25°F (14°C) from
the temperature recommended on the package.
■ The bake time may be slightly less than stated on the
package, depending on the pizza.
■ A pizza stone may be used with the Convect Frozen
Pizza mode.
■ Use Convect Frozen Pizza with 1-rack baking.
■ Allow the oven to preheat completely before placing your
pizza in the oven.
2. Touch the down arrow, and then touch
PROOF.
Proof
3. Touch START or touch TIMER NOT
SET and then START.
Time Not Set
Start
Timer Not Set sets a cook time. See the “Cook Timer” section.
Prepare Dough before Second Proofing:
Shape dough, place in baking pan(s), coat with cooking spray,
and cover loosely. Follow same placement and control steps
above. Before baking, remove cover.
21
Page 22
Gourmet Guides
Probe
My Creations
Auto Convection
Conversion
Most Used Modes:
Home
Mode
Temperature
Cook Timer
Convect Bake
Bake
Broil
Keep Warm
Convect Slow
Roast
Proof
Convect Pastry
Start
Home
Mode
Self-Clean
Delay Start
325°
Timer Not Set
Home
Temperature
Delay Start
Rapid Proof
200°
The oven controls temperature in proofing modes.
USING YOUR OVEN
Light
Setup Menu
Kitchen Timer
Cooking complete.
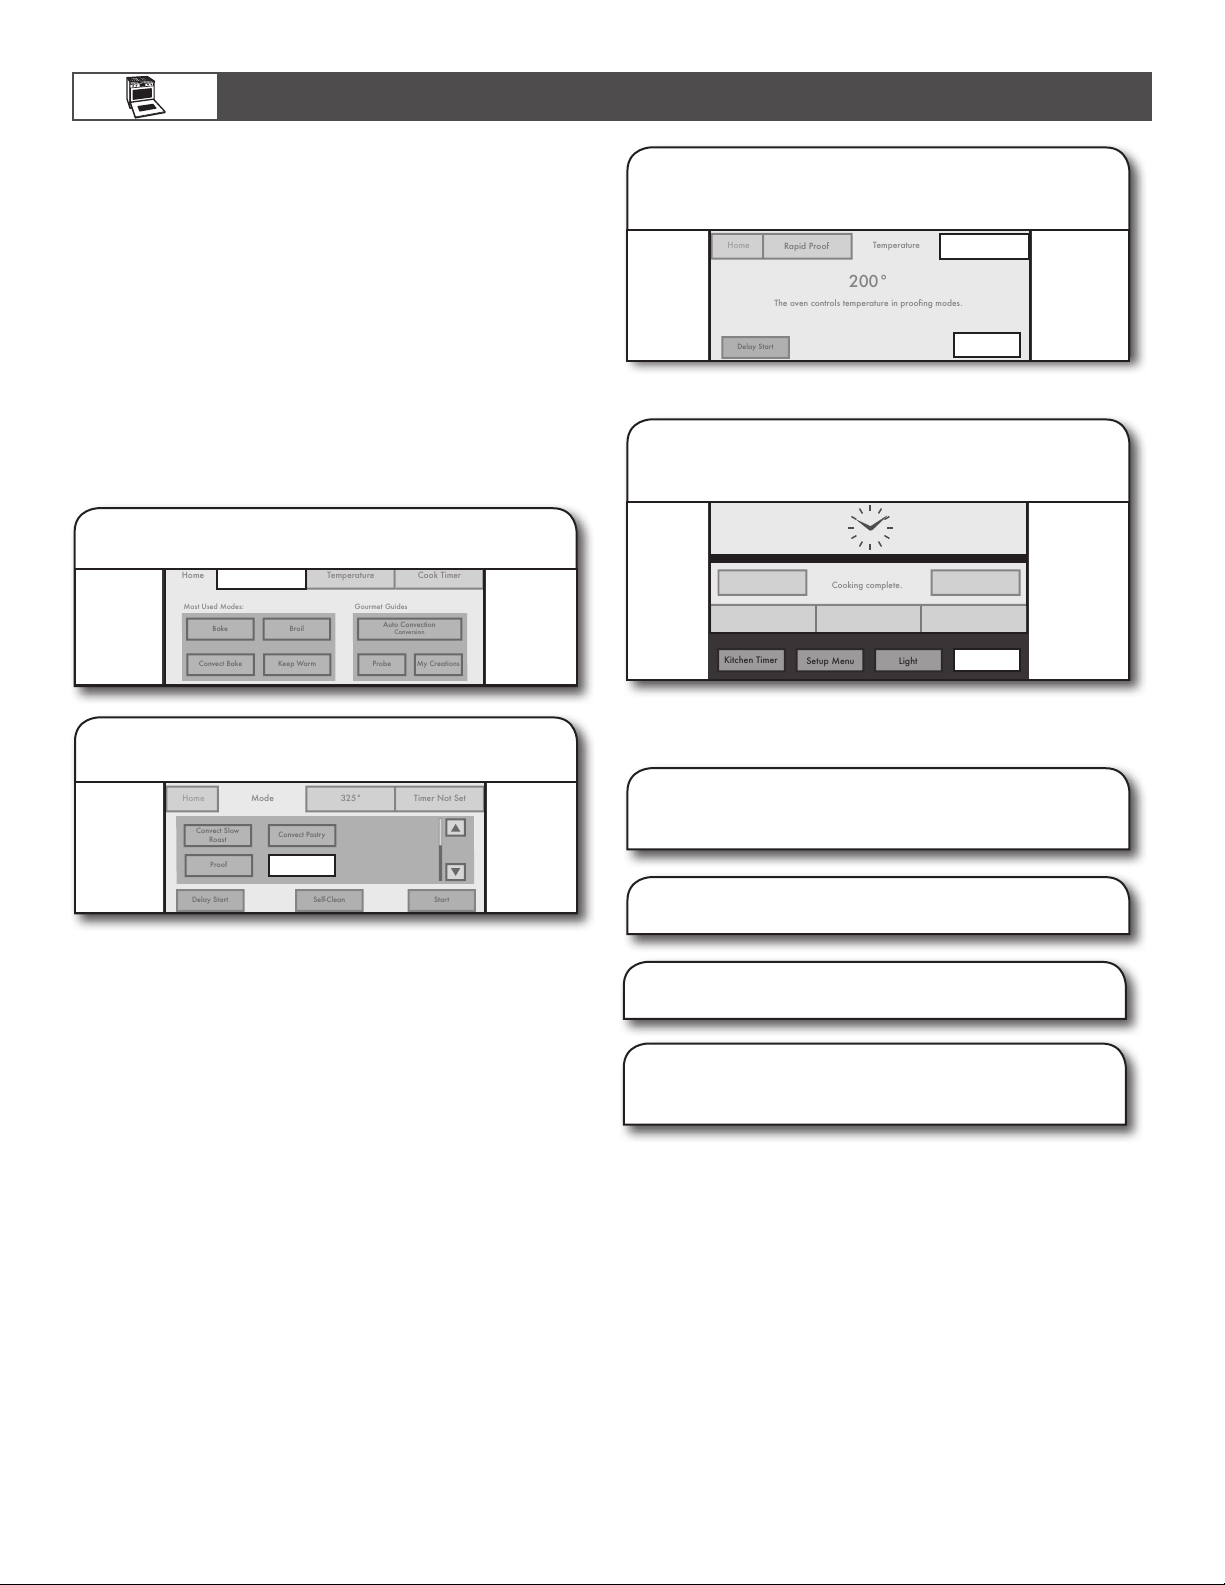
RAPID PROOF
Rapid Proof is used to proof frozen dough. The Rapid Proof
mode requires the oven be preheated and then canceled.
Know Your Rapid Proof Mode
■ The set temperature of 200°F (93°C) cannot be changed.
■ The Rapid Proof mode can be used even if the temperature
is above the preset temperature for the Rapid Proof mode.
Before Using Rapid Proof:
1. Place frozen dough in a lightly greased bowl. Cover bowl
with damp towel. Place bowl on rack position 3.
2. Place the food in the oven and close the door.
To Use Rapid Proof:
1. Touch MODE.
3. Touch START or touch TIMER NOT
SET and then START.
Timer Not Set
Start
Timer Not Set sets a cook time. See the “Cook Timer” section.
4. Proof for 10 minutes, and then touch
CANCEL.
Keep Warm
Exit Timer
2. Touch RAPID PROOF.
Rapid Proof
Rapid Proof
Off
Add More Time
Cancel Oven
IMPORTANT: By not pressing CANCEL after 10 minutes,
the dough may burn or dry out.
5. Leave dough in oven until desired
height is reached.
6. Remove dough from oven.
7. Preheat oven according to recipe.
8. Insert dough in oven after reaching
desired temperature.
22
Page 23

Gourmet Guides
Probe
Auto Convection
Conversion
Most Used Modes:
Home
Mode
Temperature
Cook Timer
Convect Bake
Bake
Broil
Keep Warm
Back
My Creations
Start
Home
Edit
Delete
Select the desired cooking mode:
Back
Home
Select the desired cooking temperature:
Back
Home
Back
Select how to monitor cooking:
Home
USING YOUR OVEN
Enter cook timer length:
Back
Home
Clear
HR:MIN
- - : - -
Select the probe target internal temperature:
Back
Home
Next >
Range: 130-185˚
160˚
Fresh Beef, Veal, Lamb
Medium Rare
Medium
Well Done
Whole
Breast
Medium
Well-Done
Ham, Precooked
Chicken, Turkey
Pork
135˚
150˚
160˚
180˚
170˚
150˚
160˚
140˚
Review your settings:
Back
Home
Save
Bake 350° 160 °
Optional
Optional
Edit
Delete
Add Stage
Add Stage
Back
Name the creation:
Clear All
40
-
space
Review your settings:
Back
Home
Save
Bake 350° 16 0°
Optional
Optional
Edit
Delete
Add Stage
Add Stage
SPECIAL MODES
MY CREATIONS
My Creations allows the customization of cooking processes.
When My Creations is selected from the Main menu, a list of
existing recipes is presented along with the ability to create more.
NOTE: If the model is a double oven, first select the oven.
1. Touch MY CREATIONS.
My Creations
2. Touch CREATE NEW.
Save frequent recipe settings for easy access in the future!
You may also link multiple modes together. For example, create a favorite
lasagna recipe which bakes for 40 minutes, then broils 5 minutes at the end to
brown the cheese.
Create New
If Timer Is Chosen:
6. Enter cook timer length, and then
touch NEXT.
1 2 3 4 5
6 7 8 9 0
Next >
7. Touch SAVE & START.
Save & Start
If Probe Is Chosen:
8. Select probe internal temperature.
3. Select desired cooking mode,
and then touch NEXT.
Bake
Convect Bake
Keep Warm
Convect Roast
Broil
Cvt. Frozen Pizza
Next >
4. Enter desired cooking temperature,
and then touch NEXT.
200° 250°
-5°
350°
350° 400°
300°
450°
+5°
550°
500°
Next >
5. Select how to monitor cooking,
and then touch NEXT.
-5˚ +5˚
9. Enter new stage information,
and then touch SAVE & START.
Save & Start
Touch ADD STAGE. Touch EDIT next to a stage to re-enter
settings, if desired. Touch DELETE to immediately delete
stage. Touch SAVE & START to save stage.
10. Enter food name, and then touch OK.
ABC DEF GHI JKL
MNO PQRS TUV WXYZ 0-9
Delete
<
OK
Timer
Alerts you when a cook timer is complete
Alerts you when a target probe temperature is reached
Probe
None Non Alerts
Next >
Touch a keypad repeatedly to cycle through its letters. For
example, press “ABC” once to enter “a,” twice to enter “b” and
three times to enter “c.” After 2 seconds, the letter is accepted
and the cursor moves to the next position. A name cannot
exceed 40 characters, including spaces. Touch DELETE to
delete the last character in the text box.
23
Page 24
Gourmet Guides
Probe
Auto Convection
Conversion
Most Used Modes:
Home
Mode
Temperature
Cook Timer
Convect Bake
Bake
Broil
Keep Warm
My Creations - Touch to select food
Back
Home
Save
Edit
Create New
Delete
Review your settings:
Back
Home
Start
Cancel
Bake 350° 16 0°
Optional
Optional
Delete
Add Stage
Add Stage
Gourmet Guides
Probe
My Creations
Most Used Modes:
Home
Convect Bake
Bake
Broil
Keep Warm
Mode
Temperature
Cook Timer
Select an Automatic Convection Conversion mode:
Manual
View all manual modes to skip the recipe update process
Back
Home
Select standard cooking temperature in your recipe:
Next >
Back
Home
Clear
HR:MIN:SEC
--:--:--
Enter standard cooking time in your recipe:
Back
Home
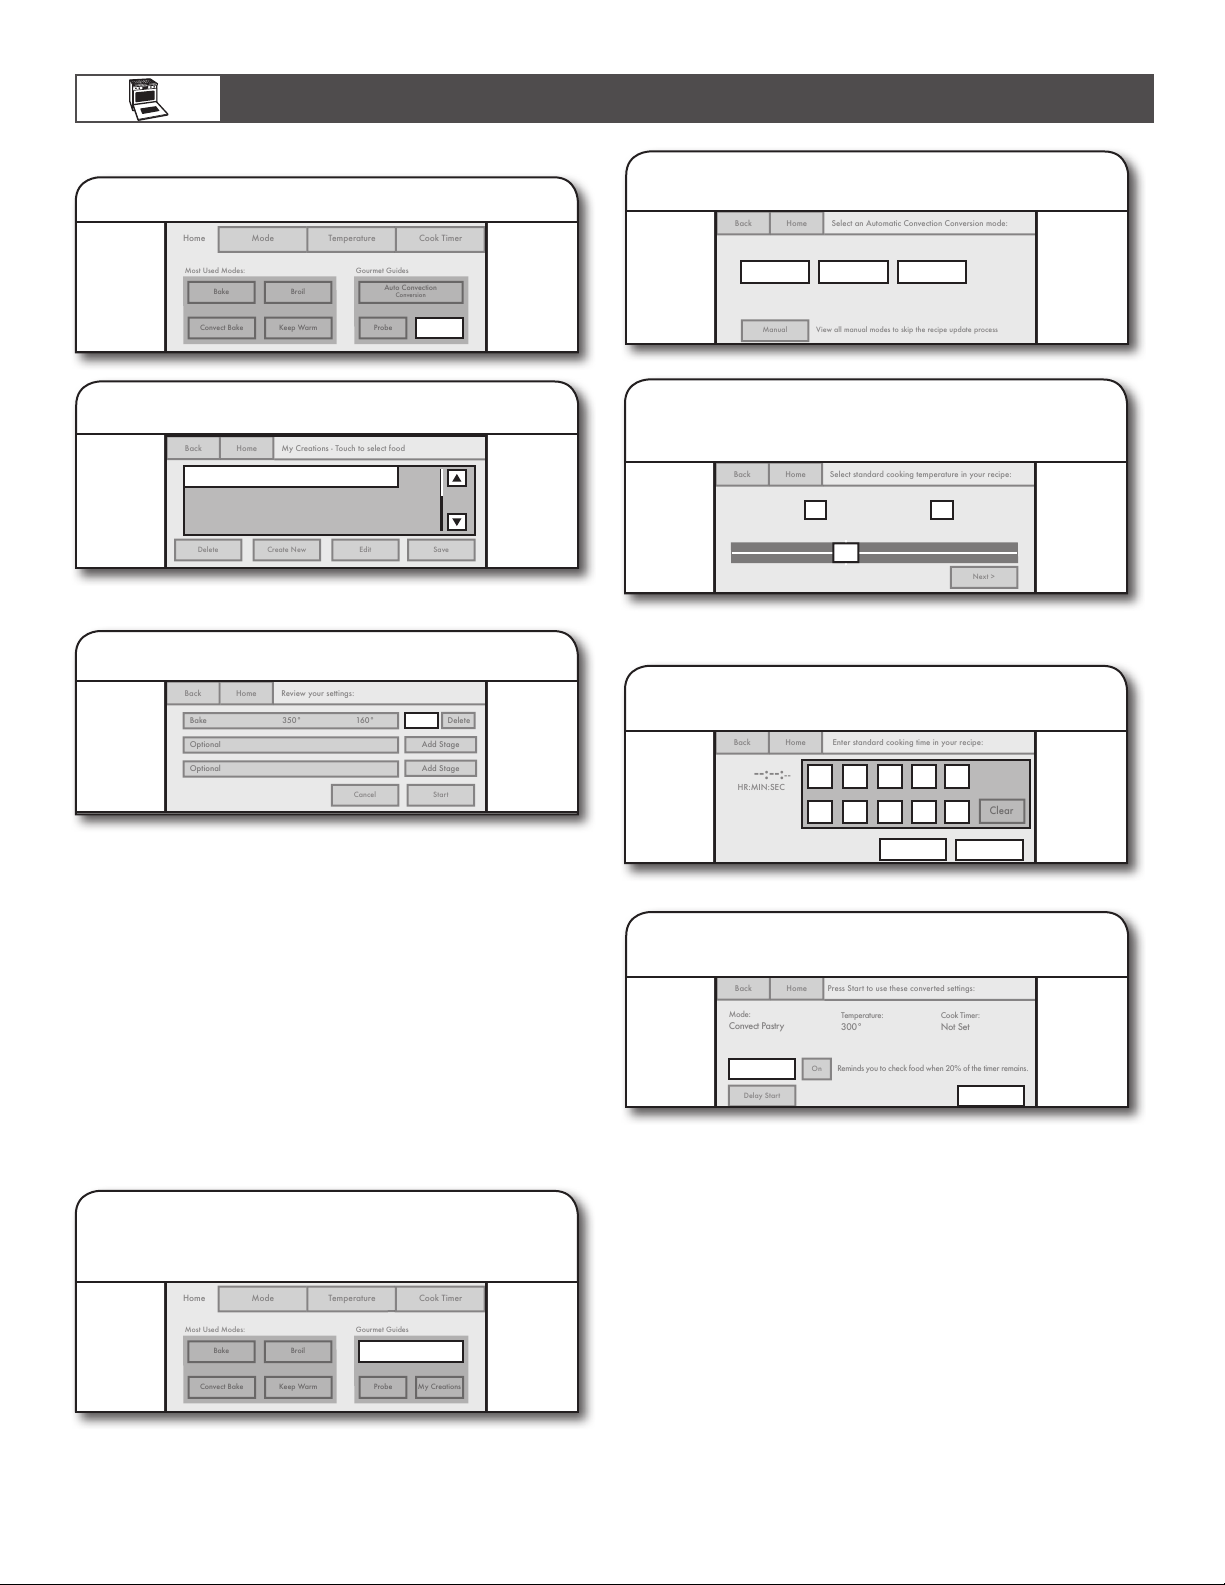
Press Start to use these converted settings:
Reminds you to check food when 20% of the timer remains.
Mode:
Convect Pastry
Cook Timer:
Not Set
Temperature:
300°
Back
Home
On
Delay Start
USING YOUR OVEN
To Edit or Delete after Saving Settings:
1. Touch MY CREATIONS.
My Creations
2. Select Recipe Conversion Mode.
This process will automatically update your standard recipe for convection cooking.
Convect Bake Convect Roast Convect Pastry
2. Select setting name to edit or delete.
Chocolate Cake
Scroll to find name if needed. Touch EDIT or DELETE.
3. Select steps to edit.
Edit
Touch EDIT for each desired step, and then follow the
instructions. When finished, touch START & SAVE or just
touch SAVE to save without starting the cycle.
AUTO CONVECTION CONVERSION
Convection temperatures and/or times differ from those of
standard cooking. The oven can automatically reduce the
standard recipe temperature and/or time for convection cooking.
By selecting Auto Convection Conversion, you can select a
category, then enter a temperature and time according to the
recipe or package instructions. The oven will convert the time
and/or temperature you entered.
The conversion may not be exact because foods are grouped
in general categories.
To Use Auto Convection Conversion:
1. Touch AUTO CONVECTION
CONVERSION.
3. Enter desired cooking temperature,
and then touch NEXT.
-5°
200° 250°
300°
350°
350° 400°
Touch a keypad or use the slide bar.
450°
+5°
550°
500°
4. Enter standard cooking time.
1 2 3 4 5
6 7 8 9 0
Skip Timer
Next >
Touch NEXT or SKIP TIMER.
5. Choose Reminder setting.
Reminder:
Start
Toggle on or off. Then touch START. This setting reminds
you to check food when 20% of the timer remains. If Skip
Timer is chosen, you will review your converted settings and
be able to set Reminder and Delay Start. When the preheat
signal sounds, place the food in the oven and close the door.
24
Auto Convection
Conversion
Page 25

Gourmet Guides
Probe
My Creations
Auto Convection
Conversion
Most Used Modes:
Home
Mode
Temperature
Convect Bake
Bake
Broil
Keep Warm
Home
Clear
HR:MIN:SEC
--:--:--
Rapid Proof
200
o
For Manual:
Select an Automatic Convection Conversion mode:
Convect Bake
Convect Roast
Convect Pastry
View all manual modes to skip the recipe update process
Back
Home
Home
Mode
350°
Timer Not Set
Convect Bake
Bake
Convect Roast
Keep Warm
Cvt. Frozen Pizza
Broil
Delay Start
Self-Clean
Broil
170°
RIGHT
--:--:
--
Preheating to: 350°
Use Left Oven
Use Left Oven
Preheating to 350°
170°
00:00:10
Bake
RIGHT
WARNING
1. Touch MANUAL.
This process will automatically update your standard recipe for convection cooking.
USING YOUR OVEN
2. Select desired cook time, and then
touch START.
Cook Timer
1 2 3 4 5
6 7 8 9 0
Manual
2. Touch MODE, and then touch START.
Start
3. (Optional) Touch SET TIMER to enter
a Cook Time, and then touch OK.
Set Timer
COOK TIMER
The Cook Timer allows the oven to cook for a programmed
length of time. The Cook Timer can be accessed by touching
COOK TIMER or TIMER NOT SET whenever available.
Delay Start Start
3. Touch START TIMER.
Start Timer
When the preheat signal sounds, place the food in the oven
and close the door. If a Delay Start is programmed, place the
food in the oven when setting the mode.
Food Poisoning Hazard
Do not let food sit in oven more than one hour before
or after cooking.
Doing so can result in food poisoning or sickness.
NOTE: Do not use Delay Start for items that require a
preheated oven, such as cakes, cookies, and breads. If food
is in the oven during preheat, it may become overcooked.
Know Your Cook Timer
The Cook Timer countdown is started several ways:
■ Touching START TIMER starts the countdown immediately.
■ Opening, then closing the door before preheat is complete
starts the timer as soon as preheat is complete.
■ Opening, then closing the door when preheat is complete
starts the countdown immediately.
■ Cook Timer countdown will automatically start 2 minutes
after the preheat signal if none of the above activities have
occurred.
■ The Cook Timer cannot be set for Convect Slow Roast.
NOTE: The control will signal when 20% of the cook time remains.
To Use Cook Timer:
1. Touch COOK TIMER.
Cook Timer
25
Page 26

Use Left Oven
Keep Warm
Cooking Complete.
Off
Add More Time
Bake
RIGHT
Back
Clear
HR:MIN:SEC
00:00:00
Adjust cook timer:
Cancel Timer
Use Left Oven
Keep Warm
Cooking Complete.
Restart Oven
Off
Bake
RIGHT
Gourmet Guides
My Creations
Auto Convection
Conversion
Most Used Modes:
Home
Mode
Temperature
Cook Timer
Convect Bake
Bake
Broil
Keep Warm
Back
Home
Cooking with a probe:
Probe: Not Inserted
Tip: Insert food and probe BEFORE heating the oven.
Recommended manual cook modes:
Home
Convect Bake
325°
Cancel Probe
Delay Start
Cancel Probe
Delay Start
Home
Convect Roast
160°
Home
Convect Roast
160°
Delay Start
-5°
+5°
USING YOUR OVEN
When Cook Timer Ends, if Needed:
4. Select ADD MORE TIME.
Add More Time
1 2 3 4 5
6 7 8 9 0
Add 1 Min
OK
Enter amount with number keypads or touch ADD 1 MIN
to set time in 1-minute increments. Touch OK.
To reset previously set time:
5. Touch RESTART FOR.
TEMPERATURE PROBE
The temperature probe accurately measures the internal
temperature of meat, poultry, and casseroles and should
be used in determining the doneness of food. It can be used
during Bake, Convect Bake, and Convect Roast. The oven
will beep when the food has reached the target temperature.
Know Your Temperature Probe
■ Always unplug and remove the temperature probe from the
oven when removing food.
■ The temperature probe is not available in the left oven cavity
on 48" (121.9 cm) models.
Before Using Temperature Probe:
■ Remove any racks above the food that are not in use.
■ Insert the probe into the food item. For meats, the probe tip
should be located in the center of the thickest part of the
meat and not into the fat or touching a bone.
■ Place food in oven and connect the temperature probe
to the jack.
■ Keep probe as far away from heat source as possible.
Close oven door.
To Use Temperature Probe:
1. Touch PROBE.
2. Touch CONVECT
BAKE, CONVECT
ROAST, or BAKE.
Restart For
This will add the same time that was previously entered.
Convect Bake
Probe
Convect Roast Bake
To Adjust Probe Temperature, if Needed:
3. Touch -5°F (-1°C)
or +5°F (+1°C),
and then touch
START.
Fresh Beef, Veal, Lamb Medium Rare 135
Medium 150°
Well-Done 160°
160°
Range: 130-185°
Then touch Temperature keypad.
Chicken, Turkey Whole 180°
Breast 170°
-5°
+5°
Pork Medium 150°
Well-Done 160°
Ham, Precooked 140°
4. Enter desired
cooking
temperature, and
then touch START.
Probe Temp
°
Start
Touch keypads or slide bar.
200° 250°
-5°
300°
Temperature
350°
350° 400°
+5°
550°
450°
500°
Start
To Remove Probe Temperature but Keep Current
Mode and Cavity Temperature:
5. Touch CANCEL PROBE and START.
Temperature
26
200° 250°
300°
350°
350° 400°
Cancel Probe
450°
500°
550°
Start
Page 27

DELAY START
Gourmet Guides
Probe
My Creations
Auto Convection
Conversion
Most Used Modes:
Home
Mode
Temperature
Convect Bake
Bake
Broil
Keep Warm
Home
Clear
Keep Warm
Off
1 2 3 4 5
6 7 8 9 0
HR:MIN:SEC
--:--:--
Bake
350
o
Start
Select when cooking should begin:
Begin:
3:10pm
When no timer is set, the oven will automatically turn off after
cooking for 12 hours.
Back
Home
Clear
Keep Warm
Off
HR:MIN:SEC
00:00:19
Bake
350
o
Start
Select when cooking should begin:
Begin:
3:10 pm
End:
3:15 pm
The oven will automatically keep the food warm after cooking for:
00:00:19
Back
Back
Convect Bake
325
o
-5o-5
o
Range: 130-185
o
Pork Medium 150
o
Well-Done 160
o
Ham, Precooked 140
o
Chicken, Turkey Whole 180
o
Breast 170
o
Fresh Beef, Veal, Lamb Medium Rare 135
o
Medium 15 0
o
Well-Done 160
o
Cancel Probe
Start
160
o
Select when cooking should begin:
Begin:
3:32pm
The oven will automatically keep the food warm when the probe
reaches the target temperature.
Back
Cooking will start at:
1:30
Home
Clear
Keep Warm
Off
HR:MIN:SEC
00:00:19
Bake
350
o
Delay Start
WARNING
Food Poisoning Hazard
Do not let food sit in oven more than one hour before
or after cooking.
Doing so can result in food poisoning or sickness.
USING YOUR OVEN
3. Enter desired start and end times,
and then touch SET DELAY.
-15 min +15 min
4:00 6:00 8:00 10:00 12:00 2:00 4:00 6:00
Set Delay
Delay Start allows the oven(s) to be set to turn on at a certain
time of day and cook for a set length of time.
Delay Start should not be used for food such as breads and
cakes because they may not bake properly.
Delay Start is available with any cycle that has a Delay Start
keypad.
To Set a Delay Start:
1. Touch DELAY
START.
2. Enter desired
start time, and
then touch SET
DELAY.
Cook Timer
-15 min +15 min
4:00 6:005:00 8:007:00 9:00 10:00 12:00 11:00 1:00 2:00 3:00
Delay Start
Touch keypad or slide bar.
To Delay with Cook Timer:
1.
Select TIMER NOT SET or COOK TIMER.
Cook Timer
Set Delay
Touch the 15 Min keypad(s) or slide the bar. The difference
between the start and end times should equal the cook time.
To Delay with Probe:
After selecting cooking mode:
1. Touch DELAY START.
Probe Temp
Delay Start
2. Enter desired start time, and then
touch SET DELAY.
-15 min +15 min
4:00 6:005:00 8:007:00 9:00 10:00 12:00 11:00 1:00 2:00 3:00
Set Delay
Touch the 15 Min keypad(s) or slide the bar. The oven will
automatically keep the food warm when the probe reaches
the target temperature.
2. Select desired cook time, and then
touch DELAY START.
Delay Start
1 2 3 4 5
6 7 8 9 0
Cook Timer
To Cancel Delay Start Only:
1. Touch CANCEL DELAY.
Cancel Delay
2. Enter Cook Time, and then touch
START.
Cook Timer
1 2 3 4 5
6 7 8 9 0
Start
NOTE: To cancel Cook cycle and Delay Start,
touch CANCEL OVEN.
27
Page 28

CARE AND CLEANING
IMPORTANT:
■ Before cleaning, make sure all controls are OFF and the
oven and cooktop are cool. Do not use oven cleaners,
bleach, or rust removers.
■ Soap, water, and a soft cloth or sponge are suggested first
unless otherwise noted.
COOKTOP SURFACE
After Each Use:
1. Wipe off cooktop, grates, and caps.
3. Clean clogged burner ports.
Use a straight pin. Do not enlarge or distort the port. Do not
use a wooden toothpick. If the burner needs to be adjusted,
contact a trained repair specialist.
4. Replace burner cap.
Stacked Power Burner
2. Clean food spills.
To preserve the finish, clean food spills containing acids,
such as vinegar and tomato, as soon as the entire appliance
is cool.
SEALED SURFACE BURNERS
1. Remove burner cap and base.
1
2
Medium Burner
1
2
Simmer/Melt Burner
1
2
Incorrect
1
Correct
2
Incorrect
1
Correct
2
Incorrect
1
Correct
2
2. Clean gas opening with damp cloth.
28
Make sure alignment pins are properly aligned with burner cap.
5. Turn on burner.
If the burner does not light, check cap alignment. If the
burner still does not light, do not service the sealed burner
yourself. Contact a trained repair specialist.
Page 29

CARE AND CLEANING
PORCELAIN-COATED GRATES
AND CAPS
Use scrub and cleanser.
Clean with a nonabrasive nylon scrub pad and mildly
abrasive cleanser.
Know Your Grates and Caps
■ Food spills containing acids, such as vinegar and tomato,
should be cleaned as soon as the cooktop, grates, and caps
are cool. These spills may affect the finish.
■ To avoid chipping, do not bang grates and caps against each
other or hard surfaces such as cast iron cookware.
■ Do not reassemble caps on burners while wet.
■ Do not clean in the Self-Cleaning cycle.
■ Do not clean in dishwasher.
GRIDDLE
Tips:
■ Prior to cleaning the griddle, make sure that all cooktop
burners have been turned off and the oven controls have
been locked.
■ For best results, clean the griddle shortly after removing
the food.
Do Not Use:
■ Soap
■ Abrasive materials
■ Cleaning materials, including stainless steel cleaner
After Each Use:
3. Scrape residue into drip tray.
Use a pad holder or wooden spoon with non-scratch pad.
Use pressure on soiled areas. Repeat if needed for heavy
soils.
4. Remove remaining residue.
Fold a damp towel and, with the pad holder or wooden spoon,
go over the griddle to remove remaining residue.
5. Turn off griddle and let cool.
6. Wipe off griddle.
1. Heat for 10 to 15 minutes at 300°F
(149°C).
2. Pour water on soiled area.
Using a measuring cup, pour up to 1 cup tap water over
the soiled area. Start at the back, allowing the water to run
toward the drip tray in the front. Allow the water to bubble
on the griddle for 3–4 seconds.
Once cool, wipe the griddle with a clean, damp terry
cloth towel. Then buff with a microfiber cloth. If streaking,
rainbowing, or ghosting occurs, use a mixture of 1 part white
vinegar to 2 parts water on a towel to wipe the griddle.
7. Remove, empty, and clean drip tray.
Clean the drip tray with warm, soapy water. Wipe the area
under the drip tray clean. Once dry, put the drip tray back
in position.
29
Page 30

Automatic Lock
Self-clean
Sound Volume
Set Time
Set Date
Setup Menu
Back
CARE AND CLEANING
COOKTOP CONTROLS
1. Remove knobs.
Pull the knobs straight away from the control panel to remove.
2. Clean with warm, soapy water.
Know Your Cooktop Controls
■ To avoid damage to the cooktop controls, do not use steel
wool, abrasive cleansers, or oven cleaner.
■ To avoid damage, do not soak knobs.
■ When replacing knobs, make sure knobs are in the Off
position.
■ Do not remove seals under knobs.
■ When replacing knobs after cleaning either the surface burner
controls or the griddle module control, make sure the knobs
are replaced to the correct location. The power burner knobs
have power settings, and the griddle knob has temperature
settings. All other knobs have Hi, Med, and Lo settings only.
CONTROL PANEL
1. Activate LOCK BUTTONS NOW.
Lock Buttons Now
Locking buttons avoids touch screen activation during
cleaning.
2. Apply cleaner.
Apply glass cleaner to soft cloth or sponge, not directly
on panel, or use affresh® Kitchen and Appliance Cleaner
(not included).
Do Not Use:
■ Abrasive cleaners
■ Steel-wool pads
■ Gritty washcloths
■ Abrasive paper towels
DOOR EXTERIOR
STAINLESS STEEL
(on some models)
Use cleaner or wipes.
Use affresh® Stainless Steel Cleaner or affresh® Stainless Steel
Cleaning Wipes (not included). Rub in direction of grain to
avoid possible damage to the steel surface.
Do Not Use:
■ Soap-filled scouring pads
■ Abrasive cleaners
■ Cooktop polishing creme
■ Steel-wool pads
■ Gritty washcloths
■ Abrasive paper towels
30
Apply cleaner.
Apply glass cleaner to soft cloth or sponge, not directly
on panel, or use affresh® Kitchen and Appliance Cleaner
(not included).
Page 31

CARE AND CLEANING
WARNING
DOOR INTERIOR
1. Wipe away any deposits.
Use a damp sponge.
2. Use Self-Cleaning cycle.
See the “Self-Cleaning the Oven”
section.
OVEN RACKS
1. Empty out oven and remove racks.
SELF-CLEANING THE OVEN
Burn Hazard
Do not touch the oven during the Self-Cleaning cycle.
Keep children away from oven during
Self-Cleaning cycle.
Failure to follow these instructions can result in burns.
IMPORTANT:
■ The health of some birds is extremely sensitive to the fumes
given off during the Self-Cleaning cycle. Exposure to the
fumes may result in death to certain birds. Always move birds
to another closed and well-ventilated room.
■ Self-clean the oven before it becomes heavily soiled. Heavy
soil results in longer cleaning and more smoke.
■ Keep the kitchen well-ventilated during the Self-Cleaning
cycle to help get rid of heat, odors, and smoke.
■ Do not block the oven vent(s) during the Self-Cleaning cycle.
Air must be able to move freely. See “Oven Vent” in the
“Know Your Oven” section.
■ Do not clean, rub, damage, or move the oven door gasket.
The door gasket is essential for a good seal.
Remove broiler pan, grid, cookware, and bakeware and,
on some models, the temperature probe from the oven.
IMPORTANT: Remove racks before the Self-Cleaning cycle
to avoid discoloring and difficulty sliding.
2. Use steel-wool pad.
OVEN CAVITY
■ Do not use oven cleaners.
■ Food spills should be cleaned when oven cools. At high
temperatures, foods react with porcelain. Staining, etching,
pitting, or faint white spots can result.
To Prepare Oven:
1. Empty out oven and remove racks.
Remove broiler pan, grid, cookware and bakeware and,
on some models, the temperature probe from the oven.
IMPORTANT: Remove racks before the Self-Cleaning cycle
to avoid discoloring and difficulty sliding.
31
Page 32

Lock Buttons Now
Automatic Lock
Sound Volume
Set Time
Set Date
Back
Setup Menu
Next
>
Self-clean
Back
Home
CARE AND CLEANING
2. Remove any foil from oven.
Foil may burn or melt, damaging the oven.
How the Cycle Works
IMPORTANT:
■ The heating and cooling of porcelain on steel in the oven
may result in discoloring, loss of gloss, hairline cracks, and
popping sounds.
■ The Self-Cleaning cycle uses very high temperatures, burning
soil to a powdery ash.
■ The oven is preset for a 3-hour 30-minute Self-Cleaning
cycle; however, the time can be changed.
Use the following chart as a guide to determine the desired
cleaning level:
3. Hand clean.
With a damp cloth, hand clean the inside door edge and 1½"
(3.8 cm) of the area around the inside oven cavity frame. Be
certain not to move or bend the gasket. This area does not
get hot enough during self-cleaning to remove soil. Do not let
water, cleaner, etc., enter slots on door frame.
4. Wipe out loose soil.
Wiping out soil reduces smoke and avoids damage. At high
temperatures, foods react with porcelain. Staining, etching,
pitting, or faint white spots can result. This will not affect
cooking performance.
CLEANING LEVEL
TOTAL CLEANING TIME
(includes a 30-minute cool-down time)
Light 3 hours 30 minutes
Medium 4 hours
Heavy 4 hours 30 minutes
Once the oven has completely cooled:
■ Remove ash with a damp cloth.
■ If soil remains after wiping, that means the length of the
Self-Cleaning cycle was not long enough for the amount of
soil in the oven. Repeat the Self-Cleaning cycle if desired or
the soil will be removed during the next Self-Cleaning cycle.
■ To avoid breaking the glass, do not apply a cool damp cloth
to the inner door glass before it has completely cooled.
■ The oven lights will not light during the Self-Cleaning cycle.
■ On 48" (121.9 cm) ranges, only one oven can self-clean at a
time. If one oven is self-cleaning, the other oven cannot be
set or turned on.
NOTE: The oven has a 2-speed cooling fan motor. During
self-cleaning, the fan(s) will operate at their highest speed to
increase airflow to better exhaust the hotter air through the
oven vent(s). An increase of noise may be noticeable during
and after the Self-Cleaning cycle until the oven cools.
To Use Self-Clean:
1. Touch SELF-CLEAN.
To Prepare Cooktop:
Remove plastic items.
Plastic items may melt.
32
Self-clean
If Accessing Self-Clean by Using the Setup Menu
on 48" (121.9 cm) Ranges:
2. Select oven to clean.
Which oven do you want to clean?
Left Right
Page 33

Before cleaning the oven:
1. Remove all oven racks and pans from the oven. Racks could discolor and not slide easily after a
self- clean cycle.
2. Clean oven frame and door frame with a non-abrasive cleaning agent because they are not
exposed to cleaning temperatures. Do not clean gasket.
Back
Home
3. Touch NEXT.
Delay Start
Select the cleaning level:
Note: The oven will cool for an additional 30
minutes after cleaning completes.
Back
Home
Light
Start
Back
Home
Select the cleaning level:
Note: The oven will cool for an additional 30
minutes after cleaning completes.
2 hours of cleaning
Medium
3 hours of cleaning
Heavy
4 hours of cleaning
Set Delay
Back
Select when cleaning should begin:
Begin:
2:32 pm
End:
6:02 pm
Gourmet Guides
Probe
My Creations
Auto Convection
Conversion
Most Used Modes:
Home
Mode
Temperature
Cook Timer
Convect Bake
Bake
Broil
Keep Warm
Light
Setup Menu
Kitchen Timer
4. Select cleaning level.
Next
CARE AND CLEANING
To Delay for Self-Clean:
5. Touch DELAY START.
>
Delay Start
6. Enter desired start time.
Light
2 hours of cleaning
Medium
3 hours of cleaning
Heavy
4 hours of cleaning
Start
The door(s) will lock.
NOTE: The oven will cool for an additional 30 minutes after
cleaning is completed.
-15 min +15 min
4:00 6:00 8:00 10:00 12:00 2:00 4:00 6:00
The oven will calculate the end time based on your cleaning
level choice. The oven will cool for an additional 30 minutes
after cleaning is completed.
To Stop Self-Clean Any Time:
Touch CANCEL OVEN.
Cancel Oven
Touch CANCEL OVEN (CANCEL LEFT or CANCEL RIGHT on
48" [121.9 cm] oven models). If the oven temperature is too
high, the door will remain locked. It will not unlock until the
oven cools.
33
Page 34

CARE AND CLEANING
OVEN LIGHTS
The oven lights are 120-volt, 25-watt maximum halogen bulbs.
They will come on when the oven door is opened.
On 48" (121.9 cm) ranges, both the left and right oven lights
turn on or off when Oven Light is touched. The oven lights will
not work during the Self-Cleaning cycle. When the oven door is
closed, touch OVEN LIGHT to turn light on or off.
To Replace:
Before replacing the bulb, make sure the oven is OFF and cool.
1. Disconnect power.
2. Remove glass light cover.
4. Replace bulb.
Use a tissue or wear cotton gloves to handle the bulb. To avoid
damage or decreasing the life of the new bulb, do not touch
bulb with bare fingers.
5. Replace bulb cover.
Grasp the front edge, and pull away from the oven.
3. Remove bulb from socket.
Snap back into the wall.
6. Reconnect power.
34
Page 35

TROUBLESHOOTING
First try the solutions suggested here. If you need further assistance or more recommendations that may help you avoid
a service call, refer to the “Warranty” section in this manual and scan the code there with your mobile device, or visit
https://jennair.custhelp.com. In Canada, visit http://www.jennair.ca.
If you experience Possible Causes Solution
Nothing will operate. A household fuse has blown
Surface burners will not
operate.
Surface burner flames are
uneven, yellow, and/or
noisy.
Surface burner makes
popping noises.
Burner sparks but does
not light.
Excessive heat around
cookware on cooktop.
Cooktop cooking results
not what expected.
Oven will not operate. This is the first time the oven has
Oven temperature too high
or too low.
Cooling fan runs during
baking, broiling, or cleaning.
or a circuit breaker has tripped.
This is the first time the surface
burners have been used.
The control knob is not set
correctly.
The burner ports are clogged. Clean clogged burner ports with a straight pin.
The burner ports are clogged. Clean clogged burner ports with a straight pin.
On models with caps, the burner
caps are not positioned properly.
Propane gas is being used. The range may have been converted improperly. Contact
The burner is wet. Let it dry.
There is continuous sparking, but
the burner does not light.
The cookware is not the proper
size.
The proper cookware is not being
used.
The control knob is not set to the
proper heat level.
The range is not level. The range must be level for the griddle to operate properly.
been used.
The electronic oven control is not
set correctly.
A Delay Start has been set. This will cause the oven to start at a later time.
On some models, Lock Buttons
Now is set.
On some models, the Sabbath
mode is set.
The oven temperature calibration
needs adjustment.
Replace the fuse or reset the circuit breaker. If the problem
continues, call an electrician.
Turn on any one of the surface burner knobs to release air from
the gas lines.
Push in knob before turning to a setting.
Make sure alignment pins are properly aligned with the
burner cap.
a trained repair specialist.
Discontinue use of the surface burner and contact a service
technician.
Use cookware about the same size as the surface cooking
area or surface burner. Cookware should not extend more
than ¹⁄2" (1.3 cm) outside the cooking area.
Use medium-to-heavy cookware made of the material that cooks
food the way you want. The best cookware should have a flat
bottom, straight sides, and a well-fitting lid.
Set the Cooktop Control to HI, MED, or LO, depending upon
the type of cooking you want to do.
See the Installation Instructions for leveling instructions.
Turn on any one of the surface burner knobs to release air from
the gas lines.
Make sure you have followed the instructions for the function
you want to perform.
All the buttons will be locked. Slide the bar up on the main
screen to unlock the button/screen.
This mode allows oven operation in keeping with the Jewish
Sabbath. When set, only the number and start keys will function.
Select the temperature offset up to +35°F.
It is normal for the fan to automatically run while the oven
is in use or for some time after the oven is shut off to cool
the electronic control.
35
Page 36

TROUBLESHOOTING
First try the solutions suggested here. If you need further assistance or more recommendations that may help you avoid
a service call, refer to the “Warranty” section in this manual and scan the code there with your mobile device, or visit
https://jennair.custhelp.com. In Canada, visit http://www.jennair.ca.
If you experience Possible Causes Solution
Gas range noises during
Bake and Broil operations.
Display shows messages. The display is showing a letter
Self-Cleaning cycle will
not operate.
Oven cooking results
not what expected.
Noises that may be heard during
the Bake and Broil operations:
Whooshing, poof, clicking, snaps,
pop — These sounds are normal
operational noises that can be
heard each time the Bake or Broil
burners ignite during the cycle.
followed by a number.
The oven door is open. Close the oven door all the way.
The function has not been entered. Make sure you have properly followed the Self-Cleaning cycle
On some models, a delay start
Self-Cleaning cycle has been set.
A Delay Start has been set. This will prevent the oven from starting any function until the
On 48" (121.9 cm) ranges, one
oven is self-cleaning.
The proper temperature is not set. Double-check the recipe in a reliable cookbook.
The proper oven temperature
calibration is not set.
The oven was not preheated. If the proper steps are followed when setting the desired
The proper bakeware is not being
used.
The racks are not positioned
properly.
There is not proper air circulation
around bakeware.
The batter is not evenly distributed
in the pan.
The proper length of time is not
being used.
The oven door has been opened
while cooking.
Baked items are too brown on the
bottom.
Pie crust edges are browning early. Use aluminum foil to cover the edge of the crust and/or reduce
■ A pop can be heard when the gas valve is opening or cycling
on and will make a single pop when it snaps open from the
solenoid. It sounds similar to a suction cup being pulled off
of a piece of glass.
■ The igniters will click several times until the flame is
detected. These are short clicking sounds like tapping a nail
onto a piece of glass.
■ A whooshing or poof sound is heard when the bake or broil
burner ignites.
■ On some models, a clicking sound can be heard when the
convection fan relay cycles on and off.
Clear the display. If a letter followed by a number reappears, call
for service.
instructions.
This will cause the oven to start the Self-Cleaning cycle at
a later time.
delayed start time is reached or has been canceled.
When one oven is self-cleaning, the other oven cannot be set to
self-clean.
Select the temperature offset up to +35°F to increase or
decrease the temperature as desired.
function, the oven will preheat before cooking.
Make sure the bakeware used is appropriate for the food being
cooked.
Place racks so there is adequate space above each food item.
Allow 2" (5.0 cm) of space around bakeware and oven walls.
Check that batter is level in the pan.
Adjust cooking time.
Oven peeking releases oven heat and can result in longer
cooking times.
Move rack to higher position in the oven.
baking temperature.
36
Page 37

ASSISTANCE OR SERVICE
Before calling for assistance or service, please check the “Troubleshooting” section. It may save you the cost of a service call.
If you still need help, follow the instructions below. When calling, please know the purchase date and the complete model and serial
numbers of your appliance. This information will help us to better respond to your request.
If You Need Replacement Parts
If you need to order replacement parts, we recommend that you use only factory specified parts. These factory specified parts will fit
right and work right because they are made with the same precision used to build every new Jenn-Air® appliance.
To locate factory specified parts in your area, call us or your nearest Jenn-Air designated service center.
IN THE U.S.A.
Call the Jenn-Air Customer eXperience Center toll-free:
1-800-JENNAIR (1-800-536-6247) or visit our website
at www.jennair.com.
Our consultants provide assistance with:
■ Scheduling of service. Jenn-Air
technicians are trained to fulfill the product warranty and
provide after-warranty service anywhere in the United States.
■ Features and specifications on our full line of appliances.
■ Referrals to local Jenn-Air
■ Installation information.
■ Use and maintenance procedures.
■ Accessory and repair parts sales.
■ Specialized customer assistance (Spanish speaking, hearing
impaired, limited vision, etc.).
For further assistance
If you need further assistance, you can write to Jenn-Air with any
questions or concerns at:
Jenn-Air Brand Home Appliances
Customer eXperience Center
553 Benson Road
Benton Harbor, MI 49022-2692
Please include a daytime phone number in your correspondence.
®
appliances designated service
®
appliance dealers.
IN CANADA
Call the Jenn-Air Canada Customer eXperience Centre toll-free:
1-800-JENNAIR (1-800-536-6247) or visit our website at
www.jennair.ca.
Our consultants provide assistance with:
■ Scheduling of service. Jenn-Air
service technicians are trained to fulfill the product warranty
and provide after-warranty service anywhere in Canada.
■ Features and specifications on our full line of appliances.
■ Referrals to local Jenn-Air
■ Installation information.
■ Use and maintenance procedures.
■ Accessory and repair parts sales.
For further assistance
If you need further assistance, you can write to Jenn-Air Canada
with any questions or concerns at:
Customer eXperience Centre
Jenn-Air Canada
200 - 6750 Century Ave.
Mississauga, Ontario L5N 0B7
Please include a daytime phone number in your correspondence.
®
appliances designated
®
appliance dealers.
ACCESSORIES
For accessories in the U.S.A., you can visit our website at www.jennair.com or call us at 1-800-JENNAIR (1-800-536-6247).
In Canada, visit our website at www.jennair.ca or call us at 1-800-JENNAIR (1-800-536-6247). Or see the “Accessories”
brochure to order.
affresh® Stainless Steel Cleaner
(stainless steel models)
affresh® Stainless Steel Cleaning Wipes
(stainless steel models)
Gas Grate/Drip Pan Cleaner
affresh® Kitchen and Appliance Cleaner
Stainless Steel Griddle Cover
Wok Ring
Extendable Roller Rack with Handle
Broiler Pan Kit
37
Page 38

ATTACH YOUR RECEIPT HERE. PROOF OF PURCHASE IS REQUIRED
TO OBTAIN WARRANTY SERVICE.
Please have the following information available when you call the
JENN-AIR® COOKING
LIMITED WARRANTY
Customer eXperience Center:
■ Name, address and telephone number
■ Model number and serial number
■ A clear, detailed description of the problem
■ Proof of purchase including dealer or retailer name and address
IF YOU NEED SERVICE:
1. Before contacting us to arrange service, please determine whether your product requires repair. Some questions
can be addressed without service. Please take a few minutes to review the Troubleshooting or Problem Solver
section of the Use and Care Guide, scan the QR code on the right to access additional resources, or visit
https://jennair.custhelp.com.
2. All warranty service is provided exclusively by our authorized Jenn-Air Service Providers. In the U.S. and Canada,
direct all requests for warranty service to:
Jenn-Air Customer eXperience Center
1-800-JENNAIR (1-800-536-6247).
If outside the 50 United States or Canada, contact your authorized Jenn-Air dealer to determine whether another warranty applies.
https://jennair.custhelp.com
FIVE YEAR LIMITED WARRANTY
WHAT IS COVERED WHAT IS NOT COVERED
TWO YEAR LIMITED WARRANTY (PARTS & LABOR)
For two years from the date of purchase, when this major appliance
is installed, operated and maintained according to instructions
attached to or furnished with the product, Jenn-Air brand of
Whirlpool Corporation or Whirlpool Canada, LP (hereafter “Jenn-Air”)
will pay for factory specified replacement parts and repair labor to
correct defects in materials or workmanship that existed when this
major appliance was purchased or, at its sole discretion replace the
product. In the event of product replacement, your appliance will be
warranted for the remaining term of the original unit’s warranty period.
THIRD THROUGH FIFTH YEAR LIMITED WARRANTY
(CERTAIN COMPONENT PARTS ONLY - LABOR NOT INCLUDED)
In the third through fifth years from the date of original purchase,
when this major appliance is installed, operated and maintained
according to instructions attached to or furnished with the product,
Jenn-Air will pay for factory specified parts for the following
components to correct non-cosmetic defects in materials or
workmanship in these parts that prevent function of this major
appliance and that existed when this major appliance was
purchased. This is a limited 5-year warranty on the below named
parts only and does not include repair labor.
■ Electric element
■ Touch Pad and microprocessor
■ Glass ceramic cooktop: if due to thermal breakage
■ Electronic controls
■ Magnetron tube
■ Sealed gas burners
YOUR SOLE AND EXCLUSIVE REMEDY UNDER THIS LIMITED
WARRANTY SHALL BE PRODUCT REPAIR AS PROVIDED HEREIN.
Service must be provided by a Jenn-Air designated service company.
This limited warranty is valid only in the United States or Canada
and applies only when the major appliance is used in the country in
which it was purchased. This limited warranty is effective from the
date of original consumer purchase. Proof of original purchase date is
required to obtain service under this limited warranty.
DISCLAIMER OF IMPLIED WARRANTIES
IMPLIED WARRANTIES, INCLUDING ANY IMPLIED WARRANTY OF MERCHANTABILITY OR IMPLIED WARRANTY OF FITNESS FOR A
PARTICULAR PURPOSE, ARE LIMITED TO ONE YEAR OR THE SHORTEST PERIOD ALLOWED BY LAW. Some states and provinces do not allow
limitations on the duration of implied warranties of merchantability or fitness, so this limitation may not apply to you. This warranty gives you specific
legal rights, and you also may have other rights that vary from state to state or province to province.
DISCLAIMER OF REPRESENTATIONS OUTSIDE OF WARRANTY
Jenn-Air makes no representations about the quality, durability, or need for service or repair of this major appliance other than the representations
contained in this warranty. If you want a longer or more comprehensive warranty than the limited warranty that comes with this major appliance, you
should ask Jenn-Air or your retailer about buying an extended warranty.
LIMITATION OF REMEDIES; EXCLUSION OF INCIDENTAL AND CONSEQUENTIAL DAMAGES
YOUR SOLE AND EXCLUSIVE REMEDY UNDER THIS LIMITED WARRANTY SHALL BE PRODUCT REPAIR AS PROVIDED HEREIN. JENN-AIR
SHALL NOT BE LIABLE FOR INCIDENTAL OR CONSEQUENTIAL DAMAGES. Some states and provinces do not allow the exclusion or limitation of
incidental or consequential damages, so these limitations and exclusions may not apply to you. This warranty gives you specific legal rights, and you
also may have other rights that vary from state to state or province to province.
1. Commercial, non-residential, multiple-family use, or use inconsistent
with published user, operator or installation instructions.
2. In-home instruction on how to use your product.
3. Service to correct improper product maintenance or installation,
installation not in accordance with electrical or plumbing codes or
correction of household electrical or plumbing (i.e. house wiring, fuses
or water inlet hoses).
4. Consumable parts (i.e. light bulbs, batteries, air or water filters,
preservation solutions, etc.).
5. Defects or damage caused by the use of non-genuine Jenn-Air parts
or accessories.
6. Conversion of products from natural gas or L.P. gas.
7. Damage from accident, misuse, abuse, fire, floods, acts of God or
use with products not approved by Jenn-Air.
8. Repairs to parts or systems to correct product damage or defects
caused by unauthorized service, alteration or modification of
the appliance.
9. Cosmetic damage including scratches, dents, chips, and other damage
to the appliance finishes unless such damage results from defects in
materials and workmanship and is reported to Jenn-Air within 30 days.
10. Discoloration, rust or oxidation of surfaces resulting from caustic
or corrosive environments including but not limited to high salt
concentrations, high moisture or humidity or exposure to chemicals.
11. Food or medicine loss due to product failure.
12. Pick-up or delivery. This product is intended for in-home repair.
13. Travel or transportation expenses for service in remote locations where
an authorized Jenn-Air servicer is not available.
14. Removal or reinstallation of inaccessible appliances or built-in fixtures
(i.e. trim, decorative panels, flooring, cabinetry, islands, countertops,
drywall, etc.) that interfere with servicing, removal or replacement of
the product.
15. Service or parts for appliances with original model/serial numbers
removed, altered or not easily determined.
The cost of repair or replacement under these excluded circumstances
shall be borne by the customer.
12/14
38
Page 39

INFORMATIONS DE SÉCURITÉ
Votre sécurité et celle des autres est très importante.
Nous donnons de nombreux messages de sécurité importants dans ce manuel et sur votre appareil ménager. Assurez-vous de
toujours lire tous les messages de sécurité et de vous y conformer.
Voici le symbole d’alerte de sécurité.
Ce symbole d’alerte de sécurité vous signale les dangers potentiels de décès et de blessures graves à vous
et à d’autres.
Tous les messages de sécurité suivront le symbole d’alerte de sécurité et le mot “DANGER” ou
“AVERTISSEMENT”. Ces mots signifient :
Risque possible de décès ou de blessure grave si vous ne
DANGER
AVERTISSEMENT
Tous les messages de sécurité vous diront quel est le danger potentiel et vous disent comment réduire le risque de blessure et
ce qui peut se produire en cas de non-respect des instructions.
AVERTISSEMENT : Si les renseignements dans ce manuel ne sont pas exactement
observés, un incendie ou une explosion peut survenir, causant des dommages au
produit, des blessures ou un décès.
suivez pas immédiatement les instructions.
Risque possible de décès ou de blessure grave si vous
ne suivez pas les instructions.
– Ne pas entreposer ni utiliser de l’essence ou d’autres vapeurs ou liquides inflammables
à proximité de cet appareil ou de tout autre appareil électroménager.
– QUE FAIRE DANS LE CAS D’UNE ODEUR DE GAZ :
Ne pas tenter d’allumer un appareil.
•
Ne pas toucher à un commutateur électrique.
•
Ne pas utiliser le téléphone se trouvant sur les lieux.
•
Appeler immédiatement le fournisseur de gaz à partir du téléphone d'un voisin. Suivre
•
ses instructions.
À défaut de joindre votre fournisseur de gaz, appeler les pompiers.
•
– L’installation et l’entretien doivent être effectués par un installateur qualifié, une agence
de service ou le fournisseur de gaz.
AVERTISSEMENT : L’odorat ne permet pas toujours la détection d’une fuite de gaz.
Les distributeurs de gaz recommandent l’emploi d’un détecteur de gaz (homologation UL ou CSA).
Pour d’autre information, contacter le fournisseur de gaz local.
En cas de détection d’une fuite de gaz, exécuter les instructions “Que faire dans le cas d’une odeur de gaz”.
Avertissements de la proposition 65 de l'État de Californie :
AVERTISSEMENT : Ce produit contient au moins un produit chimique connu par l’État de Californie pour être à l’origine de
cancers.
AVERTISSEMENT : Ce produit contient au moins un produit chimique connu par l’État de Californie pour être à l’origine de
malformations et autres déficiences de naissance.
39
Page 40

INFORMATIONS DE SÉCURITÉ
LE PIED ANTIBASCULEMENT
La cuisinière ne basculera pas pendant une utilisation normale. Cependant, la cuisinière peut basculer, si vous appliquez trop de force
ou de poids à la porte de la cuisinière, sans avoir adéquatement fixé le pied antibasculement.
AVERTISSEMENT
Risque de basculement
Un enfant ou une personne adulte peut faire basculer la cuisinière, ce qui peut causer un décès.
Vérifier que la bride antibasculement est bien installée et engagée, conformément aux
instructions d’installation.
Réengager la bride antibasculement si la cuisinière a été déplacée.
Ne pas faire fonctionner la cuisinière si la bride antibasculement n’est pas installée et engagée.
Le non-respect de ces instructions peut causer un décès ou des brûlures graves aux enfants et
aux adultes.
Pour vérifier que la bride antibasculement est bien installée et engagée:
La bride
antibasculement
Le pied de la cuisinière
• Faire glisser la cuisinière vers l'avant.
• Vérifier que la bride antibasculement est bien fixée au plancher ou au mur.
Faire de nouveau glisser la cuisinière vers l’arrière de sorte que le pied de la cuisinière•
se trouve sous la bride antibasculement.
• Voir les instructions d’installation pour plus de détails.
IMPORTANTES INSTRUCTIONS DE SÉCURITÉ
AVERTISSEMENT : Pour réduire le risque d’incendie,
de choc électrique, de blessures ou de dommages lors de
l’utilisation de la cuisinière, il convient d’observer certaines
précautions élémentaires dont les suivantes :
■
AVERTISSEMENT :
DE BASCULEMENT DE LA CUISINIÈRE, ELLE DOIT ÊTRE
BIEN IMMOBILISÉE PAR DES DISPOSITIFS
ANTIBASCULEMENT CORRECTEMENT INSTALLÉS.
POUR VÉRIFIER SI LES DISPOSITIFS SONT
CORRECTEMENT INSTALLÉS, GLISSER LA
CUISINIÈRE VERS L’AVANT ET VÉRIFIER SI LA BRIDE
ANTIBASCULEMENT EST BIEN FIXÉE AU PLANCHER
OU AU MUR, ET GLISSER LA CUISINIÈRE VERS
L’ARRIÈRE POUR QUE LE PIED ARRIÈRE DE LA
CUISINIÈRE SOIT SOUS LA BRIDE
ANTIBASCULEMENT.
■ AVERTISSEMENT : POUR RÉDUIRE LE RISQUE DE
BRÛLURE, NE PAS DÉPLACER LA CUISINIÈRE
LORSQU'ELLE EST CHAUDE. CETTE CUISINIÈRE
COMPORTE DES ROULETTES POUR EN FACILITER LE
DÉPLACEMENT. POUR RÉDUIRE LE RISQUE DE
BLESSURE LIÉ AU BASCULEMENT DE L'APPAREIL,
VÉRIFIER LA QUALITÉ DE LA RÉINSTALLATION DE LA
CUISINIÈRE DANS LE DISPOSITIF ANTI-BASCULEMENT
FOURNI ET DÉPLOYER LES PIEDS DE NIVELLEMENT
APRÈS AVOIR RAMENÉ LA CUISINIÈRE À SA POSITION
D'INSTALLATION INITIALE.
■ AVERTISSEMENT : NE JAMAIS utiliser cet appareil
comme dispositif de chauffage de la pièce. Le nonrespect de cette instruction peut entraîner une intoxication
au monoxyde de carbone et une surchauffe du four.
POUR MINIMISER LE RISQUE
■ AVERTISSEMENT :
ou passages d’air au fond du four ou couvrir entièrement
une grille avec des matériaux tels que du papier
d’aluminium. Le non-respect de cette instruction empêche la
circulation de l’air dans le four et peut entraîner une
intoxication au monoxyde de carbone. Les feuilles de papier
d’aluminium peuvent également retenir la chaleur et créer un
risque d’incendie.
■ MISE EN GARDE : Ne pas remiser dans des armoires
au-dessus de la cuisinière ou sur le dosseret d’une
cuisinière, des objets que des enfants pourraient vouloir
atteindre. Les enfants pourraient se brûler ou se blesser en
grimpant sur la cuisinière.
■ Ne pas laisser les enfants seuls – Les enfants ne doivent
pas être laissés seuls ou sans surveillance dans la pièce où
la cuisinière est en service. Ne jamais laisser les enfants
s’asseoir ou se tenir sur une partie quelconque de la
cuisinière.
■ Porter des vêtements appropriés – Des vêtements amples
ou détachés ne doivent jamais être portés pendant
l’utilisation de la cuisinière.
■ Entretien par l’utilisateur – Ne pas réparer ni remplacer toute
pièce de la cuisinière si ce n’est pas spécifiquement
recommandé dans le manuel. Toute autre opération
d’entretien ou de réparation doit être confiée à un
technicien qualifié.
■ Remisage dans ou sur la cuisinière – Des matériaux
inflammables ne doivent pas être remisés dans un four ou
près des éléments de surface.
■ Ne pas utiliser d’eau pour éteindre un feu de graisse –
Étouffer le feu ou les flammes ou utiliser un extincteur à
produits chimiques secs, ou un extincteur à mousse.
NE JAMAIS couvrir les fentes, trous
40
CONSERVEZ CES INSTRUCTIONS
Page 41

INFORMATIONS DE SÉCURITÉ
IMPORTANTES INSTRUCTIONS DE SÉCURITÉ
N’utiliser que des mitaines de four sèches – Des mitaines
■
de four mouillées ou humides sur des surfaces chaudes
peuvent provoquer des brûlures provenant de la vapeur.
Ne pas laisser les mitaines de four toucher les éléments
chauffants. Ne pas utiliser une serviette ou un tissu épais.
■ NE PAS TOUCHER LES ÉLÉMENTS DE SURFACE OU
L’ESPACE PRÈS DES ÉLÉMENTS – Les éléments de
surface peuvent être chauds même lorsqu’ils ont une
teinte foncée. Les endroits près des éléments de surface
peuvent devenir assez chauds pour causer des brûlures.
Pendant et après l’utilisation, ne pas toucher les éléments
chauffants et ne pas laisser les vêtements ou autres
matériaux inflammables entrer en contact avec ces
éléments de surface ou les endroits près des éléments,
avant qu’ils aient suffisamment refroidi. Ces endroits
comprennent la table de cuisson et les surfaces près de
la table de la cuisson.
■ Ne jamais laisser les éléments de la table de cuisson sans
surveillance alors qu’ils chauffent à la puissance
maximale. Il pourrait en résulter une ébullition qui cause
de la fumée et des renversements de corps gras qui
peuvent s’enflammer.
Ustensiles de cuisson vitrifiés – Seulement certains types
■
d’ustensiles de verre, vitrocéramique, céramique, faïence ou
autres surfaces vitrifiées conviennent pour le service sur une
table de cuisson, sans bris attribuables aux changements
soudains de température.
■ Les poignées des ustensiles doivent être tournées vers
l’intérieur et non vers le dessus des éléments adjacents –
Pour réduire le risque de brûlures, d’inflammation de
produits inflammables et de renversements dus à
l’entrechoquement non intentionnel des ustensiles, la
poignée d’un ustensile doit être positionnée de sorte qu’elle
soit tournée vers l’intérieur et non au-dessus des éléments
de surface adjacents.
Nettoyer la table de cuisson avec prudence – Si une éponge
■
ou un chiffon mouillé est utilisé pour essuyer les
renversements sur une surface de cuisson chaude, éviter
les brûlures causées par la vapeur chaude. Certains
nettoyants peuvent produire des émanations nocives
lorsqu’ils sont utilisés sur une surface chaude.
Exercer une grande prudence lors de l’ouverture de la porte
■
– Laisser l’air chaud ou la vapeur s’échapper avant
d’enlever ou de replacer un plat.
■ Ne pas faire chauffer des contenants fermés –
L’accumulation de pression peut causer une explosion du
contenant et des blessures.
CONSERVEZ CES INSTRUCTIONS
41
Page 42

PIÈCES ET CARACTÉRISTIQUES
Ce manuel couvre plusieurs modèles différents. La cuisinière que vous avez achetée peut comporter l’ensemble des éléments
énumérés ou seulement certains d’entre eux. L’emplacement et l’apparence des caractéristiques illustrées peuvent ne pas
correspondre à ceux de votre modèle. Se reporter à ce manuel ou à la section Foire aux questions (FAQ) de notre site Web sur
www.jennair.com pour des instructions plus détaillées. Au Canada, consulter la section du service à la clientèle sur www.jennair.ca.
GAMME
1
2
3
4
13
12
11
Cuisinière de 48" (121,9 cm) illustrée
Garniture périphérique
1
Grille de la table de cuisson
2
Plaque à frire électrique (sur certains modèles)
3
10
9
8
9
10
8
Pieds de nivellement
Portes du four
Fenêtre
5
6
7
4
Plateau d’égouttement
Panneaux latéraux
5
6
Panneau de la console
7
Pieds sur roulettes
Consulter la section “Accessoires” pour découvrir plus d’accessoires et d’options.
11
Panneau inférieur/garde-pieds
12
Commande de l’écran tactile du four
13
Boutons de commande
42
Page 43

B
B
C
D
E
F
INTÉRIEUR DU FOUR
PIÈCES ET CARACTÉRISTIQUES
B
2
3
C
Lampes à halogène
1
2
Éléments de cuisson au gril avec réflecteur de
cuisson au gril
4
D
3
Capteur de la cavité du four
1
A
4
A
1
Prise de sonde thermométrique (non disponible sur
la cavité du four de gauche pour les modèles de
48" [121,9 cm])
5
Ventilateurs de convection
6
Couvercle du brûleur de cuisson au four
F
6
E
5
COMMANDES ÉLECTRONIQUES DU FOUR
On peut accéder aux commandes du four au moyen du tableau de commande et de l’affichage tactile interactif.
REMARQUE : En raison de la sensibilité du tableau de commande, consulter la section “Entretien” pour obtenir des instructions
spéciales de nettoyage.
30" (76,2 CM) ET 36" (91,4 CM)
48" (121,9 CM)
Keep Warm
F
4
E
3
D
2
Annulation du four
1
Lampe du four
2
Menu de réglage
3
C
1
Minuterie de cuisine
4
Annulation four droit
5
Annulation four gauche
6
6
4
52
43
Page 44

CARACTÉRISTIQUES DE LA TABLE DE CUISSON
BRÛLEURS
AVERTISSEMENT
Risque d’incendie
La flamme d'un brûleur ne devrait pas dépasser le bord
du récipient de cuisson.
Fermer tous les réglages lorsque la cuisson est
terminée.
Le non-respect de ces instructions peut causer un
décès ou un incendie.
BTU/H
Brûleurs
superposés Ul
Brûleur
moyen
APPARENCE DU
BRÛLEUR
CARACTÉRISTIQUES
Ce brûleur est muni d’une
flamme supérieure et
inférieure. Le réglage de
la puissance à Hi (élevé)
permet d’utiliser les deux
flammes à puissance
maximale pour offrir la plus
grande chaleur. Il est idéal
pour la cuisson de grandes
quantités d’aliments ou
de liquides ou lors de
l’utilisation de grandes
marmites et casseroles.
Les réglages de Simmer
Hi (mijotage élevé) et Lo
(mijotage faible) n’utilisent
que la flamme du haut.
Ce brûleur est recommandé
pour cuisiner de plus petites
quantités d’aliments et pour
faire fondre le chocolat ou le
beurre.
■ Vérifier visuellement que le brûleur est allumé. Si le brûleur
ne s’allume pas, écouter pour savoir si un déclic se produit.
Si l’allumeur n’émet aucun déclic, éteindre le brûleur. Vérifier
si le disjoncteur ne s’est pas déclenché ou si un fusible n’est
pas grillé.
■ Vérifier que le bouton de commande est complètement
enfoncé sur la tige de la soupape. Si l’allumeur ne fonctionne
toujours pas, appeler un technicien de réparation qualifié.
■ Lorsque les boutons de commande d’un brûleur de petite
ou moyenne puissance sont tournés à la position LITE
(allumage), tous les brûleurs de petite ou moyenne puissance
émettent un déclic. Lorsque le bouton de commande est
activé, le gros brûleur est tourné à la position LITE (allumage),
ces brûleurs émettent des déclics indépendamment des
autres brûleurs. Dans les deux cas, seul le brûleur dont le
bouton de commande est placé sur LITE (allumage) produira
une flamme.
NE PAS OUBLIER : Lors de l’utilisation de la cuisinière ou
durant le programme d’autonettoyage, toute la surface de
cuisson peut devenir chaude.
Caractéristique de rallumage Flame-Sensing™
Durant l’utilisation de la table de cuisson, si un ou plusieurs
brûleurs s’éteignent en raison de causes extérieures (tel qu’un
renversement de liquide, un courant d’air ou un mouvement d’air
lié à l’aspiration), le système d’allumage s’active pour rallumer la
flamme. Lorsque la flamme réapparaît, la production d’étincelles
cesse. Si l’on n’élimine pas le courant d’air dans la pièce, la
production épisodique d’étincelles peut se poursuivre. Une
production d’étincelles peut aussi se produire occasionnellement
lorsqu’on utilise le débit thermique minimal sur l’un des brûleurs.
Pour régler un brûleur :
1.
Pousser et tourner
dans le sens
antihoraire
2. Tourner le bouton
dans le sens
antihoraire
Brûleur
de
mijotage
Ce brûleur n’atteint pas plus
de 500 BTU/h. Il procure la
douce chaleur nécessaire
pour laisser mijoter les
soupes et les ragoûts ou
faire fondre des ingrédients
délicats comme le beurre, le
fromage et le chocolat.
Allumer les brûleurs :
■ Des allumeurs électriques allument automatiquement les
brûleurs de surface lorsque les boutons de commande sont
tournés à LITE (allumage).
■ Avant de régler un bouton de commande, placer l’ustensile
de cuisson rempli sur la grille. Ne pas faire fonctionner un
brûleur avec un ustensile de cuisson vide ou sans ustensile
de cuisson sur la grille.
44
position LITE
(allumage).
Enfoncer une fois de plus pour passer de LO (faible) à Simmer HI
(mijotage élevé).
entre HI (élevé) et LO
(faible).
En cas de panne
de courant
Tenir une allumette
allumée près d’un brûleur
et tourner le bouton dans
le sens antihoraire à HI
(élevé). Une fois le brûleur
allumé, tourner le bouton
au réglage souhaité.
Page 45

CARACTÉRISTIQUES DE LA TABLE DE CUISSON
A
B
C
Brûleurs de surface scellés
Les brûleurs de surface scellés sont conçus pour réduire les
espaces et joints qui pourraient permettre aux liquides et
éclaboussures d’atteindre l’espace sous la table de cuisson.
Cette conception rend le nettoyage simple et rapide.
Chapeau de brûleur
Brûleurs à air soufflé
superposés
1
2
Brûleur moyen
3
Brûleur de mijotage ou
pour faire fondre
1
2
1
Base du brûleur
2
Douille de
3
réduction (pour
utilisation
avec le brûleur
de moyenne
puissance,
uniquement pour
l’alimentation au
propane)
IMPORTANT : Ne pas entraver l’évacuation de l’air de
combustion et de ventilation autour des bords des grilles de
brûleur.
Chapeau de brûleur : Toujours garder le chapeau de brûleur
en place lorsqu’un brûleur de surface est utilisé. Un chapeau
de brûleur propre aide à empêcher le mauvais allumage et les
flammes irrégulières. Toujours nettoyer le chapeau du brûleur
après un renversement; enlever et nettoyer régulièrement les
chapeaux comme indiqué à la section “Entretien”.
Ouverture de gaz : Pour que le brûleur s’allume
convenablement, le gaz doit pouvoir circuler librement à travers
l’orifice de gaz. Garder cette zone propre et ne pas laisser de
renversements, d’aliments, d’agents de nettoyage ou tout autre
produit pénétrer dans l’ouverture de gaz. Toujours utiliser un
chapeau de brûleur pour protéger l’ouverture de gaz contre tout
renversement.
1 à 1¹⁄2"
1
1
(25 à
38 mm)
Orifices de
2
brûleur
2
Orifices de brûleur :
Examiner occasionnellement les flammes des brûleurs pour en
vérifier la taille et la forme comme indiqué ci-dessus. Une bonne
flamme est bleue plutôt que jaune. Garder cette zone exempte de
souillures et ne pas laisser les produits renversés, les aliments,
les agents de nettoyage ou autre produit pénétrer dans les
orifices de brûleur.
1
2
45
Page 46

B
CARACTÉRISTIQUES DE LA TABLE DE CUISSON
PLAQUE À FRIRE CHROMÉE
(sur certains modèles)
La plaque à frire électrique chromée offre la surface de cuisson
par excellence pour les sandwichs grillés, les crêpes, les œufs,
les hamburgers, les sautés de légume et plusieurs autres plats
préférés de la famille. La surface à faible adhérence de belle
apparence est conçue pour faciliter le nettoyage.
2
1
A
Plateau d’égouttement
1
Plaque à frire
2
Le système de plaque à frire électrique chromée fournit une
surface de cuisson à répartition de chaleur uniforme.
■ Vérifier que la pellicule de plastique a bien été retirée et
que la surface a été lavée à l’eau chaude avant la première
utilisation.
■ Afin d’éviter d’égratigner la plaque à frire, ne pas placer de
casseroles ou de poêles sur la plaque à frire. N’utiliser que
des ustensiles en plastique résistant à la chaleur ou en bois.
■ La surface de la plaque à frire est prête à l’emploi et ne
nécessite pas de préparation.
■ Le fait de verser de l’eau froide sur une plaque à frire chaude
peut déformer la plaque à frire et produire une surface de
cuisson irrégulière.
Utilisation :
1. Placer le plateau d’égouttement.
2. Pousser et
tourner dans
le bouton.
Le témoin lumineux de la plaque à frire s’éteint lorsque le
préchauffage de la plaque à frire est terminé. Le témoin
lumineux de la plaque à frire s’allume et s’éteint durant
l’utilisation pour indiquer que l’élément de la plaque à frire
maintient la température de surface sélectionnée.
3. Mettre les
aliments sur la
plaque à frire
et cuir jusqu’à la cuisson
désirée.
46
Page 47

Gourmet Guides
Setup Menu
My Creations
Auto Convection
Conversion
Most Used Modes:
Home
Mode
Temperature
Convect Bake
Bake
Broil
Probe
Cancel Right
Light
Kitchen Timer
Cancel Left
Cancel Right
Light
Kitchen Timer
Cancel Left
Cancel Right
Light
Kitchen Timer
Cancel Left
Home
Bake
Timer Not Set
Start
Delay Start
-5°
+5°
Back
Regional Settings:
Next
Back
Regional Settings:
Next
Clock style:
Analog
Digital
Back
Regional Settings:
Next
Select clock units:
AM/PM
24-Hour (Military)
Enter Clock Time:
Back
Next
Enter a valid time, the press Next.
Clear
HR:MIN
- - : - -
Select the date:
Back
Next
Select a screen theme to match your style:
Done
Back
UTILISATION DU FOUR
TABLEAU DE COMMANDE
Le tableau de commande regroupe le menu de commande
et les commandes des différentes fonctions. Les touches de
commande sont très sensibles et il suffit d’un léger toucher pour
les activer.
Pour plus d’information sur chaque commande, voir leurs
sections respectives dans ce manuel.
Guide de bienvenue
Ceci apparaît sur l’affichage la première fois que le four est mis
sous tension. Le Guide de bienvenue permet à l’utilisateur de
régler le nouveau four.
1. Choisir la langue.
Welcome! Please Select your language.
English
Bienvenue! Sʼil vous plaît...
Français
2.
Sélectionner
les unités de
température et le
mode éconergique
de jour.
Select temperature degree units:
Fahrenheit Celsius
Daylight-Savings-Time observed:
Yes
No
3. Sélectionner
les unités de
l’horloge.
Select clock units:
AM/PM 24-Hour (Military)
4. Configurer le
style d’horloge.
Clock style:
Analog
Digital
AFFICHAGE
■ Lorsqu’on utilise
le four (alors
au mode actif),
l’affichage indique
l’horloge, le mode,
la température du
four et la minuterie si
elle est réglée. Si la minuterie n’est pas réglée, on peut la
régler à partir de cet écran.
■ Après environ
2 minutes d’inactivité,
l’affichage passe
au mode de veille
et le panneau
Slide to unlock.
lumineux de
l’affichage
s’assombrit. Lorsque
le four fonctionne,
l’affichage reste actif.
■ Pendant la
Faire glisser la barre vers le
haut pour déverrouiller l’écran
et revenir à l’écran d’accueil.
programmation,
l’affichage indique
les menus et
les sélections
200° 250°
300°
appropriées pour leur
fonction de cuisson
respective.
Exemple pour le menu de cuisson
350°
350° 400°
Temperature
Cook Timer
550°
450°
500°
AFFICHEUR TACTILE INTERACTIF
À partir du menu Accueil et du menu Modes, tous les
programmes de cuisson automatiques peuvent être activés; tous
les programmes de cuisson manuels peuvent être programmés;
les réglages peuvent être ajustés et les instructions, les directives
de préparation et les conseils sont accessibles.
5. Entrer l’heure.
6. Sélectionner
Month:
Year:
la date
d’aujourd’hui.
< >January
< >2010
Day:
< >1
1 2 3 4 5
6 7 8 9 0
PMAM
7. Sélectionner
l’apparence
de l’écran.
Dark/BlueDark/Orange
Light/Blue
47
Page 48

00:00
:42
00:00
:42
Gourmet Guides
Probe
My Creations
Auto Convection
Conversion
Most Used Modes:
Home
Convect Bake
Bake
Broil
Keep Warm
Mode
Temperature
Cook Timer
1 2 3 4 5
6 7 8 9 0
Start Timer
HR:MIN:SEC
--:-1:20
Gourmet Guides
Probe
My Creations
Auto Convection
Conversion
Most Used Modes:
Home
Convect Bake
Bake
Broil
Keep Warm
Mode
Temperature
Cook Timer
HR:MIN:SEC
--:--:--
Close
Clear
Gourmet Guides
Probe
My Creations
Auto Convection
Conversion
Most Used Modes:
Home
Convect Bake
Bake
Broil
Keep Warm
Mode
Temperature
Cook Timer
HR:MIN:SEC
--:-1:20
Close
Clear
Gourmet Guides
Probe
My Creations
Auto Convection
Conversion
Most Used Modes:
Home
Convect Bake
Bake
Broil
Keep Warm
Mode
Temperature
Cook Timer
OK
HR:MIN:SEC
00:00:00
12345
67890
Clear
Gourmet Guides
Probe
My Creations
Auto Convection
Conversion
Most Used Modes:
Home
Mode
Temperature
Cook Timer
Convect Bake
Bake
Broil
Keep Warm
Cancel Oven
Light
Setup Menu
Gourmet Guides
Probe
My Creations
Auto Convection
Conversion
Most Used Modes:
Home
Convect Bake
Bake
Broil
Keep Warm
Cancel Oven
Light
Setup Menu
Kitchen Timer
Mode
Temperature
Cook Timer
Start Timer
HR:MIN:SEC
--:--:--
Close
Clear
Gourmet Guides
Probe
My Creations
Auto Convection
Conversion
Most Used Modes:
Home
Convect Bake
Bake
Broil
Keep Warm
Cancel Oven
Light
Setup Menu
Kitchen Timer
Mode
Temperature
Cook Timer
1 2 3 4 5
6 7 8 9 0
Start Timer
HR:MIN:SEC
--:--:--
Close
Gourmet Guides
Probe
My Creations
Auto Convection
Conversion
Most Used Modes:
Home
Convect Bake
Bake
Broil
Keep Warm
Cancel Oven
Light
Setup Menu
Kitchen Timer
Mode
Temperature
Cook Timer
HR:MIN:SEC
00:01:30
12345
67890
Close
Clear
Gourmet Guides
Probe
My Creations
Auto Convection
Conversion
Most Used Modes:
Home
Convect Bake
Bake
Broil
Keep Warm
Cancel Oven
Light
Setup Menu
Kitchen Timer
Mode
Temperature
Cook Timer
1 2 3 4 5
6 7 8 9 0
Start Timer
HR:MIN:SEC
--:--:--
Close
UTILISATION DU FOUR
MINUTERIE DE CUISINE
La minuterie de cuisine est une minuterie indépendante sans lien
avec les minuteries de cuisson.
1. Appuyer sur KITCHEN TIMER
(minuterie de cuisine).
Kitchen Timer
Modèle de 30" et 36" illustrés
2. Entrer la durée
désirée.
1 2 3 4 5
6 7 8 9 0
4. Appuyer sur
START TIMER
(démarrer
minuterie).
Start Timer
Une tonalité retentit lorsque
la minuterie atteint 0 h.
Pour ajouter du temps lorsque la minuterie a expiré :
1. Toucher ADD
MORE TIME
(ajouter du
temps).
2. Saisir le temps,
puis toucher
START TIMER
(démarrer la
minuterie).
Add More Time
Start Timer
Pour modifier la minuterie pendant l’utilisation :
1. Toucher ADJUST
2. Saisir le nouveau
(ajuster).
1 2 3 4 5
6 7 8 9 0
temps, puis
toucher START
TIMER (démarrer
la minuterie).
Adjust
Start Timer
1 2 3 4 5
6 7 8 9 0
3. Toucher CLEAR
(effacer) pour
réinitialiser
l’horloge.
Ceci permet de remettre la
minuterie à (- - : - - : - -).
5. Toucher OK ou
CLEAR (effacer),
Pour quitter pendant l’utilisation de la minuterie
de cuisine :
puis CLOSE
(fermer).
1. Toucher ADJUST
(ajuster).
2. Toucher CLEAR
(effacer), puis
CLOSE (fermer).
Clear
Ceci permet de quitter
l’affichage et de l’effacer.
Clear
Adjust
Close
Clear
48
Page 49

UTILISATION DU FOUR
Gourmet Guides
My Creations
Auto Convection
Conversion
Most Used Modes:
Home
Convect Bake
Bake
Broil
Probe
Mode
Temperature
Cook Timer
Lock Buttons Now
Automatic Lock
Self-clean
Sound Volume
Set Time
Set Date
Back
Setup Menu
On
Button lock:
Cancel
Back
Lock Buttons Now
Self-clean
Sound Volume
Set Time
Set Date
Back
Setup Menu
Off
Button lock:
Cancel
Back
Back
Enter Clock Time:
Enter a valid time, the press Save.
Clear
HR:MIN
10:29
PM
AM
Lock Buttons Now
Automatic Lock
Self-clean
Sound Volume
Set Date
Setup Menu
Back
MENU DE RÉGLAGE
Le four offre la possibilité de commander plusieurs des réglages
par défaut et d’accéder à des informations au moyen de
l’affichage à l’écran.
1. Appuyer sur
SETUP MENU
(menu de
réglage).
Setup Menu
Modèle de 48" illustré
Autonettoyage
Ce réglage est désactivé pendant l’utilisation du four.
Verrouiller boutons maintenant
Cette fonction permet le verrouillage de tous les boutons. Elle est
automatiquement désactivée si la minuterie de cuisine fonctionne
ou si l’on utilise le four.
Pour déverrouiller un bouton ou un écran :
Faire glisser la barre vers le haut.
2. Utiliser les
flèches vers le
haut et le bas.
Permet de voir et d’accéder
aux réglages. Si le four est
en cours d’utilisation, Setup
Menu (menu de réglage) est
désactivé.
Verrouillage automatique
Activation :
1. Appuyer sur AUTOMATIC LOCK
(verrouillage automatique).
Automatic Lock
2. Appuyer sur ON
(marche) et SAVE
(sauvegarder).
Automatically lock after each use
Désactivation :
Appuyer sur OFF (arrêt) et SAVE
(sauvegarder).
On
3. Faire glisser
la barre vers
le haut pour
déverrouiller
Save
Slide to unlock.
pour continuer à utiliser la
commande après avoir réglé
le verrouillage automatique.
Slide to unlock.
Automatically lock after each use
Off
Réglage du temps
1. Appuyer sur
SET TIME (régler le
temps).
Set Time
Save
2. Saisir le
temps, puis
toucher SAVE
(sauvegarder).
1 2 3 4 5
6 7 8 9 0
Save
49
Page 50

Sabbath Mode
Screen Brightness
Screen Appearance
Language
Regional Settings
Back
Setup Menu
Clock Options
Cancel
Back
Sabbath Mode
Screen Brightness
Clock Options
Language
Regional Settings
Setup Menu
Back
Select a screen theme to match your style:
Back
Cancel
Show animations
when cooking:
On
Sabbath Mode
Screen Appearance
Clock Options
Lanuage
Regional Settings
Back
Setup Menu
Select the screen brightness:
Cancel
Back
Lock Buttons Now
Automatic Lock
Self-clean
Set Time
Set Date
Setup Menu
Back
Set the desired volume levels
Cancel
Start-up and
shut down sounds:
Loud
Back
Lock Buttons Now
Automatic Lock
Self-clean
Sound Volume
Set Time
Setup Menu
Back
Select the date:
Back
Cancel
Enter Clock Time:
Save
12345
67890
HR:MIN
09:13
AM
PM
Cancel
Back
UTILISATION DU FOUR
Pour remettre l’horloge à 00:00 :
Appuyer sur CLEAR (effacer).
Réglage de l’heure
1. Appuyer sur SET
2. Saisir la
DATE (régler la
date).
Month:
< >January
Year:
< >2010
Set Date
Régler le volume sonore
1. Appuyer sur
2. Régler les
SOUND VOLUME
(volume sonore).
Clear
date, puis
toucher SAVE
(sauvegarder).
Day:
< >1
sons, puis
toucher SAVE
(sauvegarder).
Régler les options de l’horloge
1. Appuyer sur la
flèche vers le bas,
puis sur CLOCK
OPTIONS (options
d’horloge).
Clock Options
2. Sélectionner
les unités de
temps, puis
toucher SAVE
(sauvegarder).
Select clock units:
AM/PM 24-Hour (Military)
Clock Style:
Analog
Digital
Save
Réglage de l’apparence d’écran
1.
Appuyer sur la
flèche vers le bas,
puis sur SCREEN
Save
APPEARANCE
(apparence
d’écran).
Screen Appearance
2. Sélectionner
l’apparence
de l’écran,
puis appuyer
sur SAVE
(sauvegarder).
Dark/BlueDark/Orange
Light/Blue
Save
Choisir l’apparence d’écran
assortie à l’apparence du four.
Off
Sound Volume
Off
Save
Utiliser la barre de glissement
pour régler la minuterie,
l’alarme ou le volume sonore
lorsqu’on appuie sur un
bouton. Appuyer ensuite sur
ON/OFF (marche/arrêt) pour
alterner entre les réglages
pour les sons de mise en
marche et d’extinction.
Si l’on sélectionne “Marche”, le four émet un son lorsqu’il entre
au mode de veille et lorsqu’il en sort. Lorsqu’il est à “Arrêt”,
aucun son ne retentit.
REMARQUE : Si l’on appuie sur le bouton Cancel (annulation),
les réglages sonores passent au niveau recommandé.
Réglage de la luminosité de l’écran
1.
Appuyer sur la
flèche vers le bas,
puis sur SCREEN
BRIGHTNESS
(
luminosité
d’écran).
2. Régler la
luminosité et
le réglage de
veille d’écran,
puis appuyer
sur SAVE
(sauvegarder).
Dim
Screen Brightness
When the appliance has not been used
for 5 minutes:
Dim the screen
Utiliser la barre de
glissement. Sélectionner
“DIM THE SCREEN”
(Assombrir l’écran) ou
“TURN OFF THE SCREEN”
(Éteindre l’écran) pour choisir
le mode d’utilisation du four
lorsqu’il est en veille pendant
5 minutes.
REMARQUE : Si l’on appuie sur le bouton Cancel (annulation),
la luminosité de l’écran passe au niveau recommandé.
Recommended Bright
Turn off the
screen
Save
50
Page 51

UTILISATION DU FOUR
Sabbath Mode
Screen Appearance
Clock Options
Screen Brightness
Regional Settings
Setup Menu
Back
Back
Select your language:
Cancel
Regional Settings
Screen Appearance
Clock Options
Screen Brightness
Language
Setup Menu
Back
Sabbath Mode:
Back
When the oven is running in Sabbath mode:
-The standard 12-hour shutoff is disabled.
-All prompts, messages, and beeps will be deactivated.
-The set temperature will be displayed, not the actual oven temperature.
-The cavity light will remain in whatever state it is now.
Sabbath Mode:
OK
Sabbath Mode:
Sabbath Mode:
On
Start
Delay Start
< Touch to set
< Touch to set
Sabbath Mode:
Sabbath Mode:
On
Start
Delay Start
< Touch to set
Sabbath Mode
Screen Appearance
Clock Options
Screen Brightness
Language
Setup Menu
Back
Regional Settings:
Back
Cancel
Choisir la langue
1.
Appuyer sur la
flèche vers le
bas, puis sur
LANGUAGE
(
langue).
Language
2. Choisir la langue,
puis appuyer
sur SAVE
(sauvegarder).
English Français
REMARQUE : Toucher le bouton Cancel (annulation) pour
revenir aux réglages par défaut.
Effectuer des réglages régionaux
2.
1. Appuyer sur la
flèche vers le
bas, puis sur
REGIONAL
SETTINGS
(
réglages
régionaux).
Sélectionner
les unités de
température et
le mode
éconergique de
jour, puis toucher
SAVE (sauvegarder).
REMARQUE : Si l’on appuie sur Mode Sabbat alors que la
sonde de cuisson est programmée, le message “Sonde non
insérée” s’affiche. Retirer la sonde de cuisson et appuyer sur
NEXT (suivant) pour entrer dans le mode Sabbat. Appuyer sur
CANCEL (annulation) pour revenir au mode de cuisson au four.
Utilisation du mode Sabbat :
1. Sélectionner SABBATH MODE
(mode Sabbat).
Save
Faire défiler la barre jusqu’à ce que Mode Sabbat apparaisse
et appuyer sur SABBATH MODE (mode Sabbat).
Sabbath Mode
2. Activer le mode Sabbat.
Off
Regional Settings
Mode Sabbat
■ Le mode Sabbat permet au four de continuer à fonctionner
sur un réglage de cuisson au four jusqu’à ce qu’on l’éteigne.
■ Un mode Sabbat minuté peut également être programmé
pour garder le four allumé seulement pendant une partie du
mode Sabbat.
■ Lorsque le mode Sabbat est réglé, seules les touches
numériques et la touche de mise en marche fonctionnent.
■ Aucun signal sonore ne retentit et l’afficheur n’indique pas de
messages et n’affiche pas les changements de température.
■ Les icônes de source de chaleur restent allumées sur
l’affichage du four lors du fonctionnement du mode Sabbat.
■ Lorsque la porte du four est ouverte ou fermée, la lampe
du four ne s’allume ou ne s’éteint pas et les éléments
de chauffage ne s’allument ou ne s’éteignent pas
immédiatement.
■ Si une panne de courant se produit lorsque le mode Sabbat
est programmé, le four restera au mode Sabbat, mais ne
sera plus en mode actif de cuisson. Lorsque l’alimentation
électrique est rétablie, l’affichage indique “SABBATH MODE
- Power outage has occured” (Mode Sabbat – panne de
courant). Appuyer sur CANCEL (annulation) pour revenir à un
mode de fonctionnement normal (pas de mode Sabbat, pas
de cuisson).
■ Le mode Sabbat doit être activé chaque fois qu’il est utilisé.
■ Le mode Sabbat désactive l’arrêt au bout de douze heures.
Toutes les lumières et les affichages sont désactivés de sorte
qu’il n’y a aucune activité visible lorsque l’on ouvre la porte
du four.
Select temperature degree units:
Fahrenheit Celsius
Daylight-Savings-Time observed:
Yes
Lire les instructions à l’écran, puis appuyer sur OFF (arrêt)
pour mettre en marche le mode Sabbat.
No
Save
Sur les cuisinières de 48" (121,9 cm), appuyer sur les boutons
four gauche ou four droit pour choisir le four à régler.
3. Sélectionner le four à régler.
Left Oven
Right Oven
Fours simples :
Appuyer sur COOK SETTINGS
(réglages de cuisson).
Cook Settings
51
Page 52

AVERTISSEMENT
Light
Kitchen Timer
-25°
-25°
00:01:00
350°
Sabbath Bake
LEFT
Back
Select when cooking should begin:
Begin:
11 :10pm
Sabbath Mode:
Left Oven:
Right Oven:
Start
00:01:00
350°
Sabbath Bake
LEFT
Light
Kitchen Timer
-25°
-25°
00:01:00
350°
Sabbath Bake
LEFT
Sabbath Mode - Select oven temperature:
Back
Sabbath Mode - Select cook timer:
Back
Next >
Clear
HR:MIN:SEC
--:--:--
Note:
-In Sabbath Mode,
setting
timer is optional.
- When the timer ends,
the oven cavity will
stop heating.
UTILISATION DU FOUR
4. Sélectionner la température du four
désiré, puis appuyer sur NEXT (suivant).
-5°
200° 250°
300°
350°
350° 400°
Utiliser le curseur pour entrer la température souhaitée ou
appuyer sur les boutons -5°F (-1°C) ou +5°F (+1°C) pour
augmenter ou diminuer la température.
450°
+5°
550°
500°
Next >
5. Selon votre goût, régler la minuterie
de cuisson, puis toucher NEXT
(suivant) (même si aucune minuterie
de cuisson n’est souhaitée.)
1 2 3 4 5
6 7 8 9 0
Sur les cuisinières de 48" (121,9 cm), répéter les étapes 1 à 5
pour régler le deuxième four si désiré.
7. Éteindre le four.
Press Cancel to exit Sabbath mode.
Cancel Left
Appuyer sur CANCEL OVEN (annuler le four) (CANCEL LEFT
[annuler gauche] ou CANCEL RIGHT [annuler droit] sur les
modèles de 48" [121,9 cm]) pour éteindre le four.
Désactivation du mode Sabbat :
Le mode Sabbat se désactive automatiquement à la fin du
temps de cuisson
OU
Appuyer sur CANCEL (annulation).
Press Cancel to exit Sabbath mode.
Cancel Right
Risque d'empoisonnement alimentaire
Ne pas laisser des aliments dans un four plus d'une
heure avant ou après la cuisson.
Le non-respect de cette instruction peut causer un
empoisonnement alimentaire ou une maladie.
6. Régler le temps (optionnel).
Sabbath Mode: Press Start to begin heating.
o
Bake, 350
Touch to set.
Delay Start
-15 min +15 min
12:00 2:001:00 4:003:00 5:00 6:00 7:00 8:00 9:00 10:00 11:00
Set Delay
Toucher DELAY START (mise en marche différée), utiliser la
barre de coulissement, puis appuyer sur SET DELAY (régler la
mise en marche différée). Lorsque l’heure de mise en marche
est atteinte, le four s’allume automatiquement.
Cancel Left
Cancel Right
Pour changer la température :
La température du four peut être modifiée lorsque le four
est en mode Sabbat. Aucun signal sonore ne retentira et
l’affichage ne changera pas.
Toucher -25°F (-14°C) ou +25°F (+14°C).
-25° -25°
Press Cancel to exit Sabbath mode.
Appuyer une fois sur les boutons -25°F (-14°C) ou +25°F
(+14°C) pour chaque modification par tranche de 25°F (14°C)
souhaitée.
REMARQUE : Sur les fours doubles, si les deux fours
fonctionnent au mode Sabbat, les températures de chaque
four peuvent être modifiées indépendamment.
52
Page 53

Calibration de la température
Touchscreen Calibration
Reset All Settings
Service Information
Back
Setup Menu
Next >Cancel
Temperature Calibration
Back
Cancel
Temperature Calibration
Select the temperature off-set:
If oven seems to cool.
If oven seems to hot.
Back
0°
Temperature Calibration
Reset All Settings
Service Information
Back
Setup Menu
Cancel
Touchscreen Calibration
Back
Cancel
1.
Toucher TEMPERATURE CALIBRATION
(calibration de la température).
UTILISATION DU FOUR
2. Appuyer sur NEXT (suivant).
If buttons on the screen are difficult to press accurately, you may need to calibrate the touchscreen.
You will be asked to press and hold three targets to calibrate.
Temperature Calibration
Sur les cuisinières de 48" (121,9 cm) seulement, sélectionner le
four à calibrer en appuyant sur LEFT (gauche) ou RIGHT (droit).
2. Sélectionner le four.
Which oven do you want to calibrate?
Left Right
3. Sélectionner l’écart de température,
puis appuyer sur SAVE (sauvegarder).
-1° +1°
Save
Next
>
3. Choisir les cibles à calibrer.
Cible 1
Cible 2
Cible 3
Lorsqu’on touche, maintient enfoncés, puis relâche
3 différentes cibles à calibrer. Touchez à nouveau les cibles
dans un délai de 10 secondes. Si la calibration échoue, le
processus reprendra à l’étape 2.
Touch & hold center:
Touch & hold center:
Touch & hold center:
Appuyer sur le bouton -1° si le four semble trop chaud ou sur
le bouton +1° si le four semble trop froid. La température du
four peut être réglée de ±35°F.
Calibration de l’écran tactile
IMPORTANT : S’il est difficile d’appuyer sur les boutons à
l’écran, il faudra peut-être calibrer l’écran tactile.
1.
Toucher TOUCHSCREEN CALIBRATION
(calibration de l’écran tactile).
Touchscreen Calibration
4. Vérifier la calibration.
Test calibration by moving the circle around the screen. Ensure you can reach
all the corners.
Try Again
Tester le calibrage en déplaçant le cercle autour de l’écran.
S’assurer de bien atteindre tous les coins. Toucher TRY
AGAIN (essayer de nouveau) pour lancer de nouveau
la calibration ou appuyer sur SAVE (sauvegarder) pour
sauvegarder le réglage.
REMARQUE : Si l’on appuie sur Cancel (annulation), le
calibrage de l’écran tactile est annulé.
Save
53
Page 54

Temperature Calibration
Touchscreen Calibration
Service Information
Setup Menu
Back
Reset all settings to factory defaults?
Back
Temperature Calibration
Touchscreen Calibration
Reset All Settings
Setup Menu
Back
Cancel
Service information:
For help with your product, consult:
- The Use and Care Manual
-ww.JennAir.com/service
- 1-800-Jenn-Air
Back
UTILISATION DU FOUR
Restaurer le paramétrage usine de tous les
réglages
1. Toucher RESET ALL SETTINGS
(réinitialiser tous les réglages).
Reset All Settings
2. Appuyer sur RESET (réinitialiser)
ou CANCEL (annulation).
The following settings will be lost:
- Most used modes
- My Creations
- Date/Time
- Lanuage
The Welcome Guide will appear to help you reset these.
Reset
Si le bouton Reset (réinitialiser) est touché, les réglages
suivants seront perdus : Modes les plus utilisés, Mes
créations, Date/heure, Unités de température et Langue.
Le mode Guide de bienvenue sera à nouveau affiché pour
configurer de nouveau les réglages.
Obtenir les renseignements de service
Cancel
1. Toucher SERVICE INFORMATION
(renseignements de service).
CONNAÎTRE VOTRE FOUR
■ Des odeurs et de la fumée sont normales lorsque le four est
utilisé les premières fois et lorsqu’il est très sale.
■ Lors de l’utilisation du four, les éléments de chauffage ne
sont pas actifs, mais fonctionnent par intermittence lors du
fonctionnement du four.
IMPORTANT : La santé de certains oiseaux est très sensible
aux émanations de fumée. L’exposition aux émanations peut
entraîner la mort de certains oiseaux. Toujours déplacer les
oiseaux dans une autre pièce fermée et bien aérée.
Papier d’aluminium
IMPORTANT : Pour éviter des dommages permanents au fini du
fond du four, ne pas recouvrir le fond avec du papier d’aluminium
ou un revêtement quelconque.
■ Pour obtenir les meilleurs résultats de cuisson, ne pas couvrir
la grille d’aluminium, car l’air doit pouvoir circuler librement.
Positionnement des grilles et des ustensiles de
cuisson au four
IMPORTANT : Afin d’éviter des dommages permanents au fini en
porcelaine, ne pas placer d’aliments ou d’ustensiles de cuisson
au four directement sur la porte ou sur le fond du four.
Grilles
■ Placer les grilles avant d’allumer le four.
■ Ne pas installer les
grilles lorsque des
ustensiles de cuisson
au four se trouvent
dessus.
■ S’assurer que les
grilles sont
horizontales.
5
4
3
2
1
Service Information
2. Sélectionner le réglage du DEMO
MODE (mode Démo), puis appuyer
sur SAVE (sauvegarder).
Store-Aisle Demo Mode
(heating will be disabled)
Choisir ON (marche) ou OFF (arrêt) pour le mode Démo.
IMPORTANT : Destinée au personnel en magasin, cette fonction
permet, avec un raccordement au secteur 120 V, de présenter
les fonctions des commandes sans pour autant activer les
éléments chauffants. Si cette fonction est activée, le four ne
fonctionnera pas.
REMARQUE : Si l’on appuie sur CANCEL (annulation), les
renseignements de service reviennent au réglage effectué
par défaut.
Demo Mode:
Off
Save
Ustensiles de cuisson
L’air chaud doit pouvoir
circuler autour de
l’aliment pour le cuire
uniformément. Laisser
2" (5,0 cm) entre les
ustensiles de cuisson et
les parois du four.
2"
(5 cm)
2"
(5 cm)
54
Page 55

UTILISATION DU FOUR
A
B
C
Grille coulissante déployable
Cette grille coulissante déployable offre un accès facile à
l’utilisateur pour le positionnement et le retrait des aliments.
Elle peut être utilisées sur les positions de grille 1 à 4. La grille
coulissante déployable ne peut être placée en position 5.
Position déployée
1
2
B
Grille coulissante déployable
1
Supports coulissants
2
Position rétractée et emboîtée
2
B
Pour enlever la grille coulissante déployable :
1. Soulever l’avant de la grille/du
support et glisser vers l’intérieur.
La grille doit être rétractée et emboîtée avec le support coulissant.
Avec les 2 mains, soulever le rebord avant de la grille et de
la tablette coulissante en même temps. Pousser lentement
l’ensemble vers le fond du four.
La partie avant de la grille et de la tablette coulissante devrait
s’appuyer sur les guides de grilles situés sur les côtés du four.
L’avant de la grille et du support coulissant doivent se trouver plus
haut que l’arrière.
1
A
A
1
2
Grille coulissante déployable
1
Supports coulissants
2
3
Support coulissant
1
Guide de grille
2
Grille coulissante déployable
3
2. Soulever l’arrière de la grille/tablette.
Avec les 2 mains, soulever l’arrière de la grille et de la tablette
coulissante de façon à ce que l’avant et l’arrière soient
horizontaux sur le support de grille. Sortir.
55
Page 56

UTILISATION DU FOUR
Pour remettre en place la grille coulissante
déployable :
1. Placer sur les guides de grille.
À 2 mains, saisir l’avant de la grille rétractée et le support
coulissant. Placer la grille rétractée et le support coulissant sur
le rail pour grille.
2. Positionner la grille/le support.
Pousser lentement la grille et la tablette coulissante vers
l’arrière du four jusqu’à ce que le rebord arrière de l’étagère
coulissante retombe.
3. Tirer la grille/le support.
CONNAÎTRE VOS GRILLES
■ Afin d’éviter d’endommager les supports coulissants, ne pas
placer plus de 25 lb (11,4 kg) sur la grille.
■ Ne pas nettoyer la grille coulissante déployable au lave-
vaisselle. Ceci pourrait enlever le lubrifiant de la grille et nuire
à ses facultés de glissement.
■ Voir la section “Entretien et nettoyage” pour plus
d’informations.
Thermomètre à viande
Sur les modèles dépourvus d’une sonde thermométrique, utiliser
un thermomètre à viande pour déterminer si la cuisson de la
viande, de la volaille ou du poisson correspond au degré de
cuisson souhaité. C’est la température interne et non l’apparence
qui permet de déterminer le degré de cuisson. Il n’y a pas
de thermomètre à viande fourni avec cet appareil. Suivre les
instructions du fabricant pour l’utilisation du thermomètre à
viande.
Évent du four
Ne pas obstruer ni
couvrir l’évent du four,
car il permet à l’air
chaud et à l’humidité
de s’échapper du four.
Le fait d’obstruer ou de
couvrir l’évent entraîne
une mauvaise circulation
de l’air et affecte les
résultats de cuisson et
de nettoyage. Ne pas
placer près de l’évent
du four des objets en
plastique, en papier ou
susceptibles de fondre ou
de brûler.
A
1
Évent du four
1
Tirer la grille et la tablette coulissante légèrement vers l’avant
jusqu’à ce que le rebord avant retombe et que la tablette
coulissante se trouve sur la glissière de grille.
56
Ventilateur de refroidissement
Le four possède un moteur de ventilateur de refroidissement à
2 vitesses.
Lorsque la température du four atteint 475°F (246°C) ou si le
programme d’autonettoyage est en cours de fonctionnement, le
ventilateur fonctionne à la vitesse maximale pour augmenter le
flux d’air et mieux évacuer l’air plus chaud par les évents du four.
On remarquera peut-être une augmentation du bruit jusqu’à ce
que le four ait refroidi.
Page 57

UTILISATION DU FOUR
Home
Bake
Temperature
Timer Not Set
Delay Start
Light
Kitchen Timer
Adjust cook mode:
Convect Bake
Bake
Convect Roast
Keep Warm
Cvt. Frozen Pizza
Broil
Back
Adjust cook mode:
Back
Gourmet Guides
Probe
My Creations
Auto Convection
Conversion
Most Used Modes:
Home
Temperature
Cook Timer
Convect Bake
Bake
Broil
Keep Warm
Home
Mode
350°
Timer Not Set
StartDelay Start Self-Clean
MODES DE CUISSON
(CUISSON AU FOUR, GRIL, MAINTIEN AU CHAUD, CUISSON
AU FOUR PAR CONVECTION, CUISSON DE PÂTISSERIES
PAR CONVECTION, RÔTISSAGE PAR CONVECTION,
RÔTISSAGE LENT PAR CONVECTION, CUISSON PAR
CONVECTION DE PIZZA SURGELÉE, LEVÉE, LEVÉE RAPIDE)
L’onglet Accueil permet d’accéder facilement aux Modes les plus
utilisés et aux Assistants culinaires.
1. Onglet MODE (mode) tactile.
Mode
2. Sélection de l’option.
Bake
Convect Bake
Keep Warm
Convect Roast
Broil
Cvt. Frozen Pizza
Changer le mode, la température ou le temps de
cuisson pendant l’utilisation du four.
Toucher les onglets appropriés pour
effectuer de nouvelles sélections, puis
appuyer sur OK.
Bake
Convect Bake
Suivre les instructions appropriées au mode sélectionné.
Consulter la section du mode de cuisson désiré pour obtenir
plus de renseignements.
Pour éteindre le four :
Keep Warm
Convect Roast
Exemple
Broil
Cvt. Frozen Pizza
OK
Appuyer sur CANCEL OVEN (annuler four).
3. Saisir la température de cuisson
souhaitée, puis appuyer sur START
(démarrer).
-5°
200° 250°
300°
350°
350° 400°
Exemple de Bake (cuisson au four)
Déplacer le curseur pour saisir la température de cuisson
souhaitée ou appuyer sur les boutons -5°F (-1°C) ou +5°F (+1°C).
REMARQUE : Consulter la section du mode de cuisson désiré
pour obtenir plus de renseignements.
OPTIONS :
Minuterie de cuisson – Consulter la section “Minuterie de
cuisson”.
Mise en marche différée – Consulter la section “Mise en
marche différée”.
450°
+5°
550°
500°
Start
Cancel Left
Cancel Right
Appuyer sur CANCEL LEFT (annuler gauche) ou CANCEL RIGHT
(annuler droit) sur les modèles de four de 48" (121,9 cm).
57
Page 58

A
UTILISATION DU FOUR
PRODUITS DE
BOULANGERIE
Gâteaux Cuisson au four,
cuisson au four par
convection
Biscuits Cuisson au four,
cuisson au four par
convection
MODES
RECOMMANDÉES
POSITIONS DE GRILLE
RECOMMANDÉES CONSEILS
Trois grilles — 1, 3, 5
Deux grilles — 2 et 4
Une grille — 3
Trois grilles — 1, 3, 5
Deux grilles — 2 et 4,
1 et 4 (Cuisson au four par
convection seulement)
Une grille — 3
CUISSON AU FOUR
Le mode de cuisson au four repose principalement sur la chaleur
produite par l’élément de cuisson inférieur du four et la chaleur
radiante provenant de la cavité du four pour créer les conditions
parfaites pour les gâteaux, biscuits, pains éclair, pains à levure,
pains de viande et desserts cuits. Ce mode est idéal pour les
aliments qui doivent être dorés des deux côtés.
Connaître votre mode de cuisson au four
■ Durant la cuisson au
four, les éléments de
chauffage adéquats
et les ventilateurs
s’allument et
s’éteignent par
intermittence afin
de maintenir le
four à température
constante.
■ La cuisson au four
est utilisée pour
C
3
cuire jusqu’à 2 grilles
d’aliments.
Ventilateur de convection
■ Pour de meilleurs
résultats, laisser le
four préchauffer avant
de placer les aliments
1
Élément de convection
2
Élément de cuisson au four
3
dans le four.
■ Si la porte du four est ouverte pendant la cuisson au four, le
brûleur de cuisson au four s’éteint environ 30 secondes après
l’ouverture de la porte. Ils se remettent en marche environ
30 secondes après la fermeture de la porte.
1
A
2
B
CUISSON AU GRIL
Le mode de cuisson au grill utilise une chaleur intense
provenant du dessus pour rapidement cuire les aliments, ce
mode est parfait pour obtenir des surfaces extérieures riches et
savoureuses. Idéal pour le bifteck, le poulet, le porc, le poisson
et les légumes comme les oignons et les poivrons. Ce mode
permet aussi de dorer et de rendre croustillants les desserts et
les dessus de plats en casserole.
Pour des résultats
optimaux lors de la cuisson
d’un gâteau sur 2 grilles,
placer les gâteaux sur les
grilles, tel qu’illustré.
Connaître votre mode de cuisson au gril
REMARQUE : La fonction
n’est pas disponible sur la
cavité du four de gauche
pour les modèles de 48"
(121,9 cm).
■ La cuisson au gril utilise
la chaleur radiante directe
pour cuire les aliments.
■ Le brûleur de cuisson au
gril s’allume et s’éteint
par intermittence pour
maintenir la température
du four.
■ Si la porte du four est ouverte pendant la cuisson au gril,
l’élément de cuisson au gril s’éteint au bout d’environ
30 secondes. Lorsqu’on referme la porte du four, les éléments
se rallument environ 30 secondes plus tard.
■ Pour de meilleurs résultats, utiliser une lèchefrite et une grille.
La grille est conçue pour laisser s’écouler les jus et aider à
éviter les éclaboussures et la fumée.
■ Pour que l’écoulement puisse se faire correctement, ne
pas recouvrir la grille de papier d’aluminium. Le fond de
la lèchefrite peut être garni de papier d’aluminium pour en
faciliter le nettoyage.
■ Enlever l’excès de graisse pour réduire les éclaboussures.
Entailler le gras résiduel sur les côtés pour éviter que la
viande ne se recroqueville.
■ Pendant la cuisson au gril, le changement de température
permet un contrôle plus précis. Réduire la température
permettra aux aliments de cuir plus lentement. Les morceaux
épais et de forme irrégulière de viande, de poisson et de
volaille cuisent mieux à des températures de cuisson au gril
plus basses.
■ Sortir la grille jusqu’à la butée d’arrêt avant de tourner ou
d’enlever les aliments. Utiliser une pince pour tourner les
aliments et éviter la perte de jus. Il est possible qu’il ne soit
pas nécessaire de tourner les coupes très minces de poisson,
de volaille ou de viande.
■ Après une cuisson au gril, retirer du four le plat contenant les
aliments. Les jus de cuisson cuiront sur la lèchefrite si on la
laisse dans le four encore chaud et rendront le nettoyage plus
difficile.
1
Cuisson au gril
1
58
Page 59

UTILISATION DU FOUR
Start
Delay Start
-5°
+5°
Home
Bake
Temperature
Home
Bake
170 °
Cook Timer
Start
Clear
12345
67890
HR:MIN:SEC
--:--:--
Delay Start
Home
Bake
170 °
Cook Timer
Clear
HR:MIN:SEC
--:--:--
Keep Warm:
On
Delay Start
AVERTISSEMENT
Broil
170°
RIGHT
--:--:
--
Preheating to: 170°
Set Timer
Use Left Oven
Back
Adjust cook temperature:
A
Utilisation de la cuisson au gril :
Il n’est pas nécessaire de préchauffer le four avant d’y placer
l’aliment, sauf si la recette le recommande. Placer l’aliment sur la
grille de la lèchefrite, puis placer celle-ci au centre de la grille du
four, avec le côté le plus long de la lèchefrite parallèle à la porte du
four. Continuer avec les étapes de réglage dans la section “Modes
de cuisson”.
Option Keep Warm™ (maintien au chaud)
L’option Keep Warm™ (maintien au chaud) permet de garder les
aliments cuits chauds à une température de service. Elle peut
aussi être utilisée à la fin d’une cuisson minutée.
Risque d'empoisonnement alimentaire
Ne pas laisser des aliments dans un four plus d'une
heure avant ou après la cuisson.
Le non-respect de cette instruction peut causer un
empoisonnement alimentaire ou une maladie.
IMPORTANT : Les aliments doivent être à la température de
service avant d’être placés dans le four chaud. Les aliments
peuvent être gardés au four jusqu’à une heure; toutefois, les
pains et les mets en sauce peuvent devenir trop secs s’ils sont
laissés dans le four alors que la fonction Keep Warm™ (maintien
au chaud) est activée.
Utilisation de la fonction Keep Warm™ (maintien
au chaud) à la fin d’un programme de cuisson :
Pendant le réglage du programme de cuisson :
1. Toucher TIMER NOT SET/COOK TIME
(minuterie du four non réglée/temps
de cuisson).
Timer Not Set
170°
200° 250°
300°
350° 400°
450°
2. Régler KEEP WARM (maintien au
chaud) à ON (marche).
500°
550°
Keep Warm:
On
3. Saisir le temps de cuisson, puis
toucher START (démarrer).
1 2 3 4 5
6 7 8 9 0
Start
Le four entre automatiquement au mode de Keep Warm™
(maintien au chaud) lorsque la minuterie de cuisson s’arrête.
Pour modifier la température du mode de Keep Warm™
(maintien au chaud) pendant le programme :
1. Toucher la température programmée.
2.
Modifier la température et appuyer
sur OK.
-5°
200° 250°
300°
170°
350° 400°
CUISSON PAR CONVECTION
La cuisson par convection
permet de cuire les aliments
de façon plus égale et rapide
qu’un mode de cuisson
traditionnel.
■ Les éléments de
convection sont situés
à l’arrière de la cavité
du four. Ils sont aidés
par des ventilateurs
de convection qui
permettent d’obtenir
une chaleur constante
et égale.
REMARQUE : Sur les
modèles de 48" (121,9 cm),
la cavité du four de gauche
ne possède qu’un ventilateur
de convection et pas
d’élément de convection.
1
2
3
4
+5°
500°
550°
OK
450°
1
Ventilateurs de convection
Élément de cuisson au gril
Élément de convection
Élément de cuisson au four
2
B
C
3
D
4
59
Page 60

UTILISATION DU FOUR
CUISSON AU FOUR PAR CONVECTION
Le mode de cuisson par convection utilise plusieurs éléments
et un ventilateur pour faire circuler l’air chaud dans le four, ce
qui permet de faire cuire des aliments de 10 % à 20 % plus
rapidement qu’avec une méthode traditionnelle. La cuisson par
convection peut être utilisée avec la majorité des aliments, mais
elle donne un résultat exceptionnel avec les biscuits, tartes,
plats de pâtes, plats mijotés, aliments congelés et aliments
prêt-à-servir.
Connaître votre mode de cuisson par convection
■ Lors de la cuisson au four d’un repas comportant différents
types d’aliments, veiller à choisir des recettes nécessitant des
températures semblables. Prévoir un espace d’au moins 1"
(2,5 cm) entre l’ustensile de cuisson et les parois du four.
■ Lors du préchauffage pour la cuisson au four par convection,
les éléments de convection, cuisson au four et au gril
chauffent la cavité du four. Après le préchauffage, les
éléments de convection, de cuisson au four et au gril
ainsi que les ventilateurs fonctionnent par intermittence à
intervalles réguliers pour maintenir la température du four.
■ Si la porte du four est ouverte pendant la cuisson au four
par convection, les ventilateurs s’éteignent immédiatement
lorsque la porte est ouverte et s’allument immédiatement
lorsque la porte est fermée. Les éléments de cuisson
par convection, de cuisson au four et de cuisson au gril
s’éteignent environ 30 secondes après l’ouverture de la porte.
Ils se mettront de nouveau en marche environ 30 secondes
après la fermeture de la porte.
■ Vérifier les aliments au moment indiqué sur l’emballage ou
dans la recette, en choisissant le plus court temps des deux.
Prévoir plus de temps de cuisson lorsque plusieurs grilles
sont utilisées.
■ Choisir des plaques à biscuits sans rebords pour que l’air
puisse circuler librement autour des aliments.
CUISSON DE PÂTISSERIES PAR CONVECTION
Ce mode permet d’obtenir une cuisson progressive qui favorise
au départ la levée de la pâte feuilletée et délicate et qui termine
avec un équilibre idéal de chaleur pour obtenir une surface dorée
parfaite. La température de la recette n’a pas besoin d’être
réduite avec ce mode. Le mode de cuisson de pâtisseries par
convection est idéal pour l’utilisation d’une ou de plusieurs grilles
pour faire cuire des choux à la crème, des chaussons et des
croissants.
RÔTISSAGE PAR CONVECTION
Le mode de rôtissage par convection utilise plusieurs éléments
et un ventilateur pour faire circuler l’air chaud dans la cavité.
La circulation d’air permet de faire caraméliser la surface des
aliments et d’en améliorer la saveur tout en conservant l’intérieur
tendre et juteux. Le rôtissage par convection est parfait pour rôtir
les viandes, le poulet, le poisson à chair ferme et les légumes.
La distribution égale et constante de chaleur réduit le temps
de cuisson d’environ 25 % par rapport à un mode de cuisson
traditionnel. La température de la recette n’a pas besoin d’être
réduite avec ce mode.
Connaître votre mode de rôtissage par convection
■ Si la porte du four est ouverte pendant le rôtissage par
convection, les ventilateurs s’éteignent immédiatement
lorsqu’on ouvre la porte et se rallument dès qu’on la referme.
Les éléments de cuisson au four, de cuisson au gril et de
cuisson par convection s’éteignent environ 30 secondes
après l’ouverture de la porte. Ils se mettront de nouveau en
marche environ 30 secondes après la fermeture de la porte.
■ La durée de cuisson doit être réduite de 15 à 30 %. Il n’est
pas nécessaire de réduire la température du four.
■ Pour des résultats optimaux, utiliser la lèchefrite, la grille de
lèchefrite et la grille de rôtissage conçues pour la récupération
des jus de cuisson et qui aident à éviter les éclaboussures et
la fumée.
Avant d’utiliser le rôtissage par convection :
■ Il n’est pas nécessaire de préchauffer le four avant d’y placer
l’aliment, sauf si la recette le recommande.
■ Utiliser la grille de rôtissage au-dessus de la lèchefrite et de
sa grille. Ce positionnement garde l’aliment au-dessus de la
grille et permet la libre circulation de l’air autour de toutes les
surfaces.
RÔTISSAGE LENT PAR CONVECTION
Le mode de rôtissage lent par convection utilise une température
basse pour aider à conserver l’humidité et un temps de cuisson
plus long pour permettre d’obtenir une viande plus tendre. Le
rôtissage lent par convection est très efficace pour les pièces de
viande de taille moyenne à grande, le poulet, le porc, ainsi que les
pièces de viande moins tendres. Les aliments peuvent être cuits
pendant une durée maximale de 12 heures. La température de la
recette n’a pas besoin d’être réduite avec ce mode.
Connaître votre mode de rôtissage lent par
convection
60
■ Les aliments doivent être complètement décongelés.
■ Couvrir les aliments pour qu’ils restent tendres.
■ Avant un rôtissage lent, on peut saisir la viande dans une
poêle ou la saisir au gril des deux côtés jusqu’à ce qu’elle
soit dorée, pour en améliorer le goût et la tendreté.
Page 61

UTILISATION DU FOUR
Gourmet Guides
Probe
My Creations
Auto Convection
Conversion
Most Used Modes:
Home
Temperature
Cook Timer
Convect Bake
Bake
Broil
Keep Warm
Convect Slow
Roast
Rapid Proof
Convect Pastry
Start
Home
Mode
325°
Time Not Set
Self-Clean
Delay Start
Home
Temperature
Delay Start
Proof
100°
The oven controls temperature in proofing modes.
CUISSON PAR CONVECTION DE PIZZA
SURGELÉE
La cuisson par convection de pizza surgelée est utilisée pour
la cuisson au four de pizzas surgelées à croûte épaisse ou fine.
Durant la cuisson par convection de pizza surgelée, les éléments
de cuisson par convection et de cuisson au four s’allument et
s’éteignent par intermittence à intervalles réguliers pour maintenir
la température du four. Les ventilateurs de convection restent
continuellement actifs pour faire circuler l’air chaud autour de la
pizza.
Connaître votre mode de pizza surgelée par
convection
■ Si la porte du four est ouverte durant la cuisson par
convection de pizza surgelée, les ventilateurs s’éteignent
immédiatement. Ils se rallument dès que l’on referme la
porte. Les éléments de cuisson au four, de cuisson au gril et
de cuisson par convection s’éteignent environ 30 secondes
après la fermeture de la porte.
■ La température de cuisson au four doit être réduite de
25°F (14°C) par rapport à la température recommandée sur
l’emballage.
■ La durée de cuisson au four peut être légèrement inférieure
à celle qui est indiquée sur l’emballage, selon la pizza.
■ On peut utiliser une pierre à pizza avec le mode de cuisson
par convection de pizza surgelée.
■ Utilisation de la cuisson par convection de pizza surgelée
avec cuisson au four sur 1 grille.
■ Laisser le four préchauffer complètement avant de placer la
pizza dans le four.
LEVÉE
Le programme de levée du pain prépare la pâte pour la cuisson
au four en activant la levure. Suivre les directives de la recette ou
de l’emballage pour savoir le nombre de fois que la pâte doit être
levée.
Avant d’utiliser le mode levé :
1. Placer la pâte dans un bol légèrement graissé. Placer
le bol sur la grille en position 3.
2. Placer les aliments dans le four et fermer la porte.
Utilisation de la levée :
1. Toucher MODE (mode).
Mode
2. Appuyer sur la flèche vers le bas,
puis sur PROOF (levée).
Proof
3. Toucher START (démarrer) ou TIMER
NOT SET (minuterie non réglée), puis
START (démarrer).
Time Not Set
Connaître votre mode de levée
■ La température est réglée à 100°F (38°C) et ne peut être
modifiée.
■ Le mode levée peut être utilisé même si la température est
supérieure à celle préréglée pour ce mode.
Start
La fonction minuterie non réglée règle un temps de cuisson.
Consulter la section “Minuterie de cuisson”.
Préparer de la pâte avant la seconde levée :
Préparer la pâte, la placer dans un moule, ajouter de l’enduit
à cuisson antiadhésif, puis recouvrir sans serrer. Reprendre
le même positionnement et suivre les étapes de commande
mentionnées ci-dessus. Avant la cuisson au four, retirer la
pellicule protectrice.
61
Page 62

Convect Slow
Roast
Proof
Convect Pastry
Start
Home
Mode
Self-Clean
Delay Start
325°
Timer Not Set
Home
Temperature
Delay Start
Rapid Proof
200°
The oven controls temperature in proofing modes.
Gourmet Guides
Probe
My Creations
Auto Convection
Conversion
Most Used Modes:
Home
Mode
Temperature
Cook Timer
Convect Bake
Bake
Broil
Keep Warm
Light
Setup Menu
Kitchen Timer
Cooking complete.
UTILISATION DU FOUR
LEVÉE RAPIDE
Le mode Levée rapide est utilisé pour la levée des pâtes
surgelées. Le mode Levée rapide nécessite que le four soit
préchauffé, puis que cette fonction soit annulée.
Connaître votre mode de levée rapide
4. Faire lever pendant 10 minutes,
puis appuyer sur CANCEL (annuler).
■ La température est réglée à 200°F (93°C) et ne peut pas être
modifiée.
■ Le mode Levée rapide peut être utilisé même si la
température est supérieure à celle préréglée pour ce mode.
Avant d’utiliser le mode levé rapide :
1. Placer la pâte surgelée dans un bol légèrement graissé.
Couvrir le bol d’un tissu humide. Placer le bol sur la grille
en position 3.
2. Placer les aliments dans le four et fermer la porte.
Utilisation de Levée rapide :
1. Toucher MODE (mode).
2. Appuyer sur RAPID PROOF (levée
rapide).
Rapid Proof
Keep Warm
Rapid Proof
Off
Exit Timer
Add More Time
Cancel Oven
IMPORTANT : Le fait de ne pas appuyer sur CANCEL (annuler)
après 10 minutes pourrait faire brûler ou sécher la pâte.
5. Laisser la pâte dans le four jusqu’à ce
que la hauteur souhaitée soit atteinte.
6. Retirer la pâte du four.
7. Préchauffer le four comme le demande
la recette.
8. Placer la pâte dans le four une fois
la température désirée atteinte.
3. Toucher START (démarrer) ou TIMER
NOT SET (minuterie non réglée), puis
START (démarrer).
La fonction minuterie non réglée règle un temps de cuisson.
Consulter la section “Minuterie de cuisson”.
62
Timer Not Set
Start
Page 63

Gourmet Guides
Probe
Auto Convection
Conversion
Most Used Modes:
Home
Mode
Temperature
Cook Timer
Convect Bake
Bake
Broil
Keep Warm
Back
My Creations
Start
Home
Edit
Delete
Select the desired cooking mode:
Back
Home
MODES SPÉCIAUX
Select the desired cooking temperature:
Back
Home
Back
Select how to monitor cooking:
Home
Enter cook timer length:
Back
Home
Clear
HR:MIN
- - : - -
Select the probe target internal temperature:
Back
Home
Next >
Range: 130-185˚
160˚
Fresh Beef, Veal, Lamb
Medium Rare
Medium
Well Done
Whole
Breast
Medium
Well-Done
Ham, Precooked
Chicken, Turkey
Pork
135˚
150˚
160˚
180˚
170˚
150˚
160˚
140˚
Review your settings:
Back
Home
Save
Bake 350° 160 °
Optional
Optional
Edit
Delete
Add Stage
Add Stage
Review your settings:
Back
Home
Save
Bake 350° 16 0°
Optional
Optional
Edit
Delete
Add Stage
Add Stage
MES CRÉATIONS
Mes créations permet de personnaliser les processus de
cuisson. Lorsque l’on sélectionne Mes créations à partir du
menu principal, une liste des recettes existantes apparaît et
la possibilité d’en créer d’autres est offerte.
REMARQUE : S’il s’agit d’un four double, sélectionner d’abord
le four.
UTILISATION DU FOUR
5. Sélectionner le mode de surveillance
de la cuisson, puis toucher NEXT
(suivant).
Timer
Alerts you when a cook timer is complete
Alerts you when a target probe temperature is reached
Probe
None Non Alerts
Next >
1. Toucher MY CREATIONS
(mes créations).
My Creations
2. Appuyer sur CREATE NEW (créer
nouvelle).
Save frequent recipe settings for easy access in the future!
You may also link multiple modes together. For example, create a favorite
lasagna recipe which bakes for 40 minutes, then broils 5 minutes at the end to
brown the cheese.
Create New
3.
Sélectionner le mode de cuisson
désiré, puis appuyer sur NEXT (suivant).
Bake
Convect Bake
Keep Warm
Convect Roast
Broil
Cvt. Frozen Pizza
Si la minuterie est sélectionnée :
6. Saisir le temps de cuisson, puis
toucher NEXT (suivant).
1 2 3 4 5
6 7 8 9 0
Next >
7. Appuyer sur SAVE & START
(sauvegarder et démarrer).
Save & Start
Si la sonde est sélectionnée :
8. Sélectionner la température internet
de la sonde.
4. Saisir la température de cuisson
souhaitée, puis appuyer sur NEXT
(suivant).
200° 250°
Next >
-5˚ +5˚
9. Saisir la nouvelle information
-5°
350°
350° 400°
300°
450°
+5°
550°
500°
Next >
d’étape, puis toucher SAVE & START
(sauvegarder et démarrer).
Save & Start
Appuyer sur ADD STAGE (ajouter une étape). Appuyer sur la
touche EDIT (modifier) située près d’une étape pour modifier
les réglages, au besoin. Appuyer sur DELETE (supprimer)
pour immédiatement supprimer l’étape. Appuyer sur SAVE &
START (sauvegarder et démarrer) pour sauvegarder l’étape.
63
Page 64

Back
Name the creation:
Clear All
40
-
space
Gourmet Guides
Probe
Auto Convection
Conversion
Most Used Modes:
Home
Mode
Temperature
Cook Timer
Convect Bake
Bake
Broil
Keep Warm
My Creations - Touch to select food
Back
Home
Save
Edit
Create New
Delete
Review your settings:
Back
Home
Start
Cancel
Bake 350° 16 0°
Optional
Optional
Delete
Add Stage
Add Stage
UTILISATION DU FOUR
Gourmet Guides
Probe
My Creations
Most Used Modes:
Home
Convect Bake
Bake
Broil
Keep Warm
Mode
Temperature
Cook Timer
Select an Automatic Convection Conversion mode:
Manual
View all manual modes to skip the recipe update process
Back
Home
Select standard cooking temperature in your recipe:
Next >
Back
Home
10. Saisir le nom de l’aliment, puis
toucher OK.
ABC DEF GHI JKL
MNO PQRS TUV WXYZ 0-9
Appuyer plusieurs fois sur une touche de clavier pour alterner
entre les lettres. Par exemple, appuyer une fois sur “ABC”
pour entrer “a,” deux fois pour entrer “b” et trois fois pour
entrer “c.” Après 2 secondes, la lettre est acceptée et le
curseur se place à la position suivante. Un nom ne peut
pas dépasser 40 caractères, espaces compris. Appuyer sur
DELETE (effacer) pour effacer la dernière lettre de la zone
de texte.
Pour modifier après avoir sauvegardé les
1. Toucher MY CREATIONS (mes
créations).
Delete
<
OK
CONVERSION AUTOMATIQUE POUR
CONVECTION
Les températures ou durées de convection sont différentes
de celles d’une cuisson traditionnelle. Le four peut réduire
automatiquement la température normale de la recette ou la
durée de cuisson par convection.
En sélectionnant la conversion automatique pour convection,
on peut sélectionner une catégorie puis entrer une température
et une durée en fonction de la recette ou des instructions de
l’emballage. Le four convertit la durée ou la température entrée.
La conversion peut ne pas être exacte, car les aliments sont
regroupés en catégories générales.
Utilisation de la conversion automatique pour
convection :
1. Appuyer sur AUTO CONVECTION
CONVERSION (conversion
automatique pour convection).
Auto Convection
Conversion
My Creations
2. Sélectionner le nom de réglage
à modifier.
Chocolate Cake
Faire défiler pour trouver le nom, au besoin. Toucher EDIT
(modifier).
3. Sélectionner les étapes à modifier.
Edit
Toucher EDIT (modifier) pour chaque étape souhaitée, puis
suivre les instructions. Une fois terminé, appuyer sur SAVE
& START (sauvegarder et démarrer) ou toucher simplement
SAVE (sauvegarder) pour effectuer la sauvegarde sans
démarrer le programme.
2. Sélectionner le mode de conversion
de recette.
This process will automatically update your standard recipe for convection cooking.
Convect Bake Convect Roast Convect Pastry
3. Saisir la température de cuisson
souhaitée, puis appuyer sur NEXT
(suivant).
-5°
200° 250°
300°
350°
350° 400°
Appuyer sur une touche ou utiliser la barre de coulissement.
450°
+5°
550°
500°
64
Page 65

Clear
HR:MIN:SEC
--:--:--
Enter standard cooking time in your recipe:
Back
Home
4. Saisir un temps de cuisson normal.
Press Start to use these converted settings:
Reminds you to check food when 20% of the timer remains.
Mode:
Convect Pastry
Cook Timer:
Not Set
Temperature:
300°
Back
Home
On
Delay Start
Select an Automatic Convection Conversion mode:
Convect Bake
Convect Roast
Convect Pastry
View all manual modes to skip the recipe update process
Back
Home
Home
Mode
350°
Timer Not Set
Convect Bake
Bake
Convect Roast
Keep Warm
Cvt. Frozen Pizza
Broil
Delay Start
Self-Clean
Broil
170°
RIGHT
--:--:
--
Preheating to: 350°
Use Left Oven
Gourmet Guides
Probe
My Creations
Auto Convection
Conversion
Most Used Modes:
Home
Mode
Temperature
Convect Bake
Bake
Broil
Keep Warm
Home
Clear
HR:MIN:SEC
--:--:--
Rapid Proof
200
o
1 2 3 4 5
6 7 8 9 0
Skip Timer
Next >
Appuyer sur NEXT (suivant) ou SKIP TIMER (passer la
minuterie).
5. Choisir le réglage de rappel.
Reminder:
Start
Alterner entre marche et arrêt. Appuyer ensuite sur START
(démarrer). Ce réglage rappelle à l’utilisateur de vérifier
l’aliment lorsqu’il reste 20 % du temps de la minuterie. Si
l’utilisateur choisit Passer la minuterie, il passe en revue
les réglages convertis et peut régler REMINDER (rappel) et
DELAY START (mise en marche différée). Lorsque le signal de
préchauffage se fait entendre, placer les aliments dans le four
et fermer la porte.
Pour manuelle :
1. Toucher MANUAL (manuelle).
UTILISATION DU FOUR
MINUTERIE DE CUISSON
La Minuterie de cuisson permet au four de réaliser une cuisson
pendant une durée préréglée. On peut accéder à la minuterie de
cuisson en appuyant sur COOK TIMER (minuterie de cuisson) ou
TIMER NOT SET (minuterie non réglée) selon que ces fonctions
sont disponibles ou non.
Connaître votre minuterie de cuisson
On peut lancer le compte à rebours de la minuterie de plusieurs
façons :
■ Le fait d’appuyer sur START TIMER (démarrer la minuterie)
démarre immédiatement le compte à rebours.
■ Si l’on ouvre puis referme la porte avant la fin du
préchauffage, la minuterie démarre dès la fin du
préchauffage.
■ Si l’on ouvre puis referme la porte lorsque le préchauffage est
terminé, le compte à rebours démarre immédiatement.
■ Si aucune des actions mentionnées ci-dessus ne s’est
produite, le compte à rebours de la minuterie de cuisson
démarre automatiquement 2 minutes après le signal sonore
de préchauffage.
■ Le temps de cuisson ne peut être réglé pour le rôtissage lent
par convection.
REMARQUE : La commande signale à l’utilisateur lorsqu’il reste
20 % du temps de cuisson.
Utilisation de la minuterie de cuisson :
1. Appuyer sur COOK TIMER
(minuterie de cuisson).
Cook Timer
This process will automatically update your standard recipe for convection cooking.
Manual
2. Appuyer sur MODE (mode), puis sur
START (démarrer).
Start
3. (Optionnel) Toucher SET TIMER
(régler la minuterie )pour saisir
un temps de cuisson, puis OK.
Set Timer
2. Sélectionner le temps de cuisson
désiré, puis toucher START (démarrer).
Cook Timer
1 2 3 4 5
6 7 8 9 0
Delay Start Start
65
Page 66

Use Left Oven
Preheating to 350°
170°
00:00:10
Bake
RIGHT
Back
Clear
HR:MIN:SEC
00:00:00
Adjust cook timer:
Cancel Timer
Use Left Oven
Keep Warm
Cooking Complete.
Restart Oven
Off
Bake
RIGHT
UTILISATION DU FOUR
Use Left Oven
Keep Warm
Cooking Complete.
Off
Add More Time
Bake
RIGHT
3. Appuyer sur START TIMER
(démarrer minuterie).
Start Timer
Lorsque le signal de préchauffage se fait entendre, placer
les aliments dans le four et fermer la porte. Si une mise en
marche différée est programmée, placer les aliments dans le
four au moment du réglage du mode.
AVERTISSEMENT
Risque d'empoisonnement alimentaire
Ne pas laisser des aliments dans un four plus d'une
heure avant ou après la cuisson.
Le non-respect de cette instruction peut causer un
empoisonnement alimentaire ou une maladie.
REMARQUE : Ne pas utiliser la mise en marche différée pour
des aliments nécessitant le préchauffage du four, comme les
gâteaux, les biscuits et le pain. Si l’on place les aliments dans le
four durant le préchauffage, ils pourraient être trop cuits.
Lorsque la minuterie de cuisson est terminée, au
besoin :
4. Sélectionner ADD MORE TIME
(ajouter du temps).
Pour remettre à zéro le temps déjà saisi :
5. Toucher RESTART FOR (redémarrer
pour).
Restart For
Ceci ajoutera le même nombre de temps qui a déjà été ajouté.
SONDE THERMOMÉTRIQUE
La sonde thermométrique mesure précisément la température
interne de la viande, de la volaille et des mets en sauce et doit
être utilisée pour déterminer le degré de cuisson des aliments.
Elle peut être utilisée durant la cuisson au four, la cuisson au four
par convection et le rôtissage par convection. Le four émet une
tonalité lorsque les aliments atteignent la température cible.
Connaître votre sonde thermométrique
■ Toujours débrancher et retirer la sonde thermométrique du
four lorsqu’on retire les aliments.
■ La prise de sonde thermométrique n’est pas disponible sur la
cavité du four de gauche pour les modèles de 48" (121,9 cm).
Avant d’utiliser la sonde thermométrique :
■ Retirer les grilles non utilisées situées au-dessus des
aliments.
■ Insérer la sonde à l’intérieur de l’aliment. Pour les viandes,
l’extrémité de la sonde doit se trouver au centre de la partie
la plus épaisse de la viande et non dans le gras ou au contact
d’un os.
■ Placer les aliments dans le four et connecter la sonde
thermométrique à la prise.
■ Maintenir la sonde aussi loin que possible de la source
de chaleur. Fermer la porte du four.
Add More Time
1 2 3 4 5
6 7 8 9 0
Add 1 Min
OK
Saisir la durée à l’aide des touches numériques ou appuyer
sur ADD 1 MIN (ajouter 1 minute) pour augmenter le temps de
cuisson par coups de 1 minute. Appuyer sur OK.
66
Page 67

Gourmet Guides
My Creations
Auto Convection
Conversion
Most Used Modes:
Home
Mode
Temperature
Cook Timer
Convect Bake
Bake
Broil
Keep Warm
Back
Home
Cooking with a probe:
Probe: Not Inserted
Tip: Insert food and probe BEFORE heating the oven.
Recommended manual cook modes:
Home
Convect Bake
325°
Cancel Probe
Delay Start
Cancel Probe
Delay Start
Home
Convect Roast
160°
Home
Convect Roast
160°
Delay Start
-5°
+5°
UTILISATION DU FOUR
Home
Clear
Keep Warm
Off
1 2 3 4 5
6 7 8 9 0
HR:MIN:SEC
--:--:--
Bake
350
o
Start
Select when cooking should begin:
Begin:
3:10pm
When no timer is set, the oven will automatically turn off after
cooking for 12 hours.
Back
Utilisation de la sonde thermométrique :
1. Toucher PROBE
(sonde).
2. Appuyer sur
CONVECT BAKE
(cuisson au four
par convection),
CONVECT ROAST
(rôtissage par
convection) ou
BAKE (cuisson
au four).
Convect Bake
Probe
Pour régler la température de la sonde, au besoin :
3. Toucher -5°F
4. Saisir la
(-1°C) ou +5°F
(+1°C), puis
START (démarrer).
Convect Roast Bake
température de
cuisson souhaitée,
puis appuyer sur
START (démarrer).
Probe Temp
Fresh Beef, Veal, Lamb Medium Rare 135
Medium 150°
Well-Done 160°
160°
Range: 130-185°
Chicken, Turkey Whole 180°
Breast 170°
-5°
+5°
Pork Medium 150°
Well-Done 160°
Ham, Precooked 140°
Toucher ensuite l’onglet de
température.
°
200° 250°
Start
Appuyer sur les touches
ou utiliser la barre de
coulissement.
Pour annuler la température de la sonde tout en
conservant le mode et la température de cavité
actuels :
Temperature
-5°
350°
350° 400°
300°
+5°
550°
450°
500°
Start
MISE EN MARCHE DIFFÉRÉE
AVERTISSEMENT
Risque d'empoisonnement alimentaire
Ne pas laisser des aliments dans un four plus d'une
heure avant ou après la cuisson.
Le non-respect de cette instruction peut causer un
empoisonnement alimentaire ou une maladie.
La mise en marche différée permet aux fours d’être programmés
pour se mettre en marche à une certaine heure et de cuire
pendant une certaine durée.
La mise en marche différée ne doit pas être utilisée pour les
aliments tels que pains et gâteaux, car ils risquent de ne pas bien
cuire.
La mise en marche différée est disponible avec n’importe quel
programme équipé d’un bouton de mise en marche différée.
Pour régler une mise en marche différée :
1. Appuyer sur
DELAY START
(mise en marche
différée).
Delay Start
2. Saisir l’heure
de départ
souhaitée, puis
toucher SET
DELAY (mise en
marche différée).
Cook Timer
-15 min +15 min
4:00 6:005:00 8:007:00 9:00 10:00 12:00 11:00 1:00 2:00 3:00
Appuyer sur la touche
ou utiliser la barre de
coulissement.
Set Delay
5. Toucher CANCEL PROBE (annuler
sonde) et START (démarrer).
200° 250°
300°
Temperature
350°
350° 400°
Cancel Probe
450°
500°
550°
Start
67
Page 68

Home
Clear
Keep Warm
Off
HR:MIN:SEC
00:00:19
Bake
350
o
Start
Select when cooking should begin:
Begin:
3:10 pm
End:
3:15 pm
The oven will automatically keep the food warm after cooking for:
00:00:19
Back
Back
Convect Bake
325
o
-5o-5
o
Range: 130-185
o
Pork Medium 150
o
Well-Done 160
o
Ham, Precooked 140
o
Chicken, Turkey Whole 180
o
Breast 170
o
Fresh Beef, Veal, Lamb Medium Rare 135
o
Medium 15 0
o
Well-Done 160
o
Cancel Probe
Start
160
o
Select when cooking should begin:
Begin:
3:32pm
The oven will automatically keep the food warm when the probe
reaches the target temperature.
Back
UTILISATION DU FOUR
Cooking will start at:
1:30
Home
Clear
Keep Warm
Off
HR:MIN:SEC
00:00:19
Bake
350
o
Delay Start
Gourmet Guides
Probe
My Creations
Auto Convection
Conversion
Most Used Modes:
Home
Mode
Temperature
Convect Bake
Bake
Broil
Keep Warm
Mise en marche différée avec minuterie de
cuisson :
1. Sélectionner TIMER NOT SET
(minuterie non réglée) ou COOK
TIMER (minuterie de cuisson).
Cook Timer
2. Sélectionner le temps de cuisson
désiré, puis toucher DELAY START
(mise en marche différée).
Cook Timer
1 2 3 4 5
6 7 8 9 0
Delay Start
3. Saisir les heures de départ et de fin
souhaitées, puis toucher SET DELAY
(mise en marche différée).
Mise en marche différée avec sonde :
Après avoir sélectionné le mode de cuisson :
1. Appuyer sur DELAY START (mise en
marche différée).
Probe Temp
Delay Start
2. Saisir l’heure de départ souhaitée,
puis toucher SET DELAY (mise en
marche différée).
-15 min +15 min
4:00 6:005:00 8:007:00 9:00 10:00 12:00 11:00 1:00 2:00 3:00
Set Delay
Appuyer sur les touches 15 minutes ou utiliser la barre de
glissement. Le four conserve automatiquement les aliments
au chaud une fois que la sonde a atteint la température cible.
Pour annuler la mise en marche différée seulement :
-15 min +15 min
4:00 6:00 8:00 10:00 12:00 2:00 4:00 6:00
Set Delay
Appuyer sur les touches 15 minutes ou utiliser la barre de
glissement. La différence entre l’heure de début et l’heure de
fin devrait être égale à la durée de cuisson.
1. Appuyer sur CANCEL DELAY (annuler
différer).
Cancel Delay
2. Saisir le temps de cuisson, puis
toucher START (démarrer).
Cook Timer
1 2 3 4 5
6 7 8 9 0
Start
REMARQUE : Pour annuler le programme de cuisson, et retarder
le départ, toucher CANCEL OVEN (annuler le four).
68
Page 69

ENTRETIEN ET NETTOYAGE
IMPORTANT :
■ Avant le nettoyage, s’assurer que toutes les commandes
sont éteintes et que le four et la table de cuisson sont
froids. Ne pas utiliser de nettoyants à four, d’agent de
blanchiment ou de décapants à rouille.
■ L’usage de savon, d’eau et d’un chiffon doux ou d’une
éponge est suggéré en priorité, sauf indication contraire.
SURFACE DE LA TABLE DE
CUISSON
Après chaque utilisation :
1. Essuyer la table de cuisson, les grilles
et les chapeaux.
3. Nettoyer les orifices de brûleur
obstrués.
Utiliser une épingle droite. Ne pas agrandir ni déformer l’orifice.
Ne pas utiliser un cure-dents en bois. Si le brûleur a besoin
d’être ajusté, contacter un technicien de réparation qualifié.
4. Réinstaller le chapeau de brûleur.
Brûleurs à air soufflé superposés
2. Nettoyer les aliments renversés.
Pour protéger le fini, nettoyer les aliments renversés qui
contiennent des acides, comme le vinaigre et les tomates,
dès que l’appareil est refroidi.
BRÛLEURS DE SURFACE
SCELLÉS
1. Retirer le chapeau et la base du
brûleur.
1
2
Brûleur moyen
1
2
Brûleur de mijotage ou pour faire fondre
1
2
Vous assurer que les tiges sont bien alignées avec le chapeau
de brûleur.
Incorrect
1
Correct
2
Incorrect
1
Correct
2
Incorrect
1
Correct
2
2. Nettoyer l’ouverture de gaz avec un
chiffon humide.
5. Allumer le brûleur.
Si le brûleur ne s’allume pas, vérifier l’alignement du chapeau.
Si le brûleur ne s’allume toujours pas, ne pas réparer vousmême le brûleur scellé. Contacter un technicien de réparation
qualifié.
69
Page 70

ENTRETIEN ET NETTOYAGE
GRILLES ET CHAPEAUX
ÉMAILLÉS
Utiliser un tampon à récurer et un
détergent.
Nettoyer à l’aide d’outils de récurage en nylon non abrasif et
nettoyant légèrement abrasif :
Connaître vos grilles et chapeaux.
■ Les renversements d’aliments contenant des produits acides,
tels que vinaigre et tomates, doivent être nettoyés dès que la
table de cuisson, les grilles et les chapeaux ont refroidi. Ces
salissures peuvent endommager le fini.
■ Pour éviter l’écaillement, ne pas entrechoquer les grilles et les
chapeaux ni les frapper contre des surfaces dures telles que
les ustensiles en fonte.
■ Ne pas réinstaller les chapeaux sur les brûleurs lorsqu’ils sont
mouillés.
■ Ne pas utiliser le programme d’autonettoyage pour les
nettoyer.
■ Ne pas nettoyer au lave-vaisselle.
Après chaque utilisation :
1. Faire chauffer pendant 10 à
15 minutes à 300°F (149°C).
2. Mouiller la zone sale.
À l’aide d’une tasse à mesurer, ajouter 1 tasse d’eau du
robinet sur la zone souillée. Commercer par l’arrière pour
permettre à l’eau de couler vers le plateau d’égouttement
situé à l’avant. Permettre à l’eau de faire des bulles sur la
plaque pendant 3 à 4 secondes.
PLAQUE À FRIRE
Astuces :
■ Avant de nettoyer la plaque à frire, vérifier que les brûleurs de
la table de cuisson sont éteints et que les commandes du four
ont été verrouillées.
■ Pour obtenir de bons résultats, nettoyer la plaque à frire peu
de temps après avoir retiré les aliments.
Ne pas utiliser :
■ Savon
■ Matériaux abrasifs
■ Matériaux de nettoyage, incluant les tampons en acier
inoxydable.
3. Gratter les résidus dans le plateau
d’égouttement.
Utiliser un porte-tampon à récurer ou une cuillère en bois et
un tampon à récurer antiégratignures. Appliquer une pression
sur les zones souillées. Répéter au besoin pour les zones très
sales.
4. Retirer les résidus restants.
Plier un chiffon humide, et à l’aide du porte-tampon à récurer
ou de la cuillère de bois, passer sur la plaque à frire pour
enlever les résidus restants.
70
Page 71

ENTRETIEN ET NETTOYAGE
5. Éteindre la plaque et la laisser refroidir.
6. Essuyer la plaque à frire.
Une fois refroidie, essuyer la plaque à frire avec un linge
en ratine humide et propre. Polir ensuite avec un tissu en
microfibres. Si des rayures, un effet arc-en-ciel ou un effet flou
apparaît, utiliser un mélange comportant une part de vinaigre
pour 2 parts d’eau et essuyer la plaque à l’aide d’un tissu.
7. Enlever, vider et nettoyer le plateau
d’égouttement.
Nettoyer le plateau d’égouttement avec de l’eau tiède
savonneuse. Essuyer la zone sous le plateau d’égouttement.
Une fois sèche, replacer le plateau d’égouttement.
COMMANDES DE LA TABLE
DE CUISSON
1. Retirer les boutons.
Tirer les boutons directement hors du tableau de commande
pour les enlever.
2. Nettoyer à l’aide d’eau chaude et
savonneuse.
Connaître les commandes de votre table de
cuisson
■ Afin d’éviter d’endommager les commandes de la table de
cuisson, ne pas utiliser de laine d’acier, de nettoyants abrasifs
ou de nettoyant pour four.
■ Afin d’éviter toute détérioration, ne pas laisser tremper les
boutons de commande.
■ Lors de la réinstallation des boutons, s’assurer que chaque
bouton est à la position Off (arrêt).
■ Ne pas retirer les joints sous les boutons.
■ Lors de la réinstallation des boutons après le nettoyage des
commandes des brûleurs de surface ou de la commande
du module de la plaque à frire, vérifier que les boutons sont
réinstallés à leur emplacement correct. Les boutons de
brûleurs possèdent des réglages de puissance et le bouton
de la plaque à frire des réglages de température. Tous les
autres boutons possèdent uniquement les réglages Hi (élevé),
Med (moyen) et Lo (faible).
71
Page 72

Automatic Lock
Self-clean
Sound Volume
Set Time
Set Date
Setup Menu
Back
ENTRETIEN ET NETTOYAGE
ACIER INOXYDABLE
(sur certains modèles)
Utiliser un nettoyant ou des lingettes.
Utiliser le nettoyant pour acier inoxydable affresh® ou les
lingettes nettoyantes pour acier inoxydable affresh®. (vendus
séparément) Frotter dans la direction du grain pour éviter tout
dommage de la surface en acier.
Ne pas utiliser :
■ Tampons à récuré imbibé de savon
■ Nettoyants abrasifs
■ Crème à polir pour table de cuisson
■ Tampons de laine d’acier
■ Gant de toilette rugueux
■ Serviettes en papier abrasives
EXTÉRIEUR DE LA PORTE
Ajouter le nettoyant.
Ajouter du nettoyant pour vitres sur un chiffon doux ou une
éponge, jamais directement sur le panneau ou utiliser le
nettoyant pour cuisine et appareils ménagers affresh® (non
inclus).
INTÉRIEUR DE LA PORTE
1. Essuyer tout dépôt.
TABLEAU DE COMMANDE
1. Activer LOCK BUTTONS NOW
(verrouillage boutons maintenant).
Lock Buttons Now
Verrouiller les boutons empêche d’activer l’écran tactile
pendant le nettoyage.
2. Ajouter le nettoyant.
Ajouter du nettoyant pour vitres sur un chiffon doux ou une
éponge, jamais directement sur le panneau ou utiliser le
nettoyant pour cuisine et appareils ménagers affresh® (non
inclus).
Ne pas utiliser :
■ Nettoyants abrasifs
■ Tampons de laine d’acier
■ Gant de toilette rugueux
■ Serviettes en papier abrasives
Utiliser une éponge humide.
2. Utilisation du programme
Consulter la section
“Autonettoyage du four”.
72
Page 73

ENTRETIEN ET NETTOYAGE
AVERTISSEMENT
GRILLES DU FOUR
1. Vider le four et retirer les grilles.
Sortir du four la lèchefrite, la grille et les ustensiles
de cuisson au four et, sur certains modèles, la sonde
thermométrique.
IMPORTANT : Enlever les grilles avant d’effectuer le
programme d’autonettoyage pour éviter de les décolorer
et de rendre le mouvement de coulissement difficile.
2. Utiliser un tampon de laine d’acier.
CAVITÉ DU FOUR
■ Ne pas utiliser de nettoyants à four.
■ Les éclaboussures alimentaires doivent être nettoyées
lorsque le four a refroidi. À des températures élevées, les
aliments réagissent avec la porcelaine. Cette réaction peut
causer des taches, des attaques, des piqûres ou de légères
taches blanches.
AUTONETTOYAGE DU FOUR
Risque de brûlures
Ne pas toucher le four au cours du programme
d'autonettoyage.
Garder les enfants loin du four au cours du programme
d'autonettoyage.
Le non-respect de ces instructions peut causer des
brûlures.
IMPORTANT :
■ La santé de certains oiseaux est très sensible aux émanations
qui surviennent durant le programme d’autonettoyage.
L’exposition aux émanations peut entraîner la mort de
certains oiseaux. Toujours déplacer les oiseaux dans une
autre pièce fermée et bien aérée.
■ Procéder à l’autonettoyage du four avant qu’il ne devienne
très sale. Les saletés intenses nécessitent un nettoyage plus
long et dégagent plus de fumée.
■ Veiller à ce que la cuisine soit bien aérée pendant le
programme d’autonettoyage afin d’aider à éliminer la chaleur,
les odeurs et la fumée.
■ Ne pas obstruer le ou les évents du four durant le programme
d’autonettoyage. L’air doit pouvoir circuler librement. Voir la
section “Évent du four” dans la section “Connaître votre four”.
■ Ne pas nettoyer, frotter, endommager ou déplacer le joint
d’étanchéité de la porte du four. Le joint de la porte est
essentiel pour une bonne étanchéité.
Préparation du four :
1. Vider le four et retirer les grilles.
Sortir du four la lèchefrite, la grille et les ustensiles
de cuisson au four et, sur certains modèles, la sonde
thermométrique.
IMPORTANT : Enlever les grilles avant d’effectuer le
programme d’autonettoyage pour éviter de les décolorer
et de rendre le mouvement de coulissement difficile.
73
Page 74

ENTRETIEN ET NETTOYAGE
2. Enlever tout le papier aluminium
du four.
Le papier aluminium peut fondre ou brûler et endommager
le four.
3. Nettoyage à la main.
À l’aide d’un chiffon humide, essuyer l’intérieur de la porte
et 1½" (3,8 cm) à l’entrée de la zone du cadre de la cavité.
Faire attention à ne pas déplacer ou plier le joint d’étanchéité.
Cette section ne devient pas assez chaude au cours du
programme d’autonettoyage pour pouvoir éliminer la saleté.
Ne pas laisser d’eau, de nettoyant, etc. pénétrer dans les
fentes du cadre de la porte.
4. Essuyer la saleté décollée.
Essuyer la saleté réduit la production de fumée et éviter
les dommages. À des températures élevées, les aliments
réagissent avec la porcelaine. Cette réaction peut causer
des taches, des attaques, des piqûres ou de légères taches
blanches. Ceci n’affectera pas la performance de cuisson.
Préparation de la table de cuisson :
Comment fonctionne le programme
IMPORTANT :
■ Le chauffage et le refroidissement de la porcelaine sur l’acier
dans le four peuvent causer une décoloration, une perte de
lustre, des fissures minuscules et des craquements.
■ Le programme d’autonettoyage utilise des températures très
élevées, brûlant les saletés pour les réduire en cendre.
■ Le four est préréglé pour un programme d’autonettoyage de
3 heures 30 minutes, mais la durée peut être modifiée.
Utiliser le tableau ci-dessous comme guide pour déterminer
le niveau de nettoyage désiré.
NIVEAU DE
NETTOYAGE
Léger 3 heures 30 minutes
Moyen 4 heures
Important 4 heures 30 minutes
Une fois le four complètement refroidi :
■ Nettoyer les cendres avec un chiffon humide.
■ S’il reste des saletés après l’essuyage, cela signifie que le
programme de nettoyage n’a pas fonctionné suffisamment
longtemps pour pouvoir éliminer toutes les saletés du four.
Répéter le programme d’autonettoyage si désiré; on peut
aussi attendre le prochain programme de nettoyage pour
éliminer ces saletés.
■ Afin d’éviter de briser le verre, ne pas appliquer de chiffon
humide et froid sur la partie interne du hublot de la porte
avant qu’il n’ait complètement refroidi.
■ L’éclairage du four ne fonctionne pas durant le programme
d’autonettoyage.
■ Sur les cuisinières de 48" (121,9 cm), l’autonettoyage ne peut
s’effectuer que sur un four à la fois. Lorsqu’un four effectue
un programme d’autonettoyage, l’autre four ne peut pas être
réglé ni allumé.
REMARQUE : Le four possède un moteur de ventilateur de
refroidissement à 2 vitesses. Pendant l’autonettoyage, les
ventilateurs fonctionneront à la vitesse la plus élevée pour
augmenter le flux d’air et faciliter l’évacuation de l’air chaud
par les évents du four. Une augmentation du bruit peut être
constatée pendant et après le programme d’autonettoyage
jusqu’au refroidissement du four.
TEMPS TOTAL DE NETTOYAGE
(comprend une période de
refroidissement de 30 minutes)
Retirer les articles en plastique.
Les articles en plastique risquent de fondre.
74
Page 75

ENTRETIEN ET NETTOYAGE
Lock Buttons Now
Automatic Lock
Sound Volume
Set Time
Set Date
Back
Setup Menu
Next
>
Self-clean
Back
Home
Before cleaning the oven:
1. Remove all oven racks and pans from the oven. Racks could discolor and not slide easily after a
self- clean cycle.
2. Clean oven frame and door frame with a non-abrasive cleaning agent because they are not
exposed to cleaning temperatures. Do not clean gasket.
Back
Home
Delay Start
Select the cleaning level:
Note: The oven will cool for an additional 30
minutes after cleaning completes.
Back
Home
Light
Start
Back
Home
Select the cleaning level:
Note: The oven will cool for an additional 30
minutes after cleaning completes.
2 hours of cleaning
Medium
3 hours of cleaning
Heavy
4 hours of cleaning
Set Delay
Back
Select when cleaning should begin:
Begin:
2:32 pm
End:
6:02 pm
Gourmet Guides
Probe
My Creations
Auto Convection
Conversion
Most Used Modes:
Home
Mode
Temperature
Cook Timer
Convect Bake
Bake
Broil
Keep Warm
Light
Setup Menu
Kitchen Timer
Utilisation de l’autonettoyage :
1. Toucher SELF-CLEAN (autonettoyage).
Self-clean
Lors de l’accès à l’autonettoyage en utilisant
le menu de réglage sur les cuisinières de 48"
(121,9 cm) :
2. Sélectionner le four à nettoyer.
Which oven do you want to clean?
Left Right
3. Appuyer sur NEXT (suivant).
Nettoyage différé :
5. Appuyer sur DELAY START (mise en
marche différée).
Delay Start
6. Entrer l’heure de départ désirée.
-15 min +15 min
4:00 6:00 8:00 10:00 12:00 2:00 4:00 6:00
Le four calcule l’heure de fin en fonction du choix de
niveau de nettoyage. Le four refroidit pendant 30 minutes
supplémentaires une fois le nettoyage terminé.
Pour arrêter le programme d’autonettoyage
à tout moment :
Next
>
4. Sélectionner le degré de nettoyage.
Light
2 hours of cleaning
Les portes se verrouillent.
REMARQUE : Le four refroidit pendant 30 minutes
supplémentaires une fois le nettoyage terminé.
Medium
3 hours of cleaning
Heavy
4 hours of cleaning
Start
Appuyer sur CANCEL OVEN (annuler four).
Cancel Oven
Appuyer sur CANCEL OVEN (annulation four) (CANCEL LEFT
[annulation four gauche] ou CANCEL RIGHT [annulation
four droit] sur les modèles de four de 48" [121,9 cm]). Si la
température du four est trop élevée, la porte reste verrouillée.
Elle ne se déverrouille pas tant que le four n’a pas refroidi.
75
Page 76

ENTRETIEN ET NETTOYAGE
LAMPES DU FOUR
Les lampes du four sont des ampoules à halogène de 120 V,
25 W maximum. Elles s’allument à l’ouverture de la porte du four.
Sur les cuisinières de 48" (121,9 cm), les lampes du four de
gauche et de droite s’éteignent lorsqu’on appuie sur OVEN
LIGHT (lampe du four). Les lampes du four ne fonctionnent pas
durant le programme d’autonettoyage. Tandis que la porte du
four est fermée, appuyer sur OVEN LIGHT (lampe du four) pour
allumer ou éteindre la lampe.
Remplacement :
Avant de procéder au remplacement, s’assurer que le four est
éteint et froid.
1. Déconnecter la source de courant
électrique.
2. Enlever le couvercle d’ampoule en
verre.
3. Ôter l’ampoule de la douille.
4. Remplacer l’ampoule.
Utiliser un mouchoir de papier ou des gants de coton pour
manipuler l’ampoule. Pour éviter d’endommager ou de réduire
la longévité de l’ampoule neuve, ne pas toucher l’ampoule
avec les doigts nus.
Saisir la partie avant et dégager du four.
5. Remplacer le couvercle d’ampoule.
Repousser rapidement dans le mur.
6. Reconnecter la source de courant
électrique.
76
Page 77

DÉPANNAGE
Essayez d’abord les solutions suggérées ici. Pour obtenir de l’aide ou des conseils qui permettront peut-être d’éviter une
intervention de dépannage, consulter la page de garantie de ce manuel et balayer le code QR avec votre appareil mobile, ou visiter
le site Web http://jennair.custhelp.com. Au Canada, visiter le http://www.jennair.ca.
Si vous rencontrez les
problèmes suivants
Rien ne fonctionne. Un fusible est grillé ou un
Les brûleurs de surface ne
fonctionnent pas.
Les flammes des brûleurs
de surface ne sont pas
uniformes, sont de teinte
jaune ou sont bruyantes.
Le brûleur de surface émet
des bruits d’éclatement.
Le brûleur émet des
étincelles, mais ne s’allume
pas.
Chaleur excessive autour
des ustensiles de cuisson
sur la table de cuisson.
La cuisson ne produit pas
les résultats escomptés.
Le four ne fonctionne pas. C’est la première fois que le four
La température du four est
trop élevée ou trop basse.
Le ventilateur de
refroidissement fonctionne
durant la cuisson au four,
la cuisson au gril ou le
nettoyage.
disjoncteur est déclenché.
C’est la première fois que les
brûleurs de surface sont utilisés.
Le bouton de commande n’est pas
réglé correctement.
Les orifices du brûleur sont
obstrués.
Les orifices du brûleur sont
obstrués.
Sur les modèles avec chapeaux,
les chapeaux de brûleur ne sont
pas correctement positionnés.
Du gaz propane est utilisé. La cuisinière a peut-être été mal convertie. Contacter un
Le brûleur est mouillé. Laisser sécher.
Il y a production continue
d’étincelles sans que le brûleur
s’allume.
Les ustensiles de cuisson n’ont
pas la bonne taille.
Le bon ustensile de cuisson n’est
pas utilisé.
Le bouton de commande est réglé
au niveau approprié de chaleur.
La cuisinière n’est pas d’aplomb. La cuisinière doit être d’aplomb pour que la plaque à frire puisse
est utilisé.
Le module de commande
électronique du four est
correctement réglé.
Une mise en marche différée a été
réglée.
Sur certains modèles, le mode
verrouillage de boutons maintenant
est activé.
Sur certains modèles, le mode
Sabbat est activé.
Il faut régler le calibrage de la
température du four.
Causes possibles Solution
Remplacer le fusible ou réenclencher le disjoncteur. Si le
problème persiste, appeler un électricien.
Allumer n’importe quel brûleur de surface pour libérer l’air des
canalisations de gaz.
Enfoncer le bouton avant de le tourner à un réglage.
Nettoyer les orifices de brûleur obstrués avec une épingle droite.
Nettoyer les orifices de brûleur obstrués avec une épingle droite.
Vous assurer que les tiges sont bien alignées avec le chapeau de
brûleur.
technicien de réparation qualifié.
Discontinuer l’utilisation du brûleur de surface et contacter un
technicien de service.
Utiliser un ustensile de cuisson à peu près de la même dimension
que la surface de cuisson ou le brûleur de surface. L’ustensile de
cuisson ne doit pas dépasser de plus de Z\x" (1,3 cm) la zone de
cuisson.
Utiliser des ustensiles de cuisson d’un poids moyen à lourd
fabriqués des matériaux pour le type de cuisson désiré. Les
meilleurs ustensiles de cuisson doivent avoir un fond plat, des
parois droites et un couvercle qui ferme hermétiquement.
Régler les commandes de cuisson à HI (élevé), MED (moyen) ou
LO (faible) selon le type de cuisson désiré.
fonctionner correctement. Voir les Instructions d’installation pour
des instructions de nivellement.
Allumer n’importe quel brûleur de surface pour libérer l’air des
canalisations de gaz.
Vous assurer d’avoir suivi correctement les instructions de
fonctionnement de la fonction à utiliser.
Le four ne fonctionnera qu’à la fin de la minuterie.
Tous les boutons seront verrouillés. Faire glisser la barre vers le
haut sur l’écran principal pour déverrouiller les boutons/l’écran.
Ce mode permet de fonctionner en respectant le Sabbat juif.
Lorsque réglées, seules les touches numériques et la touche de
mise en marche fonctionnent.
Sélectionner un écart de température allant jusqu’à +35°F.
Il est normal que le ventilateur fonctionne automatiquement
pendant l’utilisation du four et pendant un certain temps
après l’arrêt du four pour refroidir le module de commande
électronique.
77
Page 78

DÉPANNAGE
Essayez d’abord les solutions suggérées ici. Pour obtenir de l’aide ou des conseils qui permettront peut-être d’éviter une
intervention de dépannage, consulter la page de garantie de ce manuel et balayer le code QR avec votre appareil mobile, ou visiter
le site Web http://jennair.custhelp.com. Au Canada, visiter le http://www.jennair.ca.
Si vous rencontrez les
problèmes suivants
Bruits émis par la cuisinière
à gaz lors des opérations
de cuisson au four et de
cuisson au gril.
Des messages s’affichent. L’afficheur indique une lettre suivie
Le programme
d’autonettoyage ne
fonctionne pas.
La cuisson au four ne
produit pas les résultats
prévus.
Il est possible que l’on entende les
bruits suivants lors des opérations
de cuisson au four et de cuisson
au gril :
Chuintement, affaissement,
claquement, craquement et
éclatement – Ces bruits sont des
bruits de fonctionnement normaux
qui peuvent survenir chaque fois
que les brûleurs de cuisson au four
ou de cuisson au gril s’allument au
cours du programme.
d’un chiffre.
La porte du four est ouverte. Fermer la porte du four complètement.
La fonction n’a pas été entrée. Vérifier que les instructions d’utilisation du programme
Sur certains modèles, un
programme d’autonettoyage à mise
en marche différée a été réglé.
Une mise en marche différée a été
réglée.
Sur les cuisinières de 48"
(121,9 cm), l’un des fours est en
cours d’autonettoyage.
La bonne température n’est pas
réglée.
La bonne calibration de température
de four n’est pas réglée.
Le four n’a pas été préchauffé. Si les bonnes étapes ont été suivies lors du réglage des
Le bon ustensile de cuisson au
four n’est pas utilisé.
Les grilles ne sont pas bien
positionnées.
Il n’y a pas de circulation d’air
appropriée autour des ustensiles
de cuisson.
La pâte n’est pas répartie de façon
uniforme dans le plat.
La durée de cuisson utilisée n’est
pas appropriée.
La porte du four a été ouverte
pendant la cuisson.
Les articles cuits au four sont trop
bruns à la base.
Les bords des croûtes ont trop
bruni.
Causes possibles Solution
■ Il est possible que l’on entende un bruit d’éclatement lorsque
le robinet de gaz s’ouvre ou se met en marche; un seul
bruit d’éclatement retentira lorsqu’il se libère du solénoïde.
Le bruit est similaire au bruit de succion qu’émettrait une
ventouse que l’on retire d’une surface de verre.
■ Les allumeurs émettent plusieurs déclics jusqu’à ce que
la flamme soit détectée. Il s’agit de bruits de claquements
courts, similaires au bruit d’un ongle tapotant sur une surface
de verre.
■ Un bruit de chuintement ou d’affaissement peut se faire
entendre lorsque le brûleur de cuisson au four ou de cuisson
au gril s’allume.
■ Sur certains modèles, un cliquetis peut se faire entendre
lorsque le relais du ventilateur de convection fonctionne par
intermittence.
Effacer l’affichage. Si une lettre suivie d’un chiffre réapparaît,
faire un appel de service.
d’autonettoyage ont bien été suivies.
Le programme d’autonettoyage ne fonctionnera qu’à la fin de la
minuterie.
Le four ne peut marcher ou utiliser des fonctions avant que la
minuterie soit terminée ou ait été annulée.
Lorsqu’un four effectue un programme d’autonettoyage, l’autre
four ne peut pas être réglé sur un programme d’autonettoyage.
Vérifier la recette dans un livre de recettes fiable.
Sélectionner un écart de température allant jusqu’à +35°F pour
augmenter ou réduire la température selon le besoin.
fonctions désirées, le four préchauffera avant la cuisson.
Vous assurer que le bon ustensile de cuisson au four est utilisé
pour le type d’aliment à cuire.
Positionner les grilles pour qu’il y ait suffisamment d’espace
au-dessus de chacun des aliments.
Laisser 2" (5,0 cm) entre les ustensiles de cuisson et les parois
du four.
Vérifier que la pâte est répartie uniformément dans le plat.
Ajuster la durée de cuisson.
L’ouverture de la porte pour vérifier la cuisson laisse la chaleur
du four s’échapper et peut nécessiter des durées de cuisson
plus longues.
Déplacer la grille à une position plus élevée dans le four.
Utiliser du papier d’aluminium pour couvrir le bord de la croûte
ou réduire la température de cuisson du four.
78
Page 79

ASSISTANCE OU SERVICE
Avant de faire un appel pour assistance ou service, vérifier la section “Dépannage”. Cette vérification peut vous faire économiser le
coût d’une intervention de dépannage. Si vous avez encore besoin d’aide, suivez les instructions ci-dessous. Avant d’appeler, vous
devez connaître la date d’achat et les numéros de modèle et de série complets de votre appareil. Ces renseignements nous aideront
à mieux répondre à votre demande.
Si vous avez besoin de pièces de rechange
Si vous avez besoin de commander des pièces de rechange, nous vous recommandons d’utiliser seulement des pièces spécifiées
par l’usine. Les pièces de rechange spécifiées par l’usine conviendront et fonctionneront bien parce qu’elles sont fabriquées selon la
même précision que celle utilisée pour fabriquer chaque nouvel appareil Jenn-Air®.
Pour savoir où trouver des pièces d’usine spécifiques dans votre région, nous appeler ou contacter le centre de service désigné par
Jenn-Air le plus proche.
AUX É.-U.
Téléphoner sans frais au Centre pour l’eXpérience de la clientèle
de Jenn-Air au : 1-800-JENNAIR (1-800-536-6247) ou visiter
notre site Web au www.jennair.com.
Nos consultants peuvent vous aider sur les points
suivants :
■ Planification d’une intervention de dépannage. Les
techniciens de service désignés par la gamme des appareils
électroménagers Jenn-Air® sont formés pour remplir la
garantie des produits et fournir un service après garantie
partout aux États-Unis.
■ Caractéristiques et spécifications de notre gamme complète
d’appareils ménagers.
■ Consulter le revendeur local d’appareils Jenn-Air
■ Renseignements d’installation.
■ Procédés d’utilisation et d’entretien.
■ Vente d’accessoires et de pièces de rechange.
■ Assistance spécialisée au client (langue espagnole,
malentendants, malvoyants, etc.).
Pour de l’aide supplémentaire
Si vous avez besoin de plus d’assistance, vous pouvez écrire à
Jenn-Air en soumettant toute question ou tout problème à :
Jenn-Air Brand Home Appliances
Customer eXperience Center
553 Benson Road
Benton Harbor, MI 49022-2692
Veuillez indiquer dans votre correspondance un numéro de
téléphone où l’on peut vous joindre dans la journée.
®
.
AU CANADA
Téléphoner sans frais au Centre pour l’eXpérience de la clientèle
canadien de Jenn-Air au : 1-800-JENNAIR (1-800-536-6247) ou
consulter notre site Web à l’adresse www.jennair.ca.
Nos consultants peuvent vous aider sur les points
suivants :
■ Planification d’une intervention de dépannage. Les
techniciens de service désignés par Jenn-Air® sont formés
pour remplir la garantie des produits et fournir un service
après la garantie, partout au Canada.
■ Caractéristiques et spécifications de notre gamme complète
d’appareils ménagers.
■ Consulter le revendeur local d’appareils Jenn-Air
■ Renseignements d’installation.
■ Procédés d’utilisation et d’entretien.
■ Vente d’accessoires et de pièces de rechange.
Pour de l’aide supplémentaire
Si vous avez besoin de plus d’assistance, vous pouvez écrire
à Jenn-Air Canada en soumettant toute question ou tout
problème à :
Customer eXperience Centre
Jenn-Air Canada
200 - 6750 Century Ave.
Mississauga, Ontario L5N 0B7
Veuillez indiquer dans votre correspondance un numéro de
téléphone où l’on peut vous joindre dans la journée.
®
.
ACCESSOIRES
Aux É.-U., pour les accessoires, consulter notre site Web www.jennair.com ou nous contacter au 1-800-JENNAIR (1-800-536-6247).
Au Canada, consulter notre site Web www.jennair.ca ou nous contacter au 1-800-JENNAIR (1-800-536-6247). Ou consulter aussi
notre dépliant d’accessoires pour commander.
Nettoyant pour acier inoxydable affresh
®
(modèles en acier inoxydable)
Lingettes nettoyantes pour acier inoxydable affresh
(modèles en acier inoxydable)
Nettoyant pour grille et plateau d’égouttement
Nettoyant pour cuisine et appareils ménagers affresh
®
®
Couvercle pour plaque à frire en acier inoxydable
Cerclage de wok
Grille coulissante déployable avec poignée
Trousse de lèchefrite
79
Page 80

ATTACHEZ ICI VOTRE REÇU DE VENTE. UNE PREUVE D’ACHAT EST OBLIGATOIRE
POUR OBTENIR L’APPLICATION DE LA GARANTIE.
GARANTIE LIMITÉE
DES APPAREILS DE
CUISSON JENN-AIR
®
Lorsque vous appelez le centre d’eXpérience de la clientèle, veuillez garder à
disposition les renseignements suivants :
■ Nom, adresse et numéro de téléphone
■ Numéros de modèle et de série
■ Une description claire et détaillée du problème rencontré
■ Une preuve d’achat incluant le nom et l’adresse du marchand ou du détaillant
SI VOUS AVEZ BESOIN DE SERVICE :
1. Avant de nous contacter pour obtenir un dépannage, veuillez déterminer si des réparations sont nécessaires pour
votre produit. Certains problèmes peuvent être résolus sans intervention de dépannage. Prenez quelques minutes
pour parcourir la section Dépannage ou Résolution de problèmes du guide d’utilisation et d’entretien, scannez le code
QR ci-contre avec votre téléphone intelligent pour accéder à des ressources supplémentaires, ou rendez-vous sur le
site https://www.jennair.ca.
2. Tout service sous garantie doit être effectué exclusivement par nos fournisseurs de dépannage autorisés
Jenn-Air. Aux É.-U. et au Canada, dirigez toutes vos demandes de service sous garantie au
Centre d’eXpérience de la clientèle Jenn-Air
1-800-JENNAIR (1-800-536-6247).
Si vous résidez à l’extérieur du Canada et des 50 États des États-Unis, contactez votre marchand Jenn-Air autorisé pour déterminer si une autre
garantie s’applique.
https://www.jennair.ca
GARANTIE LIMITÉE DE CINQ ANS
CE QUI EST COUVERT CE QUI N’EST PAS COUVERT
GARANTIE LIMITÉE DE DEUX ANS
(PIÈCES ET MAIN-D’ŒUVRE)
Pendant deux ans à compter de la date d’achat, lorsque ce gros
appareil ménager est installé, utilisé et entretenu conformément
aux instructions jointes au produit ou fournies avec, la marque
Jenn-Air de Whirlpool Corporation ou Whirlpool Canada, LP (ciaprès désignées “Jenn-Air”) paiera pour les pièces de rechange
spécifiées par l’usine et pour la main-d’œuvre pour corriger les
vices de matériaux ou de fabrication qui existaient déjà lorsque ce
gros appareil ménager a été acheté. S’il est remplacé, l’appareil
sera couvert pour la période restant à courir de la garantie limitée
d’un an du produit d’origine.
GARANTIE LIMITÉE DE LA TROISIÈME À LA CINQUIÈME
ANNÉE (CERTAINS COMPOSANTS UNIQUEMENT -
MAIN D’ŒUVRE NON COMPRISE)
De la troisième à la cinquième année inclusivement à compter
de la date d’achat initiale, lorsque ce gros appareil ménager est
installé, utilisé et entretenu conformément aux instructions jointes
au produit ou fournies avec, Jenn-Air paiera pour les pièces
de rechange spécifiées par l’usine concernant les composants
suivants pour corriger les défauts non esthétiques de matériau ou
de fabrication desdites pièces qui empêchent le gros appareil de
fonctionner et qui étaient déjà présentes lorsque ce gros appareil
ménager a été acheté. La présente garantie est une garantie
limitée de 5 ans sur les pièces énumérées ci-dessous et elle ne
comprend pas la main-d’œuvre de réparation.
■ Élément électrique
■ Clavier tactile et microprocesseur
■ Table de cuisson en vitrocéramique : en cas de bris
d’origine thermique
■ Commandes électroniques
■ Tube magnétron
■ Brûleurs à gaz scellés
LE SEUL ET EXCLUSIF RECOURS DU CLIENT DANS LE
CADRE DE LA PRÉSENTE GARANTIE LIMITÉE CONSISTE EN
LA RÉPARATION PRÉVUE PAR LA PRÉSENTE. Le service doit
être fourni par une compagnie de service désignée par Jenn-Air.
Cette garantie limitée est valide uniquement aux États-Unis ou
au Canada et s’applique exclusivement lorsque le gros appareil
ménager est utilisé dans le pays où il a été acheté. La présente
garantie limitée est valable à compter de la date d’achat initial
par le consommateur. Une preuve de la date d’achat initial est
exigée pour obtenir un dépannage dans le cadre de la présente
garantie limitée.
1. Usage commercial, non résidentiel ou par plusieurs familles, ou non-
respect des instructions de l’utilisateur, de l’opérateur ou des instructions
d’installation.
2. Visite d’instruction à domicile pour montrer à l’utilisateur comment
utiliser l’appareil.
3. Visites de service pour rectifier une installation ou un entretien fautifs
du produit, une installation non conforme aux codes d’électricité ou de
plomberie, ou la rectification de l’installation électrique ou de la plomberie
du domicile (ex : câblage électrique, fusibles ou tuyaux d’arrivée d’eau du
domicile).
4. Pièces consomptibles (ex : ampoules, batteries, filtres à air ou à eau,
solutions de conservation, etc.).
5. Défauts ou dommage résultant de l’utilisation de pièces ou accessoires
Jenn-Air non authentiques.
6. Conversion de votre produit du gaz naturel ou du gaz de pétrole liquéfié.
7. Dommages causés par : accident, mésusage, abus, incendie, inondations,
catastrophe naturelle ou l’utilisation de produits non approuvés par Jenn-Air.
8. Réparations aux pièces ou systèmes dans le but de rectifier un dommage
ou des défauts résultant d’une réparation, altération ou modification non
autorisée faite à l’appareil.
9. Défauts d’apparence, notamment les éraflures, traces de choc, fissures ou
tout autre dommage causés au fini de l’appareil ménager, à moins que ces
dommages ne résultent de vices de matériaux ou de fabrication et ne soient
signalés à Jenn-Air dans les 30 jours suivant la date d’achat.
10. Décoloration, rouille ou oxydation des surfaces résultant d’environnements
caustiques ou corrosifs incluant des concentrations élevées de sel, un haut
degré d’humidité ou une exposition à des produits chimiques.
11. Perte d’aliments ou de médicaments due à la défaillance du produit.
12. Enlèvement ou livraison. Ce produit est conçu pour être réparé au domicile.
13. Frais de déplacement et de transport pour le dépannage/la réparation dans
une région éloignée où une compagnie de service Jenn-Air autorisée n’est
pas disponible.
14. Retrait ou réinstallation d’appareils inaccessibles ou de dispositifs
préinstallés (ex : garnitures, panneaux décoratifs, plancher, meubles, îlots
de cuisine, plans de travail, panneaux de gypse, etc.) qui entravent le
dépannage, le retrait ou le remplacement du produit.
15. Service et pièces pour des appareils dont les numéros de série et de
modèle originaux ont été enlevés, modifiés ou ne peuvent pas être
facilement identifiés.
Le coût d’une réparation ou d’un remplacement dans le cadre de ces
circonstances exclues est à la charge du client.
80
Page 81

CLAUSE D’EXONÉRATION DE RESPONSABILITÉ AU TITRE DES GARANTIES IMPLICITES
LES GARANTIES IMPLICITES, Y COMPRIS LES GARANTIES APPLICABLES DE QUALITÉ MARCHANDE OU D’APTITUDE À UN USAGE
PARTICULIER, SONT LIMITÉES À UN AN OU À LA PLUS COURTE PÉRIODE AUTORISÉE PAR LA LOI. Certains États et provinces ne permettent
pas de limitation sur la durée des garanties implicites de qualité marchande ou d’aptitude à un usage particulier, de sorte que la limitation ci-dessus
peut ne pas être applicable dans votre cas. Cette garantie vous confère des droits juridiques spécifiques et vous pouvez également jouir d’autres
droits qui peuvent varier d’une juridiction à l’autre.
EXONÉRATION DE RESPONSABILITÉ DANS LES DOMAINES NON COUVERTS PAR LA GARANTIE
Jenn-Air décline toute responsabilité au titre de la qualité, de la durabilité ou en cas de dépannage ou de réparation nécessaire sur ce gros appareil
ménager autre que les responsabilités énoncées dans la présente garantie. Si vous souhaitez une garantie plus étendue ou plus complète que
la garantie limitée fournie avec ce gros appareil ménager, adressez-vous à Jenn-Air ou à votre détaillant pour obtenir les modalités d’achat d’une
garantie étendue.
LIMITATION DES RECOURS; EXCLUSION DES DOMMAGES FORTUITS OU INDIRECTS
LE SEUL ET EXCLUSIF RECOURS DU CLIENT DANS LE CADRE DE LA PRÉSENTE GARANTIE LIMITÉE CONSISTE EN LA RÉPARATION PRÉVUE
PAR LA PRÉSENTE. JENN-AIR N’ASSUME AUCUNE RESPONSABILITÉ POUR LES DOMMAGES FORTUITS OU INDIRECTS. Certains États et
certaines provinces ne permettent pas l’exclusion ou la limitation des dommages fortuits ou indirects de sorte que ces limitations et exclusions
peuvent ne pas être applicables dans votre cas. Cette garantie vous confère des droits juridiques spécifiques et vous pouvez également jouir
d’autres droits qui peuvent varier d’une juridiction à l’autre.
12/14
81
Page 82

NOTES
82
Page 83

NOTES
83
Page 84

W10837387B
SP: W10837407
®/TM © 2016. All rights reserved. Used under license in Canada.
®/TM © 2016. Tous droits réservés. Utilisé sous licence au Canada.
5/16
 Loading...